
A good lunch salad has a very specific personality. It needs to survive a fridge shelf, a commute, and the moment when you’re standing at the counter at noon with one hand on a fork and the other on a keyboard. A real salad for easy lunches doesn’t slump into watery leaves by lunch break. It stays crisp where it should, creamy where it should, and filling enough that you’re not hunting for crackers an hour later.
I’m picky about this category because I’ve been burned by too many “healthy lunch” salads that were really just a bowl of lettuce with a guilt complex. The best ones feel assembled, not improvised. They have a backbone — beans, chicken, eggs, grains, tuna, pasta, crunchy vegetables, or all of the above — and the dressing is handled like a finishing move instead of a flood.
The trick is in the build. Sturdy greens go with juicy ingredients. Soft things get tucked between firm things. Dressing sits where it won’t wreck texture. Once you start packing lunches that way, the whole routine gets easier, and the fridge starts feeling less like a graveyard of leftovers and more like a lunch station.
Why These Salads Earn a Spot in Your Lunch Rotation
-
They hold texture after a night in the fridge. The recipes lean on romaine, cabbage, beans, grains, pasta, and chopped vegetables instead of fragile leaves that collapse by noon.
-
Protein is built in, not added as an afterthought. Chicken, tuna, eggs, shrimp, lentils, and chickpeas make these salads feel like a full meal, not a side dish in disguise.
-
Most of them travel well. If you pack dressing separately or layer it properly, these salads can ride in a lunch container without turning soupy.
-
They’re easy to scale up. Nearly every recipe here can be doubled on a Sunday and split into two or three lunches with almost no extra work.
-
You can use leftovers without making lunch taste like leftovers. Rotisserie chicken, roasted vegetables, cooked grains, and extra pasta all fit neatly into this kind of meal.
-
The flavor payoff is better than the effort. A lemony dressing, a handful of herbs, or a crunchy topping does more work here than in most lunch foods.
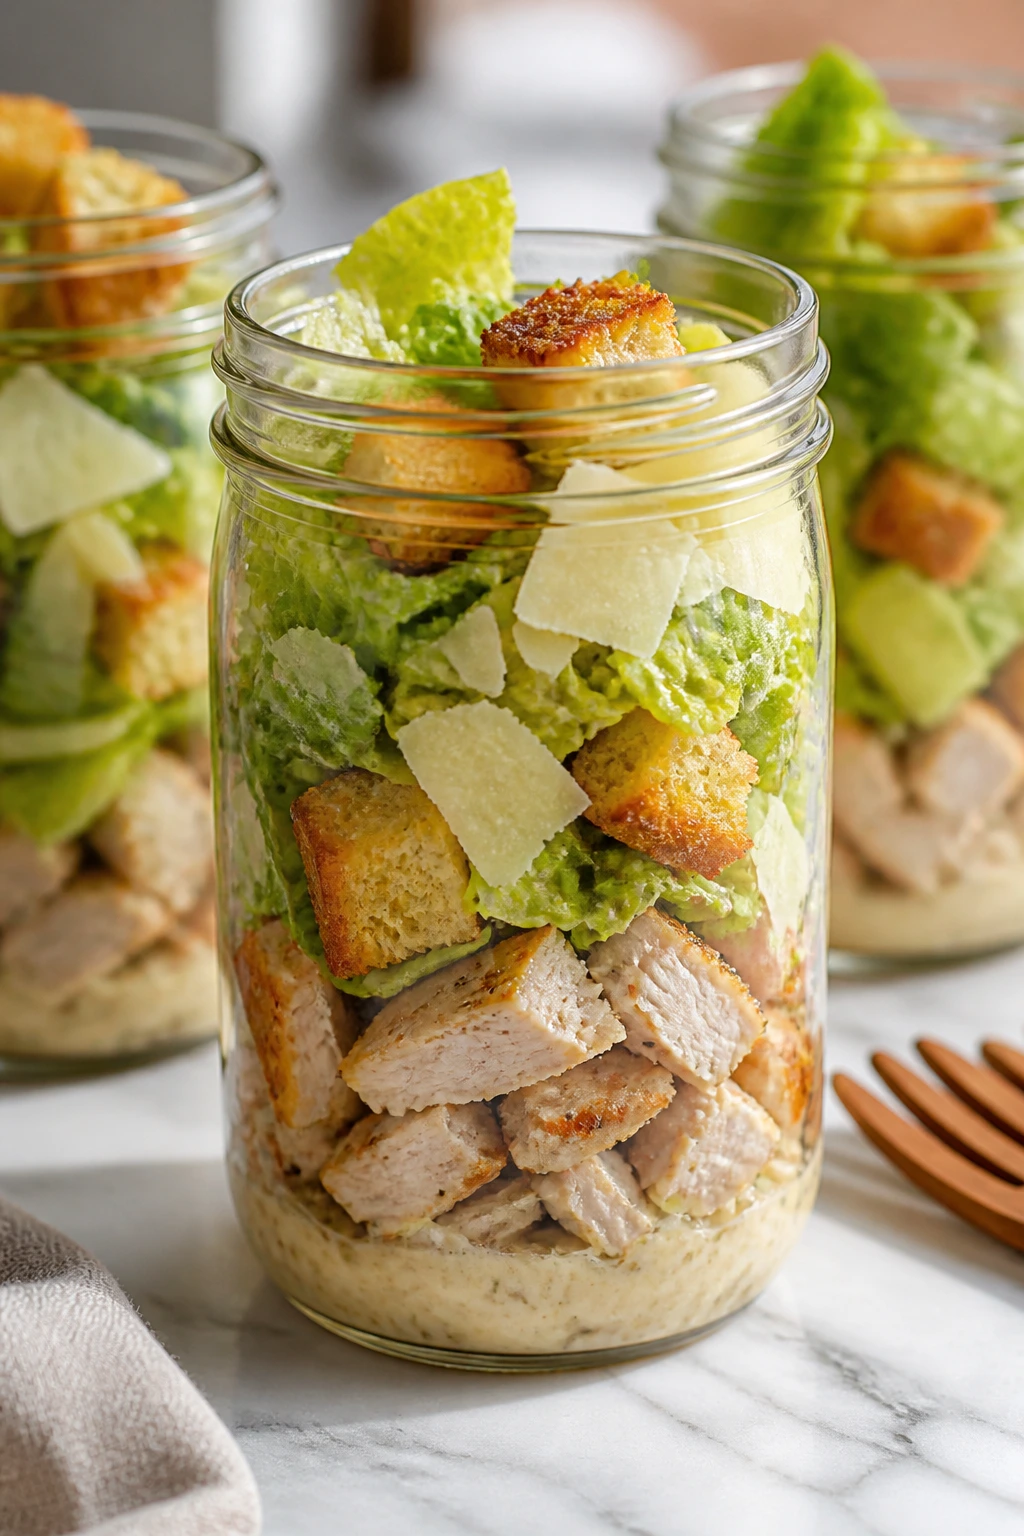
1. Chicken Caesar Salad Jars
A good Caesar has bite. The romaine should still crunch, the Parmesan should cling to the chicken, and the dressing should taste garlicky and sharp, not heavy. Packed into jars or containers, this one behaves better than a sandwich ever will.
Why It Works:
The mix of chicken, romaine, and Parmesan gives you protein, volume, and salt in one shot. Caesar dressing is strong enough to flavor every bite, but it needs to stay off the lettuce until lunch or the greens wilt fast. Croutons add the hard crunch that keeps this from feeling limp.
Key Ingredients:
- 4 cups chopped romaine lettuce
- 2 cups cooked chicken breast, chopped
- 1/2 cup shaved Parmesan cheese
- 1 cup croutons
- 1/3 cup Caesar dressing
- 1 tablespoon lemon juice
- 1/4 teaspoon black pepper
Quick Steps:
- Chop the romaine into bite-size pieces and dry it well.
- Toss the chicken with lemon juice and black pepper.
- Layer dressing at the bottom of each jar or container.
- Add chicken, Parmesan, and romaine in that order.
- Pack croutons separately so they stay crisp.
- Shake the jar into a bowl right before eating, then top with croutons.
Equipment for This Recipe:
- 2 wide-mouth jars or airtight lunch containers
- Chef’s knife
- Cutting board
- Small bowl
- Measuring cups
How to Serve This Dish:
Serve it cold with a fork and a few extra shavings of Parmesan on top. A slice of sourdough on the side works if you want more carb ballast. One jar usually feeds one hungry lunch, especially if you’re using the full 2 cups of chicken.
Pro Tips for This Recipe:
- Dry the romaine completely. Wet leaves make the dressing slide off.
- Use rotisserie chicken if you want this done fast.
- Keep croutons in a little bag or separate cup.
- Add a squeeze of lemon at the end if the dressing tastes flat.
Variations on This Dish:
- Grilled Caesar: Use grilled chicken thighs and a few charred corn kernels.
- Anchovy Caesar: Add 1 minced anchovy to the dressing if you like a louder, saltier Caesar.
- Chicken Caesar Wrap Bowl: Serve everything over chopped romaine with a tortilla on the side for scooping.
Common Mistakes to Avoid with This Dish:
- Packing the croutons with the greens: They turn soft in an hour.
- Using too much dressing: The salad should look glossy, not wet.
- Skipping the drying step: Water on the lettuce dilutes the dressing and makes everything taste thin.
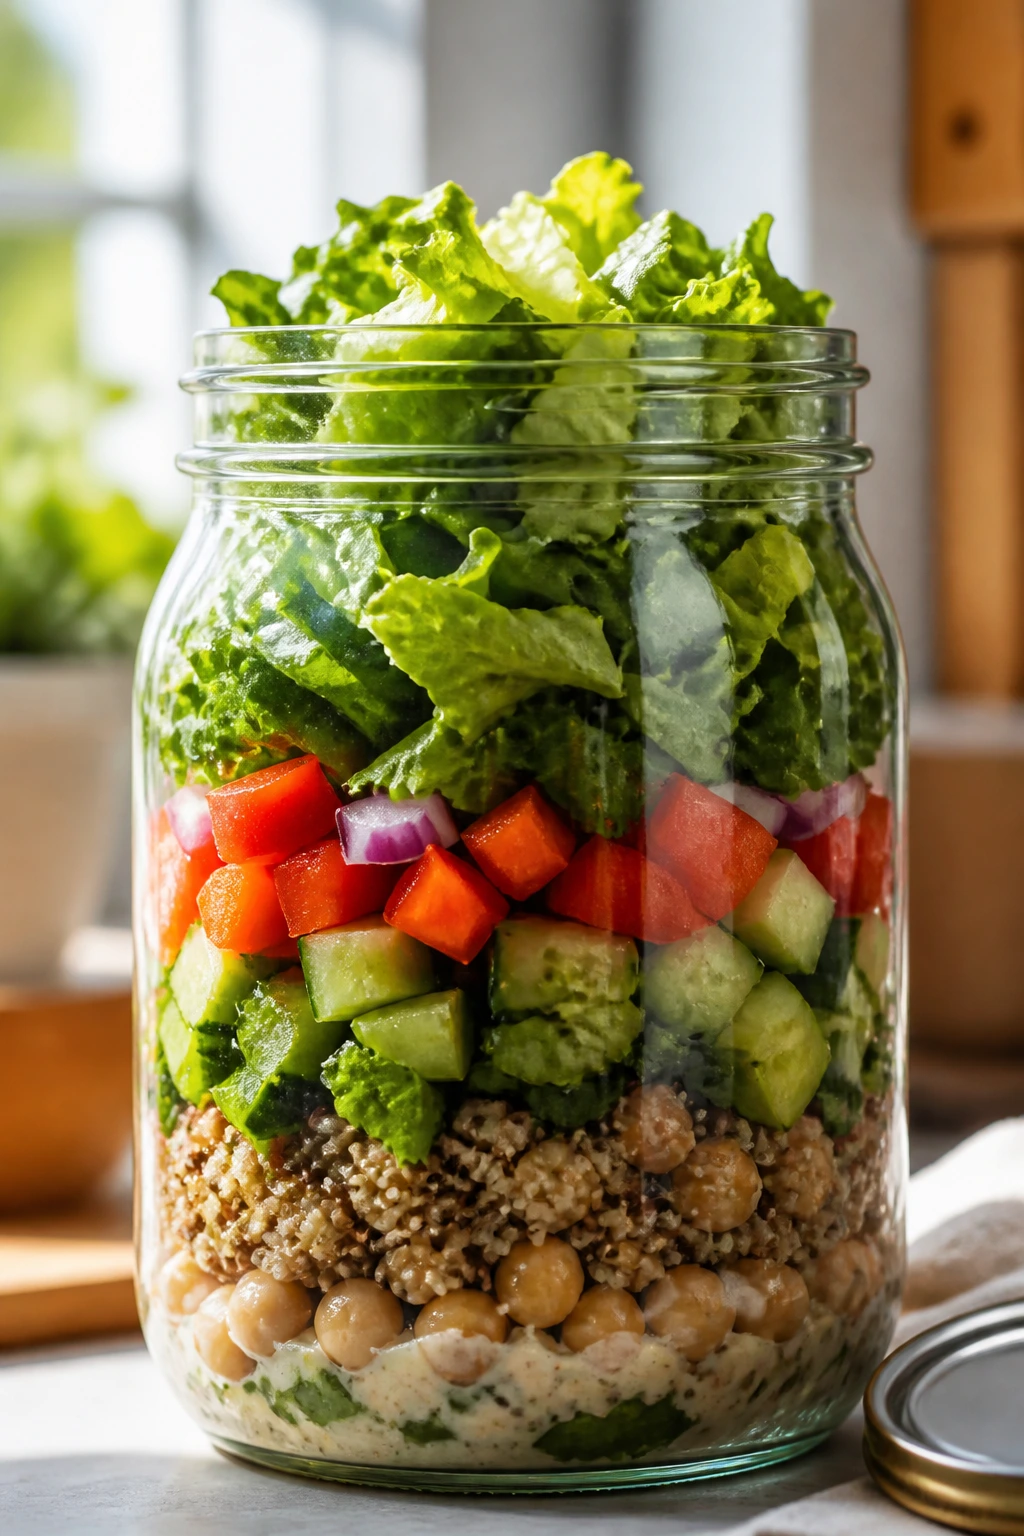
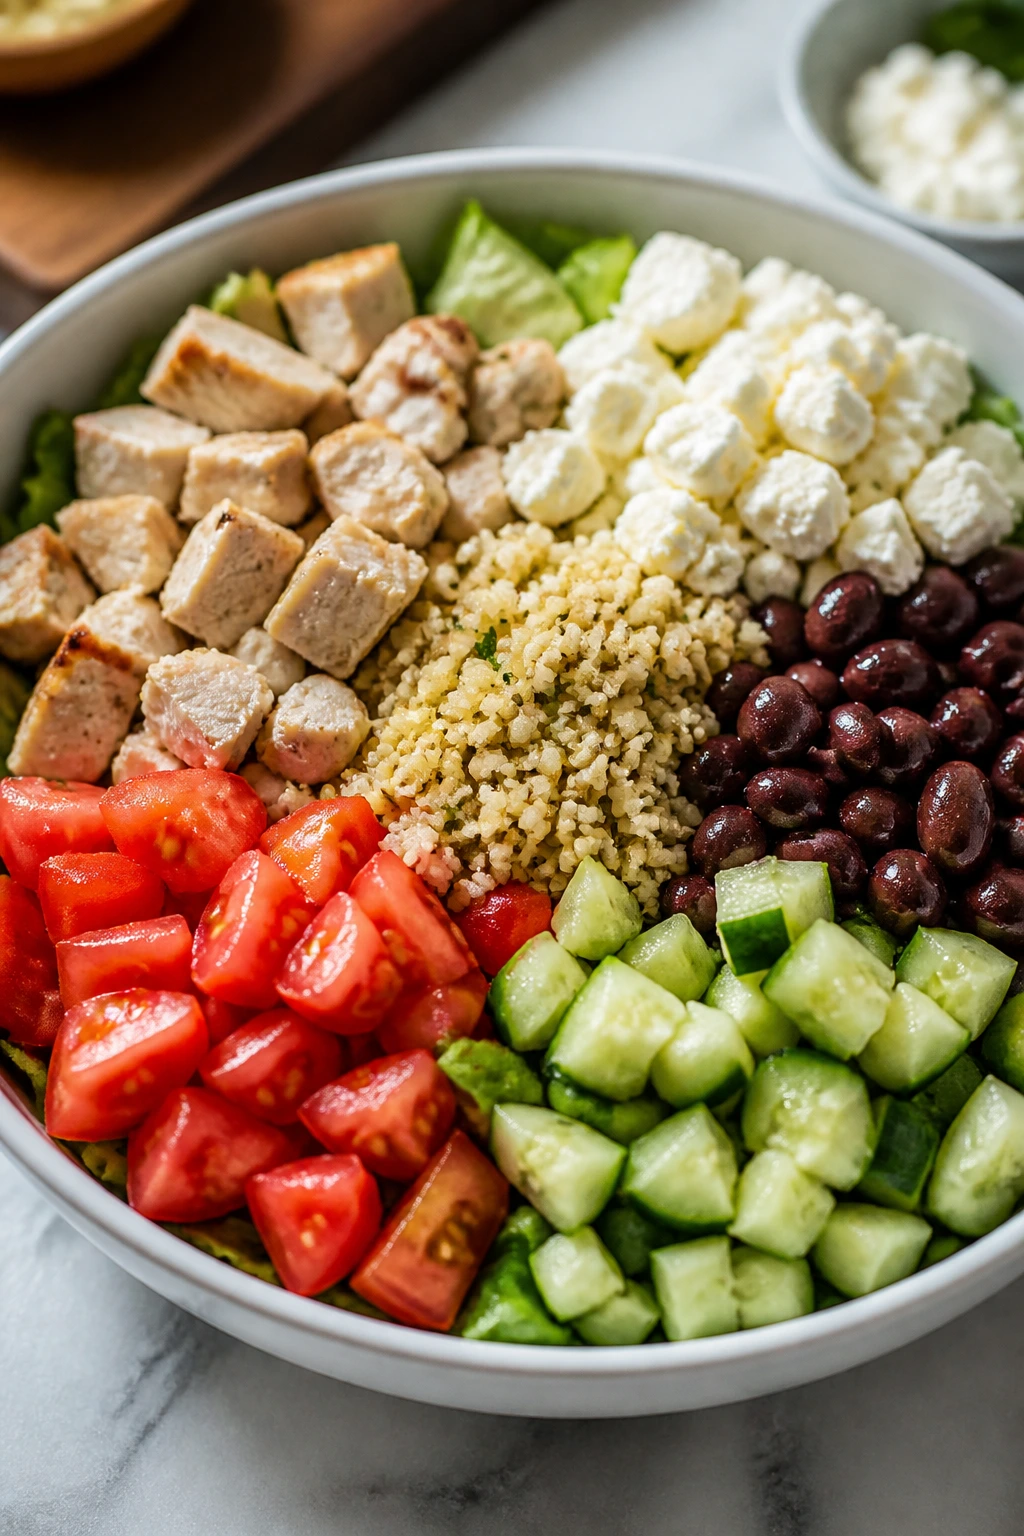
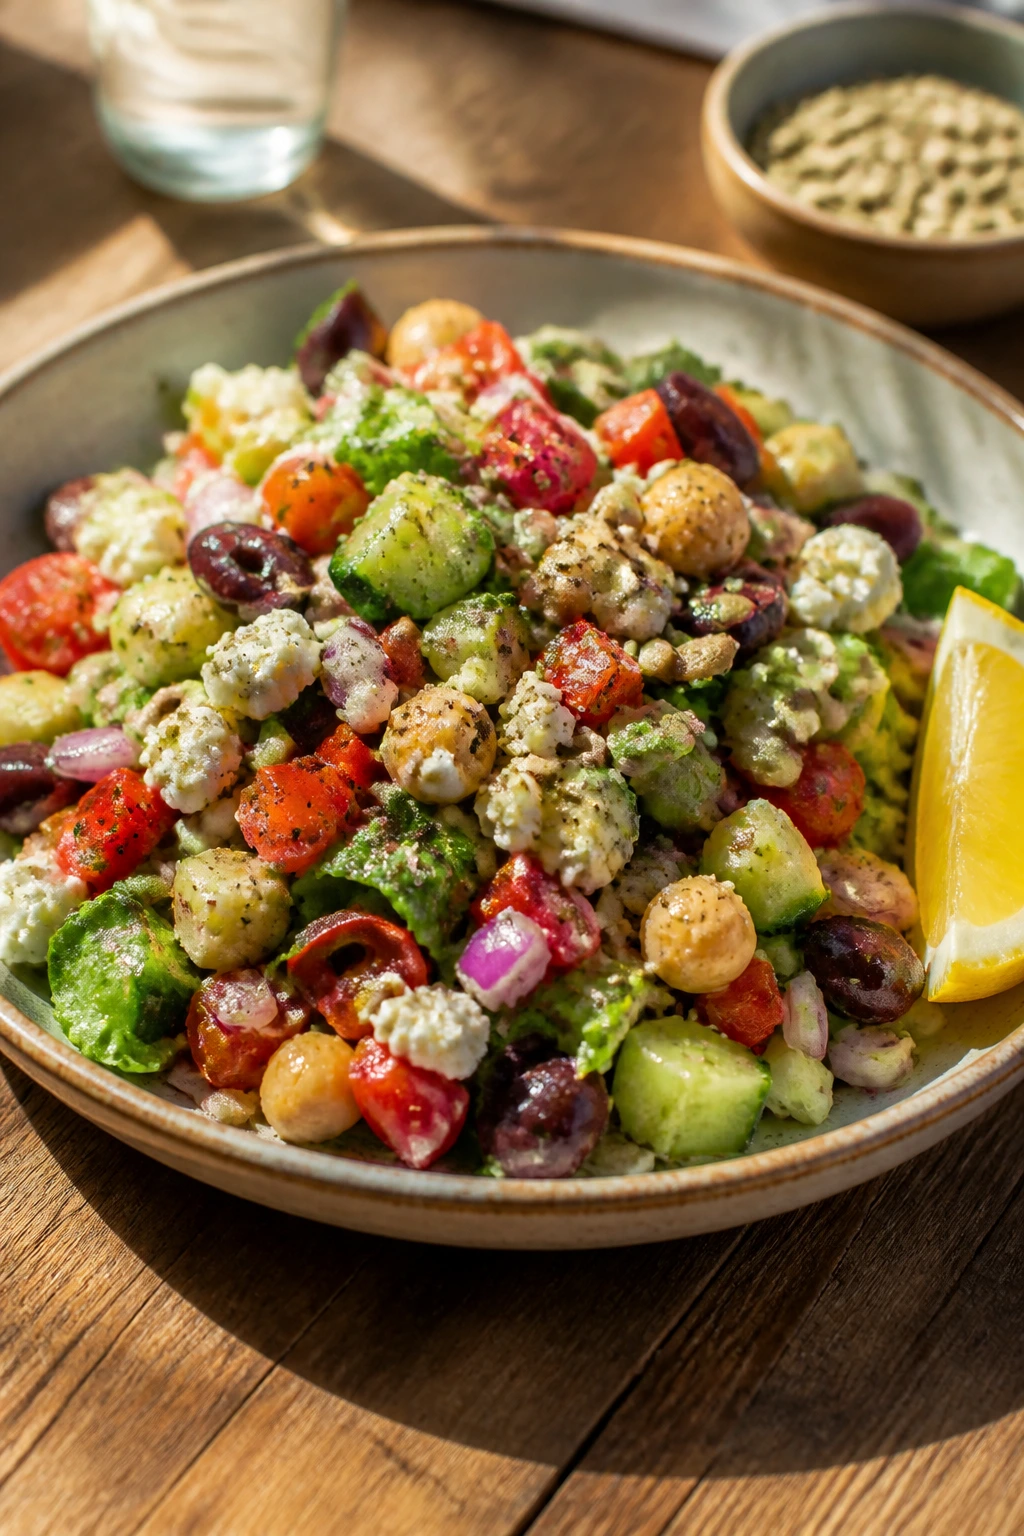
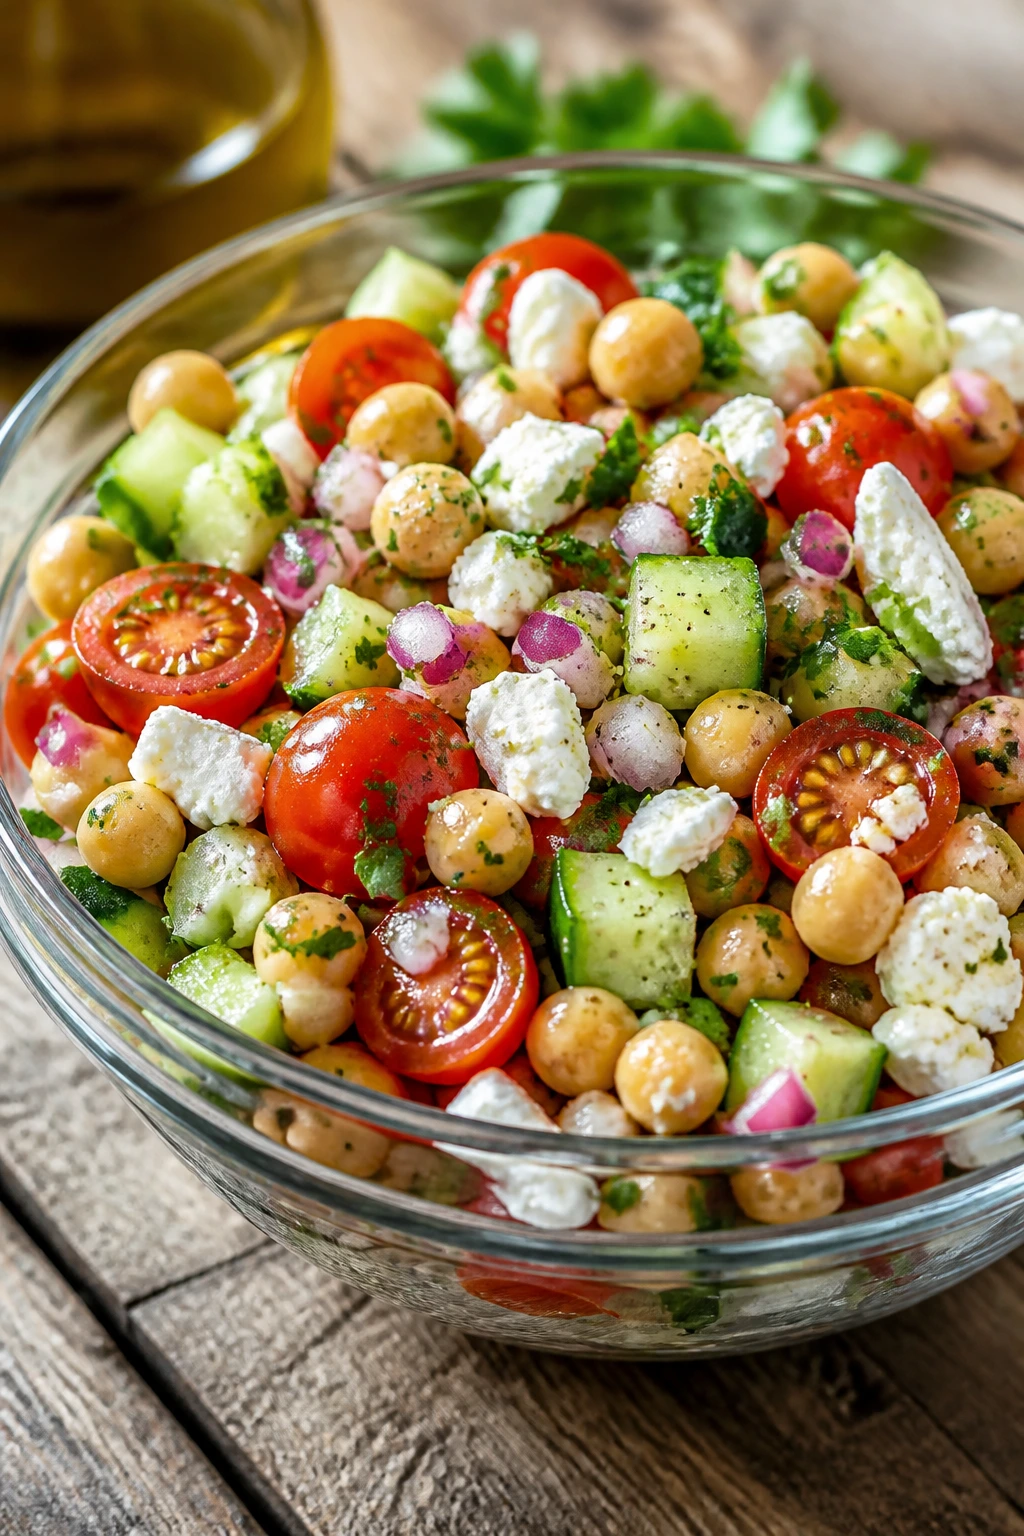
2. Mediterranean Chickpea Cucumber Salad
This one tastes bright before it tastes filling. The chickpeas bring a nutty, dense bite, the cucumber gives cold snap, and the feta keeps the whole bowl from feeling one-note. It’s the kind of salad that gets better after a short rest, which is useful when lunch is not on your schedule.
Why It Works:
Chickpeas carry the meal. Cucumbers, tomato, and red onion add freshness and crunch, while feta and olive oil make it feel finished. Lemon juice wakes everything up, and parsley keeps the flavor from drifting sleepy or flat.
Key Ingredients:
- 2 cans chickpeas, drained and rinsed
- 1 large cucumber, diced
- 1 1/2 cups cherry tomatoes, halved
- 1/4 red onion, thinly sliced
- 1/2 cup crumbled feta
- 1/4 cup chopped parsley
- 3 tablespoons olive oil
- 2 tablespoons lemon juice
- 1 teaspoon dried oregano
- 1/2 teaspoon salt
Quick Steps:
- Drain and rinse the chickpeas well.
- Dice the cucumber and halve the tomatoes.
- Thinly slice the red onion so it doesn’t bulldoze the bowl.
- Whisk olive oil, lemon juice, oregano, and salt.
- Toss everything together and let it sit 10 minutes.
- Taste again before packing; chickpeas drink up seasoning.
Equipment for This Recipe:
- Large mixing bowl
- Sharp knife
- Colander
- Measuring spoons
- Airtight container
How to Serve This Dish:
Pile it into a shallow bowl and finish with extra parsley and a little more feta. Pita chips work well if you want a crunchier lunch. It also sits nicely beside hummus and a few olives.
Pro Tips for This Recipe:
- Salt the cucumbers lightly and blot them if they seem watery.
- Slice onion paper-thin so it blends in instead of dominating.
- Let the salad rest 10 to 15 minutes before eating.
- A little lemon zest makes the dressing taste sharper without more acid.
Variations on This Dish:
- Greek-Style Chickpea Salad: Add kalamata olives and diced green bell pepper.
- Avocado Version: Fold in avocado right before serving for a creamier bowl.
- Tahini Chickpea Salad: Swap half the olive oil for tahini and thin with a splash of water.
Common Mistakes to Avoid with This Dish:
- Leaving the chickpeas unseasoned: They need salt and acid or they taste dull.
- Using too much cucumber water: Dry the diced cucumber if it seems loose.
- Overloading with feta: Feta should season the salad, not bury it.
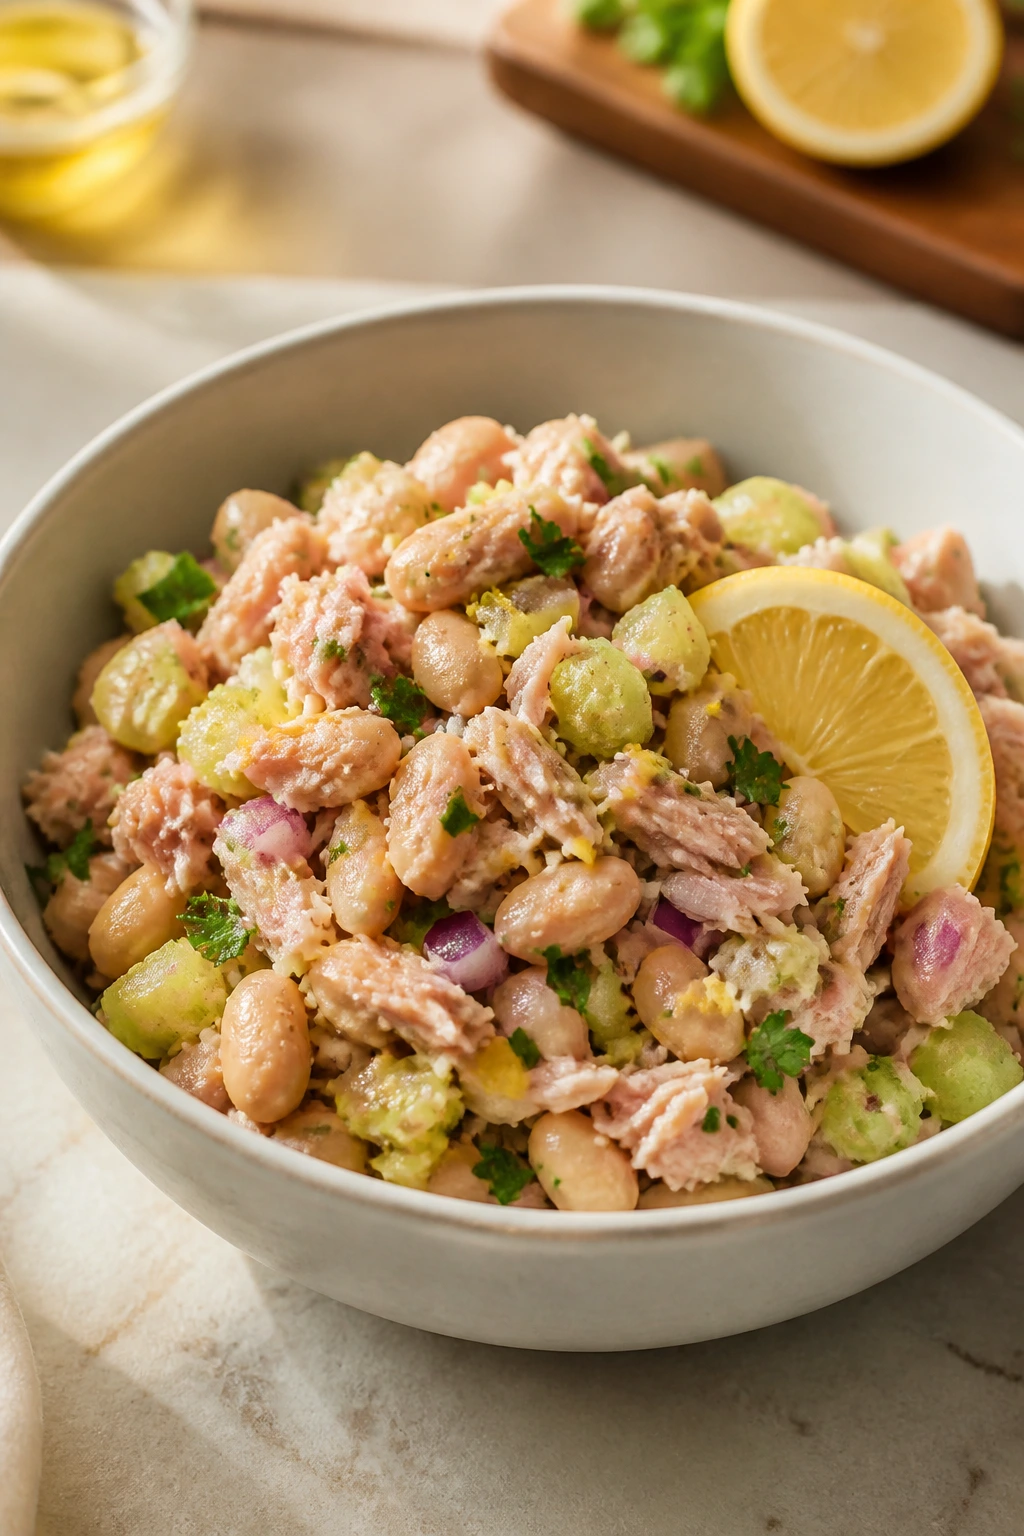
3. Tuna White Bean Salad with Lemon
This salad has a clean, briny flavor that wakes up a dull afternoon. Tuna and white beans give it heft, and the lemon dressing keeps it from tasting like pantry food. It’s one of those lunches that takes almost no effort and still feels like a real meal.
Why It Works:
White beans soften the edge of the tuna and make the salad more filling. Celery and red onion keep each bite from turning mushy, while lemon juice and Dijon give the dressing the kind of sharpness tuna actually needs. It’s cold, compact, and sturdy enough for meal prep.
Key Ingredients:
- 2 cans tuna in water, drained
- 1 can cannellini beans, drained and rinsed
- 2 celery stalks, diced
- 1/4 red onion, finely chopped
- 2 tablespoons chopped dill or parsley
- 2 tablespoons olive oil
- 1 1/2 tablespoons lemon juice
- 1 teaspoon Dijon mustard
- 1/2 teaspoon salt
- 1/4 teaspoon black pepper
Quick Steps:
- Drain the tuna well and break it into chunks.
- Rinse the beans and let them dry for a minute in the colander.
- Chop the celery and onion very small.
- Whisk olive oil, lemon juice, Dijon, salt, and pepper.
- Toss everything together gently so the beans stay intact.
- Chill 15 minutes if you have time; the flavor settles in.
Equipment for This Recipe:
- Mixing bowl
- Colander
- Fork
- Knife and cutting board
- Airtight lunch box
How to Serve This Dish:
Serve it over arugula, spoon it into lettuce cups, or tuck it into a pita with sliced tomato. A cracked pepper finish helps. I like this one cold, straight from the fridge.
Pro Tips for This Recipe:
- Use tuna packed in water for a cleaner, less oily bowl.
- Chop the celery finely so it doesn’t overpower the beans.
- A splash of pickle brine works if the lemon tastes too soft.
- Don’t mash the beans; the whole-bean texture is part of the appeal.
Variations on This Dish:
- Mediterranean Tuna Bowl: Add chopped olives and sun-dried tomatoes.
- Caper Lemon Version: Stir in 1 tablespoon capers for more bite.
- Herby Tuna Smash: Mash half the beans with the tuna for a creamier texture.
Common Mistakes to Avoid with This Dish:
- Using watery tuna: Drain it well or the dressing gets thin.
- Chopping the vegetables too large: Big chunks make the salad awkward.
- Skipping acid: Without lemon or vinegar, tuna tastes flat and dusty.
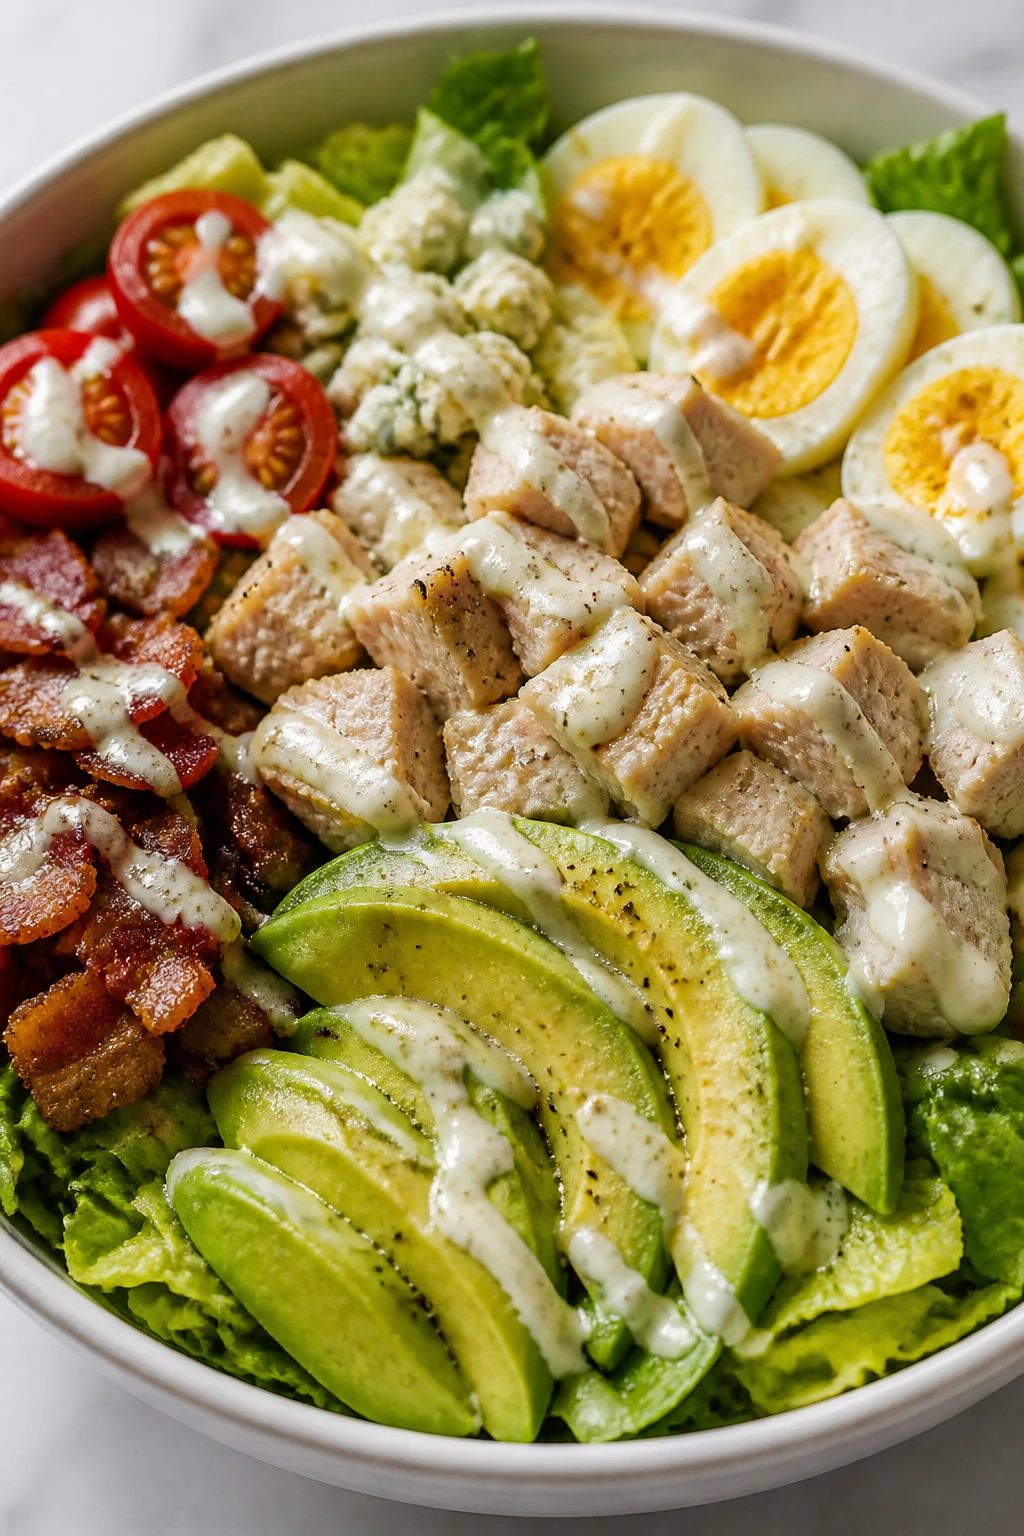
4. Turkey Cobb Salad with Avocado
A Cobb salad is basically a lunch tray with better manners. Turkey, egg, avocado, bacon, and blue cheese make a bowl that eats like a full meal, not a green side. It’s rich, but the chopped format keeps it practical.
Why It Works:
The mix of protein sources keeps hunger away for hours. Chopped romaine gives a crisp base, while avocado and blue cheese bring creaminess and salt. Tomato and cucumber break up the heavier flavors so the bowl doesn’t feel like an armload of deli food.
Key Ingredients:
- 4 cups chopped romaine
- 1 1/2 cups cooked turkey breast, chopped
- 2 hard-boiled eggs, quartered
- 1 avocado, sliced
- 4 slices cooked bacon, crumbled
- 1/2 cup cherry tomatoes, halved
- 1/4 cup crumbled blue cheese
- 3 tablespoons ranch or red wine vinaigrette
Quick Steps:
- Chop the romaine and spread it in two containers or bowls.
- Slice the turkey into bite-size pieces.
- Quarter the eggs and halve the tomatoes.
- Arrange each topping in neat sections over the lettuce.
- Add avocado right before serving so it stays green.
- Drizzle with dressing or pack it separately.
Equipment for This Recipe:
- Cutting board
- Chef’s knife
- Small saucepan for eggs
- Airtight containers
- Spoon for packing avocado
How to Serve This Dish:
Serve it in a wide bowl so the toppings stay visible. A small baguette on the side works if you want something to swipe through the dressing. This is a lunch that feels a little more dressed up than the average desk meal.
Pro Tips for This Recipe:
- Cook bacon until crisp; floppy bacon gets lost.
- Keep avocado separate until the last minute.
- If using deli turkey, choose slices that aren’t too wet.
- A pinch of salt on the tomatoes makes them taste sweeter.
Variations on This Dish:
- Chicken Cobb: Swap turkey for leftover roast chicken.
- California Cobb: Add cucumber and shredded carrot for more crunch.
- Blue Cheese-Free Cobb: Use feta or shaved Parmesan if blue cheese is too sharp.
Common Mistakes to Avoid with This Dish:
- Making the bowl too dense with dressing: Cobb should taste rich, not soggy.
- Adding avocado too early: It browns and softens fast.
- Using underseasoned eggs: A tiny pinch of salt on the yolks matters more than you’d think.
5. Taco Salad with Seasoned Beef
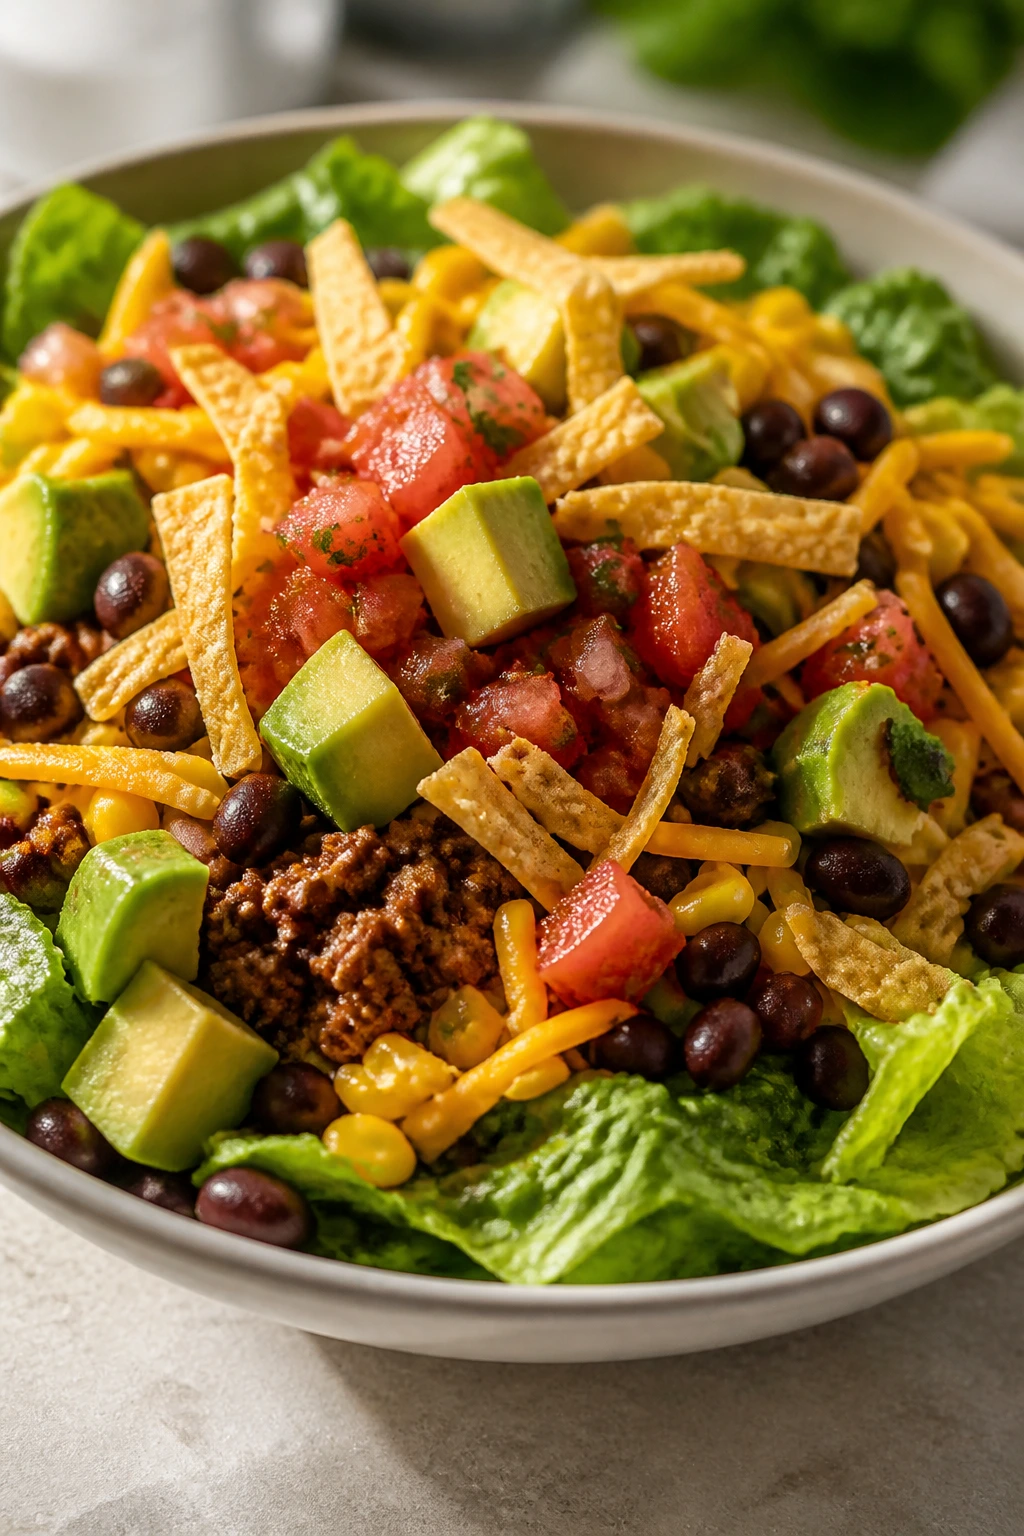
This is the lunch version of taco night, minus the drama. You get crisp lettuce, warm spiced beef, beans, corn, and a little cheese, all in a bowl that rewards a fork. It’s the rare salad that doesn’t apologize for being satisfying.
Why It Works:
Seasoned beef carries the whole dish, and black beans extend it without making it feel heavy. Crunchy tortilla strips matter here; they give you the textural hit that keeps the salad from turning into taco soup. Salsa or lime dressing ties the bowl together fast.
Key Ingredients:
- 1 lb ground beef
- 1 teaspoon chili powder
- 1/2 teaspoon cumin
- 1/2 teaspoon garlic powder
- 1/2 teaspoon salt
- 4 cups chopped romaine
- 1 cup black beans, rinsed
- 1 cup corn kernels
- 1/2 cup shredded cheddar
- 1 avocado, diced
- 1/2 cup salsa
- 1 cup tortilla strips
Quick Steps:
- Brown the beef in a skillet over medium-high heat.
- Stir in chili powder, cumin, garlic powder, and salt.
- Cook until the beef is no longer pink and the spices smell toasted.
- Build bowls with romaine, beans, corn, cheese, and avocado.
- Spoon warm beef over the top.
- Finish with salsa and tortilla strips right before eating.
Equipment for This Recipe:
- Large skillet
- Wooden spoon
- Cutting board
- Sharp knife
- Salad bowls or meal-prep containers
How to Serve This Dish:
Serve warm beef over cold greens for the best contrast. Sour cream or plain Greek yogurt works if you want a creamier finish. A lime wedge on the side sharpens everything.
Pro Tips for This Recipe:
- Drain excess fat if the beef leaves a greasy puddle.
- Add the tortilla strips at the end so they stay crunchy.
- Use chunky salsa if you want more texture.
- Season the beef a touch more than you think; the lettuce softens the flavor.
Variations on This Dish:
- Turkey Taco Salad: Use ground turkey and a little extra oil in the pan.
- Bean-Heavy Version: Replace half the beef with black beans for a lighter bowl.
- Chipotle Taco Salad: Add chopped chipotle in adobo for smoke and heat.
Common Mistakes to Avoid with This Dish:
- Putting hot beef directly on delicate greens and sealing the box immediately: Let it cool a few minutes first.
- Skipping acid: Salsa, lime, or pickled onions keep the bowl from tasting muddy.
- Overfilling with cheese: Too much cheese mutes the seasoning.
6. Salmon Niçoise Salad
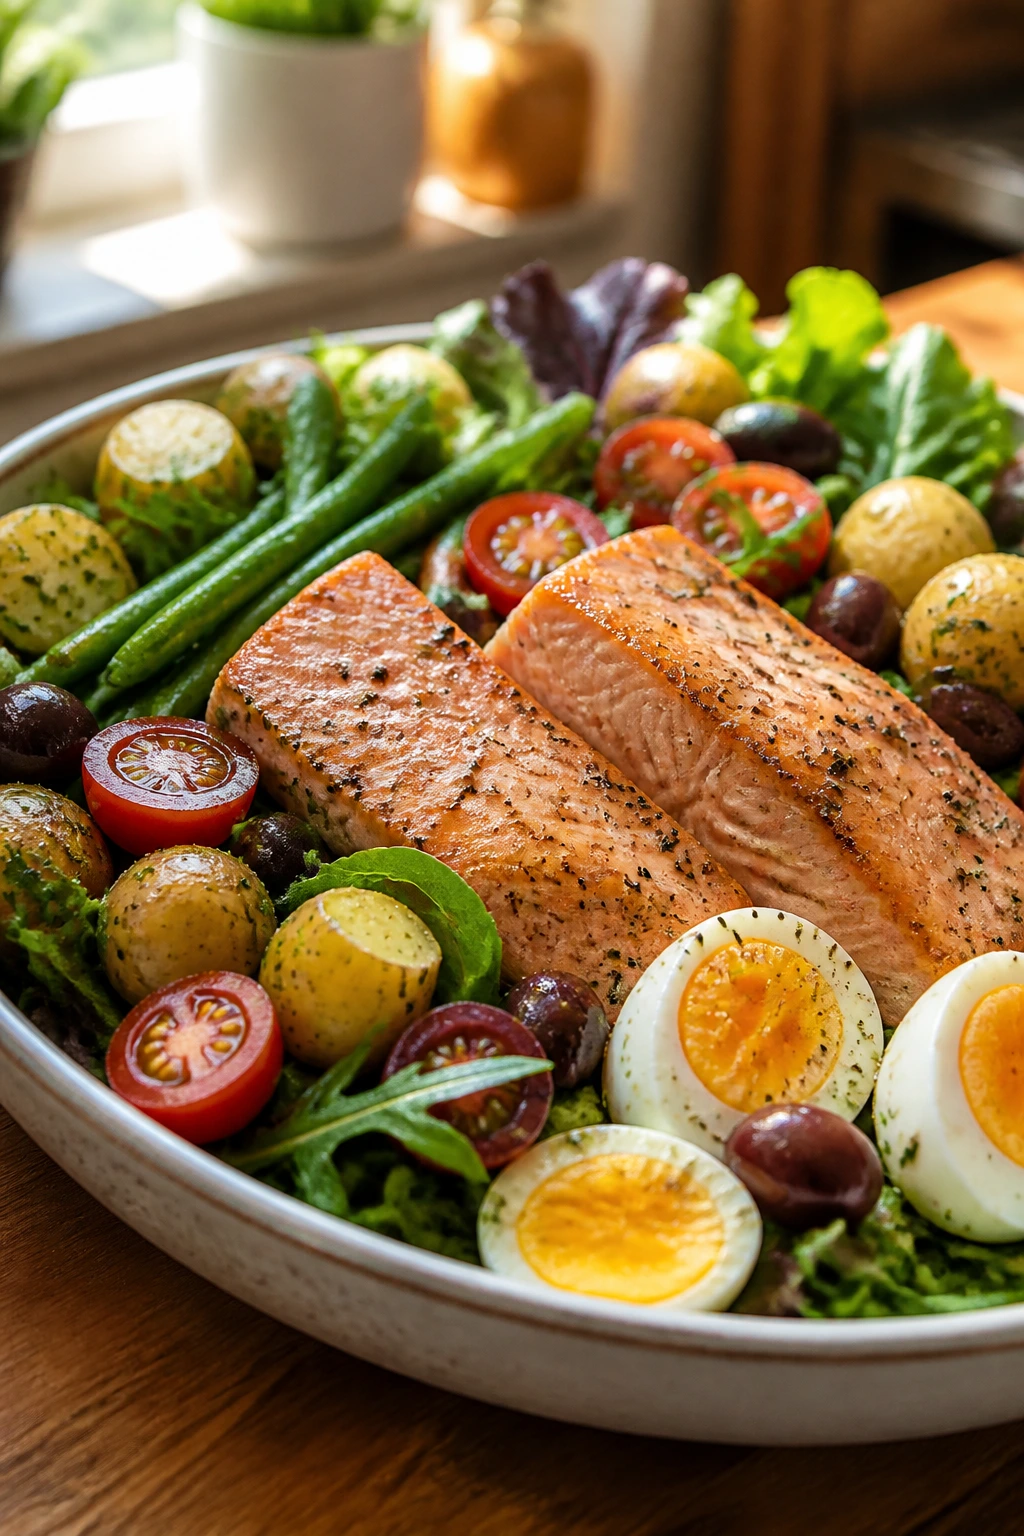
This salad looks fussy and eats like a power lunch. Tender salmon, potatoes, green beans, olives, and eggs bring real structure to the bowl. You don’t need to build it with restaurant precision, but the ingredients do need to be cooked cleanly.
Why It Works:
Niçoise-style salads work because every ingredient has a job. Potatoes give starch, green beans bring snap, eggs supply richness, and salmon adds a clean, meaty flavor that doesn’t need much dressing. A simple Dijon vinaigrette keeps the bowl bright.
Key Ingredients:
- 2 salmon fillets, about 6 oz each
- 2 cups baby potatoes, halved
- 1 cup green beans, trimmed
- 2 hard-boiled eggs, halved
- 1 cup cherry tomatoes
- 1/4 cup Kalamata olives
- 4 cups mixed greens
- 3 tablespoons olive oil
- 1 tablespoon Dijon mustard
- 1 tablespoon red wine vinegar
- 1/2 teaspoon salt
Quick Steps:
- Roast or pan-cook the salmon until it flakes easily.
- Boil the potatoes until fork-tender, about 12 to 15 minutes.
- Blanch the green beans for 2 to 3 minutes, then cool them.
- Whisk olive oil, Dijon, vinegar, and salt.
- Arrange greens, potatoes, beans, tomatoes, olives, eggs, and salmon in containers.
- Dress just before eating.
Equipment for This Recipe:
- Sheet pan or skillet
- Saucepan
- Slotted spoon
- Mixing bowl
- Airtight containers
How to Serve This Dish:
Serve it slightly cool, not icy cold. A small piece of crusty bread works well with the vinaigrette and potato pieces. If you’re packing lunch, keep the dressing in a separate cup.
Pro Tips for This Recipe:
- Salt the potatoes while they’re still warm.
- Don’t overcook the salmon; dry salmon makes the whole salad feel dry.
- Cool the green beans before packing so the greens don’t wilt.
- Use a firm potato like Yukon Gold, not a crumbly one.
Variations on This Dish:
- Tuna Niçoise: Swap salmon for tuna if that’s what you have.
- Warm Niçoise Bowl: Serve the potatoes and salmon warm over greens.
- Herb Niçoise: Add chopped dill, parsley, and chives to the dressing.
Common Mistakes to Avoid with This Dish:
- Overcooking the salmon: It turns chalky fast.
- Packing warm potatoes with lettuce: They steam the greens.
- Using too many olives: The salt should support the bowl, not dominate it.
7. Dill Egg Salad Greens
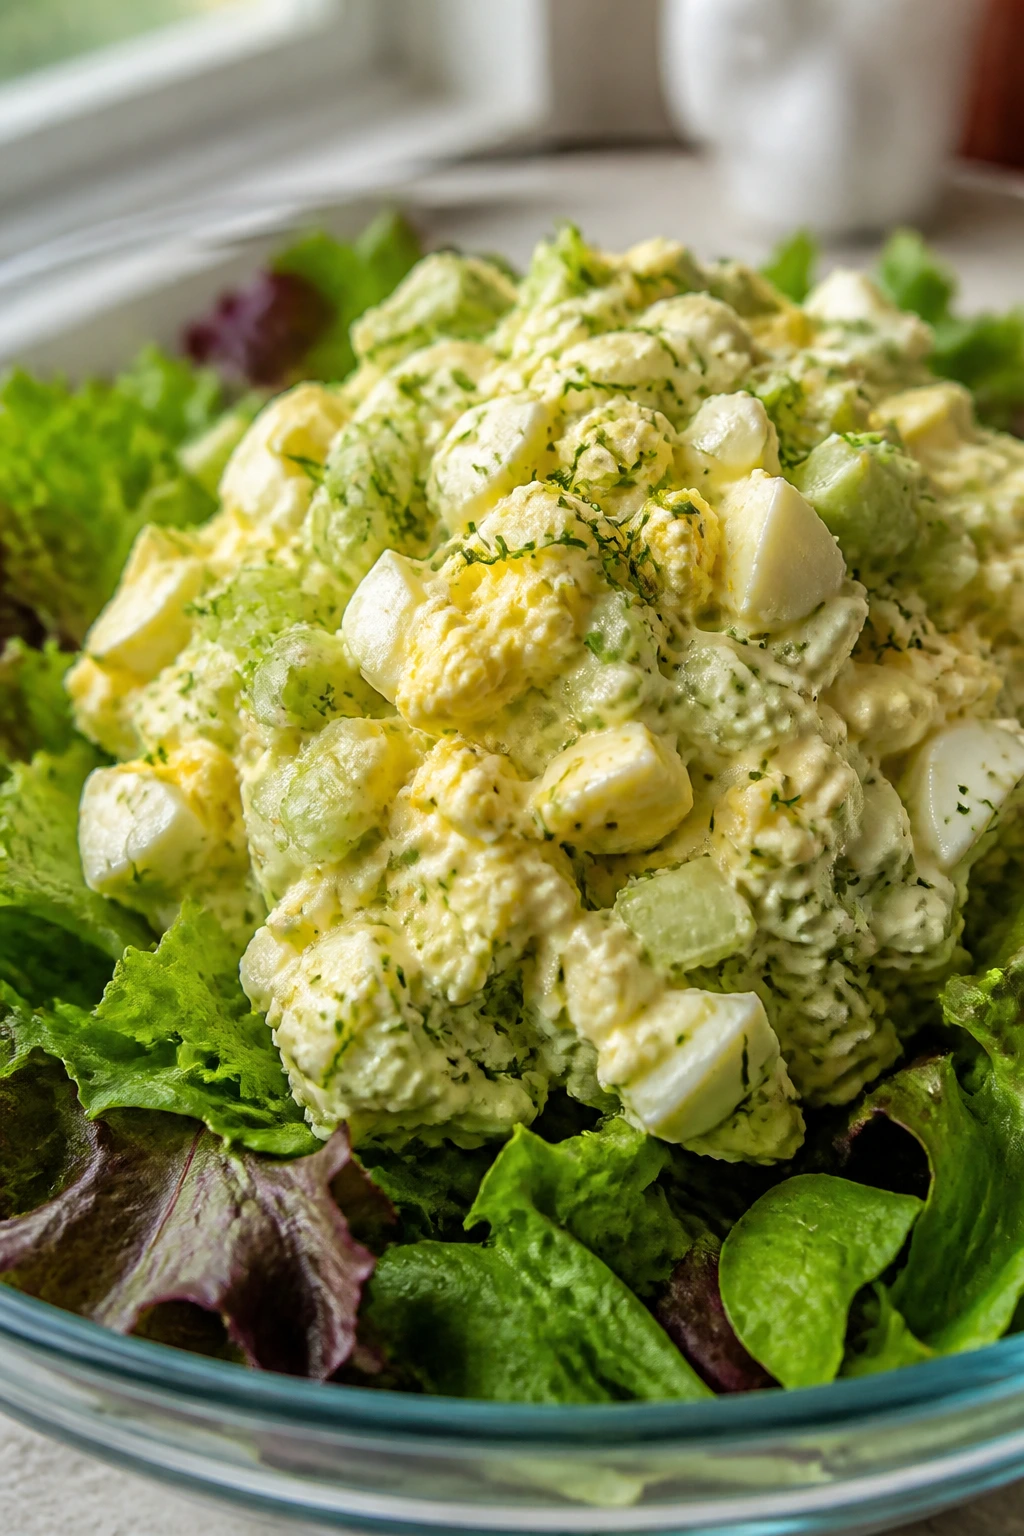
Egg salad gets a better life when you stop hiding it between two slices of bread. Piled over greens with dill and crisp celery, it turns into a lunch that still feels soft and creamy, but with enough crunch to keep it interesting. Cold, peppery, and straightforward.
Why It Works:
Egg salad is naturally rich, so it needs sharp herbs and fresh crunch to stay balanced. Dill, celery, and a little mustard keep the yolks from feeling heavy. Putting it over greens also gives you volume without making the meal dense.
Key Ingredients:
- 6 hard-boiled eggs, chopped
- 3 tablespoons mayonnaise
- 1 teaspoon Dijon mustard
- 1 tablespoon chopped dill
- 2 celery stalks, finely diced
- 1 tablespoon chopped chives
- 1 teaspoon lemon juice
- 1/2 teaspoon salt
- 1/4 teaspoon black pepper
- 4 cups mixed greens
Quick Steps:
- Chop the hard-boiled eggs into small pieces.
- Stir together mayonnaise, Dijon, dill, lemon juice, salt, and pepper.
- Fold in celery, chives, and eggs.
- Spoon over greens right before eating.
- Chill the egg salad at least 15 minutes for better flavor.
- Add extra dill on top if you want a brighter finish.
Equipment for This Recipe:
- Medium bowl
- Fork or spatula
- Knife and cutting board
- Saucepan for boiling eggs
- Airtight container
How to Serve This Dish:
Serve it in a bowl with a few crackers or toast points on the side. A handful of sliced radishes adds a peppery bite. I like this one cold and well peppered.
Pro Tips for This Recipe:
- Cool the eggs fully before mixing or the mayonnaise loosens.
- Chop the eggs by hand for better texture than a mash.
- A little celery seed can replace some of the fresh celery crunch.
- Make the salad base first, then add the egg mixture on top.
Variations on This Dish:
- Curried Egg Salad: Add 1/2 teaspoon curry powder and a few raisins.
- Avocado Egg Salad: Replace half the mayonnaise with mashed avocado.
- Pickle Dill Egg Salad: Stir in 1 tablespoon chopped dill pickles.
Common Mistakes to Avoid with This Dish:
- Overmixing the eggs into paste: Keep some chunks.
- Adding too much mayo: The salad should hold shape on a fork.
- Skipping the chill time: The dill and mustard need a minute to settle.
8. Quinoa Tabbouleh with Feta
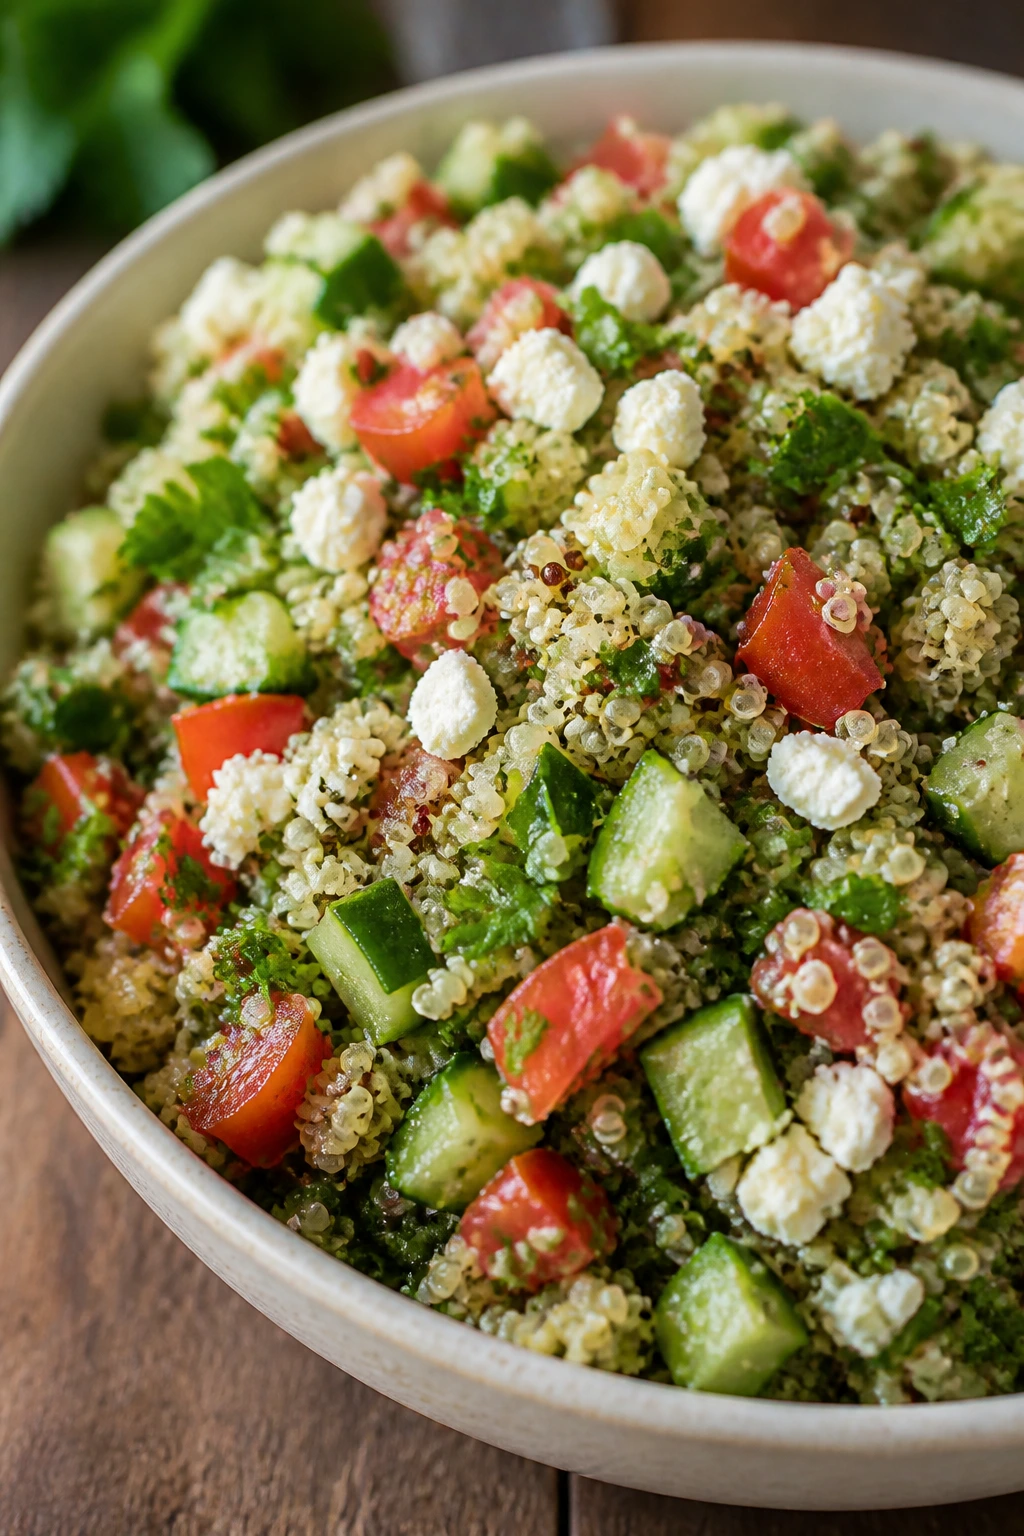
This is tabbouleh’s sturdier cousin. Quinoa gives you the grain backbone, parsley keeps it fresh, and cucumber plus tomato make every forkful feel cold and clean. It’s one of the best lunches for days when you want something bright but not flimsy.
Why It Works:
Quinoa absorbs lemon and olive oil without losing texture. Traditional tabbouleh leans heavily on herbs and fine chopping, and that same logic works here. The feta adds a creamy, salty layer that keeps the whole bowl from tasting too green.
Key Ingredients:
- 1 cup dry quinoa
- 2 cups water
- 1 1/2 cups chopped parsley
- 1/2 cup chopped mint
- 1 cucumber, diced
- 1 cup cherry tomatoes, diced
- 1/4 cup red onion, minced
- 1/2 cup crumbled feta
- 3 tablespoons olive oil
- 3 tablespoons lemon juice
- 1/2 teaspoon salt
Quick Steps:
- Rinse the quinoa and simmer it in water for 15 minutes.
- Fluff and cool it until it’s no longer steaming.
- Chop the herbs very fine.
- Mix quinoa, herbs, cucumber, tomato, onion, and feta.
- Whisk olive oil, lemon juice, and salt, then toss.
- Taste after 10 minutes and add more lemon if needed.
Equipment for This Recipe:
- Fine-mesh strainer
- Saucepan with lid
- Large bowl
- Sharp knife
- Airtight container
How to Serve This Dish:
Serve it cold or at room temperature with grilled chicken or hummus on the side. It’s good in a lunch bowl, but it also works spooned into romaine leaves. A few extra mint leaves on top make it look fresh, because it is.
Pro Tips for This Recipe:
- Cool the quinoa fully so it doesn’t steam the herbs.
- Chop the parsley finely; big stems are annoying here.
- Salt the cucumber lightly if it releases a lot of water.
- A pinch of cumin gives the bowl a quiet background note.
Variations on This Dish:
- Couscous Tabbouleh: Swap quinoa for couscous if you want a softer grain.
- Lentil Tabbouleh: Use cooked green lentils for more chew.
- No-Feta Version: Add diced avocado or olives for another creamy element.
Common Mistakes to Avoid with This Dish:
- Using hot quinoa: It wilts the herbs.
- Chopping the herbs lazily: Big parsley pieces feel stringy.
- Under-salting: Quinoa needs seasoning or it tastes dusty.
9. Greek Pasta Salad with Chicken
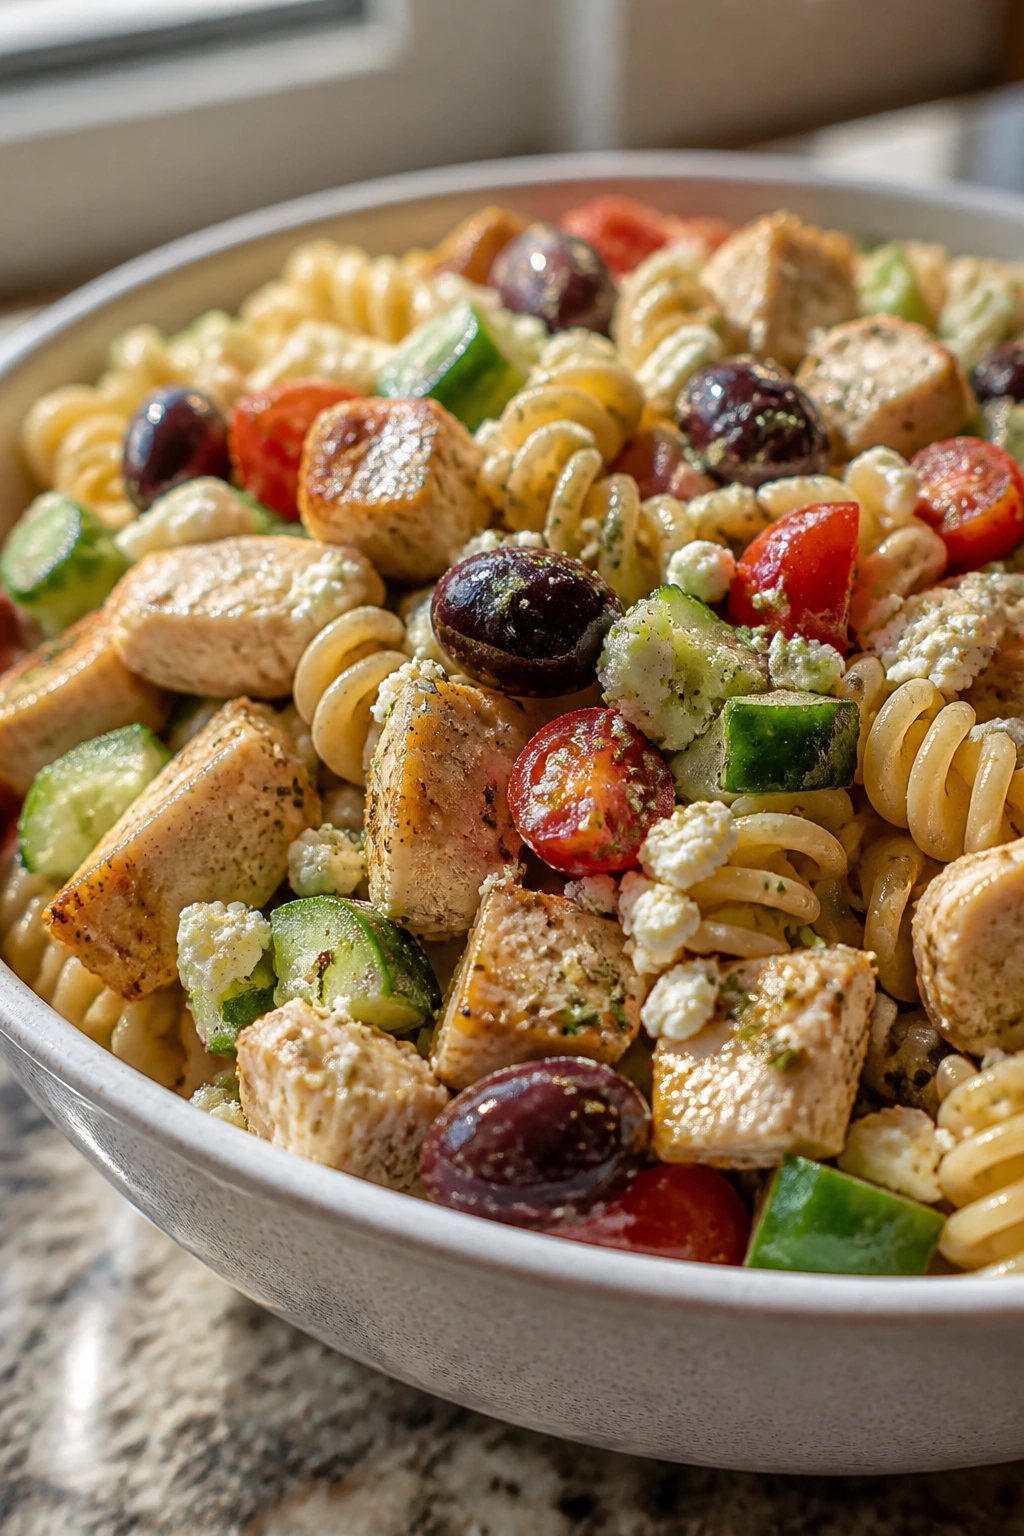
This is the lunchbox salad for people who want something cold, tangy, and not remotely shy about feta. Pasta gives it staying power, chicken makes it lunch, and the olives and cucumber keep it from drifting into bland territory. It holds up well for a couple of days, which is half the charm.
Why It Works:
Short pasta catches dressing in its ridges, so every bite has flavor. Chicken and feta add protein, while cucumber, tomato, and red onion keep the bowl from feeling heavy. A simple oregano vinaigrette is enough; you do not need a fancy dressing here.
Key Ingredients:
- 8 oz short pasta, cooked and cooled
- 2 cups cooked chicken, chopped
- 1 cup cucumber, diced
- 1 cup cherry tomatoes, halved
- 1/3 cup sliced Kalamata olives
- 1/2 cup crumbled feta
- 2 tablespoons olive oil
- 1 tablespoon red wine vinegar
- 1 teaspoon dried oregano
- 1/2 teaspoon salt
Quick Steps:
- Cook the pasta until just tender, then rinse briefly and cool.
- Chop the chicken and vegetables into bite-size pieces.
- Whisk olive oil, vinegar, oregano, and salt.
- Toss pasta, chicken, vegetables, olives, and feta together.
- Add dressing and stir until the pasta is lightly coated.
- Chill for 20 minutes before packing.
Equipment for This Recipe:
- Large pot
- Colander
- Mixing bowl
- Whisk
- Airtight lunch container
How to Serve This Dish:
Serve it cold with a fork and maybe a few peppery greens underneath if you want more volume. It works as a stand-alone lunch, but pita wedges are a good side. The bowl should look glossy, not drowned.
Pro Tips for This Recipe:
- Salt the pasta water well so the pasta tastes like something.
- Rinse the pasta just enough to cool it; don’t wash the flavor away.
- Add feta last if you want it to stay in chunks.
- A little lemon zest perks up the dressing more than more vinegar does.
Variations on This Dish:
- Rotisserie Shortcut: Use store-bought chicken and save time.
- Artichoke Greek Pasta: Add chopped artichoke hearts for more tang.
- Whole Wheat Version: Use whole wheat pasta for a nuttier flavor and firmer bite.
Common Mistakes to Avoid with This Dish:
- Overcooking the pasta: Soft pasta turns mushy after chilling.
- Mixing in too much dressing at once: Start small; pasta keeps absorbing it.
- Skipping the cool-down: Hot pasta steam-wrecks the cucumber.
10. Strawberry Spinach Chicken Salad
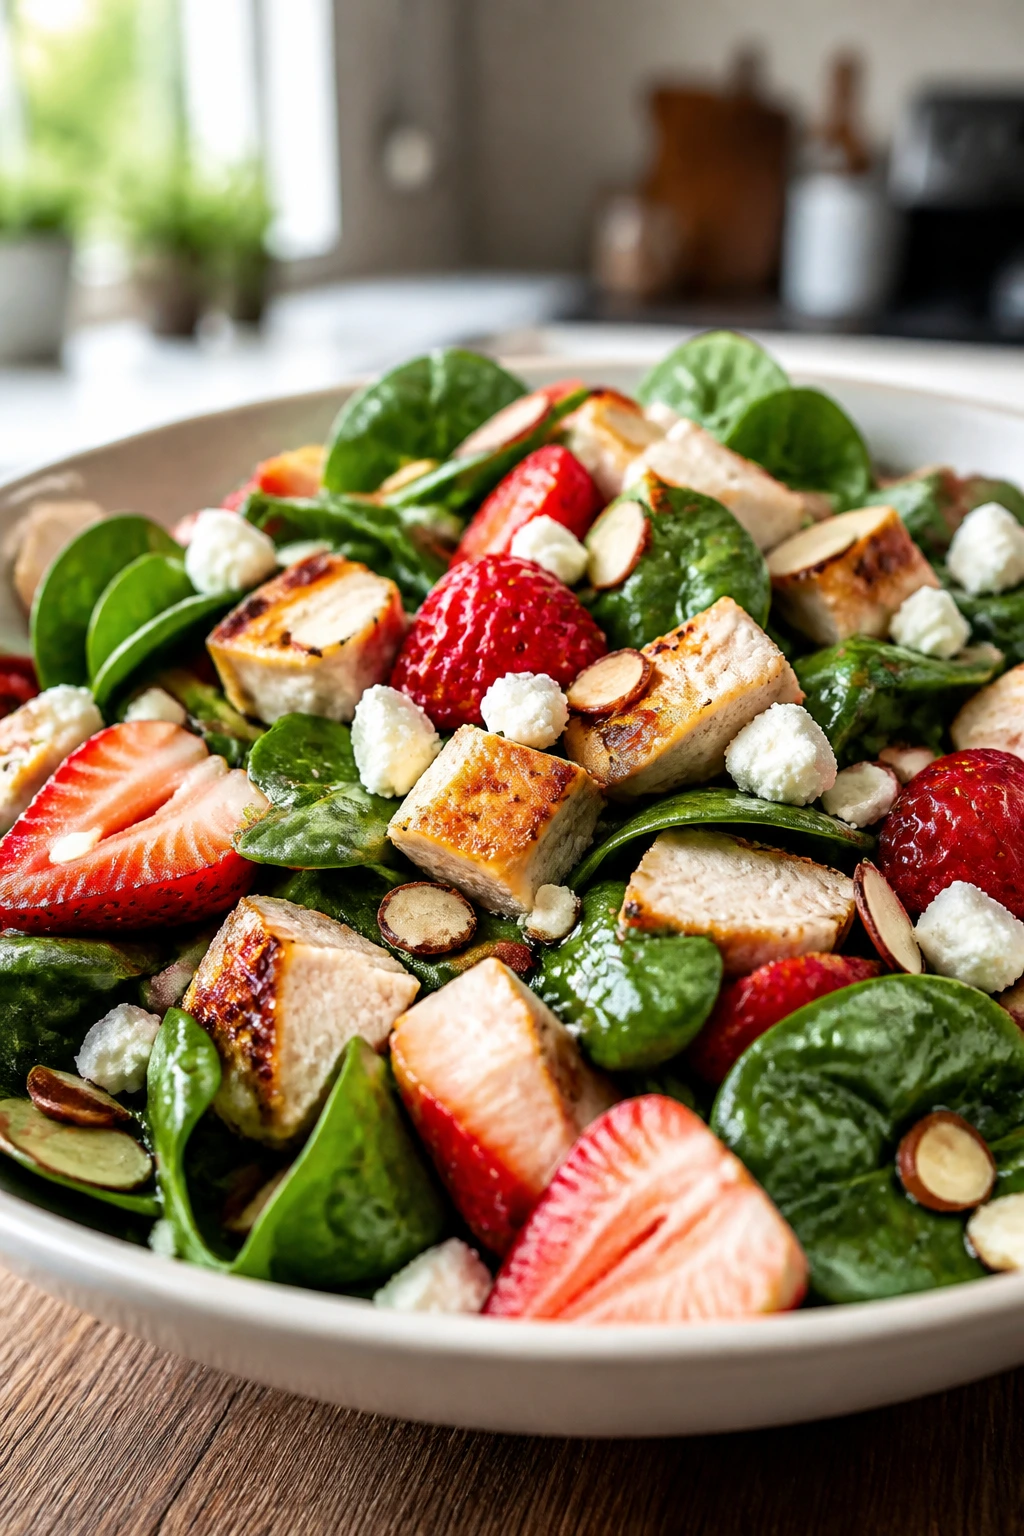
This one is all about contrast. Sweet strawberries, salty cheese, tender chicken, and spinach give you a lunch that feels lighter without tasting flimsy. The poppyseed dressing matters here; without it, the bowl can lean a little too quiet.
Why It Works:
Spinach gives a soft base that still survives a lunch container. Strawberries bring sweetness and a watery freshness that pairs well with chicken and feta. Almonds or pecans add crunch so the salad doesn’t flatten out.
Key Ingredients:
- 4 cups baby spinach
- 2 cups cooked chicken, sliced
- 1 1/2 cups strawberries, sliced
- 1/3 cup crumbled feta
- 1/4 cup sliced almonds
- 3 tablespoons poppyseed dressing
- 1 tablespoon balsamic vinegar
- 1/2 teaspoon black pepper
Quick Steps:
- Slice the strawberries and chicken.
- Toast the almonds for 3 to 4 minutes until fragrant.
- Layer spinach, chicken, strawberries, feta, and almonds.
- Whisk poppyseed dressing with balsamic vinegar and pepper.
- Dress right before eating so the spinach stays perky.
- Taste for sweetness; add a pinch of salt if needed.
Equipment for This Recipe:
- Salad bowl
- Knife and board
- Small skillet
- Tongs or spoon
- Container for dressing
How to Serve This Dish:
Serve it in a shallow bowl where the strawberries can sit on top instead of sinking. A slice of whole-grain bread works if you want to make the lunch feel less dainty. This salad is best cold and dressed at the last second.
Pro Tips for This Recipe:
- Dry the strawberries after washing so they don’t bleed into the spinach.
- Toast the nuts; raw almonds are too flat here.
- Use feta sparingly if your dressing is sweet.
- Add a few thin red onion slices if you want more bite.
Variations on This Dish:
- Blue Cheese Strawberry Salad: Swap feta for blue cheese if you want sharper flavor.
- Berry Mix Version: Add blueberries or blackberries with the strawberries.
- No-Chicken Version: Use chickpeas and extra almonds for a vegetarian bowl.
Common Mistakes to Avoid with This Dish:
- Dressing too early: Spinach loses its spring fast.
- Using pale strawberries: They need real flavor to hold the bowl.
- Skipping the nut toast: Raw nuts don’t bring much crunch.
11. Thai Peanut Crunch Salad
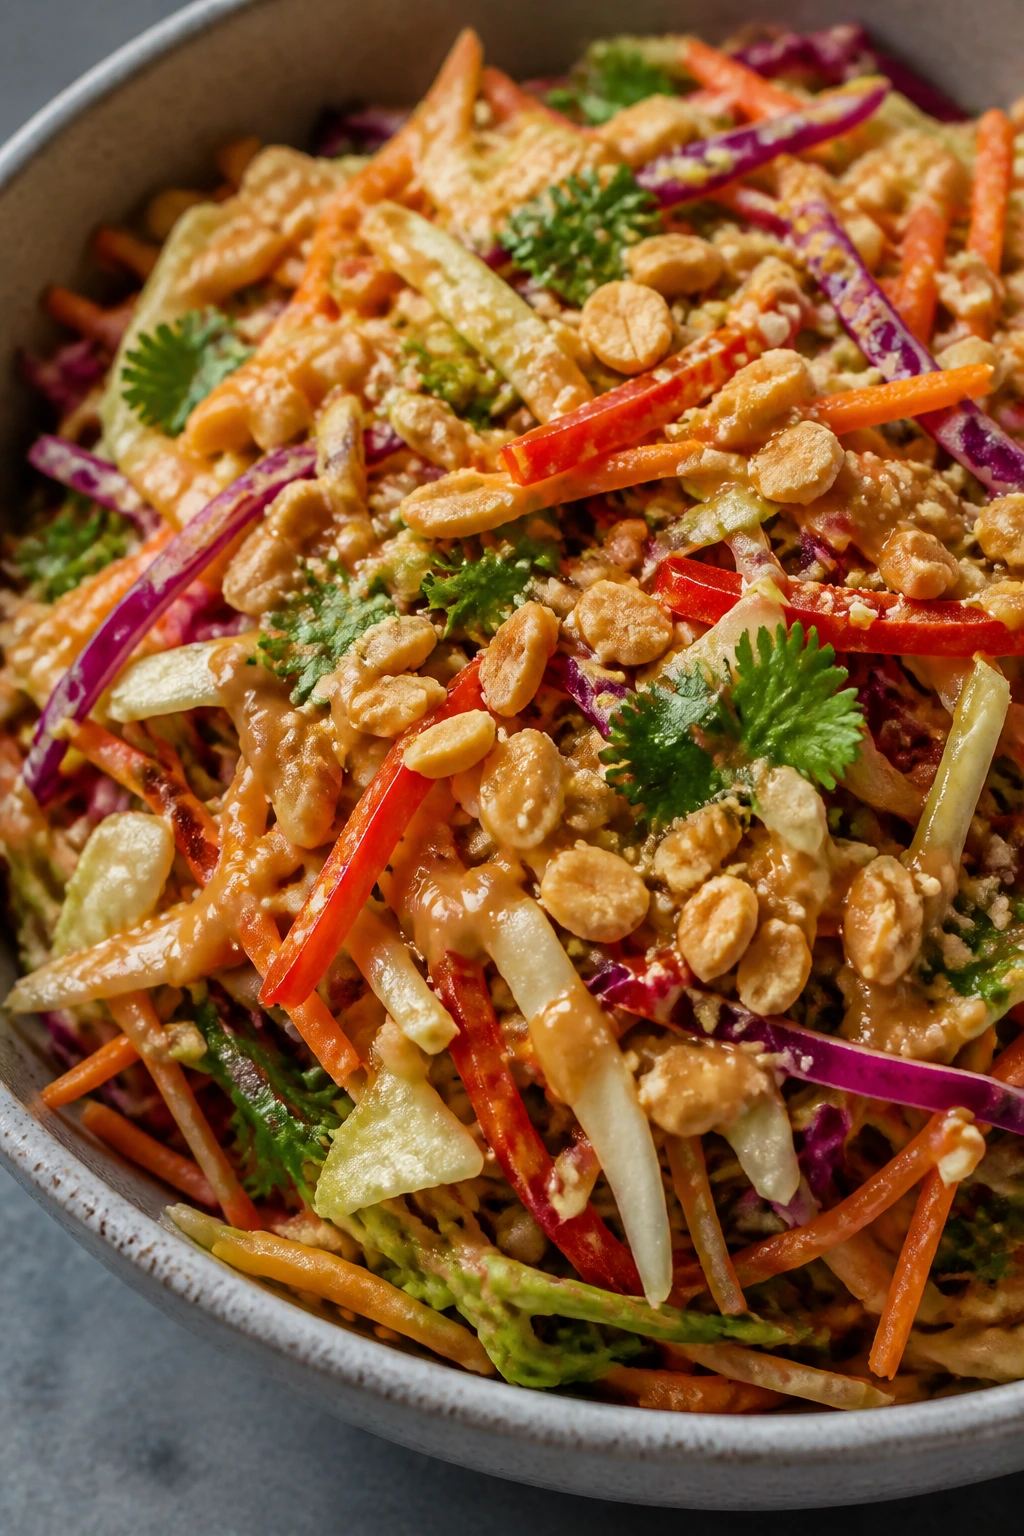
This is the salad for days when lunch needs a little attitude. Cabbage, carrots, herbs, and peanut dressing make a bowl that eats like a cold noodle dish without the noodles. It’s crunchy, savory, and a little sweet in the way Thai-inspired lunches usually are.
Why It Works:
Shredded cabbage handles dressing better than lettuce, which makes it a smart base for meal prep. Peanut butter gives the dressing body, lime adds lift, and a little soy sauce keeps it grounded. Edamame or chicken can boost the protein if you want the bowl to last longer.
Key Ingredients:
- 4 cups shredded green cabbage
- 2 cups shredded red cabbage
- 1 cup shredded carrots
- 1/2 cup sliced bell pepper
- 1/4 cup chopped cilantro
- 1/4 cup chopped peanuts
- 1 cup cooked edamame or shredded chicken
- 3 tablespoons peanut butter
- 2 tablespoons lime juice
- 1 tablespoon soy sauce
- 1 teaspoon honey
- 1 teaspoon sesame oil
Quick Steps:
- Shred the cabbage and carrots into thin strips.
- Whisk peanut butter, lime juice, soy sauce, honey, and sesame oil.
- Add a spoonful of water if the dressing feels too thick.
- Toss the vegetables with the dressing.
- Top with cilantro, peanuts, and protein.
- Pack extra peanuts separately for crunch.
Equipment for This Recipe:
- Large bowl
- Whisk
- Sharp knife or mandoline
- Jar with lid
- Airtight container
How to Serve This Dish:
Serve it cold in a deep bowl and finish with more peanuts and a squeeze of lime. Rice crackers or a side of fruit work well if you want a broader lunch. The cabbage should still crackle when you bite it.
Pro Tips for This Recipe:
- Thinly shred the cabbage so it eats cleanly.
- Warm the peanut butter slightly if it won’t whisk smooth.
- Add dressing in stages; cabbage can handle more than lettuce, but not endless amounts.
- Cilantro stems are fine here if they’re chopped small.
Variations on This Dish:
- Sesame Ginger Version: Add fresh ginger and more sesame oil.
- Tofu Crunch Bowl: Use baked tofu instead of chicken or edamame.
- Spicy Peanut Salad: Stir in chili garlic sauce for heat.
Common Mistakes to Avoid with This Dish:
- Using a thin dressing: Peanut dressing should coat, not slide off.
- Chopping the cabbage too coarse: Long strips are awkward in a lunch box.
- Overloading with honey: Too much sweetness makes the bowl sticky.
12. BBQ Chicken Chopped Salad

This one tastes like a summer cookout got chopped into lunch form. BBQ chicken, corn, black beans, and crisp lettuce make it hearty without turning into a plate of nachos. The trick is keeping the dressing from fighting the barbecue sauce.
Why It Works:
BBQ sauce gives the chicken its main flavor, so the rest of the salad should stay fresh and crisp. Black beans and corn echo the barbecue feel, while cabbage or romaine adds a crunch that survives the sauce. A creamy ranch drizzle can calm the sweetness if the BBQ sauce runs high.
Key Ingredients:
- 2 cups cooked chicken, shredded
- 1/3 cup BBQ sauce
- 4 cups chopped romaine or cabbage
- 1 cup corn kernels
- 1 cup black beans, rinsed
- 1/2 cup cherry tomatoes, halved
- 1/3 cup shredded cheddar
- 2 tablespoons ranch dressing
- 1 tablespoon chopped cilantro
Quick Steps:
- Toss the shredded chicken with BBQ sauce.
- Chop the romaine or cabbage into small pieces.
- Combine greens, corn, beans, tomatoes, and cheddar.
- Spoon BBQ chicken over the top.
- Drizzle with ranch and scatter cilantro.
- Add tortilla strips if you want more crunch.
Equipment for This Recipe:
- Mixing bowl
- Skillet or microwave-safe bowl for chicken
- Knife and cutting board
- Airtight container
- Spoon for dressing
How to Serve This Dish:
Serve it in a big shallow bowl so the toppings stay visible. Cornbread on the side is a natural fit, though not required. This salad is better with a fork than a spoon because the chopped pieces need a little wrestling.
Pro Tips for This Recipe:
- Use a thick BBQ sauce so the chicken doesn’t get watery.
- Chop the greens small; this is a chopped salad, not a leaf pile.
- Add ranch sparingly or the flavors blur together.
- Leftover grilled chicken works well if it’s not too smoky.
Variations on This Dish:
- Pulled Pork Version: Swap chicken for pulled pork if that’s what’s left over.
- Spicy BBQ Salad: Use chipotle BBQ sauce and pepper jack cheese.
- Tex-Mex Chicken Chopped Salad: Add avocado and pickled jalapeños.
Common Mistakes to Avoid with This Dish:
- Overdoing both sauces: BBQ plus ranch can get muddy fast.
- Using flimsy greens: Iceberg or cabbage is safer than soft lettuce.
- Packing tortilla strips too early: They soften almost immediately.
13. Caprese Farro Salad
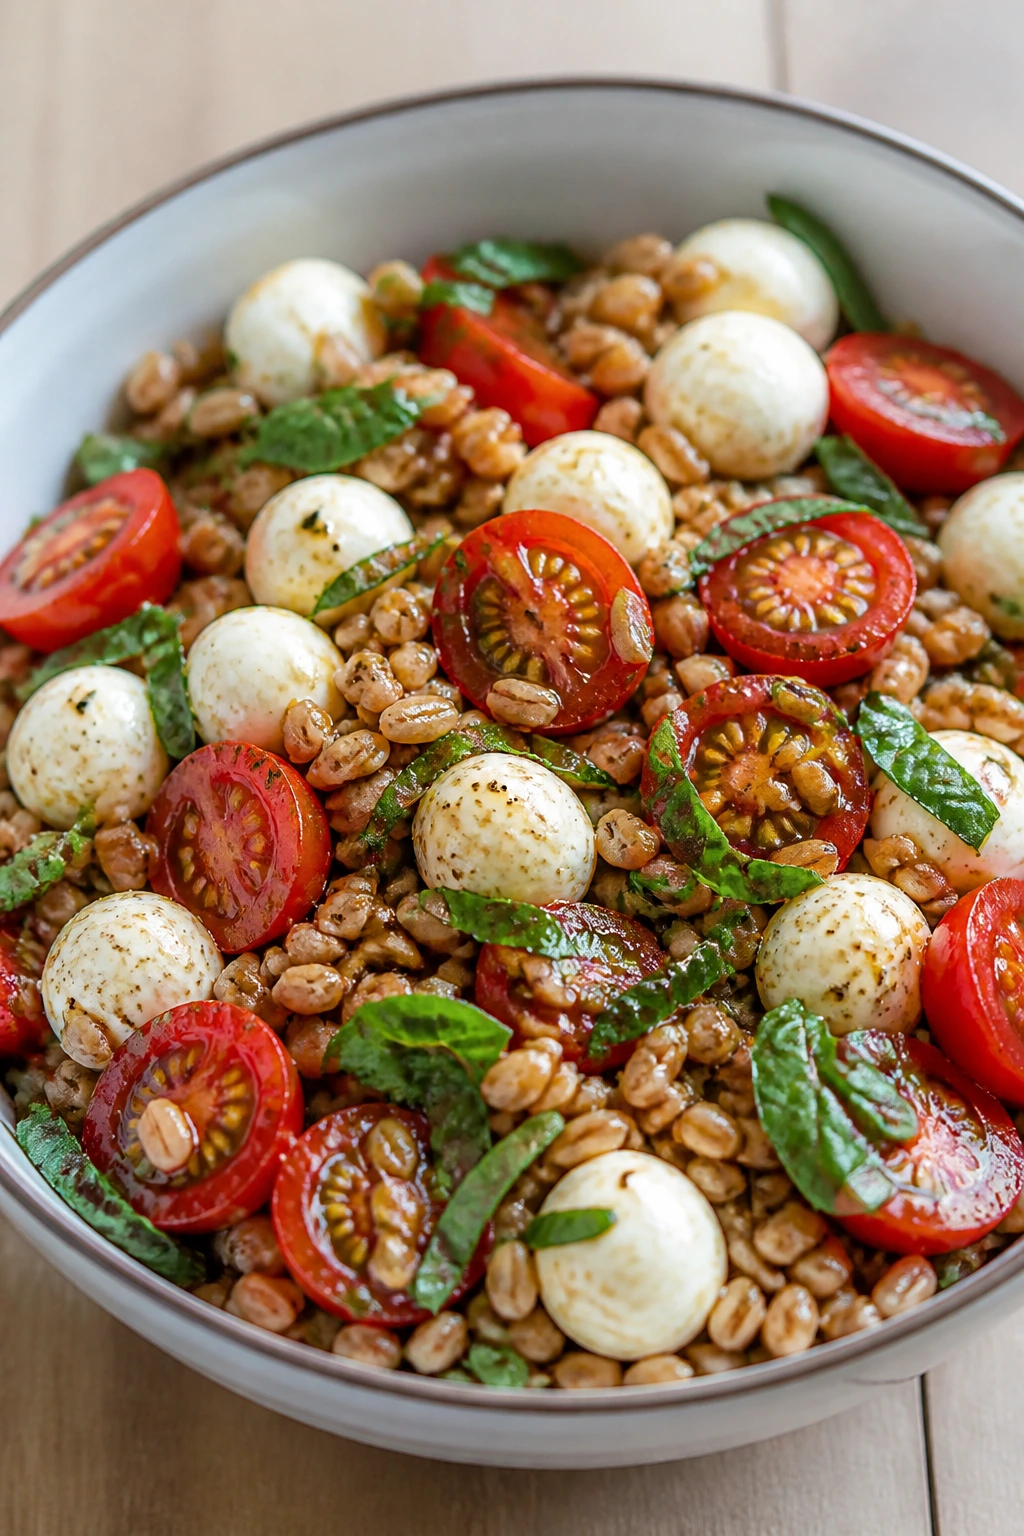
Farro gives this salad a chewy, almost nutty backbone that plain tomatoes can’t provide on their own. With mozzarella, basil, and balsamic, it’s basically a Caprese plate that decided to show up for lunch and stay awhile. This one holds its shape better than most tomato-heavy salads.
Why It Works:
Farro has enough texture to stay pleasant after chilling. Cherry tomatoes bring juice, mozzarella adds soft richness, and basil keeps the flavor bright. The balsamic doesn’t need to be fancy; it just needs enough acidity to cut through the grain.
Key Ingredients:
- 1 cup dry farro
- 3 cups water
- 1 1/2 cups cherry tomatoes, halved
- 8 oz fresh mozzarella pearls
- 1/2 cup torn basil leaves
- 2 tablespoons olive oil
- 1 tablespoon balsamic vinegar
- 1/2 teaspoon salt
- 1/4 teaspoon black pepper
Quick Steps:
- Simmer the farro in water until tender, about 25 to 30 minutes.
- Drain any extra water and cool the grain.
- Halve the tomatoes and tear the basil.
- Toss farro, tomatoes, mozzarella, basil, olive oil, balsamic, salt, and pepper.
- Chill 15 minutes so the flavors settle.
- Taste and add more balsamic if the farro seems flat.
Equipment for This Recipe:
- Saucepan
- Strainer
- Mixing bowl
- Cutting board
- Airtight container
How to Serve This Dish:
Serve it cold or at room temperature with a few extra basil leaves on top. Grilled chicken or a boiled egg can make it more filling if needed. The farro should stay chewy, not soft and bloated.
Pro Tips for This Recipe:
- Salt the farro water so the grain isn’t bland inside.
- Cool the farro before adding basil or it will darken.
- Use small mozzarella pearls for easier eating.
- A splash of good olive oil makes a noticeable difference here.
Variations on This Dish:
- Pesto Caprese Farro: Stir in 1 tablespoon pesto.
- Tomato-Peach Version: Add sliced peach for sweetness.
- No-Mozzarella Version: Use chickpeas for a dairy-free bowl.
Common Mistakes to Avoid with This Dish:
- Overcooking the farro: Mushy farro makes the salad heavy.
- Adding basil too early: It bruises and darkens.
- Using pale tomatoes: The dish leans on tomato flavor, so use the best ones you can find.
14. Roasted Sweet Potato Black Bean Salad
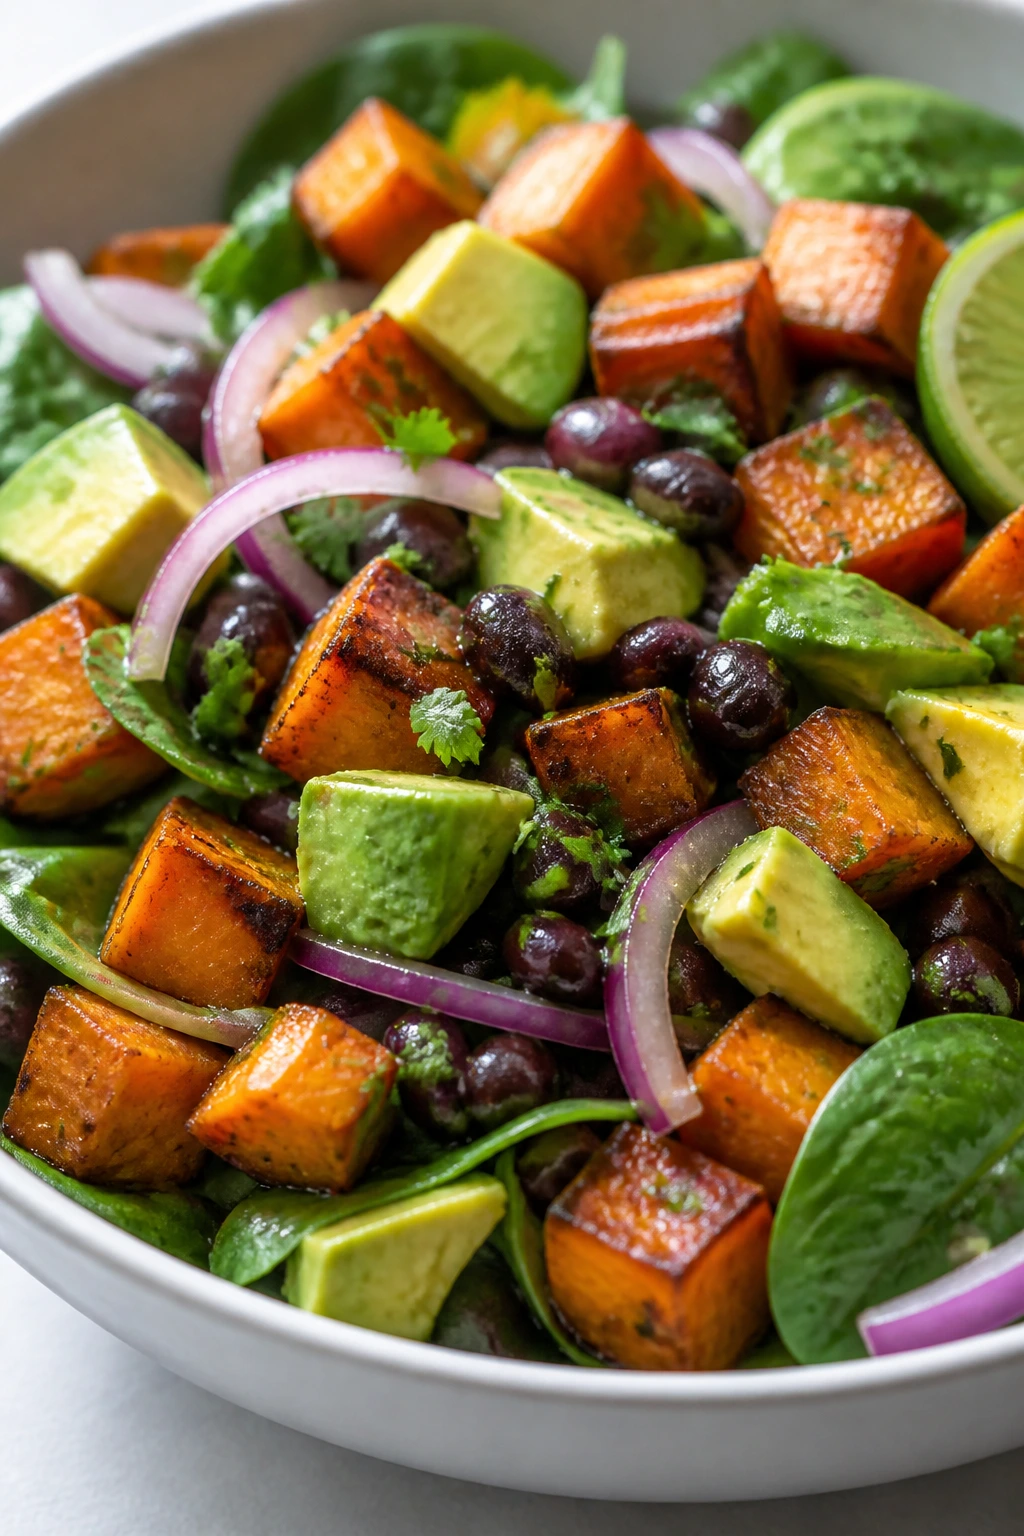
Sweet potato and black bean is a lunch pairing that earns its keep fast. The sweet potato brings warm, soft cubes; the beans bring heft; lime and cilantro keep the bowl from getting sleepy. It’s filling in the clean way, not the brick-in-the-stomach way.
Why It Works:
Roasting sweet potatoes concentrates their flavor and keeps the edges a little caramelized. Black beans supply protein and texture, while red onion and lime add enough sharpness to keep every bite alive. This salad can be eaten warm or cold, which makes it useful.
Key Ingredients:
- 2 medium sweet potatoes, peeled and cubed
- 1 can black beans, drained and rinsed
- 4 cups baby spinach or chopped romaine
- 1/2 red onion, thinly sliced
- 1 avocado, diced
- 2 tablespoons olive oil
- 1 tablespoon lime juice
- 1/2 teaspoon cumin
- 1/2 teaspoon salt
- 1/4 cup chopped cilantro
Quick Steps:
- Roast the sweet potatoes at 425°F (220°C) for 20 to 25 minutes.
- Toss them with olive oil, cumin, and salt before roasting.
- Let the potatoes cool slightly.
- Combine greens, beans, onion, avocado, and cilantro.
- Add the warm potatoes on top.
- Finish with lime juice and a little extra salt if needed.
Equipment for This Recipe:
- Rimmed sheet pan
- Parchment paper
- Large bowl
- Knife
- Airtight container
How to Serve This Dish:
Serve it warm for a cozier lunch or cold if you’re packing ahead. Salsa verde or a spoonful of plain yogurt works on top. I like it in a bowl with the avocado added at the end, because browned avocado is a waste of a good avocado.
Pro Tips for This Recipe:
- Cut the sweet potato pieces the same size so they roast evenly.
- Don’t crowd the pan or they steam.
- Add avocado at the last second.
- A pinch of chili powder works if you want more heat.
Variations on This Dish:
- Southwest Bowl: Add corn and a handful of tortilla strips.
- Feta Version: Crumble feta over the top for a salty edge.
- Tahini Lime Salad: Drizzle with tahini thinned with lime juice and water.
Common Mistakes to Avoid with This Dish:
- Under-roasting the potatoes: Pale cubes taste starchy.
- Packing avocado early: It browns and softens.
- Overcrowding the pan: That kills the caramelized edges.
15. Waldorf Chicken Salad
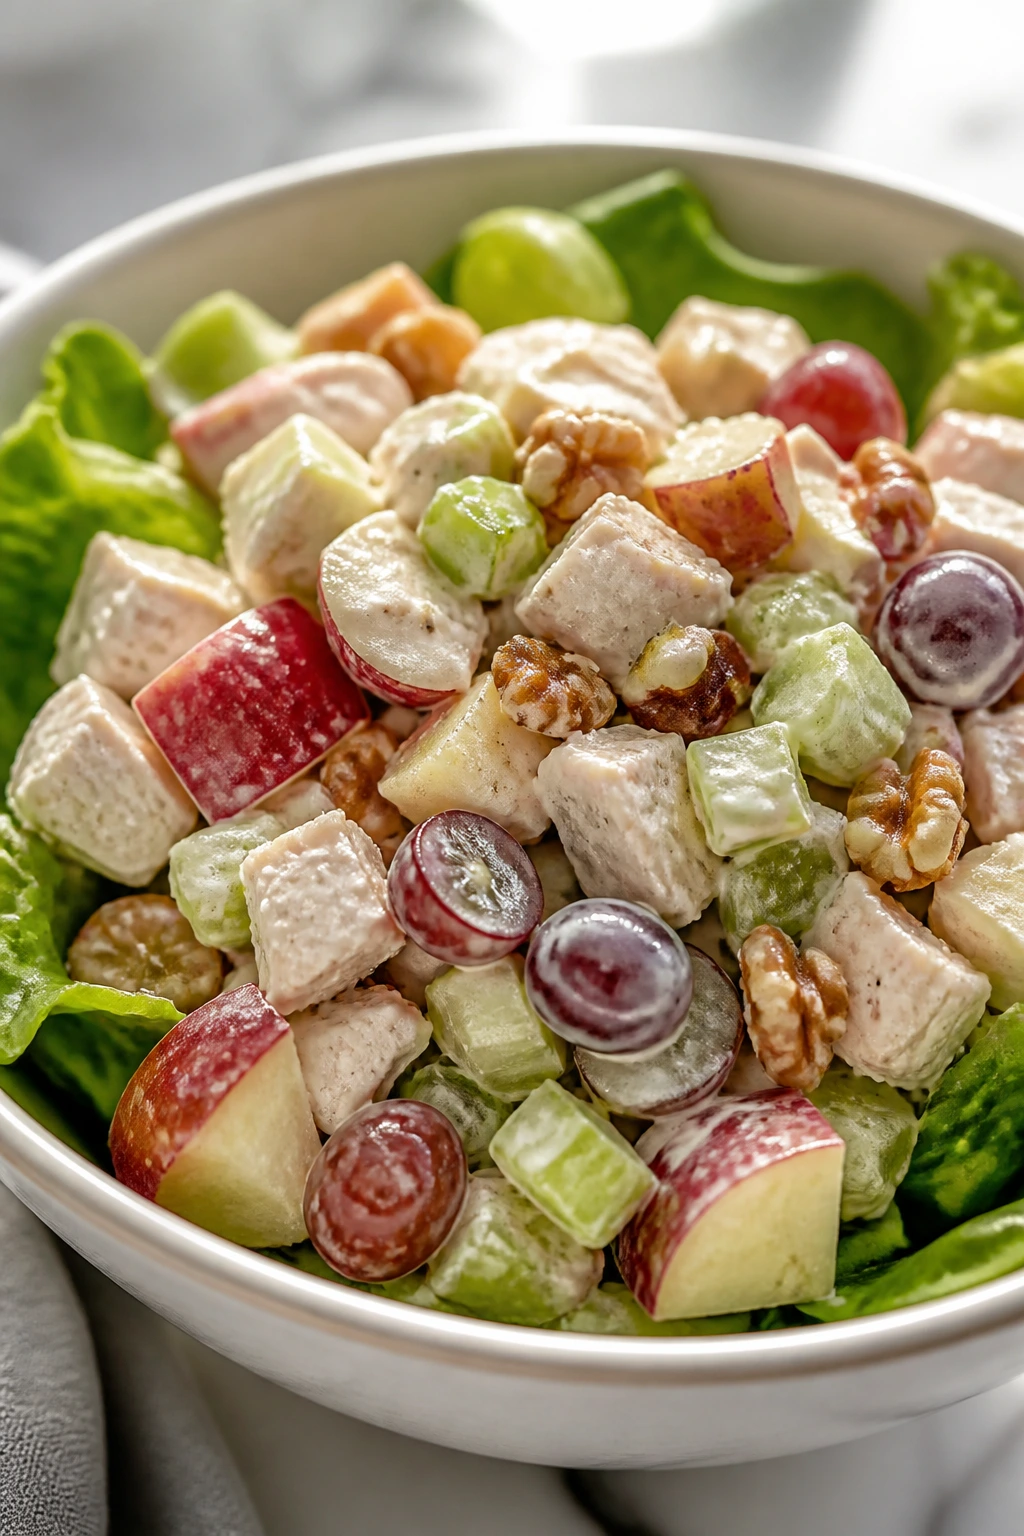
Waldorf salad can get sticky and old-fashioned if you’re careless. Done right, though, it’s crisp, cool, and a little sweet in a way that makes sense for lunch. Apples, celery, grapes, and chicken give it a snappy texture that is hard to beat.
Why It Works:
The apple and celery bring crunch, grapes bring bursts of sweetness, and chicken gives the bowl enough weight to count as lunch. Walnuts add a toasted edge, and a light mayo-yogurt dressing keeps it from becoming heavy. Over greens, it feels fresher than the diner version.
Key Ingredients:
- 2 cups cooked chicken, diced
- 1 apple, diced
- 1 cup seedless grapes, halved
- 2 celery stalks, diced
- 1/3 cup walnuts, chopped
- 3 tablespoons mayonnaise
- 2 tablespoons plain Greek yogurt
- 1 teaspoon lemon juice
- 1/2 teaspoon salt
- 4 cups lettuce or mixed greens
Quick Steps:
- Dice the chicken, apple, and celery.
- Halve the grapes and chop the walnuts.
- Stir together mayonnaise, yogurt, lemon juice, and salt.
- Fold the chicken and fruit into the dressing.
- Spoon over greens and top with walnuts.
- Chill briefly if you want the flavors to settle.
Equipment for This Recipe:
- Mixing bowl
- Knife and cutting board
- Spoon or spatula
- Airtight container
- Small bowl
How to Serve This Dish:
Serve it in a bowl with a few extra apple slices on top. A slice of toast or a handful of crackers works beside it. This one is good cold, and the grapes keep it feeling lively.
Pro Tips for This Recipe:
- Toss the apple with lemon first so it doesn’t brown.
- Toast the walnuts for deeper flavor.
- Use a firm apple like Honeycrisp or Pink Lady.
- Keep the dressing light; Waldorf should stay crisp.
Variations on This Dish:
- Curry Waldorf: Add a pinch of curry powder and raisins.
- Turkey Waldorf: Swap chicken for turkey.
- Dairy-Free Waldorf: Use all mayonnaise instead of yogurt.
Common Mistakes to Avoid with This Dish:
- Using soft apples: They collapse and turn mealy.
- Adding too much dressing: The fruit should still look fresh.
- Skipping the nuts: You’ll miss the crunch more than you expect.
16. Sesame Soba Noodle Salad
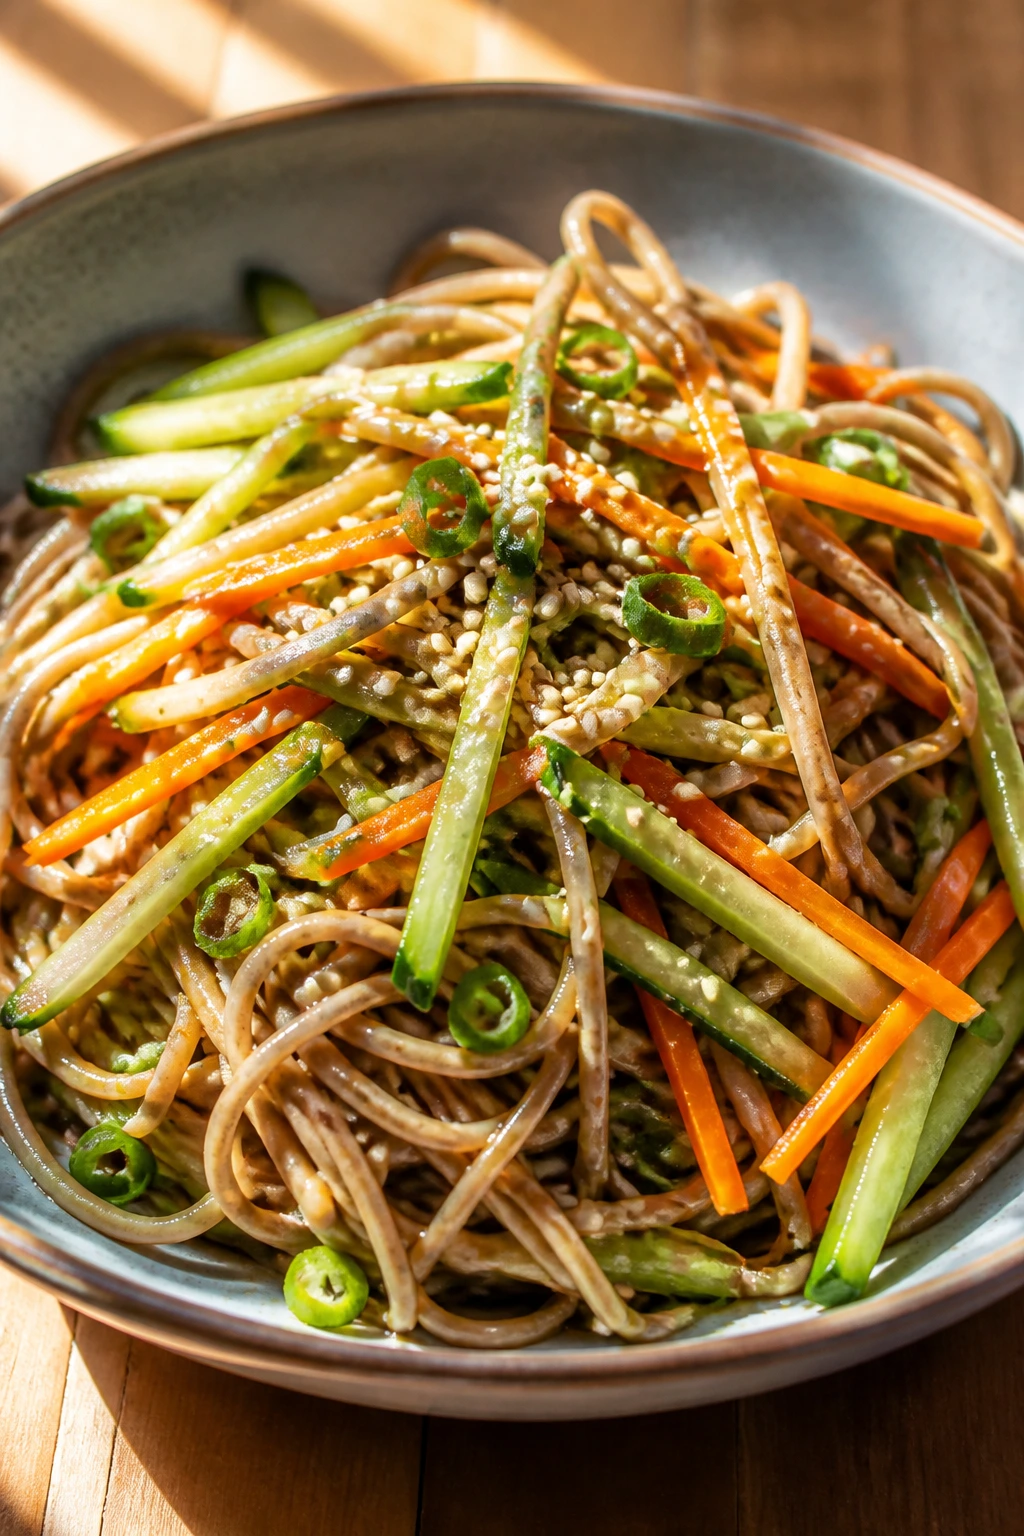
Cold soba noodles have a specific kind of pull: nutty, slippery, and just chewy enough to feel substantial. Tossed with cucumber, carrot, and sesame dressing, they make a lunch that feels composed without asking much from you. Great cold. Even better the next day.
Why It Works:
Buckwheat soba carries dressing well and stays satisfying after chilling. Sesame oil gives the bowl a toasty flavor, rice vinegar adds brightness, and soy sauce supplies the salt you need. Cucumber and carrot keep the texture light and sharp.
Key Ingredients:
- 8 oz soba noodles
- 1 cucumber, julienned
- 1 large carrot, julienned
- 2 green onions, sliced
- 2 tablespoons sesame oil
- 1 tablespoon soy sauce
- 1 tablespoon rice vinegar
- 1 teaspoon honey
- 1 teaspoon toasted sesame seeds
Quick Steps:
- Cook the soba noodles according to package directions.
- Rinse them under cold water until fully cool.
- Toss noodles with sesame oil so they don’t stick.
- Whisk soy sauce, rice vinegar, and honey.
- Mix noodles with cucumber, carrot, and green onion.
- Top with sesame seeds and chill before packing.
Equipment for This Recipe:
- Pot
- Colander
- Large bowl
- Whisk
- Lunch container
How to Serve This Dish:
Serve it cold with extra sesame seeds and a few strips of nori if you like that flavor. It works as a stand-alone lunch, though edamame makes it sturdier. A fork and chopsticks both work, depending on how patient you feel.
Pro Tips for This Recipe:
- Rinse the noodles well or they clump.
- Toss with sesame oil immediately after draining.
- Cut the vegetables thin so they mix into the noodles.
- Add chili crisp if you want a little heat.
Variations on This Dish:
- Chicken Soba Bowl: Add shredded chicken.
- Peanut Soba Salad: Swap sesame dressing for peanut dressing.
- Miso Soba Version: Add a little miso to the dressing for depth.
Common Mistakes to Avoid with This Dish:
- Overcooking soba: It turns gummy fast.
- Skipping the oil after rinsing: The noodles stick together.
- Using thick-cut vegetables: They fight the noodles instead of blending in.
17. BLT Chopped Salad
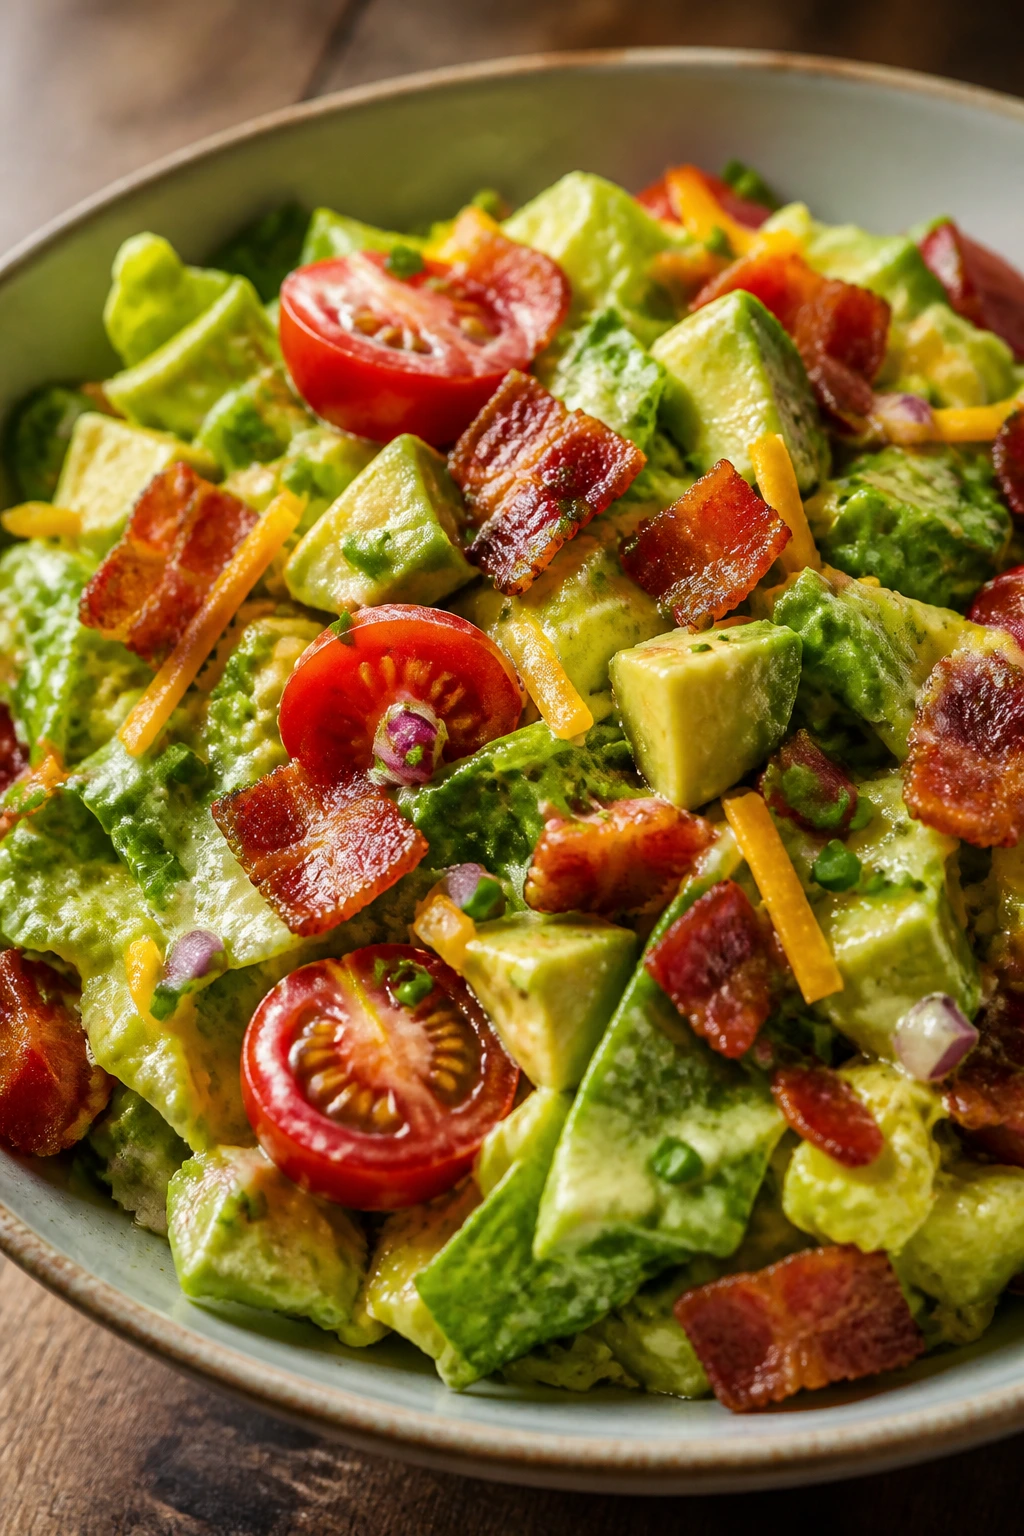
This is what happens when a sandwich gets wise and loses the bread. Bacon, lettuce, tomato, and a few chopped extras make a salad that tastes familiar but eats lighter. If you like the salt-and-crunch rhythm of a BLT, this bowl lands fast.
Why It Works:
Bacon supplies the salty backbone, tomatoes give juiciness, and chopped lettuce keeps the texture crisp. A creamy dressing ties everything together, but not so much that it turns the bowl into a condiment parade. Corn or avocado can make it feel more like lunch and less like a side.
Key Ingredients:
- 4 cups chopped romaine
- 6 slices cooked bacon, chopped
- 1 1/2 cups cherry tomatoes, halved
- 1/2 avocado, diced
- 1/4 cup red onion, thinly sliced
- 1/4 cup shredded cheddar
- 3 tablespoons ranch or mayo-based dressing
- 1 tablespoon chopped chives
Quick Steps:
- Chop the romaine into bite-size pieces.
- Cook and chop the bacon.
- Halve the tomatoes and dice the avocado.
- Toss lettuce, tomatoes, onion, and cheddar together.
- Top with bacon, avocado, and chives.
- Dress lightly right before serving.
Equipment for This Recipe:
- Skillet
- Knife and cutting board
- Large bowl
- Tongs
- Airtight container
How to Serve This Dish:
Serve it in a large bowl with a few toast points if you want a little bread on the side. It’s better with a light hand on the dressing. Too much ranch and the whole thing loses its crispness.
Pro Tips for This Recipe:
- Let the bacon cool before chopping so it stays crisp.
- Salt the tomatoes lightly.
- Add avocado at the last possible moment.
- If using iceberg, dry it well so it doesn’t puddle.
Variations on This Dish:
- BLT Chicken Salad: Add grilled chicken for more protein.
- California BLT: Add cucumber and use avocado as the creamy element.
- Smoky BLT: Use smoked bacon and a little smoked paprika in the dressing.
Common Mistakes to Avoid with This Dish:
- Using warm bacon: It softens the lettuce.
- Too much dressing: The salad should still crunch.
- Leaving the tomatoes in thick slices: Smaller pieces distribute the juice better.
18. Pesto Tortellini Salad
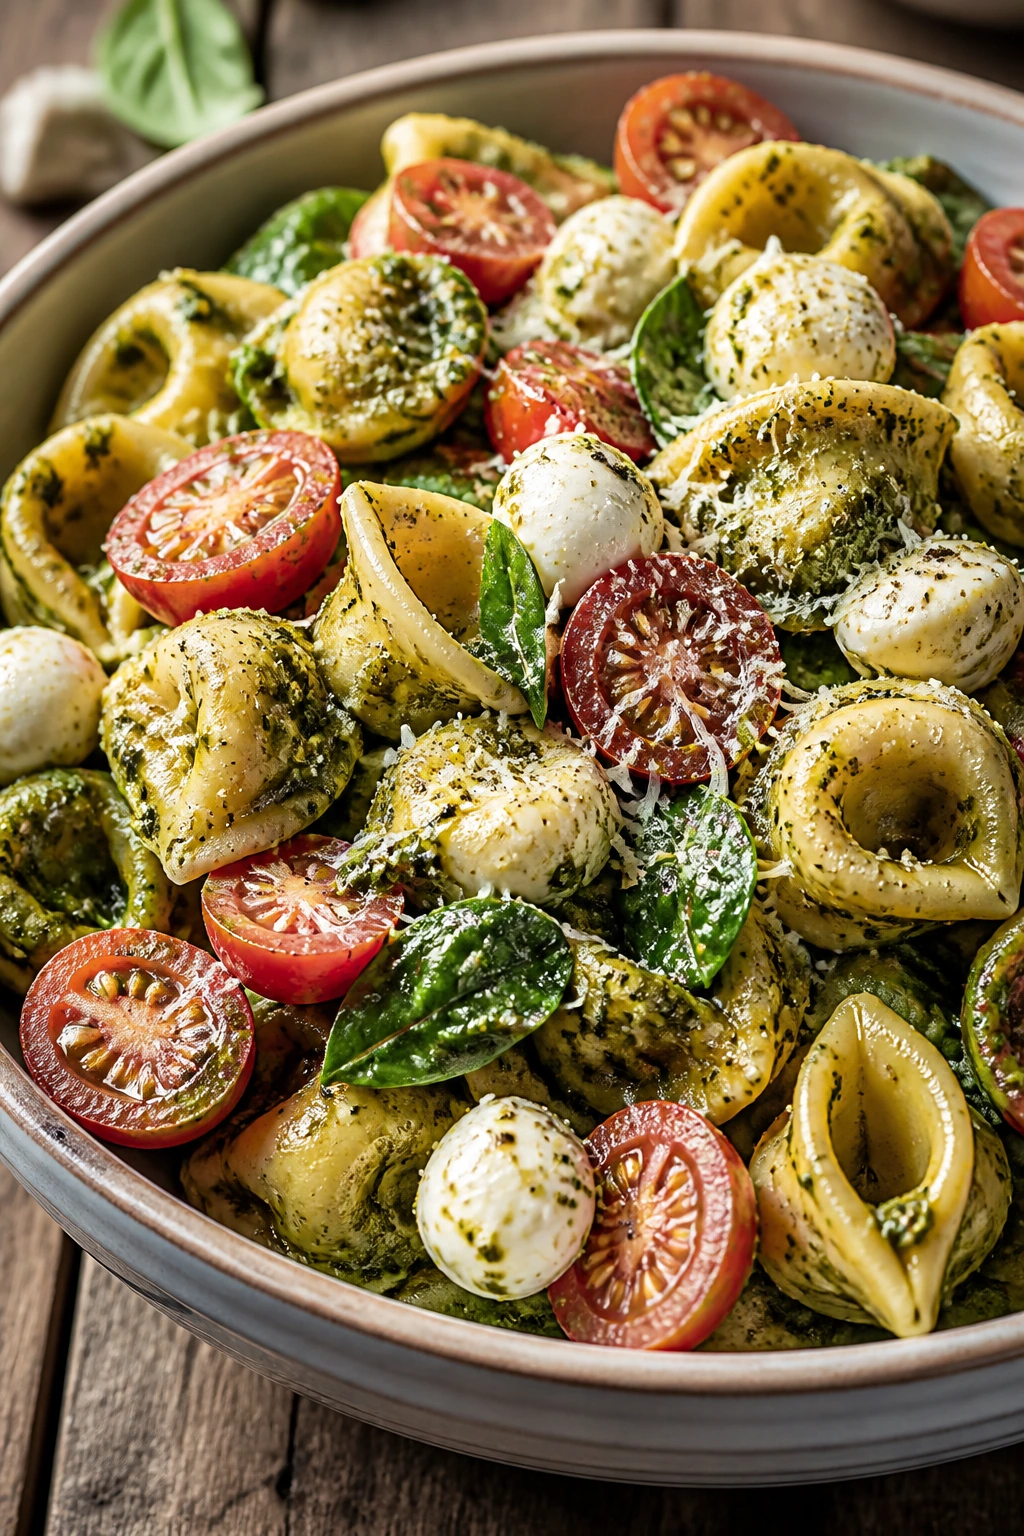
Pesto tortellini salad is lunch with a slight grin. The pasta is soft and rich, the basil sauce is loud in the best way, and the tomatoes give little hits of acidity so it doesn’t turn heavy. It’s especially good when you want a cold lunch that still feels indulgent.
Why It Works:
Cheese tortellini gives built-in flavor and enough heft to count as a full meal. Pesto coats the pasta well, while tomatoes and spinach lighten the mix. A bit of mozzarella or Parmesan gives it a finished, salty edge.
Key Ingredients:
- 1 package cheese tortellini, about 9 oz
- 1/3 cup pesto
- 1 cup cherry tomatoes, halved
- 2 cups baby spinach
- 1/2 cup mozzarella pearls
- 2 tablespoons grated Parmesan
- 1 tablespoon olive oil
- 1/4 teaspoon black pepper
Quick Steps:
- Cook the tortellini until tender, then drain and cool.
- Toss it with a little olive oil so it doesn’t clump.
- Stir in pesto until the pasta is coated.
- Add tomatoes, spinach, mozzarella, Parmesan, and black pepper.
- Chill for 15 minutes.
- Add a splash of water or olive oil if the pesto tightens too much.
Equipment for This Recipe:
- Pot
- Colander
- Mixing bowl
- Spoon or spatula
- Lunch container
How to Serve This Dish:
Serve it cold or room temperature with a few basil leaves on top. A piece of fruit or a small salad can sit beside it, but it doesn’t need much help. This is one of the easier salads to pack because the pasta does the heavy lifting.
Pro Tips for This Recipe:
- Cool the tortellini fully before mixing in spinach.
- Use a pesto with good basil flavor; bland pesto makes the whole thing drag.
- Add extra Parmesan right before serving.
- Chopped roasted red peppers can brighten the bowl fast.
Variations on This Dish:
- Chicken Pesto Tortellini: Add diced chicken breast.
- Sun-Dried Tomato Version: Swap half the fresh tomatoes for sun-dried tomatoes.
- Dairy-Light Version: Use a dairy-free pesto and skip the cheese.
Common Mistakes to Avoid with This Dish:
- Adding spinach to hot pasta: It wilts into nothing.
- Using too much pesto: Heavy pesto turns sticky.
- Packing without a little oil: Tortellini can glue itself together.
19. Apple Cheddar Arugula Salad
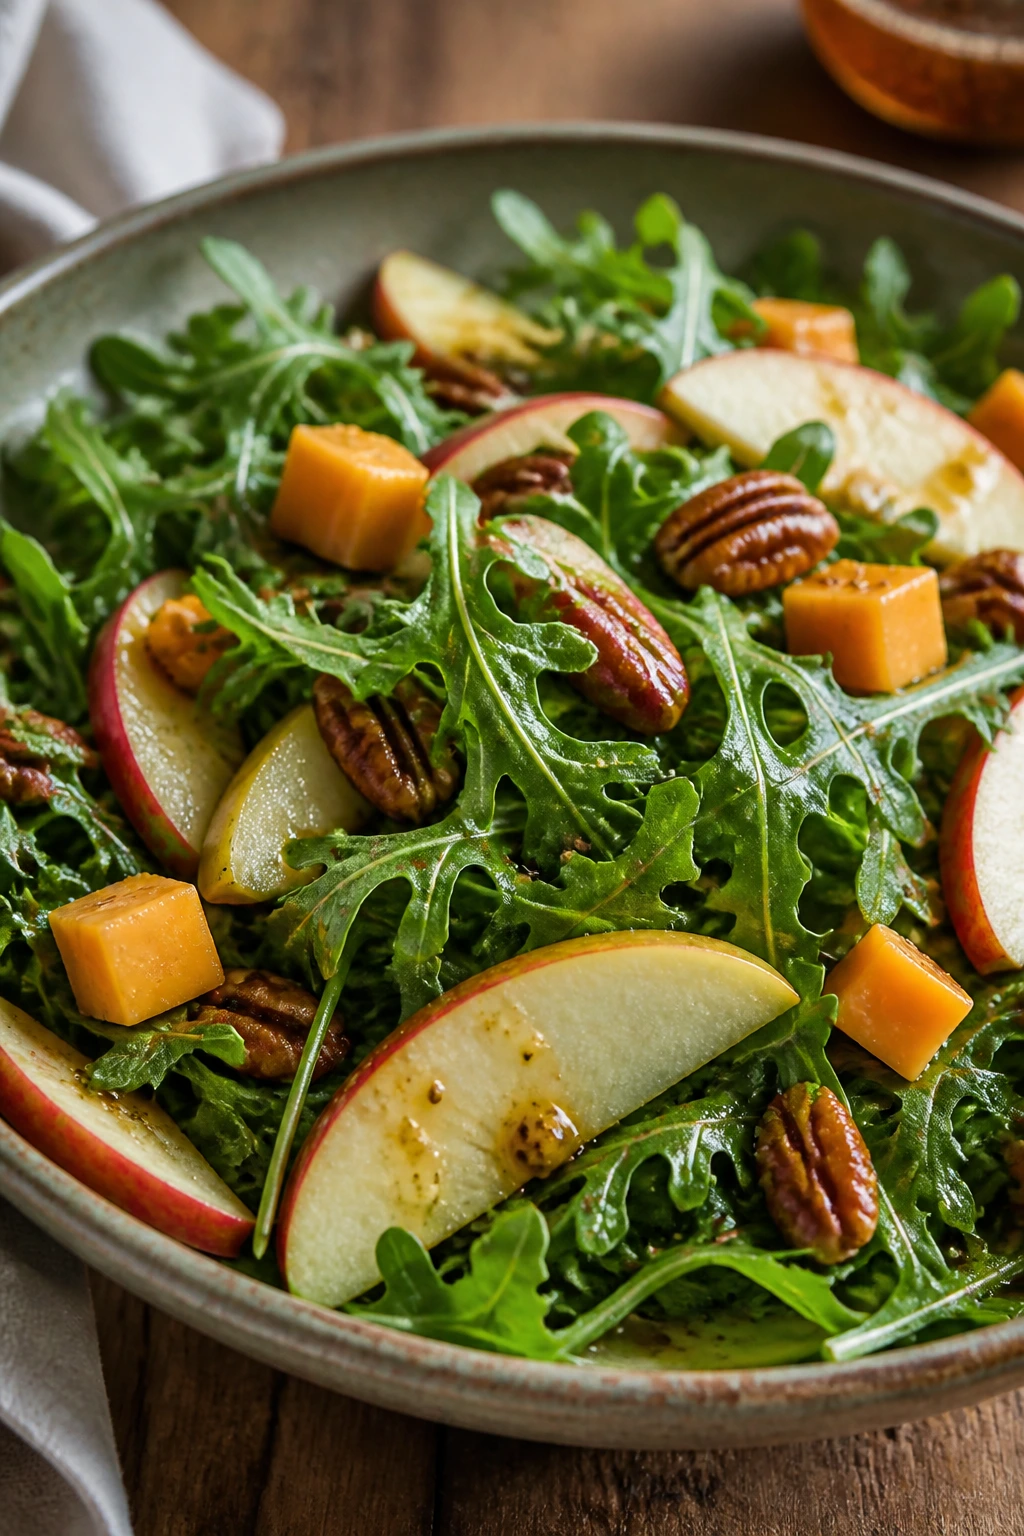
This salad has bite from the first forkful. Peppery arugula, crisp apple, sharp cheddar, and toasted pecans make a lunch that tastes deliberate without requiring a long prep list. It’s clean, crunchy, and a little grown-up without being fussy.
Why It Works:
Arugula gives pepper and lift, which is exactly what sweet apple needs. Cheddar adds salt and body, and pecans bring the toasted crunch that keeps the salad from feeling soft. A maple Dijon dressing suits the apple without turning the bowl dessert-like.
Key Ingredients:
- 4 cups arugula
- 1 apple, thinly sliced
- 1/2 cup sharp cheddar, sliced or cubed
- 1/3 cup pecans, toasted
- 2 tablespoons olive oil
- 1 tablespoon apple cider vinegar
- 1 teaspoon Dijon mustard
- 1 teaspoon maple syrup
- 1/4 teaspoon salt
Quick Steps:
- Toast the pecans until fragrant.
- Thinly slice the apple.
- Whisk olive oil, vinegar, Dijon, maple syrup, and salt.
- Toss arugula lightly with the dressing.
- Add apple, cheddar, and pecans on top.
- Serve immediately so the arugula stays sharp.
Equipment for This Recipe:
- Small skillet
- Whisk
- Bowl
- Knife
- Lunch container
How to Serve This Dish:
Serve it in a shallow bowl with the apple slices visible on top. It works well beside soup or a sandwich if you’re building a bigger lunch. A few extra cracks of black pepper make the salad taste more awake.
Pro Tips for This Recipe:
- Slice the apple thin so it doesn’t overpower the arugula.
- Toast the pecans; raw ones taste flat here.
- Use a strong cheddar, not a mild one.
- Dress sparingly, because arugula collapses fast if drowned.
Variations on This Dish:
- Pear Cheddar Salad: Swap apple for pear.
- Chicken Apple Salad: Add sliced chicken breast.
- Blue Cheese Pecan Salad: Use blue cheese if you want more punch.
Common Mistakes to Avoid with This Dish:
- Using too much dressing: Arugula needs a light hand.
- Cutting the apple too thick: Thick slices feel clunky.
- Skipping the toast on the nuts: Crunch matters here.
20. Lentil Roasted Veg Salad
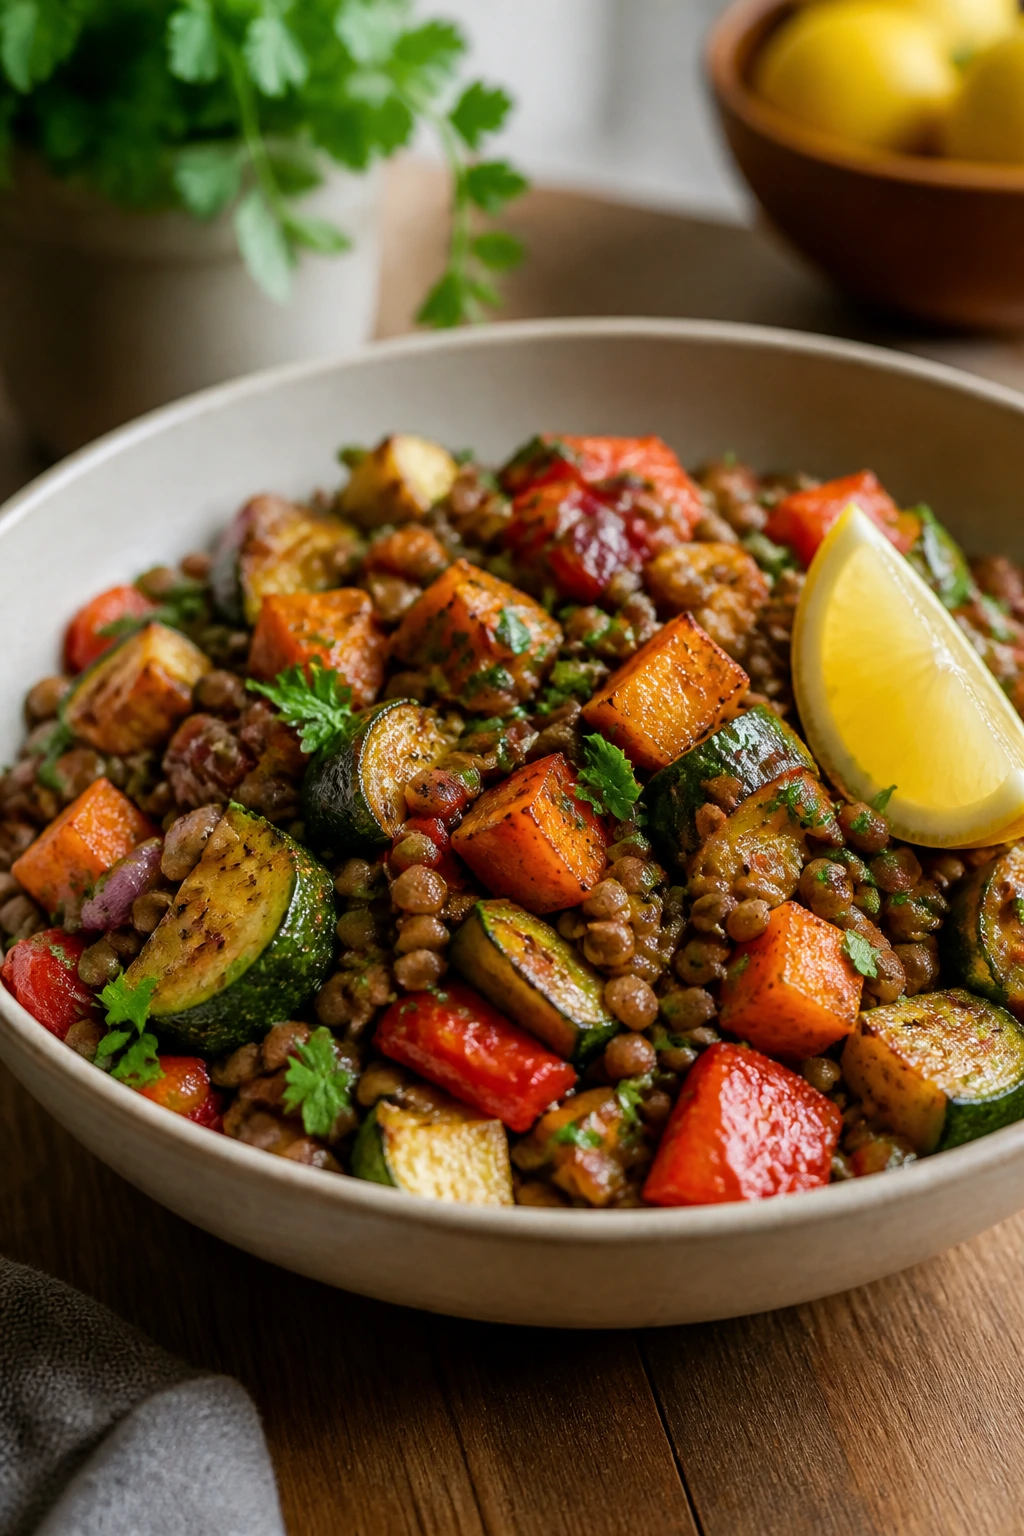
Lentils are the lunch hero people forget to keep around. They stay intact, they absorb dressing, and they don’t get weird after a day in the fridge. Roasted vegetables make the bowl deeper and less bean-ish, while herbs and lemon keep it clean.
Why It Works:
Cooked lentils bring structure and protein without needing meat. Roasted carrots, zucchini, or peppers add sweetness and softness, and fresh herbs keep the bowl from feeling like a pot of stew in salad clothing. A mustardy vinaigrette gives the whole thing a spine.
Key Ingredients:
- 1 cup dry green lentils
- 3 cups water
- 1 zucchini, chopped and roasted
- 2 carrots, chopped and roasted
- 1 red bell pepper, chopped and roasted
- 2 tablespoons olive oil
- 1 tablespoon red wine vinegar
- 1 teaspoon Dijon mustard
- 1 tablespoon chopped parsley
- 1/2 teaspoon salt
Quick Steps:
- Simmer the lentils until tender but not mushy, about 20 to 25 minutes.
- Roast the vegetables at 425°F (220°C) until browned at the edges.
- Cool the lentils slightly.
- Whisk olive oil, vinegar, Dijon, parsley, and salt.
- Toss lentils and roasted vegetables with the dressing.
- Taste and add more vinegar if the salad feels heavy.
Equipment for This Recipe:
- Saucepan
- Sheet pan
- Mixing bowl
- Strainer
- Airtight container
How to Serve This Dish:
Serve it room temperature or cold with a dollop of yogurt or hummus if you want creaminess. It also works under a soft-boiled egg. I like this one best after the lentils have had a chance to drink up the dressing.
Pro Tips for This Recipe:
- Don’t overcook the lentils; mushy ones flatten the salad.
- Roast the vegetables until the edges color.
- Salt after tasting, since lentils vary in how much seasoning they need.
- Add feta if you want more bite.
Variations on This Dish:
- Middle Eastern Lentil Salad: Add cumin, mint, and lemon.
- Warm Lentil Bowl: Serve the lentils and vegetables warm over greens.
- Vegan Protein Bowl: Add chickpeas for a larger lunch.
Common Mistakes to Avoid with This Dish:
- Cooking lentils to mush: They should hold shape.
- Underoasting vegetables: Pale vegetables taste watery.
- Forgetting acid: Lentils need vinegar or lemon to wake up.
21. Buffalo Chicken Salad
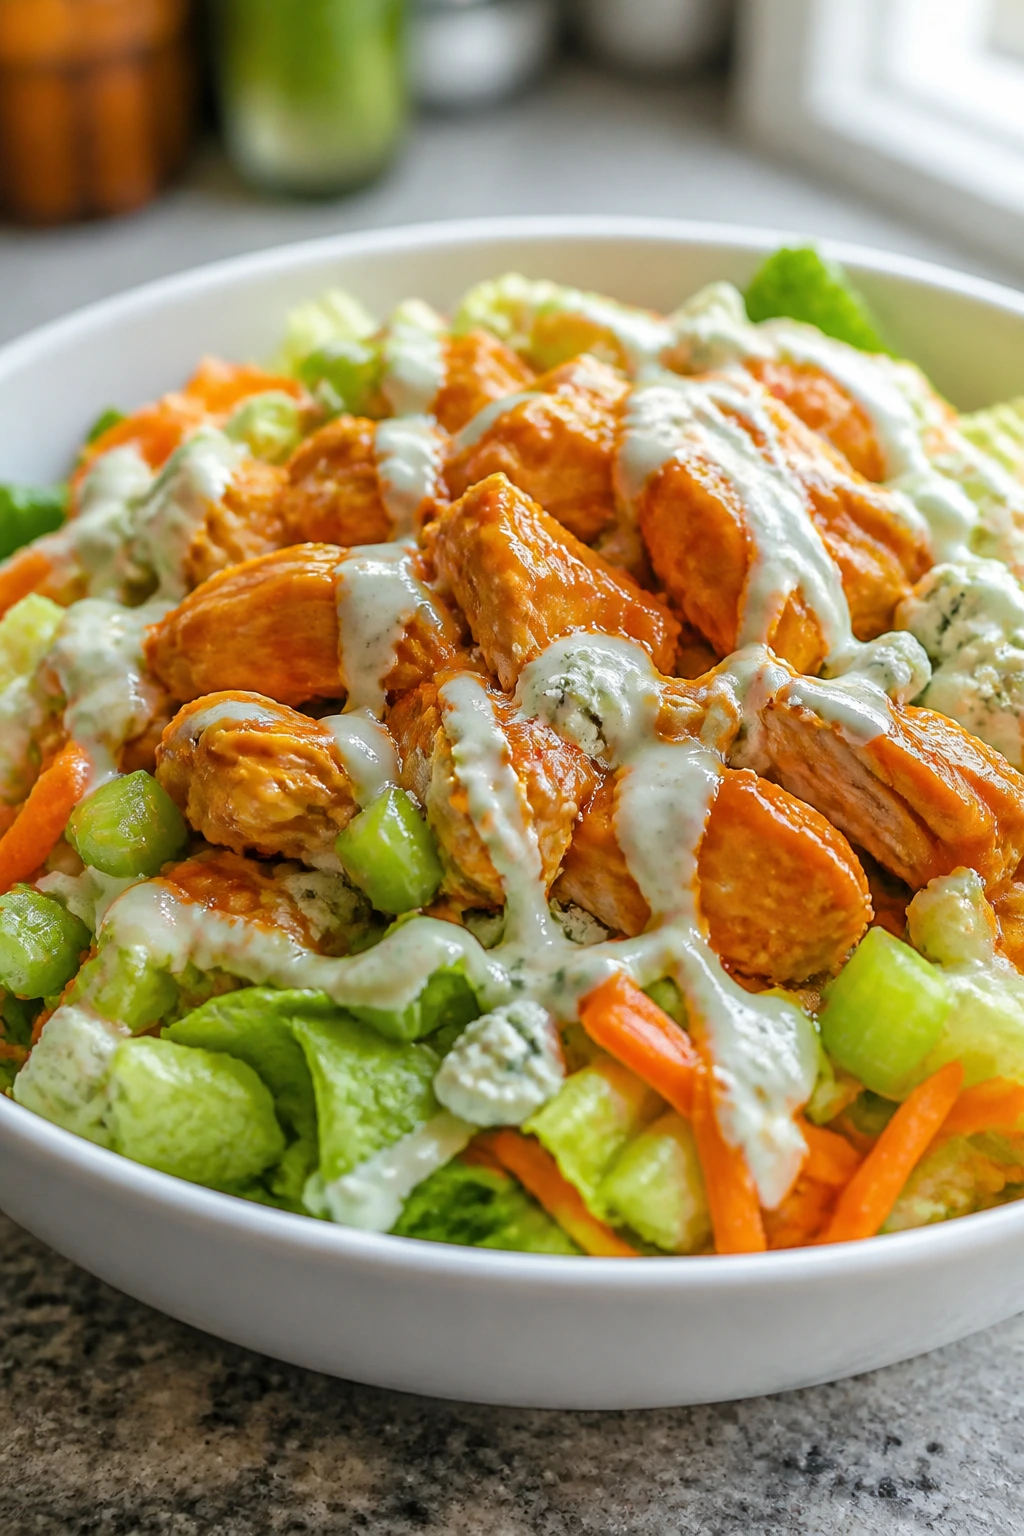
Buffalo chicken salad is messy in the best way, minus the wing bones. Spicy chicken, crunchy vegetables, and a cool dressing make it a lunch that feels bold without requiring a nap afterward. Celery is not optional; it matters here.
Why It Works:
Buffalo sauce brings heat and tang, and the cool vegetables keep that heat from swallowing the bowl. Chicken soaks up the sauce well, while ranch or blue cheese dressing provides the necessary cooling contrast. Crisp lettuce and celery give the salad its wing-night personality.
Key Ingredients:
- 2 cups cooked chicken, shredded
- 1/4 cup Buffalo sauce
- 4 cups chopped romaine
- 1 cup celery, sliced thin
- 1 cup shredded carrots
- 1/3 cup crumbled blue cheese or feta
- 2 tablespoons ranch dressing
- 1 tablespoon chopped green onion
Quick Steps:
- Toss the chicken with Buffalo sauce.
- Chop the romaine and slice the celery thin.
- Combine lettuce, celery, carrots, and green onion.
- Top with Buffalo chicken and cheese.
- Drizzle with ranch right before eating.
- Add extra celery if you want more crunch.
Equipment for This Recipe:
- Bowl
- Knife and board
- Spoon
- Airtight container
- Skillet or microwave-safe dish for chicken
How to Serve This Dish:
Serve it cold with a few crackers or carrot sticks on the side. It’s good for people who want lunch to keep its personality. If the Buffalo sauce is intense, a little extra ranch calms it down without erasing the flavor.
Pro Tips for This Recipe:
- Warm the chicken slightly before saucing so it absorbs better.
- Use celery slices that are thin enough to bite cleanly.
- Don’t drown the greens; Buffalo chicken already brings moisture.
- Blue cheese adds more edge than ranch, if you want it.
Variations on This Dish:
- Buffalo Turkey Salad: Swap in leftover turkey.
- Buffalo Cauliflower Bowl: Use roasted cauliflower for a meatless version.
- Extra-Creamy Version: Add diced avocado to soften the heat.
Common Mistakes to Avoid with This Dish:
- Using too much sauce: It can swamp the lettuce.
- Leaving out the celery: The salad loses its snap.
- Packing dressing with spicy chicken too early: The flavors can turn muddy.
22. Shrimp Avocado Corn Salad

Shrimp and avocado are a strong lunch pairing because neither one needs much help. Corn brings sweetness, lime brings sharpness, and the whole bowl feels cool and bright without being tiny. It’s the sort of salad that looks like you meant to take care of yourself, which is a nice feeling at lunch.
Why It Works:
Shrimp cooks quickly and stays tender if you stop before it gets rubbery. Avocado adds creaminess, corn gives sweet crunch, and lime keeps the flavors from settling into one soft note. A little cilantro and red onion tie the bowl together.
Key Ingredients:
- 1 lb cooked shrimp, peeled and deveined
- 1 avocado, diced
- 1 cup corn kernels
- 1 cup cherry tomatoes, halved
- 1/4 red onion, finely chopped
- 2 tablespoons lime juice
- 2 tablespoons olive oil
- 1/4 cup chopped cilantro
- 1/2 teaspoon salt
- 4 cups chopped romaine or mixed greens
Quick Steps:
- Cook and cool the shrimp if they aren’t already cooked.
- Dice the avocado and halve the tomatoes.
- Mix lime juice, olive oil, salt, and cilantro.
- Toss corn, onion, tomatoes, and greens with the dressing.
- Top with shrimp and avocado.
- Serve immediately so the avocado stays fresh.
Equipment for This Recipe:
- Skillet or saucepan for shrimp
- Knife and board
- Mixing bowl
- Spoon
- Airtight container
How to Serve This Dish:
Serve it cold with extra lime on the side and maybe a few tortilla chips if you want crunch. This salad works well in a bowl because the shrimp and avocado are easier to eat that way than in a box. It’s a lunch that should look bright.
Pro Tips for This Recipe:
- Pat the shrimp dry before dressing them.
- Add avocado at the very end.
- If using frozen shrimp, thaw them completely first.
- A pinch of chili flakes gives the bowl some lift.
Variations on This Dish:
- Mango Shrimp Salad: Add diced mango for sweetness.
- Spicy Shrimp Bowl: Use chili-lime seasoning on the shrimp.
- No-Greens Version: Serve it over cucumber ribbons for a lighter feel.
Common Mistakes to Avoid with This Dish:
- Using rubbery shrimp: They ruin the texture fast.
- Cutting avocado too early: It browns and softens.
- Not seasoning the dressing enough: Lime alone can taste thin without salt.
23. Smashed Chickpea Salad Wrap Bowl
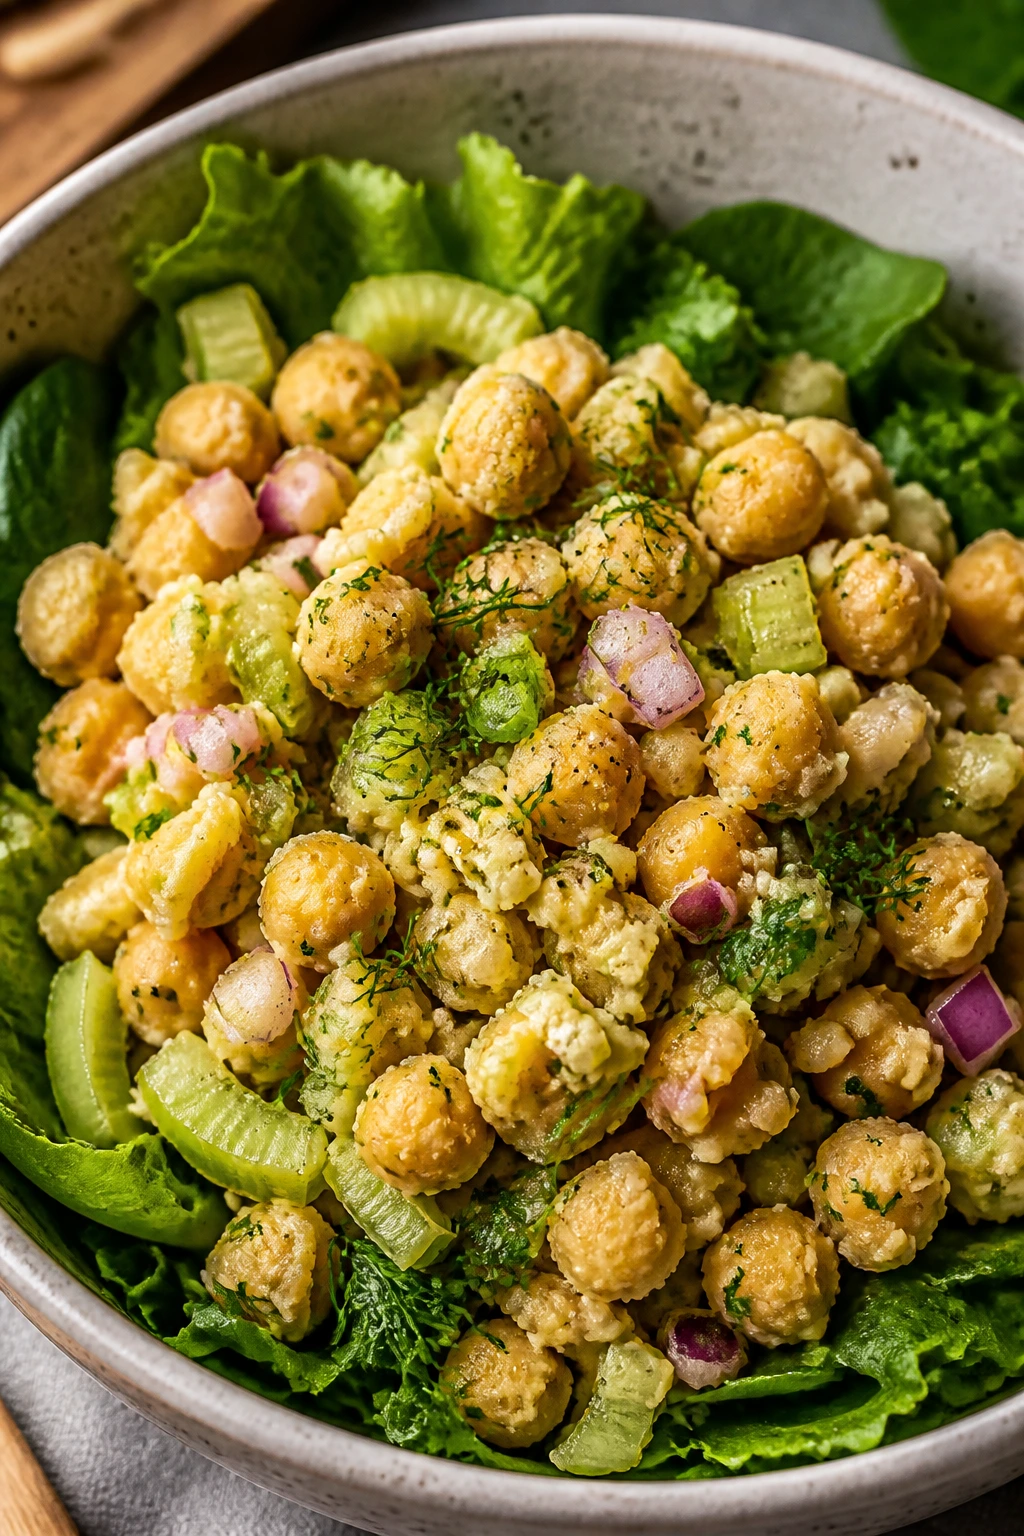
Smashed chickpeas give you the comfort of sandwich filling without the bread problem. Add celery, herbs, and a little mustard, and you get a lunch that is cheap, fast, and oddly satisfying. It’s also one of the easiest salads to turn into a wrap or lettuce cup later.
Why It Works:
Smashed chickpeas mimic the texture of tuna or egg salad in a plant-based way. Celery and onion keep it crisp, while mustard and lemon bring enough sharpness to stop the bowl from tasting beige. Greens underneath turn it into a proper salad instead of just a dip with ambition.
Key Ingredients:
- 2 cans chickpeas, drained and rinsed
- 2 celery stalks, finely diced
- 2 tablespoons red onion, minced
- 3 tablespoons mayonnaise or vegan mayo
- 1 teaspoon Dijon mustard
- 1 tablespoon lemon juice
- 1 tablespoon chopped dill or parsley
- 1/2 teaspoon salt
- 4 cups greens or shredded lettuce
Quick Steps:
- Mash about two-thirds of the chickpeas with a fork.
- Leave some whole for texture.
- Stir in celery, onion, mayo, mustard, lemon juice, herbs, and salt.
- Taste and adjust the lemon.
- Spoon over greens or pack into lettuce cups.
- Chill 15 minutes if you want the flavors to meld.
Equipment for This Recipe:
- Bowl
- Fork or potato masher
- Knife and board
- Airtight container
- Spoon
How to Serve This Dish:
Serve it in a bowl with cucumber slices, crackers, or lettuce cups alongside. It also works in a pita, but the salad version keeps lunch lighter. A dusting of black pepper helps more than it sounds like it should.
Pro Tips for This Recipe:
- Don’t mash every chickpea; texture matters.
- Finely dice the celery so it doesn’t feel stringy.
- A little chopped pickle is welcome if you like more tang.
- Use sturdy greens underneath if packing ahead.
Variations on This Dish:
- Curried Chickpea Salad: Add curry powder and raisins.
- Avocado Chickpea Salad: Replace half the mayo with mashed avocado.
- Dill Pickle Version: Add chopped pickles and a splash of pickle brine.
Common Mistakes to Avoid with This Dish:
- Overmashing into paste: It loses the lunch appeal.
- Skipping enough acid: Chickpeas need brightness.
- Using very delicate lettuce: It can’t support the filling.
24. Mexican Street Corn Salad with Chicken
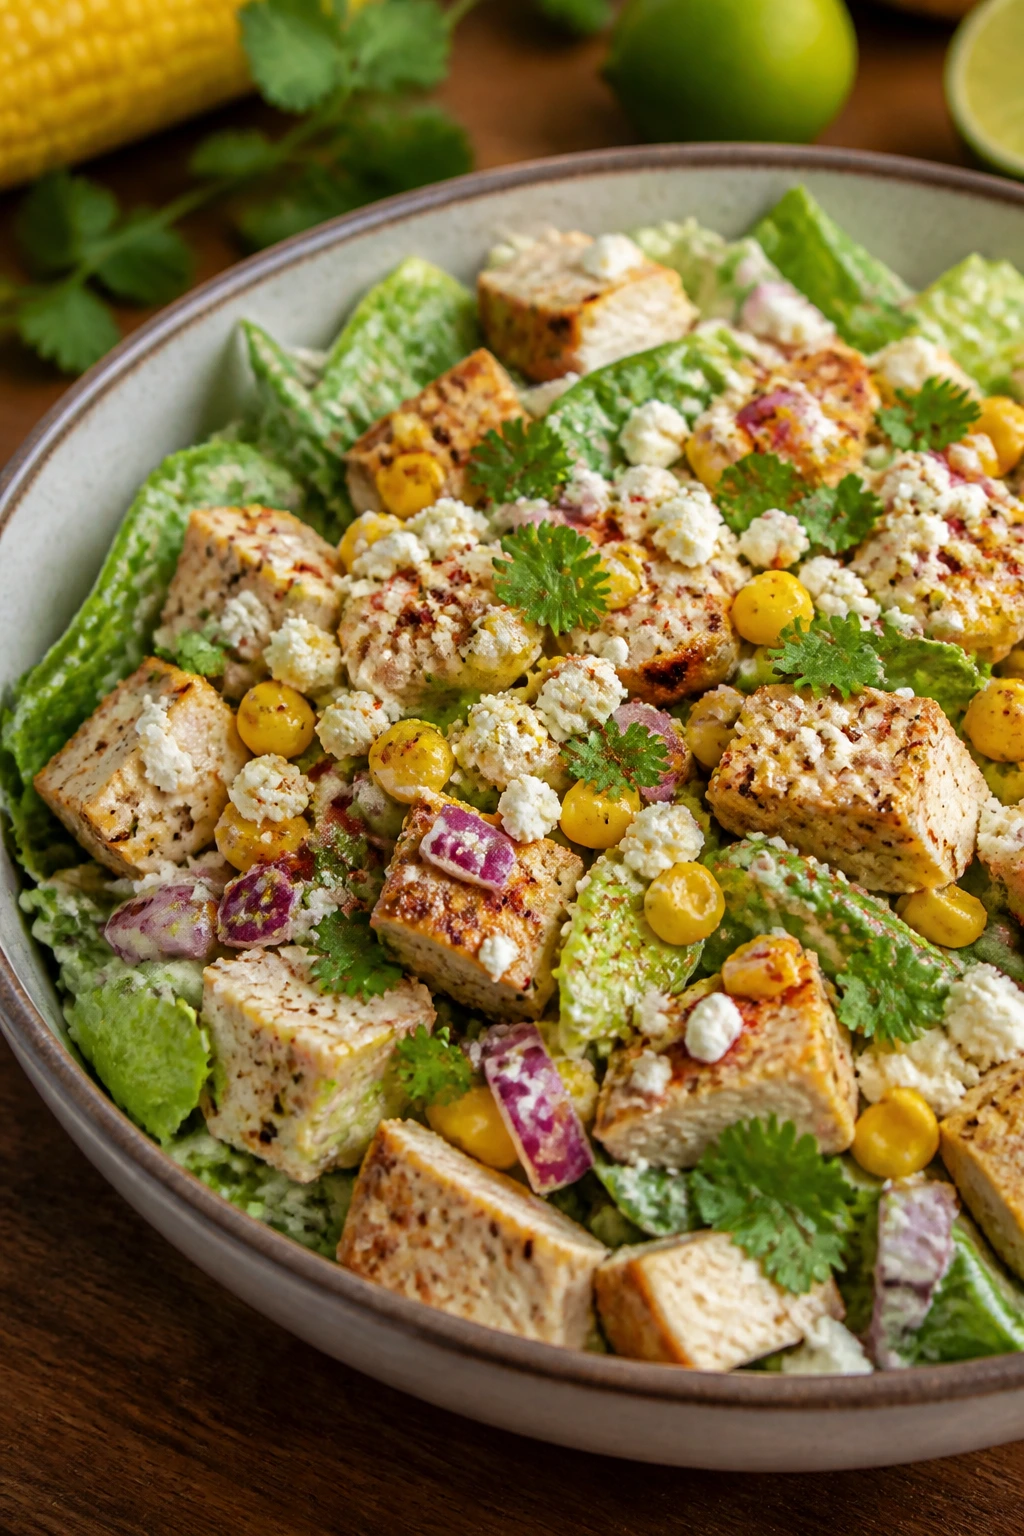
This salad borrows the best parts of elote and turns them into lunch. Corn, lime, creamy dressing, chili, and chicken make a bowl that is sweet, spicy, salty, and rich at the same time. It’s a strong move when plain greens are not going to cut it.
Why It Works:
Corn brings sweetness and chew, while chili powder and lime keep the flavor moving. Chicken makes it a proper lunch, and cotija or feta gives the salty finish that street corn needs. Romaine or cabbage can handle the creamier dressing without collapsing.
Key Ingredients:
- 2 cups cooked chicken, chopped
- 2 cups corn kernels
- 4 cups chopped romaine or shredded cabbage
- 1/4 cup red onion, diced
- 1/4 cup chopped cilantro
- 1/3 cup cotija or feta
- 3 tablespoons mayonnaise or Greek yogurt
- 1 tablespoon lime juice
- 1/2 teaspoon chili powder
- 1/2 teaspoon salt
Quick Steps:
- If needed, warm and season the corn in a skillet until lightly browned.
- Chop the greens and onion.
- Mix mayo or yogurt with lime juice, chili powder, and salt.
- Toss greens, chicken, corn, onion, and cilantro with the dressing.
- Finish with cotija or feta.
- Add extra lime right before eating.
Equipment for This Recipe:
- Skillet
- Mixing bowl
- Knife and board
- Spoon
- Lunch container
How to Serve This Dish:
Serve it in a wide bowl with extra cilantro and a lime wedge. Tortilla chips are a sensible side if you want more crunch. This one is best when the corn has a little char on it, because that smoky note gives the whole bowl structure.
Pro Tips for This Recipe:
- Brown the corn a little for more flavor.
- Use cabbage if you want better meal-prep durability.
- Don’t overdo the creamy dressing.
- Cotija is ideal, but feta works when that’s what you have.
Variations on This Dish:
- No-Chicken Street Corn Salad: Add black beans instead.
- Spicy Chipotle Version: Stir chipotle in adobo into the dressing.
- Warm Grain Bowl: Serve over rice or quinoa for a heartier lunch.
Common Mistakes to Avoid with This Dish:
- Using raw corn with no seasoning: It needs help.
- Too much mayo: The flavor should stay bright.
- Using soft lettuce only: It gets soggy fast.
25. Smoked Salmon Bagel Salad
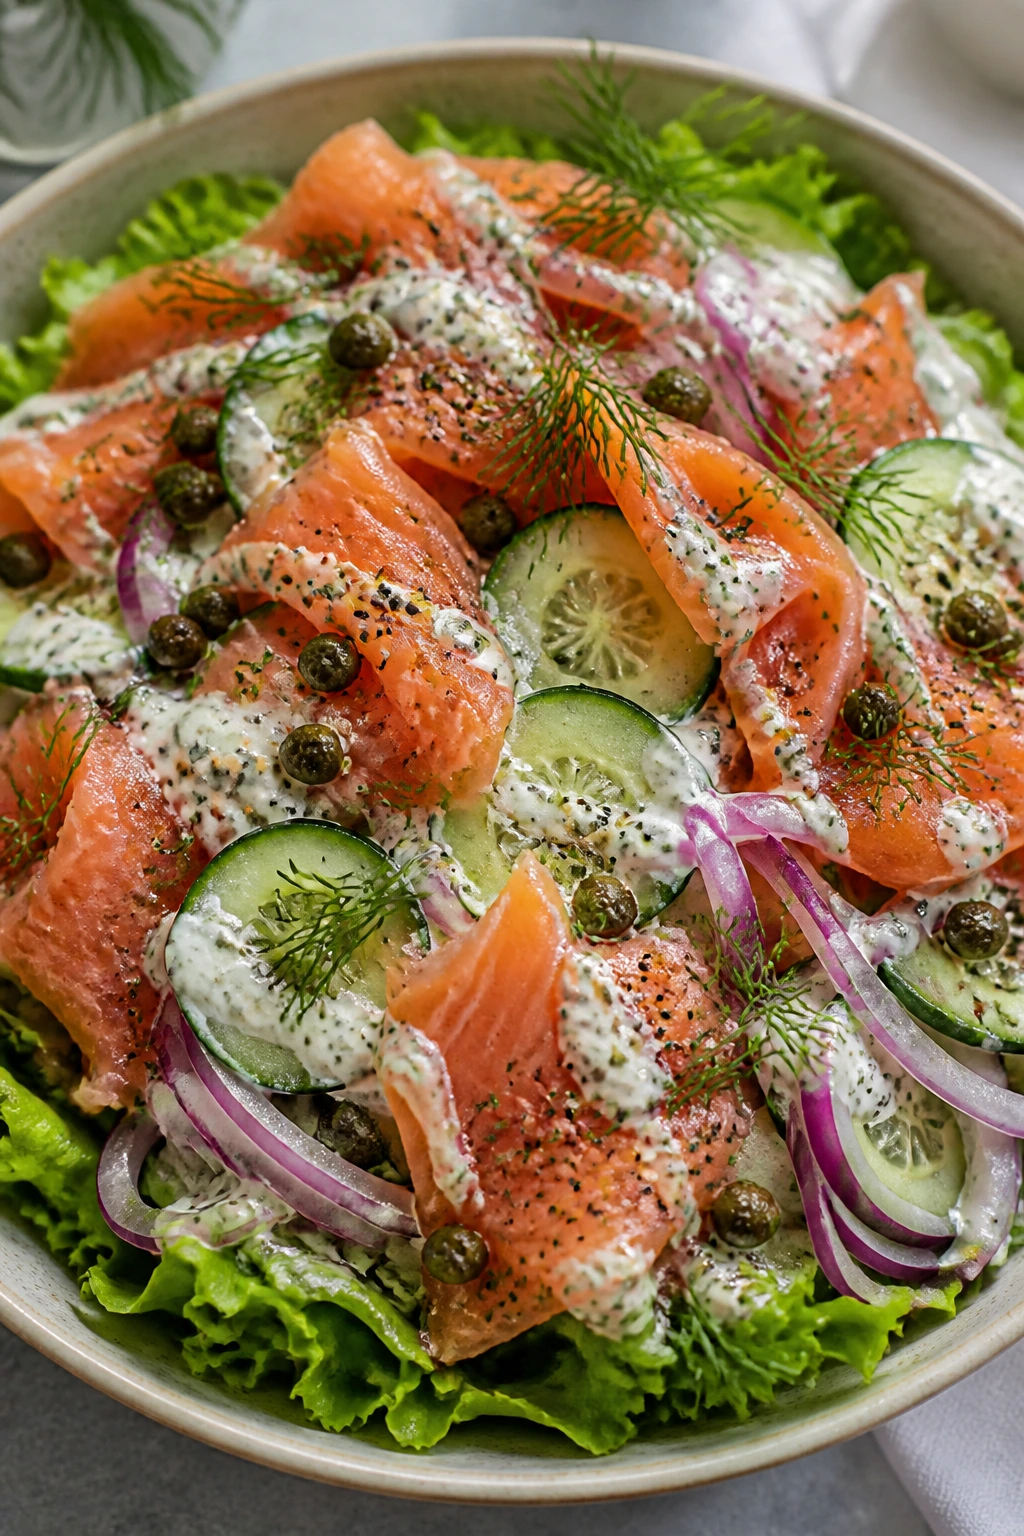
This is the lunch that tastes like a bagel shop without the bagel dragging everything down. Smoked salmon, cucumber, red onion, dill, capers, and a creamy dressing give you the same savory, briny flavor in a cleaner bowl. It’s sharp, cool, and a little luxurious.
Why It Works:
Smoked salmon already brings salt and smoke, so the rest of the salad should stay crisp and cool. Cucumber and lettuce keep the texture fresh, while capers and dill echo the salmon’s flavor. A lemony cream cheese dressing turns the whole thing into something between a salad and a brunch plate.
Key Ingredients:
- 4 cups chopped romaine or mixed greens
- 6 oz smoked salmon, torn into pieces
- 1 cucumber, sliced
- 1/4 red onion, very thinly sliced
- 1 tablespoon capers
- 2 tablespoons chopped dill
- 3 tablespoons cream cheese, softened
- 1 tablespoon plain yogurt
- 1 tablespoon lemon juice
- 1/4 teaspoon black pepper
Quick Steps:
- Stir cream cheese, yogurt, lemon juice, and black pepper until smooth.
- Chop the greens and slice the cucumber and onion.
- Toss greens lightly with the dressing.
- Top with smoked salmon, capers, onion, and dill.
- Serve immediately so the salmon stays silky.
- Add a few crackers if you want a bagel-shop feel.
Equipment for This Recipe:
- Small bowl
- Fork or spoon
- Knife and board
- Salad bowl
- Airtight container
How to Serve This Dish:
Serve it cold with a lemon wedge and maybe rye crackers on the side. It’s one of the few salads here that doesn’t need much volume to feel complete. The smoked salmon should sit in loose ribbons, not chopped to bits.
Pro Tips for This Recipe:
- Keep the salmon cold until the last minute.
- Slice the onion paper-thin so it doesn’t take over.
- Soften the cream cheese first or the dressing stays lumpy.
- Add capers sparingly; they’re loud.
Variations on This Dish:
- Bagel Bowl Version: Add chopped cucumber, tomato, and a sprinkle of everything seasoning.
- Herbed Salmon Salad: Use chives and parsley with the dill.
- No-Cream Cheese Version: Swap in Greek yogurt and a little olive oil.
Common Mistakes to Avoid with This Dish:
- Using too much red onion: It can dominate the salmon.
- Letting the dressing get too thick: Thin it with a little extra yogurt if needed.
- Packing it warm: Smoked salmon wants the fridge, not the counter.
Why Chopped Lunch Salads Keep Working When Sandwiches Quit
There’s a reason chopped salads keep showing up in lunch routines. The ingredients are easier to balance. A tomato can stay near a cucumber. A bean can sit next to a grain. A piece of chicken does not have to fight through bread, sauce, and a thousand uneven bites to do its job. That kind of structure makes lunch feel calmer, which sounds fussy until you’re the one eating at a desk with one clean fork and twelve minutes to spare.
The real payoff is texture control. Sandwiches go stale, wraps go soggy, and leafy salads fall apart if you pack them carelessly. Chopped bowls don’t have that problem to the same degree. Even the delicate ones here — strawberry spinach, smoked salmon, Caesar — get a little more mercy because the components are separated in the bowl before they’re tossed together.
I’m also partial to the fact that lunch salads are one of the few meal-prep categories where leftovers feel like an advantage rather than a compromise. Roasted sweet potatoes, cooked farro, boiled eggs, last night’s chicken, the half cup of feta sitting in the fridge door — they all get another life here. That’s not waste reduction in a sentimental sense. It’s just efficient.
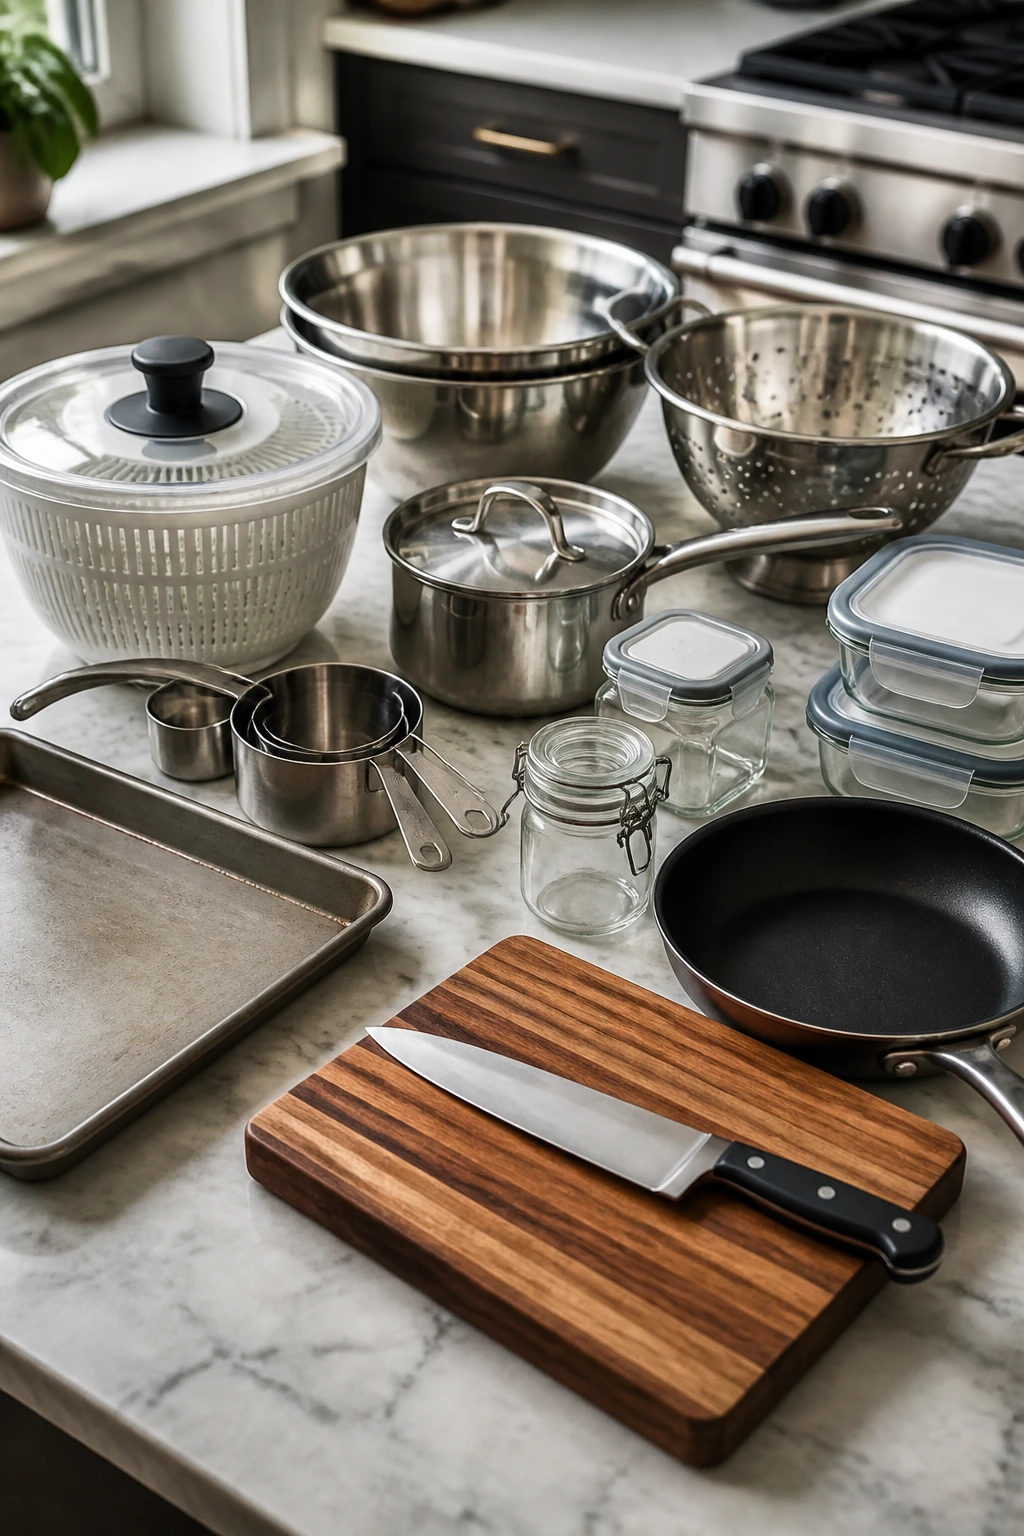
Essential Equipment for These Recipes
-
Large mixing bowls — You’ll want at least two: one for tossing and one for packing components without a mess.
-
Sharp chef’s knife — Most of these salads live or die by clean chopping, especially the ones with cucumber, herbs, celery, or cabbage.
-
Cutting board — A sturdy board keeps everything moving fast and keeps your counter from turning into a salad crime scene.
-
Salad spinner — Not mandatory, but extremely useful for romaine, spinach, arugula, and herbs that arrive clingy with water.
-
Measuring cups and spoons — Dressings taste better when the acid and oil are measured instead of guessed.
-
Sheet pan — Needed for roasted sweet potatoes, vegetables, and anything else that benefits from browned edges.
-
Saucepan with lid — Useful for quinoa, farro, lentils, and eggs.
-
Colander or fine-mesh strainer — For rinsing beans, draining grains, and cooling cooked pasta.
-
Skillet — Handy for bacon, taco beef, corn, or quickly warming chicken.
-
Airtight meal-prep containers — Glass containers hold up well for grain salads and chopped bowls.
-
Small jars with lids — The best way to pack dressing separately without leaks.
Smart Shopping and Ingredient Tips
Start with greens that can handle a little weight. Romaine hearts, cabbage, arugula, spinach, and mixed sturdy lettuces are safer than loose, feathery leaves if lunch sits in the fridge until midday. If you like delicate greens, use them as a top layer or mix them with something stronger.
Protein is where a lot of lunch salads go wrong. Rotisserie chicken is fine. Canned tuna is fine. Leftover salmon is fine if it’s been cooled quickly and stored properly. What you want to avoid is protein that has been dried out into little beige pebbles. If it looks overcooked before it goes into the salad, it will taste even drier after chilling.
Beans and grains are cheap lunch insurance. Rinse canned beans well to get rid of the can liquid, and season them at least a little before they go into the bowl. Grain salads behave better when the grains are fully cooled and lightly dressed first, which keeps them from stealing all the moisture out of the vegetables later.
For cheese, buy what fits the job. Feta and cotija bring salt. Parmesan brings a dry, savory hit. Mozzarella softens the edges. Blue cheese is strong and should be treated like a seasoning, not a blanket. Too much cheese can flatten a salad fast.
Dressings deserve more attention than they usually get. If a salad has fruit, lean toward lemon, vinegar, or a light creamy dressing. If it has beans, chicken, pasta, or grains, you can use a thicker dressing because the base won’t collapse under it. Keep a few basics around: olive oil, lemon juice, Dijon, red wine vinegar, soy sauce, and something creamy like yogurt or mayo. That combination covers a ridiculous amount of lunch territory.
How to Serve These Recipes
Presentation: Pack chopped salads in shallow bowls or clear containers so the layers stay visible and the toppings don’t sink into the base. Grain and pasta salads look best when the herbs and cheese sit on top instead of getting buried. A final sprinkle of seeds, nuts, or chopped herbs right before eating gives the bowl a fresher look and better texture.
Accompaniments: Most of these salads do not need much beside them, but a small side can make lunch feel more complete. Pita wedges, crackers, toast points, fruit, soup, or a hard-boiled egg fit naturally with the lighter recipes. The heavier ones — taco salad, Cobb, tortellini, BBQ chicken — can stand alone without a side at all.
Portions: A good lunch portion is usually 2 to 3 cups for leafy salads and 1 1/2 to 2 cups for grain, pasta, or bean salads, with protein already mixed in or layered on top. If you’re feeding someone with a big appetite, make sure there’s at least 4 to 6 ounces of protein or a full cup of beans. For smaller lunches, cut the dressing in half and keep the crunchy topping to a tablespoon or two.
Beverage Pairing: Cold sparkling water with lemon works across almost every salad here. Unsweetened iced tea is a strong second choice, especially with chicken, tuna, or grain bowls. For the richer salads, black coffee or a crisp mineral water can cut the fat better than a sweet drink ever will.
Additional Tips and Flavor Boosters
Flavor Enhancement: A spoonful of pickled onion, chopped capers, or a splash of pickle brine can wake up almost any lunch salad that tastes a little flat. Acid makes greens, grains, and beans act like they were planned, not just assembled.
Customization: Keep two or three “modules” in the fridge — a protein, a grain or bean, and a crunchy vegetable — and combine them with a different dressing each day. Chicken, chickpeas, and quinoa can become three different lunches if the sauce changes.
Serving Suggestions: Toasted seeds, chopped nuts, crisp tortilla strips, shaved cheese, fresh herbs, and a squeeze of lemon do more work than another half cup of lettuce. Use the garnish to solve the problem the salad still has: not enough crunch, not enough salt, or not enough brightness.
Make-It-Yours: For dairy-free lunches, lean on avocado, tahini, olives, nuts, or hummus instead of cheese. For vegetarian bowls, chickpeas, lentils, edamame, and eggs can carry the protein load without making the salad feel flimsy. For lower-carb versions, use cabbage, romaine, cucumber, radish, and herbs as the base and skip the grains or pasta.
Make-Ahead, Storage, and Reheating Guidance
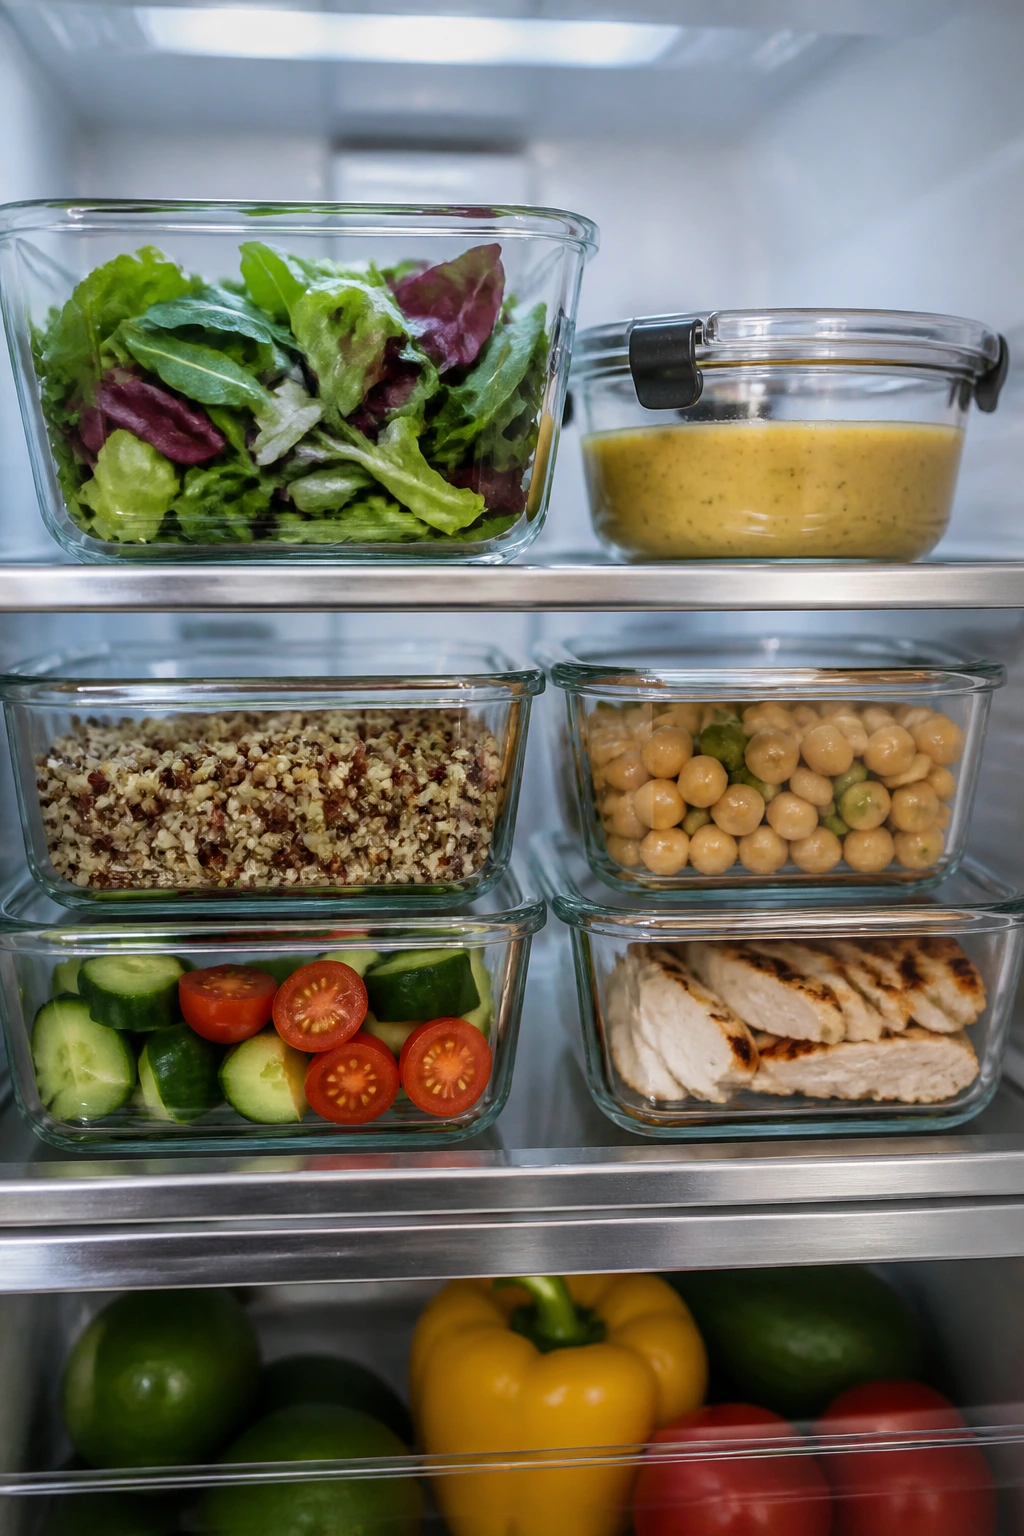
Most of these salads keep best when the components are stored separately and assembled later. Leafy salads with dressing on the side usually stay crisp for 3 to 4 days in the refrigerator. Grain, pasta, bean, and lentil salads can usually hold for 4 days, and many taste better on day two once the dressing settles in.
Cooked chicken, beef, turkey, quinoa, farro, lentils, and roasted vegetables can be made ahead and refrigerated for up to 4 days in airtight containers. If you want to warm a component before building the salad, do it gently — about 30 to 60 seconds in the microwave for meat or grains, then let it cool for a minute so it doesn’t wilt the greens. Shrimp and smoked salmon are more delicate; keep them cold and use them within 1 to 2 days for the best texture.
Egg salad, tuna salad, and similar creamy mixtures are safest and tastiest when eaten within 2 to 3 days. That’s the point where the texture is still clean and the dressing hasn’t broken down. If a salad includes avocado, add it at the last minute or toss the avocado with lemon juice and pack it in a tiny separate cup. It still browns, but slowly enough to matter.
Freezing is not a good move for most assembled salads. Lettuce, cucumber, tomato, and avocado all turn sad after thawing. You can freeze cooked grains, roasted vegetables, or cooked chicken for later use, though, which makes the next salad easier. If a dressing separates in the fridge, whisk it again or shake it in a jar before using. A little separation is normal. A lumpy or sour smell is not.
Variations and Adaptations to Try
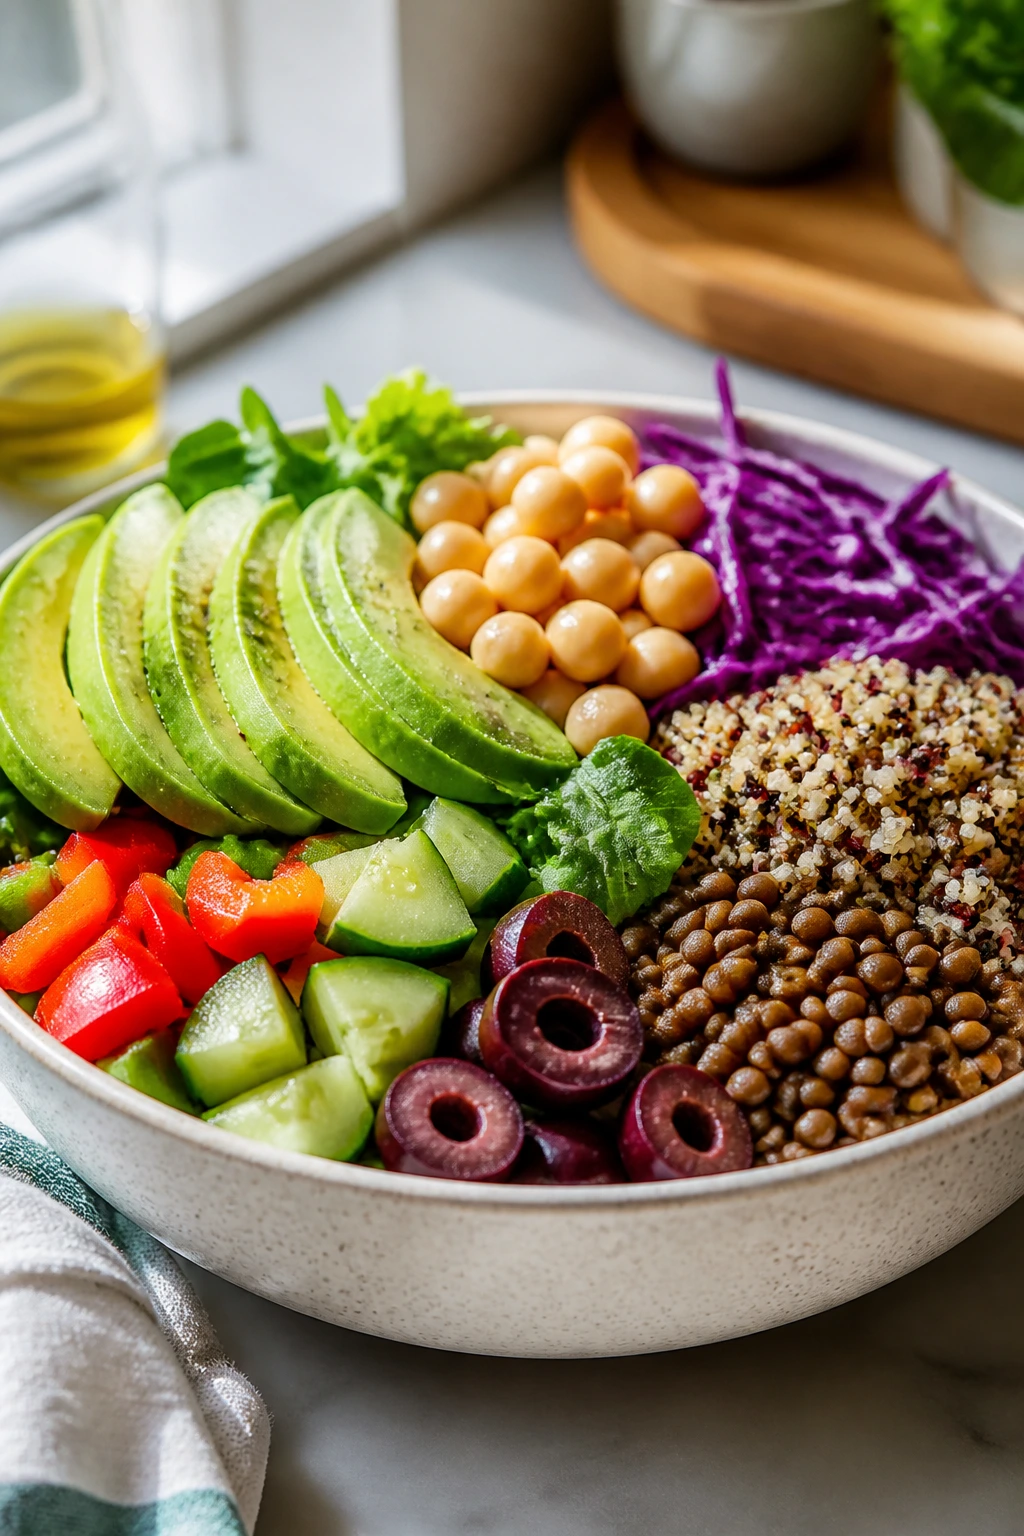
No-Dairy Lunch Box: Swap feta, blue cheese, Parmesan, and creamy dressings for avocado, tahini, hummus, olive oil, or a lemon vinaigrette. This works especially well with chickpea, grain, and cabbage-based salads, where the flavor still feels full without cheese doing the work.
Gluten-Free Bowl Swap: Use quinoa, farro alternatives, rice, corn tortilla strips, or extra beans instead of pasta, wheat berries, or bread-based add-ons. Most of the salads here are already close to gluten-free if you check the dressing and croutons.
Higher-Protein Build: Add an extra egg, another half cup of chicken, a second can of tuna, or 1/2 cup of edamame. This is the easiest way to make lunch hold up for a long afternoon without changing the flavor profile too much.
Lower-Sodium Version: Choose low-sodium canned beans, rinse them well, and go easy on olives, capers, cheese, and bottled dressings. Finish with lemon, herbs, and pepper so the bowl still tastes alive without leaning on salt.
Kid-Friendly Crunch: Keep the dressing mild, cut everything smaller, and add apple slices, carrots, corn, or grapes. Most kids who reject “salad” will still eat a bowl that has one sweet ingredient, one crunchy ingredient, and a protein they recognize.
Spice-Level Tuning: Buffalo sauce, chipotle, chili crisp, and pickled jalapeños can all push these salads in a hotter direction. If heat is the goal, keep one cooling element around — yogurt, avocado, cucumber, or ranch — so the bowl doesn’t turn into a dare.
Common Mistakes to Avoid
The biggest mistake is dressing the salad too early. Leafy greens wilt, tomatoes leak, and crunchy toppings lose their bite if they sit in vinaigrette overnight. For lunch prep, dressing should go on just before eating or at the very bottom of a layered container where it can’t soak the leaves.
Wet produce causes more lunch misery than bad recipes do. Romaine straight from the wash, cucumber that wasn’t blotted, or tomatoes that were tossed in with their seeds still dripping will all leave you with a watery bowl. Dry the greens, drain the beans, and give juicy vegetables a minute on paper towels if they seem too wet.
A lot of people under-season the proteins and grains. Plain chicken, bland quinoa, and rinsed beans need salt, acid, and often a little fat before they belong in a salad. Season them while they’re still warm if you can; they’ll take the flavor better than after they’ve chilled into silence.
Another common error is mixing too many soft things together. Avocado, mozzarella, tomatoes, and dressing can get mushy fast if there isn’t enough crunch underneath them. Every salad here should have at least one hard element — cabbage, celery, toasted nuts, cucumber, tortilla strips, or croutons — so the texture doesn’t go flat.
People also pack delicate ingredients with no separation. Croutons in dressing, avocado against lemon juice, and smoked salmon sitting on warm grains are all small ways to wreck lunch. A couple of tiny containers fix most of this. Annoying? Maybe. Worth it? Absolutely.
Frequently Asked Questions
Can I make these salads the night before?
Yes, and most of them are built for that. Keep the dressing separate, add avocado at the last minute, and pack crunchy toppings in their own container so they don’t soften overnight.
Which salads hold up best for meal prep?
Bean salads, grain salads, pasta salads, cabbage-based salads, and chopped salads with sturdy greens hold up best. The Mediterranean chickpea salad, quinoa tabbouleh, sesame soba, lentil roasted veg salad, and Thai peanut crunch salad are especially reliable.
What’s the best way to keep greens crisp?
Dry them thoroughly, store them with a paper towel in the container, and keep them away from wet ingredients until serving. Romaine and cabbage last longer than soft spring mixes, which makes them smarter for lunches that sit around.
Can I use rotisserie chicken in these recipes?
Absolutely. Rotisserie chicken is one of the best shortcuts for lunch salads because it’s already cooked, seasoned, and easy to shred or chop. Just avoid the skin if it’s soggy, and taste before adding extra salt.
How do I keep avocado from browning?
Toss it with lemon or lime juice and pack it in a tiny separate cup if you can. It will still darken a little after a few hours, but the acid slows the process enough to matter.
What if my salad tastes flat after chilling?
Add acid first: lemon juice, vinegar, or a little pickle brine. Then add salt and a final drizzle of olive oil if the bowl still feels dry. Cold food often needs more seasoning than warm food because the flavors shut down a little in the fridge.
Are these salads enough for dinner too?
Several of them are, especially the Cobb, taco salad, BBQ chicken chopped salad, tortellini salad, and salmon Niçoise. For lighter ones, add bread, fruit, or another protein so the meal has enough weight.
Can I make a dressing that works across multiple salads?
Yes. A lemon-Dijon vinaigrette and a creamy yogurt-based dressing cover a surprising amount of ground. Keep one bright and one creamy around, and most of these bowls can be handled with very little extra thought.
What’s the easiest salad to start with if I’m new to meal prep?
The tuna white bean salad, chickpea cucumber salad, and Greek pasta salad are probably the simplest. They use pantry ingredients, don’t need special cooking, and stay good long enough that one mistake won’t ruin the batch.
Cold Lunches That Keep Their Shape

Lunch salads work when they’re built like a meal instead of a punishment. That means one sturdy base, one clear protein, one crunchy thing, one bright thing, and a dressing that knows when to stay out of the way. Get that balance right, and even a plain Tuesday lunch starts feeling organized.
The nice part is how little perfection matters once the structure is sound. A few beans swapped for lentils, chicken swapped for tuna, feta swapped for avocado — none of that breaks the idea. You’re building a lunch system, not a museum piece.
Pick two or three salads from this list, batch the protein once, and keep the dressing separate. That’s usually enough to make the rest of the week easier, one cold bowl at a time.