
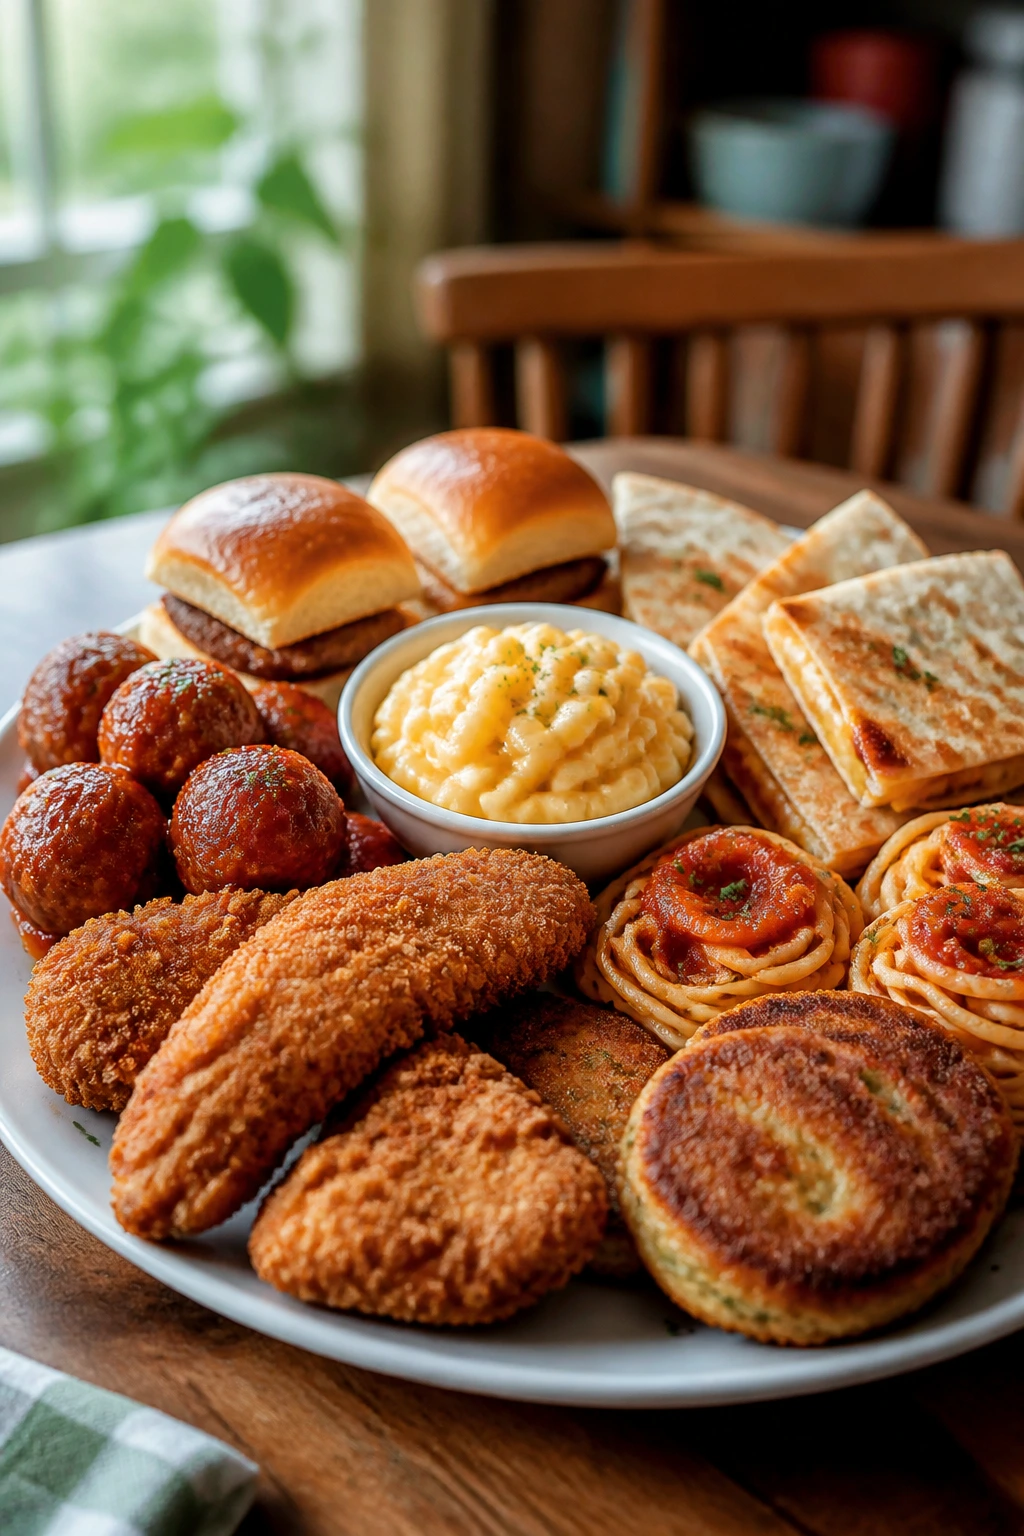
Family meals kids will actually eat usually share one blunt, useful trait: they look familiar before they taste familiar. A crispy strip, a meatball, a cheesy pasta bake, a little slider bun, a bowl of noodles — those shapes lower the stakes before the first bite even lands.
I’m not interested in dinners that need a speech. Give me mild seasoning, soft vegetables, a sauce that clings instead of running everywhere, and a texture kids can trust. That’s the lane where plates come back clean and nobody has to negotiate over one lonely broccoli floret.
Family meals kids will actually eat are rarely fancy. They’re usually the meals that smell good when they hit the table, reheat without turning sad, and leave enough structure for picky eaters to sort through the pieces without feeling ambushed.
Why This Collection Works at a Family Table
- Familiar Shapes: Tenders, meatballs, sliders, quesadillas, noodles, and patties give kids a visual cue before they taste anything.
- Soft, Mild Vegetables: Carrots, spinach, peas, broccoli, zucchini, and beans show up where they cook tender or blend into sauce instead of sitting there like a warning sign.
- Flexible Proteins: Chicken, turkey, beef, salmon, tuna, beans, and sausage can swap around without changing the whole dinner.
- Leftovers That Hold Up: Saucy bakes, skillet meals, and soups usually reheat better than dry roasted food, which matters on the second night.
- One-Pan and One-Pot Friendly: Several of these dinners keep cleanup in check, and that matters more than a lot of glossy recipe photos want to admit.
- Mild but Not Flat: Honey mustard, marinara, teriyaki, cheese, and tomato-based sauces bring enough flavor to keep adults from feeling punished.
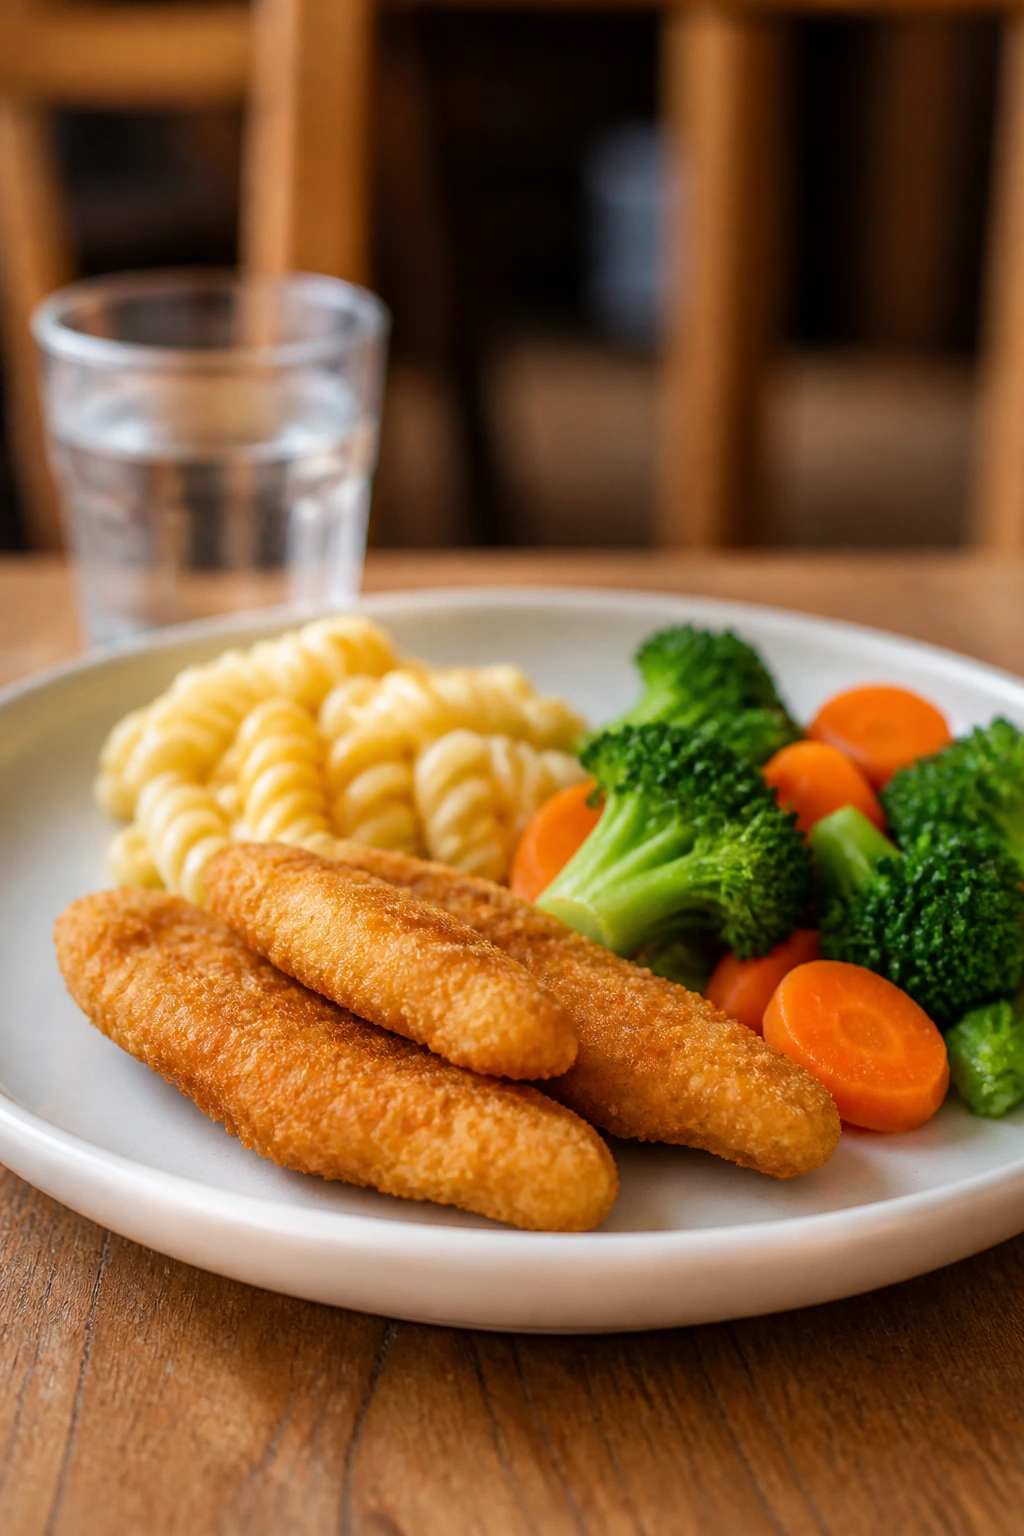
1. Crispy Baked Chicken Tenders
These are the chicken tenders that disappear from the tray while you’re still looking for the ketchup. The crust is crisp and sandy in the best way — panko, Parmesan, and a little oil give you that toasted edge without a deep fryer.
Kids like the shape. Adults like that the chicken stays juicy if you don’t overbake it. That’s the whole trick.
Why It Works: The breading is thin enough to stay crunchy, but the Parmesan adds salt and browning that make each bite taste more finished. Baking at 425°F gives the coating time to toast before the chicken dries out. The strips also cook fast enough that dinner doesn’t drag.
Key Ingredients:
- 1 1/2 lb chicken tenders or 2 large chicken breasts cut into 1-inch strips — keep the pieces even so they bake at the same speed.
- 1 cup all-purpose flour — helps the egg stick.
- 2 large eggs plus 2 tablespoons milk — makes a simple coating that clings.
- 1 cup panko breadcrumbs — gives the crust its crunch.
- 1/2 cup finely grated Parmesan — browns well and adds salt.
- 1 teaspoon kosher salt, 1 teaspoon paprika, and 1/2 teaspoon garlic powder — the seasoning layer.
- 3 tablespoons olive oil or melted butter — helps the crumbs toast.
Quick Steps:
- Preheat the oven to 425°F (220°C) and line a rimmed sheet pan with parchment.
- Set out three shallow bowls: flour mixed with salt, paprika, and garlic powder; beaten eggs and milk; panko mixed with Parmesan.
- Dredge each chicken strip in flour, dip in egg, then press into the panko mixture until coated.
- Set the strips on the pan, drizzle or brush lightly with oil, and leave a little space between each piece.
- Bake for 18 to 20 minutes, flipping once halfway, until the coating is golden and the chicken reaches 165°F.
- Rest for 3 minutes before serving so the crust settles.
Equipment for This Recipe:
- Rimmed sheet pan — keeps crumbs contained.
- Parchment paper — helps with browning and cleanup.
- Three shallow bowls — for a clean breading setup.
- Tongs — keeps your fingers out of the mess.
How to Serve This Dish: Pile the tenders on a platter with carrot sticks, cucumber spears, and a small bowl of ranch or honey mustard. They also work with roasted potatoes or a simple buttered rice side if you want a fuller plate.
Pro Tips for This Recipe:
- Press the crumbs on firmly. Loose coating falls off in the oven.
- Use finely grated Parmesan, not big shreds. Shreds won’t melt into the crust the same way.
- If your pan is crowded, use two pans. Steam is the enemy here.
Variations on This Dish:
- Cornflake Crunch: Swap the panko for crushed plain cornflakes for a sweeter, more brittle crust.
- Lemon Pepper Tenders: Add 1 teaspoon lemon pepper to the flour mixture for a brighter finish.
- Air Fryer Version: Cook at 400°F for 10 to 12 minutes, turning once, until crisp and cooked through.
Common Mistakes to Avoid with This Dish:
- Don’t skip the flour step. Without it, the egg slides off and the crust patches out.
- Don’t bake on a bare pan with no oil. The bottoms can go sandy instead of crisp.
- Don’t crowd the strips. If they touch, they steam.
2. Turkey Meatballs in Marinara
These meatballs are soft enough for small mouths but sturdy enough to hold up in a bowl of pasta. Ground turkey can go dry if you bully it, so the milk, breadcrumbs, and Parmesan matter more here than they would in a sloppy meatball recipe.
The sauce does the heavy lifting. It gives the meatballs a glossy coat and makes the whole dish feel like dinner instead of a pile of parts.
Why It Works: Turkey needs fat and moisture support, and this mix gives both. Browning the meatballs first builds flavor, then simmering them in marinara keeps them tender and gives the sauce a meaty edge. It’s a nice trick when you want pasta night without a heavy hand.
Key Ingredients:
- 1 1/2 lb ground turkey — go for 93% lean, not the driest package on the shelf.
- 1/2 cup breadcrumbs — helps the meatballs stay soft.
- 1 egg — binds everything together.
- 1/4 cup grated Parmesan — adds salt and depth.
- 2 tablespoons milk — keeps the texture from getting tight.
- 2 cloves garlic, minced, 1 teaspoon Italian seasoning, 1 teaspoon salt, and 1/2 teaspoon black pepper — the flavor base.
- 2 tablespoons olive oil — for browning.
- 24 oz marinara sauce and 12 oz spaghetti — for serving.
Quick Steps:
- Bring a large pot of salted water to a boil for the spaghetti.
- Mix turkey, breadcrumbs, egg, Parmesan, milk, garlic, seasoning, salt, and pepper until just combined.
- Roll into 1 1/2-inch meatballs and brown them in olive oil over medium heat for 6 to 8 minutes, turning gently.
- Pour in the marinara, cover, and simmer on low for 10 minutes until the meatballs are cooked through.
- Cook the spaghetti until just al dente, toss it with a ladle of sauce, and top with meatballs.
Equipment for This Recipe:
- Large skillet with a lid — for browning and simmering.
- Mixing bowl — for the meatball mixture.
- Large pot — for the pasta.
- Wooden spoon or silicone spatula — easier on the sauce than metal.
How to Serve This Dish: Twirl the spaghetti into shallow bowls and spoon the meatballs on top so the sauce stays in the pasta instead of pooling at the bottom. A little grated Parmesan and a few torn basil leaves make the plate look finished without trying too hard.
Pro Tips for This Recipe:
- Wet your hands before rolling the meatballs. It keeps the mixture from sticking.
- Stop mixing as soon as the ingredients come together. Overworking ground turkey makes it dense.
- If the sauce gets too thick, add 1/4 cup water from the pasta pot.
Variations on This Dish:
- Baked Meatball Shortcut: Bake the meatballs at 400°F for 14 to 16 minutes, then simmer in sauce.
- Cheesy Center: Press a small cube of mozzarella into each meatball before rolling.
- Gluten-Free Bowl: Use gluten-free breadcrumbs and serve over rice or gluten-free pasta.
Common Mistakes to Avoid with This Dish:
- Don’t cook the meatballs over high heat. The outside browns too fast before the center catches up.
- Don’t use ultra-lean turkey. It turns crumbly and dry.
- Don’t boil the sauce after adding the meatballs. Gentle simmer only.
3. Hidden-Veggie Mac and Cheese

This is mac and cheese that tastes like mac and cheese first, vegetables second. The cauliflower and carrot melt into the sauce, which is exactly what you want when the goal is dinner, not a lecture about produce.
The cheese still leads. It just gets a little backup.
Why It Works: Cauliflower and carrot bring body and a soft sweetness that plays nicely with cheddar. Blending them into the sauce keeps the texture creamy instead of chunky, and the pasta gives kids something familiar to grab. It’s a useful move when vegetables get rejected the second they hit the fork.
Key Ingredients:
- 12 oz elbow macaroni — the classic shape for holding sauce.
- 2 cups cauliflower florets — mild enough to disappear into the sauce.
- 1 medium carrot, peeled and sliced — adds color and a little sweetness.
- 2 tablespoons butter and 2 tablespoons flour — the base of the sauce.
- 2 cups milk — for a smooth, pourable cheese sauce.
- 2 cups shredded sharp cheddar and 1/2 cup shredded mozzarella — one for flavor, one for melt.
- 1/2 teaspoon salt and 1/4 teaspoon mustard powder — keeps the sauce from tasting flat.
Quick Steps:
- Cook the macaroni in salted water until just shy of al dente, then drain.
- Simmer the cauliflower and carrot in a small pot of water until very tender, about 10 minutes, then drain.
- Blend the cooked vegetables with 1 cup of the milk until completely smooth.
- Melt the butter in a saucepan, whisk in the flour for 1 minute, then whisk in the remaining milk and the vegetable puree.
- Stir in the cheddar, mozzarella, salt, and mustard powder until melted, then fold in the pasta.
- Serve right away, or bake at 375°F for 15 minutes if you want a browned top.
Equipment for This Recipe:
- Large pot — for the pasta.
- Small saucepan — for the vegetables.
- Blender or immersion blender — for the smooth sauce.
- Whisk — keeps the roux from clumping.
How to Serve This Dish: Scoop it into bowls and top with a little extra cheddar or buttered breadcrumbs. If you want a fresher plate, add apple slices or steamed peas on the side; the contrast helps.
Pro Tips for This Recipe:
- Blend the vegetables until truly smooth. Any lumps stand out in a sauce this familiar.
- Save a splash of pasta water before draining. It helps loosen the sauce if needed.
- Undercook the pasta by a minute if you plan to bake it.
Variations on This Dish:
- Broccoli Boost: Swap the carrot for 2 cups broccoli florets if your crowd likes a greener taste.
- White Cheddar Version: Use white cheddar and skip the paprika-style seasonings for a milder look.
- Stovetop Only: Skip the baking step and serve straight from the pot.
Common Mistakes to Avoid with This Dish:
- Don’t overboil the sauce after the cheese goes in. It can turn grainy.
- Don’t use pre-shredded cheese if you can avoid it; the coating can dull the melt.
- Don’t forget to season the vegetable puree. Bland vegetables make the whole sauce taste sleepy.
4. Sheet Pan Honey Mustard Chicken with Potatoes and Carrots
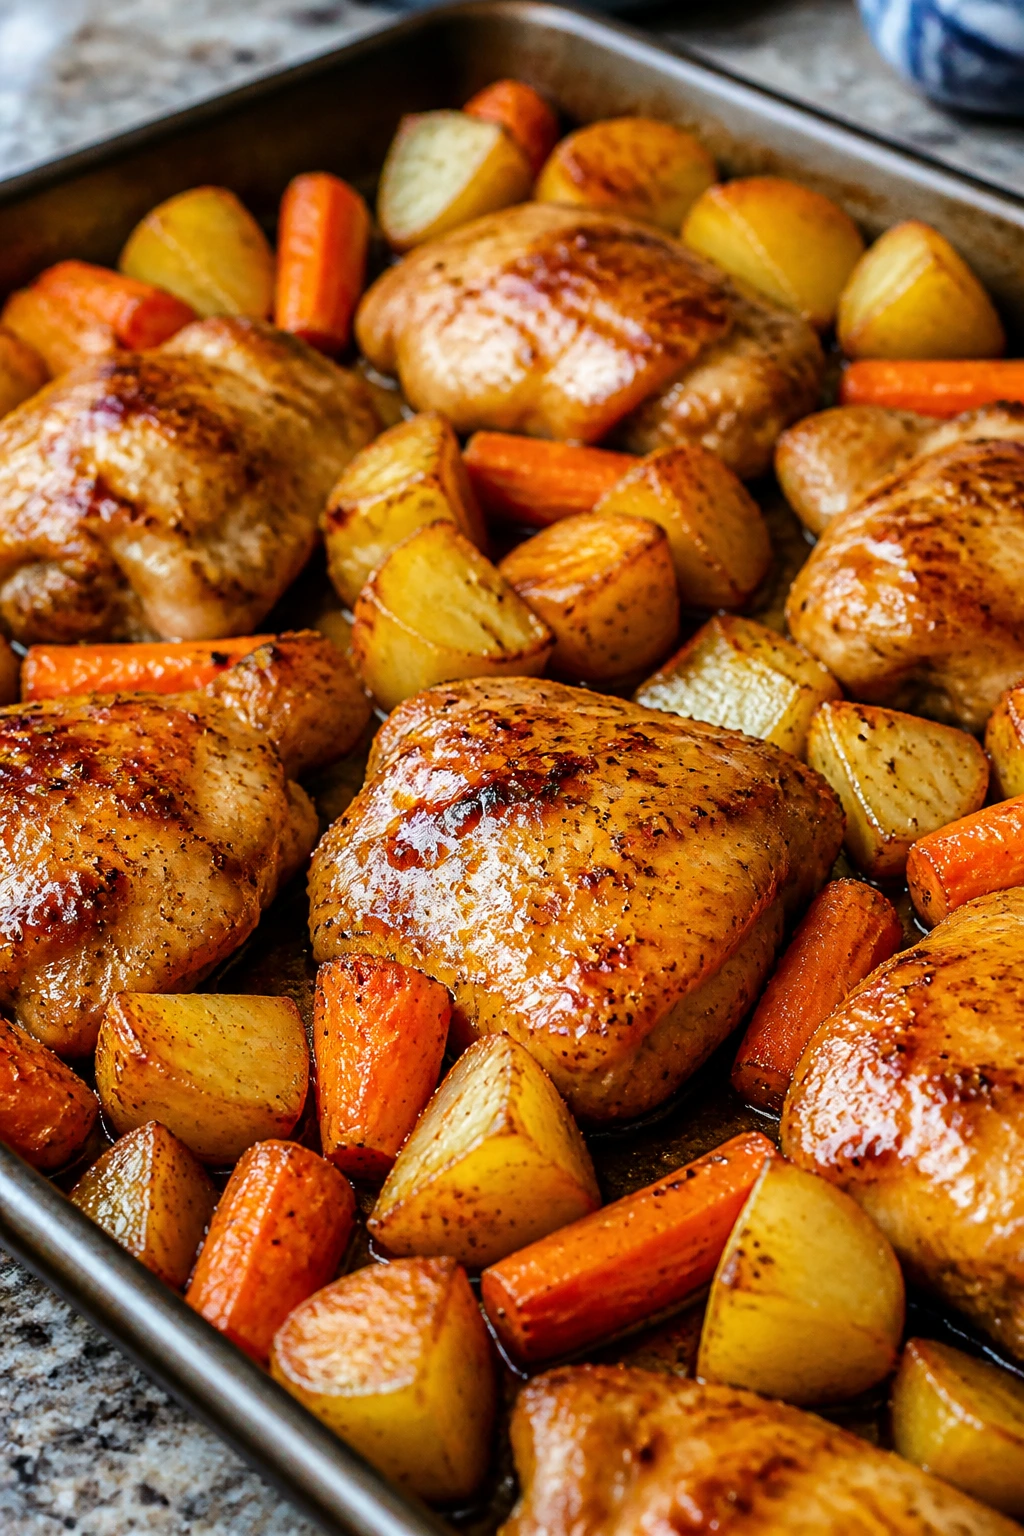
This is the kind of dinner that smells like you planned ahead, even if you didn’t. Honey mustard turns sticky and glossy in the oven, and the carrots take on a sweet edge that makes them easier to finish than plain roasted vegetables.
The potatoes do the quiet work. They catch the drips and come out browned underneath.
Why It Works: Honey and Dijon do two jobs here: they season the chicken and glaze the vegetables. Roasting the potatoes and carrots first gives them a head start, so the chicken can finish at the same time without the roots going mushy. That timing matters.
Key Ingredients:
- 2 lb boneless skinless chicken thighs or breasts — thighs stay juicier, breasts work fine if cut evenly.
- 1 1/2 lb baby potatoes, halved — small pieces roast faster.
- 4 large carrots, cut into 2-inch pieces — keep them thick enough to stay tender.
- 2 tablespoons olive oil — for the vegetables and pan.
- 3 tablespoons Dijon mustard and 2 tablespoons honey — the glaze.
- 2 cloves garlic, minced, 1 teaspoon dried thyme, 1 teaspoon salt, and 1/2 teaspoon pepper — the seasoning.
- 1 tablespoon lemon juice — brightens the glaze at the end.
Quick Steps:
- Heat the oven to 425°F and line a sheet pan with parchment.
- Toss the potatoes and carrots with half the oil, half the salt, and half the thyme. Roast for 15 minutes.
- Mix the mustard, honey, garlic, lemon juice, and the rest of the seasoning.
- Nestle the chicken on the pan, brush it with the glaze, and add the vegetables back around it.
- Roast 18 to 22 minutes more, until the chicken reaches 165°F and the potatoes are tender with browned edges.
- Rest the chicken for 5 minutes before slicing.
Equipment for This Recipe:
- Rimmed sheet pan — catches the glaze and keeps it all in one place.
- Parchment paper — saves scrubbing.
- Small bowl and brush — for the honey mustard.
- Instant-read thermometer — the easiest way to avoid dry chicken.
How to Serve This Dish: Serve the chicken sliced over the potatoes and carrots so the glaze lands on everything. A spoonful of plain yogurt or a side of steamed green beans rounds it out without adding noise.
Pro Tips for This Recipe:
- Cut the carrots thick. Thin rounds go soft too fast.
- If using chicken breasts, pound them lightly so they roast evenly.
- Brush on a second thin layer of glaze during the last 5 minutes if you want a stickier finish.
Variations on This Dish:
- Apple-Dijon Version: Add 1 sliced apple to the pan for a little sweetness.
- Herb-Forward Swap: Use rosemary instead of thyme if you want a sharper roast flavor.
- Dairy-Free Side: Serve with olive oil mashed potatoes instead of yogurt or butter-heavy extras.
Common Mistakes to Avoid with This Dish:
- Don’t start with cold, wet vegetables. Dry them after washing so they brown.
- Don’t crowd the pan. The vegetables need open space to roast instead of steam.
- Don’t guess the chicken temp. Pull it at 165°F, not “when it looks done.”
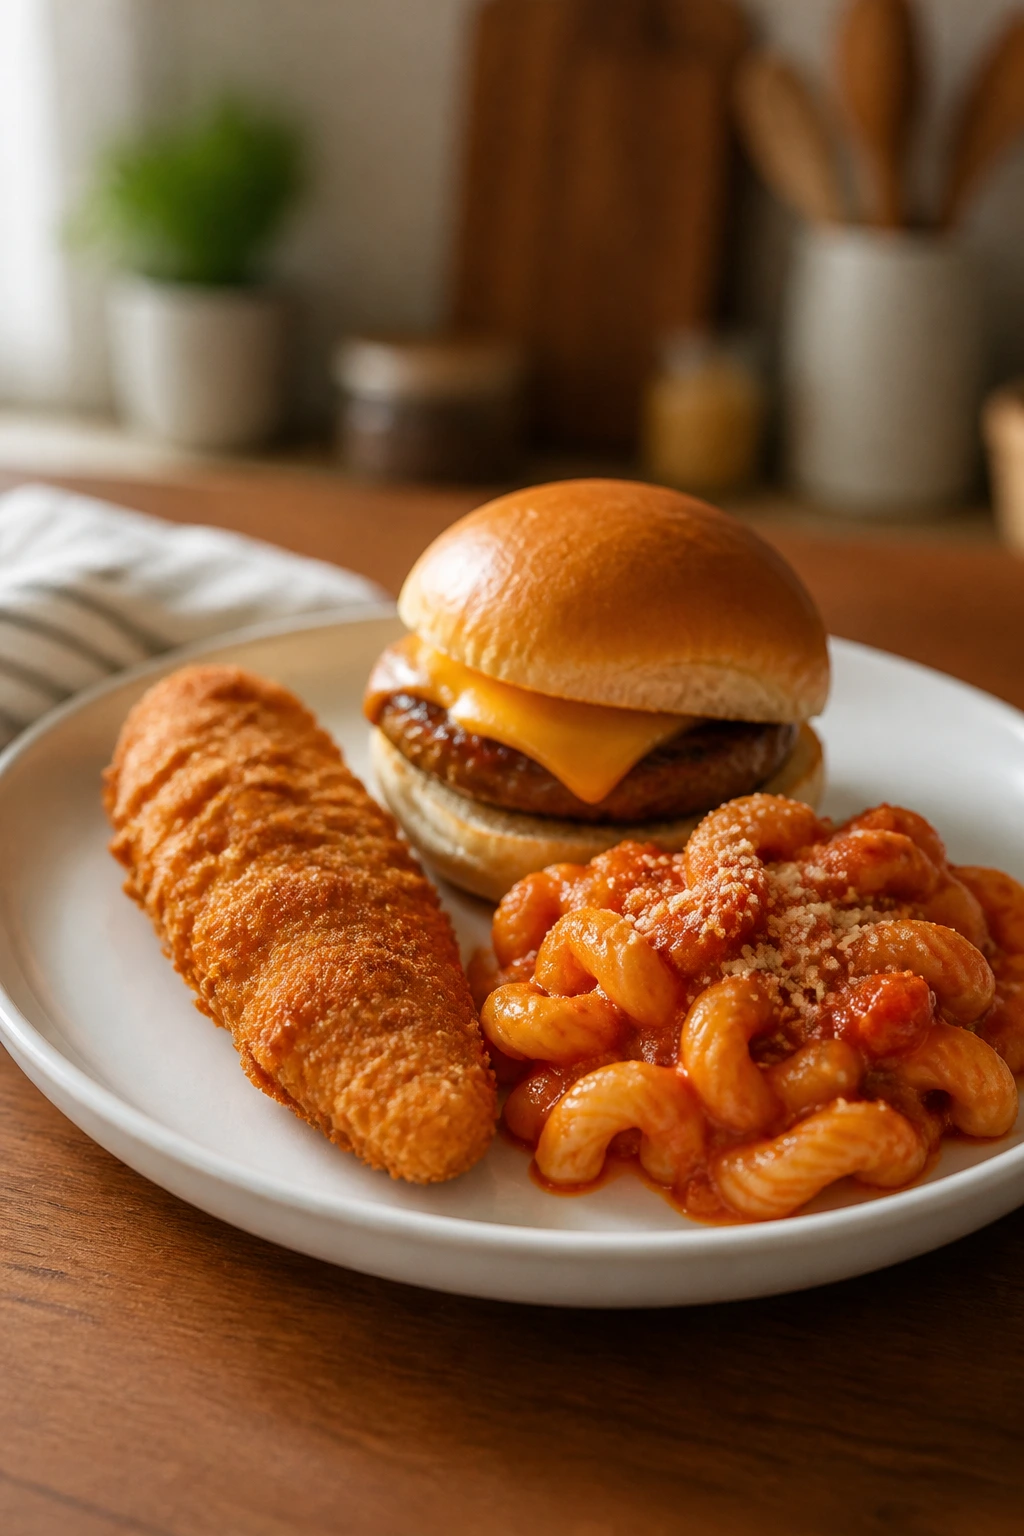
5. Cheeseburger Pasta Skillet
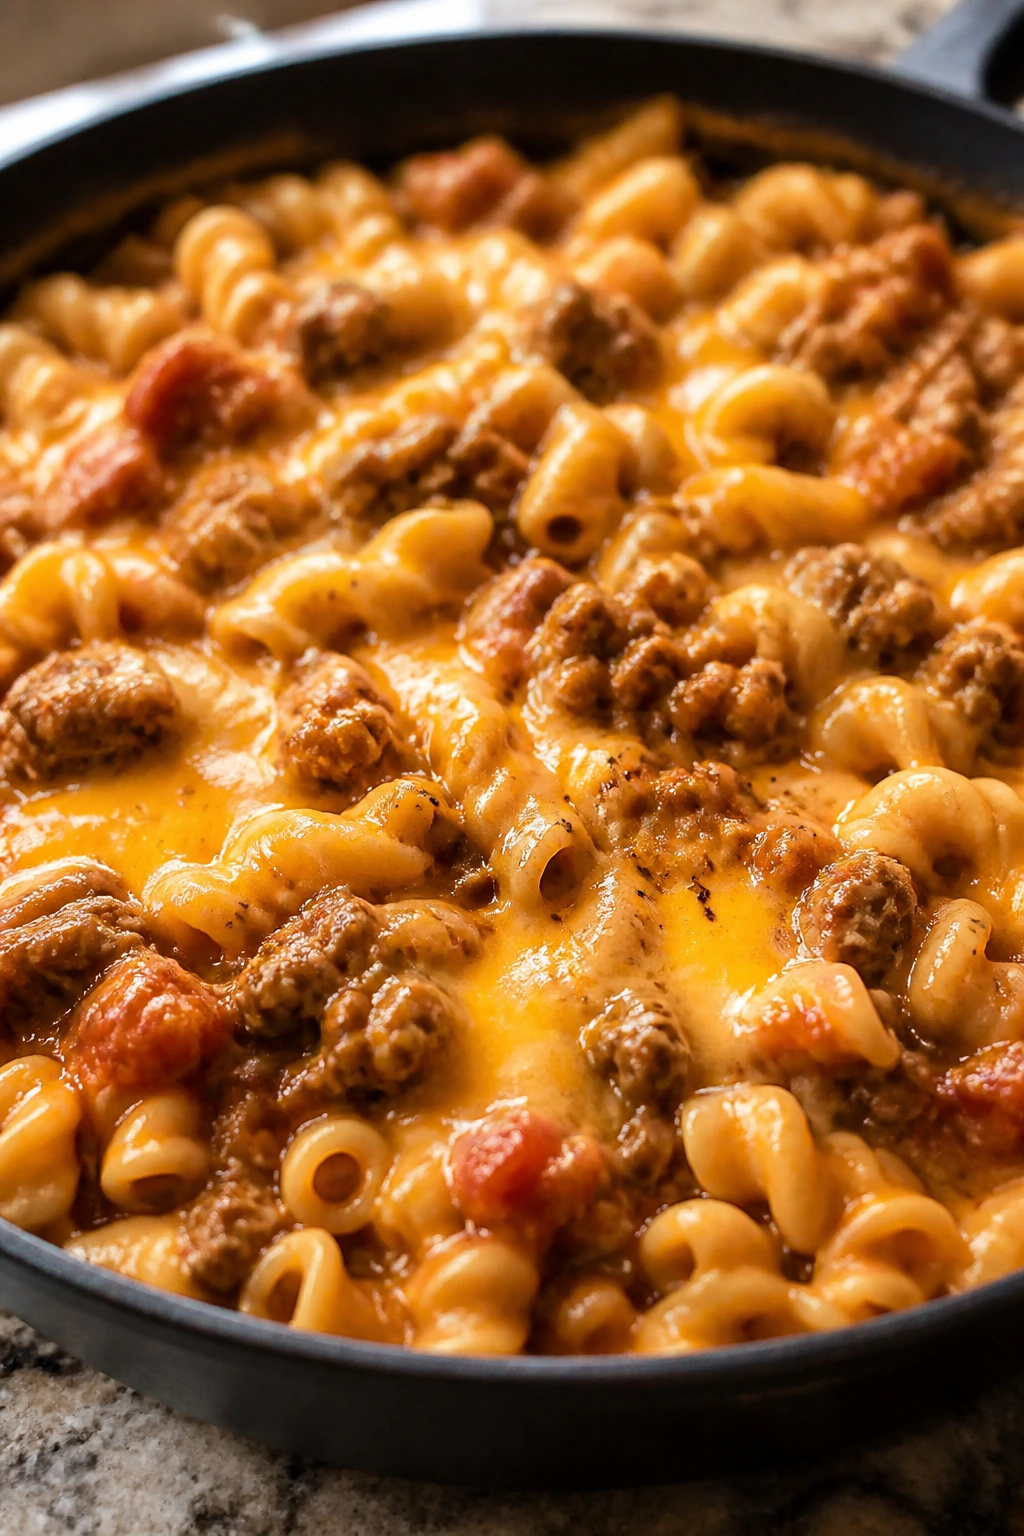
This tastes like a cheeseburger that took a shortcut through a pasta pot, and I mean that in the nicest possible way. It’s rich, tomato-y, and a little tangy from the mustard, with enough cheese to make the noodles feel coated instead of drowned.
Kids usually trust this one fast. It looks like macaroni, smells like burger night, and lands somewhere in the middle.
Why It Works: Ground beef gives the sauce a savory backbone, while pasta soaks up the tomato and cheese. The mustard and ketchup keep it from tasting like plain meat sauce. One skillet also means the noodles cook in flavor, not just water.
Key Ingredients:
- 1 lb lean ground beef — enough flavor without too much grease.
- 1 small onion, diced, and 2 cloves garlic, minced — the base.
- 8 oz elbow macaroni — cooks right in the sauce.
- 2 cups beef broth and 2 cups milk — the cooking liquid.
- 1 cup tomato sauce, 1 tablespoon ketchup, and 1 teaspoon yellow mustard — the cheeseburger note.
- 2 cups shredded cheddar — melts into the sauce.
- 1 teaspoon salt and 1/2 teaspoon pepper — to finish.
Quick Steps:
- Brown the beef and onion in a large skillet over medium-high heat until the meat is no longer pink.
- Stir in the garlic, then add the macaroni, broth, milk, tomato sauce, ketchup, mustard, salt, and pepper.
- Bring to a simmer, then lower the heat and cook for 12 to 14 minutes, stirring often, until the pasta is tender and most of the liquid is absorbed.
- Turn off the heat and stir in the cheddar until glossy and melted.
- Rest for 2 minutes so the sauce thickens before serving.
Equipment for This Recipe:
- Deep 12-inch skillet — big enough for pasta and sauce.
- Wooden spoon — scrapes the bottom without scratching.
- Lid — helpful if the pasta needs a little extra liquid.
How to Serve This Dish: Spoon it into bowls with sliced pickles or a quick cucumber salad on the side. If you want to sell the burger idea a little harder, top each bowl with a few diced tomatoes or a pinch of sesame seeds.
Pro Tips for This Recipe:
- Stir often once the pasta goes in. It likes to stick.
- Use lean beef, but not extra-lean. A little fat helps the flavor.
- If the sauce looks too thick before the pasta is done, add 1/4 cup water.
Variations on This Dish:
- Turkey Burger Skillet: Swap in ground turkey and add an extra tablespoon of Worcestershire.
- Pickle Relish Finish: Stir in 2 tablespoons sweet pickle relish at the end for a more burger-like bite.
- Whole-Wheat Noodle Version: Use whole-wheat elbows and add a splash more broth.
Common Mistakes to Avoid with This Dish:
- Don’t blast the heat once the pasta starts simmering. The liquid evaporates too fast.
- Don’t dump in the cheese while the skillet is boiling. It can turn stringy.
- Don’t skip the mustard. It’s small, but it keeps the sauce from tasting flat.
6. Mild Chicken Enchilada Casserole
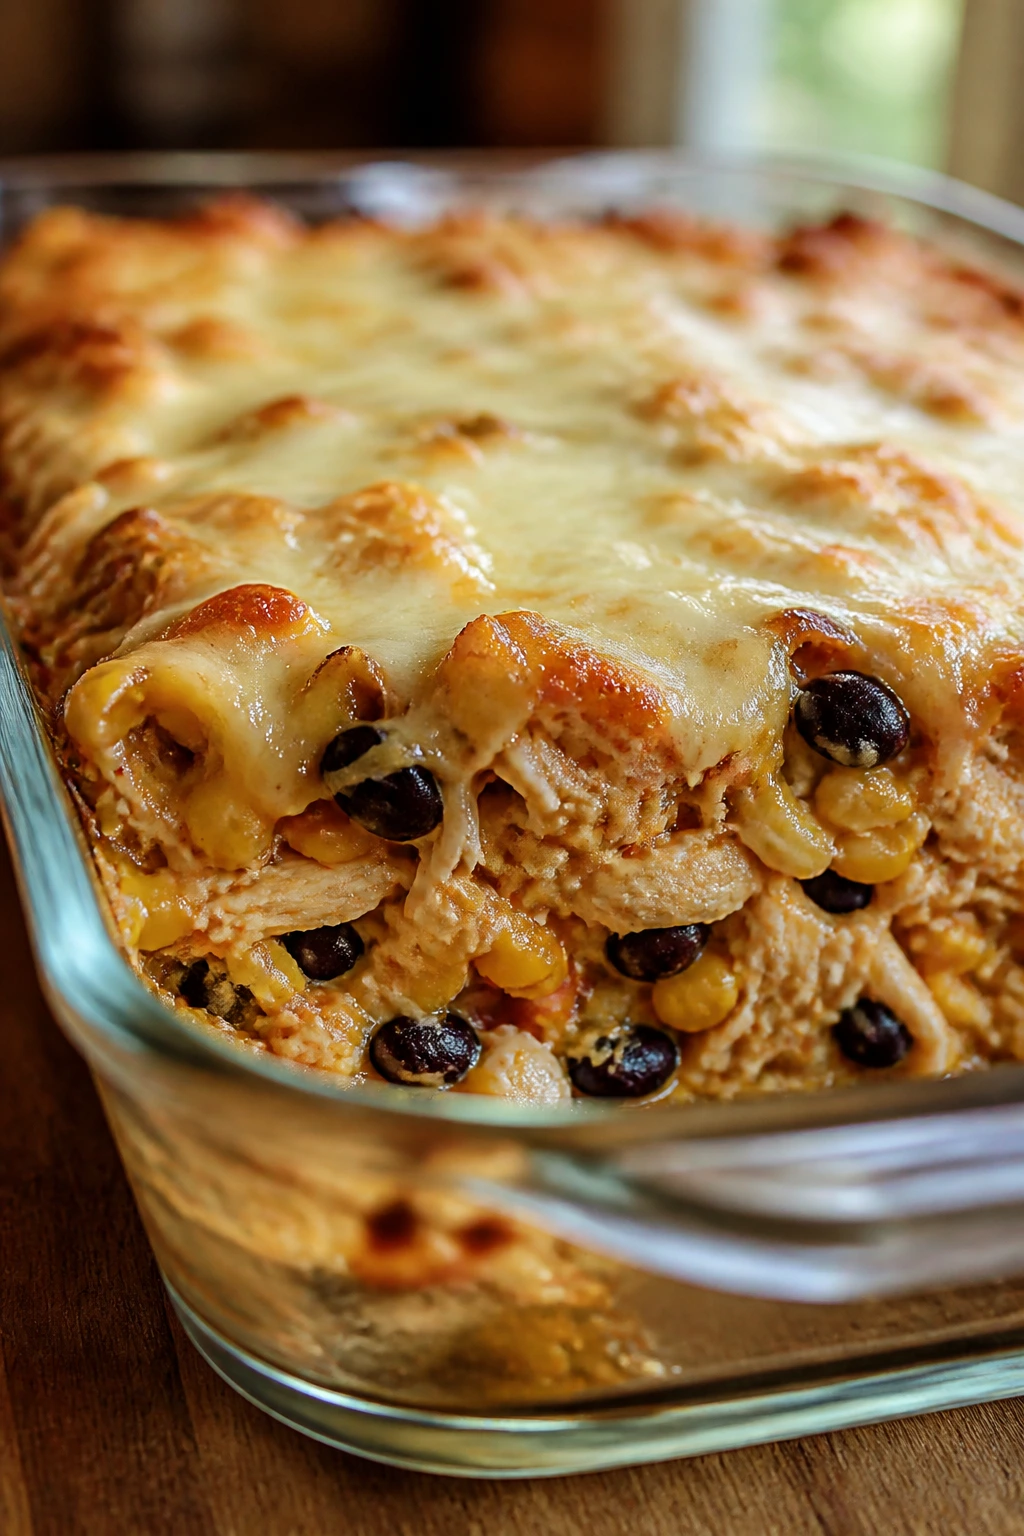
This is enchilada night without the assembly line. The tortillas soften into the sauce, the chicken stays tucked in the middle, and the melted cheese on top gives you the one thing every kid notices first.
I like casseroles that cut cleanly. This one does, as long as you let it rest a few minutes after baking.
Why It Works: Using tortilla strips instead of rolled enchiladas makes the dish faster and less fussy. The mild enchilada sauce coats everything without setting off spice alarms, and the beans and corn add texture that keeps the filling from feeling one-note. It also reheats well, which is half the point.
Key Ingredients:
- 3 cups shredded cooked chicken — rotisserie chicken works fine.
- 10 oz mild red enchilada sauce — keeps the heat low.
- 1 cup mild salsa — adds body to the sauce.
- 6 corn tortillas, cut into strips — the casserole layers.
- 1 can black beans, rinsed and drained — extra protein and fiber.
- 1 cup frozen corn — sweet pops in the filling.
- 2 cups shredded Monterey Jack or cheddar — the top layer.
- 1/2 cup plain Greek yogurt or sour cream — to serve.
Quick Steps:
- Heat the oven to 375°F and lightly grease a 9×13-inch baking dish.
- Stir the enchilada sauce and salsa together.
- Layer half the tortillas, half the chicken, half the beans, half the corn, and half the sauce in the dish; repeat.
- Top with the cheese and bake for 25 to 30 minutes, until bubbling and browned at the edges.
- Let it rest for 10 minutes before cutting so the layers hold together.
- Spoon yogurt or sour cream on top if you want a cooler finish.
Equipment for This Recipe:
- 9×13-inch baking dish — the right shape for neat layers.
- Mixing bowl — for the sauce.
- Sharp knife — for cutting the tortillas into strips.
How to Serve This Dish: Cut it into squares and serve with shredded lettuce, diced avocado, or a few tortilla chips on the side. A spoonful of plain yogurt cools the sauce if anyone in the house is suspicious of anything with “enchilada” in the name.
Pro Tips for This Recipe:
- Warm the tortillas for 20 seconds in the microwave if they crack while cutting.
- Use mild salsa, not chunky hot salsa, or the spice level jumps fast.
- Let the casserole rest. If you cut too soon, it slides apart.
Variations on This Dish:
- Bean-Heavy Version: Replace half the chicken with another can of black beans.
- Green Sauce Swap: Use mild salsa verde and mozzarella for a brighter casserole.
- Tortilla Chip Top: Sprinkle crushed tortilla chips over the cheese for extra crunch.
Common Mistakes to Avoid with This Dish:
- Don’t use dry, unseasoned chicken. The whole casserole depends on the filling being flavorful.
- Don’t overdo the sauce. Too much makes the tortillas soggy.
- Don’t forget the rest time. It’s the difference between slices and mush.
7. Mini Meatloaf Muffins
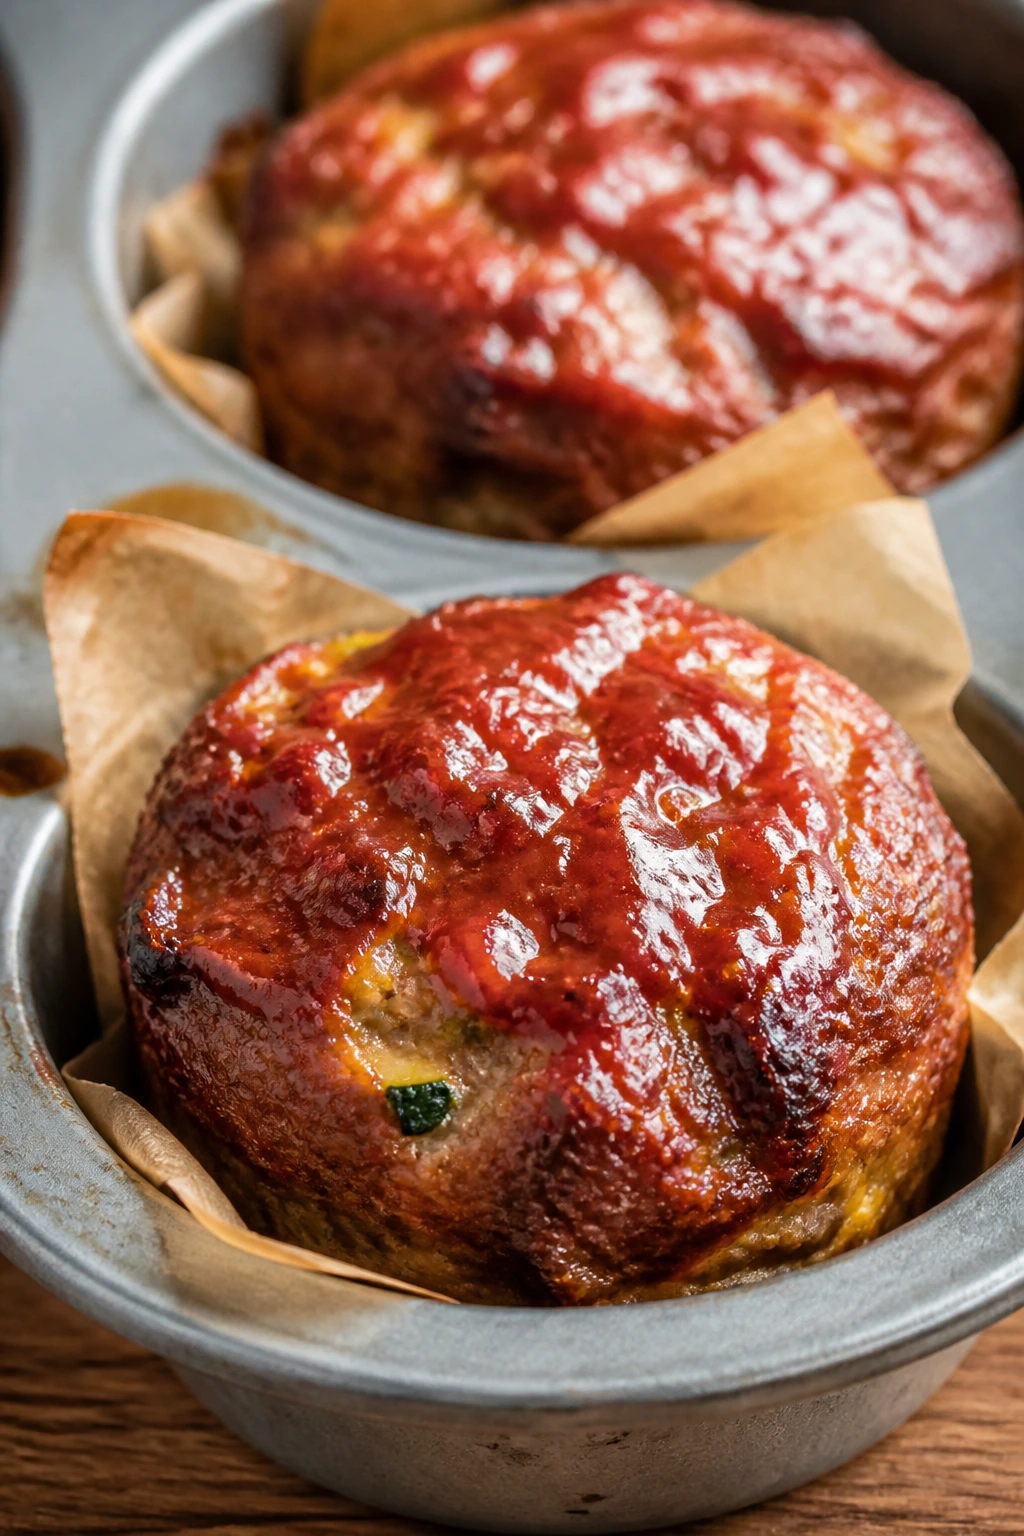
Meatloaf gets a lot less pushback when it arrives in muffin form. The edges brown quickly, the centers stay juicy, and every kid gets a little personal portion instead of facing a giant loaf on a platter.
The zucchini disappears into the mix here. Nobody notices, which is the point.
Why It Works: Muffin tin meatloaf cooks faster and gives you more browned surface area, which is the part people usually want anyway. The grated zucchini adds moisture without changing the flavor much, and the ketchup-maple glaze turns tacky in the oven instead of sliding off. That’s a good trade.
Key Ingredients:
- 1 1/2 lb ground beef or turkey — beef gives more flavor, turkey stays lighter.
- 1 cup breadcrumbs — holds the mixture together.
- 1 egg — the binder.
- 1/2 cup milk — keeps the texture soft.
- 1 small zucchini, grated and squeezed dry — mild moisture.
- 1/4 cup ketchup, 1 tablespoon Worcestershire, 1 teaspoon salt, 1/2 teaspoon pepper, and 1/2 teaspoon onion powder — seasoning.
- 1/4 cup ketchup plus 1 tablespoon maple syrup — the glaze.
Quick Steps:
- Heat the oven to 375°F and grease a 12-cup muffin tin.
- Mix the meat, breadcrumbs, egg, milk, zucchini, seasonings, and Worcestershire just until combined.
- Divide the mixture among the muffin cups and shape lightly with damp hands.
- Stir the glaze together and spoon a little over each portion.
- Bake for 20 to 22 minutes, until the centers reach 160°F for beef or 165°F for turkey.
- Rest for 5 minutes before lifting them out.
Equipment for This Recipe:
- Muffin tin — gives the smaller shape.
- Large mixing bowl — enough room to combine without overmixing.
- Spoon or ice cream scoop — helps portion evenly.
How to Serve This Dish: Serve two muffins per adult or one to two per child with mashed potatoes and green beans. The glaze makes them look finished even if the rest of the plate is plain.
Pro Tips for This Recipe:
- Squeeze the zucchini dry in a clean towel. Too much water softens the texture.
- Don’t pack the mixture into the cups too hard. Light shaping keeps them tender.
- Pull turkey meatloaf muffins as soon as they reach temp; they dry fast if you leave them in.
Variations on This Dish:
- BBQ Muffins: Swap the glaze for barbecue sauce.
- Cheddar Center: Press a small cube of cheddar into the middle of each muffin before baking.
- Gluten-Free Version: Use gluten-free breadcrumbs or crushed GF crackers.
Common Mistakes to Avoid with This Dish:
- Don’t overmix. That makes the meat compact and springy.
- Don’t skip the grease on the tin. Meatloaf likes to cling.
- Don’t guess doneness by color alone. Use a thermometer.
8. Veggie-Packed Spaghetti Bolognese
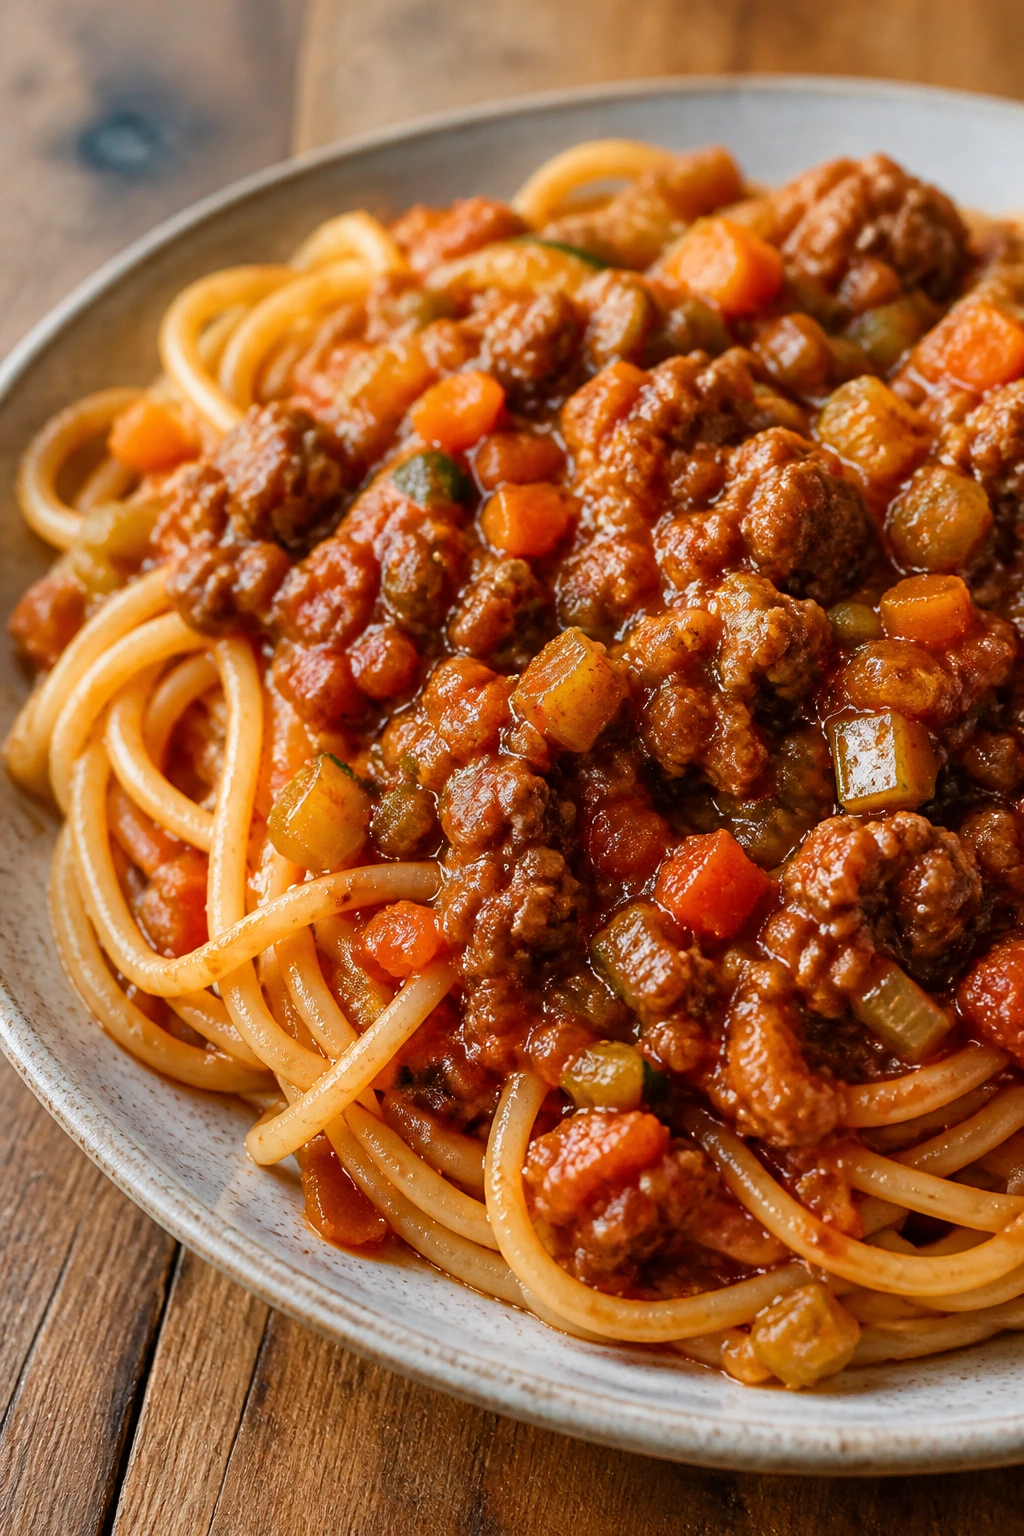
This is the red sauce dinner that quietly does more work than it lets on. The carrot, celery, and zucchini melt down until they’re part of the sauce instead of separate objects kids can pick around.
You still get the comfort of spaghetti. You just get more body in the sauce, too.
Why It Works: Finely chopped vegetables disappear into the meat sauce, which means the texture stays familiar. A long simmer reduces the acidity of the tomatoes and gives the sauce a deeper, sweeter flavor. That makes a big difference on the second bite.
Key Ingredients:
- 1 tablespoon olive oil — for the base.
- 1 onion, 1 carrot, 1 celery stalk, and 1 zucchini, all finely diced or grated — the hidden vegetable mix.
- 1 lb ground beef or turkey — the protein.
- 2 cloves garlic, minced, and 2 tablespoons tomato paste — for depth.
- 28 oz crushed tomatoes — the main sauce.
- 1 teaspoon Italian seasoning, 1 teaspoon salt, and 1/2 teaspoon pepper — the seasoning.
- 12 oz spaghetti — the pasta.
- 1/2 cup milk — softens the tomatoes.
Quick Steps:
- Heat the oil in a large pot and cook the onion, carrot, celery, and zucchini over medium heat for 6 to 8 minutes until softened.
- Add the meat and cook until browned, breaking it up as it cooks.
- Stir in the garlic and tomato paste for 1 minute.
- Add the crushed tomatoes, milk, seasoning, salt, and pepper, then simmer for 20 to 25 minutes.
- Cook the spaghetti until al dente, drain, and toss with the sauce.
Equipment for This Recipe:
- Large pot or Dutch oven — for the sauce.
- Box grater or food processor — for the vegetables.
- Pasta pot — for the spaghetti.
How to Serve This Dish: Twirl the pasta into bowls and top with a little Parmesan. A side salad or garlic bread is fine, but plain steamed peas also make sense here if you want another vegetable on the table.
Pro Tips for This Recipe:
- Grate the zucchini if your kids notice diced vegetables easily.
- Let the sauce simmer uncovered so it thickens.
- Salt the pasta water. Spaghetti tastes dull without it.
Variations on This Dish:
- Pork and Beef Mix: Use half ground pork for a richer sauce.
- Lentil Swap: Replace half the meat with cooked brown lentils for a softer texture.
- Creamier Sauce: Stir in 2 tablespoons of butter at the end.
Common Mistakes to Avoid with This Dish:
- Don’t rush the vegetable sauté. Raw onion taste leaks through the whole pot.
- Don’t drown the sauce in sugar. The milk and simmer already smooth the acidity.
- Don’t overcook the pasta before mixing it with the sauce. It keeps softening.
9. Taco Rice Bowls
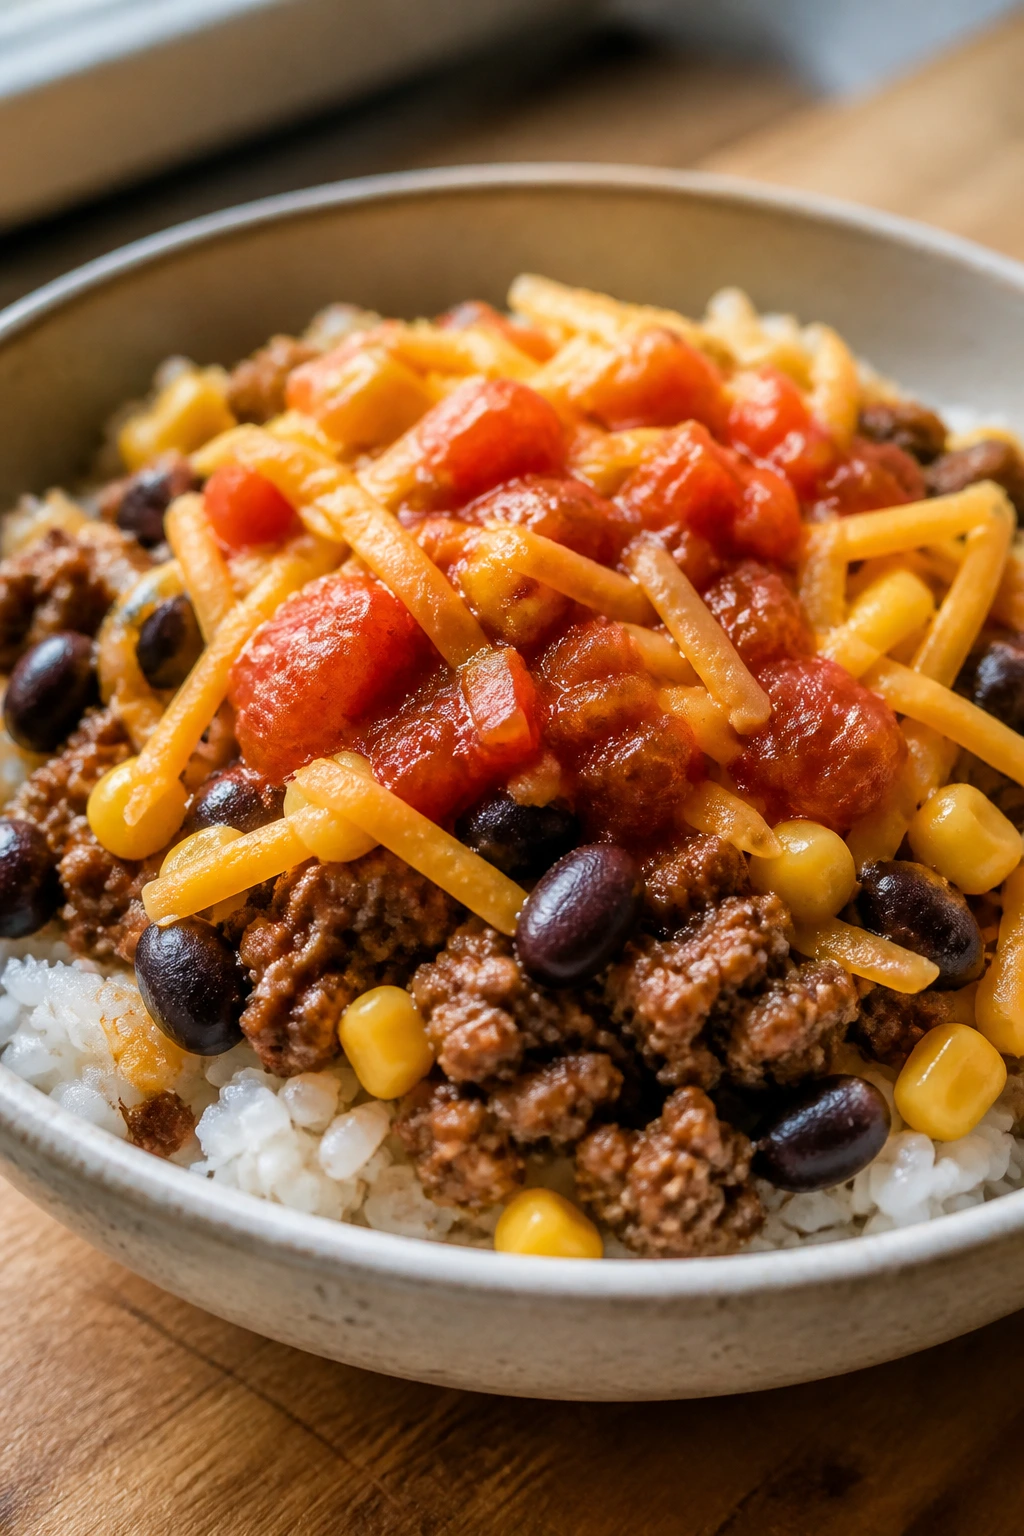
This is the meal that gets eaten with the toppings negotiated at the table. Some people want cheese. Some want corn. Some want everything separate, which is fine, because bowls are built for that.
The structure matters here. Rice under the meat, toppings on top, and everyone chooses their own path.
Why It Works: Taco seasoning gives the meat enough flavor without turning the whole bowl spicy. Beans and corn make the meal feel fuller without a second pan’s worth of work. And because each component stays visible, picky eaters can work around what they don’t want.
Key Ingredients:
- 1 lb ground turkey or beef — the base.
- 1 tablespoon olive oil — if the meat is very lean.
- 2 tablespoons mild taco seasoning — enough to season without heat.
- 1 cup long-grain white rice and 2 cups water — the grain base.
- 1 can black beans, rinsed and drained — adds protein and texture.
- 1 cup corn — fresh, frozen, or canned.
- 1 cup salsa and 1 cup shredded cheddar — the finishing layer.
- Lettuce, avocado, or lime wedges — optional toppings.
Quick Steps:
- Cook the rice according to the package directions.
- Brown the meat in a skillet, stir in the taco seasoning, and add 2 tablespoons water.
- Warm the beans and corn in the skillet or microwave.
- Spoon rice into bowls, top with the meat, beans, corn, salsa, and cheese.
- Add lettuce, avocado, or lime if you want more crunch or brightness.
Equipment for This Recipe:
- Medium skillet — for the meat.
- Saucepan or rice cooker — for the rice.
- Serving bowls — important here, since the meal is built in layers.
How to Serve This Dish: Set out the toppings separately so kids can build their own bowls. If you want a little extra on the table, serve tortilla chips or cucumber sticks alongside.
Pro Tips for This Recipe:
- Don’t over-season the meat. Taco bowls get better with toppings than with a heavy hand in the skillet.
- Rinse canned beans well so the bowl doesn’t taste muddy.
- Warm the salsa slightly if you’re serving younger kids; cold salsa can feel sharp.
Variations on This Dish:
- Chicken Taco Bowls: Swap in shredded chicken and use the same seasoning.
- Bean-Only Version: Use black beans and pinto beans instead of meat.
- Brown Rice Bowl: Use brown rice, but plan for the longer cook time.
Common Mistakes to Avoid with This Dish:
- Don’t make the rice too dry. Slightly fluffy rice works better than sticky clumps.
- Don’t bury the toppings in the meat. Kids like to see what they’re eating.
- Don’t forget a little acid, like lime or salsa. It wakes everything up.
10. Teriyaki Chicken and Broccoli Bowls
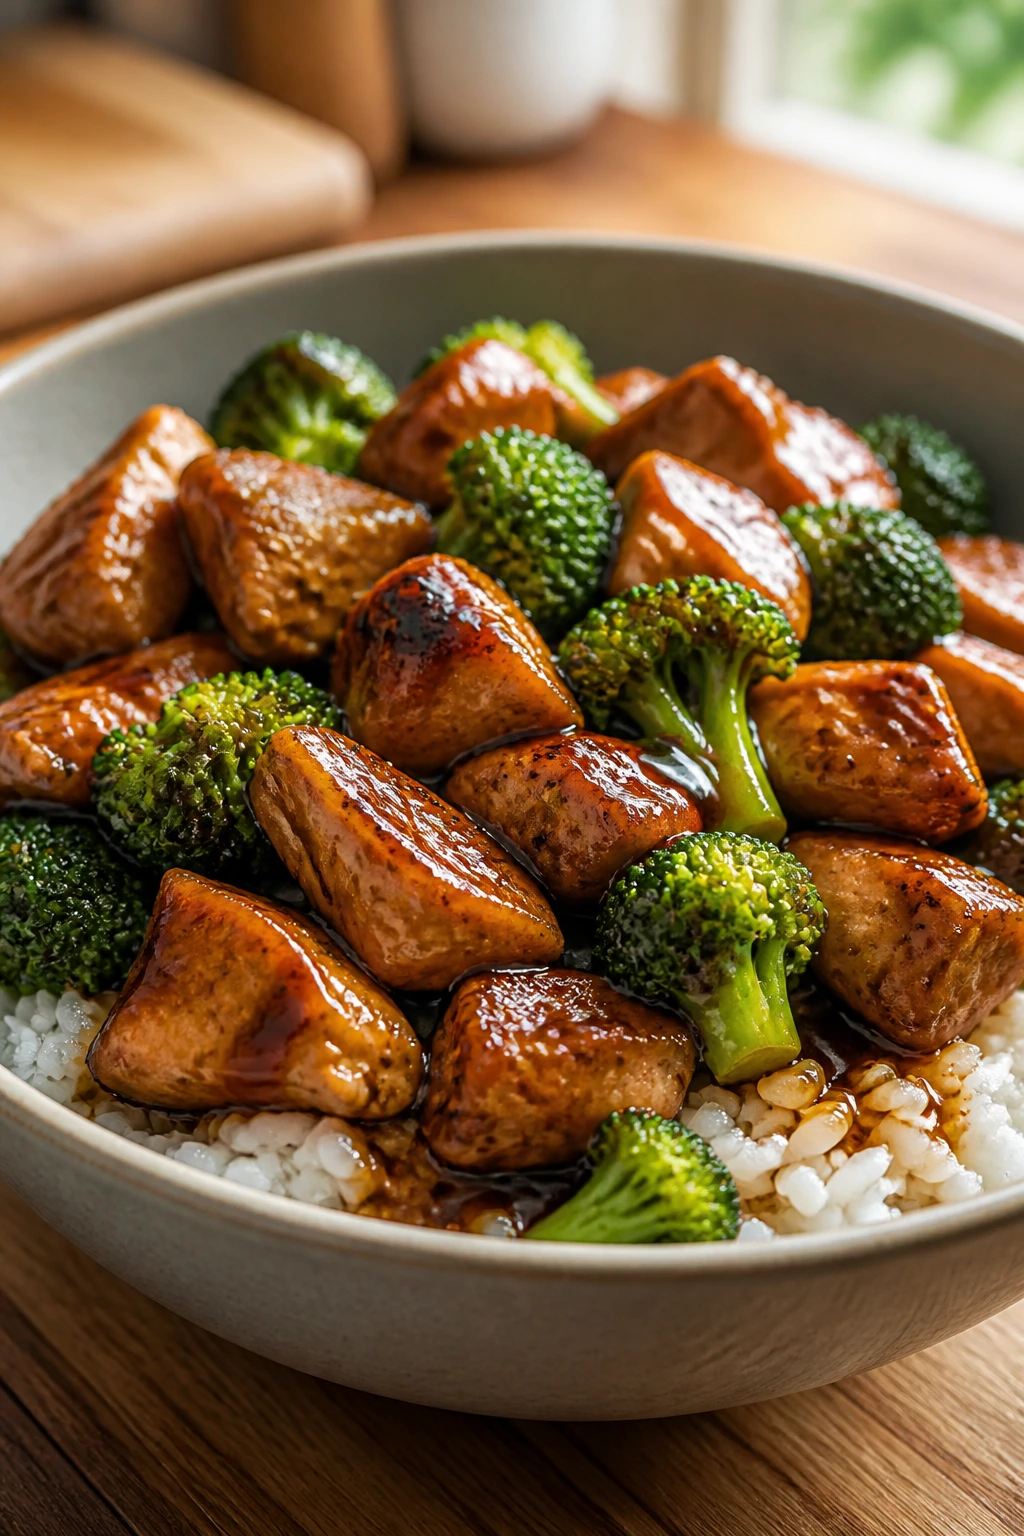
This is the dinner that tastes like takeout but behaves better at home. The sauce is glossy, sweet-salty, and thick enough to coat the chicken without puddling all over the rice.
Broccoli belongs here because it catches sauce in the florets. That’s not a small thing.
Why It Works: Teriyaki sauce has enough sweetness to win over hesitant eaters, and the cornstarch gives it that shiny finish people expect from a bowl meal. Cooking the broccoli until bright green and just tender keeps it from turning mushy. The rice gives the sauce somewhere to land.
Key Ingredients:
- 1 1/2 lb chicken thighs or breasts, cut into bite-size pieces — thighs stay juicier.
- 1 tablespoon neutral oil — for the pan.
- 3 cups broccoli florets — cut small so they cook evenly.
- 1 cup uncooked rice and 2 cups water — the base.
- 1/3 cup low-sodium soy sauce, 3 tablespoons honey, 1 tablespoon rice vinegar, 1 teaspoon sesame oil — the sauce.
- 2 teaspoons cornstarch mixed with 2 tablespoons water — for thickening.
- 2 cloves garlic and 1 teaspoon grated ginger — the flavor.
- 1 tablespoon toasted sesame seeds — optional.
Quick Steps:
- Cook the rice and keep it warm.
- Whisk the soy sauce, honey, vinegar, sesame oil, garlic, ginger, cornstarch, and water.
- Cook the chicken in oil over medium-high heat until browned and cooked through.
- Add the broccoli and 2 tablespoons water, cover for 3 minutes, then uncover.
- Pour in the sauce and stir until thick and glossy, about 1 to 2 minutes.
- Serve over rice.
Equipment for This Recipe:
- Large skillet — for the chicken and broccoli.
- Small bowl — for the sauce.
- Saucepan or rice cooker — for the rice.
How to Serve This Dish: Spoon the chicken and broccoli over rice and top with sesame seeds. If you want a cooler side, add sliced cucumbers dressed with a few drops of rice vinegar.
Pro Tips for This Recipe:
- Cut the broccoli into small florets so kids aren’t wrestling with giant stems.
- Don’t let the sauce boil too long after thickening or it can get sticky.
- Taste the sauce before it goes in; some soy sauces are saltier than others.
Variations on This Dish:
- Pineapple Bowl: Stir in 1 cup pineapple chunks at the end.
- Turkey Swap: Use ground turkey instead of chicken for a softer texture.
- Veggie-Heavy Version: Add snap peas or carrots with the broccoli.
Common Mistakes to Avoid with This Dish:
- Don’t crowd the chicken. It needs space to brown.
- Don’t overcook the broccoli. Bright green tastes better than drab olive.
- Don’t skip the cornstarch slurry; thin teriyaki slides right off the rice.
11. Pizza Quesadillas
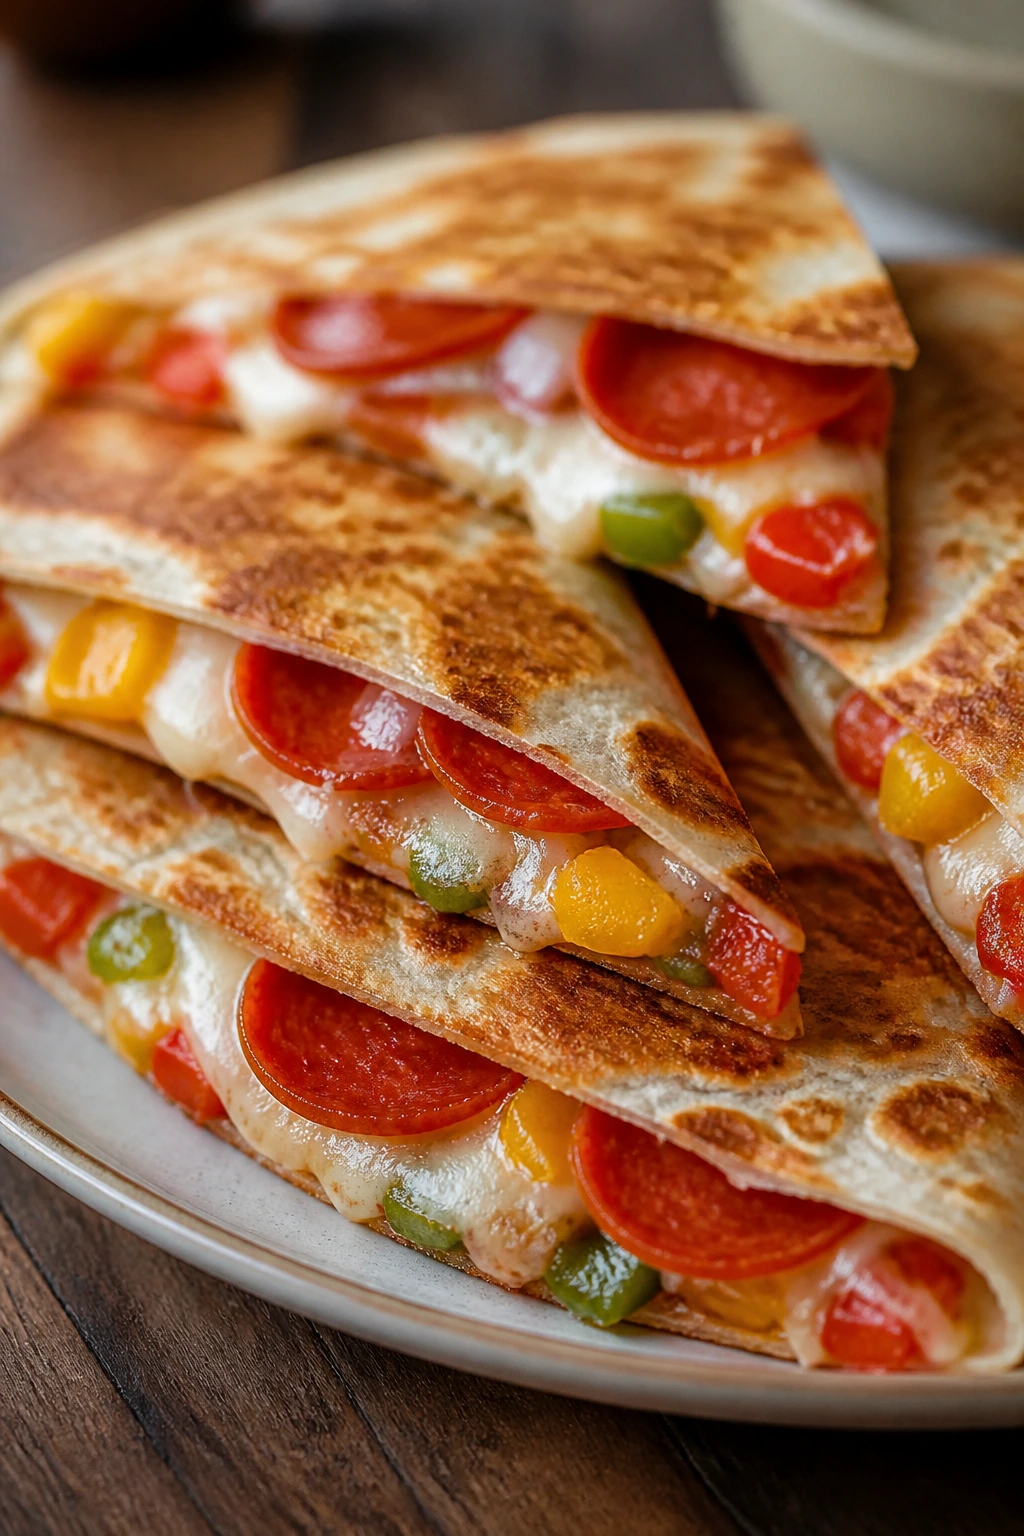
Pizza night in quesadilla form is shamelessly efficient. You get melted cheese, tomato sauce, and a crisp tortilla shell that cuts into wedges instead of dripping off a slice of bread.
Pepperoni works because it’s salty and familiar. Bell pepper works because it softens enough to disappear into the cheese.
Why It Works: The tortilla gets crisp before the filling turns watery, which is the whole battle with pizza-inspired food at home. The cheese anchors the sauce and keeps the quesadilla from falling apart. It’s also fast enough to make on a night when everyone is already circling the kitchen.
Key Ingredients:
- 8 small flour tortillas — easy to fold and crisp.
- 1 cup pizza sauce — don’t overdo it.
- 2 cups shredded mozzarella — the melt.
- 1 cup turkey pepperoni or diced ham — kid-friendly protein.
- 1/2 cup finely chopped bell pepper — optional but useful.
- 1 teaspoon Italian seasoning — adds pizza flavor.
- 2 tablespoons butter or olive oil — for the pan.
Quick Steps:
- Heat a skillet over medium heat and melt a little butter.
- Spread pizza sauce on half of each tortilla, then add cheese, pepperoni, bell pepper, and seasoning.
- Fold the tortillas over and cook 2 to 3 minutes per side until crisp and the cheese melts.
- Cut into wedges and serve while the cheese is still stretchy.
Equipment for This Recipe:
- Large skillet — for crisping.
- Spatula — for flipping cleanly.
- Sharp knife or pizza cutter — for cutting the wedges.
How to Serve This Dish: Serve with carrot sticks, cucumber slices, or a small bowl of extra pizza sauce for dipping. A simple green salad on the side keeps the plate from feeling too snacky.
Pro Tips for This Recipe:
- Use a light hand with sauce. Too much makes the tortilla soggy.
- Grate the cheese yourself if possible; it melts smoother.
- Press the quesadilla lightly with the spatula as it cooks so the filling settles.
Variations on This Dish:
- Margherita Quesadilla: Use mozzarella, tomato slices, and basil.
- Veggie Pizza: Skip the pepperoni and add mushrooms or spinach.
- Gluten-Free Swap: Use GF tortillas and watch the heat so they don’t crack.
Common Mistakes to Avoid with This Dish:
- Don’t cook over high heat. The tortilla browns too fast before the cheese melts.
- Don’t overfill. Pizza quesadillas need room to fold.
- Don’t cut immediately off the pan or the filling spills out.
12. Baked Ziti with Spinach
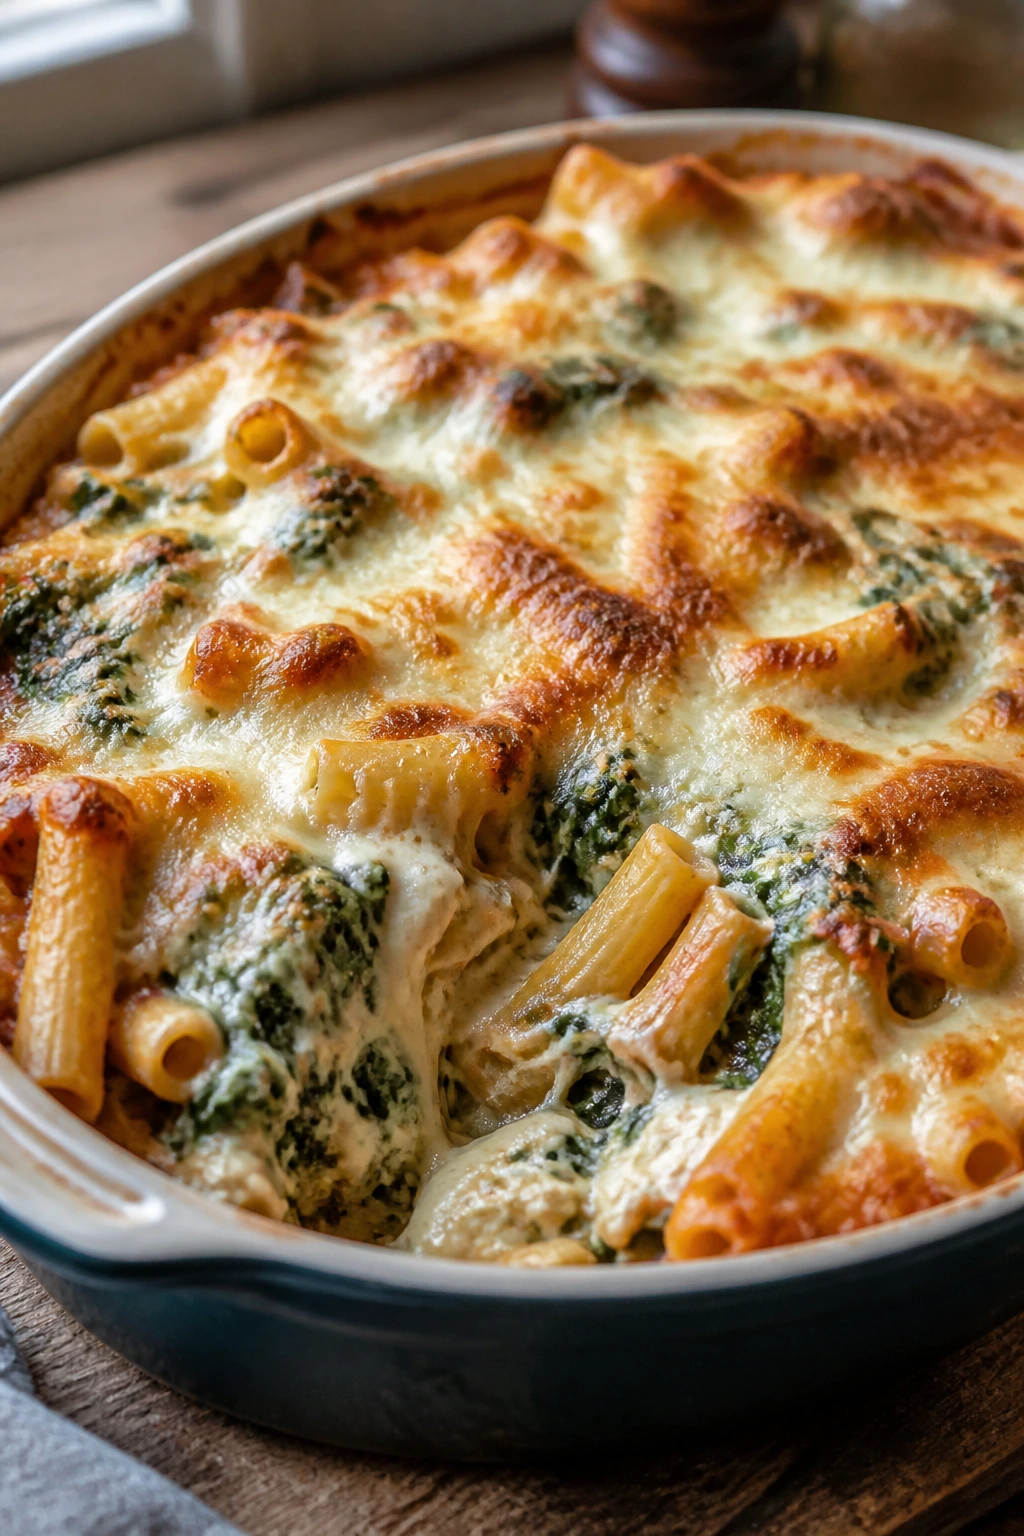
Baked ziti is one of those dinners that looks like you worked harder than you did. The spinach disappears into the sauce, the pasta catches the cheese, and the top gets those browned spots that people always fight over.
The trick is not overloading it. Keep the layers simple and let the cheese do its job.
Why It Works: Ricotta and mozzarella make the pasta creamy and stretchy, while spinach softens into the sauce without changing the flavor much. Baking the pasta instead of just tossing it in sauce gives you that hot, set texture that cuts neatly. It’s a solid leftover dish, too.
Key Ingredients:
- 12 oz ziti — the pasta shape matters here.
- 1 tablespoon olive oil — for the pan.
- 2 cloves garlic, minced — flavor.
- 24 oz marinara sauce — the tomato base.
- 3 cups baby spinach — wilts into the sauce.
- 1 cup ricotta and 1 egg — make the filling creamy.
- 2 cups shredded mozzarella and 1/2 cup Parmesan — the top and finish.
- 1 teaspoon salt and 1/2 teaspoon pepper — seasoning.
Quick Steps:
- Cook the ziti until just under al dente and drain.
- Stir the marinara, garlic, spinach, salt, and pepper together in a large bowl.
- Fold in the pasta, ricotta, and egg.
- Spread the mixture in a greased 9×13-inch dish and top with mozzarella and Parmesan.
- Bake at 375°F for 25 minutes until bubbling, then broil briefly if you want more browning.
Equipment for This Recipe:
- Large pot — for the pasta.
- Mixing bowl — for the filling.
- 9×13-inch baking dish — for the bake.
How to Serve This Dish: Cut it into squares and serve with a simple salad or roasted broccoli. Garlic bread works if you want, but the ziti already carries enough comfort on its own.
Pro Tips for This Recipe:
- Undercook the pasta a little; it finishes in the oven.
- Squeeze excess liquid from the spinach if it’s wet from rinsing.
- Let it rest 10 minutes before serving so the cheese settles.
Variations on This Dish:
- Sausage Ziti: Add browned Italian sausage for a meatier version.
- Veggie Bake: Stir in mushrooms or chopped zucchini with the spinach.
- Lighter Cheese Top: Use part-skim mozzarella if you want a less heavy finish.
Common Mistakes to Avoid with This Dish:
- Don’t overcook the pasta first. It turns soft after baking.
- Don’t use watery sauce. The bake needs enough thickness to hold.
- Don’t cut it straight from the oven. It needs a short rest.
13. Tomato Soup with Grilled Cheese Croutons
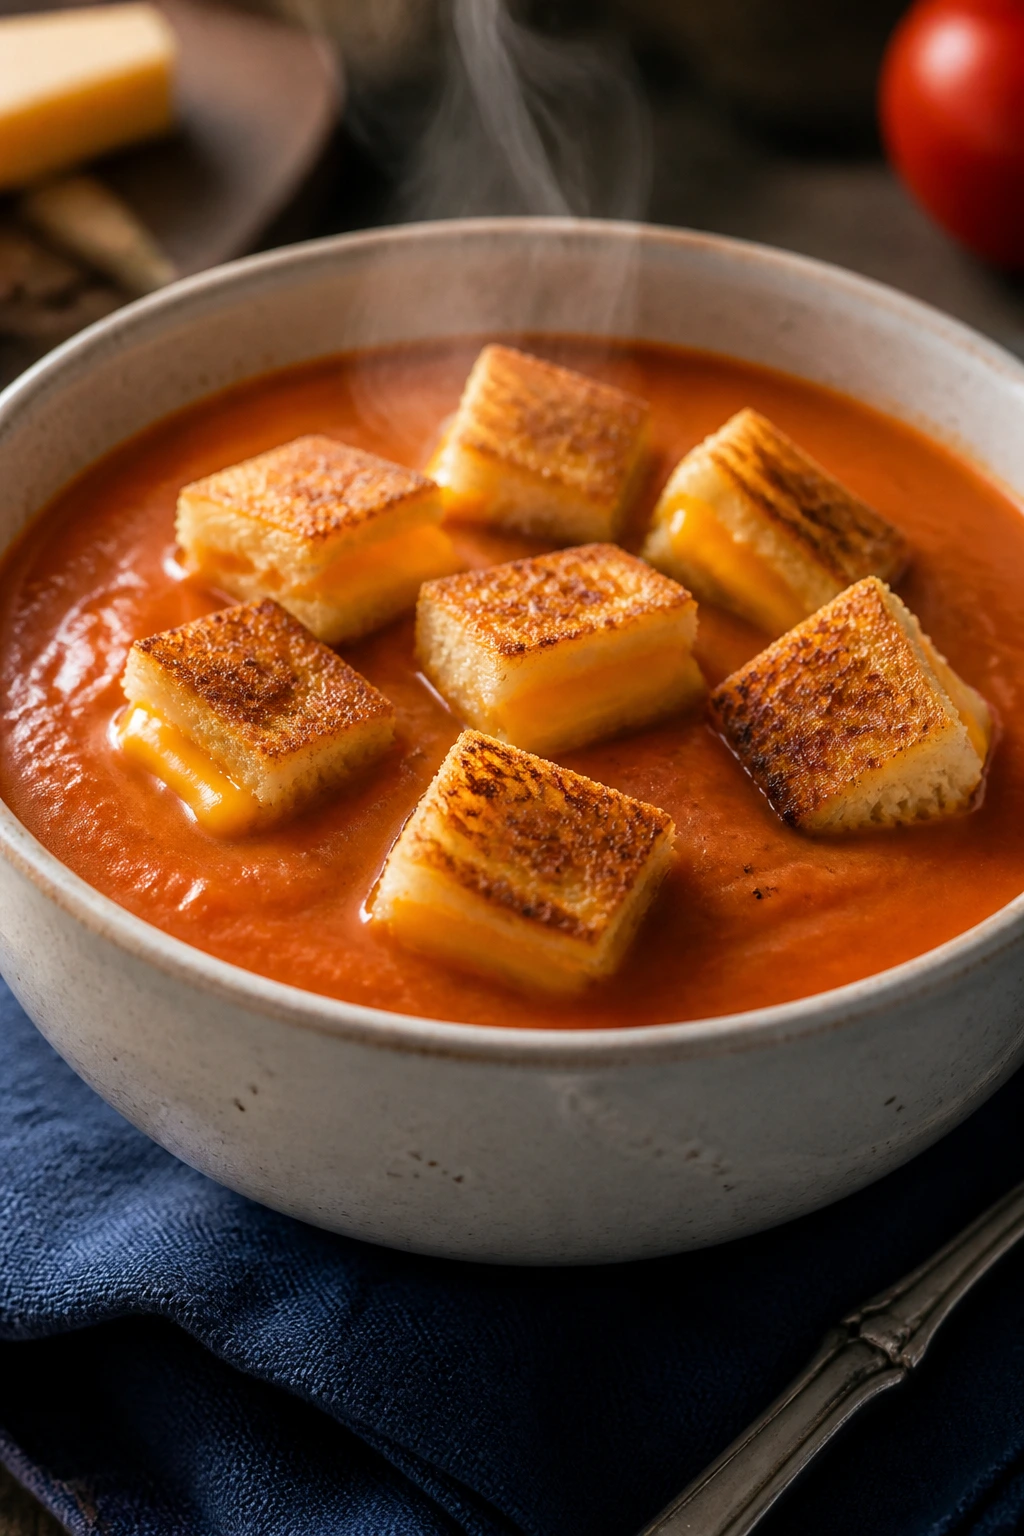
This is comfort food with a little bit of theater. Instead of dunking a sandwich, you cut the grilled cheese into cubes and float them on top like crunchy little islands.
The soup should be smooth, not sharp. A bit of cream at the end softens the tomato and keeps it kid-friendly.
Why It Works: Tomato soup and grilled cheese already make sense together, but turning the sandwich into croutons gives the texture more contrast. The soup’s acidity gets mellowed with a little milk or cream, and the buttered bread brings salt and crunch. It’s a warm, easy dinner when the fridge looks bare.
Key Ingredients:
- 2 tablespoons butter — for the soup base.
- 1 onion, chopped — sweetness after cooking.
- 2 tablespoons tomato paste — deepens the flavor.
- 28 oz crushed tomatoes and 2 cups chicken broth — the soup.
- 1 teaspoon sugar, 1/2 teaspoon salt, and 1/4 teaspoon pepper — to balance the tomatoes.
- 1/2 cup milk or cream — for a softer finish.
- 8 slices bread, 2 cups shredded cheddar, and 2 tablespoons butter — for the grilled cheese croutons.
Quick Steps:
- Melt the butter and cook the onion over medium heat until soft, about 6 minutes.
- Stir in the tomato paste, then add the tomatoes, broth, sugar, salt, and pepper. Simmer for 15 minutes.
- Blend if you want a smooth soup, then stir in the milk or cream.
- Make grilled cheese sandwiches with the bread, cheddar, and butter; cook until crisp and golden.
- Cut the sandwiches into bite-size cubes and float them on the soup.
Equipment for This Recipe:
- Soup pot — for the tomato base.
- Blender or immersion blender — optional, for a smoother texture.
- Skillet — for the grilled cheese.
- Sharp knife — for the croutons.
How to Serve This Dish: Pour the soup into bowls and let the grilled cheese cubes sit on top for a minute before eating. A few carrot sticks or apple slices on the side keep the meal from feeling one-note.
Pro Tips for This Recipe:
- Don’t skip the sugar if the tomatoes taste sharp.
- Blend carefully if the soup is hot; steam can make a mess.
- Use medium heat on the grilled cheese so the bread browns before the cheese leaks out.
Variations on This Dish:
- Herby Soup: Add a little dried basil or oregano.
- Cheddar-Mozzarella Croutons: Mix the cheeses for a stretchier bite.
- Dairy-Light Version: Use olive oil instead of butter and skip the cream.
Common Mistakes to Avoid with This Dish:
- Don’t boil the soup hard after adding cream. It can split.
- Don’t burn the bread. Soft, pale centers with a crisp crust are the goal.
- Don’t leave the croutons in the soup too long before serving or they go soggy.
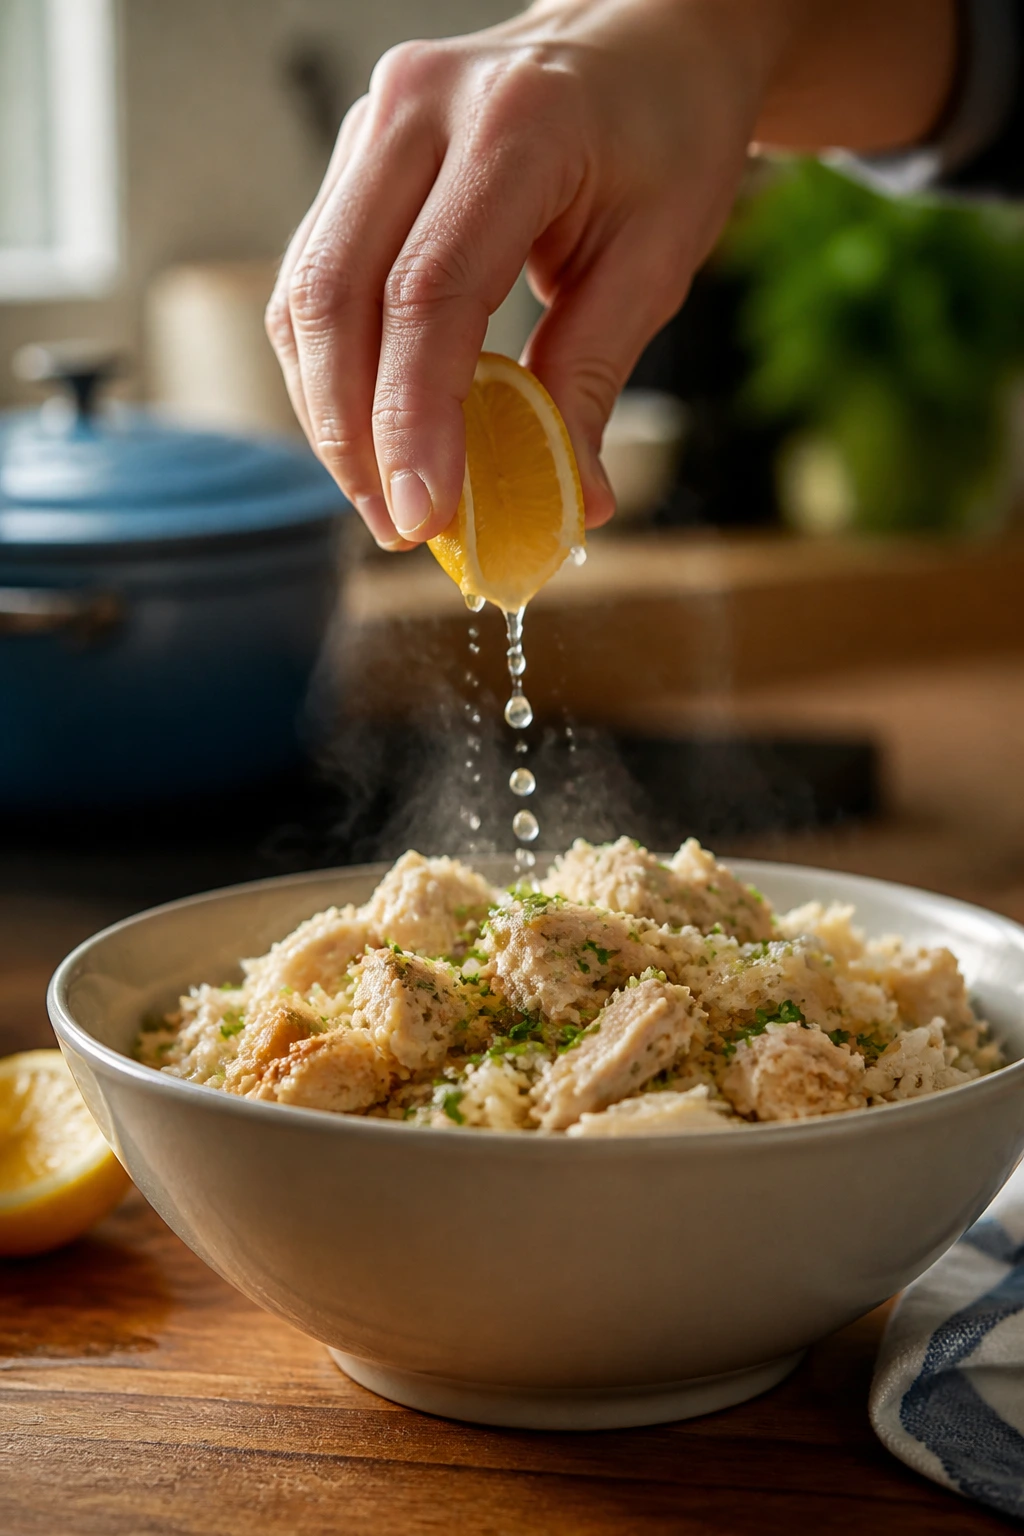
14. Salmon Cakes with Dill Yogurt Sauce
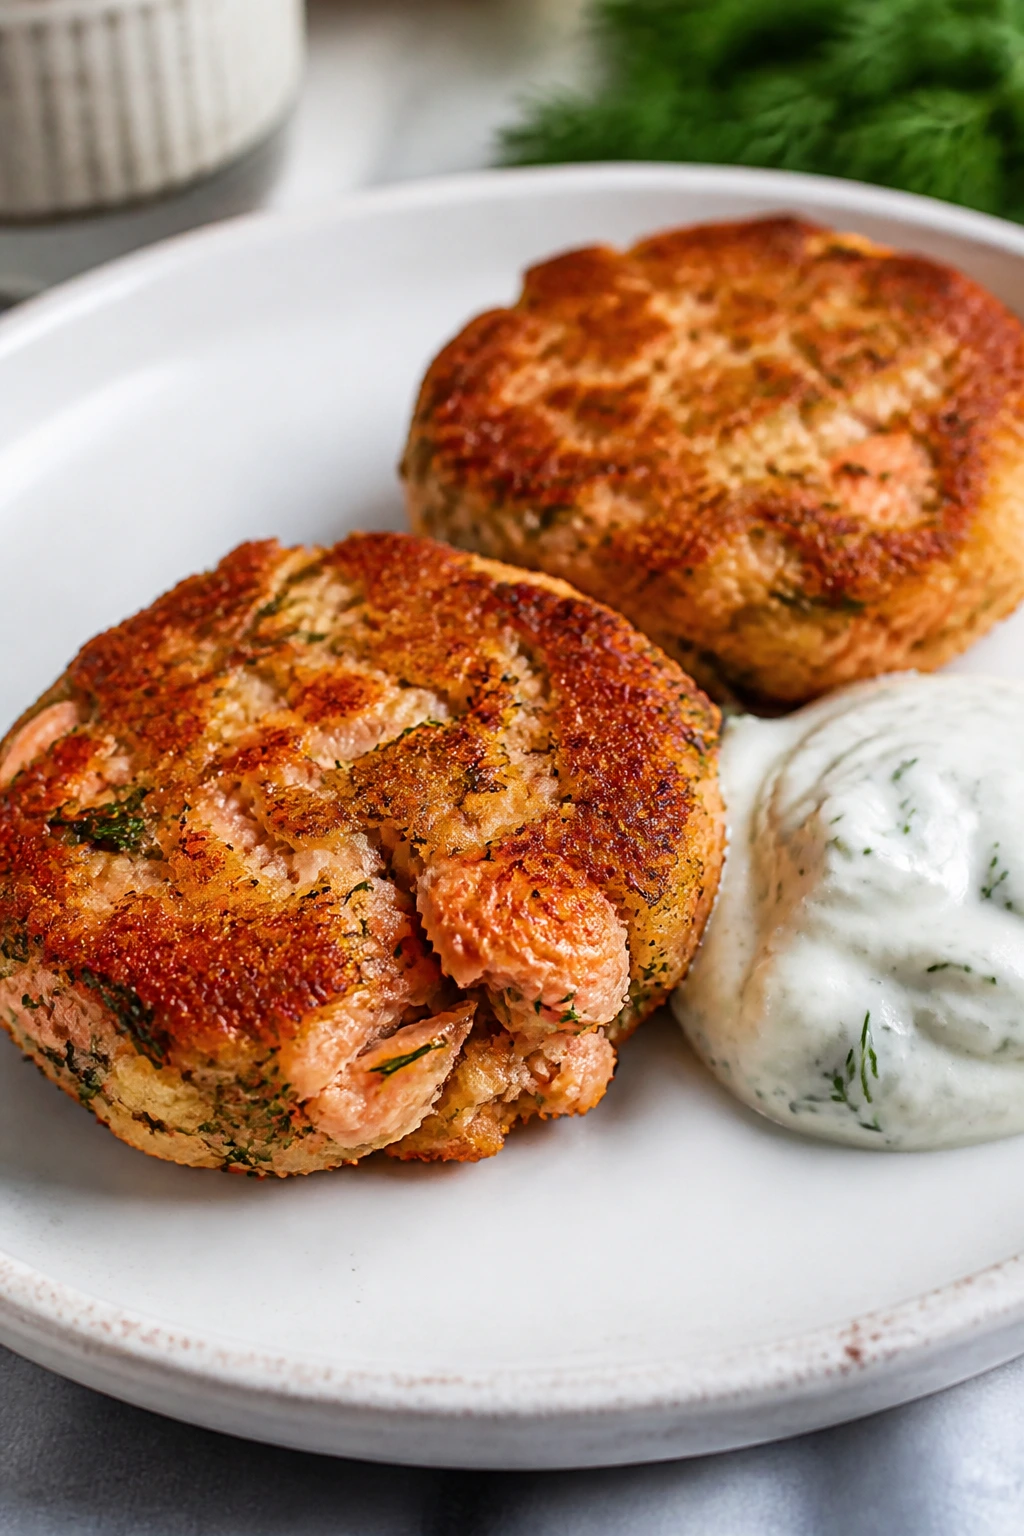
Salmon cakes are a smart way to serve fish without the full fish-fillets-on-a-plate drama. They’re crisp outside, soft inside, and easy to eat with a fork or even fingers if you’re keeping things casual.
The yogurt sauce cools the flavor down and gives the cakes a clean finish. That helps with kids who are suspicious of anything that tastes “fishy.”
Why It Works: Canned salmon is sturdy, affordable, and already cooked, which makes the cakes fast. The panko keeps the cakes light, while the egg and mayo hold the mixture together. Pan-frying gives you the browned edges people tend to trust more than pale baked fish.
Key Ingredients:
- 2 cans salmon, drained and flaked, about 14 to 15 oz total — remove big bones if you want a smoother texture.
- 1 cup panko breadcrumbs — light binder.
- 1 egg and 2 tablespoons mayonnaise — keep the cakes moist.
- 2 tablespoons minced onion — mild flavor.
- 1 tablespoon lemon juice and 1 teaspoon Dijon — brightness.
- 1/2 teaspoon salt — seasoning.
- 2 tablespoons oil — for the skillet.
- 1/2 cup Greek yogurt, 1 tablespoon chopped dill, 1 teaspoon lemon juice, and a pinch of salt — the sauce.
Quick Steps:
- Mix the salmon, panko, egg, mayo, onion, lemon juice, Dijon, and salt.
- Shape into 6 small cakes and chill for 10 minutes if the mixture feels soft.
- Whisk the yogurt sauce ingredients together.
- Heat the oil in a skillet over medium heat and cook the cakes for 3 to 4 minutes per side until browned.
- Serve with the dill yogurt sauce.
Equipment for This Recipe:
- Mixing bowl — for the cakes.
- Skillet — for frying.
- Spatula — for flipping.
- Small bowl — for the sauce.
How to Serve This Dish: Serve the cakes with peas, roasted potatoes, or a simple cucumber salad. A lemon wedge on the side is useful even if only half the table uses it.
Pro Tips for This Recipe:
- Chill soft cakes before cooking so they don’t fall apart.
- Use a medium pan, not a screaming-hot one, or the outside browns too fast.
- Drain the salmon well so the cakes don’t get wet and loose.
Variations on This Dish:
- Herb Swap: Use parsley instead of dill if that’s what you have.
- Panko-Crusted Bake: Bake at 400°F for 15 minutes if you want less frying.
- Tuna Version: Replace the salmon with tuna for a milder fish cake.
Common Mistakes to Avoid with This Dish:
- Don’t make the cakes huge. Small cakes hold together better.
- Don’t overmix the salmon or it turns paste-like.
- Don’t crowd the skillet. They need room to brown.
15. Chicken Fried Rice
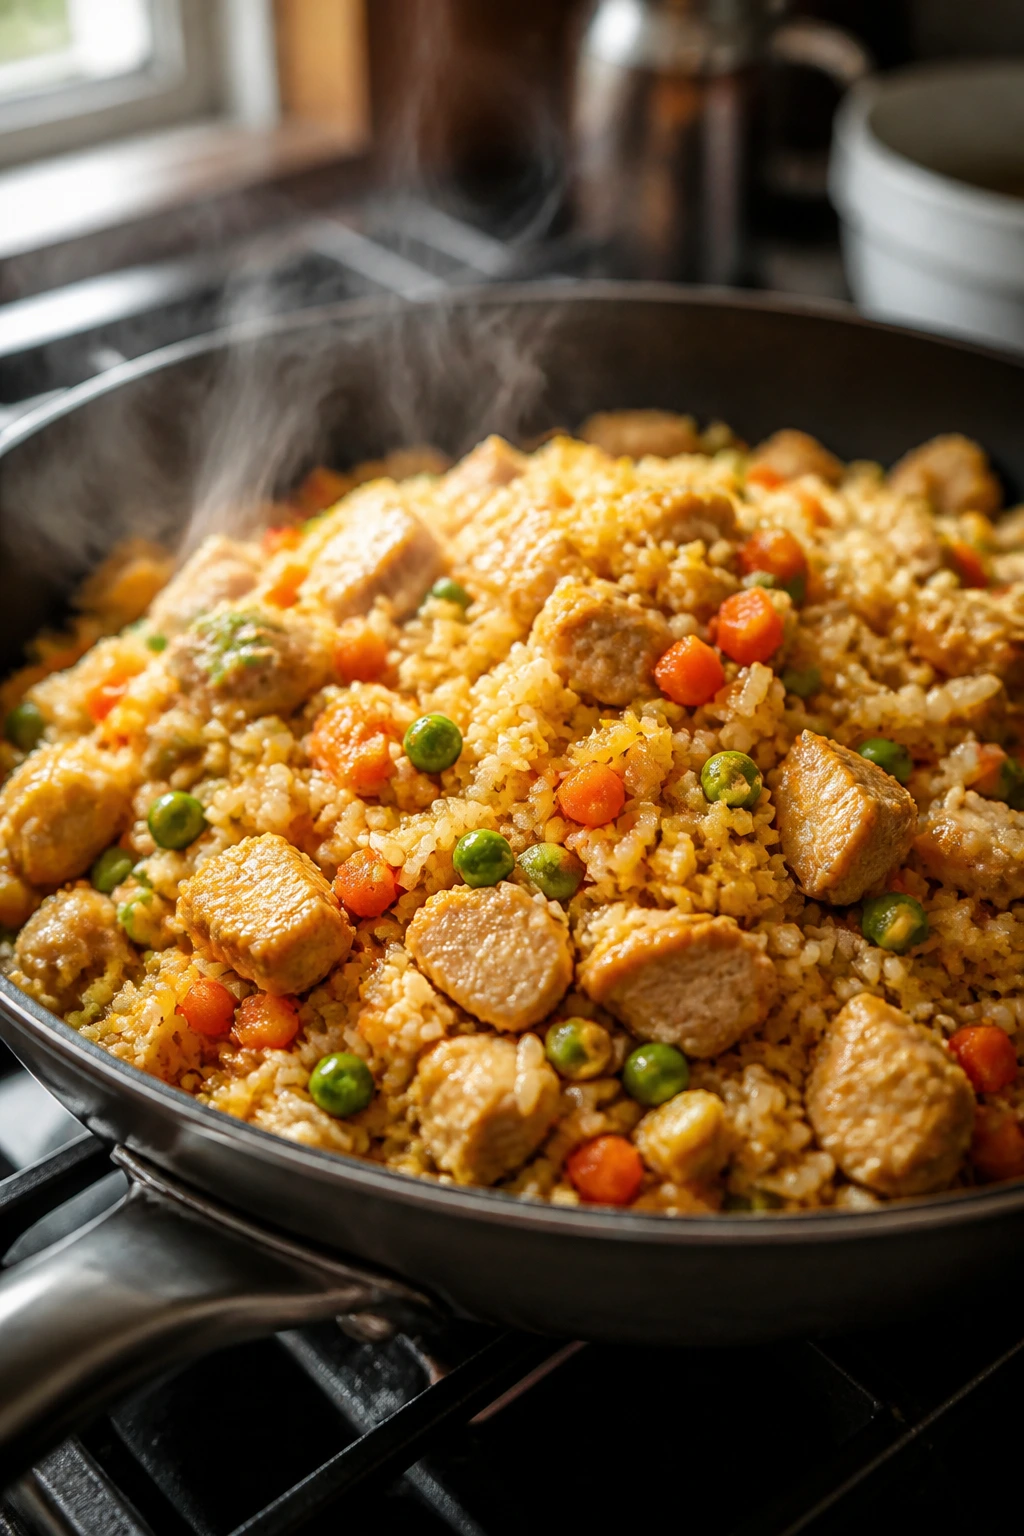
Chicken fried rice is the clean-out-the-fridge dinner that still feels planned. The rice has to be cold, the chicken bite-size, and the pan hot enough to keep everything from steaming into mush.
A little sesame oil at the end does a lot. A little more than that and the whole thing tastes heavy, so keep your hand light.
Why It Works: Cold rice fries better because the grains stay separate. Eggs, peas, carrots, and chicken give you a full meal in one pan, and soy sauce plus sesame oil adds enough flavor without making it salty if you measure carefully. It’s a practical weeknight dish, plain and simple.
Key Ingredients:
- 3 cups cold cooked rice — day-old rice works best.
- 1 lb chicken breast, diced — bite-size pieces cook fast.
- 2 tablespoons neutral oil — for high-heat cooking.
- 2 eggs, beaten — adds richness.
- 1 cup frozen peas and carrots — easy vegetable mix.
- 3 tablespoons low-sodium soy sauce — seasoning.
- 1 teaspoon sesame oil — finish.
- 2 cloves garlic and 2 sliced green onions — the aromatics.
Quick Steps:
- Heat one tablespoon of oil in a large skillet or wok and cook the chicken until browned and cooked through.
- Push the chicken aside, add the remaining oil, and scramble the eggs.
- Add the garlic, peas, and carrots and cook for 2 minutes.
- Stir in the rice and soy sauce, breaking up clumps as the rice heats through.
- Finish with sesame oil and green onions.
Equipment for This Recipe:
- Large skillet or wok — room matters here.
- Spatula — for constant stirring.
- Bowl for the beaten eggs — keep the egg step ready.
How to Serve This Dish: Serve it straight from the pan in bowls, with extra green onions or a few cucumber slices if you want something fresh. It’s already a full meal, so don’t overcomplicate the plate.
Pro Tips for This Recipe:
- Use cold rice, not fresh. Fresh rice goes sticky.
- Cook the chicken first and pull it to the side if it browns too fast.
- Keep the heat up so the rice fries instead of steaming.
Variations on This Dish:
- Turkey Fried Rice: Swap in diced turkey or leftover roast chicken.
- Egg-Heavy Version: Add one extra egg for a softer, richer dish.
- Veggie Boost: Toss in chopped spinach or edamame at the end.
Common Mistakes to Avoid with This Dish:
- Don’t use wet rice. It clumps and turns gummy.
- Don’t add too much soy sauce at once. You can always add more.
- Don’t let the pan cool down. Fried rice needs heat.
16. Turkey Sloppy Joe Sliders
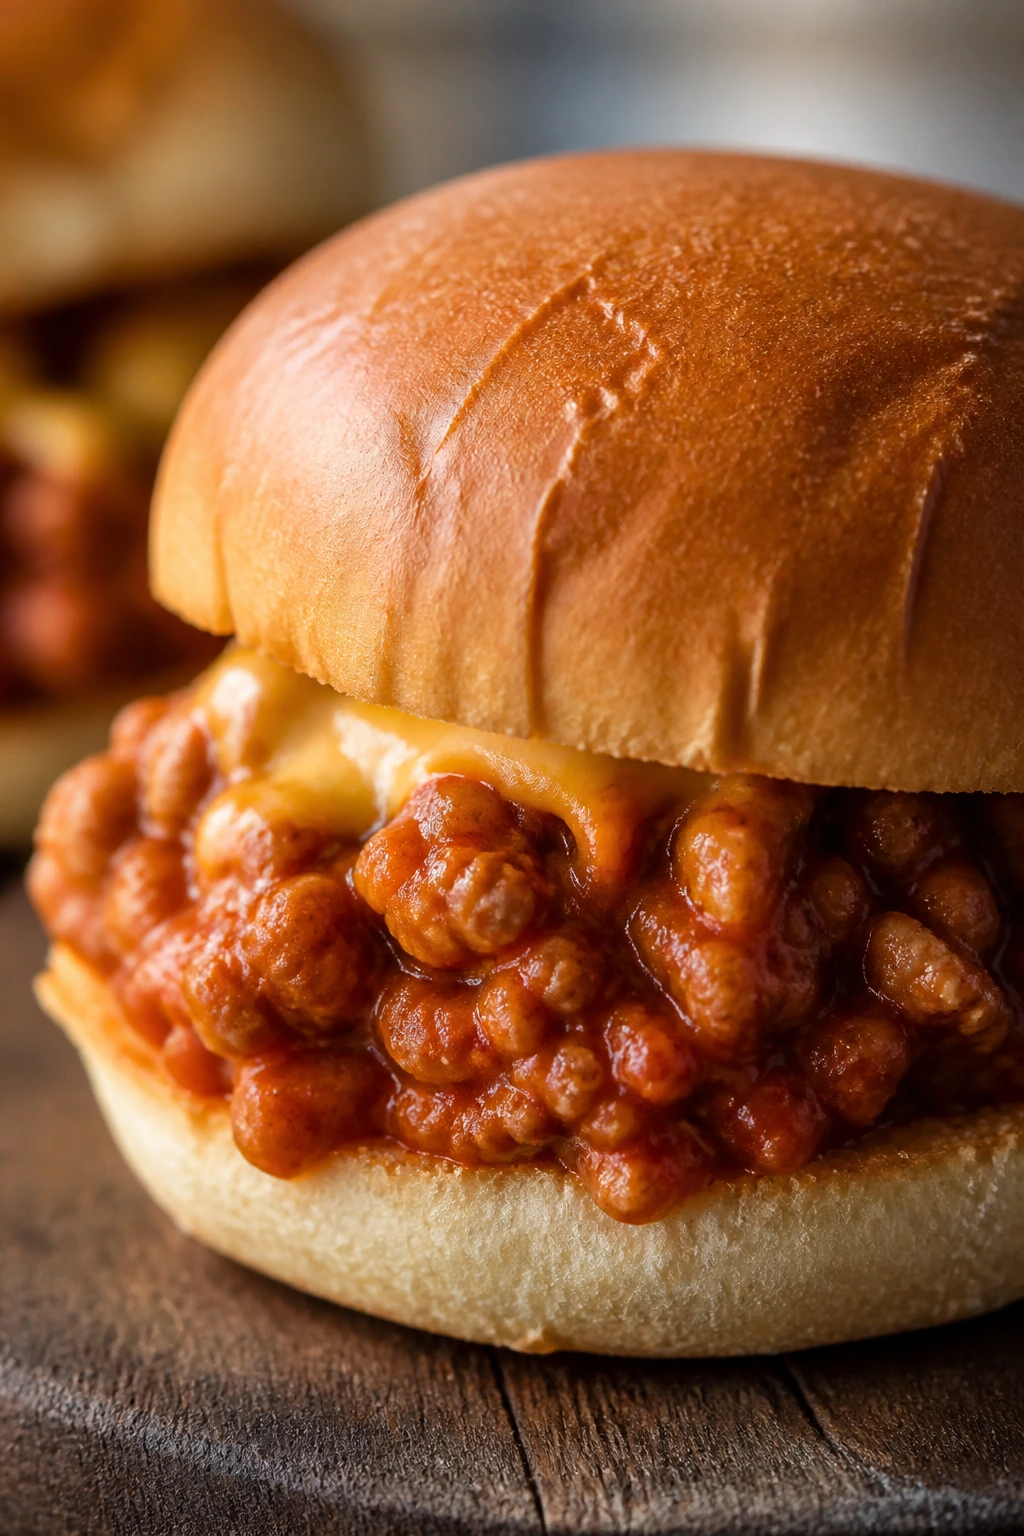
Sloppy Joes are messy by design, which is part of their charm. The turkey version stays a little lighter, but the sauce still clings to the meat and soaks into the bun just enough to matter.
Slider buns help here. They make the meal feel smaller and less intimidating.
Why It Works: The sauce is sweet, tangy, and thick enough to stay put on the bun. Sliders are easier for small hands than full-size sandwiches, and you can make a tray of them without much extra effort. It’s a smart way to turn ground turkey into something that doesn’t feel lean or dull.
Key Ingredients:
- 1 lb ground turkey — the base.
- 1 small onion, finely diced — softens into the sauce.
- 1 cup tomato sauce — keeps the filling moist.
- 2 tablespoons ketchup, 1 tablespoon brown sugar, 1 tablespoon Worcestershire, and 1 teaspoon mustard — the sloppy joe flavor.
- 1/2 teaspoon salt — seasoning.
- 8 slider buns — the bread.
- 4 slices cheddar, optional — for extra richness.
Quick Steps:
- Brown the turkey and onion in a skillet over medium heat.
- Stir in the tomato sauce, ketchup, brown sugar, Worcestershire, mustard, and salt.
- Simmer for 8 to 10 minutes until the sauce thickens and coats the meat.
- Spoon the filling onto the slider buns and top with cheddar if using.
- Serve warm.
Equipment for This Recipe:
- Skillet — for the filling.
- Wooden spoon — for breaking up the turkey.
- Baking sheet — useful if you want to warm the assembled sliders.
How to Serve This Dish: Serve the sliders with carrot sticks, celery sticks, or a bowl of grapes. A little potato salad works too if you want a fuller meal.
Pro Tips for This Recipe:
- Chop the onion small so it melts into the sauce.
- If the filling looks thin, simmer a few minutes longer.
- Toast the buns lightly so they don’t go soft too fast.
Variations on This Dish:
- Cheesy Melt Slider: Add cheese and warm the sliders in the oven for 5 minutes.
- Bean Stretch: Stir in 1/2 cup mashed beans to extend the filling.
- BBQ Sloppy Joes: Replace half the ketchup with barbecue sauce.
Common Mistakes to Avoid with This Dish:
- Don’t make the sauce too runny. It will soak the buns in a bad way.
- Don’t skip the simmer. The flavors need time to marry.
- Don’t serve cold buns unless you enjoy cardboard.
17. Sheet Pan Pancakes with Berries

Breakfast for dinner has a way of making kids smile before the plate lands. Sheet pan pancakes make that even easier because you don’t stand over a skillet flipping one little cake after another.
The berries bake right into the batter and pop sweet and tart against the soft crumb. That’s a nice change from syrup alone.
Why It Works: A sheet pan bakes the batter evenly and gives you neat squares instead of a stack that cools while you cook the rest. Buttermilk keeps the pancakes tender, and the berries add enough brightness that the whole thing doesn’t taste flat. It’s low-stress and easy to portion.
Key Ingredients:
- 2 cups all-purpose flour — the base.
- 2 tablespoons sugar, 2 teaspoons baking powder, 1/2 teaspoon baking soda, and 1/2 teaspoon salt — the lift.
- 2 cups buttermilk — moisture and tang.
- 2 eggs and 4 tablespoons melted butter — richness.
- 1 teaspoon vanilla — for warmth.
- 1 cup berries — fresh or frozen.
- Maple syrup or yogurt for serving — optional.
Quick Steps:
- Heat the oven to 425°F and grease a rimmed sheet pan well.
- Whisk the flour, sugar, baking powder, baking soda, and salt in a bowl.
- Whisk the buttermilk, eggs, melted butter, and vanilla in another bowl, then stir into the dry ingredients just until combined.
- Spread the batter into the pan and scatter the berries on top.
- Bake for 15 to 18 minutes until golden and springy in the center.
- Cut into squares and serve warm.
Equipment for This Recipe:
- Rimmed sheet pan — the whole trick.
- Whisk — for a smooth batter.
- Parchment or grease — helps with easy lifting.
How to Serve This Dish: Cut into squares and serve with yogurt, maple syrup, or nut butter. A side of scrambled eggs makes it feel like dinner instead of dessert wearing a disguise.
Pro Tips for This Recipe:
- Don’t overmix the batter. A few small lumps are fine.
- Frozen berries work well, but don’t thaw them first or they bleed everywhere.
- Grease the pan generously, especially in the corners.
Variations on This Dish:
- Banana Chip Version: Add sliced bananas and mini chocolate chips.
- Whole-Wheat Swap: Replace half the flour with whole-wheat flour.
- Savory Turn: Skip the berries and bake with chopped ham and cheese.
Common Mistakes to Avoid with This Dish:
- Don’t pour batter into an ungreased pan. Sheet pancakes stick hard.
- Don’t overbake. They dry out fast.
- Don’t slice them while scorching hot or the squares tear.
18. Creamy Chicken and Broccoli Orzo
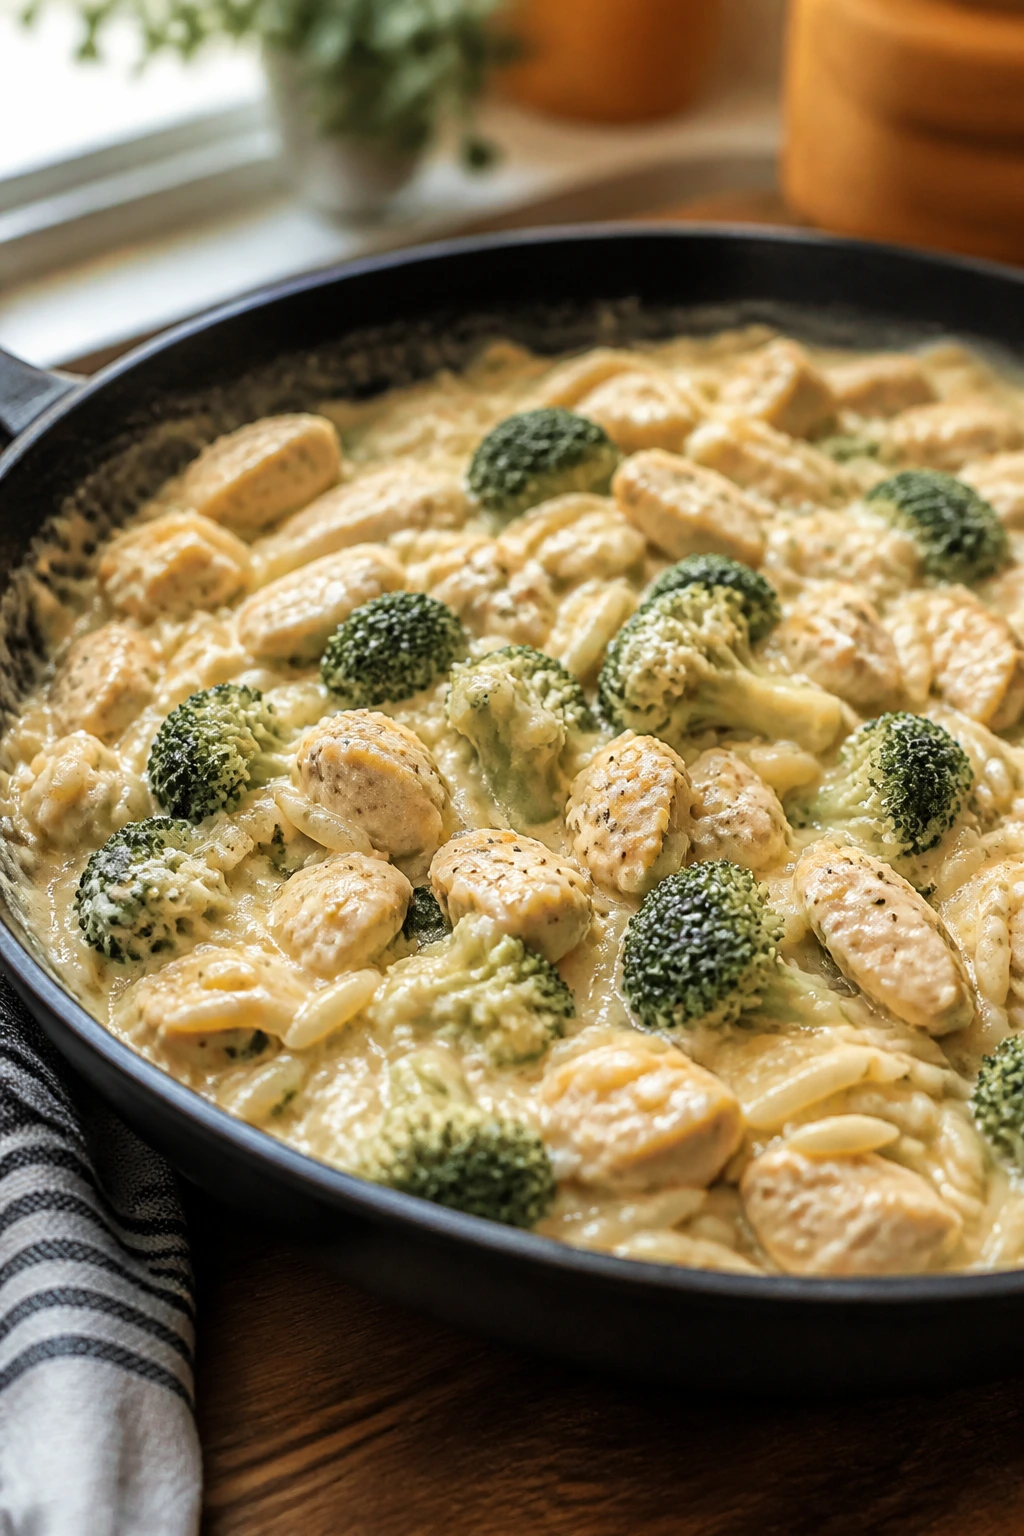
Orzo is a good shape for kids who are suspicious of big pasta shapes. It cooks fast, it feels cozy in a spoon, and it makes broccoli less threatening because everything lands in the same bite.
This is a one-pan dinner with a soft edge. The Parmesan and milk turn it into something creamy without making it heavy.
Why It Works: Orzo releases a little starch as it cooks, which thickens the pan sauce naturally. Chicken gives the dish substance, and broccoli cooks right in the same pan so it absorbs some of the broth and cheese. That makes the whole thing taste like a completed meal, not a starch with vegetables thrown on top.
Key Ingredients:
- 1 lb chicken breast, cut into bite-size pieces — cooks fast.
- 1 tablespoon olive oil — for browning.
- 1 small onion, diced, and 2 cloves garlic, minced — the flavor base.
- 1 cup orzo — the pasta.
- 3 cups chicken broth — cooking liquid.
- 2 cups small broccoli florets — cut small for quicker cooking.
- 1/2 cup milk and 1/2 cup Parmesan — the creamy finish.
- 1 teaspoon salt and 1/2 teaspoon pepper — seasoning.
Quick Steps:
- Brown the chicken in olive oil in a deep skillet, then move it to one side or a plate.
- Cook the onion and garlic in the same pan for 2 minutes.
- Stir in the orzo and broth, then simmer for 8 minutes.
- Add the broccoli and chicken back in and cook 4 to 5 minutes more until the orzo is tender and the broccoli is bright green.
- Stir in the milk and Parmesan, then season to taste.
Equipment for This Recipe:
- Deep skillet or sauté pan — enough depth for the orzo.
- Wooden spoon — for scraping up flavor.
- Lid — helps the orzo cook evenly.
How to Serve This Dish: Serve it in bowls while it’s still glossy, with extra Parmesan on top if needed. A side of sliced tomatoes or a small apple salad brings a little crisp contrast to the creamy texture.
Pro Tips for This Recipe:
- Keep the broccoli pieces small so they cook through at the same pace as the orzo.
- Stir the pan a few times so the orzo doesn’t stick.
- Add a splash of broth if the pan gets dry before the pasta finishes.
Variations on This Dish:
- Lemon Orzo: Stir in 1 tablespoon lemon juice at the end.
- Turkey Version: Use diced turkey or leftover chicken.
- Pea Swap: Replace broccoli with peas for a softer vegetable bite.
Common Mistakes to Avoid with This Dish:
- Don’t add too much liquid at once. Orzo should be creamy, not soupy.
- Don’t overcook the broccoli or it turns drab.
- Don’t walk away from the pan. Orzo likes to stick on the bottom.
19. Beef and Bean Burrito Skillet
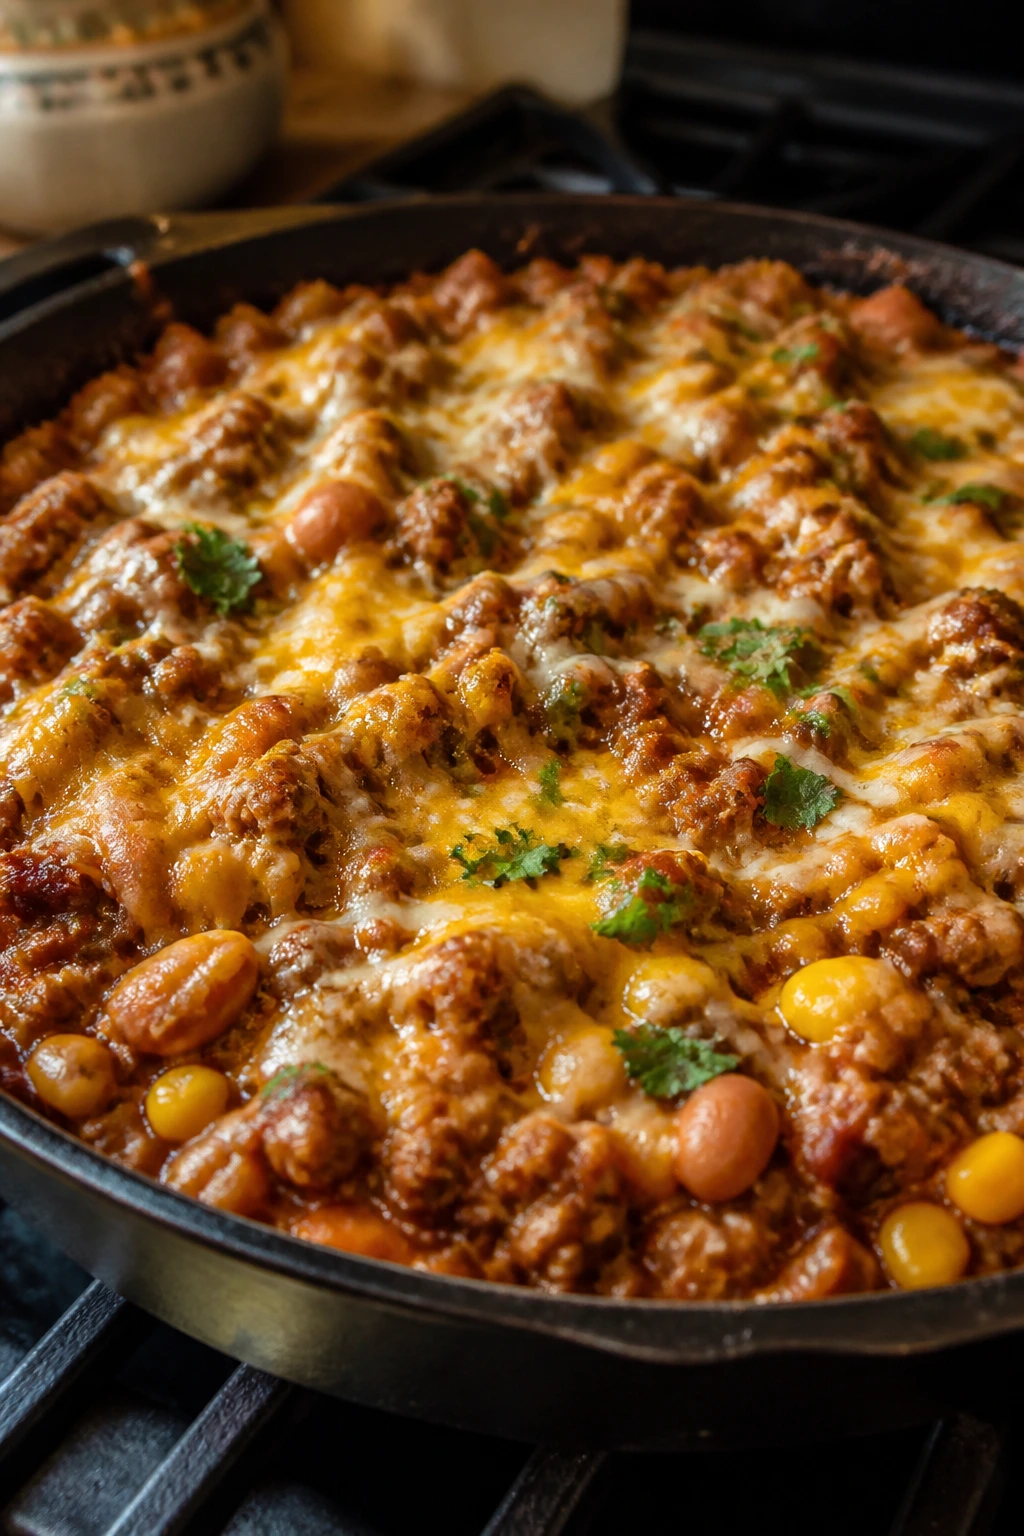
This is the burrito you don’t have to roll. Everything lands in one pan, the cheese melts across the top, and kids can scoop it into tortillas, bowls, or even straight from the skillet if nobody is watching.
Beans stretch the meat in a way that feels practical, not stingy. That matters on busy nights.
Why It Works: Ground beef brings the savory part, beans bring softness and bulk, and salsa keeps the filling moist. A burrito skillet also gives everyone the chance to customize at the table, which helps with picky eaters who dislike “mixed” food but still want the components nearby.
Key Ingredients:
- 1 lb ground beef or turkey — the main filling.
- 1 small onion, diced — flavor and texture.
- 1 tablespoon mild taco seasoning — enough seasoning without heat.
- 1 can pinto beans, rinsed and drained — makes the skillet heartier.
- 1 cup salsa — moisture and flavor.
- 1 cup cooked rice — helps the filling feel complete.
- 1 cup corn — sweet pops.
- 1 cup shredded cheese — the top.
- Tortillas for serving — optional but useful.
Quick Steps:
- Brown the meat and onion in a large skillet.
- Stir in the taco seasoning, beans, salsa, rice, and corn.
- Cook for 3 to 4 minutes until everything is hot and thickened.
- Sprinkle the cheese over the top and cover until melted.
- Serve with tortillas, bowls, or chips.
Equipment for This Recipe:
- Large skillet — the whole meal lives here.
- Spoon or spatula — for stirring and serving.
- Lid — for melting the cheese.
How to Serve This Dish: Set the skillet in the middle of the table with warm tortillas, shredded lettuce, and a little sour cream. It’s also good with avocado slices or chopped tomatoes if you want the bowl to look brighter.
Pro Tips for This Recipe:
- Drain the beans well so the skillet doesn’t turn watery.
- Warm the tortillas for 15 seconds so they fold without cracking.
- If the salsa is chunky and watery, simmer a minute longer before adding the cheese.
Variations on This Dish:
- Chicken Burrito Skillet: Swap in shredded chicken and keep the same seasonings.
- Veggie Skillet: Use extra beans and mushrooms instead of meat.
- Cauliflower Rice Version: Replace the rice with cauliflower rice and cook it briefly so it stays firm.
Common Mistakes to Avoid with This Dish:
- Don’t leave the beans undrained. Extra liquid waters the filling down.
- Don’t over-salt before the cheese goes in. Cheese adds plenty.
- Don’t skip the cheese melt under a lid. It makes the skillet feel finished.
20. Buttered Noodles with Peas and Chicken
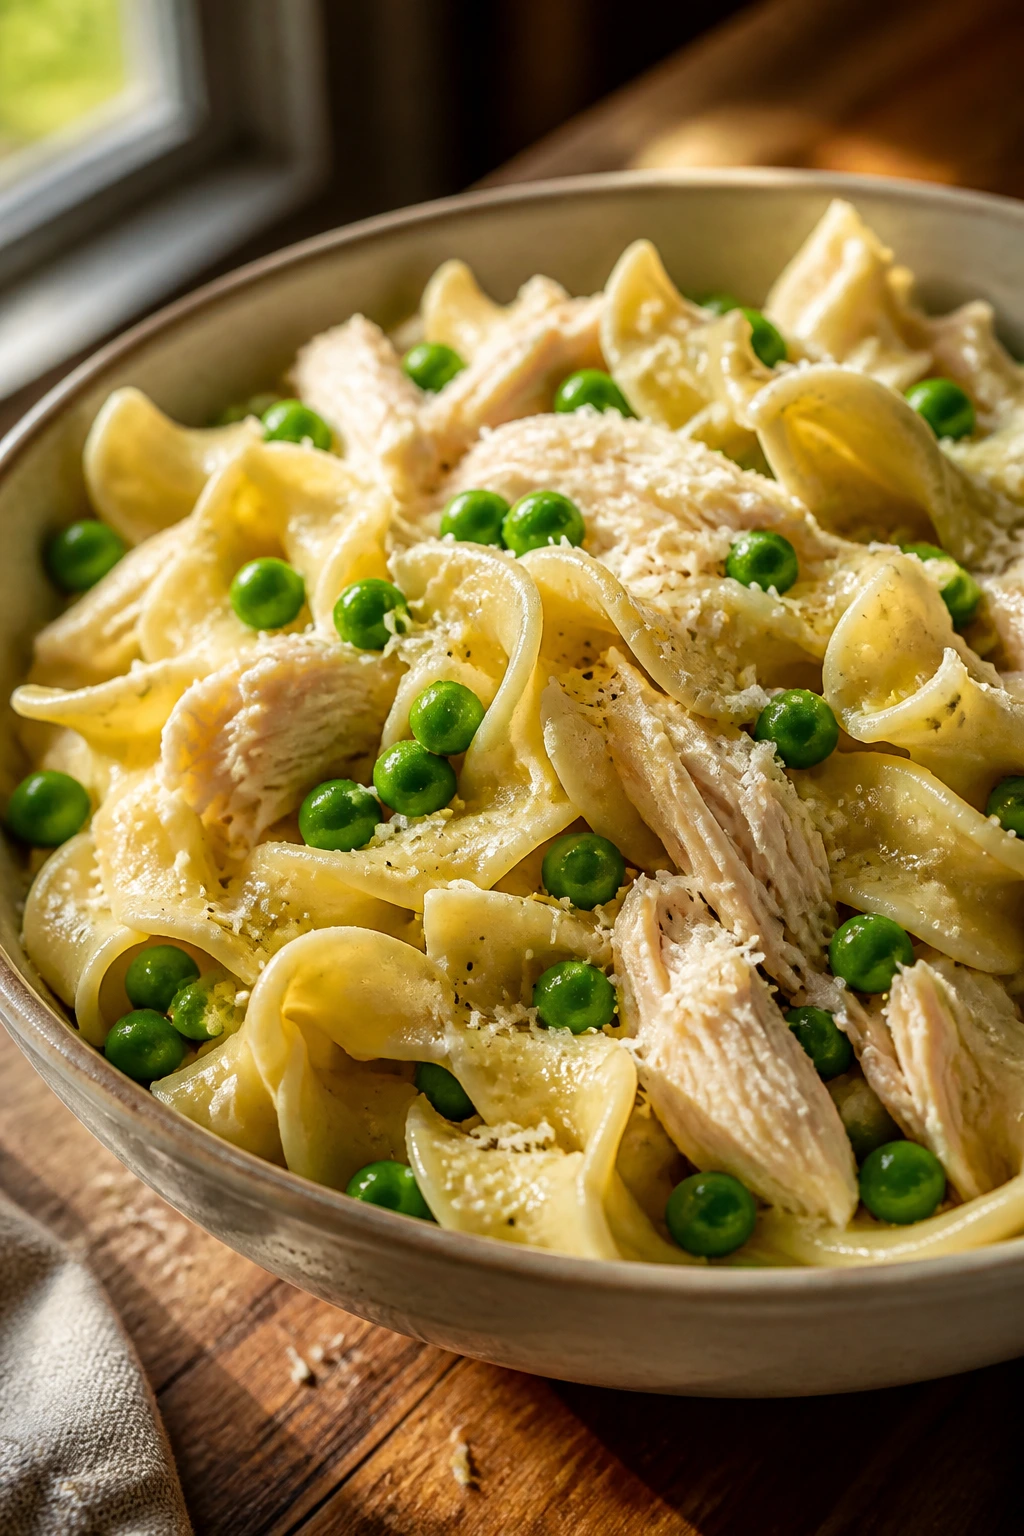
This is the very definition of a quiet win. Buttered noodles are gentle, peas add a little color, and rotisserie chicken turns it into dinner without making you cook a whole new protein.
It’s not flashy. That’s why it works.
Why It Works: Egg noodles hold butter well and stay soft enough for younger eaters. The peas bring sweetness, and the chicken gives the bowl enough substance to count as a meal. A little Parmesan at the end sharpens the flavor without pushing the dish out of kid territory.
Key Ingredients:
- 12 oz egg noodles — fast-cooking and soft.
- 3 tablespoons butter — the main sauce.
- 2 cups shredded rotisserie chicken — easy protein.
- 1 cup frozen peas — quick vegetable.
- 1/2 cup Parmesan — gives the dish more flavor.
- 1/2 cup reserved pasta water — loosens the sauce.
- 1 teaspoon lemon juice — optional but useful.
- 1/2 teaspoon salt and black pepper — to taste.
Quick Steps:
- Cook the noodles in salted water until just tender and reserve 1/2 cup pasta water.
- Add the peas during the last minute of cooking, then drain.
- Return the noodles and peas to the pot and stir in the butter until melted.
- Add the chicken, Parmesan, and a splash of pasta water.
- Season with salt, pepper, and lemon juice if using.
Equipment for This Recipe:
- Large pot — for the noodles.
- Colander — for draining.
- Wooden spoon — for tossing everything together.
How to Serve This Dish: Serve in shallow bowls with extra Parmesan on top. If you want a side, keep it simple: sliced cucumbers, apple wedges, or steamed carrots all fit.
Pro Tips for This Recipe:
- Use the pasta water. It helps the butter and cheese coat the noodles.
- Add the peas near the end so they stay bright.
- If the chicken is cold from the fridge, warm it in the hot noodles before serving.
Variations on This Dish:
- Garlic Butter Version: Add 1 clove minced garlic to the butter.
- Broccoli Swap: Use small broccoli florets instead of peas.
- Herbed Finish: Sprinkle in parsley or dill for a fresher edge.
Common Mistakes to Avoid with This Dish:
- Don’t overcook the noodles. They soften more once they hit the butter.
- Don’t skip seasoning because the recipe looks plain. Salt matters here.
- Don’t use too little butter or the noodles turn dry and sticky.
21. Sausage, Apple, and Sweet Potato Skillet
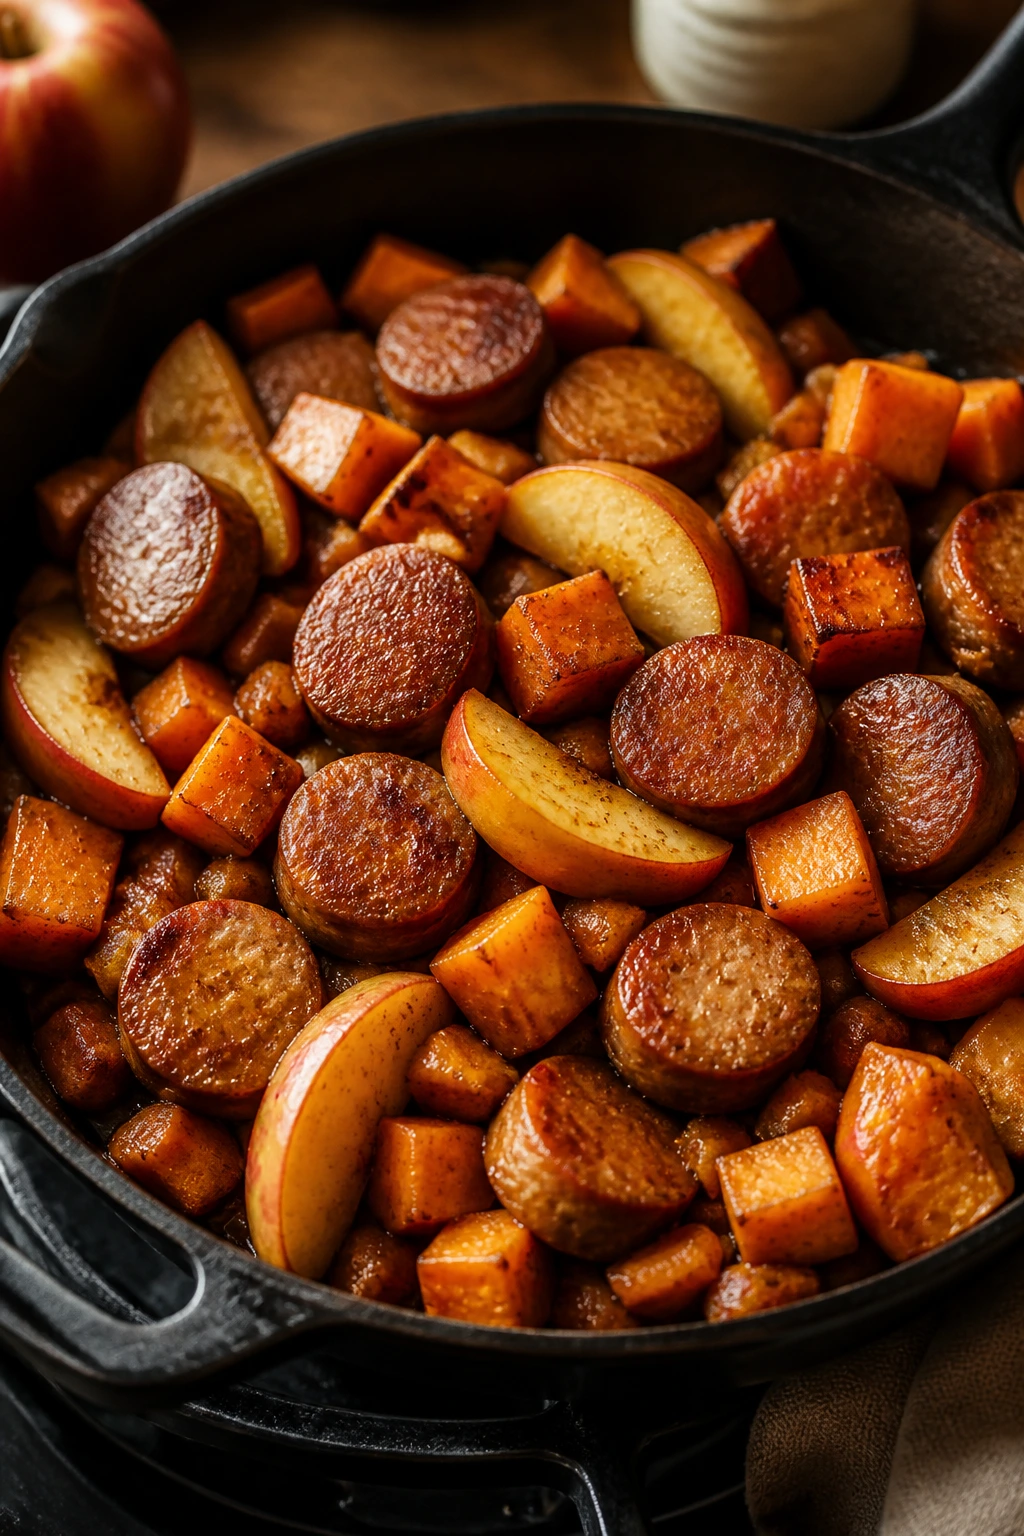
This is the skillet meal that tastes a little sweet, a little savory, and very much like fall without needing a calendar reference. The apples soften into the sausage drippings, and the sweet potatoes keep the dish grounded.
It’s a nice one for nights when everyone wants something warm but not heavy.
Why It Works: Sweet potatoes and apples both soften at about the same pace if you cut them evenly. Chicken or turkey sausage adds salt and seasoning, so the pan doesn’t need much else. That balance keeps the dish friendly without tasting bland.
Key Ingredients:
- 1 lb chicken or turkey sausage, sliced — pre-cooked sausage keeps the cook time short.
- 2 medium sweet potatoes, peeled and diced — cut into 1/2-inch pieces.
- 2 apples, cored and sliced — choose firm ones.
- 1 small onion, sliced — the savory anchor.
- 2 tablespoons olive oil — for browning.
- 1 teaspoon salt, 1/2 teaspoon pepper, and 1/2 teaspoon cinnamon — the seasoning.
- 1 tablespoon Dijon or maple syrup — optional finish.
Quick Steps:
- Heat the oil in a large skillet and cook the sweet potatoes with a lid on for 8 minutes, stirring once or twice.
- Add the onion and sausage and cook until the sausage browns a little.
- Stir in the apples, salt, pepper, and cinnamon.
- Cook 4 to 5 minutes more until the apples soften at the edges.
- Finish with Dijon or maple syrup if using.
Equipment for This Recipe:
- Large skillet with a lid — helps the sweet potatoes cook through.
- Cutting board and knife — uniform pieces matter.
- Spatula — for stirring without smashing the apples.
How to Serve This Dish: Spoon it into bowls and keep the portions modest; the sweet potatoes make it filling fast. A green salad or a few roasted green beans fit well if you want a vegetable with less sweetness.
Pro Tips for This Recipe:
- Dice the sweet potatoes small or they’ll lag behind everything else.
- Use firm apples so they hold some shape.
- Put the lid on early to soften the potatoes before they brown too hard.
Variations on This Dish:
- Breakfast Version: Top with fried eggs and call it dinner if you want.
- Maple Mustard Finish: Use a teaspoon of maple syrup and a little extra Dijon.
- Veggie-Only Bowl: Leave out the sausage and add white beans.
Common Mistakes to Avoid with This Dish:
- Don’t cut the potatoes too large. They’ll stay raw in the center.
- Don’t use mealy apples. They collapse into mush.
- Don’t skip the lid at the start or the skillet takes forever.
22. Baked Quesadilla Squares
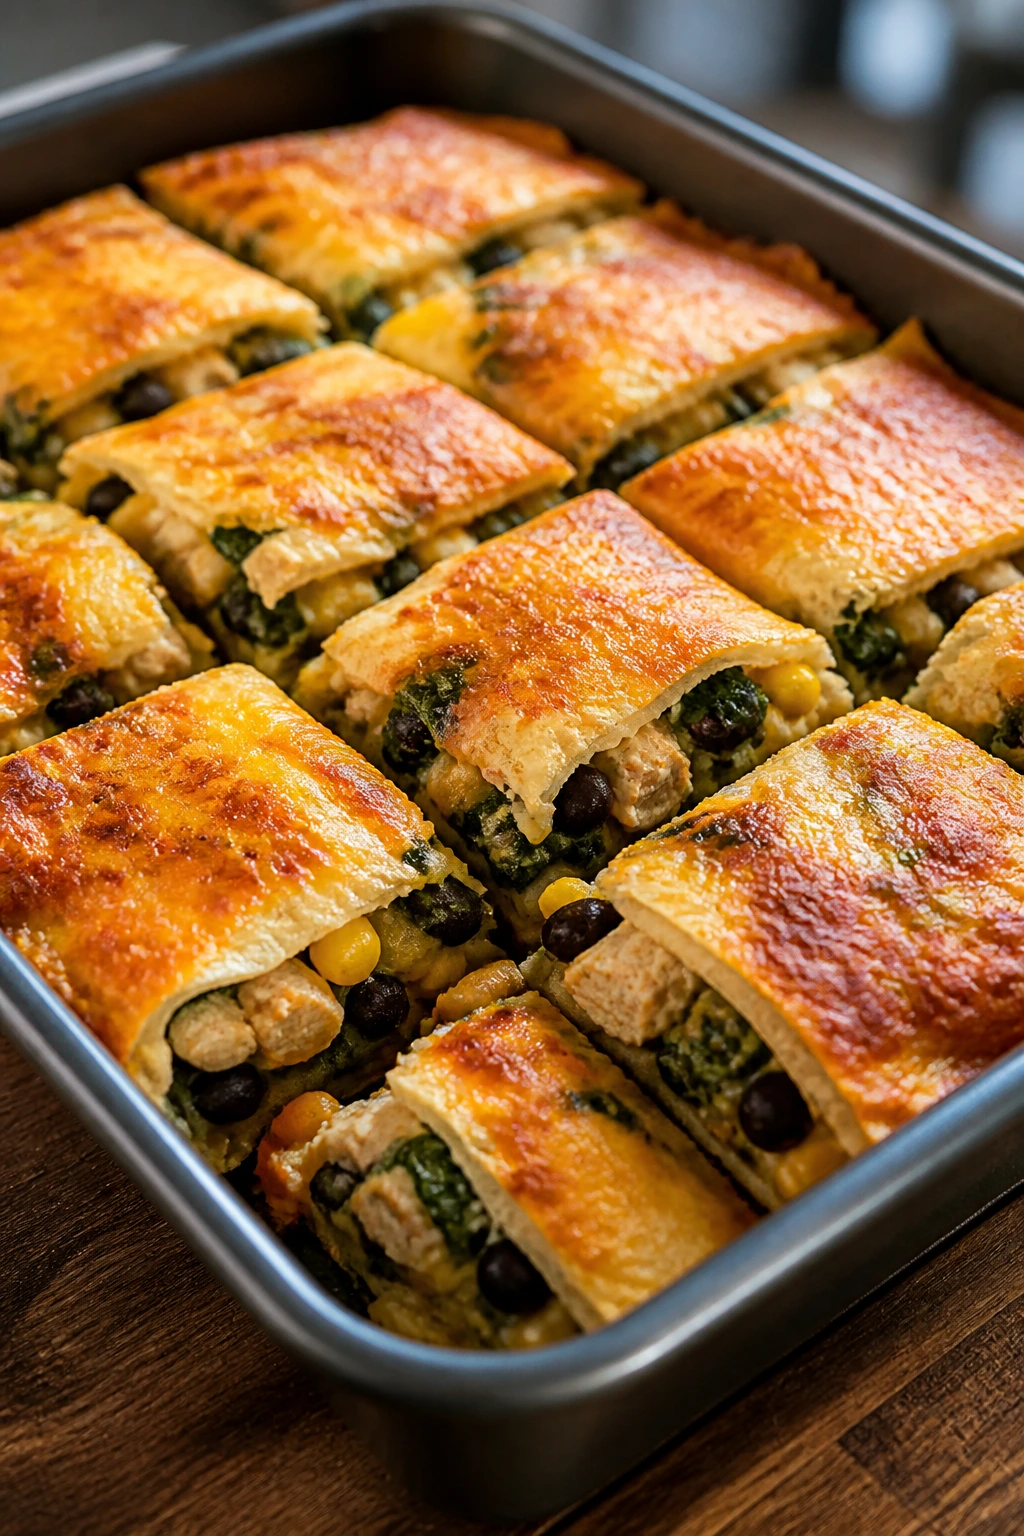
These are what happen when quesadillas stop being individual and become a pan dinner. The tortillas bake into the filling, the cheese melts through the layers, and you cut the whole thing into squares with a knife instead of standing over a skillet.
It’s a good one for feeding a group that likes the same flavors but not the same level of effort.
Why It Works: Baking the quesadillas keeps the edges crisp while the middle stays soft and melty. Chicken, beans, corn, and spinach make the filling feel complete without overcomplicating the flavor. This is the sort of dinner kids often accept because it feels like a giant, cheese-backed snack.
Key Ingredients:
- 8 flour tortillas — the layers.
- 2 cups shredded cooked chicken or black beans — the main filling.
- 2 cups shredded cheddar or Monterey Jack — the melt.
- 1 cup frozen corn — sweetness and texture.
- 1/2 cup salsa — moisture.
- 1/4 cup chopped spinach — tucks in quietly.
- 1 teaspoon cumin — mild seasoning.
- 2 tablespoons melted butter or oil — for brushing.
Quick Steps:
- Heat the oven to 400°F and grease a 9×13-inch baking dish.
- Layer tortillas, filling, cheese, corn, salsa, spinach, and cumin, repeating as needed.
- Finish with tortillas on top and brush lightly with butter or oil.
- Bake for 15 to 18 minutes until the top is golden and the cheese is melted.
- Rest 5 minutes, then cut into squares.
Equipment for This Recipe:
- 9×13-inch baking dish — for the layered bake.
- Pastry brush — for the top.
- Sharp knife or pizza cutter — for neat squares.
How to Serve This Dish: Serve the squares with sour cream, guacamole, or extra salsa on the side. A fruit bowl beside it helps balance the richness without making dinner fussy.
Pro Tips for This Recipe:
- Don’t overfill the layers or the middle turns slippery.
- Warm the tortillas for a few seconds if they’re stiff.
- Rest before cutting so the cheese sets a little.
Variations on This Dish:
- Bean and Cheese Only: Skip the chicken and lean on beans.
- Breakfast Bake: Add scrambled eggs and diced ham.
- Mild Salsa Verde: Use green salsa for a brighter flavor.
Common Mistakes to Avoid with This Dish:
- Don’t drown the layers in salsa. Too much liquid makes the bottom soggy.
- Don’t skip the rest time. The squares need a minute to settle.
- Don’t bake until dark brown; golden is enough.
23. Tuna Pasta Bake
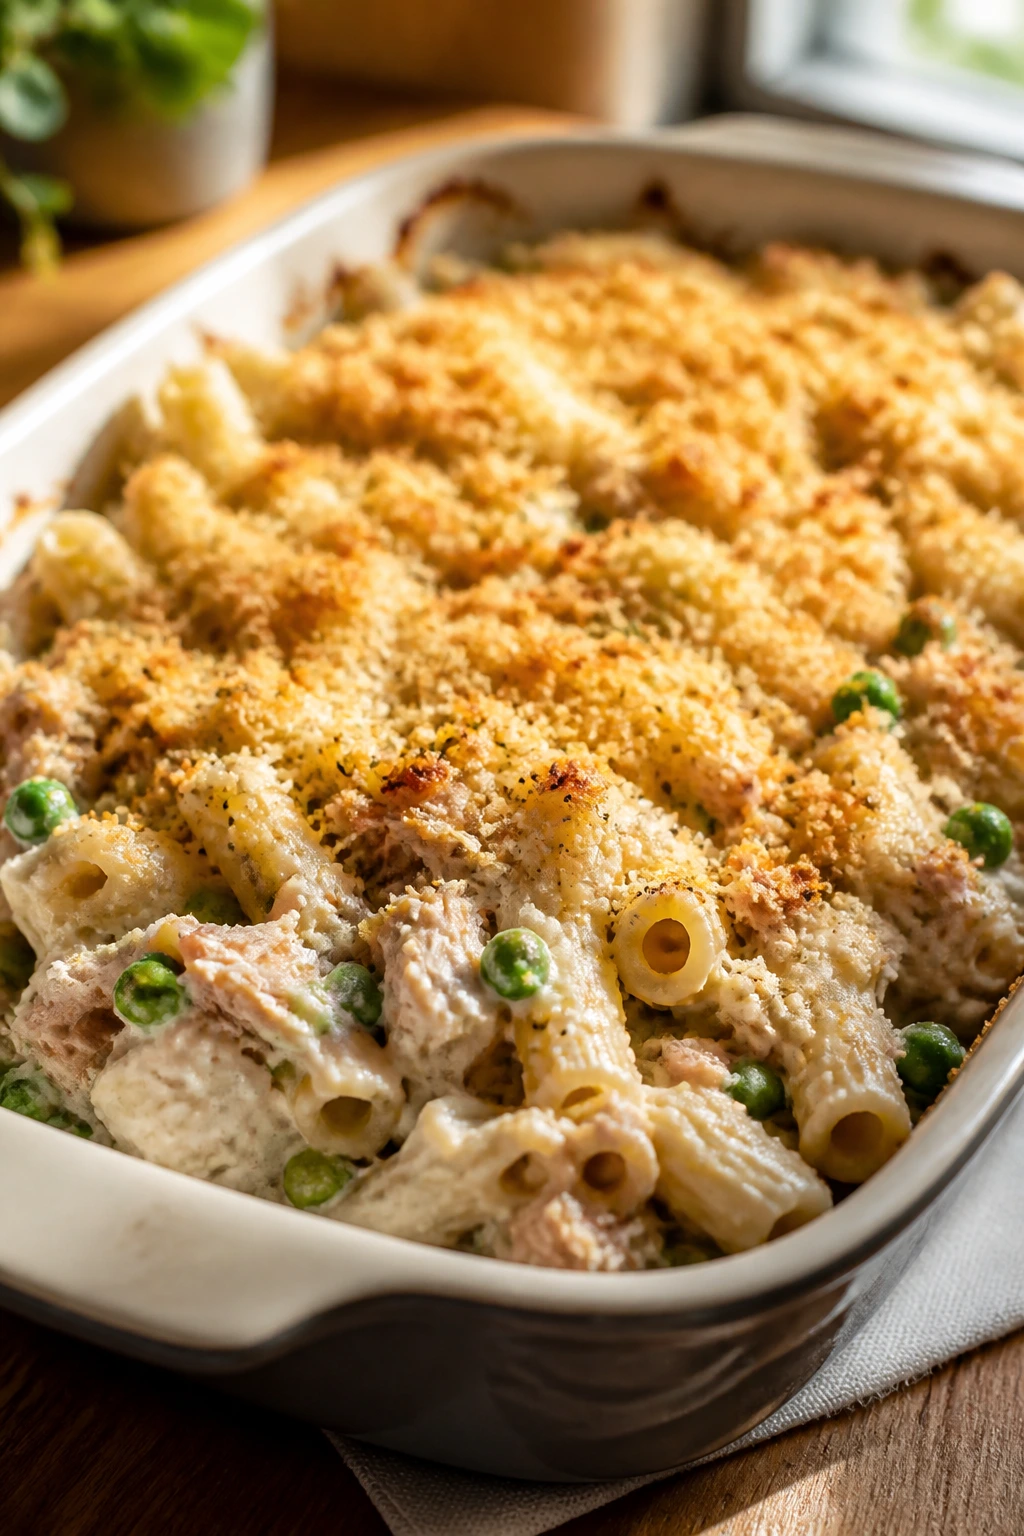
Tuna pasta bake is a quiet pantry dinner that still feels like somebody cared. The sauce wraps around the pasta, the peas keep it from feeling one-colored, and the crunchy breadcrumb top gives the whole dish a little lift.
It’s the kind of meal that sits somewhere between casserole and comfort food. That’s a nice place to be.
Why It Works: Tuna brings a mild, easy protein that mixes well with a creamy sauce. Peas add sweetness, and the breadcrumb topping gives you a crisp bite against the soft pasta. It’s useful when the fridge is lean but the family still wants dinner.
Key Ingredients:
- 12 oz short pasta — penne, shells, or elbows work.
- 2 cans tuna, drained — use tuna packed in water for a lighter result.
- 1 cup frozen peas — the vegetable.
- 2 tablespoons butter and 2 tablespoons flour — the sauce base.
- 2 cups milk — for the cream sauce.
- 1 teaspoon Dijon, 1 cup shredded cheddar, 1/2 teaspoon salt, and 1/4 teaspoon pepper — flavor and cheese.
- 1/2 cup breadcrumbs — the top.
Quick Steps:
- Cook the pasta until just under al dente and drain.
- Melt the butter, whisk in the flour for 1 minute, then whisk in the milk until smooth and thickened.
- Stir in the Dijon, cheddar, salt, pepper, tuna, peas, and pasta.
- Pour into a baking dish and top with breadcrumbs.
- Bake at 375°F for 20 minutes until bubbling and golden.
Equipment for This Recipe:
- Large pot — for pasta.
- Saucepan — for the cream sauce.
- Baking dish — for finishing in the oven.
How to Serve This Dish: Serve it with sliced tomatoes or a crisp green salad. If the table needs a little extra, a spoonful of pickle relish on the side surprisingly works.
Pro Tips for This Recipe:
- Undercook the pasta slightly so it doesn’t go soft in the oven.
- Drain the tuna well or the sauce loosens too much.
- Toast the breadcrumbs in a dry pan first if you want more crunch.
Variations on This Dish:
- Cheddar-Mustard Version: Add an extra teaspoon of Dijon for a sharper sauce.
- Corn Swap: Replace the peas with corn if that’s what your kids prefer.
- Dairy-Free Route: Use unsweetened oat milk and dairy-free cheese if needed.
Common Mistakes to Avoid with This Dish:
- Don’t skip the flour-butter base or the sauce stays thin.
- Don’t overbake the casserole. It only needs enough time to bubble.
- Don’t use a watery tuna mix. Drain it well.
24. Slow Cooker Chicken and Rice
This is the dinner you set up earlier in the day and forget about until the house starts smelling like soup and comfort. The rice softens into the broth, the chicken shreds easily, and the peas go in near the end so they stay bright.
It’s not a glamorous slow cooker recipe. It’s a practical one.
Why It Works: The slow cooker handles the chicken and vegetables with almost no attention, then the rice finishes in the liquid so the whole pot thickens naturally. Adding the peas and milk at the end keeps the texture from getting dull. This is a useful way to get a soft, full meal without hovering over the stove.
Key Ingredients:
- 1 1/2 lb boneless skinless chicken breasts — easy to shred.
- 1 onion, diced — flavor.
- 2 carrots and 2 celery stalks, diced — the vegetable base.
- 6 cups low-sodium chicken broth — enough liquid for the rice.
- 1 teaspoon dried thyme, 1 teaspoon salt, and 1/2 teaspoon pepper — seasoning.
- 1 cup long-grain white rice, rinsed — add near the end.
- 1 cup frozen peas — the finish.
- 1/2 cup milk — softens the broth slightly.
Quick Steps:
- Place the chicken, onion, carrots, celery, broth, thyme, salt, and pepper in the slow cooker.
- Cook on low for 5 to 6 hours until the chicken is tender.
- Remove the chicken, shred it, and return it to the pot.
- Stir in the rice and cook on high for 30 to 40 minutes until tender.
- Add the peas and milk, then cook 5 minutes more before serving.
Equipment for This Recipe:
- Slow cooker — the main tool.
- Cutting board and knife — for the vegetables.
- Forks — for shredding the chicken.
How to Serve This Dish: Ladle it into bowls while it’s hot and finish with black pepper or a little Parmesan if you want more flavor. A piece of buttered toast or a biscuit on the side fits better than you might think.
Pro Tips for This Recipe:
- Rinse the rice so the broth doesn’t turn gluey.
- Add the rice late. If it cooks all day, it goes mushy.
- Shred the chicken before adding the peas so the pot mixes evenly.
Variations on This Dish:
- Lemon Chicken Rice: Stir in 1 tablespoon lemon juice at the end.
- Turkey Swap: Use cooked turkey instead of chicken.
- Creamier Pot: Add a little more milk and reduce the broth by 1 cup if you want it thicker.
Common Mistakes to Avoid with This Recipe:
- Don’t add the rice too early. It overcooks fast.
- Don’t use wild rice here unless you want a much longer cook time.
- Don’t leave the peas in too long or they dull out.
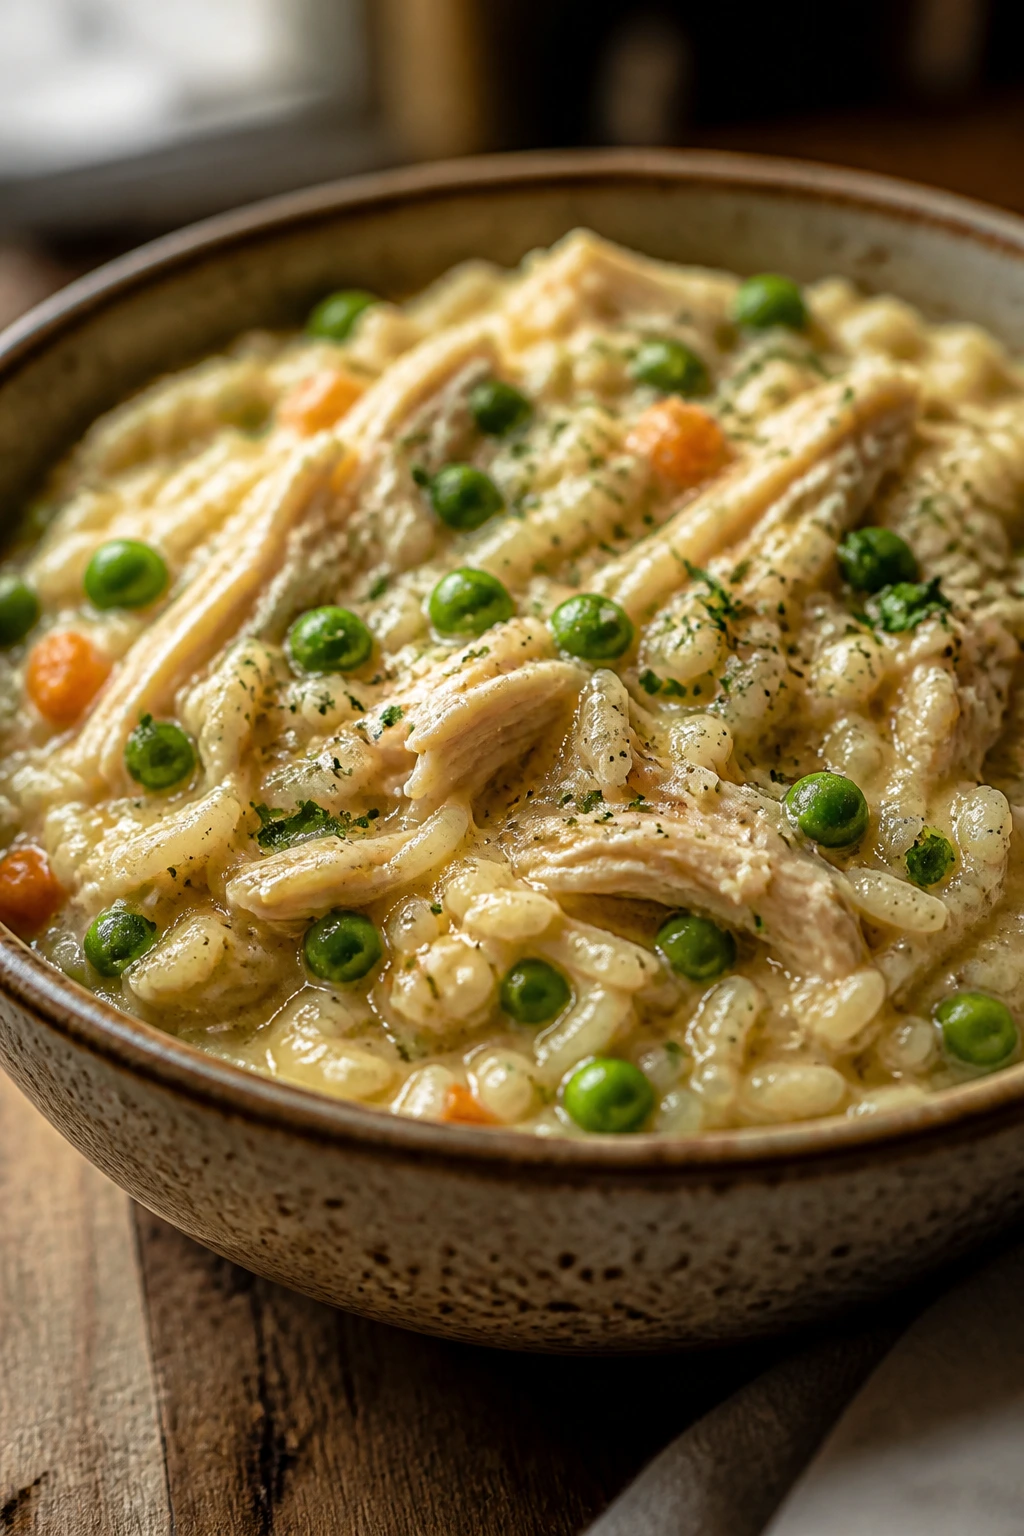
25. Chicken Pot Pie Biscuit Bake
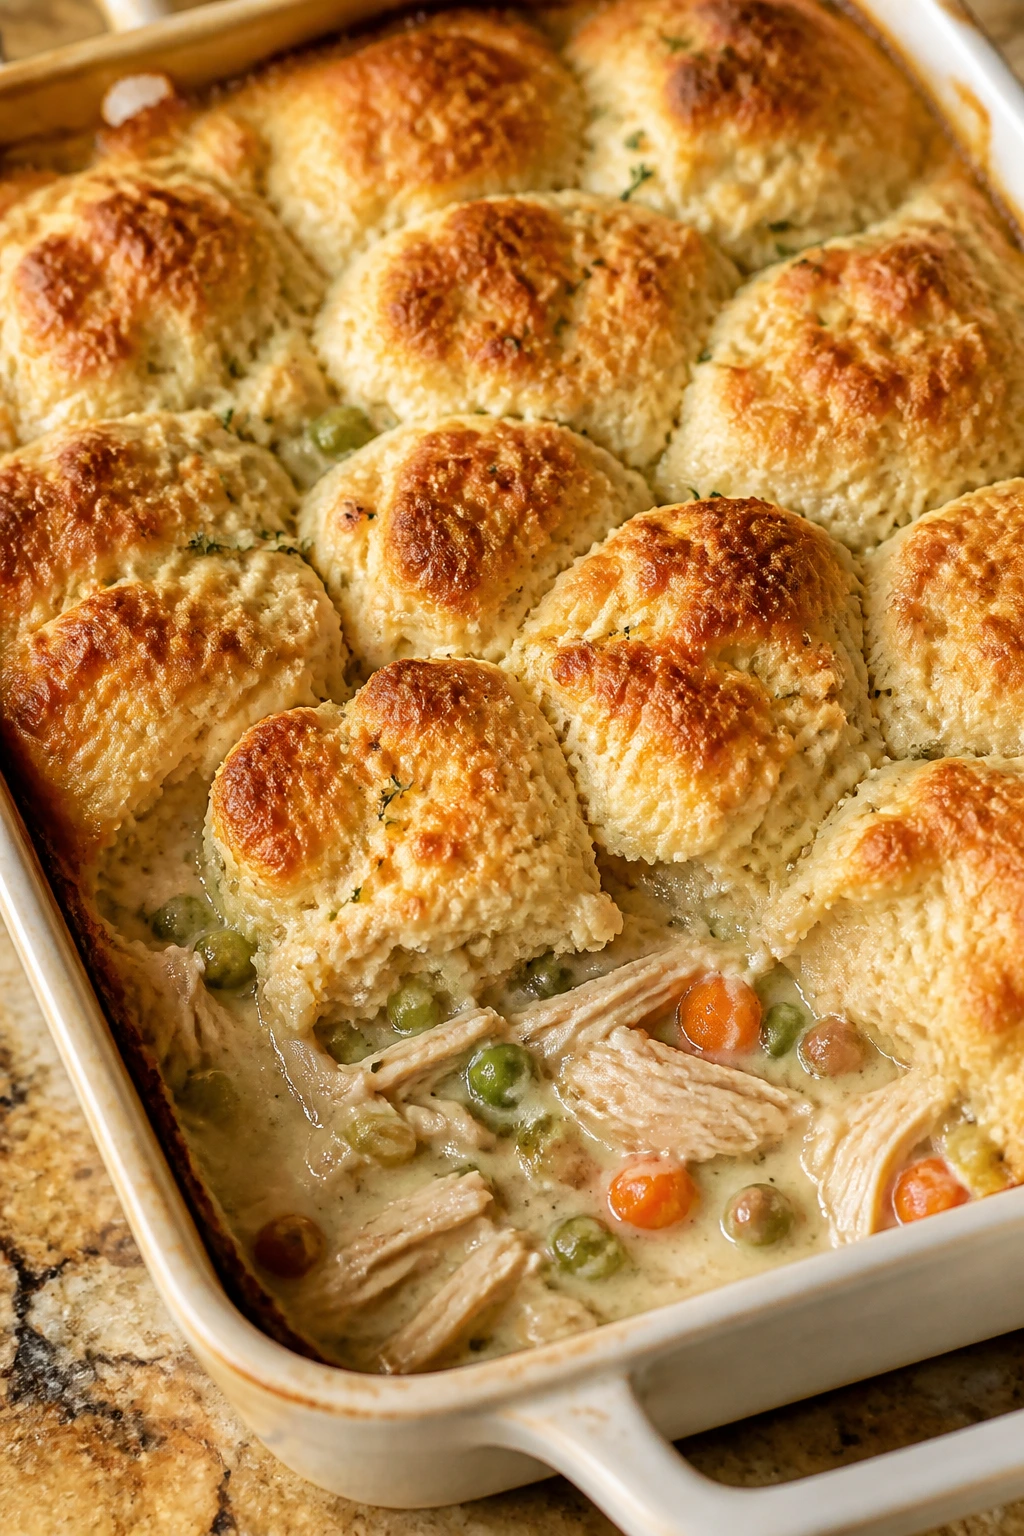
This is the pot pie shortcut that still feels like a proper dinner. The filling is creamy and full of vegetables, and the biscuits bake on top until they’re golden and a little crisp where they touch the sauce.
I like that the biscuits tell the kid brain what to do: pull apart, dip, eat.
Why It Works: The creamy filling acts like classic pot pie gravy, but the biscuit top saves you from rolling dough. Shredded chicken and frozen peas keep the filling easy, while carrots and celery give enough vegetable presence to make the dish feel balanced. It’s one of those meals that looks generous on the table without demanding much from you.
Key Ingredients:
- 2 tablespoons butter — for the filling.
- 1 onion, 2 carrots, and 2 celery stalks, diced — the vegetables.
- 1/3 cup flour — thickens the sauce.
- 2 cups chicken broth and 1 cup milk — the creamy gravy base.
- 3 cups shredded cooked chicken — the filling.
- 1 cup frozen peas, 1 teaspoon dried thyme, 1/2 teaspoon salt, and 1/2 teaspoon pepper — finishing flavor.
- 1 can refrigerated biscuits, 8 count — the topping.
Quick Steps:
- Heat the oven to 400°F.
- Melt the butter in a large skillet and cook the onion, carrots, and celery until softened, about 6 to 8 minutes.
- Stir in the flour for 1 minute, then whisk in the broth and milk until thickened.
- Add the chicken, peas, thyme, salt, and pepper and cook for 2 minutes.
- Pour the filling into a baking dish, top with biscuits, and bake 15 to 18 minutes until the biscuits are golden and the filling is bubbling.
Equipment for This Recipe:
- Large skillet — for the filling.
- Baking dish — for the bake.
- Whisk — keeps the gravy smooth.
- Spoon — for placing the biscuits.
How to Serve This Dish: Serve a biscuit or two over the filling and make sure each bowl gets some of the gravy underneath. A plain green salad or sliced apples keeps the plate from leaning too rich.
Pro Tips for This Recipe:
- Cut the vegetables small so they soften in time.
- Leave a little space between biscuits so the tops brown.
- Let it cool 5 to 10 minutes before serving or the filling runs everywhere.
Variations on This Dish:
- Turkey Pot Pie: Use leftover turkey instead of chicken.
- Herb Biscuit Top: Brush the biscuits with melted butter and parsley before baking.
- Corn Add-In: Stir in 1 cup corn with the peas for extra sweetness.
Common Mistakes to Avoid with This Recipe:
- Don’t make the filling too thin. It should be spoonable, not watery.
- Don’t underbake the biscuits. Pale tops taste doughy.
- Don’t cut into the bake immediately. The filling needs a short rest.
Why These Family Meals Usually Win at the Table
The same pattern shows up again and again: a mild sauce, a familiar shape, and enough structure for kids to understand what’s on the plate. That matters more than a lot of ornate “kid-friendly” cooking advice wants to admit. A chicken tender is safer than a stew. A slider is friendlier than a giant sandwich. A bowl lets a kid sort their food without feeling trapped by it.
Another thing these dinners do well is keep texture honest. Crisp edges stay crisp, saucy meals stay saucy, and the vegetables usually get cooked soft enough to fit in rather than fighting for attention. That means less plate-picking and fewer forkfuls of rejected carrots sitting at the side like tiny orange accusations.
I also like that most of these meals give you room to adjust. More cheese here, less sauce there, a few peas added to a skillet, a different protein in the same pan. That flexibility is what makes a recipe repeatable instead of just “good once.”
Essential Equipment for These Recipes
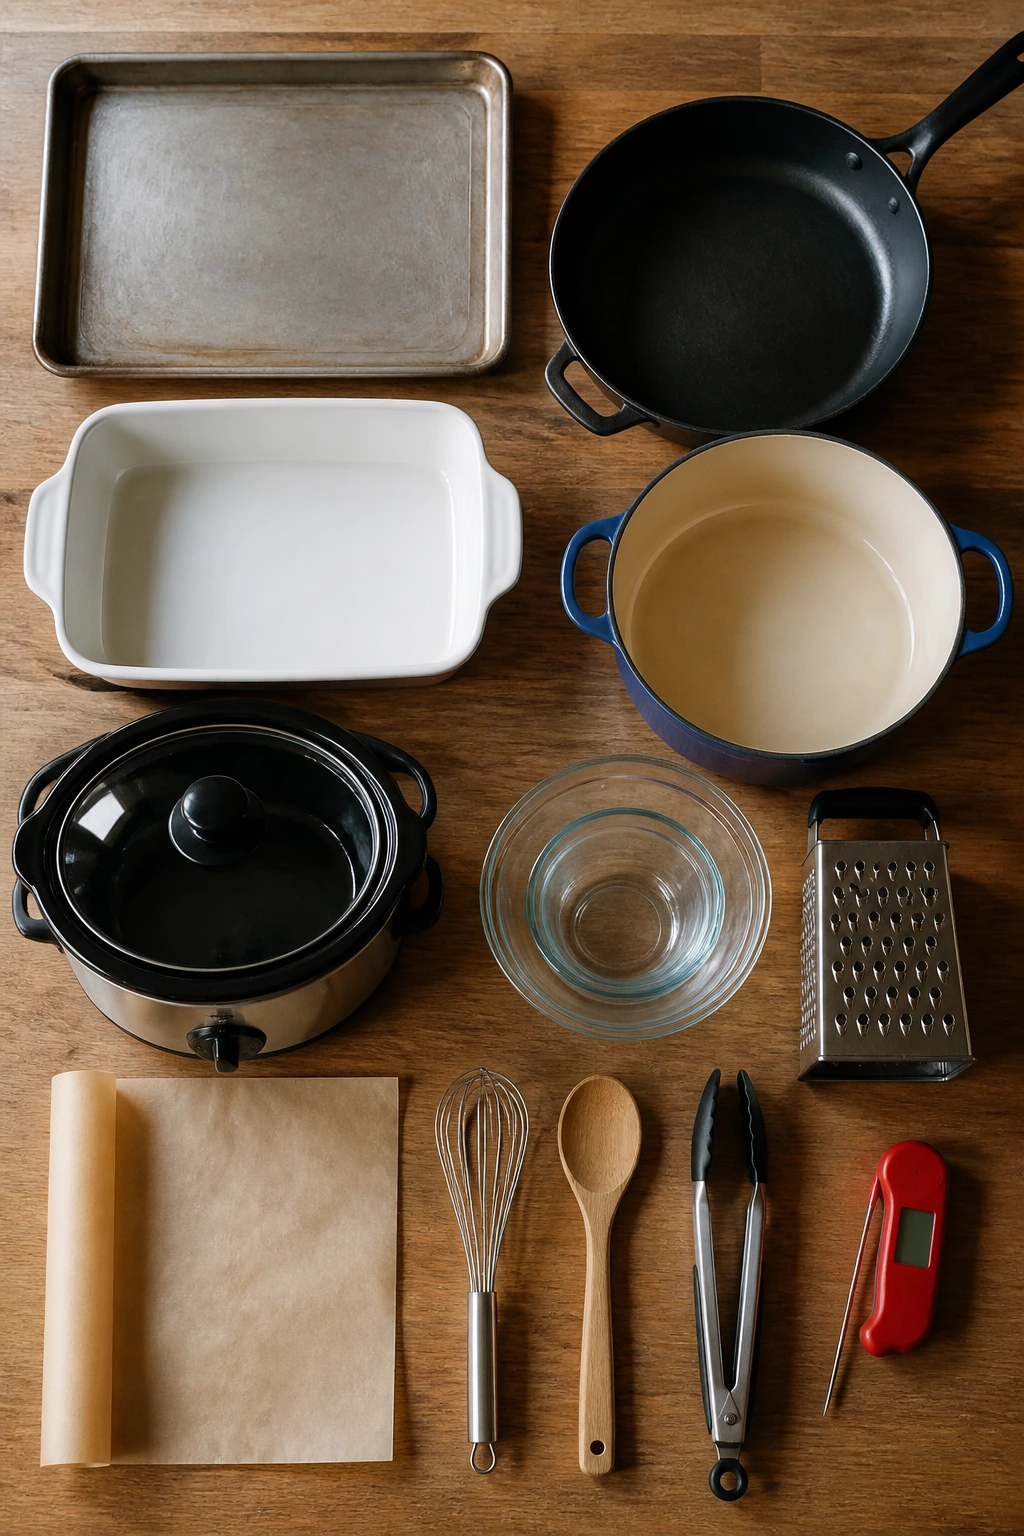
- Rimmed sheet pans: Chicken tenders, honey mustard chicken, and sheet pan pancakes all depend on a pan that won’t spill.
- Large skillet or sauté pan: You’ll use this for fried rice, skillet pastas, taco fillings, and quick casseroles.
- 9×13-inch baking dish: Bakes like enchiladas, ziti, and pot pie need a standard casserole dish.
- Large pot or Dutch oven: Helpful for pasta sauces, soups, and the tomato soup base.
- Slow cooker: Only a few recipes need it, but it’s worth having for low-effort chicken meals.
- Mixing bowls: A couple of medium bowls make meatballs, batter, and sauces much easier.
- Whisk: Useful for any sauce with flour, milk, or broth.
- Wooden spoon or silicone spatula: Better than metal for scraping sauce and folding noodles.
- Tongs: Handy for chicken tenders, sausage, and flipping quesadillas.
- Instant-read thermometer: The easiest way to keep chicken juicy and meatloaf safe.
- Parchment paper: Helps with roasted chicken, biscuits, and sheet pan cleanup.
- Fine grater or box grater: Good for Parmesan, zucchini, and quick carrot prep.
Smart Shopping for Kid-Friendly Ingredients
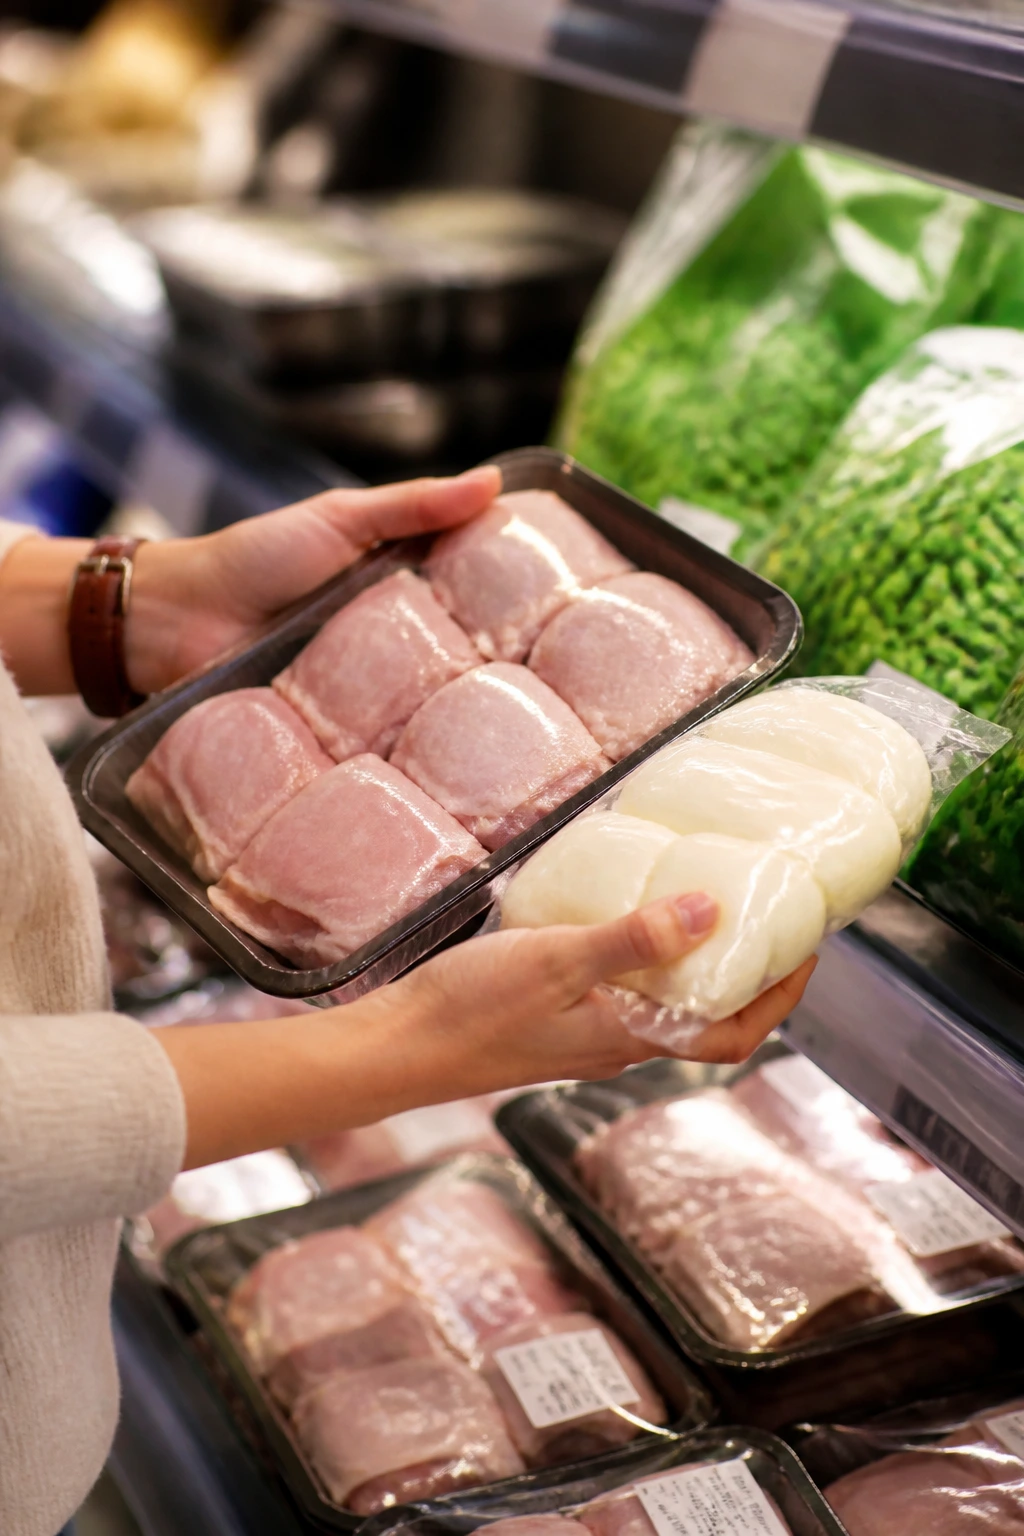
If you want family meals kids will actually eat, start by buying ingredients that behave well in the pan. That usually means chicken thighs if you want juiciness, 93% lean turkey if you want less grease, and low-moisture mozzarella if you want a cleaner melt. Fresh mozzarella tastes lovely on a salad, but it throws off too much water in casseroles and quesadillas. Not ideal.
Canned and frozen ingredients earn their place here. Frozen peas, corn, broccoli florets, and spinach often work better than sad produce drawer leftovers because they’re already picked, chopped, and ready to cook. Canned beans should be rinsed well. Canned tomatoes should be the plain kind unless the recipe asks for sauce, because seasoned cans can tilt a dish in the wrong direction fast.
For pasta sauces and skillet meals, low-sodium broth gives you room to season without overshooting. For taco night, buy mild salsa and mild enchilada sauce unless your whole table likes heat. Kids tend to accept flavor more easily when it’s built in layers, not dumped on all at once. I’d rather add heat at the table than spend dinner negotiating with a too-spicy pan.
And one small thing that matters more than it sounds: buy bread that fits the job. Slider buns should be soft but not flimsy. Tortillas should bend without cracking. Sandwich bread for grilled cheese should have enough body to brown before the filling melts out. Boring detail. Important detail.
How to Serve These Meals at the Table
Presentation: Keep the food recognizable. Serve chicken tenders in a low basket, pasta in shallow bowls, sliders cut in half, and casseroles in square portions so kids can see the edges and understand what they’re getting. A little neatness goes a long way, even with messy food.
Accompaniments: Pick one simple vegetable and one simple fruit when the main dish is rich. Carrot sticks, cucumber slices, steamed peas, apple wedges, grapes, or a quick green salad all fit next to the meals in this collection without adding more work. Bread is useful with soups and casseroles, but you do not need a carb for every carb.
Portions: Younger kids usually do fine with smaller scoops of protein — about 1/2 cup pasta or rice, 2 to 3 ounces of meat, and a spoonful of vegetables. Older kids and adults can obviously take more, but starting smaller often means less waste. Refill if they ask. That’s better than building a dinner plate that feels like a dare.
Beverage Pairing: Milk remains a very practical partner for cheesy and tomato-based meals. Sparkling water with lemon works well with richer skillet dinners, and unsweetened iced tea fits the more savory dishes. Keep the drink simple. The food already has enough going on.
Small Flavor Moves That Make a Big Difference
Flavor Enhancement: A small finish matters more than most people think. A squeeze of lemon over chicken bowls, a dusting of Parmesan over pasta, a spoon of yogurt over enchiladas, or a dab of mustard in a skillet can wake a whole dish up without changing its kid-friendly shape. I keep a few of those moves on repeat because they save bland dinners from themselves.
Customization: Build a topping bar when the meal allows it. Shredded cheese, diced avocado, pickles, salsa, sliced cucumbers, crushed tortilla chips, and chopped herbs let kids choose how far they want to go. The weird thing is that kids often eat more when they get a hand in the final step.
Serving Suggestions: Cut food smaller than you think. Quesadillas into wedges, sliders in halves, chicken into strips, and casseroles into clean squares all make a dinner feel easier to approach. If you want a little contrast, put something cold and crunchy next to something hot and soft.
Make-It-Yours: For gluten-free eaters, swap in GF pasta, corn tortillas, rice, or gluten-free breadcrumbs. For dairy-free meals, use olive oil, dairy-free shreds, and broth-forward sauces instead of cream-heavy ones. For lower-sodium versions, lean on herbs, lemon, garlic, and mustard rather than piling on more salt.
Make-Ahead, Storage, and Reheating Guidance
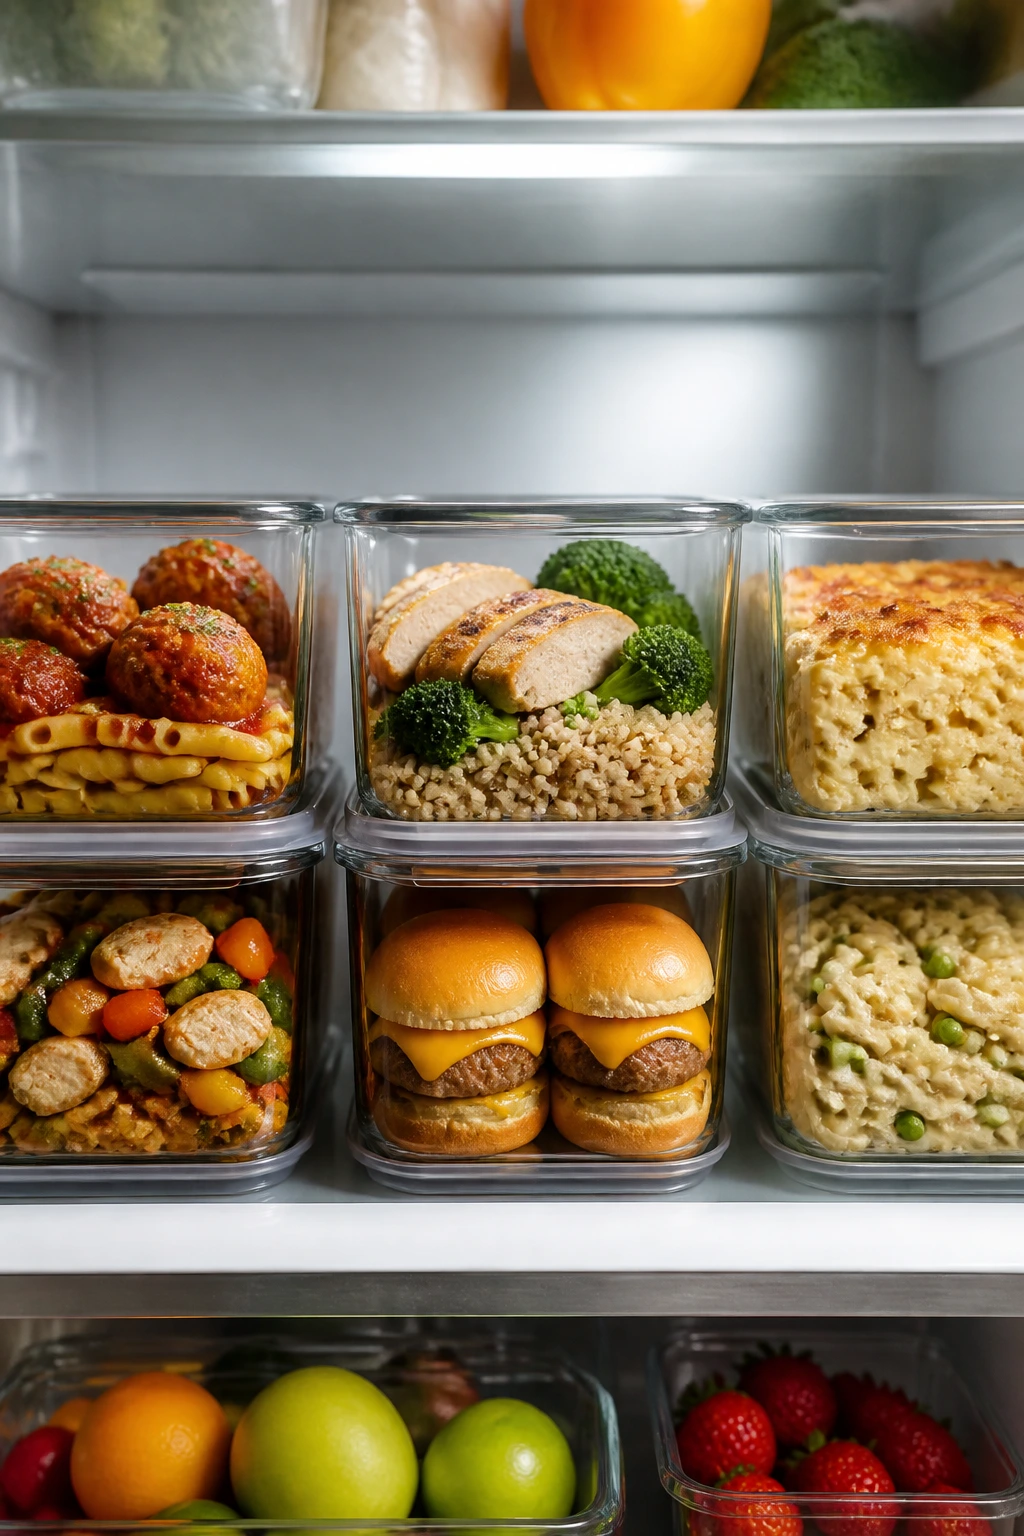
Most of these meals keep well for 3 to 4 days in the refrigerator if you cool them within 2 hours and pack them in shallow containers. Soups, saucy pasta bakes, meatballs, and skillet meals usually handle leftovers best because the sauce protects the protein from drying out. Chicken tenders, quesadilla squares, and sheet pan pancakes are better fresh, but they still reheat well in a hot oven if you keep the heat moderate.
For the freezer, aim for up to 2 to 3 months on casseroles, meatballs, sloppy joe filling, pot pie filling, and soups. Pasta dishes can freeze, but they’re at their best when slightly undercooked before freezing. Rice bowls and fried rice freeze less gracefully unless the rice is on the firmer side and the sauce is not too wet. Label the container, because guessing what’s in a frozen block is a bad hobby.
Reheat casseroles and baked pasta in a 350°F oven, covered loosely with foil, until hot in the center. Add a splash of milk or broth if the dish looks tight. Skillet meals and fried rice do better in a pan over medium heat with a spoonful of water or broth. Chicken tenders and quesadilla squares crisp back up in a 375°F to 400°F oven for 8 to 12 minutes. Microwave works in a pinch, but use short bursts and stop before the edges dry out.
A good make-ahead habit: cook the components separately when you can. Rice, sauce, meatballs, and chopped vegetables can often be made the day before, then combined later. That keeps textures better and gives you a faster path to dinner when the evening gets loud.
Easy Variations and Adaptations to Try
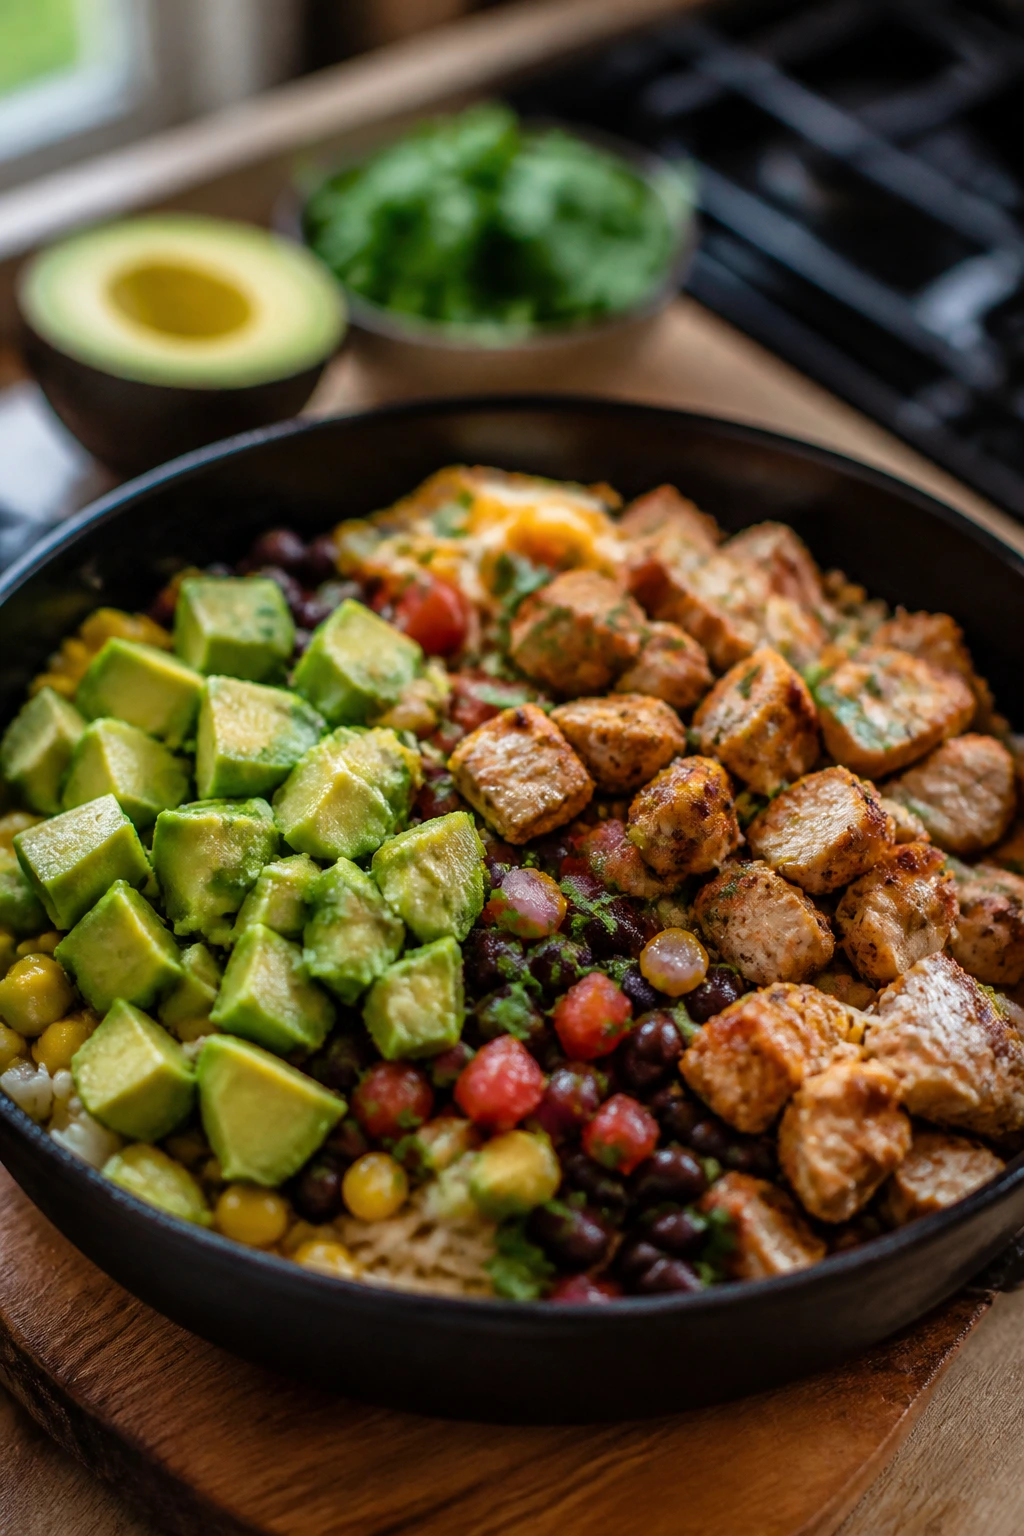
Gluten-Free Table: Use rice bowls, corn tortillas, GF pasta, and gluten-free breadcrumbs to keep the same dinner structure without the wheat. Chicken tenders, taco bowls, and fried rice adapt especially well.
Dairy-Light Swap: Lean on tomato sauces, broth-based skillets, and olive oil finishes. A little dairy-free cheese works in casseroles, but some dishes are better with a different finish, like lemon, herbs, or avocado.
Vegetable-First Night: Add a second vegetable to the pan or casserole instead of hiding everything. Broccoli with orzo, spinach in ziti, carrots in pot pie, and peas in fried rice all work without making the meal feel overloaded.
Protein Shuffle: Chicken, turkey, beef, salmon, tuna, and beans can swap around more often than people think. Keep the seasoning shape the same and change the protein to match what’s on hand.
Mild-to-Zesty Split: Keep the base dish mild and put hot sauce, chili flakes, pickled jalapeños, or spicy salsa on the table for the grown-ups. That’s a lot smarter than making the whole pot child-proof and adult-boring.
Budget Pantry Mode: Use canned beans, frozen vegetables, rotisserie chicken, pasta, rice, and pantry sauces to stretch the meal plan without changing the dinner pattern. The food still feels planned, which is half the battle.
Common Mistakes That Make Kids Push the Plate Away
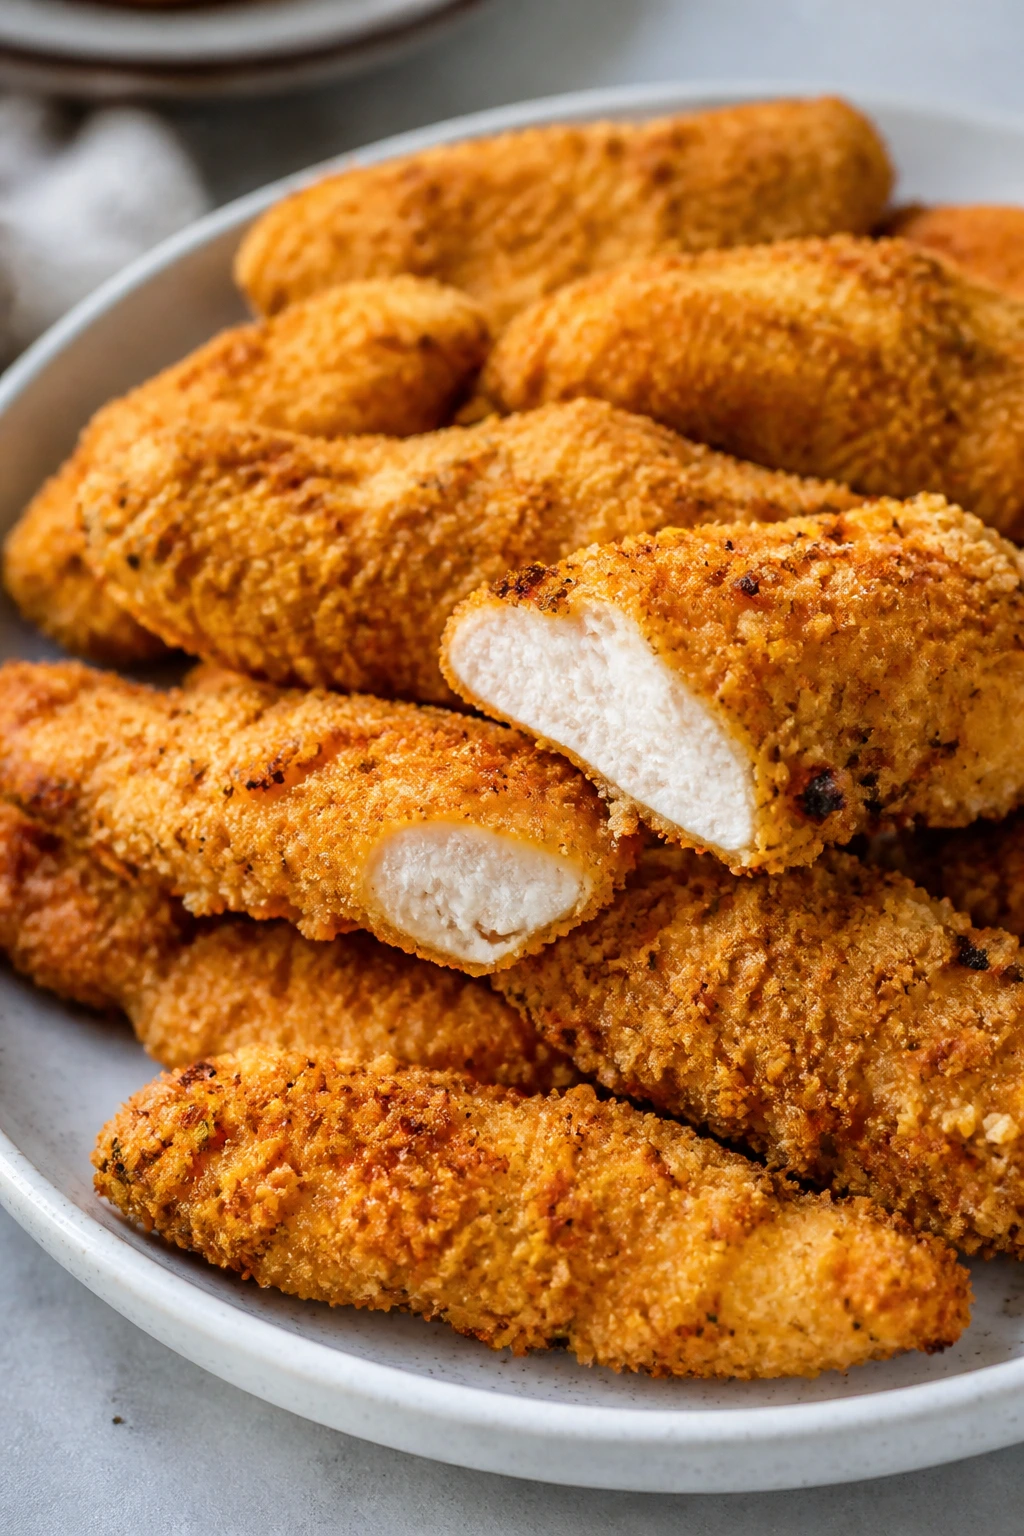
The first mistake is pushing flavor too far in one direction. A lot of adults think “kid-friendly” means bland, then overcorrect by making the whole pan sweet, salty, or spicy. Kids usually do better with mild food that still tastes like something. Keep the flavor readable, not loud.
The second mistake is hiding vegetables so hard that the texture turns weird. Pureed carrots in mac and cheese work because they disappear into creaminess. Big watery chunks hidden in a casserole usually do not. If the vegetable changes the mouthfeel in a bad way, the cover story falls apart.
Another common miss is overcooking food because you’re trying to avoid undercooked chicken, dry pasta, or crunchy carrots. The better fix is to use the right temperatures and times. A thermometer for chicken, al dente pasta, and vegetables cut in even pieces solve more problems than extra minutes ever will.
People also forget that kids notice contrast. A fully soft plate can feel flat. A crisp top on a casserole, a wedge of fresh fruit, or a cold crunch on the side gives the meal a little breathing room. That small contrast often helps more than another sauce.
Last one: too much sauce too early. Soups, casseroles, and skillet dinners all need enough moisture to stay tender, but drowning the pan turns breading soggy and noodles heavy. Add a little, check the texture, then add more if needed. That’s the boring part that saves dinner.
Frequently Asked Questions

How do I make these meals less fussy for picky eaters?
Keep the main dish simple and offer toppings on the side instead of mixing everything together. A bowl of cheese, a few cucumber slices, or some plain rice gives kids control, and control usually lowers the resistance.
Which recipes freeze the best?
Meatballs in sauce, sloppy joe filling, chicken pot pie filling, chili-style skillet meals, and soup tend to freeze the cleanest. Casseroles can freeze too, but they’re best when you slightly undercook the pasta or rice before freezing.
Can I swap turkey for beef or chicken for beef in most of these?
Usually, yes. Just watch the fat level and add a little oil or sauce if the swap makes the dish leaner than the original. Turkey often needs more help with moisture than beef does.
What if my child hates mixed foods?
Use bowls, plates with compartments, or build-your-own dinners like taco rice bowls and burrito skillets. When the parts stay visible, kids can pick the route they trust without rejecting the whole meal.
How do I keep pasta from getting mushy in leftovers?
Undercook it by a minute or two before mixing it with sauce, then cool leftovers quickly and store them in shallow containers. Reheat gently with a splash of broth, milk, or water so the sauce loosens before the pasta softens too much.
Can I make these meals ahead for busy nights?
Yes. Meatballs, taco filling, sauces, shredded chicken, rice, and chopped vegetables are all good prep-ahead pieces. If you keep components separate until dinner time, the textures stay better.
What should I serve when the main dish is already heavy?
Use something crisp and light: cucumbers, apples, grapes, or a plain green salad. Heavy mains need a fresh edge, not another rich side.
How do I fix a sauce that tastes too sharp?
Add a little dairy, a pinch of sugar, or a small pat of butter, depending on the dish. Tomato sauces usually need a touch of sweetness or cream; teriyaki and honey mustard usually need a splash of acid or water.
Back to the Dinner Table
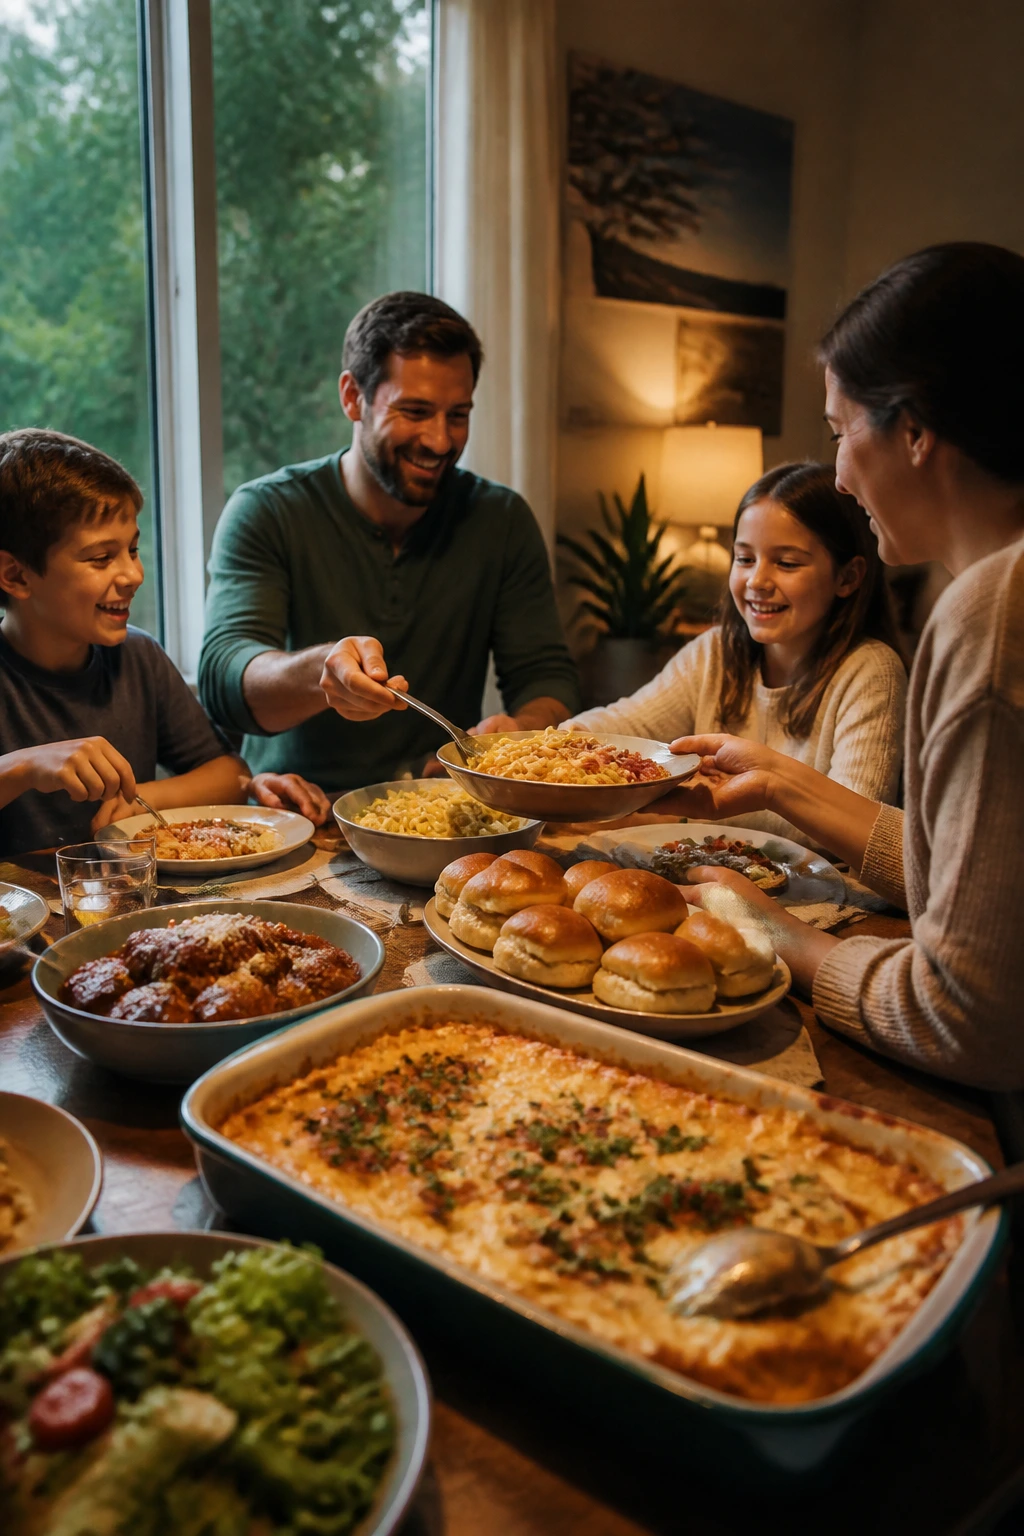
The best family meals are rarely the fanciest ones. They’re the pans that come out of the oven smelling like dinner has already been handled, the bowls that stay warm long enough for seconds, and the plates that don’t come back with a little food still arranged like an argument.
That’s what makes these recipes worth keeping around. They give you a workable mix of comfort, texture, and flexibility, which is a lot more useful than trying to impress anyone at 6:15 on a weekday. Make one, then make another, and keep the ones that disappear first.