
These 15 recipes for picky eaters usually start with one simple rule: nothing on the plate should look suspicious. If the sauce is neon, the vegetables are hidden in a mystery mash, or the texture changes halfway through a bite, a lot of kids — and plenty of adults — will push the fork around the plate and call it dinner.
That is why this kind of cooking works best when the food stays familiar. Crisp chicken, buttery noodles, cheesy tortillas, mild meatballs, baked potatoes, soft oatmeal with apples you can still see. You are not trying to trick anyone into eating something they resent. You are making food that looks safe, tastes clean, and gives them one less reason to say no.
I like recipes that survive real life. The chicken should stay crunchy after it sits for ten minutes. The pasta sauce should blend smooth if someone hates bits. The casserole should still taste like dinner after a reheating round that was not quite perfect. These are the kinds of details that matter at a family table, so I built this collection around them.
Why These Recipes Work for Picky Eaters
-
Familiar flavors first: cheese, pasta, chicken, potatoes, rice, apples, and mild seasonings show up over and over because they lower the chance of a hard no at first glance.
-
Clear textures: crispy, creamy, soft, or chewy is easier to accept than a plate that mixes everything into one vague pile.
-
Easy to customize at the table: several of these dishes keep toppings, dips, or add-ins separate, which helps when one person wants plain food and another wants more flavor.
-
Leftovers that still hold up: these recipes reheat well because they avoid delicate sauces and complicated toppings that collapse into mush.
-
Budget-friendly pantry staples: breadcrumbs, oats, tortillas, pasta, rice, and canned tomatoes do a lot of heavy lifting here, which keeps dinner practical.
-
Low-drama cleanup: sheet pans, skillets, casseroles, and one slow cooker make these recipes easier to finish when the evening already feels busy.
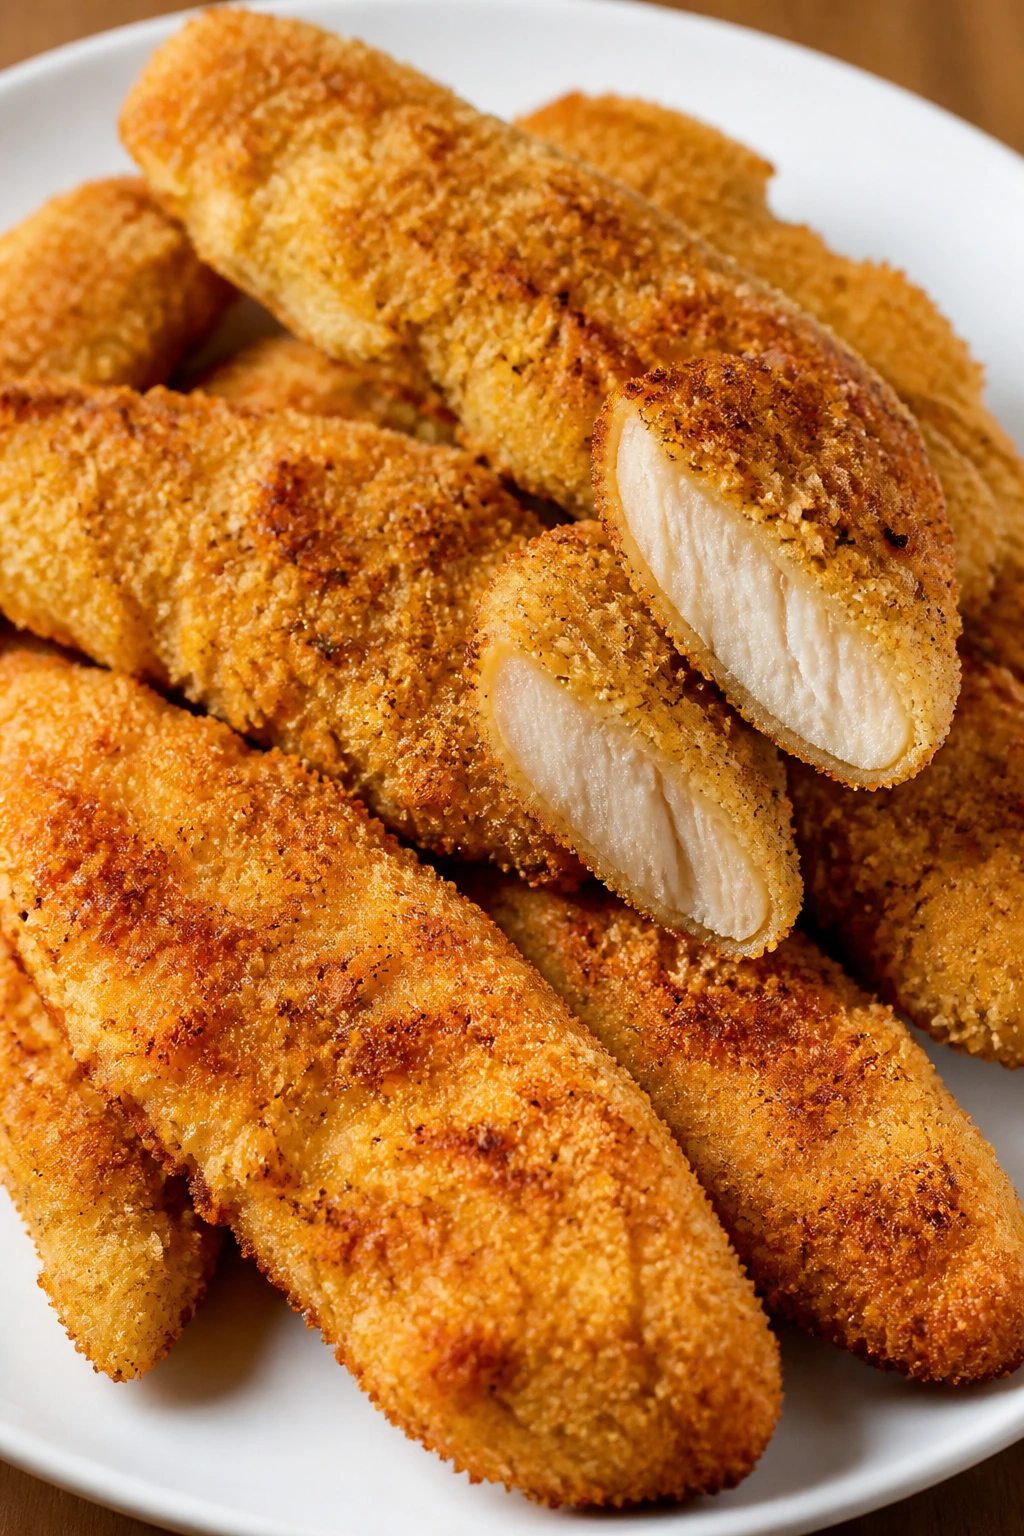
1. Crispy Baked Chicken Tenders
A good chicken tender should crack a little when you bite into it, then give way to juicy meat that does not fight back. That’s the goal here. The coating is golden, lightly salty, and sturdy enough to hold up to ketchup, ranch, or plain old nothing at all.
Why It Works:
Baked chicken tenders solve two problems at once: they feel like comfort food, and they do not need a frying pot on the stove. A hot oven at 425°F gives the breadcrumb coating enough heat to brown fast before the chicken dries out. Using panko keeps the crust light and crisp instead of heavy and dusty.
Key Ingredients:
- 1½ lbs chicken tenders
- 1 cup all-purpose flour
- 2 large eggs
- 2 tablespoons milk
- 2 cups panko breadcrumbs
- 1 cup finely grated Parmesan cheese
- 1 teaspoon kosher salt
- 1 teaspoon garlic powder
- 1 teaspoon paprika
- ½ teaspoon black pepper
- Cooking spray
Quick Steps:
- Preheat the oven to 425°F and set a wire rack on a rimmed sheet pan. If you do not have a rack, line the pan with parchment and plan to flip the tenders halfway through.
- Set up three shallow bowls: flour in one, beaten eggs mixed with milk in the second, and panko, Parmesan, salt, garlic powder, paprika, and pepper in the third.
- Dredge each chicken tender in flour, dip it in egg, then press it into the breadcrumb mix so the coating sticks in a thick layer.
- Arrange the coated tenders on the rack or pan, leaving a little space between pieces. Spray the tops lightly with cooking spray.
- Bake for 16 to 18 minutes, flipping once if needed, until the coating is deep golden and the chicken reaches 165°F in the thickest part.
- Rest for 3 minutes before serving so the juices stay inside the meat instead of running onto the plate.
Equipment for This Recipe:
- Rimmed sheet pan
- Wire rack
- Three shallow bowls
- Tongs
- Instant-read thermometer
How to Serve This Dish:
Serve the tenders with ketchup, honey mustard, or ranch on the side so nobody feels trapped by one dip. A pile of oven fries and sliced cucumbers makes the plate feel familiar, and three to four tenders is a solid serving for most kids.
Pro Tips for This Recipe:
- Pat the chicken dry first. Wet chicken makes the coating slip off in patches.
- Grate the Parmesan fine. Thick shreds fall off in the oven.
- Do not crowd the pan. Steam is the enemy of crisp edges.
- If the breadcrumbs look pale at the end, give them one extra minute under the broiler and watch them like a hawk.
Variations on This Dish:
- Lemon Pepper Tenders: Add 1 teaspoon lemon pepper seasoning to the breadcrumb mix and serve with plain yogurt dip.
- Mild Buffalo Version: Toss the baked tenders with 2 tablespoons melted butter mixed with 2 tablespoons mild hot sauce.
- Gluten-Free Crust: Swap in gluten-free flour and gluten-free panko; the method stays the same.
Common Mistakes to Avoid with This Dish:
- Skipping the rack: the bottoms turn soft if they sit in pooled oil.
- Using chunky breadcrumbs: they leave bare spots and fall off during baking.
- Pulling them out by color alone: if the crust looks done but the center is undercooked, use the thermometer. Chicken has no reason to guess.
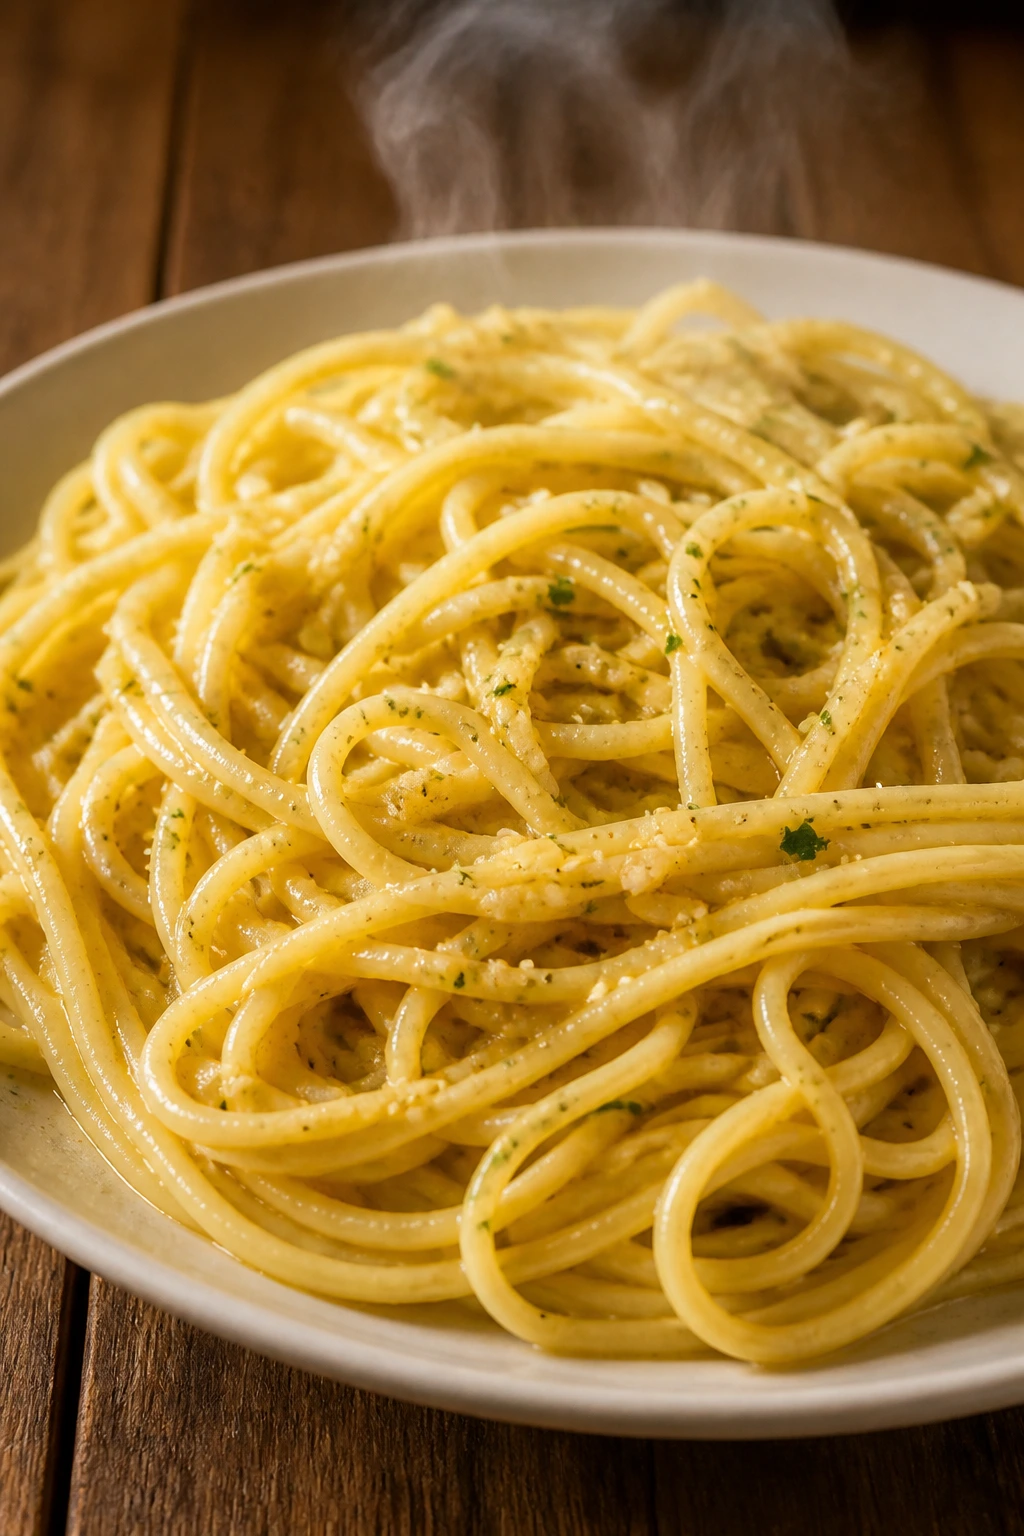
2. Buttery Garlic Noodles
This is the sort of dinner that disappears fast because it tastes like a side dish that accidentally became the whole plan. The noodles are glossy, salty, and gently garlicky, with enough butter to feel rich but not so much that the bowl turns greasy.
Why It Works:
Garlic noodles are a hard sell for almost nobody. They use plain spaghetti, a short ingredient list, and a sauce that coats every strand without leaving strange bits behind. A splash of reserved pasta water helps the butter and cheese cling to the noodles instead of sliding to the bottom of the bowl.
Key Ingredients:
- 12 oz spaghetti or linguine
- 4 tablespoons unsalted butter
- 4 cloves garlic, minced
- 1 tablespoon soy sauce
- ½ cup reserved pasta water
- ½ cup finely grated Parmesan cheese
- ½ teaspoon kosher salt
- ¼ teaspoon black pepper
- 1 tablespoon chopped parsley
Quick Steps:
- Boil the pasta in well-salted water until just al dente, then scoop out ½ cup of the cooking water before draining.
- Melt the butter in a large skillet over medium heat, then add the garlic and cook for 30 to 45 seconds until it smells sweet, not sharp.
- Stir in the soy sauce and reserved pasta water. The mixture will look thin at first, and that is fine.
- Add the drained noodles and toss for 1 to 2 minutes until every strand looks shiny and the sauce starts to cling.
- Sprinkle in the Parmesan, black pepper, and parsley, then toss again until the cheese melts into a light coating.
- Serve right away while the noodles are still glossy and soft.
Equipment for This Recipe:
- Large pot
- Colander
- Wide skillet
- Tongs
- Microplane or fine grater
How to Serve This Dish:
Put the noodles in shallow bowls and finish with a little extra Parmesan on top. They work well beside roasted chicken, but they also stand alone with sliced fruit or steamed green beans if you want a plain plate.
Pro Tips for This Recipe:
- Use finely grated Parmesan so it melts into the sauce instead of clumping.
- Keep the garlic pale. Brown garlic turns bitter fast.
- If the noodles look dry, add pasta water 1 tablespoon at a time.
- A squeeze of lemon at the end brightens the butter without making the dish taste tangy.
Variations on This Dish:
- Cheesy Garlic Butter Noodles: Add an extra ¼ cup Parmesan for a heavier cheese pull.
- Chicken Noodle Bowl: Stir in 1 cup diced rotisserie chicken at the end.
- No-Soy Version: Replace soy sauce with ½ teaspoon salt and 1 teaspoon lemon juice.
Common Mistakes to Avoid with This Dish:
- Draining all the pasta water: you need that starchy liquid to pull the sauce together.
- Overcooking the garlic: a few extra seconds can flip it from sweet to harsh.
- Dumping in cold cheese on low heat: the sauce can seize; keep the pan warm and toss continuously.
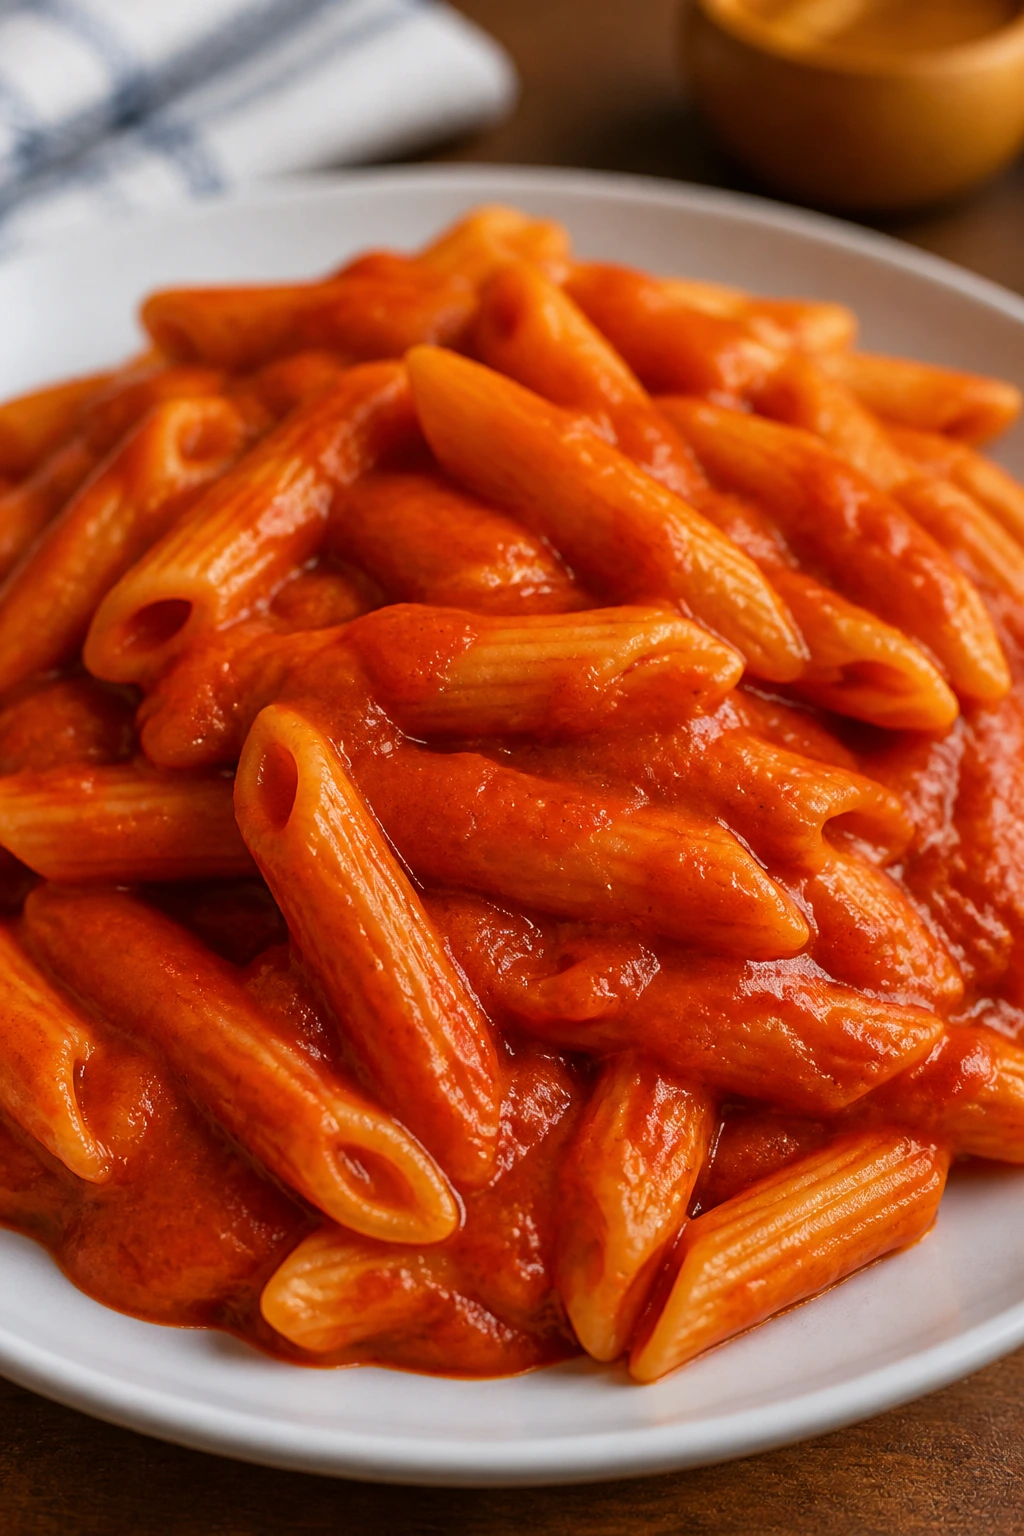
3. Hidden-Veggie Tomato Sauce with Pasta
If a child usually picks around tomato chunks, carrot shreds, or soft onion pieces, this sauce has a trick that is actually worth using. Everything cooks down and gets blended smooth, so the finished bowl tastes like a classic red sauce, not a vegetable report.
Why It Works:
The vegetables are there for body and sweetness, but they do not stay visible. Grated carrot and zucchini melt into the tomatoes after a long simmer, and blending the sauce at the end removes the last little bits. That means the sauce clings to pasta with a smooth, restaurant-style feel instead of looking busy.
Key Ingredients:
- 1 tablespoon olive oil
- 1 small yellow onion, chopped
- 1 medium carrot, peeled and grated
- 1 medium zucchini, grated and lightly squeezed
- 3 cloves garlic, minced
- 2 tablespoons tomato paste
- 1 (28 oz) can crushed tomatoes
- 1 teaspoon sugar
- 1 teaspoon kosher salt
- ½ teaspoon dried basil
- ¼ teaspoon black pepper
- 12 oz pasta
Quick Steps:
- Heat the olive oil in a saucepan over medium heat, then cook the onion, carrot, and zucchini for 6 to 8 minutes until soft and glossy.
- Add the garlic and tomato paste, stirring for 1 minute until the paste darkens slightly and smells richer.
- Pour in the crushed tomatoes, sugar, salt, basil, and pepper, then bring the sauce to a gentle simmer.
- Cook for 20 to 25 minutes, stirring now and then, until the sauce thickens and the carrot flavor disappears into the tomato.
- Blend the sauce with an immersion blender until smooth, or carefully transfer it to a countertop blender in batches.
- Toss with cooked pasta and serve hot.
Equipment for This Recipe:
- Medium saucepan
- Box grater
- Immersion blender or regular blender
- Large pot for pasta
- Wooden spoon
How to Serve This Dish:
Serve it with spaghetti, penne, or shells, depending on what gets eaten most easily in your house. A little Parmesan on top is enough, though garlic bread on the side never hurts. A child-sized portion is usually ¾ cup pasta plus sauce; a bigger eater might want 1½ cups.
Pro Tips for This Recipe:
- Squeeze the grated zucchini lightly so the sauce does not turn watery.
- Let the sauce simmer long enough to lose that raw tomato edge.
- If the finished sauce tastes too sharp, add another pinch of sugar, not a lot.
- Blend it while hot, but leave the blender vent open a crack to avoid pressure buildup.
Variations on This Dish:
- Creamy Red Sauce: Stir in ¼ cup heavy cream after blending for a softer, paler sauce.
- Meaty Marinara: Brown 1 lb ground beef before the onion and continue as written.
- Chunk-Lover’s Version: Skip the blender and leave the vegetables visible for anyone who wants them.
Common Mistakes to Avoid with This Dish:
- Rushing the simmer: the sauce tastes flat if the vegetables do not cook down enough.
- Skipping the blend: the hidden-vegetable magic depends on a smooth texture.
- Adding too much zucchini: extra moisture makes the sauce thin and weak.
4. Cheesy Quesadilla Wedges
A quesadilla is one of the safest bets in family cooking. It is soft on the inside, crisp at the edges, and easy to cut into triangles that feel familiar even to cautious eaters.
Why It Works:
The filling is simple: mild cheese, warm tortilla, and enough fat in the pan to make the outside golden without turning greasy. Keeping the filling thin matters. If you stuff it too full, the tortilla tears before the cheese melts, and the whole thing gets messy in a way that picky eaters notice fast.
Key Ingredients:
- 8 flour tortillas, 8-inch
- 2 cups shredded mild cheddar
- 2 cups shredded Monterey Jack
- 2 tablespoons butter or neutral oil
- ½ teaspoon kosher salt
- Salsa, sour cream, or guacamole for serving
Quick Steps:
- Warm a skillet over medium heat and melt ½ tablespoon butter in the pan.
- Lay one tortilla in the skillet and sprinkle a thin, even layer of cheddar and Monterey Jack over half of it.
- Fold the tortilla over and cook for 2 to 3 minutes until the bottom is spotted golden and the cheese starts to melt.
- Flip carefully and cook the second side for another 1 to 2 minutes until the tortilla is crisp and the cheese is fully melted.
- Move the quesadilla to a cutting board and rest it for 30 seconds before slicing into wedges.
- Repeat with the remaining tortillas, adding a little butter to the pan each time.
Equipment for This Recipe:
- Nonstick or cast-iron skillet
- Spatula
- Cutting board
- Chef’s knife
- Cheese grater
How to Serve This Dish:
Stack the wedges on a plate and keep the dip bowls separate. That matters more than people admit. Some kids want plain quesadilla wedges, and having salsa on the side feels less pushy than spooning it on top.
Pro Tips for This Recipe:
- Shred the cheese yourself if you can. Pre-shredded cheese works, but it melts a little less smoothly.
- Keep the heat at medium, not high. Burnt tortillas and unmelted cheese are a bad trade.
- Press the quesadilla lightly with the spatula while it cooks so the cheese settles into a single layer.
- Slice after a short rest so the filling does not slide out.
Variations on This Dish:
- Chicken Quesadilla: Add ½ cup finely shredded cooked chicken to each quesadilla.
- Pizza Quesadilla: Add a few spoonfuls of pizza sauce and a pinch of oregano.
- Bean and Cheese Version: Spread 2 tablespoons refried beans before adding the cheese.
Common Mistakes to Avoid with This Dish:
- Overfilling the tortilla: the seam breaks before the cheese melts.
- Using high heat: the outside burns while the center stays cold.
- Cutting too soon: the filling needs that half-minute to set.
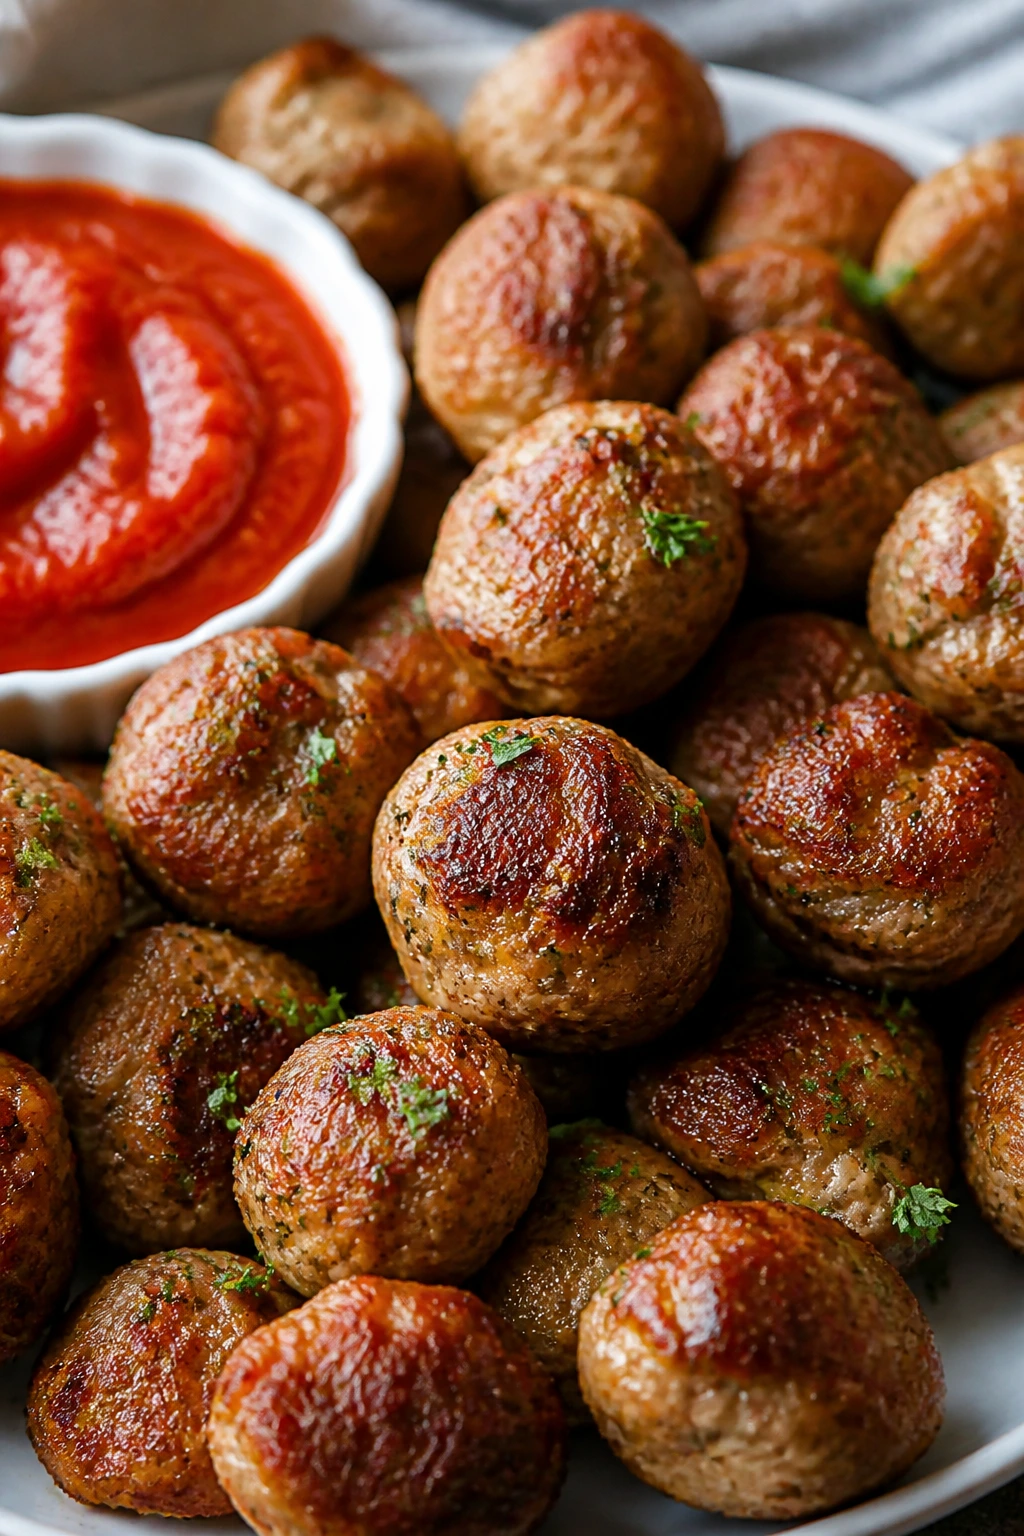
5. Mini Turkey Meatballs
Mini meatballs are easier on picky eaters than big ones because they look tidy and eat in two bites. These stay soft, mild, and a little savory, with enough Parmesan to keep them from tasting bland.
Why It Works:
Ground turkey can dry out if you handle it carelessly, so the trick is to add enough moisture and enough fat in the form of egg, milk, and cheese. Baking them instead of pan-frying keeps the shape neat and lets you make a whole tray at once. A short simmer in marinara after baking helps them taste richer without turning them mushy.
Key Ingredients:
- 1 lb ground turkey
- ½ cup fine breadcrumbs
- 1 large egg
- ¼ cup grated Parmesan
- 2 tablespoons milk
- 1 teaspoon onion powder
- 1 teaspoon garlic powder
- 1 teaspoon kosher salt
- ½ teaspoon black pepper
- 2 cups marinara sauce
Quick Steps:
- Preheat the oven to 400°F and line a sheet pan with parchment paper.
- Mix the turkey, breadcrumbs, egg, Parmesan, milk, onion powder, garlic powder, salt, and pepper in a bowl just until combined. Do not mash it for too long.
- Shape the mixture into 1½-inch meatballs and place them on the pan with a little space between each one.
- Bake for 14 to 16 minutes until the meatballs are lightly browned and reach 165°F in the center.
- Warm the marinara in a skillet or saucepan while the meatballs bake.
- Toss the baked meatballs in the sauce and simmer for 3 to 5 minutes.
Equipment for This Recipe:
- Rimmed sheet pan
- Parchment paper
- Mixing bowl
- Small cookie scoop or spoon
- Saucepan
How to Serve This Dish:
Serve them over pasta, tucked into slider buns, or on toothpicks with sauce on the side. Four to six mini meatballs make a normal dinner serving for a child; eight to ten is more like a hungry-teen portion.
Pro Tips for This Recipe:
- Wet your hands lightly when rolling. The meatball mix will stop sticking.
- Make them all the same size so they finish at the same time.
- If the turkey feels sticky, chill the mixture for 10 minutes before shaping.
- Use a mild marinara. Aggressive spice can take over the whole dish.
Variations on This Dish:
- Italian Herb Meatballs: Add 1 teaspoon dried Italian seasoning.
- Cheesier Version: Fold 2 extra tablespoons Parmesan into the mix.
- Chicken Meatballs: Swap ground chicken in for turkey and keep everything else the same.
Common Mistakes to Avoid with This Dish:
- Overmixing the meat: the meatballs get dense and rubbery.
- Skipping the sauce finish: baked meatballs alone can taste dry.
- Making them too large: bigger meatballs dry out before the center is done.
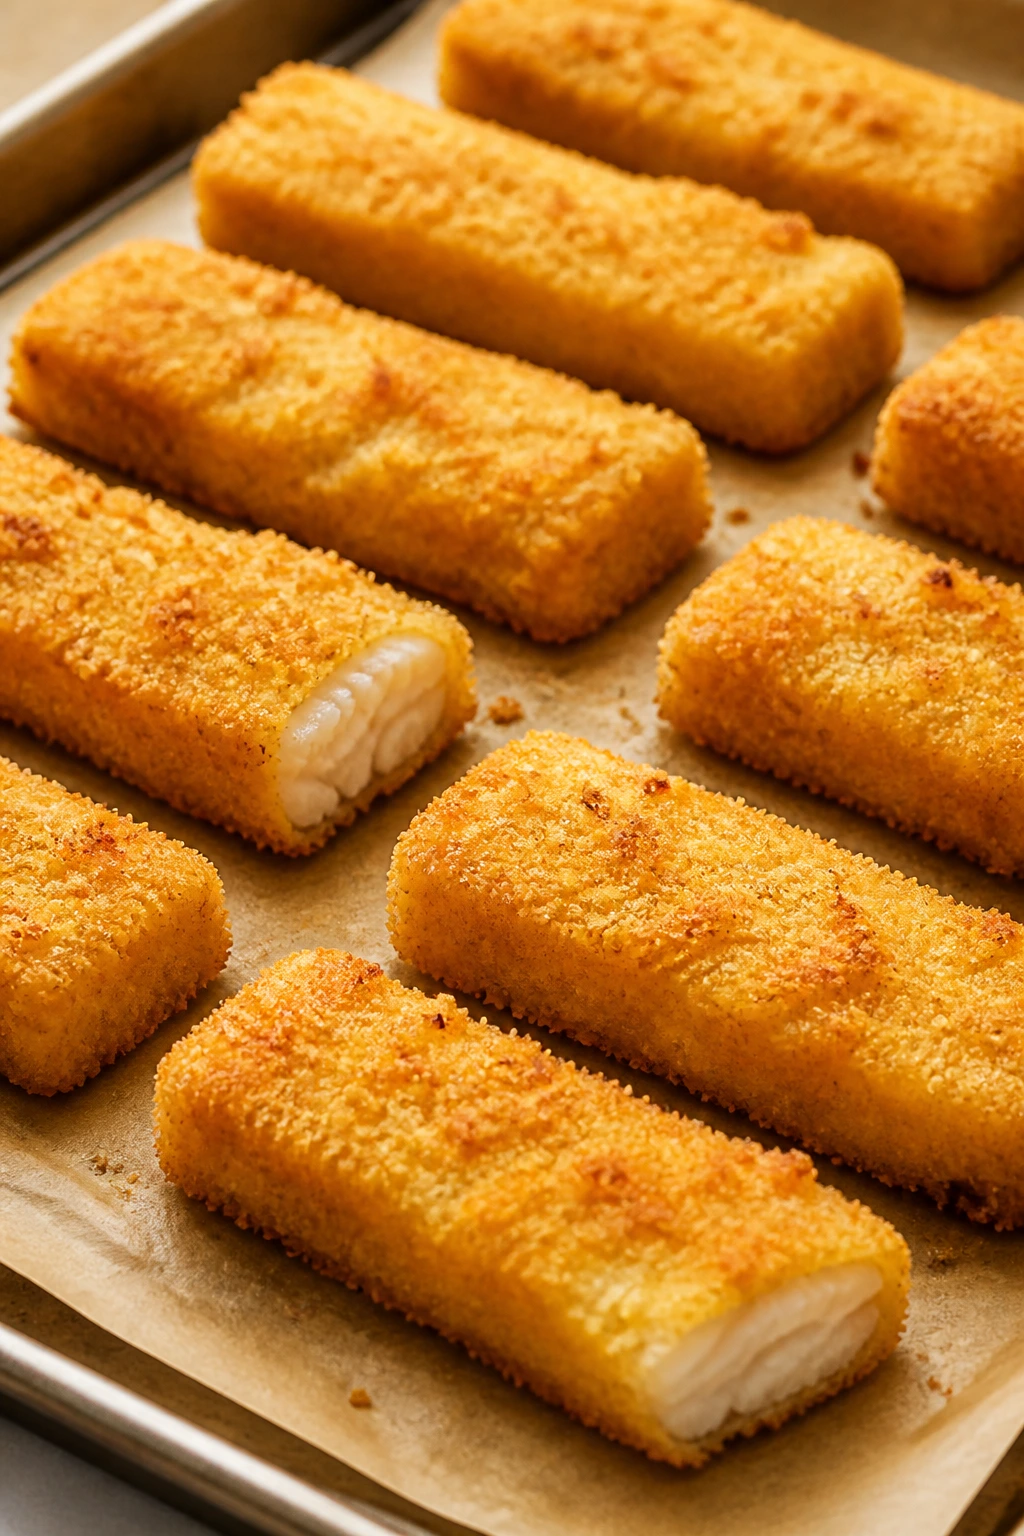
6. Oven-Baked Fish Sticks
Store-bought fish sticks have their place, but homemade ones have a cleaner fish flavor and a better crunch. The coating stays pale-gold and crisp, and the fish inside flakes in neat layers instead of turning to paste.
Why It Works:
Picky eaters often accept fish more easily in stick form because the shape feels familiar. Baking at a hot temperature keeps the crumbs crunchy while the fish cooks fast enough to stay tender. Cutting the fillets into even strips matters more than people think; uneven pieces lead to some overcooked sticks and some underdone ones.
Key Ingredients:
- 1½ lbs cod or haddock fillets
- ½ cup all-purpose flour
- 2 large eggs
- 1 tablespoon water
- 2 cups panko breadcrumbs
- 1 teaspoon kosher salt
- ½ teaspoon paprika
- ½ teaspoon garlic powder
- ¼ teaspoon black pepper
- 2 tablespoons olive oil or cooking spray
- Lemon wedges, for serving
Quick Steps:
- Preheat the oven to 425°F and set a wire rack on a sheet pan.
- Cut the fish into 1-inch-wide sticks and pat them dry with paper towels.
- Set up three bowls: flour in the first, beaten eggs with water in the second, and panko mixed with salt, paprika, garlic powder, and pepper in the third.
- Coat each fish stick in flour, then egg, then panko, pressing lightly so the crumbs stick.
- Place the coated sticks on the rack, drizzle or spray them with oil, and bake for 12 to 15 minutes until the coating is crisp and the fish flakes easily.
- Serve with lemon wedges and a dip like tartar sauce or ketchup.
Equipment for This Recipe:
- Sharp knife
- Sheet pan
- Wire rack
- Three shallow bowls
- Fish spatula or thin spatula
How to Serve This Dish:
Serve the fish sticks in a row with fries, peas, or plain rice. If the eaters at your table are cautious, keep the lemon wedges off to the side and let them decide whether to use them.
Pro Tips for This Recipe:
- Dry fish sticks brown better. Moisture softens the coating.
- Use one hand for dry ingredients and the other for egg. Less mess.
- If the coating looks pale, give it 1 extra minute, not five.
- Cod gives a mild flavor; haddock is a little firmer and can hold up better.
Variations on This Dish:
- Cornflake Crust: Crush plain cornflakes instead of using panko for a sweeter crunch.
- Parmesan Fish Sticks: Mix ¼ cup Parmesan into the crumb coating.
- Air Fryer Version: Cook at 400°F for 8 to 10 minutes, flipping once.
Common Mistakes to Avoid with This Dish:
- Cutting uneven strips: they will not cook at the same pace.
- Skipping the oil spray: dry crumbs stay dusty instead of crisp.
- Overbaking fish: the coating may look fine, but the fish will turn dry and chalky.
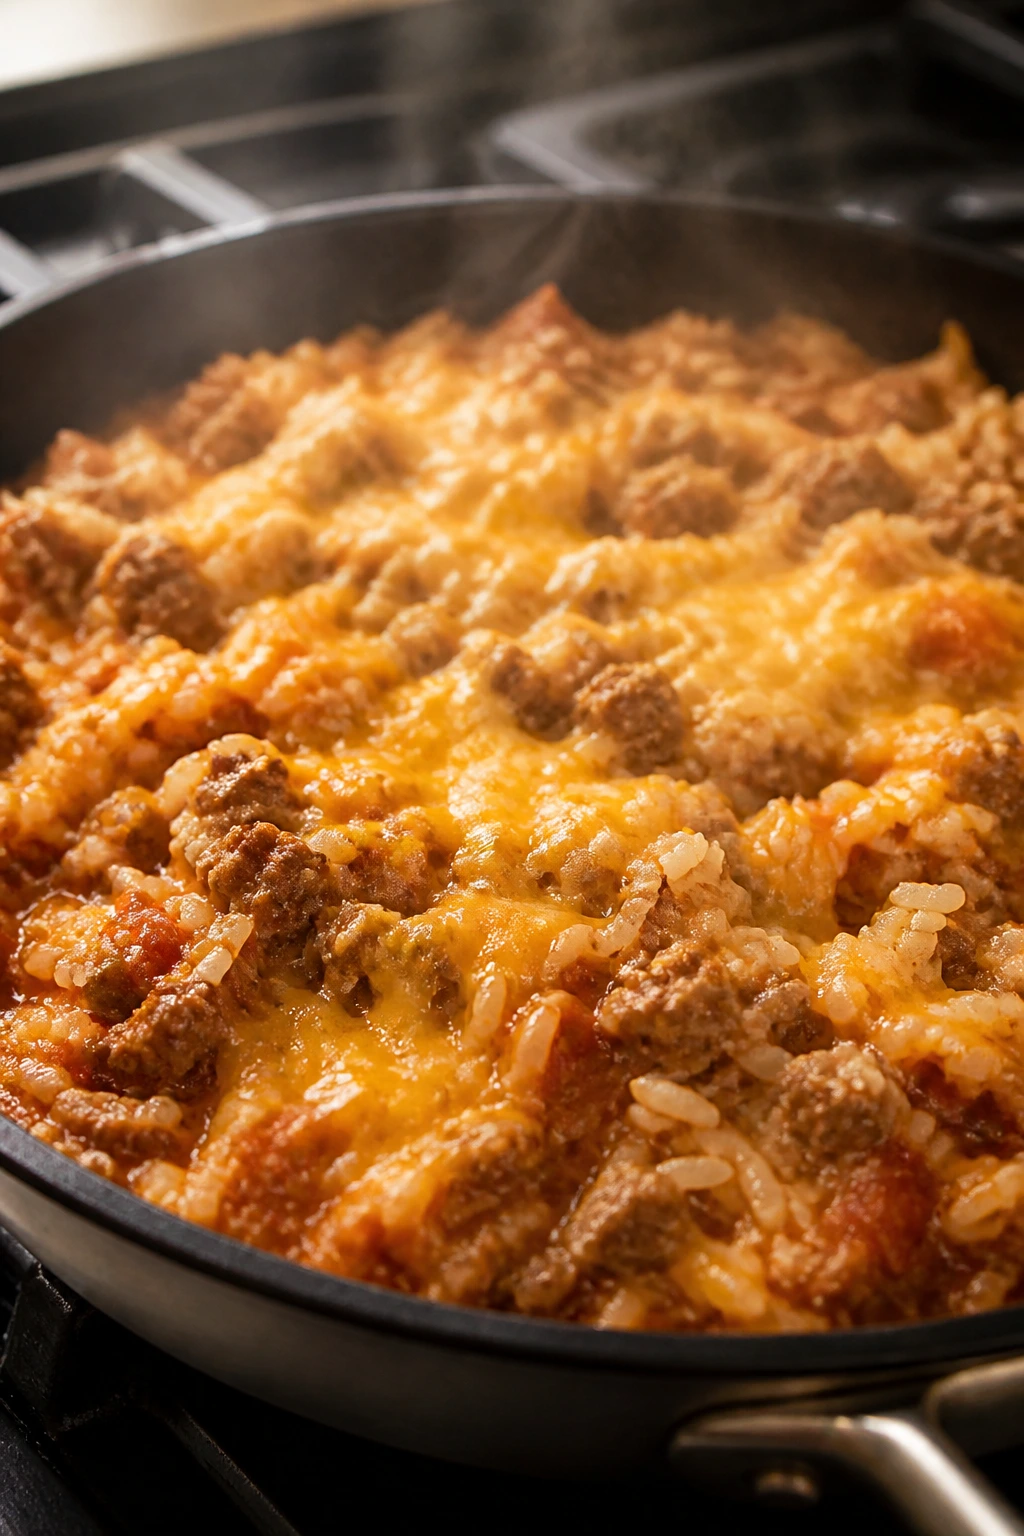
7. Mild Beef and Rice Skillet
This is the kind of dinner that looks plain in the best way. Beef, rice, and melted cheese are easy to recognize, and the whole skillet tastes like something that has been sitting on the stove for longer than it actually has.
Why It Works:
Rice stretches a pound of beef into a full pan of dinner without asking for strange ingredients. The tomato sauce gives everything a soft, savory backbone, and the cheddar on top makes the whole thing feel finished. Because the rice cooks right in the skillet, you only dirty one pan if you time the liquid correctly.
Key Ingredients:
- 1 tablespoon olive oil
- 1 lb ground beef
- 1 small onion, finely chopped
- 2 cloves garlic, minced
- 1 cup long-grain white rice
- 2 cups beef broth
- 1 (8 oz) can tomato sauce
- 1 teaspoon kosher salt
- ½ teaspoon black pepper
- 1 teaspoon paprika
- 1 cup shredded cheddar cheese
Quick Steps:
- Heat the olive oil in a large skillet over medium heat, then cook the beef and onion for 6 to 8 minutes until the meat is browned and the onion softens.
- Add the garlic and cook for 30 seconds until fragrant.
- Stir in the rice, broth, tomato sauce, salt, pepper, and paprika.
- Bring the pan to a simmer, then cover and reduce the heat to low. Cook for 18 to 20 minutes until the rice is tender and the liquid is absorbed.
- Fluff the rice with a fork, sprinkle the cheddar over the top, and cover for 2 minutes until the cheese melts.
- Serve hot from the skillet.
Equipment for This Recipe:
- Large deep skillet with lid
- Wooden spoon
- Measuring cup
- Fork
- Cheese grater
How to Serve This Dish:
Spoon it into shallow bowls and keep the top cheesy and simple. A few cucumber slices or apple wedges on the side are enough to round out the plate without complicating it.
Pro Tips for This Recipe:
- Use long-grain white rice, not instant rice. Instant rice overcooks fast in a skillet.
- Keep the lid on while the rice cooks. Lifting it too often lets steam escape.
- If the pan looks dry before the rice is tender, add 2 tablespoons of hot broth.
- Let the skillet rest for 5 minutes before serving. The rice finishes settling during that pause.
Variations on This Dish:
- Cheeseburger Skillet: Stir in 2 tablespoons ketchup and 1 tablespoon mustard.
- Taco Rice Version: Add 1 teaspoon cumin and swap cheddar for Monterey Jack.
- Hidden Veggie Option: Stir in ½ cup finely grated carrot with the onion.
Common Mistakes to Avoid with This Dish:
- Using too much heat: the bottom scorches before the rice softens.
- Stirring after the lid goes on: that can make the rice gummy.
- Adding cheese too early: it can disappear into the rice instead of sitting on top.
8. Breakfast Egg Muffins
These little egg cups are plain in the best way: soft, savory, and easy to eat with one hand. They look friendly on a plate, and they do not fall apart the second you pick them up.
Why It Works:
Egg muffins are useful because you can make them mild and tidy. The filling is mixed into the eggs instead of sitting in big chunks, so each bite tastes balanced. They also reheat better than scrambled eggs, which tend to go rubbery if you look at them wrong.
Key Ingredients:
- 8 large eggs
- ¼ cup milk
- 1 cup shredded cheddar cheese
- ½ cup diced ham
- ¼ teaspoon kosher salt
- ¼ teaspoon black pepper
- Nonstick cooking spray
- ¼ cup finely chopped spinach or bell pepper, optional
Quick Steps:
- Preheat the oven to 350°F and grease a 12-cup muffin tin well with cooking spray.
- Whisk the eggs, milk, salt, and pepper in a bowl until the mixture looks even and a little frothy.
- Stir in the cheddar, ham, and optional vegetables.
- Divide the mixture evenly among the muffin cups, filling each one about three-quarters full.
- Bake for 18 to 20 minutes until the centers are set and the tops are lightly puffed.
- Cool for 5 minutes, then run a thin knife around the edges and lift the muffins out.
Equipment for This Recipe:
- 12-cup muffin tin
- Mixing bowl
- Whisk
- Measuring cup
- Rubber spatula
How to Serve This Dish:
Serve two or three muffins with toast, fruit, or a few potato wedges. They are nice on a breakfast plate because the portions are clear and nobody has to guess what is inside.
Pro Tips for This Recipe:
- Grease the tin well. Egg loves to stick to dry metal.
- Chop any add-ins small enough that they do not poke through the top.
- If the muffins puff and then sink a little, that is normal.
- Cool before storing so condensation does not soften the tops.
Variations on This Dish:
- Cheese-Only Muffins: Skip the ham and use 1¼ cups cheese.
- Bacon Breakfast Cups: Swap in crisp chopped bacon for the ham.
- Veggie Light: Use just 2 tablespoons chopped spinach in each cup so the green stays subtle.
Common Mistakes to Avoid with This Dish:
- Overfilling the cups: the eggs spill and bake into a mess.
- Baking until dry: the muffins should be set, not leathery.
- Skipping the cool-down: hot egg cups break apart more easily.
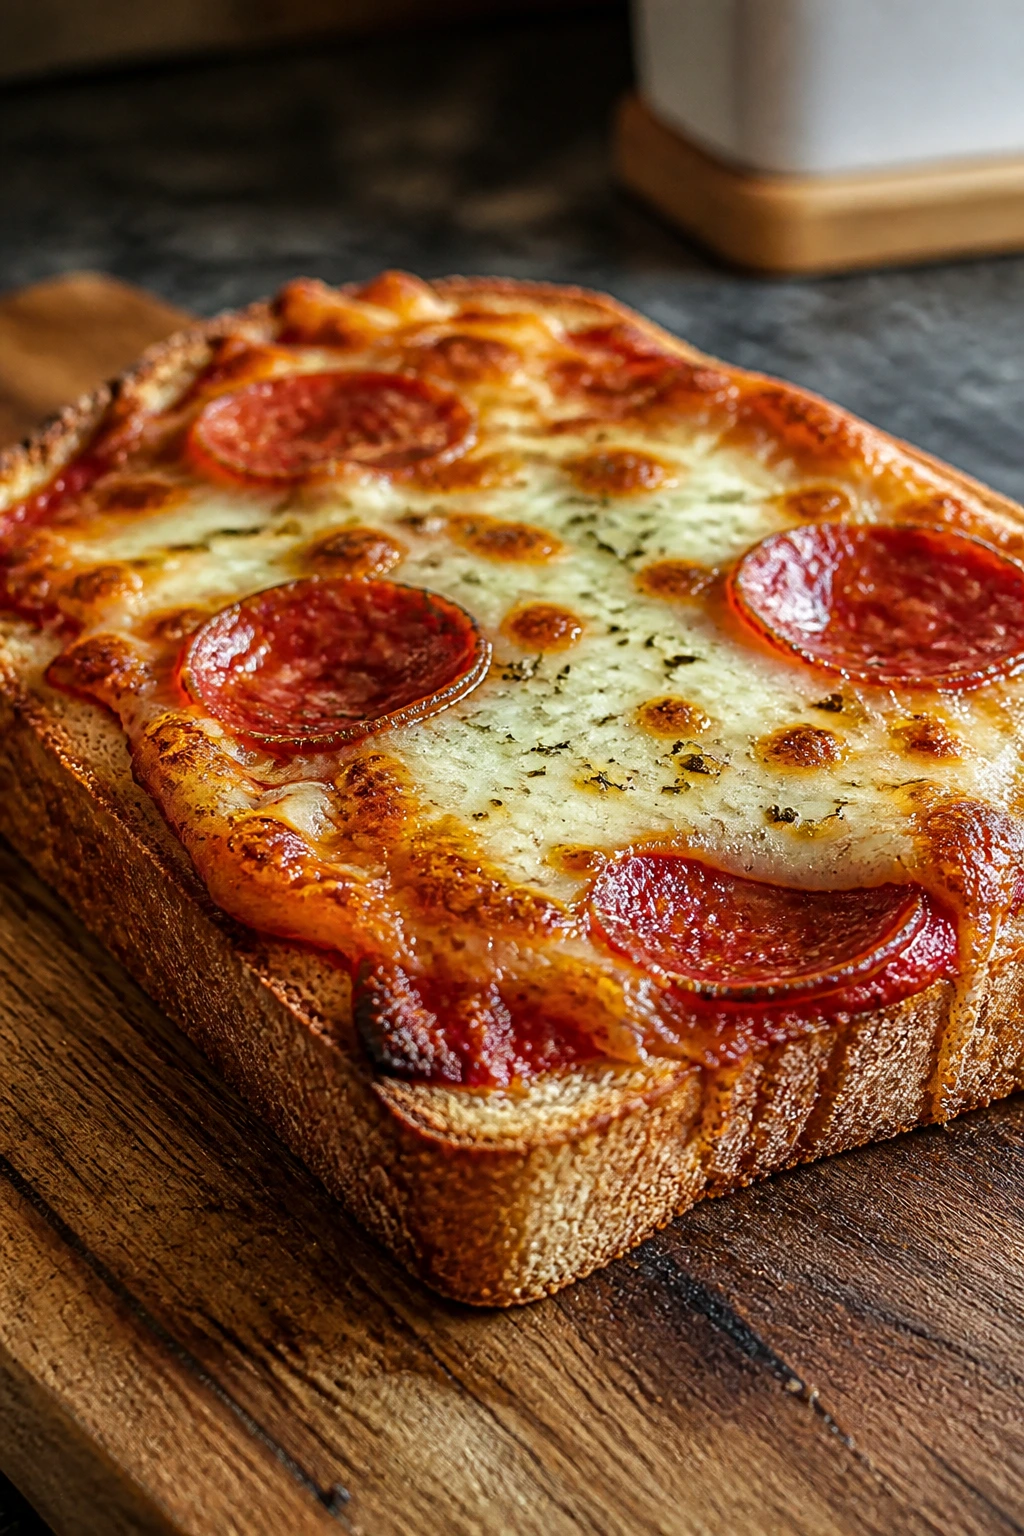
9. Homemade Pizza Toast
Pizza toast is what happens when bread gets dressed up just enough to feel like a treat. The edges crisp, the cheese bubbles, and the sauce stays familiar enough for the most cautious eater to try a corner.
Why It Works:
All the flavors are already known: bread, tomato sauce, cheese, and a little oregano. The toast gets lightly crisp before the toppings go on, which keeps it from turning soggy in the oven. Using thick bread matters because thin slices bend under the sauce and cheese.
Key Ingredients:
- 6 slices sturdy bread or 4 slices Texas toast
- ½ cup pizza sauce or marinara
- 1½ cups shredded mozzarella cheese
- 24 pepperoni slices
- 1 tablespoon olive oil or butter
- ½ teaspoon dried oregano
- 2 tablespoons grated Parmesan, optional
Quick Steps:
- Preheat the oven to 425°F and line a baking sheet with parchment.
- Brush the bread lightly with olive oil or butter, then toast it in the oven for 3 minutes to set the surface.
- Spread each slice with sauce, leaving a little border at the edge.
- Top with mozzarella, pepperoni, oregano, and Parmesan if using.
- Bake for 7 to 9 minutes until the cheese melts and the edges are crisp.
- Broil for 30 to 60 seconds if you want more browning, then serve.
Equipment for This Recipe:
- Baking sheet
- Parchment paper
- Pastry brush or spoon
- Small knife
- Oven mitts
How to Serve This Dish:
Cut the slices into strips or squares so they feel snack-like instead of formal. A bowl of grapes or sliced carrots beside them keeps the plate simple and balanced without turning dinner into a project.
Pro Tips for This Recipe:
- Toast the bread first. That keeps the sauce from soaking through.
- Use a light hand with sauce; too much turns the toast floppy.
- Pepperoni curls more when the cheese goes on top of it.
- If you want a softer bite, bake on a lower rack for the full time and skip the broiler.
Variations on This Dish:
- Cheese Pizza Toast: Leave off the pepperoni and use extra mozzarella.
- Ham and Pineapple Toast: Add tiny pineapple pieces only if your crowd accepts sweet and savory together.
- Mini English Muffin Pizzas: Split the bread base into smaller rounds for younger kids.
Common Mistakes to Avoid with This Dish:
- Using soft sandwich bread: it collapses under the toppings.
- Overloading the sauce: soggy toast is the fastest way to lose interest.
- Walking away from the broiler: cheese goes from browned to burnt fast.
10. Creamy Mac and Cheese
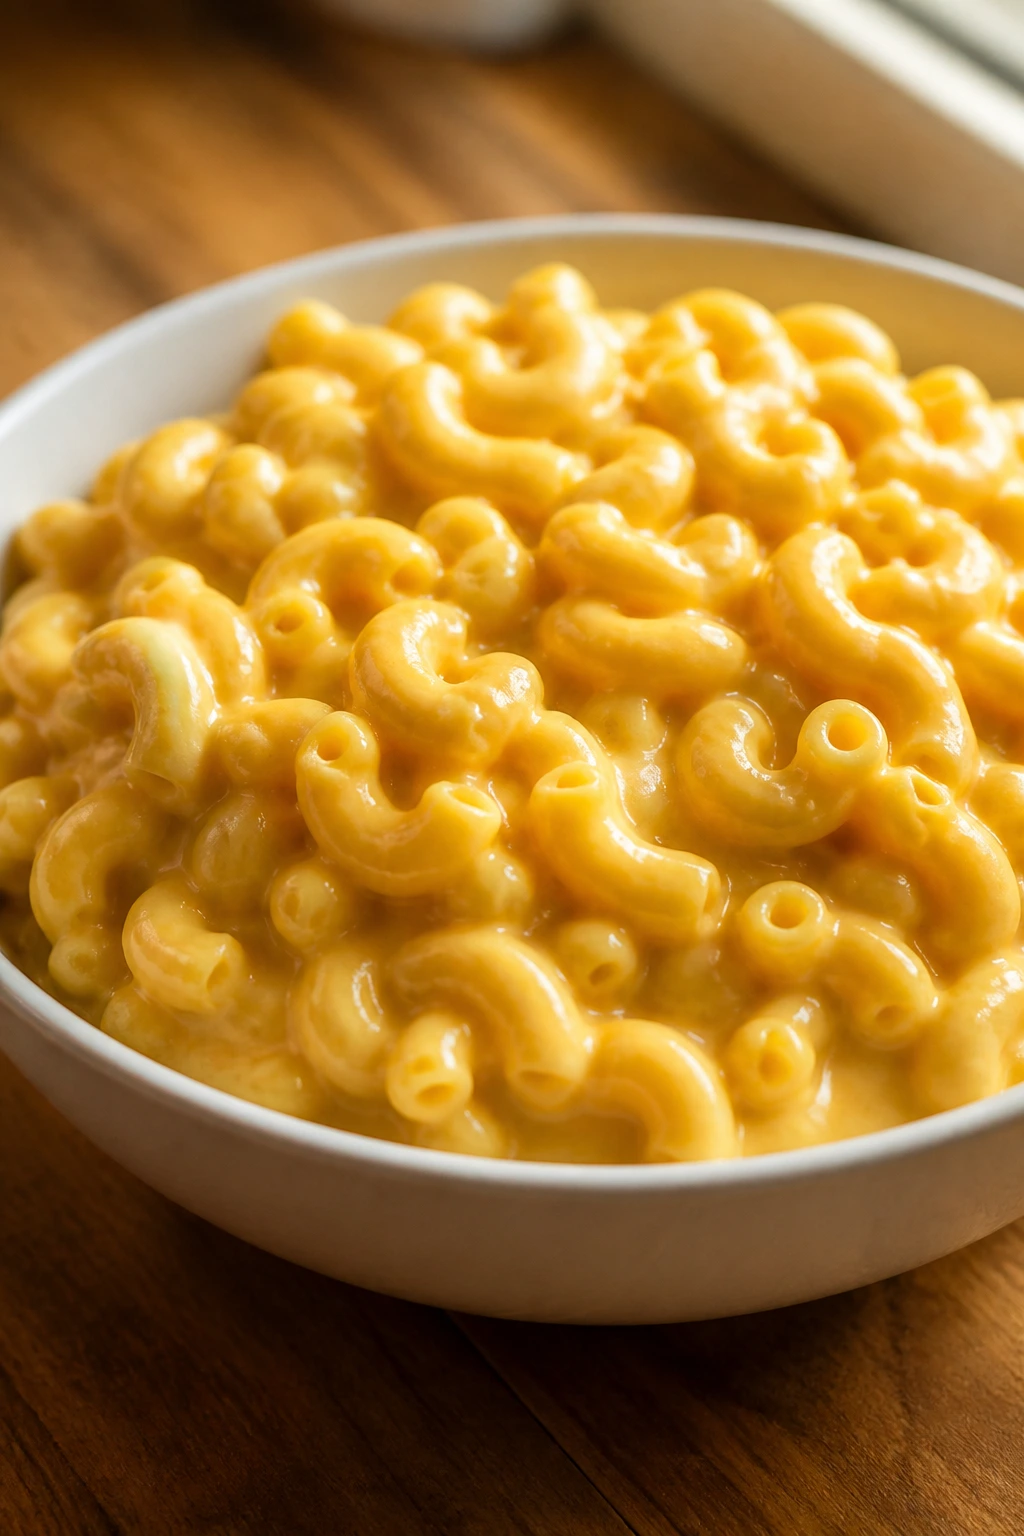
Mac and cheese earns its place because it hits a very specific texture note: soft pasta, silky sauce, and a top that stays creamy instead of turning into one big sticky block. When it is done well, it tastes like it came from a pot that never had to apologize for anything.
Why It Works:
A simple roux gives the sauce body, and a mix of cheddar and mozzarella gives both flavor and stretch. The sauce should cling to the macaroni, not sit under it like soup. This version keeps the seasoning light so the cheese stays the main event.
Key Ingredients:
- 12 oz elbow macaroni
- 4 tablespoons unsalted butter
- 3 tablespoons all-purpose flour
- 2½ cups milk
- 2 cups shredded sharp cheddar cheese
- 1 cup shredded mozzarella cheese
- 1 teaspoon kosher salt
- ½ teaspoon dry mustard
- ¼ teaspoon black pepper
Quick Steps:
- Cook the macaroni in salted water until al dente, then drain and set aside.
- Melt the butter in a saucepan over medium heat, whisk in the flour, and cook for 1 minute until the mixture smells a little nutty.
- Whisk in the milk slowly and keep whisking until the sauce thickens enough to coat a spoon.
- Lower the heat and stir in the cheddar, mozzarella, salt, dry mustard, and pepper until the cheese melts smooth.
- Fold in the macaroni and stir until every elbow is coated.
- Serve hot, or spoon into a baking dish and broil briefly for a browned top if you want one.
Equipment for This Recipe:
- Large pot
- Saucepan
- Whisk
- Colander
- Wooden spoon
How to Serve This Dish:
Serve it in warm bowls with no extra drama. If you want a side, keep it plain: peas, sliced apples, or a few cucumber rounds work without competing for attention.
Pro Tips for This Recipe:
- Shred your own cheese if possible. It melts smoother than the bagged stuff.
- Keep the heat low when the cheese goes in. Boiling sauce can turn grainy.
- Save a splash of pasta water if the sauce thickens too much.
- Salt the pasta water well; the sauce should not have to do all the seasoning.
Variations on This Dish:
- Baked Mac: Top with ½ cup breadcrumbs mixed with 1 tablespoon melted butter and bake at 375°F for 15 minutes.
- Extra-Soft Version: Use all cheddar if you want a stronger, less stretchy cheese pull.
- Broccoli Add-In: Stir in 1 cup very small steamed florets for kids who accept green things in tiny doses.
Common Mistakes to Avoid with This Dish:
- Boiling the cheese sauce: that can make it grainy.
- Undersalting the pasta water: the whole dish tastes flat.
- Walking away from the roux: one minute is enough; much longer can darken it too much for a mild mac.
11. Chicken and Broccoli Rice Casserole
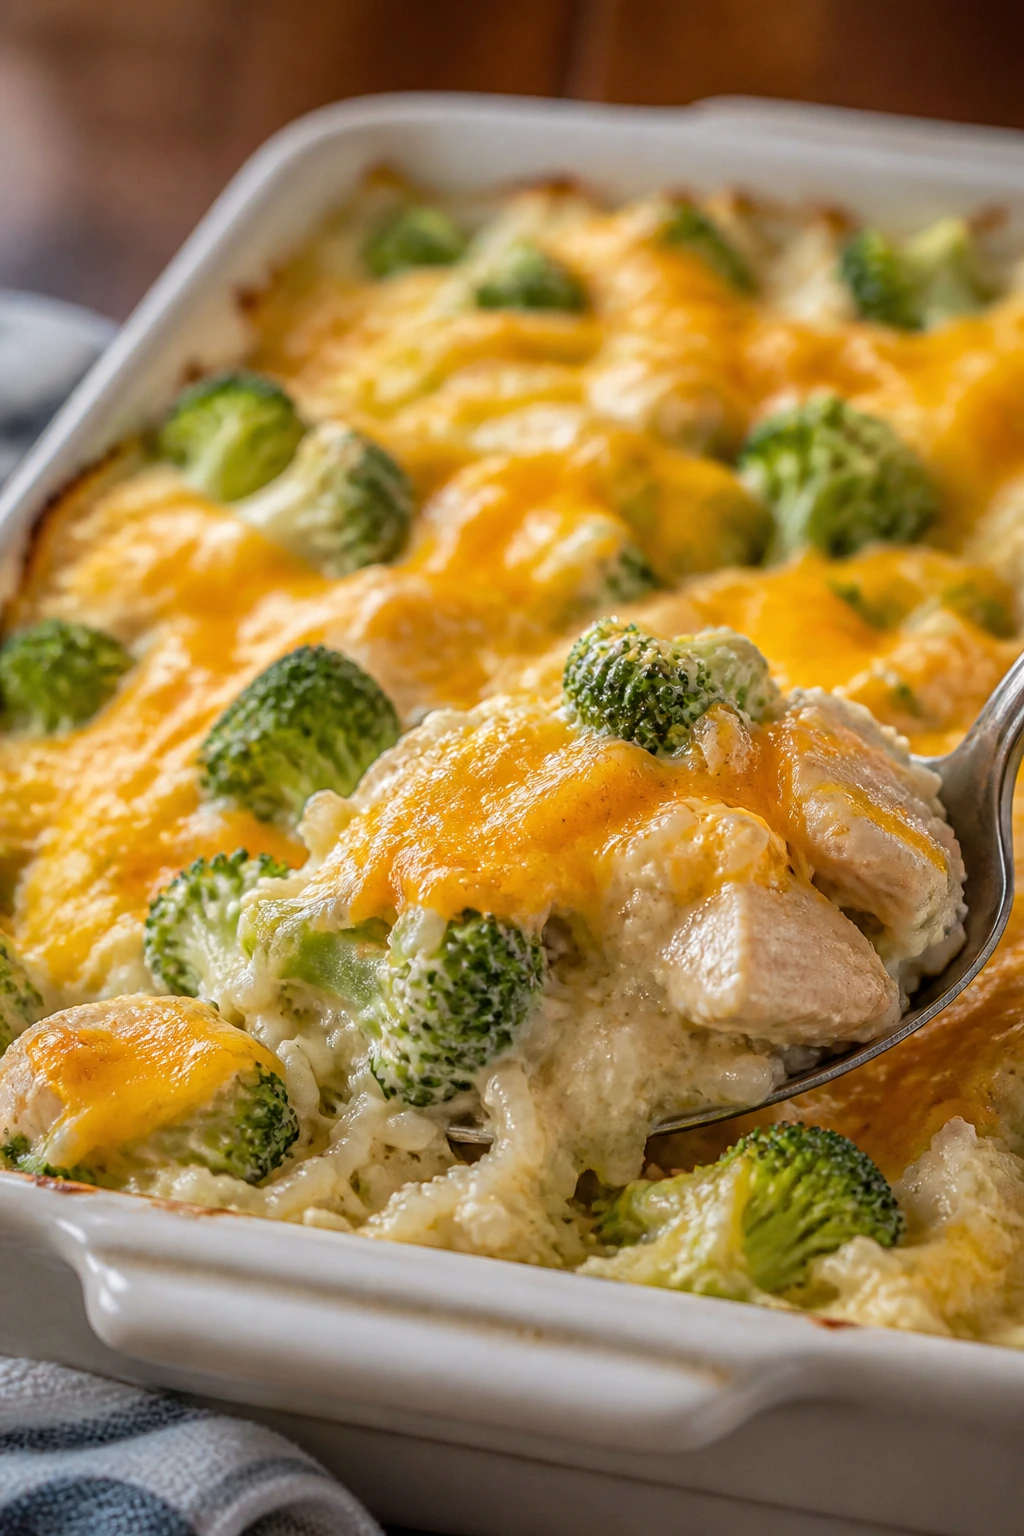
This casserole tastes like a single spoonful of several familiar things: chicken, rice, melted cheddar, and broccoli that has softened enough to stop looking like a challenge. It is the kind of dish that can sit in the oven while the rest of dinner chaos settles down.
Why It Works:
Cream soup holds the casserole together, while cooked rice makes the texture soft and predictable. Cutting the broccoli into small florets matters. Big florets can feel too obvious, but tiny ones fold into the casserole and become less confrontational without disappearing completely.
Key Ingredients:
- 3 cups cooked white rice
- 2 cups cooked diced chicken
- 3 cups small broccoli florets, chopped small
- 1 (10.5 oz) can cream of chicken soup
- ½ cup milk
- 2 cups shredded cheddar cheese
- ½ cup breadcrumbs
- 2 tablespoons melted butter
- ½ teaspoon kosher salt
- ¼ teaspoon black pepper
Quick Steps:
- Preheat the oven to 375°F and grease a 9-by-13-inch baking dish.
- Mix the rice, chicken, broccoli, soup, milk, 1½ cups cheddar, salt, and pepper in a large bowl.
- Spread the mixture into the baking dish and smooth the top.
- Combine the breadcrumbs, melted butter, and remaining cheddar in a small bowl.
- Sprinkle the topping evenly over the casserole.
- Bake for 25 to 30 minutes until the casserole is bubbling at the edges and the top is golden.
Equipment for This Recipe:
- 9-by-13-inch baking dish
- Large mixing bowl
- Wooden spoon
- Measuring cups
- Small bowl for topping
How to Serve This Dish:
Scoop it into squares or big spoonfuls, depending on how neat you need the table to feel. It pairs nicely with applesauce or a plain green salad, though honestly it also works as a full dinner by itself.
Pro Tips for This Recipe:
- Use already-cooked chicken so the casserole does not spend forever in the oven.
- Dry the broccoli after washing it. Extra water loosens the sauce.
- Let the casserole rest 10 minutes before serving so it slices more cleanly.
- If the top browns too fast, tent it with foil for the last 10 minutes.
Variations on This Dish:
- Turkey Swap: Use cooked turkey instead of chicken.
- Rice-and-Corn Version: Replace half the broccoli with ½ cup thawed corn.
- Extra-Cheesy Bake: Add another ½ cup cheddar to the middle layer.
Common Mistakes to Avoid with This Dish:
- Using raw chicken: it changes the timing and can leave the rice dry.
- Leaving the broccoli pieces too large: they stand out more than they should.
- Skipping the rest time: hot casserole falls apart when you try to serve it too fast.
12. Banana Oat Pancakes
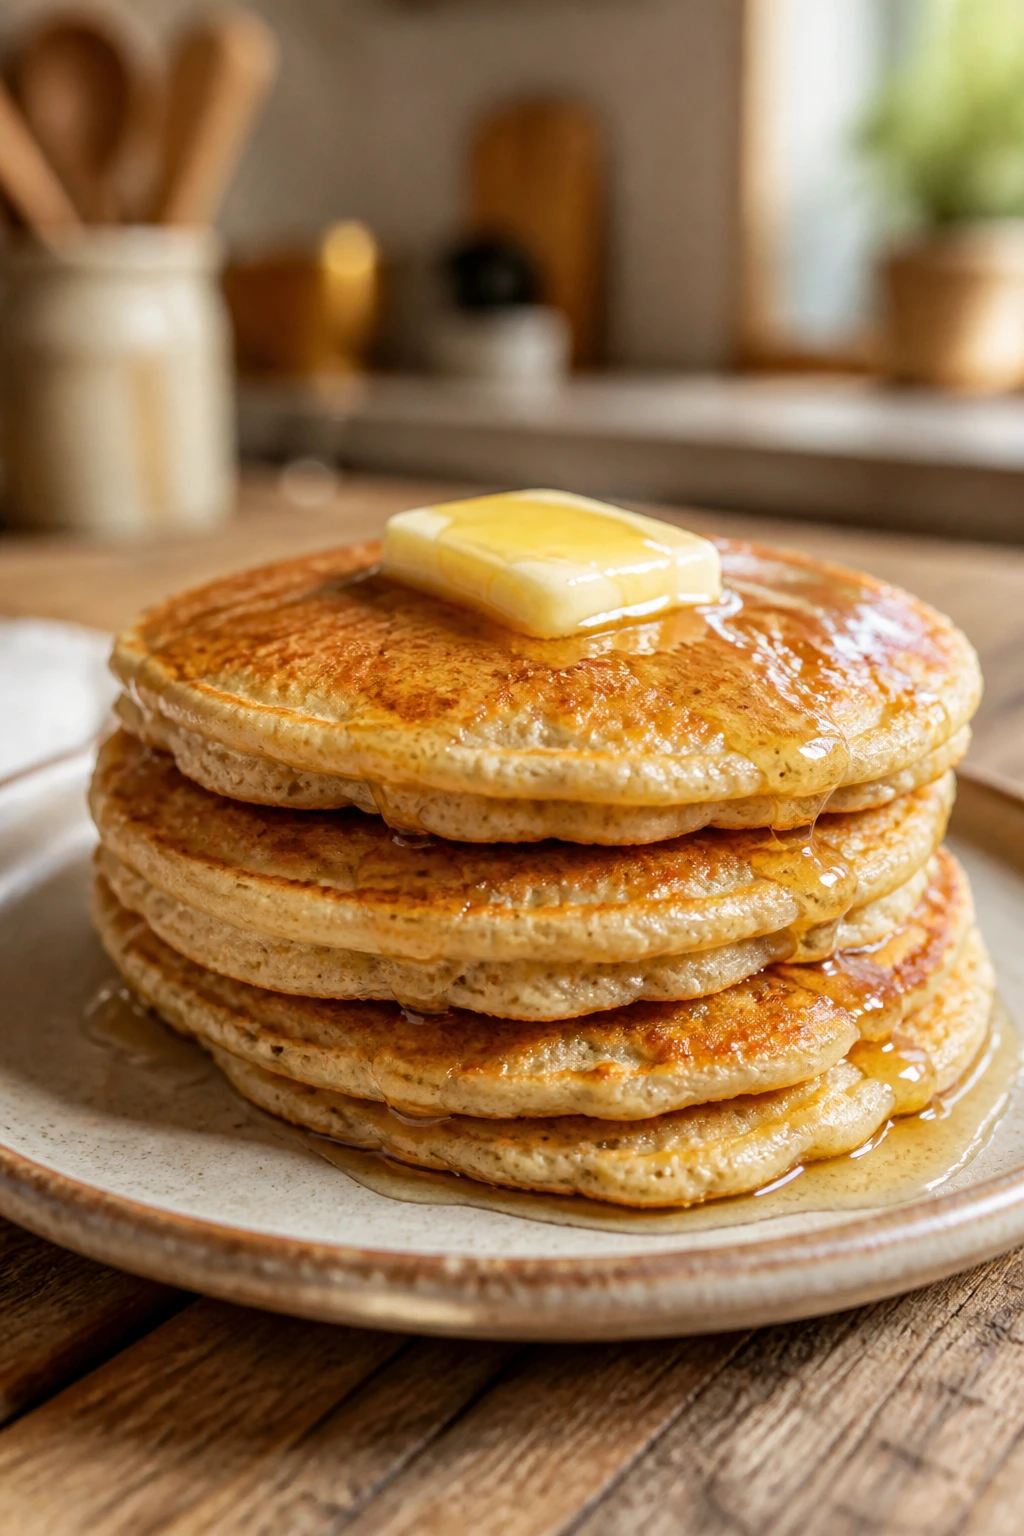
These pancakes taste like breakfast got a little softer and a little sweeter without leaving familiar territory. They are fluffy at the edges, tender in the center, and naturally sweet enough that you do not need a heavy pour of syrup to make them work.
Why It Works:
Bananas do the sweetening, oats give the batter a gentle chew, and eggs hold the whole thing together. Blending the batter gives you a smoother texture, which matters if you are feeding someone who notices every little lump. The batter cooks into small, easy pancakes that feel less intimidating than a plate of giant ones.
Key Ingredients:
- 2 ripe bananas
- 2 large eggs
- 1 cup rolled oats
- ½ cup milk
- 1 teaspoon baking powder
- 1 teaspoon cinnamon
- ½ teaspoon vanilla extract
- Pinch of salt
- Butter, for the skillet
Quick Steps:
- Blend the bananas, eggs, oats, milk, baking powder, cinnamon, vanilla, and salt until smooth.
- Rest the batter for 5 minutes so the oats soften slightly.
- Heat a skillet over medium heat and melt a small pat of butter.
- Spoon 2 tablespoons of batter per pancake into the skillet.
- Cook for 2 to 3 minutes until the tops look set and small bubbles appear, then flip and cook for 1 to 2 minutes more.
- Serve warm with syrup, yogurt, or sliced strawberries.
Equipment for This Recipe:
- Blender
- Nonstick skillet or griddle
- Spatula
- Measuring cups
- Ladle or tablespoon
How to Serve This Dish:
Stack three or four pancakes on a plate and keep the toppings simple. Peanut butter, sliced banana, or a small spoonful of yogurt works well if syrup feels too sweet.
Pro Tips for This Recipe:
- Use bananas with brown spots. Pale bananas will not sweeten the batter enough.
- Keep the pancakes small so they are easier to flip.
- If the batter looks too thick, add 1 tablespoon milk at a time.
- Wipe the pan between batches so stray oats do not burn.
Variations on This Dish:
- Blueberry Pancakes: Fold in ½ cup blueberries after blending.
- Apple Cinnamon Version: Add ¼ cup finely grated apple and reduce the milk by 2 tablespoons.
- Protein Boost: Stir in 2 tablespoons peanut butter for a thicker, richer batter.
Common Mistakes to Avoid with This Dish:
- Using green bananas: the batter tastes bland and less sweet.
- Cooking over high heat: the outside browns before the center sets.
- Making the pancakes too large: they are harder to flip and easier to break.
13. Slow Cooker BBQ Pulled Chicken Sliders
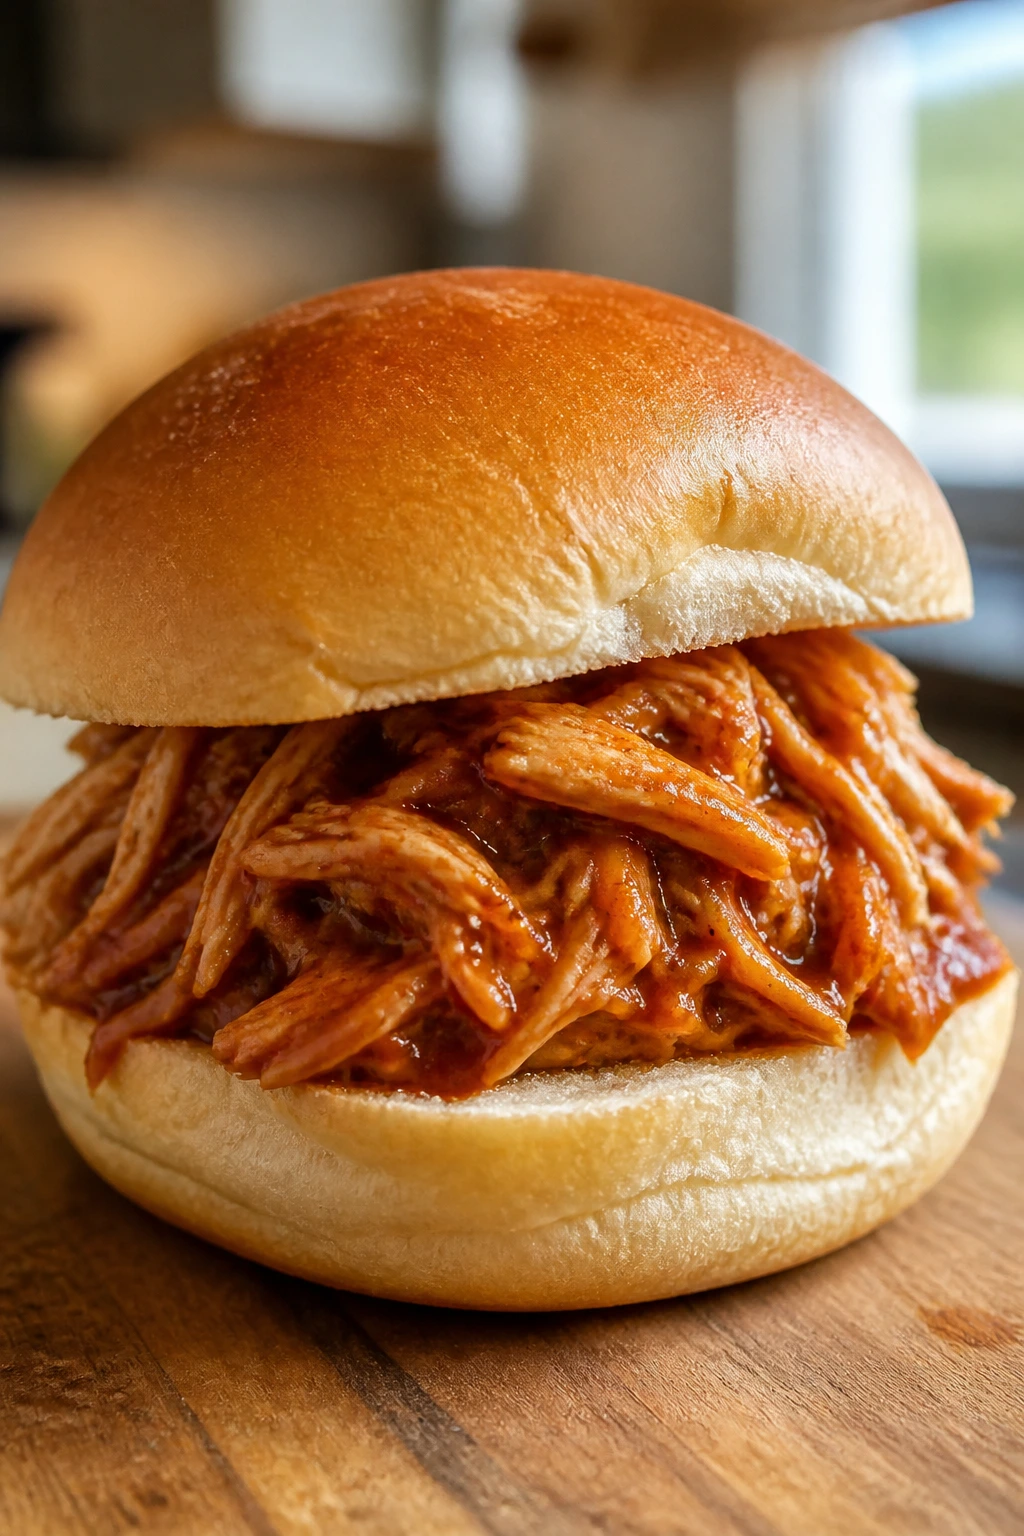
Pulled chicken works for picky eaters because the texture is soft and the flavor is familiar. Put it on a bun, keep the sauce mild, and you get a meal that feels like a sandwich instead of a pile of meat.
Why It Works:
The slow cooker keeps the chicken tender without much attention from you, which is the whole appeal. BBQ sauce and onion give it enough flavor to taste finished, but not so much that the sauce becomes sharp or smoky in a way kids reject. Shredding the chicken right in the pot helps it soak up the sauce.
Key Ingredients:
- 2 lbs boneless, skinless chicken thighs or breasts
- 1 cup barbecue sauce
- ½ cup chicken broth
- 1 small onion, thinly sliced
- 1 teaspoon smoked paprika
- ½ teaspoon kosher salt
- 12 slider buns
- Pickle slices, optional
- 1 tablespoon butter, optional for toasting buns
Quick Steps:
- Layer the onion in the bottom of the slow cooker.
- Place the chicken on top and sprinkle with smoked paprika and salt.
- Pour in the barbecue sauce and chicken broth.
- Cook on low for 5 to 6 hours or on high for 3 to 4 hours until the chicken shreds easily with a fork.
- Shred the chicken directly in the cooker and stir it into the sauce.
- Pile onto slider buns and serve warm.
Equipment for This Recipe:
- Slow cooker
- Two forks
- Cutting board
- Serving spoon
- Small skillet, optional for buns
How to Serve This Dish:
Set out the chicken and buns separately if you have mixed opinions at the table. That way the people who want a plain slider can build one, and the people who like pickles or extra sauce can go their own way.
Pro Tips for This Recipe:
- Use a mild barbecue sauce if your crowd is sensitive to smoke or heat.
- Thighs stay juicier than breasts, though both work.
- Toast the buns lightly so they do not get soggy right away.
- If the sauce looks thin after shredding, cook uncovered for 10 minutes on high.
Variations on This Dish:
- Cheddar Sliders: Add a slice or sprinkle of cheese to each bun.
- Honey BBQ Version: Mix 1 tablespoon honey into the sauce for a softer finish.
- Plain Pulled Chicken: Use half the barbecue sauce and serve the rest on the side.
Common Mistakes to Avoid with This Dish:
- Overcooking on high: the chicken can dry out at the edges.
- Adding too much sauce at the start: the sliders turn messy fast.
- Skipping the onion layer: it helps keep the chicken off the bottom so it cooks more evenly.
14. Baked Potato Bar with Simple Toppings
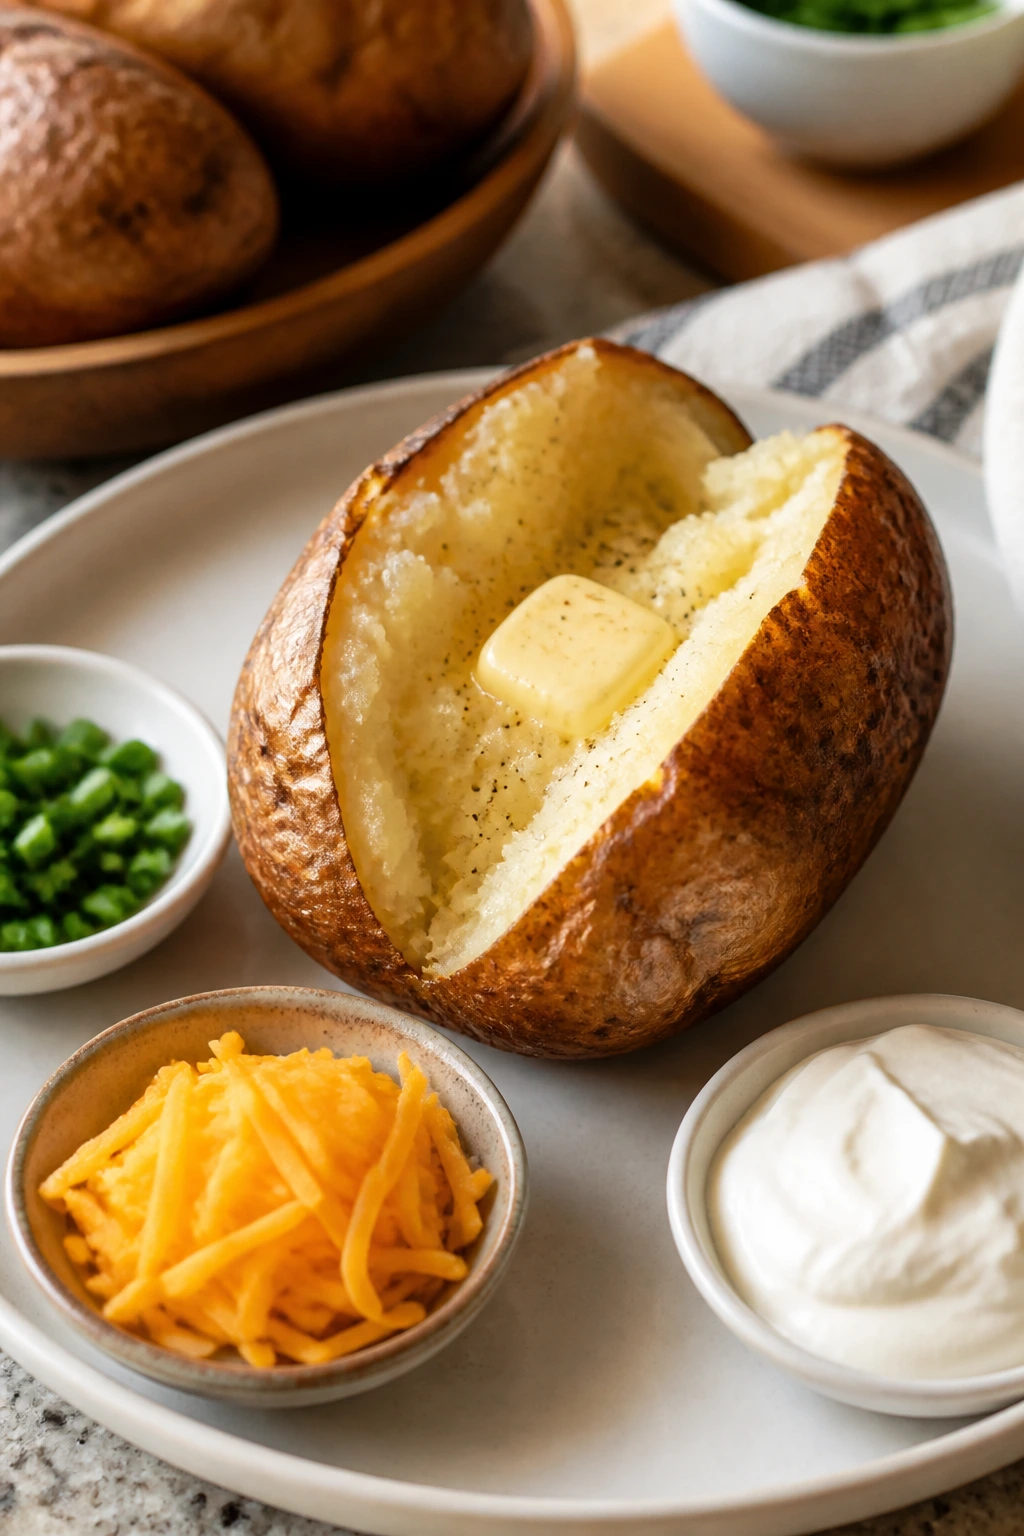
A baked potato is honest food. It looks exactly like what it is, which is part of the charm. The skin gets crisp, the inside turns fluffy, and the toppings stay separate so everyone can build the version they actually want.
Why It Works:
Potato bars are gold when different people at the table want different things. One potato can stay plain with butter and salt, while another gets cheese, sour cream, and bacon. That little bit of control matters a lot for picky eaters, because the plate stops feeling like a surprise.
Key Ingredients:
- 4 large russet potatoes
- 2 tablespoons olive oil
- 1 teaspoon kosher salt
- 4 tablespoons unsalted butter
- 1 cup sour cream
- 1½ cups shredded cheddar cheese
- 6 slices cooked bacon, crumbled
- 2 tablespoons chopped chives
- Salt and pepper, to taste
Quick Steps:
- Preheat the oven to 425°F.
- Scrub the potatoes, dry them well, and prick each one 4 or 5 times with a fork.
- Rub the skins with olive oil and salt, then place the potatoes directly on the oven rack or on a sheet pan.
- Bake for 50 to 60 minutes until the skins feel crisp and a knife slides through the center easily.
- Split each potato open, squeeze the ends lightly to fluff the inside, and add butter first so it melts into the hot flesh.
- Set out the toppings and let everyone build their own.
Equipment for This Recipe:
- Oven
- Baking sheet, optional
- Fork
- Sharp knife
- Small bowls for toppings
How to Serve This Dish:
Serve the potatoes hot and split open down the middle so the steam escapes and the insides stay fluffy. A potato bar works well with nothing more than a salad or a bowl of soup, and it lets each person keep things as plain or loaded as they want.
Pro Tips for This Recipe:
- Dry skins crisp better than damp ones.
- Don’t wrap potatoes in foil if you want a crisp outside.
- If you are short on time, microwave the potatoes for 6 minutes first, then finish in the oven.
- Warm the toppings slightly so the potato does not cool down too fast.
Variations on This Dish:
- Broccoli and Cheese Potato: Add a little steamed broccoli and extra cheddar.
- Chili Potato: Top with mild chili for people who want a bigger meal.
- Plain Butter Potato: Keep it to butter and salt only, which is often the safest move.
Common Mistakes to Avoid with This Dish:
- Skipping the salt on the skin: the exterior tastes flat.
- Wrapping in foil: the skin steams instead of crisping.
- Underbaking: the inside should feel light and fluffy, not waxy.
15. Apple Cinnamon Baked Oatmeal
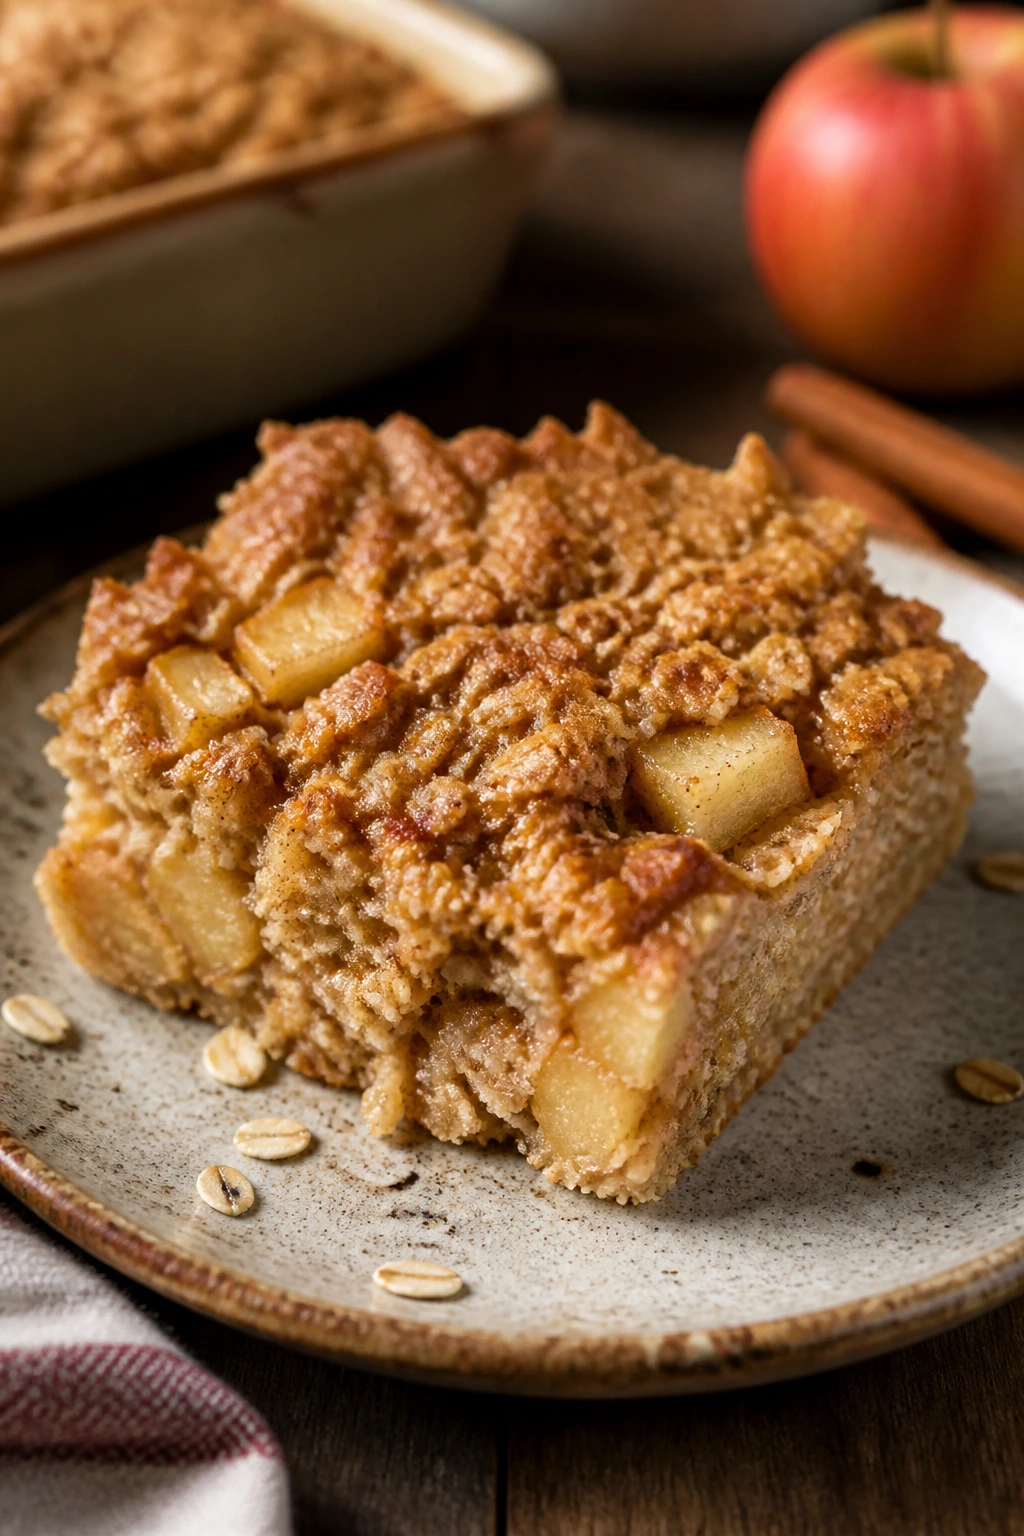
This is breakfast that smells like warm apples and cinnamon the moment it comes out of the oven. The texture sits between soft cake and cozy oatmeal, which is exactly why kids who resist mushy cereal often accept it.
Why It Works:
Baked oatmeal is gentle, structured, and easy to slice. The apples stay in little cubes, so the dish still tastes like real fruit instead of an anonymous sweet mass. It is also one of those rare breakfasts that can be made ahead and reheated without turning sad.
Key Ingredients:
- 2 cups rolled oats
- 2 medium apples, peeled and diced
- 2 large eggs
- 2 cups milk
- ⅓ cup maple syrup or honey
- 1 teaspoon cinnamon
- 1 teaspoon baking powder
- ½ teaspoon kosher salt
- 2 tablespoons melted butter
- 1 teaspoon vanilla extract
Quick Steps:
- Preheat the oven to 350°F and grease an 8-by-8-inch baking dish.
- Whisk the eggs, milk, maple syrup, melted butter, vanilla, cinnamon, baking powder, and salt in a large bowl.
- Stir in the oats and diced apples until everything is evenly coated.
- Pour the mixture into the baking dish and smooth the top.
- Bake for 35 to 40 minutes until the center is set and the top is lightly golden.
- Cool for 10 minutes before slicing so it holds together.
Equipment for This Recipe:
- 8-by-8-inch baking dish
- Mixing bowl
- Whisk
- Measuring cups
- Knife and cutting board
How to Serve This Dish:
Cut it into squares and serve warm with a spoonful of yogurt or a small drizzle of syrup. It is sturdy enough to eat at the table or on the way out the door, which is more useful than a lot of breakfast recipes admit.
Pro Tips for This Recipe:
- Dice the apples small so every bite gets one or two pieces.
- Use rolled oats, not instant oats, for a better sliceable texture.
- If the top browns too quickly, loosely cover it with foil.
- A pinch of nutmeg can work, but do not overdo it; cinnamon should stay in charge.
Variations on This Dish:
- Berry Baked Oatmeal: Swap half the apples for blueberries.
- Banana Apple Version: Add 1 mashed banana and reduce the milk by ¼ cup.
- Dairy-Free Bake: Use oat milk or almond milk and the oatmeal still sets well.
Common Mistakes to Avoid with This Dish:
- Using too much liquid: the bake turns wet and heavy.
- Slicing too early: the squares fall apart if they do not rest.
- Choosing apples that turn to mush: firm apples keep the texture clearer.
Why These Recipes Work at the Family Table
Picky eaters usually want three things more than they want novelty: familiar shapes, predictable textures, and flavors that do not shout at them. That is why a sheet pan of chicken tenders or a skillet of mac and cheese tends to land better than a casserole full of mixed surprises. The food looks recognizable before anyone takes a bite. That matters.
There is also a practical side to it. A recipe that can be dipped, sliced, stacked, or served with toppings on the side gives the eater some control, and control lowers resistance. A child who refuses broccoli mixed into sauce may happily eat a plain baked potato with broccoli on the side. Same food. Different presentation. Big difference at the table.
Essential Equipment for These Recipes
-
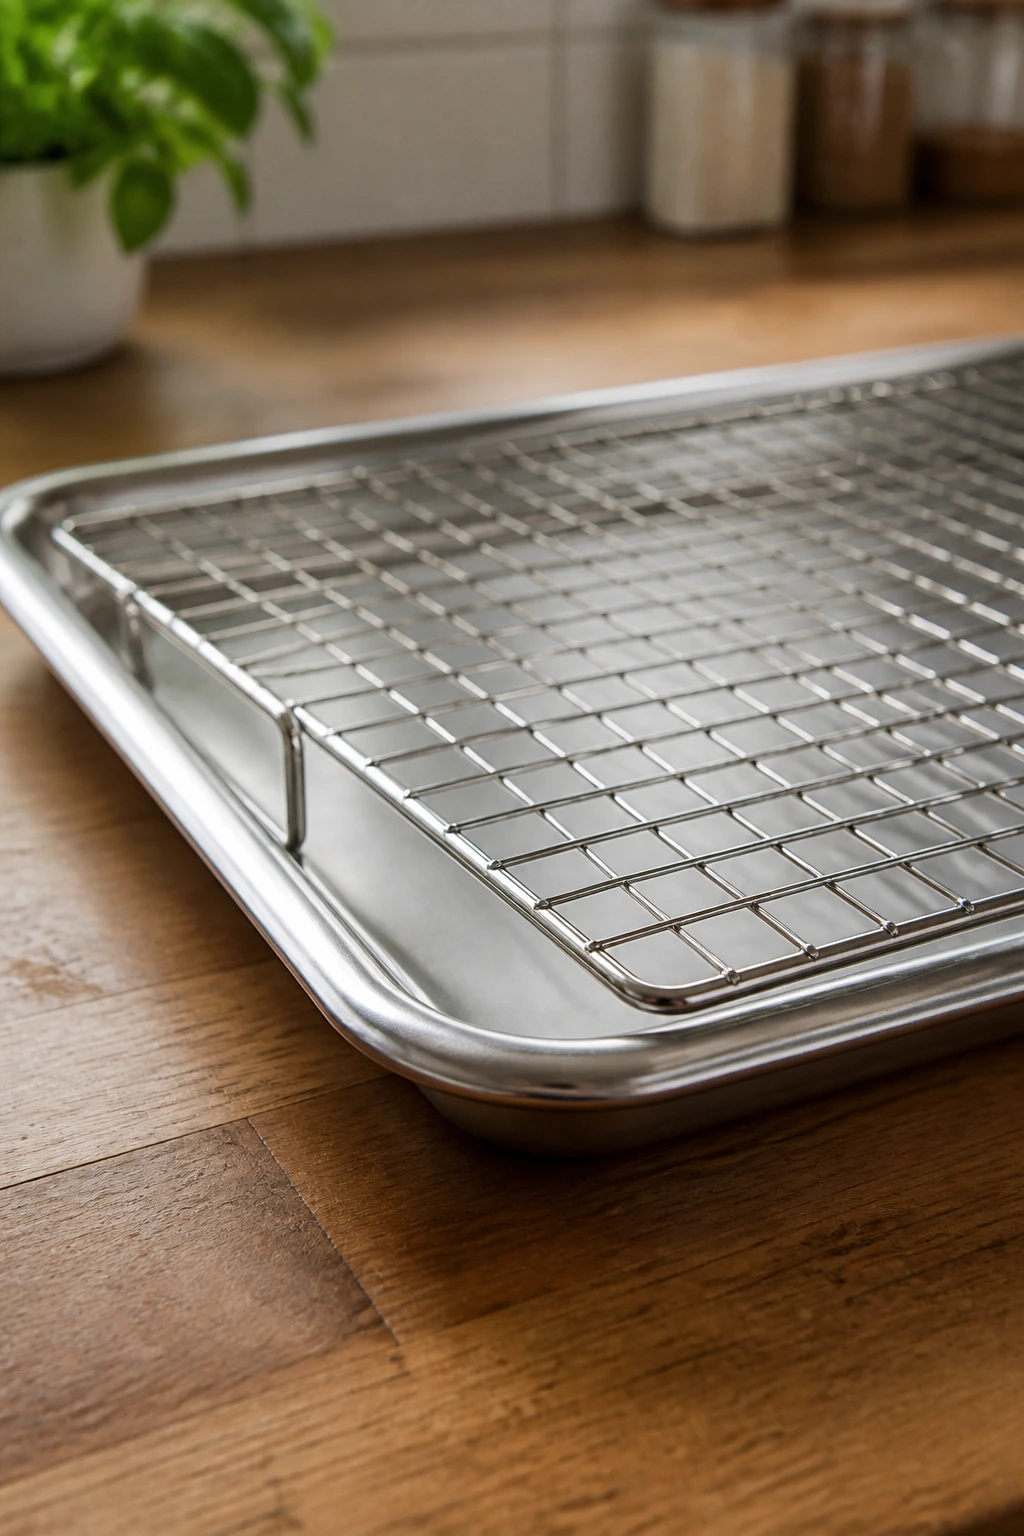
Rimmed sheet pans: useful for chicken tenders, fish sticks, and baked oatmeal if you want even browning and easy cleanup.
-
Wire rack: keeps breaded foods crisp by letting hot air move underneath them.
-
Large skillet with lid: helps with rice, noodles, and one-pan dinners where steam does part of the work.
-
Slow cooker: best for pulled chicken and anything that needs long, hands-off cooking.
-
9-by-13-inch baking dish: the right size for casseroles, baked mac, and potato-style bakes.
-
Muffin tin: gives egg muffins clean edges and even baking.
-
Blender or immersion blender: useful for smooth sauces that need to hide vegetable texture.
-
Whisk: makes egg batters, sauces, and baked oatmeal mix evenly without clumps.
-
Instant-read thermometer: especially handy for chicken, fish, and meatballs so you do not have to guess.
-
Box grater: works for cheese, carrot, and zucchini, and it makes hidden-veg cooking much easier.
Smart Shopping and Ingredient Tips
For picky-eater recipes, ingredient quality is not about fancy shopping. It is about choosing the version that cooks into the texture you actually want. Panko breadcrumbs make a lighter crust than regular breadcrumbs. Russet potatoes bake fluffier than waxy ones. Long-grain white rice stays separate in a skillet where short-grain rice can go sticky fast.
Cheese deserves a little attention, too. Pre-shredded cheese is convenient, and in a recipe like quesadillas or baked casseroles it is often fine. If you are making a sauce, though, block cheese you grate yourself melts more smoothly because it does not carry the anti-caking powder that can make a sauce grainy. I reach for that more often than not when the goal is a silky finish.
For vegetables, smaller is usually safer. A grated carrot disappears faster than a coin-shaped slice. A finely chopped broccoli floret feels less intrusive than a giant one. If a recipe uses hidden vegetables, buy ones that cook down easily: zucchini, carrots, onions, and tomatoes are your friends here.
Meat choice matters for texture. Chicken thighs stay moister than breasts in the slow cooker. Ground turkey needs a little extra moisture if you are shaping meatballs. Cod makes a mild fish stick, while haddock has a slightly firmer bite. None of that is glamorous. It just saves dinner.
How to Serve These Recipes
Presentation:
Keep the plate clean and readable. Separate dips, sauces, and toppings instead of dumping everything on top. Triangles for quesadillas, strips for chicken, small bowls for noodles, and neat scoops for casseroles make the food look less complicated before anyone has to eat it.
Accompaniments:
Lean on plain sides that do not create extra decisions: apple slices, cucumber coins, peas, carrot sticks, steamed broccoli, buttered corn, or a simple green salad. Bread works beside pasta and casseroles. Fruit works beside almost everything else. If the main dish is already rich, keep the sides crisp and plain.
Portions:
Most of these recipes are built for 4 to 6 servings, though the exact amount depends on age and appetite. A child’s plate usually does better with one main item, one small side, and a dip on the edge of the plate. If you are feeding teens, add an extra carb side or scale the protein by about one-third.
Beverage Pairing:
Cold milk pairs with the richest dishes like mac and cheese and pizza toast. Water with lemon suits chicken tenders, fish sticks, and quesadillas. For breakfast recipes, apple juice or plain tea fits well without turning the meal sugary.
Additional Tips and Flavor Boosters

Flavor Enhancement: A tiny amount of acid goes a long way. A squeeze of lemon over fish sticks, a spoonful of sour cream on a potato, or a little tomato paste in a sauce can make food taste fuller without making it feel “different.”
Customization: Keep one ingredient back at the table. Cheese, pickles, chopped chives, extra sauce, or plain yogurt let each eater steer the meal in a direction they trust. That trick matters more than hidden ingredients do.
Serving Suggestions: Use small bowls and separate plates for toppings. A bowl of shredded cheese beside chili rice or a ramekin of ketchup next to chicken tenders can turn a defensive eater into a cooperative one.
Make-It-Yours: If someone at the table avoids dairy, swap in olive oil for butter in some recipes and choose a dairy-free cheese where it really matters. If gluten is the issue, panko and flour can usually be replaced without changing the spirit of the dish. For lower salt, skip packaged seasoning blends and season with garlic powder, onion powder, and a careful hand.
Make-Ahead, Storage, and Reheating Guidance
Most of these recipes keep well in the refrigerator for 3 to 4 days in airtight containers. Casseroles, meatballs in sauce, pulled chicken, baked oatmeal, and rice dishes are the easiest to store because they already have enough moisture to survive a second round. Breaded foods are less forgiving. Chicken tenders and fish sticks lose some crispness, but they can still be reheated well enough if you use the oven or air fryer instead of the microwave.
The freezer is useful for the more structured dishes. Meatballs, pulled chicken, casserole portions, baked oatmeal squares, and even plain rice skillet leftovers can go up to 2 months frozen if wrapped tightly and packed flat. Label the containers before you forget what’s inside. Future-you will be grateful. For better texture, freeze sauce separately from pasta when possible; cooked noodles soften on the second go-around.
Reheating depends on the dish. Breaded chicken and fish do best at 375°F for 8 to 12 minutes in the oven or 6 to 8 minutes in an air fryer. Casseroles and mac and cheese reheat at 350°F, covered loosely with foil until hot in the center. Skillet rice and noodles usually need a splash of water or broth plus gentle heat on the stove. Egg muffins can go in the microwave for 20 to 30 seconds, though a toaster oven keeps the edges better. If a dish looks dry before reheating, add moisture first; do not expect the oven to fix a dry casserole by magic.
Variations and Adaptations to Try
-
Mild-Mouth Version: Keep garlic, onion, and black pepper low, and lean on butter, cheese, and a little salt. This is useful for kids who notice every spice note.
-
Gluten-Free Swap: Use gluten-free panko, gluten-free flour, certified gluten-free oats, and rice-based pasta where needed. The structure of these recipes still holds.
-
Dairy-Light Menu: Replace butter with olive oil in noodles or skillet dishes, use dairy-free cheese for quesadillas and casseroles, and choose unsweetened plant milk for baked oatmeal or egg muffins.
-
Veggie-Quiet Strategy: Grate or mince vegetables small enough that they blend into sauce or casserole. Carrot, zucchini, onion, and cauliflower work best when the goal is to keep the flavor mild and the texture calm.
-
Dip-First Dinner: Build the meal around sauces on the side. Ketchup, ranch, mild salsa, sour cream, and marinara give picky eaters a sense of control without changing the core recipe.
-
Freezer Batch Cooking: Make double batches of meatballs, pulled chicken, and baked oatmeal, then portion them flat in freezer bags. These are the recipes in this collection that benefit most from doing the work once and eating twice.
Common Mistakes to Avoid
The biggest mistake is trying to hide too much. If you bury vegetables in a dish so completely that the texture changes in a way the eater notices, trust me, they notice. Small pieces, blended sauces, and familiar colors go over better than a stealth mission.
Another common slip is overcomplicating the plate. Picky eaters often do better when food is separated, not piled together. A quesadilla with salsa on the side feels manageable; the same quesadilla drenched in sauce can suddenly become a problem.
Overcooking is a quiet dinner killer. Chicken tenders dry out. Fish turns chalky. Egg muffins get rubbery. A lot of home cooks wait for food to look a little too done because they are nervous, and that extra minute or two changes the texture more than people expect.
Seasoning is a balancing act. Underseasoned food tastes flat, but strong spice or too much smoke can scare off a cautious eater. Start mild, taste as you go, and push the flavor in small steps. You can always add more cheese, a little lemon, or another pinch of salt. You cannot pull it back once the dish tastes too loud.
Finally, do not ignore the serving temperature. Food that should be crisp loses its edge if it sits. Creamy dishes can tighten up if they cool too far. If the table is not ready, hold breaded food on a rack, keep casseroles covered, and serve the simple stuff while it still has the texture you worked for.
Frequently Asked Questions

How do I make these recipes less scary for a very cautious eater?
Start with one familiar item on the plate and one very small new thing beside it. A child who accepts chicken tenders might tolerate two carrot sticks next to them if the rest of the meal stays predictable. Keep dips separate and avoid mixing sauces over the whole plate.
Can I leave the vegetables out completely?
Yes. Several of these recipes work fine without them, especially quesadillas, chicken tenders, pizza toast, and baked potatoes. If the goal is getting dinner eaten without a fight, a plain version is better than forcing a “healthy” version no one touches.
Which of these recipes are best for freezing?
Mini meatballs, pulled chicken, baked oatmeal, and casserole-style dishes freeze best. Breaded items can be frozen too, but they lose some crispness and need the oven or air fryer when reheated. Pasta dishes are better fresh or refrigerated for a short stretch.
What if my child hates sauce?
Keep sauces on the side and make the food work without them. Chicken tenders, fish sticks, egg muffins, baked potatoes, and pizza toast can all stand alone. If sauce is part of the recipe, use just enough to keep the food moist and set out more in a separate cup.
Can I use chicken breasts instead of thighs in the slow cooker?
Yes, but check them a little earlier because breasts dry out more quickly. Thighs stay juicier and shred more easily, so they are my first choice for pulled chicken. If you use breasts, cook until they shred without forcing it, then stop.
How do I reheat breaded foods without making them soggy?
Use a hot oven or air fryer, never the microwave if you want the crust to stay crisp. Put them on a rack if possible and give them a light spray of oil before reheating. That small step helps the coating wake back up.
Can I make any of these recipes ahead of time for a busy night?
Yes. Casseroles, meatballs, pulled chicken, baked oatmeal, and the tomato sauce all hold up well. Breaded items are best coated ahead and baked later, or baked ahead and reheated in a hot oven right before eating.
What if I only have one or two ingredients on hand and still need dinner?
Quesadillas, garlic noodles, pizza toast, and baked potatoes are the most flexible. They are built from pantry basics and can be dressed up or stripped down without breaking the recipe. That is part of why they work so well when the cupboard looks thin.
A Kinder Way to Cook
Picky-eater cooking gets easier once you stop treating every meal like a test of courage. The point is not to sneak in everything a child has ever refused. The point is to make the table feel calm enough that they stay at it long enough to eat.
A few honest recipes, some clear textures, and a little control at serving time can change dinner more than a dozen clever tricks ever will. Keep the flavors familiar, the plate readable, and the options plain where they need to be. That is where the win lives, and it is worth repeating because it works.