
Cheap dinners can still feel like dinner, which sounds obvious until you’re staring at a half cabbage, three eggs, a lonely lemon, and a grocery bill that needs to behave. The best quick light dinner ideas for cheap family dinners usually come from that exact kind of fridge clean-out energy: a few sturdy staples, a fast cooking method, and enough acid or herbs at the end to make the whole plate wake up.
I’m not interested in the kind of “budget meal” that tastes like compromise. I want the skillet to smell like garlic and onion, the rice to stay fluffy instead of clumping into paste, and the vegetables to keep a little bite. That’s the real trick with cheap family dinners: choose ingredients that carry their own weight — cabbage, beans, eggs, pasta, tortillas, potatoes, frozen vegetables — and then cook them with enough attention that they don’t turn into beige exhaustion.
A lot of light dinners fail because people mistake “light” for “small.” Wrong move. A bowl of soup with beans, greens, and a little pasta can eat like a proper meal, and a taco night built around cabbage slaw and black beans can go further than a tray of baked chicken ever will. Once you learn which cheap ingredients brown well, stretch well, and reheat well, weeknight cooking stops feeling like a rescue mission.
Why These Dinners Earn a Spot on the Rotation
-
Low-cost anchors: Beans, eggs, cabbage, pasta, rice, and potatoes show up again and again because they keep the cart small and the portions honest.
-
Fast enough for real life: Most of these land in the 15-to-30-minute range, which matters when the clock is already bossy and everyone is hungry.
-
Light without being skimpy: Broth, greens, slaw, tomatoes, and crisp vegetables keep the plates bright, while protein and starch keep nobody from wandering back to the pantry an hour later.
-
Flexible when the fridge is messy: If you’ve got a pepper instead of zucchini, or tuna instead of chicken, most of these still work without a whole rewrite.
-
Leftovers behave well: Soup, rice bowls, noodle dishes, and bean-based fillings usually reheat cleanly if you don’t drown them in sauce.
-
Family-proof by design: These dinners let you keep spice on the side, serve toppings separately, and make one pan feed more mouths than it looks like it should.
1. Lemon Garlic Chicken and Cabbage Skillet
A hot skillet of chicken and cabbage smells like the kind of dinner that costs less than it looks. The cabbage softens and sweetens at the edges, the lemon cuts through the richness, and the chicken gives you enough heft that nobody starts sniffing around for bread five minutes later.
Why It Works:
Cabbage is the quiet bargain hero here; it cooks down fast, takes on garlic and lemon without getting mushy, and turns a small amount of chicken into a full pan of food. I like boneless thighs for this because they stay juicy even if you leave them on the heat a minute too long.
Key Ingredients:
- 1 lb boneless, skinless chicken thighs, cut into bite-size pieces — thighs stay tender and cost less than breasts in many stores.
- 1 small green cabbage, about 2 lb, thinly sliced — slice it fine so it softens in the same time as the chicken.
- 1 small yellow onion, sliced — it sweetens as it cooks and gives the pan some base flavor.
- 3 cloves garlic, minced — add it after the onion so it doesn’t scorch.
- 2 tablespoons olive oil — enough to brown the chicken and coat the cabbage.
- 1 lemon, zested and juiced — use both; the zest carries the aroma, the juice does the finishing work.
- 1/2 cup low-sodium chicken broth — just enough to loosen the browned bits.
- 1 teaspoon kosher salt and 1/2 teaspoon black pepper — season in layers, not all at the end.
Quick Steps:
- Season the chicken with salt and pepper.
- Heat the oil in a large skillet over medium-high heat, then sear the chicken for 4 to 5 minutes until lightly browned.
- Add the onion and cabbage and cook for 5 minutes, stirring often, until the cabbage starts to collapse.
- Stir in the garlic for 30 seconds, then pour in the broth and scrape up the browned bits from the pan.
- Cook for another 4 to 6 minutes until the chicken is cooked through and the cabbage is tender with a little bite.
- Finish with lemon zest and juice, taste for salt, and serve hot.
Equipment for This Recipe:
- Large 12-inch skillet — wide enough so the cabbage can sauté instead of steam.
- Sharp knife and cutting board — thin cabbage slices matter here.
- Wooden spoon or spatula — helps scrape the pan clean.
- Citrus juicer or fork — makes the lemon juice easier to catch.
How to Serve This Dish:
Pile it into shallow bowls so the lemony pan juices stay with the cabbage. A slice of toast or a scoop of rice works if you need to stretch it, but I usually stop at the skillet and call it good.
Pro Tips for This Recipe:
- Brown the chicken first; pale chicken tastes boiled, and that’s not the mood.
- Slice the cabbage thin enough that it softens in the same pan time as the meat.
- Add the lemon at the end so it stays bright instead of turning flat.
- If the pan looks dry before the cabbage is tender, splash in 2 tablespoons of water or broth.
Variations on This Dish:
- Smoky Paprika Version: Add 1 teaspoon smoked paprika with the salt for a warmer, deeper flavor.
- Mustard Pan Sauce: Stir in 1 tablespoon Dijon with the broth for a sharper finish.
- Vegetable-Only Skillet: Skip the chicken and add a can of drained white beans at the end.
Common Mistakes to Avoid with This Dish:
- Crowding the pan: If the chicken sits in a pile, it steams instead of browns. Use the biggest skillet you own.
- Overcooking the cabbage: It should be soft with a little chew, not limp and gray.
- Adding lemon too early: The juice can taste dull after long cooking; finish with it.
2. Tuna Pasta with Peas and Lemon Breadcrumbs
This is the kind of pasta I make when the pantry looks unimpressive but still has enough in it to save dinner. The tuna gives the sauce a salty, meaty edge, the peas bring sweetness, and the lemon breadcrumbs on top keep the whole bowl from feeling heavy.
Why It Works:
Canned tuna is one of the cheapest ways to get protein on the table fast, and it pairs better with pasta than people give it credit for. The breadcrumb topping adds crunch for almost no money, which matters because soft-on-soft pasta can taste flat.
Key Ingredients:
- 12 oz spaghetti, linguine, or penne — use what’s cheapest.
- 2 cans tuna in water, drained — oil-packed works too, but drain it well.
- 1 cup frozen peas — toss them in straight from the freezer.
- 3 tablespoons olive oil — divided between the sauce and the breadcrumbs.
- 2 cloves garlic, minced — keep it gentle so it doesn’t dominate the tuna.
- 1/2 cup breadcrumbs — plain or seasoned both work.
- 1 lemon, zested and juiced — this is what keeps the tuna from tasting canned.
- 2 tablespoons chopped parsley — optional, but it freshens the bowl fast.
- 1/4 teaspoon red pepper flakes — optional if you want a little heat.
Quick Steps:
- Cook the pasta in well-salted water until just al dente, then reserve 1 cup of pasta water.
- Warm 2 tablespoons olive oil in a skillet over medium heat and toast the breadcrumbs with the lemon zest until golden, about 2 minutes.
- Add the remaining oil and garlic to the skillet, then stir in the tuna and peas.
- Splash in 1/2 cup pasta water and the lemon juice, then toss in the drained pasta.
- Stir until the noodles are glossy and the sauce lightly clings, adding more pasta water if needed.
- Top with the lemon breadcrumbs and parsley before serving.
Equipment for This Recipe:
- Large pot — for boiling the pasta.
- Skillet — for building the sauce and toasting breadcrumbs.
- Colander — to drain the pasta.
- Microplane or fine grater — handy for the lemon zest.
How to Serve This Dish:
Serve it in wide bowls so the breadcrumbs stay on top instead of sinking into the pasta. A side of sliced cucumbers or a simple tomato plate keeps the meal light without adding much cost.
Pro Tips for This Recipe:
- Salt the pasta water until it tastes like the sea; weak water makes weak pasta.
- Keep 1 cup of pasta water back. It’s the cheapest sauce insurance you have.
- Break up the tuna with a fork before it hits the pan so you don’t get clumps.
- Toast the breadcrumbs only until golden; they go bitter fast once they darken.
Variations on This Dish:
- Creamy Pantry Pasta: Stir in 2 tablespoons cream cheese or plain yogurt at the end.
- Tomato Tuna Version: Add 1/2 cup crushed tomatoes with the tuna for a red sauce feel.
- No-Breadcrumb Finish: Use crushed salted crackers or skip the topping and add extra parsley.
Common Mistakes to Avoid with This Dish:
- Overcooking the pasta: You want it a little firm because it keeps cooking in the skillet.
- Using too much tuna water or oil: Drain the cans well or the sauce turns murky.
- Skipping the lemon: Tuna and lemon belong together; without it, the bowl tastes heavy.
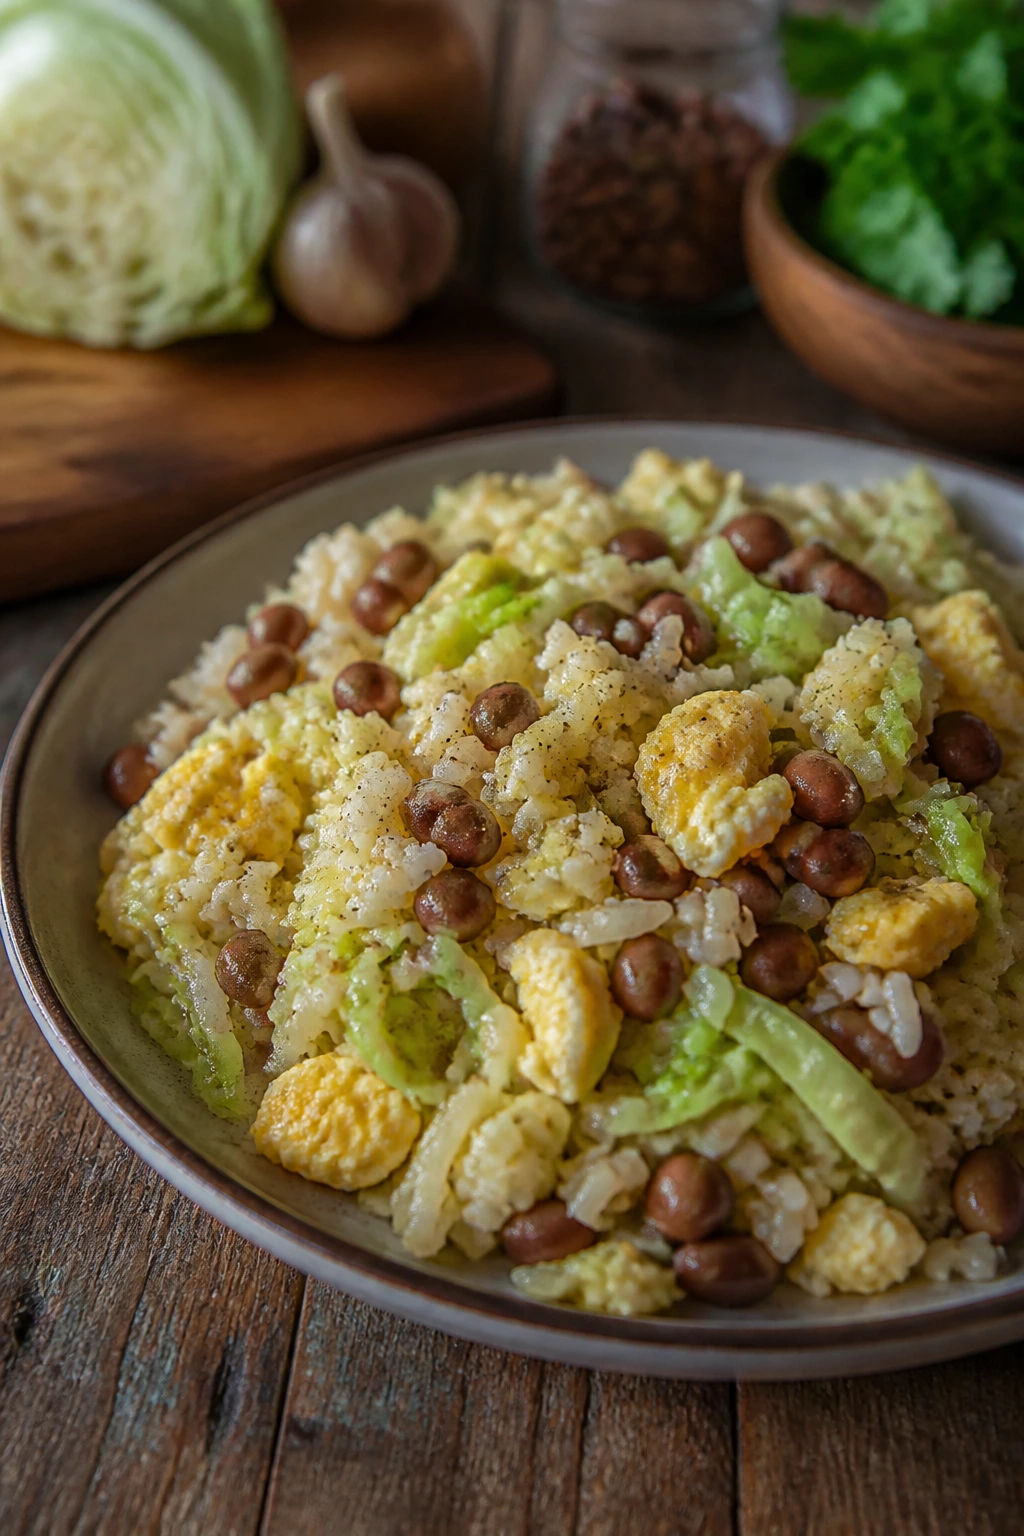
3. Egg Fried Rice with Frozen Veggies
If you’ve got leftover rice, eggs, and a bag of frozen vegetables, you’ve got dinner. Fried rice is one of those rare cheap meals that tastes better when you don’t overthink it, which is exactly why I keep it in heavy rotation.
Why It Works:
Cold rice fries instead of steaming, and that’s the whole point. Eggs give the dish body, frozen vegetables keep the cost low, and a quick hit of soy sauce and sesame oil makes the pan smell like you know what you’re doing.
Key Ingredients:
- 4 cups cooked rice, chilled — day-old rice is best because it dries out a bit.
- 4 large eggs, beaten — they cook quickly and stretch the meal.
- 2 cups frozen mixed vegetables — peas, carrots, corn, and green beans all work.
- 3 tablespoons neutral oil — divided for eggs and rice.
- 3 tablespoons low-sodium soy sauce — add more at the end if needed.
- 2 scallions, sliced — they add a fresh bite.
- 2 cloves garlic, minced — optional but worth it.
- 1 teaspoon sesame oil — a small amount goes a long way.
Quick Steps:
- Heat 1 tablespoon oil in a large skillet or wok over medium-high heat and scramble the eggs until just set; move them to a plate.
- Add the remaining oil, then cook the garlic and frozen vegetables for 2 to 3 minutes until the ice has cooked off.
- Stir in the rice and break up any clumps with the spatula.
- Pour the soy sauce around the edge of the pan and toss until the rice turns evenly colored.
- Fold the eggs back in, add the scallions and sesame oil, and cook for 1 minute more.
- Taste and add a small splash of water if the rice looks dry.
Equipment for This Recipe:
- Large skillet or wok — the more surface area, the better the fry.
- Spatula — for breaking up rice clumps.
- Bowl — for beating the eggs.
- Measuring spoons — easy to oversalt this one.
How to Serve This Dish:
Serve it straight from the pan with a little hot sauce or soy sauce at the table. If you want to make it feel like a fuller plate, add sliced cucumber or a quick cabbage salad with vinegar.
Pro Tips for This Recipe:
- Chilled rice fries cleaner than warm rice; if you only have fresh rice, spread it on a tray for 15 minutes first.
- Don’t dump in too much soy sauce at once. The rice should be seasoned, not wet.
- Frozen vegetables are fine here. In fact, they’re practical.
- Let the rice sit in the hot pan for 20 to 30 seconds before tossing so you get a little toast on the bottom.
Variations on This Dish:
- Chicken Fried Rice Shortcut: Add 1 cup shredded cooked chicken with the vegetables.
- Spicy Chili Crisp Version: Finish with 1 teaspoon chili crisp or garlic chili oil.
- Vegetarian Egg-Heavy Version: Use 6 eggs and fewer vegetables for a richer bowl.
Common Mistakes to Avoid with This Dish:
- Using fresh hot rice: It clumps and steams. Chill it first.
- Overcrowding with vegetables: Too many frozen veg make the rice soggy.
- Pouring soy sauce directly onto the eggs: Season the rice instead; the eggs can go rubbery if they take the full hit.
4. Black Bean Quesadillas with Crunchy Slaw
These are the quesadillas I reach for when the fridge is a little sad but still workable. The beans and cheese give you substance, the tortillas crisp up fast, and the slaw on the side keeps the meal from tasting like a stack of melted everything.
Why It Works:
Black beans are cheap, filling, and mild enough to take on whatever seasoning you throw at them. A quick cabbage slaw gives crunch and acid, which is exactly what quesadillas need if you want them to feel like a full dinner instead of snack food.
Key Ingredients:
- 4 flour tortillas — 8-inch ones are easiest to flip.
- 1 can black beans, drained and rinsed — mash half for better filling texture.
- 1 1/2 cups shredded cheddar or Monterey Jack — use what melts well.
- 1 teaspoon cumin — warms up the bean filling.
- 1/2 teaspoon chili powder — optional, but it helps.
- 2 cups shredded cabbage — the crunchy side.
- 1 tablespoon lime juice — brightens the slaw.
- 2 tablespoons plain yogurt or mayo — for the slaw dressing.
- Salt and pepper — enough to wake up the beans.
Quick Steps:
- Mash half the beans with cumin, chili powder, salt, and a spoonful of water.
- Toss the cabbage with lime juice, yogurt, salt, and pepper.
- Spread the bean mixture over half the tortillas, then top with cheese and fold shut.
- Cook each quesadilla in a dry skillet over medium heat for 2 to 3 minutes per side until golden and crisp.
- Slice into wedges and serve with the slaw and salsa.
Equipment for This Recipe:
- Nonstick skillet — helps with flipping.
- Bowl — for the slaw and bean mash.
- Spatula — for pressing the quesadillas flat.
- Knife or pizza cutter — for clean wedges.
How to Serve This Dish:
Serve two wedges per person with a heap of slaw right next to them. If you’ve got salsa or pickled jalapeños, use them; they keep the plate bright and stop the cheese from feeling heavy.
Pro Tips for This Recipe:
- Mash some of the beans so the filling holds together instead of falling out.
- Keep the heat at medium, not high. Cheese needs time to melt before the tortilla burns.
- Make the slaw first so it can soften slightly while you cook.
- If the tortillas are dry, brush the outsides with a little oil for better browning.
Variations on This Dish:
- Corn and Bean Version: Add 1/2 cup frozen corn to the filling.
- Green Salsa Quesadillas: Spread a spoonful of salsa verde inside with the beans.
- No-Cheese Version: Use extra mashed beans and serve with avocado if you have it.
Common Mistakes to Avoid with This Dish:
- Overstuffing the tortillas: They tear when you flip them.
- Cooking on high heat: The outside burns before the filling melts.
- Skipping the slaw: You need something crisp and acidic to balance the cheese.
5. Turkey Lettuce Wraps with Peanut Sauce
This is one of my favorite “light but not sad” dinners because the lettuce gives you crunch, the turkey cooks fast, and the peanut sauce makes the whole thing taste more deliberate than it is. It’s cheap enough to keep in rotation and fast enough that I don’t start bargaining with myself about takeout.
Why It Works:
Ground turkey is lean, quick-cooking, and easy to stretch with shredded vegetables. The peanut sauce acts like glue and seasoning in one shot, which means you don’t need a dozen bottles lined up on the counter.
Key Ingredients:
- 1 lb ground turkey — lean is fine; just don’t overcook it.
- 1 small onion, finely chopped — adds moisture and sweetness.
- 1 carrot, grated — cheap crunch that blends into the filling.
- 2 cloves garlic, minced — keep it fine so it disappears into the sauce.
- 1 head butter lettuce or romaine — leaves should be big enough to hold filling.
- 1/4 cup peanut butter — the base of the sauce.
- 2 tablespoons soy sauce — salt and depth.
- 1 tablespoon rice vinegar — sharpens the sauce.
- 1 tablespoon honey or sugar — balances the peanut butter.
- 2 tablespoons warm water — loosens the sauce so it drizzles.
Quick Steps:
- Whisk the peanut butter, soy sauce, vinegar, honey, and warm water until smooth.
- Cook the onion in a skillet over medium heat for 2 minutes, then add the turkey and break it up.
- Stir in the garlic and grated carrot, then cook until the turkey is no longer pink.
- Spoon in half the sauce and toss until the filling looks glossy.
- Spoon the turkey into lettuce leaves and drizzle with the remaining sauce.
Equipment for This Recipe:
- Large skillet — for quick browning.
- Whisk or fork — to smooth the sauce.
- Box grater — for the carrot.
- Serving plate — lettuce wraps are easier to assemble at the table.
How to Serve This Dish:
Set the lettuce leaves, filling, and sauce out separately so everyone can build their own. A bowl of rice on the side turns this into a bigger meal if you’re feeding hungry people.
Pro Tips for This Recipe:
- Don’t cook the turkey until it dries out; it only needs to lose its pink color.
- Warm water makes the peanut sauce smooth. Cold water leaves it clumpy.
- Butter lettuce folds better than iceberg, but romaine is cheaper and still works.
- Add a pinch of red pepper flakes if your family likes a little heat.
Variations on This Dish:
- Ground Chicken Swap: Use ground chicken in place of turkey with the same method.
- Sesame Version: Add 1 teaspoon sesame oil and some sliced scallions.
- Rice Bowl Shortcut: Spoon the filling over rice if lettuce wraps feel too fussy.
Common Mistakes to Avoid with This Dish:
- Making the sauce too thick: It should coat a spoon, not sit in a lump.
- Using tiny lettuce leaves: They spill everywhere. Pick the biggest leaves.
- Overcooking the turkey: Lean meat dries fast, and nobody wants chalky filling.
6. Chickpea Couscous Skillet with Tomatoes and Parsley
Couscous is one of those ingredients that feels fancier than the price tag suggests, which I love. Pair it with chickpeas, tomatoes, and parsley, and you get a dinner that tastes sunny and light without asking the grocery bill to suffer.
Why It Works:
Couscous cooks in minutes, chickpeas bring protein, and canned tomatoes give you moisture without a lot of effort. This is a good “one pan, one pot” situation because the entire dish can be made with pantry items and a handful of herbs.
Key Ingredients:
- 1 cup couscous — regular Moroccan couscous cooks fastest.
- 1 can chickpeas, drained and rinsed — budget protein that holds its shape.
- 1 small onion, diced — gives the pan sweetness.
- 2 cloves garlic, minced — basic but essential.
- 1 can diced tomatoes, about 14.5 oz — use the whole can.
- 1 cup low-sodium vegetable broth — cooks the couscous and builds flavor.
- 2 tablespoons olive oil — for sautéing.
- 1/4 cup chopped parsley — brightens the finish.
- 1/2 teaspoon cumin — gives the dish warmth.
- Salt and pepper — to balance the tomatoes.
Quick Steps:
- Warm the olive oil in a skillet and cook the onion for 3 minutes until soft.
- Stir in the garlic and cumin for 30 seconds, then add the tomatoes, broth, chickpeas, salt, and pepper.
- Bring the mixture to a simmer, then stir in the couscous.
- Cover the pan, remove it from the heat, and let it sit for 5 minutes.
- Fluff with a fork, fold in the parsley, and taste for seasoning.
Equipment for This Recipe:
- Medium skillet with lid — the lid matters for steaming the couscous.
- Fork — for fluffing.
- Knife and cutting board — for the onion and parsley.
- Measuring cup — couscous likes precise liquid.
How to Serve This Dish:
Serve it warm in bowls with a spoon of yogurt or a squeeze of lemon. If you want more volume, a side of sliced cucumbers with salt is enough to finish the plate.
Pro Tips for This Recipe:
- Use the exact broth-to-couscous ratio on the package if it differs from yours.
- Let the pan sit covered after the couscous goes in; that short rest does the work.
- Parsley is cheap and does a lot here, so don’t skip it if you can help it.
- If the tomatoes are very acidic, add a pinch of sugar.
Variations on This Dish:
- Spinach Couscous Bowl: Stir in a few handfuls of spinach at the end.
- Lemon Herb Version: Add lemon zest and dill instead of parsley.
- Spicy Chickpea Skillet: Add 1/2 teaspoon chili flakes with the cumin.
Common Mistakes to Avoid with This Dish:
- Adding too much liquid: Couscous turns gummy fast.
- Leaving out the lid: It won’t steam properly and stays crunchy.
- Underseasoning the tomatoes: Canned tomatoes need salt to taste like dinner.
7. Baked Potato Bar with Broccoli and White Beans
A baked potato bar sounds old-school because it is, and that’s part of the appeal. Potatoes are cheap, filling, and forgiving, and when you load them with broccoli and white beans, the whole thing becomes a light dinner that still eats like you meant it.
Why It Works:
The potato does the heavy lifting, which means you don’t need a lot of extra food to make people full. White beans add protein without much cost, and broccoli gives the plate enough green to keep the meal from feeling one-note.
Key Ingredients:
- 4 medium russet potatoes — scrub them well and pierce the skins.
- 2 cups broccoli florets — fresh or frozen both work.
- 1 can white beans, drained and rinsed — cannellini or navy beans.
- 2 tablespoons olive oil — helps the broccoli brown.
- 1/2 cup plain yogurt or sour cream — for the top.
- 1/2 cup shredded cheddar, optional — if you want a richer bar.
- Salt and pepper — on the potatoes and beans.
- 2 tablespoons chopped chives or scallions — a fresh finish.
Quick Steps:
- Bake the potatoes at 425°F for 45 to 55 minutes until the skins are crisp and the centers are soft.
- Toss the broccoli with olive oil, salt, and pepper, then roast it on a sheet pan for 15 minutes.
- Warm the white beans in a small saucepan with a pinch of salt and a splash of water.
- Split the potatoes and fluff the centers with a fork.
- Top with broccoli, beans, yogurt, and cheddar if using.
Equipment for This Recipe:
- Oven and baking sheet — for the potatoes and broccoli.
- Small saucepan — for the beans.
- Fork — for fluffing.
- Sharp knife — to split the potatoes safely.
How to Serve This Dish:
Set everything out buffet-style so people can build their own potatoes. I like to add a bowl of chopped tomatoes or a quick green salad so the plate feels complete without much extra work.
Pro Tips for This Recipe:
- Rub the potatoes with a little oil and salt before baking for better skins.
- Frozen broccoli works well; just roast it hot enough to dry the edges.
- Warm the beans with a splash of water so they don’t dry out.
- If you’re feeding kids, keep the toppings separate and let them choose.
Variations on This Dish:
- Chili Potato Bar: Spoon leftover chili over the potatoes instead of beans.
- Herbed Yogurt Version: Mix dill and lemon into the yogurt.
- Sweet Potato Swap: Use sweet potatoes, but add a little extra salt on top.
Common Mistakes to Avoid with This Dish:
- Wrapping potatoes in foil: That steams the skins soft.
- Skipping salt on the potatoes: The skin needs seasoning too.
- Overloading with cheese only: You want broccoli and beans in the mix, not just melted dairy.
8. Vegetable Minestrone with Small Pasta
Minestrone is the soup I trust when I need to clear the vegetable drawer without making anyone feel punished. It’s brothy, filling, and cheap in the best way — beans, pasta, and vegetables sharing the same bowl instead of fighting over the budget.
Why It Works:
Tomatoes and broth give the soup a real base, while beans and pasta make it a meal instead of a starter. The nicest part is that this soup doesn’t care if your vegetables are perfectly fresh; small scraps and half-used zucchini do fine.
Key Ingredients:
- 2 tablespoons olive oil — for the vegetables.
- 1 onion, diced — the base flavor.
- 2 carrots, diced — cheap sweetness.
- 2 celery stalks, diced — classic soup flavor.
- 3 cloves garlic, minced — add after the vegetables soften.
- 1 can diced tomatoes, about 14.5 oz — use the whole can.
- 4 cups low-sodium broth — chicken or vegetable.
- 1 can cannellini beans, drained and rinsed — creamy and filling.
- 1 cup small pasta, such as ditalini — cooks fast.
- 2 cups chopped spinach or kale — goes in at the end.
Quick Steps:
- Cook the onion, carrots, and celery in olive oil over medium heat for 5 minutes.
- Add the garlic and cook for 30 seconds.
- Stir in the tomatoes and broth, then bring the pot to a simmer.
- Add the beans and pasta and cook until the pasta is tender, about 8 to 10 minutes.
- Stir in the spinach and cook until wilted.
- Taste and adjust with salt, pepper, and a drizzle of olive oil.
Equipment for This Recipe:
- Large soup pot — you need space for the pasta.
- Ladle — makes serving easier.
- Knife and cutting board — for the vegetables.
- Can opener — self-explanatory, but it still counts.
How to Serve This Dish:
Serve it with a small piece of crusty bread or just on its own in a big bowl. A little grated Parmesan on top is nice, but the soup does not need it to work.
Pro Tips for This Recipe:
- Cook the pasta in the soup only if you plan to eat it soon; otherwise, add cooked pasta to each bowl.
- A parmesan rind simmered in the pot adds depth if you have one.
- Chop the vegetables small so they cook at the same pace.
- Add more broth if the soup thickens too much after sitting.
Variations on This Dish:
- Sausage Minestrone: Add sliced cooked sausage if you want a meatier pot.
- Pesto Finish: Stir in 1 tablespoon pesto at the end for a herbal kick.
- Rice Swap: Use cooked rice instead of pasta for a gluten-free version.
Common Mistakes to Avoid with This Dish:
- Adding pasta too early: It can go mushy fast.
- Underseasoning the broth: Soups need more salt than people expect.
- Using huge vegetable chunks: They won’t soften in time for a weeknight pot.
9. Chicken Spinach Rice Soup
Some soups try to be fancy and end up fussy. This one doesn’t. It uses rice for body, chicken for protein, and spinach at the end so the bowl tastes fresh instead of tired.
Why It Works:
Rice thickens the broth a little as it cooks, which gives you a fuller spoonful without adding cream. Spinach wilts in seconds, so you can toss in a big handful and make the pot look much greener than the ingredient list suggests.
Key Ingredients:
- 1 lb boneless chicken breast or thighs, cut into bite-size pieces — thighs stay juicier.
- 1 tablespoon olive oil — for the chicken and onion.
- 1 onion, diced — base flavor.
- 2 carrots, sliced — cheap and classic.
- 2 cloves garlic, minced — don’t let it burn.
- 6 cups low-sodium chicken broth — the backbone of the soup.
- 3/4 cup white rice, rinsed — rinsing helps keep the broth cleaner.
- 3 cups baby spinach — stir it in at the end.
- 1 lemon, juiced — brightens the whole bowl.
Quick Steps:
- Brown the chicken in olive oil in a soup pot for 3 to 4 minutes.
- Add the onion and carrots and cook for 4 minutes until the onion softens.
- Stir in the garlic, then pour in the broth and bring it to a simmer.
- Add the rice and cook gently for 15 minutes until tender.
- Stir in the spinach and lemon juice, then taste for salt.
- Serve while hot, with the chicken cooked through and the rice tender.
Equipment for This Recipe:
- Soup pot — roomy enough for the rice.
- Ladle — for serving.
- Wooden spoon — to keep the bottom from sticking.
- Measuring cups — rice and broth should stay in balance.
How to Serve This Dish:
Serve it with crackers or a plain piece of toast if you want a little crunch. I like a squeeze of extra lemon at the table because chicken soup always wakes up under acid.
Pro Tips for This Recipe:
- Rinse the rice so the broth stays clearer.
- If you want softer chicken, cut it smaller than you think you need.
- Add spinach right at the end; it only needs a minute.
- If the soup thickens after sitting, thin it with hot water or broth.
Variations on This Dish:
- Herbed Chicken Soup: Add dill or parsley with the lemon.
- Orzo Swap: Use orzo instead of rice for a different texture.
- Bean-Boosted Bowl: Stir in a can of white beans if you want more bulk.
Common Mistakes to Avoid with This Dish:
- Boiling hard after the rice goes in: That can make the rice split and the broth cloudy.
- Adding spinach too early: It turns dull and stringy.
- Forgetting the lemon: The soup needs that sharp lift at the end.
10. Sweet Potato Black Bean Tacos
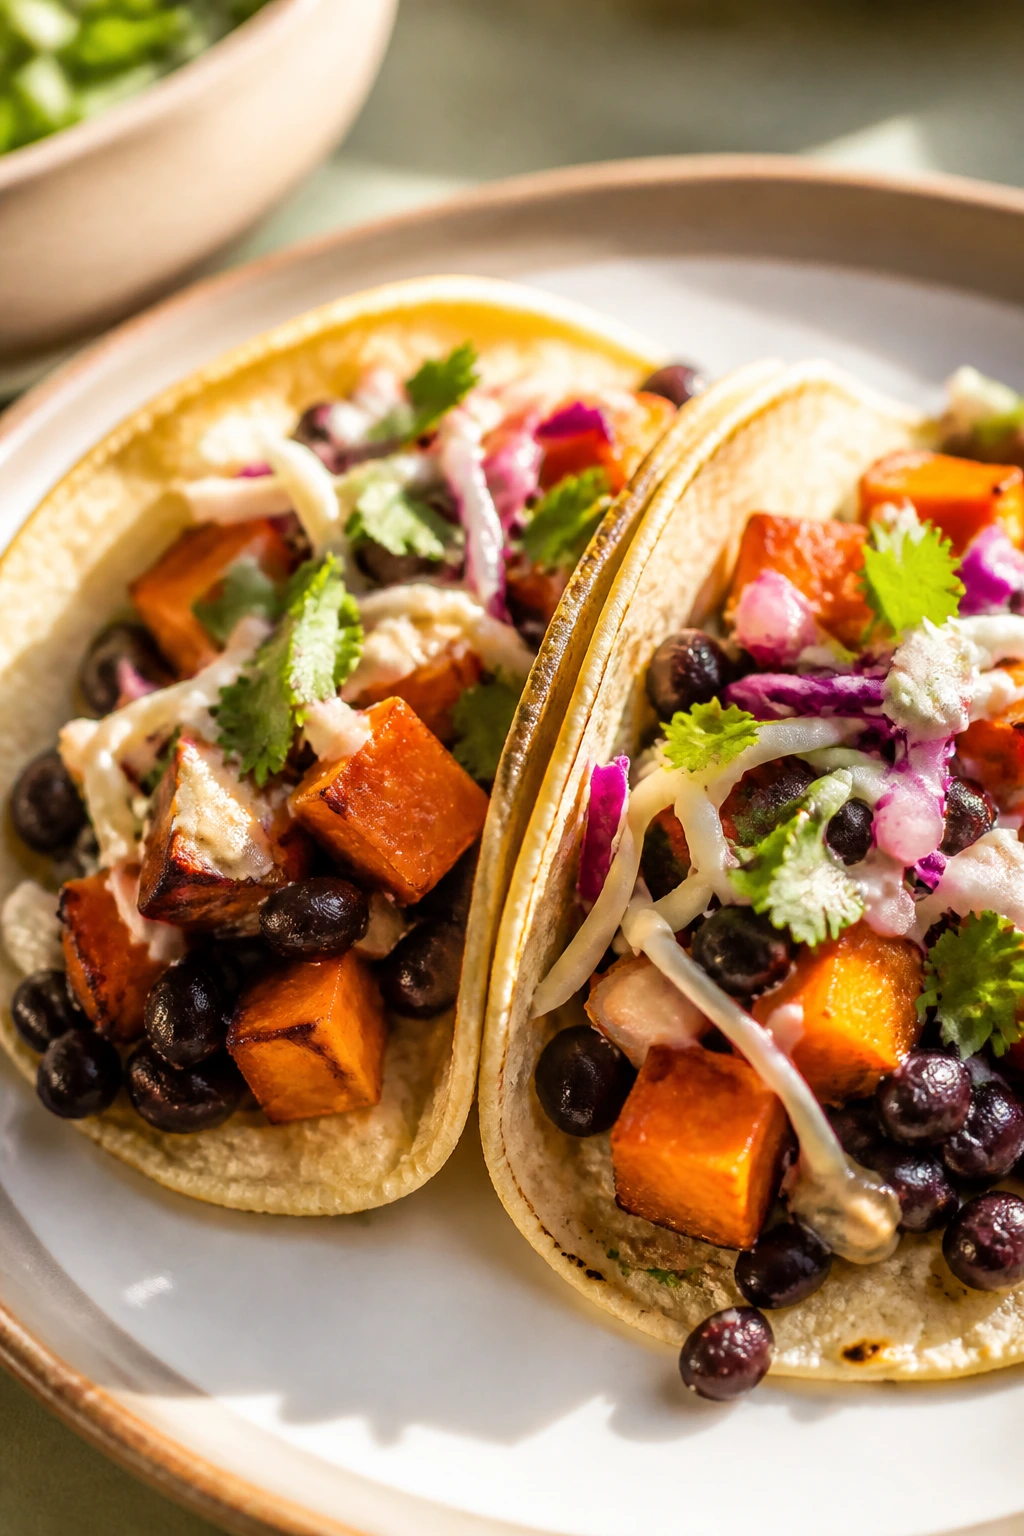
Sweet potatoes and black beans do a lot of heavy lifting for very little money. Roast them hot, tuck them into tortillas, and you get tacos that are bright, filling, and cheap enough to keep coming back around.
Why It Works:
The sweet potato gives you caramelized edges and a soft center, while black beans add protein and make the tacos feel complete. A little lime and cabbage on top keeps the whole thing from turning soft and sleepy.
Key Ingredients:
- 2 medium sweet potatoes, peeled and diced — small cubes roast faster.
- 1 can black beans, drained and rinsed — warm them briefly before assembling.
- 8 small corn or flour tortillas — whichever is cheaper or already in the kitchen.
- 2 tablespoons olive oil — for the sweet potatoes.
- 1 teaspoon cumin — gives the filling warmth.
- 1/2 teaspoon chili powder — optional but helpful.
- 2 cups shredded cabbage — the crunch layer.
- 1 lime, cut into wedges — the finishing squeeze.
- 1/4 cup plain yogurt or sour cream — for drizzling.
Quick Steps:
- Toss the sweet potatoes with olive oil, cumin, chili powder, salt, and pepper.
- Roast at 425°F for 20 to 25 minutes until the edges brown.
- Warm the beans in a small pan with a splash of water and a pinch of salt.
- Warm the tortillas in a dry skillet or over a low flame.
- Fill each tortilla with sweet potatoes, beans, cabbage, and yogurt.
- Finish with lime juice and serve right away.
Equipment for This Recipe:
- Rimmed baking sheet — for roasting.
- Small saucepan — for the beans.
- Dry skillet — to warm tortillas.
- Knife and peeler — for the sweet potatoes.
How to Serve This Dish:
Serve the tacos with lime wedges and a bowl of chopped tomatoes if you have them. If you want a fuller plate, a spoonful of rice on the side makes the meal go farther.
Pro Tips for This Recipe:
- Dice the sweet potatoes small so they roast in time.
- Don’t drown the tacos in sauce; a little yogurt and lime is enough.
- Warm tortillas right before serving so they stay flexible.
- Cabbage holds up better than lettuce if the tacos sit for a few minutes.
Variations on This Dish:
- Chipotle Version: Add a little chipotle in adobo to the beans.
- Avocado Finish: Use sliced avocado if it’s on sale.
- Breakfast Taco Spin: Top with a fried egg instead of yogurt.
Common Mistakes to Avoid with This Dish:
- Cutting sweet potatoes too big: They won’t roast fast enough.
- Stuffing cold tortillas: They crack and spill.
- Skipping the lime: The tacos need acid to balance the sweetness.
11. Veggie Pita Pizzas
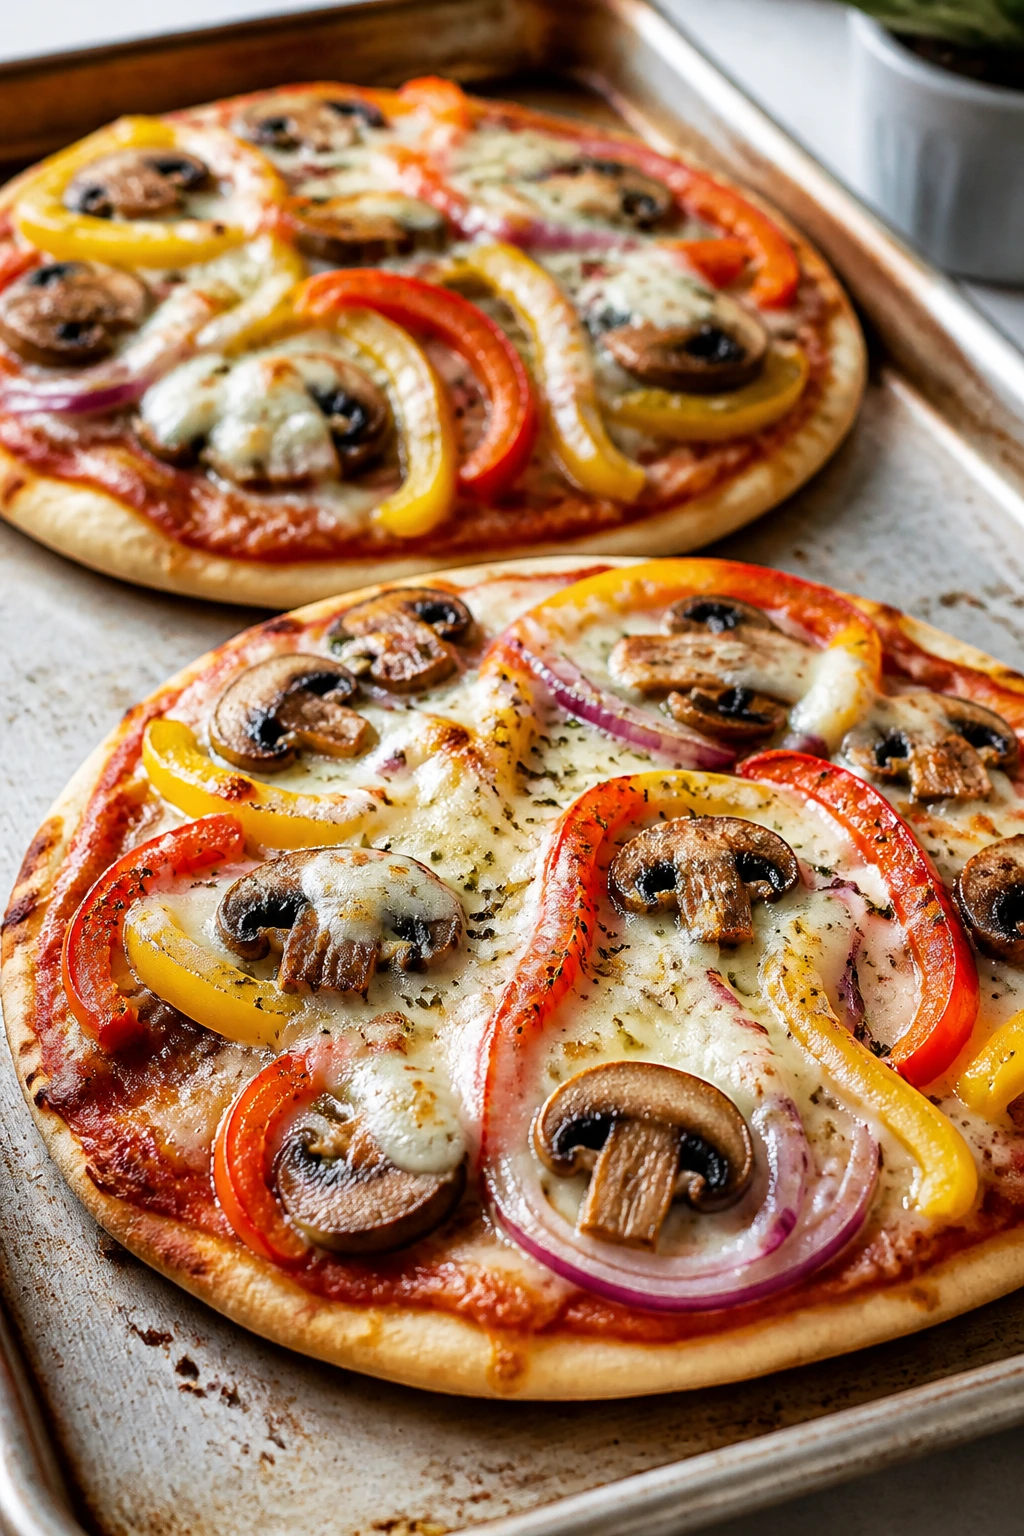
Pita pizzas are the dinner equivalent of cheating honestly. You get the feeling of pizza night, the cost stays low, and the vegetables can be whatever’s hanging around in the crisper drawer, which is how I like it.
Why It Works:
Pita breads bake fast, so you don’t need a long dough rise or any fancy steps. Because the base is already thin, the toppings stay light and crisp instead of sinking into a heavy bread slab.
Key Ingredients:
- 4 pita breads — pocketless or split pitas both work.
- 1/2 cup pizza sauce or marinara — spread it thin.
- 1 1/2 cups shredded mozzarella — enough to melt without smothering.
- 1/2 cup sliced mushrooms — cheap and earthy.
- 1/2 bell pepper, thinly sliced — use any color.
- 1/4 small red onion, thinly sliced — sharp and sweet once baked.
- 1 teaspoon olive oil — for the vegetables.
- 1/2 teaspoon dried oregano — makes it taste like pizza, not toast.
Quick Steps:
- Heat the oven to 425°F.
- Toss the vegetables with olive oil and oregano.
- Lay the pitas on a baking sheet and spread each with a thin layer of sauce.
- Add cheese and vegetables.
- Bake for 8 to 10 minutes until the cheese melts and the edges crisp.
Equipment for This Recipe:
- Baking sheet — one layer keeps the pitas crisp.
- Knife and cutting board — for the toppings.
- Spoon — for spreading sauce.
- Oven mitts — the pan gets hot fast.
How to Serve This Dish:
Cut each pita into wedges and serve with a side salad or carrot sticks. If you want the meal to feel more like pizza night, set out chili flakes and extra Parmesan.
Pro Tips for This Recipe:
- Don’t pile on the sauce or the base softens.
- Pre-cook watery vegetables like mushrooms for a minute if you want them drier.
- Bake on the upper rack if your oven runs cool.
- Serve immediately; pita loses its snap as it sits.
Variations on This Dish:
- Margherita Pita: Use tomato slices and basil instead of mixed vegetables.
- White Pizza Version: Swap sauce for ricotta and garlic.
- Pepperoni Budget Version: Add a few sliced pepperoni pieces if you want a meat option.
Common Mistakes to Avoid with This Dish:
- Using too much sauce: The pita gets soggy.
- Baking too long: The cheese turns rubbery and the edges burn.
- Crowding with toppings: It turns into a floppy mess.
12. Sesame Peanut Noodles with Cabbage
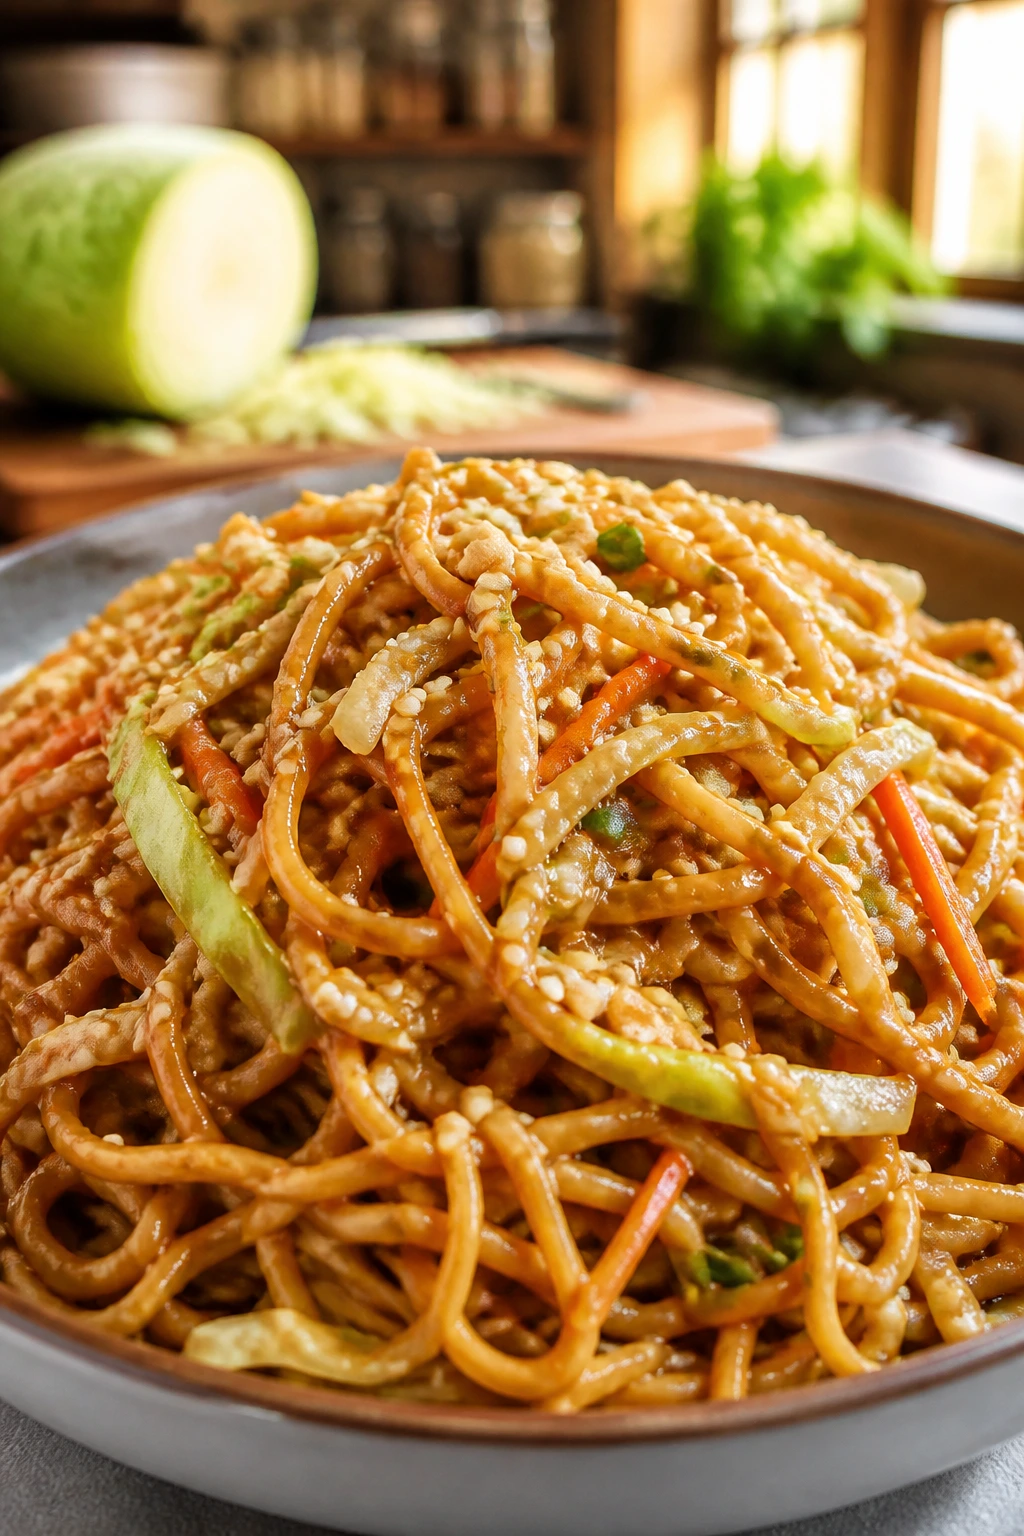
Cold-weather or not, I’ll happily eat sesame peanut noodles any day of the week. They’re cheap, quick, and the cabbage gives you enough crunch that the bowl doesn’t collapse into soft noodles and regret.
Why It Works:
Peanut butter turns into a fast sauce with hot water, soy sauce, and vinegar, so you don’t need a jarred dressing. Cabbage and carrots bring bulk and bite, which means a small amount of noodles can still feed a table.
Key Ingredients:
- 12 oz spaghetti or noodles — use the cheapest shape you have.
- 2 cups shredded cabbage — crunchy and low-cost.
- 1 carrot, julienned or grated — adds sweetness and color.
- 1/4 cup peanut butter — the sauce base.
- 2 tablespoons soy sauce — savory balance.
- 1 tablespoon rice vinegar — sharpens the sauce.
- 1 teaspoon sesame oil — just enough for aroma.
- 2 tablespoons hot water — loosen the sauce.
- 2 scallions, sliced — for a fresh finish.
Quick Steps:
- Cook the noodles, then rinse briefly under cool water if you want them less sticky.
- Whisk the peanut butter, soy sauce, vinegar, sesame oil, and hot water until smooth.
- Toss the noodles with the sauce.
- Fold in the cabbage and carrot.
- Top with scallions and serve.
Equipment for This Recipe:
- Pot — for the noodles.
- Mixing bowl — for the sauce.
- Whisk or fork — for smoothing the peanut butter.
- Colander — for draining.
How to Serve This Dish:
Serve it chilled or at room temperature with cucumber slices on the side. If you want to stretch it, add a fried egg or leftover chicken on top.
Pro Tips for This Recipe:
- Add the hot water slowly so the sauce doesn’t go from thick to watery.
- Use a sharp knife or mandoline for the cabbage if you want finer strands.
- Taste before salting; soy sauce already brings plenty.
- A squeeze of lime works well if you want the sauce brighter.
Variations on This Dish:
- Spicy Peanut Noodles: Add chili crisp or sriracha.
- Sesame Chicken Bowl: Add shredded chicken and extra scallions.
- Cold Noodle Salad: Chill the finished noodles for 20 minutes before serving.
Common Mistakes to Avoid with This Dish:
- Using too little water in the sauce: It clumps instead of coating.
- Skipping acid: Vinegar or lime keeps the peanut butter from feeling heavy.
- Overcooking the noodles: They need a little bite to hold the sauce.
13. Egg Drop Soup with Rice and Scallions

Egg drop soup is fast enough to make when you’re already tired of cooking, which is partly why I love it. A few eggs, some broth, and a scoop of rice turn into a light dinner that feels calm instead of chaotic.
Why It Works:
Egg ribbons cook in seconds, and they make broth feel richer without adding a lot of cost. Rice gives the soup enough body to count as dinner, while scallions and ginger keep the flavor sharp and clean.
Key Ingredients:
- 6 cups low-sodium broth — chicken or vegetable.
- 3 large eggs, beaten — the ribbons.
- 2 cups cooked rice — use chilled or freshly cooked.
- 1 tablespoon cornstarch mixed with 2 tablespoons water — optional for a slightly thicker broth.
- 1 teaspoon grated ginger — gives the soup lift.
- 2 scallions, sliced — for freshness.
- 1 tablespoon soy sauce — to season the broth.
- 1 teaspoon sesame oil — finish only.
Quick Steps:
- Bring the broth, ginger, and soy sauce to a gentle simmer.
- Stir in the cornstarch slurry if you want a silkier broth.
- Add the rice and warm it through for 2 minutes.
- Slowly drizzle in the beaten eggs while stirring the soup in one direction.
- Add scallions and sesame oil, then serve right away.
Equipment for This Recipe:
- Soup pot — wide enough for the egg ribbons.
- Whisk or fork — for beating the eggs.
- Ladle — for serving.
- Small bowl — for the cornstarch slurry.
How to Serve This Dish:
Serve it in deep bowls with a few extra scallions on top. If the family wants more food, put out steamed broccoli or a plate of sliced cucumbers rather than piling on bread.
Pro Tips for This Recipe:
- Drizzle the eggs in slowly; fast dumping makes chunky curds.
- Keep the broth at a gentle simmer, not a rolling boil.
- Fresh ginger matters here if you have it.
- Add sesame oil at the end so it stays fragrant.
Variations on This Dish:
- Spinach Egg Drop Soup: Stir in baby spinach at the end.
- Corn Version: Add 1/2 cup canned corn for sweetness.
- Garlic Ginger Bowl: Add a minced garlic clove with the ginger.
Common Mistakes to Avoid with This Dish:
- Boiling the broth hard: The eggs break into scraps.
- Adding too much cornstarch: The soup turns gluey.
- Forgetting to season the broth: Plain broth tastes thin and dull.
14. White Bean and Kale Toasts
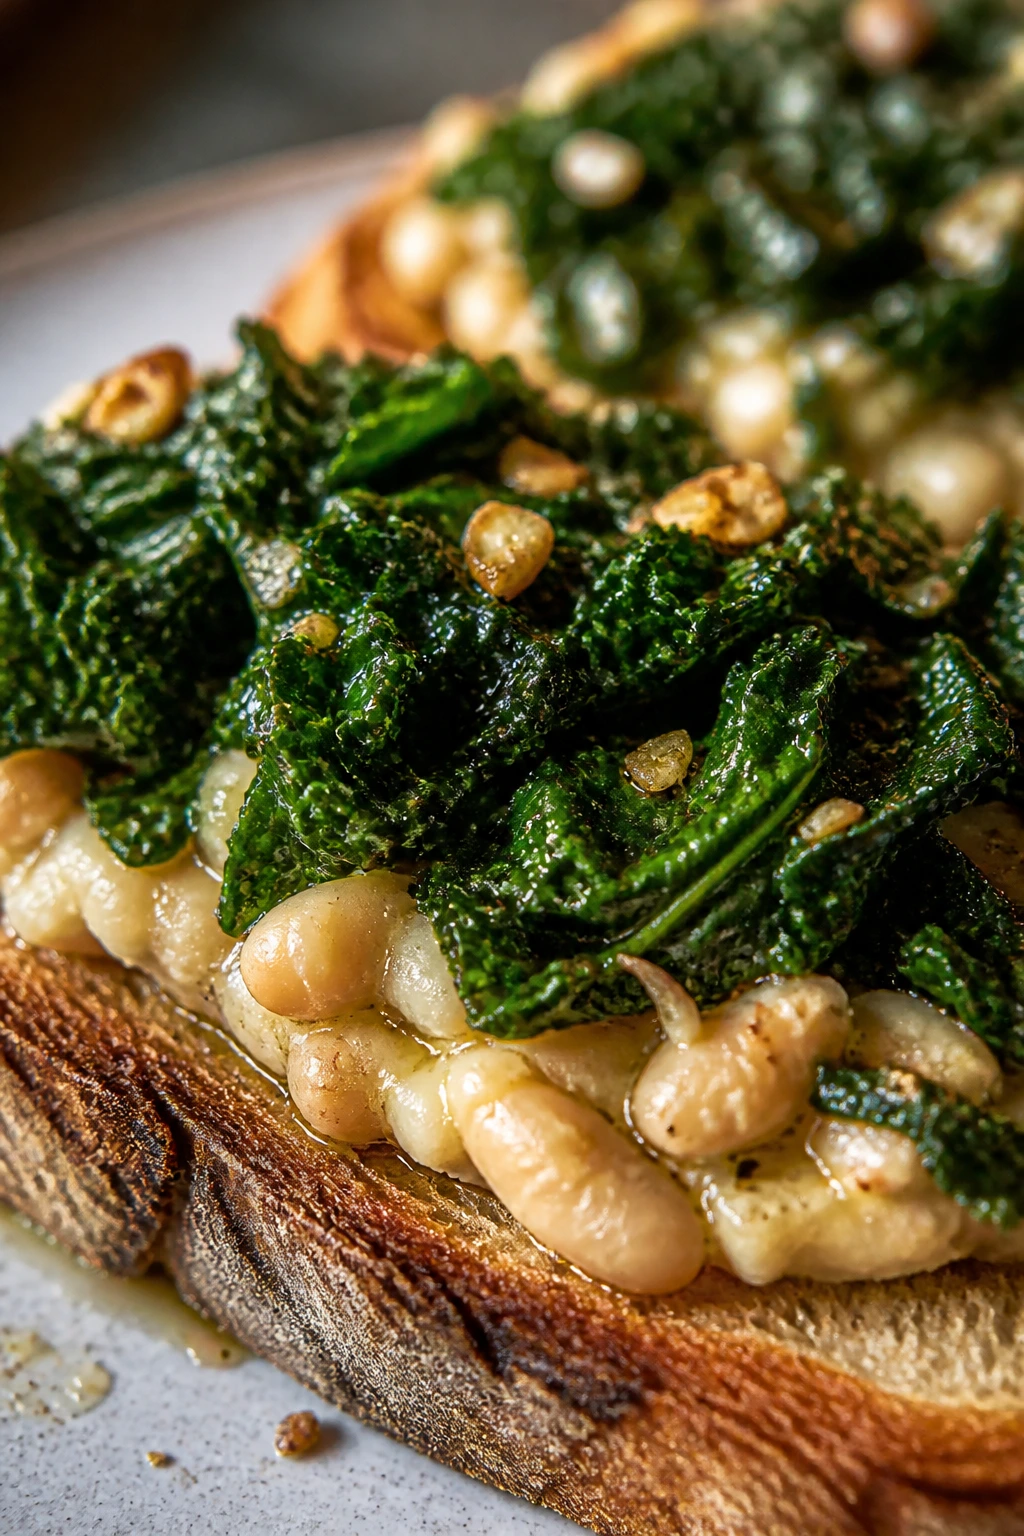
This is the dinner I make when I want to feel sensible without making a project out of it. Toast, beans, and kale sound plain on paper; in the pan, they become garlicky, salty, and sturdy enough to count as a real plate.
Why It Works:
White beans mash into a creamy layer that sits nicely on toast, and kale wilts down fast with garlic. The whole thing is cheap, fast, and surprisingly filling because you get protein, greens, and bread in one go.
Key Ingredients:
- 4 thick slices bread — country bread or sourdough is sturdy.
- 1 can white beans, drained and rinsed — mash them slightly.
- 2 cups chopped kale, stems removed — remove the tough ribs.
- 2 cloves garlic, minced — split between the beans and greens.
- 2 tablespoons olive oil — for the kale and toasting.
- 1 tablespoon lemon juice — brightens the beans.
- 1/4 teaspoon red pepper flakes — optional.
- Salt and pepper — don’t be shy.
Quick Steps:
- Toast the bread until golden.
- Mash the beans with half the garlic, lemon juice, salt, and a drizzle of olive oil.
- Sauté the kale in the remaining olive oil for 2 to 3 minutes with the rest of the garlic.
- Spread the bean mixture on toast.
- Top with the kale and a pinch of red pepper flakes.
Equipment for This Recipe:
- Skillet — for the kale.
- Toaster or oven — for the bread.
- Fork — for mashing beans.
- Knife — for trimming the kale.
How to Serve This Dish:
Serve two toasts per person with tomato slices or fruit on the side if you want a little more freshness. A fried egg on top turns this into a larger dinner without changing the budget much.
Pro Tips for This Recipe:
- Salt the bean mash well; beans need help.
- Remove the kale stems or you’ll be chewing forever.
- Use thick bread so the toast doesn’t go soggy under the beans.
- A drizzle of chili oil is a nice finishing move if you like heat.
Variations on This Dish:
- Tomato Bean Toasts: Add sliced tomatoes on top of the beans.
- Egg-on-Top Version: Add a fried egg for extra protein.
- Herby Spread: Mix in parsley or dill with the beans.
Common Mistakes to Avoid with This Dish:
- Using thin bread: It softens before you finish eating.
- Leaving kale untrimmed: The stems stay tough.
- Underseasoning the beans: They’ll taste like mashed filler.
15. Shrimp Tacos with Cabbage and Lime
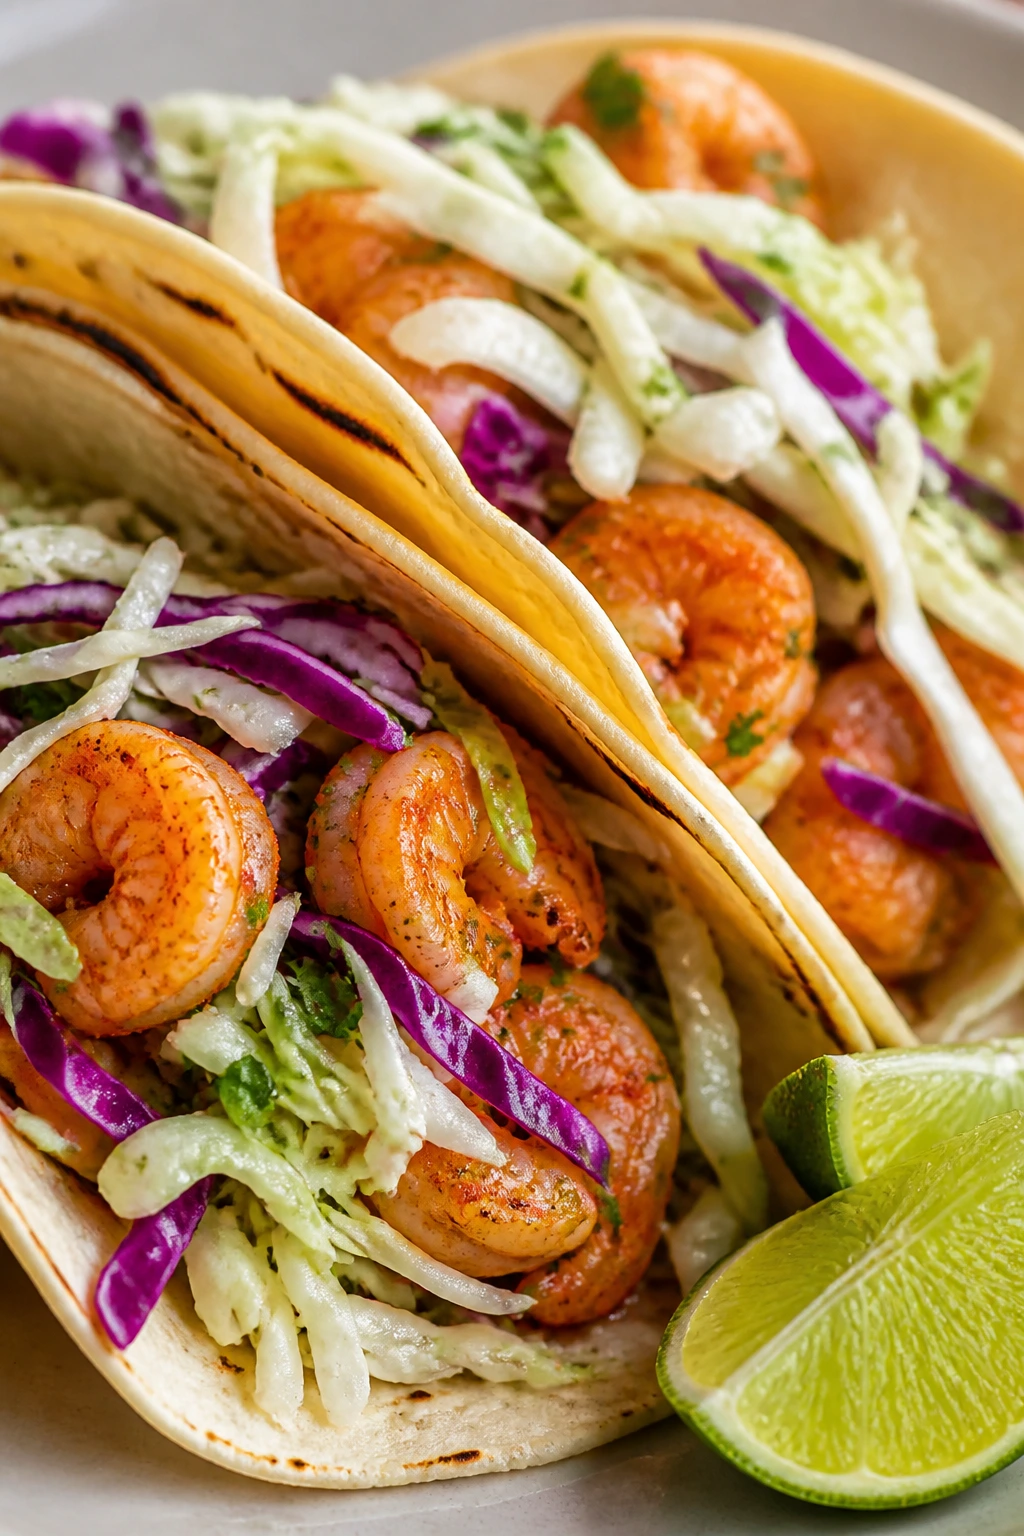
Shrimp can be pricier than beans, but frozen shrimp in the right package often lands in budget range, especially when you only need a pound. Toss them into tacos with cabbage and lime, and the dinner feels light, quick, and a little special without acting expensive.
Why It Works:
Shrimp cook in a few minutes, which keeps the whole meal fast. Cabbage stretches the filling, lime cuts through the richness, and tortillas make the shrimp feel like a real family dinner instead of a side dish.
Key Ingredients:
- 1 lb peeled shrimp, thawed if frozen — medium shrimp are easiest.
- 8 small tortillas — corn or flour both work.
- 2 cups shredded cabbage — for crunch.
- 1 tablespoon olive oil — for the shrimp.
- 1 teaspoon chili powder — for simple seasoning.
- 1/2 teaspoon garlic powder — optional but useful.
- 1 lime, cut into wedges — don’t skip it.
- 1/4 cup plain yogurt or sour cream — for the sauce.
- Salt and pepper — on the shrimp.
Quick Steps:
- Pat the shrimp dry and season them with chili powder, garlic powder, salt, and pepper.
- Cook the shrimp in olive oil over medium-high heat for 2 to 3 minutes per side until pink and curled.
- Warm the tortillas in a dry skillet.
- Mix the yogurt with a little lime juice and salt.
- Fill each tortilla with cabbage, shrimp, and yogurt sauce, then squeeze lime over the top.
Equipment for This Recipe:
- Skillet — for the shrimp.
- Tongs — for flipping quickly.
- Small bowl — for the sauce.
- Dry pan — for warming tortillas.
How to Serve This Dish:
Serve the tacos with extra lime and a simple tomato salad. If you need more food on the table, a scoop of rice or black beans beside the tacos does the trick.
Pro Tips for This Recipe:
- Dry the shrimp well or they’ll steam instead of sear.
- Don’t overcook them; curled and opaque is the target, not rubbery little rings.
- Make the sauce first so dinner assembles fast.
- Cabbage keeps better than lettuce if these tacos sit for a minute.
Variations on This Dish:
- Garlic Butter Shrimp Tacos: Swap olive oil for a little butter.
- Cajun Version: Use Cajun seasoning instead of chili powder.
- Fishless Swap: Use strips of sautéed mushrooms if shrimp is out of budget.
Common Mistakes to Avoid with This Dish:
- Overcooking shrimp: They go tough fast.
- Using wet cabbage: It waters down the tacos.
- Forgetting to warm the tortillas: Cold tortillas crack and spill.
16. Zucchini Corn Fritters with Yogurt Dip

Fritters are a sneaky way to turn a couple of cheap vegetables into dinner. Zucchini gives moisture, corn brings sweetness, and a tangy yogurt dip keeps the whole plate from feeling like a pile of fried bits.
Why It Works:
Zucchini is cheap when it’s in season or sold in bulk, and it shreds well into batter. The eggs and flour bind everything together, while the yogurt dip adds enough sharpness to make the fritters feel finished.
Key Ingredients:
- 2 medium zucchini, grated — squeeze out the water well.
- 1 cup corn kernels, fresh or frozen — thawed if frozen.
- 2 large eggs — to bind the batter.
- 1/3 cup all-purpose flour — just enough to hold things together.
- 1/4 cup chopped onion — adds flavor.
- 1/2 teaspoon salt — zucchini needs it.
- 1/4 teaspoon black pepper — for balance.
- 1/2 cup plain yogurt — for the dip.
- 1 tablespoon lemon juice — makes the dip bright.
Quick Steps:
- Grate the zucchini and squeeze out as much water as you can with a towel.
- Mix the zucchini, corn, eggs, flour, onion, salt, and pepper.
- Heat a thin layer of oil in a skillet over medium heat.
- Drop spoonfuls of batter into the pan and flatten slightly.
- Cook 3 to 4 minutes per side until deeply golden.
- Stir the yogurt with lemon juice and serve alongside.
Equipment for This Recipe:
- Box grater — for the zucchini.
- Clean towel — for squeezing out moisture.
- Skillet — for frying.
- Spatula — for flipping.
How to Serve This Dish:
Serve the fritters hot with the yogurt dip and a handful of salad greens. If you want the meal more substantial, add a boiled egg or a scoop of rice.
Pro Tips for This Recipe:
- Squeeze the zucchini hard. Watery batter makes sad fritters.
- Don’t fry them too thick or the centers stay damp.
- Keep the oil at medium so the outsides brown evenly.
- Make the dip first so it can chill while you cook.
Variations on This Dish:
- Cheesy Fritters: Add 1/3 cup shredded cheddar to the batter.
- Herb Version: Mix in dill or parsley.
- No-Corn Swap: Use grated carrot if corn is pricey.
Common Mistakes to Avoid with This Dish:
- Skipping the zucchini squeeze: The batter falls apart.
- Crowding the pan: The fritters steam instead of crisping.
- Flipping too early: Wait for the edges to set and brown.
17. Tuna Melt Skillet with Tomato Salad
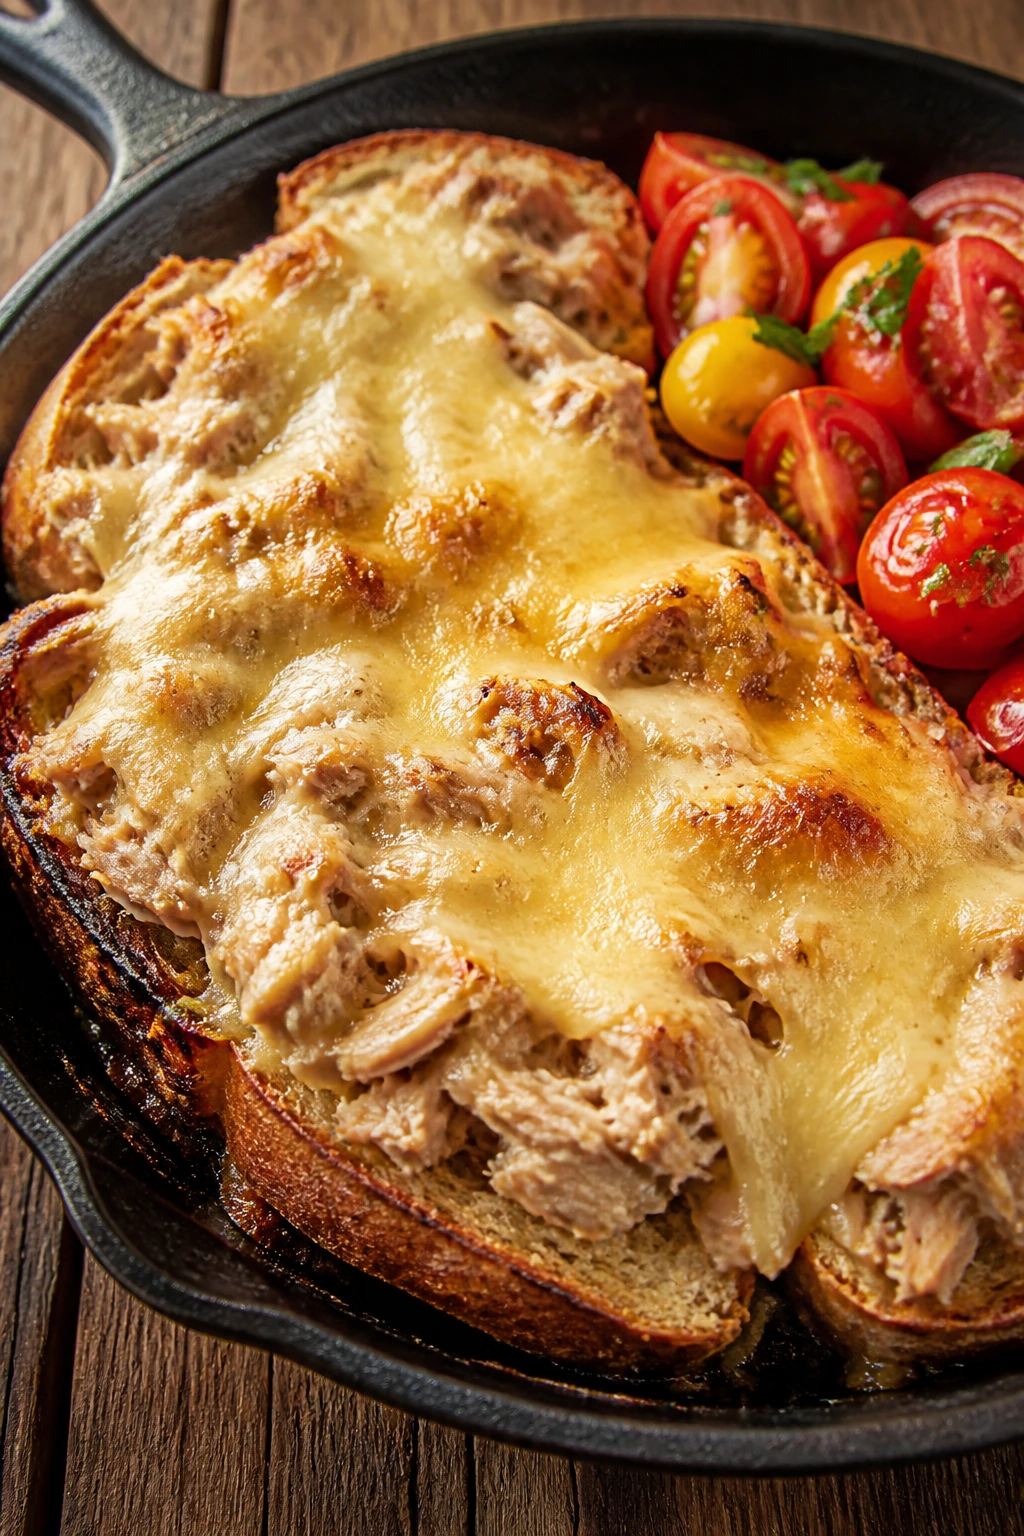
A tuna melt doesn’t need a diner booth to work. When you make it in a skillet and serve it with tomato salad, it turns into a light dinner that feels a little nostalgic without getting heavy or expensive.
Why It Works:
Tuna and cheese give you protein and comfort, while tomato salad keeps the plate fresh. Using the skillet instead of a sandwich press also means you can toast the bread and melt the cheese with one pan.
Key Ingredients:
- 4 slices bread — sturdy sandwich bread is fine.
- 2 cans tuna, drained — break it up well.
- 2 tablespoons mayo or plain yogurt — enough to bind the filling.
- 1 stalk celery, finely chopped — for crunch.
- 4 slices cheese, like cheddar or American — whatever melts smoothly.
- 2 tomatoes, sliced — for the side salad.
- 1 tablespoon olive oil — for the tomato salad.
- 1 teaspoon lemon juice — brightens the tomatoes.
- Salt and pepper — on the tuna and tomatoes.
Quick Steps:
- Mix the tuna with mayo, celery, salt, and pepper.
- Spread the filling on two slices of bread, top with cheese, and close the sandwiches.
- Toast the sandwiches in a skillet over medium heat, 3 to 4 minutes per side, until golden and melted.
- Toss the tomatoes with olive oil, lemon, salt, and pepper.
- Slice and serve with the salad.
Equipment for This Recipe:
- Skillet with lid — helpful for melting the cheese.
- Mixing bowl — for the tuna filling.
- Knife — for the tomatoes.
- Spatula — for flipping carefully.
How to Serve This Dish:
Cut the sandwiches in half and stack them beside the tomato salad. A few pickles on the plate make the whole dinner feel sharper and keep the tuna from getting too rich.
Pro Tips for This Recipe:
- Drain the tuna well or the sandwich filling gets wet.
- Use medium heat so the bread browns before the cheese burns.
- A lid helps trap heat and melt the cheese faster.
- If the bread is thin, butter the outside lightly for better color.
Variations on This Dish:
- Open-Faced Melt: Use one slice of bread per serving and pile the tuna on top.
- Tomato Tuna Melt: Add a thin tomato slice inside the sandwich.
- Spicy Version: Stir in a little hot sauce or mustard.
Common Mistakes to Avoid with This Dish:
- Using too much mayo: The filling slips out.
- Cooking on high heat: The bread burns before the cheese melts.
- Skipping the salad: The acid matters here.
18. Chicken Tortilla Soup

Chicken tortilla soup is one of those low-cost meals that feels bigger than the shopping list. Broth, salsa, beans, and a little chicken make a pot that’s lively enough to serve all by itself, especially with crisp tortilla strips on top.
Why It Works:
Salsa does a lot of the flavor work for you, which saves time and money. Beans and tortillas turn a simple soup into dinner, while shredded chicken stretches the broth so you don’t need a lot of meat.
Key Ingredients:
- 1 lb cooked shredded chicken — rotisserie or leftover chicken both work.
- 1 tablespoon olive oil — for the onion.
- 1 onion, diced — adds sweetness.
- 1 jar salsa, about 16 oz — the flavor base.
- 4 cups chicken broth — more if you want it looser.
- 1 can black beans, drained and rinsed — for body.
- 1 cup frozen corn — optional but good.
- 4 corn tortillas, cut into strips — for topping or crisping.
- Lime wedges and cilantro — for serving.
Quick Steps:
- Cook the onion in olive oil for 3 minutes until soft.
- Add the salsa and broth, then bring to a simmer.
- Stir in the shredded chicken, beans, and corn.
- Simmer for 10 minutes so the flavors come together.
- Crisp the tortilla strips in a dry skillet or oven.
- Ladle into bowls and top with lime and cilantro.
Equipment for This Recipe:
- Soup pot — for the broth.
- Knife — for the onion and tortilla strips.
- Baking sheet or skillet — for crisping tortillas.
- Ladle — for serving.
How to Serve This Dish:
Serve the soup with tortilla strips on top and a spoonful of yogurt or sour cream if you want it creamier. It also works well with a side of rice if the family wants a bigger bowl.
Pro Tips for This Recipe:
- Use salsa you already like; bland salsa makes bland soup.
- Crisp the tortilla strips separately so they stay crunchy.
- Add lime at the end for a sharper bowl.
- If the broth tastes thin, simmer it a little longer before adding the chicken.
Variations on This Dish:
- Creamy Tortilla Soup: Stir in a little sour cream at the end.
- Vegetarian Version: Skip the chicken and add another can of beans.
- Spicy Batch: Use hot salsa or add diced jalapeño.
Common Mistakes to Avoid with This Dish:
- Using soft tortilla strips too early: They turn to mush.
- Skipping the simmer: Salsa needs time to settle into broth.
- Overloading with toppings: A little crunch goes farther than a mountain of cheese.
19. Pasta e Fagioli with Greens
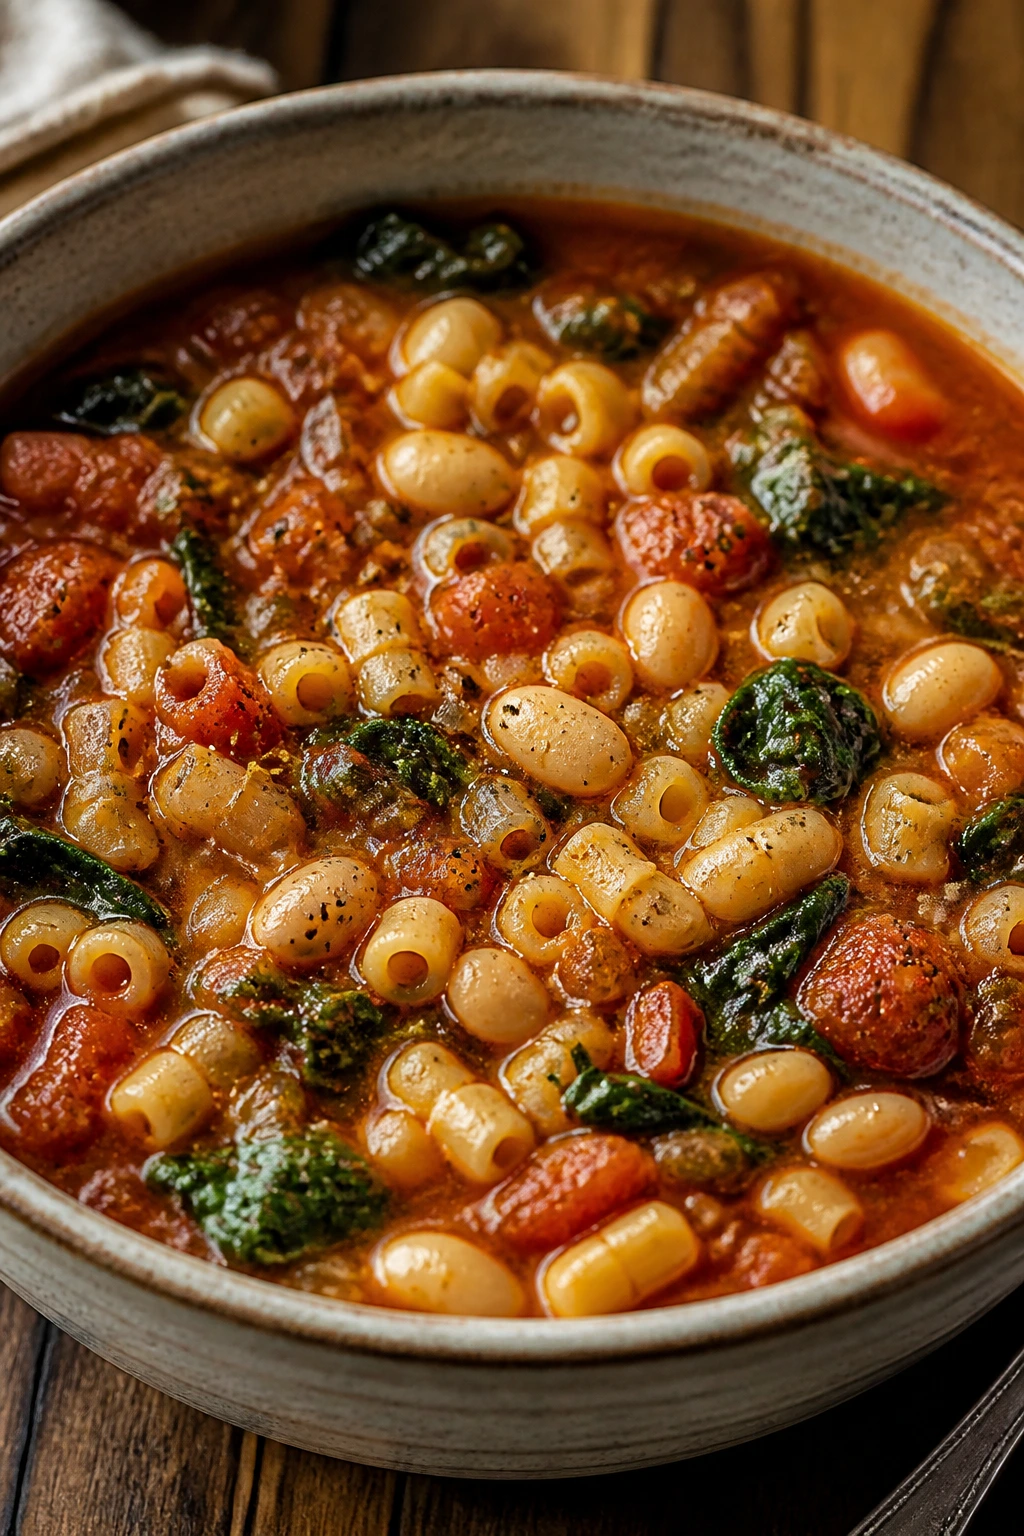
Pasta e fagioli is one of those old reliable pots that makes you look more organized than you feel. Beans, pasta, and greens in tomato broth cost little, fill a lot of bowls, and taste better the second day if there are any leftovers left at all.
Why It Works:
The beans thicken the broth naturally, while pasta makes the soup hearty enough for dinner. A handful of greens at the end brings freshness and keeps the bowl from feeling like a starch festival.
Key Ingredients:
- 2 tablespoons olive oil — for the onion and carrot.
- 1 onion, diced — flavor base.
- 1 carrot, diced — slight sweetness.
- 2 cloves garlic, minced — short cook time.
- 1 can crushed tomatoes, about 15 oz — gives the soup its body.
- 4 cups broth — chicken or vegetable.
- 2 cans cannellini beans, drained and rinsed — mash a few for thickness.
- 1 cup small pasta — ditalini is classic.
- 2 cups chopped spinach or kale — stir in at the end.
- 1 teaspoon dried rosemary or Italian seasoning — the herbal note.
Quick Steps:
- Cook the onion and carrot in olive oil for 5 minutes.
- Add the garlic and herbs for 30 seconds.
- Stir in the tomatoes, broth, and beans, then simmer for 10 minutes.
- Add the pasta and cook until tender.
- Stir in the greens and let them wilt.
- Taste and finish with salt, pepper, and a drizzle of olive oil.
Equipment for This Recipe:
- Large pot — for the full batch.
- Wooden spoon — for mashing a few beans.
- Knife and cutting board — for the vegetables.
- Ladle — for serving.
How to Serve This Dish:
Serve it in deep bowls with a little olive oil on top and cracked pepper if you like that style. I’d rather have this with toast than with a fussy side.
Pro Tips for This Recipe:
- Mash some beans against the side of the pot for a creamier broth.
- Add pasta only when you’re close to serving if you want leftovers to stay nicer.
- Use dried rosemary sparingly; it can take over.
- A parmesan rind simmered in the pot is a cheap flavor boost.
Variations on This Dish:
- Sausage and Beans Version: Add cooked sausage slices.
- Tomato-Free Style: Use more broth and beans if you want it lighter.
- Rice Bowl Spin: Serve over rice instead of adding pasta.
Common Mistakes to Avoid with This Dish:
- Overcooking the pasta: It will swell and turn soft.
- Skipping the greens: They keep the soup from feeling heavy.
- Using too little salt: Beans and pasta need seasoning.
20. Veggie Omelet Dinner with Toast and Fruit
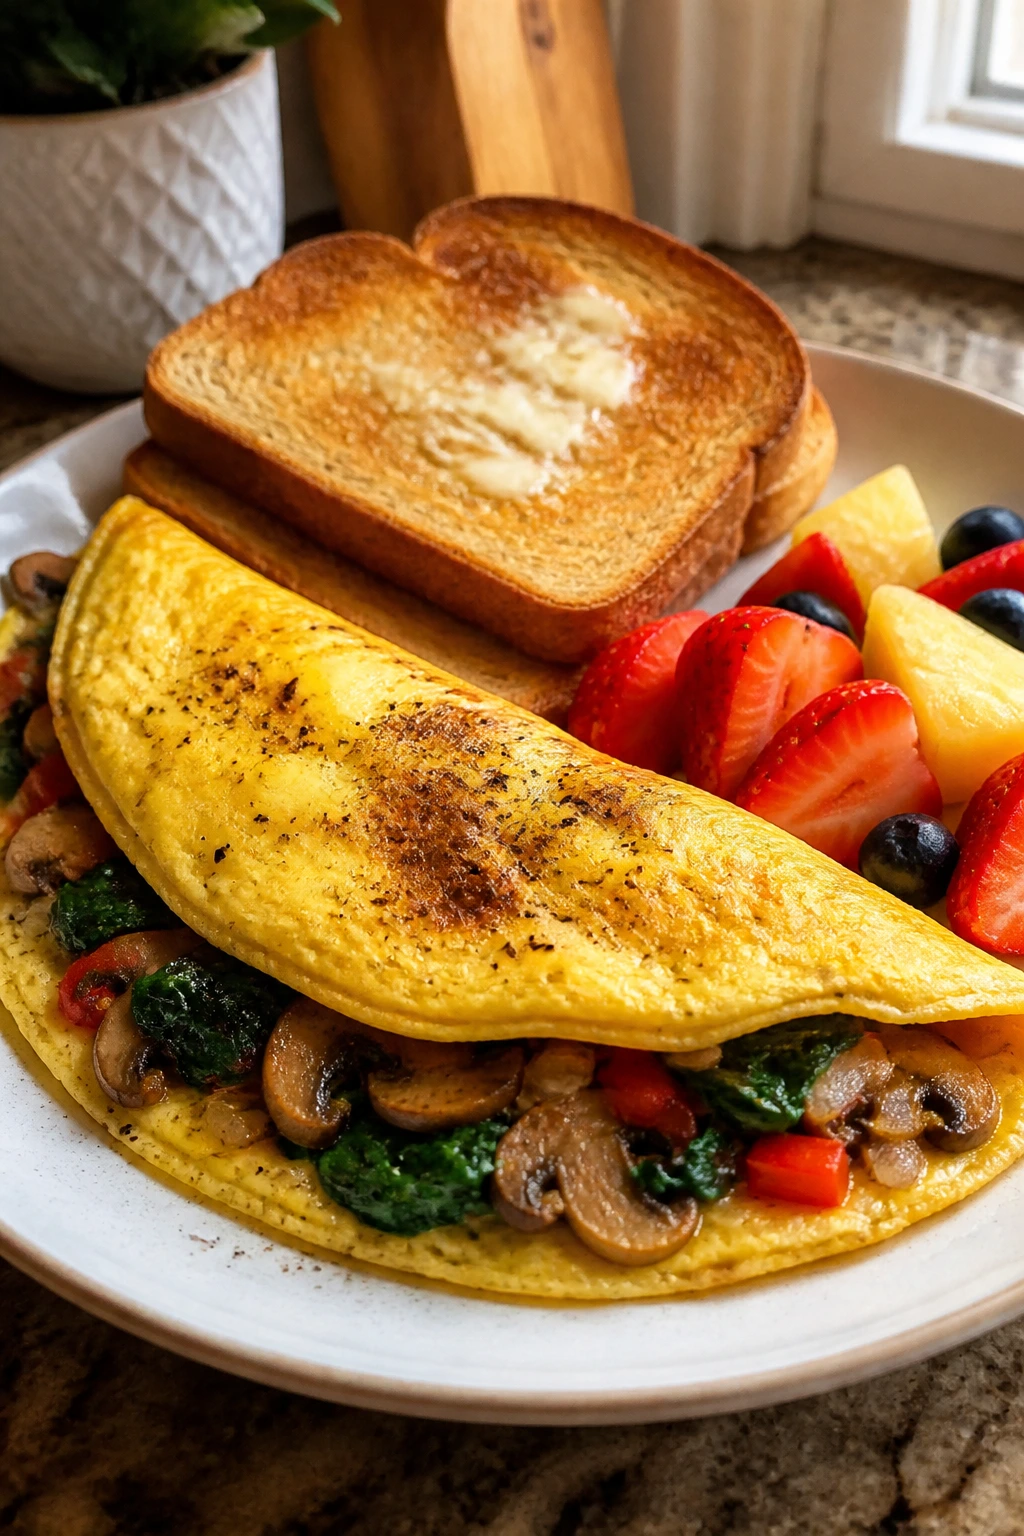
Breakfast-for-dinner works because it skips the act. Eggs, vegetables, toast, and fruit make a cheap meal that lands fast and feels comforting without demanding much from you.
Why It Works:
Eggs are one of the cheapest proteins around, and they cook in minutes. A veggie omelet also gives you a way to use scraps — half an onion, a few mushrooms, some spinach — without waiting for a recipe to tell you what to do.
Key Ingredients:
- 6 large eggs — enough for 3 small omelets or 2 larger ones.
- 2 tablespoons milk — optional, for a softer omelet.
- 1 tablespoon butter or oil — for the pan.
- 1/2 cup sliced mushrooms — optional but nice.
- 1/2 cup spinach — a small handful.
- 1/4 cup diced onion — for sweetness.
- 1/2 cup shredded cheese — optional.
- 4 slices toast — for serving.
- 2 cups sliced fruit — apples, oranges, or whatever is cheap.
Quick Steps:
- Cook the mushrooms and onion in butter until soft.
- Whisk the eggs with milk, salt, and pepper.
- Pour the eggs into the skillet over medium-low heat and cook until the edges set.
- Add the vegetables and cheese to one half, then fold the omelet.
- Serve with toast and fruit.
Equipment for This Recipe:
- Nonstick skillet — makes folding easier.
- Whisk or fork — for the eggs.
- Spatula — for folding.
- Small bowl — for whisking.
How to Serve This Dish:
Serve the omelet with buttered toast and a bowl of fruit so the plate feels complete. If you need to stretch it, add roasted potatoes or a simple green salad.
Pro Tips for This Recipe:
- Keep the heat low enough that the eggs stay tender.
- Don’t overfill the omelet; it’s supposed to fold, not burst.
- Cook the vegetables first so they don’t water down the eggs.
- Use a nonstick pan unless you enjoy scraping egg out of steel.
Variations on This Dish:
- Cheese-Only Version: Skip the vegetables and use just cheese.
- Herbed Omelet: Add chives or parsley to the eggs.
- Scramble Instead: If folding feels annoying, scramble everything together.
Common Mistakes to Avoid with This Dish:
- Cooking eggs too hot: They turn rubbery fast.
- Using watery vegetables raw: The omelet gets wet.
- Trying to flip too early: Let the eggs set before folding.
21. Sausage and Pepper Skillet with Rice
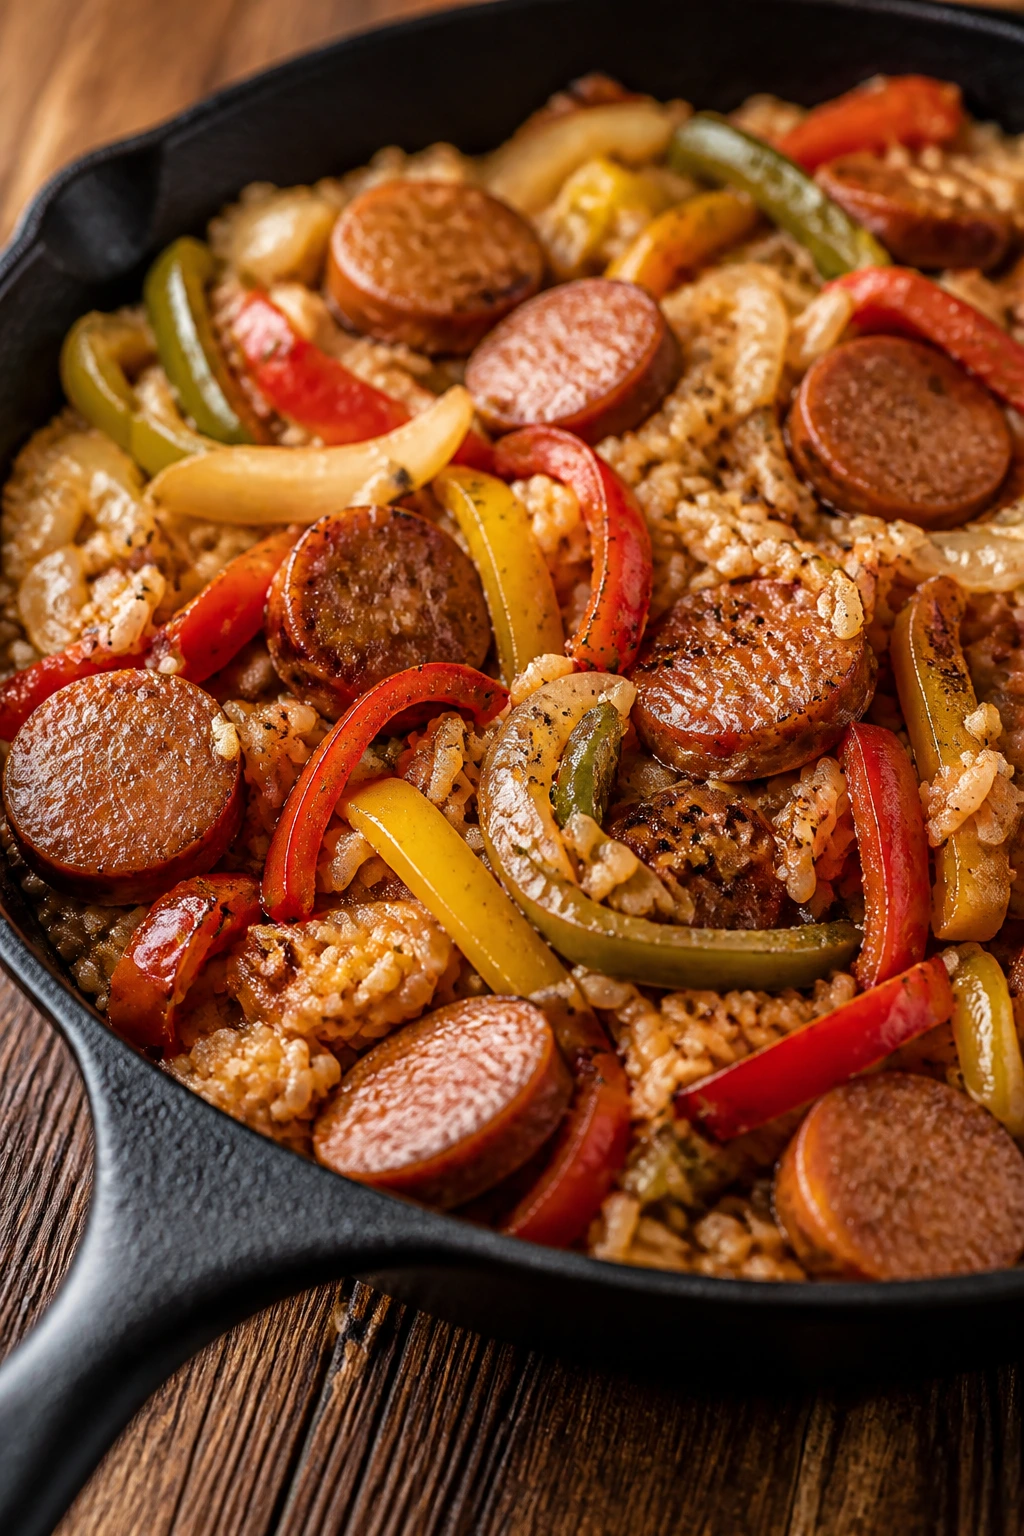
This one edges a little heartier than some of the others, but it still fits the budget-and-light dinner lane if you keep the sausage portion reasonable. Peppers, onions, and rice stretch the pan so the sausage feels like flavor, not the whole bill.
Why It Works:
A few slices of sausage can perfume an entire skillet, which is exactly what you want when shopping carefully. Peppers and onions soften into sweet strands, and rice catches all the browned bits at the bottom of the pan.
Key Ingredients:
- 12 oz smoked sausage, sliced — choose a simple, inexpensive variety.
- 1 tablespoon olive oil — usually enough because sausage releases fat.
- 2 bell peppers, sliced — any color.
- 1 onion, sliced — for sweetness.
- 2 cloves garlic, minced — short and sharp.
- 2 cups cooked rice — white or brown.
- 1/2 cup canned diced tomatoes — optional for moisture.
- 1 teaspoon Italian seasoning — ties the skillet together.
Quick Steps:
- Brown the sausage slices in a skillet over medium heat for 3 minutes.
- Add the peppers and onion and cook until softened.
- Stir in the garlic and Italian seasoning.
- Add the rice and tomatoes, then cook until heated through.
- Taste and adjust with salt and pepper.
Equipment for This Recipe:
- Large skillet — all the ingredients need space.
- Spatula — for stirring.
- Knife and cutting board — for the peppers and onion.
- Measuring cup — for the rice.
How to Serve This Dish:
Serve it in bowls with a little chopped parsley or green onion if you have it. A side of steamed broccoli keeps the plate balanced if you want more vegetables.
Pro Tips for This Recipe:
- Slice the sausage thin so a small amount flavors the whole pan.
- Let the peppers soften before adding the rice.
- If the pan looks dry, add 2 tablespoons of water.
- Use day-old rice if possible for better texture.
Variations on This Dish:
- Sausage and Cabbage Version: Swap peppers for sliced cabbage.
- Tomato-Rich Skillet: Add more canned tomatoes for a saucier bowl.
- Turkey Sausage Swap: Use turkey sausage if that’s what’s on sale.
Common Mistakes to Avoid with This Dish:
- Overdoing the sausage: It stops being a cheap dinner pretty fast.
- Undercooking the onions: They should soften and sweeten.
- Using too much rice: The sausage flavor gets lost.
22. Lentil Sloppy Joes
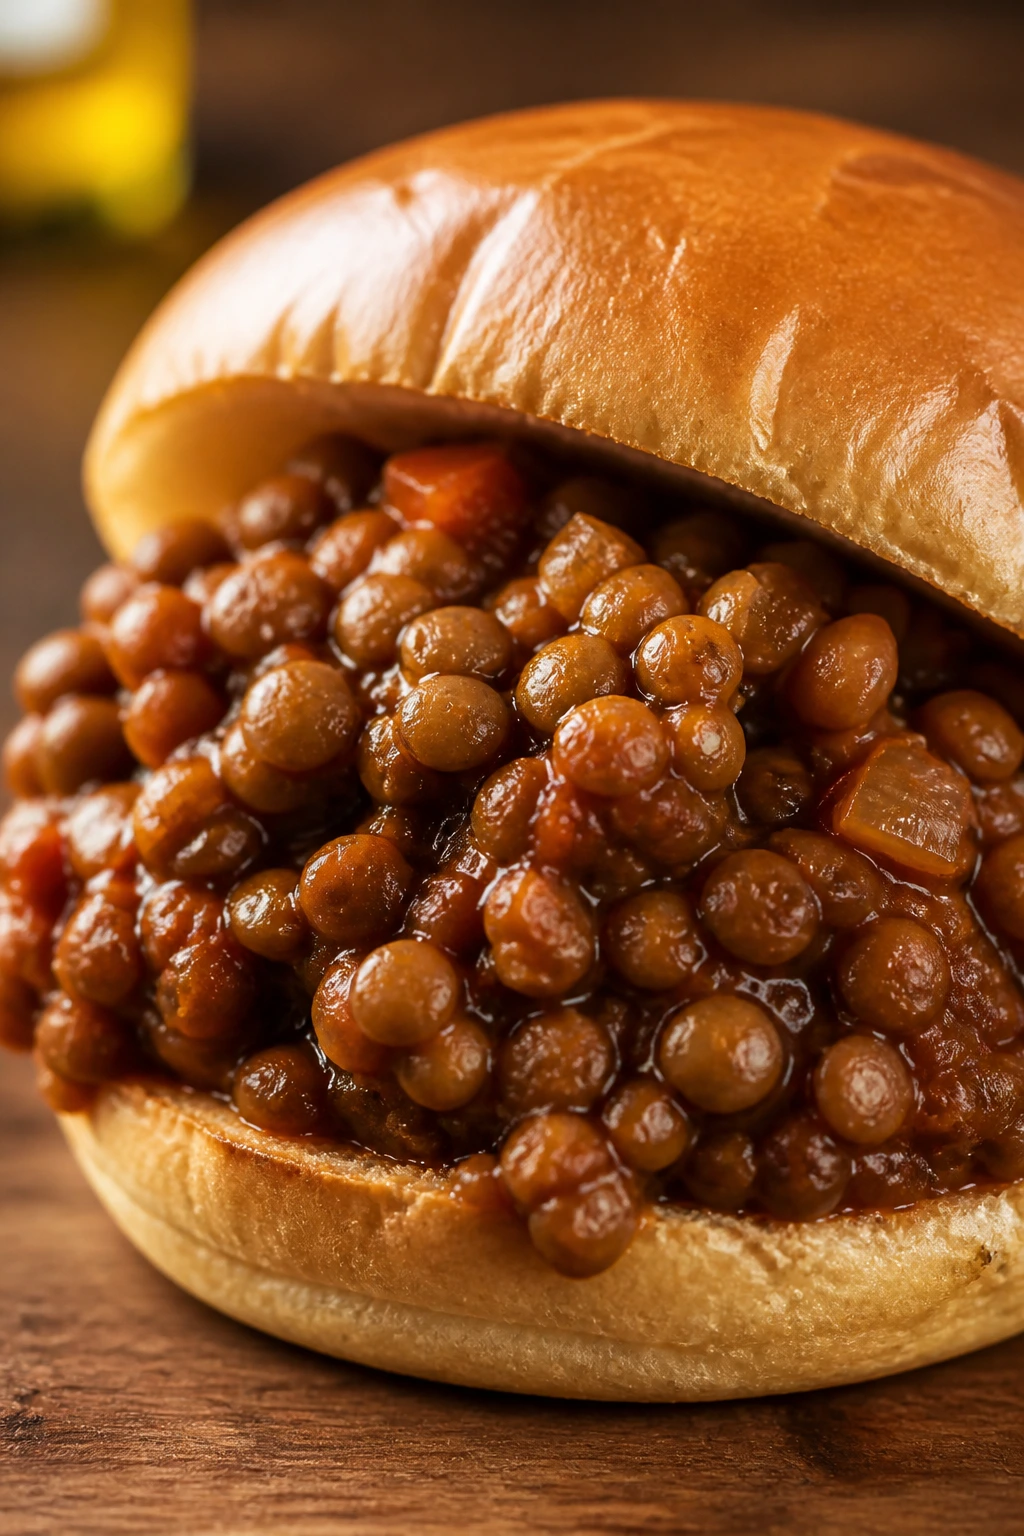
Lentil sloppy joes are the sort of thing people doubt until they eat the first messy bite. They’re cheap, filling, and light enough to feel like dinner rather than a plate of regret, especially when you pile on a little slaw.
Why It Works:
Lentils cook soft and hold seasoning well, which makes them a smart stand-in for ground meat. Tomato paste, ketchup, and mustard give you that familiar tangy-sweet sloppy joe flavor without needing a big pack of beef.
Key Ingredients:
- 1 cup dry brown or green lentils, rinsed — they hold shape better than red lentils.
- 1 tablespoon olive oil — for the onion.
- 1 onion, diced — the base flavor.
- 2 cloves garlic, minced — optional but useful.
- 2 tablespoons tomato paste — deepens the sauce.
- 1/4 cup ketchup — classic sloppy joe flavor.
- 1 tablespoon mustard — for tang.
- 1 tablespoon Worcestershire sauce or soy sauce — for savory depth.
- 4 buns — toasted if you like them sturdier.
Quick Steps:
- Simmer the lentils in water until tender, about 20 minutes, then drain.
- Cook the onion in olive oil until soft.
- Stir in the garlic and tomato paste for 30 seconds.
- Add the lentils, ketchup, mustard, and Worcestershire sauce.
- Cook for 5 minutes until thick and spoonable.
- Spoon onto buns and serve.
Equipment for This Recipe:
- Medium pot — for the lentils.
- Skillet — for the sauce.
- Colander — to drain the lentils.
- Spoon — for mashing a few lentils if needed.
How to Serve This Dish:
Serve the lentils on toasted buns with a spoonful of slaw or sliced pickles on top. If you want the plate lighter, skip the bun and spoon the mixture over baked potatoes or rice.
Pro Tips for This Recipe:
- Don’t overcook the lentils or they’ll turn to mush.
- Taste after simmering; lentils soak up salt more than you expect.
- A splash of pickle juice can sharpen the sauce in a good way.
- Toast the buns if you want them to survive the filling.
Variations on This Dish:
- BBQ Lentil Sandwiches: Swap ketchup for barbecue sauce.
- Spicy Joe Version: Add hot sauce or chili flakes.
- Open-Faced Style: Serve the mixture on toast instead of buns.
Common Mistakes to Avoid with This Dish:
- Using red lentils: They break down too much for this texture.
- Keeping the filling too wet: It runs right out of the bun.
- Skipping the tang: Mustard or vinegar matters here.
23. Greek Pasta Salad with Chickpeas
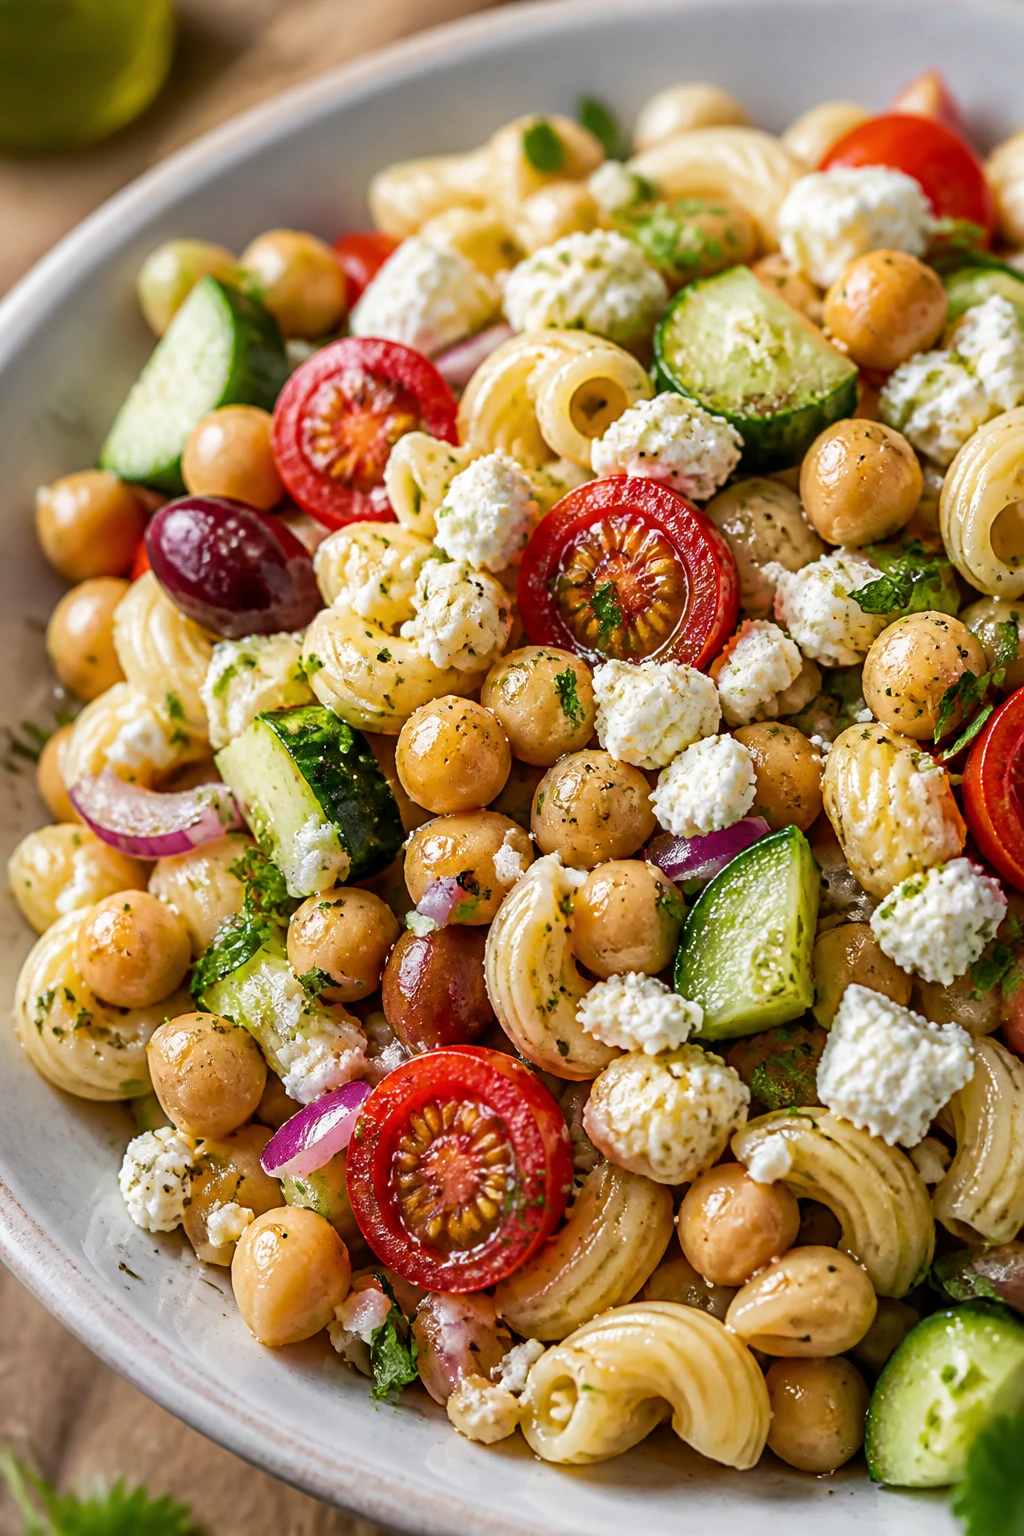
This is the dinner I make when I want something cold, cheap, and not fussy. Chickpeas, pasta, cucumber, tomatoes, and feta make a meal that feels bright enough for warm evenings but still works any time the fridge needs saving.
Why It Works:
Pasta salad is cheap because the dressing does the heavy lifting and the vegetables don’t need a long cook time. Chickpeas bring protein, and a lemony oil dressing keeps the bowl from tasting dry or stalled out.
Key Ingredients:
- 12 oz pasta, such as rotini or penne — shapes with ridges hold the dressing.
- 1 can chickpeas, drained and rinsed — for protein.
- 1 cucumber, diced — cool and crunchy.
- 1 pint cherry tomatoes, halved — sweeter than large tomatoes.
- 1/2 cup crumbled feta — optional, but salty and useful.
- 3 tablespoons olive oil — for the dressing.
- 2 tablespoons lemon juice — brightens the salad.
- 1 teaspoon dried oregano — classic Greek flavor.
- Salt and pepper — to balance the dressing.
Quick Steps:
- Cook the pasta until al dente, then rinse under cool water.
- Whisk the olive oil, lemon juice, oregano, salt, and pepper.
- Toss the pasta with chickpeas, cucumber, tomatoes, and feta.
- Pour the dressing over and mix well.
- Chill for 10 minutes if you have time, then serve.
Equipment for This Recipe:
- Pot — for the pasta.
- Large mixing bowl — for tossing.
- Colander — for draining.
- Whisk — for the dressing.
How to Serve This Dish:
Serve it cold or at room temperature with a spoonful of extra feta on top. It’s good on its own, but a few olives or a boiled egg can make it feel more dinner-like.
Pro Tips for This Recipe:
- Salt the pasta water well so the salad doesn’t taste flat later.
- Rinse the pasta only enough to cool it; you don’t want it icy.
- Add the tomatoes after the pasta cools a bit so they don’t collapse.
- Taste again after chilling, since cold food needs more seasoning.
Variations on This Dish:
- Tuna Greek Salad: Add a can of tuna for more protein.
- No-Feta Version: Use extra salt, lemon, and olives.
- Herby Swap: Add dill or parsley for a fresher profile.
Common Mistakes to Avoid with This Dish:
- Overcooking the pasta: It turns mushy once dressed.
- Using too little dressing: Pasta salad soaks it up.
- Serving it straight from the fridge: A few minutes at room temp improves the flavor.
24. Broccoli Cheddar Baked Rice Casserole
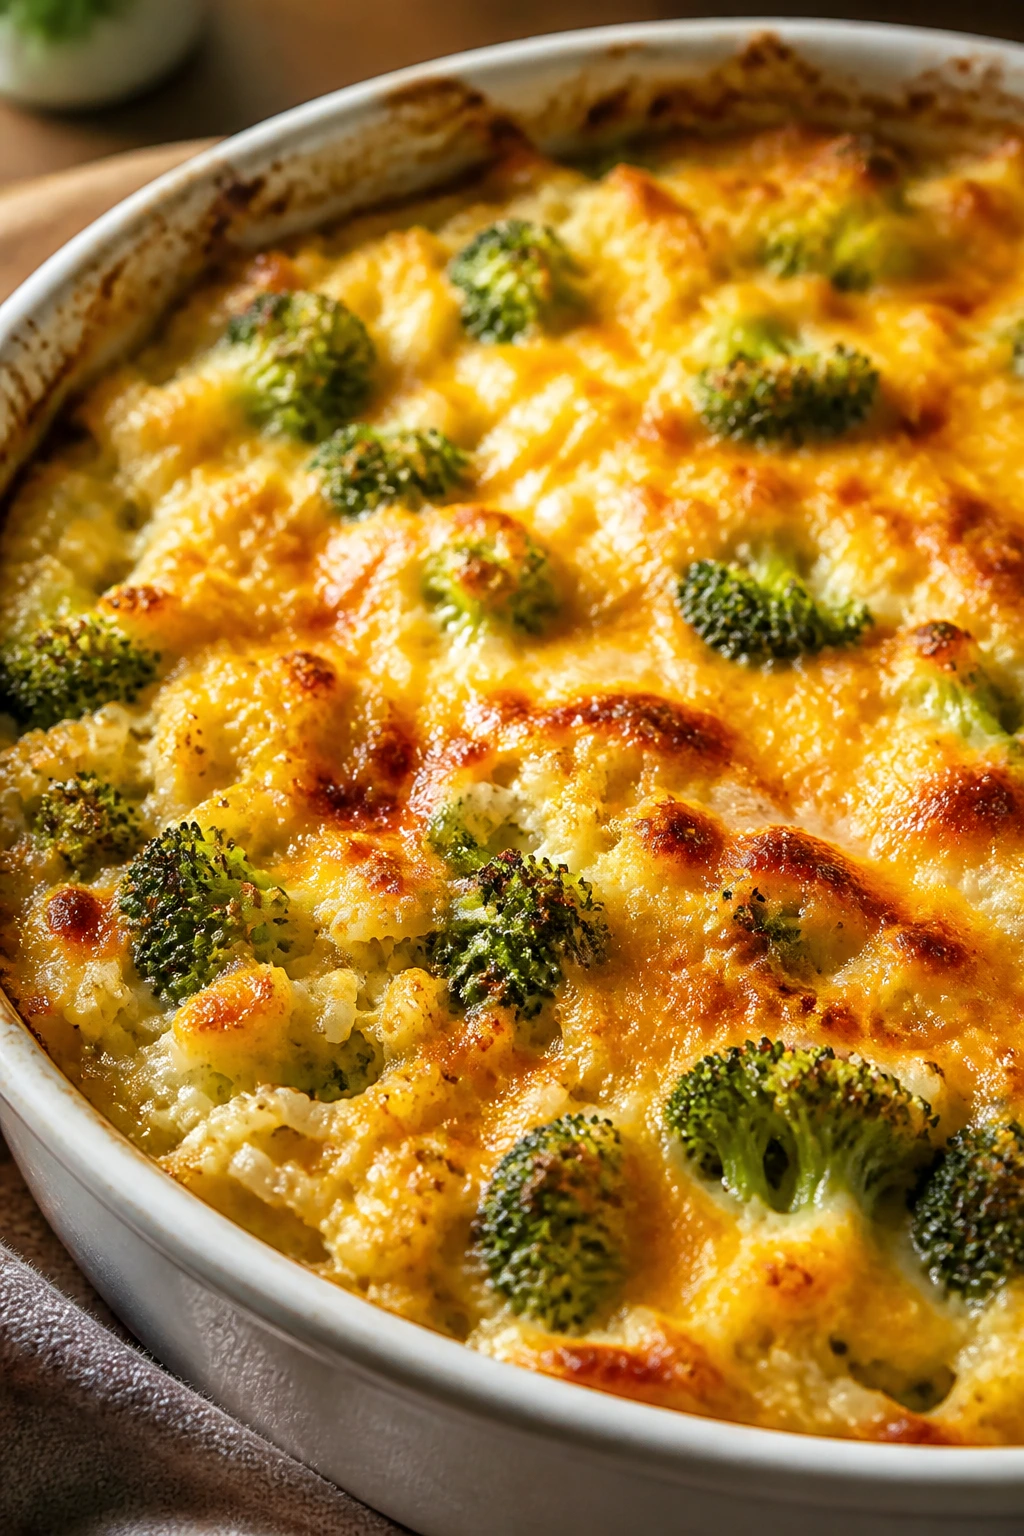
This casserole lands a little richer than some of the others, but it still fits the cheap family dinner lane because rice and broccoli stretch the cheese in a very practical way. It’s cozy without being heavy, and the broccoli keeps the pan from sinking into pure starch.
Why It Works:
Rice is the base, broccoli brings volume and color, and cheddar gives you enough richness to make it feel like a complete meal. Baking everything together means you get a browned top, which is half the pleasure of a casserole anyway.
Key Ingredients:
- 3 cups cooked rice — day-old rice holds up best.
- 3 cups broccoli florets, chopped small — fresh or frozen.
- 1 1/2 cups shredded cheddar — enough to bind the casserole.
- 1 cup milk — for moisture.
- 1 onion, finely chopped — for base flavor.
- 1 tablespoon butter or oil — to cook the onion.
- 1/2 cup breadcrumbs — for the top, optional.
- Salt and pepper — to season the whole dish.
- 1 teaspoon Dijon mustard — optional but sharp and useful.
Quick Steps:
- Cook the onion in butter until soft.
- Mix the rice, broccoli, onion, milk, half the cheddar, mustard, salt, and pepper.
- Spoon into a baking dish and top with the remaining cheese and breadcrumbs.
- Bake at 375°F for 20 to 25 minutes until bubbling and lightly browned.
- Let it sit for 5 minutes before serving.
Equipment for This Recipe:
- Baking dish — 8×8 or similar.
- Mixing bowl — to combine everything.
- Spoon — for the casserole mix.
- Oven mitts — because bubbling cheese is hot.
How to Serve This Dish:
Serve it as the main dish with a simple tomato salad or sliced apples on the side. If you want more protein, a fried egg on top works better than you’d think.
Pro Tips for This Recipe:
- Chop the broccoli small so it cooks through.
- Use cooked rice; raw rice won’t finish in time.
- Let it rest after baking so it sets up a bit.
- A little mustard in the mix sharpens the cheddar.
Variations on This Dish:
- Chicken Broccoli Casserole: Add shredded cooked chicken.
- Extra-Green Version: Add spinach with the broccoli.
- Cracker-Topped Style: Use crushed crackers instead of breadcrumbs.
Common Mistakes to Avoid with This Dish:
- Adding too much milk: The casserole goes soupy.
- Using raw broccoli in big chunks: It stays tough.
- Cutting immediately: The rice needs a few minutes to settle.
25. Teriyaki Chicken Cabbage Bowls
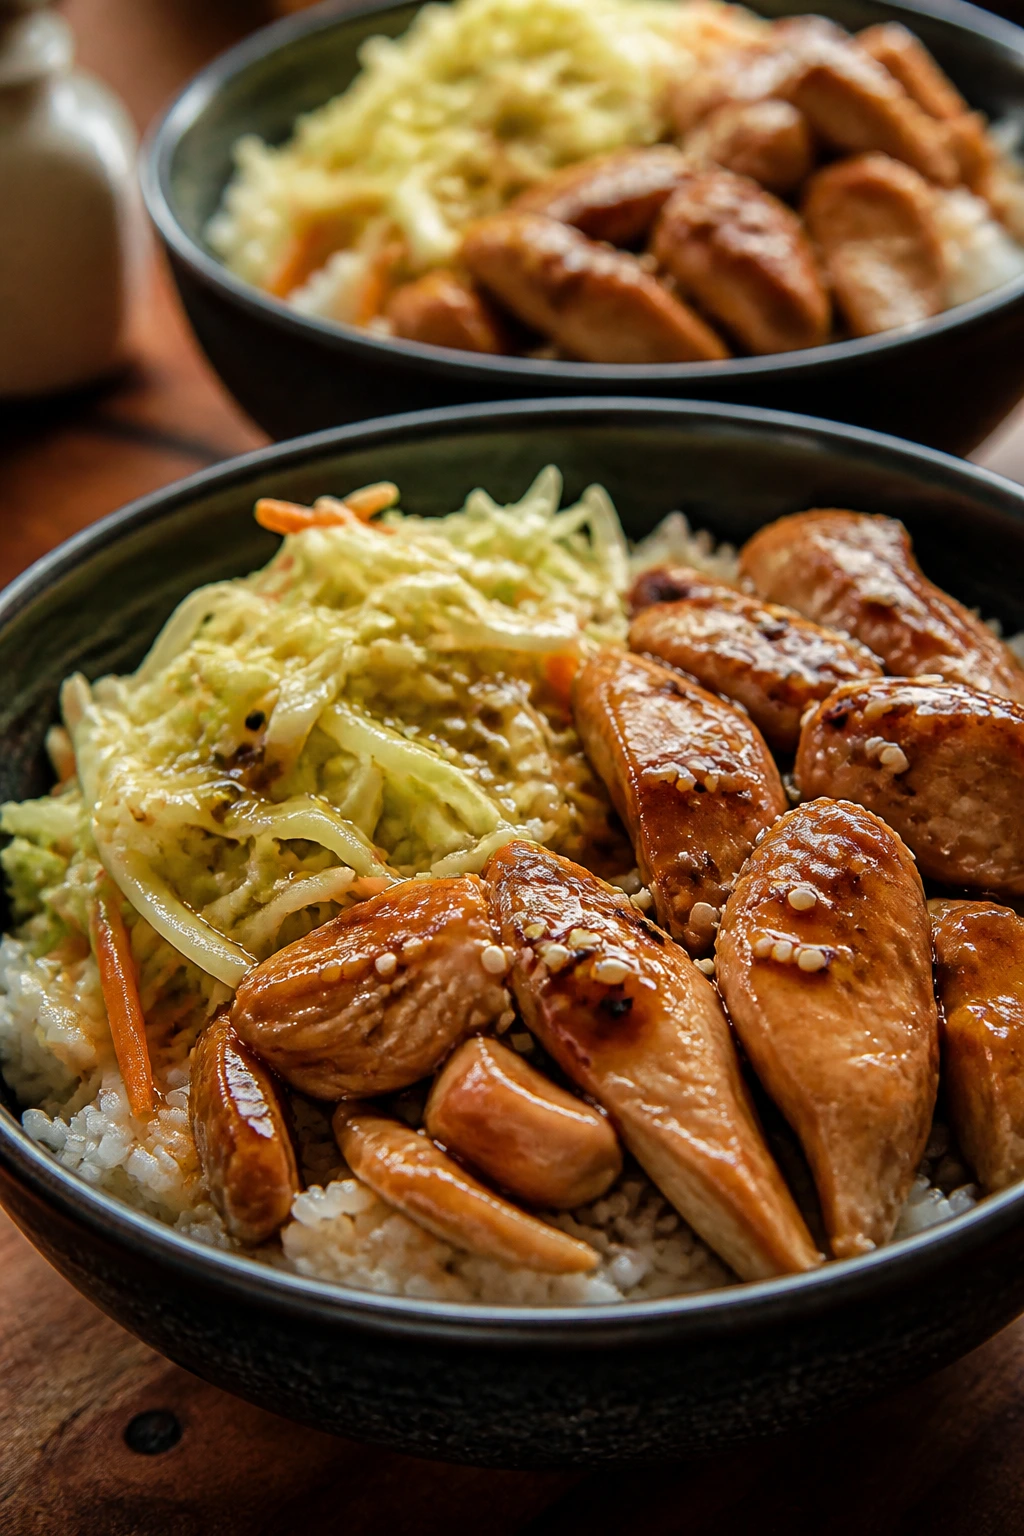
This is one of those bowls that tastes like it came from a takeout menu but shops like a sensible adult. Cabbage, chicken, and rice make a cheap base, and the teriyaki sauce gives everything enough gloss to feel finished.
Why It Works:
Cabbage cooks down fast and absorbs sauce beautifully, which means a small amount goes a long way. Chicken thighs or breasts both work, and the sweet-salty sauce gives the bowl the kind of flavor families usually expect from more expensive dinners.
Key Ingredients:
- 1 lb chicken thighs or breasts, sliced — thighs stay juicier.
- 3 cups shredded cabbage — the bowl’s volume.
- 2 cups cooked rice — white or brown.
- 2 tablespoons soy sauce — for the sauce.
- 1 tablespoon honey or brown sugar — for sweetness.
- 1 tablespoon rice vinegar — for balance.
- 1 clove garlic, minced — small but necessary.
- 1 teaspoon grated ginger — optional, but worth it.
- 1 teaspoon cornstarch mixed with 2 tablespoons water — for thickening.
Quick Steps:
- Stir the soy sauce, honey, vinegar, garlic, ginger, and cornstarch slurry together.
- Cook the chicken in a skillet until browned and cooked through.
- Add the cabbage and cook for 3 to 4 minutes until it starts to soften.
- Pour in the sauce and cook until glossy and lightly thickened.
- Spoon over rice and serve.
Equipment for This Recipe:
- Large skillet — to cook everything together.
- Small bowl — for the sauce.
- Spatula — for tossing.
- Measuring spoons — the sauce is simple but needs balance.
How to Serve This Dish:
Serve the chicken and cabbage over rice with sesame seeds if you have them. A few sliced cucumbers on the side keep the bowl feeling lighter and add crunch.
Pro Tips for This Recipe:
- Slice the chicken thin so it cooks quickly.
- Add the sauce after the cabbage has started to soften, not before.
- Keep the cornstarch slurry mixed right before it goes in.
- Use low-sodium soy sauce if you don’t want a salty bowl.
Variations on This Dish:
- Turkey Bowl: Swap chicken for ground turkey.
- No-Rice Version: Serve over shredded cabbage for a lighter bowl.
- Spicy Teriyaki: Add chili paste or sriracha to the sauce.
Common Mistakes to Avoid with This Dish:
- Using too much sauce: It turns the bowl sticky instead of glossy.
- Overcooking cabbage: It should still have a little texture.
- Adding cornstarch dry: It clumps fast unless mixed with water first.
26. Bean and Cheese Enchiladas
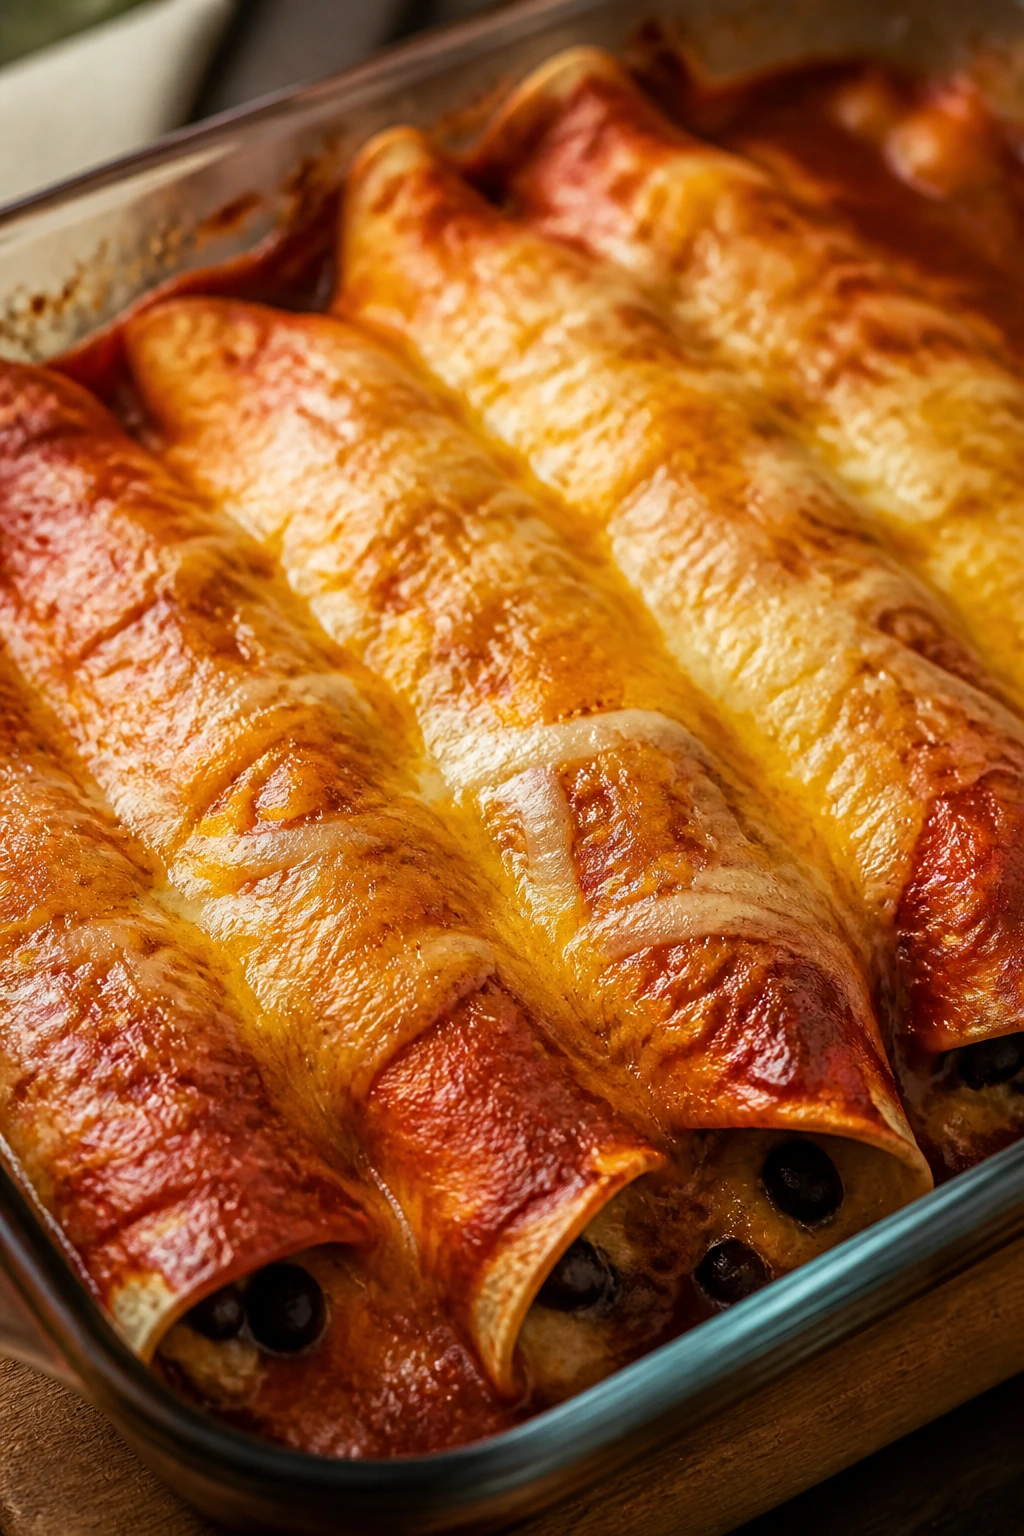
Bean and cheese enchiladas are a reliable way to make tortillas feel like more than tortillas. They’re cheap, they freeze well, and they can feed a table without needing a big meat package to get the job done.
Why It Works:
Beans give you the filling bulk, cheese adds richness, and enchilada sauce ties everything together. The tortillas soften in the oven, so the final dish feels cohesive rather than like separate parts fighting on the plate.
Key Ingredients:
- 8 small tortillas — corn tortillas hold up well.
- 2 cans beans, drained and rinsed — black or pinto.
- 2 cups shredded cheese — cheddar, Monterey Jack, or a mix.
- 2 cups enchilada sauce — store-bought is fine.
- 1 small onion, finely chopped — for the filling.
- 1 teaspoon cumin — for warmth.
- 1/2 teaspoon salt — beans need it.
- 1/4 cup chopped cilantro — optional for serving.
Quick Steps:
- Mix the beans with onion, cumin, and salt.
- Warm the tortillas briefly so they roll without cracking.
- Spoon bean filling and cheese into each tortilla, then roll and place seam-side down in a baking dish.
- Pour enchilada sauce over the top and add the remaining cheese.
- Bake at 375°F for 20 minutes until bubbling.
Equipment for This Recipe:
- Baking dish — for the rolled enchiladas.
- Skillet or microwave — to warm tortillas.
- Spoon — for filling.
- Foil — optional if you want to cover the dish.
How to Serve This Dish:
Serve with a spoon of yogurt, chopped cilantro, and a quick cabbage salad. The enchiladas are rich enough that a simple side is enough to round them out.
Pro Tips for This Recipe:
- Warm the tortillas or they’ll split when you roll them.
- Use enough sauce to coat the tops, but not so much that the dish floods.
- Let the baked enchiladas sit for 5 minutes so they slice cleanly.
- Corn tortillas need a quick warm-up more than flour ones do.
Variations on This Dish:
- Chicken and Bean Version: Add a little shredded chicken if you have it.
- Green Enchiladas: Use salsa verde instead of red sauce.
- Veggie-Enchilada Mix: Add sautéed zucchini or spinach to the filling.
Common Mistakes to Avoid with This Dish:
- Rolling cold tortillas: They crack.
- Using dry filling: Add a spoonful of sauce or water if the beans feel crumbly.
- Skipping the rest time: The sauce needs a few minutes to settle.
27. Tomato Spinach Gnocchi Skillet
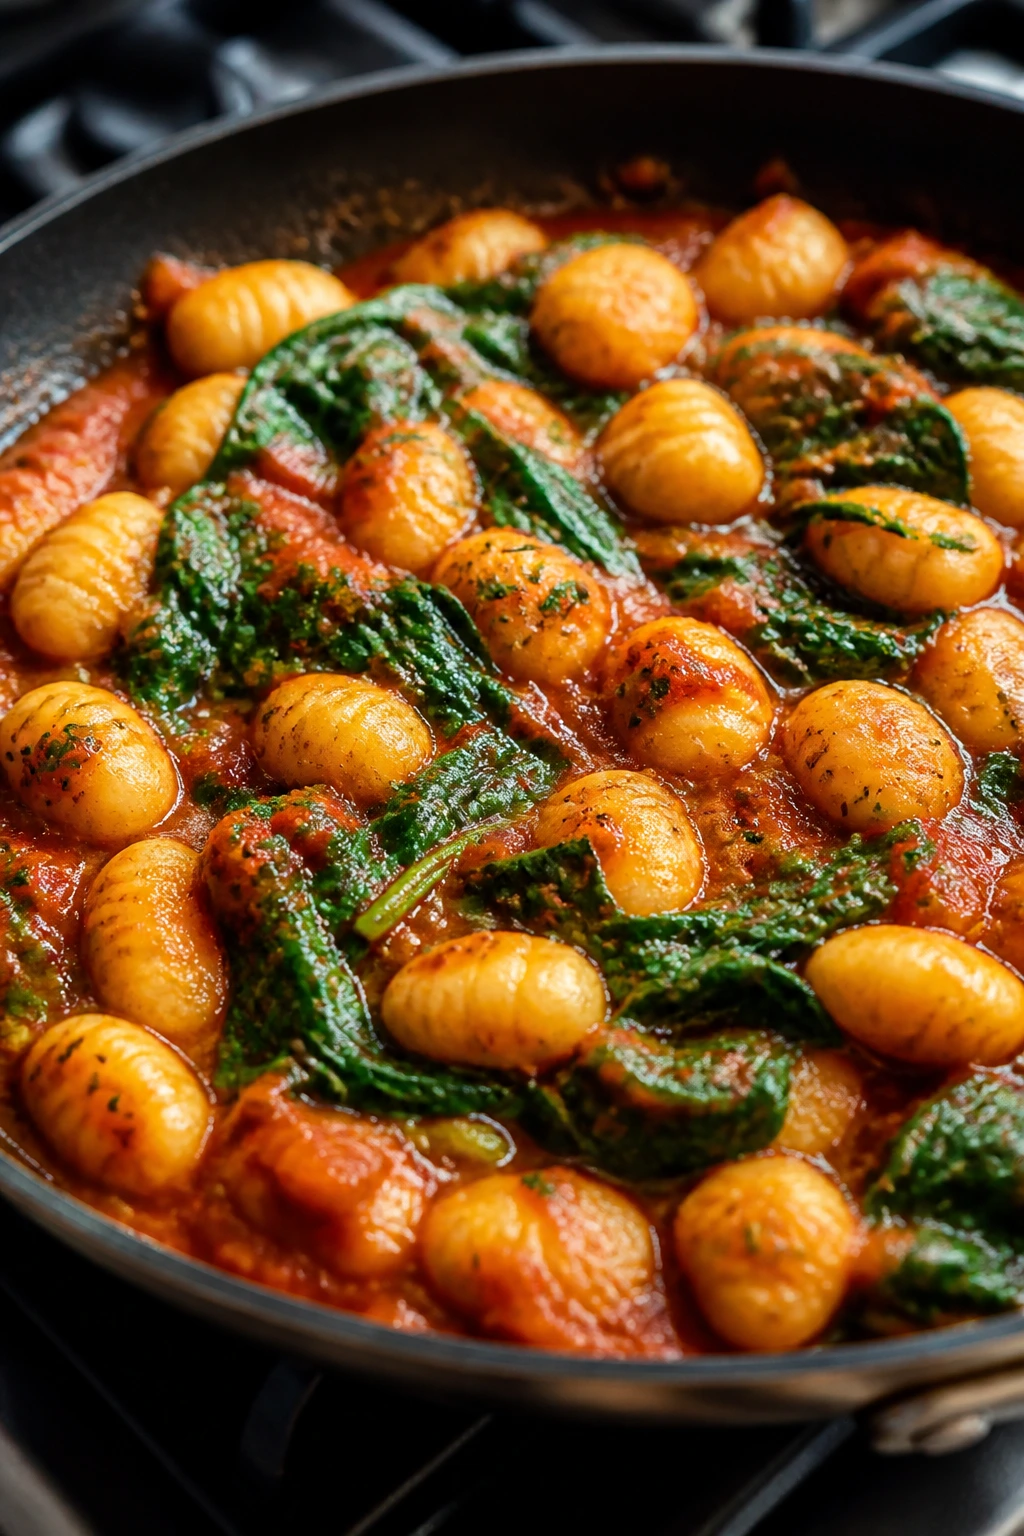
Shelf-stable gnocchi is one of my favorite cheap shortcuts because it cooks in minutes and feels more substantial than pasta without asking much in return. Tomato sauce, spinach, and a little cheese turn it into a quick skillet dinner that looks far more involved than it is.
Why It Works:
Gnocchi browns a bit in the pan and then softens in the sauce, which gives the dish a nice mix of textures. Spinach wilts in seconds, so you can make the whole thing with one skillet and a handful of pantry items.
Key Ingredients:
- 1 package shelf-stable gnocchi, about 16 oz — no boiling needed if you pan-cook it.
- 1 tablespoon olive oil — for the onion and gnocchi.
- 1 onion, thinly sliced — adds sweetness.
- 2 cloves garlic, minced — quick and sharp.
- 1 can crushed tomatoes, about 15 oz — the sauce base.
- 2 cups baby spinach — stir in at the end.
- 1/4 teaspoon red pepper flakes — optional.
- 1/2 cup shredded mozzarella or Parmesan — for finishing.
- Salt and pepper — to season the sauce.
Quick Steps:
- Cook the onion in olive oil for 4 minutes until soft.
- Add the garlic and red pepper flakes for 30 seconds.
- Stir in the gnocchi and cook for 2 minutes to lightly brown it.
- Add the tomatoes, salt, and pepper, then simmer for 5 minutes.
- Stir in the spinach until wilted.
- Finish with cheese and serve.
Equipment for This Recipe:
- Large skillet with lid — helpful for the simmer.
- Spatula — for turning the gnocchi.
- Knife and cutting board — for the onion.
- Measuring cup — for the tomatoes.
How to Serve This Dish:
Serve it in shallow bowls with extra cheese on top. A small salad or sliced cucumbers on the side keeps the meal light enough for the “quick dinner” brief.
Pro Tips for This Recipe:
- Brown the gnocchi a bit first; it keeps the texture from going soft all at once.
- Don’t overdo the tomatoes or the skillet gets watery.
- Spinach only needs a minute.
- Parmesan gives a saltier finish than mozzarella.
Variations on This Dish:
- Creamy Gnocchi: Stir in 2 tablespoons cream cheese.
- Sausage Gnocchi: Add sliced cooked sausage with the onion.
- Herb Version: Add basil or oregano at the end.
Common Mistakes to Avoid with This Dish:
- Skipping the browning step: The gnocchi tastes flat.
- Using too much sauce: It turns soupy.
- Cooking spinach too long: It loses color and texture.
28. Ground Turkey Stuffed Peppers
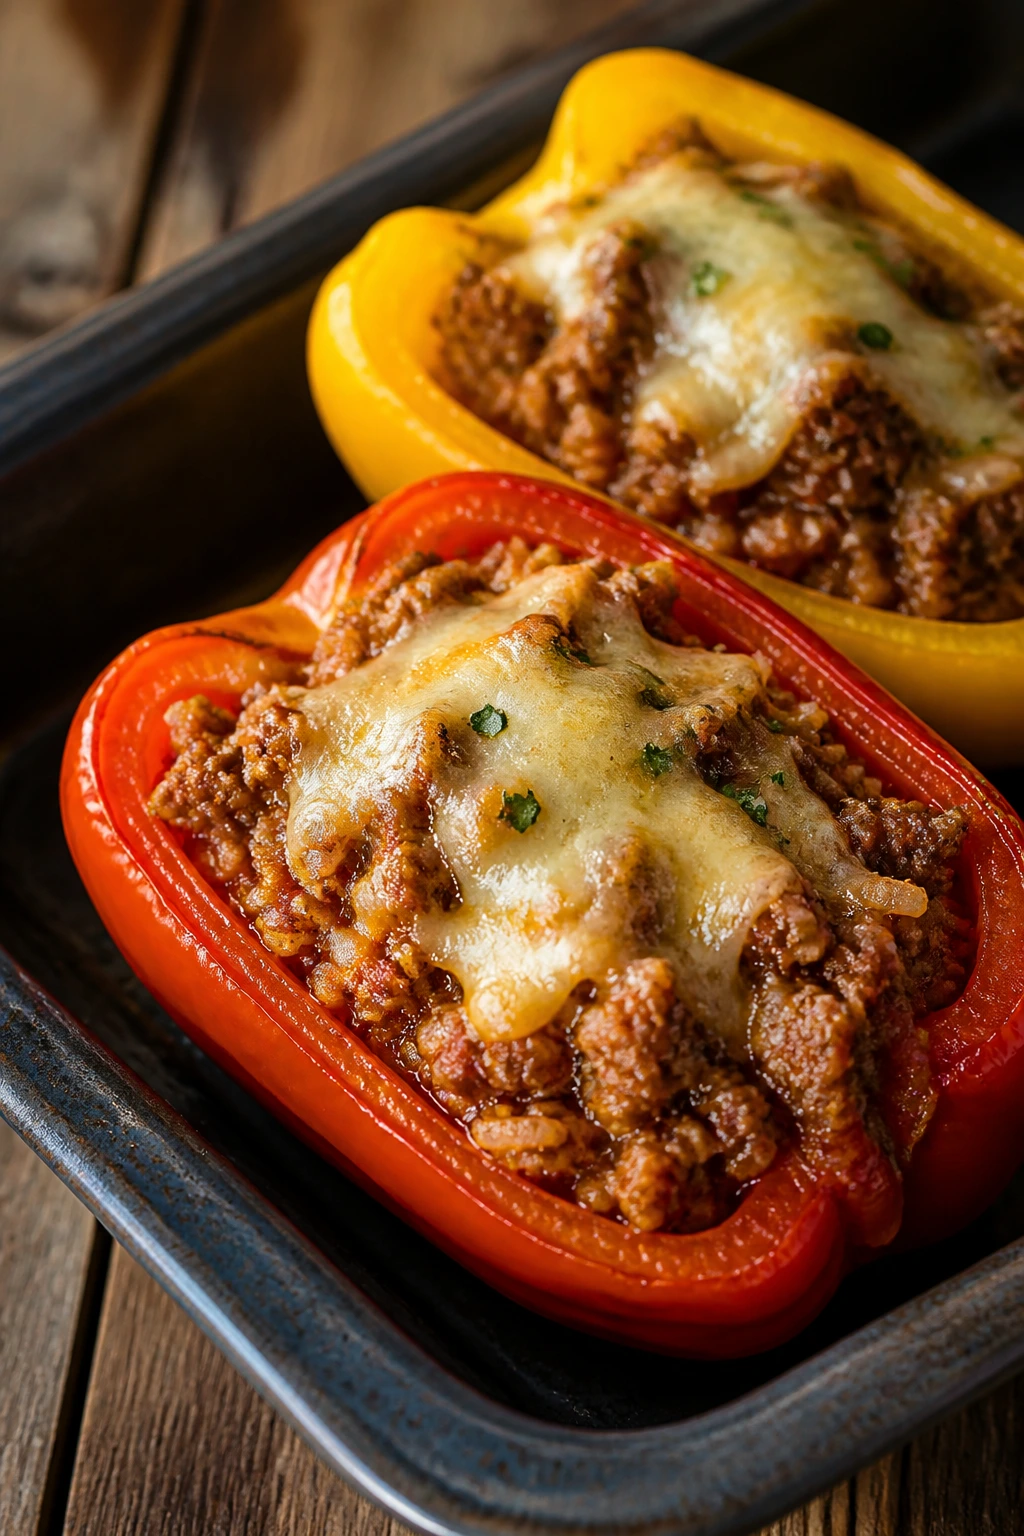
Stuffed peppers look fancier than they are, which is handy when you want dinner to feel composed without spending much. Ground turkey, rice, and tomato sauce keep the filling cheap, while the peppers give you a built-in edible bowl.
Why It Works:
Peppers roast into sweet, soft shells that hold the filling well. Turkey and rice stretch easily, so a little meat feeds more people, and the tomato sauce keeps the whole thing moist.
Key Ingredients:
- 4 bell peppers, halved and seeded — any color works.
- 1 lb ground turkey — lean and quick.
- 1 cup cooked rice — use leftover rice if you have it.
- 1 small onion, diced — for the filling.
- 2 cloves garlic, minced — short cook time.
- 1 cup tomato sauce — for moisture and flavor.
- 1 teaspoon Italian seasoning — simple and useful.
- 1/2 cup shredded cheese — optional for the top.
- Salt and pepper — season the filling properly.
Quick Steps:
- Brown the turkey with onion in a skillet.
- Stir in garlic, rice, tomato sauce, seasoning, salt, and pepper.
- Arrange the pepper halves in a baking dish.
- Spoon the filling into the peppers and top with cheese if using.
- Bake at 375°F for 25 to 30 minutes until the peppers are tender.
Equipment for This Recipe:
- Baking dish — holds the pepper halves upright.
- Skillet — for the filling.
- Spoon — for stuffing.
- Foil — optional if you want to cover the dish early.
How to Serve This Dish:
Serve one or two pepper halves per person with a little extra sauce spooned around the plate. A side salad is enough, though a slice of bread doesn’t hurt if the eaters are extra hungry.
Pro Tips for This Recipe:
- Partially cook the peppers if you like them softer.
- Don’t overstuff them or the filling dries out at the edges.
- Use cooked rice so the filling comes together fast.
- Taste the filling before stuffing; bland turkey stays bland inside a pepper.
Variations on This Dish:
- Italian Sausage Version: Swap turkey for sausage if that’s what’s on sale.
- Vegetarian Stuffed Peppers: Use lentils instead of turkey.
- Cheesy Topper: Add extra cheese in the last 5 minutes of baking.
Common Mistakes to Avoid with This Dish:
- Using raw rice: It won’t cook through in time.
- Overbaking: The peppers turn collapsed and watery.
- Underseasoning the filling: The pepper shell needs help from the inside.
29. Peanut Butter Noodle Soup with Veggies
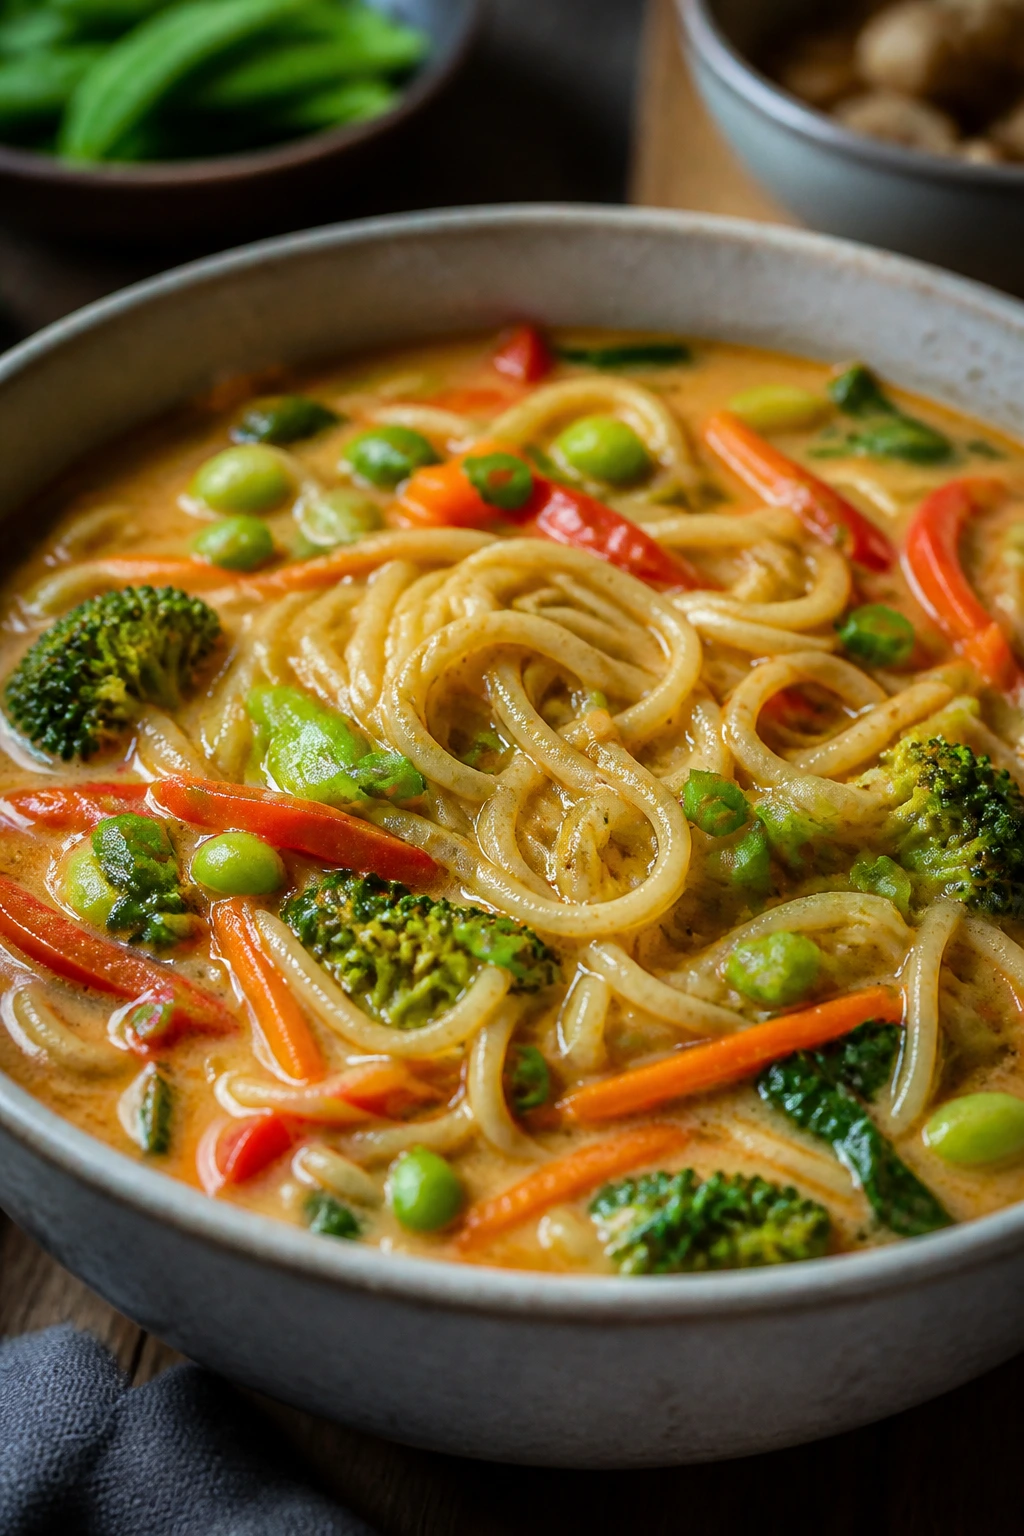
This is a weird-sounding dinner that makes complete sense the moment you taste it. Peanut butter, broth, noodles, and vegetables create a broth that’s creamy without dairy and filling without a lot of expensive ingredients.
Why It Works:
Peanut butter gives the broth body and a little richness, while soy sauce and lime keep it from tasting heavy. Noodles and shredded vegetables turn the pot into a meal that’s cheap, fast, and a little more interesting than plain soup.
Key Ingredients:
- 6 cups broth — chicken or vegetable.
- 1/3 cup peanut butter — smooth works best.
- 2 tablespoons soy sauce — for salt and depth.
- 1 tablespoon lime juice — brightens the broth.
- 6 oz noodles — ramen, spaghetti, or rice noodles.
- 2 cups shredded cabbage — cheap bulk.
- 1 carrot, sliced thin or grated — for sweetness.
- 2 cloves garlic, minced — to build flavor.
- 1 teaspoon grated ginger — optional but excellent.
Quick Steps:
- Whisk the peanut butter into the warm broth until smooth.
- Add the soy sauce, garlic, and ginger, then bring the pot to a gentle simmer.
- Stir in the noodles and cook until just tender.
- Add the cabbage and carrot and cook for 1 to 2 minutes.
- Finish with lime juice and serve.
Equipment for This Recipe:
- Soup pot — for the broth.
- Whisk — to smooth out the peanut butter.
- Ladle — for serving.
- Knife or grater — for the vegetables.
How to Serve This Dish:
Serve it in big bowls with a little extra lime at the table. If you want the dinner to feel more substantial, top it with a soft-boiled egg or leftover chicken.
Pro Tips for This Recipe:
- Whisk the peanut butter into warm broth before adding noodles so it doesn’t clump.
- Don’t overcook the noodles; they keep softening in the broth.
- A handful of scallions or cilantro on top makes a big difference.
- Use more broth if you want it soupier, less if you want it more like a noodle bowl.
Variations on This Dish:
- Spicy Peanut Soup: Add chili paste or sriracha.
- Chicken Version: Add shredded cooked chicken.
- Rice Noodle Swap: Use rice noodles for a lighter texture.
Common Mistakes to Avoid with This Dish:
- Dumping peanut butter straight in: It clumps.
- Letting noodles overcook: They turn bloated and soft.
- Skipping the lime: The broth needs acid to stay lively.
30. Breakfast Burrito Bowls
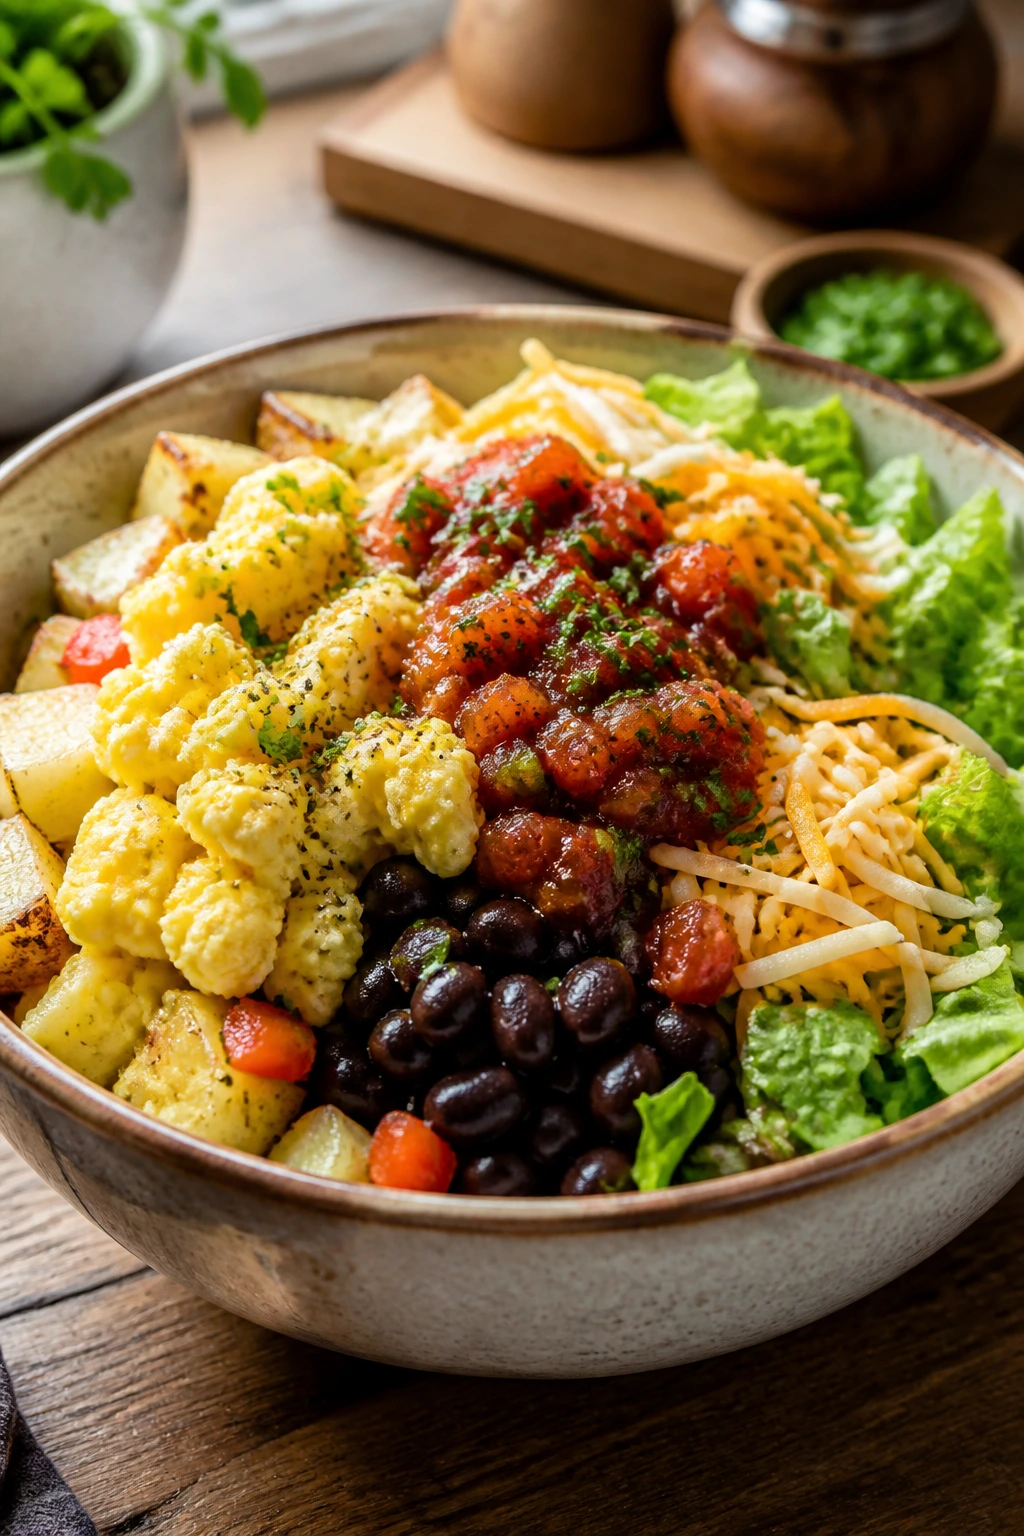
Breakfast burrito bowls are the dinner answer when the fridge has eggs, potatoes, beans, and not much else. They’re cheap, flexible, and satisfying without feeling weighed down, especially if you keep the toppings bright.
Why It Works:
Eggs and beans are a low-cost protein pair that fill a bowl fast. Potatoes or rice add bulk, salsa gives you seasoning without a long sauce, and the whole thing is easy to scale up if someone shows up hungry.
Key Ingredients:
- 4 large eggs — scrambled or fried.
- 2 cups diced potatoes or cooked rice — use whichever is cheaper or already cooked.
- 1 can black beans, drained and rinsed — warm them with a little salt.
- 1/2 cup salsa — the fastest flavor fix.
- 1/2 cup shredded cheese — optional.
- 2 cups shredded lettuce — or chopped cabbage for more crunch.
- 1 tablespoon oil — for the potatoes or eggs.
- Salt and pepper — season each layer.
- Tortillas, optional — if you want to turn bowls into burritos.
Quick Steps:
- Cook the potatoes in oil until browned and tender, or warm the rice if using rice.
- Heat the beans in a small pan with a pinch of salt.
- Scramble or fry the eggs in a separate skillet.
- Assemble bowls with potatoes or rice, beans, eggs, lettuce, salsa, and cheese.
- Serve with tortillas on the side if wanted.
Equipment for This Recipe:
- Skillet — for the potatoes and eggs.
- Small saucepan — for the beans.
- Bowls — for assembling.
- Spatula — for scrambling.
How to Serve This Dish:
Serve everything in separate piles so people can build their own bowl. A little hot sauce or pickled jalapeño on the table makes the dinner feel more awake without raising the cost much.
Pro Tips for This Recipe:
- Brown the potatoes well; pale potatoes taste flat.
- Season the eggs lightly while they cook.
- Cabbage gives more crunch than lettuce and holds up better.
- Warm the beans separately so they don’t cool the whole bowl.
Variations on This Dish:
- Sausage Bowl: Add a few spoonfuls of cooked sausage.
- Green Bowl: Use avocado and salsa verde if those are on hand.
- Egg-Heavy Version: Add an extra egg or two for a more filling plate.
Common Mistakes to Avoid with This Dish:
- Skipping seasoning on the potatoes: They carry the bowl.
- Using cold beans straight from the can: They make the meal feel unfinished.
- Overloading with cheese only: You want the bowl balanced, not buried.
Why Cheap Light Dinners Work Better When You Keep the Pantry Simple
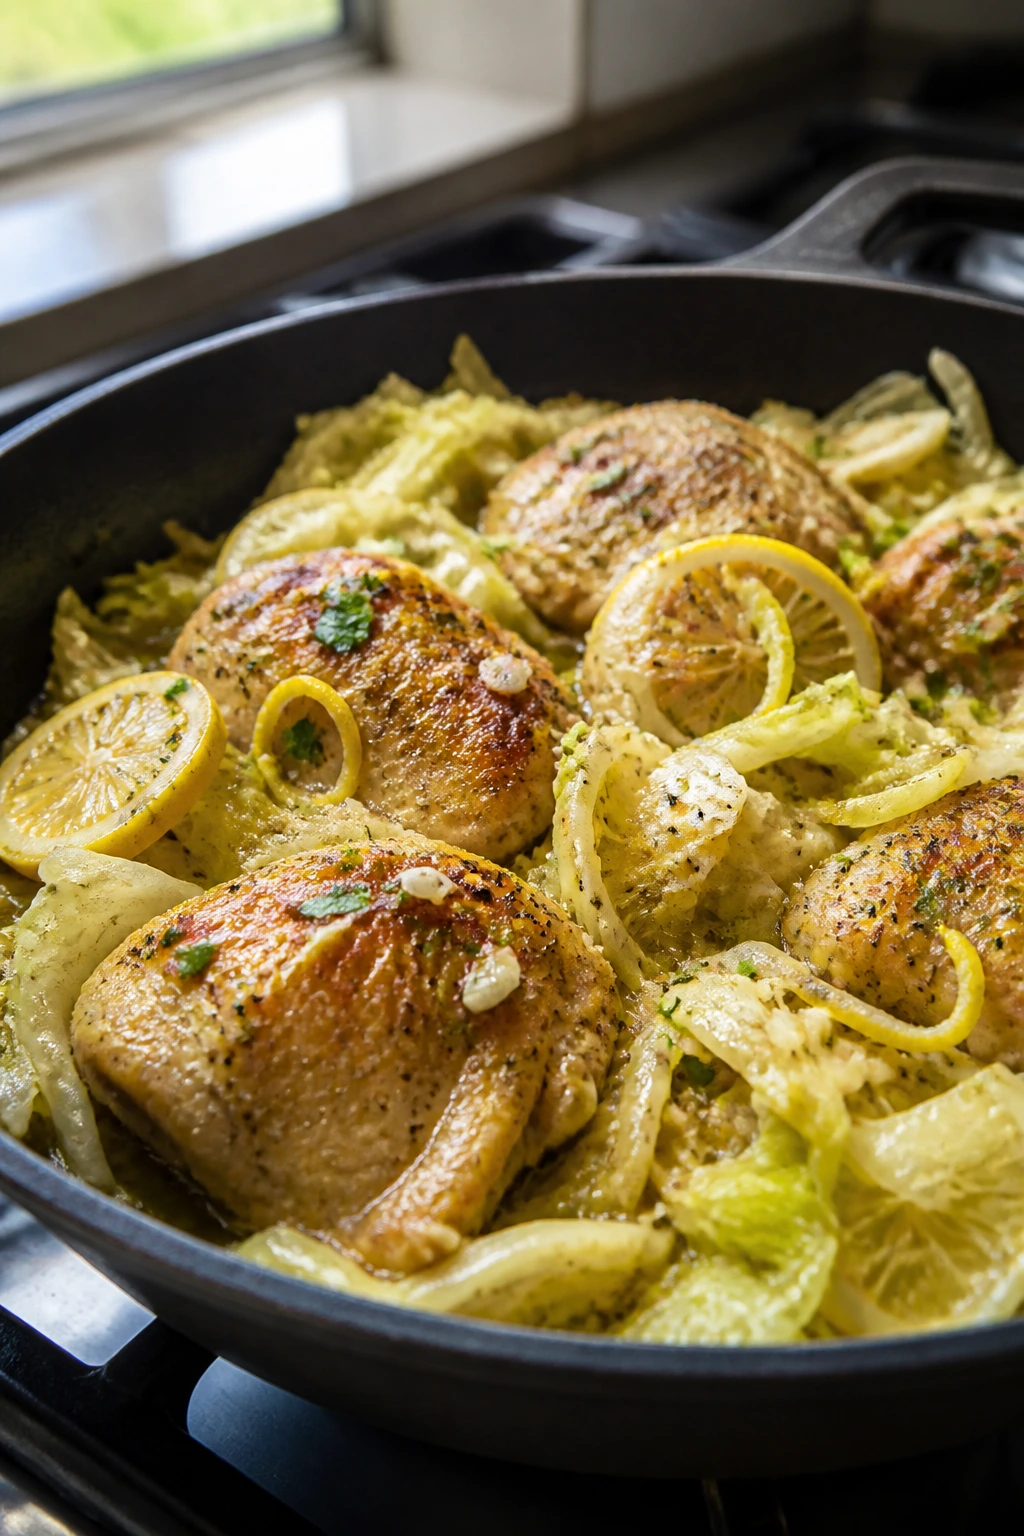
The best cheap family dinners usually start with a very plain idea: one protein, one starch, one vegetable, one sharp finish. That’s the skeleton. Once you have it, you can move fast without the meal feeling thin.
I like cooking this way because it keeps the grocery list sane. Cabbage, onions, carrots, rice, pasta, canned beans, tortillas, potatoes, eggs, frozen peas — these ingredients are inexpensive for a reason, but they’re also useful for a reason. They cook fast, they hold seasoning, and they can stretch to feed more people than the package suggests.
There’s also a texture thing here that a lot of people miss. Cheap food turns boring when every bite feels soft and samey, so the little contrasts matter more than they do in a fancier dinner. Crunchy slaw next to beans. Toasted breadcrumbs on tuna pasta. Crisped tortilla strips on soup. A roasted potato skin beside a creamy center. Those details don’t cost much, but they make a plate feel finished.
And honestly, that’s the whole game. You don’t need a high-end ingredient to make dinner feel good. You need a hot pan, enough salt, and the sense to stop cooking vegetables a minute before they turn to mush.
Essential Equipment for These Recipes
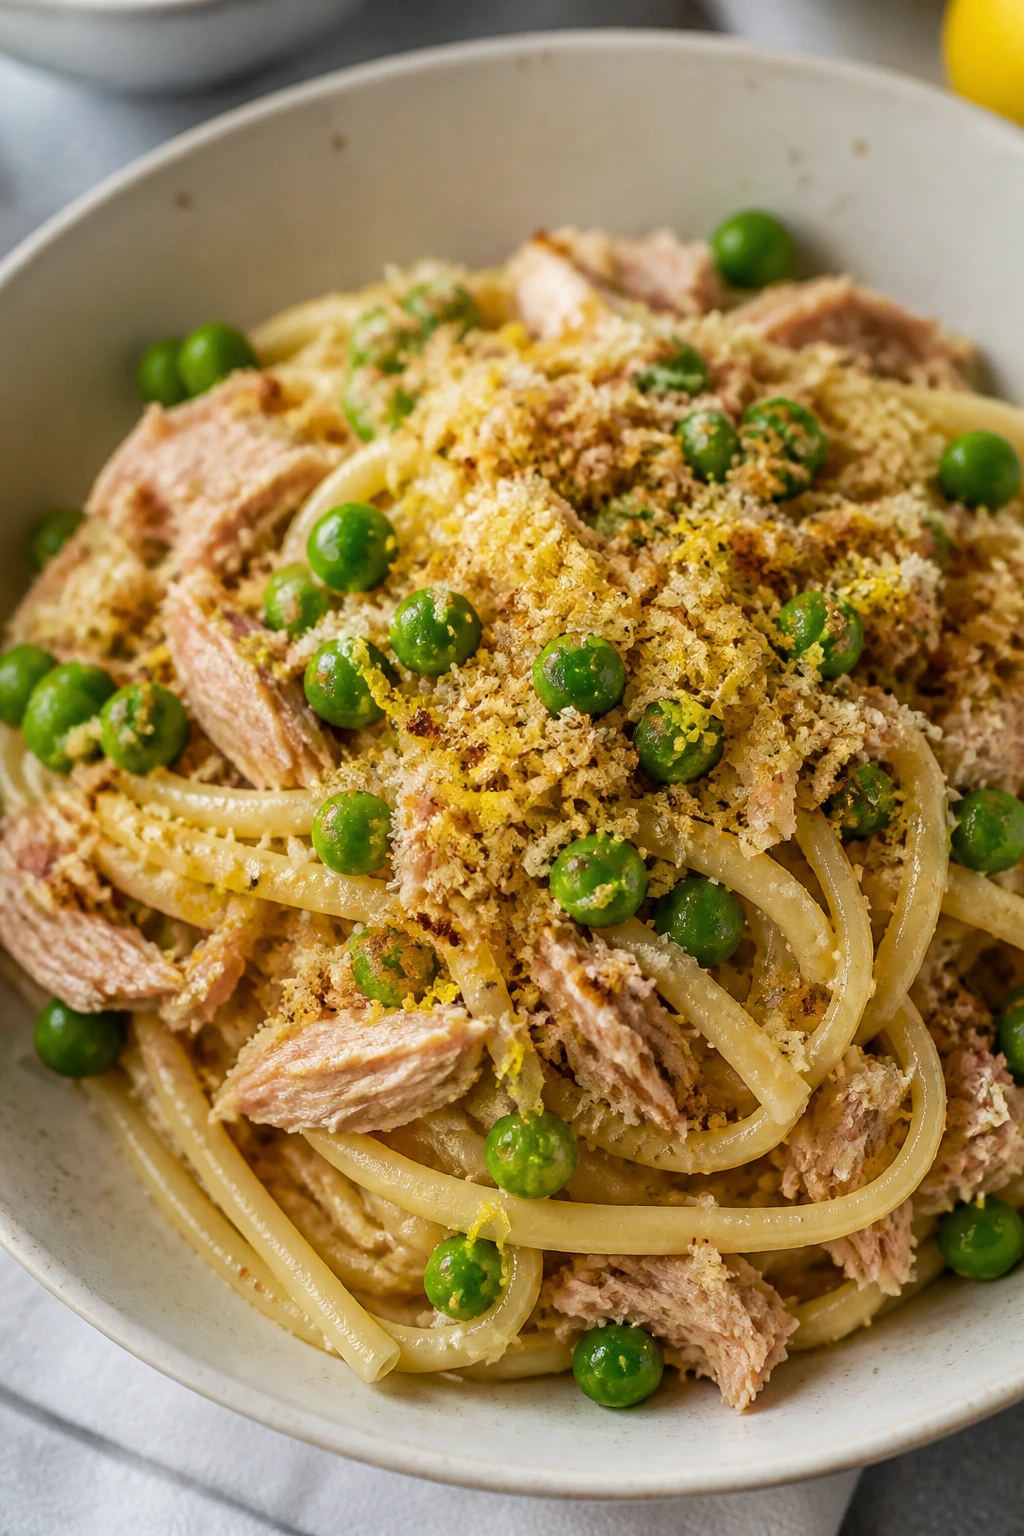
- Large skillet or sauté pan: You’ll use it for chicken, noodles, fried rice, skillet pasta, and anything that needs quick browning.
- Medium soup pot: Soup, egg drop broth, minestrone, and tortillla soup all need enough room to simmer without splashing.
- Rimmed baking sheet: Handy for roasted sweet potatoes, potatoes, broccoli, and tortilla strips.
- 8×8 or 9×13 baking dish: Enchiladas, stuffed peppers, and casseroles need something that holds sauce without leaking.
- Sharp chef’s knife: Thin cabbage, peppers, onions, and herbs cook faster and look better.
- Cutting board: A roomy board makes prep less chaotic.
- Colander: Pasta, beans, and rice-adjacent draining jobs all get easier.
- Wooden spoon or spatula: Good for scraping browned bits from the pan and folding delicate fillings.
- Mixing bowls in two sizes: One for sauces, one for fillings, and one less if you’re better organized than I am.
- Measuring cups and spoons: Cheap cooking still goes wrong when the liquid balance is off.
- Can opener: Not glamorous, but essential for a lot of these dinners.
- Airtight containers: Leftovers keep their texture better when they’re portioned quickly.
Smart Shopping and Ingredient Tips
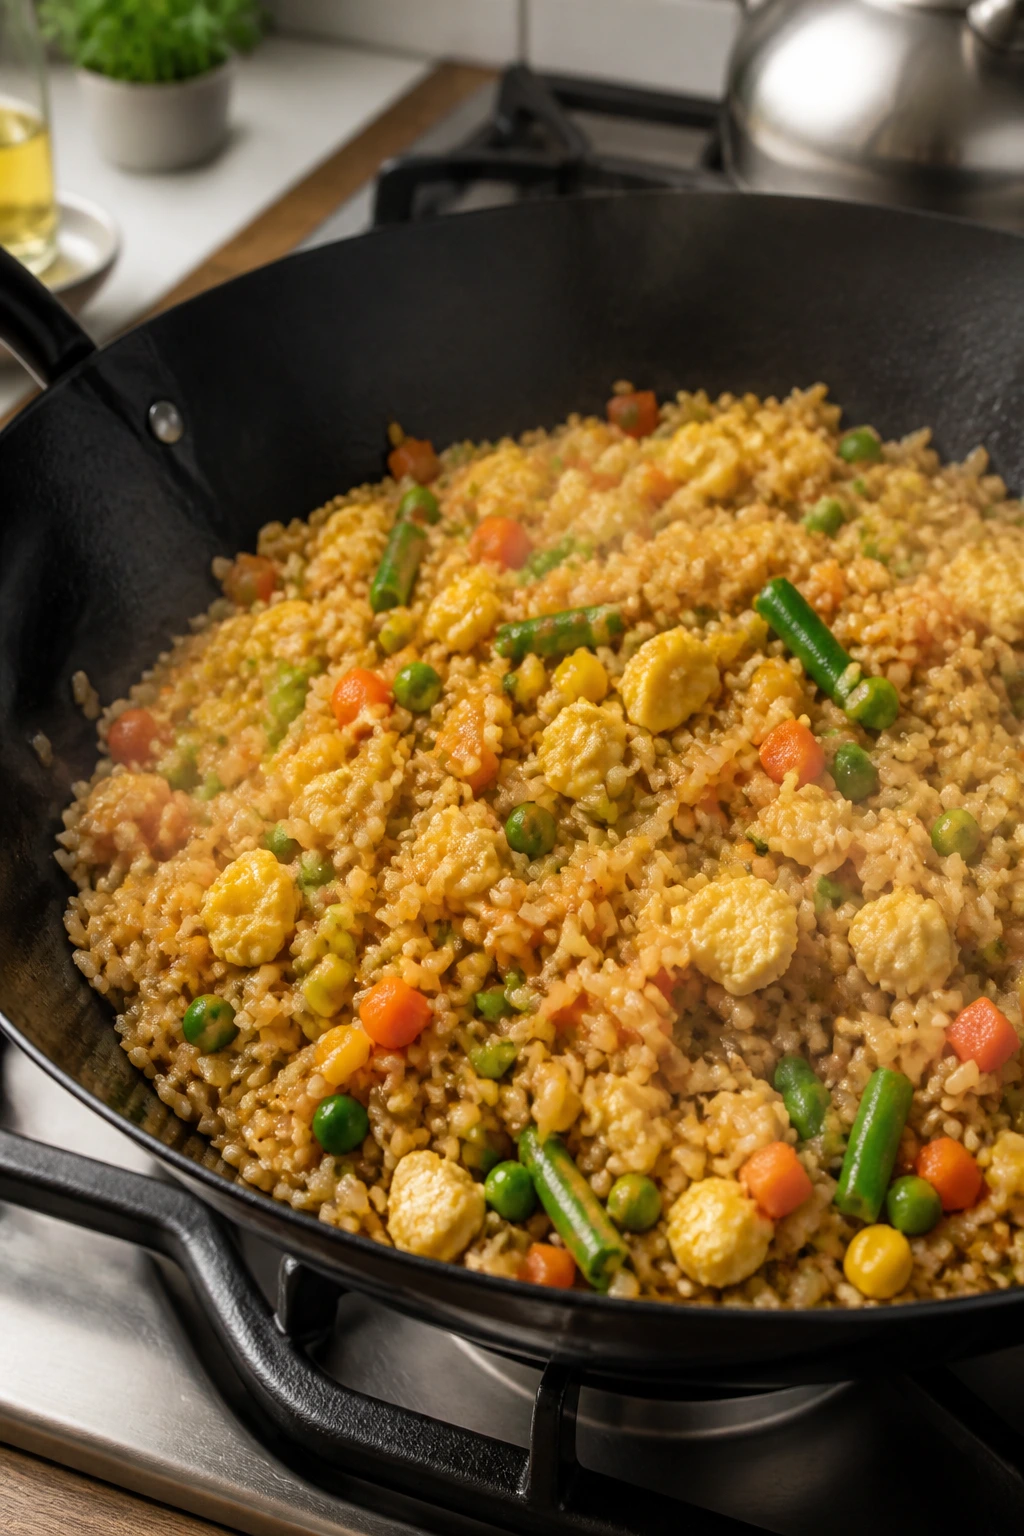
The cheapest dinner cart usually starts in the produce aisle, not the meat case. Cabbage, onions, carrots, potatoes, lemons, limes, and bananas are the kind of items that cost little per serving and still make the plate look alive. A head of cabbage can become slaw, soup, stir-fry, taco filling, or a skillet base; that kind of flexibility is worth more than a one-use convenience item.
Frozen vegetables deserve more respect than they get. Frozen peas, broccoli, corn, spinach, and mixed vegetables are picked and packed quickly, which means they often beat sad fresh produce that’s been riding around the store for days. I buy frozen greens for soups and casseroles without hesitation. They’re practical, and practical is the point.
For proteins, look for what cooks fast and stretches well. Eggs, canned tuna, beans, lentils, ground turkey, chicken thighs, and occasional shrimp on sale usually do more useful work than a giant package of something expensive and fussy. Boneless thighs often stay juicier than breasts in skillet dishes, and canned beans should be rinsed unless you want every bowl salty and muddy.
Pasta, rice, tortillas, couscous, and potatoes are your volume builders. Buy the store brand unless the shape or texture is bad, and keep an eye on package size because the cheapest-looking bag is not always the lowest unit price. Small pasta shapes and rice are especially useful because they disappear into soups, bowls, and casseroles without making the meal feel heavy.
A final note: don’t cheap out on acid. Lemons, limes, vinegar, and even a decent jar of salsa change the flavor of a low-cost meal faster than almost anything else in the kitchen. A few cents of sharpness can rescue a whole pan.
How to Serve These Recipes
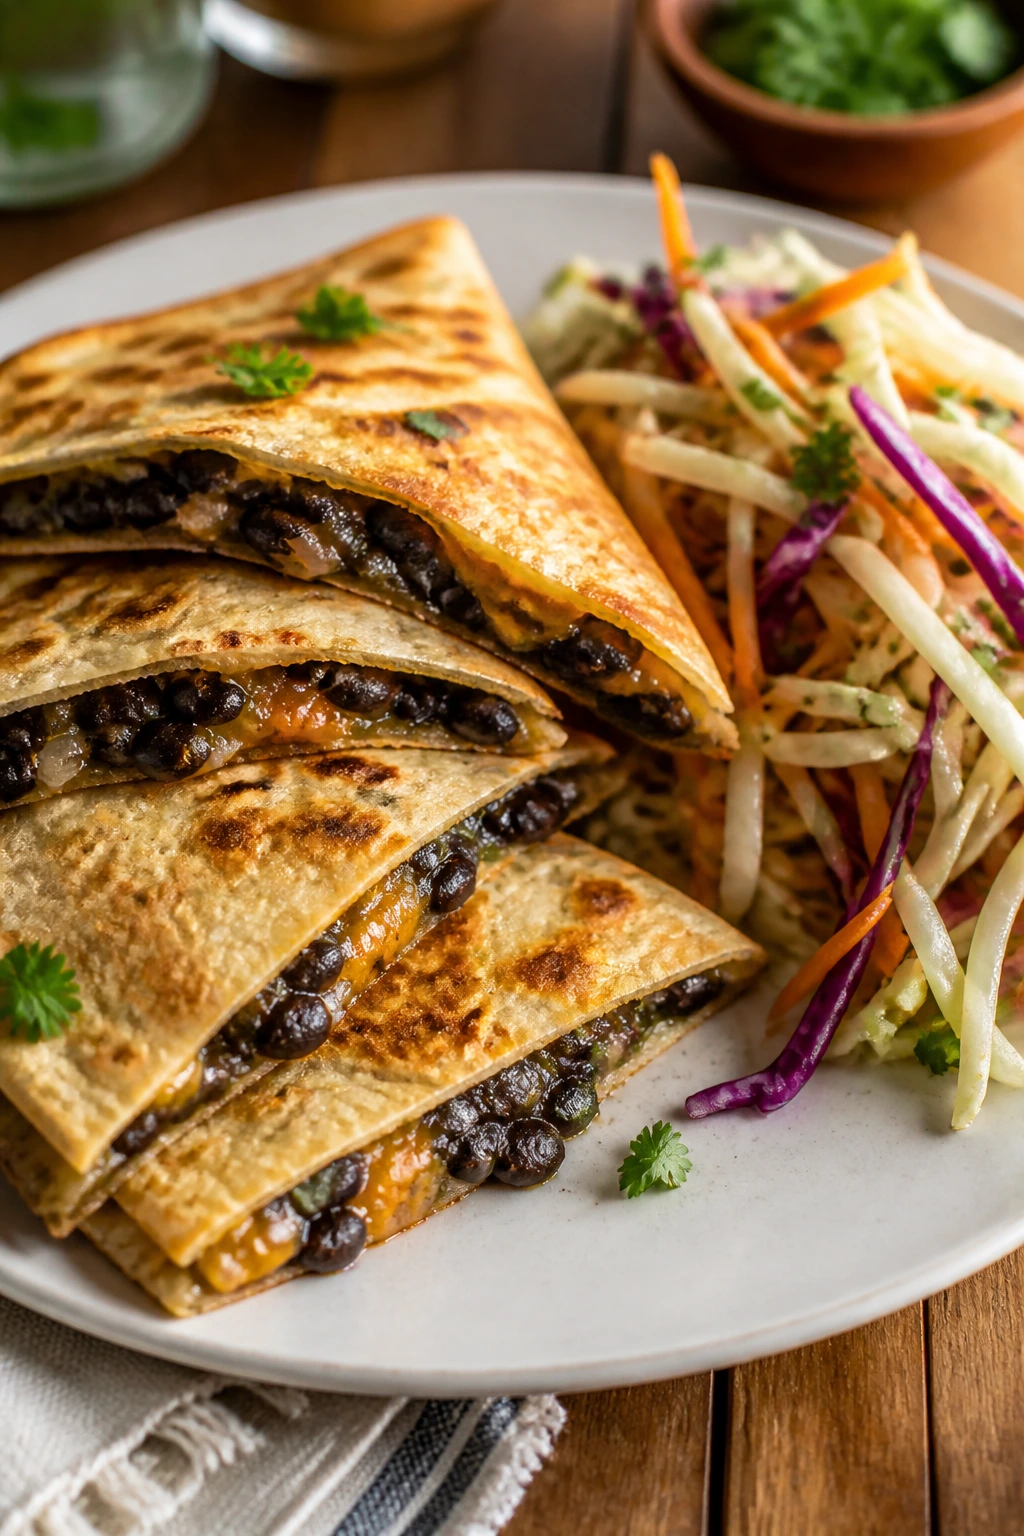
Presentation: Keep the food in shallow bowls, wide plates, or straight-from-the-pan serving dishes so the textures stay visible. Crisp toppings, herbs, lemon wedges, and a few bright vegetables on the side do more than a pile of cheese ever will.
Accompaniments: Toast, rice, cabbage slaw, sliced cucumbers, fruit, simple green salad, and roasted potatoes all pair cleanly with this kind of dinner. If the main dish is already starchy, stick with something sharp or crunchy beside it.
Portions: Most of these recipes feed 4 with normal appetites, though the bean, pasta, and soup dishes often stretch to 5 or 6 if you include bread or rice. For bigger eaters, add an egg on top, extra beans, or a second slice of toast instead of starting from scratch.
Beverage Pairing: Cold water with lemon works with almost all of them, and unsweetened iced tea is a safe second choice. If you want something warm, a plain herbal tea or broth-based soup alongside a sandwich-style dinner keeps the table calm.
Additional Tips and Flavor Boosters
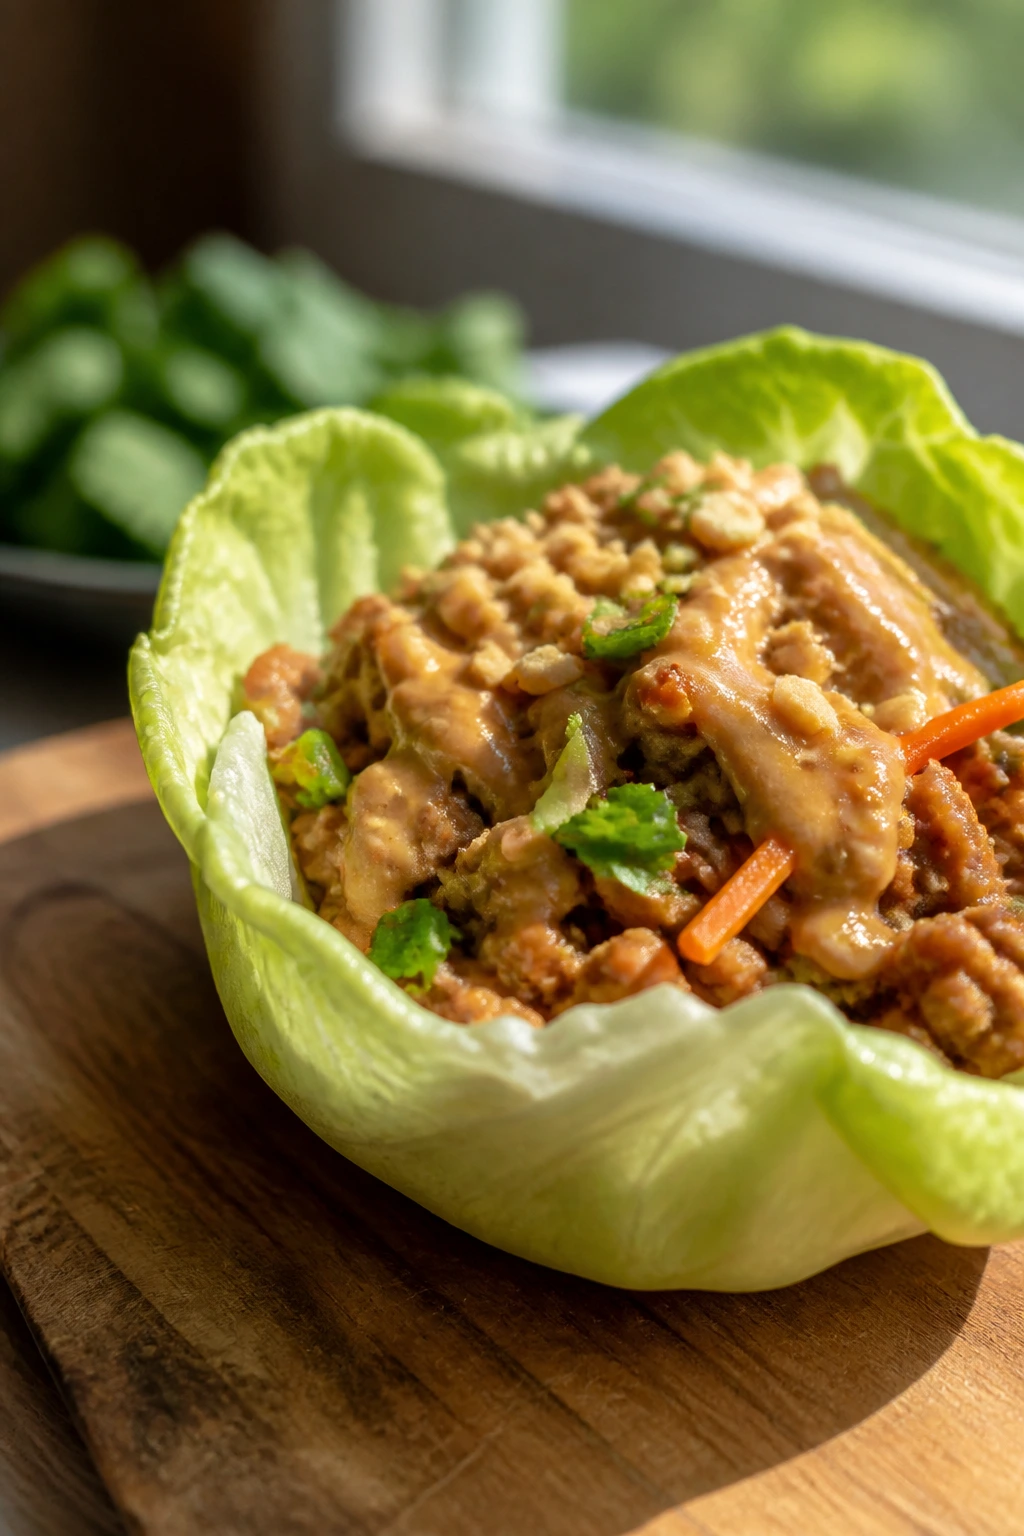
Flavor Enhancement: Keep one bright finish in the house at all times — lemons, limes, vinegar, pickles, or hot sauce. Cheap dinners often taste fine before the final touch and alive after it.
Customization: Add leftover vegetables wherever they fit, but chop them small so they cook on schedule. A stray handful of spinach, frozen corn, or diced peppers can save a dinner from feeling repetitive.
Serving Suggestions: Use chopped herbs, a spoon of yogurt, crushed crackers, sesame seeds, or toasted breadcrumbs to add texture at the end. The garnish should do a job, not just sit there looking polite.
Make-It-Yours: For dairy-free plates, lean on beans, broth, olive oil, and citrus instead of cheese and cream. For gluten-free meals, use rice, corn tortillas, potatoes, or gluten-free pasta, and for vegetarian dinners, lentils and chickpeas step in faster than most people think.
Make-Ahead, Storage, and Reheating Guidance
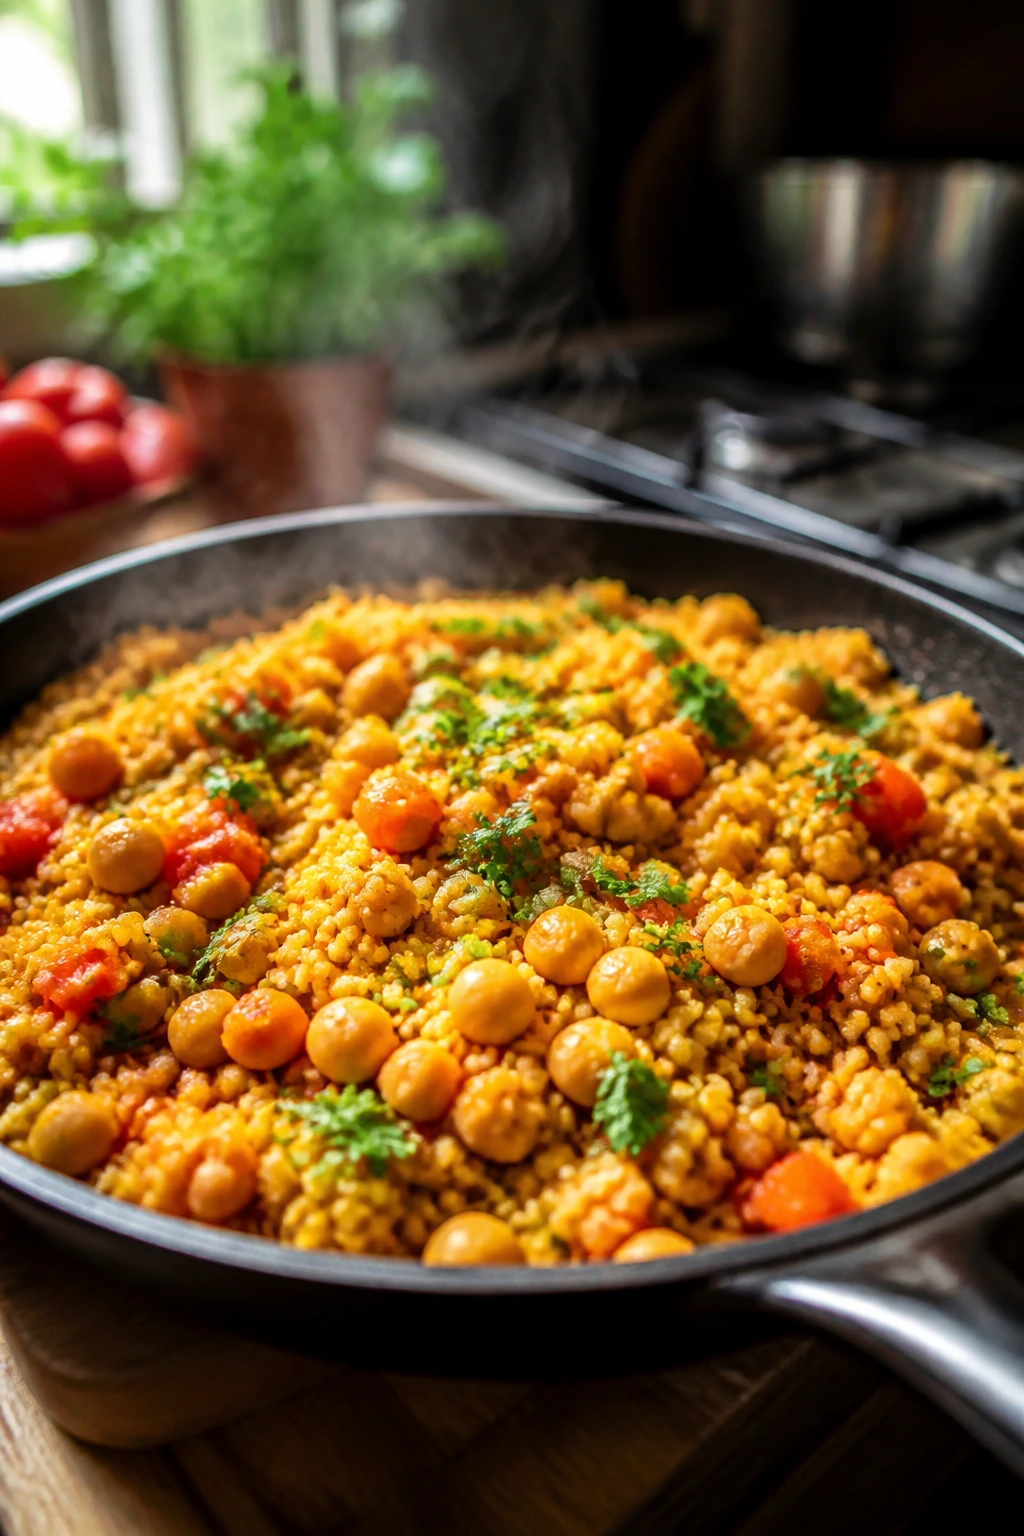
Most of these dinners keep well for 3 to 4 days in the refrigerator if you get them into shallow containers and cool them promptly. Soups, stews, bean fillings, and skillet chicken usually freeze for up to 2 months, though pasta dishes and rice-heavy recipes can soften a little after thawing. That’s not a deal-breaker; it just means you should expect a softer texture, not restaurant perfection.
Cooked rice and chicken deserve a little care. Get them into the fridge within 2 hours, and sooner if the kitchen is warm. Spread rice out in a thin layer so it cools faster, then cover and chill. That one habit saves a lot of food safety headaches and keeps the texture cleaner too.
For reheating, the skillet is often better than the microwave. Fried rice, noodles, cabbage dishes, and pasta come back to life with a splash of water or broth over medium heat. Soups can go straight back on the stove. Casseroles and enchiladas do best in a 350°F oven, covered loosely with foil, until the center is hot.
A few dishes are best assembled fresh. Quesadillas, pita pizzas, tacos, and lettuce wraps hold their texture longer if you store the parts separately. Keep sauces in small containers, greens dry, and crunchy toppings out of the fridge until serving time. That way the leftovers feel like ingredients, not salvage.
Variations and Adaptations to Try
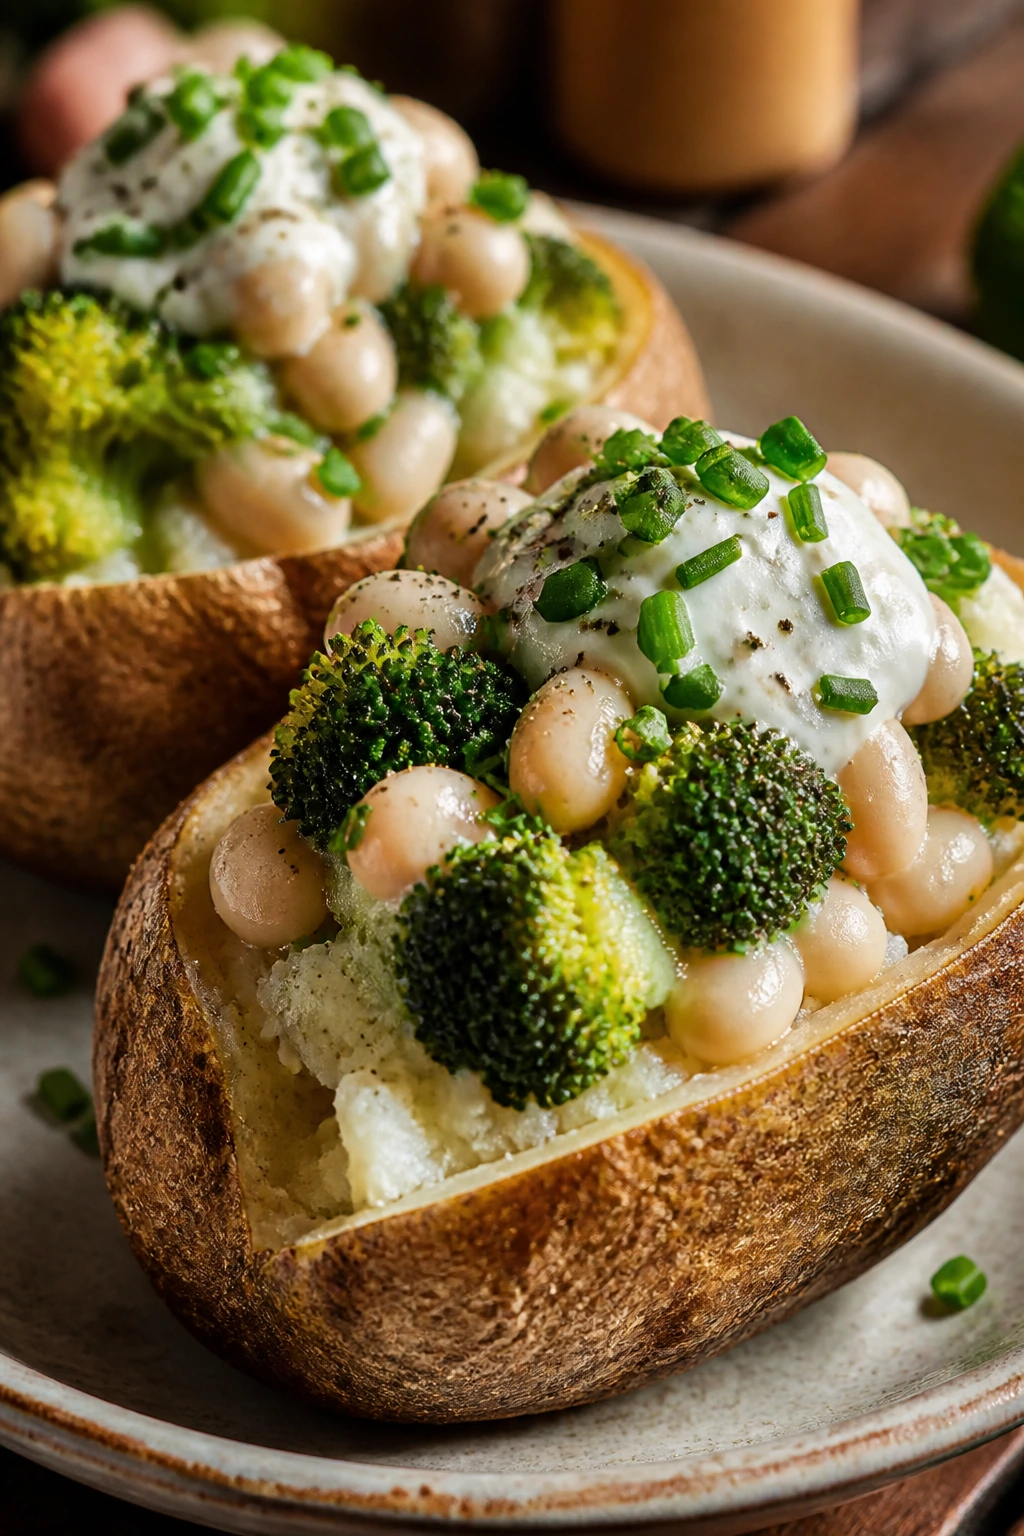
Pantry-Only Night: Build dinner from canned beans, rice, pasta, tuna, broth, and frozen vegetables. This approach is useful when the fridge is empty but the cupboards still have enough to work with.
Gluten-Free Swap Night: Use rice bowls, corn tortillas, baked potatoes, or gluten-free pasta instead of bread and wheat noodles. Most of these dinners are easy to adapt because the flavor lives in the seasoning, not the starch.
Dairy-Free Plates: Skip the cheese and lean on salsa, lemon, herbs, peanut sauce, olive oil, and beans for richness. You won’t miss the dairy if the food has enough salt and acid.
Kid-Soft Version: Serve the components separately, keep the spice mild, and chop vegetables small. Kids often eat better when they can recognize the parts on the plate.
Extra-Protein Upgrade: Add a fried egg, canned tuna, shredded chicken, or a second scoop of beans to the base recipe. That’s cheaper than doubling the meat and usually works just as well.
Heat-Lover’s Version: Keep chili flakes, hot sauce, chili crisp, or pickled jalapeños at the table. You can make one base dinner and let the spice live in the toppings.
Common Mistakes to Avoid
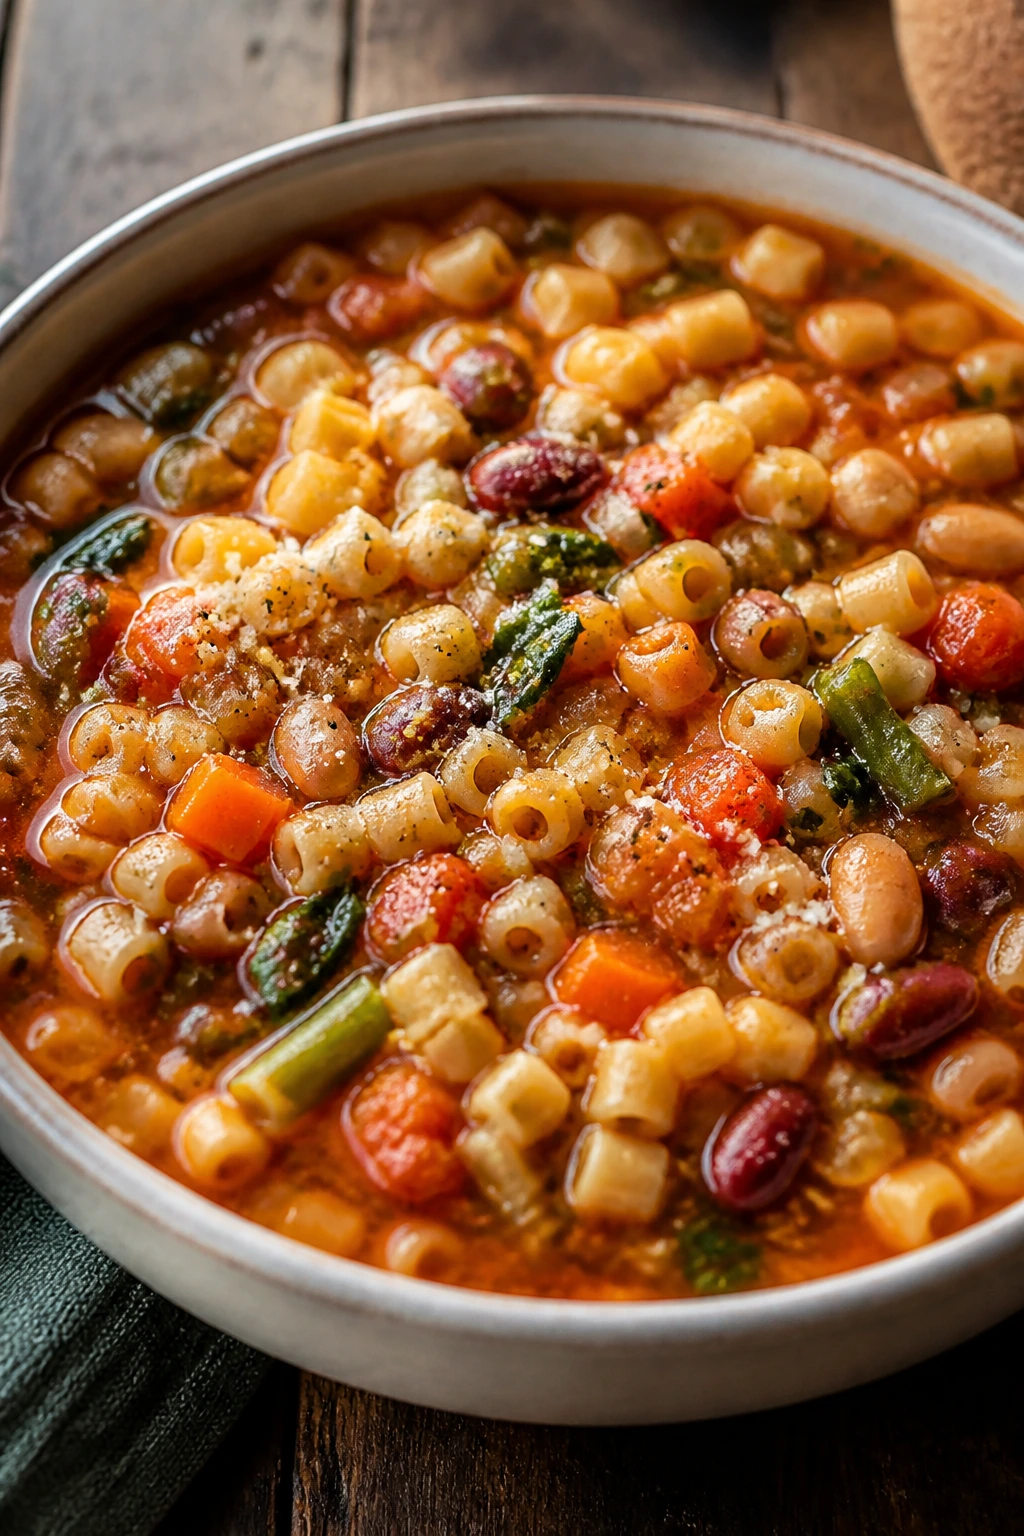
The biggest mistake with cheap light dinners is trying to make them feel fancy by piling on too many ingredients. Too much cheese, too much sauce, too many toppings — and suddenly the meal is neither cheap nor light. The better move is to pick one or two strong flavors and let them do their job.
Another common problem is overcooking the cheap proteins. Ground turkey dries out, shrimp turn rubbery, chicken breast goes chalky, and eggs become tough if you keep pushing the heat. These foods usually want less time than people think. Pull them early and trust the carryover heat.
Underseasoning is a sneaky failure. Beans need salt. Rice needs salt. Tomatoes need salt. Soup broth almost always needs more than seems polite. If dinner tastes flat, don’t reach for more food; reach for salt, acid, or both.
Texture matters too. A bowl of soft food with no crunch gets boring fast, even if the flavors are decent. That’s why cabbage, toasted breadcrumbs, cucumber, slaw, and crisp tortilla strips show up so often in this collection. They’re cheap, and they keep the plate awake.
Finally, don’t let leftovers sit in one giant container until the next day. Split them into smaller portions, because food cools and reheats better that way. It’s a small habit, but it saves texture and reduces waste.
Questions Readers Ask Before They Cook
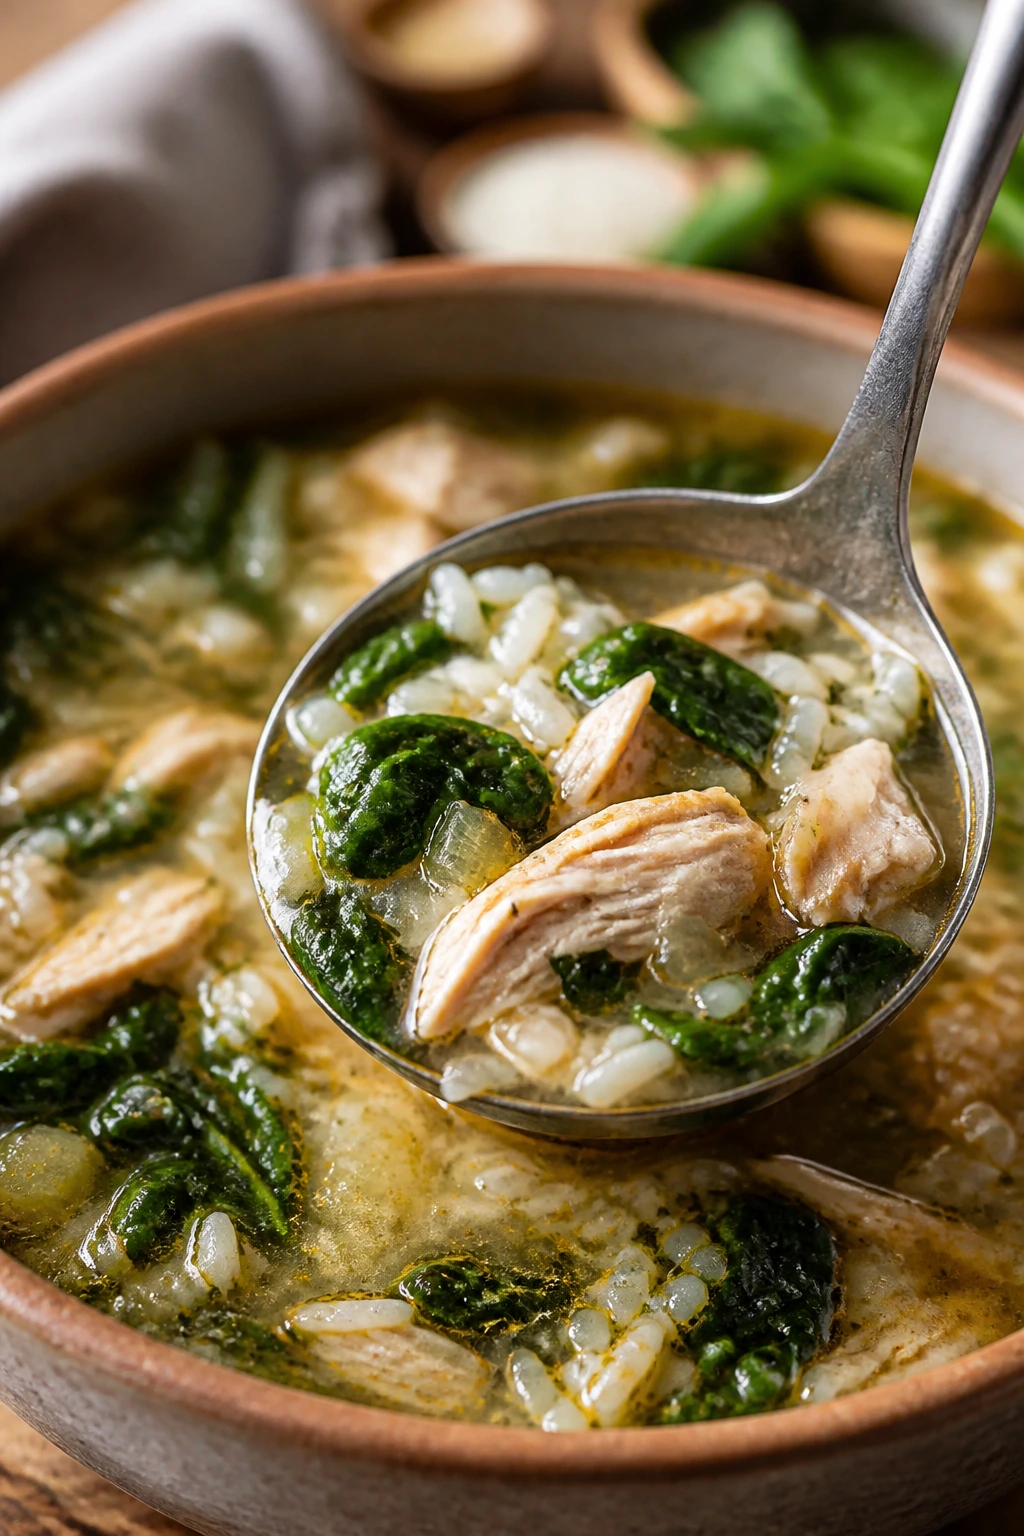
Can I swap chicken thighs for chicken breasts in these dinners?
Yes, and in skillet dishes I often do. Breasts cook faster and dry out more easily, so keep the heat moderate and pull them as soon as they’re done. Thighs are usually more forgiving if the pan gets busy.
What’s the cheapest way to add protein without using much meat?
Beans, lentils, eggs, tuna, and chickpeas are the best answers. They stretch well, season easily, and won’t blow up the shopping bill the way a big meat package can.
Are frozen vegetables good enough for dinner, or should I use fresh?
Frozen vegetables are absolutely good enough, especially for soups, fried rice, casseroles, and skillet meals. Use fresh when you want crisp texture or raw crunch, but frozen is often the smarter buy for cooked dishes.
How do I keep these meals from feeling too small?
Use volume smartly: cabbage, rice, potatoes, beans, pasta, and soup broth help a plate look full without pushing the grocery total up too much. A fried egg on top or a slice of toast on the side can also make a light dinner feel complete.
Can I make these recipes ahead for busy nights?
Yes, especially the soups, bean fillings, casseroles, and rice-based dishes. Keep crunchy toppings and fresh greens separate until serving so the leftovers don’t turn soft and dull.
What if my family doesn’t like spicy food?
Leave the heat out and put hot sauce on the table instead. Most of these recipes taste fine with garlic, onion, lemon, soy sauce, or salsa doing the heavy lifting.
How long do leftovers stay safe in the fridge?
Most cooked leftovers are good for 3 to 4 days if they’re cooled quickly and stored cold. Soups and stews often do well in that window; rice and chicken need prompt chilling, especially if the kitchen is warm.
What if a dish comes out too dry?
Add a splash of broth, water, lemon juice, or olive oil depending on the recipe. Dry pasta, rice, and skillet meals usually need a little liquid at reheat time, and that small fix often brings them back.
Cheap Dinners That Still Feel Like Dinner

A good cheap dinner doesn’t apologize for being cheap. It knows what it is: a hot pan, a few smart staples, and enough seasoning to make the room smell like somebody cared. That’s the standard here, and it’s a useful one.
If you keep cabbage, beans, eggs, rice, pasta, potatoes, and a few frozen vegetables around, you’re never that far from a meal. Pick one recipe when the fridge is full and another when it’s bare. Either way, you’ll land on something that feeds the table without draining the wallet, and that’s a habit worth keeping.