
Some weeknights need dinner with a pulse. You open the fridge at 6:40, find a lonely chicken breast, a half bag of spinach, and a jar of salsa, and the whole thing starts to feel like a negotiation. High protein meals fix that problem when they’re built around food that cooks fast, tastes like something, and doesn’t leave you hungry again an hour later.
The best versions are not giant slabs of chicken with a token pile of greens beside them. They’re skillets, bowls, sheet pans, tacos, stuffed peppers, and stir-fries where the protein actually has somewhere to go — into a sauce, a grain, a tortilla, a noodle bowl, or a melty top layer that makes the pan worth scrubbing. That balance matters. Too lean, and dinner turns dry. Too crowded, and nothing browns. Too much cheese, and you’ve just built a casserole wearing a fake gym membership.
What I love about protein-forward weeknight dinners is how flexible they are once you stop treating them like a punishment. A spoonful of yogurt can become a marinade. A can of beans can stretch a pound of meat into a real meal. A hot skillet, a little acid, and a finishing herb can rescue something that would otherwise taste flat and beige. You do not need a complicated plan. You need a few reliable recipes, a decent pan, and a short list of ingredients that pull their weight.
Why These Meals Earn Their Keep
- They finish fast without tasting rushed: Most of these dinners land in the 20- to 35-minute zone, which is about the window before everyone starts wandering into the kitchen asking what smells good.
- The protein is built into the main event: Chicken, turkey, salmon, tofu, eggs, beans, tuna, shrimp, and beef all show up as the center of the plate, not a side note.
- One pan often does the heavy lifting: Skillets, sheet pans, and pots keep cleanup sane, and they also help food brown instead of steaming in a crowded dish.
- Leftovers reheat like actual food: Grain bowls, chili, meatballs, and saucy stir-fries hold up better than delicate salads or dry baked chicken.
- There’s enough flavor to keep it interesting: Lemon, miso, yogurt, enchilada sauce, pesto, curry, peanut sauce, and salsa each give the protein somewhere to go.
- The ingredients overlap on purpose: Buy one bag of rice, one onion, a few peppers, a carton of eggs, and a couple sauces, and you can build half the list without a second trip to the store.
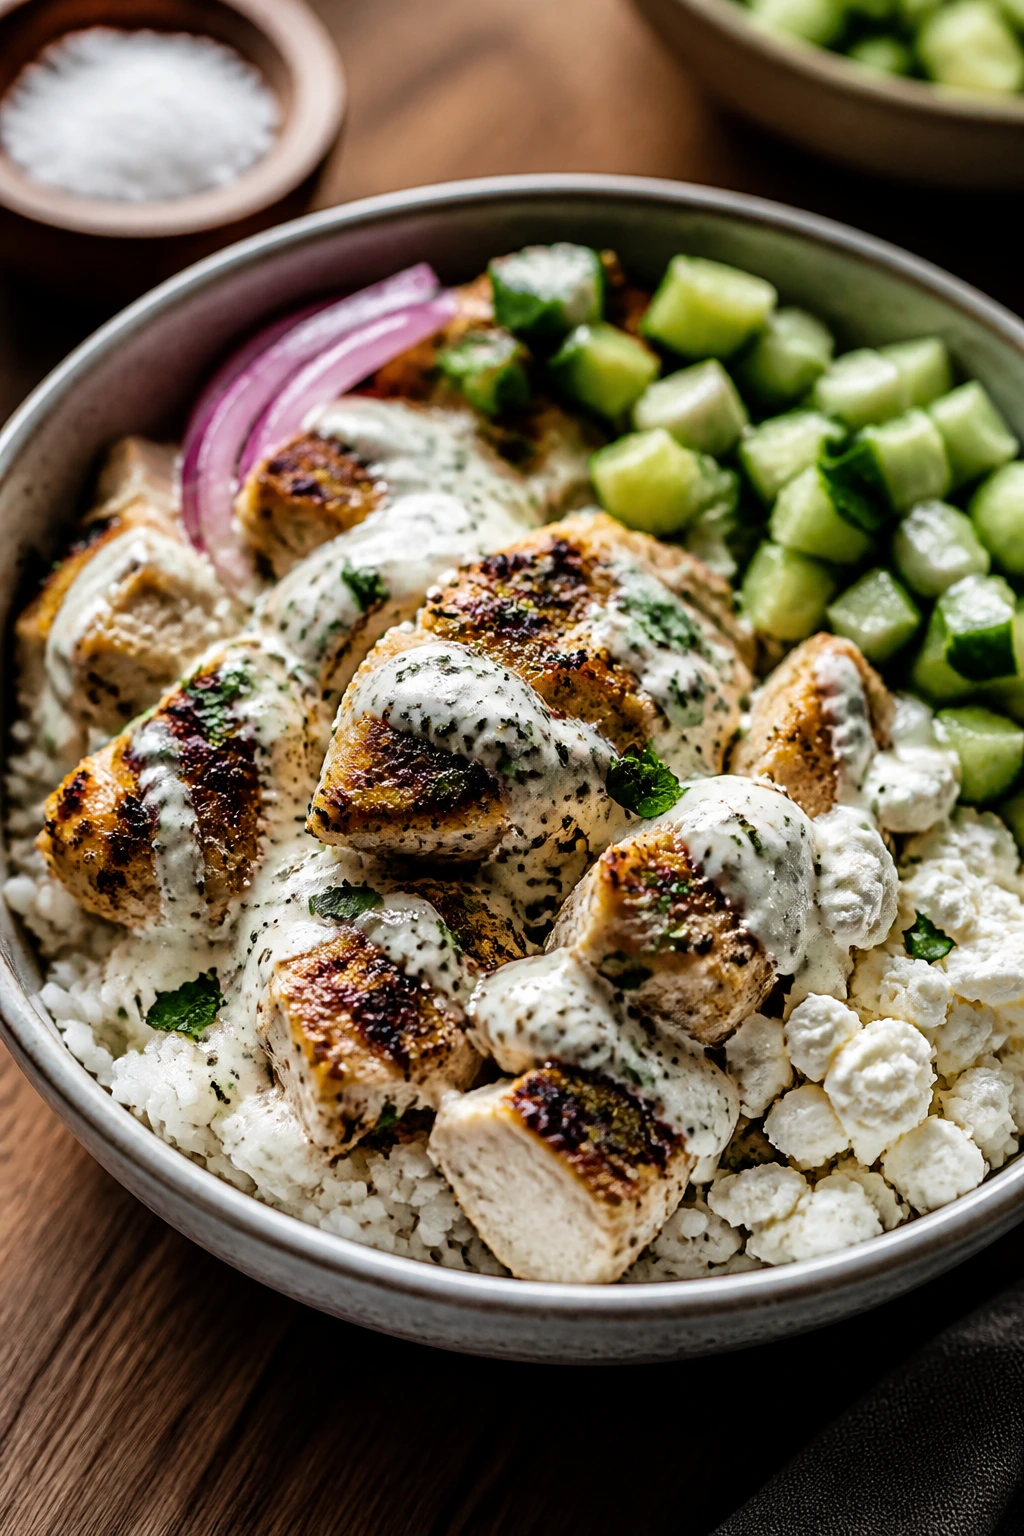
1. Garlic Yogurt Chicken Bowls
Intro: This is the kind of chicken bowl that actually tastes like dinner, not meal prep. The yogurt makes the chicken tender, the garlic and lemon give it a sharp, clean edge, and the rice catches every drop of juice. Spoon it into a bowl with cucumbers and feta, and it feels crisp, creamy, and warm all at once.
Why It Works: Greek yogurt does more than add tang; it helps the chicken stay moist while it sears. A short marinade, even 15 minutes, gives the garlic and lemon time to cling to the meat. The bowl format also keeps the protein balanced with carbs and crunch, so one serving feels complete instead of skeletal.
Key Ingredients:
- 1½ lbs boneless, skinless chicken thighs
- ½ cup plain Greek yogurt
- 3 garlic cloves, grated
- 1 lemon, zested and juiced
- 2 tbsp olive oil
- 1 tsp ground cumin
- 1 tsp kosher salt
- 3 cups cooked rice
- 1 cucumber, diced
- ½ cup crumbled feta
Quick Steps:
- Stir the yogurt, garlic, lemon, olive oil, cumin, and salt in a bowl.
- Coat the chicken and let it sit for 15 to 30 minutes.
- Heat a skillet over medium-high and cook the chicken for 5 to 7 minutes per side, until browned and the center reaches 165°F.
- Rest the chicken for 5 minutes, then slice it.
- Build bowls with rice, chicken, cucumber, feta, and any extra lemon juice.
Equipment for This Recipe:
- Large skillet
- Mixing bowl
- Instant-read thermometer
How to Serve This Dish: Pile the chicken over rice with a generous spoon of yogurt from the pan if there’s any left. Add tomato, cucumber, and a little dill if you want the bowl to lean fresher.
Pro Tips for This Recipe:
- Use thighs, not breasts, if you want the chicken to stay juicy after slicing.
- Wipe off excess yogurt before searing so the pan browns instead of steaming.
- Add the feta after the chicken rests; it keeps the bowl from turning salty too early. Variations on This Dish:
- Lemon Herb Bowl: Add chopped dill and parsley to the yogurt marinade.
- Spicy Paprika Version: Mix in 1 tsp smoked paprika and a pinch of cayenne. Common Mistakes to Avoid with This Dish:
- Don’t crowd the skillet or the chicken will go pale and soft instead of browned.
- Don’t slice the chicken immediately; the juices will run straight onto the cutting board.
2. Turkey Taco Skillet
Intro: Ground turkey gets a bad reputation when people underseason it. Give it taco seasoning, salsa, black beans, and a handful of cheese, and it turns into the kind of skillet dinner that disappears fast. The texture stays saucy, the spice stays friendly, and the whole thing scoops cleanly into tortillas.
Why It Works: Turkey is lean, which means it needs help from onion, salsa, and beans to feel substantial. The beans stretch the skillet without making it heavy, and the cheese melts into the sauce instead of sitting on top like an afterthought. A quick simmer keeps the turkey from drying out.
Key Ingredients:
- 1½ lbs ground turkey
- 1 small yellow onion, diced
- 2 tbsp taco seasoning
- 1 cup salsa
- 1 can (15 oz) black beans, rinsed and drained
- 1 cup frozen corn
- 1 cup shredded cheddar
- 8 small tortillas
- 2 tbsp olive oil
Quick Steps:
- Warm the oil in a large skillet over medium heat and cook the onion for 3 minutes.
- Add the turkey and cook, breaking it up, until no pink remains.
- Stir in taco seasoning, salsa, beans, and corn.
- Simmer for 5 minutes until the mixture looks thick and glossy.
- Top with cheddar, cover for 1 minute, and serve with tortillas.
Equipment for This Recipe:
- Large skillet
- Wooden spoon
- Small lid or foil
How to Serve This Dish: Spoon the filling into warm tortillas or over rice. A squeeze of lime and a few pickled onions make the whole pan taste sharper and less heavy.
Pro Tips for This Recipe:
- Salt the onion lightly at the start so it softens faster.
- If the skillet looks dry, add 2 to 3 tbsp water before the cheese goes on.
- Use thick salsa, not watery salsa, or the skillet turns soupy. Variations on This Dish:
- Sweet Corn Taco Skillet: Add roasted red peppers for a sweeter finish.
- Bean-Heavy Version: Swap half the turkey for an extra can of pinto beans. Common Mistakes to Avoid with This Dish:
- Don’t skip the simmer. Raw seasoning tastes dusty; 5 minutes in the sauce fixes that.
- Don’t dump in the cheese while the mixture is still boiling hard or it gets greasy.
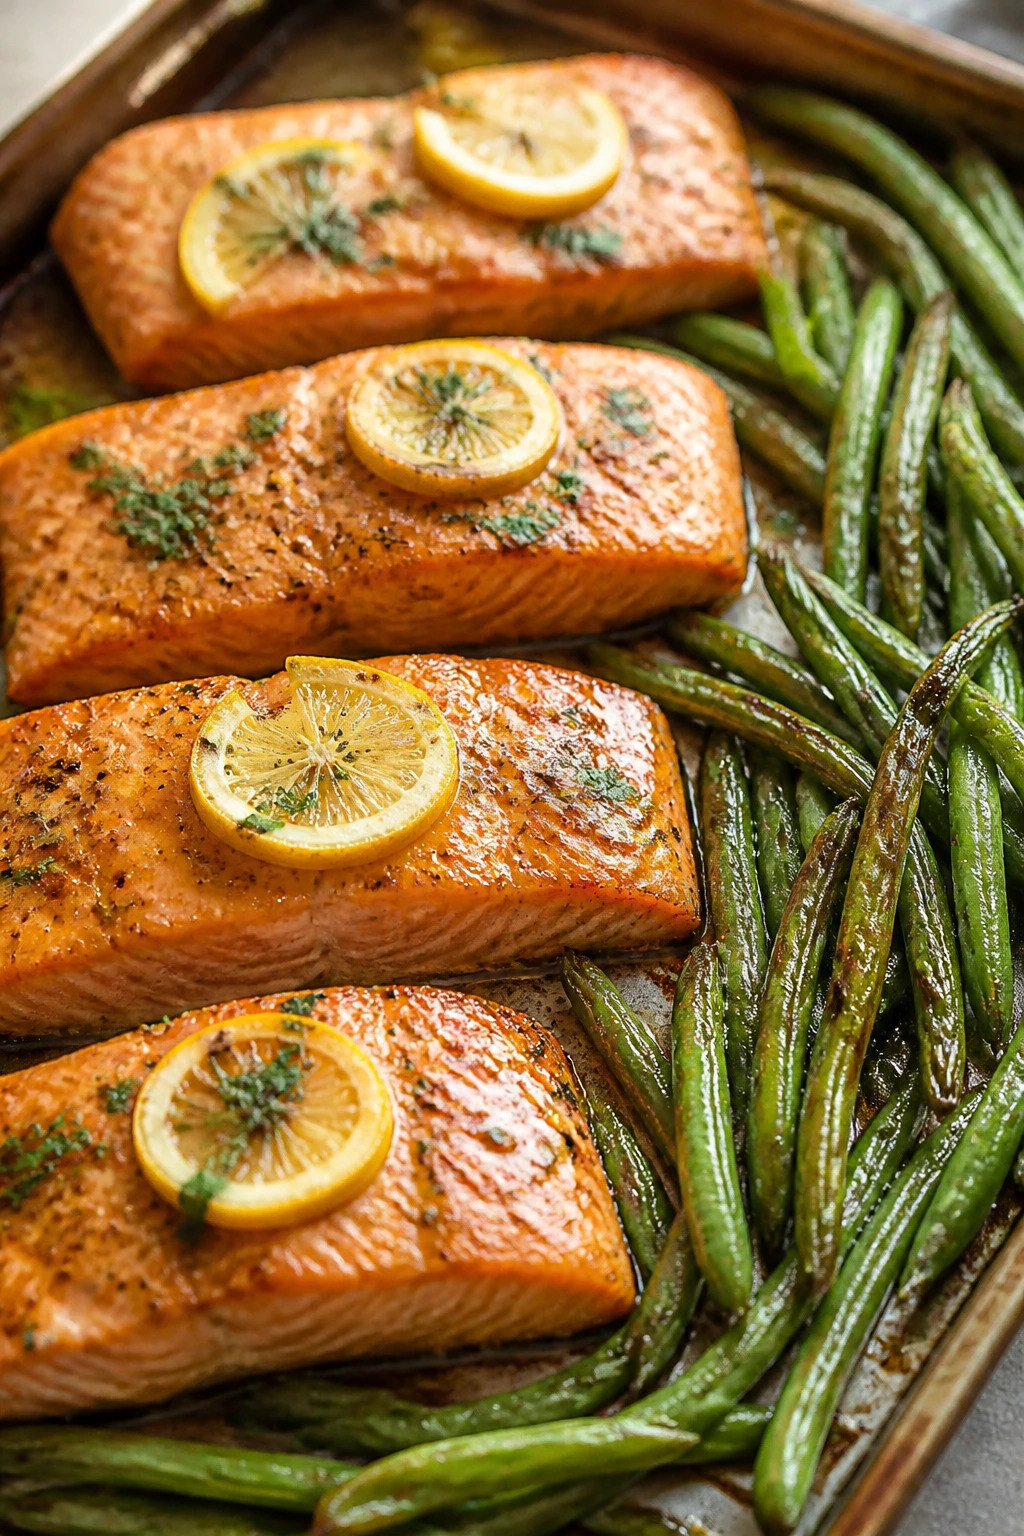
3. Lemon Salmon and Green Beans
Intro: Salmon is one of those proteins that looks fancier than it is. Ten minutes in the oven, a tray of green beans beside it, and dinner is done before anyone can start complaining. The lemon keeps the fish bright, and the butter gives the edges a soft, glossy finish.
Why It Works: Salmon needs heat that is hot enough to set the surface but not so hot that the center dries out. Green beans roast in the same time window, so the sheet pan actually earns its space in the oven. Dijon and lemon help the fish taste lively, not oily.
Key Ingredients:
- 4 salmon fillets, about 6 oz each
- 12 oz green beans, trimmed
- 2 tbsp olive oil
- 1 lemon, sliced and juiced
- 1 tbsp Dijon mustard
- 2 tbsp butter, melted
- 1 tsp kosher salt
- ½ tsp black pepper
Quick Steps:
- Heat the oven to 425°F and line a sheet pan.
- Toss the green beans with olive oil, salt, and pepper.
- Mix lemon juice, Dijon, and butter, then brush it over the salmon.
- Roast the beans for 5 minutes, add the salmon, and roast 10 to 12 minutes more.
- Serve with extra lemon slices over the top.
Equipment for This Recipe:
- Rimmed sheet pan
- Parchment paper
- Pastry brush or spoon
How to Serve This Dish: Put the salmon on a bed of rice or mashed potatoes so the juices have somewhere to land. A simple cucumber salad on the side keeps the plate from feeling too rich.
Pro Tips for This Recipe:
- Choose salmon fillets that are similar in thickness so they finish together.
- Pull the fish when the center still looks slightly translucent; carryover heat finishes the job.
- If the beans are thin, cut the roast time by 2 minutes so they stay crisp. Variations on This Dish:
- Herb Butter Salmon: Add chopped dill and parsley to the melted butter.
- Honey Lemon Salmon: Stir 1 tsp honey into the glaze for a softer finish. Common Mistakes to Avoid with This Dish:
- Don’t overbake salmon until it flakes like dust. It should still look moist in the center.
- Don’t put wet green beans on the pan or they’ll steam instead of roasting.
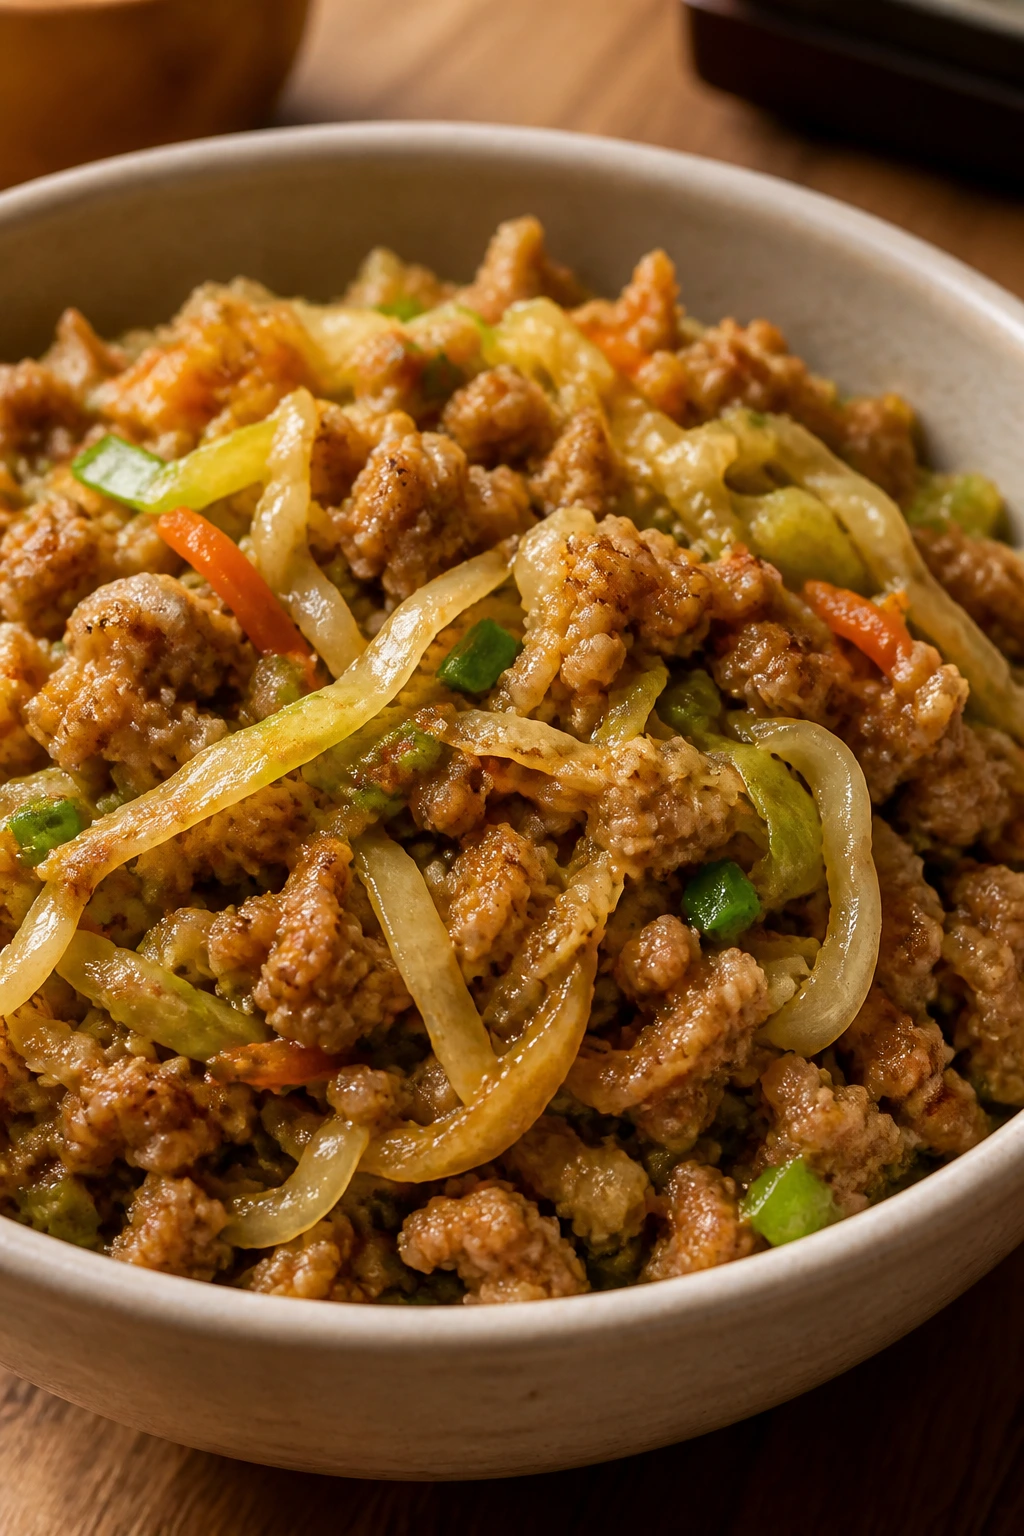
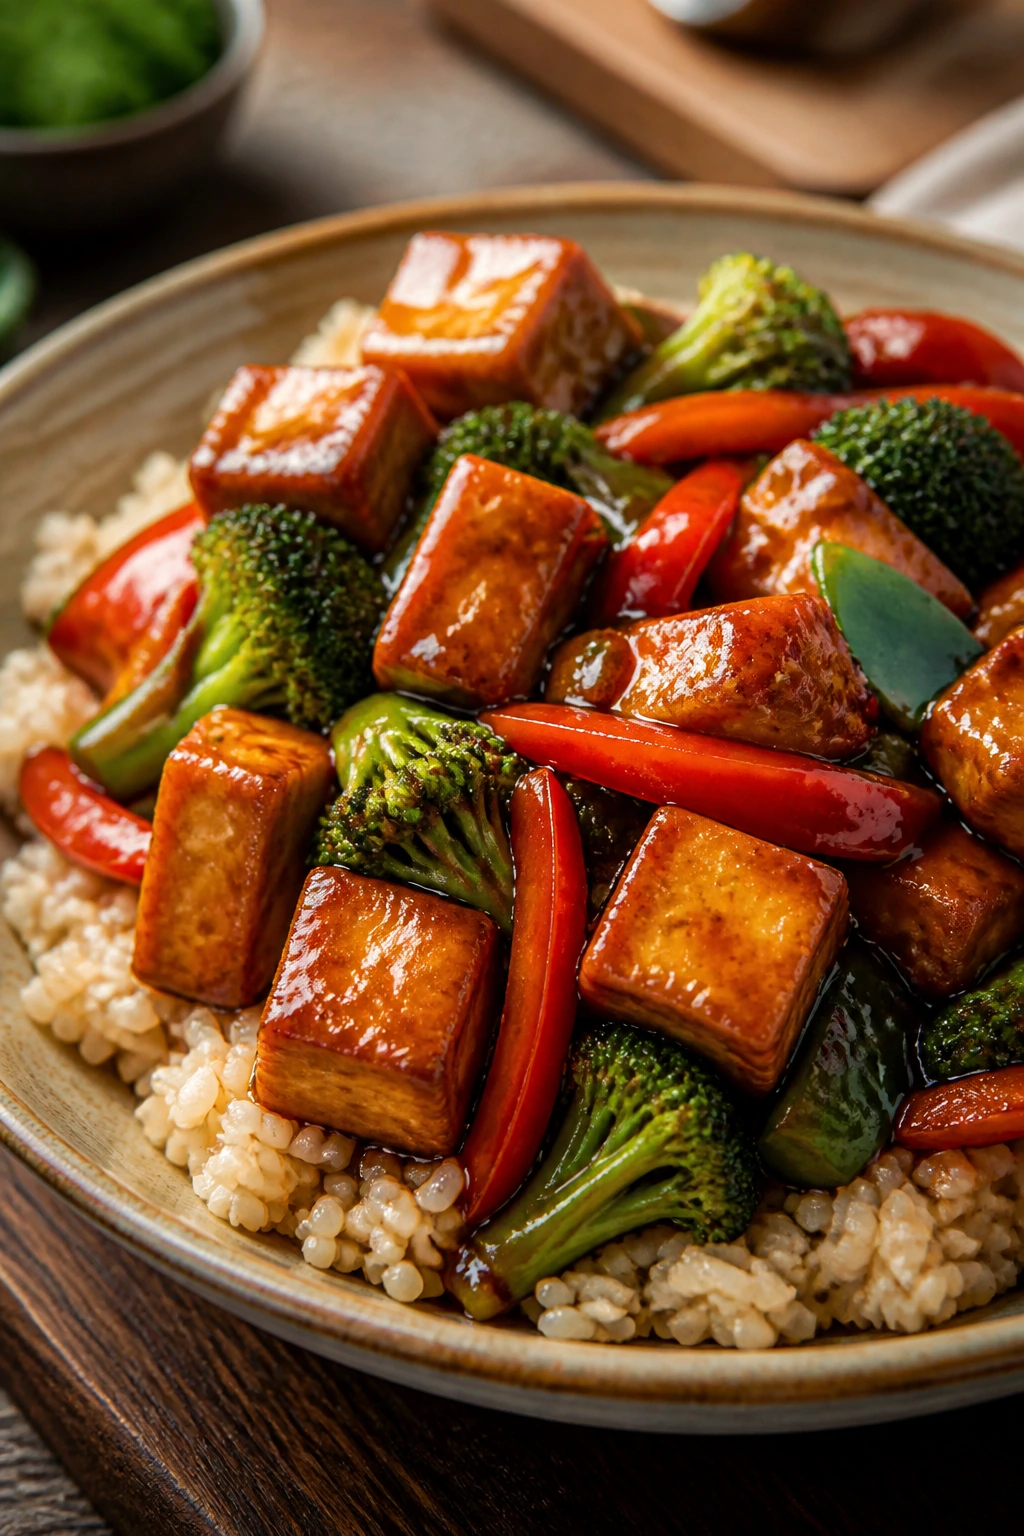
4. Beef and Broccoli Rice Skillet
Intro: This one gives takeout energy without the delivery fee. Ground beef cooks fast, broccoli keeps some bite, and the soy-garlic sauce coats everything with a dark, glossy finish. If you’ve got rice already cooked, dinner moves even faster.
Why It Works: Ground beef browns quickly and carries sauce well, which makes it a strong base for a weeknight skillet. Broccoli adds texture and gives the dish some lift so it isn’t all meat and salt. A little ginger and sesame oil keep the flavor from going flat.
Key Ingredients:
- 1 lb ground beef
- 4 cups broccoli florets
- 3 cups cooked rice
- 3 garlic cloves, minced
- 1 tbsp fresh ginger, grated
- ¼ cup soy sauce
- 1 tbsp sesame oil
- 1 tbsp cornstarch mixed with 2 tbsp water
- 2 green onions, sliced
Quick Steps:
- Brown the beef in a skillet over medium-high heat.
- Add garlic and ginger and cook for 30 seconds.
- Stir in broccoli and ¼ cup water, then cover for 3 minutes.
- Pour in soy sauce and cornstarch slurry, simmer until glossy.
- Serve over rice and top with green onions.
Equipment for This Recipe:
- Large skillet
- Small bowl for slurry
- Rice cooker or saucepan
How to Serve This Dish: Serve it in shallow bowls so the sauce can soak into the rice instead of disappearing. A sprinkle of sesame seeds gives the top a little crunch.
Pro Tips for This Recipe:
- Use beef with enough fat to brown, but drain excess grease before adding the sauce.
- Cut broccoli small so it cooks through in the covered pan.
- Mix the cornstarch slurry before it hits the heat or it clumps. Variations on This Dish:
- Spicy Chili Crisp Version: Stir in 1 tsp chili crisp at the end.
- Brown Rice Bowl: Swap in brown rice for a chewier, nuttier base. Common Mistakes to Avoid with This Dish:
- Don’t overcook the broccoli until it turns drab and soft.
- Don’t skip the slurry if you want the sauce to coat the rice instead of pooling at the bottom.
5. Teriyaki Tofu Stir-Fry
Intro: If tofu has ever tasted bland to you, it probably needed heat, salt, and a sauce with backbone. This stir-fry gives it all three. The tofu crisps on the edges, the broccoli stays green, and the teriyaki clings to every square inch.
Why It Works: Extra-firm tofu sears better than softer blocks because it holds its shape when you toss it. Pressing it for 10 minutes matters here; it keeps the pan from spitting and helps the surface brown. A fast teriyaki sauce gives you sweet-salty balance without dragging the dish down.
Key Ingredients:
- 1 block (14 oz) extra-firm tofu, pressed and cubed
- 2 cups broccoli florets
- 1 red bell pepper, sliced
- 3 tbsp teriyaki sauce
- 1 tbsp soy sauce
- 1 tbsp sesame oil
- 2 cups cooked rice
- 1 tbsp neutral oil
- 1 tsp sesame seeds
Quick Steps:
- Pat the tofu dry and season lightly with salt.
- Brown the tofu in oil over medium-high heat until the sides look golden.
- Add broccoli and pepper, then splash in 2 tbsp water and cover for 2 minutes.
- Stir in teriyaki, soy sauce, and sesame oil.
- Serve over rice with sesame seeds.
Equipment for This Recipe:
- Large nonstick or stainless skillet
- Tofu press or paper towels
- Spatula
How to Serve This Dish: Stack the tofu and vegetables over rice, then add a few sliced scallions if you have them. A squeeze of lime is not traditional, but it wakes the whole thing up.
Pro Tips for This Recipe:
- Press the tofu before you cut it so the cubes keep their shape.
- Let the tofu sit in the pan long enough to form a crust before you turn it.
- If your teriyaki sauce is very sweet, thin it with a splash of water. Variations on This Dish:
- Ginger-Sesame Tofu: Add 1 tsp grated ginger with the garlic.
- Peanut Tofu Bowl: Swap teriyaki for a peanut sauce. Common Mistakes to Avoid with This Dish:
- Don’t move the tofu too soon or it tears before it browns.
- Don’t drown the pan in sauce; tofu needs a little dry heat to stay crisp.
6. Cottage Cheese Pasta Bake with Turkey
Intro: Cottage cheese in pasta bake sounds odd until you taste it. It melts into the sauce, makes the filling creamy, and bumps the protein without turning the whole dish heavy. With ground turkey and spinach in the mix, it eats like a proper baked dinner.
Why It Works: Cottage cheese blends into marinara better than people expect, especially once it bakes under mozzarella. Ground turkey gives the dish enough body to feel substantial, while spinach keeps the texture from going soft and same-y. Whole wheat pasta adds chew and holds the sauce.
Key Ingredients:
- 12 oz whole wheat pasta
- 1 lb ground turkey
- 2 cups marinara sauce
- 1½ cups cottage cheese
- 2 cups baby spinach
- 1½ cups shredded mozzarella
- 1 tbsp olive oil
- 1 tsp Italian seasoning
Quick Steps:
- Cook the pasta until just shy of al dente.
- Brown the turkey in oil with Italian seasoning.
- Stir in marinara, spinach, and cottage cheese.
- Toss with pasta, top with mozzarella, and bake at 400°F for 15 minutes.
- Rest 5 minutes before scooping.
Equipment for This Recipe:
- Large pot
- 9×13-inch baking dish
- Mixing spoon
How to Serve This Dish: Serve it with a crisp green salad because the bake is rich and soft. The edges that hit the pan get a little chewy, and that’s the best part.
Pro Tips for This Recipe:
- Undercook the pasta by 1 minute so it finishes in the oven.
- Stir the cottage cheese into the sauce before baking; don’t leave it in separate pockets.
- Let it rest or the first scoop turns sloppy. Variations on This Dish:
- Red Pepper Version: Add chopped roasted peppers to the sauce.
- Lighter Skillet Version: Skip the bake and eat it straight from the pan. Common Mistakes to Avoid with This Dish:
- Don’t use watery cottage cheese without draining it a little.
- Don’t overbake or the pasta starts soaking up all the sauce.
7. Shrimp Fajita Bowls
Intro: Shrimp is one of the fastest high protein meals on the list, and fajita seasoning gives it enough personality to carry the whole bowl. Peppers and onions cook in the same skillet, the rice soaks up the juice, and the lime at the end keeps everything sharp. Fast dinner, no dead weight.
Why It Works: Shrimp only needs a short blast of heat, which is why it suits weeknight cooking so well. Sliced peppers and onions soften at nearly the same pace, so they can share a pan without weird textures. A little char on the vegetables makes the bowl taste cooked, not assembled.
Key Ingredients:
- 1½ lbs peeled shrimp
- 2 bell peppers, sliced
- 1 large onion, sliced
- 2 tbsp olive oil
- 2 tsp fajita seasoning
- 3 cups cooked rice
- 1 lime, cut into wedges
- 1 avocado, sliced
Quick Steps:
- Toss shrimp with 1 tsp seasoning.
- Cook peppers and onion in oil over medium-high heat for 6 to 7 minutes.
- Add shrimp and the remaining seasoning; cook 2 to 3 minutes per side.
- Serve over rice with lime and avocado.
- Finish with chopped cilantro if you like it.
Equipment for This Recipe:
- Large skillet
- Cutting board
- Citrus juicer
How to Serve This Dish: Build the bowl with rice first, then pile the shrimp and vegetables in the center so the lime juice runs down through the grains. A spoonful of salsa works fine here.
Pro Tips for This Recipe:
- Don’t marinate shrimp too long or the acid starts changing the texture.
- Slice the peppers thin so they blister instead of staying raw in the middle.
- Cook shrimp just until pink and curled; they go rubbery fast. Variations on This Dish:
- Cauliflower Rice Bowl: Use cauliflower rice for a lighter base.
- Chipotle Fajita Bowl: Add chipotle powder for smoke and heat. Common Mistakes to Avoid with This Dish:
- Don’t overfill the pan; shrimp need direct contact with heat.
- Don’t walk away during the last minute or they’ll overcook while you’re finding the lime.
8. White Bean Tuna Salad Pitas
Intro: This is lunch logic turned into dinner, and I mean that as a compliment. Tuna and white beans make the salad sturdier than the usual mayo-heavy version, and the pita gives it enough structure to eat with one hand if that’s where the night is headed. Cold, bright, and fast.
Why It Works: Tuna brings lean protein, and the beans stretch it into a meal that doesn’t feel skimpy. Greek yogurt cuts the mayo and keeps the salad creamy without burying the flavor. Celery and lemon keep the texture and taste from getting flat.
Key Ingredients:
- 2 cans tuna in water, drained
- 1 can (15 oz) cannellini beans, rinsed and drained
- ¼ cup plain Greek yogurt
- 2 tbsp mayonnaise
- 2 celery stalks, diced
- 1 lemon, juiced
- 4 pita pockets
- 2 tbsp chopped parsley
Quick Steps:
- Flake the tuna into a bowl.
- Fold in beans, yogurt, mayo, celery, lemon juice, and parsley.
- Taste and season with salt and pepper.
- Spoon into warm pita pockets.
- Serve with cucumber slices or chips.
Equipment for This Recipe:
- Mixing bowl
- Fork
- Knife and cutting board
How to Serve This Dish: Stuff the pitas only when you’re ready to eat or they get soggy fast. If you prefer a fork-and-bowl dinner, pile it over greens instead.
Pro Tips for This Recipe:
- Mash about a quarter of the beans with the fork to make the salad cling better.
- Drain the tuna well or the filling gets watery.
- Warm the pitas for 20 seconds so they don’t crack. Variations on This Dish:
- Dill Pickle Version: Add chopped pickles and a teaspoon of pickle brine.
- Mediterranean Bowl: Serve over cucumber, tomato, and olives instead of pita. Common Mistakes to Avoid with This Dish:
- Don’t drown the salad in mayo; the beans should still be visible.
- Don’t stuff dry pita straight from the package or it splits at the seam.
9. BBQ Chicken Sweet Potato Skins
Intro: Sweet potato skins already feel halfway like dinner, and shredded chicken finishes the job. The BBQ sauce gets sticky in the oven, the cheese melts into the orange flesh, and the whole thing eats like a backyard plate with less effort. Weirdly satisfying.
Why It Works: Sweet potatoes give you a built-in base that handles sauce and cheese better than a plain baked potato. Pre-cooked chicken keeps the process quick, and the BBQ sauce keeps the filling from tasting dry. The skins crisp again in the oven, which matters more than people think.
Key Ingredients:
- 2 large sweet potatoes
- 2 cups cooked shredded chicken
- ⅓ cup BBQ sauce
- 1 cup shredded cheddar
- 2 tbsp sour cream
- 2 green onions, sliced
- 1 tbsp olive oil
- Salt and pepper
Quick Steps:
- Bake the sweet potatoes at 400°F until tender, about 45 minutes, or microwave them if you’re in a hurry.
- Split and scoop out a little of the center.
- Mix chicken with BBQ sauce and stuff the skins.
- Top with cheddar and bake 10 minutes until melted.
- Finish with sour cream and green onions.
Equipment for This Recipe:
- Baking sheet
- Spoon for scooping
- Fork for piercing potatoes
How to Serve This Dish: Serve two halves per person with a sharp slaw or simple salad on the side. They eat best while the cheese is still stretchy and the skins are crisp at the edges.
Pro Tips for This Recipe:
- Don’t scoop too much flesh or the skins collapse.
- A smoky BBQ sauce works better than a very sweet one.
- Rub the potato skins with oil before the second bake so they crisp up. Variations on This Dish:
- Buffalo Chicken Skins: Swap BBQ sauce for buffalo sauce and ranch drizzle.
- Tex-Mex Version: Add black beans and jalapeños to the filling. Common Mistakes to Avoid with This Dish:
- Don’t overfill the skins or the filling spills onto the pan.
- Don’t skip the second bake; cold stuffed skins taste unfinished.
10. Lentil Bolognese with Pasta
Intro: Lentils make a better meatless bolognese than most people expect. They bring a soft, earthy bite that fits right into tomato sauce, and the whole pot tastes like it simmered longer than it did. Over pasta, it lands squarely in dinner territory.
Why It Works: Brown lentils keep their shape enough to mimic the texture of a meat sauce. Onion, carrot, and celery build a proper base, which is why this tastes deeper than a shortcut red sauce. Parmesan at the end sharpens the whole pan.
Key Ingredients:
- 1 cup dry brown lentils
- 12 oz pasta
- 1 small onion, diced
- 1 carrot, diced
- 1 celery stalk, diced
- 1 can (28 oz) crushed tomatoes
- 2 tbsp olive oil
- ½ cup grated Parmesan
Quick Steps:
- Cook lentils until just tender, about 20 minutes.
- Sauté onion, carrot, and celery in oil.
- Add tomatoes and lentils, then simmer 10 minutes.
- Cook pasta and reserve a little water.
- Toss pasta with sauce and Parmesan.
Equipment for This Recipe:
- Saucepan
- Large pot
- Wooden spoon
How to Serve This Dish: Twirl it into shallow bowls and add extra Parmesan on top. A slice of garlic bread is not subtle, but it fits.
Pro Tips for This Recipe:
- Salt the tomato sauce after it reduces a little, not at the start.
- Save pasta water; a splash helps the sauce coat the noodles.
- Chop the vegetables small so they melt into the sauce. Variations on This Dish:
- Turkey-Lentil Hybrid: Add ½ lb ground turkey with the vegetables.
- Spicy Arrabbiata Style: Stir in red pepper flakes and more garlic. Common Mistakes to Avoid with This Dish:
- Don’t overcook the lentils until they turn mushy.
- Don’t drain the pasta completely dry; a little water helps the sauce cling.
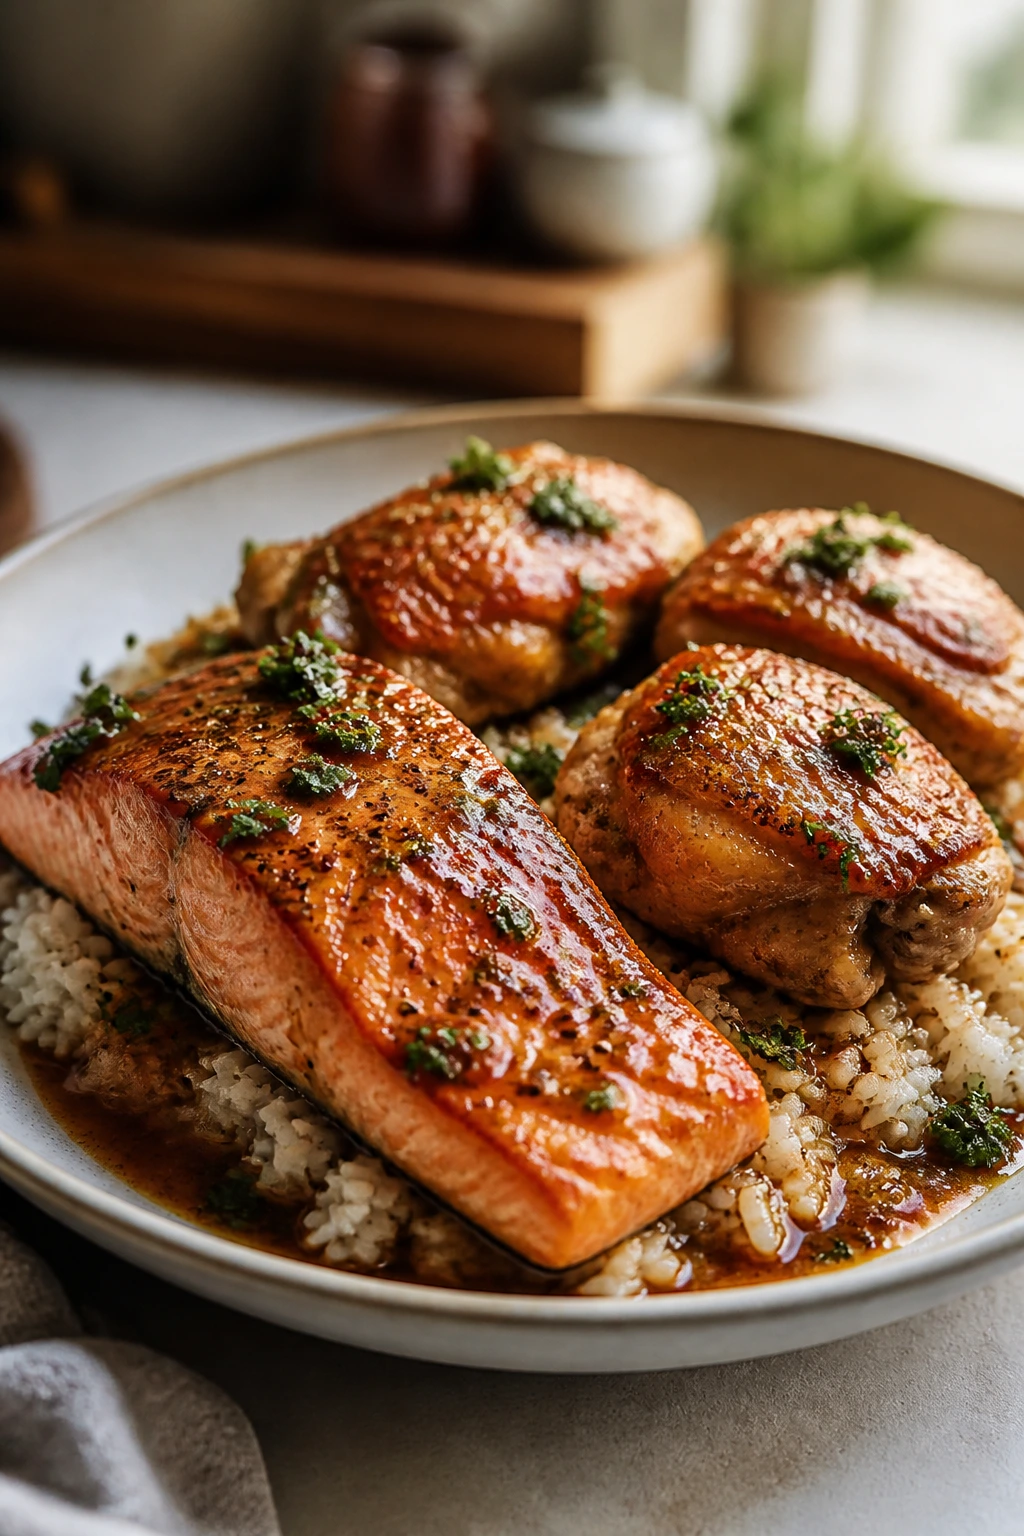
11. Pork Tenderloin with Apples and Onions
Intro: Pork tenderloin is lean, fast, and easy to ruin if you cook it too long. Pair it with apples and onions, and suddenly it tastes rounder, sweeter, and more like a meal you meant to make. The pan juices are the whole point here.
Why It Works: Pork tenderloin cooks quickly enough for a weeknight but still slices cleanly for neat portions. Apples soften into the onions and create a quick pan sauce with almost no extra work. A short roast keeps the meat tender instead of dry.
Key Ingredients:
- 1½ lbs pork tenderloin
- 2 apples, sliced
- 1 large onion, sliced
- 2 tbsp olive oil
- 1 tbsp Dijon mustard
- 1 tsp fresh thyme
- 1 tsp kosher salt
- ½ tsp black pepper
Quick Steps:
- Sear the pork in oil over medium-high heat until browned.
- Add onions and apples to the pan.
- Brush the pork with Dijon and sprinkle with thyme.
- Roast at 425°F for 15 to 20 minutes, until the pork reaches 145°F.
- Rest and slice; spoon apples and onions over the top.
Equipment for This Recipe:
- Oven-safe skillet
- Instant-read thermometer
- Sharp knife
How to Serve This Dish: Serve it with mashed potatoes or roasted carrots so the apple-onion pan juices have somewhere to go. Thin slices look best here, and the center should still be faintly rosy.
Pro Tips for This Recipe:
- Use a thermometer. Pork tenderloin goes from tender to dry in a narrow window.
- Let the meat rest or the juices flood the plate.
- Choose firm apples so they hold shape in the oven. Variations on This Dish:
- Mustard Herb Pork: Add rosemary and a little extra Dijon.
- Cider Pan Sauce: Splash in ¼ cup apple cider before roasting. Common Mistakes to Avoid with This Dish:
- Don’t confuse tenderloin with pork loin; the cooking time is different.
- Don’t overcook until the slices look chalky and tight.
12. Egg Roll in a Bowl with Turkey
Intro: This is one of those dinners that tastes more work-intensive than it is. Ground turkey, shredded cabbage, garlic, ginger, and soy sauce give you the egg roll flavor without the wrapper or the frying oil. It’s fast, salty in the right way, and oddly satisfying straight from the skillet.
Why It Works: Coleslaw mix cooks in minutes, which makes it perfect for weeknights. Turkey gives the bowl its protein, while ginger and sesame oil do the heavy lifting on flavor. A little crunch at the end keeps it from turning mushy.
Key Ingredients:
- 1½ lbs ground turkey
- 1 bag (14 oz) coleslaw mix
- 3 garlic cloves, minced
- 1 tbsp fresh ginger, grated
- 3 tbsp soy sauce
- 1 tbsp sesame oil
- 2 green onions, sliced
- 1 tbsp neutral oil
Quick Steps:
- Brown the turkey in oil.
- Add garlic and ginger and cook 30 seconds.
- Stir in coleslaw mix and soy sauce.
- Cook 4 to 5 minutes, until the cabbage softens but still has bite.
- Finish with sesame oil and green onions.
Equipment for This Recipe:
- Large skillet
- Spatula
- Grater or microplane
How to Serve This Dish: Eat it as-is, or scoop it over rice if you want more bulk. Chili crisp on top is not traditional, but it works.
Pro Tips for This Recipe:
- Keep the heat fairly high so the cabbage softens without turning watery.
- Add sesame oil at the end so the aroma stays sharp.
- If using very lean turkey, add a splash of water to help it stay juicy. Variations on This Dish:
- Pork Version: Use ground pork instead of turkey.
- Spicy Bowl: Add sriracha or chili garlic sauce. Common Mistakes to Avoid with This Dish:
- Don’t overcook the cabbage into limp strands.
- Don’t skip the ginger; without it, the skillet tastes flat.
13. Greek Chickpea Chicken Salad
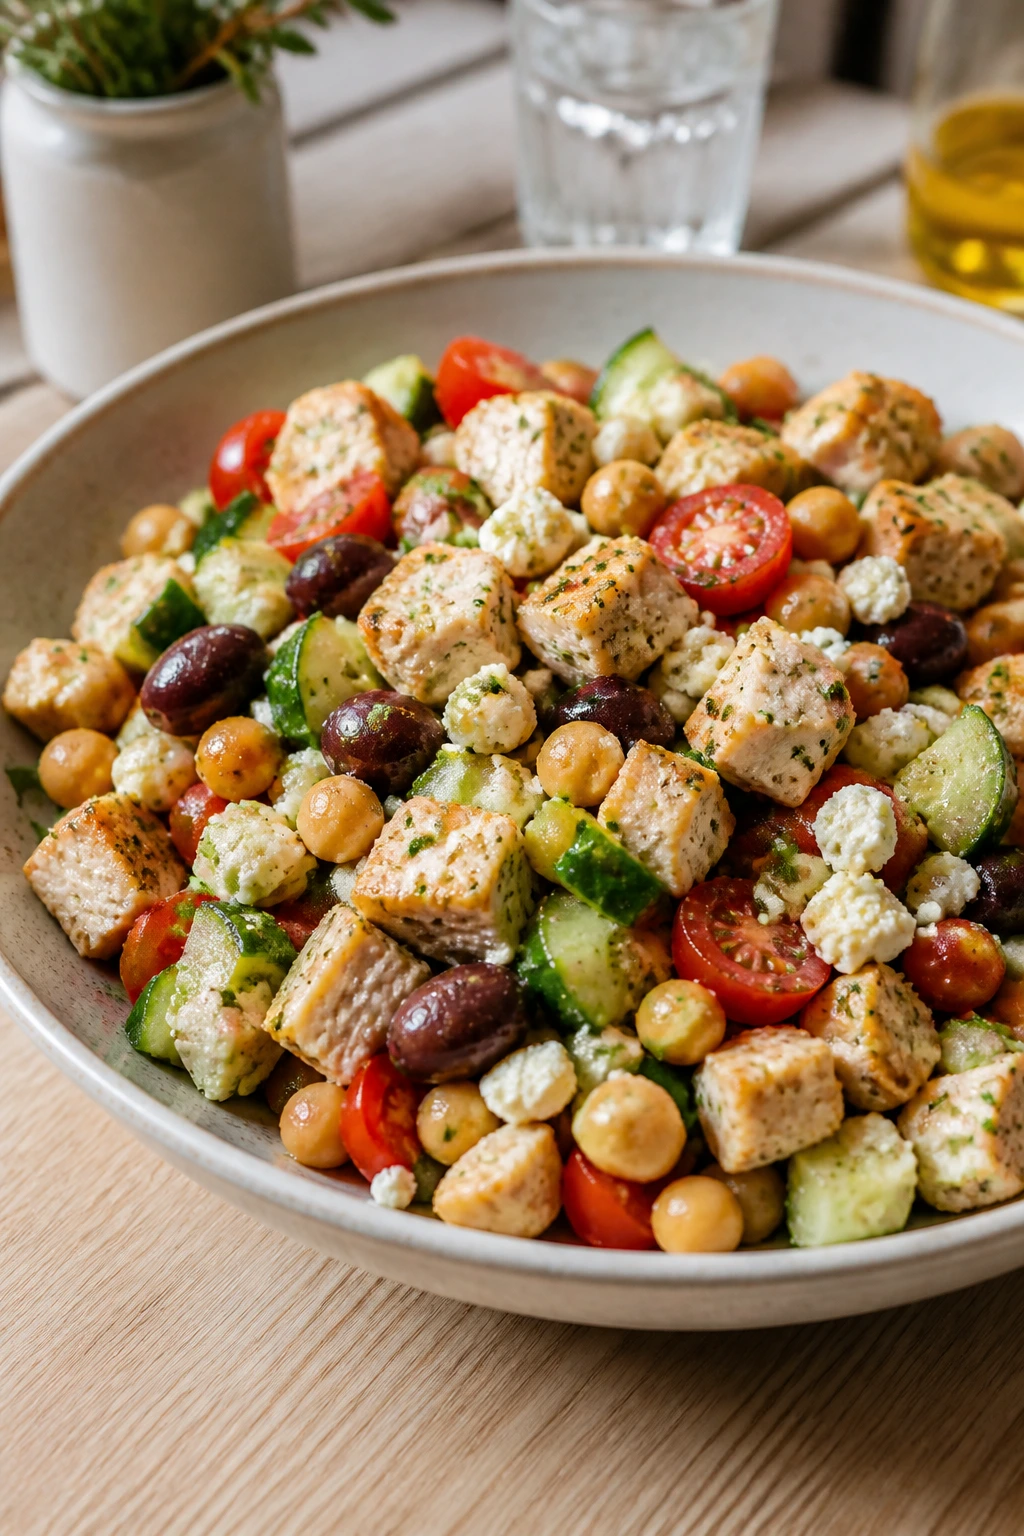
Intro: This is the kind of salad that can stand up to dinner, not just act as a side. Chicken, chickpeas, cucumber, tomato, feta, and olives make it cold, salty, and sturdy enough to carry you through a long evening. The lemon dressing pulls it together.
Why It Works: Chickpeas stretch the chicken and add fiber without making the bowl heavy. The salty feta and olives wake up the milder chicken, while cucumber keeps the texture crisp. A lemon-olive oil dressing is the right amount of sharpness for all the other ingredients.
Key Ingredients:
- 2 cups cooked chicken, chopped
- 1 can (15 oz) chickpeas, rinsed and drained
- 1 cucumber, chopped
- 1 cup cherry tomatoes, halved
- ½ cup feta
- ⅓ cup kalamata olives
- 3 tbsp olive oil
- 2 tbsp lemon juice
Quick Steps:
- Combine the chicken, chickpeas, cucumber, tomatoes, feta, and olives.
- Whisk olive oil, lemon juice, salt, and pepper.
- Toss the dressing through the salad.
- Chill for 10 minutes if you have time.
- Serve with pita or greens.
Equipment for This Recipe:
- Large bowl
- Small whisk
- Cutting board
How to Serve This Dish: Pile it into pita pockets, or serve it over romaine if you want more crunch. It travels well, though the tomatoes get a little softer after a day.
Pro Tips for This Recipe:
- Salt the tomatoes lightly before mixing so they give off a bit of juice.
- Chop everything close to the same size for easier bites.
- Use full-fat feta if you want a creamier finish. Variations on This Dish:
- No-Cook Version: Use rotisserie chicken.
- Dairy-Free Bowl: Skip the feta and add avocado. Common Mistakes to Avoid with This Dish:
- Don’t overdress the salad; it should glisten, not swim.
- Don’t cut the cucumber too large or it throws off the bite.
14. Chili Lime Steak Tacos
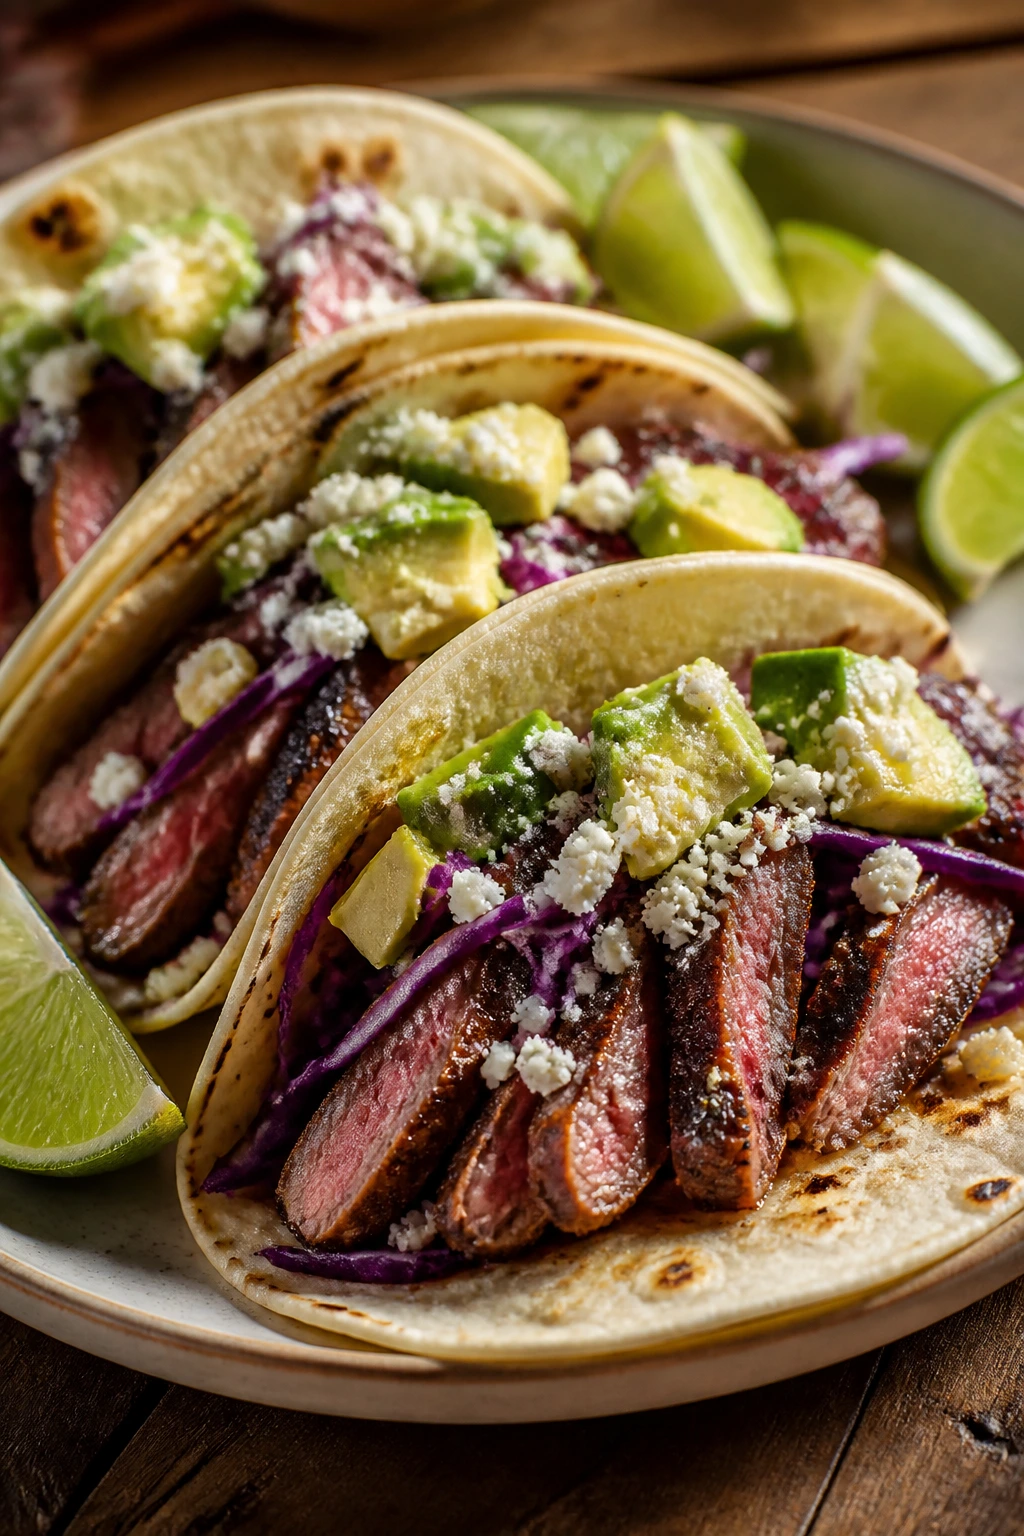
Intro: Steak tacos sound like a night-out meal, but they don’t have to be. A quick chili-lime marinade, a hot skillet, and soft tortillas are enough to make dinner feel intentional. The edges of the steak get a little charred, which is exactly where the flavor lives.
Why It Works: Flank steak cooks quickly if you slice it thin against the grain. Lime and chili powder wake up the beef, while a short rest keeps the slices juicy. Tacos give the steak room to breathe instead of letting it get buried under starch.
Key Ingredients:
- 1½ lbs flank steak
- 2 tbsp olive oil
- 2 tbsp lime juice
- 1 tsp chili powder
- 1 tsp cumin
- 8 small tortillas
- 1 cup shredded cabbage
- 1 avocado, sliced
- ¼ cup crumbled cotija
Quick Steps:
- Rub steak with oil, lime juice, chili powder, cumin, salt, and pepper.
- Sear in a hot skillet for 3 to 5 minutes per side.
- Rest the steak for 5 minutes.
- Slice thinly against the grain.
- Fill tortillas with steak, cabbage, avocado, and cotija.
Equipment for This Recipe:
- Cast-iron skillet
- Sharp slicing knife
- Tongs
How to Serve This Dish: Serve with extra lime wedges and a spoon of salsa on the side. Warm tortillas matter more than people admit; cold tortillas make the whole thing clumsy.
Pro Tips for This Recipe:
- Pat the steak dry before it hits the pan so it sears fast.
- Slice across the grain or the meat eats like rope.
- Let the tortillas warm in the dry skillet for 20 seconds per side. Variations on This Dish:
- Street Taco Style: Add diced onion and cilantro.
- Spicy Salsa Verde Version: Swap lime-lime marinade for salsa verde and jalapeño. Common Mistakes to Avoid with This Dish:
- Don’t cook flank steak past medium or it gets tough.
- Don’t slice with the grain. That one matters.
15. Miso Ginger Cod with Rice
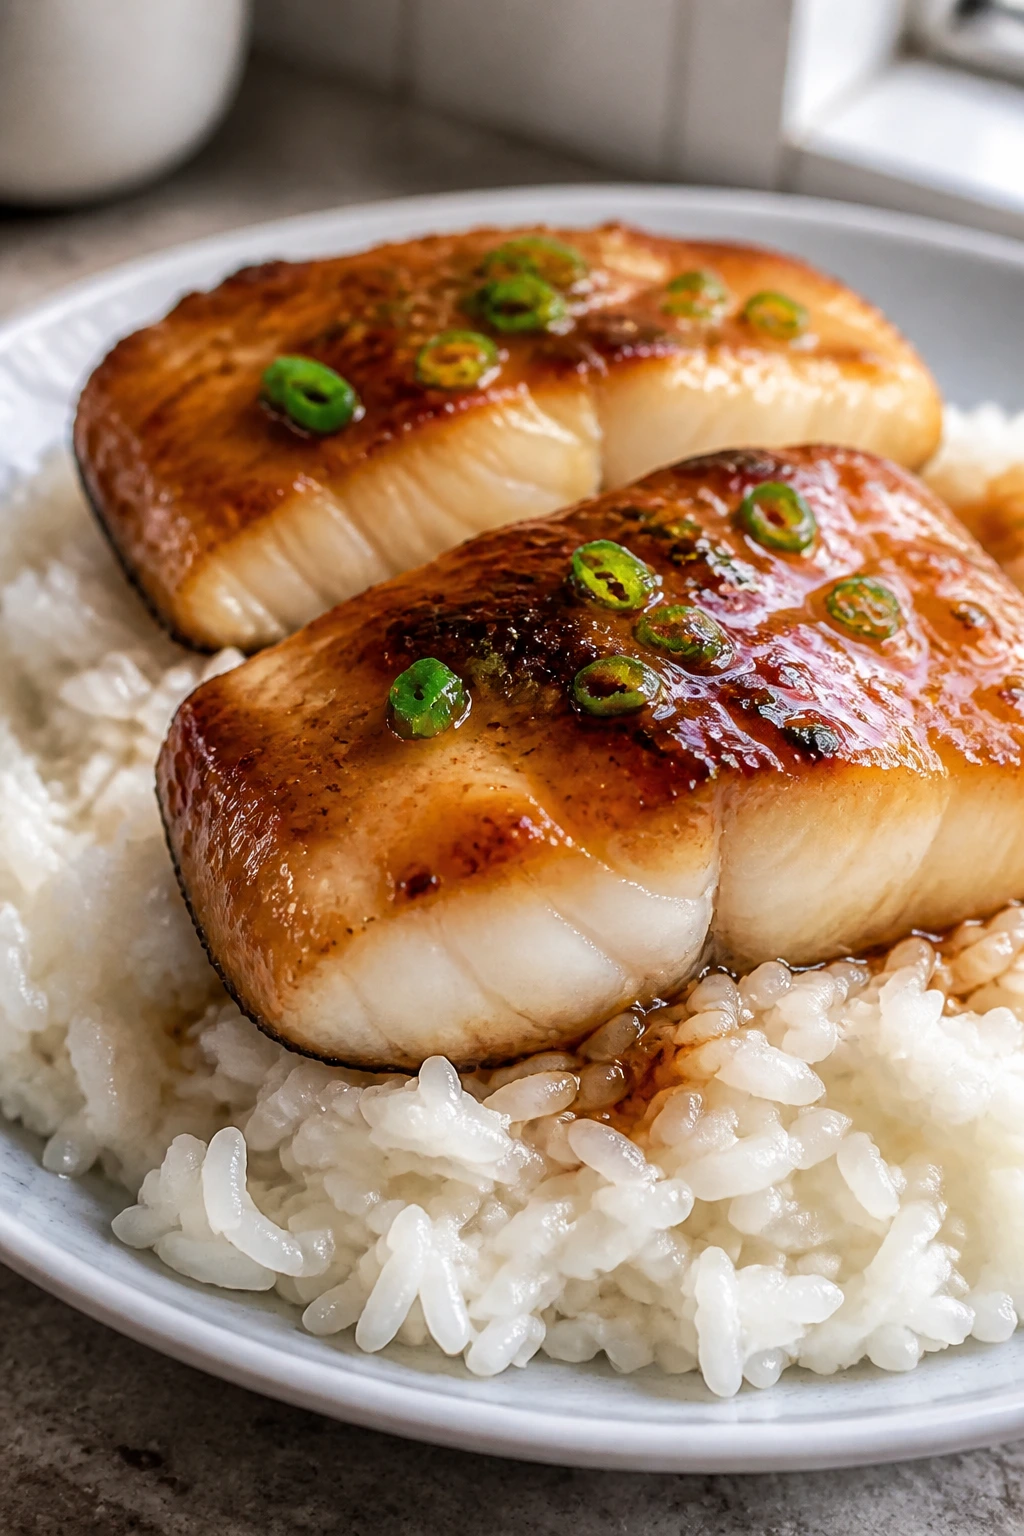
Intro: Cod is delicate, clean, and easy to overdo, which is why a miso glaze helps. It adds salt, depth, and a faint sweetness that sticks to the fish like lacquer. Over rice, this turns into a very calm, very practical dinner.
Why It Works: Miso brings umami, which helps cod taste richer without needing heavy sauce. Ginger cuts through the sweetness and keeps the glaze bright. Because cod cooks quickly, you can get dinner on the table in less than 25 minutes if the rice is already ready.
Key Ingredients:
- 4 cod fillets, about 6 oz each
- 2 tbsp white miso paste
- 1 tbsp soy sauce
- 1 tbsp honey
- 1 tsp grated ginger
- 2 tbsp water
- 3 cups cooked rice
- 2 scallions, sliced
Quick Steps:
- Mix miso, soy sauce, honey, ginger, and water.
- Spread the glaze over the cod.
- Bake at 400°F for 10 to 12 minutes.
- Flake gently with a fork when opaque.
- Serve over rice with scallions.
Equipment for This Recipe:
- Baking dish
- Small bowl
- Spoon or brush
How to Serve This Dish: Put the cod over rice and spoon any glaze from the pan on top. A side of sautéed bok choy or spinach fits the mood well.
Pro Tips for This Recipe:
- Keep an eye on thickness; thin cod fillets finish faster than you think.
- Use white miso for a softer, rounder glaze.
- Don’t overmix the glaze once it’s on the fish or it wipes off. Variations on This Dish:
- Salmon Swap: Use the same glaze on salmon fillets.
- Citrus Miso Version: Add a little orange zest. Common Mistakes to Avoid with This Dish:
- Don’t bake until the cod looks dry and stringy.
- Don’t use a broiler if the glaze is already thick; it can burn quickly.
16. Sausage and Peppers with Polenta
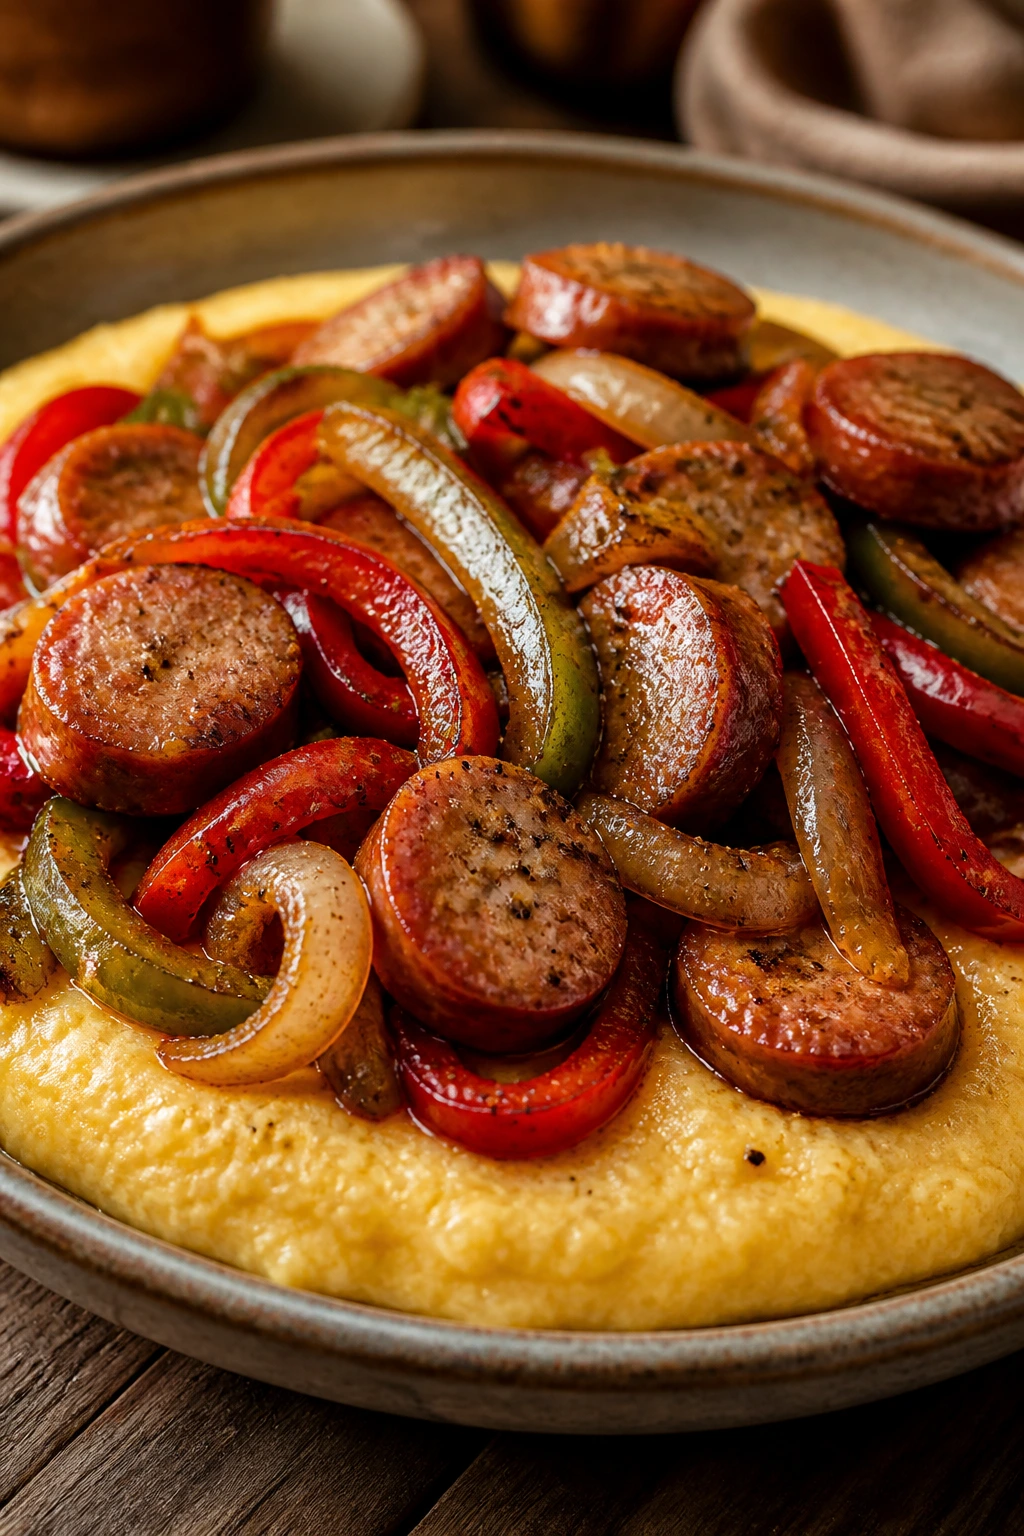
Intro: This is one of the easiest dinners to make feel more complete than it is. Sausage browns fast, peppers soften into sweetness, and the polenta underneath catches the juices like a bowl. It’s hearty without requiring much thought.
Why It Works: Sausage brings built-in seasoning, which means you don’t have to build flavor from scratch. Peppers and onions soften in the same skillet, and creamy polenta gives the dish a soft base that soaks up the pan drippings. It’s the kind of meal that looks like it took more energy than it did.
Key Ingredients:
- 1 lb chicken or turkey sausage
- 2 bell peppers, sliced
- 1 large onion, sliced
- 1 tube or package quick-cook polenta, about 18 oz
- 1 tbsp olive oil
- ½ cup chicken broth
- 2 tbsp grated Parmesan
Quick Steps:
- Brown the sausage in a skillet and remove.
- Cook peppers and onion in the same pan.
- Slice sausage and return it to the skillet with broth.
- Heat the polenta according to the package and stir in Parmesan.
- Spoon the sausage mixture over the polenta.
Equipment for This Recipe:
- Large skillet
- Saucepan
- Sharp knife
How to Serve This Dish: Serve it in shallow bowls so the polenta stays creamy and the sauce stays pooled on top. A bitter green salad works nicely against the sweetness of the peppers.
Pro Tips for This Recipe:
- Brown the sausage well before adding the vegetables.
- Use quick-cook polenta on a weeknight; the traditional kind takes longer.
- Add a splash more broth if the pan looks dry. Variations on This Dish:
- Spicy Sausage Version: Use hot Italian sausage.
- Tomato Braise: Add a cup of marinara for more sauce. Common Mistakes to Avoid with This Dish:
- Don’t cut the peppers too thick or they stay crunchy.
- Don’t let the polenta sit uncovered too long or it stiffens.
17. Black Bean Turkey Burgers
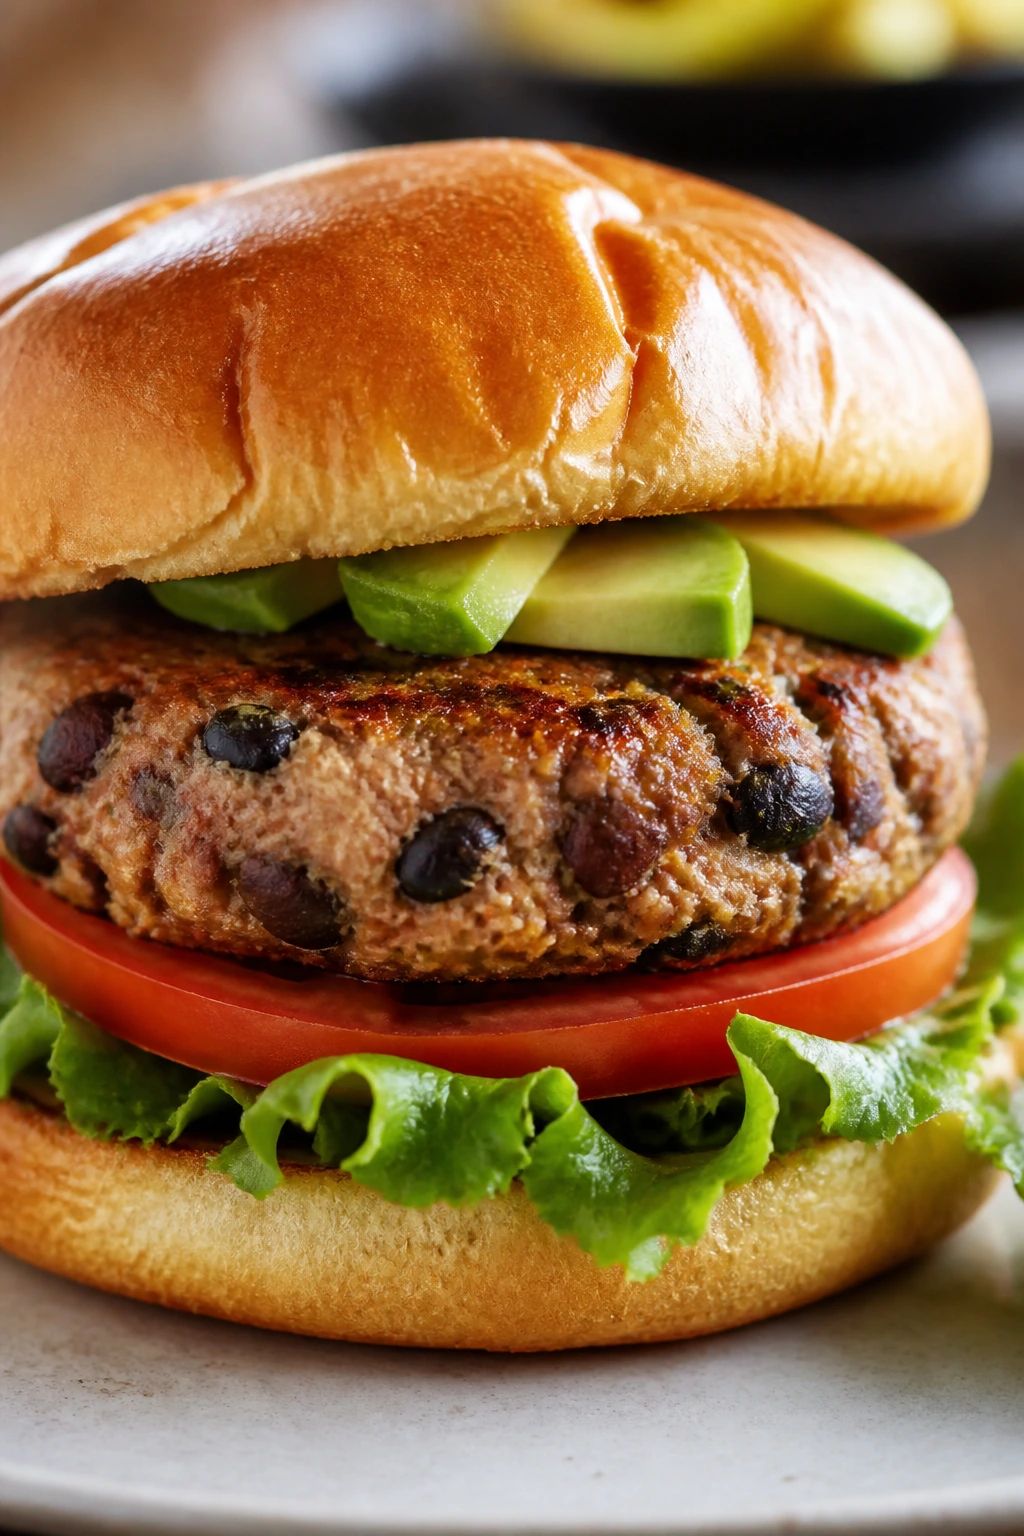
Intro: Black beans keep turkey burgers from drying out, and they make the patties feel a little bigger without turning them heavy. These are the kind of burgers that work with a quick side salad or inside a bun with the usual toppings. No long prep, no fuss.
Why It Works: Ground turkey needs moisture and structure, and mashed beans provide both. Onion, cumin, and garlic give the patties enough seasoning to stand on their own. A hot pan makes the outside brown before the center overcooks.
Key Ingredients:
- 1 lb ground turkey
- 1 can (15 oz) black beans, rinsed and mashed
- ¼ cup finely diced onion
- 1 garlic clove, minced
- 1 tsp cumin
- 1 egg
- 4 burger buns
- Lettuce and tomato for serving
Quick Steps:
- Mix turkey, beans, onion, garlic, cumin, salt, pepper, and egg.
- Form into 4 patties.
- Cook in a skillet over medium heat for 5 to 6 minutes per side.
- Check for 165°F in the center.
- Serve on buns with lettuce and tomato.
Equipment for This Recipe:
- Mixing bowl
- Skillet or grill pan
- Spatula
How to Serve This Dish: Serve them like burgers, or skip the bun and plate them over greens with avocado. A spoon of mustard or mayo gives the lean patty a little more richness.
Pro Tips for This Recipe:
- Chill the patties for 10 minutes if the mixture feels too soft.
- Don’t mash the beans into a paste; a little texture helps the burger hold together.
- Press a small thumbprint into the center of each patty so they cook evenly. Variations on This Dish:
- Tex-Mex Burger: Add chopped jalapeño and cheddar.
- Lettuce Wrap Version: Skip the bun and use romaine leaves. Common Mistakes to Avoid with This Dish:
- Don’t flip too early or the patties can break.
- Don’t make them huge; thinner patties cook better and stay juicier.
18. Spinach Feta Omelet Wraps

Intro: Eggs are one of the fastest ways to get protein on the table, and wrapping them around spinach and feta makes them feel more like dinner than breakfast. These are soft, salty, and easy to scale up when everyone arrives at different times.
Why It Works: Eggs and egg whites give you protein without making the wrap heavy. Spinach wilts in seconds, feta adds salt, and a tortilla turns the whole thing into a portable meal. A little yogurt or hot sauce on the side helps.
Key Ingredients:
- 4 large eggs
- 4 egg whites
- 2 cups baby spinach
- ½ cup crumbled feta
- 2 large tortillas
- 1 tbsp butter
- Salt and pepper
- Hot sauce, optional
Quick Steps:
- Whisk eggs, egg whites, salt, and pepper.
- Wilt spinach in butter for 30 seconds.
- Pour in eggs and cook until softly set.
- Add feta, fold into a thin omelet, and slide onto tortillas.
- Roll and serve.
Equipment for This Recipe:
- Nonstick skillet
- Whisk
- Spatula
How to Serve This Dish: Serve the wraps whole or sliced in half on a plate with tomatoes and fruit. They’re good warm, but they also hold together well enough to eat on the go.
Pro Tips for This Recipe:
- Keep the eggs slightly soft so they stay tender in the wrap.
- Warm the tortillas first or they crack when you roll them.
- Add feta after the eggs begin to set so it doesn’t sink and scorch. Variations on This Dish:
- Tomato Herb Wrap: Add chopped tomato and dill.
- Cheddar Spinach Version: Swap feta for cheddar if you want a milder flavor. Common Mistakes to Avoid with This Dish:
- Don’t overfill the wrap or the eggs split through the tortilla.
- Don’t cook the omelet until it’s dry; it keeps cooking off the heat.
19. Buffalo Chicken Cauliflower Rice Skillet
Intro: Buffalo sauce can save a plain chicken dinner in about ten seconds. Add cauliflower rice, celery, and a little blue cheese or ranch, and you’ve got the messy, sharp, salty dinner that somehow still feels light enough for a Tuesday.
Why It Works: Cauliflower rice absorbs sauce well, which makes it ideal for a skillet like this. Chicken gives the bowl enough heft, and the celery keeps some crunch in the mix. The buffalo sauce carries most of the flavor, so there’s not much fiddling required.
Key Ingredients:
- 1½ lbs cooked or raw chicken breast, diced
- 4 cups cauliflower rice
- ⅓ cup buffalo sauce
- 2 stalks celery, diced
- 2 tbsp butter
- ¼ cup crumbled blue cheese or ranch drizzle
- 1 tbsp olive oil
- Salt and pepper
Quick Steps:
- Cook the chicken in oil until done, then remove if raw.
- Add cauliflower rice and celery to the skillet.
- Stir in buffalo sauce and butter.
- Return chicken and warm through.
- Finish with blue cheese or ranch.
Equipment for This Recipe:
- Large skillet
- Wooden spoon
- Cutting board
How to Serve This Dish: Serve it in bowls with extra celery on the side for crunch. If you want more bulk, tuck it into a tortilla or spoon it over steamed rice.
Pro Tips for This Recipe:
- Don’t overcook cauliflower rice or it turns watery.
- Melt the butter into the buffalo sauce so the heat feels rounder.
- If using raw chicken, cut it into small pieces for faster cooking. Variations on This Dish:
- Buffalo Turkey Skillet: Use ground turkey instead of chicken.
- Loaded Version: Add a few diced avocado cubes on top. Common Mistakes to Avoid with This Dish:
- Don’t drown the skillet in sauce before the cauliflower cooks down.
- Don’t skip a creamy finish; buffalo without it can taste harsh.
20. Salmon Burgers with Dill Yogurt
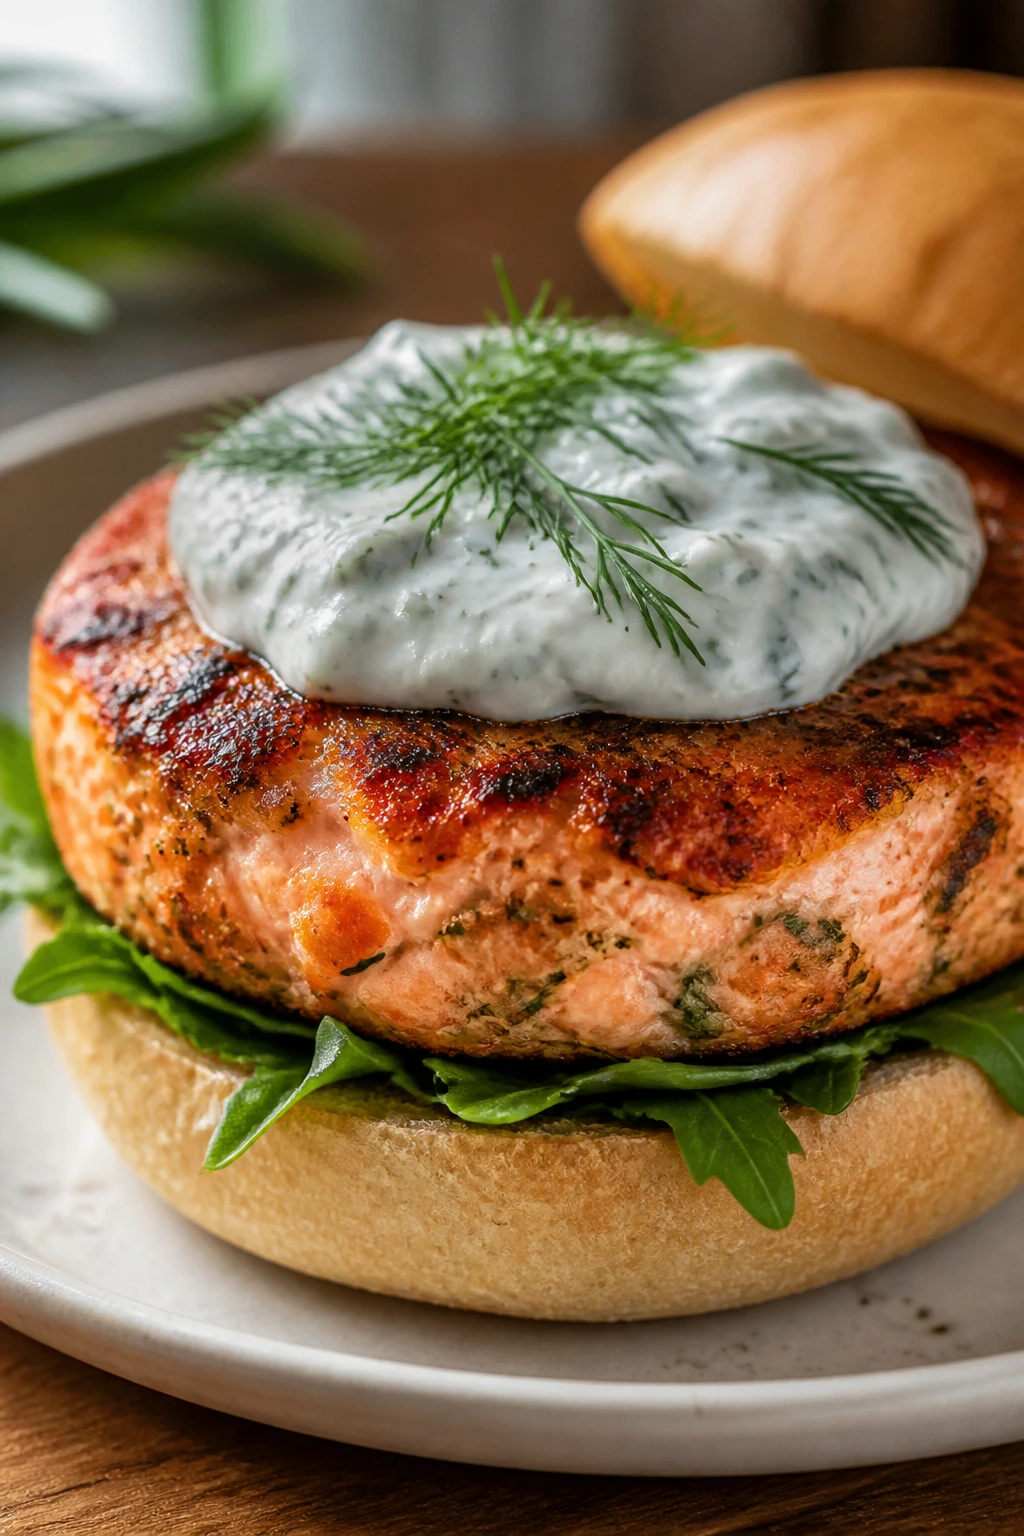
Intro: Salmon burgers hit a sweet spot: fast, protein-packed, and not dependent on a complicated side. The dill yogurt sauce makes them taste bright and clean, which matters because salmon can feel heavy if you just stack it into a bun and hope for the best.
Why It Works: Salmon flakes into a patty better than people expect, especially when mixed with breadcrumbs and egg. Dill and lemon in the yogurt sauce add freshness that balances the richness of the fish. A quick pan sear gives the burgers a crisp edge without drying them out.
Key Ingredients:
- 1 lb salmon, finely chopped or pulsed
- ½ cup breadcrumbs
- 1 egg
- 2 tbsp mayonnaise
- 2 tbsp fresh dill, chopped
- ½ cup Greek yogurt
- 1 lemon, juiced
- 4 burger buns
Quick Steps:
- Mix salmon, breadcrumbs, egg, and mayonnaise.
- Form into 4 patties.
- Cook in a skillet over medium heat for 4 to 5 minutes per side.
- Stir yogurt, dill, and lemon into a quick sauce.
- Serve on buns with sauce and greens.
Equipment for This Recipe:
- Skillet
- Mixing bowl
- Fish spatula or thin spatula
How to Serve This Dish: Serve with sliced cucumber and a few potato wedges if you want the plate to feel complete. These burgers also work well over a salad if you don’t want a bun.
Pro Tips for This Recipe:
- Chill the patties briefly if they feel soft.
- Use salmon that’s finely chopped, not mashed to paste.
- Keep the pan at medium heat so the outside browns before the inside dries out. Variations on This Dish:
- Lemon Caper Version: Add chopped capers to the sauce.
- Open-Face Style: Serve on toasted sourdough instead of buns. Common Mistakes to Avoid with This Dish:
- Don’t overwork the mixture or the patties get dense.
- Don’t cook on high heat; salmon browns fast and can dry out.
21. Chicken Enchilada Stuffed Peppers
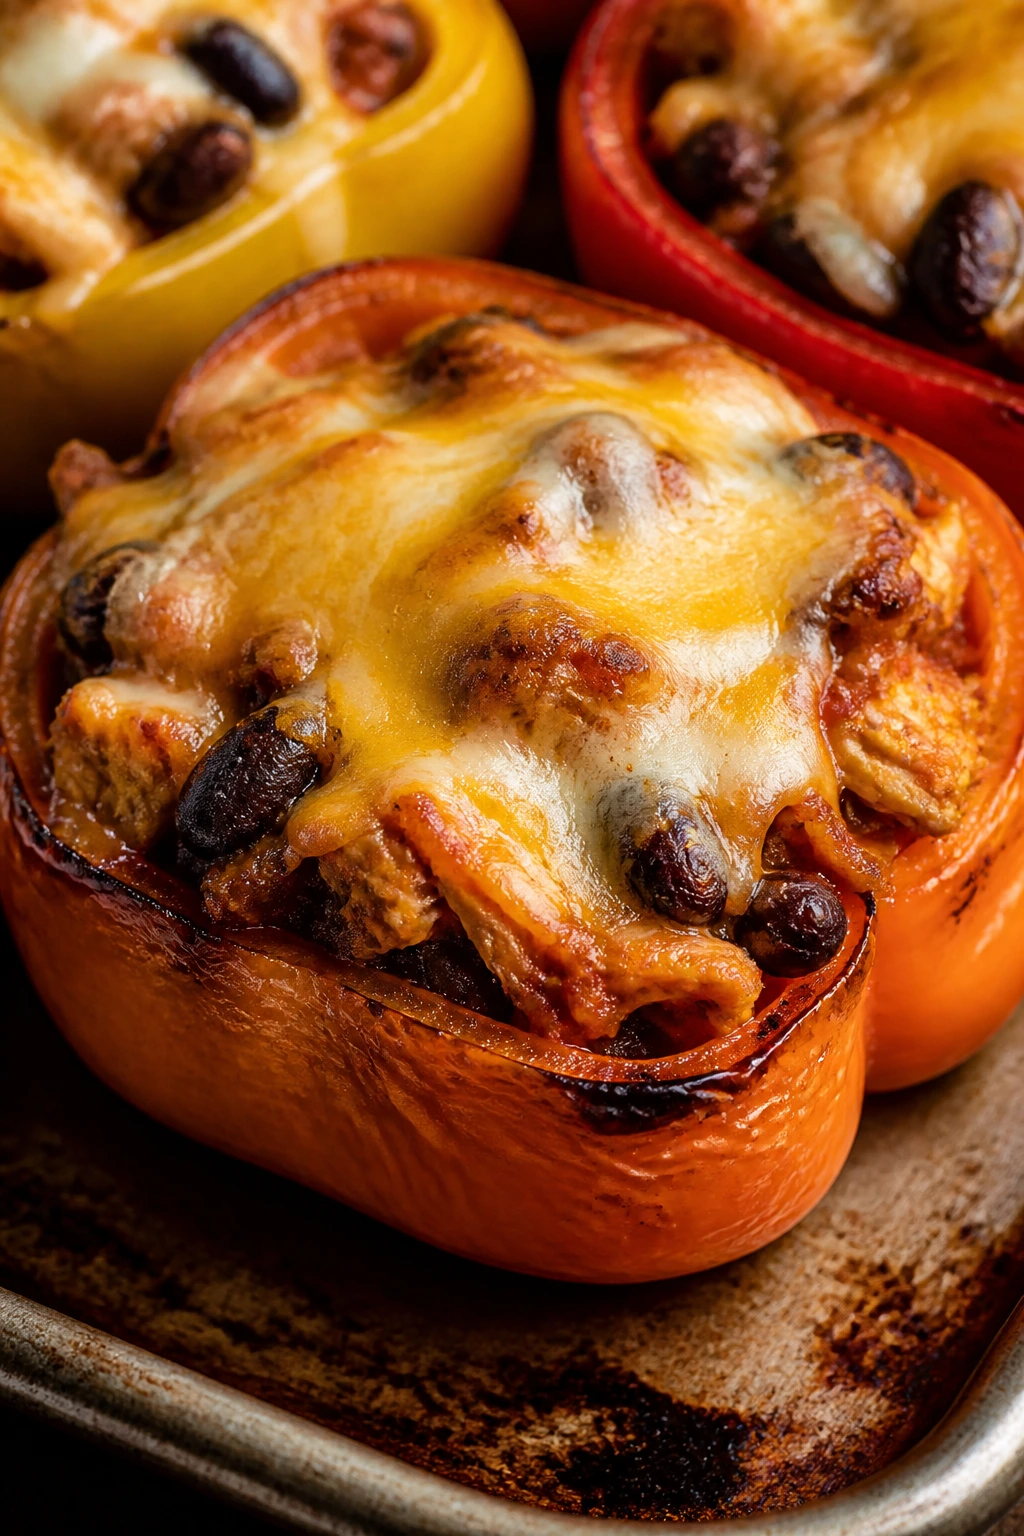
Intro: Stuffed peppers can be a pain when they’re underseasoned and watery. These fix that by stuffing roasted peppers with chicken, enchilada sauce, and beans, then finishing with cheese so the top actually tastes like something. It’s weeknight-friendly and still feels complete.
Why It Works: Roasted peppers soften enough to become edible without turning mushy. Chicken and beans add protein and body, while enchilada sauce keeps the filling moist. Cheese on top seals the deal and gives you a browned, savory lid.
Key Ingredients:
- 4 large bell peppers, halved and seeded
- 2 cups cooked shredded chicken
- 1 cup black beans
- 1 cup enchilada sauce
- 1 cup cooked rice
- 1 cup shredded Monterey Jack
- 1 tsp cumin
- Salt and pepper
Quick Steps:
- Roast pepper halves at 400°F for 10 minutes.
- Mix chicken, beans, sauce, rice, cumin, salt, and pepper.
- Fill the peppers and top with cheese.
- Bake 15 minutes until hot and melty.
- Rest 5 minutes before serving.
Equipment for This Recipe:
- Baking dish
- Mixing bowl
- Spoon
How to Serve This Dish: Serve two pepper halves per person with salsa and sour cream on the side. A simple green salad helps keep the plate from feeling one-note.
Pro Tips for This Recipe:
- Pre-roast the peppers so they’re tender, not crunchy.
- Use thick enchilada sauce; thin sauce makes the filling watery.
- Pack the filling gently instead of mounding it high. Variations on This Dish:
- Beef Enchilada Peppers: Swap shredded beef for chicken.
- Vegetarian Version: Double the beans and add corn. Common Mistakes to Avoid with This Dish:
- Don’t skip the pre-roast or the peppers stay hard in the final bake.
- Don’t use tiny peppers; they collapse before the filling heats through.
22. Sesame Tempeh Noodle Bowls
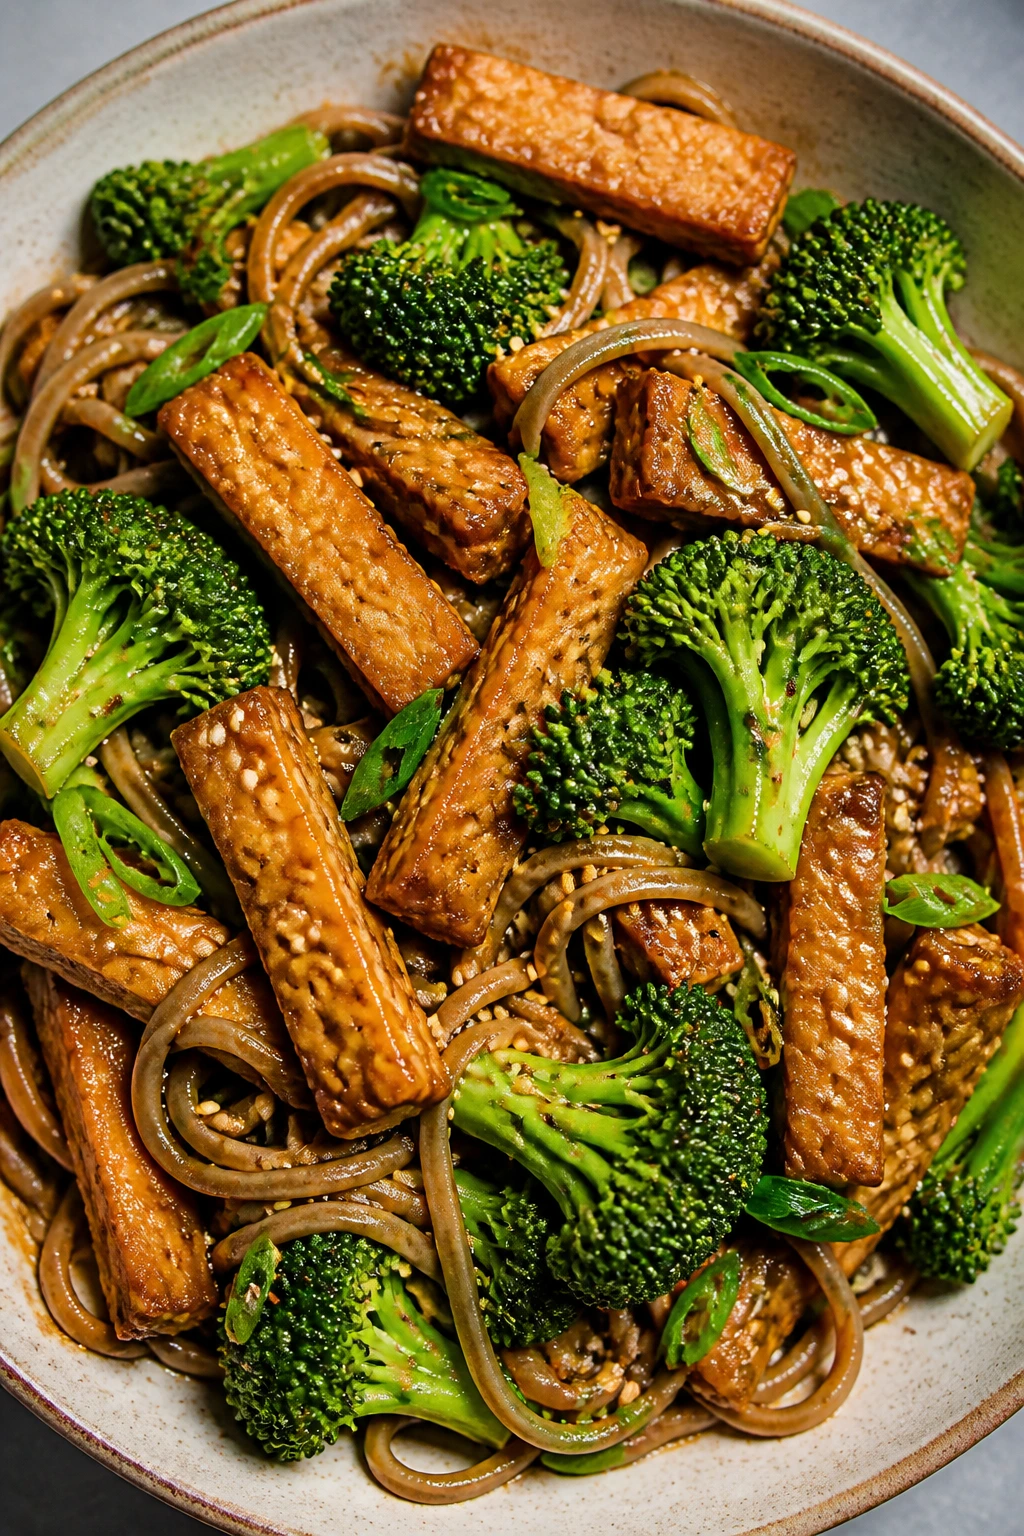
Intro: Tempeh has a nutty, firm bite that holds up better than tofu when you want something with texture. Toss it with noodles, broccoli, and sesame sauce, and it becomes a bowl that feels balanced rather than “meatless by default.”
Why It Works: Tempeh browns fast and keeps its shape in sauce. Soba noodles give the dish chew, and the sesame-soy dressing coats everything without needing cream. Broccoli adds a clean snap that keeps the bowl lively.
Key Ingredients:
- 8 oz tempeh, sliced thin
- 8 oz soba noodles
- 3 cups broccoli florets
- 3 tbsp soy sauce
- 1 tbsp sesame oil
- 1 tbsp rice vinegar
- 1 tbsp honey or maple syrup
- 1 tbsp sesame seeds
Quick Steps:
- Brown the tempeh in a skillet until the edges darken.
- Cook soba and broccoli together, then drain.
- Whisk soy sauce, sesame oil, vinegar, and honey.
- Toss noodles, broccoli, and tempeh with sauce.
- Finish with sesame seeds.
Equipment for This Recipe:
- Skillet
- Pot for noodles
- Colander
How to Serve This Dish: Serve in wide bowls with chopsticks or a fork, whichever is easier. A few sliced scallions or a spoon of chili crisp make it feel more finished.
Pro Tips for This Recipe:
- Steam the tempeh for 5 minutes first if you want a softer flavor.
- Don’t overcook soba or it gets gummy.
- Add the sauce while the noodles are still hot so they absorb it better. Variations on This Dish:
- Peanut Sesame Version: Stir peanut butter into the sauce.
- Spicy Bowl: Add sriracha and sliced cucumber. Common Mistakes to Avoid with This Dish:
- Don’t skip browning the tempeh; it tastes dull if it stays pale.
- Don’t leave the noodles sitting after draining or they clump.
23. Chickpea Shakshuka with Eggs
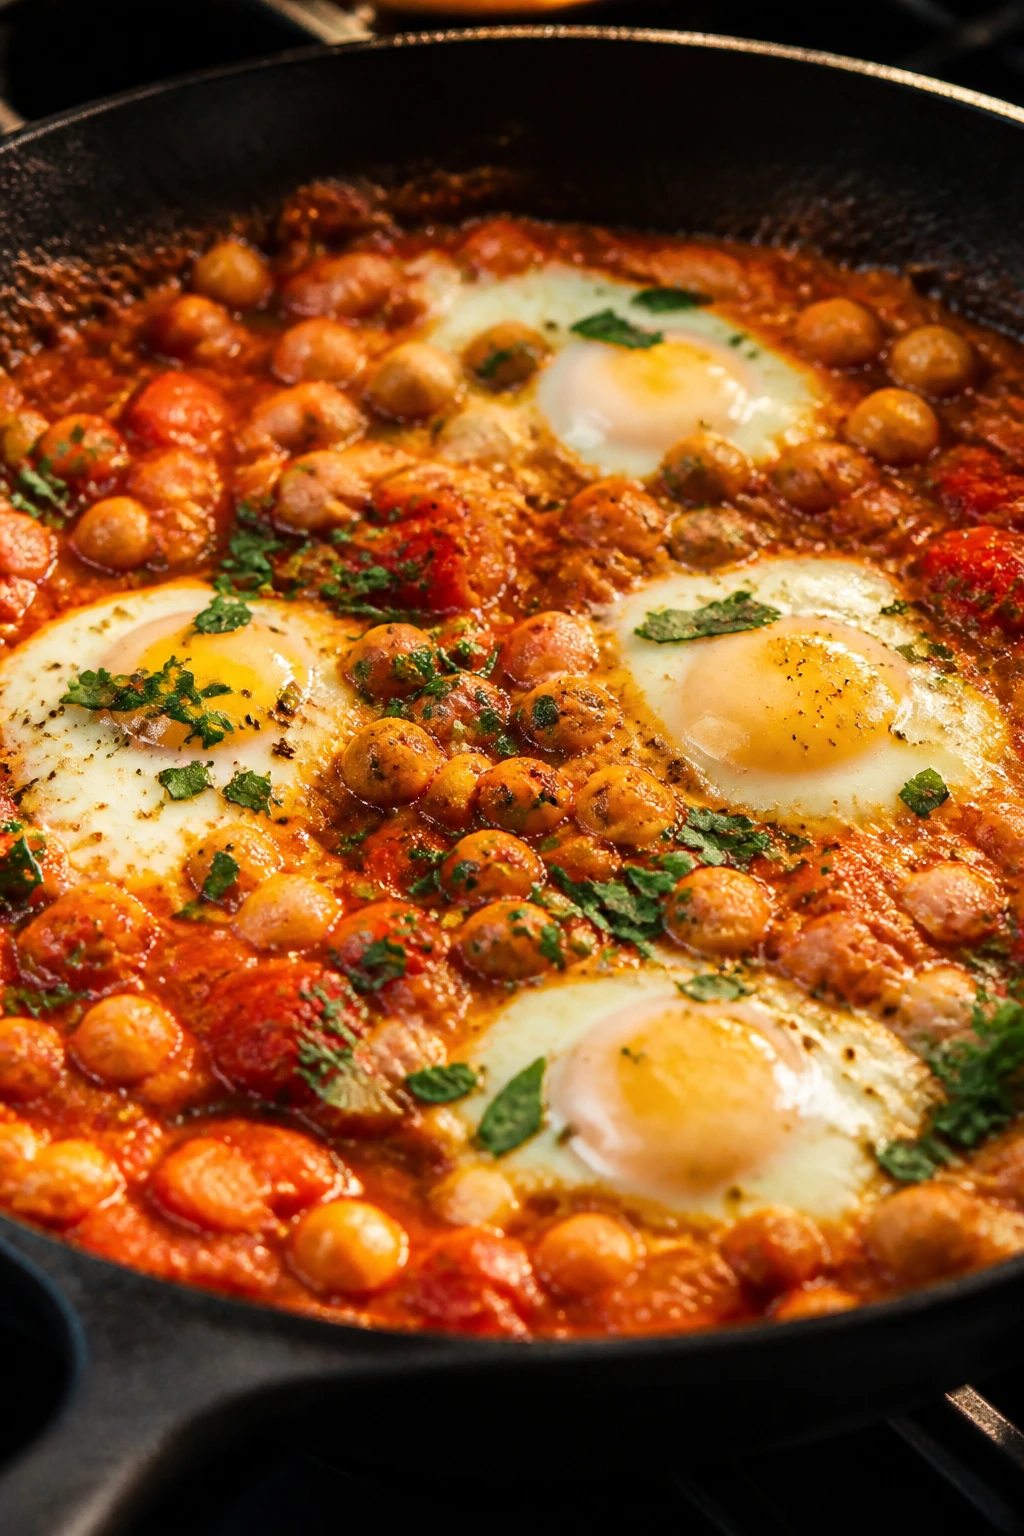
Intro: Shakshuka is the rare egg dinner that feels both cozy and sharp. The tomatoes simmer into a thick sauce, the chickpeas make it filling, and the eggs poach right in the pan so you don’t need a second pot. Spoon it with bread and call it done.
Why It Works: Chickpeas give the tomato base some bulk so the dish can hold a dinner role. Eggs poach gently in the sauce, which keeps the yolks soft and runny if you time it right. Cumin and paprika give the pan its warmth without making it heavy.
Key Ingredients:
- 1 can (15 oz) chickpeas, rinsed and drained
- 6 large eggs
- 1 onion, diced
- 1 red bell pepper, diced
- 1 can (28 oz) crushed tomatoes
- 2 tbsp olive oil
- 1 tsp cumin
- 1 tsp paprika
- Bread for serving
Quick Steps:
- Sauté onion and pepper in oil until soft.
- Add tomatoes, chickpeas, cumin, paprika, salt, and pepper.
- Simmer 10 minutes until thick.
- Make 6 little wells and crack in the eggs.
- Cover and cook until the whites set but yolks stay soft.
Equipment for This Recipe:
- Large skillet with lid
- Wooden spoon
- Measuring spoon
How to Serve This Dish: Serve it straight from the skillet with bread for scooping. A spoon of yogurt or a shower of herbs over the top makes the sauce taste brighter.
Pro Tips for This Recipe:
- Keep the simmer gentle or the sauce spits.
- Use a lid so the eggs set on top without overcooking underneath.
- Crack each egg into a cup first if you’re worried about broken yolks. Variations on This Dish:
- Harissa Version: Stir harissa paste into the sauce.
- Feta Finish: Add feta just before serving. Common Mistakes to Avoid with This Dish:
- Don’t overcook the eggs until the yolks go chalky.
- Don’t make the sauce too thin or the eggs sink and disappear.
24. Coconut Curry Chicken and Cauliflower
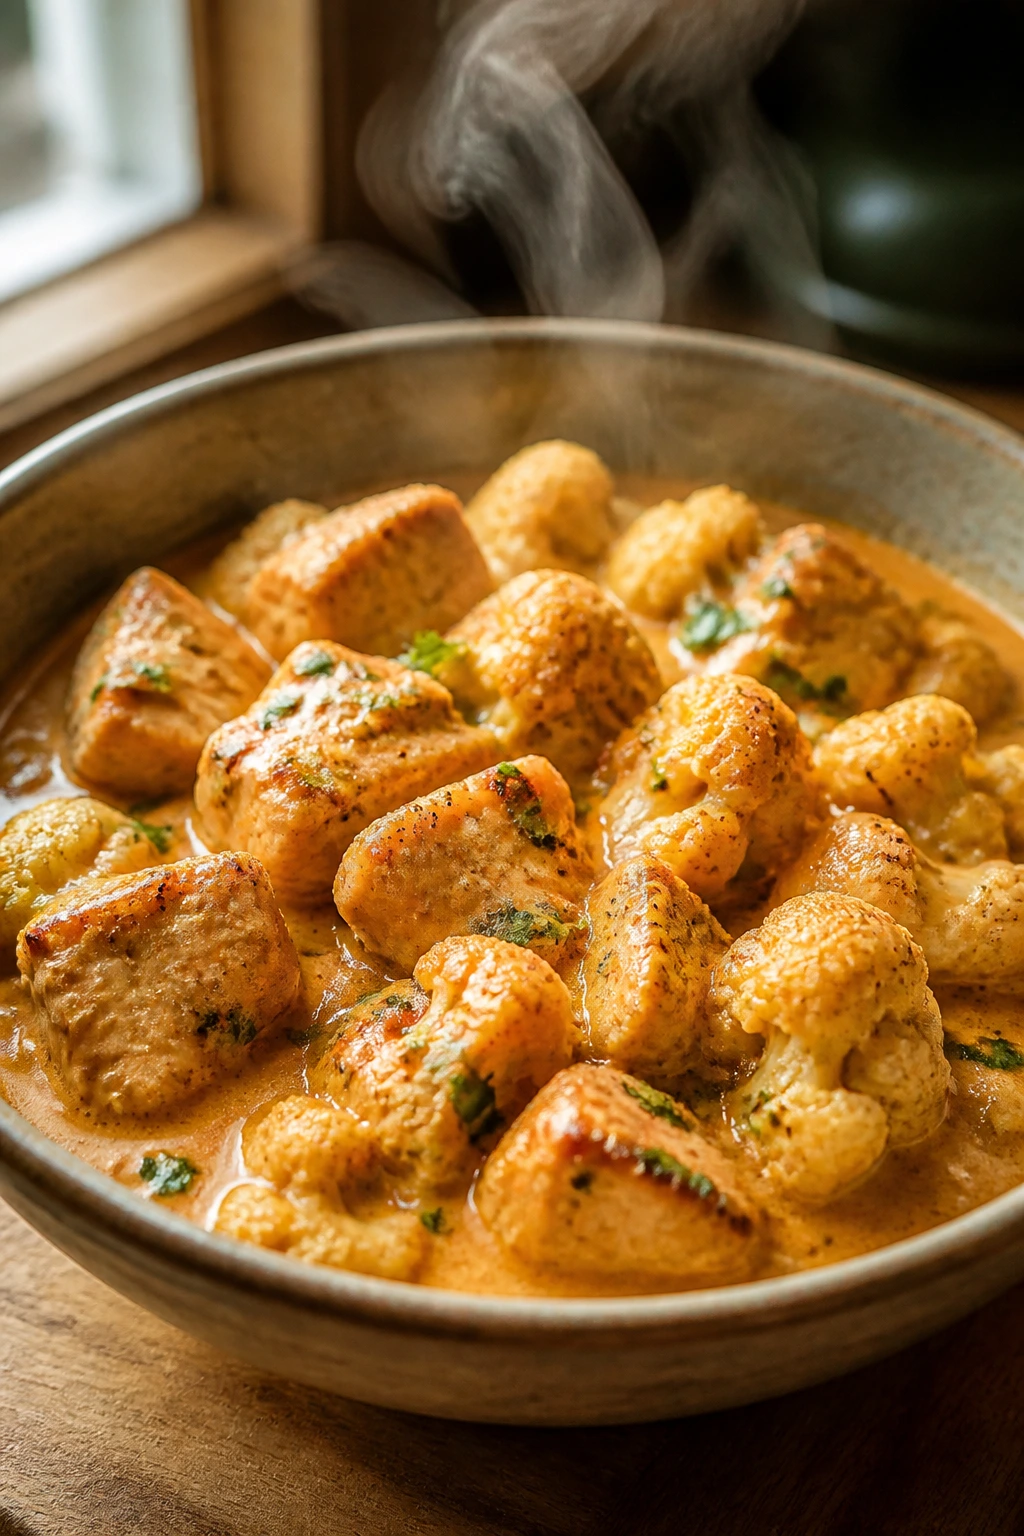
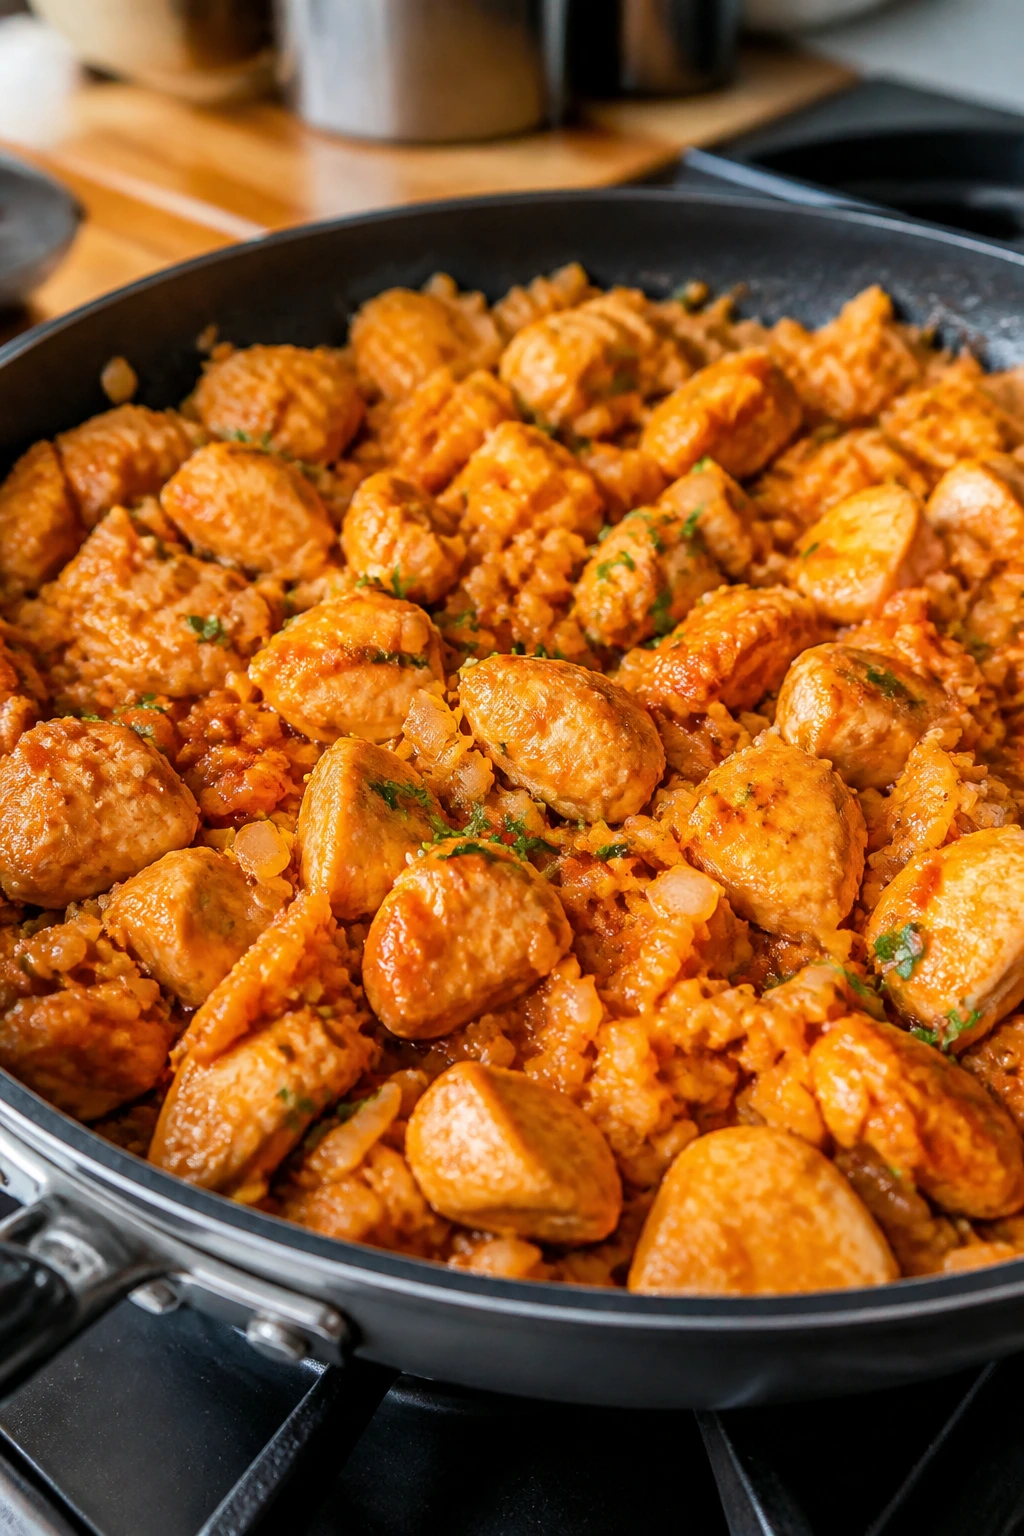
Intro: Curry is a good answer when a weeknight needs more flavor than effort. Coconut milk softens the heat, cauliflower soaks up the sauce, and chicken gives the whole skillet enough substance to stand alone. It smells like dinner long before it hits the bowl.
Why It Works: Curry paste brings layered spice in one spoonful, which saves time. Coconut milk keeps the sauce rich, and cauliflower turns tender without breaking down. Chicken thighs are a smart choice here because they stay moist in the simmer.
Key Ingredients:
- 1½ lbs chicken thighs, cut into chunks
- 1 small cauliflower, cut into florets
- 1 can (13.5 oz) coconut milk
- 2 tbsp curry paste
- 1 onion, sliced
- 2 tbsp oil
- 2 cups cooked rice
- Salt to taste
Quick Steps:
- Brown the chicken in oil.
- Add onion and curry paste, cooking 1 minute.
- Stir in coconut milk and cauliflower.
- Simmer 12 to 15 minutes until the chicken is done and cauliflower is tender.
- Serve over rice.
Equipment for This Recipe:
- Large skillet or Dutch oven
- Wooden spoon
- Ladle
How to Serve This Dish: Serve over rice with a squeeze of lime if you have one. A handful of herbs on top keeps the coconut sauce from feeling too rich.
Pro Tips for This Recipe:
- Don’t boil the coconut milk hard or it can split.
- Cut the cauliflower into medium florets so it doesn’t vanish.
- Taste at the end; curry paste brands vary a lot in salt and heat. Variations on This Dish:
- Vegetable-Heavy Version: Add spinach or peas at the end.
- Red Curry Heat: Use red curry paste for a sharper finish. Common Mistakes to Avoid with This Dish:
- Don’t rush the simmer or the chicken won’t tenderize properly.
- Don’t add rice too early or it turns soggy.
25. Tuna Melt Stuffed Tomatoes
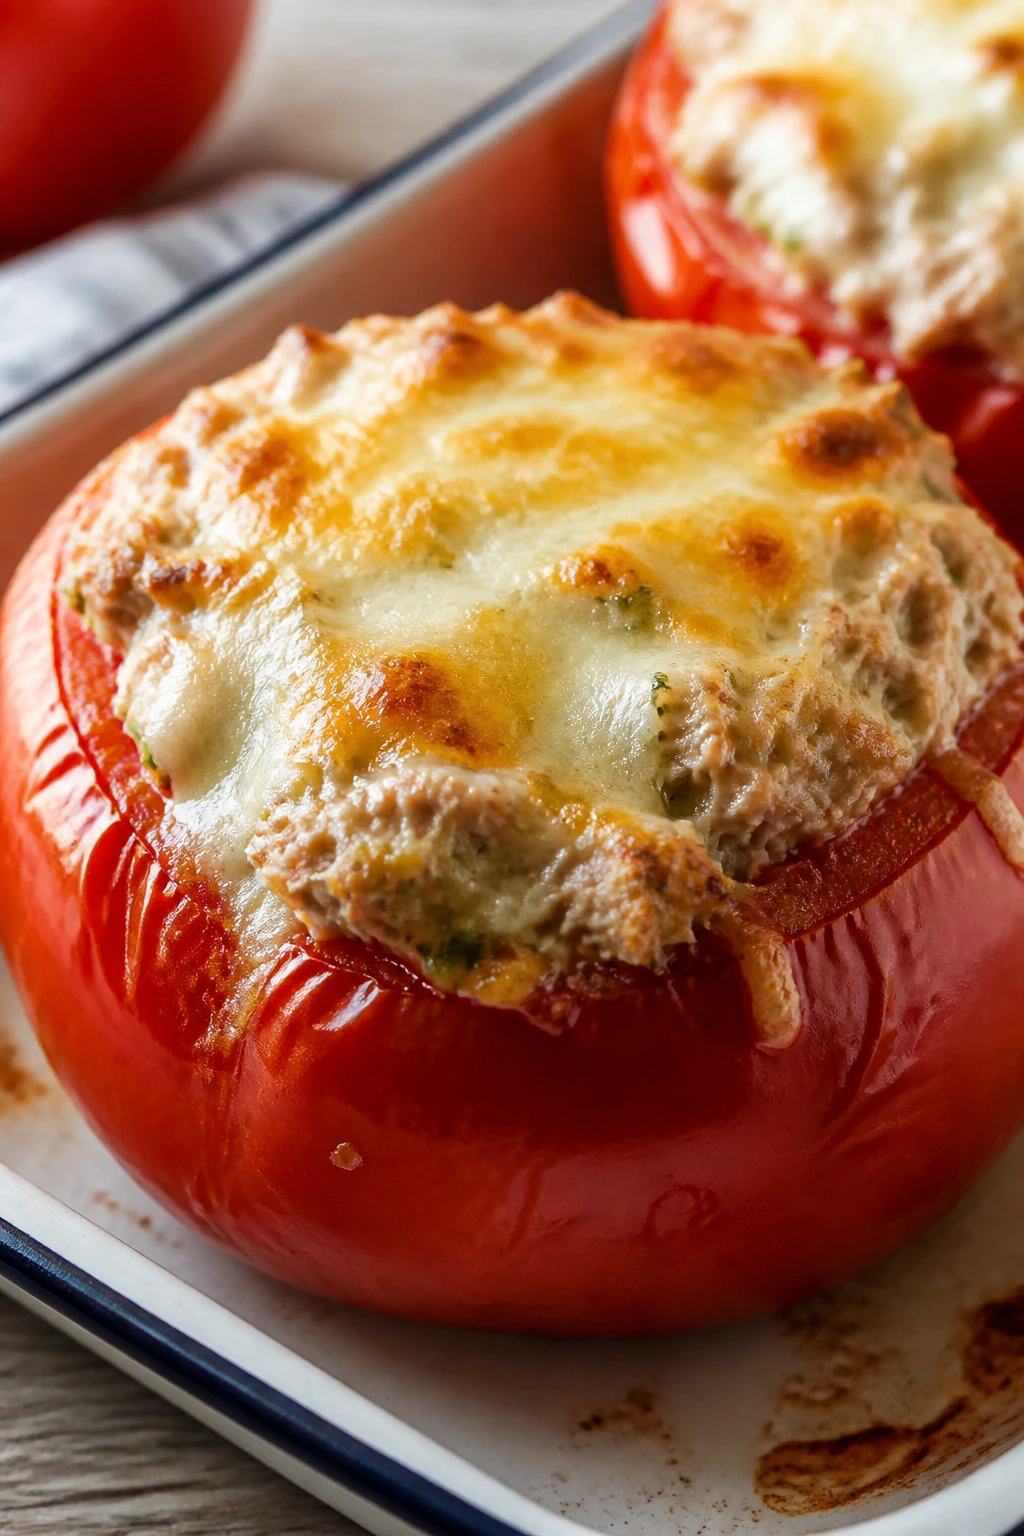
Intro: Tuna melts don’t have to live inside bread. When you hollow out tomatoes and fill them with tuna salad and cheese, they become warmer, juicier, and less clunky to eat. It’s the kind of dinner that feels like a clever move without asking much of you.
Why It Works: Tomatoes give you a built-in shell that bakes quickly. Tuna salad brings the protein, and the cheese on top gives you the melt without the heaviness of a full sandwich. The tomato juice also helps keep the filling from drying out.
Key Ingredients:
- 4 large tomatoes
- 2 cans tuna, drained
- ¼ cup mayonnaise
- 2 tbsp chopped celery
- 1 tbsp chopped onion
- 1 cup shredded cheddar or Swiss
- 1 tsp Dijon mustard
- Salt and pepper
Quick Steps:
- Cut the tops off the tomatoes and scoop out some seeds.
- Mix tuna, mayo, celery, onion, Dijon, salt, and pepper.
- Fill the tomatoes and top with cheese.
- Bake at 375°F for 12 to 15 minutes.
- Serve warm.
Equipment for This Recipe:
- Baking dish
- Spoon for hollowing
- Mixing bowl
How to Serve This Dish: Serve with crackers, a green salad, or roasted potatoes if you need more heft. The tomato skins should hold their shape, but the centers will be soft and juicy.
Pro Tips for This Recipe:
- Salt the tomato cavities lightly and let them drain for a few minutes first.
- Don’t overfill or the cheese slides off the sides.
- Use firm tomatoes that can handle the oven. Variations on This Dish:
- Spicy Tuna Melt: Add chopped jalapeño and a little hot sauce.
- Broiled Version: Broil for the last minute if you want a browned top. Common Mistakes to Avoid with This Dish:
- Don’t use very ripe tomatoes; they collapse.
- Don’t skip draining the tuna or the filling becomes watery.
26. Turkey Meatballs with Zucchini Noodles
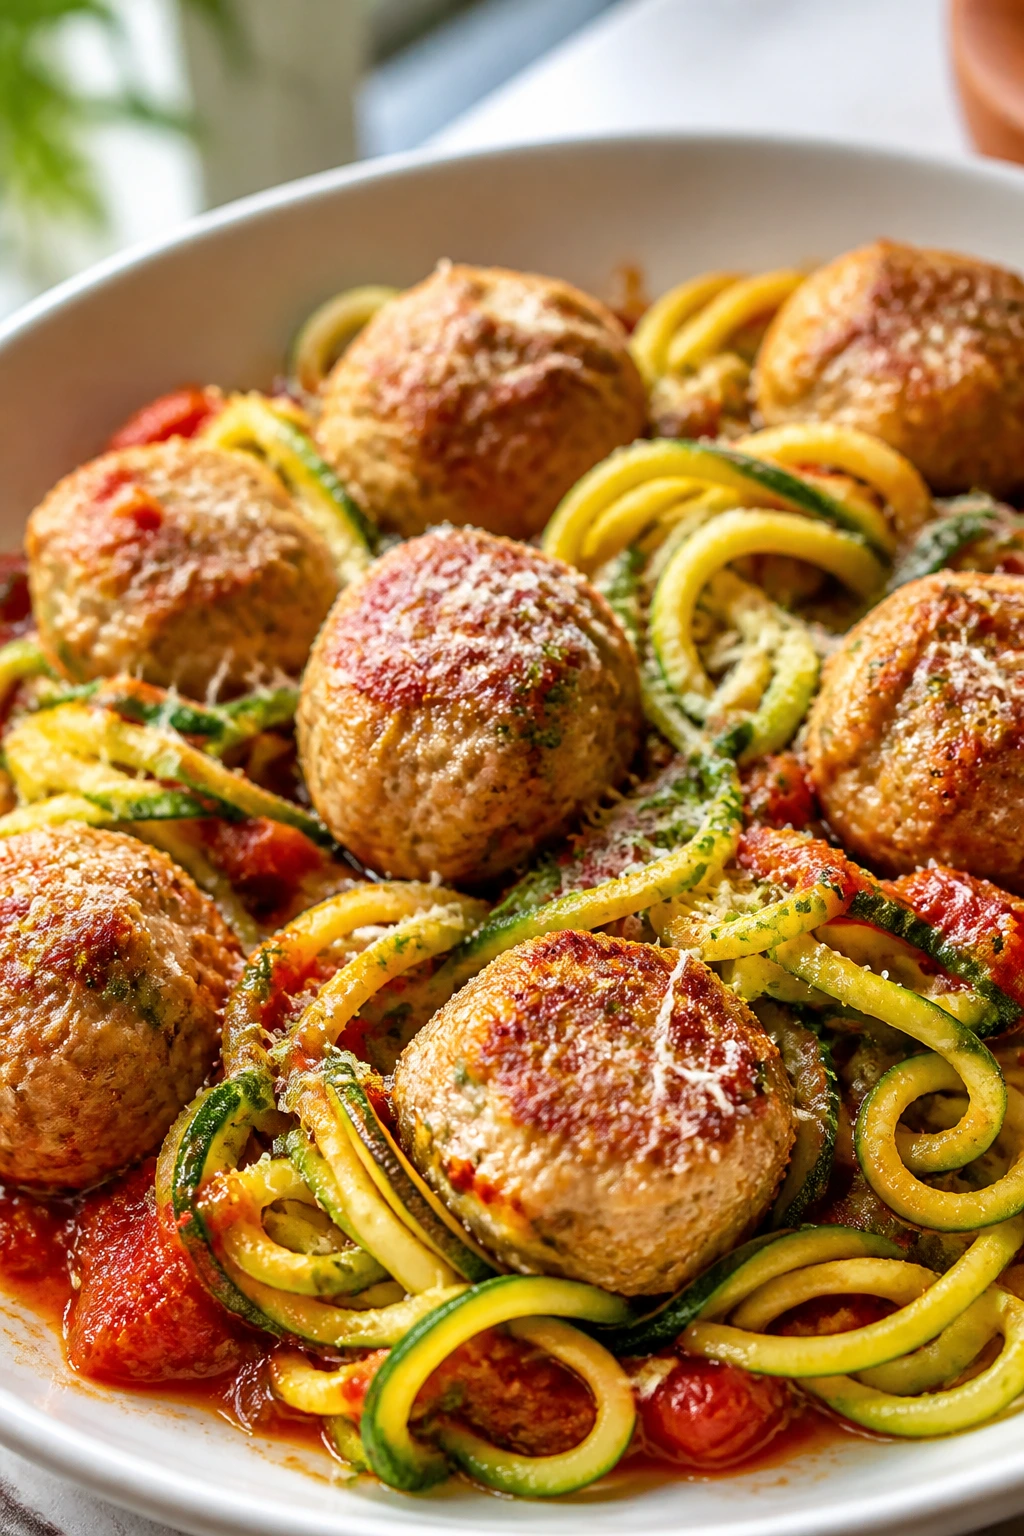
Intro: Turkey meatballs and zucchini noodles solve the “I want pasta but not a heavy plate” problem. The meatballs stay tender if you don’t overmix them, and the zucchini gets just enough heat to soften without going limp. Fresh, fast, and a little brighter than pasta night.
Why It Works: Breadcrumbs and egg keep turkey meatballs from crumbling. Zucchini noodles cook in minutes, which means they can go in at the end and stay lightly crisp. Marinara adds enough moisture that the whole dish doesn’t feel dry or skimpy.
Key Ingredients:
- 1 lb ground turkey
- ½ cup breadcrumbs
- 1 egg
- 2 cloves garlic, minced
- 2 medium zucchini, spiralized
- 2 cups marinara sauce
- 2 tbsp Parmesan
- 1 tbsp olive oil
Quick Steps:
- Mix turkey, breadcrumbs, egg, garlic, salt, and pepper.
- Form meatballs and brown in oil.
- Add marinara and simmer until meatballs reach 165°F.
- Toss zucchini noodles in the sauce for 1 to 2 minutes.
- Top with Parmesan.
Equipment for This Recipe:
- Large skillet
- Mixing bowl
- Spiralizer or julienne peeler
How to Serve This Dish: Twirl the zoodles into bowls and spoon extra sauce over the top. Garlic bread is optional, but I would not refuse it.
Pro Tips for This Recipe:
- Don’t overmix the meatball mixture or they get dense.
- Cook zucchini noodles only briefly or they turn watery.
- Brown the meatballs first for better flavor. Variations on This Dish:
- Beef Blend: Mix turkey with half ground beef.
- Pesto Finish: Stir in a spoon of pesto at the end. Common Mistakes to Avoid with This Dish:
- Don’t boil the sauce hard once the meatballs are in it.
- Don’t spiralize the zucchini too far ahead or it leaks water.
27. Crispy Tofu Burrito Bowls
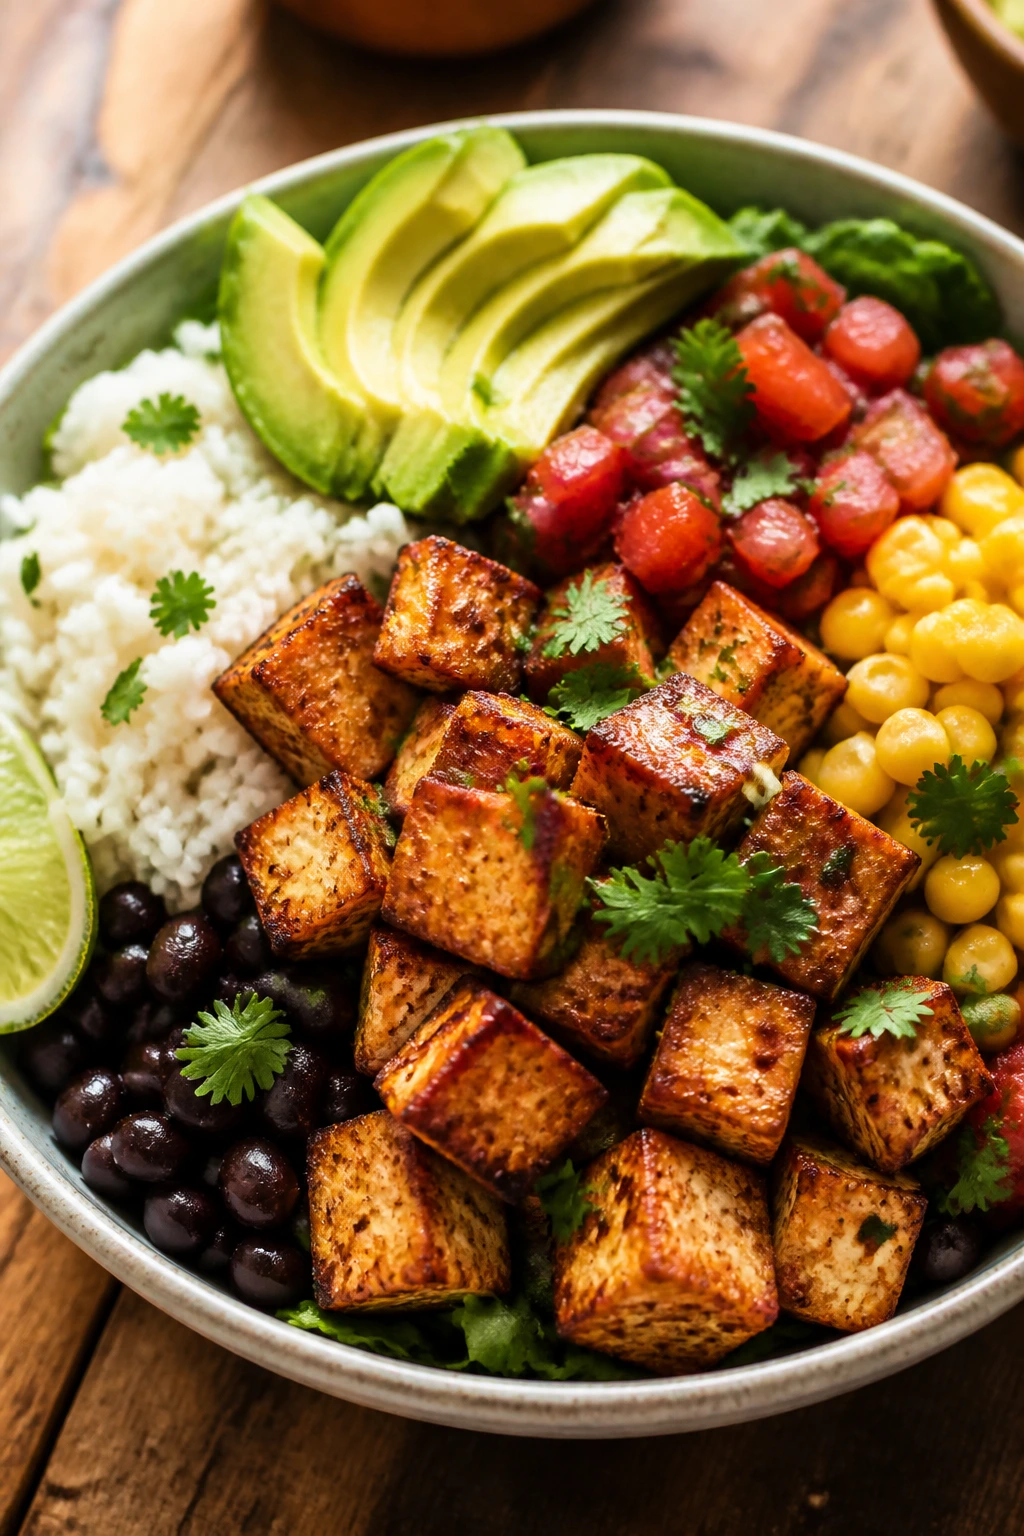
Intro: Crispy tofu makes a much better burrito bowl than soft cubes floating in salsa. The outside gets golden, the inside stays tender, and the rice, beans, corn, and avocado turn it into a full plate. It’s flexible, which is why it gets made often.
Why It Works: Pressed tofu browns where the surface is dry, and a light cornstarch coating helps it crisp. Beans and rice add the sturdy base that keeps the bowl satisfying. Salsa and avocado bring moisture so the tofu doesn’t have to do every job.
Key Ingredients:
- 1 block (14 oz) extra-firm tofu, pressed and cubed
- 1 tbsp cornstarch
- 2 tbsp oil
- 3 cups cooked rice
- 1 can black beans, rinsed
- 1 cup corn
- ½ cup salsa
- 1 avocado, sliced
Quick Steps:
- Toss tofu with cornstarch and a pinch of salt.
- Pan-fry until golden on most sides.
- Warm the beans and corn.
- Build bowls with rice, tofu, beans, corn, salsa, and avocado.
- Add lime if you want extra brightness.
Equipment for This Recipe:
- Nonstick skillet
- Paper towels
- Bowl for tossing
How to Serve This Dish: Serve with chopped lettuce if you want more crunch. A spoon of Greek yogurt can stand in for sour cream without changing the bowl much.
Pro Tips for This Recipe:
- Press the tofu well or the coating won’t stick.
- Don’t stir too often while the tofu crisps.
- Warm the beans separately so the bowl stays hot. Variations on This Dish:
- Chipotle Bowl: Add chipotle powder to the tofu.
- Cauliflower Rice Version: Swap half the rice for cauliflower rice. Common Mistakes to Avoid with This Dish:
- Don’t skip the cornstarch if you want crisp edges.
- Don’t add cold beans straight from the can; they cool the whole bowl.
28. Ground Beef and Cabbage Stir-Fry
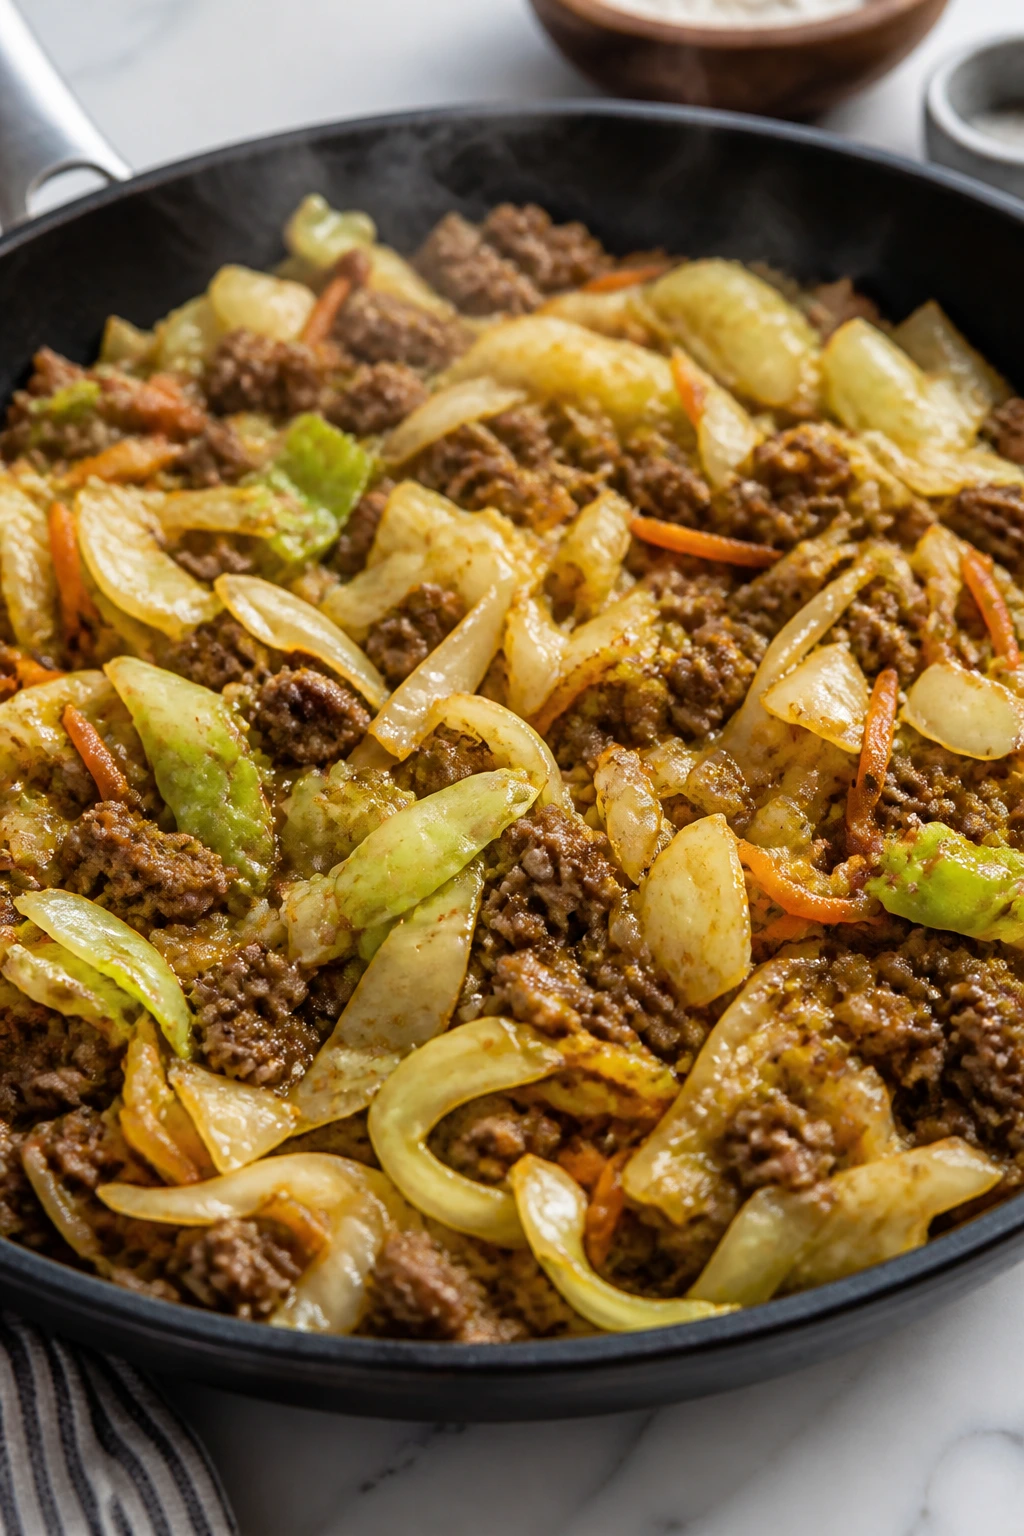
Intro: Cabbage is one of the most underrated weeknight vegetables. It cooks fast, costs less than most greens, and gives ground beef something to soften against. This stir-fry is salty, a little sweet, and built for fast cleanup.
Why It Works: Ground beef and cabbage both handle high heat well, so you can cook them in one skillet without fuss. Soy sauce and garlic add the savory backbone, while cabbage soaks up the juices instead of sliding around dry. It’s a practical dinner, which I like more than I probably should.
Key Ingredients:
- 1 lb ground beef
- 1 small cabbage, thinly sliced
- 2 carrots, shredded
- 3 garlic cloves, minced
- 3 tbsp soy sauce
- 1 tbsp sesame oil
- 1 tbsp neutral oil
- 2 cups cooked rice
Quick Steps:
- Brown the beef in oil.
- Add garlic and carrots, cooking 1 minute.
- Stir in cabbage and soy sauce.
- Cook 5 to 7 minutes until the cabbage softens.
- Finish with sesame oil and serve over rice.
Equipment for This Recipe:
- Large skillet
- Sharp knife
- Spatula
How to Serve This Dish: Serve it over rice or noodles, with chili flakes on top if you want more heat. The cabbage should still have a little snap, not mush.
Pro Tips for This Recipe:
- Slice the cabbage thin so it cooks evenly.
- Drain excess beef fat if the pan gets greasy.
- Add sesame oil at the end for better aroma. Variations on This Dish:
- Ginger Beef Cabbage: Add 1 tbsp fresh ginger.
- Low-Carb Version: Serve in lettuce cups. Common Mistakes to Avoid with This Dish:
- Don’t overcook the cabbage until it smells sulfurous and soft.
- Don’t crowd the pan with too much cabbage at once.
29. Pesto Chicken Orzo Skillet
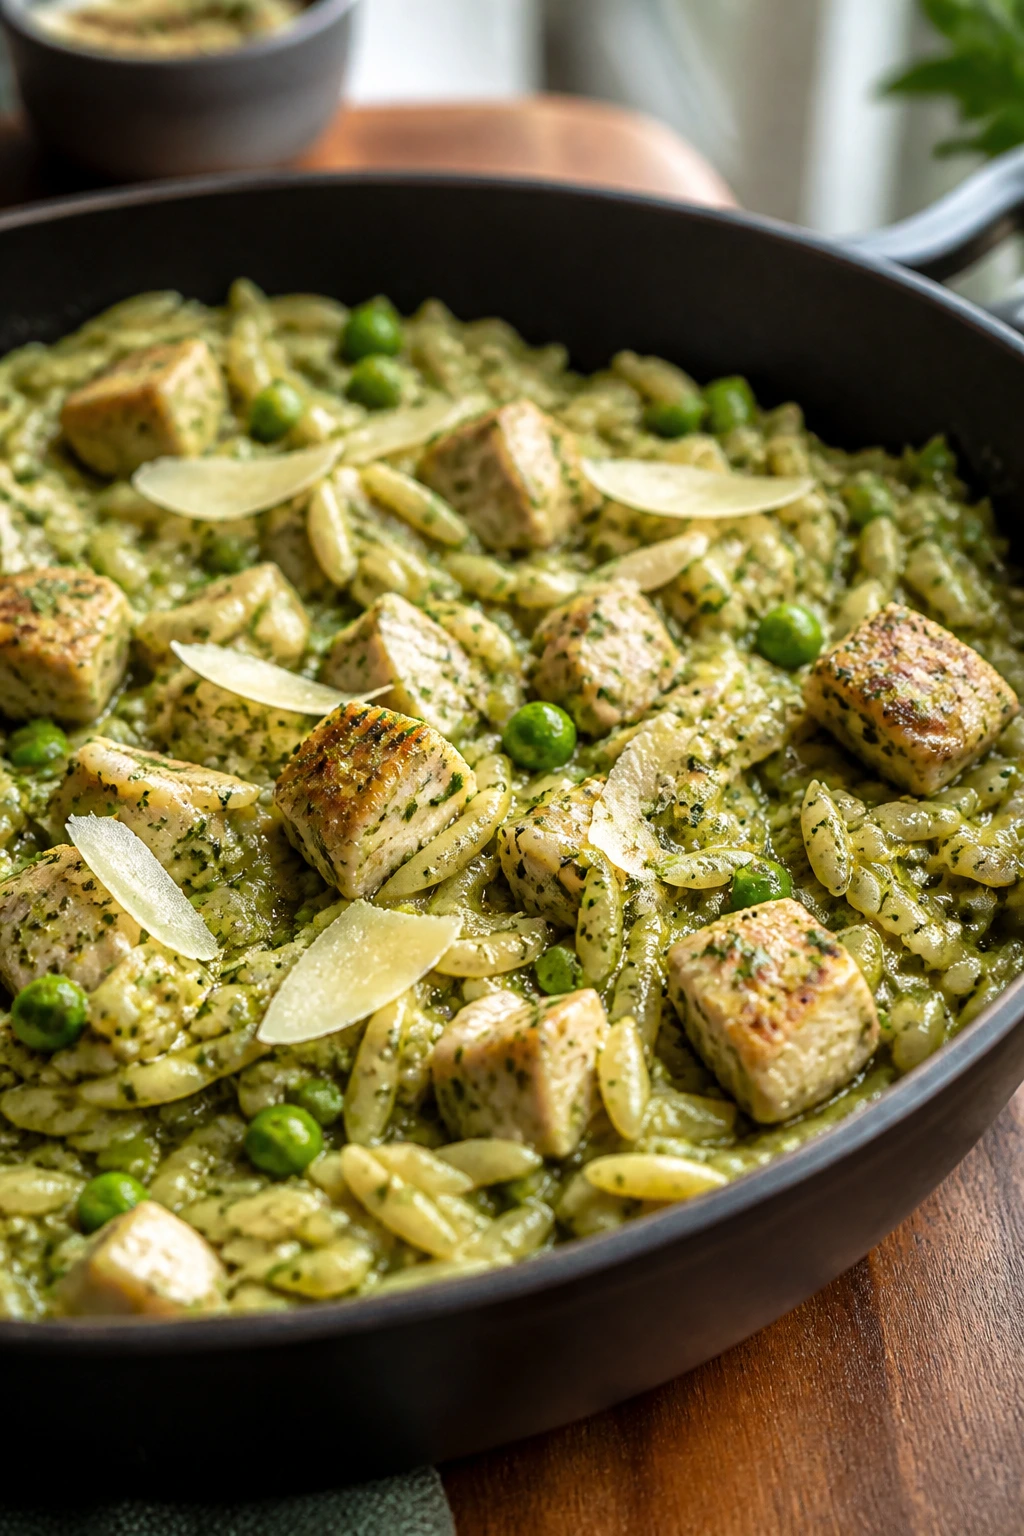
Intro: Pesto makes chicken taste like you spent longer than you did. Orzo cooks right in the skillet, peas add little bursts of sweetness, and parmesan ties the whole thing together. This is one of those meals that lands between pasta and risotto, which is part of the charm.
Why It Works: Orzo absorbs broth and pesto quickly, so the skillet ends up creamy without needing cream. Chicken gives the dish its main protein, and peas bring color and a little texture. Lemon at the end keeps the basil from tasting heavy.
Key Ingredients:
- 1 lb chicken breast, diced
- 1½ cups orzo
- 3 cups chicken broth
- ⅓ cup pesto
- 1 cup frozen peas
- ¼ cup grated Parmesan
- 1 tbsp olive oil
- 1 lemon, juiced
Quick Steps:
- Brown the chicken in oil.
- Stir in orzo and broth.
- Simmer 10 to 12 minutes until the orzo is tender.
- Add peas, pesto, Parmesan, and lemon juice.
- Stir until creamy and serve.
Equipment for This Recipe:
- Deep skillet
- Wooden spoon
- Measuring cup
How to Serve This Dish: Serve it in bowls and top with a little extra Parmesan. A simple arugula salad on the side keeps the pesto from feeling too rich.
Pro Tips for This Recipe:
- Stir the orzo often so it doesn’t stick.
- Use broth, not water, or the dish tastes thin.
- Add pesto off the heat if you want the basil flavor to stay bright. Variations on This Dish:
- Sun-Dried Tomato Version: Stir in chopped sun-dried tomatoes.
- Turkey Swap: Use diced turkey breast instead of chicken. Common Mistakes to Avoid with This Dish:
- Don’t let the orzo dry out before it finishes cooking.
- Don’t add too much pesto at once; it can overpower the skillet.
30. Ricotta Spinach Stuffed Shells with Chicken
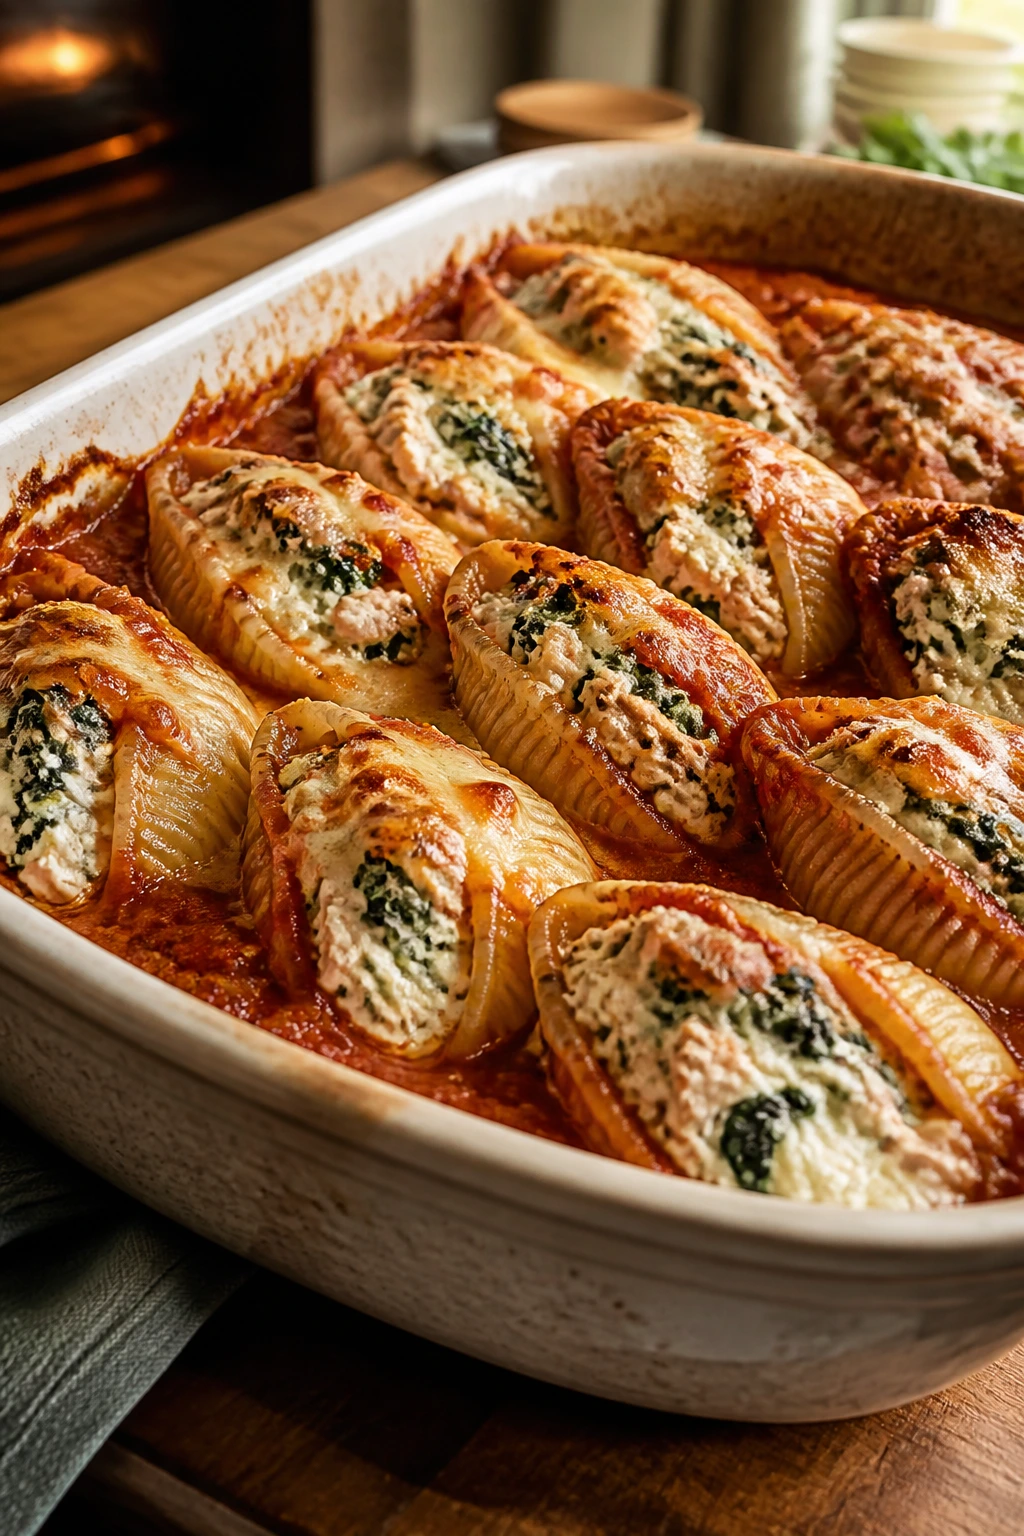
Intro: Stuffed shells feel like a bigger project than they are if you use pre-cooked chicken. Ricotta makes the filling creamy, spinach keeps it from feeling too heavy, and marinara gives the whole dish enough moisture to bake well. It’s comforting without being fussy.
Why It Works: Ricotta and shredded chicken create a filling that stays soft after baking. Shells are sturdy enough to hold the mixture, and marinara prevents the pasta from drying out in the oven. Spinach folds in easily and keeps the filling from turning bland.
Key Ingredients:
- 20 jumbo pasta shells
- 2 cups ricotta
- 2 cups cooked shredded chicken
- 2 cups chopped spinach
- 2 cups marinara sauce
- 1 cup shredded mozzarella
- ¼ cup Parmesan
- 1 egg
Quick Steps:
- Cook the shells until al dente and drain.
- Mix ricotta, chicken, spinach, egg, salt, and pepper.
- Fill each shell and place in marinara.
- Top with mozzarella and Parmesan.
- Bake at 375°F for 25 minutes.
Equipment for This Recipe:
- Baking dish
- Mixing bowl
- Spoon or piping bag
How to Serve This Dish: Serve three to four shells per person with a crisp salad and maybe garlic bread if you want the plate to feel finished. The cheesy top should be lightly browned, not dark.
Pro Tips for This Recipe:
- Cool the shells before filling so they’re easier to handle.
- If the filling seems loose, add a little more Parmesan.
- Cover with foil for most of the bake, then uncover at the end for color. Variations on This Dish:
- Turkey Version: Use cooked ground turkey instead of chicken.
- White Sauce Swap: Replace marinara with a light Alfredo-style sauce. Common Mistakes to Avoid with This Dish:
- Don’t overcook the shells or they tear while stuffing.
- Don’t under-sauce the baking dish or the pasta dries out.
31. Haddock Fish Tacos with Slaw
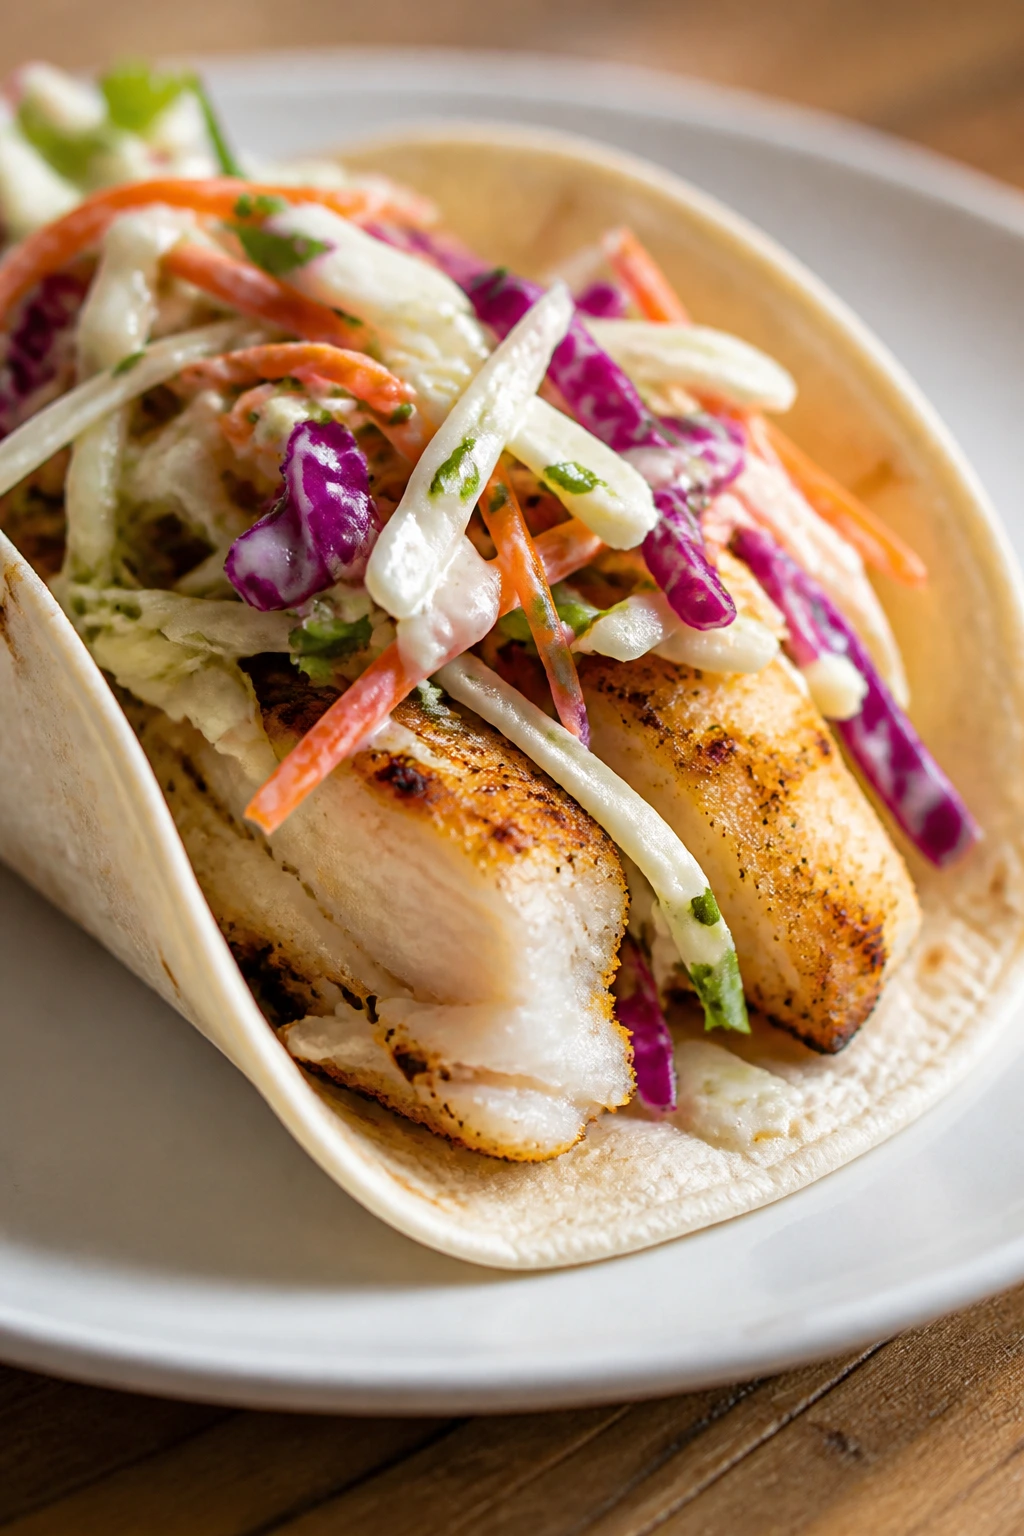
Intro: Haddock is mild enough for tacos and sturdy enough to hold together on the pan. With a quick seasoning rub and a bright slaw, you get soft fish, crunchy vegetables, and warm tortillas in one meal. Clean, fast, and not fussy.
Why It Works: Haddock cooks quickly and flakes neatly, which makes it easy to tuck into tortillas. Slaw gives texture and acidity, so the fish doesn’t need a heavy sauce. A hot pan gives you a little color without destroying the fillets.
Key Ingredients:
- 1½ lbs haddock fillets
- 2 tbsp oil
- 1 tsp chili powder
- 1 tsp cumin
- 2 cups shredded cabbage
- 2 tbsp lime juice
- ½ cup sour cream or yogurt
- 8 small tortillas
Quick Steps:
- Season haddock with oil, chili powder, cumin, salt, and pepper.
- Pan-sear 3 to 4 minutes per side until opaque.
- Toss cabbage with lime juice and a pinch of salt.
- Warm tortillas.
- Assemble tacos with fish, slaw, and sour cream.
Equipment for This Recipe:
- Skillet
- Mixing bowl
- Spatula
How to Serve This Dish: Serve with extra lime wedges and a thin drizzle of crema or yogurt. A few sliced radishes make the tacos feel sharper and more complete.
Pro Tips for This Recipe:
- Dry the fish well before seasoning so it browns.
- Don’t flip too early or the fillets break apart.
- Warm tortillas in a dry skillet for better flexibility. Variations on This Dish:
- Blackened Version: Add paprika and cayenne.
- Baja-Style Slaw: Mix the cabbage with yogurt and cilantro. Common Mistakes to Avoid with This Dish:
- Don’t overcook haddock; it turns dry fast.
- Don’t let the slaw sit too long or it goes limp.
32. Peanut Chicken Soba Bowls
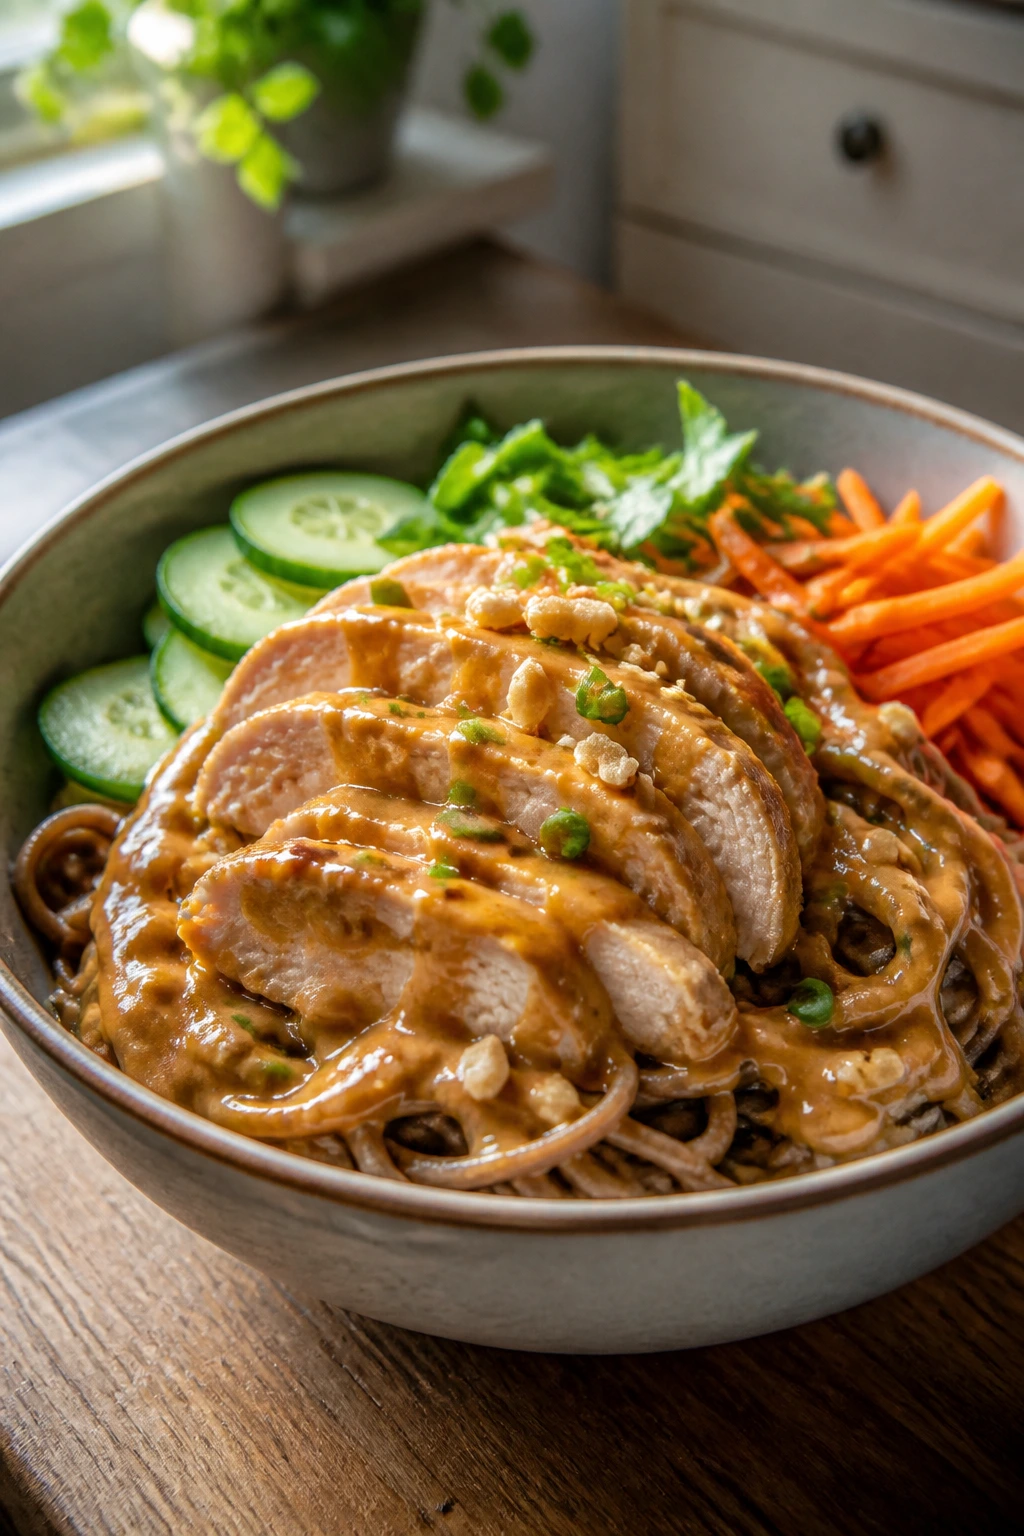
Intro: Peanut sauce has a way of making chicken and noodles feel much more put together than they are. It clings to soba, softens into the chicken, and gives the vegetables a rich, salty edge. This is one of my favorite “cold weather or tired brain” dinners.
Why It Works: Peanut butter adds body and protein to the sauce, which helps the bowl feel substantial. Soba noodles cook quickly and pair well with sharp, crunchy vegetables like cucumber and carrot. Chicken gives you a familiar base that keeps the bowl from feeling too saucy.
Key Ingredients:
- 1 lb chicken breast, sliced thin
- 8 oz soba noodles
- ¼ cup peanut butter
- 2 tbsp soy sauce
- 1 tbsp rice vinegar
- 1 tbsp honey
- 1 cucumber, sliced
- 1 carrot, shredded
Quick Steps:
- Cook soba noodles and rinse briefly.
- Cook chicken in a skillet until done.
- Whisk peanut butter, soy sauce, vinegar, honey, and a splash of warm water.
- Toss noodles, chicken, cucumber, and carrot with sauce.
- Serve with crushed peanuts.
Equipment for This Recipe:
- Skillet
- Pot for noodles
- Whisk
How to Serve This Dish: Serve in deep bowls and top with peanuts or sesame seeds. A little chili oil on top is optional, but it adds a nice sting.
Pro Tips for This Recipe:
- Thin the peanut sauce slowly with warm water so it turns glossy instead of clumpy.
- Rinse soba after cooking to stop it from sticking.
- Slice the chicken thin so it cooks quickly and stays tender. Variations on This Dish:
- Tofu Peanut Bowls: Swap chicken for tofu.
- Spicy Sesame Version: Add chili garlic sauce to the dressing. Common Mistakes to Avoid with This Dish:
- Don’t over-thicken the sauce before tossing.
- Don’t let the noodles sit drained too long or they seize up.
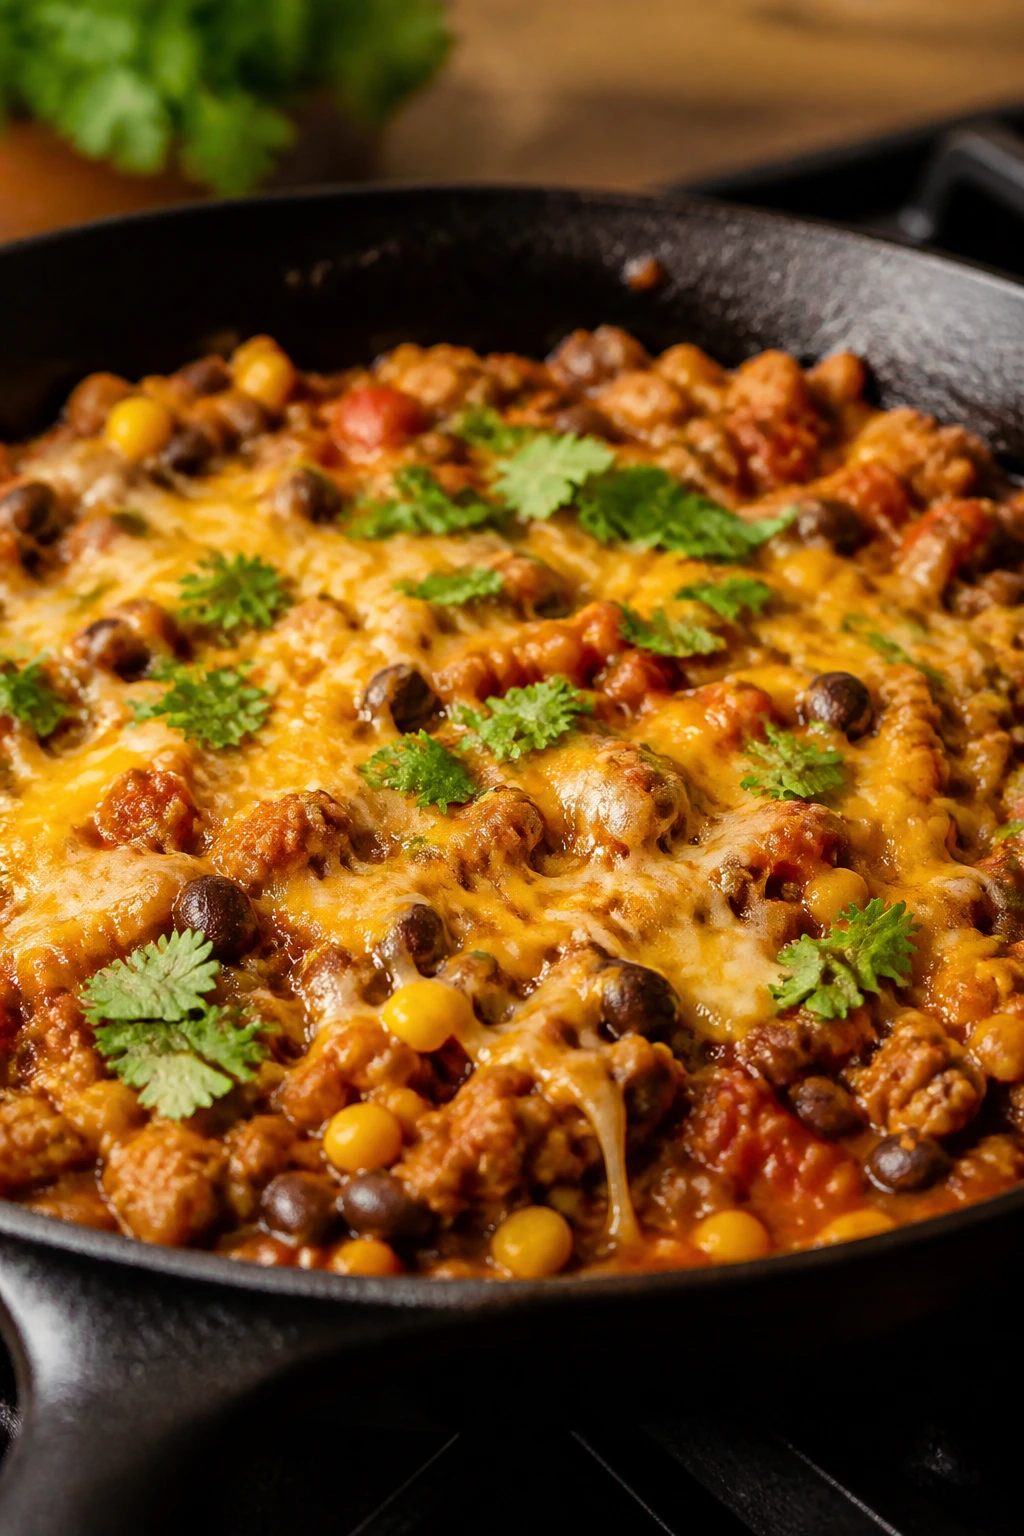
33. Fast Beef Chili with Beans
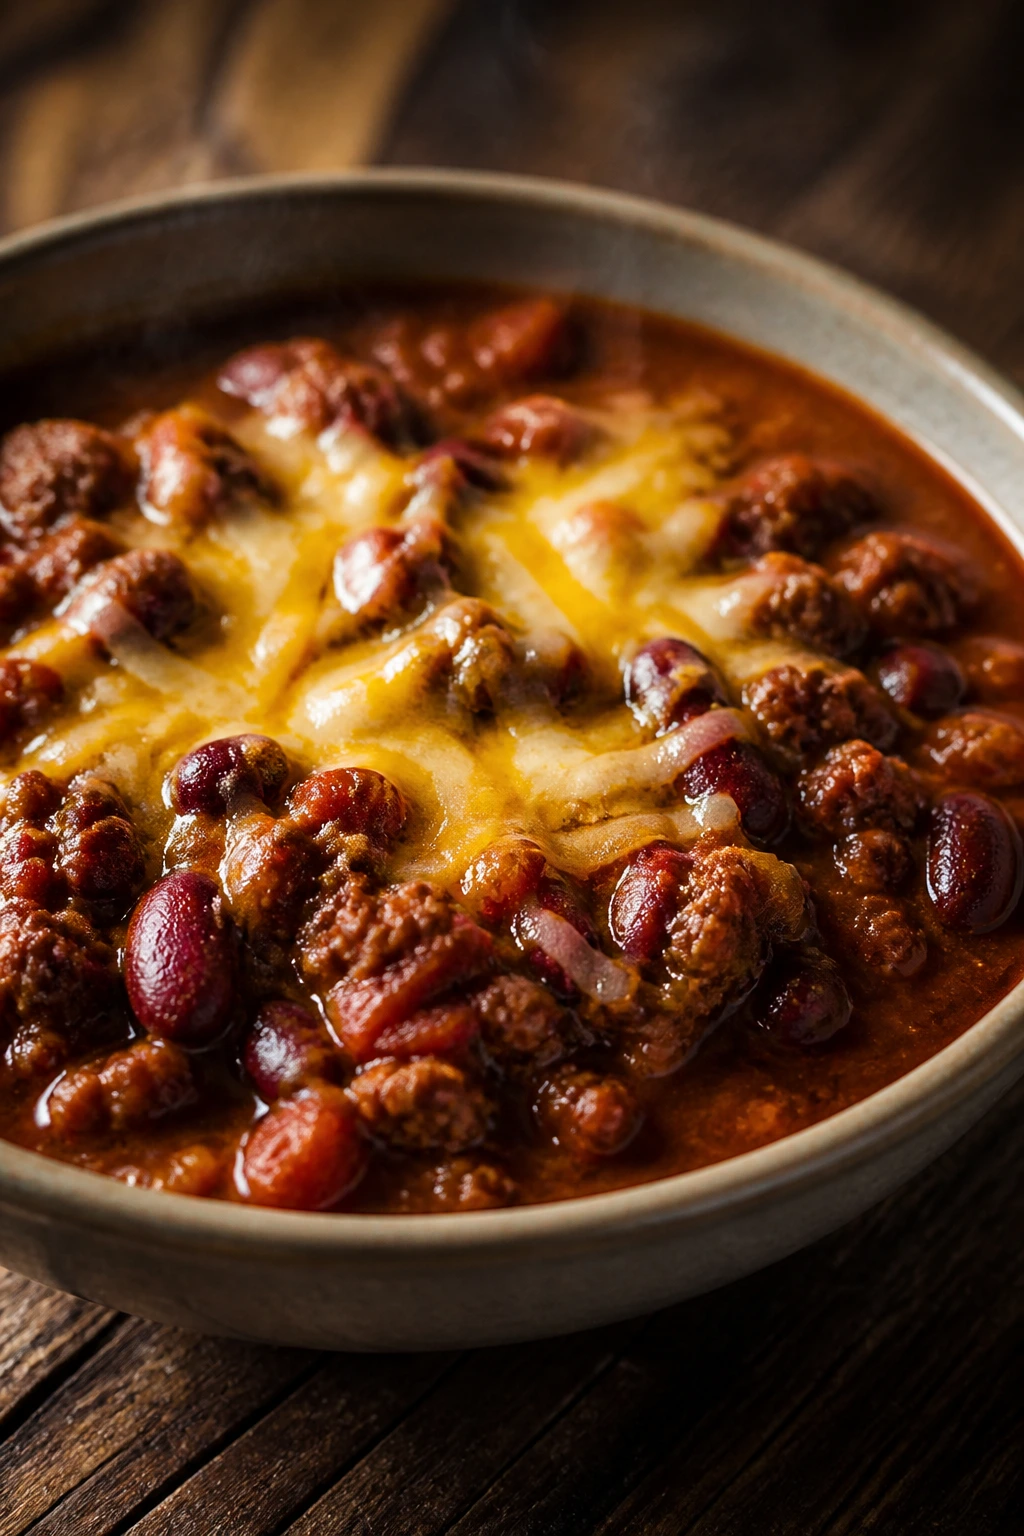
Intro: Chili doesn’t need half a day to work. Ground beef, beans, tomatoes, and a sane amount of spice make a pot that tastes like it simmered longer than it did. This is the dinner that keeps well, which is half the reason people love it.
Why It Works: Ground beef gives the chili richness right away, and beans stretch it into several real servings. Tomato paste and chili powder build depth quickly, while a short simmer makes the broth thicker and more cohesive. It’s the kind of pot that improves as it sits.
Key Ingredients:
- 1½ lbs ground beef
- 1 onion, diced
- 2 cans beans, drained
- 1 can (28 oz) crushed tomatoes
- 2 tbsp tomato paste
- 2 tbsp chili powder
- 1 tsp cumin
- 1 tbsp oil
Quick Steps:
- Brown the beef with onion in oil.
- Stir in tomato paste, chili powder, and cumin.
- Add tomatoes, beans, salt, and pepper.
- Simmer 20 minutes until thick.
- Serve with toppings.
Equipment for This Recipe:
- Dutch oven or large pot
- Wooden spoon
- Ladle
How to Serve This Dish: Serve it in bowls with shredded cheese, sour cream, or chopped onion. Cornbread is classic, but tortilla chips also work fine.
Pro Tips for This Recipe:
- Brown the tomato paste for a minute to deepen the flavor.
- Use at least one darker bean, like kidney or black, for better texture.
- Let the chili rest 10 minutes before serving if you want it thicker. Variations on This Dish:
- Turkey Chili: Use ground turkey for a lighter version.
- Bean-Heavy Version: Cut the meat in half and add an extra can of beans. Common Mistakes to Avoid with This Dish:
- Don’t leave the chili watery; simmer until it coats a spoon.
- Don’t underseason the pot at the end, because beans absorb a lot of salt.
34. Greek Turkey Burgers with Tzatziki
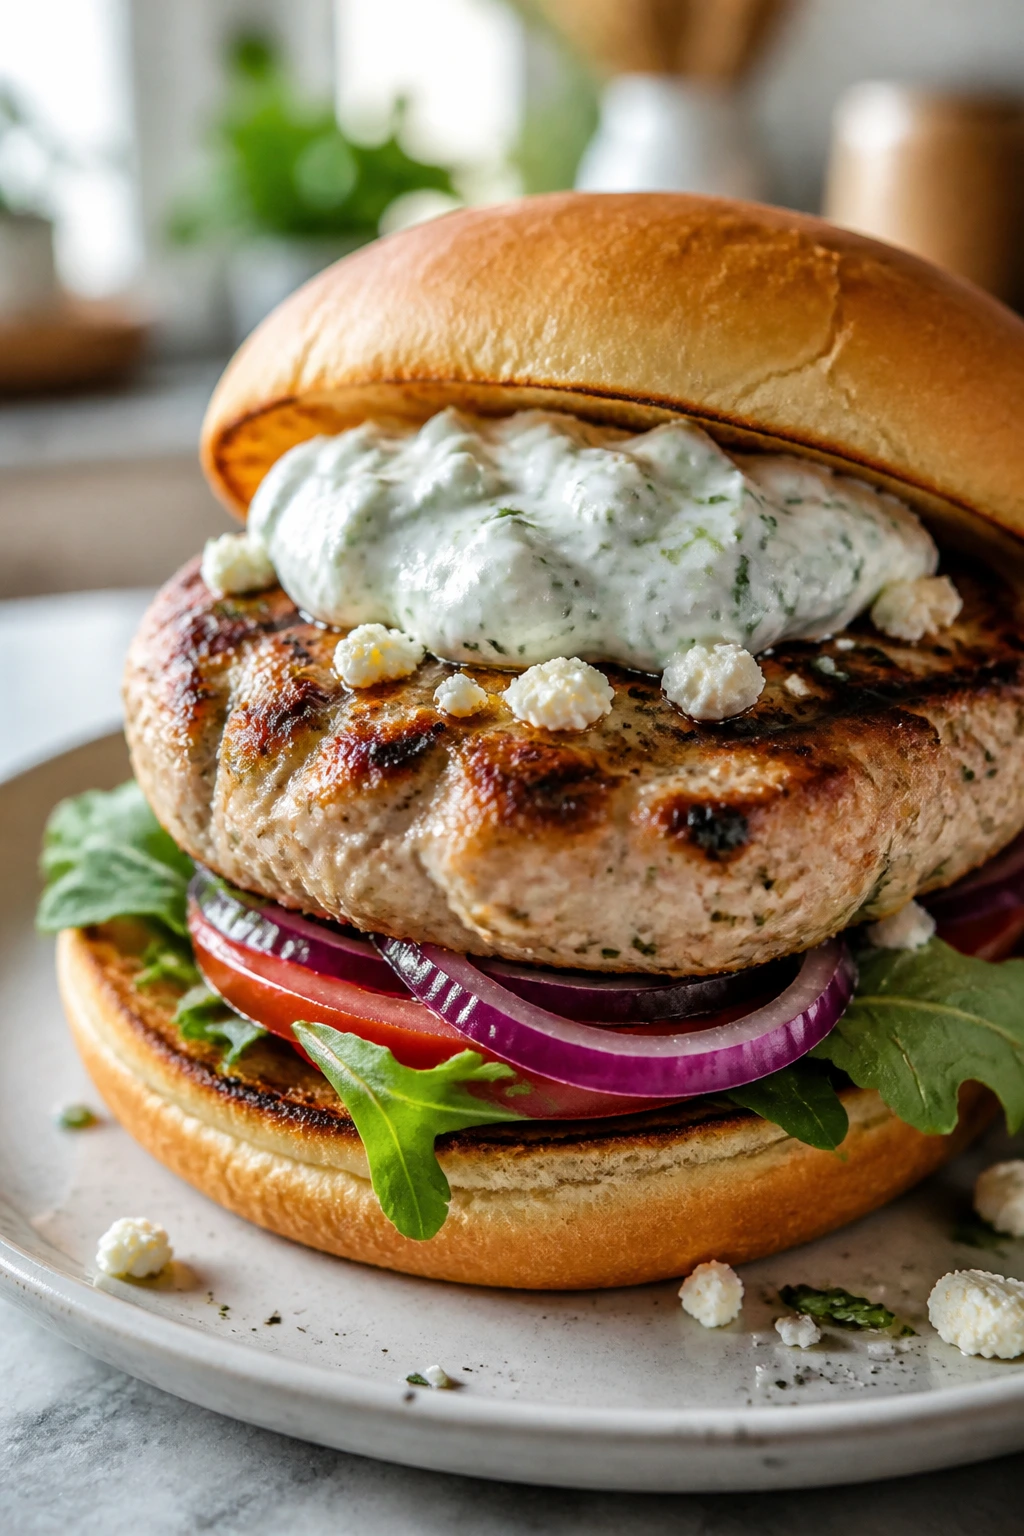
Intro: Turkey burgers can be dry, but feta, oregano, and a spoonful of yogurt in the mix fix that fast. Add cucumber-yogurt sauce on top and you get a burger that feels fresh instead of flat. It’s an easy grill-pan dinner with a little lift.
Why It Works: Feta brings salt and moisture into the patty, which is exactly what lean turkey needs. Oregano and garlic give it Greek flavor without a long marinade. Tzatziki adds coolness and keeps the burger from feeling heavy in a bun.
Key Ingredients:
- 1 lb ground turkey
- ¼ cup crumbled feta
- 1 tsp dried oregano
- 1 garlic clove, minced
- ½ cup Greek yogurt
- ½ cucumber, grated and squeezed dry
- 4 burger buns
- Lettuce and tomato
Quick Steps:
- Mix turkey, feta, oregano, garlic, salt, and pepper.
- Form 4 patties.
- Cook in a skillet 5 to 6 minutes per side.
- Stir yogurt and cucumber for quick tzatziki.
- Serve on buns with lettuce, tomato, and sauce.
Equipment for This Recipe:
- Mixing bowl
- Skillet or grill pan
- Box grater
How to Serve This Dish: Serve with roasted potatoes or a quick tomato salad. The tzatziki should sit on top of the burger and drip a little, not disappear into the bun.
Pro Tips for This Recipe:
- Squeeze the grated cucumber dry so the sauce stays thick.
- Make the patties slightly wider than the buns; they shrink a little.
- Let them rest a few minutes so they stay juicy. Variations on This Dish:
- Lamb-Turkey Mix: Add a little ground lamb for richer flavor.
- Lettuce Wrap Version: Skip the bun and serve in romaine leaves. Common Mistakes to Avoid with This Dish:
- Don’t make the patties too thick or the outside cooks before the center.
- Don’t use watery tzatziki; it runs right out of the bun.
35. Edamame Fried Rice with Eggs and Shrimp
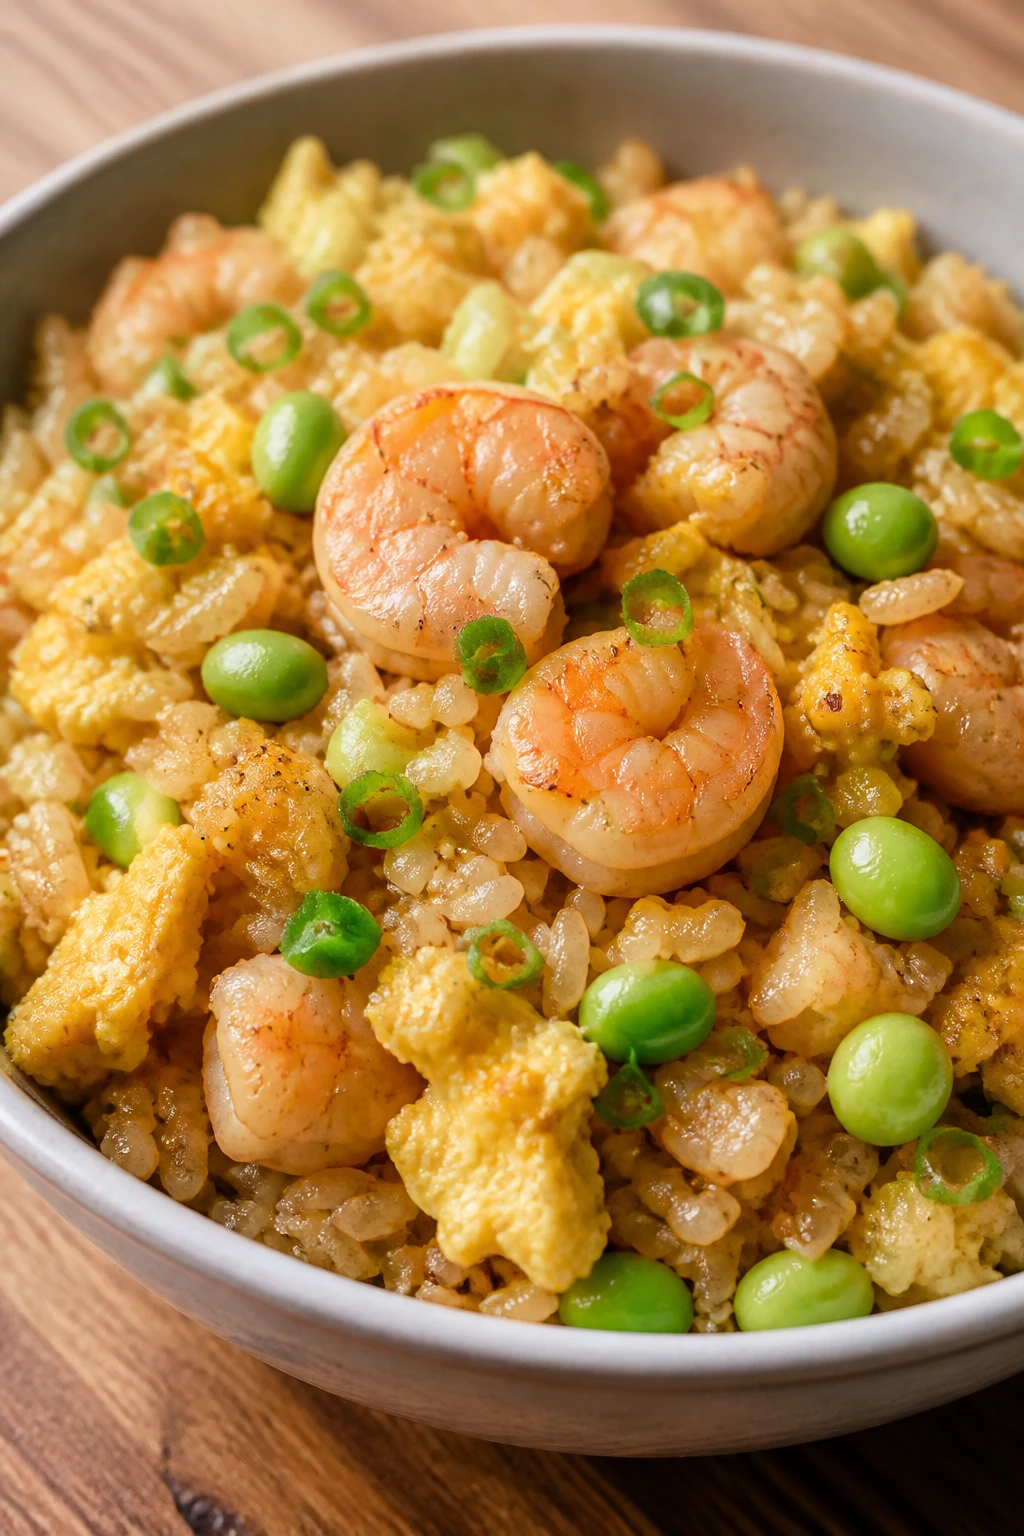
Intro: Fried rice is one of the most useful weeknight meals because it likes leftovers and doesn’t complain. Shrimp and eggs bring the protein, edamame adds a second layer of it, and cold rice fries up better than fresh. Fast, salty, and a little addictive.
Why It Works: Day-old rice dries out enough to fry instead of clumping. Eggs add richness, shrimp cook in minutes, and edamame brings a clean, chewy bite. Soy sauce and scallions make the whole pan taste complete without much effort.
Key Ingredients:
- 3 cups cold cooked rice
- 1 lb shrimp, peeled and deveined
- 2 eggs, beaten
- 1 cup shelled edamame
- 2 scallions, sliced
- 3 tbsp soy sauce
- 1 tbsp sesame oil
- 1 tbsp neutral oil
Quick Steps:
- Scramble the eggs in a hot skillet and remove.
- Cook the shrimp in neutral oil until pink.
- Add rice and edamame, breaking up any clumps.
- Stir in soy sauce and return the eggs.
- Finish with sesame oil and scallions.
Equipment for This Recipe:
- Large skillet or wok
- Spatula
- Bowl for beaten eggs
How to Serve This Dish: Serve it in bowls with chili crisp or a little extra soy on the side. It’s complete on its own, though sliced cucumber next to it is a good move.
Pro Tips for This Recipe:
- Use cold rice or the pan turns mushy.
- Cook in a hot skillet so the rice picks up a little toast.
- Add sesame oil at the very end for a stronger aroma. Variations on This Dish:
- Chicken Fried Rice: Swap shrimp for diced chicken.
- Vegetable-Heavy Version: Add peas, carrots, or chopped bell pepper. Common Mistakes to Avoid with This Dish:
- Don’t use fresh, steaming rice unless you enjoy sticky clumps.
- Don’t overcook the shrimp; they only need a short turn in the pan.
Why High-Protein Weeknight Cooking Feels Different
A good weeknight dinner has to do more than fill the plate. It has to survive the commute from stove to table, hold up to leftovers, and taste like you meant it. Protein helps, but only when it’s paired with something that makes sense — rice, tortillas, noodles, potatoes, beans, or a sauce that keeps the whole thing from eating dry.
The meals above work because they respect timing. Salmon gets a short roast. Shrimp barely touches the heat. Chicken thighs can take a little more. Tofu needs a dry pan and patience. Once you match the protein to the method, dinner stops fighting you.
I also like that these meals don’t require one magic ingredient you’ll never buy again. Yogurt, beans, rice, cabbage, eggs, pasta, salsa, pesto, and canned tomatoes show up because they’re useful more than once. That’s how weeknight cooking actually works in a real kitchen.
Essential Equipment for These Recipes
- Large skillet: A 10- to 12-inch skillet handles most of the chicken, beef, turkey, tofu, and stir-fry recipes without crowding.
- Rimmed sheet pan: Needed for salmon, stuffed peppers, and any baked dinner that benefits from space and high heat.
- Dutch oven or deep pot: Best for chili, lentil sauce, curry, and anything that starts on the stove and finishes with a simmer.
- Instant-read thermometer: The quickest way to keep chicken, pork, and fish from going past the point where they dry out.
- Mixing bowls: You’ll use them for marinades, sauces, burger mixes, and quick salads.
- Sharp knife and cutting board: Slicing steak, peppers, onions, cabbage, and chicken evenly matters more than people think.
- Tongs and spatula: Tongs help with searing and flipping; a sturdy spatula keeps burgers and fish intact.
- Colander: Handy for pasta, soba, rice rinse jobs, and draining canned beans.
- Measuring cups and spoons: Sauces like miso glaze, peanut sauce, and curry paste are forgiving, but not that forgiving.
Smart Shopping and Ingredient Tips
Protein dinners get easier when you shop with overlap in mind. Pick one or two base proteins that can play multiple roles — chicken thighs, ground turkey, eggs, canned tuna, salmon, tofu, or beans — and then build flavor with sauces and herbs. That way you’re not buying twelve special items for one dinner and watching the rest of them wilt in the drawer.
Lean meats need moisture. That means yogurt, salsa, marinara, enchilada sauce, pesto, or a quick pan sauce is not decoration; it’s the thing that keeps chicken breast or turkey from tasting dry. If a recipe uses cod, haddock, shrimp, or salmon, look for fish that smells clean and mild, not sharp. With ground meat, a little fat helps. The ultra-lean stuff can work, but it needs more help from sauce and seasoning.
Canned beans, crushed tomatoes, coconut milk, salsa, and broth are the quiet heroes of this list. Buy ones with short ingredient lists if you can. The same goes for pesto and curry paste; they vary a lot in salt and heat, so taste before dumping in the full amount. For vegetables, broccoli, cabbage, green beans, peppers, onions, zucchini, and spinach are all easy to move through the week because they show up in different cuisines without acting precious.
How to Serve These Recipes
Presentation: Use shallow bowls for saucy dishes like chili, curry, stir-fries, and grain bowls so the sauce stays visible. For tacos, burgers, and stuffed peppers, keep garnishes simple and close to the plate edge so the main protein stays the focus.
Accompaniments: Rice works with salmon, curry, peanut noodles, and most skillet dinners. Tortillas fit taco skillet, shrimp fajitas, and pulled chicken fillings. Roasted potatoes, salad greens, and crusty bread do good work beside pork tenderloin, stuffed tomatoes, and pasta bakes.
Portions: Most of these recipes serve 4 with a standard dinner portion, though some like fried rice, chili, and pasta bake stretch farther. If you’re feeding bigger eaters, add the starch or the vegetable side first, not just more meat; the plate feels fuller and the meal tastes more balanced.
Beverage Pairing: Sparkling water with lime suits tacos, salmon, and shrimp. A cold lager or pale ale works with burgers, chili, and buffalo chicken. For non-alcoholic dinners, unsweetened iced tea or cucumber water keeps the plate from feeling too rich.
Additional Tips and Flavor Boosters
Flavor Enhancement: A finishing squeeze of lemon or lime changes more dinners than people expect. Use it on salmon, chicken bowls, taco fillings, tofu, and bean dishes right before serving; it wakes up salt and spice that taste dull after cooking.
Customization: Keep one sharp sauce and one creamy sauce in the fridge. Salsa, hot sauce, pesto, yogurt sauce, tahini, or peanut sauce can all turn a plain protein base into dinner without requiring a new recipe.
Serving Suggestions: Fresh herbs matter here. Parsley, cilantro, dill, basil, and scallions each bring a different kind of brightness, and they work best after the heat is off. A little herb on top can save a meal that tastes technically correct but emotionally flat.
Make-It-Yours: For dairy-free meals, lean on salsa, tahini, coconut milk, or olive oil instead of cheese and sour cream. For lower-carb meals, swap rice for cauliflower rice or a pile of cabbage. For extra-calorie nights, add avocado, olive oil, or a handful of nuts rather than just piling on more starch.
Make-Ahead, Storage, and Reheating Guidance

Most of these meals keep well in the fridge for 3 to 4 days, though a few deserve shorter attention. Cooked fish is best within 2 days. Shrimp also prefers the short end of the window. Chili, lentil sauce, meatballs in sauce, curry, pasta bake, and egg roll in a bowl all reheat nicely and often taste more settled the next day.
Store sauces separately when you can. That matters most for bowls with rice, tacos with cabbage, burgers with buns, and anything with crunchy toppings. Keep lettuce, avocado, tortilla shells, and toasted bread out of the storage container until serving time. If you don’t, the texture gets sad fast.
For reheating, the skillet usually beats the microwave. Stir-fries, fried rice, curry, and cabbage dishes come back best over medium heat with a splash of water or broth. Pasta bakes and stuffed shells do better in a 350°F oven covered with foil until hot through. Salmon, cod, haddock, and shrimp should be reheated gently, if at all; a low oven or brief microwave bursts keep them from turning chalky. Freeze chili, bolognese, meatballs, and cooked turkey mixtures for up to 2 months in airtight containers. Label them, because freezer mystery food is how good intentions disappear.
Variations and Adaptations to Try
Gluten-Free Track: Swap regular pasta for gluten-free pasta, use corn tortillas instead of flour, and choose tamari where soy sauce appears. Rice bowls, stuffed peppers, chili, curries, and lettuce-wrap dinners already make this fairly easy.
Dairy-Free Route: Skip cheese and sour cream, then lean on yogurt alternatives, avocado, coconut milk, tahini, or extra salsa for creaminess. Chicken bowls, curry, stir-fries, tacos, and fried rice adapt cleanly with almost no drama.
Lower-Sodium Shift: Choose unsalted broth, rinse canned beans well, and use lemon, lime, herbs, garlic, and spice for flavor instead of extra salt. Miso, soy sauce, and curry paste need careful handling here; use less and taste as you go.
Vegetarian Protein Swap: Replace chicken or turkey with tofu, tempeh, beans, lentils, eggs, or a mix of beans and grains. The trick is not pretending the swap is invisible. Give the plant protein a sauce, a little browning, and a real texture contrast.
Extra-Spicy Lane: Add chili crisp, jalapeño, cayenne, hot sauce, or chipotle to taco bowls, curry, fried rice, burritos, and chicken skillets. Spice lands best when it’s built into the sauce, not just sprinkled on top at the last second.
Kid-Friendly Tweak: Keep the spice mild, cut the vegetables smaller, and serve sauces on the side. Bowls, tacos, burgers, meatballs, and pasta bakes usually land better when kids can assemble part of the plate themselves.
Common Mistakes to Avoid
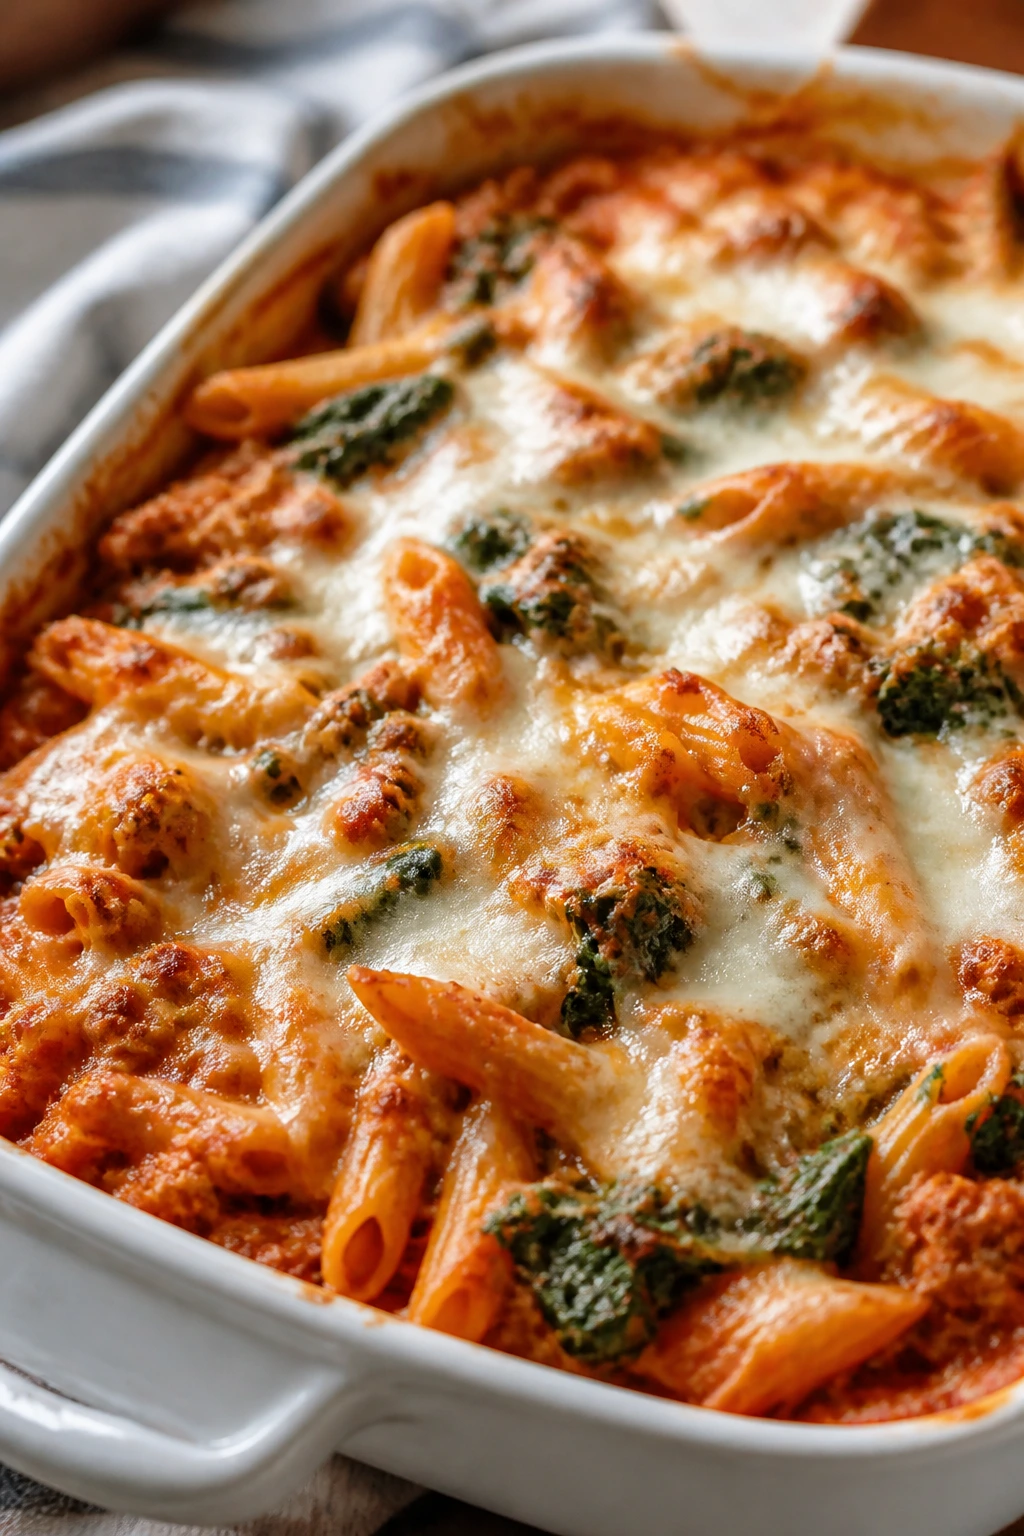
Underseasoning lean protein: Chicken breast, turkey, tofu, and fish all need more help than beef or sausage. If dinner tastes flat, the fix is often salt, acid, and a better sauce — not more cooking time.
Crowding the pan: This is the fastest way to lose browning. When ingredients steam instead of sear, the texture gets soft and the flavor gets muddy. Use a bigger skillet or cook in batches.
Overcooking fast proteins: Shrimp, cod, haddock, and salmon can cross the line in a minute or two. Pull them early and let residual heat finish the job. Waiting for them to look perfect in the pan usually means they’re already past perfect.
Forgetting the acid: Lemon, lime, vinegar, and tomato brightness are what keep high-protein dinners from tasting heavy. If the plate feels dull, the answer is often one squeeze away.
Using the wrong base texture: Fresh rice clumps in fried rice. Watery yogurt makes fillings run. Thin salsa turns skillets soupy. Match the ingredient to the method, and the dinner stops fighting you.
Skipping the rest time for meat: Chicken, steak, and pork need a few minutes off the heat. If you slice too soon, the juices end up on the cutting board, and the dinner gets dry before it reaches the plate.
Frequently Asked Questions
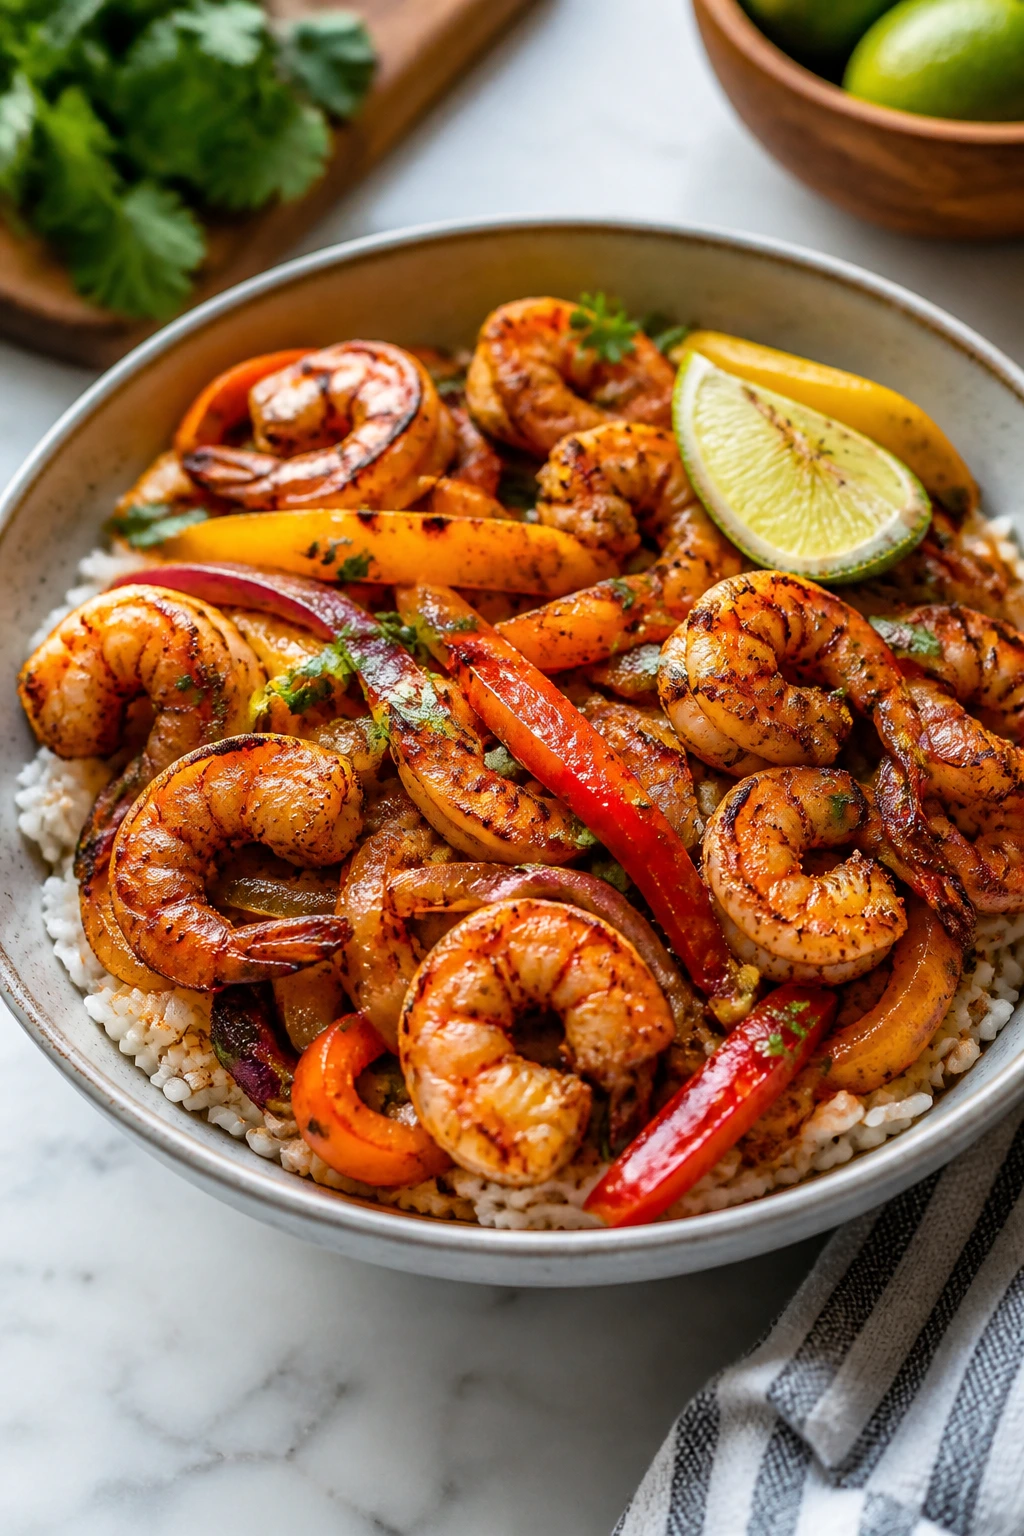
How much protein should a weeknight dinner have?
A lot of home cooks aim for something in the 25- to 35-gram range per person, but the better target is a dinner that leaves you satisfied without needing a second snack an hour later. A chicken thigh bowl, chili, turkey skillet, or salmon plate usually gets there without much math.
Can I make these meals ahead of time?
Yes, though some hold better than others. Chili, pasta bake, curry, meatballs, and grain bowls are the easiest to prep ahead. Keep crunchy toppings, sauces, and leafy greens separate until serving so the texture stays intact.
What protein works best when I’m short on time?
Shrimp, eggs, canned tuna, tofu, and ground turkey are the fastest to cook. If you already have cooked chicken or rice in the fridge, that speeds things up even more and cuts your active time to a bare minimum.
How do I keep chicken from drying out?
Use thighs when you can, or slice breasts thinner so they cook faster. Pull chicken at 165°F, then let it rest for 5 minutes before slicing. A sauce or yogurt marinade helps a lot more than extra heat.
Can I use frozen vegetables in these dinners?
Absolutely. Frozen corn, peas, edamame, broccoli, cauliflower rice, and spinach all work well. Just keep an eye on moisture; frozen vegetables release water as they cook, so you may need a little more heat or a minute longer in the pan.
What if I don’t have time to cook rice or pasta from scratch?
Use microwavable rice, pre-cooked grains, or whatever starch is already in the cupboard. Several of these dinners are really just a protein plus a fast sauce plus a base, and the base can be as simple as leftover rice or toasted bread.
How do I make these meals more filling without adding much more meat?
Beans, lentils, eggs, chickpeas, and extra vegetables do that job well. They stretch the protein, give the meal more texture, and keep the plate from feeling narrow. In practical terms, a skillet with turkey plus beans usually satisfies better than turkey alone.
Which of these dinners reheats the best?
Chili, lentil bolognese, curry, pasta bake, stuffed shells, meatballs in sauce, and fried rice are the strongest leftovers. Fish and shrimp are the least forgiving, so cook those when you plan to eat them fresh.
Weeknight Dinners Worth Repeating
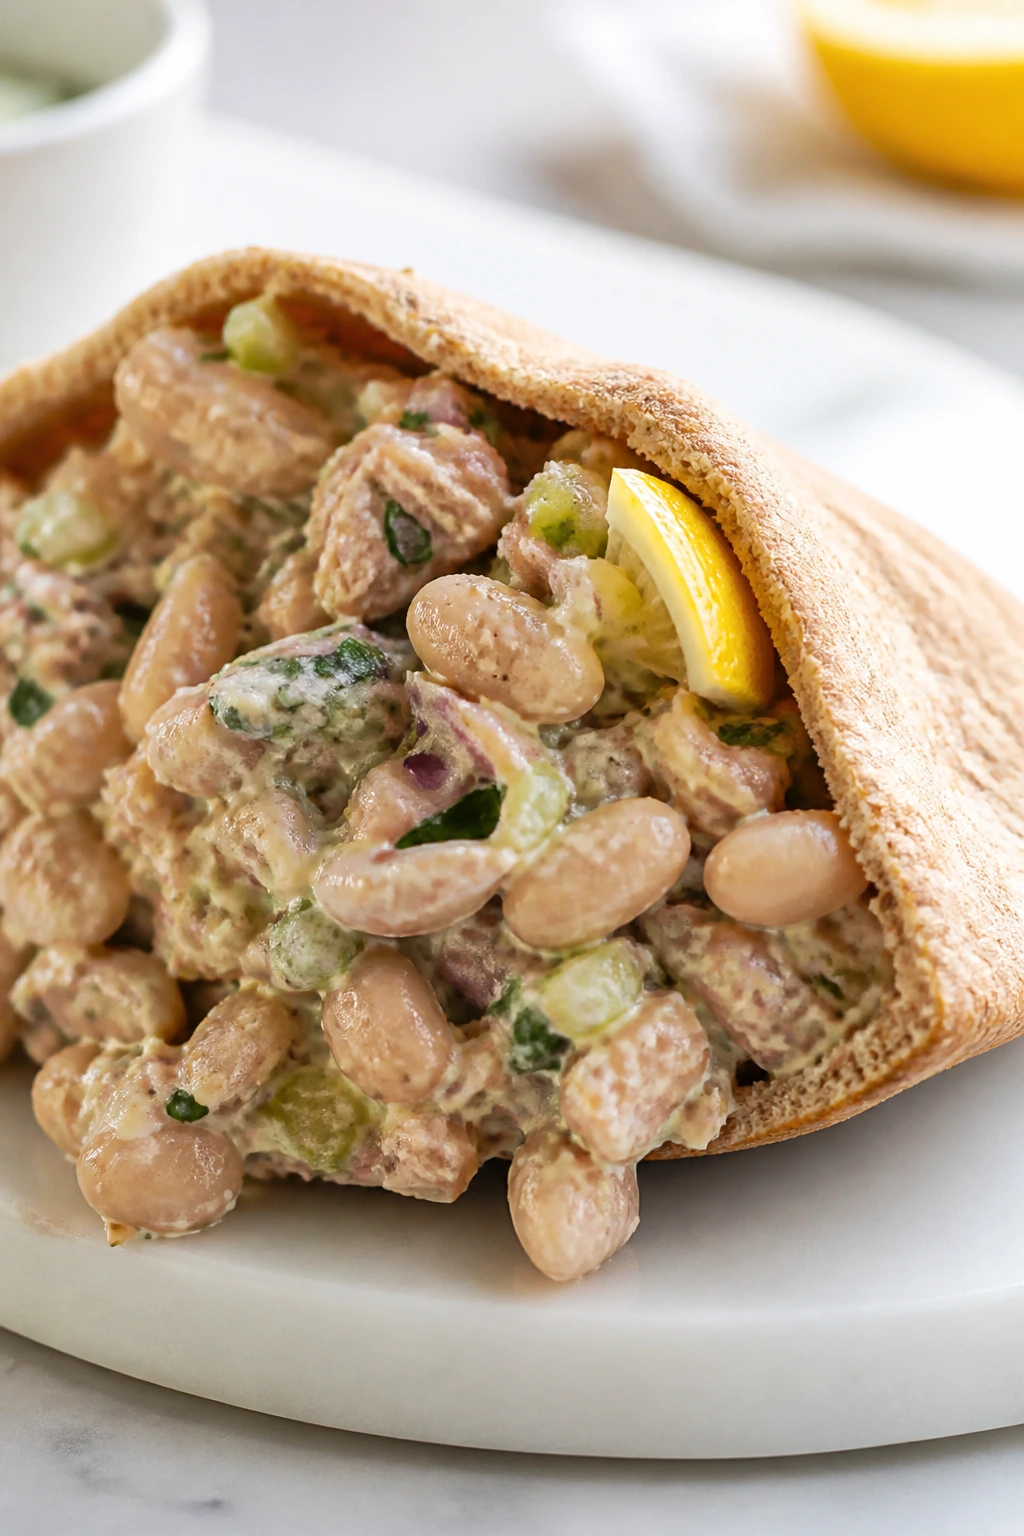
A good high protein dinner doesn’t need a hero moment. It needs to show up, taste good, and not leave you with a wrecked kitchen and a sink full of regret. That’s the real test. Not perfection. Repeatability.
The best recipes in this list lean on the same quiet strengths: a fast-cooking protein, a sauce with personality, and a base that makes the meal feel complete. Once you get that combination in your head, weeknight cooking stops being a rescue operation and starts feeling like something you can actually count on.
If you keep just a few of these on rotation — maybe the turkey taco skillet, the salmon sheet pan, the chili, and the fried rice — you’ll have enough range to avoid dinner fatigue without needing a new plan every night. That’s the sweet spot.