
A proper summer sandwich solves the exact problem hot nights create: you want dinner that feels fresh, but you do not want to stand over a stove for forty minutes while the kitchen turns sticky and hot. Summer sandwiches live or die on texture. The bread has to hold. The filling has to stay bright. And the whole thing should taste like someone paid attention to salt, acid, and crunch instead of just stacking cold ingredients between slices of bread and hoping for the best.
That’s why the best easy summer nights meals are almost never fussy. They’re built from ripe tomatoes that stain the cutting board, crisp lettuce that snaps when you tear it, herbs that smell like they were just cut, and bread that gets toasted or griddled so it can take the hit. A good sandwich should feel casual, yes, but not careless. There’s a difference.
I’ve always thought the smartest summer sandwich is the one that gives you options. Some nights you want a chilled tuna salad tucked into soft bread. Other nights call for a hot grilled chicken sandwich with pesto dripping onto the plate. Sometimes you want a tomato sandwich so simple it seems almost rude until you take a bite and realize the tomato juice, mayo, and salt are doing all the heavy lifting. That’s the kind of dinner this is built around.
Why These Summer Sandwiches Earn Their Spot on the Table
-
Fast Assembly: Most of these sandwiches come together in 15 to 30 minutes, and several of them are even faster if you already have cooked chicken, pulled pork, or shrimp on hand.
-
Heat-Friendly Cooking: A few recipes use the grill or a hot skillet, but none of them demand a long oven session, which matters when the air already feels thick.
-
Good Bread Matters Here: These recipes lean on ciabatta, sourdough, rolls, pitas, and split-top buns because soft sandwich bread collapses under juicy tomatoes and dressed fillings.
-
Built-In Variety: You get cold sandwiches, hot sandwiches, seafood, vegetarian options, chicken, beef, and a few lunch-counter classics that work just as well at dinner.
-
Easy to Scale: Most of the fillings can be doubled without changing the method, which makes these useful for casual guests, beach weekends, or the sort of night when a second sandwich sounds like a reasonable idea.
-
Texture First: Every recipe has some mix of crunch, creaminess, and acidity, because the best summer sandwiches fall apart when one of those goes missing.
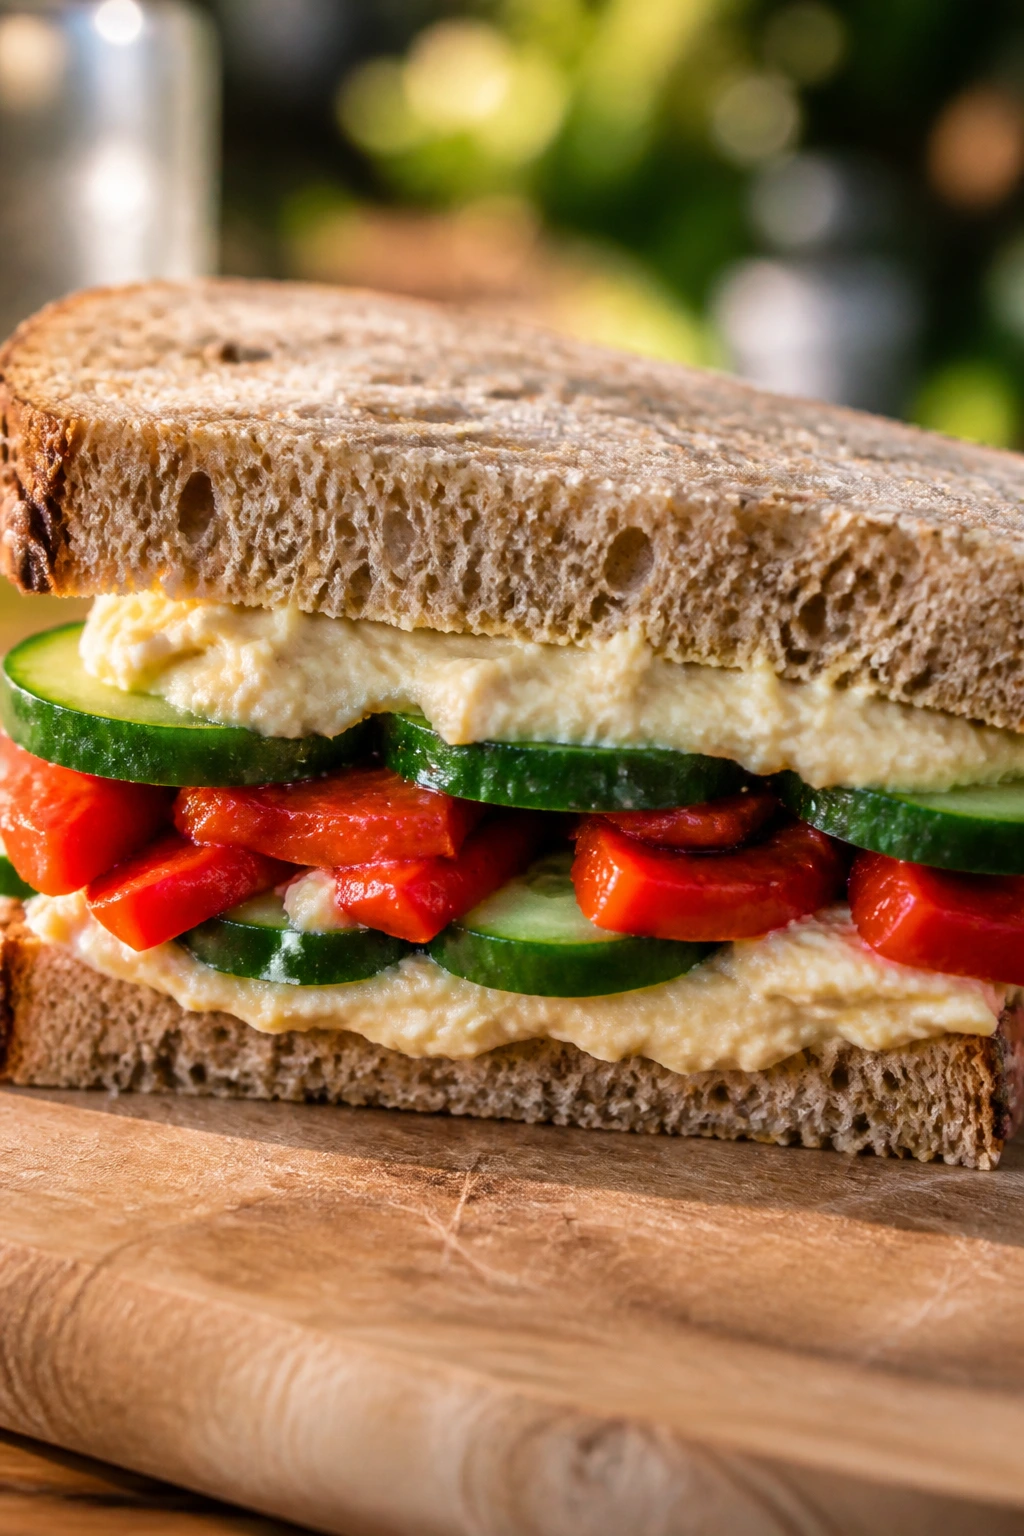
1. Heirloom Tomato Sandwich with Basil Mayo
The best tomato sandwich is almost annoyingly simple, which is exactly why people mess it up. You need bread with enough structure to soak up tomato juice without turning soggy in five minutes, and you need tomatoes that taste like they were picked after a warm day. Add basil mayo, flaky salt, and a little pepper, and the whole thing tastes cleaner and sharper than a sandwich this plain has any right to taste.
What makes this one worth making is the balance. The bread gets toasted so it stays firm. The tomatoes are salted for a few minutes to pull out excess water. The basil mayo gives the sandwich enough richness to feel complete without burying the tomato. I’m not interested in timid tomato sandwiches. They should be messy in a controlled way.
Why It Works:
A tomato sandwich stands on three things: ripe fruit, good salt, and bread that can take moisture without dissolving. Toasting the bread for 2 to 3 minutes gives it a dry surface that buys you time. The basil mayo also keeps the flavor from reading flat; the herb note makes each bite taste fresher, not heavier. This recipe works best when the tomatoes are at room temperature, because cold tomatoes taste muted and throw off the balance.
Key Ingredients:
- 8 slices sourdough or sturdy sandwich bread, about 1/2-inch thick
- 3 large heirloom tomatoes, sliced about 1/4-inch thick
- 1/2 teaspoon kosher salt, plus more to taste
- 1/2 teaspoon black pepper
- 1/2 cup mayonnaise
- 1 tablespoon finely chopped fresh basil
- 1 teaspoon lemon juice
- 2 tablespoons softened butter for toasting the bread
Quick Steps:
- Make the basil mayo: Stir the mayonnaise, basil, lemon juice, black pepper, and a pinch of salt in a small bowl until smooth and speckled green.
- Prep the tomatoes: Slice the tomatoes and lay them on a plate. Sprinkle both sides lightly with kosher salt and let them sit for 5 to 10 minutes until beads of juice appear.
- Toast the bread: Heat a skillet over medium heat and butter one side of each slice. Toast the bread, buttered side down, for 1 to 2 minutes per side until golden and crisp at the edges.
- Assemble carefully: Spread basil mayo on both slices of bread. Layer tomato slices generously, overlapping them slightly so every bite gets juice and flesh.
- Finish and serve: Add a final pinch of salt and pepper, close the sandwich, and cut on the diagonal. Eat it right away while the toast still has some crunch.
Equipment for This Recipe:
- Cutting board and sharp serrated knife
- Small mixing bowl
- Skillet or griddle
- Spatula
- Plate for salting the tomatoes
How to Serve This Dish:
Serve it with kettle chips or a handful of salted corn chips so the meal has some crunch next to all the soft tomato. A chilled cucumber salad is the nicest side if you want something lighter.
Cut the sandwich into triangles and serve it open a minute after assembling so the juices settle instead of racing out onto the plate.
Pro Tips for This Recipe:
- Salt the tomatoes before assembling; that 5-minute pause keeps the bread from getting wet too fast.
- Use a serrated knife and a gentle sawing motion so the tomatoes don’t squish out the sides.
- If your bread is very soft, toast both slices a shade darker than you think you need.
- A thin swipe of mayo on the bread and a thicker swipe on the tomatoes gives better coverage than dumping it all in one spot.
Variations on This Dish:
- Tomato and Avocado Stack: Add thin avocado slices under the tomatoes for a richer sandwich that still tastes fresh.
- Garlic Basil Toast: Rub one cut garlic clove over the warm toast before spreading the mayo for a sharper, more savory edge.
- Heirloom Caprese Style: Add fresh mozzarella and a drizzle of balsamic glaze if you want something closer to a caprese sandwich.
Common Mistakes to Avoid with This Dish:
- Using cold, bland tomatoes: They taste watery and dull. Let them sit on the counter for 20 to 30 minutes before slicing.
- Skipping the salt step: The sandwich turns slick and leaks juice immediately. Salt the tomatoes first.
- Using flimsy bread: Soft sandwich bread goes soggy almost at once. Use sourdough, country loaf, or another sturdy slice.
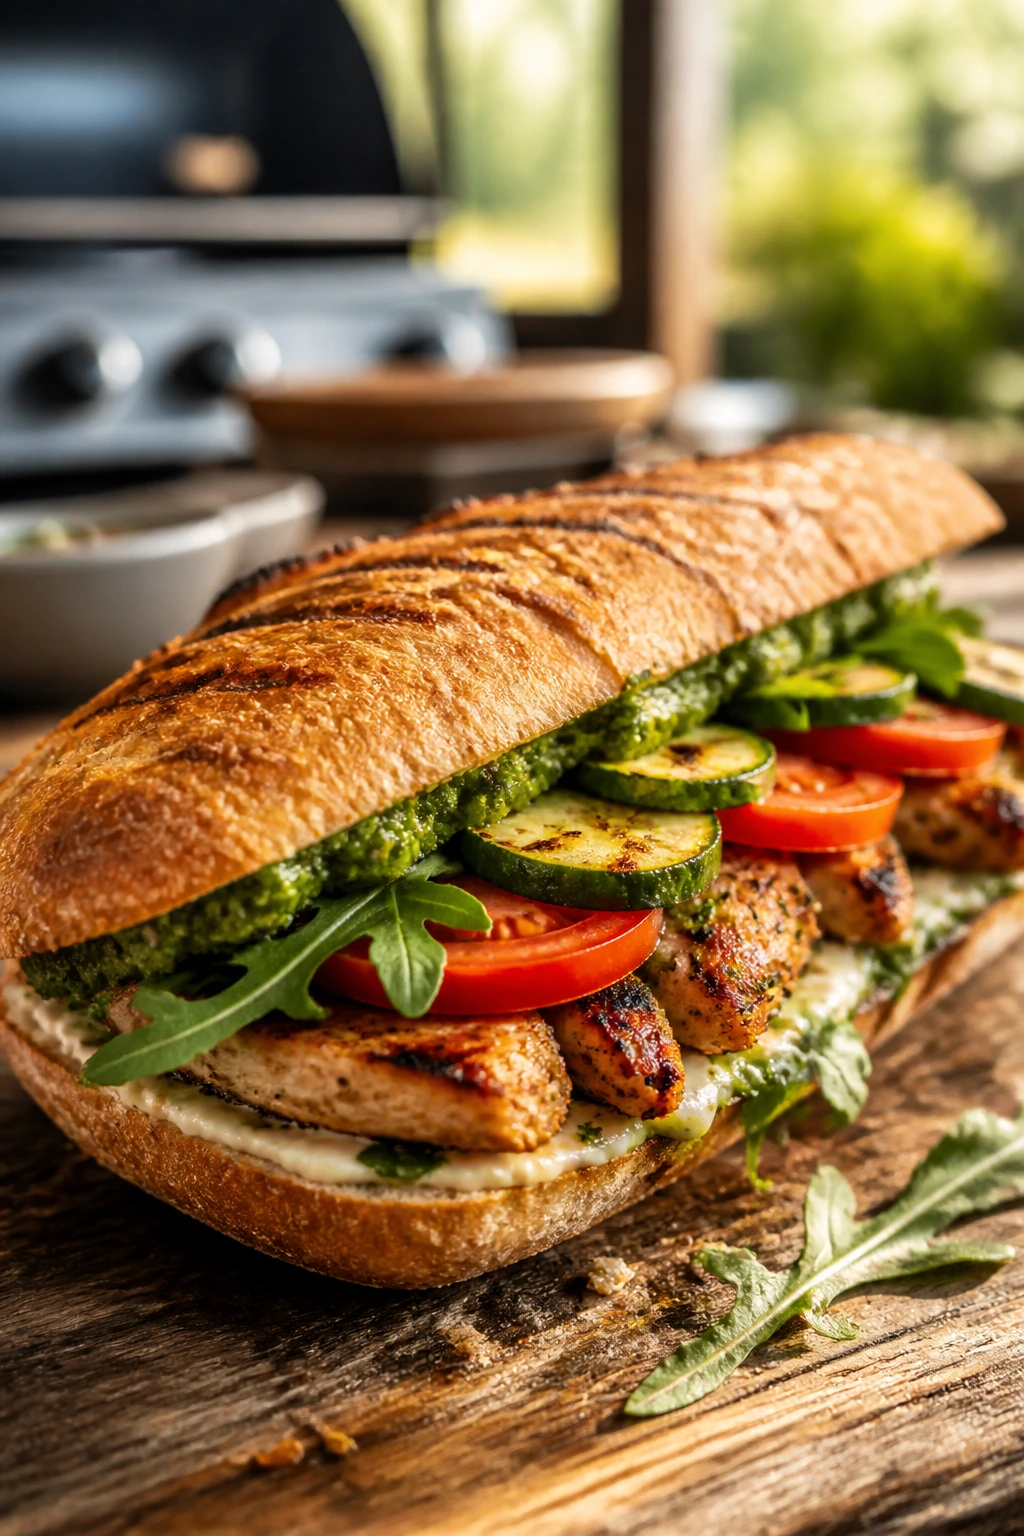
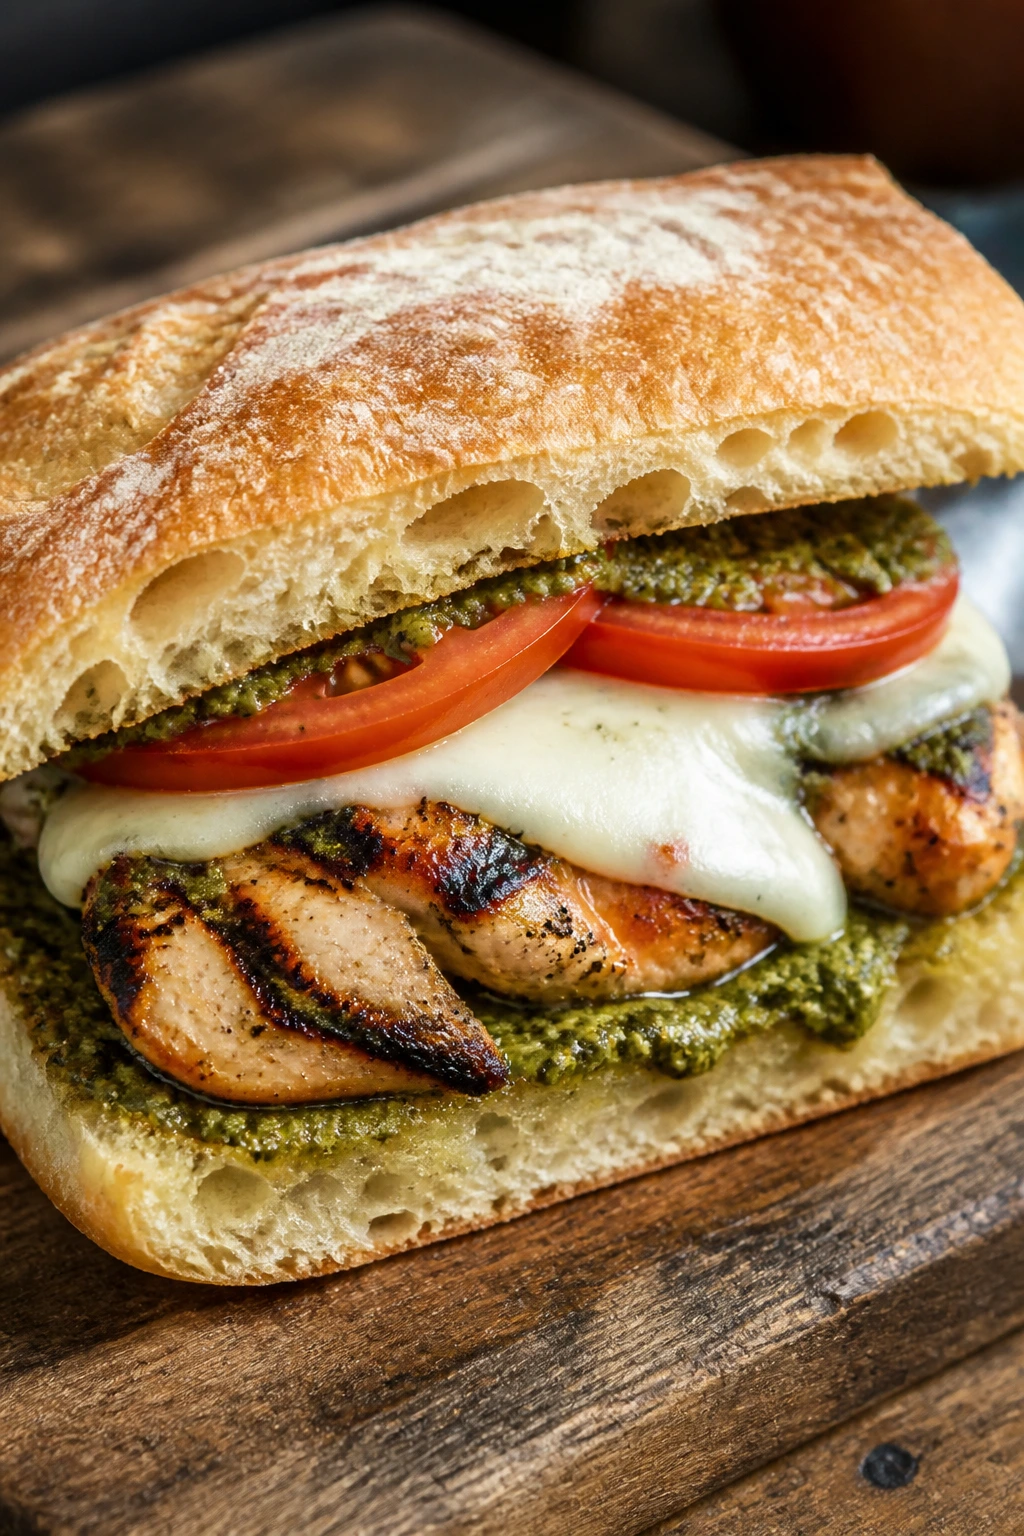
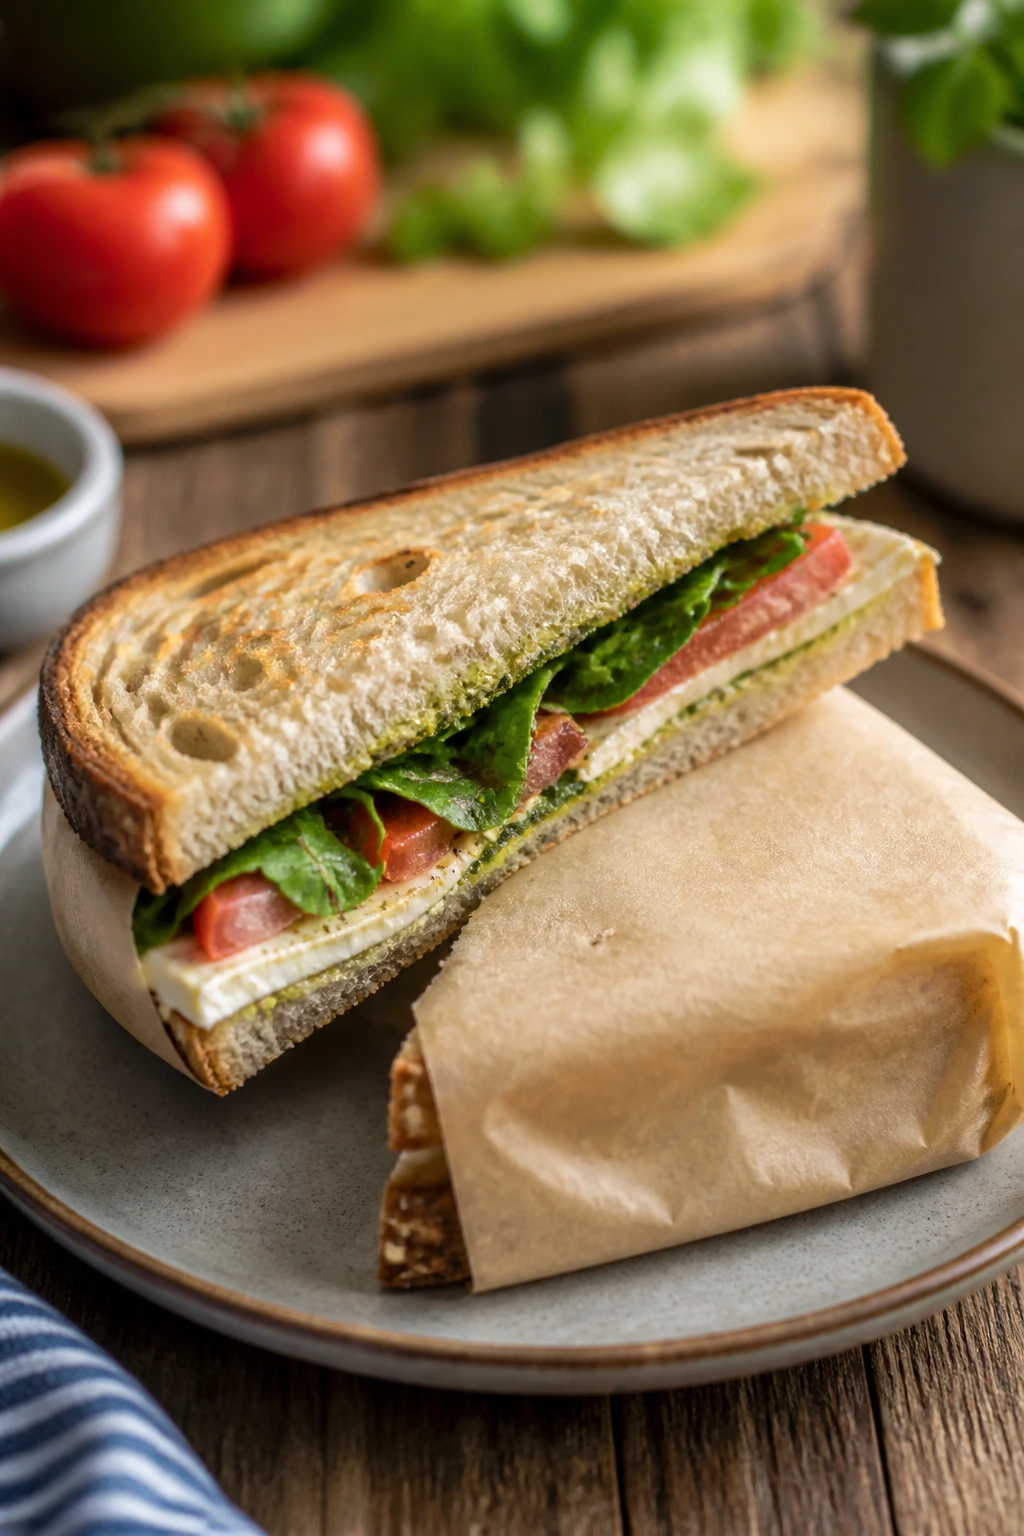
2. Grilled Chicken Pesto and Mozzarella Sandwich
This is the sandwich I reach for when I want something that feels closer to dinner than lunch but still belongs on a warm evening table. Grilled chicken gives it substance, pesto adds that sharp basil-garlic hit, and fresh mozzarella melts just enough from the residual heat to make each bite creamy without turning into a puddle. Ciabatta is the right move here because it handles the weight.
There’s a very specific pleasure in this one: the grill marks on the chicken, the smell of pesto hitting warm bread, the slice of tomato that softens against the cheese. It is not subtle. Good. Summer food should not be shy.
Why It Works:
Pesto brings salt, fat, garlic, and herbs in one spoonful, which means you do not need much else to make the sandwich taste finished. Grilling the chicken to 165°F keeps it juicy without making it stringy, and slicing it after a 5-minute rest helps the juices stay in the meat instead of flooding the bread. The mozzarella softens just enough against the warm chicken to make the sandwich feel cohesive.
Key Ingredients:
- 1 1/4 pounds boneless, skinless chicken breasts, pounded to even thickness
- 1 tablespoon olive oil
- 1 teaspoon kosher salt
- 1/2 teaspoon black pepper
- 1/3 cup basil pesto
- 8 ounces fresh mozzarella, sliced
- 1 large ripe tomato, sliced
- 4 ciabatta rolls, split
- 2 cups arugula
- 1 tablespoon balsamic glaze
Quick Steps:
- Season the chicken: Rub the chicken with olive oil, salt, and black pepper on both sides.
- Grill the chicken: Cook over medium-high heat for 4 to 5 minutes per side, or until the thickest part reaches 165°F and the surface has clear grill marks.
- Rest and slice: Let the chicken rest for 5 minutes, then slice it against the grain into thin strips.
- Toast the rolls: Split the ciabatta and toast the cut sides until lightly crisp, about 1 to 2 minutes.
- Build the sandwich: Spread pesto on both sides of each roll. Layer arugula, chicken, tomato, and mozzarella.
- Finish with glaze: Drizzle a little balsamic glaze over the top, close the sandwich, and press gently before serving.
Equipment for This Recipe:
- Outdoor grill or grill pan
- Tongs
- Instant-read thermometer
- Serrated knife
- Sheet pan for assembly
How to Serve This Dish:
Serve it whole with grilled zucchini or a small pile of potato chips. If you want the sandwich to look tidy, slice it straight down the middle and stack the halves slightly offset on the plate.
It eats well as a dinner sandwich because the chicken makes it filling enough to stand alone.
Pro Tips for This Recipe:
- Pound the chicken to even thickness so the thinner edge does not dry out before the center finishes.
- Toast the bread after grilling the chicken so you can use the warm pan or grill for both jobs.
- Use fresh mozzarella that has been patted dry with paper towels; otherwise the sandwich gets slick.
- If your pesto is thick, thin it with 1 teaspoon of olive oil so it spreads instead of tearing the bread.
Variations on This Dish:
- Chicken Pesto Melty: Add provolone instead of mozzarella if you want a firmer, more obvious melt.
- Sun-Dried Tomato Version: Add a few chopped sun-dried tomatoes for a deeper, sweeter tomato note.
- Spicy Basil Chicken: Stir a pinch of red pepper flakes into the pesto for a sharper finish.
Common Mistakes to Avoid with This Dish:
- Slicing the chicken too soon: The juices run out and soak the roll. Rest it for the full 5 minutes.
- Using too much pesto: The sandwich turns greasy and masks the chicken. Spread a thin layer.
- Skipping the toast: Soft rolls collapse under warm chicken and mozzarella.
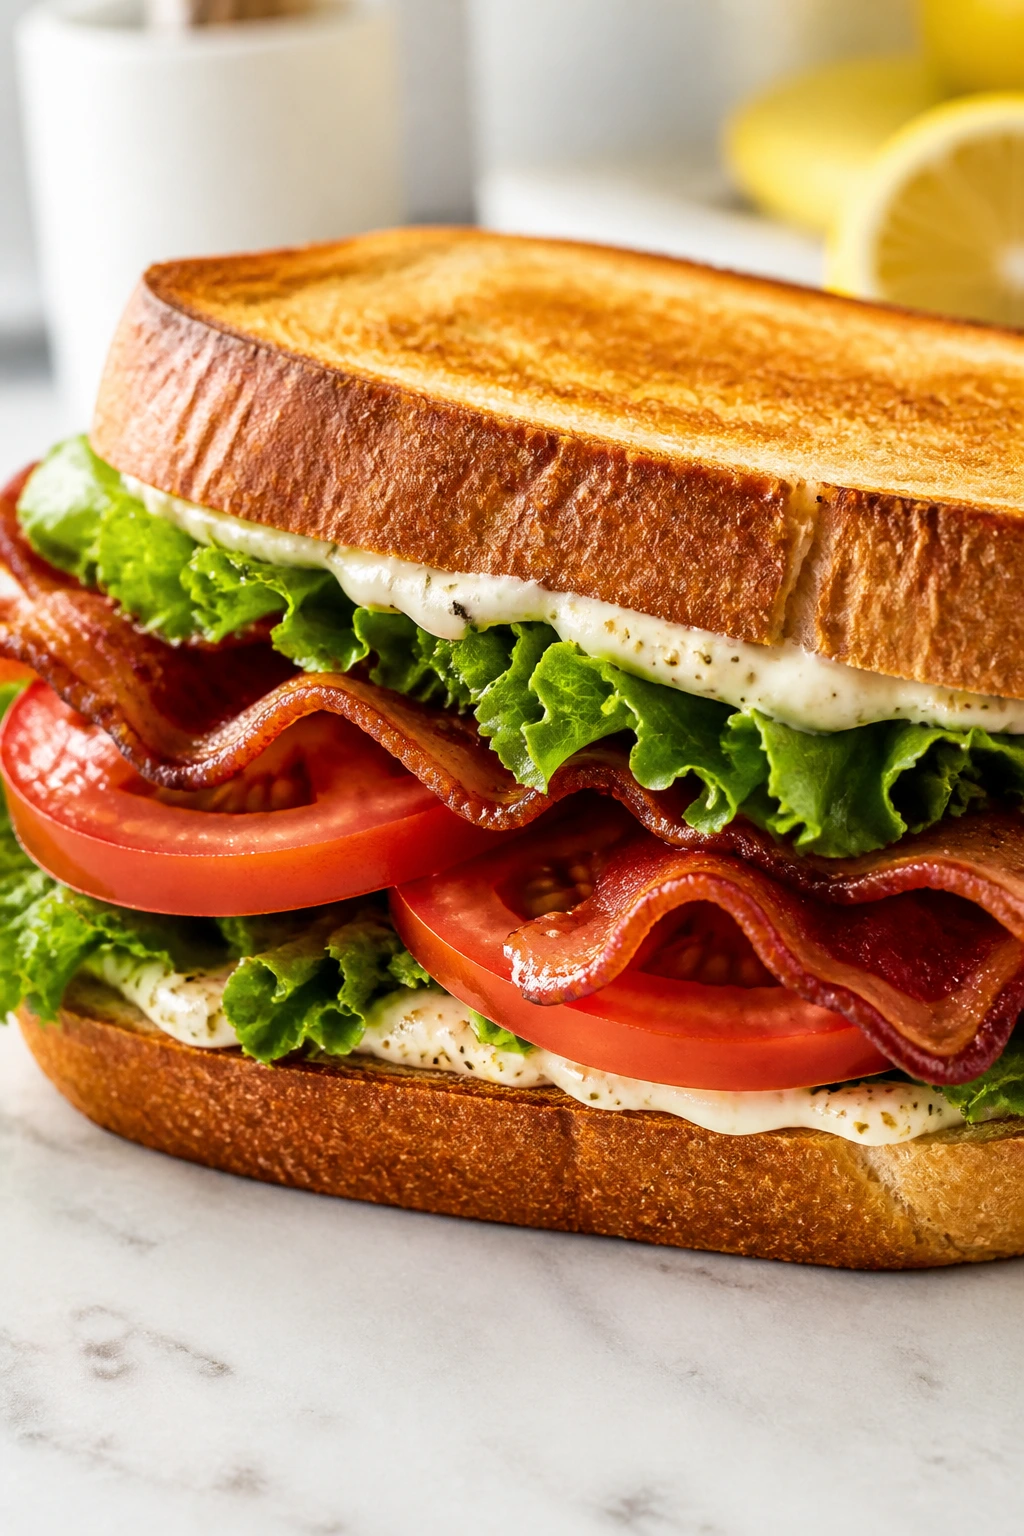
3. BLT with Lemon Pepper Mayo
A BLT is one of those sandwiches people think they know until they make one with bad bacon, pale tomatoes, and limp lettuce. Then it tastes like a missed opportunity. A proper BLT should be salty, crisp, juicy, and clean enough to make you want a second one before you finish the first.
The lemon pepper mayo is the small change that wakes the whole thing up. It doesn’t scream “look at me.” It just gives the sandwich a little lift so the bacon feels brighter and the tomato tastes more like tomato. That citrus note matters more than people think.
Why It Works:
The BLT is already built on contrast: hot bacon, cold lettuce, juicy tomato, soft bread. Lemon zest in the mayo keeps the richness from feeling heavy, and thick-cut bacon gives enough crunch that the sandwich does not vanish in three bites. Toasting the bread creates a barrier that helps keep the tomato juice in check for a little while, which is all you can ask from a BLT.
Key Ingredients:
- 8 slices thick-cut bacon
- 8 slices sandwich bread or sourdough
- 2 medium tomatoes, sliced
- 4 large leaves romaine or iceberg lettuce
- 1/2 cup mayonnaise
- 1 teaspoon lemon zest
- 1/2 teaspoon black pepper
- 1 tablespoon butter for toasting
Quick Steps:
- Cook the bacon: Lay the bacon in a cold skillet and cook over medium heat for 8 to 10 minutes, turning once, until crisp and browned.
- Mix the mayo: Stir the mayonnaise, lemon zest, and black pepper together in a small bowl.
- Toast the bread: Butter the bread lightly and toast it in a skillet until golden on both sides.
- Prep the fillings: Pat the bacon on paper towels, and slice the tomatoes if needed.
- Assemble the BLT: Spread the lemon pepper mayo on each slice of bread. Layer lettuce, tomato, bacon, and the second slice of bread.
- Serve immediately: Press gently, cut in half, and eat while the bacon still has crunch.
Equipment for This Recipe:
- Skillet
- Spatula or tongs
- Small bowl
- Paper towels
- Serrated knife
How to Serve This Dish:
A BLT belongs with potato chips, dill pickles, or a pile of cherry tomatoes sprinkled with salt. If you want to make it dinner-sized, add a bowl of melon on the side and call it done.
Cut it diagonally so the layers show, because a BLT should look a little wild.
Pro Tips for This Recipe:
- Cold-start bacon renders more fat and cooks more evenly than bacon tossed into a hot pan.
- Iceberg lettuce gives more crunch than soft butter lettuce and holds up better against tomato juice.
- Toast both sides of the bread if you know the sandwich will sit for even 5 minutes.
- If your tomatoes are especially juicy, scoop out the seedier center and use the firmer outer slices.
Variations on This Dish:
- BLT with Avocado: Add thin avocado slices for extra richness and a softer bite.
- Spicy BLT: Stir a little hot sauce into the mayo and add thin slices of jalapeño.
- Open-Face BLT: Serve it on one thick slice of toast for a lighter lunch-style plate.
Common Mistakes to Avoid with This Dish:
- Underbrowning the bacon: Limp bacon disappears under the other fillings. Cook it until it snaps.
- Skipping the toast: Soft bread absorbs tomato juice and breaks down fast.
- Overloading the tomato: Too many slices make the sandwich slippery and hard to eat.
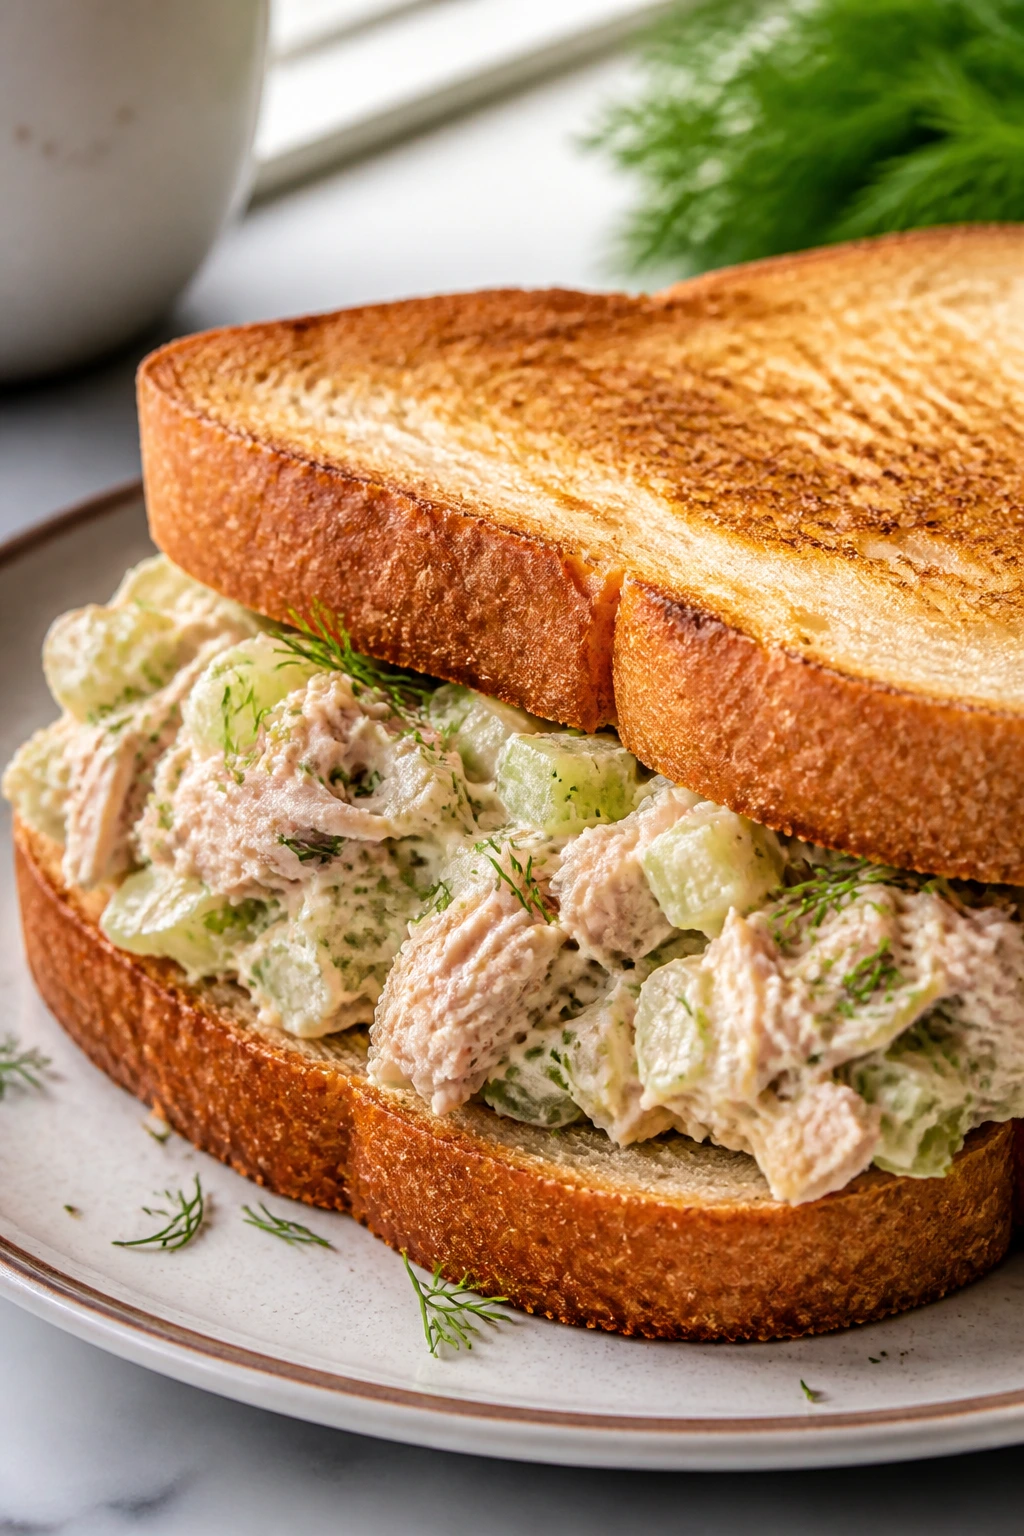
4. Tuna Salad Sandwich with Celery and Dill
Tuna salad is one of those fillings that can be forgettable or sharp and briny in the best way, and the difference comes down to texture. I like mine with enough celery for crunch, enough dill for a green, almost grassy note, and enough lemon to stop the mayo from feeling heavy. That’s the whole trick.
This version is what I make when I want lunch that still feels like dinner insurance. It keeps well for a day, tastes better after a short chill, and doesn’t need a grill or skillet. You can make the filling while the bread is still warming in the toaster.
Why It Works:
The mayonnaise and Greek yogurt give the tuna a creamy base, while lemon juice cuts through the richness so the salad does not taste muddy. Celery and red onion keep each bite from turning into a smooth paste, which is the failure mode of too many tuna salads. A little Dijon helps with the savory side and gives the filling a steadier flavor than salt alone.
Key Ingredients:
- 2 cans tuna in water or olive oil, drained, about 10 ounces total
- 1/4 cup mayonnaise
- 2 tablespoons plain Greek yogurt
- 1 celery stalk, finely diced
- 2 tablespoons finely diced red onion
- 1 tablespoon chopped fresh dill
- 1 teaspoon Dijon mustard
- 1 teaspoon lemon juice
- 1/2 teaspoon kosher salt
- 1/4 teaspoon black pepper
- 8 slices sandwich bread
- Lettuce leaves for serving
Quick Steps:
- Drain the tuna well: Press the tuna gently in the can or a fine-mesh strainer so the salad does not turn watery.
- Mix the filling: Combine tuna, mayonnaise, yogurt, celery, red onion, dill, Dijon, lemon juice, salt, and pepper in a bowl.
- Chill briefly: Let the tuna salad sit for 10 to 15 minutes so the dill and lemon settle into the mixture.
- Toast or leave soft: Toast the bread if you want more structure, or keep it soft if you plan to eat right away.
- Assemble the sandwich: Add lettuce, scoop on tuna salad, and close the sandwich.
- Cut and serve: Slice it in half and serve cold or just cool.
Equipment for This Recipe:
- Mixing bowl
- Fork
- Can opener
- Cutting board
- Butter knife or spatula for spreading
How to Serve This Dish:
Serve it with kettle chips or a dill pickle spear, and if you’re feeling extra sensible, pair it with sliced cucumbers and a little salt. The sandwich is especially good on soft sandwich bread when eaten right away.
If you use toasted bread, pack the tuna salad and bread separately and assemble at the table.
Pro Tips for This Recipe:
- Drain the tuna more than you think you need to; extra liquid shows up fast once the mayo goes in.
- Fresh dill tastes cleaner than dried dill here, and the difference is obvious.
- Dice the celery small so the crunch is there without feeling chunky and clumsy.
- A little extra lemon juice wakes the whole bowl up if the tuna tastes flat.
Variations on This Dish:
- Caper Tuna Salad: Add 1 tablespoon chopped capers for a saltier, more briny version.
- Crunchier Picnic Style: Fold in diced dill pickles for extra snap.
- No-Mayo Version: Replace half the mayo with mashed avocado for a softer, greener salad.
Common Mistakes to Avoid with This Dish:
- Leaving the tuna wet: The filling turns loose and slides out of the bread.
- Using too much onion: It takes over the sandwich and lingers in a bad way.
- Making it too far ahead on soft bread: The filling is fine for a day, but the assembled sandwich gets soggy.
5. Turkey, Avocado, and Crisp Lettuce Club
A club sandwich earns its keep when each layer does a different job. Turkey gives the body, avocado gives the creaminess, bacon gives the salt, and lettuce gives the snap. Put it on toasted bread and you have a sandwich that eats like lunch and dinner at the same time.
This one works especially well on summer nights because it does not ask for cooking beyond the bacon, and even that can be done in advance. The avocado should be ripe but still hold its shape, not so soft that it turns into green pudding the second you slice it. That detail matters more than people admit.
Why It Works:
The club format creates separate layers instead of one heavy filling, which keeps the sandwich from feeling soggy in the middle. Toasted bread gives structure, and the mayo-mustard spread adds enough tang to keep the avocado and turkey from tasting flat. Bacon adds salt and smoke, which is the reason the sandwich never feels boring.
Key Ingredients:
- 12 slices sandwich bread, toasted
- 8 slices cooked bacon
- 8 ounces sliced turkey breast
- 1 ripe avocado, sliced
- 4 romaine leaves
- 2 medium tomatoes, sliced
- 1/3 cup mayonnaise
- 1 tablespoon Dijon mustard
- 1/2 teaspoon black pepper
- 1 tablespoon butter, optional for toast
Quick Steps:
- Toast the bread: Toast all 12 slices until golden and dry enough to support a layered sandwich.
- Mix the spread: Stir the mayonnaise, Dijon, and black pepper together.
- Build the first layer: Spread the mayo mixture on 4 slices, then top with lettuce, tomato, and turkey.
- Add the middle layer: Place 4 more slices of toast on top, spread them lightly, and add avocado and bacon.
- Finish the club: Top with the remaining bread slices, press gently, and secure with toothpicks if needed.
- Slice and serve: Cut each club into halves or quarters for easier handling.
Equipment for This Recipe:
- Toaster or skillet
- Sharp knife
- Small bowl
- Toothpicks or long sandwich picks
- Cutting board
How to Serve This Dish:
Serve it with corn chips, a cucumber salad, or a handful of grapes if you want the plate to feel complete without extra work. Because it is tall, cut the club into triangles and let the layers show.
It’s a sturdy sandwich, so it travels well if wrapped tightly in parchment first.
Pro Tips for This Recipe:
- Dry the tomato slices with a paper towel before layering them.
- Slightly under-ripe avocado slices hold better than mushy ones.
- If you’re packing the club for later, keep the tomato separate and add it at the last minute.
- Bacon cooked until crisp but not brittle gives the best texture inside a layered sandwich.
Variations on This Dish:
- Club with Chipotle Mayo: Add a small spoonful of chipotle in adobo to the spread for heat.
- Smoked Turkey Club: Use smoked turkey if you want a deeper, deli-style flavor.
- Lighter Club: Skip one layer of bread and build it as an open-faced sandwich.
Common Mistakes to Avoid with This Dish:
- Using wet tomato slices: They slide around and soften the bread fast.
- Skipping the toast: A club without toasted bread gets heavy and soft in the middle.
- Cutting it before pressing lightly: The layers can slip apart if the sandwich is not settled.
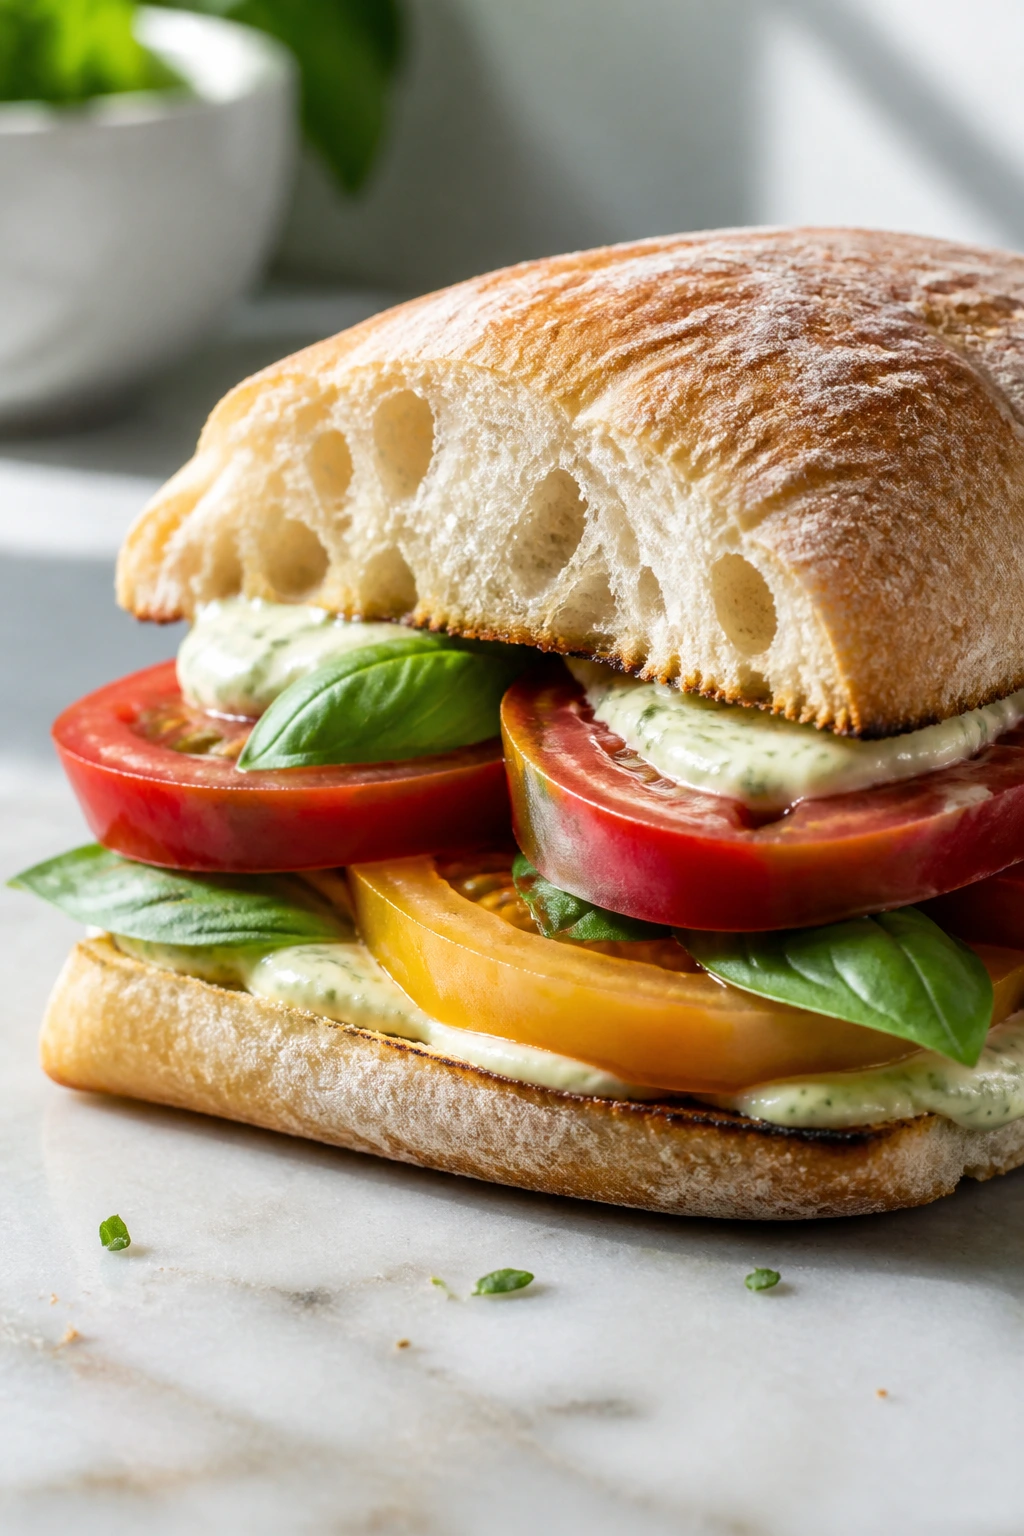
6. Caprese Sandwich with Balsamic Glaze
A caprese sandwich lives or dies on ingredients. There is nowhere to hide. You need tomatoes that taste like tomatoes, mozzarella that actually has some milky softness, basil with a sharp smell when you tear it, and bread that gets crisp at the edges without going rock-hard. When it’s right, it tastes like the cleanest version of summer.
I like this one on days when dinner should feel light but not thin. The balsamic glaze gives the sweet-sour finish that keeps the sandwich from reading as salad on bread, which is a trap a lot of caprese sandwiches fall into. The grill or skillet on the bread matters because it gives the cheese a small amount of warmth.
Why It Works:
Fresh mozzarella, ripe tomato, and basil are already a complete flavor set, but they need salt and acid to stop the sandwich from tasting one-note. Balsamic glaze gives a sticky, concentrated finish that clings to the bread instead of running everywhere. Toasting the bread helps the sandwich stay intact, especially if the tomatoes are juicy.
Key Ingredients:
- 8 slices ciabatta or focaccia-style bread
- 2 large ripe tomatoes, sliced
- 8 ounces fresh mozzarella, sliced
- 1 packed cup fresh basil leaves
- 2 tablespoons olive oil
- 1/2 teaspoon kosher salt
- 1/4 teaspoon black pepper
- 2 tablespoons balsamic glaze
Quick Steps:
- Toast the bread: Brush the cut sides with olive oil and toast until lightly crisp, about 1 to 2 minutes.
- Season the tomatoes: Sprinkle tomato slices with salt and pepper and let them sit for 5 minutes.
- Layer the sandwich: Add mozzarella, tomato, and basil leaves to the toasted bread.
- Drizzle the glaze: Spoon a thin line of balsamic glaze over the tomatoes.
- Close and press: Top with the second piece of bread and press gently so the filling settles.
- Cut and serve: Slice with a serrated knife and eat while the bread is still warm.
Equipment for This Recipe:
- Skillet or grill pan
- Pastry brush or spoon
- Serrated knife
- Cutting board
- Small plate for seasoning tomatoes
How to Serve This Dish:
Serve it with a simple green salad dressed in olive oil and lemon, or with chilled melon if you want something even lighter. The sandwich tastes best cut in half and eaten soon after assembling.
If you want a prettier plate, tuck extra basil leaves around the edge instead of burying them inside.
Pro Tips for This Recipe:
- Pat the mozzarella dry so the sandwich doesn’t slide apart.
- Use a light hand with the balsamic glaze; too much makes the sandwich sticky and sweet.
- Salt the tomatoes before assembly to sharpen their flavor.
- If the bread is very airy, toast it longer so it can hold up to the fillings.
Variations on This Dish:
- Prosciutto Caprese: Add 2 to 3 slices of prosciutto per sandwich for a saltier, more filling version.
- Pesto Caprese: Swap the olive oil for a thin layer of pesto.
- Grilled Caprese: Grill the assembled sandwich in a skillet for a warmer, melty finish.
Common Mistakes to Avoid with This Dish:
- Using pale tomatoes: The sandwich tastes flat and watery. Buy tomatoes that smell sweet at the stem.
- Overdoing the glaze: Too much balsamic makes it taste syrupy.
- Skipping the drying step for mozzarella: Extra moisture leads to a slippery sandwich.
7. Shrimp Po’ Boy with Quick Remoulade
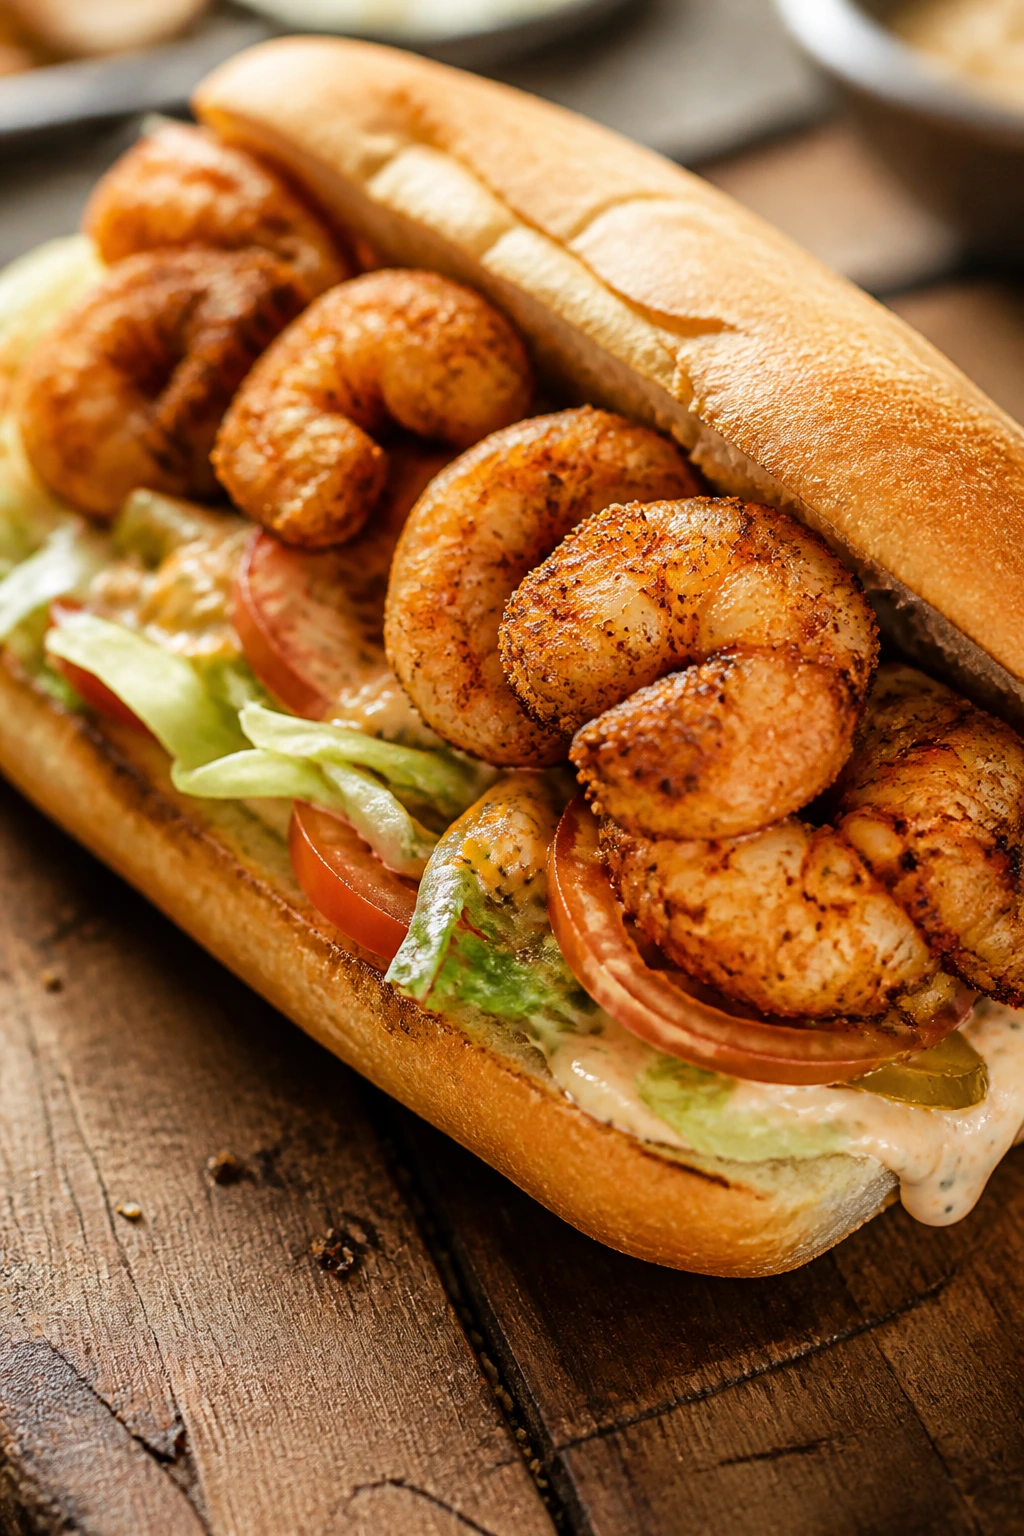
A shrimp po’ boy should be crunchy, a little messy, and full of seasoning. If the shrimp are bland or the roll is too soft, the whole thing collapses. But when the coating is crisp and the remoulade has enough acid to cut through the fried shrimp, you get one of the best summer sandwiches there is.
This version is straightforward: seasoned shrimp, quick pan-fry, shredded lettuce, tomato, and a remoulade that comes together in one bowl. It tastes like something from a beach shack, even if you’re standing in your own kitchen in bare feet.
Why It Works:
Cornmeal in the coating gives the shrimp a rougher, crunchier crust than flour alone, and that texture holds up under the remoulade. The sauce needs mayonnaise, Dijon, pickle relish, lemon, and hot sauce because po’ boys taste flat without acid and bite. A soft roll is traditional, but it should still be toasted so the filling doesn’t soak through immediately.
Key Ingredients:
- 1 pound large shrimp, peeled and deveined
- 1/2 cup all-purpose flour
- 1/2 cup fine cornmeal
- 1 teaspoon paprika
- 1/2 teaspoon garlic powder
- 1/2 teaspoon kosher salt
- 1/4 teaspoon black pepper
- 1 egg, beaten
- 2 tablespoons milk
- 1/2 cup mayonnaise
- 1 tablespoon Dijon mustard
- 1 tablespoon sweet pickle relish
- 1 teaspoon hot sauce
- 1 teaspoon lemon juice
- 4 soft sandwich rolls or hoagie rolls
- Shredded lettuce and sliced tomato for serving
Quick Steps:
- Make the remoulade: Stir together mayonnaise, Dijon, relish, hot sauce, and lemon juice. Chill while you cook the shrimp.
- Set up the coating: Mix flour, cornmeal, paprika, garlic powder, salt, and pepper in one bowl. Beat the egg and milk in another.
- Coat the shrimp: Dip each shrimp in the egg mixture, then in the dry mixture, pressing lightly so the coating sticks.
- Fry the shrimp: Heat 1/2 inch of oil in a skillet to 350°F and fry the shrimp for 2 to 3 minutes per side until golden and crisp.
- Toast the rolls: Split the rolls and toast them lightly in the skillet or oven.
- Assemble the po’ boys: Spread remoulade on the bread, add lettuce, tomato, and shrimp, then close and serve right away.
Equipment for This Recipe:
- Large skillet
- Thermometer for oil
- Mixing bowls
- Tongs
- Paper towels
How to Serve This Dish:
Serve with potato wedges, coleslaw, or a pile of kettle chips. If the rolls are large, one po’ boy can feed two lighter eaters, but I rarely trust that kind of plan.
Wrap the sandwich in parchment for the classic casual feel.
Pro Tips for This Recipe:
- Dry the shrimp well before coating; wet shrimp make the crust patchy.
- Keep the oil around 350°F so the coating crisps before the shrimp overcook.
- Toast the rolls after frying, not before, so they stay warm and sturdy.
- Add a little extra lemon juice to the remoulade if the sandwich tastes heavy.
Variations on This Dish:
- Blackened Shrimp Po’ Boy: Skip the breading and sear seasoned shrimp in a hot skillet.
- Oven-Crisped Version: Bake breaded shrimp on a rack at 425°F if you do not want to fry.
- Spicy Pickle Remoulade: Use chopped dill pickles instead of sweet relish for a sharper sauce.
Common Mistakes to Avoid with This Dish:
- Oil that’s too cool: The shrimp absorb oil and turn greasy. Use a thermometer.
- Overcrowding the skillet: The temperature drops and the crust steams instead of crisping.
- Building too early: The bread softens under the sauce. Assemble right before eating.
8. Steak and Chimichurri Sandwich
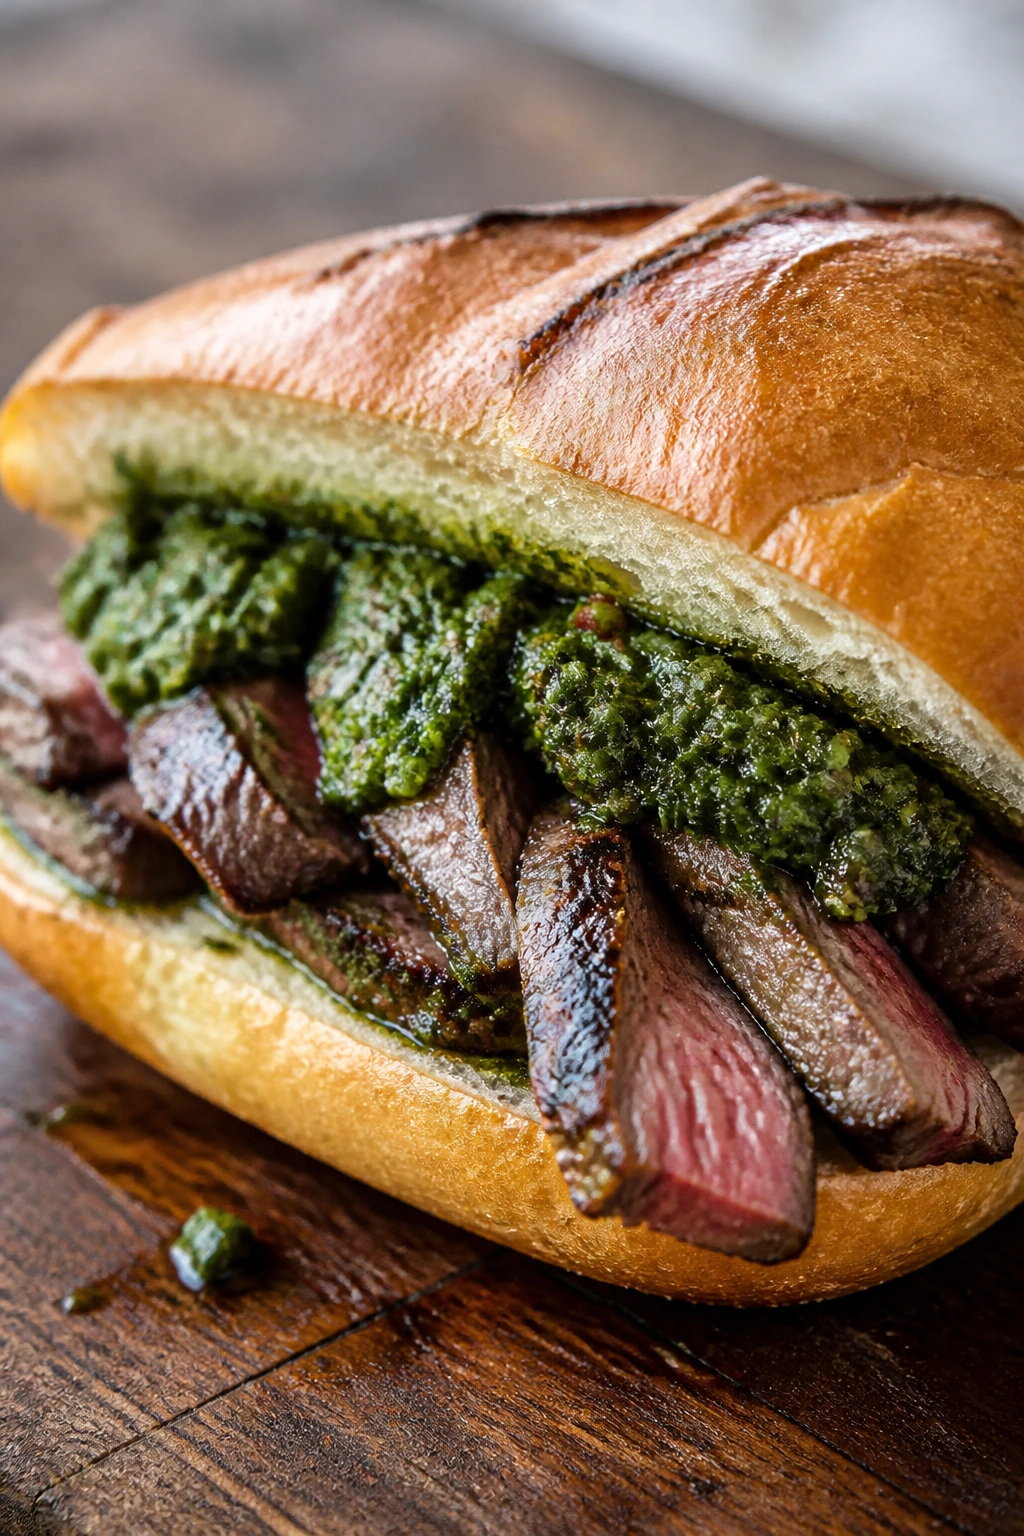
This is the sandwich for when you want something bold but not complicated. Steak plus chimichurri is one of those combinations that works because it refuses to be subtle: charred beef, sharp herbs, garlic, vinegar, and a good roll that can catch the dripping green sauce. It tastes expensive, even if you made it on a Tuesday.
The trick is slicing the steak thin and against the grain. Do that, and it stays tender. Skip it, and the sandwich turns chewy fast. Chimichurri is the thing that keeps the whole sandwich from feeling heavy, which is why I prefer it to a thick steak sauce here.
Why It Works:
Flank steak or skirt steak gives you deep beef flavor quickly, and the short high-heat cook keeps the center juicy. Chimichurri cuts through the richness with parsley, garlic, vinegar, and olive oil, so the sandwich stays bright rather than dense. A toasted roll keeps the juices under control and adds some crunch against the soft meat.
Key Ingredients:
- 1 1/2 pounds flank steak
- 2 teaspoons kosher salt
- 1 teaspoon black pepper
- 1 tablespoon olive oil
- 4 sturdy sandwich rolls
- 1 cup parsley leaves, finely chopped
- 2 garlic cloves, minced
- 2 tablespoons red wine vinegar
- 1/3 cup olive oil
- 1/4 teaspoon red pepper flakes
- 2 cups arugula or baby greens
- 1 small red onion, thinly sliced
Quick Steps:
- Season the steak: Rub the steak with salt, pepper, and olive oil.
- Make the chimichurri: Stir parsley, garlic, vinegar, olive oil, red pepper flakes, and a pinch of salt in a bowl.
- Cook the steak: Sear over medium-high heat for 4 to 5 minutes per side for medium-rare, or until the internal temperature reaches 130°F to 135°F.
- Rest and slice: Let the steak rest for 10 minutes, then slice very thinly against the grain.
- Toast the rolls: Warm the rolls cut-side down until lightly crisp.
- Assemble: Add greens, steak, onion, and plenty of chimichurri, then close and serve.
Equipment for This Recipe:
- Cast-iron skillet or grill
- Sharp carving knife
- Cutting board
- Small bowl
- Tongs
How to Serve This Dish:
Serve it with roasted potatoes, a cucumber salad, or grilled corn if you want a full plate. The sandwich is rich enough that something crisp and cold beside it helps.
If you want cleaner eating, wrap the bottom half in parchment and leave the top open.
Pro Tips for This Recipe:
- Slice the steak across the grain or it will chew like rubber bands.
- Make the chimichurri at least 10 minutes ahead so the garlic softens.
- Warm the rolls just enough to toast the crumb; you do not want them hard.
- Add the onions last so the sandwich keeps some bite.
Variations on This Dish:
- Steak Chimichurri Wrap: Use large tortillas if you want less bread and a tighter wrap.
- Spicy Herb Version: Add extra red pepper flakes or a minced jalapeño to the sauce.
- Leftover Steak Sandwich: Thinly slice leftover grilled steak and warm it briefly before assembling.
Common Mistakes to Avoid with This Dish:
- Overcooking the steak: Thin-sliced steak dries out fast. Pull it early and rest it well.
- Skipping the grain check: Slicing the wrong direction makes the meat tough.
- Using too little chimichurri: The sandwich needs the sauce to keep the beef from feeling dry.
9. Greek Chicken Pita with Tzatziki
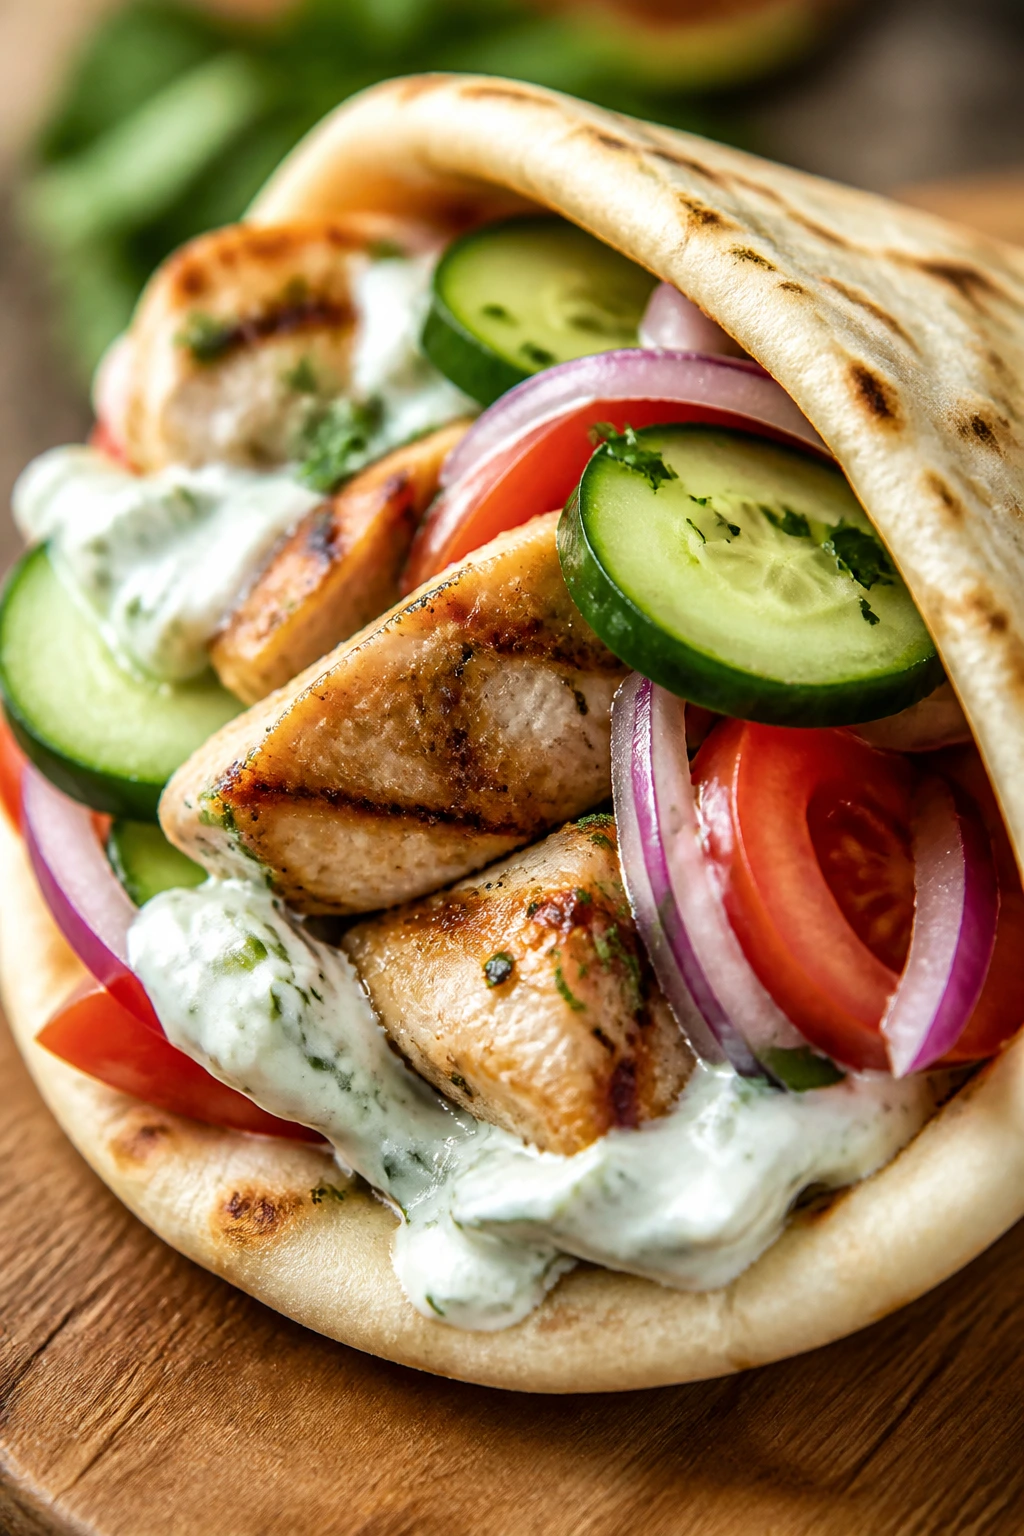
A Greek chicken pita is one of the easiest summer sandwiches to make well because the parts are simple and each one has a job. The chicken should taste lemony and garlicky, the tzatziki should be cold and thick, and the vegetables should stay crisp enough to crack when you bite through them. That contrast is the whole point.
I like using thighs here because they stay juicier than breasts and handle the grill or skillet without drying out. Stuff them into warm pita with cucumber, tomato, and red onion, and you have a dinner that feels refreshing instead of heavy.
Why It Works:
Chicken thighs give you more forgiveness on heat, which matters on a busy night when you are trying to get dinner on the table without hovering over the pan. Tzatziki adds coolness and moisture, but it also needs thick yogurt so it does not flood the pita. Warm bread, cold sauce, and crisp vegetables make the sandwich taste balanced from the first bite to the last.
Key Ingredients:
- 1 1/4 pounds boneless, skinless chicken thighs
- 2 tablespoons olive oil
- 2 tablespoons lemon juice
- 2 garlic cloves, minced
- 1 teaspoon dried oregano
- 1 teaspoon kosher salt
- 1/2 teaspoon black pepper
- 4 pita rounds
- 1 cup tzatziki
- 1 cucumber, sliced
- 2 tomatoes, chopped
- 1/2 red onion, thinly sliced
Quick Steps:
- Marinate the chicken: Toss the chicken with olive oil, lemon juice, garlic, oregano, salt, and pepper. Let it sit for 15 minutes if you have time.
- Cook the chicken: Grill or skillet-cook over medium-high heat for 5 to 6 minutes per side until the thickest part reaches 165°F.
- Rest and slice: Rest for 5 minutes, then slice into strips.
- Warm the pita: Heat the pita in a dry skillet for 20 to 30 seconds per side until pliable.
- Fill the pita: Spread tzatziki inside, then add chicken, cucumber, tomato, and onion.
- Serve immediately: Fold gently and eat while the pita is still warm.
Equipment for This Recipe:
- Grill pan or skillet
- Tongs
- Mixing bowl
- Knife and cutting board
- Small bowl for tzatziki
How to Serve This Dish:
Serve with lemon potatoes, olives, or a simple chopped salad if you want to lean into the Greek-style plate. It also works well with a few spoonfuls of extra tzatziki on the side for dipping.
If you’re feeding a group, lay out the fillings and let everyone build their own pita.
Pro Tips for This Recipe:
- Warm pita in a dry skillet instead of the microwave so it stays soft, not rubbery.
- Slice the chicken after resting or the juices will run into the pita and soften it too fast.
- Use thick tzatziki; thin yogurt sauce will soak the bread.
- A pinch of extra salt on the tomatoes makes the whole sandwich taste brighter.
Variations on This Dish:
- Chicken Gyro Style: Add shredded lettuce and a few fries inside the pita if you want a more diner-style version.
- Vegetarian Greek Pita: Swap the chicken for grilled halloumi or roasted chickpeas.
- Spicy Tzatziki: Stir in a pinch of cayenne or a spoonful of minced jalapeño.
Common Mistakes to Avoid with This Dish:
- Overstuffing the pita: It tears before you get to the table.
- Using watery vegetables without draining them: The pita turns soggy quickly.
- Skipping the rest on the chicken: You lose the juices that keep the filling tender.
10. Italian Sub with Pickled Peppers
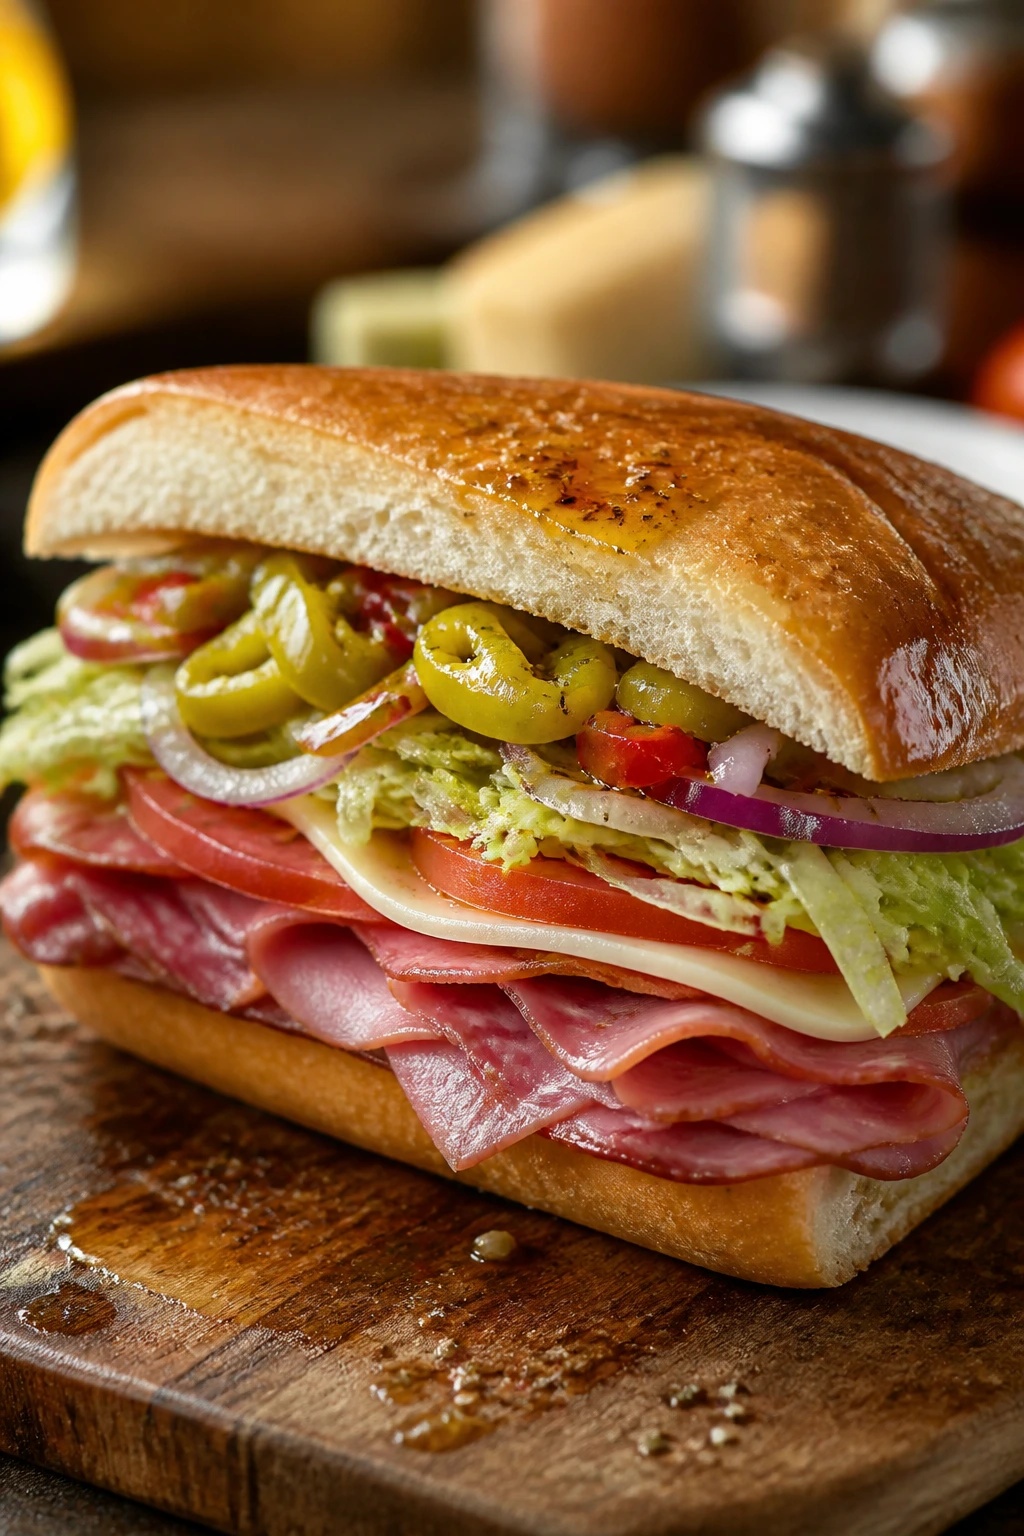
An Italian sub works because every layer is loud enough to matter. Salami gives fat and spice, ham adds salt, provolone brings the mellow note, and the pickled peppers cut through all of it. There is no shy version of this sandwich, and that’s the appeal.
This is the one I like when dinner should feel like a deli counter without requiring a deli run. The vinegar from the dressing and the brine from the peppers do a lot of the work. You barely need to cook anything, which is a relief when the evening is already hot.
Why It Works:
A good sub depends on contrast: cured meat, creamy cheese, sharp vinegar, crisp lettuce, and bread that can hold everything together. The oil-and-vinegar dressing softens the roll just enough without making it collapse. Pickled peppers are the part that keep the whole sandwich from tasting too salty and one-dimensional.
Key Ingredients:
- 4 sub rolls, split lengthwise
- 4 ounces Genoa salami
- 4 ounces ham, thinly sliced
- 4 ounces provolone, sliced
- 1 cup shredded lettuce
- 1 tomato, thinly sliced
- 1/2 red onion, thinly sliced
- 1/2 cup pickled peppers or pepperoncini
- 2 tablespoons olive oil
- 1 tablespoon red wine vinegar
- 1 teaspoon dried oregano
- 1/2 teaspoon kosher salt
- 1/4 teaspoon black pepper
Quick Steps:
- Mix the dressing: Stir olive oil, vinegar, oregano, salt, and pepper together.
- Prep the rolls: Lightly hollow out some of the soft interior if the rolls are very fluffy.
- Layer the meats and cheese: Add salami, ham, and provolone to each roll.
- Add the vegetables: Top with lettuce, tomato, onion, and pickled peppers.
- Drizzle the dressing: Spoon a little dressing over each sub, then close and press gently.
- Serve or wrap: Eat right away or wrap tightly for 10 minutes so the flavors settle.
Equipment for This Recipe:
- Serrated knife
- Cutting board
- Small bowl
- Spoon
- Parchment or deli paper
How to Serve This Dish:
Serve it with potato chips, a cold pasta salad, or a handful of pickles. The sandwich is bold enough to stand alone, so you do not need to overthink the plate.
Wrapping it in parchment makes it easier to hold and keeps the filling from spilling out at the first bite.
Pro Tips for This Recipe:
- Use a roll with a thin crust and a soft crumb so it bends, not cracks.
- Drain the pickled peppers before adding them or the bread gets wet fast.
- Stack the lettuce near the bread to create a small moisture barrier.
- If the sub tastes too salty, add more tomato and a few extra drops of vinegar.
Variations on This Dish:
- Turkey Italian Sub: Replace the ham with turkey for a lighter deli-style version.
- Hot Toasted Sub: Toast the whole sandwich for 2 to 3 minutes until the cheese softens.
- Veggie Italian Sub: Swap the meats for marinated artichokes and extra provolone.
Common Mistakes to Avoid with This Dish:
- Using too much dressing: The roll gets soggy and falls apart.
- Skipping the pepper brine: The sandwich loses the sharp bite that makes it work.
- Overstuffing the sub: You cannot close it cleanly, and the fillings scatter everywhere.
11. Grilled Halloumi and Zucchini Sandwich

Halloumi is one of the few cheeses that can walk onto a grill and come out looking confident. It browns at the edges, stays firm in the middle, and gives you a salty bite that plays well with vegetables. In a summer sandwich, that matters a lot because you do not need meat to create heft.
Zucchini gives this sandwich a soft vegetal sweetness, and pesto or a similar herb spread pulls everything together. I like this on nights when the grill is already hot and I do not want another heavy meal. It feels alive, not weighed down.
Why It Works:
Halloumi has a high melting point, which means it browns before it collapses, giving you a crisp surface and a squeaky center. Zucchini cooks fast and picks up grill flavor in a few minutes, so you get enough char without losing shape. The sandwich needs a spread with some fat and garlic — pesto is the easy choice — so the vegetables don’t feel dry.
Key Ingredients:
- 8 ounces halloumi, sliced 1/4-inch thick
- 2 medium zucchini, sliced lengthwise
- 2 tablespoons olive oil
- 1/2 teaspoon black pepper
- 1/2 teaspoon kosher salt
- 4 ciabatta rolls or sturdy buns
- 1/3 cup pesto
- 1 cup arugula
- 1 tablespoon lemon juice
Quick Steps:
- Prep the vegetables: Toss zucchini with olive oil, salt, and pepper.
- Grill the zucchini: Cook over medium-high heat for 2 to 3 minutes per side until softened and marked.
- Grill the halloumi: Cook the cheese for 1 to 2 minutes per side until deeply golden.
- Toast the rolls: Warm the bread cut-side down until lightly crisp.
- Assemble the sandwich: Spread pesto on the rolls, then layer arugula, zucchini, and halloumi.
- Finish with lemon: Add a small squeeze of lemon juice before closing the sandwich.
Equipment for This Recipe:
- Grill or grill pan
- Tongs
- Knife and cutting board
- Pastry brush or spoon
- Plate for assembly
How to Serve This Dish:
Serve it with grilled corn, sliced melon, or a tomato salad if you want to stay in the same summer lane. It’s a filling vegetarian dinner, so you do not need much beside it.
Cut it in half while warm so the halloumi stays firm instead of cooling into a block.
Pro Tips for This Recipe:
- Pat the halloumi dry before grilling so it browns instead of steaming.
- Cut zucchini lengthwise, not into rounds, so it sits neatly in the sandwich.
- Pesto should be thin enough to spread; if it’s thick, loosen it with olive oil.
- A little lemon juice at the end keeps the cheese from tasting too dense.
Variations on This Dish:
- Halloumi and Tomato: Add sliced tomato if you want more juiciness.
- Sun-Dried Tomato Spread: Swap pesto for a sun-dried tomato spread for a sweeter, deeper flavor.
- Spicy Halloumi Sandwich: Add sliced pickled jalapeños for heat.
Common Mistakes to Avoid with This Dish:
- Wet halloumi: It won’t brown properly.
- Overcooking the cheese: Halloumi should be browned, not leathery.
- Skipping the spread: Without pesto or something similar, the sandwich tastes dry.
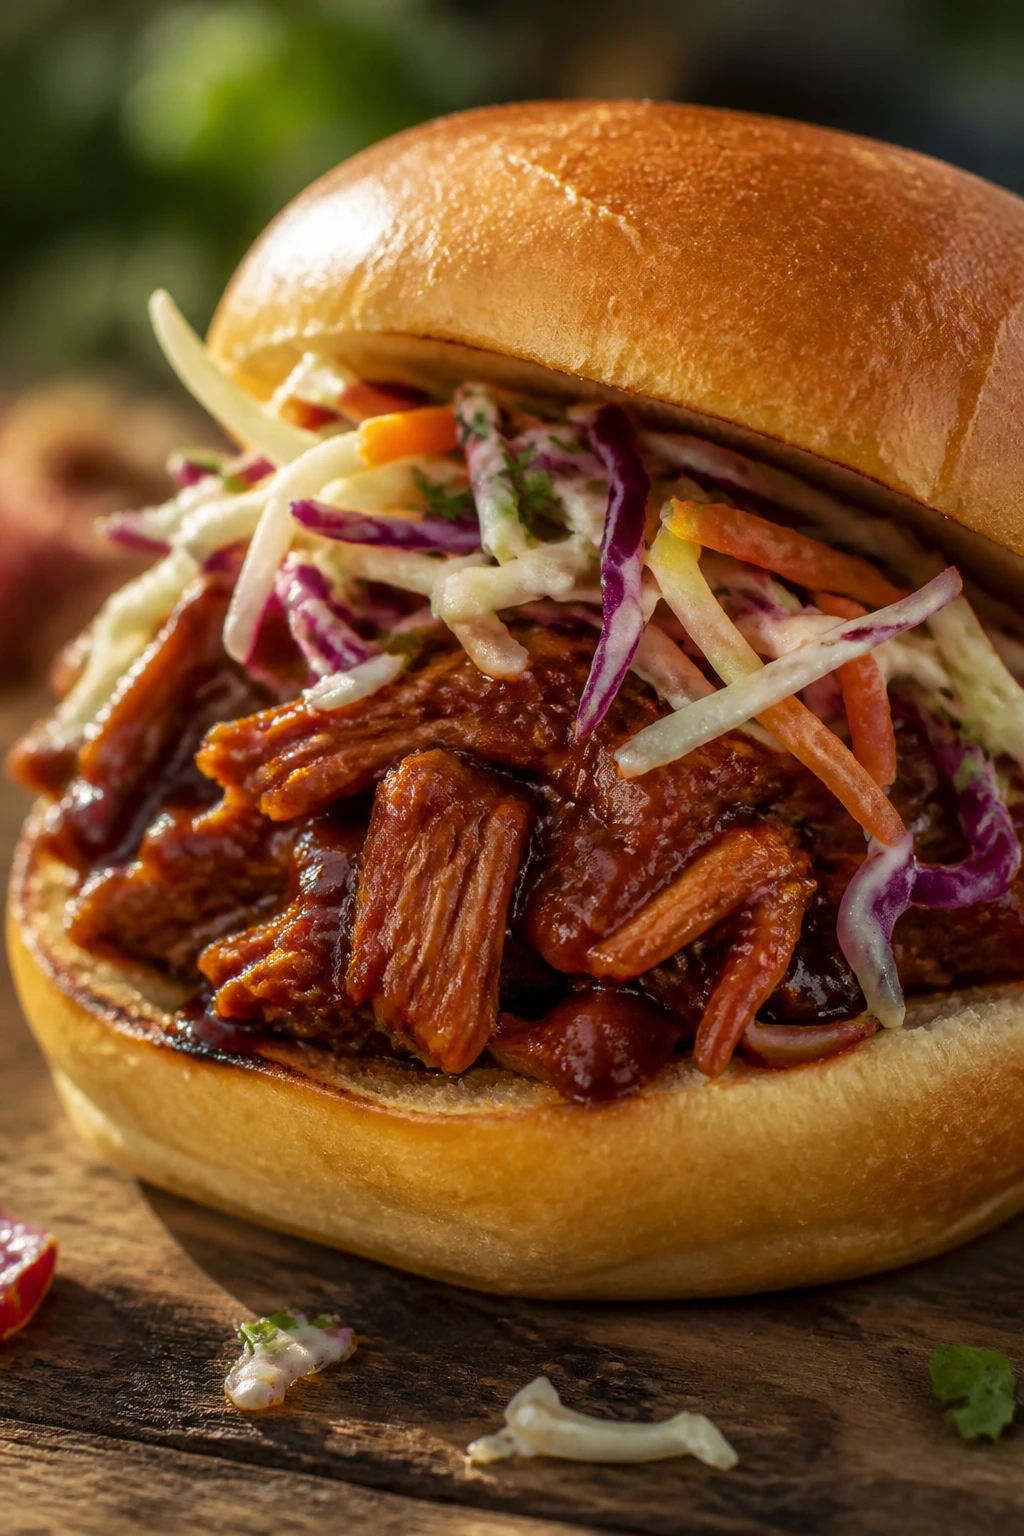
12. Pulled Pork Sliders with Vinegar Slaw
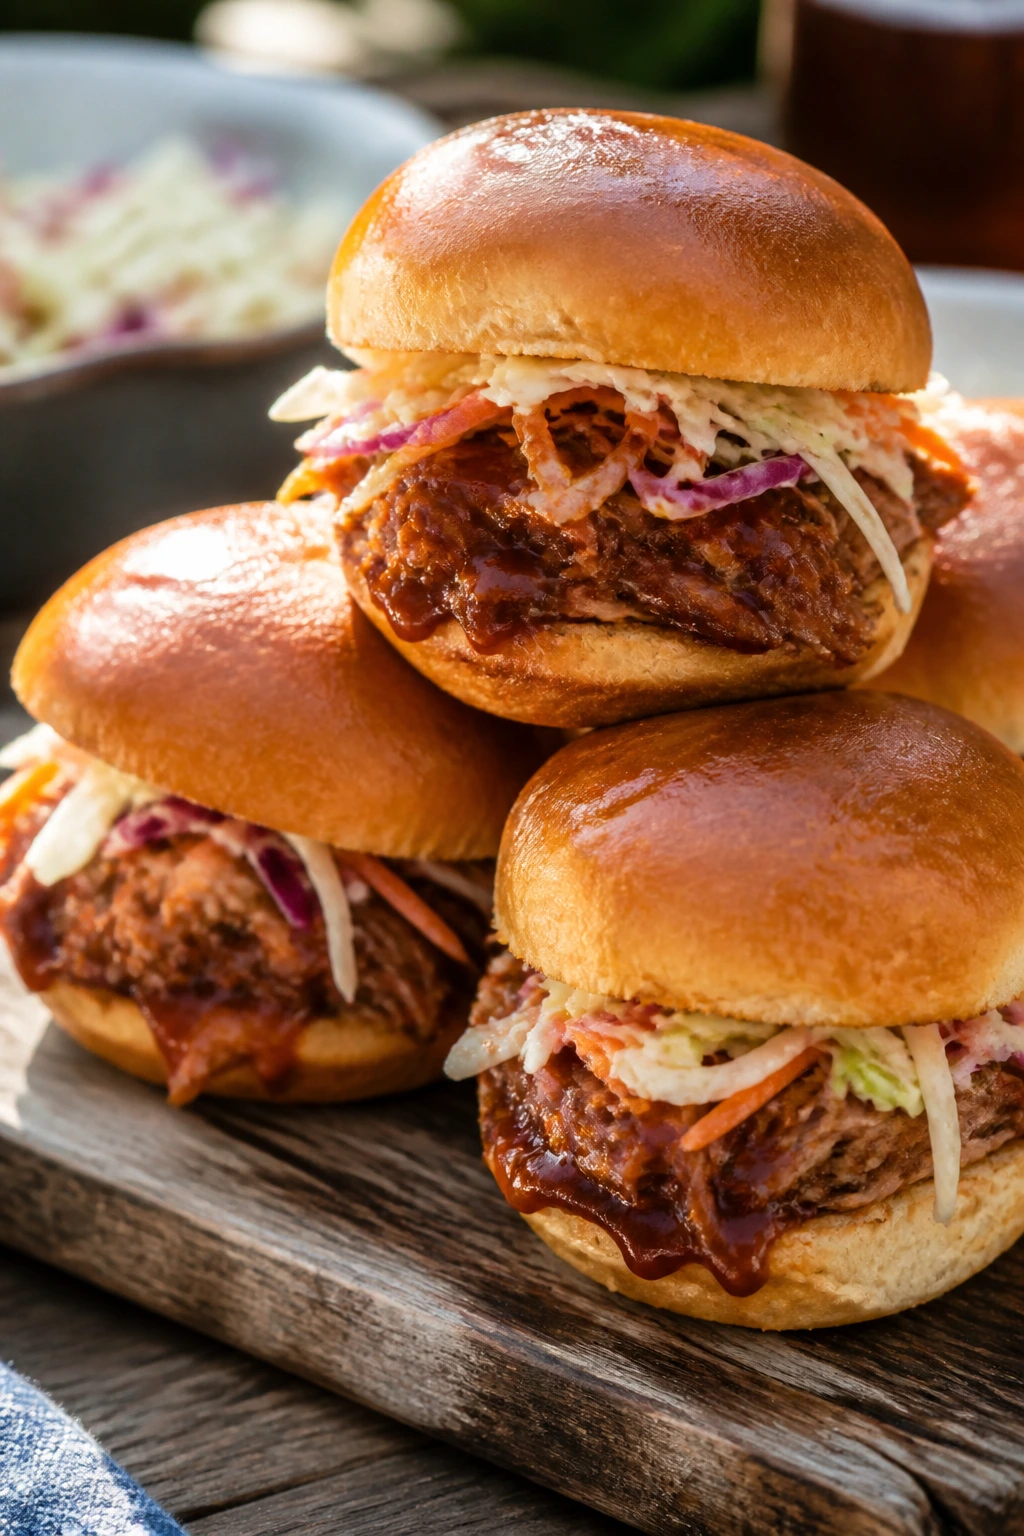
Pulled pork sliders are useful in the way a good backup plan is useful: they save dinner when the evening has gone sideways. Use leftover pulled pork, heat it with a little barbecue sauce, pile on vinegar slaw, and suddenly you have a sandwich that tastes like more effort than it required. That’s good summer cooking.
The vinegar slaw is the real workhorse. It cuts the richness of the pork and keeps the slider from tasting like a soft, sweet lump. Brioche slider buns are nice here, but they should be toasted first so they don’t turn pasty.
Why It Works:
Pulled pork can lean heavy if you do not add acid and crunch. The slaw fixes that problem with vinegar, shredded cabbage, and a little sugar for balance. Smaller buns mean you get a better ratio of bread to filling, and the sliders are easier to handle at a casual dinner or cookout.
Key Ingredients:
- 3 cups cooked pulled pork
- 1/2 cup barbecue sauce
- 12 slider buns
- 2 cups shredded green cabbage
- 1 cup shredded red cabbage
- 1/4 cup apple cider vinegar
- 1 tablespoon sugar
- 1 tablespoon olive oil
- 1/2 teaspoon kosher salt
- 1/4 teaspoon black pepper
Quick Steps:
- Make the slaw: Toss green cabbage, red cabbage, vinegar, sugar, olive oil, salt, and pepper in a bowl.
- Warm the pork: Heat the pulled pork with barbecue sauce in a skillet over medium-low heat until hot and glossy.
- Toast the buns: Split and toast the slider buns lightly.
- Build the sliders: Spoon pork onto the bottom buns and top with a mound of slaw.
- Close and press: Add the tops, press gently, and serve warm.
Equipment for This Recipe:
- Skillet
- Mixing bowl
- Tongs or spoon
- Sheet pan for toasting buns
- Sharp knife
How to Serve This Dish:
These are party-friendly, but they also work as a weeknight dinner with baked beans or corn on the cob. Serve 2 to 3 sliders per person, depending on what else is on the table.
If the pork is especially saucy, line the serving plate with parchment so cleanup stays easy.
Pro Tips for This Recipe:
- Toast the buns or the barbecue sauce will soften them too fast.
- Let the slaw sit for 10 minutes so the cabbage relaxes slightly.
- Warm the pork just until hot; boiling it dries it out.
- If your sauce is very sweet, add a teaspoon of vinegar to sharpen it.
Variations on This Dish:
- Spicy Carolina Style: Use a vinegar-forward sauce and add sliced pickles.
- Cheesy Slider Version: Add a thin slice of cheddar to the hot pork.
- Leftover Chicken Sliders: Use shredded rotisserie chicken in the same method.
Common Mistakes to Avoid with This Dish:
- Using cold pork straight from the fridge: The filling feels dense and greasy.
- Skipping the slaw: The slider loses its brightness.
- Making the buns too soft: They fall apart under the sauce.
13. Smash Burger with Pickles and Onion
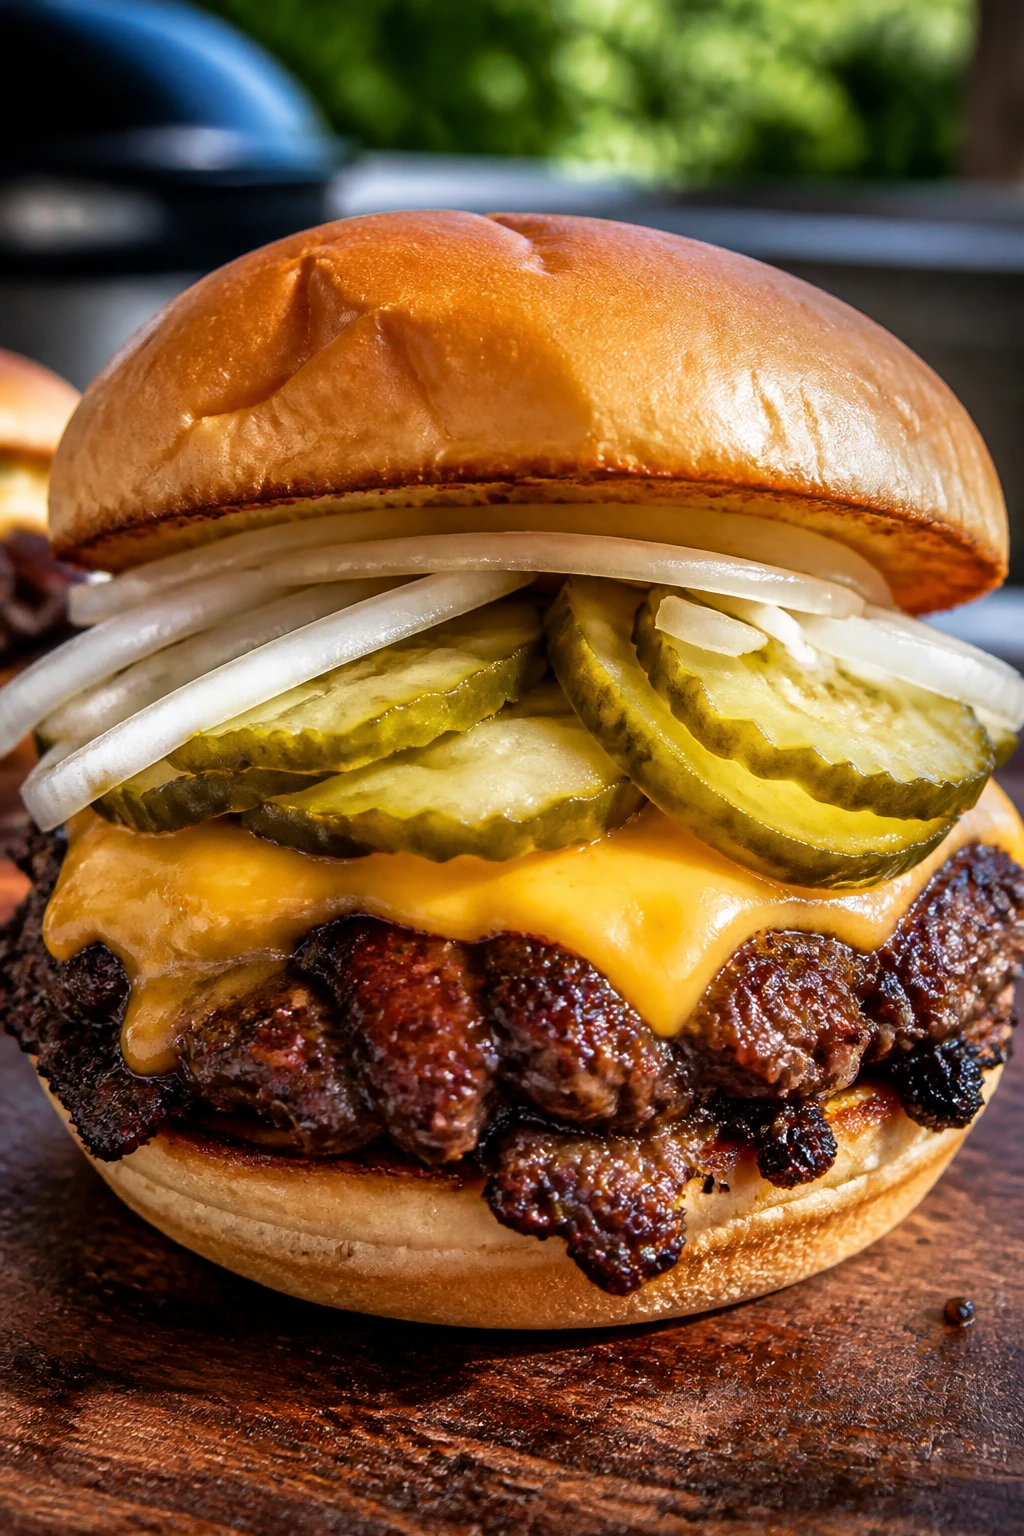
A smash burger is still one of the best things you can make on a hot night because it cooks fast and tastes like it came from a place with a grease-stained griddle and a line out the door. The thin patty gets a deeply browned crust, the onion melts into the beef, and the pickles cut through everything with just enough acid to keep you interested.
This is not the burger for stacking up every topping in the refrigerator. Keep it tight. Keep it sharp. A good smash burger should be aggressive in the first bite and tidy enough to finish without losing the bun in your lap.
Why It Works:
The smash method gives you more browned surface area, and browned surface area means flavor. Using 80/20 beef keeps the burgers juicy enough to survive the high heat, while American cheese melts into the hot meat without fighting it. Pickles and onion keep the burger from getting heavy, especially if you use a soft toasted bun with a little mayo and mustard.
Key Ingredients:
- 1 1/2 pounds ground beef, 80/20
- 1 teaspoon kosher salt
- 1/2 teaspoon black pepper
- 4 burger buns
- 4 slices American cheese
- 1 small onion, very thinly sliced
- 12 dill pickle slices
- 2 tablespoons mayonnaise
- 1 tablespoon mustard
- 1 tablespoon butter for toasting buns
Quick Steps:
- Shape the beef: Divide the ground beef into 4 loose balls and season lightly.
- Toast the buns: Butter the cut sides and toast them until golden.
- Smash the patties: Press each beef ball onto a very hot skillet and smash thin with a sturdy spatula.
- Cook and flip: Cook for about 2 minutes until the edges brown, flip, add cheese, and cook 1 minute more.
- Build the burgers: Spread mayo and mustard on the buns, add onion, pickles, and the hot patties.
- Serve right away: Close the buns and eat while the cheese is still soft.
Equipment for This Recipe:
- Cast-iron skillet or griddle
- Heavy spatula
- Burger press or second spatula for smashing
- Knife
- Small plate for toppings
How to Serve This Dish:
Serve with fries, chips, or a crisp dill pickle spear, which feels almost too obvious but works every time. These burgers are best eaten right away, hot enough that the cheese is still loose.
If you’re feeding a crowd, cook the patties in batches and toast the buns between rounds.
Pro Tips for This Recipe:
- Do not overwork the beef; loose, cold meat smashes better.
- Get the pan very hot before the meat hits it.
- Smashing once and then leaving the patty alone gives a better crust.
- Thin onion slices work better than thick ones because they do not overwhelm the burger.
Variations on This Dish:
- Double Smash Burger: Use 2 thin patties per sandwich if you want a bigger dinner.
- Spicy Burger: Add sliced jalapeños or a dab of hot sauce to the mayo.
- Cheddar Burger: Swap the American cheese for sharp cheddar if you want a firmer melt.
Common Mistakes to Avoid with This Dish:
- Pressing the burger after flipping: That squeezes out the juices.
- Using lean beef: The burger dries out and tastes thin.
- Loading it with toppings: The smash burger works best when it stays compact.
14. Egg Salad Sandwich with Chives and Cucumber

Egg salad gets dismissed too easily, mostly because people keep making it bland. If you season the eggs properly, keep the texture a little chunky, and add chives plus cucumber, it turns into a sandwich with more snap than anyone expects. It also happens to be one of the easiest make-ahead fillings on this list.
I like this version because it feels cool and calm on a hot evening. Hard-boiled eggs, mustard, mayo, and a little crisp cucumber are enough. No stove stress after the eggs are boiled.
Why It Works:
Egg salad needs acid and texture or it tastes heavy. Dijon mustard and a little lemon juice keep the mayo from taking over, and chives give the filling a fresh onion note without the bite of raw onion. Cucumber adds crunch and a cool finish that suits summer weather better than most sandwich fillings.
Key Ingredients:
- 6 large eggs
- 1/4 cup mayonnaise
- 1 teaspoon Dijon mustard
- 1 teaspoon lemon juice
- 2 tablespoons finely chopped chives
- 1/4 cup finely diced cucumber
- 1/4 teaspoon kosher salt
- 1/8 teaspoon black pepper
- 8 slices bread or sandwich rolls
- Lettuce leaves, optional
Quick Steps:
- Boil the eggs: Cover the eggs with water, bring to a boil, then turn off the heat and cover for 10 to 11 minutes.
- Cool and peel: Transfer the eggs to ice water for a few minutes, then peel and chop them.
- Mix the filling: Stir eggs, mayonnaise, Dijon, lemon juice, chives, cucumber, salt, and pepper together.
- Chill briefly: Let the salad sit for 10 minutes so the flavors settle.
- Assemble the sandwich: Spread on bread with lettuce if you want extra structure.
- Serve cold: Cut and eat straight from the fridge or after a short chill.
Equipment for This Recipe:
- Saucepan
- Slotted spoon
- Mixing bowl
- Fork or spoon
- Knife and cutting board
How to Serve This Dish:
Serve it with potato chips, sliced tomatoes, or a handful of salt-and-vinegar chips if you want a louder side. It is especially good on lightly toasted bread, which keeps the filling from sliding around.
If you’re making lunch for later, pack the filling separately and assemble just before eating.
Pro Tips for This Recipe:
- Chop the eggs by hand instead of mashing them into paste.
- Dry the cucumber pieces before mixing them in so the salad does not loosen.
- Chill the eggs before peeling; hot eggs are annoying to peel and tear badly.
- Add a pinch more salt after chilling, because cold egg salad often tastes flatter.
Variations on This Dish:
- Dill Egg Salad: Replace half the chives with dill for a sharper herbal note.
- Curried Egg Salad: Add 1/4 teaspoon curry powder for a warmer flavor.
- Avocado Egg Salad: Swap half the mayo for mashed avocado.
Common Mistakes to Avoid with This Dish:
- Overmixing the eggs: The filling turns gluey.
- Using too much mayo: The sandwich becomes heavy and slippery.
- Skipping the chill: The flavors taste disconnected until the salad sits a few minutes.
15. Salmon Salad Sandwich with Dill and Lemon
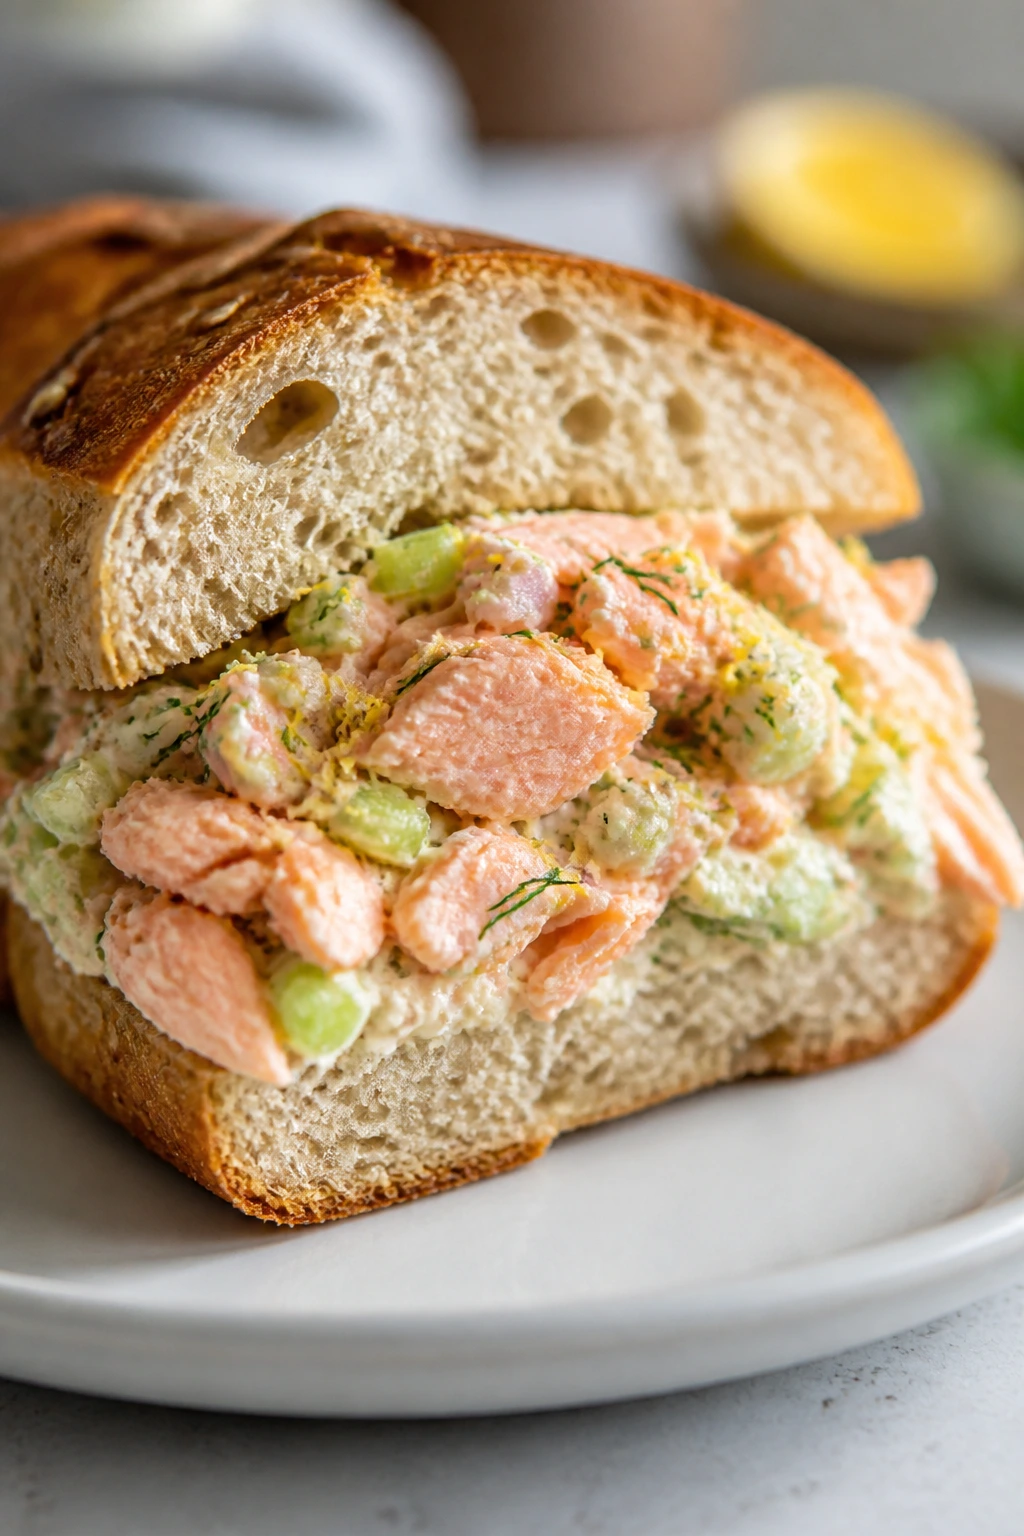
Salmon salad has the same basic appeal as tuna salad, but it tastes a little softer and a little richer, which I like for summer evenings when the meal should feel less canned and more deliberate. The lemon, dill, and celery keep it bright. Capers are optional, but I almost always add them because salmon can handle the brine.
You can use canned salmon or cooked leftover salmon. If you have a fillet from dinner the night before, this is one of the smartest ways to use it. The filling tastes good cold, and that matters when you do not want to light anything on fire.
Why It Works:
Salmon has enough fat to taste satisfying without needing much mayo, and lemon keeps the salad from feeling dense. Dill works especially well with salmon because its sharp green flavor matches the fish instead of fighting it. The celery and onion add crunch, which gives the sandwich structure and keeps every bite from feeling soft all the way through.
Key Ingredients:
- 12 ounces cooked salmon or canned salmon, drained
- 1/4 cup mayonnaise
- 1 teaspoon lemon zest
- 1 tablespoon lemon juice
- 2 tablespoons chopped dill
- 2 tablespoons finely diced celery
- 1 tablespoon finely diced red onion
- 1 tablespoon capers, chopped, optional
- 1/4 teaspoon black pepper
- 8 slices bread or 4 sandwich rolls
- Lettuce for serving
Quick Steps:
- Flake the salmon: Break the salmon into bite-size pieces in a bowl and remove any bones if needed.
- Mix the dressing: Stir mayonnaise, lemon zest, lemon juice, dill, celery, onion, capers, and pepper together.
- Combine gently: Fold the salmon into the dressing without smashing it into a puree.
- Chill for 10 minutes: Let the salad settle so the lemon and dill spread through.
- Assemble on bread: Add lettuce, spoon on salmon salad, and close the sandwich.
- Serve cold: Cut and serve immediately or keep chilled until mealtime.
Equipment for This Recipe:
- Mixing bowl
- Fork
- Knife and cutting board
- Spoon
- Plate or tray for assembly
How to Serve This Dish:
Serve with potato chips, cucumber spears, or a small tomato salad. It also makes a good tea-sandwich-style lunch if you cut the bread crusts off and use thinner slices.
A seeded bread or sturdy sourdough gives the filling a better grip than soft white bread.
Pro Tips for This Recipe:
- Remove extra liquid from canned salmon before mixing.
- Use fresh dill if you can; dried dill tastes dusty here.
- Add capers sparingly unless you want a stronger briny edge.
- Chill the salmon salad for at least 10 minutes so it tastes less loose.
Variations on This Dish:
- Smoked Salmon Salad: Use flaked smoked salmon for a stronger flavor.
- Greek Salmon Sandwich: Add diced cucumber and a little Greek yogurt.
- Open-Face Version: Spoon the salad over toasted bread and top with herbs.
Common Mistakes to Avoid with This Dish:
- Overmashing the salmon: The texture turns pasty.
- Using too much lemon juice: It can overpower the fish.
- Making the sandwich too early on soft bread: The filling loosens the slices fast.
16. BBQ Jackfruit Sandwich with Crunchy Slaw
BBQ jackfruit is one of those fillings that sounds trendy until you actually make it and realize why it works: the fruit shreds in long strands, so it catches sauce the way pulled pork does, but with a lighter finish. That makes it a useful summer dinner if you want something smoky without meat.
The key is to cook the jackfruit long enough for the canned flavor to disappear and the edges to pick up some browning. Then you need slaw. Always slaw. Without a crisp top layer, the sandwich reads soft and one-note.
Why It Works:
Young green jackfruit has a stringy texture that takes on barbecue sauce well after a short cook in a skillet. Onion and garlic give the filling savory depth, while the slaw adds crunch and acid so the sandwich does not turn sticky. Toasted buns keep the sauce in place better than soft ones, and that small detail matters a lot.
Key Ingredients:
- 2 cans young green jackfruit in brine, drained and rinsed
- 1 tablespoon olive oil
- 1 small onion, thinly sliced
- 2 garlic cloves, minced
- 1 cup barbecue sauce
- 1/2 teaspoon smoked paprika
- 1/4 teaspoon black pepper
- 4 burger buns
- 2 cups shredded cabbage slaw mix
- 2 tablespoons apple cider vinegar
- 1 tablespoon mayonnaise or vegan mayo
- 1 teaspoon sugar
- 1/4 teaspoon salt
Quick Steps:
- Prep the jackfruit: Pull apart the pieces with your fingers and trim out any hard core bits.
- Cook the aromatics: Sauté onion in olive oil for 3 to 4 minutes, then add garlic for 30 seconds.
- Add the jackfruit: Stir in jackfruit, barbecue sauce, smoked paprika, and pepper. Cook for 10 to 12 minutes, stirring and lightly mashing until it looks shredded.
- Make the slaw: Toss cabbage, vinegar, mayo, sugar, and salt together.
- Toast the buns: Lightly toast the buns so they can handle the sauce.
- Assemble: Pile jackfruit on the bun and top with slaw.
Equipment for This Recipe:
- Large skillet
- Wooden spoon or spatula
- Mixing bowl
- Knife and cutting board
- Can opener
How to Serve This Dish:
Serve it with corn on the cob, baked beans, or chips if you want the plate to feel like barbecue night. The sandwich is best fresh and hot, when the jackfruit has some edges and the slaw stays crisp.
If you like a cleaner bite, put the slaw directly on the top bun instead of the filling.
Pro Tips for This Recipe:
- Rinse the jackfruit well or it can taste faintly briny.
- Press some of the jackfruit pieces against the pan so they pick up a little browning.
- Use a sauce with a little vinegar so the filling doesn’t taste flat.
- Toast the buns even if you think you can skip it. You can’t.
Variations on This Dish:
- Smoky Chipotle Jackfruit: Add minced chipotle in adobo for heat and smoke.
- Carolina Style: Use a vinegar-based barbecue sauce and thinner slaw.
- BBQ Jackfruit Wrap: Tuck the filling into a large tortilla for easier eating.
Common Mistakes to Avoid with This Dish:
- Leaving the jackfruit too wet: The sauce won’t cling well.
- Not cooking it long enough: It tastes like canned fruit instead of barbecue filling.
- Skipping the slaw: You lose the crunch that makes it work.
17. Lobster Roll with Celery and Chives
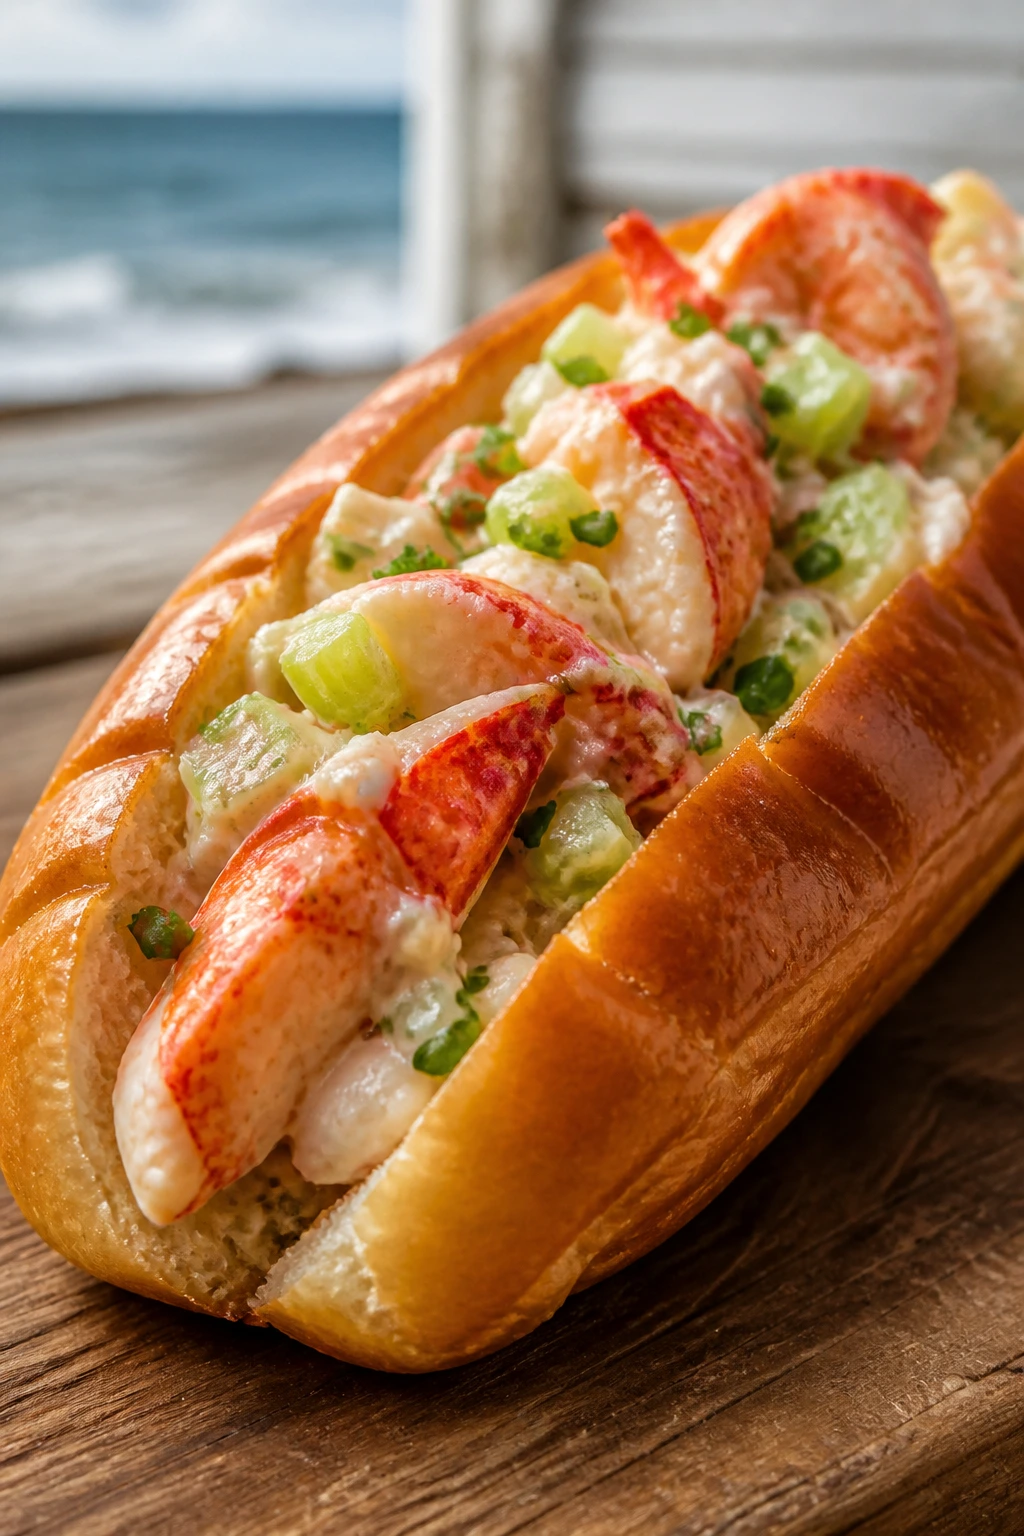
A lobster roll is one of the few sandwiches that feels luxurious without needing a long ingredient list. The sweet lobster meat does most of the talking, so the dressing has to stay light. Celery, chives, lemon, and a small amount of mayo are enough. Anything heavier turns it into a waste of lobster.
The split-top bun matters here because it gives you flat, buttery sides to toast and a shape that cradles the filling without getting in the way. If you’ve never made one at home, the biggest surprise is how simple it is once the lobster is cooked and cooled.
Why It Works:
Lobster has a delicate sweetness that gets buried fast if you drown it in dressing. A small amount of mayonnaise gives the filling body while celery and chives add freshness and crunch. Toasted, buttered buns help the sandwich feel rich without making the lobster itself feel heavy.
Key Ingredients:
- 1 pound cooked lobster meat, chopped into bite-size pieces
- 2 tablespoons mayonnaise
- 1 teaspoon lemon juice
- 1 tablespoon chopped chives
- 2 tablespoons finely diced celery
- 1/4 teaspoon kosher salt
- 1/8 teaspoon black pepper
- 4 split-top hot dog buns
- 2 tablespoons butter, softened
- Lemon wedges for serving
Quick Steps:
- Mix the lobster filling: Combine lobster, mayonnaise, lemon juice, chives, celery, salt, and pepper in a bowl.
- Chill briefly: Let the filling rest for 10 minutes while you toast the buns.
- Butter the buns: Spread softened butter on the flat sides of the buns.
- Toast the buns: Cook in a skillet over medium heat until golden and crisp on the buttered sides.
- Fill the buns: Spoon lobster salad into each bun generously.
- Serve with lemon: Add a squeeze of lemon right before eating.
Equipment for This Recipe:
- Mixing bowl
- Skillet
- Spatula
- Knife and cutting board
- Spoon for filling
How to Serve This Dish:
Serve it with potato chips, a simple green salad, or corn on the cob. Lobster rolls are rich enough that a lighter side makes the meal feel balanced.
Keep the filling cold until the buns are ready, then assemble at the last second.
Pro Tips for This Recipe:
- Chop the lobster into pieces that are big enough to feel luxurious but small enough to fit the bun.
- Use very little mayo; the lobster should still be the main texture.
- Toast the buns in butter, not oil, for the classic flavor.
- Add the lemon at the end so the filling stays bright.
Variations on This Dish:
- Connecticut Style: Skip the mayo and warm the lobster with melted butter.
- Celery-Heavy Version: Add a little extra celery if you like more crunch.
- Lobster Salad Lettuce Cups: Serve the filling in butter lettuce leaves for a lighter plate.
Common Mistakes to Avoid with This Dish:
- Using too much dressing: It buries the lobster.
- Overheating the filling: Lobster turns rubbery fast.
- Serving on soft buns: They collapse and get slippery.
18. Chicken Caesar Sandwich
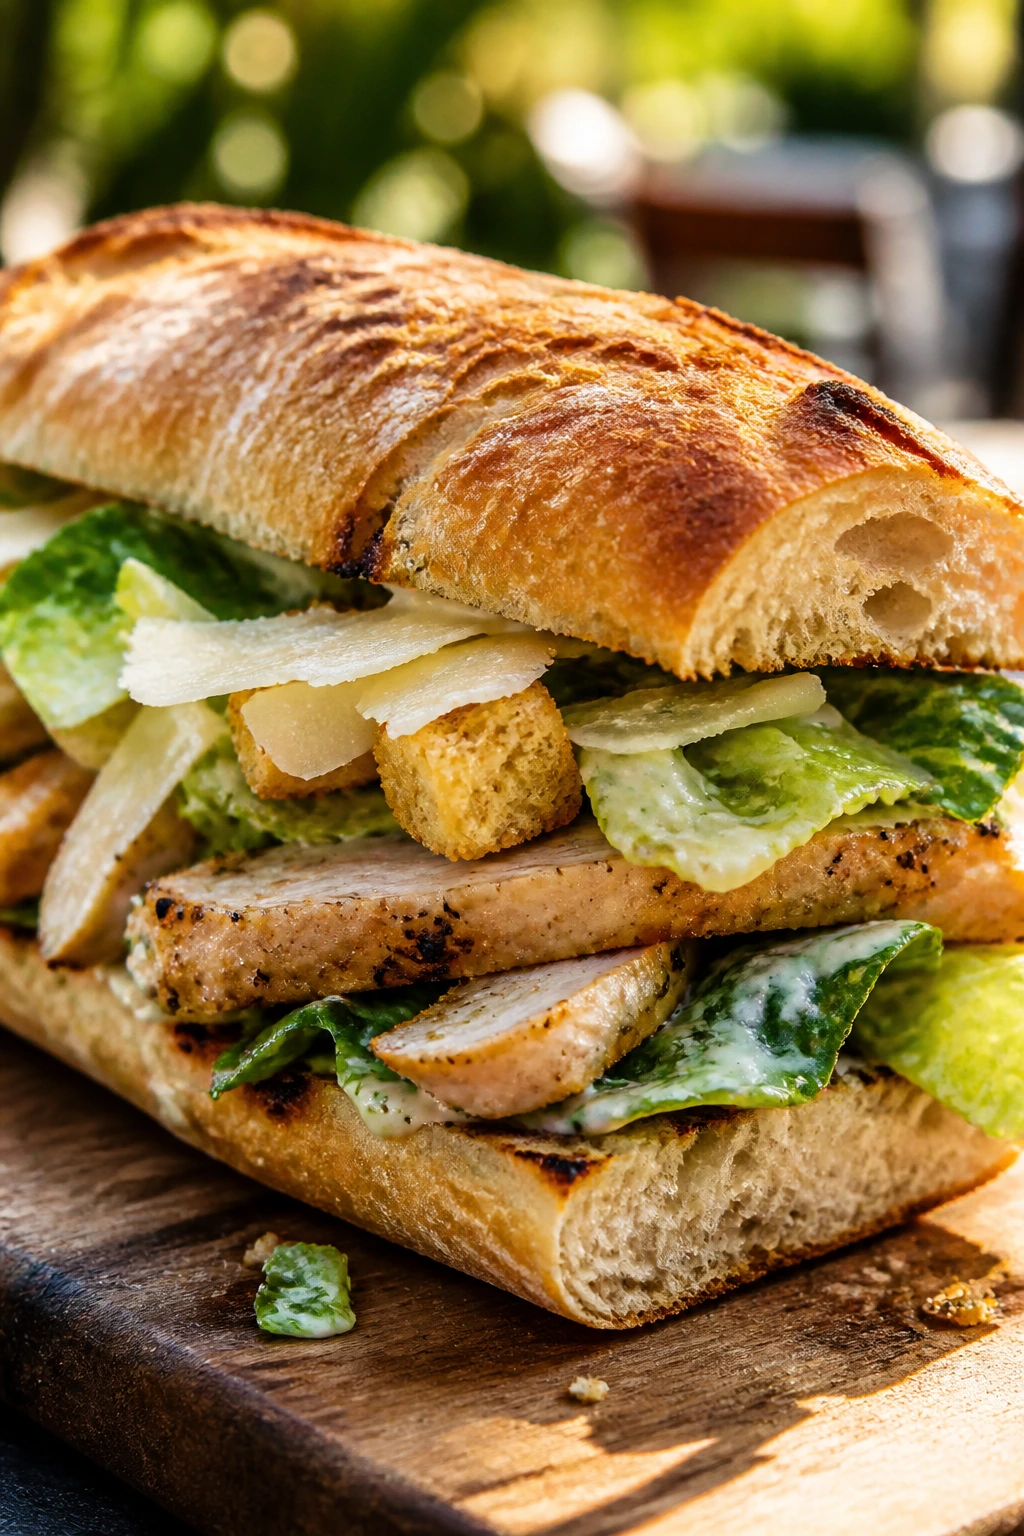
Chicken Caesar belongs in sandwich form because the flavors already know how to behave together: garlicky dressing, salty parmesan, crisp romaine, and chicken with enough char to hold its own. The only thing that changes is the shape. Put it on toasted bread or a sub roll and it becomes a dinner that feels familiar without being boring.
I like this one for nights when I have leftover grilled chicken but don’t want another bowl meal. The crouton crumbs are optional, but I’m firmly in favor of them because they give the sandwich the crunchy little echo of a Caesar salad.
Why It Works:
Caesar dressing needs sharpness to keep the sandwich from tasting heavy, and the romaine has to stay crisp so it can handle the sauce. Grilled chicken gives you a savory base, while parmesan adds a salty finish that ties the filling together. Crushed croutons, if you use them, absorb a little dressing and keep the texture from going flat.
Key Ingredients:
- 1 pound cooked grilled chicken breast, sliced
- 1/3 cup Caesar dressing
- 1 teaspoon lemon juice
- 1/4 cup grated parmesan
- 3 cups chopped romaine lettuce
- 1/2 cup cherry tomatoes, halved
- 4 ciabatta rolls or sandwich rolls
- 1/2 cup croutons, lightly crushed, optional
- Black pepper to taste
Quick Steps:
- Toss the lettuce: Combine romaine, Caesar dressing, lemon juice, parmesan, and pepper.
- Prep the bread: Toast the rolls cut-side down until lightly crisp.
- Layer the sandwich: Add chicken to the bottom half, then top with the dressed lettuce and tomatoes.
- Add crunch: Sprinkle croutons over the filling if using.
- Close and press: Put on the top bun and press gently.
- Serve right away: Eat before the dressing softens the bread too much.
Equipment for This Recipe:
- Mixing bowl
- Tongs or spoon
- Knife and cutting board
- Toaster or skillet
- Cutting board for assembly
How to Serve This Dish:
Serve with fries, chips, or a small bowl of fruit if you want to keep the plate moving quickly. The sandwich is best after a little toast, when the bread still has a dry surface and the lettuce stays crunchy.
If you want a neater version, use slightly less dressing and keep extra on the side for dipping.
Pro Tips for This Recipe:
- Dress the lettuce lightly; too much Caesar makes the sandwich slippery.
- Use romaine hearts for the best crunch.
- If the chicken is cold from the fridge, let it sit out for 10 minutes so it does not chill the whole sandwich too much.
- Croutons should be broken into smaller pieces so they distribute evenly.
Variations on This Dish:
- Chicken Caesar Wrap: Use a large tortilla instead of bread.
- Anchovy Caesar Version: Add chopped anchovy to the dressing for a stronger savory note.
- Garlic Bread Caesar Sandwich: Toast the rolls with garlic butter before assembling.
Common Mistakes to Avoid with This Dish:
- Too much dressing: The sandwich falls apart.
- Not draining tomatoes: Extra liquid makes the bottom bun soggy.
- Using floppy lettuce: It wilts too quickly once dressed.
19. Grilled Peach, Burrata, and Prosciutto Sandwich
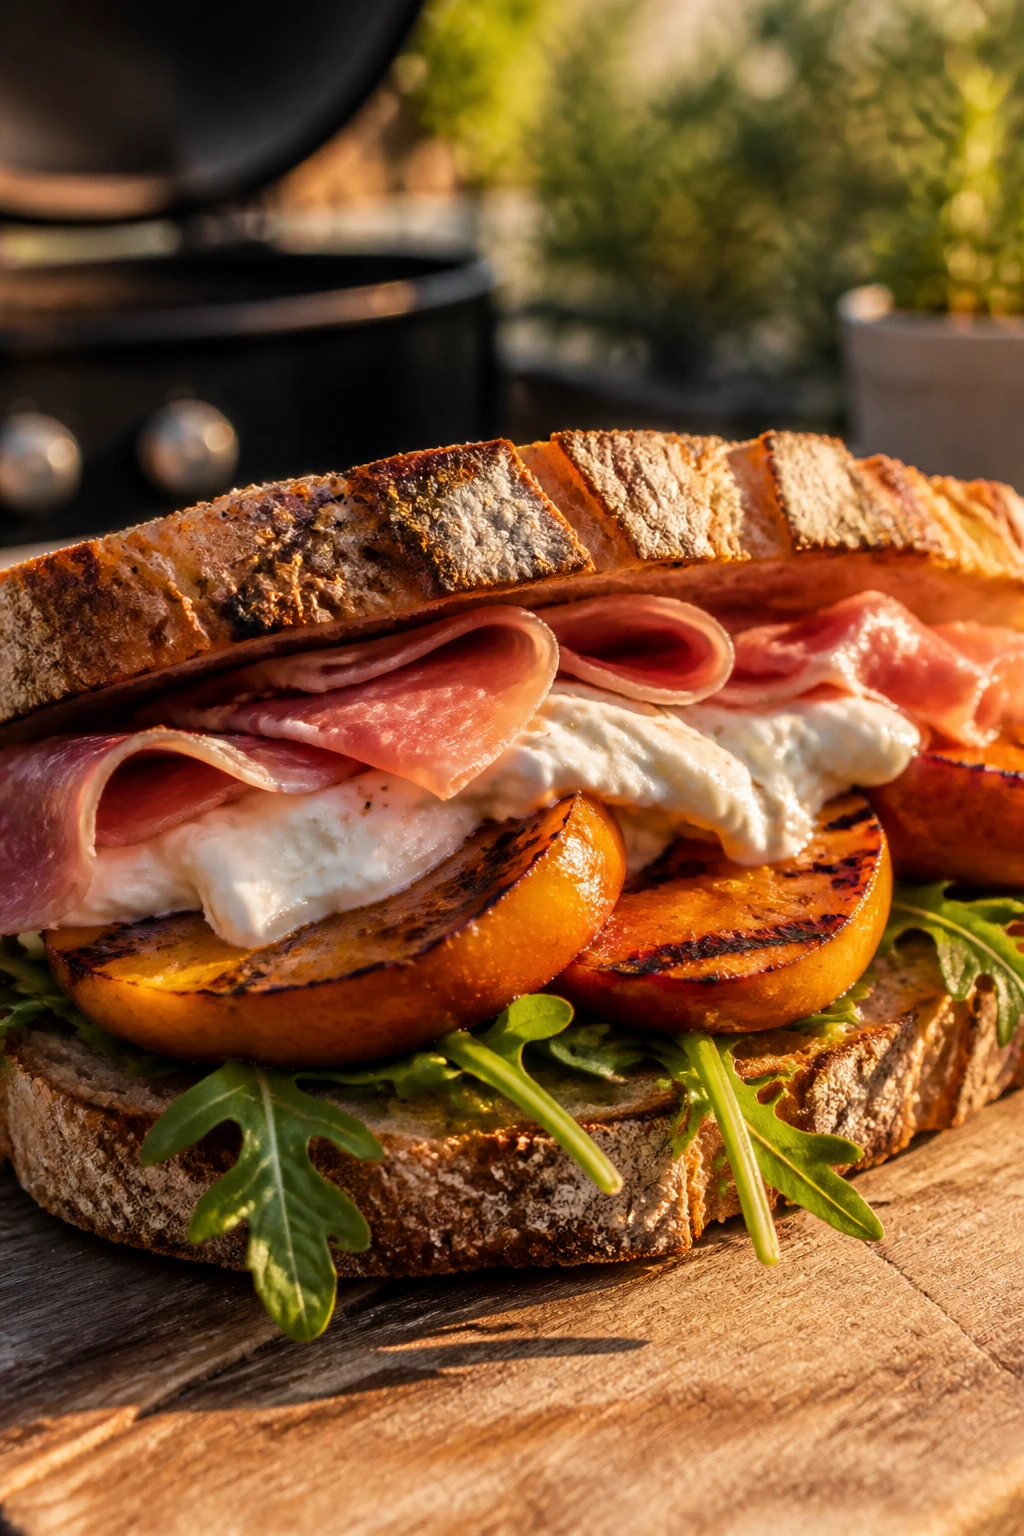
This is the sandwich that makes summer feel like a better idea. Grilled peaches bring a little caramelized sweetness, burrata brings soft creaminess, and prosciutto adds enough salt to keep the whole thing from tipping into dessert. I like it on thick sourdough or country bread because the filling is lush, and lush fillings need support.
There’s no pretension in making this at home. You just need ripe peaches, a hot grill or skillet, and a light hand with the honey. The combination sounds fancy because the parts are good, not because it’s difficult.
Why It Works:
Grilling the peaches concentrates their flavor and gives the flesh a slightly smoky edge that plain raw fruit won’t provide. Burrata offers creamy contrast, while prosciutto brings salt and a little chew. A sturdy bread lets the juices and cream sit on top instead of leaking through the bottom.
Key Ingredients:
- 2 ripe peaches, pitted and sliced into wedges
- 1 tablespoon olive oil
- 4 slices sourdough or country bread
- 4 ounces burrata
- 4 to 6 slices prosciutto
- 1 cup arugula
- 1 teaspoon honey
- 1 teaspoon balsamic glaze
- 1/4 teaspoon flaky salt
Quick Steps:
- Grill the peaches: Brush with olive oil and grill over medium heat for 1 to 2 minutes per side until marked and softened.
- Toast the bread: Toast the sourdough until the surface is crisp and lightly browned.
- Build the base: Spread burrata over the bread in a thick layer.
- Add the toppings: Arrange peach slices, prosciutto, and arugula on top.
- Finish the sandwich: Drizzle with honey and balsamic glaze, then sprinkle with flaky salt.
- Serve immediately: Cut and eat while the bread still has some crunch.
Equipment for This Recipe:
- Grill pan or skillet
- Tongs
- Knife and cutting board
- Small spoon for burrata
- Plate for assembly
How to Serve This Dish:
Serve it with a green salad or a handful of marinated olives if you want the meal to lean into the savory side. It also works well cut into smaller pieces and served as a first course before grilled fish or chicken.
I would not pack this one up and forget it; burrata wants to be eaten now.
Pro Tips for This Recipe:
- Choose peaches that are ripe but still hold their shape on the grill.
- Let the burrata come to cool room temperature so it spreads more easily.
- Use only a small drizzle of honey; too much turns the sandwich sweet in a way that loses the point.
- Prosciutto should be folded loosely, not stacked in thick clumps.
Variations on This Dish:
- Peach and Mozzarella: Use fresh mozzarella if burrata feels too rich.
- Arugula-Free Version: Swap in basil leaves for a softer herb note.
- Stone Fruit Mix: Add a few grilled plum slices along with the peaches.
Common Mistakes to Avoid with This Dish:
- Using hard peaches: They do not grill well and taste flat.
- Overdoing the honey: The sandwich should still read savory.
- Using soft bread: The cheese and fruit will soak straight through.
20. Hummus, Cucumber, and Roasted Red Pepper Sandwich
This is the most no-drama sandwich in the group, and I mean that as praise. Hummus gives you body, cucumber brings cool crunch, roasted red peppers add sweetness, and a good bread ties it all together without demanding any cooking. If your evening is hot, busy, or a little chaotic, this is the answer.
I like it because it behaves. It packs well, it tastes better after a short rest, and it does not depend on perfect timing. The sandwich is only as good as the bread, though, so choose something sturdy enough to handle the spread.
Why It Works:
Hummus works as both spread and moisture buffer, which means the bread is less likely to go soggy. Cucumber adds cold crunch, roasted red pepper gives sweetness and softness, and a little feta or sprouts can make the sandwich feel more complete without extra effort. This is the kind of filling that proves you do not need meat to make a dinner sandwich feel finished.
Key Ingredients:
- 1 cup hummus
- 1 cucumber, thinly sliced
- 1 cup roasted red peppers, drained and sliced
- 1 cup baby spinach or sprouts
- 1/4 small red onion, thinly sliced
- 4 slices sturdy whole grain bread or 2 large rolls
- 2 tablespoons feta, crumbled, optional
- 1 tablespoon olive oil
- 1/4 teaspoon black pepper
Quick Steps:
- Prep the vegetables: Pat the roasted peppers dry and slice the cucumber thinly.
- Build the spread: Stir the hummus with olive oil and black pepper if you want it looser and easier to spread.
- Assemble the sandwich: Spread hummus on both slices of bread, then layer spinach, cucumber, red pepper, onion, and feta if using.
- Close and press: Press gently so the filling settles without squishing out.
- Slice and serve: Cut the sandwich in half and eat right away or within a short time.
Equipment for This Recipe:
- Knife and cutting board
- Spoon or offset spatula
- Small bowl
- Paper towels for drying peppers
- Bread knife
How to Serve This Dish:
Serve it with olives, fruit, or a simple tomato salad. It works well for a lighter dinner because the hummus gives enough substance to carry the meal without making it feel heavy.
If you need it for a lunchbox, keep the cucumber separate until the last minute.
Pro Tips for This Recipe:
- Dry the roasted peppers well or they will soak the bread.
- Use a thick hummus so the sandwich does not slide apart.
- Slice the cucumber very thin; thick slices fight the bread.
- A little feta adds salt that the filling needs.
Variations on This Dish:
- Mediterranean Hummus Sandwich: Add olives and tomato slices.
- Spicy Hummus Version: Use harissa hummus or stir in a little hot sauce.
- Grilled Veggie Version: Add leftover grilled zucchini or eggplant.
Common Mistakes to Avoid with This Dish:
- Wet peppers: They make the sandwich soggy fast.
- Bread that is too soft: It collapses under the hummus.
- Too much cucumber: The filling becomes slippery and hard to handle.
Why Grilling, Toasting, and Cool Fillings Work So Well Together
Summer sandwiches are at their best when the bread and filling do not fight each other. The trick is usually some version of contrast: cool against warm, crisp against creamy, salty against sweet. Toasting the bread buys you time. It gives the crumb a dry surface so tomato juice, dressing, or sauce does not seep straight through in the first minute.
Heat also changes flavor in ways people notice even if they never name it. A grilled chicken breast tastes different from poached chicken. A toasted roll tastes different from a soft one. A grilled peach tastes different from raw fruit because the sugars tighten and brown a little at the edges. None of that is subtle, and that’s why these sandwiches work so well on a hot night. They don’t ask the same thing from every ingredient.
I also think the best summer sandwiches respect the season instead of pretending it doesn’t exist. That means ripe tomatoes. Fresh herbs. Cucumber with actual snap. Bread that is sturdy enough to hold up. And if you’re cooking protein, fast high heat is your friend. Long braises and heavy sauces belong elsewhere. Here, the point is speed and texture.
Essential Equipment for a Summer Sandwich Night
-
Cast-iron skillet or grill pan: Good for smashing burgers, searing chicken, toasting bread, and grilling halloumi when the outdoor grill is not an option.
-
Outdoor grill or tabletop grill: Useful for chicken, steak, peaches, zucchini, and anything that benefits from char without heating the whole kitchen.
-
Instant-read thermometer: The easiest way to keep chicken and steak from overcooking. 165°F for chicken, 130°F to 135°F for medium-rare steak.
-
Sharp serrated knife: Tomatoes, rolls, and ciabatta are easier to cut cleanly with a serrated blade.
-
Mixing bowls in two or three sizes: One for sauces, one for fillings, one for slaw or dressed greens.
-
Cutting board with a damp towel underneath: Keeps the board from sliding while you slice tomato, onion, and bread.
-
Tongs: Helpful for grilling, flipping, and moving hot bread without tearing it.
-
Fine-mesh strainer: Good for draining tuna, salmon, or jackfruit so fillings do not turn watery.
-
Paper towels: Not glamorous, but they are the difference between crisp bacon and greasy bacon, dry mozzarella and slippery mozzarella, dry tomatoes and soggy bread.
-
Sheet pan: Handy for holding toasted buns, sliced fillings, or assembled components if you are serving a group.
Smart Shopping and Ingredient Tips
Bread matters more here than in a lot of sandwich lists. Buy loaves and rolls with a tight crumb and a real crust: ciabatta, sourdough, sub rolls, split-top buns, and sturdy whole grain bread all hold up better than soft white slices. If you like soft bread, toast it. Don’t rely on luck.
For tomatoes, choose fruit that smells sweet at the stem and feels heavy for its size. Pale grocery tomatoes can still work if you salt them well, but the flavor is thinner. Heirloom tomatoes, beefsteak slices, and even good Roma tomatoes can all do the job if they’re ripe and not mealy.
Deli meats should be sliced thin enough to fold, not stack into slabs. For turkey, ham, and salami, thickness changes the sandwich more than people think. Thin slices make the layers easier to eat and keep the bread from buckling under the weight.
With cheese, freshness matters. Fresh mozzarella should be stored in liquid until you use it, then patted dry before it goes on the sandwich. Halloumi should feel firm, not dry and cracked. Burrata needs to be soft enough to spread without being runny.
For seafood, buy what you will use right away. Lobster, shrimp, tuna, and salmon all need careful handling, and the flavor payoff is best when they’re fresh or properly chilled. Canned tuna and canned salmon are fine for pantry nights. They are not a compromise in every case; sometimes they are the right answer.
Herbs are worth the small extra cost. Basil, dill, chives, parsley, and cilantro change the whole tone of a sandwich with almost no effort. If a bunch looks tired at the store, skip it. Limp herbs make a sandwich taste tired too.
How to Serve These Summer Sandwiches
Presentation:
Cut sandwiches on the diagonal when the filling can handle it. For stacked clubs and subs, a parchment wrap around the bottom half keeps things tidy and gives the whole plate a deli feel. Let tomato-heavy sandwiches sit 30 seconds before cutting so the juices don’t gush out everywhere.
Accompaniments:
Kettle chips, potato chips, dill pickles, fruit salad, cucumber salad, grilled corn, and simple greens all make sense here. For richer sandwiches like smash burgers, steak, or pulled pork sliders, go with something crisp and acidic. For lighter ones like hummus, tomato, or caprese, fruit or a cold salad is enough.
Portions:
Most of these recipes are written for 4 servings, and one generous sandwich is enough for a normal dinner when there’s a side dish. Sliders can run 2 to 3 per person. Lobster rolls and po’ boys can be large enough that one sandwich is the whole meal. If you’re feeding bigger appetites, add chips or a cold vegetable side instead of just piling on more bread.
Beverage Pairing:
Iced tea with lemon works across the board. So does lemonade, sparkling water with lime, or a cold pilsner if the sandwich leans grilled or savory. For the richer sandwiches, especially steak, pulled pork, and burgers, something crisp and not too sweet is the safer move.
Extra Tricks for Better Flavor
Flavor Enhancement: A little acid goes farther than another spoonful of sauce. Lemon juice, pickled peppers, balsamic glaze, vinegar slaw, or even a quick drizzle of red wine vinegar can wake up a sandwich that tastes flat after assembly.
Customization: If you like heat, add sliced jalapeños, pepperoncini, chili crisp, or hot sauce to the mayo. If you want more texture, add cucumbers, shredded lettuce, or a handful of crushed chips just before serving. That last one sounds odd until you try it.
Serving Suggestions: Fresh herbs should go on at the end, not buried under the filling. Basil, dill, parsley, chives, and arugula all lose some punch if they sit too long against warm meat. A few leaves on top make the sandwich look more intentional and taste brighter.
Make-It-Yours: For dairy-free sandwiches, use hummus, avocado, or a dairy-free mayo. For gluten-free versions, use a sturdier gluten-free bread and toast it more aggressively than you would wheat bread. For lighter meals, turn any of the larger sandwiches into lettuce wraps or open-faced plates; the filling usually carries the flavor even if the bread changes.
Common Mistakes to Avoid
The most common error is treating all bread the same. Soft sandwich bread is fine for egg salad or tuna if you eat it immediately, but it is a bad choice for juicy tomatoes, dressed slaws, or hot fillings. The fix is simple: match the bread to the moisture level. Use crustier bread for wetter fillings and toast it enough that the surface feels dry to the touch.
Another mistake is overstuffing. It feels generous for about ten seconds, then the sandwich starts slipping apart in your hands. Especially with po’ boys, clubs, and subs, it’s better to build a strong ratio of filling to bread than to create a tower that topples over the second you bite in.
People also forget to season the produce. Tomato slices need salt. Cucumbers need a little salt if they’re going in a cold filling. Lettuce benefits from a light dressing when it’s being used Caesar-style or in a sub. A sandwich with good components still tastes flat if the vegetables are left naked and unseasoned.
Wet fillings are a problem across the board. Tuna salad with too much liquid, roasted peppers that were not drained, tomatoes sliced straight from the fridge, and slaw that sits too long all soften the bread fast. The fix is preparation: drain, pat dry, salt early, and assemble as late as possible.
Finally, a lot of people underestimate how much a resting step matters. Chicken needs a few minutes after grilling. Steak needs a real rest before slicing. Even tuna or salmon salad tastes better after the flavors settle. Rush those parts, and the sandwich still works, but it loses the kind of texture that makes it memorable.
Easy Variations and Swaps to Try
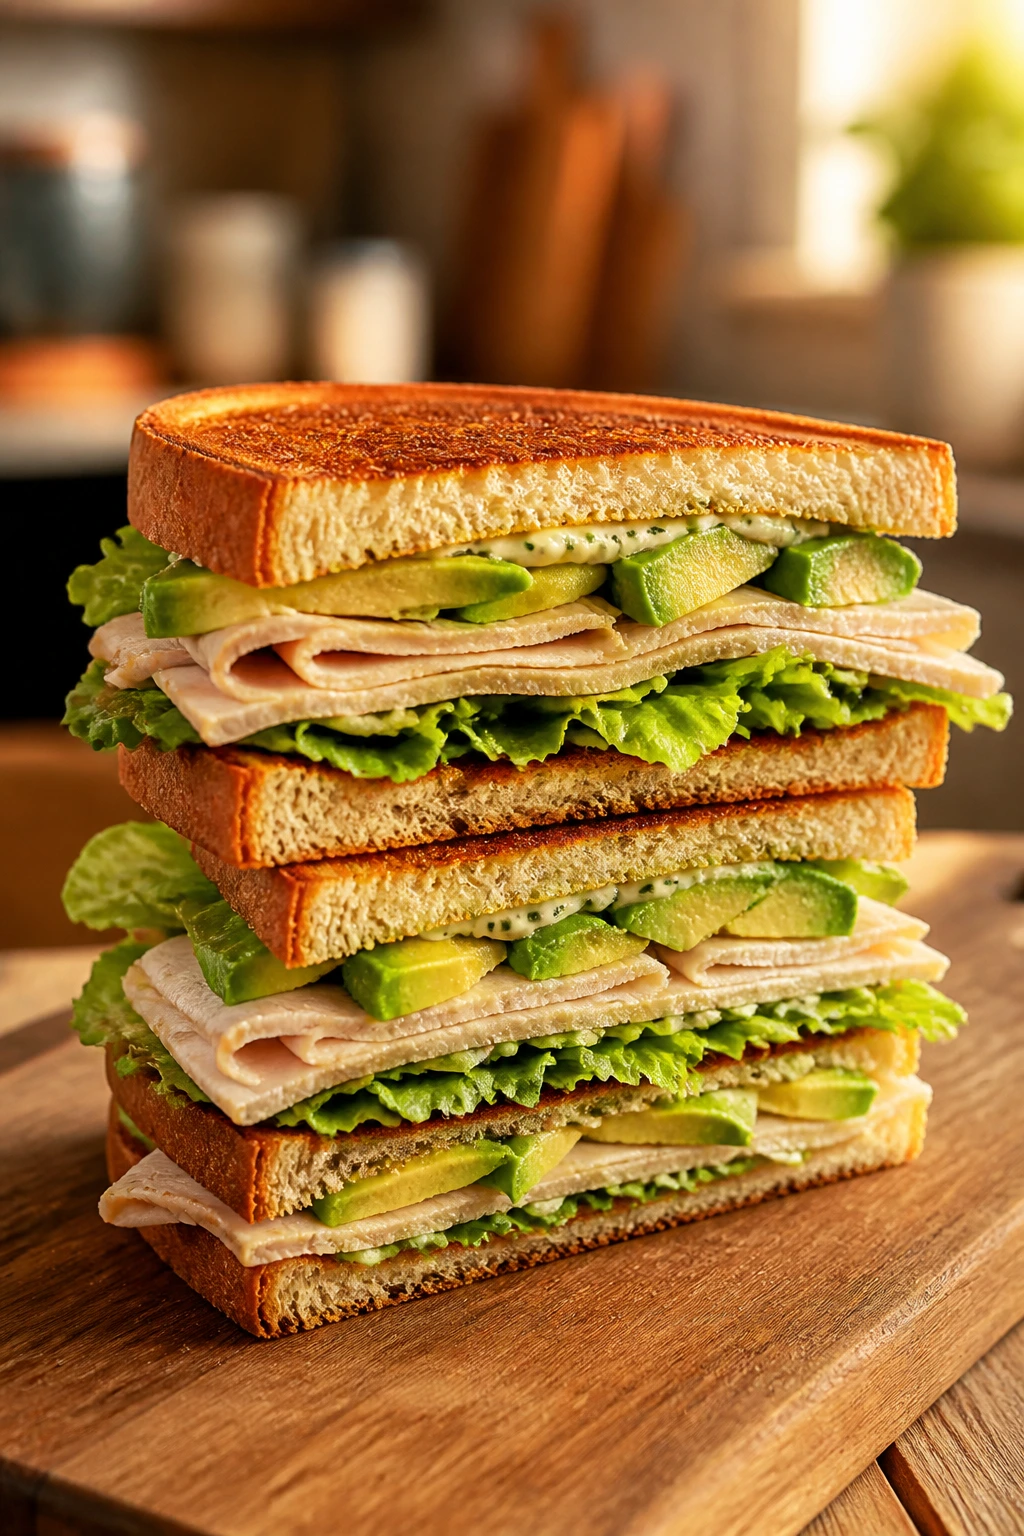
Gluten-Free Bread Swap: Use a sturdy gluten-free loaf or bun and toast it more than usual. Gluten-free bread tends to be softer and more fragile, so a dry, crisp surface helps it survive juicy fillings.
Dairy-Free Path: Choose hummus, avocado, olive oil spreads, or dairy-free mayo for the creamy element. That swap works especially well for the tomato, hummus, tuna, salmon, and chicken Caesar sandwiches.
Lower-Sodium Version: Cut back on deli meats, pickles, capers, and cheese, then lean harder on herbs, lemon, cucumber, and fresh tomato. The sandwich will taste cleaner and less salty without feeling dull.
Heat-Lovers’ Batch: Add jalapeños, hot sauce, pepperoncini, or chipotle mayo to almost any sandwich here. I would do this with the chicken pesto, BLT, smash burger, shrimp po’ boy, and BBQ jackfruit first.
Picnic-Ready Wraps: Convert the softer fillings into wraps using large tortillas or flatbreads. Tuna salad, egg salad, chicken Caesar, hummus, and Greek chicken all work especially well this way because the wrap traps the filling more neatly.
Cold-Only Menu: If you do not want to cook at all, lean on tomato, tuna, egg salad, salmon salad, hummus, Italian sub, and lobster roll. Those are the ones that still feel like dinner even when the stove stays off.
Make-Ahead, Storage, and Reheating Guidance
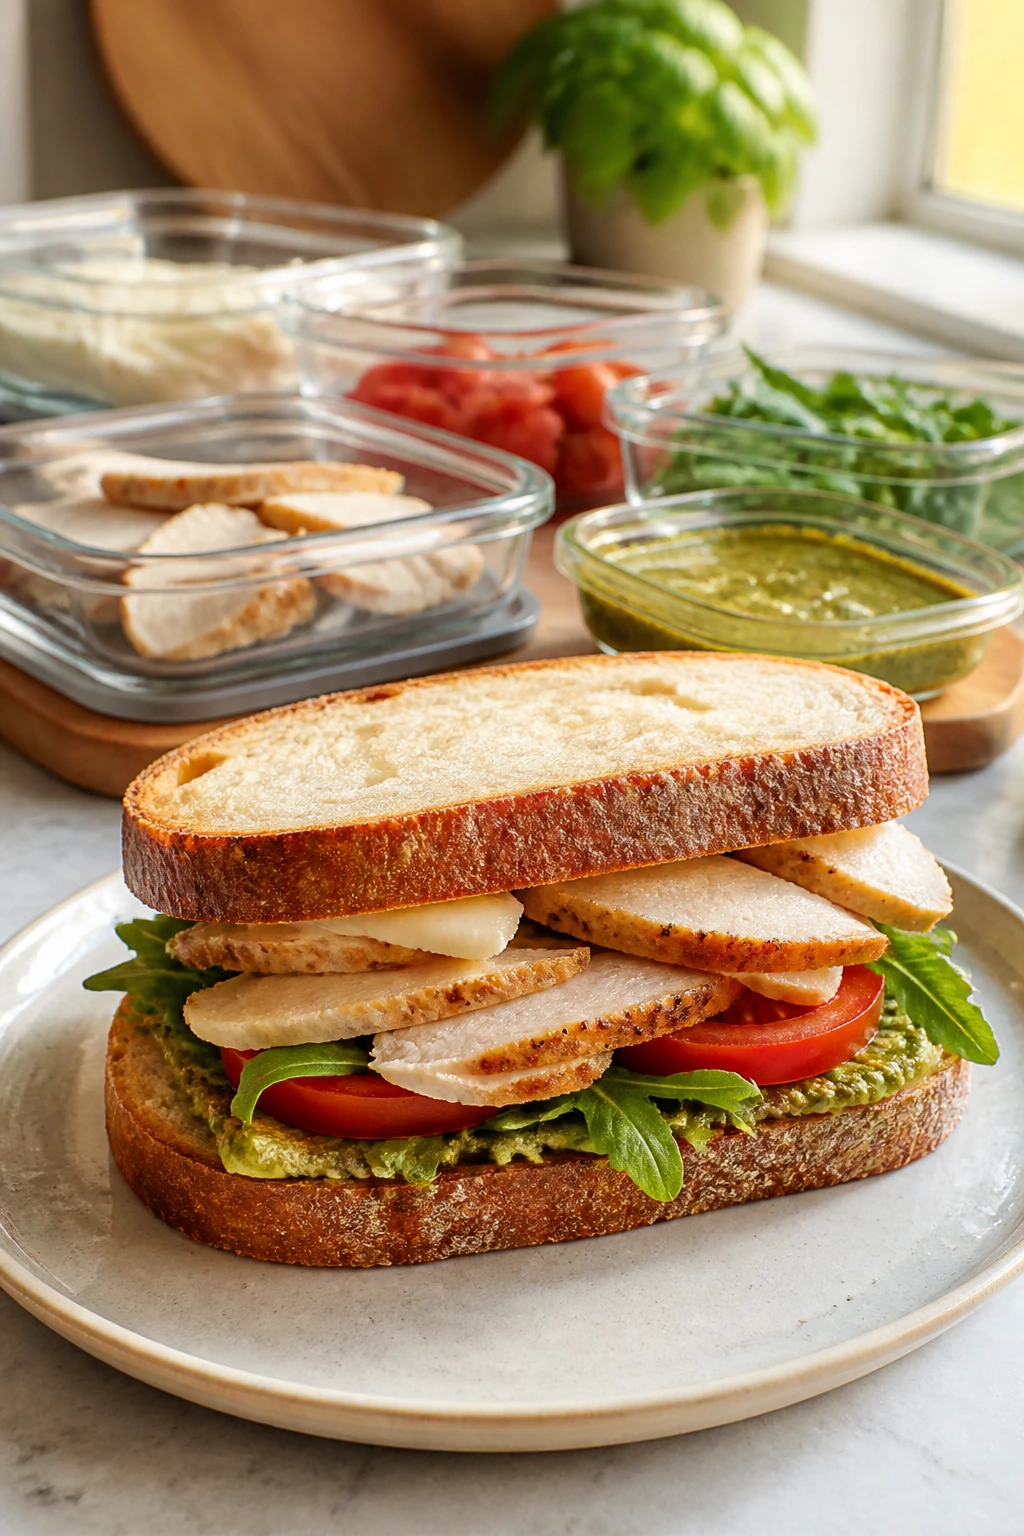
Most sandwich fillings hold well for 3 to 4 days in the refrigerator if they are kept in airtight containers. Tuna salad, egg salad, salmon salad, BBQ jackfruit, pulled pork, chimichurri, and chicken filling can all be made ahead, but bread should stay separate until assembly. Once bread meets a wet filling, the clock starts immediately.
Cooked meats keep well for 3 to 4 days refrigerated, and most can be frozen for up to 2 months if wrapped tightly. Pulled pork and grilled chicken freeze especially well. Steak can freeze too, though the texture is better if you slice it after thawing and reheat it briefly rather than freezing fully assembled sandwiches.
For reheating, use the method that matches the filling. Chicken, steak, and pulled pork are best warmed in a skillet over medium-low heat with a splash of water or sauce so they do not dry out. Smash burgers and halloumi should be made fresh, because they lose too much texture when reheated. Shrimp is the least forgiving; reheat it gently and only until warm, or it turns rubbery.
Cold sandwiches are easiest to make ahead if you keep the components separate. Tomato slices, cucumbers, and dressed greens should be packed in a separate container with a paper towel if they’re especially wet. Toasted bread can be cooled completely, then stored uncovered for a few minutes before wrapping so condensation does not soften the crust. If you want the best texture, assemble within 10 minutes of serving for most sandwiches, and within 2 to 3 minutes for anything with juicy tomatoes or hot melted cheese.
Frequently Asked Questions
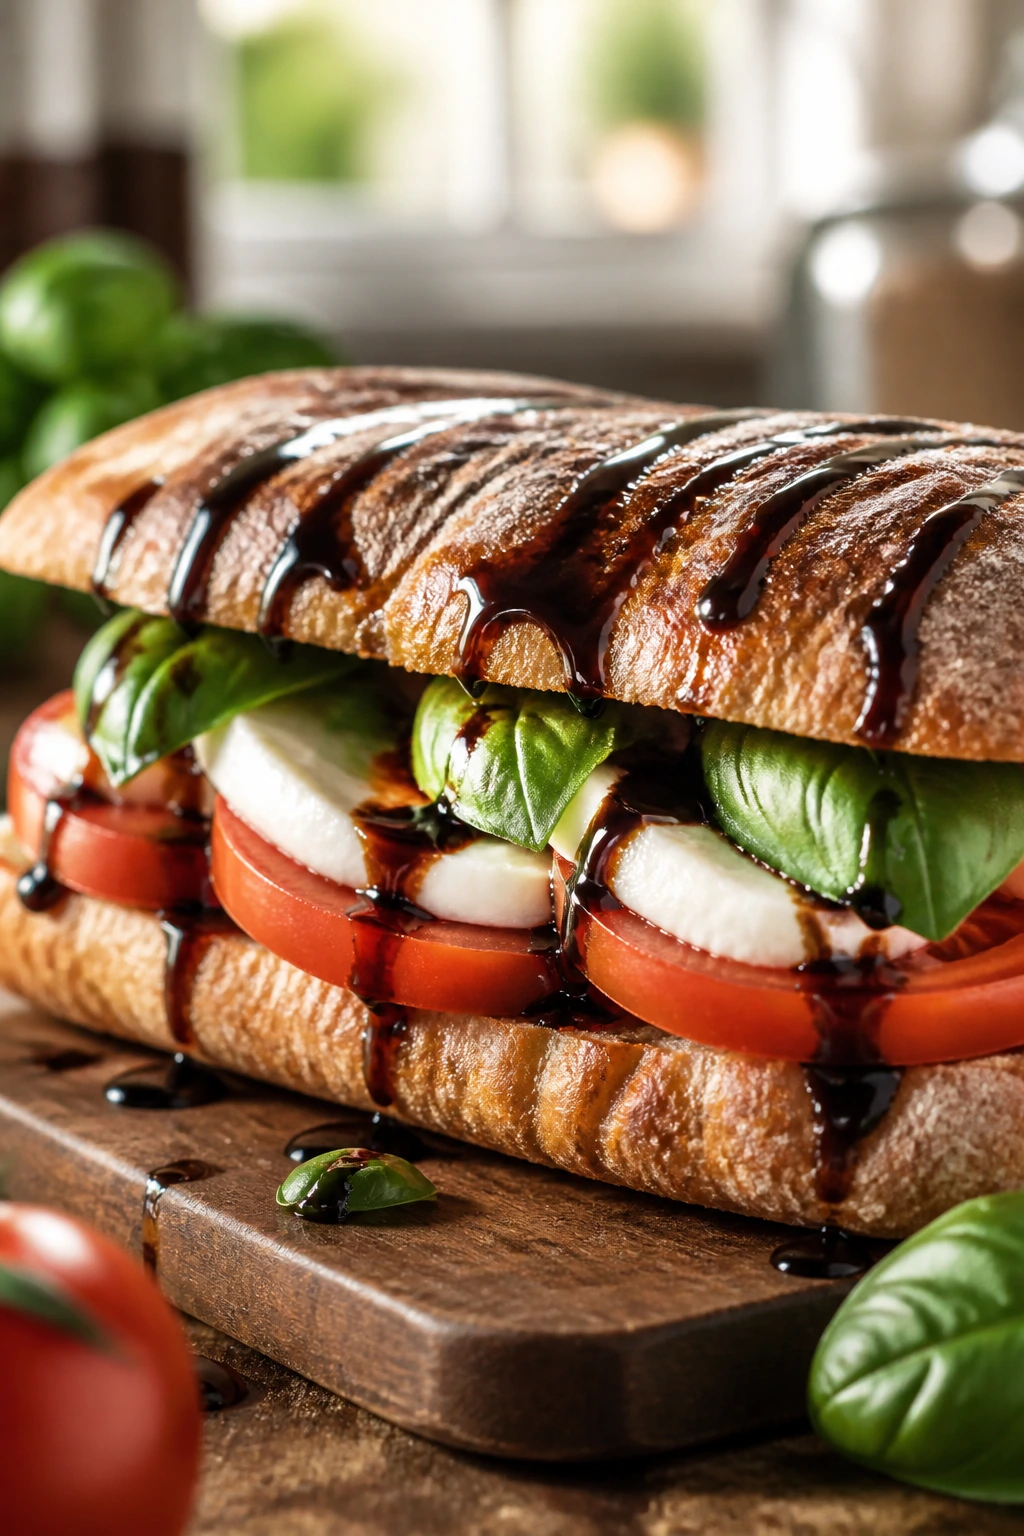
Which breads hold up best for summer sandwiches?
Ciabatta, sourdough, split-top buns, sub rolls, and sturdy whole grain bread usually hold up best because they have more structure. Soft white bread works for lighter fillings, but only if you eat the sandwich right away.
Can I make these sandwiches ahead for a picnic?
Yes, but pack the fillings and bread separately whenever possible. Tomato, cucumber, and dressed greens should go in their own containers, and anything hot should cool before you wrap it so condensation does not soak the bread.
What if I don’t have a grill?
A hot cast-iron skillet or grill pan handles most of these recipes just fine. You can sear chicken, steak, halloumi, peaches, zucchini, and even toast bread in the same pan.
How do I keep tomato sandwiches from getting soggy?
Salt the tomatoes first, let them drain for a few minutes, and toast the bread. If you’re making them ahead, keep the tomatoes separate until the last second.
Can I use rotisserie chicken instead of grilling chicken?
Absolutely. Rotisserie chicken works especially well in the pesto, Caesar, and Greek-style sandwiches. Just warm it gently if you want a hot sandwich, or use it cold for a quicker assembly.
What’s the safest way to handle seafood sandwiches?
Keep seafood chilled until serving, use clean cutting boards and utensils, and do not let shrimp, lobster, tuna, or salmon sit out for long in warm weather. If the filling has mayo, keep it cold until the bread is ready.
How do I make these sandwiches lighter without losing flavor?
Use more herbs, lemon, cucumber, and greens, and trim back the cheese or mayo a little. The tomato sandwich, Greek chicken pita, hummus sandwich, and salmon salad are easy places to start.
Can I toast the bread in advance?
Yes, but cool it fully before wrapping or stacking. Warm toasted bread trapped in a container will steam itself soft, and that defeats the point.
What should I do if a sandwich tastes flat?
Add salt first, then acid. A pinch of flaky salt, a few drops of lemon, a spoonful of vinegar, or a few pickled peppers usually fixes the problem faster than more mayo ever will.
A Cooler, Better Kind of Dinner
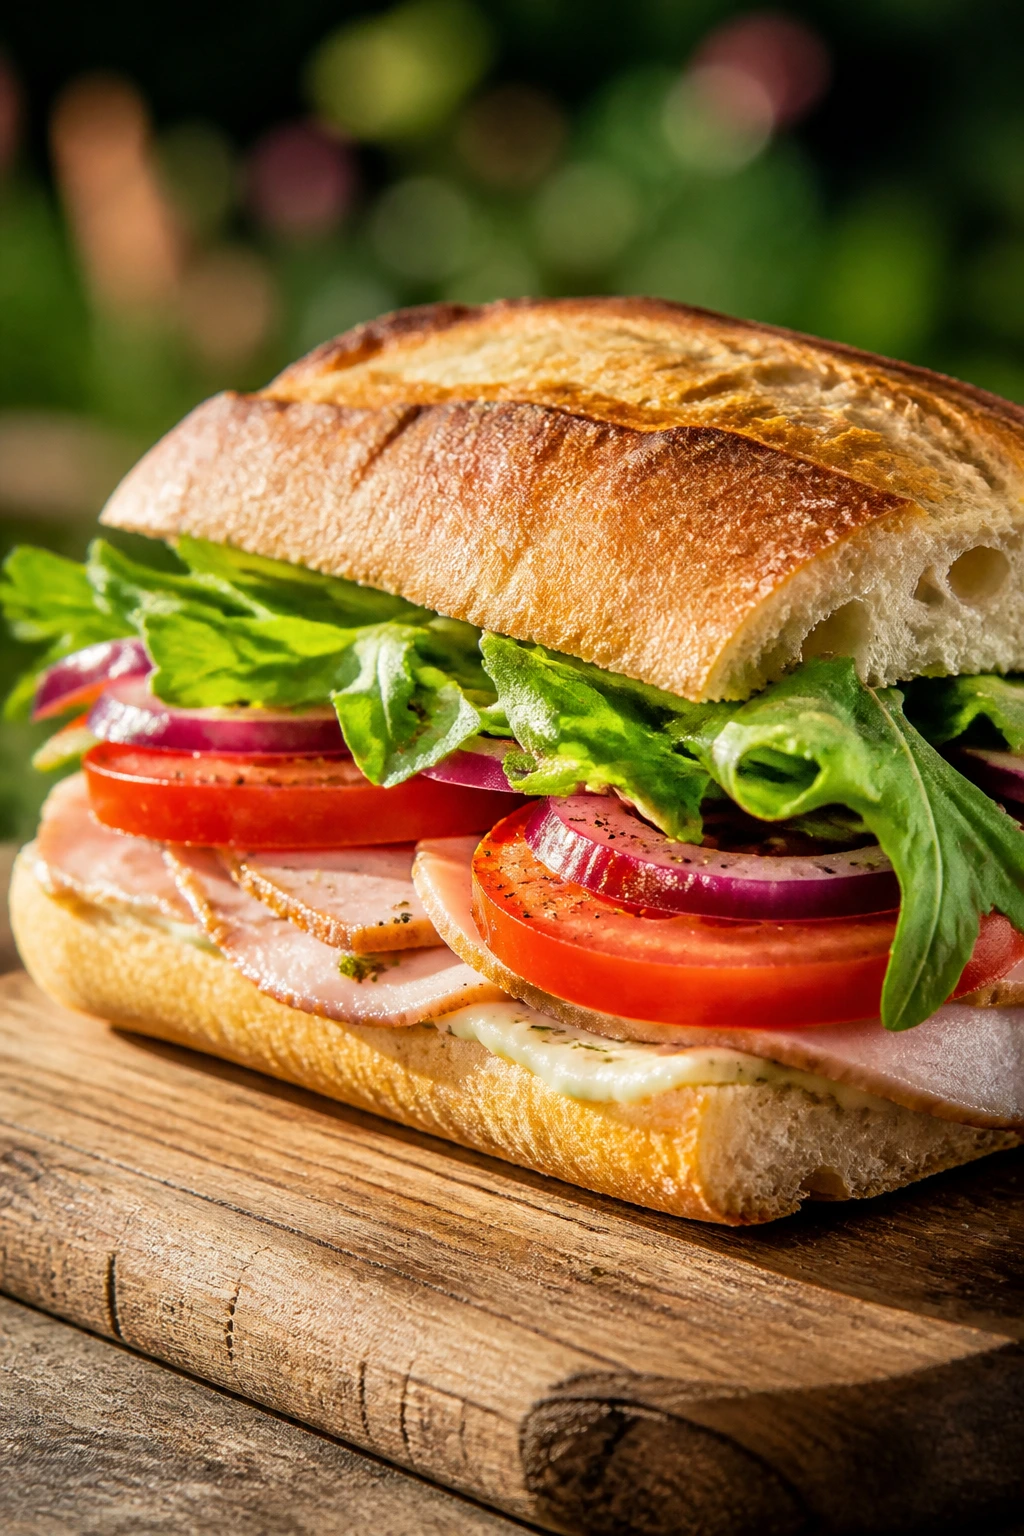
Good summer sandwiches do not ask much from you, but they return a lot when you choose the right bread, season the filling properly, and respect the moisture. That’s the whole game. Toast where you need structure. Salt the tomatoes. Drain the tuna. Rest the steak. Keep the bread from getting bullied by the filling.
The nicest part is how flexible these are. A hot night can turn into a grill night, a no-cook night, a leftovers night, or a “everyone fend for themselves” night without turning into a dinner emergency. That’s the kind of cooking I trust most: the kind that makes the evening easier and still gives you something worth sitting down for.