
Fruit desserts for kids do not need a fancy shopping list. A few apples, a bag of oats, a jar of jam, some flour, and one tired stick of butter can become a pan of bubbling cobbler or a tray of chewy bars that smells like cinnamon the second it leaves the oven. That’s the whole appeal here: pantry staples do the heavy lifting, while the fruit brings the brightness and the color.
I like desserts that can be pulled together from what’s already sitting in the cupboard or fridge door. A ripe banana that looks past its best, a can of peaches, a handful of frozen berries, the last scoop of brown sugar in the bin — those are the ingredients that turn into the kind of sweet things kids actually eat without negotiating every bite. Nothing fussy. Nothing precious. And, honestly, that’s usually where the best family desserts live.
The trick is knowing which pantry staples build structure, which ones keep fruit from turning watery, and which ones give you that soft, warm, spoonable finish kids tend to go back for. Once you see the pattern, you can mix and match fruit, crumbs, batters, and toppings without starting from scratch each time.
Why These Pantry-First Desserts Earn a Spot in the Rotation
No special run to the store: Most of these use flour, oats, sugar, butter, eggs, milk, and one fruit you already have, which means dessert happens without a second grocery trip.
Better use for soft fruit: Overripe bananas, bruised apples, and sad-looking pears are perfect here because heat turns them sweet and soft instead of throwing them away.
Kid-friendly texture: Crispy edges, tender centers, jammy fruit, and a little crunch on top give kids something to like even when they’re picky about mixed textures.
Easy to scale: A mug cake feeds one, a cobbler feeds a crowd, and the bars or muffins freeze well enough to tuck into lunchboxes later.
Fresh, frozen, or canned all work: That matters more than people think. Frozen berries hold their shape, canned peaches bake fast, and fresh apples bring the best bite when you want something sturdier.
Built from plain ingredients: These are the desserts that still work when your pantry looks ordinary, which is usually when you need dessert the most.
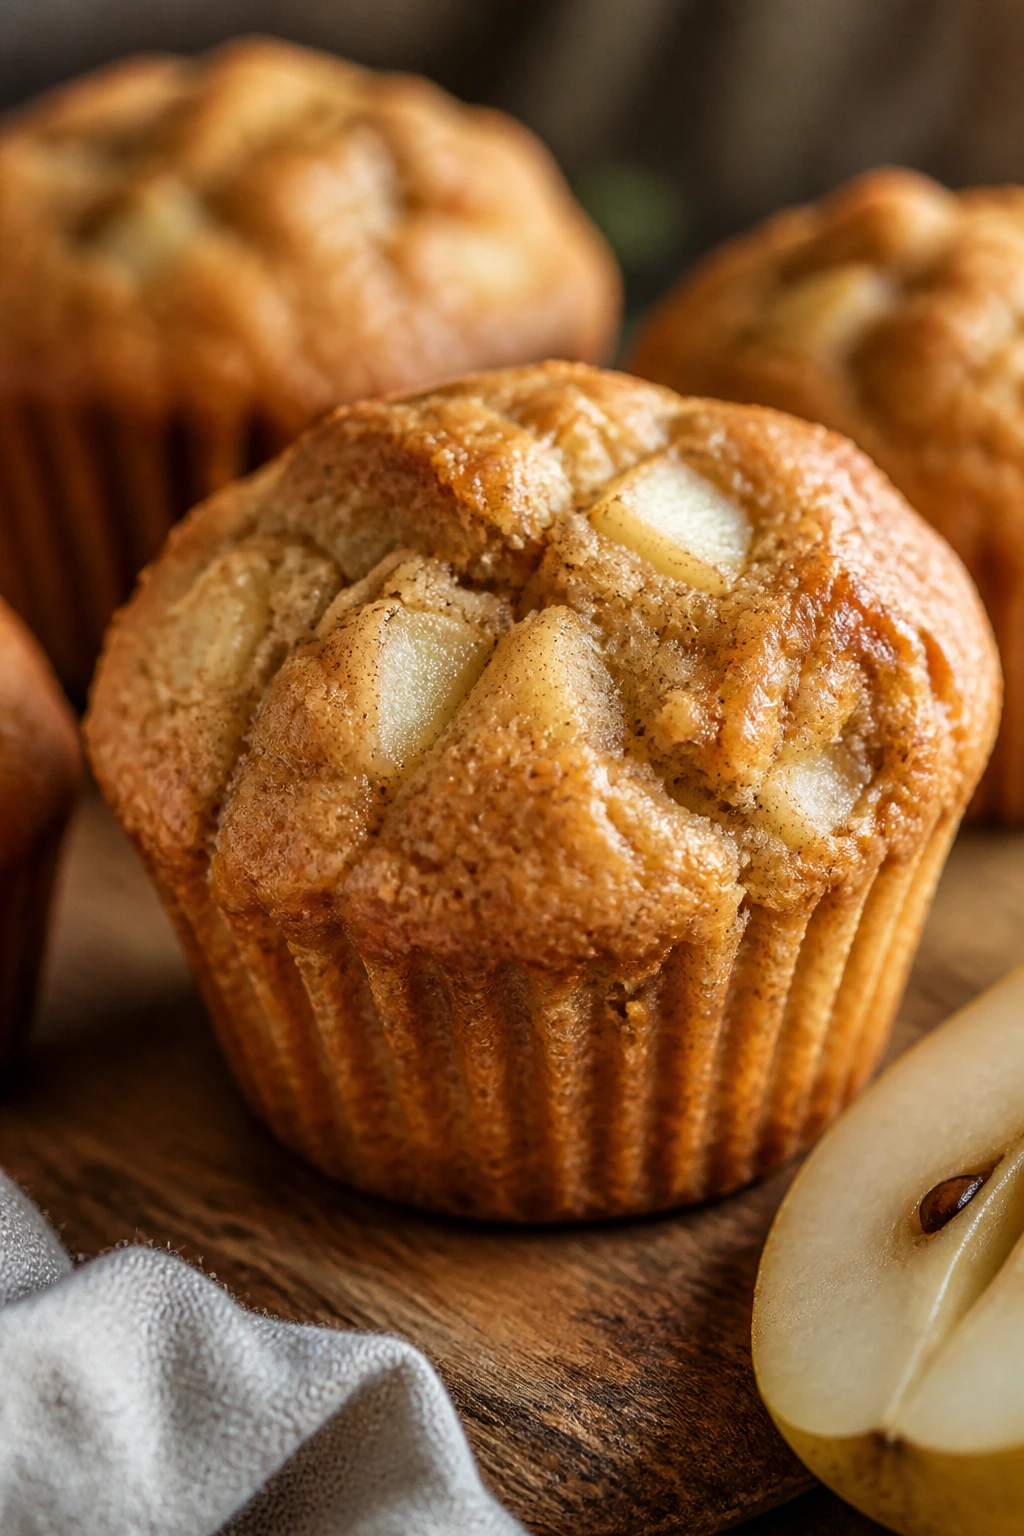
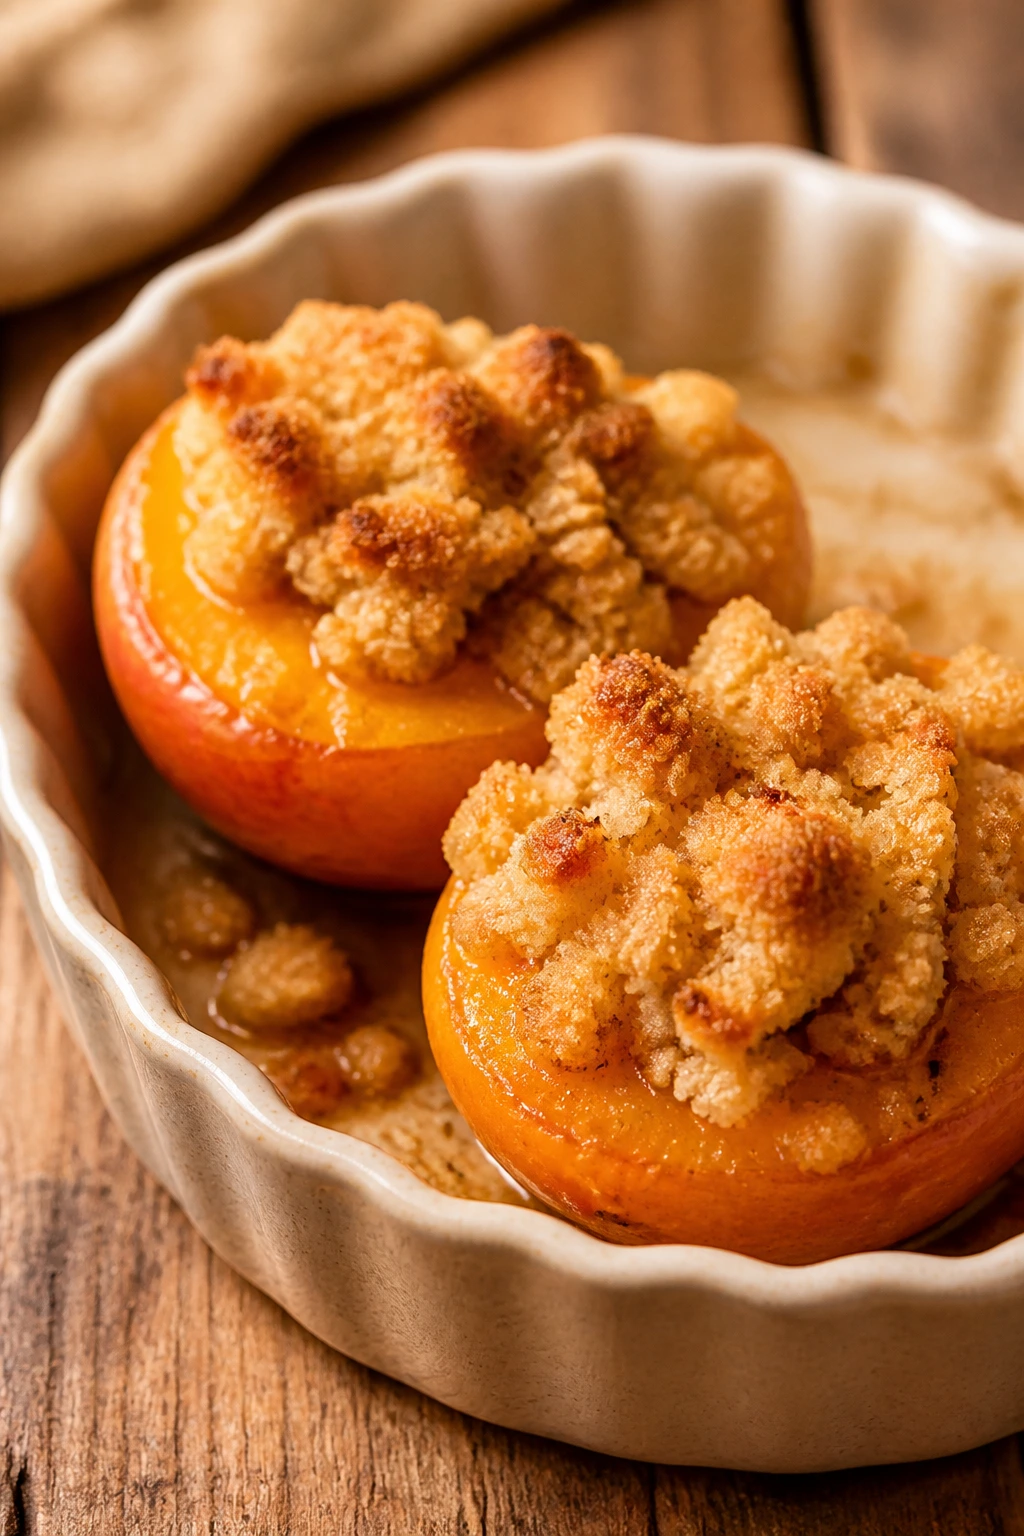
1. Cinnamon Sugar Baked Apples
Warm apples split open in the oven, their skins wrinkling as the brown sugar melts into the center. This is the dessert I make when I want something that tastes like a pie’s quieter cousin.
Why It Works: Apples keep their shape, but the flesh turns soft enough to scoop with a spoon after about 25 minutes. The oats soak up the juices, so you get a syrupy filling instead of a soggy puddle. Kids tend to like this one because it feels like built-in applesauce with a buttery topping.
Key Ingredients:
- 4 medium apples, cored
- 1/3 cup brown sugar
- 1/4 cup rolled oats
- 2 tablespoons butter, cut into small pieces
- 1 teaspoon cinnamon
- 2 tablespoons raisins
- 1 teaspoon vanilla extract
- 1/4 cup water
Quick Steps:
- Preheat the oven to 375°F and set four cored apples in a baking dish.
- Stir brown sugar, oats, cinnamon, raisins, and vanilla together in a small bowl.
- Spoon the mixture into the apple centers, packing it lightly.
- Dot each apple with butter and pour the water around the base of the dish.
- Bake for 25 to 30 minutes, until the apples are tender and the filling bubbles.
Equipment for This Recipe:
- 8×8-inch baking dish
- Small mixing bowl
- Paring knife and spoon
- Measuring cups
How to Serve This Dish: Spoon a little of the pan juice over each apple and serve it warm with a dollop of plain yogurt or vanilla ice cream. One apple makes a neat little dessert for a child; half an apple is enough for a younger eater.
Pro Tips for This Recipe:
- Choose apples that hold shape, like Gala or Honeycrisp.
- If the tops brown too fast, tent loosely with foil for the last 10 minutes.
- A pinch of salt in the filling keeps the sweetness from tasting flat.
Variations on This Dish:
- Nutty Orchard Version: Add 2 tablespoons chopped walnuts if the kids like crunch.
- Raisin-Free Swap: Use diced dates or skip the dried fruit entirely.
- Maple Finish: Drizzle 1 tablespoon maple syrup over the apples before baking.
Common Mistakes to Avoid with This Dish:
- Using apples that collapse fast: Very soft apples turn mushy. Use firmer varieties so the centers stay scoopable.
- Skipping the water: The dish needs that steam to keep the bottoms from sticking.
- Overstuffing the apples: If the filling piles too high, it spills before the apples turn tender.
2. Banana Oat Drop Cookies
These bake up like the middle of a breakfast cookie and a soft oatmeal bar had a kid of their own. They’re brown around the edges, a little chewy in the center, and exactly the sort of thing a child will grab with sticky fingers.
Why It Works: Bananas act like the glue here, so you don’t need much flour or fat. The oats give the cookies enough shape to hold together, and peanut butter adds the richness that keeps them from tasting like mashed fruit on a tray. They’re done fast, which is the entire point.
Key Ingredients:
- 2 ripe bananas, mashed
- 1 1/2 cups rolled oats
- 1/3 cup peanut butter
- 1/4 cup mini chocolate chips
- 1/4 cup raisins
- 1 teaspoon cinnamon
- 1 teaspoon vanilla extract
- Pinch of salt
Quick Steps:
- Preheat the oven to 350°F and line a baking sheet with parchment.
- Mash the bananas in a bowl until mostly smooth.
- Stir in oats, peanut butter, chocolate chips, raisins, cinnamon, vanilla, and salt.
- Scoop tablespoon-size mounds onto the sheet and flatten them slightly.
- Bake for 12 to 14 minutes, until the edges look set and the tops feel dry.
Equipment for This Recipe:
- Baking sheet
- Parchment paper
- Mixing bowl
- Spoon or small cookie scoop
How to Serve This Dish: These are good warm, but they hold together better after a short cool-down. Stack them on a plate with milk or pack them in a lunchbox once they’ve fully cooled.
Pro Tips for This Recipe:
- Use bananas with brown speckles; pale bananas won’t mash sweet enough.
- If the dough feels wet, add 2 more tablespoons oats.
- Press the cookies flatter than you think. They don’t spread much.
Variations on This Dish:
- Chocolate Breakfast Cookie: Add 1 tablespoon cocoa powder for a deeper flavor.
- Sunflower Swap: Replace peanut butter with sunflower seed butter for allergy-friendly baking.
- Cinnamon Chip Version: Use cinnamon chips instead of chocolate chips for a warmer flavor.
Common Mistakes to Avoid with This Dish:
- Making the batter too loose: The cookies won’t hold together. Add oats until the dough looks sticky but scoopable.
- Overbaking: They should stay soft in the middle. Wait until the edges set, not until they turn hard.
- Using too much peanut butter: A heavy hand makes them greasy and flat.
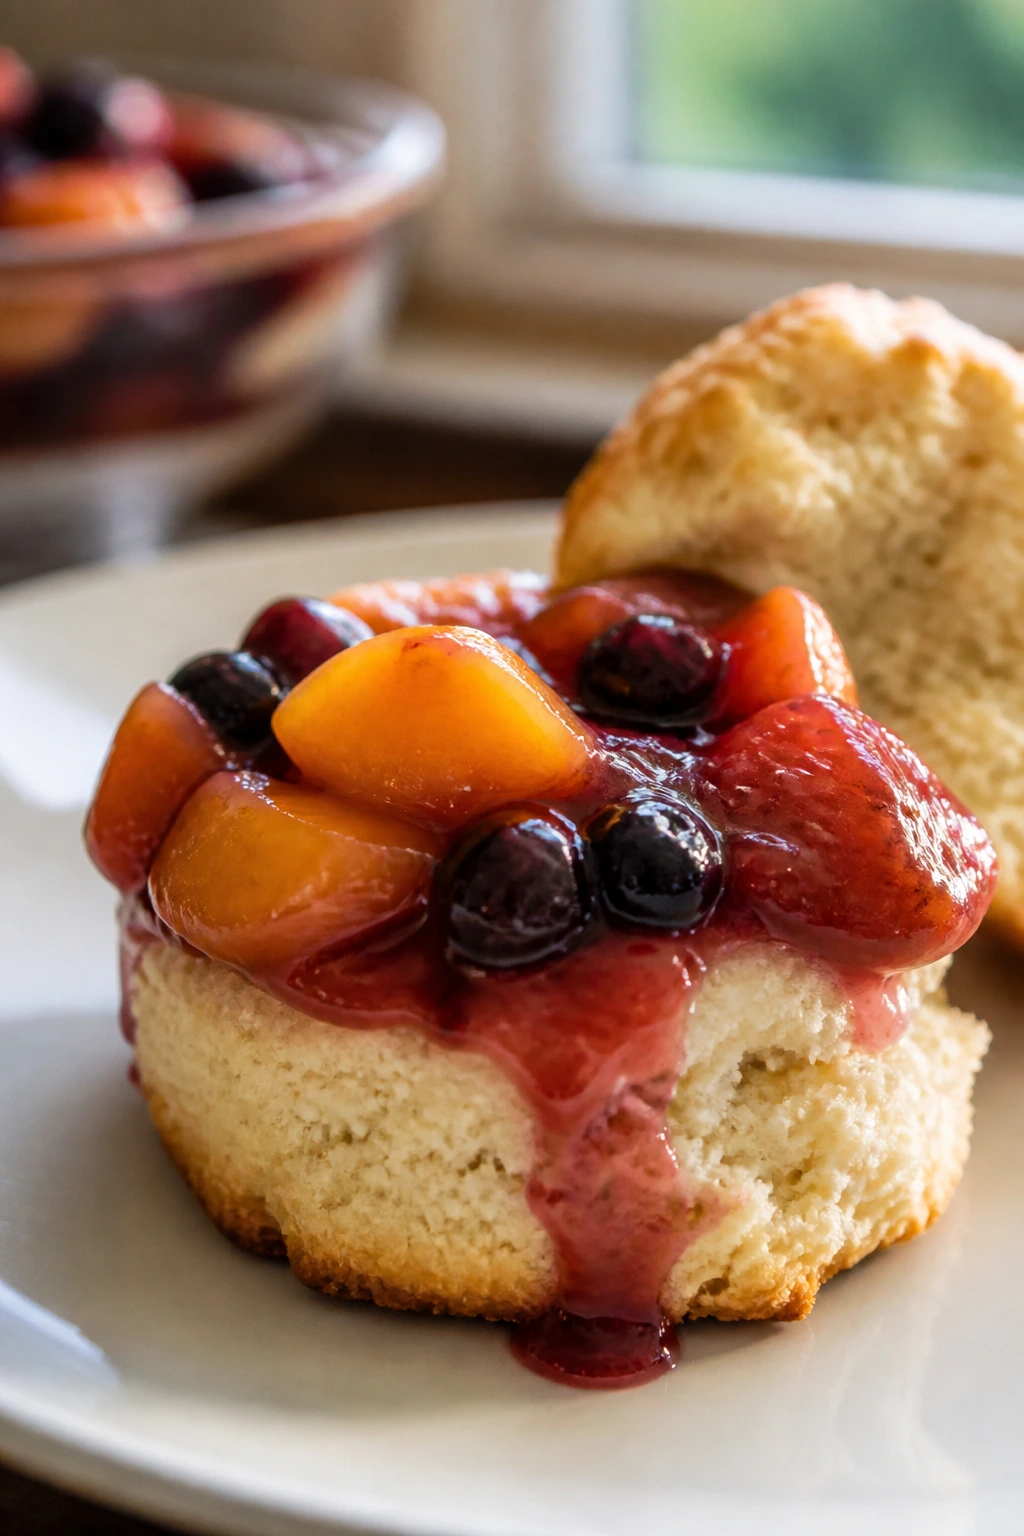
3. Strawberry Shortcake Biscuit Cups
The biscuit base comes out tender and slightly crumbly, the strawberries turn glossy with sugar, and the yogurt on top cools everything down. It feels like shortcake without the bakery fuss.
Why It Works: Baking the biscuit dough in a muffin tin gives you little cups that can hold the fruit instead of collapsing under it. Macerated strawberries make their own syrup in 10 minutes, which means the whole dessert tastes fresher than it looks. Kids like the “build-your-own” part, and honestly, so do adults.
Key Ingredients:
- 2 cups all-purpose flour
- 1 tablespoon sugar
- 1 tablespoon baking powder
- 1/2 teaspoon salt
- 4 tablespoons cold butter, cubed
- 2/3 cup milk
- 2 cups strawberries, sliced
- 2 tablespoons sugar
- 1 cup plain yogurt
- 1 teaspoon vanilla extract
Quick Steps:
- Preheat the oven to 425°F and grease a muffin tin.
- Mix flour, sugar, baking powder, and salt, then cut in the butter until crumbly.
- Stir in milk just until a soft dough forms, then spoon it into the muffin cups.
- Bake for 12 to 14 minutes, until lightly golden on top.
- Toss strawberries with sugar and vanilla, let them sit for 10 minutes, then split the biscuit cups and fill with fruit and yogurt.
Equipment for This Recipe:
- Muffin tin
- Mixing bowl
- Pastry cutter or fork
- Spoon
How to Serve This Dish: Serve each cup open-faced so the strawberry juice drips into the biscuit. A spoonful of the syrup over the yogurt makes the plate look polished without extra work.
Pro Tips for This Recipe:
- Keep the butter cold so the biscuits bake up tender.
- Let the strawberries sit long enough to get syrupy, not watery.
- Use full-fat yogurt if you want a richer filling.
Variations on This Dish:
- Blueberry Shortcake Cups: Swap in blueberries and reduce the sugar to 1 tablespoon.
- Jam Shortcut: Use 1/3 cup strawberry jam mixed with fresh berries when the fruit is shy.
- Creamy Version: Replace yogurt with lightly sweetened whipped cream.
Common Mistakes to Avoid with This Dish:
- Overmixing the biscuit dough: That makes the cups tough.
- Skipping the rest time for berries: Dry fruit won’t give you the sauce you want.
- Filling before cooling: Warm biscuits turn the yogurt thin and sad.
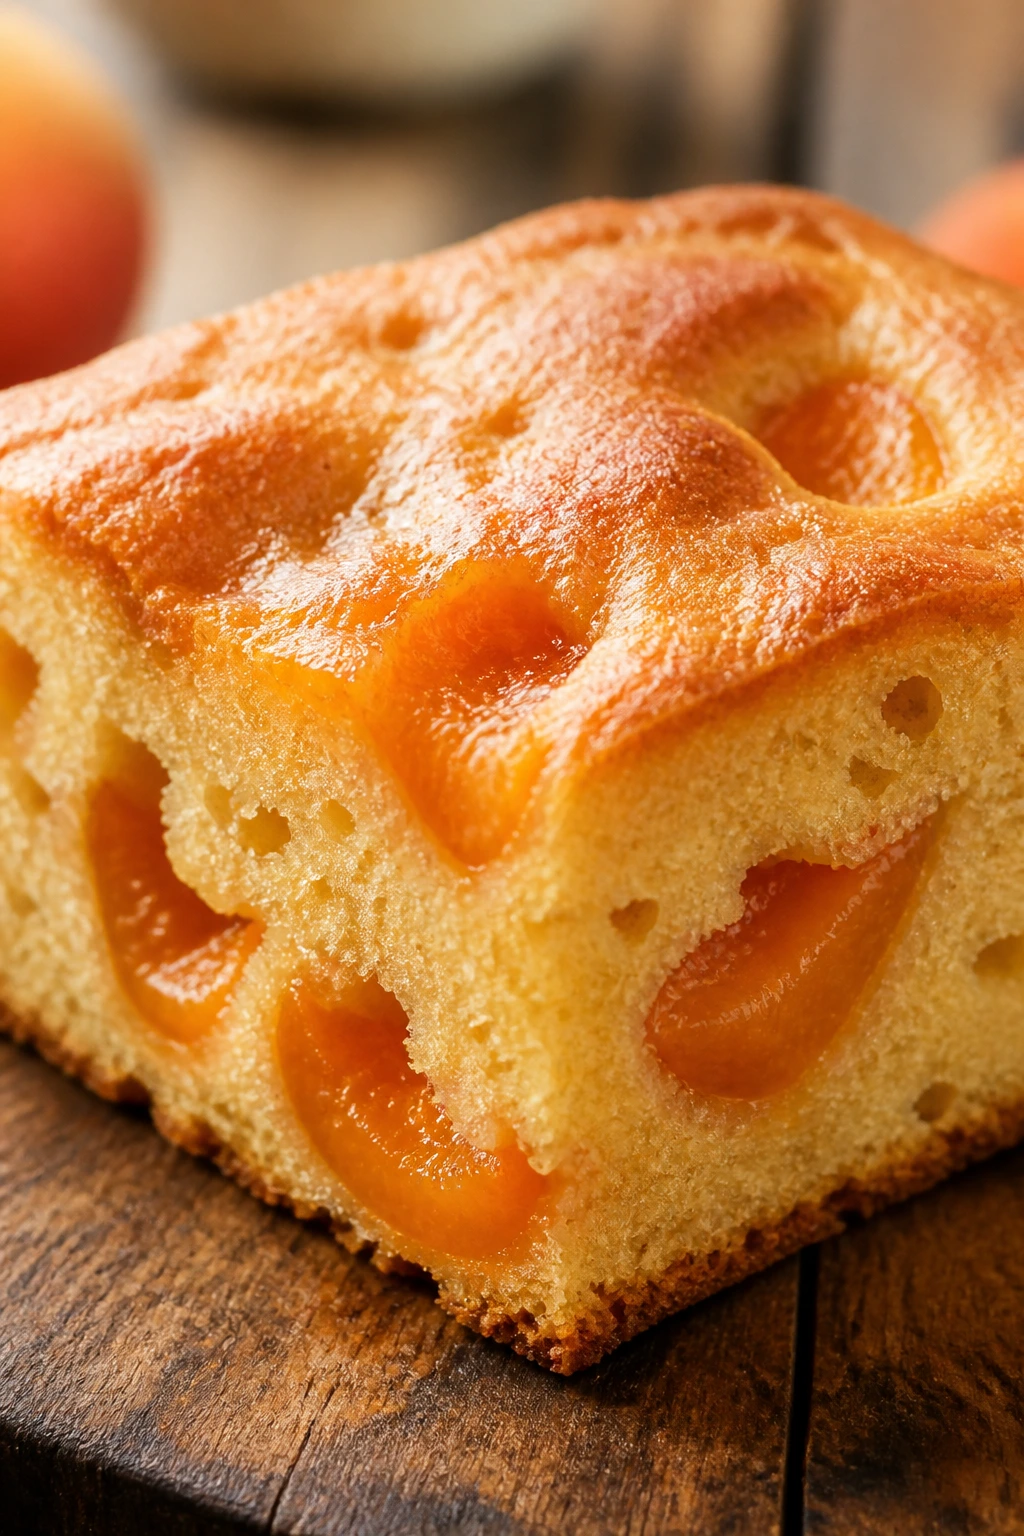
4. Peach Cobbler with Cake Mix
This is the cobbler you make when you want a bubbling pan of dessert with almost no ceremony. The top bakes into a golden crust, while the peaches underneath go soft and syrupy.
Why It Works: Cake mix brings flour, sugar, and leavening in one box, which is why this cobbler gets such a good crust with almost no measuring. The melted butter pools through the mix and makes those crunchy patches kids go after first. Canned peaches work especially well here because they’re already sweet and soft.
Key Ingredients:
- 2 cans sliced peaches in juice, drained
- 1 box yellow cake mix
- 1/2 cup unsalted butter, melted
- 1 teaspoon cinnamon
- 1 tablespoon brown sugar
- 1/4 cup water
- Pinch of salt
Quick Steps:
- Preheat the oven to 350°F and grease a 9×13-inch baking dish.
- Spread the peaches in the dish and sprinkle with cinnamon, brown sugar, and salt.
- Scatter the dry cake mix evenly over the fruit.
- Drizzle the melted butter over the top, then sprinkle with water if any dry patches remain.
- Bake for 40 to 45 minutes, until the top is golden and the filling bubbles at the edges.
Equipment for This Recipe:
- 9×13-inch baking dish
- Measuring cups
- Spoon
- Small bowl for melting butter
How to Serve This Dish: Serve it warm in shallow bowls so the peach juice stays put. A small scoop of vanilla ice cream melts into the crust in a way that children notice immediately.
Pro Tips for This Recipe:
- Use peaches in juice, not heavy syrup, so the filling doesn’t turn cloying.
- Don’t stir once the cake mix is on top.
- If the top looks dry after 20 minutes, drizzle on 1 to 2 more tablespoons of butter.
Variations on This Dish:
- Mixed Fruit Cobbler: Replace one can of peaches with canned pears or pineapple.
- Spice Cake Version: Use spice cake mix instead of yellow cake mix.
- Fresh Peach Upgrade: Use 5 cups sliced fresh peaches and add 2 tablespoons extra sugar.
Common Mistakes to Avoid with This Dish:
- Mixing the topping into the fruit: The cobbler needs layered, not stirred, batter.
- Using too little butter: Dry spots stay powdery. Aim to coat most of the mix.
- Overbaking until the edges harden: Stop when the top is deep gold and the fruit is bubbling.
5. Blueberry Almond Crisp
The top turns sandy and crisp, the fruit underneath goes jammy, and the whole pan smells like butter and toasted oats. I like this one because it doesn’t pretend to be delicate.
Why It Works: Blueberries release a lot of juice, so the cornstarch keeps the filling thick instead of runny. Oats and flour make a topping that clumps in uneven bits, which is exactly what gives you those crunchy pockets kids pick out first. Almonds add a little snap without taking over the fruit.
Key Ingredients:
- 4 cups blueberries, fresh or frozen
- 1/4 cup sugar
- 1 tablespoon cornstarch
- 1 teaspoon lemon juice
- 1 cup rolled oats
- 1/2 cup all-purpose flour
- 1/2 cup brown sugar
- 1/2 cup butter, softened
- 1/3 cup sliced almonds
- 1 teaspoon vanilla extract
Quick Steps:
- Preheat the oven to 375°F and grease an 8×8-inch baking dish.
- Toss blueberries with sugar, cornstarch, and lemon juice, then spread them in the dish.
- Mix oats, flour, brown sugar, almonds, vanilla, and butter until crumbly.
- Sprinkle the topping evenly over the fruit.
- Bake for 30 to 35 minutes, until the top is brown and the filling bubbles at the edges.
Equipment for This Recipe:
- Baking dish
- Mixing bowl
- Fork or pastry cutter
- Measuring spoons
How to Serve This Dish: Let it sit for 10 minutes before scooping so the juices thicken a bit. A spoonful in a small bowl is enough for younger kids; older kids usually ask for a second scoop.
Pro Tips for This Recipe:
- Frozen blueberries go straight in; don’t thaw them first.
- If your berries are very tart, use the full 1/4 cup sugar.
- A pinch of salt in the topping helps the almonds taste more toasted.
Variations on This Dish:
- Oat-Heavy Version: Increase oats to 1 1/2 cups for a chunkier topping.
- No-Nut Swap: Leave out almonds and add 2 tablespoons extra oats.
- Mixed Berry Crisp: Use half blueberries and half raspberries for sharper flavor.
Common Mistakes to Avoid with This Dish:
- Using too much cornstarch: The filling can turn gummy. One tablespoon is enough here.
- Skipping the rest time: Hot fruit looks loose even when it’s ready.
- Packing the topping down: Loose crumbs bake up crisper.
6. Cherry Hand Pies
These are the kind of dessert that makes kids feel like they’re holding something special. The crust bakes flaky and the cherry filling stays tucked inside, thick enough to stay put after the first bite.
Why It Works: Pie crust gives you portable dessert without slicing or serving bowls. Canned cherry filling is already thick and sweet, so you can get straight to shaping and baking. The egg wash browns the tops fast, which gives the pies that bakery look without actual bakery effort.
Key Ingredients:
- 2 refrigerated pie crusts
- 1 1/2 cups cherry pie filling
- 1 egg, beaten
- 1 tablespoon milk
- 2 tablespoons sugar
- 1/2 teaspoon cinnamon
- 1 tablespoon flour, for dusting
- Pinch of salt
Quick Steps:
- Preheat the oven to 400°F and line a baking sheet with parchment.
- Roll out the pie crusts and cut them into 4- to 5-inch circles.
- Spoon 1 tablespoon cherry filling onto each circle, leaving a clean edge.
- Fold over, crimp with a fork, and brush with egg mixed with milk.
- Sprinkle sugar on top and bake for 18 to 20 minutes, until deeply golden.
Equipment for This Recipe:
- Baking sheet
- Parchment paper
- Rolling pin
- Fork
- Pastry brush
How to Serve This Dish: Let the pies cool for at least 10 minutes or the filling will burn tongues. A napkin matters here; the cherry juice tends to sneak out on the first bite.
Pro Tips for This Recipe:
- Chill the assembled pies for 10 minutes before baking if the dough softens.
- Don’t overfill them. One spoonful is enough.
- Vent the top with a tiny slit if the filling looks extra juicy.
Variations on This Dish:
- Apple Hand Pies: Swap in apple pie filling and add extra cinnamon.
- Jam Pies: Use thick strawberry jam when pie filling is out of reach.
- Sugar-Crust Version: Skip cinnamon and use coarse sugar for a cleaner sweet finish.
Common Mistakes to Avoid with This Dish:
- Sealing over wet filling: The edges won’t stay shut. Keep the rim clean.
- Baking on a warm tray: The crust gets greasy. Start with a cool sheet pan.
- Serving too soon: Hot filling slips out and burns.
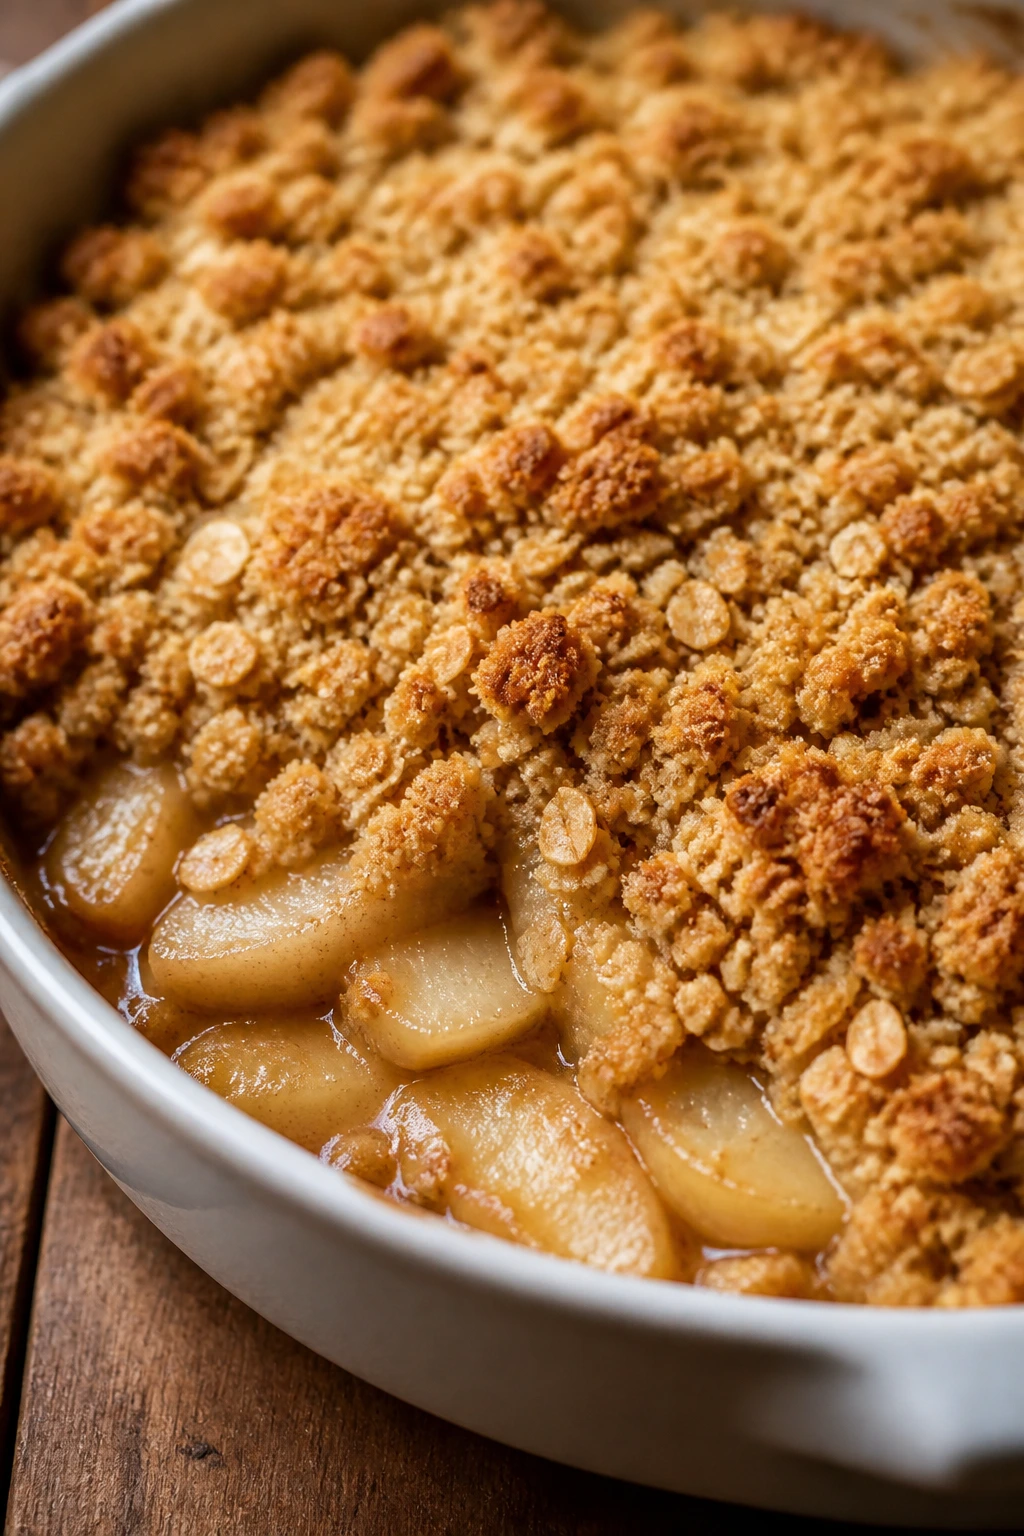
7. Apple Crumble Bars
These have a shortbread-like bottom, a soft apple layer in the middle, and a crumble that turns sandy and golden on top. They’re the bar you cut when you want pie flavor without rolling a crust.
Why It Works: The bottom layer doubles as the topping, which means you only make one dough. Apples cook down between the layers and turn jammy without leaking everywhere. Kids like the neat square shape; parents like that it travels well.
Key Ingredients:
- 2 cups all-purpose flour
- 1 cup rolled oats
- 1 cup brown sugar
- 1 cup butter, cold and cubed
- 3 medium apples, peeled and diced
- 1 teaspoon cinnamon
- 1 tablespoon lemon juice
- 2 tablespoons sugar
- 1 tablespoon cornstarch
- Pinch of salt
Quick Steps:
- Preheat the oven to 350°F and line an 8×8-inch pan with parchment.
- Mix flour, oats, brown sugar, salt, and butter until crumbly.
- Press two-thirds of the mixture into the pan.
- Toss apples with cinnamon, lemon juice, sugar, and cornstarch, then spread over the base.
- Crumble the remaining mixture on top and bake for 38 to 42 minutes, until the top is golden and the fruit looks thick.
Equipment for This Recipe:
- 8×8-inch baking pan
- Parchment paper
- Mixing bowl
- Spoon or spatula
How to Serve This Dish: Cool completely before slicing or the bars will fall apart. They’re tidy enough for lunchboxes once cut into small squares.
Pro Tips for This Recipe:
- Use tart apples so the bars don’t taste flat.
- Press the base firmly; loose crumbs won’t hold the fruit.
- A thin dusting of powdered sugar makes them look finished.
Variations on This Dish:
- Pear Crumble Bars: Swap pears for apples and add a touch of nutmeg.
- Berry Layer Bars: Use 2 cups berries and increase cornstarch to 2 tablespoons.
- Extra-Soft Version: Add 2 tablespoons applesauce to the filling.
Common Mistakes to Avoid with This Dish:
- Cutting too warm: The middle needs time to set.
- Using too much filling: The bars slide apart.
- Forgetting the cornstarch: Juicy apples need a thickener.
8. Frozen Yogurt Berry Bark
Cold, creamy, and a little messy in the best way, this bark breaks into bright shards with berries stuck in the top like confetti. It’s more snack-dessert than formal dessert, and kids tend to love that.
Why It Works: Yogurt freezes into a firm base, and honey keeps it from tasting icy. Berries and granola add color and crunch, so each piece has more going on than plain frozen yogurt. This is also one of the fastest ways to use berries that need to move.
Key Ingredients:
- 2 cups plain Greek yogurt
- 2 tablespoons honey
- 1 teaspoon vanilla extract
- 1 1/2 cups berries
- 1/3 cup granola
- 2 tablespoons mini chocolate chips
- Pinch of salt
Quick Steps:
- Line a baking sheet with parchment.
- Stir yogurt, honey, vanilla, and salt together.
- Spread the yogurt in a 1/4-inch layer on the sheet.
- Scatter berries, granola, and chocolate chips over the top.
- Freeze for 3 hours, then break into pieces.
Equipment for This Recipe:
- Rimmed baking sheet
- Parchment paper
- Spoon
- Freezer space
How to Serve This Dish: Serve straight from the freezer so it holds its shape. Put the pieces in a bowl only right before eating; they soften fast.
Pro Tips for This Recipe:
- Pat very juicy berries dry first.
- Don’t spread the yogurt too thick or the bark gets hard to bite.
- Use parchment, not wax paper, or the bark can stick.
Variations on This Dish:
- Peanut Butter Swirl Bark: Drizzle 2 tablespoons peanut butter over the yogurt before freezing.
- Cherry Crunch Bark: Swap cherries and use crushed cereal instead of granola.
- Lemon Berry Bark: Add 1 teaspoon lemon zest to the yogurt.
Common Mistakes to Avoid with This Dish:
- Leaving it uncovered in the freezer: It picks up freezer smells fast.
- Using watery fruit: The top turns icy and loose.
- Waiting too long to break it: It gets harder to snap cleanly.
9. Pineapple Upside-Down Cupcakes
They come out with glossy pineapple tops and a sticky brown sugar layer that makes the liner worth peeling off. Kids like the upside-down reveal, which is half the fun here.
Why It Works: The caramel starts right in the muffin tin, so every cupcake gets its own pocket of syrup. Canned pineapple keeps the fruit soft and sweet, and the cherry center gives a bright pop of color. These bake faster than a full cake, which helps when the dessert needs to happen on a short clock.
Key Ingredients:
- 1 box yellow cake mix
- Ingredients called for on the box, usually eggs, oil, and water
- 1/4 cup butter, melted
- 1/2 cup brown sugar
- 6 pineapple rings, cut into pieces
- 12 maraschino cherries
- Pinch of salt
Quick Steps:
- Preheat the oven to 350°F and grease a muffin tin well.
- Spoon melted butter into each cup, then add 1 teaspoon brown sugar.
- Place pineapple pieces and one cherry in each cup.
- Mix the cake batter according to the box directions.
- Fill the cups two-thirds full and bake for 18 to 22 minutes, until the tops spring back.
Equipment for This Recipe:
- Muffin tin
- Mixing bowl
- Spoon
- Cooling rack
How to Serve This Dish: Invert them while warm so the sticky topping slides out cleanly. They’re easiest to eat with a fork, though kids usually ignore that and go straight in.
Pro Tips for This Recipe:
- Grease the pan well or the fruit topping clings.
- Don’t overfill; the batter puffs up fast.
- Let them rest 5 minutes before turning out.
Variations on This Dish:
- Mini Tropical Cakes: Add shredded coconut to the batter.
- Cherry-Only Swap: Use two cherries and skip the pineapple if needed.
- Spice Cake Version: Use spice cake mix for a warmer flavor.
Common Mistakes to Avoid with This Dish:
- Turning them out too soon: The topping can tear.
- Using too much sugar in the cups: It overflows and burns.
- Ignoring the fruit drain: Wet pineapple makes the topping slide.
10. Mixed Berry Mug Cake
This is the emergency dessert that still feels like dessert. It’s soft, warm, and dotted with little berry pockets that burst when you cut through the center with a spoon.
Why It Works: A mug cake cooks fast because the batter is thin and the portion is tiny. Jam swirled through the middle adds sweetness and keeps the cake from tasting plain. It’s a good fix when one child wants dessert and nobody wants to heat the whole oven.
Key Ingredients:
- 1/4 cup all-purpose flour
- 2 tablespoons sugar
- 1/4 teaspoon baking powder
- Pinch of salt
- 3 tablespoons milk
- 1 tablespoon neutral oil
- 2 tablespoons berries
- 1 tablespoon jam
- 1/4 teaspoon vanilla extract
Quick Steps:
- Grease a large microwave-safe mug lightly.
- Stir flour, sugar, baking powder, and salt in the mug.
- Add milk, oil, vanilla, and berries, then mix until smooth.
- Drop the jam into the center and swirl once.
- Microwave for 1 minute 15 seconds to 1 minute 30 seconds, until the top looks set.
Equipment for This Recipe:
- Large microwave-safe mug
- Spoon
- Measuring spoons
How to Serve This Dish: Let it sit for 1 minute before eating so the center stops steaming. A spoonful of yogurt on top makes it feel more like a plated dessert.
Pro Tips for This Recipe:
- Use a big mug. Small mugs overflow fast.
- Frozen berries work, but chop very large ones first.
- Stop microwaving as soon as the top loses its wet shine.
Variations on This Dish:
- Chocolate Berry Mug Cake: Add 1 teaspoon cocoa powder.
- Peach Jam Version: Use peach preserves and diced canned peaches.
- Banana Berry Cake: Mash in 1 tablespoon banana for a softer crumb.
Common Mistakes to Avoid with This Dish:
- Overcooking: Mug cakes go from tender to rubbery fast.
- Using a small mug: Batter spills and burns around the edges.
- Skipping the rest minute: The center finishes setting after the microwave stops.
11. Pear and Honey Crumble
Soft pears bake down into a gentle, sweet filling, and the crumble on top gives you the crunch kids want after the first spoonful. It’s calm dessert, not flashy dessert.
Why It Works: Pears turn silky faster than apples, so they need a topping that can stand up to all that juice. Oats, flour, and butter make a rough crumb that bakes brown and stays crisp for a while. Honey softens the flavor and keeps the fruit from tasting one-note.
Key Ingredients:
- 5 ripe pears, peeled and sliced
- 2 tablespoons honey
- 1 teaspoon cinnamon
- 1 tablespoon lemon juice
- 3/4 cup rolled oats
- 1/2 cup flour
- 1/2 cup brown sugar
- 1/2 cup butter, cold and cubed
- Pinch of salt
Quick Steps:
- Preheat the oven to 375°F and grease a 9-inch baking dish.
- Toss pears with honey, cinnamon, and lemon juice.
- Spread the pears in the dish.
- Mix oats, flour, brown sugar, salt, and butter until crumbly.
- Scatter the topping over the pears and bake for 30 to 35 minutes, until bubbling and golden.
Equipment for This Recipe:
- Baking dish
- Mixing bowl
- Fork
- Spoon
How to Serve This Dish: Wait 10 minutes before serving so the pears settle. It’s excellent with a spoonful of yogurt or a small scoop of ice cream, depending on how sweet you want it.
Pro Tips for This Recipe:
- Use pears that are ripe but not mushy.
- If the pears are very juicy, add 1 teaspoon cornstarch.
- A little lemon juice keeps the flavor bright.
Variations on This Dish:
- Apple-Pear Mix: Swap half the pears for apples to add structure.
- Ginger Crumble: Add 1/2 teaspoon ground ginger to the topping.
- Nutty Crunch: Add 1/4 cup chopped pecans.
Common Mistakes to Avoid with This Dish:
- Using underripe pears: They stay hard after baking.
- Skipping the salt: The topping tastes flat without it.
- Serving immediately from the oven: The filling runs too much.
12. Jam Thumbprint Cookies
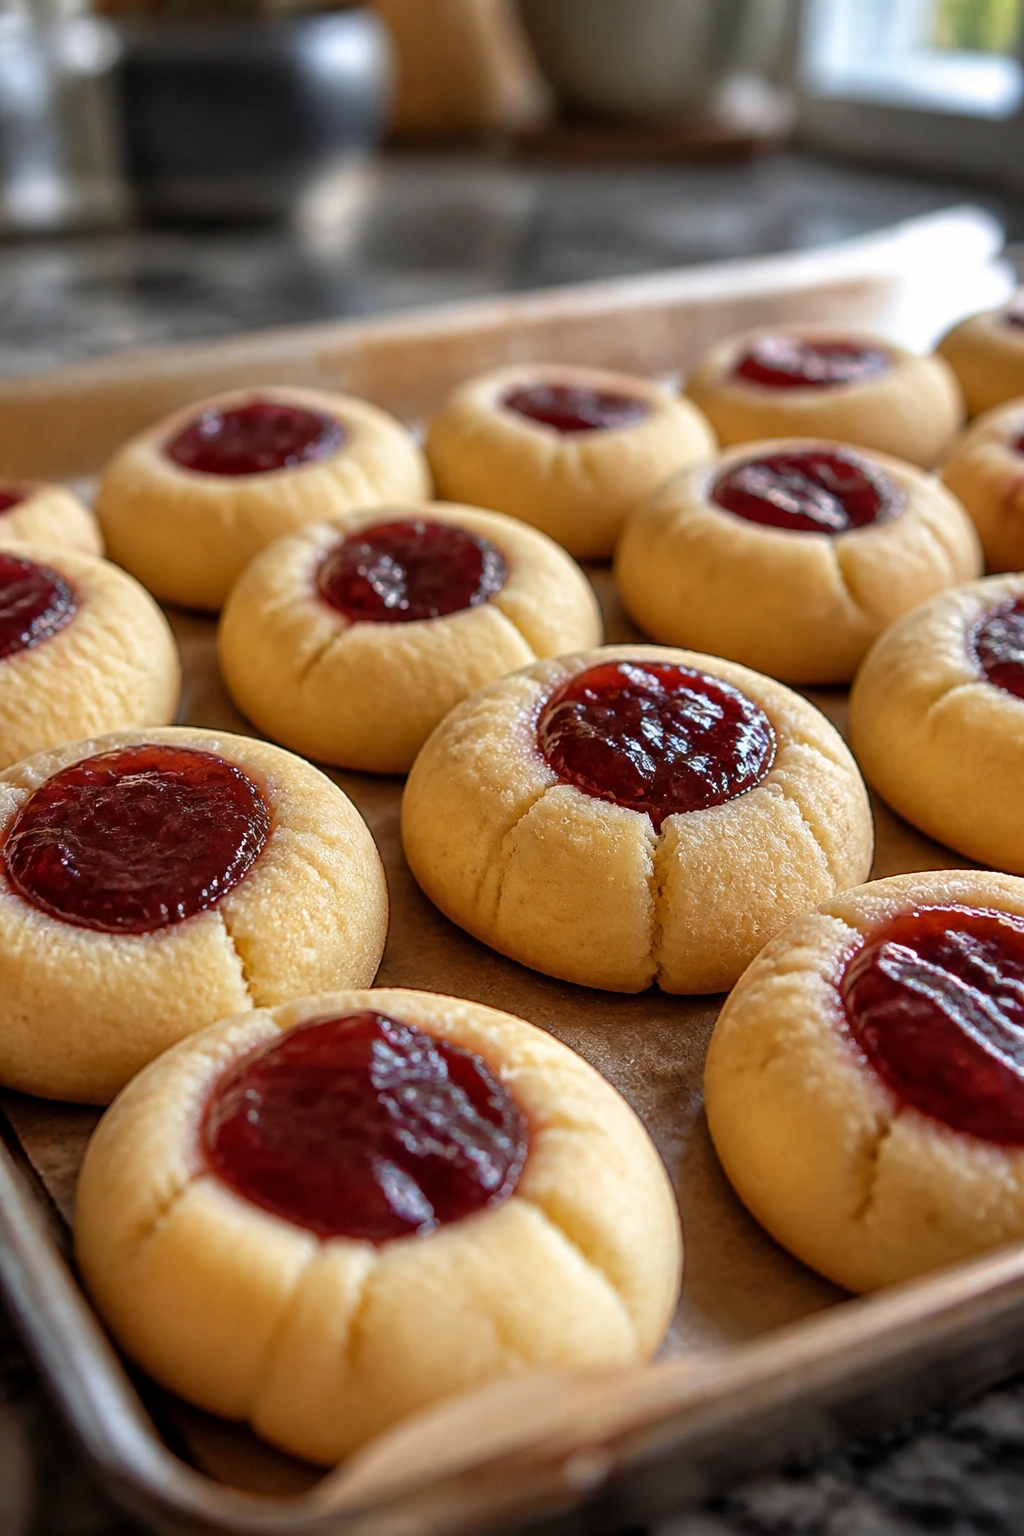
These are little butter cookies with a jewel of jam in the middle, and kids seem to understand them instantly. The texture lands somewhere between shortbread and sugar cookie, which is a nice place to be.
Why It Works: The dough is sturdy enough to hold a thumbprint without cracking apart, and the jam bakes into a glossy center. You get a cookie that looks more complicated than it is. That’s a rare and useful thing.
Key Ingredients:
- 1 cup butter, softened
- 2/3 cup sugar
- 1 egg yolk
- 2 teaspoons vanilla extract
- 2 cups all-purpose flour
- 1/4 teaspoon salt
- 1/2 cup jam, any flavor
- 1 tablespoon powdered sugar, optional
Quick Steps:
- Preheat the oven to 350°F and line a baking sheet with parchment.
- Beat butter and sugar until fluffy, then mix in the egg yolk and vanilla.
- Stir in flour and salt until a soft dough forms.
- Roll into 1-inch balls, make a dent in the center of each, and fill with jam.
- Bake for 12 to 14 minutes, until the edges are lightly golden.
Equipment for This Recipe:
- Baking sheet
- Parchment paper
- Mixing bowl
- Wooden spoon or mixer
How to Serve This Dish: Let the jam set before moving them. They’re nice on a plate with fruit salad, but they also work well as a lunchbox treat once cool.
Pro Tips for This Recipe:
- Chill the dough 15 minutes if it feels sticky.
- Use thick jam so it doesn’t run.
- Re-press the centers gently after baking if they puff back up.
Variations on This Dish:
- Apricot Thumbprints: Use apricot preserves for a brighter finish.
- Chocolate Center Cookies: Swap 1 tablespoon jam for chocolate hazelnut spread.
- Lemon Glaze Version: Drizzle with powdered sugar glaze after cooling.
Common Mistakes to Avoid with This Dish:
- Overfilling the centers: The jam bubbles over and burns.
- Baking on a hot tray: The bottoms brown too fast.
- Using a loose dough: It cracks when you press the centers.
13. Banana Bread Brownies
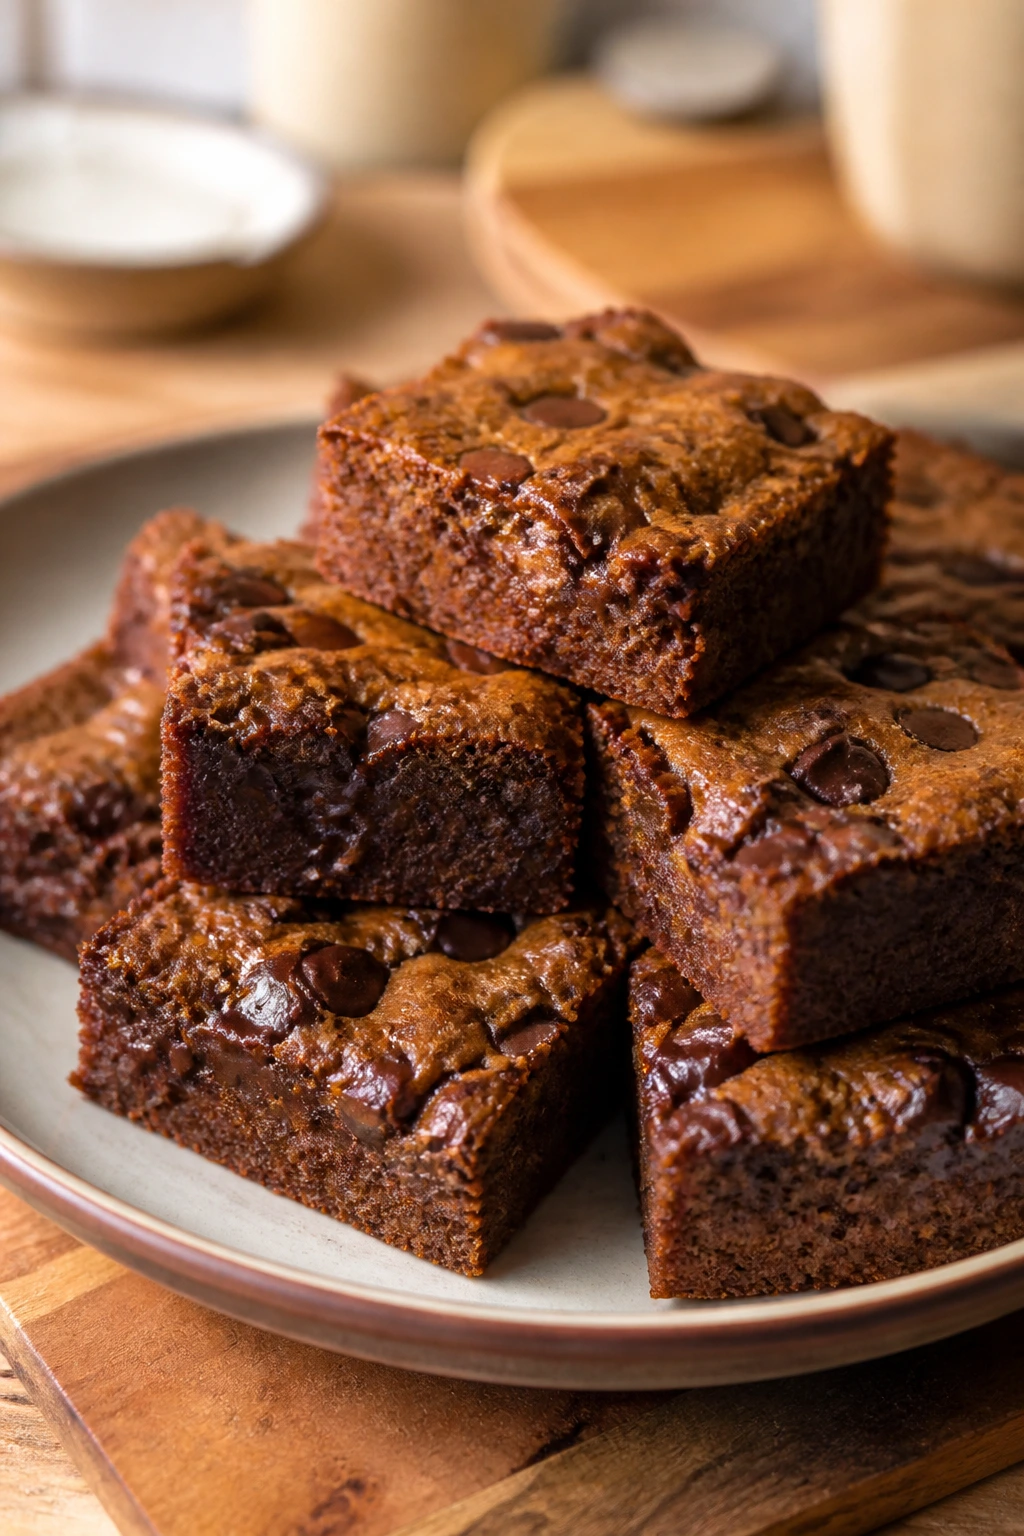
Think banana bread, but flatter, richer, and easier to cut into neat squares. The crumb stays soft, and the chocolate chips melt into tiny pockets that make this one feel more like dessert than breakfast.
Why It Works: Bananas keep the bars moist without making them soggy, and melted butter gives the batter a denser finish than a standard loaf. Baking in a square pan means every piece cooks evenly, which is useful when you need predictable results for kids.
Key Ingredients:
- 3 ripe bananas, mashed
- 1/2 cup butter, melted
- 3/4 cup sugar
- 2 eggs
- 1 1/2 cups flour
- 1 teaspoon baking soda
- 1 teaspoon cinnamon
- 1 teaspoon vanilla extract
- 1/2 cup chocolate chips
- Pinch of salt
Quick Steps:
- Preheat the oven to 350°F and line an 8×8-inch pan.
- Whisk bananas, butter, sugar, eggs, and vanilla together.
- Stir in flour, baking soda, cinnamon, salt, and chocolate chips until combined.
- Spread the batter in the pan.
- Bake for 28 to 32 minutes, until the center springs back and a toothpick comes out with a few moist crumbs.
Equipment for This Recipe:
- 8×8-inch pan
- Mixing bowl
- Whisk and spoon
- Parchment paper
How to Serve This Dish: Cool before slicing so the bars stay clean. They’re sweet enough on their own, though a smear of peanut butter on the side does something nice.
Pro Tips for This Recipe:
- Use very ripe bananas for the deepest flavor.
- Don’t overmix after adding flour.
- A pinch of espresso powder sharpens the chocolate if you want a more grown-up edge.
Variations on This Dish:
- Nutty Banana Bars: Fold in 1/3 cup chopped walnuts.
- Plain Banana Snack Cake: Leave out the chocolate chips.
- Cinnamon Sugar Top: Sprinkle the top with 1 tablespoon cinnamon sugar before baking.
Common Mistakes to Avoid with This Dish:
- Using underripe bananas: The flavor ends up dull.
- Cutting too early: Warm bars collapse.
- Adding too much flour: The brownies turn dry and heavy.
14. Fruit Salsa with Cinnamon Chips
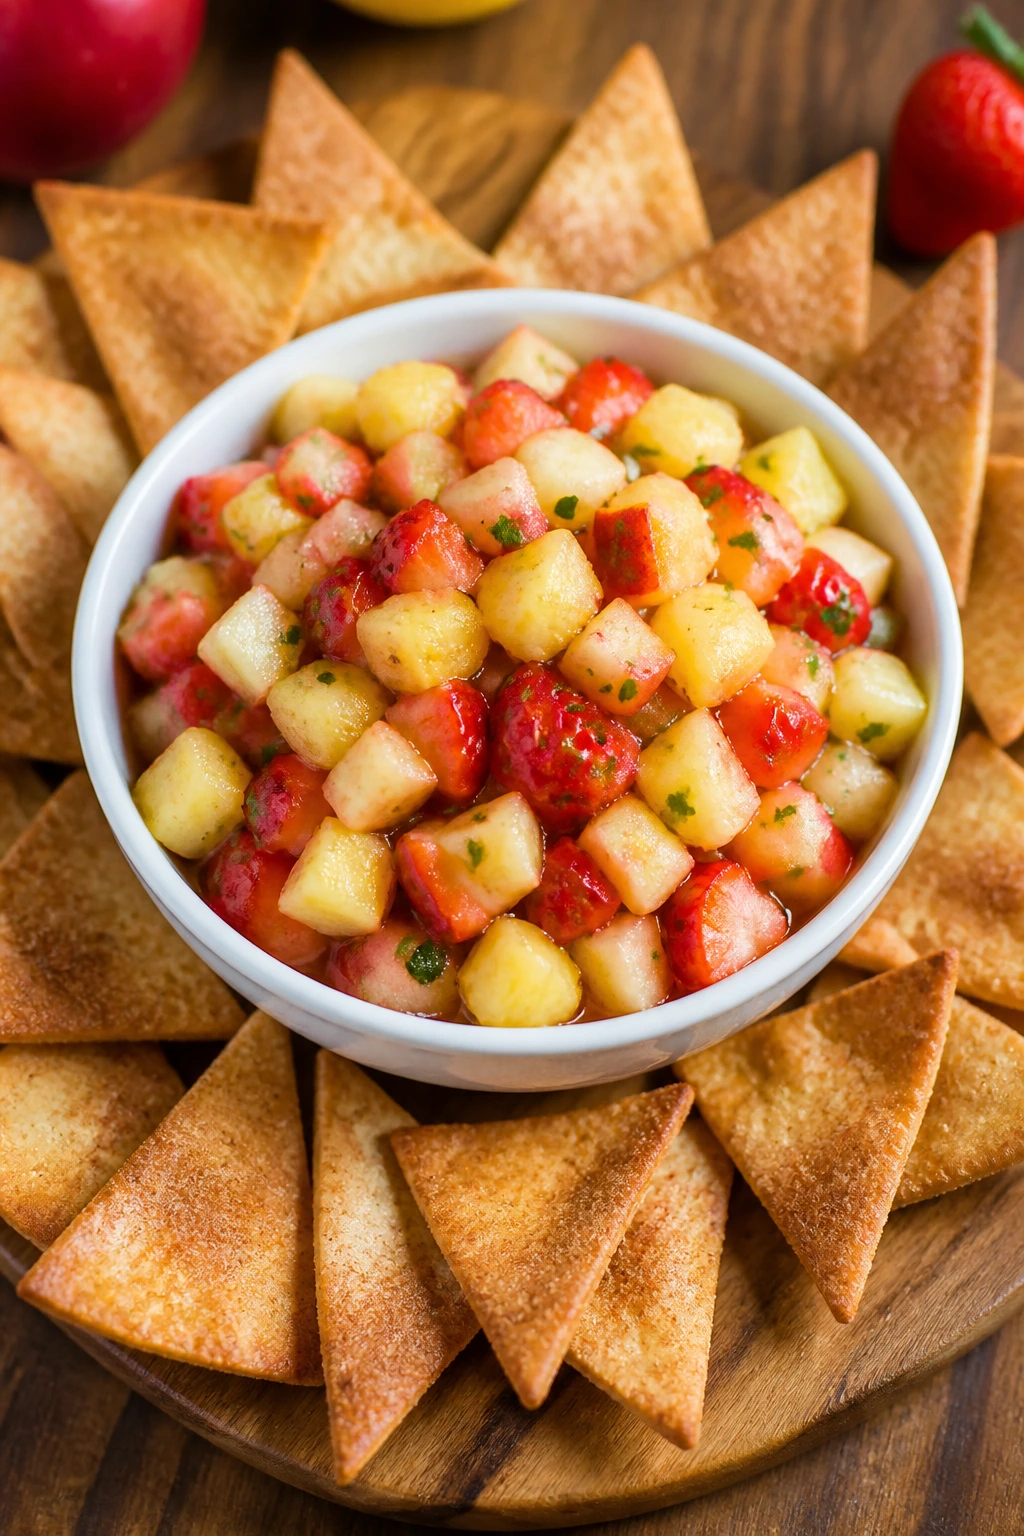
This one is bright and crunchy, a little different from the usual baked desserts. The fruit gets chopped small, the cinnamon chips bake until crisp, and the whole thing eats like a party snack pretending to be dessert.
Why It Works: Fresh fruit salsa gives kids a chance to dip, which always changes the mood around dessert. The lemon juice keeps the apples from browning, and the cinnamon sugar chips bring enough sweetness to make the fruit feel special. It’s the kind of plate that disappears fast because it looks playful.
Key Ingredients:
- 2 apples, diced small
- 1 cup strawberries, diced
- 1 cup canned pineapple, drained and chopped
- 2 tablespoons honey
- 1 tablespoon lemon juice
- 1 teaspoon cinnamon
- 8 flour tortillas
- 3 tablespoons butter, melted
- 2 tablespoons sugar
Quick Steps:
- Mix apples, strawberries, pineapple, honey, lemon juice, and cinnamon in a bowl.
- Chill the salsa while you make the chips.
- Preheat the oven to 375°F and brush tortillas with melted butter.
- Sprinkle with sugar and cut into triangles.
- Bake for 8 to 10 minutes, until crisp and lightly browned.
Equipment for This Recipe:
- Mixing bowl
- Baking sheet
- Sharp knife
- Pastry brush
How to Serve This Dish: Serve the salsa in a bowl with the chips fanned around it. Kids like scooping; adults usually like the clean crunch of the chips.
Pro Tips for This Recipe:
- Dice the fruit small so it scoops neatly.
- Drain the pineapple well or the salsa gets watery.
- Let the chips cool fully so they crisp up.
Variations on This Dish:
- Berry Salsa: Use blueberries and raspberries instead of pineapple.
- Peach Salsa: Swap in canned peaches for a softer mix.
- Sweet Dip Add-On: Offer vanilla yogurt alongside the salsa.
Common Mistakes to Avoid with This Dish:
- Cutting fruit too large: The salsa won’t stay on the chip.
- Leaving the tortillas too long: They go from crisp to burnt fast.
- Serving immediately after mixing: The fruit needs a few minutes to mingle.
15. Rice Pudding with Raisins and Apples
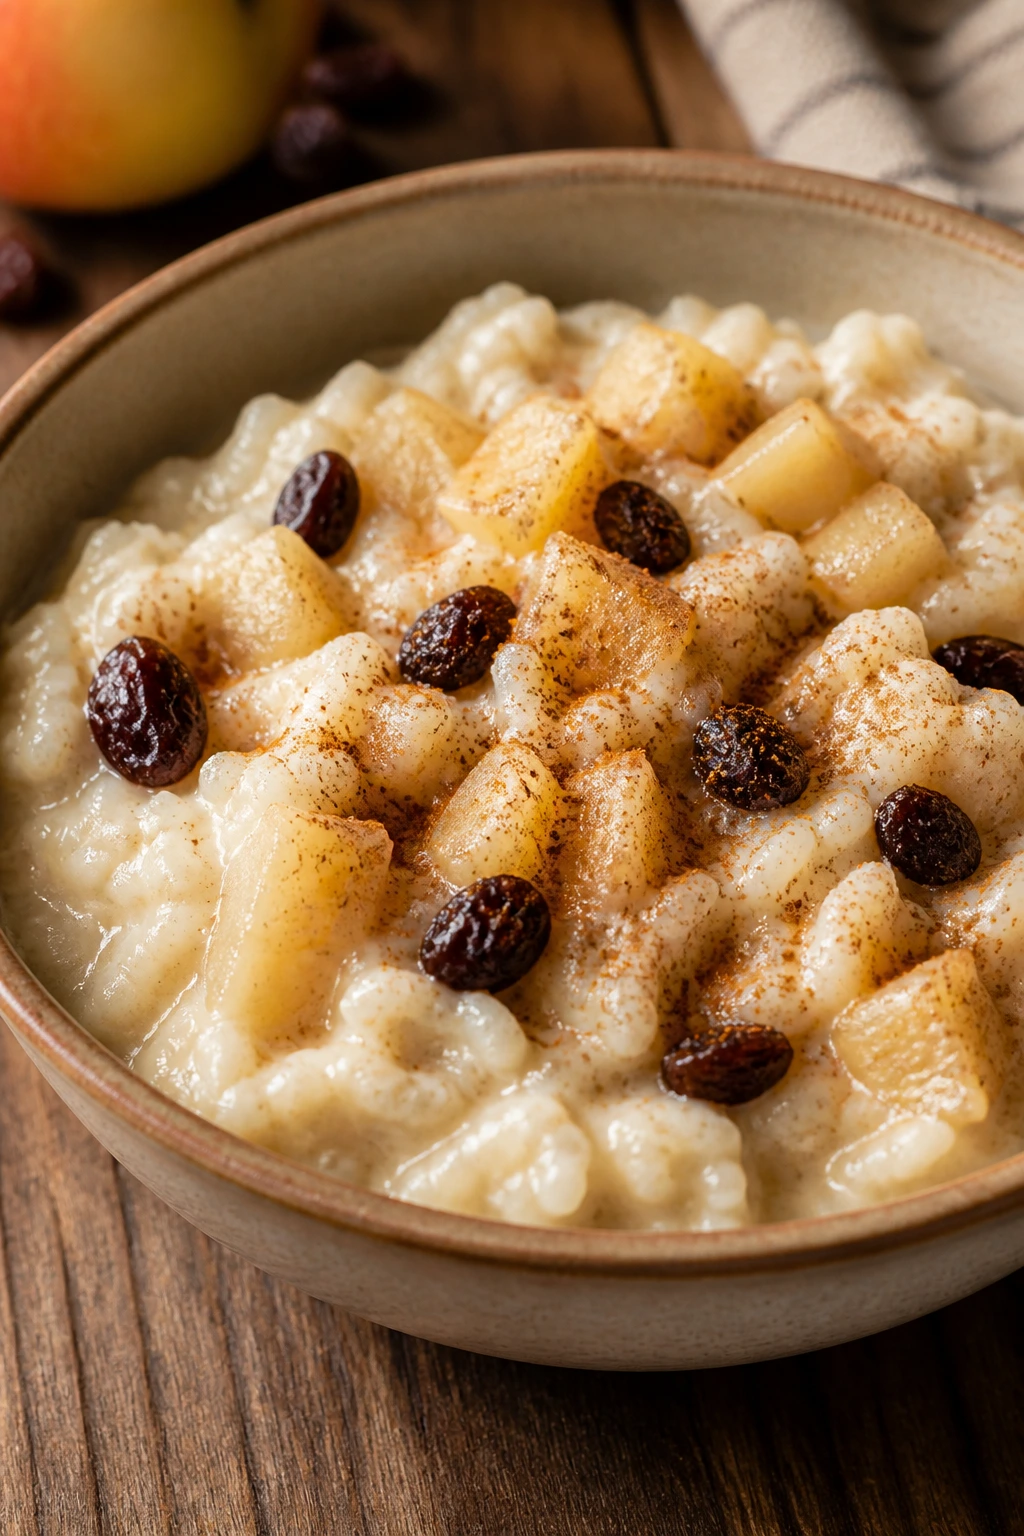
Creamy rice pudding is one of those old-fashioned desserts that still works because the texture is so soothing. The apples go tender, the raisins plump up, and the whole pot smells like cinnamon toast.
Why It Works: Rice thickens the milk as it cooks, so you get a pudding without cornstarch or pudding mix. The apples add pieces for kids who want a little bite, while raisins melt into the background and sweeten the whole bowl. It’s also a good way to stretch a small amount of fruit.
Key Ingredients:
- 1/2 cup white rice
- 2 cups milk
- 1/4 cup sugar
- 1 apple, peeled and diced
- 1/3 cup raisins
- 1 teaspoon cinnamon
- 1 teaspoon vanilla extract
- Pinch of salt
Quick Steps:
- Combine rice, milk, sugar, cinnamon, and salt in a saucepan.
- Bring to a gentle simmer over medium-low heat, stirring often.
- Add the diced apple and raisins after 10 minutes.
- Cook for 20 to 25 minutes total, until the rice is tender and the pudding thickens.
- Stir in vanilla and let it cool slightly before serving.
Equipment for This Recipe:
- Medium saucepan
- Wooden spoon
- Measuring cup
- Knife and cutting board
How to Serve This Dish: Serve warm in small bowls with a dusting of cinnamon on top. Cold rice pudding works too, but the warm version feels softer and more kid-friendly.
Pro Tips for This Recipe:
- Stir often so the milk does not scorch.
- Use short- or medium-grain rice if you have it.
- Add a splash of milk when reheating; it thickens as it cools.
Variations on This Dish:
- Coconut Rice Pudding: Replace 1 cup milk with canned coconut milk.
- Berry Version: Fold in 1/2 cup berries at the end.
- Apple Pie Pudding: Add a pinch of nutmeg and extra cinnamon.
Common Mistakes to Avoid with This Dish:
- Boiling too hard: The milk can split or stick.
- Adding fruit too early: Apples can disappear into mush.
- Skipping the stirring: Rice pudding burns fast on the bottom.
16. Peach Oatmeal Bars
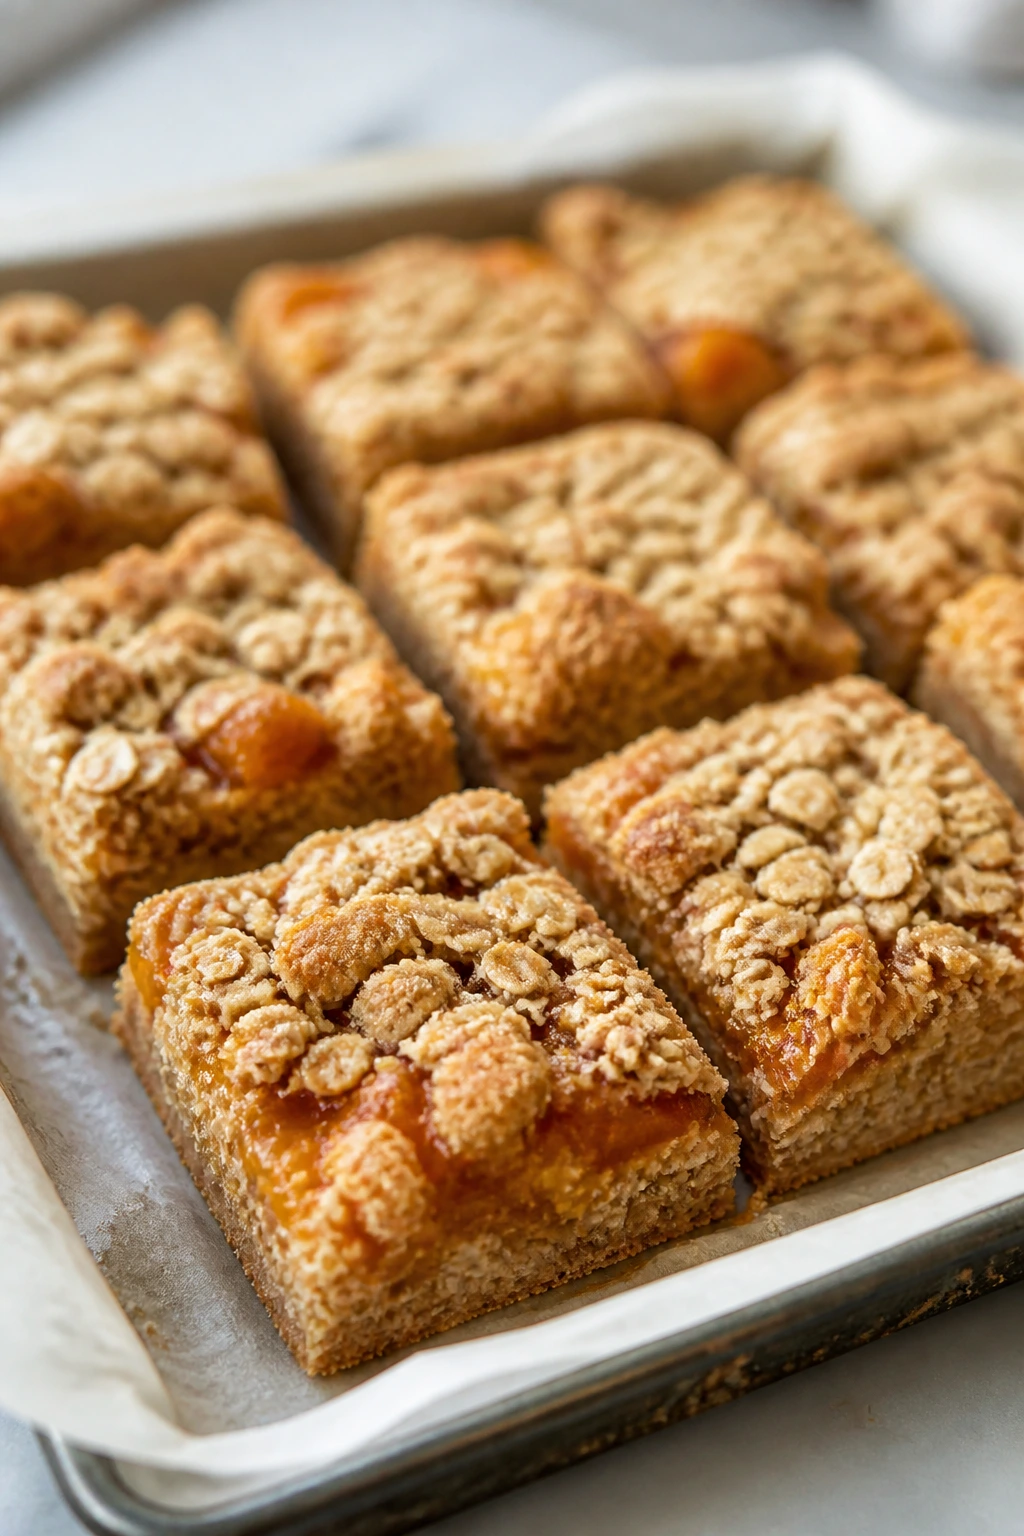
These bars taste like a peach crumble got flattened into something easier to hold with one hand. They’re soft in the middle, crumbly on top, and sturdy enough to pack up once cooled.
Why It Works: Oats and flour create a base that stays firm even with juicy peaches in the middle. Brown sugar gives the filling a caramel note, and the bars slice cleanly after cooling, which is the detail that matters if you’re feeding kids in a hurry.
Key Ingredients:
- 1 1/2 cups rolled oats
- 1 1/2 cups flour
- 1 cup brown sugar
- 1 cup butter, melted
- 2 cups canned peaches, drained and chopped
- 1 teaspoon cinnamon
- 1 teaspoon vanilla extract
- 1 tablespoon cornstarch
- Pinch of salt
Quick Steps:
- Preheat the oven to 350°F and line an 8×8-inch pan.
- Mix oats, flour, brown sugar, salt, and melted butter until crumbly.
- Press half the mixture into the pan.
- Stir peaches with cinnamon, vanilla, and cornstarch, then spread over the base.
- Sprinkle the remaining oat mixture on top and bake for 35 to 38 minutes.
Equipment for This Recipe:
- Baking pan
- Parchment paper
- Mixing bowl
- Spoon
How to Serve This Dish: Cut into squares once fully cool. They’re good on their own, or with a thin line of yogurt spooned across the top.
Pro Tips for This Recipe:
- Drain canned peaches well or the bars stay loose.
- Let the bars cool all the way before slicing.
- Press the bottom layer firmly enough to hold together.
Variations on This Dish:
- Apricot Oat Bars: Swap canned apricots for peaches.
- Extra-Spiced Version: Add 1/4 teaspoon nutmeg.
- Jam Layer Bars: Spread 1/4 cup peach jam under the fruit for a stronger flavor.
Common Mistakes to Avoid with This Dish:
- Using wet fruit: The bars won’t set.
- Cutting while warm: They’ll crumble apart.
- Leaving the top too thin: The bars need a proper crumb layer.
17. Strawberry Sheet Pan Cake
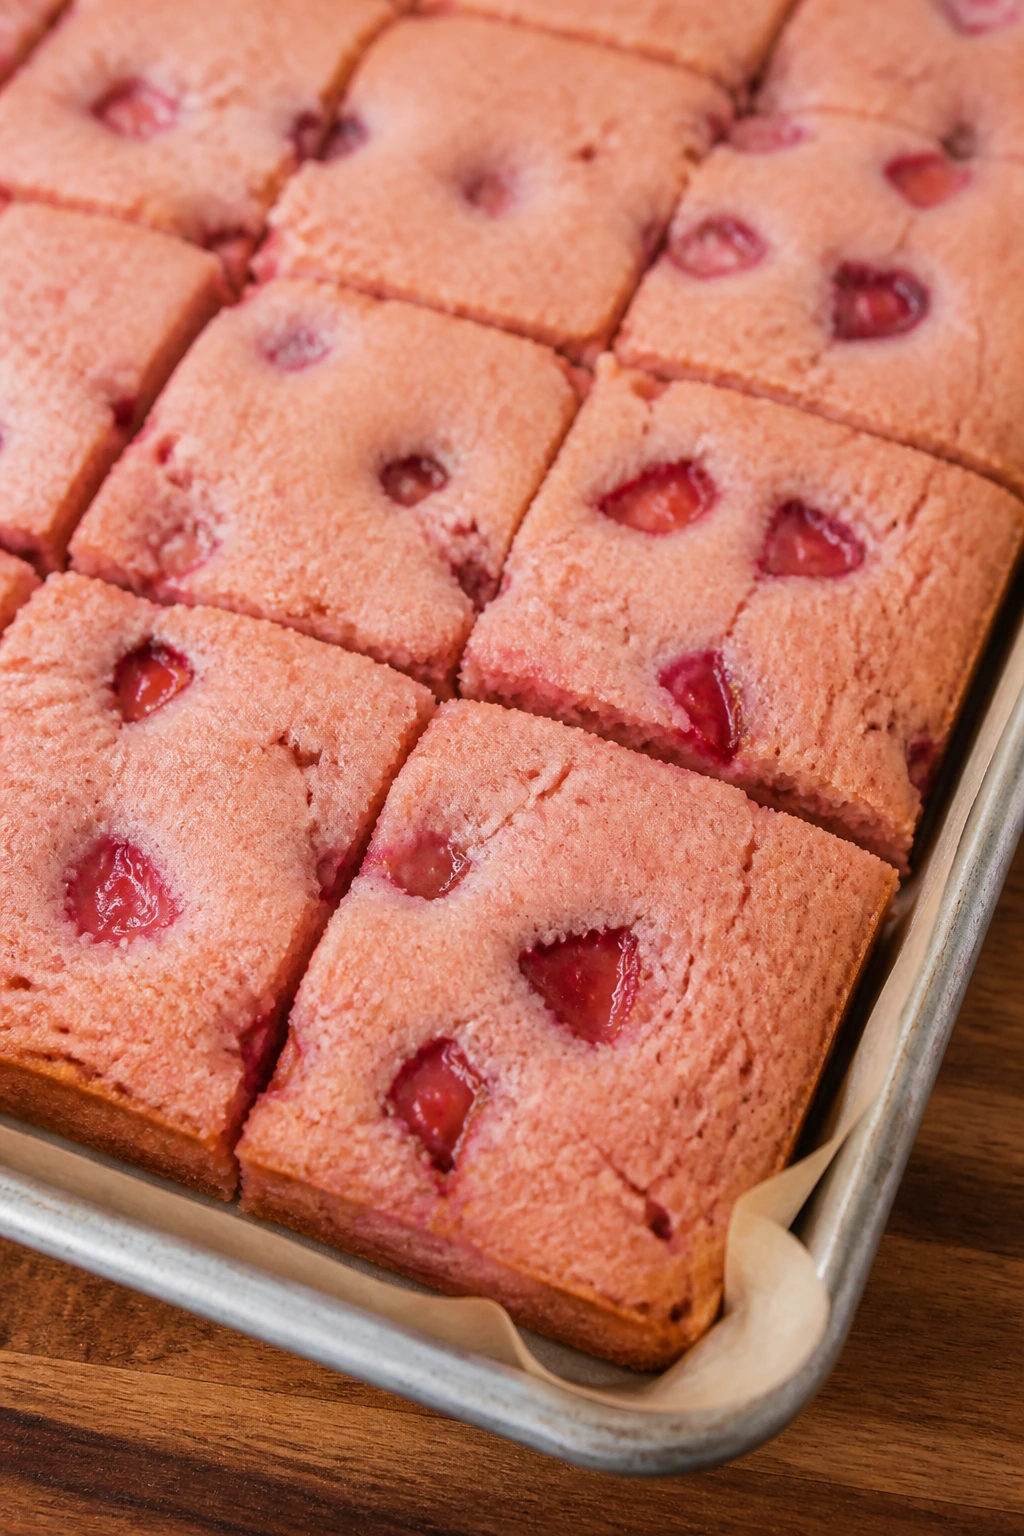
This is a simple snack cake with strawberries baked right into the batter, which means you get pinkish fruit pockets and a soft crumb without any fussy decoration. It slices clean and feeds more people than you’d expect from one pan.
Why It Works: A sheet pan spreads the batter thin enough that the cake bakes evenly and stays tender. Strawberries sink just enough to leave juicy spots without making the whole thing soggy, especially if you dust them with flour first. It’s the kind of cake that feels casual enough for a Tuesday.
Key Ingredients:
- 2 cups flour
- 1 cup sugar
- 2 teaspoons baking powder
- 1/2 teaspoon salt
- 1/2 cup butter, softened
- 2 eggs
- 3/4 cup milk
- 1 teaspoon vanilla extract
- 2 cups strawberries, chopped
- 1 tablespoon flour, for tossing berries
Quick Steps:
- Preheat the oven to 350°F and line a rimmed sheet pan or 9×13-inch pan.
- Beat butter and sugar until fluffy, then mix in eggs and vanilla.
- Stir in flour, baking powder, salt, and milk until just combined.
- Toss strawberries with the extra flour and fold them into the batter.
- Bake for 25 to 30 minutes, until the top springs back and the center is set.
Equipment for This Recipe:
- Rimmed sheet pan or 9×13-inch pan
- Mixing bowls
- Hand mixer or spoon
- Spatula
How to Serve This Dish: Cut into squares and serve with powdered sugar or a swipe of whipped cream. It’s nice cold too, which makes it useful for lunchboxes and picnics.
Pro Tips for This Recipe:
- Don’t chop the strawberries too small or they disappear.
- Flour on the berries keeps them from sinking as fast.
- Check the center early; sheet cakes can overbake at the edges.
Variations on This Dish:
- Mixed Berry Sheet Cake: Use raspberries and blueberries with the strawberries.
- Lemon Strawberry Cake: Add 1 teaspoon lemon zest.
- Plain Vanilla Version: Leave the berries on top instead of folding them in.
Common Mistakes to Avoid with This Dish:
- Overmixing the batter: The crumb gets tight.
- Using frozen berries without coating: They bleed too much.
- Cutting before cooling: The slices tear.
18. Orange Creamsicle Parfaits
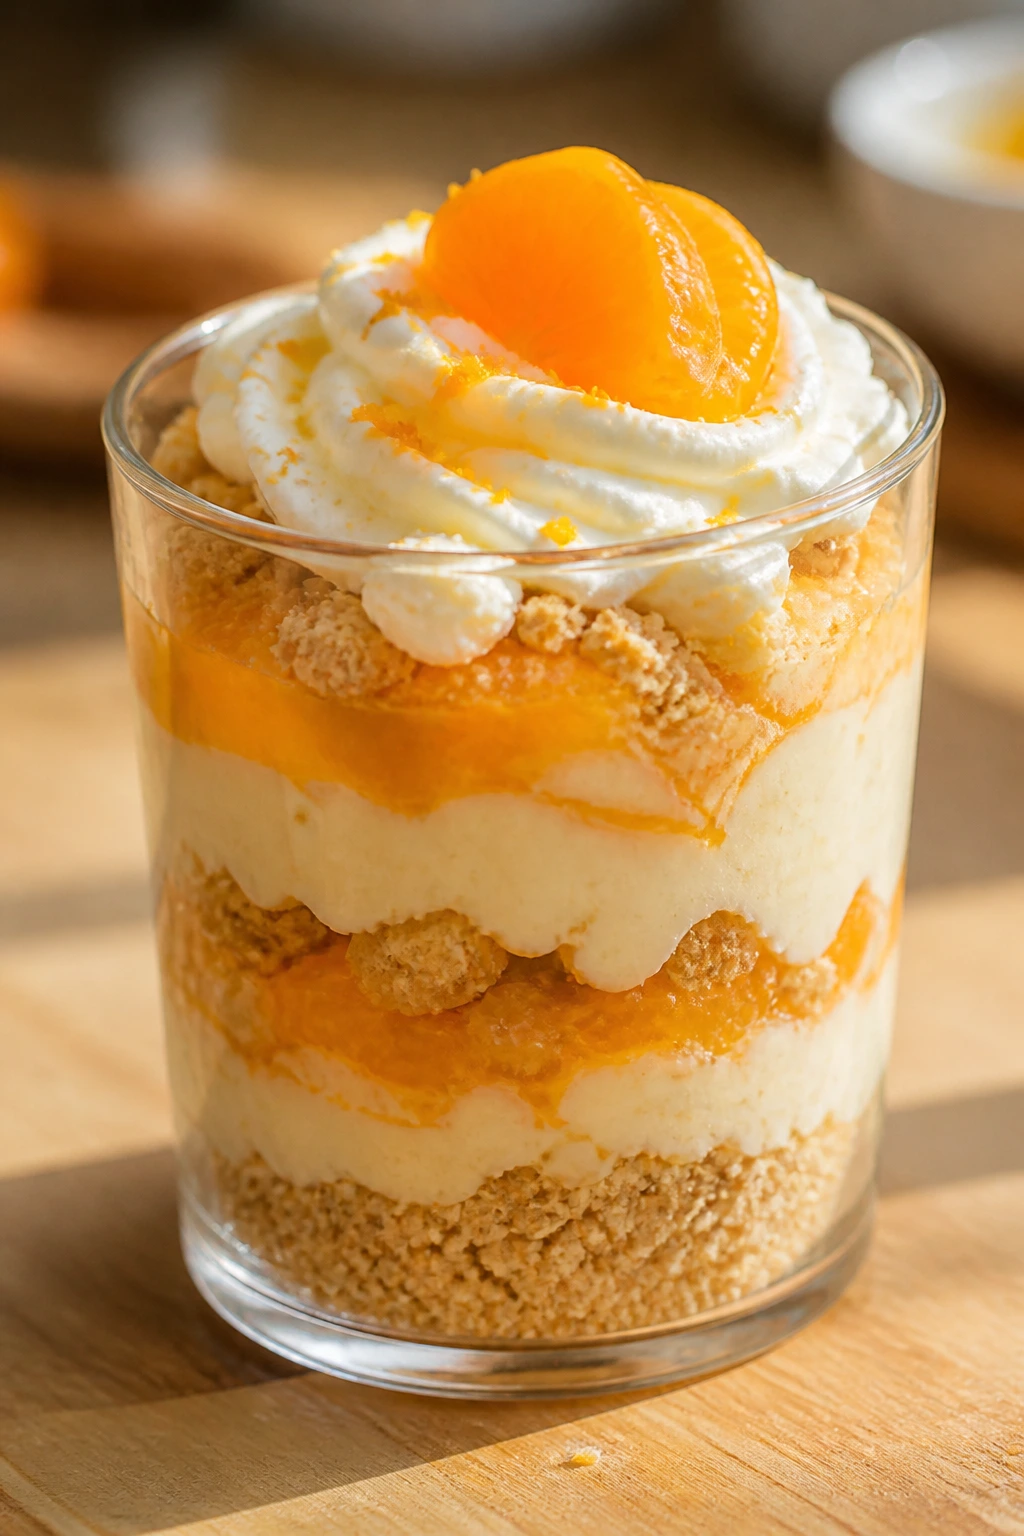
Cold, creamy, and a little nostalgic, these parfaits taste like a frozen treat translated into a spoon dessert. The orange flavor comes through cleanly, not like perfume, and the crushed grahams give it some crunch.
Why It Works: Pudding and yogurt give the filling body without needing an oven. Canned mandarins or orange segments keep the fruit easy to eat, and the graham crumbs soak up just enough cream to stay soft instead of dusty. Kids usually go for this one because it feels layered and playful.
Key Ingredients:
- 1 box vanilla pudding mix
- 2 cups milk
- 1 cup vanilla yogurt
- 1 teaspoon orange zest
- 1 can mandarin oranges, drained
- 1 1/2 cups crushed graham crackers
- 1/2 cup whipped topping
- 1 tablespoon sugar
Quick Steps:
- Whisk pudding mix and milk until thick, then fold in yogurt, orange zest, and sugar.
- Let the pudding sit for 5 minutes.
- Spoon crumbs into the bottom of cups.
- Add pudding, orange segments, and more crumbs in layers.
- Chill for 20 minutes before serving.
Equipment for This Recipe:
- Mixing bowl
- Whisk
- Parfait glasses or cups
- Spoon
How to Serve This Dish: Use clear cups if you want the stripes to show. A little orange segment on top makes the dessert look brighter and gives kids a clear “finish line.”
Pro Tips for This Recipe:
- Chill the pudding before layering if you want cleaner sides.
- Drain the mandarins well so they don’t water down the cup.
- Fresh orange zest matters here; it lifts the whole bowl.
Variations on This Dish:
- Berry Creamsicle Cups: Swap the oranges for strawberries.
- Cookie Crumb Parfait: Use crushed vanilla wafers instead of grahams.
- Lighter Version: Use only yogurt and skip the whipped topping.
Common Mistakes to Avoid with This Dish:
- Assembling too far ahead: The crumbs get too soft.
- Using watery fruit: The layers slip.
- Skipping the zest: The orange flavor gets dull fast.
19. Baked Plums with Streusel
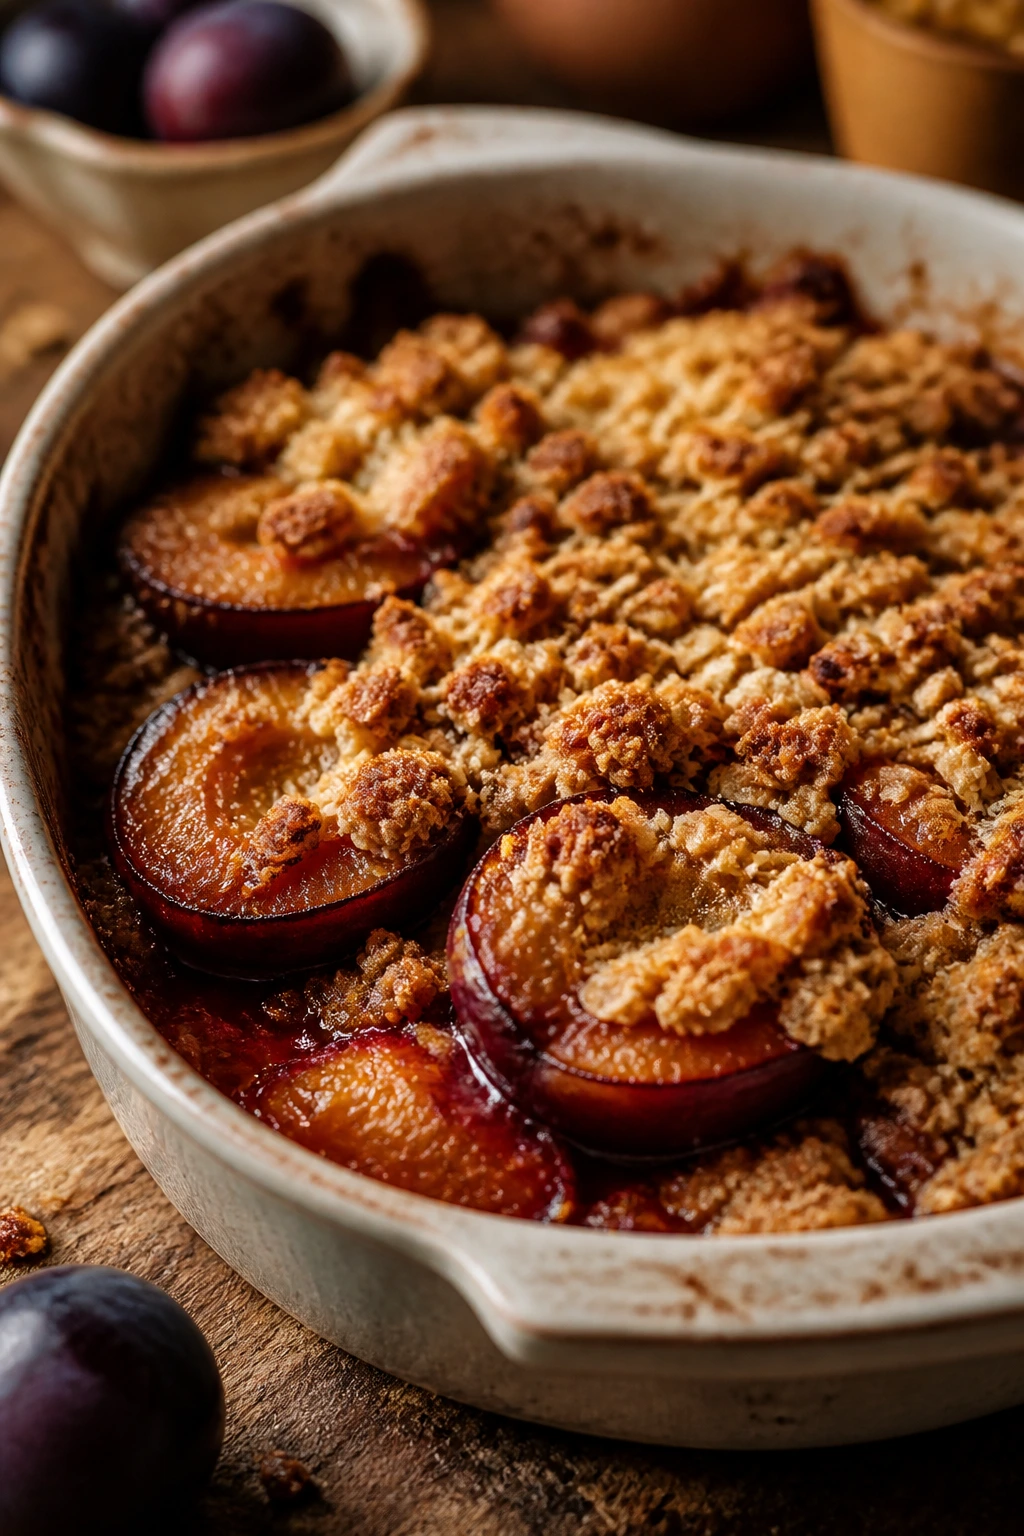
Baked plums are one of those desserts that feels fancier than the ingredient list deserves. The fruit turns jammy and tart, while the streusel adds a sandy, buttery layer that cracks under the spoon.
Why It Works: Plums need heat to soften and sweeten, and a crumb topping keeps them from drying out. The oats and butter make the topping sturdy enough to handle juicy fruit, which matters because plums can be slippery. A little vanilla rounds out the sharpness.
Key Ingredients:
- 6 ripe plums, halved and pitted
- 1/4 cup brown sugar
- 1 teaspoon vanilla extract
- 1 teaspoon lemon juice
- 1/2 cup flour
- 1/2 cup rolled oats
- 1/3 cup sugar
- 1/3 cup butter, cold and cubed
- 1/2 teaspoon cinnamon
Quick Steps:
- Preheat the oven to 375°F and arrange the plums cut-side up in a baking dish.
- Drizzle with lemon juice, vanilla, and brown sugar.
- Mix flour, oats, sugar, cinnamon, and butter until crumbly.
- Spoon the streusel over the plums.
- Bake for 25 to 30 minutes, until the fruit is soft and the topping is golden.
Equipment for This Recipe:
- Baking dish
- Mixing bowl
- Fork
- Spoon
How to Serve This Dish: Serve warm with yogurt, cream, or a scoop of vanilla ice cream. A little syrup in the bottom of the dish is a good thing — don’t waste it.
Pro Tips for This Recipe:
- Choose plums that give slightly at the stem.
- If the plums are very tart, add 1 tablespoon extra sugar.
- Let the dish rest briefly so the juices thicken.
Variations on This Dish:
- Peach-Plum Mix: Use half peaches for a softer filling.
- Ginger Streusel: Add 1/4 teaspoon ground ginger.
- Nutty Topping: Mix in 2 tablespoons chopped almonds.
Common Mistakes to Avoid with This Dish:
- Using underripe plums: They stay sharp and hard.
- Packing the streusel tightly: Loose crumbs bake better.
- Overbaking: The fruit can collapse into mush.
20. Blueberry Lemon Muffin Tops
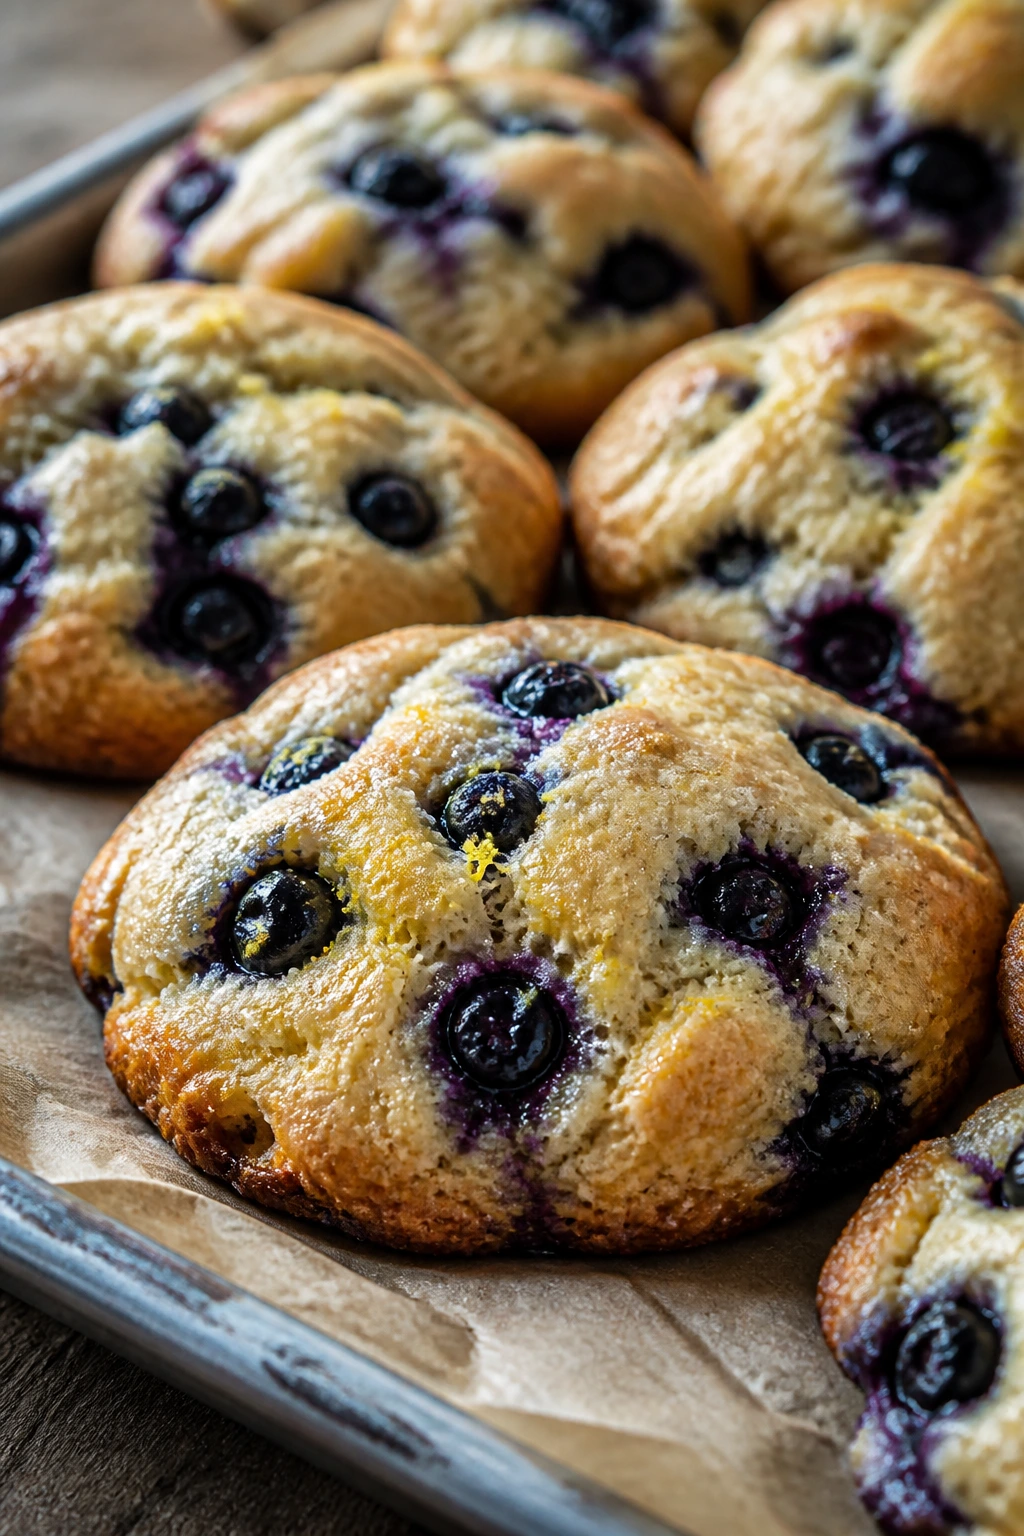
These are all the best parts of a muffin with none of the paper liner drama. The edges go golden, the tops crack open, and the blueberries leave little purple streaks that kids usually pick at first.
Why It Works: Baking the batter as muffin tops gives more surface area for browning, which means more flavor in each bite. Lemon zest sharpens the blueberries and keeps the sweetness from getting sticky. A slightly thick batter helps the muffins hold their dome shape.
Key Ingredients:
- 2 cups flour
- 1/2 cup sugar
- 2 teaspoons baking powder
- 1/2 teaspoon salt
- 1/2 cup butter, melted
- 1 egg
- 3/4 cup milk
- 1 teaspoon lemon zest
- 1 cup blueberries
- 1 teaspoon vanilla extract
Quick Steps:
- Preheat the oven to 400°F and line a baking sheet with parchment.
- Mix flour, sugar, baking powder, salt, and lemon zest.
- Stir in butter, egg, milk, and vanilla until just combined.
- Fold in blueberries gently.
- Scoop thick mounds onto the sheet and bake for 14 to 16 minutes.
Equipment for This Recipe:
- Baking sheet
- Parchment paper
- Mixing bowl
- Spoon or scoop
How to Serve This Dish: These work warm or at room temperature. Split them and spread with butter, or serve as-is with a little fruit on the side.
Pro Tips for This Recipe:
- Don’t thaw frozen blueberries first.
- Coat berries lightly with flour if you want less bleeding.
- Keep the batter thick; thin batter spreads flat.
Variations on This Dish:
- Raspberry Muffin Tops: Use raspberries and reduce mixing.
- Orange Blueberry Version: Swap lemon zest for orange zest.
- Crumble-Topped Tops: Sprinkle with a little cinnamon sugar before baking.
Common Mistakes to Avoid with This Dish:
- Stirring too hard: The berries break and stain the batter.
- Overfilling the sheet: They spread into each other.
- Baking too low: The tops don’t rise properly.
21. Apple Pie Nachos
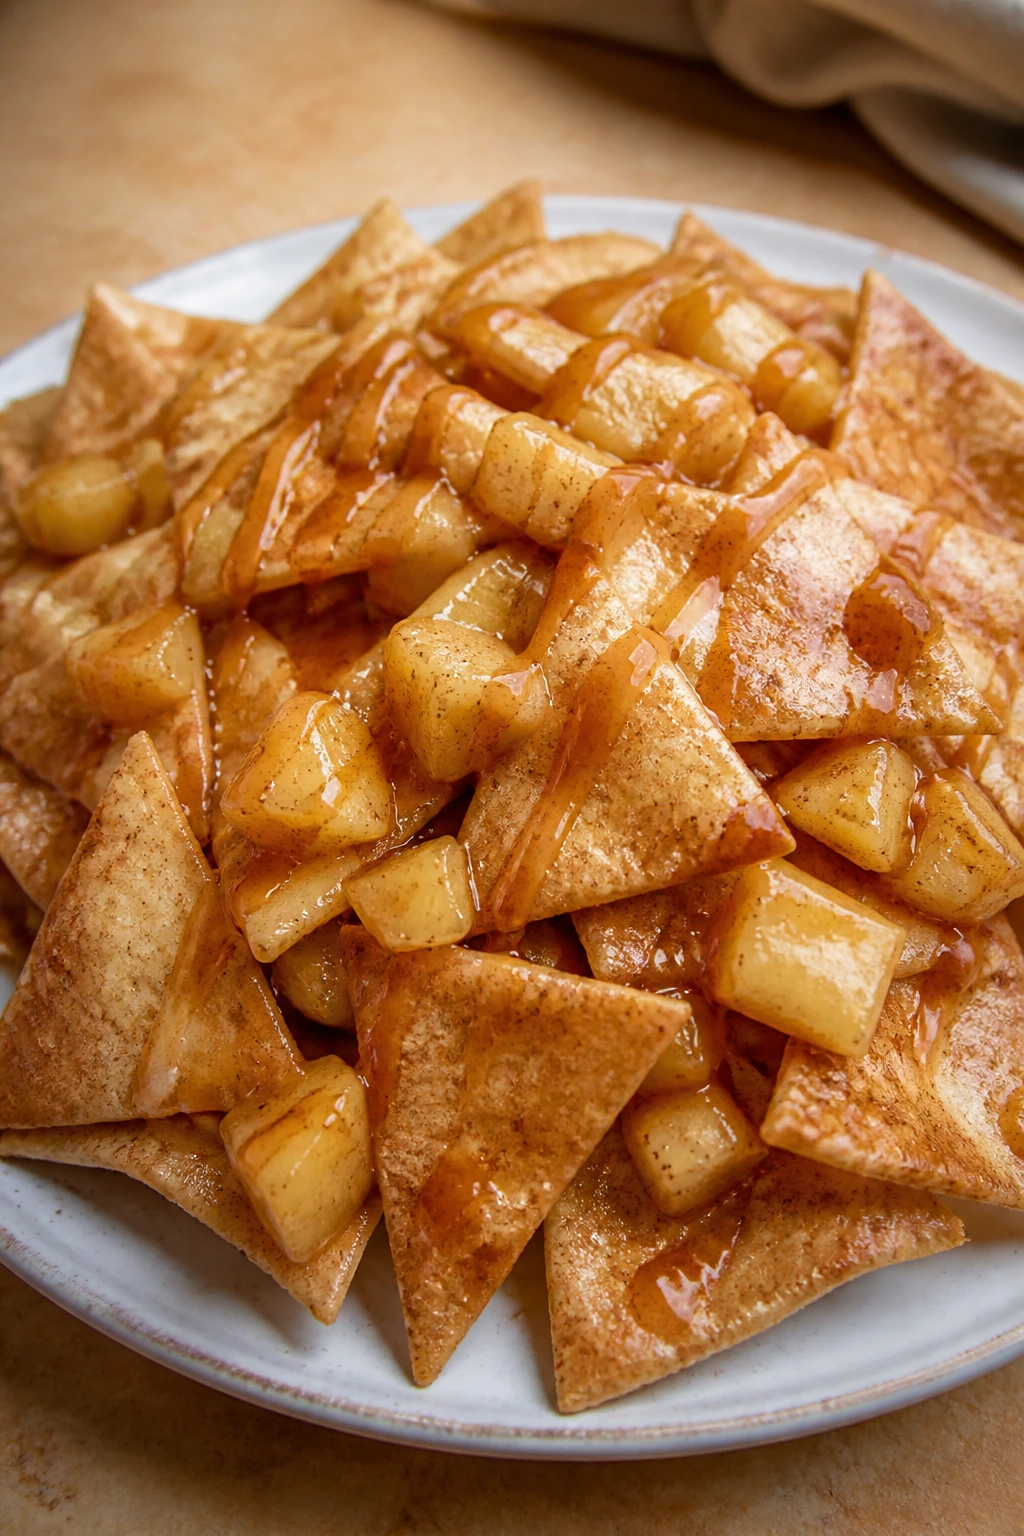
This is dessert that behaves like a snack tray. Crisp tortilla chips, warm spiced apples, and a little drizzle of sweetness make it the kind of messy plate kids attack fast.
Why It Works: The chips give you crunch, the apples give you warmth, and the sauce or drizzle ties it together. It’s a clever use for leftover tortillas, and the whole thing can be stacked on one tray. That makes serving easier than slicing a pie.
Key Ingredients:
- 6 flour tortillas
- 2 tablespoons melted butter
- 2 tablespoons sugar
- 1 teaspoon cinnamon
- 2 apples, peeled and diced
- 1 tablespoon brown sugar
- 1 teaspoon lemon juice
- 1 tablespoon water
- 2 tablespoons caramel sauce, optional
Quick Steps:
- Preheat the oven to 375°F and cut tortillas into triangles.
- Brush with butter, then sprinkle with sugar and cinnamon.
- Bake for 8 to 10 minutes until crisp.
- Cook apples with brown sugar, lemon juice, and water in a skillet for 6 to 8 minutes until soft.
- Pile the apples over the chips and drizzle with caramel.
Equipment for This Recipe:
- Baking sheet
- Skillet
- Knife
- Spoon
How to Serve This Dish: Serve it on a large plate or platter so everyone can grab a chip. If you want cleaner eating, spoon the apples at the edge and keep the chips separate until the last second.
Pro Tips for This Recipe:
- Slice the tortillas thin so they crisp evenly.
- Cook the apples just until tender, not mushy.
- Add the topping right before serving or the chips soften.
Variations on This Dish:
- Peach Nachos: Use diced canned peaches.
- Berry Nachos: Warm berries with a little sugar instead of apples.
- Peanut Butter Drizzle: Add a thin peanut butter glaze for extra richness.
Common Mistakes to Avoid with This Dish:
- Overbaking the chips: They burn quickly.
- Using too much apple filling: The chips wilt.
- Skipping the lemon juice: The apples taste dull and brown fast.
22. Mango Coconut Pudding

This one tastes tropical but still leans on ordinary pantry logic: pudding mix, milk, canned fruit, and a little coconut. It’s cold, smooth, and soft enough for younger kids to spoon easily.
Why It Works: Instant pudding gives you instant thickness, which is useful when fruit is already adding moisture. Coconut adds chew and fragrance without turning the dessert into a full-on candy bar. Canned mango is soft and bright, so it plays well with creamier ingredients.
Key Ingredients:
- 1 box vanilla pudding mix
- 2 cups milk
- 1 cup canned mango, diced
- 1/3 cup shredded coconut
- 1 cup crushed graham crackers
- 1 tablespoon honey
- 1 teaspoon vanilla extract
- Pinch of salt
Quick Steps:
- Whisk pudding mix and milk until thick.
- Stir in vanilla, honey, and salt.
- Fold in diced mango and coconut.
- Layer pudding and graham crumbs in cups.
- Chill for 20 minutes before serving.
Equipment for This Recipe:
- Mixing bowl
- Whisk
- Cups or small bowls
- Spoon
How to Serve This Dish: Top each cup with a few extra mango pieces and a pinch of coconut. It’s best cold, straight from the fridge.
Pro Tips for This Recipe:
- Drain canned mango if it’s packed in syrup.
- Toast the coconut lightly if you want more flavor.
- Keep the crumb layer thin so it doesn’t take over.
Variations on This Dish:
- Banana Coconut Pudding: Swap mango for sliced banana.
- Tropical Trifle: Add a layer of whipped topping.
- Dairy-Free Version: Use dairy-free milk and a compatible pudding mix.
Common Mistakes to Avoid with This Dish:
- Using too much fruit: The pudding loosens.
- Skipping the chill time: The flavors stay separate.
- Overloading the crumbs: The texture gets dry and heavy.
23. Cranberry Orange Loaf
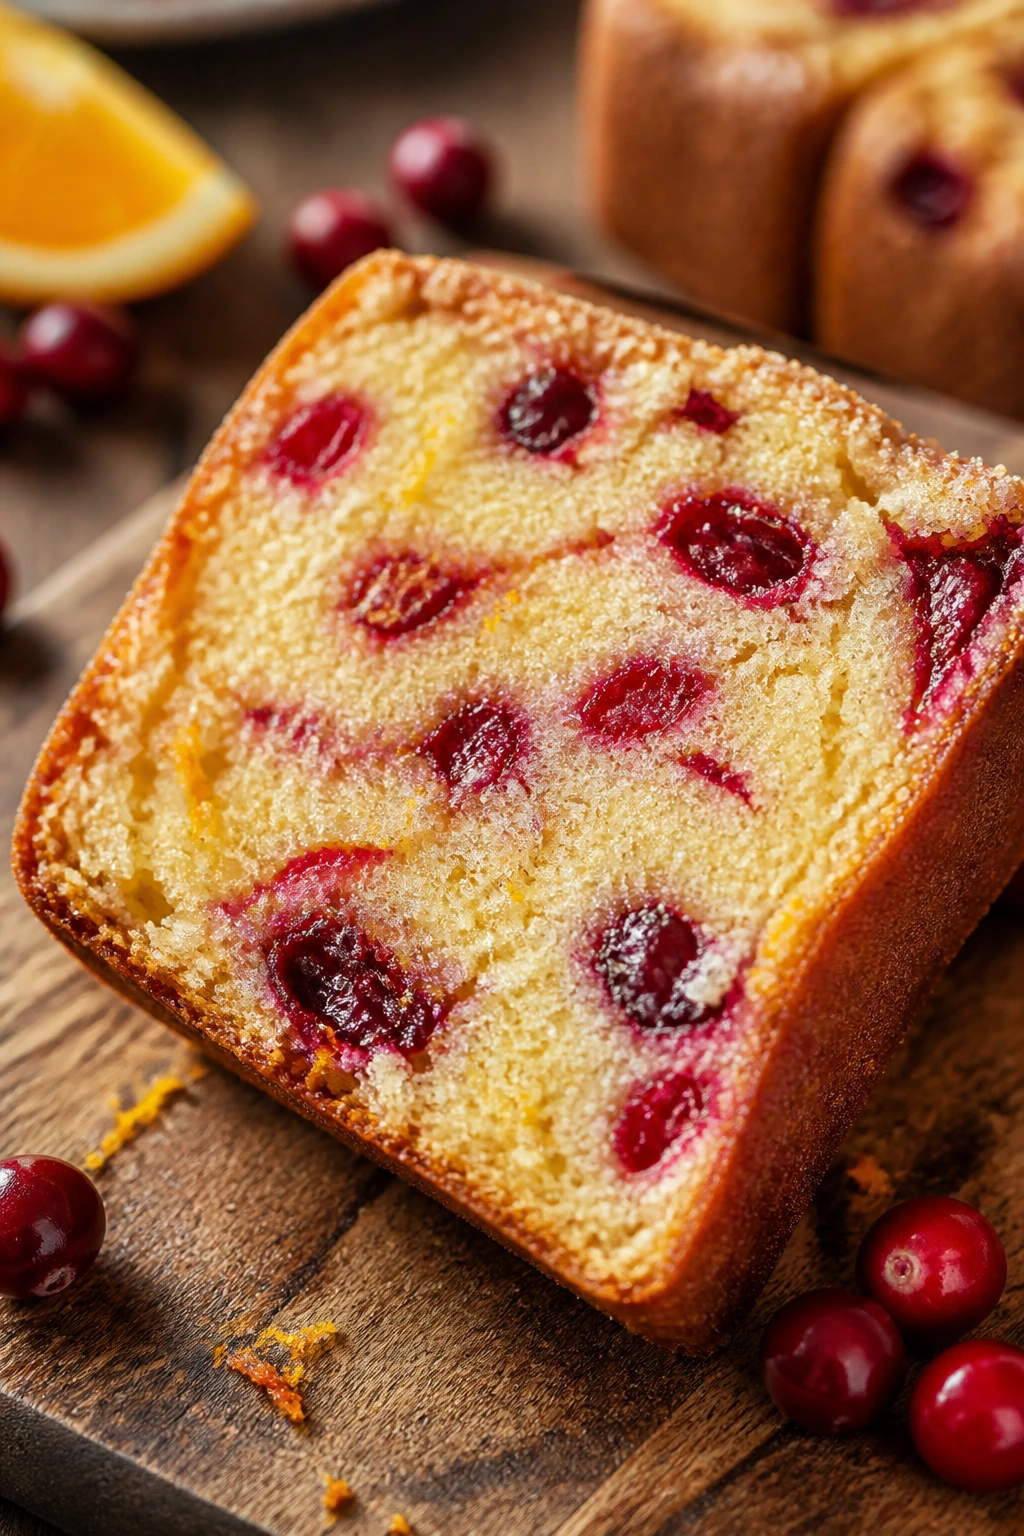
A slice of this loaf gives you tart cranberry bursts and orange aroma in the first bite. It’s more snack cake than breakfast bread, which is exactly why kids usually go back for another slice.
Why It Works: The orange zest brightens the batter and makes the cranberries taste sharper and less bitter. A loaf pan bakes the cake slowly and evenly, so the fruit doesn’t sink as badly as it might in a thinner batter. It slices neatly once cool, which makes it useful for sharing.
Key Ingredients:
- 2 cups flour
- 1 cup sugar
- 2 teaspoons baking powder
- 1/2 teaspoon salt
- 1/2 cup butter, softened
- 2 eggs
- 3/4 cup milk
- 1 tablespoon orange zest
- 1 cup cranberries, fresh or frozen
- 1 teaspoon vanilla extract
Quick Steps:
- Preheat the oven to 350°F and grease a loaf pan.
- Beat butter and sugar until fluffy, then add eggs, vanilla, and orange zest.
- Stir in flour, baking powder, salt, and milk until just combined.
- Fold in cranberries gently.
- Bake for 50 to 55 minutes, until a toothpick comes out clean.
Equipment for This Recipe:
- Loaf pan
- Mixing bowl
- Whisk or mixer
- Spatula
How to Serve This Dish: Serve plain or with a thin glaze of powdered sugar and orange juice. A warm slice with butter is a nice afternoon dessert.
Pro Tips for This Recipe:
- Toss cranberries with a spoonful of flour to keep them suspended.
- Don’t overmix or the loaf gets tight.
- Let it cool fully before slicing or the crumb tears.
Variations on This Dish:
- Blueberry Orange Loaf: Swap the cranberries for blueberries.
- Glazed Version: Add a powdered sugar glaze after cooling.
- Muffin Version: Bake in muffin cups for 18 to 20 minutes.
Common Mistakes to Avoid with This Dish:
- Cutting too soon: The loaf breaks apart.
- Using too much zest: Orange can turn bitter.
- Leaving fruit uncoated: It sinks to the bottom.
24. Apricot Snack Cake
This cake is soft, sunny, and a little old-school in the best way. The apricots bake into the batter and turn jammy, which gives every slice a sweet spot.
Why It Works: Canned apricots are already tender, so they merge into the batter without fighting it. The cake itself stays light because the milk and butter balance the fruit’s acidity. It’s a straightforward pan cake that looks more cheerful than it sounds.
Key Ingredients:
- 2 cups flour
- 1 cup sugar
- 2 teaspoons baking powder
- 1/2 teaspoon salt
- 1/2 cup butter, softened
- 2 eggs
- 3/4 cup milk
- 1 cup canned apricots, chopped
- 1 teaspoon vanilla extract
- 1/2 teaspoon cinnamon
Quick Steps:
- Preheat the oven to 350°F and grease an 8×8-inch pan.
- Beat butter and sugar until fluffy.
- Add eggs and vanilla, then stir in flour, baking powder, salt, and milk.
- Fold in apricots and cinnamon.
- Bake for 30 to 35 minutes, until the center springs back.
Equipment for This Recipe:
- 8×8-inch pan
- Mixing bowl
- Spatula
- Measuring cups
How to Serve This Dish: Dust it with powdered sugar and cut into small squares. It also works with a little whipped cream if you want to dress it up.
Pro Tips for This Recipe:
- Drain apricots well so the batter doesn’t thin out.
- Chop the fruit small for even slices.
- Keep an eye on the center; fruit cakes can look done before they are.
Variations on This Dish:
- Peach Snack Cake: Swap in peaches and skip the cinnamon.
- Apricot Almond Cake: Add 1/4 teaspoon almond extract.
- Mini Cakes: Bake in a muffin tin for faster portions.
Common Mistakes to Avoid with This Dish:
- Using wet fruit: The crumb gets dense.
- Overbaking: The fruit dries out quickly.
- Cutting while hot: The cake loses its shape.
25. Banana Split No-Bake Cups
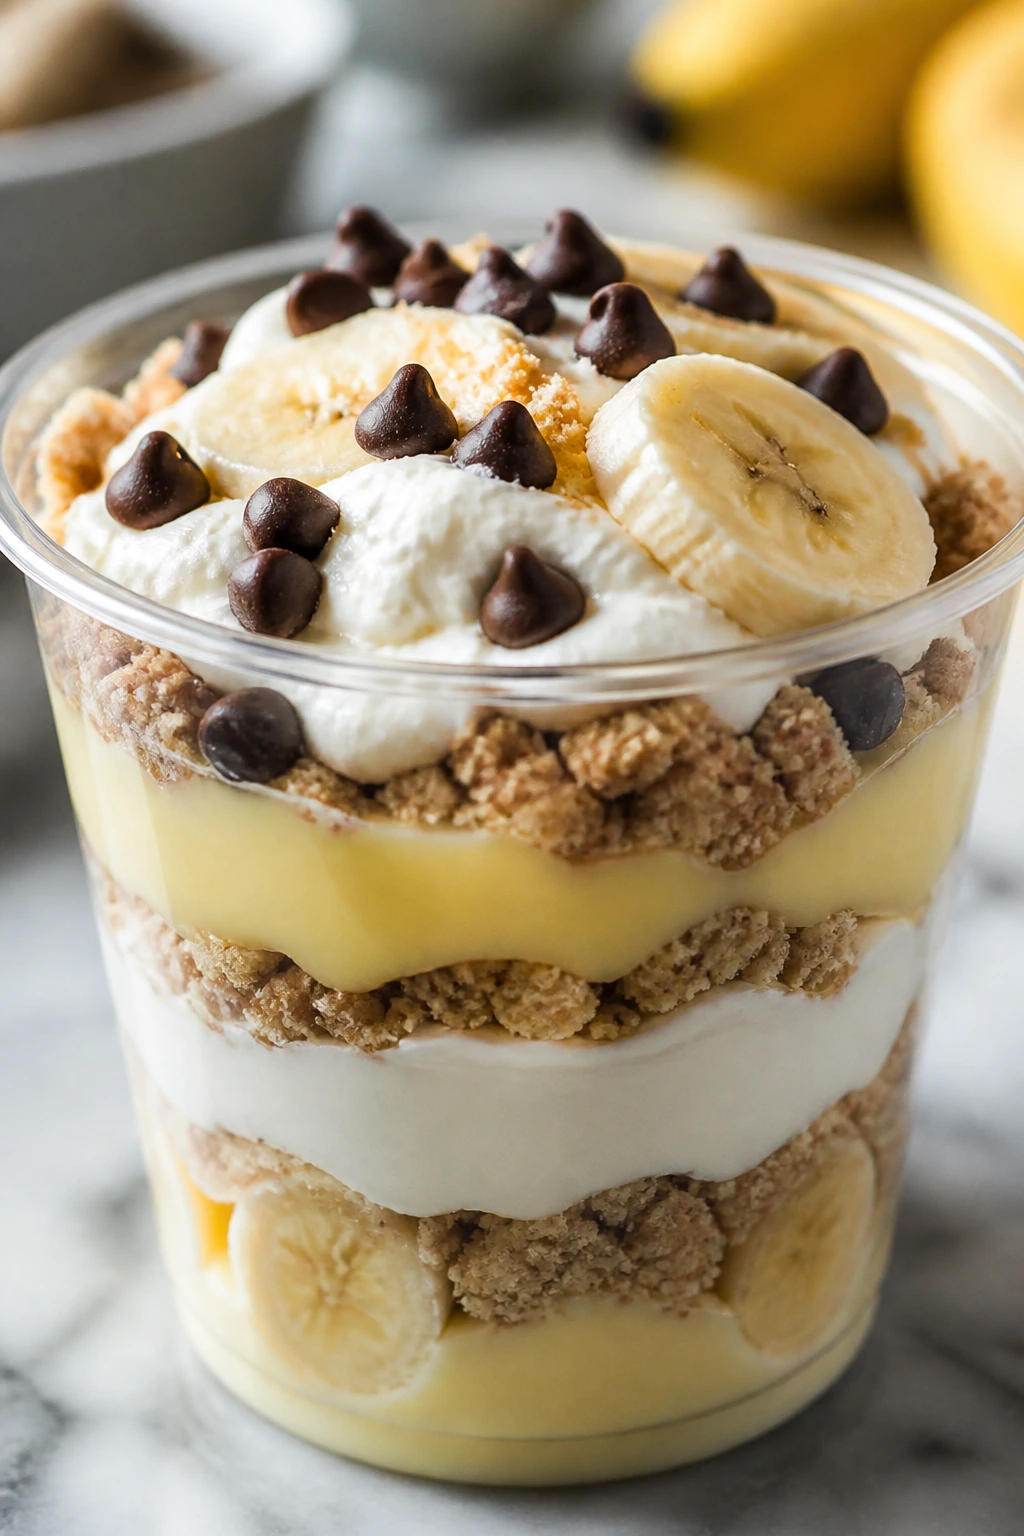
These cups borrow the flavor idea of a banana split without asking for ice cream or a sundae glass. You get banana, pudding, crunch, and chocolate in neat layers that kids can eat with a spoon.
Why It Works: Pudding gives the dessert body, bananas add sweetness, and graham crumbs stand in for a crust. Because there’s no baking, the fruit stays fresh and the chocolate chips keep a little snap. It’s an easy one to assemble while the rest of dinner is still on the stove.
Key Ingredients:
- 1 box vanilla pudding mix
- 2 cups milk
- 2 bananas, sliced
- 1 1/2 cups crushed graham crackers
- 1/2 cup vanilla yogurt
- 1/4 cup mini chocolate chips
- 2 tablespoons chopped strawberries
- 1 tablespoon sugar
Quick Steps:
- Whisk pudding mix and milk until thick.
- Layer graham crumbs, pudding, banana slices, and yogurt in cups.
- Sprinkle with chocolate chips, strawberries, and sugar.
- Chill for 15 minutes before serving.
- Add one more banana slice on top right before eating.
Equipment for This Recipe:
- Mixing bowl
- Whisk
- Cups or small jars
- Spoon
How to Serve This Dish: Use small cups so the layers stay tidy. Serve with spoons rather than forks; the whole point is soft layers and easy scooping.
Pro Tips for This Recipe:
- Assemble close to serving time so the bananas stay bright.
- Add a little lemon juice to the banana slices if they need to hold longer.
- Crumble the grahams fairly fine for a cleaner layer.
Variations on This Dish:
- Strawberry Split Cups: Use strawberries and skip the chocolate chips.
- Nutty Split: Add chopped peanuts on top.
- Brownie Crumb Cups: Replace grahams with crushed brownies.
Common Mistakes to Avoid with This Dish:
- Making the cups too far ahead: Bananas brown and the crumbs soften.
- Overloading the top: The cups get messy fast.
- Using too much pudding: The layers slide.
26. Fruit Pizza Bars
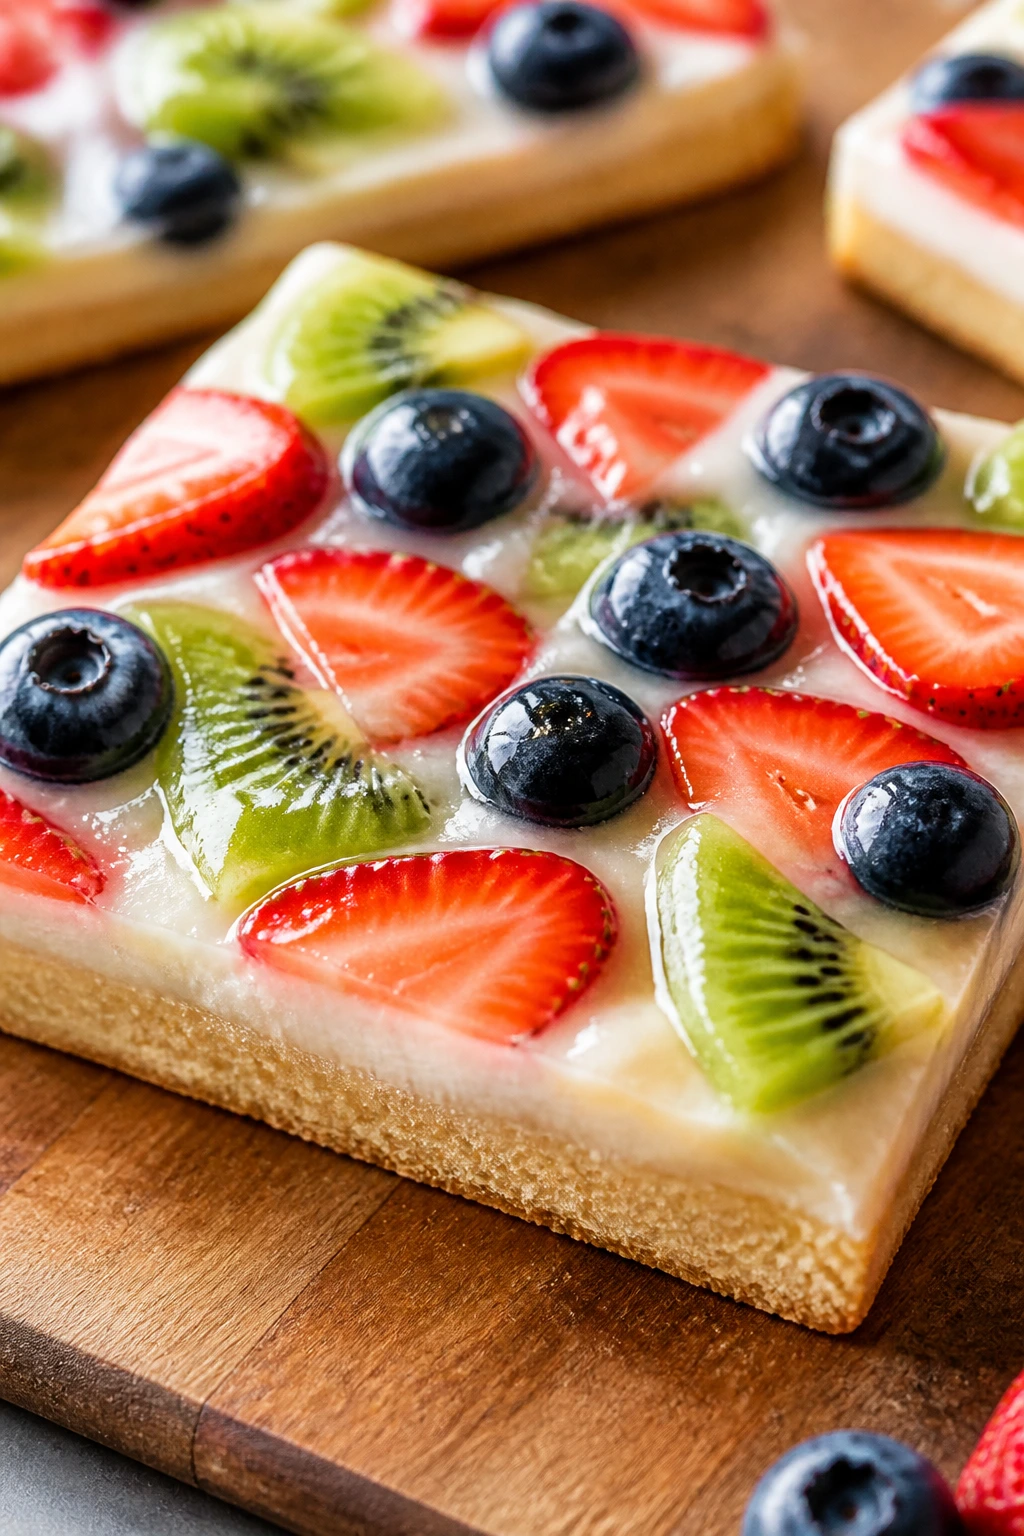
These bars give you the fruit pizza idea without the awkward slicing of a giant cookie. The base is tender, the topping is creamy, and the fruit sits on top like a bright mosaic.
Why It Works: A bar pan gives you neat edges and makes portioning easy. The cream cheese or yogurt layer acts as glue for the fruit, while a thin glaze helps keep the top glossy. Kids like picking their own pieces, which usually means they eat more of the fruit than they thought they would.
Key Ingredients:
- 1 package sugar cookie dough, or 2 cups homemade dough
- 4 ounces cream cheese, softened
- 1/4 cup powdered sugar
- 1 teaspoon vanilla extract
- 1 cup strawberries, sliced
- 1 cup blueberries
- 1 kiwi, sliced
- 2 tablespoons apricot jam
- 1 tablespoon water
Quick Steps:
- Preheat the oven to 350°F and press the cookie dough into an 8×8-inch pan.
- Bake for 18 to 20 minutes, then cool completely.
- Beat cream cheese, powdered sugar, and vanilla until smooth.
- Spread the topping over the cooled base.
- Arrange fruit on top, then warm the jam with water and brush it lightly over the fruit.
Equipment for This Recipe:
- 8×8-inch pan
- Mixing bowl
- Hand mixer or spoon
- Pastry brush
How to Serve This Dish: Chill the bars before slicing so the topping firms up. Use a sharp knife wiped clean between cuts if you want neat edges.
Pro Tips for This Recipe:
- Cool the base all the way before adding topping.
- Pat very juicy fruit dry first.
- Keep the fruit layer modest; too much weight makes the bars slip.
Variations on This Dish:
- Berry-Only Bars: Use only strawberries and blueberries.
- Peach Pizza Bars: Use sliced peaches and skip the kiwi.
- Yogurt Frosting Version: Replace cream cheese with thick Greek yogurt.
Common Mistakes to Avoid with This Dish:
- Topping a warm base: The cream layer melts.
- Using wet fruit: The bars get soggy.
- Cutting too soon: The topping drags.
27. Blackberry Cobbler
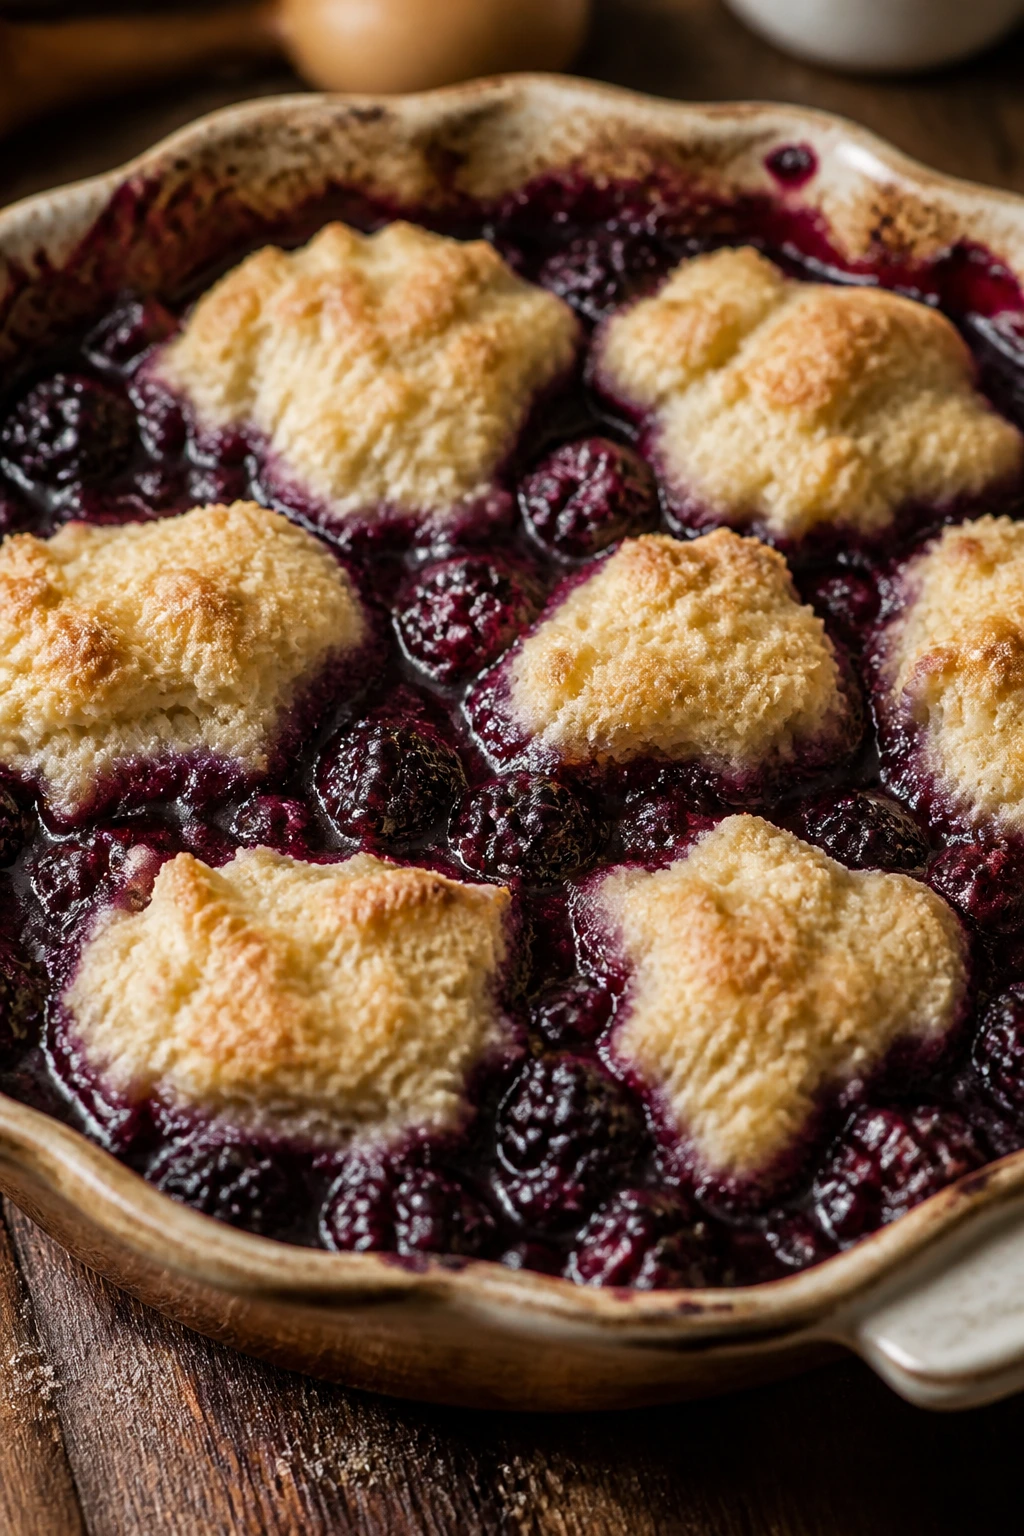
Blackberries turn deep and juicy in the oven, and the biscuit topping bakes into pale golden islands that soak up the syrup. This one tastes like summer managed to stay put.
Why It Works: Blackberries need enough sugar to soften their sharp edge, but not so much that they turn candy-sweet. A drop-biscuit topping is easy to make and sturdy enough to sit on top of the fruit instead of disappearing into it. The rough, rustic look is part of the charm.
Key Ingredients:
- 4 cups blackberries
- 1/3 cup sugar
- 1 tablespoon cornstarch
- 1 teaspoon lemon juice
- 1 cup flour
- 1 tablespoon sugar
- 1 1/2 teaspoons baking powder
- 1/2 cup milk
- 3 tablespoons butter, melted
- Pinch of salt
Quick Steps:
- Preheat the oven to 375°F and grease a baking dish.
- Toss blackberries with sugar, cornstarch, and lemon juice.
- Spread the fruit in the dish.
- Mix flour, sugar, baking powder, salt, milk, and butter into a thick batter.
- Drop spoonfuls over the fruit and bake for 28 to 32 minutes, until bubbling and golden.
Equipment for This Recipe:
- Baking dish
- Mixing bowl
- Spoon
- Measuring cups
How to Serve This Dish: Let the cobbler cool for 10 minutes before serving so the juices settle. A small scoop in a bowl is better than trying to cut clean pieces.
Pro Tips for This Recipe:
- Use cornstarch if the berries are very juicy.
- Don’t spread the topping smooth; rough dollops bake better.
- Taste the berries first. Some are so sweet they need less sugar.
Variations on This Dish:
- Mixed Berry Cobbler: Add raspberries or blueberries.
- Lemon Cobbler: Increase lemon juice and add zest.
- Bisquick Shortcut: Use biscuit mix when you need a faster topping.
Common Mistakes to Avoid with This Dish:
- Using too little thickener: The filling runs.
- Overworking the topping: It gets tough.
- Serving too soon: The fruit needs a minute to thicken.
28. Cherry Chocolate Oat Clusters

These little clusters sit somewhere between candy and granola. They’re chewy, chocolatey, and useful when you want a no-bake dessert that kids can pick up by hand.
Why It Works: Oats give the clusters shape, peanut butter gives them body, and honey acts as the glue. Dried cherries add a tart hit that keeps the chocolate from tasting too sweet. Once chilled, they hold together surprisingly well.
Key Ingredients:
- 2 cups rolled oats
- 3/4 cup dried cherries
- 1/2 cup peanut butter
- 1/3 cup honey
- 2 tablespoons cocoa powder
- 1/4 cup mini chocolate chips
- 1 teaspoon vanilla extract
- Pinch of salt
Quick Steps:
- Line a baking sheet with parchment.
- Warm peanut butter and honey just enough to stir smoothly.
- Mix oats, cherries, cocoa powder, chocolate chips, vanilla, and salt in a bowl.
- Stir in the peanut butter mixture until coated.
- Scoop clusters onto the sheet and chill for 20 minutes.
Equipment for This Recipe:
- Mixing bowl
- Saucepan or microwave-safe bowl
- Baking sheet
- Spoon
How to Serve This Dish: Keep them chilled if you want a firmer bite. They’re a good one for little hands because they don’t crumble much once set.
Pro Tips for This Recipe:
- Let the warm mixture cool a bit before adding the chips.
- If the mix looks loose, add 1/4 cup more oats.
- Line the tray well so the clusters lift cleanly.
Variations on This Dish:
- White Chocolate Cherry Clusters: Swap cocoa for extra oats and use white chips.
- Trail Mix Version: Add sunflower seeds or chopped almonds.
- Cranberry Swap: Use dried cranberries instead of cherries.
Common Mistakes to Avoid with This Dish:
- Making the mixture too hot: The chips melt into a streak.
- Skipping the chill: The clusters won’t set.
- Too much honey: They stay sticky.
29. Pear Muffins
These muffins are soft, lightly sweet, and loaded with small pieces of pear that bake into little pockets of softness. They’re one of the easiest ways to use pears before they go wrinkly.
Why It Works: Pear pieces stay tender in muffins instead of turning sharp or dry. The batter is simple enough to let the fruit stay the focus, and the cinnamon adds enough warmth to make them feel like dessert. They also freeze well, which is practical in a way that matters.
Key Ingredients:
- 2 cups flour
- 3/4 cup sugar
- 2 teaspoons baking powder
- 1/2 teaspoon salt
- 1/2 cup butter, melted
- 2 eggs
- 3/4 cup milk
- 2 ripe pears, peeled and diced
- 1 teaspoon cinnamon
- 1 teaspoon vanilla extract
Quick Steps:
- Preheat the oven to 375°F and line a muffin tin.
- Mix flour, sugar, baking powder, salt, and cinnamon.
- Whisk butter, eggs, milk, and vanilla together.
- Stir wet ingredients into dry, then fold in pears.
- Bake for 18 to 20 minutes, until the tops spring back.
Equipment for This Recipe:
- Muffin tin
- Mixing bowls
- Whisk
- Spoon
How to Serve This Dish: They’re good plain, warm, and split with a little butter. For dessert, a drizzle of honey over the top works nicely.
Pro Tips for This Recipe:
- Dice pears small so they distribute evenly.
- Don’t overfill the cups; muffins need room to rise.
- Let them cool for 5 minutes in the pan before moving them.
Variations on This Dish:
- Pear-Chocolate Muffins: Add 1/3 cup chocolate chips.
- Apple Muffins: Swap apples for pears and add extra cinnamon.
- Mini Muffins: Bake for 11 to 13 minutes for bite-size portions.
Common Mistakes to Avoid with This Dish:
- Using pears that are too hard: They bake unevenly.
- Overmixing the batter: The muffins get tough.
- Skipping the cooling time: They tear when unmolded.
30. Peach Turnovers
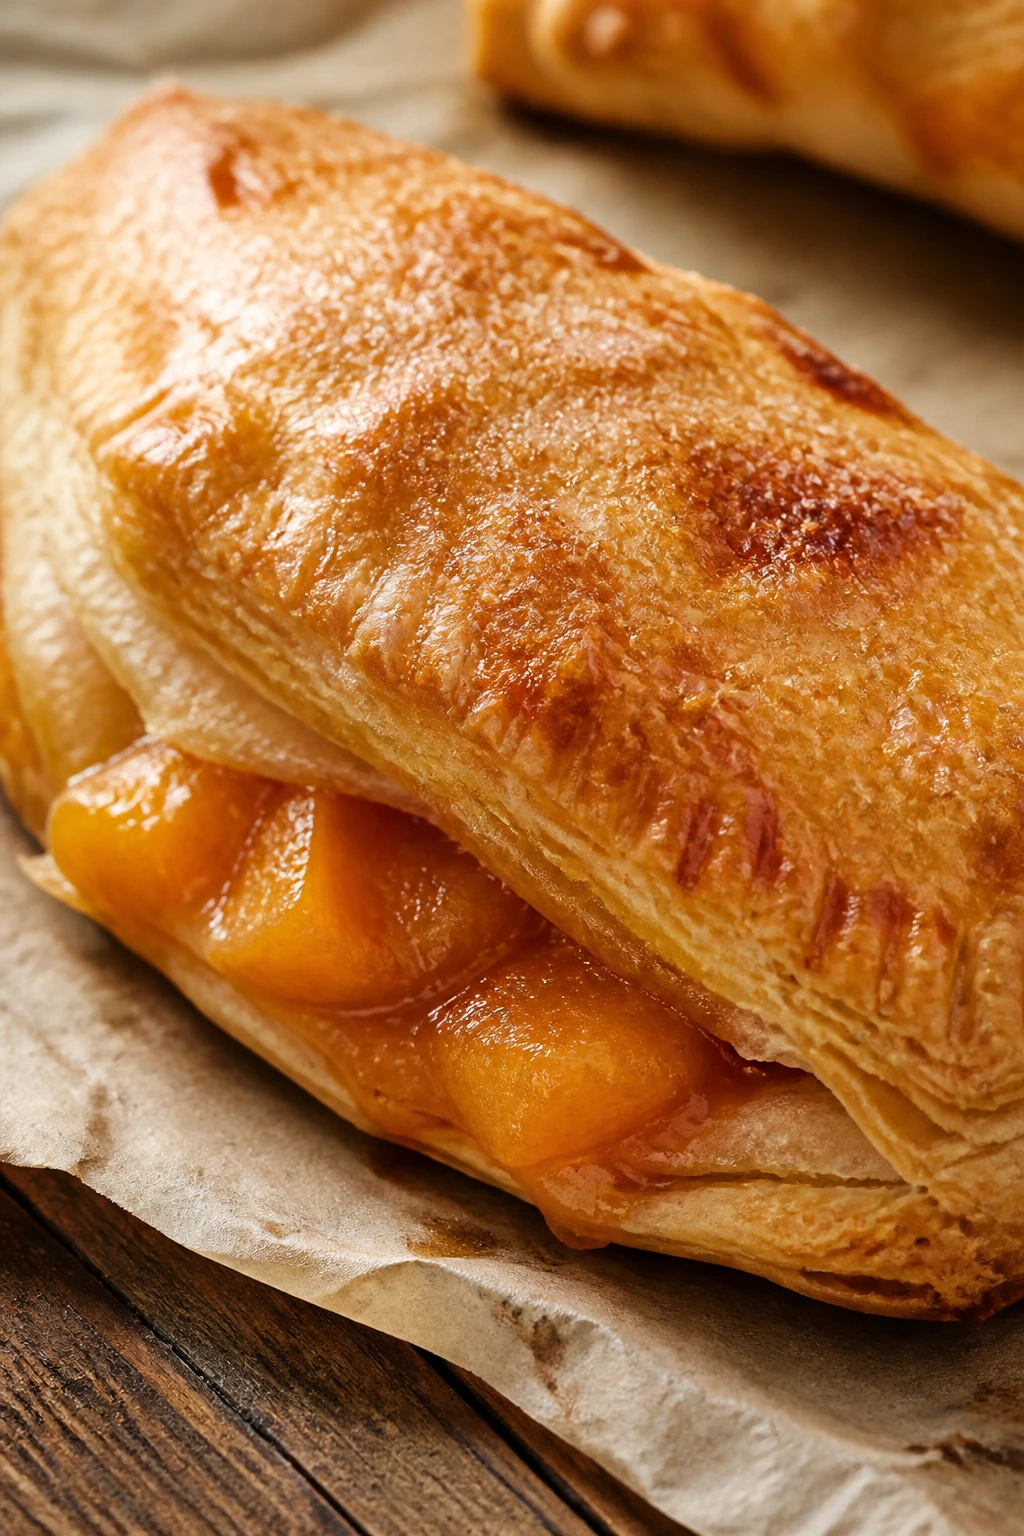
Flaky pastry, sticky peach filling, and a crackly sugar top — these are small enough for kids to hold, which is half their appeal. They feel like handheld pie without the hassle of a full crust.
Why It Works: Pie crust bakes crisp around a thick filling, which means the fruit doesn’t leak everywhere. Cornstarch keeps the peaches in a spoonable pocket instead of a runny one. A sealed turnover also makes cleanup easier, which I never complain about.
Key Ingredients:
- 2 refrigerated pie crusts
- 1 1/2 cups canned peaches, drained and chopped
- 2 tablespoons sugar
- 1 tablespoon cornstarch
- 1/2 teaspoon cinnamon
- 1 egg, beaten
- 1 tablespoon milk
- 1 tablespoon sugar, for topping
Quick Steps:
- Preheat the oven to 400°F and line a baking sheet.
- Mix peaches, sugar, cornstarch, and cinnamon.
- Cut crusts into squares and spoon filling into the center.
- Fold over into triangles, seal edges, and brush with egg mixed with milk.
- Sprinkle sugar on top and bake for 18 to 22 minutes.
Equipment for This Recipe:
- Baking sheet
- Parchment paper
- Knife or pastry wheel
- Pastry brush
How to Serve This Dish: Serve warm enough for the filling to smell peachy, but not so hot that it escapes. They’re good as-is, though a thin glaze makes them look finished.
Pro Tips for This Recipe:
- Don’t overfill the centers.
- Seal the edges with a fork so the fruit stays put.
- Cut a tiny steam slit if the filling looks wet.
Variations on This Dish:
- Apple Turnovers: Use diced apples and extra cinnamon.
- Berry Turnovers: Swap in thick berry jam or cooked berries.
- Cream Cheese Turnovers: Add a teaspoon of sweetened cream cheese under the fruit.
Common Mistakes to Avoid with This Recipe:
- Using warm filling: It softens the pastry.
- Baking on an unlined tray: Leaks turn into a mess.
- Skipping the egg wash: The tops stay pale.
31. Strawberry Icebox Cake
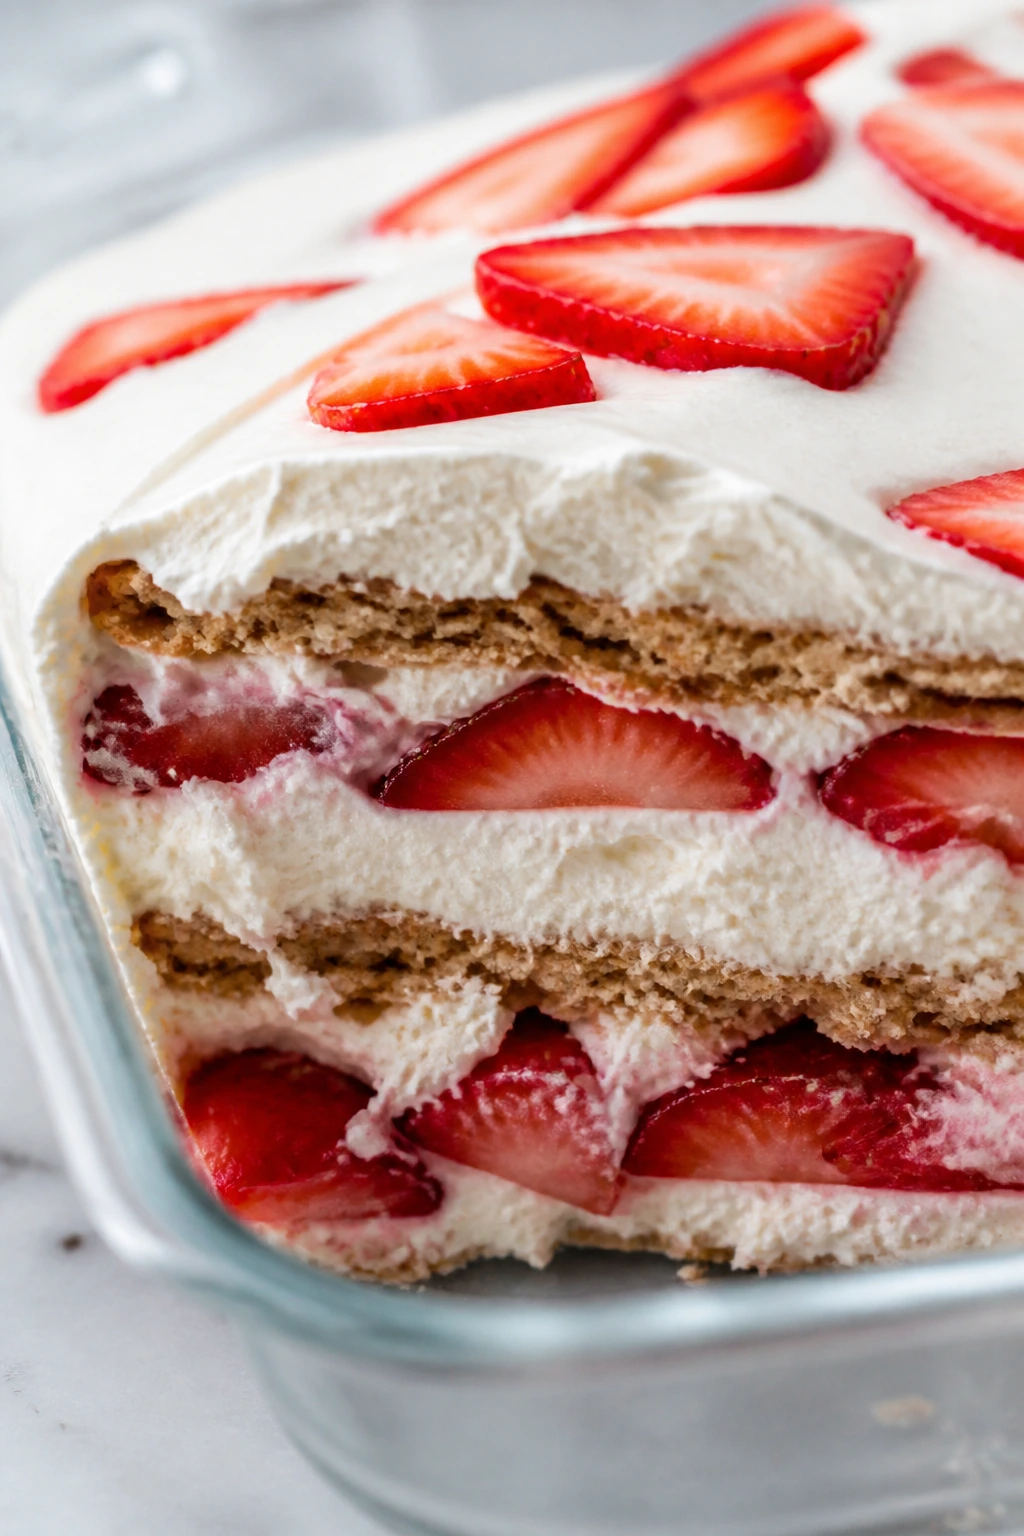
This is the easiest kind of layered dessert: cookies, cream, strawberries, repeat. The crackers soften into cake-like layers, and the strawberries bring enough freshness to keep the whole thing from feeling heavy.
Why It Works: Graham crackers absorb moisture from the cream and berries, so you get soft layers without baking. Strawberries add color and a little tartness, while the cream filling keeps each bite rich enough for dessert. Time in the fridge is what turns it from a stack into a slice.
Key Ingredients:
- 2 cups strawberries, sliced
- 2 sleeves graham crackers
- 2 cups heavy cream
- 1/4 cup powdered sugar
- 1 teaspoon vanilla extract
- 1 cup vanilla yogurt
- 1 teaspoon lemon zest
Quick Steps:
- Whip cream, powdered sugar, vanilla, and lemon zest to soft peaks.
- Fold in the yogurt.
- Spread a thin layer of cream in a dish.
- Layer graham crackers, cream, and strawberries, repeating until full.
- Chill for at least 4 hours, then slice.
Equipment for This Recipe:
- Mixing bowl
- Hand mixer or whisk
- 8×8-inch dish
- Spatula
How to Serve This Dish: Serve chilled with a clean knife dipped in warm water for neater slices. A few extra strawberries on top make the pieces look less flat.
Pro Tips for This Recipe:
- Use ripe strawberries so the flavor carries.
- Don’t skimp on chilling time.
- Keep the layers even or the cake leans when sliced.
Variations on This Dish:
- Banana Icebox Cake: Add banana slices between the layers.
- Chocolate Icebox Cake: Use chocolate grahams.
- Berry Mix Cake: Layer in blueberries or raspberries.
Common Mistakes to Avoid with This Dish:
- Slicing too early: The layers haven’t softened.
- Using wet berries: They make the cream loose.
- Building layers too thick: The stack slides.
32. Raspberry Crumble Squares
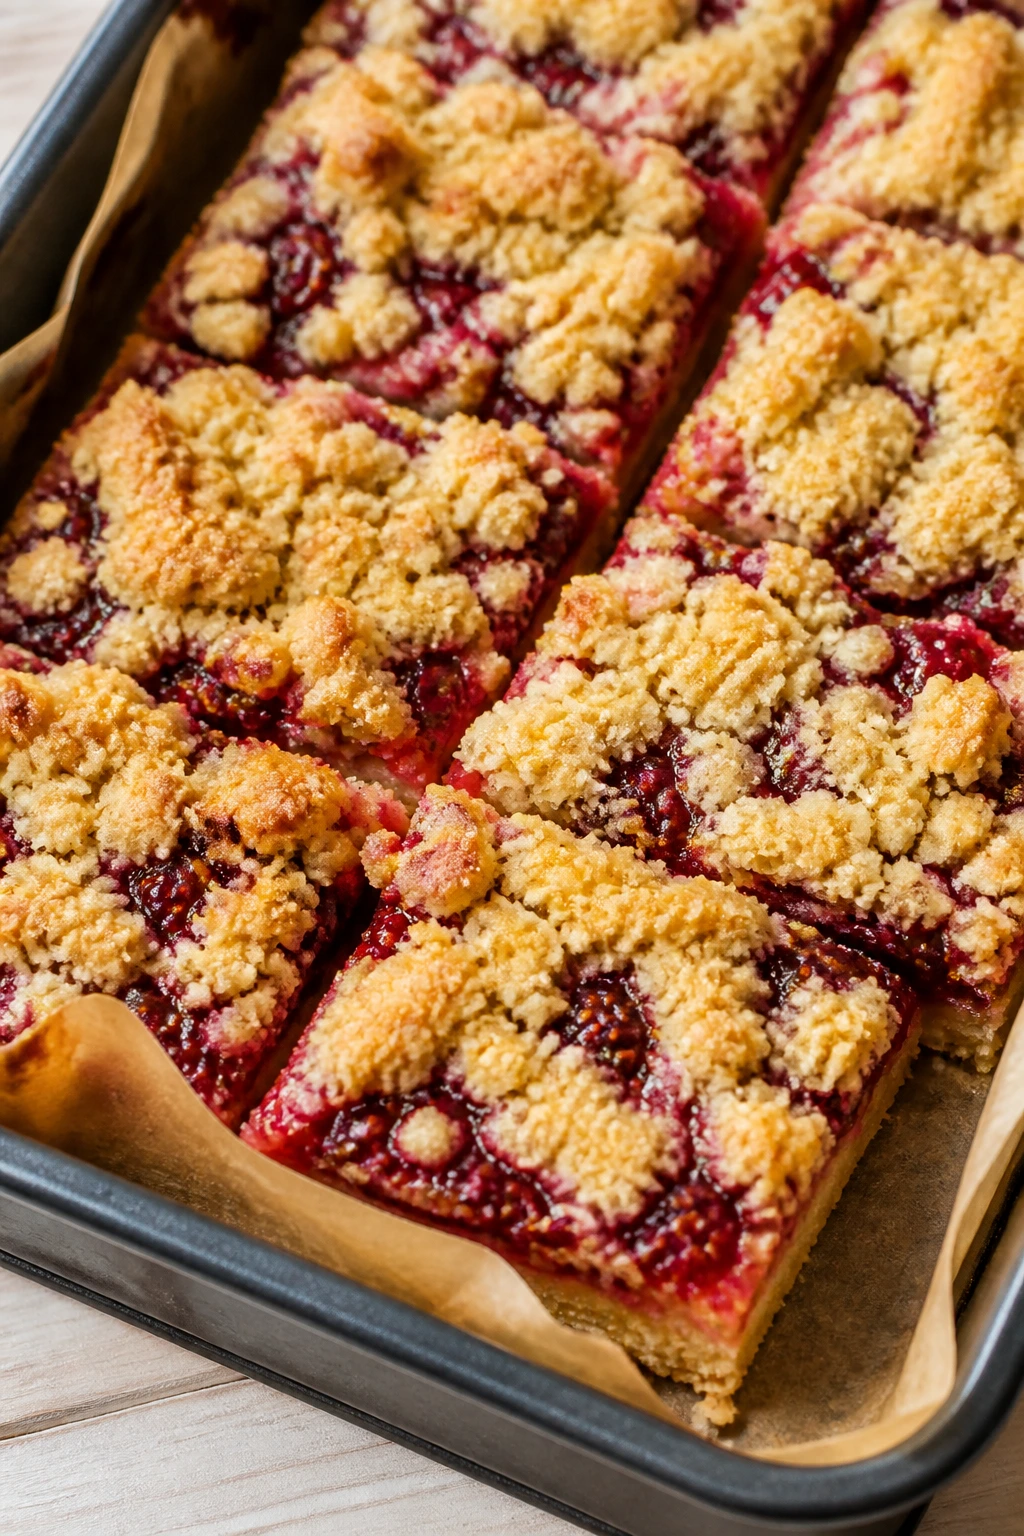
These squares have a buttery base and a jammy raspberry middle that tastes bright without needing much sugar. The crumble on top bakes into rough, golden crumbs that kids can pick at with their fingers if you let them.
Why It Works: Raspberries cook down quickly, so cornstarch gives the filling enough hold to slice cleanly. The base and topping use the same mixture, which keeps the recipe simple and the texture consistent. A bar pan helps the fruit layer stay even.
Key Ingredients:
- 1 1/2 cups flour
- 1 cup rolled oats
- 3/4 cup brown sugar
- 3/4 cup butter, cold and cubed
- 2 cups raspberries
- 1 tablespoon cornstarch
- 1 tablespoon lemon juice
- 1 teaspoon vanilla extract
- Pinch of salt
Quick Steps:
- Preheat the oven to 350°F and line an 8×8-inch pan.
- Mix flour, oats, brown sugar, salt, and butter into crumbs.
- Press half into the pan.
- Stir raspberries with cornstarch, lemon juice, and vanilla, then spread over the crust.
- Crumble the rest on top and bake for 35 to 40 minutes.
Equipment for This Recipe:
- Baking pan
- Parchment paper
- Mixing bowl
- Spoon
How to Serve This Dish: Cool fully before cutting or the middle smears. A dusting of powdered sugar helps the raspberry color stand out.
Pro Tips for This Recipe:
- If the berries are very juicy, add another teaspoon cornstarch.
- Press the base firmly so it doesn’t crumble.
- Line the pan for easier lifting.
Variations on This Dish:
- Blueberry-Raspberry Squares: Use half blueberries for a softer flavor.
- Lemon Crumble Squares: Add lemon zest to the crust.
- Seedless Jam Version: Use thick raspberry jam when fresh berries are scarce.
Common Mistakes to Avoid with This Recipe:
- Cutting while warm: The filling runs.
- Using loose crumbs for the base: The bars break apart.
- Not enough thickener: The fruit leaks out.
33. Tropical Fruit Crisp

This crisp tastes bright and sunny, but the ingredients are still plain enough to keep in the pantry. Pineapple, mango, oats, and coconut make a top layer that smells nutty before it even hits the table.
Why It Works: Tropical fruit tends to be juicy, so the cornstarch and oat topping keep the filling from turning soupy. Coconut adds chew and flavor without needing a complicated custard or sauce. The result is sweet, soft, and easy to scoop.
Key Ingredients:
- 2 cups pineapple chunks, drained
- 2 cups mango chunks, fresh or frozen
- 2 tablespoons sugar
- 1 tablespoon cornstarch
- 1 cup rolled oats
- 1/2 cup flour
- 1/2 cup brown sugar
- 1/2 cup butter, cold and cubed
- 1/4 cup shredded coconut
- 1 teaspoon lime juice
Quick Steps:
- Preheat the oven to 375°F and grease a baking dish.
- Toss pineapple, mango, sugar, cornstarch, and lime juice together.
- Spread the fruit in the dish.
- Mix oats, flour, brown sugar, coconut, and butter into crumbs.
- Sprinkle over the fruit and bake for 30 to 35 minutes.
Equipment for This Recipe:
- Baking dish
- Mixing bowl
- Fork
- Spoon
How to Serve This Dish: Serve warm with yogurt or ice cream. A little extra coconut on top gives the dish a nicer finish.
Pro Tips for This Recipe:
- Drain canned pineapple thoroughly.
- Use frozen mango straight from the freezer.
- Lime juice keeps the fruit bright and stops the flavor from going flat.
Variations on This Dish:
- Pineapple-Only Crisp: Use all pineapple and add extra cornstarch.
- Banana Tropical Crisp: Add sliced banana after baking.
- Nutty Version: Mix chopped macadamias or almonds into the topping.
Common Mistakes to Avoid with This Recipe:
- Using too much fruit liquid: The crisp turns runny.
- Skipping the cornstarch: The filling won’t set.
- Burning the coconut: Check the top early if your oven runs hot.
34. Baked Apricots with Vanilla Crumbs
Baked apricots turn soft and almost jammy, and the crumb topping gives just enough texture to keep every spoonful interesting. It’s a small dessert with a big payoff in aroma.
Why It Works: Apricots have a tart edge that mellows under heat, and vanilla rounds them out without stealing the show. The crumb topping gives contrast to the soft fruit, which kids tend to appreciate once they’ve taken the first bite. It’s simple and quietly good.
Key Ingredients:
- 8 apricots, halved and pitted
- 1 tablespoon sugar
- 1 teaspoon vanilla extract
- 1/2 cup flour
- 1/3 cup oats
- 1/3 cup brown sugar
- 1/3 cup butter, cold and cubed
- 1/2 teaspoon cinnamon
- Pinch of salt
Quick Steps:
- Preheat the oven to 375°F and arrange apricots in a baking dish.
- Sprinkle with sugar and vanilla.
- Mix flour, oats, brown sugar, cinnamon, salt, and butter into crumbs.
- Spoon the crumbs over the apricots.
- Bake for 20 to 25 minutes, until the fruit softens and the topping browns.
Equipment for This Recipe:
- Baking dish
- Mixing bowl
- Fork
- Spoon
How to Serve This Dish: Serve warm in small bowls. A spoonful of cream or yogurt on top smooths out the tartness.
Pro Tips for This Recipe:
- Pick apricots that are ripe but not collapsing.
- If they’re very tart, add a second teaspoon of sugar.
- Don’t skip the vanilla; it softens the fruit’s sharpness.
Variations on This Dish:
- Peach Version: Use halved peaches and bake a few minutes longer.
- Almond Crumbs: Add 2 tablespoons sliced almonds to the topping.
- Cinnamon Sugar Finish: Sprinkle more cinnamon sugar after baking.
Common Mistakes to Avoid with This Dish:
- Overbaking the fruit: It turns to mush.
- Packing on a heavy topping: The fruit won’t shine through.
- Serving too hot: The juices run everywhere.
35. Blueberry Pancake Bake
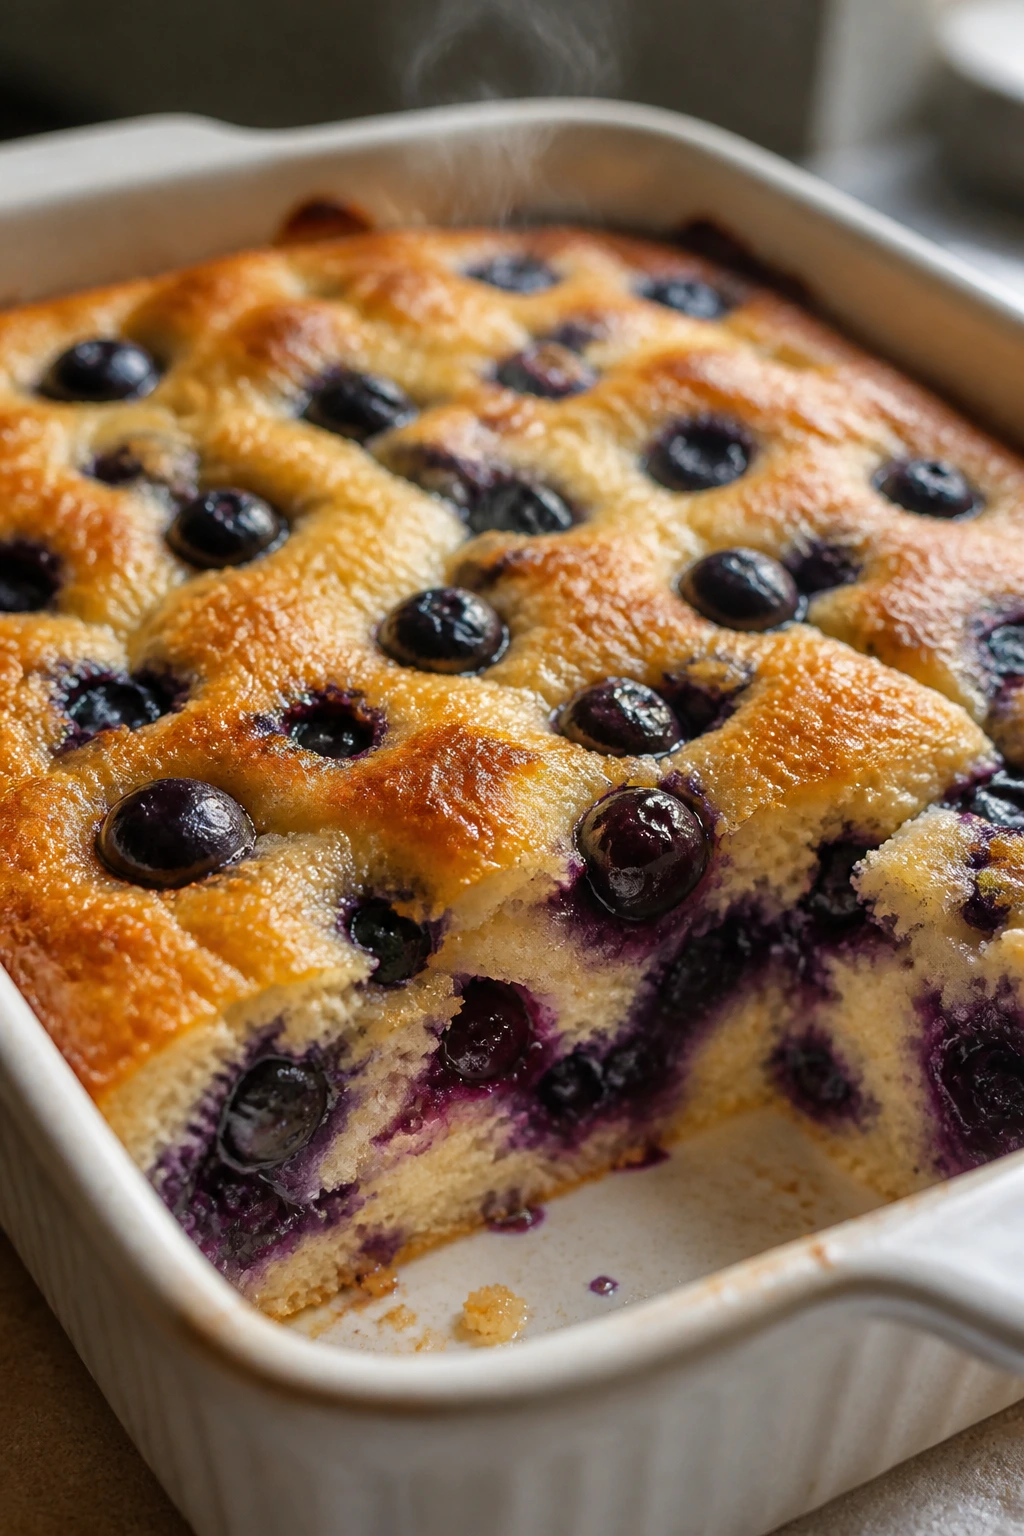
This is breakfast leaning into dessert, and I’m not sorry about that. It comes out fluffy in the middle, golden on top, and dotted with blueberries that burst into little blue pockets.
Why It Works: Pancake mix already has flour, leavening, and salt, so the batter comes together fast. Baking it in a dish gives you a soft, sliceable texture instead of a stack of pancakes to babysit on the stove. Blueberries keep it sweet enough for dessert if you pour on a little syrup.
Key Ingredients:
- 2 cups pancake mix
- 1 1/2 cups milk
- 1 egg
- 2 tablespoons sugar
- 1 teaspoon vanilla extract
- 1 1/2 cups blueberries
- 1 tablespoon butter, for the pan
- 1/2 teaspoon cinnamon
Quick Steps:
- Preheat the oven to 375°F and butter an 8×8-inch dish.
- Whisk pancake mix, milk, egg, sugar, vanilla, and cinnamon.
- Fold in blueberries.
- Pour into the dish and bake for 22 to 25 minutes, until the center is set.
- Let it rest for 5 minutes before slicing.
Equipment for This Recipe:
- Baking dish
- Mixing bowl
- Whisk
- Spatula
How to Serve This Dish: Cut into squares and serve with a drizzle of maple syrup or a spoonful of yogurt. It works for dessert, but it also slides onto a breakfast plate without complaint.
Pro Tips for This Recipe:
- Don’t overmix the batter.
- Frozen blueberries can go in straight from the freezer.
- Check the center with a toothpick before pulling it out.
Variations on This Dish:
- Strawberry Pancake Bake: Swap in chopped strawberries.
- Chocolate Chip Version: Add 1/3 cup mini chips.
- Lemon Blueberry Bake: Add lemon zest to the batter.
Common Mistakes to Avoid with This Recipe:
- Baking in too small a dish: The center stays wet.
- Using too much sugar: The top browns too quickly.
- Serving immediately: The slice won’t hold.
36. Grape Jelly Swirl Blondies
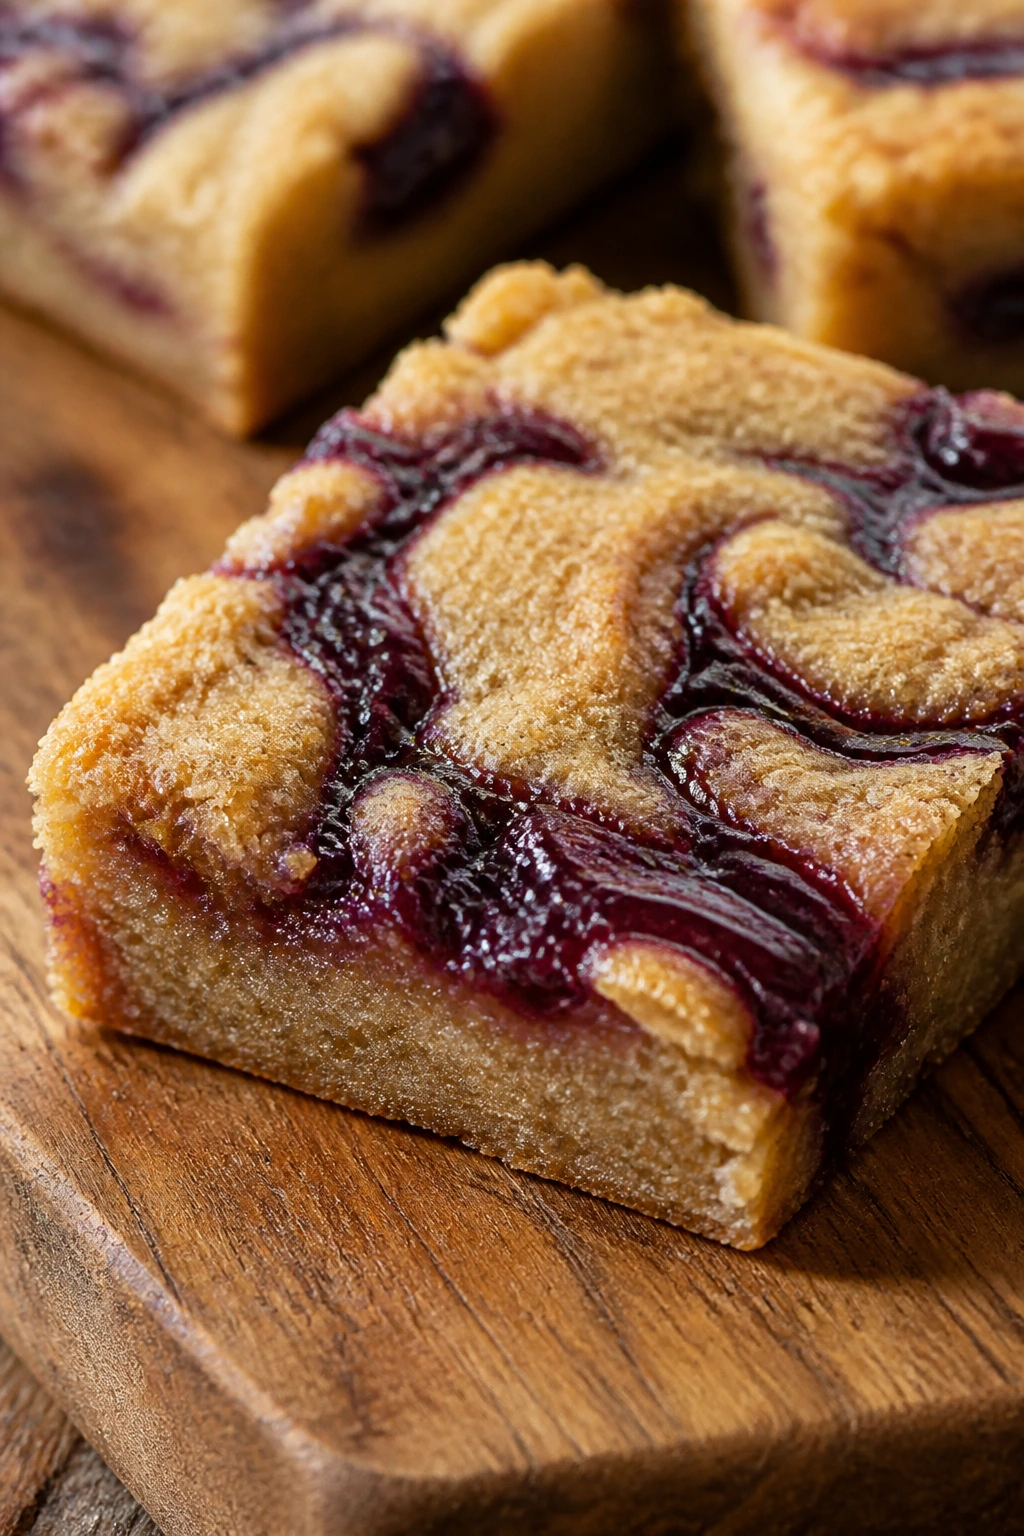
These blondies have that old-school peanut-butter-and-jelly feeling baked right in, except the jelly swirls across the top like stained glass. They’re dense, chewy, and more interesting than plain bar cookies.
Why It Works: Brown sugar gives blondies their caramel note, and grape jelly bakes into a bright, fruity swirl that cuts through the richness. The texture stays chewy because the batter is simple and doesn’t need much mixing. This is a good one when you want fruit flavor without actual fruit pieces.
Key Ingredients:
- 1/2 cup butter, melted
- 1 cup brown sugar
- 1 egg
- 1 teaspoon vanilla extract
- 1 cup flour
- 1/2 teaspoon baking powder
- 1/4 teaspoon salt
- 1/3 cup grape jelly
- 1/4 cup mini chocolate chips, optional
Quick Steps:
- Preheat the oven to 350°F and line an 8×8-inch pan.
- Stir butter and brown sugar together, then mix in the egg and vanilla.
- Add flour, baking powder, and salt until combined.
- Spread the batter in the pan and spoon jelly on top.
- Swirl lightly with a knife and bake for 22 to 25 minutes.
Equipment for This Recipe:
- 8×8-inch pan
- Mixing bowl
- Spoon
- Knife for swirling
How to Serve This Dish: Cool before slicing or the jelly smears. Small squares are enough; these bars are richer than they look.
Pro Tips for This Recipe:
- Don’t over-swirl or the jelly disappears.
- Use thick jelly, not runny spread.
- Let the bars cool fully for the cleanest cut.
Variations on This Dish:
- Strawberry Swirl Blondies: Use strawberry jam instead.
- PB&J Blondies: Add 1/4 cup peanut butter to the batter.
- Chocolate-Cherry Blondies: Swap in cherry preserves and chocolate chips.
Common Mistakes to Avoid with This Recipe:
- Swirling too deep: The jelly sinks.
- Overbaking: The bars dry out fast.
- Using thin jelly: It runs and pools.
37. Mixed Fruit Compote over Biscuits
This one tastes like dessert for people who like their fruit soft and spoonable. The compote bubbles down into something saucy, and the biscuits soak up the juice like they were built for it.
Why It Works: Frozen mixed fruit gives you color and flavor without any peeling or chopping. A little cornstarch thickens the juices so they cling to the biscuit instead of sliding off the plate. Drop biscuits keep the whole dessert from becoming a project.
Key Ingredients:
- 4 cups frozen mixed fruit
- 1/4 cup sugar
- 1 tablespoon lemon juice
- 1 tablespoon cornstarch
- 1 cup biscuit mix
- 1/2 cup milk
- 2 tablespoons butter, melted
- 1 teaspoon vanilla extract
- Pinch of salt
Quick Steps:
- Preheat the oven to 400°F and bake or prep the biscuits from the mix.
- Simmer fruit, sugar, lemon juice, cornstarch, and vanilla in a saucepan until thick.
- Stir gently so the fruit stays in pieces.
- Drop or bake the biscuits until golden.
- Spoon the warm compote over split biscuits.
Equipment for This Recipe:
- Saucepan
- Baking sheet or biscuit pan
- Spoon
- Measuring cups
How to Serve This Dish: Split the biscuits and spoon the fruit over the top so the sauce runs into the middle. It looks especially good in shallow bowls.
Pro Tips for This Recipe:
- Keep the compote slightly chunky.
- If the fruit is very tart, add 1 more tablespoon sugar.
- Warm the biscuits just before serving so they soak better.
Variations on This Dish:
- Single-Fruit Compote: Use all berries or all peaches.
- Vanilla Biscuit Base: Add 1 teaspoon vanilla to the biscuit dough.
- Creamy Finish: Add a spoonful of yogurt or whipped cream.
Common Mistakes to Avoid with This Recipe:
- Boiling the compote too hard: The fruit turns jammy too fast.
- Skipping the cornstarch: The sauce stays thin.
- Letting biscuits sit too long: They go stale before serving.
38. Cinnamon Raisin Apple Muffins
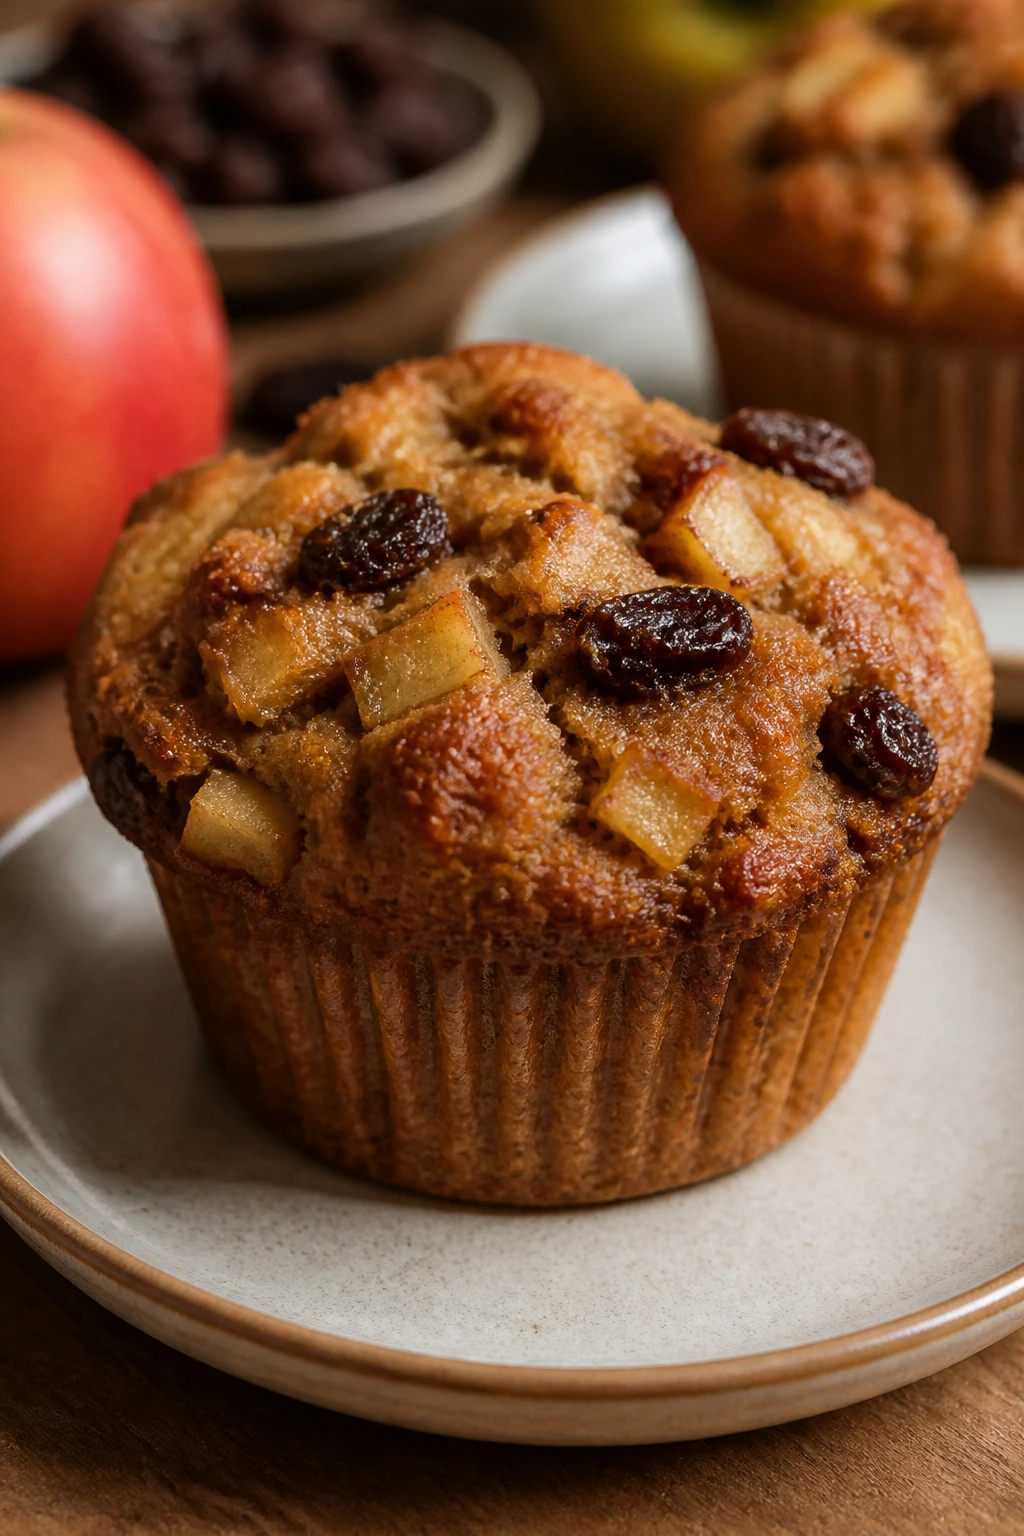
These muffins taste like a lunchbox treat that wandered into dessert territory. The apples stay soft, the raisins plump up, and the cinnamon makes the whole kitchen smell better than it has any right to.
Why It Works: Apples add moisture and little bursts of sweetness, while raisins give you chewy spots that feel dense in a good way. Cinnamon is the bridge between fruit and batter here, and it helps the muffins taste more finished. They’re also one of the easiest things to bake ahead.
Key Ingredients:
- 2 cups flour
- 3/4 cup sugar
- 2 teaspoons baking powder
- 1 teaspoon cinnamon
- 1/2 teaspoon salt
- 1/2 cup butter, melted
- 2 eggs
- 3/4 cup milk
- 1 apple, peeled and diced
- 1/2 cup raisins
- 1 teaspoon vanilla extract
Quick Steps:
- Preheat the oven to 375°F and line a muffin tin.
- Mix flour, sugar, baking powder, cinnamon, and salt.
- Whisk butter, eggs, milk, and vanilla together.
- Stir wet into dry, then fold in apple and raisins.
- Bake for 18 to 20 minutes, until golden and springy.
Equipment for This Recipe:
- Muffin tin
- Mixing bowls
- Whisk
- Spoon
How to Serve This Dish: Serve them warm with butter or pack them into snack bags once cool. A drizzle of honey turns them from snack to dessert fast.
Pro Tips for This Recipe:
- Dice the apple small so it cooks through.
- Soak raisins in warm water for 5 minutes if they seem dry.
- Don’t overfill the cups; the tops need space to dome.
Variations on This Dish:
- Apple Walnut Muffins: Add chopped walnuts for crunch.
- Cranberry Raisin Version: Replace half the raisins with dried cranberries.
- Mini Muffins: Bake 10 to 12 minutes for bite-size treats.
Common Mistakes to Avoid with This Recipe:
- Using giant apple chunks: They stay underdone.
- Overmixing: The muffins turn tough.
- Pulling them out too early: The centers sink.
39. Lemon Berry Pudding Cups
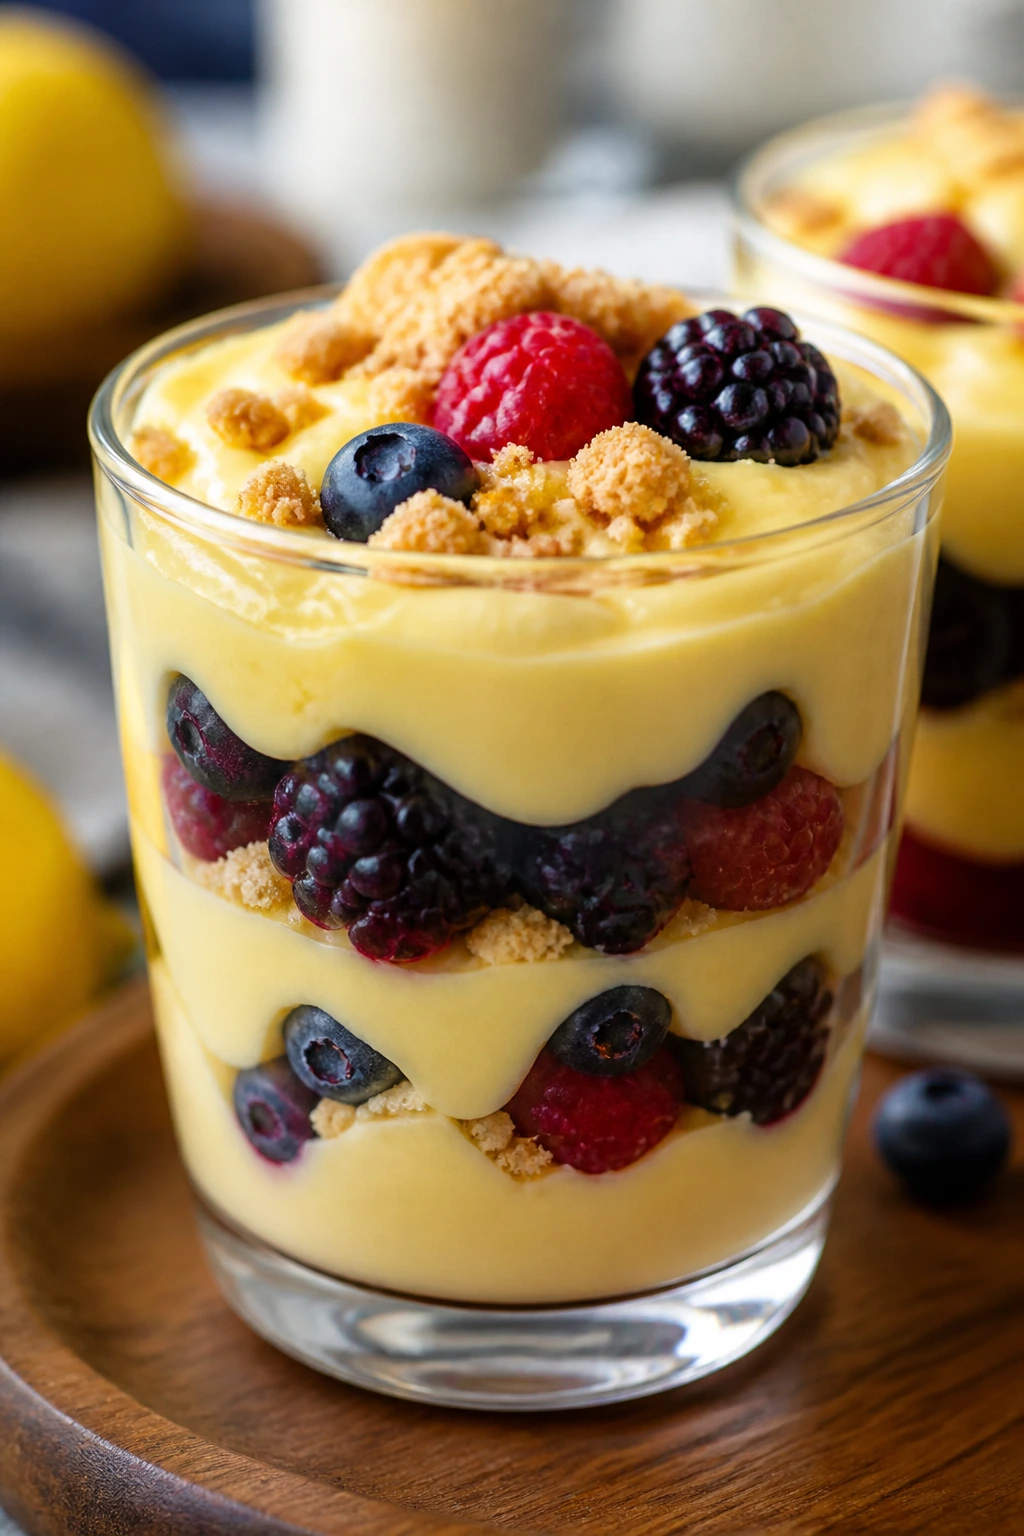
These cups are bright, cool, and a little sharper than the other desserts in the list, which is why I like them near the end of a heavy meal. The lemon makes the berries taste louder, not sweeter.
Why It Works: Lemon pudding sets quickly and gives you a silky base without needing to cook anything. Berries on top provide color and a pop of freshness, while crushed cookies or grahams add enough crunch to keep each spoonful moving. It’s easy to scale up, which is handy for a bigger family.
Key Ingredients:
- 1 box lemon pudding mix
- 2 cups milk
- 1 cup vanilla yogurt
- 1 teaspoon lemon zest
- 1 1/2 cups berries
- 1 cup crushed graham crackers
- 1 tablespoon sugar
- 1 teaspoon vanilla extract
Quick Steps:
- Whisk pudding mix and milk until thick.
- Fold in yogurt, lemon zest, sugar, and vanilla.
- Spoon crumbs into the bottom of cups.
- Add pudding and berries in layers.
- Chill for 20 minutes before serving.
Equipment for This Recipe:
- Mixing bowl
- Whisk
- Cups or jars
- Spoon
How to Serve This Dish: Serve well chilled so the lemon stays crisp and the pudding holds. A few berries on the top layer make it look more deliberate than it is.
Pro Tips for This Recipe:
- Use fresh lemon zest if you can.
- Drain berries if they’re very juicy.
- Keep the crumb layer thin to avoid a dry bottom.
Variations on This Dish:
- Berry-Lime Cups: Swap lemon zest for lime.
- Chocolate Crumb Version: Use crushed chocolate cookies.
- Creamier Finish: Add whipped topping to the pudding.
Common Mistakes to Avoid with This Recipe:
- Using watery berries: The cups loosen.
- Skipping the chill: The pudding stays soft.
- Overdoing the crumbs: The texture gets dusty.
40. Cherry-Almond Granola Clusters
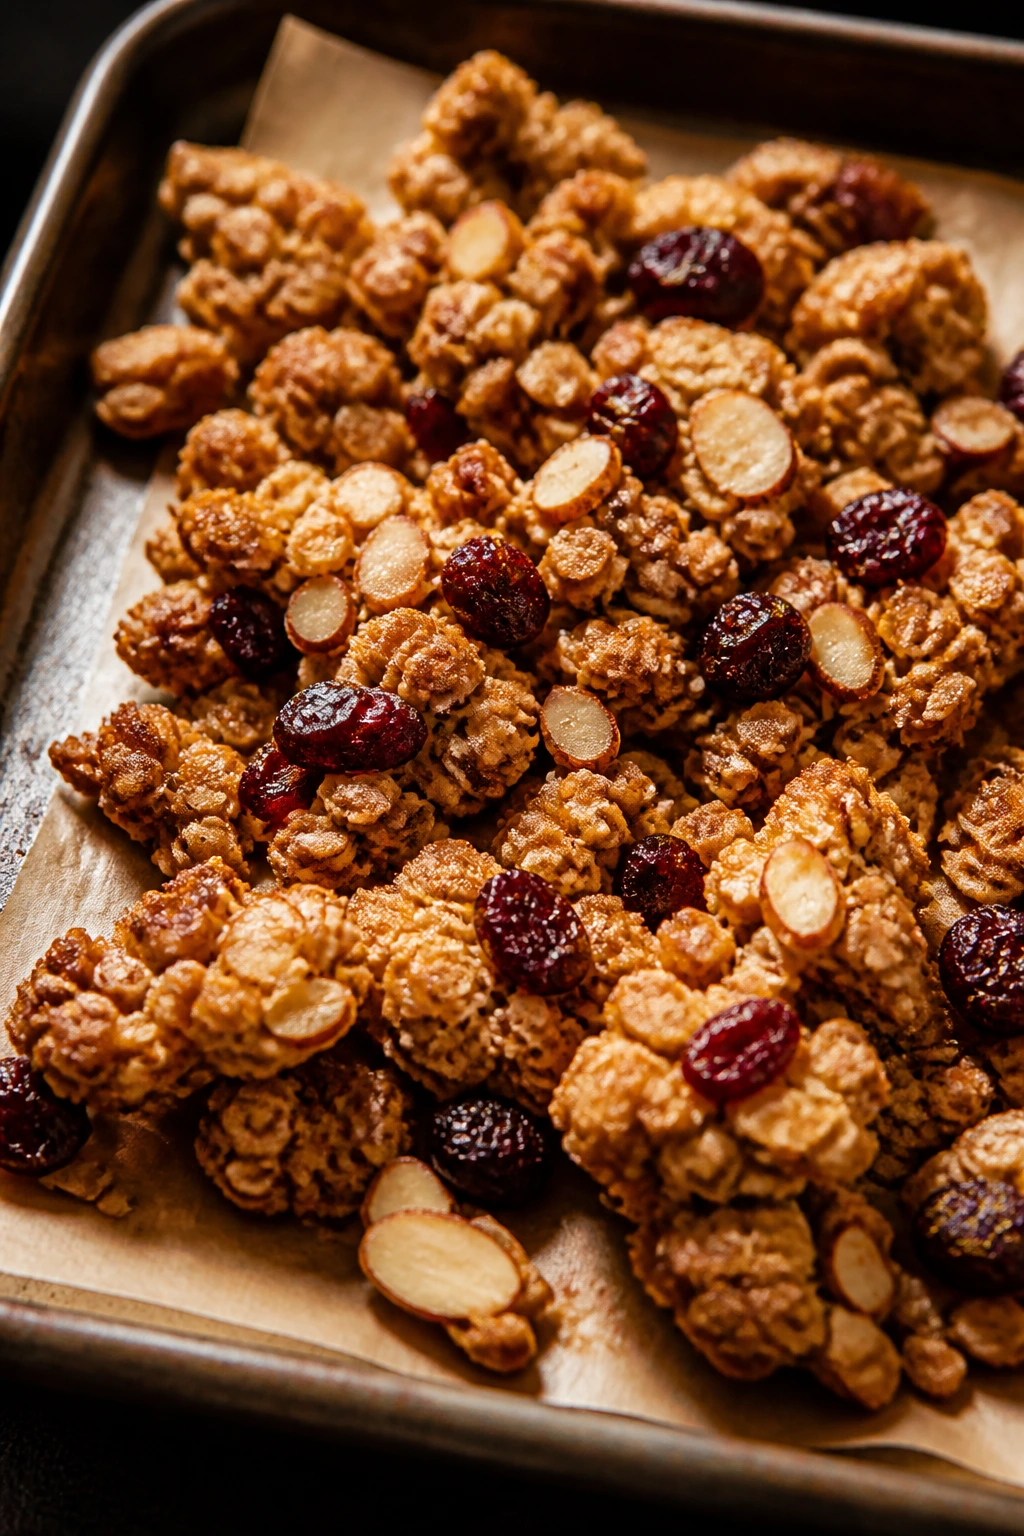
These clusters are crunchy, chewy, and easy to stash in a container for later. They feel like a snack first, dessert second, which is often exactly how kids eat them anyway.
Why It Works: Oats, honey, and peanut butter hold the clusters together without baking into a brick. Dried cherries give a tart little chew, and almond slices add a crisp edge that keeps the texture from going flat. They’re fast, portable, and less fussy than cookies.
Key Ingredients:
- 2 cups rolled oats
- 3/4 cup dried cherries
- 1/2 cup sliced almonds
- 1/2 cup peanut butter
- 1/3 cup honey
- 1 teaspoon vanilla extract
- 1/2 teaspoon cinnamon
- Pinch of salt
Quick Steps:
- Line a baking sheet with parchment.
- Warm peanut butter and honey until easy to stir.
- Mix oats, cherries, almonds, cinnamon, vanilla, and salt in a bowl.
- Stir in the peanut butter mixture until coated.
- Scoop clusters onto the sheet and chill for 20 to 30 minutes.
Equipment for This Recipe:
- Mixing bowl
- Small saucepan or microwave-safe bowl
- Baking sheet
- Spoon
How to Serve This Dish: Serve them cold or at room temperature once set. They’re nice in a small bowl with extra dried fruit scattered around them.
Pro Tips for This Recipe:
- If the mix crumbles, add another spoonful of honey.
- Use parchment so the clusters release cleanly.
- Let the warm mixture cool a minute before scooping.
Variations on This Dish:
- Chocolate Cherry Clusters: Add 2 tablespoons mini chips after the mix cools slightly.
- Seeded Version: Use sunflower seeds for extra crunch.
- Cranberry Almond Clusters: Swap dried cherries for cranberries.
Common Mistakes to Avoid with This Recipe:
- Overheating the binder: The peanut butter can seize.
- Packing the clusters too tightly: They become hard instead of crisp-chewy.
- Skipping the chill time: They fall apart.
Why Pantry Staples Make Fruit Desserts So Easy to Keep Around
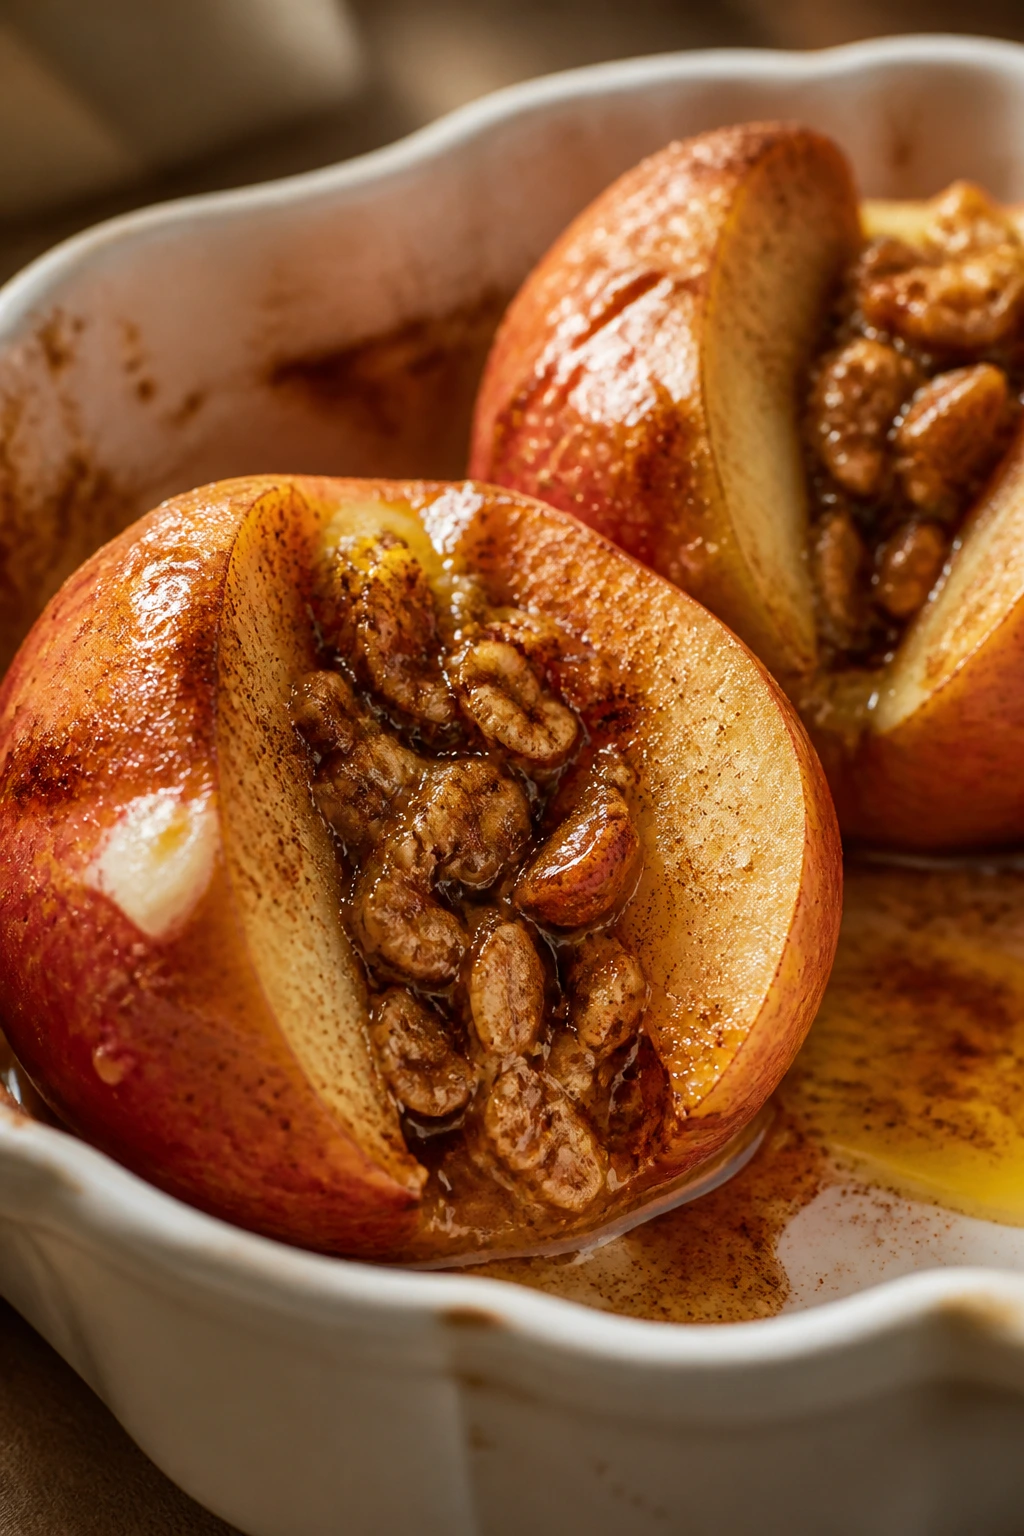
The reason this kind of dessert works is simple: fruit brings the flavor, and pantry staples bring the structure. Flour, oats, sugar, butter, eggs, pudding mix, graham crackers, and cake mix all do different jobs, but the pattern is familiar once you’ve made a few of these. Crumbles need dry ingredients that can brown and hold; bars need something to press into a base; puddings and parfaits need something to thicken and cushion the fruit.
That means you can stop thinking in full recipes and start thinking in parts. A fruit crisp is fruit plus a crumb topping. A hand pie is fruit plus a sealed crust. A mug cake is a tiny batter with fruit folded in. Once that clicks, the pantry becomes a dessert kit instead of a random shelf of odds and ends.
Kids also tend to do better with desserts that have a clear texture story. Crunch on top. Soft fruit in the middle. Cold cream layered with crumbs. A handheld piece instead of a loose spoon dessert. I’ve seen the same apple eaten with suspicion when it’s raw and with enthusiasm when it’s tucked into a bar or baked under oats. The oven does some of the persuasion for you.
Essential Equipment for These Recipes
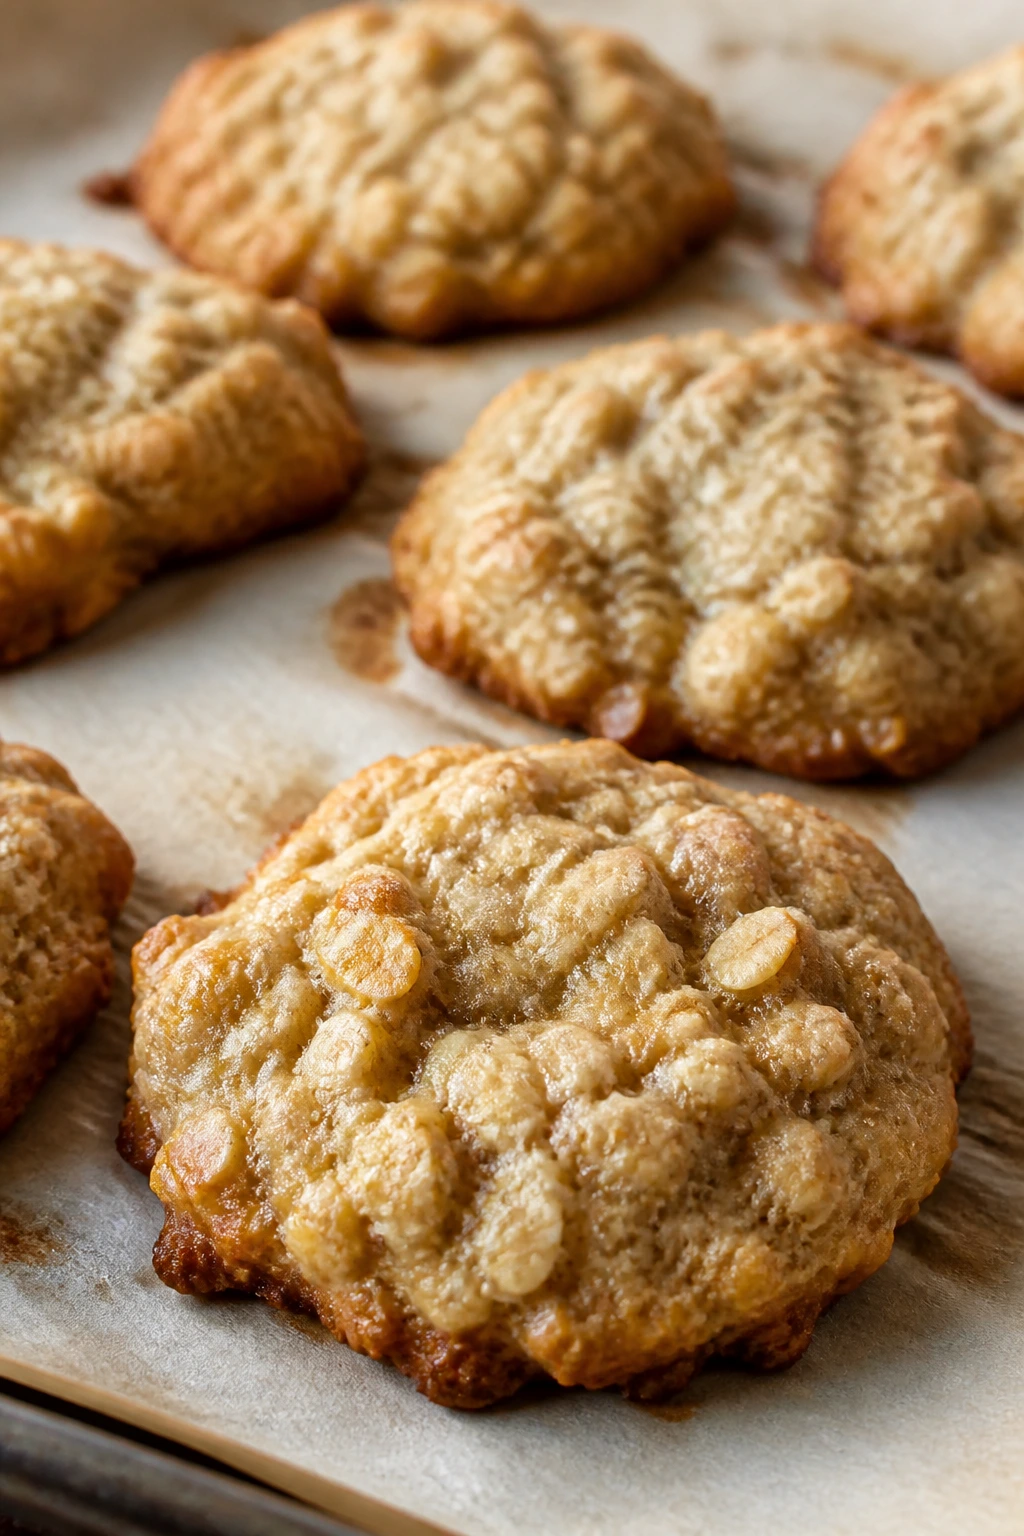
- 9×13-inch baking dish: Best for cobblers, sheet cakes, and large bakes that need room to bubble.
- 8×8-inch baking pan: Handy for bars, small cakes, and anything you want to slice into neat squares.
- Muffin tin: Useful for cupcakes, muffin tops, and mini portions that kids can grab.
- Rimmed baking sheet: Needed for bark, chips, hand pies, turnovers, and crisping tortillas.
- Mixing bowls in two sizes: One for dry ingredients, one for fruit or wet mixtures.
- Whisk and sturdy spoon: The whisk helps with batters and puddings; the spoon handles thick fillings.
- Parchment paper: Makes bars and clusters easier to lift and keeps sticky fruit from welding to the pan.
- Measuring cups and spoons: These recipes depend on balance, especially when fruit is juicy.
- Paring knife and cutting board: For apples, pears, peaches, plums, and strawberries.
- Pastry brush: Useful for egg wash, buttering tortilla chips, and glazing fruit tops.
- Microwave-safe mug and small jars: Good for mug cakes and parfaits.
- Fine-mesh sieve or tea strainer: Optional, but nice for powdered sugar dusting or catching any lumps in pudding.
Smart Shopping and Ingredient Tips
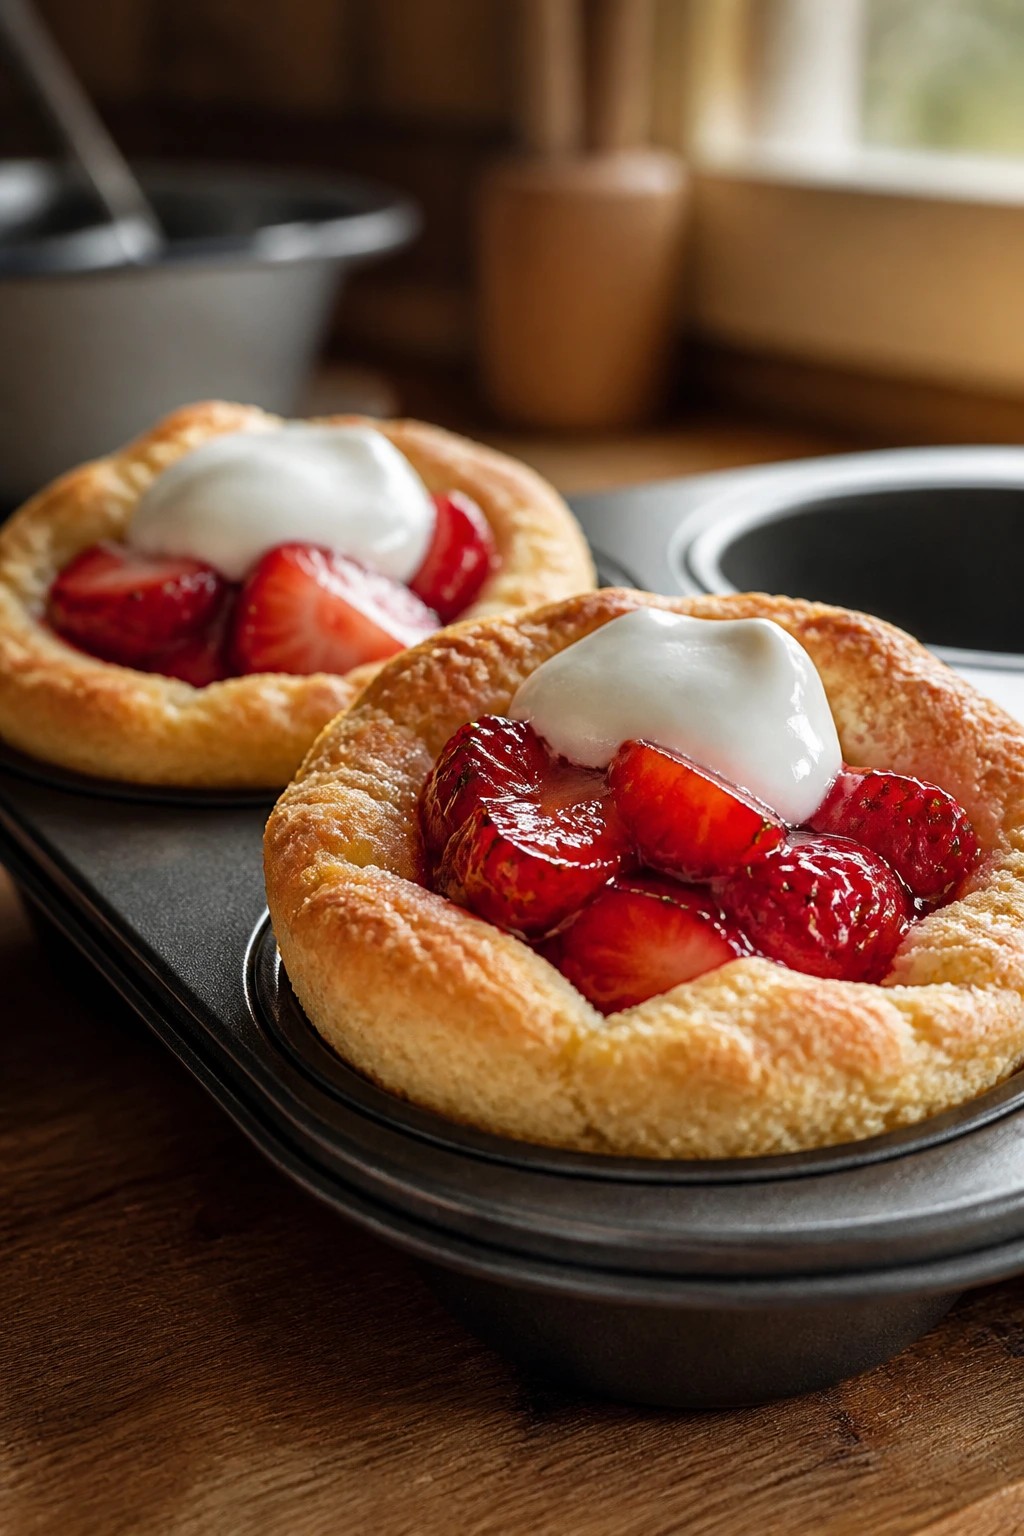
Fruit desserts get easier the moment you stop chasing perfect fruit and start buying for the job. Apples and pears should be firm enough to hold shape in the oven. Bananas should be speckled brown if you want sweetness and mashability. Berries can be fresh or frozen, but frozen fruit often wins when the fresh pile looks tired or expensive. Canned peaches, pineapple, mandarin oranges, and apricots are worth keeping around because they give you sweetness and softness without any chopping beyond a drain and dice.
For pantry items, the quality details are plain but useful. Rolled oats give a better crumble than quick oats because they stay toothsome. Brown sugar adds moisture and a deeper flavor than plain white sugar in crisps and bars. Unsalted butter lets you control the salt, but salted butter works in a pinch if you trim back any extra salt in the recipe. Cornstarch matters more than people expect; a tablespoon can keep a watery fruit filling from turning into soup.
Jam, graham crackers, cake mix, and pudding mix earn their shelf space here. Thick jam behaves better in thumbprints and swirls than runny preserves. Grahams soften into good layers for icebox cakes and parfaits. Cake mix is not cheating when you’re making a peach cobbler or cupcake with fruit on top; it’s the shortcut that keeps dessert happening when energy is low.
How to Serve These Fruit Desserts for Kids
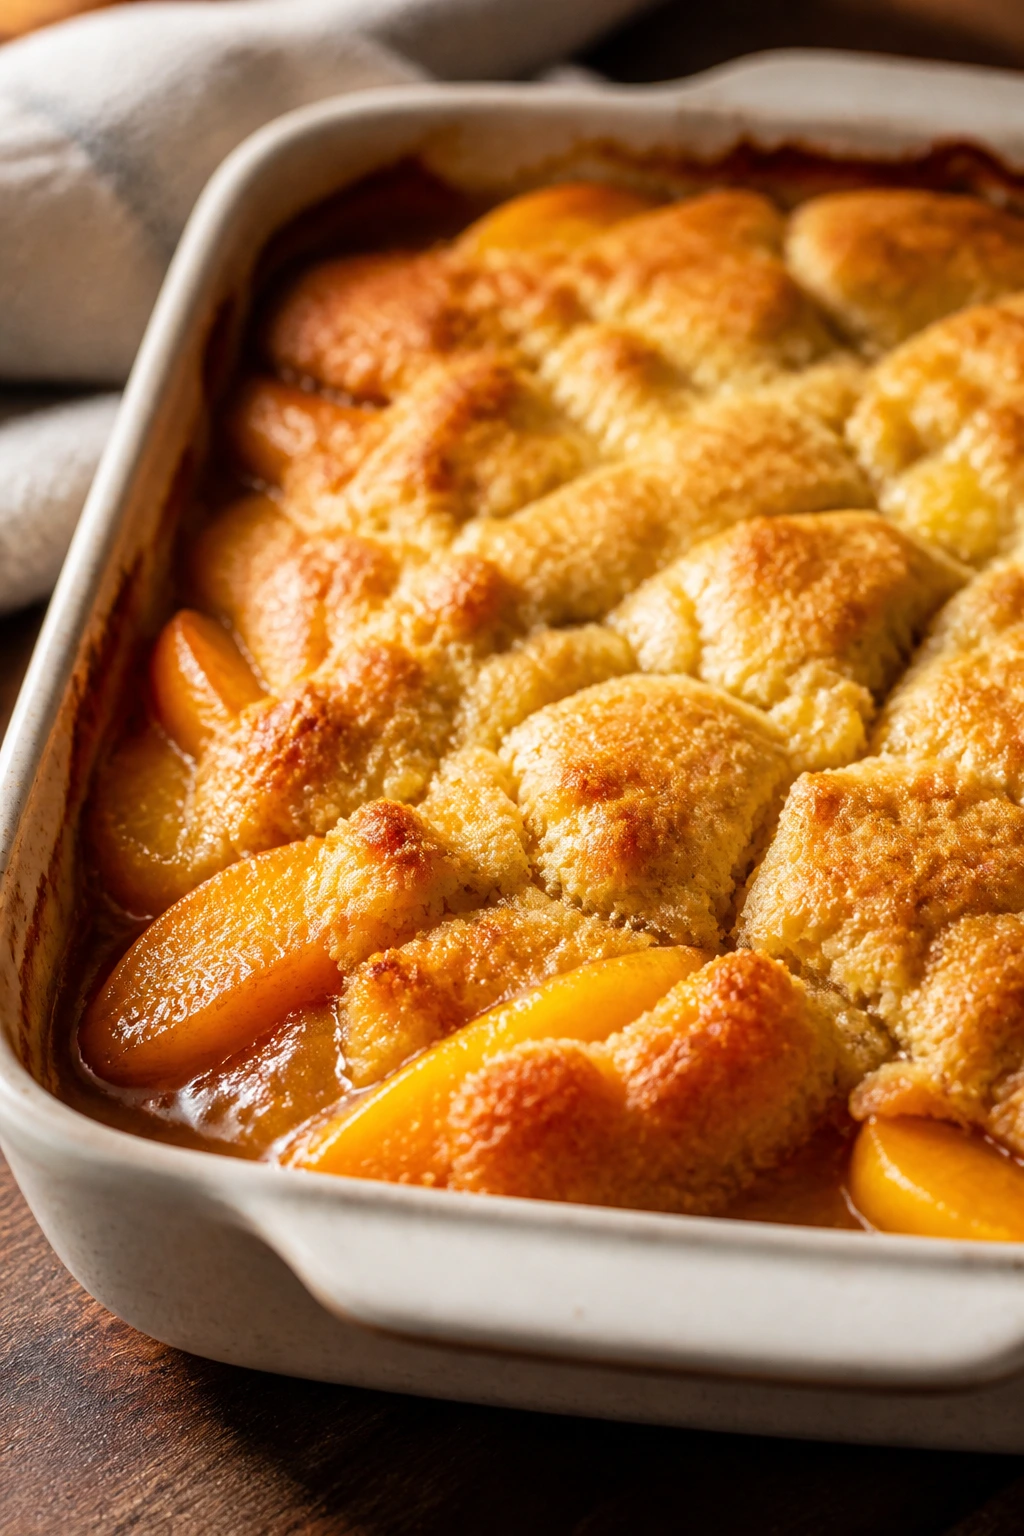
Presentation: Small portions usually win. Square bars, muffin-size cakes, and cups with clear layers make dessert feel manageable, and a dusting of powdered sugar or a few fresh berries on top is enough to make the plate look finished.
Accompaniments: Plain yogurt, vanilla ice cream, whipped cream, and a glass of cold milk fit almost every dessert in this collection. For the warmer bakes, serve them with a spoonful of cream or a little custard. For the crisp and crunchy ones, keep the soft topping on the side so the texture doesn’t disappear too fast.
Portions: Younger kids often do fine with a half-serving of cobbler or a small square of bars. Older kids usually want the full portion if the dessert is handheld. If you’re feeding a group, cut bars into 16 small pieces instead of 9 heavy ones — that keeps the dessert from feeling too large after dinner.
Beverage Pairing: Cold milk is the safe answer, and it works. For a brighter choice, try unsweetened iced tea with lemon for the fruit-heavy desserts, or plain sparkling water when the dessert is already rich and sweet.
Additional Tips and Flavor Boosters
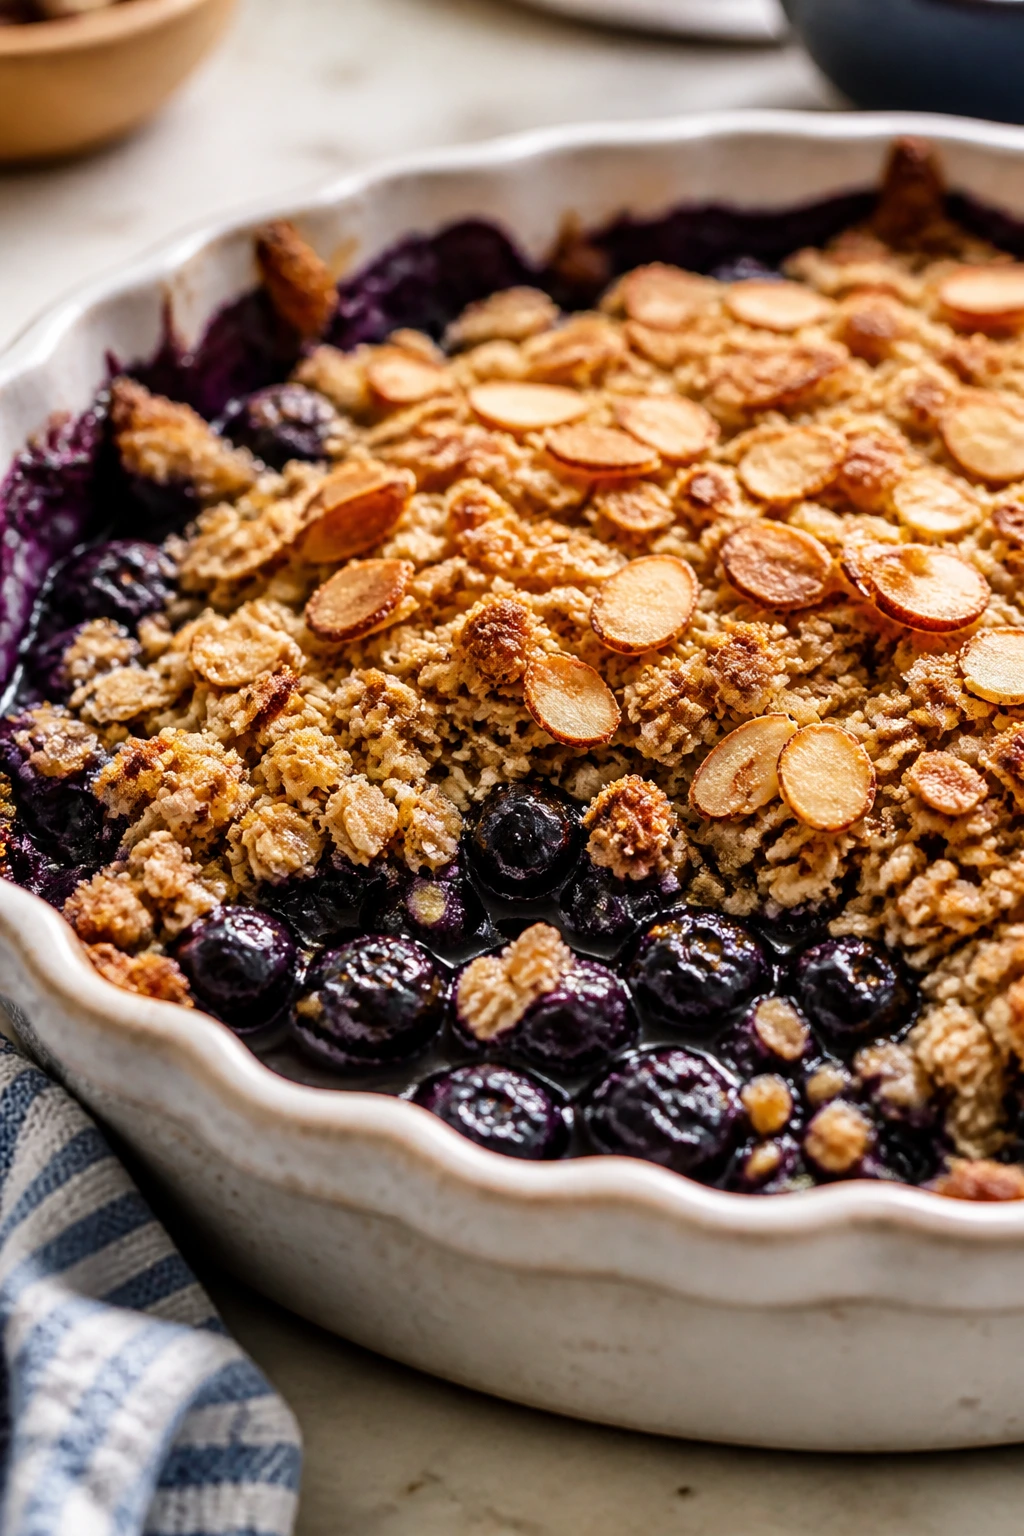
Flavor Enhancement: A small pinch of salt in fruit fillings makes a bigger difference than another spoonful of sugar. It sharpens berries, pulls out the apple flavor, and keeps custard-style desserts from tasting flat.
Customization: If the kids like crunch, add granola, sliced almonds, or a crumb topping to anything soft. If they prefer smooth textures, lean toward puddings, parfaits, compotes, and baked fruit that breaks down under a spoon.
Serving Suggestions: A little citrus zest on top of baked fruit wakes up the whole plate. Lemon zest suits berries, orange zest suits cranberries and apricots, and lime zest works well with pineapple or mango.
Make-It-Yours: For dairy-free desserts, use coconut milk, oat milk, or a dairy-free yogurt where the recipe calls for milk or yogurt. For nut-free versions, skip peanut butter and almonds and use oats, sunflower seed butter, or extra flour crumbs instead. For lower-sugar versions, rely on ripe fruit, tart apples, and a little vanilla instead of loading up the sugar bowl.
Make-Ahead, Storage, and Reheating Guidance
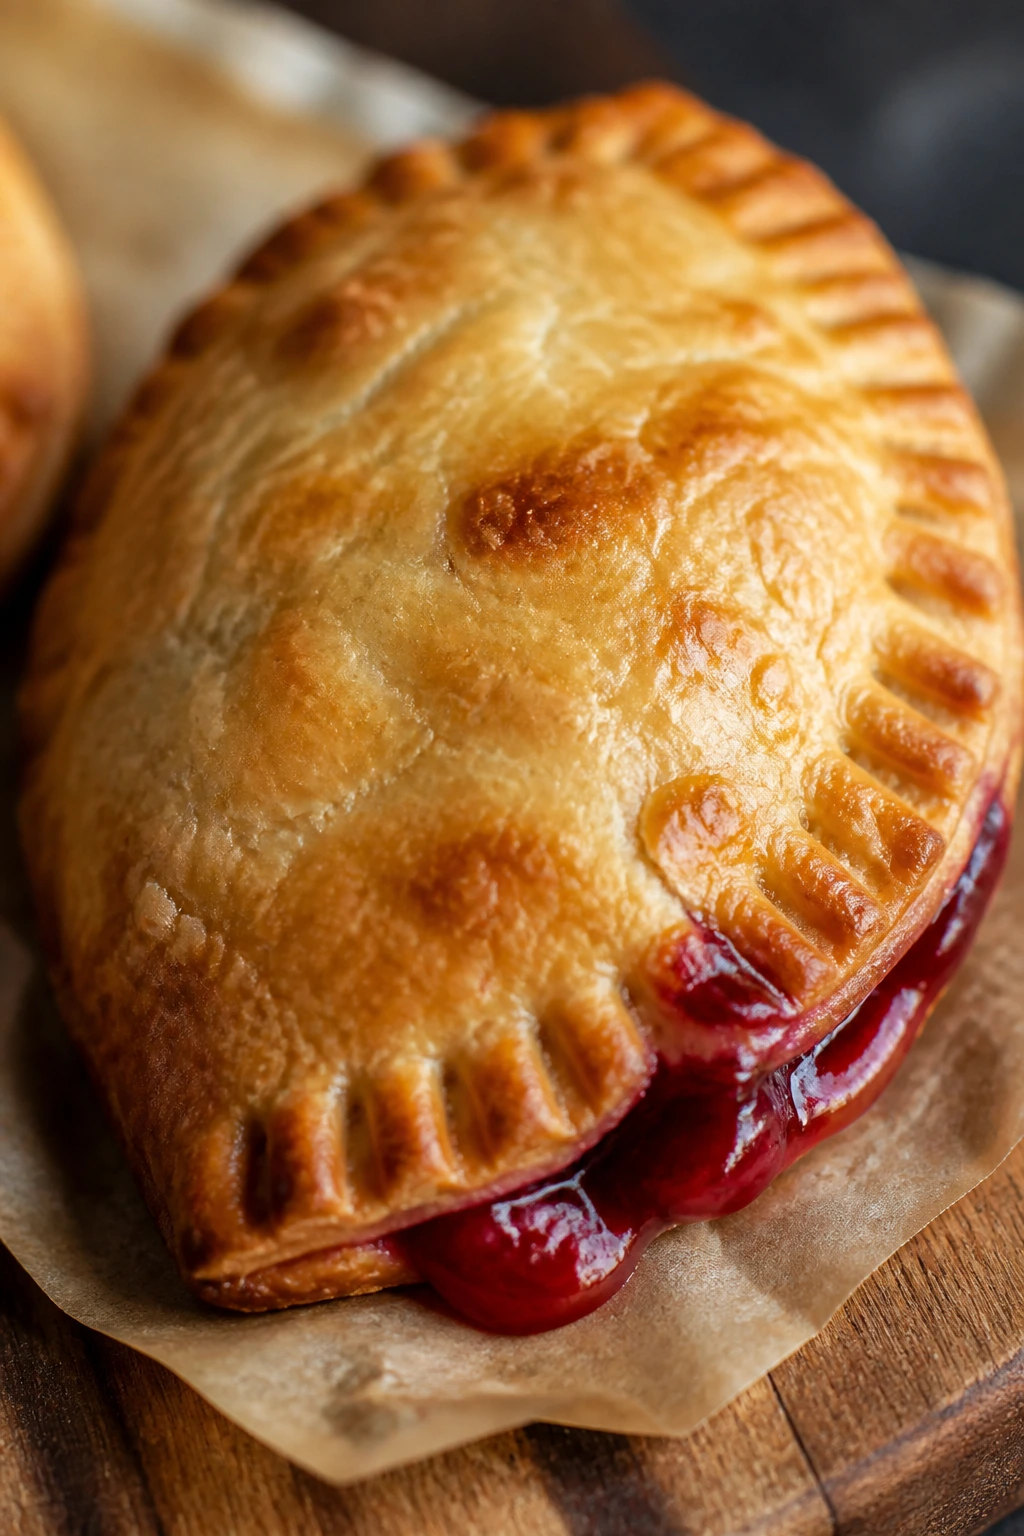
Most baked fruit desserts keep well for 2 to 3 days at room temperature if they don’t contain dairy-heavy fillings. Once cream, yogurt, pudding, or icebox layers enter the picture, move them to the fridge within 2 hours and keep them there for up to 3 days. Bars, muffins, thumbprint cookies, loaf cakes, and crumble squares freeze well for up to 2 months when wrapped tightly and stored in a freezer bag or airtight container.
Crisps, cobblers, and baked fruit are best reheated in a 325°F oven for 10 to 15 minutes. That brings back the topping without turning the fruit to mush. Mug cakes don’t reheat well; make those fresh. Hand pies can go back into a toaster oven for a few minutes if you want the crust to crisp again. Icebox cakes, parfaits, pudding cups, and fruit bark should stay cold, with bark kept frozen until the last minute.
If you want to work ahead, the smart move is to prep the parts separately. Fruit fillings can usually be mixed a day ahead and kept covered in the fridge. Crumble toppings can be made and chilled in a zip bag, then sprinkled on when you’re ready. Muffin batters and quick-cake batters are better baked the same day, but dry mixes and chopped fruit can wait. Some of these desserts — apple crumble bars, fruit compote, rice pudding — taste even better after a short rest because the flavors settle in and the fruit thickens.
Variations and Adaptations to Try
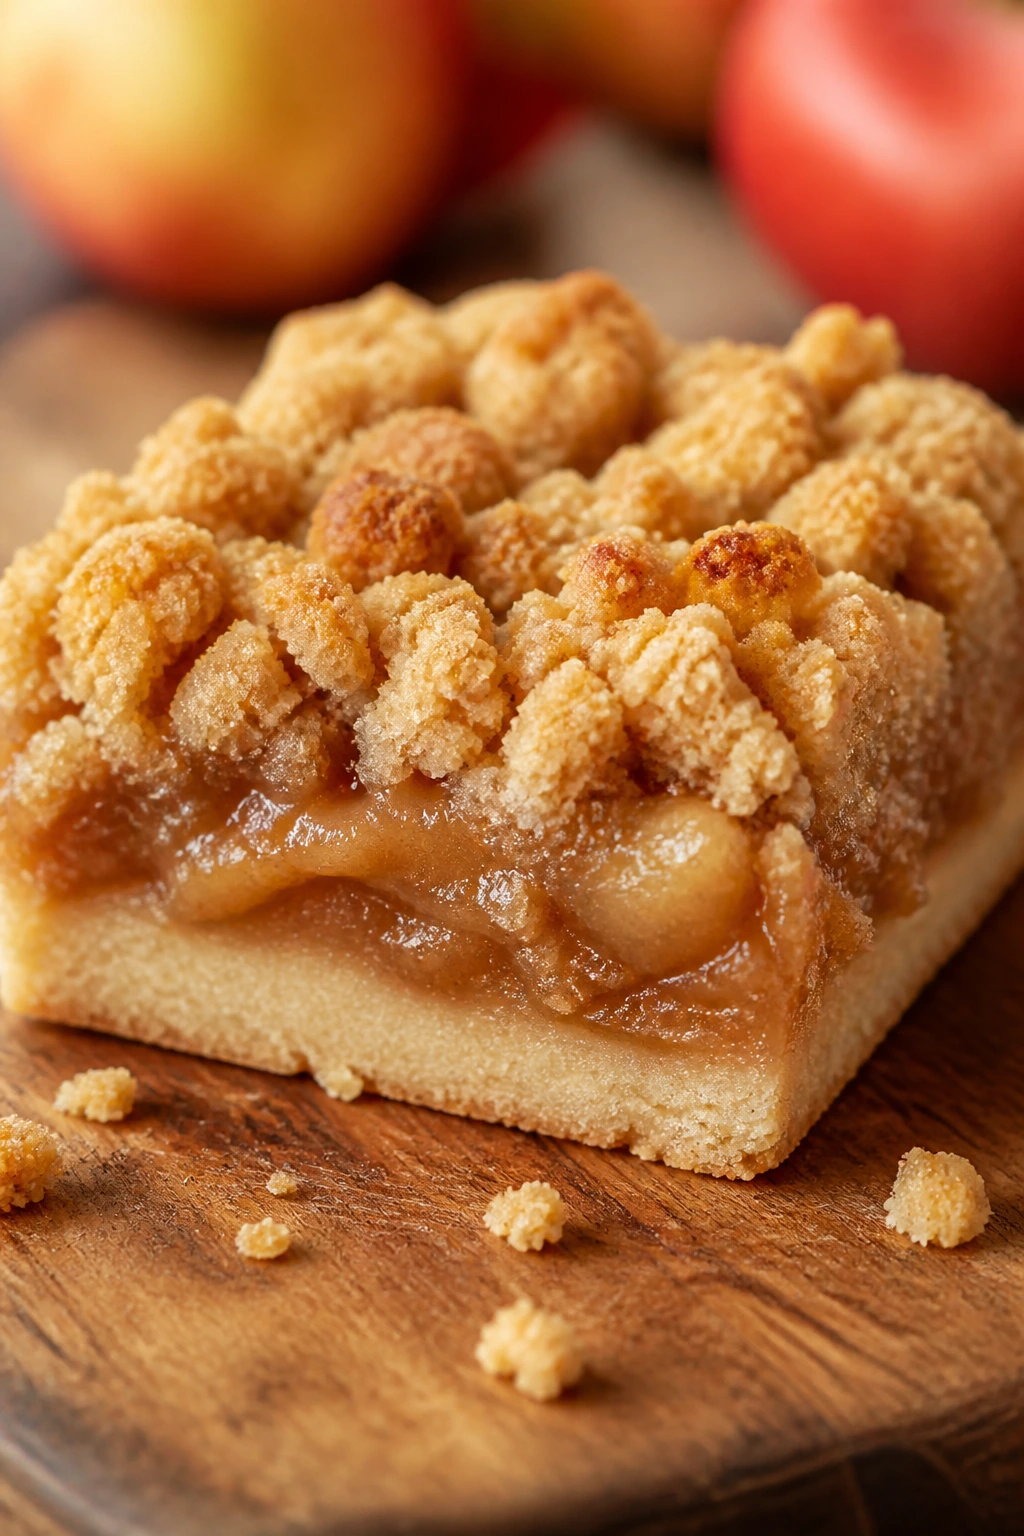
Gluten-Free Pantry Swap: Use certified gluten-free oats, a 1:1 gluten-free flour blend, and gluten-free graham crackers where needed. Crisps, puddings, bark, and some bars adapt cleanly, especially when the fruit filling is doing most of the work.
Dairy-Free Fix: Coconut milk, oat milk, and dairy-free yogurt handle most of the creamy desserts without much trouble. Use plant butter or neutral oil for baked items, and keep an eye on browning because some dairy-free fats bake faster.
Lower-Sugar Fruit-First Version: Use very ripe fruit, cut the added sugar by a third, and lean on cinnamon, vanilla, and citrus zest. Apples, pears, berries, and bananas can carry more sweetness than people give them credit for.
Extra-Crunch Path: Add chopped nuts, granola, toasted coconut, or coarse sugar to toppings and crusts. That works especially well in crisps, hand pies, bars, and baked fruit where the texture contrast makes the dessert feel more alive.
Lunchbox-Friendly Bake: Choose bars, muffins, thumbprints, and clusters. They travel better than puddings or icebox desserts and are less likely to leak, smear, or slump before the school bag opens.
Warm-Spice Twist: Cinnamon is the safe default, but a little nutmeg, ginger, or cardamom can make apples, pears, peaches, and plums taste deeper. Use a light hand; kids usually like the warmth, but they don’t need a spice cabinet dump.
Common Mistakes to Avoid
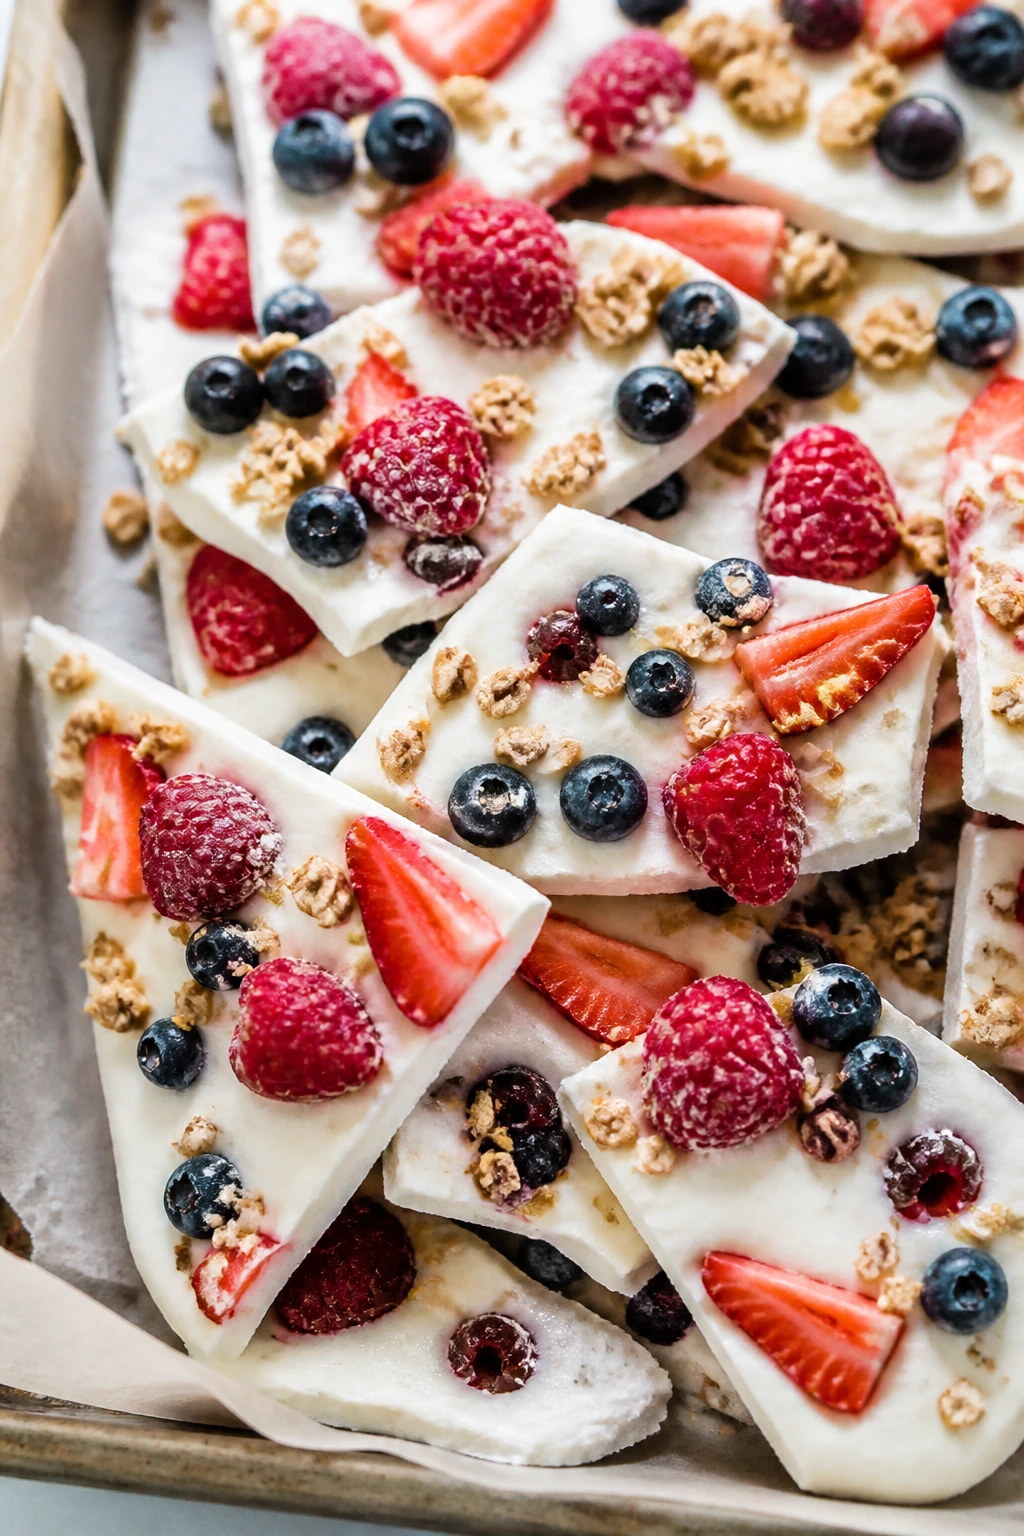
Using watery fruit without a thickener: This is the fastest way to end up with fruit soup under a crumb topping. If the fruit is juicy — frozen berries, canned peaches, ripe plums — add cornstarch or choose a tighter topping.
Overbaking the fruit desserts: Fruit changes quickly under heat. One minute it’s tender, and five minutes later it’s dry around the edges. Pull bakes when the filling bubbles and the top is golden, not when everything looks dark.
Skipping salt: Sweet fruit needs a little salt to taste full. Without it, apples seem flat, berries seem thin, and caramel-like toppings can read as one-note.
Slicing or serving too early: Bars, loaf cakes, and puddings need a bit of time to settle. Warm desserts may still taste fine, but they cut badly and look messy on the plate.
Using the wrong fruit shape for the job: Soft fruit works in puddings and crisps; firmer fruit works in hand pies and bars. If you force the wrong fruit into the wrong dessert, you end up fighting the recipe instead of cooking it.
Packing toppings too tightly: Crumble toppings need air gaps to brown. If you press them into a flat lid, they bake into a dense blanket instead of a crisp top.
Frequently Asked Questions
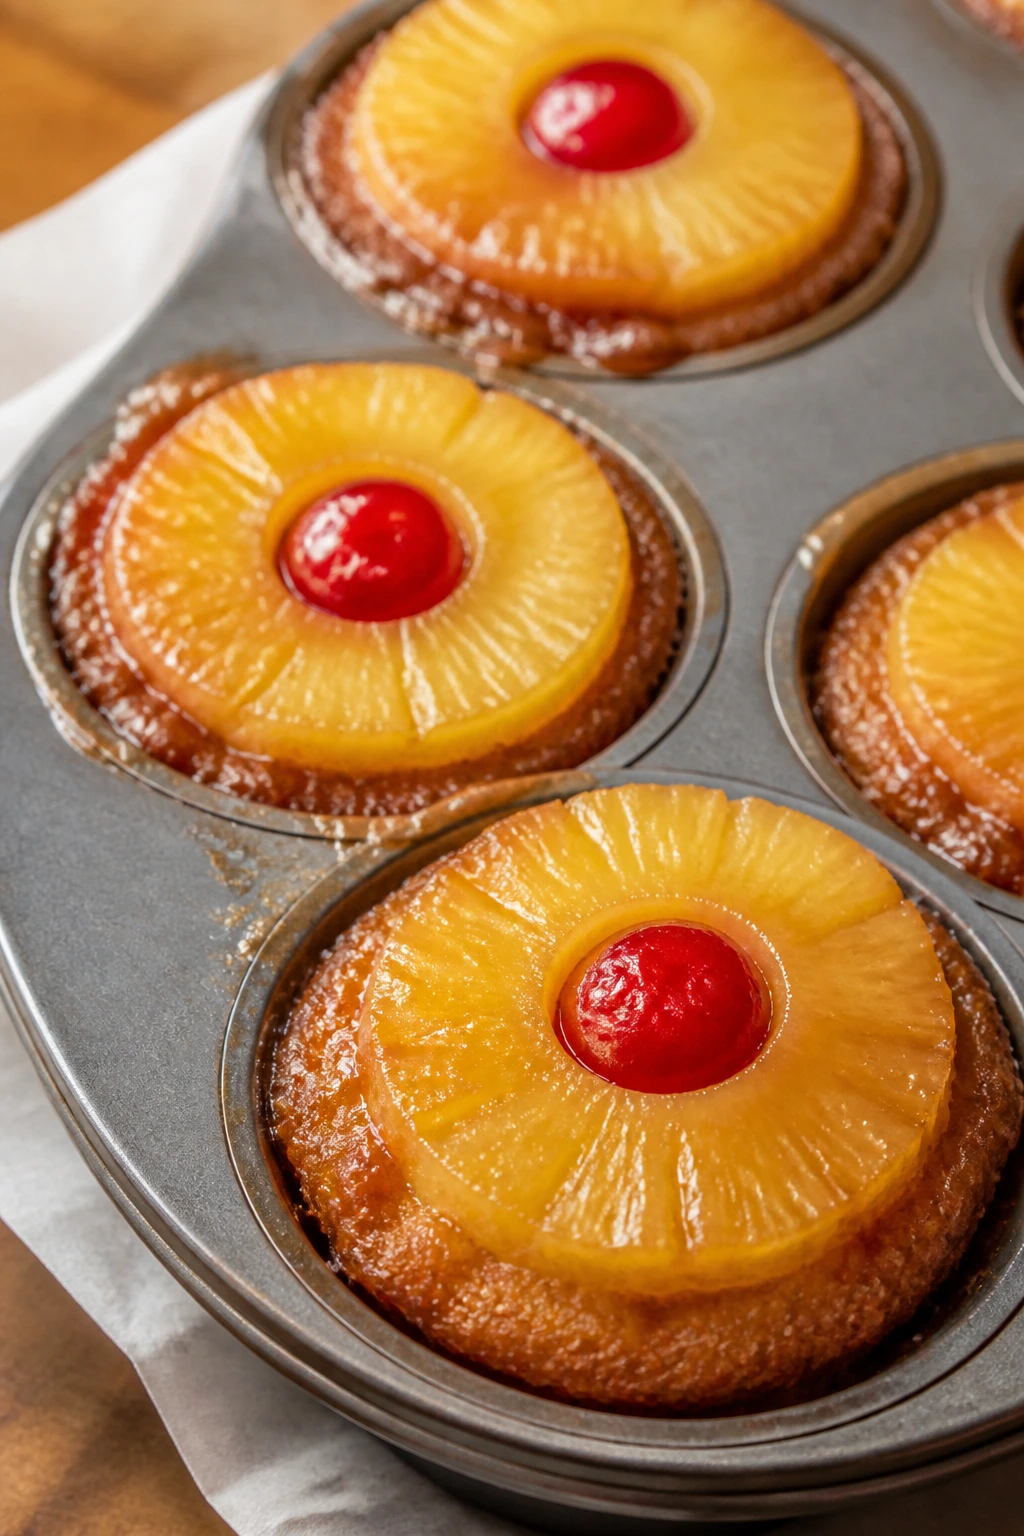
Can I use frozen fruit straight from the freezer?
Yes, in most baked desserts. Frozen berries, mango, and peaches usually go in without thawing; just add a little extra cornstarch if they’re very juicy. For cold desserts like parfaits and bark, thawed fruit can make the layers runnier, so pat it dry first.
Which fruits work best with pantry staples?
Apples, bananas, pears, berries, peaches, plums, cherries, and pineapple all do well because they either hold shape or break down in a useful way. Apples and pears are best for bars and hand pies. Berries and peaches shine in crisps, cobblers, and pudding cups.
How do I keep fruit desserts from getting soggy?
Drain canned fruit well, dry fresh fruit if it’s wet, and use cornstarch when the filling will bake into a sauce. Also, don’t assemble crumb-heavy desserts too far ahead unless they’re supposed to soften, like icebox cake or parfaits.
Can I cut the sugar without wrecking the recipe?
Usually, yes, but trim slowly. Fruit already carries sugar, so you can often reduce the added sugar by a few tablespoons in crisps, bars, and cakes. Don’t strip it all away; sugar still helps with browning and texture.
What if I only have jam or preserves instead of fresh fruit?
Use it in thumbprints, blondies, swirl bars, parfaits, or as a layer under fresh fruit. Thick jam behaves more like fruit filling than thin jelly does. It’s also a fast fix for fruit pizza bars and no-bake cups.
Which desserts travel best to school or a picnic?
Bars, muffins, thumbprints, cookie clusters, and hand pies travel best. Anything creamy, layered, or topped with syrup should stay home or go in a cold container. If you need clean fingers and no forks, choose the square or the cookie.
How do I make these dairy-free?
Swap in plant milk, plant butter, and dairy-free yogurt where needed. Recipes that rely on crumbs, fruit, and oats tend to adapt easily. Custard-heavy desserts need a little more attention, so choose pudding mixes and dairy-free alternatives that are meant to set.
Can I make a fruit dessert ahead for a party?
Yes, but choose the type carefully. Bars, loaf cakes, crisps, and muffins are the easiest make-ahead picks. Icebox cake and pudding cups should be chilled ahead, but fruit toppings go on best close to serving so they stay fresh.
What if my fruit filling turns runny after baking?
Let it sit for 10 to 15 minutes first; many fruit desserts thicken as they cool. If it still looks loose, the likely issue is too much liquid or too little cornstarch. Next time, drain the fruit more thoroughly and measure the thickener carefully.
A Sweet Pantry Habit Worth Keeping
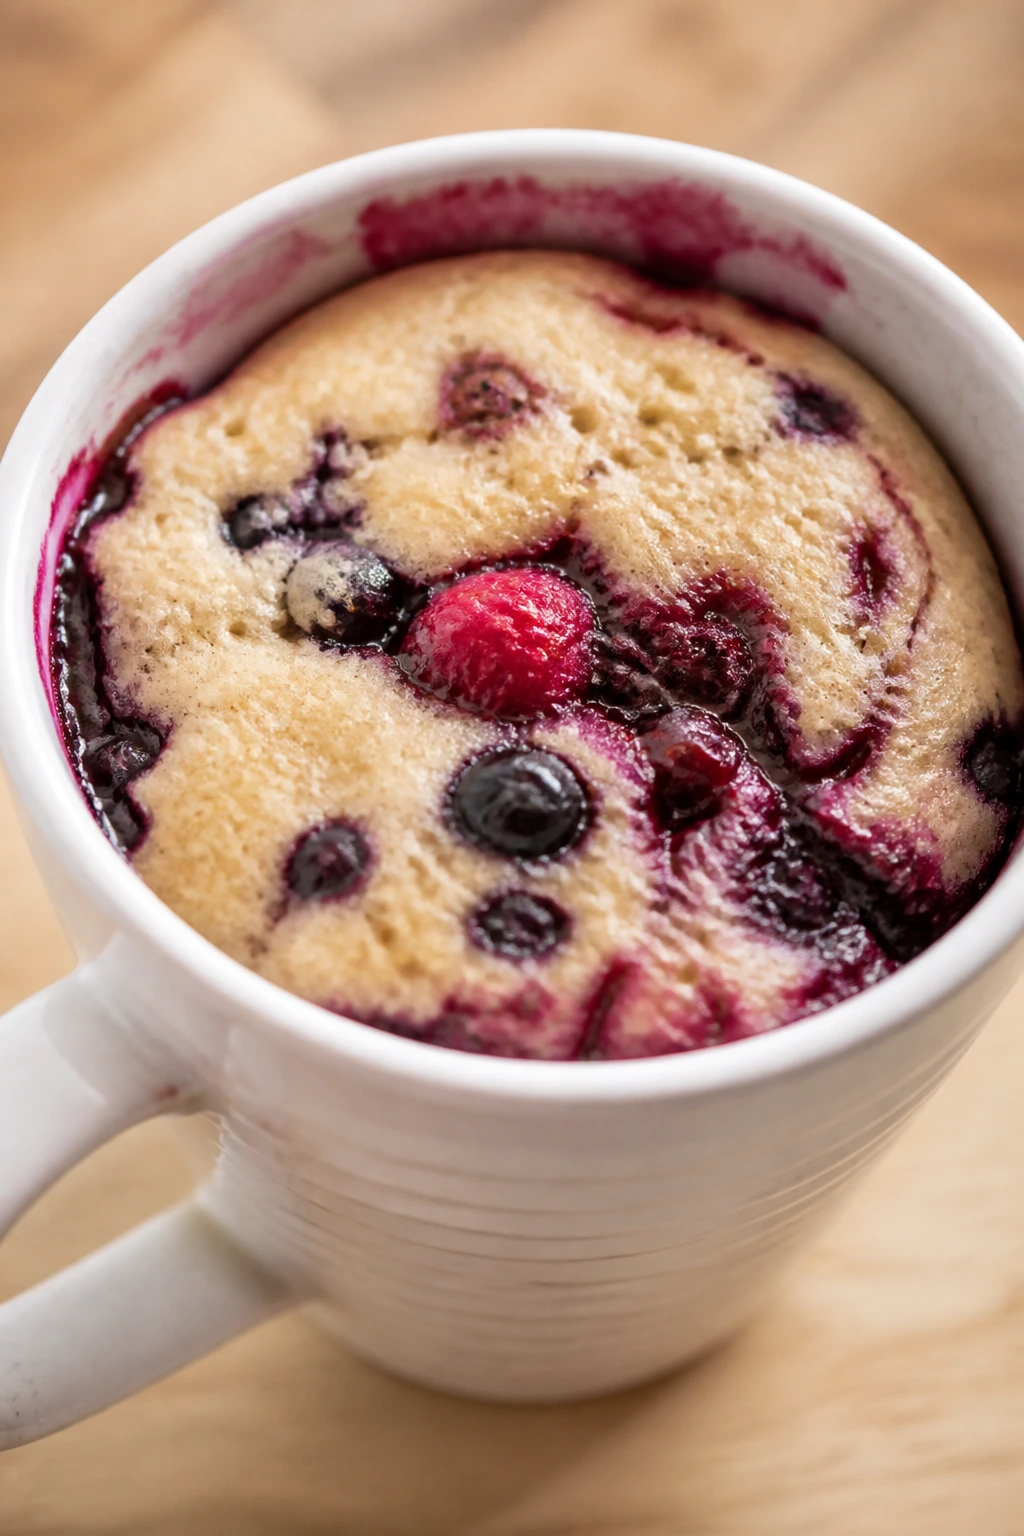
A good fruit dessert for kids does not need a parade of special ingredients. It needs fruit that knows its job, a pantry that can back it up, and a little understanding of texture. Once you’ve made a few bars, crisps, muffins, and no-bake cups, the whole category gets easier in a way that’s oddly satisfying.
The best part is that these desserts stay flexible. If the fruit changes, the structure usually stays the same. If the fruit’s in the freezer, the cabinet still has a path forward. That’s the kind of dessert habit that earns its keep, especially when the pantry looks ordinary and the kids want something sweet right now.