
The best picnic food has a small trick up its sleeve: it looks polished, but it never acts precious. A good basket can survive a blanket with a slight slope, a breeze that keeps poking at the napkins, and a walk from the kitchen to the park without turning sloppy. That’s the sweet spot here — fancy picnic food ideas that still taste good after a short ride in a cooler and a little time in the sun.
I’m talking about food with actual structure. Crisp bread instead of soggy bread. Salads that hold their shape. Cheese that softens at the edges instead of melting into a puddle. A few bright, salty, sweet touches go a long way outdoors, where flavor gets flattened faster than people expect. Lemon, herbs, flaky salt, good olive oil, and a decent amount of crunch do more work than a mountain of garnish ever will.
There’s no need to make picnic cooking fussy. The smartest picnic dishes are often the ones you can assemble in stages: roast one thing, chill another, cut fruit at the last minute, and keep the dressing in a jar until the basket is packed. That’s where the fun starts, so let’s get straight to the foods that make an evening picnic feel a little more dressed up than usual.
Why This Collection Earns a Spot in the Picnic Basket

- Portable by design: Every recipe here can be packed without drama, so you’re not babysitting a bowl of sauce while trying to enjoy the blanket.
- Easy to make ahead: Most of these hold well for at least a few hours, and several taste better after they’ve had time to chill and settle.
- Bright enough for warm weather: Acid, herbs, fresh fruit, and salty cheeses keep the flavors sharp even when the air feels heavy.
- Fancy without fragility: You’ll see tartlets, skewers, little cups, and wrapped bites — pretty food, yes, but not the kind that collapses the second you move it.
- Mix-and-match friendly: You can build a picnic from cold bites, one baked item, and one dessert without repeating the same flavor three times.
- Worth the cooler space: These recipes earn their spot in the bag because they travel well and still feel intentional when you open the lid.
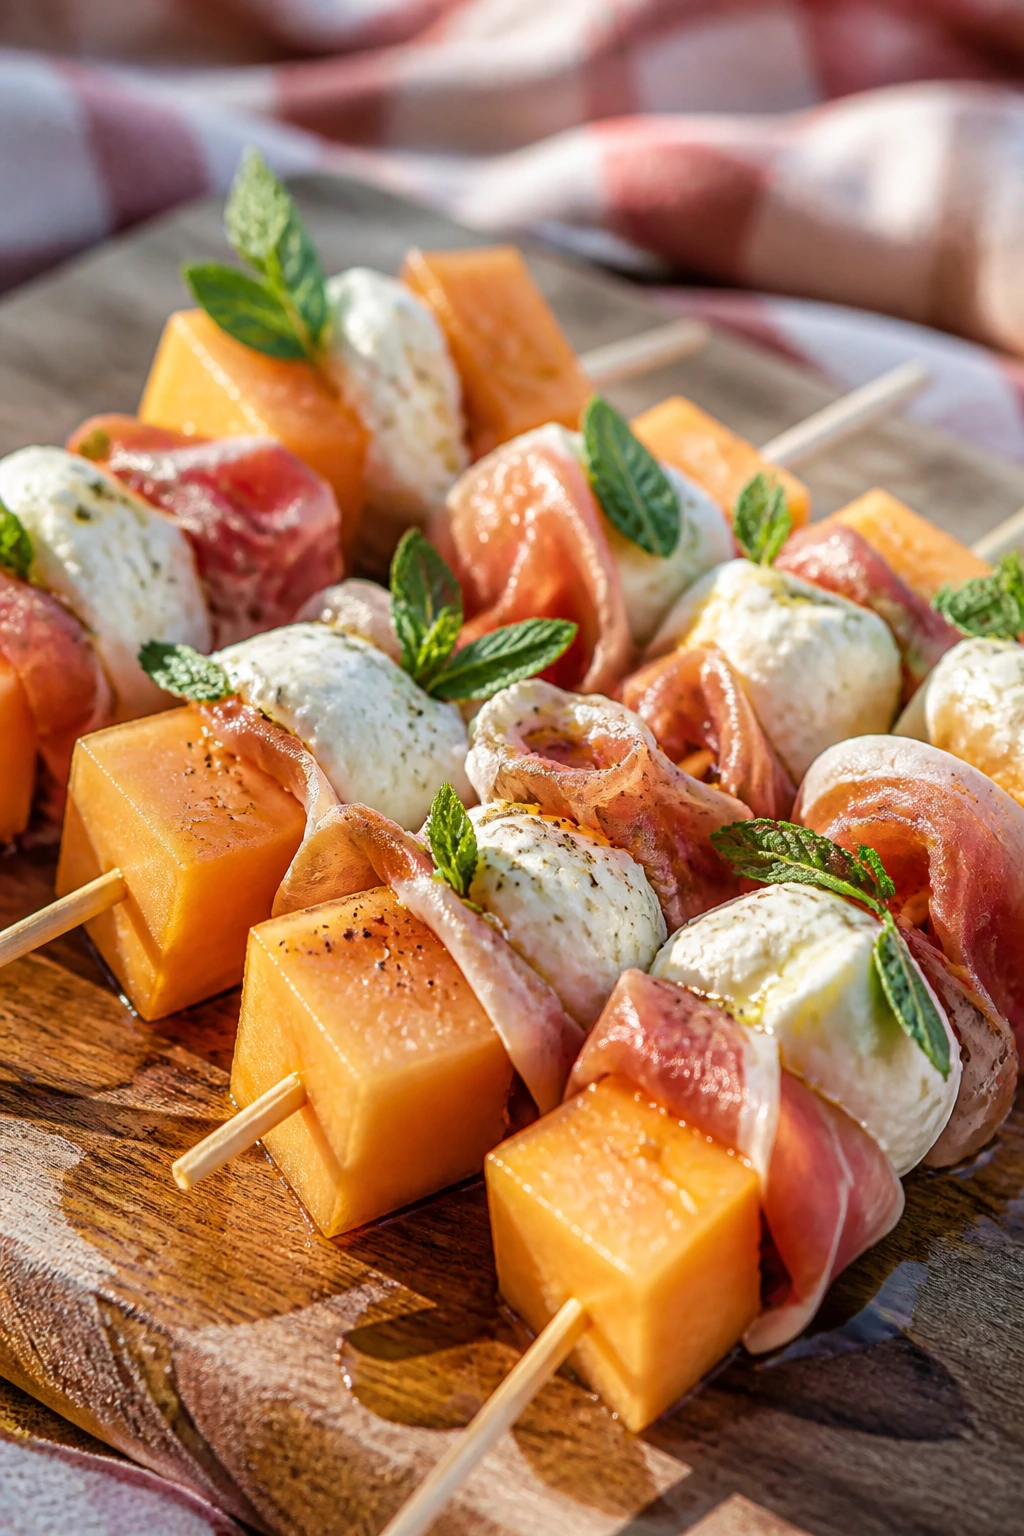
1. Prosciutto, Melon, and Burrata Skewers
These are the kind of skewers I’d bring to any picnic where the food needs to look elegant in five seconds flat. The melon stays juicy, the prosciutto brings salt and a little chew, and the burrata gives you that soft, milky center that makes people lean in for a second bite. Add mint and a drizzle of olive oil, and the whole thing tastes cooler than the temperature outside.
Why It Works:
Sweet melon and salty cured ham are an old pairing for a reason; they wake each other up. Burrata makes the bite feel more generous than a plain fruit skewer, and because it’s torn into pieces instead of sliced, it stays lush without turning messy. These also hold for a short window in a chilled container, which matters when you’re packing a basket and not a plated dinner.
Key Ingredients:
- 8 thin slices prosciutto, cut in half lengthwise
- 1 small cantaloupe, peeled and cut into 1-inch cubes
- 8 oz burrata, torn into 12 to 16 pieces
- 2 tablespoons extra-virgin olive oil
- 1 tablespoon fresh mint, thinly sliced
- 1 teaspoon flaky sea salt
- 1/2 teaspoon freshly ground black pepper
- 12 to 16 small skewers or sturdy cocktail picks
Quick Steps:
- Cut the cantaloupe into even 1-inch cubes so the skewers sit straight and don’t topple in the container.
- Thread one piece of melon, a folded strip of prosciutto, and a piece of burrata onto each skewer.
- Arrange the skewers on a chilled platter or tray and tuck the burrata pieces in gently so they don’t smear.
- Drizzle with olive oil, then finish with mint, flaky salt, and black pepper right before packing or serving.
- Chill for 10 to 15 minutes if you want the flavors to tighten up, but do not leave them sitting in direct heat.
Equipment for This Recipe:
- Sharp chef’s knife
- Small cutting board
- 12 to 16 cocktail skewers
- Shallow tray or lunch-size container
- Spoon for drizzling
How to Serve This Dish:
Pile them on a flat platter lined with parchment and tuck a few mint leaves between the skewers. They’re best as a first-bite snack before the heavier picnic items come out. Two skewers per person feels right if you’re serving these alongside sandwiches and salad.
Pro Tips for This Recipe:
- Use melon that smells sweet at the stem end; if it has no scent, it probably won’t taste like much.
- Keep the burrata cold until the last moment so it stays creamy instead of sliding off the skewer.
- If your prosciutto is very wide, tear it into strips instead of folding huge ribbons.
- A tiny splash of aged balsamic is nice, but use it sparingly or it will drown the melon.
Variations on This Dish:
- Peach and Parma Swap: Use ripe peach wedges instead of cantaloupe when the fruit is soft and fragrant.
- Mozzarella Summer Version: Replace burrata with small mozzarella balls for a tidier skewer that travels a little better.
- Herb Garden Finish: Add basil ribbons with the mint for a greener, sharper bite.
Common Mistakes to Avoid with This Dish:
- Cutting melon too small: Tiny cubes split under the weight of the prosciutto. Keep the pieces chunky enough to hold their shape.
- Over-dressing before packing: Too much oil makes the burrata slick and the tray slippery. Drizzle lightly and carry extra in a small jar.
- Using limp prosciutto: If the slices are wet and sticky, they’ll clump. Separate them before you start threading.
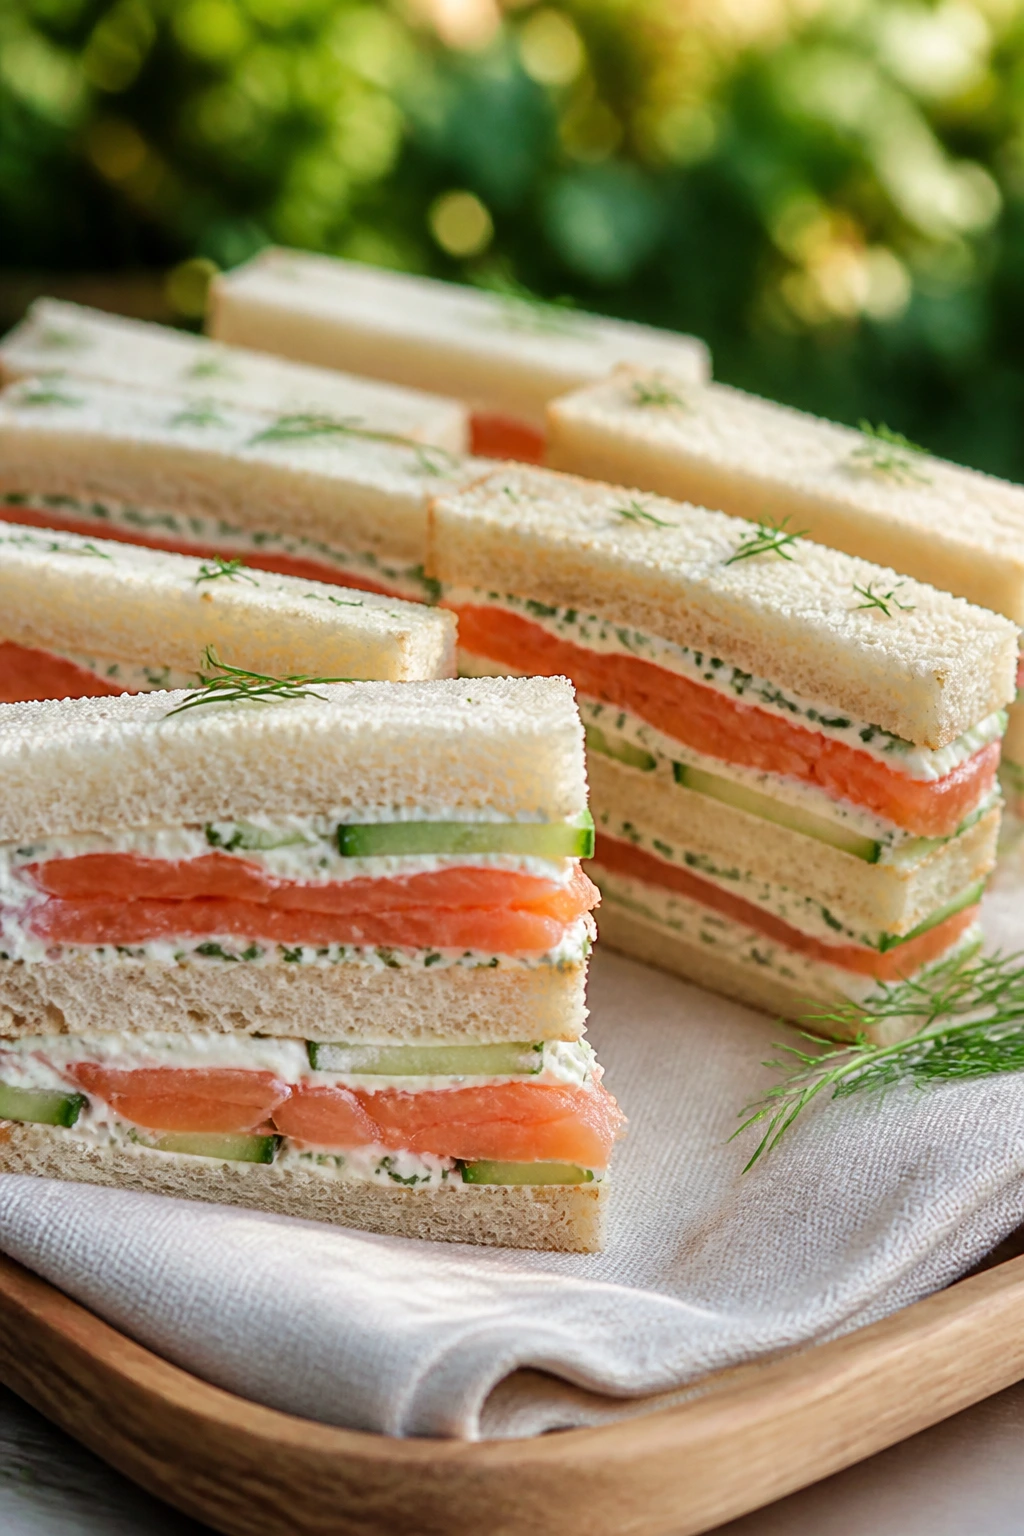
2. Smoked Salmon Cucumber Tea Sandwiches
Cucumber sandwiches can be forgettable. These aren’t. The smoked salmon brings a clean, briny edge, the dill cream cheese sticks to the bread, and the cucumber gives that cold snap you want from a picnic bite. Cut them into neat fingers or little squares, and they look like they came from a proper tea service — just with a cooler and a blanket.
Why It Works:
Smoked salmon tastes richer when it’s paired with something cool and mild, which is exactly what cucumber and soft bread provide. The cream cheese acts like glue, so the sandwich slices cleanly instead of pulling apart. If you chill them briefly before cutting, the edges sharpen up and the filling stays put.
Key Ingredients:
- 8 slices soft sandwich bread, crusts removed
- 4 oz cream cheese, softened
- 2 tablespoons sour cream
- 1 tablespoon finely chopped dill
- 1 teaspoon lemon zest
- 1/4 teaspoon black pepper
- 4 oz sliced smoked salmon
- 1 small cucumber, very thinly sliced
- 1 tablespoon capers, drained
Quick Steps:
- Stir the cream cheese, sour cream, dill, lemon zest, and pepper until smooth.
- Spread the mixture on four slices of bread in an even layer all the way to the edges.
- Lay smoked salmon over the cream cheese, then add cucumber slices and a few capers.
- Top with the remaining bread slices and press lightly.
- Chill the sandwiches for 10 minutes, then cut into fingers or squares with a sharp knife.
Equipment for This Recipe:
- Mixing bowl
- Rubber spatula
- Serrated knife
- Sharp chef’s knife
- Cutting board
How to Serve This Dish:
Serve them stacked in neat rows with lemon wedges on the side. They’re sturdy enough to sit on a platter for a while, but they’re best cold and freshly cut. Pair them with a crisp salad or a handful of kettle chips.
Pro Tips for This Recipe:
- Pat the cucumber dry with paper towels so it doesn’t loosen the bread.
- Use soft sandwich bread, not crusty artisan slices; these need to cut cleanly.
- A little horseradish in the cream cheese is a sharp, welcome move if you like more bite.
- Keep the sandwiches wrapped until serving so the bread doesn’t dry out at the corners.
Variations on This Dish:
- Lemon-Dill Classic: Keep the filling simple and let the salmon do the talking.
- Everything Bagel Twist: Sprinkle a little everything seasoning on the cream cheese before layering.
- Open-Face Style: Serve on thin rye with the top slice removed for a more casual look.
Common Mistakes to Avoid with This Dish:
- Too much filling: If the layer gets thick, the sandwiches slide apart when you cut them. Keep it thin and even.
- Wet cucumber slices: Moisture is the enemy here. Dry the slices before they hit the bread.
- Cutting with a dull knife: You’ll compress the bread and squash the filling. Use a sharp serrated knife and a gentle sawing motion.
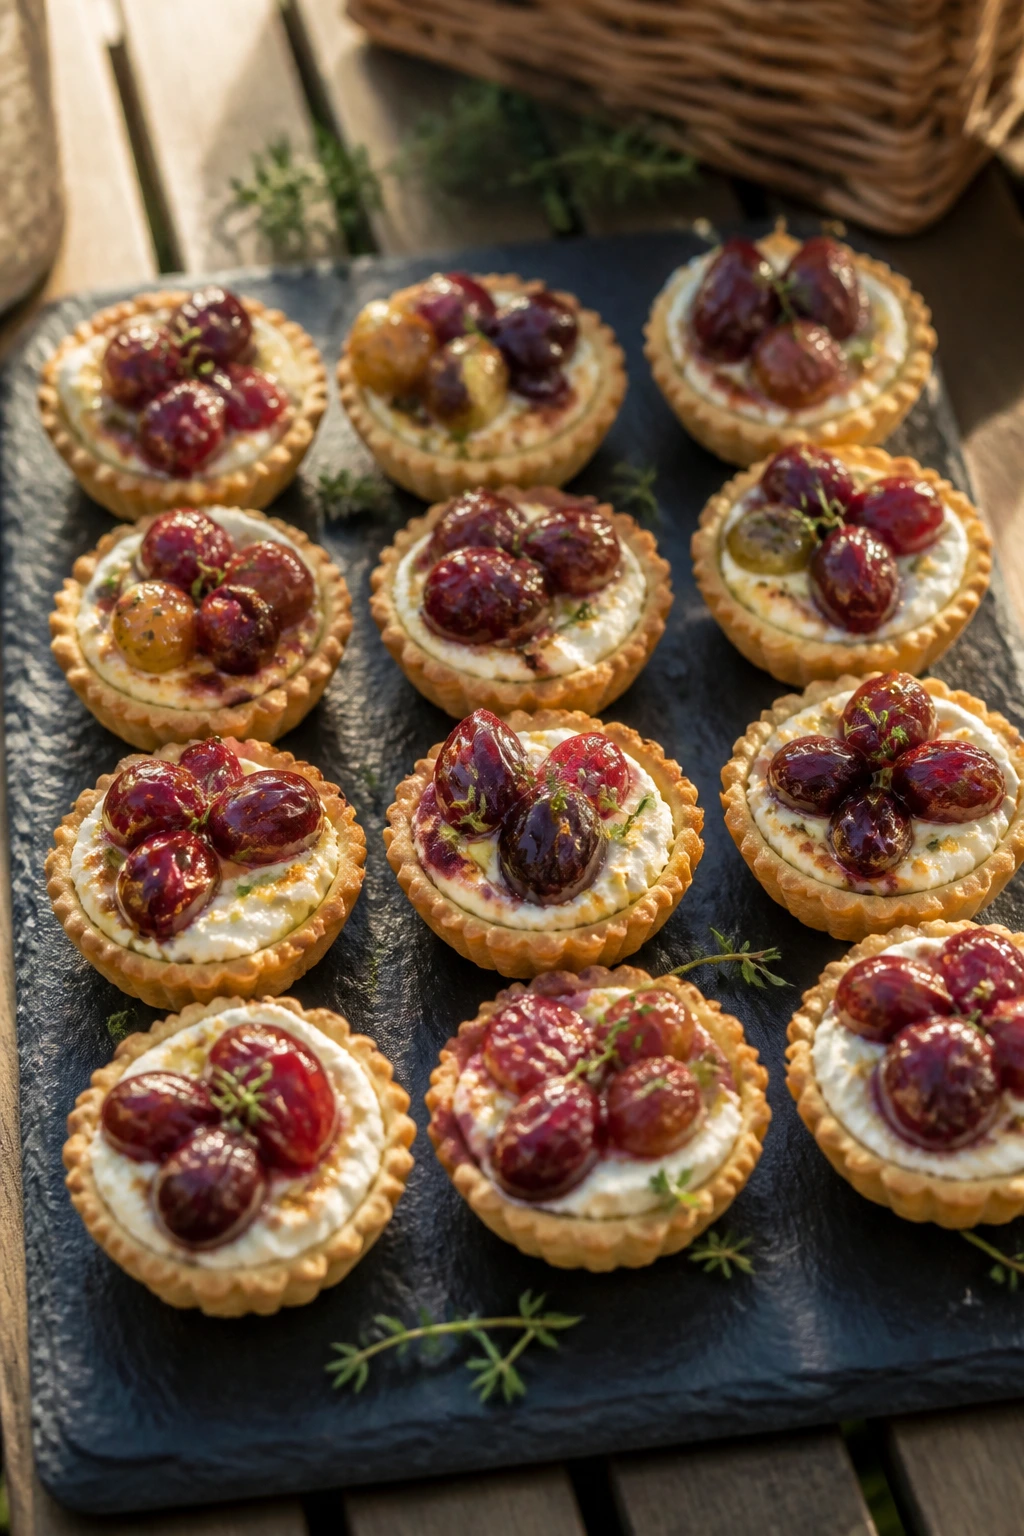
3. Goat Cheese and Roasted Grape Tartlets
Roasted grapes sound fancy because they are a little fancy. They turn jammy and glossy in the oven, which makes them perfect against tangy goat cheese and crisp pastry shells. One bite tastes creamy, tart, sweet, and a little savory all at once. That’s a lot for a tiny tartlet.
Why It Works:
Roasting concentrates the grapes’ sugars, so they behave more like a wine-kissed compote than fresh fruit. Goat cheese keeps the filling bright, and the pastry shell brings the crunch that picnic food often lacks. These can be baked ahead and served at room temperature, which is half the appeal.
Key Ingredients:
- 1 sheet puff pastry, thawed
- 1 1/2 cups seedless red grapes
- 1 tablespoon olive oil
- 6 oz goat cheese, softened
- 2 tablespoons cream cheese
- 1 tablespoon honey
- 1 teaspoon fresh thyme leaves
- 1 egg, beaten for egg wash
- Pinch of salt
Quick Steps:
- Heat the oven to 400°F and line a baking sheet with parchment.
- Toss the grapes with olive oil and roast for 12 to 15 minutes, until they wrinkle and start to burst.
- Cut the puff pastry into 12 squares and press them into mini muffin cups or form shallow tart shapes on the tray.
- Mix goat cheese, cream cheese, honey, thyme, and salt until smooth, then spoon into each shell.
- Top with roasted grapes and bake for 14 to 18 minutes, until the pastry is golden and crisp.
Equipment for This Recipe:
- Baking sheet
- Parchment paper
- Mini muffin tin or tart pan
- Small bowl
- Spoon or small offset spatula
How to Serve This Dish:
Let them cool for 10 minutes so the cheese settles and the pastry stays crisp. Serve them on a board with a few thyme sprigs scattered around the edges. They work as a starter or as the one savory-sweet bite that makes people pause mid-conversation.
Pro Tips for This Recipe:
- Keep the pastry cold until the moment you cut it; warm puff pastry is sticky and hard to handle.
- Roast the grapes until some burst. That jammy juice is what makes the tartlets sing.
- If your goat cheese is very tangy, add an extra teaspoon of honey.
- Bake in a shallow mold if you want cleaner edges for transport.
Variations on This Dish:
- Balsamic Fig Version: Swap grapes for chopped figs and finish with a few drops of balsamic glaze.
- Herb and Walnut Finish: Add chopped toasted walnuts on top for crunch.
- Blue Cheese Shortcut: Use a mild blue cheese if you want a stronger, saltier tartlet.
Common Mistakes to Avoid with This Dish:
- Under-roasting the grapes: Pale grapes taste flat. Wait for wrinkled skins and a little burst juice.
- Overfilling the shells: Too much cheese spills over and softens the pastry.
- Serving straight from the oven: Hot filling can taste loose. Let the tartlets settle for a short rest.
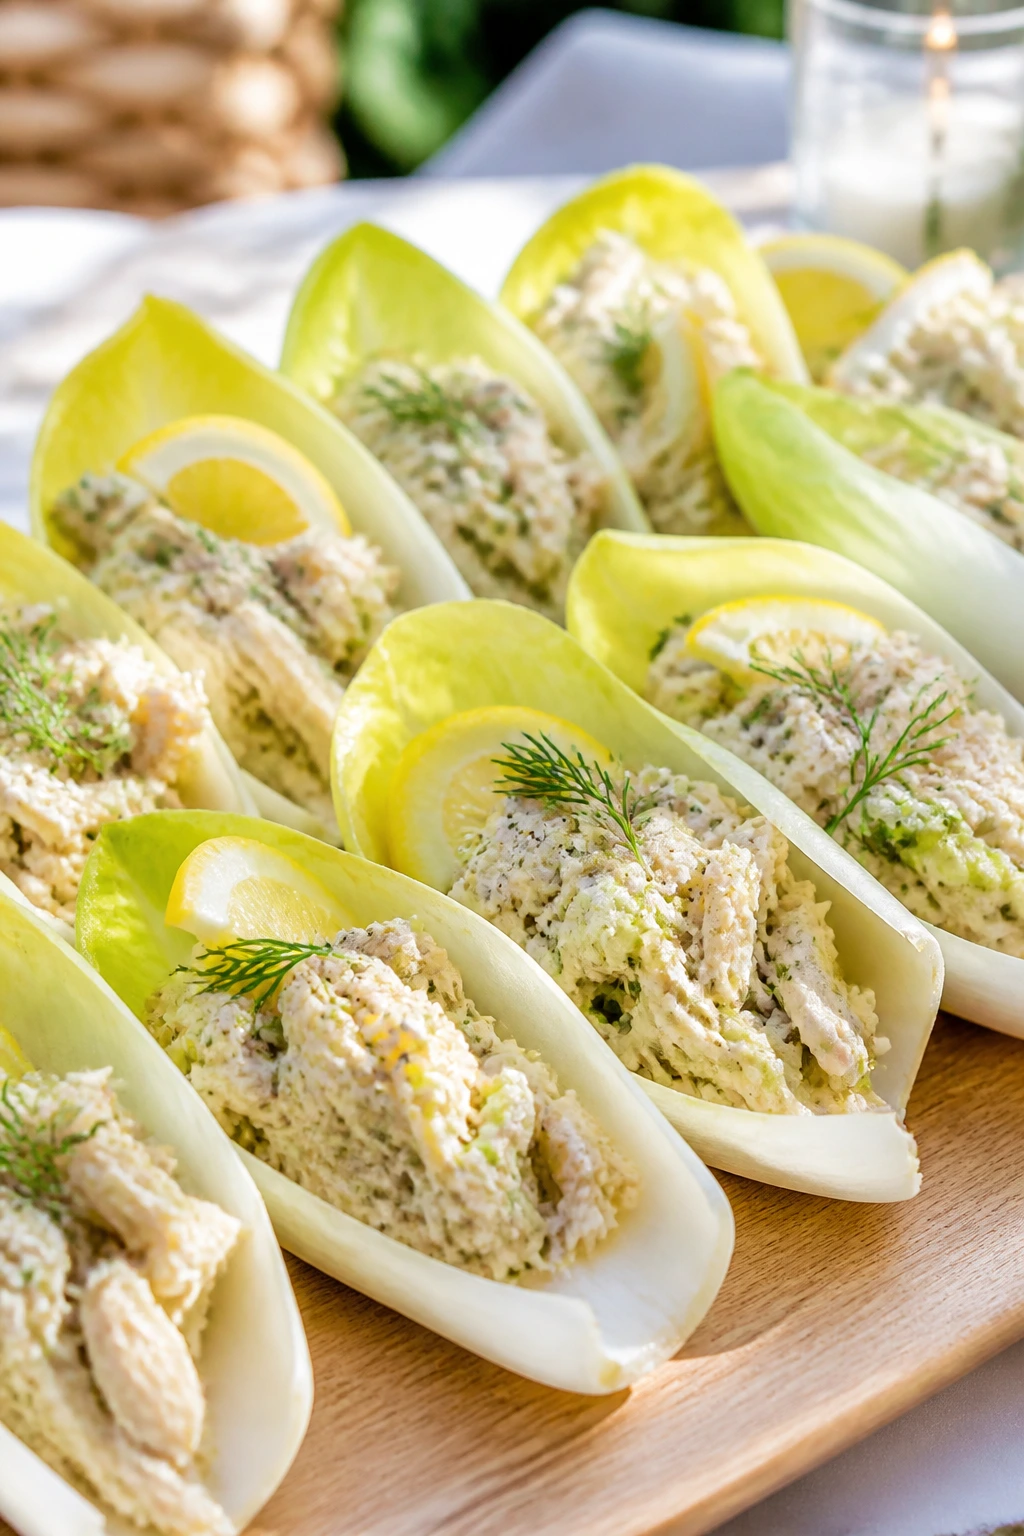
4. Lemon-Herb Chicken Salad Endive Cups
Endive cups are one of those tricks that make chicken salad feel sharper and cleaner. The leaves are crisp, almost snappy, and they hold the filling without turning soggy in the first hour. Add lemon, herbs, and a little Dijon, and the whole thing feels like a polished lunch instead of leftovers in disguise.
Why It Works:
Chicken salad can get heavy fast, especially if it’s all mayo and no acid. Here the lemon and Dijon cut through the richness, while celery and herbs keep each bite lively. Endive has a built-in boat shape, so you get a tidy, handheld bite that looks deliberate on a platter.
Key Ingredients:
- 2 cups cooked chicken, shredded or chopped
- 1/3 cup mayonnaise
- 1 tablespoon Greek yogurt
- 1 tablespoon Dijon mustard
- 1 tablespoon lemon juice
- 1 teaspoon lemon zest
- 2 celery stalks, finely diced
- 2 tablespoons chopped parsley
- 1 tablespoon chopped chives
- 2 heads endive, leaves separated
Quick Steps:
- Stir the mayonnaise, yogurt, Dijon, lemon juice, lemon zest, salt, and pepper in a bowl.
- Fold in the chicken, celery, parsley, and chives until every piece is lightly coated.
- Taste for salt; chicken salad usually needs more than people think.
- Spoon the mixture into endive leaves, keeping each cup full but not heaped.
- Chill for 15 minutes if you want the filling slightly firmer before packing.
Equipment for This Recipe:
- Mixing bowl
- Spoon or small scoop
- Cutting board
- Sharp knife
- Airtight container
How to Serve This Dish:
Arrange the endive cups in a ring on a platter, with lemon wedges tucked in the middle. They’re light enough to start the picnic and structured enough to hold their shape even when the day is warm. I like serving them with crackers on the side for anyone who wants a little extra crunch.
Pro Tips for This Recipe:
- Roast or poach the chicken with salt so the salad doesn’t taste bland from the start.
- Dry the endive leaves well after washing; trapped water makes the cups slippery.
- Dice the celery very fine so the filling stays neat in the leaves.
- Add chopped toasted almonds if you want a little extra crunch.
Variations on This Dish:
- Curry Chicken Version: Add 1/2 teaspoon curry powder and a few chopped raisins.
- Avocado Swap: Replace half the mayonnaise with mashed avocado for a softer, greener filling.
- Tarragon Finish: Use tarragon instead of parsley for a more aromatic, almost French bistro feel.
Common Mistakes to Avoid with This Dish:
- Over-wetting the filling: Too much mayo turns the salad slippery. Keep the coating light.
- Using limp endive leaves: Buy heads with tight, pale leaves and trim away any bruised outer pieces.
- Skipping the seasoning: Cold chicken salad needs salt and acid to wake it up.
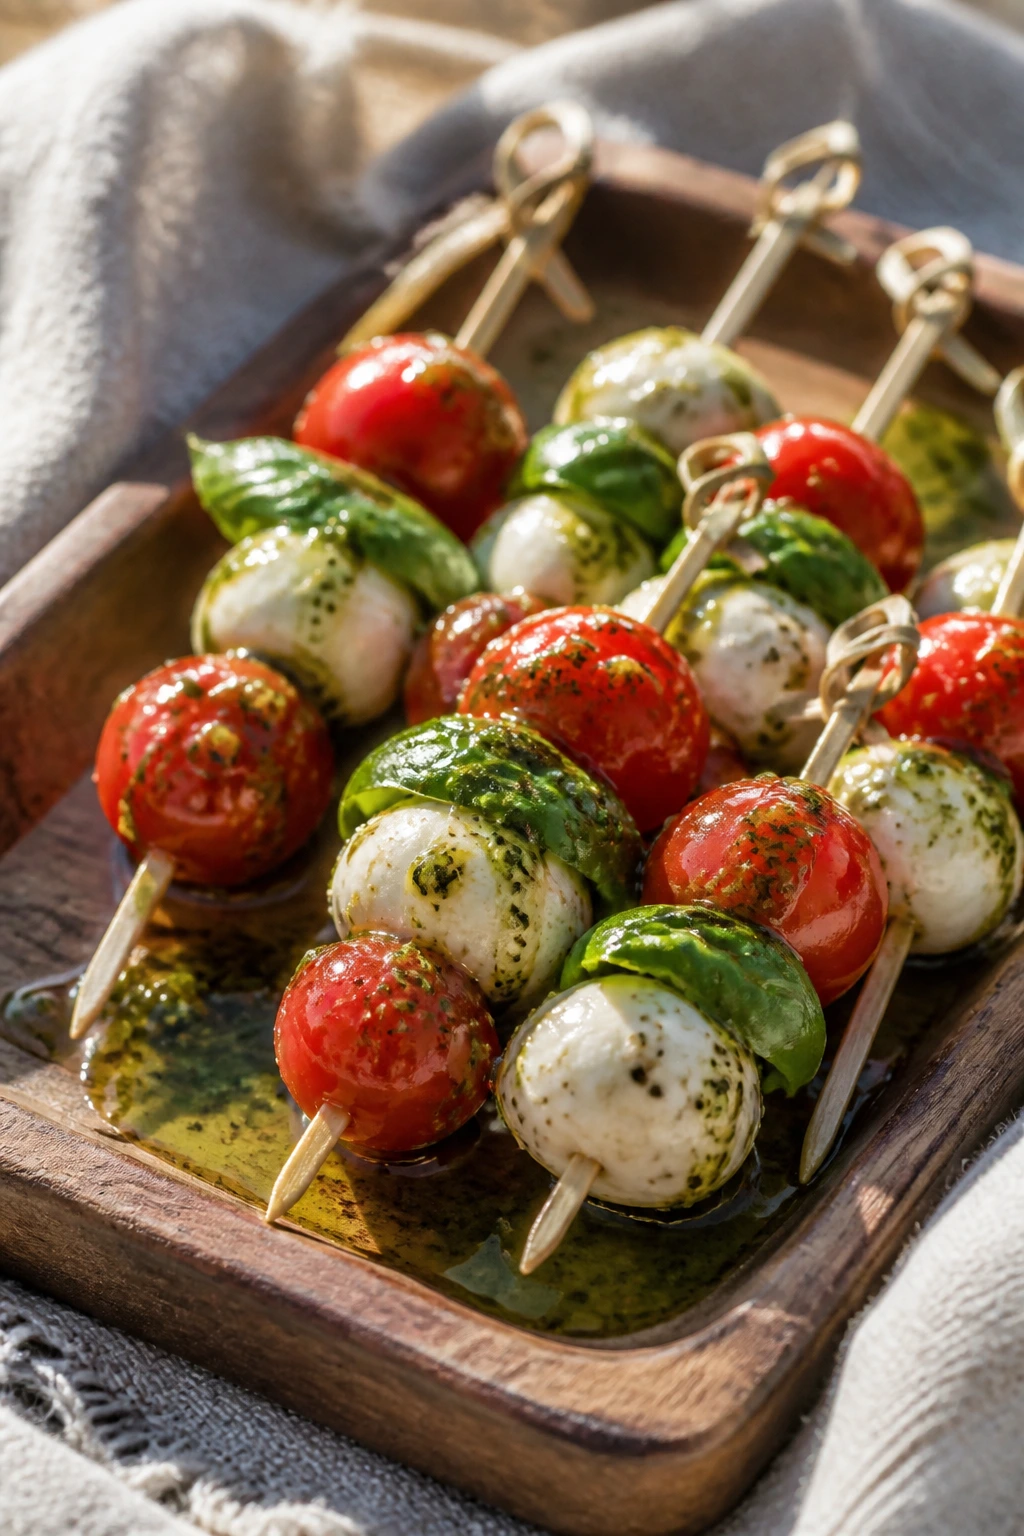
5. Caprese Skewers with Basil Oil
This is the picnic version of a Caprese salad, only neater and easier to carry. Cherry tomatoes burst with juice, mozzarella gives a mild milky bite, and basil oil wraps everything in a green, peppery finish. They look clean on a tray and eat with one hand, which is a small but very real picnic advantage.
Why It Works:
Caprese ingredients are already built for warm weather. The tomatoes stay bright, the cheese cools the palate, and basil brings a scent that makes the whole basket smell better when you open it. Turning the salad into skewers keeps the tomatoes from swimming in dressing.
Key Ingredients:
- 24 cherry tomatoes
- 24 mini mozzarella balls
- 24 small basil leaves
- 2 tablespoons olive oil
- 1 tablespoon basil, finely chopped
- 1 teaspoon lemon juice
- 1/2 teaspoon flaky salt
- 1/4 teaspoon black pepper
- 24 small skewers or picks
Quick Steps:
- Whisk olive oil, chopped basil, lemon juice, salt, and pepper to make the basil oil.
- Thread one tomato, one basil leaf, and one mozzarella ball onto each skewer.
- Arrange the skewers on a tray and spoon the basil oil lightly over the top.
- Chill for 10 minutes so the flavor settles.
- Serve cold or cool, with extra basil oil on the side.
Equipment for This Recipe:
- Small bowl
- Whisk
- Serving tray
- Cocktail picks
- Measuring spoons
How to Serve This Dish:
Lay them in rows and finish with a tiny pinch of salt on each skewer. They fit nicely beside sandwiches, pastries, or anything grilled. If you’re packing them for transport, keep the basil oil separate until the last moment.
Pro Tips for This Recipe:
- Use cherry tomatoes that feel heavy for their size; that usually means they’re juicy.
- Pat the mozzarella dry so the oil clings instead of sliding off.
- Tear the basil only if the leaves are large and floppy; small leaves can stay whole.
- A few drops of balsamic glaze are fine, but don’t turn them into dessert.
Variations on This Dish:
- Peach Caprese: Swap half the tomatoes for ripe peach chunks.
- Pesto Brush: Use thinned pesto instead of basil oil if you want a stronger garlic note.
- Burrata Bites: Replace mozzarella with tiny burrata pieces for a richer bite.
Common Mistakes to Avoid with This Dish:
- Using watery mozzarella: Fresh mozzarella needs a quick blot with paper towels.
- Drowning the skewers in oil: You want shine, not a slick tray.
- Choosing underripe tomatoes: Hard, pale tomatoes taste flat outdoors. Wait for actual flavor.
6. Mini Zucchini-Feta Frittata Muffins
These little frittata muffins are what happen when a brunch dish decides to go picnic-friendly. They’re firm enough to hold with your fingers, but still tender in the middle, with pockets of zucchini, salty feta, and herbs in every bite. They travel far better than a slice of quiche and reheat without much complaint.
Why It Works:
Eggs set neatly in muffin tins, which gives you portion control and an easy carry. Zucchini keeps the crumb moist, while feta brings enough salt that you do not need much else. They can be served warm, cool, or room temperature, and that flexibility matters more than people admit.
Key Ingredients:
- 8 large eggs
- 1/4 cup whole milk
- 1 medium zucchini, grated and squeezed dry
- 1/2 cup crumbled feta
- 2 tablespoons chopped dill
- 2 tablespoons chopped parsley
- 1/4 cup finely diced red onion
- 1 tablespoon olive oil
- 1/2 teaspoon salt
- 1/4 teaspoon black pepper
Quick Steps:
- Heat the oven to 375°F and grease a 12-cup muffin tin well.
- Whisk the eggs, milk, salt, and pepper until the mixture looks smooth and pale.
- Stir in zucchini, feta, dill, parsley, and red onion.
- Divide the mixture among the muffin cups and bake for 18 to 22 minutes, until the centers are set and the tops are lightly golden.
- Cool in the pan for 5 minutes, then lift them out with a knife if needed.
Equipment for This Recipe:
- 12-cup muffin tin
- Large mixing bowl
- Whisk
- Box grater
- Paper towels
How to Serve This Dish:
Serve them with a simple tomato salad or a handful of olives. They’re good cold, which makes them one of the safest baked items to pack. Two muffins per person is a fair start if they’re part of a bigger spread.
Pro Tips for This Recipe:
- Squeeze the zucchini hard after grating; extra water leads to spongy muffins.
- Grease the muffin tin well or use parchment liners that don’t stick.
- Add the feta after the eggs are whisked so it stays in little pockets.
- Bake until the centers are just set; overbaking makes them rubbery.
Variations on This Dish:
- Spinach and Goat Cheese: Swap zucchini for chopped spinach and use goat cheese for a tangier bite.
- Sun-Dried Tomato Version: Fold in chopped sun-dried tomatoes for a deeper, sweeter note.
- Dairy-Light Option: Use a small splash of oat milk and reduce the cheese slightly.
Common Mistakes to Avoid with This Dish:
- Leaving zucchini wet: That’s the main reason the texture turns soft and sad. Squeeze it well.
- Overfilling the cups: They puff, then spill. Fill only about three-quarters full.
- Pulling them too early: The centers should feel set when you tap the tray.
7. Niçoise Pasta Salad Jars
This is the picnic salad that doesn’t collapse the minute you toss a fork into it. Baby potatoes, green beans, tuna, olives, eggs, and pasta create a cold main dish with enough heft to feel like dinner. Pack it in jars or lidded containers, and it stays layered, tidy, and sharp instead of soggy.
Why It Works:
The Niçoise combination is already built around strong flavors and sturdy ingredients. Pasta gives it body, green beans stay snappy when blanched properly, and the vinaigrette is acidic enough to wake up the tuna and potatoes. Layering the jars keeps the dressing away from the greens until you shake or toss.
Key Ingredients:
- 8 oz short pasta, such as fusilli or farfalle
- 1 cup baby potatoes, halved
- 1 cup green beans, trimmed
- 2 hard-boiled eggs, quartered
- 1 can tuna in olive oil, drained
- 1/2 cup cherry tomatoes, halved
- 1/3 cup Kalamata olives
- 3 tablespoons olive oil
- 1 tablespoon red wine vinegar
- 1 teaspoon Dijon mustard
- 1 teaspoon capers
Quick Steps:
- Cook the pasta until al dente, then rinse briefly under cool water and drain well.
- Boil or steam the potatoes until just tender, and blanch the green beans for 2 to 3 minutes until bright green.
- Whisk olive oil, vinegar, Dijon, capers, salt, and pepper into a loose vinaigrette.
- Layer jars with dressing on the bottom, then potatoes, pasta, green beans, tomatoes, tuna, olives, and eggs.
- Chill for at least 30 minutes before packing.
Equipment for This Recipe:
- Large pot
- Colander
- Small jar or bowl for dressing
- 4 wide-mouth jars or lidded containers
- Slotted spoon
How to Serve This Dish:
Shake the jar, pour into a bowl if you like, and finish with a little extra pepper. It’s substantial enough to serve as the main meal of a picnic, especially with bread on the side. A chilled fork and a napkin are not optional here.
Pro Tips for This Recipe:
- Salt the pasta water well; bland pasta makes the whole salad feel flat.
- Dry the beans after blanching so the jars don’t pool with water.
- Use tuna packed in olive oil if you can; the flavor is fuller and less dry.
- Keep the eggs near the top so they don’t get crushed.
Variations on This Dish:
- Anchovy Brightened Version: Mash one anchovy into the dressing if you want deeper savory flavor.
- White Bean Swap: Replace the tuna with cannellini beans for a vegetarian jar.
- Orzo Shortcut: Use orzo for a tighter, spoonable salad.
Common Mistakes to Avoid with This Dish:
- Overcooking the pasta: Soft pasta turns gummy once chilled. Stop at al dente.
- Skipping the cool rinse: A quick rinse keeps the noodles from clumping.
- Building the jar too early with dressing touching everything: Layer it so the greens stay perky.
8. Shrimp Cocktail Lettuce Cups
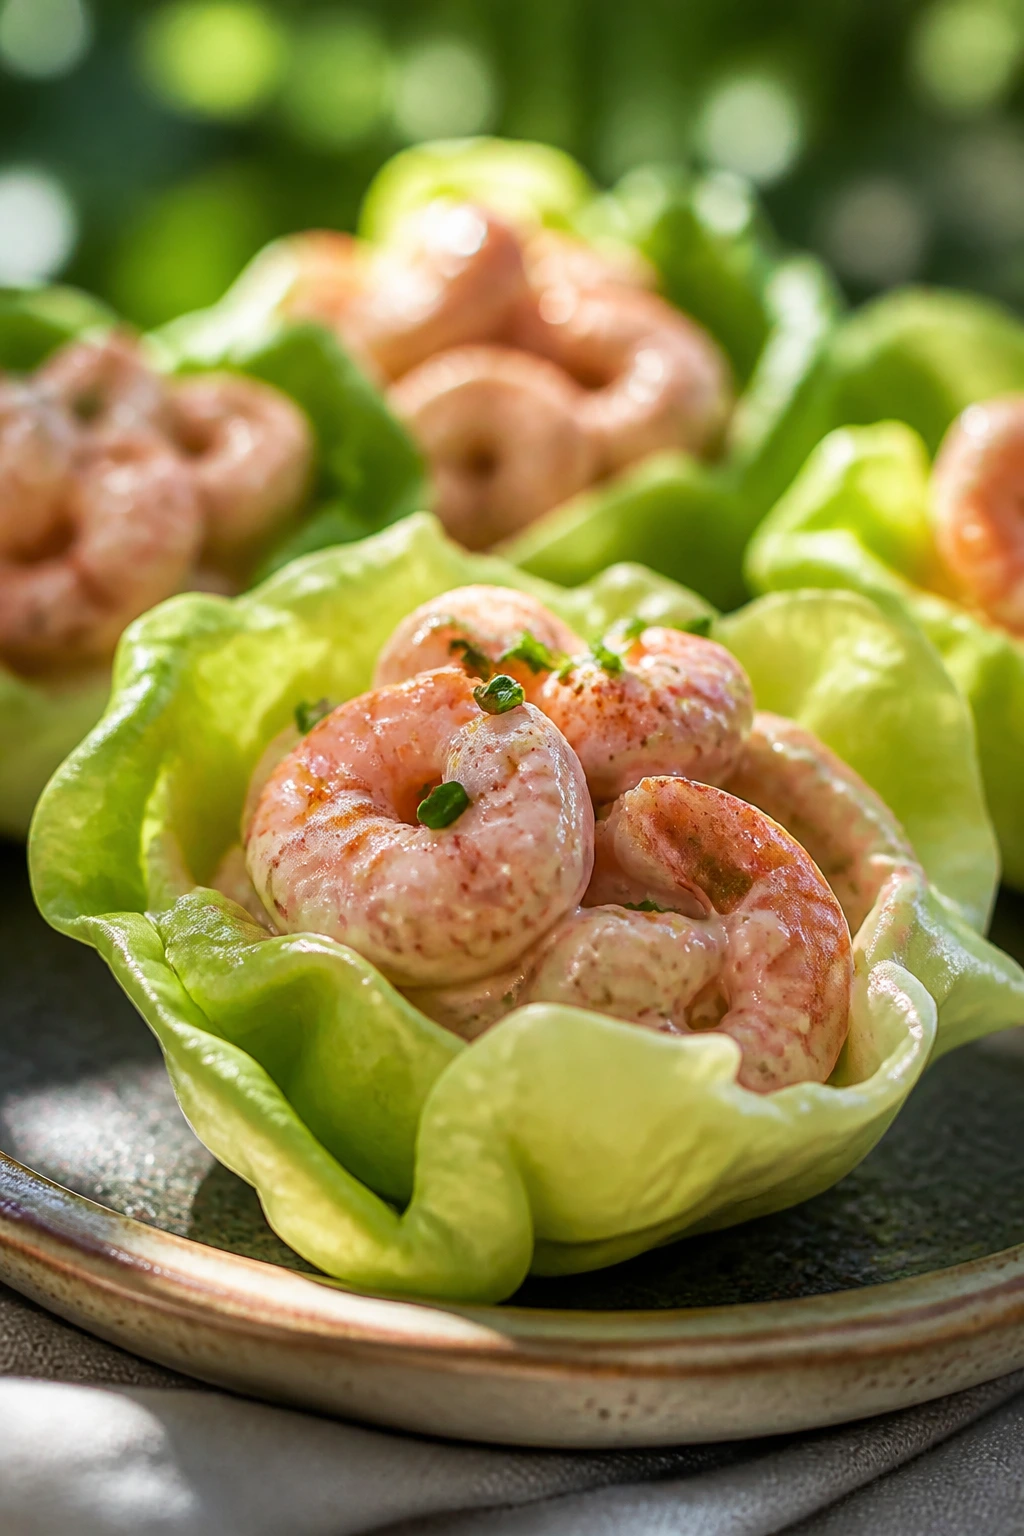
Shrimp cocktail is already a picnic classic if you think about it, but lettuce cups make it feel lighter and easier to handle. The shrimp stay cold and snappy, the sauce brings that tomato-horseradish kick, and the lettuce gives each bite a chilled crunch. It’s the kind of food that disappears fast because it tastes like a little event.
Why It Works:
Cold seafood needs contrast: acid, crunch, and a sauce with enough punch to keep it from tasting plain. Romaine or butter lettuce provides the bowl, and chilled shrimp keep the texture firm rather than rubbery. Because each cup is built individually, nobody is trying to juggle a heavy platter outdoors.
Key Ingredients:
- 1 lb large shrimp, peeled and deveined
- 1 lemon, halved
- 1 teaspoon salt
- 1/2 teaspoon black peppercorns
- 1/3 cup ketchup
- 2 tablespoons prepared horseradish
- 1 tablespoon lemon juice
- 1 teaspoon Worcestershire sauce
- 1 head butter lettuce or romaine hearts
- 1 avocado, diced
Quick Steps:
- Poach the shrimp in salted water with lemon halves, peppercorns, and a splash of lemon juice for 2 to 3 minutes until pink and opaque.
- Transfer them to ice water immediately, then drain and chill.
- Stir ketchup, horseradish, lemon juice, Worcestershire sauce, and a pinch of salt for the cocktail sauce.
- Spoon a little sauce into each lettuce cup, add shrimp, and finish with avocado.
- Serve cold within a couple of hours.
Equipment for This Recipe:
- Medium pot
- Slotted spoon
- Bowl of ice water
- Mixing bowl
- Serving platter
How to Serve This Dish:
Arrange the cups upright on a chilled tray so the shrimp stay visible and the lettuce doesn’t wilt. These are best as a first round bite before anything bread-heavy comes out. A lemon wedge on the tray does more than garnish; it gives people a quick squeeze if they want more lift.
Pro Tips for This Recipe:
- Don’t over-poach the shrimp. Two to three minutes is enough for large shrimp.
- Chill the shrimp fast so they keep their springy texture.
- Dry the lettuce leaves well or the sauce will slide.
- Add the avocado just before serving if you want it clean and green.
Variations on This Dish:
- Spicy Cocktail Cup: Add a few drops of hot sauce to the sauce.
- Herb Garden Version: Toss chopped dill into the sauce for a fresher edge.
- Cucumber Boat Swap: Use thick cucumber halves instead of lettuce for a firmer vessel.
Common Mistakes to Avoid with This Dish:
- Rubbery shrimp: That usually means they were left in the water too long. Pull them the second they turn opaque.
- Watery sauce: Too much lemon juice can thin it out. Keep the balance bold, not loose.
- Warm serving temperature: Cold shrimp are the point. Keep them chilled until the last minute.
9. Asparagus Puff Pastry Bundles
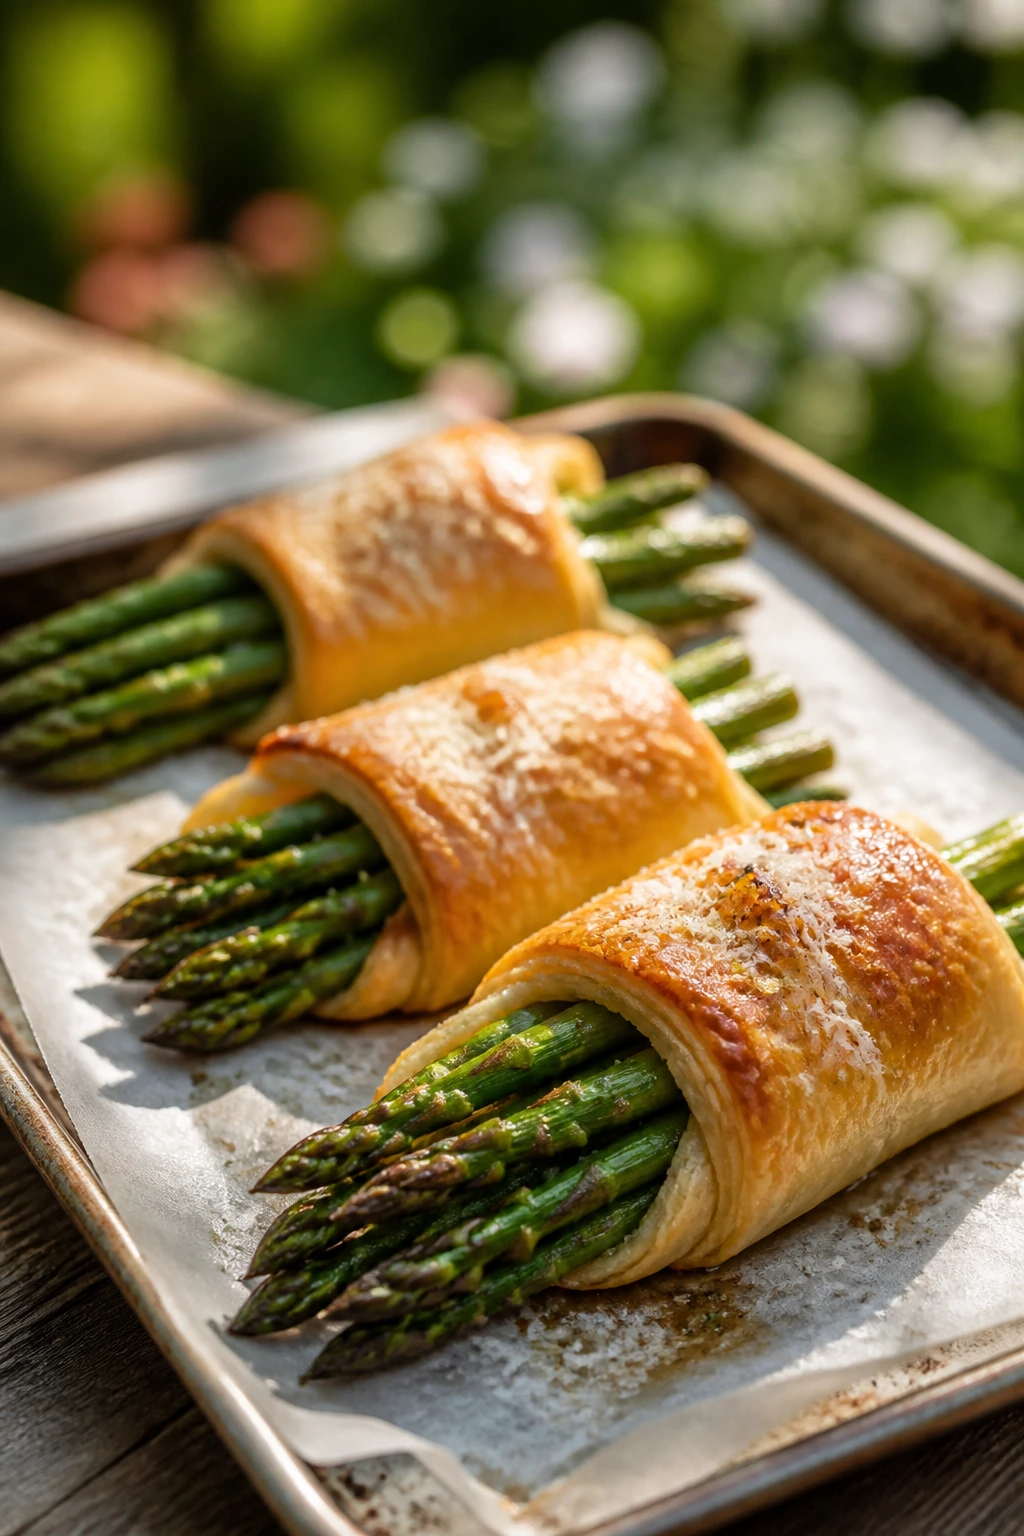
These bundles look like you spent a lot of effort, even though the pastry does most of the work. Tender asparagus, a little mustard, and a shower of Parmesan tucked into crisp pastry strips — it’s a tidy package that eats like a pastry case snack from a good bakery. Best part? They don’t fall apart in your hand.
Why It Works:
Puff pastry creates a crisp shell that protects the filling, which is exactly what picnic food needs. Asparagus keeps a clean vegetal flavor, while mustard and cheese add enough salt and bite to keep each bundle from tasting flat. Bake them until the pastry is fully golden; underbaked puff pastry turns soft fast once it cools.
Key Ingredients:
- 1 sheet puff pastry, thawed
- 12 asparagus spears, trimmed
- 2 tablespoons Dijon mustard
- 1/2 cup grated Parmesan
- 1 egg, beaten
- 1 tablespoon olive oil
- 1/4 teaspoon black pepper
- Pinch of salt
Quick Steps:
- Heat the oven to 400°F and line a baking sheet with parchment.
- Cut the puff pastry into 12 strips.
- Brush each strip with a thin layer of Dijon, then sprinkle with Parmesan.
- Wrap one or two asparagus spears with each pastry strip and place seam-side down on the tray.
- Brush with egg wash, drizzle lightly with olive oil, and bake for 18 to 22 minutes until deeply golden.
Equipment for This Recipe:
- Baking sheet
- Parchment paper
- Pastry brush
- Sharp knife or pizza cutter
- Small bowl for egg wash
How to Serve This Dish:
Serve them slightly warm or fully cooled; they’re good either way. Stack them loosely so the pastry edges stay crisp instead of steaming under their own heat. A little extra Dijon on the side is a nice move for people who like more sharpness.
Pro Tips for This Recipe:
- Trim the asparagus so the spears fit the pastry without poking out too far.
- Don’t overdo the mustard or the pastry can get soggy in the middle.
- Bake until the bottom is browned, not just the top.
- Cool on a rack if you want the pastry to stay crisp.
Variations on This Dish:
- Prosciutto Bundle: Add a thin strip of prosciutto under each asparagus spear.
- Cheddar and Chive Version: Swap Parmesan for sharp cheddar and a little chive.
- Sesame Finish: Sprinkle sesame seeds on the egg wash for a nuttier crust.
Common Mistakes to Avoid with This Dish:
- Using thick asparagus without blanching: Very thick spears stay tough. Thin spears work best here.
- Packing while hot: Steam softens the pastry. Let them cool before closing the box.
- Too much filling: Keep the cheese layer light or the pastry won’t puff evenly.
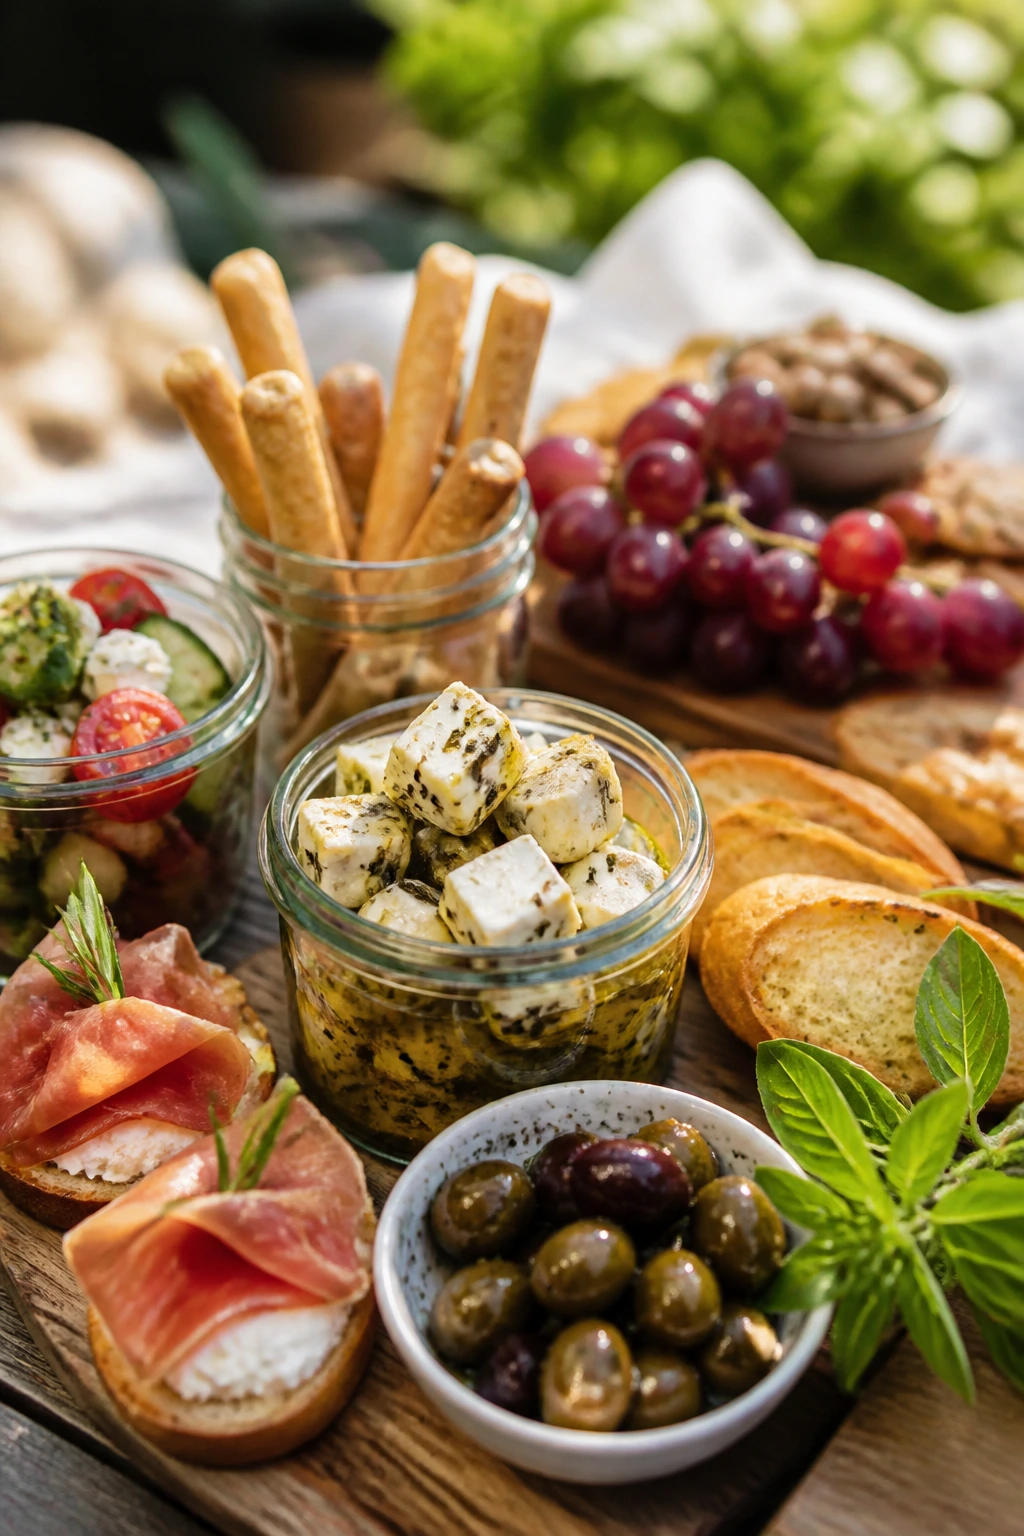
10. Mediterranean Mezze Picnic Box
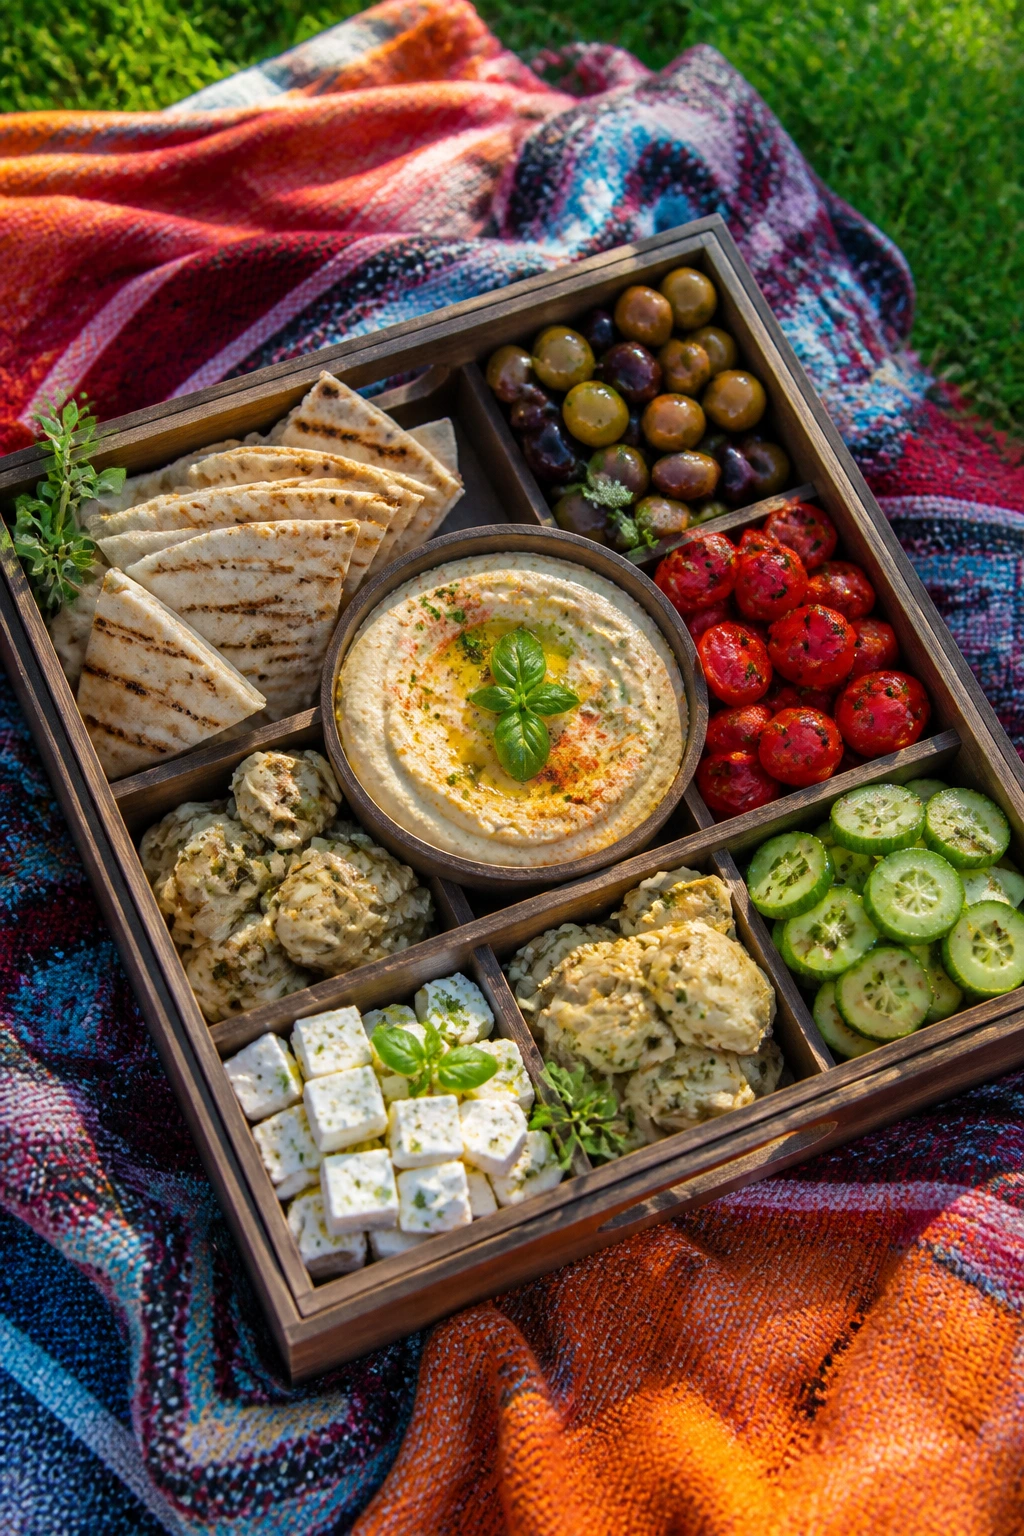
A good picnic box should feel abundant the second you open it. This one does: hummus, olives, roasted vegetables, pita, cucumber, herbs, and something creamy to balance the salty edges. It’s less a single recipe than a smart arrangement, which is exactly why it works so well for easy summer nights.
Why It Works:
Mezze food is naturally communal and easy to nibble, so it fits picnic grazing better than most plated dishes. The mix of creamy, crunchy, briny, and fresh keeps everyone reaching for one more thing instead of getting bored halfway through the meal. You can prep each part separately and build the box just before leaving.
Key Ingredients:
- 1 cup hummus
- 1 cup baba ghanoush or whipped feta
- 1 cup mixed olives
- 1 cup cherry tomatoes
- 1 cucumber, sliced
- 1 roasted red pepper, sliced
- 4 pita breads, cut into wedges
- 1/2 cup marinated artichoke hearts
- 1/4 cup crumbled feta
- Handful of fresh mint or parsley
Quick Steps:
- Let all components cool completely if any were recently cooked.
- Spread hummus and baba ghanoush into two compartments or small containers.
- Group olives, tomatoes, cucumber, roasted peppers, artichokes, and feta in separate sections.
- Add pita wedges last so they stay dry.
- Tuck herbs over the top and close the box with a tight lid.
Equipment for This Recipe:
- Divided container or large box
- Small lidded cups
- Knife and cutting board
- Parchment or lettuce leaves for lining
- Spoon for spreading
How to Serve This Dish:
Set it in the center of the blanket and let everyone graze. The beauty here is the lack of ceremony; people can build bites exactly how they want. If you want it to feel more elegant, add a few radish halves and a small bowl of olive oil for dipping.
Pro Tips for This Recipe:
- Keep wet and dry items apart until serving time.
- Line the container with parchment so the bread doesn’t pick up stray moisture.
- Use good olives; cheap ones taste harsh in a box like this.
- If you add roasted vegetables, make sure they’re fully cool first.
Variations on This Dish:
- Falafel Add-On: Pack a few baked falafel balls for more heft.
- Labneh Swap: Use labneh instead of baba ghanoush for a tangier, thicker spread.
- Herbed Rice Salad Sidecar: Add a small container of cold rice salad if you want the box to function as dinner.
Common Mistakes to Avoid with This Dish:
- Mixing everything together: That turns a good box into a damp pile. Separate compartments matter.
- Packing warm vegetables: Heat creates condensation and soft pita.
- Choosing one-note ingredients: The box needs contrast; don’t make it all creamy.
11. Ham, Peach, and Havarti Sandwiches with Dijon Butter
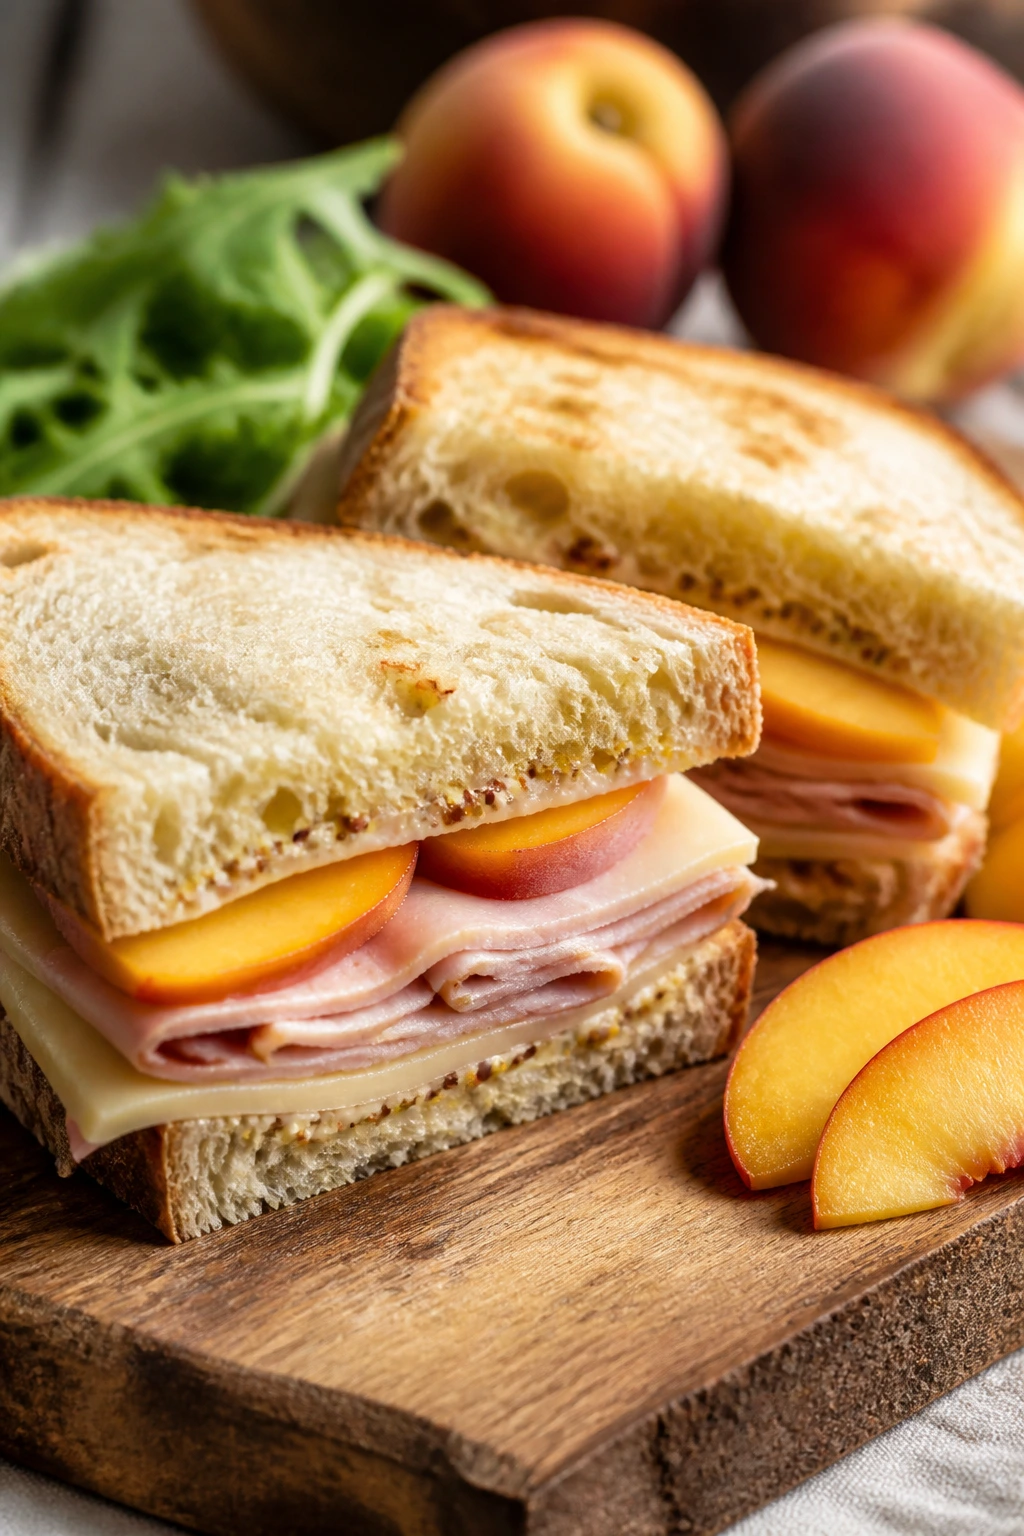
Sweet fruit in a sandwich sounds risky until you try peach with salty ham and mellow Havarti. The peach stays juicy, the cheese softens the edges, and the Dijon butter gives the whole thing enough backbone to keep from tasting sugary. These are the sandwiches I’d make when I want something a little more dressed up than plain deli fare.
Why It Works:
Peaches bring perfume and juice, but they need salt to feel complete. Ham gives that salt, Havarti melts into a smooth layer, and Dijon butter keeps the bread from going flat and bland. Slice them into neat triangles and they feel picnic-ready, not lunchbox-basic.
Key Ingredients:
- 8 slices soft sandwich bread
- 4 tablespoons softened butter
- 1 tablespoon Dijon mustard
- 8 oz sliced ham
- 4 oz sliced Havarti cheese
- 1 ripe peach, thinly sliced
- Handful of arugula
- Pinch of salt
- Fresh black pepper
Quick Steps:
- Mix the butter and Dijon until smooth.
- Spread the Dijon butter on all slices of bread, edge to edge.
- Layer ham, Havarti, peach slices, arugula, salt, and pepper on four slices.
- Top with the remaining bread, press gently, and cut into triangles.
- Wrap tightly and chill for 10 to 15 minutes before packing.
Equipment for This Recipe:
- Butter knife or spatula
- Sharp knife
- Cutting board
- Parchment or sandwich wrap
- Airtight container
How to Serve This Dish:
Cut them small enough to eat in a few bites. They look best when the peach slice shows through at the edge, which is your cue to cut cleanly with a sharp knife. A handful of potato chips or a crisp salad makes the plate feel finished.
Pro Tips for This Recipe:
- Use peaches that are ripe but still firm, or they’ll squish.
- A little arugula gives peppery lift and keeps the sandwich from feeling sweet.
- Wrap tightly so the bread stays soft and the filling doesn’t shift.
- If the ham is salty, go light on the added salt.
Variations on This Dish:
- Turkey and Plum Version: Swap ham for turkey and peach for plum slices.
- Brioche Upgrade: Use brioche if you want a softer, richer sandwich.
- Grilled Sandwich Style: Press these briefly in a skillet, then chill and pack.
Common Mistakes to Avoid with This Dish:
- Overripe fruit: Mushy peaches turn the sandwich soggy. Firm-ripe is the sweet spot.
- Skipping the butter barrier: The butter keeps the bread from soaking up fruit juice.
- Cutting before chilling: A short chill helps the layers hold together.
12. Crispy Chickpea and Herb Grain Salad
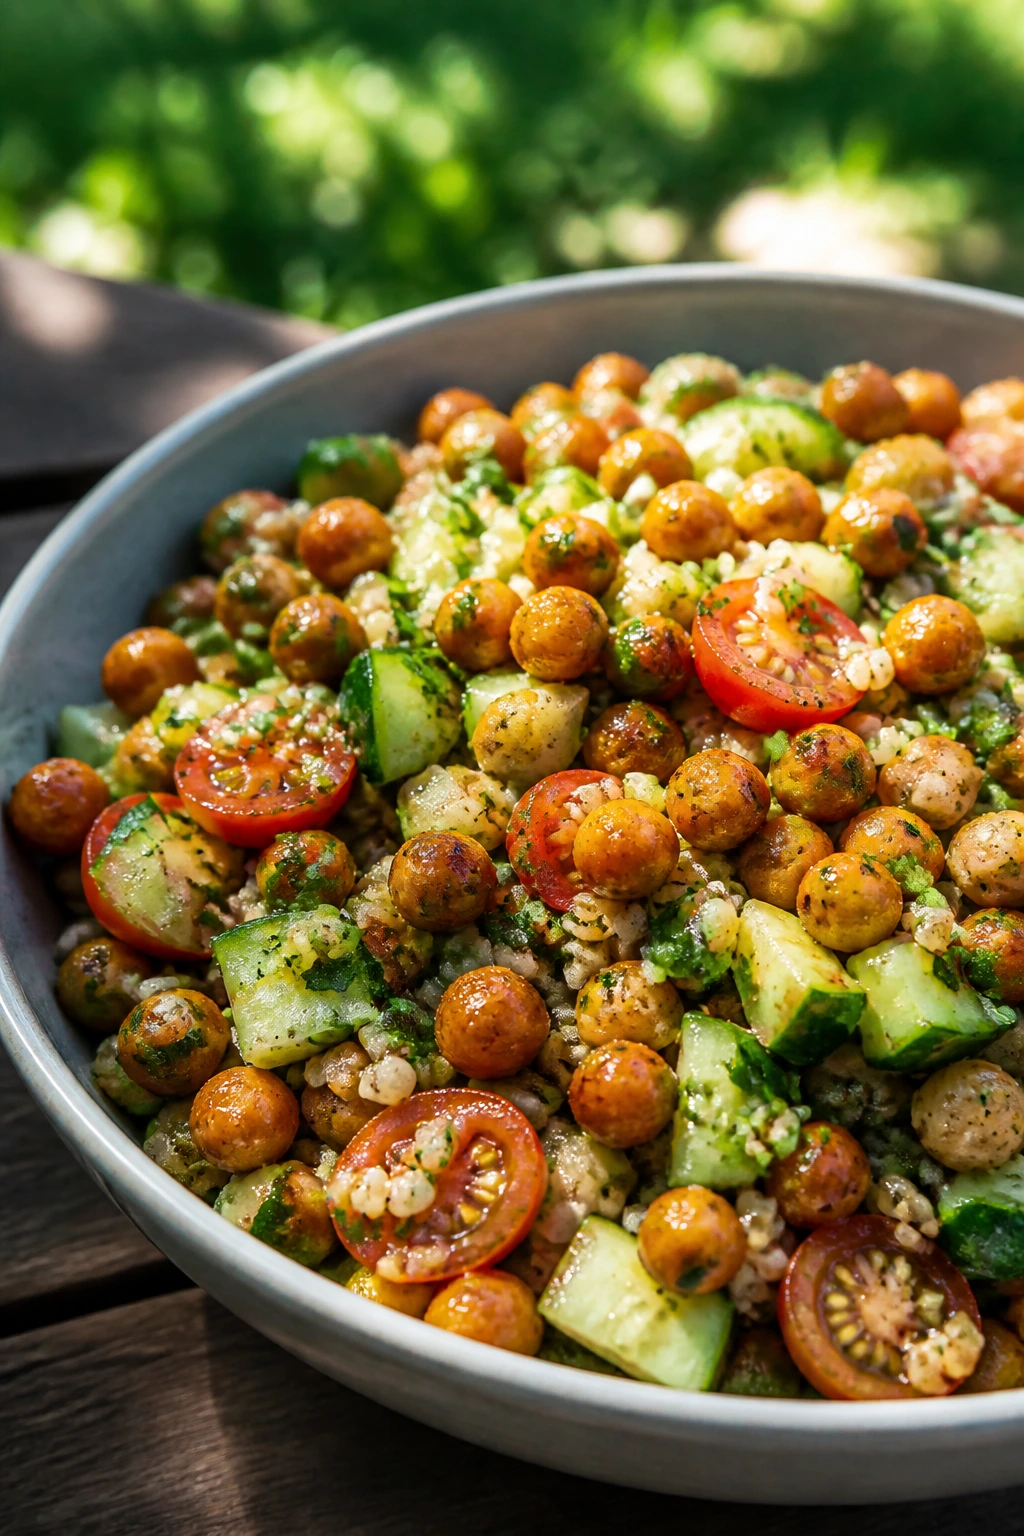
If you need one vegetarian dish that feels substantial, this is the one I’d pack. Crispy chickpeas, chewy grain, herbs, cucumber, and lemony dressing give the salad enough shape to work as a main or a side. It’s picnic food with backbone.
Why It Works:
The contrast matters here. Crisp chickpeas against tender grains. Cool cucumber against warm spices. Herbs against lemon. Grain salads can be dull if they’re all soft and beige, but this one keeps changing texture as you eat it, which is the whole point.
Key Ingredients:
- 1 cup cooked farro or quinoa
- 1 can chickpeas, drained and rinsed
- 1 tablespoon olive oil
- 1/2 teaspoon smoked paprika
- 1/2 teaspoon salt
- 1 cucumber, diced
- 1/2 cup cherry tomatoes, halved
- 1/4 cup chopped parsley
- 2 tablespoons chopped mint
- 2 tablespoons lemon juice
- 3 tablespoons olive oil
Quick Steps:
- Pat the chickpeas dry, toss with olive oil, paprika, and salt, and roast at 425°F for 20 to 25 minutes until crisp.
- Cool the grains completely.
- Whisk lemon juice, olive oil, salt, and pepper for the dressing.
- Toss grains with cucumber, tomatoes, parsley, mint, and dressing.
- Fold in the chickpeas just before serving so they stay crunchy.
Equipment for This Recipe:
- Sheet pan
- Mixing bowl
- Whisk
- Cutting board and knife
- Airtight container
How to Serve This Dish:
Serve it in a shallow bowl or pack it in a lidded container for easy scooping. A spoonful over lettuce leaves makes it feel more polished. It’s one of the few picnic salads that still tastes interesting after a couple of hours chilled.
Pro Tips for This Recipe:
- Dry the chickpeas well or they’ll steam instead of crisp.
- Dress the grains after they cool so the herbs stay bright.
- Add feta if you want extra salt and creaminess.
- Keep the chickpeas separate until the last minute if crunch matters.
Variations on This Dish:
- Mediterranean Version: Add olives, feta, and roasted red peppers.
- Spicy Harissa Bowl: Toss the chickpeas with a little harissa paste before roasting.
- Brown Rice Swap: Use brown rice when you want a softer, more filling base.
Common Mistakes to Avoid with This Dish:
- Warm grains plus dressing: That turns the salad limp. Cool everything first.
- Skipping acid: Without lemon, the whole bowl tastes heavier than it should.
- Roasting chickpeas too long after they’re crisp: They harden and lose their pleasant crunch.
13. Pimento Cheese Celery Sticks
There’s a reason celery gets paired with a rich filling: it gives the bite a clean snap. Pimento cheese brings sharp cheddar, creaminess, and a little tang, while the celery acts like a built-in tray. These are easy, old-school, and much better than they sound if the cheese is made with enough bite.
Why It Works:
Pimento cheese needs something cool and crunchy to balance the richness. Celery is perfect because it stays sturdy and doesn’t wilt quickly. The result is low-drama finger food that holds up in a picnic box and still feels cheerful when you pull it out.
Key Ingredients:
- 8 celery stalks, trimmed and cut into 3-inch lengths
- 1 cup sharp cheddar, finely grated
- 4 oz cream cheese, softened
- 2 tablespoons mayonnaise
- 2 tablespoons diced pimentos, drained
- 1 teaspoon Dijon mustard
- 1/4 teaspoon garlic powder
- Pinch of cayenne
- Salt and black pepper
Quick Steps:
- Stir cheddar, cream cheese, mayonnaise, pimentos, mustard, garlic powder, cayenne, salt, and pepper until thick and spreadable.
- Wash and dry the celery, then cut each stalk into tidy lengths.
- Spoon or pipe the pimento cheese into the groove of each celery stick.
- Chill for 15 minutes so the filling firms slightly.
- Pack in a container lined with paper towels to catch moisture.
Equipment for This Recipe:
- Mixing bowl
- Spoon or piping bag
- Knife
- Paper towels
- Storage container
How to Serve This Dish:
Pile them on a tray with a few extra pimentos or chives scattered over the top. They’re best as a snack between heavier items. If you want them to feel less rustic, cut the celery into short pieces and serve them like little hors d’oeuvres.
Pro Tips for This Recipe:
- Grate the cheddar finely so the filling turns smooth instead of chunky.
- Dry the celery well or the filling slips.
- A little more cayenne wakes up the cheese without making it hot.
- Make the filling a few hours ahead so the flavors blend.
Variations on This Dish:
- Bacon Pimento Version: Fold in crisp chopped bacon.
- Jalapeño Kick: Add a spoonful of finely chopped jalapeño for more heat.
- Cucumber Cup Swap: Hollow out cucumber coins and use them instead of celery for a cleaner bite.
Common Mistakes to Avoid with This Dish:
- Soft, bland cheddar: Sharp cheddar is the whole point. Mild cheese makes the filling dull.
- Overstuffing the celery: Too much filling falls off when you pick it up.
- Wet stalks: Moisture breaks the filling. Pat them dry before you fill them.
14. Smoked Trout Potato Salad with Dill
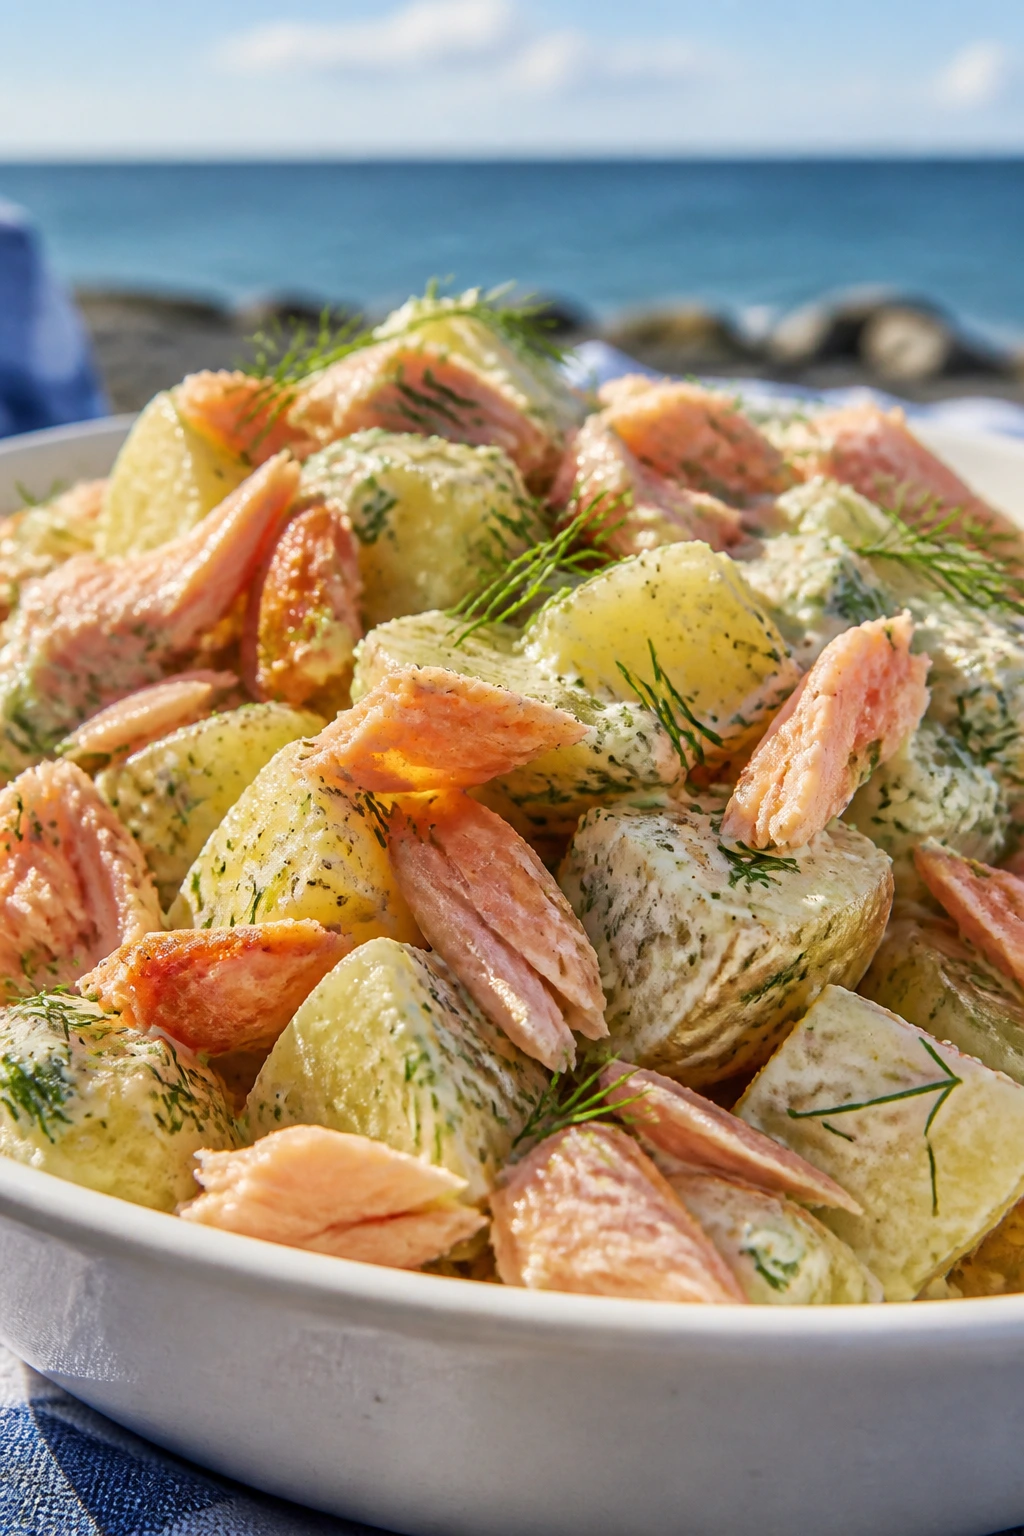
This potato salad is richer and more interesting than the usual picnic version. Smoked trout brings a silky, savory flavor that doesn’t need much help, and dill gives the whole bowl a fresh, green edge. Serve it chilled or barely cool, and it eats like something from a seaside café.
Why It Works:
Potatoes are excellent at carrying bold flavors, and smoked trout gives this salad depth without turning it heavy. The dressing should be tangy and loose enough to coat every piece, not glue it shut. Dill and lemon keep the whole bowl from feeling beige, which is a common potato salad problem.
Key Ingredients:
- 2 lbs baby potatoes, halved
- 6 oz smoked trout, flaked
- 1/3 cup sour cream
- 2 tablespoons mayonnaise
- 1 tablespoon Dijon mustard
- 1 tablespoon lemon juice
- 2 tablespoons chopped dill
- 2 tablespoons chopped chives
- 1 celery stalk, finely diced
- Salt and black pepper
Quick Steps:
- Boil the potatoes in salted water until just tender, about 12 to 15 minutes.
- Drain and cool until no longer steaming.
- Mix sour cream, mayonnaise, Dijon, lemon juice, dill, chives, salt, and pepper.
- Fold the potatoes, celery, and trout into the dressing gently so the pieces stay intact.
- Chill for 30 minutes before serving.
Equipment for This Recipe:
- Large pot
- Colander
- Mixing bowl
- Rubber spatula
- Serving bowl with lid
How to Serve This Dish:
Serve it cold or at cool room temperature with a final scatter of dill on top. It’s substantial enough to sit next to grilled foods or sandwiches. A wedge of lemon on the side is useful for anyone who wants a brighter finish.
Pro Tips for This Recipe:
- Salt the potato water generously; bland potatoes make a sad salad.
- Toss the potatoes while they’re just cool, not hot, so they absorb some dressing.
- Flake the trout into large pieces so it doesn’t disappear.
- Hold back a spoonful of dressing to stir in after chilling if the salad tightens up.
Variations on This Dish:
- Horseradish Finish: Add a teaspoon of horseradish to sharpen the dressing.
- Yogurt Lighten-Up: Swap part of the sour cream for Greek yogurt.
- Caper and Onion Version: Add chopped capers and a little minced red onion.
Common Mistakes to Avoid with This Dish:
- Overcooking the potatoes: Mushy potatoes break apart and make the salad heavy.
- Using too much mayonnaise: This salad should coat, not drown.
- Adding trout too aggressively: Stir gently or the fish turns to paste.
15. Stuffed Mini Peppers with Whipped Ricotta
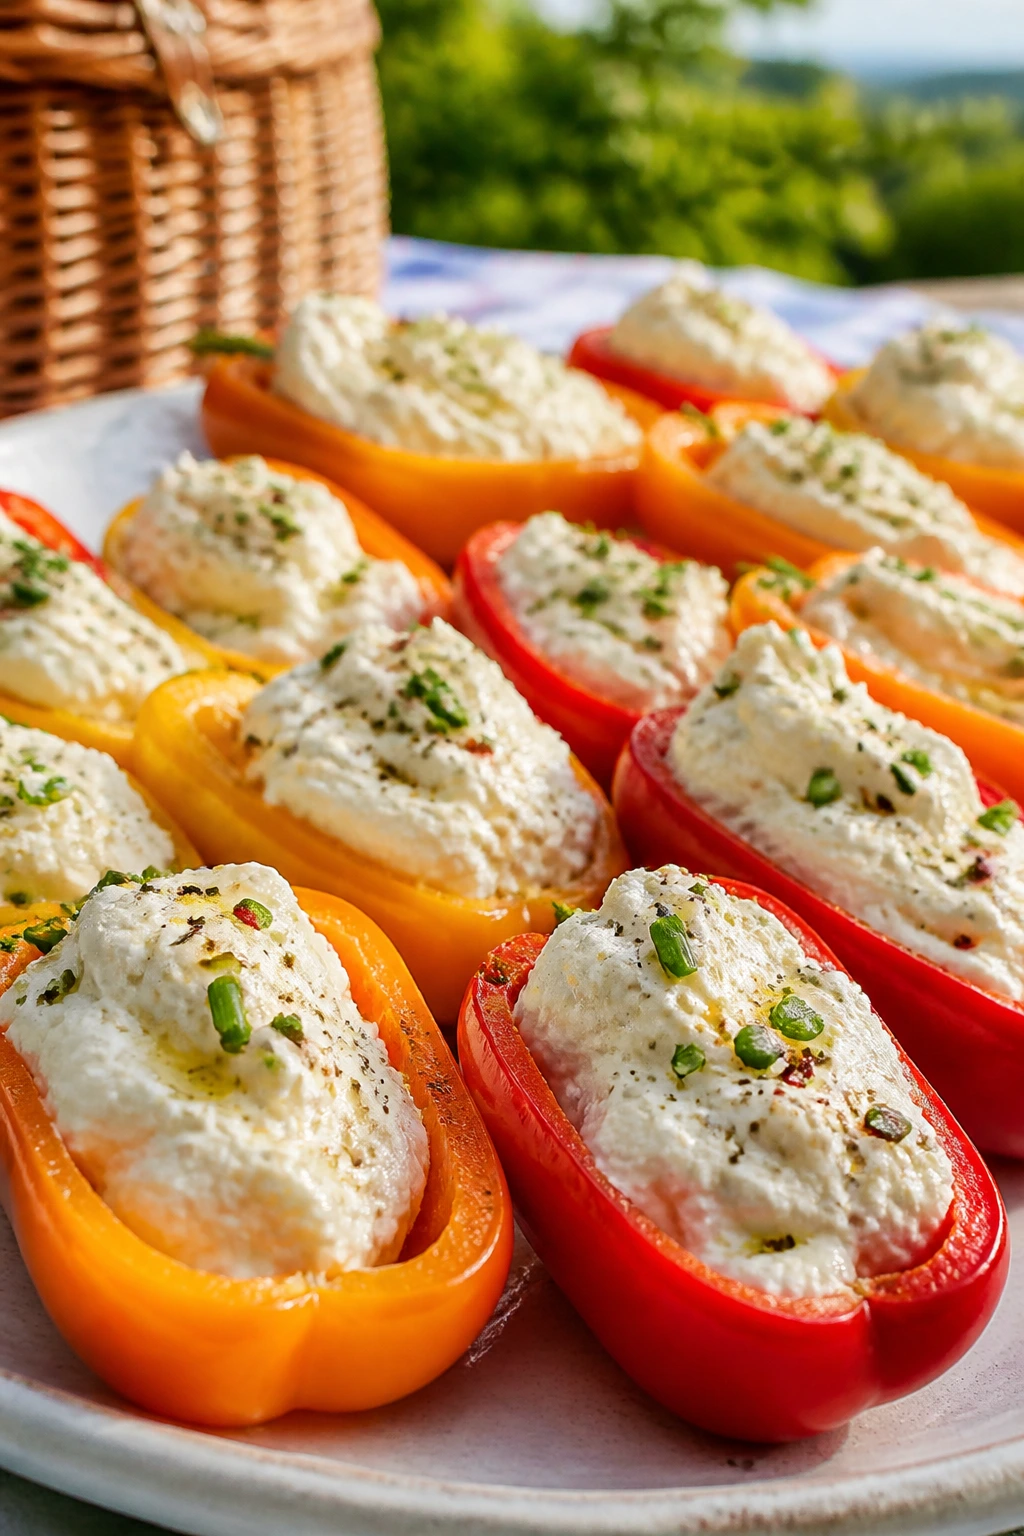
Mini peppers are one of the easiest ways to make a snack table look intentional. Their curved shape is neat, the color is bright, and the sweet pepper flesh gives a crisp contrast to whipped ricotta. Add lemon zest, herbs, and a little peppery finish, and these disappear fast.
Why It Works:
Whipped ricotta is light but still creamy enough to feel special. The peppers are naturally portable and don’t need a wrapper or skewer, which makes them picnic gold. A little acid from lemon keeps the cheese from tasting flat after a few bites.
Key Ingredients:
- 12 mini sweet peppers, halved lengthwise and seeded
- 1 cup ricotta
- 2 tablespoons cream cheese
- 1 tablespoon olive oil
- 1 teaspoon lemon zest
- 1 tablespoon chopped basil
- 1 tablespoon chopped parsley
- Salt and black pepper
- Pinch of red pepper flakes
Quick Steps:
- Beat ricotta, cream cheese, olive oil, lemon zest, herbs, salt, and pepper until fluffy.
- Halve the peppers and remove seeds and pale ribs.
- Spoon or pipe the ricotta mixture into each pepper half.
- Finish with red pepper flakes and a drizzle of olive oil.
- Chill for 15 minutes before packing.
Equipment for This Recipe:
- Mixing bowl
- Hand mixer or spoon
- Spoon or piping bag
- Knife
- Shallow storage container
How to Serve This Dish:
Line them up on a plate like little boats. They work as a light starter, but I also like them alongside olives and bread. If you want them to feel more luxurious, finish with tiny bits of lemon zest right before serving.
Pro Tips for This Recipe:
- Whip the ricotta until smooth; grainy filling feels unfinished.
- Dry the peppers after washing so the cheese sticks well.
- Don’t overfill the halves or the filling smears as soon as the tray moves.
- Add chopped chives if you want a sharper herb note.
Variations on This Dish:
- Basil Pesto Ricotta: Swirl in a spoonful of pesto.
- Whipped Feta Swap: Use half ricotta, half feta for a saltier filling.
- Olive Crunch Version: Top with chopped olives for a briny finish.
Common Mistakes to Avoid with This Dish:
- Using cold, stiff ricotta: It won’t whip properly. Let it soften a bit first.
- Too much liquid seasoning: The filling should be thick enough to hold its shape.
- Packing them with wet pepper halves: Moisture makes the filling slide.
16. Grilled Halloumi and Nectarine Skewers
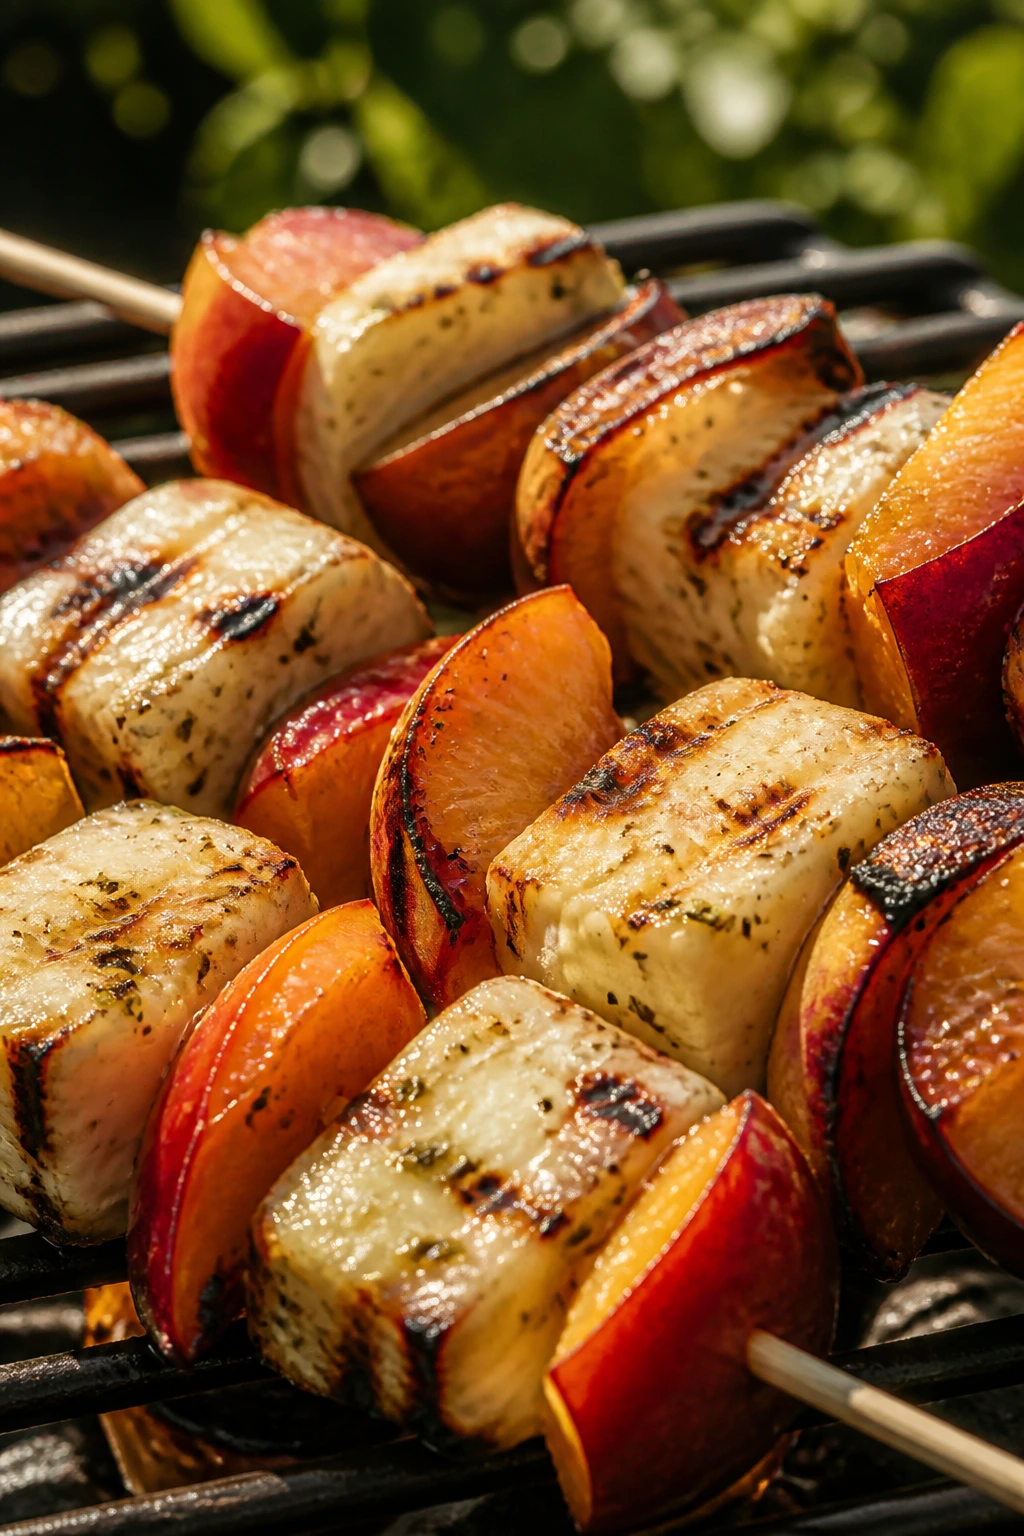
Halloumi likes heat, and nectarines love a little char. Put them together and you get a bite that’s salty, sweet, smoky, and just a touch chewy around the edges. These skewers feel like summer doing its best work.
Why It Works:
Halloumi is one of the few cheeses that keeps its shape over direct heat, which makes it ideal for skewers and picnics alike. Nectarines caramelize quickly, so you get soft fruit without losing structure. A tiny drizzle of honey and lemon after grilling ties the whole thing together.
Key Ingredients:
- 8 oz halloumi, cut into 1-inch cubes
- 2 ripe nectarines, cut into wedges
- 1 tablespoon olive oil
- 1 tablespoon honey
- 1 teaspoon lemon juice
- 1 teaspoon chopped mint
- 1/4 teaspoon black pepper
- Small skewers
Quick Steps:
- Thread halloumi and nectarine wedges onto skewers.
- Brush lightly with olive oil.
- Grill over medium heat for 2 to 3 minutes per side, until the cheese is golden and the fruit has char marks.
- Drizzle with honey and lemon juice while still warm.
- Finish with mint and black pepper.
Equipment for This Recipe:
- Grill pan or outdoor grill
- Skewers
- Pastry brush
- Small bowl
- Tongs
How to Serve This Dish:
Serve them warm or at room temperature, but not piping hot. They’re excellent as the one grilled element in a cold picnic spread. A few basil leaves on the platter make the plate feel brighter.
Pro Tips for This Recipe:
- Soak wooden skewers if you’re grilling over flame.
- Don’t crowd the pieces too tightly or they’ll steam.
- Use nectarines that are ripe but still firm.
- Serve fast after grilling so the halloumi stays pleasantly squeaky.
Variations on This Dish:
- Peach and Thyme Version: Swap nectarines for peaches and mint for thyme.
- Spiced Honey Finish: Add a pinch of chili flakes to the honey.
- Tomato-Halloumi Mix: Alternate the cheese with cherry tomatoes for more color.
Common Mistakes to Avoid with This Dish:
- Overgrilling halloumi: It can go rubbery if left too long. Pull it when the edges brown.
- Using very soft fruit: It slides apart on the skewer.
- Skipping the acid: Lemon keeps the sweetness from taking over.
17. Herbed Turkey Pinwheels with Sun-Dried Tomato Spread
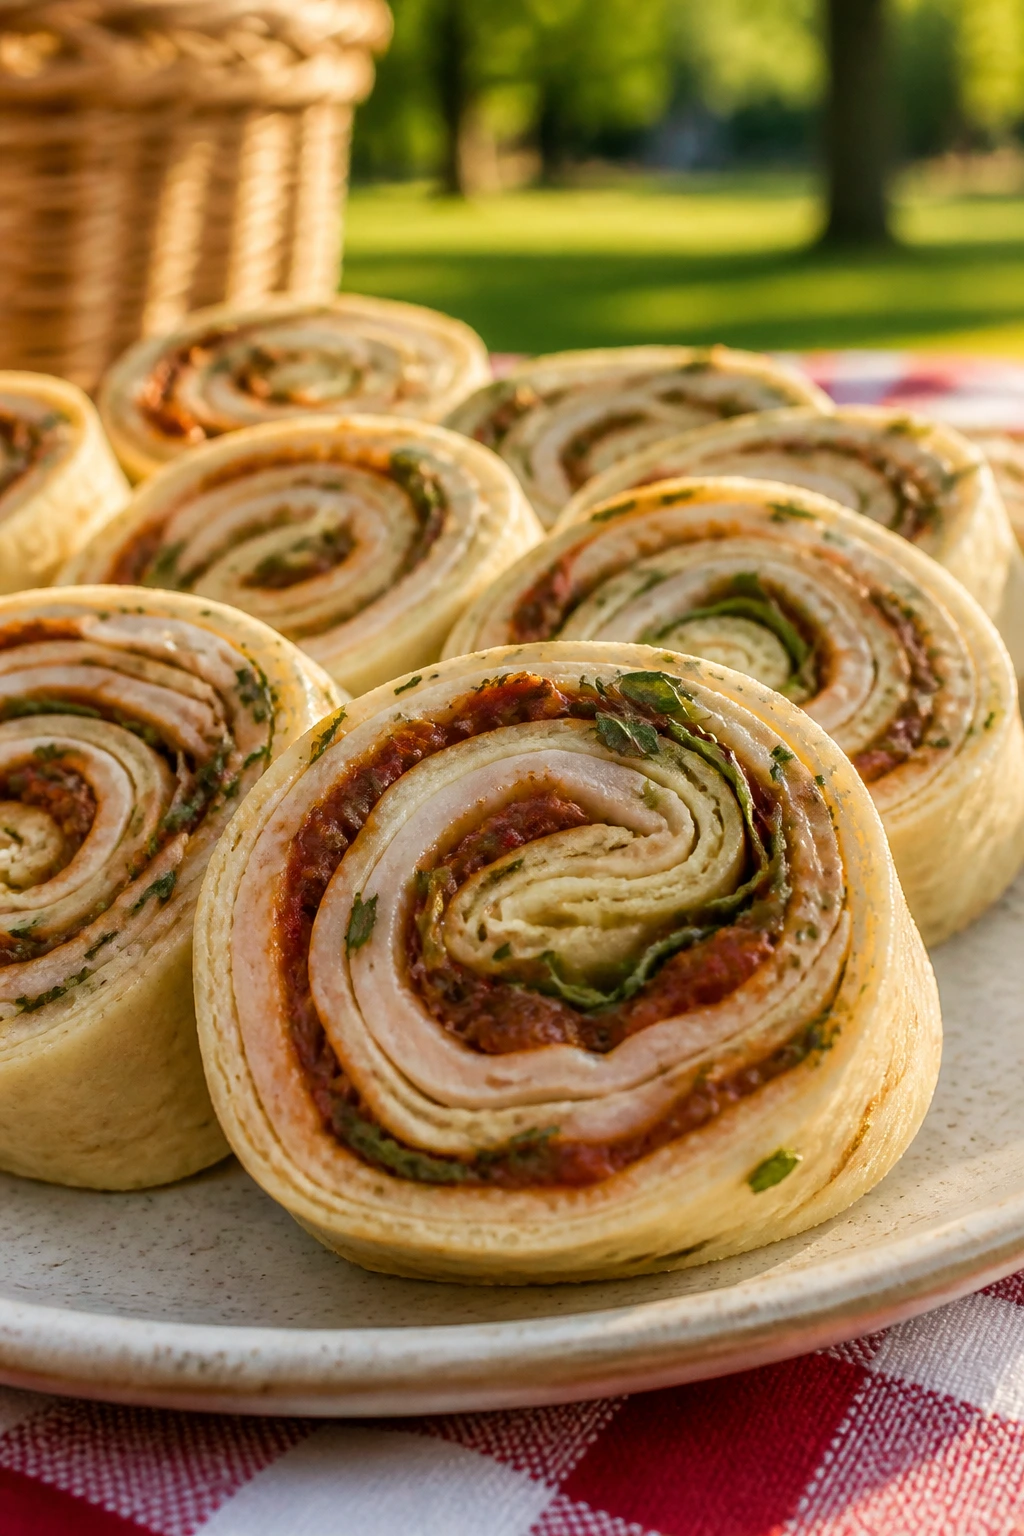
Pinwheels have a reputation for being retro, but that’s only a problem if the filling is boring. Here, the sun-dried tomato spread brings a punchy, savory base, the turkey keeps things light, and the herbs make each spiral look purposeful. Slice them cleanly and they look like you planned the entire basket around them.
Why It Works:
A spreadable filling helps the tortilla hold together and keeps the slices from falling apart. Turkey is mild enough to carry the tomato and herb flavors, and the pinwheel shape makes portioning easy. They are also one of the better make-ahead picnic items because they tighten up in the fridge before slicing.
Key Ingredients:
- 4 large flour tortillas
- 4 oz cream cheese, softened
- 1/3 cup sun-dried tomatoes, finely chopped
- 1 tablespoon olive oil
- 1 teaspoon balsamic vinegar
- 8 oz sliced turkey
- 1 cup baby spinach
- 2 tablespoons chopped basil
- 2 tablespoons chopped parsley
- Black pepper
Quick Steps:
- Stir cream cheese, sun-dried tomatoes, olive oil, balsamic vinegar, and pepper into a spread.
- Lay out the tortillas and spread the mixture in a thin layer.
- Layer turkey, spinach, basil, and parsley evenly over the spread.
- Roll each tortilla tightly, then chill for 20 minutes.
- Slice into 1-inch pinwheels with a sharp knife.
Equipment for This Recipe:
- Mixing bowl
- Rubber spatula
- Sharp knife
- Cutting board
- Plastic wrap or parchment
How to Serve This Dish:
Arrange the pinwheels cut side up so the swirls show. They work well beside fruit and chips, and they’re sturdy enough to pack in a line without crushing. If you want them neater, trim the ends before serving.
Pro Tips for This Recipe:
- Roll tightly; loose rolls gap when sliced.
- Chill before cutting so the spirals hold.
- Pat spinach dry or it can loosen the wrap.
- Use thin slices of turkey rather than thick folded piles.
Variations on This Dish:
- Chicken Caesar Version: Swap turkey for shredded chicken and the spread for Caesar-style dressing.
- Roasted Pepper Twist: Add thin strips of roasted red pepper.
- Dairy-Free Roll-Up: Use a dairy-free spread and extra mustard for flavor.
Common Mistakes to Avoid with This Dish:
- Overfilling the tortillas: They won’t seal well and will split when sliced.
- Slicing too soon: Warm, soft rolls go squashed.
- Using dry tortillas: Warm them briefly so they roll without cracking.
18. Tiny Tomato Galettes

A tomato galette is basically a rustic tart that forgot to be shy. The pastry edges fold up around slices of tomato, cheese, and herbs, creating a crisp, buttery shell with a juicy center. These are ideal if you want one baked item that feels a little more special than a hand pie but less stiff than a tart.
Why It Works:
Tomatoes need a barrier or they’ll leak into the crust. Cheese, mustard, or a thin layer of herbed spread gives you that barrier while also adding flavor. The free-form shape means no blind-baking and no perfectionism, which is a relief when the oven is hot and the picnic basket is waiting.
Key Ingredients:
- 1 sheet pie dough or puff pastry
- 2 medium tomatoes, sliced and lightly salted
- 1/2 cup ricotta or goat cheese
- 1 teaspoon Dijon mustard
- 1 tablespoon chopped basil
- 1 tablespoon olive oil
- 1 egg, beaten
- Black pepper
- Flaky salt
Quick Steps:
- Heat the oven to 400°F and line a baking sheet with parchment.
- Pat the tomato slices dry after salting them for 10 minutes.
- Roll the dough into a rough 10-inch round and spread the cheese and mustard in the center.
- Layer the tomatoes over the cheese, leaving a 2-inch border.
- Fold the edges up, brush with egg wash, and bake for 30 to 35 minutes until the crust is deep golden.
Equipment for This Recipe:
- Baking sheet
- Parchment paper
- Rolling pin
- Sharp knife
- Pastry brush
How to Serve This Dish:
Cut into wedges and serve warm or room temperature. A few basil leaves and extra black pepper on top make the galette look finished without much effort. It’s lovely with a green salad and cold lemonade.
Pro Tips for This Recipe:
- Salt and blot the tomatoes or the crust will get damp.
- Keep the filling in the center and the border clear.
- Bake until the bottom is browned, not pale.
- Let it cool a bit before cutting or the filling slides.
Variations on This Dish:
- Caramelized Onion Base: Add a thin layer of sweet onions under the tomatoes.
- Feta and Herb Swap: Use feta for a saltier, sharper filling.
- Pesto Tomato Galette: Replace the mustard with pesto.
Common Mistakes to Avoid with This Dish:
- Wet tomatoes: That’s the fastest way to a soggy crust. Salt and blot them.
- Too much filling: A galette is rustic, not overloaded.
- Cutting too soon: The center needs a few minutes to settle.
19. Melon, Mozzarella, and Pistachio Salad Cups
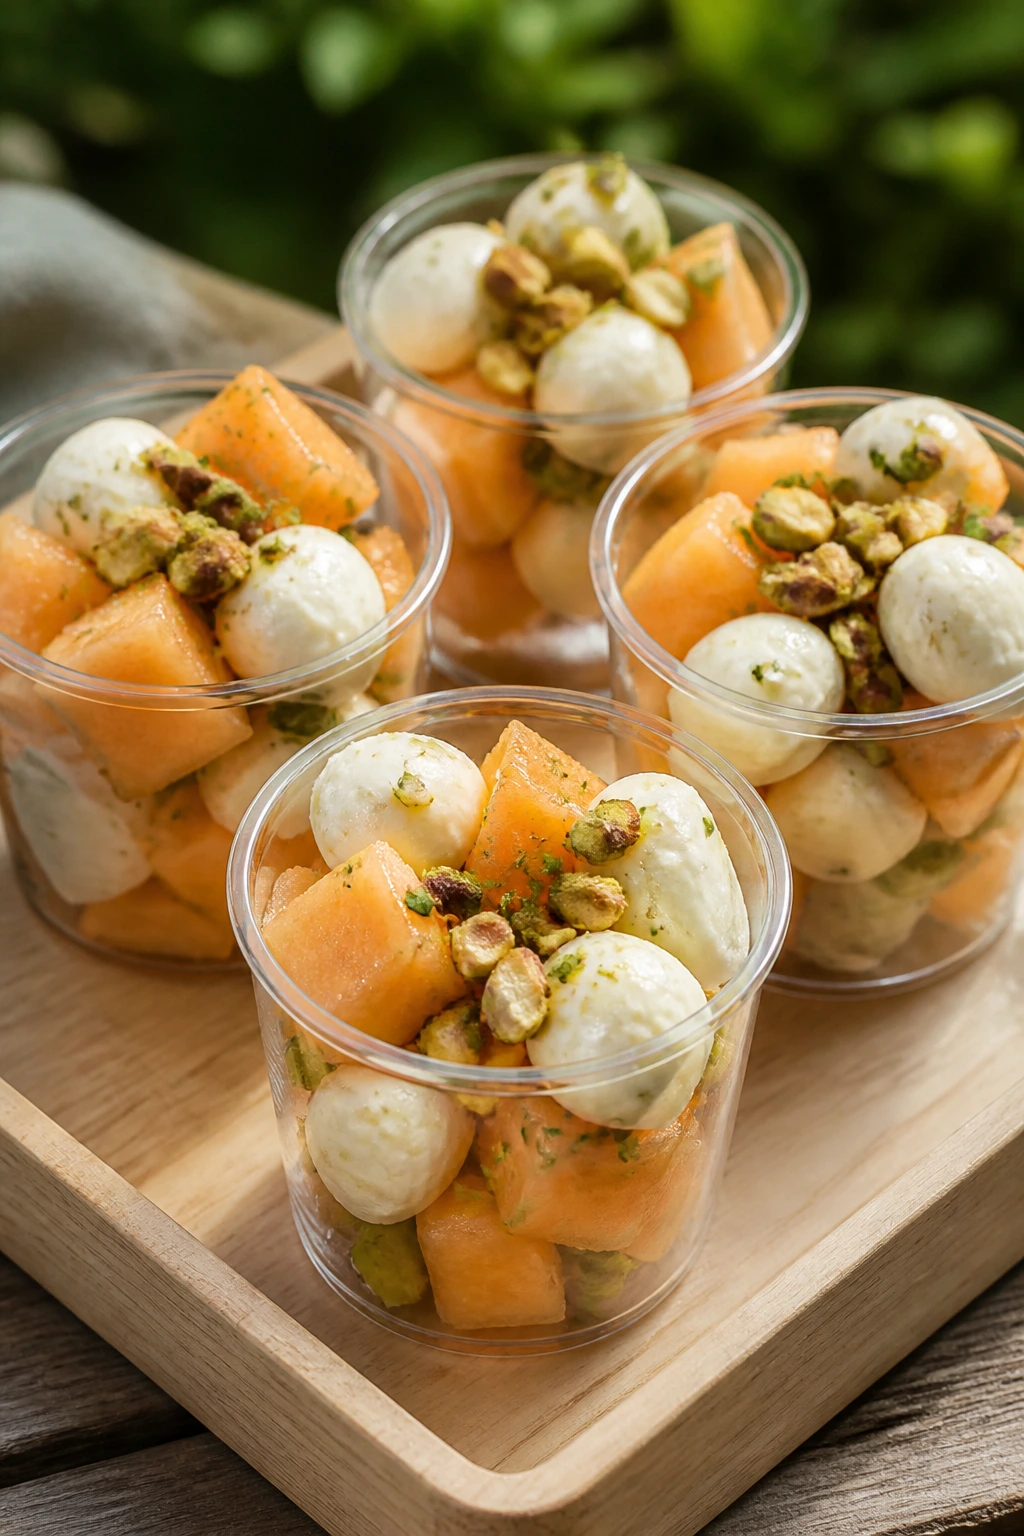
This is the quieter, cooler cousin of Caprese. Melon brings sweetness, mozzarella softens the edges, and pistachios add the crunch that keeps each spoonful from going sleepy. Served in small cups, it feels polished without needing any cooking at all.
Why It Works:
Fruit and cheese are easy to get wrong when the balance leans too sweet or too salty. Here the pistachios and lime keep the melon in check, and the mozzarella gives the salad enough body to feel more like a composed dish than a fruit bowl. It’s especially nice when you want something cold but not dessert-like.
Key Ingredients:
- 3 cups melon balls or 1-inch cubes
- 8 oz mini mozzarella balls, halved
- 1/4 cup shelled pistachios, chopped
- 1 tablespoon olive oil
- 1 tablespoon lime juice
- 1 teaspoon honey
- 1 tablespoon mint, chopped
- Pinch of salt
Quick Steps:
- Whisk olive oil, lime juice, honey, mint, and salt into a light dressing.
- Toss melon gently with the dressing.
- Fold in mozzarella and pistachios.
- Spoon into small cups or jars.
- Chill briefly before serving.
Equipment for This Recipe:
- Melon baller or knife
- Mixing bowl
- Spoon
- Small cups or jars
- Chopping board
How to Serve This Dish:
Serve in short glasses or paper dessert cups for easy carrying. It’s a natural bridge between savory food and the sweet ending of the picnic. A small mint leaf on top is enough garnish.
Pro Tips for This Recipe:
- Use melon that’s cold and fragrant.
- Chop the pistachios fairly small so they don’t dominate the texture.
- Dress lightly; you want shine, not pooled juice.
- Add the cheese close to serving time for the cleanest look.
Variations on This Dish:
- Prosciutto Accent: Add a ribbon of prosciutto for a saltier version.
- Cucumber Cooler: Mix in peeled cucumber for extra freshness.
- Lemon-Basil Swap: Use lemon zest and basil instead of lime and mint.
Common Mistakes to Avoid with This Dish:
- Overripe melon: It turns watery and falls apart.
- Too much dressing: This should taste light, not slippery.
- Big nut pieces: Keep the pistachios fine enough to mix through.
20. Chicken Souvlaki Pita Bites
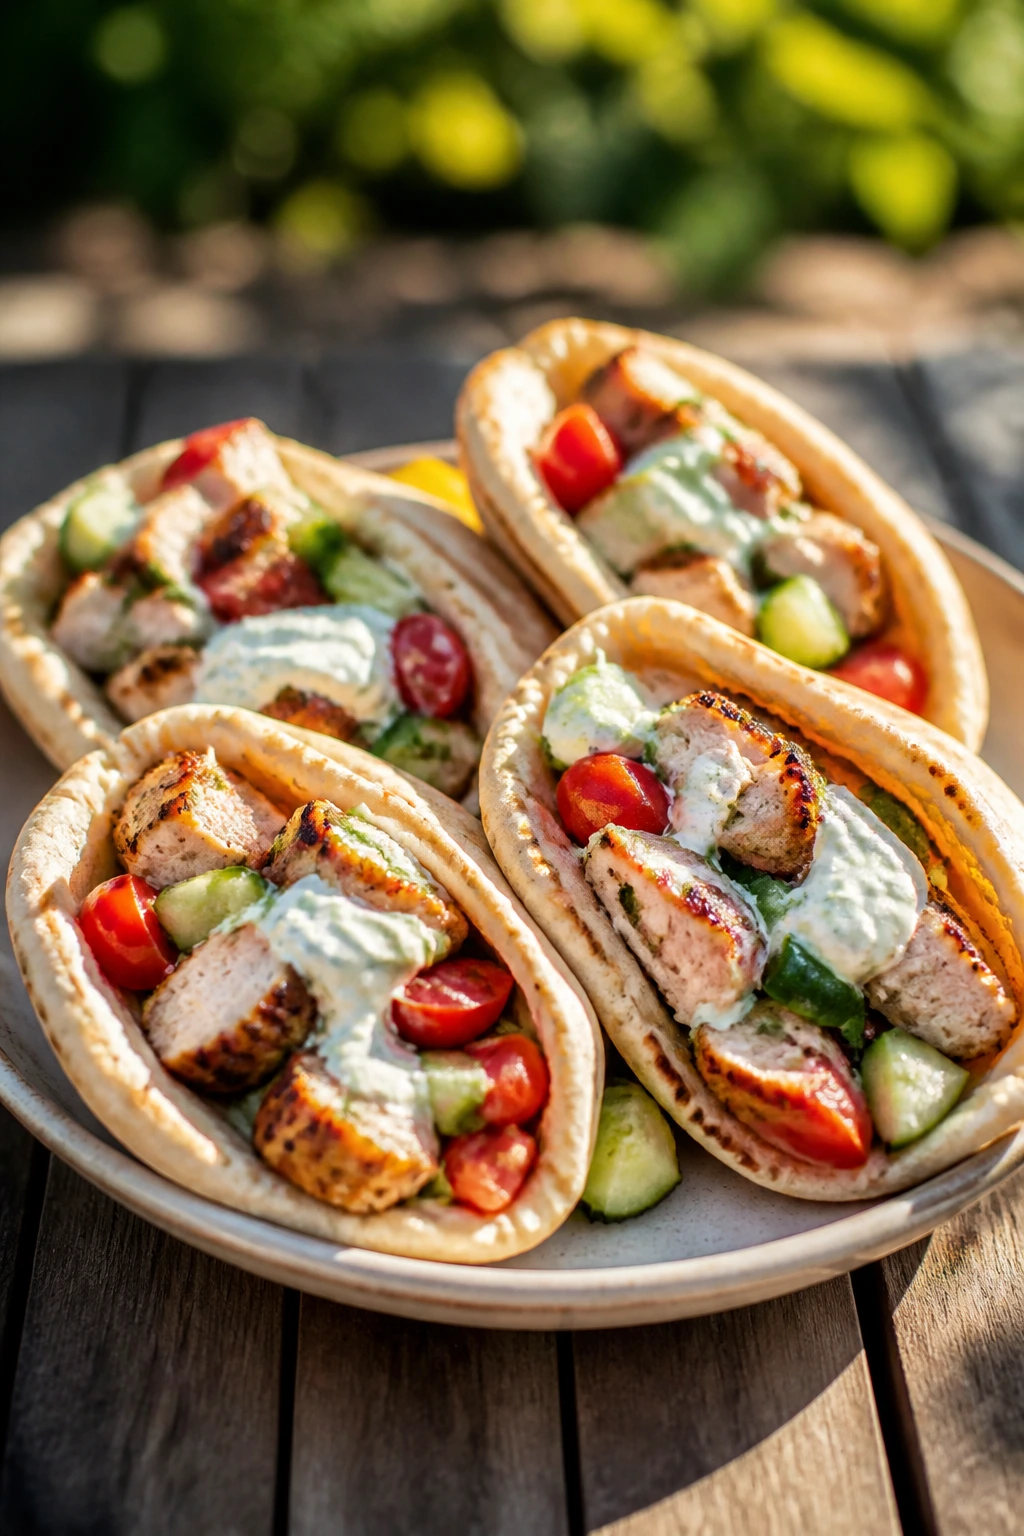
These little pita bites taste like a cookout and a picnic had a sensible compromise. Lemon-garlic chicken, cucumber, tomato, and a little yogurt sauce tucked into pita pieces give you a handheld meal that feels complete without being bulky. They’re sturdy, flavorful, and easy to eat without a knife.
Why It Works:
Marinated chicken holds up well when grilled or roasted, and the lemon-garlic flavor stays bright even after it cools. Yogurt sauce adds creaminess without the weight of mayo, while cucumbers and tomatoes keep the bite fresh. Small pita pockets or cut triangles make the whole thing far easier to pack than a full sandwich.
Key Ingredients:
- 1 lb boneless chicken thighs, cut into strips
- 2 tablespoons olive oil
- 1 tablespoon lemon juice
- 2 cloves garlic, minced
- 1 teaspoon dried oregano
- 1/2 teaspoon salt
- 1/4 teaspoon black pepper
- 4 pita breads, cut into triangles
- 1 cucumber, diced
- 1 cup cherry tomatoes, halved
- 1/2 cup plain yogurt
Quick Steps:
- Toss the chicken with olive oil, lemon juice, garlic, oregano, salt, and pepper.
- Marinate for at least 20 minutes, then grill or pan-sear until cooked through and lightly browned.
- Mix the yogurt with a pinch of salt and a little extra lemon juice.
- Fill pita triangles with chicken, cucumber, tomato, and yogurt sauce.
- Pack the sauce separately if you want the pitas extra crisp.
Equipment for This Recipe:
- Grill pan or skillet
- Mixing bowl
- Knife and cutting board
- Spoon
- Lidded container
How to Serve This Dish:
Serve the pita bites in a basket lined with parchment so they feel like little street-food parcels. They’re substantial enough to anchor the meal, especially beside a salad or fruit. A sprinkle of chopped dill makes them look finished.
Pro Tips for This Recipe:
- Chicken thighs stay juicier than breast meat after cooling.
- Don’t overfill the pitas or they’ll split.
- Keep the yogurt sauce chilled until serving.
- A quick char on the chicken adds a lot of flavor.
Variations on This Dish:
- Lamb Version: Use lamb strips if you want a deeper, richer flavor.
- Tzatziki Swap: Replace the plain yogurt with cucumber tzatziki.
- Rice Bowl Style: Skip the pita and serve over rice for a larger meal.
Common Mistakes to Avoid with This Dish:
- Dry chicken: Overcooking ruins the whole bite. Pull it as soon as it’s cooked through.
- Watery fillings: Pat the cucumber dry before packing.
- Sauce inside the pita too early: It softens the bread fast. Pack it separately if needed.
21. Blackberry Brie Phyllo Cups

Blackberries and Brie have a sneaky amount of charm together. The berries are tart and glossy, the cheese melts into something soft and buttery, and the phyllo cup gives each bite a delicate crackle. They look like pastry-shop food, which is a nice trick for a blanket picnic.
Why It Works:
Phyllo cups stay crisp longer than most pastry shells, especially when you bake them just enough to color the edges. Brie adds richness without needing much else, and blackberries bring enough acidity to keep the bite from feeling heavy. A little thyme or honey ties the flavors together with very little effort.
Key Ingredients:
- 12 mini phyllo cups
- 6 oz Brie, cut into small pieces
- 1 cup blackberries
- 1 tablespoon honey
- 1 teaspoon fresh thyme leaves
- 1 tablespoon chopped walnuts
- Pinch of salt
Quick Steps:
- Heat the oven to 350°F.
- Place a small piece of Brie in each phyllo cup.
- Top with a blackberry or two, a drizzle of honey, and a pinch of thyme.
- Bake for 8 to 10 minutes until the cheese softens.
- Finish with walnuts and a tiny pinch of salt.
Equipment for This Recipe:
- Mini muffin tray or baking sheet
- Small knife
- Spoon
- Parchment paper
- Serving tray
How to Serve This Dish:
Serve them warm if possible, but they’re still good at room temperature. Arrange them close together so they don’t tip in transit. A few extra berries around the plate make the whole thing feel more abundant.
Pro Tips for This Recipe:
- Cut the Brie into small pieces so it melts evenly.
- Don’t overload the cups or they’ll leak.
- Add the walnuts after baking so they stay crisp.
- Pack them in a single layer if you’re moving them far.
Variations on This Dish:
- Apricot and Brie: Swap blackberries for sliced apricot.
- Rosemary Finish: Use rosemary instead of thyme for a piney note.
- Fig and Walnut Version: Use fig preserves and chopped walnuts for a richer cup.
Common Mistakes to Avoid with This Dish:
- Overbaking: Phyllo goes from crisp to brittle fast. Pull them once the cheese softens.
- Using frozen berries without thawing and draining: Extra water wrecks the shell.
- Packing in a deep stack: These need a single layer.
22. Cold Soba Noodle Salad with Sesame Cucumber
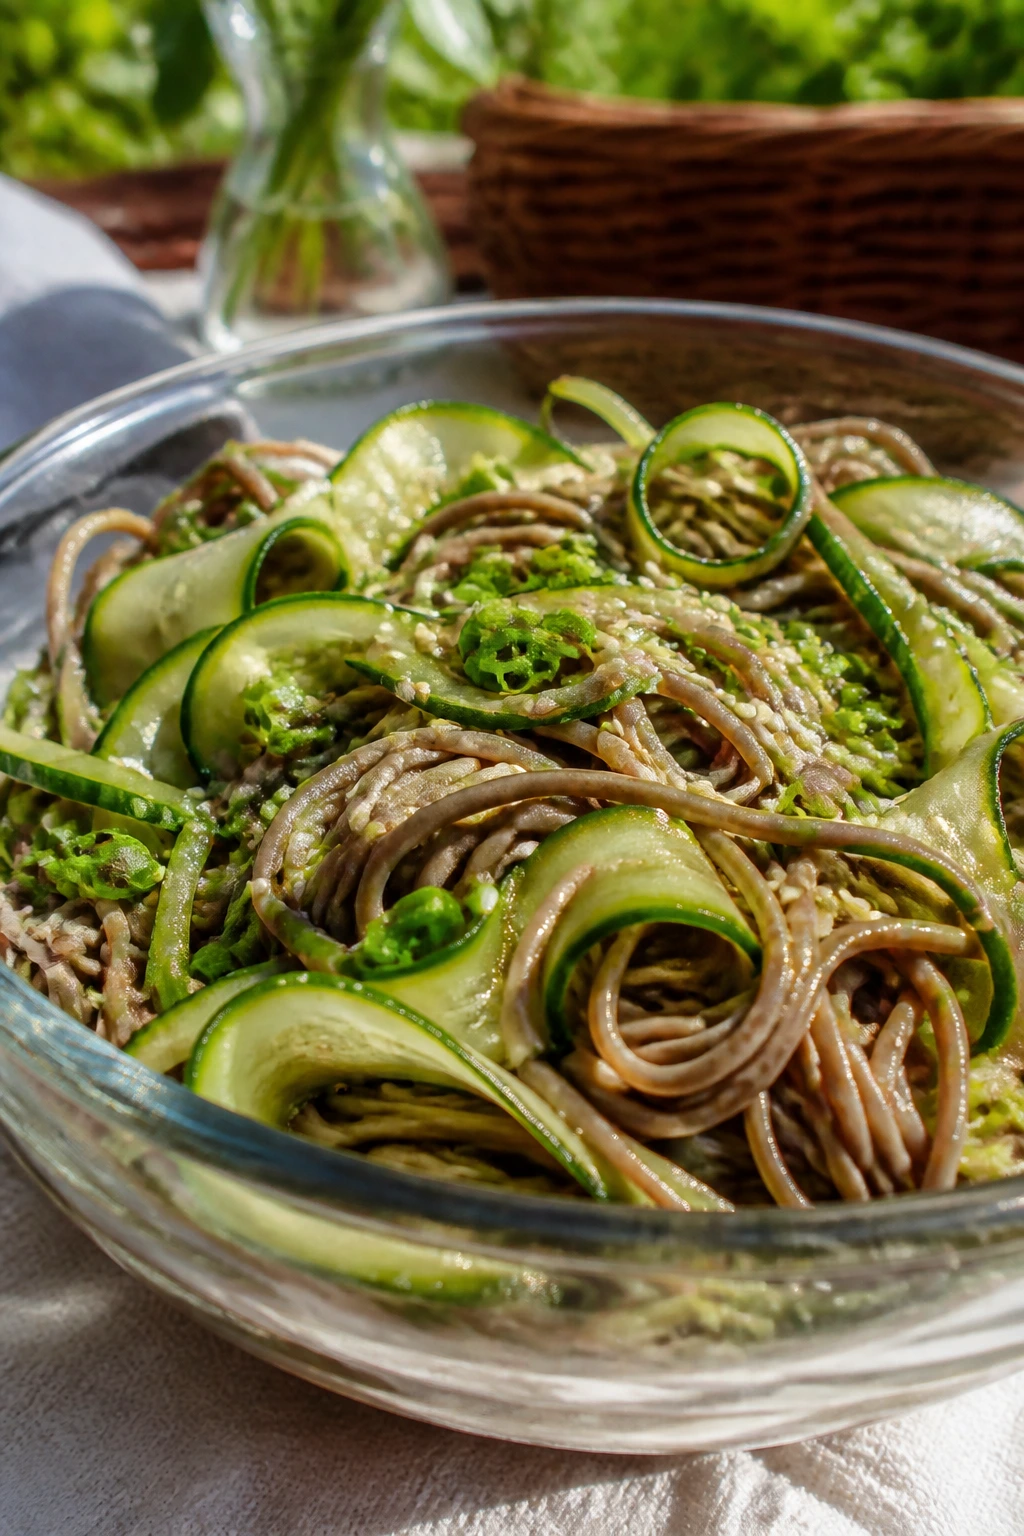
Cold noodles belong at picnics more often than they do. Soba has a nutty flavor that works well chilled, sesame dressing coats it lightly, and cucumber keeps the bowl crisp. Add scallions and a few sesame seeds, and you’ve got a salad that feels intentional instead of leftover-y.
Why It Works:
Soba noodles hold their texture when cooked properly and rinsed cold. The sesame dressing brings salt and fat without heaviness, and cucumber gives the salad a cool crunch that stands up to outdoor eating. A touch of rice vinegar keeps the noodles lively after chilling.
Key Ingredients:
- 8 oz soba noodles
- 1 cucumber, julienned or thinly sliced
- 2 scallions, sliced
- 2 tablespoons soy sauce
- 1 tablespoon rice vinegar
- 1 tablespoon sesame oil
- 1 teaspoon honey
- 1 teaspoon toasted sesame seeds
- 1 teaspoon grated ginger
- Pinch of chili flakes
Quick Steps:
- Cook the soba noodles until just tender, then rinse under cold water and drain very well.
- Whisk soy sauce, rice vinegar, sesame oil, honey, ginger, and chili flakes.
- Toss noodles with cucumber, scallions, and dressing.
- Sprinkle sesame seeds on top.
- Chill for 20 minutes before packing.
Equipment for This Recipe:
- Pot
- Colander
- Mixing bowl
- Whisk
- Tongs or chopsticks
How to Serve This Dish:
Serve in a shallow container or bowl with chopsticks or a fork. It’s a smart side for grilled meat, but it can also stand alone with a few extra cucumber ribbons. If you want it to look more finished, add cilantro or a few thin carrot strips.
Pro Tips for This Recipe:
- Rinse the noodles well so they don’t clump.
- Drain thoroughly before dressing, or the sauce thins out.
- Cut the cucumber thin so it blends through the bowl.
- Add a few drops of toasted sesame oil only if you want a stronger nutty note.
Variations on This Dish:
- Peanut Soba: Add a spoonful of peanut butter to the dressing.
- Miso Version: Stir in a little white miso for a deeper flavor.
- Edamame Addition: Toss in shelled edamame for more body.
Common Mistakes to Avoid with This Dish:
- Undercooked noodles: Soba should be tender but still hold shape.
- Too much dressing: Start lightly; you can always add more.
- Packing while warm: Warm noodles clump and wilt the cucumber.
23. Deviled Eggs with Crispy Capers
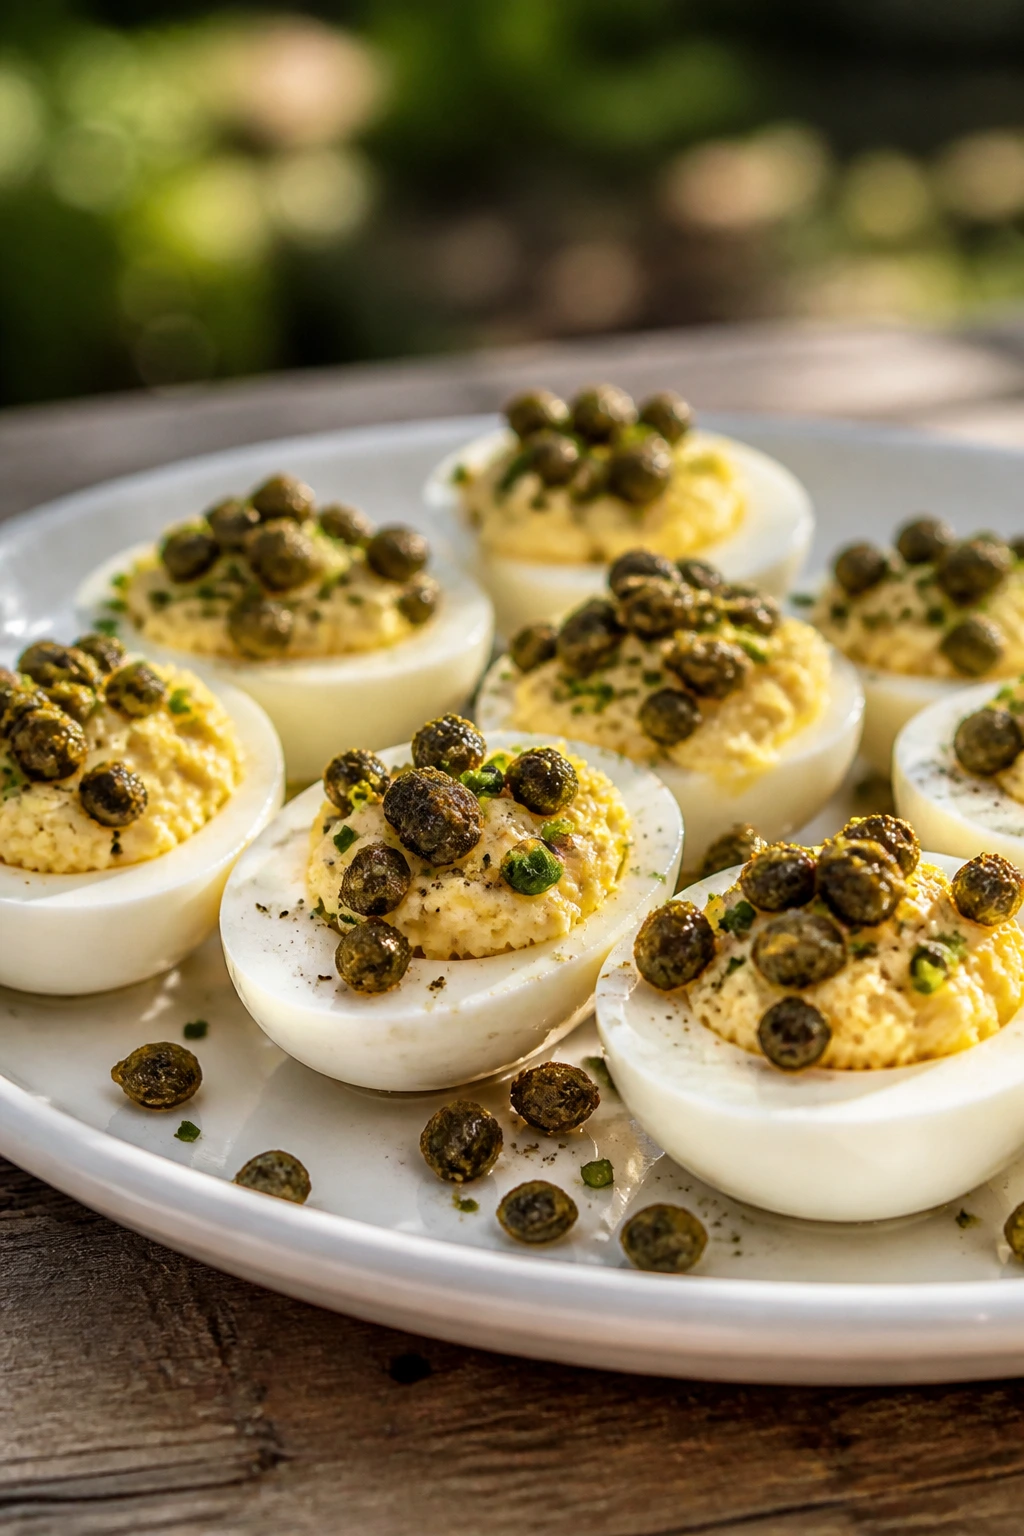
Deviled eggs are picnic royalty, but they need a little something extra to feel fresh. Crispy capers add salty crunch, which is a smart contrast to the smooth yolk filling. A little mustard and vinegar keep the filling bright so the whole thing tastes sharper than the usual version.
Why It Works:
Egg yolks are rich and mild, so they need acidity and salt to stay interesting. Capers fry quickly and bring a brittle, briny crunch that plays against the creamy filling. These are easy to make ahead, but they should be packed carefully so the yolks don’t smear.
Key Ingredients:
- 6 large eggs
- 3 tablespoons mayonnaise
- 1 teaspoon Dijon mustard
- 1 teaspoon white vinegar
- 1 tablespoon capers, drained
- 1 tablespoon oil for frying capers
- Pinch of paprika
- Salt and black pepper
- Chopped chives for garnish
Quick Steps:
- Hard-boil the eggs, cool them in ice water, and peel them.
- Slice in half and remove the yolks.
- Mash yolks with mayonnaise, mustard, vinegar, salt, and pepper until smooth.
- Fry the capers in oil for 1 to 2 minutes until crisp, then drain on paper towels.
- Pipe or spoon the filling into the egg whites and top with capers, paprika, and chives.
Equipment for This Recipe:
- Small pot
- Mixing bowl
- Fork or piping bag
- Skillet
- Paper towels
How to Serve This Dish:
Serve them in a shallow box or egg carrier so they don’t roll around. They’re one of the first things people reach for, so put them out near the front of the picnic spread. A tiny pinch of extra paprika right before serving makes them look neat.
Pro Tips for This Recipe:
- Cook the eggs until the yolks are fully set, about 10 to 11 minutes after the water comes to a boil.
- Chill before peeling for cleaner whites.
- Fry capers until they actually crisp; pale capers are not the goal.
- Make the filling smooth enough to pipe if you want clean edges.
Variations on This Dish:
- Dill Pickle Version: Add a spoonful of finely chopped pickle.
- Smoked Paprika Twist: Use smoked paprika for a warmer flavor.
- Avocado Green Eggs: Replace half the mayo with mashed avocado.
Common Mistakes to Avoid with This Dish:
- Overcooked yolks: They turn chalky and gray-green. Pull the eggs on time.
- Loose filling: Too much mayonnaise makes the halves wobble.
- Skipping the caper drain: Oil slicks the eggs and softens the topping.
24. Lemon Bars with Shortbread Crust
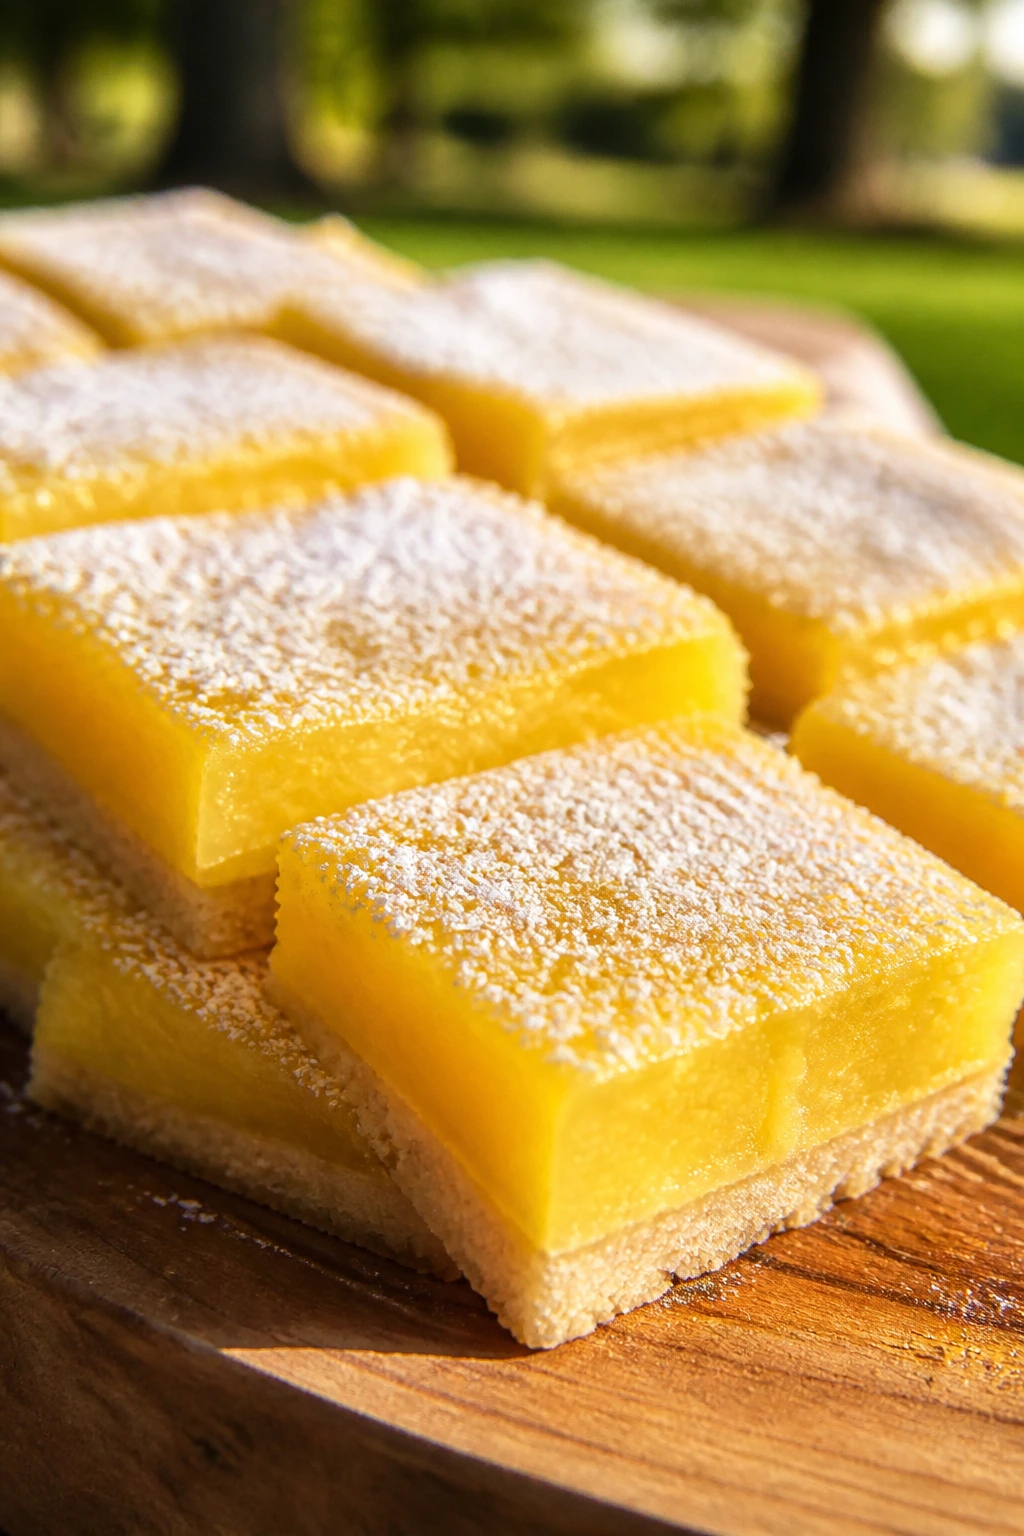
Lemon bars bring the picnic to a proper finish. The crust is buttery and firm, the lemon layer is tart enough to wake up your palate, and a light dusting of powdered sugar makes them look finished without any extra decorating. They travel better than most frosted desserts, which is half the reason I trust them outdoors.
Why It Works:
A shortbread crust gives the bars structure, and the filling sets cleanly when baked with enough time. Lemon juice and zest carry the flavor, but the sugar and eggs are what give the curd that smooth sliceable texture. Chill them before cutting, and you get tidy squares instead of a lemon puddle.
Key Ingredients:
- 1 cup unsalted butter, softened
- 1/2 cup powdered sugar
- 2 cups all-purpose flour
- 1/4 teaspoon salt
- 4 large eggs
- 1 1/2 cups granulated sugar
- 1/2 cup fresh lemon juice
- 1 tablespoon lemon zest
- 1/4 cup all-purpose flour for filling
- Powdered sugar for dusting
Quick Steps:
- Heat the oven to 350°F and line an 8-inch square pan with parchment.
- Mix butter, powdered sugar, flour, and salt into a shortbread dough and press into the pan.
- Bake the crust for 18 to 20 minutes until lightly golden.
- Whisk eggs, sugar, lemon juice, zest, and flour until smooth.
- Pour over the hot crust and bake for 20 to 25 minutes until the center is just set.
- Cool completely, then chill before slicing.
Equipment for This Recipe:
- 8-inch square baking pan
- Parchment paper
- Mixing bowls
- Whisk
- Sharp knife
How to Serve This Dish:
Dust with powdered sugar right before serving so it doesn’t dissolve. Cut into small squares for picnic ease; these are rich, and a little goes a long way. They sit nicely beside berries or a cup of chilled tea.
Pro Tips for This Recipe:
- Use fresh lemon juice, not bottled.
- Line the pan with parchment so you can lift the bars out cleanly.
- Chill fully before slicing if you want sharp edges.
- Wipe the knife between cuts for tidy squares.
Variations on This Dish:
- Lime Bars: Swap lemon for lime and add a little extra zest.
- Ginger Crust Version: Add ground ginger to the shortbread for warmth.
- Berry Swirl Bars: Drop a few spoonfuls of berry puree into the filling and swirl lightly.
Common Mistakes to Avoid with This Dish:
- Cutting while warm: The filling won’t hold. Chill first.
- Undercooked center: It should wobble only slightly when you move the pan.
- Too much powdered sugar early: Dust it at the end or it melts.
25. Chocolate-Dipped Strawberries with Citrus Salt
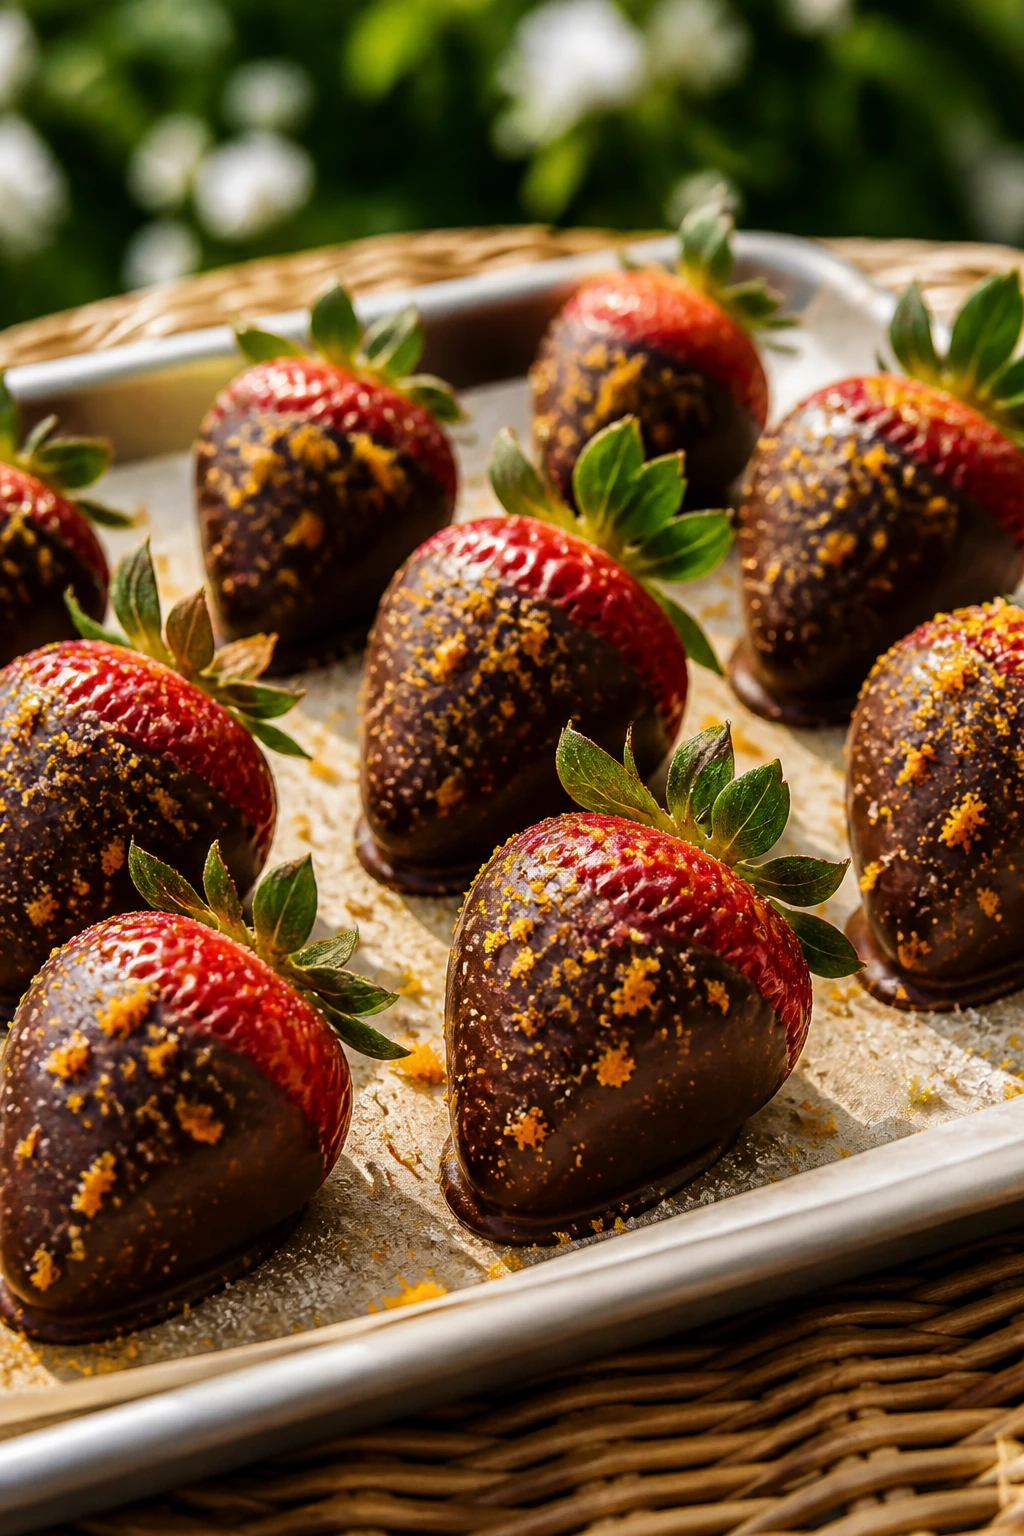
Chocolate-dipped strawberries are never a bad idea, but a little citrus salt makes them feel more deliberate. The chocolate sets into a neat shell, the strawberry stays juicy, and the salt sharpens the sweetness instead of burying it. These are the easy dessert that still looks like you planned ahead.
Why It Works:
Strawberries and chocolate do most of the work on their own. Citrus zest and flaky salt keep the flavor bright, which matters outdoors when desserts can taste flat. Because they need no cutting or plates, they’re also one of the cleanest picnic sweets to serve.
Key Ingredients:
- 1 lb strawberries, washed and thoroughly dried
- 8 oz semisweet chocolate, chopped
- 1 teaspoon coconut oil or neutral oil
- 1 tablespoon finely grated orange zest
- 1 teaspoon flaky salt
- Optional: 2 tablespoons chopped pistachios
Quick Steps:
- Line a tray with parchment and make sure the strawberries are fully dry.
- Melt the chocolate with the oil until smooth.
- Dip each strawberry halfway into the chocolate and set it on the tray.
- Sprinkle lightly with orange zest, flaky salt, and pistachios if using.
- Chill until the chocolate sets, about 15 to 20 minutes.
Equipment for This Recipe:
- Heatproof bowl
- Spoon or fork
- Parchment-lined tray
- Small grater
- Refrigerator space
How to Serve This Dish:
Serve them cold, straight from the tray or in a small paper cup. They look nicest when the chocolate edge is clean and the berries still have their stem on. Keep them shaded if the picnic is warm, because chocolate has no patience.
Pro Tips for This Recipe:
- Dry the strawberries well or the chocolate can seize and slide.
- Use good chocolate; the flavor matters because there are so few ingredients.
- Add the salt while the chocolate is still tacky.
- Chill on parchment, not foil, or they’ll stick.
Variations on This Dish:
- Dark Chocolate and Sea Salt: Go full dark if you want less sweetness.
- White Chocolate Citrus: Use white chocolate and extra orange zest.
- Crushed Almond Finish: Swap pistachios for toasted almonds.
Common Mistakes to Avoid with This Dish:
- Wet berries: Even a little moisture makes the coating fail.
- Overheating chocolate: Melt it gently or it thickens and clumps.
- Packing before set: The coating smears if you rush it.
What Makes a Picnic Menu Feel Fancy Without Becoming Fussy
A picnic starts feeling a little special when the food has contrast built into it. Crunch next to cream. Salt next to fruit. Something with a clean edge next to something soft and rich. That’s why these dishes work together: they don’t all chase the same texture, and they don’t all demand the same amount of attention once they’re packed.
I also think the container matters more than people admit. A good lidded box, a few jars, parchment, and a cooler with one honest ice pack can make a melon skewer feel like a restaurant plate and keep a sandwich from going limp before you even reach the park. Fancy picnic food is not about being delicate. It’s about being organized.
The smartest menu has one or two baked items, a couple of cold savory bites, something with fruit, and one dessert that doesn’t need a fork. Keep the cheese and dressed salads cool, leave the bread and crackers separate when you can, and finish with fresh herbs or citrus right before you leave. That tiny bit of last-minute attention does more than a dozen decorative touches.
Essential Equipment for These Recipes
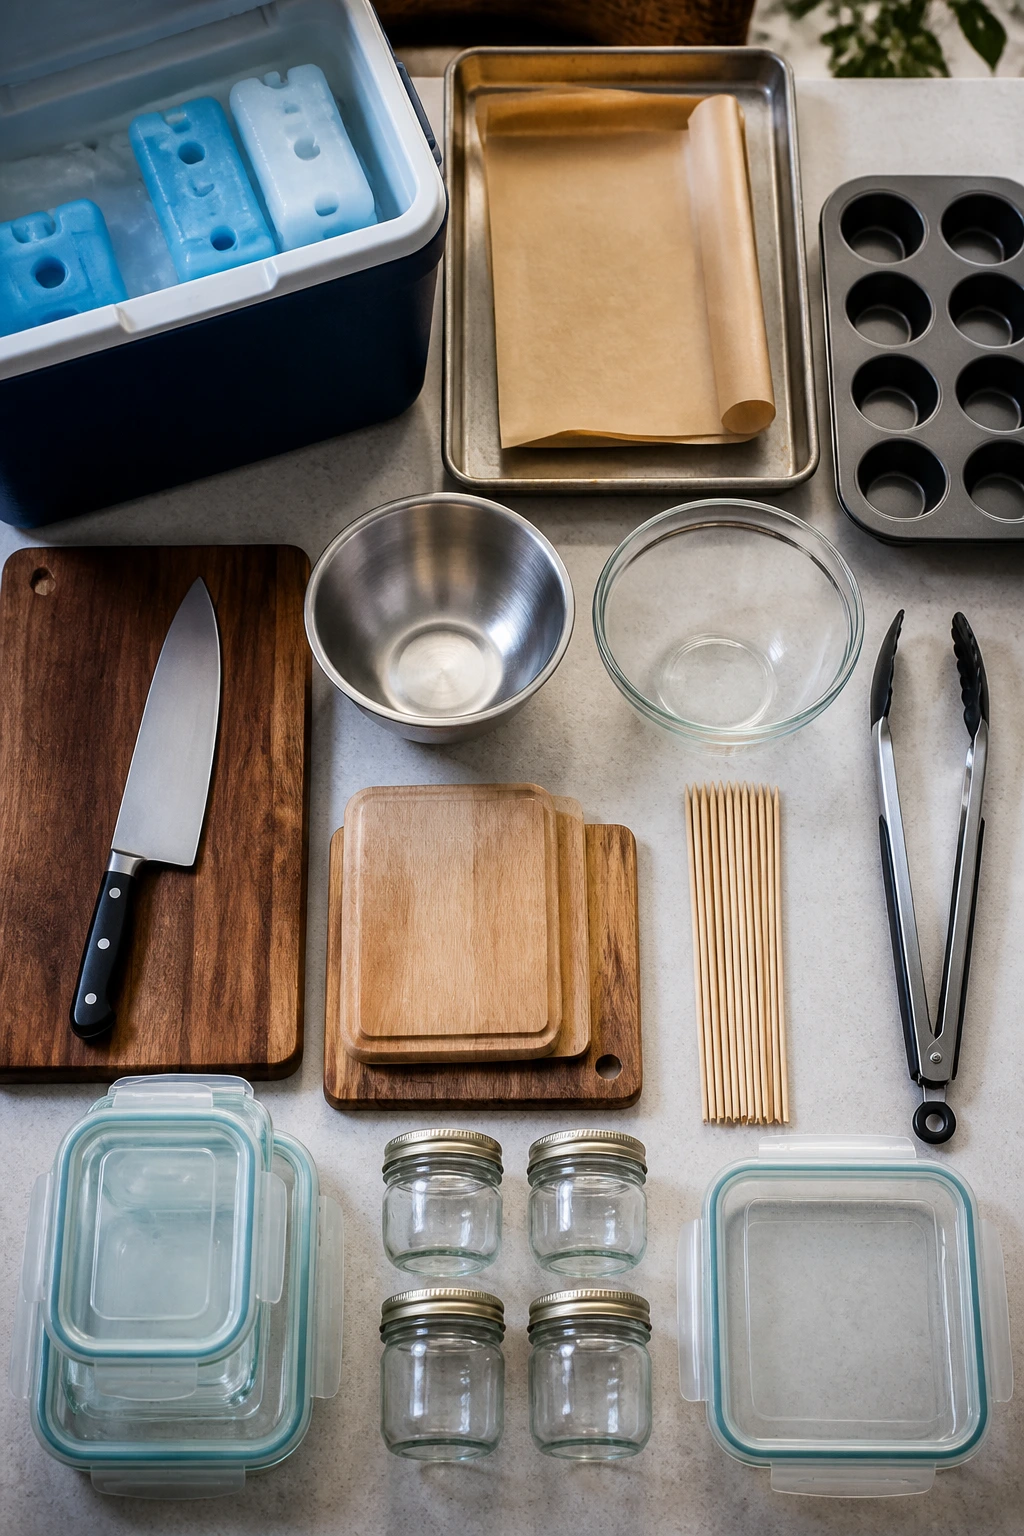
- Sharp chef’s knife: Clean cuts matter for sandwiches, fruit, pastry, and anything you want to slice neatly.
- Small cutting board: One for fruit and one for savory items is even better, especially when you’re handling seafood.
- Mixing bowls in two sizes: You’ll use them constantly for dressings, fillings, and quick tosses.
- Sheet pans: Essential for roasting grapes, chickpeas, asparagus bundles, and galettes.
- Parchment paper: Keeps pastry from sticking and helps with clean transport.
- Airtight containers: Flat, lidded containers are the difference between tidy pinwheels and crushed pinwheels.
- Small jars with lids: Best for dressings, sauces, and layered salads.
- Muffin tin: Needed for the frittata muffins and handy for any mini tart or cup recipe.
- Skewers or cocktail picks: Useful for melon skewers, Caprese bites, and halloumi fruit pairings.
- Cooler with ice packs: Not glamorous, but absolutely part of the equipment list for picnic food that contains eggs, dairy, or seafood.
- Serving tongs or small spoons: Makes the spread easier to portion without wrecking the presentation.
Smart Shopping and Ingredient Tips
The trick to picnic food is buying ingredients that can take a little time out of the fridge without sulking. Pick melons that smell fragrant at the stem end, tomatoes that feel heavy for their size, and herbs that still look perky, not tired. A wilted herb bunch can flatten a whole dish.
For cheese, I’m partial to blocks and wedges over pre-cut odds and ends. Burrata, halloumi, Brie, goat cheese, feta, and ricotta all bring something different, but they each behave better if you handle them cold and gently. If you’re buying smoked fish or shrimp, choose the freshest option you can get and keep it chilled until the last possible minute. Outdoor food safety is not the place to improvise.
Bread and pastry need their own kind of attention. Soft sandwich bread is ideal for tea sandwiches and pinwheels because it slices cleanly and doesn’t fight the filling. Puff pastry should stay cold until the oven is ready. Phyllo cups and crackers are worth buying because they save time and hold their structure. And if a fruit is barely ripe, use it for skewers or salads with salt and cheese rather than a dessert where it has to carry the flavor alone.
How to Serve These Recipes
Presentation:
Build the basket the way you’d build a good plate: tall items standing up, flat items stacked in rows, and wet items tucked into their own containers. Skewers look better laid side by side, pinwheels look better cut face-up, and jars should be opened only when people are ready to eat. A little parchment, a few herb sprigs, and one clean tray can make even simple food look intentional.
Accompaniments:
Choose one crisp thing, one soft thing, and one cold thing. Crackers or pita for the spreads, a green salad or sliced cucumbers for the rich bites, and fruit or bars for the end of the meal. If the menu includes sandwiches, keep chips or olives on the side so there’s something salty to bridge between bites.
Portions:
For a light picnic, plan 3 to 4 smaller bites per person if you’re serving a mix of items. For a full meal, give each person one substantial item — like the chicken souvlaki pita bites or the Niçoise salad jars — plus two smaller bites and dessert. Fancy picnic food works best when no single item is asked to do all the work.
Beverage Pairing:
Sparkling water with lemon is the easy default, but iced tea, dry rosé, or a lightly bitter spritz plays well with salty cheeses, fruit, and herbs. If you’re serving smoked salmon or trout, keep the drink crisp and clean. If the picnic ends with lemon bars or chocolate strawberries, coffee or black tea holds up nicely.
Additional Tips and Flavor Boosters
Flavor Enhancement:
A finishing hit of acid changes everything. Lemon zest on ricotta, a squeeze of lime over melon, or a few drops of vinegar in a grain salad can wake up cold food that has been sitting in a cooler.
Customization:
You can turn almost any savory item into a vegetarian version by swapping in roasted vegetables, beans, or marinated cheese. For the meat-heavy dishes, think in terms of balance: if the filling gets richer, the crunchy element should get fresher.
Serving Suggestions:
Fresh herbs are not decoration here; they change the smell of the food when you open the container. Mint on melon, dill on eggs, basil on tomatoes, chives on cheese — those small additions matter outdoors where aroma hits first.
Make-It-Yours:
For dairy-free picnics, lean on hummus, olive oil, and herb-heavy salads. For gluten-free spreads, use lettuce cups, skewers, rice paper rolls, or grain salads. For bigger appetites, tuck in cooked potatoes, farro, or a second layer of protein so the basket feels like dinner, not just snacks.
Make-Ahead, Storage, and Reheating Guidance
Most of these recipes are best packed cold and eaten the same day, but a few hold well for longer. Chicken salad, grain salads, pasta salads, frittata muffins, and potato salad will usually keep 3 to 4 days refrigerated in airtight containers. Sandwiches, pinwheels, and lettuce cups are better within 24 hours, especially if they contain juicy fruit, cucumber, or dressed greens. Seafood items should be kept cold and eaten the same day you make them.
Pastry-based items deserve more care. Tartlets, galettes, asparagus bundles, and phyllo cups can be baked a few hours ahead and held at room temperature for a short stretch, but they’re best the day they’re made. If you need to refresh them, warm them in a 350°F oven for 6 to 10 minutes to bring back some crispness. Do not microwave pastry unless you want it soft and a little sad.
Chocolate-dipped strawberries and lemon bars are the dessert exceptions. Strawberries should be chilled and eaten within a day, because condensation softens the coating. Lemon bars keep well for up to 4 days refrigerated, and they freeze decently for about 2 months if wrapped tightly. For all picnic food, use ice packs in the cooler and keep mayo, eggs, seafood, and dairy out of the heat as much as possible. If a dish has sat warm for more than 2 hours, or 1 hour in hot weather, it’s time to be careful.
Variations and Adaptations to Try
The Vegetarian Basket:
Build a spread around chickpea grain salad, mezze box items, stuffed peppers, Caprese skewers, and cheese tartlets. The key is not pretending vegetables need to imitate meat; give them their own texture and salt. A vegetarian picnic works best when it includes at least one crunchy item, one creamy item, and one thing with acid.
The Gluten-Free Carry-All:
Swap sandwiches and pinwheels for lettuce cups, skewers, salad jars, and deviled eggs. The baked items can be replaced with frittata muffins or phyllo cups made from gluten-free pastry if you have a reliable brand. Don’t force it with dry gluten-free bread unless you already know it behaves well in a picnic container.
The Dairy-Light Spread:
Choose the melon skewers, soba salad, shrimp cups, and chicken souvlaki bites, then keep cheese-heavy recipes to a minimum. Lemon, herbs, olives, and olive oil do enough lifting that you won’t miss every creamy element. If you want richness, add avocado or tahini instead of piling on more cheese.
The Heat-Friendly Menu:
For hotter days, lean into items that stay firm: pasta salad jars, grain salads, Caprese skewers, chicken bites, and lemon bars. Skip anything that depends on very soft cheese sitting in direct sun. The cooler becomes the star, and that’s fine.
The Kid-Calm Version:
Use milder cheese, less mustard, and fruit that stays firm, like melon cubes or strawberries. Cut everything into smaller, obvious pieces so the basket feels approachable rather than suspicious. A little honey on cheese or fruit usually works better with kids than a pile of herbs.
The Brighter, Saltier Version:
If you like bold flavor, add capers, olives, lemon zest, pickled onions, or a spoonful of Dijon to several dishes. Picnic food can handle more salt than people think, especially once it’s chilled. The trick is to add it in small, deliberate hits instead of trying to make every bite loud.
Common Mistakes to Avoid

Too much moisture in the box:
This is the classic picnic failure. Wet cucumbers, undried greens, warm roasted vegetables, and juicy fruit touching bread all create condensation, and condensation turns good food limp. The fix is simple: dry ingredients well, separate wet items, and keep sauces in their own containers until serving.
Packing everything the same way:
A cooler full of flat containers and one loose sandwich is a recipe for smashed edges. Stack flat items flat, stand jars upright, and keep fragile pastry on top. If it can roll, it will roll.
Forgetting temperature matters:
A picnic is not a buffet on the kitchen counter. Seafood, eggs, dairy, and mayo need to stay cold, and pastry needs to stay out of steam. Use the cooler, keep it closed, and serve in smaller rounds so the whole spread doesn’t sit out at once.
Overdressing salads:
Cold salads need enough dressing to taste lively, but not so much that the grains, pasta, or vegetables start swimming. Dress lightly at first, then adjust after chilling. The salad should glisten, not puddle.
Choosing the wrong bread:
Crusty bread can be excellent on its own, but many picnic fillings do better with soft sandwich bread, pita, or tortillas that fold without splitting. Pick the bread for the filling, not the other way around. A beautiful filling inside a bad loaf is still a bad sandwich.
Trying to make everything the same flavor profile:
If every dish is lemony, creamy, and herby, the basket gets monotonous fast. Mix in fruit, brine, char, and a little sweetness so the meal changes from bite to bite. That’s where the “fancy” feeling comes from — not from decoration, from contrast.
Frequently Asked Questions
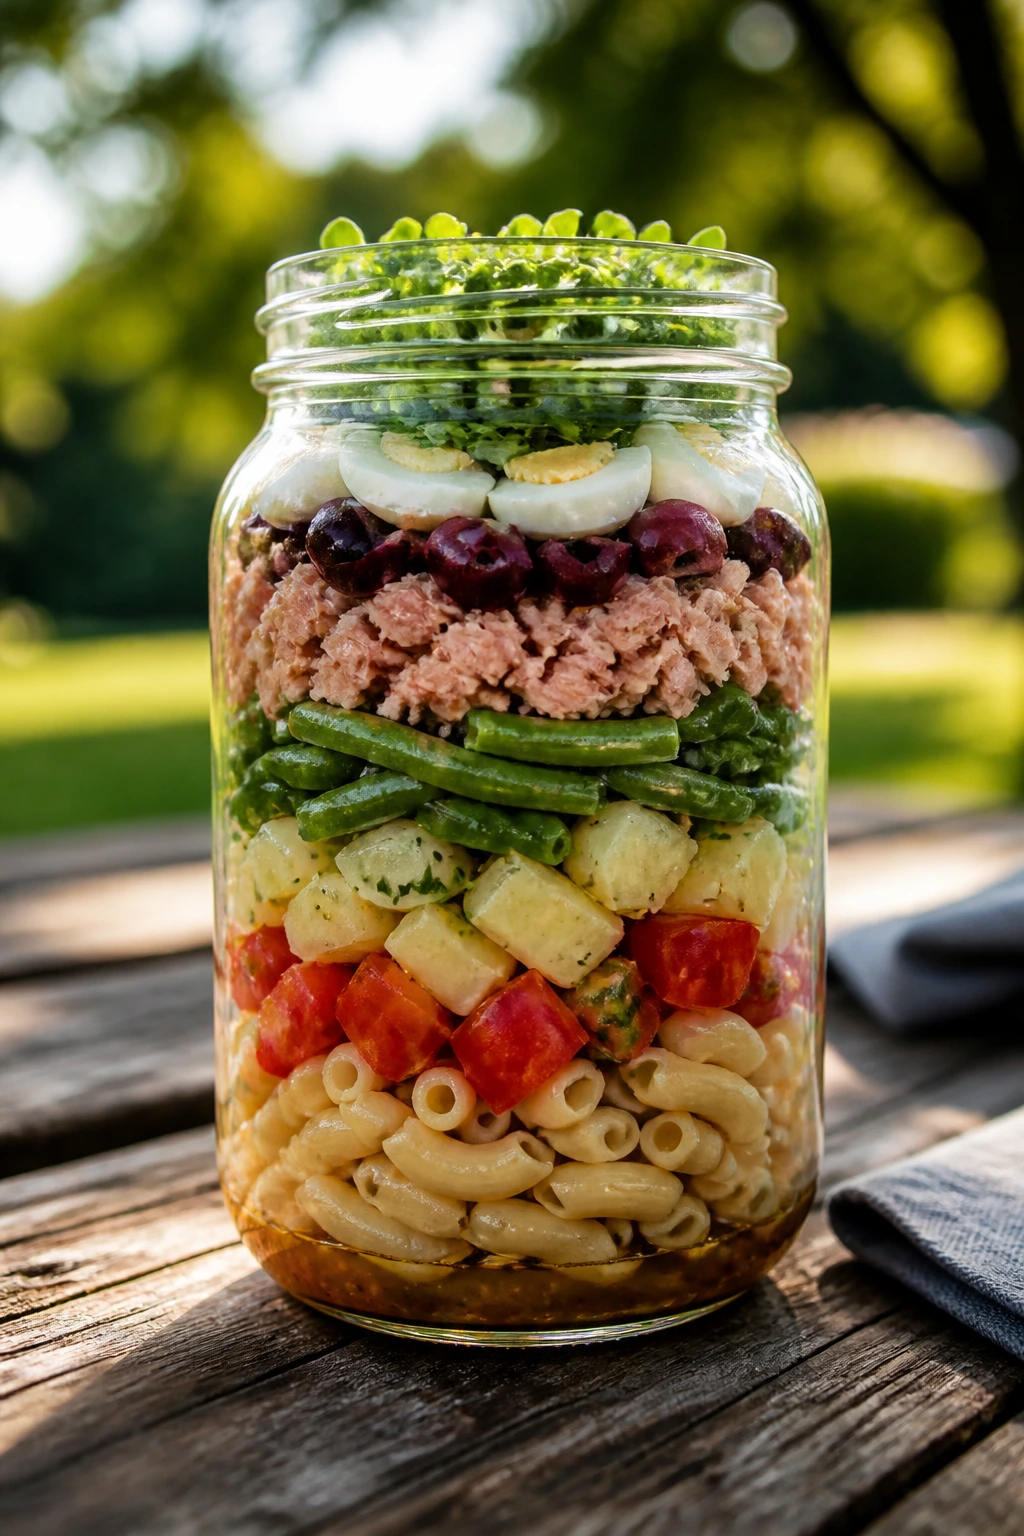
How far ahead can I make picnic food?
A few items, like lemon bars, grain salads, and frittata muffins, can be made a day or two ahead and chilled. Sandwiches, avocado items, and anything with delicate pastry are better closer to serving time. If in doubt, prep the components ahead and assemble the final dish on the day of the picnic.
What picnic foods travel best in a cooler?
Anything sturdy and cold holds up well: pasta salads, grain salads, skewers, deviled eggs, and jars. Foods that need crisp pastry or extremely fresh bread are more fragile, so keep those at the top of the cooler and pack them separately from anything wet. I’d trust a salad jar more than I’d trust a dressed sandwich.
How do I keep sandwiches from getting soggy?
Use a butter, cheese, or cream cheese barrier between the bread and the wet ingredients. Dry cucumbers, tomatoes, and fruit before they go in, and wrap the sandwiches tightly before chilling. If the filling is especially juicy, pack it separately and assemble at the picnic site.
Can I make these recipes without a cooler?
You can make some of them, but I wouldn’t risk seafood, eggs, mayo, or dairy-heavy dishes without cold storage. Fruit skewers, bars, whole fruit, crackers, nuts, and dry pastry items are safer choices if you’re going that route. A simple cooler with one ice pack makes a much wider menu possible.
What if the pastry goes soft before we eat?
Put it back in a hot oven for a few minutes if you’re at home. If you’re already outdoors, serve it as is and keep the filling side up so steam doesn’t collect underneath. Puff pastry and phyllo both lose crispness fast once they sit in a closed container, so let them cool before packing and never trap them while steaming.
Are there good picnic foods that don’t need utensils?
Yes. Skewers, pinwheels, stuffed peppers, lettuce cups, sandwich triangles, and tartlets all work well by hand. If you want a truly low-mess basket, build around those and keep the grain salads and jars as optional extras.
What should I do if the salad tastes flat after chilling?
Add a pinch more salt, a splash of vinegar or lemon juice, and a little fresh herb. Cold food often needs sharper seasoning than you think, because the fridge softens flavor. Taste right before packing and again just before serving.
Can I swap dairy or meat ingredients in these recipes?
Usually, yes, but keep the texture in mind. If you remove a creamy element, replace it with something that still gives body — hummus, avocado, tahini, or a good olive oil dressing. If you remove meat, add another source of salt and heft so the food doesn’t feel like a side dish pretending to be dinner.
A Cooler Full of Good Ideas
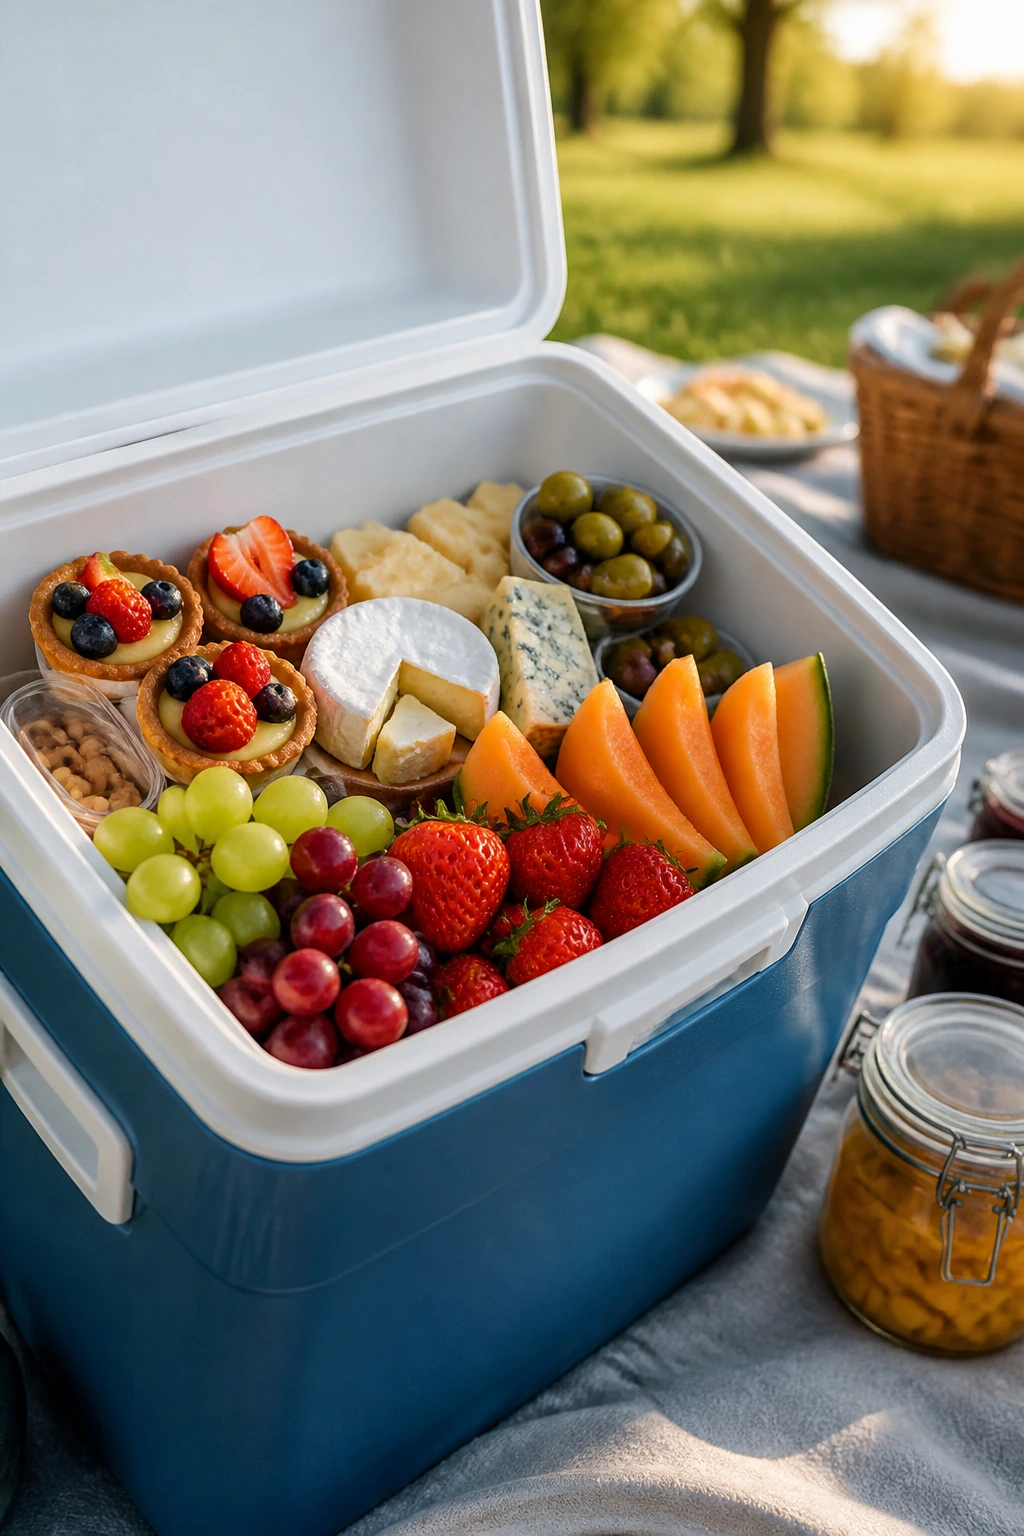
Picnic food gets better when it stops pretending it has to be simple. A few sharp cheeses, one or two fruit pairings, something crisp from the oven, and a dessert that doesn’t melt into the napkin — that’s a picnic worth carrying. The food can be casual. It just shouldn’t be careless.
I like a basket that opens with color, texture, and a little surprise. Prosciutto with melon. Egg salad with crunch. A tartlet that still has a crisp edge when you lift it with your fingers. Pack the cooler well, keep the wet things separate, and let the evening do the rest.