
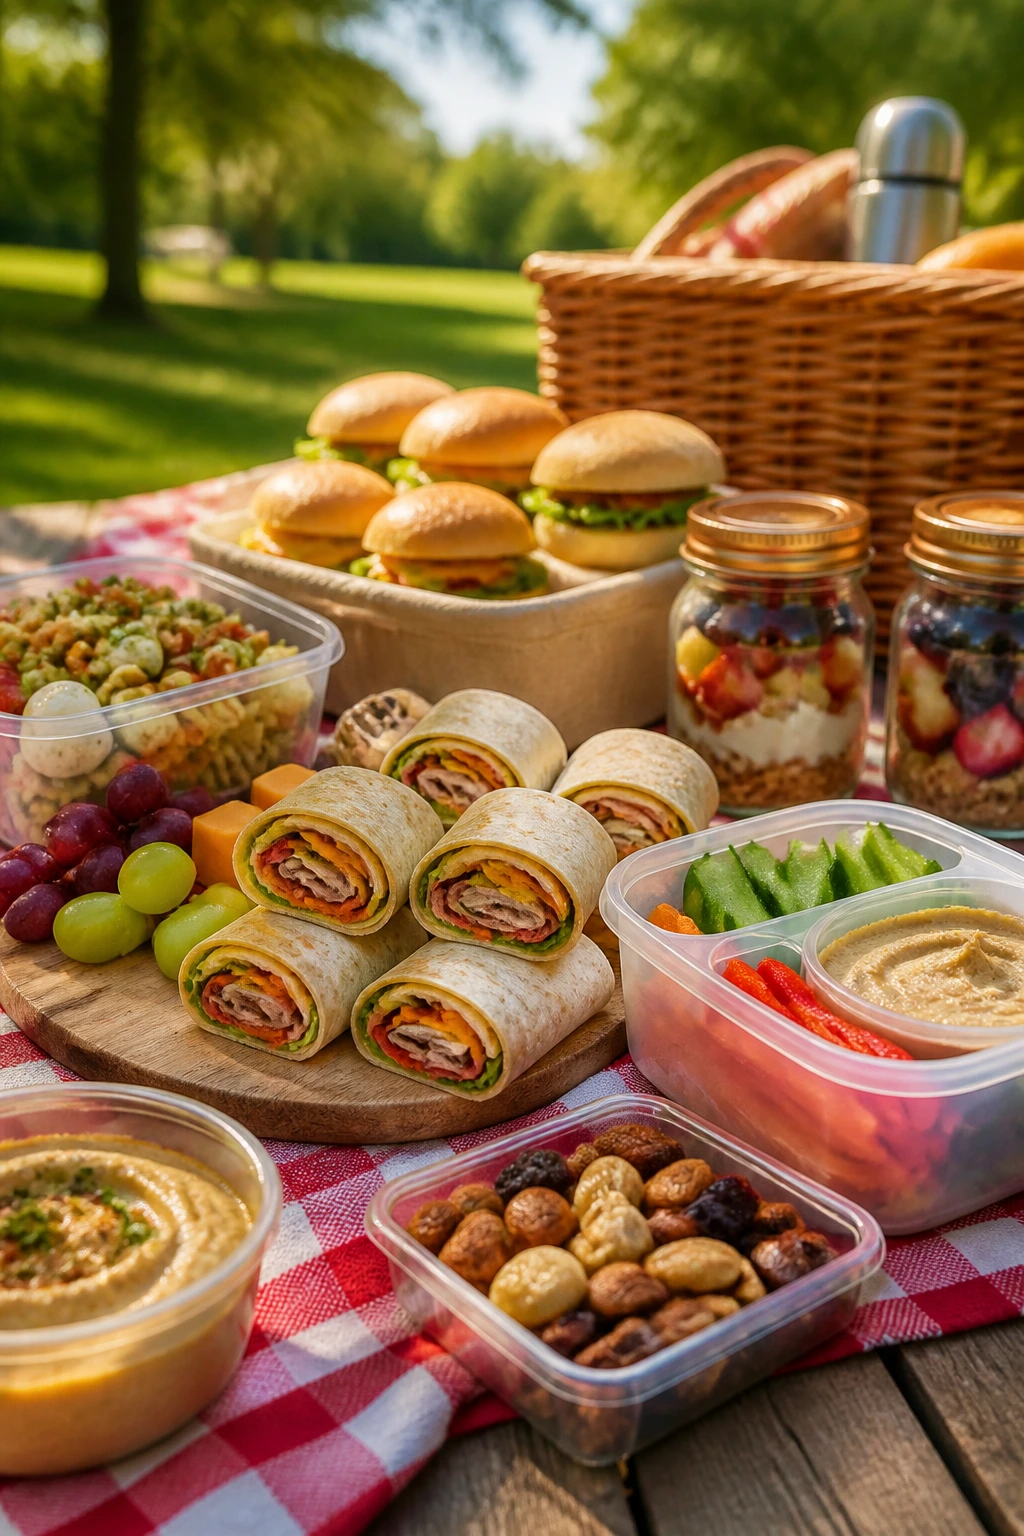
A picnic can go wrong in three minutes. One warm cooler, one soggy sandwich, one salad that leaks through the foil, and the whole spread feels like a chore instead of a break. The best outdoor picnic food ideas do the opposite: they travel cleanly, taste good cold or at room temperature, and still feel worth unpacking after the long walk from the car, the blanket, and the fight with the last stubborn lid.
A cold drink changes the game, too. Lemonade, iced tea, sparkling water, a crisp lager, a light spritz — all of them make salty, tangy, crunchy picnic food taste sharper. That means the smartest picnic basket is built around food that can handle a little chill, a little heat, and a little jostling without turning limp or muddy.
So the list below leans hard into foods that know how to behave outside: hand-held sandwiches, sturdy salads, skewers, dips, bite-size sweets, and a few things that get better after they’ve had time to rest. If you’ve ever opened a cooler and found bread damp from a too-wet filling, you already know why the details matter.
Why These Picnic Food Ideas Hold Up So Well
-
Built for the cooler: These picnic recipes keep their shape after an hour or two in transit, which matters more than fancy garnish when you’re eating outdoors.
-
Easy to eat with one hand: A good picnic plate should leave one hand free for a drink, a napkin, or the kid who keeps stealing the chips.
-
Flavor that wakes up cold: Acid, salt, herbs, and a little fat make chilled food taste lively instead of flat.
-
Low-mess packing: Several of these ideas can be boxed separately, so bread stays dry and dressings don’t drift into everything else.
-
Mix-and-match friendly: A basket with one sandwich, one salad, one crunchy snack, and one sweet thing feels complete without becoming heavy.
-
Better after a short rest: Quite a few of these actually taste better after 20 to 30 minutes in the fridge, once the seasonings settle in.
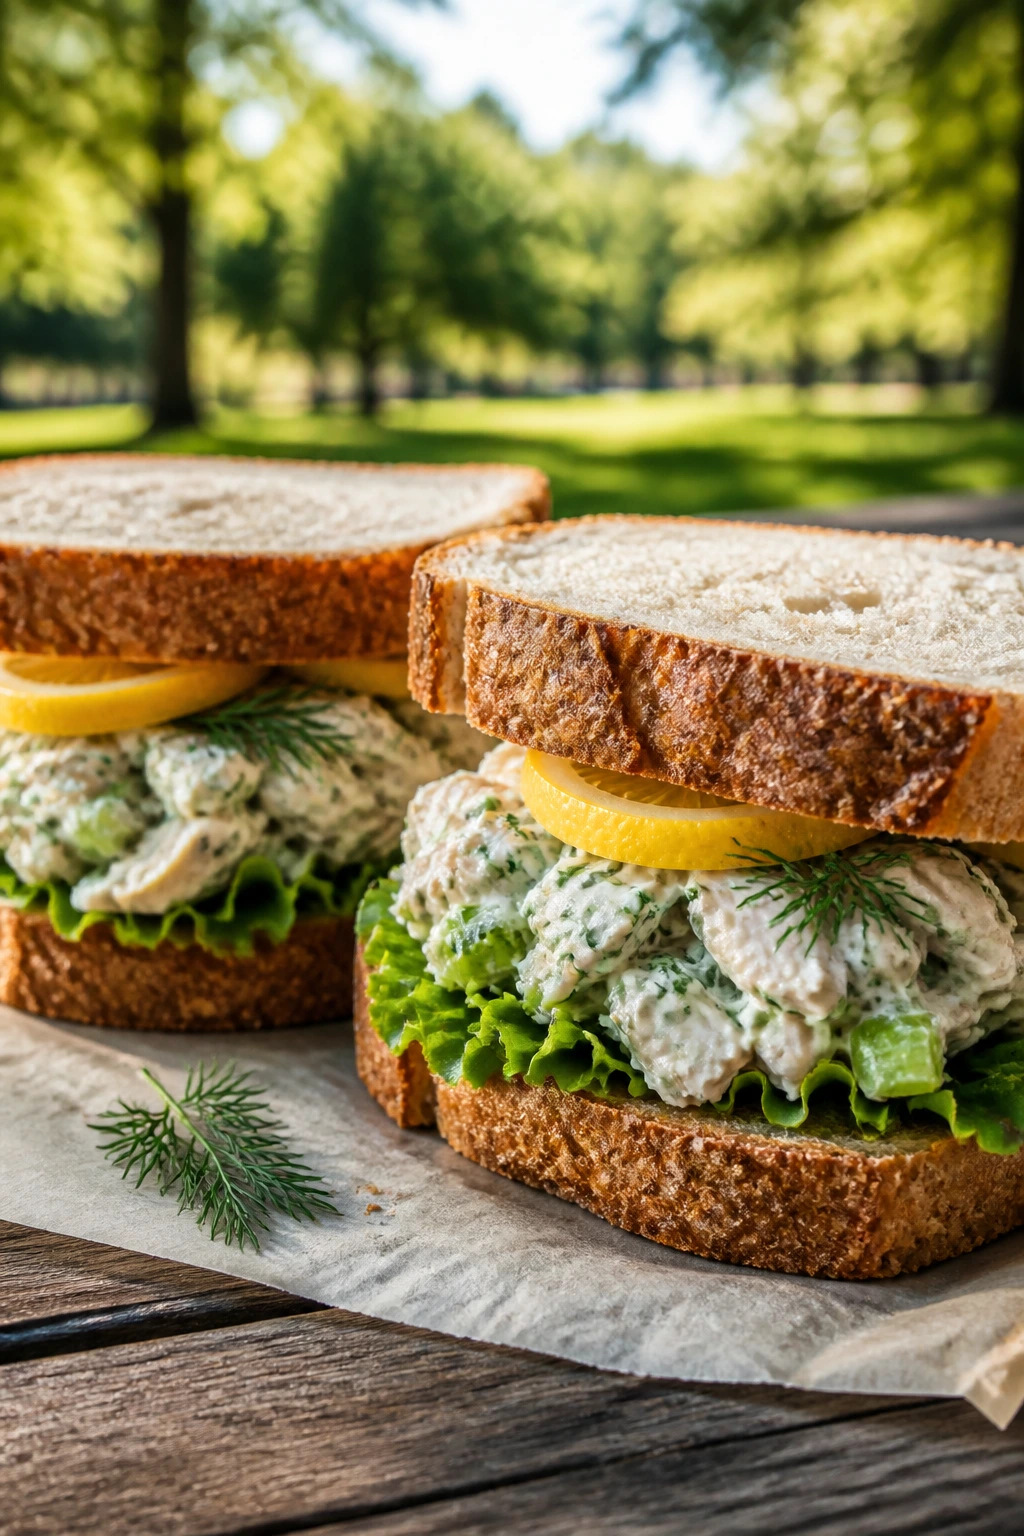
1. Lemon-Herb Chicken Salad Sandwiches
Cool, creamy, and a little bright from lemon zest, this chicken salad belongs in a picnic basket. The celery gives it a clean crunch, the dill keeps it from tasting heavy, and the cold sandwich holds up much better than a warm deli sub that sweats in the sun.
Why It Works:
Chicken salad is one of those picnic foods that gets better when it chills for 30 minutes. The lemon wakes up the mayo, and the herbs keep the filling from feeling flat beside a cold drink like iced tea or a dry cider.
Key Ingredients:
- 3 cups cooked shredded chicken
- 1/2 cup mayonnaise
- 2 tablespoons plain Greek yogurt
- 1 tablespoon lemon juice
- 1 teaspoon lemon zest
- 1 celery stalk, finely diced
- 2 tablespoons chopped dill
- 8 slices sturdy sandwich bread
- Salt and black pepper
Quick Steps:
- Mix the chicken, mayo, yogurt, lemon juice, zest, celery, dill, salt, and pepper in a bowl until evenly coated.
- Chill the filling for 20 to 30 minutes so the flavor settles and the texture firms up.
- Spoon onto bread, cut into halves or triangles, and wrap tightly in parchment.
Equipment for This Recipe:
- Large mixing bowl
- Cutting board and sharp knife
How to Serve This Dish:
Pile the sandwiches next to kettle chips and a few dill pickles. They’re best with a bottle of sparkling lemonade or unsweetened iced tea, because the acidity keeps the creamy filling from feeling heavy.
Pro Tips for This Recipe:
- Use chicken that’s fully cooled before mixing or the filling will loosen.
- Toast the bread lightly if your picnic is a long drive.
- Add a spoon of chopped pickle if you want a sharper, brinier finish.
Variations on This Dish:
- Grape Crunch Version: Fold in halved red grapes for sweetness and a juicier bite.
- Dijon Herbed Version: Swap some mayo for Dijon if you want a more savory, lunch-counter style filling.
Common Mistakes to Avoid with This Dish:
- Don’t over-mix the chicken or it turns pasty.
- Don’t build the sandwiches too far ahead unless you’re wrapping them tightly; bread softens fast.
2. Tomato, Mozzarella, and Basil Skewers
Three ingredients, one skewer, zero fuss. These little stacks taste like a caprese salad that learned how to travel, and they look clean on a picnic board even when the rest of the basket is chaos.
Why It Works:
Cherry tomatoes stay juicy, mozzarella pearls stay creamy, and basil gives you that sharp, fresh smell the second you unwrap the container. A drizzle of olive oil and balsamic glaze makes them pair neatly with sparkling water or a cold lager.
Key Ingredients:
- 24 cherry tomatoes
- 24 mini mozzarella balls
- 24 basil leaves
- 2 tablespoons olive oil
- 1 tablespoon balsamic glaze
- Flaky salt
Quick Steps:
- Thread one tomato, one basil leaf, and one mozzarella ball onto each skewer.
- Arrange on a tray and drizzle with olive oil.
- Finish with balsamic glaze and a pinch of flaky salt just before packing.
Equipment for This Recipe:
- Small skewers or toothpicks
- Serving platter
How to Serve This Dish:
Set these beside crackers or crusty bread so the juices have something to soak into. They’re especially good with a cold glass of lemonade or a dry white spritzer.
Pro Tips for This Recipe:
- Tear oversized basil leaves so they don’t overpower the skewer.
- Keep the glaze separate until the last minute if you’re packing for travel.
- Buy the smallest mozzarella pearls you can find; they stay neat.
Variations on This Dish:
- Peach Caprese Swap: Add a thin peach slice between the tomato and mozzarella for sweeter edges.
- Prosciutto Upgrade: Wrap the skewer with a ribbon of prosciutto for a saltier, more filling bite.
Common Mistakes to Avoid with This Dish:
- Don’t drown them in balsamic glaze or they turn sticky.
- Don’t pack them with wet basil leaves; pat them dry first.
3. Deviled Eggs with Smoked Paprika
Deviled eggs are old-school picnic food for a reason. The filling stays cool, the whites hold their shape, and the smoked paprika gives you a little smoky edge that feels right next to a cold drink with bubbles.
Why It Works:
Eggs can be boiled ahead, chilled, and filled later, which is exactly the sort of split-task picnic cooking that saves your sanity. The mustard and vinegar cut through the yolk richness, so these don’t taste dense after a few bites.
Key Ingredients:
- 6 large eggs
- 3 tablespoons mayonnaise
- 1 teaspoon Dijon mustard
- 1 teaspoon white vinegar
- Salt and black pepper
- Smoked paprika
- Chopped chives
Quick Steps:
- Boil the eggs for 10 to 11 minutes, then move them to ice water for 10 minutes.
- Peel, halve, and remove the yolks.
- Mash the yolks with mayo, mustard, vinegar, salt, and pepper, spoon into the whites, and dust with paprika and chives.
Equipment for This Recipe:
- Medium saucepan
- Slotted spoon
- Small piping bag or zip-top bag
How to Serve This Dish:
Pack them in a shallow container lined with lettuce so they don’t roll around. A cold pilsner or a glass of iced tea works well because both cut through the yolk filling.
Pro Tips for This Recipe:
- Start the eggs in simmering, not violently boiling, water for cleaner whites.
- Peel under running water if the shells cling stubbornly.
- Fill the eggs after they’re fully cold so the yolk mixture stays firm.
Variations on This Dish:
- Relish Version: Stir in a teaspoon of sweet relish for a softer, slightly sweeter filling.
- Chive-and-Cheddar Version: Add finely grated cheddar for a denser, snackier egg.
Common Mistakes to Avoid with This Dish:
- Don’t overcook the yolks; they’ll get chalky and gray.
- Don’t fill warm whites, or the filling slides and loosens.
4. Cucumber-Dill Potato Salad
This is the potato salad I reach for when mayo alone would feel too heavy. The cucumber brings crunch, the dill brings a green snap, and the mustard keeps the whole bowl from going sleepy after an hour in the cooler.
Why It Works:
Baby potatoes hold their shape better than big russets, and a yogurt-mayo dressing clings without turning greasy. The salad tastes especially good after a half hour of chilling, which makes it ideal alongside lemonade or a cold wheat beer.
Key Ingredients:
- 2 pounds baby potatoes, halved
- 1 cup cucumber, diced
- 1/3 cup mayonnaise
- 1/3 cup plain Greek yogurt
- 1 tablespoon Dijon mustard
- 2 tablespoons chopped dill
- 2 tablespoons chopped scallions
- Salt and black pepper
Quick Steps:
- Boil the potatoes in salted water for 12 to 15 minutes until just tender.
- Drain, cool for 10 minutes, then toss with cucumber, mayo, yogurt, mustard, dill, scallions, salt, and pepper.
- Chill at least 30 minutes before packing.
Equipment for This Recipe:
- Large pot
- Colander
- Mixing bowl
How to Serve This Dish:
Scoop it into a shallow bowl and finish with more dill on top. It pairs well with grilled chicken, fried chicken, or a can of sparkling water with lemon.
Pro Tips for This Recipe:
- Salt the potato water well; bland potatoes make the whole salad fall flat.
- Cool the potatoes slightly before dressing them so the yogurt doesn’t thin out.
- Cut the cucumber small so it adds crunch without flooding the bowl.
Variations on This Dish:
- Pickle Dill Version: Replace half the cucumber with diced dill pickles for more tang.
- Sour Cream Version: Swap the yogurt for sour cream if you want a richer finish.
Common Mistakes to Avoid with This Dish:
- Don’t dress hot potatoes or the sauce can turn loose.
- Don’t leave the skins unevenly cooked; cut the potatoes the same size.
5. Pimento Cheese with Crackers and Celery
Sharp cheddar, creamy cheese, and sweet little pimentos are hard to beat when you want something salty next to a cold drink. It spreads cleanly, scoops well, and eats like a Southern snack board that never needs a knife after the first swipe.
Why It Works:
Pimento cheese is sturdy enough for a cooler and flexible enough to become a dip, sandwich filling, or cracker topping. The cream cheese gives body, while the cheddar keeps the flavor bold enough for ginger ale or a crisp lager.
Key Ingredients:
- 2 cups shredded sharp cheddar
- 4 ounces cream cheese, softened
- 1/4 cup mayonnaise
- 1/4 cup diced pimentos, drained
- 1 teaspoon hot sauce
- 1/4 teaspoon garlic powder
- Salt and black pepper
- Crackers and celery sticks for serving
Quick Steps:
- Stir the cheddar, cream cheese, mayo, pimentos, hot sauce, garlic powder, salt, and pepper until thick and spreadable.
- Chill for 20 minutes so it firms up.
- Serve with crackers and celery, or spoon into small containers for packing.
Equipment for This Recipe:
- Mixing bowl
- Rubber spatula
How to Serve This Dish:
Put the cheese in a shallow container and keep the crackers separate so they stay crisp. Cold cola, lemonade, or sweet tea all work, depending on whether you want sharp, sweet, or smoky beside it.
Pro Tips for This Recipe:
- Shred the cheddar yourself if you want a smoother texture.
- Add a spoonful of minced jalapeño if you want more bite.
- Let it sit a few minutes after chilling so it spreads without tearing crackers.
Variations on This Dish:
- Bacon Pimento Version: Fold in crisp bacon crumbles right before serving.
- Mild Picnic Version: Skip the hot sauce and use extra paprika for warmth without heat.
Common Mistakes to Avoid with This Dish:
- Don’t use oily pre-shredded cheese if you want a smooth dip.
- Don’t pack it beside warm items; it softens fast.
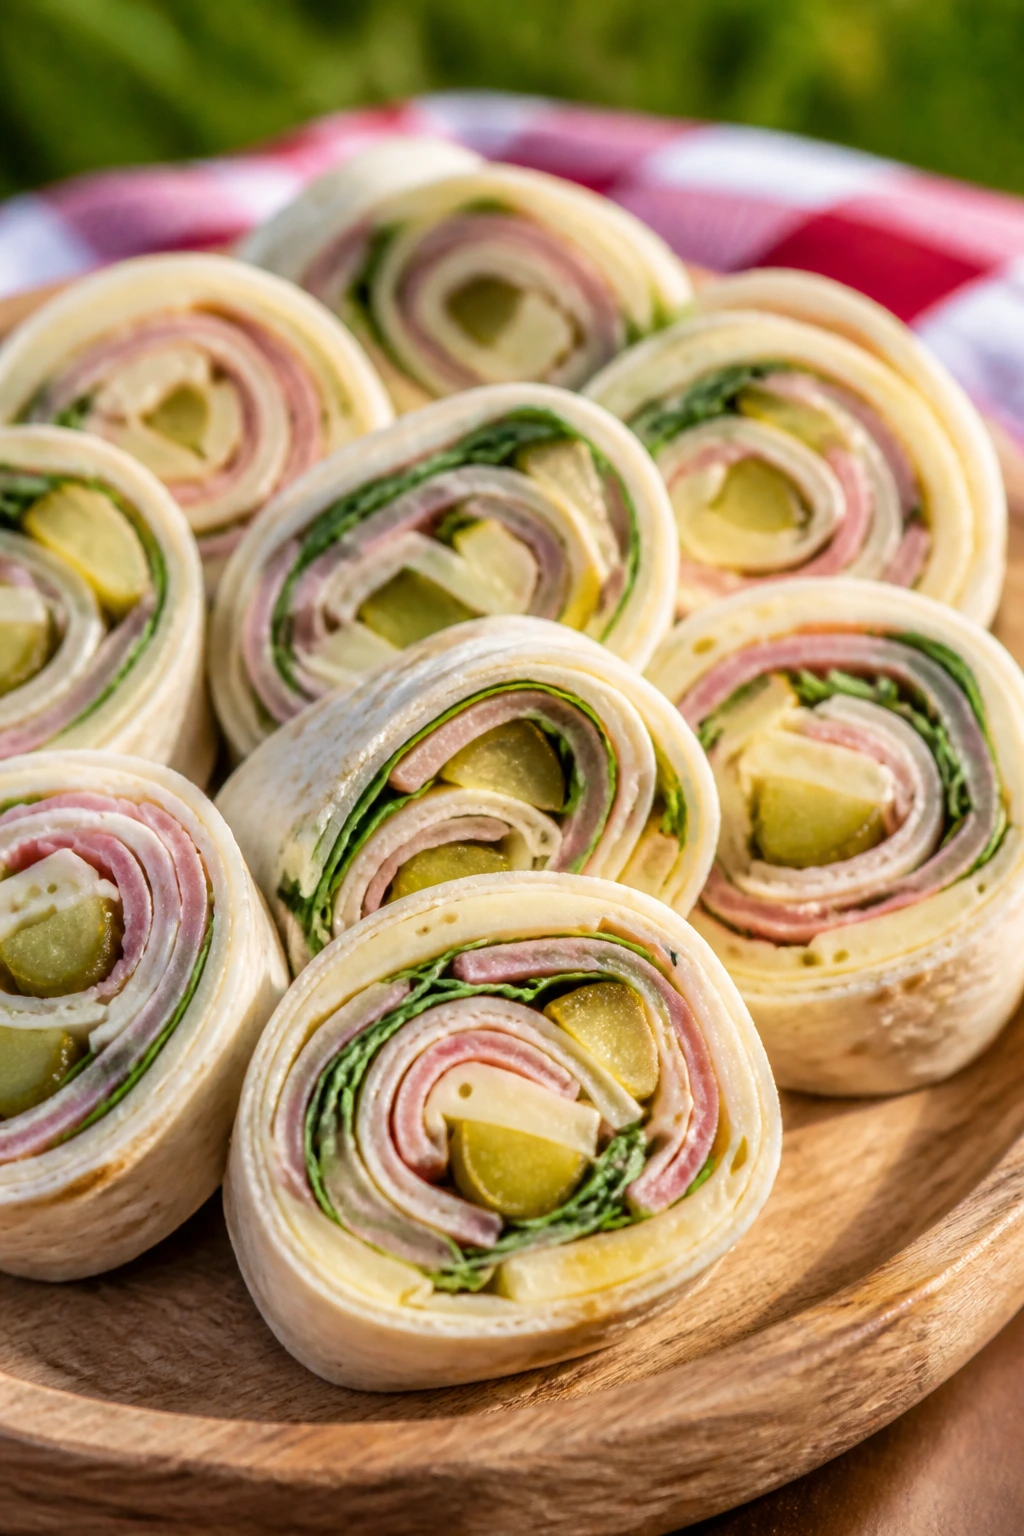
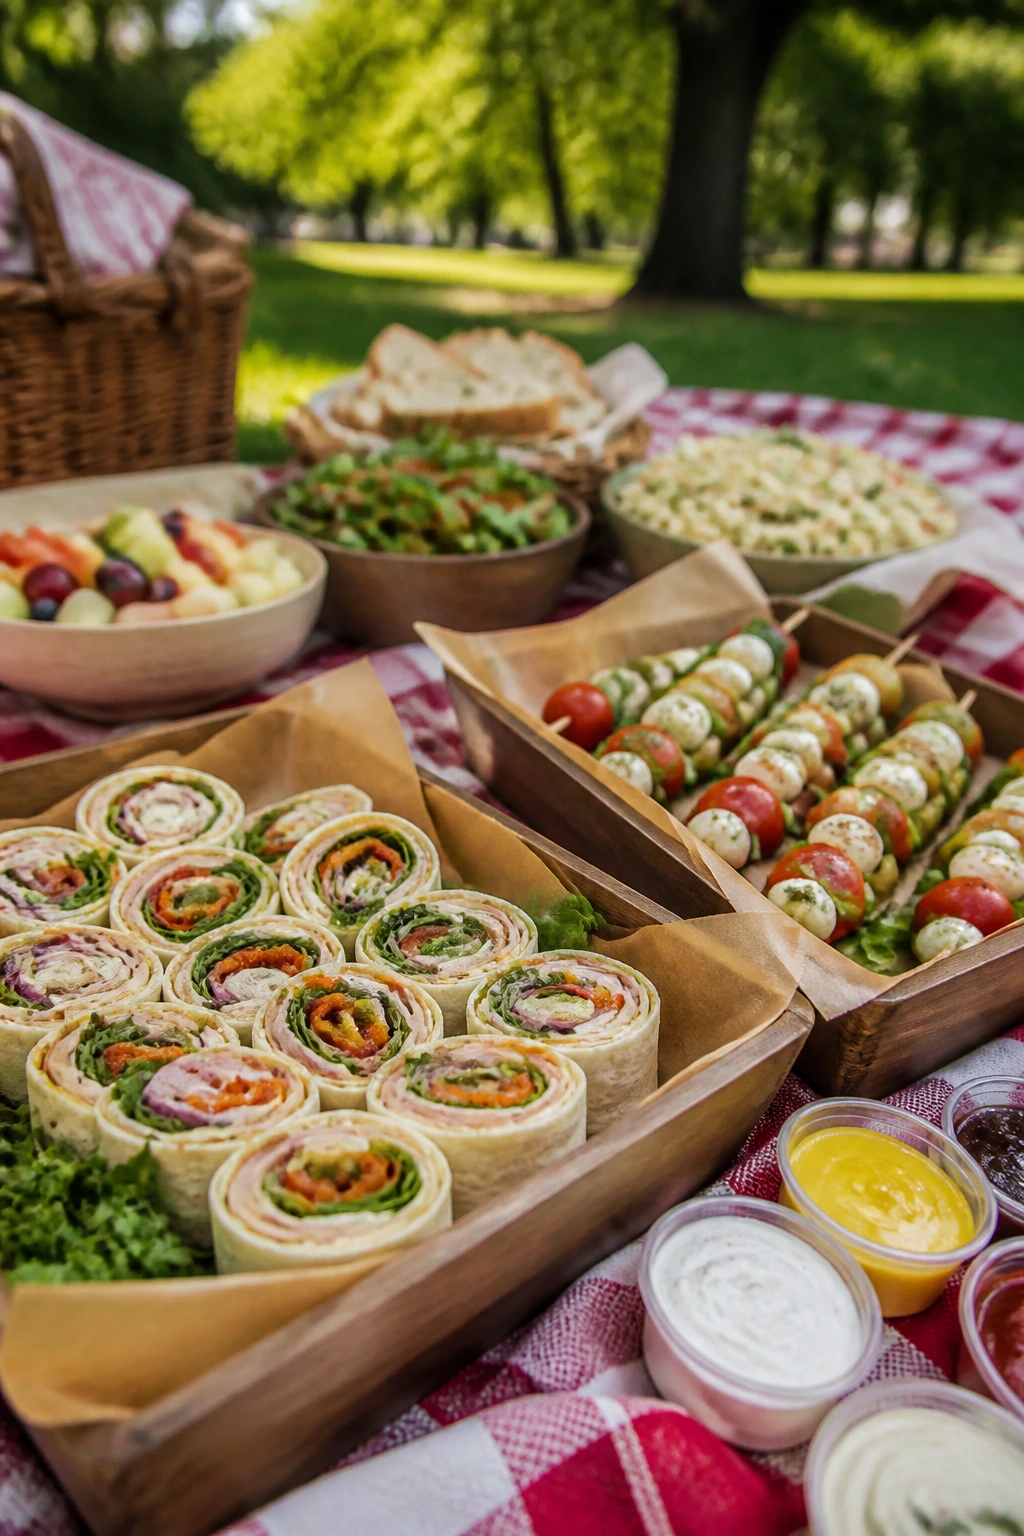
6. Turkey, Cheddar, and Pickle Wraps
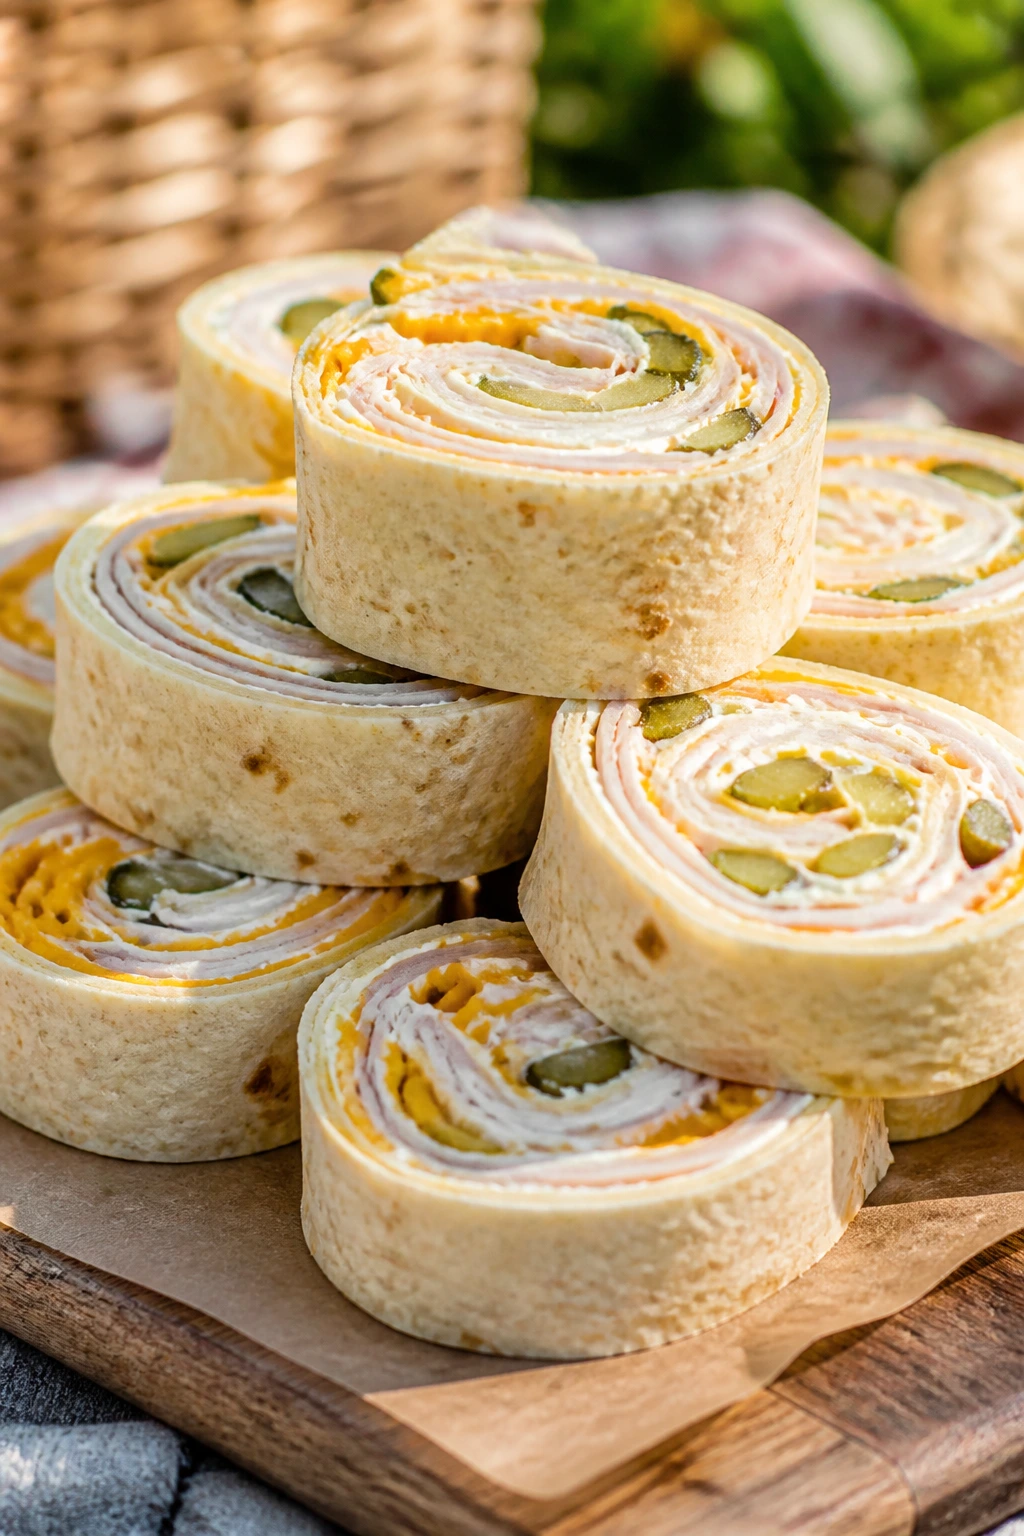
Wraps beat ordinary sandwiches when you want something that won’t fall apart after one turn in the cooler. The pickle gives a sharp crunch, the cheddar adds salt, and the cream cheese holds the whole thing together like edible tape.
Why It Works:
Tortillas flex better than sliced bread, so these survive transport without crumbling. The pickle brine keeps the filling lively, and a cold drink like dill soda, sparkling water, or iced tea makes the salt pop.
Key Ingredients:
- 4 large flour tortillas
- 8 ounces sliced turkey
- 8 ounces sliced cheddar
- 1/2 cup cream cheese, softened
- 2 tablespoons mustard
- 4 dill pickles, sliced lengthwise
- 1 cup shredded lettuce
Quick Steps:
- Mix the cream cheese and mustard.
- Spread over each tortilla, then layer turkey, cheddar, pickles, and lettuce.
- Roll tightly, chill 15 minutes, then slice into pinwheel-style rounds or halves.
Equipment for This Recipe:
- Cutting board
- Sharp serrated knife
How to Serve This Dish:
Wrap halves in parchment and pack with a few chips or grapes. A cold unsweetened tea or a crisp soda keeps the pickle and cheddar from feeling too rich.
Pro Tips for This Recipe:
- Dry the pickle slices so the tortillas don’t get slippery.
- Roll tightly and slice after chilling or the wrap will squish.
- Use the thick, soft tortillas from the deli section if you can.
Variations on This Dish:
- Ham Swap: Use ham instead of turkey for a saltier, lunchbox-style wrap.
- Ranch Version: Replace mustard with ranch seasoning mixed into cream cheese.
Common Mistakes to Avoid with This Dish:
- Don’t overfill the wrap or it tears when you slice it.
- Don’t skip the chill time; it makes clean cuts possible.
7. Watermelon, Feta, and Mint Salad
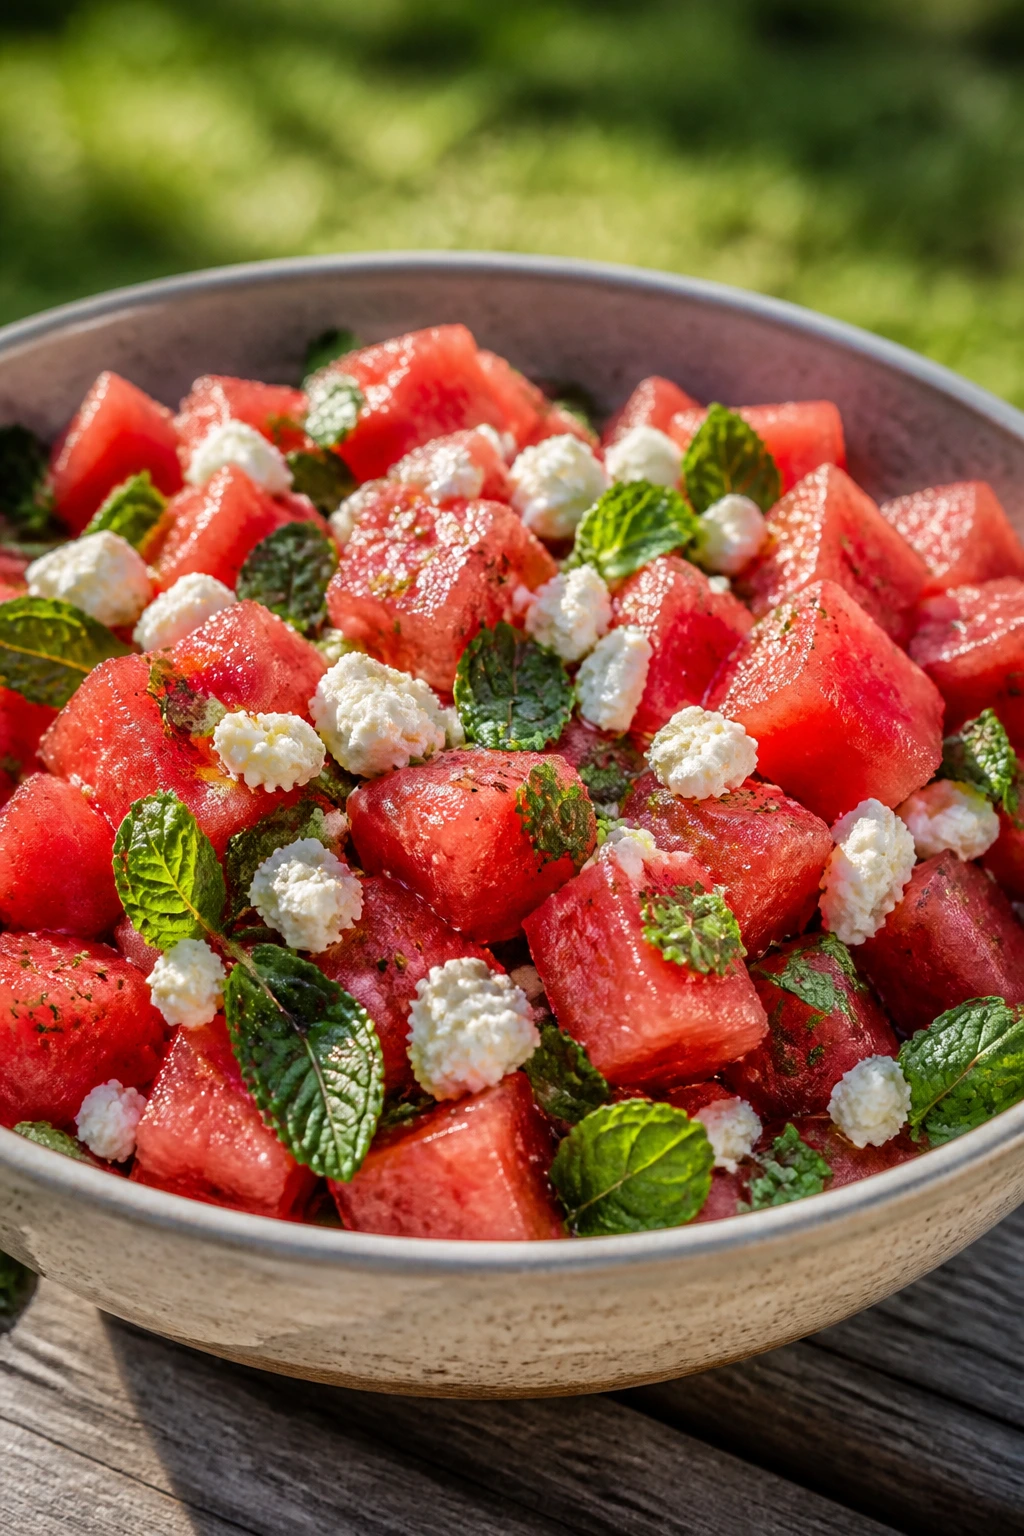
This is the picnic bowl that disappears first. Watermelon brings the cold juice, feta brings the salt, and mint gives that bright, cooling smell that feels almost made for a blanket in the grass.
Why It Works:
The sweet-salty contrast is the whole point here. Add lime and a little black pepper, and suddenly the salad plays very nicely with sparkling water or a dry rosé.
Key Ingredients:
- 6 cups watermelon cubes
- 1 cup feta, crumbled
- 1/4 cup fresh mint leaves
- 1 tablespoon lime juice
- 1 teaspoon olive oil
- Black pepper
Quick Steps:
- Cube the watermelon and pat it dry if it’s especially juicy.
- Toss gently with feta, mint, lime juice, olive oil, and black pepper.
- Chill briefly, then serve cold.
Equipment for This Recipe:
- Large bowl
- Sharp knife
How to Serve This Dish:
Serve it in a wide bowl so the feta stays visible and doesn’t sink. It’s a strong match for salty crackers or grilled chicken and a cold citrus soda.
Pro Tips for This Recipe:
- Add the mint at the end so it stays green.
- Don’t overmix or the feta will smear into the fruit.
- Use seedless watermelon to keep the salad easy to eat.
Variations on This Dish:
- Cucumber Cooler Version: Add thin cucumber slices for more crunch.
- Chili-Lime Version: Dust with chile flakes and extra lime for a sharper finish.
Common Mistakes to Avoid with This Dish:
- Don’t salt it heavily or the watermelon will weep too much.
- Don’t make it too far ahead unless you’re okay with a little juice in the bowl.
8. BBQ Chicken Sliders with Vinegar Slaw
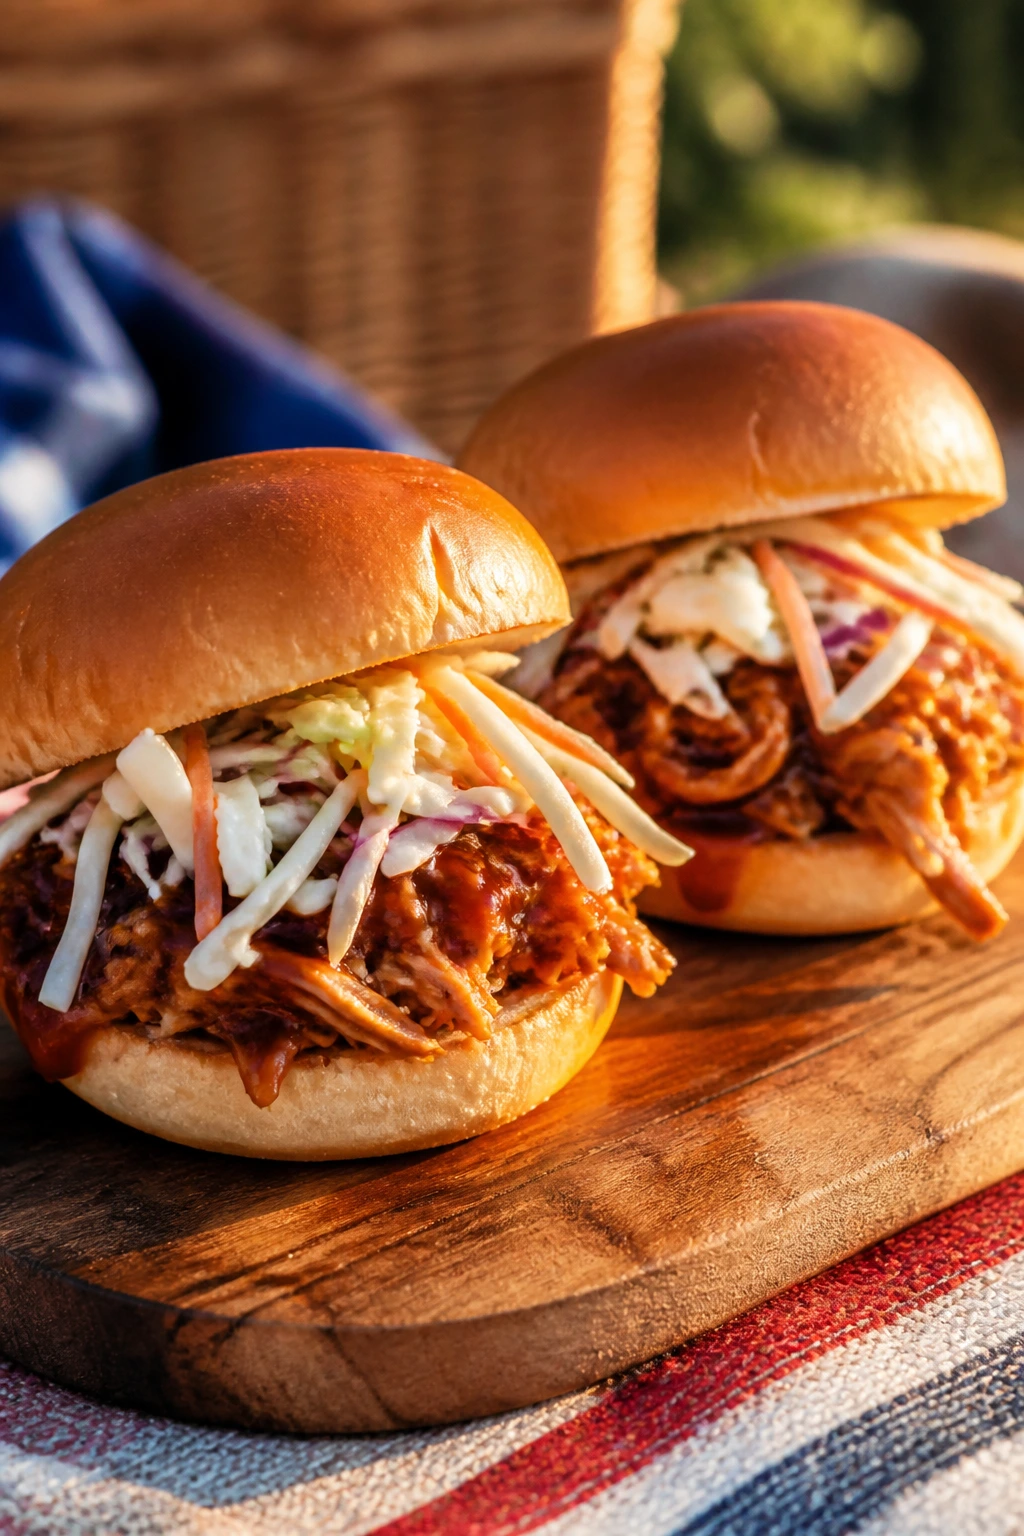
These sliders are messy in the good way, not the collapse-in-your-hands way. The BBQ chicken gives you smoke and sweetness, and the vinegar slaw keeps the sandwich from tasting like a one-note sauce bomb.
Why It Works:
Small buns are easier to pack than full sandwiches, and shredded chicken absorbs sauce without going stringy. The slaw adds crunch even after a little travel time, which is why these go so well with iced cola or a cold pale ale.
Key Ingredients:
- 3 cups cooked shredded chicken
- 1 cup BBQ sauce
- 8 slider buns
- 2 cups shredded cabbage
- 2 tablespoons apple cider vinegar
- 1 tablespoon mayonnaise
- 1 teaspoon sugar
- Salt and pepper
Quick Steps:
- Warm the chicken with BBQ sauce until coated and steaming.
- Toss the cabbage with vinegar, mayo, sugar, salt, and pepper.
- Split the buns, fill with chicken and slaw, and wrap tightly.
Equipment for This Recipe:
- Skillet or saucepan
- Mixing bowl
How to Serve This Dish:
Serve two sliders per person with chips or corn salad. A cold lager, sweet tea, or ginger beer stands up to the smoke and vinegar nicely.
Pro Tips for This Recipe:
- Keep the slaw dry enough to crunch; too much dressing makes the buns soggy.
- Use a thicker BBQ sauce so it clings to the chicken.
- Toast the buns lightly if you’re packing them for later.
Variations on This Dish:
- Spicy Slider Version: Add hot sauce or chopped pickled jalapeños to the chicken.
- Pulled Pork Swap: Use pulled pork if that’s what you have; the slaw still works.
Common Mistakes to Avoid with This Dish:
- Don’t drown the chicken in sauce or it leaks through the bun.
- Don’t pack hot sliders in a sealed container; steam softens everything.
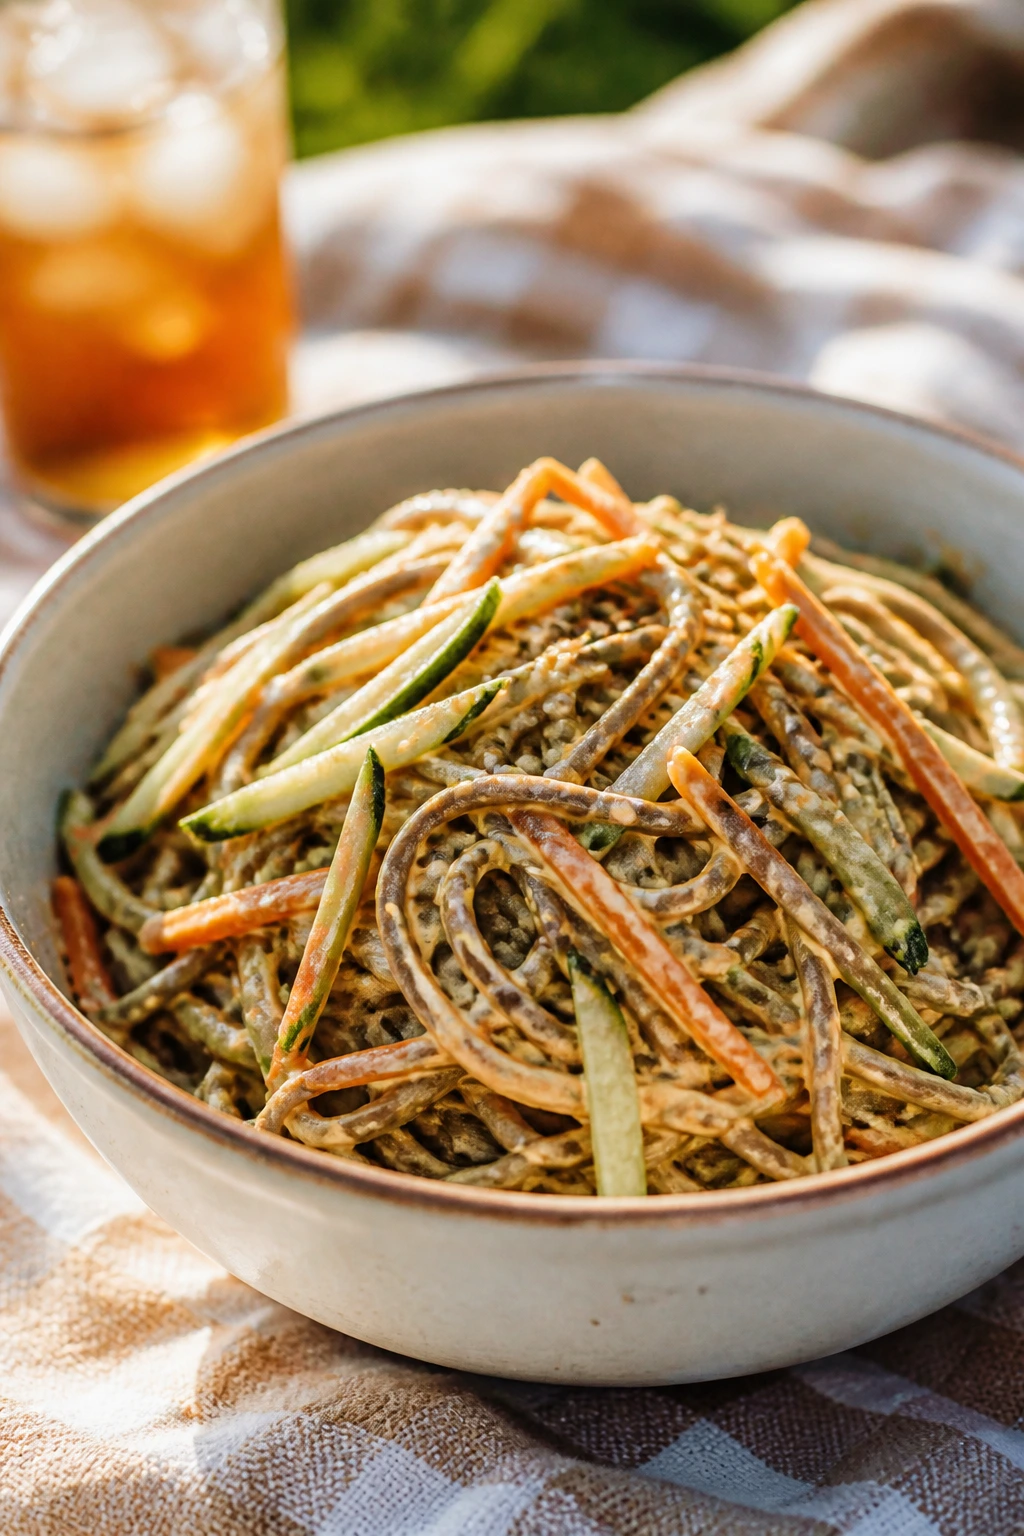
9. Cold Sesame Noodle Salad
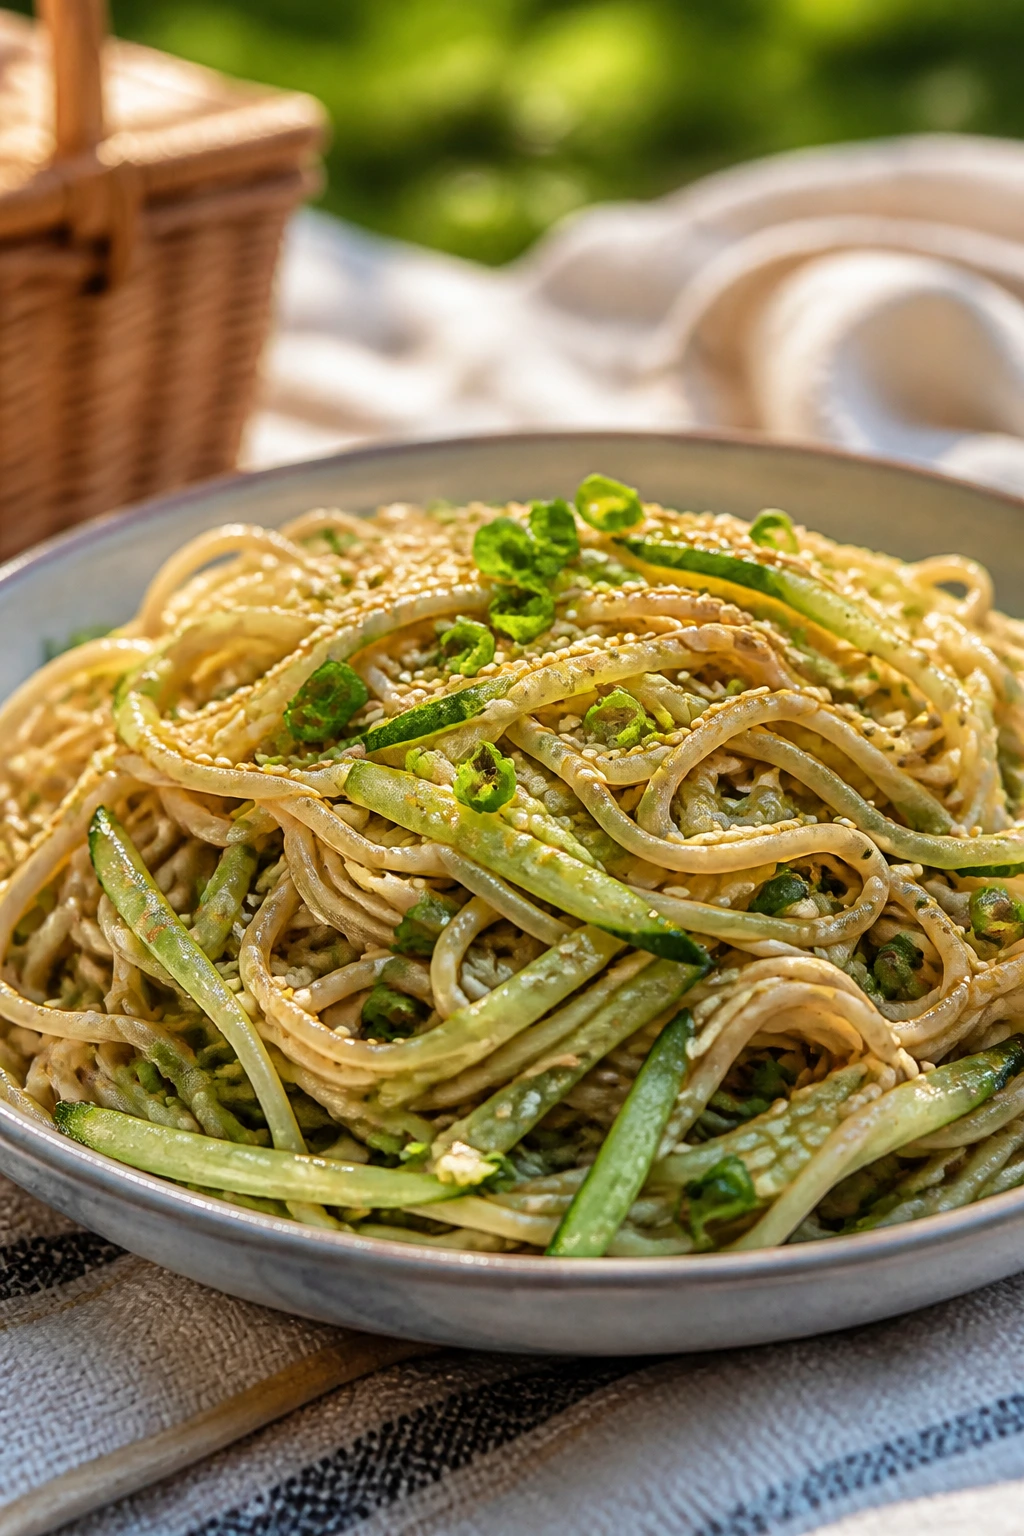
Cold noodles are one of the best picnic moves because they don’t fight the cooler. Peanut butter, soy sauce, and sesame oil make a dressing that tastes bold even after it chills, and the vegetables keep it from feeling sticky.
Why It Works:
This salad is built to be eaten cold, which means no awkward reheating and no panic if the blanket sits out for a while. It pairs especially well with iced green tea or a sparkling lime drink.
Key Ingredients:
- 12 ounces spaghetti or soba noodles
- 1/4 cup peanut butter
- 2 tablespoons soy sauce
- 2 tablespoons rice vinegar
- 1 tablespoon sesame oil
- 1 teaspoon honey
- 1 cucumber, julienned
- 2 scallions, sliced
- Sesame seeds
Quick Steps:
- Cook the noodles, rinse them under cold water, and drain well.
- Whisk the peanut butter, soy sauce, vinegar, sesame oil, and honey.
- Toss noodles with the dressing, cucumber, scallions, and sesame seeds, then chill.
Equipment for This Recipe:
- Large pot
- Whisk
- Colander
How to Serve This Dish:
Pack it in a wide container and sprinkle the sesame seeds right before eating. A cold ginger ale or iced tea with lemon balances the nutty dressing well.
Pro Tips for This Recipe:
- Rinse the noodles well or they’ll clump.
- Thin the dressing with a spoon of warm water if it feels too thick.
- Add the cucumber just before serving if you want maximum crunch.
Variations on This Dish:
- Spicy Peanut Version: Stir in chili crisp or sriracha.
- Tahini Swap: Use tahini instead of peanut butter for a more sesame-forward flavor.
Common Mistakes to Avoid with This Dish:
- Don’t leave the noodles wet after rinsing or the dressing slides off.
- Don’t overdo the soy sauce; cold noodles can taste saltier than you expect.
10. Roasted Vegetable Feta Pinwheels
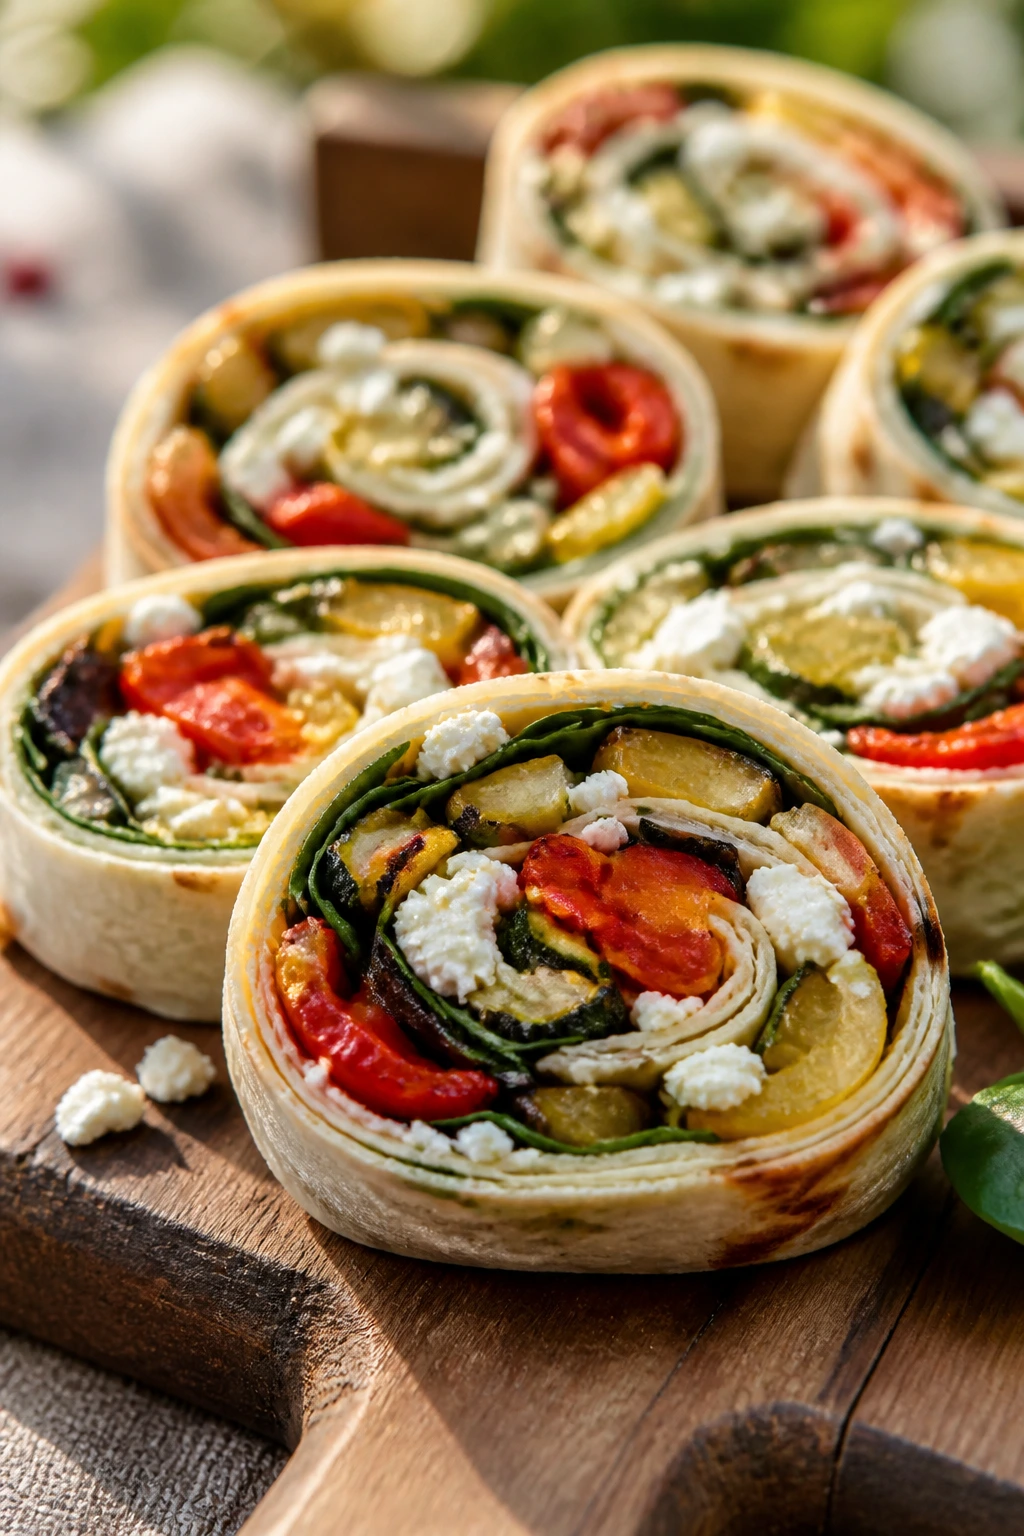
These pinwheels look fancy enough for a party but pack like a lunchbox staple. Roasted peppers, zucchini, and feta give them enough body that they won’t dissolve into a soft blur after an hour in the cooler.
Why It Works:
A tortilla wrap with a thick spread and dry fillings slices cleanly if you chill it first. The feta and vegetables bring tang and sweetness, which makes a cold drink like sparkling water or a dry rosé feel like the right companion.
Key Ingredients:
- 4 large flour tortillas
- 1 cup hummus
- 1 cup roasted red peppers, drained
- 1 small zucchini, roasted or sautéed and cooled
- 1 cup baby spinach
- 1/2 cup feta, crumbled
- Black pepper
Quick Steps:
- Spread hummus over each tortilla.
- Layer with spinach, peppers, zucchini, feta, and pepper.
- Roll tightly, chill 20 minutes, then slice into pinwheels.
Equipment for This Recipe:
- Baking sheet
- Sharp knife
How to Serve This Dish:
Arrange the pinwheels cut-side up so the colors show. They’re good with olives, chips, and a cold citrus soda or iced herbal tea.
Pro Tips for This Recipe:
- Drain the peppers well so the tortilla doesn’t get slick.
- Chill before slicing or the spirals won’t hold.
- Use roasted vegetables that are fully cool.
Variations on This Dish:
- Tapenade Version: Spread olive tapenade under the hummus for more briny flavor.
- Vegan Version: Skip the feta and use extra hummus with chopped herbs.
Common Mistakes to Avoid with This Dish:
- Don’t use watery vegetables; they make the wrap slide apart.
- Don’t slice too early or the filling squashes out.
11. Hummus Veggie Pita Boxes
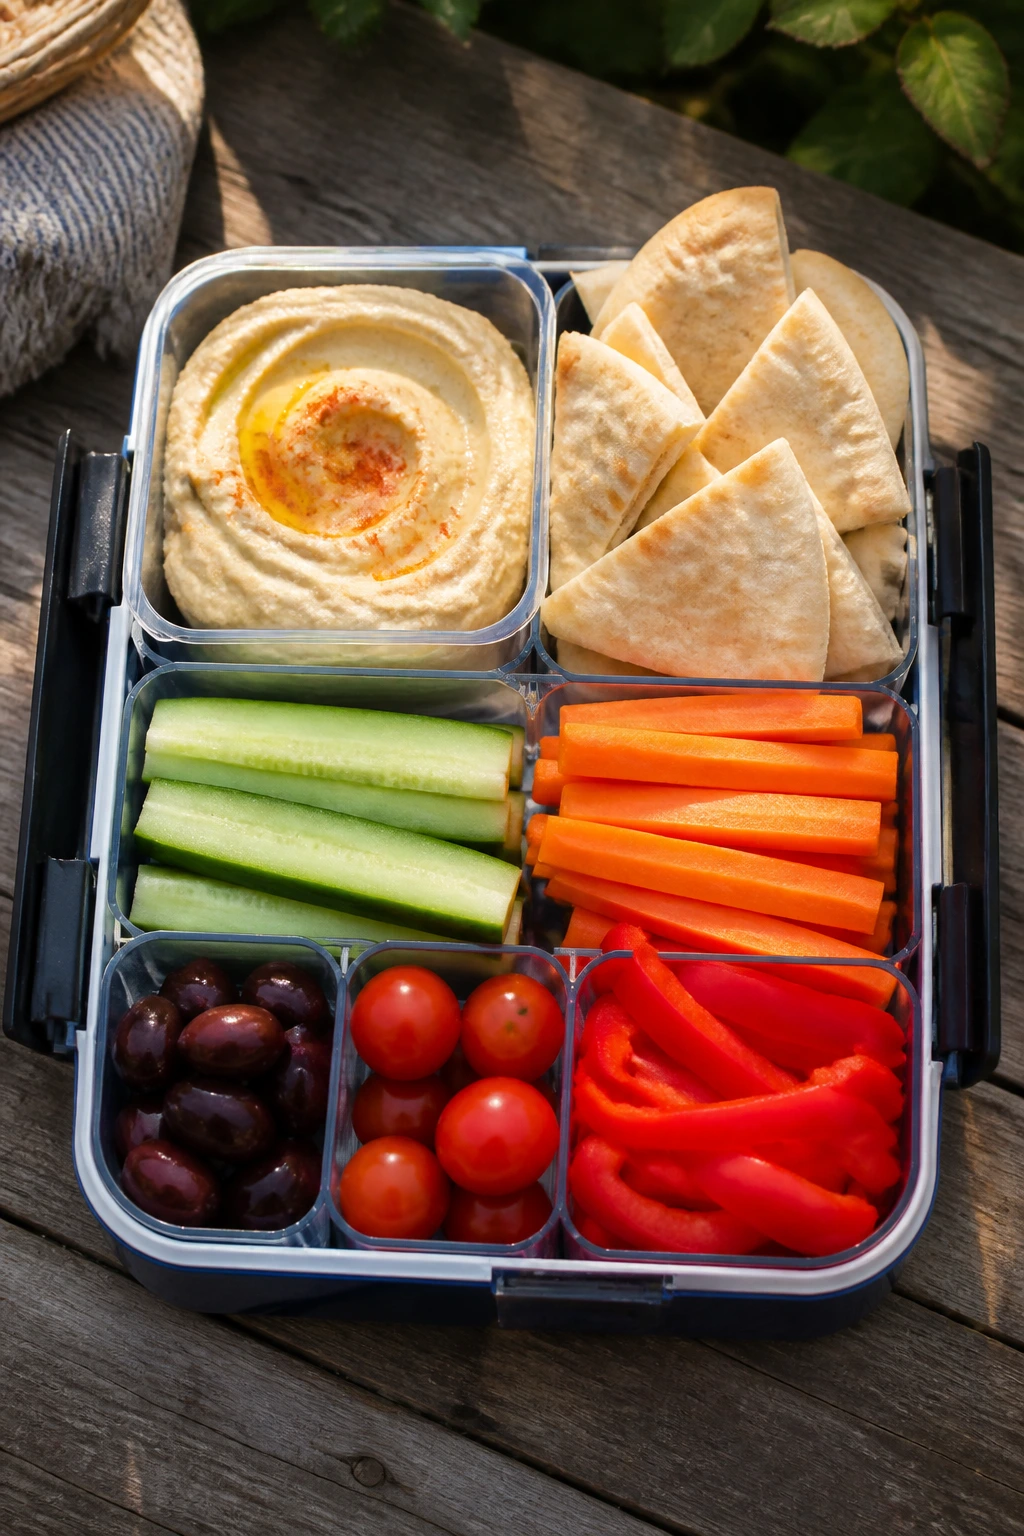
A good picnic box feels organized, and this one is about as neat as it gets. Hummus, crisp vegetables, and pita wedges keep lunch light but not boring, and the separate compartments mean nothing turns to mush in transit.
Why It Works:
This is the kind of picnic food that survives without drama. Cool cucumber, sweet carrots, and salty olives all stay distinct, which makes them easy to nibble beside a cold sparkling water or iced mint tea.
Key Ingredients:
- 2 cups hummus
- 4 pita breads, cut into wedges
- 1 cucumber, sliced
- 2 carrots, cut into sticks
- 1 red bell pepper, sliced
- 1 cup olives
- 1 cup cherry tomatoes
Quick Steps:
- Slice the vegetables and pita.
- Portion hummus into small containers or one large central cup.
- Pack each ingredient in its own compartment and chill until serving.
Equipment for This Recipe:
- Cutting board
- Knife
- Compartmented lunch container
How to Serve This Dish:
Serve the hummus cold, with the pita tucked beside it so it stays soft but not soggy. A cold lemon soda or sparkling water makes the vegetable crunch feel sharper.
Pro Tips for This Recipe:
- Pat the vegetables dry after washing.
- Use thick hummus so it doesn’t ooze into the box.
- Toast the pita lightly if you want more structure.
Variations on This Dish:
- Roasted Garlic Version: Use roasted garlic hummus for a deeper, sweeter flavor.
- Protein Box Version: Add hard-boiled egg halves or chickpeas for a more filling lunch.
Common Mistakes to Avoid with This Dish:
- Don’t pack wet veggies right against the pita.
- Don’t forget a small spoon for the hummus if you’re using dip containers.
12. Corn and Black Bean Salad
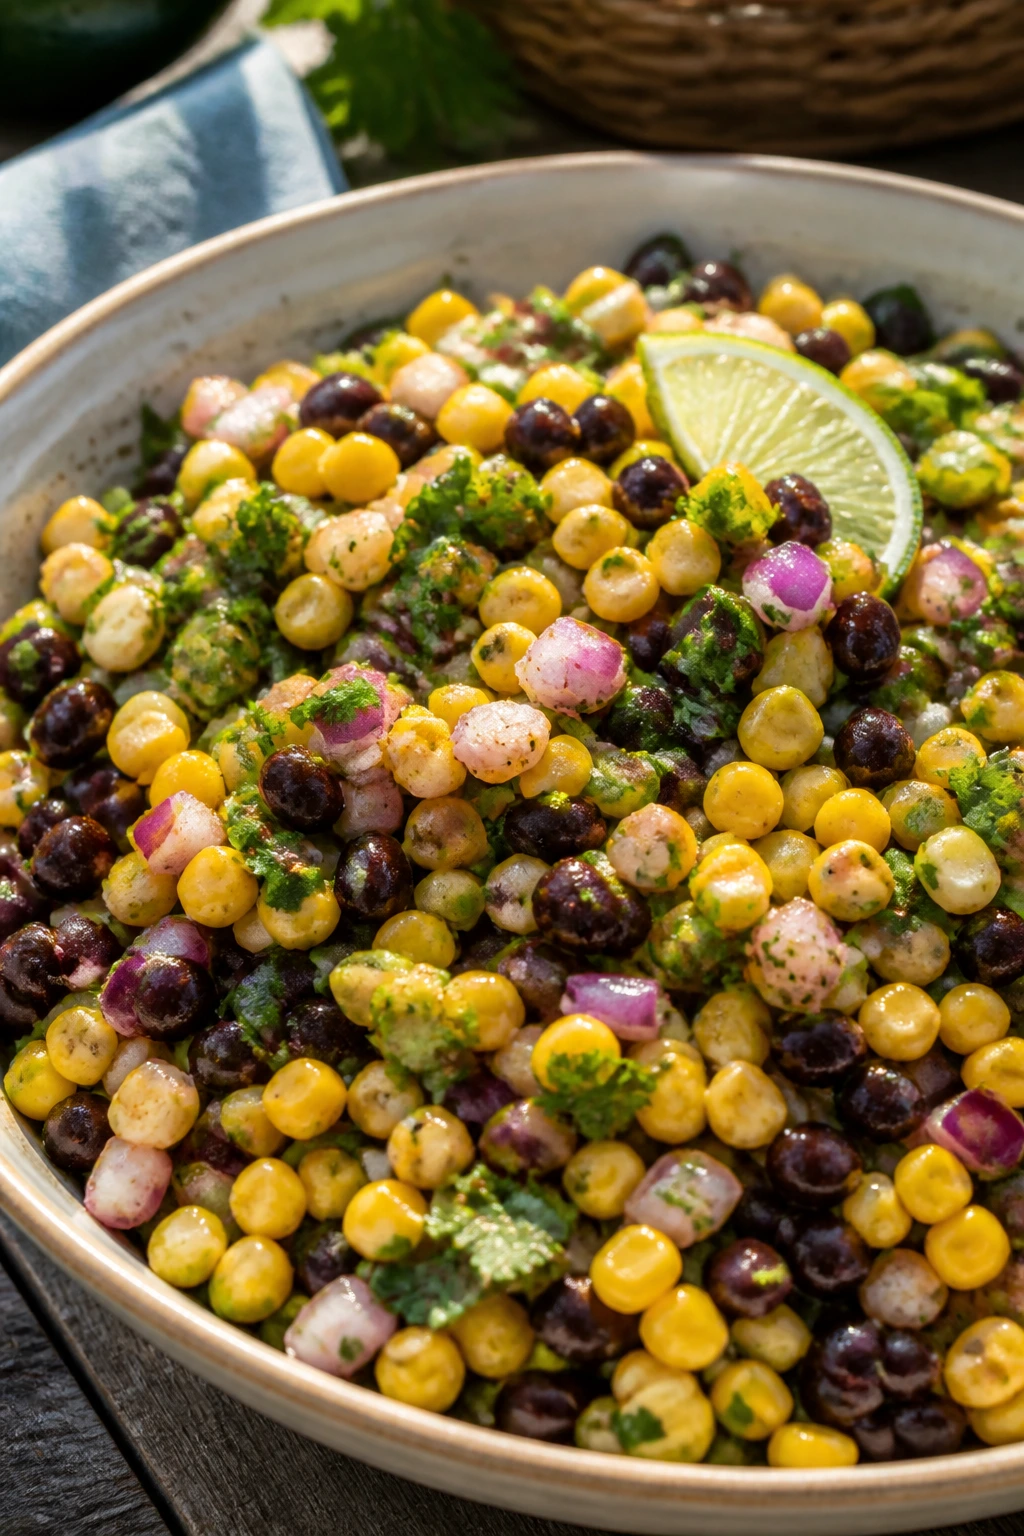
This salad tastes like the bowl you bring when you want one thing that can sit next to everything else. The corn is sweet, the beans are earthy, and the lime keeps the whole thing bright enough to match a cold drink.
Why It Works:
It’s sturdy, colorful, and not fussy about being served cold. A little cilantro and red onion keep it from going dull, and it pairs well with iced tea or a cold Mexican lager.
Key Ingredients:
- 2 cups corn kernels, fresh or thawed frozen
- 1 can black beans, rinsed and drained
- 1/2 red onion, finely diced
- 1/4 cup chopped cilantro
- Juice of 2 limes
- 2 tablespoons olive oil
- 1/2 teaspoon cumin
- Salt and pepper
- Cotija or feta, optional
Quick Steps:
- Combine the corn, beans, onion, and cilantro.
- Whisk the lime juice, oil, cumin, salt, and pepper, then toss with the salad.
- Chill 20 minutes and top with cheese if you want it.
Equipment for This Recipe:
- Mixing bowl
- Citrus juicer
How to Serve This Dish:
Scoop it with tortilla chips or spoon it beside grilled meat. A cold lime soda or a pale lager makes the lime and cumin taste even brighter.
Pro Tips for This Recipe:
- Use thawed frozen corn when fresh corn isn’t worth the hassle.
- Let the onion sit in lime juice for 5 minutes if you want it less sharp.
- Add avocado only if you’re serving soon.
Variations on This Dish:
- Avocado Version: Fold in diced avocado just before serving.
- Spicy Southwest Version: Add jalapeño and a pinch of chili powder.
Common Mistakes to Avoid with This Dish:
- Don’t overdress it; too much liquid makes it soupy.
- Don’t skip salt — beans need it.
13. Grilled Chicken Skewers with Yogurt Dip
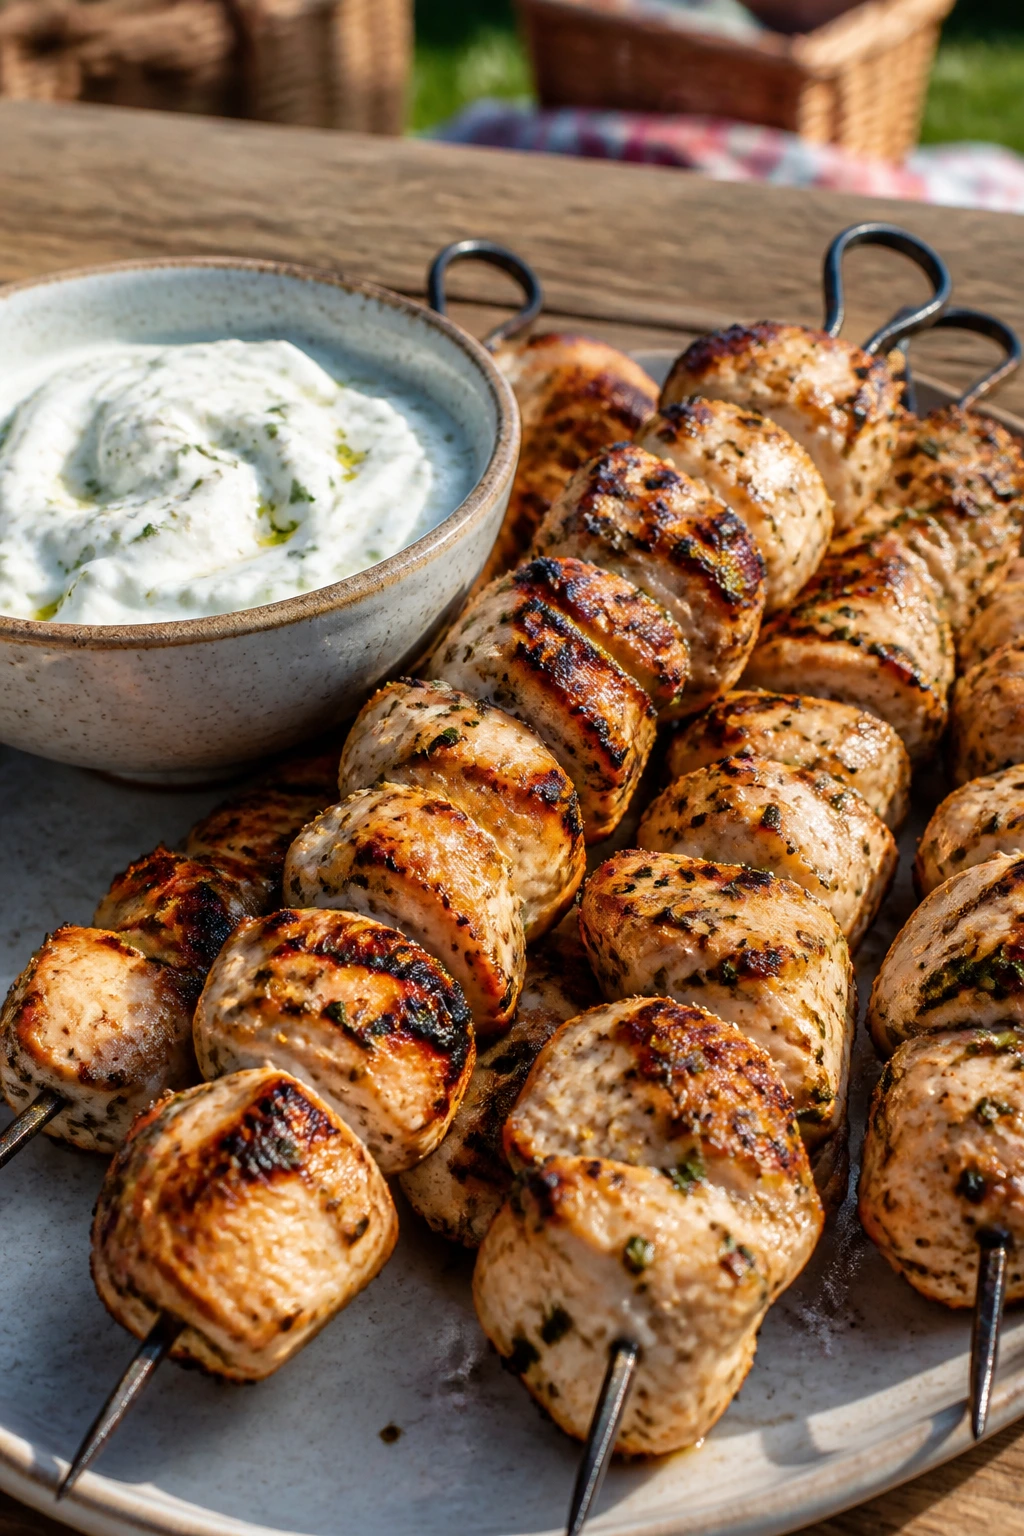
These skewers belong in a picnic spread because they’re easy to portion and easy to eat once they cool down a bit. The yogurt dip brings garlic and lemon, which keeps each bite from feeling dry or heavy.
Why It Works:
Chicken thighs stay juicier than breasts on the grill, and skewers give you quick, even browning. The dip tastes excellent cold, which makes it perfect with sparkling lemonade or a crisp pilsner.
Key Ingredients:
- 1 1/2 pounds boneless chicken thighs, cubed
- 2 tablespoons olive oil
- 1 teaspoon garlic powder
- 1 teaspoon oregano
- Salt and pepper
- 1 cup plain Greek yogurt
- 1 tablespoon lemon juice
- 1 small garlic clove, grated
Quick Steps:
- Toss the chicken with oil, garlic powder, oregano, salt, and pepper.
- Thread onto skewers and grill at medium-high heat for 10 to 12 minutes, turning once, until 165°F.
- Stir the yogurt with lemon and garlic, then chill and serve alongside the cooled skewers.
Equipment for This Recipe:
- Grill or grill pan
- Metal or soaked wooden skewers
- Mixing bowls
How to Serve This Dish:
Serve the skewers at room temperature with pita and cucumber salad. A cold lager or lemon soda cuts the garlic yogurt well.
Pro Tips for This Recipe:
- Cut the chicken into even pieces so it cooks at the same speed.
- Let the skewers rest 5 minutes before packing.
- Keep the dip in a separate sealed cup.
Variations on This Dish:
- Lemon-Pepper Version: Add more lemon zest and cracked pepper.
- Harissa Version: Stir a spoon of harissa into the yogurt for heat.
Common Mistakes to Avoid with This Dish:
- Don’t grill past 165°F or the chicken dries out.
- Don’t pack the dip directly against the hot skewers.
14. Tuna Salad Stuffed Mini Peppers
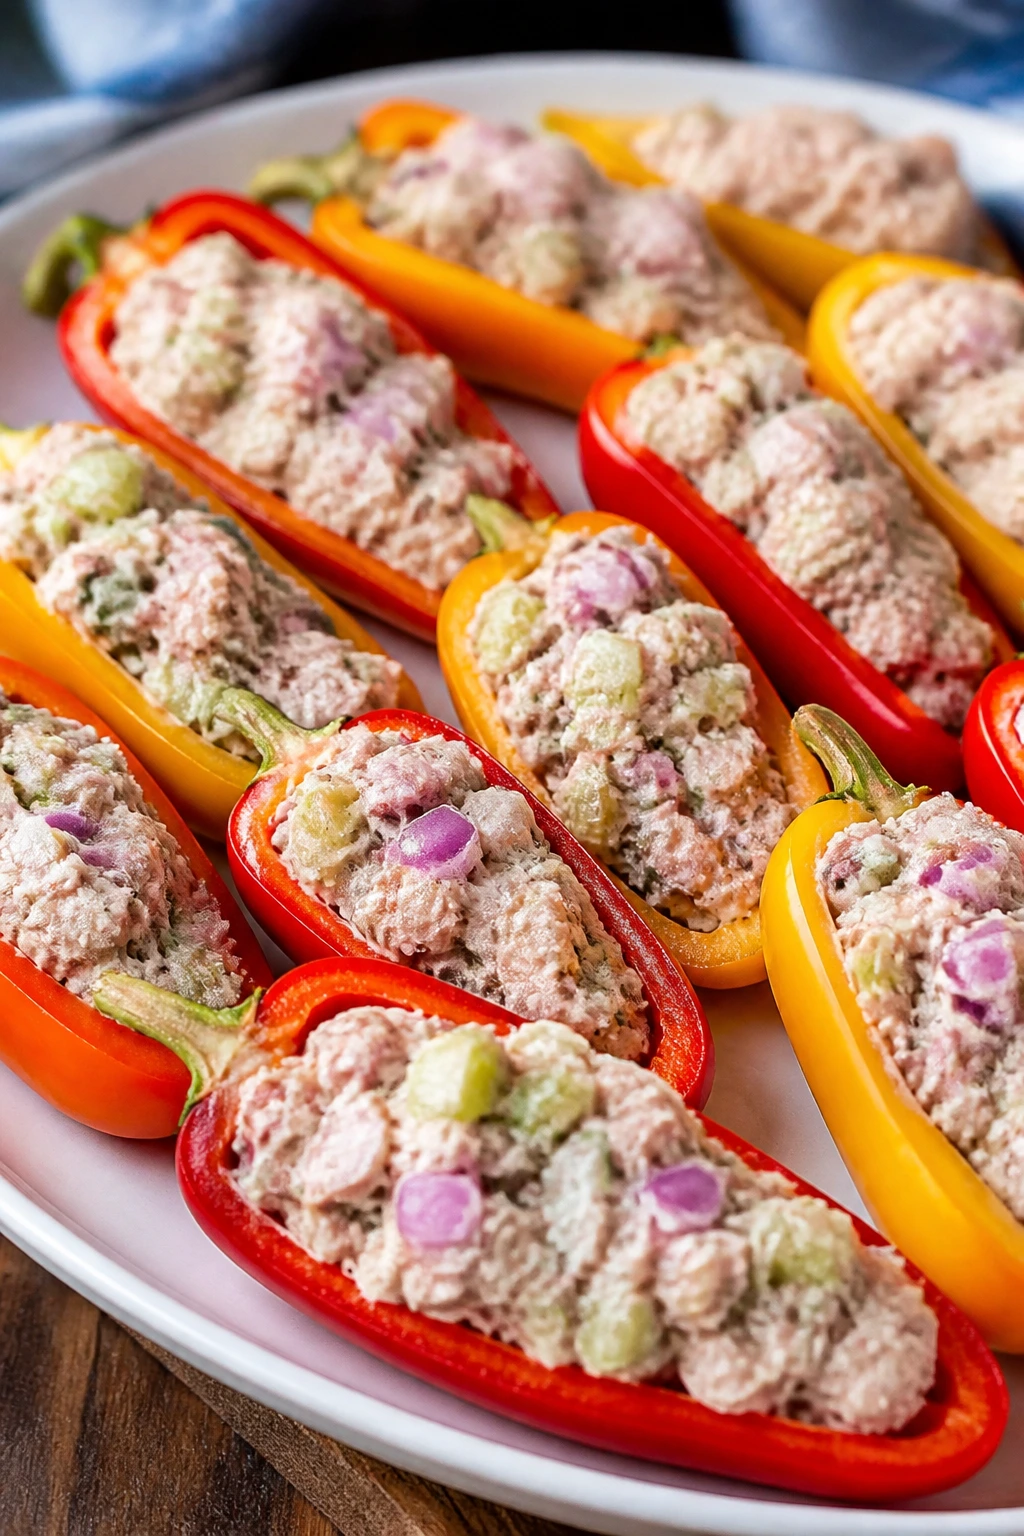
Mini peppers are a smart picnic container because they stay crisp and edible by hand. Fill them with tuna salad, and you get a cool, crunchy bite that tastes cleaner than a sandwich and travels much better than a lettuce cup.
Why It Works:
The pepper walls hold the filling without collapsing, and the tuna salad stays cold in neat portions. Dill and lemon keep the tuna from tasting flat, which matters beside cold soda or iced tea.
Key Ingredients:
- 2 cans tuna, drained
- 1/4 cup mayonnaise
- 1 tablespoon lemon juice
- 1 celery stalk, finely diced
- 1 tablespoon chopped dill
- 8 mini sweet peppers, halved and seeded
- Salt and pepper
Quick Steps:
- Mix the tuna, mayo, lemon, celery, dill, salt, and pepper.
- Spoon into the pepper halves.
- Chill until ready to serve.
Equipment for This Recipe:
- Mixing bowl
- Spoon
- Knife and cutting board
How to Serve This Dish:
Arrange them in a single layer so the filling stays put. They work nicely with crackers and a cold cucumber water or lager.
Pro Tips for This Recipe:
- Drain the tuna well so the filling doesn’t get watery.
- Use the sweeter mini peppers rather than bell peppers for easier eating.
- Add chopped pickle for extra crunch.
Variations on This Dish:
- Avocado Tuna Version: Replace half the mayo with mashed avocado.
- Curried Version: Add a pinch of curry powder and golden raisins.
Common Mistakes to Avoid with This Dish:
- Don’t overfill the peppers or they become hard to carry.
- Don’t leave the tuna warm while you prep; keep it chilled.
15. Herbed Egg Salad Tea Sandwiches
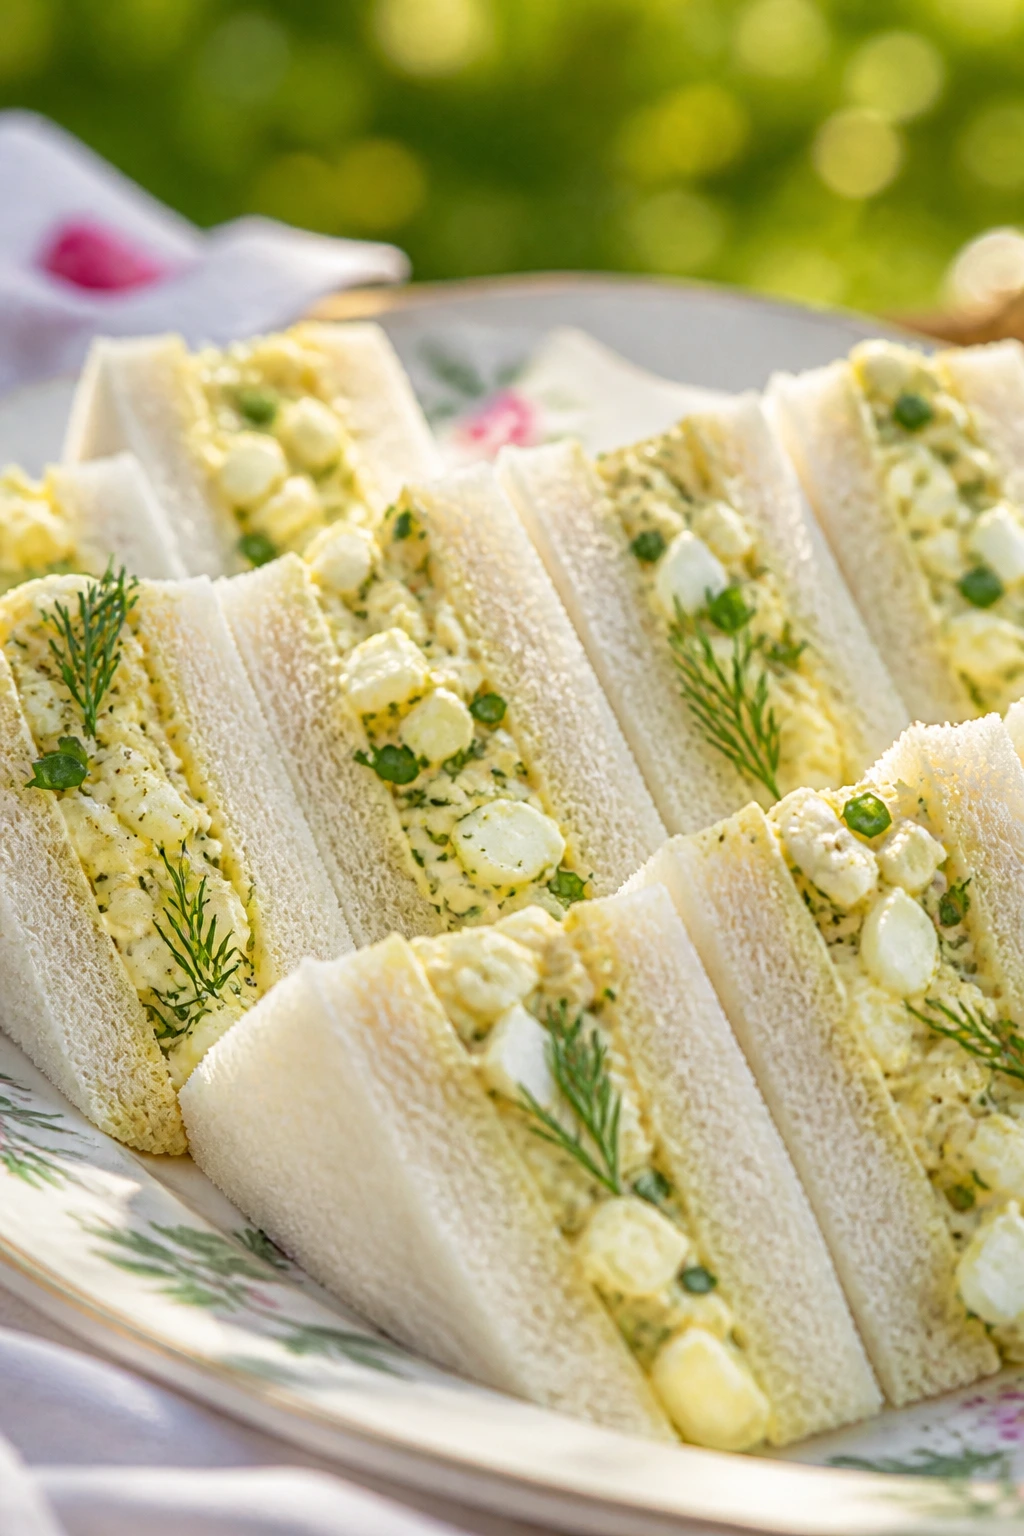
Egg salad is delicate work, and that’s part of the charm. Thin bread, soft herbs, and a small squeeze of lemon give these little sandwiches the exact kind of cool richness that belongs with iced tea.
Why It Works:
Egg salad tastes best when it’s not overcomplicated. Chives and tarragon keep it from feeling one-note, and cutting off the crusts gives you a tidy picnic bite that doesn’t crumble all over the blanket.
Key Ingredients:
- 6 hard-boiled eggs
- 1/4 cup mayonnaise
- 1 teaspoon Dijon mustard
- 1 tablespoon chopped chives
- 1 teaspoon chopped tarragon or dill
- 1 teaspoon lemon juice
- 8 slices soft white or milk bread
- Salt and pepper
Quick Steps:
- Chop the eggs and mix with mayo, mustard, herbs, lemon, salt, and pepper.
- Spread onto bread, close the sandwiches, and trim the crusts.
- Chill briefly, then cut into quarters.
Equipment for This Recipe:
- Saucepan
- Mixing bowl
- Serrated knife
How to Serve This Dish:
Stack the quarters on a platter and cover with a damp paper towel until packing. They’re lovely with unsweetened iced tea or a light sparkling drink.
Pro Tips for This Recipe:
- Chop the eggs finely if you want a smooth filling.
- Use soft bread so the texture stays tender.
- Don’t add too much mayo; egg salad should hold together, not spill.
Variations on This Dish:
- Relish Version: A spoon of pickle relish adds tang and crunch.
- Smoked Paprika Version: Add a pinch of smoked paprika for depth.
Common Mistakes to Avoid with This Dish:
- Don’t use crusty bread or the filling pushes out.
- Don’t make them too far ahead unless you keep them sealed and cold.
16. Greek Orzo Salad with Cucumbers and Olives
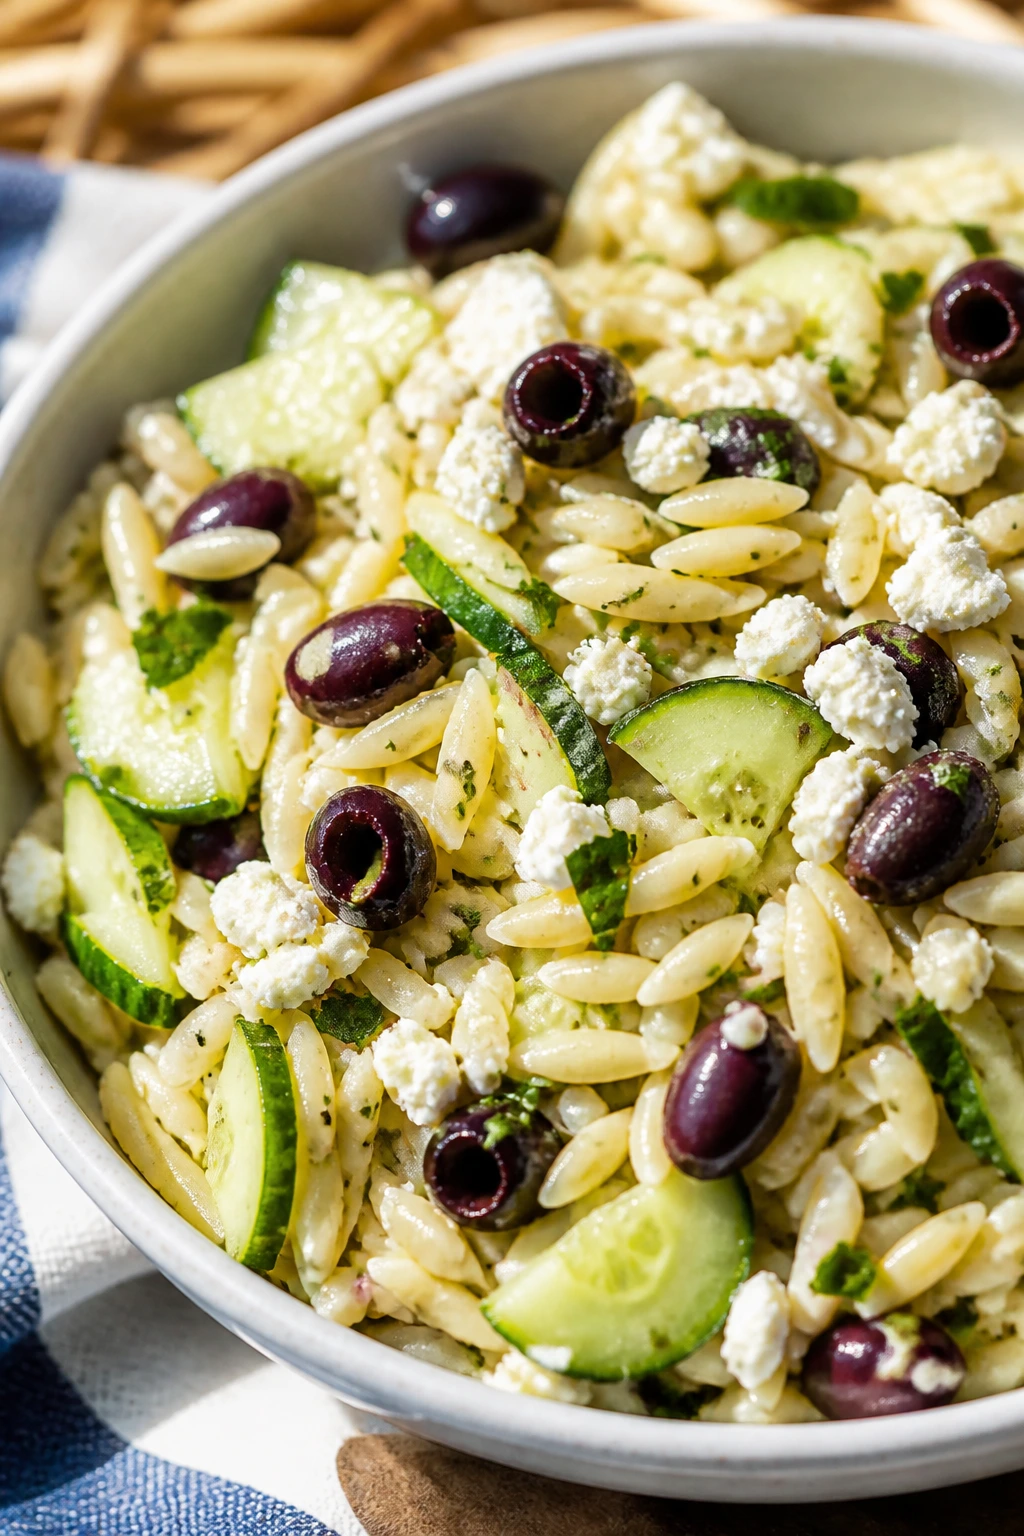
Orzo makes a picnic salad feel more like a meal than a side. With cucumbers, olives, feta, and a lemony dressing, it stays bright in the cooler and tastes right beside a cold drink with bubbles.
Why It Works:
Small pasta holds dressing without going heavy, and the cucumber gives fresh crunch. The feta and olives bring enough salt that you do not need much else to make it taste complete.
Key Ingredients:
- 8 ounces orzo
- 1 cucumber, diced
- 1 cup cherry tomatoes, halved
- 1/2 cup Kalamata olives, sliced
- 1/2 cup feta, crumbled
- 3 tablespoons olive oil
- 2 tablespoons lemon juice
- 1 teaspoon oregano
- Salt and pepper
Quick Steps:
- Cook the orzo until tender, then rinse cool and drain well.
- Toss with cucumber, tomatoes, olives, feta, oil, lemon juice, oregano, salt, and pepper.
- Chill before packing.
Equipment for This Recipe:
- Saucepan
- Colander
- Large bowl
How to Serve This Dish:
Serve it cold in a shallow bowl with grilled meat or pita. A dry white wine spritzer or sparkling water with lemon fits it nicely.
Pro Tips for This Recipe:
- Cool the pasta completely before dressing it.
- Add a spoon of pasta water if the salad feels too dry.
- Salt lightly at the end because feta and olives already bring plenty.
Variations on This Dish:
- Chicken Version: Fold in diced grilled chicken for a fuller main dish.
- Sun-Dried Tomato Version: Swap tomatoes for chopped sun-dried tomatoes for a deeper flavor.
Common Mistakes to Avoid with This Dish:
- Don’t overcook the orzo; mushy pasta ruins the texture.
- Don’t forget enough dressing, since pasta drinks it up.
17. Ham and Swiss Pinwheels
These are the kind of picnic snacks that disappear fast because they feel like lunch but eat like finger food. Ham, Swiss, and a creamy mustard spread make a neat spiral that holds up better than a floppy sandwich.
Why It Works:
The tortillas grip the filling once chilled, and the pickle crunch gives each bite a little snap. These are especially good with a cold lager or sparkling lemonade.
Key Ingredients:
- 4 large flour tortillas
- 1/2 cup cream cheese, softened
- 1 tablespoon Dijon mustard
- 8 ounces sliced ham
- 8 ounces sliced Swiss cheese
- 1/2 cup chopped baby spinach or shredded lettuce
- 2 tablespoons finely chopped pickles, optional
Quick Steps:
- Mix cream cheese and Dijon.
- Spread over tortillas, then layer ham, cheese, greens, and pickles.
- Roll tightly, chill 20 minutes, and slice into rounds.
Equipment for This Recipe:
- Cutting board
- Sharp knife
How to Serve This Dish:
Set them cut-side up on a tray and keep them covered until the last minute. A cold cider or ginger beer works well with the salty ham and creamy cheese.
Pro Tips for This Recipe:
- Dry the greens before adding them.
- Use large tortillas so the roll stays tight.
- Chill before slicing for the cleanest spirals.
Variations on This Dish:
- Honey Mustard Version: Add a spoon of honey mustard to the cream cheese.
- Turkey and Provolone Version: Swap the meats and cheese without changing the method.
Common Mistakes to Avoid with This Dish:
- Don’t pile on too much filling or the tortilla splits.
- Don’t skip the chill time or the slices look ragged.
18. Cold Fried Chicken Drumsticks
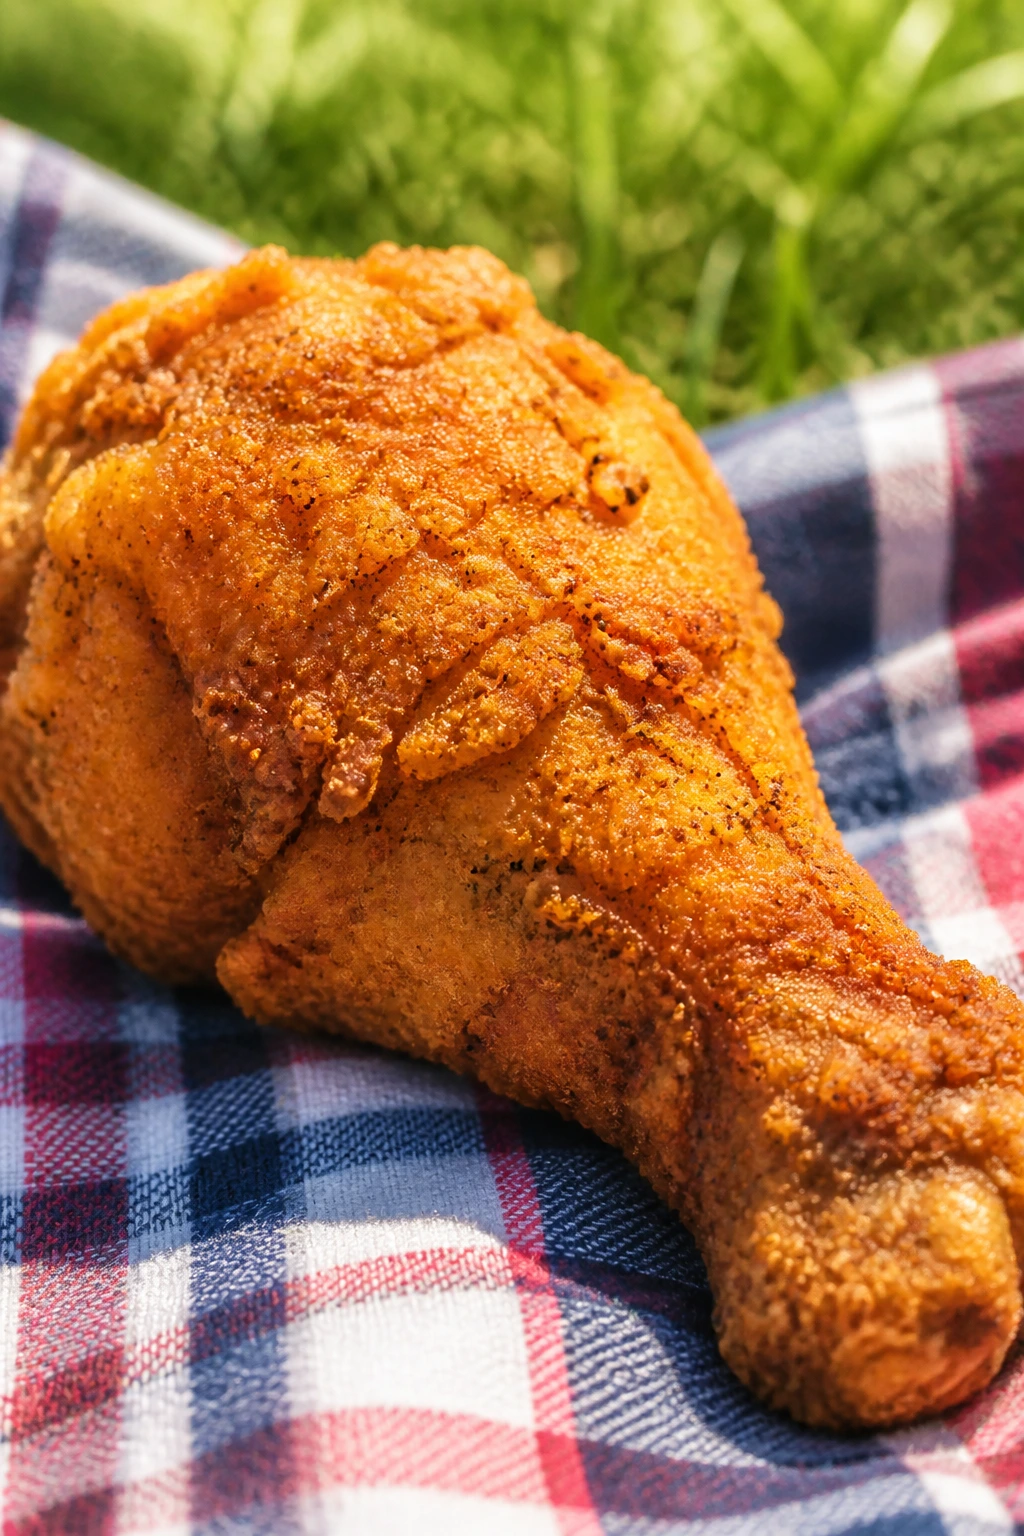
Fried chicken is picnic royalty, and cold fried chicken is the version that makes the most sense once the sun is out. The crust stays crisp enough, the meat stays juicy, and the whole thing tastes oddly better after a short rest.
Why It Works:
Chicken skin and seasoned flour are built for this job. Once the pieces cool, the seasoning settles into the crust, which is why a cold drumstick goes so well with iced tea or a cold beer.
Key Ingredients:
- 8 chicken drumsticks
- 2 cups buttermilk
- 2 cups all-purpose flour
- 1 tablespoon paprika
- 1 teaspoon garlic powder
- 1 teaspoon onion powder
- Salt and pepper
- Oil for frying
Quick Steps:
- Marinate the drumsticks in buttermilk, salt, and pepper for at least 2 hours.
- Mix flour with paprika, garlic powder, and onion powder, then dredge the chicken.
- Fry at 350°F until golden and the internal temperature reaches 165°F, then drain and cool completely.
Equipment for This Recipe:
- Dutch oven or heavy pot
- Thermometer
- Wire rack
How to Serve This Dish:
Let the chicken cool before packing so the crust doesn’t steam itself soft. It’s excellent with potato salad and a cold lager or sweet tea.
Pro Tips for This Recipe:
- Keep the oil near 350°F; too hot burns the crust before the meat cooks.
- Drain on a rack, not paper towels, if you want a crisper finish.
- Pack in a single layer with parchment between pieces.
Variations on This Dish:
- Cayenne Version: Add cayenne to the flour for more heat.
- Oven-Fried Version: Bake on a rack at 425°F if you want less mess, though the crust will be different.
Common Mistakes to Avoid with This Dish:
- Don’t pack it while it’s still hot.
- Don’t fry in oil that’s too cool or the coating turns greasy.
19. Shrimp Cocktail Cups
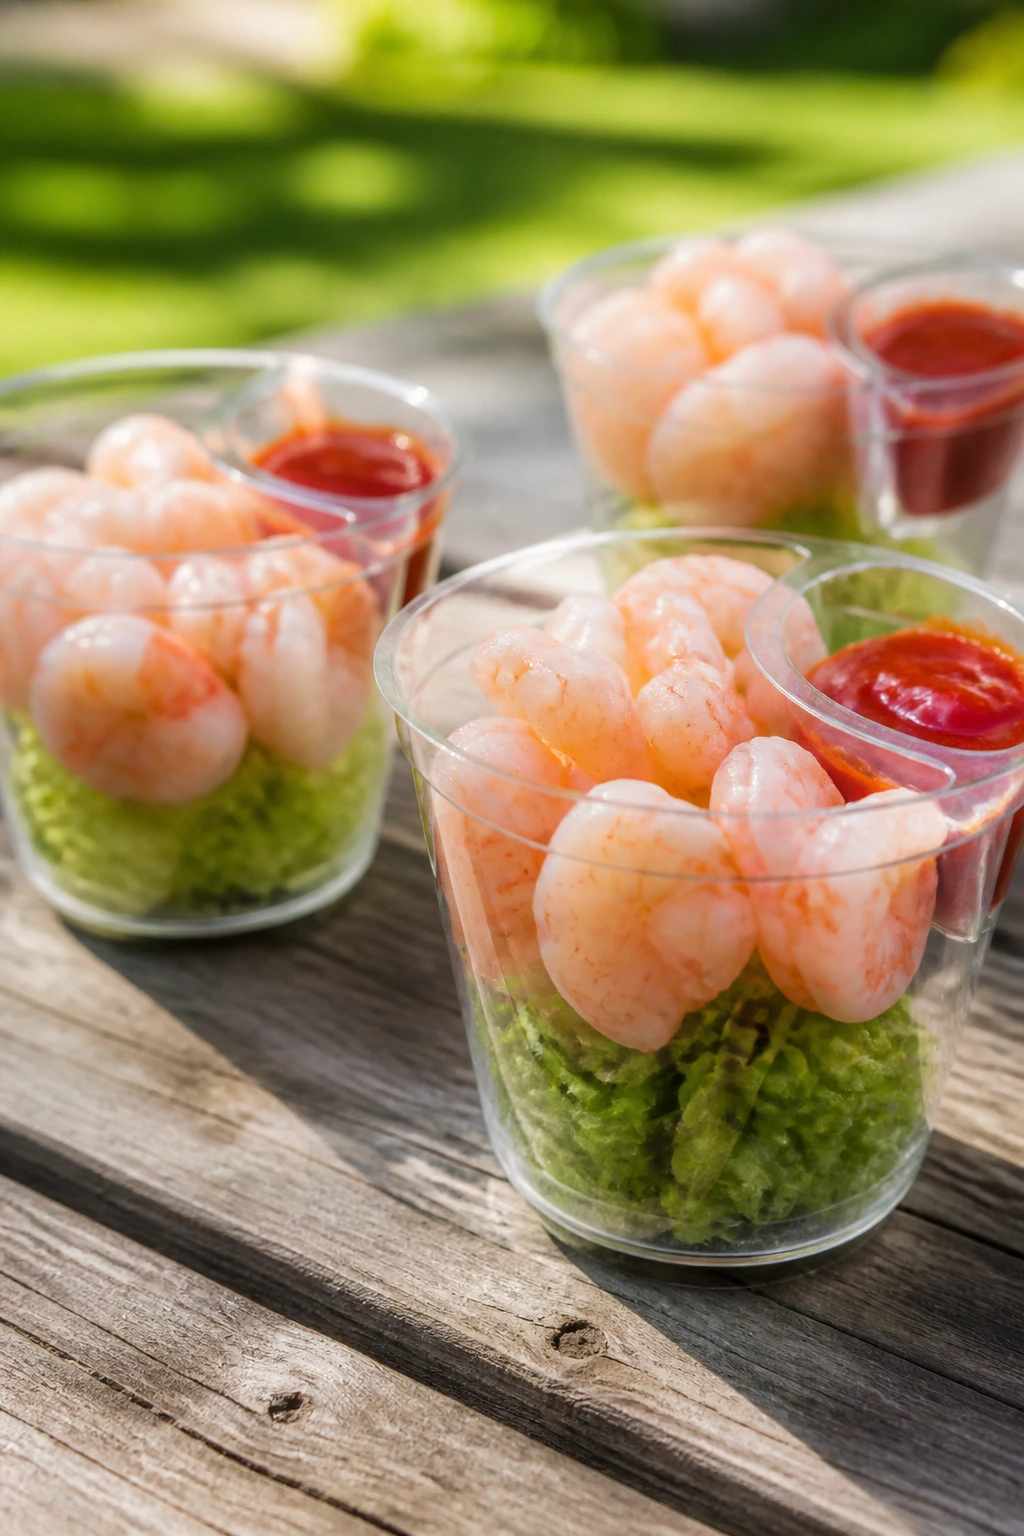
Shrimp cocktail is one of the neatest picnic foods you can bring. Each cup stays cold, the sauce stays separate, and nobody has to wrestle with a shared platter while balancing a drink.
Why It Works:
Shrimp cooks fast, chills quickly, and tastes clean with sharp cocktail sauce. The celery or lettuce base keeps the cups tidy, and a cold gin and tonic or sparkling water with lime makes the whole thing feel crisp.
Key Ingredients:
- 1 pound medium shrimp, peeled and deveined
- 1 lemon, halved
- 1 cup cocktail sauce
- 1 celery stalk, finely sliced
- Ice for chilling
- Lettuce leaves or small cups
Quick Steps:
- Boil the shrimp in salted water for 2 to 3 minutes until pink and curled.
- Chill immediately in ice water, then drain well.
- Fill small cups with lettuce or celery, add shrimp, and spoon in cocktail sauce.
Equipment for This Recipe:
- Saucepan
- Slotted spoon
- Small cups
How to Serve This Dish:
Keep the sauce in a separate little cup if you want the shrimp extra cold. This one loves a cold citrus drink, especially something with bubbles.
Pro Tips for This Recipe:
- Do not overcook the shrimp; they go rubbery fast.
- Dry them before packing or the cups turn watery.
- Use medium shrimp for easy two-bite eating.
Variations on This Dish:
- Spicy Sauce Version: Stir horseradish or hot sauce into the cocktail sauce.
- Avocado Cup Version: Add avocado chunks right before serving if you’re eating soon.
Common Mistakes to Avoid with This Dish:
- Don’t let the shrimp sit warm after boiling.
- Don’t flood the cups with sauce; keep them neat.
20. Broccoli Bacon Salad
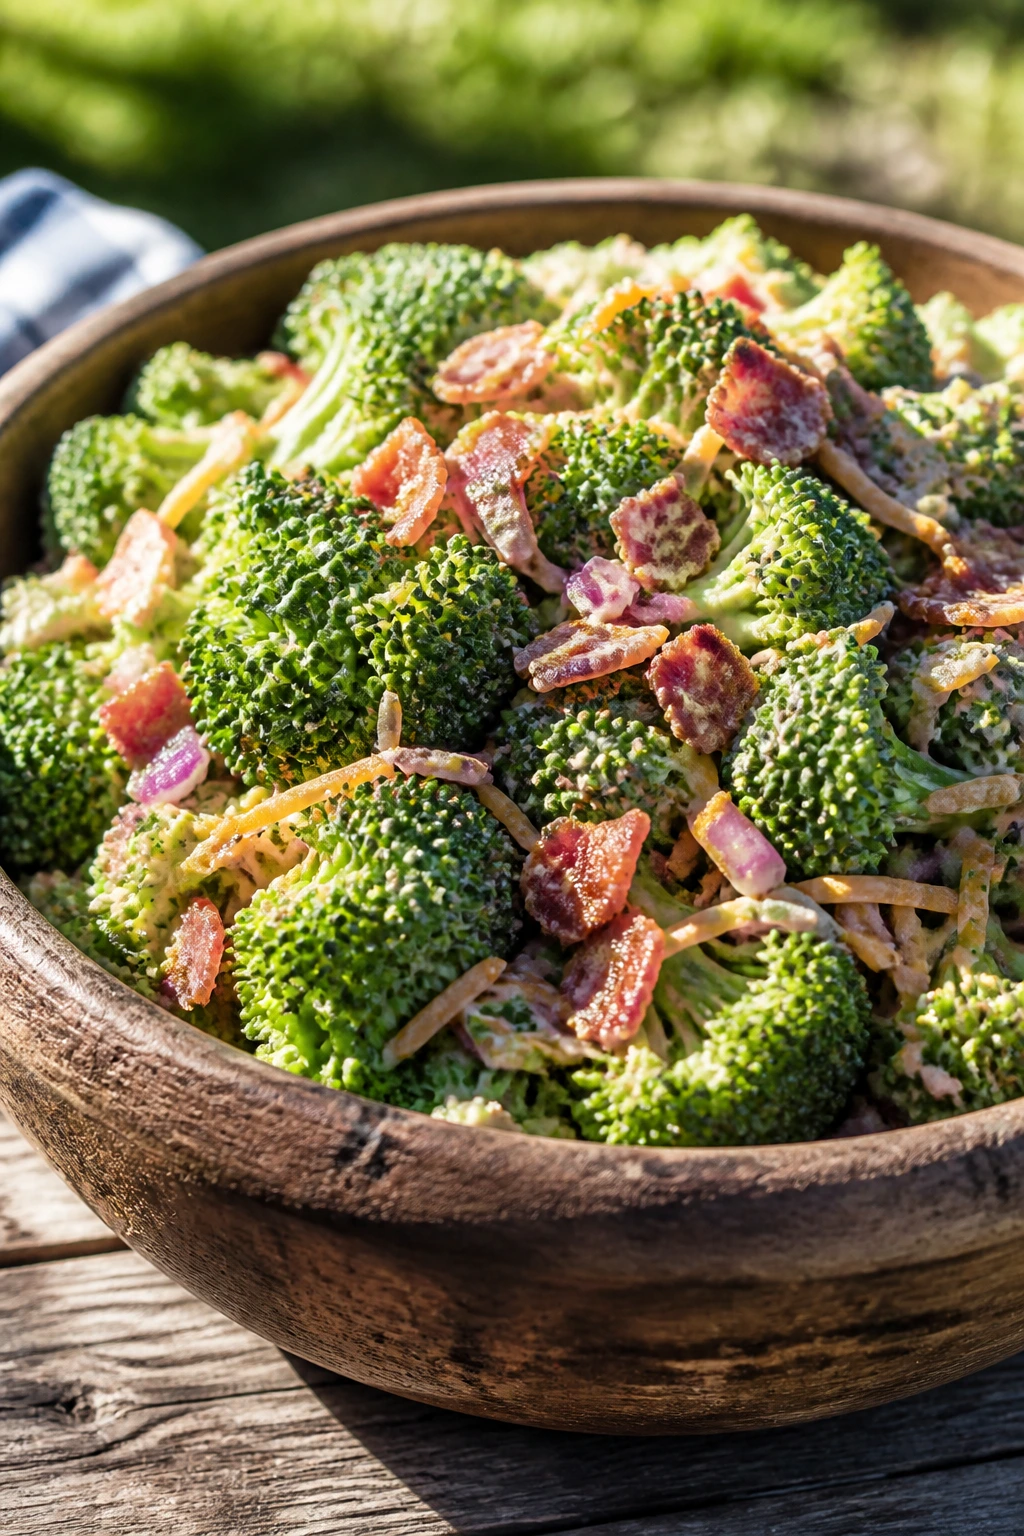
This salad has the exact right kind of rough edge for a picnic. Crunchy broccoli, salty bacon, a little sweetness, and a creamy dressing make it feel substantial enough to stand beside a cold drink without getting tired.
Why It Works:
Raw broccoli keeps its crunch for hours, which is rare and useful. The bacon and cheddar give it depth, while a sweet-tangy dressing keeps it from tasting like a rough grocery-store side.
Key Ingredients:
- 5 cups broccoli florets
- 6 slices cooked bacon, chopped
- 1/2 cup shredded cheddar
- 1/4 cup red onion, finely diced
- 1/4 cup dried cranberries
- 1/3 cup mayonnaise
- 2 tablespoons apple cider vinegar
- 1 tablespoon sugar
- Salt and pepper
Quick Steps:
- Whisk mayo, vinegar, sugar, salt, and pepper.
- Toss with broccoli, bacon, cheddar, onion, and cranberries.
- Chill 30 minutes before serving.
Equipment for This Recipe:
- Large bowl
- Whisk
How to Serve This Dish:
Serve it chilled in a shallow bowl with grilled meat or sandwiches. A cold cider or unsweetened tea works well with the bacon and sweet dressing.
Pro Tips for This Recipe:
- Cut the broccoli small so it eats easily.
- Let the bacon cool before mixing so the salad stays cold.
- Add the dressing a little at a time if you want a lighter coat.
Variations on This Dish:
- Sunflower Seed Version: Swap cranberries for sunflower seeds for a nuttier crunch.
- Lighter Version: Use half yogurt in the dressing if you want it less rich.
Common Mistakes to Avoid with This Dish:
- Don’t chop the florets too large or the salad feels awkward.
- Don’t overdress it; broccoli should still taste like broccoli.
21. Smoked Salmon Cucumber Rounds
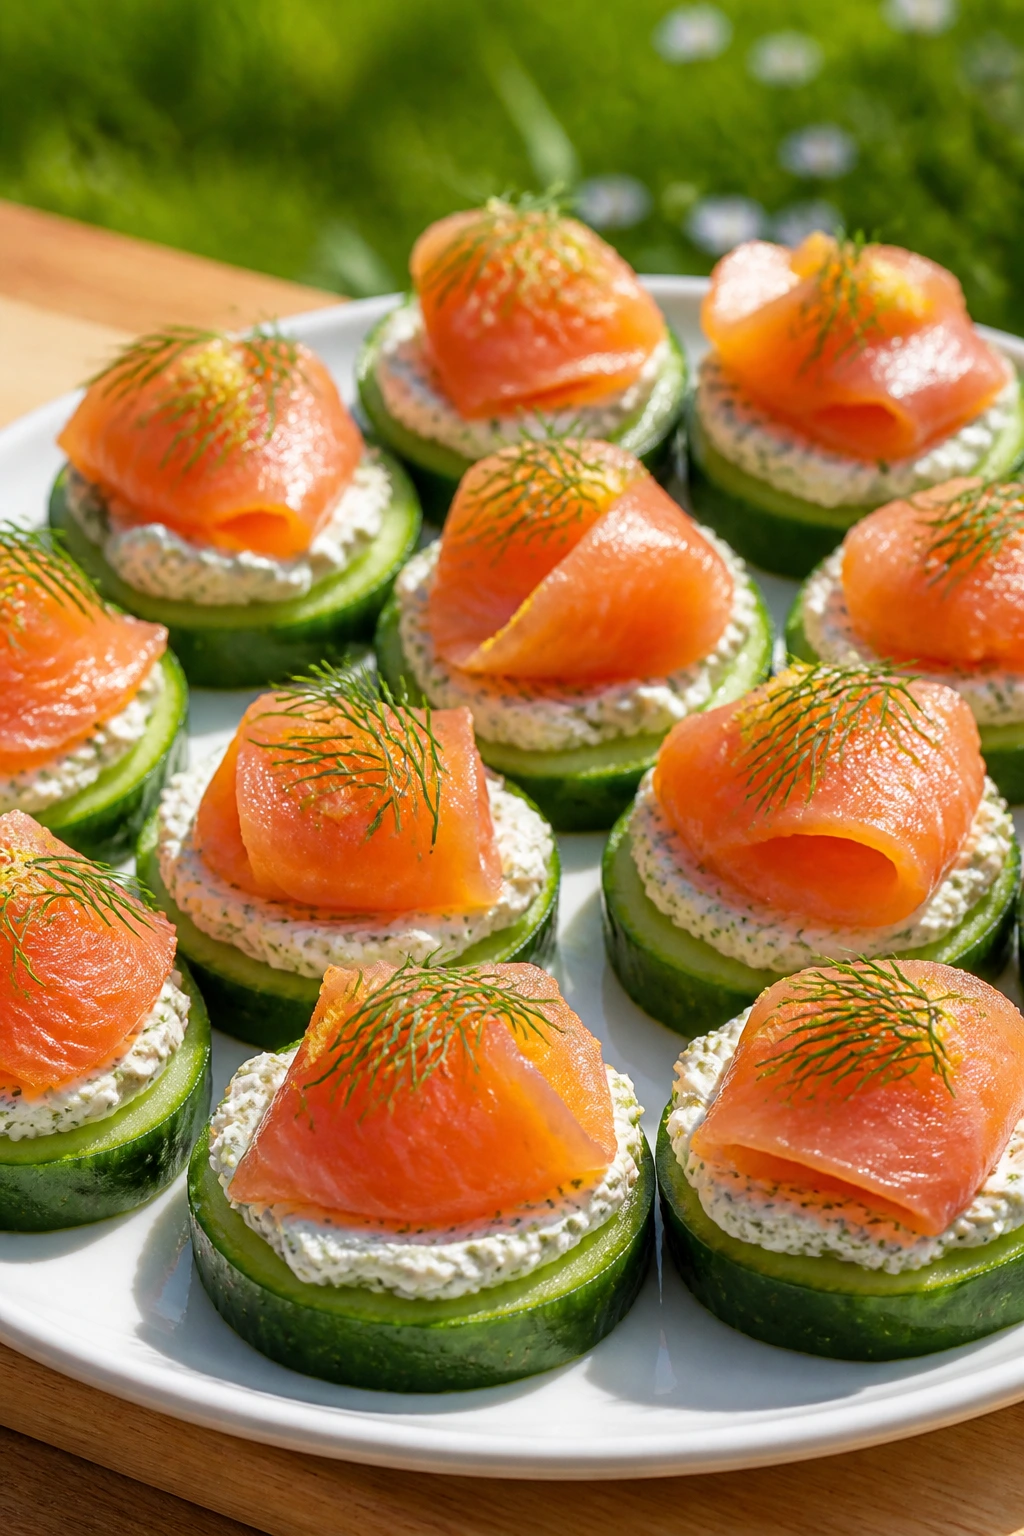
These are tiny, neat, and a little posh without being fussy. The cucumber gives the crunch, the smoked salmon gives the salt, and the cream cheese keeps the bite cold and tidy.
Why It Works:
Cucumber rounds are a natural picnic base because they don’t need bread and won’t go stale. The lemon and dill keep the salmon bright, which plays nicely with sparkling water or a dry white spritz.
Key Ingredients:
- 2 large cucumbers
- 6 ounces smoked salmon
- 4 ounces cream cheese, softened
- 1 tablespoon lemon juice
- 1 tablespoon chopped dill
- Capers, optional
- Black pepper
Quick Steps:
- Slice the cucumbers into thick rounds.
- Mix the cream cheese with lemon and dill.
- Top each round with cream cheese, salmon, capers, and pepper.
Equipment for This Recipe:
- Knife
- Small bowl
- Spoon
How to Serve This Dish:
Arrange them on a chilled tray and eat them soon after packing. They go well with crisp white wine, sparkling water, or cucumber lemonade.
Pro Tips for This Recipe:
- Pat the cucumber slices dry so the topping stays put.
- Use cold cream cheese for cleaner dollops.
- Top with capers sparingly; they should sharpen, not take over.
Variations on This Dish:
- Chive Version: Swap dill for chives if you want a milder finish.
- Avocado Version: Add a thin avocado slice under the salmon for a softer base.
Common Mistakes to Avoid with This Dish:
- Don’t cut the cucumber too thin or it bends under the topping.
- Don’t make these hours ahead; the cucumber gives off water.
22. Chickpea Salad Lettuce Cups
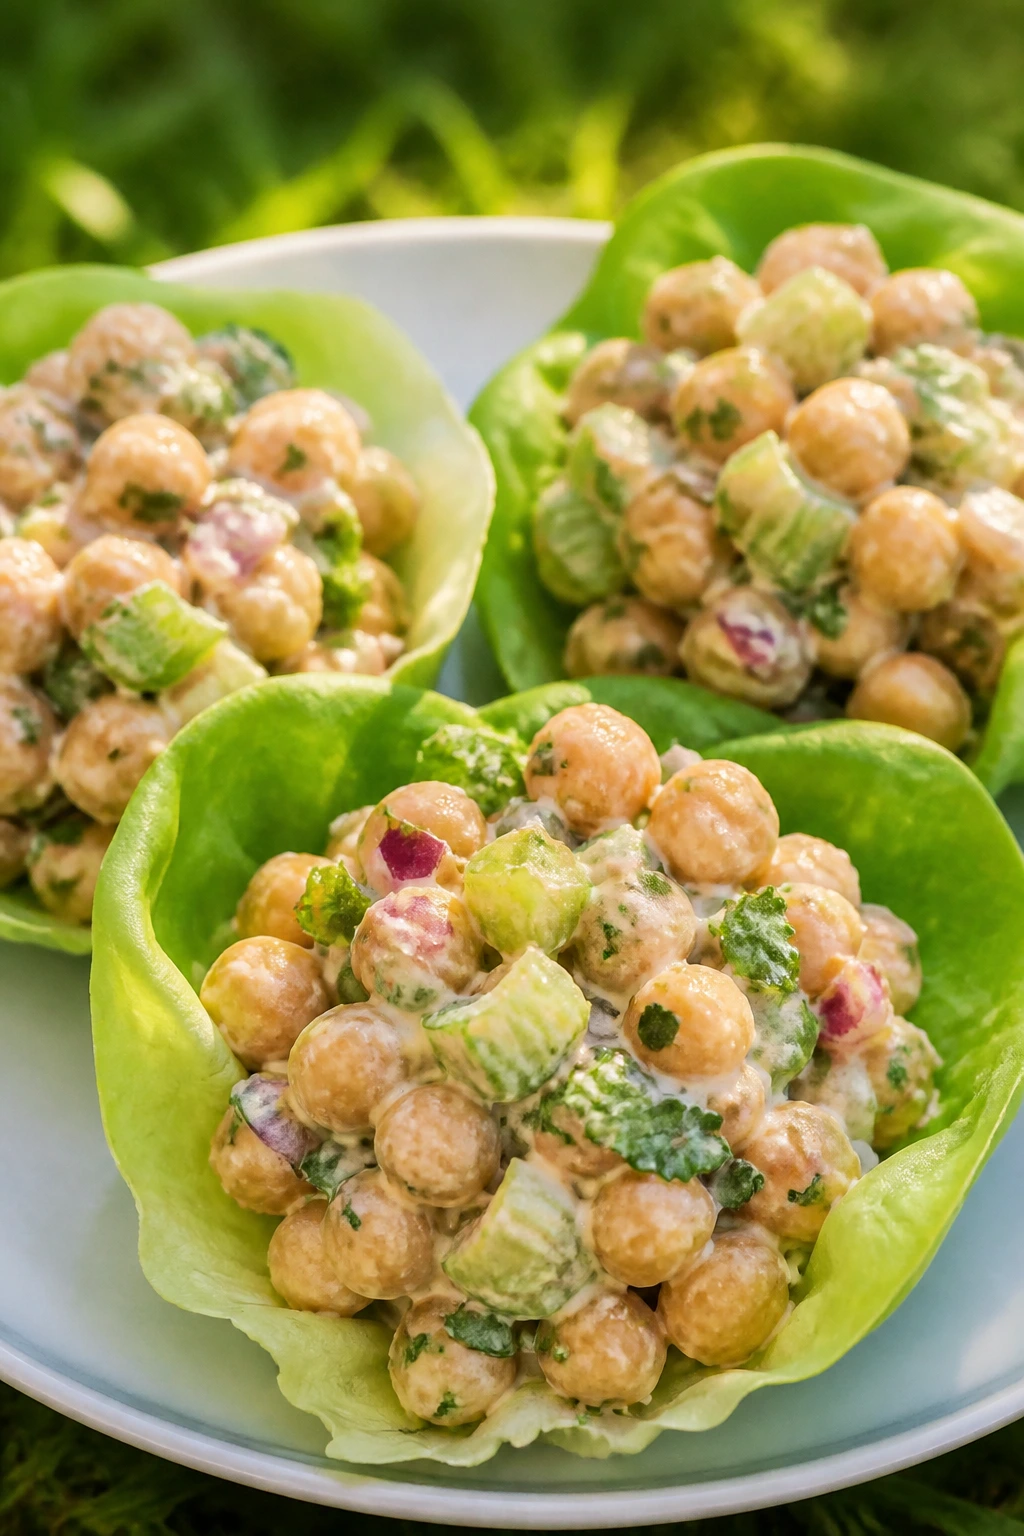
Chickpea salad is one of those picnic foods that feels fresher than it has any right to. The chickpeas bring body, the celery brings crunch, and the lettuce cups keep each bite cool and tidy.
Why It Works:
This is a solid vegetarian option that doesn’t rely on bread. Lemon, herbs, and a little mayo or yogurt make the filling taste clean beside a cold drink like iced tea or sparkling water.
Key Ingredients:
- 2 cans chickpeas, rinsed and drained
- 1/4 cup mayonnaise or yogurt
- 1 tablespoon lemon juice
- 1 celery stalk, diced
- 2 tablespoons chopped parsley
- 1 small red onion, finely diced
- Butter lettuce leaves
- Salt and pepper
Quick Steps:
- Mash half the chickpeas lightly, then mix with the remaining chickpeas and all other filling ingredients.
- Spoon into lettuce leaves.
- Chill the filling before serving.
Equipment for This Recipe:
- Mixing bowl
- Fork
How to Serve This Dish:
Pack the filling and lettuce separately, then assemble at the picnic if you can. A cold lemon soda or ginger beer matches the herbal, creamy filling nicely.
Pro Tips for This Recipe:
- Mash only part of the chickpeas for a better texture.
- Keep the lettuce dry and cold.
- Add chopped cucumber if you want more crunch.
Variations on This Dish:
- Curried Version: Add curry powder and golden raisins.
- Avocado Version: Replace some mayo with mashed avocado for a softer filling.
Common Mistakes to Avoid with This Dish:
- Don’t make the filling too wet or the lettuce cups slip.
- Don’t use limp lettuce; crisp leaves matter here.
23. Peach and Burrata Salad

When peaches are ripe, this is the dish I want on the blanket first. Burrata brings the soft, milky center, basil brings the green smell, and a little olive oil ties it all together like a lazy summer lunch with better manners.
Why It Works:
Peaches are juicy without needing cooking, and burrata adds richness without making the salad feel heavy. A splash of vinegar or lemon keeps it sharp enough for a cold glass of prosecco or sparkling water.
Key Ingredients:
- 3 ripe peaches, sliced
- 2 balls burrata
- 2 cups arugula
- 1/4 cup basil leaves
- 1 tablespoon olive oil
- 1 teaspoon balsamic vinegar
- Flaky salt and pepper
Quick Steps:
- Spread the arugula on a platter.
- Add peaches and torn burrata.
- Finish with basil, oil, vinegar, salt, and pepper.
Equipment for This Recipe:
- Sharp knife
- Serving platter
How to Serve This Dish:
Serve it cold and eat it with crackers or crusty bread. A dry rosé or sparkling lemon drink works well with the creamy burrata.
Pro Tips for This Recipe:
- Ripen the peaches fully so they’re soft but not collapsing.
- Tear the burrata just before serving for the best texture.
- Don’t drown it in vinegar; a little goes far.
Variations on This Dish:
- Plum Version: Swap peaches for plums when you want more tartness.
- Prosciutto Version: Add thin slices of prosciutto for a salty edge.
Common Mistakes to Avoid with This Dish:
- Don’t cut the peaches too early or they brown.
- Don’t make this much ahead; the burrata is best fresh.
24. Antipasto Skewers
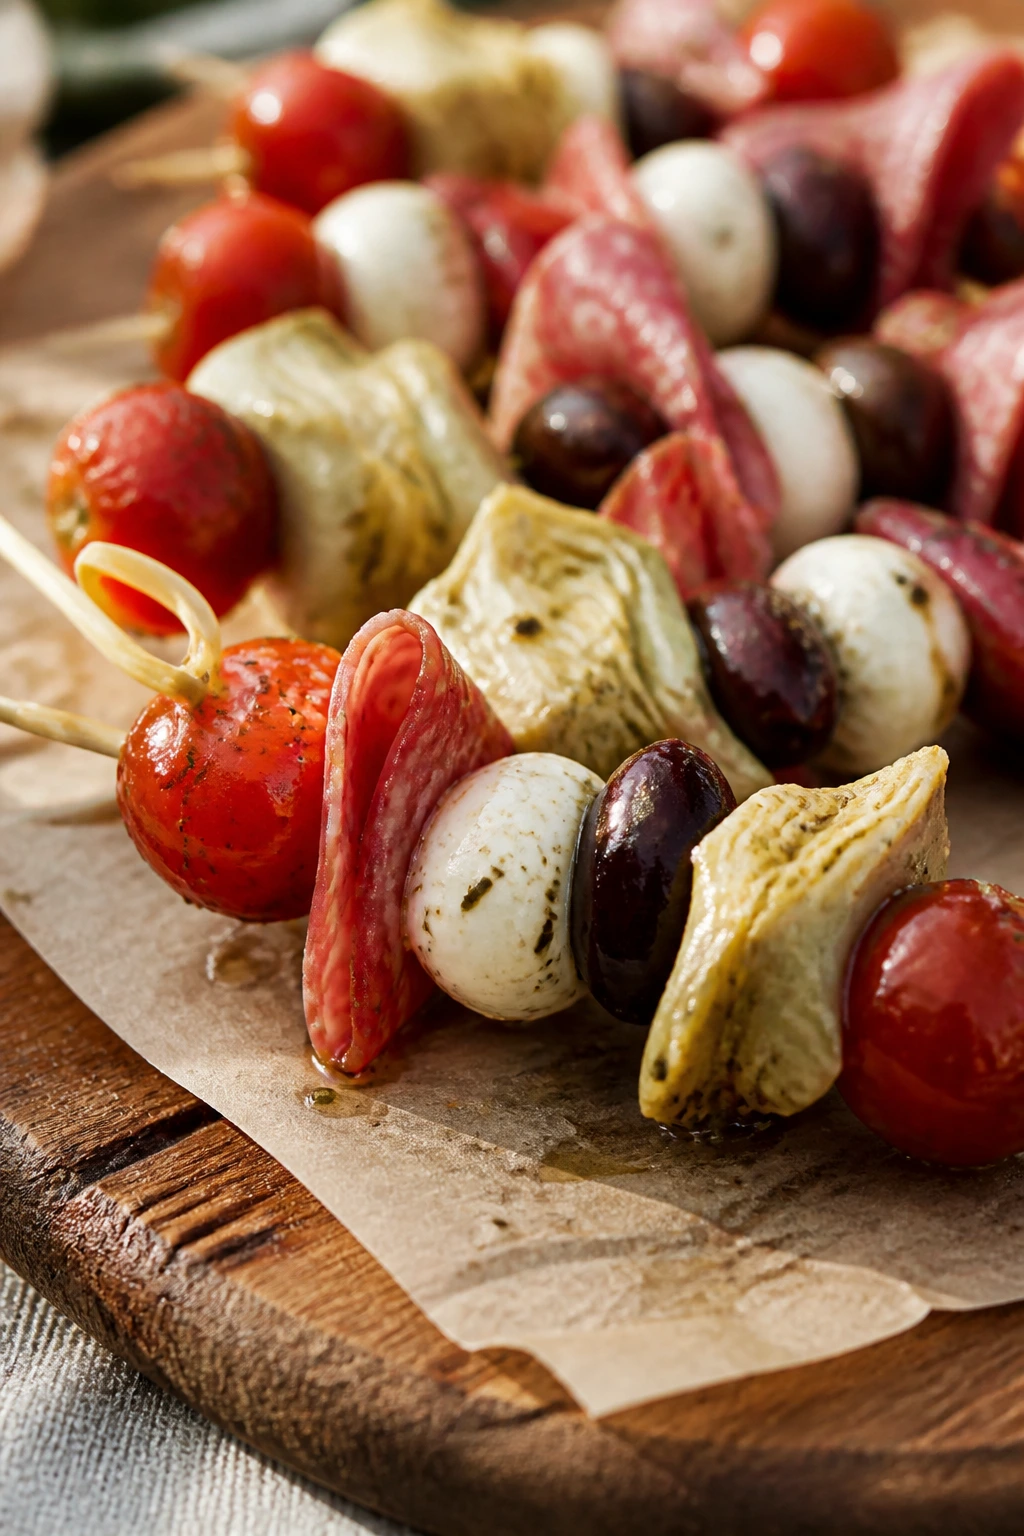
This is the easiest way to bring charcuterie to the blanket without dragging along a board, a knife, and a prayer. Salami, mozzarella, olives, and artichokes make a bite that tastes like a tiny Italian lunch with no cleanup.
Why It Works:
Each skewer gives you salt, fat, and acid in one neat line. That makes it a strong partner for a cold beer or sparkling water with lemon, because the flavors stay lively instead of muddy.
Key Ingredients:
- 12 salami slices, folded
- 12 mozzarella pearls
- 12 olives
- 12 marinated artichoke pieces
- 12 cherry tomatoes
- 1 tablespoon olive oil
Quick Steps:
- Thread salami, mozzarella, olives, artichokes, and tomatoes onto skewers.
- Drizzle lightly with olive oil.
- Chill until packing time.
Equipment for This Recipe:
- Skewers
- Tray
How to Serve This Dish:
Line them up on parchment and serve with crackers. A cold pilsner or sparkling mineral water works especially well with the salt.
Pro Tips for This Recipe:
- Drain the marinated items so the skewers aren’t slippery.
- Fold salami rather than stuffing it flat; it looks better and stays put.
- Keep them cold until the picnic starts.
Variations on This Dish:
- Vegetarian Version: Skip the salami and add more cheese and peppers.
- Spicy Version: Add pepperoncini for more heat and tang.
Common Mistakes to Avoid with This Dish:
- Don’t overload the skewers or they split.
- Don’t forget to chill the cheese first if the day is warm.
25. Roast Beef and Horseradish Slaw Sandwiches
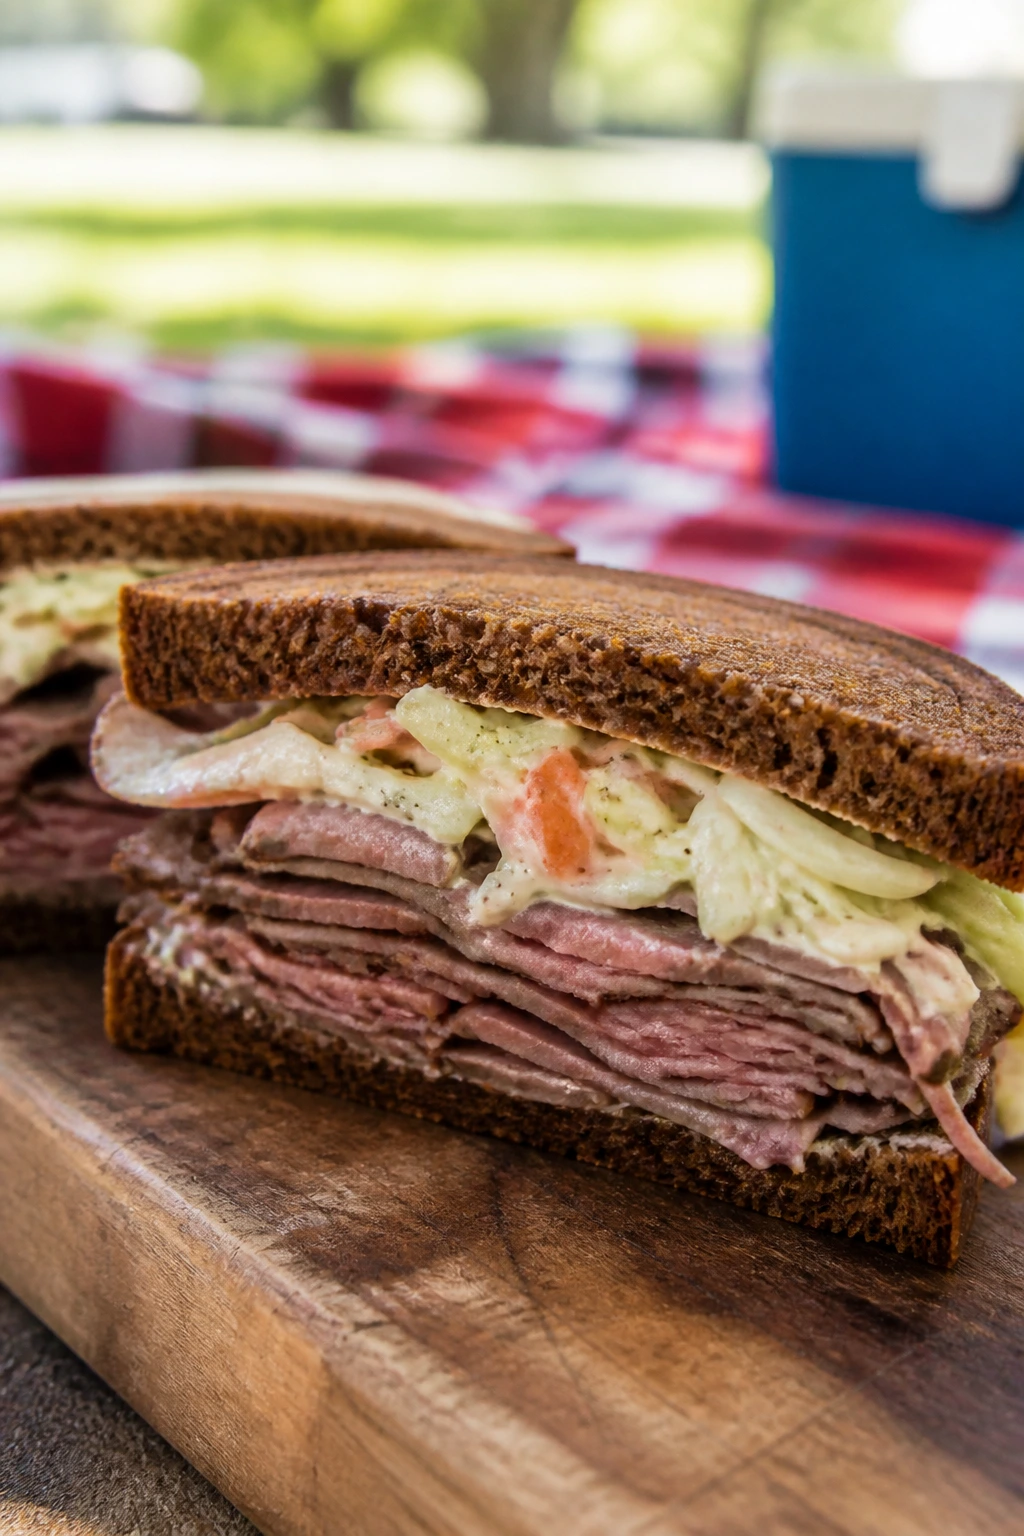
These are for people who want a little bite with their picnic. Roast beef, horseradish, and slaw create a sandwich that feels sturdy and sharp, with enough moisture to stay good after a short ride in the cooler.
Why It Works:
Rye or seeded bread handles the filling better than soft white bread. Horseradish cuts through the beef, and the slaw keeps the sandwich from becoming dry, which makes it a strong match for iced tea or a cold dark beer.
Key Ingredients:
- 8 slices rye or seeded bread
- 12 ounces sliced roast beef
- 1/4 cup mayonnaise
- 1 tablespoon prepared horseradish
- 2 cups shredded cabbage
- 1 tablespoon vinegar
- Salt and pepper
- Pickles, optional
Quick Steps:
- Mix mayo and horseradish.
- Toss cabbage with vinegar, salt, and pepper.
- Build sandwiches with beef, slaw, and pickles, then cut and wrap.
Equipment for This Recipe:
- Cutting board
- Small bowl
- Serrated knife
How to Serve This Dish:
Serve with potato chips and dill pickles for a classic deli-style plate. A cold lager or cola holds up to the horseradish nicely.
Pro Tips for This Recipe:
- Use thin-sliced beef so the sandwich folds easily.
- Keep the slaw dry enough to avoid soggy bread.
- Toast the rye lightly if you’re packing for later.
Variations on This Dish:
- Swiss Version: Add Swiss cheese for a richer, more traditional deli sandwich.
- Mustard-Only Version: Skip mayo and use mustard if you want less richness.
Common Mistakes to Avoid with This Dish:
- Don’t use soft bread that collapses under the meat.
- Don’t overdo the horseradish unless you like a loud bite.
26. Cold Peanut Soba Noodles
Soba noodles are one of the easiest picnic lunches to make feel deliberate. The peanut sauce clings to the noodles, the cucumber and carrots add crunch, and the whole bowl tastes right with a cold drink and a napkin nearby.
Why It Works:
These noodles are meant to be eaten cold, so there’s no awkward reheating. The sauce is bold enough to stay interesting after chilling, which is why it matches well with iced green tea or a lime seltzer.
Key Ingredients:
- 8 ounces soba noodles
- 1/4 cup peanut butter
- 2 tablespoons soy sauce
- 1 tablespoon rice vinegar
- 1 tablespoon sesame oil
- 1 teaspoon honey
- 1 carrot, julienned
- 1 cucumber, julienned
- Sesame seeds
Quick Steps:
- Cook the soba, rinse cold, and drain well.
- Whisk the sauce ingredients until smooth.
- Toss with noodles and vegetables, then chill.
Equipment for This Recipe:
- Pot
- Colander
- Whisk
How to Serve This Dish:
Pack it in a flat container so it doesn’t compact too much. Cold ginger tea or a crisp pilsner works well with the peanut and sesame notes.
Pro Tips for This Recipe:
- Rinse the noodles until they feel cool and separate.
- Thin the sauce with water if it clumps.
- Add the vegetables right before packing if you want extra crunch.
Variations on This Dish:
- Soy-Garlic Version: Add grated garlic and more soy for a sharper taste.
- Tahini Version: Use tahini instead of peanut butter for a nut-free, sesame-forward bowl.
Common Mistakes to Avoid with This Dish:
- Don’t forget to salt the noodle water.
- Don’t let the noodles sit uncoated or they stick together.
27. Savory Chive Cheese Scones
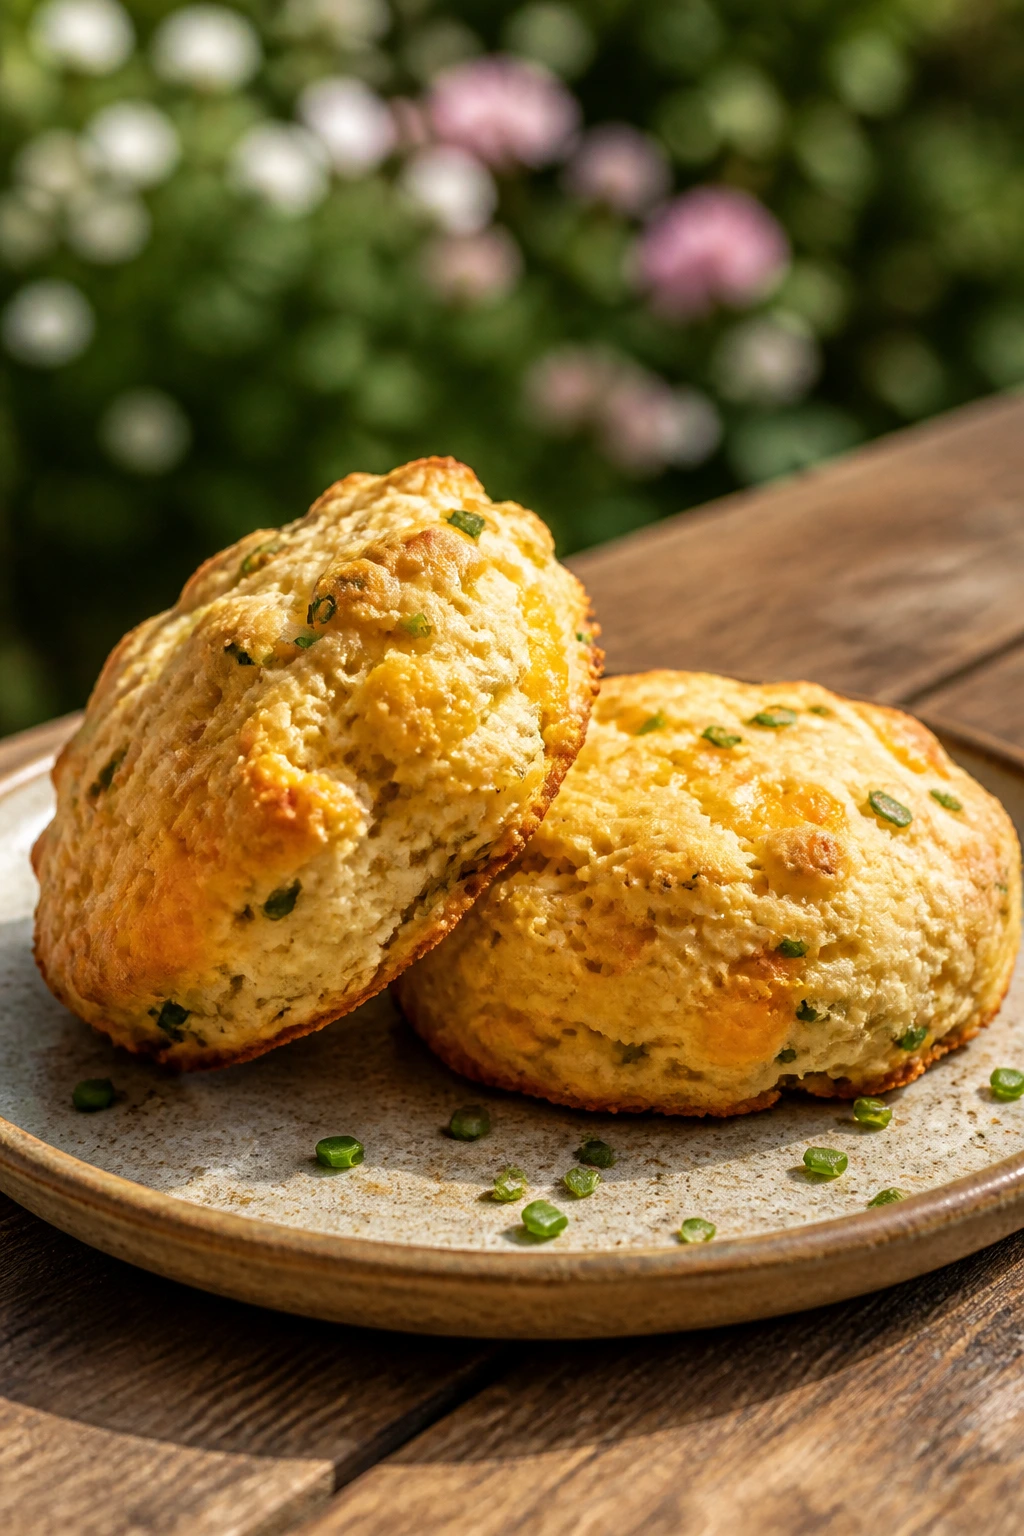
Scones are picnic gold because they travel dry and taste good plain, with cheese, or split open for butter. Chives keep these from feeling like breakfast leftovers, and the cheddar gives them enough salt to work beside a cold beer or iced tea.
Why It Works:
A scone’s crumb is sturdy, which makes it useful in a basket. These don’t need to be perfect — a little roughness is part of the appeal, and the cheese melts into little salty pockets.
Key Ingredients:
- 2 cups all-purpose flour
- 1 tablespoon baking powder
- 1/2 teaspoon salt
- 6 tablespoons cold butter, cubed
- 1 cup shredded cheddar
- 2 tablespoons chopped chives
- 3/4 cup milk or buttermilk
- 1 egg, optional for brushing
Quick Steps:
- Cut the butter into the flour, baking powder, and salt until the mix looks like coarse crumbs.
- Stir in cheddar and chives, then add milk just until the dough comes together.
- Shape, cut, and bake at 400°F for 15 to 18 minutes until golden.
Equipment for This Recipe:
- Mixing bowl
- Baking sheet
- Pastry cutter or fork
How to Serve This Dish:
Serve warm or at room temperature with butter or jam. They’re good with sweet tea or a cold cider, especially if you want something less sweet than a dessert bar.
Pro Tips for This Recipe:
- Keep the butter cold for a flakier crumb.
- Do not overwork the dough or the scones turn tough.
- Brush the tops with milk or egg for better color.
Variations on This Dish:
- Bacon Chive Version: Add chopped bacon for a smokier edge.
- Jalapeño Cheddar Version: Add diced jalapeño for a sharper bite.
Common Mistakes to Avoid with This Dish:
- Don’t knead the dough like bread.
- Don’t underbake the centers or the scones taste doughy.
28. Mini Quiche Muffins
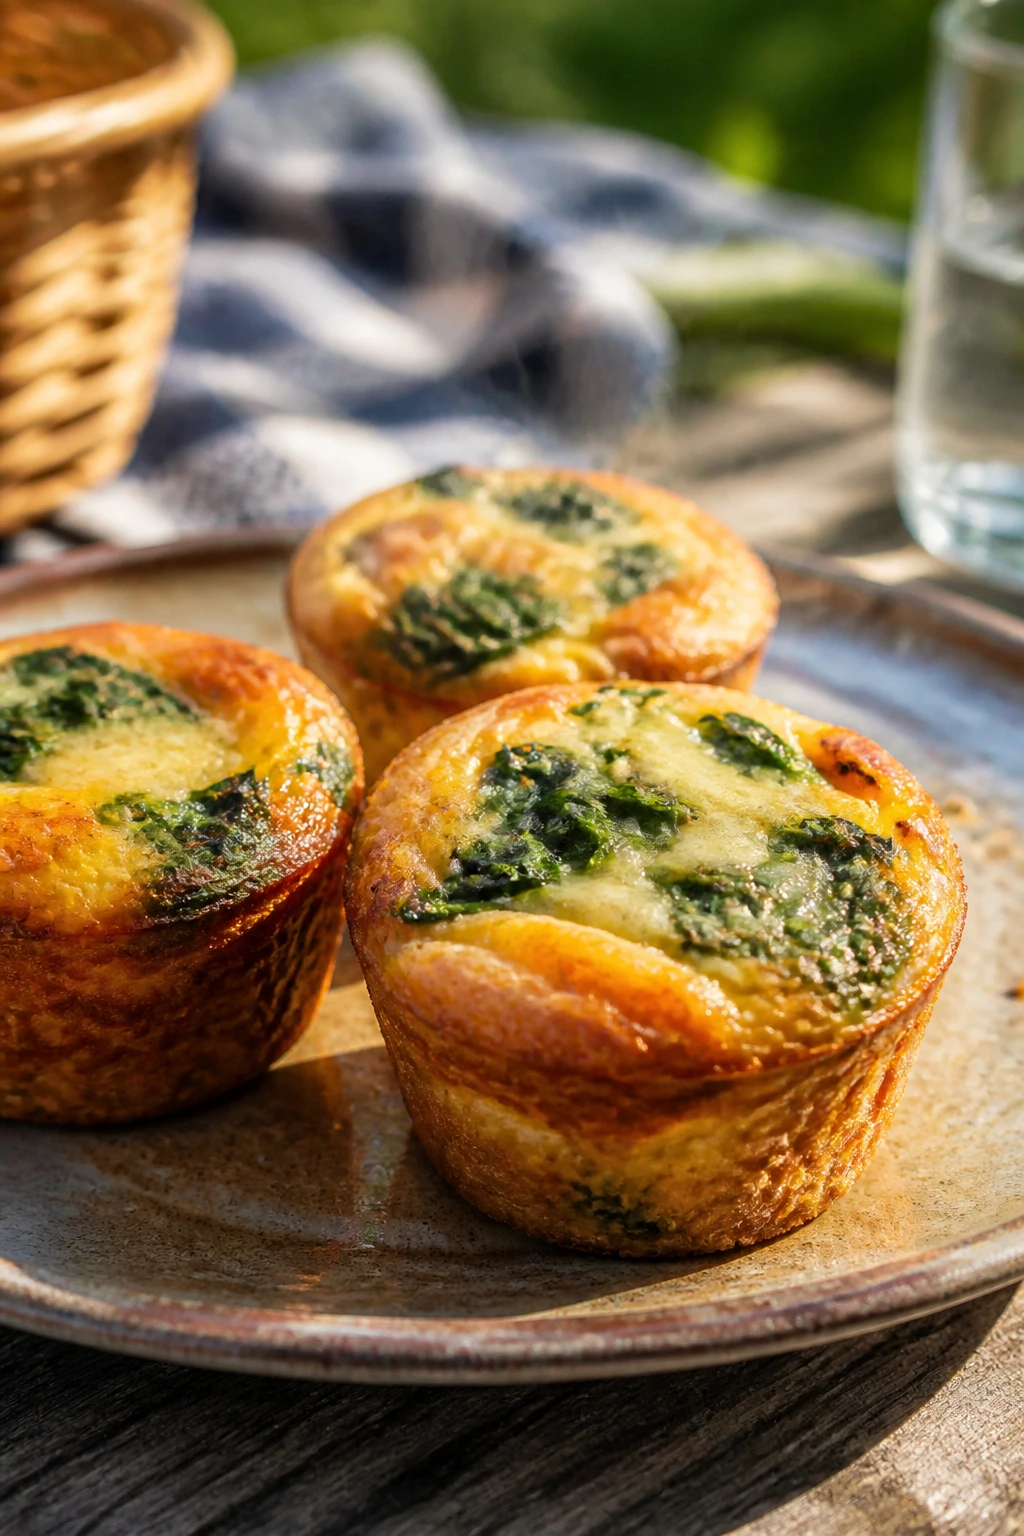
Mini quiche muffins bring real picnic convenience: they’re compact, neat, and easy to eat at room temperature. Eggs, cheese, and whatever vegetables you like set into little cups that feel more substantial than a snack but less formal than a full brunch.
Why It Works:
A muffin tin gives you portion control, which is handy when the basket has limited space. They’re good warm or cold, and they match well with iced coffee, lemonade, or sparkling water.
Key Ingredients:
- 6 large eggs
- 1/2 cup milk
- 1 cup shredded cheese
- 1/2 cup chopped spinach
- 1/4 cup diced ham or bacon, optional
- 1/4 teaspoon salt
- 1/4 teaspoon black pepper
- Nonstick spray
Quick Steps:
- Whisk eggs, milk, salt, and pepper.
- Divide cheese, spinach, and ham into a greased muffin tin, then pour in the egg mixture.
- Bake at 375°F for 18 to 22 minutes until puffed and set.
Equipment for This Recipe:
- Muffin tin
- Whisk
- Measuring cups
How to Serve This Dish:
Pack them in a container with parchment between layers. A cold tomato juice, iced tea, or a pale ale works well with the egg-and-cheese flavor.
Pro Tips for This Recipe:
- Don’t fill the cups all the way to the top or they spill over.
- Let them cool before packing so they don’t steam.
- Use smaller bits of vegetables so the muffins hold together.
Variations on This Dish:
- Spinach-Feta Version: Use feta and spinach for a sharper, saltier fill.
- Mushroom Version: Sauté mushrooms first so they don’t leak water into the eggs.
Common Mistakes to Avoid with This Dish:
- Don’t underbake; the center should feel set, not jiggly.
- Don’t pack them while hot or condensation softens the tops.
29. Deviled Potatoes
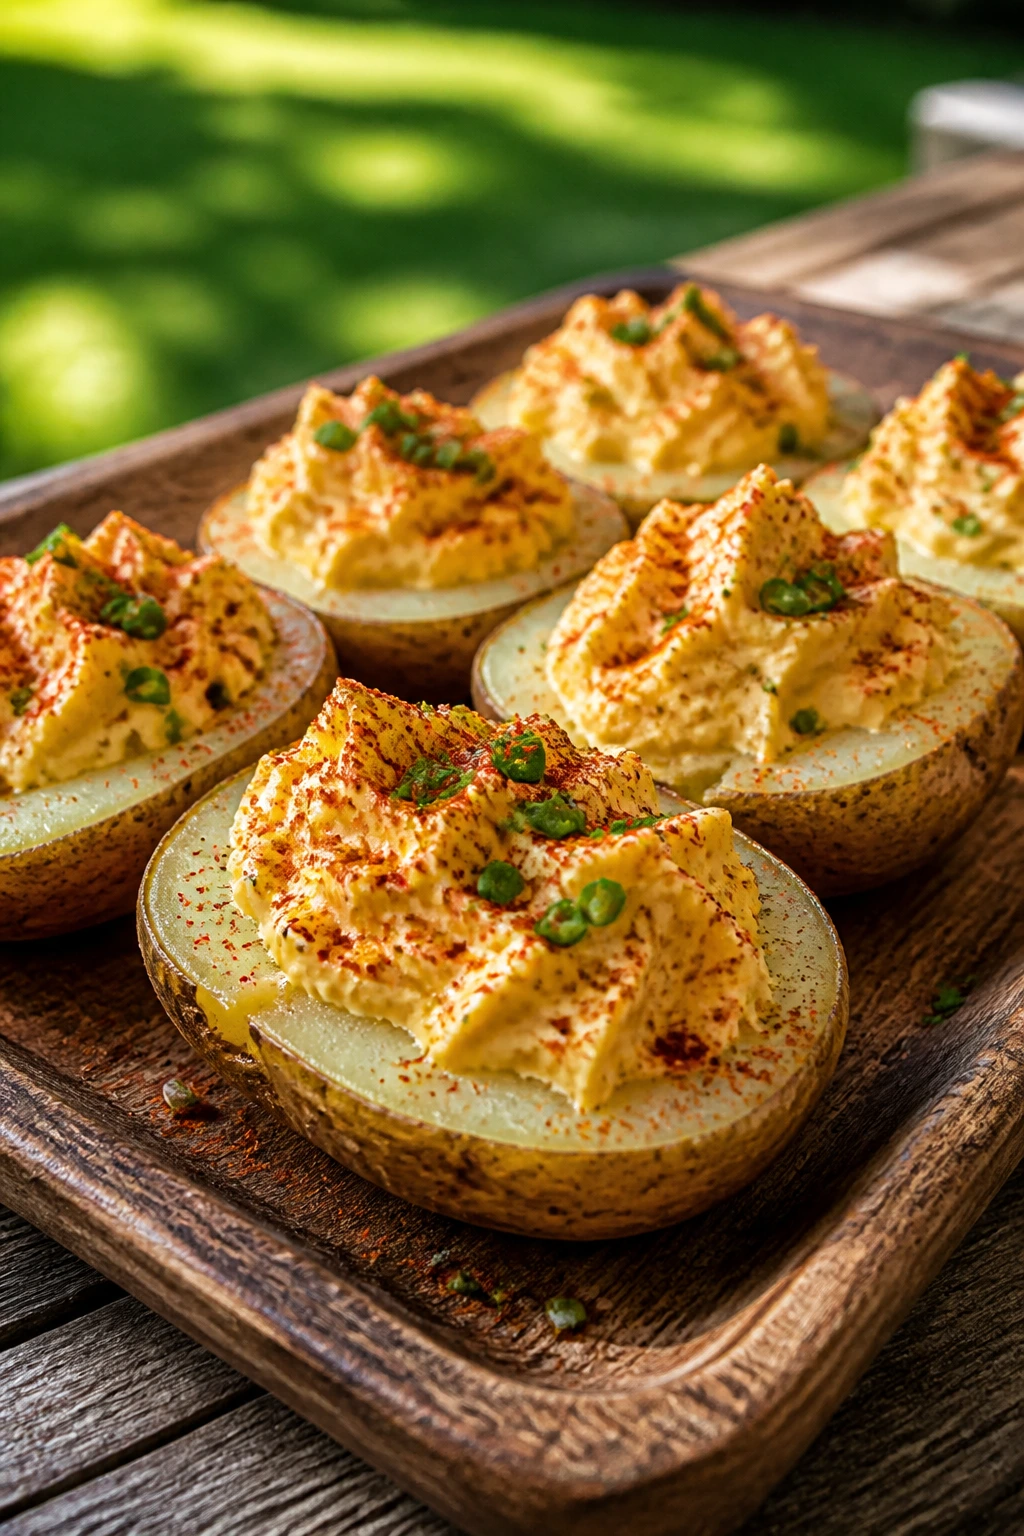
These little potato bites are the cousin of deviled eggs that nobody expects and everyone keeps reaching for. The potatoes stay neat, the filling is creamy and tangy, and the paprika gives them the right picnic-red finish.
Why It Works:
Baby potatoes hold filling better than larger ones and don’t need a fork if you use a toothpick or just pick them up. They pair well with a cold beer or lemonade because the mustardy filling cuts the starch.
Key Ingredients:
- 1 1/2 pounds baby potatoes
- 3 egg yolks, hard-boiled
- 3 tablespoons mayonnaise
- 1 teaspoon Dijon mustard
- 1 teaspoon vinegar
- Salt and pepper
- Paprika and chives
Quick Steps:
- Boil the potatoes until tender, then slice off a thin top and scoop a small pocket from the center.
- Mash yolks with mayo, mustard, vinegar, salt, and pepper.
- Spoon the filling into the potatoes and dust with paprika and chives.
Equipment for This Recipe:
- Saucepan
- Small spoon
- Mixing bowl
How to Serve This Dish:
Line them up on a tray and chill before serving. They’re good with cold pilsner, iced tea, or a sharp lemonade.
Pro Tips for This Recipe:
- Choose potatoes that sit flat so they don’t roll.
- Don’t over-scoop or the shells split.
- Keep the filling thick so it mounds nicely.
Variations on This Dish:
- Sour Cream Version: Swap some mayo for sour cream for a cooler tang.
- Relish Version: Add a spoon of chopped pickle relish for more crunch.
Common Mistakes to Avoid with This Dish:
- Don’t boil the potatoes until they fall apart.
- Don’t make the filling loose or it slides off.
30. Fruit Skewers with Honey-Lime Yogurt Dip
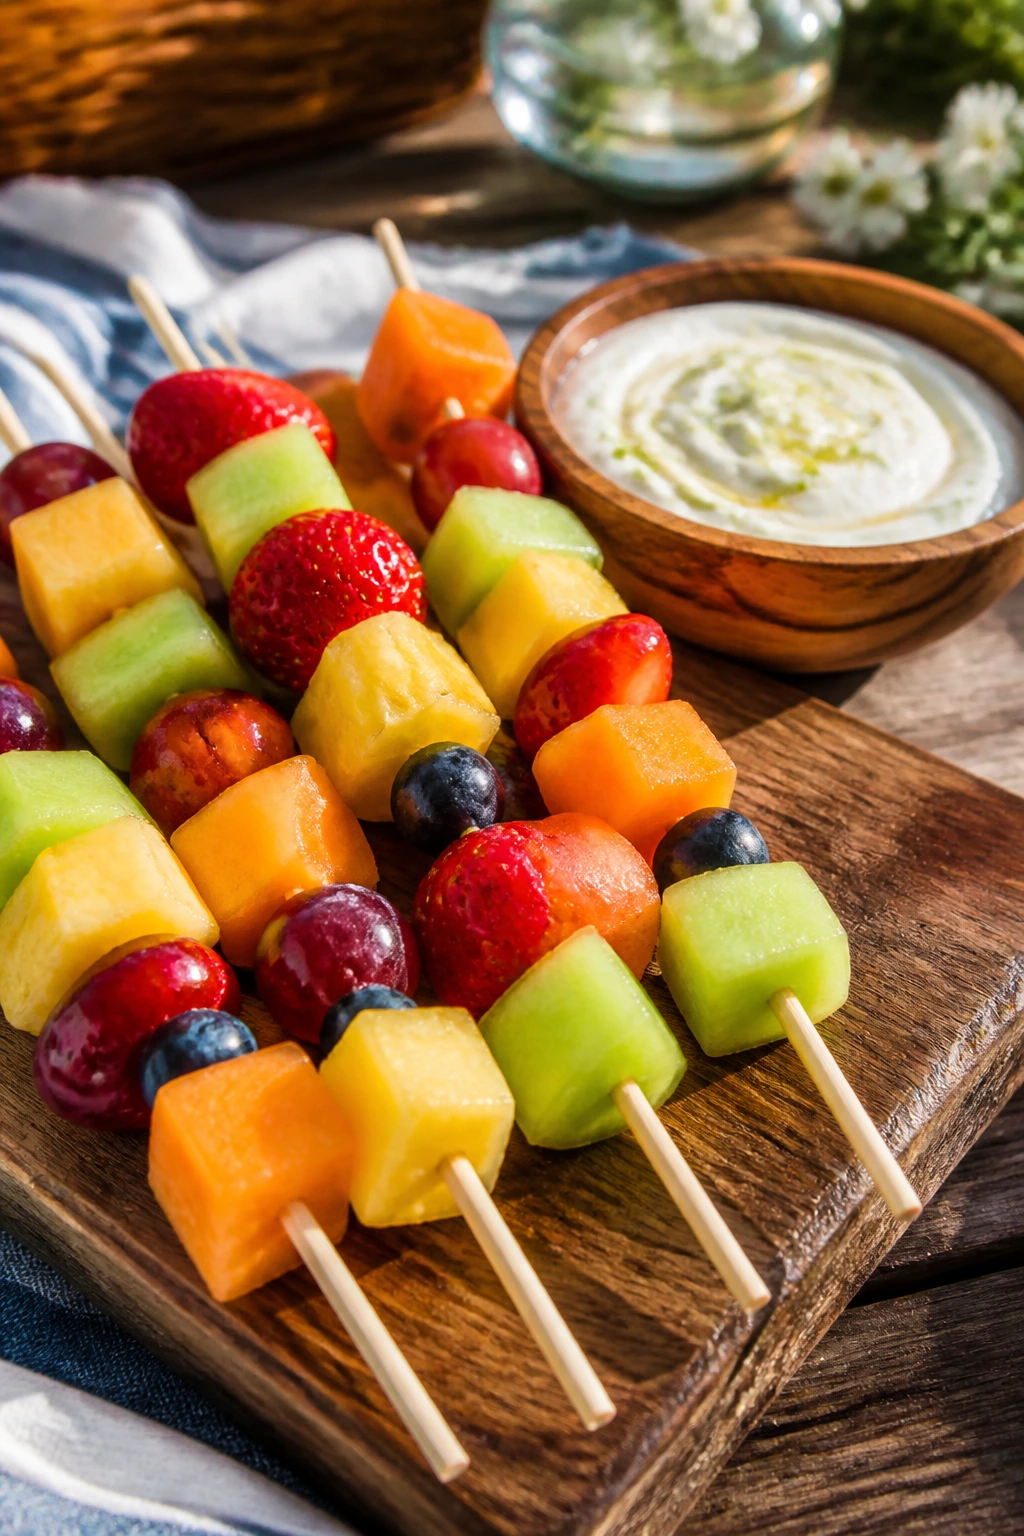
Fruit skewers are the one dish in the basket that feels like a reset button. They’re cold, easy to eat, and bright enough to clean your mouth between salty bites, which is exactly what a picnic needs.
Why It Works:
A mix of melon, berries, grapes, and pineapple gives you different textures without any knife work at the blanket. The honey-lime dip adds just enough creaminess to pair with a cold drink or sparkling water.
Key Ingredients:
- 1 cup strawberries
- 1 cup melon cubes
- 1 cup seedless grapes
- 1 cup pineapple chunks
- 1 cup plain yogurt
- 1 tablespoon honey
- 1 teaspoon lime juice
Quick Steps:
- Thread fruit onto skewers.
- Stir yogurt, honey, and lime juice together.
- Chill both pieces separately until serving.
Equipment for This Recipe:
- Skewers
- Small bowl
How to Serve This Dish:
Serve the dip in a separate cup so the fruit stays dry. Cold lemonade or a spritzy water with mint suits this especially well.
Pro Tips for This Recipe:
- Dry the fruit after washing so the skewers don’t slide.
- Use firm fruit pieces that won’t burst in the cooler.
- If the dip feels thin, chill it longer before packing.
Variations on This Dish:
- Coconut Yogurt Version: Use coconut yogurt for a dairy-free dip.
- Citrus Dust Version: Add a pinch of lime zest to the fruit for extra brightness.
Common Mistakes to Avoid with This Dish:
- Don’t choose overly soft fruit like overripe berries.
- Don’t pack the dip on top of the fruit.
31. Southwestern Tortilla Roll-Ups
These roll-ups taste like a party appetizer that learned how to travel. Cream cheese holds the beans, corn, and cheddar in place, and the salsa gives the whole spiral a little heat and color.
Why It Works:
They slice neatly after a short chill, which is half the job with picnic finger food. The black beans add heft, so a few pieces can stand in for a light lunch beside a cold soda or a lime beer.
Key Ingredients:
- 4 large flour tortillas
- 8 ounces cream cheese, softened
- 1/2 cup salsa, drained slightly
- 1/2 cup black beans, rinsed and drained
- 1/2 cup corn kernels
- 1 cup shredded cheddar
- 2 tablespoons chopped green onion
Quick Steps:
- Mix cream cheese with salsa.
- Spread on tortillas, then top with beans, corn, cheddar, and green onion.
- Roll tightly, chill 20 minutes, and slice into pinwheels.
Equipment for This Recipe:
- Mixing bowl
- Knife
- Cutting board
How to Serve This Dish:
Arrange cut-side up and keep them cold until the basket opens. They work well with tortilla chips and a chilled citrus soda.
Pro Tips for This Recipe:
- Drain the salsa a little so the tortillas don’t get wet.
- Roll firmly so the spirals hold.
- Chill before slicing for clean edges.
Variations on This Dish:
- Chicken Version: Add shredded rotisserie chicken for a bigger fill.
- Spicy Version: Use pepper jack and hot salsa for more heat.
Common Mistakes to Avoid with This Dish:
- Don’t overstuff them.
- Don’t skip draining the salsa or the wraps get slippery.
32. Gazpacho Shooters
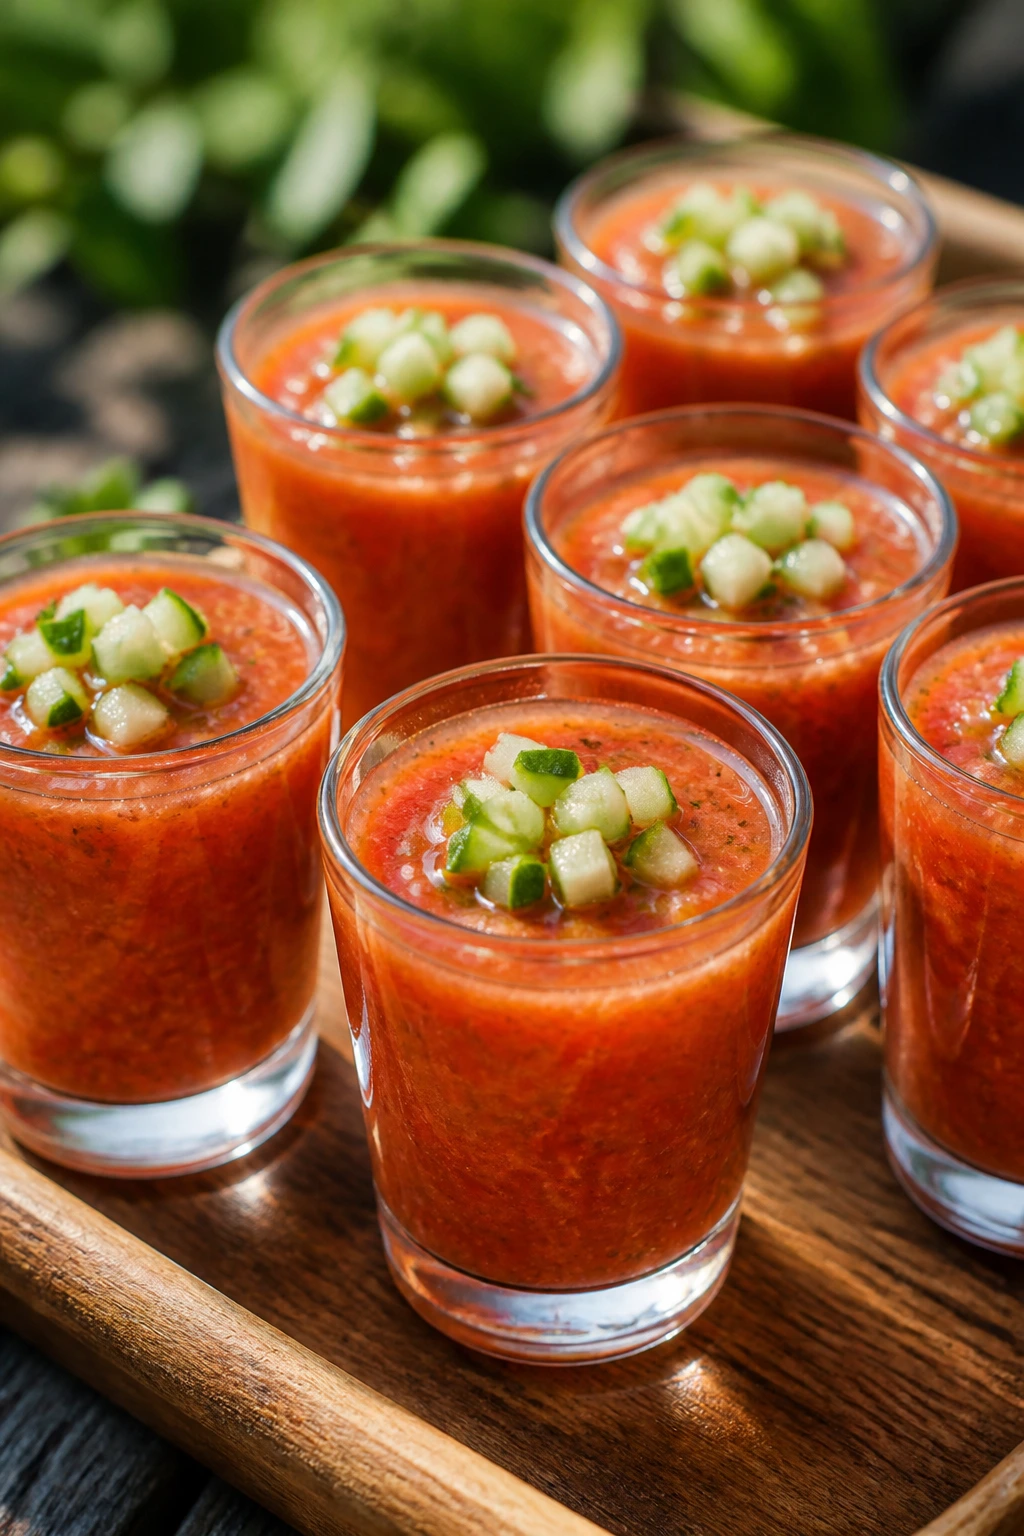
Gazpacho is the cold drink of picnic foods. It’s tomato-heavy, cucumber-bright, and designed to be sipped or spooned without any heat at all, which is useful when the rest of the basket is doing more work.
Why It Works:
The soup is chilled on purpose, so you’re not fighting the weather. It pairs beautifully with crunchy snacks and gives the cooler something fresh and savory that feels almost fancy in a paper cup.
Key Ingredients:
- 4 ripe tomatoes
- 1 cucumber, peeled and chopped
- 1 red bell pepper, chopped
- 1/4 small red onion
- 1 garlic clove
- 2 tablespoons olive oil
- 1 tablespoon sherry vinegar
- Salt
- Croutons or diced cucumber, for topping
Quick Steps:
- Blend the tomatoes, cucumber, pepper, onion, garlic, oil, vinegar, and salt until smooth or slightly chunky.
- Chill at least 1 hour.
- Pour into small cups and top with croutons or cucumber.
Equipment for This Recipe:
- Blender
- Measuring cups
- Small cups
How to Serve This Dish:
Serve it very cold, ideally straight from the cooler. A cold white wine spritzer or sparkling water with lemon is the right match.
Pro Tips for This Recipe:
- Use ripe tomatoes or the soup tastes thin and sharp in the wrong way.
- Chill the soup before packing, not after arriving.
- Keep toppings separate until serving.
Variations on This Dish:
- Spicy Gazpacho: Add jalapeño for a stronger bite.
- Watermelon Gazpacho: Blend in a little watermelon for sweetness.
Common Mistakes to Avoid with This Dish:
- Don’t under-salt it; cold soup needs more seasoning than you think.
- Don’t skip chilling or the flavors stay muddled.
33. Beef Meatballs with Chimichurri in Cups
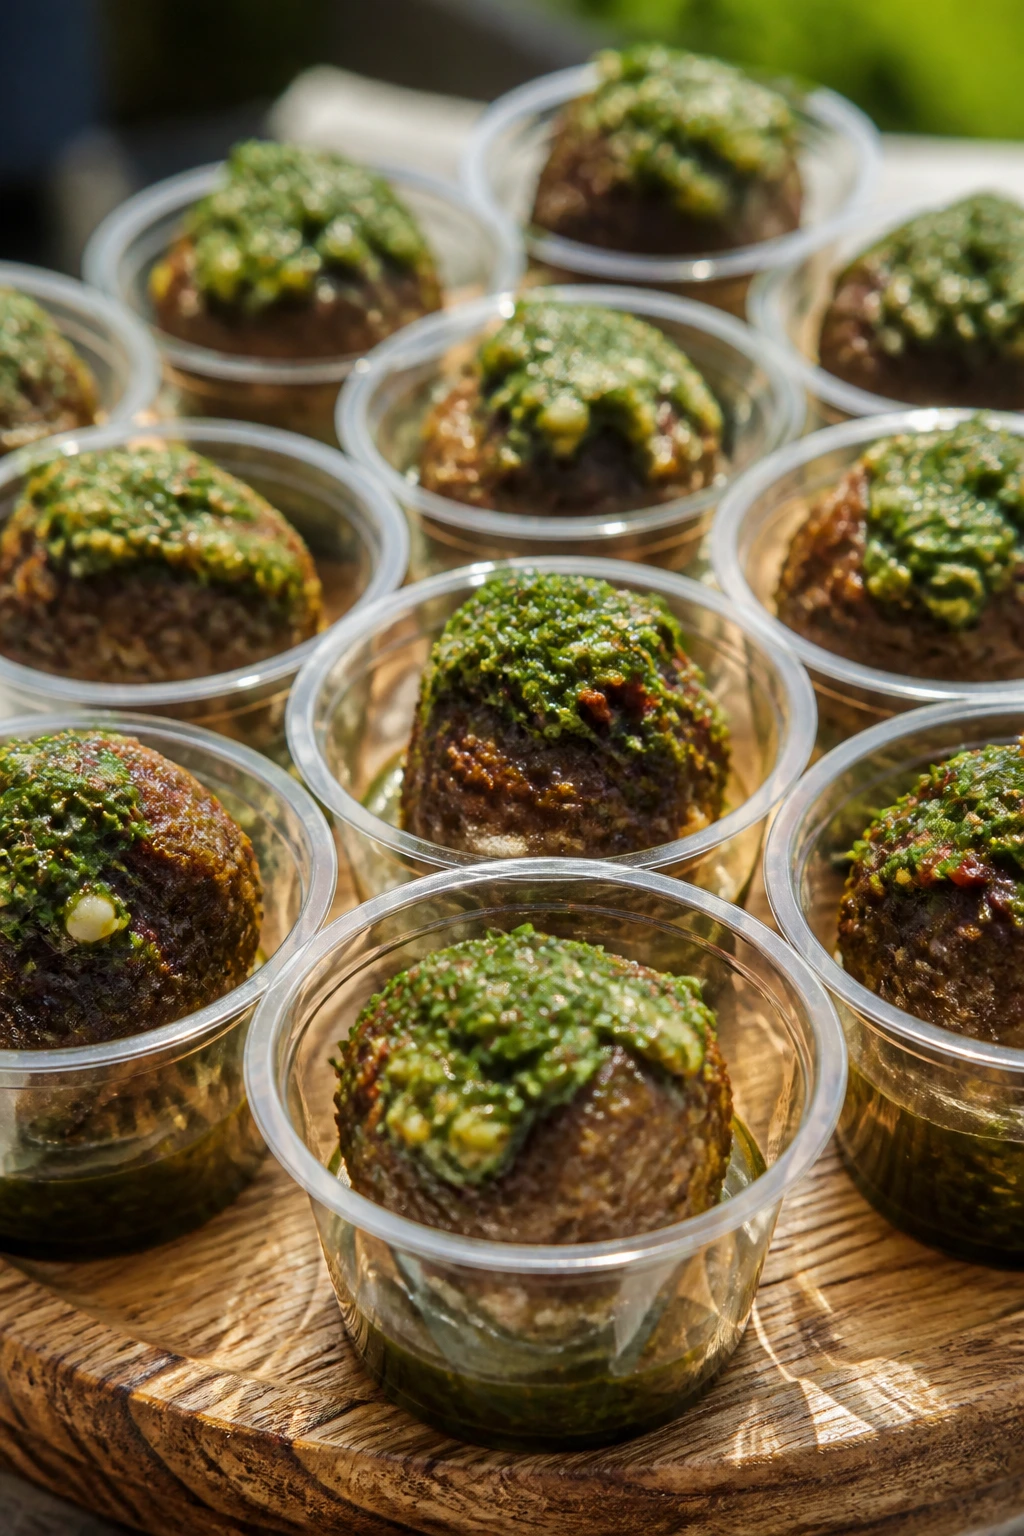
These meatballs are a little more substantial than the average picnic nibble, which is exactly the point. Serve them in small cups with chimichurri, and you get savory bites that still stay neat enough for a blanket.
Why It Works:
Beef meatballs hold temperature well and can be eaten warm or cool. Chimichurri adds herbs, garlic, and vinegar, so every bite stays bright beside a cold beer or iced tea.
Key Ingredients:
- 1 pound ground beef
- 1/2 cup breadcrumbs
- 1 egg
- 2 tablespoons grated onion
- 1 teaspoon salt
- 1/2 teaspoon pepper
- 1 cup chimichurri sauce
Quick Steps:
- Mix the beef, breadcrumbs, egg, onion, salt, and pepper gently.
- Roll into 1-inch meatballs and bake at 400°F for 15 to 18 minutes until cooked through.
- Cool slightly, then spoon into cups with chimichurri.
Equipment for This Recipe:
- Baking sheet
- Mixing bowl
- Small serving cups
How to Serve This Dish:
Serve with toothpicks and extra sauce on the side. A cold lager or sparkling water with lime keeps the herbs and beef in balance.
Pro Tips for This Recipe:
- Mix the meat lightly so the meatballs stay tender.
- Make the chimichurri a few hours ahead if you can; it improves as it sits.
- Use a small scoop for even meatballs.
Variations on This Dish:
- Turkey Meatball Version: Swap in ground turkey for a lighter bite.
- Spicy Herb Version: Add red pepper flakes to the chimichurri.
Common Mistakes to Avoid with This Dish:
- Don’t overbake or the meatballs dry out.
- Don’t drown them in sauce; keep the cups manageable.
34. Cornbread Muffins with Hot Honey Butter
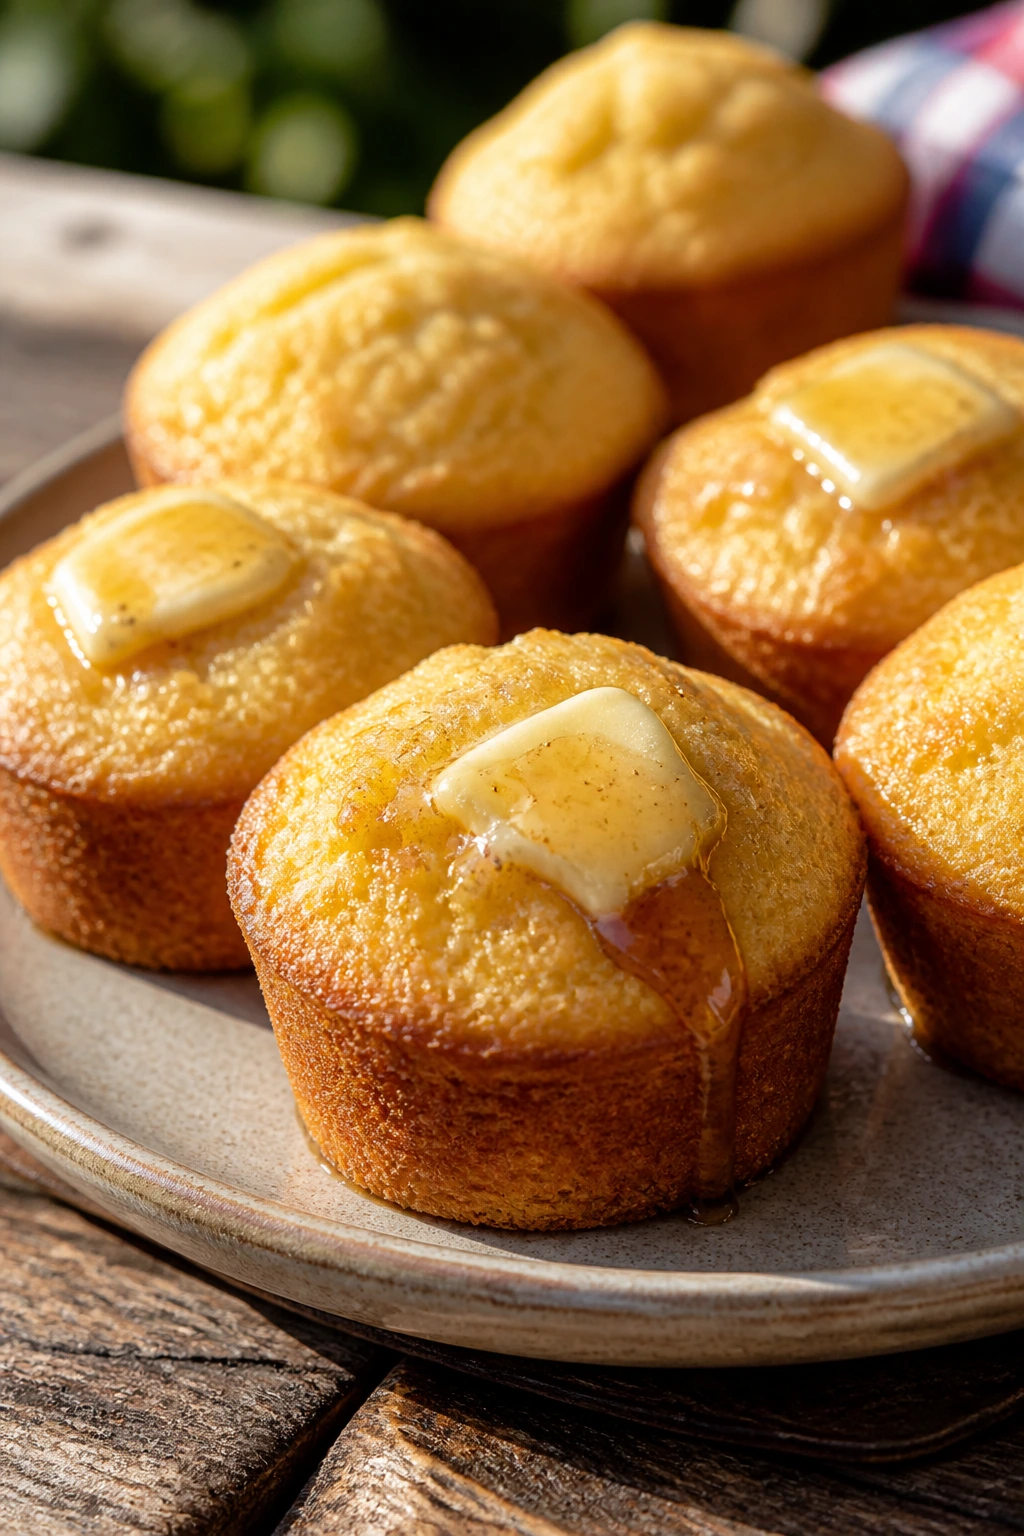
Cornbread muffins bring a little sweetness and a little grit to a picnic spread. They’re sturdy enough to pack, and the hot honey butter melts into the crumb in a way that feels almost unfair with a cold drink.
Why It Works:
Cornbread doesn’t need refrigeration for a short outing, which makes it useful and low-stress. The hot honey adds heat and shine, and a cold iced tea or lager helps balance the sweetness.
Key Ingredients:
- 1 cup cornmeal
- 1 cup flour
- 1/4 cup sugar
- 1 tablespoon baking powder
- 1/2 teaspoon salt
- 1 cup buttermilk
- 2 eggs
- 1/4 cup melted butter
- 2 tablespoons honey
- Pinch of cayenne, optional
Quick Steps:
- Mix the dry ingredients.
- Whisk the buttermilk, eggs, melted butter, and honey, then combine with the dry mix.
- Bake in a muffin tin at 400°F for 18 to 20 minutes.
Equipment for This Recipe:
- Muffin tin
- Mixing bowls
- Whisk
How to Serve This Dish:
Split them open and spread with hot honey butter or plain butter. They work with chili, grilled chicken, or a cold sweet tea.
Pro Tips for This Recipe:
- Don’t overmix the batter.
- Serve them warm if possible, but they’re still good at room temp.
- Add extra honey to the butter if you want more sweetness.
Variations on This Dish:
- Jalapeño Version: Fold in minced jalapeño and cheddar.
- Skillet Version: Bake in a cast-iron skillet for crisp edges.
Common Mistakes to Avoid with This Dish:
- Don’t let the batter sit too long before baking.
- Don’t overbake or the muffins go dry.
35. Lemon Bars
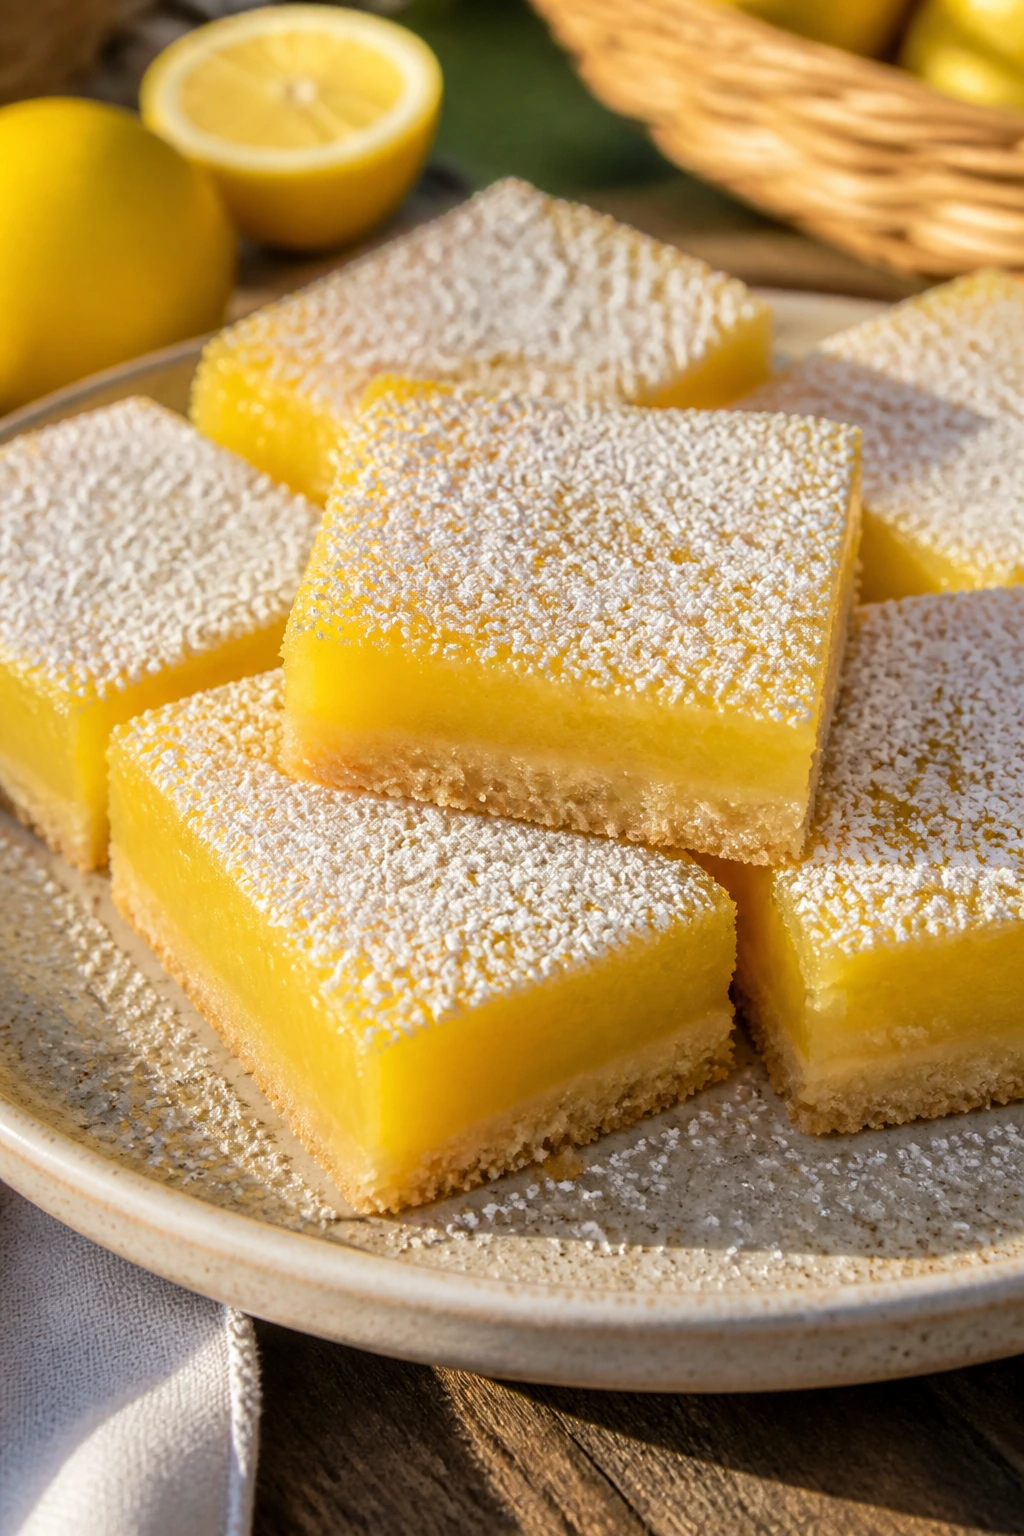
Lemon bars are the dessert that holds up in a picnic box without melting into regret. The buttery crust gives structure, the filling is sharp and sweet, and the powdered sugar on top looks good even after a little travel.
Why It Works:
Citrus desserts taste especially clean after salty picnic food. The bars chill neatly, slice neatly, and pair with cold tea, lemonade, or sparkling water without feeling heavy.
Key Ingredients:
- 1 cup butter, softened
- 2 cups flour, divided
- 1/2 cup powdered sugar
- 4 large eggs
- 1 1/2 cups sugar
- 1/2 cup lemon juice
- 1 tablespoon lemon zest
- Pinch of salt
Quick Steps:
- Make the crust with butter, flour, and powdered sugar, then press into a pan and bake at 350°F for 15 minutes.
- Whisk eggs, sugar, lemon juice, zest, flour, and salt.
- Pour over the crust and bake 20 to 25 minutes until set; chill before cutting.
Equipment for This Recipe:
- 9×13-inch pan
- Whisk
- Parchment paper
How to Serve This Dish:
Dust with powdered sugar right before serving. A cold lemonade might sound redundant, but it works, and so does iced tea with mint.
Pro Tips for This Recipe:
- Let the bars cool fully before slicing or the filling smears.
- Line the pan with parchment so you can lift them out cleanly.
- Use fresh lemon juice, not bottled, for a cleaner finish.
Variations on This Dish:
- Lime Bars: Swap the citrus for lime if you want a sharper edge.
- Berry Lemon Bars: Add a thin layer of berries under the filling.
Common Mistakes to Avoid with This Dish:
- Don’t cut them warm.
- Don’t underbake the center or the filling won’t set.
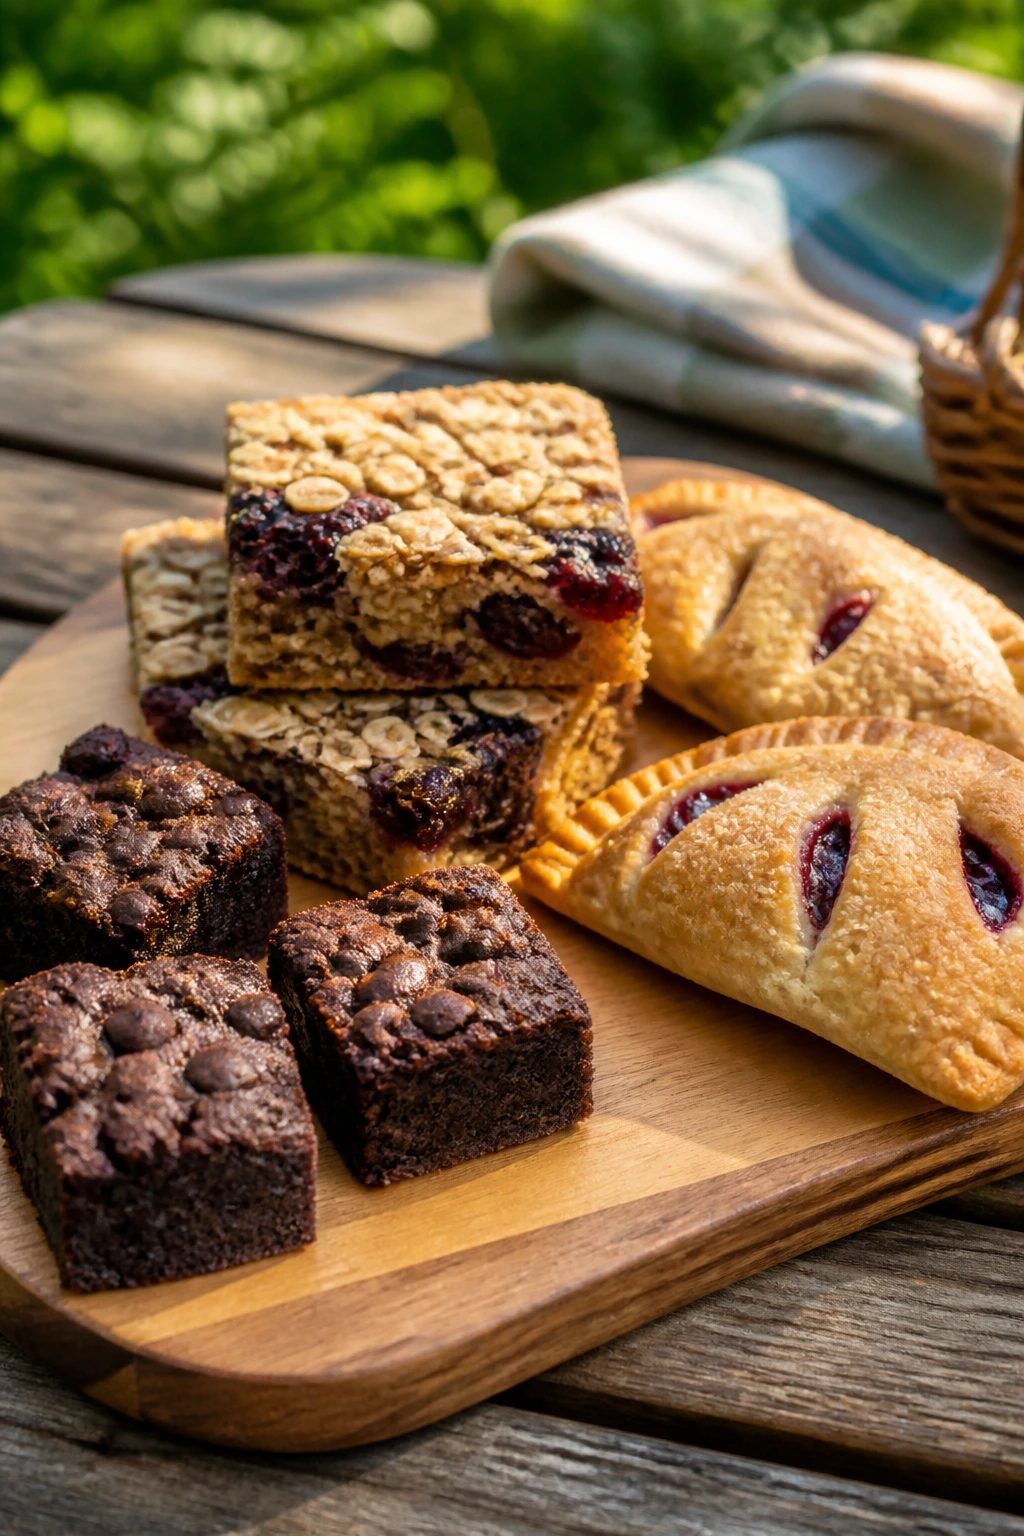
36. Brownie Bites with Sea Salt
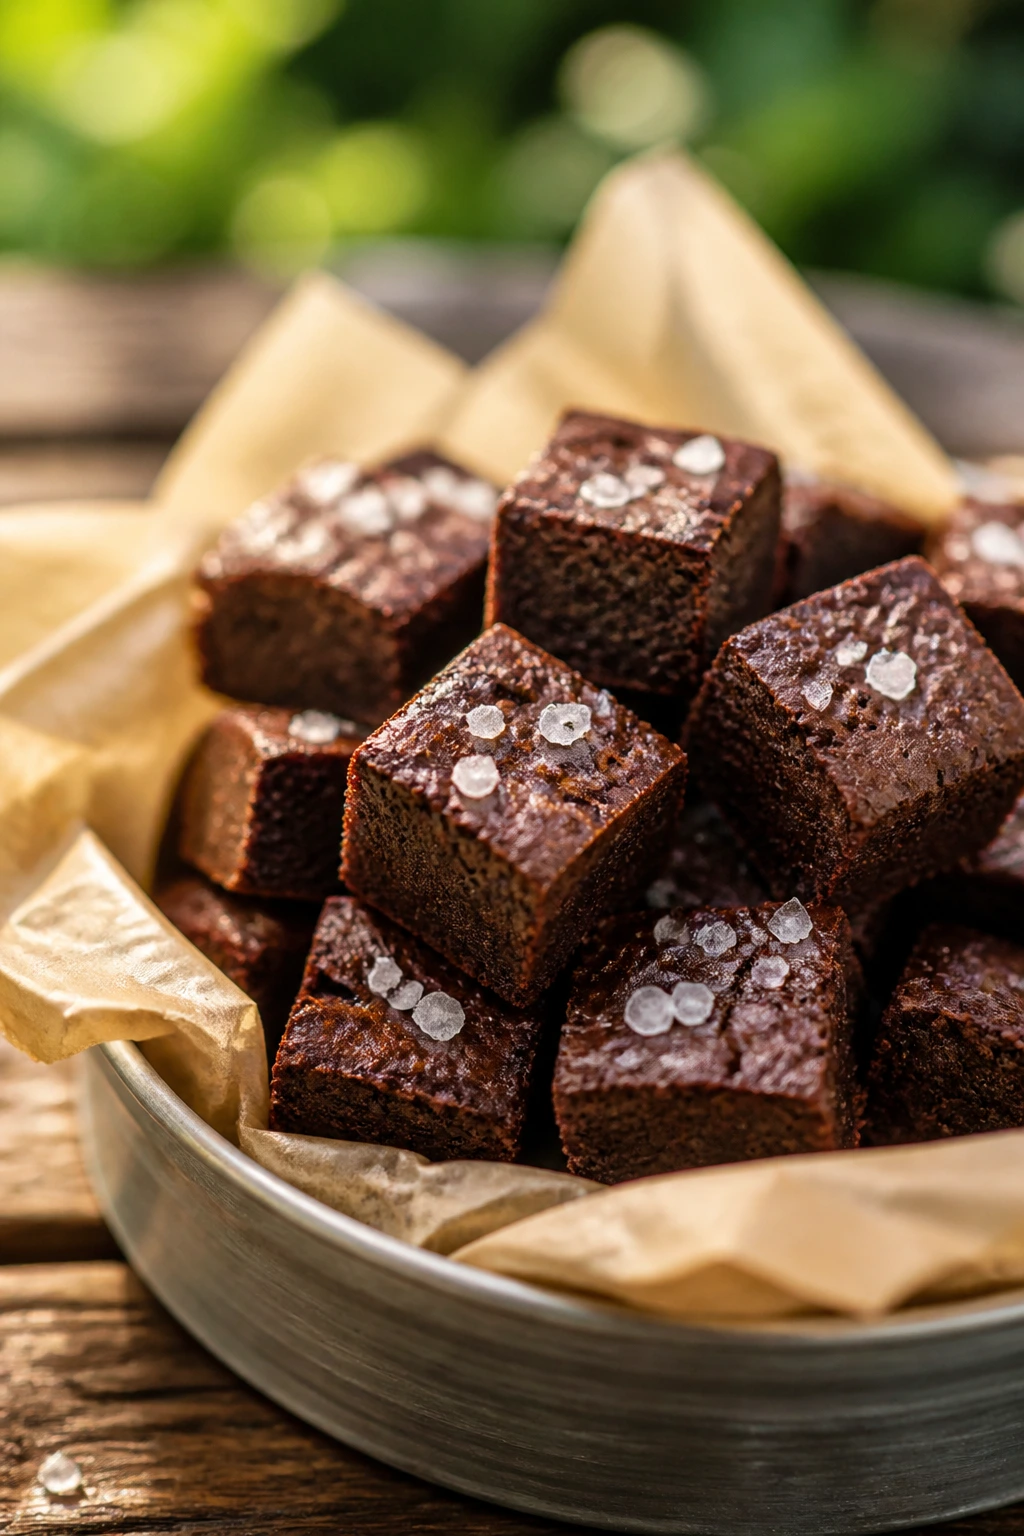
Brownie bites are the dessert version of a reliable picnic friend. They don’t need frosting, they don’t melt easily, and the sprinkle of flaky salt keeps the chocolate from feeling too sweet beside a cold drink.
Why It Works:
Small squares are easier to pack than a full pan of brownies and easier to eat with one hand. The sea salt on top makes them good with milk, iced coffee, or even a stout if the picnic leans that way.
Key Ingredients:
- 1/2 cup butter
- 1 cup sugar
- 2 eggs
- 1 teaspoon vanilla
- 1/3 cup cocoa powder
- 1/2 cup flour
- 1/4 teaspoon salt
- Flaky sea salt
Quick Steps:
- Melt the butter, then whisk in sugar, eggs, and vanilla.
- Stir in cocoa, flour, and salt.
- Bake in a lined pan at 350°F for 20 to 25 minutes, then cool and cut into bites.
Equipment for This Recipe:
- Mixing bowl
- Whisk
- Baking pan
How to Serve This Dish:
Stack them in a tin with parchment between layers. They’re excellent with cold milk, iced coffee, or a dark beer for adults who want a dessert with edges.
Pro Tips for This Recipe:
- Pull them when the center still has a few moist crumbs.
- Salt the top while they’re still warm so it sticks.
- Use parchment for easy lifting.
Variations on This Dish:
- Walnut Version: Fold in chopped walnuts for crunch.
- Espresso Version: Add a spoon of espresso powder for deeper chocolate flavor.
Common Mistakes to Avoid with This Dish:
- Don’t overbake or they go dry.
- Don’t slice too soon or the centers crumble.
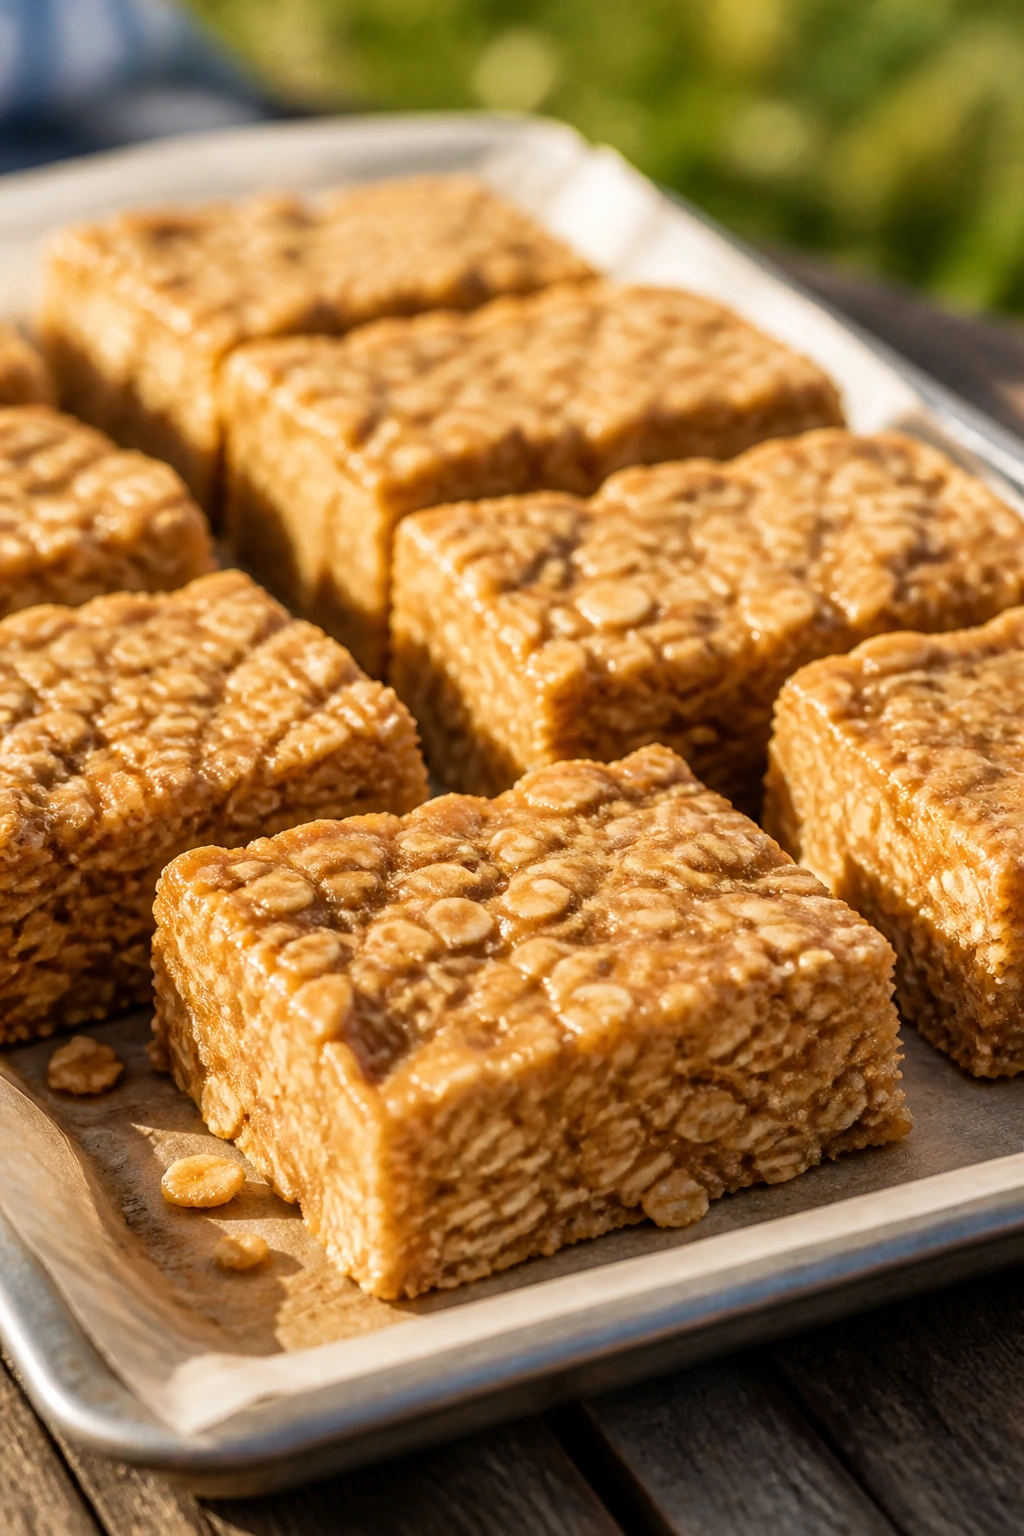
37. Oatmeal Raisin Picnic Bars
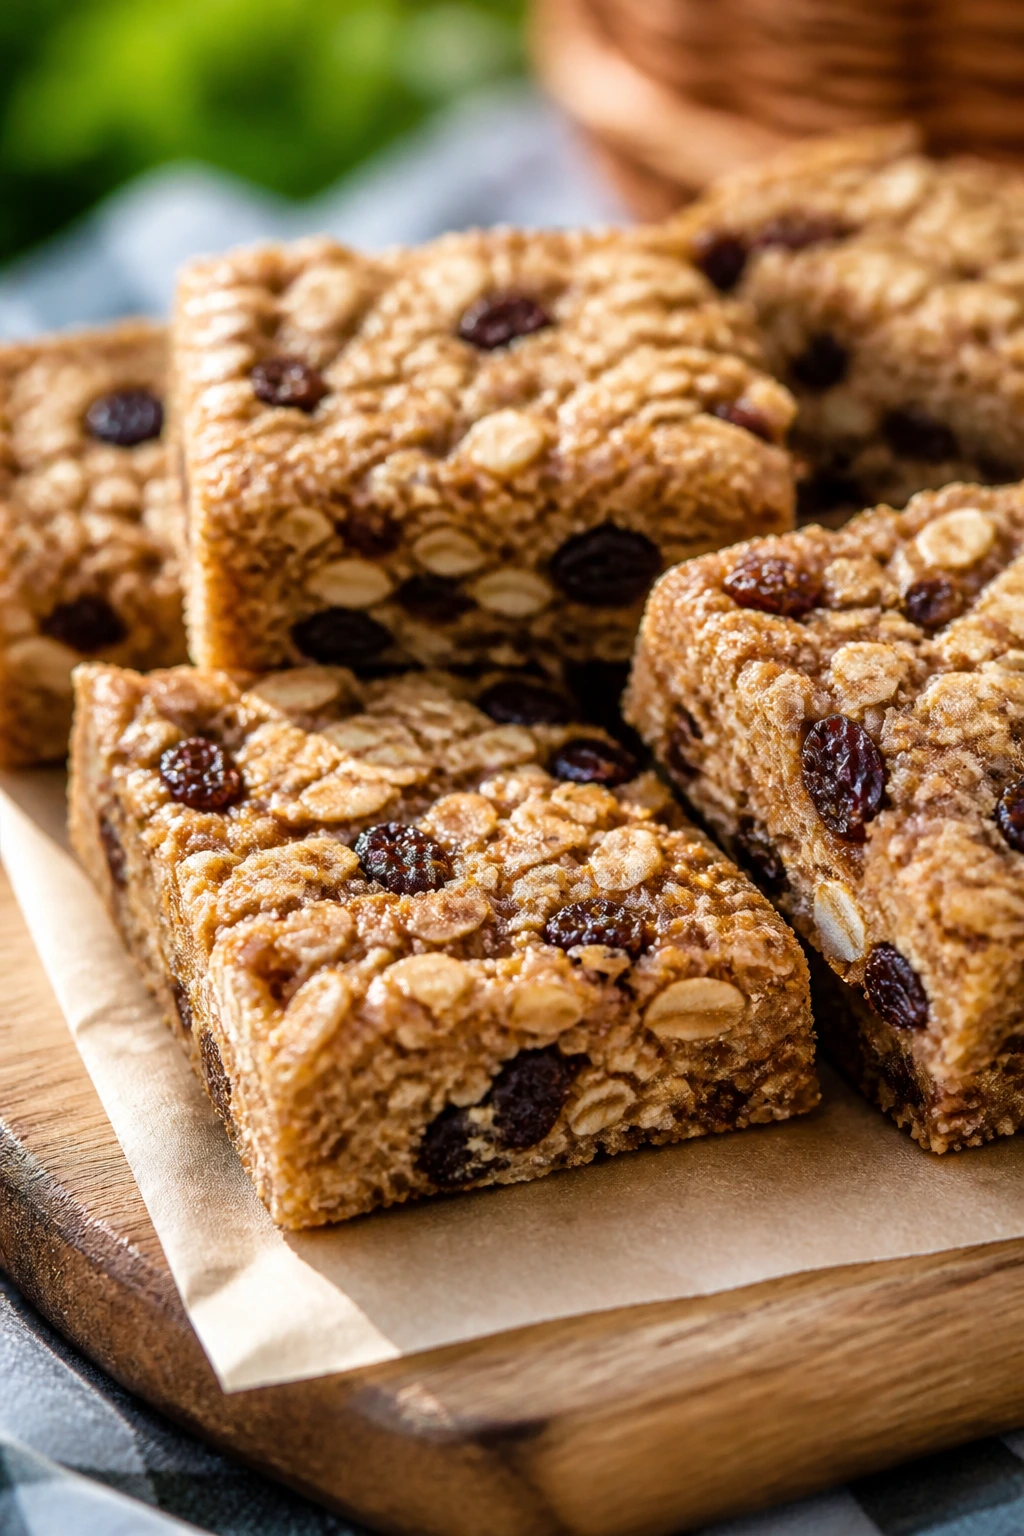
These bars are old-fashioned in the best way. They’re chewy, sturdy, and sweet enough to finish a basket without needing icing or a fork, which is useful when the blanket setup is already enough work.
Why It Works:
Oats hold together better than a soft cake crumb, so these travel cleanly. Cinnamon and raisin give them warmth that still feels right next to a cold drink or iced coffee.
Key Ingredients:
- 1 cup butter, softened
- 1 cup brown sugar
- 2 eggs
- 1 teaspoon vanilla
- 1 1/2 cups flour
- 2 cups oats
- 1 teaspoon cinnamon
- 1 cup raisins
- 1/2 teaspoon salt
Quick Steps:
- Cream butter and brown sugar, then beat in eggs and vanilla.
- Stir in flour, oats, cinnamon, raisins, and salt.
- Press into a pan and bake at 350°F for 22 to 28 minutes.
Equipment for This Recipe:
- Mixing bowl
- 9×13-inch pan
- Wooden spoon
How to Serve This Dish:
Cut them into narrow bars so they’re easy to eat with one hand. Cold milk, iced coffee, or black tea all work.
Pro Tips for This Recipe:
- Don’t overpack the flour or they get dry.
- Let them cool before slicing or they break.
- Add chopped walnuts if you want more bite.
Variations on This Dish:
- Cranberry Version: Swap raisins for dried cranberries.
- Chocolate Chip Version: Add a handful of chips for a sweeter bar.
Common Mistakes to Avoid with This Dish:
- Don’t cut while warm.
- Don’t bake until the edges are dark all the way through.
38. No-Bake Peanut Butter Oat Bars
These are the picnic bars I make when the oven is already full or I do not feel like turning it on. Peanut butter and oats give the bars enough structure to survive a cooler, and the chocolate drizzle makes them feel finished.
Why It Works:
No-bake bars are friendly to warm weather because they set in the fridge, not the oven. They pair well with cold milk, iced coffee, or a crisp sparkling soda because the peanut butter and honey are dense enough to need a clean sip.
Key Ingredients:
- 2 cups oats
- 1 cup peanut butter
- 1/2 cup honey
- 1 teaspoon vanilla
- Pinch of salt
- 1/2 cup chocolate chips, optional
Quick Steps:
- Warm the peanut butter and honey just enough to stir together.
- Mix with oats, vanilla, and salt, then press into a lined pan.
- Chill 1 hour, slice, and drizzle with melted chocolate if using.
Equipment for This Recipe:
- Saucepan or microwave-safe bowl
- Mixing bowl
- Lined baking pan
How to Serve This Dish:
Serve them cold from the fridge or cooler. They’re tidy enough to tuck beside fruit or a sandwich and strong enough to stand up to a sweet iced drink.
Pro Tips for This Recipe:
- Press the mixture firmly so the bars don’t crumble.
- Chill fully before slicing.
- Use natural peanut butter only if you’re okay with a softer set.
Variations on This Dish:
- Almond Butter Version: Swap in almond butter for a different nut flavor.
- Coconut Version: Add shredded coconut for extra chew.
Common Mistakes to Avoid with This Dish:
- Don’t skimp on chilling time.
- Don’t make them too thick or they’re hard to bite.
39. Cherry Tomato Focaccia Squares
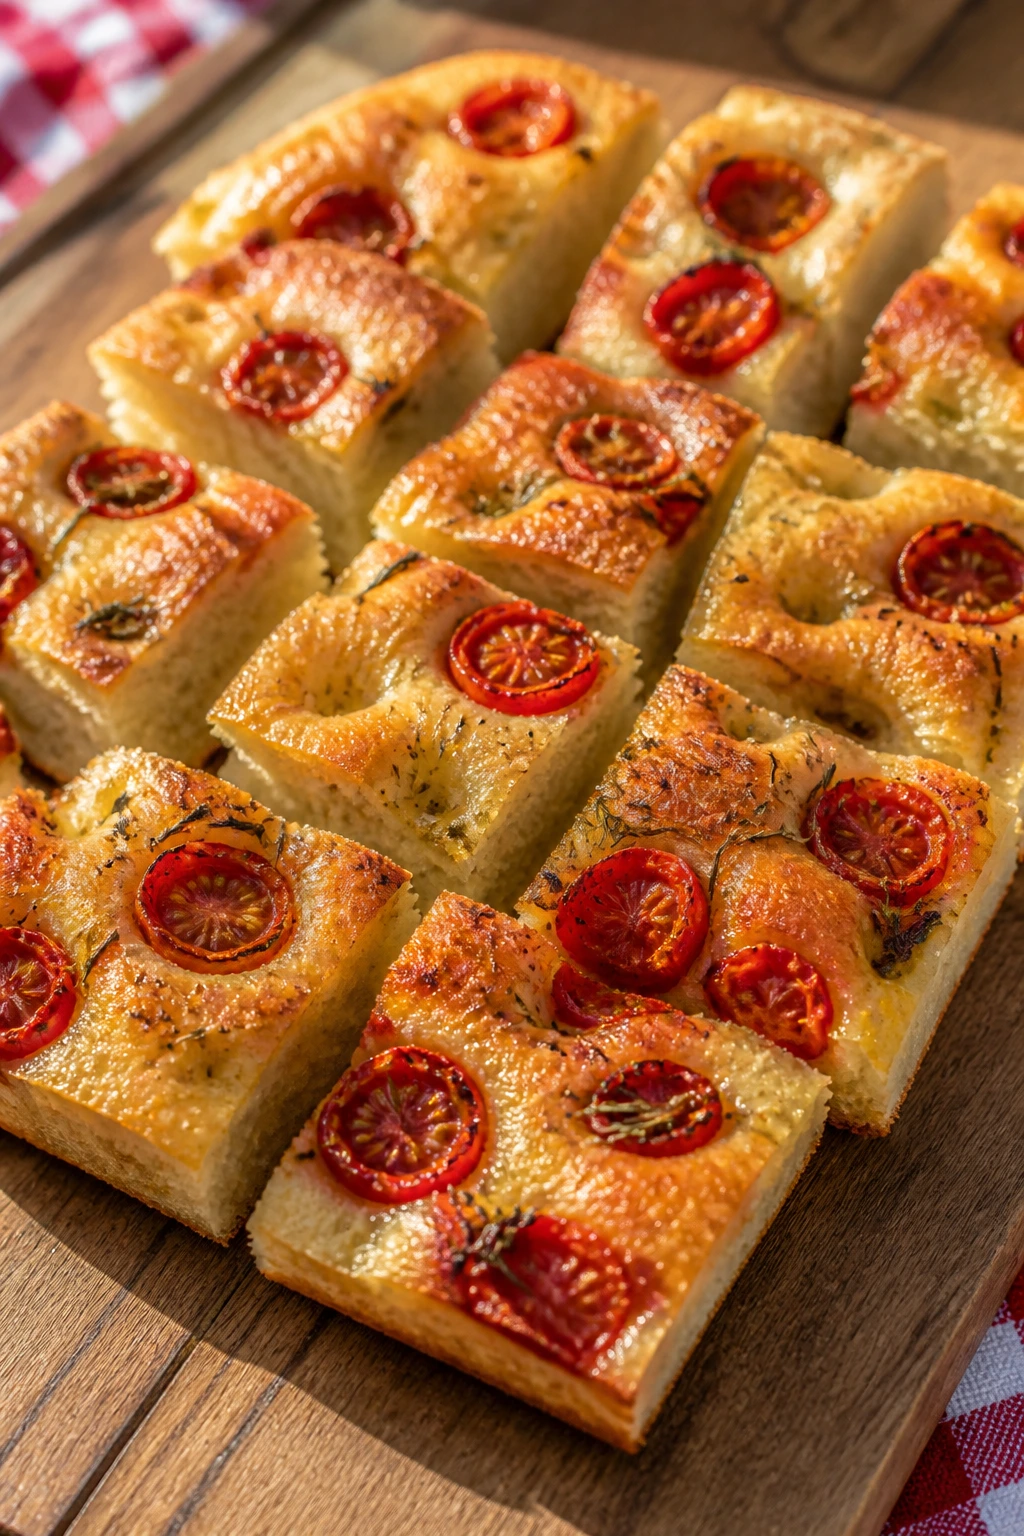
Focaccia is one of the smartest picnic breads because it carries its own flavor and doesn’t need a lot of help. The cherry tomatoes burst a little in the oven, the rosemary smells like a warm grocery aisle in the best possible way, and the squares travel better than sliced sandwiches.
Why It Works:
A good focaccia holds olive oil without going greasy, which means the crumb stays soft and the edges stay crisp. It’s ideal with a cold lager, sparkling water, or a glass of iced lemon tea.
Key Ingredients:
- 1 pound prepared pizza dough or focaccia dough
- 1 cup cherry tomatoes, halved
- 2 tablespoons olive oil
- 1 teaspoon chopped rosemary
- 1/2 teaspoon flaky salt
- Black pepper
Quick Steps:
- Press the dough into an oiled pan and let it rise until puffy.
- Dimple the surface, scatter tomatoes, rosemary, salt, and pepper, then drizzle with oil.
- Bake at 425°F for 18 to 22 minutes until golden, cool, and cut into squares.
Equipment for This Recipe:
- Baking pan
- Bowl
- Knife
How to Serve This Dish:
Cut into small squares and eat warm or room temperature. It’s excellent with cheese, olives, and a cold drink that has some bitterness, like a pilsner or dry sparkling water.
Pro Tips for This Recipe:
- Don’t overload the dough with tomatoes or the center gets wet.
- Let it cool before slicing or the crumb tears.
- Add flaky salt at the end for better texture.
Variations on This Dish:
- Onion Version: Add thinly sliced red onion before baking.
- Olive Version: Swap some tomatoes for olives if you want more brine.
Common Mistakes to Avoid with This Dish:
- Don’t underbake the bottom.
- Don’t slice while hot if you want clean squares.
40. Stone Fruit Hand Pies

Hand pies are the dessert that makes a picnic feel planned instead of improvised. The crust stays sealed, the fruit filling stays inside, and each little pie gives you pastry, fruit, and a clean finish with no fork needed.
Why It Works:
Stone fruit bakes into a jammy filling that doesn’t run everywhere if you add just enough thickener. These are exactly the sort of sweet thing that tastes good beside cold lemonade, iced tea, or a small cup of sparkling wine.
Key Ingredients:
- 2 sheets pie dough
- 2 cups chopped peaches, plums, or apricots
- 1/3 cup sugar
- 1 tablespoon cornstarch
- 1 teaspoon lemon juice
- 1/2 teaspoon cinnamon
- 1 egg, beaten for egg wash
- Coarse sugar, optional
Quick Steps:
- Mix the fruit with sugar, cornstarch, lemon juice, and cinnamon.
- Cut dough into rounds or rectangles, fill, fold, seal, and brush with egg wash.
- Bake at 375°F for 20 to 25 minutes until deeply golden, then cool before packing.
Equipment for This Recipe:
- Baking sheet
- Parchment paper
- Fork
How to Serve This Dish:
Serve them at room temperature so the filling sets and the crust stays crisp. They’re especially nice with a cold glass of iced tea or a lightly sweet spritz.
Pro Tips for This Recipe:
- Cut the fruit into small pieces so the pies seal well.
- Vent the tops with a tiny slash so steam can escape.
- Let them cool fully or the filling runs when you bite in.
Variations on This Dish:
- Berry Stone Fruit Version: Add a handful of berries for a softer, juicier filling.
- Cardamom Version: Swap cinnamon for cardamom if you want a brighter spice.
Common Mistakes to Avoid with This Dish:
- Don’t overfill the pies.
- Don’t skip sealing the edges or the juices leak out.
Why Picnic Food That Travels Well Makes the Whole Spread Easier
Picnic food has one job that restaurant food never has to think about: survive the trip. That means the best dishes are the ones that can handle a little time in the cooler, a little movement in the basket, and a little delay before they hit a plate. Salt, acid, crunch, and sturdy textures matter more here than decoration ever will.
I like to think of picnic planning in layers. You want at least one thing you can hold with one hand, one thing that tastes crisp straight from the cooler, one creamy dish that benefits from chilling, and one sweet bite that doesn’t melt into a puddle. That combination feels balanced beside a cold drink, whether the drink is lemonade, tea, beer, or plain sparkling water with lime.
And yes, there’s room for a little mess. Fried chicken can be glorious. So can a loaded slider, a juicy tomato skewer, or a hand pie with a burst of fruit inside. The trick is choosing which messes you’re willing to live with.
Essential Equipment for These Picnic Recipes
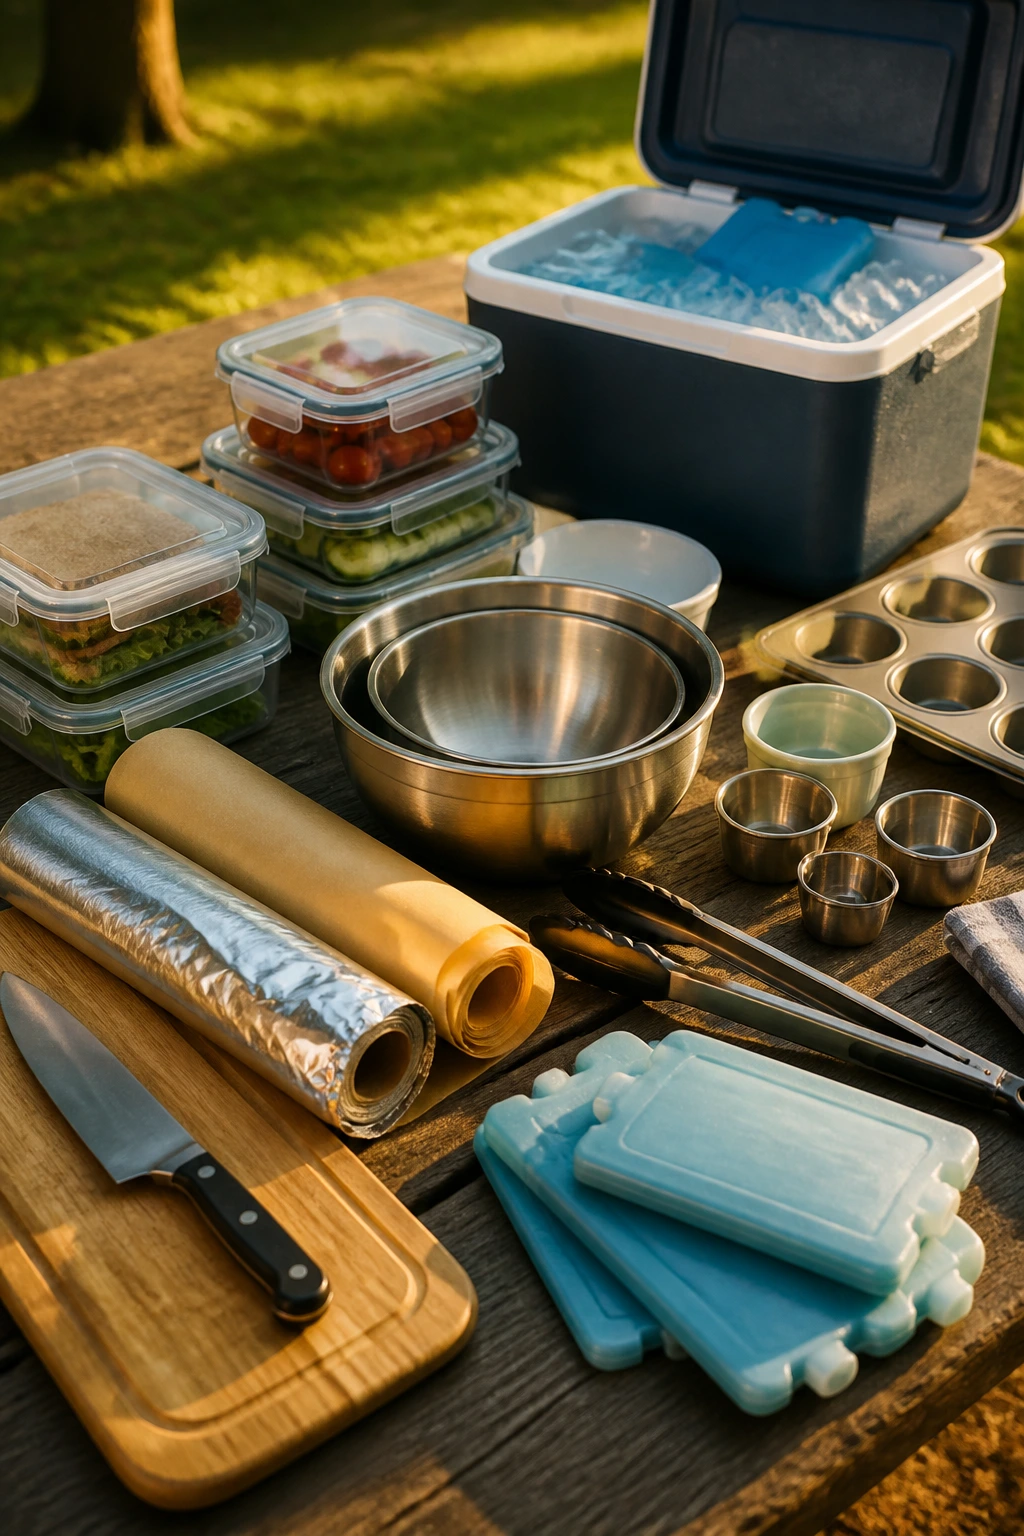
- Leakproof food containers: Wide, shallow containers keep salads and skewers from getting crushed.
- Insulated cooler with ice packs: A real cooler matters for egg dishes, chicken salads, seafood, and anything mayo-based.
- Parchment paper and foil: Wrap sandwiches, sliders, bars, and scones without trapping too much steam.
- Sharp knife: Clean cuts make pinwheels, hand pies, and sandwiches look tidy instead of mangled.
- Cutting board: You’ll use it for slicing fruit, vegetables, bread, and baked items.
- Mixing bowls: A medium bowl and a large bowl cover most of the prep.
- Serving tongs and toothpicks: These keep sticky or saucy foods from becoming a hand fight.
- Small cups or ramekins: Ideal for shrimp cocktail, gazpacho, meatballs, and dips.
- Muffin tin or baking sheet: Needed for quiche muffins, scones, bars, and hand pies.
- Reusable ice packs: The cheap foam coolers only do so much; ice packs keep dairy and egg dishes cold longer.
Smart Shopping and Ingredient Tips for Picnic Baskets
The best picnic shopping starts with ingredients that don’t sulk outside the fridge. For bread, choose something with a little structure: rye, seeded sandwich bread, tortillas, pita, or rolls with a decent crumb. Fluffy white bread has its place, but it collapses quickly when it meets a juicy filling or a damp cooler.
For produce, think about moisture first. Tomatoes, cucumbers, watermelon, peaches, and berries are all picnic-friendly, but they need different handling. Pat tomatoes dry before skewering them, salt cucumbers lightly only if you’re serving them soon, and keep berries whole until the last minute so they don’t leak into the container.
Cheese is another place where texture matters. Block cheddar and sliced Swiss pack cleaner than soft cheeses when you need neat sandwiches. Soft cheeses like burrata, cream cheese, and burrata-style fillings are still fine — they just belong in their own container, not squashed against warm bread or wet greens.
If you’re buying meat, deli slices should be folded loosely and kept cold. For cooked chicken and chicken salad, rotisserie chicken saves time and brings good flavor, though plain roasted chicken works if you season the filling well. And for seafood, buy it the same day you plan to serve it if you can. Shrimp cocktail and smoked salmon reward freshness more than almost anything else on this list.
How to Serve These Picnic Foods
Presentation:
A picnic spread looks better when the food has space to breathe. Use parchment-lined trays for pinwheels and skewers, shallow bowls for salads, and small cups for anything saucy. Keep wet items in separate containers until the last minute so the basket doesn’t turn into one large, confused sauce.
Accompaniments:
The easiest partners are kettle chips, crackers, olives, pickles, grapes, and extra fruit. If you’re serving a heavier dish like fried chicken or sliders, add a crisp salad or a chilled fruit item beside it so the basket doesn’t lean too far in one direction. Bread, chips, and one clean crunchy thing go a long way.
Portions:
For a mixed picnic, plan on 2 to 3 savory bites per person if you’re serving lots of variety, or 1 sandwich plus 2 sides if the basket is more meal than snack. Dessert bars and hand pies usually work best cut smaller than you think; people eat more outdoors because the food feels casual. If you’re packing for a group that likes to graze, make extras of the items that travel well: potato salad, pinwheels, bars, and fruit.
Beverage Pairing:
Cold drinks are part of the menu here, not an afterthought. Iced tea works with almost everything savory. Lemonade loves salty foods and fruit desserts. Sparkling water with lime keeps rich items like pimento cheese, sliders, and quiche muffins from feeling heavy. If alcohol is on the table, a pale lager or dry cider is the easiest match for the majority of these dishes.
Additional Tips and Flavor Boosters

Flavor Enhancement:
A little acid goes a long way outdoors. Lemon zest in chicken salad, vinegar in slaw, lime in fruit, or a splash of balsamic on tomatoes makes chilled food taste sharper and less sleepy. Salt also matters more than people think once food is cold, so taste your salads before packing and season them a touch more than you would for indoor service.
Customization:
Swap chicken for chickpeas, turkey for ham, soba for spaghetti, or tortillas for lettuce cups when you need a different lane. Most of these recipes are forgiving if you keep the texture logic intact: dry things stay dry, wet things stay separate, and crunchy things go in last.
Serving Suggestions:
Fresh herbs are worth the trouble. A few basil leaves on tomatoes, dill on potato salad, chives on egg salad, or mint on fruit lifts the whole basket without adding work. Flaky salt on brownies, cornbread, or focaccia also gives a picnic spread a finished look and a better bite.
Make-It-Yours:
For dairy-free guests, use hummus, olive oil dressings, or dairy-free mayo in the wraps and salads. For gluten-free picnic baskets, lean on skewers, fruit, deviled eggs, potato salad, lettuce cups, gazpacho, and bars made with certified GF oats. For kids, keep the flavors mild and cut everything into smaller pieces; tiny skewers and roll-ups usually disappear faster than formal sandwiches.
Make-Ahead, Storage, and Reheating Guidance
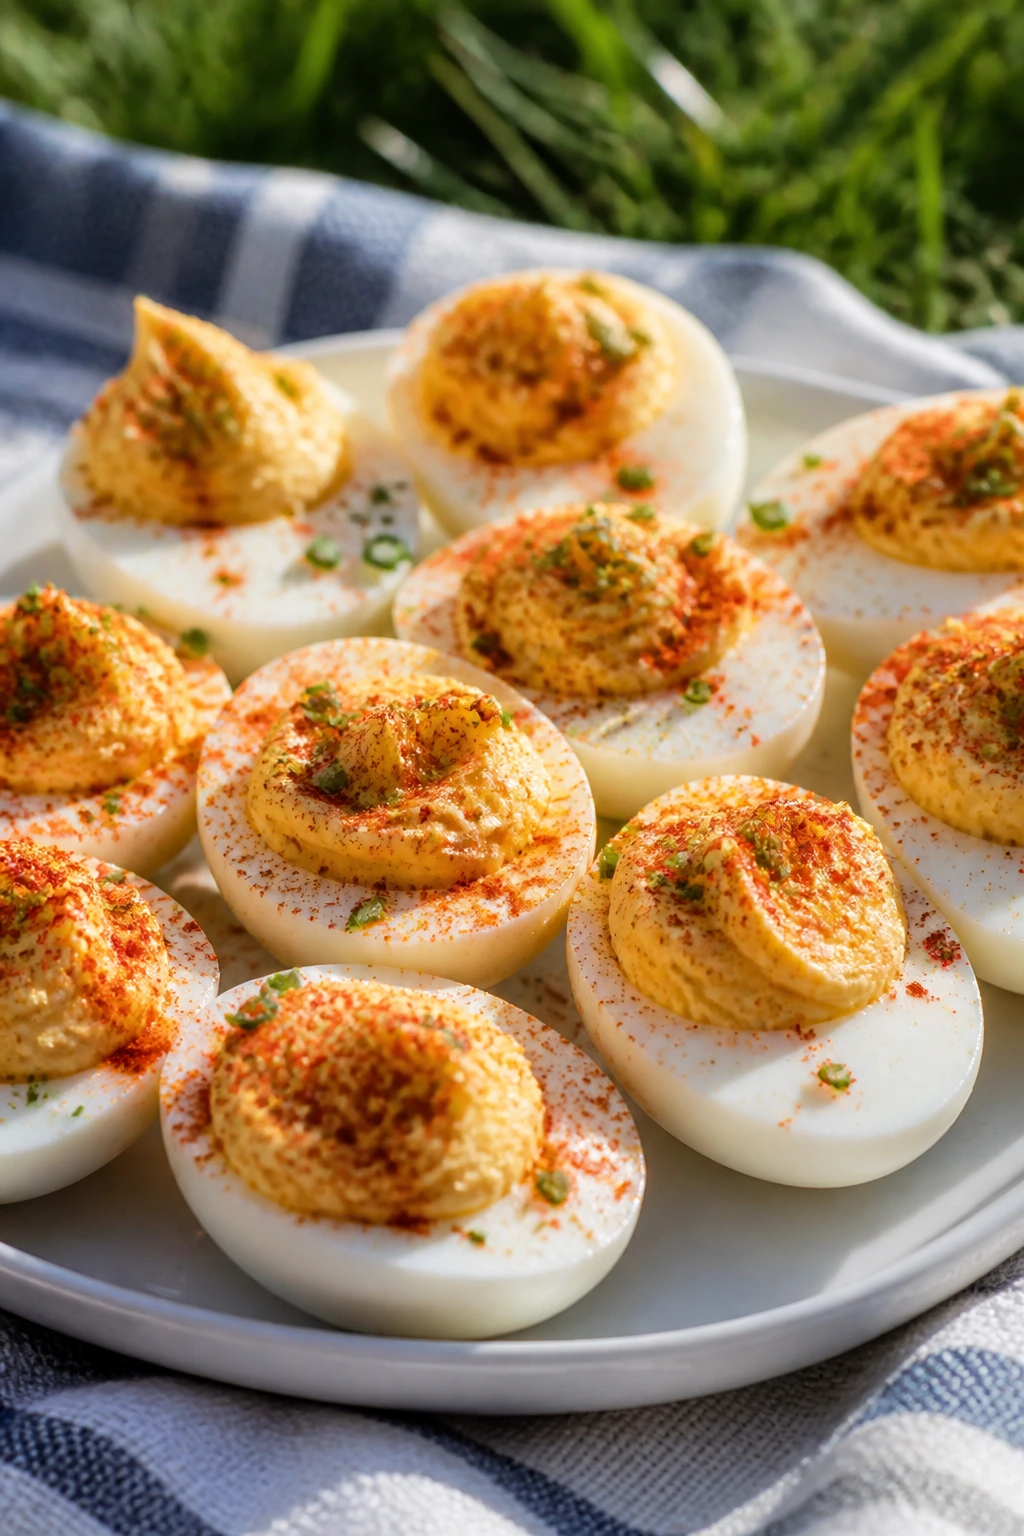
Most of these picnic foods can be made ahead, but they do not all want the same treatment. Sandwich fillings, egg salad, chicken salad, tuna salad, potato salad, and slaws usually keep 3 to 4 days refrigerated in sealed containers. Salads with cucumbers, tomatoes, or fruit are best the same day or within 24 hours, because the water content climbs fast and the texture softens.
Cooked meats like grilled chicken, meatballs, and fried chicken keep 3 to 4 days in the fridge and up to 2 months frozen if wrapped well. Reheat grilled chicken and meatballs in a 350°F oven for 10 to 15 minutes until warmed through. Fried chicken is better reheated uncovered on a rack at 375°F for 12 to 18 minutes so the crust has a chance to crisp again, though cold fried chicken still tastes fine if you’re not chasing crunch.
Bars, scones, lemon bars, brownie bites, cornbread muffins, and hand pies hold up well at room temperature for 1 to 2 days if the weather is mild and they’re packed airtight. For longer storage, refrigerate them for up to 5 days or freeze for up to 2 months, then thaw at room temperature. Hand pies and scones reheat well in a 325°F oven for 8 to 10 minutes, which is much kinder than the microwave.
Cold salads and dairy dishes need the most discipline. Keep them at 40°F or below in the cooler, use ice packs, and avoid opening the lid every five minutes. Mayo-based dishes should not sit out more than 2 hours, and if the day is hot enough to make the cooler sweat, treat 1 hour as the safer window. Pack the cooler so the coldest items stay on top, and keep dressings, sauces, and bread separate whenever possible.
Picnic-Friendly Variations and Adaptations to Try
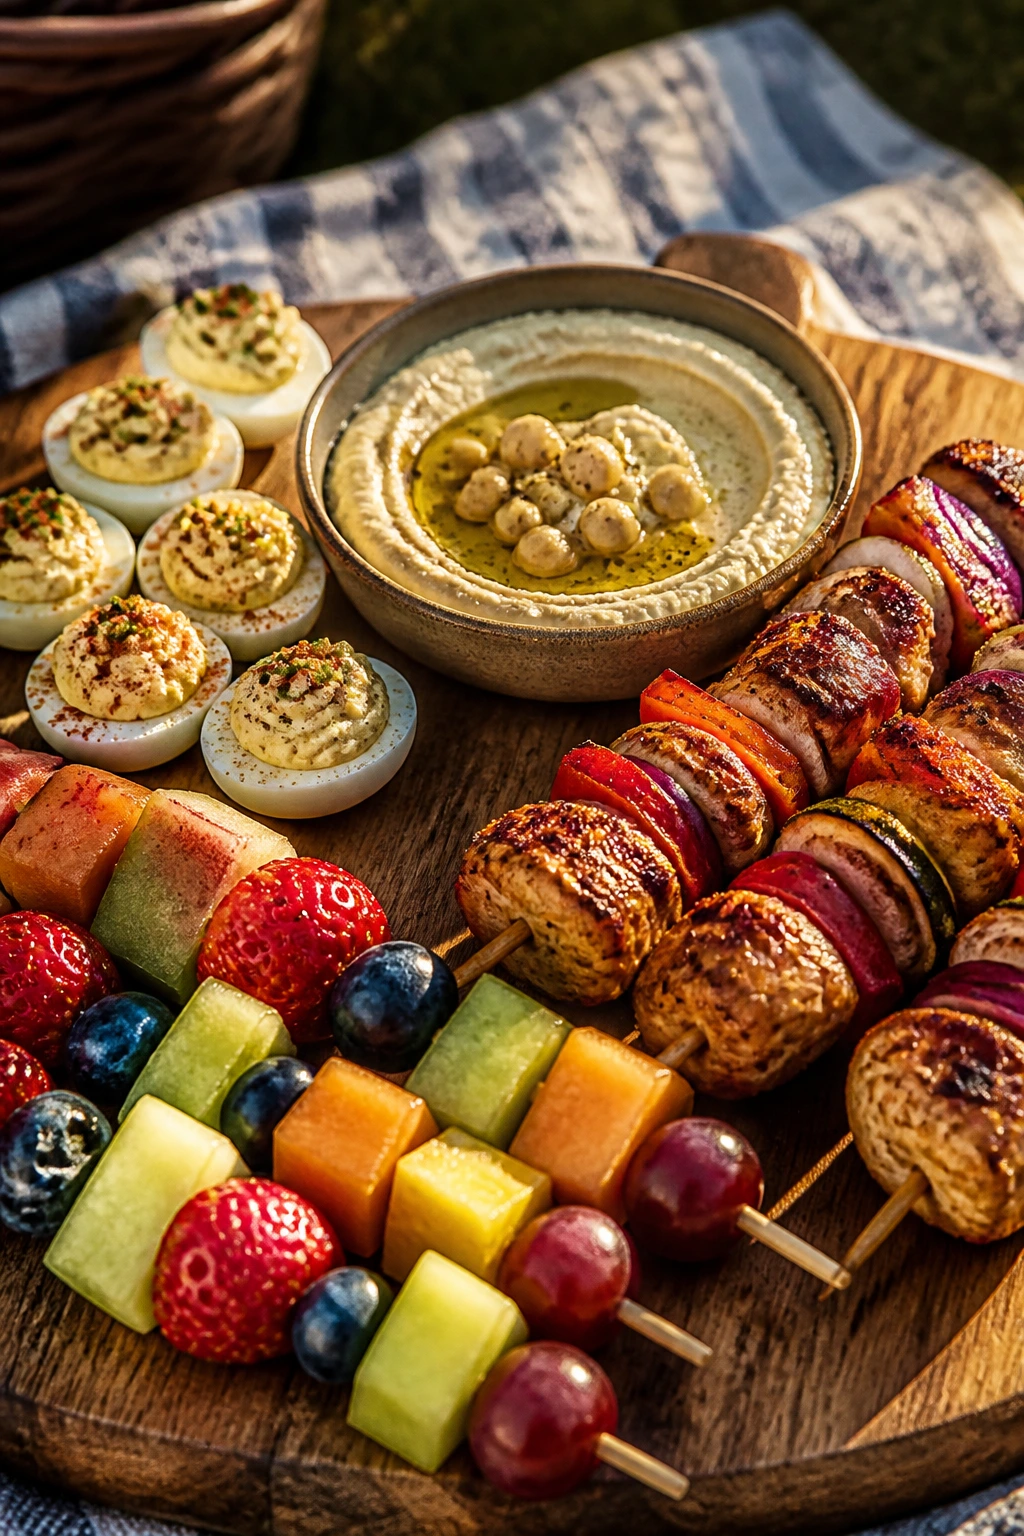
The Gluten-Free Basket Swap
Build around naturally gluten-free foods like deviled eggs, grilled chicken skewers, fruit skewers, gazpacho, potato salad, shrimp cocktail, and cornbread made with a gluten-free blend. Use corn tortillas, lettuce cups, or rice noodles where bread usually shows up. The basket ends up feeling lighter, not limited.
The Dairy-Light Spread
Use olive oil dressings, hummus, salsa, and lemon-based marinades instead of cream-heavy fillings. Chicken salad can shift toward mustard and herbs, while pasta salad can lean on vinaigrette instead of mayo. That keeps the cooler easier to manage and gives the food a brighter edge.
The Protein-Heavy Lunch Box
If your group wants something more filling, double down on chicken skewers, meatballs, tuna-stuffed peppers, egg salad, and sliders. This version works well when picnic lunch has to carry the afternoon, not just snack through it. Add chips or roasted potatoes and you’re done.
The Plant-Based Basket
Chickpea salad, hummus boxes, fruit skewers, gazpacho, corn salad, focaccia, and roasted vegetable pinwheels make a strong no-meat spread. Add olives, pickles, nuts, and a good dip or two so the basket still feels complete. No one needs to miss the meat if the seasoning is right.
The Heat-Lover’s Picnic
Hot honey cornbread, spicy roll-ups, chili-lime fruit, harissa chicken skewers, and jalapeño cheddar scones give the basket a little swagger. The trick is not to make everything hot, just enough to keep the cool drinks interesting. A spicy spread with lemonade or lager is hard to argue with.
The Kid-Friendly Miniature Spread
Make everything smaller and milder: pinwheels, tiny sandwiches, fruit skewers, muffin-size quiche, small bars, and quartered deviled potatoes. Kids usually do better with familiar flavors in finger-food form, and adults usually end up stealing half of it anyway.
Common Mistakes to Avoid When Packing Picnic Food
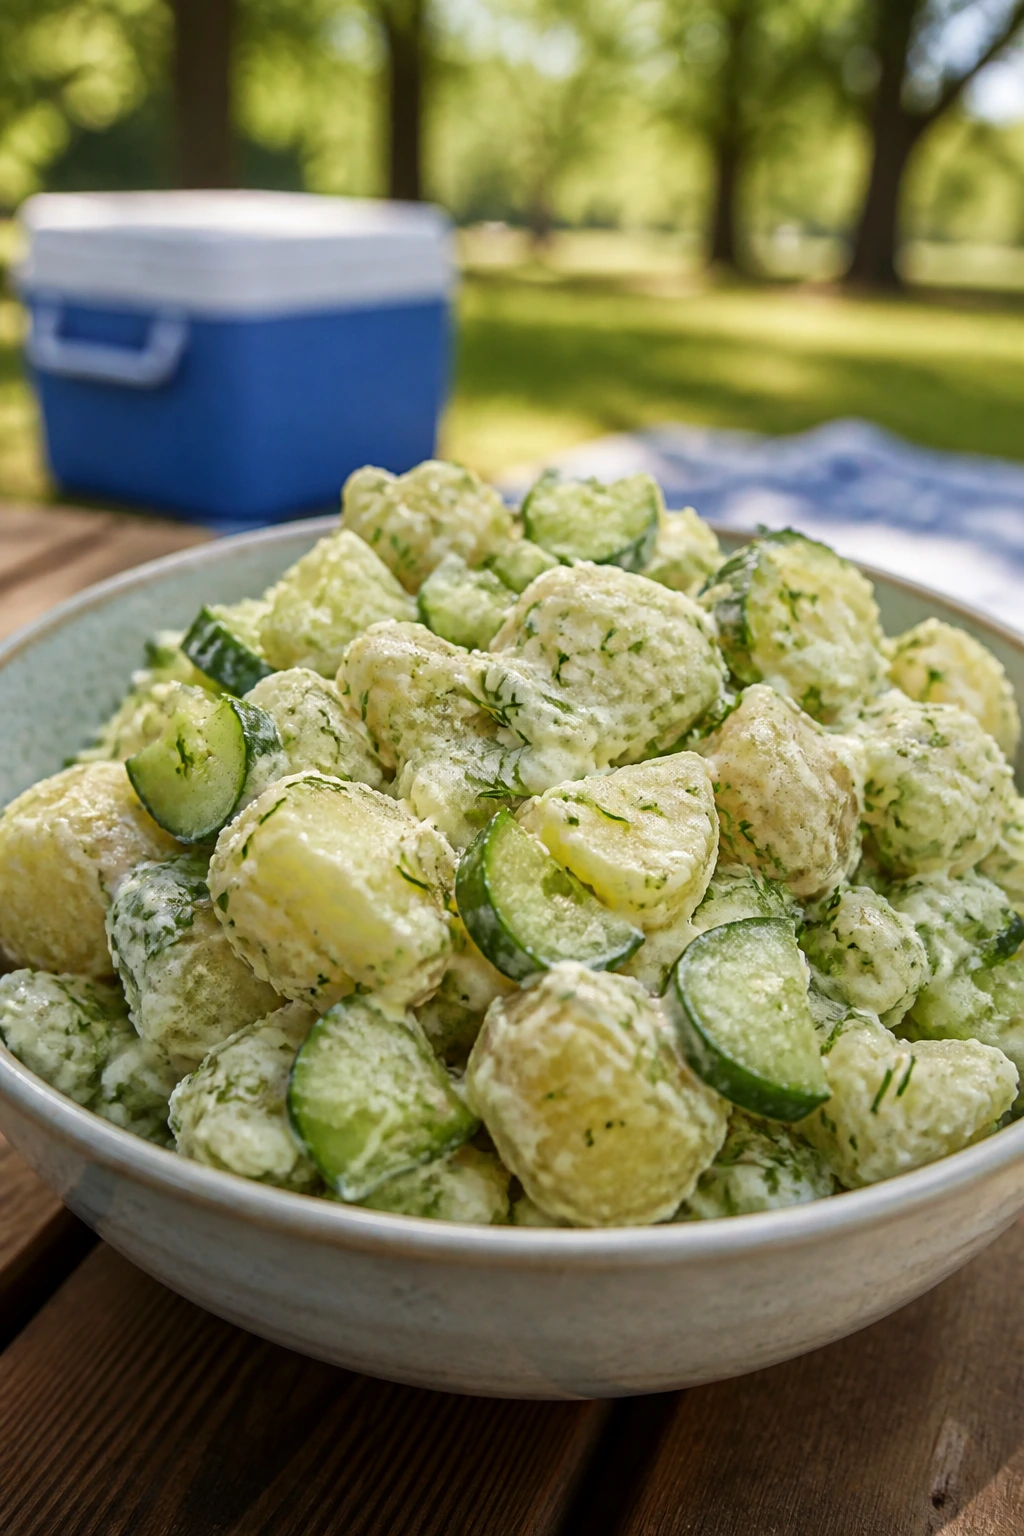
The first mistake is packing wet food against dry food. It sounds obvious until a tomato salad leaks into bread or a warm container steams a stack of crackers. Keep sauces, dressings, and juicy fruit in separate containers and assemble only when possible.
The second is under-chilling the cooler. A cooler with a single half-melted ice pack is a warm box with better marketing. Use more ice than you think you need, keep the cooler in the shade, and put cold drinks in a separate space if they’ll be opened often.
Another common miss is making everything too early. Bread softens, herbs darken, cucumbers weep, and tortillas loosen if they sit around too long. If a dish involves crunch, wait to combine the crisp part until closer to serving time. If it involves a cut surface — like cucumber rounds, skewers, or stuffed peppers — dry it first.
People also forget that cold food needs stronger seasoning. A potato salad or pasta salad that tastes fine warm can go dull after chilling. Taste your dressing before it goes into the fridge and be willing to add a little more salt, lemon, vinegar, or mustard than feels natural in the bowl.
Finally, don’t stack soft foods under heavy ones. A tin full of brownies can crush scones; a container of pinwheels can get flattened by bottles. Pack the basket like you want the food to arrive looking alive, not like it fought its way there.
Frequently Asked Questions About Picnic Food Ideas
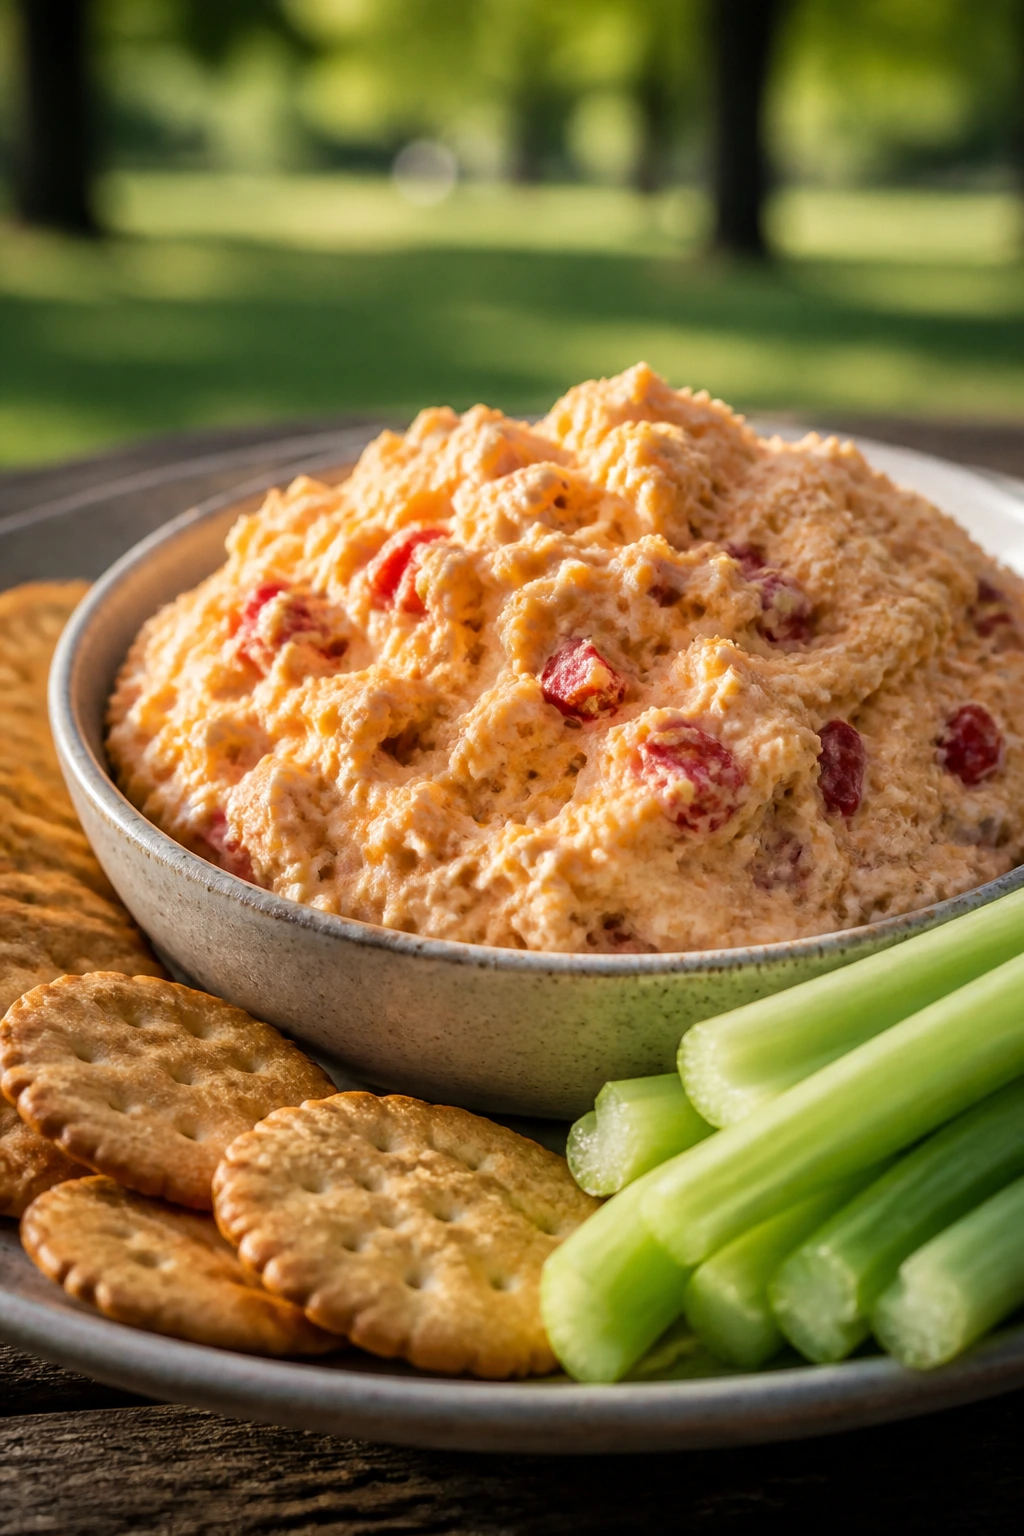
What foods travel best for a picnic with cold drinks?
Anything sturdy and cold-friendly: sandwiches with thick fillings, pinwheels, potato salad, pasta salad, fruit skewers, deviled eggs, skewers, and bars. The best ones have enough structure to survive the basket and enough seasoning to stay interesting when chilled.
How do I keep sandwiches from getting soggy?
Use sturdy bread, dry the fillings, and keep wet ingredients like tomatoes, pickles, and dressing separate until the end. A thin spread of butter, cream cheese, or mustard on the bread also creates a small moisture barrier.
Can I make picnic food the day before?
Yes, and many items are better with a night in the fridge. Chicken salad, egg salad, potato salad, dips, bars, and hand pies all work well ahead, but anything crunchy or juicy — like cucumbers, tomatoes, and lettuce — should stay separate until serving.
What’s the safest way to pack mayo-based dishes?
Keep them in a cooler with ice packs and do not let them sit out long in the sun. Use sealed containers, keep the cooler closed as much as possible, and aim to eat those foods within a couple of hours of taking them out.
How much food should I pack per person?
For a mixed picnic, plan on one main item, two sides, and one dessert portion per person. If the spread is mostly snack food, make enough so each person can graze on 6 to 8 small bites without finishing the basket in ten minutes.
What if I don’t have a cooler?
Focus on foods that are naturally stable for a few hours: cornbread muffins, hand pies, bars, whole fruit, focaccia, scones, and sturdy sandwiches made shortly before leaving. Skip delicate seafood, egg salad, and anything with a loose creamy filling.
Which dishes should stay out of the sun until the last minute?
Shrimp cocktail, smoked salmon bites, burrata salad, deviled eggs, fruit with yogurt dip, and any mayo-heavy salad should stay cold right up until serving. Shade helps, but cold storage helps more.
Can I pack these for a park picnic with a long walk in?
Yes, if you pack smart. Put heavy items at the bottom, keep ice packs on top and around the cold dishes, and use smaller containers so each item stays sealed. A basket looks charming, but a well-packed insulated bag usually wins once you’ve walked more than a few blocks.
A Basket That Travels Well
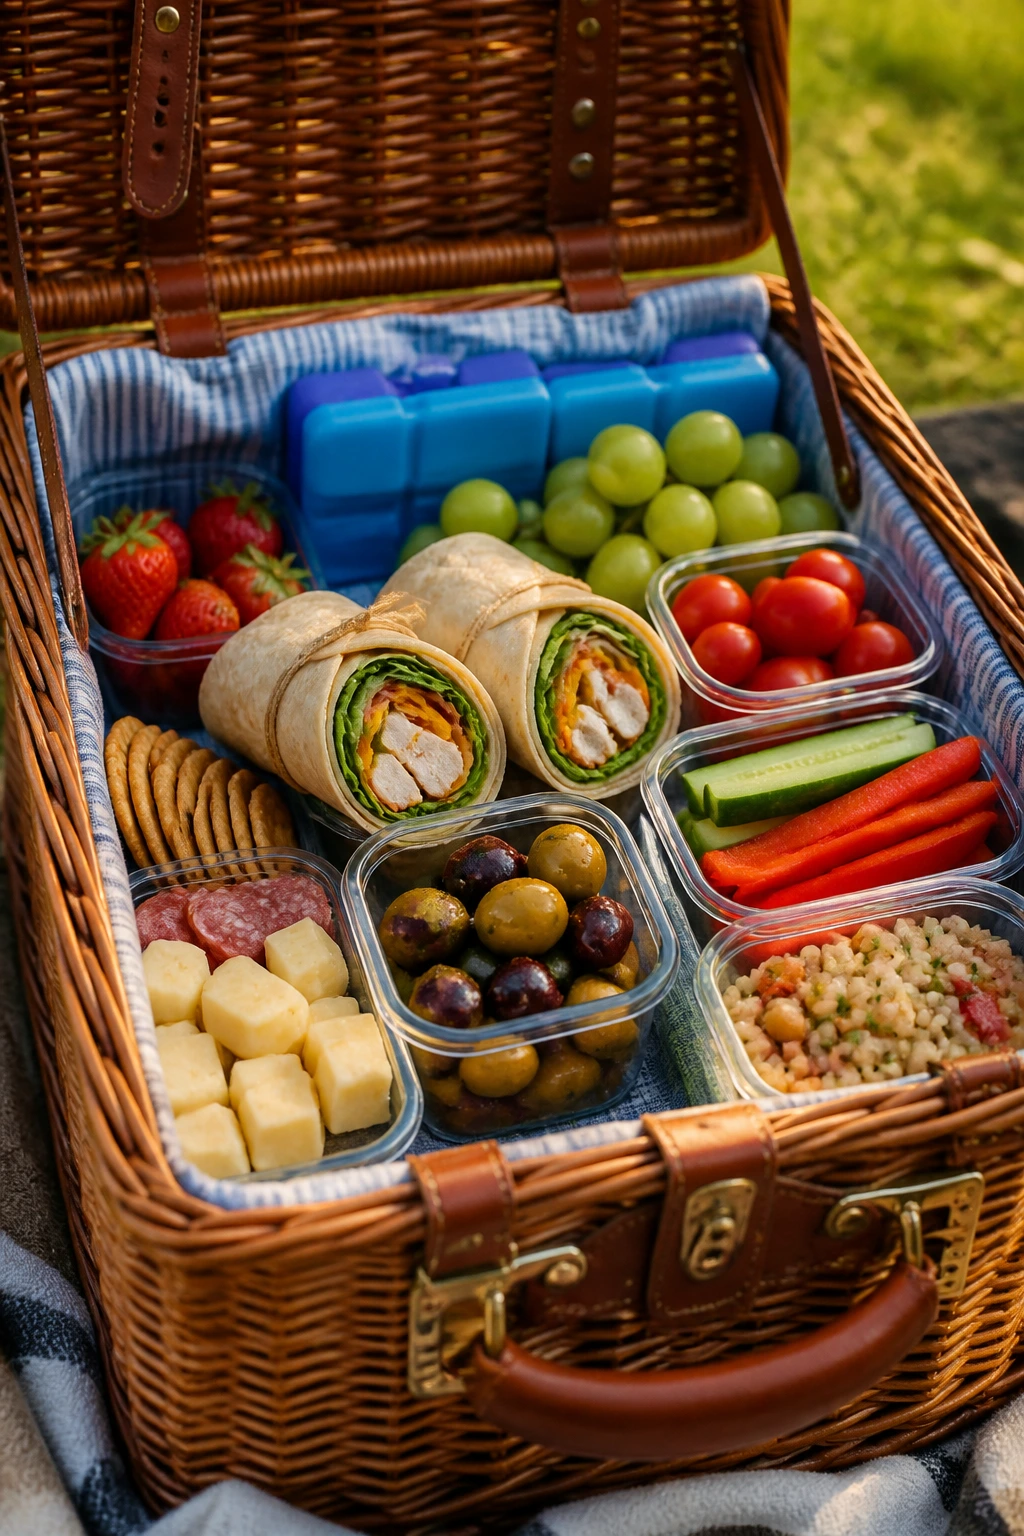
Good picnic food doesn’t need to be fancy. It needs to hold together, taste good cold, and play nicely with a drink that has some chill in it. That’s a smaller job than “feed everyone beautifully,” but it’s a harder one, and the recipes above are built with that reality in mind.
The easiest way to make a picnic feel generous is to mix textures on purpose: one crunchy thing, one creamy thing, one salty thing, one sweet thing. Do that, keep the cooler cold, and the whole spread starts to feel like a plan instead of a pile.
Pack the basket with foods that know how to behave, and the cold drinks take care of the rest.