
Pita dinners are the rare weeknight meals that feel casual and smart at the same time. A warm pita can hold saucy chicken, crisp vegetables, creamy hummus, or a tangle of spiced meat without making the whole plate feel fussy. It’s dinner with a built-in handle. That matters when the sink is already full and nobody wants a pile of dishes.
I keep coming back to pita because it forgives almost everything. Slightly overcooked chicken? Tuck it with yogurt sauce and herbs. A lonely cucumber, half a red onion, a spoonful of tahini? Dinner. Even the bread itself does part of the work, especially if you warm it in a dry skillet until the surface blisters and smells faintly toasty.
The trick is not making pita “special.” The trick is treating it like good weeknight infrastructure. Once you know how to pair a sturdy filling with something cool and bright, pita dinners stop feeling like a backup plan and start feeling like a very good habit.
Why These Pita Dinners Earn a Spot in the Rotation
-
Fast without tasting rushed: Most of these dinners come together in about 30 to 40 minutes, and a few move even faster if you use rotisserie chicken or prepared falafel.
-
Built for leftovers: Cooked chicken, meatballs, roasted vegetables, and chickpeas all hold up well for a few days, so tomorrow’s lunch is already halfway handled.
-
Flexible by design: The same pita can take chicken shawarma one night and roasted halloumi the next, which is handy when the fridge is full of odds and ends.
-
Easy to scale up or down: A single skillet, sheet pan, or mixing bowl can feed two people or a hungry table without much extra work.
-
Fresh, but not fussy: Crisp vegetables, tangy sauces, and warm bread do the heavy lifting, so you get a dinner that feels balanced without requiring a long ingredient list.
-
Good for picky eaters: Keep the sauces on the side, let people build their own, and the whole meal gets a lot easier to manage.
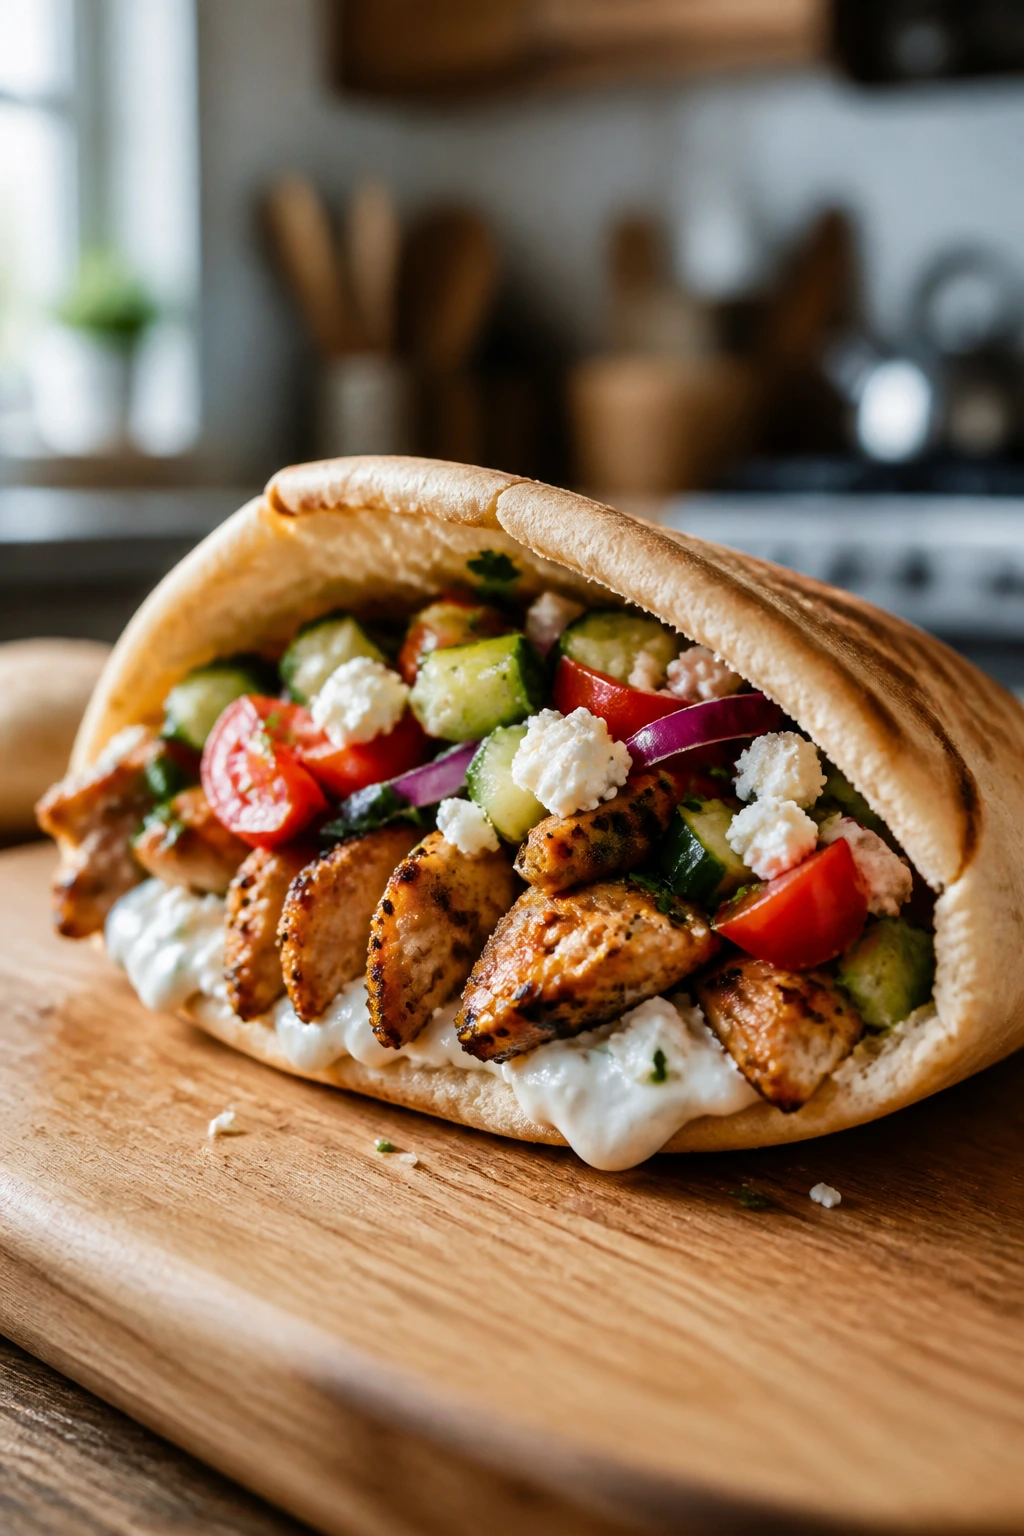
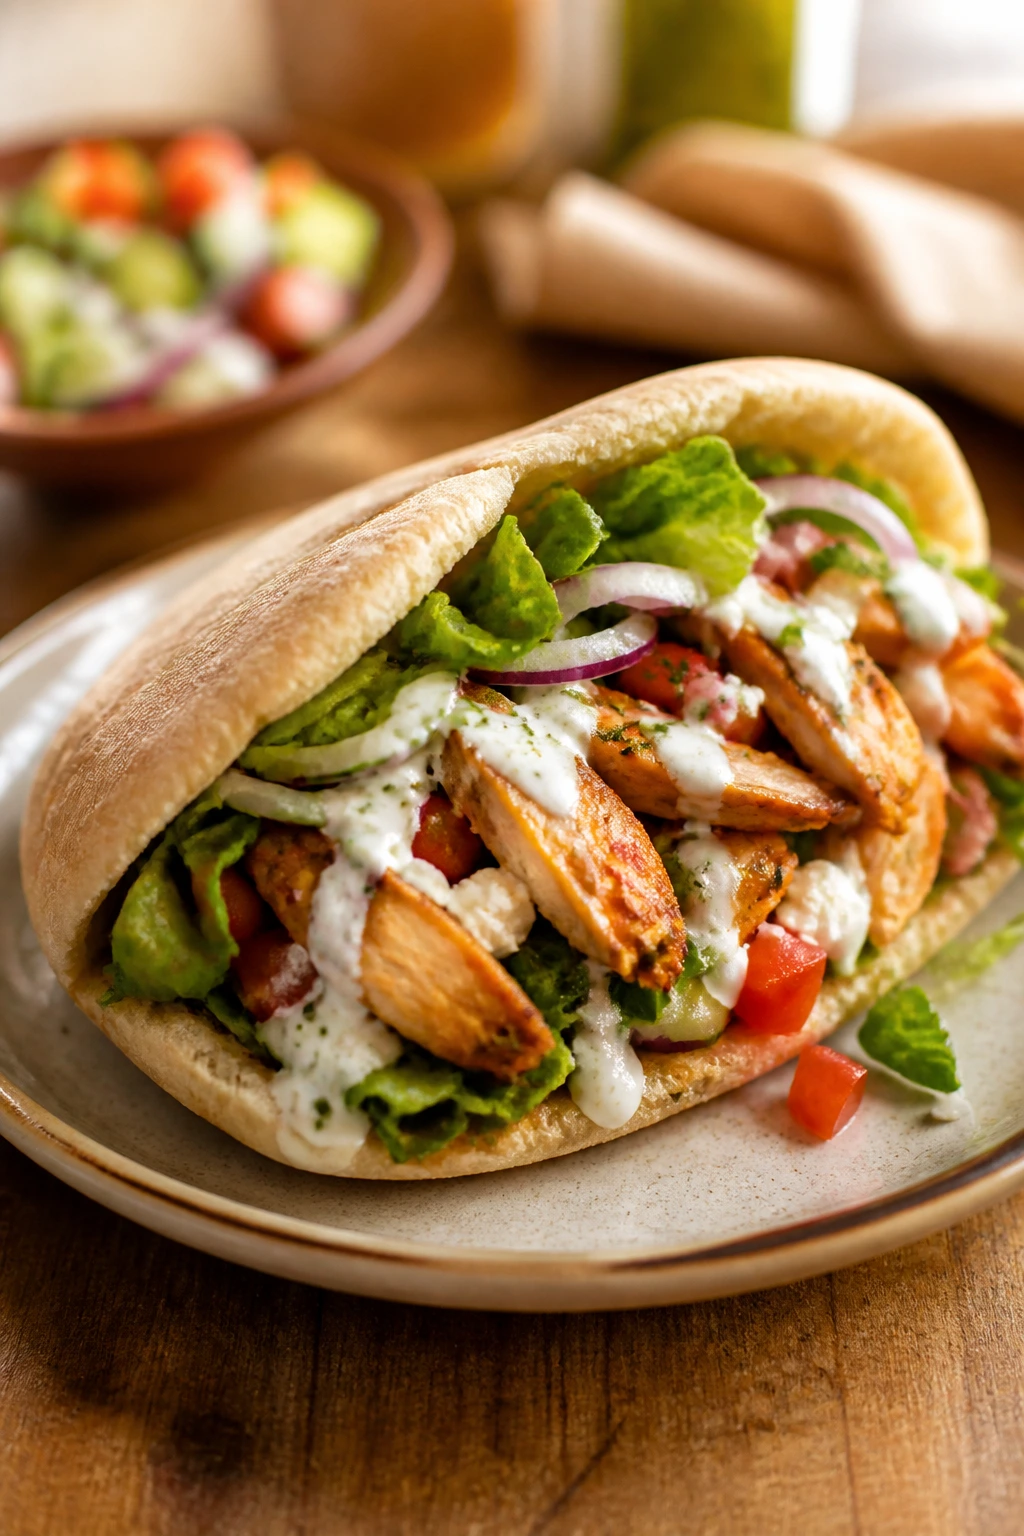
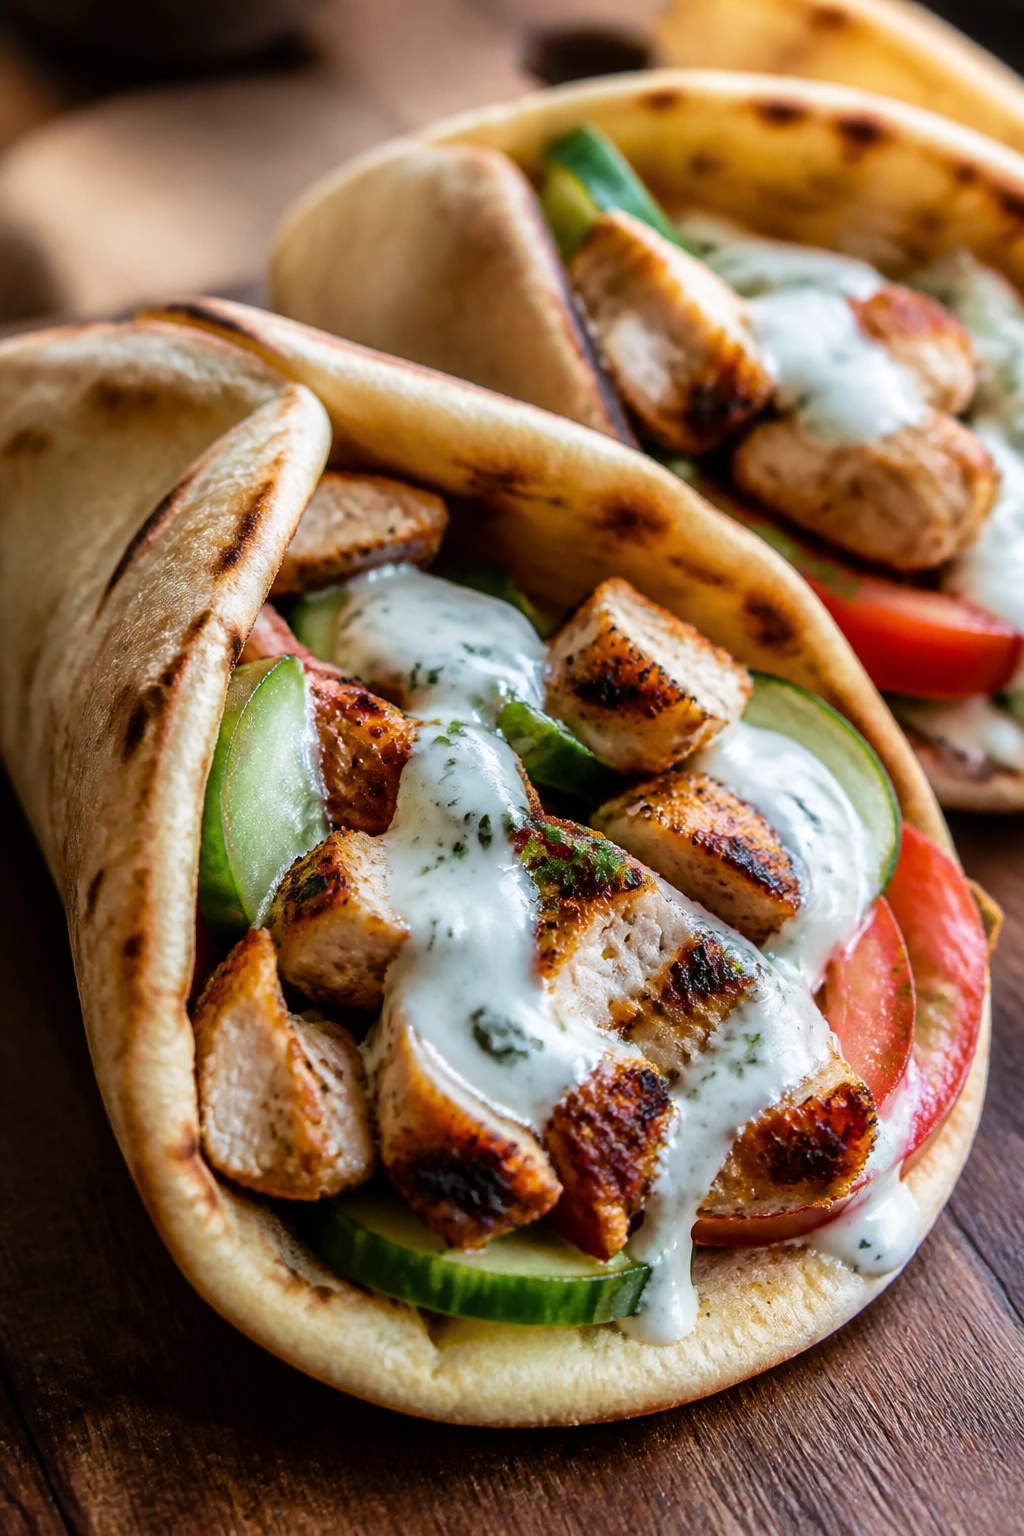
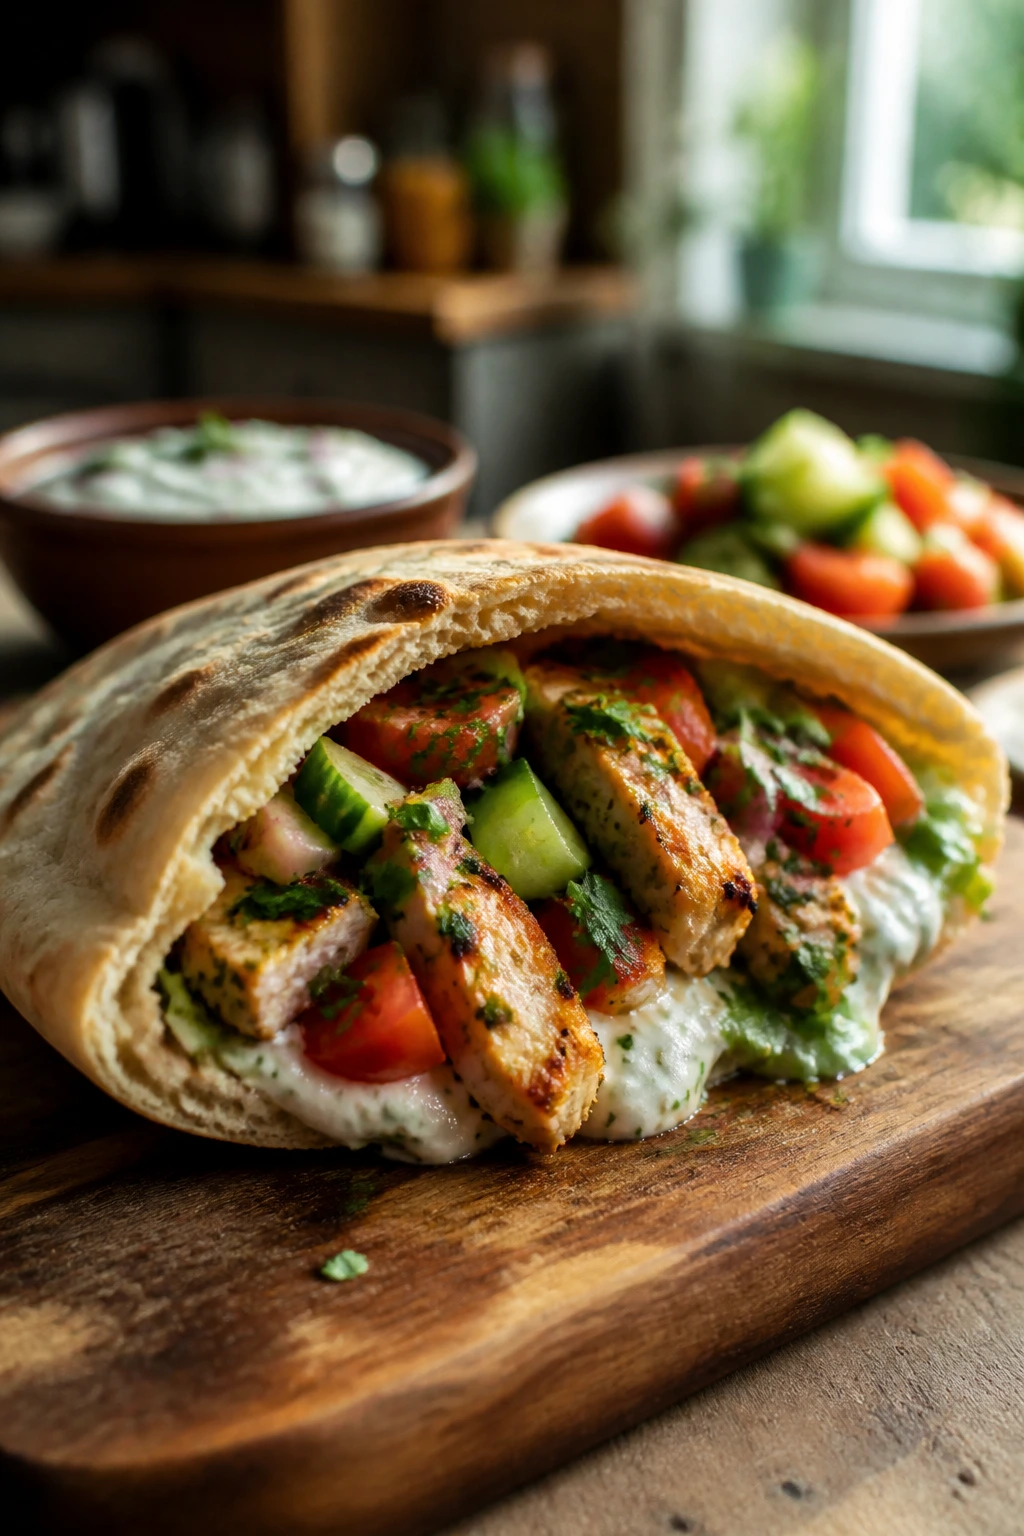
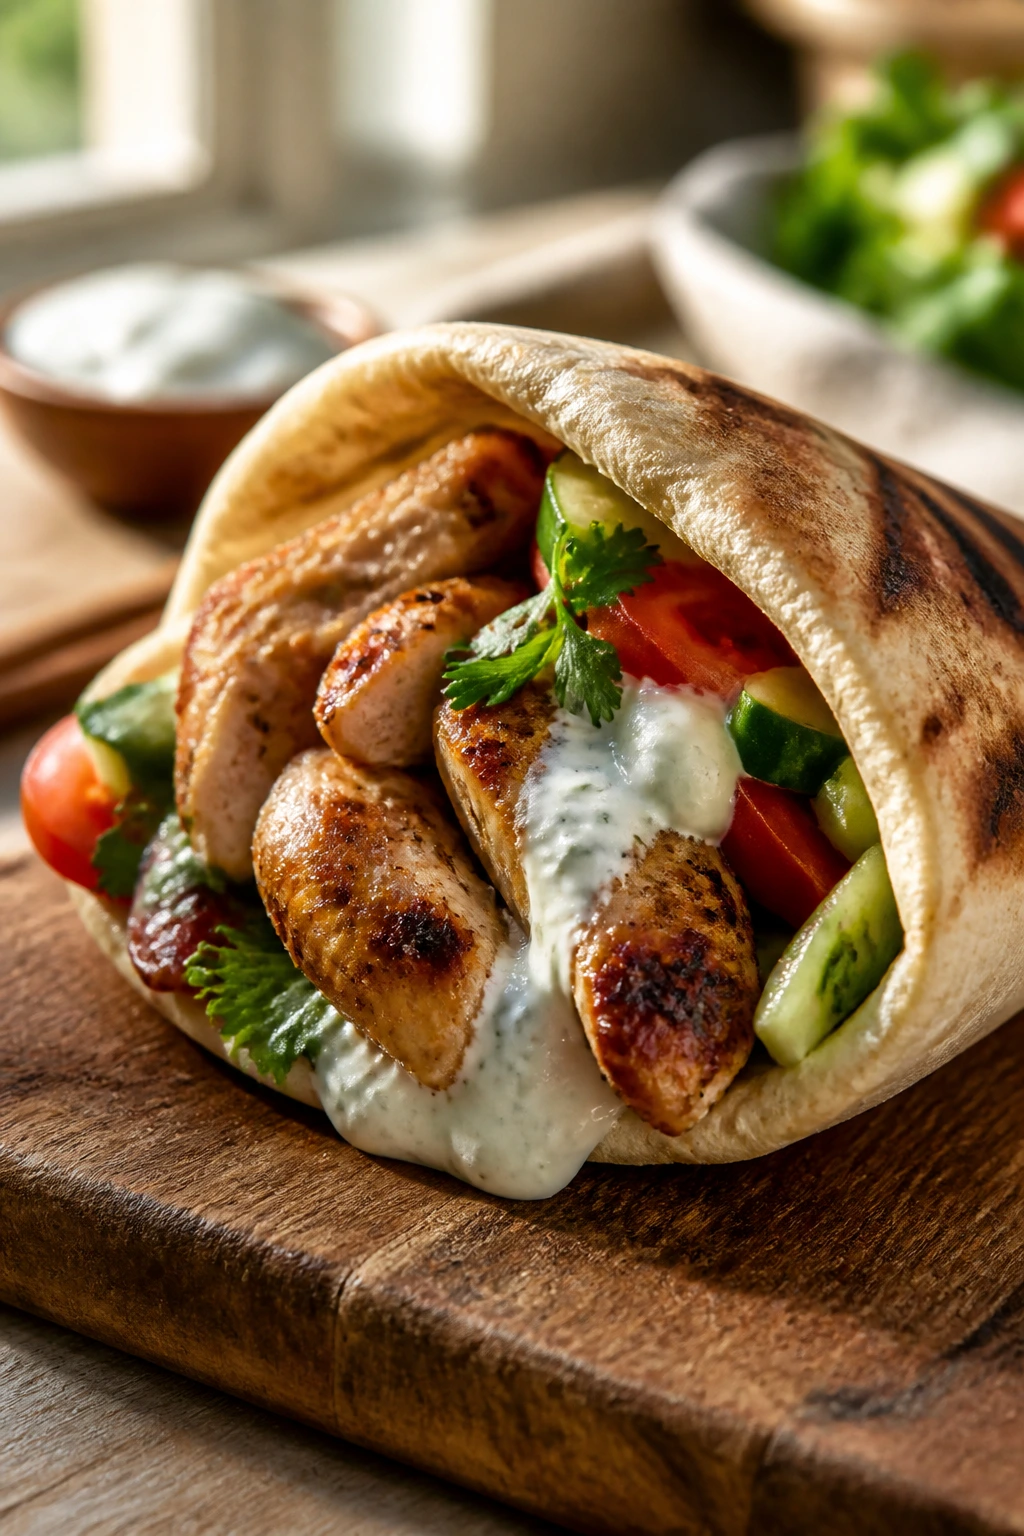
1. Chicken Shawarma Pitas with Cool Yogurt Sauce
Chicken shawarma is the pita dinner I reach for when I want dinner to feel as if I paid more attention than I actually did. The spices are warm and earthy, the chicken gets browned at the edges, and the yogurt sauce cools everything down in the best way. It smells like a proper meal as soon as the garlic hits the pan.
What I love here is the contrast. You get juicy chicken, crunchy cucumber, bright tomato, and the little bit of char that makes the spices taste deeper. It’s the kind of filling that makes pita pocket dinners feel sturdy instead of skimpy.
Why It Works
Chicken thighs are the right move because they stay tender even if you leave them in the skillet a minute too long. The shawarma-style spice mix—cumin, coriander, paprika, turmeric, and a touch of cinnamon—blooms in hot oil and clings to the meat instead of sliding off. A quick yogurt sauce brings acidity and body, which matters when the filling is rich and heavily seasoned.
This also works because the whole dish has a built-in temperature contrast. Hot chicken, cool sauce, room-temperature vegetables, warm pita. That’s the magic formula.
Key Ingredients
For the Chicken
- 1 1/2 lb boneless, skinless chicken thighs, trimmed and cut into 2-inch strips
- 2 tbsp olive oil
- 1 tbsp lemon juice
- 3 garlic cloves, minced
- 1 tsp ground cumin
- 1 tsp ground coriander
- 1 tsp smoked paprika
- 1/2 tsp turmeric
- 1/4 tsp ground cinnamon
- 1 tsp kosher salt
- 1/2 tsp black pepper
For the Yogurt Sauce
- 1 cup plain Greek yogurt
- 1 tbsp tahini
- 1 tbsp lemon juice
- 1 small garlic clove, grated
- Pinch of salt
For Assembling
- 4 large pita breads, warmed
- 1 cup shredded lettuce
- 1 cup diced cucumber
- 1 cup diced tomato
- 1/2 small red onion, thinly sliced
- 2 tbsp chopped parsley
Quick Steps
-
Mix the marinade: In a bowl, combine the olive oil, lemon juice, garlic, cumin, coriander, paprika, turmeric, cinnamon, salt, and pepper. Add the chicken strips and toss until every piece is coated. Let it sit for 15 to 30 minutes while you prep the vegetables.
-
Heat the skillet: Set a large skillet over medium-high heat and let it get hot before the chicken goes in. Add the chicken in a single layer. Crowding the pan will steam the meat instead of browning it.
-
Cook until browned: Sear the chicken for 4 to 5 minutes per side, stirring once or twice, until the edges are deeply browned and the thickest piece reaches 165°F. The smell should be warm and garlicky, not sharp or raw.
-
Rest and slice: Transfer the chicken to a cutting board and rest it for 5 minutes. Slice any thicker pieces if needed. That short rest keeps the juices in the meat instead of spilling into the board.
-
Whisk the sauce: Stir the yogurt, tahini, lemon juice, grated garlic, and salt together until smooth. If it feels too thick, add 1 to 2 teaspoons of water.
-
Warm the pita and assemble: Warm the pita breads in a dry skillet for 20 to 30 seconds per side, then fill each one with lettuce, chicken, cucumber, tomato, onion, parsley, and a spoonful of yogurt sauce.
Tips and Variations
- Better browning: Pat the chicken dry after marinating if the pan looks crowded with liquid; dry meat sears better.
- Substitution: Chicken breasts work, but pull them from the heat as soon as they reach 160°F and let carryover cooking finish the job.
- Serving move: Add pickled onions or chopped olives if you want a sharper, saltier finish.
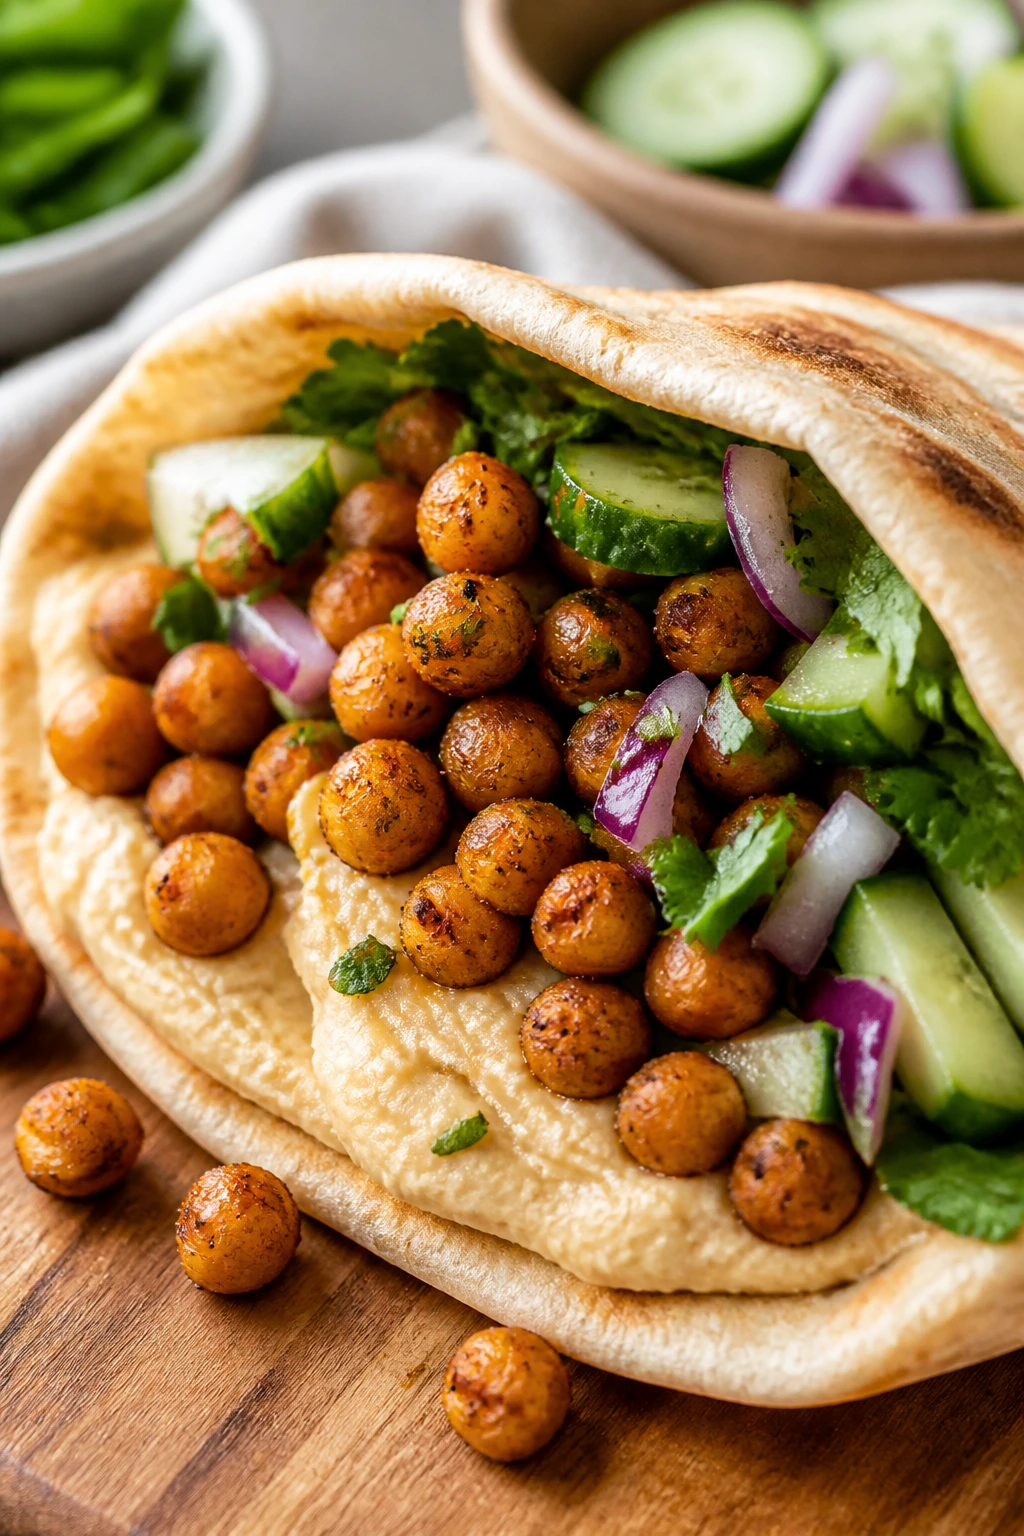
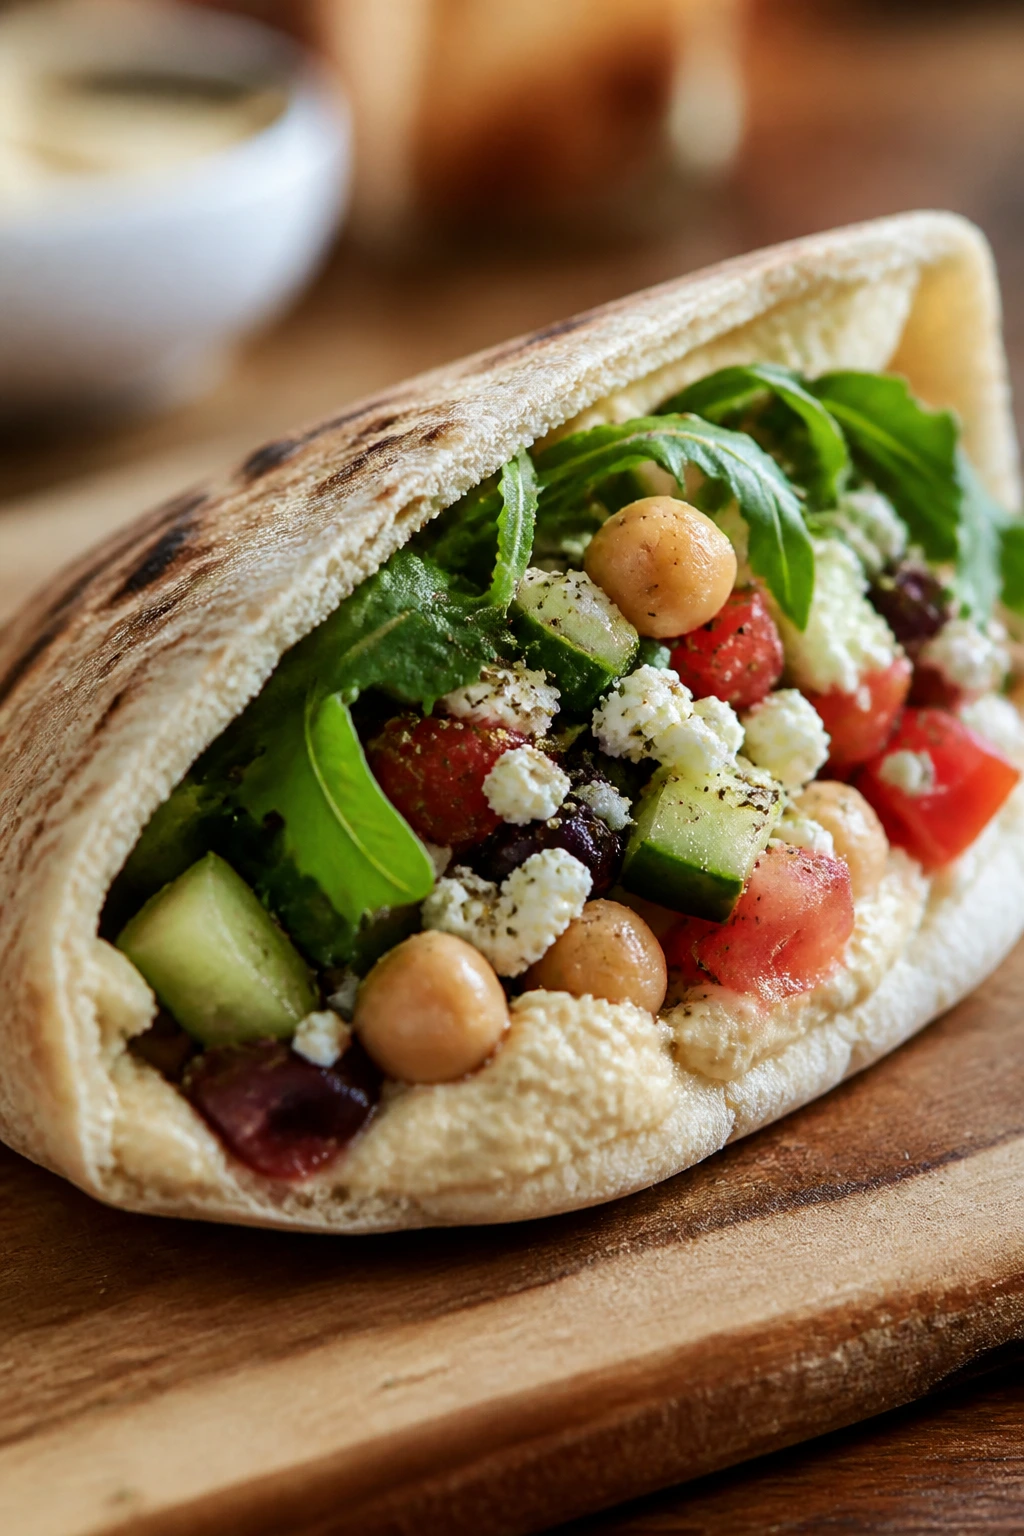
2. Crispy Chickpea and Hummus Pitas
What if dinner is basically one can of chickpeas, a tub of hummus, and a decent knife? That’s this meal. It sounds too simple until you take the first bite and get the crunch from the chickpeas, the creaminess from the hummus, and the clean snap of cucumber and onion.
This is the pita dinner I make when I want something meatless but not meek. The roasted chickpeas bring texture that feels almost snacky, which is why people end up eating this faster than expected. A squeeze of lemon at the end wakes the whole thing up.
Why It Works
Roasting canned chickpeas changes their mood completely. The outside dries out and turns crisp while the centers stay nutty, which gives you a filling with actual texture instead of a soft mash. Hummus acts like a sauce and a glue, keeping the pita from feeling dry without turning everything soggy.
The vegetables matter here more than they do in some other sandwiches. Cucumber and tomato add coolness, red onion adds bite, and spinach gives the filling a little volume so the pita feels full without being overstuffed.
Key Ingredients
For the Chickpeas
- 2 cans chickpeas (15 oz each), drained, rinsed, and patted very dry
- 2 tbsp olive oil
- 1 tsp ground cumin
- 1 tsp smoked paprika
- 1/2 tsp garlic powder
- 1/2 tsp kosher salt
- 1/4 tsp black pepper
For the Filling
- 1 cup hummus
- 4 pita breads, warmed
- 2 cups baby spinach
- 1 cup diced cucumber
- 1 cup diced tomato
- 1/4 cup thinly sliced red onion
- 1 tbsp lemon juice
- 2 tbsp chopped parsley
- 1/4 cup crumbled feta, optional
Quick Steps
-
Heat the oven: Preheat the oven to 425°F and line a sheet pan with parchment paper.
-
Season the chickpeas: Toss the dried chickpeas with olive oil, cumin, paprika, garlic powder, salt, and pepper. Spread them out in a single layer. Dry chickpeas roast; damp chickpeas steam.
-
Roast until crisp: Bake for 20 to 25 minutes, shaking the pan once halfway through, until the chickpeas are browned at the edges and feel slightly firm when pressed.
-
Prep the vegetables: While the chickpeas roast, combine the cucumber, tomato, red onion, lemon juice, and parsley in a bowl. If you’re using feta, fold it in now.
-
Warm the pita: Heat the pitas in a skillet or wrapped in foil in the oven for a minute or two until they bend easily without cracking.
-
Build the pita: Spread hummus inside each pita, add spinach, spoon in the chickpeas, then top with the vegetable mixture.
Tips and Variations
- Texture fix: If the chickpeas seem soft after roasting, leave them on the hot pan for 5 minutes before filling the pita.
- Flavor boost: A pinch of za’atar over the hummus gives the whole thing more lift.
- Shortcut: Use store-bought chopped salad if you don’t want to dice vegetables one by one.
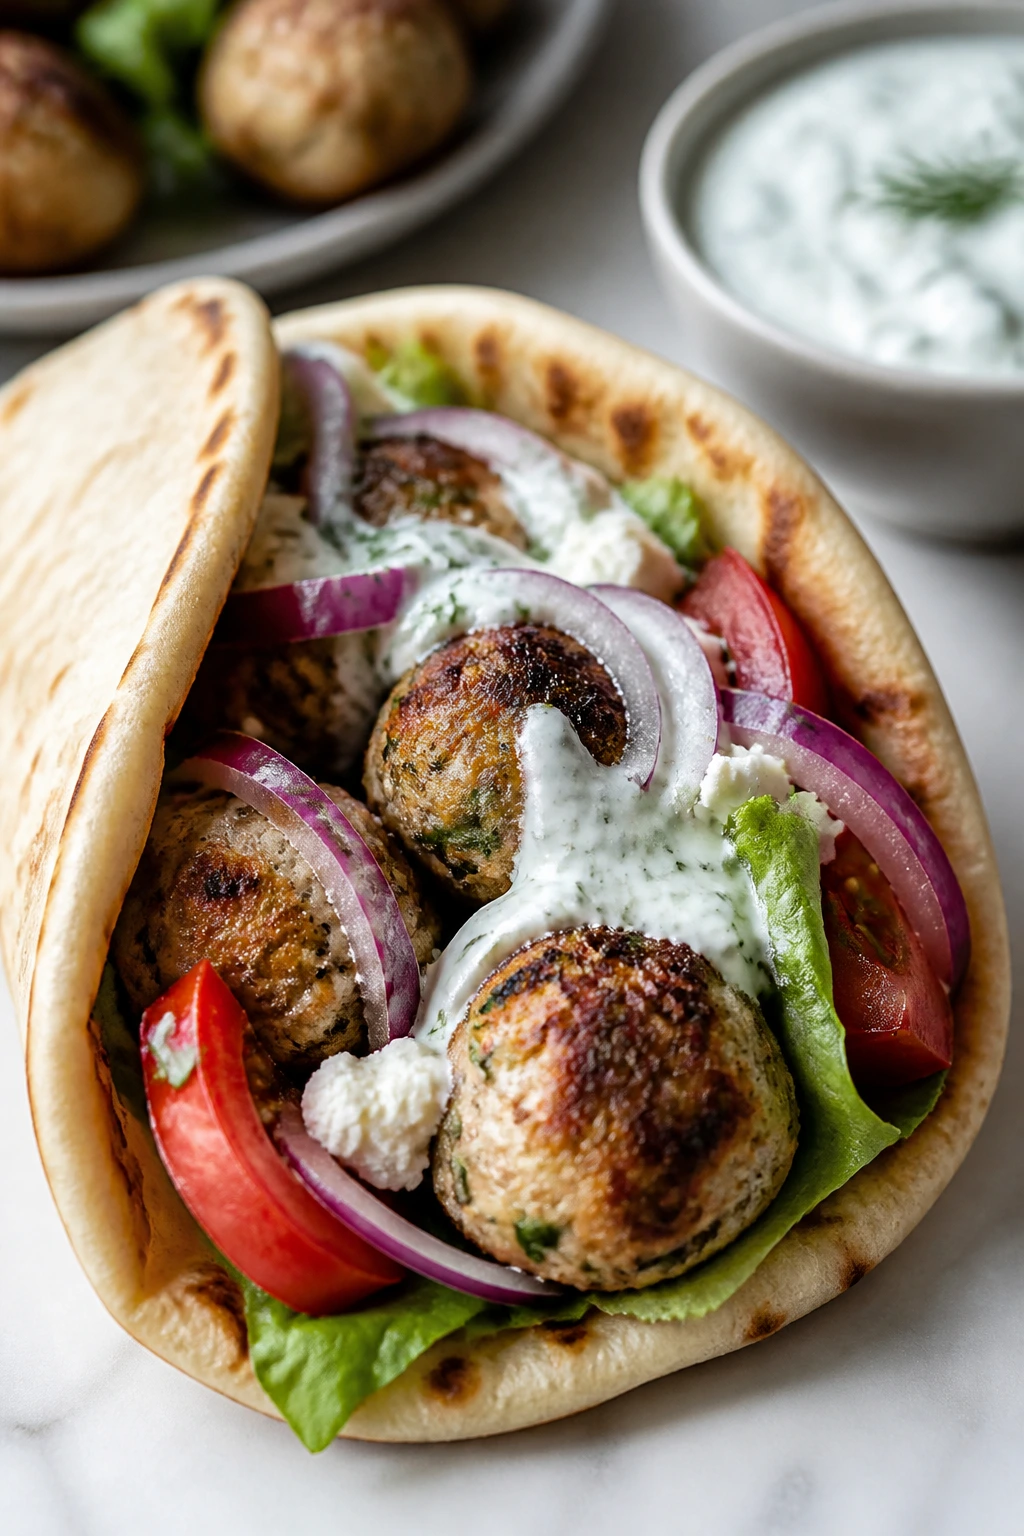
3. Greek Turkey Meatball Pitas with Tzatziki
If you like meatballs that can be eaten in one hand and still feel like a real dinner, this is the move. Turkey keeps them lighter than beef, and the herbs, garlic, and onion do the heavy lifting so they don’t taste timid. Add tzatziki and suddenly the whole thing feels cool, creamy, and a little old-school in the best way.
I like this recipe because it behaves well. The meatballs bake on a sheet pan, which means you can chop tomatoes or stir sauce while they cook. No babysitting. No splattering oil.
Why It Works
Ground turkey can go dry fast, so the egg, breadcrumbs, and grated onion are doing more work than they look like they are. They hold onto moisture and keep the meatballs tender long enough to brown without turning crumbly. Baking at a high enough temperature gives you a little exterior color without forcing you to stand at the stove.
Tzatziki pulls everything into balance. The cucumber cools the heat from the garlic and oregano, and the yogurt keeps the pita from tasting dry. It’s one of those combinations that feels simple because it is simple, not because it’s lazy.
Key Ingredients
For the Meatballs
- 1 lb ground turkey
- 1/2 cup breadcrumbs
- 1 large egg
- 1/4 cup grated yellow onion
- 2 garlic cloves, minced
- 1 tsp dried oregano
- 1 tsp kosher salt
- 1/2 tsp black pepper
- 2 tbsp chopped parsley
For the Tzatziki
- 1 cup plain Greek yogurt
- 1/2 cup grated cucumber, squeezed dry
- 1 tbsp chopped dill
- 1 tbsp lemon juice
- 1 small garlic clove, grated
- Pinch of salt
For Assembling
- 4 pita breads, warmed
- 2 cups shredded romaine
- 1 cup diced tomato
- 1/2 small red onion, thinly sliced
- 1/4 cup feta crumbles
Quick Steps
-
Preheat the oven: Set the oven to 400°F and line a sheet pan with parchment paper.
-
Mix the meatball base: Combine the turkey, breadcrumbs, egg, onion, garlic, oregano, salt, pepper, and parsley in a bowl. Mix with your hands until the ingredients are evenly distributed. Stop once it looks cohesive; overmixing makes the meatballs dense.
-
Shape and bake: Roll the mixture into 16 small meatballs, about 1 1/2 tablespoons each. Place them on the sheet pan with a little space between each one. Bake for 14 to 16 minutes, until browned and cooked through to 165°F.
-
Stir the tzatziki: Mix the yogurt, grated cucumber, dill, lemon juice, garlic, and salt. If the cucumber seems watery, squeeze it again. Thin sauce is the enemy here.
-
Warm the pita: Heat the pita in a dry skillet for about 30 seconds per side or wrap it in foil and warm it in the oven for a few minutes.
-
Assemble: Split the pita, tuck in romaine, add meatballs, spoon on tzatziki, then finish with tomato, onion, and feta.
Tips and Variations
- Moisture trick: Grating the onion instead of chopping it keeps the meatballs softer and helps the mixture bind.
- Make-ahead: The meatballs can be shaped a day ahead and chilled on a tray, covered.
- Swap: Ground chicken works too, but it needs the full 165°F and a gentle hand when mixing.
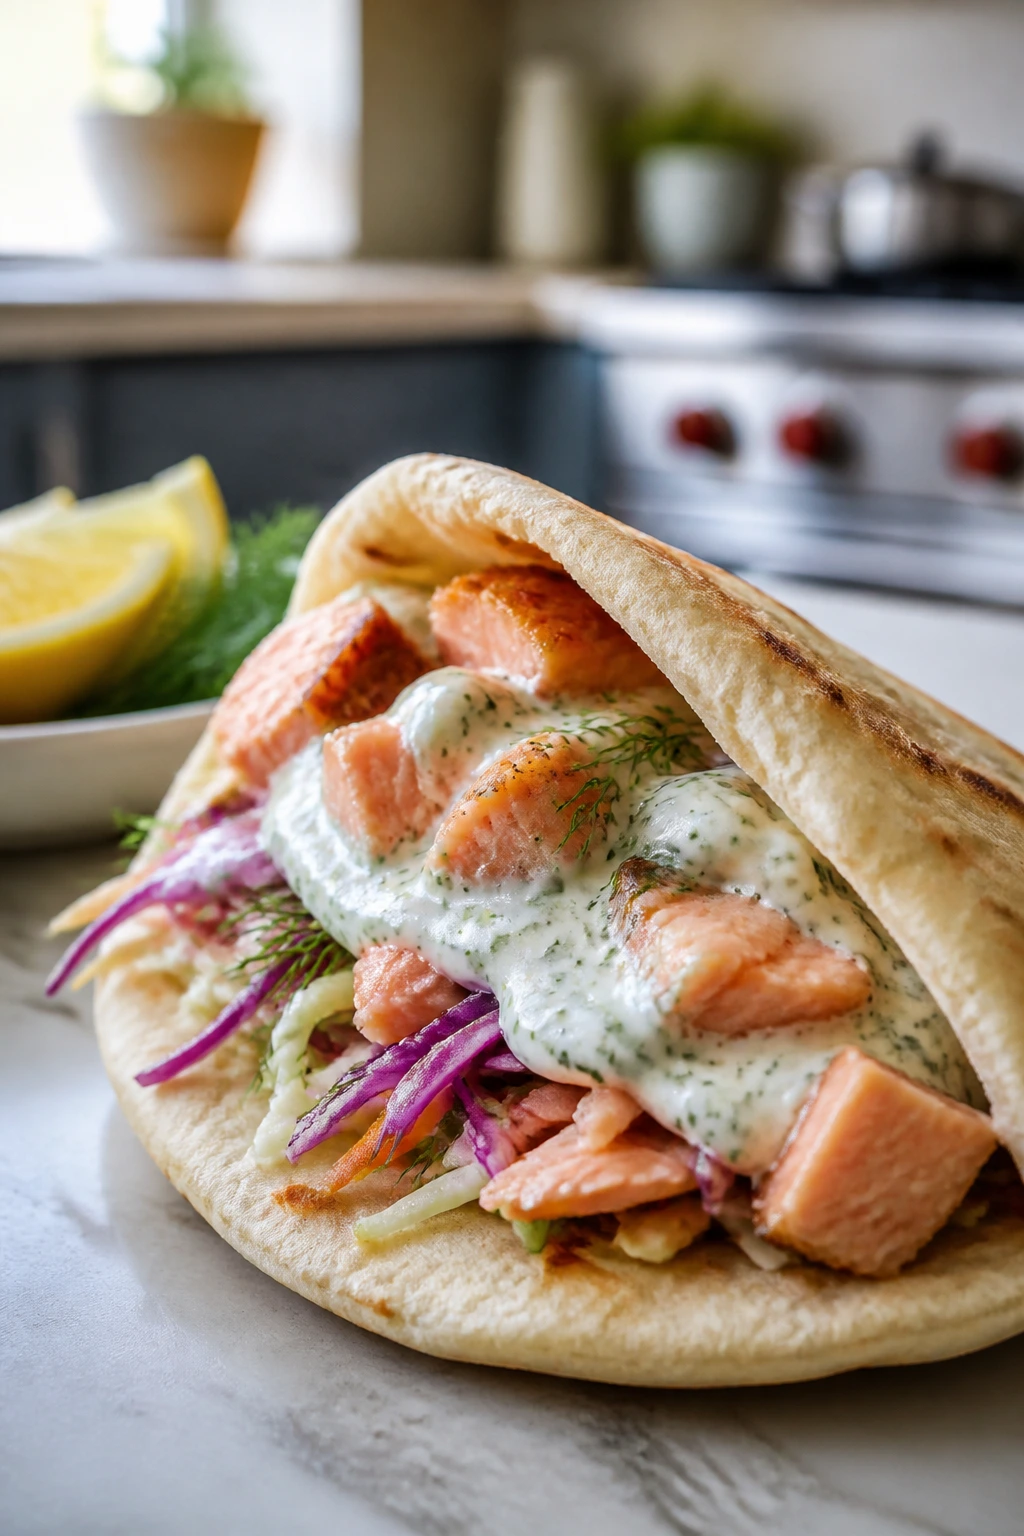
4. Salmon Pitas with Lemon-Dill Yogurt
The smell of salmon hitting a hot pan is one of the fastest ways to make a kitchen feel awake. Here, though, I prefer the oven because it keeps the fish tender and gives you time to make the sauce and slaw without juggling a spatula in one hand. The result is fresh, clean, and just rich enough.
This is the pita dinner that feels a little lighter without drifting into “salad for dinner” territory. You get flaky fish, bright herbs, and crunchy cabbage all tucked into warm bread. It’s fast, but it doesn’t taste like a shortcut.
Why It Works
Salmon cooks quickly, which is its gift and its trap. Pull it too late and it turns dry; pull it on time and it flakes into soft, buttery pieces that don’t need much help. A simple lemon-dill yogurt sauce keeps the fish from feeling heavy and gives the pita a creamy edge.
The cabbage slaw matters more than it first appears. It stays crisp under warm fish and sauce, so each bite still has a little snap. That textural contrast keeps the sandwich from leaning soft all the way through.
Key Ingredients
For the Salmon
- 1 1/4 lb skinless salmon fillet, cut into 4 portions
- 1 tbsp olive oil
- 1 tsp kosher salt
- 1/2 tsp black pepper
- 1 tsp lemon zest
- 1/2 tsp smoked paprika, optional
For the Lemon-Dill Yogurt
- 3/4 cup plain Greek yogurt
- 2 tbsp chopped dill
- 1 tbsp lemon juice
- 1 small garlic clove, grated
- Pinch of salt
For the Slaw and Assembly
- 2 cups shredded cabbage
- 1 cup diced cucumber
- 1 tbsp olive oil
- 1 tbsp lemon juice
- 1 tbsp chopped dill or parsley
- 4 pita breads, warmed
- 2 tbsp capers, optional
Quick Steps
-
Preheat the oven: Set the oven to 425°F and line a sheet pan with parchment paper.
-
Season the salmon: Place the salmon on the sheet pan and rub it with olive oil, salt, pepper, lemon zest, and paprika if using. Leave a little space between portions so the edges roast instead of steam.
-
Make the slaw: Toss the cabbage, cucumber, olive oil, lemon juice, and dill together in a bowl. The cabbage should be lightly coated, not drenched.
-
Mix the yogurt sauce: Stir the yogurt, dill, lemon juice, garlic, and salt until smooth. If it’s too thick to spoon easily, add a teaspoon of water.
-
Roast the fish: Bake for 10 to 12 minutes, until the salmon flakes easily with a fork and the center is just opaque. Do not wait until it looks dry; salmon finishes fast.
-
Assemble the pitas: Warm the pita, add slaw, flake the salmon over the top, spoon on the yogurt sauce, and finish with capers if you like that briny edge.
Tips and Variations
- Cleaner texture: Check the fish a minute early if the fillet is thin; overcooked salmon gets chalky fast.
- Substitution: Trout works well here if that’s what you have.
- Serving move: Add sliced avocado only if you’re serving right away; it doesn’t hold as well once the pita is packed.
5. Oven-Falafel Pitas with Pickled Onions
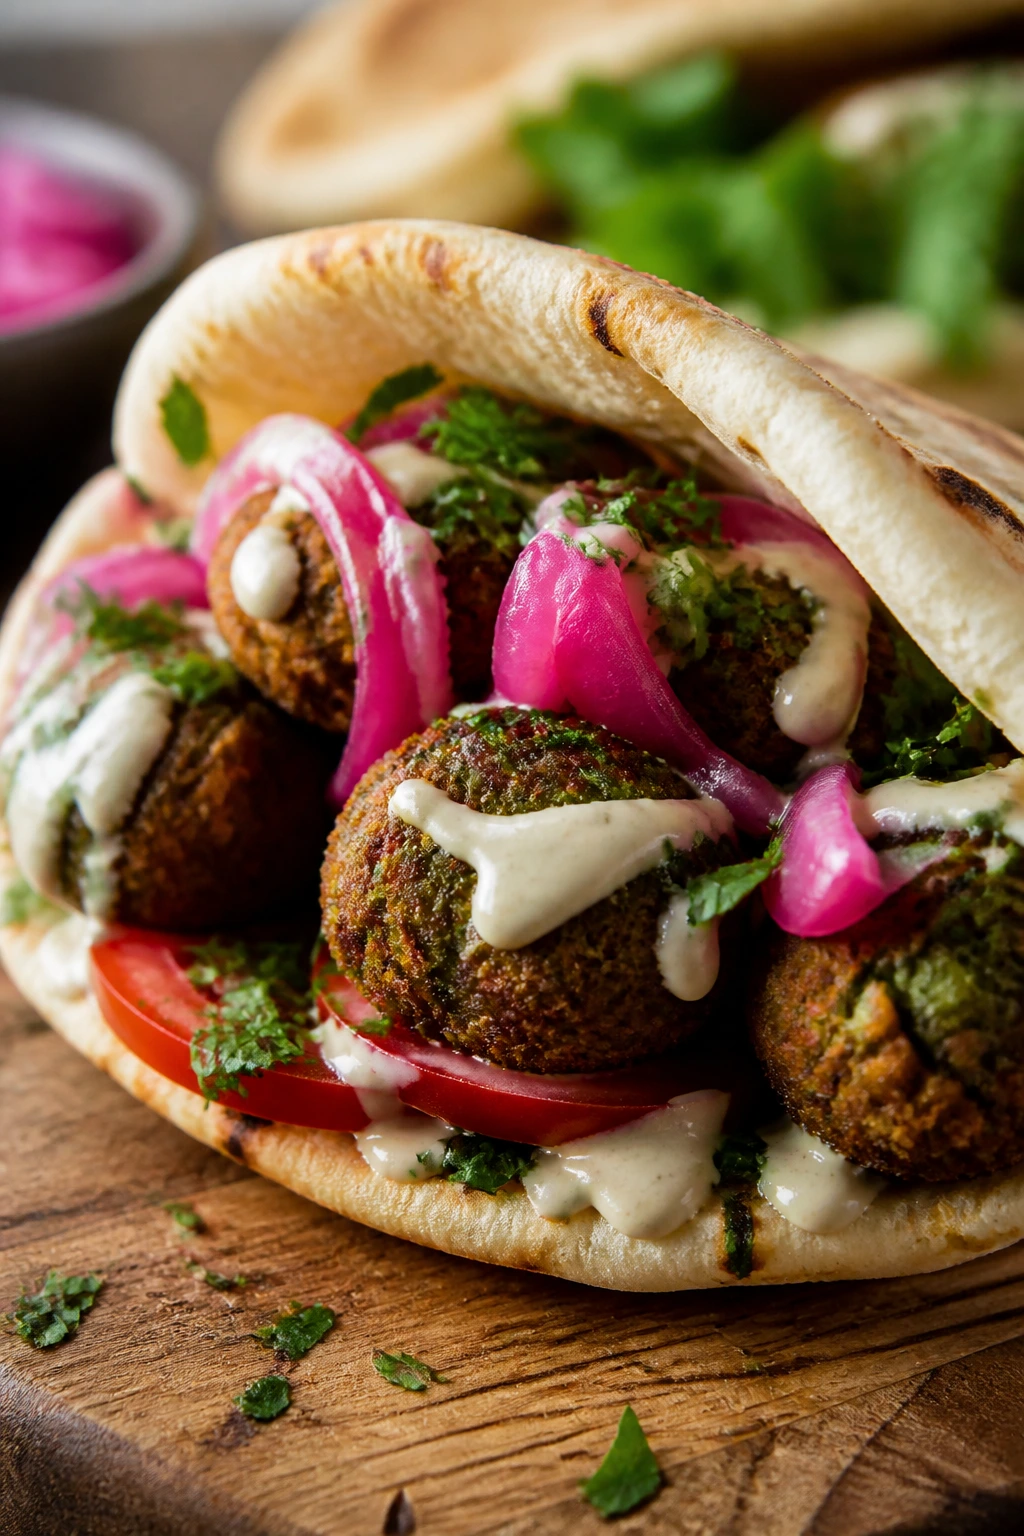
Falafel sounds like a project until you use a good mix and a hot oven. Then it turns into one of the least fussy dinners in the group. The outside crisps, the inside stays soft and herb-y, and the tahini sauce gives you that earthy, nutty finish that makes the whole thing taste organized.
The pickled onions are not optional in my kitchen. They cut through the richness of the falafel and tahini so each bite stays sharp, not heavy. If you like a little acidity with your dinner, this one delivers it cleanly.
Why It Works
Falafel gets its appeal from contrast. A good batch should be crisp at the edges, tender in the middle, and seasoned enough that you can taste the herbs even after it’s tucked into bread. Baking instead of frying keeps the process manageable and still gives you enough browning to matter.
Tahini sauce is the other half of the equation. It’s thick, slightly bitter, and better than yogurt when you want a dairy-free option. Pair it with quick pickled onions, and the filling stops tasting one-note.
Key Ingredients
For the Falafel
- 1 package falafel mix, prepared according to package directions to yield 12 falafel balls or patties
- 2 tbsp olive oil
For the Quick Pickled Onions
- 1/2 small red onion, thinly sliced
- 1/2 cup white vinegar
- 1 tsp sugar
- 1/2 tsp salt
For the Tahini Sauce
- 1/3 cup tahini
- 2 tbsp lemon juice
- 1 small garlic clove, grated
- 3 to 5 tbsp warm water
- 1/4 tsp kosher salt
For Assembling
- 4 pita breads, warmed
- 2 cups shredded lettuce
- 1 cup diced cucumber
- 1 cup diced tomato
- 2 tbsp chopped parsley
- 1/4 cup chopped pickles or pickled turnips, optional
Quick Steps
-
Quick-pickle the onion: Stir the vinegar, sugar, and salt together until dissolved. Add the onion and set it aside for at least 10 minutes while you prep everything else.
-
Prepare the falafel: Mix the falafel according to the package directions and shape it into 12 balls or small patties. Brush or drizzle with olive oil.
-
Bake until crisp: Arrange the falafel on a parchment-lined sheet pan and bake at 425°F for 15 to 18 minutes, turning once halfway through, until the outside is browned and crisp.
-
Whisk the tahini sauce: Combine tahini, lemon juice, garlic, salt, and warm water. Add the water slowly until the sauce turns pourable but still thick enough to cling to a spoon.
-
Warm the pita: Heat the pitas in a skillet or oven until flexible.
-
Assemble: Spread tahini sauce inside each pita, add lettuce, falafel, cucumber, tomato, onion, parsley, and pickles if using.
Tips and Variations
- Sauce fix: If the tahini seizes and turns stiff, keep whisking in warm water a teaspoon at a time.
- Flavor move: Add a pinch of cumin or sumac to the tahini sauce for a little extra depth.
- Shortcut: Store-bought falafel from the freezer aisle works fine on a night when you do not want to measure another thing.
6. Buffalo Chicken Slaw Pitas
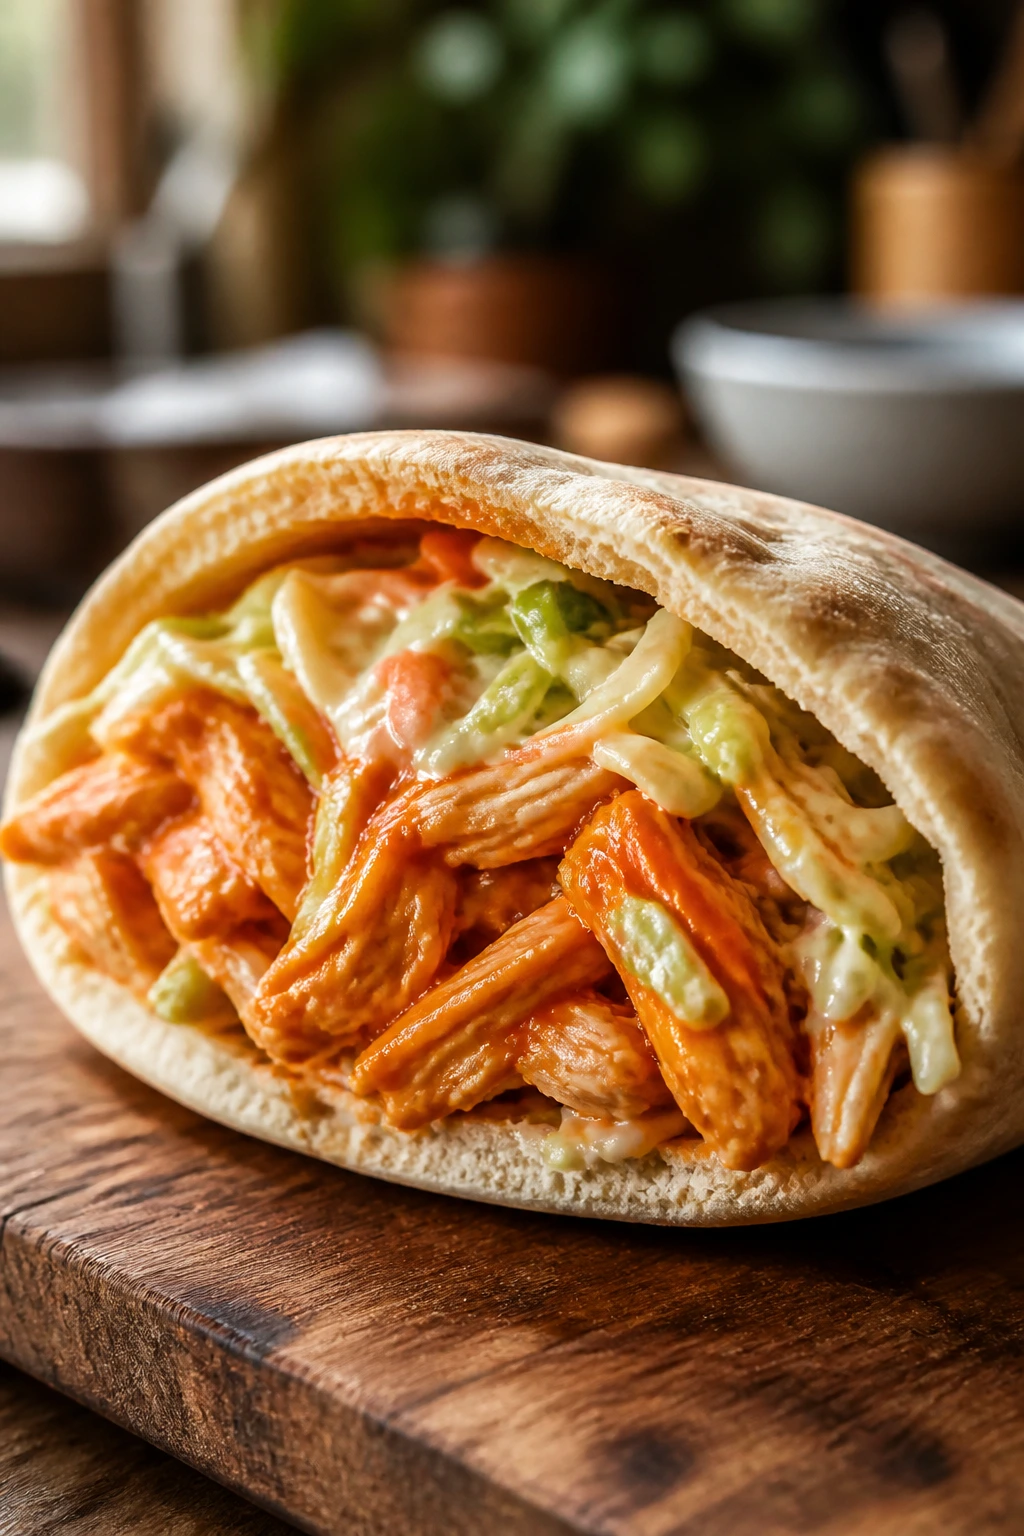
Got leftover chicken in the fridge and zero patience? This is the rescue meal. Buffalo sauce wakes up shredded chicken in seconds, and the cabbage slaw keeps the whole thing crisp instead of heavy. It’s the kind of dinner that feels messy in a good way.
I prefer this version to a full buffalo sandwich because pita handles the sauce better. A bun can go soggy. Pita holds up, especially if you tuck the slaw in first and let it act like a cushion.
Why It Works
Shredded chicken absorbs sauce fast, which means you don’t need to babysit it. A little butter or olive oil smooths out the buffalo sauce so it coats the meat instead of sitting on top in a sharp layer. The slaw adds crunch and keeps each bite from being all heat and no relief.
This recipe also scales beautifully for people who like different spice levels. Keep extra buffalo sauce on the side, or stir in a spoonful of honey if you want the heat to feel friendlier. That small adjustment changes the whole mood.
Key Ingredients
For the Buffalo Chicken
- 1 1/2 lb cooked shredded chicken
- 1/3 cup buffalo sauce
- 2 tbsp unsalted butter or olive oil
- 1 tbsp honey, optional
For the Slaw
- 3 cups shredded green cabbage
- 1 cup shredded carrots
- 2 celery stalks, thinly sliced
- 2 tbsp Greek yogurt or mayonnaise
- 1 tbsp apple cider vinegar
- 1/4 tsp kosher salt
For Assembling
- 4 pita breads, warmed
- 1/2 cup blue cheese crumbles or ranch dressing
- 2 scallions, sliced
- 1 tbsp chopped parsley
Quick Steps
-
Warm the chicken: Put the shredded chicken, buffalo sauce, butter or olive oil, and honey if using into a skillet over medium heat. Stir until the chicken is hot and evenly coated, about 4 to 5 minutes.
-
Make the slaw: Toss the cabbage, carrots, celery, yogurt or mayonnaise, vinegar, and salt in a bowl. The vegetables should be lightly dressed, not dripping.
-
Heat the pita: Warm the pita in a skillet or wrapped in foil until soft and pliable.
-
Start the filling: Spoon the slaw into each pita first. That layer helps catch the sauce.
-
Add the chicken: Top with the hot buffalo chicken, then finish with blue cheese or ranch.
-
Garnish and serve: Scatter scallions and parsley over the top. Serve right away while the chicken is hot and the pita still has some give.
Tips and Variations
- Heat control: Use half buffalo sauce and half unsalted melted butter if you want a milder result.
- Best leftover use: This is one of the best ways to use rotisserie chicken.
- Crunch fix: Keep the slaw separate until serving if you’re making these for later.
7. Beef Kofta Pitas with Tomato Relish
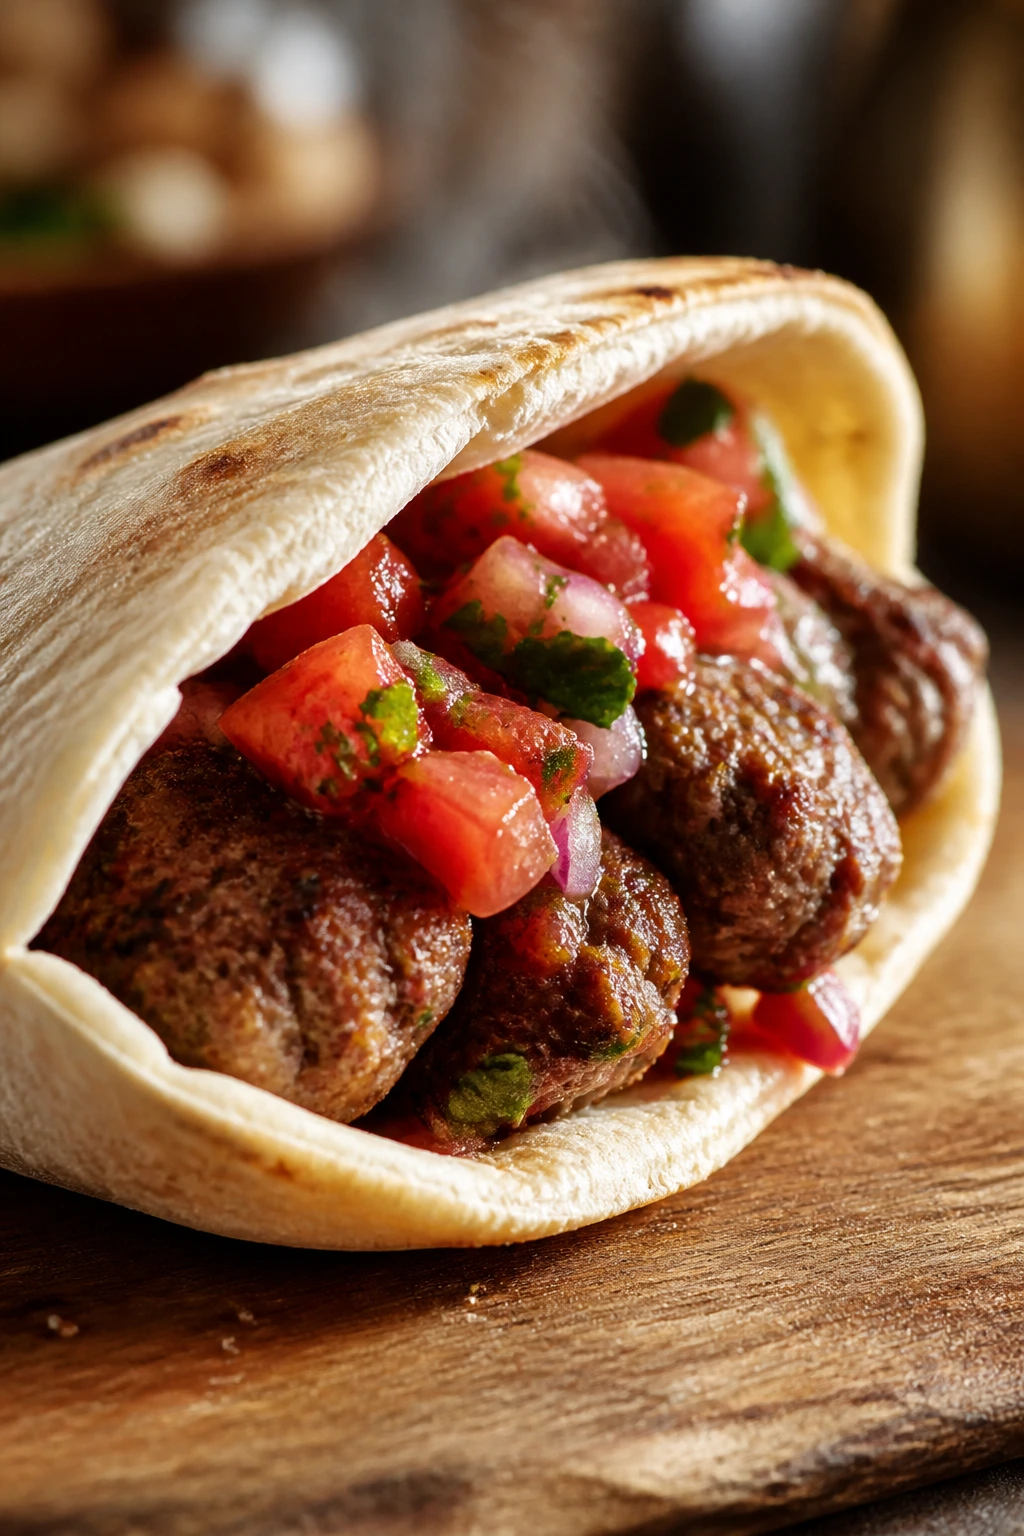
If you like grilled edges and warm spices, beef kofta gives you both without asking for much back. The meat is seasoned enough to taste deep, but not so heavily that it starts feeling like a holiday project. Tomato relish and yogurt or tahini keep it bright.
I like kofta in pita because the shape matters. Logs or ovals brown more surface area than meatballs, which means more char and more flavor in less time. That’s the whole argument, really.
Why It Works
Ground beef—or lamb, if you want more richness—needs just enough binder from the onion and herbs to stay tender, not tight. You don’t want a dense meatloaf situation. A quick broil or hot skillet gives the outside a browned crust while the center stays juicy.
The relish matters because kofta is savory and warm. Tomato, cucumber, onion, lemon, and olive oil bring freshness and a little acidity, which stops the pita from tasting heavy. That contrast is what makes this dinner feel complete instead of merely filling.
Key Ingredients
For the Kofta
- 1 lb ground beef or lamb
- 1/4 cup finely grated onion
- 2 garlic cloves, minced
- 2 tbsp chopped parsley
- 1 tsp ground cumin
- 1 tsp ground coriander
- 1/2 tsp ground cinnamon
- 1 tsp kosher salt
- 1/2 tsp black pepper
For the Tomato Relish
- 1 cup diced tomato
- 1 cup diced cucumber
- 1/4 cup thinly sliced red onion
- 1 tbsp olive oil
- 1 tbsp lemon juice
- Pinch of salt
For Assembling
- 1/2 cup Greek yogurt or tahini sauce
- 4 pita breads, warmed
- 1 cup shredded lettuce
- 2 tbsp chopped mint or parsley
Quick Steps
-
Mix gently: Combine the beef, grated onion, garlic, parsley, cumin, coriander, cinnamon, salt, and pepper in a bowl. Mix until just combined. Too much mixing makes the kofta tight and chewy.
-
Shape the logs: Divide the mixture into 8 portions and shape each one into a short oval or log. Wet your hands slightly if the meat sticks.
-
Cook the kofta: Broil on a foil-lined sheet pan for 4 to 5 minutes per side, or pan-sear over medium-high heat for about 8 to 10 minutes total, until the centers reach 160°F.
-
Rest the meat: Let the kofta rest for 3 minutes before slicing or stuffing. This keeps the juices where they belong.
-
Mix the relish: Stir together the tomato, cucumber, red onion, olive oil, lemon juice, and salt.
-
Assemble: Spread yogurt or tahini inside the pita, add lettuce, kofta, relish, and herbs, then fold and eat while warm.
Tips and Variations
- Shape trick: If you’re broiling, flatten the logs a little so more surface area browns.
- Flavor move: A pinch of sumac in the relish gives it a sharper, more lemony edge.
- Substitution: Ground turkey can work, but it needs a little olive oil in the mix to stay juicy.
8. Halloumi and Roasted Vegetable Pitas with Tahini
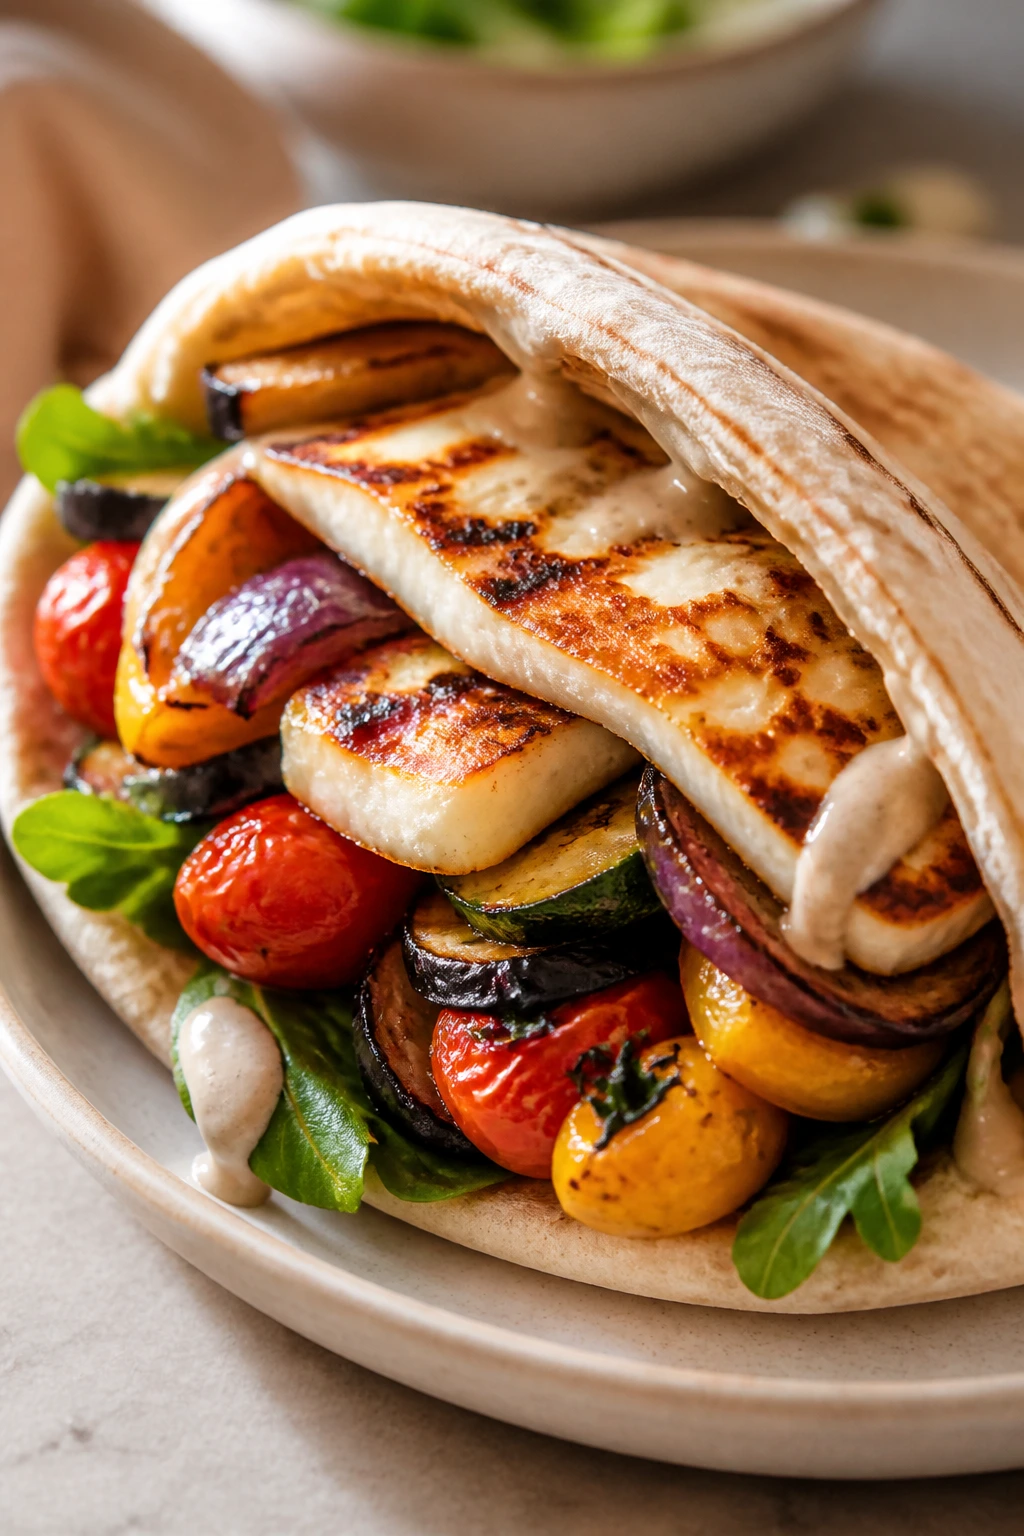
Halloumi is the cheese that shows up, gets loud, and then saves dinner. It doesn’t melt into a puddle; it browns. That’s the whole selling point. Pair it with roasted vegetables and a tahini sauce, and you get a pita dinner that feels satisfying without leaning on meat.
This one has a little more of a sheet-pan feel, but it’s still weeknight-friendly. The vegetables roast while you whisk the sauce and warm the bread, and the halloumi sears in minutes. The trick is timing the cheese so it still has a squeaky bite when it lands in the pita.
Why It Works
Halloumi has a high melting point, which means it keeps its shape and gets a golden crust instead of disappearing into the pan. That makes it unusually good for pita because it gives you chew and salt in each bite. The roasted vegetables bring sweetness, especially the onions and tomatoes, so the filling feels balanced.
Tahini sauce does the same job it does in the falafel pita: it binds the filling and softens the sharper edges of the vegetables. A handful of greens and mint at the end keeps the whole thing from feeling too rich. You want contrast here, not just volume.
Key Ingredients
For the Roasted Vegetables
- 1 zucchini, sliced into half-moons
- 1 red bell pepper, sliced
- 1 small red onion, cut into wedges
- 1 cup cherry tomatoes
- 2 tbsp olive oil
- 1 tsp za’atar
- 1/2 tsp kosher salt
- 1/4 tsp black pepper
For the Halloumi and Sauce
- 8 oz halloumi, sliced into 8 slabs
- 1/3 cup tahini
- 2 tbsp lemon juice
- 1 small garlic clove, grated
- 3 to 5 tbsp warm water
- Pinch of salt
For Assembling
- 4 pita breads, warmed
- 2 cups arugula
- 2 tbsp chopped mint
- 2 tbsp toasted sesame seeds, optional
Quick Steps
-
Roast the vegetables: Preheat the oven to 425°F. Toss the zucchini, bell pepper, onion, and cherry tomatoes with olive oil, za’atar, salt, and pepper. Spread them on a sheet pan and roast for 18 to 20 minutes, until the onions are soft and the tomato skins are starting to split.
-
Whisk the tahini sauce: Stir tahini, lemon juice, garlic, salt, and warm water together until smooth and pourable. Add water slowly so the sauce doesn’t get too thin.
-
Dry the halloumi: Pat the cheese dry with paper towels. Wet halloumi splatters and browns unevenly.
-
Sear the cheese: Heat a skillet over medium-high heat and cook the halloumi for 1 to 2 minutes per side, until the surface is golden brown and the edges look crisp.
-
Warm the pita: Heat the pita in a skillet or oven until flexible.
-
Build the pita: Fill each pita with arugula, roasted vegetables, halloumi, tahini sauce, mint, and sesame seeds if using.
Tips and Variations
- Salt check: Halloumi is salty on its own, so don’t overdo the seasoning on the vegetables.
- Flavor boost: A spoonful of chopped olives or a few capers gives this more briny depth.
- Swap: If you can’t find halloumi, firm feta grilled in a basket or thick slices of paneer can stand in, though the texture changes.
Why Pita Dinners Work So Well on Busy Nights
Pita does something practical that a lot of breads don’t: it creates a small, contained meal without turning dinner into a knife-and-fork event. The bread itself is sturdy enough to hold fillings, but soft enough to bite through cleanly when it’s warmed first. That tiny bit of structure matters when you’re dealing with sauces, juicy tomatoes, or roasted vegetables that tend to slide around on a plate.
The other reason pita dinners keep showing up in real kitchens is the way they handle leftovers. Roast extra chicken once, make a few meatballs on the side, or stash a bowl of tahini in the fridge and you’ve already built the bones of another meal. Pita is less a recipe than a format, and that’s why it lasts.
There’s also a practical sweet spot between hot and cold. The bread can be warm while the filling is cool, or the filling can be hot while the vegetables stay crisp. That contrast keeps the food interesting without requiring much effort, which is the whole point on a busy night.
Essential Equipment for These Recipes
-
Large skillet or sauté pan: Best for searing chicken, buffalo chicken, and halloumi without crowding the pan.
-
Sheet pan: Needed for roasting chickpeas, baking meatballs, roasting vegetables, and cooking salmon.
-
Mixing bowls: Keep one small bowl for sauces and at least one medium bowl for fillings.
-
Sharp knife and cutting board: A clean dice matters here, especially for cucumber, tomato, and onion.
-
Box grater or microplane: Useful for onion, garlic, and cucumber in the tzatziki or meatball mix.
-
Tongs: Helpful for turning chicken, salmon, falafel, and halloumi without tearing them apart.
-
Instant-read thermometer: The easiest way to know when chicken, turkey, or beef is actually done.
-
Whisk: Tahini sauces behave better when they’re whisked, not stirred lazily with a spoon.
-
Parchment paper or foil: Makes cleanup easier and helps delicate items release from the pan.
-
Airtight storage containers: Keep sauces, chopped vegetables, and cooked proteins separate for better leftovers.
Smart Shopping and Ingredient Tips
Pita bread makes or breaks these dinners, and the bread aisle can be a little deceptive. Choose pita that feels pliable, not brittle. Pocket pita works well for stuffing, while pocketless or thicker pita is better for folding around saucy fillings. If the bread seems dry, don’t give up on it; a quick warm-up in foil or a skillet can bring it back.
For proteins, cut matters more than most people think. Chicken thighs stay juicy and handle bold spices better than breasts. Salmon should look moist and smell clean, not fishy. Ground turkey needs either a little binder or a little fat so it doesn’t turn crumbly, and ground beef or lamb should have enough fat to brown instead of dry out.
The same rule applies to sauces. Thick Greek yogurt gives you a sturdier tzatziki or lemon sauce than thinner yogurt. Tahini should smell nutty and clean, not stale or bitter. Hummus can be homemade or store-bought, but if you buy it, check the texture; a dry, gummy tub makes the whole pita feel flat.
Vegetables matter more than people expect because they bring the cold, crunchy parts that keep each bite alive. Cucumbers should be firm. Tomatoes should be ripe but not watery. Red onions can be sliced thin and soaked in lemon juice or vinegar for a few minutes if you want them softer. Chickpeas are easy to buy canned, but rinse them well and dry them carefully before roasting if you want crisp edges.
How to Serve These Recipes
Presentation: Warm the pita first, then fill it loosely instead of packing it tight. A little spilling at the edges is fine; it makes the meal look generous and keeps the bread from tearing. Finish with herbs, a few crumbles of feta, or a drizzle of sauce on top so the filling looks intentional rather than stuffed at random.
Accompaniments: A simple cucumber salad, lemon rice, roasted potatoes, or even a handful of olives can round out the plate without stealing time. If the pita is already loaded with vegetables, keep the side dish plain and crisp. A tomato soup or lentil soup also works when you want something cozier.
Portions: Plan on 1 large pita per person for the heartier fillings and 1 1/2 smaller pita rounds for lighter vegetarian versions. If you’re feeding a mixed group, set the fillings out separately and let everyone build their own. That makes scaling easier and helps avoid waste.
Beverage Pairing: Sparkling water with lemon, mint tea, or a crisp white wine all sit nicely beside these dinners. For the richer chicken or kofta versions, I like something cold and plain; for the vegetarian fillings, a citrusy drink keeps the whole meal bright.
Additional Tips and Flavor Boosters
Flavor Enhancement: A spoonful of quick-pickled onions, a sprinkle of sumac, or a squeeze of lemon right at the end changes the whole sandwich. Pita fillings almost always benefit from one sharp, fresh note.
Customization: Add sliced avocado, chopped olives, roasted peppers, or shredded cabbage depending on what’s in the fridge. These dinners aren’t delicate, so they can take a few extra layers without losing their shape.
Serving Suggestions: Cut the pita in half if you’re serving kids or using smaller rounds. Put extra sauce in a bowl on the side. A few sesame seeds, chopped herbs, or a drizzle of olive oil over the top makes the plate look finished without much effort.
Make-It-Yours: For dairy-free eating, tahini sauces do most of the work. For gluten-free needs, serve the fillings in lettuce cups or over rice. For mild palates, hold back the hot sauce and chili flakes, then let people add them at the table. That keeps one dinner useful for the whole table instead of splitting it into separate meals.
Make-Ahead, Storage, and Reheating Guidance
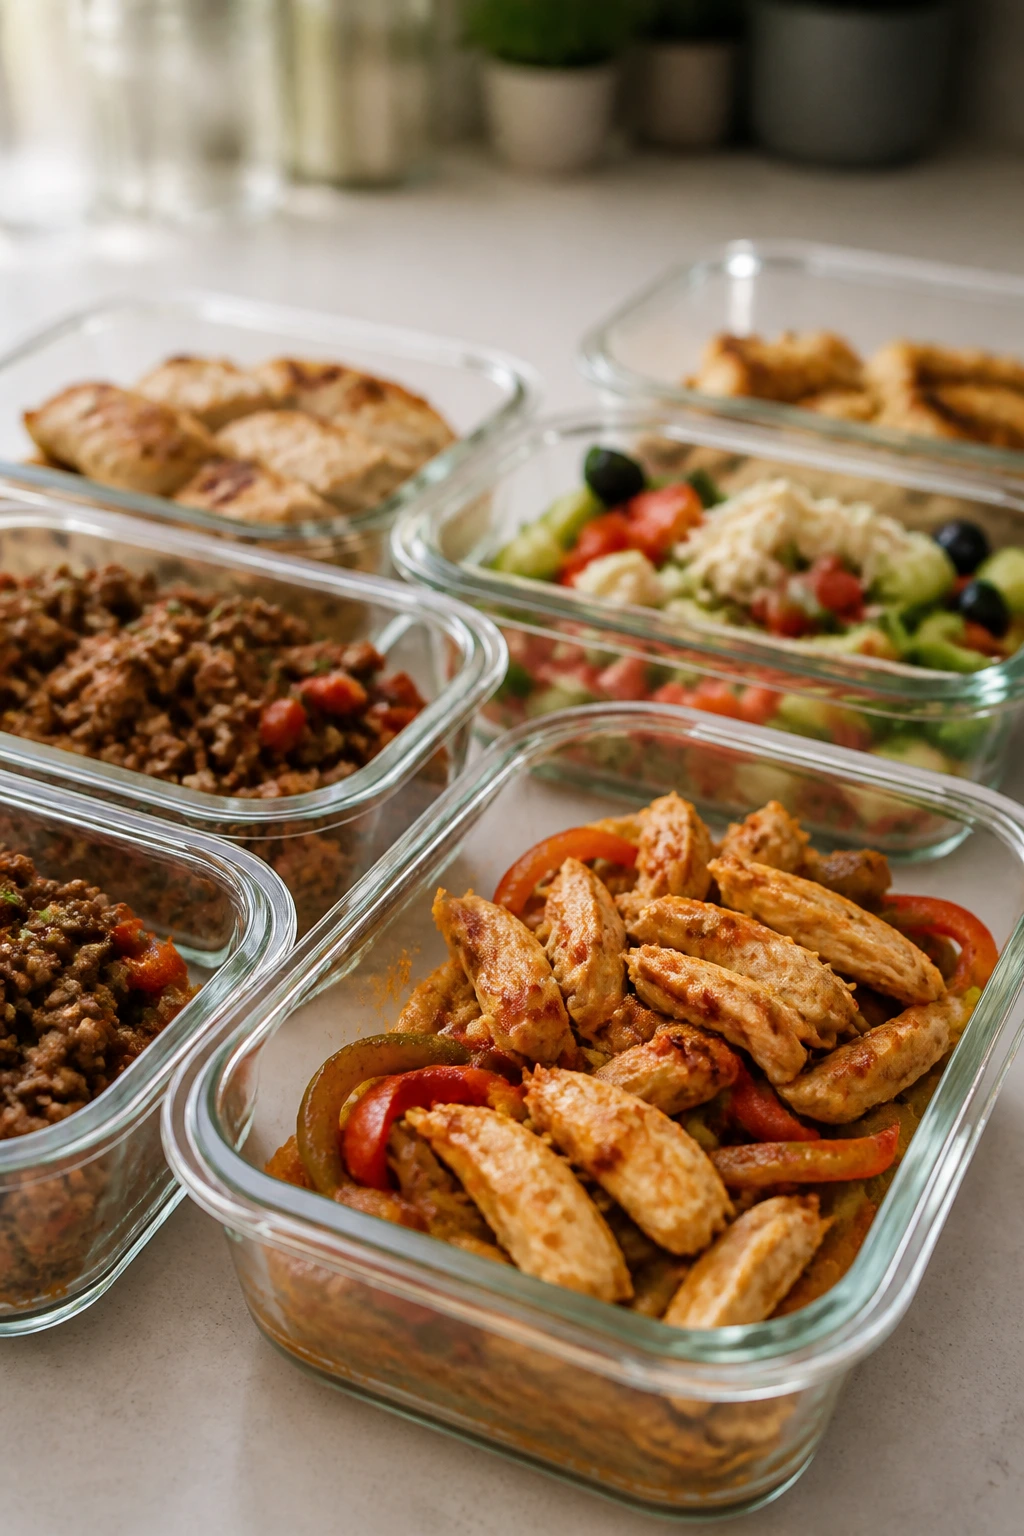
Most of these pita dinners are better when the components are stored separately. Cooked chicken, turkey meatballs, beef kofta, buffalo chicken, roasted vegetables, and chickpeas keep for 3 to 4 days in the refrigerator in airtight containers. Salmon is the exception; it tastes best within 2 days, and it’s one of the few fillings I would not freeze if I could avoid it. Tahini sauce, yogurt sauce, and tzatziki keep for 3 to 4 days refrigerated as well, though tzatziki will loosen a little as the cucumber releases water.
Freezing works best for cooked proteins. Chicken, meatballs, kofta, and buffalo chicken freeze well for up to 2 months if wrapped tightly and stored flat. Falafel can also be frozen after baking, though the texture is best when reheated in the oven rather than the microwave. Pita bread freezes well for up to 2 months, too. Separate each round with parchment if you’re stacking them, then thaw at room temperature or warm from frozen in foil.
For reheating, use the method that protects texture. A skillet over medium heat is the easiest way to rewarm pita bread for 20 to 30 seconds per side. Cooked chicken, meatballs, kofta, and buffalo chicken reheat well in a 325°F oven for 8 to 12 minutes, covered loosely with foil so they don’t dry out. A microwave works in a pinch, but use short bursts and cover the food with a damp paper towel. Sauces should be added after reheating, not before, or they’ll break and make the filling soggy. Halloumi is the one filling that really wants to be cooked fresh; if it sits too long, it gets rubbery.
Variations and Adaptations to Try
Lettuce-Cup Pitas: If you want something lighter or need a gluten-free option, spoon the fillings into romaine leaves or cabbage cups instead of pita. The same chicken, kofta, or chickpea mixtures work fine this way, and the crunch can be a nice change.
Tahini-Only Dinner Night: Skip yogurt sauces and use tahini-lemon-garlic sauce across the board. It works with chicken, falafel, vegetables, and halloumi, and it’s the easiest route if you’re cooking for someone who avoids dairy.
Mild Family Version: Pull back on hot sauce, garlic, and black pepper, then keep a stronger sauce on the table for adults. This is especially useful for buffalo chicken and shawarma, where the base flavor stays good even when the heat comes down.
Pantry-First Pitas: Canned chickpeas, jarred pickles, store-bought hummus, rotisserie chicken, and packaged falafel can carry an entire week of dinners. The point is not to cook everything from scratch; the point is to keep the meal moving.
Extra-Herb Finish: Add dill, parsley, mint, or cilantro to the fillings right before serving. Herbs change the whole character of the pita and make even a simple sandwich taste more awake.
Common Mistakes to Avoid
-
Overstuffing the pita: The seam tears, the filling spills, and dinner gets messy in a frustrating way instead of a fun way. Keep the filling generous but leave room at the top so the bread can fold.
-
Skipping the warm-up: Cold pita cracks the second you fold it. Warm it in a dry skillet or wrapped in foil until it bends easily.
-
Using wet vegetables without draining them: Tomatoes and cucumbers can flood the bread if you dice them and dump them straight in. Let them sit in a colander for a few minutes or blot them dry.
-
Overcooking lean proteins: Turkey, salmon, and chicken breasts dry out quickly. Use a thermometer, pull them a touch early, and let carryover heat finish the job.
-
Adding sauce too early: Sauces can soften the pita and mute the textures that make these dinners work. Put most of the sauce inside at the last minute and serve extra on the side.
Frequently Asked Questions
Can I use naan or flatbread instead of pita?
Yes. Naan is softer and a little richer, so it works well for saucy fillings like buffalo chicken or halloumi. Thin flatbread is better if you want a wrap-style dinner rather than a stuffed pocket.
How do I keep pita from tearing?
Warm it first, don’t overfill it, and keep especially wet ingredients away from the seam. A layer of hummus, yogurt sauce, or greens helps create a barrier between the bread and the juicier parts of the filling.
Which fillings hold up best for lunch boxes?
Chicken shawarma, turkey meatballs, chickpeas, beef kofta, and roasted vegetables hold up well because they stay tasty at room temperature for a little while. Pack sauces separately and assemble right before eating if you can.
Can these be made vegetarian or vegan?
Yes. Chickpea, falafel, and roasted vegetable pitas already fit that lane, and the chicken or meat versions can be swapped for marinated tofu, tempeh, or extra chickpeas. Tahini sauce is the easiest dairy-free finishing sauce to use across the board.
What’s the best way to keep pita from getting soggy?
Use thicker fillings as the base, like hummus or shredded greens, and drain juicy vegetables before they go in. If you’re packing lunch or serving a crowd, keep the sauce separate until the last possible minute.
Can I freeze the fillings?
Cooked chicken, turkey meatballs, beef kofta, buffalo chicken, and baked falafel freeze well. Salmon and fresh vegetable fillings do not freeze as nicely, so keep those for the fridge instead.
How much filling should go into each pita?
Enough to make it satisfying, not so much that the bread splits. For a large pita, 1/2 to 3/4 cup of filling plus a few spoonfuls of sauce is usually the sweet spot.
What if my tahini sauce gets too thick or grainy?
Keep whisking and add warm water one teaspoon at a time. Tahini often thickens before it loosens, so patience helps. A little lemon juice at the end brightens the flavor and smooths the texture.
The Weeknight Habit That Sticks
Pita dinners work because they’re flexible without feeling random. A good filling, a sharp sauce, a handful of vegetables, warm bread. That’s enough structure to make dinner feel complete, and enough looseness to keep you from resenting the process.
The nicest part is how easily they adapt to the contents of the fridge. One night it’s shawarma chicken, another night chickpeas and hummus, and the next night might be halloumi with roasted peppers because the cheese drawer is finally looking useful. Keep pita on hand, keep one sauce in the fridge, and dinner gets easier in a way that actually lasts.
Recipe Collection Quick Reference Table
| Recipe | Prep Time | Cook Time | Total Time | Servings | Standout Detail |
|---|---|---|---|---|---|
| Chicken Shawarma Pitas with Cool Yogurt Sauce | 20 minutes | 15 minutes | 35 minutes | 4 | Smoky-spiced chicken with cool yogurt |
| Crispy Chickpea and Hummus Pitas | 15 minutes | 25 minutes | 40 minutes | 4 | Crunchy chickpeas and creamy hummus |
| Greek Turkey Meatball Pitas with Tzatziki | 20 minutes | 15 minutes | 35 minutes | 4 | Meal-prep friendly meatballs |
| Salmon Pitas with Lemon-Dill Yogurt | 15 minutes | 12 minutes | 27 minutes | 4 | Fast fish dinner with bright herbs |
| Oven-Falafel Pitas with Pickled Onions | 15 minutes | 18 minutes | 33 minutes | 4 | Crisp falafel with sharp tahini |
| Buffalo Chicken Slaw Pitas | 15 minutes | 10 minutes | 25 minutes | 4 | Best use for leftover chicken |
| Beef Kofta Pitas with Tomato Relish | 20 minutes | 12 minutes | 32 minutes | 4 | Charred spiced meat with fresh relish |
| Halloumi and Roasted Vegetable Pitas with Tahini | 15 minutes | 20 minutes | 35 minutes | 4 | Salty halloumi and caramelized vegetables |