
The smell hits first. Beef warming over hot metal, a little smoke from the grates, the faint sweetness of a bun toasting nearby, and that low, steady sizzle that tells you the grill is doing its job. A good grilled hamburger has a very specific kind of appeal: it looks plain at the start, then the first bite gives you a seared edge, a juicy center, and a bun that isn’t falling apart in your hands.
Too many burger recipes get fussy at exactly the wrong moment. They add crumbs, eggs, minced onions, sauces, and all sorts of extras that turn a burger into a dense meat puck wearing a burger costume. I prefer a backyard burger that tastes like beef first. Salt. Pepper. Hot grill. Good buns. That’s the whole thesis, and it works because each part has a job instead of five jobs at once.
There’s a reason grilled hamburgers show up at cookouts, block parties, and backyard gatherings more often than almost anything else. They cook fast, feed a crowd without drama, and forgive a little chaos if you keep the heat honest and the patties cold. The trick is not adding more. It’s knowing exactly where to stop.
Why These Grilled Hamburgers Belong at a Backyard Cookout
- Short ingredient list: Six or seven good ingredients beat a crowded mixing bowl every time, especially when the grill is already hot and people are hovering near the cooler.
- Juicy without tricks: 80/20 ground chuck gives you enough fat to keep the center moist while the outside develops browned, crisp edges.
- Fast enough for a crowd: A batch of burgers can be grilled, rested, and on buns in about 30 minutes if the patties are shaped before the fire is fully ready.
- Easy to scale: You can double the patties without changing the method, as long as you leave a little room between them on the grate.
- Flexible on toppings: The base burger stays steady while the toppings shift from classic ketchup-and-pickle to a full picnic spread with onions, tomatoes, and cheese.
- Cookout-friendly timing: Burgers finish fast, so you don’t end up juggling a dozen covered dishes while the main course goes cold.
What Makes a Burger Taste Like It Came Off the Grill, Not a Frying Pan
A backyard burger has a job a skillet burger doesn’t. It has to stand up to flame, smoke, wind, and the kind of outdoor eating where somebody hands you a paper plate and the napkins are all the way across the yard. That means the burger has to be built for heat and speed, not for a long, careful braise of anything. The better burgers are almost stubborn about it. They don’t need help from breadcrumbs or eggs or chopped vegetables to hold together.
I’m opinionated on this point: the leaner the beef, the more you have to manage the cook, and the less forgiving the burger becomes. Ground chuck, with its 80/20 fat ratio, is the sweet spot for most grills because the fat renders as the patty cooks. That rendered fat is what keeps the middle from tasting like sawdust when the outside has already picked up its browned crust. You can make a burger from leaner beef, sure, but then you’re spending the whole cook trying to protect it from itself.
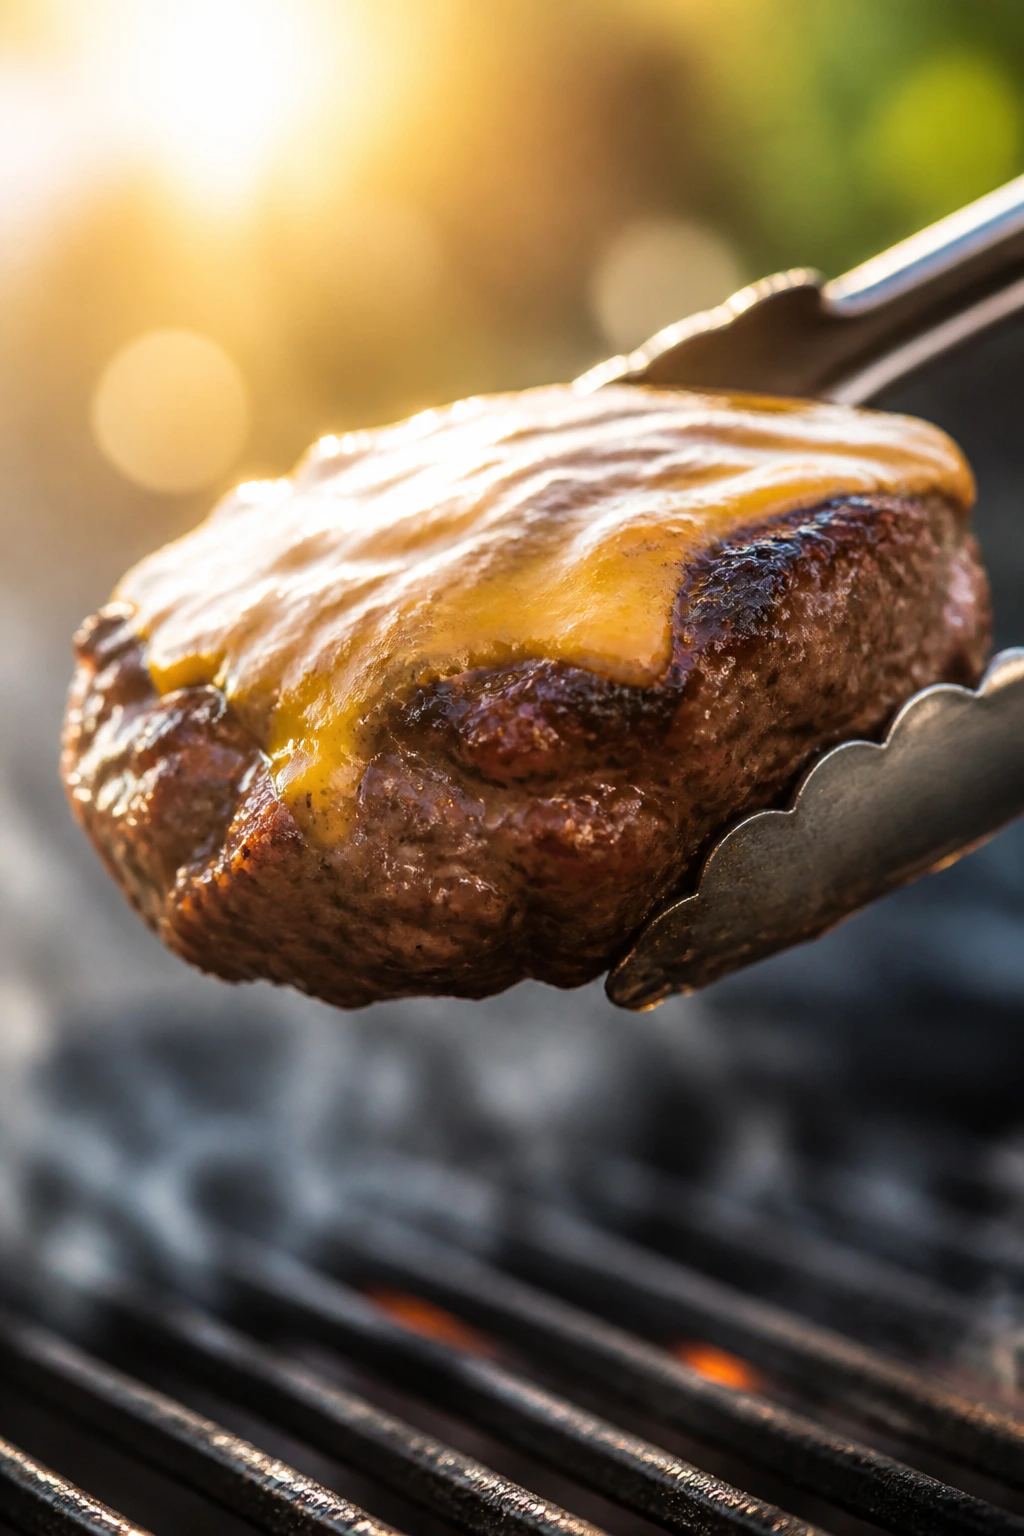
The grill also changes the texture in a way a pan can’t quite copy. Direct heat gives you those tiny charred spots where the meat touches the bars, and those little dark patches matter. They’re not decoration. They’re flavor. A burger that comes off a hot grate tastes more open and more savory than one that’s been steamed in its own moisture.
And there’s another practical detail people miss: a grilled burger needs to be handled less than a loaf of bread dough. Form it gently. Season it at the last second. Leave it alone once it hits the grate. That restraint is what makes the meat taste like meat.
Cookout Timing and Yield
Yield: 6 burgers
Prep Time: 20 minutes
Cook Time: 10 to 12 minutes
Total Time: 30 to 32 minutes
Difficulty: Beginner — the steps are simple, but the grill temperature and a thermometer matter.
Best Served: Right off the grill, after a brief rest and while the buns still have a little warmth and stretch.
A six-burger batch is a sweet spot for a normal backyard grill. It gives you enough food for a family or a small group without forcing you to crowd the grates. If your grill is small, cook four at a time and keep the finished patties on a warm tray, loosely tented with foil. Don’t stack them. The bottom ones will steam and lose that edge you worked for.
The timing gets easier if you split the work. Shape the patties while the grill heats, line up the toppings in little bowls, and set the buns nearby so they’re ready to toast the second the meat comes off. A burger is a fast cook, which means the messy part isn’t the grilling. It’s the last two minutes when everything happens at once.
If you’re feeding a bigger group, make the patties slightly smaller rather than thicker. A 5-ounce burger cooks more evenly than a big, thick mound, and it won’t leave you with a cold center and a black crust. That matters more than people think.
The Short Ingredient List
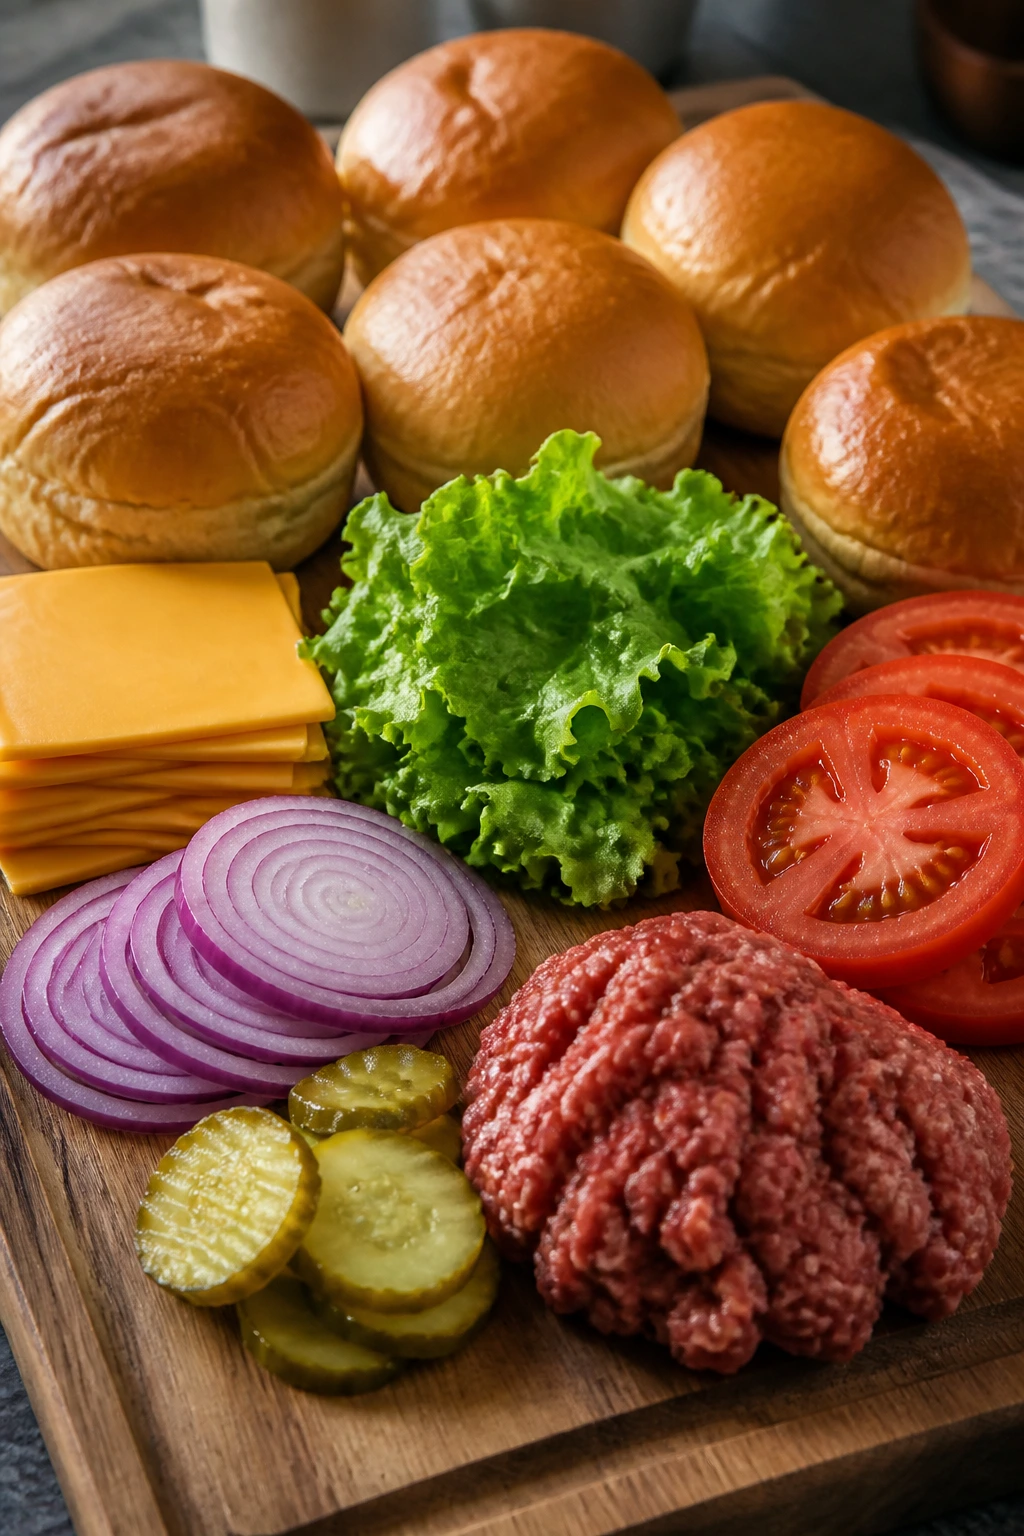
For the Burgers
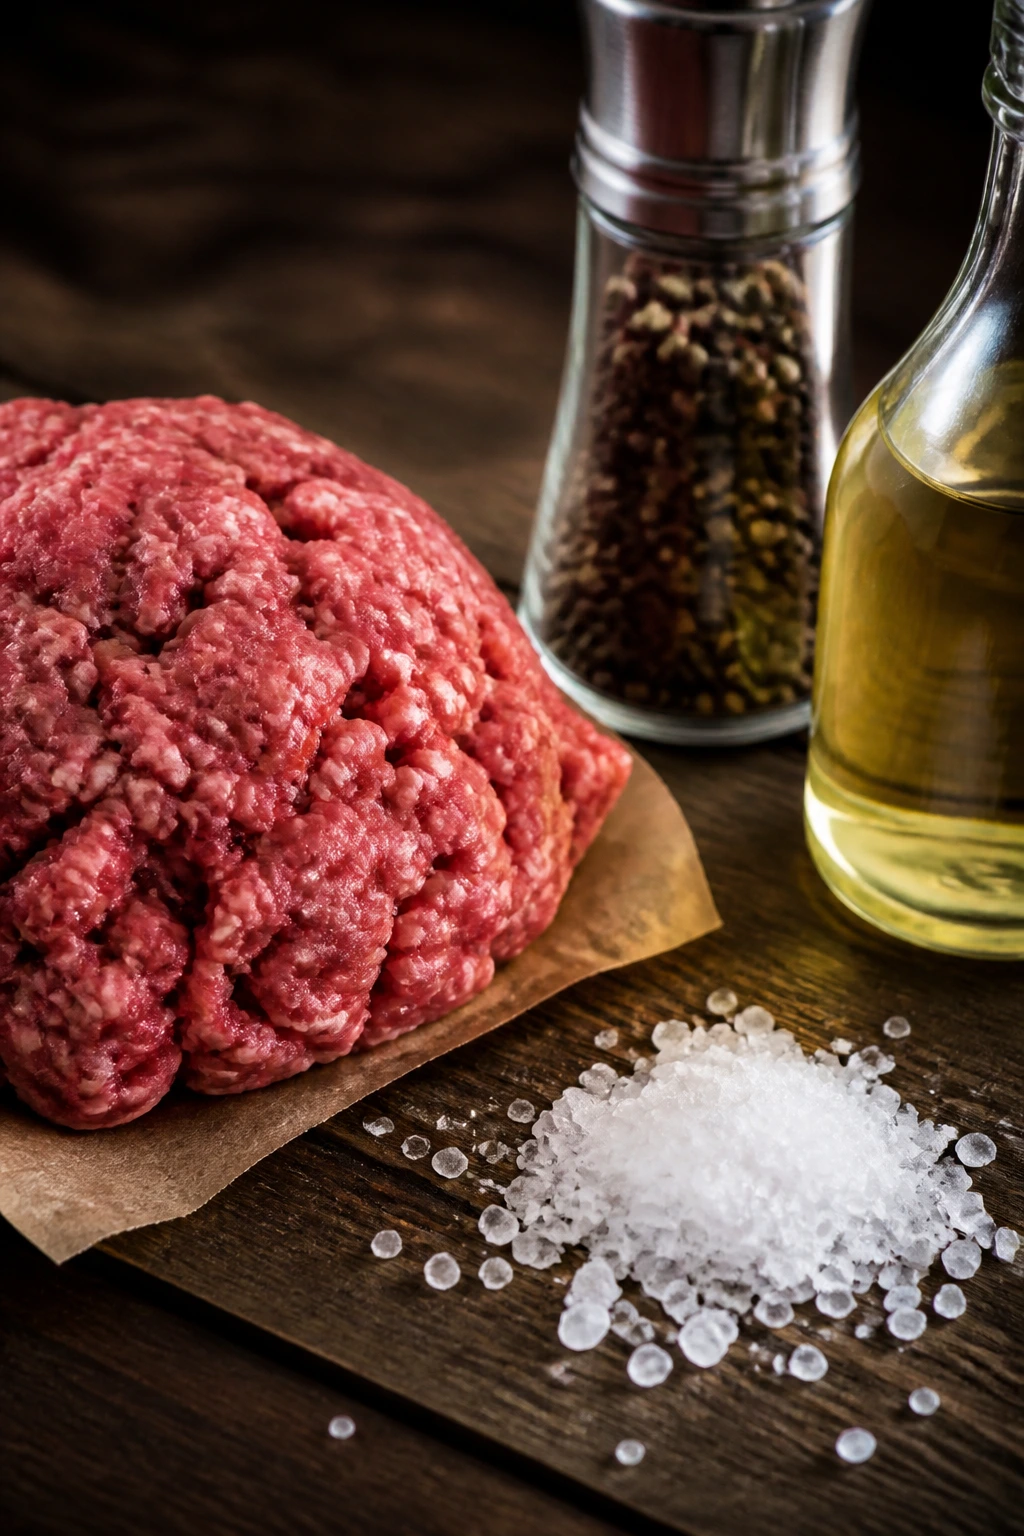
- 2 pounds ground chuck (80/20), kept cold
- 1 1/2 teaspoons kosher salt
- 1 teaspoon freshly ground black pepper
- 1 tablespoon neutral oil, for oiling the grill grates
For Assembly
- 6 hamburger buns, split
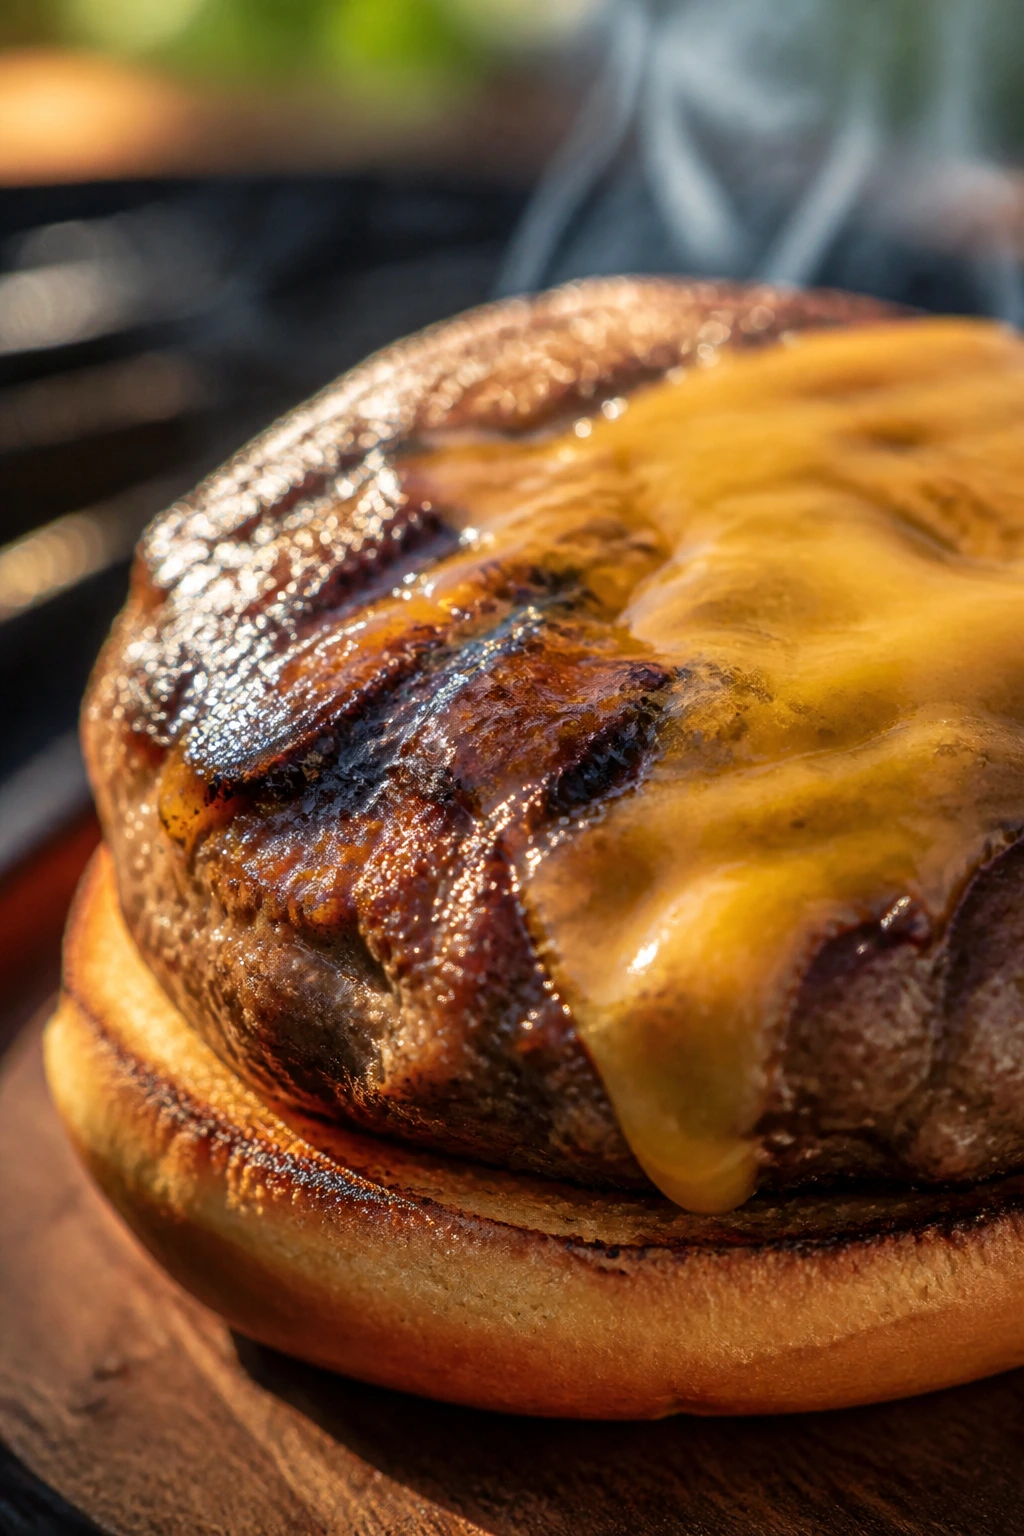
- 6 slices American cheese or sharp cheddar
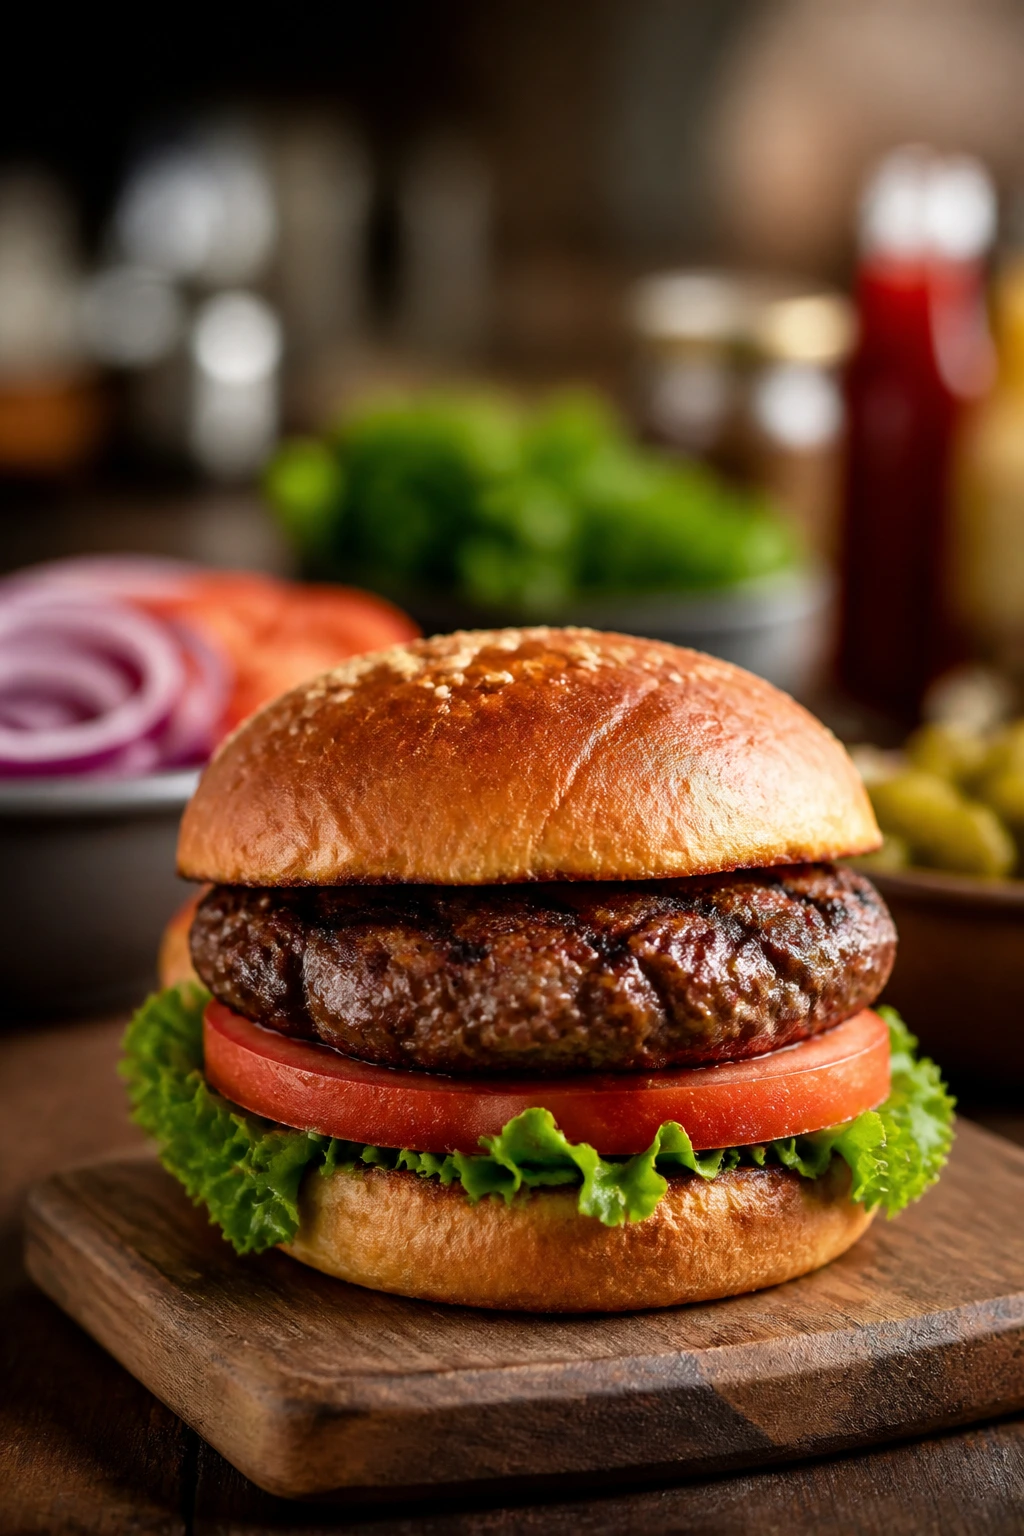
- 6 lettuce leaves
- 1 large tomato, sliced into 6 thick rounds
- 1 small red onion, thinly sliced
- 6 dill pickle slices or spears
- Ketchup, yellow mustard, and mayonnaise, for serving
Why Each Ingredient Matters
Main Protein
What to use: 2 pounds of 80/20 ground chuck, divided into 6 equal portions.
Preparation: Keep the meat cold until the last possible minute, then handle it with a light touch and shape it into patties just thick enough to hold together on the grill.
Substitutions: An 85/15 blend works if that’s what you can get, though the burgers will cook drier; a chuck-brisket blend gives you a little extra beefy flavor if your butcher carries it.
Tips: Make the patties a little wider than the buns because they shrink inward as the fat renders. That tiny oversize move saves you from a sad, narrow burger at the end.
Seasoning and Grill Prep
What to use: 1 1/2 teaspoons kosher salt, 1 teaspoon black pepper, and 1 tablespoon neutral oil for the grates.
Preparation: Measure the seasoning before you touch the meat so you’re not fumbling with a salty hand over a raw burger. Oil the hot grates right before the patties go on.
Substitutions: Fine sea salt works if that’s what lives in your kitchen, and avocado oil or canola oil both handle the heat well.
Tips: Seasoning belongs on the outside of the patty, not mixed into the meat. Once you start kneading salt through ground beef, the texture goes from loose and juicy to tight and springy.
Buns and Cheese
What to use: 6 hamburger buns and 6 slices of American cheese or sharp cheddar.
Preparation: Split the buns before the burgers are ready, and keep them covered so they don’t dry out while the grill does the hard part.
Substitutions: Potato buns are soft and a little richer, brioche buns bring extra sweetness, and sesame seed buns give the classic diner look. Swiss or provolone can replace cheddar if you want a milder melt.
Tips: American cheese melts into a smooth blanket at the exact moment the patty is done. Cheddar has a sharper bite, but it needs a minute longer under the lid to soften fully.
Toppings and Condiments
What to use: Lettuce, tomato, red onion, pickles, ketchup, mustard, and mayonnaise.
Preparation: Dry the lettuce after washing, slice the tomato thick enough to stay intact, and cut the onion thin so it doesn’t shove the burger apart in the first bite.
Substitutions: Iceberg lettuce gives the cold crunch most people want; romaine is sturdier; pickled onions can stand in for raw onion if you like a little tang.
Tips: The toppings should cool and brighten the burger, not bury it. If your tomato is weak and pale, salt the slices lightly 5 minutes before serving and let them sit on paper towels.
Equipment for the Grill and the Table
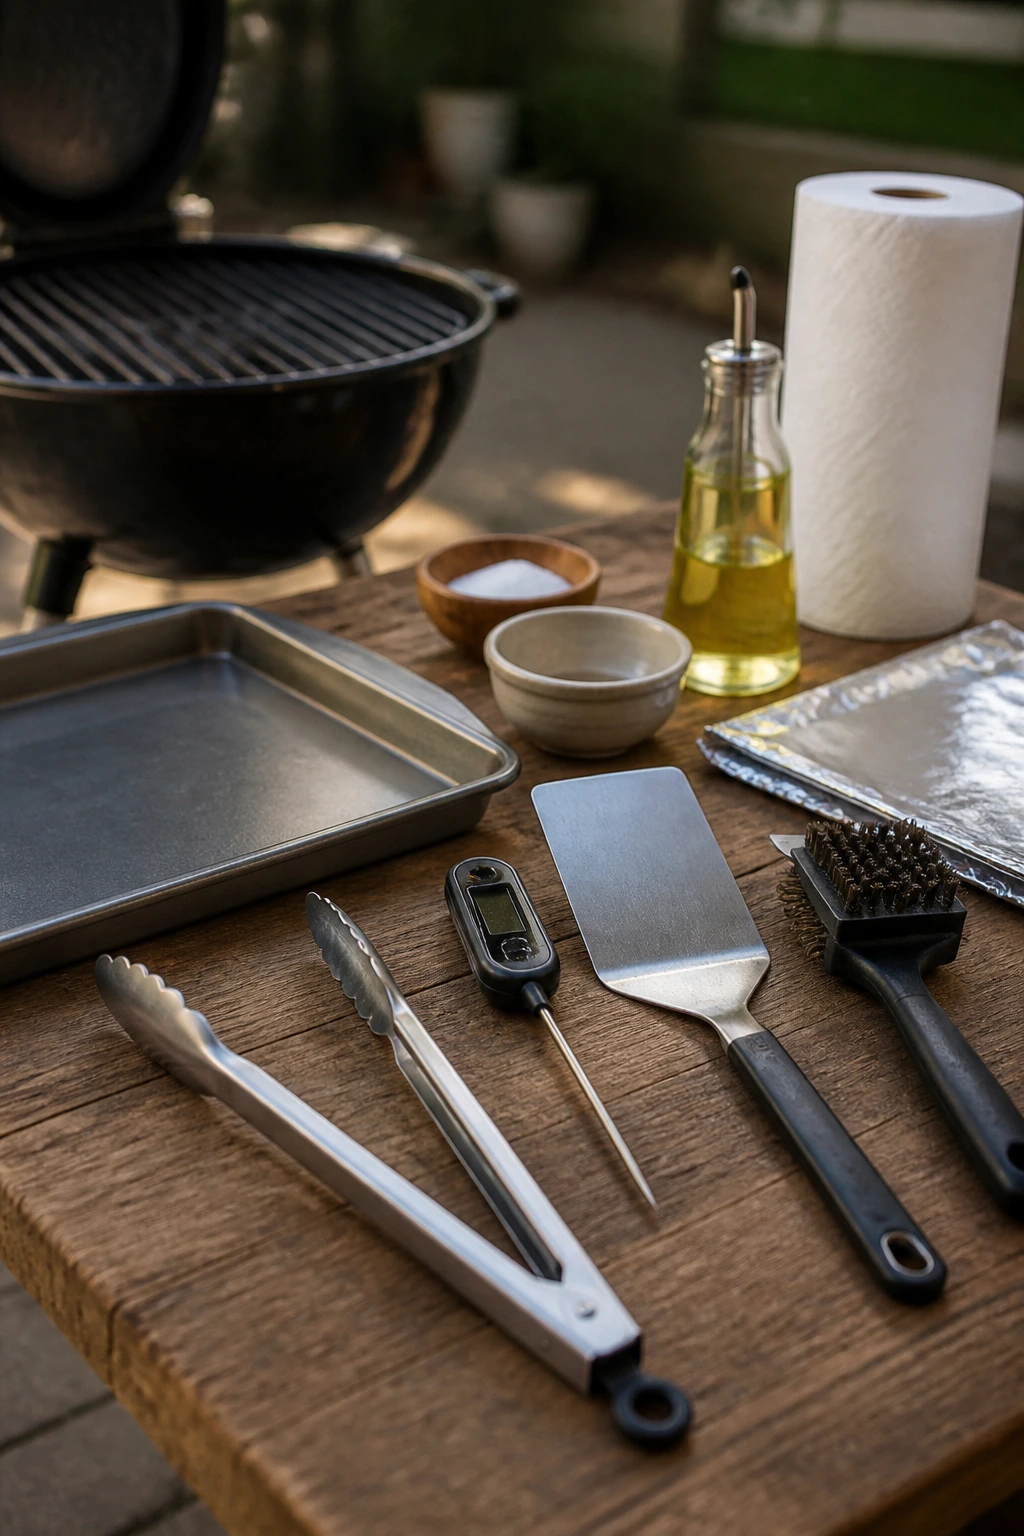
- Gas grill or charcoal kettle grill — Either one works; you want a hot direct zone and enough room to move patties if flare-ups start.
- Long-handled tongs — Better than a fork, because a fork punches holes in the meat and leaks juice you don’t get back.
- Instant-read thermometer — The one tool I’d call non-negotiable for burgers.
- Wide metal spatula — Useful for turning and transferring patties, especially if one catches a little and needs a careful lift.
- Grill brush or scraper — Clean grates help burgers release instead of welding themselves to old char.
- Sheet pan or platter — For carrying raw patties out and holding finished burgers for the brief rest.
- Small bowls — Handy for toppings, condiments, and sliced onions so the table doesn’t turn into a sprawl.
- Paper towels and neutral oil — For greasing the grates without leaving a greasy puddle.
- Aluminum foil — Optional, but useful for a loose tent if you’re grilling in batches.
The Grill Method, Step by Step
Prep the Heat and the Toppings
- Preheat a gas grill to medium-high heat, about 450°F to 500°F, for 10 to 15 minutes. If you’re using charcoal, wait until the coals are covered in gray ash and glowing hot.
- Clean the grates with a brush, then oil them lightly with a paper towel dipped in neutral oil and held with long tongs. Hot, clean grates make sticking far less likely.
- Set out the buns, lettuce, tomato, onion, pickles, and condiments before the meat goes on. Burgers cook fast. You do not want to be slicing tomatoes while the first side is already searing.
Shape the Patties
4. Divide the beef into 6 equal portions, about 5 1/3 ounces each, and shape them into loose patties about 3/4-inch thick. Press a shallow thumbprint into the center of each one to keep the middle from puffing up like a balloon.
5. Handle the meat gently. A burger should hold together, not feel packed. If you compress the meat too hard, the texture turns dense and bouncy.
Season and Grill
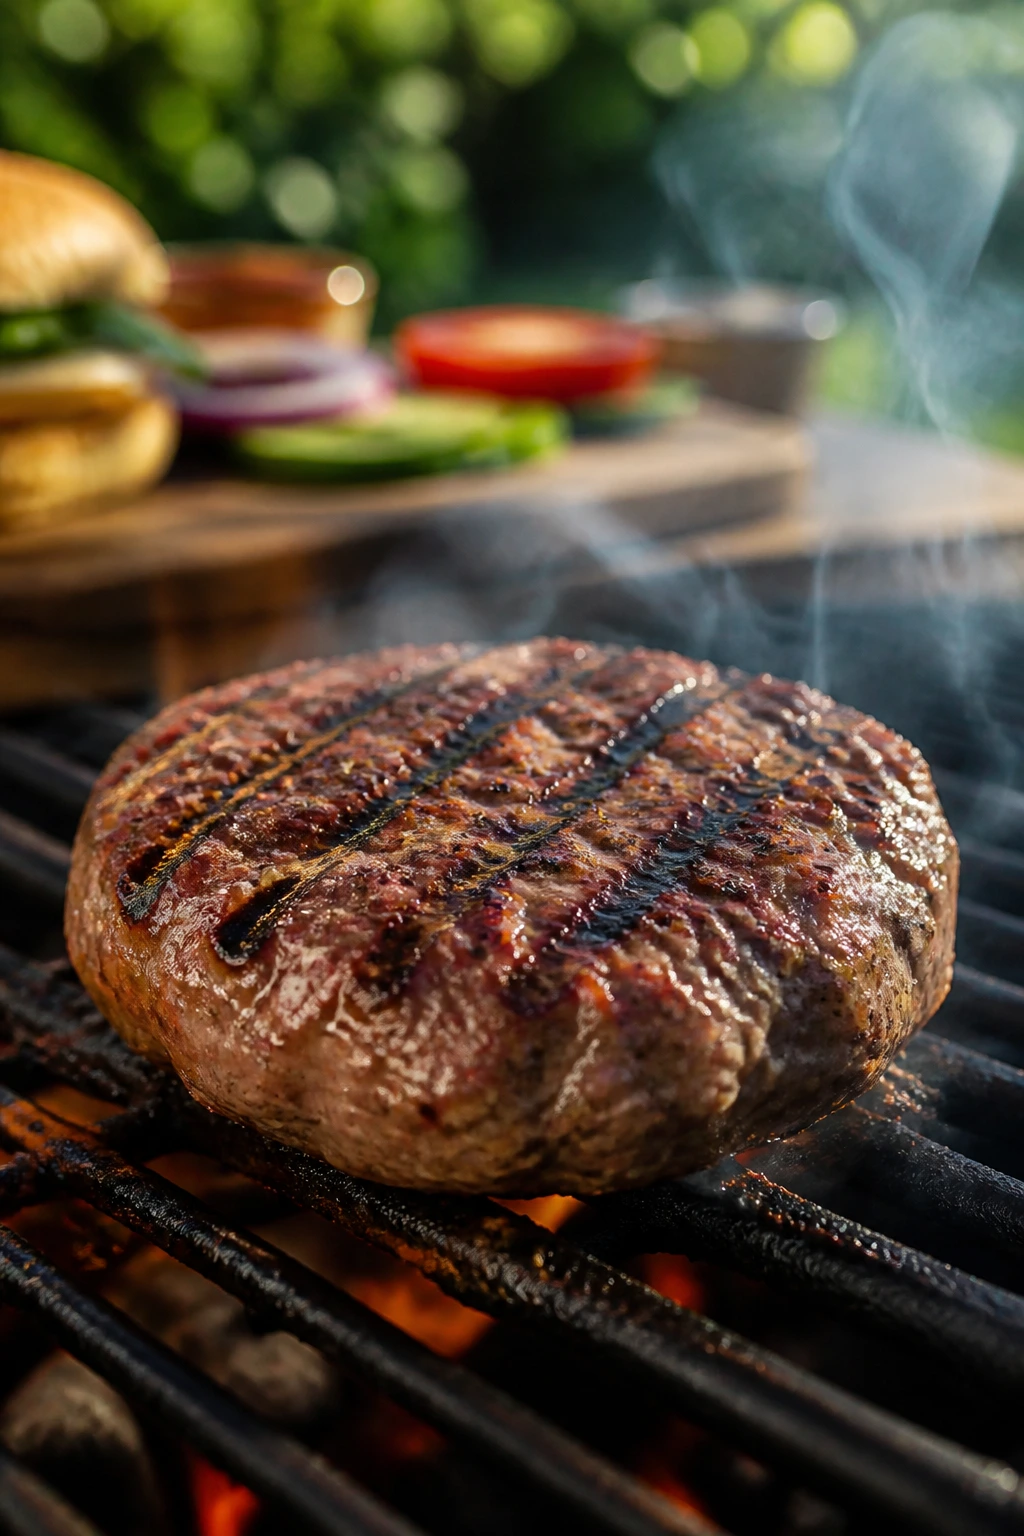
6. Sprinkle the patties with the salt and pepper on both sides just before they hit the grill. Set them directly over the hot zone.
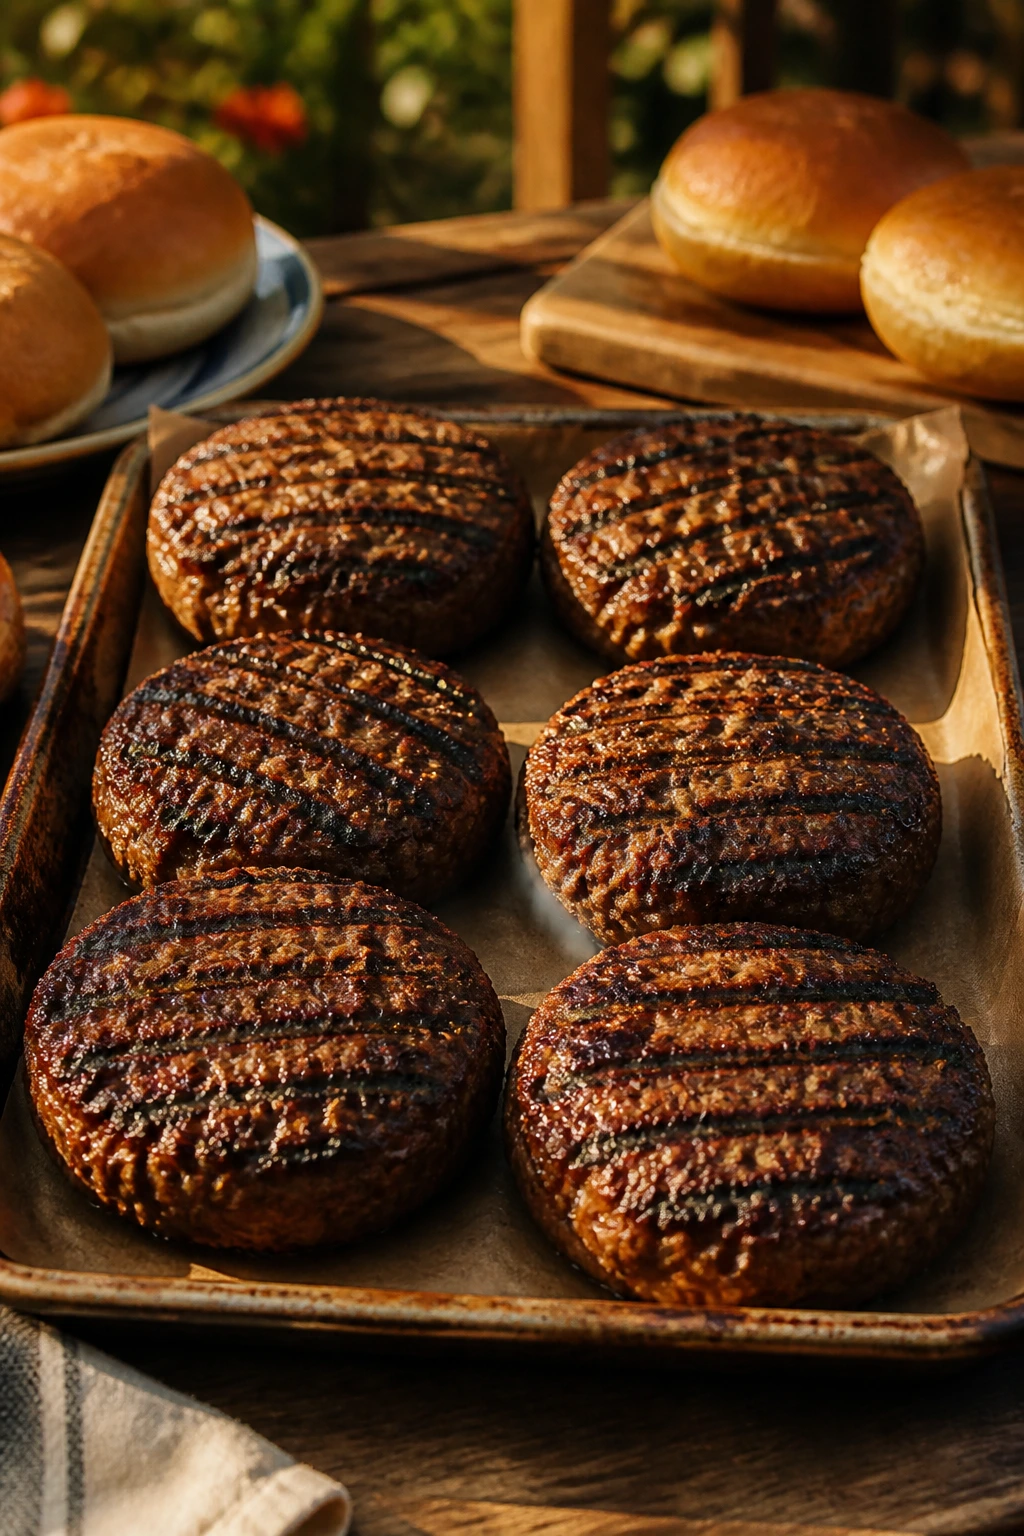
7. Grill the first side for 3 to 4 minutes without pressing them down. Wait until the burger releases from the grate on its own and shows browned edges before flipping. If it sticks, give it another 30 seconds.
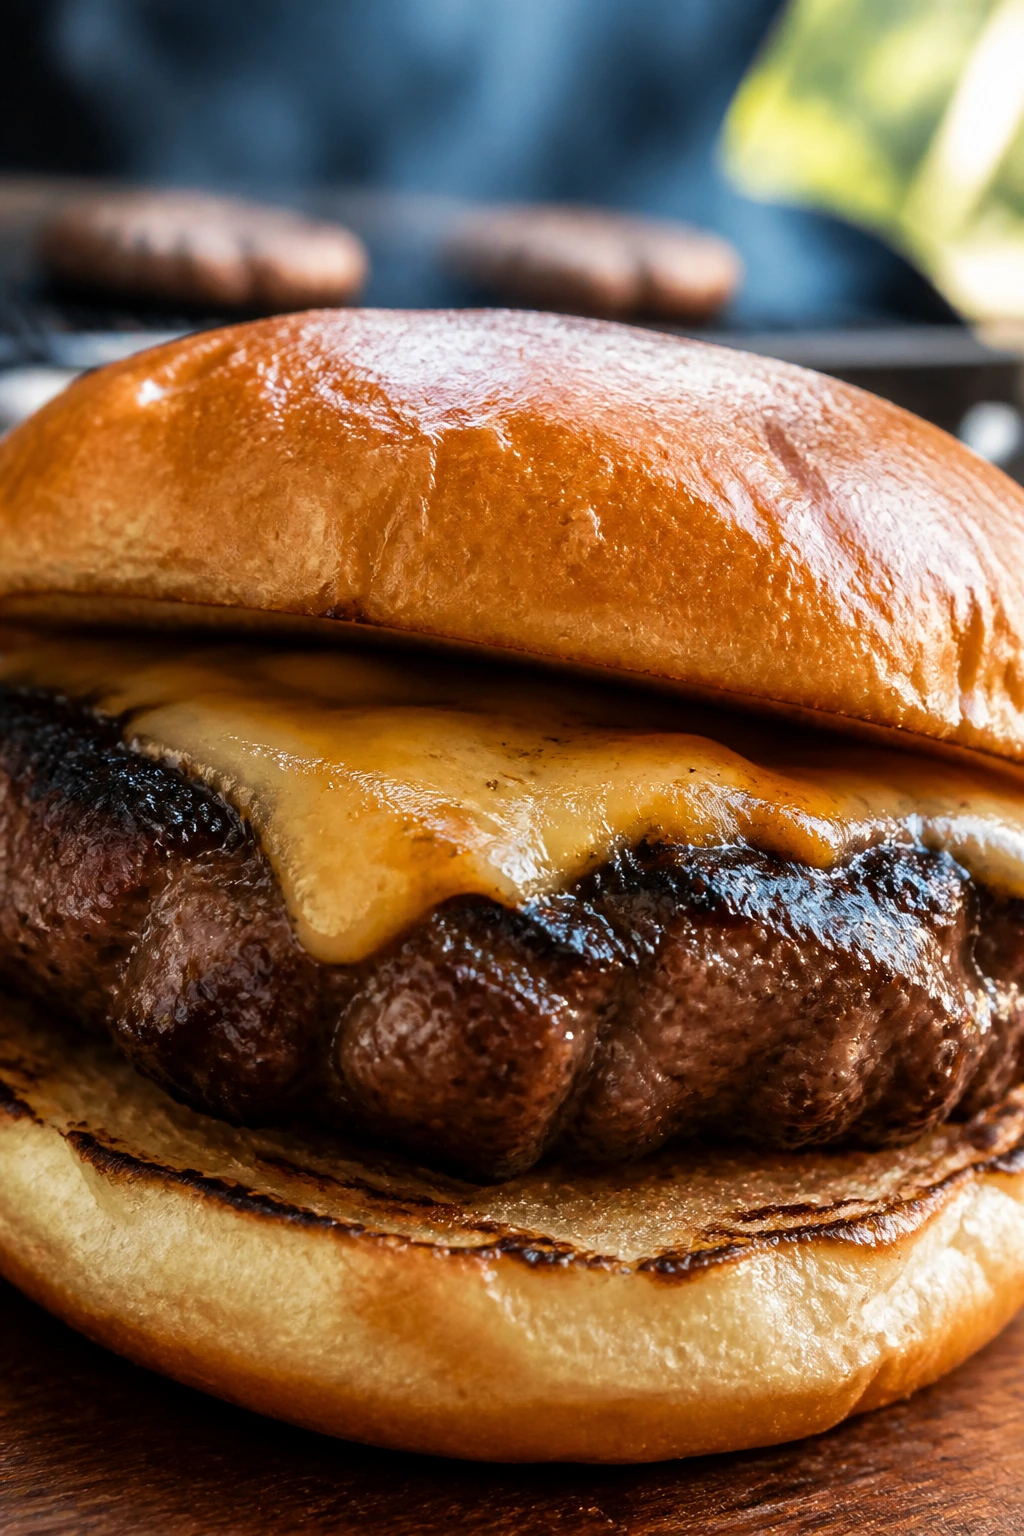
8. Flip once and grill the second side for 3 to 4 minutes more, until the internal temperature reads 155°F to 160°F at the center. Add the cheese during the last 45 to 60 seconds and close the lid so it melts. For ground beef, 160°F is the safe finish line.
Rest, Toast, and Assemble
9. Move the burgers to a clean platter and rest them for 3 minutes. The juices settle back in, and the cheese firms up just enough to stay put.
10. Toast the cut sides of the buns over the grill for 30 to 45 seconds, just until they show light color and a little crispness.
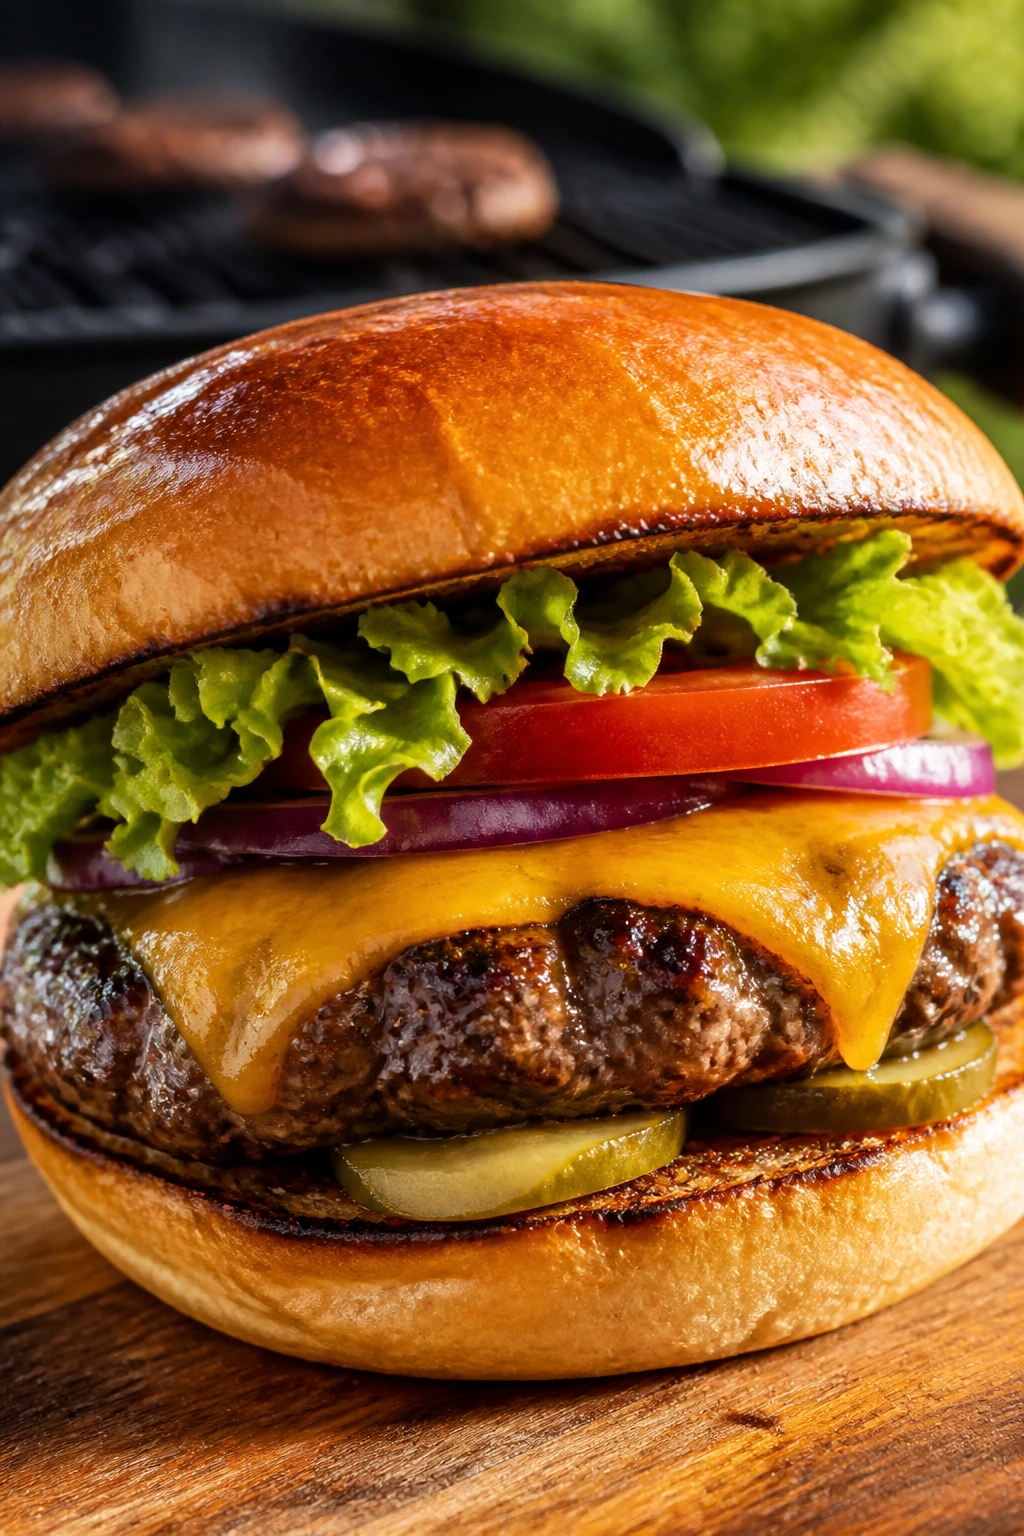
11. Build the burgers with condiments on both buns, then layer lettuce, tomato, onion, pickles, and the patty. Serve right away while the bottom bun still has some structure.
How to Serve Them
Presentation:
Stack the burgers on a platter lined with parchment or a clean kitchen towel so they don’t skid around the second they leave the grill. If you’re serving a crowd, keep the toppings in separate bowls and let people build their own. That one small choice keeps tomato slices from turning the buns soggy while you’re still fetching plates.
Accompaniments:
I like grilled hamburgers with potato salad, coleslaw, baked beans, corn on the cob, or a bowl of chips that somebody inevitably forgets to close. A crisp dill pickle on the side is not optional in my book. If you want something lighter, a vinegary cucumber salad or a simple lettuce salad with plenty of black pepper cuts through the richness nicely.
Portions:
One 6-ounce burger with a bun is a full serving for most adults. If the spread includes a few heavy sides, a smaller 4-ounce patty makes sense, especially for kids or for people who are more interested in the cake than the meat. I’d rather make slightly smaller burgers and serve seconds than make giant patties that cook unevenly.
Beverage Pairing:
A cold lager is the easy win here because it scrubs the fat from the palate without stealing the show. Iced tea with lemon, sparkling water, or a dry lemonade also works, especially if the toppings lean salty and sharp. For a nonalcoholic grill companion with a little more bite, root beer is a fun choice.
Extra Tips and Flavor Boosters
Flavor Enhancement:
Brush the cut sides of the buns with a thin smear of mayonnaise before toasting them. It browns faster than butter, and the flavor is mild enough that it disappears into the bun instead of fighting the beef. If you want more bite, add a few thin slices of dill pickle on top of the cheese while the burger rests; the heat softens them just enough.
Time-Saver:
Shape the patties on a parchment-lined tray while the grill preheats. If you’ve got a second pair of hands, one person can prep toppings while the other handles the meat, and that split shaves off the frantic part of cookout cooking. Burgers reward a clean little production line.
Texture Move:
Keep the meat cold and the seasoning on the outside. That’s the difference between a loose, tender burger and one that feels packed like a meatball. A 10-minute chill in the fridge before grilling helps if the kitchen is warm or the patties feel soft after shaping.
Make-It-Yours:
If you like heat, add pickled jalapeños or a little hot sauce to the finished burger rather than the meat. If you want a richer burger, swap the cheddar for American plus a spoonful of caramelized onions. And if you’re feeding people who want simple, let the beef and bun carry the whole thing; not every burger needs a costume.
Common Mistakes That Ruin Grilled Hamburgers
- Packing the meat too tightly. The burger turns springy and dense instead of tender. Shape it with a light hand and stop once the patty holds together.
- Putting the patties on a weak grill. If the grate isn’t hot, the meat steams and sticks. Wait for true medium-high heat, then oil the grates right before the burgers go on.
- Pressing the burger with a spatula. You’ll see juice run out in a little flood, and that juice is the part that keeps the burger from tasting dry. Leave the patty alone after it hits the fire.
- Seasoning too early. Salt left sitting on the surface can tighten the meat if it has time to draw moisture out before grilling. Season just before the patties go on.
- Cutting one open to check doneness. That leaks juice and ruins the look of the burger for the sake of curiosity. Use an instant-read thermometer and trust it.
- Building the burger before the bun is ready. A soft, untoasted bun gets soggy fast. Toasting takes half a minute and saves the whole sandwich.
Variations and Adaptations to Try
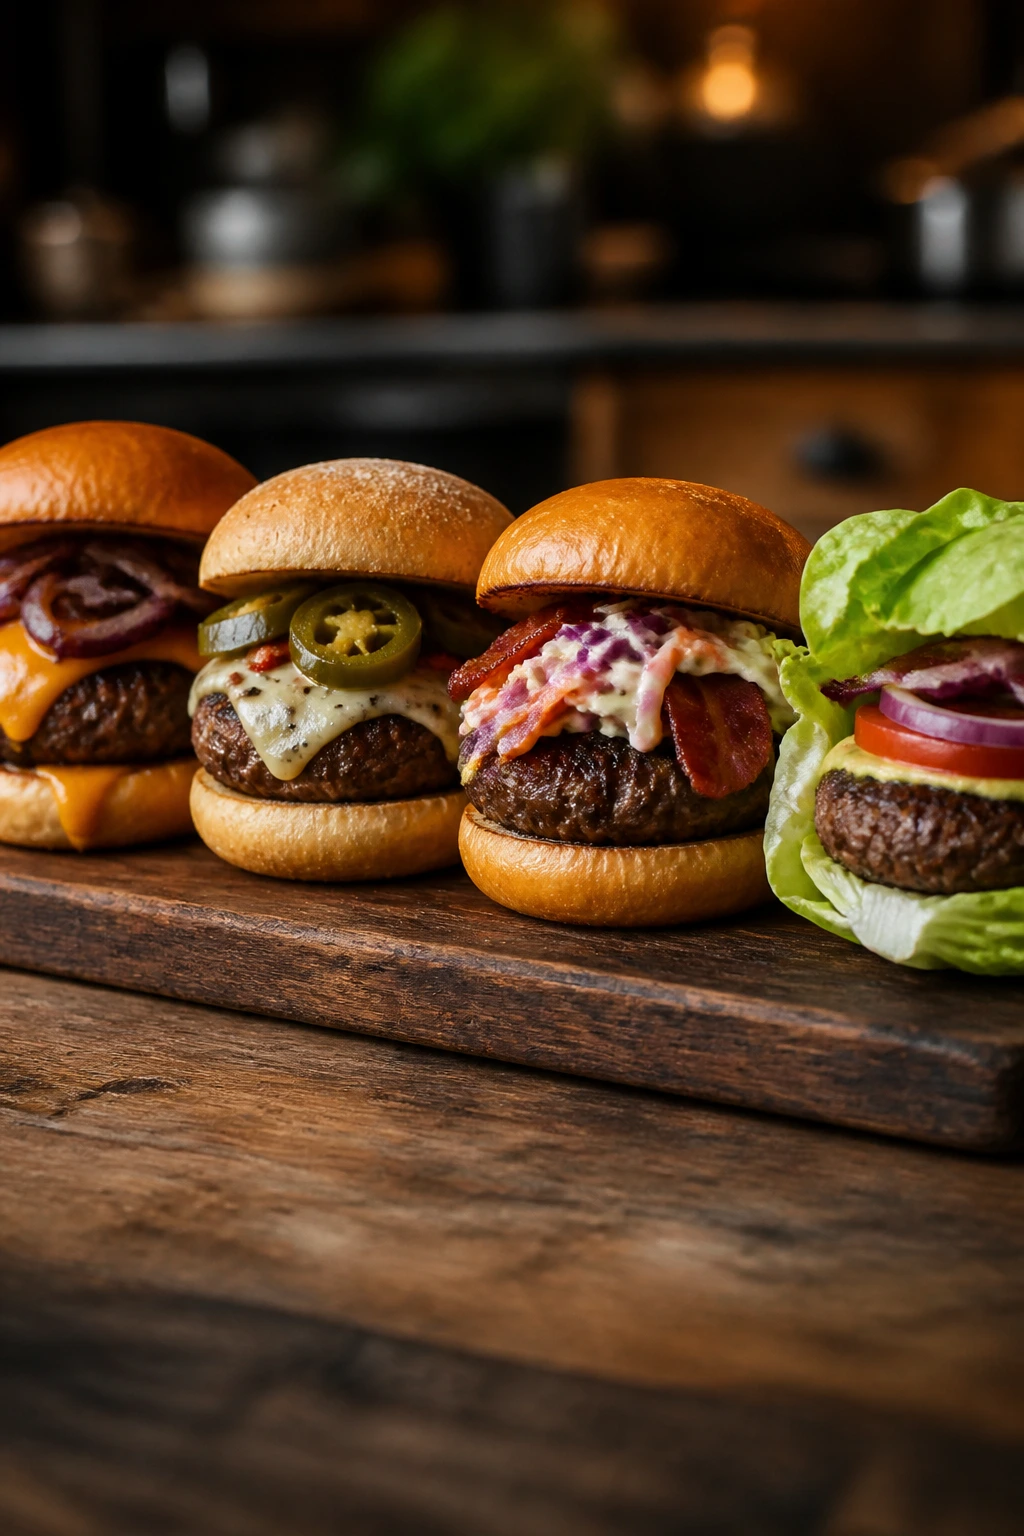
Smoky Cheddar Stack
Swap the American cheese for sharp cheddar and add a few grilled onion slices on top. The cheddar brings a firmer, saltier bite, and the onions add a sweet edge that feels right with charcoal smoke.
Classic Diner Burger
Use American cheese, shredded iceberg lettuce, thin onion, pickles, ketchup, and yellow mustard. It’s the cleanest version of the whole thing, and it tastes like the burger counter in the best way.
Pepper Jack Heat
Replace the cheese with pepper jack and top the finished burger with pickled jalapeños and a spoonful of mayo mixed with hot sauce. That gives you heat without making the beef itself taste crowded.
Bacon and Slaw Burger
Add crisp bacon and a small scoop of vinegar slaw. The slaw’s crunch and acidity cut the richness of the beef better than another heavy sauce ever could.
Lettuce-Wrapped Burger
Skip the bun and wrap the patty in large iceberg leaves or romaine hearts. It’s messier than a bun in a different way, but the cold crunch is nice when you want the burger flavor without the bread.
Make-Ahead, Storage, and Reheating Guidance
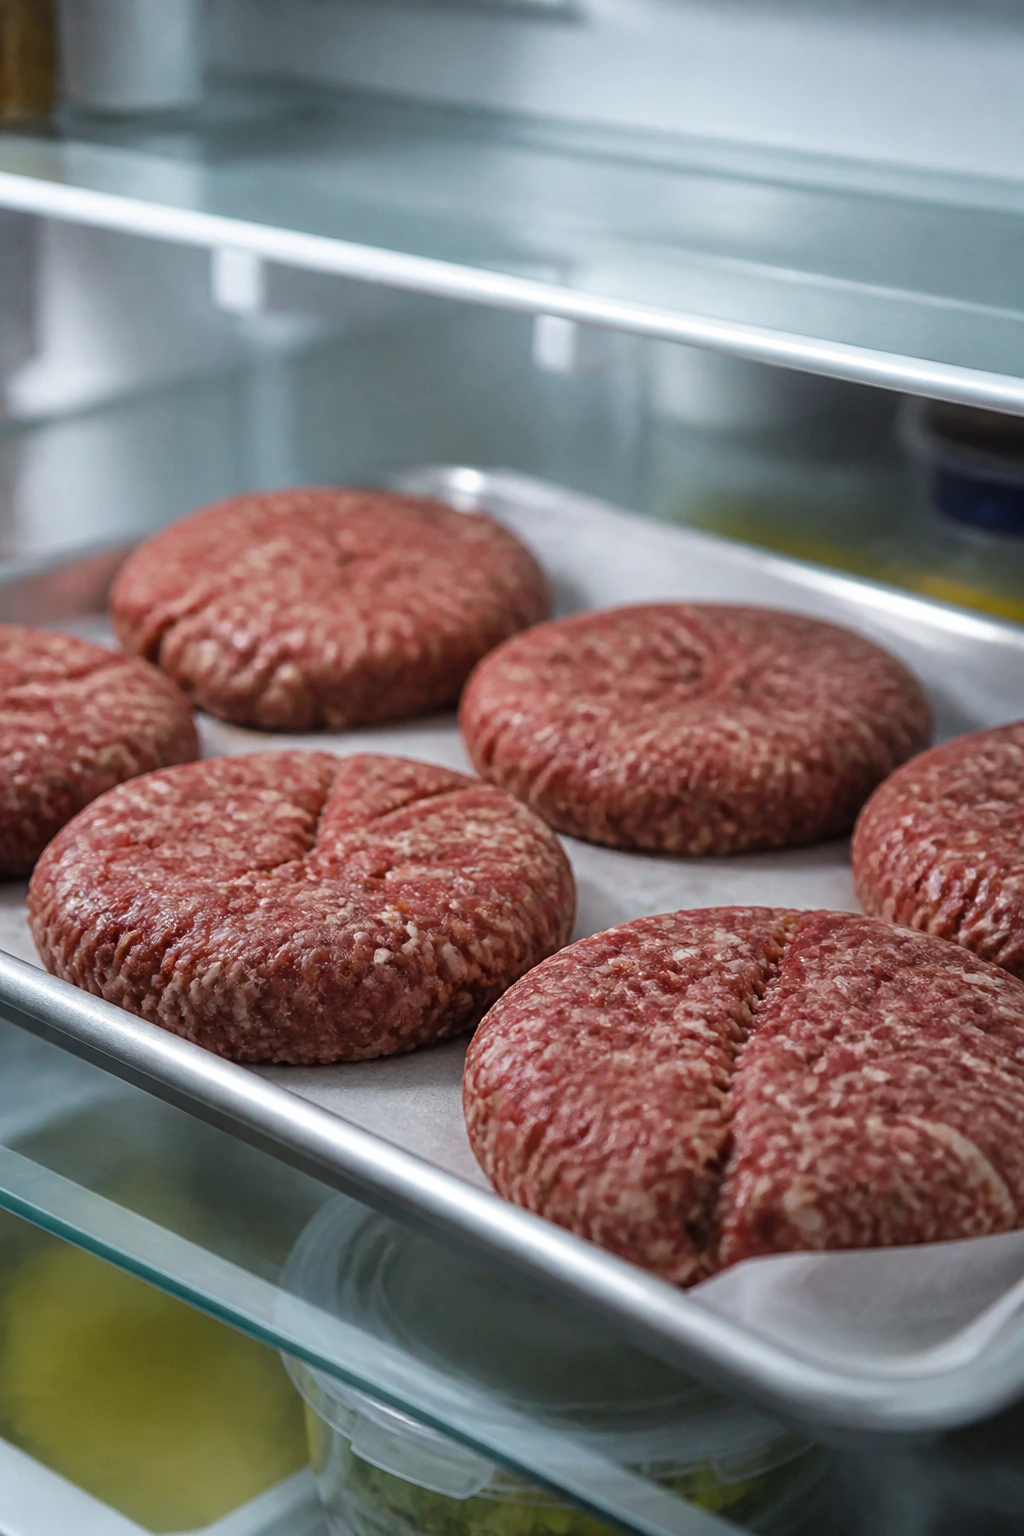
Raw patties can be shaped up to 24 hours ahead and kept covered in the refrigerator. Lay them on a parchment-lined tray or plate, separate layers with more parchment if you stack them, and keep them cold until the grill is ready. If they sit in a warm kitchen for a while, give them a short trip back into the fridge before cooking.
Cooked burgers keep in the refrigerator for 3 to 4 days. Store them in an airtight container, and if you can, keep the toppings and buns separate. Once the burger is assembled with tomato and lettuce, the whole thing gets soggy and sad in a hurry. I’d rather reheat a plain patty and rebuild the sandwich fresh.
For freezing, raw patties hold well for about 2 to 3 months. Freeze them on a tray until firm, then wrap each patty tightly and stack them with parchment between layers. Cooked patties also freeze, though I like them best within 2 months because the texture stays closer to the original. Thaw overnight in the refrigerator before reheating.
The best reheating method depends on what you’ve got. A skillet over medium heat with a lid and a tablespoon of water will warm a patty gently in 3 to 4 minutes per side. An oven at 325°F works too, especially if you wrap the burger in foil so it doesn’t dry out. Microwave reheating is the last resort — fast, yes, but it makes the beef rubbery and the bun limp.
Room temperature is the one place I’d keep the time short. Don’t leave cooked burgers out longer than 2 hours, and cut that down if the weather is hot. If a burger has already been assembled with mayonnaise or lettuce, it should be eaten sooner rather than later.
Frequently Asked Questions
What’s the best fat ratio for grilled hamburgers?
80/20 ground chuck is the balance I reach for most often. It has enough fat to stay juicy over direct heat without turning greasy, and the fat helps the surface brown instead of drying out before the center is done.
Should I mix salt into the beef or season the outside?
Season the outside right before grilling. If you mix salt deeply into the meat and let it sit, the texture tightens and the burger starts to feel more like a dense patty than a loose grilled hamburger.
How do I keep burgers from sticking to the grill?
Start with a clean grate, a fully preheated grill, and a light coat of oil right before the patties go on. If a burger sticks for a moment, don’t force it; give it another 30 seconds and try again. A properly seared patty releases on its own.
Do I need to use a thermometer?
Yes, if you want consistent burgers without guesswork. Ground beef should reach 160°F in the center for safety, and a thermometer keeps you from slicing the burger open just to check, which is a rough trade for one bite of certainty.
Can I make the patties ahead of time?
Absolutely. Shape them a few hours ahead or even the day before, then keep them cold and covered. If you’re making them very early, place parchment between the patties so they don’t fuse together and go misshapen when you try to separate them.
Why do my burgers puff up in the middle?
The center expands as the outer edges firm up. A shallow thumbprint in the middle of each patty keeps the surface flatter, which means the burger sits better on the bun instead of looking like a little meat dome.
Can I grill burgers from frozen?
You can, but they’re harder to season well and they cook less evenly than thawed patties. If you do grill from frozen, use thinner patties, lower your expectations about browning, and rely on the thermometer instead of the clock.
What cheese melts best on a grilled burger?
American cheese melts fastest and smoothest, which is why it’s the classic cookout choice. Sharp cheddar tastes deeper, but it needs a little more heat time under the lid to soften fully. Swiss and provolone work too, though they bring a gentler flavor.
Why do my burgers dry out even when they look done on time?
Usually the grill was too hot, the patties were too lean, or they were pressed during cooking. A burger can look fine on the outside and still lose its juices if you’re squeezing it with the spatula or cooking it past the 160°F mark.
Why This Burger Keeps Getting Made
A good grilled hamburger doesn’t need a speech. It needs a hot grate, a steady hand, and enough restraint to let the beef do the heavy lifting. That’s the part people forget when they start adding fillers and sauces before the fire even starts. The best cookout burgers are plain in the right way — the kind of plain that leaves room for smoke, salt, and a crisp bun.
There’s room to make them fancy if that’s the mood. There’s room to keep them stripped down too. Either way, the structure stays the same: cold meat, hot grill, short cook, fast assembly. Get those pieces right once, and the burger turns into the dependable thing everyone comes back to first.
Backyard Grilled Hamburgers — Recipe Card
Recipe Name: Backyard Grilled Hamburgers
Description: Juicy grilled hamburgers made with 80/20 ground chuck, simple seasoning, toasted buns, and classic cookout toppings. The patties sear over high heat, stay tender in the center, and hold up well on a backyard table.
Prep Time: 20 minutes
Cook Time: 10 to 12 minutes
Total Time: 30 to 32 minutes
Course: Main Course
Cuisine: American
Servings: 6 servings
Calories: About 550 kcal per serving
Ingredients
For the Burgers
- 2 pounds ground chuck (80/20), kept cold
- 1 1/2 teaspoons kosher salt
- 1 teaspoon freshly ground black pepper
- 1 tablespoon neutral oil, for oiling the grill grates
For Assembly
- 6 hamburger buns, split
- 6 slices American cheese or sharp cheddar
- 6 lettuce leaves
- 1 large tomato, sliced into 6 thick rounds
- 1 small red onion, thinly sliced
- 6 dill pickle slices or spears
- Ketchup, yellow mustard, and mayonnaise, for serving
Instructions
-
Preheat a gas grill to medium-high heat, about 450°F to 500°F, or prepare a charcoal grill with hot coals and a direct-heat zone.
-
Clean the grates and oil them lightly with neutral oil.
-
Divide the beef into 6 equal portions and shape them into loose patties about 3/4-inch thick. Make a shallow thumbprint in the center of each patty.
-
Season the patties with the salt and pepper just before grilling.
-
Grill the burgers over direct heat for 3 to 4 minutes on the first side.
-
Flip once and cook for 3 to 4 minutes more, until the internal temperature reaches 160°F. Add the cheese during the last minute and close the lid to melt it.
-
Transfer the burgers to a platter and rest for 3 minutes.
-
Toast the buns cut-side down on the grill for 30 to 45 seconds.
-
Assemble with condiments, lettuce, tomato, onion, pickles, and the burger patty. Serve immediately.
Notes: Keep the meat cold until shaping time; don’t press the patties while grilling; toast the buns right before serving for the best texture.