
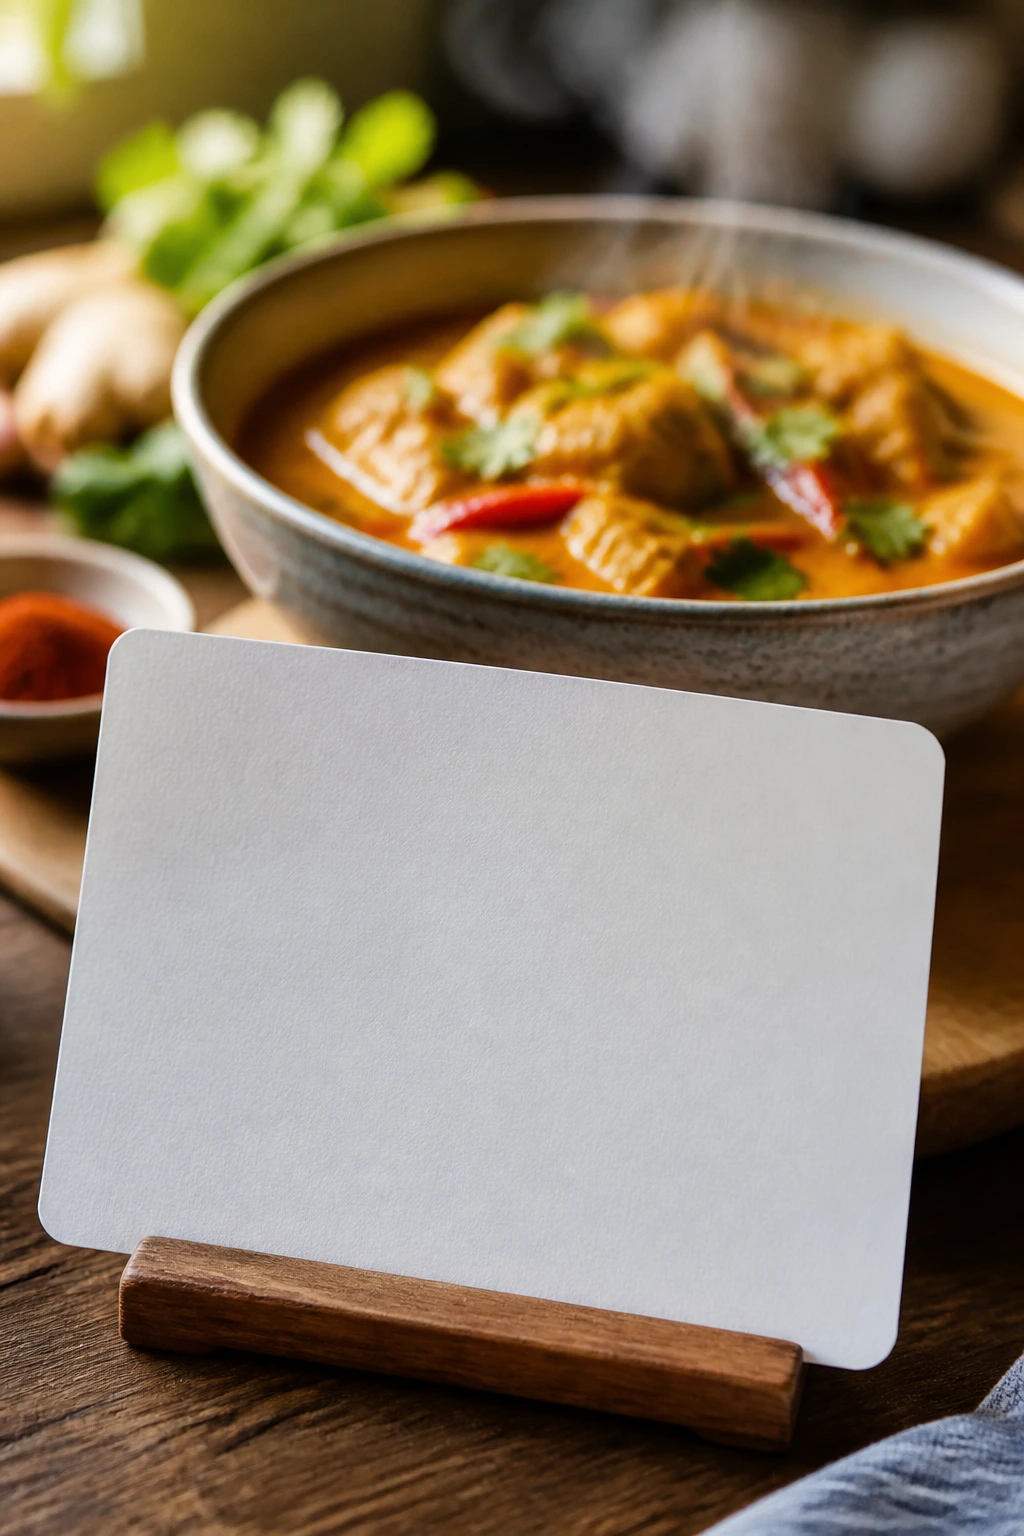
Sticky Thai coconut curry has a way of making a kitchen smell like a place you want to stay in for a while. The first hit is the curry paste hitting hot oil — sharp, red, a little smoky — and then the coconut milk turns that edge into something rounded and rich, the kind of sauce that clings to rice instead of sliding off it. When it’s done well, you get sweetness, salt, heat, and lime all in the same spoonful, and none of them gets to boss the others around.
Takeout curry often misses on one of those points. It arrives either too thin, too sweet, or so heavy with coconut that the spices blur into mush. At home, you get to fix that. You can bloom the paste long enough to wake it up, simmer the sauce until it looks glossy rather than watery, and finish with lime at the exact moment the curry needs to stop tasting flat.
The trick is not complicated, but it does ask for a little attention. Full-fat coconut milk matters. So does a wide pan. And the last minute — the part most people rush through — is where the whole pot either turns lazy and one-note or lands with that restaurant-style shine that makes people keep scraping the bottom of the bowl.
Why This Curry Earns a Spot on the Stove
-
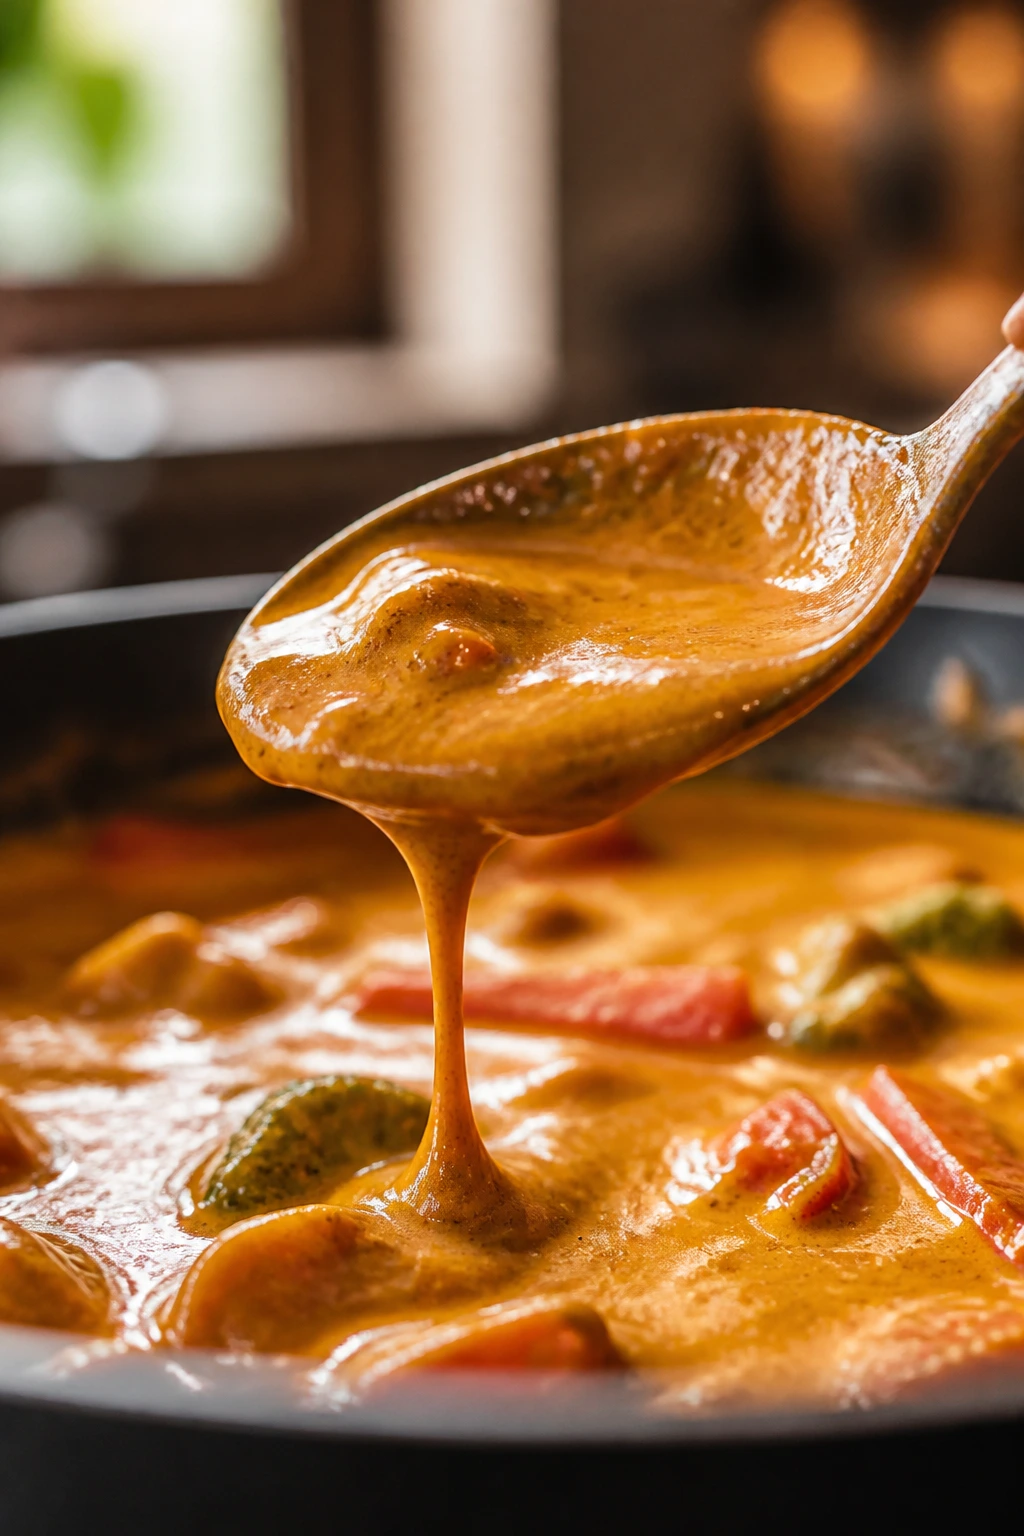
The sauce actually coats the food: A short simmer and a small cornstarch slurry keep the curry glossy enough to cling to chicken, peppers, and rice instead of pooling like soup.
-
The heat is adjustable without wrecking the flavor: Three tablespoons of red curry paste give real backbone, but you can pull it back to two tablespoons if you want a softer burn.
-
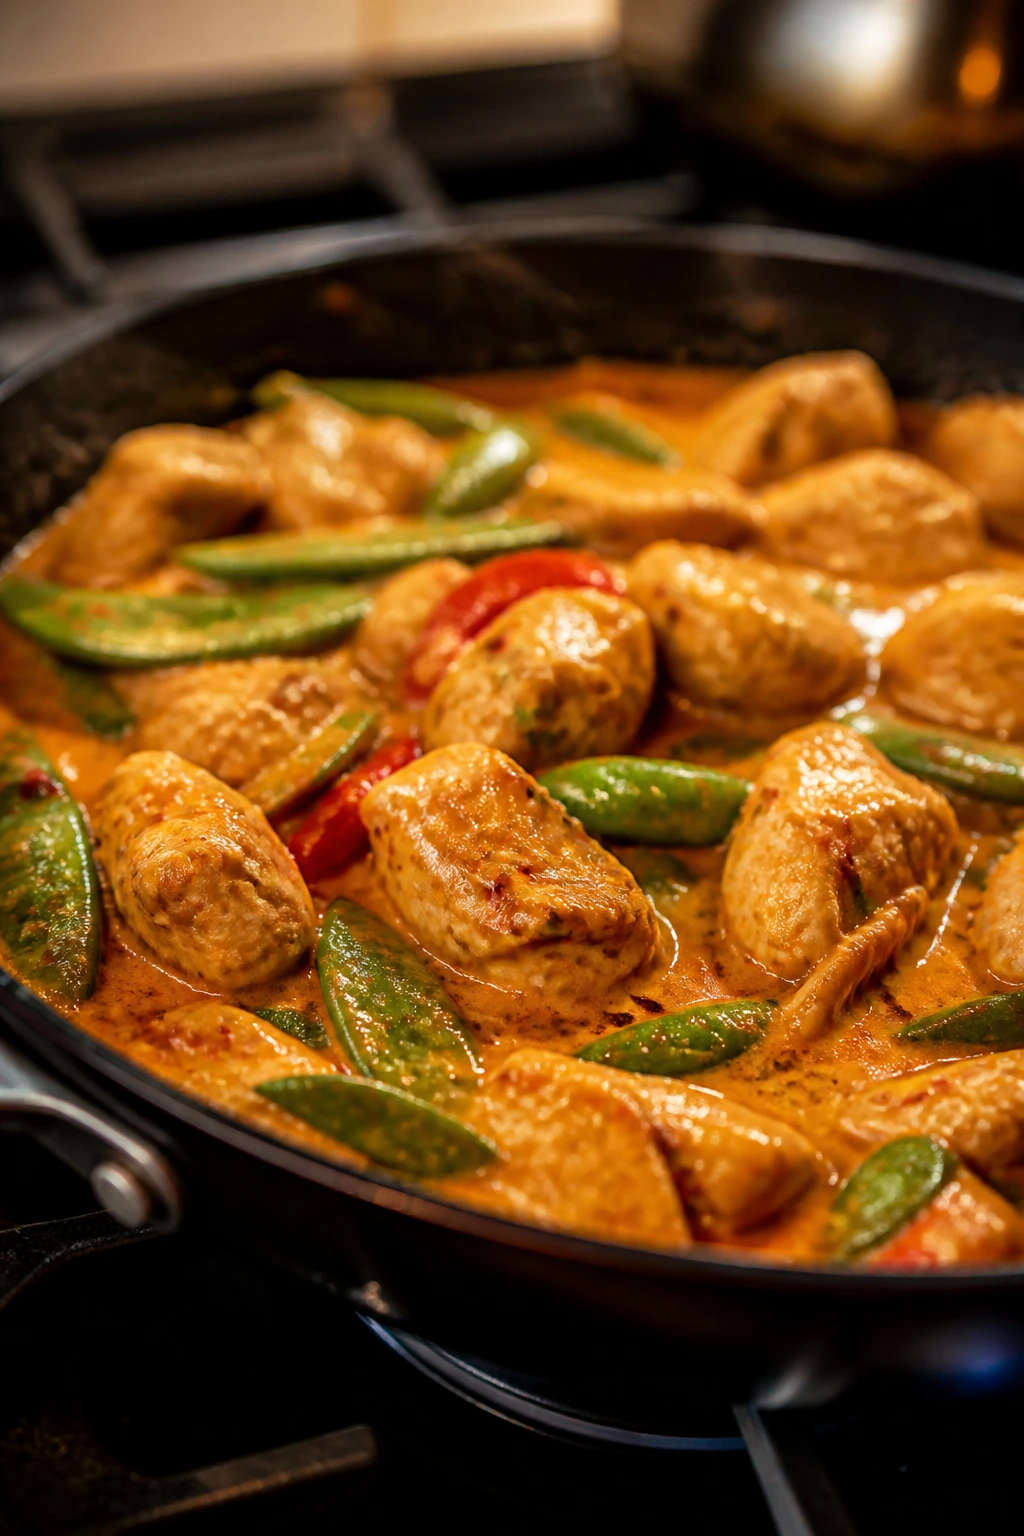
The texture stays interesting: Snap peas and bell pepper keep the curry from feeling heavy, and they still have a little snap when the sauce is done.
-
Leftovers hold up well: The curry thickens in the fridge and settles into itself overnight, which is one of the few times a second-day coconut sauce is better than the first.
-
It uses pantry-friendly pieces with one or two smart fresh touches: Coconut milk, curry paste, fish sauce, and sugar do most of the work. Lime and basil at the end stop the whole thing from tasting canned.
-
You can build it around your schedule: If the vegetables are cut and the rice is cooking, the actual stovetop work takes about 25 to 30 minutes.
How the Sauce Gets Thick, Glossy, and a Little Bit Sticky
A Thai coconut curry gets that takeout-style finish when you treat the coconut milk like a cooking fat, not just a liquid. The first few minutes matter more than people think. If you dump everything into the pan at once, the sauce tastes flat and thin. If you fry the curry paste in oil first, then let the coconut cream bubble against it, the flavor gets darker and deeper almost immediately.
Bloom the curry paste in fat first
That red paste is carrying dried chiles, lemongrass, garlic, shallot, galangal, and usually some makrut lime peel. Those flavors wake up in hot fat. Not boiling water. Fat. When the paste hits the pan and you stir it for a minute or two, the smell changes from sharp and raw to round and fragrant, and that is the point where the curry starts acting like dinner instead of a jar.
Reduce before you panic
Coconut milk can look loose at first, especially if the can has been shaken. That is fine. Let it simmer uncovered for a few minutes and it will tighten up on its own. A wide pan helps here because more surface area means faster evaporation, which is exactly what you want when you’re chasing a glossy sauce that stays on the spoon.
Finish with salt, sweet, and acid in that order
Fish sauce gives depth. Brown sugar smooths the edges. Lime juice wakes the whole thing up at the end. Skip any one of those and the curry can feel oddly one-dimensional. The lime goes in off the heat, too. If you boil it hard, the brightness fades and the curry tastes like it’s wearing a dull coat.
Choosing Coconut Milk, Curry Paste, and the Right Heat
Not all coconut milk behaves the same way in a pan, and the difference shows fast. The better cans usually separate into cream and liquid when they sit, which is not a defect. It’s a useful sign. You want the full-fat version with enough coconut solids to make the sauce rich without needing a stack of other ingredients to fix it later.
Red curry paste is the safest place to start for this dish. Green curry paste leans sharper and more herbal. Yellow curry paste moves gentler, with more turmeric and a softer spice profile. Red lands in the sweet spot here because it can take coconut milk, fish sauce, and lime without losing its spine. If the label lists shrimp paste, the paste is not vegan, so check before you cook if that matters to you.
Heat control changes everything. Medium heat is your friend. High heat can scorch the paste before the coconut milk has a chance to lift it, and once curry paste burns, it tastes bitter in a way you can’t hide with sugar. A quiet simmer is enough. You’re looking for small bubbles around the edges, not a rolling boil that shakes the whole pot.
One more thing people miss: curry paste from a jar is not the same as curry powder. Powder is dry spice mix. Paste has moisture, aromatics, salt, and often some fat. That’s why it behaves like a base rather than a seasoning. If you treat it like a random spoonful of spice, you’ll undercook it. If you let it cook in oil first, it turns into the whole backbone of the dish.
What Goes Into the Pot
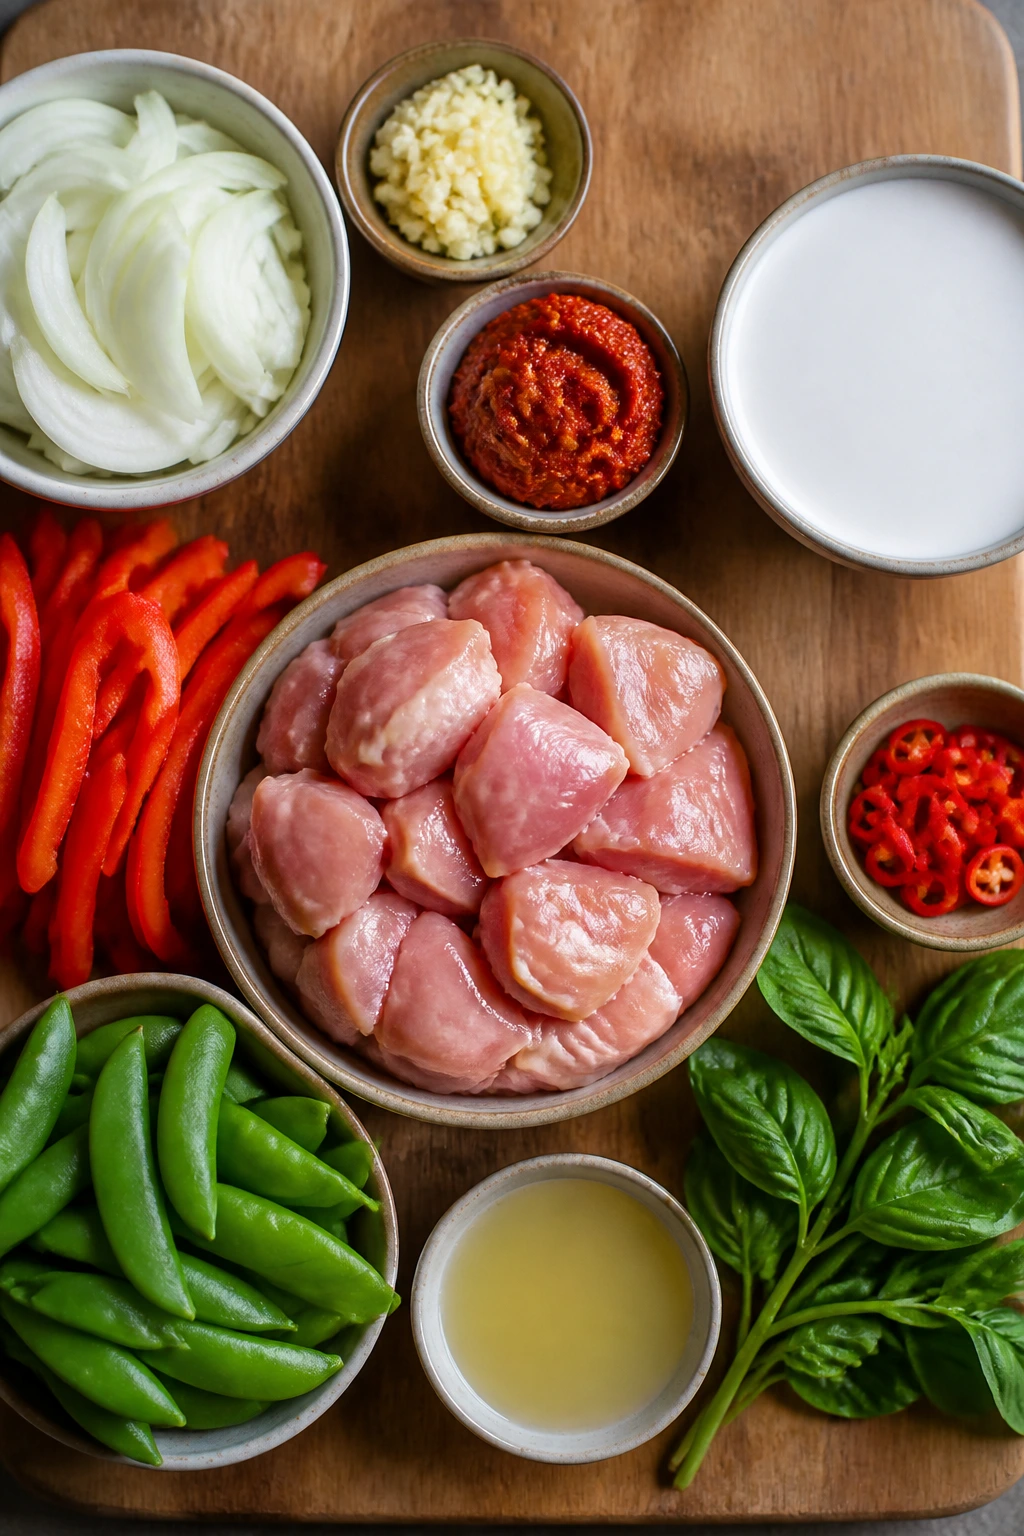
Before the pot starts sizzling, get everything cut, measured, and lined up. Curry moves quickly once the pan gets hot, and nobody enjoys mincing garlic while coconut milk is threatening to boil over.
Yield: Serves 4 to 6
Prep Time: 20 minutes
Cook Time: 30 minutes
Total Time: 50 minutes
Difficulty: Intermediate — the steps are straightforward, but the flavor balance and sauce texture improve a lot when you pay attention at the stove.
Best Served: Right away, while the sauce is hot and glossy
For the Curry
- 2 tablespoons neutral oil, such as avocado or canola
- 1 medium yellow onion, thinly sliced
- 3 tablespoons Thai red curry paste
- 4 cloves garlic, finely minced
- 1 tablespoon fresh ginger, finely grated
- 1 can (13.5 ounces / 400 ml) full-fat coconut milk
- 1 cup unsalted chicken stock or water
- 1½ pounds boneless, skinless chicken thighs, trimmed and cut into 1-inch pieces
- 2 tablespoons fish sauce
- 1½ tablespoons light brown sugar, packed
- 1 red bell pepper, sliced into thin strips
- 1 cup snap peas, trimmed
- 1 teaspoon cornstarch mixed with 2 teaspoons cold water
- 1 tablespoon fresh lime juice
- ½ cup Thai basil leaves or cilantro leaves, loosely packed
- 1 small red chile, thinly sliced, optional
For Serving
- 3 to 4 cups hot jasmine rice
- Lime wedges
- 2 tablespoons crushed roasted peanuts or fried shallots, optional
What Each Ingredient Is Doing in the Pan
Main Protein
- What to use: 1½ pounds boneless, skinless chicken thighs, cut into 1-inch pieces.
- Preparation: Pat the chicken dry before it goes anywhere near the pan, then cut it into pieces that are close in size so they cook at the same pace.
- Substitutions: Extra-firm tofu works if you press it well and cube it into 1-inch pieces; peeled shrimp also work, but they need a shorter simmer.
- Tips: Thighs stay juicy in a coconut curry better than breasts do. Breasts can go stringy if the sauce boils too hard or if you leave them in a minute too long.
Coconut Curry Base
- What to use: 1 can full-fat coconut milk, 1 cup chicken stock, 3 tablespoons red curry paste, 2 tablespoons fish sauce, 1½ tablespoons brown sugar, and the cornstarch slurry.
- Preparation: Open the coconut milk and be ready for it to look separated; that’s normal. Stir the can if you want a fully blended base, or spoon the thick cream from the top first if you want a richer fry on the curry paste.
- Substitutions: Vegetable stock works fine, soy sauce or tamari can stand in for fish sauce, and palm sugar gives a slightly deeper sweetness if you have it.
- Tips: Blooming the curry paste in the coconut cream before adding the full liquid gives you the darker, more concentrated flavor that takeout curry usually has.
Aromatics and Vegetables
- What to use: 1 medium onion, 4 cloves garlic, 1 tablespoon grated ginger, 1 red bell pepper, and 1 cup snap peas.
- Preparation: Slice the onion thin so it softens quickly, mince the garlic fine so it disappears into the sauce, and trim the snap peas so they stay clean and crisp.
- Substitutions: Shallots can replace the onion, green beans can replace snap peas, and sliced carrots can go in if you want a little more body.
- Tips: Add quick-cooking vegetables later in the simmer so they keep their shape. If they go in too early, they lose their color and the curry starts looking tired.
Finishing Brightness
- What to use: 1 tablespoon lime juice, ½ cup Thai basil or cilantro, plus optional red chile, lime wedges, and peanuts.
- Preparation: Tear the basil right before serving so the leaves stay fragrant. Keep the lime juice for the end so it sharpens the curry instead of fading in the heat.
- Substitutions: Mint can stand in for part of the basil if that’s what you have. Cilantro is the easier fallback and still works well.
- Tips: Thai basil tastes a little anise-like and peppery, which is part of what makes this curry taste finished rather than one-note. If you can find it, use it.
Serving Base
- What to use: 3 to 4 cups hot jasmine rice, plus a few lime wedges.
- Preparation: Cook the rice while the curry simmers so everything lands hot at the same time.
- Substitutions: Brown jasmine rice, basmati, or rice noodles can carry the sauce too, though jasmine rice gives the best fit for the curry’s texture.
- Tips: Slightly dry rice is better than wet rice here. The sauce needs something with enough structure to hold onto it.
Special Equipment for This Recipe
- 12-inch skillet or wide sauté pan with high sides — The wider surface helps the sauce reduce faster and gives you room to stir without sloshing coconut milk over the edge.
- Wooden spoon or silicone spatula — You’ll use it for scraping up the curry paste and keeping the coconut milk moving.
- Sharp chef’s knife — Thin onion slices and even chicken pieces cook more evenly, which matters more than people admit.
- Cutting board — A large one makes the prep feel calmer. Small boards get messy fast with curry ingredients.
- Measuring spoons and cups — Curry paste, fish sauce, and sugar all need actual measurements. Freehanding them usually makes the sauce too sweet or too salty.
- Small bowl — For the cornstarch slurry. Keep it ready before the heat goes on.
- Rice cooker or medium saucepan with lid — Whatever you use for jasmine rice is fine, as long as it doesn’t turn mushy.
- Ladle — Optional, but it makes serving easier and keeps the bowl neat.
Build the Curry, Step by Step

Prep the rice and ingredients
-
Rinse 1½ cups jasmine rice under cool water until the water runs less cloudy, then cook it with 2¼ cups water and a pinch of salt, or use your usual rice method. Keep it covered and warm while the curry finishes.
-
Cut the chicken thighs into 1-inch pieces, slice the onion thinly, mince the garlic, grate the ginger, slice the bell pepper, and trim the snap peas. Mix 1 teaspoon cornstarch with 2 teaspoons cold water in a small bowl and set it nearby. Once the pan heats up, there won’t be a good moment to stop and hunt for anything.
Start the curry base
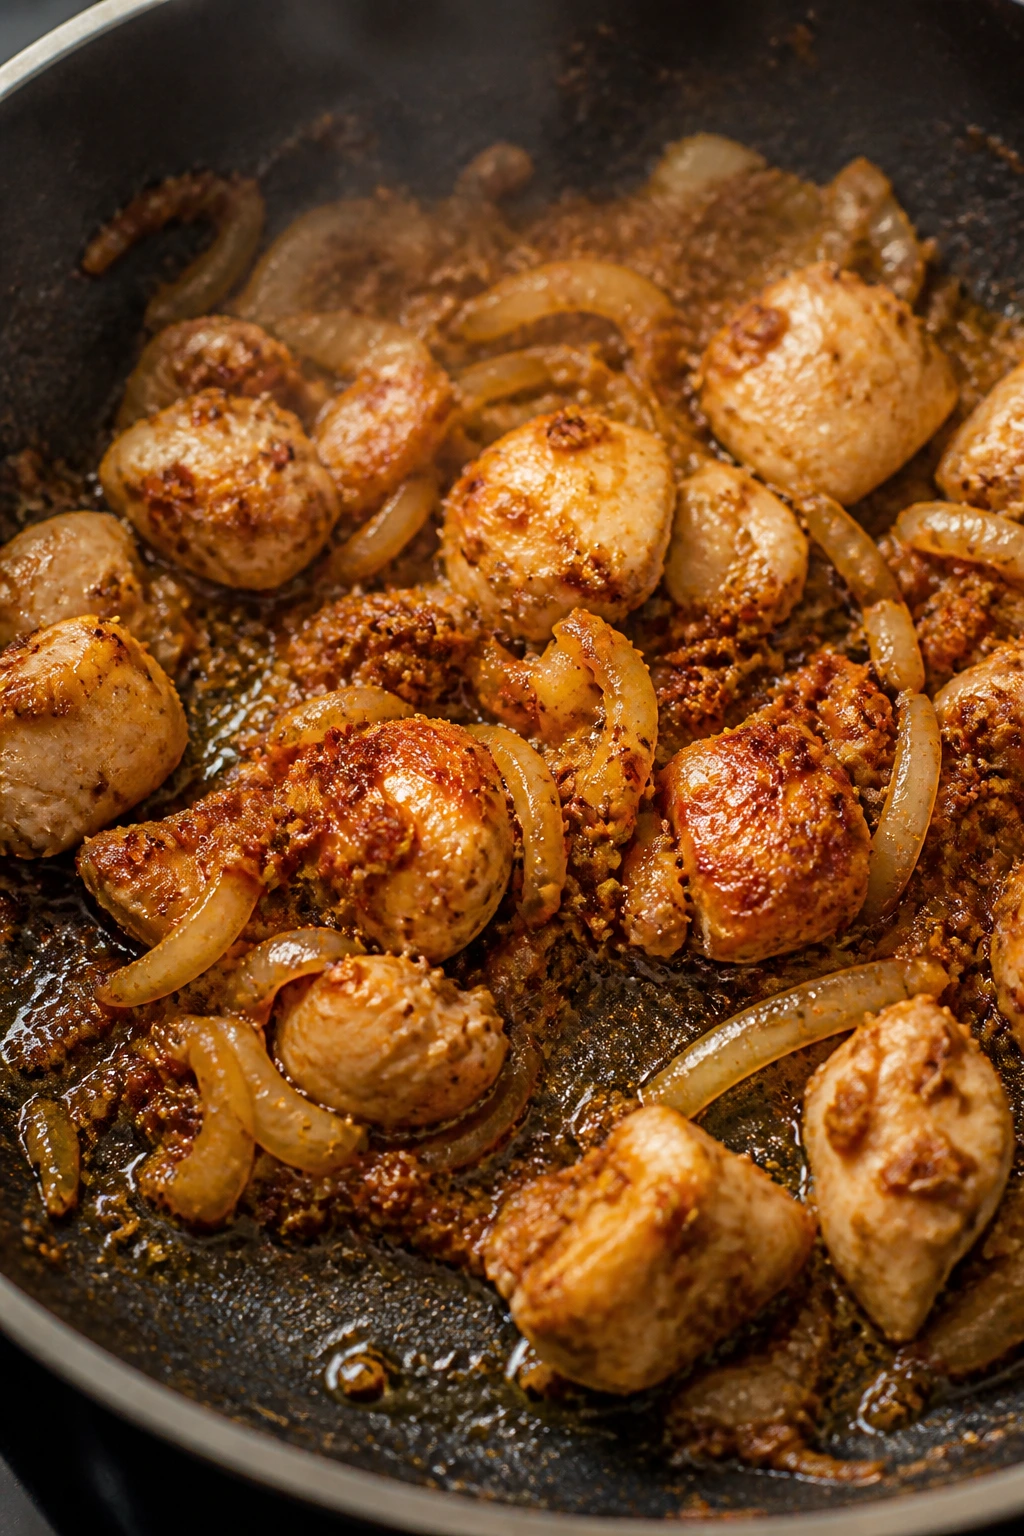
-
Heat 2 tablespoons neutral oil in a wide skillet over medium heat until it shimmers. Add the onion and cook for 4 to 5 minutes, stirring now and then, until it softens and turns translucent at the edges. Do not rush this step — raw onion makes the sauce taste sharp and unfinished.
-
Add the curry paste and stir it into the onion for 1 to 2 minutes. The paste should darken slightly, smell fragrant, and look glossy as the oil starts to separate around the edges. That is the bloom you want. If it smells scorched or bitter, the heat is too high.
-
Stir in the garlic and ginger and cook for 30 seconds, just until the garlic stops smelling raw. The pan should smell deep and spicy now, not harsh. If the mixture looks dry, add a splash of coconut milk from the can to keep it moving.
Build the sauce and cook the chicken
-
Pour in the coconut milk and chicken stock, scraping up any paste stuck to the bottom of the pan. Bring the mixture to a gentle simmer, then add the chicken, fish sauce, and brown sugar. Cook for 8 to 10 minutes, stirring once or twice, until the chicken is opaque and cooked through. Keep the heat at a lazy simmer; a hard boil can split the coconut milk and toughen the chicken.
-
Add the red bell pepper and snap peas. Simmer for 3 to 4 minutes, just until the peppers soften around the edges and the snap peas stay bright green. Stir in the cornstarch slurry and cook for 1 to 2 minutes more, until the sauce turns glossy and coats the back of a spoon. If it still looks loose, give it another minute before deciding it needs more slurry.
Finish and serve
-
Turn off the heat and stir in the lime juice and Thai basil. Taste the sauce and adjust with a small splash more fish sauce if it needs salt, or another squeeze of lime if it tastes heavy. Let the curry sit for 2 minutes before serving so the sauce settles slightly and thickens on its own.
-
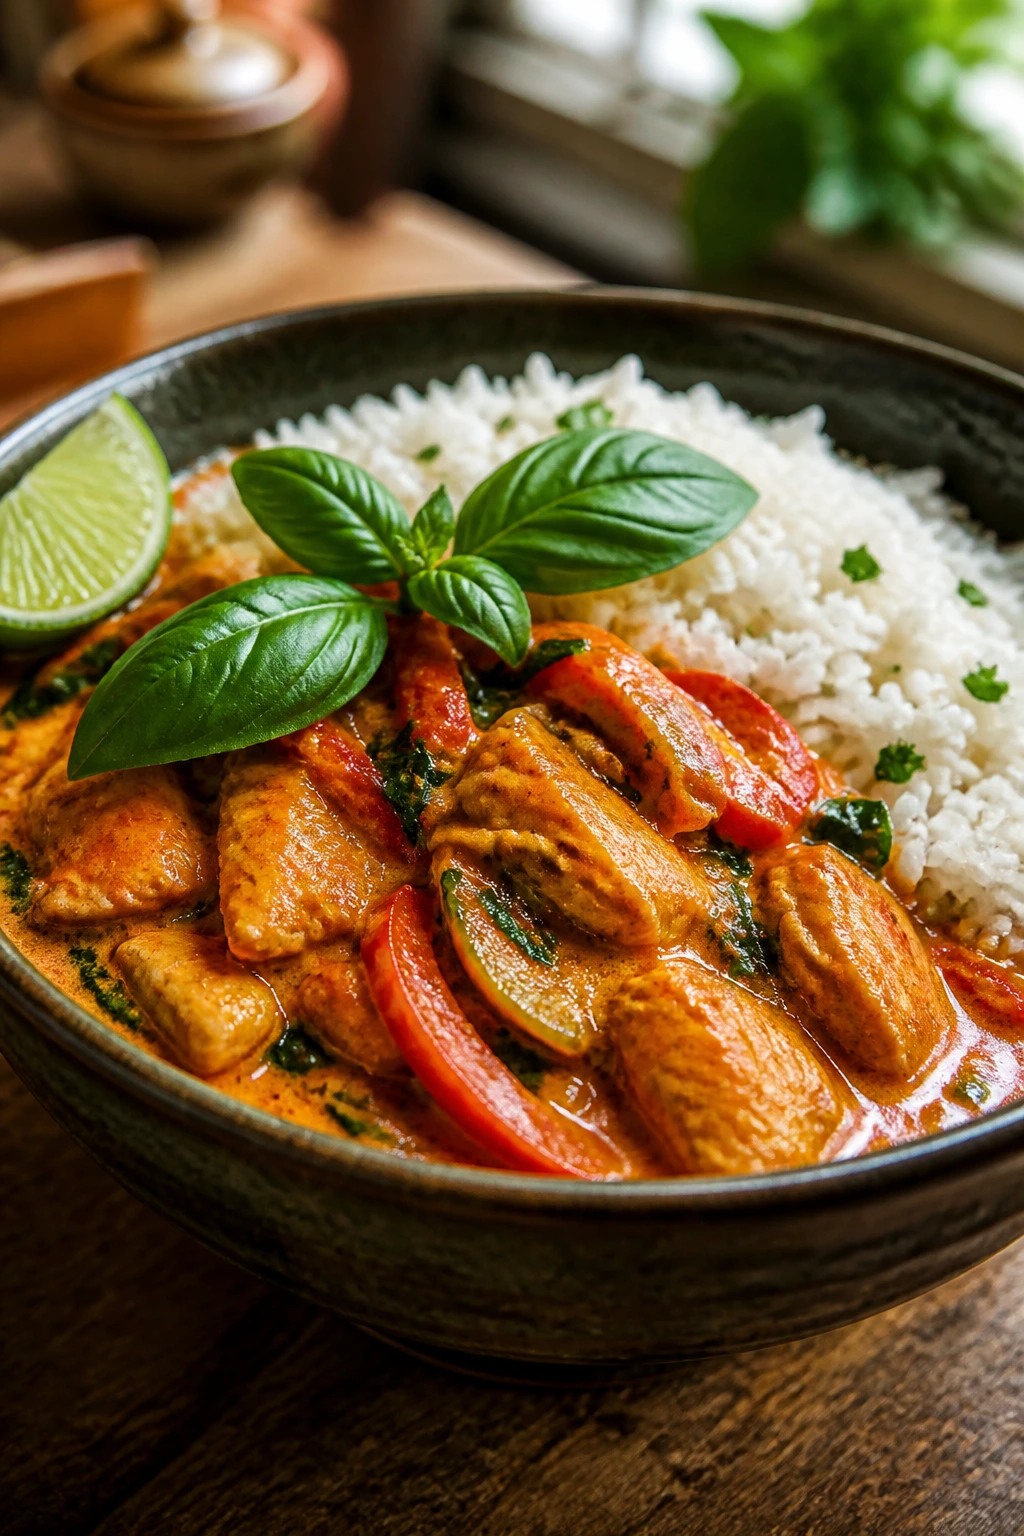
Spoon the curry over hot jasmine rice, top with peanuts or fried shallots if you like that crunch, and finish with lime wedges on the side. The sauce should cling to the rice, not disappear into it.
How to Serve Sticky Thai Coconut Curry
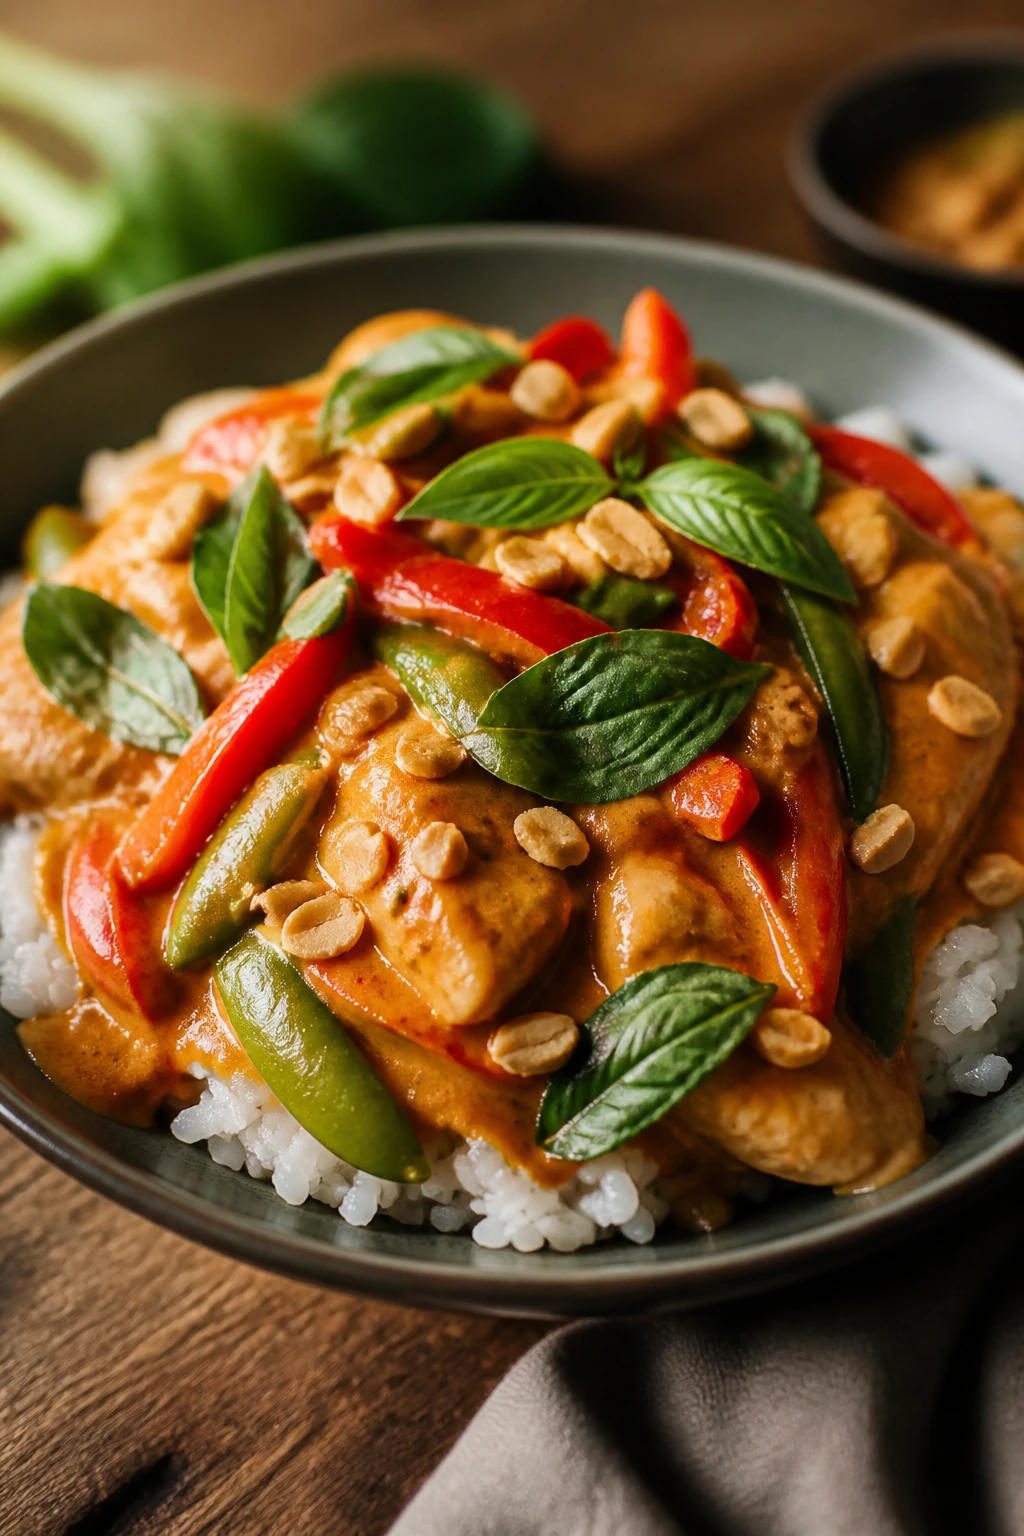
Presentation: Spoon the curry over rice in shallow bowls, then place a few bell pepper strips and snap peas on top so the color shows through the coconut sauce. A scatter of torn basil and a few peanuts on the surface keeps the bowl from looking like a beige accident.
Accompaniments: Plain jasmine rice is the cleanest match, but cucumber slices with a pinch of salt, a quick cucumber salad, or steamed bok choy work well beside it. If you want bread, go with something soft and plain rather than anything heavily flavored.
Portions: Plan on about 1½ cups curry plus ¾ cup cooked rice per adult serving. For bigger appetites, go up to 2 cups curry and a full cup of rice. For a lighter plate, cut the rice back and serve the curry with extra vegetables.
Beverage Pairing: An iced jasmine tea fits the flavors without fighting them. If you want something colder and a little sharper, a crisp lager or a dry Riesling handles the coconut richness and the curry heat nicely.
Practical Tips, Shortcuts, and Tiny Upgrades
Flavor Boost: A small pinch of lime zest at the end gives the curry a brighter top note than lime juice alone. You only need a little; too much zest can turn perfumy fast.
Time Saver: Slice the vegetables while the onion softens. That’s the best place to hide the prep work because the onion needs those 4 to 5 minutes anyway. If you prep everything first, the cook feels almost too easy.
Texture Fix: If the sauce looks thin after the chicken is cooked, let it bubble uncovered for another 2 minutes before reaching for more slurry. A lot of curry “problems” solve themselves once the water has a chance to leave the pan.
Heat Control: If you like the flavor of red curry paste but not much burn, use 2 tablespoons of paste and add a sliced chile on top at the end for the people who want more heat. That keeps the base balanced instead of turning the whole pot hot.
Cost-Saver: Frozen bell pepper strips work here. Thaw them on a paper towel first so they don’t dump extra water into the curry. I would not do that with snap peas, though; they need their snap to keep the curry from getting soft and sleepy.
Make-Ahead Move: Cook the curry without the basil and lime if you’re making it ahead. Finish with both right before serving. Basil loses its edge fast in the fridge, and lime tastes dull if it sits in the sauce overnight.
Common Mistakes That Make the Curry Flat
-
Cooking the curry paste too briefly: If you only stir the paste for 10 or 15 seconds, the sauce tastes raw and one-note. Let it fry in the oil for a full minute or two until the color darkens and the smell turns round.
-
Using light coconut milk to “save calories”: Light coconut milk makes the sauce thin and a little watery, and it never gets the same sheen. If you want the curry to taste like it came from a good Thai kitchen, use the full-fat can and serve a slightly smaller portion.
-
Boiling the sauce hard after the coconut milk goes in: A rolling boil can split the coconut fat and leave the sauce greasy on top and thin underneath. Keep the simmer gentle and stir now and then.
-
Adding lime juice too early: Lime that cooks for several minutes loses its brightness. Stir it in after the heat is off so the curry tastes lively instead of heavy.
-
Letting the vegetables go soft: Bell peppers and snap peas should still have shape. If they collapse, the curry starts feeling mushy. Add them late and stop cooking as soon as the edges soften.
-
Over-salting before tasting the finished sauce: Fish sauce brings salt, but the coconut milk and sugar need a minute to settle before you decide if the curry needs more. Taste at the end, not halfway through.
Variations and Adaptations That Actually Fit
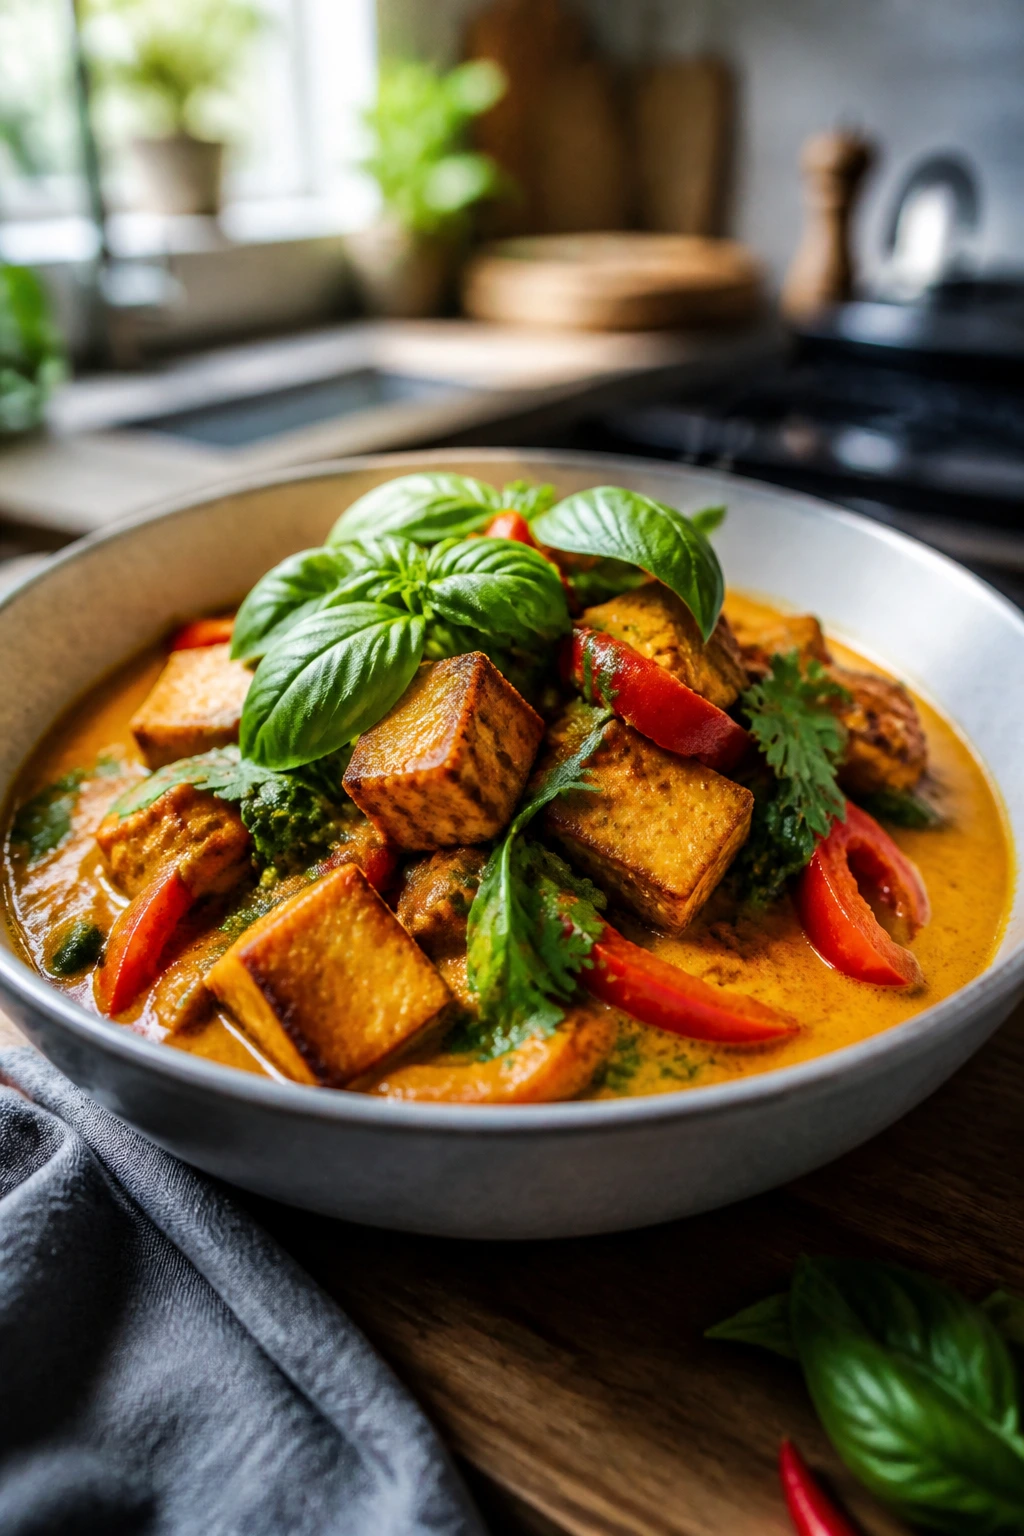
Crispy Tofu Coconut Curry — Press 14 ounces of extra-firm tofu for 20 minutes, cube it, and sear the pieces in a separate pan until they’re golden on two sides. Stir them into the curry right at the end so they keep their shape. This version works well when you want the same sauce but a lighter, meat-free bowl.
Shrimp in a Hurry — Swap the chicken for 1½ pounds peeled shrimp and add them during the last 3 to 4 minutes of cooking. Shrimp go rubbery if they sit in simmering coconut milk too long, so they need a short finish and a careful eye.
Vegetable-Heavy Fridge Cleanout Bowl — Cut the chicken back to 1 pound and add sliced carrots, mushrooms, and green beans. Start the carrots with the onion so they get a head start, then layer in the mushrooms and beans as the sauce reduces. The curry ends up more brothy in feel, but the sauce still stays sticky enough to coat rice.
Mild Yellow Curry Turn — If red curry paste feels loud to you, use yellow curry paste and keep the lime and basil at the end. The result is softer, a little more turmeric-forward, and easier for anyone who doesn’t want much chili heat.
Peanut Silk Version — Stir 1 tablespoon of smooth peanut butter into the coconut milk before the chicken goes in. It makes the sauce thicker and a touch nutty, which leans into the sticky part of the dish without turning it into a separate recipe. Use this if you want a deeper, rounder sauce and don’t mind the peanut note.
Make-Ahead, Storage, and Reheating

Sticky Thai coconut curry keeps well, which is one reason I keep making versions of it. Stored in an airtight container, it holds in the refrigerator for 3 to 4 days. The sauce gets thicker as it chills, and that’s normal; coconut fat firms up a bit in the cold, then melts again when heated.
If you want to freeze it, do it without the rice and, if possible, without the basil. The curry itself freezes for up to 2 months in a freezer-safe container. Leave a little headspace at the top because coconut sauces expand slightly as they freeze. Thaw it overnight in the refrigerator when you can. If you’re in a hurry, reheat it gently from frozen on the stove over low heat with a splash of stock or water.
For reheating, the stovetop wins. Put the curry in a skillet or saucepan over medium-low heat and stir every minute or so until it loosens and starts steaming evenly. If the sauce looks a little broken, a tablespoon of hot water and a patient stir usually brings it back together. The microwave works too, but use 60-second bursts and stir in between so the sauce heats evenly instead of splitting at the edges.
Rice is a separate story. Refrigerate leftover jasmine rice in its own container for 3 to 4 days, and reheat it with a damp paper towel over the bowl so it doesn’t dry out. I would not freeze the rice with the curry unless you have no other choice. Curry freezes well. Rice gets weird.
The curry base can be made a day ahead and held without the basil and lime. In fact, that version tastes calmer and more blended after a night in the fridge. Finish it fresh with the herbs and acid, and it comes back with more life than it had on day one.
Frequently Asked Questions

Can I make this with chicken breasts instead of thighs?
You can, but you’ll need to watch the simmer closely. Chicken breasts dry out faster in coconut curry, especially once the sauce thickens, so cut them into larger pieces and pull the pan off the heat as soon as they hit 165°F.
How spicy is this curry?
With 3 tablespoons of red curry paste, it has a clear kick but not a brutal one. If your curry paste runs hot, start with 2 tablespoons and taste the sauce before adding more. Heat varies a lot by brand, and one spoonful can feel tame in one jar and sharp in another.
Can I make it vegan?
Yes. Use tofu or a mix of tofu and vegetables, swap the chicken stock for vegetable stock, and replace fish sauce with soy sauce or tamari plus a little extra salt if needed. Check the curry paste label too, because many brands include shrimp paste.
Why did my sauce separate?
Usually the heat was too high, or the curry simmered too hard after the coconut milk went in. Coconut milk can split if it gets bullied. Lower the heat, stir in a splash of stock, and whisk gently until it looks smooth again.
What if my curry tastes flat at the end?
It usually needs one of three things: salt, lime, or a little more sugar. Add them in tiny steps. A half-teaspoon of fish sauce, a squeeze of lime, and a pinch of sugar can change the whole bowl faster than another minute of boiling will.
Can I use light coconut milk?
You can, but the sauce will be thinner and less rich. If that’s the route you need to take, reduce the stock by ¼ cup and let the curry simmer uncovered a bit longer so it has a chance to tighten up.
What vegetables work best if I want to swap the ones in the recipe?
Green beans, sliced carrots, mushrooms, baby corn, and broccoli florets all fit the flavor profile. The rule is timing: firm vegetables go in earlier, quick-cooking ones go in near the end, and anything leafy should barely see the heat before serving.
A Bowl Worth Repeating
Some dinners feel like a compromise. This one doesn’t. Once the curry paste has bloomed and the coconut milk has simmered down to that glossy, spoon-coating finish, the bowl starts tasting like more than the sum of its parts — chicken, rice, lime, basil, heat, and a little sweetness that keeps pulling you back in.
The best part is that the method stays honest. You do a few things in the right order, keep the heat in check, and finish with fresh lime while the sauce is still hot. That’s the whole game. Make it once, and the next time you’re staring into the fridge wondering what to cook, this curry has a nasty habit of jumping to the front of the line.
Sticky Thai Coconut Curry — Recipe Card
Recipe Name: Sticky Thai Coconut Curry
Description: A glossy Thai-inspired coconut curry with red curry paste, chicken thighs, bell pepper, snap peas, basil, and lime. The sauce cooks down until it clings to rice instead of running off the plate.
Prep Time: 20 minutes
Cook Time: 30 minutes
Total Time: 50 minutes
Course: Dinner, Main Course
Cuisine: Thai-Inspired
Servings: 4 to 6 servings
Calories: About 430 kcal per serving, not counting rice
Ingredients
For the Curry
- 2 tablespoons neutral oil, such as avocado or canola
- 1 medium yellow onion, thinly sliced
- 3 tablespoons Thai red curry paste
- 4 cloves garlic, finely minced
- 1 tablespoon fresh ginger, finely grated
- 1 can (13.5 ounces / 400 ml) full-fat coconut milk
- 1 cup unsalted chicken stock or water
- 1½ pounds boneless, skinless chicken thighs, trimmed and cut into 1-inch pieces
- 2 tablespoons fish sauce
- 1½ tablespoons light brown sugar, packed
- 1 red bell pepper, sliced into thin strips
- 1 cup snap peas, trimmed
- 1 teaspoon cornstarch mixed with 2 teaspoons cold water
- 1 tablespoon fresh lime juice
- ½ cup Thai basil leaves or cilantro leaves, loosely packed
- 1 small red chile, thinly sliced, optional
For Serving
- 3 to 4 cups hot jasmine rice
- Lime wedges
- 2 tablespoons crushed roasted peanuts or fried shallots, optional
Instructions
-
Rinse and cook the jasmine rice, then keep it warm.
-
Prep the chicken, onion, garlic, ginger, bell pepper, snap peas, and cornstarch slurry.
-
Heat the oil in a wide skillet over medium heat. Add the onion and cook until softened.
-
Stir in the curry paste and cook until fragrant and darker in color. Add the garlic and ginger and cook briefly.
-
Pour in the coconut milk and stock, scraping the pan. Bring to a gentle simmer.
-
Add the chicken, fish sauce, and brown sugar. Simmer until the chicken is cooked through.
-
Stir in the bell pepper and snap peas. Add the cornstarch slurry and cook until the sauce turns glossy and slightly thick.
-
Turn off the heat. Stir in lime juice and basil. Serve over jasmine rice with lime wedges and peanuts if using.
Notes: Use full-fat coconut milk for the best texture. Keep the lime and basil for the end. If the sauce seems thin, simmer uncovered for 1 to 2 extra minutes before adding more slurry.