
A pan of brownies can rescue a tired Tuesday faster than almost any dessert I know. Easy brownies recipes are the ones I reach for when the craving is real but the energy is not: melt a little butter, whisk in sugar and eggs, fold in cocoa and flour, and you’ve got a square pan of chocolate with a shiny top and a center that still gives a little when you press it.
The charm is in the range. Some brownies lean dense and fudgy, almost like chocolate truffle bars. Some bake up a little lighter, with a finer crumb and crisp edges. A few carry peanut butter, caramel, tahini, marshmallows, or fruit in a way that makes them feel new without asking for a long shopping list or a full afternoon in the kitchen.
That’s the sweet spot here. Nothing fussy. No frosting marathon. No careful layering that turns dessert into a project. Just 16 brownies that can live in the space between pantry baking and actual payoff, which is where most weeknight treats need to be.
Why These Brownies Work on a Busy Night
One bowl keeps cleanup small: Most of these recipes come together with a whisk, a spatula, and a single mixing bowl, which matters when the dishwasher is already full of dinner plates.
The base ingredients are familiar: Butter, cocoa, sugar, eggs, flour, and salt do most of the work, so you can bake without hunting for specialty ingredients in three different stores.
The bake times stay short: A lot of these pans finish in 22 to 30 minutes, which is fast enough to fit between dinner and the part of the evening where everyone starts asking for something sweet.
Swirls change the mood fast: Peanut butter, cream cheese, caramel, tahini, and fruit all ride on the same basic batter, so one brownie recipe can feel like four different desserts.
They slice and pack well: Once cooled, these brownies cut into clean squares that can go on a plate, into a lunch box, or beside a scoop of ice cream without falling apart in your hand.
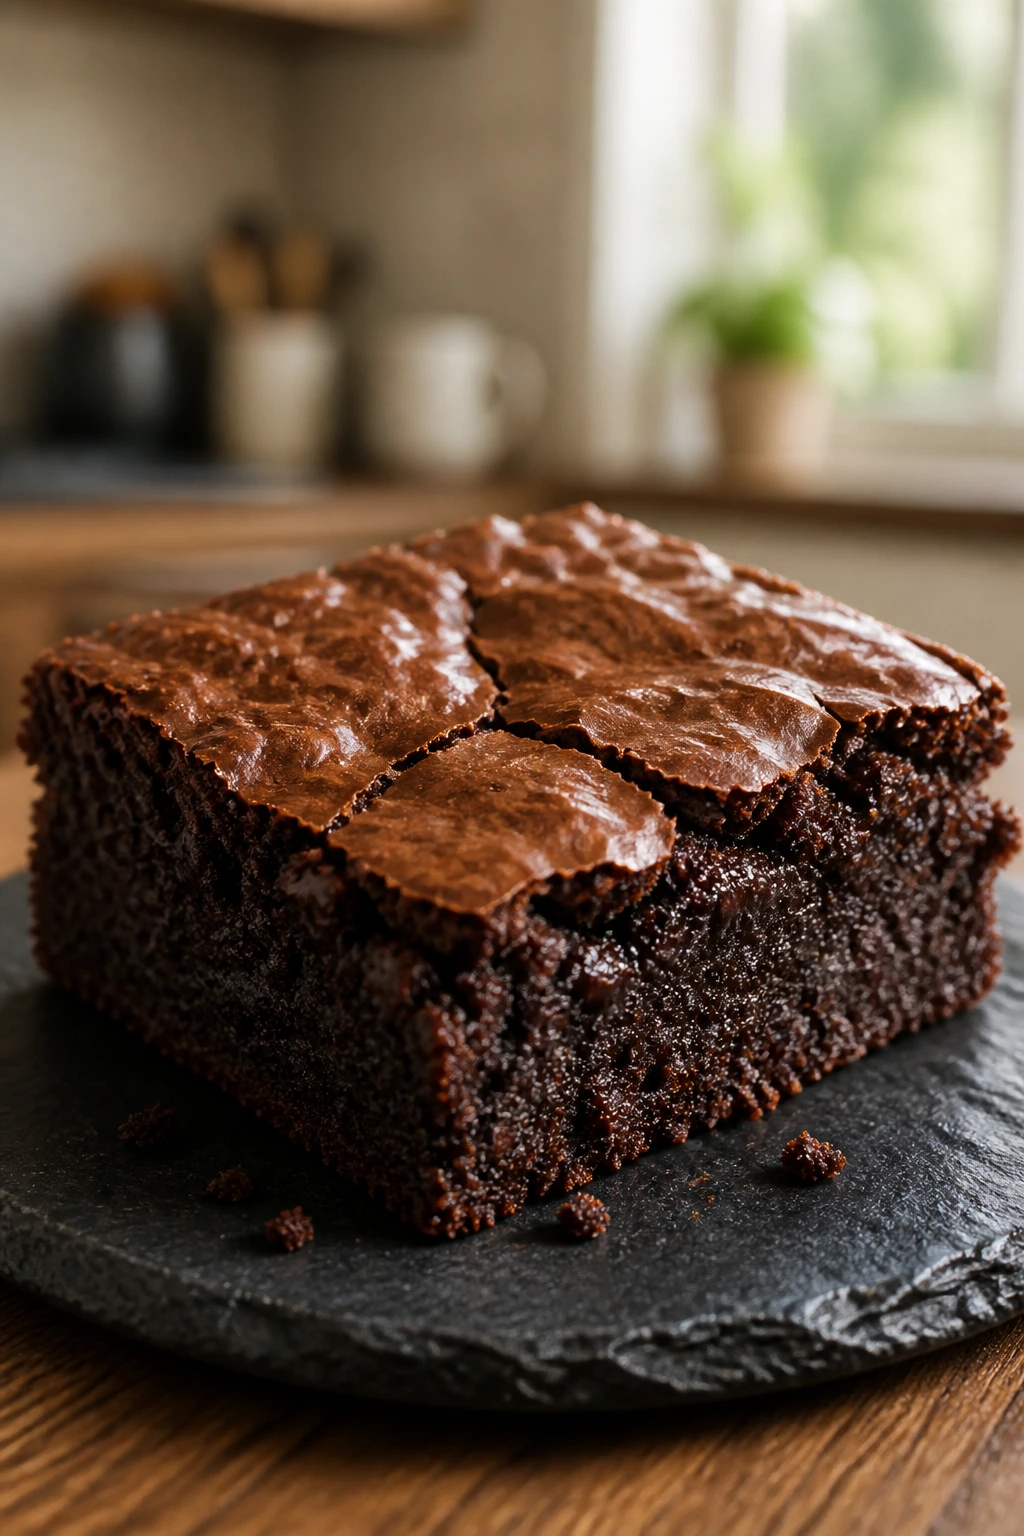
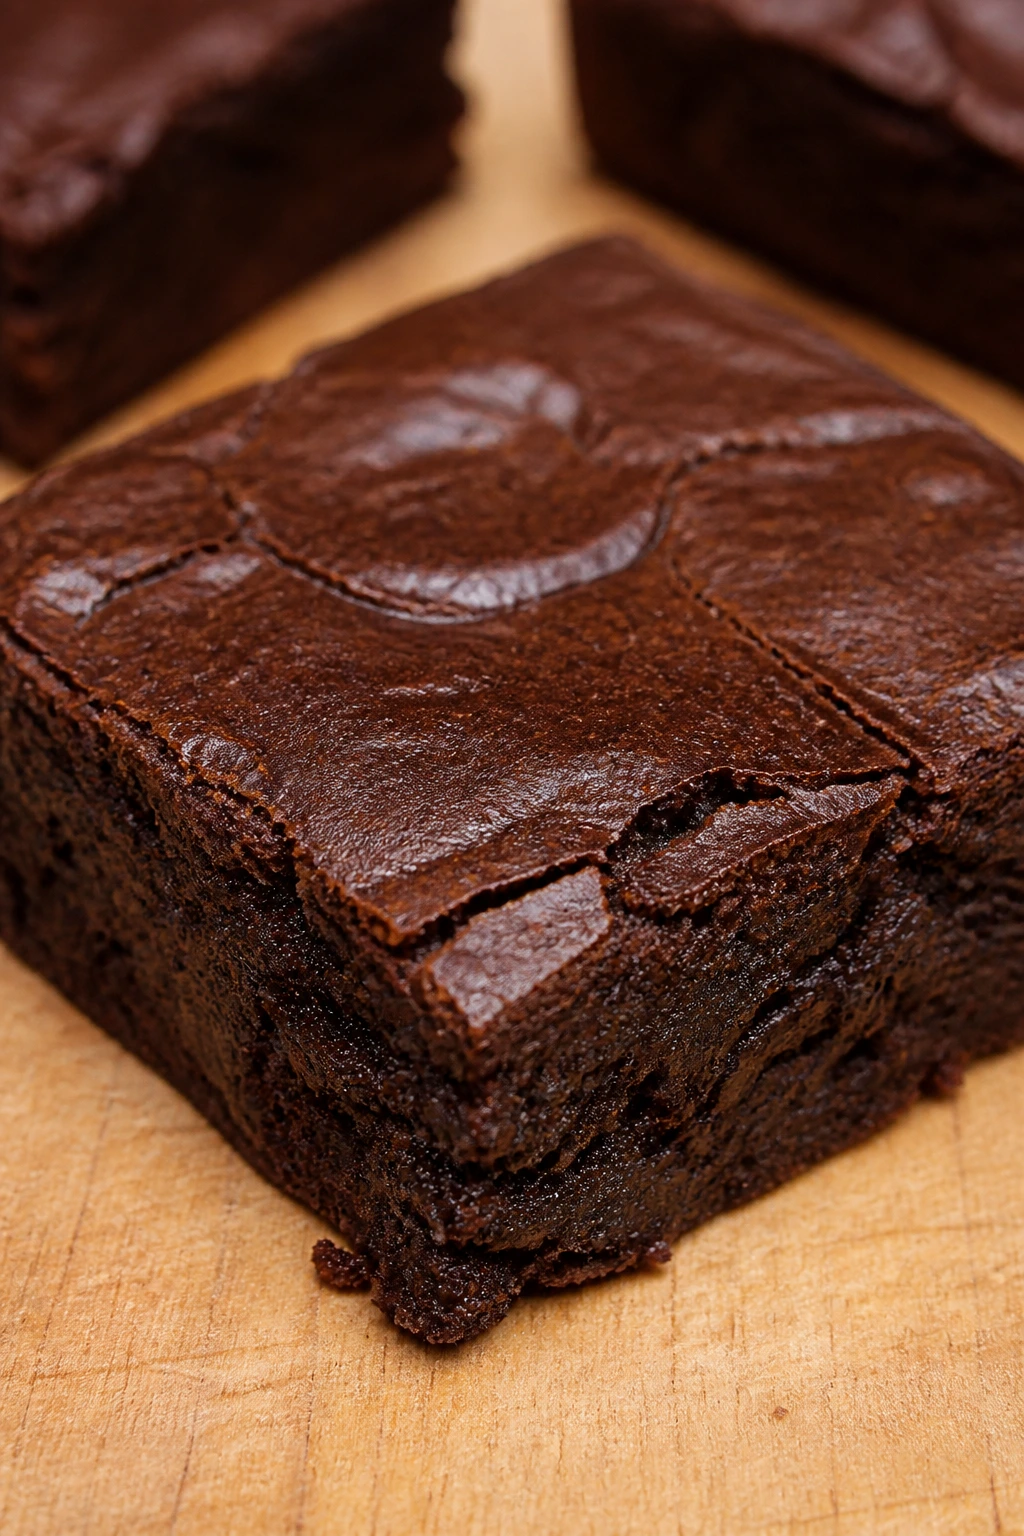
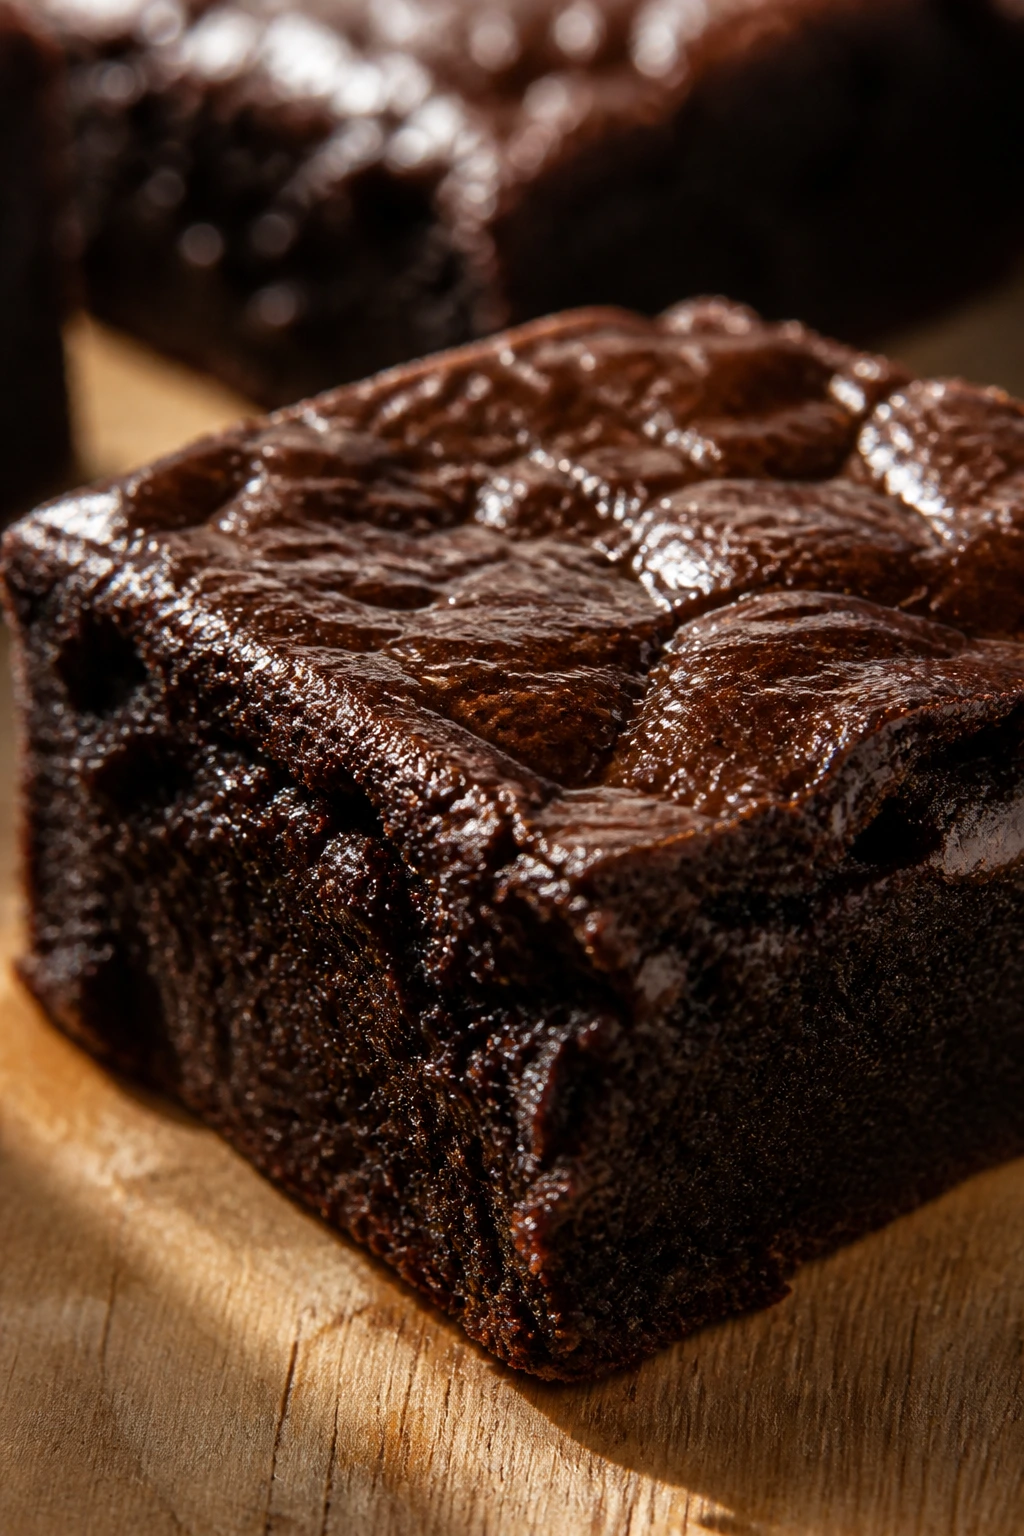
1. Fudgy One-Bowl Cocoa Brownies
These are the plain-Jane brownies I trust most. They taste like deep cocoa and butter, not like a cake trying to pretend it’s a brownie, and the top gets that thin, crackly shell that breaks cleanly under a knife.
The whole pan is built for nights when you want a chocolate fix without a lot of drama. A little whisking, a short bake, and a long enough cool-down to keep the center dense instead of sloppy.
Why It Works:
Melted butter gives the batter enough fat for a fudgy crumb, and whisking the sugar into the warm butter helps build that shiny top. Cocoa powder brings a sharper chocolate flavor than melted chips alone, while a small amount of flour keeps the middle set. The batter stays simple on purpose, which is why these brownies are so dependable.
Key Ingredients:
- 1/2 cup (1 stick) unsalted butter, melted and cooled 5 minutes — this gives the brownies richness without making the batter greasy.
- 1 cup granulated sugar — the sugar helps create the glossy crust on top.
- 2 large eggs, room temperature — room-temp eggs mix in faster and keep the batter smoother.
- 1 teaspoon vanilla extract — enough to round out the cocoa without turning the brownies into vanilla dessert bars.
- 3/4 cup unsweetened cocoa powder, sifted — sift it if your cocoa tends to clump.
- 1/2 cup all-purpose flour — just enough to hold the brownie together.
- 1/2 teaspoon fine sea salt — it keeps the chocolate from tasting flat.
- 1/2 cup semisweet chocolate chips — optional, but they add soft melted pockets in the middle.
Quick Steps:
- Preheat the oven to 350°F (175°C) and line an 8-inch square metal pan with parchment, leaving two long overhangs for lifting.
- Whisk the melted butter and sugar in a large bowl for 30 seconds, until the mixture looks thick and a little glossy.
- Add the eggs one at a time, whisking well after each one, then whisk in the vanilla.
- Sift the cocoa powder, flour, and salt over the bowl, then fold with a spatula until no dry streaks remain. Stir in the chocolate chips.
- Spread the batter into the pan and bake for 24 to 28 minutes, until the edges look set and the center shows a few moist crumbs on a tester.
- Cool in the pan for at least 45 minutes before lifting out and cutting.
Equipment for This Recipe:
- 8-inch square metal baking pan — metal browns the edges better than glass.
- Mixing bowl — large enough to whisk without sloshing batter over the side.
- Whisk — helps build that shiny top.
- Rubber spatula — best for folding without overmixing.
- Parchment paper — makes the brownies lift out in one piece.
How to Serve This Dish:
Cut these into 9 large squares or 16 smaller ones, then serve them warm with a scoop of vanilla ice cream if you want the classic move. They also sit nicely next to berries or a glass of cold milk, which is about as simple as dessert gets.
Pro Tips for This Recipe:
- Whisk the eggs and sugar well; that glossy crust depends on it.
- Pull the pan when the center still has a little give. The brownies keep cooking as they cool.
- Use a metal pan, not glass. Glass takes longer and can leave the middle soft while the edges overbake.
- If your cocoa is lumpy, sift it. Brownie batter hates dry pockets.
Variations on This Dish:
- Walnut Crunch: Fold in 3/4 cup toasted walnuts for a firmer bite and a little bitterness.
- Mocha Edge: Add 1 teaspoon instant espresso powder to the cocoa for a deeper chocolate flavor.
- Dairy-Free Swap: Use a neutral dairy-free butter substitute and keep the rest of the batter the same.
Common Mistakes to Avoid with This Dish:
- Cutting them too soon: The center looks set before it is actually ready; wait for a full cool-down or the squares will smear.
- Adding too much flour: Level the flour, don’t pack it. Extra flour makes the brownies cakey.
- Baking until the tester comes out clean: A clean tester usually means dry brownies. You want a few moist crumbs.
2. Brown Butter Espresso Brownies
Brown butter changes the smell of the kitchen before the brownies even hit the oven. It goes nutty and deep, and when espresso powder joins the batter, the whole pan tastes darker and a little more serious.
This one is for the nights when plain chocolate feels too flat. You still get an easy brownie, but the flavor has more edges.
Why It Works:
Brown butter adds toasted milk solids, which give the brownies a caramel note without needing caramel in the pan. Espresso powder doesn’t make the brownies taste like coffee; it sharpens the chocolate and keeps the sweetness from sitting too high. A single extra egg yolk helps the crumb stay rich and dense.
Key Ingredients:
- 3/4 cup (1 1/2 sticks) unsalted butter — browned until amber and fragrant.
- 1 cup granulated sugar — gives the top its shine.
- 1/2 cup packed light brown sugar — adds chew and a little molasses depth.
- 2 large eggs plus 1 egg yolk — the yolk makes the center silkier.
- 1 teaspoon vanilla extract — rounds out the toasted butter flavor.
- 1 tablespoon instant espresso powder — a small amount deepens the cocoa.
- 2/3 cup Dutch-process cocoa powder — darker and smoother than natural cocoa.
- 3/4 cup all-purpose flour — enough structure without turning cakey.
- 1/2 teaspoon fine salt — keeps the chocolate flavor focused.
- 3/4 cup chopped bittersweet chocolate — for soft pockets in the middle.
Quick Steps:
- Brown the butter in a small saucepan over medium heat for 5 to 7 minutes, stirring often, until it smells nutty and the bottom shows golden-brown bits.
- Pour the butter into a bowl and let it cool for 10 minutes so it does not scramble the eggs.
- Whisk in both sugars, then add the eggs, yolk, vanilla, and espresso powder until the mixture thickens.
- Fold in the cocoa, flour, and salt, then stir in the chopped chocolate.
- Spread into a parchment-lined 8-inch square pan and bake at 350°F (175°C) for 24 to 27 minutes.
- Cool completely before slicing so the brown butter flavor settles in.
Equipment for This Recipe:
- Small saucepan — needed for browning the butter.
- 8-inch square baking pan — keeps the brownies thick.
- Whisk — for the eggs and sugar.
- Rubber spatula — to fold in the dry ingredients.
- Cooling rack — helps the pan cool evenly.
How to Serve This Dish:
These brownies go well with black coffee or plain whipped cream because the flavor is already busy in the best way. I like them cut a little smaller than plain brownies; the brown butter makes each square taste richer, and you do not need a huge piece.
Pro Tips for This Recipe:
- Watch the butter carefully once it starts foaming. Brown butter turns from nutty to burnt fast.
- Cool the butter before adding the eggs. Warm, not hot.
- Use espresso powder, not brewed coffee. Powder gives the flavor without watering down the batter.
- Let the brownies rest overnight if you can. The toasted flavor gets better after a day.
Variations on This Dish:
- Hazelnut Brown Butter: Fold in 1/2 cup chopped hazelnuts for a praline-like finish.
- Salted Top: Sprinkle flaky salt on the surface right after baking for a sharper sweet-salty edge.
- Extra Dark Version: Swap in black cocoa for 1/4 cup of the Dutch cocoa if you want a near-ink color and a firmer chocolate hit.
Common Mistakes to Avoid with This Dish:
- Burning the butter: If the milk solids go black, the flavor turns bitter. Pull it off heat when it smells like toasted nuts.
- Using too much espresso powder: More is not better here. One tablespoon is enough to support the chocolate.
- Slicing while warm: The center needs time to set after the brown butter goes in.
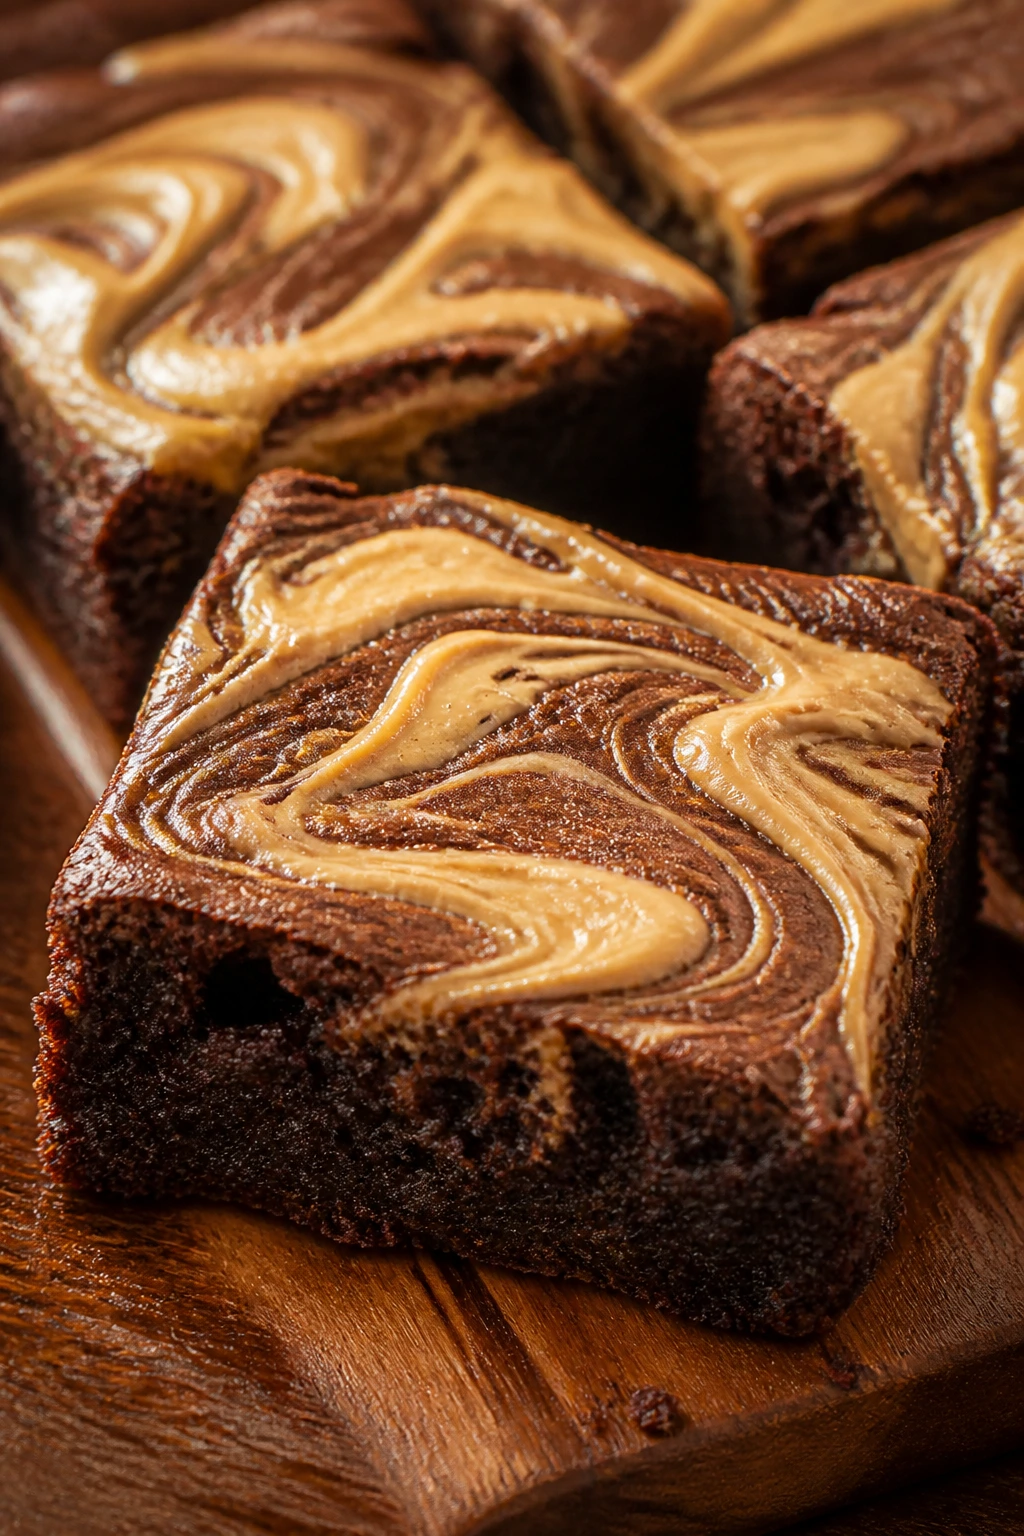
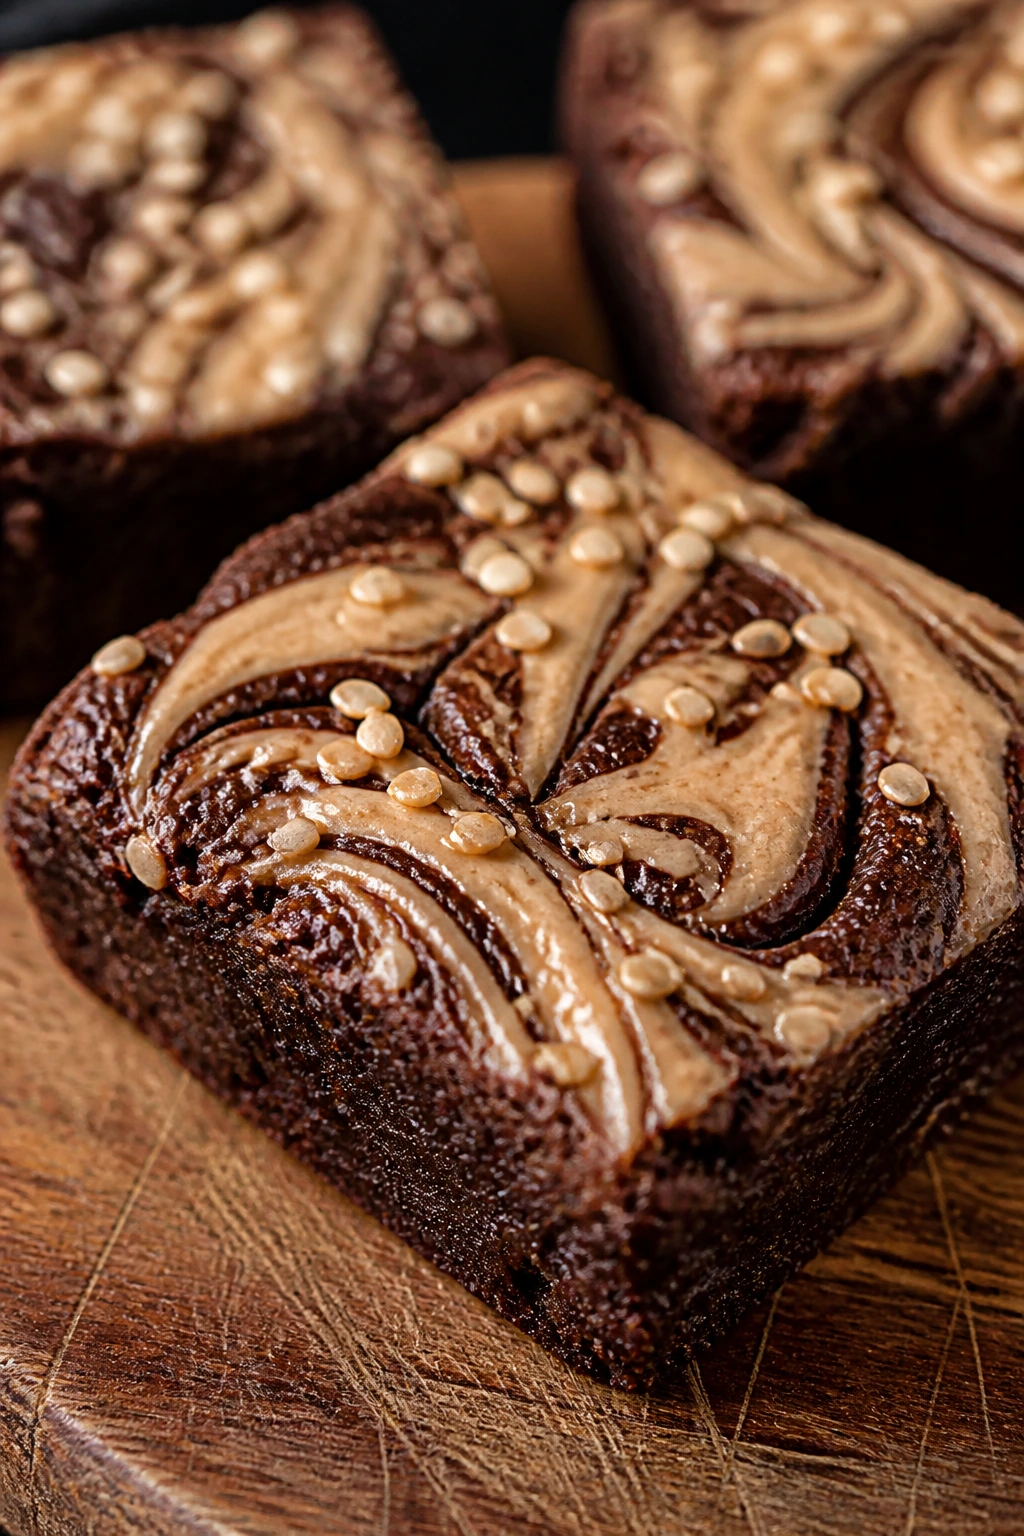
3. Peanut Butter Swirl Brownies
Peanut butter and chocolate still work because one is salty, soft, and nutty while the other is dark and dense. In brownie form, they melt into each other without losing their own shape.
The swirls make these look more involved than they are. That’s a nice trick on a tired night.
Why It Works:
The brownie base stays simple and fudgy, which gives the peanut butter swirl room to stand out instead of disappearing. Mixing the peanut butter with a little powdered sugar and milk loosens it enough to drag into ribbons without sinking. The salt in the peanut butter also gives the chocolate more contrast.
Key Ingredients:
- 1/2 cup unsalted butter, melted — builds the brownie base.
- 1 cup granulated sugar — helps with the crackly top.
- 2 large eggs — hold the batter together.
- 1 teaspoon vanilla extract — softens the cocoa edge.
- 1/2 cup unsweetened cocoa powder — the brownie base.
- 3/4 cup all-purpose flour — keeps the squares intact.
- 1/2 teaspoon fine salt — important because peanut butter needs salt.
- 1/2 cup creamy peanut butter — use a well-stirred jar for a smooth swirl.
- 2 tablespoons powdered sugar — thickens the peanut butter layer.
- 1 tablespoon milk — loosens the swirl just enough to marble.
Quick Steps:
- Preheat the oven to 350°F (175°C) and line an 8-inch square pan with parchment.
- Mix the melted butter and sugar, then whisk in the eggs and vanilla until glossy.
- Fold in the cocoa, flour, and salt until the batter is just combined.
- Stir the peanut butter, powdered sugar, and milk together in a small bowl until smooth.
- Spread the brownie batter into the pan, dollop the peanut butter mixture over the top, and swirl it once or twice with a knife.
- Bake for 25 to 29 minutes, until the edges are set and the center still looks a little soft.
- Cool fully before slicing, because the swirl firms up as it cools.
Equipment for This Recipe:
- 8-inch square baking pan — thick enough for good swirls.
- Small bowl — for the peanut butter mixture.
- Butter knife or skewer — for the marbling.
- Whisk and spatula — for the brownie batter.
- Parchment paper — makes clean removal easy.
How to Serve This Dish:
These are excellent slightly warm, with a spoonful of vanilla ice cream that melts into the peanut butter ripple. They also do well at room temperature with a glass of milk and a handful of salted peanuts on the side.
Pro Tips for This Recipe:
- Warm the peanut butter for 10 seconds in the microwave if it feels stiff.
- Swirl only once or twice. Too much marbling turns it muddy.
- Use creamy peanut butter, not a natural jar with a lot of oil separation.
- Sprinkle a few chopped peanuts on top if you want more crunch.
Variations on This Dish:
- Chocolate Peanut Butter Cup: Add 1/2 cup chopped peanut butter cups to the batter for extra pockets of candy.
- Crunchy Swirl: Swap in crunchy peanut butter and reduce the milk to 2 teaspoons.
- Darker Finish: Use black cocoa in place of 2 tablespoons of the regular cocoa for a deeper color.
Common Mistakes to Avoid with This Dish:
- Over-swirling: If you keep dragging the knife back and forth, you lose the distinct peanut butter ribbons.
- Using oily natural peanut butter: Stirring helps, but the texture can still separate and sink.
- Baking until fully firm in the center: Peanut butter brownies should come out a little soft, not dry.
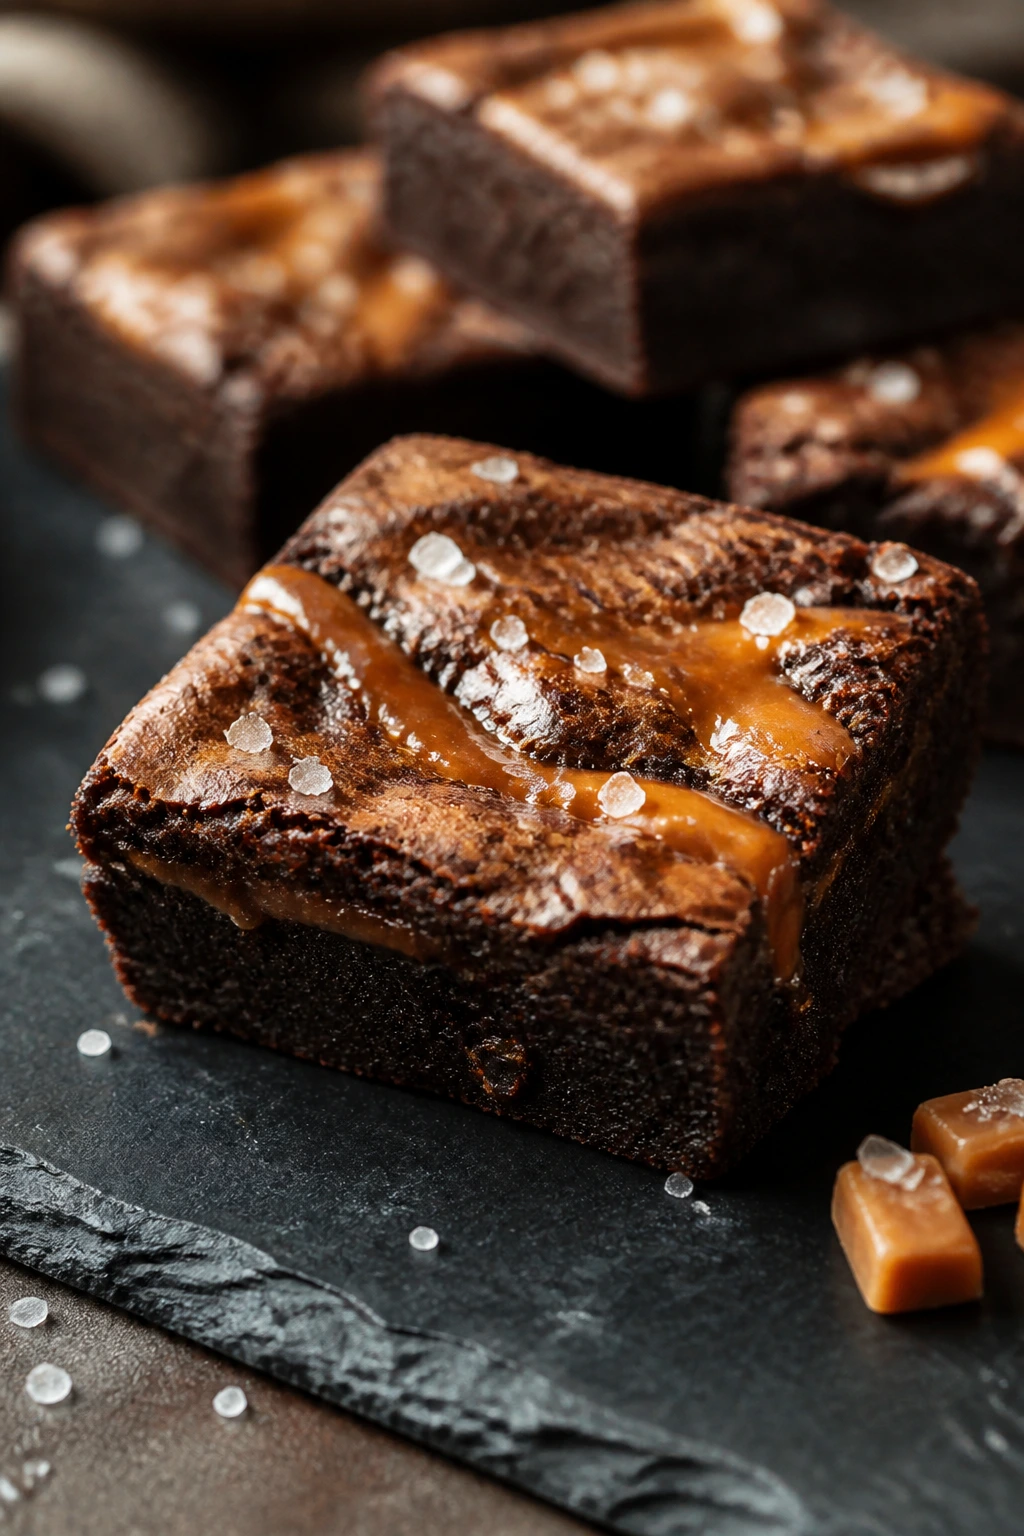
4. Salted Caramel Brownies
A caramel drizzle turns a brownie pan into something that feels like a bakery case dessert, but without much extra work. The key is using a thick caramel so it stays in ribbons instead of dissolving into the batter.
These brownies land somewhere between fudgy and gooey. The salt on top keeps the sweetness from taking over.
Why It Works:
Caramel adds chew and a buttery note that plain brownies do not have. If you keep the caramel thick and swirl it only near the surface, it stays visible and gives the top little pockets of sticky sweetness. A pinch of flaky salt after baking makes the whole pan taste sharper.
Key Ingredients:
- 1/2 cup unsalted butter, melted — for the brownie base.
- 1 cup granulated sugar — gives the crust.
- 2 large eggs — the structure.
- 1 teaspoon vanilla extract — balances the caramel.
- 1/2 cup unsweetened cocoa powder — keeps the base chocolatey.
- 3/4 cup all-purpose flour — the framework.
- 1/2 teaspoon fine salt — needed, since caramel is sweet.
- 12 soft caramel candies — melt smoothly for the swirl.
- 2 tablespoons heavy cream — loosens the caramel just enough to swirl.
- 1 teaspoon flaky salt — finish on top after baking.
- 1/2 cup chocolate chunks — optional, but nice.
Quick Steps:
- Preheat the oven to 350°F (175°C) and line an 8-inch square pan with parchment.
- Melt the caramel candies with the cream in a small saucepan over low heat, stirring until smooth.
- Make the brownie batter by whisking the melted butter, sugar, eggs, and vanilla, then folding in cocoa, flour, and salt.
- Spread half the batter in the pan, drizzle on half the caramel, then add the remaining batter and finish with the rest of the caramel.
- Drag a knife through the top once or twice to make broad swirls, then bake for 25 to 30 minutes.
- Sprinkle flaky salt over the top while the brownies are still warm, then cool before cutting.
Equipment for This Recipe:
- Small saucepan — for melting the caramel.
- 8-inch square pan — keeps the caramel layer thick.
- Parchment paper — makes the sticky edges easier to lift.
- Whisk and spatula — for the base batter.
- Butter knife — for the swirl.
How to Serve This Dish:
Serve these with plain ice cream or whipped cream, not more caramel sauce, unless you are leaning all the way in. A small square goes a long way because the caramel makes each bite taste richer than it looks.
Pro Tips for This Recipe:
- Use soft caramels, not hard candies. Hard caramels fight you and scorch easier.
- Keep the caramel thick. Thin caramel disappears into the batter.
- Add the flaky salt after baking so it stays on top.
- Let the brownies cool before moving them. The caramel layer is sticky while warm.
Variations on This Dish:
- Sea Salt Espresso Caramel: Add 1 teaspoon espresso powder to the brownie batter for a deeper chocolate note.
- Chocolate Chip Caramel: Fold 1/2 cup chocolate chips into the base and keep the caramel swirl on top.
- Nutty Caramel: Sprinkle 1/2 cup chopped pecans over the caramel before baking.
Common Mistakes to Avoid with This Dish:
- Using too much caramel: Heavy drizzles can make the center gummy instead of fudgy.
- Adding salt before baking: It melts into the batter and disappears.
- Not lining the pan: Sticky caramel on bare metal is a mess no one wants.
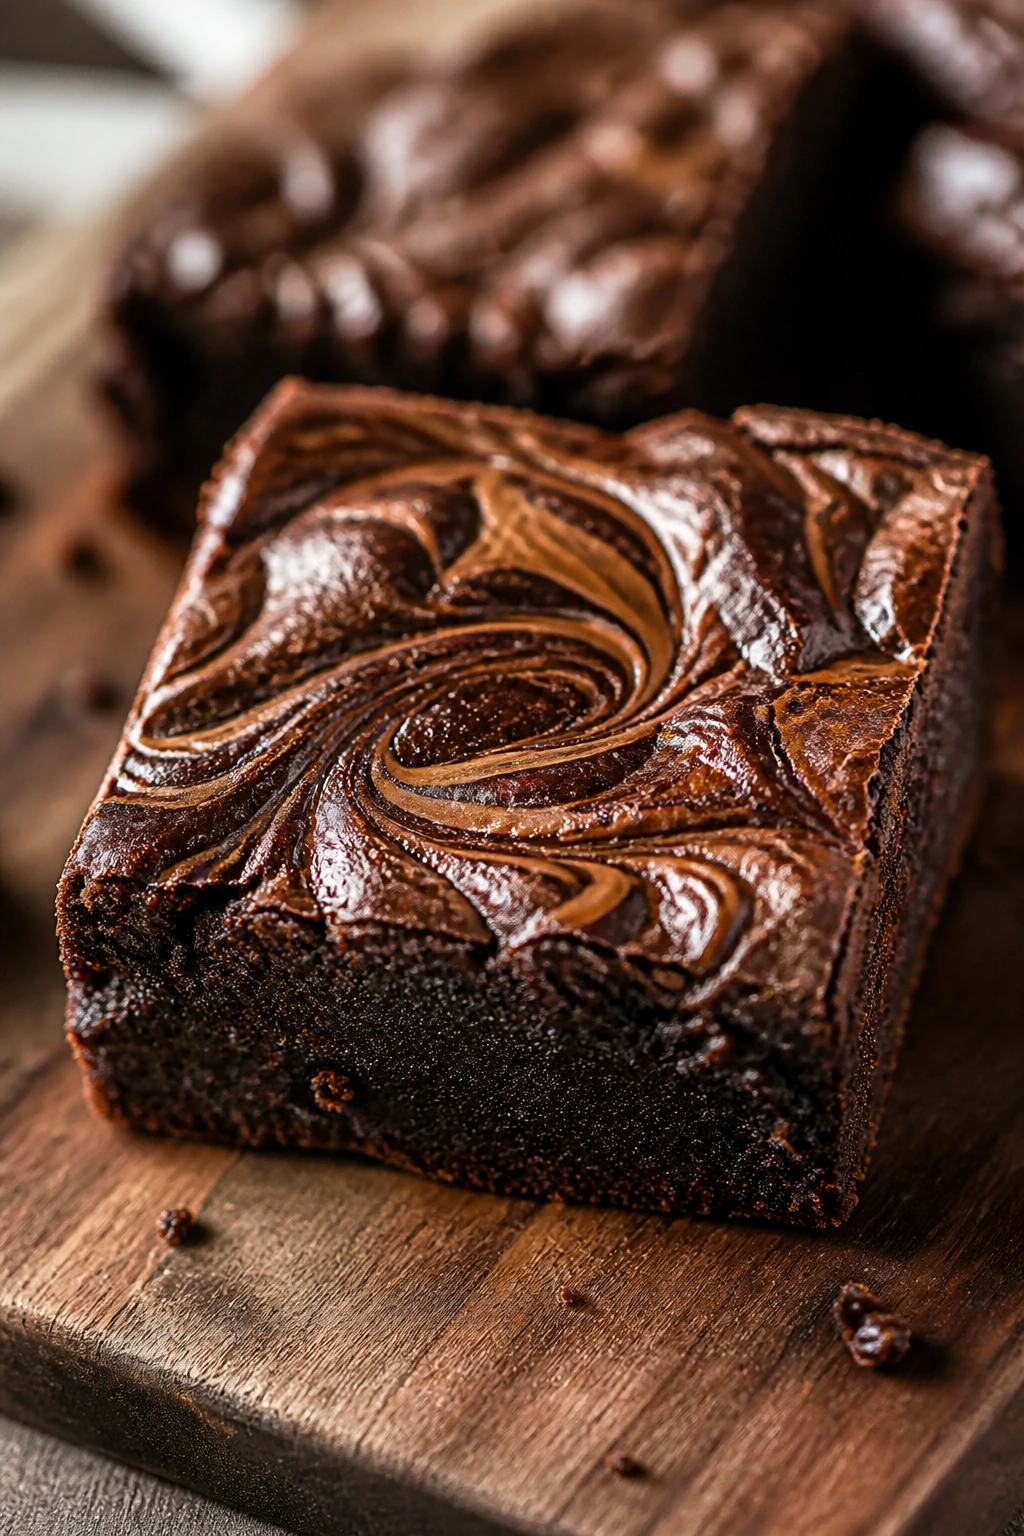
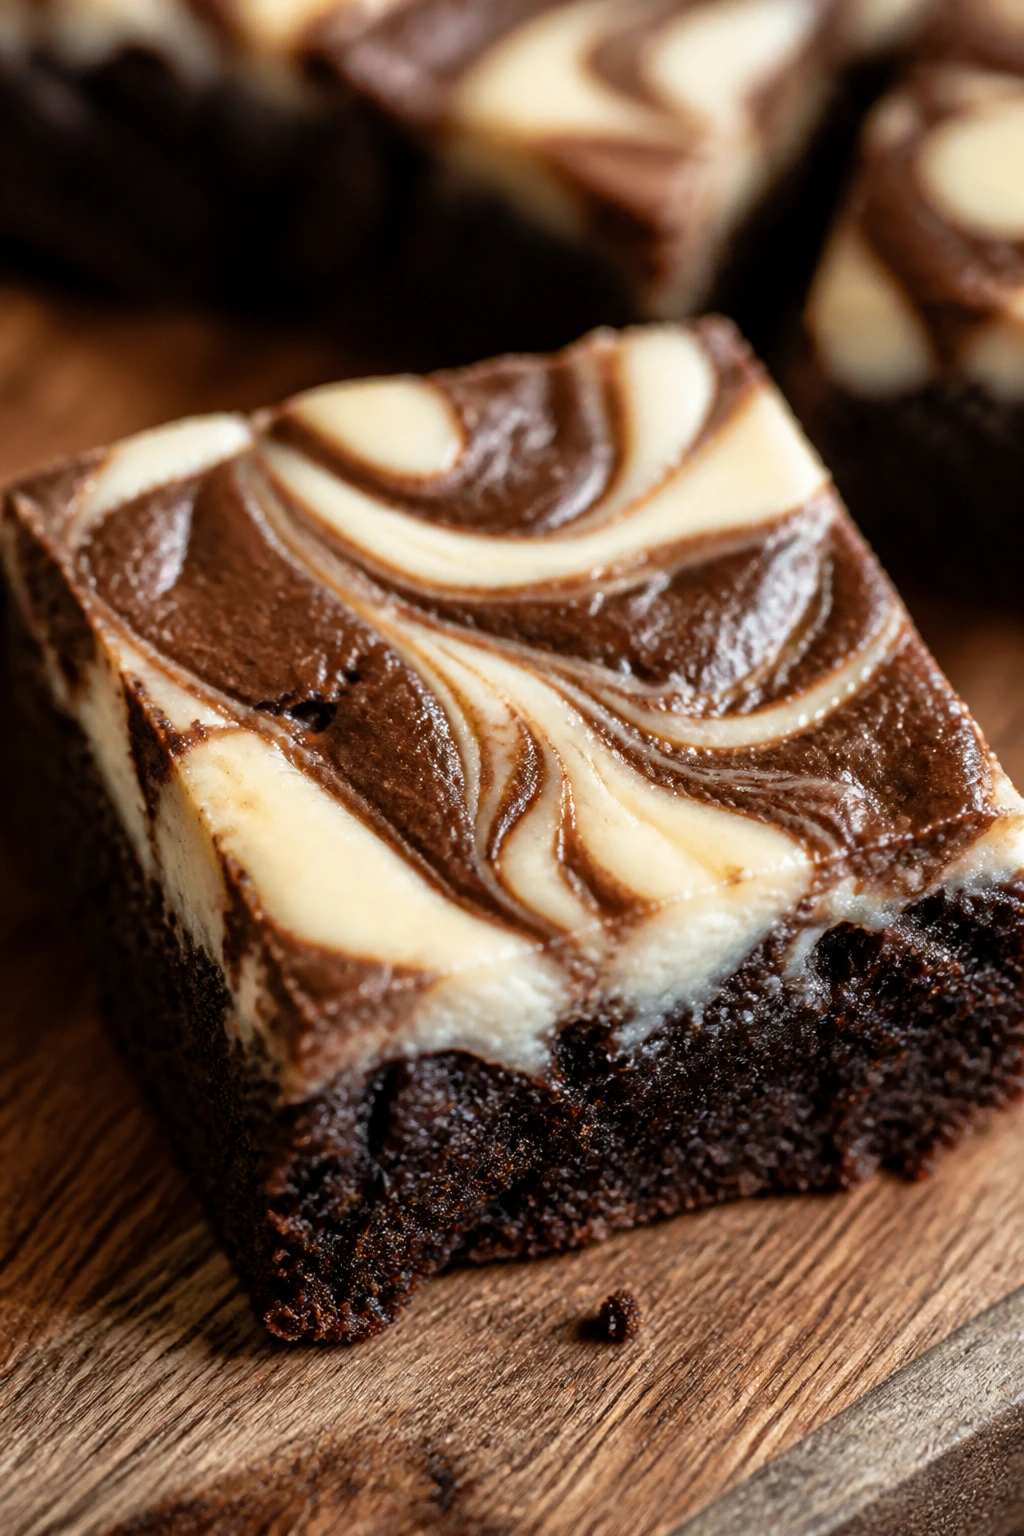
5. Cream Cheese Swirl Brownies
Cream cheese and chocolate have the same effect as a good black-and-white cookie: each side is nicer because the other one is there. The swirl makes the top look like something from a bakery, even though the batter is straightforward.
These are a little lighter on the tongue than straight fudge brownies. The tang from the cream cheese keeps the sweetness from feeling heavy.
Why It Works:
The cream cheese layer adds acidity, so the brownie tastes less one-note. A little sugar, an egg yolk, and a touch of flour make the swirl set softly instead of turning runny. The contrast between the dense chocolate base and the pale swirl gives each square a clean, marbled look.
Key Ingredients:
- 1/2 cup unsalted butter, melted — for the brownie base.
- 1 cup granulated sugar — for sweetness and crust.
- 2 large eggs — binder for the base.
- 1 teaspoon vanilla extract — rounds out the chocolate.
- 1/2 cup unsweetened cocoa powder — the base flavor.
- 3/4 cup all-purpose flour — structure.
- 1/2 teaspoon fine salt — keeps the chocolate from tasting flat.
- 8 ounces cream cheese, softened — the swirl layer.
- 1/4 cup granulated sugar — sweetens the swirl.
- 1 large egg yolk — helps the cream cheese set.
- 1 teaspoon vanilla extract — softens the tang.
- 1 tablespoon all-purpose flour — keeps the swirl from weeping.
Quick Steps:
- Preheat the oven to 350°F (175°C) and line an 8-inch square pan with parchment.
- Beat the softened cream cheese, sugar, egg yolk, vanilla, and flour in a small bowl until smooth.
- In a separate bowl, whisk the melted butter, sugar, eggs, and vanilla, then fold in cocoa, flour, and salt.
- Spread the brownie batter in the pan and dollop the cream cheese mixture on top.
- Swirl the top with a knife in broad S-shapes, then bake for 26 to 30 minutes.
- Cool fully, then chill for 20 minutes if you want very clean slices.
Equipment for This Recipe:
- 8-inch square baking pan — a smaller pan keeps the swirl thick.
- Mixing bowl for the base and a second bowl for the swirl.
- Hand mixer or sturdy whisk — the cream cheese needs to be smooth.
- Parchment paper — helps the dense brownies lift cleanly.
- Knife or skewer — for the marbling.
How to Serve This Dish:
These are nice chilled or at cool room temperature, especially if you want neat edges on the cream cheese swirl. A few fresh raspberries on the plate make the tang in the filling taste brighter.
Pro Tips for This Recipe:
- Soften the cream cheese all the way. Lumpy swirl batter shows up in the final squares.
- Don’t over-swirl. A few turns are enough.
- Chill before slicing if you want bakery-style edges.
- Use room-temperature eggs so the swirl sets evenly.
Variations on This Dish:
- Lemon Cheesecake Brownies: Add 1 teaspoon lemon zest to the cream cheese mixture.
- Raspberry Swirl: Spoon 2 tablespoons of thick raspberry jam between the brownie and cream cheese layers.
- Chocolate Chip Cheesecake: Fold 1/4 cup mini chips into the swirl.
Common Mistakes to Avoid with This Dish:
- Using cold cream cheese: It leaves little lumps that never melt out in the oven.
- Baking too long: The swirl should be set, not dry and crumbly.
- Slicing warm: The cream cheese layer needs time to firm up.
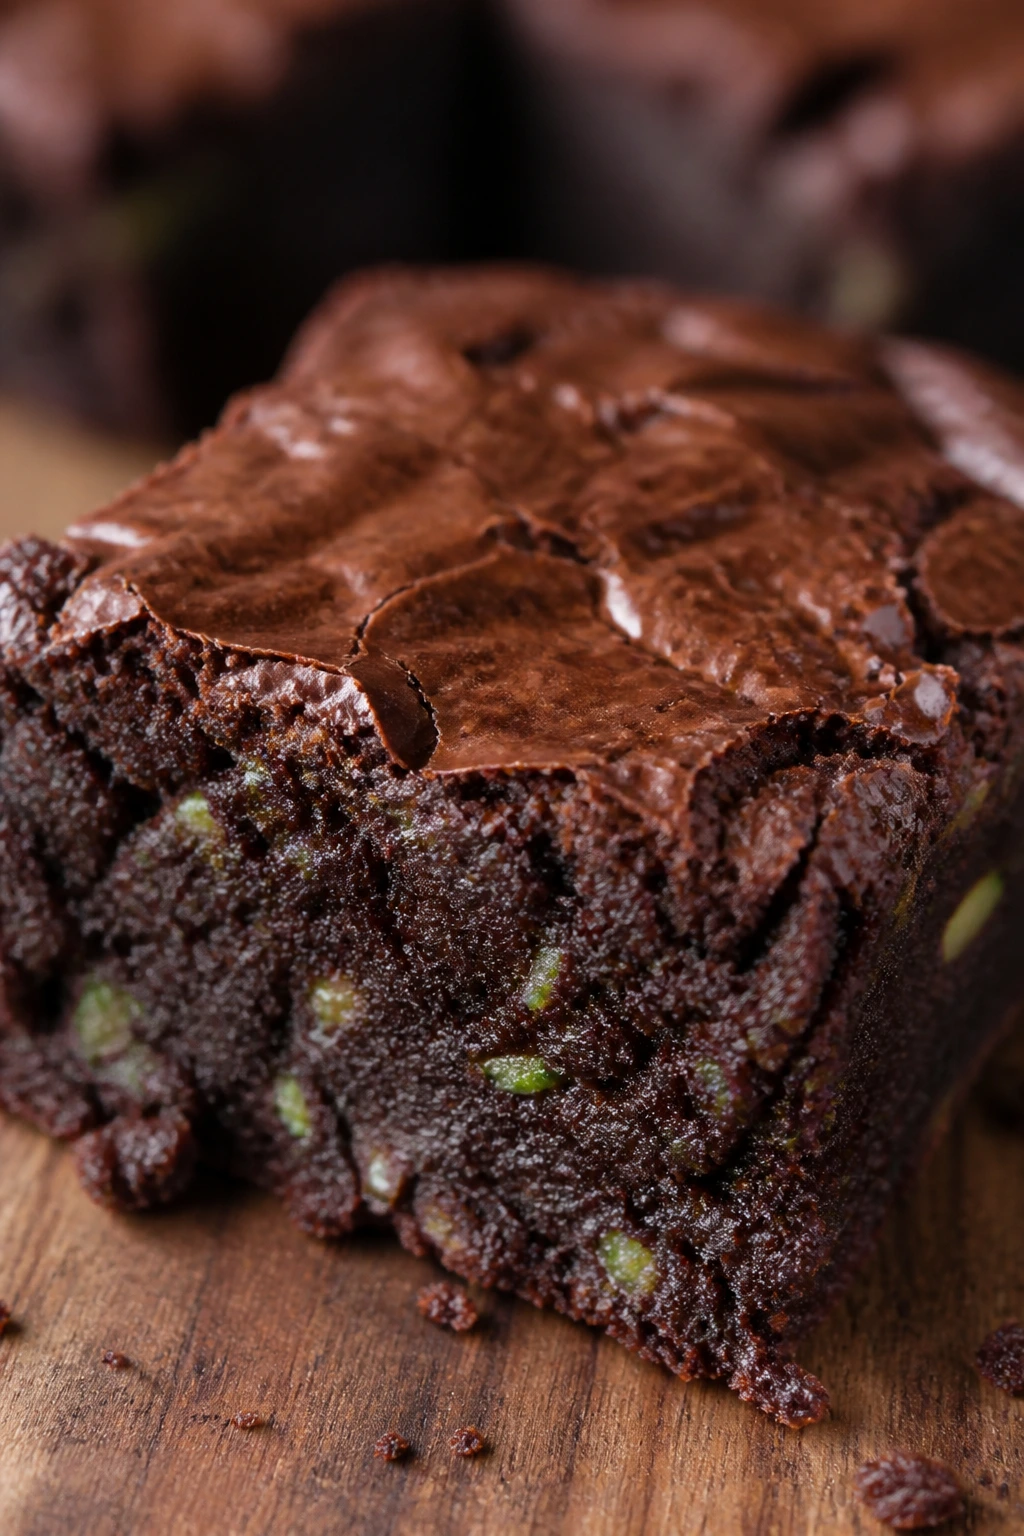
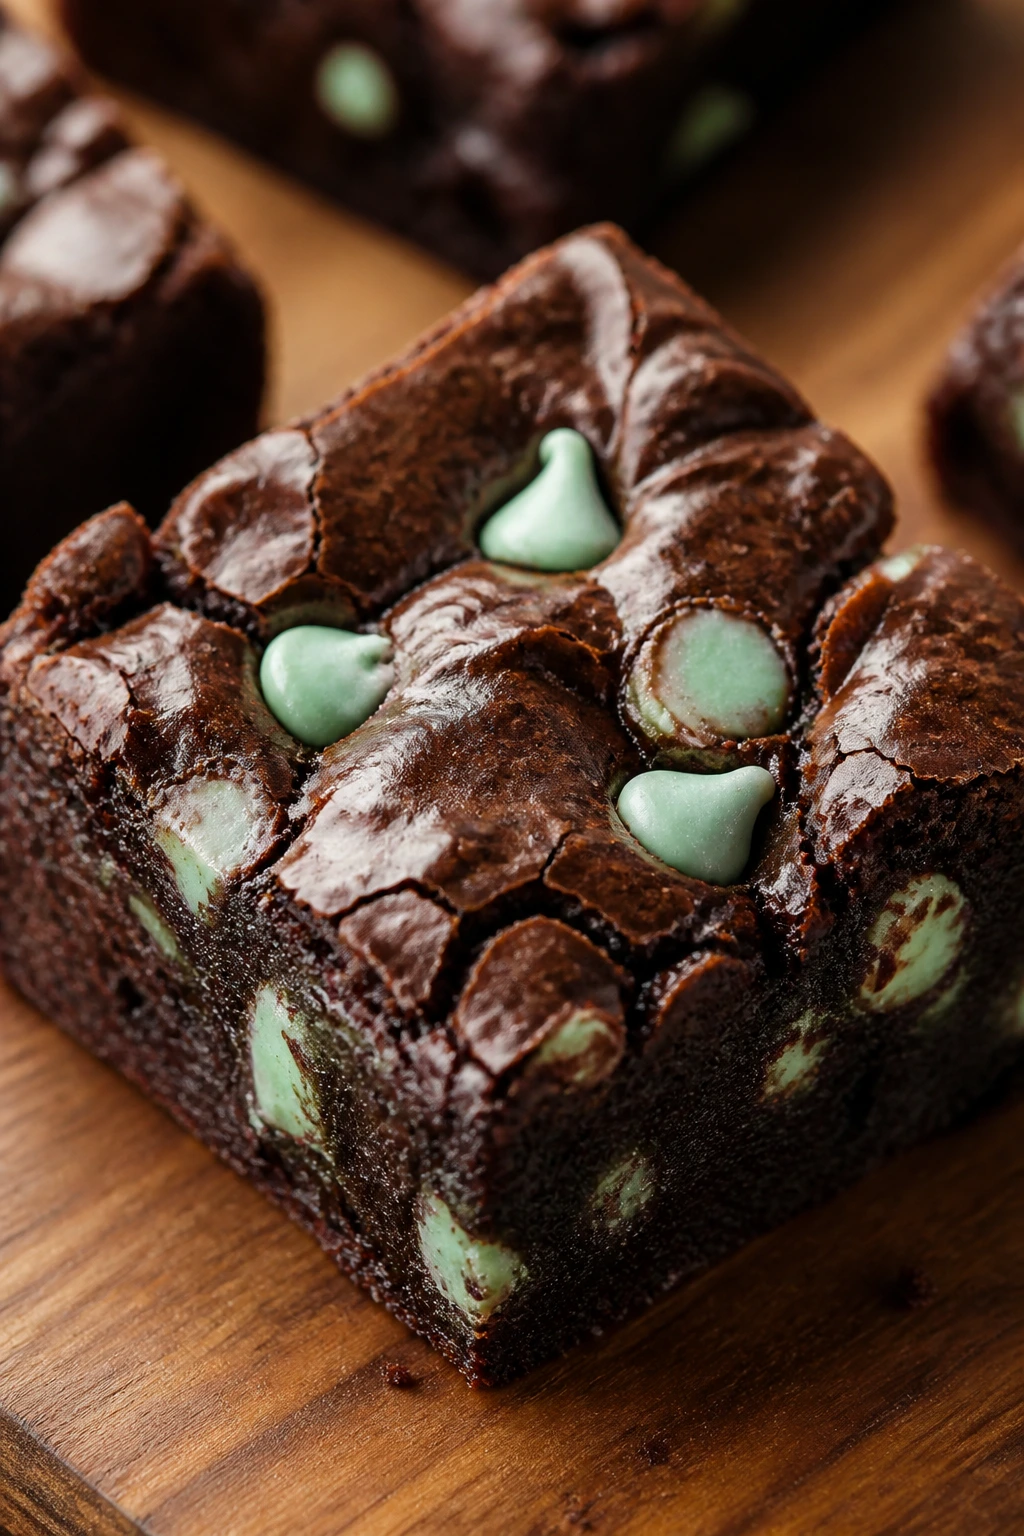
6. Mint Chocolate Brownies
Mint brownies can go wrong fast if the peppermint is too loud. Kept in check, though, they give you that cool, clean finish that makes the chocolate taste even darker.
These are the brownies I make when I want something that feels a little sharper and less heavy. The mint should whisper, not shout.
Why It Works:
Peppermint extract adds a cold, clean note that brightens the cocoa without adding moisture. Mint chocolate chips or chopped mint candies melt into little pockets, so you get both flavor and texture. Because the brownie base is still simple, the mint stays front and center instead of getting buried.
Key Ingredients:
- 1/2 cup unsalted butter, melted — keeps the base fudgy.
- 1 cup granulated sugar — helps the crust form.
- 2 large eggs — give the batter structure.
- 1 teaspoon vanilla extract — softens the mint edge.
- 1/2 to 1 teaspoon peppermint extract — start with less; mint can take over fast.
- 1/2 cup unsweetened cocoa powder — the chocolate base.
- 3/4 cup all-purpose flour — enough to hold the pan together.
- 1/2 teaspoon fine salt — balances the sweetness.
- 3/4 cup semisweet chocolate chips — for the melted chocolate pockets.
- 1/2 cup chopped mint chocolate candies or mint chips — the cool finish.
Quick Steps:
- Preheat the oven to 350°F (175°C) and line an 8-inch square pan with parchment.
- Whisk the melted butter and sugar, then add the eggs, vanilla, and peppermint extract.
- Fold in the cocoa, flour, and salt until just combined.
- Stir in the chocolate chips and mint pieces, then spread the batter into the pan.
- Bake for 24 to 27 minutes, until the center is set but still a little soft.
- Cool completely before cutting so the mint pieces do not smear.
Equipment for This Recipe:
- Square baking pan — 8 inches is ideal.
- Parchment paper — makes clean removal easier.
- Mixing bowl and whisk — enough for a simple batter.
- Spatula — for folding in the chips.
- Sharp knife — the mint bits cut cleaner once the brownies cool.
How to Serve This Dish:
These taste best at room temperature with a cold glass of milk or a plain cup of coffee. If you want a little extra drama, drizzle the squares with melted chocolate and a few crushed mint candies on top.
Pro Tips for This Recipe:
- Start with 1/2 teaspoon peppermint extract. You can always add more next time.
- Use real peppermint extract, not spearmint flavoring, if you want that classic cool taste.
- Let the brownies cool fully before slicing so the mint chips stay neat.
- Keep the topping simple. Too many add-ons make the mint taste muddy.
Variations on This Dish:
- Peppermint Bark Brownies: Scatter crushed peppermint bark over the top after baking.
- Dark Mint Version: Use dark chocolate chips instead of semisweet for a stronger cocoa base.
- Frosted Mint: Spread a thin layer of chocolate ganache over the cooled brownies.
Common Mistakes to Avoid with This Dish:
- Overdoing the extract: Too much peppermint tastes like toothpaste, and the pan won’t recover.
- Using mint candies that are too soft: They can melt into streaks instead of staying in pieces.
- Cutting too soon: Mint chips smear if the pan is still warm.
7. Tahini Swirl Brownies
Tahini in brownies sounds odd until you taste it. Then it makes sense: sesame brings a nutty, savory note that keeps the chocolate from feeling too sweet.
This version is the most grown-up of the bunch, and I mean that in a good way. It has a little edge.
Why It Works:
Tahini has a smooth, bitter-nutty flavor that plays well with cocoa. When you sweeten it slightly and swirl it over the batter, it becomes a ribbon instead of a heavy layer. A pinch of sesame seeds on top adds a faint crunch and makes the finished squares feel more finished.
Key Ingredients:
- 1/2 cup unsalted butter, melted — for the brownie base.
- 1 cup granulated sugar — enough for a crackly top.
- 2 large eggs — structure and lift.
- 1 teaspoon vanilla extract — softens the sesame note.
- 1/2 cup unsweetened cocoa powder — chocolate backbone.
- 3/4 cup all-purpose flour — sets the crumb.
- 1/2 teaspoon fine salt — especially useful with tahini.
- 1/3 cup tahini — use a smooth, runny jar.
- 2 tablespoons honey or maple syrup — sweetens the swirl.
- 1 tablespoon sesame seeds — optional, for the top.
Quick Steps:
- Preheat the oven to 350°F (175°C) and line an 8-inch square pan with parchment.
- Stir the tahini and honey together until smooth and glossy.
- Whisk the melted butter, sugar, eggs, and vanilla in a bowl until well blended.
- Fold in the cocoa, flour, and salt, then spread the batter in the pan.
- Spoon the tahini mixture over the top and swirl it lightly with a skewer.
- Bake for 25 to 29 minutes, then cool before slicing.
Equipment for This Recipe:
- 8-inch square pan — thick enough for the swirl.
- Small bowl — for the tahini mixture.
- Whisk and spatula — the standard brownie pair.
- Skewer or knife — for the swirl pattern.
- Parchment paper — always worth it.
How to Serve This Dish:
These are excellent with coffee or black tea because the sesame can hold its own against something bitter. A pinch of flaky salt on the cut squares makes the tahini taste deeper and less sweet.
Pro Tips for This Recipe:
- Stir the tahini jar well before measuring. The oil separation changes the texture.
- Use a runny tahini, not a dry paste.
- Swirl shallowly so the tahini stays visible.
- A little flaky salt on top after baking makes the sesame taste more pronounced.
Variations on This Dish:
- Chocolate Halva Style: Add 2 tablespoons sesame seeds and 1/4 teaspoon cardamom.
- Dark Tahini: Swap in black sesame tahini if you want a darker, nuttier finish.
- Orange-Sesame: Add 1 teaspoon orange zest to the batter for a bright note.
Common Mistakes to Avoid with This Dish:
- Using separated tahini straight from the jar: Stir it first or the swirl can break.
- Overbaking: Tahini brownies dry out faster than plain brownies if you leave them too long.
- Trying to make the swirl too neat: A loose marble looks better and tastes the same.
8. Black Bean Blender Brownies
These are the brownies you make when the pantry is looking thin and you still want chocolate. The black beans disappear into the batter when they’re blended smooth, leaving behind moisture and body, not a bean flavor.
The blender does the heavy lifting here. That means less stirring and a batter that comes together fast.
Why It Works:
Black beans add starch and moisture, which helps the brownies stay soft without a long ingredient list. The cocoa and sugar cover the bean flavor when the batter is blended completely smooth. Oat flour keeps the crumb a little denser than cake, which suits this style.
Key Ingredients:
- 1 can (15 ounces) black beans, rinsed and drained — rinse well so the batter doesn’t taste canned.
- 2 large eggs — bind everything together.
- 1/3 cup neutral oil — keeps the brownies soft.
- 3/4 cup granulated sugar — covers the bean flavor and helps the crust.
- 1/2 cup unsweetened cocoa powder — the dominant flavor.
- 1/2 cup oat flour — or finely ground oats.
- 1 teaspoon vanilla extract — rounds out the batter.
- 1 teaspoon baking powder — gives a little lift.
- 1/2 teaspoon fine salt — balances the cocoa.
- 1/2 cup chocolate chips — for pockets of melted chocolate.
Quick Steps:
- Preheat the oven to 350°F (175°C) and line an 8-inch square pan with parchment.
- Add the black beans, eggs, oil, sugar, cocoa, oat flour, vanilla, baking powder, and salt to a blender or food processor.
- Blend for 45 to 60 seconds, scraping down once, until the batter looks completely smooth.
- Stir in the chocolate chips by hand so they do not get chopped up.
- Spread the batter into the pan and bake for 27 to 31 minutes, until the center is set but still soft.
- Cool fully before cutting, because these brownies firm up a lot as they cool.
Equipment for This Recipe:
- Blender or food processor — essential for a smooth texture.
- 8-inch square pan — the batter is dense and likes a smaller pan.
- Parchment paper — helps lift the brownies cleanly.
- Spatula — for scraping the blender bowl.
- Cooling rack — keeps the bottom from steaming.
How to Serve This Dish:
Serve these at room temperature with berries or a dusting of powdered sugar. They’re especially nice with a spoonful of yogurt on the side if you want the tang to cut through the cocoa.
Pro Tips for This Recipe:
- Rinse the beans until the water runs clear.
- Blend until the batter is silky. Any bean pieces will show up in the final squares.
- Let the brownies cool completely. The texture improves a lot after resting.
- Use oat flour or ground oats for a finer crumb.
Variations on This Dish:
- Fudgier Version: Add 2 tablespoons melted butter for a richer mouthfeel.
- Peanut Butter Blend: Swirl 1/4 cup peanut butter across the top before baking.
- Mocha Black Bean: Add 1 teaspoon espresso powder to deepen the chocolate.
Common Mistakes to Avoid with This Dish:
- Leaving the beans under-rinsed: Canned flavor can linger if you rush the rinse.
- Stopping the blender too early: The batter should look smooth, not speckled with bean skins.
- Serving them warm from the oven: The texture needs time to settle.
9. Gluten-Free Almond Flour Brownies
Almond flour gives brownies a softer, almost truffle-like crumb. The squares stay tender without needing wheat flour, and the chocolate comes through clean because almond flour does not fight it.
This is one of the easiest gluten-free brownies to get right. The batter is simple, and the oven does the rest.
Why It Works:
Blanched almond flour has enough fat to keep the brownies moist and enough structure to hold the pan together. Eggs provide the lift, while cocoa and chocolate chips keep the flavor firmly in brownie territory. The result is dense, soft, and a little more delicate than a standard wheat-flour pan.
Key Ingredients:
- 2 cups blanched almond flour — use blanched flour, not almond meal.
- 3/4 cup unsweetened cocoa powder — the chocolate base.
- 1 cup granulated sugar — needed for sweetness and crust.
- 3 large eggs — bind the almond flour.
- 1/2 cup unsalted butter, melted and cooled slightly — for richness.
- 1 teaspoon vanilla extract — rounds out the cocoa.
- 1/2 teaspoon baking powder — gives a little lift.
- 1/2 teaspoon fine salt — balances the sweetness.
- 1/2 cup chocolate chips — for extra chocolate pockets.
Quick Steps:
- Preheat the oven to 350°F (175°C) and line an 8-inch square pan with parchment.
- Whisk the sugar, eggs, melted butter, and vanilla until smooth.
- Fold in the almond flour, cocoa, baking powder, and salt until the batter thickens.
- Stir in the chocolate chips.
- Spread the batter into the pan and bake for 22 to 26 minutes, until the center is just set.
- Cool completely before cutting; almond flour brownies need time to finish setting.
Equipment for This Recipe:
- 8-inch square pan — thicker brownies work better here.
- Mixing bowl — large enough for the thick batter.
- Whisk and spatula — the whisk starts the batter, the spatula finishes it.
- Parchment paper — the brownies are tender and lift best this way.
- Cooling rack — helps them set without sweating.
How to Serve This Dish:
These are nice with fresh strawberries or a spoonful of lightly sweetened whipped cream. The almond flavor in the crumb also likes a little flaky salt on top, which keeps the sweetness from running away.
Pro Tips for This Recipe:
- Use blanched almond flour, not almond meal. Meal can make the crumb gritty.
- Pull the pan a little early; almond flour brownies can go from soft to dry quickly.
- Let them cool all the way before slicing.
- If you want a darker flavor, add 1 teaspoon instant espresso powder.
Variations on This Dish:
- Almond Joy Style: Fold in 1/2 cup shredded coconut and 1/4 cup chopped almonds.
- Orange Chocolate: Add 1 teaspoon orange zest to the batter.
- Nut-Free Option: This one is not nut-free, so use a different brownie recipe instead of trying to swap almond flour straight across.
Common Mistakes to Avoid with This Dish:
- Using almond meal: It makes the brownies grainy.
- Overbaking: The center should look just set, not dry.
- Slicing hot: The crumb needs time to firm up.
10. Vegan Olive Oil Brownies
Olive oil gives these brownies a soft, almost silky crumb, and the flavor stays clean when you choose a mild bottle. The flax eggs hold everything together without dairy or butter.
These are the brownies I make when I want a plant-based pan that does not taste like a compromise. They still feel like brownies.
Why It Works:
Flax eggs thicken enough to stand in for eggs, while olive oil keeps the crumb moist for days. Cocoa powder supplies the deep chocolate note, and the sugar helps build a shiny top even without butter. A mild olive oil is worth it here; a peppery one can fight the chocolate.
Key Ingredients:
- 2 tablespoons ground flaxseed — for the flax eggs.
- 5 tablespoons warm water — to hydrate the flax.
- 1/2 cup mild olive oil — choose one that tastes soft, not grassy.
- 1 cup granulated sugar — helps with crust and sweetness.
- 3/4 cup all-purpose flour — the structure.
- 1/2 cup unsweetened cocoa powder — the chocolate base.
- 1/2 teaspoon baking powder — a little lift.
- 1/2 teaspoon fine salt — keeps the flavor grounded.
- 1 teaspoon vanilla extract — rounds out the cocoa.
- 1/2 cup dairy-free chocolate chips — for melted pockets.
Quick Steps:
- Mix the ground flaxseed and warm water in a small bowl and let it sit for 10 minutes until thick.
- Preheat the oven to 350°F (175°C) and line an 8-inch square pan with parchment.
- Whisk the olive oil and sugar together, then add the flax eggs and vanilla.
- Fold in the flour, cocoa, baking powder, and salt, then stir in the dairy-free chocolate chips.
- Spread the batter into the pan and bake for 25 to 30 minutes, until the center is set but still soft.
- Cool fully before cutting, because vegan brownies can seem fragile when warm.
Equipment for This Recipe:
- Small bowl — for the flax eggs.
- 8-inch square pan — keeps the brownies thick.
- Whisk and spatula — enough for this batter.
- Parchment paper — makes removal easy.
- Cooling rack — keeps the bottom from steaming.
How to Serve This Dish:
These do well at room temperature with raspberries or a scoop of dairy-free vanilla ice cream. If you dust the top with a little cocoa powder, the olive oil flavor stays in the background and the chocolate takes over.
Pro Tips for This Recipe:
- Use mild olive oil. Strong extra-virgin oil can make the brownies taste savory.
- Let the flax eggs gel fully before mixing.
- Don’t worry if the batter looks a little looser than a butter-based brownie.
- Chill the brownies for 20 minutes before cutting if you want neater squares.
Variations on This Dish:
- Orange Olive Oil: Add 1 teaspoon orange zest for a bright edge.
- Nutty Vegan: Fold in 1/2 cup chopped walnuts or hazelnuts.
- Sea Salt Finish: Sprinkle flaky salt over the top right after baking.
Common Mistakes to Avoid with This Dish:
- Using a heavy, peppery olive oil: The flavor can dominate the chocolate.
- Skipping the flax rest time: The batter won’t hold together as well.
- Cutting before the brownies cool: Vegan brownies need a little extra set time.
11. Zucchini Chocolate Brownies
Zucchini disappears into brownie batter in the same quiet way spinach disappears into pesto. What you get is moisture, not vegetable flavor, and that makes the crumb stay soft for days.
This is a smart way to use up a zucchini that’s sitting in the crisper drawer. The grater does the work, and the chocolate hides the rest.
Why It Works:
Zucchini brings water and tenderness to the batter, which keeps the brownies from drying out. Because the vegetable is mild, cocoa and sugar easily cover its flavor. A little baking soda helps the brownies rise just enough to keep them from feeling heavy.
Key Ingredients:
- 1 cup finely grated zucchini, lightly squeezed — leave a little moisture in it.
- 1/2 cup neutral oil — keeps the crumb soft.
- 1 cup granulated sugar — sweetness and crust.
- 1 large egg — structure.
- 1 teaspoon vanilla extract — rounds out the batter.
- 1/2 cup unsweetened cocoa powder — the chocolate flavor.
- 1 1/4 cups all-purpose flour — more flour than a fudgy brownie needs.
- 1/2 teaspoon baking soda — helps with lift.
- 1/2 teaspoon fine salt — keeps the flavor balanced.
- 3/4 cup chocolate chips — because zucchini brownies still need chocolate.
Quick Steps:
- Preheat the oven to 350°F (175°C) and line an 8-inch square pan with parchment.
- Grate the zucchini finely, then press it gently in a clean towel so it stays moist but not wet.
- Whisk the oil, sugar, egg, and vanilla in a bowl until smooth.
- Fold in the cocoa, flour, baking soda, and salt, then stir in the zucchini and chocolate chips.
- Spread the batter into the pan and bake for 30 to 34 minutes, until the center springs back lightly.
- Cool before slicing so the zucchini moisture settles into the crumb.
Equipment for This Recipe:
- Box grater — fine grating works best.
- Clean kitchen towel — for squeezing the zucchini.
- 8-inch square pan — thicker squares hold the moisture well.
- Mixing bowl and spatula — all you need.
- Parchment paper — makes removal less sticky.
How to Serve This Dish:
These brownies are good plain, but they also take well to a scoop of vanilla ice cream or a spoonful of whipped cream. The crumb stays soft, so cut them with a clean, sharp knife rather than a serrated one.
Pro Tips for This Recipe:
- Grate the zucchini finely so it disappears into the batter.
- Do not squeeze it bone dry; a little moisture is the point.
- Use semi-sweet chocolate chips if you want a sweeter pan.
- Let them cool fully, or the zucchini moisture makes the squares messy.
Variations on This Dish:
- Walnut Zucchini: Add 1/2 cup chopped walnuts for crunch.
- Double Chocolate Zucchini: Swap in dark chocolate chips for a deeper finish.
- Cinnamon Note: Add 1/2 teaspoon cinnamon if you want a warmer flavor.
Common Mistakes to Avoid with This Dish:
- Using too much zucchini: More is not better here; the batter can turn wet and heavy.
- Leaving the zucchini in big shreds: Fine grating helps it vanish into the crumb.
- Underbaking: The center should bounce back slightly, not jiggle like batter.
12. Banana Brownies
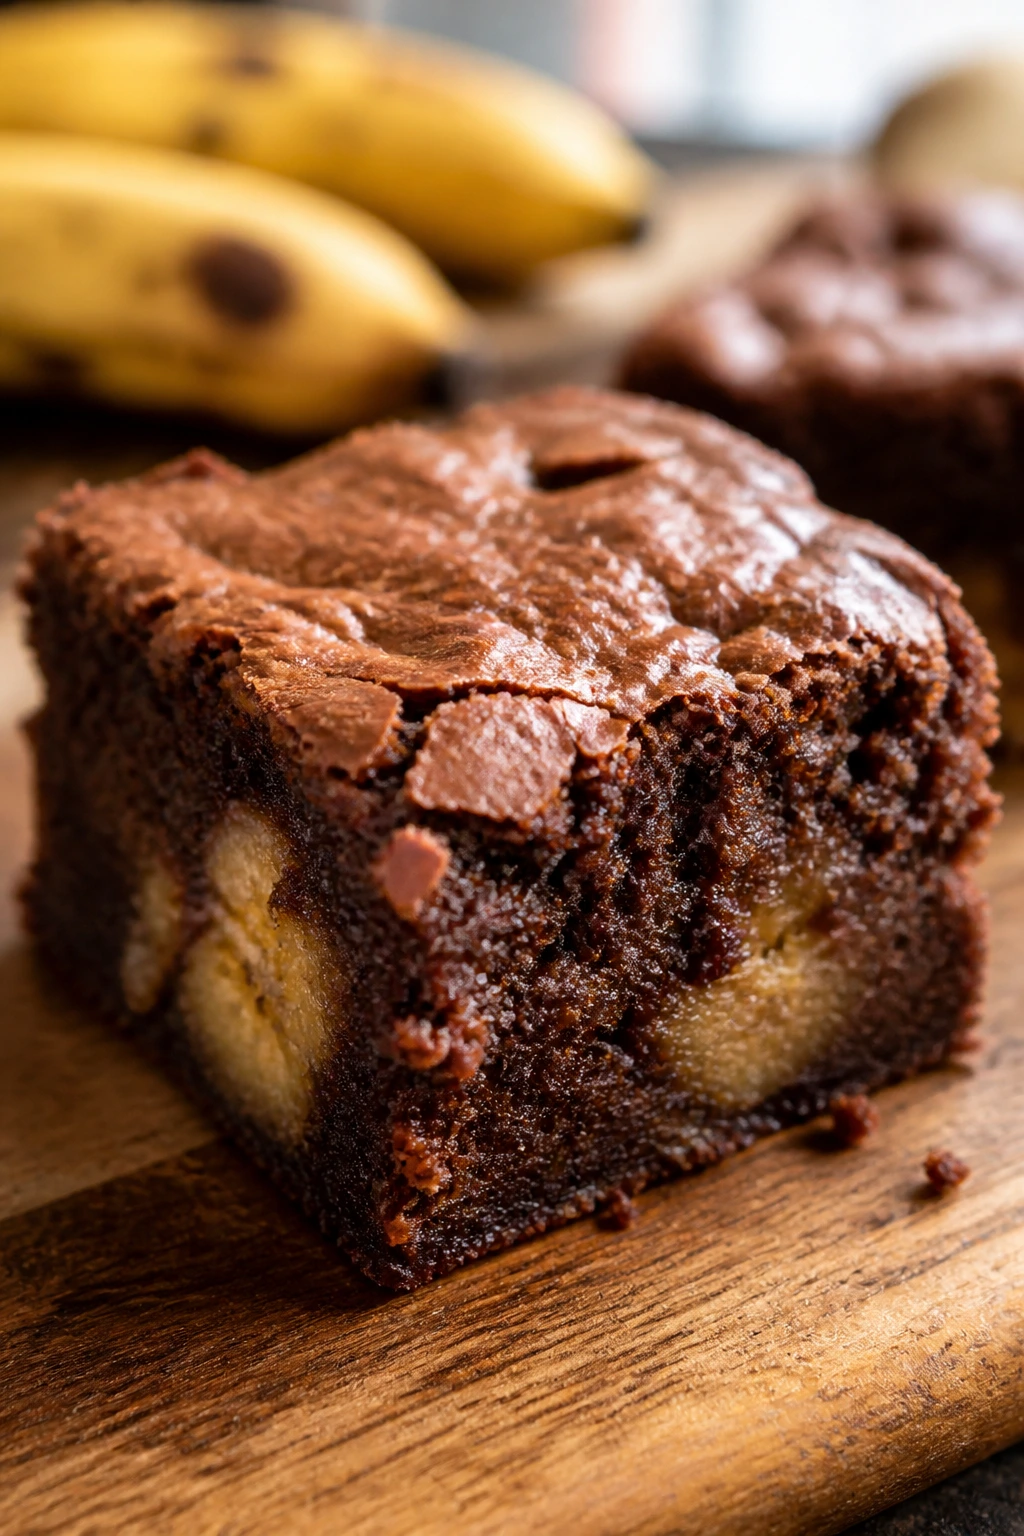
Banana brownies live in the space between dessert and a very indulgent loaf. They taste like chocolate and ripe banana in the same bite, which is a nice way to use bananas that have gone soft on the counter.
If you like banana bread and brownies, this pan is an easy yes. It is not a strict brownie, and that is part of the fun.
Why It Works:
Very ripe bananas bring sweetness and moisture, so the brownies stay soft without a long ingredient list. Brown sugar deepens the banana flavor, and cocoa keeps the batter from drifting into bread territory. A little baking powder gives just enough lift to keep the crumb tender.
Key Ingredients:
- 2 very ripe bananas, mashed — the darker the peel, the better.
- 1/2 cup unsalted butter, melted — adds richness.
- 1/2 cup packed brown sugar — brings a molasses note.
- 1 large egg — binds the batter.
- 1 teaspoon vanilla extract — rounds out the banana.
- 1/2 cup unsweetened cocoa powder — keeps the chocolate flavor strong.
- 1 cup all-purpose flour — the structure.
- 1/2 teaspoon baking powder — a little lift.
- 1/2 teaspoon fine salt — balances the sweetness.
- 1/2 cup chopped walnuts or chocolate chips — use one or both.
Quick Steps:
- Preheat the oven to 350°F (175°C) and line an 8-inch square pan with parchment.
- Mash the bananas in a bowl until mostly smooth, then whisk in the melted butter, brown sugar, egg, and vanilla.
- Fold in the cocoa, flour, baking powder, and salt until the batter is just combined.
- Stir in the walnuts or chocolate chips.
- Spread the batter into the pan and bake for 25 to 30 minutes, until the center is set and the top looks matte.
- Cool before cutting so the banana flavor settles.
Equipment for This Recipe:
- Mixing bowl — one bowl is enough.
- Fork or potato masher — for the bananas.
- 8-inch square pan — thick enough for the banana batter.
- Spatula — for folding.
- Parchment paper — makes lifting easy.
How to Serve This Dish:
These are good on their own, but they are especially nice warm with a little salted butter or a scoop of vanilla ice cream. If you want a breakfast-adjacent feel, cut them small and serve them with coffee.
Pro Tips for This Recipe:
- Use bananas with lots of brown spots.
- Mash well, but don’t chase every tiny lump.
- Walnuts add structure if you like a more bread-like bite.
- The brownies taste better after the banana flavor has had time to settle.
Variations on This Dish:
- Chocolate Chip Banana: Skip the walnuts and use all chocolate chips.
- Walnut Streusel Top: Sprinkle extra chopped walnuts over the batter before baking.
- Peanut Butter Banana: Swirl 1/4 cup peanut butter over the top for a richer pan.
Common Mistakes to Avoid with This Dish:
- Using under-ripe bananas: The flavor won’t be strong enough, and the sweetness drops.
- Overmixing after the flour goes in: That pushes the texture toward bread.
- Cutting while hot: Banana brownies need time to firm up.
13. Double Chocolate Chunk Brownies
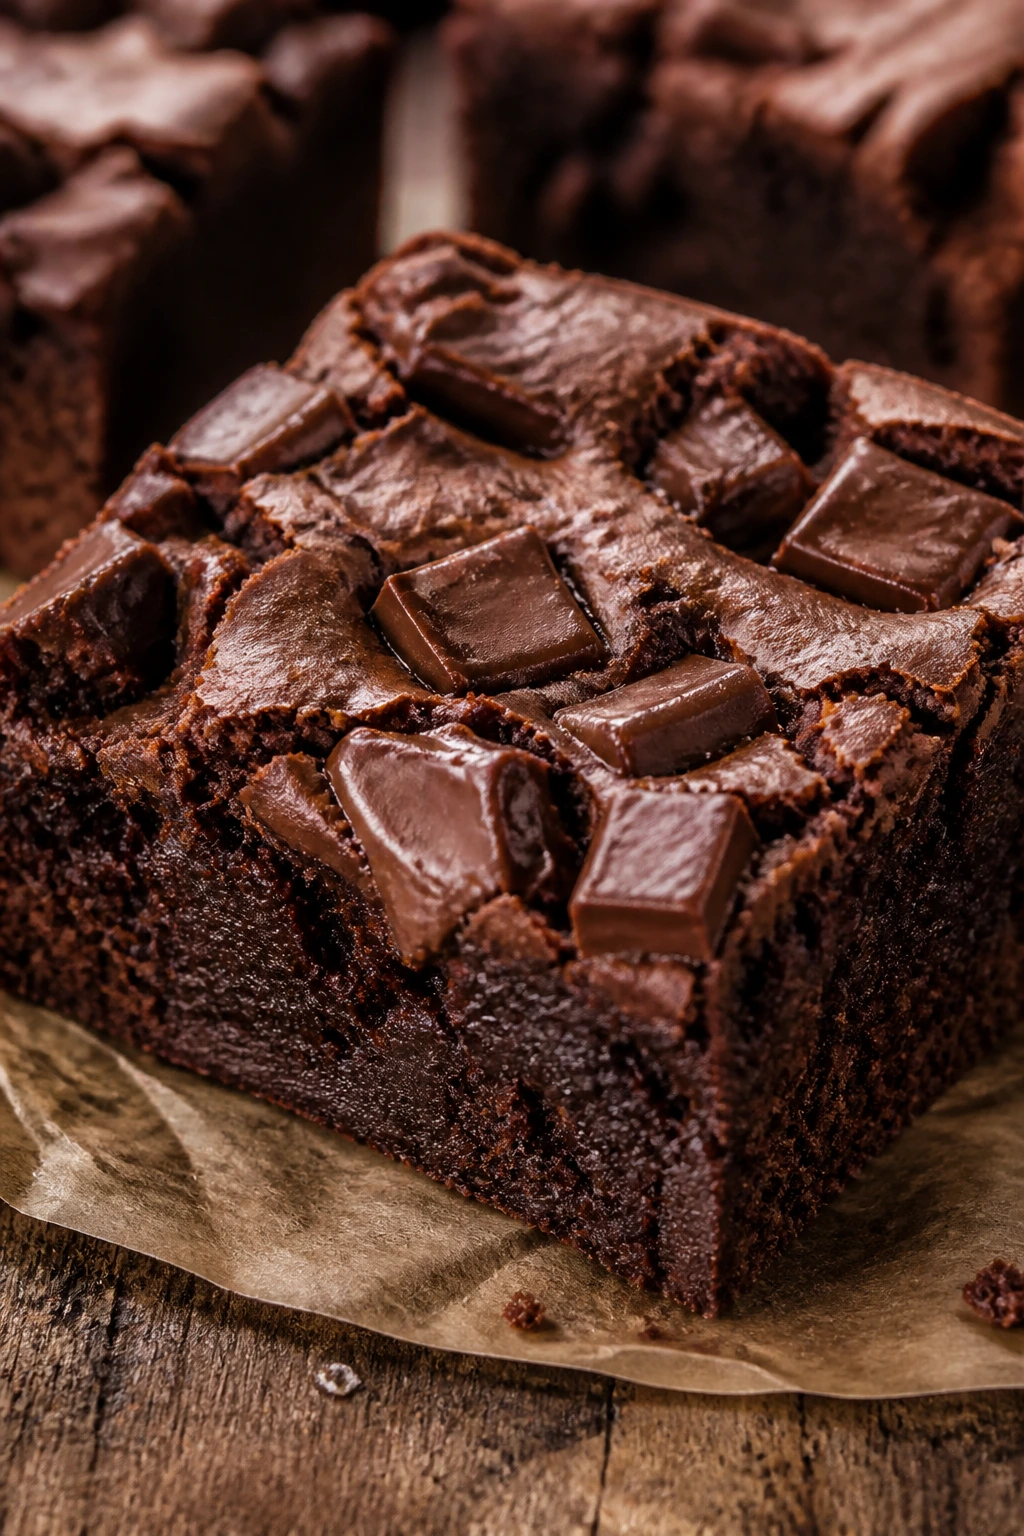
If one kind of chocolate is good, two kinds are hard to argue with. These brownies use cocoa in the batter and bigger chocolate chunks for the pockets, so every square has both a deep base and a melty bite.
This is the pan I make when I want brownies to taste unapologetically chocolatey. No subtlety needed.
Why It Works:
Cocoa powder builds the brownie base, while chopped chocolate melts into soft pockets that stay chewy as the pan cools. Keeping some chocolate on top helps the squares look craggy and bakery-like. The batter is still easy, but the final texture feels more layered than a basic cocoa pan.
Key Ingredients:
- 1/2 cup unsalted butter, melted — for the brownie base.
- 1 cup granulated sugar — creates a shiny top.
- 2 large eggs — hold the batter together.
- 1 teaspoon vanilla extract — smooths the cocoa.
- 3/4 cup unsweetened cocoa powder — the main chocolate layer.
- 3/4 cup all-purpose flour — enough structure.
- 1/2 teaspoon fine salt — keeps the flavor grounded.
- 1 cup semisweet chocolate chunks, divided — half in the batter, half on top.
- 1/2 cup dark chocolate chips or chopped chocolate — for extra pockets.
- 1 teaspoon instant espresso powder — optional, but useful.
Quick Steps:
- Preheat the oven to 350°F (175°C) and line an 8-inch square pan with parchment.
- Whisk the melted butter and sugar, then add the eggs and vanilla until the batter looks thick.
- Fold in the cocoa, flour, salt, and espresso powder if using.
- Stir in half the chocolate chunks and half the chips, then spread the batter into the pan.
- Scatter the remaining chocolate over the top and bake for 24 to 28 minutes.
- Cool before slicing so the chocolate pockets stay distinct.
Equipment for This Recipe:
- 8-inch square pan — keeps the brownies thick enough for the chunks.
- Mixing bowl and whisk — all you need for the batter.
- Spatula — to fold in the chocolate.
- Parchment paper — for easy removal.
- Cooling rack — prevents a soggy bottom.
How to Serve This Dish:
These brownies can stand on their own, but a scoop of vanilla ice cream makes the melted chocolate chunks even better. A few raspberries on the plate give the rich squares a little acid and keep the dessert from feeling heavy.
Pro Tips for This Recipe:
- Reserve some chocolate for the top. It gives the pan a better look and better texture.
- Chop the chocolate into uneven pieces if you want different melt patterns.
- Pull them early by a minute if your pan runs dark or hot.
- A teaspoon of espresso powder deepens the chocolate without making it taste like coffee.
Variations on This Dish:
- Triple Chocolate: Add white chocolate chips along with the dark chocolate pieces.
- Walnut Chunk: Fold in 1/2 cup toasted walnuts for crunch.
- Salted Top: Finish with flaky salt as soon as the pan comes out of the oven.
Common Mistakes to Avoid with This Dish:
- Using only chips, no chopped chocolate: Chips melt less dramatically and give fewer gooey pockets.
- Overbaking to set every corner: The middle should still have a little softness.
- Skipping the top scatter: The brownie looks flatter and tastes less layered.
14. S’mores Brownies
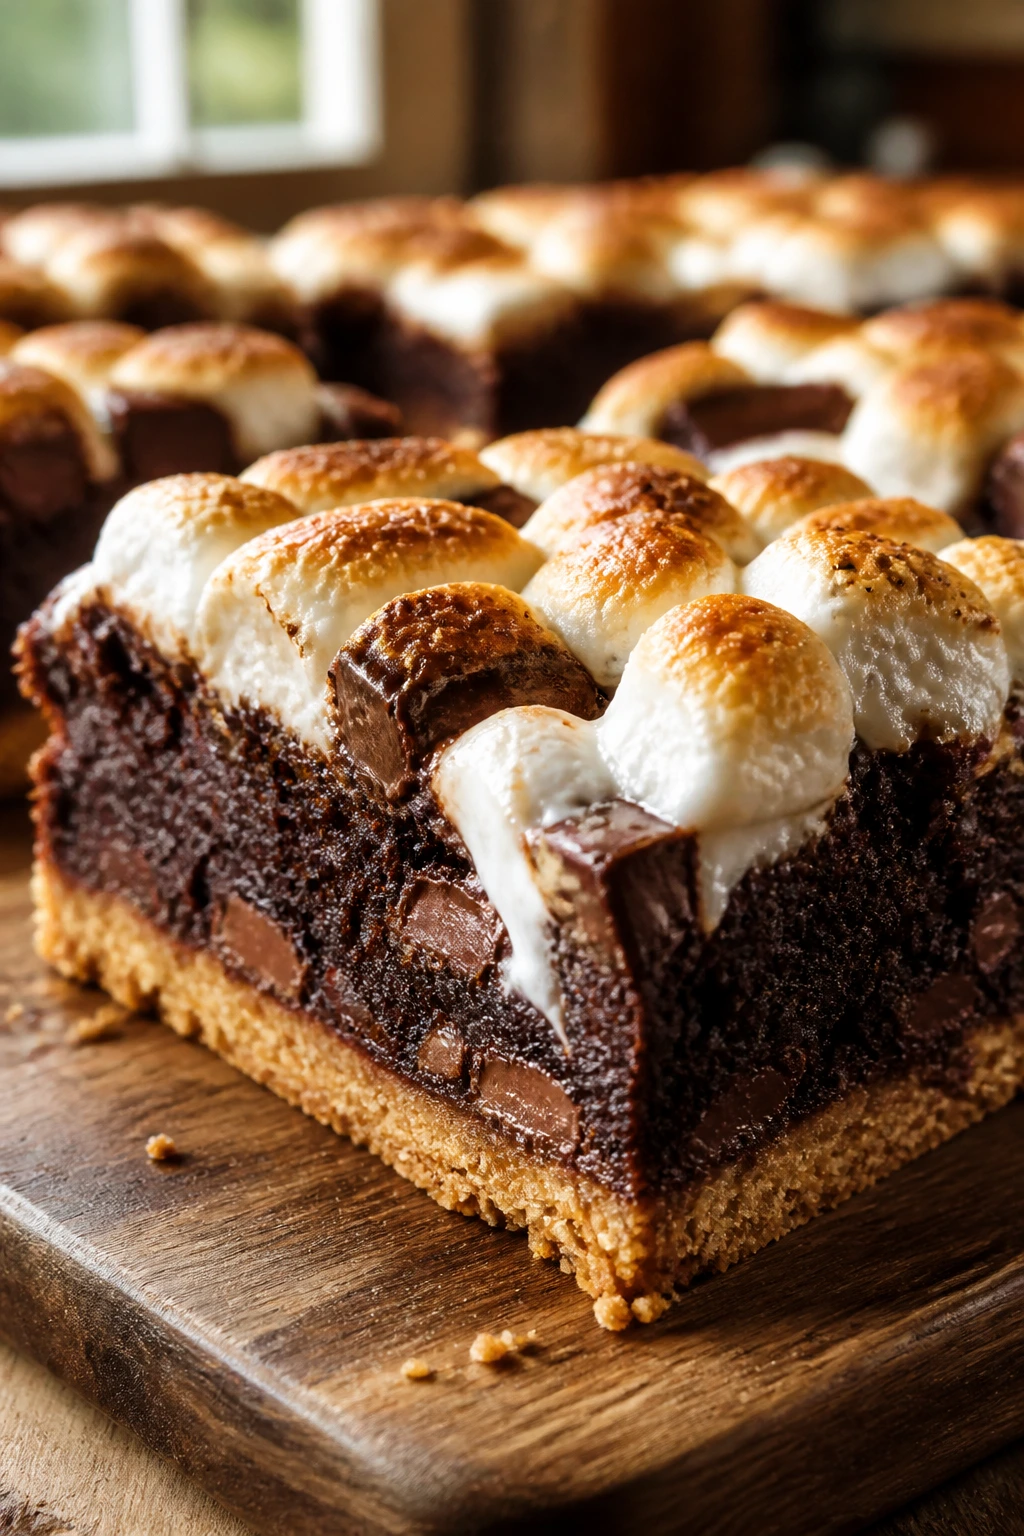
A graham crust, a layer of brownie batter, chocolate chunks, and marshmallows on top — that is the whole deal, and it works every time. These brownies taste like a campfire treat without needing a fire.
The trick is timing the marshmallows so they toast instead of vanishing. Do that, and the top gets sticky and bronzed.
Why It Works:
The graham cracker layer gives the brownies a dry, sandy base that keeps them from feeling too rich. Marshmallows added near the end of baking soften and toast without fully melting away. Chocolate chunks tucked into the brownie layer make the whole pan taste like a s’more instead of just a brownie with marshmallows on it.
Key Ingredients:
- 1 1/2 cups graham cracker crumbs — the crust layer.
- 6 tablespoons melted unsalted butter — binds the crumbs.
- 2 tablespoons granulated sugar — sweetens the crust.
- Pinch of fine salt — keeps the crust from tasting flat.
- 1/2 cup unsalted butter, melted — for the brownie batter.
- 1 cup granulated sugar — the brownie sweetness.
- 2 large eggs — structure.
- 1 teaspoon vanilla extract — rounds the chocolate.
- 1/2 cup unsweetened cocoa powder — the brownie base.
- 3/4 cup all-purpose flour — the structure.
- 1/2 teaspoon fine salt — balances the mix.
- 1 cup chocolate chunks — the s’mores center.
- 1 1/2 cups mini marshmallows — the finish.
Quick Steps:
- Preheat the oven to 350°F (175°C) and line an 8-inch square pan with parchment.
- Mix the graham crumbs, melted butter, sugar, and salt, then press the mixture into the bottom of the pan.
- Whisk the brownie butter, sugar, eggs, and vanilla, then fold in the cocoa, flour, and salt.
- Spread the brownie batter over the crust and scatter the chocolate chunks on top.
- Bake for 18 minutes, then pull the pan out, scatter the mini marshmallows over the surface, and return it to the oven for 5 to 7 minutes until the marshmallows are puffed and lightly browned.
- Cool before cutting so the crust holds together.
Equipment for This Recipe:
- 8-inch square baking pan — thick enough for three layers.
- Mixing bowl — one for the crust and one for the batter.
- Parchment paper — helps lift the sticky corners.
- Spatula — for spreading the batter over the crust.
- Measuring cups — crumb crusts need real measurements.
How to Serve This Dish:
These are best cut into smaller squares than plain brownies because the marshmallow top is rich and sticky. Serve them with cold milk or vanilla ice cream, and let the chocolate chunks do the heavy lifting.
Pro Tips for This Recipe:
- Press the crust firmly so it doesn’t crumble when sliced.
- Add marshmallows near the end, not from the start.
- Use mini marshmallows, not giant ones. They cover more surface and toast evenly.
- Let the pan cool fully before cutting or the crust will fall apart.
Variations on This Dish:
- Peanut S’mores: Add 1/4 cup peanut butter chips to the brownie batter.
- Dark Campfire: Use dark chocolate chunks and a darker cocoa powder.
- Cookie Crust: Swap the graham crumbs for crushed chocolate wafers.
Common Mistakes to Avoid with This Dish:
- Baking the marshmallows too long: They burn fast and turn bitter.
- Using too much crust butter: The bottom gets greasy instead of firm.
- Slicing while warm: The layers need time to set or they slide.
15. Coconut Pecan Brownies
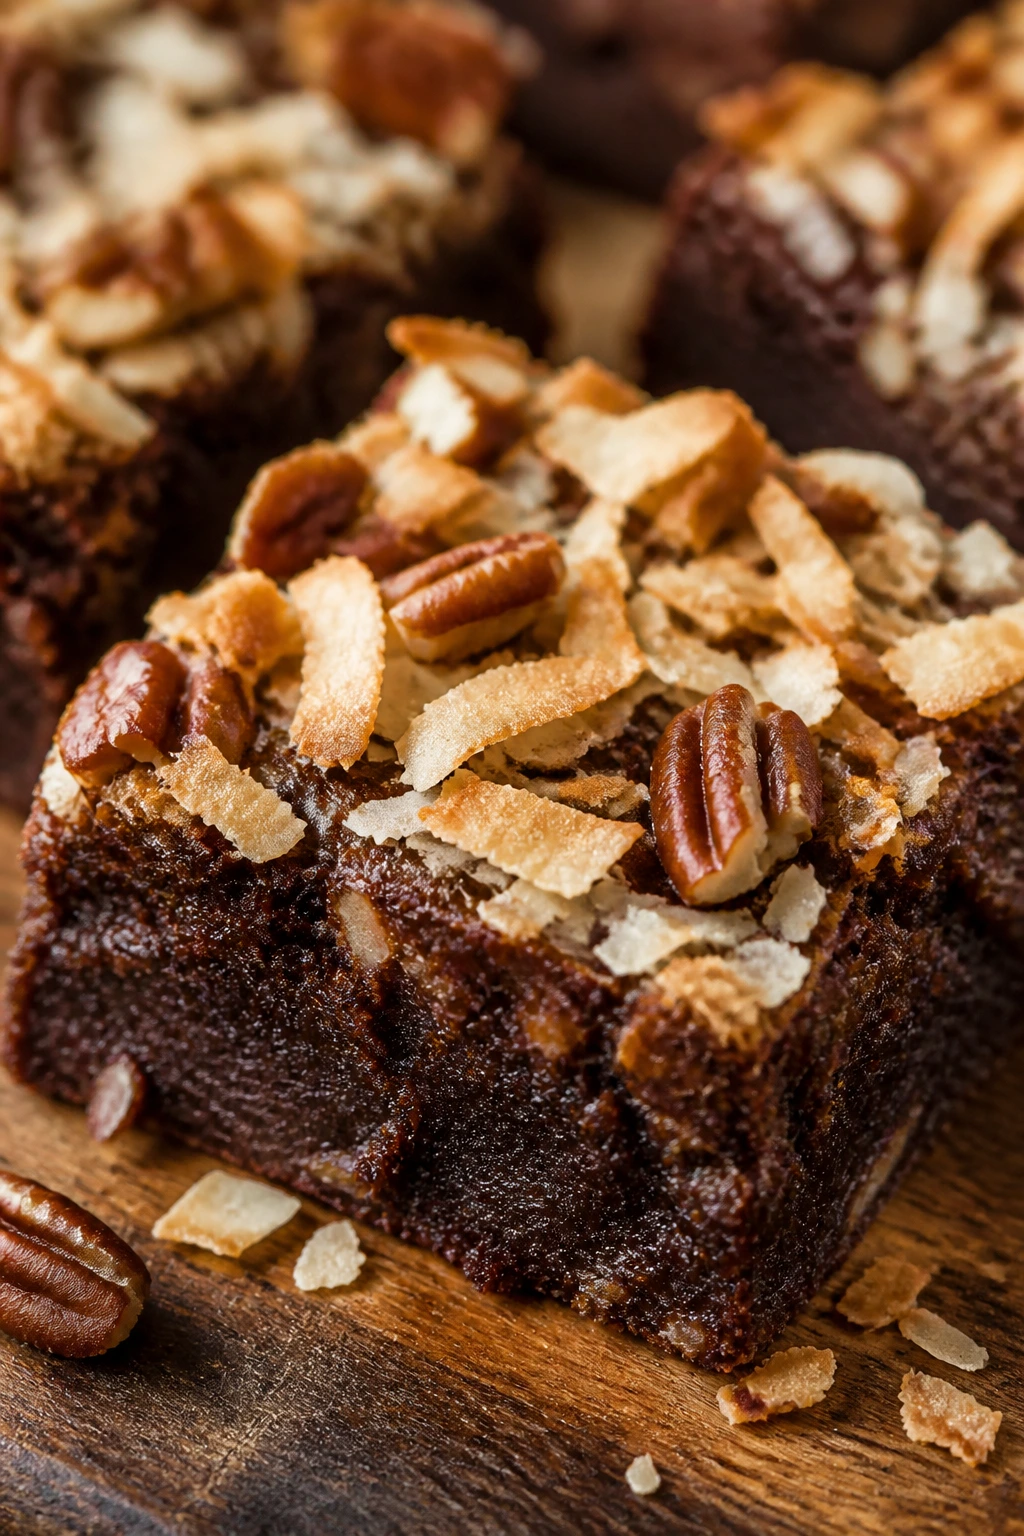
Coconut and pecans give brownies a chewy, nutty top and a little texture in the middle. Toast them first and the pan starts smelling like a bakery before the batter even goes in.
This is one of the more textured brownies here, and that’s the point. It lands somewhere between candy bar and brownie.
Why It Works:
Toasted coconut brings sweetness and a faint crisp edge, while pecans add a buttery bite that stands up to chocolate. Folding some of both into the batter and scattering the rest on top gives you texture in every square. The mix of fat, crunch, and cocoa makes these feel fuller without adding much work.
Key Ingredients:
- 1/2 cup unsalted butter, melted — for the brownie base.
- 1 cup granulated sugar — to sweeten the cocoa.
- 2 large eggs — bind the batter.
- 1 teaspoon vanilla extract — rounds out the nutty flavor.
- 1/2 cup unsweetened cocoa powder — the chocolate base.
- 3/4 cup all-purpose flour — enough structure.
- 1/2 teaspoon fine salt — balances the coconut sweetness.
- 1 cup sweetened shredded coconut, divided — half folded in, half on top.
- 3/4 cup chopped pecans, divided — toast them first.
- 1/2 cup semisweet chocolate chips — optional, but useful.
Quick Steps:
- Preheat the oven to 350°F (175°C) and line an 8-inch square pan with parchment.
- Toast the coconut and pecans in a dry skillet over medium heat for 3 to 5 minutes, stirring often, until fragrant and lightly golden.
- Whisk the melted butter, sugar, eggs, and vanilla, then fold in the cocoa, flour, and salt.
- Stir in half the coconut, half the pecans, and the chocolate chips.
- Spread the batter into the pan and top with the remaining coconut and pecans.
- Bake for 25 to 30 minutes, then cool before slicing.
Equipment for This Recipe:
- Dry skillet — for toasting coconut and pecans.
- 8-inch square pan — thick enough to hold the mix-ins.
- Mixing bowl and spatula — standard brownie tools.
- Parchment paper — useful for the sticky coconut top.
- Cooling rack — helps the pan cool evenly.
How to Serve This Dish:
These brownies are nice with coffee, tea, or a scoop of vanilla ice cream. I like them cut into smaller squares because the coconut and pecans make each bite feel denser than a plain brownie.
Pro Tips for This Recipe:
- Toast the coconut and pecans. Raw coconut tastes flat by comparison.
- Keep some mix-ins on top so the pan looks and tastes more layered.
- Use sweetened coconut if you want a more candy-like finish.
- Let the brownies cool fully; the nutty texture tightens up as they sit.
Variations on This Dish:
- German Chocolate Style: Add 1 tablespoon brown sugar to the topping mix for a deeper caramel note.
- Macadamia Swap: Replace the pecans with chopped macadamias for a softer crunch.
- Coconut-Free Version: Keep the pecans and skip the coconut, then add 1/2 cup chocolate chunks.
Common Mistakes to Avoid with This Dish:
- Skipping the toast step: Untoasted coconut is softer and less flavorful.
- Using too many pecans: The brownies can get crumbly if the pan is overloaded.
- Cutting while hot: The coconut top needs to cool or it tears.
16. Cherry Almond Brownies
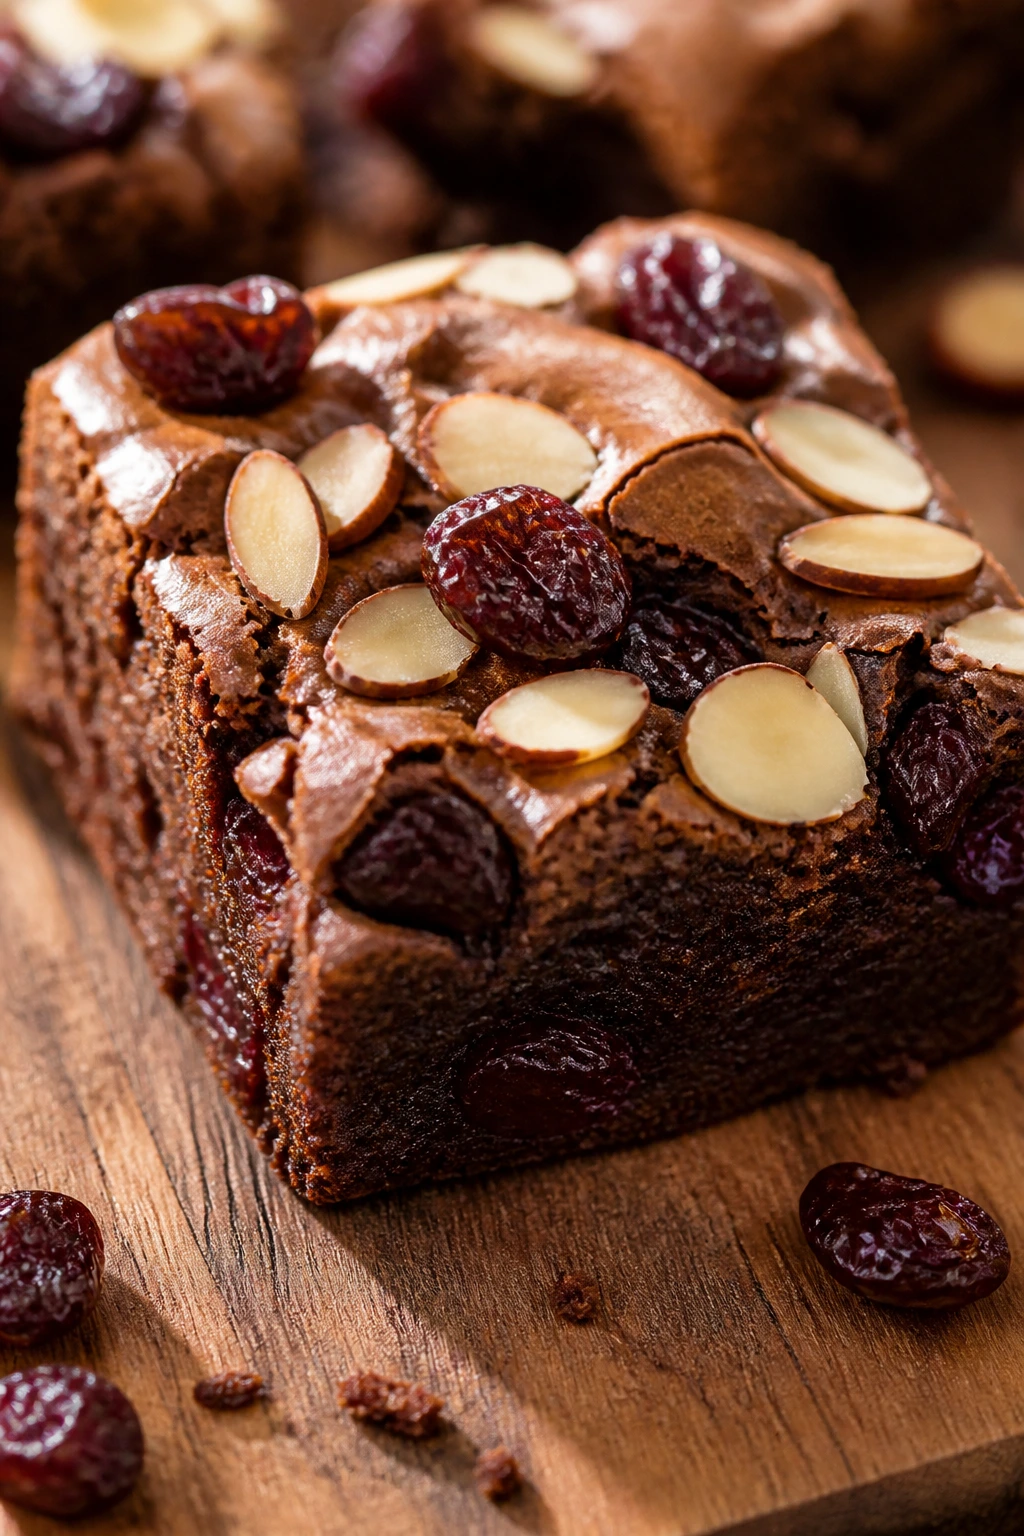
Dried cherries and almond extract give brownies a tart, almost bakery-cookie feel. The fruit cuts through the chocolate, and the almonds bring a crisp finish that keeps the pan from feeling too heavy.
These are the brownies I reach for when I want something a little more polished without adding extra effort. They taste like they took more work than they did.
Why It Works:
Dried cherries bring chew and brightness, which wakes up the cocoa. Almond extract adds a floral, nutty note that makes the chocolate taste deeper without needing extra ingredients. Sliced almonds on top add crunch and a little visual lift.
Key Ingredients:
- 1/2 cup unsalted butter, melted — the brownie base.
- 1 cup granulated sugar — for sweetness and crust.
- 2 large eggs — the binder.
- 1 teaspoon vanilla extract — rounds out the batter.
- 1/2 teaspoon almond extract — strong enough to notice, not enough to overpower.
- 1/2 cup unsweetened cocoa powder — the chocolate flavor.
- 3/4 cup all-purpose flour — structure.
- 1/2 teaspoon fine salt — balances the fruit.
- 3/4 cup dried tart cherries — use dried, not wet cherries.
- 1/2 cup sliced almonds, divided — some in the batter, some on top.
- 1/2 cup semisweet chocolate chunks — optional but helpful.
Quick Steps:
- Preheat the oven to 350°F (175°C) and line an 8-inch square pan with parchment.
- Whisk the melted butter, sugar, eggs, vanilla, and almond extract until smooth.
- Fold in the cocoa, flour, and salt, then stir in the cherries, half the almonds, and the chocolate chunks.
- Spread the batter into the pan and scatter the remaining almonds on top.
- Bake for 24 to 28 minutes, until the center is set and the almonds are lightly toasted.
- Cool fully before slicing so the cherries do not pull the crumb apart.
Equipment for This Recipe:
- 8-inch square pan — keeps the fruit evenly distributed.
- Mixing bowl — one bowl is enough.
- Spatula — for folding in the cherries.
- Parchment paper — helps the chewy edges release.
- Sharp knife — useful once the brownies cool.
How to Serve This Dish:
These are especially nice with black tea or coffee because the tart fruit and almond flavor keep the brownies from tasting too sweet. A little powdered sugar over the top makes the almonds stand out without changing the flavor much.
Pro Tips for This Recipe:
- Use dried tart cherries, not fresh ones. Fresh fruit adds too much moisture.
- Chop the cherries if yours are large and leathery.
- Almond extract is strong; measure carefully.
- Let the pan cool before cutting so the fruit stays embedded in the crumb.
Variations on This Dish:
- Black Forest Angle: Add 1/2 cup chopped dark chocolate and a spoonful of cherry preserves swirled on top.
- Apricot Almond: Swap the cherries for chopped dried apricots.
- Nutty Cherry: Use toasted walnuts instead of sliced almonds for a deeper crunch.
Common Mistakes to Avoid with This Dish:
- Using wet fruit: Fresh or overly moist cherries can make the batter too loose.
- Overdoing almond extract: Too much tastes sharp and perfumy.
- Slicing before cooling: The fruit will drag the brownies apart.
Why Brownies Love a One-Bowl Method
Brownies are not a finicky dessert, and that is part of the appeal. They do not need creaming, layering, or long rest times the way a cake sometimes does. A one-bowl brownie works because the batter is supposed to be dense and a little stubborn; if you mix it enough to dissolve the sugar and combine the flour, you have already done the important part.
The shiny top comes from the sugar and eggs doing a little work together. When you whisk them well, the mixture thickens and picks up air, and that helps the top bake into a thin crust instead of a dull matte lid. It is a small detail, but it matters. Brownies reward that short extra whisk more than almost any dessert I know.
Melted butter, cocoa, and a modest amount of flour make the batter forgiving. If the oven runs hot, the brownies might set early at the edges. If it runs cool, they just take a few more minutes. That is why a square pan and a parchment sling are worth keeping nearby. They give you clean edges, quick removal, and less excuse to fuss.
I also like how brownie batter accepts a lot of directions without collapsing. Stir in nuts, swirl in tahini, marble cream cheese, or scatter marshmallows on top. The base can take it. That flexibility is what makes these easy brownie recipes useful on weeknights, when you do not want a whole new dessert system — you want one dependable pan and a few places to take it.
Essential Equipment for These Brownies
- 8-inch or 9-inch square metal baking pan — metal gives better browning on the edges; a smaller pan makes thicker squares.
- Parchment paper — leave overhang on two sides so you can lift the brownies out in one piece.
- Large mixing bowl — brownie batter is simple, but you still want room to whisk without spilling.
- Whisk — useful for dissolving sugar into melted butter and building a shinier top.
- Rubber spatula — the best tool for folding in flour and mix-ins without overworking the batter.
- Measuring cups and spoons — brownies punish guessing more than people expect, especially with cocoa and flour.
- Fine-mesh sieve — handy if your cocoa is lumpy or you want to dust the top with powdered sugar.
- Small saucepan — useful for browning butter or melting caramel.
- Cooling rack — keeps the bottom from getting damp while the pan cools.
- Blender or food processor — only needed for the black bean brownies, where a smooth batter matters.
Smart Shopping and Ingredient Tips
Cocoa powder is the first place I pay attention. Natural cocoa tastes a little brighter and sharper, while Dutch-process cocoa is darker and smoother. Both work in brownies, but they do not taste the same, so buy the kind you actually like to smell. If you only keep one on hand, a good natural cocoa is the most flexible choice.
Butter and oil change the mood of the pan. Butter gives you a firmer set and a little more flavor on the edges, while olive oil and neutral oil keep brownies soft for longer. For brown butter brownies, start with unsalted butter so you control the salt yourself. For vegan brownies, choose a mild olive oil unless you want that grassy note to show up.
Eggs matter more than people think. Room-temperature eggs blend into the batter faster and help the sugar dissolve more completely, which is part of how you get that shiny top. Cold eggs can still work, but they make the batter less smooth, and that shows up in the finished crumb.
Chocolate chips are useful, but chopped chocolate melts more dramatically. Chips hold their shape longer; chopped bars give you those soft, uneven pockets that feel richer. If you are adding nuts, toast them first. Five minutes in a dry skillet changes them from plain crunch to something that tastes like it belongs in the pan.
One last thing: pan color and size matter. Dark metal pans brown faster. Glass pans bake slower and can keep the center too soft while the edges get dry. If a recipe here says 8-inch square, I would not stretch it into a much larger dish unless you want thinner, firmer brownies and a shorter bake time.
How to Serve These Brownies
Presentation: Let the brownies cool fully, then lift them out with the parchment sling and cut with a sharp knife wiped clean between slices. Warm the knife under hot water for especially neat edges, then dry it before each cut.
Accompaniments: Vanilla ice cream is the easiest win, but whipped cream, fresh berries, salted peanuts, coffee, or a spoonful of Greek yogurt all fit depending on the brownie style. Peanut butter and caramel brownies like plain milk; mint and espresso brownies do well with black coffee; fruit-topped versions look better with berries on the plate.
Portions: A rich 8-inch pan usually makes 9 large squares or 12 smaller ones. If the brownies are loaded with caramel, cream cheese, or marshmallows, cut them smaller than you think you need. They’re more filling than plain brownies, and that is not a flaw.
Beverage Pairing: Cold milk is the classic move. I also like drip coffee, espresso, or a strong black tea with the darker chocolate versions; the bitterness keeps the sweetness in check. For the cherry almond brownies, tea with a little milk works beautifully, while mint brownies take to coffee better than you might expect.
Additional Tips and Flavor Boosters
Flavor Enhancement: A teaspoon of instant espresso powder deepens plain chocolate brownies without turning them into coffee dessert. Flaky salt on warm brownies does the same kind of work in a different direction — it sharpens the chocolate and gives the top more bite.
Customization: Stir in toasted walnuts, pecans, chopped pretzels, peanut butter cups, dried cherries, or sesame seeds depending on the flavor path you want. Keep wetter add-ins like caramel and cream cheese near the top of the batter so they stay visible instead of sinking to the bottom.
Serving Suggestions: Warm a square for 10 to 12 seconds in the microwave, then add ice cream and a dusting of cocoa or powdered sugar. That tiny reheat changes the texture a lot; the center softens and the chocolate tastes fuller.
Make-It-Yours: For a gluten-free version, use the almond flour brownie recipe or a good 1:1 gluten-free blend in the plain cocoa brownies. For dairy-free brownies, swap in vegan butter or olive oil and choose dairy-free chips. For a lower-sugar pan, use dark chocolate chunks and cut the sugar by 2 to 3 tablespoons, but do not slash it much farther unless you want a drier crumb.
Make-Ahead, Storage, and Reheating Guidance
Brownies are one of those desserts that often taste better after they sit. The crumb sets, the flavors meld, and the chocolate gets deeper by the next day. If you can hold off, do it. I know that is hard with a warm pan on the counter.
At room temperature, plain brownies keep well for 2 to 3 days in an airtight container. Stack them with parchment between layers if they are especially soft or have sticky swirls on top. Brownies with cream cheese swirl, fresh fruit, or extra-wet caramel should go into the refrigerator after they cool, and they’ll keep there for about 5 days.
For freezing, wrap individual squares in parchment, then foil, then slide them into a freezer bag. They’ll keep for up to 2 months that way. Thaw at room temperature for about an hour, or in the fridge overnight if you want a firmer texture. The black bean brownies and plain cocoa brownies freeze especially well; marshmallow-topped brownies are a little messier after thawing, though still usable.
Reheating is easy. A single square only needs 10 to 15 seconds in the microwave to go soft again. A whole pan can be covered loosely with foil and warmed in a 300°F (150°C) oven for 8 to 10 minutes. If you want clean, chilled slices from a cream cheese brownie, refrigerate the pan first, cut it cold, and then let the squares sit for 10 minutes before serving.
Variations and Adaptations to Try
Brownie Mix Doctoring: Start with a boxed mix, then replace the oil with melted butter, add one extra egg, and stir in 1 teaspoon vanilla plus 1/2 cup chocolate chunks. The result tastes less like a box and more like a proper pan.
Mini Muffin Brownie Bites: Spoon batter into lined mini muffin tins and bake for about 10 to 12 minutes. These cool fast, pack easily, and make portion control less of a negotiation.
Thin Sheet-Pan Squares: Double a standard 8-inch square recipe for a 9×13 pan and start checking a few minutes early. The edges get crisper and the bake turns out thinner, which is nice when you want more squares from one batch.
Dark and Bitter: Use Dutch-process cocoa, chopped dark chocolate, and flaky salt for a brownie that lands on the less-sweet side. This works especially well for brown butter, espresso, and cherry-almond versions.
Nut-Free Swaps: Skip nuts and use toasted sunflower seeds, pumpkin seeds, or crispy rice cereal for crunch. That keeps the texture interesting without sending anyone hunting for a nut-free alternative at the last minute.
Common Mistakes to Avoid
The biggest mistake is overbaking. Brownies are not supposed to come out clean and dry like a cake. If a tester is bone dry, the center has already gone too far. Pull the pan when you still see moist crumbs, not wet batter.
Using the wrong pan size can ruin a good batter. A too-large pan makes thin brownies that cook fast and dry out before the middle gets a chance to set. A too-small pan can leave you with a gummy center and overly dark edges. Stick close to the pan size in the recipe, and if you change it, watch the bake time like a hawk.
Overmixing after the flour goes in is another easy way to lose the texture you wanted. Once the dry ingredients disappear, stop. Stirring and stirring builds gluten, and gluten pushes brownies toward cake. That is fine if you want cake. It is not fine if you came here for a dense square.
Cutting warm brownies is a mess. They smear, the swirl layers blur, and the corners collapse. Give the pan time to cool, and if the brownies have caramel or cream cheese, chill them for a short stretch before slicing. Clean cuts are mostly about patience.
Finally, do not treat wet mix-ins like dried fruit, caramel, or cream cheese the same way you’d treat chocolate chips. They behave differently. Keep them small, keep them measured, and keep the batter thick enough to support them.
Frequently Asked Questions

Can I use Dutch-process cocoa in all of these brownie recipes?
Usually, yes. The plain cocoa brownies, brown butter espresso brownies, and most of the swirled versions work well with Dutch-process cocoa because the recipes rely more on eggs and butter than on baking soda. If a recipe uses baking soda, like the zucchini brownies, natural cocoa is a safer match unless you adjust the leavening.
Why do my brownies turn cakey instead of fudgy?
Most of the time it’s one of three things: too much flour, too much mixing after the flour goes in, or too long in the oven. Measure flour lightly, fold just until combined, and pull the pan while the center still shows a few moist crumbs.
Can I bake these in a 9×13 pan?
Yes, but the brownies will be thinner unless you double the batter. If you use a bigger pan, start checking earlier because thinner brownies set faster and can dry out at the edges before the center looks ready.
Do brownies need to cool before cutting?
They do, unless you want soft, messy squares. A full cool-down gives the crumb time to set, and brownies with caramel or cream cheese do even better after a short chill in the fridge.
What if I only have salted butter?
Use it and reduce the added salt by about 1/4 teaspoon. The brownies will still work fine, but you want to keep the salt from taking over the chocolate.
Can I freeze brownies with swirls or fruit?
Yes. Wrap them well after they cool, and freeze them in individual squares so you can thaw only what you need. Cream cheese brownies and caramel brownies freeze better than they sound, though they’re nicest when thawed slowly in the fridge.
How do I get that shiny crackly top?
Whisk the sugar into the warm butter or oil well, then add the eggs and keep whisking until the batter looks glossy and thick. That step matters more than people think, and it is why a one-bowl brownie can still look bakery-made.
Can I make one of these recipes without a mixer?
Absolutely. Almost all of them are meant for a whisk and spatula, not a stand mixer. The black bean brownies are the only ones that really benefit from a blender, and even there you can use a food processor if that is what you have.
Brownies Worth Keeping
The best brownie pan is the one you can make without clearing the entire evening for it. That is why these easy brownies recipes work so well: they use familiar ingredients, short bake times, and a basic pan that can turn into plain cocoa squares, peanut butter swirls, caramel ribbons, or something a little more unusual when the mood changes.
Keep one square pan lined with parchment, one good cocoa powder in the cupboard, and a jar of chocolate chips somewhere within reach. That combination gets you a long way.