
Six o’clock has a way of turning a kitchen into a pressure cooker. The sink is already full, someone is asking what’s for dinner before you’ve even dropped your bag, and the vegetables in the crisper drawer are starting to look like a personal challenge. That is exactly where healthy weeknight family dinner ideas earn their keep: not by being fussy, but by being the kind of meals you can build from ordinary groceries and still put on the table with some dignity intact.
The best weeknight dinners for families do a few jobs at once. They keep the protein lean without making it dry, they bring vegetables in by the handful instead of as a sad afterthought, and they leave room for a picky eater to slide a few pieces of onion to the side of the plate without turning the whole thing into a negotiation. I also want dinners that hold up if you eat late, reheat well the next day, and don’t leave the stove looking like a crime scene.
A good rule of thumb lives in a lot of these recipes: a lean protein, one sturdy starch, and at least two vegetables that can take heat without collapsing. That means chicken thighs instead of dry breasts when you want forgiveness, broccoli or green beans when you want speed, beans and lentils when you want fiber that actually sticks with you, and sauces that cling instead of drown. Keep that in your pocket. It matters.
Why These Dinners Earn a Spot in the Rotation
-
Less cleanup, fewer excuses: Several of these dinners use one sheet pan or one skillet, which means the cleanup stays small even when the dinner hour gets messy.
-
Built-in vegetables: Broccoli, peppers, kale, cabbage, green beans, beans, and tomatoes show up on purpose here, not as decorative garnish.
-
Flexible for mixed appetites: The seasoning levels stay adjustable, so you can put hot sauce, yogurt, herbs, or extra cheese on the table and let people steer their own plate.
-
Balanced without being boring: Lean protein, whole grains, and fiber-heavy plants do the work of a heavy cream sauce without weighing the meal down.
-
Good for leftovers: A lot of these dishes reheat cleanly, especially the soups, skillet meals, meatballs, and grain bowls, which makes tomorrow’s lunch a little less annoying.
-
Easy to shop for: You’ll find a lot of the ingredients in standard grocery aisles—beans, rice, chicken, canned tomatoes, frozen corn, yogurt, lemon, garlic—nothing that sends you on a scavenger hunt.
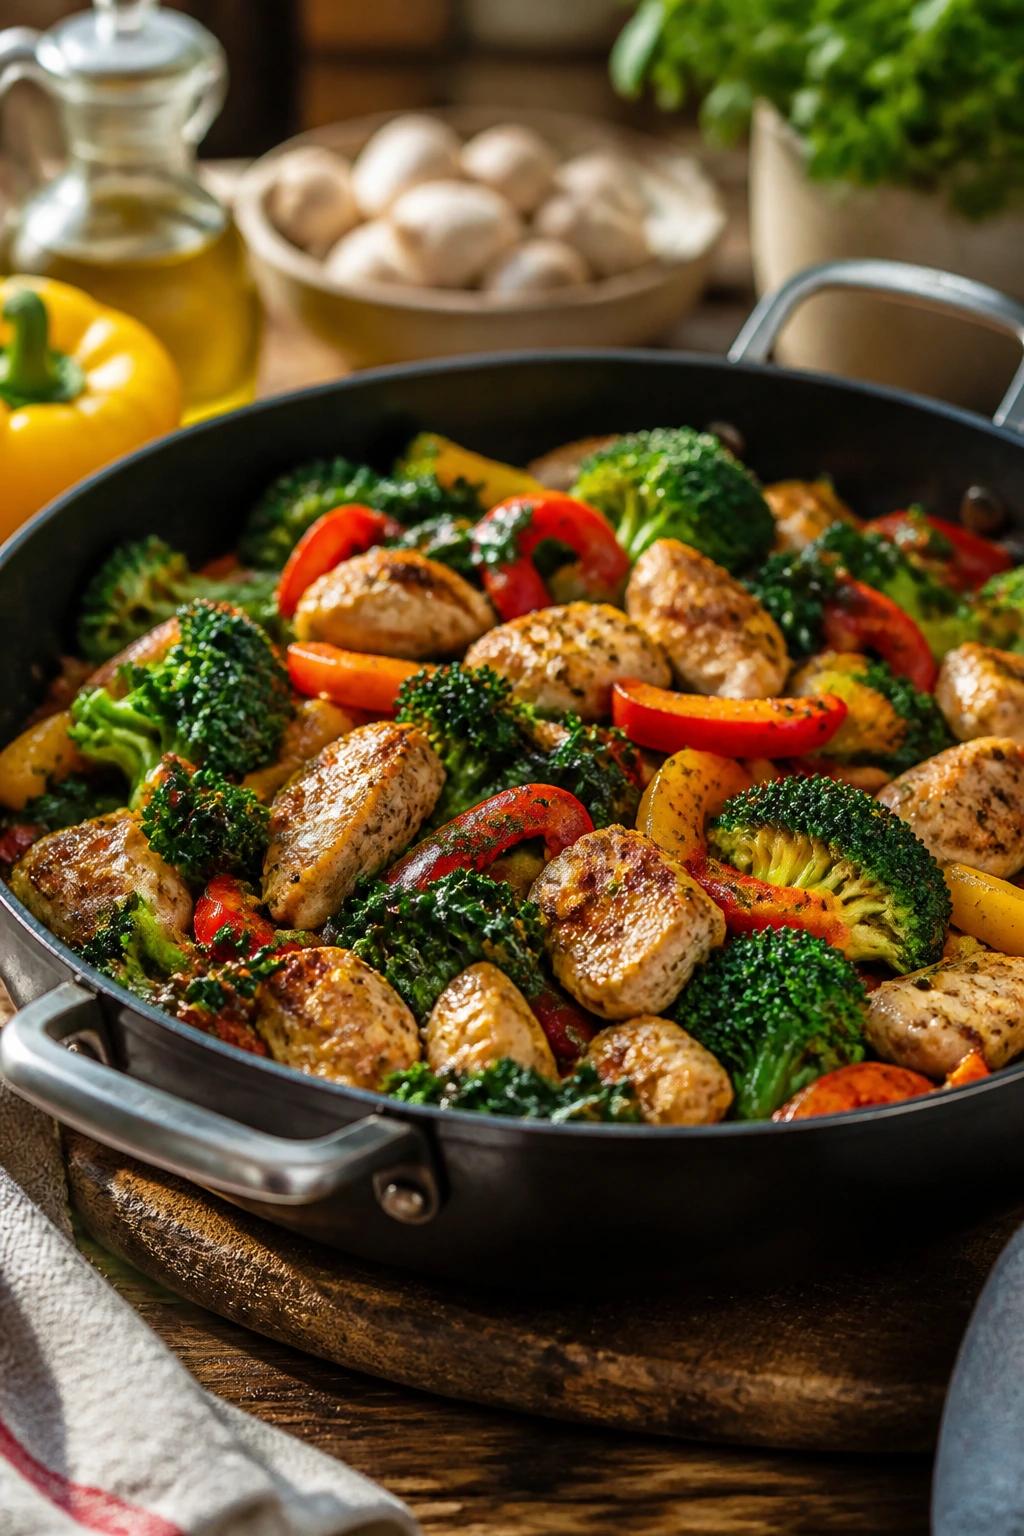
1. Lemon Garlic Chicken Sheet-Pan with Broccoli and Baby Potatoes
Intro:
This is the kind of dinner I reach for when the week has already taken a bite out of my energy. The potatoes get crisp edges, the broccoli picks up a little char, and the chicken thighs stay juicy enough to forgive a few extra minutes in the oven. The lemon and garlic keep the whole pan bright, not heavy.
Why It Works:
Sheet-pan cooking gives you separate textures without making you juggle three pans at once. The baby potatoes go in first because they need a head start, and the broccoli joins later so it roasts instead of collapsing. Chicken thighs are the smart move here; they handle a 425°F oven much better than breast meat, so dinner still works even if you get distracted by homework, socks, or whatever is happening in the other room.
Key Ingredients:
- 1½ lb boneless, skinless chicken thighs, trimmed of excess fat
They stay tender and are less likely to dry out than breasts. - 1 lb baby potatoes, halved
Cut them small enough to roast through in the same window as the chicken. - 4 cups broccoli florets
Use florets with some stem attached so they don’t vanish in the oven. - 3 tablespoons olive oil
This helps the potatoes crisp and keeps the chicken from sticking. - 3 cloves garlic, minced
Fresh garlic gives the pan its sharp, warm smell. - 1 lemon, zested and juiced
The zest goes into the seasoning, the juice finishes the dish. - 1 teaspoon kosher salt
Enough to season the vegetables and the chicken without tipping into salty. - ½ teaspoon black pepper
Gives the chicken a little edge. - 1 teaspoon dried oregano
Works with lemon and keeps the flavor from feeling flat. - 2 tablespoons chopped parsley
Adds a fresh finish after roasting.
Quick Steps:
- Preheat and prep: Heat the oven to 425°F (220°C) and line a rimmed sheet pan with parchment for easier cleanup.
- Start the potatoes: Toss the halved potatoes with half the olive oil, half the salt, the oregano, and a little pepper. Spread them cut-side down on the pan and roast for 15 minutes.
- Season the chicken: While the potatoes roast, toss the chicken thighs with the remaining oil, garlic, lemon zest, the rest of the salt, and pepper.
- Add the broccoli and chicken: Pull the pan out, push the potatoes aside, add the chicken and broccoli in a single layer, then roast for 18 to 20 minutes until the chicken reaches 165°F at the thickest part and the broccoli has browned edges.
- Finish with lemon: Squeeze the lemon juice over the hot pan, scatter parsley on top, and let it sit for 3 minutes before serving.
- Check the pan juices: If the pan looks dry, spoon the lemony juices over the chicken before plating.
Equipment for This Recipe:
- Rimmed sheet pan
A dark pan will brown faster; parchment helps with cleanup. - Mixing bowl
Big enough to toss the chicken and vegetables separately if you want. - Microplane or fine grater
Best for lemon zest and quick garlic mincing. - Tongs
Useful for turning the chicken without tearing it.
How to Serve This Dish:
Serve it straight from the pan with the broccoli and potatoes piled around the chicken. A spoonful of pan juices over each portion makes the whole plate look finished, not dry. If your family wants more starch, rice or warm pita works better than anything heavy.
Pro Tips for This Recipe:
- Cut the potatoes into even halves. Uneven potatoes mean some pieces turn chalky while others stay firm.
- Don’t add the broccoli too early. It should brown at the edges, not go limp and pale.
- If your chicken thighs are thick, flatten the plumpest ones lightly with your hand so the pan cooks evenly.
- Use the lemon juice at the end, not at the start. Acid in the oven dulls the flavor and can make the chicken taste oddly flat.
Variations on This Dish:
- Dijon Lemon Pan: Stir 1 tablespoon Dijon mustard into the chicken seasoning for a sharper finish.
- Herby Garden Version: Swap parsley for dill and add 1 teaspoon chopped rosemary with the potatoes.
- Spicy Citrus Cut: Add ¼ teaspoon red pepper flakes to the chicken if your table likes heat.
Common Mistakes to Avoid with This Dish:
- Crowding the pan: If the vegetables pile up, they steam and go soft. Use two pans if needed.
- Skipping the potato head start: Without that first 15 minutes, the chicken finishes before the potatoes do.
- Using too much lemon juice before roasting: The acid brightens the dish after baking; before baking, it can muddy the seasoning.
2. Turkey Taco Skillet Bowls with Black Beans and Corn
Intro:
This tastes like taco night got organized. The turkey gets browned and seasoned, the beans add heft, and the corn gives little bursts of sweetness that keep the skillet from feeling one-note. It’s colorful, fast, and easy to stretch if someone shows up hungry.
Why It Works:
Ground turkey can go bland fast, so the trick is to build flavor in layers: onion first, then garlic, then spices, then tomatoes and beans. That gives the skillet depth without needing a long simmer. The black beans bring fiber and body, which makes the bowls feel like dinner instead of a snack with extra steps. Serve it over brown rice, and you get a plate that lands squarely in the satisfying zone.
Key Ingredients:
- 1 lb lean ground turkey
Choose 93% lean if you want enough flavor without a greasy pan. - 1 tablespoon olive oil
Just enough to get the onion moving before the turkey renders. - 1 small yellow onion, diced
It softens into the base of the skillet. - 2 cloves garlic, minced
Add this after the turkey browns so it doesn’t burn. - 1 tablespoon chili powder
Gives the skillet its taco backbone. - 1 teaspoon ground cumin
Adds warmth and a little earthiness. - 1 teaspoon smoked paprika
This keeps the flavor from tasting flat. - 1 can (15 ounces) black beans, drained and rinsed
Rinsing knocks off the canned taste and some sodium. - 1 cup frozen corn
Frozen is fine here; it keeps a bit of bite. - 1 can (14.5 ounces) fire-roasted diced tomatoes
Use the juices too; they help the skillet stay saucy. - 1/2 cup low-sodium chicken broth
Helps everything simmer together without getting watery. - 2 cups cooked brown rice
A sturdy base that stands up under the topping. - 1 lime, cut into wedges
The squeeze at the end wakes the whole bowl up.
Quick Steps:
- Brown the turkey: Heat the oil in a large skillet over medium-high heat. Add the onion and cook for 3 minutes, then add the turkey and cook for 6 to 7 minutes, breaking it up until no pink remains.
- Season hard: Stir in the garlic, chili powder, cumin, smoked paprika, and a pinch of salt. Cook for 30 seconds until the spices smell toasted.
- Build the skillet: Add the beans, corn, diced tomatoes, and broth. Stir well and bring the mixture to a simmer.
- Thicken slightly: Cook for 6 to 8 minutes, stirring occasionally, until the sauce clings to the turkey instead of pooling around it.
- Serve over rice: Spoon the mixture over warm brown rice and finish with lime juice.
- Add toppings at the table: Avocado, cilantro, shredded lettuce, or a small spoonful of Greek yogurt all work here.
Equipment for This Recipe:
- Large 12-inch skillet
You need the surface area to brown the turkey instead of steaming it. - Wooden spoon or spatula
Best for breaking up the meat cleanly. - Measuring spoons
Taco seasoning depends on balance, not guesswork. - Rice cooker or saucepan
For the brown rice base.
How to Serve This Dish:
Pile the skillet mixture over rice in wide bowls so the beans and corn stay visible. A squeeze of lime and a few avocado slices make the plate feel complete. If you want it more casual, set the skillet on the table and let everyone build their own bowl.
Pro Tips for This Recipe:
- Brown the turkey well. Pale meat tastes flat, and the browned bits on the skillet floor are where the flavor lives.
- Drain the beans, but don’t dry them completely. A little cling from the can helps the sauce come together.
- If the skillet looks thin after simmering, cook it one minute longer before serving. The sauce should coat the meat, not drip like soup.
- Use fire-roasted tomatoes if you can find them. They add a smoky note that makes the whole thing taste cooked, not assembled.
Variations on This Dish:
- Chicken Taco Skillet: Swap in ground chicken and add 1 extra teaspoon oil so the pan doesn’t dry out.
- Vegetarian Bean Bowl: Replace the turkey with a second can of black beans and 1 cup chopped mushrooms.
- Spicy Chipotle Bowl: Stir in 1 chopped chipotle pepper in adobo for a deeper, smoky heat.
Common Mistakes to Avoid with This Dish:
- Starting with cold, wet turkey: If the skillet is crowded or the meat is icy, it steams. Let it sit out for 10 minutes first if possible.
- Adding spices too late: They need a quick toast in the hot pan or they taste dusty.
- Serving it too loose: If the mixture is soupy, simmer a little longer before spooning over rice.
3. Baked Salmon with Green Beans and Dill Yogurt
Intro:
Salmon can feel fancy even when it barely asks anything from you. Here, the green beans roast underneath, the fish flakes softly, and the dill yogurt cools everything down with a clean, grassy note. It looks like a dinner that took more effort than it did. Good.
Why It Works:
Salmon needs high heat and restraint. Roast it at 425°F long enough for the edges to turn opaque and the center to stay just shy of dry, and it will reward you with buttery texture. Green beans hold their shape better than softer vegetables, which means they can share the pan without going limp. The yogurt sauce matters more than it looks; the lemon and dill cut through the richness and keep the dish family-friendly without making it bland.
Key Ingredients:
- 1½ lb salmon fillet, skin on or off
A center-cut fillet cooks evenly and stays moist. - 1 lb green beans, trimmed
Choose beans that snap cleanly, not limp ones. - 2 tablespoons olive oil
Helps the beans and salmon roast cleanly. - 1 lemon, sliced and juiced
Half for the fish, half for the sauce. - 1 teaspoon kosher salt
Divide it between the fish and the vegetables. - ½ teaspoon black pepper
Works especially well with salmon. - 1 teaspoon garlic powder
A simple seasoning that doesn’t burn in the oven. - 1 cup plain Greek yogurt
The base of the sauce. - 2 tablespoons chopped fresh dill
Fresh dill gives the sauce its cool, sharp flavor. - 1 tablespoon Dijon mustard
Gives the yogurt enough backbone to taste like more than dip. - 1 tablespoon water
Loosens the sauce to spoonable texture.
Quick Steps:
- Heat the oven: Set the oven to 425°F (220°C) and line a sheet pan with parchment.
- Roast the beans first: Toss the green beans with half the olive oil, half the salt, and a little pepper. Spread them out and roast for 8 minutes.
- Season the salmon: Pat the salmon dry, rub it with the remaining oil, salt, pepper, garlic powder, and a little lemon juice.
- Finish the fish: Push the green beans aside, place the salmon on the pan, and roast for 10 to 12 minutes until the fish flakes at the edges but still looks moist in the center.
- Mix the sauce: Stir the yogurt, dill, Dijon, water, and the rest of the lemon juice together until smooth.
- Plate and serve: Spoon the dill yogurt under or beside the salmon and finish with lemon slices.
Equipment for This Recipe:
- Rimmed sheet pan
Needed for roasting the beans and fish together. - Small mixing bowl
For the dill yogurt sauce. - Fish spatula or thin metal spatula
Helps lift the salmon without breaking it. - Citrus juicer or fork
You’ll want the lemon juice without seeds.
How to Serve This Dish:
Serve the salmon over a small mound of quinoa, couscous, or baby potatoes if the table wants more starch. The green beans can stay on the pan or be moved to the edge of the plate. A spoonful of dill yogurt over the fish makes the whole thing look bright and clean.
Pro Tips for This Recipe:
- Dry the salmon with paper towels before seasoning. Wet fish steams where it hits the pan.
- Watch the fish early. Salmon goes from silky to dry fast, especially in thinner fillets.
- Make the yogurt sauce before the fish goes into the oven. It tastes sharper after sitting for 10 minutes.
- If your fillet has a thin tail end, fold it under slightly so the whole piece cooks at the same rate.
Variations on This Dish:
- Maple-Dijon Salmon: Brush the top with 1 tablespoon maple syrup and 1 teaspoon Dijon before roasting.
- Asparagus Swap: Replace the green beans with asparagus spears and cut the roast time down by 2 minutes.
- Garlic Herb Yogurt: Swap dill for chives and parsley if dill is too strong for your household.
Common Mistakes to Avoid with This Dish:
- Overcooking the salmon: Pull it when the center still looks slightly translucent; carryover heat finishes it.
- Salting the yogurt too early and too heavily: Let the Dijon and lemon do some of the work first.
- Roasting the beans too long before adding the fish: They should stay bright green with browned tips, not collapse into mush.
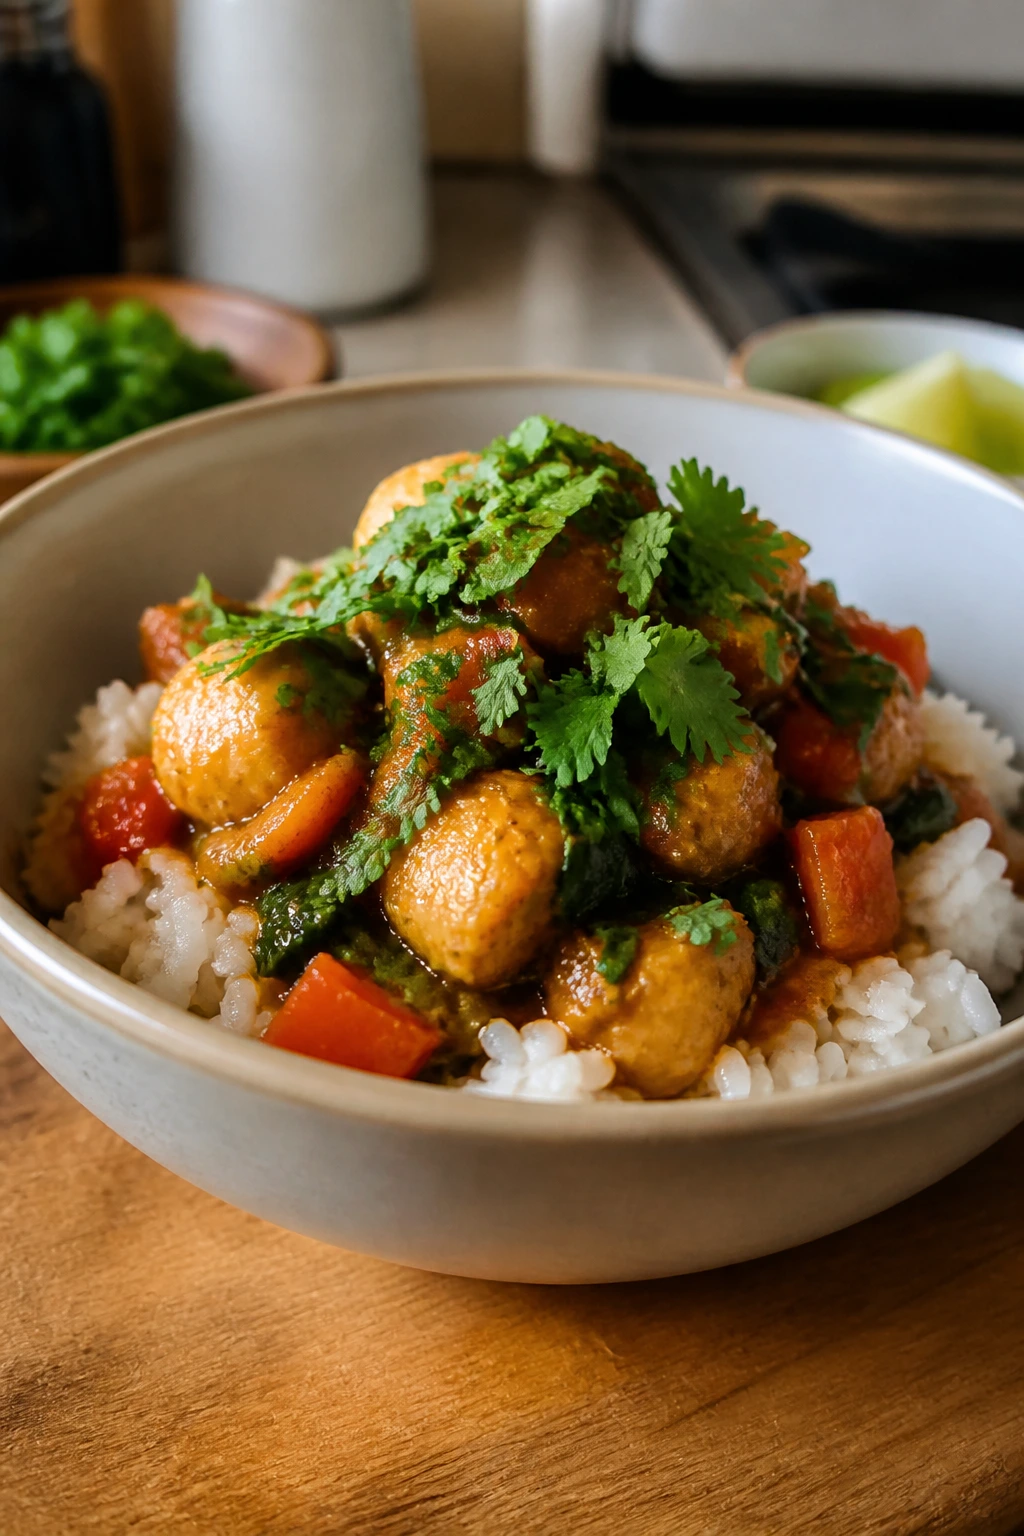
4. Chickpea Coconut Curry with Spinach and Brown Rice
Intro:
A curry like this has a way of making a Tuesday night feel less tired. The chickpeas soak up the sauce, the coconut milk softens the spice, and the spinach disappears into silky green ribbons at the end. It’s one of those dinners that looks modest in the pot and generous in the bowl.
Why It Works:
The structure matters here. You bloom the curry powder in oil first, which gives the spices a head start and stops the curry from tasting raw. Then the coconut milk and tomatoes build a sauce that is rich without being heavy, and the chickpeas hold their shape while taking on the flavor. Brown rice gives you a nutty base that stands up to the sauce instead of turning it into soup.
Key Ingredients:
- 2 tablespoons olive oil
Used for blooming the spices and softening the onions. - 1 medium yellow onion, diced
It melts into the sauce and gives the curry body. - 3 cloves garlic, minced
Stir in after the onion softens so it doesn’t scorch. - 1 tablespoon fresh ginger, grated
Fresh ginger tastes brighter than dried in this dish. - 2 tablespoons curry powder
The main flavor builder. - 1 teaspoon ground cumin
Adds warmth under the curry powder. - 2 cans (15 ounces each) chickpeas, drained and rinsed
They bulk up the curry and make it filling. - 1 can (13.5 ounces) light coconut milk
Keeps the sauce creamy without going too rich. - 1 can (14.5 ounces) diced tomatoes
Gives acidity and color. - 1/2 cup low-sodium vegetable broth
Helps the sauce simmer without getting thick too soon. - 3 cups baby spinach
Stirred in at the end so it stays tender, not gray. - 1 tablespoon lime juice
Brightens the coconut milk. - 2 cups cooked brown rice
A steady base for the curry.
Quick Steps:
- Cook the onion: Heat the oil in a large pot over medium heat. Add the onion and cook for 5 minutes until soft and translucent.
- Bloom the aromatics: Stir in the garlic, ginger, curry powder, and cumin. Cook for 30 to 45 seconds until the spices smell fragrant.
- Build the sauce: Add the chickpeas, coconut milk, tomatoes, and broth. Stir and bring to a gentle simmer.
- Simmer and thicken: Cook for 15 minutes, stirring occasionally, until the sauce looks a little darker and clings to the chickpeas.
- Finish with spinach: Stir in the spinach and cook for 1 to 2 minutes until just wilted.
- Add lime and serve: Stir in the lime juice and spoon the curry over brown rice.
Equipment for This Recipe:
- Large saucepan or Dutch oven
You need enough room for the sauce to simmer without splashing. - Wooden spoon
Good for scraping the bottom when the spices are blooming. - Grater or Microplane
For the ginger. - Rice cooker or saucepan
To get the rice going while the curry simmers.
How to Serve This Dish:
Serve the curry in shallow bowls so the sauce stays visible around the rice. A squeeze of lime and a spoonful of plain yogurt on top can cool the spice if needed. If you want a little crunch, add chopped cilantro or toasted cashews at the table.
Pro Tips for This Recipe:
- Let the onions soften before adding the spices. Raw onion keeps the sauce tasting rough.
- Use light coconut milk if you want a looser curry; full-fat coconut milk makes it richer and thicker.
- If your curry tastes flat at the end, it probably needs salt, not more spice.
- Spinach should go in last. If you cook it for five minutes, it turns dull and stringy.
Variations on This Dish:
- Sweet Potato Curry: Add 2 cups peeled, diced sweet potato with the chickpeas and simmer until tender.
- Red Curry Version: Swap curry powder for 2 tablespoons red curry paste and cut the broth to 1/4 cup.
- Protein-Heavy Bowl: Stir in 1 cup cooked shredded chicken near the end if you want extra protein.
Common Mistakes to Avoid with This Dish:
- Skipping the spice bloom: Curry powder stirred into liquid alone tastes flatter.
- Adding spinach too early: It loses its color and turns limp fast.
- Undersalting coconut milk dishes: Coconut softens salt, so taste before serving and adjust.
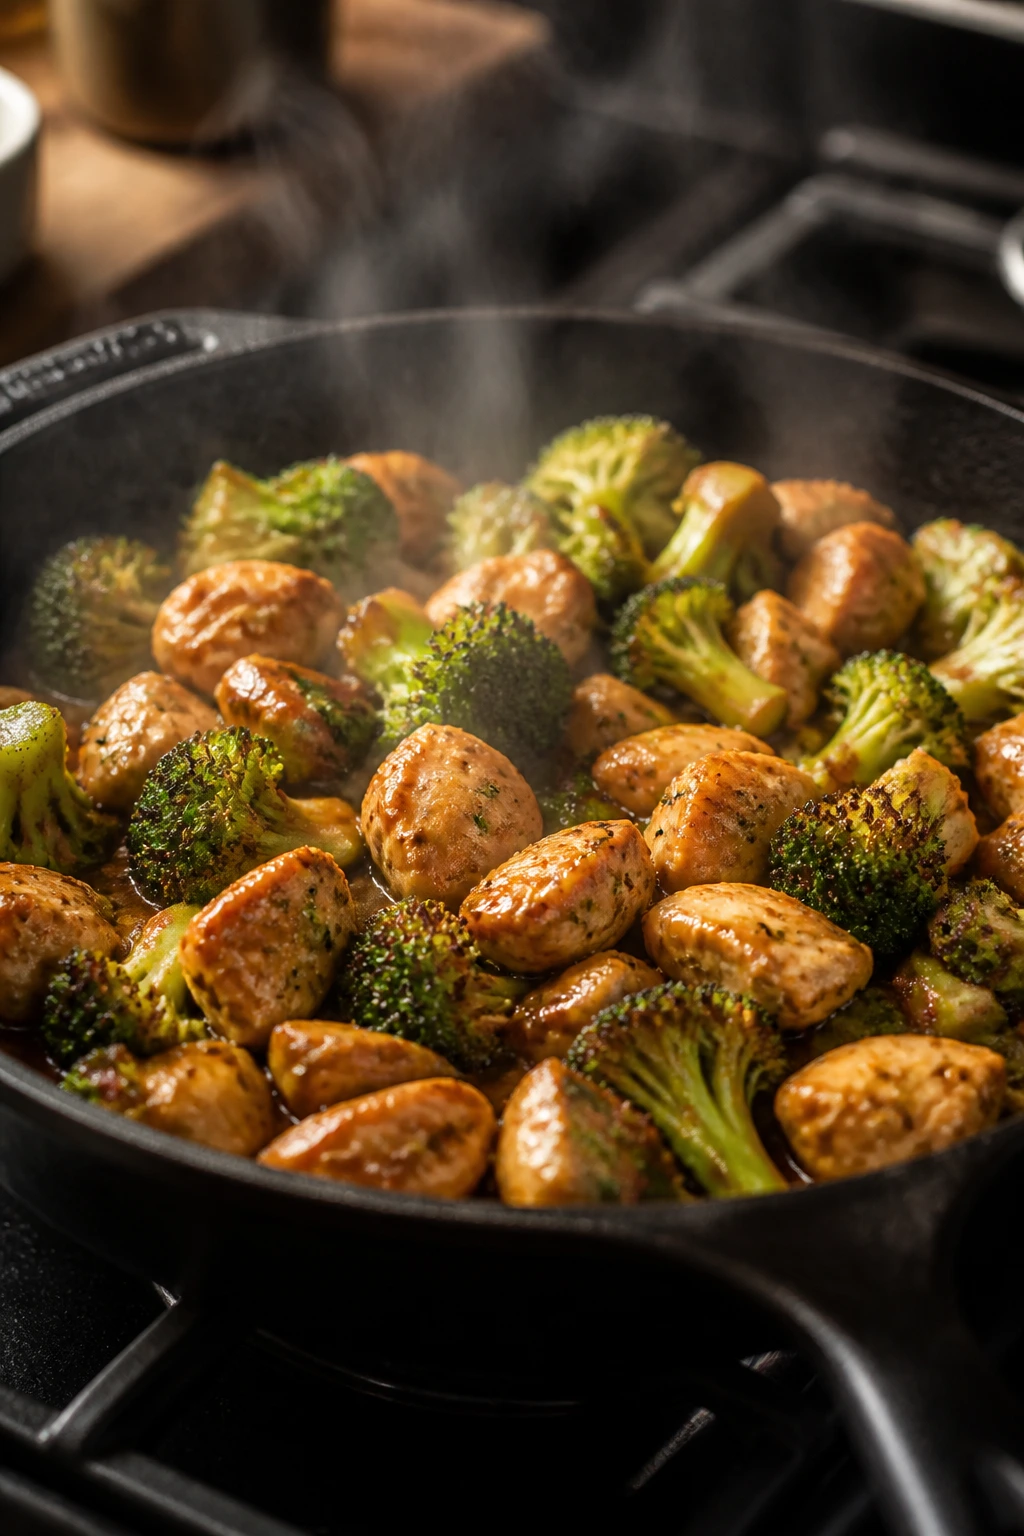
5. Beef and Broccoli Stir-Fry with Brown Rice
Intro:
This is the takeout-style dinner that actually behaves at home. Thin slices of beef sear fast, broccoli stays crisp-tender, and the sauce turns glossy instead of gloopy if you keep the heat high. Brown rice underneath keeps the whole thing honest.
Why It Works:
The success of this stir-fry comes down to surface heat and speed. Flank steak slices thinly against the grain, which keeps each bite tender instead of stringy. Broccoli gets just enough time to turn bright and a little brown around the edges, and the sauce thickens with a small hit of cornstarch so it sticks to the meat. That’s the difference between a skillet dinner and a soggy one.
Key Ingredients:
- 1 lb flank steak, very thinly sliced against the grain
Slice it while it’s cold for cleaner cuts. - 4 cups broccoli florets
Small florets cook faster and stay crisp. - 2 tablespoons avocado or canola oil
A neutral oil that handles high heat. - 3 cloves garlic, minced
Added near the end so it doesn’t burn. - 1 tablespoon fresh ginger, grated
Sharpens the whole dish. - 1/3 cup low-sodium soy sauce
The salty base of the sauce. - 2 tablespoons water
Loosens the sauce so it coats evenly. - 1 tablespoon honey
Balances the soy and browning. - 1 teaspoon cornstarch
Thickens the sauce once it hits the pan. - 1 tablespoon rice vinegar
Adds a clean finish. - 1 teaspoon sesame oil
Used at the end for flavor, not for frying. - 2 cups cooked brown rice
A sturdy base for the stir-fry.
Quick Steps:
- Mix the sauce: Whisk the soy sauce, water, honey, cornstarch, and rice vinegar in a small bowl until smooth.
- Sear the beef: Heat 1 tablespoon oil in a large skillet or wok over high heat. Add the beef in a single layer and cook for 1 to 2 minutes per side until browned but not cooked through. Remove it to a plate.
- Cook the broccoli: Add the remaining oil and broccoli. Stir-fry for 3 minutes, then splash in 2 tablespoons water and cover for 1 minute to steam the stems.
- Finish the aromatics: Uncover, add the garlic and ginger, and cook for 30 seconds.
- Return the beef: Add the beef back to the pan with the sauce and toss for 1 to 2 minutes until glossy and just cooked through.
- Serve over rice: Drizzle with sesame oil and spoon over brown rice.
Equipment for This Recipe:
- Large skillet or wok
High sides help keep the sauce from spilling. - Sharp chef’s knife
Thin beef slices depend on a clean blade. - Mixing bowl
For the sauce. - Tongs
Useful for quick tossing without shredding the steak.
How to Serve This Dish:
Serve it hot over brown rice so the sauce settles into the grains. A few sliced scallions on top make the bowl look brighter. If your family wants extra vegetables, steamed snap peas or shredded carrots fit without fighting the flavor.
Pro Tips for This Recipe:
- Freeze the steak for 20 minutes before slicing. It firms up enough to cut thinly.
- Do not crowd the pan with beef. It needs contact with the hot surface to brown.
- Stir the cornstarch sauce right before adding it, because the starch sinks fast.
- Pull the beef when it’s still slightly pink in the center; it will finish in the sauce.
Variations on This Dish:
- Chicken Broccoli Stir-Fry: Swap in thin-sliced chicken breast and cook it fully before adding the broccoli.
- Tofu Broccoli Stir-Fry: Use extra-firm tofu cubes and sear them until crisp on two sides.
- Garlic-Heavy Version: Add an extra 2 cloves garlic if your household likes a stronger finish.
Common Mistakes to Avoid with This Dish:
- Using thick beef slices: They stay chewy no matter how long you cook them.
- Letting the sauce sit too long before cooking: The cornstarch can clump at the bottom.
- Overcooking the broccoli: It should stay green and a little crisp, not fold into the sauce.
6. Turkey Meatballs with Zucchini and Whole-Wheat Spaghetti
Intro:
Turkey meatballs can be dry if you treat them like beef, and this is where people go wrong. The trick is a little moisture from egg and Parmesan, a tender hand when mixing, and a sauce that gives the meatballs something to rest in. The zucchini melts into the marinara and makes the whole pot taste fuller.
Why It Works:
Meatballs need fat, salt, and restraint. Ground turkey is lean, so breadcrumbs and egg keep it from tightening up in the oven, and Parmesan adds both salt and a little savoriness. Grated zucchini disappears into the tomato sauce, which is a useful trick when you want more vegetables without having a family discussion about vegetables. Whole-wheat spaghetti brings a nutty bite that stands up to the sauce better than standard pasta.
Key Ingredients:
- 1 lb ground turkey
Use lean turkey, but not the driest package on the shelf. - 1 large egg
Holds the meatballs together. - 1/2 cup plain breadcrumbs
Lightens the texture. - 1/4 cup grated Parmesan cheese
Adds salt and depth. - 2 cloves garlic, minced
Brings the meatballs to life. - 1 teaspoon Italian seasoning
Gives the meatballs familiar flavor. - 1/2 teaspoon kosher salt
Enough to season the meat without making it dense. - 2 tablespoons olive oil
For browning or coating the pan. - 2 medium zucchini, grated
Stir into the sauce for extra body. - 1 jar (24 ounces) marinara sauce
A good jar saves time and still tastes clean. - 12 ounces whole-wheat spaghetti
A sturdy pasta shape that won’t collapse under the sauce.
Quick Steps:
- Mix the meatball base: In a bowl, combine the turkey, egg, breadcrumbs, Parmesan, garlic, Italian seasoning, and salt. Mix with your hands until just combined. Do not mash it into paste.
- Shape the meatballs: Roll into 16 golf-ball-sized meatballs and place them on a parchment-lined sheet pan.
- Bake or brown: Bake at 400°F (205°C) for 12 to 14 minutes, or brown in a skillet with a little oil until the outsides are set.
- Build the sauce: In a saucepan, warm the marinara and stir in the grated zucchini. Simmer for 8 minutes until the zucchini softens and disappears.
- Cook the pasta: Boil the spaghetti in salted water until al dente, then drain.
- Combine and serve: Add the meatballs to the sauce, spoon over the pasta, and finish with extra Parmesan if you like.
Equipment for This Recipe:
- Rimmed baking sheet
Keeps the meatballs from rolling around. - Mixing bowl
For the turkey mixture. - Saucepan
To simmer the marinara and zucchini. - Large pot
For the pasta.
How to Serve This Dish:
Twirl the pasta into shallow bowls and nestle the meatballs on top so they don’t disappear under the sauce. A crisp side salad or steamed green beans keeps the plate balanced. If you want extra color, finish with basil or chopped parsley.
Pro Tips for This Recipe:
- Grate the zucchini fine. Bigger shreds can feel stringy in the sauce.
- Wet hands help shape turkey meatballs without sticking.
- If the turkey mixture feels loose, let it rest for 5 minutes before rolling.
- Salt the pasta water well. Whole-wheat pasta tastes dull if the water is timid.
Variations on This Dish:
- Chicken Meatball Version: Ground chicken works the same way, though it may need 1 tablespoon extra breadcrumbs.
- Dairy-Free Version: Skip the Parmesan and add 1 teaspoon nutritional yeast.
- Spicy Marinara Twist: Stir 1/4 teaspoon red pepper flakes into the sauce.
Common Mistakes to Avoid with This Dish:
- Overmixing the meat: That makes the meatballs tight instead of tender.
- Using raw zucchini as a garnish: It belongs in the sauce, where it softens and blends in.
- Overcooking the pasta: Whole-wheat spaghetti turns mushy fast if you ignore it for a minute too long.
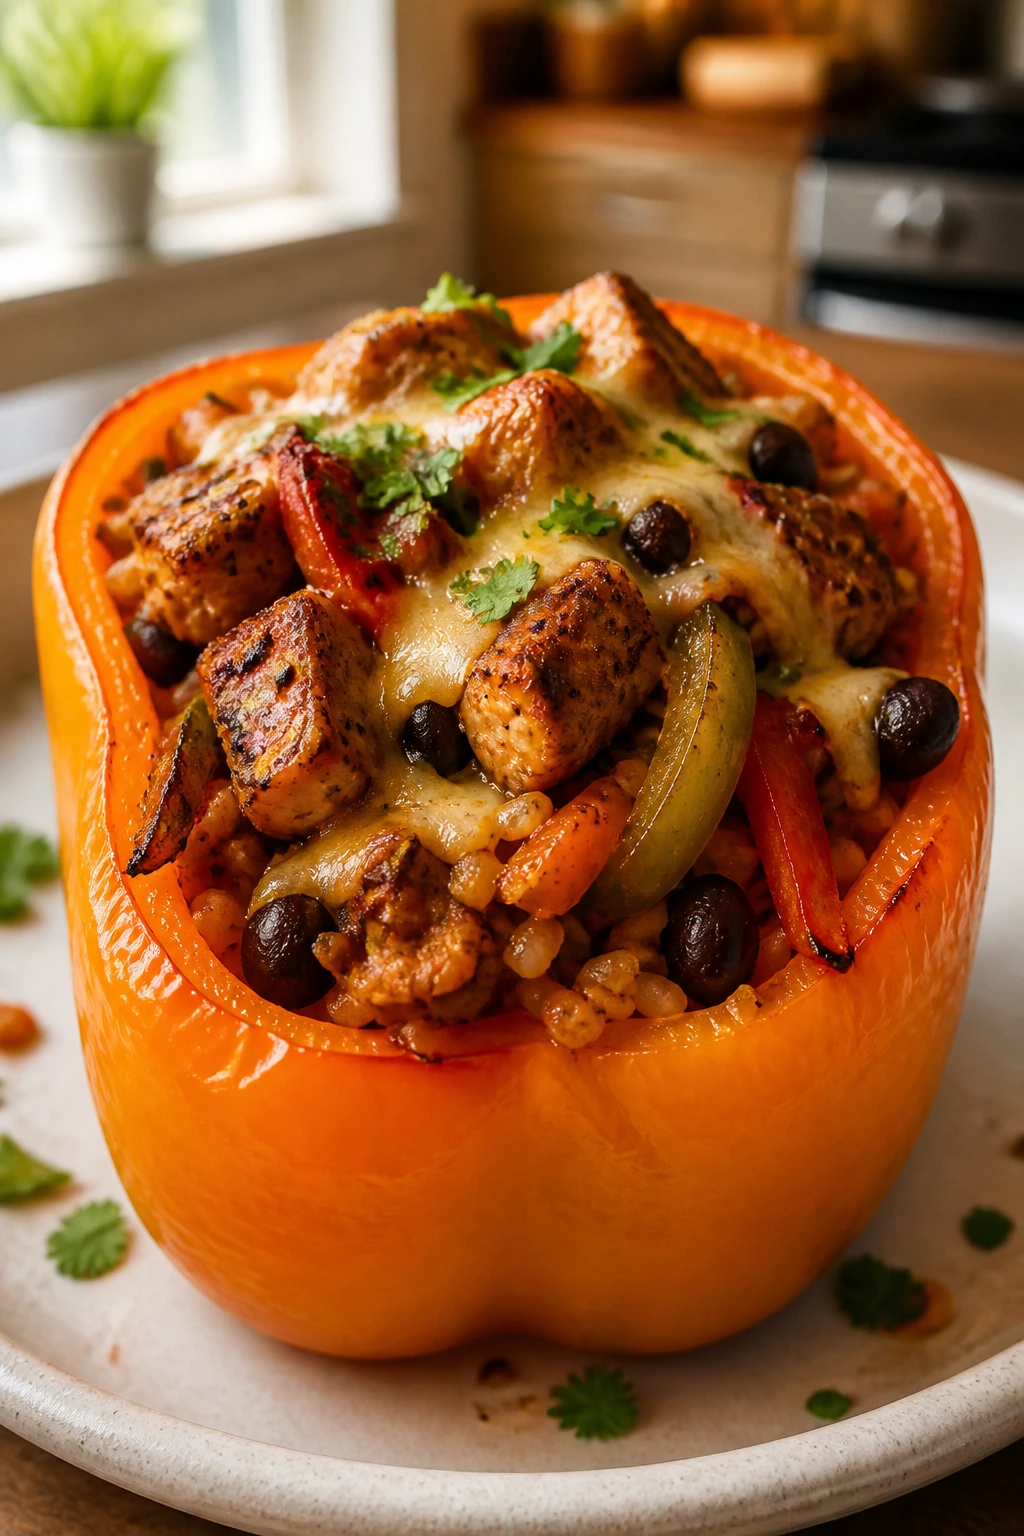
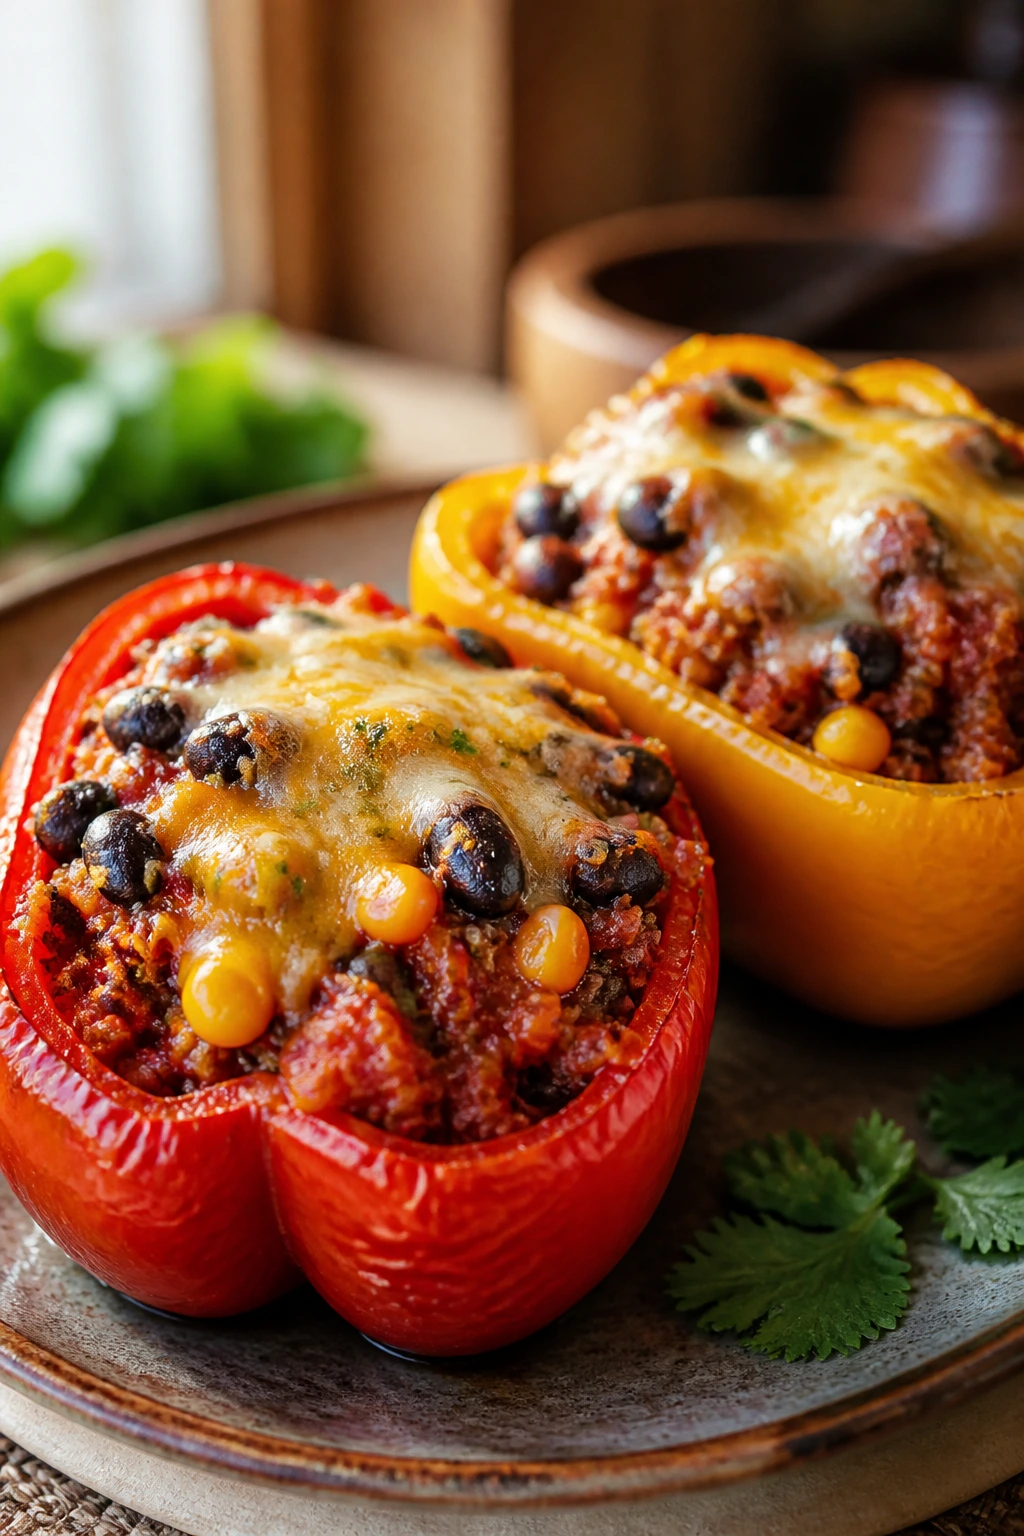
7. Chicken Fajita Stuffed Peppers
Intro:
Stuffed peppers can be a little sad when they’re underseasoned and watery. These are not that. The peppers soften at the edges, the chicken gets fajita spice, and the filling has enough rice and beans to count as dinner without turning into a brick.
Why It Works:
Roasting the pepper halves before stuffing them gives the shells a head start, which matters because raw peppers can stay stubbornly firm while the filling overcooks. Chicken breast stays lean here, but salsa and black beans keep it moist enough to reheat cleanly. A little cheese on top gives the dish a browned lid and helps pull the whole tray together. The result is orderly, filling, and easy to portion.
Key Ingredients:
- 4 large bell peppers, halved and seeded
Use peppers with flat bottoms so they sit upright. - 1 lb boneless, skinless chicken breast, diced small
Smaller pieces cook faster and fit the filling better. - 1 tablespoon olive oil
For sautéing the chicken and onions. - 1 medium onion, sliced
Softens into the fajita mix. - 1 tablespoon fajita seasoning
Store-bought or homemade both work. - 1 cup cooked brown rice
Adds structure to the filling. - 1 can (15 ounces) black beans, drained and rinsed
Brings fiber and bulk. - 1 cup salsa
Keeps the filling moist and flavorful. - 1 cup shredded Mexican cheese blend
Melts into the top layer. - 1/4 cup chopped cilantro
For finishing. - 1 lime, cut into wedges
Optional, but it wakes up the peppers.
Quick Steps:
- Roast the peppers first: Heat the oven to 400°F (205°C). Place the pepper halves cut-side up in a baking dish and roast for 10 minutes.
- Cook the filling: While they roast, heat the oil in a skillet. Add the onion and chicken and cook for 6 to 7 minutes until the chicken is no longer pink.
- Season and bulk up: Stir in the fajita seasoning, rice, beans, and salsa. Cook for 2 minutes until the filling looks cohesive and not soupy.
- Stuff the peppers: Spoon the filling into the roasted pepper halves and top with cheese.
- Bake again: Return the dish to the oven for 12 to 15 minutes until the cheese melts and the peppers are tender at the edges.
- Finish: Scatter cilantro over the top and serve with lime wedges.
Equipment for This Recipe:
- 9×13-inch baking dish
Helps the pepper halves stay upright. - Large skillet
For the filling. - Wooden spoon
Good for folding rice and beans into the chicken. - Sharp knife
Needed for halving and seeding the peppers.
How to Serve This Dish:
Serve two pepper halves per adult and one half for smaller eaters. A spoonful of salsa or Greek yogurt on the side makes the tray feel more complete. If you want more volume on the plate, a simple shredded lettuce salad works without crowding the pepper flavor.
Pro Tips for This Recipe:
- Cut the chicken small so it cooks before the peppers turn floppy.
- Use salsa with some body; very watery salsa makes the filling slip around.
- Pre-roast the peppers or you’ll end up with firm shells and mushy filling.
- Let the stuffed peppers sit for 5 minutes before serving so the filling settles.
Variations on This Dish:
- Turkey Fajita Peppers: Ground turkey swaps in cleanly and browns faster than chicken cubes.
- Quinoa Version: Replace the rice with cooked quinoa for a slightly nuttier filling.
- Vegetarian Pepper Tray: Use an extra can of beans and 1 cup corn in place of the chicken.
Common Mistakes to Avoid with This Dish:
- Filling the peppers with wet salsa: The mixture should be thick enough to mound.
- Skipping the first roast on the peppers: Raw peppers can stay too firm.
- Overstuffing the shells: Leave a little room so the cheese can melt without spilling everywhere.
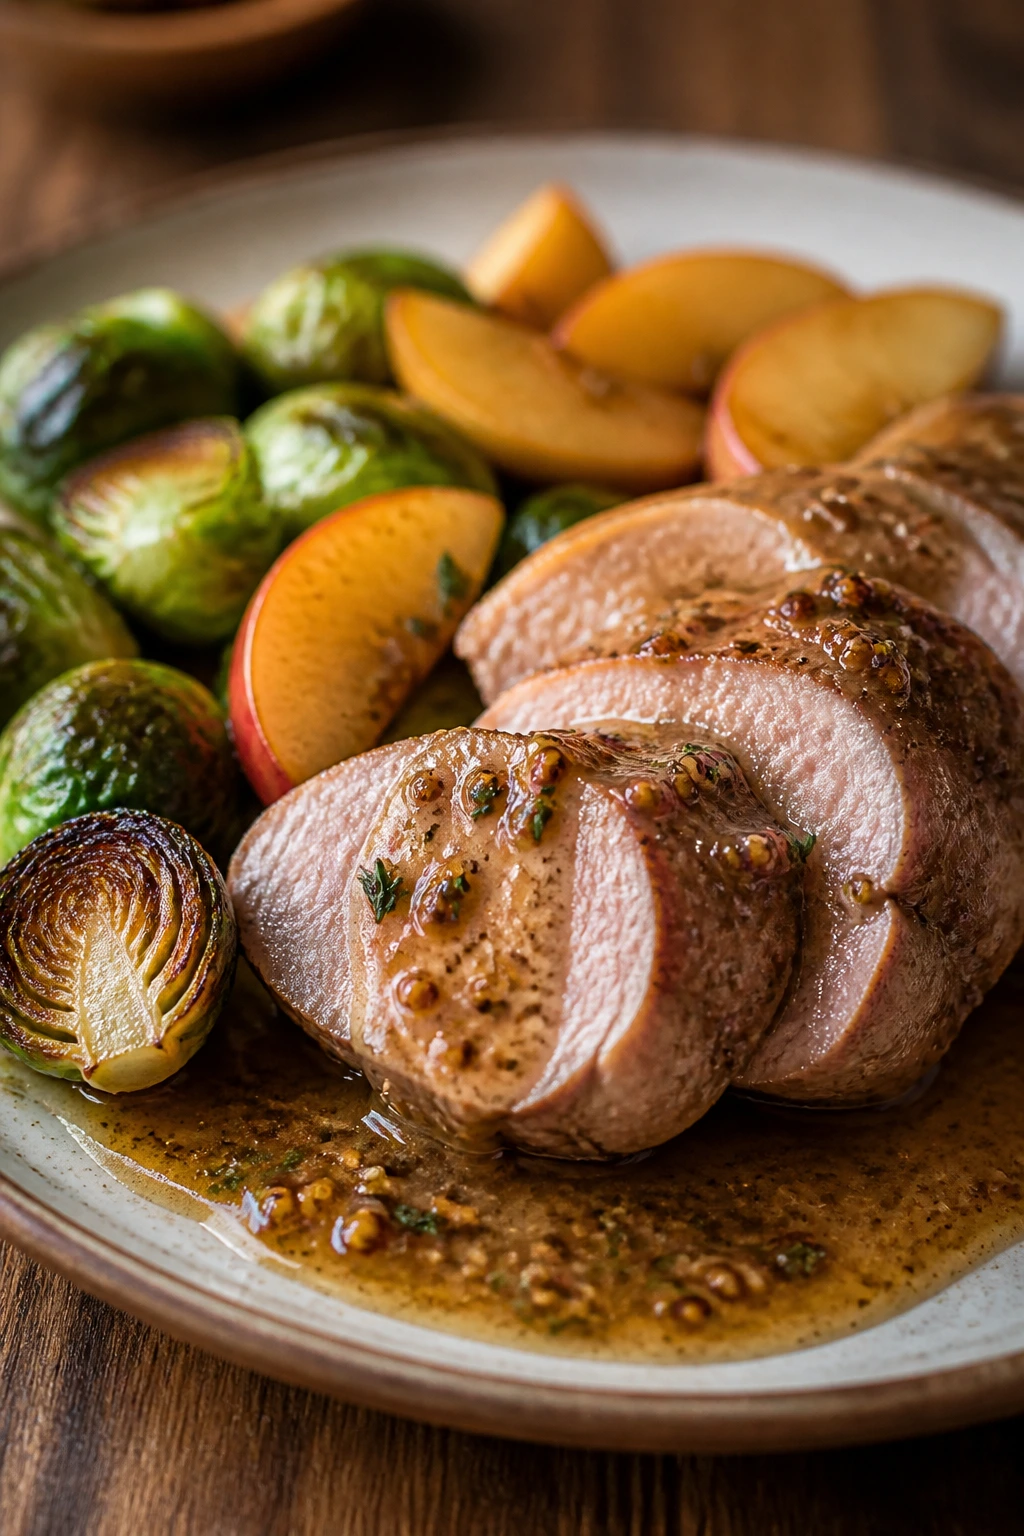
8. Pork Tenderloin with Apples, Brussels Sprouts, and Mustard Pan Sauce
Intro:
Pork tenderloin gets a bad reputation from overcooked, chalky versions. Treated well, it’s one of the fastest lean dinners around, and the apples plus Brussels sprouts give you sweet, bitter, and savory on the same pan. The mustard sauce pulls the whole thing together without turning it into a roast that needs a holiday to justify itself.
Why It Works:
Pork tenderloin cooks fast because it’s narrow, which makes it a good weeknight protein if you respect the time. Brussels sprouts roast best at high heat and turn nutty when their cut sides hit the pan, while apples soften just enough to stay recognizable. The mustard sauce uses the pan drippings, so you get real flavor from the roast instead of a bottled shortcut.
Key Ingredients:
- 1½ lb pork tenderloin
Trim the silver skin if your butcher hasn’t already. - 1 lb Brussels sprouts, halved
Smaller sprouts roast more evenly. - 2 medium apples, cored and sliced into thick wedges
Keep the pieces chunky so they don’t collapse. - 2 tablespoons olive oil
Used for roasting the vegetables and pork. - 1 teaspoon kosher salt
Divided between the pork and vegetables. - ½ teaspoon black pepper
Sharpens the pork. - 1 teaspoon chopped fresh rosemary or 1/2 teaspoon dried
Works with the apples and mustard. - 1/3 cup low-sodium chicken broth
For the pan sauce. - 1 tablespoon Dijon mustard
Gives the sauce its bite. - 1 tablespoon apple cider vinegar
Keeps the sauce bright. - 1 teaspoon honey
Rounds out the acid.
Quick Steps:
- Heat the oven: Set the oven to 425°F (220°C).
- Season the pan: Toss the Brussels sprouts and apple wedges with the olive oil, half the salt, pepper, and rosemary. Spread them on a sheet pan.
- Roast briefly: Roast for 10 minutes so the vegetables start browning before the pork joins them.
- Add the pork: Rub the tenderloin with the remaining salt and place it on the pan. Roast for 15 to 18 minutes until the pork reaches 145°F in the center.
- Rest the meat: Move the pork to a cutting board and rest it for 5 to 7 minutes.
- Make the sauce: Pour the broth into the hot pan or a small skillet, scrape up the browned bits, then whisk in the mustard, vinegar, and honey. Slice the pork and spoon the sauce over the top.
Equipment for This Recipe:
- Rimmed sheet pan
Needed for roasting the vegetables and pork together. - Small skillet
Helpful if you want to make the sauce away from the sheet pan. - Instant-read thermometer
The easiest way to avoid dry pork. - Sharp carving knife
Lets you slice the tenderloin cleanly.
How to Serve This Dish:
Slice the pork into medallions and fan them over the roasted apples and Brussels sprouts. Spoon the mustard sauce over the top so it glazes the meat. If you want a starch, mashed potatoes or barley are both good partners.
Pro Tips for This Recipe:
- Pull the pork at 145°F, not later. It keeps cooking during the rest.
- Keep the apple wedges thick. Thin slices turn to mush.
- If your Brussels sprouts are huge, quarter them so they roast at the same pace as the pork.
- Let the sauce hit the hot pan drippings right away; that’s where the flavor comes from.
Variations on This Dish:
- Pear and Sage Version: Swap pears for apples and use sage instead of rosemary.
- Balsamic Finish: Add 1 teaspoon balsamic vinegar to the pan sauce for extra depth.
- Sheet-Pan Mustard Chicken: Use bone-in chicken thighs and roast a little longer.
Common Mistakes to Avoid with This Dish:
- Overcooking the tenderloin: Pork dries out fast once it passes the right temperature.
- Cutting it immediately: The juices spill out if you skip the rest.
- Using apples that break down too fast: Choose firm varieties that hold shape in the oven.
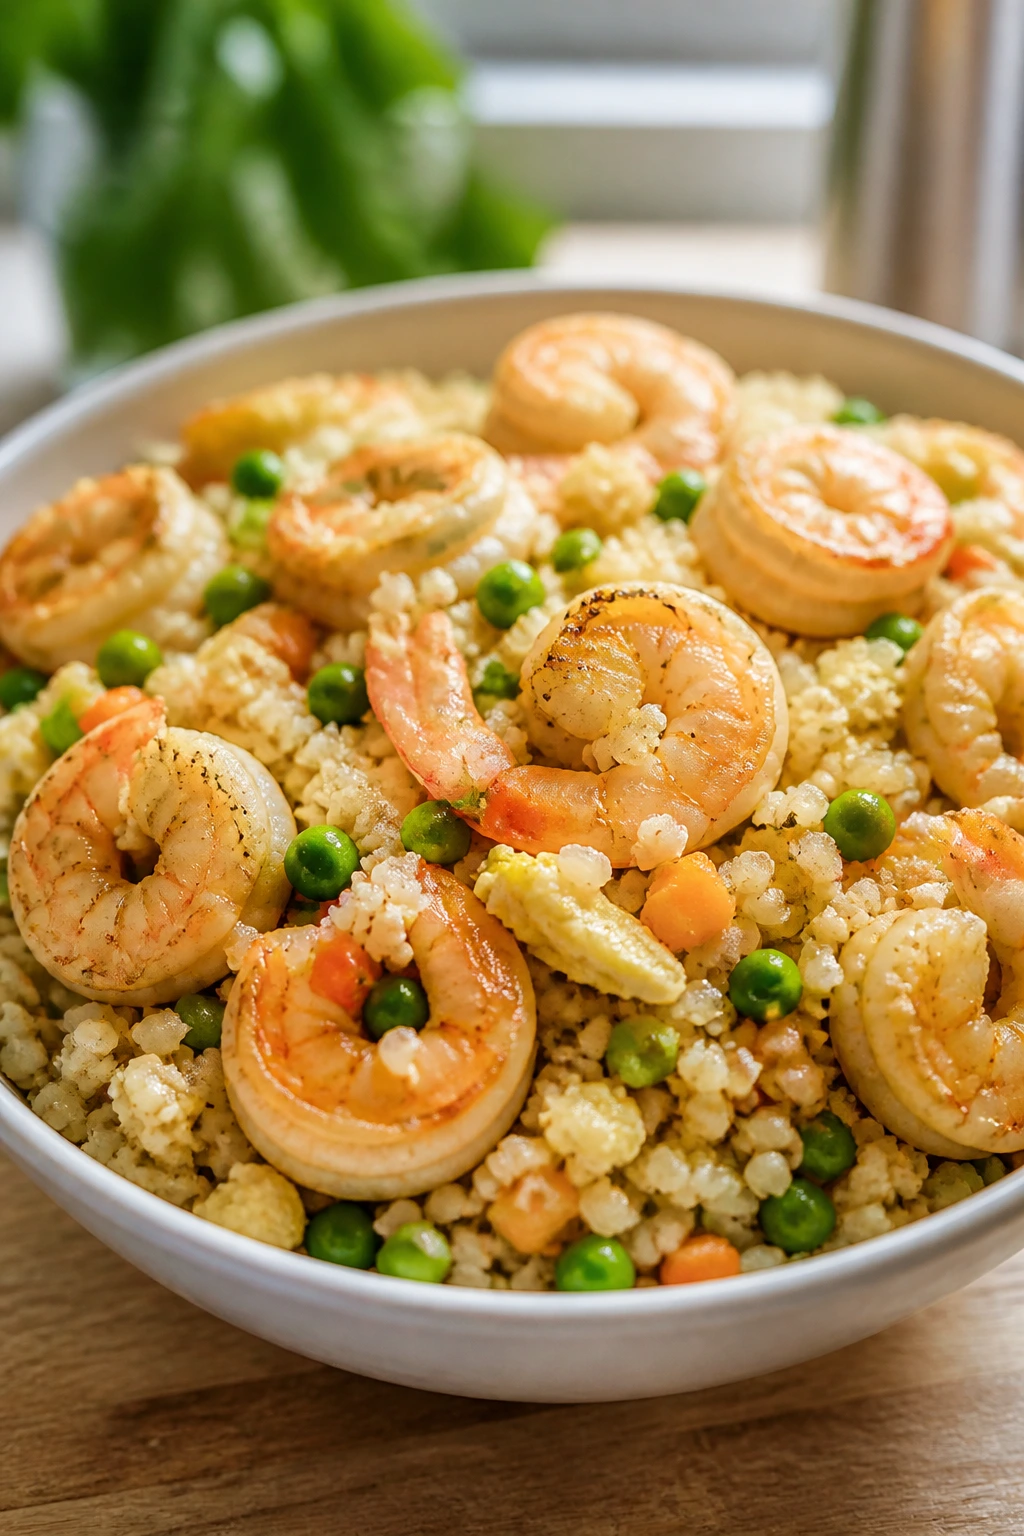
9. Shrimp Fried Rice with Cauliflower Rice and Peas
Intro:
This is fried rice that doesn’t collapse into a greasy lump. The shrimp cooks fast, the cauliflower rice keeps the texture light, and the little bit of brown rice gives enough chew that the dish still feels like dinner. It’s a smart way to use cold rice without making it feel like leftovers in disguise.
Why It Works:
Shrimp and stir-fry vegetables work best when the pan is hot and the cooking time is short. Cauliflower rice soaks up flavor quickly, but it can get watery if you don’t cook off the moisture first, so the order matters. Adding a smaller amount of cooked brown rice keeps the dish familiar and gives the cauliflower something to cling to. The peas bring sweetness; the eggs give the bowl body.
Key Ingredients:
- 1 lb large shrimp, peeled and deveined
Pat them dry so they sear instead of steam. - 4 cups cauliflower rice
Fresh or frozen both work if you cook off the moisture. - 1 cup cooked brown rice
Adds chew and helps the dish feel like fried rice. - 2 eggs, lightly beaten
Scramble into the pan for richness. - 1 cup frozen peas
Sweet, easy, and fast. - 2 tablespoons neutral oil
For high-heat cooking. - 2 cloves garlic, minced
Added late so it doesn’t burn. - 1 tablespoon grated ginger
Adds brightness. - 2 tablespoons low-sodium soy sauce
Salty enough without overpowering the shrimp. - 1 teaspoon sesame oil
A finishing note, not the main cooking fat. - 2 scallions, sliced
Freshness at the end.
Quick Steps:
- Scramble the eggs: Heat 1 tablespoon oil in a large skillet over medium-high heat. Add the eggs and scramble for 30 to 45 seconds, then move them to a plate.
- Cook the shrimp: Add the shrimp to the pan and cook for 1 to 2 minutes per side until pink and curled. Remove them.
- Stir-fry the vegetables: Add the remaining oil, cauliflower rice, peas, garlic, and ginger. Cook for 4 to 5 minutes, stirring often, until the cauliflower loses its raw smell and the moisture cooks off.
- Add the brown rice: Stir in the cooked brown rice and soy sauce. Cook for 2 minutes until the grains are hot and separated.
- Finish the pan: Return the shrimp and eggs, add the sesame oil, and toss for 1 minute.
- Top and serve: Finish with scallions.
Equipment for This Recipe:
- Large skillet or wok
Wide enough to keep the rice in contact with the heat. - Spatula
A flat spatula helps break up any clumps. - Fine grater
For ginger. - Small bowl
For the beaten eggs.
How to Serve This Dish:
Serve it in bowls with the shrimp visible on top so it doesn’t disappear into the rice. A few extra scallions or sesame seeds make it look finished. If your family wants more crunch, sliced cucumbers on the side are a clean match.
Pro Tips for This Recipe:
- Cook the cauliflower rice until the steam has mostly gone. Wet cauliflower makes mushy fried rice.
- Keep the shrimp in a single layer when possible. Crowding makes them rubbery.
- Day-old rice works better than freshly cooked rice. If you need to use fresh rice, spread it on a tray for 10 minutes to cool and dry a little.
- Add sesame oil at the end; if it hits a screaming-hot pan, the flavor gets lost.
Variations on This Dish:
- Chicken Fried Rice: Use diced cooked chicken or raw diced chicken breast cooked first.
- Vegetarian Bowl: Skip the shrimp and add diced tofu or an extra egg.
- Garlic-Lime Version: Finish with lime juice instead of sesame oil if you want a brighter bowl.
Common Mistakes to Avoid with This Dish:
- Starting with wet cauliflower rice: It turns pasty if you don’t cook off the moisture.
- Overcooking shrimp: They need only a few minutes, not a full stir-fry cycle.
- Using too much soy sauce: Fried rice should taste seasoned, not soupy or salty.
10. Lentil Bolognese over Whole-Wheat Pasta
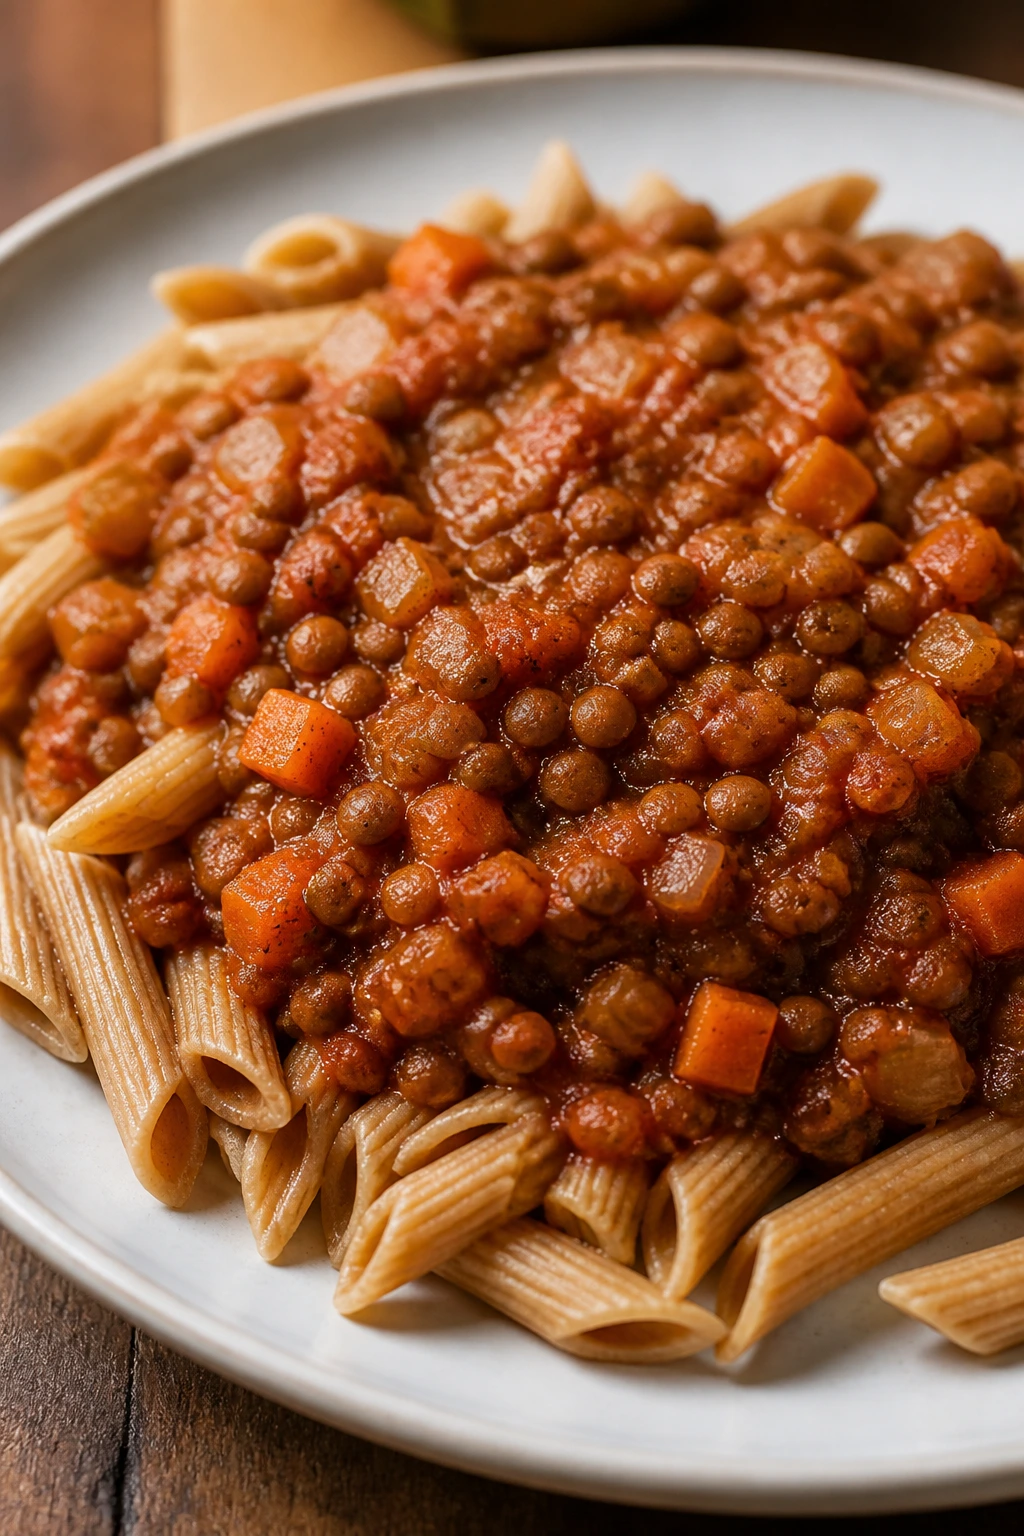
Intro:
This is the sauce I make when I want a meatless dinner that still eats like dinner. The lentils get tender and saucy, the vegetables melt into the base, and the whole-wheat pasta gives the bowl enough structure to feel substantial. It’s the sort of meal that gets better after it sits for ten minutes, which is useful on a busy night.
Why It Works:
Lentils are small, fast, and sturdy, which makes them perfect for a long-simmered sauce without the long simmer. The classic onion-carrot-celery base gives the sauce a savory start, and crushed tomatoes keep it from drying out. You’re building the flavor in layers instead of hiding the lentils, which is why the finished sauce tastes like more than a bean substitute.
Key Ingredients:
- 2 tablespoons olive oil
For sautéing the vegetables. - 1 medium onion, diced
The first layer of flavor. - 2 carrots, diced small
They soften into the sauce. - 2 celery stalks, diced small
Adds the classic bolognese base. - 3 cloves garlic, minced
Added after the vegetables soften. - 1 tablespoon tomato paste
Deepens the tomato flavor. - 1 cup brown or green lentils, rinsed
Red lentils break down too fast here. - 1 can (28 ounces) crushed tomatoes
Makes the sauce thick and rich. - 2 cups low-sodium vegetable broth
Helps the lentils cook through. - 1 teaspoon dried oregano
Keeps the sauce in the Italian lane. - 1 teaspoon kosher salt
Start here and adjust at the end. - 12 ounces whole-wheat spaghetti or penne
The pasta base. - Parmesan cheese, for serving
Optional, but useful.
Quick Steps:
- Sauté the vegetables: Heat the oil in a Dutch oven over medium heat. Add the onion, carrots, and celery and cook for 8 minutes until soft and a little golden.
- Build the flavor: Stir in the garlic and tomato paste and cook for 1 minute until the paste darkens slightly.
- Simmer the sauce: Add the lentils, crushed tomatoes, broth, oregano, and salt. Bring to a simmer, then cook for 25 to 30 minutes until the lentils are tender and the sauce is thick.
- Cook the pasta: Boil the pasta in salted water until al dente.
- Combine or plate separately: Toss the pasta with some sauce, or spoon the sauce over the top if you want cleaner portions.
- Finish: Add Parmesan and black pepper if desired.
Equipment for This Recipe:
- Dutch oven or large pot
Gives the sauce enough depth to simmer safely. - Cutting board and chef’s knife
For the vegetables. - Wooden spoon
Helps scrape the bottom as the sauce thickens. - Colander
For the pasta.
How to Serve This Dish:
Twirl the pasta onto plates and spoon the lentil sauce over the center so it doesn’t run away. A crisp green salad or roasted broccoli makes a useful side. If you have garlic bread or toast, keep it simple so the sauce stays the star.
Pro Tips for This Recipe:
- Use green or brown lentils, not red. Red lentils break down too quickly and turn the sauce muddy.
- If the sauce gets too thick before the lentils are tender, add 1/2 cup water.
- Salt at the end after tasting, because canned tomatoes vary a lot.
- Let the sauce sit for 5 minutes before serving. The texture settles into something better.
Variations on This Dish:
- Mushroom Bolognese: Add 8 ounces chopped mushrooms with the onions for a deeper savory flavor.
- Vegan Version: Skip the Parmesan or use a plant-based topping.
- Spicy Tomato Sauce: Stir in red pepper flakes with the garlic.
Common Mistakes to Avoid with This Dish:
- Using red lentils: They dissolve and turn the sauce into a puree.
- Rushing the simmer: The lentils need enough time to soften and absorb the tomato flavor.
- Overcooking the pasta: Whole-wheat noodles go from firm to soft fast, so taste early.
11. Teriyaki Tofu and Vegetable Rice Bowls
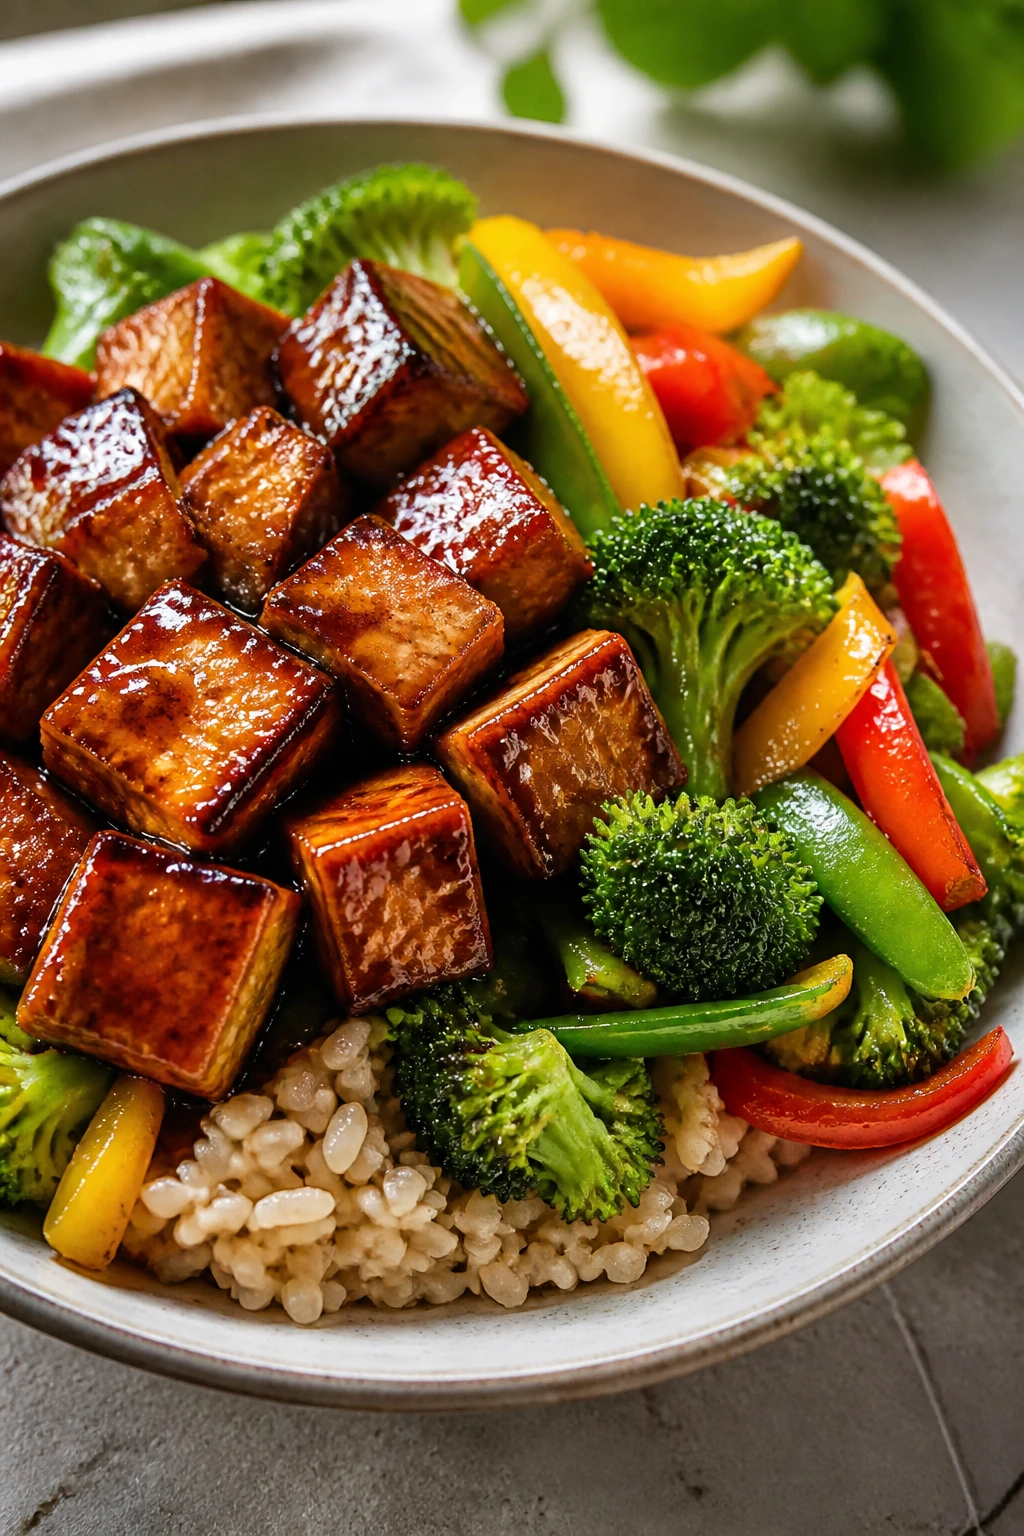
Intro:
Tofu gets a lot better when you stop treating it like a mystery and give it good heat. Here, it turns golden at the edges, the vegetables stay bright, and the teriyaki sauce sticks to everything in a thin glossy layer. Served over brown rice, it’s the kind of vegetarian dinner that doesn’t apologize for itself.
Why It Works:
Extra-firm tofu has enough structure to brown if you press it first and dust it lightly with cornstarch. That crisp shell matters, because tofu without texture can feel soft in the wrong way. The vegetables here—broccoli, peppers, snap peas, and carrots—cook quickly and keep their color, so the bowls look as lively as they taste. The teriyaki sauce should be sweet-salty, not syrupy; a little cornstarch is enough to make it cling.
Key Ingredients:
- 14 ounces extra-firm tofu, pressed and cubed
Press it for at least 15 minutes so it browns well. - 2 tablespoons cornstarch
Helps the tofu crisp. - 2 tablespoons neutral oil
For searing the tofu and vegetables. - 2 cups broccoli florets
The main vegetable backbone. - 1 red bell pepper, sliced
Adds color and a little sweetness. - 1 carrot, thinly sliced
Cut thin so it cooks quickly. - 1 cup snap peas
Stay crisp and sweet. - 1/4 cup low-sodium soy sauce
The salty base. - 2 tablespoons honey or maple syrup
Balances the sauce. - 1 tablespoon rice vinegar
Gives the sauce a little tang. - 1 teaspoon sesame oil
Finishing flavor. - 2 cloves garlic, minced
Added to the sauce or pan. - 1 teaspoon grated ginger
Sharpens the sauce. - 1 teaspoon cornstarch mixed with 2 tablespoons water
Thickens the sauce. - 2 cups cooked brown rice
The bowl’s base.
Quick Steps:
- Press and coat the tofu: Press the tofu, cut it into cubes, and toss it with cornstarch and a pinch of salt.
- Brown the tofu: Heat 1 tablespoon oil in a skillet over medium-high heat and cook the tofu for 8 to 10 minutes, turning until golden on several sides.
- Cook the vegetables: Remove the tofu, add the remaining oil, and stir-fry the broccoli, pepper, carrot, and snap peas for 4 to 5 minutes until bright and crisp-tender.
- Mix the sauce: Whisk the soy sauce, honey, vinegar, sesame oil, garlic, ginger, and cornstarch slurry together.
- Glaze the pan: Return the tofu to the skillet, pour in the sauce, and cook for 1 to 2 minutes until everything is glossy and lightly thickened.
- Serve over rice: Spoon the mixture over warm brown rice.
Equipment for This Recipe:
- Large skillet
A wide pan helps the tofu brown. - Tofu press or clean kitchen towel and plate
Useful for squeezing out moisture. - Small whisk
For the sauce. - Rice cooker or saucepan
To get the rice ready.
How to Serve This Dish:
Serve the bowls with the tofu on top so the browned edges stay visible. A sprinkle of sesame seeds or sliced scallions makes the dish feel finished. If you want extra crunch, a handful of shredded cabbage or cucumber ribbons on the side works well.
Pro Tips for This Recipe:
- Press the tofu long enough. Wet tofu steams, and steamed tofu does not crisp.
- Don’t move the tofu too soon. Let it form a crust before turning.
- Mix the cornstarch slurry right before adding it to the pan.
- Use low-sodium soy sauce or the glaze can get too salty once it reduces.
Variations on This Dish:
- Chicken Teriyaki Bowl: Swap in thin-sliced chicken breast and cook it through before the vegetables.
- Gluten-Free Bowl: Use tamari instead of soy sauce.
- Sesame Vegetable Bowl: Add mushrooms and baby corn if you want a more takeout-style mix.
Common Mistakes to Avoid with This Dish:
- Skipping the tofu press: Water is the enemy of browning.
- Overloading the skillet: Too many vegetables at once means steaming, not stir-frying.
- Making the sauce too thick: It should glaze the food, not form a sticky paste.
12. Chicken Tortilla Soup with Beans and Corn
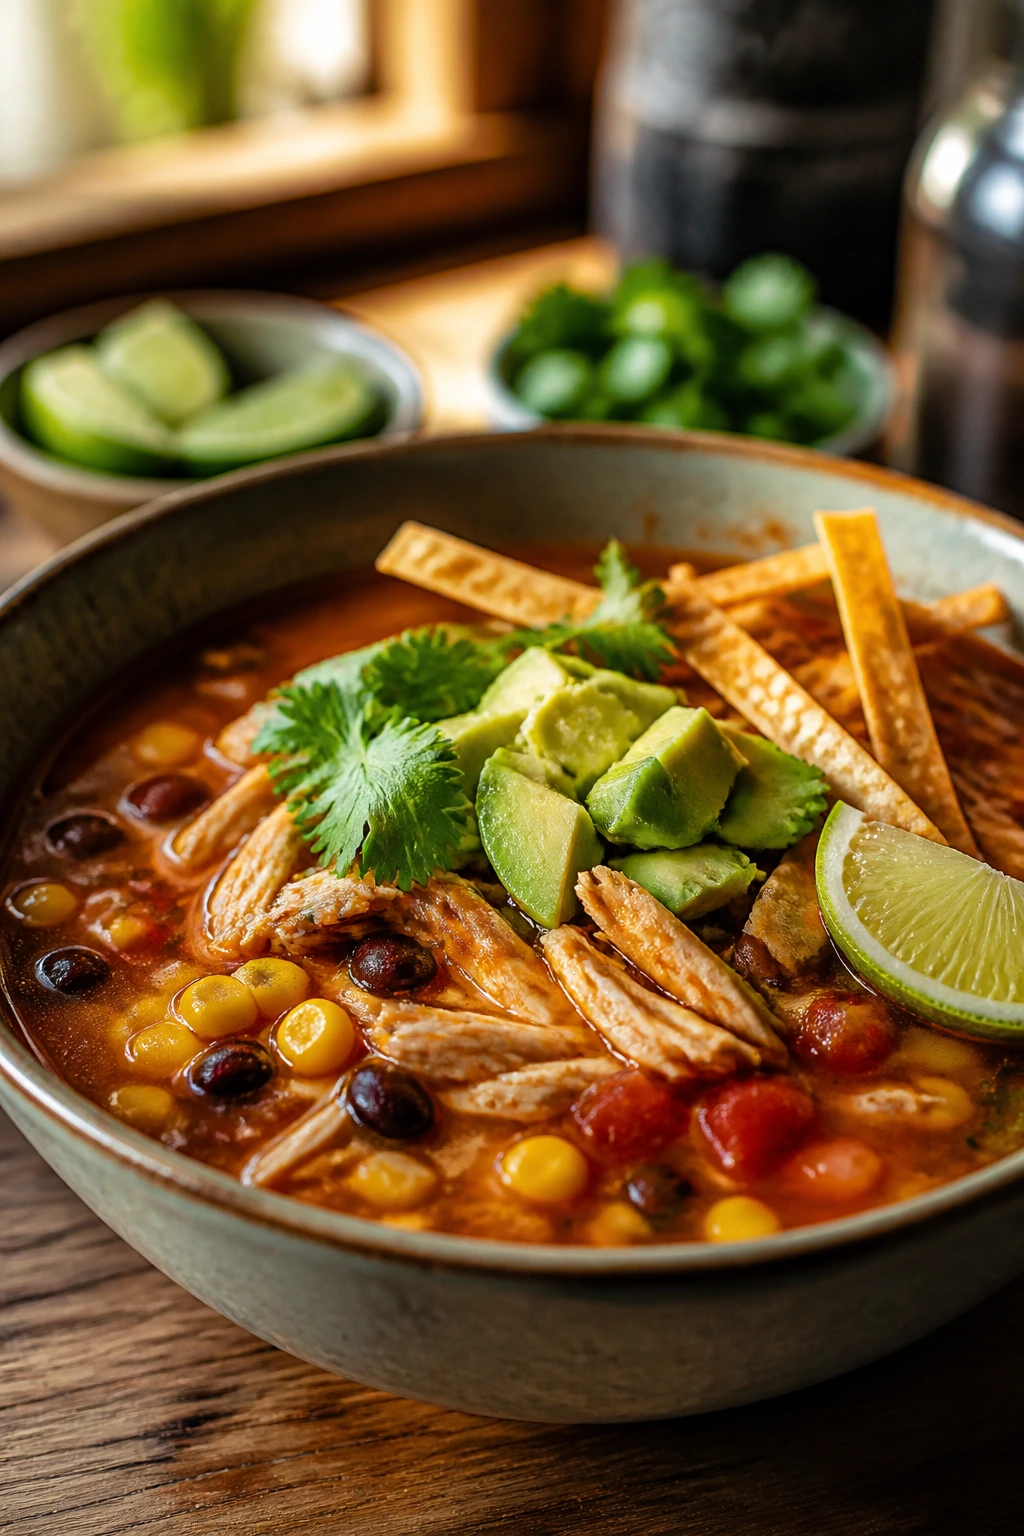
Intro:
There’s something comforting about a soup that eats like a full meal. This one has shredded chicken, beans, corn, tomatoes, and enough seasoning to keep each spoonful alive. The tortilla strips on top bring crunch, which is the difference between a decent soup and one that disappears from memory.
Why It Works:
Chicken simmers in the broth long enough to stay tender and absorb the cumin and chili powder. Black beans and corn make the soup feel substantial without needing cream, and the tomatoes give the broth body and acidity. The toppings matter as much as the soup itself; crispy tortilla strips, avocado, cilantro, and a squeeze of lime make the bowl feel finished.
Key Ingredients:
- 1 tablespoon olive oil
For the onion and garlic. - 1 medium onion, diced
The base of the soup. - 2 cloves garlic, minced
Added after the onion softens. - 1 lb boneless, skinless chicken breast or thighs
Thighs stay juicier; breasts are leaner. - 1 can (15 ounces) black beans, drained and rinsed
Brings fiber and texture. - 1 cup frozen corn
Sweet and easy. - 1 can (14.5 ounces) diced tomatoes
Adds body and acidity. - 4 cups low-sodium chicken broth
The soup base. - 1 teaspoon ground cumin
Essential for tortilla soup flavor. - 1 teaspoon chili powder
Keeps the broth warm and savory. - 1/2 teaspoon kosher salt
Adjust after simmering. - 1 lime, juiced
Brightens the whole pot. - Tortilla strips, avocado, and cilantro
For serving.
Quick Steps:
- Start the base: Heat the oil in a large pot over medium heat. Cook the onion for 5 minutes until soft, then stir in the garlic for 30 seconds.
- Simmer the chicken: Add the chicken, broth, tomatoes, cumin, chili powder, and salt. Bring to a simmer and cook for 15 to 18 minutes until the chicken is cooked through.
- Shred the chicken: Move the chicken to a bowl, shred it with two forks, and return it to the pot.
- Add beans and corn: Stir in the beans and corn and simmer for 5 minutes.
- Finish the soup: Stir in the lime juice and taste for salt.
- Serve with toppings: Ladle into bowls and add tortilla strips, avocado, and cilantro at the table.
Equipment for This Recipe:
- Large soup pot
Needs enough space for simmering and shredding. - Two forks
For shredding chicken. - Ladle
Makes serving cleaner. - Citrus juicer
Useful for the lime.
How to Serve This Dish:
Serve the soup hot, with the toppings separate so the tortilla strips stay crisp until the last minute. A little avocado on each bowl makes the texture richer. If you want more bulk, a scoop of rice in the bottom of the bowl works nicely.
Pro Tips for This Recipe:
- Use thighs if you’re worried about dry chicken. They stay nicer in soup.
- Keep the tortilla strips out of the pot until serving. They go soggy in minutes.
- Taste after the lime goes in. Acid changes how the salt reads.
- If you want a thicker broth, mash a few beans against the side of the pot.
Variations on This Dish:
- Rotisserie Shortcut Soup: Use shredded rotisserie chicken and add it with the beans and corn.
- Vegetarian Tortilla Soup: Skip the chicken and add an extra can of beans.
- Spicy Soup Bowl: Add diced jalapeño with the onion if your family likes heat.
Common Mistakes to Avoid with This Dish:
- Boiling the chicken hard: A hard boil makes it stringy. Keep the heat at a simmer.
- Adding toppings too early: Crunch disappears fast.
- Underseasoning the broth: Beans and tomatoes need enough salt and cumin to taste complete.
13. Mediterranean Baked Cod with Tomatoes and Olives
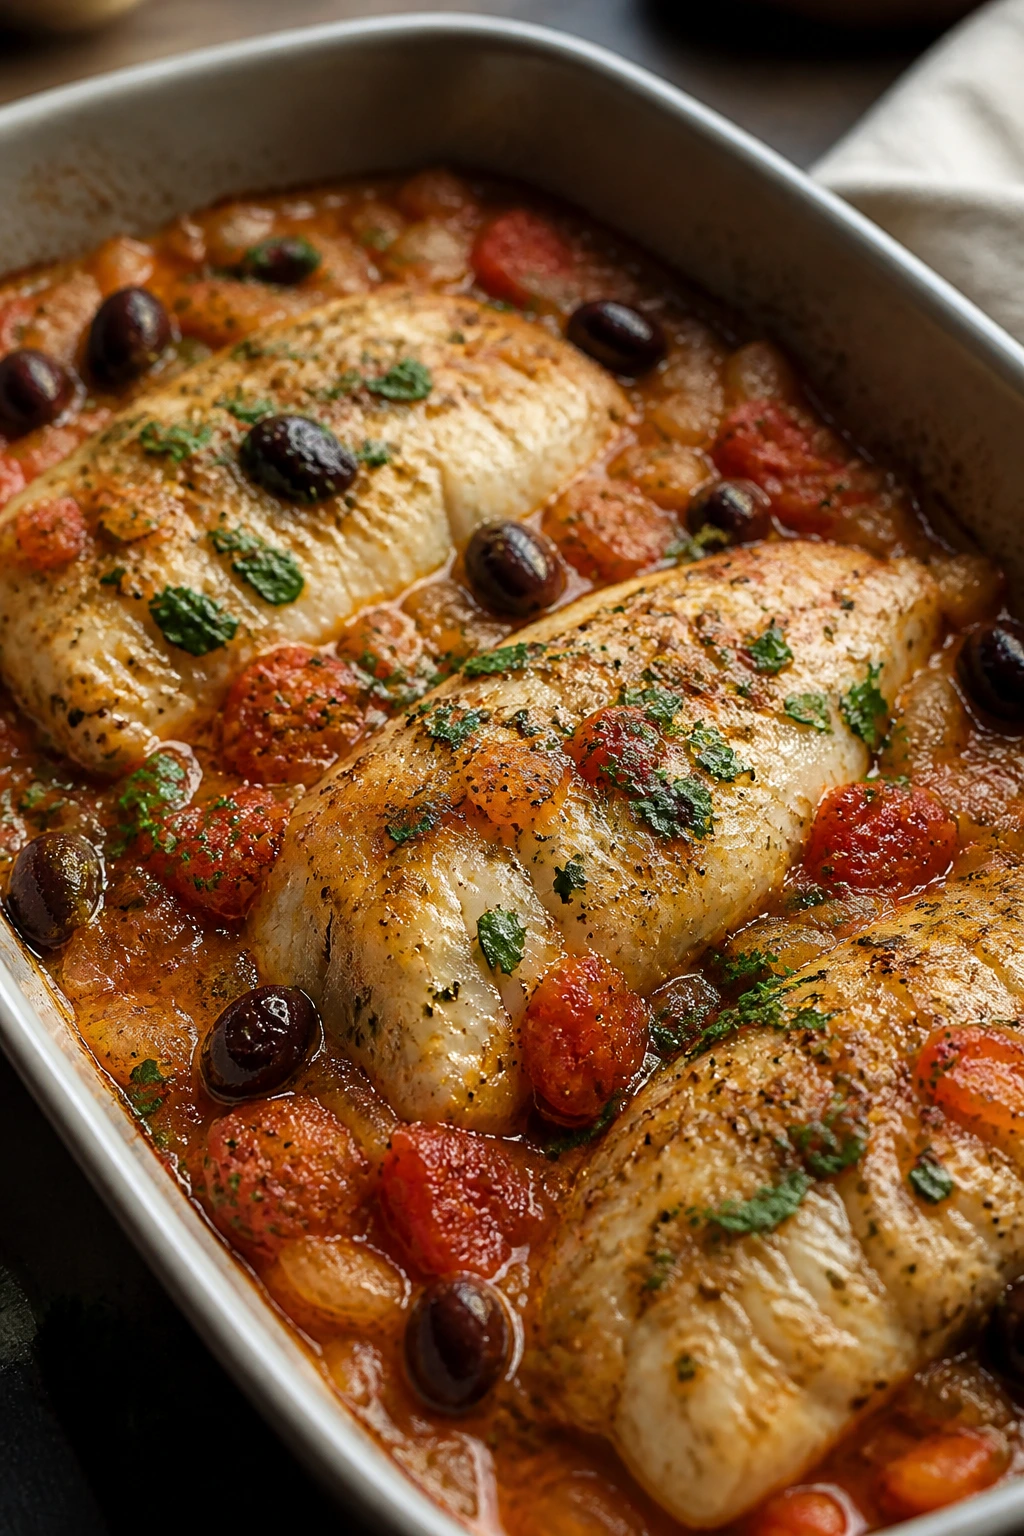
Intro:
Cod is mild, which is either a blessing or a trap. Here, the tomatoes collapse into a sauce, the olives add salt and depth, and the fish stays soft and flaky instead of falling apart into dry shreds. It’s fast enough for a weeknight and polished enough that nobody complains.
Why It Works:
Cod cooks quickly and doesn’t need much help, which makes it ideal for a one-pan dinner built around vegetables. Roasting the tomatoes and onions first creates a shallow sauce in the pan, and the olives bring enough salt that you don’t need much else. The fish goes in late, just long enough to cook through without losing its delicate texture.
Key Ingredients:
- 1½ lb cod fillets
Choose fillets of similar thickness so they finish together. - 2 cups cherry tomatoes
They burst in the oven and make the sauce. - 1/2 cup pitted Kalamata olives
Briny and strong. - 1 small red onion, thinly sliced
Softens into the tomato bed. - 2 tablespoons olive oil
For roasting. - 2 cloves garlic, minced
Added to the vegetable base. - 1 teaspoon dried oregano
Fits the Mediterranean profile. - 1/2 teaspoon kosher salt
Go easy because the olives are salty. - 1/4 teaspoon black pepper
Enough to season the fish. - 1 lemon, cut into wedges
For finishing. - 2 tablespoons chopped parsley
Fresh and bright at the end.
Quick Steps:
- Heat the oven: Set the oven to 425°F (220°C).
- Build the vegetable bed: In a baking dish, toss the tomatoes, olives, onion, olive oil, garlic, oregano, salt, and pepper. Roast for 10 minutes until the tomatoes start to blister.
- Add the cod: Pat the fish dry and nestle the fillets into the hot tomatoes and onions.
- Bake gently: Return to the oven for 8 to 10 minutes until the fish flakes easily with a fork.
- Finish with lemon and parsley: Squeeze lemon over the top and scatter parsley before serving.
- Spoon the sauce: Make sure each plate gets some of the pan juices.
Equipment for This Recipe:
- Baking dish
Keeps the tomatoes close enough to sauce the fish. - Small bowl
Helpful if you want to toss the vegetables first. - Fish spatula
Makes lifting the cod easier. - Paper towels
For drying the fish.
How to Serve This Dish:
Serve the cod over couscous, rice, or crusty bread that can absorb the juices. The tomatoes and olives should spill around the fish, not hide it. A simple cucumber salad on the side keeps the meal light and sharp.
Pro Tips for This Recipe:
- Dry the cod before baking so it roasts instead of steaming.
- Don’t overdo the salt. The olives already bring plenty.
- If your fillets are thin, check them at 7 minutes.
- Spoon the tomato mixture over the cod before serving so the fish stays moist.
Variations on This Dish:
- Halibut Version: Use halibut if you want a firmer, meatier fish.
- Capers and Fennel: Swap half the olives for capers and add thin fennel slices.
- Tomato-Free Winter Version: Use roasted peppers and onions if tomatoes are weak.
Common Mistakes to Avoid with This Dish:
- Overbaking cod: It goes from soft to dry quickly.
- Using too much olive brine: The sauce can tip into salty territory.
- Skipping the first roast on the vegetables: The fish needs that hot, saucy bed.
14. Quinoa Stuffed Bell Peppers with Black Beans and Cheese
Intro:
Stuffed peppers earn their place when the filling tastes like a real meal, not a textbook idea of one. Quinoa gives these peppers a nutty bite, black beans make them hearty, and salsa keeps the filling moist without turning it soggy. Cheese on top helps, because cheese often does.
Why It Works:
Quinoa cooks quickly and holds up well inside a pepper shell, which makes it a smart grain for busy nights. Black beans add protein and a soft, creamy counterpoint, and the salsa brings seasoning and moisture in one step. Pre-baking the pepper halves helps the shells soften enough to eat without leaving the filling overdone.
Key Ingredients:
- 4 large bell peppers, halved and seeded
Choose peppers with broad bottoms for easier stuffing. - 1 cup quinoa, rinsed
Rinsing removes the bitter outer coating. - 2 cups low-sodium vegetable broth or water
For cooking the quinoa. - 1 can (15 ounces) black beans, drained and rinsed
Adds body and protein. - 1 cup frozen corn
Sweet and fast. - 1 cup salsa
Keeps the filling moist and seasoned. - 1 teaspoon ground cumin
Gives the filling depth. - 1/2 teaspoon kosher salt
Adjust after mixing. - 1 cup shredded cheese
Cheddar or Monterey Jack both work. - 2 scallions, sliced
For garnish. - 2 tablespoons chopped cilantro
Optional, but helpful.
Quick Steps:
- Cook the quinoa: Combine the quinoa and broth in a saucepan, bring to a boil, cover, and simmer for 15 minutes. Let it stand for 5 minutes, then fluff.
- Pre-bake the peppers: Heat the oven to 400°F (205°C). Place the pepper halves in a baking dish and bake for 10 minutes.
- Make the filling: In a bowl, mix the quinoa, beans, corn, salsa, cumin, salt, and half the cheese.
- Stuff the peppers: Spoon the filling into the pre-baked peppers and top with the remaining cheese.
- Bake until hot: Return to the oven for 15 to 18 minutes until the peppers are tender and the cheese is melted.
- Finish and serve: Top with scallions and cilantro.
Equipment for This Recipe:
- Medium saucepan
For the quinoa. - Baking dish
For roasting the peppers. - Mixing bowl
For the filling. - Spoon
For packing the peppers without smashing them.
How to Serve This Dish:
Serve one or two pepper halves per person, depending on size and appetite. A spoonful of salsa or yogurt on the side helps the peppers feel less dense. If you want to stretch the meal, a simple green salad or tortilla chips can sit alongside the tray.
Pro Tips for This Recipe:
- Rinse quinoa well or it can taste bitter.
- Don’t skip the first bake on the peppers; raw shells are the most common reason stuffed peppers disappoint.
- Use thick salsa so the filling stays mounded.
- Let the peppers rest for 5 minutes before serving or the filling will spill out.
Variations on This Dish:
- Turkey Quinoa Peppers: Add 1/2 lb browned ground turkey to the filling.
- Vegan Peppers: Skip the cheese and use avocado at the table.
- Chipotle Version: Stir in 1 chopped chipotle pepper for smoky heat.
Common Mistakes to Avoid with This Dish:
- Watery filling: Thin salsa or underdrained beans make the peppers slump.
- Skipping quinoa rest time: It needs those 5 minutes to finish fluffing.
- Overstuffing: Leave a little room at the top for the cheese to melt.
15. Whole-Wheat Pita Chicken Gyros with Cucumber Salad
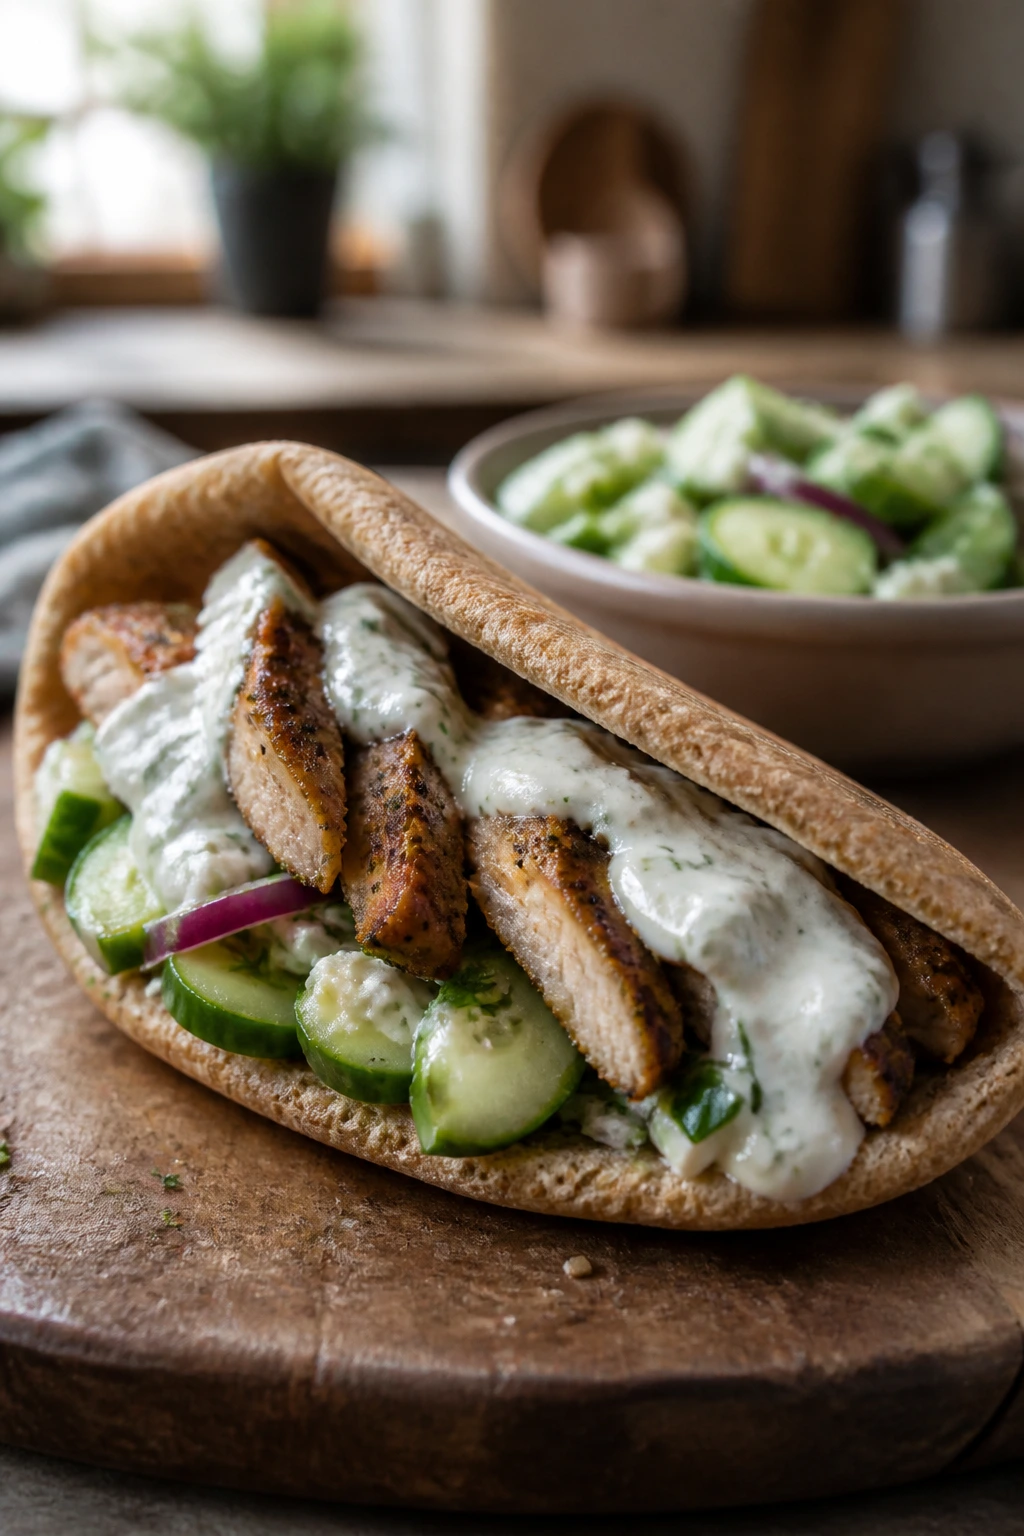
Intro:
This is dinner that feels casual in the best way. The chicken is warmly seasoned, the cucumbers stay cool and crisp, and the pita holds everything together without demanding a fork and knife. It’s the sort of meal that makes a table feel busy in a good way.
Why It Works:
Chicken thighs are the right choice here because they stay juicy in a hot skillet and handle a yogurt marinade without drying out. The cucumber salad gives you the cold-crisp contrast that gyro-style dinners need, and whole-wheat pitas add fiber without making the meal taste like health food. The yogurt sauce does double duty: it seasons the chicken and becomes the drizzle for serving.
Key Ingredients:
- 1 lb boneless, skinless chicken thighs, sliced into strips
Thighs stay tender in a skillet. - 1 cup plain Greek yogurt
Half for the marinade, half for the sauce. - 1 tablespoon lemon juice
Brightens the chicken and sauce. - 2 cloves garlic, minced
Shared between marinade and sauce. - 1 teaspoon dried oregano
Gives the chicken its gyro character. - 1 teaspoon olive oil
Helps the marinade cling. - 1/2 teaspoon kosher salt
Enough for flavor without making the yogurt harsh. - 1 cucumber, diced or sliced thin
The cool crunch. - 1 tomato, chopped
Adds juiciness. - 1/4 red onion, thinly sliced
Sharpens the salad. - 4 whole-wheat pitas
Warm them before filling. - 1 tablespoon chopped dill or parsley
For the salad or sauce.
Quick Steps:
- Marinate the chicken: Mix 1/2 cup yogurt, lemon juice, half the garlic, oregano, olive oil, and salt. Toss with the chicken and let sit for 15 minutes or up to 2 hours.
- Mix the salad: Combine the cucumber, tomato, red onion, and herbs in a bowl.
- Cook the chicken: Heat a skillet over medium-high heat and cook the chicken for 6 to 8 minutes, stirring occasionally, until browned and cooked through.
- Make the sauce: Stir the remaining yogurt with the rest of the garlic and a small pinch of salt.
- Warm the pitas: Toast or warm them in a dry skillet for 30 seconds per side.
- Assemble: Fill each pita with chicken, cucumber salad, and yogurt sauce.
Equipment for This Recipe:
- Large skillet
For the chicken. - Mixing bowls
One for marinade, one for salad. - Knife and cutting board
For the vegetables. - Dry skillet or toaster
To warm the pita.
How to Serve This Dish:
Serve the components family-style and let everyone build their own pita. That keeps the cucumbers crisp and the bread from getting soggy before dinner starts. Add extra salad on the side if the pitas feel too small.
Pro Tips for This Recipe:
- Cut the chicken into even strips so everything cooks at once.
- Warm the pita right before serving or it will crack when folded.
- Drain excess liquid from the cucumber if the salad looks wet.
- If the chicken browns too fast, lower the heat and finish gently.
Variations on This Dish:
- Turkey Gyros: Use thin turkey cutlets or ground turkey patties instead of thighs.
- Lettuce Wrap Version: Skip the pita and serve in romaine leaves.
- Feta Upgrade: Add crumbled feta for a saltier finish.
Common Mistakes to Avoid with This Dish:
- Marinating the chicken in too much yogurt: A thin coating is enough; you don’t need a bowl of sauce.
- Letting the salad sit too long: Cucumbers weep quickly.
- Using cold pita: It cracks and feels dry in the hand.
16. Black Bean Enchilada Skillet

Intro:
A good enchilada skillet has a kind of loud comfort to it. Beans, sauce, tortillas, and cheese all melt together into something that tastes like a complete dinner without the rolling and stuffing that regular enchiladas demand. This one is fast, and the skillet gives you browned edges where the cheese meets the pan.
Why It Works:
Black beans and corn give the skillet texture and enough substance that you do not need meat to make it filling. The tortillas cut into strips thicken the sauce as they soften, which is one reason this dish feels more substantial than a thin casserole. Using an oven-safe skillet lets the cheese melt on top while the bottom stays saucy and warm.
Key Ingredients:
- 1 tablespoon olive oil
For the onion. - 1 medium onion, diced
The base of the skillet. - 2 cloves garlic, minced
Adds depth after the onion softens. - 2 cans (15 ounces each) black beans, drained and rinsed
The main protein and bulk. - 1 can (10 ounces) enchilada sauce
The flavor backbone. - 1 cup frozen corn
Adds sweetness. - 1 cup cooked brown rice
Helps the skillet eat like dinner. - 6 small corn tortillas, cut into strips
Soak up the sauce and thicken it. - 1 cup shredded cheese
Melts into the top. - 1/4 cup chopped cilantro
For finishing. - 1 avocado, sliced
Optional, but it balances the spice.
Quick Steps:
- Cook the onion: Heat the oil in an oven-safe skillet over medium heat and cook the onion for 5 minutes until soft.
- Add garlic and beans: Stir in the garlic, black beans, enchilada sauce, corn, and rice. Cook for 3 minutes.
- Add tortillas: Fold in the tortilla strips and simmer for 2 minutes so they soften slightly.
- Top with cheese: Scatter the cheese over the skillet.
- Melt it through: Cover the skillet or place it under the broiler for 1 to 2 minutes until the cheese melts and bubbles.
- Finish: Top with cilantro and avocado.
Equipment for This Recipe:
- Oven-safe skillet
Cast iron works especially well here. - Wooden spoon
Good for folding the tortilla strips in without breaking them apart. - Broiler-safe lid or oven mitts
Handy if you finish under the broiler. - Knife and cutting board
For onion and avocado.
How to Serve This Dish:
Spoon the skillet straight into shallow bowls and let the cheese and sauce mingle. A little extra cilantro or chopped onion on top keeps it from feeling heavy. If the table wants more contrast, a simple lettuce salad with lime juice is enough.
Pro Tips for This Recipe:
- Use thick enchilada sauce so the skillet doesn’t turn watery.
- Don’t stir the tortilla strips too much once they go in; they should soften, not disintegrate.
- If the skillet looks dry, add 1/4 cup water before the cheese goes on.
- Serve quickly after melting the cheese. It thickens as it sits.
Variations on This Dish:
- Chicken Enchilada Skillet: Stir in 2 cups shredded cooked chicken.
- Vegan Version: Skip the cheese or use a plant-based blend.
- Green Enchilada Twist: Swap red sauce for green enchilada sauce.
Common Mistakes to Avoid with This Dish:
- Using a skillet that is too small: The tortillas need room to soften evenly.
- Adding too many tortillas: The dish turns dry and heavy.
- Letting it sit too long before serving: The sauce thickens fast once it cools.
17. Greek Turkey Burgers with Roasted Sweet Potatoes
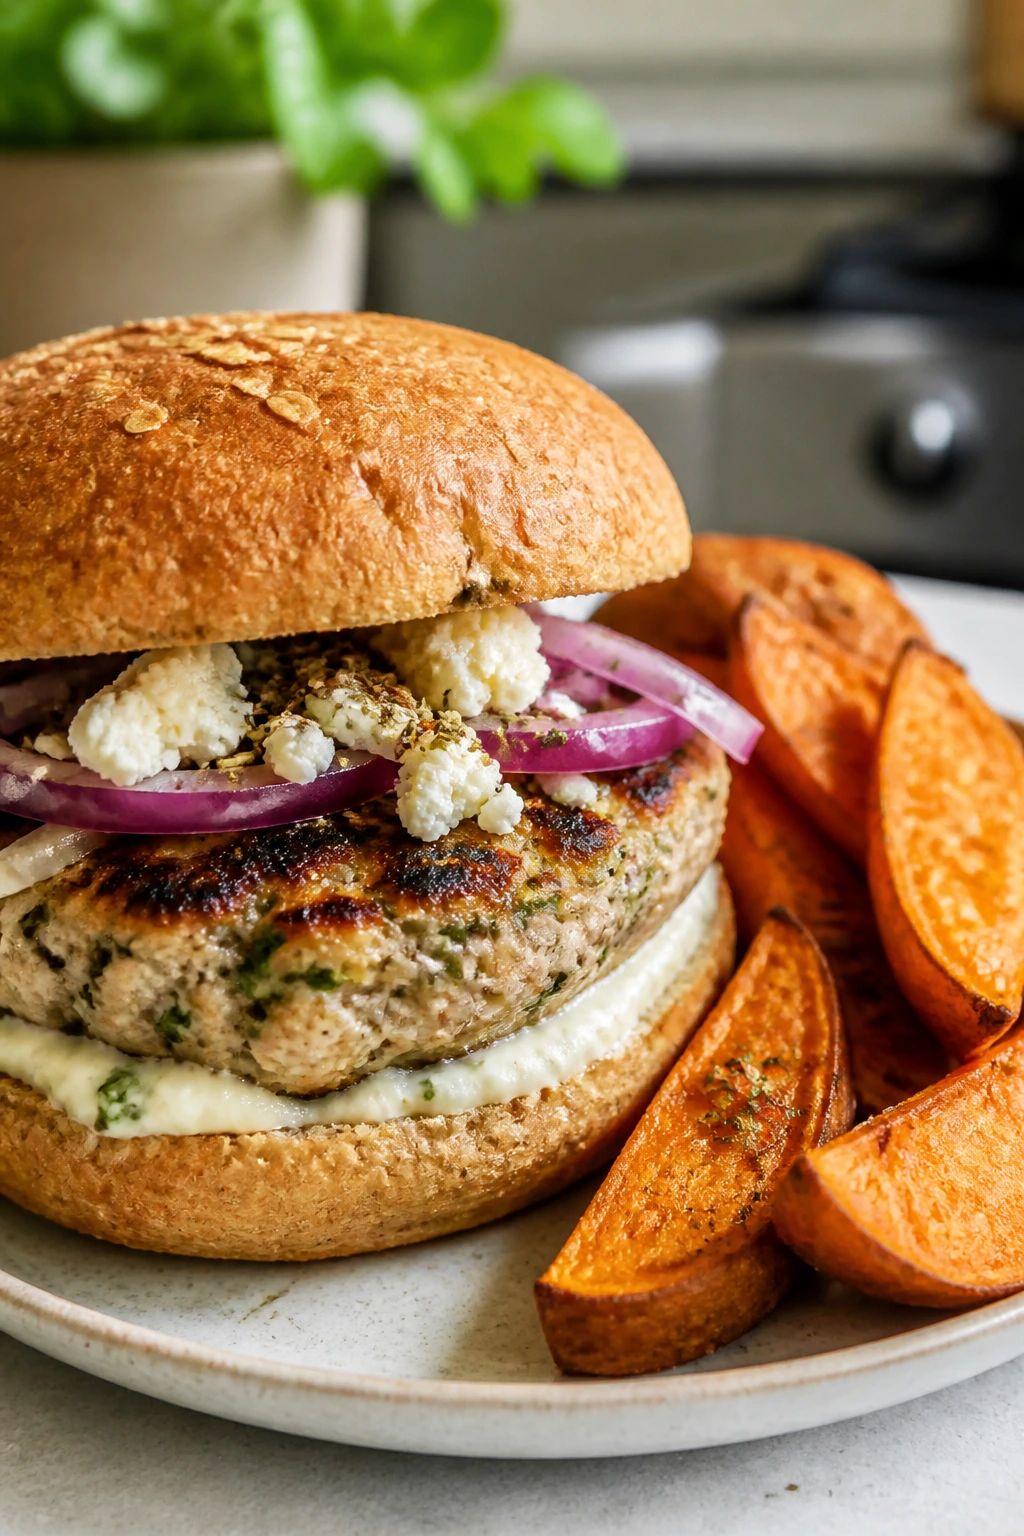
Intro:
Turkey burgers can be forgettable if you season them like a compromise. These aren’t. Feta, onion, and oregano give the patties real flavor, while roasted sweet potatoes handle the side dish without any extra work. It’s burger night with a little more structure.
Why It Works:
Ground turkey needs help, and Greek flavors do that without making the burger greasy. Feta brings salt and moisture, red onion adds bite, and oregano makes the patties taste intentional. Sweet potatoes roast at the same time and give you caramelized edges, which is the kind of texture contrast a plain burger plate usually lacks.
Key Ingredients:
- 1 lb ground turkey
Choose 93% lean for a better texture. - 1/4 cup breadcrumbs
Keeps the burgers from tightening up. - 1/4 cup crumbled feta cheese
Adds salt and moisture. - 2 tablespoons minced red onion
Sharpens the patties. - 1 clove garlic, minced
A small amount goes a long way. - 1 teaspoon dried oregano
The Greek anchor. - 1/2 teaspoon kosher salt
Enough, since feta is salty. - 1/4 teaspoon black pepper
Keeps the flavor balanced. - 2 medium sweet potatoes, cut into wedges
A sturdy side that roasts well. - 2 tablespoons olive oil
For the potatoes. - 4 whole-grain buns or lettuce leaves
Your choice at serving. - 1/2 cup plain Greek yogurt
For a quick sauce if you want one.
Quick Steps:
- Roast the sweet potatoes: Heat the oven to 425°F (220°C). Toss the wedges with olive oil, a pinch of salt, and pepper. Roast for 25 to 30 minutes, flipping once.
- Mix the burgers: Combine turkey, breadcrumbs, feta, onion, garlic, oregano, salt, and pepper in a bowl. Mix gently until just combined.
- Shape the patties: Form 4 equal patties and make a small dent in the center of each one.
- Cook the burgers: Pan-sear over medium heat for 4 to 5 minutes per side until the centers reach 165°F.
- Rest briefly: Let the burgers sit for 3 minutes so the juices settle.
- Serve: Stack on buns or lettuce with yogurt sauce if desired and plate with sweet potatoes.
Equipment for This Recipe:
- Sheet pan
For the sweet potatoes. - Skillet or grill pan
For the burgers. - Mixing bowl
For the turkey mixture. - Instant-read thermometer
Useful with lean turkey.
How to Serve This Dish:
Serve each burger with a pile of sweet potato wedges rather than fries. A spoon of Greek yogurt mixed with lemon and garlic makes a simple sauce. If buns are too much for your table, lettuce wraps keep the meal lighter.
Pro Tips for This Recipe:
- Don’t overmix the turkey. It turns dense fast.
- The center dent helps the patties stay flat instead of doming.
- Sweet potatoes need space on the pan or the wedges soften instead of crisping.
- Pull the burgers at temperature, not by guesswork.
Variations on This Dish:
- Lamb Burger Version: Swap in ground lamb and keep the feta.
- Feta-Free Option: Add chopped olives for salt if you need a dairy-free path.
- Mediterranean Wrap: Serve the patties in pita with cucumber and tomato.
Common Mistakes to Avoid with This Dish:
- Pressing the burgers down in the pan: That squeezes out the juices.
- Using too much feta: The patties can get crumbly.
- Crowding the sweet potatoes: They need breathing room to brown.
18. White Bean and Kale Minestrone with Parmesan Toast
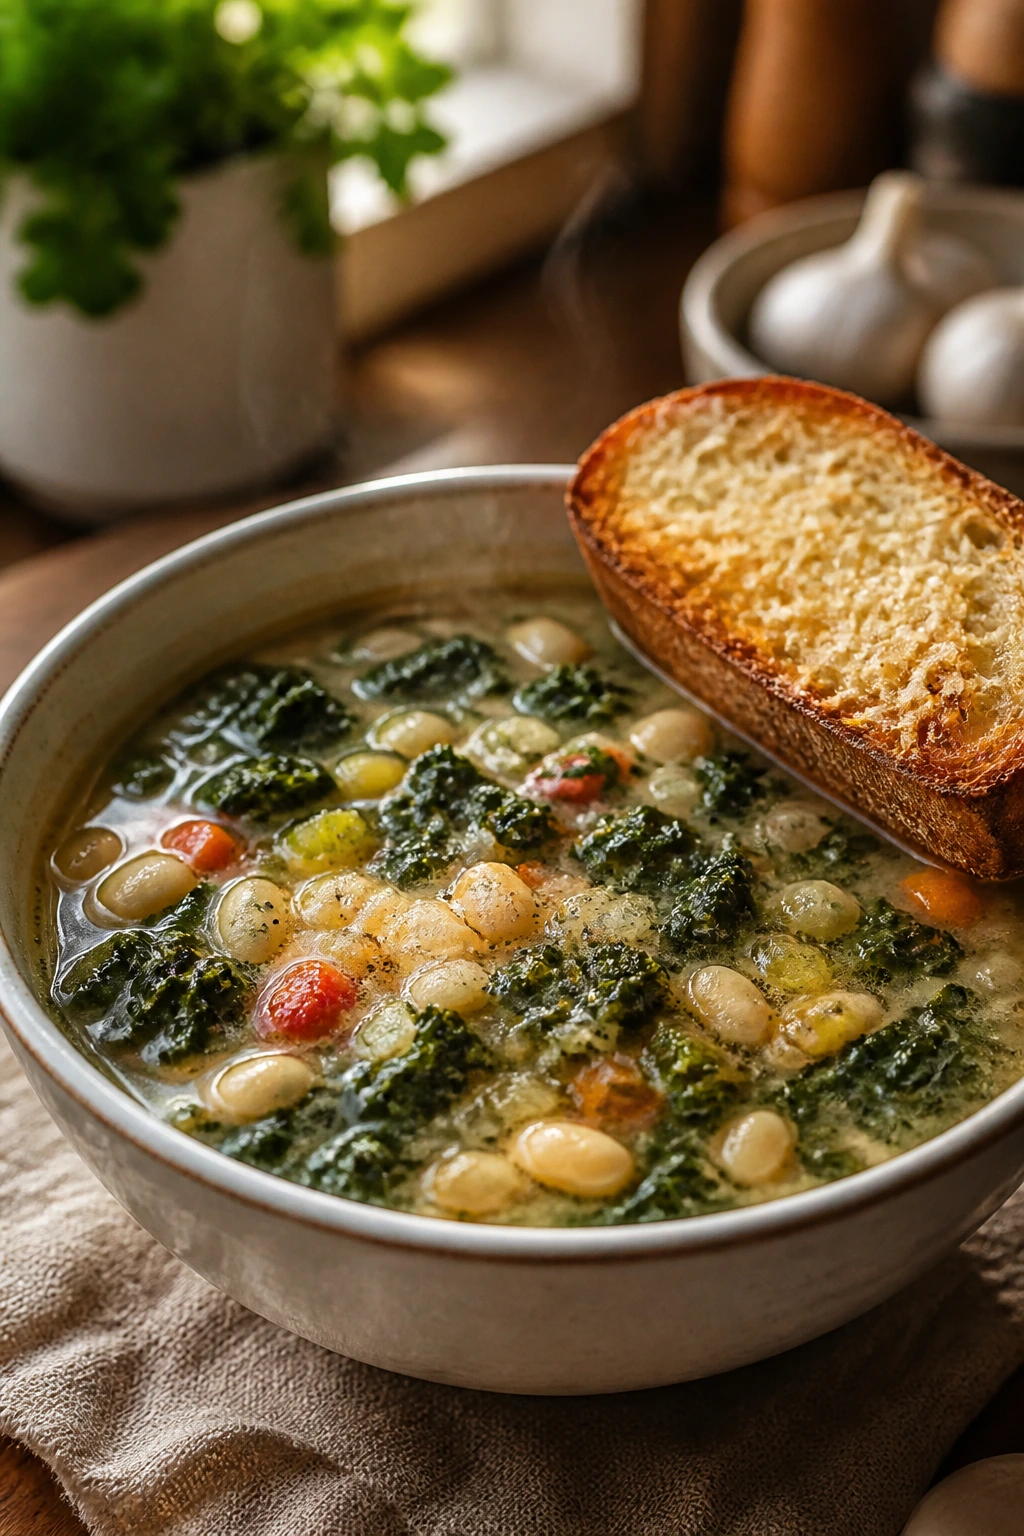
Intro:
This is the soup I want when the weather is cold, the pantry
The pot should smell like onions, garlic, broth, and that little mineral scent kale gets when it hits heat. If it smells flat, it needs salt. If it smells muddy, the beans probably sat in too much liquid. Mine a pot like this by the spoonful, and you’ll know exactly why it belongs in the weeknight rotation.
Why It Works:
White beans carry a creamy texture without any actual cream, which is one of the nicest tricks in the soup cabinet. Kale gives the soup backbone; it stays sturdy long enough to soften into the broth without collapsing into green strings. A Parmesan rind, if you have one, adds a slow, savory depth that makes the whole pot taste cooked rather than assembled.
This is also a soup that behaves well under pressure. You can build it in one pot, walk away for a few minutes, and come back to something that tastes like it simmered longer than it did. That matters on nights when the stove is sharing space with homework, backpacks, and somebody asking where the clean spoons went.
Key Ingredients:
- 2 tablespoons olive oil
For softening the vegetables at the start. - 1 medium yellow onion, diced
The base flavor of the soup. - 2 carrots, diced
They add a little sweetness and body. - 2 celery stalks, diced
Classic soup flavor; don’t skip them if you can help it. - 3 cloves garlic, minced
Added after the vegetables soften so it doesn’t scorch. - 1 teaspoon dried thyme
Works with beans and broth without shouting. - 2 cans (15 ounces each) cannellini beans, drained and rinsed
The soup’s creamy, filling center. - 6 cups low-sodium vegetable broth
Enough to make the soup feel generous without turning it thin. - 1 Parmesan rind, optional
The slow simmer gives the broth a deeper savory finish. - 1 bunch kale, stems removed and leaves chopped
Use the curly or lacinato kind; both work. - 1 teaspoon kosher salt
Start here and adjust after simmering. - 1/2 teaspoon black pepper
Enough to sharpen the broth. - 1 tablespoon lemon juice
Added at the end for brightness. - 6 slices whole-grain bread
For toasting into Parmesan bread. - 1/2 cup grated Parmesan cheese
Used on the toast or sprinkled over bowls.
Quick Steps:
- Start the soup base: Heat the olive oil in a large pot over medium heat. Add the onion, carrots, and celery and cook for 7 to 8 minutes, stirring occasionally, until the onions turn translucent and the carrots soften at the edges.
- Add the garlic and thyme: Stir in the garlic and thyme and cook for 30 seconds until fragrant.
- Build the broth: Add the beans, broth, Parmesan rind if using, salt, and pepper. Bring the pot to a simmer.
- Simmer gently: Cook for 15 minutes so the beans soften further and the broth picks up flavor.
- Add the kale: Stir in the kale and simmer for 5 to 7 minutes until the leaves are dark green and tender but still hold shape.
- Finish with lemon: Remove the Parmesan rind, stir in the lemon juice, taste, and adjust salt.
- Make the toast: While the soup simmers, toast the bread and sprinkle with Parmesan until the cheese melts and turns sandy-golden around the edges. Serve with the soup.
Equipment for This Recipe:
- Large soup pot or Dutch oven
Enough depth to simmer without splashing. - Wooden spoon
Good for scraping the bottom of the pot. - Cutting board and chef’s knife
For all the vegetables. - Baking sheet
For the Parmesan toast. - Ladle
Makes serving clean and easy.
How to Serve This Dish:
Ladle the soup into wide bowls so the beans and kale show at the top instead of disappearing under broth. Add a slice of Parmesan toast on the side or perch it across the bowl if you like a little drama. If the household is extra hungry, a drizzle of olive oil over the top gives the soup a slick finish and a little more body.
Pro Tips for This Recipe:
- Rinse the beans well or the broth can taste chalky and overly starchy.
- Don’t skip the lemon at the end. It wakes up the beans in a way salt alone cannot.
- If you want a thicker soup, mash a small scoop of beans against the side of the pot before adding the kale.
- Strip the kale leaves from the stems before chopping. The stems stay woody and don’t soften at the same pace.
Variations on This Dish:
- Tuscan Tomato Version: Add 1 can diced tomatoes with the broth for a redder, more rustic soup.
- Chicken and White Bean Soup: Stir in 2 cups shredded cooked chicken near the end.
- Spicy Bean Pot: Add a pinch of red pepper flakes with the garlic if your table likes a little heat.
Common Mistakes to Avoid with This Dish:
- Overcooking the kale: It should soften, not lose all structure.
- Skipping the acid finish: Lemon or a tiny splash of vinegar keeps the beans from tasting muddy.
- Using full-salt broth without tasting first: The Parmesan rind adds salt too, and the pot can swing too salty fast.
Why These Dinners Work on Busy Nights
A weeknight dinner lives or dies on timing. If every component needs separate oven space, separate pans, or a long soak-and-marinate situation, I’m out. The recipes in this collection are built around a simpler idea: one hot pan, one pot, or one bowl that can do more than one job.
The other thing these meals do well is protect texture. Broccoli gets roasted instead of boiled. Beans get rinsed and simmered so they taste clean. Chicken gets either thighs for forgiveness or breast meat cut small enough to finish fast. That matters more than the label “healthy,” which is a vague word that says almost nothing. A dish is healthier when it contains enough protein and fiber to keep you from hunting the pantry an hour later.
There’s also a family logic here that people ignore. You need dinners that can survive an uneven table. Somebody wants sauce. Somebody doesn’t. Somebody wants cheese on everything. Somebody wants plain rice and a piece of chicken. These dishes give you room to split the difference without cooking separate meals, and that’s the part that saves your sanity.
Essential Equipment for These Recipes
-
Rimmed sheet pans — Roasting vegetables, chicken, fish, and potatoes is much easier when juices stay on the pan instead of on the oven floor.
-
Large 12-inch skillet — A wide skillet helps ground meat brown instead of steam, and it gives sauces room to reduce.
-
Dutch oven or heavy soup pot — The soups and simmered sauces in this collection need even heat and a little depth.
-
Instant-read thermometer — Especially useful for chicken, salmon, pork tenderloin, and turkey so you’re not guessing at doneness.
-
Sharp chef’s knife — Thin slices of beef, even diced chicken, and tidy vegetables depend on a blade that actually cuts.
-
Cutting board with a damp towel underneath — That little trick keeps the board from skating around when you’re chopping in a rush.
-
Mixing bowls in two sizes — One for sauces or marinades, one for tossing vegetables or making fillings.
-
Colander — Handy for rinsing beans, draining pasta, or cooling grains quickly.
-
Wooden spoon or sturdy spatula — Useful for breaking up meat, scraping browned bits, and folding fillings without smashing them.
-
Tongs — Especially good for sheet-pan dinners, stir-fries, and turning chicken or salmon without tearing it.
Smart Shopping and Ingredient Tips
The shortest path to better weeknight dinners is buying ingredients that behave well under heat. That means choosing chicken thighs over chicken breast when you want the least drama, because thighs keep more moisture and are more forgiving if dinner runs five minutes late. It means buying baby potatoes that are roughly the same size so they roast at the same pace, and choosing broccoli with tight florets instead of big floppy crowns that can dry out before the stems soften.
Canned ingredients deserve a little respect too. Beans should be rinsed unless the recipe says otherwise; that removes the slippery can liquid and keeps the sauce cleaner. Tomatoes matter more than people think. Fire-roasted diced tomatoes bring a subtle smoky note to skillet dinners and soups, while plain diced tomatoes keep things brighter. If you like a thicker sauce, crushed tomatoes usually behave better than watery canned chunks.
For seafood, buy fish that smells like the ocean, not the dock. Salmon, cod, and shrimp all benefit from being dry before they hit heat, so keep paper towels nearby and don’t skip that step. With shrimp, size matters less than dryness and timing; even smaller shrimp cook fast if the pan is hot. For beef, ask for slices that can be cut thin against the grain, or buy a cut like flank steak that gives you that option easily.
Frozen vegetables are not a compromise here. Frozen corn, peas, and spinach can be better than tired produce that has been sitting in the drawer for too long. They’re picked and frozen quickly, and in a dinner like fried rice or curry, that speed shows up on the plate.
How to Serve These Recipes
Presentation:
Keep the food visible. Sheet-pan dinners look best when the vegetables are still browned at the edges and the chicken or fish is sliced in a way that shows the inside. Bowls need a little height—rice on the bottom, saucy topping in the center, herbs or yogurt on top. Soup should be served in wide bowls with the garnish added at the last second so it still has texture.
Accompaniments:
A few sides show up again and again because they work: warm pita, brown rice, couscous, quinoa, simple green salad, sliced avocado, roasted sweet potatoes, or a piece of crusty bread for sauces that deserve to be mopped up. You do not need all of them. One starch and one crisp side is usually enough.
Portions:
Most of these dinners serve 4 to 6, with soups and grain bowls stretching farther if you add bread or extra vegetables. For hearty eaters, plan on about 6 to 8 ounces of protein per adult when the recipe is protein-forward, or 1½ to 2 cups per adult for soups and skillet meals. Kids often do fine with smaller portions if you keep the components separated.
Beverage Pairing:
Sparkling water with lemon works with nearly all of these because it cleans the palate without fighting the food. For something a little more specific, iced green tea pairs well with roasted chicken and grain bowls, while a tart lime soda or unsweetened iced tea sits nicely with taco-style dishes and soups.
Additional Tips and Flavor Boosters

Flavor Enhancement:
A squeeze of lemon or lime at the end changes more than people expect. It doesn’t just add acid; it sharpens salt, wakes up herbs, and makes beans taste less heavy. A little fresh herb at the end—parsley, dill, cilantro, scallions—does the same kind of work.
Customization:
If your family likes richer food, add a spoonful of Greek yogurt, a sprinkle of cheese, or a little avocado at the table instead of building it into the dish. That keeps the base lighter while still giving everyone something creamy to chase with a fork. For more heat, keep red pepper flakes or hot sauce on the table rather than cooking the whole dish spicy.
Serving Suggestions:
Serve roasted dishes on warm plates if you can manage it. It sounds fussy, but it helps the food stay hot long enough to eat without rushing. A scattering of chopped herbs or a handful of toasted seeds makes a plain bowl look and taste more finished.
Make-It-Yours:
For dairy-free eaters, swap yogurt sauces for tahini-lemon sauce or an olive-oil finish. For gluten-free meals, use rice, quinoa, corn tortillas, or cauliflower rice instead of pasta or pita. For lower-sodium plates, lean on lemon, garlic, herbs, and toasted spices to build flavor before you reach for more salt.
Make-Ahead, Storage, and Reheating Guidance
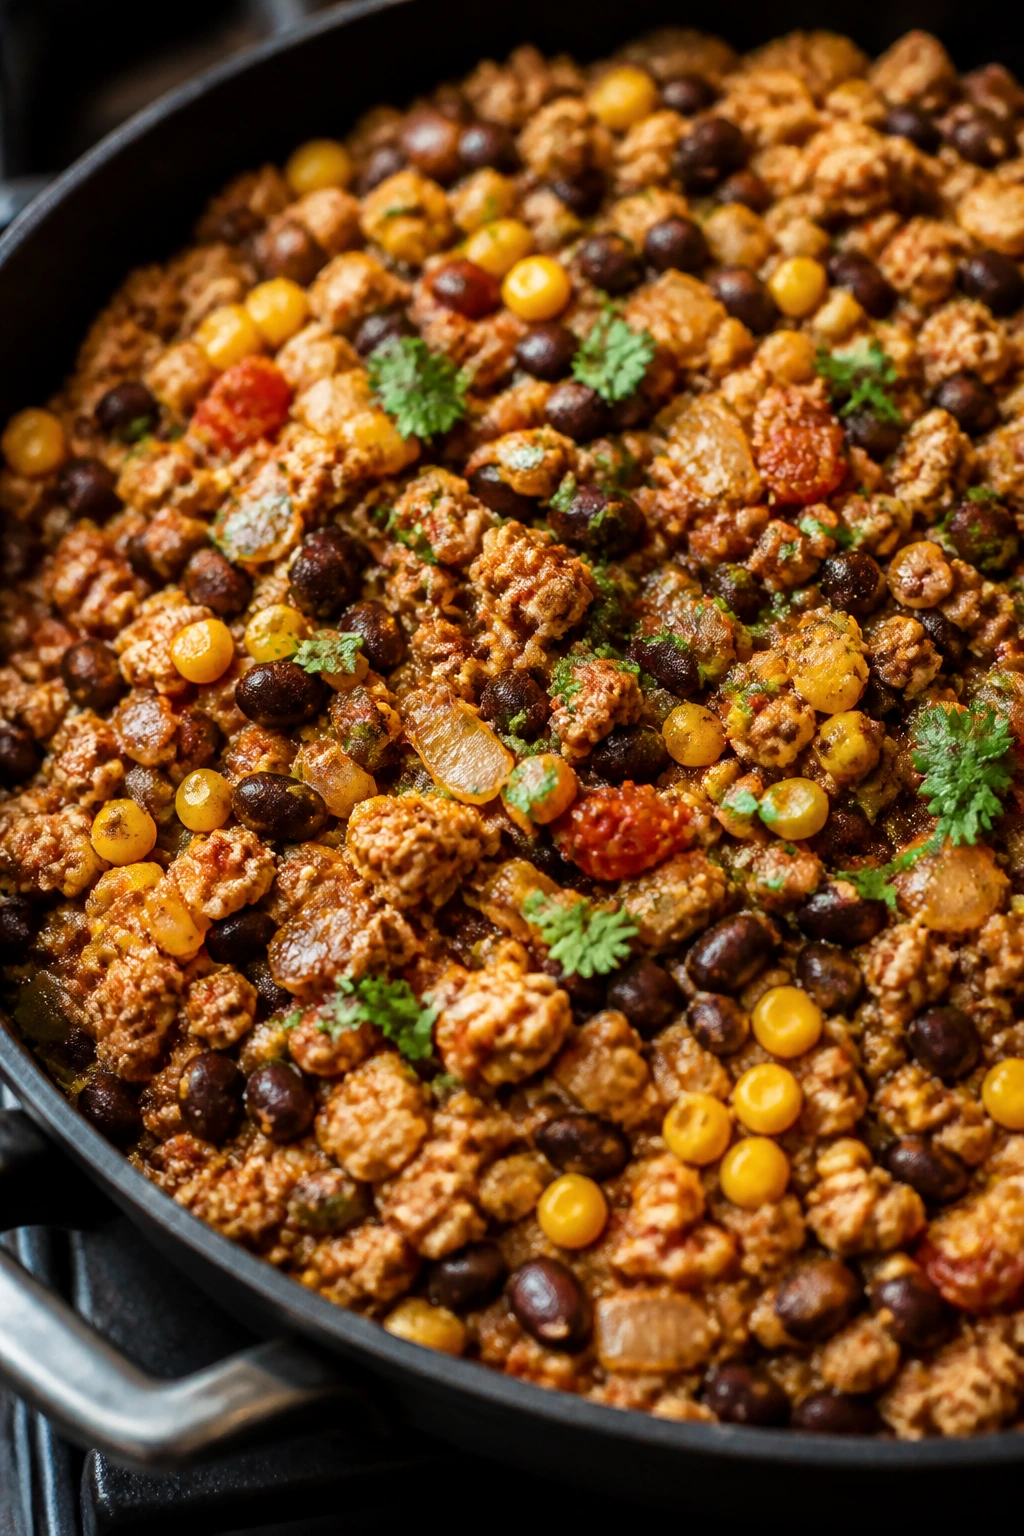
Most of these dinners keep well for 3 to 4 days in the refrigerator if stored in airtight containers once they cool. Soups, curries, lentil sauces, and skillet meals often taste better the next day because the seasoning settles in and the sauce thickens a little. Sheet-pan vegetables are the main exception; they hold up, but they lose crispness faster than saucy dishes.
Freezing is useful for the bean-based and tomato-based recipes. Chicken tortilla soup, lentil bolognese, chickpea curry, turkey taco skillet, and white bean soup freeze well for up to 2 months. Meatballs and saucy chicken dishes also freeze nicely if you keep the sauce with them. Fish and shrimp are the least freezer-friendly once cooked; they can go a little soft after thawing, so I’d eat those fresh if possible.
For reheating, use the method that protects texture. Soups and curries reheat best on the stove over medium-low heat with a splash of broth or water if they’ve thickened in the fridge. Sheet-pan chicken and roasted vegetables should go back into a 375°F oven for 10 to 12 minutes rather than the microwave, which makes the broccoli and potatoes lose their shape. Grain bowls and fried rice do fine in a skillet over medium heat with a teaspoon of water to loosen them. Pasta sauces should be warmed gently and tossed with a splash of pasta water or plain water so they don’t dry out into a stiff block.
If you want to make ahead, cook the base components and hold them separately. Roast the vegetables, simmer the sauce, cook the grains, or make the yogurt sauce a day ahead, then combine right before serving. The food stays cleaner that way, and the textures don’t all collapse into one soft layer.
Variations and Adaptations to Try
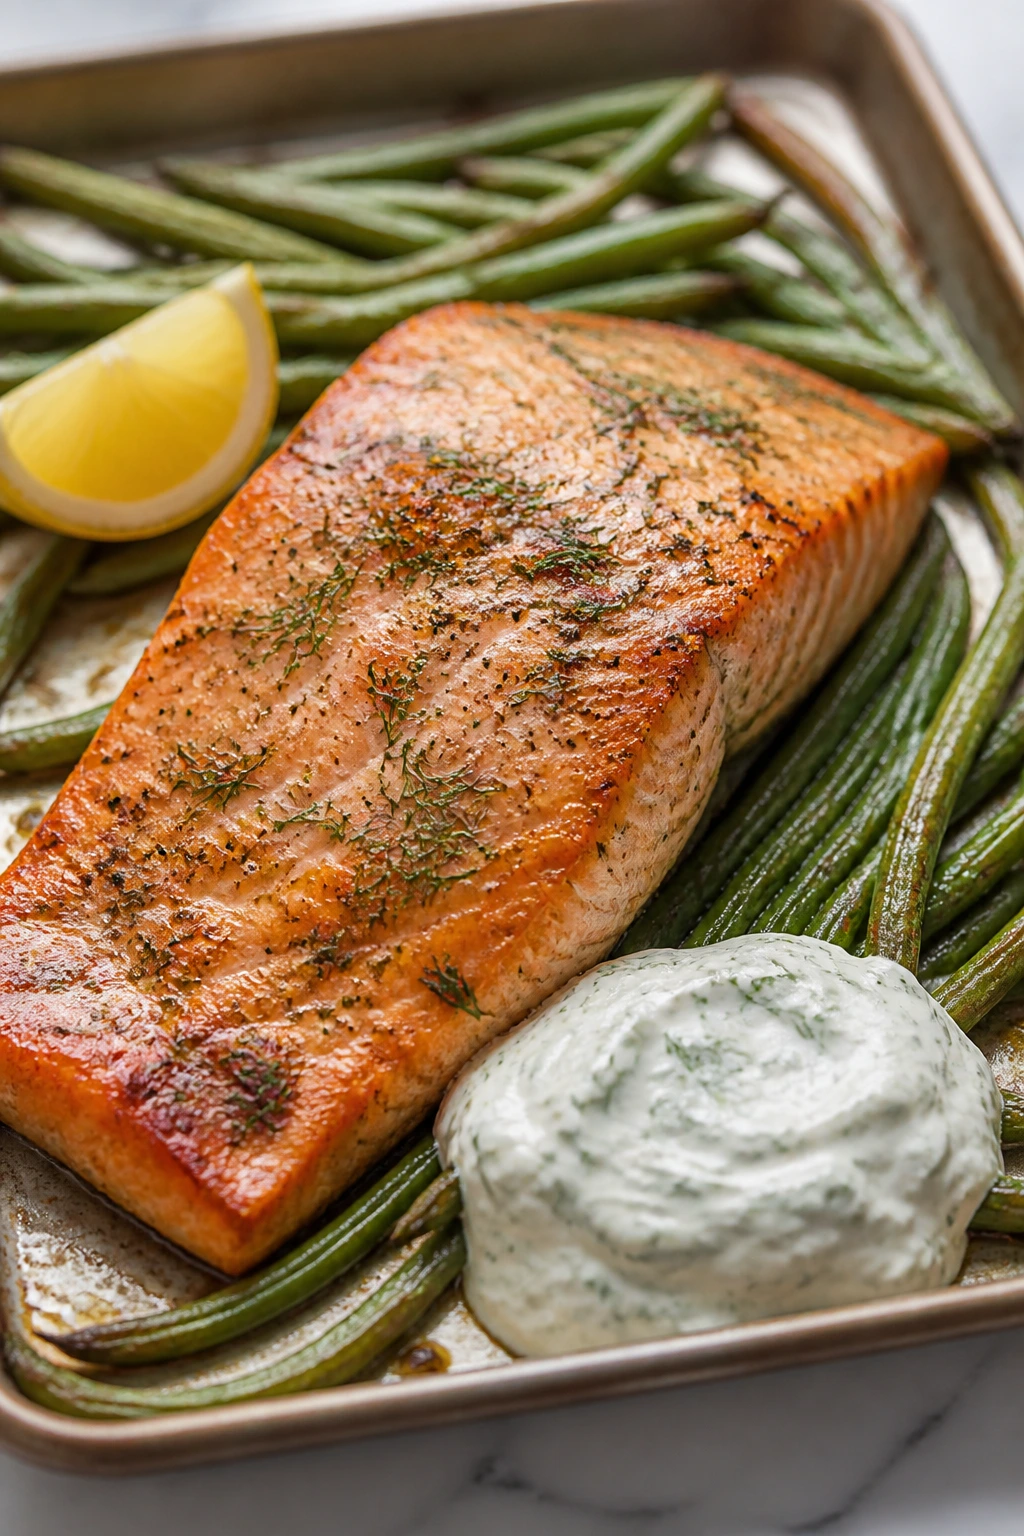
The Lower-Sodium Weeknight Plan:
Build meals around fresh herbs, citrus, garlic, and spices so you can cut back on canned salt and still have flavor. Rinse canned beans thoroughly, choose low-sodium broth, and let lemon or lime finish the dish instead of salt-heavy sauces.
The Dairy-Free Table:
Skip yogurt sauces and cheese toppings, and use tahini, avocado, olive oil, or a chopped herb salad for finish. Many of the recipes in this collection already work without dairy if you simply leave the garnish at the table instead of baking it in.
The Gluten-Free Swap-Out:
Use rice, quinoa, potatoes, corn tortillas, or cauliflower rice in place of pasta, pita, or breadcrumbs. When you need binding in meatballs or patties, use gluten-free breadcrumbs or a small amount of cooked rice instead.
The Meat-Free Night:
The chickpea curry, lentil bolognese, white bean soup, quinoa stuffed peppers, tofu bowls, and black bean skillet all cover this nicely. If you’re building a vegetarian plate from one of the meat recipes, add beans, tofu, or extra vegetables and make sure the seasoning stays bold enough to carry the dish.
The Kid-Friendly Mild Version:
Keep the base mild and put heat, pickles, hot sauce, or extra herbs on the table instead. Kids often do better with separate components anyway—plain rice, chicken, broccoli, sauce in a small dish—rather than a fully mixed bowl they can’t sort through.
The Extra-Vegetable Load-In:
Sneak in chopped spinach, grated zucchini, diced carrots, extra peppers, or cauliflower rice when a recipe already has a sauce or strong seasoning. That works especially well in tomato sauces, soups, stir-fries, curries, and skillet dinners where the vegetables can disappear into the structure of the meal.
Common Mistakes to Avoid
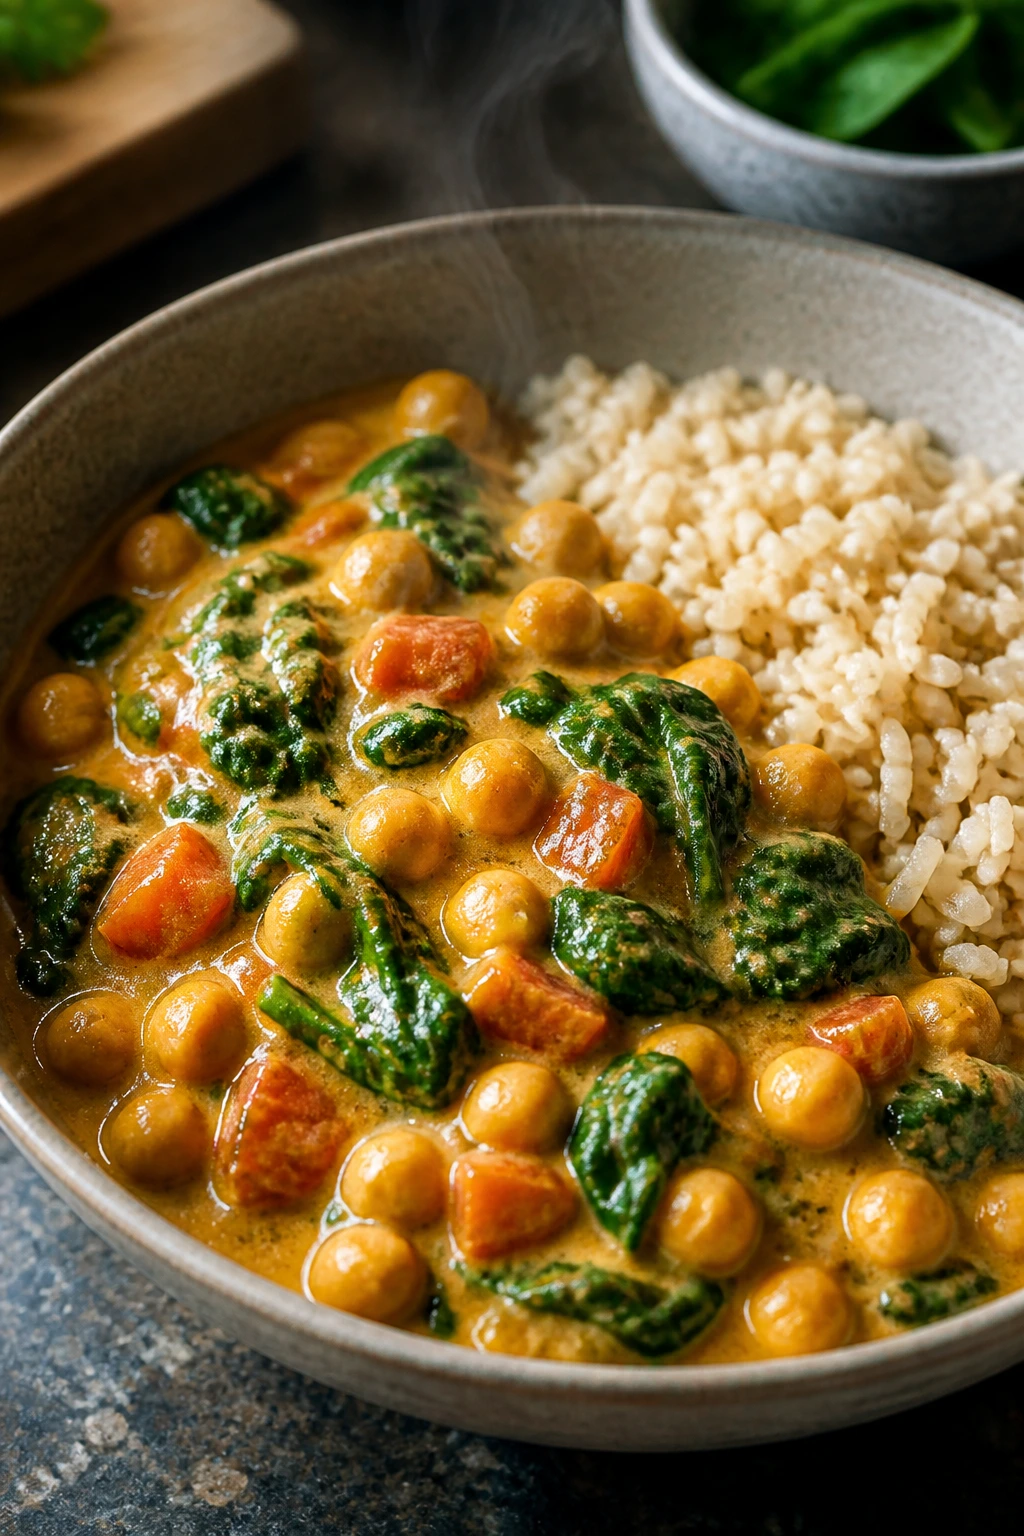
Treating every protein the same way:
Chicken breast, salmon, shrimp, pork tenderloin, and ground turkey all cook on different clocks. If you roast or sear them with a one-size-fits-all attitude, you get dry meat on one hand and undercooked centers on the other. Use a thermometer when you can, and trust visual cues only when the recipe gives you a strong one.
Crowding the pan:
This is the fast way to turn roasted vegetables into steamed vegetables and browned meat into pale, wet meat. If your skillet or sheet pan looks too full, split the food across two surfaces. That one change fixes a surprising number of bad dinners.
Adding acid too early:
Lemon, lime, vinegar, and even yogurt can change how a dish behaves if they go in before cooking is done. Save bright acids for the end unless the recipe specifically asks for a marinade. The difference between a lively sauce and a dull one is often just timing.
Underseasoning beans and grains:
Rice, quinoa, lentils, and beans are humble, which means they need help. Salt the cooking liquid, taste the sauce, and finish with herbs or citrus. Otherwise, the whole plate tastes like it’s waiting for something.
Ignoring carryover cooking:
Chicken, pork, and fish keep cooking after they leave the heat. If you wait for the exact doneness to appear in the pan, you’ve already gone too far. Pull the protein a little early, rest it when needed, and let the final temperature happen on the cutting board.
Relying on toppings to fix a weak base:
A shower of cheese or herbs can’t rescue bland food. Toppings should sharpen or finish a dish, not disguise a flat one. Get the salt, heat, and acid right first, then use the garnish as the last touch.
Frequently Asked Questions
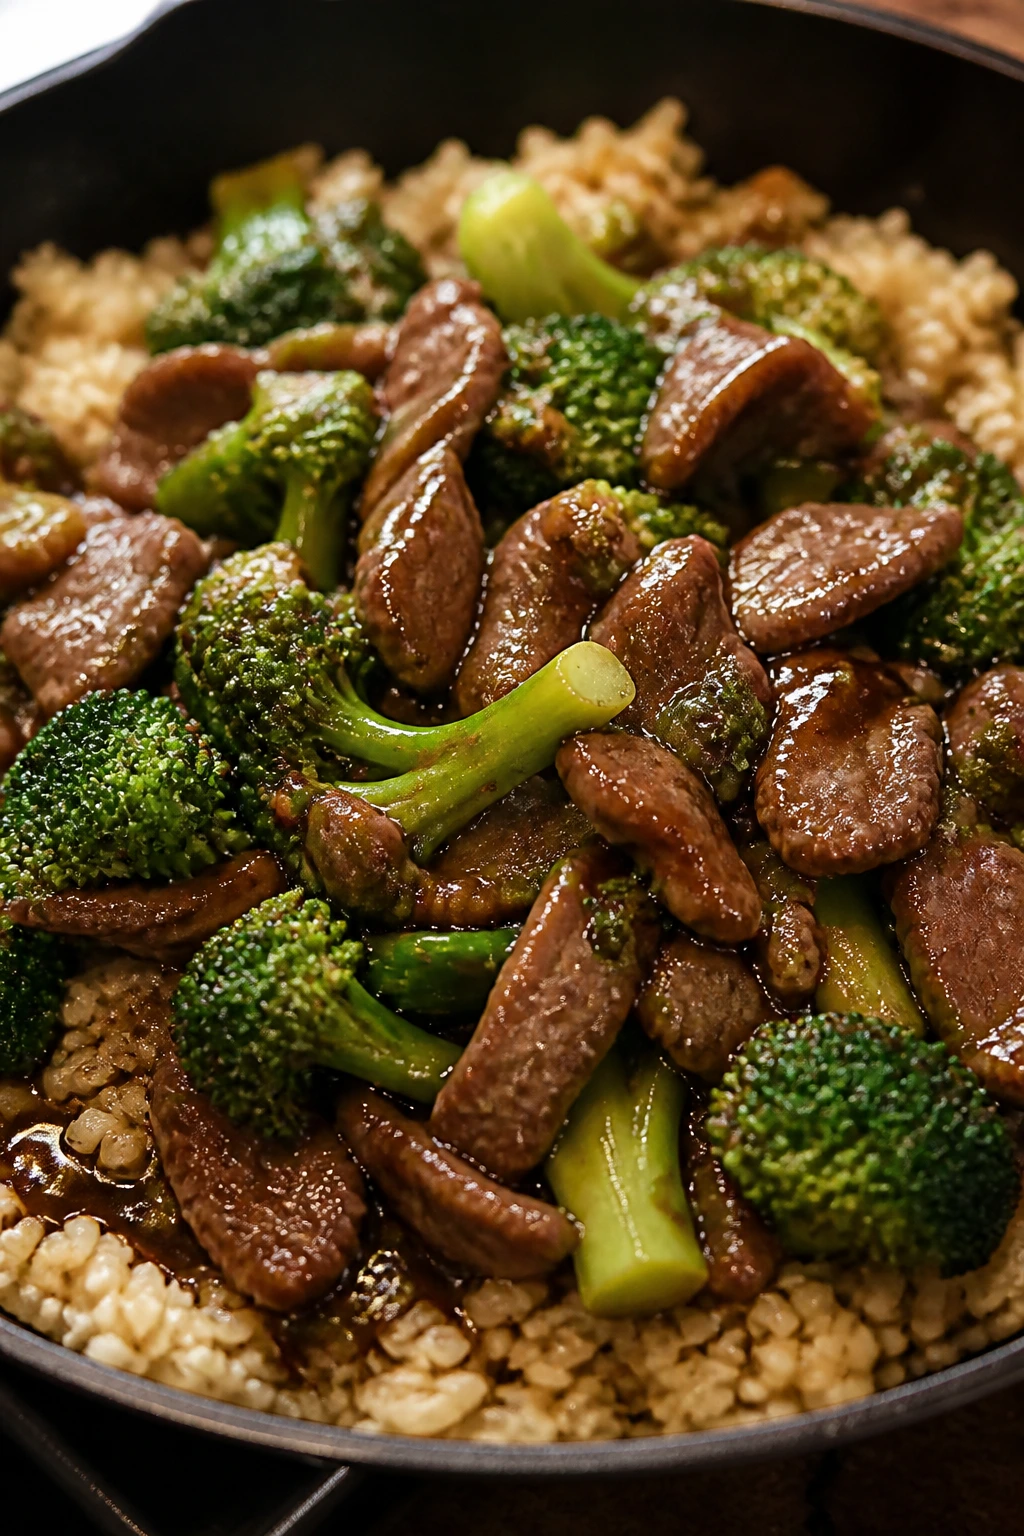
Can I mix and match sides from different recipes in this collection?
Absolutely. Roasted broccoli from one dinner can sit beside turkey meatballs from another, and brown rice works under curries, stir-fries, and taco bowls without complaint. The main thing is to keep the seasoning family in the same neighborhood so the plate doesn’t feel confused.
Which of these dinners are best for leftovers?
The soups, lentil bolognese, curries, skillet meals, and meatballs hold up best. Saucy dishes tend to improve overnight because the flavor settles in, while fish and shrimp are better eaten fresh. If leftovers matter a lot, choose one of the bean, lentil, chicken, or turkey options first.
How do I make these meals more filling without making them heavier?
Add more vegetables, not just more starch. Extra broccoli, beans, kale, cabbage, or peppers give you volume and fiber, which helps the meal last longer without turning it into a brick. You can also add a side salad or fruit if the table still seems hungry.
What if my family doesn’t like spicy food?
Keep the base mild and put the heat on the table in separate bottles or small bowls. Most of these dinners taste good with just garlic, herbs, citrus, and salt. The spice is optional; the flavor does not have to be boring just because it isn’t hot.
Can I use frozen vegetables instead of fresh?
Yes, and in some cases frozen is the better move. Frozen corn, peas, spinach, and broccoli are fine in soups, curries, stir-fries, and fried rice as long as you cook off the extra moisture. They’re less useful for sheet-pan dinners where browning matters most, but they still have a place.
What’s the easiest way to keep chicken from drying out?
Use thighs when you can, cut breast meat into smaller pieces, and stop cooking as soon as the thermometer says it’s done. Also, let it rest for a few minutes before slicing so the juices stay in the meat. Dry chicken is usually a timing problem, not a seasoning problem.
Can I prep these dinners on the weekend?
You can prep the vegetables, mix sauces, cook grains, and even marinate chicken ahead of time. I’d avoid fully cooking roasted vegetables too far in advance unless you’re fine with softer texture. The best prep move is to do the chopping and sauce-making when you have time, then cook the final dish fresh.
What should I do if a sauce turns out too thin?
Let it simmer a little longer before reaching for thickeners. If it still looks loose, mash a few beans into the pot, add a small cornstarch slurry, or reduce it uncovered for a few minutes. Thin sauces usually need heat, patience, or a starch—not a completely new recipe.
Is brown rice the only grain that works here?
No. Quinoa, couscous, farro, and even potatoes can stand in depending on the dish. Brown rice just shows up a lot because it’s sturdy, plain, and easy to batch cook. If your household prefers something else, use that and keep the rest of the plate the same.
A Final Stretch Toward Easier Weeknights
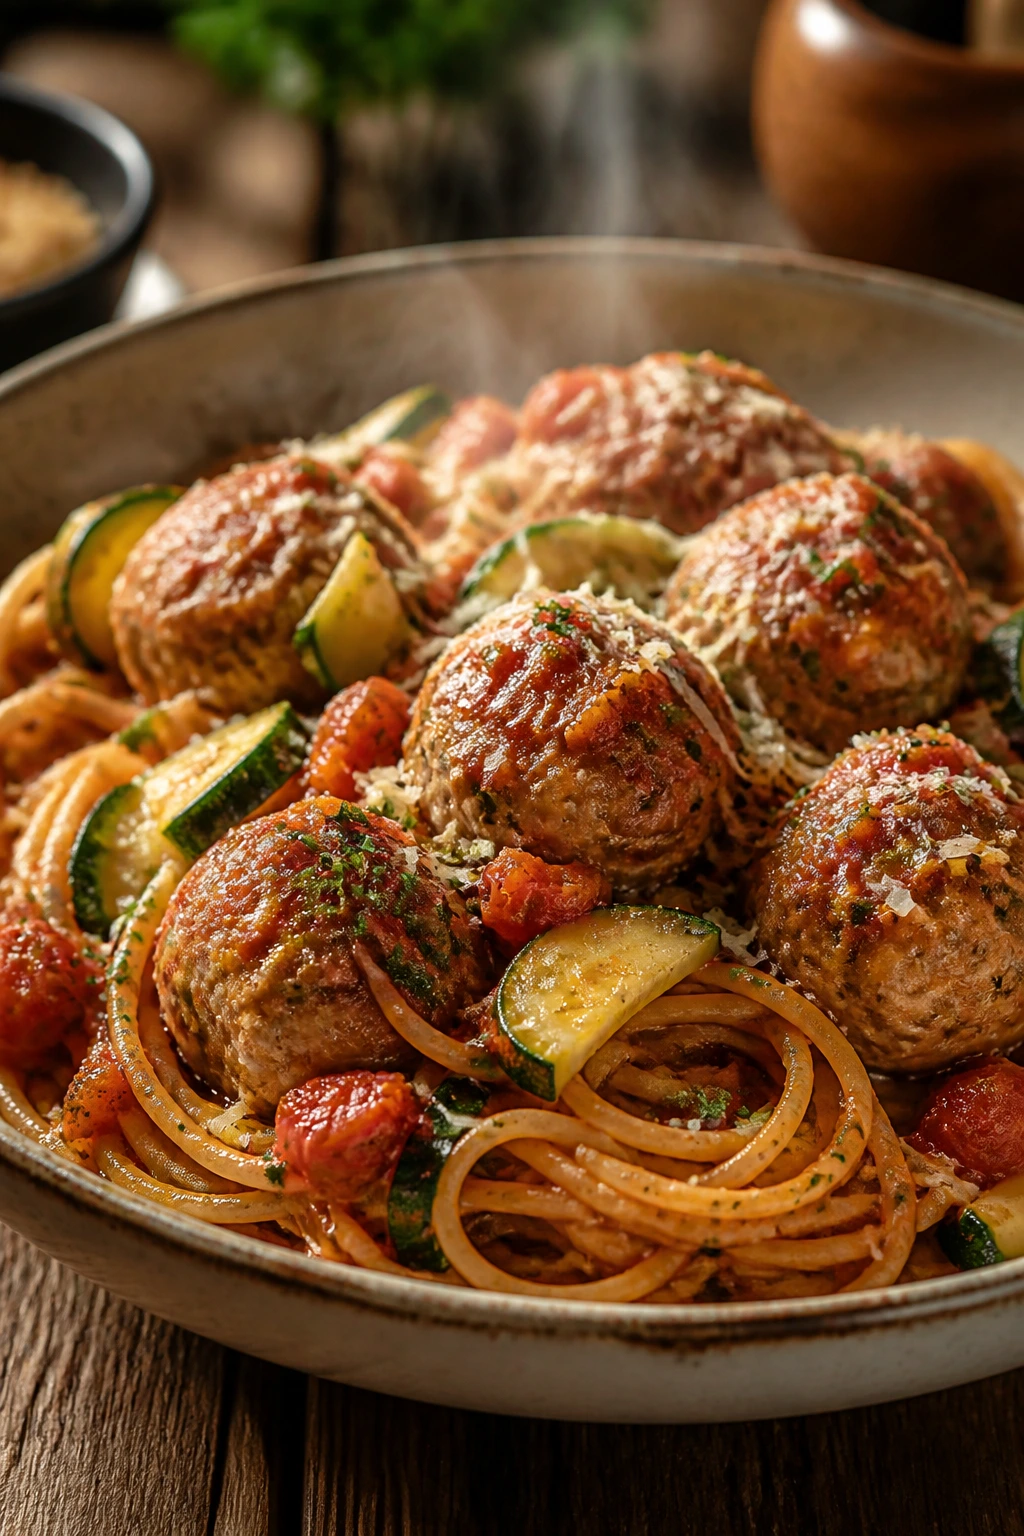
The point of these 18 healthy weeknight family dinner ideas isn’t to make dinner impressive. It’s to make dinner doable on the nights when nobody has extra patience and the clock seems to be moving faster than usual. The best meals in this set are the ones that let you cook once, serve generously, and clean up without muttering at the sink.
I keep coming back to the same quiet rule: use ingredients that forgive a busy hand. Thighs instead of breasts when you need cushion. Beans and lentils when you want a meal that sticks. Roasted vegetables instead of wilted ones. Citrus at the end. Salt with intent. Small things, but they change the whole plate.
If you build a few of these into your rotation, dinner stops feeling like a nightly test and starts acting like a reliable part of the day. That’s the real win.