
A bowl of pasta can handle a lot, but the first plate on the table sets the tone. The best Mediterranean appetizers for pasta night bring salt, acid, herbs, and a little crunch so your mouth doesn’t get flattened by a heavy sauce before the main dish even lands.
There’s a reason I reach for olives, whipped cheese, tomato toast, and smoky vegetable dips instead of random snacks. They don’t compete with pasta. They sharpen it. A garlicky bruschetta makes tomato sauce taste brighter; cool tzatziki calms a spicy sausage rigatoni; a hot tray of feta and tomatoes gives the table the same friendly nudge as a salad, only with more personality.
What matters most is balance. If dinner is a rich baked ziti, you want something sharp or briny first. If the pasta is lemony and olive-oil-based, a fried bite or a yogurt dip keeps the table from feeling flat. The little details—draining tomatoes, squeezing cucumbers, toasting walnuts, pulling phyllo from the oven the second it turns gold—are what turn a decent appetizer spread into one people remember.
Why These Small Plates Belong Beside Pasta
-
They reset the palate: Salt, lemon, vinegar, and herbs cut through cream sauce, meat sauce, and cheese-heavy pasta in a way plain crackers never will.
-
They buy you time: A bowl of marinated olives or a chilled dip can sit out while the water boils, which means the table feels full before the pasta is even plated.
-
They mix hot and cold on purpose: That contrast matters. A crisp crostini next to a creamy dip keeps the meal from feeling like one long soft texture.
-
They work with almost any sauce: Tomato-based, pesto, carbonara, baked ricotta, olive oil, sausage, seafood—there’s a starter here that fits each one.
-
They’re easy to scale: Most of these recipes double cleanly, and several can be made ahead without turning tired or soggy.
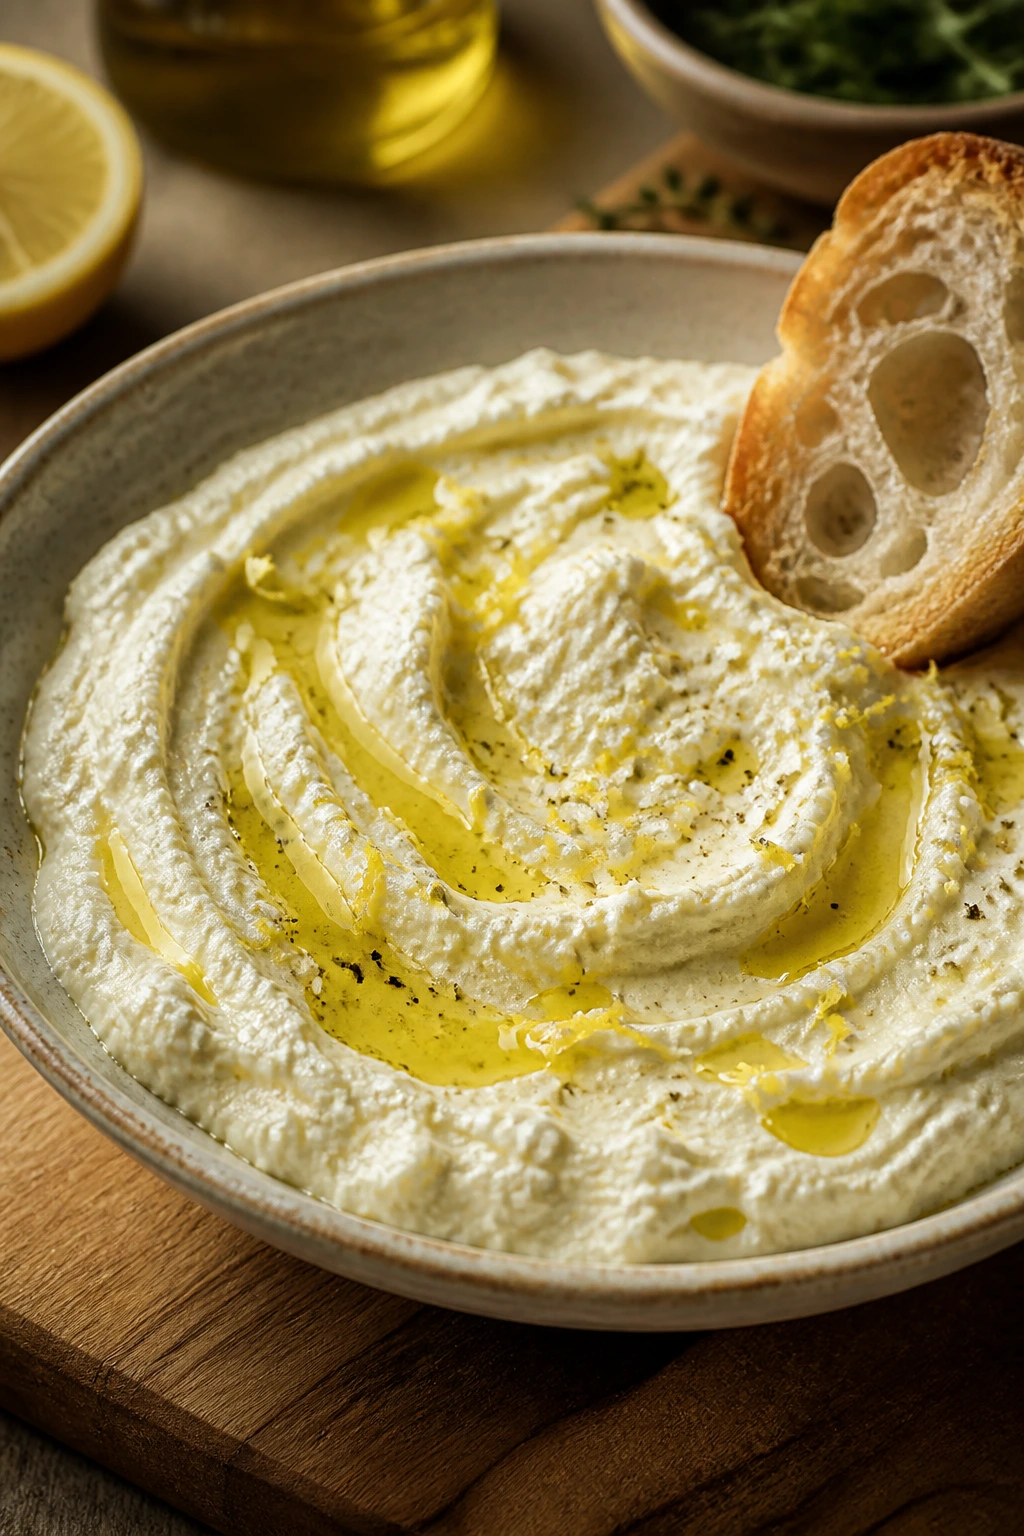
1. Whipped Feta with Lemon and Olive Oil
The first spoonful hits salty, tangy, and creamy all at once, then the lemon wakes it up. Whipped feta is the dip I make when I want something that looks polished but takes about ten minutes and a food processor. Spread it thick on a shallow bowl, and it lands somewhere between a dip and a cheese spread—the good kind, the one that disappears fast.
Why It Works:
Feta gives you the briny edge pasta night needs, while Greek yogurt smooths out the texture so it doesn’t crumble on the bread. Lemon juice keeps the mix bright enough to stand up to tomato sauce, and olive oil rounds off the sharpness. If you chill it for 15 minutes, the texture turns even silkier and holds a neat swoop under a spoon.
Key Ingredients:
- 8 oz block feta, drained and broken into chunks — block feta blends smoother than the crumbly tub version.
- 1 cup full-fat Greek yogurt — adds body and softens the salt.
- 1 small garlic clove, grated — use less if you want the feta to stay mild.
- 2 tbsp fresh lemon juice — gives the spread its clean edge.
- 1 tsp lemon zest — adds perfume without extra liquid.
- 3 tbsp extra-virgin olive oil, plus more for drizzling — smooths the finish.
- 1/4 tsp black pepper — a little bite helps the cheese taste less flat.
- 1 tsp honey, optional — nice if you’re serving this with spicy pasta.
Quick Steps:
- Blend the base. Add the feta, yogurt, garlic, lemon juice, lemon zest, pepper, and 3 tablespoons olive oil to a food processor.
- Process until smooth. Run the machine for 45 to 60 seconds, scraping down once, until the mixture looks thick, pale, and creamy.
- Taste and adjust. Add a pinch more pepper or a squeeze of lemon if the feta tastes heavy.
- Chill briefly. Scoop the spread into a shallow bowl and refrigerate for 15 minutes so it firms up slightly.
- Finish and serve. Drizzle with olive oil and, if you like, a thread of honey right before it hits the table.
Equipment for This Recipe:
- Food processor — the texture is far better than hand-mashing.
- Microplane or fine grater — for the garlic and lemon zest.
- Shallow serving bowl — gives the spread a clean, generous look.
- Rubber spatula — helps scrape every bit out of the processor.
How to Serve This Dish:
Pile it into a bowl and drag the back of a spoon through the center, then fill the groove with olive oil. Serve with warm pita wedges, cucumber rounds, and a few briny olives. It’s rich enough that 2 tablespoons per person feels right before pasta.
Pro Tips for This Recipe:
- Use block feta in brine. It blends smoother and tastes fresher than pre-crumbled cheese.
- If the dip feels too thick, add 1 tablespoon yogurt at a time until it loosens.
- A pinch of Aleppo pepper on top gives gentle heat without turning the spread aggressive.
- Make it 2 hours ahead if you want the garlic to mellow a little.
Variations on This Dish:
Herb-Flecked Whip: Blend in 2 tablespoons chopped dill and 1 tablespoon mint for a cooler, greener version. It works especially well with tomato pasta.
Smoky Chili Feta: Add 1/2 teaspoon smoked paprika and a pinch of chili flakes. That’s the version I’d set beside sausage rigatoni.
Common Mistakes to Avoid with This Dish:
- Using watery yogurt: Thin yogurt turns the dip slack. Use full-fat Greek yogurt so it holds its shape.
- Over-salting before tasting: Feta already carries plenty of salt; taste first, then adjust.
- Serving it straight from the fridge with no oil on top: A final drizzle keeps the surface glossy and keeps it from feeling stiff.
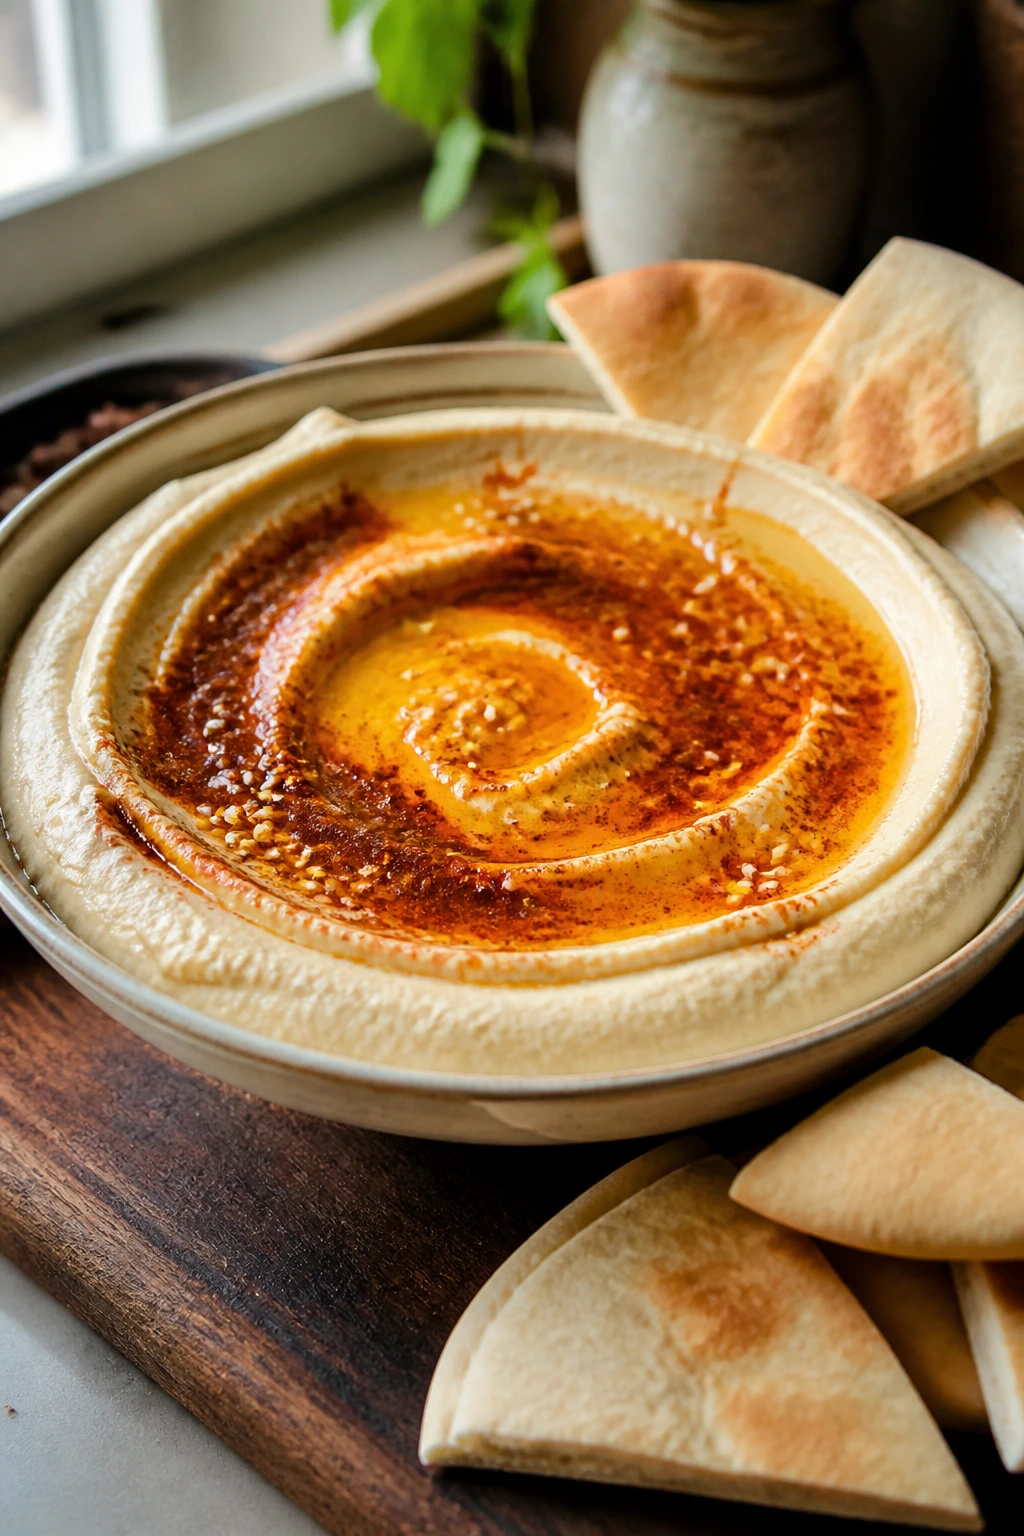
2. Hummus with Warm Paprika Oil
Good hummus should feel smooth enough to leave a clean trail from the spoon, not grainy or pasty. The paprika oil on top matters more than people think. It gives the bowl heat, color, and that glossy finish that makes the whole thing look like it belongs next to a bowl of good pasta instead of a supermarket snack tray.
Why It Works:
Chickpeas give the dip body, tahini gives it depth, and lemon juice keeps the flavor from going dull. Heating the paprika in olive oil blooms the spice, which means you get a warm, savory smell before the first bite. If you simmer the chickpeas for 8 minutes before blending, the texture comes out noticeably softer and less mealy.
Key Ingredients:
- 1 can (15 oz) chickpeas, drained and rinsed — or 1 1/2 cups cooked chickpeas.
- 1/4 cup tahini — stir it well before measuring.
- 3 tbsp fresh lemon juice — this keeps the flavor bright.
- 1 small garlic clove — enough to add bite without overpowering.
- 1/2 tsp ground cumin — adds a warm, earthy note.
- 1/4 cup ice water — helps whip the hummus light.
- 2 tbsp olive oil — blended in for body.
- 1 tbsp olive oil plus 1 tsp paprika for the topping — the finish that makes the bowl pop.
- 1/2 tsp salt, plus more to taste — hummus needs seasoning, not guessing.
Quick Steps:
- Soften the chickpeas. Simmer the chickpeas in a small saucepan of water for 8 minutes, then drain well.
- Build the tahini base. Blend the tahini and lemon juice for 20 seconds until pale and thick.
- Add the flavor. Drop in the garlic, cumin, salt, and half the chickpeas, then process until rough.
- Whip it smooth. Add the rest of the chickpeas, olive oil, and ice water, then blend for 1 to 2 minutes until creamy.
- Make the topping. Warm 1 tablespoon olive oil with paprika for about 30 seconds until fragrant, not smoky.
- Serve. Spread the hummus in a shallow bowl and spoon the paprika oil over the top.
Equipment for This Recipe:
- Food processor — for the smoothest finish.
- Small saucepan — if you want to warm the chickpeas.
- Serving bowl — shallow is better than deep here.
- Measuring cups and spoons — tahini and lemon need balance.
How to Serve This Dish:
Serve hummus with warm pita triangles, celery, carrots, and cucumber spears. If the pasta is rich, add a few olives on the side and let the hummus act like a cold, creamy pause before dinner. Two or three spoonfuls per person is enough.
Pro Tips for This Recipe:
- Warm chickpeas blend into a softer, silkier dip than cold ones.
- If your tahini tastes bitter, add another teaspoon of lemon juice before reaching for more salt.
- A splash of ice water at the end makes a bigger difference than extra oil.
- Hold back a few chickpeas for garnish if you want a little texture on top.
Variations on This Dish:
Roasted Garlic Hummus: Swap the raw garlic for 4 roasted cloves. It turns sweeter and works well with red-sauce pasta.
Green Herb Hummus: Blend in a handful of parsley and 1 tablespoon dill. The color shifts, and the flavor feels fresher.
Common Mistakes to Avoid with This Dish:
- Skipping the lemon-tahini whip: That first blend makes the dip lighter. If you dump everything in at once, it can taste heavier.
- Using too little water: Hummus should move slowly on the spoon. If it sits in a lump, add water.
- Forgetting to taste after chilling: Cold hummus tastes flatter, so adjust salt and lemon right before serving.
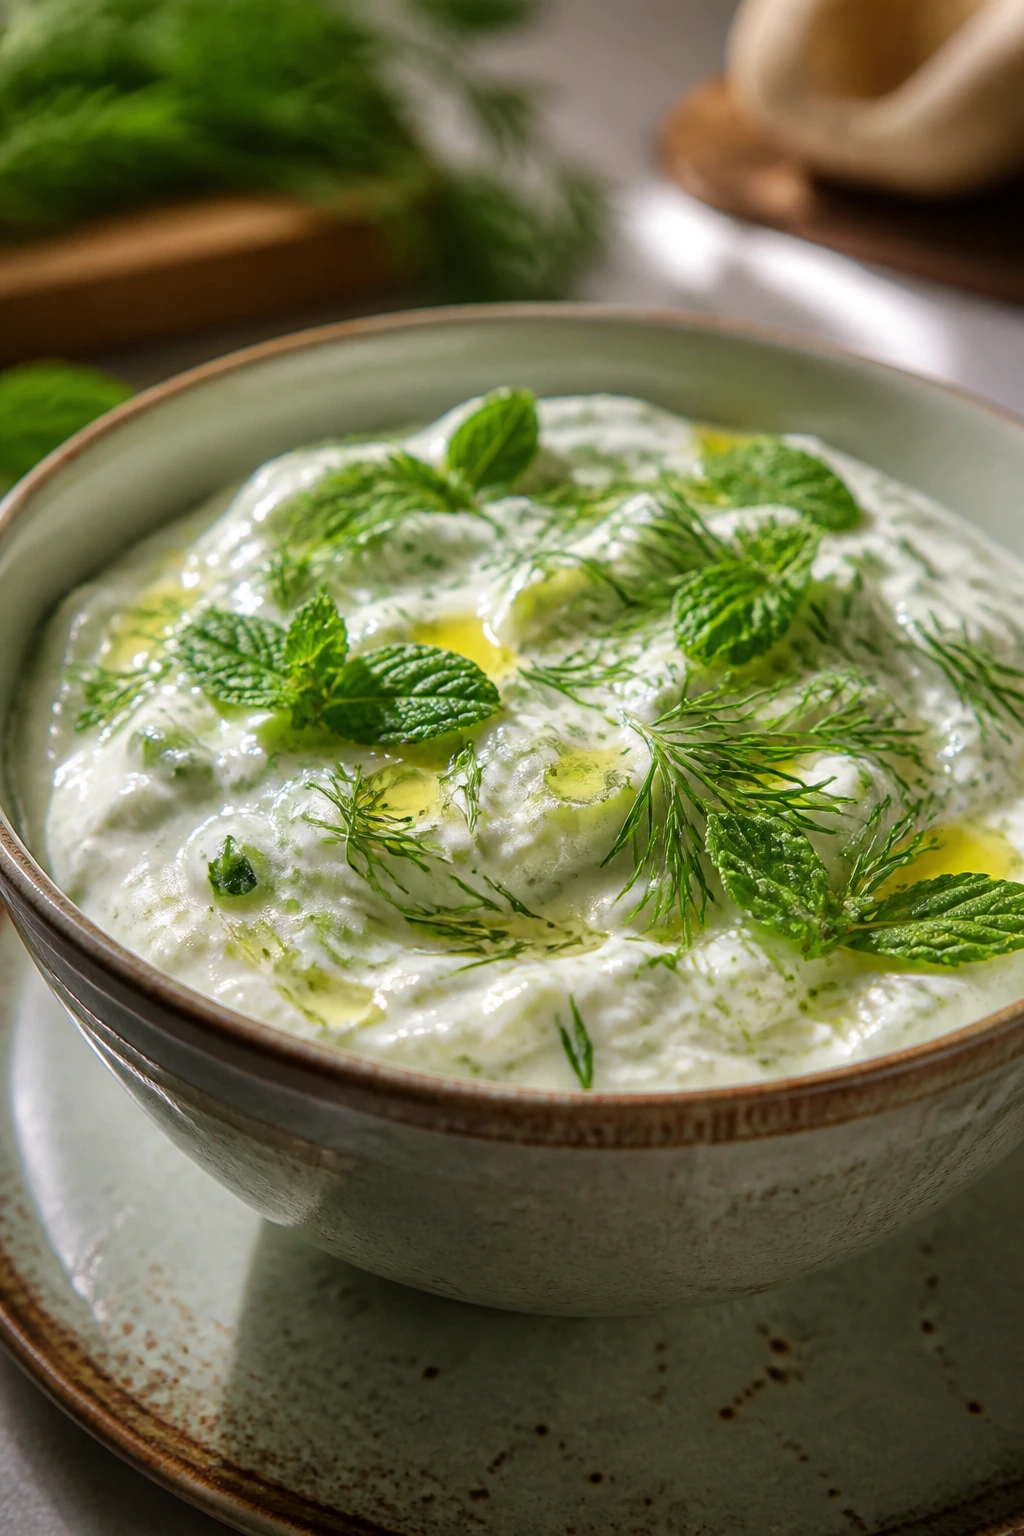
3. Tzatziki with Dill and Mint
Tzatziki is the appetizer that cools a noisy table down. It’s crisp from cucumber, creamy from yogurt, and sharp enough from garlic and lemon to wake up a plate of pasta that’s been sitting under a rich sauce. I like it best when the cucumber is squeezed dry and the dill smells almost grassy.
Why It Works:
Greek yogurt brings thickness without heaviness, and cucumber keeps each bite fresh and watery in the right way. Dill and mint give the dip a clean herbal finish, which is why it plays so well with garlicky or tomato-heavy pasta. If you salt the cucumber and let it sit for 10 minutes, you won’t get a puddle forming around the dip bowl.
Key Ingredients:
- 1 1/2 cups plain Greek yogurt — full-fat gives the best texture.
- 1 large cucumber, grated and squeezed dry — remove as much water as you can.
- 1 small garlic clove, finely grated — enough to taste, not dominate.
- 1 tbsp fresh lemon juice — brightens the yogurt.
- 1 tbsp chopped dill — the classic herb here.
- 1 tbsp chopped mint — adds a cool lift.
- 1 tbsp extra-virgin olive oil — for gloss and flavor.
- 1/2 tsp salt — more if your yogurt is very plain.
- Black pepper, to taste — optional, but nice.
Quick Steps:
- Grate the cucumber. Use the large holes of a box grater and toss the shreds with a pinch of salt.
- Drain it well. Let the cucumber sit for 10 minutes, then squeeze it hard in a clean kitchen towel until dry.
- Mix the base. Stir the yogurt, garlic, lemon juice, dill, mint, olive oil, salt, and pepper together in a bowl.
- Fold in the cucumber. Add it last so the dip stays thick and creamy.
- Rest briefly. Chill for 20 minutes so the flavors settle.
- Serve cold. Stir once before bringing it to the table.
Equipment for This Recipe:
- Box grater — for the cucumber.
- Clean kitchen towel or cheesecloth — needed to squeeze out moisture.
- Mixing bowl — medium size works best.
- Spoon or small spatula — for folding.
How to Serve This Dish:
Spoon tzatziki into a bowl and swirl the top with the back of a spoon. Serve it with pita, sliced radishes, and anything roasted or spicy on the side. It works especially well before a pasta with sausage or a roasted-vegetable sauce.
Pro Tips for This Recipe:
- Squeeze the cucumber dry or the dip will thin out in the bowl.
- Add the mint sparingly if you want the dill to stay in front.
- If the garlic is sharp, let the finished dip sit for 30 minutes.
- A drizzle of olive oil right before serving keeps the top from drying out.
Variations on This Dish:
Lemon-Heavy Tzatziki: Add another 1 teaspoon lemon juice and extra zest for a brighter, sharper finish.
Cucumber-Free Shortcut: Use grated zucchini instead of cucumber, but squeeze it just as hard. The flavor is a little softer and works fine in a rush.
Common Mistakes to Avoid with This Dish:
- Leaving the cucumber wet: That’s the fastest way to get watery tzatziki.
- Using low-fat yogurt: It can taste thin and sour.
- Adding too much garlic too early: Raw garlic gets stronger as it sits, so go slowly.
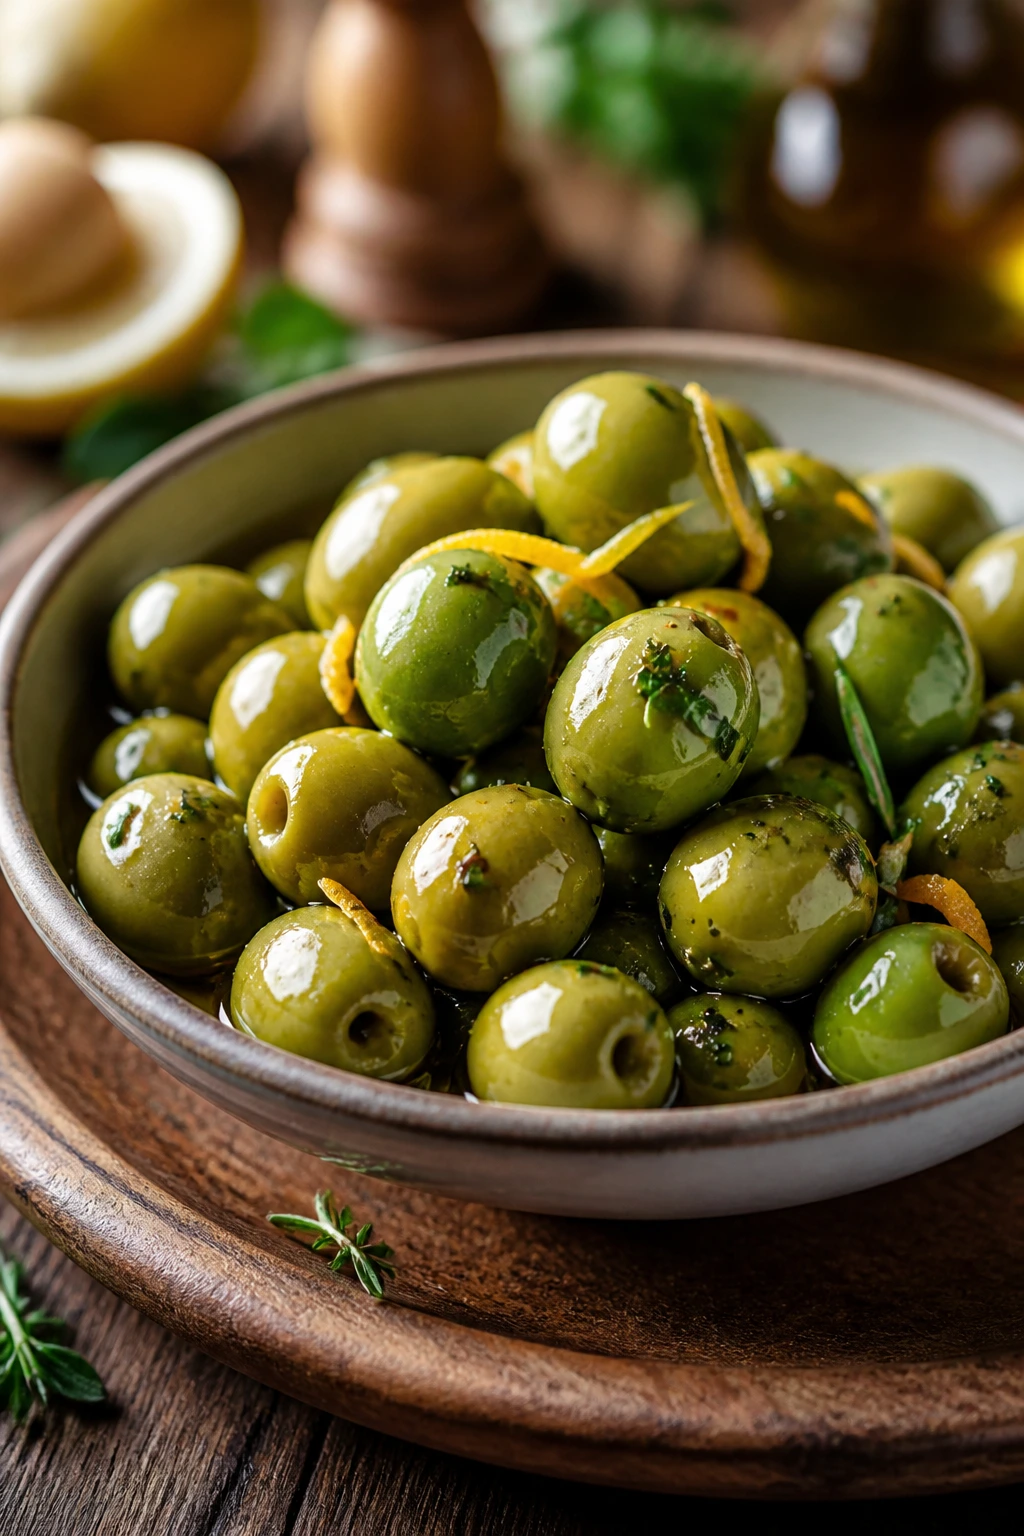
4. Marinated Castelvetrano Olives
There’s no cooking drama here, and that’s the charm. A bowl of olives tossed with citrus, herbs, and a little chili is the sort of thing that disappears before the pasta water even comes to a boil. Castelvetranos are my favorite because they’re buttery and mild, not harshly salty, which makes them easier to eat by the handful.
Why It Works:
Olives bring the briny note that cuts through rich sauces, while citrus peel and herbs keep the flavors from tasting one-dimensional. A brief warm marinade helps the garlic and rosemary smell bloom, which makes the bowl feel more intentional than a jar dump. The oil also carries the flavor, so every bite tastes seasoned instead of plain.
Key Ingredients:
- 2 cups Castelvetrano or mixed pitted olives — choose ones with good texture, not mushy ones.
- 3 tbsp extra-virgin olive oil — enough to coat and pool lightly.
- 1 strip orange peel, about 2 inches long — use just the orange part.
- 1 small garlic clove, lightly smashed — gives gentle perfume.
- 1 tsp fresh rosemary, chopped — or 1/2 tsp dried.
- 1 tsp fresh thyme leaves — optional, but nice.
- 1/2 tsp red pepper flakes — adjust for heat.
- 1 tbsp lemon juice — for brightness at the end.
Quick Steps:
- Warm the aromatics. Put the olive oil, orange peel, garlic, rosemary, thyme, and pepper flakes in a small saucepan over low heat for 2 minutes.
- Do not fry them hard. You want the oil fragrant, not sizzling.
- Cool slightly. Take the pan off the heat and let it sit for 5 minutes.
- Toss the olives. Combine the olives and warm oil in a bowl or jar, then add the lemon juice.
- Marinate. Let them sit at room temperature for 30 minutes or refrigerate overnight.
- Serve with a spoon. A little of the oil should come along for the ride.
Equipment for This Recipe:
- Small saucepan — just enough to warm the oil.
- Jar or bowl with a lid — best for marinating.
- Wooden spoon — for stirring the oil and olives.
- Citrus peeler or sharp knife — to cut the orange peel cleanly.
How to Serve This Dish:
Put the olives in a shallow bowl with some of the oil and herbs on top. Add toothpicks if you like, though honestly people usually just grab them. A few olives per person is enough to start the meal without dulling the appetite.
Pro Tips for This Recipe:
- Buy pitted olives if you want less table chatter and fewer broken teeth.
- Add the lemon juice after the oil cools a little so the flavor stays bright.
- A few strips of fennel frond are nice if you have them.
- Make this the day before if you can; the flavor gets rounder overnight.
Variations on This Dish:
Lemon and Bay Version: Swap the orange peel for lemon peel and add 1 small bay leaf. The flavor turns sharper and more savory.
Garlic-Free Bowl: Leave out the garlic and use extra herbs instead. That’s the version I serve when the pasta night menu already leans heavy on garlic.
Common Mistakes to Avoid with This Dish:
- Using poor olives: The oil can’t fix bitter or rubbery olives. Start with olives you’d eat plain.
- Heating the oil too hard: Burnt garlic tastes rough and takes over the bowl.
- Serving them dry: A little seasoned oil is part of the point.
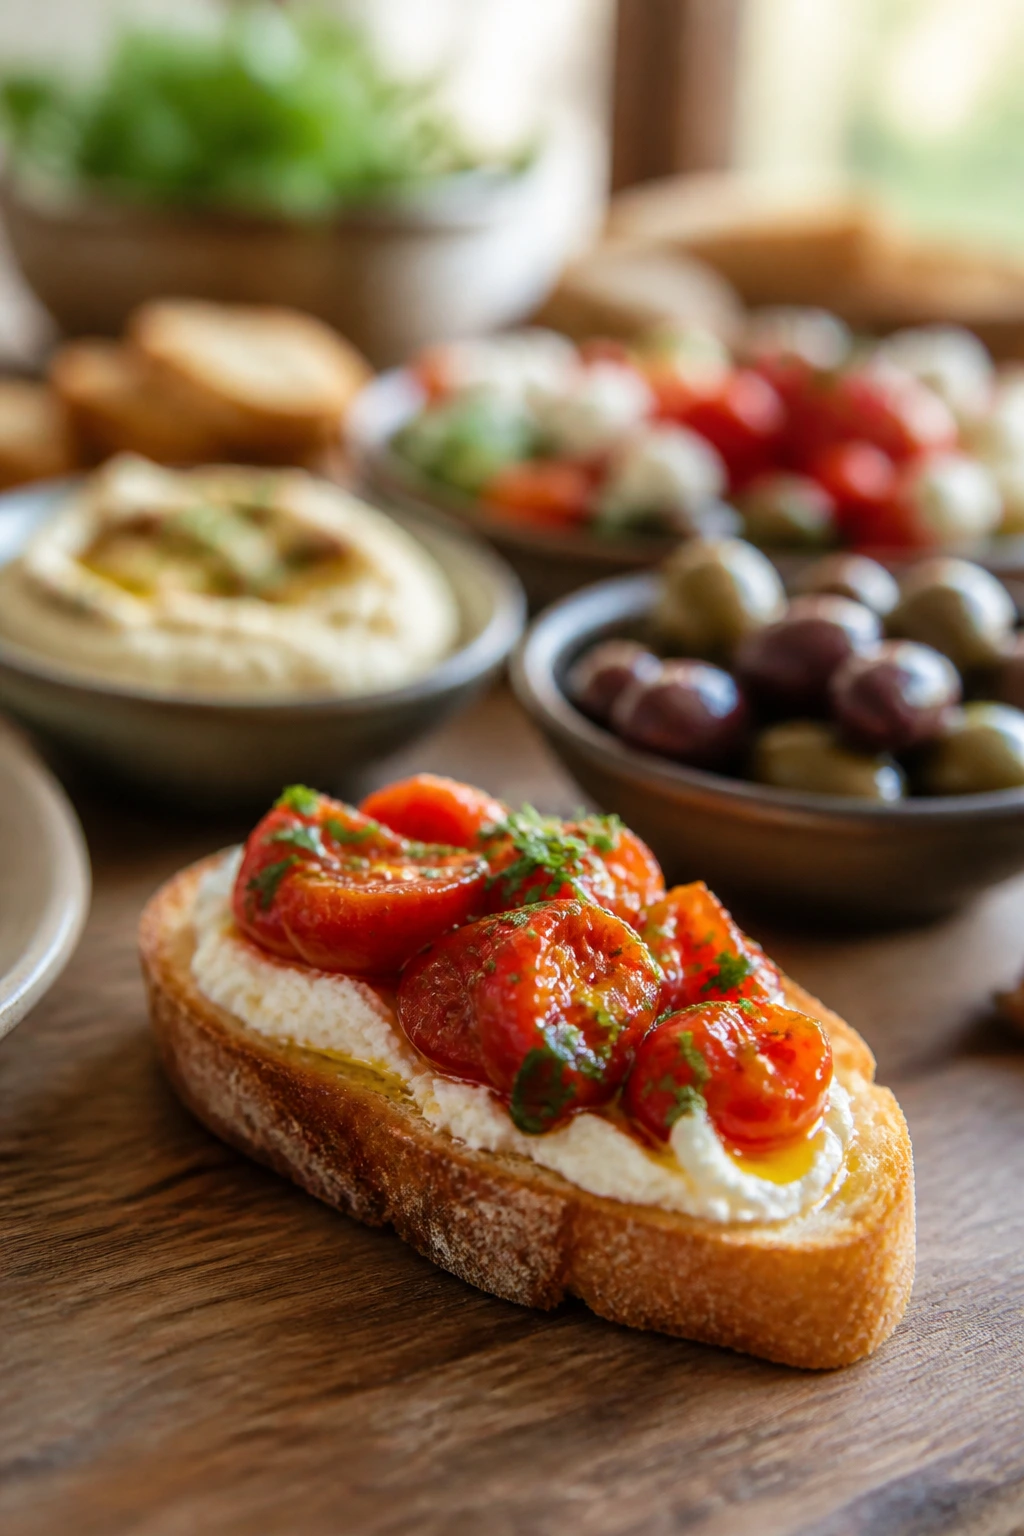
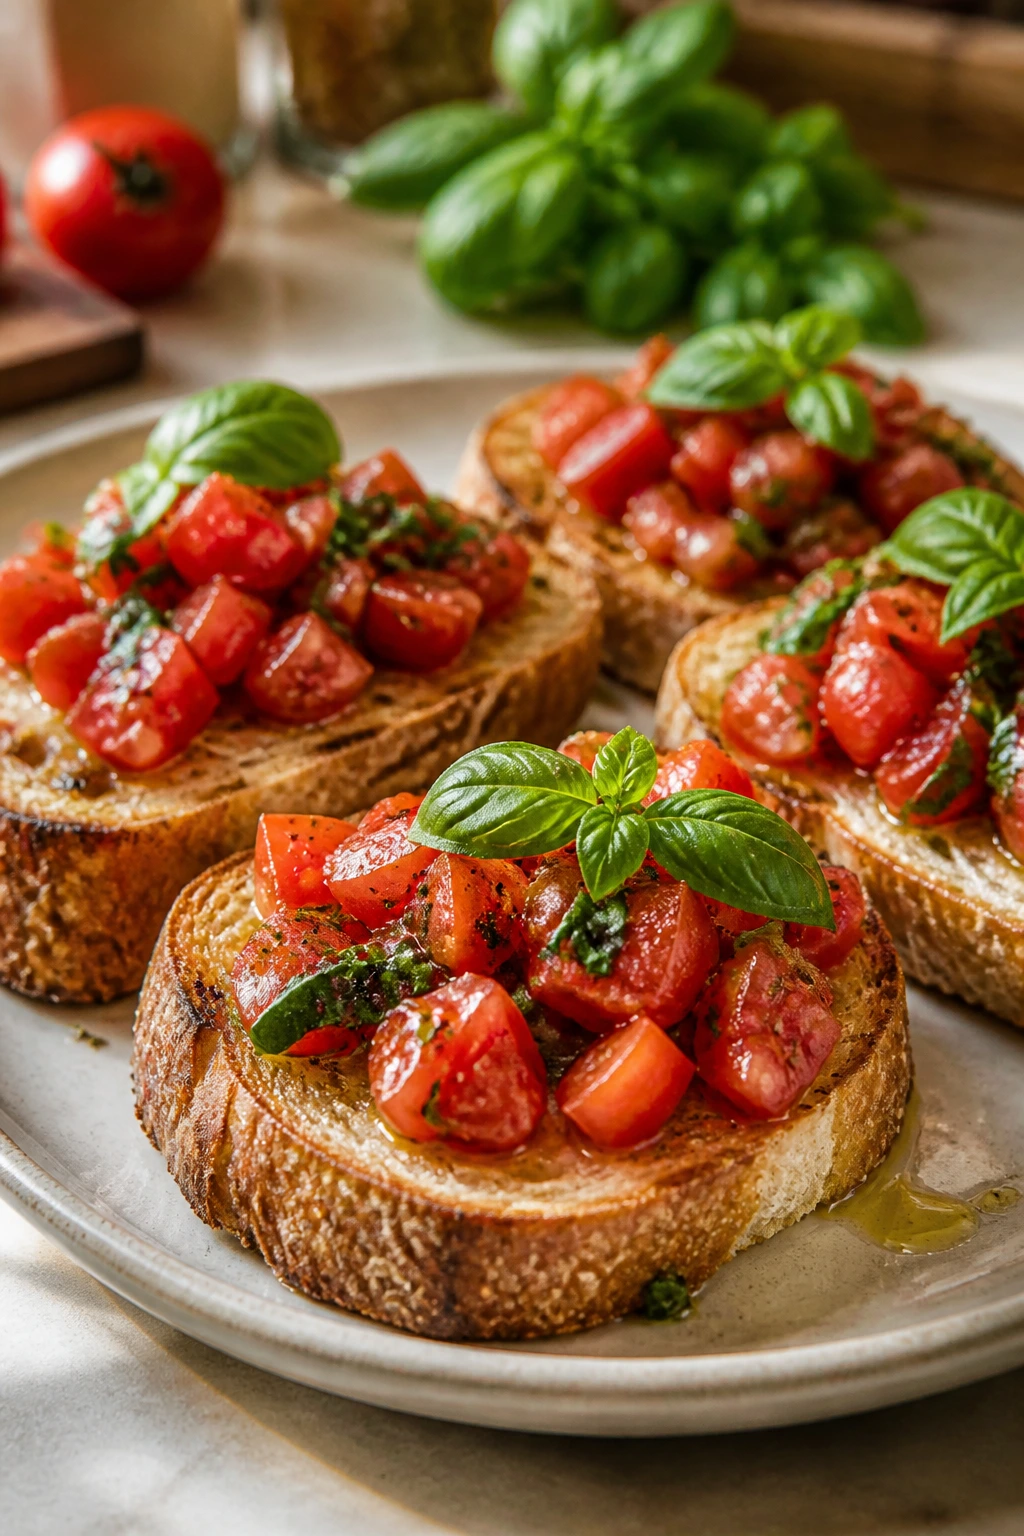
5. Tomato Basil Bruschetta
Bruschetta needs ripe tomatoes, good bread, and the self-control to assemble it at the last second. If you make it ahead and let the bread sit under the topping, it turns sad and soggy. When it’s done right, you get a crisp toast, juicy tomatoes, and garlic that smells warm rather than sharp.
Why It Works:
Tomatoes bring acid and sweetness, basil brings perfume, and toasted bread gives the crunch that pasta night usually lacks. Rubbing the toast with a cut garlic clove is a small move that matters; it leaves a thin layer of garlic flavor instead of a blast. A quick drain of the tomato mixture keeps the bread crisp for the 10 minutes it needs to stay crisp.
Key Ingredients:
- 1 baguette, sliced into 1/2-inch rounds — sturdier bread holds the topping better.
- 3 cups ripe Roma or cherry tomatoes, diced — use the best tomatoes you can find.
- 1/4 cup fresh basil, torn — not minced to death.
- 2 tbsp extra-virgin olive oil — for the topping.
- 1 tbsp balsamic vinegar — just enough to deepen the tomato flavor.
- 1 garlic clove, halved — for rubbing the toast.
- 1/2 tsp salt — helps the tomatoes release juice.
- Black pepper, to taste — a light scatter is enough.
Quick Steps:
- Toast the bread. Heat the oven to 400°F and bake the slices for 8 to 10 minutes until golden at the edges.
- Mix the topping. Combine tomatoes, basil, olive oil, balsamic vinegar, salt, and pepper in a bowl.
- Drain briefly. Let the mixture sit for 5 minutes, then spoon off any extra liquid.
- Rub with garlic. While the toast is warm, rub the cut side of the garlic over one face of each slice.
- Top and serve. Spoon the tomato mixture on right before the bread hits the table.
Equipment for This Recipe:
- Rimmed baking sheet — keeps the toast evenly crisp.
- Sharp knife — for clean tomato dice.
- Mixing bowl — to hold the topping.
- Small spoon — for topping the bread without dumping too much juice.
How to Serve This Dish:
Pile the bruschetta on a board and let people grab it while it’s still crisp. It pairs especially well with tomato sauce pasta or anything heavy on cheese. I’d count on 2 to 3 pieces per person if dinner is following soon.
Pro Tips for This Recipe:
- Use room-temperature tomatoes; cold tomatoes taste flatter.
- Salt the tomato mix right before serving so it doesn’t flood the bread.
- If your bread is soft, toast it a minute longer than you think.
- A tiny splash of balsamic glaze on top is better than drowning the bowl.
Variations on This Dish:
White Bean Bruschetta: Mash 1 cup cannellini beans with lemon and olive oil, then top with tomatoes. It’s a little more filling and softer in flavor.
Burrata Finish: Add torn burrata over the tomatoes if the pasta night feels more like a celebration than a Tuesday. Rich, messy, and worth it.
Common Mistakes to Avoid with This Dish:
- Assembling too early: The bread loses its crisp edge fast.
- Using underripe tomatoes: You’ll get sourness without sweetness.
- Skipping the garlic rub: The toast tastes plain without it.
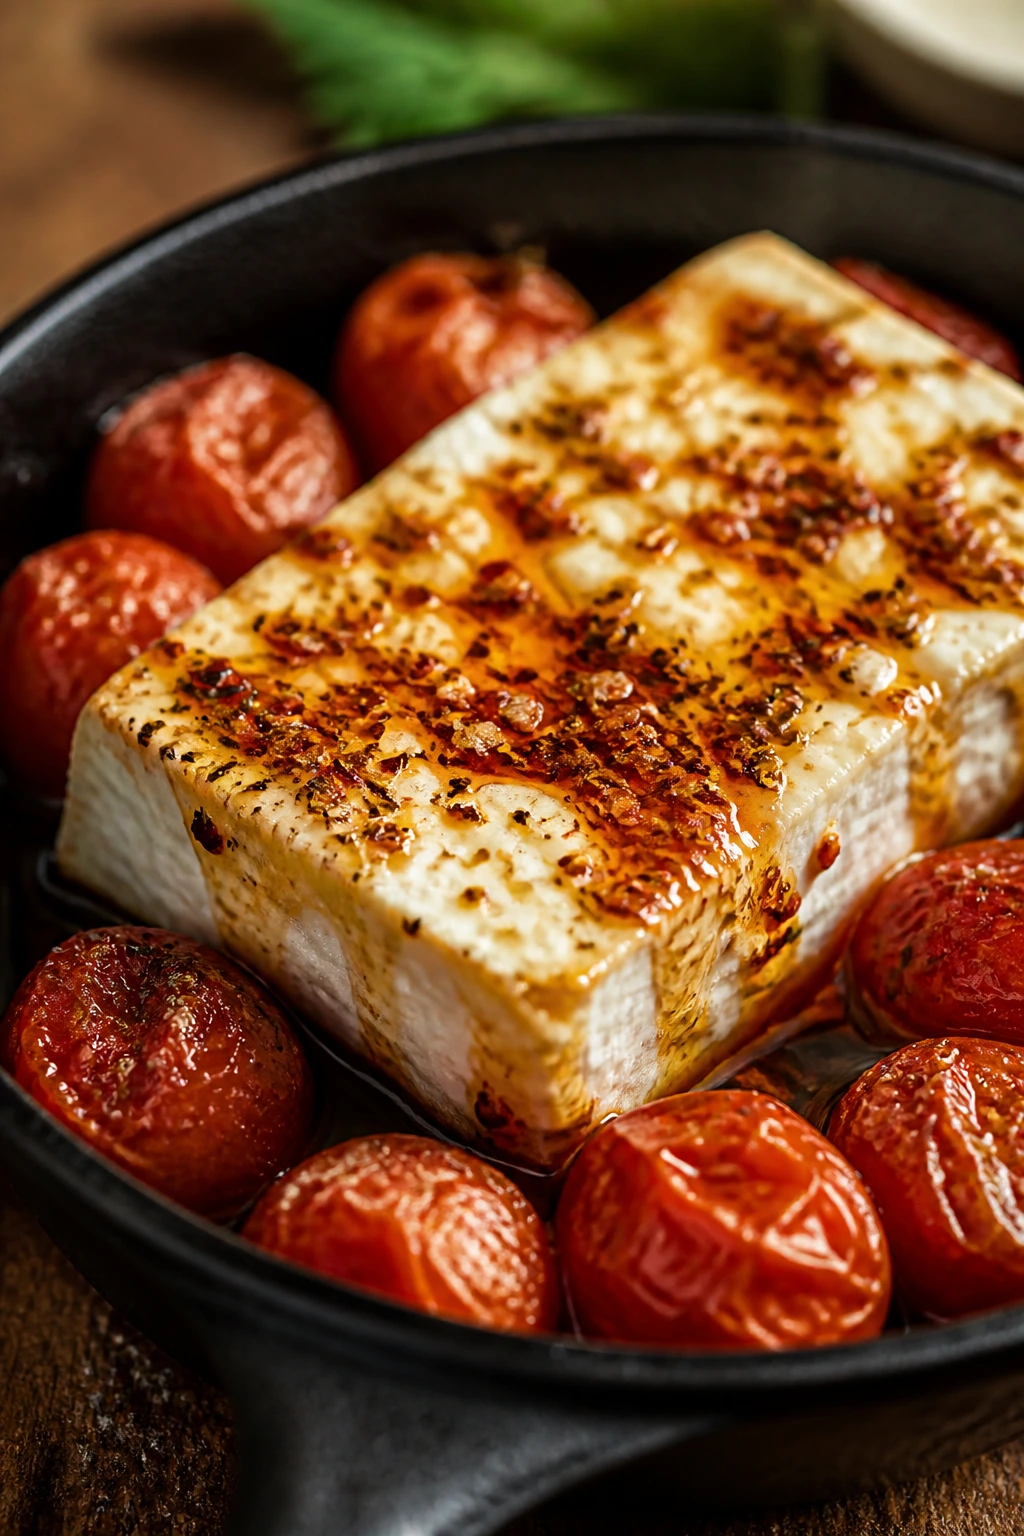
6. Baked Feta with Honey and Chili
A hot block of feta tucked among blistered tomatoes is hard to beat when the table needs something dramatic but not fussy. The cheese softens at the edges, the tomatoes collapse into a jammy puddle, and the honey turns the whole thing glossy. Scoop it with bread and you get salty, sweet, and peppery in one bite.
Why It Works:
Feta stays intact long enough to get warm without melting into a puddle, which gives you contrast: soft center, tidy edges, and juicy tomatoes around it. Honey pulls the sharpness back just enough to make the dish feel round instead of bracing. The chili flakes keep it from tasting too sweet, which matters if you’re serving a richer pasta later.
Key Ingredients:
- 1 (8 oz) block feta — choose a block in brine if possible.
- 2 cups cherry tomatoes — the smaller ones burst best.
- 3 tbsp olive oil — enough for the tomatoes and feta.
- 1 tbsp honey — drizzle, don’t flood.
- 1 tsp dried oregano — classic Mediterranean flavor.
- 1/2 tsp chili flakes — or more if you want heat.
- 1 garlic clove, thinly sliced — adds a little perfume.
- Black pepper, to taste — optional but useful.
Quick Steps:
- Preheat the oven. Set it to 400°F and place a small baking dish in the center rack.
- Build the base. Toss the tomatoes, olive oil, garlic, oregano, chili flakes, and pepper in the dish.
- Nest the feta. Put the block in the center of the tomatoes and drizzle the top with honey.
- Bake. Cook for 18 to 22 minutes, until the tomatoes burst and the feta softens at the edges.
- Broil briefly if needed. Give it 1 minute under the broiler for extra color, watching closely.
- Serve hot. Bring it out with bread and a spoon.
Equipment for This Recipe:
- Small baking dish — a shallow one works best.
- Oven mitts — the dish gets hot fast.
- Serving spoon — for scooping feta and tomatoes together.
- Bread knife — if you’re slicing a loaf at the table.
How to Serve This Dish:
Serve it straight from the baking dish with crusty bread, toasted pita, or crackers sturdy enough to pick up both cheese and tomato. It’s best as a shared plate for 4 to 6 people before pasta, especially if the main course is tomato-based.
Pro Tips for This Recipe:
- Use a block of feta, not crumbles. It softens in the oven instead of disappearing.
- If your tomatoes are small, keep them whole; if they’re larger, halve them.
- A few black olives tucked around the feta are worth adding.
- Don’t overbake, or the feta edges can dry out.
Variations on This Dish:
Olive and Herb Bake: Add 1/4 cup olives and extra oregano for a more savory tray. It leans nicely into red-sauce pasta.
Lemon-Forward Version: Finish with lemon zest after baking instead of honey. That version fits better beside seafood pasta.
Common Mistakes to Avoid with This Dish:
- Using a deep dish: The tomatoes steam instead of blistering.
- Adding honey too early in a blazing hot oven: It can darken too fast.
- Leaving it on the counter too long: Serve this while the cheese is soft, not lukewarm.
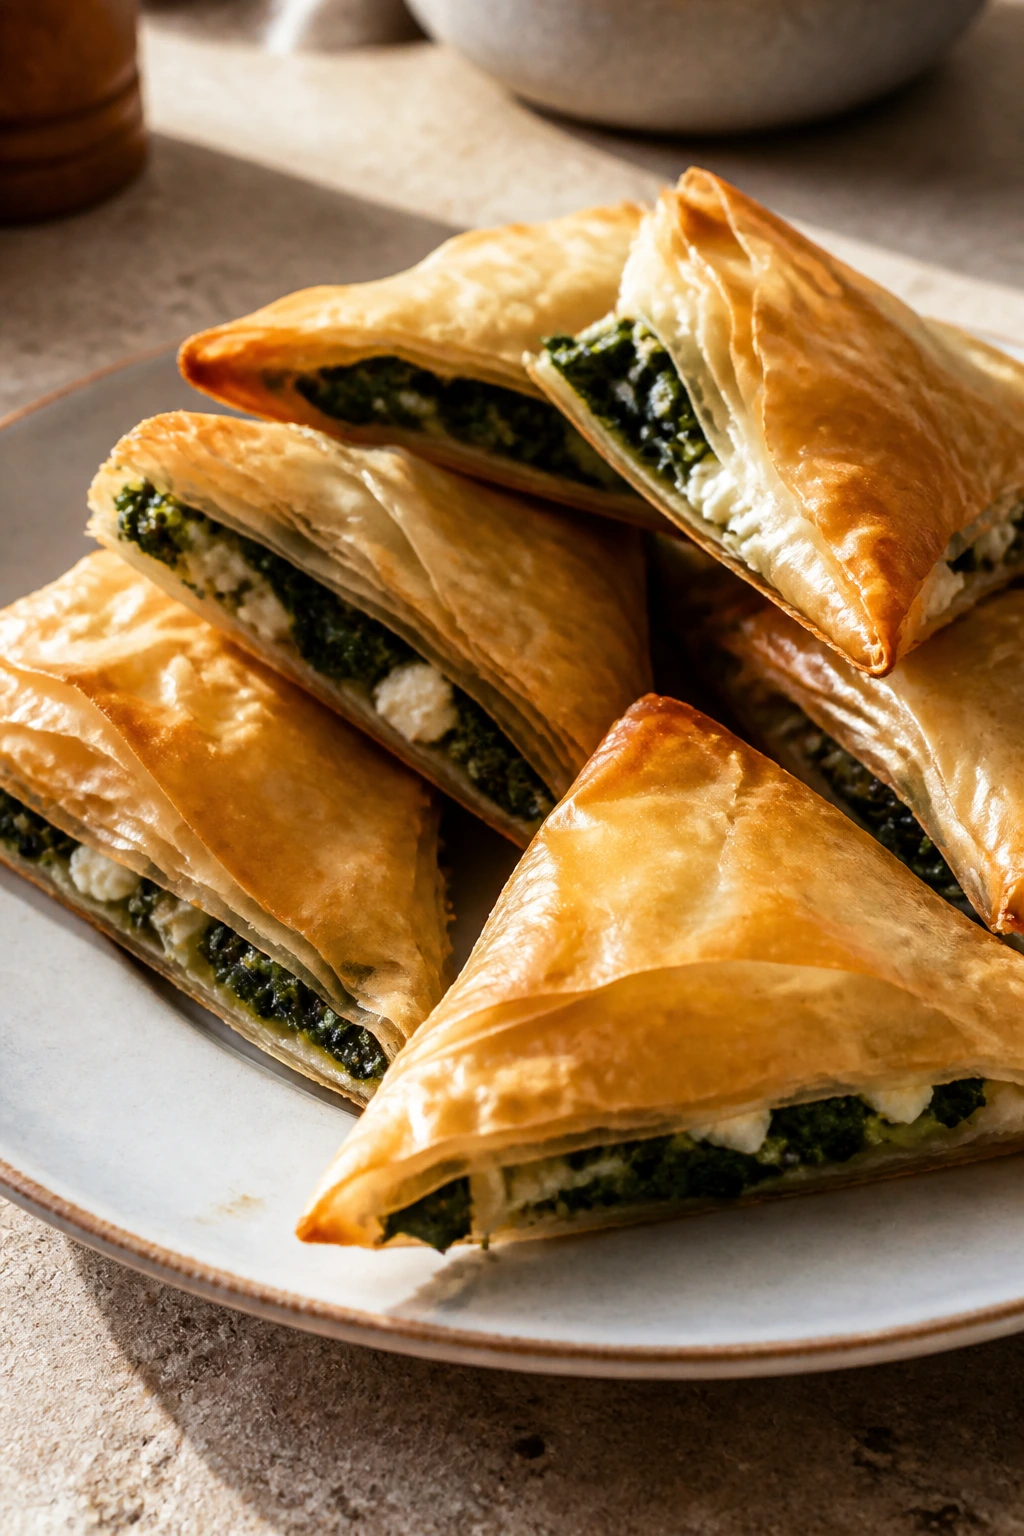
7. Spanakopita Triangles
Spanakopita is the appetizer people reach for twice because the first one vanishes before they decide they want another. Crisp phyllo, savory spinach, and feta make a sharp little bite that feels more composed than a dip and less formal than a tart. It’s fiddly in the way pastry always is, but the result is worth the fold.
Why It Works:
The filling is salty and herbaceous, while the phyllo bakes into fragile, flaky layers that shatter when you bite in. Spinach keeps the middle soft without making it heavy, and dill gives the filling that unmistakable Greek finish. If you cook out the spinach moisture first, the triangles stay crisp instead of leaking onto the pan.
Key Ingredients:
- 1 lb fresh spinach — or 10 oz frozen spinach, thawed and squeezed dry.
- 1 small onion, finely chopped — builds the savory base.
- 1 cup crumbled feta — use a briny, firm feta.
- 1/4 cup chopped dill — fresh is best here.
- 1 large egg — helps bind the filling.
- 8 sheets phyllo dough, thawed — keep it covered while you work.
- 1/2 cup melted butter or olive oil — for brushing layers.
- 1/2 tsp black pepper — enough to keep the filling lively.
Quick Steps:
- Cook the spinach dry. Sauté the onion in a skillet over medium heat for 4 minutes, then add the spinach and cook until wilted and any liquid evaporates.
- Cool the filling. Transfer it to a bowl and let it sit 10 minutes so the egg won’t scramble.
- Mix in the cheese. Stir in feta, dill, egg, and pepper.
- Build the triangles. Cut phyllo into strips, brush with butter or oil, and fold into triangle shapes around a spoonful of filling.
- Bake. Set them on a lined sheet pan and bake at 375°F for 20 to 25 minutes until deep gold.
- Cool 5 minutes. The filling settles and the phyllo stays crisp.
Equipment for This Recipe:
- Skillet — for cooking down the spinach.
- Pastry brush — brushing phyllo is easier and cleaner.
- Rimmed baking sheet — catches drips and bakes evenly.
- Sharp knife or pizza cutter — for slicing phyllo strips.
How to Serve This Dish:
Serve the triangles warm, not scorching, with lemon wedges or a bowl of yogurt on the side. Two triangles per person is a fair appetizer portion before a pasta main, though the plate tends to empty faster than that.
Pro Tips for This Recipe:
- Keep phyllo covered with a damp towel while you work or it will crack.
- Let the spinach dry out completely or the bottoms will go soggy.
- Freeze the formed triangles for 15 minutes before baking if the filling feels loose.
- Brush the tops well; dry phyllo bakes pale and brittle in the wrong way.
Variations on This Dish:
Minty Spinach Pockets: Add 1 tablespoon chopped mint for a lighter, cooler flavor.
Pine Nut Crunch: Stir in 2 tablespoons toasted pine nuts for a little texture in the filling.
Common Mistakes to Avoid with This Dish:
- Overfilling the triangles: They burst open in the oven.
- Using wet spinach: That’s the main reason the bottoms soften.
- Letting phyllo dry out on the counter: Work in small batches.
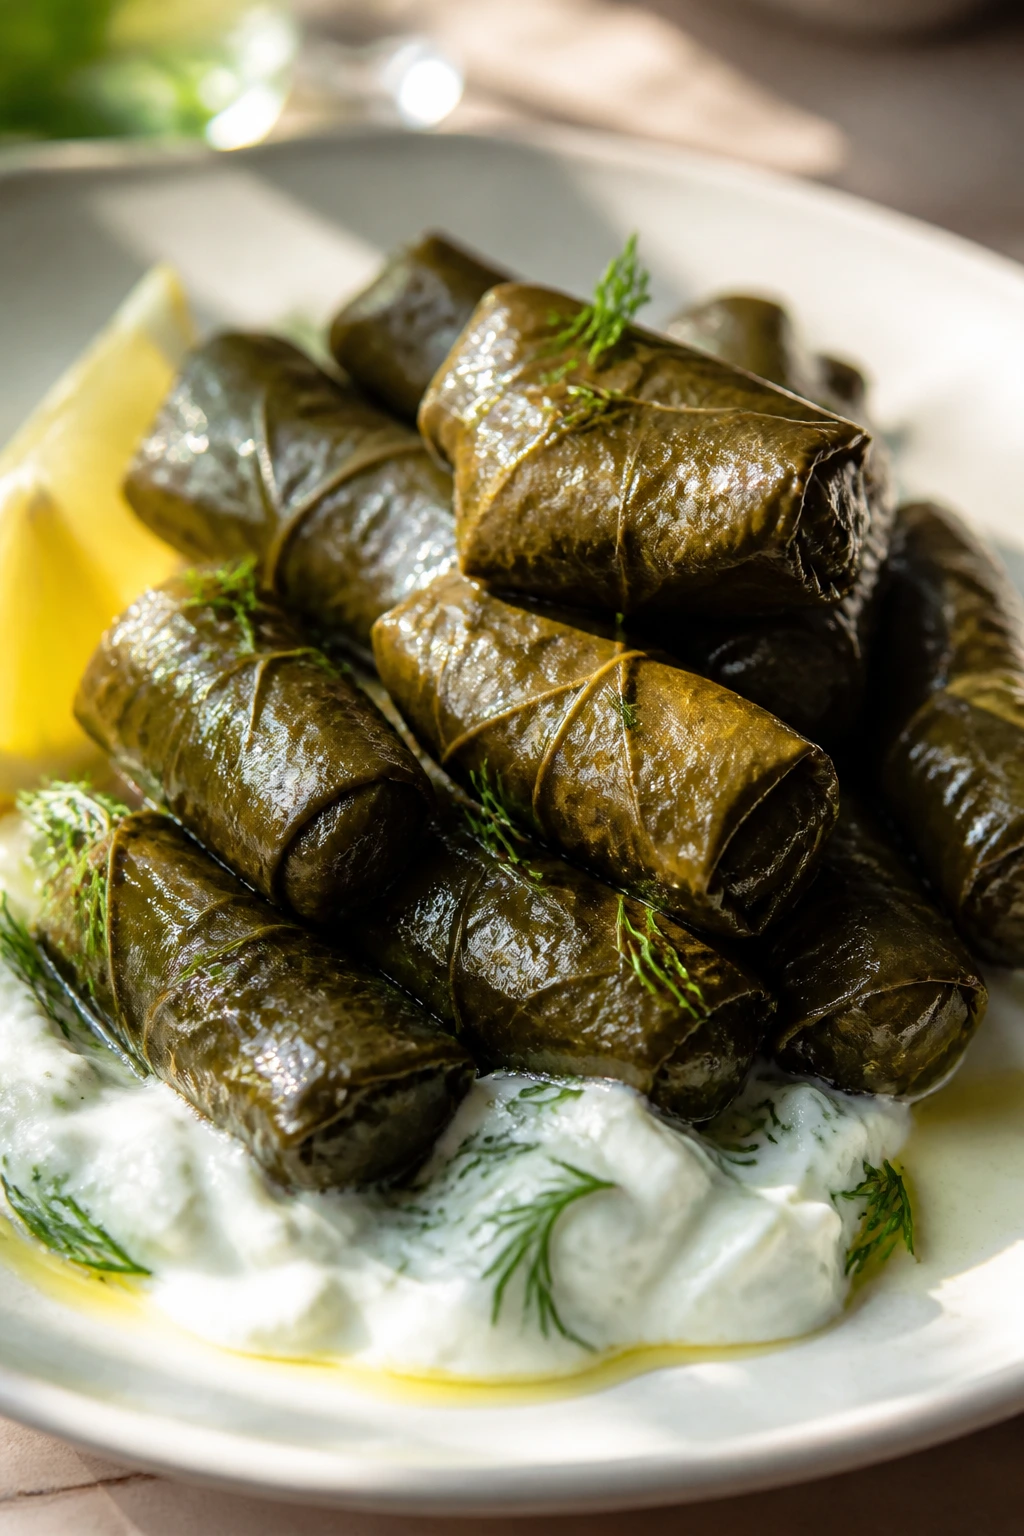
8. Dolmades with Lemon Yogurt
Dolmades look fussy until you make a few, then the fold-and-roll rhythm takes over. The flavor is gentle and herbal rather than loud: rice, dill, parsley, lemon, and olive oil tucked into grape leaves. They’re one of the few appetizers that feel good cold or room temperature, which makes them useful when the pasta timing shifts.
Why It Works:
The grape leaves bring a faint tannic note, and the rice filling picks up all the lemon and herb flavor as it simmers. Olive oil keeps the rolls tender, while the lemon yogurt on the side gives the plate a creamy lift. If you line the pot with torn leaves or a plate, the dolmades cook evenly and don’t unroll.
Key Ingredients:
- 1 jar grape leaves, about 1 lb, rinsed and drained — pick leaves that are intact.
- 1 cup short-grain rice, uncooked — holds together better than long grain.
- 1 small onion, finely chopped — softens into the filling.
- 1/4 cup chopped dill — classic and fresh.
- 1/4 cup chopped parsley — adds balance.
- 1 lemon, juiced and zested — the sharp edge the rolls need.
- 1/4 cup olive oil — for the filling and the pan.
- 2 cups vegetable broth or water — for simmering.
- 1/2 cup plain Greek yogurt — for serving with extra lemon.
Quick Steps:
- Prep the leaves. Rinse the grape leaves under cool water and trim any thick stems.
- Make the filling. Stir rice, onion, dill, parsley, lemon zest, 2 tablespoons olive oil, and 1/2 teaspoon salt together.
- Roll tightly. Place a leaf shiny-side down, add 1 teaspoon filling near the stem, fold in the sides, and roll snugly.
- Arrange in the pot. Line a saucepan with torn leaves, pack the rolls seam-side down, and tuck them close together.
- Add liquid. Pour in broth, lemon juice, and the remaining olive oil, then place a plate on top to keep them from floating.
- Simmer. Cover and cook over low heat for 45 minutes, until the rice is tender.
- Cool slightly. Serve warm or at room temperature with lemon yogurt.
Equipment for This Recipe:
- Medium saucepan with lid — the rolls need gentle simmering.
- Small bowl — for mixing the filling.
- Sharp knife — to trim stems if needed.
- Plate that fits inside the pot — keeps the rolls packed down.
How to Serve This Dish:
Stack the dolmades on a platter, then add a spoonful of lemon yogurt on the side or underneath. They work as a small bite before pasta or as a cool contrast next to a hot, garlicky dish. Plan on 3 to 4 rolls per person.
Pro Tips for This Recipe:
- Don’t pack the filling too full; rice needs room to expand.
- Roll them snugly but not tight enough to split the leaves.
- A little lemon zest in the yogurt makes the dip taste fresher.
- They taste even better after a few hours in the fridge.
Variations on This Dish:
Pine Nut Dolmades: Add 2 tablespoons toasted pine nuts to the filling for richer texture.
Tomato-Braised Version: Add 1/4 cup tomato passata to the simmering liquid for a softer, more savory roll.
Common Mistakes to Avoid with This Dish:
- Overcooking the rice filling on the stovetop first: It finishes in the pot; you don’t want mush.
- Rolling loose leaves: They open while simmering.
- Skipping the plate on top: The rolls can unfurl if they float around.
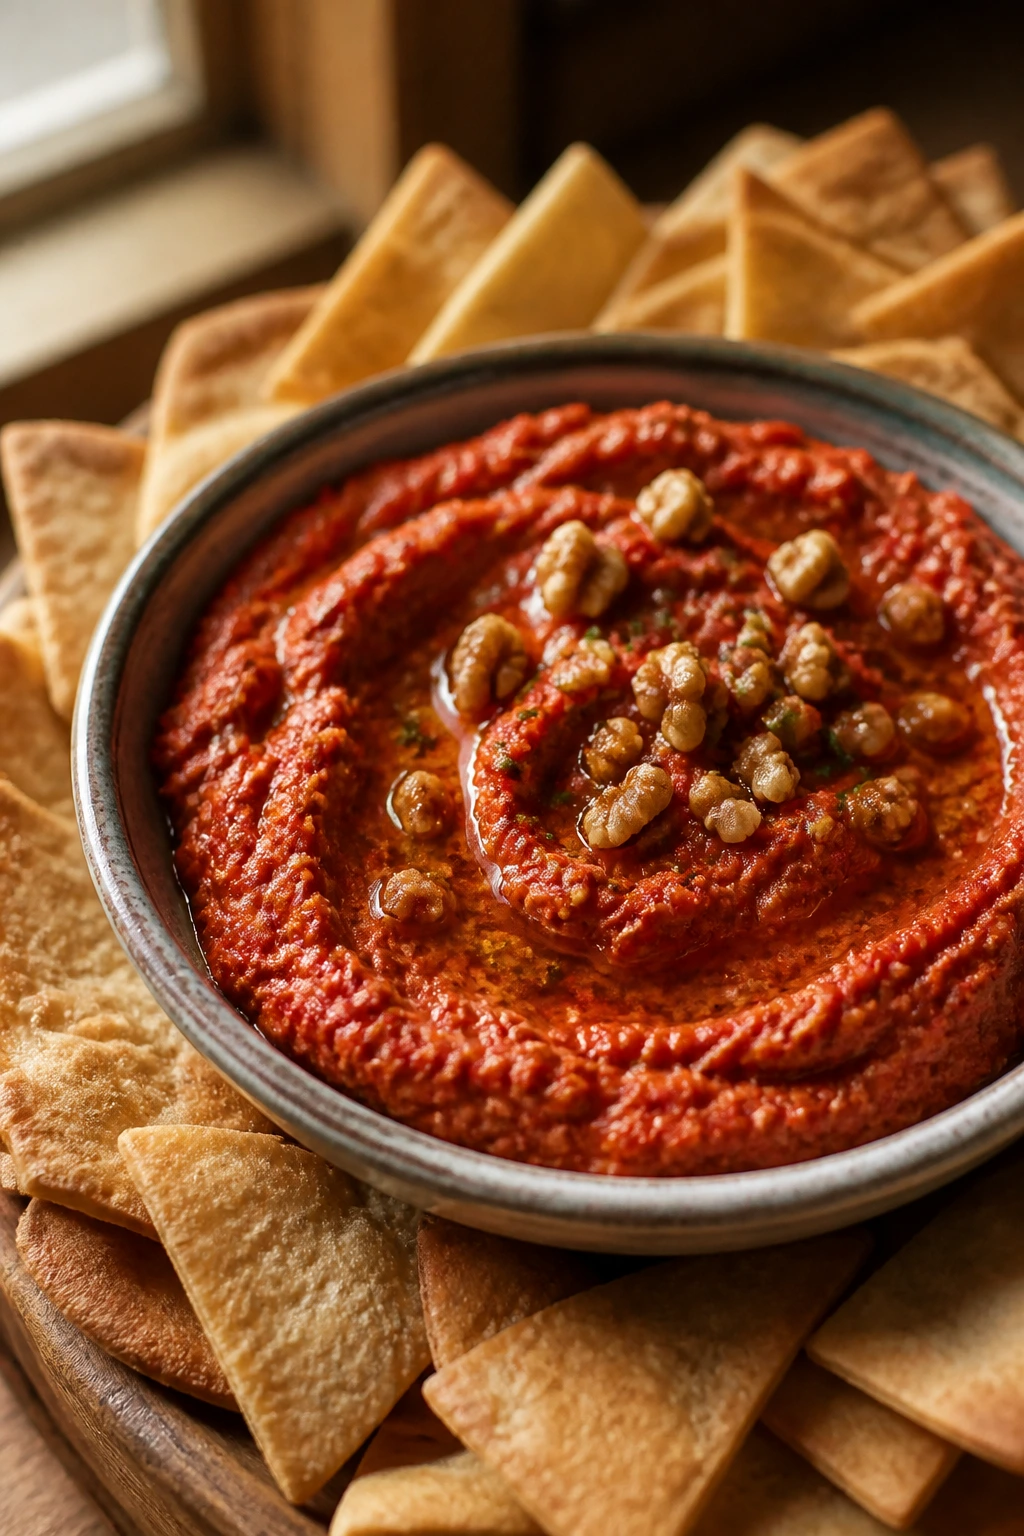
9. Muhammara with Pita Chips
Muhammara has a deep red color that looks almost too rich to be made from peppers and walnuts, and the flavor is what sells it: smoky, sweet, tangy, and just a little earthy. It’s the kind of spread that makes plain pita taste like a decision. If you like roasted red peppers and want something with more backbone than hummus, this is your dip.
Why It Works:
Roasted peppers bring sweetness, walnuts bring fat and texture, and pomegranate molasses adds a sour-sweet note that keeps the dip from going flat. Breadcrumbs tighten the texture so it feels spreadable instead of watery. A brief toast on the walnuts makes the flavor deeper and keeps the finished dip from tasting raw.
Key Ingredients:
- 2 roasted red peppers from a jar, drained — or 2 homemade roasted peppers.
- 1 cup walnuts, lightly toasted — don’t skip the toast.
- 1/4 cup breadcrumbs — helps thicken the dip.
- 1 tbsp pomegranate molasses — gives the dip its tart edge.
- 1 small garlic clove — enough to add bite.
- 2 tbsp olive oil — for smoothness.
- 1 tbsp lemon juice — brightens the whole bowl.
- 1/2 tsp cumin — warm and earthy.
- 1/2 tsp smoked paprika — for the smoky note.
- 1/2 tsp salt — or more to taste.
Quick Steps:
- Toast the walnuts. Warm them in a dry skillet over medium heat for 3 to 4 minutes until fragrant.
- Blend the base. Add the peppers, walnuts, breadcrumbs, garlic, pomegranate molasses, lemon juice, cumin, paprika, salt, and olive oil to a food processor.
- Process until coarse-smooth. You want texture, not a paste.
- Taste and balance. Add another teaspoon of lemon juice if the sweetness feels too strong.
- Chill. Let it rest for 20 minutes so the flavors settle.
- Serve with pita chips or vegetables.
Equipment for This Recipe:
- Food processor — the fastest way to the right texture.
- Dry skillet — for toasting walnuts.
- Rubber spatula — to scrape down the bowl.
- Serving bowl — a shallow one works best.
How to Serve This Dish:
Spoon muhammara into a bowl and drag the spoon through the center like you would hummus. Top with a few chopped walnuts or parsley if you want it to look finished. It’s sturdy with toasted pita, cucumber, or endive leaves.
Pro Tips for This Recipe:
- If the jarred peppers taste sharp, rinse and pat them dry first.
- Don’t overblend or you’ll lose the nutty texture.
- A drizzle of olive oil right before serving keeps the surface glossy.
- It tastes even better the next day.
Variations on This Dish:
Spicy Harissa Muhammara: Add 1 teaspoon harissa for more heat and a deeper red color.
Herb-Fresh Muhammara: Blend in a handful of parsley to soften the sweet pepper flavor.
Common Mistakes to Avoid with This Dish:
- Using stale walnuts: The dip tastes flat fast.
- Adding too much breadcrumbs: It becomes dry and pasty.
- Serving it straight from the fridge without stirring: Let it sit a few minutes and give it a quick mix.
10. Baba Ganoush with Sumac
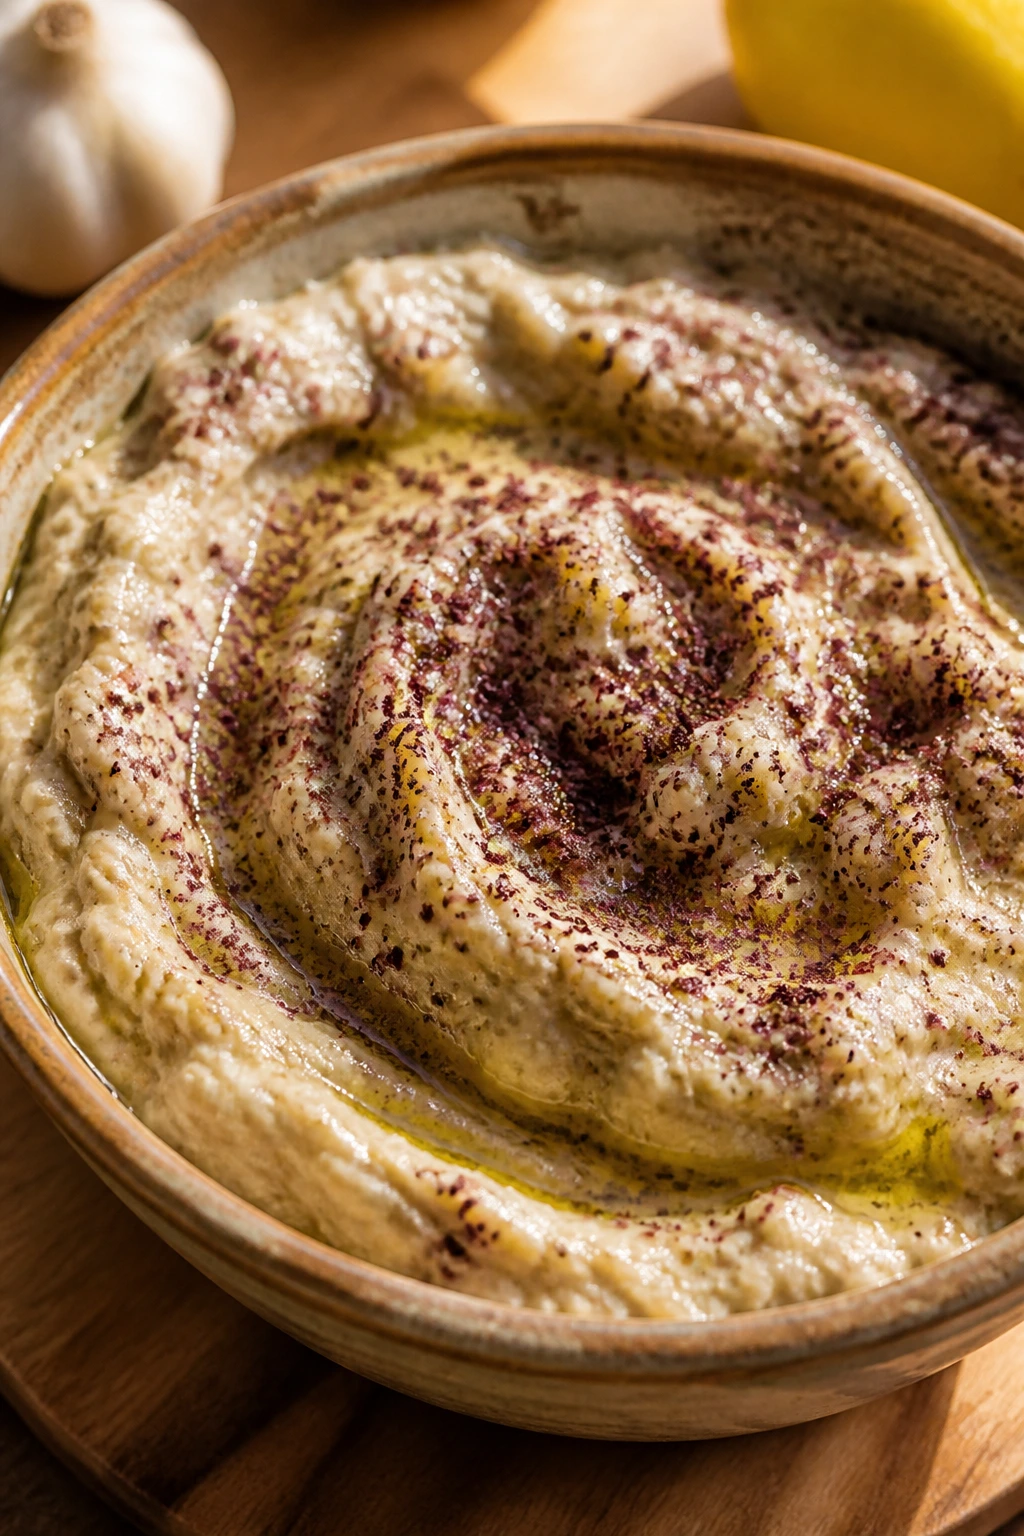
Baba ganoush has a smoky, silky thing going on that roasted eggplant fans will love and eggplant skeptics usually need one bite to understand. It’s softer than hummus, earthier, and a little more mysterious. The trick is getting the eggplant deeply roasted so the flesh tastes sweet instead of watery.
Why It Works:
Eggplant turns creamy when it’s cooked until collapsed, and tahini gives the spread richness without dairy. Lemon and garlic keep the flavor lively, while sumac on top adds that tart, almost lemon-peel sharpness. If you drain the eggplant briefly after roasting, the dip ends up more concentrated and less wet.
Key Ingredients:
- 2 medium eggplants, about 2 lb total — look for firm skins.
- 1/4 cup tahini — the creamy backbone.
- 2 tbsp lemon juice — enough to brighten without making it loose.
- 1 small garlic clove, grated — use lightly.
- 2 tbsp olive oil, plus more for drizzling — for body and finish.
- 1/2 tsp salt — adjust to taste.
- 1/4 tsp cumin — optional, but I like the warmth.
- 1 tbsp chopped parsley — for garnish.
- 1/2 tsp sumac — the top layer should not be skipped.
Quick Steps:
- Roast the eggplants. Set the oven to 425°F and roast the eggplants on a sheet pan for 35 to 45 minutes, turning once, until collapsed and blackened in spots.
- Cool enough to handle. Let them sit 10 minutes, then split and scoop the flesh into a bowl.
- Drain briefly. If there’s a lot of liquid, let it sit in a strainer for 5 minutes.
- Mix the spread. Stir in tahini, lemon juice, garlic, olive oil, salt, and cumin.
- Taste. Add more lemon if it tastes heavy.
- Serve. Spoon into a bowl, drizzle with oil, and finish with parsley and sumac.
Equipment for This Recipe:
- Sheet pan — for roasting the eggplants.
- Fork and knife — to split and scoop the flesh.
- Mixing bowl — for the spread.
- Strainer — optional, but handy if the eggplants run watery.
How to Serve This Dish:
Serve baba ganoush with pita, crackers, or sliced radishes if you want something fresher. It’s good next to tomato pasta, but I especially like it beside pesto or garlic-heavy dishes because the smoky flavor softens the sharp edges.
Pro Tips for This Recipe:
- Charred skins are fine; that’s where the smoke comes from.
- If you have a gas burner, you can blister the eggplants directly over the flame for more smoke.
- Don’t skimp on the lemon at the end.
- A spoonful of yogurt on top is optional, not traditional, but it works.
Variations on This Dish:
Garlic-Roast Version: Roast the garlic clove alongside the eggplants for a sweeter, gentler spread.
Pomegranate Finish: A few pomegranate seeds on top give the bowl color and a fresh pop.
Common Mistakes to Avoid with This Dish:
- Undercooking the eggplant: The flesh should collapse and go very soft.
- Leaving too much liquid in the bowl: That’s how baba ganoush turns thin.
- Using too much tahini: It can bury the smoke.
11. Falafel Bites with Tahini Sauce
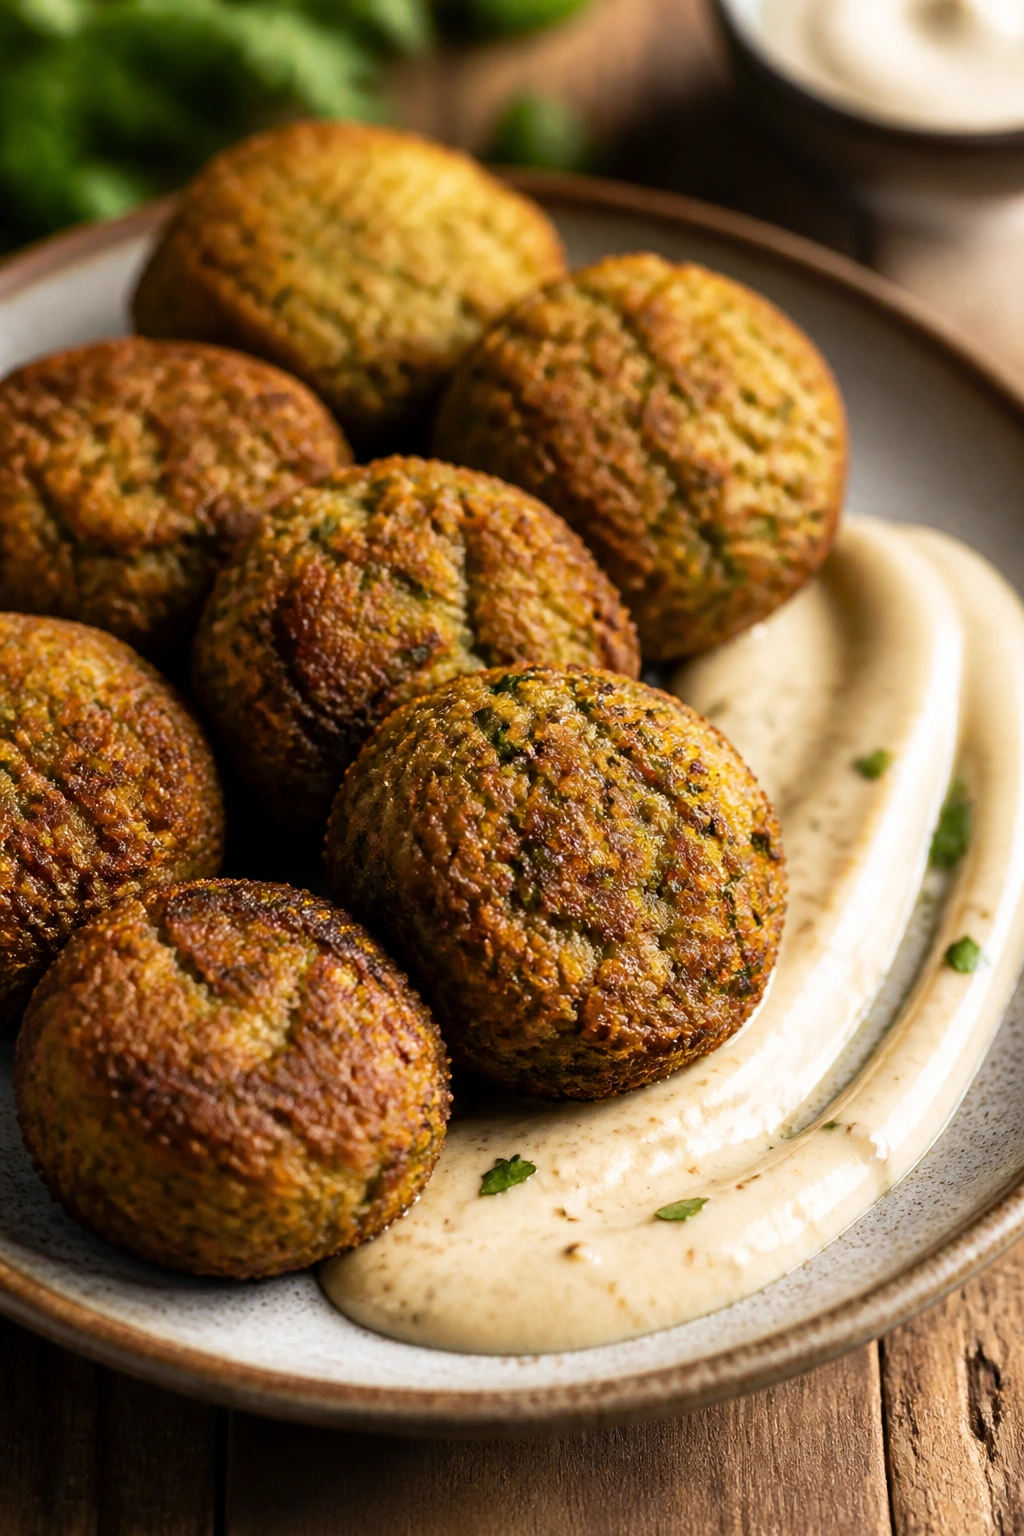
Falafel deserves a place at a pasta-night table because it gives you a crisp, herb-heavy bite before all the soft noodles arrive. When it’s made from soaked chickpeas instead of canned ones, the inside stays nutty and the outside bakes into a rough, bronzed crust. These little bites go fast, especially with a lemony tahini sauce beside them.
Why It Works:
Dried chickpeas soak up flavor and keep their structure, which is why the falafel bakes up tender instead of paste-like. Parsley, cilantro, cumin, and coriander bring the unmistakable green, savory taste that makes falafel worth making at home. Baking at a high heat keeps the outside set while the center stays moist.
Key Ingredients:
- 1 1/2 cups dried chickpeas, soaked overnight — do not use canned here.
- 1 small onion, chopped — gives sweetness and moisture.
- 1 cup parsley leaves — pack them lightly.
- 1/2 cup cilantro leaves — adds another green note.
- 3 garlic cloves — falafel likes a lot of garlic.
- 1 tsp ground cumin — for warmth.
- 1 tsp ground coriander — classic falafel flavor.
- 1 tsp salt — more to taste after blending.
- 1/2 tsp baking powder — keeps the texture lighter.
- 2 tbsp flour — helps the mixture hold.
- Tahini, lemon juice, and water for the sauce — whisk to a pourable consistency.
Quick Steps:
- Drain the soaked chickpeas. Pat them dry well so the mix doesn’t turn slack.
- Pulse the mixture. Blend chickpeas, onion, parsley, cilantro, garlic, cumin, coriander, salt, baking powder, and flour in a food processor until it holds together but still looks a little coarse.
- Chill the mix. Refrigerate for 30 minutes so the patties shape cleanly.
- Shape small bites. Roll into 1 1/2-inch balls or flat rounds and place on a lined sheet pan.
- Bake. Cook at 425°F for 18 to 20 minutes, flipping halfway, until browned at the edges.
- Make the sauce. Whisk tahini, lemon juice, salt, and water until smooth and drizzleable.
- Serve warm.
Equipment for This Recipe:
- Food processor — necessary for texture.
- Lined baking sheet — makes cleanup easier.
- Measuring spoons — the spice balance matters here.
- Small bowl — for the tahini sauce.
How to Serve This Dish:
Serve the falafel bites with tahini sauce, lemon wedges, and a little chopped cucumber. Four to five bites per person works well before pasta, though I won’t pretend leftovers ever last long enough to test that number.
Pro Tips for This Recipe:
- Soaked dried chickpeas only; canned chickpeas turn the mixture mushy.
- If the mix feels wet, add a spoonful of flour and chill again.
- Don’t pack the food processor into a paste. Texture matters.
- A hot oven and a lined pan keep the bottoms from sticking.
Variations on This Dish:
Air-Fryer Falafel: Cook at 375°F for about 12 minutes, shaking once. The crust gets crisper with less oil.
Harissa Falafel: Mix 1 teaspoon harissa into the chickpea blend for a spicier bite.
Common Mistakes to Avoid with This Dish:
- Using canned chickpeas: They’re too soft for this recipe.
- Blending too long: Paste means dense falafel.
- Skipping the chill: Warm mixture falls apart.
12. Zucchini Fritters with Mint Yogurt
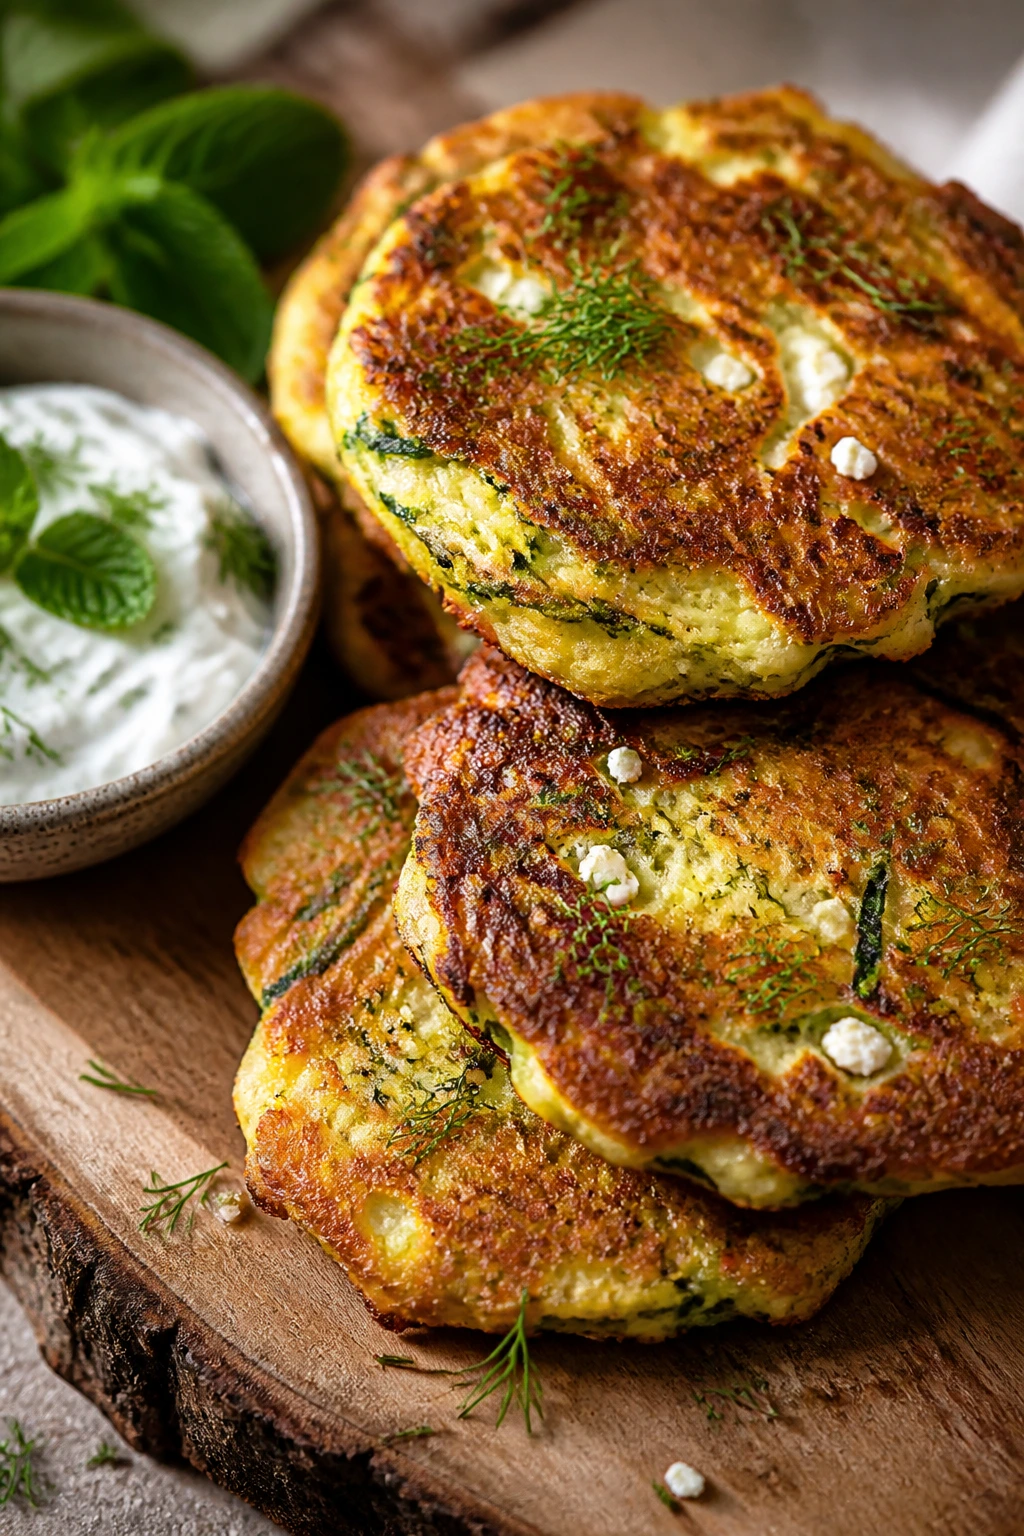
Zucchini fritters are what I make when the table needs something crisp and green, not another dip. They’re good hot, still good warm, and almost unfairly good with mint yogurt. The real work is squeezing the zucchini dry; skip that, and you’re making sad pancakes instead of fritters.
Why It Works:
Grated zucchini gives the fritters a tender interior, while the pan-fried edges go gold and crackly. Feta adds salt and a little bite, and mint yogurt cools the whole thing down. The fritters stay light because the zucchini is salted first and wrung out before mixing.
Key Ingredients:
- 2 medium zucchini, grated — about 4 cups before squeezing.
- 1 tsp salt — for drawing out water.
- 1 large egg — binds the mix.
- 1/3 cup all-purpose flour — just enough to hold the fritters together.
- 1/3 cup crumbled feta — adds salt and texture.
- 2 tbsp chopped dill — gives the fritters a clean herbal note.
- 2 scallions, thinly sliced — mild onion flavor.
- 3 tbsp olive oil — for frying.
- 1/2 cup Greek yogurt mixed with 1 tbsp mint and 1 tsp lemon juice — for serving.
- Black pepper, to taste — a little helps.
Quick Steps:
- Salt the zucchini. Toss the grated zucchini with salt and let it sit for 10 minutes.
- Squeeze hard. Wrap the zucchini in a towel and wring out as much liquid as possible.
- Mix the batter. Stir zucchini, egg, flour, feta, dill, scallions, and pepper together.
- Fry in batches. Heat olive oil in a skillet over medium heat and drop in spoonfuls of batter, flattening them slightly.
- Cook until browned. Fry 3 to 4 minutes per side until the edges are crisp and deep gold.
- Drain. Set on paper towels for 1 minute, then serve with mint yogurt.
Equipment for This Recipe:
- Box grater — for the zucchini.
- Clean kitchen towel — for squeezing out moisture.
- Large skillet — gives the fritters room to brown.
- Spatula — for flipping cleanly.
How to Serve This Dish:
Stack the fritters on a plate and spoon mint yogurt alongside, not over the top, so the crust stays crisp. They’re good as a pre-pasta bite or as the one vegetable item people keep circling back to. Two fritters per person is a solid starting point.
Pro Tips for This Recipe:
- Squeeze the zucchini until it feels almost dry.
- Don’t crowd the pan or the edges will steam instead of crisp.
- If the mixture seems loose, add a tablespoon of flour.
- Serve immediately for the best texture.
Variations on This Dish:
Feta-Free Version: Leave out the cheese and add an extra pinch of salt and dill. It’s lighter, though less savory.
Lemon-Zest Fritters: Add 1 teaspoon lemon zest to the batter for a brighter finish.
Common Mistakes to Avoid with This Dish:
- Not draining the zucchini enough: Waterlogged batter spreads and steams.
- Turning too early: Let the first side set before flipping.
- Using high heat: The outside burns before the middle cooks.
13. Caprese Skewers with Pesto Drizzle
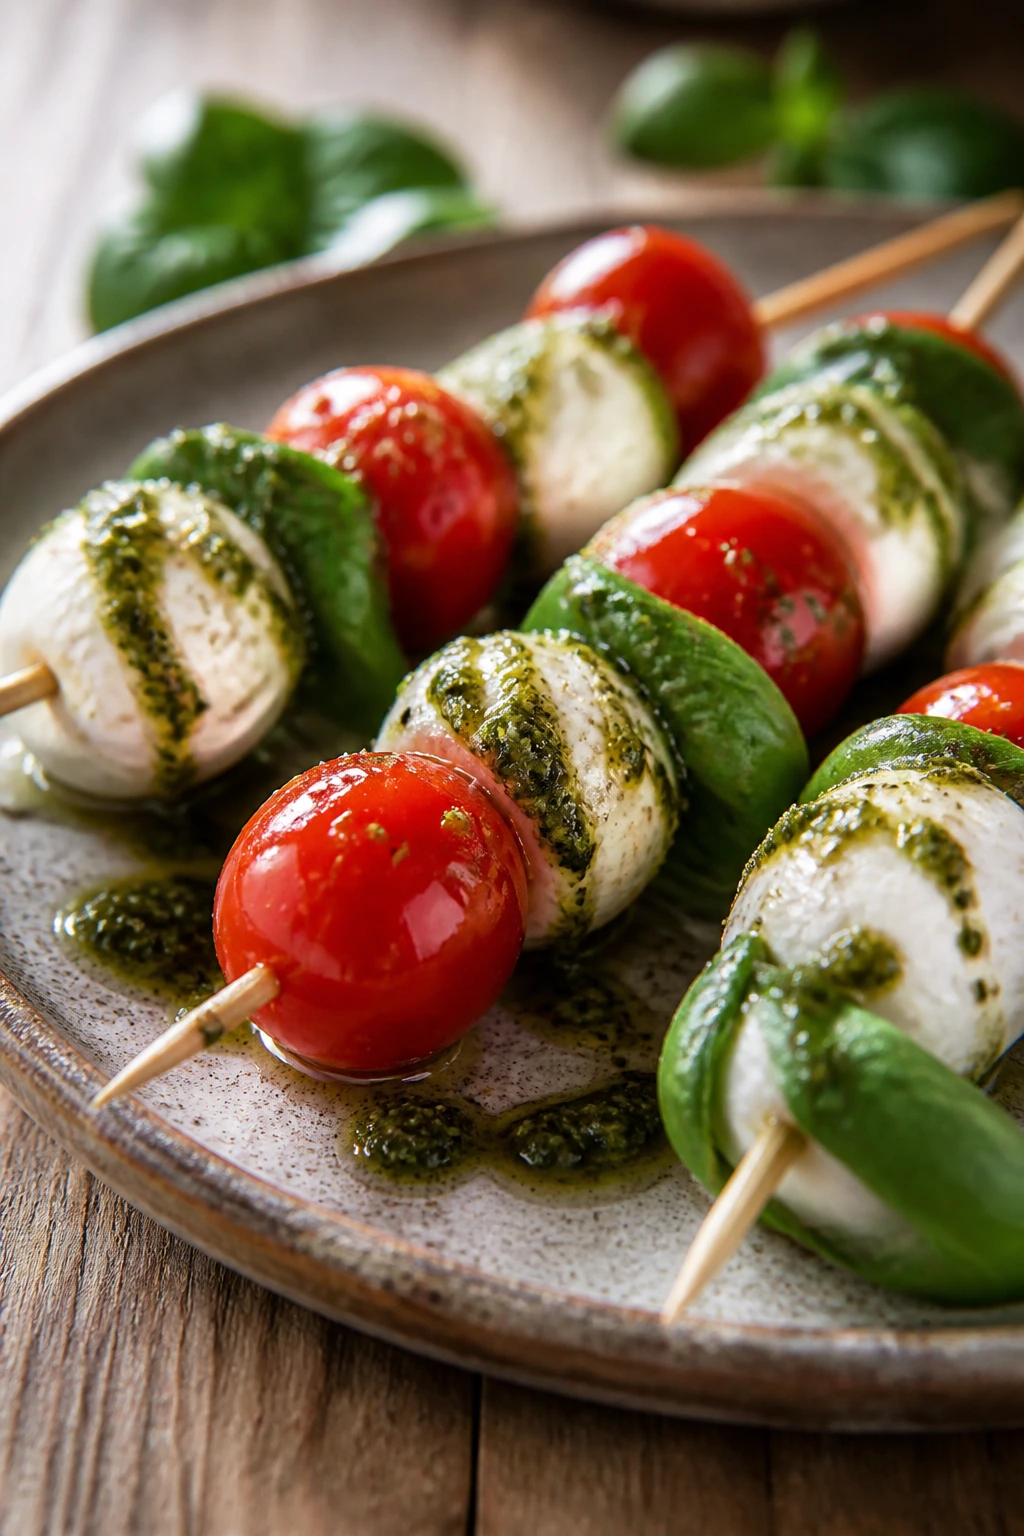
Caprese skewers are nearly too simple, which is exactly why they work when pasta night already has enough moving pieces. Sweet tomatoes, creamy mozzarella, and basil on a stick need very little help. A small pesto drizzle gives them the extra herb punch that makes them feel less like a party trick and more like a real starter.
Why It Works:
You get three clean textures in one bite: juicy tomato, soft cheese, and basil that still smells fresh when you bite it. Olive oil and a touch of balsamic glaze add gloss and acidity, while pesto ties the whole thing to the Mediterranean pantry. The skewers are also easy to eat standing up, which matters when the pasta timer is still counting down.
Key Ingredients:
- 24 cherry tomatoes — choose ones that smell sweet at the stem end.
- 24 mini mozzarella balls, drained — also called bocconcini or ciliegine.
- 24 small basil leaves — whole leaves hold best.
- 2 tbsp extra-virgin olive oil — for a light drizzle.
- 2 tbsp balsamic glaze — thicker than vinegar and easier to control.
- 1/4 tsp flaky salt — a little goes a long way.
- Black pepper, to taste — optional.
- 2 tbsp pesto — for the drizzle or a small spoonful on each skewer.
Quick Steps:
- Drain the mozzarella. Pat the balls dry so the skewers don’t get watery.
- Assemble. Thread tomato, basil leaf, and mozzarella onto small skewers or toothpicks.
- Arrange on a platter. Leave a little space between them.
- Drizzle. Spoon olive oil and pesto over the skewers, then finish with balsamic glaze.
- Season. Add flaky salt and a little pepper right before serving.
Equipment for This Recipe:
- Toothpicks or small skewers — the whole point here.
- Paper towels — for drying the cheese.
- Serving platter — flat is easiest.
- Small spoon — for the pesto drizzle.
How to Serve This Dish:
Arrange the skewers in neat rows and keep the drizzle light so the plate stays clean. They’re best as the fresh, cool item on a pasta-night spread, especially next to a hot baked dish. Plan for 2 skewers per person if they’re one of several appetizers.
Pro Tips for This Recipe:
- Dry the mozzarella or the basil slips off.
- If your tomatoes are large, cut them in half and use shorter skewers.
- Add the balsamic glaze at the end so it doesn’t soak the basil.
- Keep extra basil leaves nearby for broken skewers or garnish.
Variations on This Dish:
Peach Caprese: Swap some tomatoes for ripe peach wedges when you want a sweeter bite.
No-Pesto Version: Use only olive oil, salt, and a tiny pinch of oregano if you want the classic caprese feel.
Common Mistakes to Avoid with This Dish:
- Using wet mozzarella: It makes the platter slippery and dull.
- Adding too much glaze: The bites should still taste fresh.
- Assembling too far ahead: Basil bruises and turns dark.
14. Arancini Bites with Marinara

Arancini are the crunchy, golden answer to leftover risotto, and they bring a little more heft than the average starter. The shell shatters when you bite in, then the rice goes soft around a pocket of melted cheese. They take a little more work than the rest of this list, but they earn their place.
Why It Works:
Cold risotto firms up enough to roll, and the breadcrumb coating fries into a crisp shell that holds the rice together. A cube of mozzarella in the center gives you the pull people expect, while marinara on the side keeps the bites from feeling dry. They’re best fried in small batches so the oil stays hot and the crust stays even.
Key Ingredients:
- 3 cups cold risotto, chilled until firm — the rice should hold its shape.
- 1/2 cup grated Parmesan — adds salt and helps bind.
- 1 large egg — for structure.
- 1 cup small mozzarella cubes — about 1/2-inch pieces.
- 1 cup all-purpose flour — for dredging.
- 2 eggs, beaten — for the egg wash.
- 2 cups breadcrumbs — plain or Italian-style.
- Neutral oil for frying — enough for 2 inches in a heavy pot.
- 1 cup marinara sauce, warmed — for serving.
Quick Steps:
- Shape the bites. Mix risotto, Parmesan, and egg, then press a spoonful around a mozzarella cube into a tight ball.
- Chill if soft. Set the balls in the fridge for 15 minutes so they stay firm.
- Bread them. Dredge in flour, dip in beaten egg, then coat in breadcrumbs.
- Heat the oil. Bring oil to 350°F in a heavy pot or deep skillet.
- Fry in batches. Cook 3 to 4 minutes until deep gold, turning if needed.
- Drain briefly. Set on a rack or paper towels, then serve with warm marinara.
Equipment for This Recipe:
- Heavy pot or deep skillet — steadier for frying.
- Thermometer — oil temperature matters here.
- Cooling rack or paper towels — for draining.
- Small spoon or scoop — helps portion the balls evenly.
How to Serve This Dish:
Pile the arancini on a board with marinara in a small bowl in the center. They work best when they’re still hot enough for the cheese to stretch a little. Figure on 2 or 3 bites per person unless the crowd gets enthusiastic.
Pro Tips for This Recipe:
- Use cold risotto so the balls are easy to shape.
- Don’t let the oil drop below 340°F or the crust turns greasy.
- Freeze the formed balls for 10 minutes if the kitchen is warm.
- Season the risotto well before shaping; the breading won’t save bland rice.
Variations on This Dish:
Spinach Arancini: Fold chopped cooked spinach into the risotto for more color and a softer flavor.
Saffron Version: If your risotto already has saffron, keep the marinara simple so the flavor stays in front.
Common Mistakes to Avoid with This Dish:
- Using warm risotto: It’s too soft to shape cleanly.
- Crowding the fryer: The oil cools and the crust loses crunch.
- Skipping the breadcrumb coat: That shell is the whole point.
15. Shrimp Saganaki Skewers
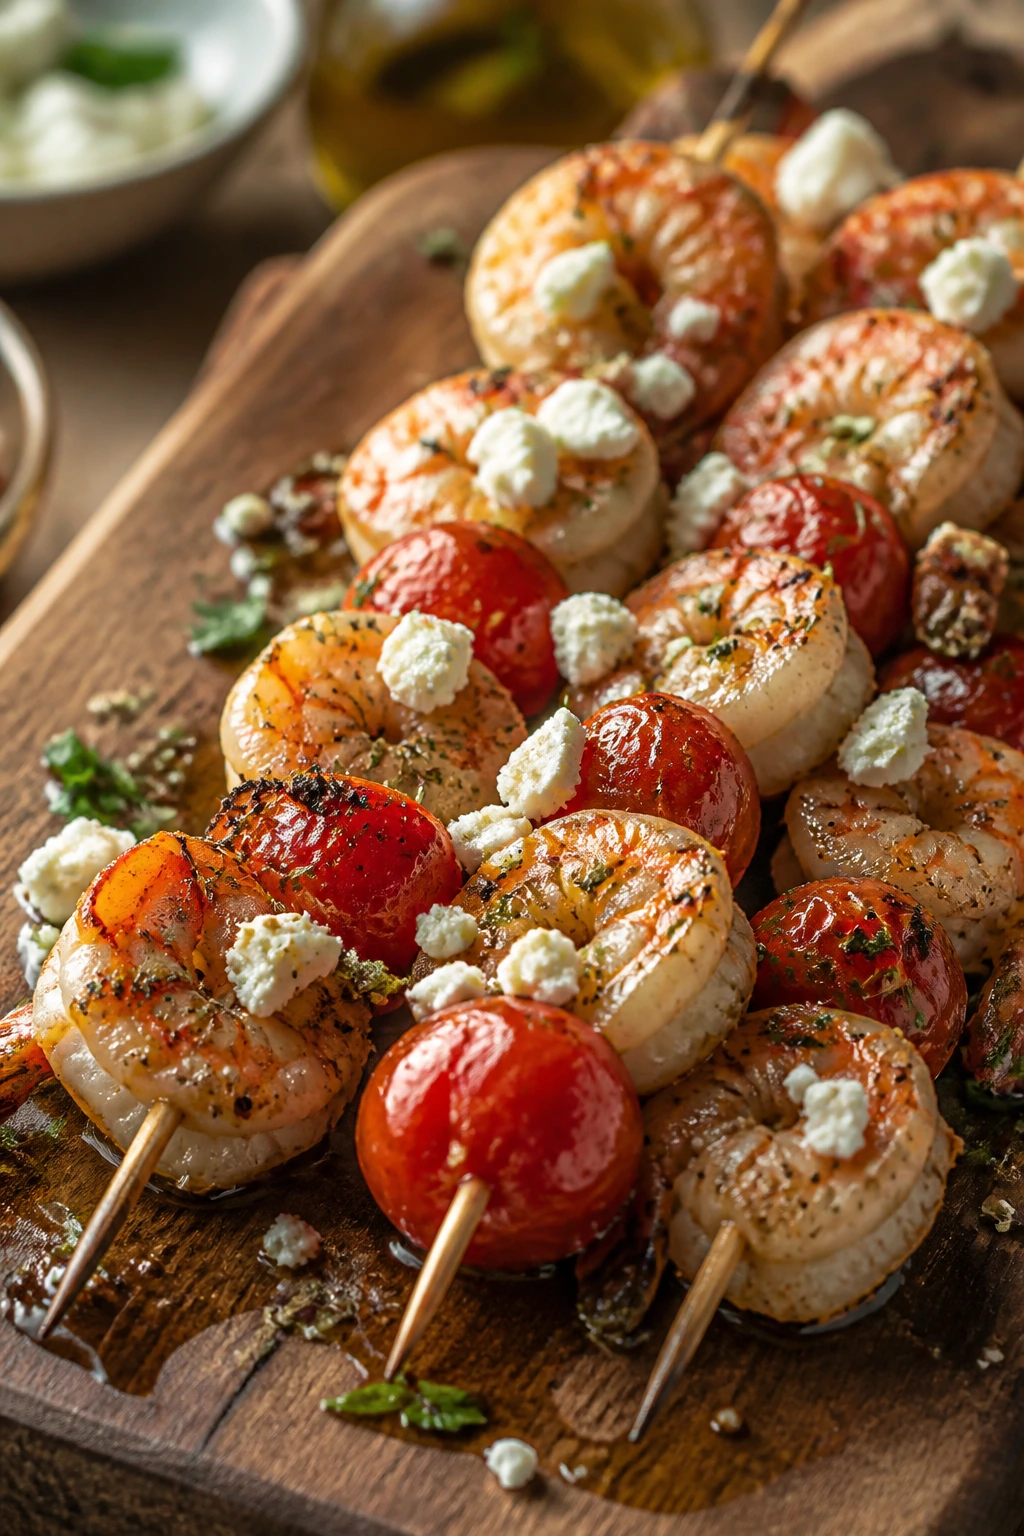
Shrimp saganaki usually lives in a skillet, bubbling with tomato and feta. Turning it into skewers makes it easier to serve with pasta night without a lot of last-minute ladling. The shrimp get fast-cooked, the tomatoes blister, and the feta goes on at the end so it softens instead of melting away.
Why It Works:
Shrimp cook in minutes, which is handy when the pasta pot is already busy. Olive oil, garlic, and oregano give you the classic Greek flavor profile, while tomatoes keep the bite juicy. A finishing shower of feta adds salt and creaminess without drowning the shrimp.
Key Ingredients:
- 1 lb large shrimp, peeled and deveined — keep the tails on if you like.
- 1 pint cherry tomatoes — choose firm ones.
- 2 tbsp olive oil — for coating.
- 2 garlic cloves, minced — the shrimp need the flavor.
- 1 tsp dried oregano — classic saganaki seasoning.
- 1/2 tsp red pepper flakes — optional heat.
- 1/2 cup crumbled feta — for finishing.
- 1 lemon, cut into wedges — brighten at the end.
- 2 tbsp chopped parsley — for garnish.
Quick Steps:
- Season the shrimp. Toss shrimp with olive oil, garlic, oregano, pepper flakes, and a pinch of salt.
- Thread the skewers. Alternate shrimp and tomatoes on small skewers.
- Cook fast. Broil on a lined sheet pan for 2 to 3 minutes per side, or grill over medium-high heat until the shrimp turn pink and opaque.
- Add feta. Sprinkle feta over the hot skewers while they’re still warm.
- Finish. Squeeze lemon over the top and scatter parsley.
Equipment for This Recipe:
- Small skewers — metal or soaked wooden ones.
- Sheet pan or grill — either works.
- Tongs — for turning the skewers.
- Small bowl — for the seasoning mix.
How to Serve This Dish:
Lay the skewers on a platter with lemon wedges and a little extra parsley. They’re best as the hot, savory bite before a pasta with tomatoes, olives, or herbs. Two skewers per person is usually enough if the meal is moving fast.
Pro Tips for This Recipe:
- Use large shrimp so they stay juicy under the broiler.
- Don’t overcook; shrimp go rubbery fast.
- If your skewers are wooden, soak them for 20 minutes.
- Add the feta after cooking so it softens instead of burning.
Variations on This Dish:
Skillet Saganaki: Skip the skewers and cook everything in a hot skillet, then crumble feta over the top. It feels more traditional.
Lemon-Oregano Version: Leave out the chili flakes and add more lemon zest for a sharper, cleaner flavor.
Common Mistakes to Avoid with This Dish:
- Overcrowding the skewer: The shrimp won’t cook evenly.
- Cooking too long: Pull them as soon as they turn opaque.
- Using tiny shrimp: They dry out before the tomatoes blister.
16. Antipasto Skewers with Artichokes and Mozzarella
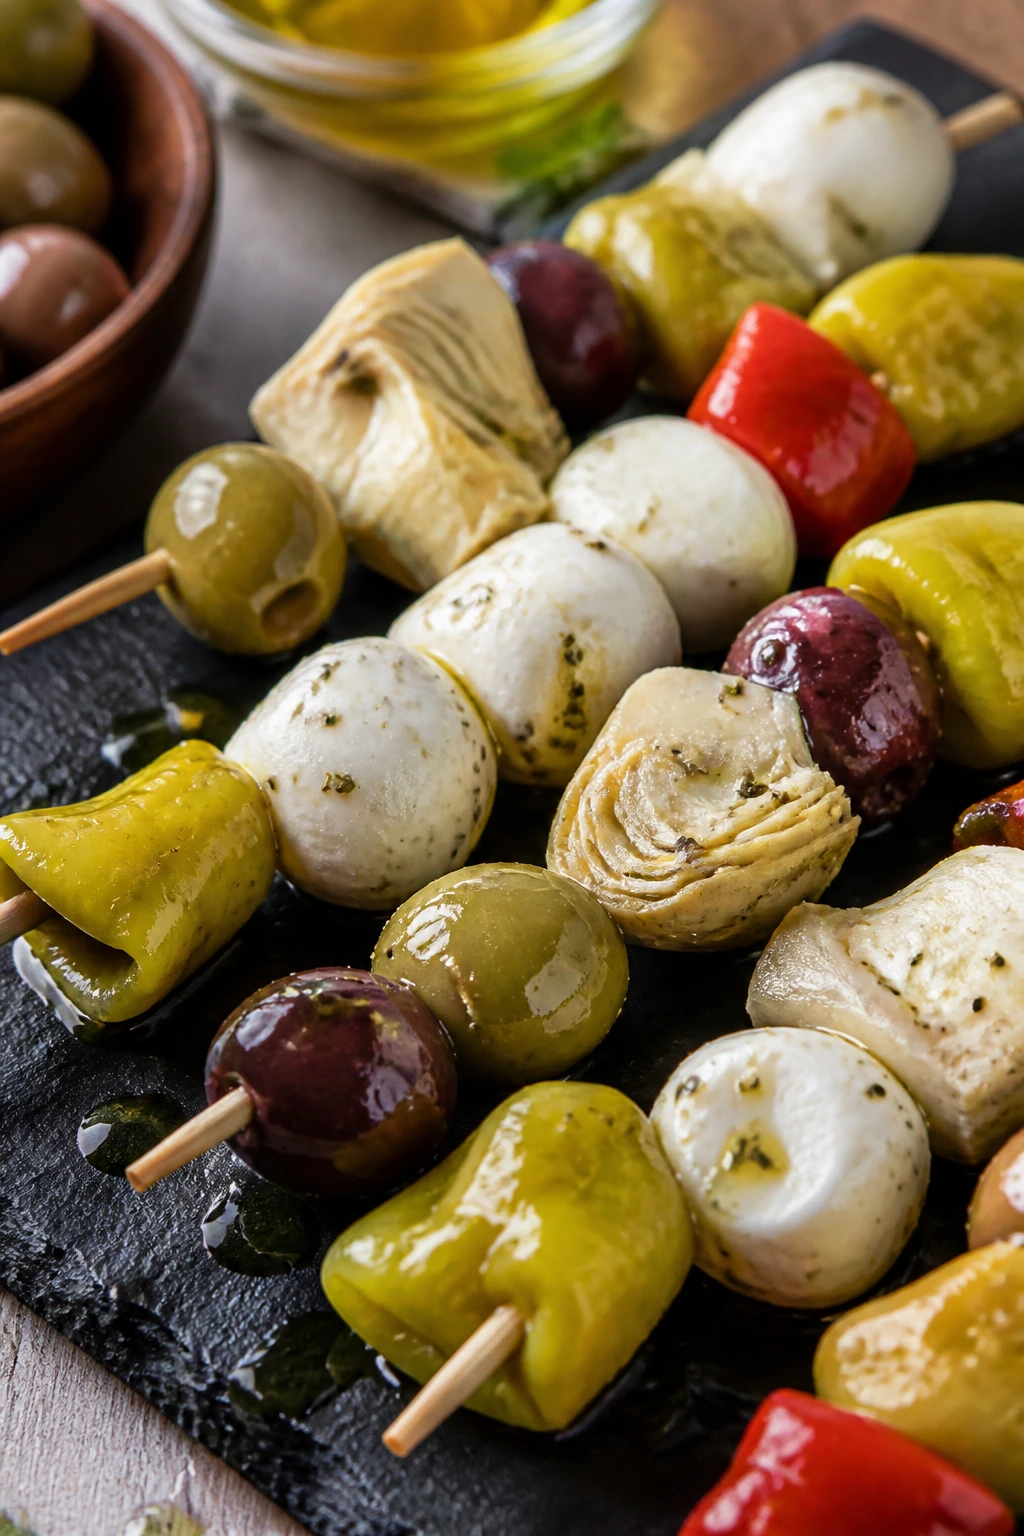
Antipasto skewers are the easiest way to make a table look full fast. There’s no cooking, no timing drama, and no risk of a tray collapsing while you’re trying to drain pasta. I like them because they hit the salty, tangy, chewy notes you want before a bowl of noodles, and they hold up well while people wander in and out.
Why It Works:
Salami or prosciutto gives the skewer a savory backbone, mozzarella softens it, and artichokes bring a sharp, marinated note that keeps the bites from feeling one-note. Olives and pepperoncini add brine and heat. Everything is already bite-sized, which means the only real work is arranging the colors so the platter looks balanced.
Key Ingredients:
- 12 slices salami or soppressata, folded — choose thin slices for easier threading.
- 12 mini mozzarella balls, drained — blot them dry.
- 1 cup marinated artichoke hearts, halved if large — well-drained.
- 12 pitted olives — Kalamata or green both work.
- 6 pepperoncini, cut into pieces — for heat and tang.
- 12 basil leaves — optional, but freshens the plate.
- 2 tbsp olive oil — for a light drizzle.
- 1 tbsp red wine vinegar — optional, just a small splash.
Quick Steps:
- Drain and dry. Pat the mozzarella and artichokes with paper towels.
- Fold the meat. Fold each slice of salami into a ribbon or small roll.
- Thread the skewers. Build each skewer with salami, mozzarella, artichoke, olive, pepperoncini, and basil.
- Arrange. Lay them on a platter in a single layer.
- Finish lightly. Drizzle with olive oil and a few drops of vinegar right before serving.
Equipment for This Recipe:
- Toothpicks or cocktail skewers — short is fine.
- Paper towels — for drying marinated items.
- Platter — flat, with enough room to spread out.
- Small spoon — for the final drizzle.
How to Serve This Dish:
Serve these cold or cool, not ice-cold from the fridge. They’re the appetizer equivalent of an organized desk: tidy, useful, and gone faster than you expected. Three skewers per person works if you have other starters, but I’d plan on more if this is the main snack.
Pro Tips for This Recipe:
- Dry the artichokes or the skewers slip around.
- Fold the salami so it doesn’t slide off.
- Add basil at the last minute so it stays green.
- A few cubes of provolone can stand in for mozzarella if needed.
Variations on This Dish:
Vegetarian Antipasto Skewers: Leave out the salami and add roasted peppers plus more olives. They still feel complete.
Spicy Version: Use hot soppressata and extra pepperoncini for a sharper bite.
Common Mistakes to Avoid with This Dish:
- Skipping the drying step: Wet ingredients make slippery skewers.
- Using huge artichoke chunks: They overpower the rest of the bite.
- Storing them uncovered too long: The basil wilts and the cheese dries.
17. Goat Cheese Stuffed Dates with Pistachios
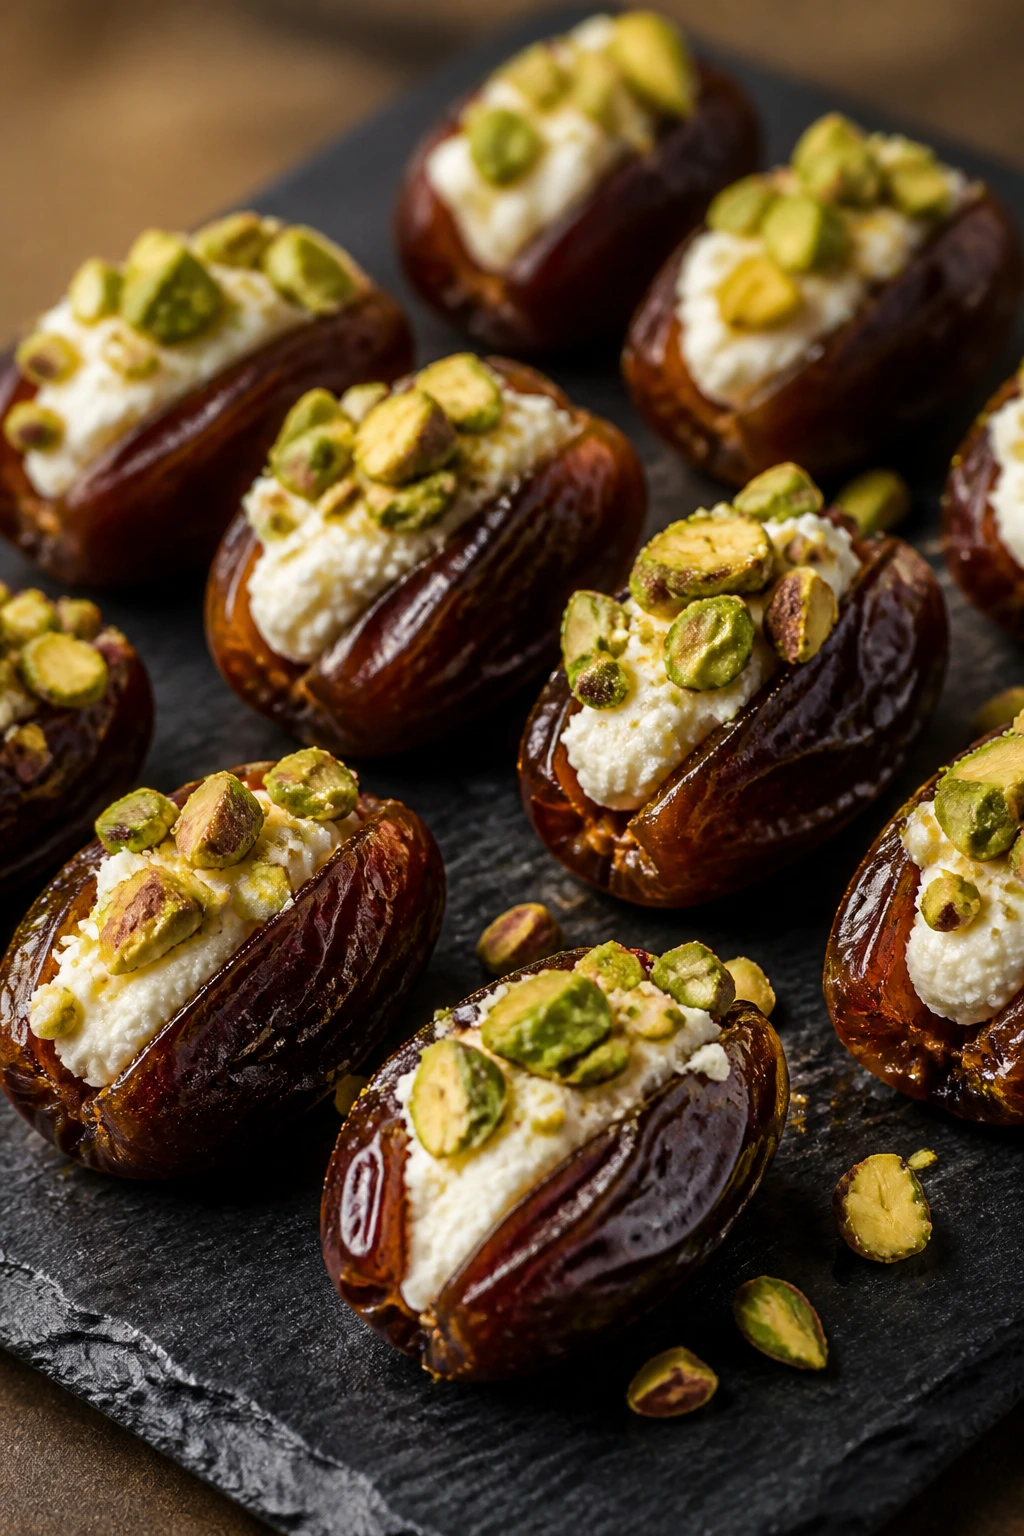
Stuffed dates are the sweet-savory appetizer that vanishes the fastest when people swear they’re “just trying one.” The sticky date, tangy goat cheese, and pistachio crunch hit in that order, and the little finish of salt keeps them from reading as dessert. They’re almost too easy, which is probably why I make them so often.
Why It Works:
Medjool dates are soft enough to open cleanly and sweet enough to balance tangy cheese. Goat cheese cuts the sugar, pistachios add crunch, and a little orange zest keeps the flavor bright. If you warm them for 5 minutes, the cheese softens and the whole thing tastes more polished.
Key Ingredients:
- 16 Medjool dates — large ones are easier to stuff.
- 4 oz goat cheese, softened — for a creamy filling.
- 1/4 cup pistachios, chopped — for crunch on top.
- 1 tsp orange zest — gives the filling lift.
- 1 tbsp honey — optional but lovely.
- Flaky salt — a pinch on top is enough.
- 1 tsp thyme leaves — optional, for a savory edge.
Quick Steps:
- Pit the dates. Slice each date lengthwise and remove the pit.
- Mix the filling. Stir goat cheese with orange zest and thyme.
- Stuff. Spoon or pipe a small amount of filling into each date.
- Top. Press chopped pistachios over the cheese and drizzle lightly with honey.
- Warm briefly if you want. Bake at 375°F for 5 minutes until the cheese softens, or serve them as-is.
- Finish with salt. A tiny pinch makes the flavors pop.
Equipment for This Recipe:
- Small knife — for pitting the dates.
- Mixing bowl — for the filling.
- Spoon or piping bag — makes stuffing easier.
- Sheet pan — if you’re warming them.
How to Serve This Dish:
Set them on a small plate or board, ideally near a bowl of olives or a brighter dip. They work well with pasta night because they give the table a sweet turn without turning the meal into dessert. Two dates per person is a sensible guess, but they’re small enough that people usually take a third.
Pro Tips for This Recipe:
- Use soft Medjool dates; dry dates tear instead of open.
- Chill the goat cheese briefly if it’s too loose to stuff neatly.
- A tiny bit of orange zest goes farther than you think.
- If you bake them, watch closely so the dates don’t harden.
Variations on This Dish:
Blue Cheese and Walnut Dates: Swap the goat cheese for blue cheese and pistachios for walnuts if you want a louder, saltier bite.
Rosemary Honey Dates: Add a drop of rosemary-infused honey for a more savory finish.
Common Mistakes to Avoid with This Dish:
- Overstuffing the dates: The filling squeezes out on the first bite.
- Using dry dates: They split and feel chewy instead of plush.
- Skipping salt on top: The flavor tastes flatter without it.
18. Sardine Crostini with Parsley and Capers
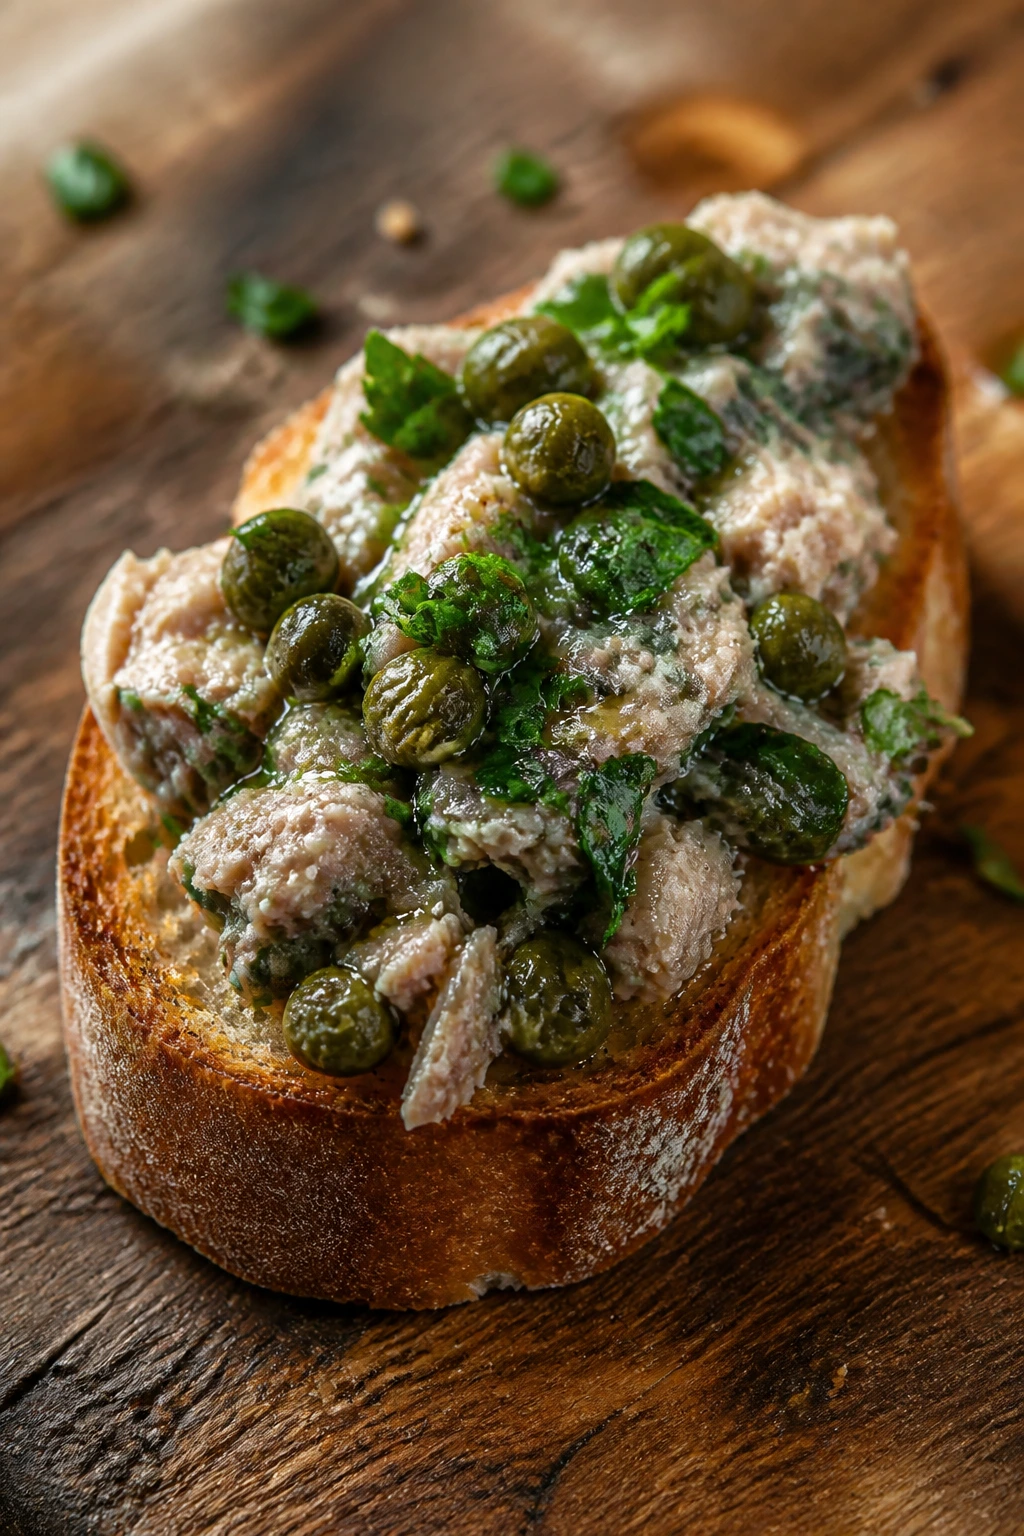
Sardine crostini is for people who like bold, briny flavors and don’t need everything to taste mild. The sardines mash into a rich, savory spread, and the capers, lemon, and parsley keep it bright enough for pasta night. If you’ve never served sardines this way, the crostini is a good place to start—they lose the “fishy” stereotype and gain actual character.
Why It Works:
Sardines bring salt, oil, and umami in a small package, which makes them useful before a bowl of pasta that might otherwise feel a little heavy. Lemon zest cuts the richness, capers add sharpness, and toasted bread gives you the crunch the spread needs. A quick rub of garlic on the toast ties the whole bite together without turning it harsh.
Key Ingredients:
- 1 baguette, sliced thin — toasted slices hold the topping well.
- 1 can sardines in olive oil, drained slightly — choose good-quality fish.
- 1 tbsp capers, chopped — gives a sharp, briny hit.
- 1 tbsp lemon juice plus 1 tsp zest — keeps the spread bright.
- 1 small garlic clove, halved — for rubbing the toast.
- 2 tbsp chopped parsley — freshens the fish.
- 1 tbsp olive oil — if the sardines need loosening.
- Red pepper flakes, optional — for a little heat.
Quick Steps:
- Toast the bread. Bake the slices at 400°F for 8 minutes until crisp and golden.
- Mash the topping. Stir sardines, capers, lemon juice, lemon zest, parsley, olive oil, and pepper flakes together with a fork.
- Rub with garlic. While the bread is warm, rub the cut garlic clove over each slice.
- Top. Spoon the sardine mixture onto the crostini.
- Finish. Add a tiny bit more parsley or lemon zest if needed.
- Serve right away. Crostini waits for no one.
Equipment for This Recipe:
- Rimmed baking sheet — for toasting the bread.
- Fork — to mash the sardines.
- Small bowl — for the topping.
- Knife — for slicing the baguette and garlic.
How to Serve This Dish:
Set the crostini on a board and keep the topping slightly chunky so the bread stays sturdy. This is the strongest-flavored starter in the group, so it’s the one I’d serve before plain buttered pasta or a lemony seafood dish. One or two crostini per person is usually enough.
Pro Tips for This Recipe:
- Choose sardines packed in olive oil, not water.
- Don’t over-mash; a little texture makes the bite better.
- Add the topping only at the last minute so the toast stays crisp.
- If you want a softer flavor, mix in a teaspoon of ricotta.
Variations on This Dish:
Tomato Sardine Toast: Add a spoonful of chopped tomato for a sunnier flavor and a little more moisture.
Chili-Lemon Version: Extra lemon zest and more chili flakes turn the crostini sharper and hotter.
Common Mistakes to Avoid with This Dish:
- Using low-quality sardines: The flavor shows up fast here.
- Skipping the garlic rub: The toast tastes flatter without it.
- Letting the topping sit on the bread too long: It softens in minutes.
Why the Mezze-And-Crostini Approach Works at Pasta Night
A pasta dinner can get heavy fast, and that’s where Mediterranean starters earn their keep. Creamy dips, briny olives, smoky vegetables, crisp fried bites, and cold skewers each solve a different problem at the table. One gives you acid, one gives you crunch, one gives you salt, and another gives you a temperature change your mouth actually notices.
I like to think in layers. Start with one cold dip, one salty nibble, and one hot item if you have the energy. That’s enough to keep people busy without spoiling the main course. A bowl of whipped feta and a plate of olives are fast; spanakopita or arancini adds the part that feels a little more special. You do not need all eighteen on the same night. Please don’t.
The other thing this style of spread gets right is pacing. While the pasta finishes, the table still has things to do. People spoon hummus, grab skewers, tear bread, and settle in without hovering over the stove. That’s a small thing, but it changes the mood of dinner.
Essential Equipment for These Recipes
- Food processor — needed for hummus, whipped feta, baba ganoush, muhammara, and falafel; a blender can work in a pinch for the smoother dips.
- Rimmed baking sheets — useful for bruschetta, spanakopita, arancini, falafel, and any bread you want toasted evenly.
- Large skillet — for zucchini fritters, spinach filling, and warming aromatics without crowding.
- Small saucepan — ideal for marinated olives, hummus chickpeas, and any quick oil infusion.
- Box grater — for cucumber, zucchini, and zesting when you don’t want a microplane.
- Clean kitchen towels — the unsung hero for squeezing cucumber, zucchini, and damp spinach dry.
- Cocktail skewers or toothpicks — for caprese, antipasto, and any bite-sized assembly.
- Fine-mesh strainer — handy for draining eggplant, chickpeas, or anything with too much liquid.
- Pastry brush — worth owning if you’re making spanakopita or any phyllo-based appetizer.
- Thermometer — especially useful for frying arancini or checking oil for anything that needs a clean, crisp shell.
Smart Shopping and Ingredient Tips
Start with the pantry items that do the heavy lifting: olive oil, tahini, pomegranate molasses, capers, jarred artichokes, and good canned sardines. If those basics are solid, half the collection already tastes more expensive than it is. Feta in brine is worth seeking out, because it blends better and tastes less chalky than the pre-crumbled kind, which can go grainy in dips and pastry fillings.
Fresh produce matters most where there’s nowhere to hide. Choose tomatoes that smell sweet and feel heavy for bruschetta and caprese; if they’re pale and bland, the appetizer will be too. Buy cucumbers with firm skin for tzatziki, and if you’re grabbing eggplant, look for one that feels dense and springy, not spongy. Zucchini should be small to medium, since oversized ones carry more water and more seeds.
Phyllo needs a little respect. Thaw it in the fridge overnight if you can, and once it’s open, keep the sheets covered with a damp towel so they don’t crack while you work. If you’re buying fresh herbs, pick bunches that still smell strong when you rub the leaves between your fingers. Basil should be bright, not limp; parsley should look crisp; dill should smell like the green part of a summer garden.
For seafood, buy shrimp that smell clean and faintly briny, never sharp. Sardines should be packed in olive oil if possible, since the oil keeps the texture softer and the flavor fuller. And when it comes to chickpeas for falafel, dried is the right answer. Canned chickpeas are fine for hummus, but falafel needs the starch structure of soaked dry beans or it falls apart.
How to Serve These Recipes
Presentation:
Use two or three bowls with different heights, then spread the rest on flat platters so the table doesn’t look crowded. A bowl of whipped feta, a sheet pan of baked feta, and a board of skewers each read differently, which makes the spread feel intentional instead of random. Keep fresh herbs in little clusters so the green shows up in more than one place.
Accompaniments:
Warm pita, toasted baguette slices, flatbread, cucumber spears, radishes, and a simple green salad can carry almost any combination here. If the pasta is creamy, lean on briny and acidic starters like olives, bruschetta, and sardines. If the pasta is tomato-heavy, add cooler pieces like tzatziki, hummus, and caprese skewers so the meal doesn’t become all red sauce and no contrast.
Portions:
For a smaller dinner, aim for 2 to 3 appetizers total and count on 2 to 4 bites of each per person. For a bigger table, choose one dip, one bread-based appetizer, one fried or baked item, and one cold, no-cook plate. That’s the sweet spot where people feel fed without getting too full before the pasta arrives.
Beverage Pairing:
A crisp white wine with enough acid to keep up—think something citrusy rather than oaky—works across most of these starters. Sparkling water with lemon is the easy nonalcoholic answer, and a light, dry rosé fits especially well with tomato, feta, and olive-based bites. If the pasta is rich, serve something with a little bite and keep the drinks cold.
Additional Tips and Flavor Boosters
Flavor Enhancement: A finishing drizzle of early-harvest olive oil changes more than it should. Use it on hummus, baba ganoush, whipped feta, and even bruschetta right before serving; the peppery finish gives the whole table a sharper first impression.
Customization: Build in one “herb lane” and one “brine lane” so the spread feels balanced. Dill, mint, parsley, basil, capers, olives, and lemon can carry a lot of the Mediterranean flavor without making every plate taste the same. If you want more heat, Aleppo pepper is gentler than crushed red pepper and easier to sprinkle without taking over.
Serving Suggestions: Keep a bowl of lemon wedges and a small dish of flaky salt nearby. They let people tune the food to their own plates, and that tiny bit of control makes a shared starter feel less static. A handful of toasted pine nuts or pistachios also helps any dip or vegetable spread feel finished.
Make-It-Yours: For dairy-free guests, lean on hummus, muhammara, baba ganoush, marinated olives, dolmades, and sardines. For gluten-free tables, swap pita and baguette for cucumber rounds, endive leaves, rice crackers, or sturdy vegetable batons. For a vegetarian spread that still feels complete, include one baked item, one fresh item, and one roasted dip so the table has real range.
Make-Ahead, Storage, and Reheating Guidance
Creamy dips hold well, but not all of them age the same way. Whipped feta, hummus, muhammara, and baba ganoush keep for 3 to 4 days in the refrigerator in airtight containers. Tzatziki is best within 2 to 3 days because the cucumber slowly gives off water, even if you squeeze it hard. If a dip tightens up in the fridge, let it sit out for 15 minutes and stir in a teaspoon of olive oil or yogurt, depending on the recipe.
Marinated olives can sit for up to 1 week refrigerated, and they often taste better on day two or three. Bruschetta topping can be made 1 day ahead, but the bread should stay separate until serving or it will soften. Caprese skewers are best assembled the same day; if you need to work ahead, thread the tomatoes and mozzarella, then add basil, oil, and glaze right before the platter goes out.
Baked and fried appetizers need a little more care. Spanakopita, falafel, zucchini fritters, and arancini keep 3 days in the fridge and freeze well for up to 2 months. Reheat them in a 375°F oven for 10 to 15 minutes from the fridge, or 18 to 25 minutes from frozen, until the outside crisps back up. An air fryer at 350°F works too, especially for fritters and falafel, which like dry heat.
Seafood should be treated with more caution. Shrimp saganaki is best the day it’s made and keeps only 2 days refrigerated. Reheat it gently in a skillet over low heat or in a 300°F oven until just warmed through; blast heat will turn the shrimp rubbery. Sardine crostini and stuffed dates are better assembled fresh, though the toppings and fillings can be prepped a day ahead.
One more thing: keep anything with dairy, seafood, or cut vegetables out at room temperature for no more than 2 hours. That rule sounds boring until it saves you from a sad, unsafe bowl on the counter.
Variations and Adaptations to Try
Gluten-Free Mezze Board:
Skip baguette, phyllo, and breadcrumbs, then lean on hummus, baba ganoush, tzatziki, olives, stuffed dates, and skewers. Serve with cucumber rounds, rice crackers, gluten-free pita, or endive leaves. The table still feels full; it just tilts more toward dips and fresh bites.
Dairy-Light Mediterranean Spread:
Build around marinated olives, bruschetta, muhammara, baba ganoush, dolmades, shrimp saganaki without the feta, and sardine crostini. You lose some creaminess, so add more olive oil, herbs, and lemon to keep the plates lively. A dairy-light table can taste cleaner and sharper, especially before a rich pasta.
Spice-Forward Finish:
Add Aleppo pepper, chili flakes, harissa, or a little minced Calabrian chili to the feta, hummus, baked tomato, and shrimp items. Keep the heat in the finish rather than dumping it into every component, or the table starts to blur together. A little controlled burn does more work than a lot of noise.
Kid-Softened Version:
Make whipped feta without garlic, skip the chili on baked feta, use mild mozzarella skewers, and lean on caprese, dates, and plain bruschetta. Kids usually like bright, simple flavors more than aggressive spice or strong fish, so build around tomatoes, cheese, bread, and sweet-salty bites. Keep the dips smooth and the bread crisp.
Vegetable-First Table:
Stack the spread with tzatziki, hummus, baba ganoush, zucchini fritters, spanakopita, bruschetta, and caprese skewers. This version feels lighter but still substantial enough to carry pasta night. Add a few olives and one baked cheese dish if you want a little more salt and depth.
One-Hour Host Version:
If time is tight, choose four pieces: marinated olives, hummus, caprese skewers, and goat cheese stuffed dates. They cover cold, creamy, fresh, and sweet without needing the oven. Keep this mix in your back pocket when the pasta simmer is already taking more attention than expected.
Common Mistakes to Avoid
-
Making every appetizer creamy. A table of dips sounds convenient, but after three spoonfuls your palate starts to blur. Add at least one crisp item and one briny item so the meal keeps moving.
-
Serving watery vegetables. Bruschetta, tzatziki, zucchini fritters, and caprese all fail if the tomatoes or cucumber are left wet. Salt, drain, squeeze, and blot; that tiny step keeps the texture where it should be.
-
Under-seasoning because pasta is coming. Pasta sauces need salt, but that doesn’t mean the starters should be timid. Hummus, feta, olives, and eggplant all need enough seasoning to stand on their own.
-
Letting bread sit under wet toppings. Bruschetta and crostini turn soft fast. Toast the bread well, top at the last minute, and keep the juicy mixture separate until people are actually at the table.
-
Overcooking the fried or roasted items. Shrimp, arancini, falafel, and phyllo each have a short window where they’re perfect. Once the crust is dark and the centers dry out, no amount of garnish saves them.
-
Forgetting the temperature mix. Pasta night gets richer and more satisfying when one plate is cold, another is hot, and the next is room temperature. That’s not a fancy trick. It just keeps the meal from feeling one-note.
Frequently Asked Questions
Can I make most of these Mediterranean appetizers the day before pasta night?
Yes, and several improve with a little resting time. Hummus, baba ganoush, muhammara, marinated olives, and dolmades can all be made ahead; just keep fresh herbs and garnishes separate until serving.
How many appetizers should I serve with pasta?
For a small dinner, two appetizers are plenty, especially if the pasta is rich. For a bigger table, three or four small plates usually feel right, as long as you mix a dip, a bread item, and something hot or crisp.
What works best beside a creamy pasta sauce?
Go for acid and crunch. Bruschetta, marinated olives, roasted red pepper muhammara, tzatziki, and caprese skewers all cut through cream sauce in a way that keeps the meal from getting heavy too fast.
What if I don’t have a food processor?
A blender can handle whipped feta, hummus, muhammara, and baba ganoush if you stop and scrape often. For anything chunkier—olive marinades, bruschetta topping, stuffed dates, antipasto skewers—you don’t need one at all.
Can I use store-bought hummus or tzatziki and still make the spread feel homemade?
Absolutely. Warm the hummus slightly and finish it with paprika oil, olive oil, or toasted pine nuts. For tzatziki, stir in fresh dill, mint, lemon zest, and a bit of grated cucumber to wake it up.
How do I keep phyllo appetizers crisp if they sit out?
Bake them until deeply golden, then cool them on a rack rather than a flat plate. If they need a brief hold, leave them uncovered so steam can escape; covering phyllo traps moisture and softens the layers fast.
Which appetizer is safest for guests with mixed diets?
Marinated olives, hummus, baba ganoush, muhammara, bruschetta, and stuffed dates give you a lot of flexibility with no meat and easy dairy-free swaps. If you need one plate that nearly everyone can eat, start there and add separate cheese or seafood items on the side.
What should I do if my dip tastes flat after chilling?
Add salt in tiny pinches, then brighten it with lemon juice or a little extra olive oil. Cold food often tastes quieter than it did in the bowl, so a last-minute taste and adjust usually fixes it.
A Table Worth Setting
Pasta night gets a lot easier when the starters know their job. They don’t need to steal the show. They just need to bring salt, crunch, freshness, smoke, and a little heat so the main bowl tastes better when it finally lands.
That’s why this spread works. A couple of these recipes are nearly no-cook, a few can be made earlier in the day, and the rest bring the sort of texture that makes people linger at the table a little longer. Keep a few of them in rotation, and dinner stops feeling like a single dish with a side note.