
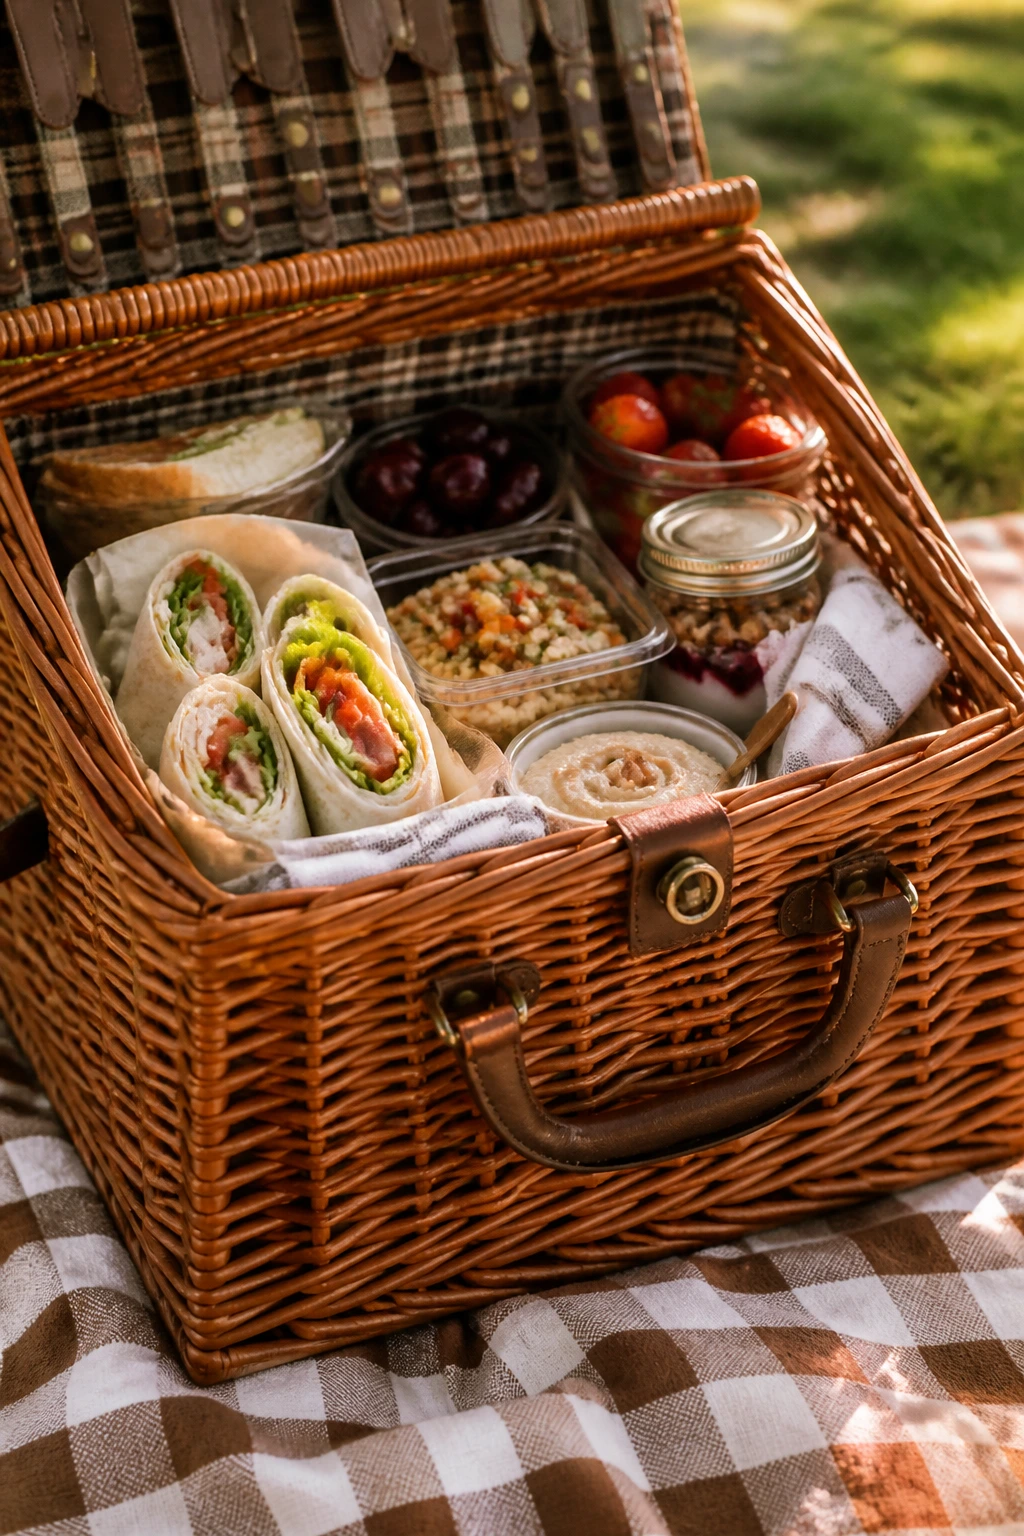
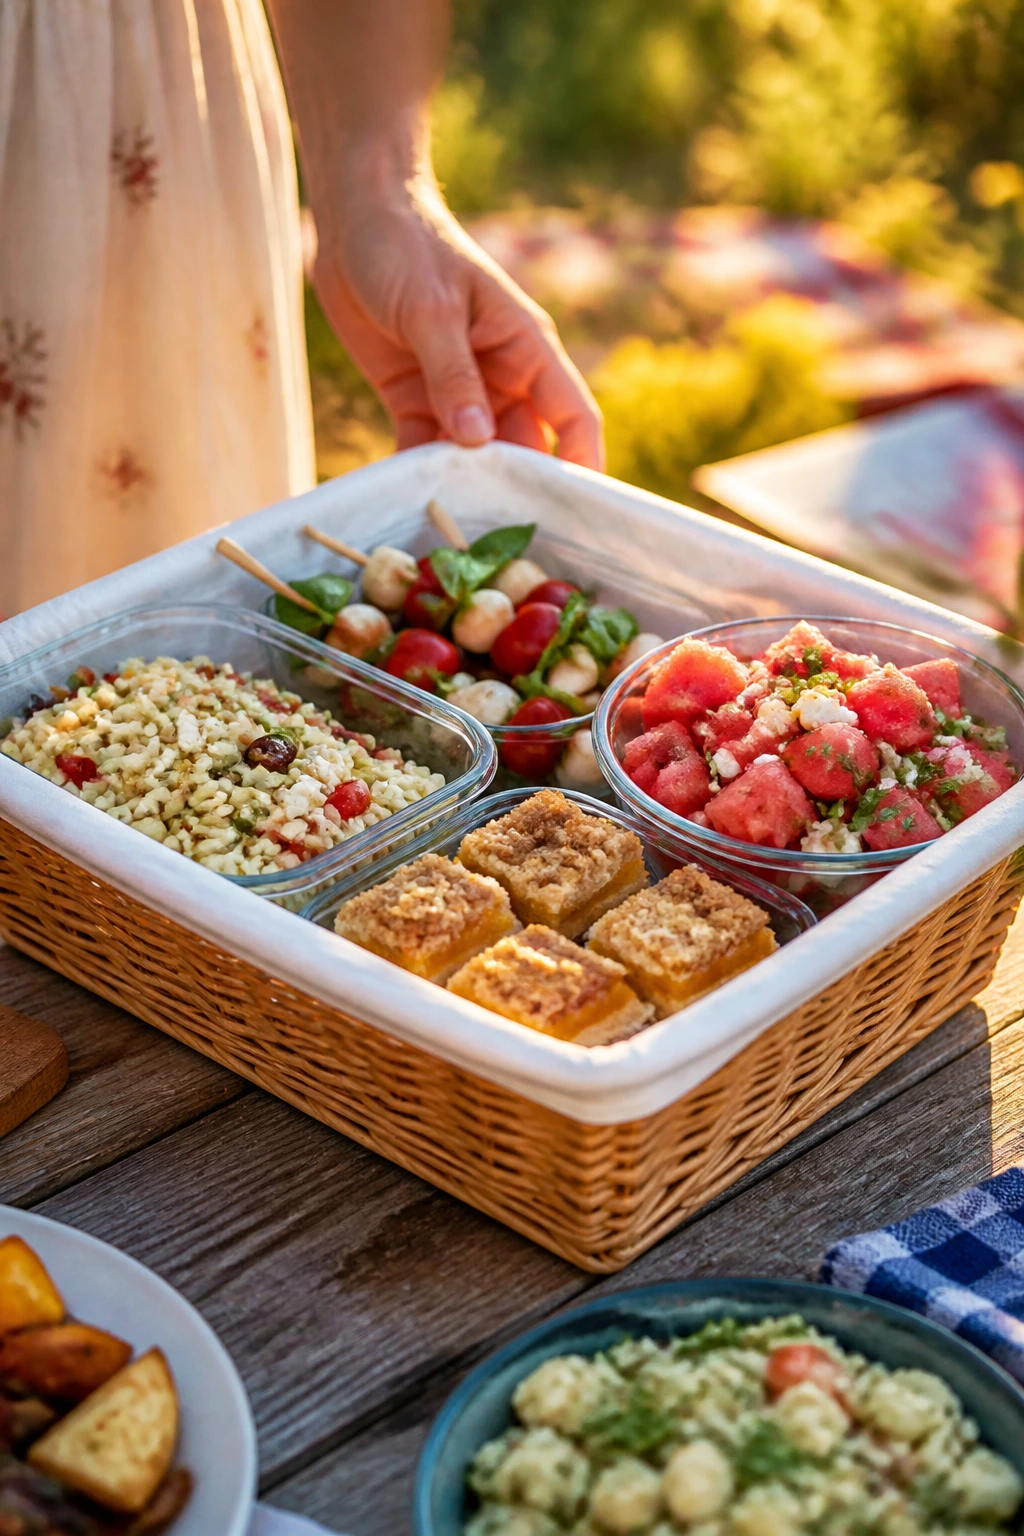
A good picnic plate has one job: survive the walk from the kitchen to the blanket without falling apart. The wrong sandwich gets soggy in ten minutes. The wrong salad turns sleepy and watery. The wrong dessert leaves sticky fingerprints on everything, which is its own small outdoor tragedy.
That’s why picnic food recipes have to think a little harder than regular weeknight food. They need structure. They need acid, salt, and enough backbone to taste awake after a cooler ride, a paper plate, and a few hours of summer air. I’m much more interested in a pasta salad that still has bite than a fussy dish that only behaves under restaurant lights.
These picnic food recipes for easy summer nights lean into that logic. Some are cold and crisp, some are room-temp sturdy, and some are the kind of hot-weather foods I trust because they don’t wilt into mush the second the sun hits them. A few are classic on purpose. A few are the sort of thing I’ve seen disappear from a blanket faster than the chips. And every one of them is built to be packed, carried, and eaten with one hand while you’re balancing a drink in the other.
Why These Picnic Recipes Earn a Spot in the Basket
-
They hold up outside: Every recipe here is built to taste good after sitting a little while, which matters more than being picture-perfect straight from the stove.
-
They don’t depend on heat: Several of these are better at room temperature, so you’re not racing the clock between the kitchen and the park table.
-
They travel without drama: I picked foods with sturdy shapes, tighter fillings, and dressings that cling instead of flooding the container.
-
They cover the whole spread: You get mains, sides, bites, and dessert, which means one basket can actually function as dinner.
-
They use summer ingredients well: Tomatoes, peaches, cucumbers, herbs, corn, and watermelon show up where they make sense, not just where they look seasonal.
-
They fit real-life packing: The best picnic food is the stuff you can make ahead, chill hard, and serve without a last-minute scramble.
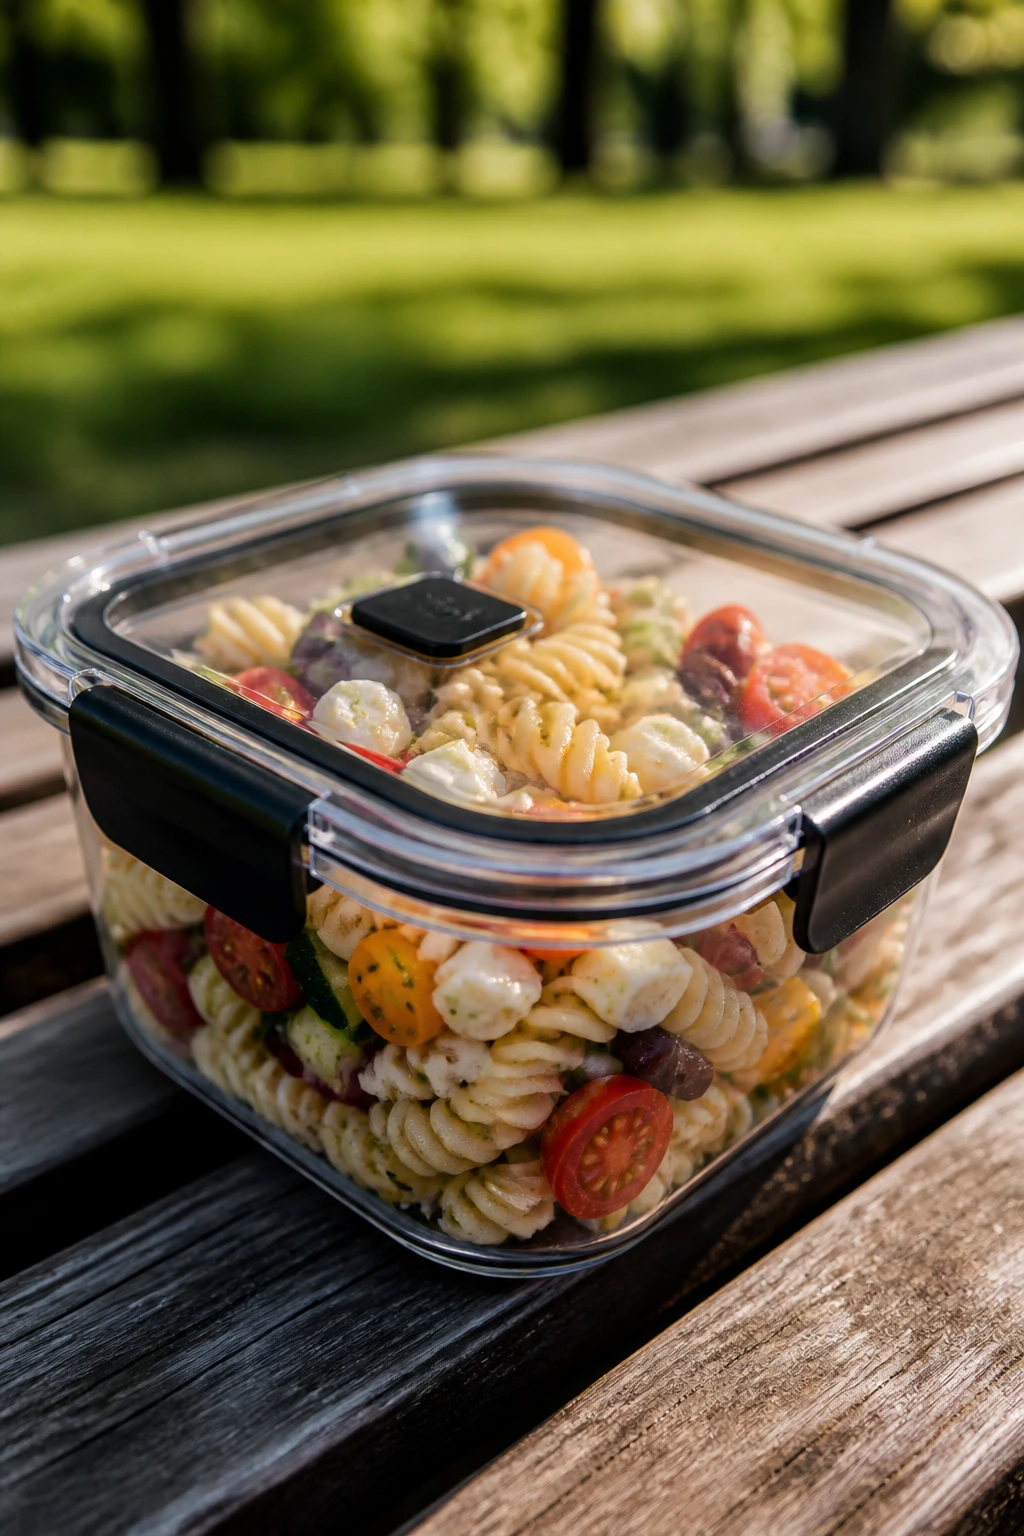
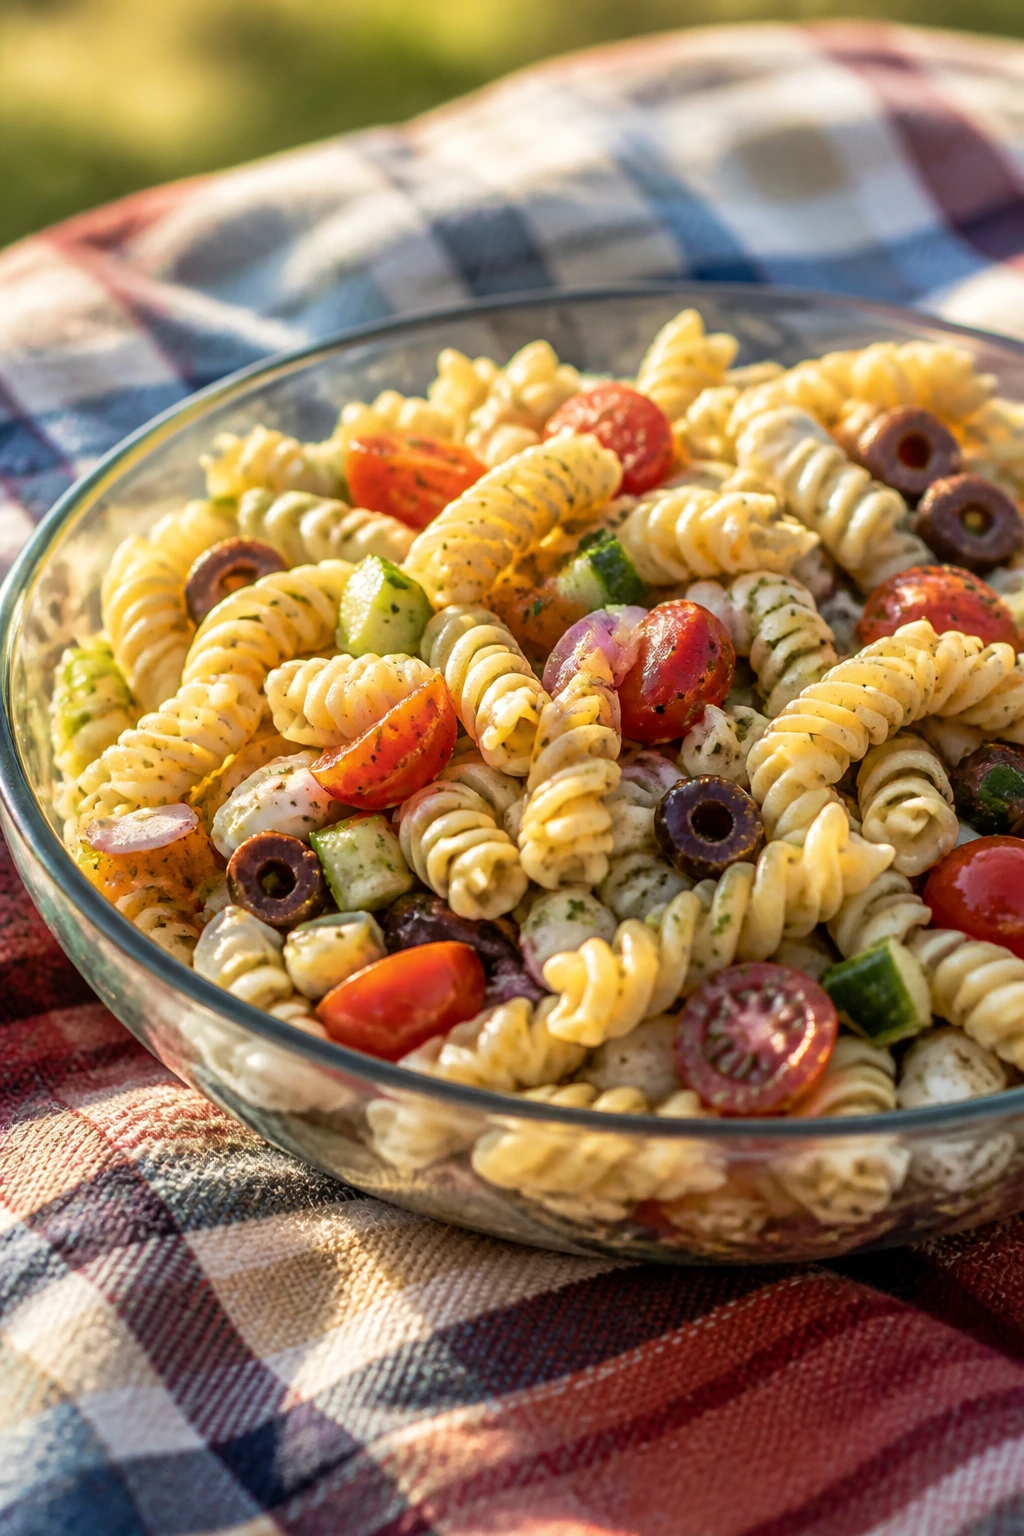
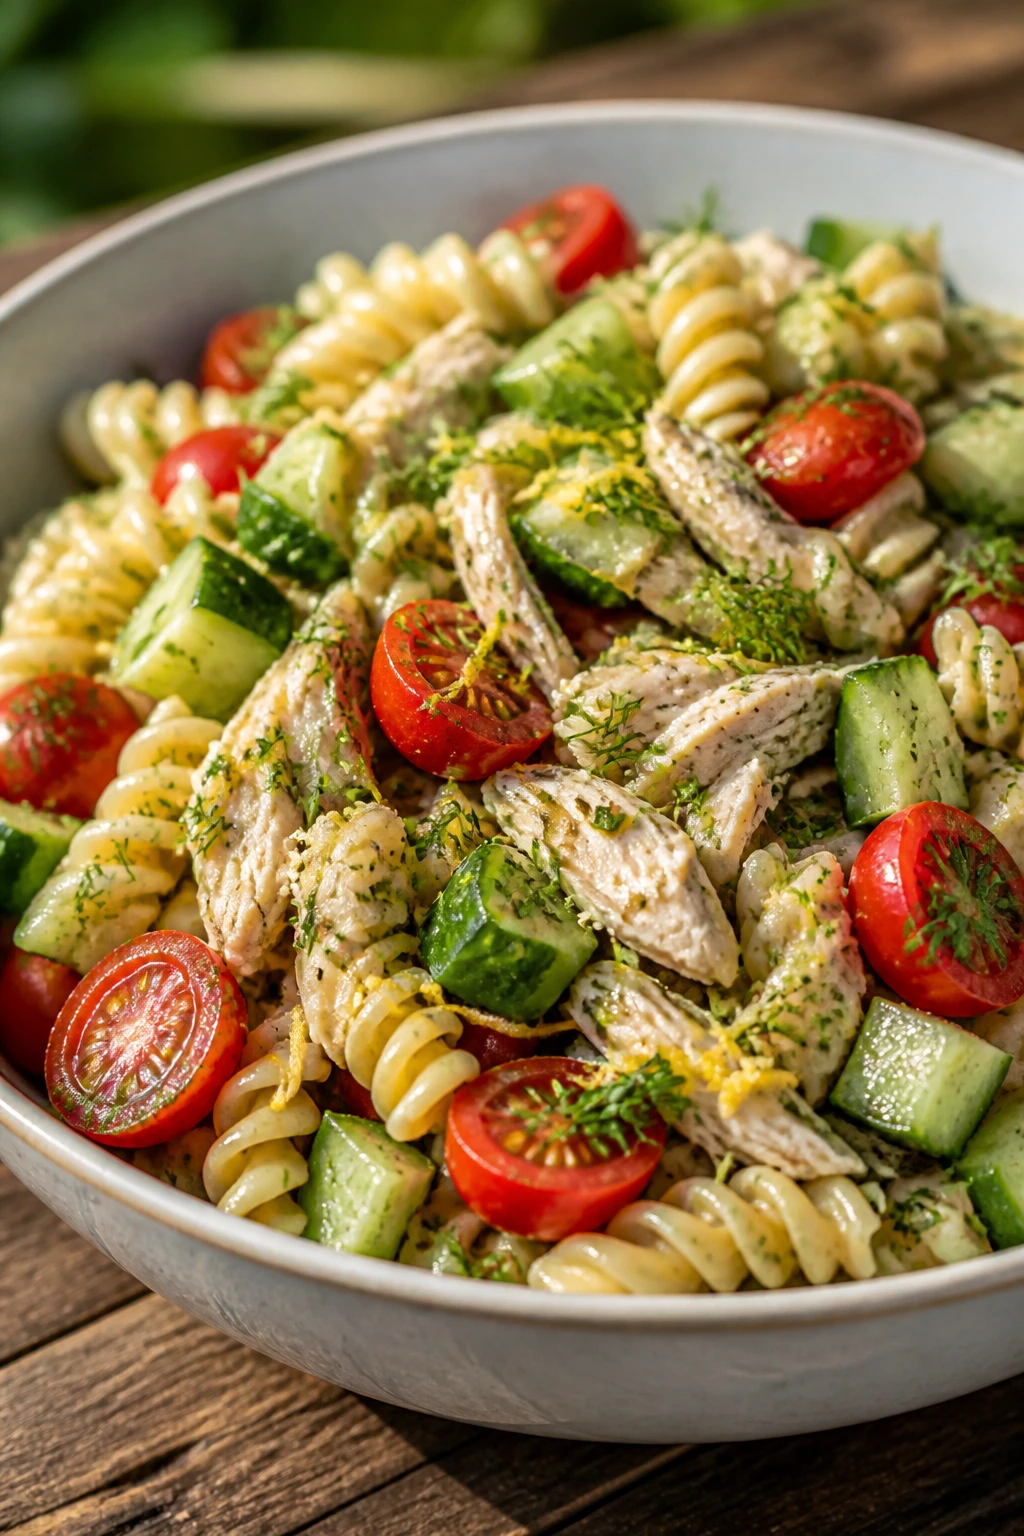
1. Lemon-Herb Chicken Pasta Salad
The first forkful should taste bright, cold, and a little briny, with pasta that still has a bite and chicken that doesn’t feel like an afterthought. This is the kind of picnic pasta salad I trust because it keeps its shape and doesn’t drown in dressing. The lemon does the lifting here, and the herbs make the whole bowl smell like you actually planned dinner instead of grabbed random leftovers.
Why It Works:
Chilled pasta salad needs three things to behave: sturdy pasta, enough acid, and ingredients that don’t leak water all over the bowl. Rotini or fusilli catch the lemon dressing in every twist, while cucumbers and tomatoes bring freshness without turning the whole dish soupy if you salt them lightly and toss just before serving. Cooked chicken gives this enough heft to be a main dish, which matters when you’re trying to feed people on a blanket instead of at a table. A handful of dill and parsley keeps the flavor sharp even after the salad chills for an hour or two.
Key Ingredients:
- 12 ounces rotini or fusilli pasta
- 2 cups cooked chicken, shredded or diced
- 1 cup cherry tomatoes, halved
- 1 cup cucumber, diced small
- 1/2 small red onion, very thinly sliced
- 1/3 cup feta cheese, crumbled
- 1/4 cup parsley, chopped
- 2 tablespoons fresh dill, chopped
- 1/4 cup olive oil
- Juice of 2 lemons
- 1 tablespoon Dijon mustard
- 1 garlic clove, grated
- 1 teaspoon kosher salt
- 1/2 teaspoon black pepper
Quick Steps:
- Bring a large pot of salted water to a boil and cook the pasta until just al dente, usually 9 to 11 minutes. Drain and rinse briefly under cold water so it stops cooking.
- Whisk the olive oil, lemon juice, Dijon, garlic, salt, and pepper in a large bowl until the dressing looks smooth and glossy.
- Add the cooled pasta, chicken, tomatoes, cucumber, red onion, parsley, dill, and feta. Toss gently until the dressing coats everything.
- Taste and adjust with a pinch more salt or a squeeze of lemon. Cold food needs more seasoning than hot food.
- Chill for at least 30 minutes so the pasta absorbs the dressing instead of sitting on top of it.
- Give it one last toss before packing or serving.
Equipment for This Recipe:
- Large pot
- Colander
- Large mixing bowl
- Sharp knife and cutting board
How to Serve This Dish:
Pile it into a shallow bowl so the herbs and feta stay visible, then tuck a few lemon wedges on the side. It works as a stand-alone dinner with crusty bread, or as a side next to grilled corn and fruit salad.
Pro Tips for This Recipe:
- Salt the pasta water until it tastes like a well-seasoned soup; bland pasta stays bland even under dressing.
- If your cucumbers are wet inside, scoop out the seedy center before dicing.
- Rotisserie chicken is fine here, and it saves time without hurting the texture.
- Keep the feta out until the end if you want the cubes to stay in neat little salty pockets.
Variations on This Dish:
- Tuna-Lemon Picnic Pasta: Swap the chicken for two cans of drained tuna and add 1 tablespoon capers.
- Mediterranean Garden Bowl: Use chickpeas instead of chicken and add sliced olives and roasted red peppers.
- Creamy Herb Version: Stir in 1/4 cup plain Greek yogurt for a softer, creamier dressing that still tastes bright.
Common Mistakes to Avoid with This Dish:
- Overcooking the pasta: Soft pasta collapses once it chills. Stop at al dente and rinse right away.
- Adding watery tomatoes too early: If your tomatoes are very juicy, salt them lightly and drain them for 10 minutes before mixing.
- Under-dressing the bowl: Pasta drinks dressing as it sits, so don’t panic if it looks a touch loose at first.
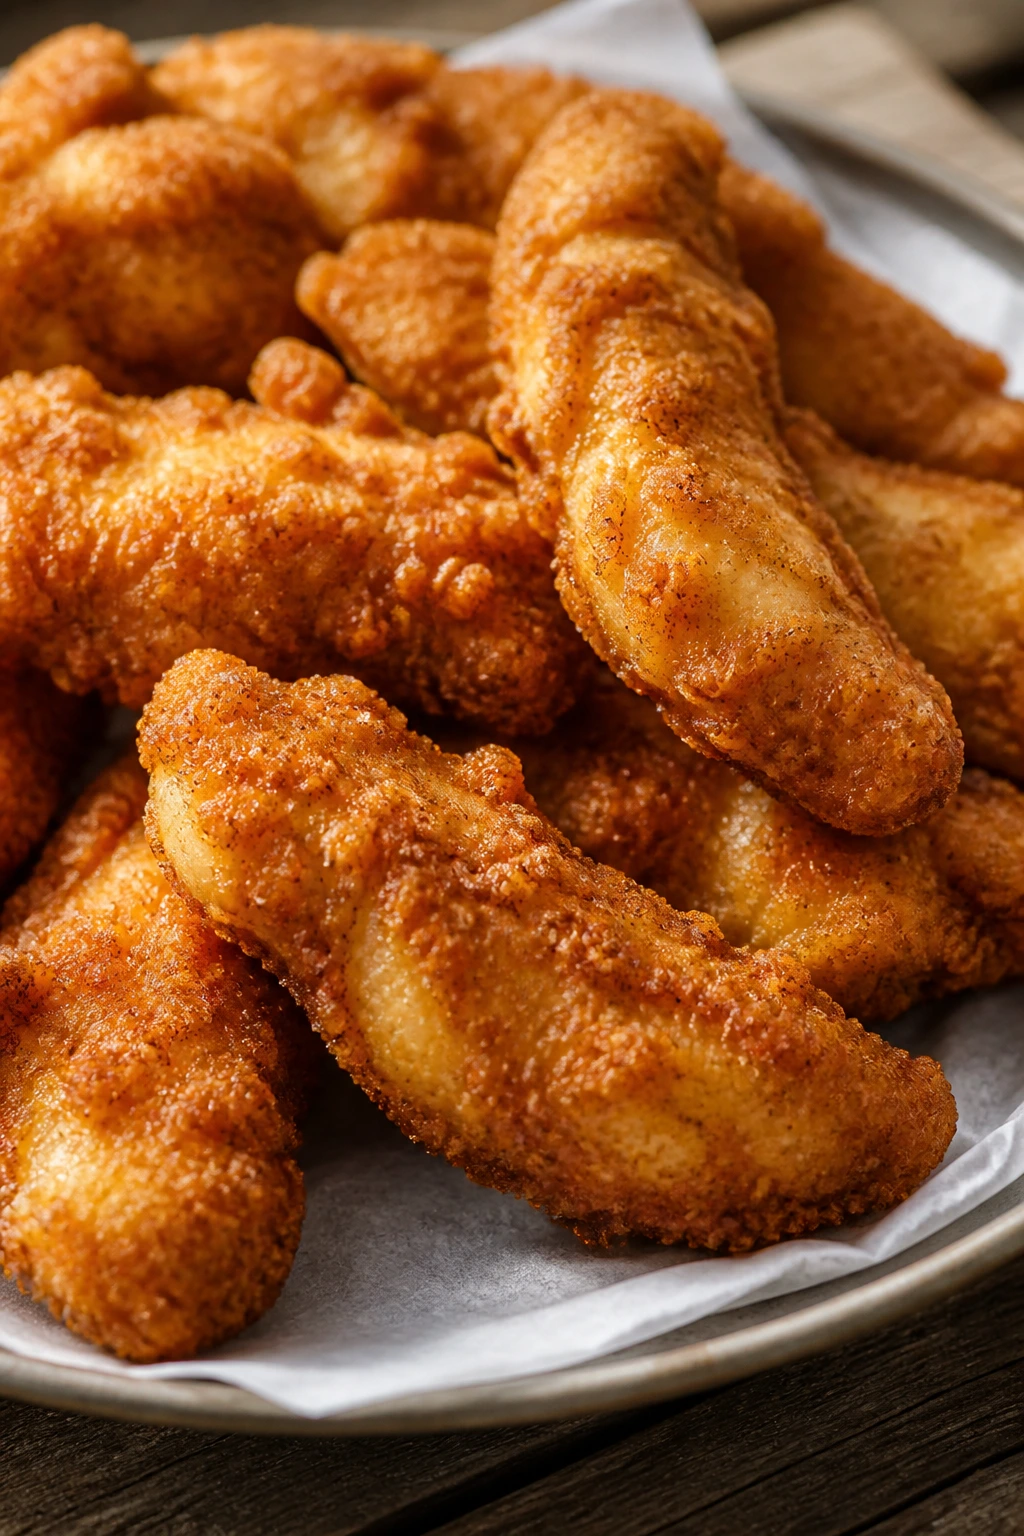
2. Crispy Buttermilk Fried Chicken Tenders
A proper picnic chicken tender should snap a little when you bite it, then stay juicy under the crust. These are salty, peppery, and built for eating with your fingers, which is how picnic food ought to behave. I like them because they’re satisfying at room temperature and still hold up after a short drive in a paper-lined box.
Why It Works:
Buttermilk softens the chicken and gives the coating something to cling to, while cornstarch in the dredge helps the crust fry up lighter and crisper than flour alone. Tenders cook fast, which means the meat stays moist if you keep the oil around 350°F and don’t crowd the pan. The spice blend is simple—paprika, garlic powder, onion powder, salt, pepper—but it lands hard when the chicken is hot out of the oil. Once cooled, it still has enough crunch to make sense on a picnic plate.
Key Ingredients:
- 2 pounds chicken tenders
- 2 cups buttermilk
- 2 teaspoons hot sauce
- 2 cups all-purpose flour
- 1 cup cornstarch
- 2 teaspoons paprika
- 1 teaspoon garlic powder
- 1 teaspoon onion powder
- 2 teaspoons kosher salt
- 1 teaspoon black pepper
- 4 cups neutral oil, for frying
Quick Steps:
- Combine the chicken, buttermilk, and hot sauce in a large bowl. Cover and chill for at least 30 minutes, or up to 4 hours.
- Mix the flour, cornstarch, paprika, garlic powder, onion powder, salt, and pepper in a second bowl.
- Heat the oil in a heavy skillet or Dutch oven to 350°F. Line a tray with a wire rack or paper towels.
- Lift each tender from the buttermilk, let the excess drip off, then coat it well in the flour mixture. Press the coating on with your fingers.
- Fry in batches for 4 to 5 minutes per side, until deep golden and the internal temperature reaches 165°F. Do not crowd the pan or the crust will go pale and greasy.
- Drain on the rack and let the tenders rest for 5 minutes before packing.
Equipment for This Recipe:
- Large bowl
- Heavy skillet or Dutch oven
- Tongs
- Instant-read thermometer
How to Serve This Dish:
Serve them with pickle spears, a mustardy dip, and a few slices of soft bread if you want to turn them into sandwiches. They look good stacked in a basket, and they disappear even faster if you set out a little honey on the side.
Pro Tips for This Recipe:
- Pat the chicken dry before the buttermilk soak if the tenders seem very wet.
- Add a spoonful of flour to the buttermilk as you go if you want the coating to stick even better.
- Let the oil come back to 350°F between batches; cold oil gives you soggy crust.
- If you’re packing them for later, keep them uncovered until fully cool so steam doesn’t soften the coating.
Variations on This Dish:
- Hot Honey Tenders: Drizzle with hot honey just before serving for a sweet-heat finish.
- Cornflake Crunch Version: Replace 1 cup of the flour mixture with crushed cornflakes for a louder crunch.
- Baked Picnic Tenders: Bake on a greased rack at 425°F for 18 to 22 minutes, flipping once, if you’d rather skip frying.
Common Mistakes to Avoid with This Dish:
- Oil that’s too cool: The coating absorbs oil and turns heavy. Use a thermometer.
- Skipping the rest: Pulling them from the fryer and packing immediately traps steam. Give them a few minutes on a rack.
- Using thick chicken pieces: Tenders cook evenly because they’re narrow. Thick cutlets need a different timing.
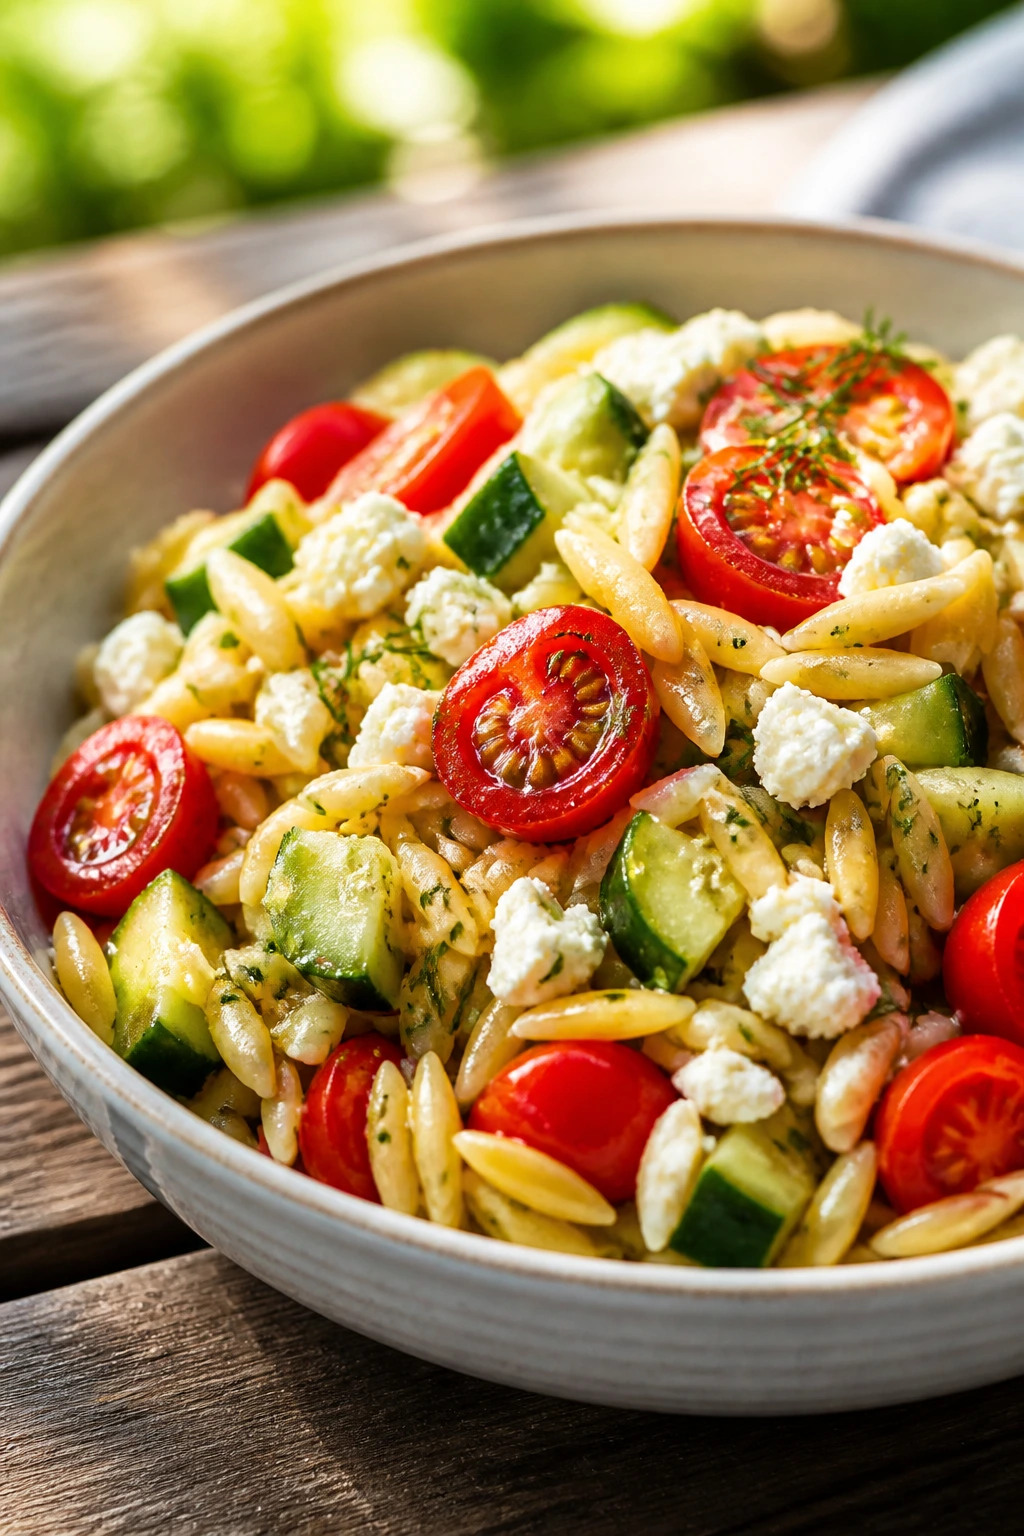
3. Tomato, Cucumber, and Feta Orzo Salad
This one smells like red wine vinegar, dill, and sun-warmed tomatoes, even when it’s coming straight from the fridge. Orzo gives you the comfort of pasta with the smaller, more nimble feel of a grain salad, which is why I keep coming back to it for picnic food. It’s clean, cold, and just salty enough to keep people circling back for another scoop.
Why It Works:
Orzo is tiny, so it cools fast and catches dressing in every spoonful without turning gluey if you stop cooking it on time. Cucumbers and tomatoes bring freshness, but the trick is to cut them into pieces close to the same size so the salad eats evenly. Feta gives the whole thing a salty finish, and dill keeps it from tasting flat once it’s chilled. A little honey in the dressing rounds out the vinegar and makes the tomato flavor pop.
Key Ingredients:
- 1 pound orzo
- 2 cups cherry tomatoes, halved
- 1 large cucumber, diced
- 1/2 small red onion, finely sliced
- 1 cup feta cheese, crumbled
- 1/4 cup fresh dill, chopped
- 1/3 cup olive oil
- 3 tablespoons red wine vinegar
- 1 tablespoon lemon juice
- 1 teaspoon honey
- 1 teaspoon dried oregano
- 1 teaspoon kosher salt
- 1/2 teaspoon black pepper
Quick Steps:
- Cook the orzo in salted water until just tender, usually 8 to 9 minutes. Drain and spread it on a tray for a few minutes so it cools faster.
- Whisk the olive oil, red wine vinegar, lemon juice, honey, oregano, salt, and pepper in a large bowl.
- Add the orzo, tomatoes, cucumber, onion, dill, and feta. Toss until everything is coated.
- Taste for salt. Feta changes how salty the dish feels, so this is not the place to guess.
- Chill for 20 to 30 minutes before serving.
- Toss once more and finish with a few dill fronds if you want it to look extra fresh.
Equipment for This Recipe:
- Large pot
- Fine colander
- Large salad bowl
- Measuring cups and spoons
How to Serve This Dish:
Spoon it into a wide bowl so the feta stays on top instead of sinking to the bottom. It sits nicely beside grilled chicken, roasted sausage, or a basket of warm pita.
Pro Tips for This Recipe:
- If you can, salt the cucumbers lightly and blot them dry before mixing.
- Slightly undercook the orzo if the salad will sit for more than an hour.
- Use a block of feta and crumble it yourself; the texture is better than the dry pre-crumbled stuff.
- A little extra lemon right before serving wakes up the whole bowl.
Variations on This Dish:
- Greek Chickpea Orzo: Add 1 can of drained chickpeas for a fuller vegetarian main.
- Roasted Pepper Twist: Stir in 1 cup chopped roasted red peppers for sweetness and color.
- Herby Olive Version: Add 1/2 cup chopped Kalamata olives and skip the honey if you want a sharper finish.
Common Mistakes to Avoid with This Dish:
- Rinsing the orzo until icy cold: That strips off starch and can make the dressing slide off. Cool it, yes. Scrub it clean, no.
- Dressing too early without adjusting later: Orzo absorbs liquid as it sits. Save a spoonful of dressing for the final toss.
- Too much onion: Raw onion takes over fast in a chilled salad, so keep the slice thin and the amount modest.
4. Classic Egg Salad Sandwiches with Chive
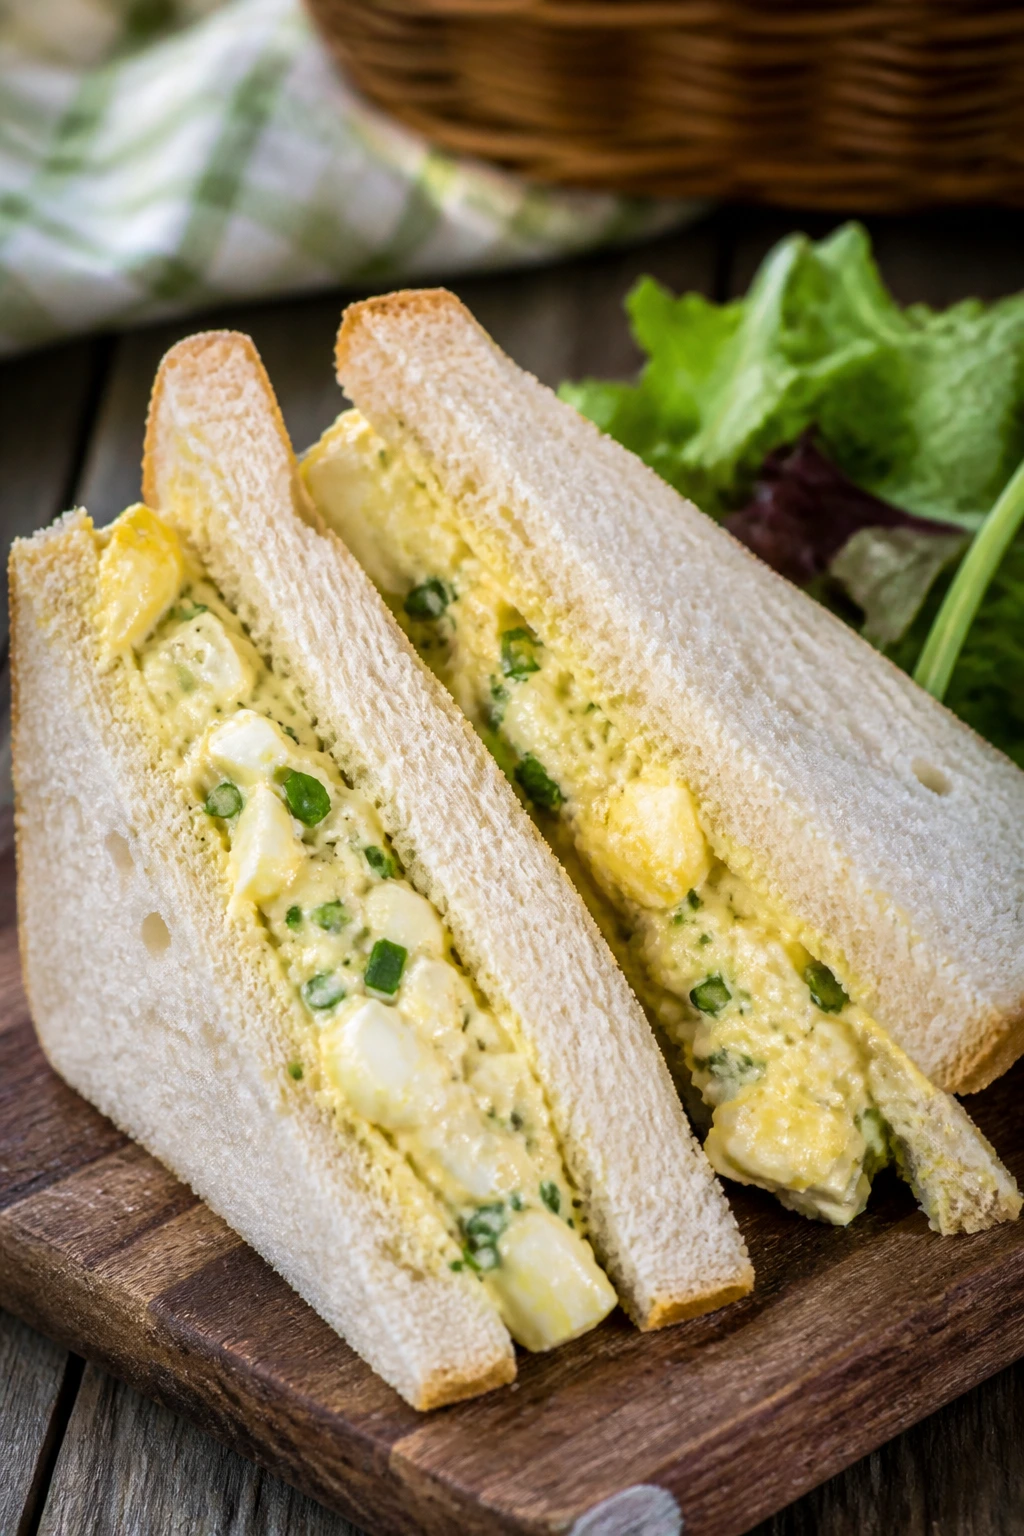
Cold egg salad has a very specific job: creamy, soft, and not too wet, with enough bite from mustard and pickles to keep it from tasting like wallpaper paste. I like this version because the celery stays crisp, the chives bring a mild onion note, and the sandwich holds together if you build it on soft but sturdy bread. It’s old-fashioned in the best way.
Why It Works:
Egg salad only works when the eggs are cooked cleanly and chopped with some texture left in them. Too smooth, and it feels heavy; too rough, and the filling falls out. Mayo gives the body, Dijon gives the edge, and a little pickle relish or chopped dill pickle brings brightness that cuts through the richness. Chives are the quiet hero here because they taste fresher than raw onion and don’t overpower the eggs after chilling.
Key Ingredients:
- 8 large eggs
- 1/3 cup mayonnaise
- 1 tablespoon Dijon mustard
- 2 tablespoons celery, finely diced
- 2 tablespoons chives, minced
- 1 tablespoon dill pickle relish or chopped dill pickles
- 1 teaspoon lemon juice
- 1/2 teaspoon kosher salt
- 1/4 teaspoon black pepper
- 8 slices soft sandwich bread or 4 soft rolls
- Butter, softened, for the bread if you like
Quick Steps:
- Place the eggs in a saucepan and cover with cold water by 1 inch. Bring to a boil, cover, remove from heat, and let stand for 10 to 12 minutes.
- Drain and cool the eggs under cold running water. Peel and chop them into small pieces.
- Stir together the mayo, Dijon, celery, chives, relish, lemon juice, salt, and pepper in a bowl.
- Fold in the chopped eggs gently so some pieces stay visible. Mash only a little; a paste-like filling is the fastest way to ruin egg salad.
- Chill for 15 to 30 minutes so the flavors settle.
- Spread on bread just before serving, or pack the filling and bread separately if you want to avoid sogginess.
Equipment for This Recipe:
- Medium saucepan
- Mixing bowl
- Fork or potato masher
- Sharp knife
How to Serve This Dish:
Trim the crusts and cut the sandwiches into halves or quarters if you want a neat picnic look. Add chips, sliced cucumbers, or a handful of grapes, and keep a cold pack under the filling if you’re outside for long.
Pro Tips for This Recipe:
- Slightly older eggs peel more easily than very fresh ones.
- If the filling looks dry after chilling, stir in a teaspoon of mayo rather than more lemon juice.
- Buttering the bread creates a thin moisture barrier, which matters more than people think.
- A pinch of paprika on top gives the sandwich a little color and a mild smoky note.
Variations on This Dish:
- Dill Pickle Egg Salad: Double the pickle relish and skip the celery for a sharper, more briny filling.
- Herbed Garden Egg Salad: Add chopped parsley and tarragon for a greener, more aromatic version.
- Avocado Egg Salad: Replace half the mayo with mashed avocado and serve it the same day.
Common Mistakes to Avoid with This Dish:
- Overmixing the eggs: You want creamy, not spreadable soup.
- Packing the sandwiches too early: Bread soaks fast, so assemble close to serving time.
- Skipping the chill: Warm egg salad tastes loose and blunt; 20 minutes in the fridge helps the flavors settle.
5. Grilled Veggie and Hummus Wraps
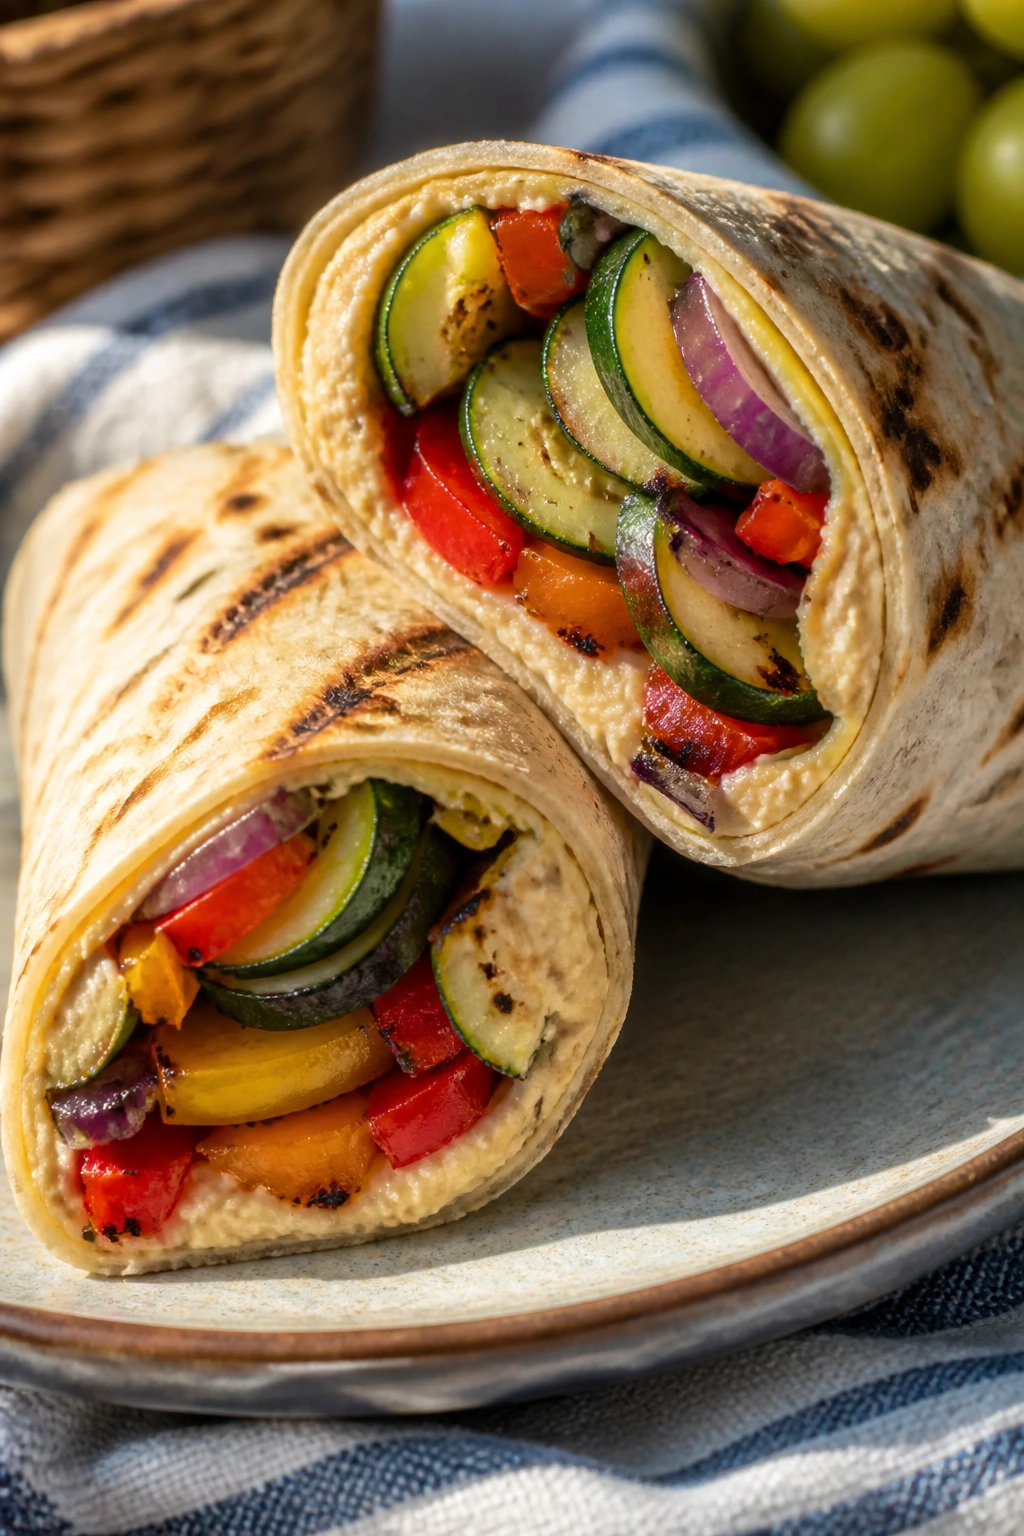
If you want a picnic lunch that eats like a full meal but doesn’t weigh you down, this is the one I reach for. The grilled zucchini, peppers, and onions bring smoke and sweetness, while hummus keeps the wrap from feeling dry. It tastes better at room temperature than most sandwiches, which makes it a very practical choice.
Why It Works:
Vegetables that have actually seen a grill hold up better than raw ones when you pack them in a tortilla. The heat removes some moisture, concentrates the flavor, and gives the wrap a little char that makes hummus taste more layered. Use large flour tortillas so the filling sits in a tight cylinder instead of spilling out the ends. A little lemon or vinegar in the vegetables keeps the wrap from tasting flat once it cools.
Key Ingredients:
- 2 zucchini, sliced lengthwise into planks
- 2 bell peppers, seeded and cut into flat panels
- 1 red onion, cut into thick rings
- 8 ounces mushrooms, halved if large
- 2 tablespoons olive oil
- 1 teaspoon kosher salt
- 1/2 teaspoon black pepper
- 1 cup hummus
- 4 large flour tortillas
- 2 cups baby spinach
- 1/2 cup crumbled feta, optional
- 1 tablespoon lemon juice
Quick Steps:
- Toss the zucchini, peppers, onion, and mushrooms with olive oil, salt, and pepper.
- Grill over medium-high heat for 3 to 5 minutes per side, until softened and marked, but not collapsing.
- Transfer the vegetables to a plate and toss with lemon juice while they’re still warm.
- Spread hummus across each tortilla, leaving a 1-inch border at the edges.
- Layer spinach, grilled vegetables, and feta if using. Roll tightly, tucking in the sides as you go.
- Wrap each roll in parchment or foil and chill for 15 minutes before slicing. A brief chill helps the wrap hold its shape.
Equipment for This Recipe:
- Grill pan or outdoor grill
- Tongs
- Sharp knife
- Parchment paper or foil
How to Serve This Dish:
Cut the wraps on a diagonal and set them cut-side up so the layers show. Pair them with cherry tomatoes, olives, or a lemony bean salad if you want more food on the table.
Pro Tips for This Recipe:
- Don’t grill the vegetables until mushy; they should still bend, not dissolve.
- Thick hummus clings better than very loose hummus.
- If the tortillas crack, warm them for 10 seconds in the microwave before filling.
- Pat the grilled vegetables dry if they’re steaming a lot on the plate.
Variations on This Dish:
- Roasted Red Pepper Wraps: Use jarred roasted peppers instead of grilling peppers if you’re short on time.
- Spicy Falafel Style: Add sliced falafel and a drizzle of tahini for more heft.
- Avocado-Crunch Version: Add sliced avocado and shredded cabbage for a softer and crunchier mix.
Common Mistakes to Avoid with This Dish:
- Overfilling the tortilla: The wrap will split and dump its guts on your lap.
- Using watery vegetables: Pat them dry after grilling or the hummus turns soupy.
- Skipping the chill before slicing: A warm wrap falls apart much more easily.
6. Pimento Cheese Tea Sandwiches
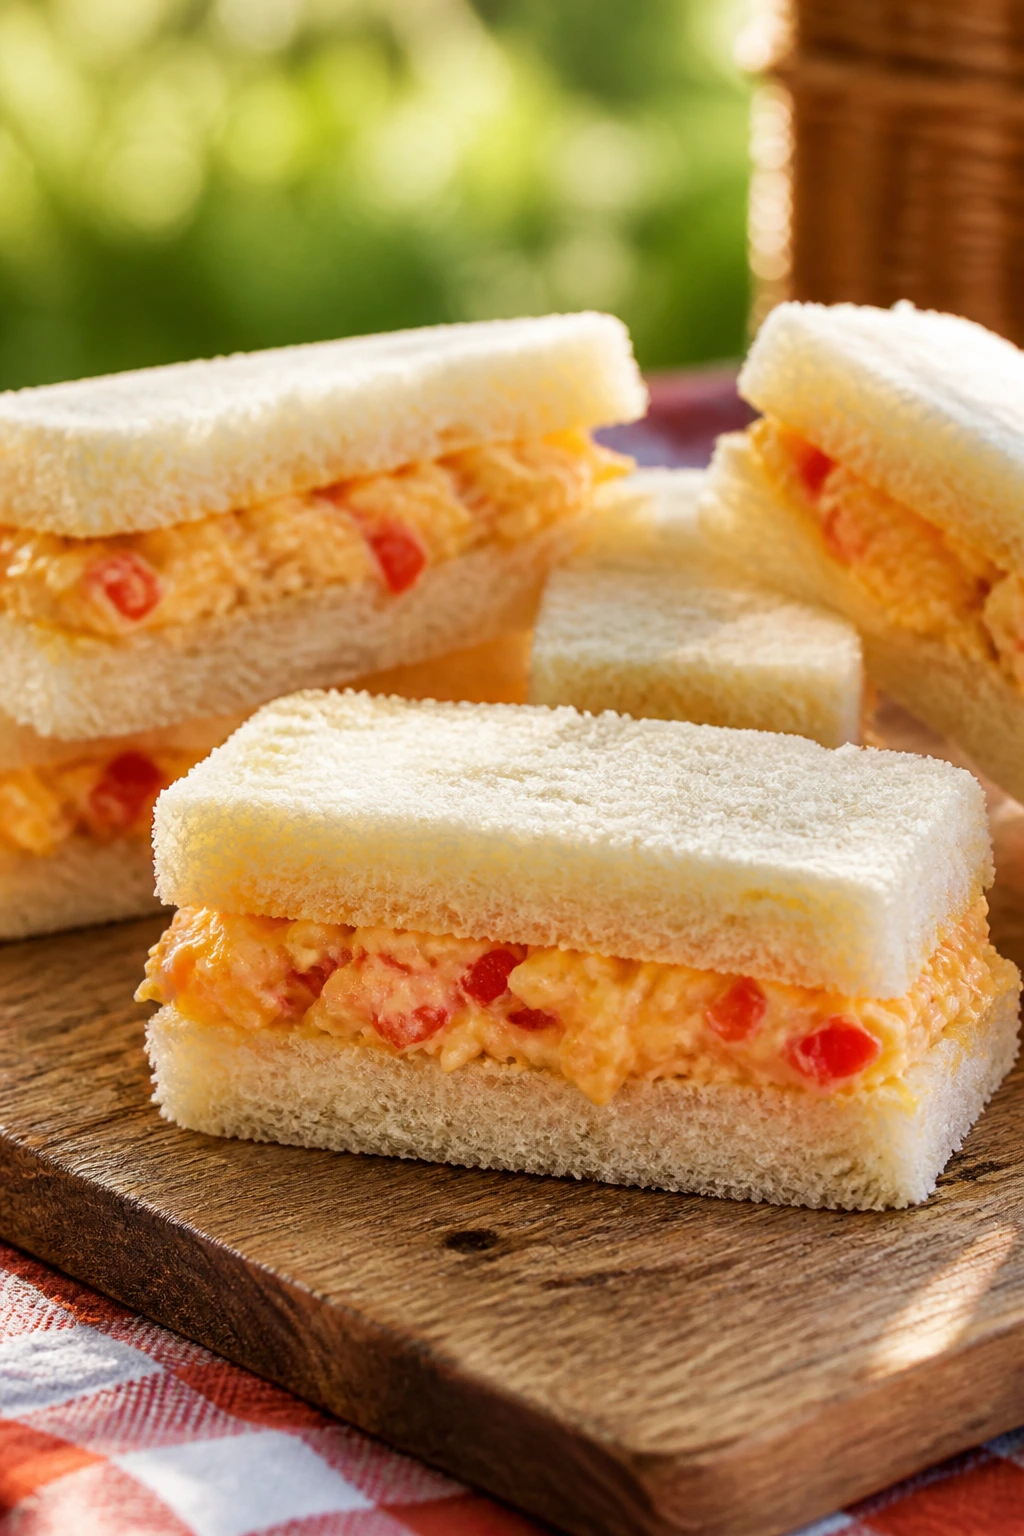
Pimento cheese is one of those spreads that makes a quiet little entrance and then steals the entire picnic. It’s sharp, creamy, tangy, and a little smoky, and on soft bread it turns into something that feels nostalgic without being fussy. These are the sandwiches I make when I want the cooler to look old-school and taste even better.
Why It Works:
Sharp cheddar gives pimento cheese its backbone, cream cheese gives it body, and mayonnaise smooths out the texture so it spreads without tearing the bread. The drained pimentos matter more than people think; if they’re wet, the filling becomes slack. A touch of paprika and Dijon keeps the cheese from tasting one-note. Tea sandwiches work because the bread is thin, the crusts are gone, and every bite is mostly filling.
Key Ingredients:
- 8 ounces sharp cheddar cheese, finely grated
- 4 ounces cream cheese, softened
- 1/4 cup mayonnaise
- 1/2 cup pimentos, drained and chopped
- 1 teaspoon Dijon mustard
- 1/2 teaspoon smoked paprika
- 1/4 teaspoon cayenne, optional
- 1/2 teaspoon black pepper
- 12 slices soft white bread
- 2 tablespoons softened butter, optional for the bread
Quick Steps:
- Stir together the cheddar, cream cheese, mayo, pimentos, Dijon, paprika, cayenne, and black pepper until the mixture is thick but spreadable.
- Chill for 15 minutes if the filling seems loose.
- Butter the bread lightly if you want an extra moisture barrier, then spread a thin layer of pimento cheese on half the slices.
- Top with the remaining bread slices and press gently.
- Trim the crusts and cut into fingers or small squares.
- Keep chilled until serving. These are best when the filling is cold but not stiff as brick.
Equipment for This Recipe:
- Mixing bowl
- Rubber spatula
- Box grater
- Serrated knife
How to Serve This Dish:
Arrange them on a platter with cornichons or celery sticks so the richness has a bright, crunchy partner. They fit especially well beside fried chicken and sliced melon, which is a combination I never get tired of.
Pro Tips for This Recipe:
- Grate the cheese finely so the filling turns creamy instead of clumpy.
- Let the cream cheese soften all the way or you’ll be fighting little cold lumps.
- Drain the pimentos well on paper towels.
- Make the filling a few hours ahead; the flavor gets deeper after a short chill.
Variations on This Dish:
- Bacon Pimento Cheese: Fold in 1/2 cup finely crumbled cooked bacon.
- Pickled Jalapeño Version: Add 2 tablespoons minced pickled jalapeños for heat and tang.
- Whole-Grain Tea Sandwiches: Use thin slices of hearty whole-grain bread if you want more chew.
Common Mistakes to Avoid with This Dish:
- Overloading the bread: Tea sandwiches should be neat, not burst at the seams.
- Using watery pimentos: That extra liquid makes the spread slide.
- Serving straight from the fridge when too cold: Let the sandwiches sit 5 to 10 minutes so the filling softens a little.
7. Cold Peanut Noodle Salad
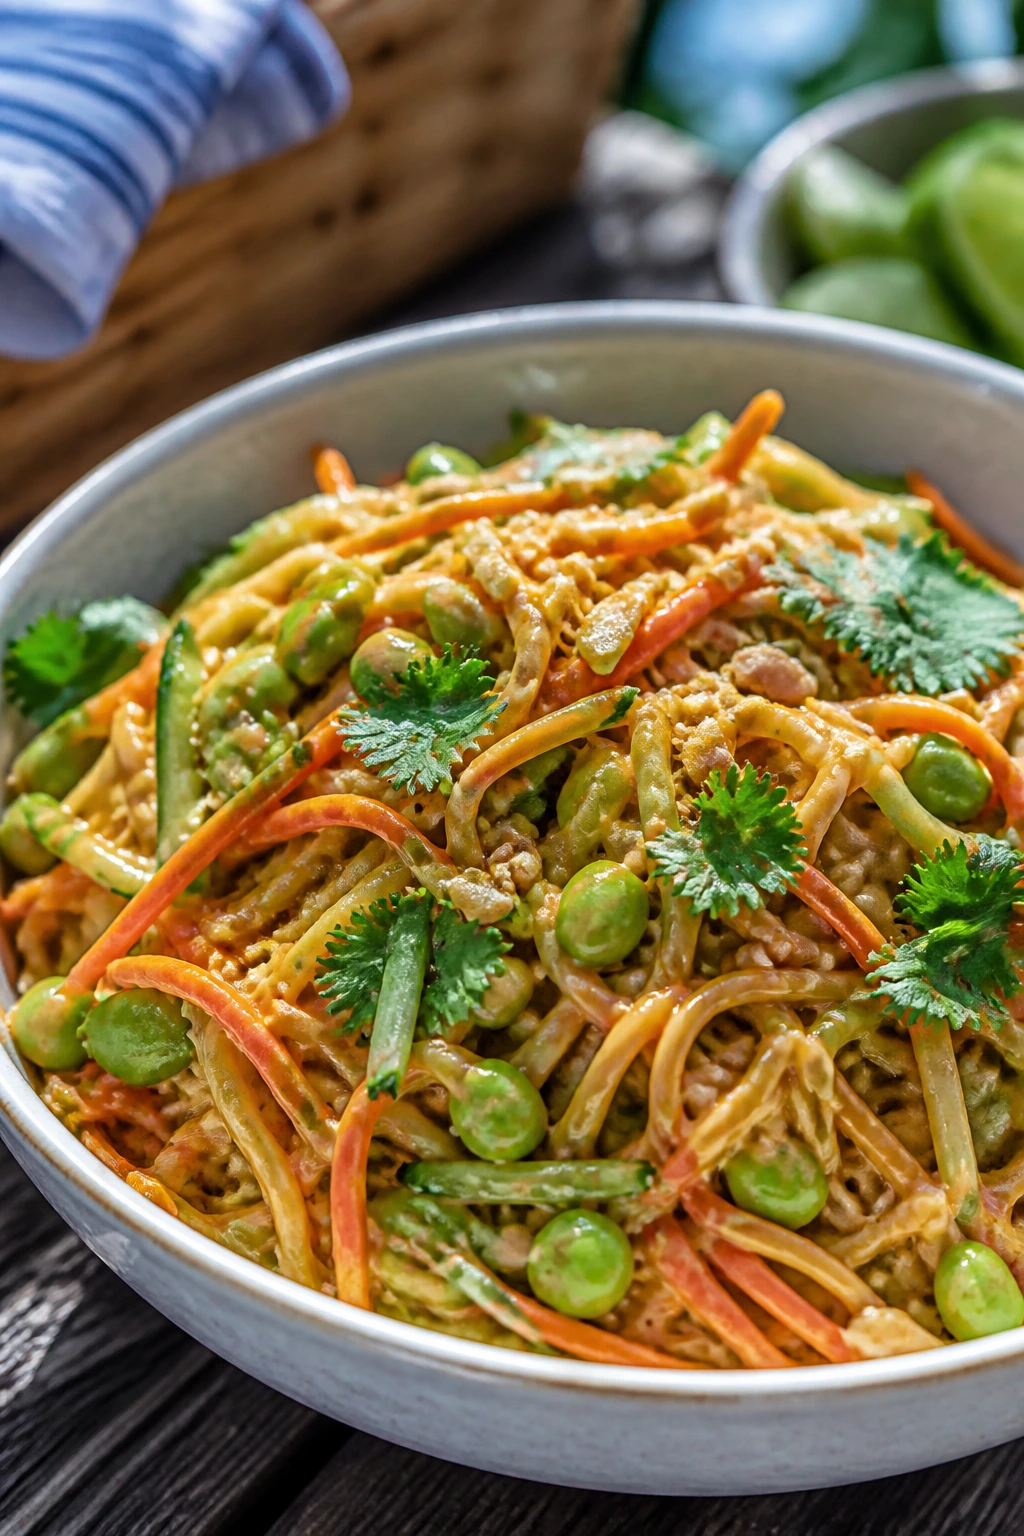
The sauce hits first: peanut, lime, soy, and ginger, with just enough sweetness to keep it from tasting harsh. Then the noodles give you that slippery, satisfying bite that makes people keep eating long after they said they were done. I like this picnic dish because it holds fine in the cooler and still tastes lively at room temperature.
Why It Works:
Rice noodles or soba are both sturdy enough to chill without getting mushy if you rinse them well and toss them with sauce before they glue together. Peanut butter gives the dressing body, while lime juice and rice vinegar keep it sharp enough to cut through the richness. Crunchy vegetables matter here, especially carrots and cucumbers, because they stop the bowl from feeling soft all the way through. Edamame adds a little protein so the salad doesn’t disappear too fast.
Key Ingredients:
- 12 ounces rice noodles or soba noodles
- 1 cup shredded carrots
- 1 cucumber, julienned or thinly sliced
- 3 scallions, sliced
- 1 cup shelled edamame, cooked and cooled
- 1/4 cup chopped cilantro
- 1/3 cup creamy peanut butter
- 3 tablespoons soy sauce
- 2 tablespoons lime juice
- 1 tablespoon rice vinegar
- 1 tablespoon honey
- 1 teaspoon grated fresh ginger
- 1 garlic clove, grated
- 2 to 4 tablespoons warm water, as needed
- 2 tablespoons chopped peanuts, for topping
Quick Steps:
- Cook the noodles according to the package directions until tender. Drain and rinse under cold water until fully cool.
- Whisk the peanut butter, soy sauce, lime juice, rice vinegar, honey, ginger, garlic, and warm water in a bowl until smooth.
- Toss the noodles with the sauce until coated.
- Fold in the carrots, cucumber, scallions, edamame, and cilantro.
- Taste and add more lime or a splash of water if the sauce feels too thick.
- Top with chopped peanuts just before serving. That last-minute crunch matters.
Equipment for This Recipe:
- Large pot
- Colander
- Whisk
- Large salad bowl
How to Serve This Dish:
Serve it in a wide bowl with extra peanuts and lime wedges nearby. It plays nicely with grilled chicken skewers, crisp cucumbers, or a bowl of chilled melon if you want a fuller picnic spread.
Pro Tips for This Recipe:
- Sesame oil can be added in a teaspoon or two if you want a deeper nutty note.
- Rinse the noodles until they feel cool and slick, not warm and starchy.
- Keep the cucumber separate if you’re packing this many hours ahead.
- A spoonful of chili crisp on top is a fine move if you like heat.
Variations on This Dish:
- Sesame-Soy Noodles: Swap peanut butter for tahini if peanuts are off the table.
- Chicken Satay Bowl: Add shredded rotisserie chicken and extra lime.
- Crunchy Cabbage Version: Replace the cucumber with shredded red cabbage for a sturdier texture.
Common Mistakes to Avoid with This Dish:
- Sauce that’s too thick: It will seize into a paste. Thin it with warm water a tablespoon at a time.
- Skipping the rinse on the noodles: They stick together and turn gummy.
- Adding the peanuts too soon: They lose their crunch and stop being useful.
8. Caprese Skewers with Basil Oil
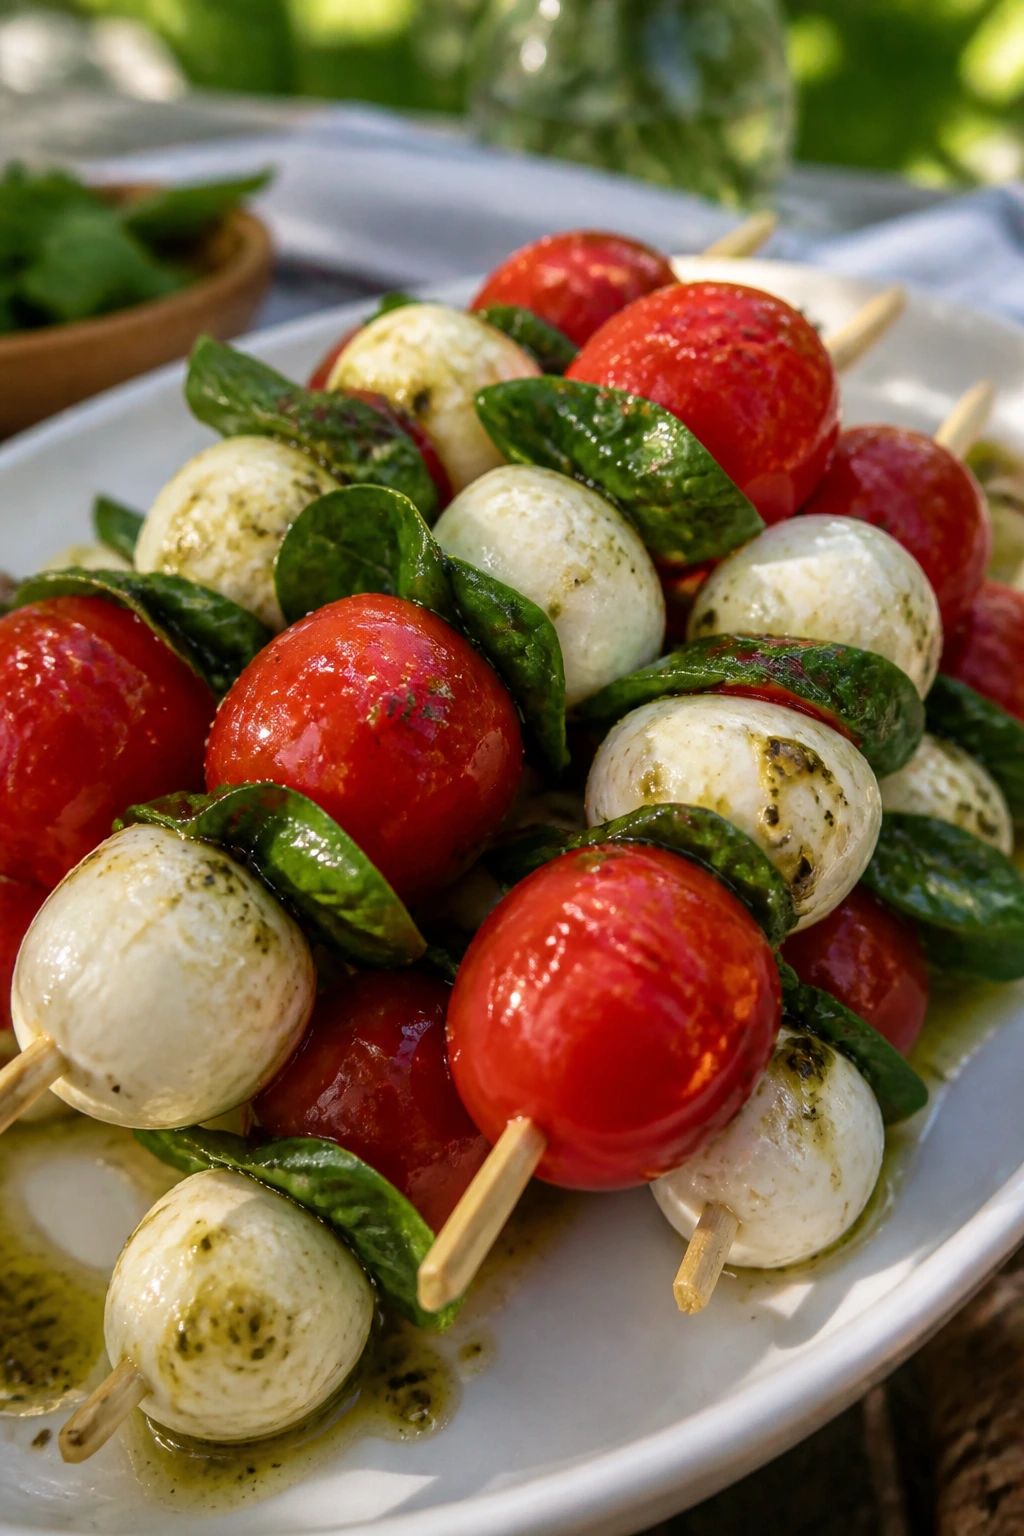
These are the easiest thing in the basket to make look deliberate. Bright tomatoes, creamy mozzarella, and basil smell like a garden the second you open the container. They’re a little fancy without being precious, which is a nice trick for picnic food.
Why It Works:
Caprese on a skewer keeps the tomato juice from soaking bread or crackers, and that alone makes it a smart picnic move. The basil oil carries the herb flavor farther than torn leaves alone, so every bite tastes more finished. Fresh mozzarella stays mild and cool, which balances the sweetness of the tomatoes. A few grains of flaky salt and a thin drizzle of balsamic glaze are enough to make the whole thing snap into place.
Key Ingredients:
- 2 pints cherry tomatoes
- 16 ounces mozzarella pearls
- 1 bunch fresh basil
- 1/4 cup olive oil
- 1 tablespoon balsamic glaze
- 1/2 teaspoon flaky salt
- 1/4 teaspoon black pepper
- 20 small skewers or toothpicks
Quick Steps:
- Pat the mozzarella pearls and tomatoes dry with paper towels.
- Thread one tomato, one basil leaf folded in half, and one mozzarella pearl onto each skewer. Repeat if your skewers are longer.
- Blend or finely chop half the basil with the olive oil to make a quick basil oil.
- Arrange the skewers on a platter and spoon the basil oil lightly over them.
- Finish with flaky salt, black pepper, and a tiny drizzle of balsamic glaze.
- Chill until serving time. Don’t drown them in dressing or the platter gets slippery fast.
Equipment for This Recipe:
- Cutting board
- Small blender or knife
- Skewers or toothpicks
- Platter
How to Serve This Dish:
Line them up on a shallow tray, then tuck a few extra basil leaves around the edges so the platter looks fresh. They’re perfect as a first bite before sandwiches or fried chicken.
Pro Tips for This Recipe:
- Use tomatoes that are ripe but still firm enough to spear without splitting.
- If basil oil sounds fussy, just tear the basil and toss it with the olive oil.
- Serve them cold, not icy. Freezing-cold mozzarella tastes dull.
- A pinch of lemon zest over the top gives them a brighter finish than more balsamic.
Variations on This Dish:
- Prosciutto Caprese: Add a folded strip of prosciutto to each skewer.
- Peach Caprese: Swap half the tomatoes for ripe peach chunks.
- Pesto Drizzle Version: Use a spoonful of thinned pesto instead of basil oil.
Common Mistakes to Avoid with This Dish:
- Wet mozzarella: It makes the platter puddle. Dry the pearls first.
- Overdoing the balsamic glaze: A little goes a long way.
- Using wooden skewers that are too long for the container: Measure your storage box before you assemble.
9. Deviled Eggs with Paprika and Pickles
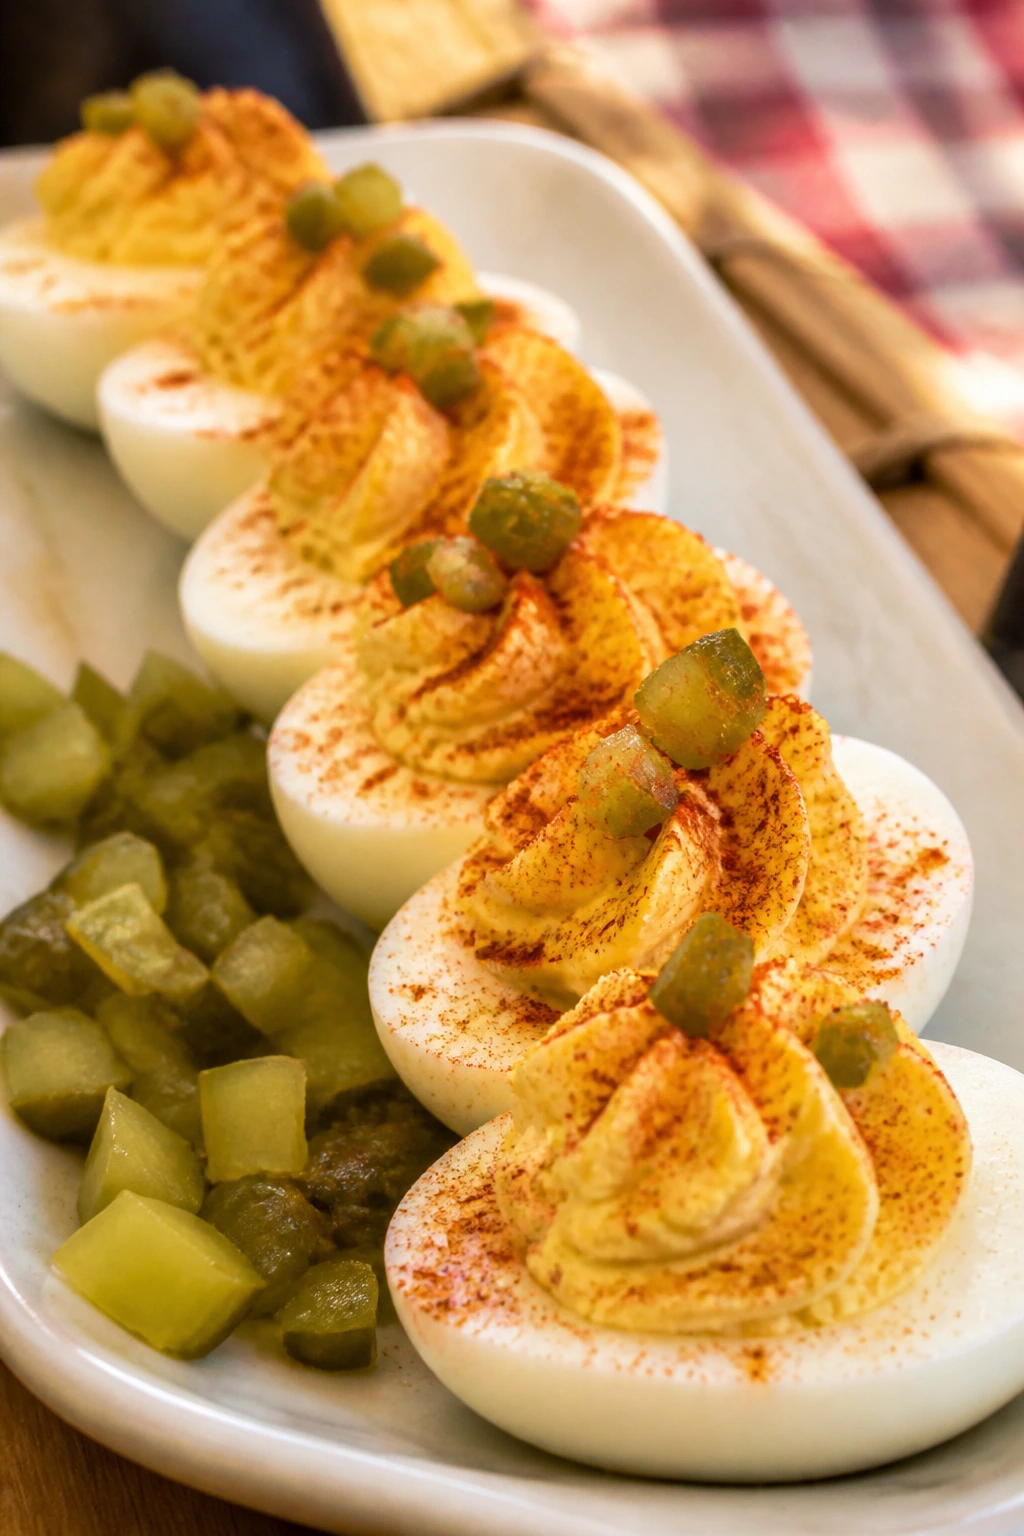
A good deviled egg should have a filling that tastes tangy before it tastes rich. The pickle and mustard keep these bright, the paprika gives the top a faint smoky note, and the yolks stay creamy instead of dense. They’re the first platter to empty when the timing is right.
Why It Works:
Deviled eggs are mostly about texture control. The yolks need enough mayo to go smooth, but not so much that the filling turns loose and slips off the whites. Pickle juice and chopped dill pickles bring acidity and crunch, which matters because a straight mayo filling can taste sleepy after a few minutes. Paprika is less about heat and more about smell; it makes the eggs feel finished when you open the container.
Key Ingredients:
- 12 large eggs
- 1/4 cup mayonnaise
- 1 teaspoon Dijon mustard
- 1 tablespoon pickle juice
- 2 tablespoons finely chopped dill pickles
- 1/4 teaspoon kosher salt
- 1/8 teaspoon black pepper
- Paprika, for dusting
- 1 tablespoon chives, chopped, optional
Quick Steps:
- Place the eggs in a saucepan, cover with cold water, and bring to a boil. Cover, remove from heat, and rest for 10 to 12 minutes.
- Chill the eggs in ice water until fully cool, then peel and split them in half lengthwise.
- Scoop the yolks into a bowl and mash with the mayo, Dijon, pickle juice, chopped pickles, salt, and pepper until smooth.
- Spoon or pipe the filling back into the whites.
- Dust with paprika and chives if using.
- Chill until serving. These taste better once the filling has had 20 minutes to settle.
Equipment for This Recipe:
- Medium saucepan
- Mixing bowl
- Fork or small mixer
- Piping bag or zip-top bag, optional
How to Serve This Dish:
Use a deviled egg tray if you have one, or nestle them in a shallow dish lined with lettuce leaves. I like them with pickles and crackers, because the salty crunch makes the eggs feel less rich.
Pro Tips for This Recipe:
- Add the mayo slowly so you stop at creamy, not loose.
- A pinch of mustard powder can deepen the flavor if your Dijon is mild.
- Pipe the filling for a neat look, but a spoon works fine.
- Keep them cold and out of direct sun once they leave the cooler.
Variations on This Dish:
- Bacon-Paprika Eggs: Top each egg with a few bacon bits.
- Herb Garden Eggs: Add minced dill and parsley to the yolk filling.
- Spicy Relish Eggs: Swap half the pickle relish for chopped jalapeños.
Common Mistakes to Avoid with This Dish:
- Overcooking the eggs: Green yolks and sulfur smell are a bad trade.
- Filling too wet to pipe: Chill it for 10 minutes, or mash in a little more yolk.
- Leaving them warm too long: Egg dishes need to stay cold in hot weather.
10. Bourbon-Glazed BBQ Meatballs
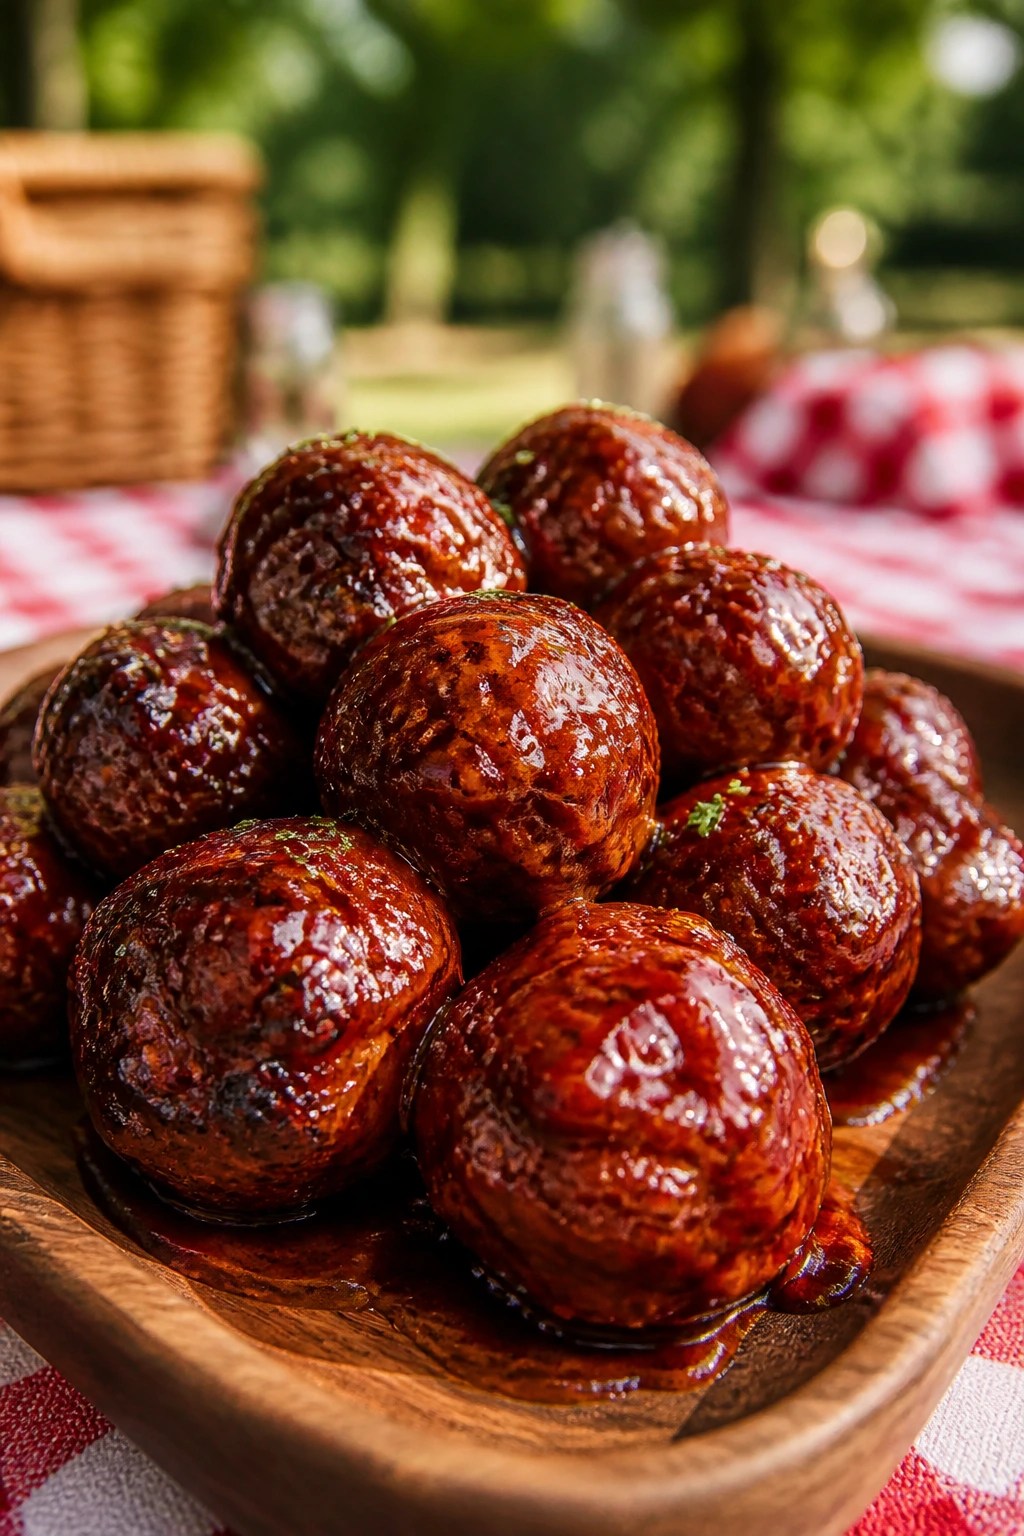
These meatballs have the kind of sticky, smoky glaze that makes people hover near the tray. They’re sturdy enough to skewer, fork, or pile into a roll, and they taste good warm or at room temperature. That makes them a picnic main that doesn’t panic if dinner runs a little late.
Why It Works:
Ground meat mixed with breadcrumbs and egg stays tender while still holding its shape in a sauce. Baking the meatballs instead of frying keeps the texture even and saves you from babysitting a skillet. The bourbon in the glaze adds a warm note without taking over, and the vinegar keeps the barbecue sauce from tasting one-dimensional. If you want something that feels a little more grown-up than plain meatballs, this is the lane.
Key Ingredients:
- 1 pound ground beef
- 1 pound ground pork
- 1 cup breadcrumbs
- 1 large egg
- 1/4 cup milk
- 1 small onion, grated
- 2 teaspoons kosher salt
- 1 teaspoon black pepper
- 1 teaspoon garlic powder
- 1 cup barbecue sauce
- 2 tablespoons bourbon
- 1 tablespoon apple cider vinegar
- 1 tablespoon brown sugar
- 1 teaspoon hot sauce
Quick Steps:
- Heat the oven to 400°F and line a sheet pan with parchment.
- Mix the beef, pork, breadcrumbs, egg, milk, onion, salt, pepper, and garlic powder until just combined.
- Roll into 1 1/2-inch meatballs and place on the pan with a little space between each one.
- Bake for 15 minutes, until the outsides are set.
- Stir the barbecue sauce, bourbon, vinegar, brown sugar, and hot sauce together, then spoon it over the meatballs.
- Return to the oven for 8 to 10 minutes, until glazed and cooked through. A thermometer should read 165°F in the center.
Equipment for This Recipe:
- Large mixing bowl
- Rimmed sheet pan
- Parchment paper
- Small saucepan or bowl for the glaze
How to Serve This Dish:
Pile them into a wide bowl with toothpicks, or stuff them into slider buns with a spoonful of slaw. They also sit nicely beside potato salad and grilled corn if you’re building a bigger spread.
Pro Tips for This Recipe:
- Grating the onion keeps the meatballs moist without leaving big chunks.
- Don’t pack the mixture too firmly or they’ll turn heavy.
- If the glaze thickens too much, loosen it with a teaspoon of water.
- A small brush helps you glaze the tops without tearing the meatballs apart.
Variations on This Dish:
- Turkey BBQ Meatballs: Swap in ground turkey and add an extra tablespoon of oil to the mix.
- Sweet Heat Version: Add 1 tablespoon honey and extra hot sauce to the glaze.
- Smoky Chipotle Meatballs: Stir chipotle in adobo into the sauce for a darker, smokier finish.
Common Mistakes to Avoid with This Dish:
- Overmixing the meat: Tight, dense meatballs are the result.
- Glazing too early: The sauce can burn before the meat finishes.
- Undercooking the center: Use a thermometer, not wishful thinking.
11. Watermelon, Mint, and Lime Salad
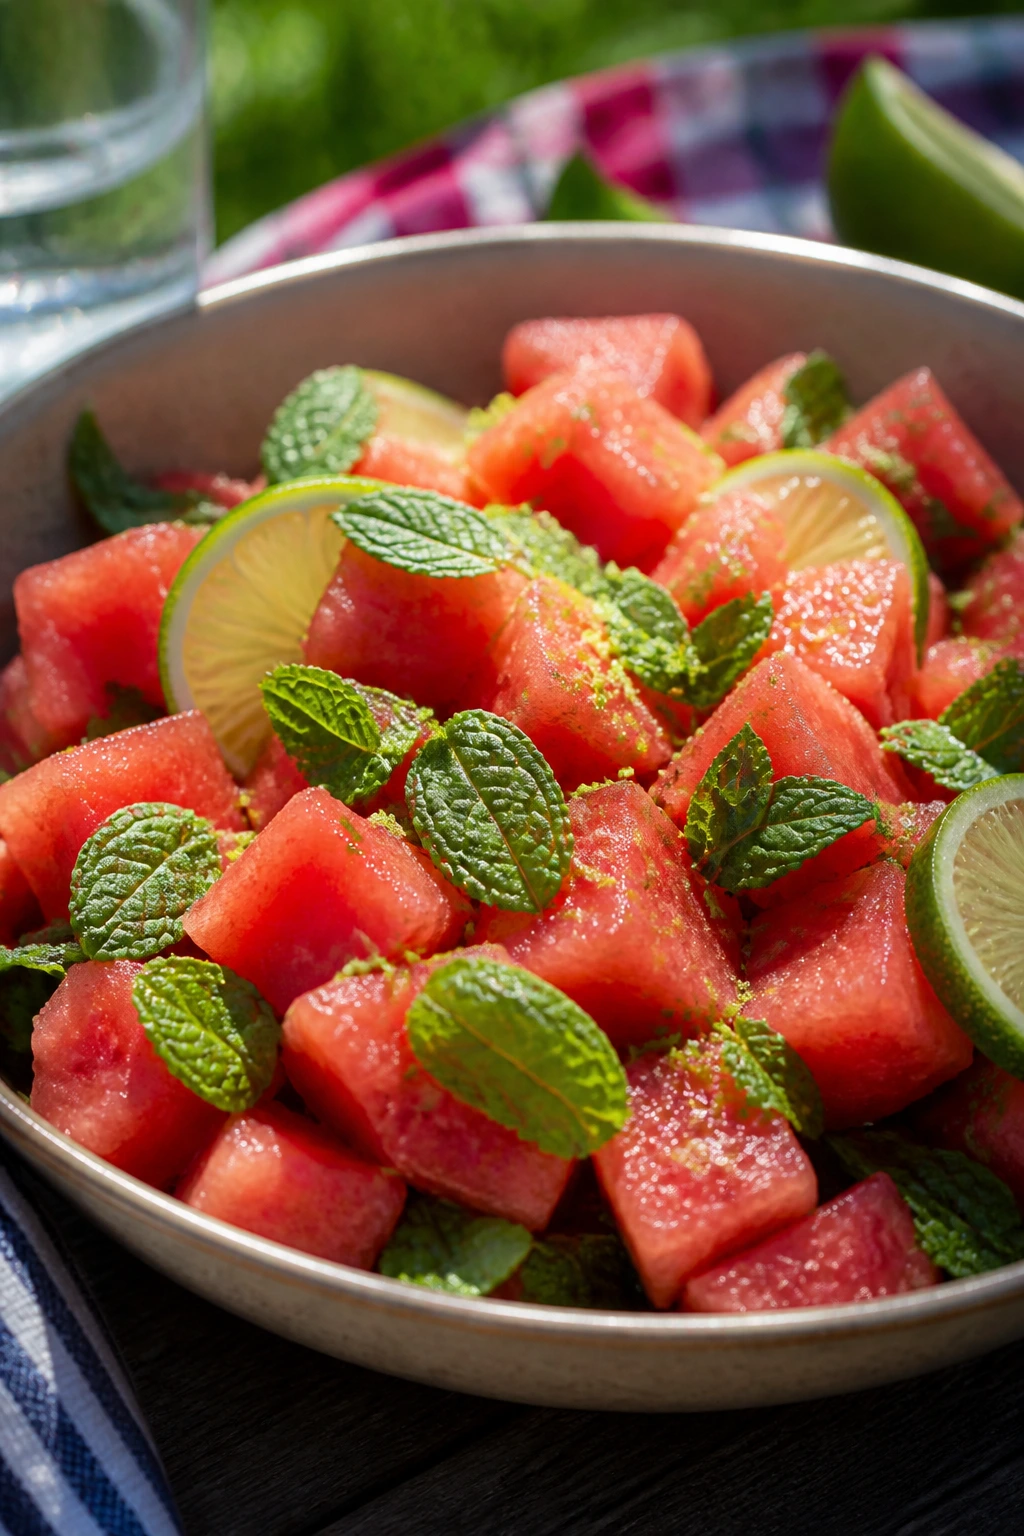
Watermelon salad sounds almost too simple until you taste it with enough lime and a pinch of salt. Then it becomes one of those bowls people keep spooning from even though it looks like dessert at first glance. It’s cold, bright, and exactly what I want when the air feels thick.
Why It Works:
Watermelon brings water and sweetness, but it needs acid and salt to stop tasting flat. Lime juice sharpens the fruit, mint makes it smell cool, and a tiny pinch of salt pushes the flavor forward. If you add cucumber, it turns the salad more savory and less candy-like, which I prefer for dinner. This is the sort of dish that tastes better after ten minutes in the fridge, not after hours.
Key Ingredients:
- 8 cups watermelon, cut into 1-inch cubes
- 1 cucumber, thinly sliced, optional
- 1/4 cup fresh mint leaves, torn
- Juice of 2 limes
- 1 teaspoon honey, optional
- 1/4 teaspoon flaky salt
- 1 tablespoon feta, optional if you like a salty edge
Quick Steps:
- Cube the watermelon and slice the cucumber if using.
- Whisk the lime juice, honey if using, and salt in a large bowl.
- Add the watermelon, cucumber, and mint, then toss very gently.
- Chill for 15 to 20 minutes.
- Add feta at the end if you want a sweet-salty combination.
- Serve cold. Do not let it sit in a pool of juice for too long or the texture goes soft.
Equipment for This Recipe:
- Sharp knife
- Large bowl
- Citrus juicer, optional
- Slotted spoon, helpful for serving
How to Serve This Dish:
Spoon it into a chilled bowl and finish with a few mint leaves on top. It works as a side with grilled meat or as the fresh thing that saves the meal from feeling heavy.
Pro Tips for This Recipe:
- Choose a watermelon that feels heavy for its size and sounds hollow when tapped.
- Tear the mint rather than chopping it into confetti.
- If the fruit is already very sweet, skip the honey.
- Keep the salad undressed until close to serving if you want a firmer bite.
Variations on This Dish:
- Watermelon Feta Salad: Add 1/2 cup feta for a salty, more substantial version.
- Spicy Lime Watermelon: Sprinkle with chili flakes and a little Tajín.
- Berry Melon Mix: Fold in a cup of strawberries or blueberries for color.
Common Mistakes to Avoid with This Dish:
- Overmixing: Watermelon bruises fast.
- Adding too much sweetener: The fruit already does the work.
- Serving it warm: Chilled is the whole point.
12. Tuna Salad Stuffed Mini Peppers
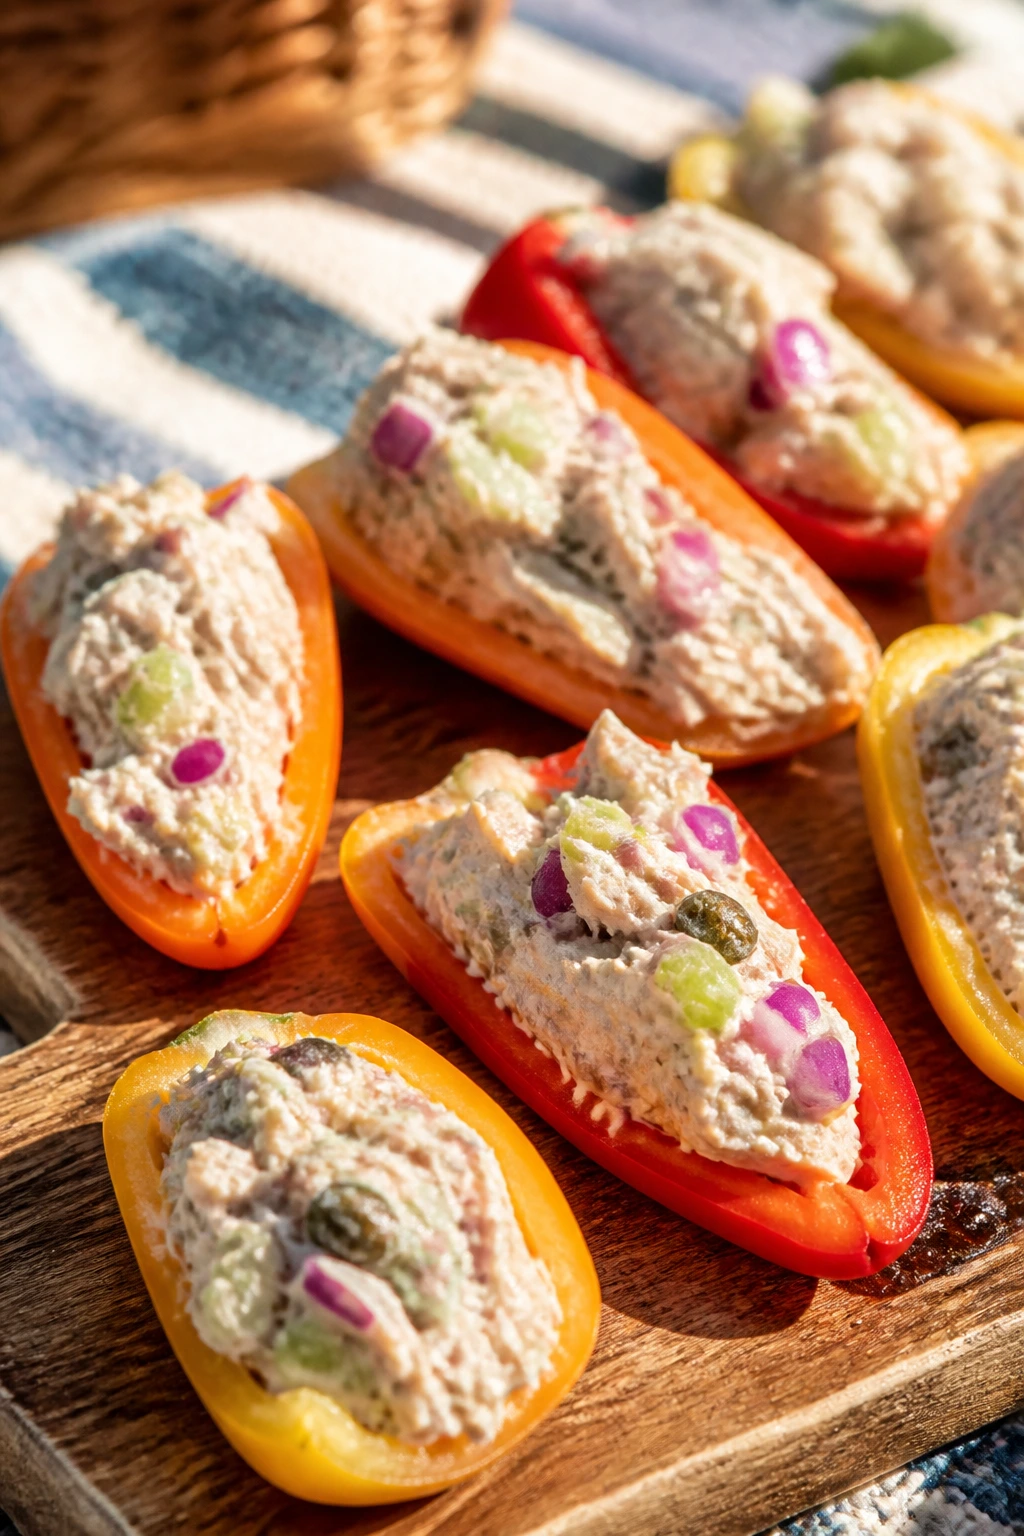
Mini peppers are the unsung picnic container. They’re crisp, bright, and naturally portioned, which means tuna salad can sit inside them without making the whole plate soggy. I like them because they feel a little more polished than crackers, but they’re just as easy to eat.
Why It Works:
Tuna salad gets a cleaner finish when you swap bread or crackers for sturdy pepper cups. The peppers bring sweetness and snap, while the tuna filling gives the dish enough salt and creaminess to taste like a meal. Celery and red onion keep the texture awake, and lemon juice keeps the tuna from feeling heavy once it chills. This is one of the best options when you want protein without a bunch of packing drama.
Key Ingredients:
- 2 cans tuna in water or oil, drained
- 1/4 cup mayonnaise
- 1 tablespoon lemon juice
- 1 tablespoon celery, finely diced
- 1 tablespoon red onion, minced
- 1 tablespoon capers or dill relish
- 1 tablespoon parsley, chopped
- 1/4 teaspoon black pepper
- 12 mini sweet peppers, halved and seeded
Quick Steps:
- Stir the tuna, mayo, lemon juice, celery, red onion, capers or relish, parsley, and pepper in a bowl.
- Taste and add a pinch of salt if needed.
- Halve the mini peppers lengthwise and remove the seeds.
- Spoon the tuna salad into each pepper half.
- Chill until serving.
- Pack them in a single layer if you can. Stacking crushes the filling and makes them slide.
Equipment for This Recipe:
- Mixing bowl
- Sharp knife
- Spoon
- Airtight container
How to Serve This Dish:
Set them on a tray with olives, pickles, and a few crackers for extra crunch. They make a strong appetizer and a respectable lunch if you pair them with fruit or a handful of chips.
Pro Tips for This Recipe:
- Use tuna packed in oil if you want a richer flavor; water-packed tuna stays lighter.
- Dice the celery very fine so it doesn’t tear the pepper shells.
- A tiny bit of Dijon helps if the filling tastes flat.
- If the peppers are large, slice them into shorter cups for easier packing.
Variations on This Dish:
- Curried Tuna Peppers: Add 1/2 teaspoon curry powder and a few raisins.
- Avocado Tuna Cups: Replace half the mayo with mashed avocado and eat them the same day.
- Spicy Relish Version: Add chopped pickled jalapeños instead of capers.
Common Mistakes to Avoid with This Dish:
- Using watery tuna: Drain well or the filling turns loose.
- Overstuffing the peppers: The filling pushes out and makes a mess.
- Packing them into a hot cooler: Keep them properly chilled so the peppers stay crisp.
13. Savory Hand Pies with Ham and Cheddar

These are the picnic pockets I wish more people made. They’re compact, tidy, and sturdy enough to eat without forks, which puts them high on my list of easy summer-night food. The ham and cheddar melt into a salty, savory filling that tastes good warm, room temp, or somewhere in between.
Why It Works:
Hand pies solve the picnic problem of loose fillings. Puff pastry or pie dough creates a sealed shell, so the cheese stays inside instead of smearing across the box. Ham brings salt, cheddar brings sharpness, and a little Dijon keeps the filling from tasting sleepy. They also reheat well, which makes them a strong make-ahead move.
Key Ingredients:
- 2 sheets puff pastry, thawed
- 6 ounces cooked ham, finely diced
- 6 ounces sharp cheddar, grated
- 1 tablespoon Dijon mustard
- 1 tablespoon chives, chopped
- 1 egg, beaten
- 1 tablespoon milk
- 1 teaspoon black pepper
- Flour, for rolling
Quick Steps:
- Heat the oven to 400°F and line a sheet pan with parchment.
- Mix the ham, cheddar, Dijon, chives, and black pepper in a bowl.
- Roll out the pastry and cut it into 6 rectangles or 8 squares.
- Spoon filling onto one half of each piece, leaving a border, then fold and seal the edges with a fork.
- Brush with the egg-and-milk wash and cut a small steam vent on top.
- Bake for 18 to 22 minutes, until puffed and deep golden. If the pastry looks pale, it probably needs more time.
Equipment for This Recipe:
- Sheet pan
- Parchment paper
- Rolling pin
- Pastry brush
How to Serve This Dish:
Serve them warm or at room temperature with mustard, pickles, or a simple green salad. They’re also excellent tucked into a lunch box with grapes and a handful of almonds.
Pro Tips for This Recipe:
- Keep the pastry cold before baking so it puffs properly.
- Chop the ham small enough that the pockets seal cleanly.
- Don’t overfill; a little too much cheese turns into a leak.
- If the edges won’t seal, brush them with a little water before crimping.
Variations on This Dish:
- Spinach and Feta Pies: Replace the ham with chopped spinach squeezed dry and crumbled feta.
- Cheddar and Onion Version: Use caramelized onions for a sweeter filling.
- Pepper Jack Pies: Swap the cheddar for pepper jack if you want heat.
Common Mistakes to Avoid with This Dish:
- Warm filling: It melts the pastry before it hits the oven.
- Pastry that’s too soft: Chill it if the kitchen is warm.
- Forgetting the vent: Steam builds up and can split the top.
14. Smoked Sausage and Potato Salad
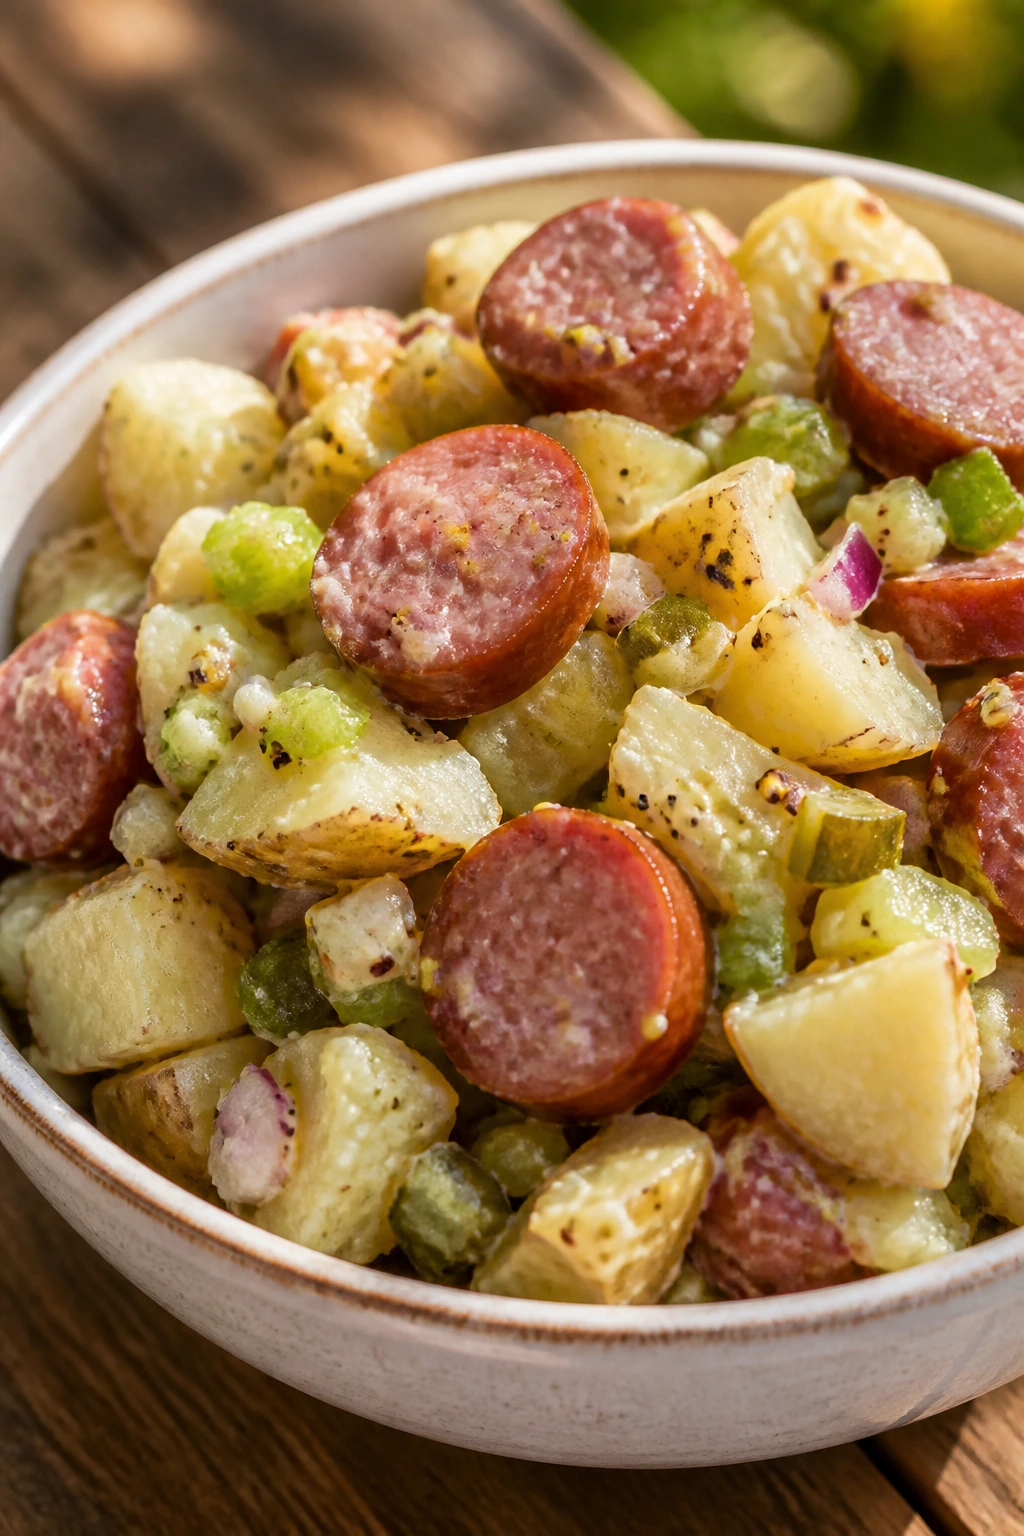
This is the heartier end of the picnic table, the one that makes a meal feel like dinner instead of a pile of snacks. The smoked sausage gives the potatoes a salty, meaty edge, and the vinegar dressing keeps the whole thing from turning heavy. It’s good warm, better after it sits a bit, and useful in a way that fancy food usually isn’t.
Why It Works:
Potato salad needs contrast, and smoked sausage gives it a chewy, savory anchor. Baby potatoes hold their shape better than big russets, which means you can toss the salad without turning it into mash. A Dijon and vinegar dressing cuts through the starch, while pickles or relish add a bright crunch that keeps each bite from feeling dense. This is picnic food for people who want something solid on the table.
Key Ingredients:
- 2 pounds baby potatoes
- 12 ounces smoked sausage, sliced
- 1/2 cup celery, diced
- 1/4 cup red onion, finely chopped
- 1/4 cup chopped dill pickles or relish
- 2 tablespoons Dijon mustard
- 3 tablespoons apple cider vinegar
- 1/4 cup olive oil
- 2 tablespoons parsley, chopped
- 1 teaspoon kosher salt
- 1/2 teaspoon black pepper
Quick Steps:
- Boil the potatoes in salted water until tender, about 12 to 15 minutes. Drain and let them cool just enough to handle.
- Slice the potatoes in halves or quarters.
- Brown the sausage in a skillet over medium heat until the edges crisp, about 4 to 5 minutes.
- Whisk the Dijon, vinegar, olive oil, salt, and pepper in a large bowl.
- Add the potatoes, sausage, celery, onion, pickles, and parsley. Toss gently.
- Taste and adjust with more vinegar or salt if needed. Warm potatoes drink up dressing better than cold ones.
Equipment for This Recipe:
- Large pot
- Skillet
- Colander
- Large mixing bowl
How to Serve This Dish:
Spoon it into a wide bowl and garnish with extra parsley and a few pickle slices. It’s strong enough to sit next to grilled vegetables or cold fruit without getting lost.
Pro Tips for This Recipe:
- Dress the potatoes while they’re still warm for the best flavor.
- Slice the sausage after browning so you keep the crust on the cut surfaces.
- If the potatoes are very waxy, use a little more vinegar.
- Fresh dill works well if you want the salad to taste brighter.
Variations on This Dish:
- Mustard Potato Salad: Leave out the sausage and add extra Dijon for a lighter side.
- Bacon Version: Swap the sausage for crisp bacon and keep the potatoes smaller.
- Herbed Creamy Style: Stir in 2 tablespoons mayo or sour cream for a softer dressing.
Common Mistakes to Avoid with This Dish:
- Using starchy potatoes that fall apart: Baby Yukon Golds are safer than russets.
- Dressing only after chilling: The flavor never gets into the potatoes as well.
- Too much sausage in one bite: Keep the balance so it still tastes like salad, not breakfast hash.
15. Chickpea Salad Lettuce Cups
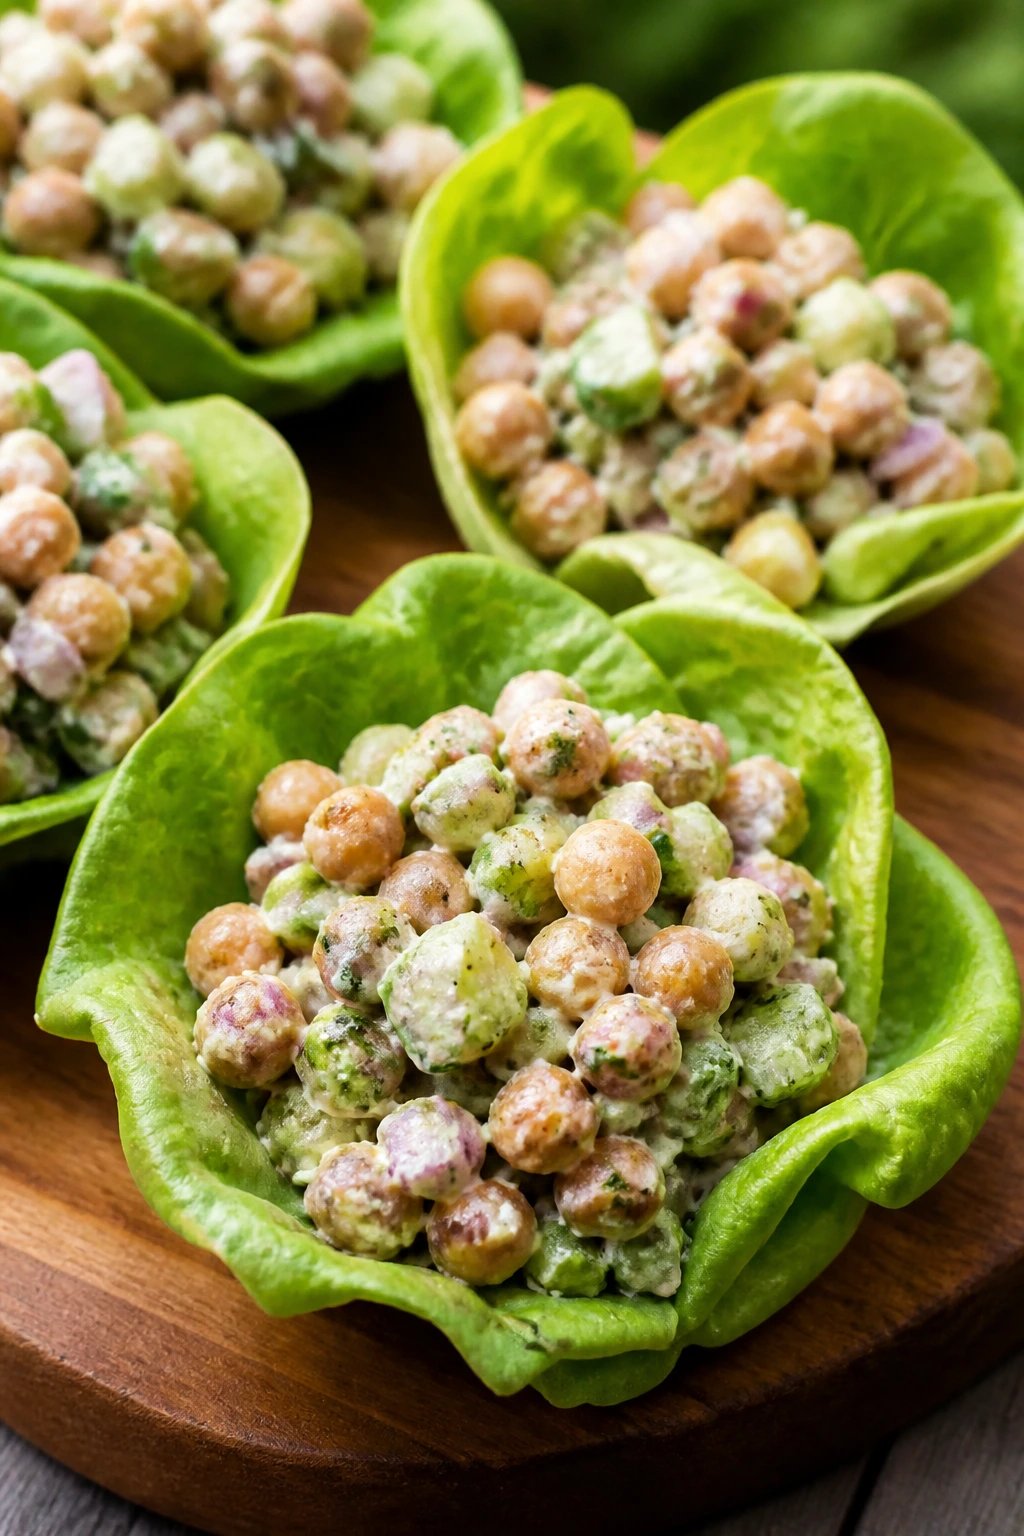
Chickpea salad in lettuce cups is the kind of picnic lunch that quietly solves several problems at once. It’s vegetarian, sturdy, cold, and neat enough to eat without bread. The chickpeas keep their shape, the herbs make the filling smell fresh, and the lettuce adds a snap that box lunches usually miss.
Why It Works:
Chickpeas mash a little when you stir them, which gives the filling body without turning it into paste. Celery and red onion give crunch, lemon keeps it bright, and a little Dijon helps the dressing cling to every bean. Butter lettuce or romaine cups act like little edible bowls, so there’s less chance of soggy bread or crumb fallout. It’s the sort of recipe that tastes even better after a short chill.
Key Ingredients:
- 2 cans chickpeas, drained and rinsed
- 1/3 cup mayonnaise or plain Greek yogurt
- 1 tablespoon lemon juice
- 1 tablespoon Dijon mustard
- 1 celery stalk, finely diced
- 2 tablespoons red onion, minced
- 2 tablespoons parsley, chopped
- 1/4 teaspoon cumin
- 1/2 teaspoon kosher salt
- 1/4 teaspoon black pepper
- 1 head butter lettuce or 2 romaine hearts, leaves separated
Quick Steps:
- Pat the chickpeas dry and mash about one-third of them with a fork in a bowl.
- Stir in the mayo or yogurt, lemon juice, Dijon, celery, red onion, parsley, cumin, salt, and pepper.
- Taste and adjust seasoning.
- Chill the filling for 15 minutes if you have time.
- Spoon into lettuce leaves just before serving.
- Pack the cups and filling separately if you want them extra crisp. Assembled too early, lettuce cups sweat fast.
Equipment for This Recipe:
- Mixing bowl
- Fork
- Cutting board
- Airtight containers
How to Serve This Dish:
Arrange the cups in rows and tuck lemon wedges around them. They work well with chips, grapes, or a tomato salad if you want a lighter dinner.
Pro Tips for This Recipe:
- Mash only some of the chickpeas so the filling stays textured.
- Use Greek yogurt if you want a tangier, lighter spread.
- Dry the lettuce leaves after washing or the filling will slip.
- A spoonful of chopped dill is a nice addition if you want more herb flavor.
Variations on This Dish:
- Curried Chickpea Cups: Add curry powder and chopped raisins for a sweeter profile.
- Mediterranean Chickpeas: Mix in chopped olives and cucumber.
- Avocado Chickpea Mash: Replace half the mayo with avocado and eat it fresh.
Common Mistakes to Avoid with This Dish:
- Too much dressing: The filling should be coated, not soupy.
- Wilty lettuce: Dry the leaves well and keep them chilled.
- Overmashing all the beans: You lose the texture that makes this work.
16. Cornbread Muffins with Honey Butter
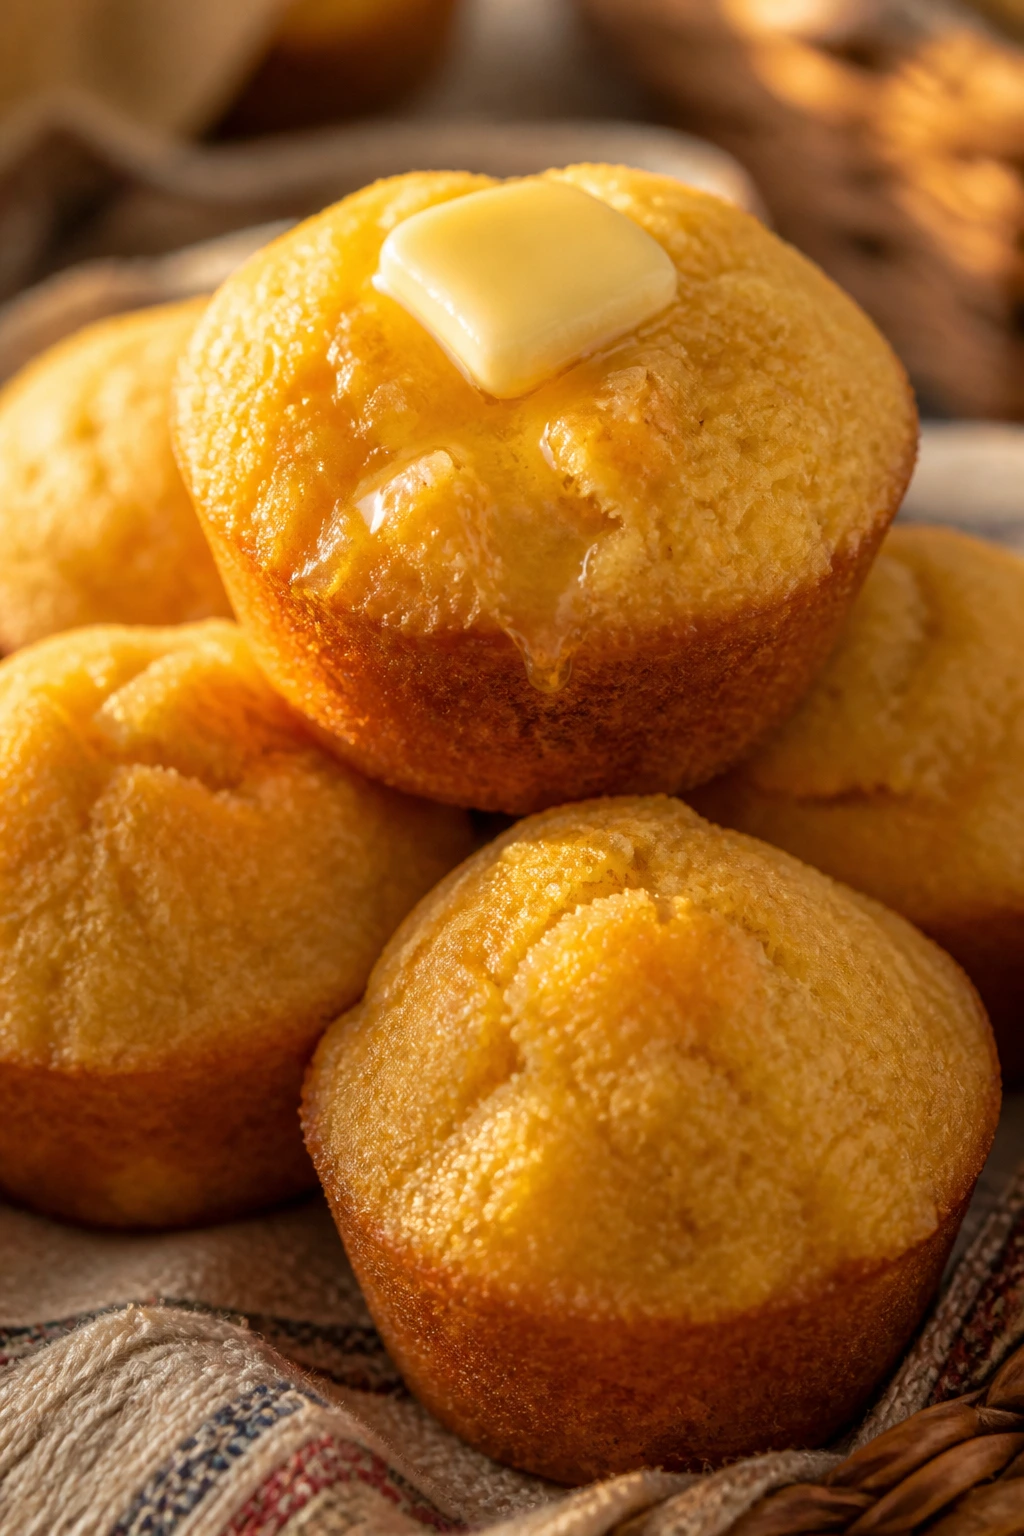
Cornbread muffins are one of those picnic staples that disappear quietly because everybody assumes someone else will take the last one. They’re slightly sweet, tender in the middle, and sturdy enough to split open and spread with butter. With honey butter, they feel a little like dessert and a little like dinner, which is a nice place to be.
Why It Works:
Cornmeal gives these muffins grit and character, while flour keeps them from crumbling in your hand. Buttermilk brings tang and helps the crumb stay soft, and melted butter gives the tops a golden edge. A little sugar rounds out the corn flavor without turning the muffins into cake. Honey butter is the easy finish that makes them feel complete without much effort.
Key Ingredients:
- 1 cup yellow cornmeal
- 1 cup all-purpose flour
- 1/4 cup granulated sugar
- 1 tablespoon baking powder
- 1/2 teaspoon kosher salt
- 1 cup buttermilk
- 2 large eggs
- 1/3 cup melted butter
- 1 cup corn kernels, optional
- 1/2 cup unsalted butter, softened, for honey butter
- 3 tablespoons honey
- Pinch of salt
Quick Steps:
- Heat the oven to 400°F and grease a 12-cup muffin tin or line it with paper cups.
- Whisk the cornmeal, flour, sugar, baking powder, and salt in a bowl.
- In another bowl, whisk the buttermilk, eggs, and melted butter.
- Stir the wet ingredients into the dry ingredients until just combined, then fold in corn kernels if using.
- Fill the muffin cups about three-quarters full and bake for 16 to 18 minutes, until the tops spring back and a toothpick comes out clean.
- Mix the softened butter, honey, and salt for the honey butter.
- Serve warm or at room temperature. Stop mixing as soon as the flour disappears or the muffins turn tough.
Equipment for This Recipe:
- Muffin tin
- Mixing bowls
- Whisk
- Rubber spatula
How to Serve This Dish:
Split them and spread with honey butter, or serve them whole beside chili, grilled chicken, or a picnic ham. They’re also useful for soaking up tomato juices, which is a more elegant sentence than the reality deserves.
Pro Tips for This Recipe:
- Don’t overfill the cups or the tops dome too hard and break apart.
- If you want a moister muffin, add 1/4 cup sour cream.
- Bake them in a hot oven so the tops set quickly.
- Honey butter keeps in the fridge for several days and softens fast at room temp.
Variations on This Dish:
- Jalapeño Cornbread Muffins: Add diced jalapeños and shredded cheddar.
- Maple Corn Muffins: Swap the sugar for maple syrup and reduce the buttermilk slightly.
- Savory Herb Muffins: Fold in chopped chives and thyme for a less sweet version.
Common Mistakes to Avoid with This Recipe:
- Mixing until smooth: Cornbread batter should look a little rough.
- Baking at too low a heat: The muffins won’t rise as well.
- Serving them dry: Honey butter or a smear of soft cheese makes them much better.
17. Shrimp and Avocado Cucumber Cups
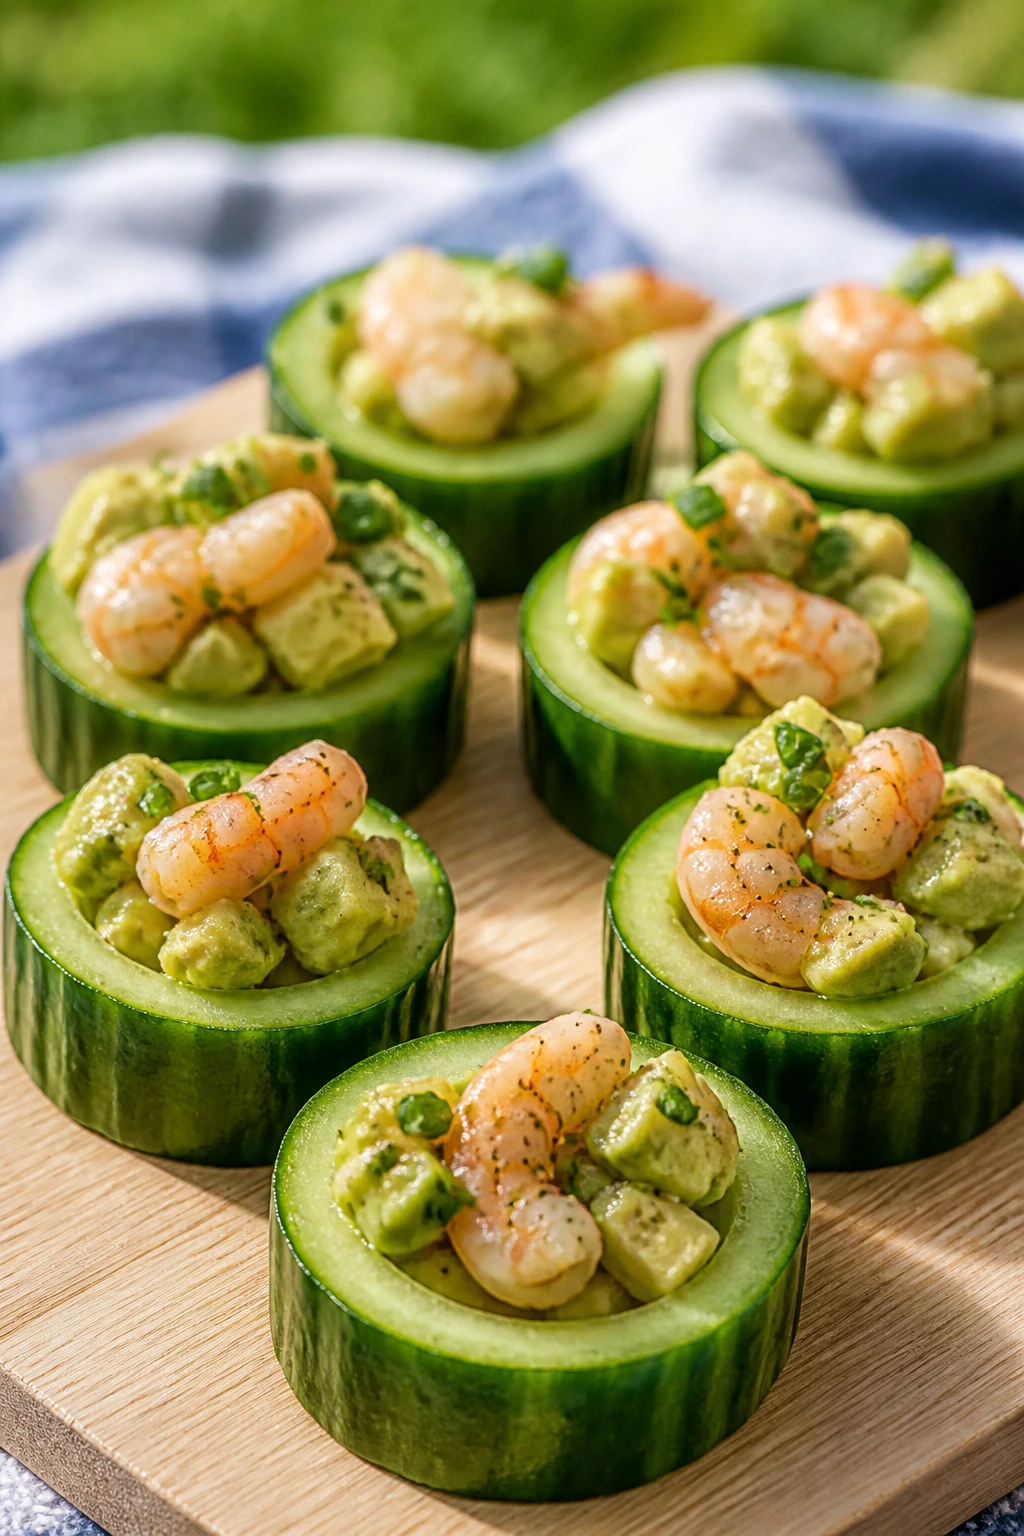
These are the cool, clean bites I want when the evening is sticky and nobody wants another heavy sandwich. Shrimp, avocado, lime, and cucumber give you enough richness and freshness in one bite that you don’t need much else. They’re tidy too, which is a rare and useful thing.
Why It Works:
Cucumber cups give the filling a crisp, watery base that feels refreshing without making everything sloppy. Shrimp brings protein and a little sweetness, while avocado smooths out the edges and makes the filling feel substantial. Lime juice keeps the avocado from browning too fast and cuts through the shrimp’s sweetness. A pinch of salt and cilantro is enough to make the whole thing taste finished.
Key Ingredients:
- 1 pound cooked shrimp, peeled and chopped
- 2 English cucumbers
- 2 ripe avocados
- 2 tablespoons lime juice
- 1 tablespoon olive oil
- 2 tablespoons cilantro, chopped
- 1 small jalapeño, minced, optional
- 1/2 teaspoon kosher salt
- 1/4 teaspoon black pepper
Quick Steps:
- Slice the cucumbers into thick rounds, then use a melon baller or small spoon to scoop out a shallow cup from each round.
- Dice the avocados and toss them with lime juice, olive oil, salt, and pepper.
- Fold in the chopped shrimp, cilantro, and jalapeño if using.
- Spoon the mixture into the cucumber cups.
- Chill until serving, but not so long that the avocado loses its color.
- Finish with extra cilantro or a dusting of black pepper. These are best the same day.
Equipment for This Recipe:
- Sharp knife
- Melon baller or small spoon
- Mixing bowl
- Spoon for filling
How to Serve This Dish:
Set them on a chilled tray and serve immediately after filling. They’re lovely alongside chilled fruit, crackers, or a tomato salad, and they look more finished than the effort they take.
Pro Tips for This Recipe:
- Pat the shrimp dry so the filling stays firm.
- Scoop the cucumber centers lightly; if you hollow too far, they collapse.
- If avocados vary in ripeness, mash one and dice the other for a better texture.
- A few drops of hot sauce can wake up the filling if it tastes flat.
Variations on This Dish:
- Crab Cucumber Cups: Swap the shrimp for crab meat and add a little dill.
- Tex-Mex Version: Add corn kernels and a pinch of cumin.
- Yogurt Shrimp Cups: Stir in a spoonful of Greek yogurt for a lighter, tangier filling.
Common Mistakes to Avoid with This Dish:
- Using overripe avocados: The filling turns mushy fast.
- Waterlogged cucumber cups: Dry the cucumber well after scooping.
- Making them too far ahead: Avocado browns and the cups soften.
18. Brown Sugar Peach Bars

Peach bars are the picnic dessert I want when the fruit is fragrant and the air smells like warm grass. They’re buttery, a little crumbly, and sturdy enough to eat with your hands once they cool and set. Brown sugar deepens the fruit flavor, which keeps the bars from tasting like a sweet slab of dough.
Why It Works:
A shortbread-style base gives the bars structure, and a cornstarch-thickened peach layer keeps the fruit from running everywhere. Brown sugar adds a caramel note that makes the peaches taste rounder, especially if the fruit is fully ripe. A crumb topping gives you texture without requiring frosting or a knife. These cut cleanly once cold, which is exactly what a picnic dessert should do.
Key Ingredients:
- 1 1/2 cups all-purpose flour
- 1/2 cup granulated sugar
- 1/4 teaspoon kosher salt
- 3/4 cup unsalted butter, cold and cubed
- 3 cups fresh peaches, peeled and sliced
- 1/3 cup brown sugar
- 1 tablespoon cornstarch
- 1 tablespoon lemon juice
- 1 teaspoon vanilla extract
- 1/2 teaspoon cinnamon
Quick Steps:
- Heat the oven to 350°F and line an 8-inch or 9-inch square pan with parchment.
- Mix the flour, granulated sugar, and salt, then cut in the cold butter until the mixture looks like coarse crumbs.
- Press about two-thirds of the crumb mixture into the pan to form the base.
- Toss the peaches with brown sugar, cornstarch, lemon juice, vanilla, and cinnamon.
- Spread the peach mixture over the base and scatter the remaining crumbs on top.
- Bake for 40 to 45 minutes, until the top is golden and the filling bubbles at the edges.
- Cool completely before cutting. Warm bars will fall apart.
Equipment for This Recipe:
- Square baking pan
- Parchment paper
- Mixing bowl
- Pastry cutter or fork
How to Serve This Dish:
Cut into neat squares and pack them with parchment between layers so they don’t stick. They’re excellent cold from the fridge, though I also like them at room temperature with a spoonful of whipped cream.
Pro Tips for This Recipe:
- If the peaches are very juicy, add an extra teaspoon of cornstarch.
- Freeze the butter for 10 minutes before cutting it in if your kitchen runs warm.
- Let the bars cool all the way before slicing or the fruit layer will slide.
- A little nutmeg in the crumb is nice, but don’t overdo it.
Variations on This Dish:
- Peach-Berry Bars: Add a cup of blueberries or raspberries for more color.
- Oat Crumble Version: Replace 1/2 cup of flour with oats for a rougher topping.
- Apricot Bars: Swap peaches for apricots if you want a sharper fruit flavor.
Common Mistakes to Avoid with This Dish:
- Undercooling before slicing: The filling needs time to set.
- Too much fruit: The base gets soggy if the layer is overloaded.
- Using limp peaches: Firm-ripe fruit gives the best shape and flavor.
Why Picnic Food Works Better When It’s Built for the Heat
Picnic food is one of those categories that exposes bad planning fast. A dish can taste great in the kitchen and still fail once it’s sitting in warm air for 30 minutes, because heat changes everything: bread softens, herbs wilt, mayo loosens, and starches keep absorbing liquid long after you’ve stopped looking at them. The winning recipes are the ones that keep their shape and still taste alive at room temperature.
The trick is balance. Acid keeps rich food from feeling heavy. Salt makes cold food taste more complete. Crunch gives you something to notice after the second bite instead of a bowl of one soft texture. That’s why pasta salads with lemon, egg salad with pickles, and cucumber cups with a little salt all work better than dishes that lean on creaminess alone.
I also think picnic food should be practical in the way a good jacket is practical. You don’t notice the smart details until the weather turns. Sturdy breads, sealed pockets, chilled bars, and foods that can be eaten with fingers instead of a knife make a picnic feel easy, which is the whole point. You want dinner that cooperates when it leaves the kitchen.
Essential Equipment for These Recipes
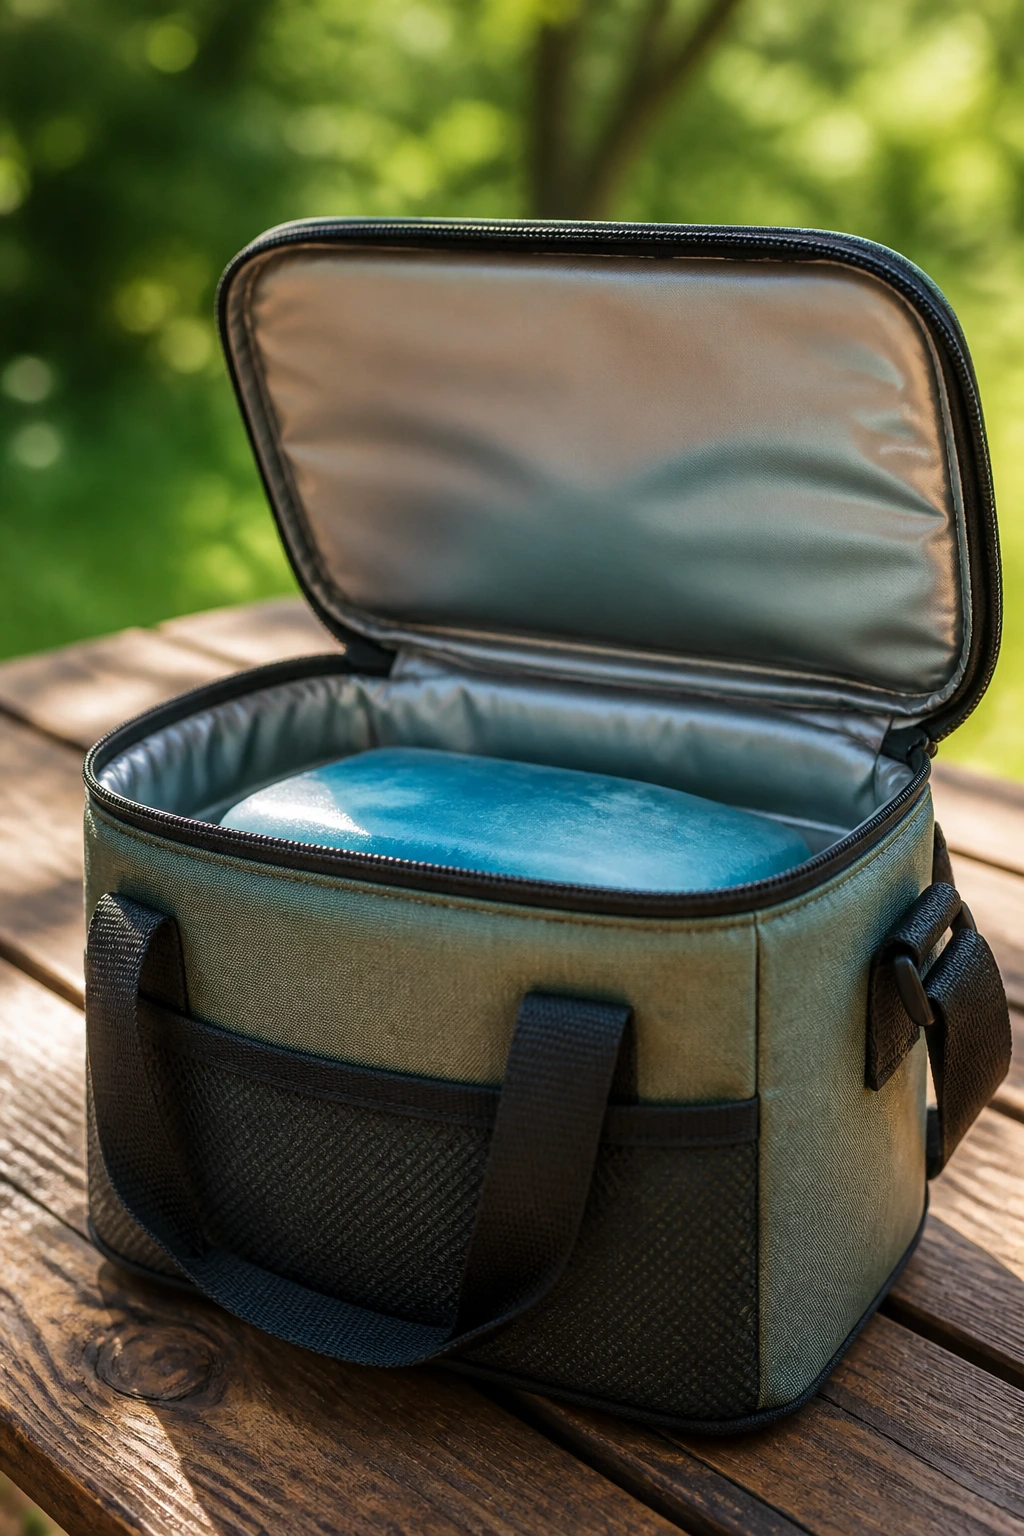
- Insulated cooler or cooler bag: Keeps cold recipes safe and stops dairy or seafood dishes from warming too fast.
- Reusable ice packs: Useful under containers, especially for egg salad, shrimp, deviled eggs, and watermelon.
- Sheet pans: Handy for cooling pasta, baking hand pies, muffins, chicken tenders, and peach bars.
- Mixing bowls in 2 or 3 sizes: These recipes move quickly when you have one bowl for dressing, one for filling, and one for assembly.
- Sharp chef’s knife: Tomatoes, cucumbers, onions, herbs, peaches, and peppers all cut cleaner with a good blade.
- Colander or fine strainer: You’ll need it for pasta, noodles, potatoes, and chickpeas.
- Instant-read thermometer: Non-negotiable for fried chicken and meatballs.
- Parchment paper: Makes baking, cooling, and packing much easier.
- Airtight containers: The less air sloshing around inside the box, the better the texture stays.
- Small skewers, toothpicks, or appetizer picks: Useful for Caprese skewers, meatballs, and anything finger-friendly.
Smart Shopping for the Best Picnic Ingredients
The shopping trip matters here more than people admit. Picnic food lives or dies on texture, and texture starts in the cart. For produce, pick tomatoes that feel heavy, cucumbers that are firm from end to end, and peaches that give just a little when you press near the stem without going mushy. If basil looks black at the edges or mint looks tired in the bunch, skip it. Fresh herbs don’t need to be perfect, but they do need to smell alive.
For dairy and eggs, buy what you’ll keep chilled and use within a few days. Sharp cheddar should be dense enough to grate cleanly. Feta should smell briny, not sour in a bad way. Eggs for deviled eggs peel better when they’re not from the same morning’s delivery, which is one of those irritating little kitchen facts that turns out to be true.
Protein choices should match the dish’s job. Rotisserie chicken works in pasta salad because the texture stays intact. Tenders are better than whole breasts for fried chicken because they cook evenly and fit the picnic hand. For tuna salad, choose cans that drain cleanly; oily tuna tastes richer, water-packed tuna tastes lighter. Shrimp should smell clean and faintly sweet, never fishy. And if you’re buying sausage for potato salad, look for one with enough smoke and spice that it doesn’t disappear against the potatoes.
Bread and pastry deserve their own brief sermon. Soft white bread is correct for tea sandwiches. Sturdy rolls or puff pastry are better for anything that has to travel. Flimsy sandwich bread is the wrong tool for tomato-heavy fillings, and that’s not a moral judgment; it’s just a wet-crumb problem waiting to happen.
How to Serve These Recipes at the Blanket
Presentation: Spread the food across shallow containers and low bowls so people can see what they’re reaching for. Use parchment squares, lettuce leaves, or paper liners under fried foods and muffins; it keeps the serving surface from getting slick. A few whole herbs, lemon wedges, or sliced fruit on the side make the table look finished without adding work.
Accompaniments: Pair the heavier dishes with crisp, cold sides. Fried chicken likes pickles and watermelon. Pasta salads sit well beside bread, chips, or grilled vegetables. Egg salad and tuna salad need crunchy partners like celery sticks, crackers, or mini cucumbers. Peach bars and cornbread muffins are better if you leave a little room around them instead of stacking everything in one pile.
Portions: For adults, plan about 1 1/2 cups of pasta salad, 2 to 3 chicken tenders, 2 hand pies, or 3 to 4 appetizer-style bites like deviled eggs or Caprese skewers. If picnic food is the whole dinner, people usually eat more than you expect, especially if the air is warm and the food is salty. For dessert, cut bars into small squares; they disappear faster that way, and nobody feels stuck with a giant sweet piece after a full meal.
Beverage Pairing: I like iced tea with lemon for almost all of this. Sparkling water with lime works when you want the food to stay the star. If alcohol is part of the evening, a cold pilsner or a dry rosé suits the salty, herby dishes without fighting them.
Additional Tips and Flavor Boosters
Flavor Enhancement: A little acid changes almost everything here. Extra lemon on the pasta salad, a splash of vinegar on the potato salad, or lime over the shrimp cups pulls the flavors into focus. If you’ve ever wondered why a chilled dish tastes flat after an hour, acid is usually the missing piece.
Customization: Keep crunchy toppings separate until serving. Chopped peanuts, croutons, crispy onions, and even extra herbs stay sharper if they’re added at the last minute. That one habit saves a lot of texture headaches, especially in noodle salads and pimento cheese sandwiches.
Serving Suggestions: Use pickles, olives, sliced radishes, and fresh fruit as side-plate accents. They fill the gaps without asking for cooking time. I also like a small dish of hot sauce or mustard on the side, because not every guest wants the same level of bite.
Make-It-Yours: For gluten-free guests, swap in rice noodles, corn tortillas, lettuce cups, or baked potatoes where bread normally shows up. For dairy-free versions, use hummus, avocado, olive oil dressings, or dairy-free mayo in place of cheese-heavy fillings. For lower-sodium versions, lean harder on herbs, citrus, and fresh vegetables, then season in smaller increments at the end.
Make-Ahead, Storage, and Reheating Guidance
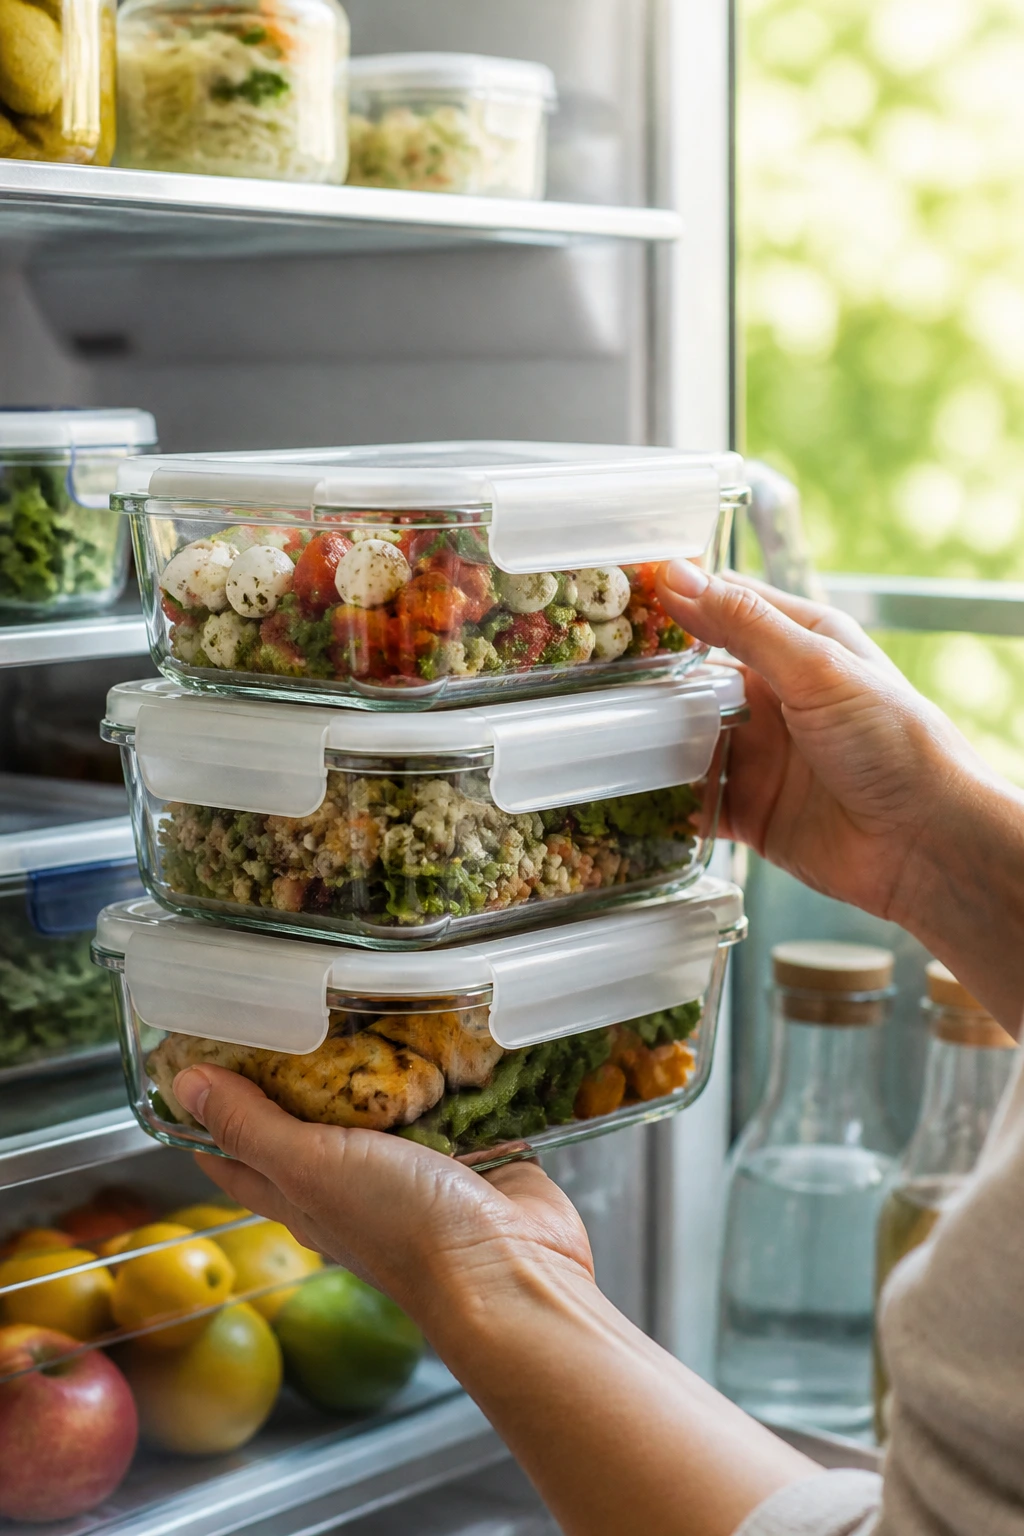
Most of these recipes do best when part of the work happens ahead of time. Pasta salads, potato salads, chickpea salads, and tuna fillings are usually good for 3 to 4 days in the fridge if they stay tightly covered. Egg salad and shrimp dishes are shorter-lived; I’d keep them to 2 days, max, and keep them cold the whole time. Fried chicken and hand pies can sit in the fridge for 3 days, though the crust is best on day one and day two.
For freezing, the baked items are the winners. Hand pies freeze well for up to 2 months, as do cornbread muffins and peach bars. Meatballs also freeze nicely once cooled, and they reheat in a 325°F oven until hot through. I would not freeze egg salad, tuna salad, deviled eggs, or cucumber cups. They come back in the wrong shape and the wrong mood.
Reheating depends on the food. Fried chicken and hand pies should go back into a 350°F oven for 10 to 15 minutes so the outside crisps again. Meatballs can be warmed covered with a little sauce so they don’t dry out. Cornbread muffins do fine at room temperature, but if you want them warm, 5 minutes in a low oven is enough. Bars and chilled salads are better cold or cool; reheating them would only make them worse.
One more thing. Keep mayonnaise-based dishes, shrimp, and eggs out of the danger zone. If you’re eating outdoors, get them back into the cooler within 2 hours, or within 1 hour if the air is very hot. That rule is boring, yes. It’s also the difference between a good evening and a regrettable one.
Variations and Adaptations to Try
The No-Cook Basket:
Build the whole meal around salads, skewers, lettuce cups, and bars. Skip the fried chicken and meatballs, and lean on the orzo salad, chickpea cups, Caprese skewers, watermelon salad, and peach bars. This version is the easiest to pack when you don’t want to touch a stove after the sun drops.
The Gluten-Free Spread:
Use rice noodles instead of wheat noodles, corn tortillas or lettuce cups instead of sandwiches, and naturally gluten-free bars and muffins made with the right flour blend. The texture changes a little, but not in a bad way if you choose sturdy recipes instead of trying to force soft bread into a job it can’t do.
The Dairy-Free Route:
Hummus wraps, tuna stuffed peppers, watermelon salad, shrimp cups, and peanut noodles already fit this lane or need only tiny adjustments. For creamy recipes, use dairy-free mayo or avocado. Skip the cheese-heavy tea sandwiches and pimento cheese, or build a separate batch with a dairy-free spread if you really want that kind of texture.
The Heat-Lover’s Basket:
Add jalapeños to the tuna peppers, hot sauce to the deviled eggs, chipotle to the meatballs, chili crisp to the peanut noodles, and cayenne to the pimento cheese. I like this approach when the rest of the meal is cold and refreshing; a little heat gives the basket more range.
The Kid-First Picnic:
Use smaller portions, milder seasoning, and more finger food. Cornbread muffins, peach bars, chicken tenders, hand pies, and watermelon salad usually go first with kids because they don’t require much explanation. If you’re packing for mixed ages, keep the spicy bits on the side and let people decide.
The Brunch-to-Dinner Version:
Egg salad, deviled eggs, cornbread muffins, Caprese skewers, and fruit-based sides can tilt the whole spread toward a late lunch that spills into evening. This is a nice move when you want picnic food without building a full heavy dinner. It feels relaxed and a little more elegant, which is easier than it sounds.
Common Mistakes to Avoid
Packing warm food over cold food:
That’s how you end up with a cooler full of soft crusts and sweating containers. Cool cooked food before it goes into the box, and keep the cold items with ice packs.
Choosing recipes that leak:
A tomato-heavy sandwich, an over-dressed salad, or a loose avocado filling can ruin the rest of the basket. Use the container as part of the recipe, not an afterthought.
Under-seasoning chilled food:
Cold dulls flavor. Pasta salad, potato salad, tuna salad, and even watermelon need a little more salt or acid than you think once they’re chilled.
Packing too close to serving time with no plan:
If you’re still assembling the meal when everyone’s already hungry, everything feels harder. Make the fillings early, chill them, and keep the final assembly short.
Using bread that can’t handle moisture:
Thin supermarket sandwich bread collapses faster than people expect, especially with egg salad or pimento cheese. Soft bread is fine. Flimsy bread is not.
Forgetting texture contrast:
A picnic spread full of soft foods gets dull halfway through. Put something crisp on the table—pickles, cucumbers, peanuts, lettuce, or peppers—and the whole meal starts acting better.
Frequently Asked Questions
Which picnic foods hold up best in warm weather?
The most reliable ones are pasta salads, potato salads, hand pies, muffins, skewers, and fruit-based sides. Anything sealed in a shell or kept in a sturdy bowl tends to travel better than loose sandwiches or very creamy fillings.
How far ahead can I make these recipes?
Many of the salads can be made a day ahead, and some taste better after a short chill. Fried foods are best the day they’re cooked, while bars, muffins, and hand pies can often be made 1 to 2 days ahead without trouble.
Can I keep these dishes cold without a big cooler?
Yes, if you work in layers. Use insulated lunch bags, ice packs, and shallow containers that chill quickly. Freeze one water bottle and tuck it into the bag; it helps more than people expect.
How do I stop sandwiches from getting soggy?
Butter the bread, keep wet ingredients away from the bread until close to serving, and use fillings that aren’t watery. Tea sandwiches and wraps do best when assembled shortly before eating or packed with the components separate.
What if I want a vegetarian picnic spread?
That’s easy here. Use the orzo salad, hummus wraps, chickpea lettuce cups, pimento cheese tea sandwiches, Caprese skewers, cornbread muffins, watermelon salad, and peach bars. You’ll still have a full table.
Can I swap mayonnaise for yogurt in these recipes?
In several of them, yes. Chickpea salad, tuna salad, egg salad, and some dressings can handle plain Greek yogurt or a half-and-half mix. The flavor will be tangier and a little lighter, so taste before you call it done.
Which recipes are best for kids?
Chicken tenders, cornbread muffins, peach bars, hand pies, watermelon salad, and mild egg salad tend to go over well because the flavors are familiar and the shapes are easy. Keep spicy toppings separate and cut everything into smaller pieces.
How do I scale this for a crowd?
Double the salads and finger foods first; they’re the easiest to multiply. For fried chicken, hand pies, and meatballs, use sheet pans and batches so the cooking time stays sane. And if you’re serving outdoors, make a little extra because people always eat more when they’re standing.
Pack the Coldest Things First

A picnic works best when the food is doing the work for you. The best dishes in this set don’t ask to be served at a perfect moment, and they don’t fall apart when the evening gets a little warm around the edges. They stay good on the blanket, which is the whole point.
I’m partial to the recipes that give you both structure and ease: the kind of food that tastes like you meant it, even if you made it in stages and packed it in a hurry. Build a basket around one sturdy main, a cold side, something crisp, and one dessert that cuts cleanly, and the whole meal starts feeling simple in the best way.
The next time dinner wants to move outdoors, choose a recipe or two from this list and let the cooler do its job.