
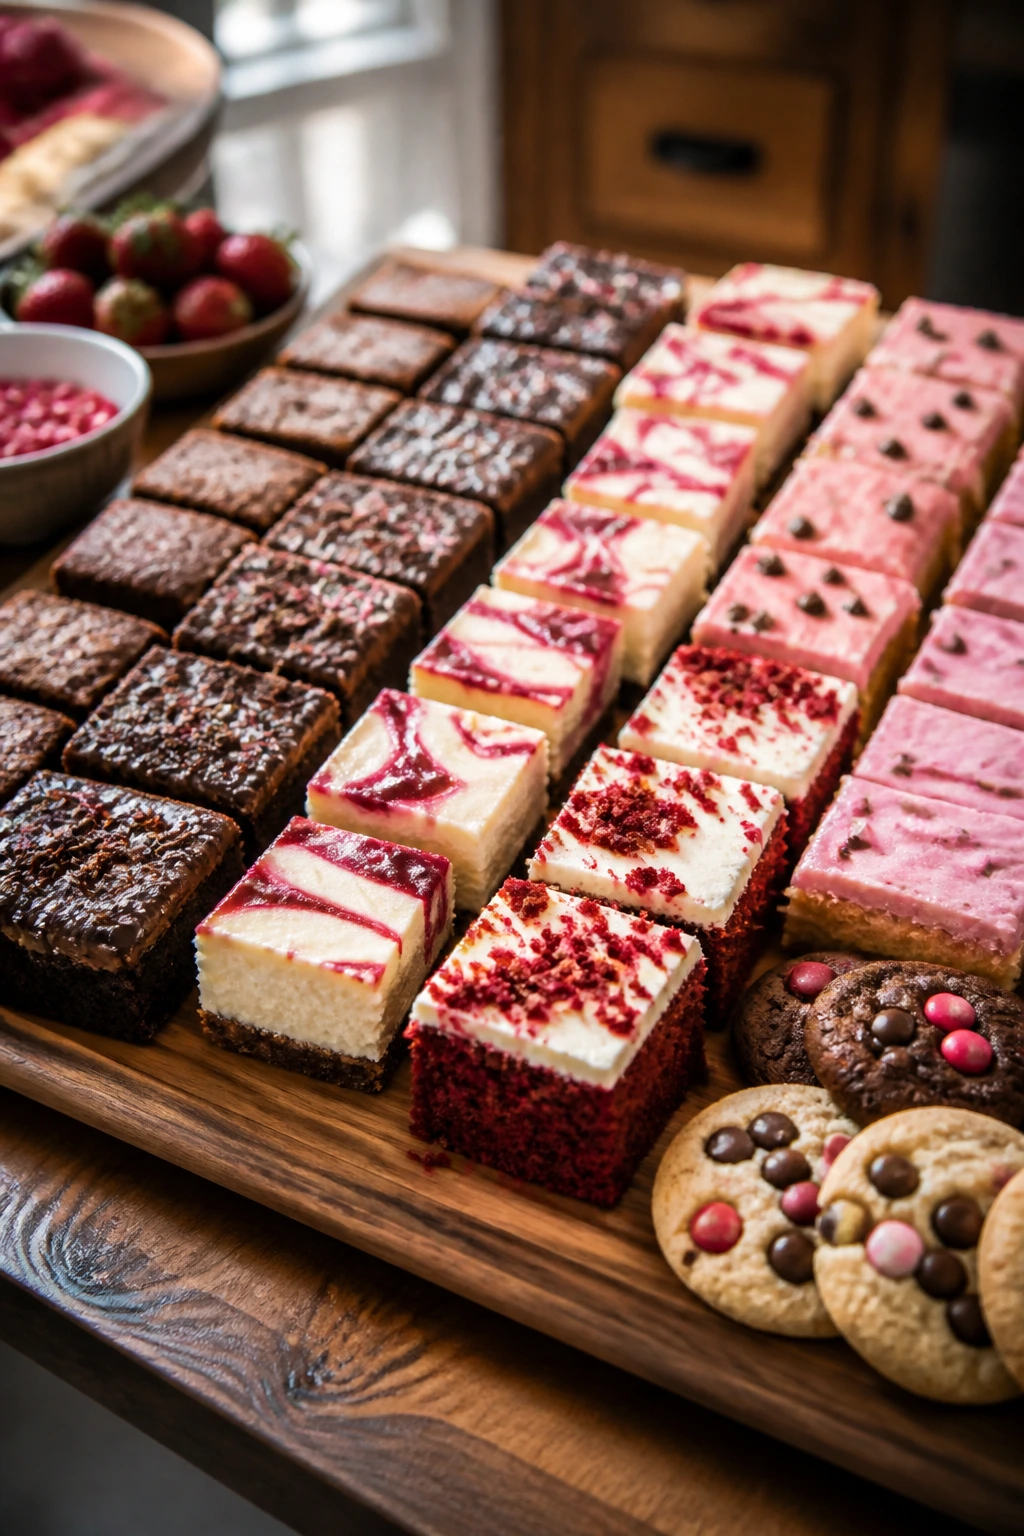
Valentine dessert ideas for a crowd live or die by one thing: whether they can sit on a table for 20 minutes and still look like somebody cared. A bowl of whipped cream that’s slowly collapsing doesn’t count. Neither does a cake that sheds crumbs like confetti the minute you try to cut it.
The smartest desserts for a room full of people are the ones that slice cleanly, chill well, or let you set out toppings without turning the kitchen into a sprint. I want color on the table — strawberries, raspberries, glossy chocolate, pale pink frosting, maybe one dessert that cracks when you cut into it and one that gives you that soft, cool spoonful of cream and berry juice. That mix matters more than decoration alone.
And yes, these Valentine dessert ideas for a crowd should feel festive. But festive doesn’t have to mean fussy. I’m far more interested in a tray of neat bars, a slab cake, or a trifle you can assemble the night before than a tower of sugar art that wilts under warm lights and awkward serving spoons. Give me structure. Give me something that can survive a long table.
Why These Desserts Work for a Room Full of People
-
Slice-and-serve friendly: Bars, slab cakes, cheesecake squares, and cookies cut into portions fast, which keeps the serving line moving and the frosting intact.
-
Make-ahead power: Several of these desserts taste better after a chill in the fridge, so you can finish the messy part before guests show up.
-
Easy to scale: Most of the recipes lean on sheet pans, 9×13-inch pans, muffin tins, or big bowls, which makes doubling or tripling straightforward.
-
Red, pink, and chocolate all show up: That color mix reads as Valentine’s Day without needing heart sprinkles on every surface.
-
Travel well: If you’re bringing dessert to someone else’s house, the bars, cookies, bark, and trifle components here won’t punish you during the car ride.
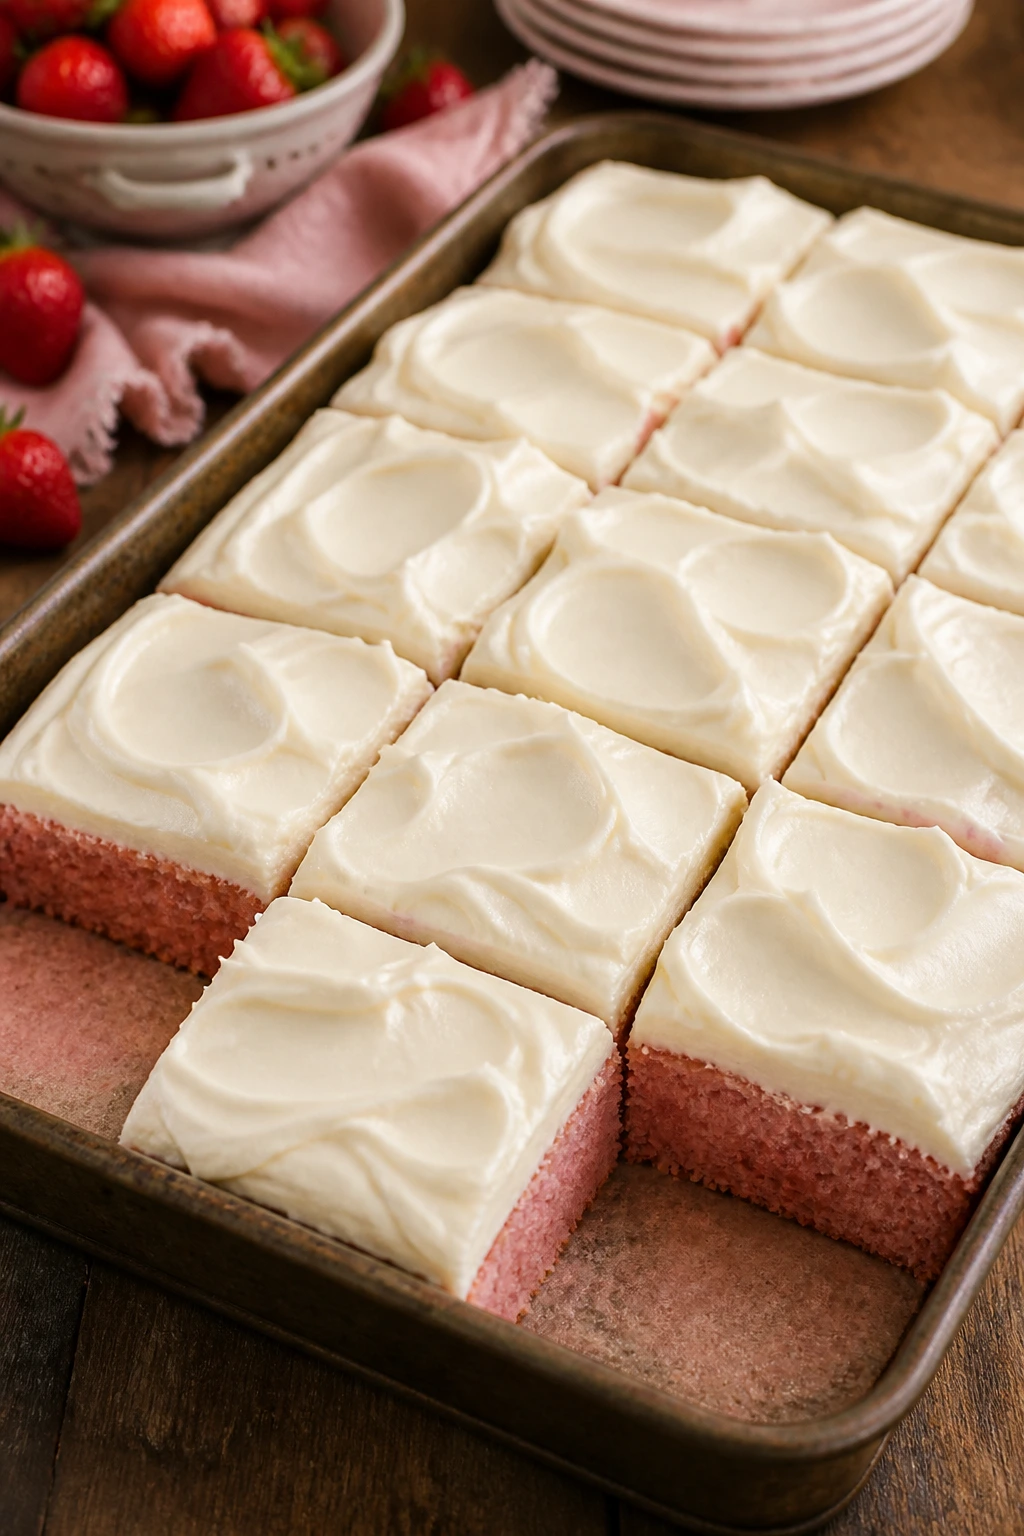
1. Strawberry Sheet Cake with Cream Cheese Frosting
A strawberry sheet cake is the dessert I reach for when I want one pan to do the work of three. The crumb is soft and pale pink, the frosting lands in thick swoops, and every square carries a little berry perfume that feels right on a crowded dessert table. This version bakes in a 9×13-inch pan, which means you get neat squares instead of awkward wedges and a pan that’s easy to carry one-handed.
Why It Works:
A sheet cake is the right shape for a crowd because the frosting stays put and the slices look tidy even after a few minutes on the buffet. The batter uses strawberry puree and a touch of vanilla, so the flavor is more berry-forward than candy-sweet. Cream cheese frosting gives you tang, and that bite matters. Without it, strawberry cake can go flat fast.
Key Ingredients:
- 2 1/2 cups all-purpose flour
- 2 teaspoons baking powder
- 1/2 teaspoon fine salt
- 1/2 cup unsalted butter, softened
- 1 3/4 cups granulated sugar
- 2 large eggs
- 1 cup strawberry puree, from fresh or thawed frozen berries
- 1/2 cup whole milk
- 1 teaspoon vanilla extract
- 1 cup cream cheese, softened
- 3 cups powdered sugar
- 2 tablespoons freeze-dried strawberry powder or finely crushed freeze-dried strawberries
Quick Steps:
- Preheat the oven to 350°F and grease a 9×13-inch pan. Line it with parchment so you can lift the cake out cleanly.
- Whisk the flour, baking powder, and salt in a bowl.
- Beat the butter and sugar for 3 minutes until pale and fluffy, then mix in the eggs one at a time.
- Add the strawberry puree, milk, and vanilla. The batter may look slightly curdled; that’s fine.
- Fold in the dry ingredients just until no flour streaks remain, then spread the batter into the pan.
- Bake for 28 to 33 minutes, until the center springs back and a toothpick comes out with a few moist crumbs.
- Cool completely before frosting, then beat the cream cheese, powdered sugar, strawberry powder, and a spoonful of vanilla until smooth. Spread in thick swirls and chill 20 minutes before slicing.
Equipment for This Recipe:
- 9×13-inch baking pan
- Parchment paper
- Hand mixer or stand mixer
- Mixing bowls
- Offset spatula
How to Serve This Dish:
Cut the cake into 15 to 18 squares and serve with a few fresh berries on the side. A little extra strawberry powder dusted over the frosting gives the top a soft blush that looks polished without trying too hard.
Pro Tips for This Recipe:
- Use thawed frozen strawberries if the fresh ones are pale; the puree matters more than the berry shape here.
- Chill the frosted cake for at least 20 minutes before cutting. The slices come out much cleaner.
- If your frosting tastes too sweet, add a pinch of salt and 1 teaspoon lemon juice. It wakes the whole pan up.
- Warm your knife under hot water, wipe it dry, then cut. That tiny step keeps the frosting from dragging.
Variations on This Dish:
- Lemon-Glazed Strawberry Cake: Add 1 tablespoon lemon zest to the batter and finish with a thin lemon glaze instead of cream cheese frosting.
- Strawberry-Chocolate Version: Fold 1/2 cup mini chocolate chips into the batter and drizzle the top with melted dark chocolate.
- Dairy-Free Pan Cake: Swap in plant butter and a dairy-free cream cheese substitute; keep the cake itself on the slightly less sweet side.
Common Mistakes to Avoid with This Dish:
- Rushing the cooling time: Warm cake and frosting do not get along. The frosting slides, the crumb tears, and the slices slump.
- Using watery puree: If your strawberries are very juicy, simmer the puree for 5 to 8 minutes to thicken it first.
- Overbaking the edges: Pull the cake when the center is done; the pan’s heat keeps the outer edges cooking for a few minutes after removal.
2. Red Velvet Brownies with White Chocolate Drizzle
These are the brownies I make when I want something dense, jewel-toned, and a little dramatic without asking anyone to fuss with layers. Red velvet in brownie form keeps the cocoa note, but the texture lands somewhere between a chewy blondie and a fudgy bar. The white chocolate drizzle on top gives just enough contrast to make the whole pan look finished.
Why It Works:
Brownies are naturally crowd-friendly because you can bake, cool, and cut them into small squares that hold up on a plate. Red velvet flavor does better in a dense bar than in a delicate cake at a party, because the cocoa and vanilla stay concentrated. A hint of vinegar sharpens the chocolate and gives that classic red velvet taste without turning the bars cakey.
Key Ingredients:
- 1 cup unsalted butter
- 2 cups granulated sugar
- 3 large eggs
- 2 tablespoons unsweetened cocoa powder
- 1 tablespoon red food coloring gel
- 1 tablespoon white vinegar
- 1 teaspoon vanilla extract
- 1 3/4 cups all-purpose flour
- 1/2 teaspoon fine salt
- 1/2 cup white chocolate chips, melted
Quick Steps:
- Heat the oven to 350°F and line a 9×13-inch pan with parchment.
- Melt the butter, then whisk in the sugar until glossy.
- Add the eggs one at a time, then stir in cocoa powder, food coloring, vinegar, and vanilla.
- Fold in flour and salt just until combined. Do not beat it smooth.
- Spread into the pan and bake 24 to 28 minutes, until the center is set and a toothpick comes out with thick crumbs.
- Cool fully, then drizzle with melted white chocolate. Let the drizzle firm up before slicing into squares.
Equipment for This Recipe:
- 9×13-inch baking pan
- Parchment paper
- Heatproof bowl
- Whisk
- Spatula
How to Serve This Dish:
Serve the brownies at room temperature for the fudgiest bite. I like them in two-inch squares on a platter with raspberries tucked around the edges, which makes the red-and-white contrast feel intentional.
Pro Tips for This Recipe:
- Use gel food coloring, not the thin liquid stuff. You get stronger color without thinning the batter.
- Pull the brownies early if you want a gooier center; they finish setting as they cool.
- A pinch of espresso powder makes the cocoa taste deeper, not coffee-like.
- Slice with a plastic knife if you want the cleanest edge. It sounds odd. It works.
Variations on This Dish:
- Cream Cheese Swirl Brownies: Drop sweetened cream cheese in spoonfuls over the batter and swirl once with a knife.
- Raspberry Red Velvet Brownies: Scatter 1/2 cup freeze-dried raspberries over the top before baking.
- Gluten-Free Brownies: Use a 1:1 gluten-free flour blend and bake until the center barely jiggles.
Common Mistakes to Avoid with This Dish:
- Overmixing the flour: That gives you a tough bar with a cakey top. Fold until the streaks disappear, then stop.
- Cutting too soon: Warm brownies smear. Cool them completely or chill the pan for 20 minutes.
- Overbaking for color: Red velvet bars can look underdone because of the deep red batter. Trust the crumb, not the color alone.
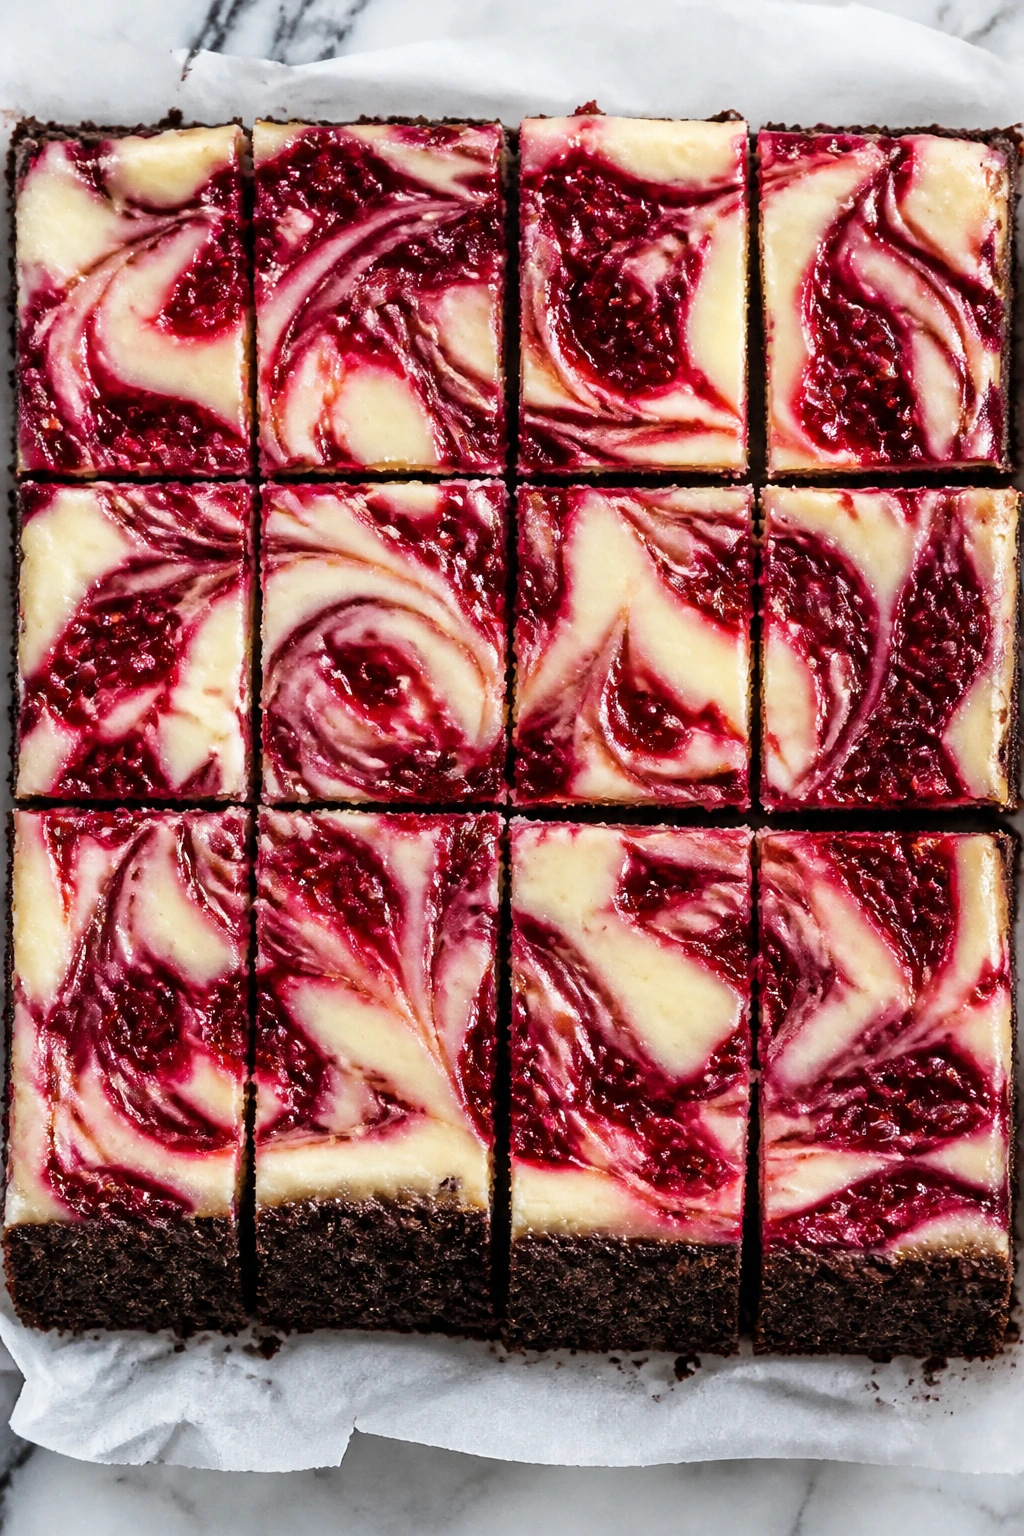
3. Chocolate Raspberry Cheesecake Bars
Chocolate raspberry cheesecake bars bring the right kind of drama: a dark crust, a creamy middle, and bright raspberry swirls running across the top like paint. They’re rich enough to feel special, but the square shape makes them easy to serve on a crowded table without anyone hunting for a fork and a prayer.
Why It Works:
Cheesecake bars solve the “how do I serve cheesecake to 20 people?” problem. You bake once in a pan, chill overnight, and cut clean squares. The raspberries cut through the cream cheese filling so the bars don’t read as heavy after a full meal.
Key Ingredients:
- 2 cups chocolate cookie crumbs
- 1/2 cup unsalted butter, melted
- 24 ounces cream cheese, softened
- 3/4 cup granulated sugar
- 3 large eggs
- 1 teaspoon vanilla extract
- 1/2 cup sour cream
- 1 cup raspberry preserves
- 1 tablespoon lemon juice
- 1/2 cup dark chocolate chips, melted
Quick Steps:
- Heat the oven to 325°F and line a 9×13-inch pan with parchment.
- Mix the cookie crumbs and melted butter, then press into the pan in an even layer.
- Beat the cream cheese and sugar until smooth, then add the eggs one at a time.
- Mix in vanilla and sour cream, then spread over the crust.
- Warm the raspberry preserves with lemon juice for 15 to 20 seconds in the microwave, then spoon over the filling and swirl lightly with a knife.
- Bake 35 to 40 minutes, until the edges are set and the center still has a slight wobble.
- Chill at least 4 hours, then drizzle with melted chocolate and cut into bars.
Equipment for This Recipe:
- 9×13-inch baking pan
- Parchment paper
- Mixer
- Mixing bowls
- Offset spatula or knife for swirling
How to Serve This Dish:
These bars look best on a chilled platter, cut into rectangles with a dark chocolate drizzle zigzagged over the top. A few fresh raspberries on the side keep the plate from feeling heavy.
Pro Tips for This Recipe:
- Let the cream cheese soften fully or you’ll get tiny lumps that never disappear.
- Don’t over-swirl the preserves. Two or three passes is enough.
- Chill the bars overnight if you can. The texture gets tighter and the slices behave.
- Use seedless preserves if you want a smoother finish.
Variations on This Dish:
- White Chocolate Raspberry Bars: Swap the chocolate cookie crust for vanilla wafer crumbs and add 1/2 cup white chocolate chips to the filling.
- Almond Raspberry Bars: Add 1/2 teaspoon almond extract and top with toasted sliced almonds.
- Mixed Berry Bars: Replace half the raspberry preserves with strawberry or cherry preserves.
Common Mistakes to Avoid with This Dish:
- Baking until the center is firm: Cheesecake bars should still wobble slightly when they come out.
- Skipping the chill: Warm cheesecake cuts like pudding. Cold cheesecake cuts like a bakery slice.
- Using a wet crust: Press the crust firmly and bake it for 8 minutes before adding the filling if your crumbs seem loose.
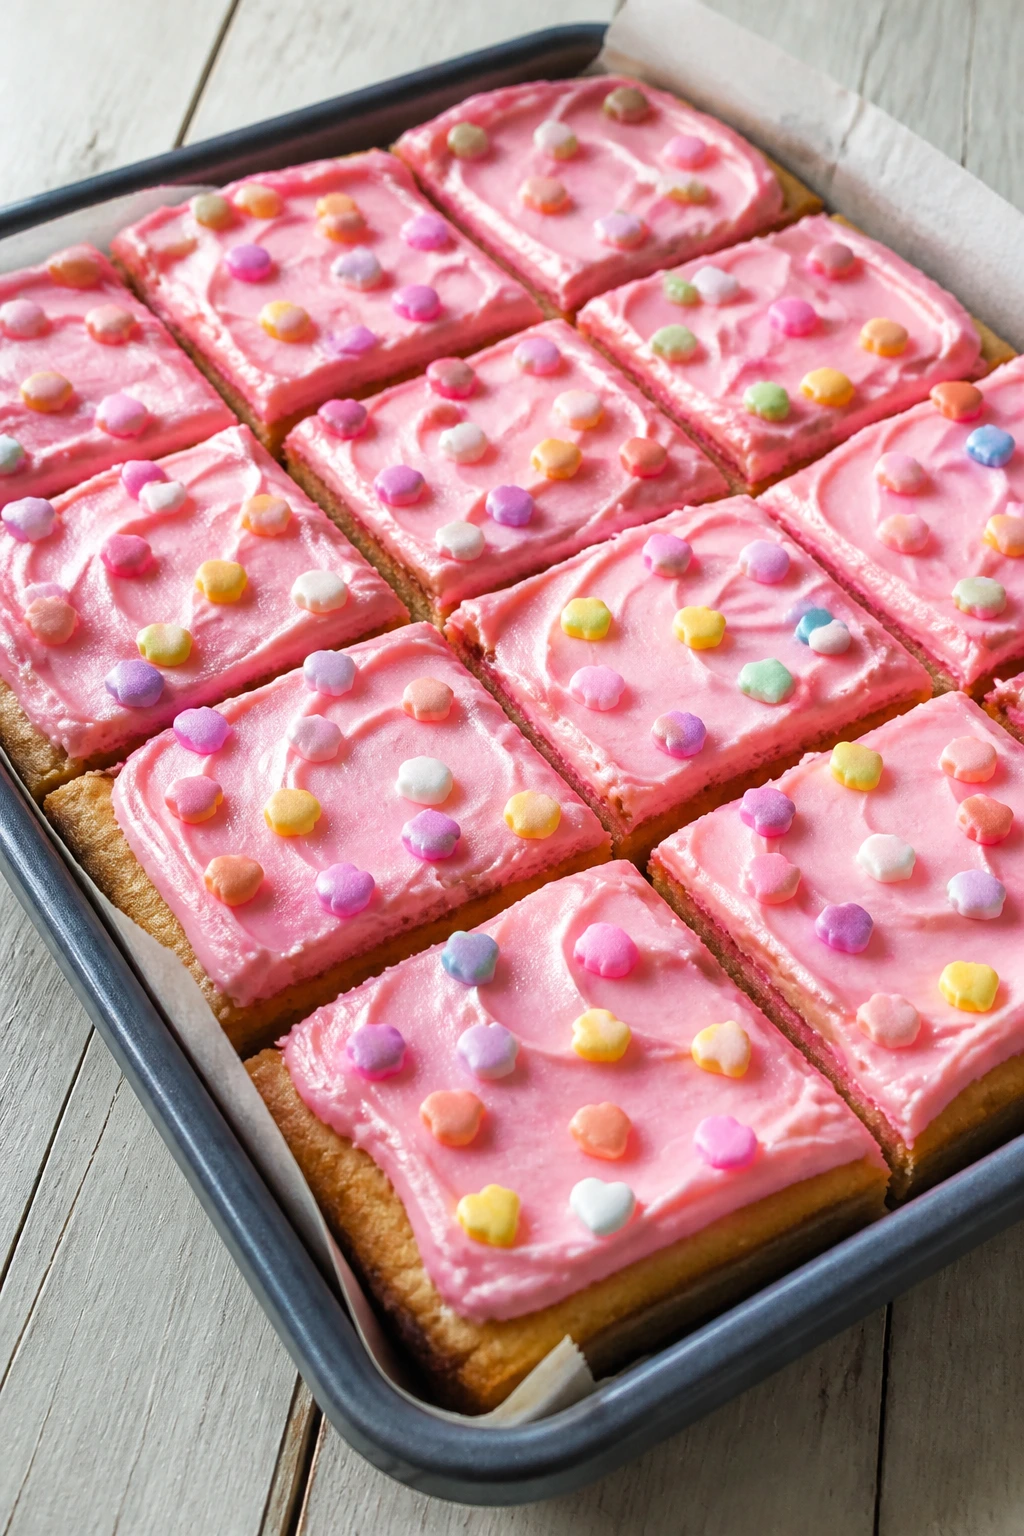
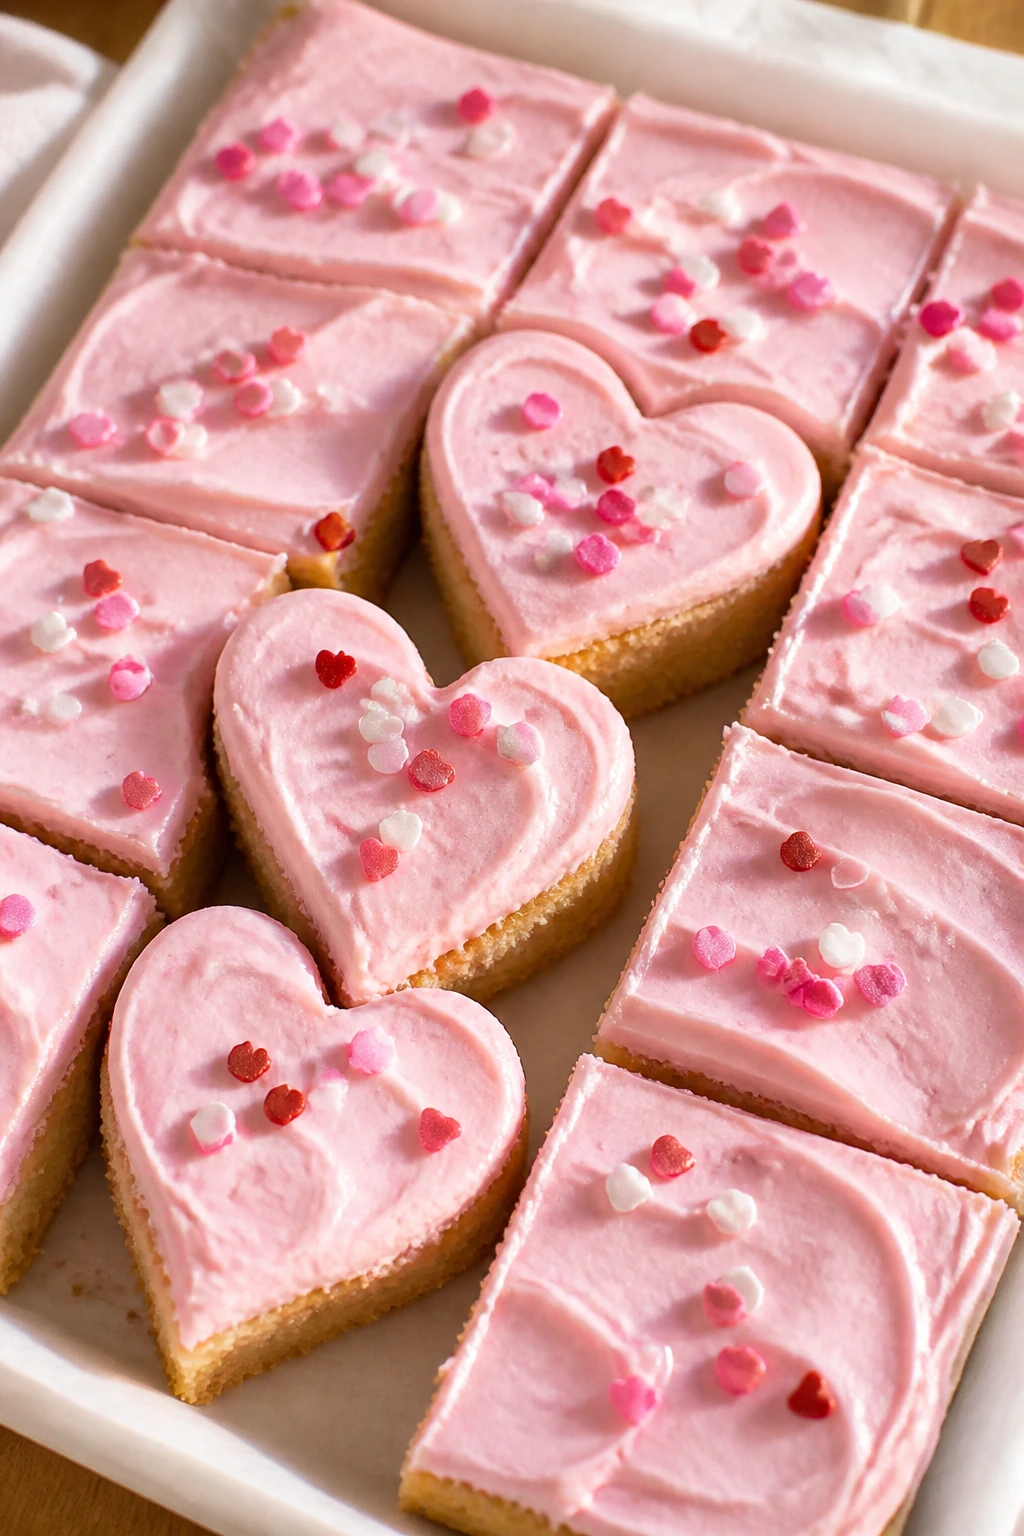
4. Heart-Shaped Sugar Cookie Bars
I like sugar cookie bars more than cutouts for one simple reason: no rolling, no re-rolling, no dusting the counter with half a bag of flour. These bake into a soft slab you can frost thickly and slice into hearts, squares, or strips if you’re in a hurry. They taste like birthday-party sugar cookies with better manners.
Why It Works:
The bar format keeps the texture soft in the middle and lightly crisp at the edges, which is exactly what people want when they reach for “just one more” piece. A single pan feeds a lot of guests, and the dough doesn’t need the chill-and-roll routine that makes cutout cookies feel like a project.
Key Ingredients:
- 1 cup unsalted butter, softened
- 1 1/4 cups granulated sugar
- 1 large egg
- 2 teaspoons vanilla extract
- 2 3/4 cups all-purpose flour
- 1/2 teaspoon baking powder
- 1/2 teaspoon fine salt
- 2 cups powdered sugar
- 3 tablespoons milk
- Pink food coloring, optional
Quick Steps:
- Heat the oven to 350°F and line a 9×13-inch pan with parchment.
- Beat the butter and sugar until fluffy, then mix in the egg and vanilla.
- Add flour, baking powder, and salt. Mix just until the dough comes together.
- Press the dough evenly into the pan.
- Bake 18 to 22 minutes, until the top is set and the edges are barely golden.
- Cool completely, then beat the powdered sugar and milk into a thick icing. Tint it pink if you want, spread over the bars, and cut into shapes.
Equipment for This Recipe:
- 9×13-inch baking pan
- Parchment paper
- Mixer
- Mixing bowls
- Offset spatula
How to Serve This Dish:
Stack the bars on a platter with a dusting of sanding sugar. If you cut them with a small heart cookie cutter after frosting, they look a little fancier, but squares feed the crowd faster.
Pro Tips for This Recipe:
- Don’t overbake them. Sugar cookie bars should stay pale.
- Cool the bars before frosting or the icing will slide.
- Add a pinch of almond extract if you want the flavor to lean bakery-style.
- If you want cleaner cuts, chill the frosted pan for 15 minutes.
Variations on This Dish:
- Lemon Sugar Cookie Bars: Add 1 tablespoon lemon zest and use a lemon glaze instead of vanilla icing.
- Confetti Valentine Bars: Fold in 1/3 cup pink and red sprinkles before baking.
- Gluten-Free Bars: Use a 1:1 baking flour blend and let the dough rest 10 minutes before pressing it into the pan.
Common Mistakes to Avoid with This Dish:
- Pressing the dough unevenly: Thin corners bake too fast. Smooth the surface with lightly greased fingertips.
- Frosting while warm: The icing melts into the crumb and loses that soft, matte finish.
- Overmixing the flour: The bars turn tight instead of tender.
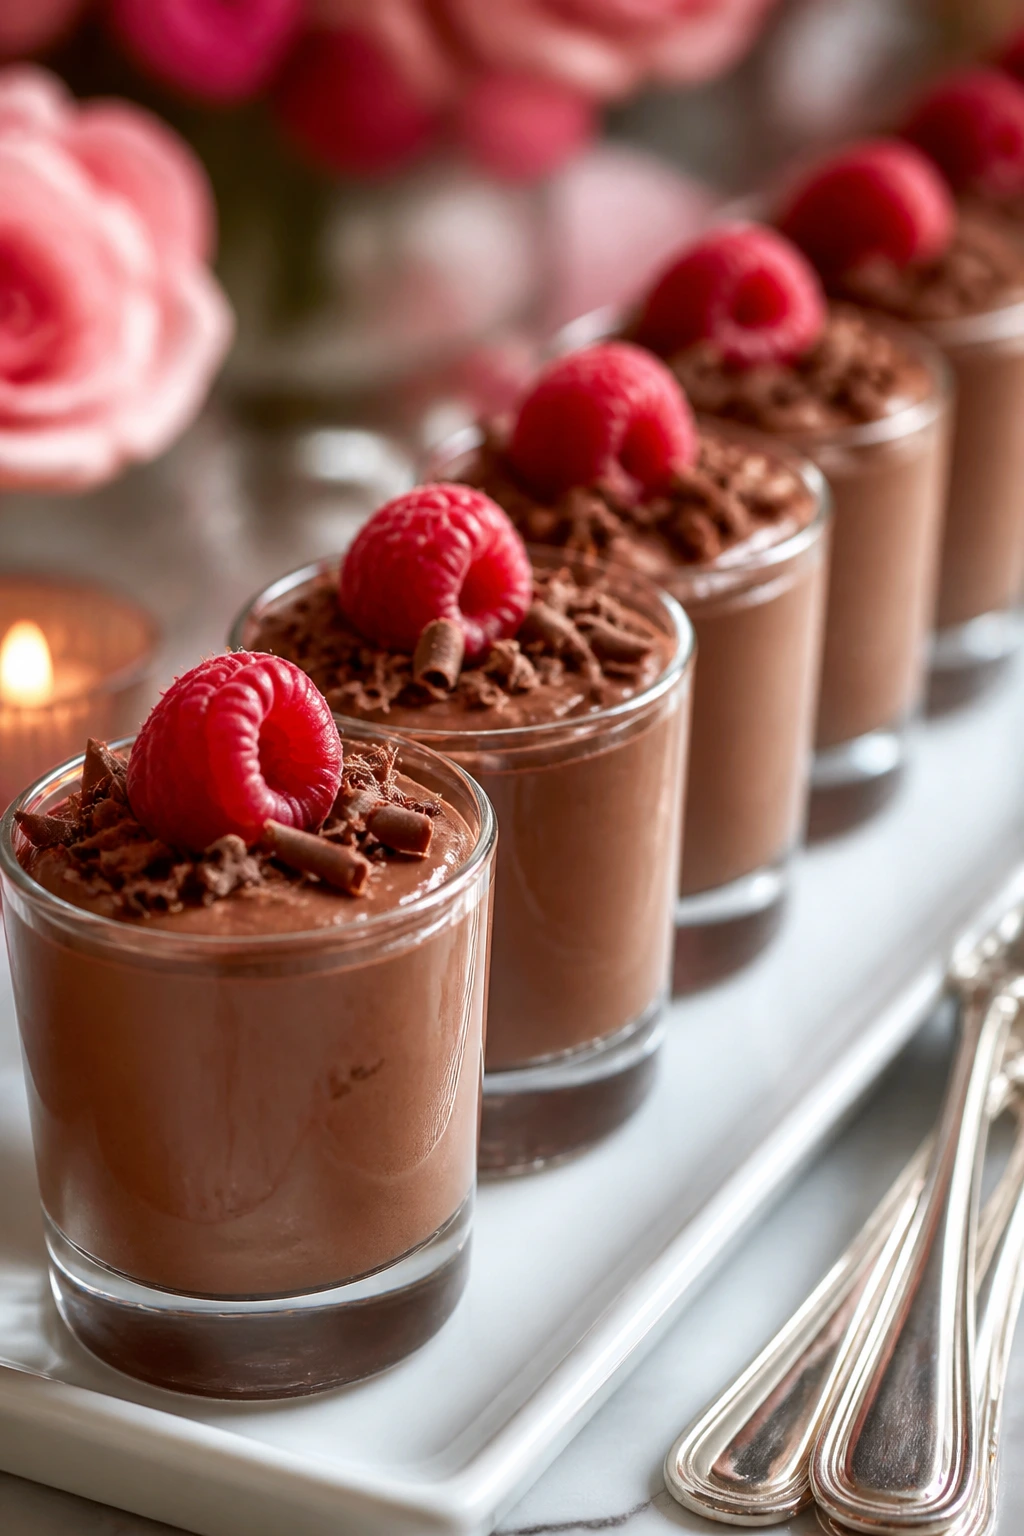
5. Mini Chocolate Mousse Cups
Mini mousse cups are the dessert equivalent of good table manners. They’re neat, cold, and rich enough that a few spoonfuls feel like a complete treat. You can make them in small glasses, espresso cups, or disposable dessert cups if you’re taking them somewhere.
Why It Works:
Chocolate mousse gives you a smooth texture that feels special without needing slicing or plating. The small portions matter here. People tend to want something rich after dinner, not a giant wedge of cream.
Key Ingredients:
- 8 ounces semi-sweet chocolate, chopped
- 2 tablespoons unsalted butter
- 3 large eggs, separated
- 1/4 cup granulated sugar
- 1 cup cold heavy cream
- 1 teaspoon vanilla extract
- Pinch of fine salt
- Fresh raspberries or shaved chocolate, for topping
Quick Steps:
- Melt the chocolate and butter together over a double boiler or in short microwave bursts. Stir until glossy, then let it cool slightly.
- Whisk the egg yolks with half the sugar, vanilla, and salt until thick.
- Stir the yolk mixture into the chocolate.
- In a clean bowl, beat the egg whites with the remaining sugar until soft glossy peaks form.
- In another bowl, whip the cream to medium peaks.
- Fold the cream into the chocolate base, then fold in the egg whites in two additions.
- Spoon into cups and chill at least 2 hours. Top with berries before serving.
Equipment for This Recipe:
- Mixing bowls
- Hand mixer
- Rubber spatula
- Small dessert cups or glasses
- Double boiler or microwave-safe bowl
How to Serve This Dish:
Serve the mousse cold, straight from the fridge, with one raspberry or a few chocolate curls on top. A small spoon is enough; this is not the dessert for oversized portions.
Pro Tips for This Recipe:
- Make sure the chocolate is warm, not hot, before folding in the eggs.
- Beat the egg whites in a completely clean bowl. Grease kills volume.
- Don’t whip the cream to stiff peaks. Medium peaks fold better and keep the mousse silky.
- Chill the cups at least 2 hours so the texture sets properly.
Variations on This Dish:
- Orange Chocolate Mousse: Add 1 teaspoon orange zest and a few drops of orange extract.
- Mocha Mousse Cups: Stir 1 teaspoon instant espresso powder into the melted chocolate.
- Dairy-Light Version: Use coconut cream in place of heavy cream and top with toasted coconut.
Common Mistakes to Avoid with This Dish:
- Folding too hard: You knock out the air and end up with dense pudding.
- Using hot chocolate: It can scramble the yolks.
- Serving too soon: The mousse needs time in the fridge to set up and taste clean.
6. Raspberry Lemon Bars
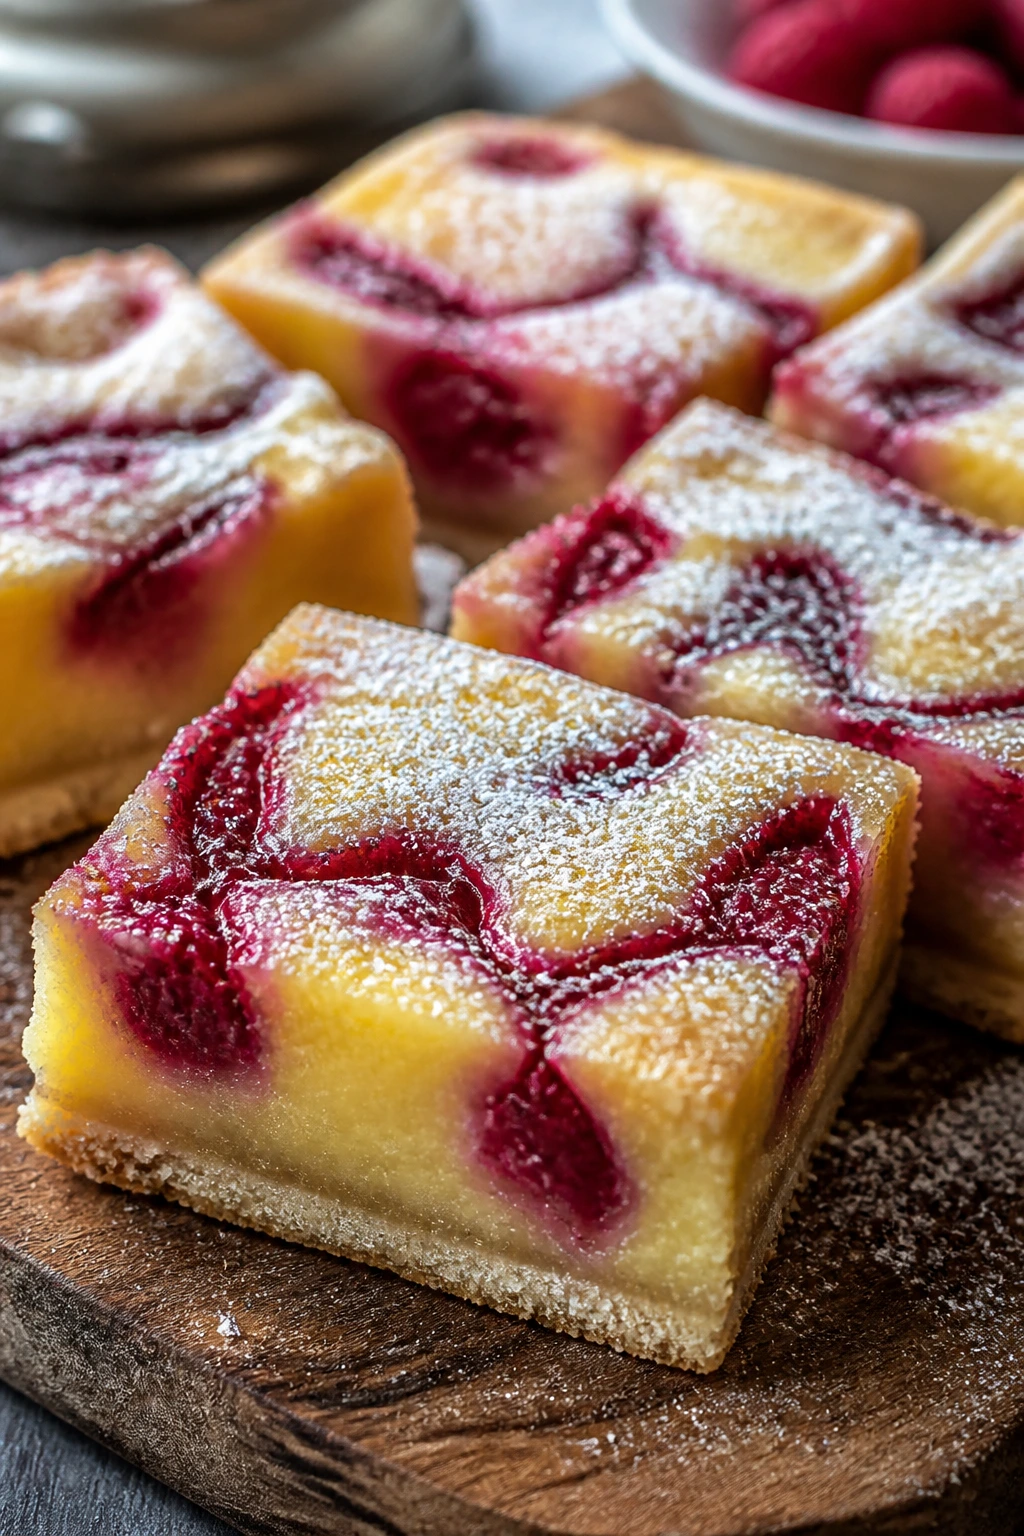
Raspberry lemon bars hit the bright end of the Valentine spectrum. They’re tart, sweet, and sunny, with a powdered sugar top that looks a little like a fresh snowfall. I like them because they wake up a buffet full of chocolate without stealing the show.
Why It Works:
Lemon curd-style filling cuts through rich desserts and gives the table some lift. Raspberry swirls make the bars look more complicated than they are, which is useful when you’re feeding people and don’t want to explain every pan. They cut clean once chilled, and they hold up well on a platter.
Key Ingredients:
- 1 1/2 cups all-purpose flour
- 1/2 cup powdered sugar
- 3/4 cup unsalted butter, cold and cubed
- 1 1/2 cups granulated sugar
- 1/4 cup flour
- 4 large eggs
- 1/2 cup fresh lemon juice
- 2 teaspoons lemon zest
- 1/2 cup raspberry puree or strained raspberry jam
- Powdered sugar, for dusting
Quick Steps:
- Heat the oven to 350°F and line an 8×8-inch or 9×9-inch pan with parchment.
- Pulse or rub together the crust flour, powdered sugar, and butter until the mixture looks like damp sand. Press into the pan.
- Bake the crust 15 to 18 minutes, until lightly golden.
- Whisk the sugar, flour, eggs, lemon juice, and zest until smooth.
- Spoon dollops of raspberry puree over the filling and swirl gently.
- Pour into the crust and bake 22 to 26 minutes, until the center is set and only slightly wobbly.
- Cool fully, chill 2 hours, then dust with powdered sugar and cut.
Equipment for This Recipe:
- Baking pan
- Parchment paper
- Mixing bowls
- Whisk
- Zester or microplane
How to Serve This Dish:
Serve these in small squares, because the flavor is bright and concentrated. A few raspberries on top and a heavier dusting of powdered sugar at the last minute keep the bars looking fresh.
Pro Tips for This Recipe:
- Strain the raspberry puree if you want a smoother swirl.
- Chill before cutting or the filling will run.
- Bake the crust until you see light gold at the edges; pale crust tastes floury.
- If your lemons are small, use three or four and measure the juice.
Variations on This Dish:
- Strawberry Lemon Bars: Replace the raspberry puree with strawberry puree for a softer pink color.
- Blackberry Lemon Bars: Use strained blackberry jam for a deeper purple swirl.
- Gluten-Free Bars: Swap in a cup-for-cup baking blend for both crust and filling flour.
Common Mistakes to Avoid with This Dish:
- Underbaking the filling: It should jiggle a little, not slosh.
- Too much raspberry: Heavy swirls can sink and make the bars wet.
- Skipping the chill: Lemon bars cut badly when warm and the powder melts into streaks.
7. Pink Velvet Cupcakes
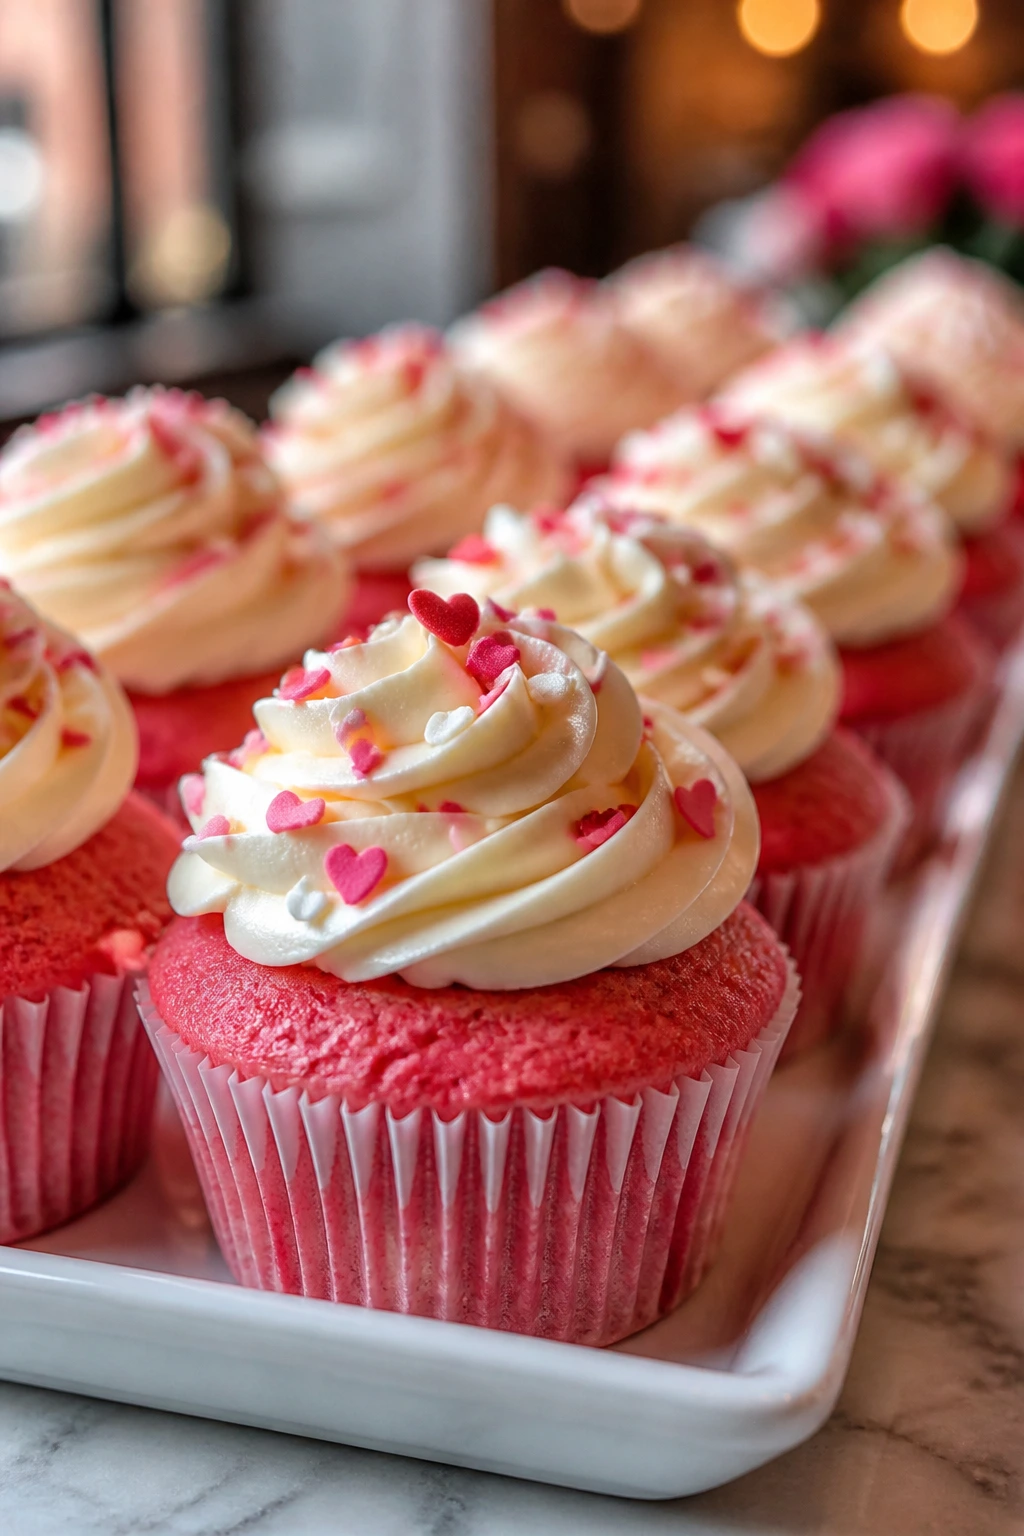
Pink velvet cupcakes give you the soft crumb of a velvet cake in a portable size that’s easy to hand around. They look cheerful on a tray, especially with a swirl of cream cheese frosting and a few tiny hearts on top. I reach for cupcakes when I want individual portions that still feel polished.
Why It Works:
Cupcakes solve the “who gets the corner piece?” problem and keep serving simple. Pink velvet keeps the cocoa note just low enough to be interesting, and the color feels festive without needing a neon dye bomb. A good frosting swirl makes even a plain cupcake look deliberate.
Key Ingredients:
- 1 3/4 cups all-purpose flour
- 2 tablespoons unsweetened cocoa powder
- 1 teaspoon baking powder
- 1/2 teaspoon baking soda
- 1/2 teaspoon salt
- 1/2 cup unsalted butter, softened
- 1 cup granulated sugar
- 2 large eggs
- 3/4 cup buttermilk
- 1 tablespoon red food coloring gel
- 1 teaspoon vanilla extract
- 8 ounces cream cheese
- 2 1/2 cups powdered sugar
Quick Steps:
- Heat the oven to 350°F and line a 12-cup muffin tin.
- Whisk the flour, cocoa, baking powder, baking soda, and salt.
- Beat the butter and sugar until fluffy, then add the eggs one at a time.
- Mix in the buttermilk, food coloring, and vanilla.
- Add the dry ingredients and stir until just combined.
- Divide between the cups and bake 18 to 20 minutes, until the tops spring back.
- Cool completely, then beat the cream cheese and powdered sugar into frosting and pipe or spread it on top.
Equipment for This Recipe:
- 12-cup muffin tin
- Cupcake liners
- Mixer
- Piping bag or offset spatula
- Cooling rack
How to Serve This Dish:
Set the cupcakes on a tiered stand or a plain white tray so the pink color stands out. One cupcake per person is enough after dinner, though a few people always come back for a second one.
Pro Tips for This Recipe:
- Use buttermilk; it keeps the crumb soft and slightly tangy.
- Don’t overfill the liners. Two-thirds full gives a tidy dome.
- Chill the frosting 10 minutes if it feels loose.
- Add a tiny pinch of salt to the frosting so it doesn’t taste like sweet paste.
Variations on This Dish:
- Raspberry-Filled Cupcakes: Hollow the centers and spoon in raspberry jam before frosting.
- Vanilla Pink Velvet: Skip the cocoa and add extra vanilla plus more gel coloring.
- Dairy-Free Cupcakes: Use dairy-free yogurt and plant-based cream cheese.
Common Mistakes to Avoid with This Dish:
- Overbeating after adding flour: That makes cupcakes dense.
- Frosting while warm: The frosting slides off and the tops tear.
- Using too much color at once: Start with less gel than you think you need; you can always add more.
8. Strawberries and Cream Trifle
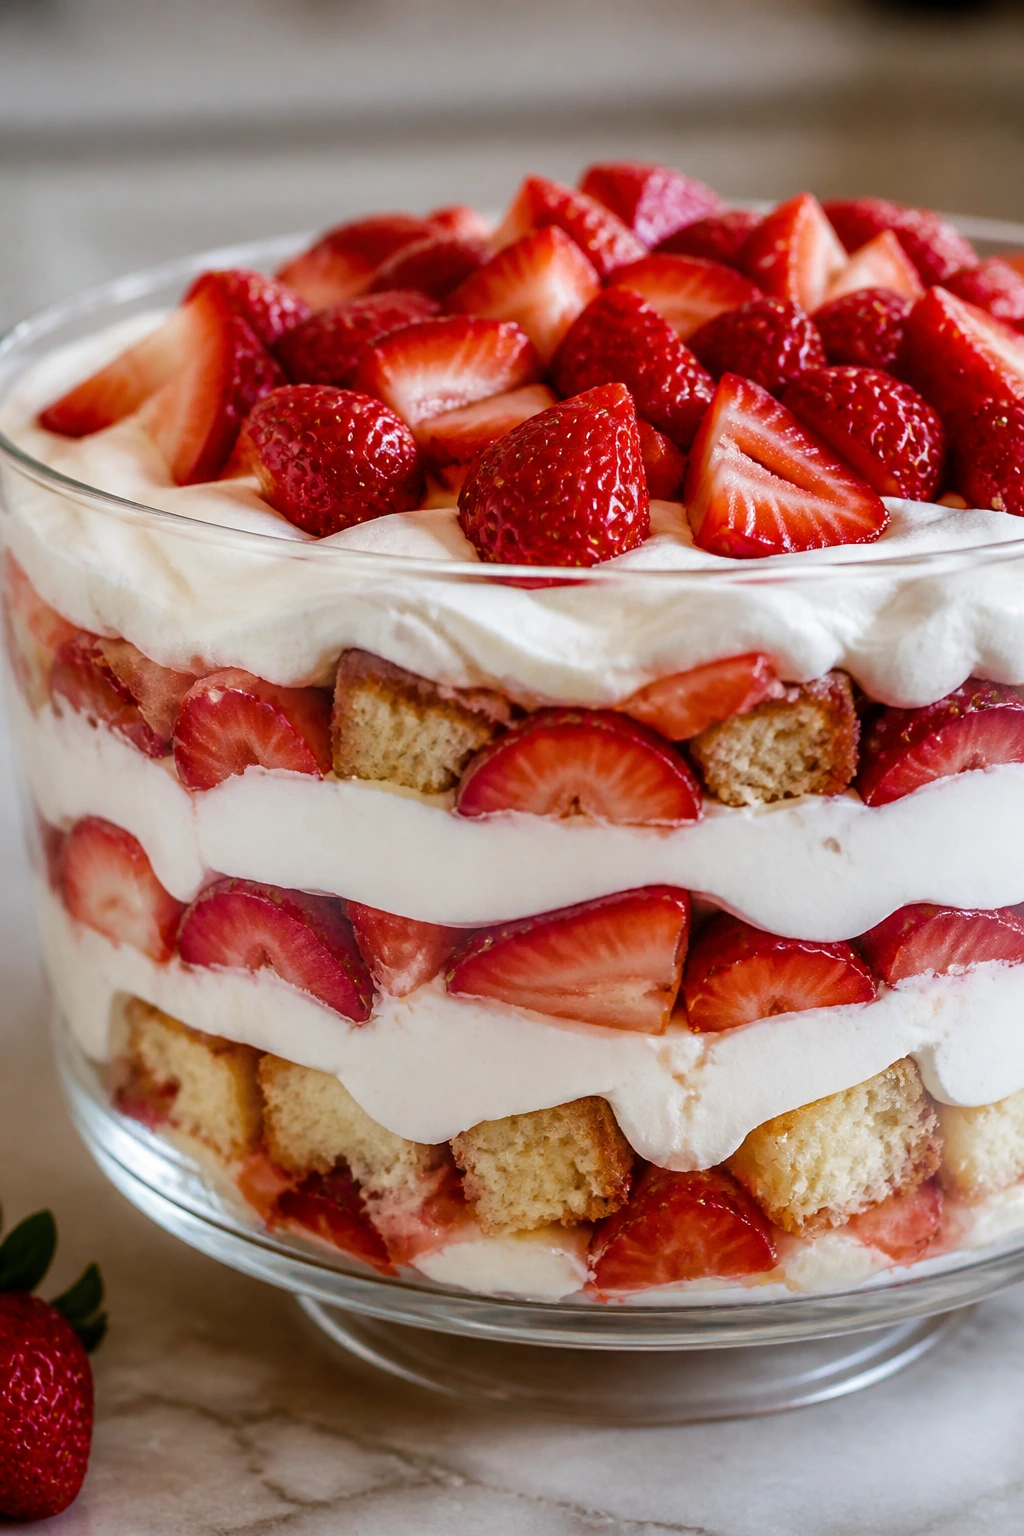
Trifle is the dessert I make when I want one bowl to look larger than the sum of its parts. Layers of cake, whipped cream, and strawberries create a dessert that’s soft, cold, and spoonable, with enough visual drama to sit in the middle of a buffet and do the talking for you.
Why It Works:
A trifle feeds a crowd without you standing over the stove. It also forgives a few imperfections. Slightly stale cake, soft berries, whipped cream that’s a little rustic — all of that works here because the bowl turns it into layers instead of flaws.
Key Ingredients:
- 1 prepared 9×13-inch vanilla sheet cake or angel food cake, cubed
- 2 pounds strawberries, sliced
- 1/4 cup granulated sugar
- 2 cups heavy cream
- 1/2 cup powdered sugar
- 1 teaspoon vanilla extract
- 8 ounces mascarpone or cream cheese, softened
- 1/2 cup strawberry jam, thinned with 1 tablespoon warm water
Quick Steps:
- Toss the sliced strawberries with the granulated sugar and let them sit 20 minutes until juicy.
- Whip the cream, powdered sugar, and vanilla to soft peaks.
- Fold in mascarpone or softened cream cheese until smooth.
- Arrange half the cake cubes in the bottom of a trifle bowl.
- Spoon over half the jam, half the strawberries, and half the cream.
- Repeat the layers, ending with cream on top.
- Chill at least 2 hours so the cake softens and the flavors settle.
Equipment for This Recipe:
- Large glass trifle bowl
- Mixing bowl
- Hand mixer
- Rubber spatula
- Sharp knife
How to Serve This Dish:
Use a large spoon or ladle to scoop deep into the bowl so each serving gets all the layers. A few strawberry halves on top keep the finish from looking too plain.
Pro Tips for This Recipe:
- Use a cake that’s sturdy enough to hold juice. Angel food and vanilla sheet cake both work.
- If your berries are very ripe, cut the sugar back to 2 tablespoons.
- Assemble closer to serving time if you want cleaner layers.
- A splash of orange liqueur in the jam is nice for adults, but not necessary.
Variations on This Dish:
- Chocolate Strawberry Trifle: Use chocolate cake and add shaved chocolate between the layers.
- Lemon Berry Trifle: Swap vanilla cake for lemon loaf and mix blueberries into the strawberries.
- Individual Trifles: Build the same layers in small cups for easier serving.
Common Mistakes to Avoid with This Dish:
- Using hot cake: It turns the cream runny.
- Overwhipping the cream: Grainy cream makes the whole bowl feel heavy.
- Letting it sit too long after assembling: The top layer can soften more than you want. A few hours is plenty.
9. Chocolate-Covered Strawberry Bark
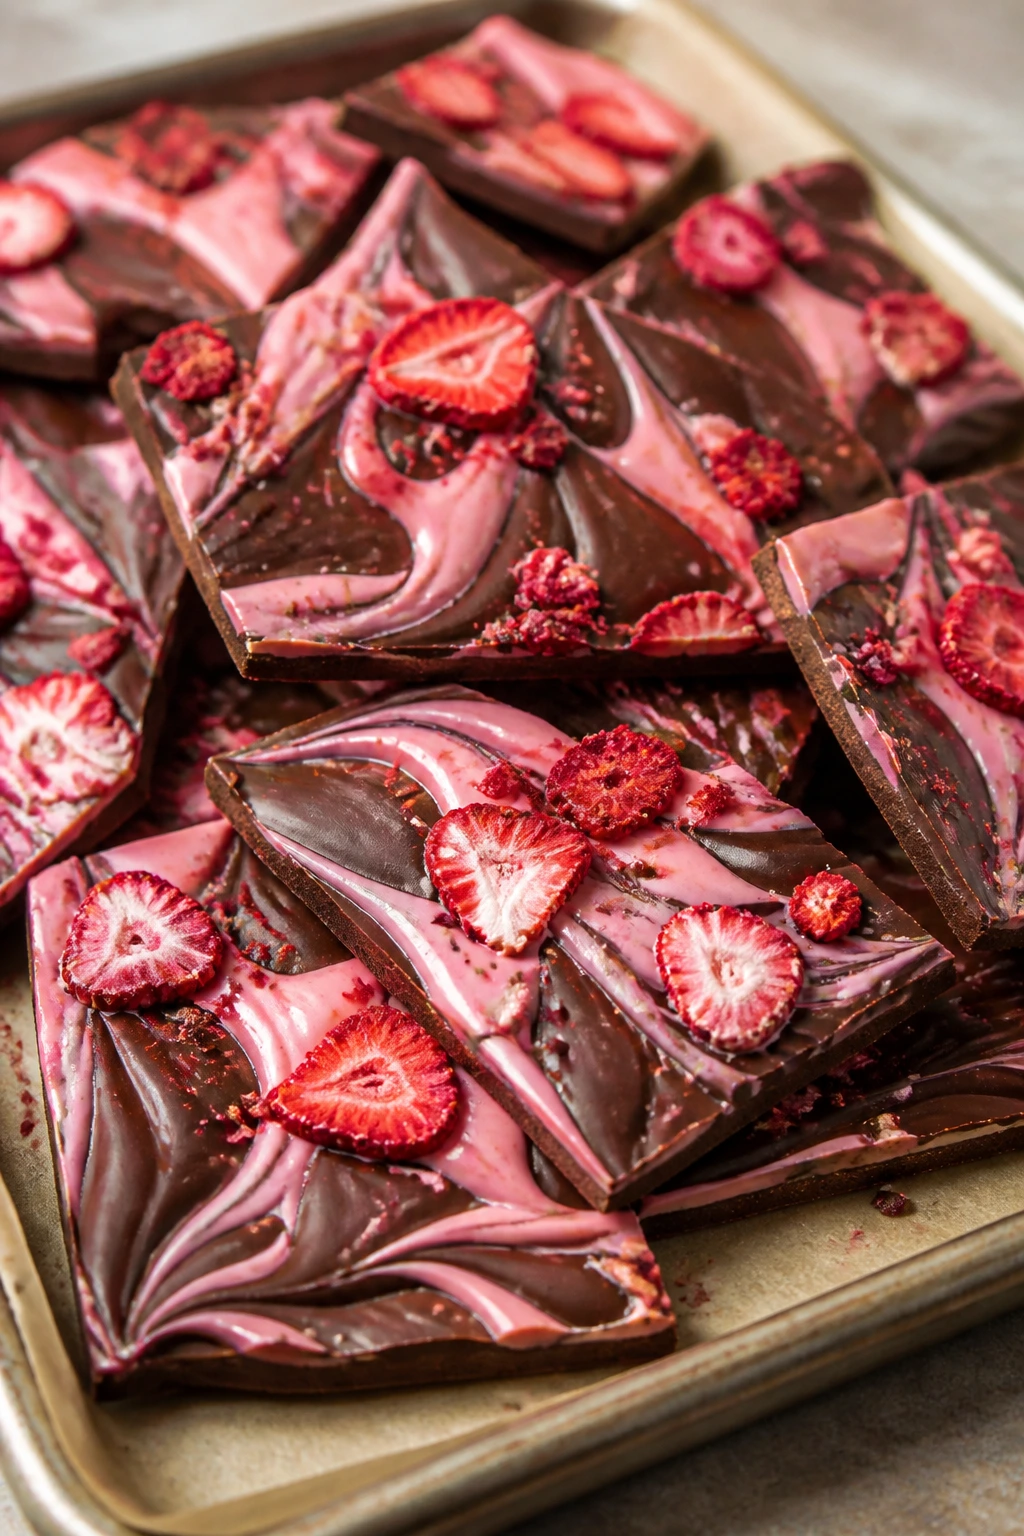
Chocolate-covered strawberry bark is the easy one, and I mean that in the best way. You melt, spread, scatter, chill, and break. The finished pieces look like a candy counter went to a Valentine party, with pink berry bits against a dark chocolate base.
Why It Works:
Bark gives you the strawberry-chocolate pairing people expect on Valentine’s Day without the labor of dipping a hundred individual berries. It travels well, sits at room temperature for a while, and breaks into irregular pieces that look handmade on purpose.
Key Ingredients:
- 12 ounces dark chocolate or semi-sweet chocolate
- 6 ounces white chocolate
- 1/2 cup freeze-dried strawberries, crushed
- 1/4 cup chopped pistachios
- 2 tablespoons pink sprinkles or sanding sugar
- Pinch of flaky salt
Quick Steps:
- Line a baking sheet with parchment.
- Melt the dark chocolate and spread it into a 1/4-inch layer.
- Melt the white chocolate and drizzle it over the dark layer.
- Drag a skewer or knife through the chocolates to make swirls.
- Sprinkle on freeze-dried strawberries, pistachios, sprinkles, and a tiny pinch of flaky salt.
- Chill 20 to 30 minutes until firm, then break into pieces.
Equipment for This Recipe:
- Baking sheet
- Parchment paper
- Microwave-safe bowls
- Spatula or offset spatula
- Knife or skewer for swirling
How to Serve This Dish:
Pile the bark into a shallow bowl so people can grab a piece without ceremony. It also works as a plate garnish next to sliced cake or mousse cups.
Pro Tips for This Recipe:
- Use freeze-dried strawberries, not fresh ones. Fresh fruit adds moisture and ruins the bark.
- If the white chocolate starts to thicken, stop and rewarm it gently.
- Keep the bark at cool room temperature in a dry spot so it doesn’t bloom.
- A little flaky salt keeps the chocolate from tasting flat.
Variations on This Dish:
- Ruby Chocolate Bark: Replace the dark chocolate with ruby chocolate for a softer pink-red color.
- White Chocolate Berry Bark: Use all white chocolate and add dried raspberries with pistachios.
- Peppermint Twist Bark: Add a few crushed peppermint candies if you want a colder finish.
Common Mistakes to Avoid with This Dish:
- Using chopped fresh strawberries: The moisture makes the chocolate seize.
- Spreading too thick: Thick bark is hard to break and eats like a candy brick.
- Skipping parchment: You’ll be chiseling chocolate off the pan.
10. Cherry Almond Blondies
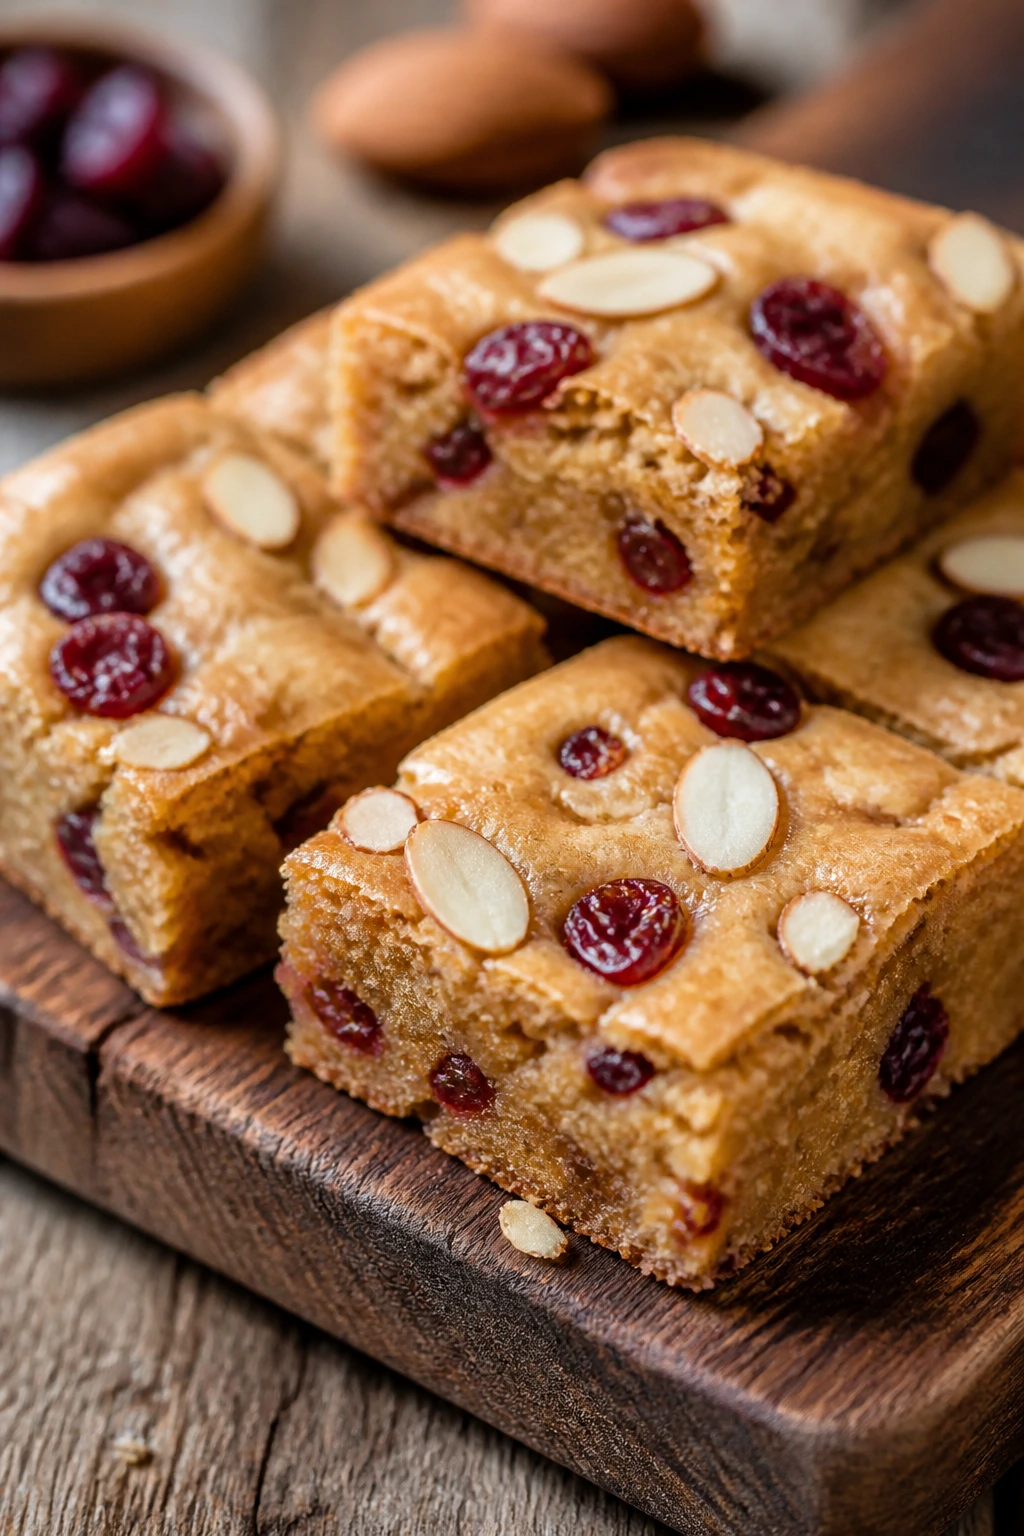
Cherry almond blondies are chewy, buttery, and a little old-school in the best way. The almond extract gives them a marzipan edge, and the cherries bring sharp little pops of flavor so the bars don’t taste one-note. I like them for a dessert table because they slice neatly and still taste homemade after an hour out.
Why It Works:
Blondies are sturdy enough for crowds and forgiving enough that you can mix them in one bowl. Dried tart cherries keep their shape during baking, which matters more than using fresh fruit here. Almond plus cherry is one of those combinations that feels festive without leaning on frosting.
Key Ingredients:
- 1 cup unsalted butter, melted
- 1 3/4 cups light brown sugar
- 2 large eggs
- 2 teaspoons almond extract
- 2 cups all-purpose flour
- 1 teaspoon baking powder
- 1/2 teaspoon salt
- 3/4 cup dried tart cherries
- 1/2 cup sliced almonds
- 1/2 cup white chocolate chunks, optional
Quick Steps:
- Heat the oven to 350°F and line a 9×13-inch pan with parchment.
- Stir the melted butter and brown sugar together until glossy.
- Add the eggs and almond extract.
- Fold in flour, baking powder, and salt, then stir in cherries, almonds, and white chocolate if using.
- Spread in the pan and bake 24 to 28 minutes, until the center is set and the top has a light crackle.
- Cool fully before slicing into bars.
Equipment for This Recipe:
- 9×13-inch baking pan
- Parchment paper
- Mixing bowl
- Spatula
- Sharp knife
How to Serve This Dish:
Serve the blondies in slim rectangles so the almond flavor doesn’t overpower the rest of the table. A dusting of powdered sugar looks nice, but I often leave them bare and let the cherries do the work.
Pro Tips for This Recipe:
- Toast the almonds for 6 to 8 minutes if you want deeper flavor.
- Don’t bake until the center is bone dry; blondies firm up as they cool.
- Chop oversized cherries so the bars slice cleaner.
- A little flaky salt on top makes the caramel notes stand out.
Variations on This Dish:
- Cherry Dark Chocolate Blondies: Use dark chocolate chunks instead of white chocolate.
- Apricot Almond Blondies: Swap the cherries for chopped dried apricots.
- Gluten-Free Blondies: Use a 1:1 flour blend and watch the bake time closely.
Common Mistakes to Avoid with This Dish:
- Overbaking: That turns chewy blondies into dry squares.
- Using wet cherries: Fresh fruit adds too much moisture and creates gummy patches.
- Skipping the parchment overhang: You want to lift the whole slab out cleanly.
11. No-Bake Strawberry Cheesecake Parfaits
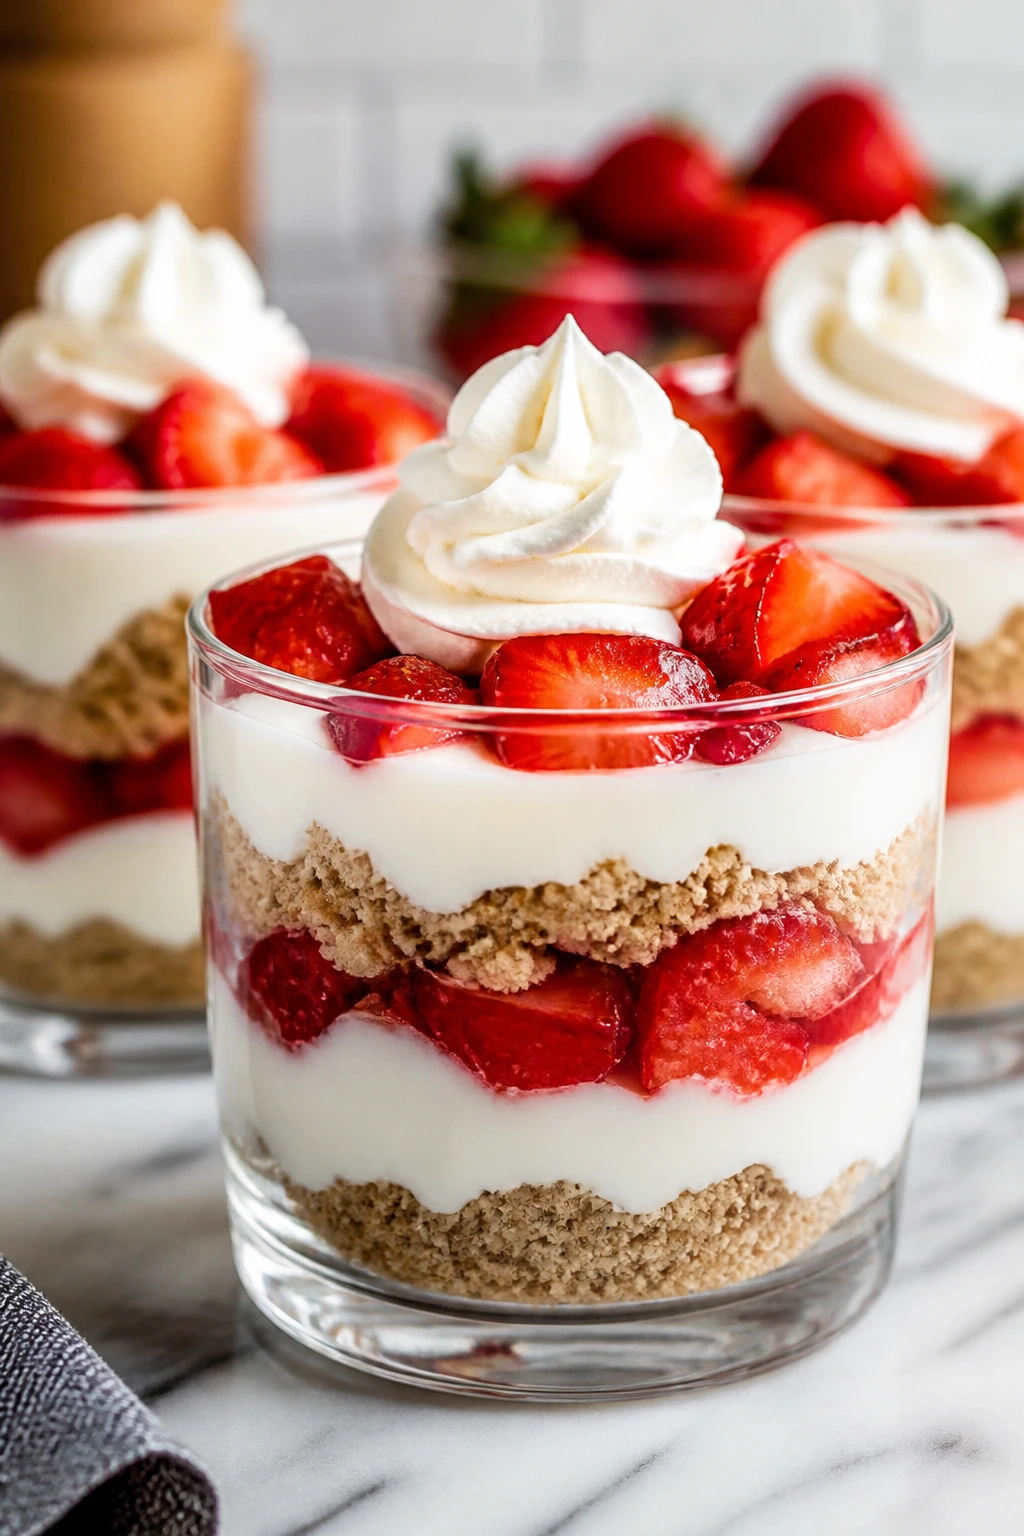
These parfaits are the answer when you need dessert and do not want to turn on the oven. Layers of crushed cookies, creamy cheesecake filling, and macerated strawberries make each cup feel composed, even if you put them together in twenty minutes while the main course is still on the stove.
Why It Works:
No-bake desserts are valuable when the oven is already busy or the room is warm. The strawberry layer gives enough freshness to keep the filling from feeling too rich, and individual cups make serving almost laughably easy. People can grab one and keep moving.
Key Ingredients:
- 2 cups fresh strawberries, chopped
- 2 tablespoons granulated sugar
- 1 1/2 cups crushed graham crackers
- 4 tablespoons melted butter
- 8 ounces cream cheese, softened
- 1/2 cup powdered sugar
- 1 teaspoon vanilla extract
- 1 1/2 cups heavy cream
- Extra strawberries, for topping
Quick Steps:
- Toss the strawberries with sugar and let them sit 15 minutes.
- Mix the graham crumbs with melted butter and press a spoonful into the bottom of each cup.
- Beat the cream cheese, powdered sugar, and vanilla until smooth.
- Whip the heavy cream to soft peaks, then fold it into the cream cheese mixture.
- Layer cheesecake filling and strawberries over the crumbs.
- Chill 1 to 2 hours, then top with more berries before serving.
Equipment for This Recipe:
- Dessert cups or small glasses
- Mixing bowls
- Hand mixer
- Rubber spatula
- Spoon for layering
How to Serve This Dish:
Serve them cold with a small spoon. If you want a fancier look, add one whole strawberry perched on top and a tiny cookie crumb ring around it.
Pro Tips for This Recipe:
- Chill the cups before layering if your kitchen runs warm.
- Keep the filling soft but not loose; medium peaks are enough.
- If the berries are very sweet, cut the sugar a little and add a squeeze of lemon.
- Add the crumb layer last if you want a cleaner glass side.
Variations on This Dish:
- Chocolate Strawberry Parfaits: Use crushed chocolate cookies instead of graham crackers.
- Lemon Berry Parfaits: Stir lemon zest into the filling and swap in blueberries.
- Lower-Sugar Parfaits: Use unsweetened whipped cream and let the berries carry the sweetness.
Common Mistakes to Avoid with This Dish:
- Overwhipping the cream: It turns grainy and hard to fold.
- Skipping the chill: The layers taste loose and slide around.
- Using soggy crumbs: Make the crumb layer just before assembling, or store it separately.
12. Mini Molten Lava Cakes for a Crowd
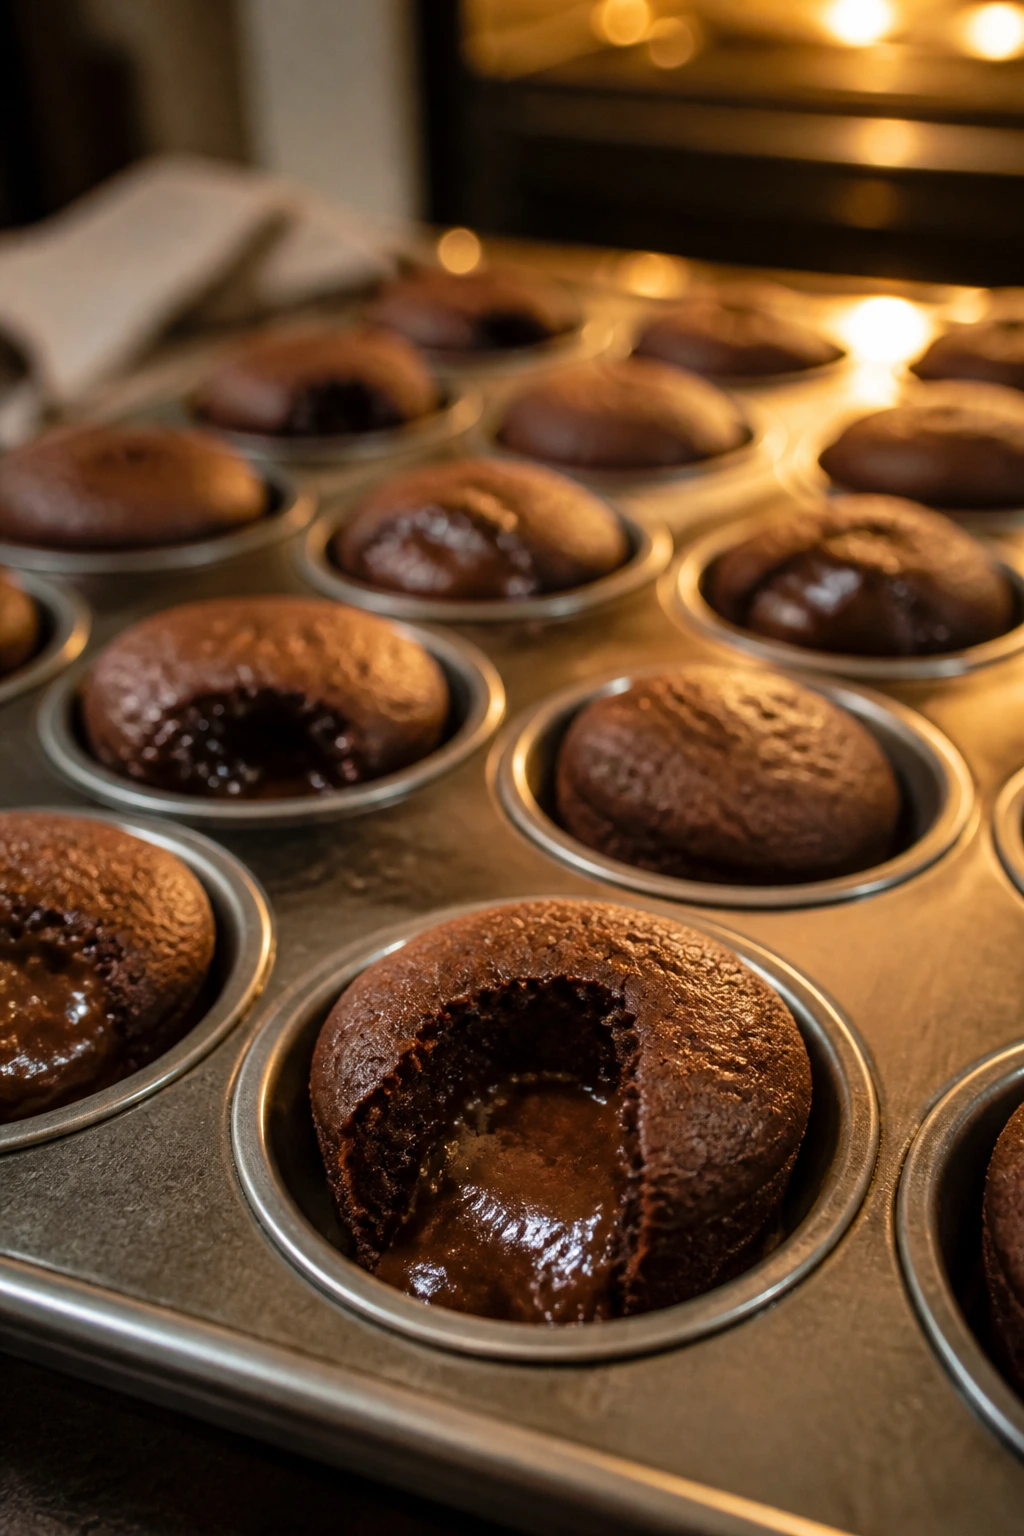
Mini molten lava cakes sound fancy, but the real trick is that they bake in muffin tins or ramekins, which makes them easier to scale than a full-size cake. The centers stay soft and glossy, the edges set, and the first spoonful gives you that warm chocolate rush people always go quiet for.
Why It Works:
A molten center feels special, and the individual portions mean everyone gets the same experience. Bake them in advance, hold them unfilled if needed, and reheat briefly before serving. The difference between a good lava cake and a dry one is usually 60 seconds in the oven. Not more.
Key Ingredients:
- 8 ounces bittersweet chocolate
- 1/2 cup unsalted butter
- 1 cup powdered sugar
- 2 large eggs
- 2 large egg yolks
- 1 teaspoon vanilla extract
- 1/2 cup all-purpose flour
- Pinch of salt
Quick Steps:
- Heat the oven to 425°F and grease 8 to 10 muffin cups or ramekins very well.
- Melt the chocolate and butter together until smooth.
- Whisk in the powdered sugar, then the eggs, yolks, vanilla, and salt.
- Fold in the flour just until combined.
- Divide into the cups and bake 9 to 11 minutes, until the edges are set but the centers still look soft.
- Rest 1 minute, run a knife around the edges, and invert onto plates.
- Serve at once with berries or whipped cream.
Equipment for This Recipe:
- Muffin tin or ramekins
- Baking sheet
- Heatproof bowl
- Whisk
- Serving plates
How to Serve This Dish:
Serve each cake immediately with a spoon of whipped cream and a few raspberries. Once the center cools, the magic disappears, so get the plates ready before they come out of the oven.
Pro Tips for This Recipe:
- Grease the cups thoroughly or they’ll cling to the pan.
- Use good chocolate. Lava cake is mostly chocolate, so flavor matters.
- Test one cake first if your oven runs hot.
- Serve straight away. No lingering. This is a fast dessert.
Variations on This Dish:
- Raspberry Lava Cakes: Drop a frozen raspberry into the center before baking.
- Salted Caramel Lava Cakes: Add a teaspoon of thick caramel to the middle.
- Espresso Lava Cakes: Stir 1 teaspoon espresso powder into the batter.
Common Mistakes to Avoid with This Recipe:
- Overbaking: The center should still look soft when you pull them.
- Using thin chocolate: Cheap chocolate can taste flat in such a small dessert.
- Waiting to plate them: They tighten up fast once they leave the oven.
13. Conversation Heart Cookie Bars
Conversation heart cookie bars are pure Valentine nostalgia, but they’re much easier than baking and decorating individual cutouts. You press one dough layer into a pan, frost it, and pipe on little phrases or simple heart shapes. They cut into generous squares and still feel playful.
Why It Works:
Cookie bars let you write with frosting instead of royal icing on thirty tiny cookies. That’s the whole appeal. The bars stay soft for days, which is helpful when the dessert table needs something cheerful that doesn’t dry out by the second hour.
Key Ingredients:
- 1 cup unsalted butter, softened
- 1 1/4 cups sugar
- 1 egg
- 1 teaspoon vanilla extract
- 2 1/2 cups all-purpose flour
- 1/2 teaspoon baking powder
- 1/2 teaspoon salt
- 2 cups powdered sugar
- 2 to 3 tablespoons milk
- Pink and red gel food coloring
Quick Steps:
- Heat the oven to 350°F and line a 9×13-inch pan with parchment.
- Beat the butter and sugar until fluffy, then add the egg and vanilla.
- Mix in the flour, baking powder, and salt.
- Press the dough into the pan and bake 20 to 24 minutes, until the top is set and pale gold.
- Cool completely, then frost with thick vanilla icing divided into pink and white portions.
- Pipe tiny hearts or short phrases on top, then cut into bars.
Equipment for This Recipe:
- 9×13-inch pan
- Parchment paper
- Mixer
- Piping bags or small zip-top bags
- Offset spatula
How to Serve This Dish:
Cut into squares or rectangles and arrange them in rows so the piped messages are easy to read. They’re the kind of dessert people photograph before they eat, which is fine by me.
Pro Tips for This Recipe:
- Keep the frosting thick or the writing blurs.
- Chill the frosted pan for 10 minutes before piping if the surface feels soft.
- Use gel color so the icing stays bold and doesn’t turn watery.
- Pipe short words. Long phrases get messy fast.
Variations on This Dish:
- Lemon Conversation Bars: Add lemon zest to the dough and glaze with lemon icing.
- Chocolate Conversation Bars: Mix in a few tablespoons cocoa powder and use pink frosting on top.
- Sprinkle-Heavy Party Bars: Add Valentine sprinkles between the dough and frosting layers.
Common Mistakes to Avoid with This Dish:
- Rolling the dough instead of pressing it: That creates extra work and uneven thickness.
- Frosting warm bars: The icing slides into the crumb.
- Writing too much text: Tiny letters blur once the bars are cut.
14. Brownie Bite Platter with Dipped Strawberries
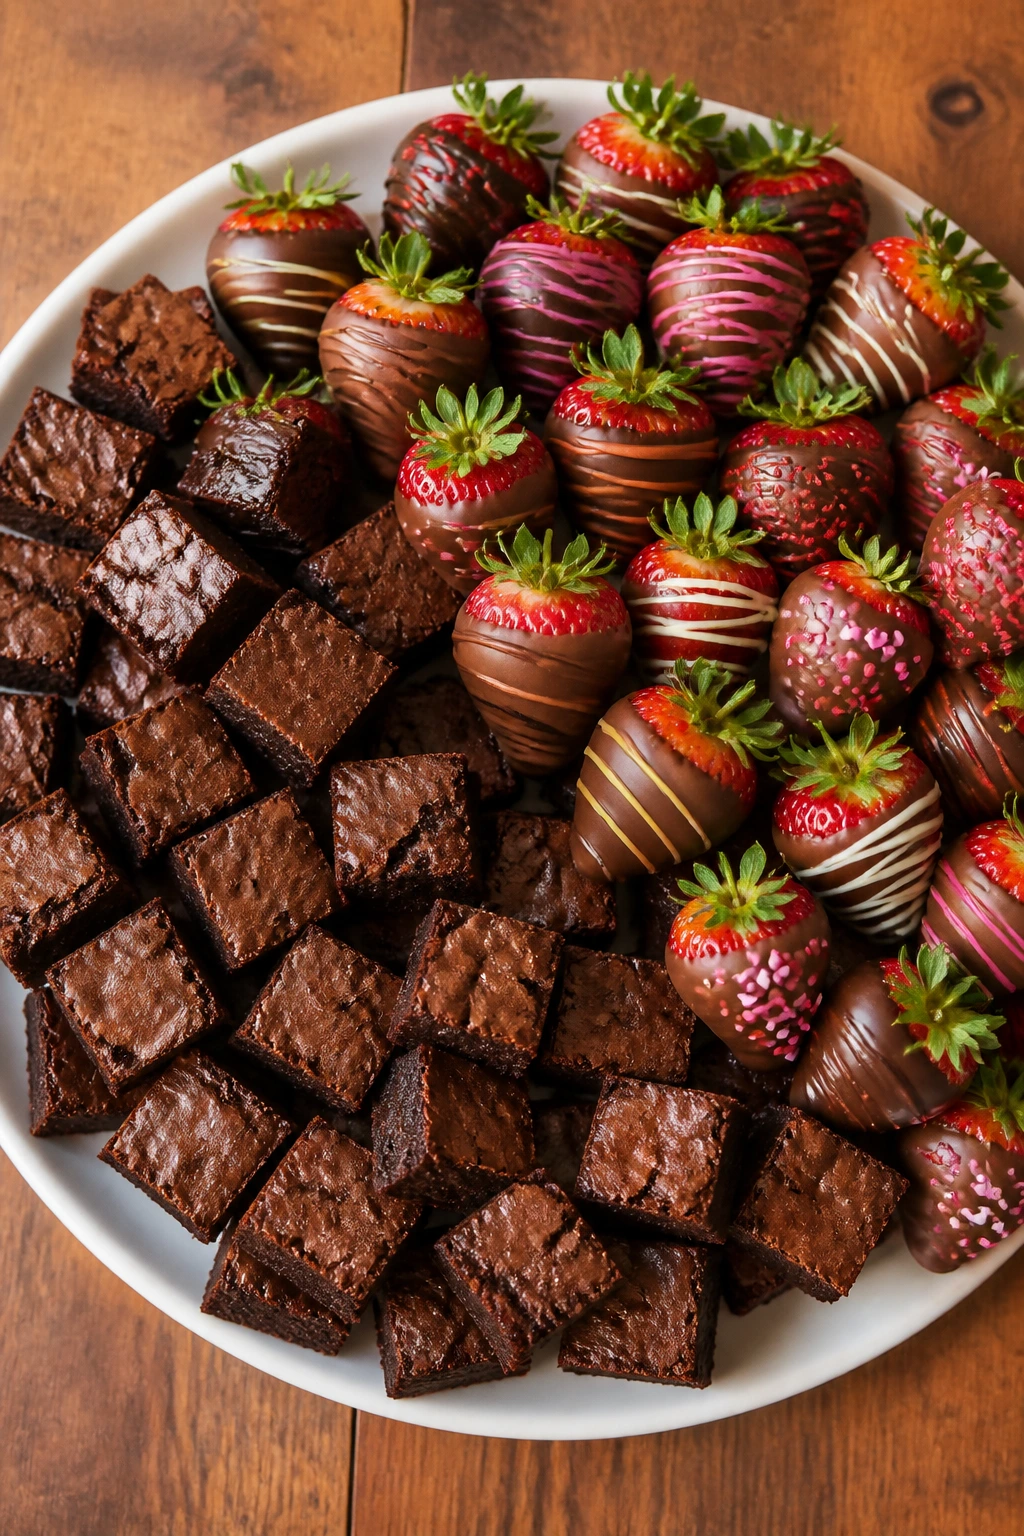
A brownie bite platter is the flexible dessert table move. Bake a pan of brownies, cut them into small squares, then surround them with chocolate-dipped strawberries and maybe a few mints or raspberries. It looks abundant, and that matters when you’re feeding a lot of people and want the table to feel full.
Why It Works:
Some guests want cake, some want fruit, some want the chocolate-only corner. This platter gives you all three without making separate desserts. The smaller brownie bites also keep portions under control, which helps when the meal before dessert was rich.
Key Ingredients:
- 1 batch fudgy brownies, baked in a 9×13-inch pan
- 1 pound strawberries, dry and whole with stems
- 8 ounces semi-sweet chocolate, melted
- 4 ounces white chocolate, melted
- 1/4 cup chopped walnuts or pistachios
- Flaky salt, optional
Quick Steps:
- Bake the brownies and cool them completely.
- Cut into bite-size squares.
- Dip the strawberries halfway into melted chocolate and set them on parchment.
- Drizzle the white chocolate over the strawberries or brownies.
- Sprinkle with nuts or a pinch of flaky salt.
- Arrange everything on a large platter and chill 10 minutes if the chocolate needs to set.
Equipment for This Recipe:
- 9×13-inch brownie pan
- Sharp knife
- Parchment paper
- Small bowls for melting chocolate
- Large serving platter
How to Serve This Dish:
Pile the brownie bites in the center and ring them with strawberries. It’s a good “help yourself” dessert, especially when people are standing around talking instead of sitting down.
Pro Tips for This Recipe:
- Dry the strawberries very well so the chocolate sticks.
- Cut brownies with a hot knife for neater edges.
- Add a little oil to the chocolate if it feels too thick for dipping.
- Make the platter close to serving time if your room is warm.
Variations on This Dish:
- Dark Chocolate Raspberry Platter: Add raspberries and swap the strawberries for some dipped raspberries on skewers.
- Salted Caramel Brownie Bites: Drizzle caramel over the brownies before plating.
- Nut-Free Version: Leave off the nuts and use cookie crumbs instead.
Common Mistakes to Avoid with This Recipe:
- Wet berries: Water and chocolate don’t mix. Dry the berries carefully.
- Warm brownies: They crumble and smear.
- Overcrowding the platter: Give the pieces breathing room so they look generous, not piled.
15. Raspberry Swirl Cheesecake Slab
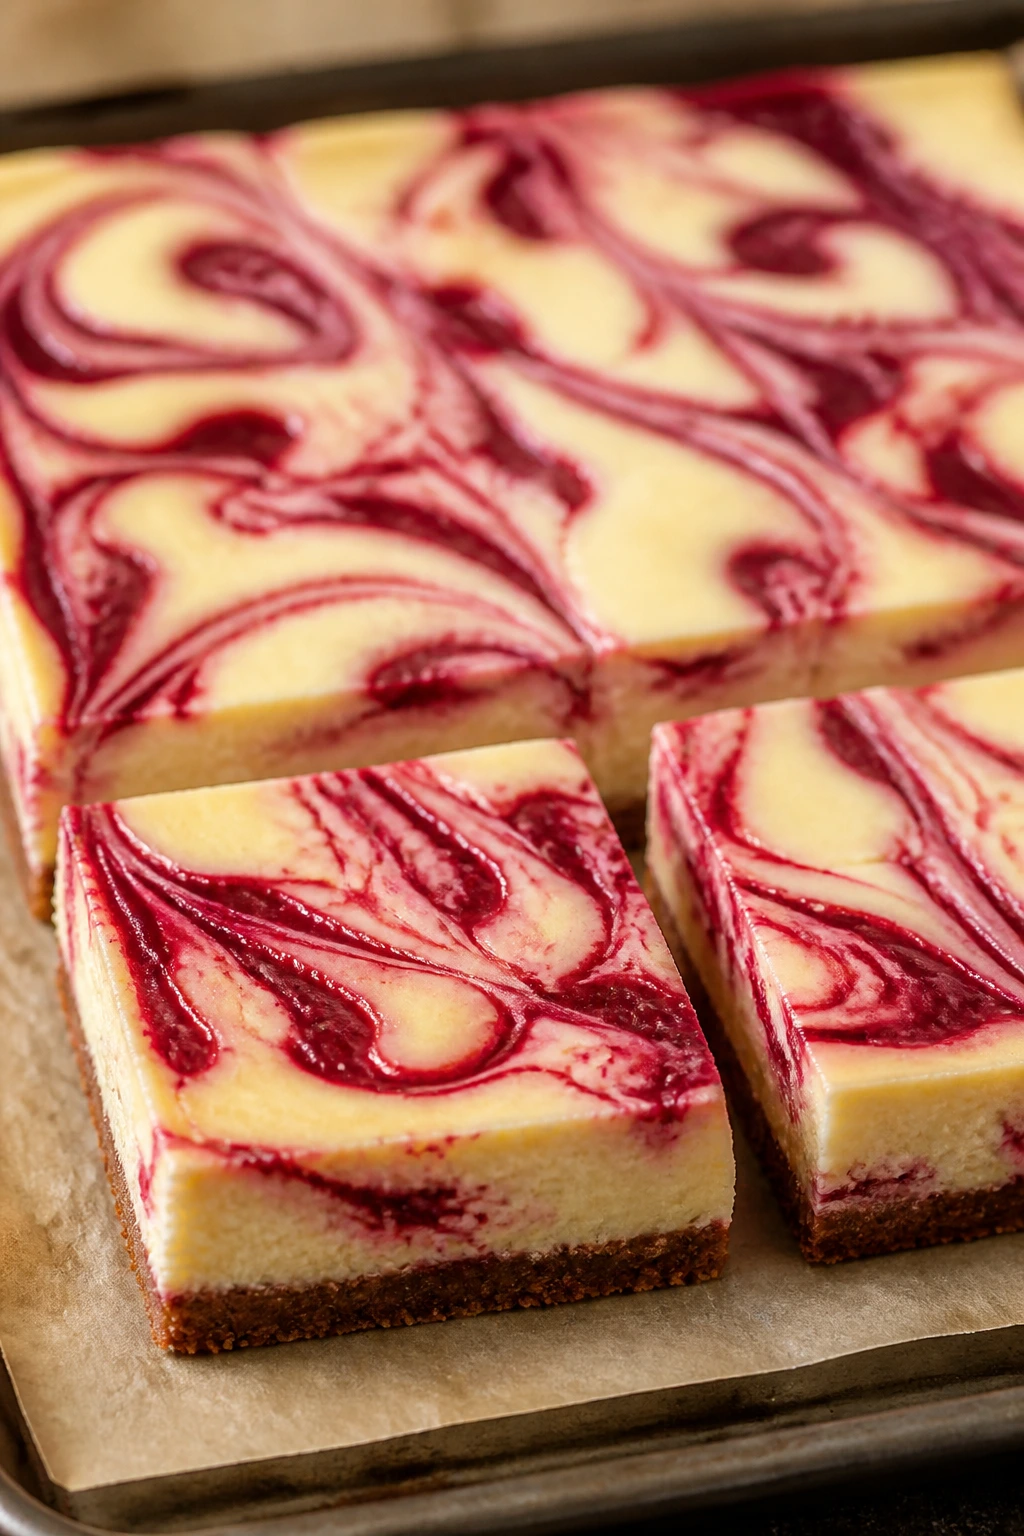
A cheesecake slab is the large-format answer to “I need cheesecake for a crowd, and I need it cut into useful pieces.” The raspberry swirl makes every square look different, which is half the fun. The texture is dense and creamy, not airy, and that’s exactly what you want with a cookie crust underneath.
Why It Works:
A slab cheesecake slices into clean bars instead of wedge-shaped pieces that tilt over on the plate. The raspberry swirl breaks up the richness and adds color with very little effort. Chill time does most of the work, which is good because cheesecake always behaves better after an overnight rest.
Key Ingredients:
- 2 1/2 cups graham cracker crumbs
- 1/2 cup unsalted butter, melted
- 32 ounces cream cheese, softened
- 1 cup granulated sugar
- 4 large eggs
- 1 teaspoon vanilla extract
- 1 cup sour cream
- 3/4 cup raspberry preserves
- 1 tablespoon lemon juice
Quick Steps:
- Heat the oven to 325°F and line a 9×13-inch pan with parchment.
- Mix the crumbs and melted butter, then press into the pan. Bake 8 minutes.
- Beat the cream cheese and sugar until smooth.
- Add the eggs one at a time, then mix in vanilla and sour cream.
- Pour over the crust.
- Warm the preserves with lemon juice, dollop over the filling, and swirl lightly.
- Bake 40 to 45 minutes, cool completely, then chill at least 6 hours before cutting.
Equipment for This Recipe:
- 9×13-inch baking pan
- Parchment paper
- Mixer
- Mixing bowls
- Sharp knife
How to Serve This Dish:
Cut the slab into tidy squares and serve with a spoon of extra raspberry sauce if you want more color. A few mint leaves keep the plate from looking too dense.
Pro Tips for This Recipe:
- Soften the cream cheese all the way through or the batter stays lumpy.
- Cool the cheesecake slowly to reduce cracking.
- Swirl the preserves lightly; strong swirls sink and get muddy.
- Chill overnight if possible for the cleanest slices.
Variations on This Dish:
- Strawberry Slab Cheesecake: Swap raspberry preserves for strawberry preserves.
- Chocolate Crust Version: Use chocolate cookie crumbs instead of graham crumbs.
- Lighter Tangy Version: Replace half the sour cream with Greek yogurt.
Common Mistakes to Avoid with This Recipe:
- Overbeating the eggs: That can add too much air and cause cracking.
- Cutting before it chills: The bars won’t hold their shape.
- Using a loose crust: Press it firmly and pre-bake it for a stronger base.
16. Chocolate-Dipped Shortbread Wedges
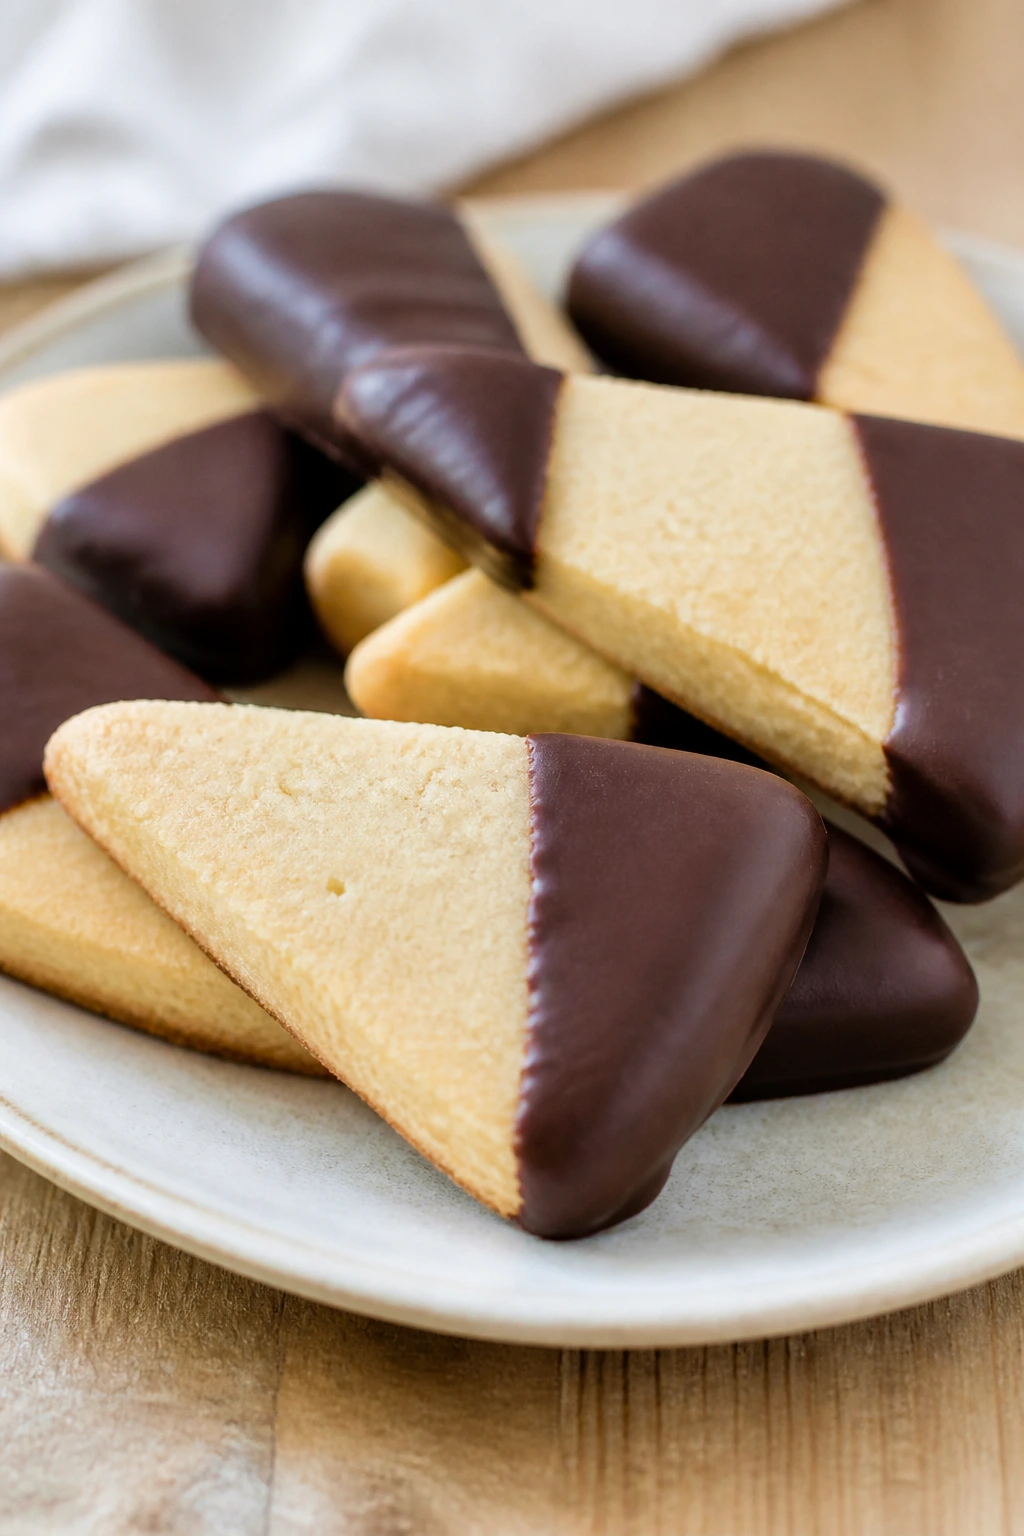
Shortbread wedges are buttery, crisp, and plain in the best possible way. Then you dip the edges in chocolate and suddenly they look like something you brought from a bakery box. I like these because they’re not fussy, and they give the dessert table a calmer note between all the berries and frosting.
Why It Works:
Shortbread is sturdy, travels well, and stays good for days. That makes it useful when your Valentine dessert ideas for a crowd need one thing that can sit out without collapsing. The chocolate edge adds enough richness to keep them from feeling too simple.
Key Ingredients:
- 1 cup unsalted butter, softened
- 1/2 cup powdered sugar
- 2 cups all-purpose flour
- 1/4 teaspoon fine salt
- 1 teaspoon vanilla extract
- 6 ounces dark chocolate, melted
- 2 tablespoons crushed freeze-dried strawberries or pink sprinkles
Quick Steps:
- Heat the oven to 325°F and line an 8×8-inch pan with parchment.
- Beat the butter, powdered sugar, and vanilla until smooth.
- Mix in the flour and salt until a soft dough forms.
- Press into the pan and prick lightly with a fork.
- Bake 25 to 30 minutes, until the top is pale gold.
- Cool completely, cut into wedges or bars, then dip one edge in melted chocolate and sprinkle with berries or sprinkles.
- Let the chocolate set on parchment.
Equipment for This Recipe:
- 8×8-inch baking pan
- Parchment paper
- Mixer
- Sharp knife
- Small bowl for melted chocolate
How to Serve This Dish:
Arrange the wedges in a fan shape on a platter. They’re excellent with coffee after a meal, which is handy when dessert is the last thing people want before heading home.
Pro Tips for This Recipe:
- Don’t overwork the dough or the shortbread turns hard.
- Cool fully before cutting or the wedges crack.
- Use good chocolate because the coating is a major flavor note here.
- A tiny pinch of flaky salt over the chocolate helps the buttery dough stand out.
Variations on This Dish:
- Orange Chocolate Shortbread: Add orange zest to the dough and dip in dark chocolate.
- Matcha Shortbread: Replace 2 tablespoons flour with matcha powder for a green finish.
- Gluten-Free Shortbread: Use a baking flour blend with a little rice flour for extra snap.
Common Mistakes to Avoid with This Recipe:
- Baking until deeply browned: Shortbread should stay pale.
- Slicing warm: It crumbles when it hasn’t cooled.
- Using thin chocolate: It won’t coat cleanly and can look streaky.
17. Mini Pavlovas with Berries
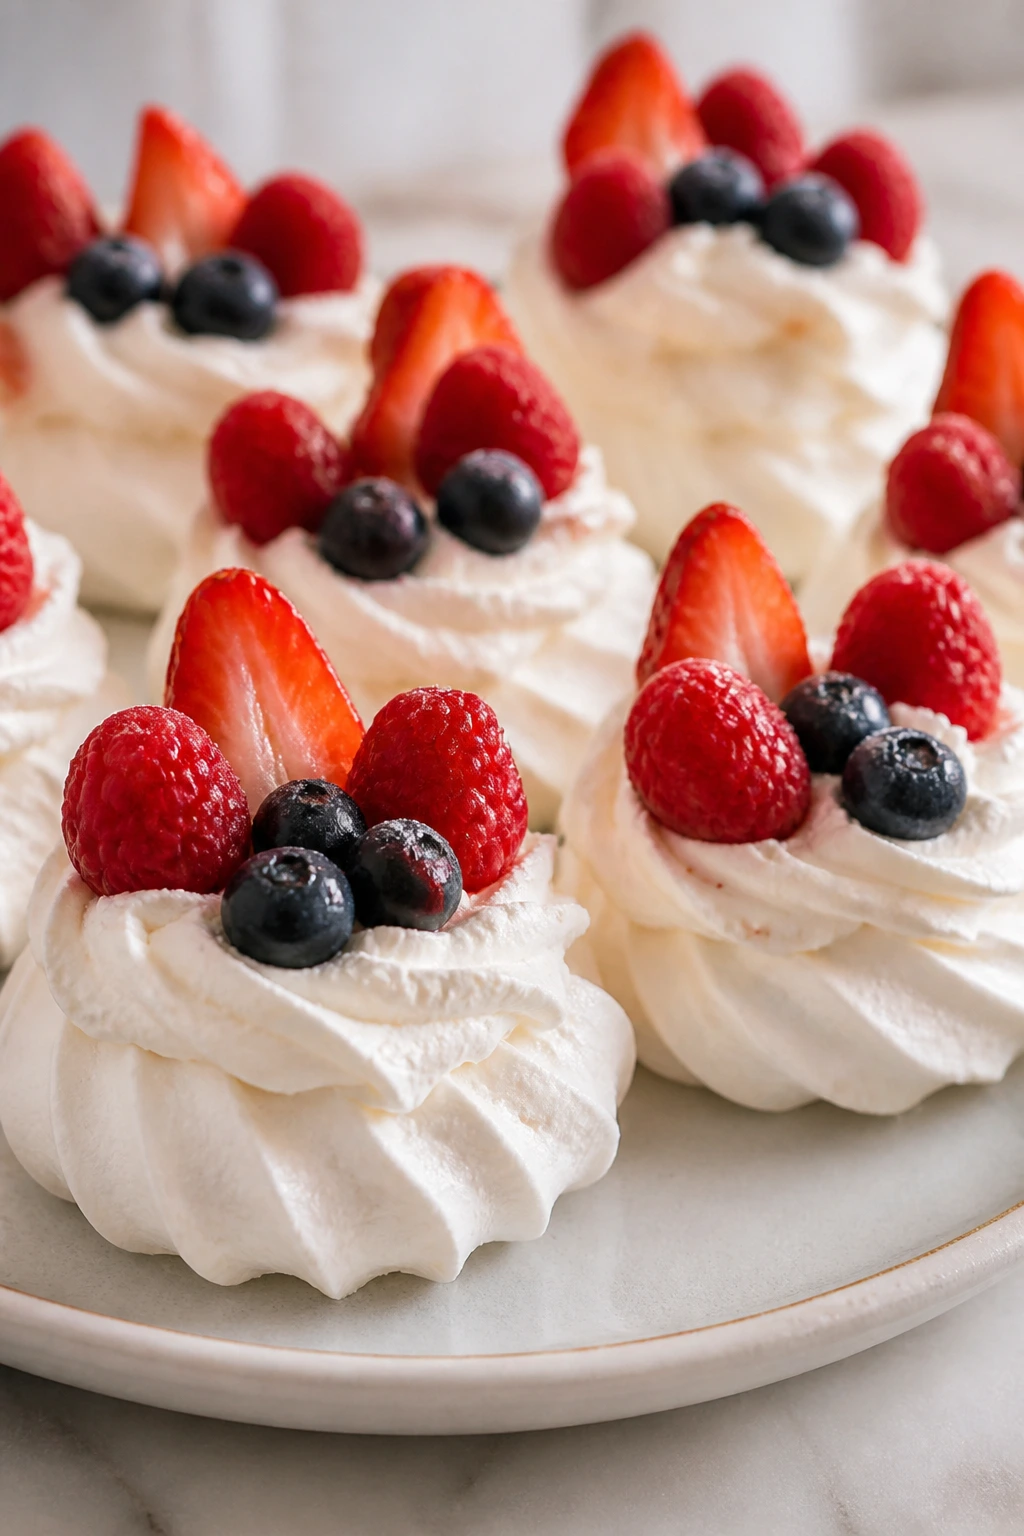
Mini pavlovas are crisp on the outside, marshmallow-soft in the middle, and they look far fancier than the amount of work they require. That contrast is why I love them for a dessert spread. The meringue shells can be made ahead, then topped with whipped cream and berries right before the party.
Why It Works:
Pavlovas give you texture, which matters when the rest of the table is creamy or dense. They also solve portioning beautifully. One shell per person is enough, and the topping can be adjusted to whatever berries look best.
Key Ingredients:
- 4 large egg whites
- 1 cup granulated sugar
- 1 teaspoon cornstarch
- 1 teaspoon white vinegar
- 1/2 teaspoon vanilla extract
- 1 1/2 cups heavy cream
- 2 tablespoons powdered sugar
- 2 cups mixed berries
Quick Steps:
- Heat the oven to 250°F and line a baking sheet with parchment.
- Beat the egg whites until soft peaks form.
- Add the sugar gradually and beat until glossy and stiff.
- Fold in cornstarch, vinegar, and vanilla.
- Spoon into small rounds and make a shallow well in the center.
- Bake 1 hour, then turn the oven off and let the shells cool inside with the door closed.
- Top with whipped cream and berries just before serving.
Equipment for This Recipe:
- Mixing bowl
- Hand mixer or stand mixer
- Baking sheet
- Parchment paper
- Small spoon or ice cream scoop
How to Serve This Dish:
Place the shells on a tray, add the cream, then pile berries into the center so the tops don’t collapse. They look best just after assembly, when the meringue still keeps its crisp shell.
Pro Tips for This Recipe:
- Use a completely grease-free bowl or the whites won’t whip properly.
- Add sugar slowly so it dissolves instead of staying gritty.
- Don’t open the oven while they bake.
- Assemble at the last minute to keep the shell crisp.
Variations on This Dish:
- Chocolate Pavlovas: Fold in 1 tablespoon cocoa powder with the cornstarch.
- Citrus Berry Pavlovas: Add orange or lemon zest to the cream.
- Individual Heart Pavlovas: Pipe the meringue into heart shapes instead of rounds.
Common Mistakes to Avoid with This Recipe:
- Humidity: Meringue hates damp air. Bake on a dry day if you can.
- Sugar not dissolved: Beat long enough that the mixture feels smooth between your fingers.
- Topping too early: The shells soften fast once cream goes on.
18. Raspberry Jam Thumbprint Cookies
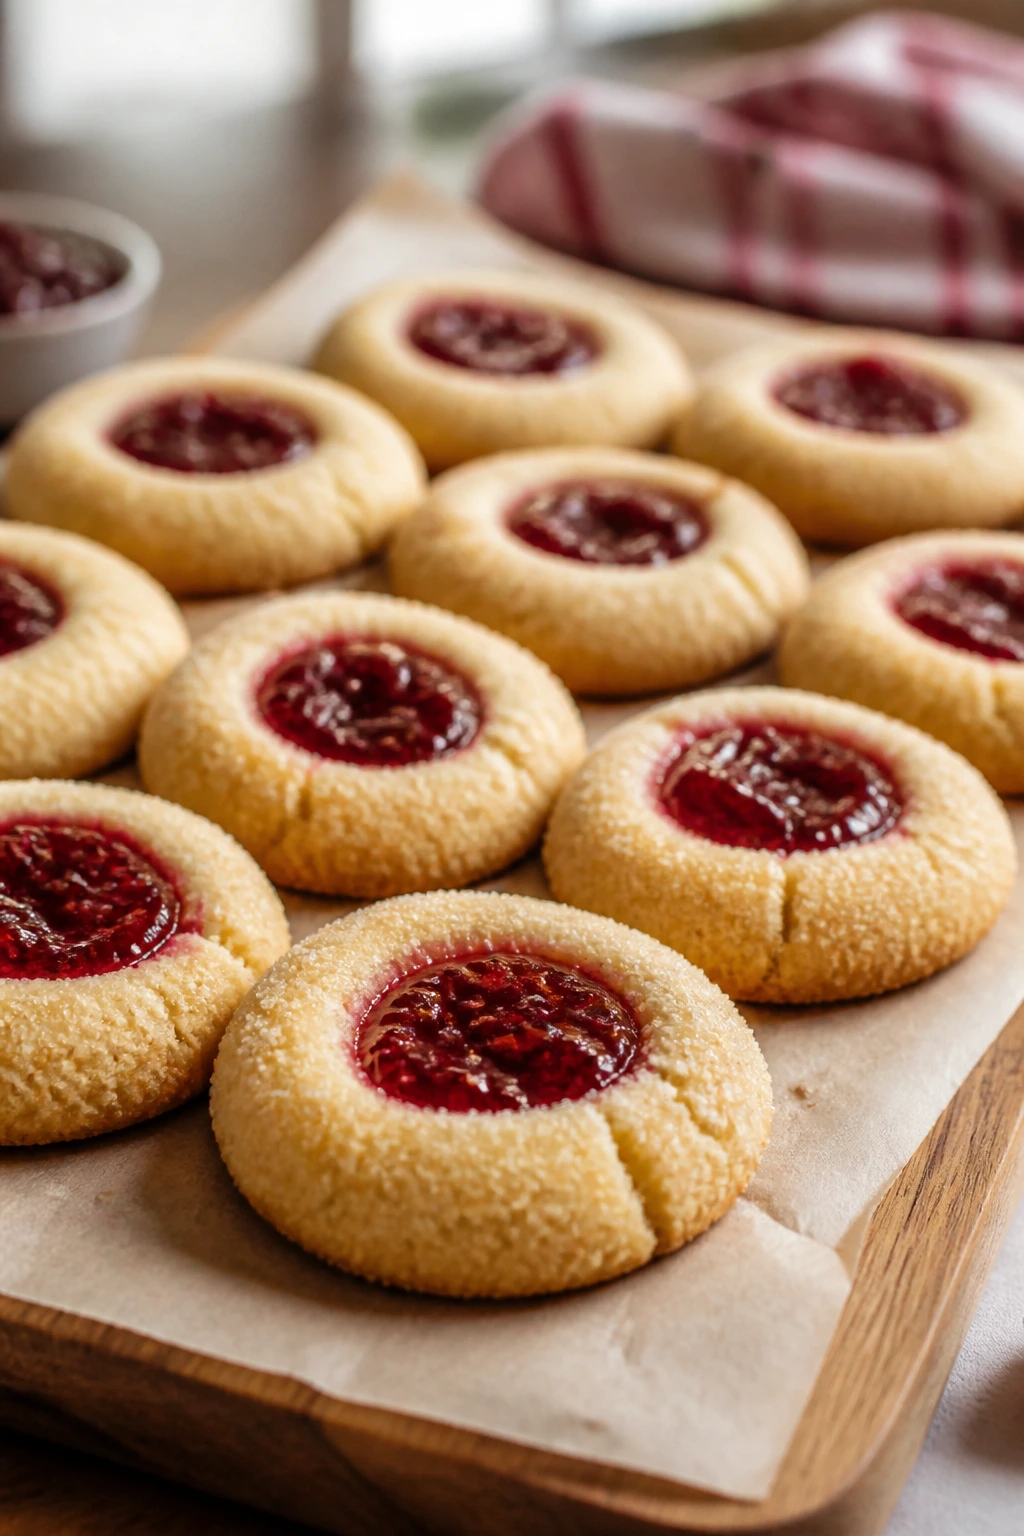
Thumbprint cookies are small, but they disappear faster than the big desserts, which tells you everything you need to know. The buttery cookie base, the shiny raspberry center, and the little edge of sugar make them feel festive without demanding a whole production. They’re also easy to stack and pass around.
Why It Works:
Cookie trays need one item that people can grab with one hand. Thumbprints do exactly that. The jam center gives a bright red spot that reads Valentine’s Day from across the room, and the dough is sturdy enough to bake in batches.
Key Ingredients:
- 1 cup unsalted butter, softened
- 2/3 cup granulated sugar
- 1 large egg yolk
- 1 teaspoon vanilla extract
- 2 cups all-purpose flour
- 1/4 teaspoon salt
- 1/2 cup raspberry jam
- 2 tablespoons finely chopped pistachios, optional
Quick Steps:
- Heat the oven to 350°F and line two baking sheets with parchment.
- Beat the butter and sugar until pale, then mix in the egg yolk and vanilla.
- Add flour and salt and mix until a soft dough forms.
- Roll into 1-inch balls, set on the trays, and press a thumbprint or teaspoon into the center of each.
- Fill each well with a small spoon of raspberry jam.
- Bake 12 to 14 minutes, until the edges are lightly golden.
- Cool fully, then sprinkle with pistachios if using.
Equipment for This Recipe:
- Baking sheets
- Parchment paper
- Mixer
- Small spoon or measuring teaspoon
- Cooling rack
How to Serve This Dish:
Pile them high on a cookie tray or tuck them into paper cups for easier grabbing. They’re a good bridge dessert between the rich bars and the lighter fruit dishes.
Pro Tips for This Recipe:
- If the dough cracks when you press it, let it sit a few minutes longer at room temperature.
- Thicken runny jam on the stove for a minute before filling the cookies.
- Roll the balls evenly so they bake at the same rate.
- Cool completely before stacking or the jam will smear.
Variations on This Dish:
- Apricot Thumbprints: Use apricot jam and chopped almonds instead of raspberry and pistachios.
- Chocolate Thumbprints: Add 2 tablespoons cocoa powder to the dough.
- Lemon-Raspberry Thumbprints: Add lemon zest to the dough for a brighter finish.
Common Mistakes to Avoid with This Recipe:
- Overfilling the centers: Jam bubbles over and glues the cookies to the pan.
- Pressing too hard: Deep holes collapse in the oven.
- Moving them too soon: They need a few minutes to set after baking.
What Makes a Dessert Table Hold Up Under Pressure
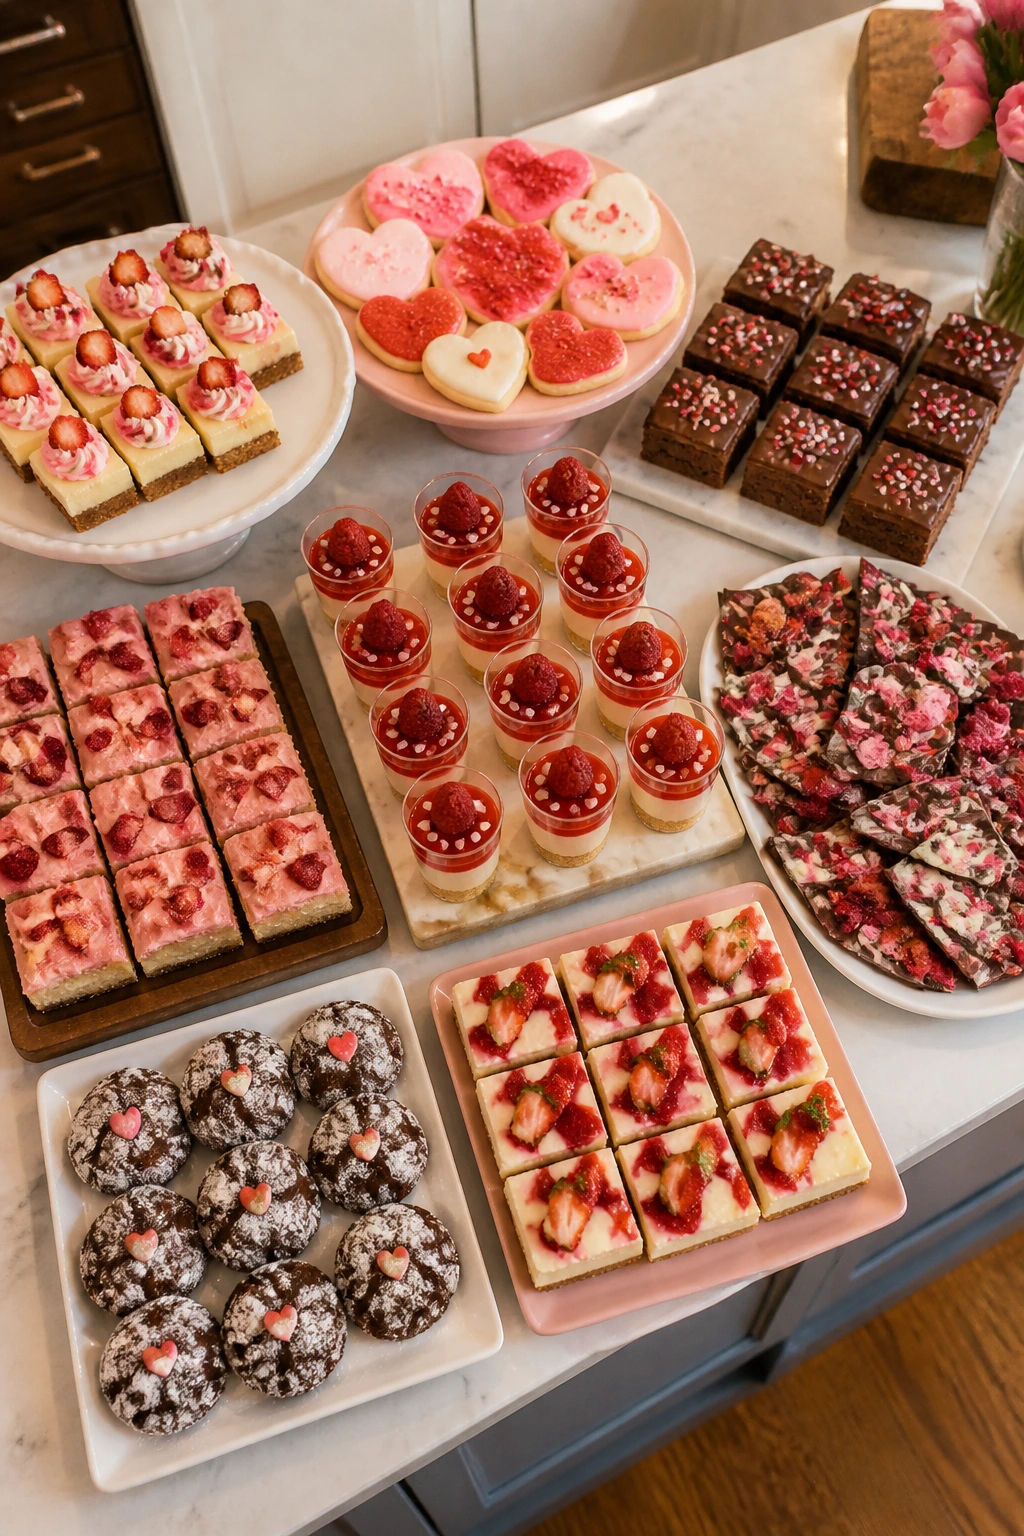
A Valentine dessert spread has a different job than a weeknight cake. It has to sit. It has to hold shape after the second conversation at the buffet. It has to look good when somebody reaches across the table for the last square and leaves a little gap in the tray. That’s why bars, slab cakes, cookies, bark, and chilled cups show up so often here. They’re not glamorous in the abstract. They’re practical. And practical wins when you’re feeding a crowd.
I also like desserts that behave differently from one another. A platter with only chocolate gets heavy fast. A platter with only fruit can feel thin. The useful middle ground is this: one or two rich chocolate desserts, one tangy cream cheese dessert, one bright berry dessert, and at least one thing that can be picked up without utensils. That mix keeps the table moving and gives people choices without making you run a pastry shop out of your kitchen.
Essential Equipment for These Recipes
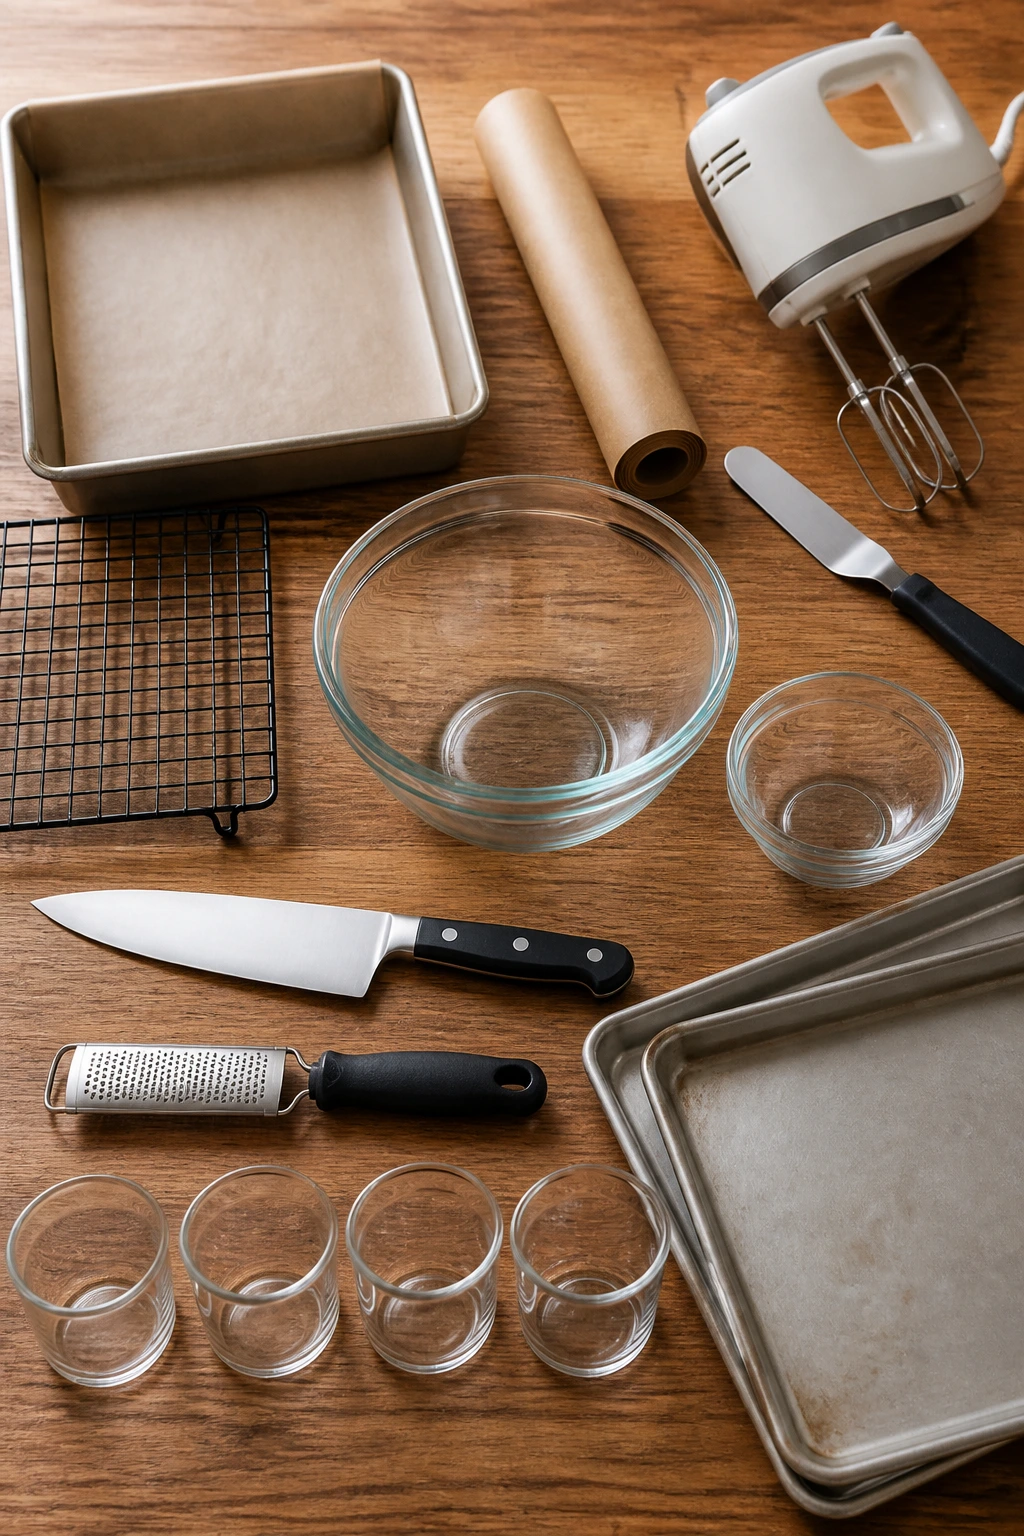
- 9×13-inch baking pan: The workhorse for sheet cakes, bars, blondies, and cheesecake slab desserts.
- Parchment paper: Makes lifting, slicing, and cleanup a lot less annoying.
- Hand mixer or stand mixer: Needed for frosting, cheesecake filling, mousse, and meringue.
- Offset spatula: Useful for smoothing batter, frosting, and trifle layers.
- Cooling rack: Helps cakes, bars, and cookies cool evenly instead of steaming in their pans.
- Sharp chef’s knife: A must for clean squares, slab cheesecake, and neat brownie bites.
- Mixing bowls in at least two sizes: You’ll want one for dry ingredients and one for cream or batter.
- Microplane or fine grater: Handy for lemon zest, chocolate shavings, and finishing touches.
- Baking sheets: Needed for bark, cookies, pavlovas, and dipped strawberries.
- Dessert cups or small glasses: Best for mousse, parfaits, and anything layered and chilled.
Smart Shopping for Strawberries, Chocolate, and Dairy
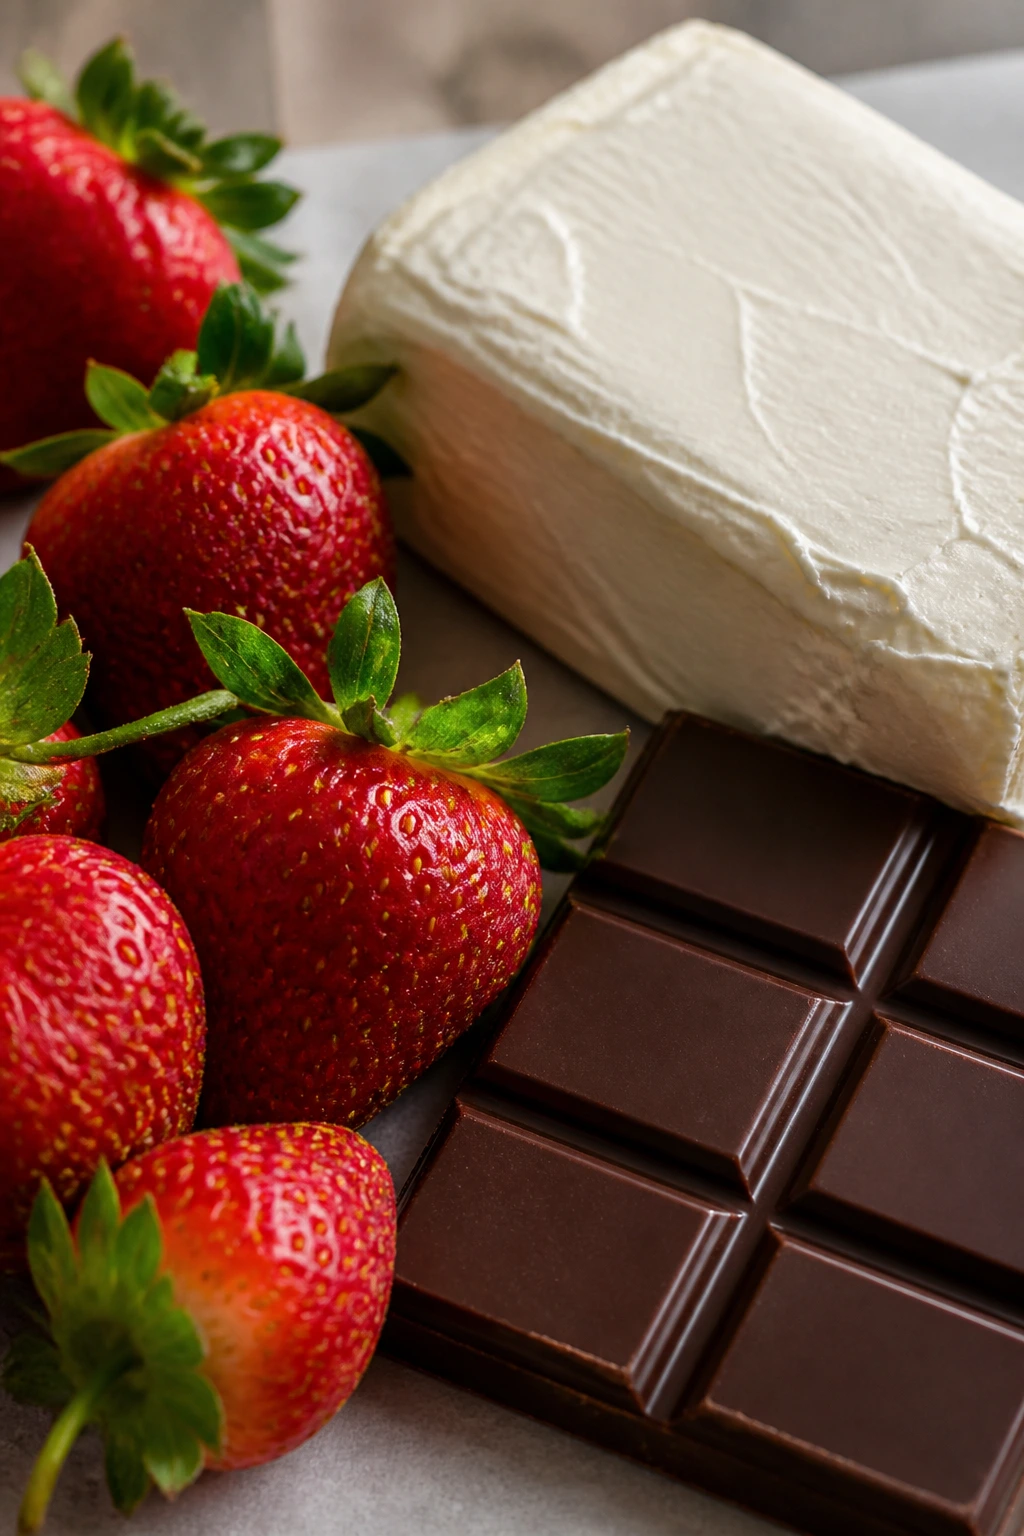
Strawberries are the first thing I look at for a Valentine dessert table, and I’m picky about them. Choose berries that smell sweet at the stem end, not just ones that look red on top. If they’re pale inside or hollow, the flavor usually falls flat. Frozen berries are fine for purees, swirls, sauces, and baked fillings, but for topping cakes or dipping in chocolate, fresh berries matter because the texture gives the plate some life.
Chocolate deserves more attention than it gets. Semi-sweet chocolate is the safest middle ground for bark, dips, brownies, and mousse. Bittersweet works when the dessert already has sugar from frosting or jam. White chocolate needs more care because cheap versions can melt badly and taste waxy. If you can, buy bars or good-quality chips that actually melt smoothly instead of chalking up in the bowl.
Dairy ingredients should be cold when they need volume and soft when they need smoothness. Cream cheese should be fully softened for cheesecake bars, slab cheesecake, and frosting, or you’ll chase lumps forever. Heavy cream whips best when it’s cold from the fridge. Butter for cookie dough and cake batter should be softened enough to press with a finger, not greasy and slumping. That little difference changes texture more than people like to admit.
For jams and preserves, go for bright fruit flavor over bargain sweetness. Raspberry, strawberry, and cherry preserves should taste like fruit first and sugar second. If the jam is overly stiff, warm it with a splash of water or lemon juice before swirling or filling. That keeps the color glossy and stops the filling from tearing the batter underneath.
How to Serve These Desserts at a Party
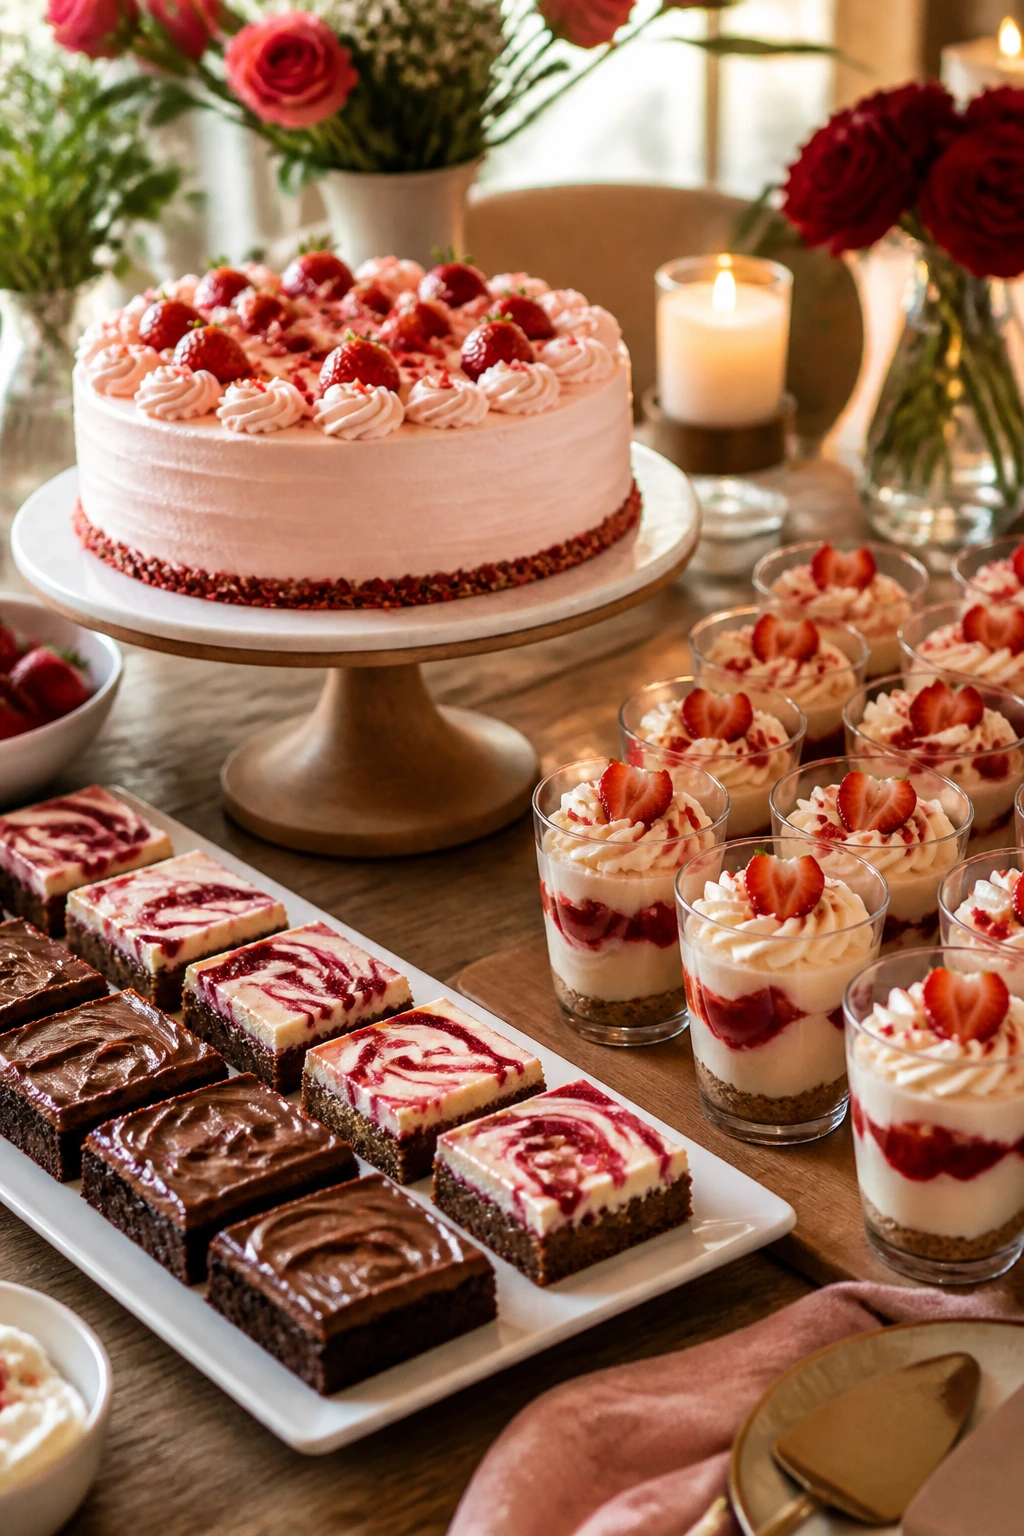
Presentation:
Use height, but keep it simple. A cake on a stand, bars on a flat tray, and cups in a tight row look better than a random pile of plates. If you’re mixing dessert types, group the rich ones together and give the lighter fruit desserts their own zone so the table feels balanced instead of chaotic.
Accompaniments:
Fresh berries, whipped cream, vanilla ice cream, and a few mint leaves are the easiest partners across this whole lineup. For coffee drinkers, shortbread, brownies, and cheesecake bars love a strong cup. For something colder, chilled milk or a berry spritz works nicely with mousse, bark, and trifle.
Portions:
For a full dessert spread, plan on one small bar, one cookie, or one cup per guest, plus enough extra for the people who always take “just a small piece” and then come back. If you’re serving only one dessert, aim for 12 to 16 portions from a 9×13-inch pan and 24 to 30 portions from cookies or bark.
Beverage Pairing:
Sparkling rosé works with strawberry and raspberry desserts, while coffee or espresso is the better fit for chocolate, brownies, and cheesecake. If you want a nonalcoholic route, hibiscus tea or a chilled berry soda keeps the flavors bright without fighting the sugar.
Additional Tips and Flavor Boosters
Flavor Enhancement:
A pinch of salt in frostings, chocolate ganache, and whipped cream does more than people expect. It keeps the sweetness from flattening out. For berry desserts, a little lemon zest wakes everything up without turning the dessert tart.
Customization:
If you’re serving mixed tastes, make one or two desserts more neutral. Shortbread, sugar cookie bars, and mousse cups can carry different toppings at the last minute. That way the table isn’t locked into one flavor family.
Serving Suggestions:
Fresh berries, chocolate curls, freeze-dried strawberry crumbs, and tiny mint leaves do most of the decorating work here. I also like crushed pistachios on anything pink or chocolate-dipped because the green gives the plate a sharper edge.
Make-It-Yours:
For nut-free guests, skip pistachios and almonds and use sprinkles, cookie crumbs, or toasted coconut. For a dairy-light table, keep the bark and some of the fruit bars, then use coconut cream in place of whipped dairy in the mousse or parfaits. For gluten-free guests, the easiest wins are bark, mousse cups, pavlovas, and any bar recipe made with a good 1:1 flour blend.
Make-Ahead, Storage, and Reheating Guidance

The best make-ahead desserts for a crowd are the ones that improve while they sit. Cheesecake bars, slab cheesecake, trifle, mousse cups, parfaits, and cookie bars all benefit from at least a short chill, and most taste better after a full night in the fridge. That’s a gift if you’re working around a dinner menu. It means the dessert can already be done before the main course hits the table.
Bars and sheet cakes keep well in the refrigerator for 3 to 4 days when covered tightly. Cheesecake-style desserts should stay chilled and can be frozen for up to 1 month if wrapped in plastic and foil, though the texture is best fresh from the fridge. Shortbread, blondies, brownies, thumbprints, and bark generally keep at room temperature for 3 to 5 days in airtight containers, assuming your kitchen isn’t hot and humid.
Whipped cream toppings are the trickiest part. Anything with fresh whipped cream, mousse, or trifle needs refrigerator storage and tastes best within 24 hours of assembly. Pavlovas are the exception: store the shells separately in a dry container at room temperature, then top them right before serving. If you assemble them too early, the shells soften and lose their snap.
For reheating, only a few desserts need it. Molten lava cakes can be baked ahead and reheated for a brief 4 to 5 minutes in a 350°F oven if they were underbaked slightly the first time, but honestly, they’re best made close to serving. Brownies and blondies don’t need reheating at all; they taste better at room temperature. If you want to warm a slice of brownie or a shortbread wedge, 8 to 10 seconds in the microwave is enough. More than that and the texture goes mushy.
Easy Swaps and Flavor Variations
Chocolate-to-Vanilla Swap:
If your table is already heavy on chocolate, shift one or two desserts toward vanilla, lemon, or almond. Sugar cookie bars, lemon bars, and shortbread give the spread some air between the richer pieces.
Berry Season Switch:
Any berry dessert here can move from strawberry to raspberry, blackberry, or blueberry without losing its shape. The only real change is sweetness. Blueberries are milder, raspberries are sharper, and blackberries bring a deeper color that stains beautifully.
Dairy-Free Table:
Chocolate bark, shortbread made with plant butter, berry jam cookies, and many fruit bars adapt well. For creamier desserts, choose coconut cream or a dairy-free cream cheese with enough structure to chill properly. Don’t expect every substitute to behave the same way in a cheesecake, though. Some are softer and need more chill time.
Lower-Sugar Finish:
Use darker chocolate, cut the sugar in whipped fillings a little, and lean on berries for sweetness. If a dessert uses jam, choose one with a bright fruit taste instead of a syrupy candy flavor. The fruit should do some of the heavy lifting.
Kid-Friendly Decorating Bar:
Set out sprinkles, freeze-dried strawberry crumbs, mini chocolate chips, and small spoons of melted chocolate so guests can finish their own cookies, bars, or mousse cups. It turns dessert into an activity without forcing you to pipe thirty identical decorations.
Elegant-Only Table:
If you want a cleaner, more grown-up look, keep to berries, dark chocolate, powdered sugar, and mint. Skip the heavy sprinkle layer. The desserts already have enough color.
Common Mistakes to Avoid When Baking for a Crowd
The first mistake is making only desserts that need last-minute attention. If every dish needs to be plated warm, garnished, or sliced right before guests arrive, you’ve built a kitchen trap for yourself. At least half the spread should be cut, chilled, or ready to grab before the room fills up.
The second mistake is choosing desserts that all taste the same. Chocolate is great. So is strawberry. But five chocolate-heavy desserts in one line start to blur together. Give yourself contrast: one tart, one creamy, one crisp, one chewy, one cold. That balance makes the table feel intentional.
Another problem is underestimating storage space. A cheesecake slab needs room in the fridge. Trifle bowls are tall and awkward. Sheet cakes need a flat shelf. If your refrigerator is already packed, make that part of the plan before you start mixing. I’ve seen more dessert disasters from fridge geometry than from bad batter.
Don’t ignore cutting tools, either. A warm knife and a clean towel matter more than fancy garnish when it comes to bars and cakes. Smudged frosting makes a dessert look tired even when it tastes fine. Clean slices give you that bakery feeling people notice before they take a bite.
Last, people often forget that some desserts are meant to be served cold and some are meant to be eaten the moment they leave the oven. Mousse, cheesecake bars, and trifle need chill time. Lava cakes and warm brownies need fast timing. Mixing those two rhythms without a plan is how dessert turns into a waiting game.
Valentine Dessert FAQ
Can I make most of these desserts the day before?
Yes, and for a crowd that’s often the better move. Cheesecake bars, sheet cake, blondies, cookie bars, mousse cups, and trifle all benefit from chilling overnight or sitting covered on the counter. The desserts that should wait until the last minute are lava cakes, pavlovas with toppings, and anything with a fresh whipped cream finish.
Which desserts travel best if I’m bringing one to someone else’s house?
Bars, brownies, shortbread, bark, thumbprint cookies, and cookie bars are the safest bets. They don’t need special serving gear and they handle car rides well if you line the container with parchment or wax paper. Trifle and mousse are more fragile unless you pack them in individual cups.
How do I keep berries from making desserts watery?
Use dry berries whenever possible, and macerate them only when the recipe calls for it. For toppings, wash berries ahead of time and dry them thoroughly on towels. If you’re using berries in a filling, frozen fruit usually needs to be cooked down first so the extra liquid doesn’t seep into the crumb.
Can I use frozen strawberries instead of fresh ones?
Absolutely for purees, sauces, swirls, and cake batter. Frozen strawberries are often better than tired fresh ones for baked desserts because they’re picked at the right ripeness and can be turned into a thicker puree. For dipping or topping, fresh berries still look and feel better.
What if my cheesecake cracks?
First, don’t panic. A cracked cheesecake still tastes like cheesecake. Cover the top with raspberry swirl, whipped cream, sliced berries, or a dusting of powdered sugar and nobody will care. Cracks usually come from overbaking, overmixing, or cooling too fast.
How do I keep chocolate bark from melting at the table?
Store it in a cool, dry place away from sunlight and heaters. If your room runs warm, keep the platter small and refill it from a chilled batch in the kitchen. Bark with a lot of white chocolate softens sooner than dark chocolate bark.
Do I need special pans for slab cakes and bar desserts?
Not really. A sturdy 9×13-inch pan handles most of this collection, and a good 8×8-inch or 9×9-inch pan covers the smaller bars. If you line the pan with parchment that hangs over the sides, you can lift the dessert out instead of digging around with a spatula.
Can I make a dessert table with only no-bake items?
You can, and it’s a smart call when the oven is tied up. Bark, mousse cups, parfaits, trifle, and chilled cheesecake bars give you plenty of structure without baking. I’d still include one crisp item like shortbread or thumbprint cookies so the table has some texture contrast.
A Sweet Table That Actually Works
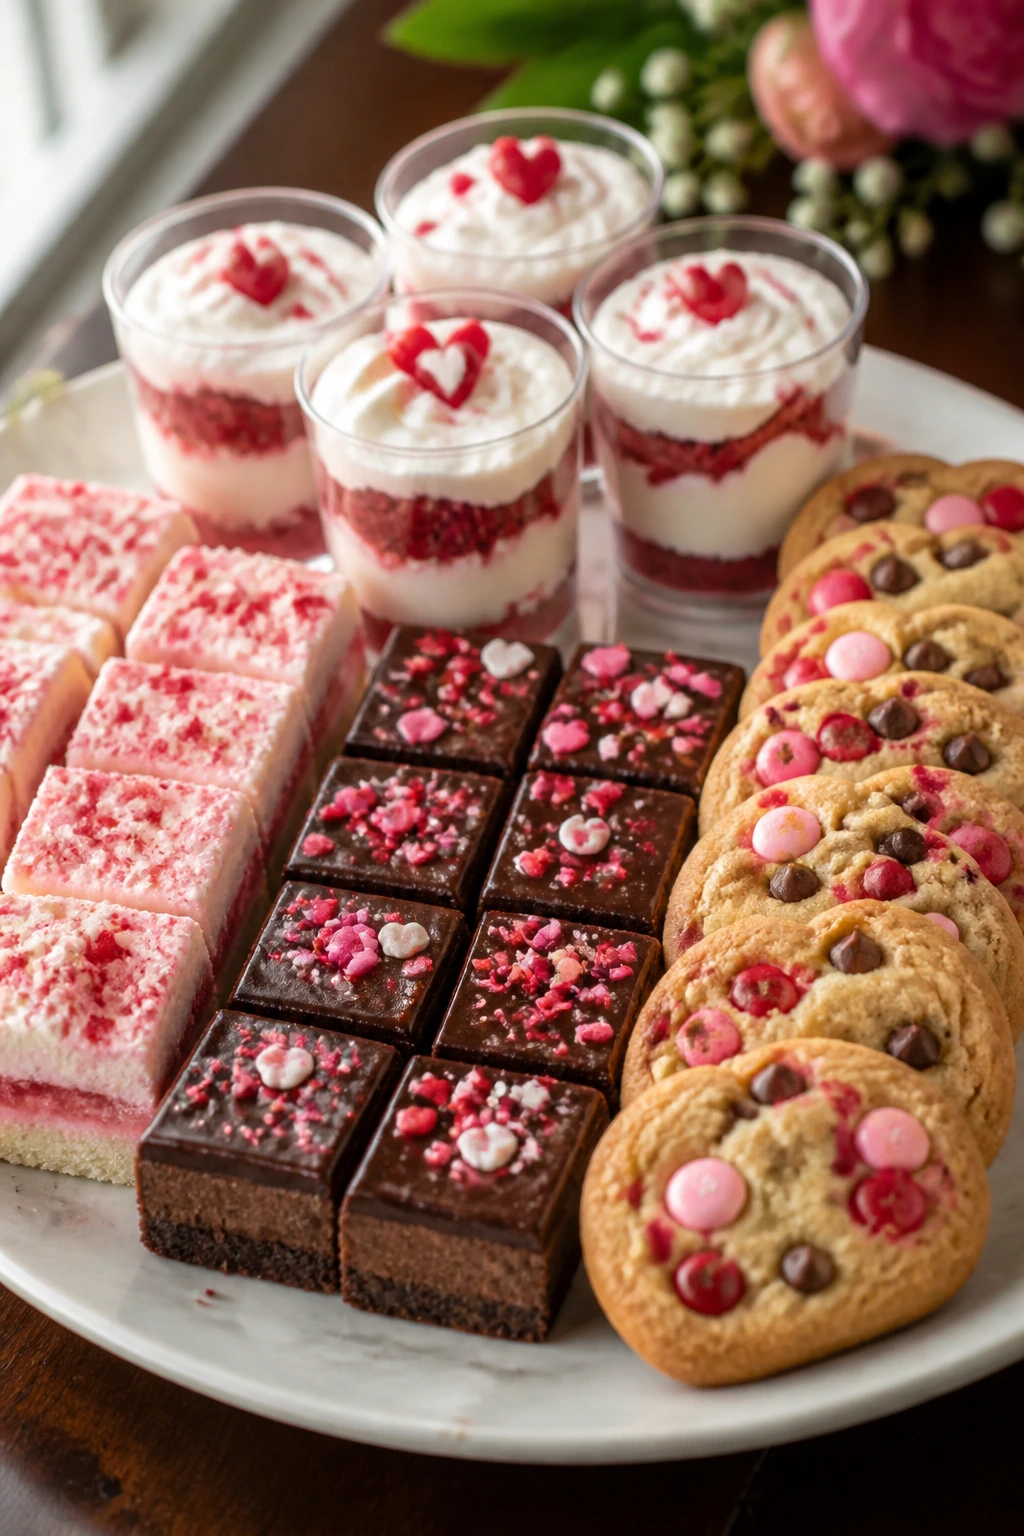
The nicest thing about these Valentine dessert ideas for a crowd is that they don’t ask you to choose between pretty and practical. You get both. A tray of bars, a bowl of trifle, a few glossy chocolate squares, and a plate of cookies can carry a whole dessert spread without turning the host into a full-time server.
I’ll take that over a tower of fussy sweets any day. A dessert table should feel generous, not fragile, and the recipes here are built to be cut, scooped, stacked, and passed around without drama. Make one rich thing, one bright thing, one cold thing, and one easy grab-and-go item, and the table takes care of itself.