
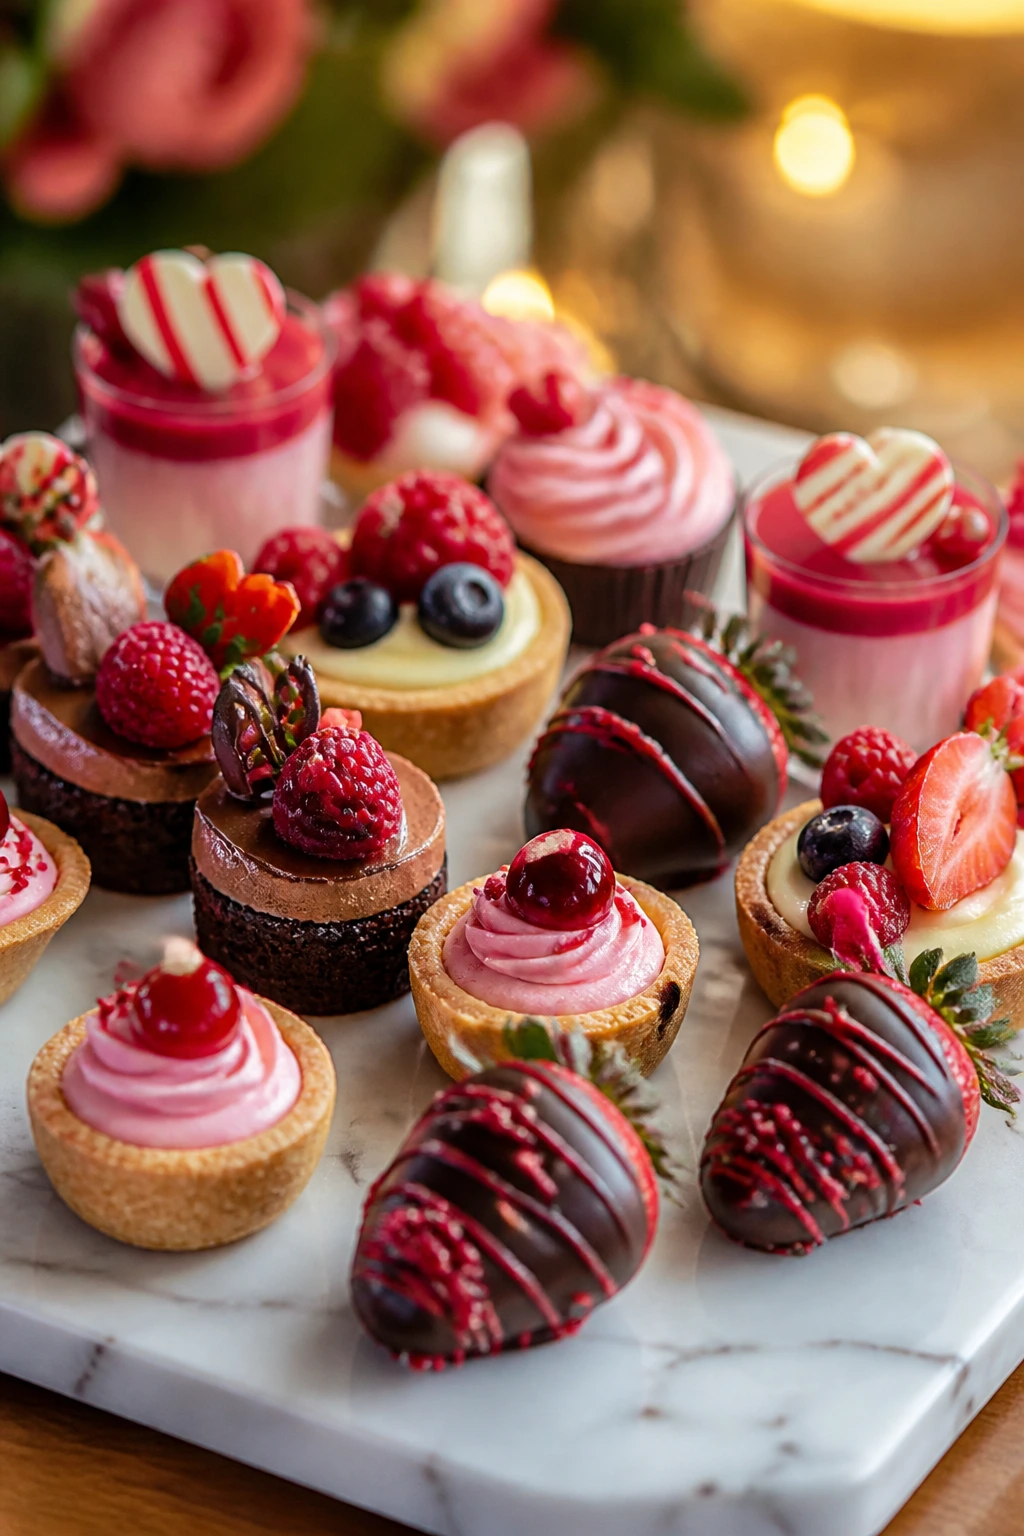
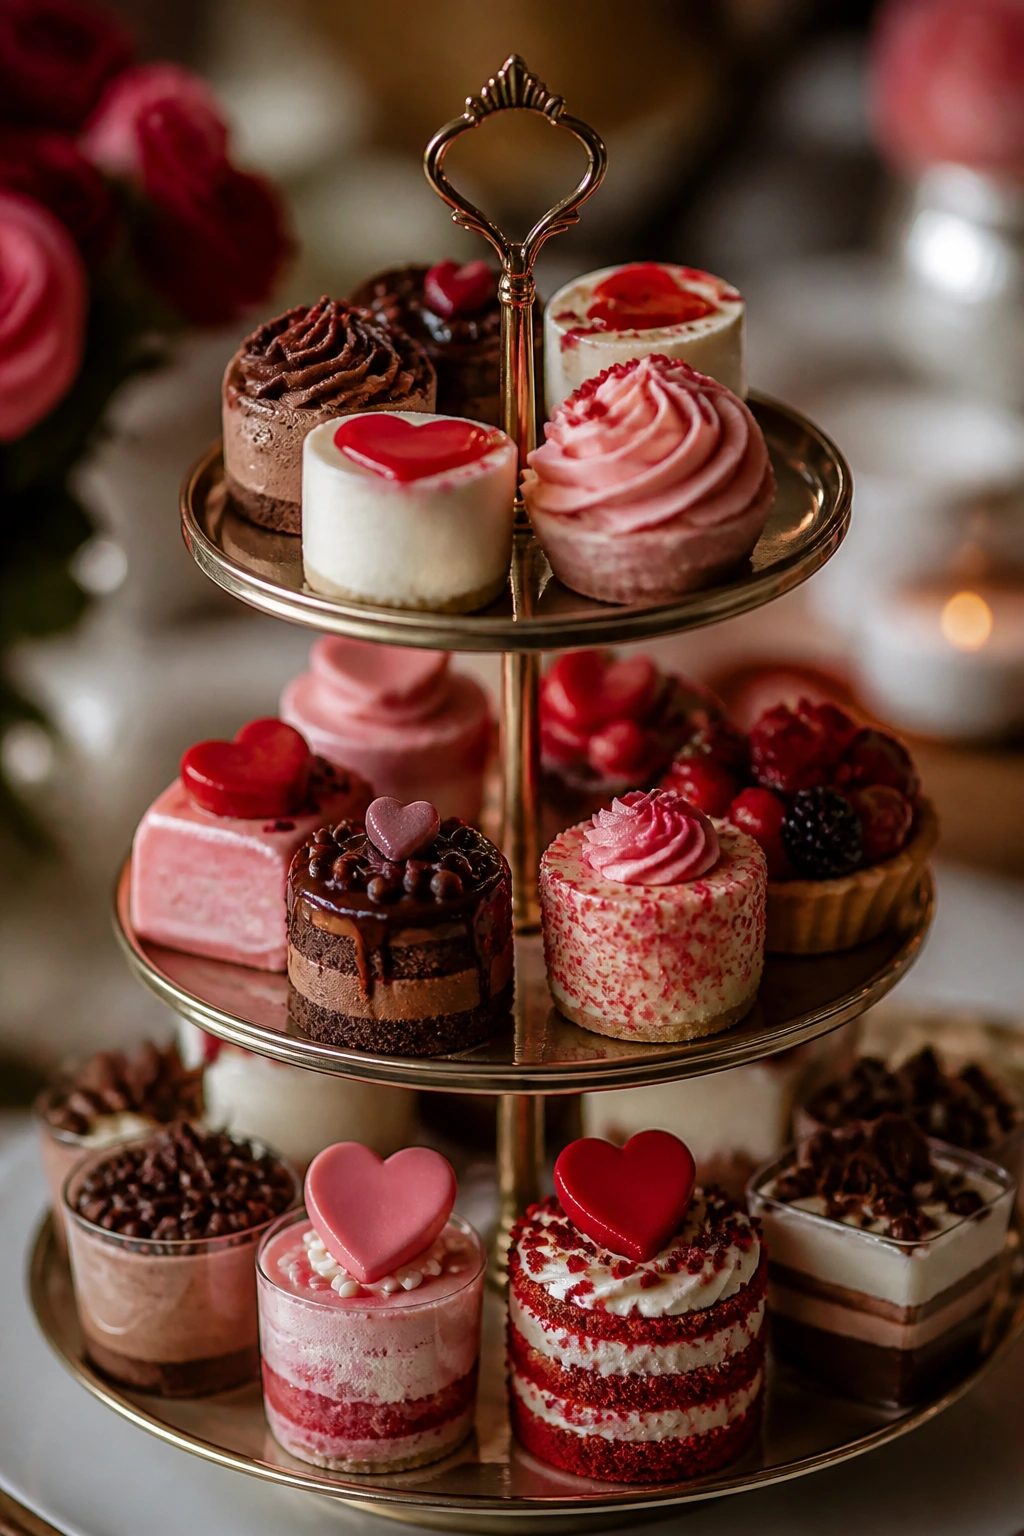
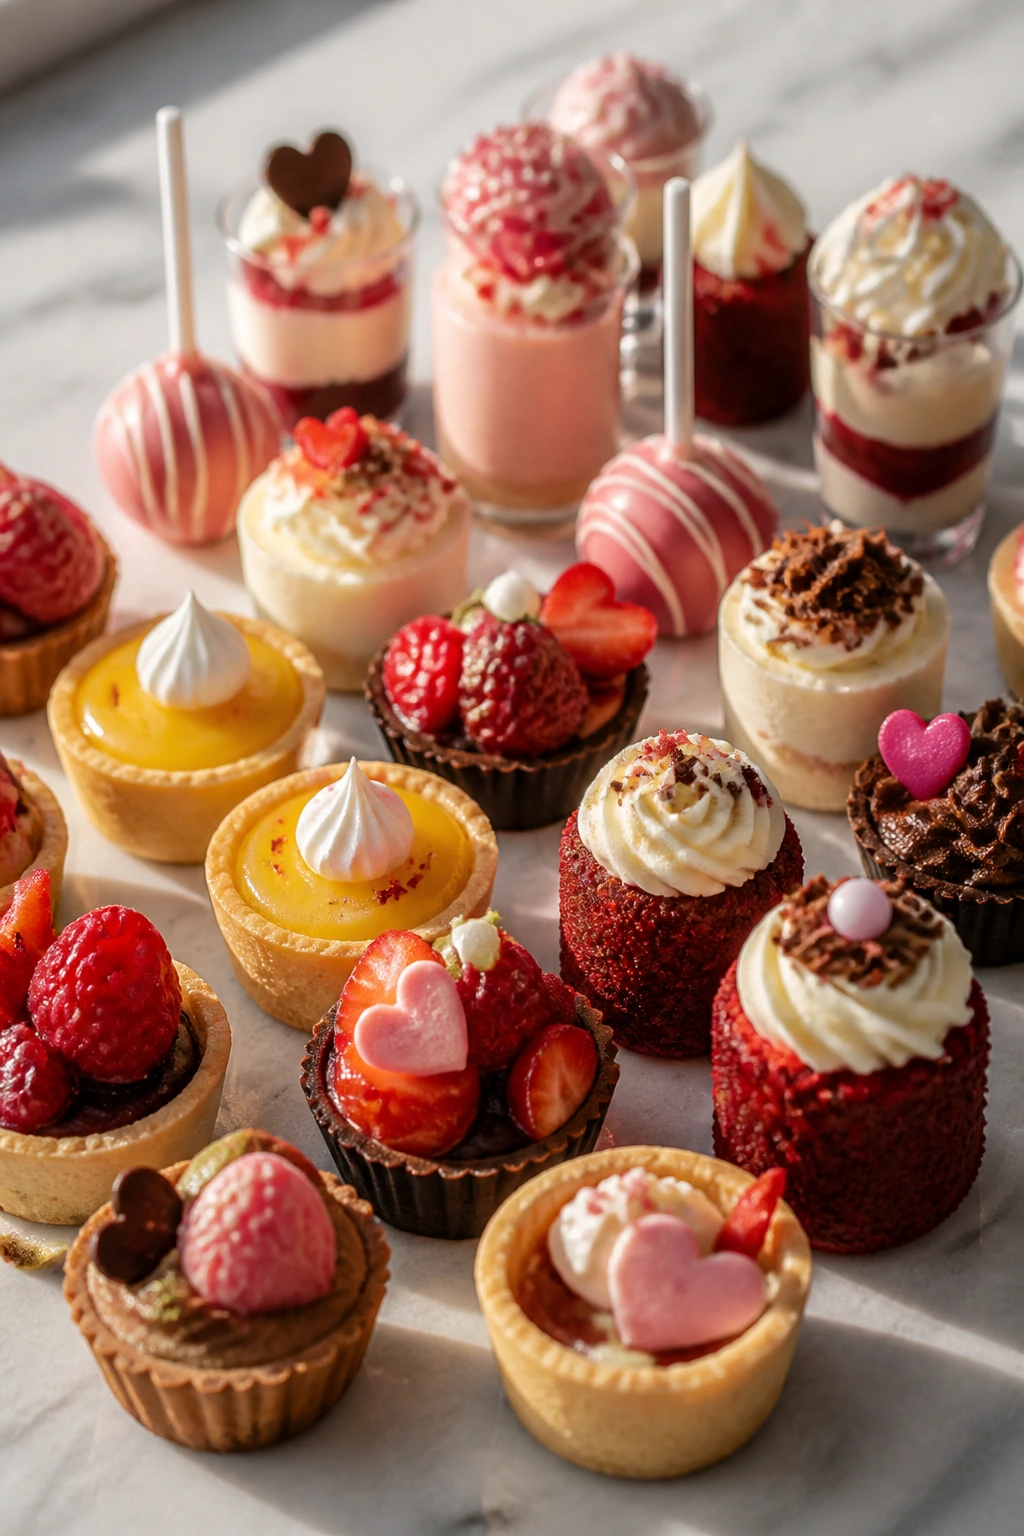
A tray of Valentines mini desserts has a different job than a full cake. It has to look polished from six feet away, hold up under a dozen curious fingers, and still taste like someone cared about every crumb, swirl, and drizzle. That’s the sweet spot here: small portions with enough detail to feel special, not fussy. A glossy berry glaze, a clean chocolate edge, a line of powdered sugar falling across a dark tart shell — those little things matter.
And mini desserts solve a practical problem that bakers know well. Full-size cakes demand slices. Pies need cutting. Cheesecakes need a knife that isn’t dragging through the crust. Bite-sized sweets skip all of that, which is why a dessert board loaded with pink, red, white, and chocolate shades feels calmer and more elegant than one giant centerpiece fighting for attention.
The best versions also use texture on purpose. Crisp shells against soft cream. Silky mousse under a pinch of flaky salt. Tart fruit cut with white chocolate or mascarpone. Once you start thinking in those contrasts, the whole table gets easier to plan, and far more fun to eat.
Why These Mini Desserts Earn the Table
- No slicing drama: Each piece is already portioned, so the last guest gets the same neat dessert as the first one.
- Color does half the work: Raspberries, strawberries, cherries, pink frosting, white chocolate, and cocoa powder give you a Valentine’s spread that looks intentional without a pile of garnish.
- Texture stays interesting: A good mini dessert should snap, melt, or crumble in a way a full cake can’t always manage.
- Most of them travel well: Tart shells, cookies, truffles, and cups can be packed into containers with parchment between layers and still look tidy.
- You can mix make-ahead and same-day recipes: That matters when the oven is busy and you still want one or two showpieces on the table.
- Small portions invite variety: People can try three or four desserts without feeling like they’ve committed to a full slice of anything.
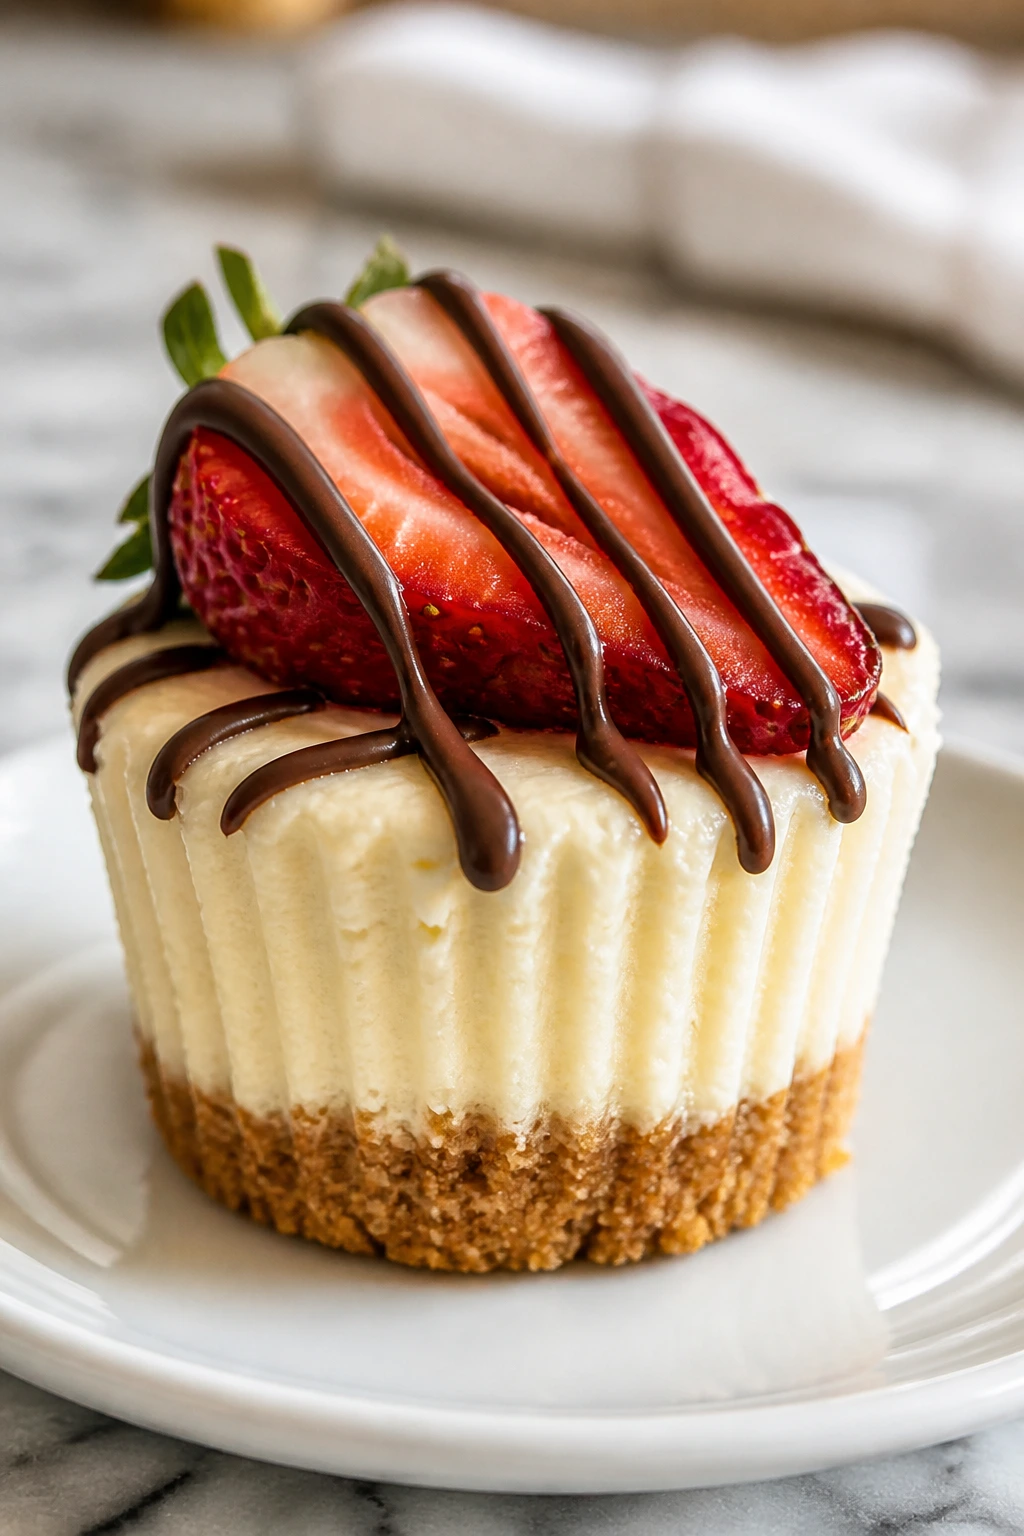
1. Mini Chocolate-Dipped Strawberry Cheesecake Cups
A good cheesecake cup is about contrast. The crust should crunch first, then give way to a cold, creamy filling with a faint tang from cream cheese and lemon. Add sliced strawberries and a little chocolate drizzle, and you’ve got the sort of dessert that looks fancier than the work it asks of you.
The thing I like about this version is the balance. It doesn’t lean so hard into sugar that the strawberries taste like decoration only. The berries stay fresh, the filling stays plush, and the chocolate gives each bite a clean edge.
Why It Works:
Mini muffin cups give you tidy individual portions, and the short bake sets the crust without drying out the filling. The cream cheese base firms up in the fridge, so these can be made ahead and topped at the last minute. A small splash of lemon juice keeps the filling from tasting flat, which matters more than people think when the dessert is this small.
Key Ingredients:
- 1 cup graham cracker crumbs
- 3 tablespoons unsalted butter, melted
- 2 tablespoons granulated sugar
- Pinch fine salt
- 8 ounces cream cheese, softened
- 1/4 cup powdered sugar
- 1/2 cup heavy cream, whipped to soft peaks
- 1 teaspoon vanilla extract
- 1 teaspoon lemon juice
- 8 to 10 strawberries, thinly sliced
- 1/2 cup semisweet chocolate chips, melted
Quick Steps:
- Preheat the oven to 350°F (175°C) and line a 12-cup muffin tin with paper liners.
- Mix the graham crumbs, melted butter, sugar, and salt until the mixture looks like wet sand.
- Press about 1 tablespoon of crust into each liner and bake for 5 minutes, until the edges smell toasty.
- Beat the cream cheese, powdered sugar, vanilla, and lemon juice until smooth, then fold in the whipped cream.
- Spoon the filling over the cooled crusts, chill for at least 2 hours, then top with strawberries and a thin drizzle of melted chocolate.
Equipment for This Recipe:
- 12-cup muffin tin
- Paper liners
- Mixing bowls
- Hand mixer
- Small offset spatula or spoon
How to Serve This Dish:
Serve these cold, straight from the fridge, with the strawberries placed in a fan or half-moon on top. They sit nicely on a white platter with a few whole berries scattered around the edges. Two cups per person is plenty if the rest of the dessert table is busy.
Pro Tips for This Recipe:
- Chill the crust for 10 minutes before filling if your kitchen is warm; it helps the base stay compact.
- Whip the cream to soft peaks only. Stiff cream turns the filling grainy when you fold it in.
- Use small strawberries rather than giant ones; they sit better on top and don’t slide off.
- Warm the chocolate for drizzling just until fluid, not hot. Hot chocolate melts the filling surface.
Variations on This Dish:
- White Chocolate Berry Cups: Swap the semisweet drizzle for melted white chocolate and use raspberries instead of strawberries.
- Lemon-Raspberry Cups: Add 1 teaspoon lemon zest to the filling and top with raspberry halves for a sharper bite.
- Gluten-Free Cups: Use gluten-free graham crumbs or almond cookie crumbs in the crust.
Common Mistakes to Avoid with This Dish:
- Don’t overfill the liners. If the filling sits too high, it slumps when you top it.
- Don’t skip the chill time. Warm cheesecake filling tastes loose and messy.
- Don’t add the strawberries too early if they’re cut. They’ll weep into the cream.
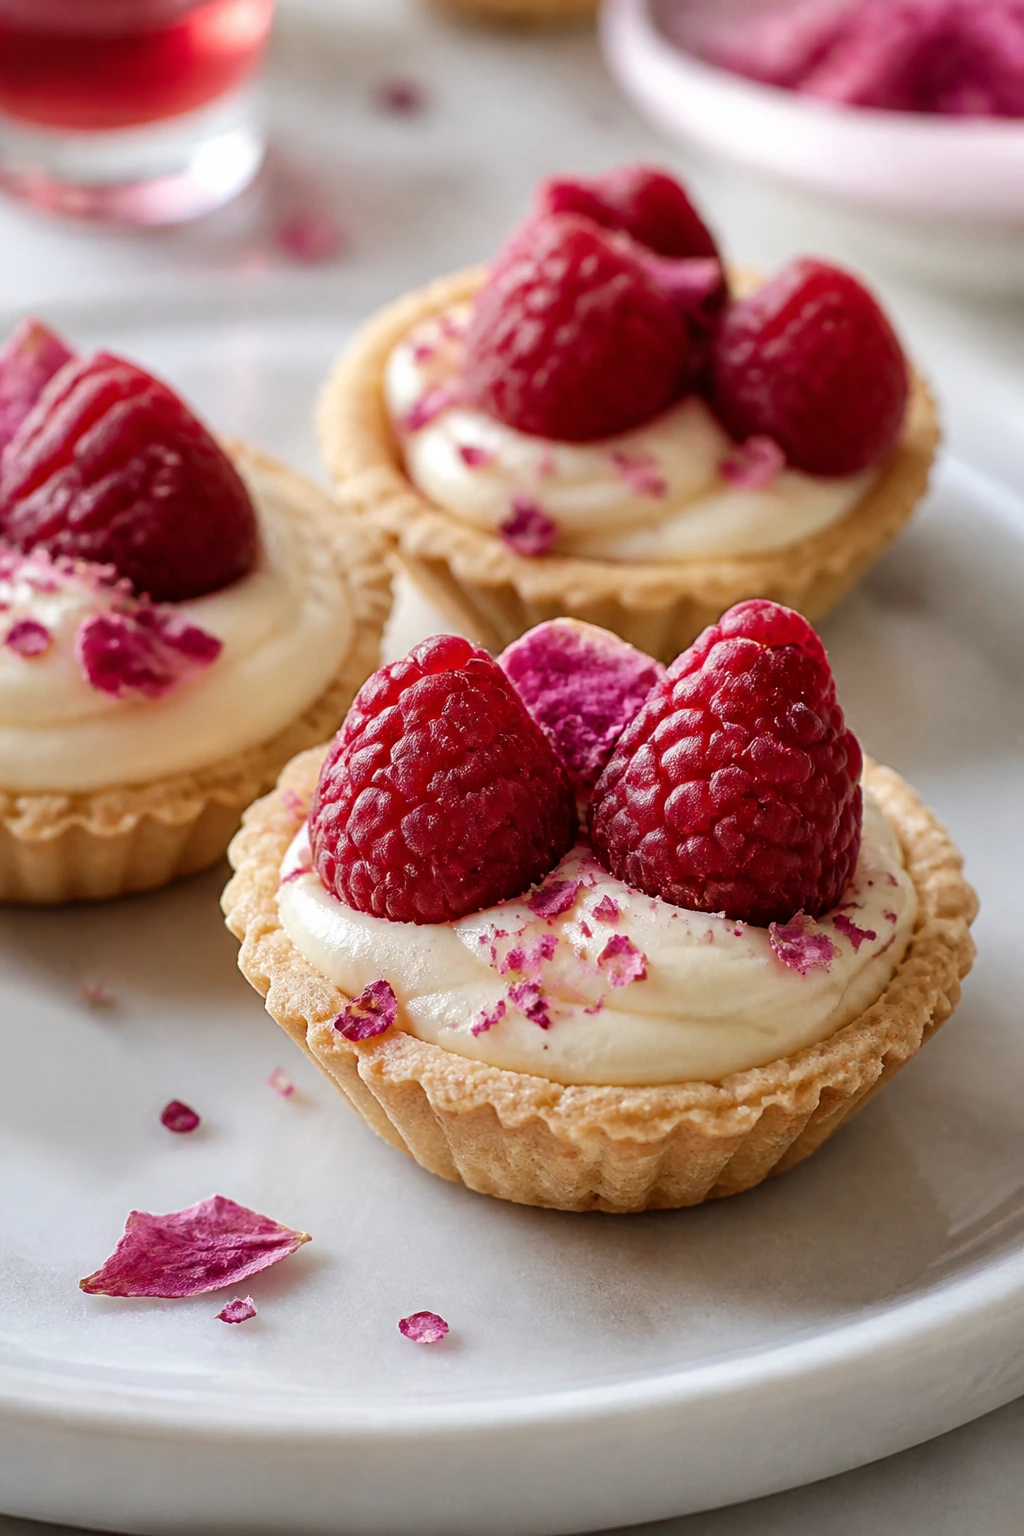
2. Raspberry Rose Mini Tartlets
These tartlets have a perfume-like quality that feels right for a Valentine’s tray. The filling is soft and pale, the raspberries sit on top like little red lanterns, and the rose water — if you use it sparingly — gives the dessert a faint floral note instead of a mouthful of soap.
I’m picky about rose flavor. Too much, and the tart tastes like scented hand cream. The trick is one measured teaspoon, maybe less, and letting the berries carry the color.
Why It Works:
Mini tart shells hold a creamy filling without needing any blind-baking fuss if you buy them pre-made. Mascarpone gives the filling body, while whipped cream keeps it light enough to pipe or spoon cleanly. Raspberry jam works as both sweetness and glue, which means the berries stay put.
Key Ingredients:
- 12 mini tart shells, baked and cooled
- 8 ounces mascarpone cheese
- 1/3 cup raspberry jam
- 1/4 cup powdered sugar
- 1 teaspoon rose water, optional
- 1/2 cup heavy cream
- 1 cup fresh raspberries
- 1 tablespoon chopped pistachios, optional
- Pinch salt
- Dried rose petals, for garnish if desired
Quick Steps:
- If using unbaked shells, bake them according to the package directions and cool completely.
- Beat the mascarpone, jam, powdered sugar, rose water, and salt until smooth.
- Whip the cream to soft peaks and fold it into the mascarpone mixture.
- Spoon or pipe the filling into each tart shell.
- Top with raspberries, pistachios, and a tiny pinch of rose petals if you want the full effect.
Equipment for This Recipe:
- Mini tart pan or store-bought tart shells
- Mixing bowl
- Hand mixer
- Piping bag or spoon
- Small spoon for jam
How to Serve This Dish:
These look nicest on a dark tray or slate board, where the red berries stand out. Serve them chilled, and keep the garnishes simple. One tartlet per person works if they’re part of a larger dessert spread; two is a generous standalone serving.
Pro Tips for This Recipe:
- Taste the filling before adding all the rose water. A few drops can be plenty.
- Drain very juicy jam through a spoon if it’s loose; runny filling makes the shells soggy.
- Fill the shells close to serving time if you want the crust to stay crisp.
- A single pistachio sprinkle gives texture without stealing the show.
Variations on This Dish:
- Chocolate Shell Tartlets: Use chocolate mini tart shells for a deeper flavor.
- Strawberry-Rose Tartlets: Swap half the raspberry jam for strawberry jam and keep the rose water light.
- No-Rose Version: Leave out the rose water and add lemon zest instead for a cleaner finish.
Common Mistakes to Avoid with This Dish:
- Don’t overmix the mascarpone. It can go loose fast.
- Don’t use jam straight from the fridge if it’s too stiff; warm it slightly so it blends.
- Don’t pile on wet fruit too far in advance unless you’re fine with a soft shell.
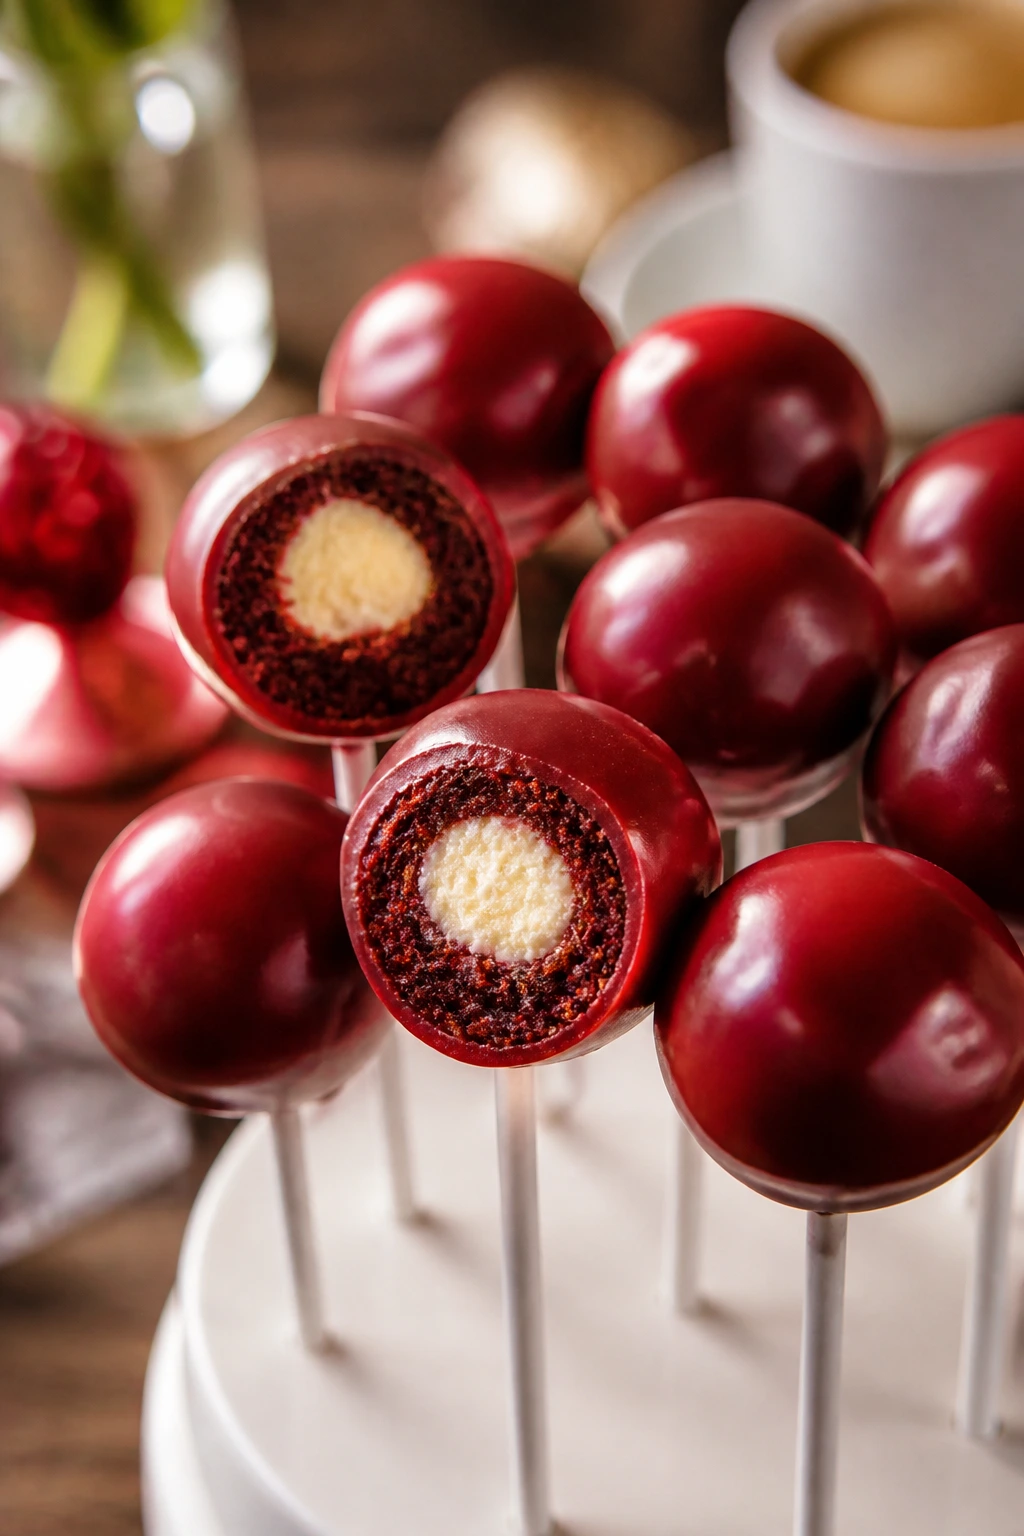
3. Red Velvet Cake Pops with Cream Cheese Centers
Cake pops can look a little too cute if they’re clumsy, and a little too dry if they’re rushed. This version fixes both problems by keeping the cake crumbs moist enough to hold shape and the coating thin enough to crack neatly when you bite in.
Red velvet gives you the right color without relying entirely on dye-heavy frosting. The cream cheese center is the part people notice first once they break one open. That little pale core against the red crumb is doing a lot of visual work.
Why It Works:
Crumbled cake mixed with a small amount of frosting forms a dense, moldable base that rolls cleanly into balls. Chilling the cake balls before dipping keeps them from falling off the stick, which is the whole battle with cake pops. A candy coating sets fast and gives you a smooth surface for sprinkles or drizzle.
Key Ingredients:
- 1 box red velvet cake mix, plus the eggs, oil, and water listed on the box
- 1/2 cup cream cheese frosting
- 12 ounces white candy melts
- 1 teaspoon coconut oil, optional
- Pink sanding sugar or heart sprinkles
- 20 to 24 lollipop sticks
Quick Steps:
- Bake the cake in a 9×13-inch pan according to the box directions and cool completely.
- Crumble the cake into a large bowl and mix in the cream cheese frosting until the mixture holds together when pressed.
- Roll into 1-inch balls, place on a parchment-lined tray, and chill for 30 minutes.
- Dip the tip of each stick into melted candy coating, insert it into a cake ball, then chill again for 10 minutes.
- Dip each pop into melted candy melts, let the excess drip off, and finish with sprinkles before the coating sets.
Equipment for This Recipe:
- 9×13-inch baking pan
- Large mixing bowl
- Parchment-lined sheet pan
- Microwave-safe bowl or double boiler
- Lollipop sticks
How to Serve This Dish:
Stand them in a tall glass filled with sugar, beans, or rice so they stay upright. These are good for a dessert buffet because nobody needs a fork. Two cake pops per person is a normal serving.
Pro Tips for This Recipe:
- Use just enough frosting to bind the crumbs; too much turns the mixture greasy and heavy.
- Dip the stick into coating before inserting it into the ball. That glue step keeps the pop from sliding.
- If the candy coating thickens, stir in a teaspoon of coconut oil or shortening.
- Work in small batches so the pops don’t sit at room temperature too long before dipping.
Variations on This Dish:
- Dark Chocolate Velvet Pops: Use dark chocolate candy melts for the coating and skip the sprinkles.
- Oreo-Center Pops: Press a mini Oreo into the center of each ball before rolling.
- Gluten-Free Pops: Use a gluten-free red velvet cake mix and check the frosting label.
Common Mistakes to Avoid with This Dish:
- Don’t make the cake balls too large. Heavy pops fall off the sticks.
- Don’t dip warm cake balls. They’ll crack the coating.
- Don’t skip chilling between each stage, especially before the first dip.
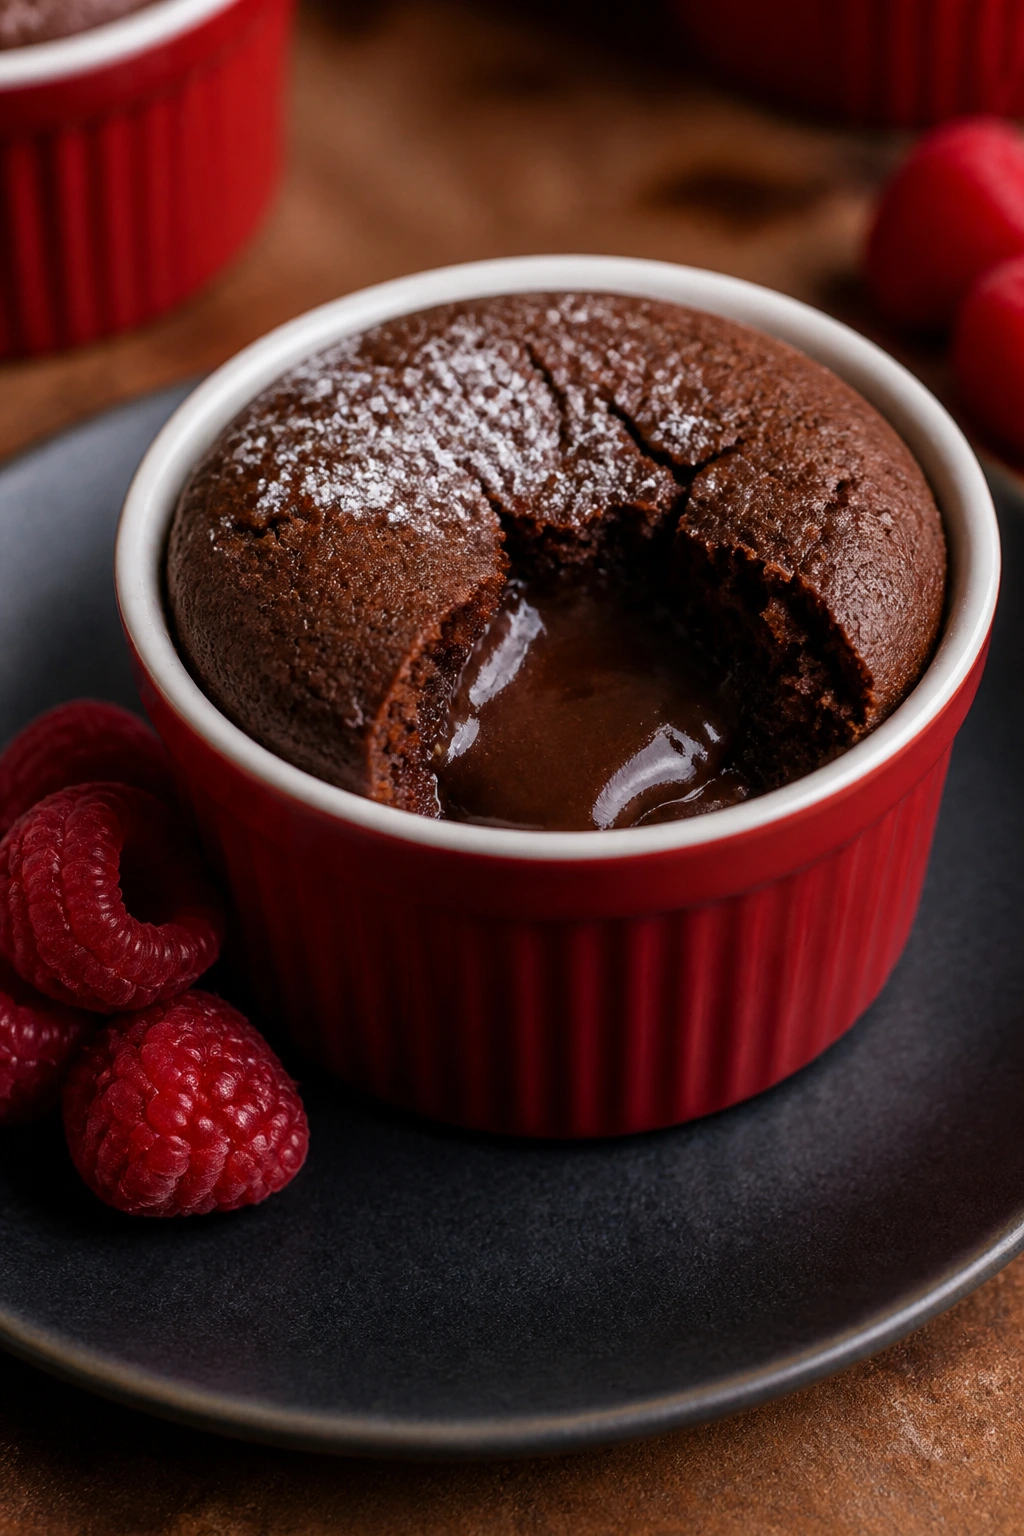
4. Molten Chocolate Lava Cakes in Ramekins
These are the little black dress of Valentine’s desserts: dark, simple, and hard to mess up if you respect the timer. The outside sets into a soft cake while the center stays molten, which means the spoon has to work for that first glossy spill.
I like serving these with berries instead of extra frosting. The fruit keeps the plate from feeling too heavy, and the sour bite cuts through the chocolate in a way whipped cream alone cannot.
Why It Works:
A high oven temperature cooks the outer edges fast while leaving the center underbaked on purpose. A mix of whole eggs and yolks gives the cakes structure without turning the middle dry. Greasing and dusting the ramekins with cocoa powder helps the cakes release cleanly, which matters more than any garnish.
Key Ingredients:
- 1/2 cup unsalted butter, plus extra for ramekins
- 4 ounces bittersweet chocolate, chopped
- 2 large eggs
- 2 large egg yolks
- 1/3 cup granulated sugar
- 2 tablespoons all-purpose flour
- 1 tablespoon cocoa powder, plus more for dusting
- 1 teaspoon vanilla extract
- Pinch fine salt
- Fresh raspberries, for serving
Quick Steps:
- Preheat the oven to 425°F (220°C) and butter four 6-ounce ramekins, then dust them with cocoa powder.
- Melt the butter and chocolate together until smooth, then let the mixture cool for 2 minutes.
- Whisk the eggs, yolks, sugar, vanilla, and salt until pale, then fold in the chocolate mixture.
- Add the flour and cocoa powder, stirring only until no dry streaks remain.
- Divide into ramekins and bake for 10 to 12 minutes, until the edges are set but the centers still wobble.
- Rest for 1 minute, then invert or serve straight from the ramekins with raspberries.
Equipment for This Recipe:
- 4 ramekins, 6-ounce size
- Mixing bowls
- Whisk
- Small saucepan or microwave-safe bowl
- Fine sieve for cocoa dusting
How to Serve This Dish:
Serve immediately with a few raspberries and, if you like, a spoonful of lightly whipped cream. The plate wants contrast, so keep the sides simple and cold. One ramekin is a full dessert.
Pro Tips for This Recipe:
- Start checking at 10 minutes. Oven heat varies more than people expect with molten cakes.
- Butter and cocoa the ramekins thoroughly or the cakes cling around the edges.
- Use bittersweet chocolate with at least 60% cacao for a deeper center.
- Let them sit for one minute before unmolding so the edge firms slightly.
Variations on This Dish:
- Espresso Lava Cakes: Add 1 teaspoon instant espresso powder to the chocolate.
- Orange-Chocolate Lava Cakes: Stir in 1 teaspoon orange zest.
- Gluten-Free Lava Cakes: Replace the flour with 1 tablespoon almond flour.
Common Mistakes to Avoid with This Dish:
- Don’t overbake. A fully set center is just a small chocolate cake.
- Don’t use a very shallow dish. The molten middle needs height.
- Don’t wait too long to serve. They lose the dramatic center as they sit.
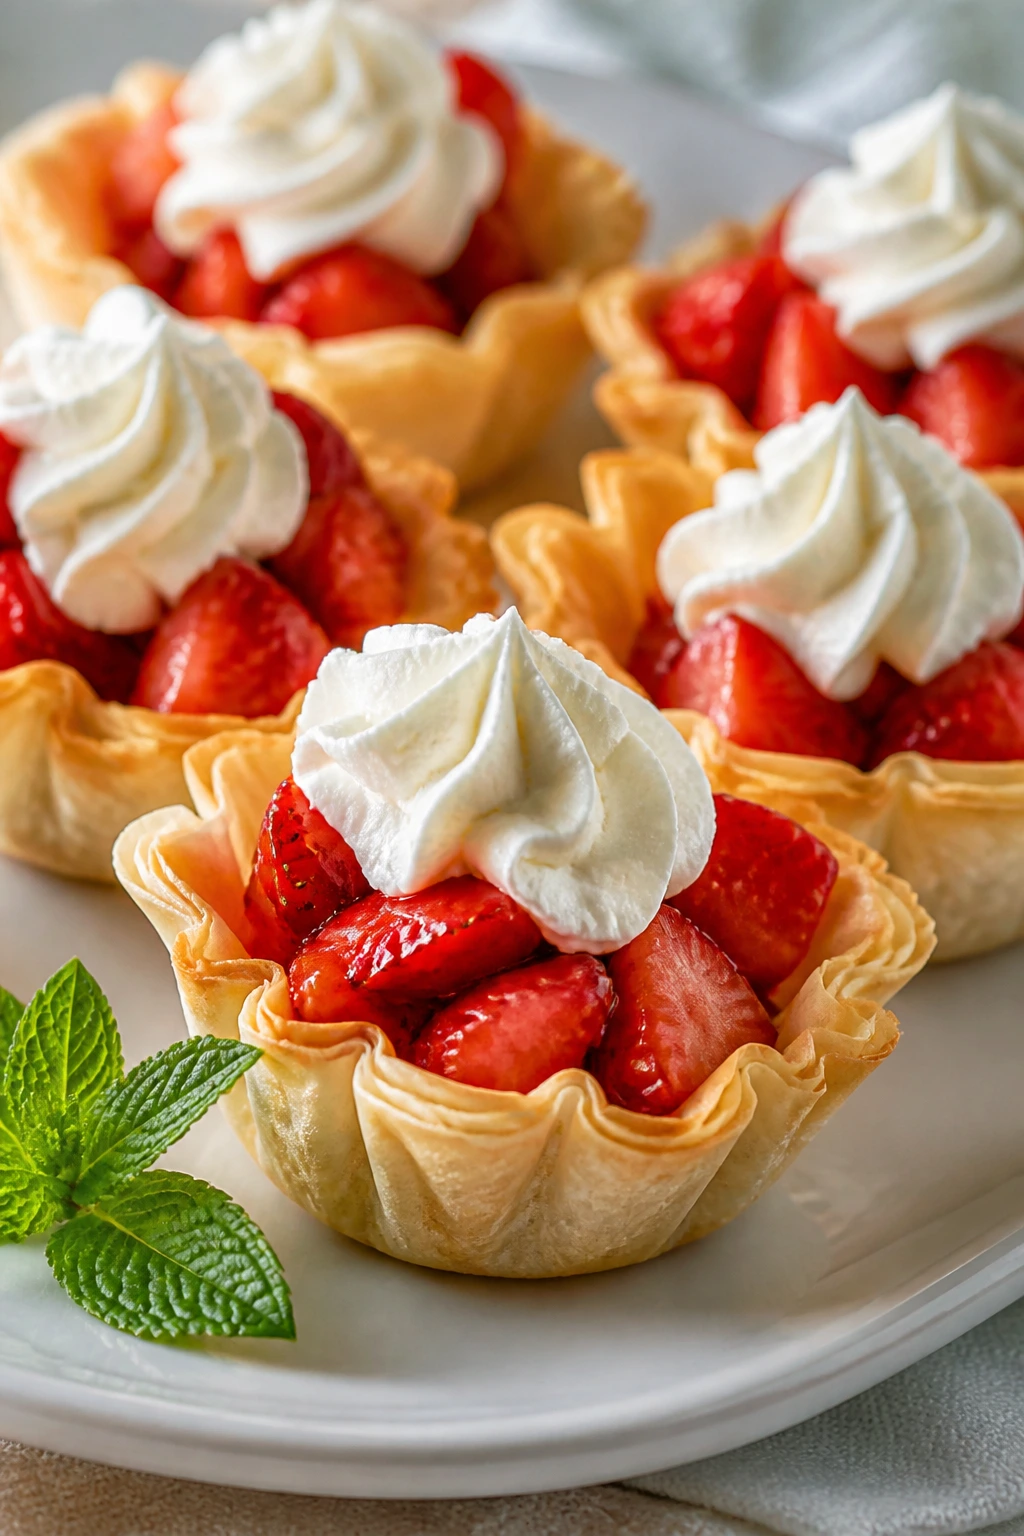
5. Strawberry Shortcake Phyllo Cups
These are the easiest dessert on the list, and that is not a downside. Crisp phyllo shells, macerated strawberries, and softly whipped cream give you a dessert that tastes like a bakery tray without requiring you to roll or chill a single sheet of dough.
The fruit does the heavy lifting here. Sugar and a little lemon pull juice out of the strawberries so the filling gets glossy, not watery. A spoonful of mascarpone in the cream makes the whole thing feel more luxurious.
Why It Works:
Store-bought phyllo cups keep their shape and bake fast, which makes them ideal for a dessert tray that needs volume. The strawberries soften in sugar for 15 to 20 minutes, enough time to build syrup without turning mushy. Because the shells are neutral, every bite lands as strawberry first, cream second, crunch last.
Key Ingredients:
- 15 frozen mini phyllo shells
- 2 cups strawberries, diced
- 2 tablespoons granulated sugar
- 1 teaspoon lemon juice
- 1/2 cup heavy cream
- 2 tablespoons mascarpone
- 1 tablespoon powdered sugar
- 1/2 teaspoon vanilla extract
- Fresh mint leaves, optional
Quick Steps:
- Bake the phyllo shells according to the package directions and cool them fully.
- Toss the strawberries with sugar and lemon juice and let them sit for 15 minutes.
- Whip the cream, mascarpone, powdered sugar, and vanilla to soft peaks.
- Spoon a little cream into each shell, then top with the strawberries and a spoon of their syrup.
- Finish with mint if you want a bright, clean look.
Equipment for This Recipe:
- Rimmed baking sheet
- Mixing bowls
- Hand mixer or whisk
- Small spoon
- Fine mesh strainer, optional for draining excess syrup
How to Serve This Dish:
Arrange them close together so the red fruit and white cream read as one pattern. They’re best served the day they’re made, while the shells still crack under the spoon. Two or three shells per person is a fair portion.
Pro Tips for This Recipe:
- Drain a little syrup if the strawberries release a lot of juice; too much will soften the shells.
- Chill the whipped cream only briefly before filling, so it pipes or spoons smoothly.
- If you want a stronger strawberry taste, mash a few berries into the diced mix.
- Add the filling no more than an hour before serving.
Variations on This Dish:
- Chocolate Phyllo Cups: Dust the shells with cocoa before filling.
- Berry-Mixed Cups: Use half strawberries and half raspberries for a sharper flavor.
- Citrus Cream Cups: Replace vanilla with orange zest in the cream.
Common Mistakes to Avoid with This Dish:
- Don’t fill the cups too early. The shells go soft fast.
- Don’t skip the sugar on the berries. Plain fruit tastes flat here.
- Don’t whip the cream to stiff peaks unless you want a grainy texture.
6. Heart-Shaped Sugar Cookies with Raspberry Jam
A sandwich cookie can look plain until you cut the center out and let the jam show through. That little window is the whole point here. It turns a simple butter cookie into something that looks like stained glass once powdered sugar hits the top.
These hold their shape best when the dough is cold and the oven isn’t too hot. You want pale edges, not browning. The cookie should stay tender enough to bite cleanly, because the jam gives you the bright, sticky middle.
Why It Works:
An egg-rich sugar cookie dough rolls cleanly and bakes flat, which is exactly what you want for sandwich cookies. Chilling the dough prevents spread and keeps the hearts sharp. Thick raspberry jam sets enough to hold the layers together without running out at the sides.
Key Ingredients:
- 2 1/2 cups all-purpose flour
- 1/2 teaspoon baking powder
- 1/2 teaspoon fine salt
- 1 cup unsalted butter, softened
- 3/4 cup granulated sugar
- 1 large egg
- 2 teaspoons vanilla extract
- 1/2 teaspoon almond extract
- 1/2 cup raspberry jam
- 1/2 cup powdered sugar, for dusting
Quick Steps:
- Whisk the flour, baking powder, and salt in one bowl.
- Beat the butter and sugar until light, then add the egg, vanilla, and almond extract.
- Mix in the dry ingredients until the dough comes together, then chill for 1 hour.
- Roll to 1/4-inch thickness, cut hearts, and cut a small heart window in half of them.
- Bake at 350°F (175°C) for 9 to 11 minutes, cool fully, then sandwich with jam and dust the tops with powdered sugar.
Equipment for This Recipe:
- Rolling pin
- Heart cookie cutters, two sizes
- Baking sheets
- Parchment paper
- Cooling rack
How to Serve This Dish:
Pile them in a low stack so the jam windows stay visible. They work well beside chocolate desserts because the fruit cuts the richness. One to two sandwich cookies per person is usually enough.
Pro Tips for This Recipe:
- Roll the dough between two sheets of parchment to keep the surface smooth.
- Cool the cookies before filling or the jam will slide.
- Use a thick jam, not a thin preserve.
- Re-roll scraps once; after that, the dough gets tougher.
Variations on This Dish:
- Strawberry Window Cookies: Swap raspberry jam for strawberry jam.
- Lemon Sugar Cookies: Add 1 tablespoon lemon zest to the dough.
- Chocolate-Dipped Edges: Dip half of each sandwich cookie in melted chocolate.
Common Mistakes to Avoid with This Dish:
- Don’t skip chilling. Warm dough spreads and loses the heart shape.
- Don’t overbake. These should stay pale with just a hint of gold at the edges.
- Don’t overfill the sandwich. Jam leaks through the sides if you get greedy.
7. Mini Pavlovas with Whipped Cream and Berries
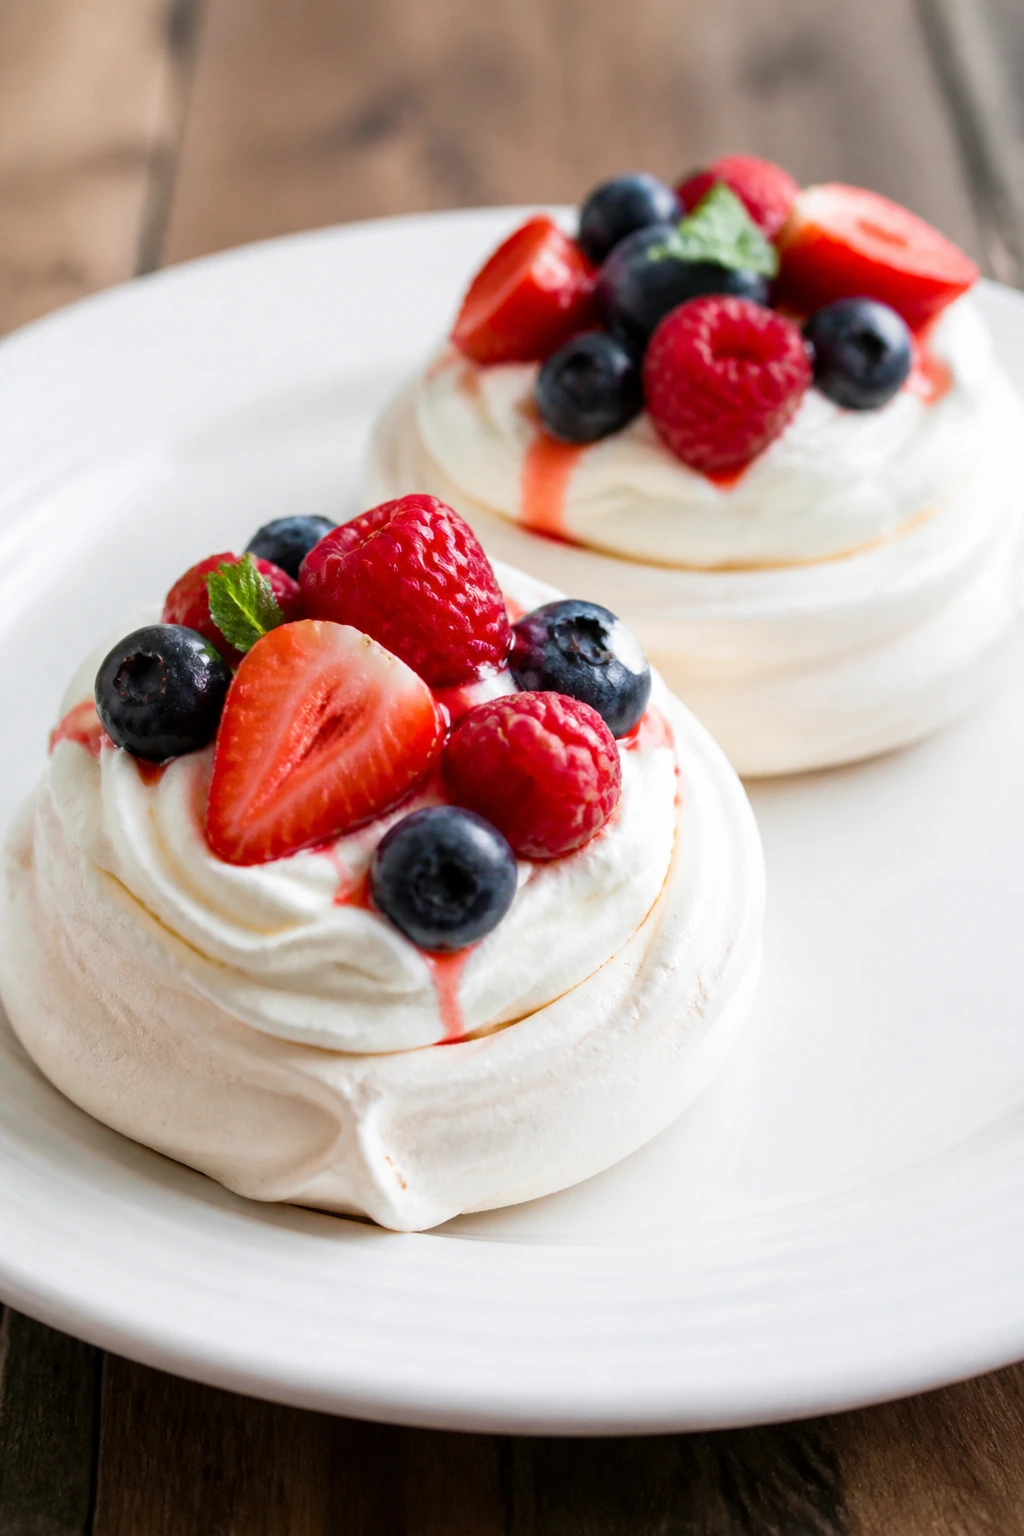
Pavlovas look delicate, and they are, but they’re also forgiving if you keep the oven low and the meringue dry. The shell should be crisp outside and marshmallow-soft inside. Once you pile on cream and berries, they become a little messier — which is exactly what makes them good.
The best thing about pavlovas is contrast. Sweet shell, cold cream, tart berries. That’s the whole show, and it doesn’t need much else.
Why It Works:
Whipping the egg whites with sugar until glossy builds a stable meringue that can be shaped into small nests. Cornstarch and vinegar help keep the center soft instead of crunchy all the way through. Because the shells bake at a low temperature, they dry out slowly and keep their shape well after cooling.
Key Ingredients:
- 4 large egg whites, room temperature
- 1 cup granulated sugar
- 1 teaspoon cornstarch
- 1 teaspoon white vinegar
- 1 teaspoon vanilla extract
- 1 cup heavy cream
- 1 tablespoon powdered sugar
- 1/2 cup strawberries, sliced
- 1/2 cup raspberries
- 1/4 cup pomegranate seeds
- Mint leaves, optional
Quick Steps:
- Preheat the oven to 225°F (110°C) and line a baking sheet with parchment.
- Beat the egg whites until soft peaks form, then add the sugar a spoonful at a time until the meringue is glossy and holds stiff peaks.
- Fold in the cornstarch, vinegar, and vanilla.
- Spoon or pipe 6 to 8 small nests onto the baking sheet and bake for 1 hour.
- Turn off the oven and let the pavlovas cool inside for another hour before topping with whipped cream and fruit.
Equipment for This Recipe:
- Stand mixer or hand mixer
- Parchment-lined baking sheet
- Piping bag or spoon
- Mixing bowls
- Whisk
How to Serve This Dish:
Serve the shells the same day you add the cream, or the outside will soften. A little fruit juice pooling in the center is part of the charm. One or two mini pavlovas per person is enough.
Pro Tips for This Recipe:
- Make sure the bowl is grease-free before whipping the egg whites.
- Add sugar slowly; dumping it in makes the meringue grainy.
- Don’t open the oven door while the shells bake.
- Pipe the cream just before serving so the shell stays crisp.
Variations on This Dish:
- Chocolate Pavlovas: Fold 1 tablespoon cocoa powder into the meringue.
- Citrus Berry Pavlovas: Add orange zest to the whipped cream.
- All-Berry Pavlovas: Use blueberries and blackberries if you want a darker plate.
Common Mistakes to Avoid with This Dish:
- Don’t try to speed up cooling. A hot pavlova cracks more.
- Don’t underbeat the whites. Soft meringue collapses in the oven.
- Don’t add cream too early unless you want a soft, sticky shell.
8. Chocolate Mousse Shooters
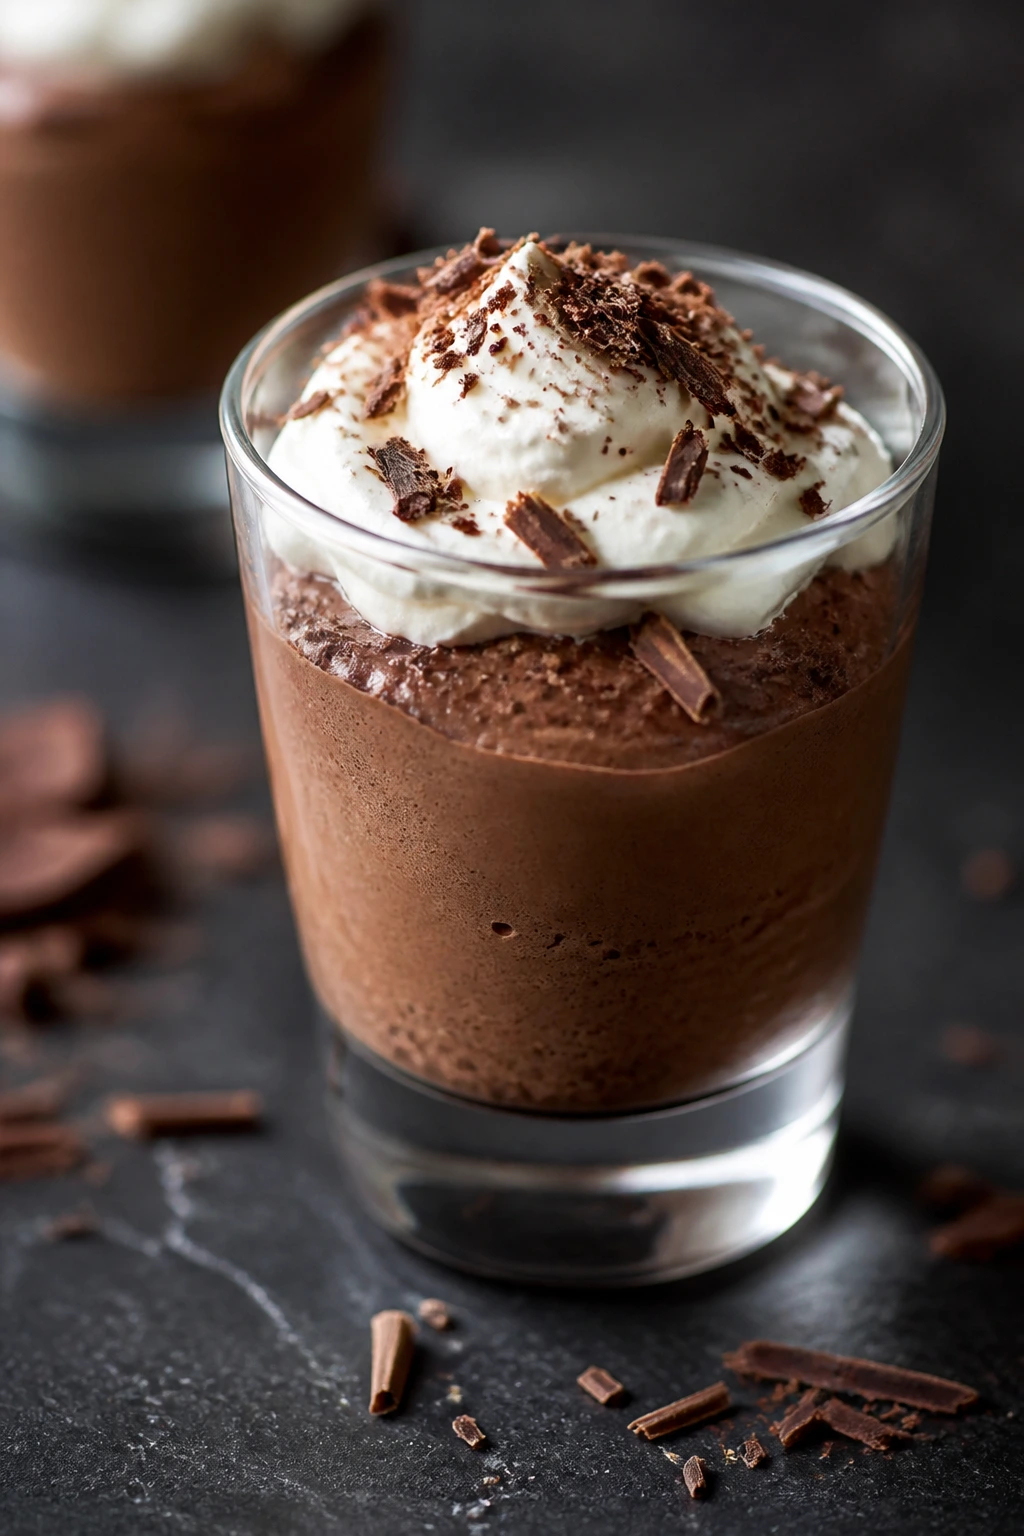
Chocolate mousse in a small glass feels a little theatrical in the best way. You get the dark, airy mousse, a white cap of whipped cream, and whatever garnish you choose sitting on top like a tiny finish line. It’s elegant without acting precious.
This recipe relies on texture, not a long ingredient list. Good chocolate and cold cream do almost all the work. The result is smooth enough to spoon but not so loose that it slides around in the glass.
Why It Works:
Melted chocolate folded into whipped cream gives the mousse a silky body with almost no cooking. A small amount of espresso deepens the chocolate flavor without making the dessert taste like coffee. Because the portions are small, the mousse chills fast and sets with a clean scoop.
Key Ingredients:
- 6 ounces semisweet chocolate, chopped
- 1 teaspoon instant espresso powder
- 1 tablespoon hot water
- 1 1/2 cups heavy cream, divided
- 2 tablespoons powdered sugar
- 1 teaspoon vanilla extract
- Pinch salt
- Shaved chocolate or raspberries, for garnish
Quick Steps:
- Dissolve the espresso powder in the hot water and stir it into the melted chocolate.
- Whip 1 cup of the cream with the powdered sugar, vanilla, and salt to medium peaks.
- Whip the remaining 1/2 cup cream to soft peaks and fold it into the chocolate mixture first, then fold in the sweetened cream.
- Spoon into small glasses or shooter cups and chill for at least 2 hours.
- Finish with whipped cream, chocolate shavings, or a berry on top.
Equipment for This Recipe:
- Mixing bowls
- Hand mixer
- Rubber spatula
- Small glasses or shooter cups
- Microplane or vegetable peeler for chocolate shavings
How to Serve This Dish:
Serve cold, in clear glasses so the mousse color shows through. A piped cream top and one raspberry are enough. Three to four ounces per person is a normal dessert portion here.
Pro Tips for This Recipe:
- Let the melted chocolate cool a bit before folding it in, or it can melt the cream.
- Fold gently with a wide spatula so the mousse stays airy.
- Use good chocolate; this recipe does not hide mediocre bars.
- Chill the glasses before filling if you want the mousse to set faster.
Variations on This Dish:
- Dark Chocolate Sea Salt Shooters: Finish each glass with flaky salt.
- Orange Chocolate Mousse: Add orange zest to the cream.
- White Chocolate Mousse: Swap in white chocolate and cut the sugar slightly.
Common Mistakes to Avoid with This Dish:
- Don’t overwhip the cream. Grainy mousse is hard to rescue.
- Don’t fold too hard. You’ll knock out the air and end up with pudding.
- Don’t serve before chilling; the texture needs time to firm.
9. Salted Caramel Brownie Bites

Brownie bites hit the table looking modest and disappear with zero dignity. That’s because they give you the chewy edge, the fudgy middle, and a little caramel drip that feels almost too indulgent for a one-inch square. Almost.
The best ones lean dark, not cakey. The caramel adds shine and salt keeps the sweetness from flattening out. If you cut them neatly and drizzle only after they cool, they look polished instead of sticky.
Why It Works:
A high-cocoa batter bakes into a dense brownie that cuts cleanly into small squares or bites. The caramel drizzle goes on after cooling, so it stays glossy instead of soaking into the top. A pinch of flaky salt wakes up the chocolate and gives each bite a sharper finish.
Key Ingredients:
- 1/2 cup unsalted butter
- 1 cup granulated sugar
- 2 large eggs
- 1 teaspoon vanilla extract
- 1/2 cup unsweetened cocoa powder
- 1/2 cup all-purpose flour
- 1/4 teaspoon fine salt
- 1/2 cup chocolate chips
- 1/3 cup caramel sauce
- Flaky salt, for finishing
Quick Steps:
- Preheat the oven to 350°F (175°C) and line an 8×8-inch pan with parchment.
- Melt the butter, then whisk in the sugar, eggs, and vanilla.
- Stir in the cocoa powder, flour, salt, and chocolate chips until just combined.
- Bake for 22 to 26 minutes, until a toothpick comes out with a few moist crumbs.
- Cool fully, cut into 1-inch bites, drizzle with caramel, and finish with flaky salt.
Equipment for This Recipe:
- 8×8-inch baking pan
- Parchment paper
- Mixing bowls
- Whisk and spatula
- Sharp knife
How to Serve This Dish:
Stack these on a small cake stand or arrange them in paper candy cups. They’re good beside berries or a scoop of vanilla ice cream if you want a softer plate. Four to six bites per person is reasonable, depending on what else is out.
Pro Tips for This Recipe:
- Pull the brownies a minute early if you want the center extra fudgy.
- Use parchment overhang so you can lift the slab out cleanly.
- Chill before slicing if you want the edges sharp.
- Warm the caramel a little so it drizzles in thin lines, not blobs.
Variations on This Dish:
- Espresso Brownie Bites: Add 1 teaspoon instant espresso powder to the batter.
- Raspberry Brownie Bites: Press a raspberry into each square after baking.
- Gluten-Free Bites: Use a 1:1 gluten-free flour blend.
Common Mistakes to Avoid with This Dish:
- Don’t overbake. Dry brownies lose the whole point.
- Don’t cut warm brownies if you want clean edges.
- Don’t pour hot caramel on top or it will melt into the crumb.
10. Cherry Almond Hand Pies
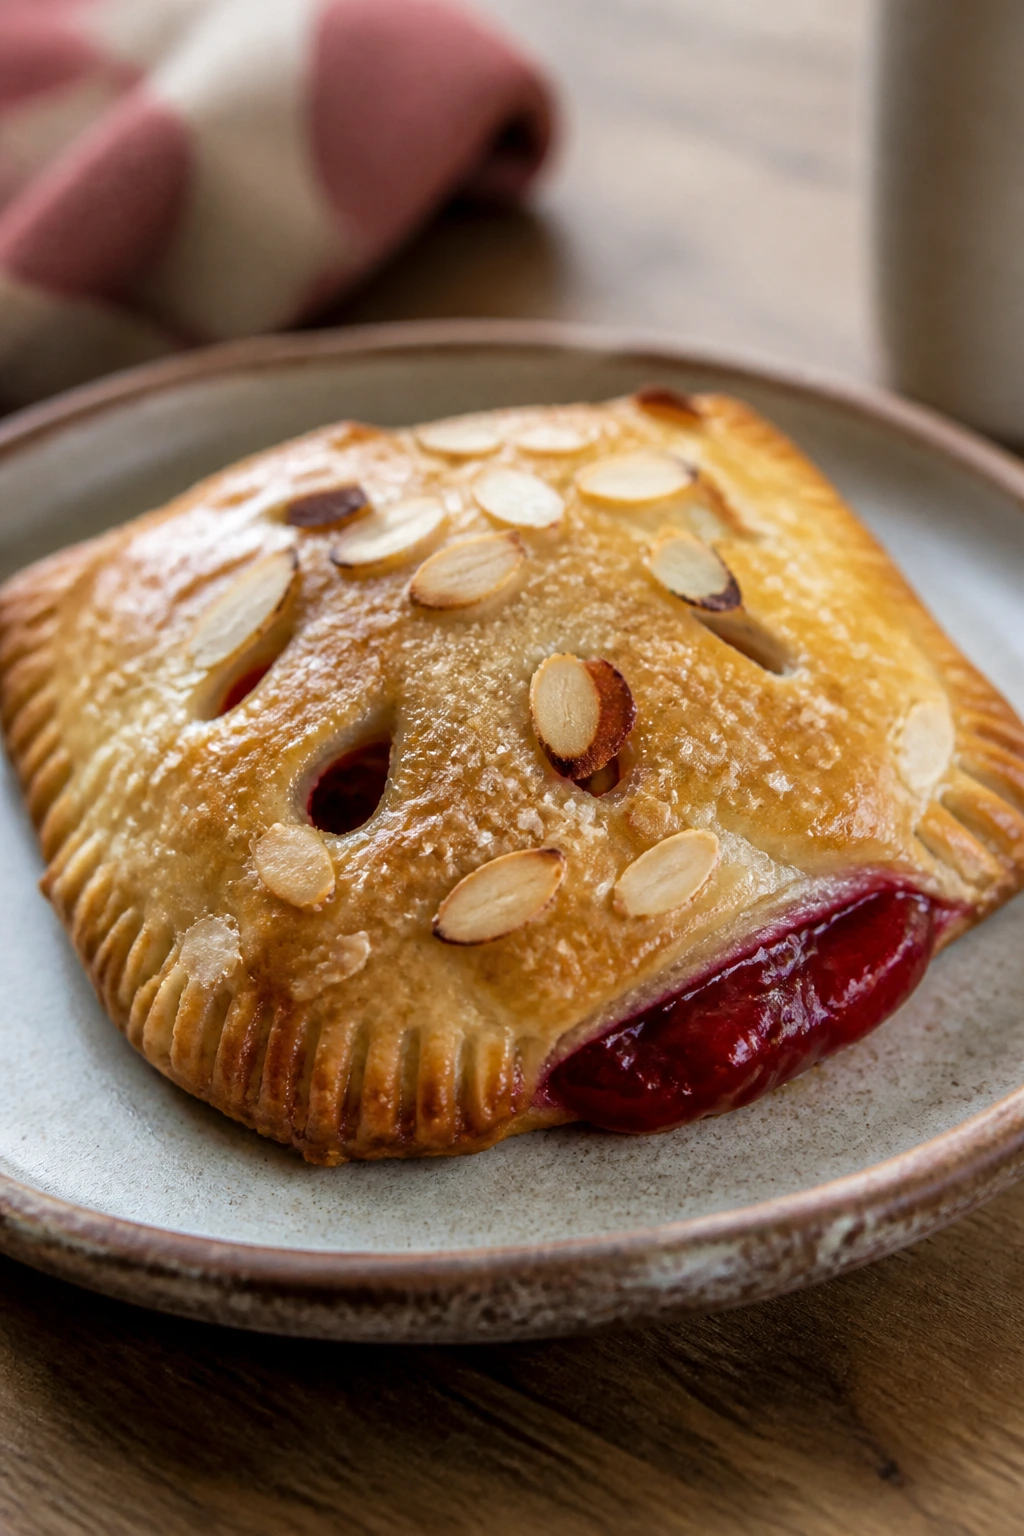
Hand pies are built for people who want pie flavor without a fork or a mess. The crust stays flaky if you keep the filling thick, and the almond note gives the cherries a softer, almost bakery-window smell when they bake.
Cherry and almond is one of those pairings that sounds old-fashioned until you bite into it. Then it makes sense. The fruit is bright, the almond makes the filling taste deeper, and the sugar on top adds a little crunch.
Why It Works:
A thick cherry filling stays put inside the dough and doesn’t burst out as the pies bake. Almond extract gives the fruit a rounded flavor that reads as richer than plain cherry alone. The sealed edges and egg wash keep the pies neat and golden.
Key Ingredients:
- 2 refrigerated pie crusts
- 1 1/2 cups cherry pie filling or pitted cherries cooked with sugar
- 1/2 teaspoon almond extract
- 1 tablespoon cornstarch, if making fresh filling
- 1 egg, beaten with 1 tablespoon water
- 2 tablespoons sliced almonds
- 1 tablespoon coarse sugar
Quick Steps:
- Preheat the oven to 400°F (205°C) and line a baking sheet with parchment.
- Mix the cherry filling with almond extract, and cornstarch if the filling is loose.
- Roll the pie crusts slightly and cut out 3-to-4-inch hearts or circles.
- Spoon a tablespoon of filling onto half the rounds, fold over, seal with a fork, and brush with egg wash.
- Top with almonds and sugar, then bake for 15 to 18 minutes until deep golden.
Equipment for This Recipe:
- Baking sheet
- Parchment paper
- Rolling pin
- Fork
- Pastry brush
How to Serve This Dish:
Serve warm or at room temperature. A little vanilla ice cream on the side is fine, but not required. One hand pie is a normal serving; two if they’re on the smaller side.
Pro Tips for This Recipe:
- Chill the assembled pies for 10 minutes before baking if the dough feels soft.
- Keep filling away from the edges or the seal will fail.
- Cut a tiny steam slit if your filling is especially juicy.
- Brush with egg wash all the way to the edges for a deeper color.
Variations on This Dish:
- Mixed Berry Hand Pies: Swap in raspberries and blueberries.
- Chocolate Cherry Hand Pies: Add 1 tablespoon mini chocolate chips to each pie.
- Glaze-Finished Pies: Skip the almonds and drizzle with powdered sugar glaze after baking.
Common Mistakes to Avoid with This Dish:
- Don’t overfill the pies. That’s how they split.
- Don’t seal on floury edges. Brush them clean first.
- Don’t skip the cornstarch if your fruit is very juicy.
11. Mini Tiramisu Cups

Tiramisu in a cup has the same layered charm as the classic version, just with less fuss and fewer opportunities for a soggy disaster. The coffee-soaked ladyfingers, mascarpone cream, and dusting of cocoa land as one cool, soft bite.
I prefer these in clear glasses because the layers are the whole appeal. You can see the coffee darkening the sponge, then the pale cream, then the cocoa on top. It’s simple, but it reads beautifully.
Why It Works:
Quick-dipped ladyfingers keep their shape instead of collapsing into mush. Mascarpone blends with whipped cream into a smooth, pipeable filling that holds in small cups. Cocoa powder on top gives the dessert a dry, bitter finish that balances the sweet cream.
Key Ingredients:
- 12 ladyfingers
- 1/2 cup strong brewed espresso or very strong coffee, cooled
- 1 tablespoon sugar
- 8 ounces mascarpone
- 1 cup heavy cream
- 1/4 cup powdered sugar
- 1 teaspoon vanilla extract
- 2 tablespoons unsweetened cocoa powder
- Dark chocolate curls, optional
Quick Steps:
- Stir the sugar into the cooled coffee and set it aside.
- Beat the mascarpone, heavy cream, powdered sugar, and vanilla until thick and smooth.
- Dip ladyfingers quickly into the coffee — one second per side is enough.
- Layer pieces of ladyfinger and mascarpone cream in small glasses, repeating once.
- Chill for at least 4 hours, then dust with cocoa powder and add chocolate curls.
Equipment for This Recipe:
- Small glass cups or dessert jars
- Mixing bowl
- Hand mixer
- Spoon or offset spatula
- Sifter for cocoa powder
How to Serve This Dish:
Serve chilled, straight from the fridge. The layers settle and taste better after resting overnight. One small glass is enough for most people, though coffee lovers may ask for a second.
Pro Tips for This Recipe:
- Dip the ladyfingers fast. Long soaking makes them fall apart.
- Use strong coffee; weak coffee disappears under the cream.
- Dust cocoa right before serving so it stays dry on top.
- If you want extra structure, chill the mascarpone cream before layering.
Variations on This Dish:
- Strawberry Tiramisu Cups: Swap coffee for strawberry syrup and layer in sliced berries.
- Amaretto Tiramisu Cups: Add a splash of amaretto to the coffee for an almond note.
- Chocolate Tiramisu Cups: Add a layer of shaved chocolate between cream layers.
Common Mistakes to Avoid with This Dish:
- Don’t soak the ladyfingers. Quick dipping only.
- Don’t use watery whipped cream. It makes the layers slide.
- Don’t serve too soon; the dessert needs time to set.
12. White Chocolate Raspberry Blondie Squares
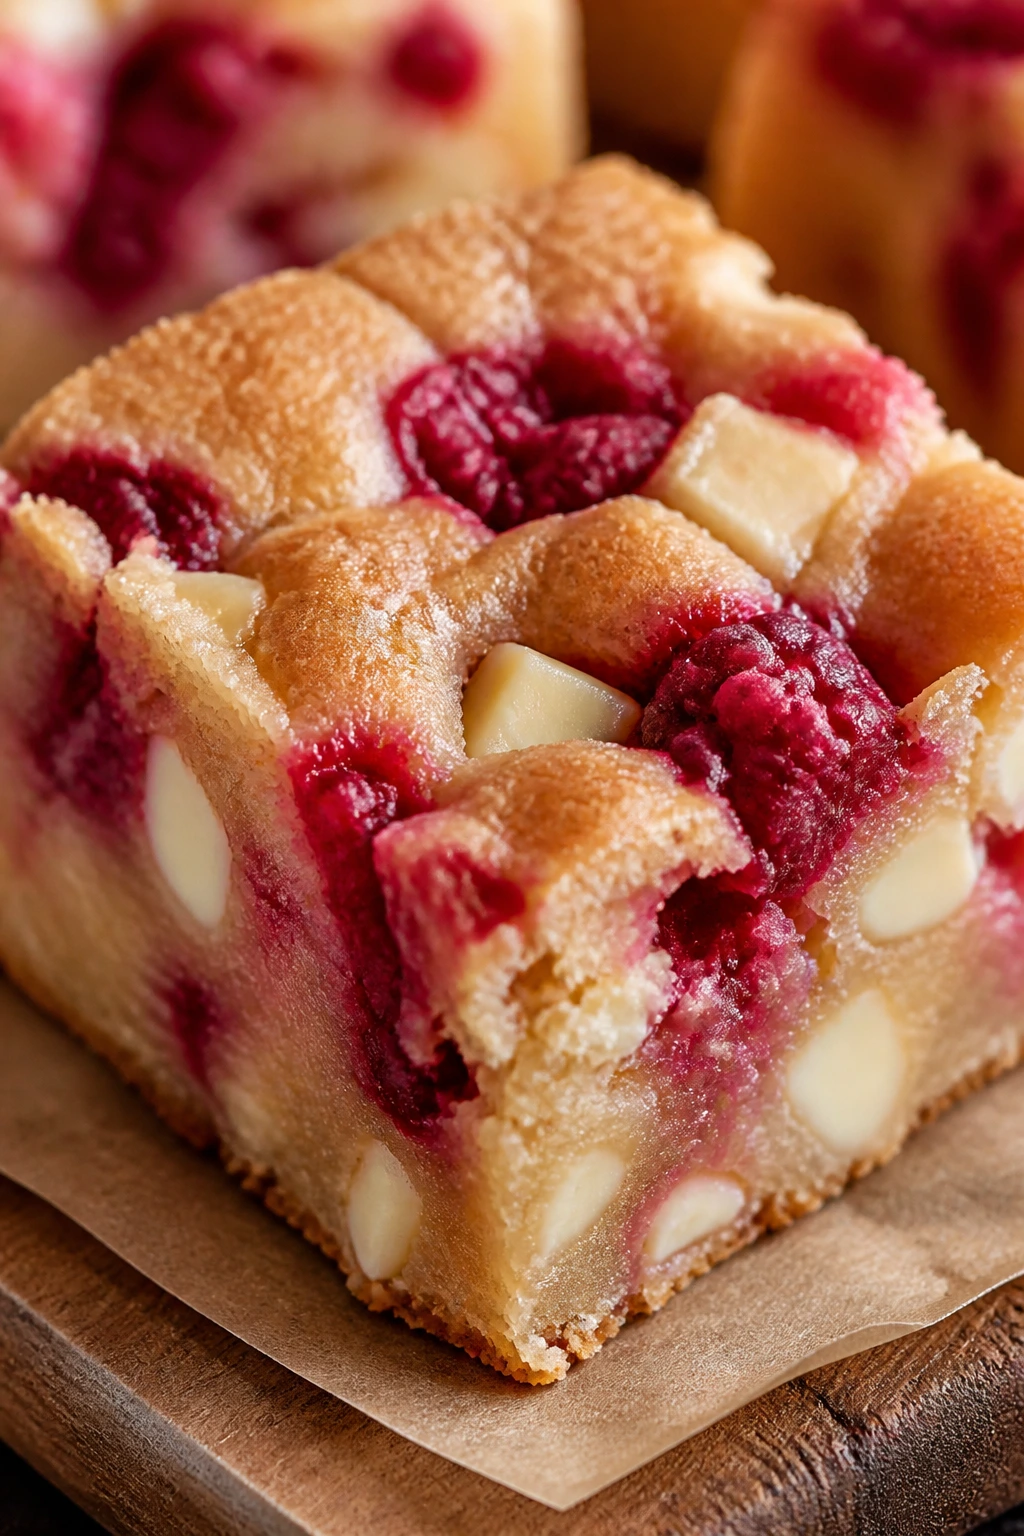
Blondies don’t always get the love they deserve, mostly because people treat them like beige brownies. That’s not fair. When you fold in white chocolate and raspberries, the bars turn buttery, tart, and just pink enough to belong on a Valentine’s tray.
They bake into a dense, chewy square with soft pockets where the berries burst. The white chocolate melts into little creamy spots, which is what keeps each bite from feeling one-note.
Why It Works:
Brown sugar gives blondies their caramel depth, while raspberries cut through that sweetness. White chocolate adds pockets of creamy richness that balance the sharp fruit. Because the batter is thick, the raspberries stay suspended instead of sinking straight to the bottom.
Key Ingredients:
- 1/2 cup unsalted butter, melted
- 1 cup light brown sugar
- 1 large egg
- 1 teaspoon vanilla extract
- 1 cup all-purpose flour
- 1/2 teaspoon baking powder
- 1/4 teaspoon fine salt
- 3/4 cup white chocolate chunks
- 3/4 cup raspberries, fresh or frozen
Quick Steps:
- Preheat the oven to 350°F (175°C) and line an 8×8-inch pan with parchment.
- Whisk the butter and brown sugar until smooth, then add the egg and vanilla.
- Fold in the flour, baking powder, salt, and white chocolate chunks.
- Gently fold in the raspberries, then spread the batter into the pan.
- Bake for 24 to 28 minutes, cool completely, and cut into 1½-inch squares.
Equipment for This Recipe:
- 8×8-inch pan
- Parchment paper
- Mixing bowl
- Spatula
- Sharp knife
How to Serve This Dish:
These can be served plain, but a light dusting of powdered sugar makes them look cleaner. Set them near the fruit desserts so the tartness line-up feels deliberate. Two squares is a normal portion.
Pro Tips for This Recipe:
- Toss frozen raspberries with a teaspoon of flour before folding them in.
- Pull the bars when the center still looks slightly soft.
- Cool fully before slicing or the raspberries will smear.
- Use good white chocolate, not chalky chips, if you want the creamy pockets to taste clean.
Variations on This Dish:
- Lemon Raspberry Blondies: Add 1 tablespoon lemon zest.
- Dark Chocolate Blondies: Use dark chocolate chunks instead of white.
- Nutty Blondies: Fold in 1/2 cup chopped toasted pistachios.
Common Mistakes to Avoid with This Dish:
- Don’t overmix once the flour goes in.
- Don’t use too many raspberries or the bars turn wet.
- Don’t cut while warm unless you want jagged edges.
13. Chocolate-Covered Strawberry Truffles
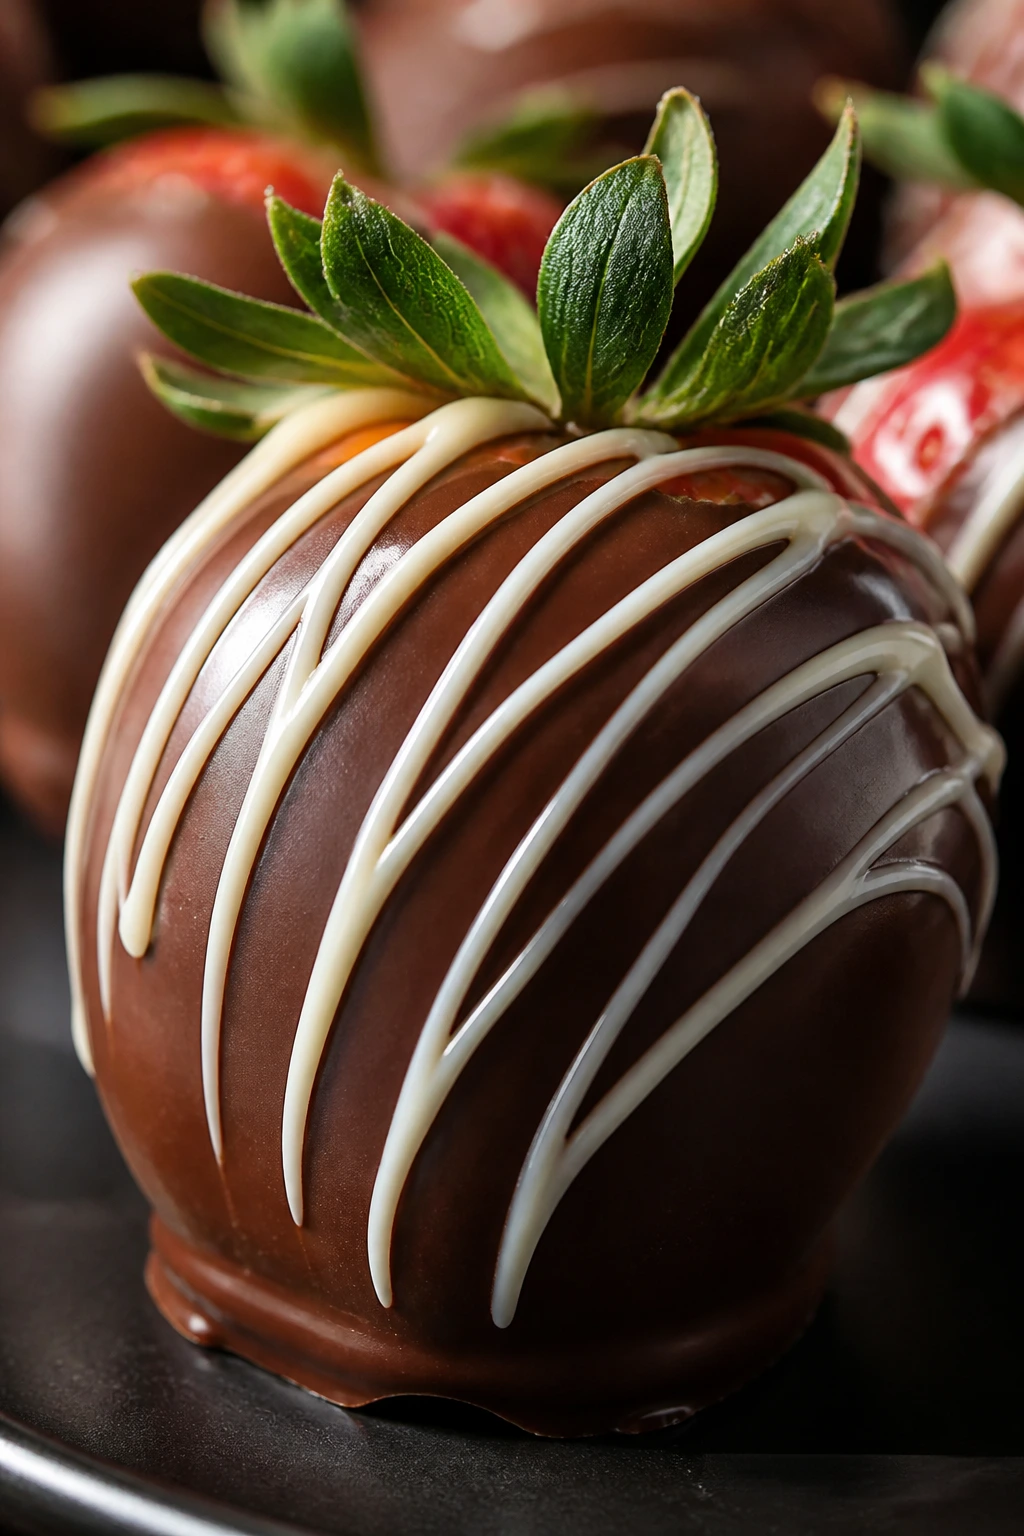
These are for the person who loves chocolate-covered strawberries but wants something sturdier on the dessert tray. The center is creamy and strawberry-sweet, the shell snaps when you bite, and the whole thing looks like a tiny candy-shop jewel.
I like the truffle route because it gives you more control. The strawberry flavor is in the center, not hiding under a thick layer of chocolate, and the white chocolate drizzle gives you a clean finish.
Why It Works:
Cream cheese and cookie crumbs make a smooth filling that rolls easily and holds its shape when chilled. Freeze-dried strawberries bring real fruit flavor without extra moisture, which is the enemy here. The chocolate shell sets thin and crisp if the centers are cold.
Key Ingredients:
- 8 ounces cream cheese, softened
- 1 1/2 cups vanilla wafer crumbs
- 1/2 cup freeze-dried strawberries, crushed
- 1/2 cup powdered sugar
- 1 teaspoon vanilla extract
- 8 ounces semisweet chocolate, melted
- 2 ounces white chocolate, melted
- 1 tablespoon coconut oil, optional
Quick Steps:
- Mix the cream cheese, wafer crumbs, strawberry powder, powdered sugar, and vanilla until thick.
- Roll into 1-inch balls and chill for 30 minutes.
- Dip each ball into melted semisweet chocolate and set on parchment.
- Drizzle with melted white chocolate once the shell firms.
- Chill until the coating sets.
Equipment for This Recipe:
- Mixing bowl
- Small cookie scoop
- Parchment-lined tray
- Microwave-safe bowls
- Fork or dipping tool
How to Serve This Dish:
Serve them chilled or slightly cool, not icy cold. They look best piled in a shallow bowl with a few strawberry slices around the edge. Two truffles per person is enough unless nobody else brought dessert.
Pro Tips for This Recipe:
- Crush the freeze-dried strawberries finely so the centers stay smooth.
- Keep your hands lightly dusted with powdered sugar if the filling is sticky.
- Chill the centers longer if your kitchen is warm.
- Work quickly with the chocolate so the coating stays thin.
Variations on This Dish:
- Chocolate-Dipped Cheesecake Truffles: Add a pinch of lemon zest for a cheesecake feel.
- Dark Berry Truffles: Swap strawberry powder for raspberry powder.
- Almond Truffles: Add a drop of almond extract and roll in chopped nuts.
Common Mistakes to Avoid with This Dish:
- Don’t use fresh strawberries in the filling. Too much moisture ruins the texture.
- Don’t make the balls too big or the coating cracks.
- Don’t skip the chill time before dipping.
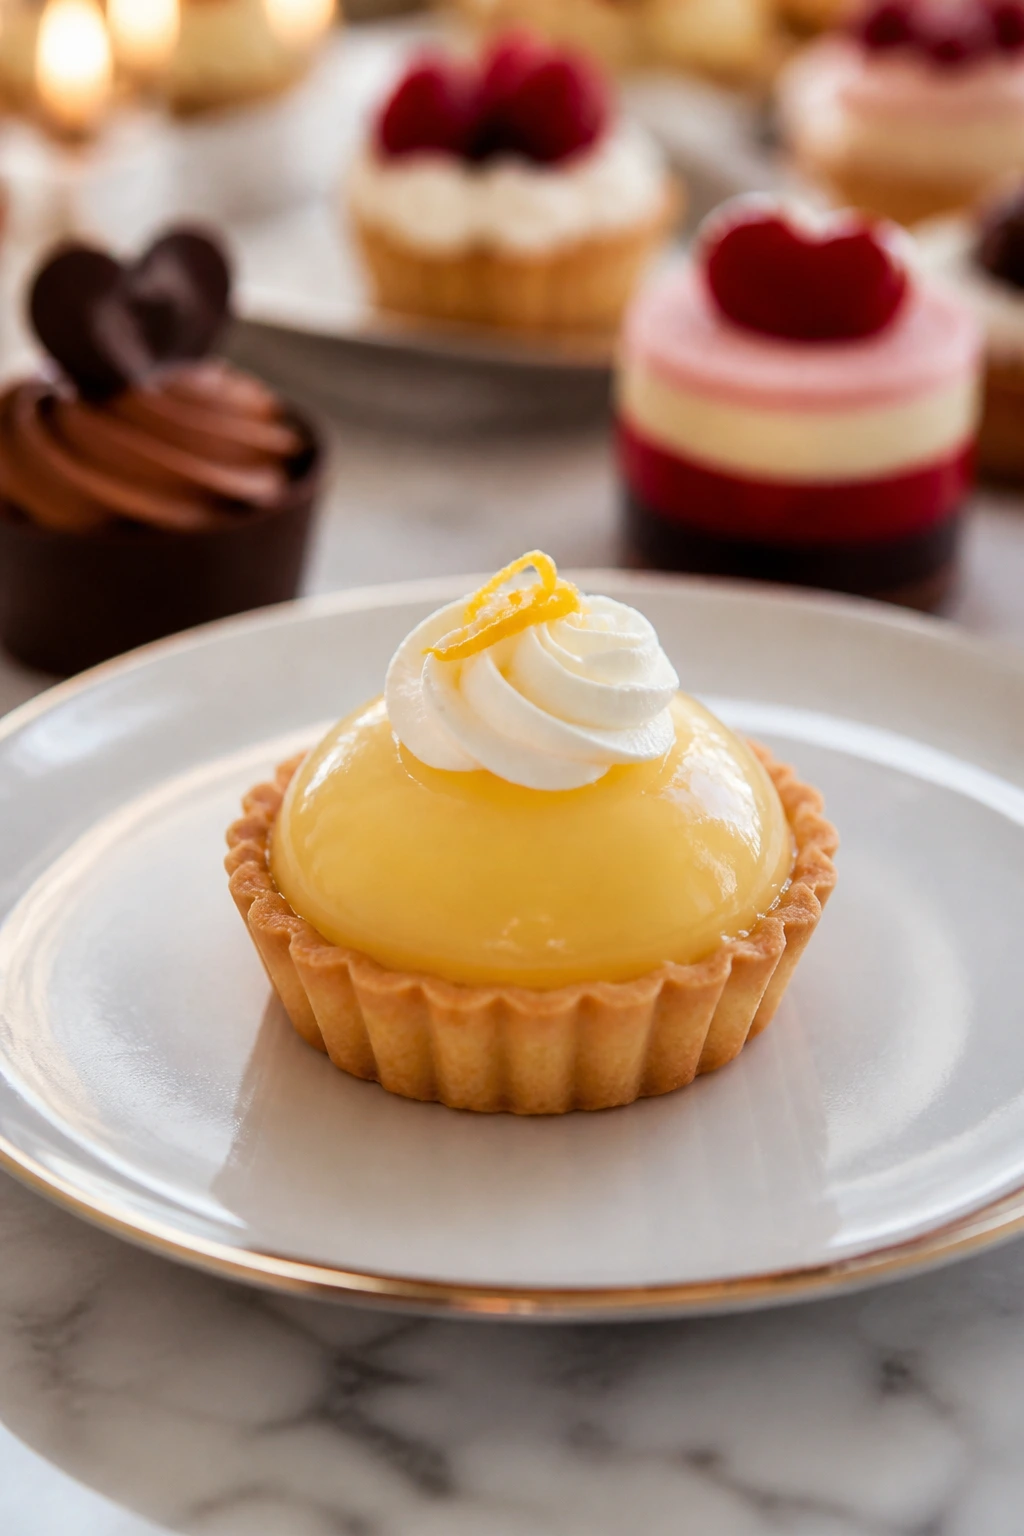
14. Mini Lemon Curd Tartlets
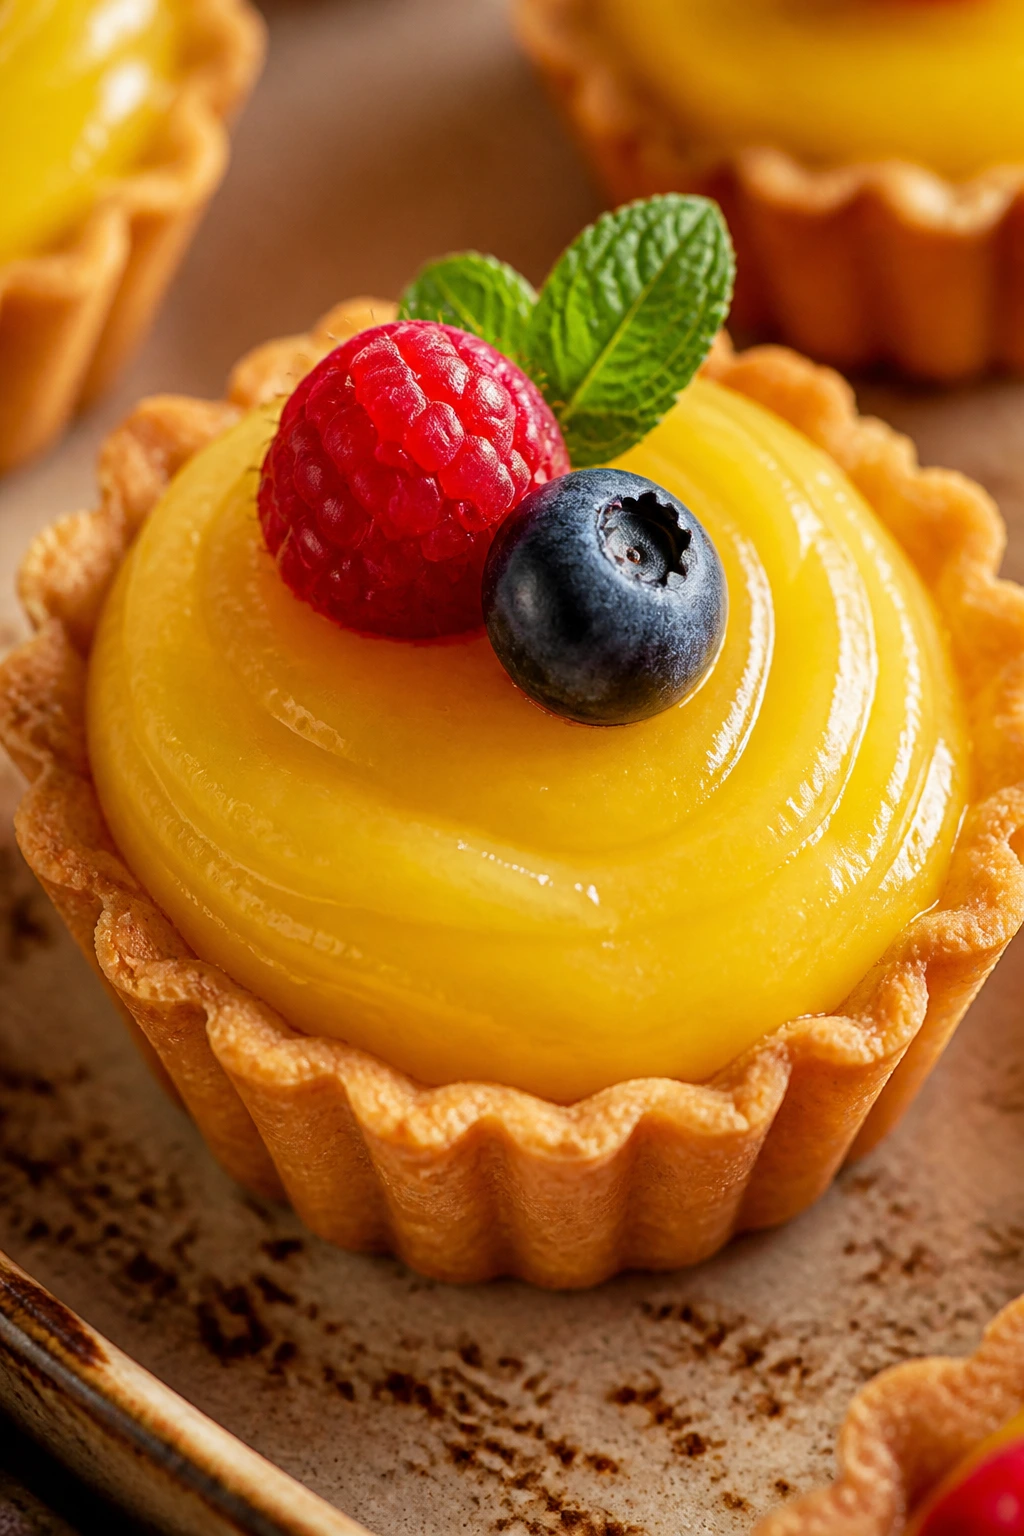
A lemon tartlet has a way of clearing the palate without acting stern. The filling is glossy and sharp, the shell brings the butter, and the berries on top keep the dessert from looking too serious. It’s the bright note on a table full of chocolate.
Lemon curd also has a useful trick up its sleeve: it tastes richer than it looks. People see yellow and think simple, then take a bite and get that clean, tart punch followed by a soft crust.
Why It Works:
A sweet tart shell gives the curd enough support to stay neat in small portions. Lemon curd is naturally thick, so you don’t need much else to make the tartlets look finished. Whipped cream or a single berry on top keeps the flavor sharp rather than sugary.
Key Ingredients:
- 12 mini tart shells, baked and cooled
- 1 cup lemon curd
- 1/2 cup heavy cream
- 1 tablespoon powdered sugar
- 1/2 teaspoon vanilla extract
- 12 fresh raspberries or blueberries
- Lemon zest, for garnish
Quick Steps:
- Bake the tart shells if needed and cool completely.
- Whip the cream, powdered sugar, and vanilla to soft peaks.
- Spoon lemon curd into each shell.
- Top with a small swirl of whipped cream and one berry.
- Finish with a pinch of lemon zest.
Equipment for This Recipe:
- Mini tart shells or tart pan
- Mixing bowl
- Hand mixer
- Spoon or piping bag
- Microplane for zest
How to Serve This Dish:
These look sharp on a white platter because the yellow filling stands out. Keep them chilled until the last minute, then bring them out with the berries already placed. One tartlet is enough for most guests.
Pro Tips for This Recipe:
- If your lemon curd is loose, chill it first so it mounds neatly.
- Use a small spoon to keep the tart shells clean around the edges.
- Add the whipped cream in a small rosette instead of a big mound.
- A little zest goes a long way; don’t bury the lemon flavor under more garnish.
Variations on This Dish:
- Meyer Lemon Tartlets: Use Meyer lemon curd for a softer citrus note.
- Berry-Lemon Tartlets: Add a teaspoon of berry jam under the curd.
- Coconut Tartlets: Sprinkle toasted coconut over the whipped cream.
Common Mistakes to Avoid with This Dish:
- Don’t overfill the shells or the curd will spill when moved.
- Don’t use hot curd; it softens the shells fast.
- Don’t skip the chill if you want the filling to hold its shape.
15. Pink Velvet Whoopie Pies
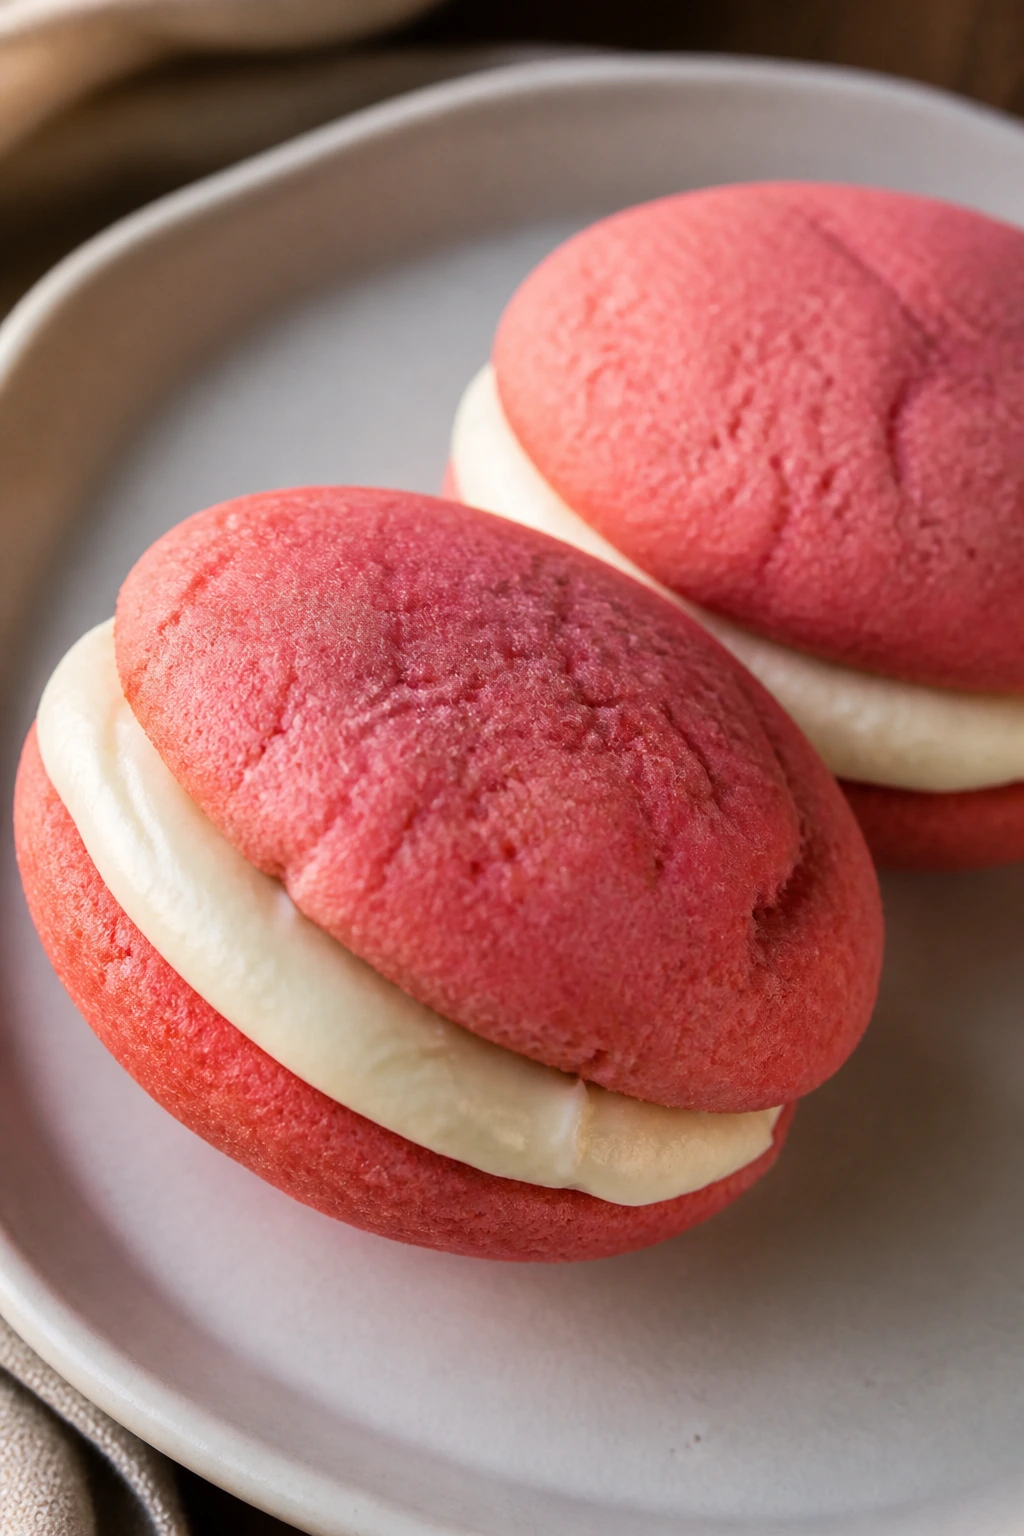
Whoopie pies sit somewhere between a cookie and a cake, which makes them perfect when you want something soft but still portable. This pink velvet version is tender, lightly cocoa-scented, and filled with cream cheese frosting that squishes just enough when you bite in.
They’re a little nostalgic, which helps. But the color and size make them feel fresh on a Valentine’s tray, especially if you keep the filling pipe-clean and the cookies uniform.
Why It Works:
A batter with buttermilk and a little cocoa bakes into soft, domed rounds that stay plush after cooling. Cream cheese filling gives the pies a tang that keeps the sweetness in check. Because each cookie is small, the frosting layer can be generous without making the sandwich collapse.
Key Ingredients:
- 2 cups all-purpose flour
- 1/4 cup cocoa powder
- 1 teaspoon baking powder
- 1/2 teaspoon baking soda
- 1/2 teaspoon fine salt
- 1/2 cup unsalted butter, softened
- 3/4 cup granulated sugar
- 1 large egg
- 1 cup buttermilk
- 1 teaspoon vanilla extract
- Pink food coloring, a few drops
- 4 ounces cream cheese, softened
- 1/4 cup butter, softened
- 1 1/2 cups powdered sugar
Quick Steps:
- Heat the oven to 350°F (175°C) and line baking sheets with parchment.
- Whisk the flour, cocoa, baking powder, baking soda, and salt.
- Beat the butter and sugar, add the egg, then mix in the buttermilk, vanilla, and food coloring.
- Fold in the dry ingredients and drop small rounds onto the sheets.
- Bake for 8 to 10 minutes, cool, then sandwich with the cream cheese frosting.
Equipment for This Recipe:
- Baking sheets
- Parchment paper
- Mixing bowls
- Hand mixer
- Cookie scoop
How to Serve This Dish:
Arrange them in pairs on a plate or stand them upright in a shallow dish. They’re best at room temperature so the filling stays soft. One whoopie pie is a normal serving, though people tend to go back for a second.
Pro Tips for This Recipe:
- Use a cookie scoop for matching sizes; uneven rounds look sloppy when sandwiched.
- Don’t overbake. The cookies should spring back gently, not brown hard.
- Chill the frosting for 10 minutes if it feels too loose to pipe.
- Add the filling to the flat side of one cookie only, then press gently.
Variations on This Dish:
- Chocolate Whoopie Pies: Increase the cocoa to 1/3 cup and skip the pink color.
- Strawberry Whoopie Pies: Add 1 teaspoon strawberry extract and a small spoon of jam to the frosting.
- Mini Whoopie Bites: Make teaspoon-sized rounds for a dessert tray.
Common Mistakes to Avoid with This Dish:
- Don’t make the cookies too big or the filling squeezes out.
- Don’t skip the cooling step before sandwiching.
- Don’t thin the frosting with too much milk or it will run.
16. Cheesecake Stuffed Strawberries
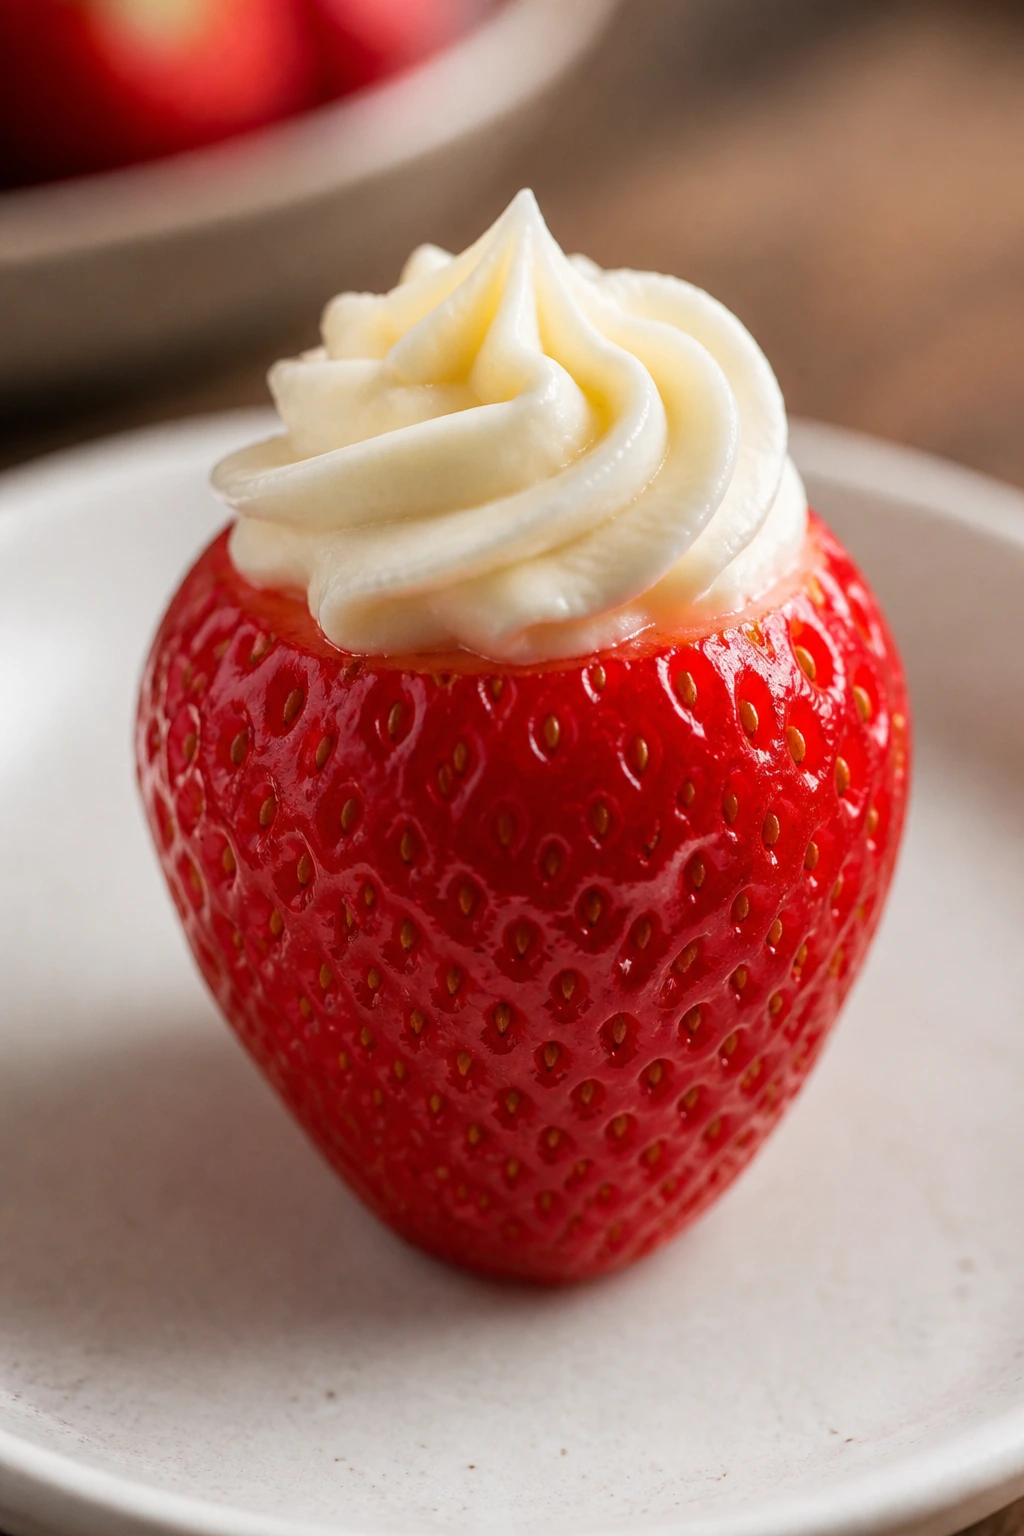
These are the cleanest little bites on the whole list. No crust. No fork. Just a hollowed strawberry filled with sweet cream cheese filling and finished with something crunchy on top. They look bright and fresh, which is useful when the rest of the table leans heavy.
The best part is that they read as fancy even though they’re not complicated. If you cut the bottoms flat, they stand up better and line up beautifully on a platter. Little details. Big payoff.
Why It Works:
Large strawberries create a natural cup that holds the filling without baking. Cream cheese whipped with powdered sugar and vanilla tastes like cheesecake filling in a faster form. A sprinkle of graham crumbs or crushed freeze-dried strawberries gives each berry a finished look and a little texture.
Key Ingredients:
- 24 large strawberries
- 4 ounces cream cheese, softened
- 1/4 cup powdered sugar
- 1/2 teaspoon vanilla extract
- 2 tablespoons heavy cream
- 1/4 cup graham cracker crumbs or crushed freeze-dried strawberries
- Melted chocolate, optional for drizzling
Quick Steps:
- Hull the strawberries and trim the bottoms just enough so they stand upright.
- Beat the cream cheese, powdered sugar, vanilla, and heavy cream until smooth.
- Pipe the filling into each strawberry.
- Dip the tops in graham crumbs or strawberry powder.
- Drizzle with chocolate if you want an extra finish, then chill briefly before serving.
Equipment for This Recipe:
- Paring knife or strawberry huller
- Mixing bowl
- Piping bag or zip-top bag
- Small spoon
- Tray lined with parchment
How to Serve This Dish:
Serve these cold on a chilled platter. They work well between richer desserts because they taste fresh and light. Three to four strawberries per person makes a solid serving.
Pro Tips for This Recipe:
- Pick large, firm strawberries with flat bottoms.
- Pat the berries dry after hulling so the filling sticks.
- Pipe filling from the cut end, not the tip, for a cleaner shape.
- Keep them refrigerated until serving time.
Variations on This Dish:
- Chocolate Cheesecake Strawberries: Fold cocoa into the filling and dip in chocolate crumbs.
- Lemon Cheesecake Strawberries: Add lemon zest to the cream cheese mix.
- Coconut Cheesecake Strawberries: Roll the filling edge in toasted coconut.
Common Mistakes to Avoid with This Dish:
- Don’t use soft berries; they wobble and leak.
- Don’t overfill. The tops get messy fast.
- Don’t make them too far ahead unless you’re fine with some juice release.
17. Dark Chocolate Panna Cotta Cups
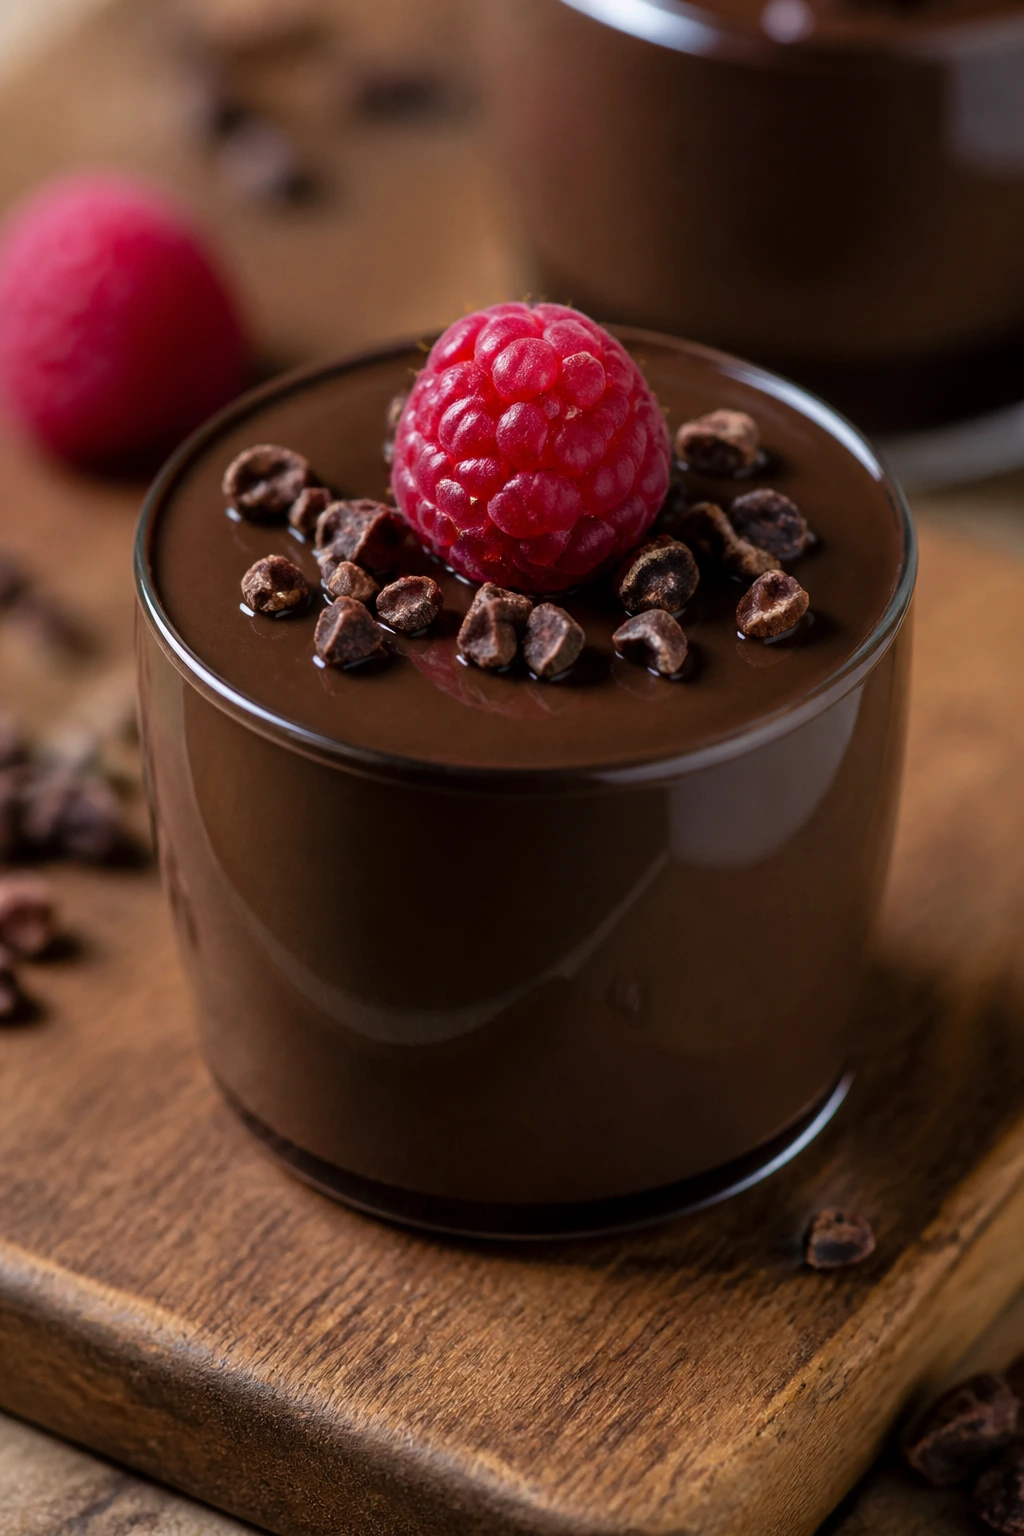
Panna cotta has a quiet kind of drama. It wobbles when you move the spoon, then melts almost immediately. Dark chocolate gives the cream a deeper color and a little bitterness, which keeps this from feeling like custard trying to be candy.
I like panna cotta in small cups because unmolding can be annoying if your kitchen is warm. In glasses, it becomes easier, cleaner, and more useful for a dessert table that needs things to be sturdy.
Why It Works:
Gelatin gives the cream enough structure to set without turning rubbery. Dark chocolate adds body and flavor, so the panna cotta tastes fuller than a plain cream version. Because the cups chill undisturbed, the surface stays smooth and the edges settle neatly.
Key Ingredients:
- 2 cups heavy cream
- 1 cup whole milk
- 1/3 cup granulated sugar
- 4 ounces dark chocolate, chopped
- 2 1/2 teaspoons unflavored gelatin
- 3 tablespoons cold water
- 1 teaspoon vanilla extract
- Pinch salt
- Raspberries or cocoa nibs, for topping
Quick Steps:
- Sprinkle the gelatin over cold water and let it bloom for 5 minutes.
- Warm the cream, milk, sugar, and salt in a saucepan until steaming but not boiling.
- Stir in the chocolate until melted, then whisk in the bloomed gelatin and vanilla.
- Pour into small cups and chill for at least 4 hours.
- Top with raspberries or cocoa nibs before serving.
Equipment for This Recipe:
- Small dessert cups or glasses
- Saucepan
- Whisk
- Measuring cups and spoons
- Fine mesh strainer, optional
How to Serve This Dish:
Serve cold, straight from the cup, with a single bright garnish on top. A few raspberries or a sprinkle of cocoa nibs is enough. Half a cup to 3/4 cup per person is plenty.
Pro Tips for This Recipe:
- Don’t boil the cream or the texture can go grainy.
- Whisk until the gelatin fully dissolves; tiny lumps are annoying later.
- Strain the mix if you want a glass-smooth surface.
- Chill on a level shelf so the cups set evenly.
Variations on This Dish:
- White Chocolate Panna Cotta: Replace the dark chocolate with white chocolate and reduce sugar a little.
- Coffee Panna Cotta: Add 1 teaspoon instant espresso powder to the warm cream.
- Berry Sauce Cups: Spoon a thin raspberry sauce over the set panna cotta.
Common Mistakes to Avoid with This Dish:
- Don’t add gelatin to boiling liquid.
- Don’t under-bloom the gelatin or the cups stay loose.
- Don’t move them while they set.
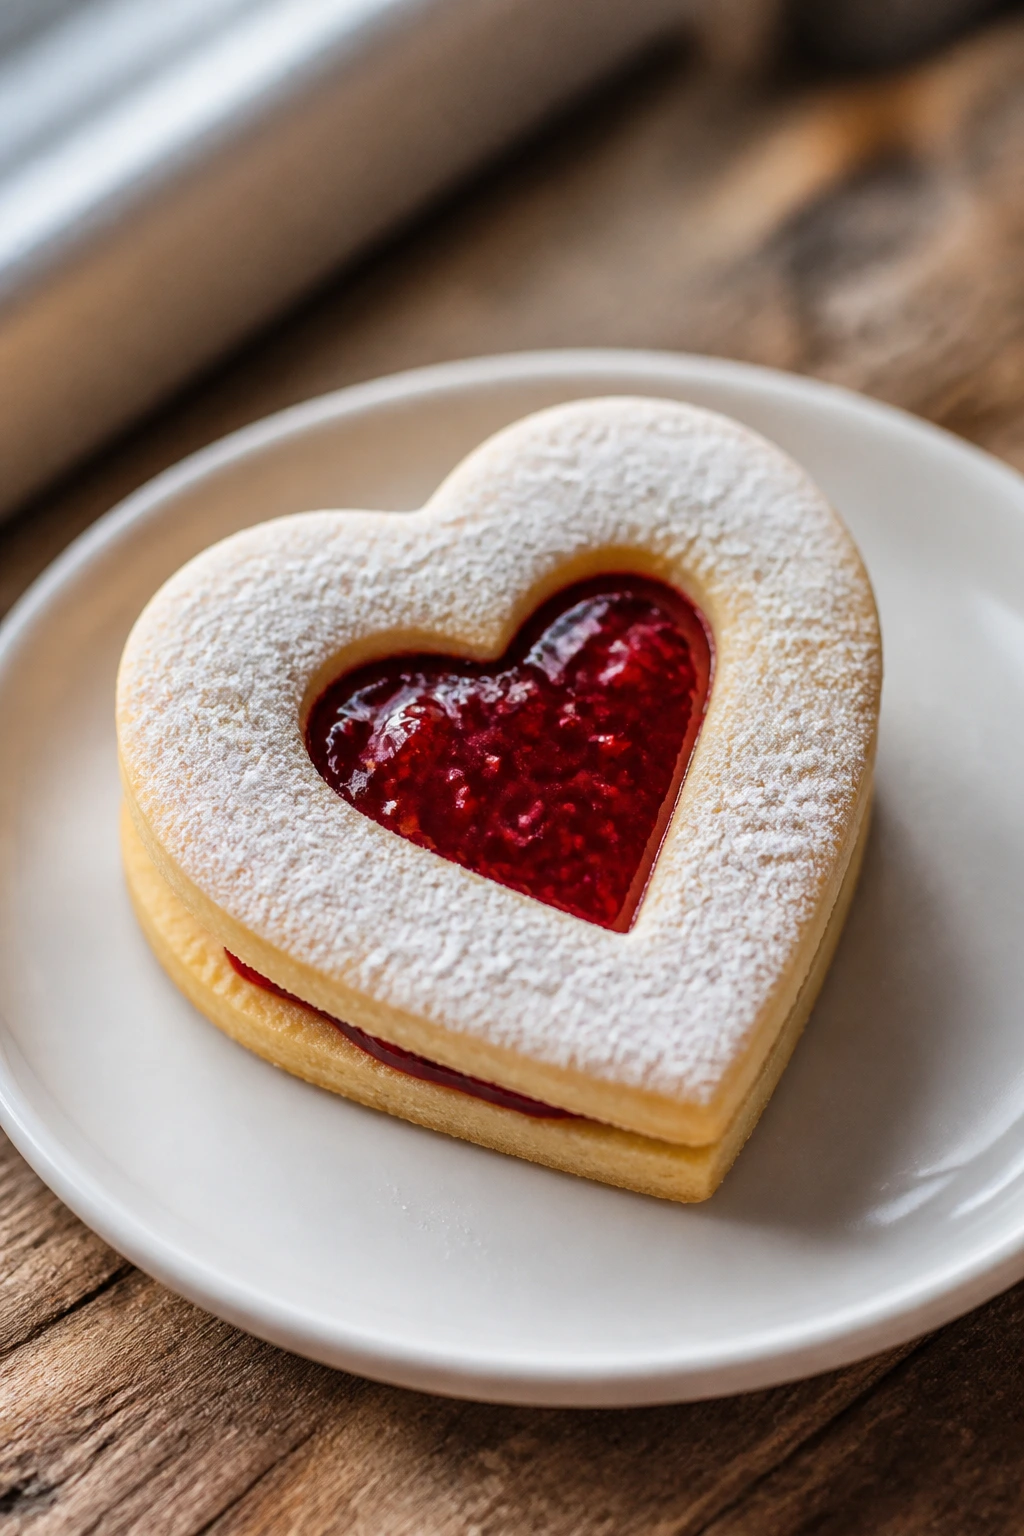
18. Heart-Shaped Linzer Cookies with Strawberry Filling
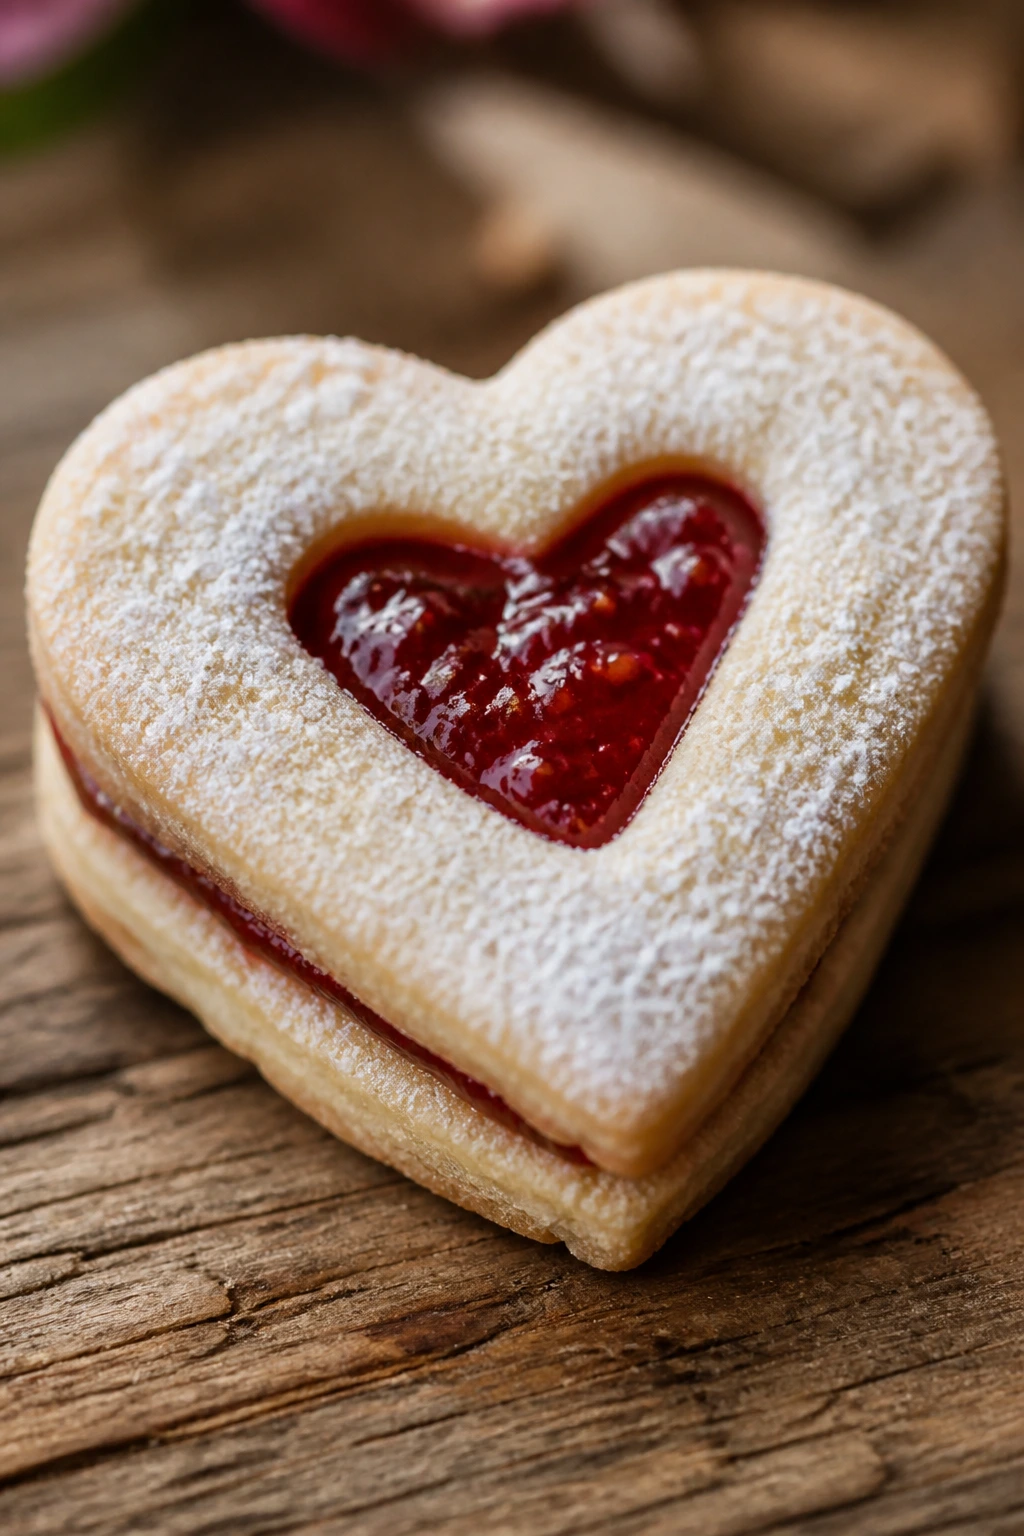
Linzer cookies are the prettiest thing you can make with a rolling pin and a little patience. The almond dough bakes into a tender, buttery cookie, and the cutout window lets the strawberry filling show through like a little badge in the center.
They’re the kind of dessert people pick up before they’re sure they want one. Then the powdered sugar gets on their fingers and the jam tastes brighter than expected. That’s the whole appeal.
Why It Works:
Almond flour adds a nutty crumb that keeps the cookie tender. The top cookie’s cutout shows off the jam, which is the part that makes Linzers feel special instead of plain sandwich cookies. Because the filling is thick and the cookies are fully cooled, the sandwich holds well without sliding.
Key Ingredients:
- 1 3/4 cups all-purpose flour
- 1/2 cup almond flour
- 1/4 teaspoon cinnamon
- 1/4 teaspoon fine salt
- 1 cup unsalted butter, softened
- 2/3 cup powdered sugar
- 1 large egg yolk
- 1 teaspoon vanilla extract
- 1/2 cup strawberry jam
- More powdered sugar, for dusting
Quick Steps:
- Whisk the flours, cinnamon, and salt.
- Beat the butter and powdered sugar until fluffy, then mix in the egg yolk and vanilla.
- Add the dry ingredients and chill the dough for 1 hour.
- Roll, cut hearts, and cut small windows in half of them.
- Bake at 350°F (175°C) for 10 to 12 minutes, cool, then sandwich with jam and dust with powdered sugar.
Equipment for This Recipe:
- Rolling pin
- Heart cutters, two sizes
- Baking sheets
- Parchment paper
- Fine sieve for powdered sugar
How to Serve This Dish:
Stack them gently so the cutouts stay visible. They’re a strong match for darker desserts because the pale sugar top stands out. One sandwich cookie is usually enough, though I’ve watched people reach for a second before they finish chewing the first.
Pro Tips for This Recipe:
- Chill the cut cookies before baking if the dough starts softening.
- Dust the tops after assembly, not before, or the sugar disappears.
- Use a thick jam so the cookies don’t leak.
- Roll the dough evenly so the sandwich layers match in height.
Variations on This Dish:
- Raspberry Linzers: Swap in raspberry jam for a sharper filling.
- Chocolate Linzers: Add 2 tablespoons cocoa powder to the dough.
- Orange-Almond Linzers: Add orange zest to the dough for a brighter scent.
Common Mistakes to Avoid with This Dish:
- Don’t overwork the dough; it makes the cookies tough.
- Don’t use thin jam.
- Don’t sandwich warm cookies or the filling will melt out.
Why Mini Desserts Win on a Valentine’s Dessert Table
The real strength of Valentines mini desserts is that they let you build contrast across the whole table. A plate of only chocolate gets heavy. A plate of only fruit can feel thin. Mix a tart lemon cup next to a dark mousse shooter, then set a berry-studded tart beside a chewy brownie bite, and suddenly the spread has rhythm. That mix matters.
Mini desserts also take better care of texture. A cookie can stay crisp, a mousse can stay airy, and a cheesecake cup can stay cool instead of softening into a puddle on a serving platter. Once the portions are small, the timing gets easier too. You can chill, stack, garnish, and transport with fewer weak spots in the plan.
I’m a big fan of anything that lowers stress without lowering the payoff. That’s what these desserts do. They let you bake in pieces, mix and match flavors, and choose one or two showpieces instead of betting everything on a single cake that has to slice cleanly.
Essential Equipment for These Recipes
- Muffin tins and mini muffin tins: These handle cheesecake cups, brownie bites, and small cake portions cleanly.
- Parchment paper: It saves you from stuck brownies, cookies, bars, and cake balls.
- Hand mixer or stand mixer: Useful for whipped fillings, meringue, mousse, and frosting.
- Mixing bowls in three sizes: One for dry ingredients, one for batters, and one for finishing cream or fillings.
- Piping bags or zip-top bags: They make filling tartlets, strawberries, and cups much neater.
- Ramekins and small dessert glasses: Needed for lava cakes, panna cotta, mousse, and tiramisu.
- Cookie cutters in heart shapes: Useful for sugar cookies, Linzers, and hand pies.
- Cooling racks: Let cookies and cakes cool without trapping steam underneath.
- Offset spatula or small spoon: Handy for smooth filling and neat spreading in small containers.
- Microplane or fine grater: Best for citrus zest and chocolate shavings.
- Sharp paring knife: For hulling strawberries, trimming pie edges, and cutting bars cleanly.
- Airtight containers: Essential for keeping cookies crisp and protecting delicate truffles or bars.
Smart Shopping and Ingredient Tips
The nicest mini desserts start with ingredients that behave well in small spaces. That means firm strawberries, good chocolate, thick jam, and cream cheese that’s actually soft enough to beat smooth. A berry that’s mushy in the store will leak on your tray later. A jam that looks elegant in the jar may be too loose for sandwich cookies or tartlets.
Chocolate matters more than people think in small desserts. Because the portions are small, the chocolate taste doesn’t get lost under frosting or filling. Semisweet chocolate around 60% cacao gives brownie bites, mousse, and lava cakes enough backbone without going bitter. For coating truffles and cake pops, candy melts are easier than tempering real chocolate, and I’m not going to pretend otherwise.
For dairy, buy blocks of cream cheese instead of whipped tubs for cheesecakes, fillings, and frosting. Block cream cheese beats smoother and holds shape better. Heavy cream should be cold when you whip it, and if you’re making several desserts at once, keep the carton in the fridge until the very last minute. Warm cream takes longer to thicken, and that’s one of those tiny kitchen annoyances that snowballs when you’re doing a dozen little recipes.
With fruit, choose based on structure as much as flavor. Raspberries are perfect when you want a sharp pop on top of cream. Strawberries work better when they’re sliced, fanned, or hollowed. Cherries should be thickened with cornstarch if they’re going inside pastry. And if a recipe calls for freeze-dried fruit powder, don’t swap in fresh fruit and hope for the same result. It changes the moisture balance completely.
How to Serve These Recipes
Presentation:
Mix heights on the table. Put panna cotta and mousse in low glasses, set tartlets and cookie sandwiches on a cake stand, and tuck cake pops or truffles into a shallow bowl so the shapes don’t compete. A little white space between items keeps the colors readable. Too much crowding makes even pretty desserts look anxious.
Accompaniments:
Fresh berries, tiny mint leaves, and a few chocolate shavings cover almost every dessert on this list. If you want a bigger spread, add plain whipped cream, vanilla ice cream, or a small bowl of berry sauce. The goal is to give people a neutral extra, not another loud flavor fighting the main dessert.
Portions:
For a mixed platter, plan on 2 to 3 small desserts per person. If you’re serving only one dessert type, count on 1 cheesecake cup, 1 tartlet, 1 whoopie pie, or 2 to 4 truffles depending on the size. Mini desserts disappear faster than full slices because people talk themselves into “just one more.”
Beverage Pairing:
Espresso, black tea, champagne, and sparkling rosé all work across this collection. If you want a nonalcoholic pairing, cold milk, sparkling water with lemon, or a lightly sweet hibiscus tea does the job without pulling focus. Keep the drinks crisp. The desserts are already bringing enough richness.
Additional Tips and Flavor Boosters
Flavor Enhancement:
A tiny pinch of salt belongs in almost every one of these desserts, even the fruit-forward ones. It sharpens chocolate, wakes up cream cheese, and keeps strawberry fillings from tasting flat. If you want a single upgrade that travels across the whole tray, flaky sea salt on brownies and chocolate desserts gives you the most visible payoff.
Customization:
Swap berries according to texture, not mood. Raspberries make the sharpest filling or garnish. Strawberries are best when sliced, diced, or hollowed. Cherries carry well in pies and bars. That one choice controls how much juice you end up fighting later.
Serving Suggestions:
Use powdered sugar as a finish on cookies, pies, and blondies, but don’t dust everything. A tray where every dessert is powdered turns chalky fast. Pick two or three items to finish that way and leave the rest glossy, drizzled, or bare so the table has some contrast.
Make-It-Yours:
For gluten-free guests, the easiest wins are cheesecake cups, mousse, panna cotta, and stuffed strawberries. For dairy-free baking, truffles and hand pies are less troublesome than cream-heavy sweets. If you want a lower-sugar spread, lean harder on fresh fruit, lemon curd, and pavlovas, because those desserts already build in some brightness without a huge frosting load.
Make-Ahead, Storage, and Reheating Guidance
Mini desserts are at their best when you split the work across two days. Cookie dough, brownie batter, cheesecake fillings, mousse, panna cotta, and tiramisu layers all benefit from advance prep. In practical terms, most cream-based desserts keep 3 to 4 days refrigerated, while baked bars, cookies, and truffles hold for up to 5 days in airtight containers. Fruit-heavy desserts are the exception; once strawberries or raspberries are cut, the clock starts moving faster.
For freezing, the sturdy items win. Brownie bites, cake pops, hand pies, sugar cookies, and some blondies freeze well for up to 2 months if wrapped tightly and packed with parchment between layers. Cheesecake cups can also freeze, though the texture softens a little on thawing. Mousse, panna cotta, stuffed strawberries, and pavlovas are not worth freezing. Their textures change in ways you can taste.
Reheating depends on the dessert. Hand pies and brownie bites can be warmed in a 300°F oven for 5 to 8 minutes until the edges loosen and the centers feel just warm. Lava cakes should be baked fresh, not reheated. Cookies and bars come back to room temperature naturally, which is usually better than trying to warm them. If you’ve chilled tartlets or cheesecake cups, let them sit out for 10 to 15 minutes before serving so the flavors open up.
Make-ahead timing is worth planning carefully. Bake cookie shells, tart shells, brownies, and hand pies a day ahead. Whip cream fillings the same day if you can. Assemble truffles, cake pops, and cheesecake cups the morning of the event, then chill until serving. If you need one rule to remember, it’s this: crisp things stay crisp only if you keep wet toppings off them until the last possible moment.
Variations and Adaptations to Try

Gluten-Free Dessert Tray:
Lean on mousse shooters, panna cotta cups, cheesecake-stuffed strawberries, and chocolate truffles. Those recipes don’t depend on flour structure, which means the swaps are straightforward instead of risky. For bars and cookies, use a 1:1 gluten-free flour blend and watch the bake time closely, since many blends brown a little faster.
Dairy-Free Mix:
Use coconut cream in mousse or panna cotta, dairy-free cream cheese for stuffed strawberries, and plant-based butter in pie crusts or cookies. The flavor shifts a bit, but chocolate, raspberry, and lemon still carry the whole tray. I would skip recipes where dairy is the backbone, like the lava cakes, unless you already know your substitute behaves well.
Fresh Fruit First Tray:
If you want the tray to feel lighter, stack it with phyllo cups, stuffed strawberries, fruit tartlets, and pavlovas. These desserts let the berries do the talking. A little whipped cream or mascarpone gives you enough richness without burying the fruit.
Chocolate-Lover’s Spread:
Build around mousse shooters, lava cakes, brownie bites, cake pops, and truffles. Then add one lemon or berry recipe so the whole table doesn’t sink into the same deep cocoa note. That contrast matters. Too much chocolate in every slot turns out to be less exciting than people expect.
Kid-Friendly Sweet Table:
Go with sugar cookies, brownie bites, strawberries stuffed with cream, and cake pops. These are easy to grab, easy to eat, and less likely to stain shirts than fruit sauces or dark cocoa dust. Keep the garnishes simple. Sprinkles do the job better than anything fancy.
Common Mistakes to Avoid
Making every dessert soft at once:
If everything on the tray is creamy, the table loses texture and starts to feel heavy after the first round. Pair a mousse with a tart shell, or a cheesecake cup with a cookie, so people get a little crunch somewhere.
Adding fruit too early:
Fresh berries look best when they’re added close to serving time. If you pile sliced strawberries onto cream or pastry too far ahead, they leak juice and leave pink puddles. That may be fine in a bowl. It is not fine on a polished dessert tray.
Chasing perfect symmetry:
Mini desserts look neat when they’re consistent, but they don’t need to be identical down to the millimeter. A slightly uneven chocolate drizzle or a jam window that sits a little high won’t ruin anything. What does ruin it is sloppy filling, broken crusts, or overstuffed cups.
Ignoring temperature:
Cold desserts like mousse, cheesecake cups, and panna cotta need the fridge. Crisp desserts like cookies and hand pies need a dry container, not a damp one. Warm desserts like lava cakes need to go straight from oven to plate. Mixing those zones up is how good desserts lose their shape.
Using thin fillings:
Runny jam, loose cream, or under-set custard will slide, especially in small portions. Mini desserts show flaws fast. If a filling seems too loose, chill it, thicken it, or choose a different one. The dessert doesn’t need to be taller. It needs to hold.
Overdecorating the tray:
A few clean garnishes go farther than a pile of everything in the pantry. Powdered sugar, chocolate curls, mint, and berries are enough. When the decorations start competing with the dessert, the whole thing looks busy instead of inviting.
Frequently Asked Questions
Can I make several of these desserts a day ahead?
Yes, and that’s the smart way to do it. Cheesecake cups, brownies, cookies, tartlets, cake pops, and truffles all hold well overnight if you keep them sealed and chilled or stored dry, depending on the recipe.
Which desserts on this list travel best?
Cookies, brownie bites, hand pies, truffles, and cake pops are the easiest to transport. Use parchment between layers and keep anything cream-filled in a chilled container with a tight lid. Pavlovas and stuffed strawberries are the least travel-friendly because they soften fast.
What’s the easiest dessert if I’m short on time?
Cheesecake stuffed strawberries, strawberry shortcake phyllo cups, and chocolate mousse shooters need the least active work. They rely on assembly more than baking, which helps when the oven is busy or the schedule is tight.
Can I swap store-bought components for homemade ones?
Absolutely. Store-bought tart shells, pie crust, lemon curd, or brownie mix can save time without wrecking the dessert tray. The trick is to choose one or two homemade elements so the whole spread still feels thoughtful.
How do I keep mini desserts from drying out?
Seal baked items in airtight containers once they cool. For cream-filled desserts, keep the tops covered loosely with plastic wrap or lids so the surface doesn’t crust over. And don’t refrigerate crisp cookies next to moist fillings unless you want the cookies to soften.
What if my chocolate coating gets too thick?
Stir in a teaspoon of coconut oil or neutral shortening and warm it gently. That loosens the coating enough for truffles, cake pops, and drizzles without making them greasy. Add it a little at a time.
Can I make these without heart-shaped cutters?
Yes. Circles, squares, and simple cut-out rounds work fine. The shape matters less than the clean edges and the color contrast. A neat circle with a glossy berry on top still reads as special.
What should I do if my cheesecake filling is too loose?
Chill it for 20 to 30 minutes before spooning or piping. If it still seems loose, fold in a bit more whipped cream or use slightly less liquid next time. Most of the time, the fix is a longer chill rather than a new recipe.
Little Desserts, Big Spread
The nicest thing about these desserts is that none of them asks to dominate the room. They work better as a group, where a pale tartlet can sit beside a dark mousse cup and a red velvet pop can stand next to a lemon curd shell. That mix is what makes the table feel alive.
And if you only make three or four of them, that still counts. A tray of small, well-chosen sweets beats a table full of half-finished ideas every time. Keep the textures varied, keep the garnishes clean, and let the colors do some of the heavy lifting.