
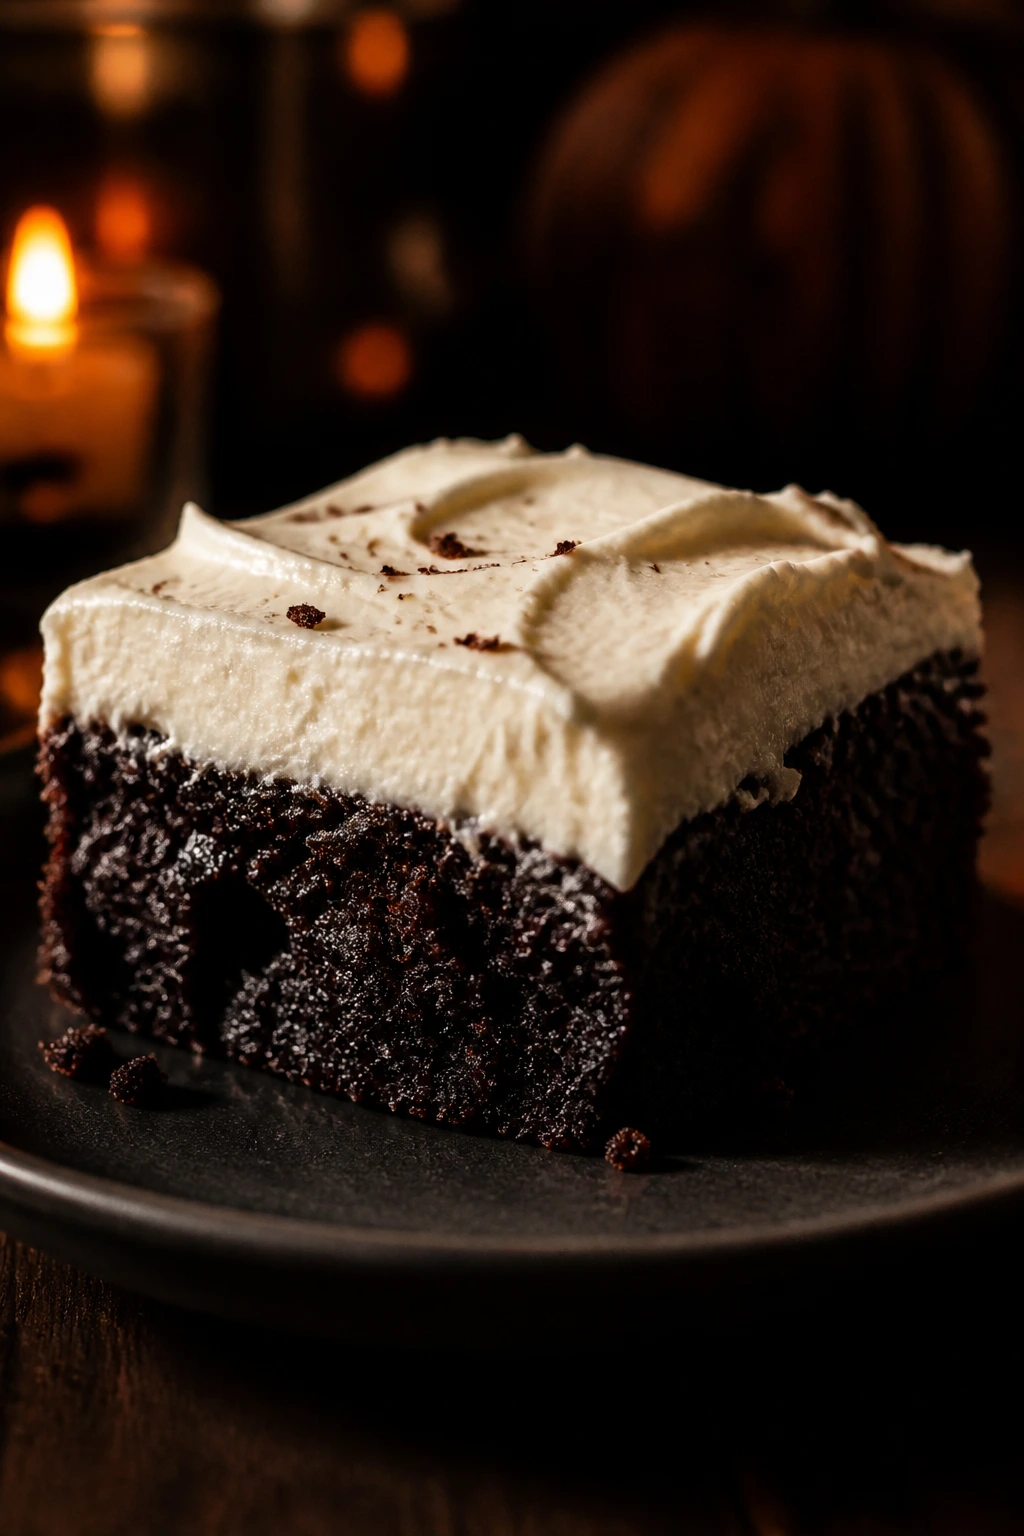
A brownie meant for Halloween should look a little dramatic. Dark crumb, glossy frosting, and a knife that comes away with thick, sticky edges — that’s the kind of dessert people remember when the candy bowl starts looking tired.
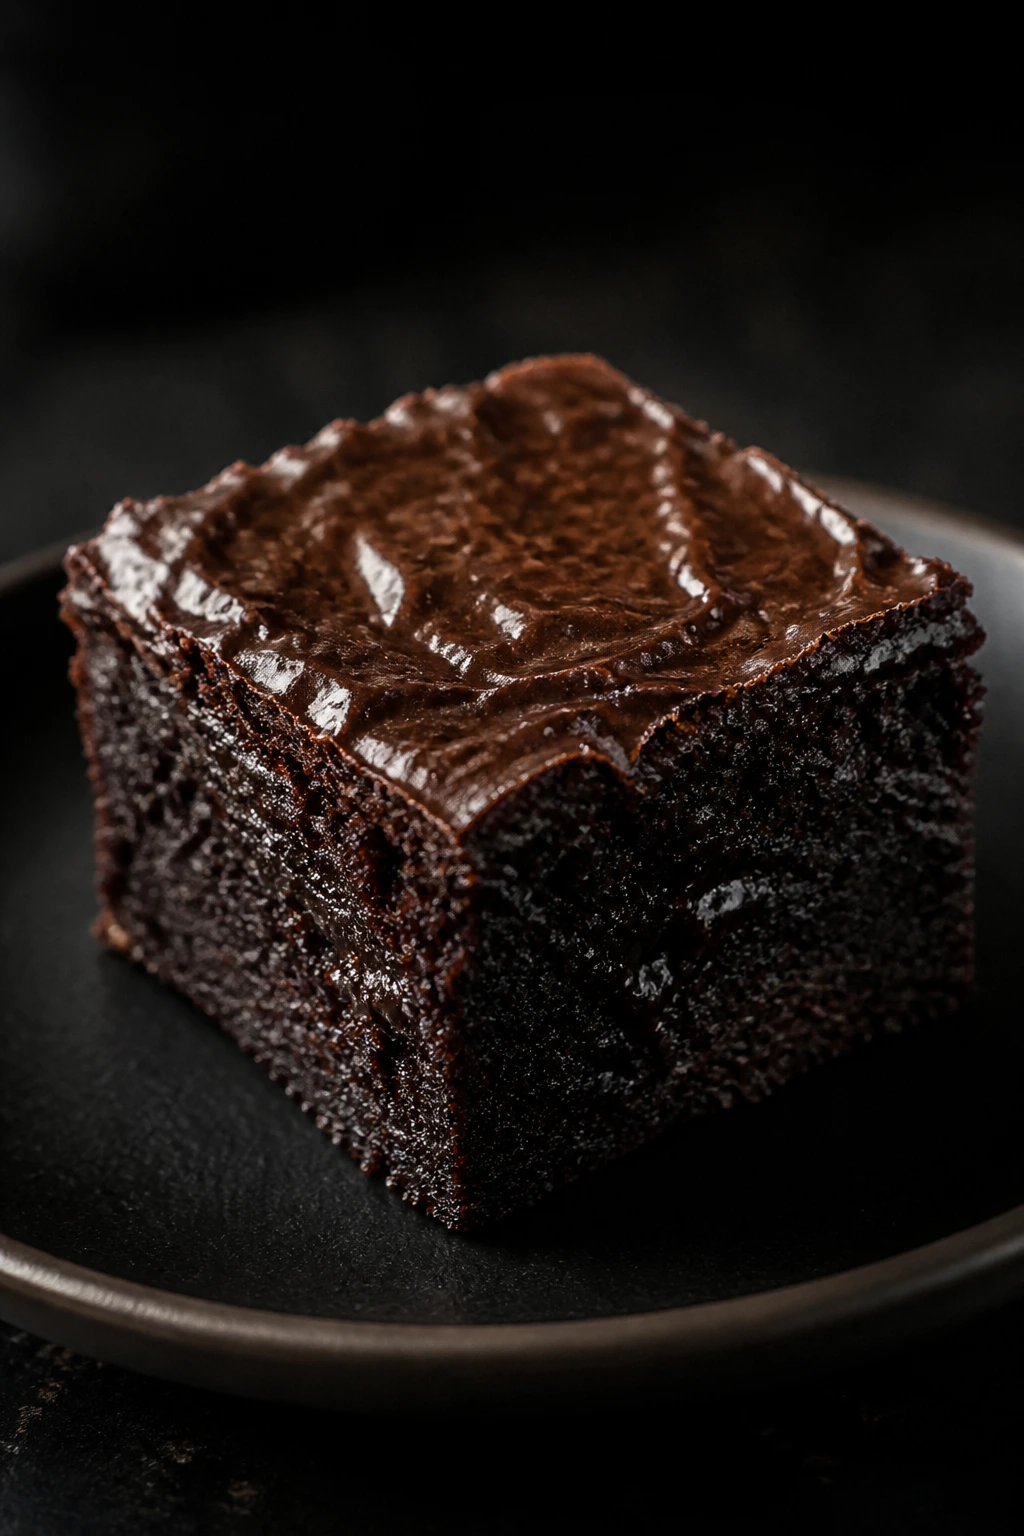
This rich Halloween brownie with cream cheese frosting leans hard into contrast. The brownie itself is deep and fudgy, with melted chocolate and cocoa giving it that almost-black color that feels right for the holiday, while the frosting brings a cold, tangy snap that keeps each bite from turning sugary and flat.
I like brownies that slice like they mean it. If the crumb is too cakey, the frosting slides; if the frosting is too soft, the whole thing turns messy; if you rush the cooling time, the flavor may still be there, but the tray loses its shape and its nerve.
The small details matter here more than people expect. A metal pan gives you better edges than glass, room-temperature eggs keep the batter smooth, and a cream cheese frosting made with truly soft butter spreads like satin instead of breaking into little ridges. The first decision worth making is simple: do you want a brownie that behaves like a party piece, or one that just tastes fine? This one does both.
Why This Brownie Feels Right for Halloween
Halloween brownies live or die by contrast. If the brownie is dark enough and the frosting has enough tang, you get a dessert that feels richer than the average sheet-pan square without becoming heavy in the wrong way.
- Deep cocoa flavor: Melted semisweet chocolate and Dutch-process cocoa give the crumb a darker, more serious chocolate taste than a plain brownie mix ever will.
- Tangy frosting: Cream cheese frosting cuts through the sugar and gives the top layer a cool, almost cheesecake-like edge.
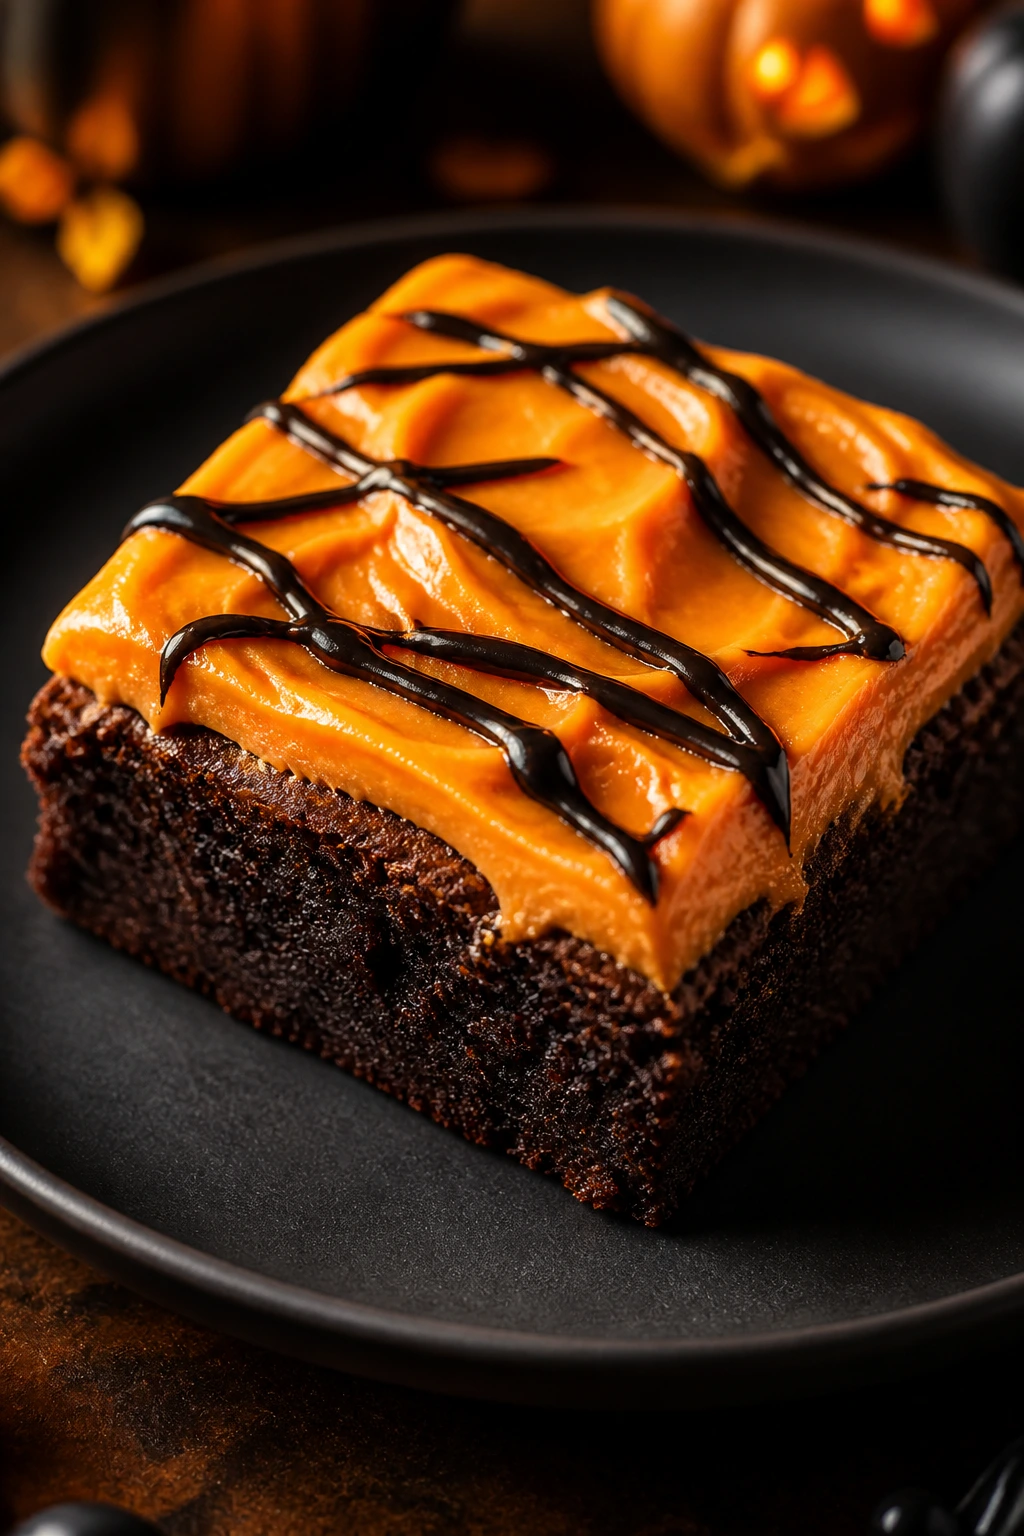
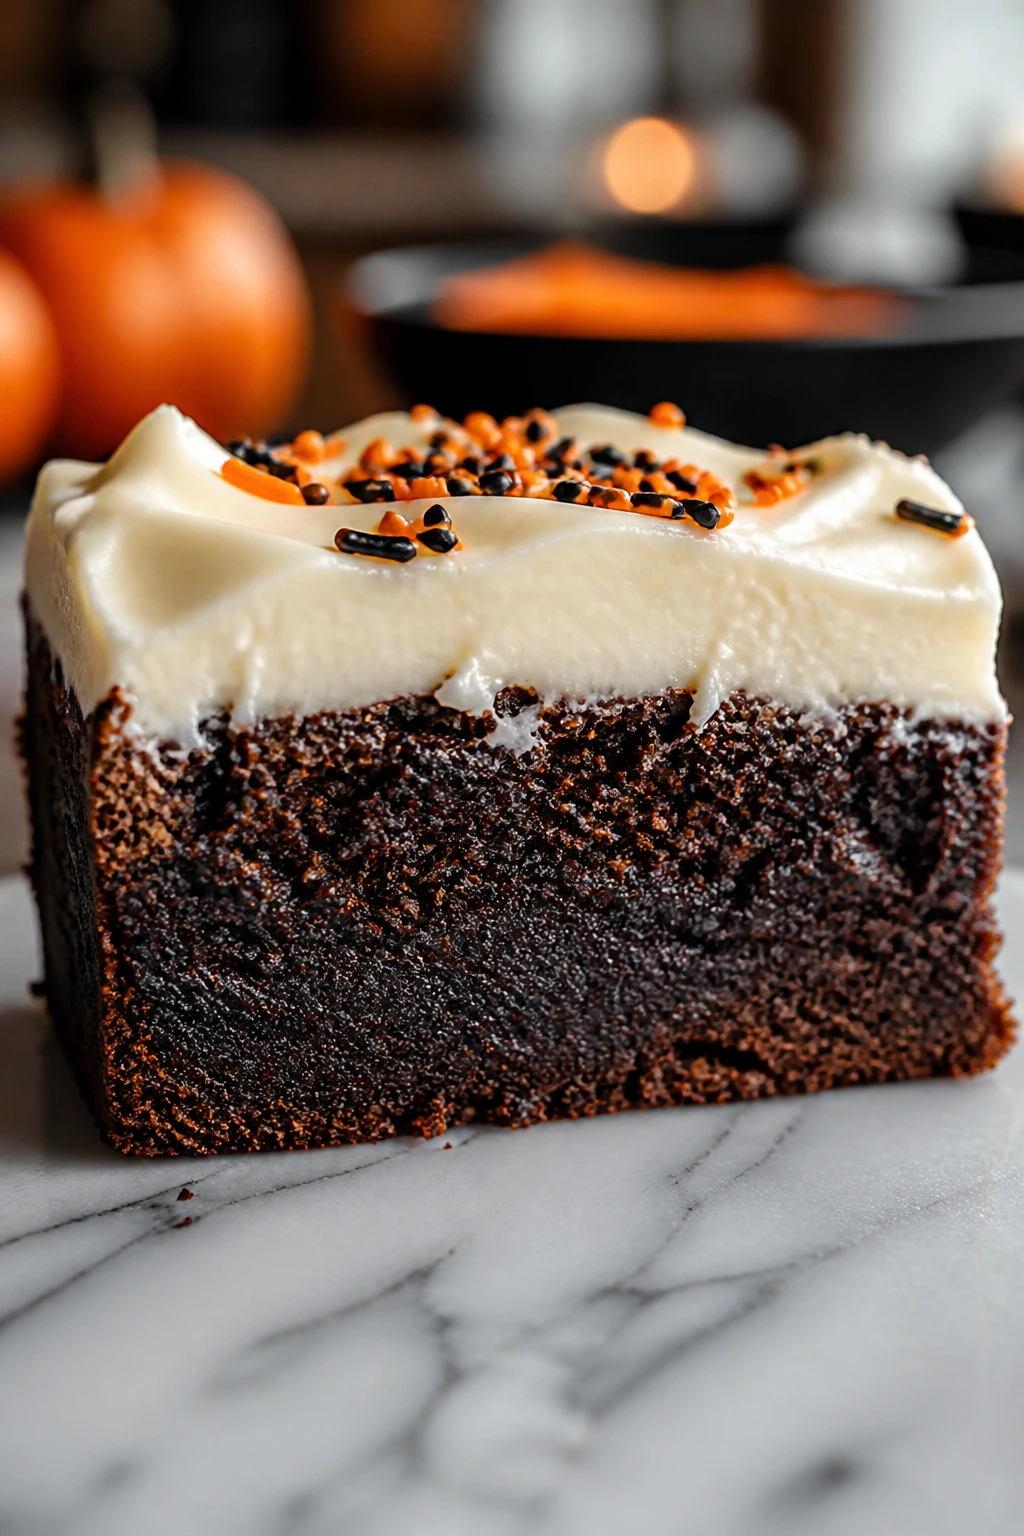
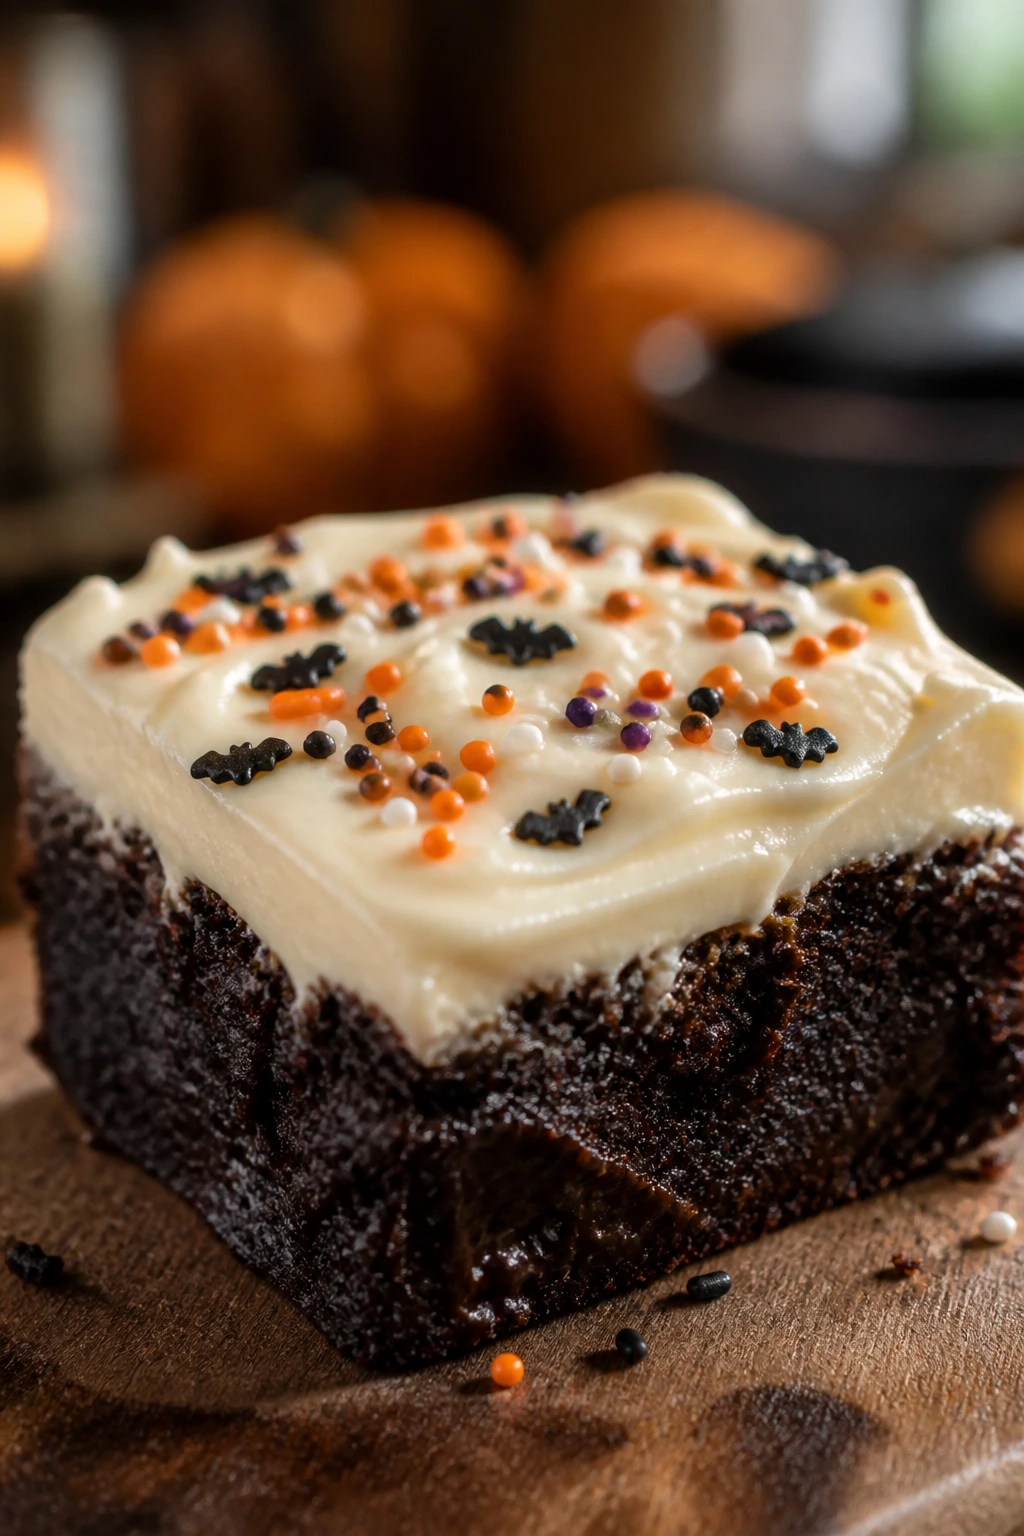
- Easy Halloween decoration: Orange frosting, black sprinkles, candy eyes, or a thin chocolate web can turn one pan into a themed tray without any special decorating skill.
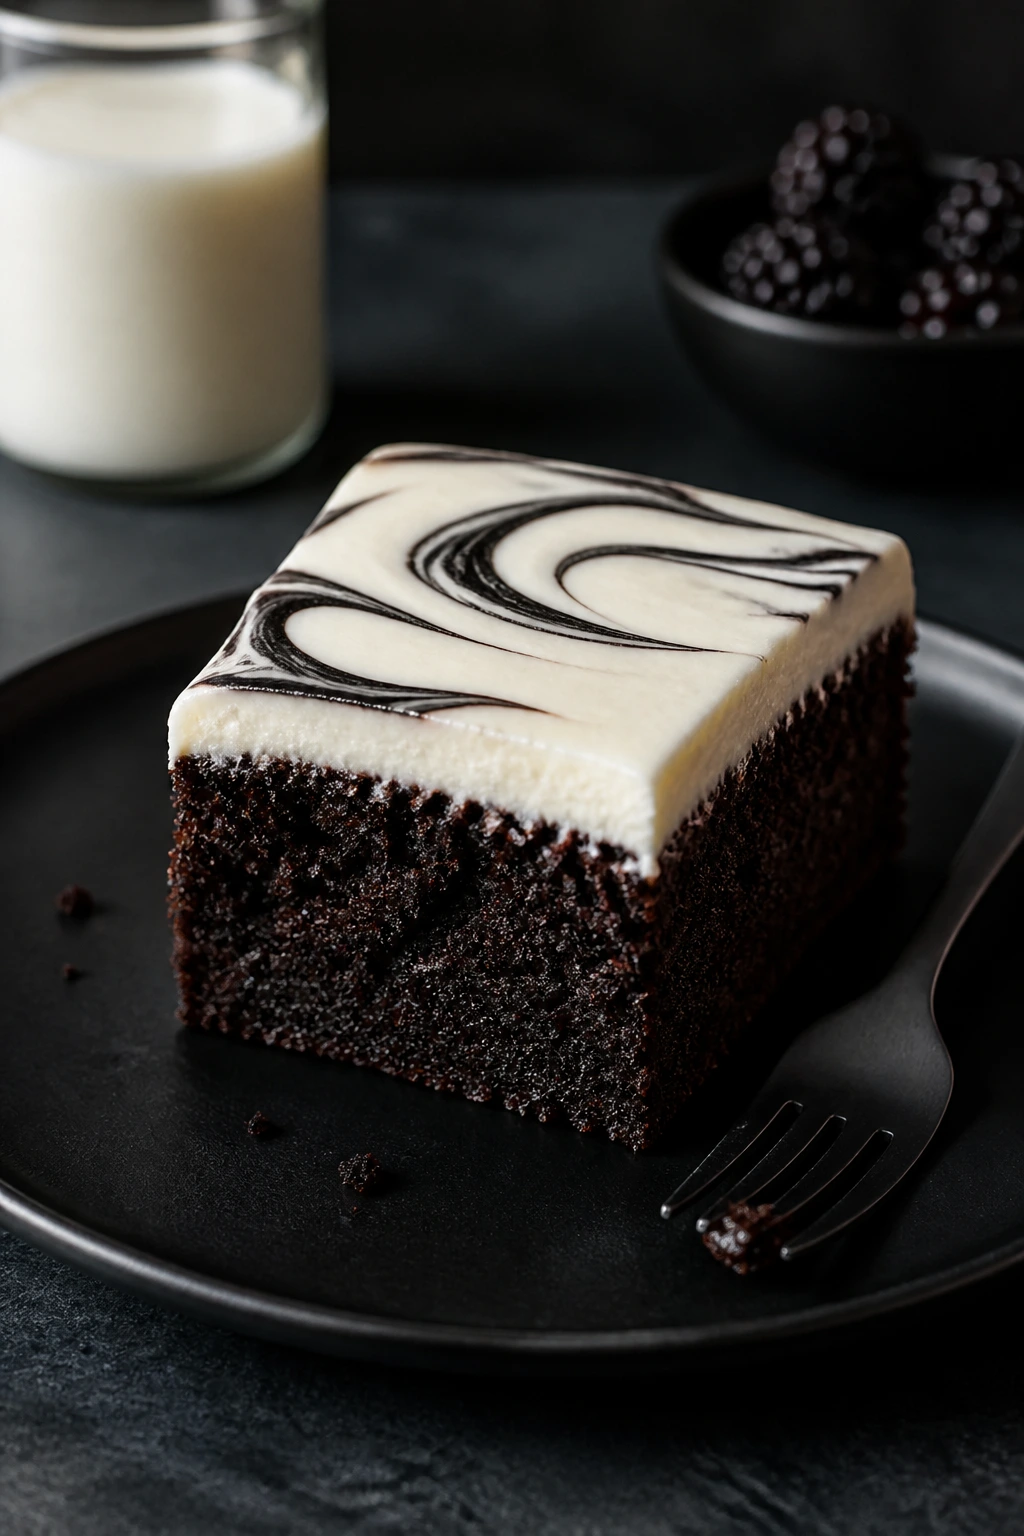
- Clean slicing after a chill: A short rest in the fridge firms the frosting just enough that you can cut neat squares instead of dragging the top layer around.
- One-pan practicality: A 9×13-inch slab is the right size for a party table, a school event, or a dessert board where people keep drifting back for “just one more piece.”
The other reason I keep coming back to this kind of brownie is the balance. It feels festive without being fussy. That matters.
Yield: 16 brownies
Prep Time: 30 minutes
Cook Time: 30 minutes
Total Time: 2 hours 20 minutes, including cooling and frosting set
Difficulty: Intermediate — the ingredient list is straightforward, but the brownies need the right bake window and a full cool-down before the frosting goes on.
Chill/Rest Time: 1 hour 20 to 30 minutes total for cooling and chilling
Best Served: Slightly cool or at cool room temperature, once the frosting has set
What Goes Into the Pan
For the Brownies:
- 1 cup (2 sticks) unsalted butter, cut into tablespoons
- 6 ounces semisweet chocolate, chopped
- 1 cup granulated sugar
- 1 cup packed light brown sugar
- 4 large eggs, at room temperature
- 2 teaspoons pure vanilla extract
- 1 cup all-purpose flour
- 1/2 cup Dutch-process cocoa powder, sifted if clumpy
- 1 teaspoon fine sea salt
- 1 teaspoon espresso powder, optional but useful
- 1 cup semisweet chocolate chips or chopped semisweet chocolate
For the Cream Cheese Frosting:
- 8 ounces full-fat cream cheese, softened to cool room temperature
- 1/2 cup (1 stick) unsalted butter, softened
- 3 cups powdered sugar, sifted
- 1 teaspoon pure vanilla extract
- 1/4 teaspoon fine sea salt
- 1 to 2 tablespoons heavy cream or whole milk, only if needed
- Orange gel food coloring, optional
For the Halloween Finish:
- 2 tablespoons Halloween sprinkles or black and orange jimmies
- 2 tablespoons melted semisweet chocolate, optional for a spiderweb pattern
- 8 to 12 candy eyes, optional
How the Batter, Frosting, and Topping Work Together
Brownie Base
What to use: The brownie layer depends on 1 cup butter, 6 ounces semisweet chocolate, both sugars, eggs, vanilla, flour, cocoa powder, salt, espresso powder, and chocolate chips. That mix gives you the dense center, crackly top, and gooey bits that make a frosted brownie worth cutting into.
Preparation: Melt the butter and chocolate together first, then whisk the sugars and eggs into the warm mixture until it looks glossy. Fold the flour and cocoa in at the end so you do not beat air into the batter.
Substitutions: Bittersweet chocolate works if you prefer a less sweet brownie; natural cocoa can replace Dutch-process cocoa in a pinch, though the color will be lighter and the flavor a little sharper. If you skip espresso powder, the brownies still work — you just lose a bit of depth.
Tips: Use room-temperature eggs so the chocolate mixture stays smooth instead of stiffening into little lumps. The brownie batter should look thick, shiny, and almost spreadable by the time it hits the pan.
Cream Cheese Frosting
What to use: The frosting is built from 8 ounces cream cheese, 1/2 cup butter, 3 cups powdered sugar, vanilla, salt, and a small splash of cream if the mixture needs loosening. That ratio gives you a frosting that spreads cleanly without running off the edges.
Preparation: Soften the cream cheese and butter fully before beating them, then add the powdered sugar in stages. Beat only until the frosting is smooth and fluffy; if you whip it forever, it can get loose and glossy in a way that sounds nice but pipes badly.
Substitutions: Neufchâtel cheese can stand in if you want a slightly lighter tang, and a good dairy-free cream cheese plus plant butter will work for a dairy-free version. If your cream cheese brand is very soft, you may not need any cream at all.
Tips: A tiny pinch of salt matters here. Cream cheese frosting can taste flat without it, especially once it sits on a sweet brownie for an hour or two.
Halloween Finish
What to use: Sprinkles, candy eyes, and a little melted chocolate are enough to make the tray feel festive. You do not need a mountain of decoration; one or two neat details go farther than a cluttered top.
Preparation: Add decorations after the frosting has been spread, then chill the pan before slicing. If you’re making a spiderweb, pipe thin chocolate lines over the orange frosting and drag a toothpick outward in short strokes.
Substitutions: Crushed chocolate sandwich cookies can stand in for sprinkles, chopped toasted pecans can add crunch, and colored sanding sugar gives you shine without extra bulk.
Tips: Keep heavy candy pieces small. Large decorations sink into the frosting or shift when you cut the first square, which is a nuisance nobody needs.
The Tools That Make Clean Squares Easier
If you’ve ever tried to unmold brownies from a pan with no parchment sling, you already know why the right tools matter. The dessert is simple; the cleanup should be, too.
- 9×13-inch metal baking pan — Metal gives you better edge control and more even browning than glass for this style of brownie.
- Parchment paper — Leave a 2-inch overhang on two sides so you can lift the entire slab out after it cools.
- Medium saucepan or microwave-safe bowl — Either one works for melting the butter and chocolate together.
- Large mixing bowl — The brownie batter gets thick, especially once the dry ingredients go in.
- Hand mixer or stand mixer — Useful for the frosting; you can make it by hand, but the mixer makes the texture much smoother.
- Rubber spatula — The best tool for folding flour without overmixing and for scraping every bit of batter into the pan.
- Offset spatula — It spreads the frosting in a thin, even layer without tearing up the brownie crumb.
- Sharp chef’s knife — A long blade gives you straighter cuts than a short serrated knife.
- Cooling rack — Keeps the bottom of the pan from sweating while the brownies cool.
- Small bowl for warm water — Dipping the knife between cuts gives you cleaner edges, especially once the frosting is set.
Mixing, Baking, and Frosting Without Guesswork
A fudgy brownie is mostly a timing problem. The ingredients matter, yes, but the difference between dense and dry is often a matter of six or seven minutes in the oven.
Prepare the Pan and Heat the Oven:
- Preheat the oven to 350°F (175°C). Position a rack in the center of the oven so the heat hits the pan evenly.
- Line a 9×13-inch metal baking pan with parchment paper, leaving a 2-inch overhang on two opposite sides. Lightly grease the parchment and any exposed pan edges. Do not skip the overhang — it is what lets you lift the brownies out intact.
Make the Brownie Base:
- Melt the butter and chopped semisweet chocolate together in a medium saucepan over low heat, stirring often, or in a microwave-safe bowl in 20-second bursts. Stop when the mixture is smooth and glossy. Let it cool for 5 minutes so it feels warm, not hot.
- In a large bowl, whisk the granulated sugar, brown sugar, eggs, and vanilla for 45 to 60 seconds, until the mixture looks thick, shiny, and a little lighter in color. The mixture should ribbon off the whisk in slow strands.
- Whisk the warm chocolate mixture into the sugar-and-egg mixture until fully combined. The batter should look dark, silky, and a little loose.
- In a separate bowl, whisk together the flour, cocoa powder, salt, and espresso powder. Fold the dry mixture into the wet batter with a rubber spatula just until the last streaks of flour disappear. Stop early if you are unsure — overmixing is the fastest way to lose the fudgy texture.
- Fold in the chocolate chips or chopped chocolate. Scrape the batter into the prepared pan and spread it into an even layer. Tap the pan once or twice on the counter to pop large air bubbles.
Bake and Cool:
- Bake for 28 to 32 minutes, rotating the pan once halfway through. The edges should look set and slightly pulled away from the pan, while the center still has a soft wobble. A toothpick inserted in the middle should come out with moist crumbs, not wet batter. If the toothpick comes out clean, you have likely gone too far.
- Set the pan on a cooling rack and let the brownies cool in the pan for at least 1 hour. Then lift them out using the parchment overhang and let them cool completely on the rack. Frosting a warm brownie will melt the cream cheese layer and slide it toward the edges.
Mix and Spread the Frosting:
- In a large bowl, beat the softened cream cheese and butter with a hand mixer or stand mixer on medium speed for 1 to 2 minutes, until smooth and lump-free. Scrape the bowl down once or twice so there are no cold pockets hiding at the bottom.
- Add the powdered sugar in two or three additions, beating on low speed at first so the sugar does not puff out of the bowl. Add the vanilla and salt, then beat on medium speed until the frosting looks fluffy and holds soft peaks. If it seems too stiff, add 1 tablespoon of cream; if it seems too loose, add a few tablespoons of powdered sugar.
- Tint the frosting with orange gel food coloring, if you want the Halloween look. Start with a tiny amount — a toothpick dab goes farther than you think — then beat until the color looks even.
Finish and Slice:
- Spread the frosting over the cooled brownie slab in one thick, even layer with an offset spatula. Add sprinkles, candy eyes, or a melted-chocolate spiderweb while the frosting is still soft enough to hold them.
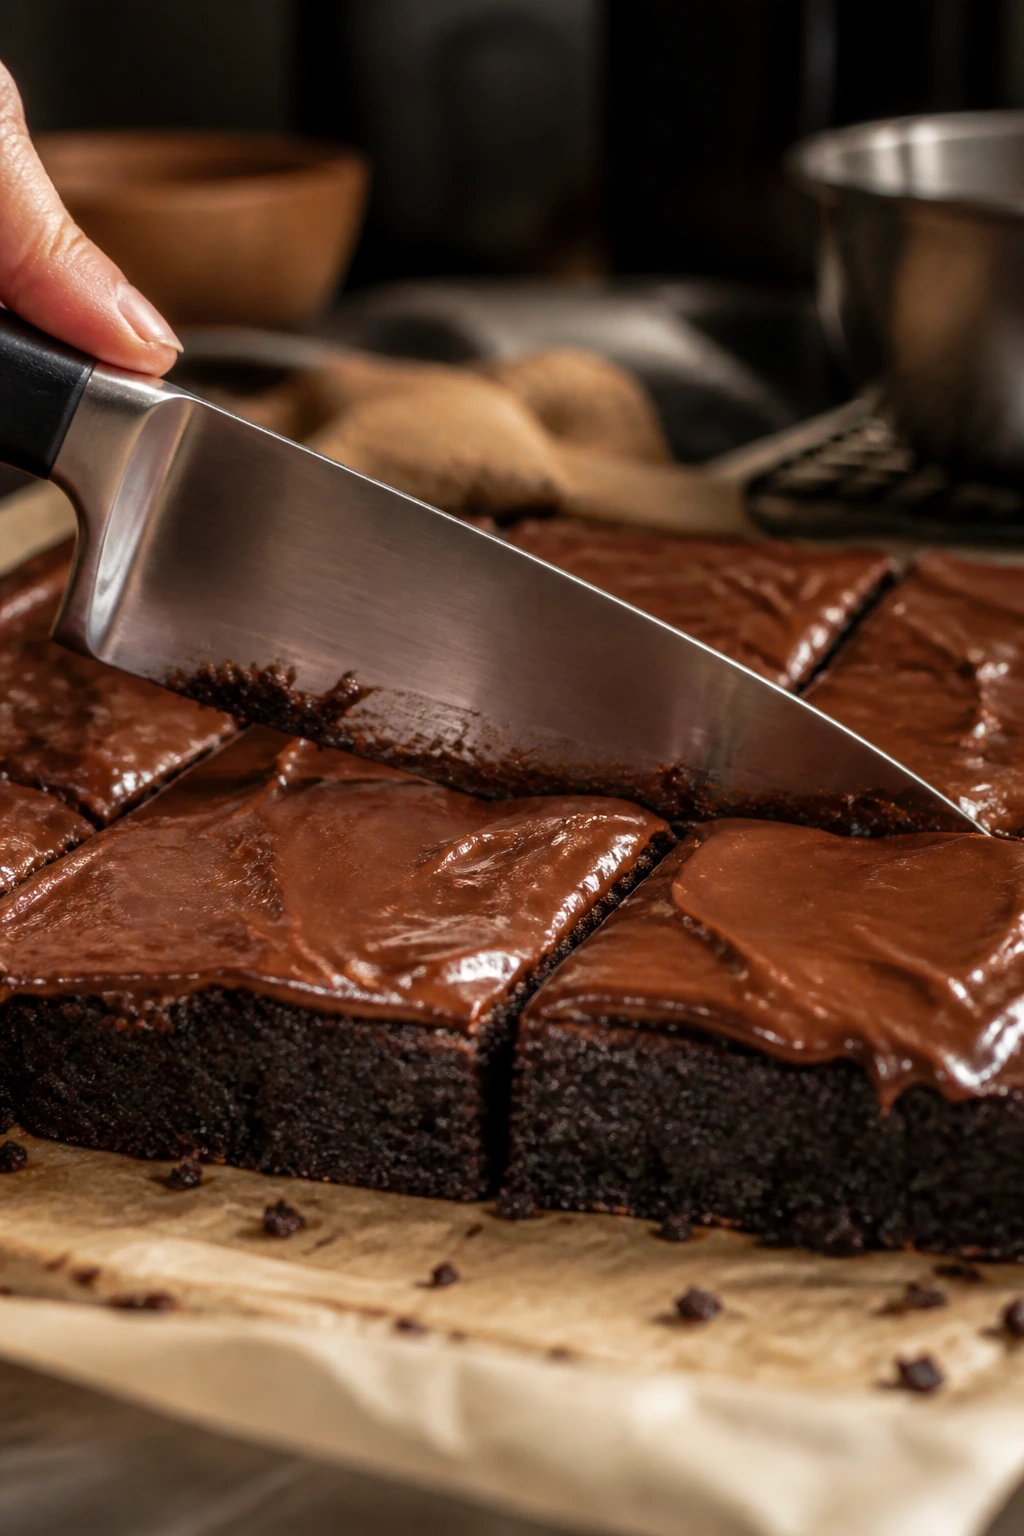
- Chill the frosted brownies for 20 to 30 minutes before slicing. Use a long sharp knife dipped in hot water and wiped dry between cuts for the cleanest squares. Wipe the blade after every cut if you want tidy edges.
How to Serve a Slice So the Frosting Stays Neat
Presentation: Cut the slab into 16 squares for a standard dessert tray, or into 24 smaller pieces if you’re setting out a mix-and-match table with other sweets. A small sprinkle of Halloween jimmies on top of each square makes the pan look finished even if you stop short of spiderweb piping.
Accompaniments: Cold whole milk is the easy answer, and it works because the frosting is rich enough to ask for something cool and plain beside it. A scoop of vanilla ice cream turns the brownie into a plated dessert, while a bowl of salted pretzels on the side gives the sweet top a little edge.
Portions: One square is enough for most people if the brownie is part of a larger dessert spread. If this is the only sweet thing on the table, the 16-piece cut is generous but still reasonable; for a bigger crowd, slice the pan into 20 or 24 smaller bars and set them out in staggered rows so the frosting doesn’t smear.
Beverage Pairing: A dark roast coffee plays well with the cocoa, especially if you keep the brew a little stronger than usual. Cold brew, black tea, or a glass of milk all fit naturally. If you want a more dessert-like pairing, hot chocolate with a pinch of salt is a little indulgent, and I mean that in the best way.
A small note from the kitchen: these brownies look best when the frosting is cool but not rock hard. If you pull them from the fridge and serve immediately, the texture feels dense; give them 10 to 15 minutes on the counter and the cream cheese layer relaxes into something softer.
Small Tweaks That Make the Flavor Deeper

Flavor Enhancement: A teaspoon of espresso powder in the brownie batter does not make the brownies taste like coffee. It pushes the chocolate flavor forward and makes the whole pan taste darker, which is exactly what you want when the decorations are orange and black.
Customization: If you like a little crunch, fold 3/4 cup of chopped toasted pecans into the brownie batter before baking. If you prefer a brighter Halloween look, split the frosting in half, tint one bowl orange and leave the other plain, then spread both in thick swoops across the top.
Serving Suggestions: A light dusting of cocoa over the frosting gives the slab a more finished look, especially if you are keeping the decorations minimal. You can also pipe a thin chocolate web over the orange frosting or place candy eyes on each square right before serving so they stay neat.
Make-It-Yours: For a less sweet tray, cut the frosting layer thinner and finish with a tiny pinch of flaky salt. For a gluten-free version, use a 1:1 gluten-free flour blend and let the batter sit for 10 minutes before baking so the flour hydrates and the crumb settles.
The main thing is to resist the urge to keep adding more. A brownie like this is rich enough already. A few sharp details beat a heavy hand every time.
Mistakes That Turn Fudgy Brownies Dry

A toothpick that comes out clean is not your friend here. That single habit ruins more brownies than bad ingredients ever will.
- Baking until the center is fully set — Dry brownies happen when the middle looks done in the oven and then gets another five minutes “just to be safe.” Pull the pan when the center still has a slight wobble and the toothpick shows moist crumbs.
- Frosting before the brownies are cold — Warm brownies melt cream cheese frosting into a soft layer that slides around and never quite firms up again. Cool the slab completely, then chill the frosted pan for a short stretch before cutting.
- Using cold cream cheese or cold butter — Lumpy frosting almost always starts with dairy straight from the fridge. Give both ingredients time to soften until they yield easily to a finger press, but do not let them turn greasy.
- Overmixing after the flour goes in — Too much stirring develops gluten and gives you a brownie with a bready bite instead of a dense one. Fold only until the dry streaks disappear, then stop.
- Skipping the parchment sling — Without overhanging parchment, the brownie slab can stick to the pan corners and tear when you lift it out. Line the pan properly once, and the whole thing becomes much easier.
- Dragging a dull knife through the frosting — Ragged edges make the tray look rushed. A long sharp knife dipped in hot water and wiped dry between cuts solves this in a few seconds.
The fix for most brownie problems is dull and unglamorous: stop a little earlier than you think, cool a little longer than you want, and cut with a clean knife. That is the whole trick.
Halloween Variations That Still Taste Like Brownies
Midnight Cocoa Squares: Swap 1/4 cup of the Dutch-process cocoa for black cocoa if you want the brownie to look nearly black. The flavor turns a little more Oreo-like and a little less floral, which makes the orange frosting pop harder on the plate.
Orange Cream Frosting: Add 1 teaspoon finely grated orange zest and a small squeeze of orange gel coloring to the cream cheese frosting. The citrus cuts through the tang and gives the top layer a brighter smell when the box is opened.
Salted Pretzel Crunch: Press 1 cup of lightly crushed pretzels over the frosting before chilling. The salt keeps the dessert from feeling too sweet, and the crunch is a nice change from the soft crumb below.
Gluten-Free Graveyard Squares: Replace the all-purpose flour with a 1:1 gluten-free flour blend that already contains xanthan gum. Let the batter rest for 10 minutes before it goes in the oven so the flour can hydrate, which helps the texture settle instead of turning sandy.
Dairy-Free Shadow Bars: Use plant-based butter and a good dairy-free cream cheese in both the brownie and frosting. The texture is a little softer, so chill the finished pan for a bit longer before slicing and keep the squares cold until serving.
If you want a more kid-style Halloween tray, the easiest path is not a complicated flavor change. It’s decoration. Candy eyes, orange frosting, and one simple chocolate web are enough to sell the theme without making the dessert taste like a craft project.
Storing, Freezing, and Making Ahead
Brownies like this behave better after a rest. The frosting settles, the crumb tightens, and the slices cut cleaner the next day than they do an hour after frosting.
Room Temperature: Unfrosted brownies can sit in an airtight container at room temperature for up to 2 days. Once the cream cheese frosting is on, do not leave the pan out for longer than 2 hours in a warm room; cream cheese frosting belongs in the fridge once the party winds down.
Refrigerator: Store frosted brownies in an airtight container for 4 to 5 days. If you need to stack the squares, place parchment between the layers so the frosting does not stick. The brownies taste best after they sit out for 10 to 15 minutes, which takes the chill off without softening the frosting too much.
Freezer: Freeze individual squares or the whole slab, well wrapped, for up to 2 months. For the cleanest result, chill the frosted brownies first, cut them, and freeze the squares in a single layer on a tray before wrapping. Thaw overnight in the fridge, then let them sit on the counter briefly before serving.
Make-Ahead: The brownie layer can be baked a day ahead, cooled, wrapped tightly, and stored at room temperature if unfrosted. The frosting can also be made a day ahead and kept in the fridge; beat it briefly before spreading to bring it back to a smooth texture. If you want to get ahead for a party, assemble the whole pan the day before, chill it overnight, and slice it just before serving. The brownies usually cut better that way anyway.
Reheating: You do not want to heat the frosted brownies. If you prefer a warm brownie, warm an unfrosted square for 8 to 10 seconds in the microwave, then add frosting after. Anything longer and the cream cheese layer starts to melt around the edges, which is a fast way to lose the sharp look.
Questions Bakers Ask Before They Start
Can I use a boxed brownie mix instead of making the brownie from scratch?
Yes, and it is a decent shortcut if you are short on time. Choose a fudgy-style mix rather than a cakey one, bake it in a 9×13-inch pan, and cool it fully before adding the cream cheese frosting.
What if my cream cheese frosting turns runny?
That usually means the cream cheese or butter was too warm, or you added too much liquid. Chill the bowl for 10 to 15 minutes, then beat in a little more powdered sugar, 1/4 cup at a time, until the frosting holds its shape.
Can I use a glass pan instead of a metal pan?
You can, but glass browns more slowly and can leave the edges overdone by the time the center is ready. If glass is all you have, start checking a few minutes earlier and expect the edges to look a little paler.
How do I know the brownies are done if the center still looks soft?
That soft center is a good sign, not a mistake. You want the edges set and the middle just barely jiggly, with moist crumbs on the toothpick rather than wet batter.
Can I add nuts or candy pieces to the batter?
Yes, but keep the amount modest — about 3/4 to 1 cup total. Too many mix-ins can make the brownie crumb break apart when you cut it, especially once the frosting is on top.
Do these brownies have to be refrigerated because of the frosting?
Yes, once the cream cheese frosting is applied, fridge storage is the safe choice. The tray can sit out for a short serving window, but after that it should go back into the refrigerator.
Can I make the brownies and frosting a day ahead and assemble later?
Absolutely. In fact, that often gives you a cleaner finish because the brownie layer is fully cool and the frosting spreads more smoothly once it has had a little time to settle in the fridge.
A Dark Square Worth Repeating
A Halloween dessert doesn’t need a pile of candy to feel festive. Sometimes the best move is a dark, fudgy brownie, a cool layer of cream cheese frosting, and one or two decorations that look sharp from across the room.
That combination gives you a square that feels playful without becoming fussy. Bake it once, and you’ll probably keep the parchment sling in the drawer because this is the kind of pan dessert that gets requested again.
Rich Halloween Brownie with Cream Cheese Frosting — Recipe Card
Recipe Name: Rich Halloween Brownie with Cream Cheese Frosting
Description: A deeply chocolatey brownie baked in a 9×13-inch pan and topped with smooth cream cheese frosting, finished with Halloween sprinkles, orange color, or a chocolate spiderweb. The brownie stays fudgy, the frosting adds tang, and the whole tray slices cleanly after a short chill.
Prep Time: 30 minutes
Cook Time: 30 minutes
Total Time: 2 hours 20 minutes, including cooling and chilling
Course: Dessert
Cuisine: American
Servings: 16 brownies
Calories: About 480 kcal per brownie
Ingredients
For the Brownies:
- 1 cup (2 sticks) unsalted butter, cut into tablespoons
- 6 ounces semisweet chocolate, chopped
- 1 cup granulated sugar
- 1 cup packed light brown sugar
- 4 large eggs, at room temperature
- 2 teaspoons pure vanilla extract
- 1 cup all-purpose flour
- 1/2 cup Dutch-process cocoa powder, sifted if needed
- 1 teaspoon fine sea salt
- 1 teaspoon espresso powder, optional
- 1 cup semisweet chocolate chips or chopped semisweet chocolate
For the Cream Cheese Frosting:
- 8 ounces full-fat cream cheese, softened
- 1/2 cup (1 stick) unsalted butter, softened
- 3 cups powdered sugar, sifted
- 1 teaspoon pure vanilla extract
- 1/4 teaspoon fine sea salt
- 1 to 2 tablespoons heavy cream or whole milk, only if needed
- Orange gel food coloring, optional
For the Halloween Finish:
- 2 tablespoons Halloween sprinkles or black and orange jimmies
- 2 tablespoons melted semisweet chocolate, optional
- 8 to 12 candy eyes, optional
Instructions
-
Preheat the oven to 350°F (175°C) and line a 9×13-inch metal baking pan with parchment paper, leaving an overhang on two sides. Lightly grease the parchment and exposed pan edges.
-
Melt the butter and semisweet chocolate together over low heat or in the microwave until smooth. Cool for 5 minutes.
-
Whisk the granulated sugar, brown sugar, eggs, and vanilla in a large bowl for 45 to 60 seconds, until glossy.
-
Whisk in the melted chocolate mixture until combined.
-
In a separate bowl, whisk the flour, cocoa powder, salt, and espresso powder. Fold the dry ingredients into the wet batter just until no flour streaks remain.
-
Fold in the chocolate chips, then scrape the batter into the prepared pan and smooth the top.
-
Bake for 28 to 32 minutes, until the edges are set and the center still has a slight wobble. A toothpick should come out with moist crumbs.
-
Cool the brownies completely in the pan on a rack, then lift them out using the parchment and finish cooling on the rack.
-
Beat the cream cheese and butter until smooth. Add the powdered sugar, vanilla, and salt in stages, then beat until fluffy. Add a little cream only if needed and tint orange if desired.
-
Spread the frosting over the cooled brownies, add sprinkles or candy eyes, and drizzle with melted chocolate if using.
-
Chill for 20 to 30 minutes, then slice with a hot, dry knife wiped clean between cuts.
Notes: Do not frost warm brownies. Chill before slicing for the cleanest squares. For the darkest color, use Dutch-process cocoa and semisweet chocolate.