
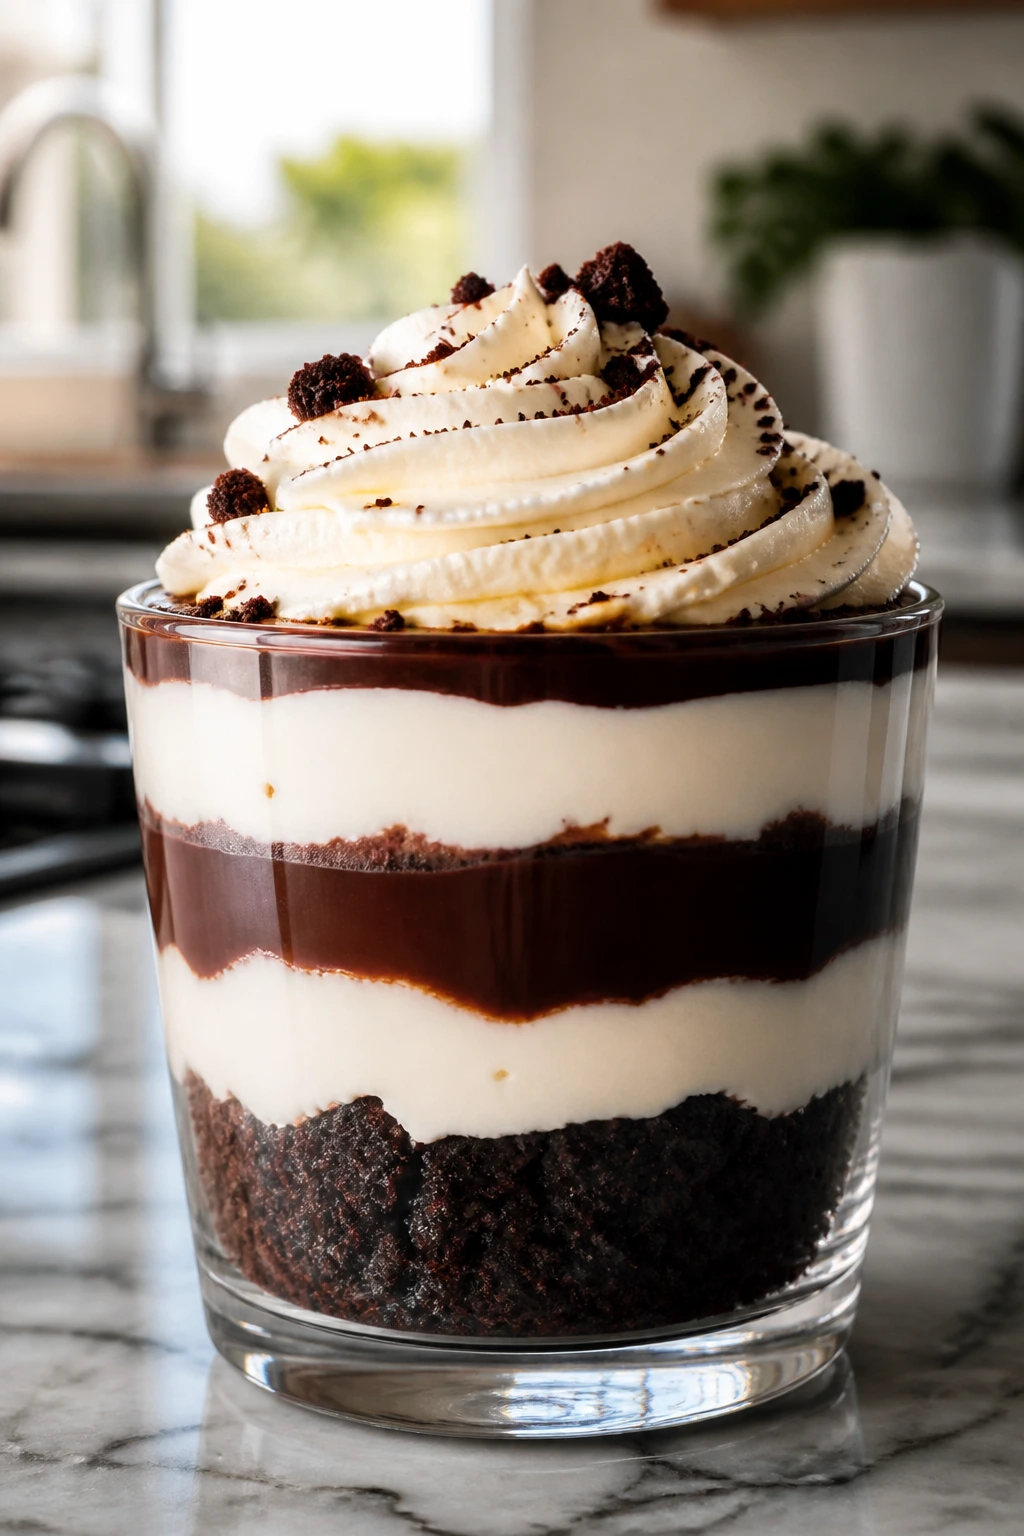
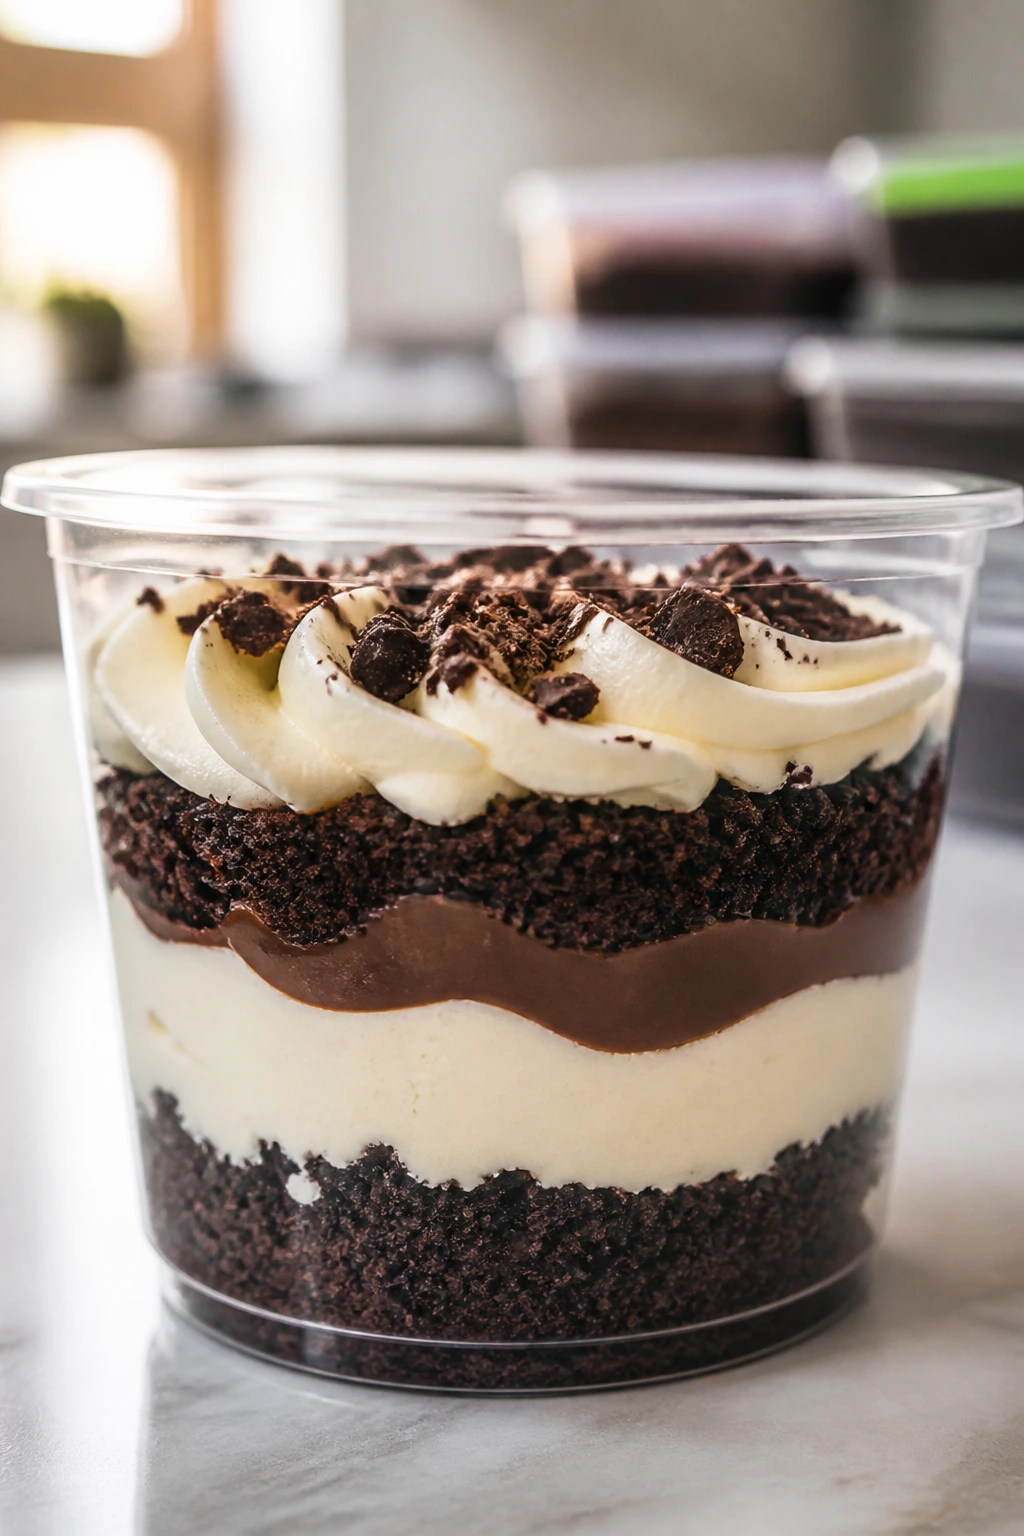
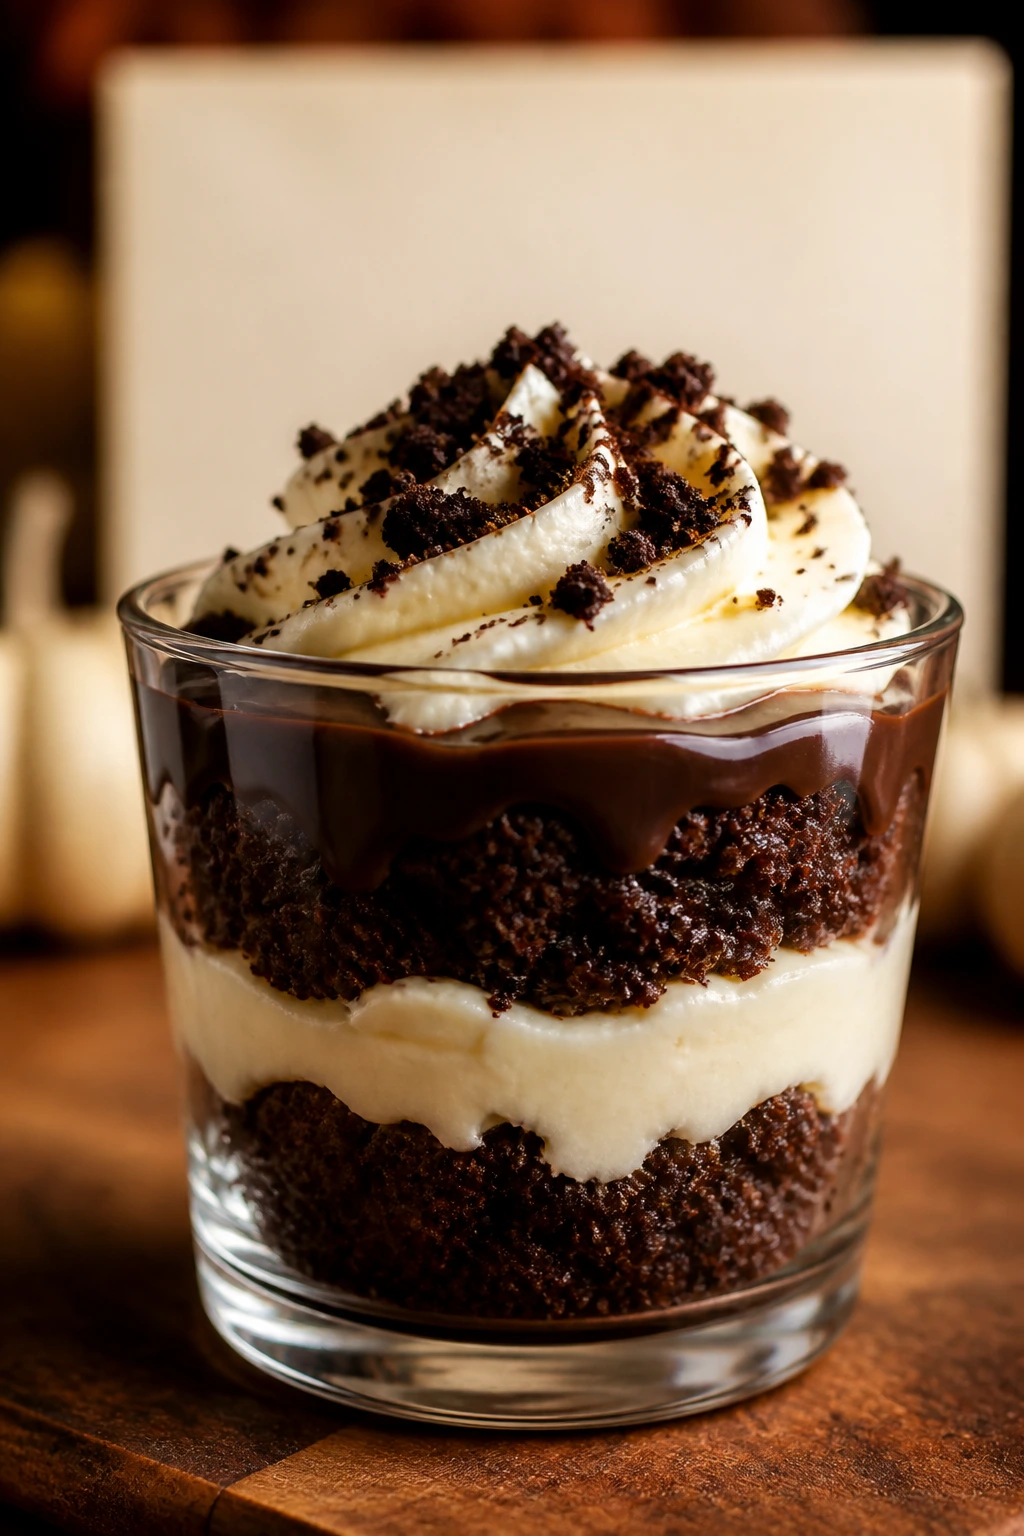
A good Halloween dessert cup should look a little theatrical and taste like somebody cared about the chocolate. Not a sad scoop of frosting in a plastic cup. Not a cupcake pretending to be a costume. The best Halloween dessert cups have distinct layers you can actually see: dark cake, pale cream cheese frosting, a glossy streak of ganache, and a gritty cookie crunch that snaps a little before it melts on your tongue.
That contrast matters more than people think. Halloween dessert cups live or die on texture, and this version gets that part right by keeping the cake soft, the frosting tangy, and the topping crisp until the last reasonable moment. I like using hot coffee in the chocolate batter because it deepens the cocoa without turning the whole thing into coffee cake, and I like cream cheese frosting here because it cuts through the sweetness in a way whipped cream never quite manages.
These are also the kind of dessert that makes serving feel easy. No slicing. No broken cake edges. No frantic scraping of a pan while guests hover. Just a tray of little cups, each one looking like it took longer than it did, which is one of the most useful tricks a dessert can pull off.
Why These Halloween Dessert Cups Earn Their Keep
-
Clear layers do the decorating for you: The dark cake, pale frosting, and black cookie crumbs show up beautifully in a clear cup, so you do not need elaborate piping skills to make them look finished.
-
The tang of cream cheese keeps the sweetness under control: A straight buttercream can make a chocolate dessert cup feel heavy after three bites; cream cheese frosting cuts that down and leaves the cocoa tasting cleaner.
-
The texture stays interesting from top to bottom: Soft cake, silky frosting, sticky ganache, and crunchy cookie crumbs give you a spoonful that keeps changing as you go.
-
Each serving is already portioned: That matters at a Halloween party, where nobody wants to stand around while someone tries to cut a neat piece of cake in a crowded kitchen.
-
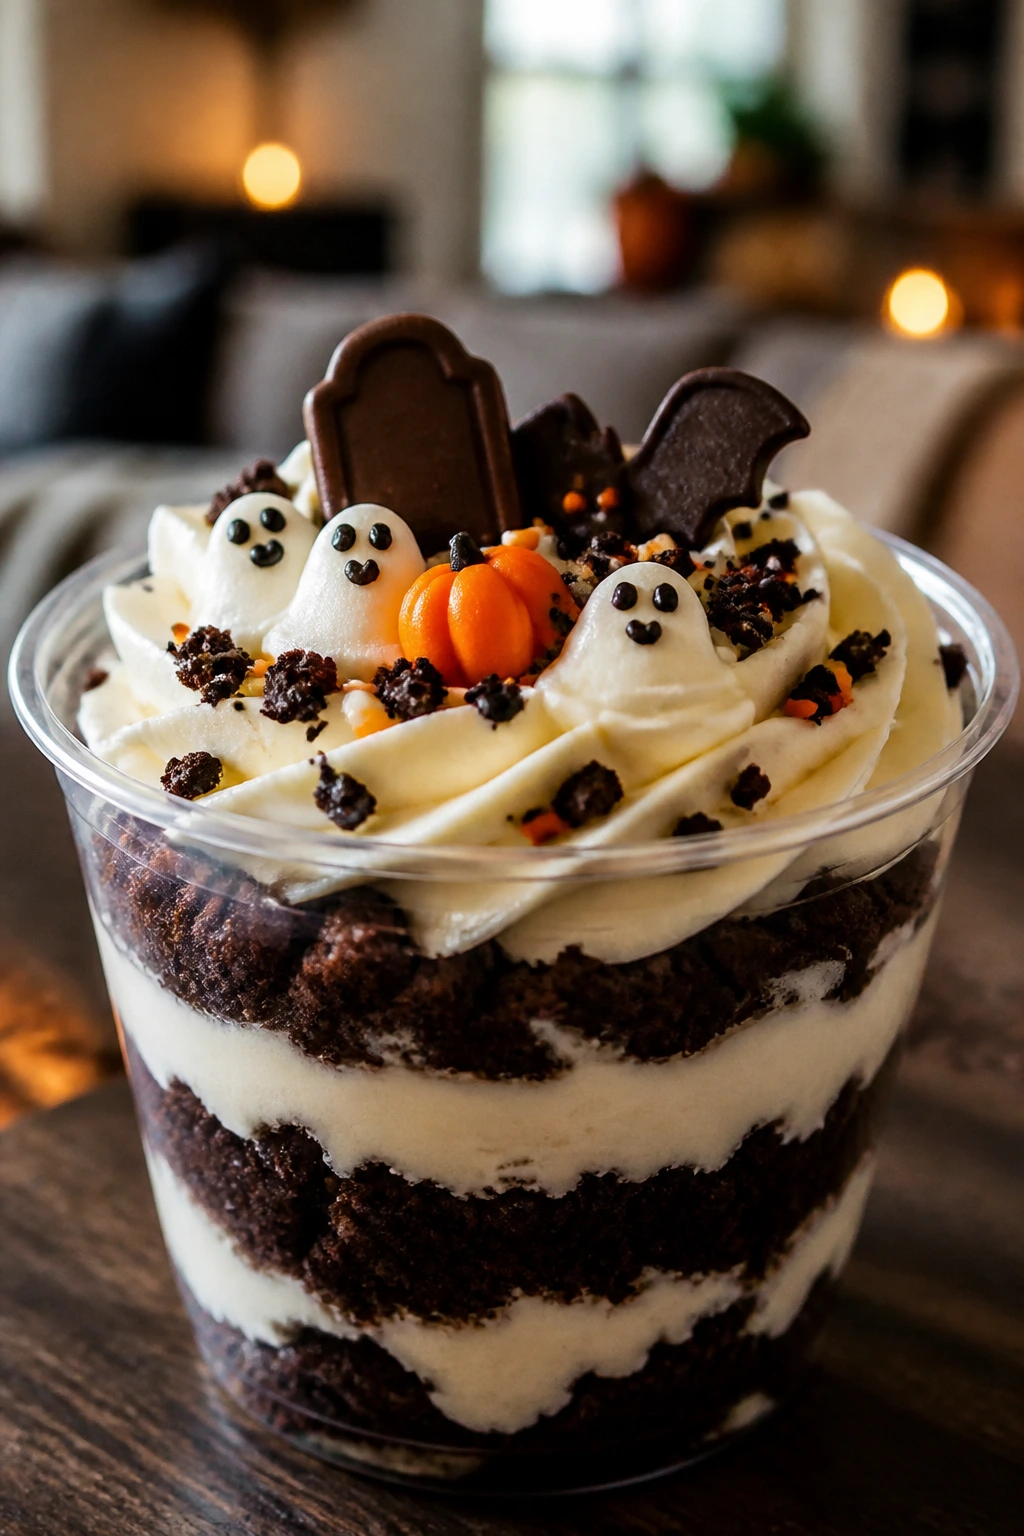
They’re easy to dress up or keep simple: A few candy eyes and orange sprinkles make them look playful, while a thin chocolate drizzle and extra cookie crumbs give them a darker, more grown-up edge.
-
They can be made in pieces: Bake the cake ahead, make the frosting ahead, even crush the cookies ahead. Assembly is the fun part, and it takes far less time than baking from scratch would suggest.
Timing and Yield at a Glance
The cake itself is quick. The part that pays off is letting it cool all the way before you start building the cups, because warm cake plus cream cheese frosting turns into a slippery mess fast. Give the cake its time, and the layers settle into clean, defined stripes instead of sinking into one another.
Yield: 8 dessert cups
Prep Time: 30 minutes
Cook Time: 25 minutes
Total Time: 1 hour 40 minutes
Chill/Rest Time: 45 minutes, including cooling the cake and a short chill after assembly
Difficulty: Intermediate — the steps are straightforward, but the cake, frosting, and ganache each need their own texture before you layer everything together.
Best Served: Chilled or cool room temperature, within a few hours of assembling for the best cookie crunch
Shopping List for the Cake, Frosting, and Toppings
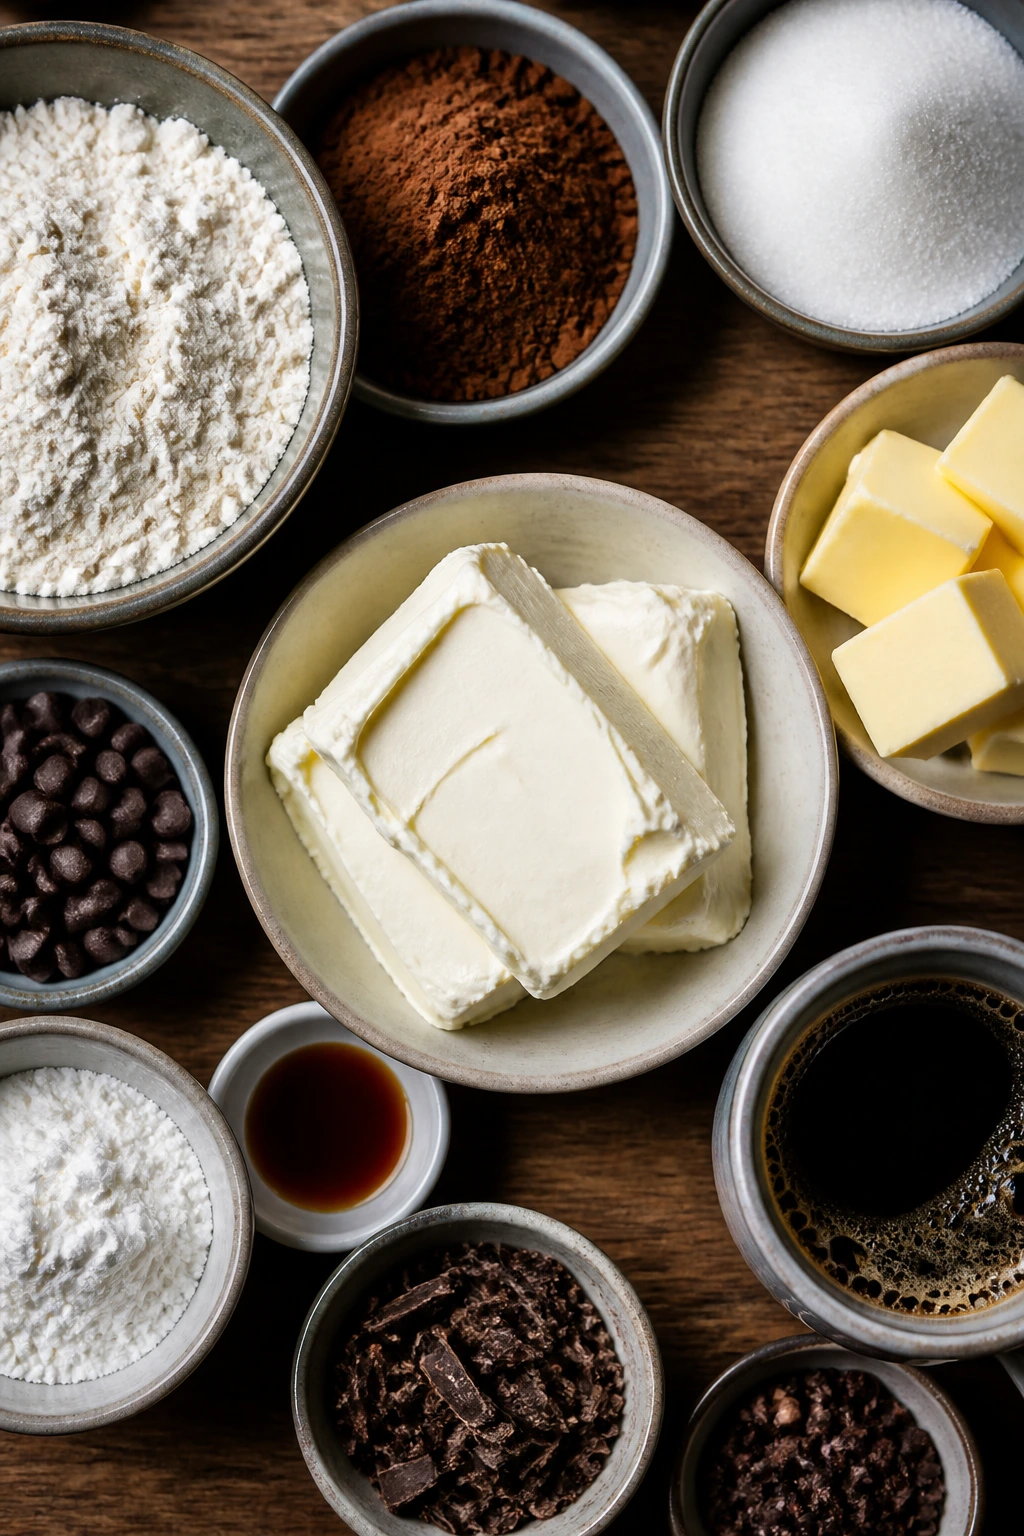
For the Chocolate Cake Layer:
- 1 cup all-purpose flour
- 1 cup granulated sugar
- 1/2 cup unsweetened cocoa powder
- 1 teaspoon baking powder
- 1/2 teaspoon baking soda
- 1/2 teaspoon fine salt
- 1 large egg, at room temperature
- 1/2 cup buttermilk, at room temperature
- 1/4 cup neutral oil
- 1 teaspoon vanilla extract
- 1/2 cup hot strong brewed coffee or hot water
For the Cream Cheese Frosting:
- 8 ounces full-fat cream cheese, softened
- 1/2 cup unsalted butter, softened
- 2 1/2 cups powdered sugar, sifted
- 1 teaspoon vanilla extract
- 1/4 teaspoon fine salt
- 1 to 2 tablespoons heavy cream, only if needed
- Orange gel food coloring, optional
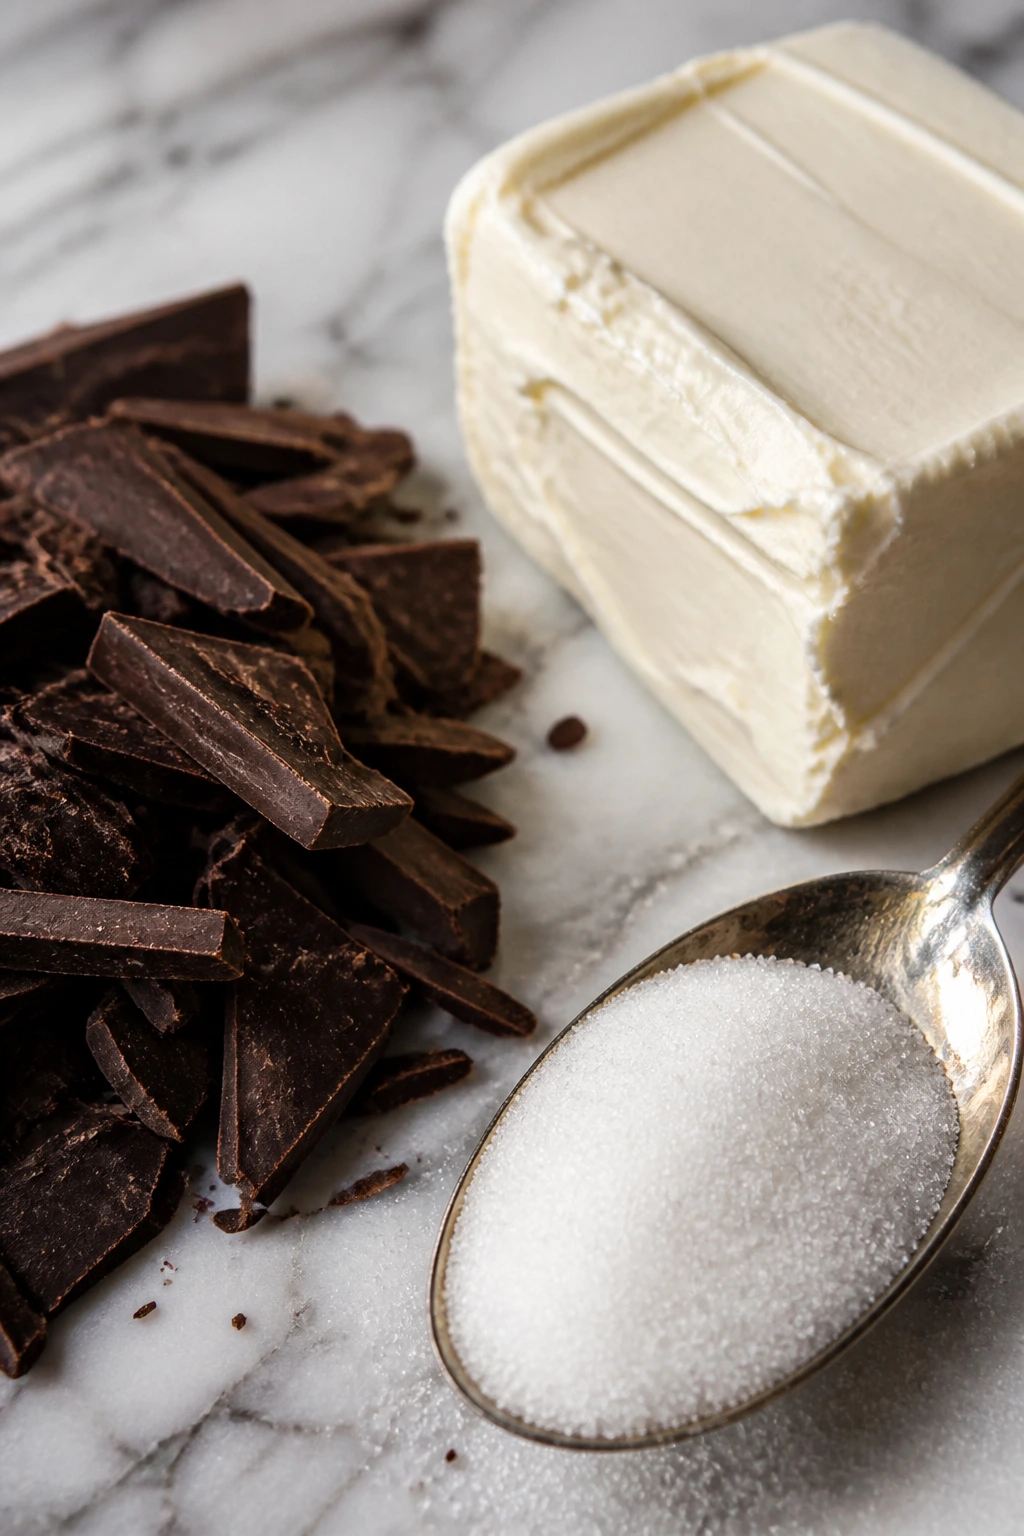
For the Ganache and Halloween Toppings:
- 1/2 cup heavy cream
- 4 ounces semisweet chocolate chips or chopped semisweet chocolate
- 1 1/2 cups chocolate sandwich cookies, crushed into coarse crumbs
- 1/2 cup orange and black sprinkles, candy eyes, or mini chocolate chips
Why Each Ingredient Pulls Its Weight
The Chocolate Cake Base
What to use: 1 cup all-purpose flour, 1 cup granulated sugar, 1/2 cup cocoa powder, 1 large egg, 1/2 cup buttermilk, 1/4 cup neutral oil, 1 teaspoon vanilla, and 1/2 cup hot coffee or hot water.
Preparation: Whisk the dry ingredients well so the cocoa breaks up before it hits the wet mixture, then add the hot liquid at the end. The batter will look thin. That’s the point.
Substitutions: If you’re out of buttermilk, use 1/2 cup whole milk plus 1 teaspoon vinegar or lemon juice and let it sit 5 minutes. Hot water works if you do not want the coffee note, though the cake tastes a little flatter without it.
Tips: Oil keeps the cake soft even after chilling, which matters in dessert cups because cold butter-based cake can turn firm. Bake only until the center springs back lightly; overbaked chocolate cake goes dry fast once it’s cubed.
The Cream Cheese Frosting
What to use: 8 ounces full-fat brick cream cheese, 1/2 cup unsalted butter, 2 1/2 cups powdered sugar, 1 teaspoon vanilla, 1/4 teaspoon salt, and a little heavy cream only if the frosting needs loosening.
Preparation: Let the cream cheese and butter soften to cool room temperature, not warm and greasy. Beat them until smooth before adding sugar, or you’ll carry little lumps through the whole batch.
Substitutions: Mascarpone can replace part of the cream cheese if you want a softer, less tangy frosting. Low-fat cream cheese is a bad trade here; it often gives you a looser texture and a less stable swirl.
Tips: Add the powdered sugar gradually so the frosting stays smooth and does not puff a cloud of sugar over your counter. If it feels too soft for piping, chill it for 10 to 15 minutes rather than dumping in more sugar.
The Ganache
What to use: 1/2 cup heavy cream and 4 ounces semisweet chocolate chips or chopped semisweet chocolate.
Preparation: Heat the cream just until you see steam and tiny bubbles around the edge, then pour it over the chocolate and let it sit before stirring. That resting time helps the chocolate melt evenly.
Substitutions: Dark chocolate gives a deeper, less sweet drizzle. Milk chocolate works too, but it makes the cups sweeter, so I’d use a little less frosting if you go that route.
Tips: A good ganache for dessert cups should be thick enough to drip slowly from a spoon, not run like sauce. If it gets too firm while you assemble, set the bowl over warm water for 10 to 15 seconds and stir again.
The Crunch and Garnish
What to use: 1 1/2 cups chocolate sandwich cookies crushed into coarse crumbs, plus orange and black sprinkles, candy eyes, or mini chocolate chips.
Preparation: Crush the cookies so some pieces are fine and some stay pebble-sized. A food processor can work, but a zip-top bag and rolling pin give you more control over the texture.
Substitutions: Gluten-free sandwich cookies work well if you need a gluten-free version. Chocolate wafer cookies or even a handful of crushed pretzels can replace part of the crumb if you want a saltier bite.
Tips: Keep the cookie crumbs a little coarse, because dust-like crumbs soften too quickly once they touch frosting or ganache. Save the prettiest toppings for the very end so they stay crisp and visible.
The Tools That Make Assembly Easier
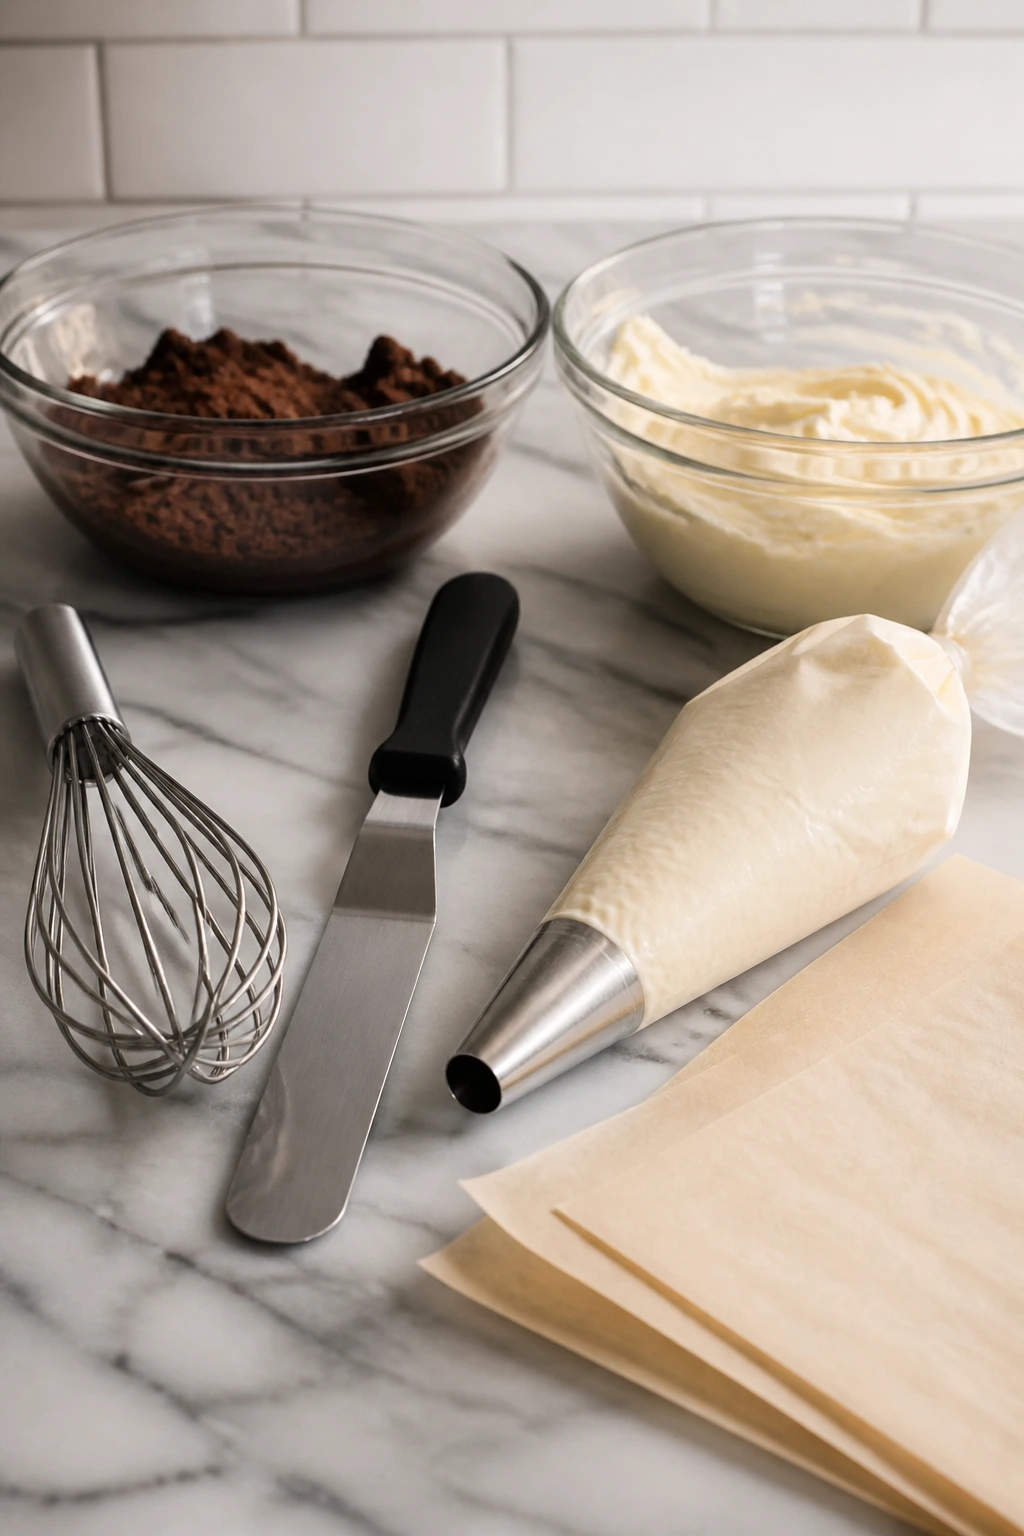
- 8-inch square baking pan — The cake bakes evenly in this size and cubes cleanly for layering.
- Parchment paper — Leave a little overhang so you can lift the cooled cake out without tearing the edges.
- Two medium mixing bowls — One for the cake batter, one for the frosting; less scrambling, fewer sticky bowls.
- Whisk and rubber spatula — The whisk breaks up cocoa clumps, and the spatula keeps you from overmixing the batter.
- Hand mixer or stand mixer — Cream cheese frosting turns smoother and lighter with actual mixing power.
- Small saucepan or microwave-safe bowl — Either one works for the ganache.
- Clear dessert cups, 6 to 8 ounces each — Glass or sturdy plastic both work; clear sides are what make the layers matter.
- Offset spatula or piping bag with a large round tip — Not mandatory, but it makes the frosting look neater and keeps the cup edges cleaner.
- Wire rack — The cake needs airflow underneath so it cools properly and does not sweat in the pan.
Baking the Cake and Building the Frosting
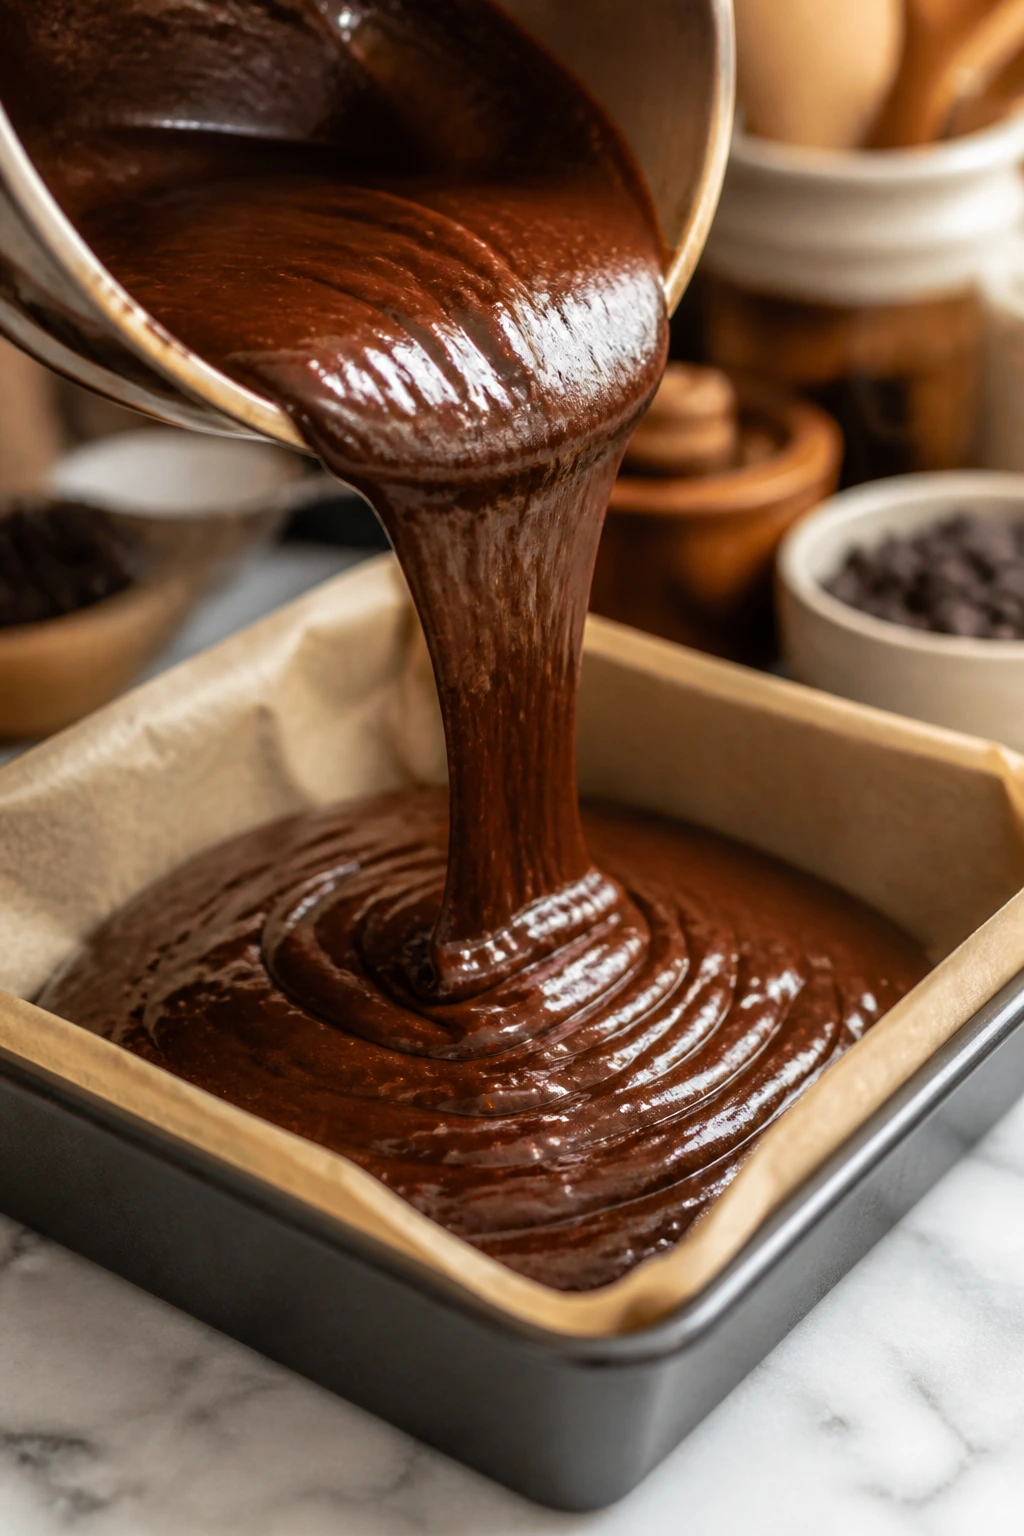
Bake the Chocolate Cake Base
-
Preheat the oven to 350°F (175°C). Grease an 8-inch square baking pan and line it with parchment, leaving an overhang on two sides so you can lift the cake out later.
-
In a medium bowl, whisk together the flour, sugar, cocoa powder, baking powder, baking soda, and salt until the cocoa is evenly blended and no dark streaks remain.
-
In a second bowl, whisk the egg, buttermilk, oil, and vanilla until smooth. The mixture should look glossy and evenly colored, with no visible egg white.
-
Add the dry ingredients to the wet ingredients and stir with a spatula until just combined. The batter will look thick at this point. That’s fine.
-
Pour in the hot coffee or hot water and whisk until the batter turns glossy and thin, about 20 to 30 seconds. Do not worry if it suddenly loosens a lot — that thin batter makes the finished cake moist and easy to cube.
-
Scrape the batter into the prepared pan and spread it into an even layer. Bake for 22 to 25 minutes, until the center springs back when pressed lightly and a toothpick comes out with a few moist crumbs, not wet batter. Cool in the pan for 15 minutes, then lift the cake onto a wire rack and cool completely, about 45 minutes.
Make the Cream Cheese Frosting and Ganache
-
Beat the cream cheese and butter together on medium speed for about 2 minutes, until the mixture looks smooth, pale, and free of lumps. Add the powdered sugar in two additions, mixing on low at first so it does not blow everywhere. Beat in the vanilla and salt, then mix until the frosting looks fluffy and holds a soft peak. If you want orange frosting, add a few drops of gel color now.
-
Set the frosting aside while you make the ganache. Heat the heavy cream in a small saucepan over medium heat until it is steaming and the edges are barely bubbling. Pour it over the chocolate chips in a heatproof bowl and let it sit for 2 minutes before stirring from the center outward until smooth and shiny. Let it cool for 5 to 10 minutes so it thickens slightly.
Assemble the Dessert Cups
-
Crush the chocolate sandwich cookies into coarse crumbs. Keep the pieces uneven; you want some sandy bits and some chunkier bits for texture.
-
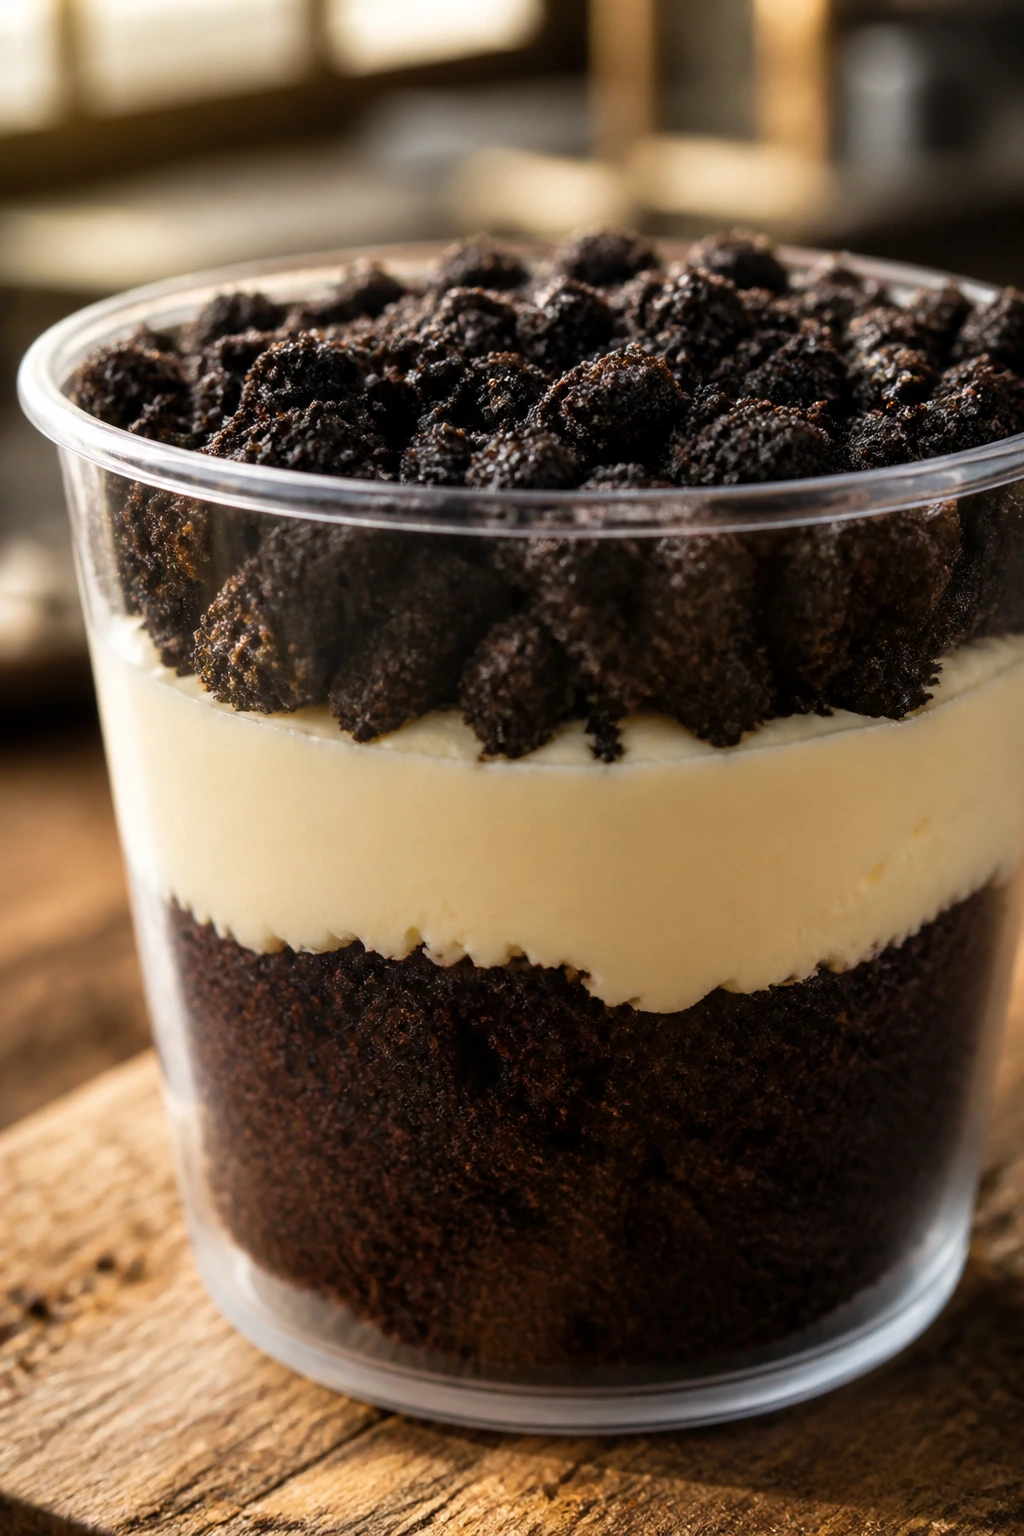
Cut the cooled cake into 1-inch cubes or crumble it into large, soft chunks if you want a more rustic look. Spoon 1 to 2 tablespoons of cookie crumbs into the bottom of each cup.
-
Add a layer of cake cubes, then drizzle a little ganache over the top. Pipe or spoon a generous layer of cream cheese frosting over that. Repeat the layers once more, ending with frosting near the top of the cup. Leave a little space at the rim so the toppings sit neatly instead of sliding off the edge.
-
Finish with the remaining cookie crumbs, sprinkles, candy eyes, or mini chocolate chips. Chill the assembled cups for 20 to 30 minutes so the layers settle and the frosting firms up enough to hold its shape when you dig in.
How to Serve Them Without Losing the Crunch
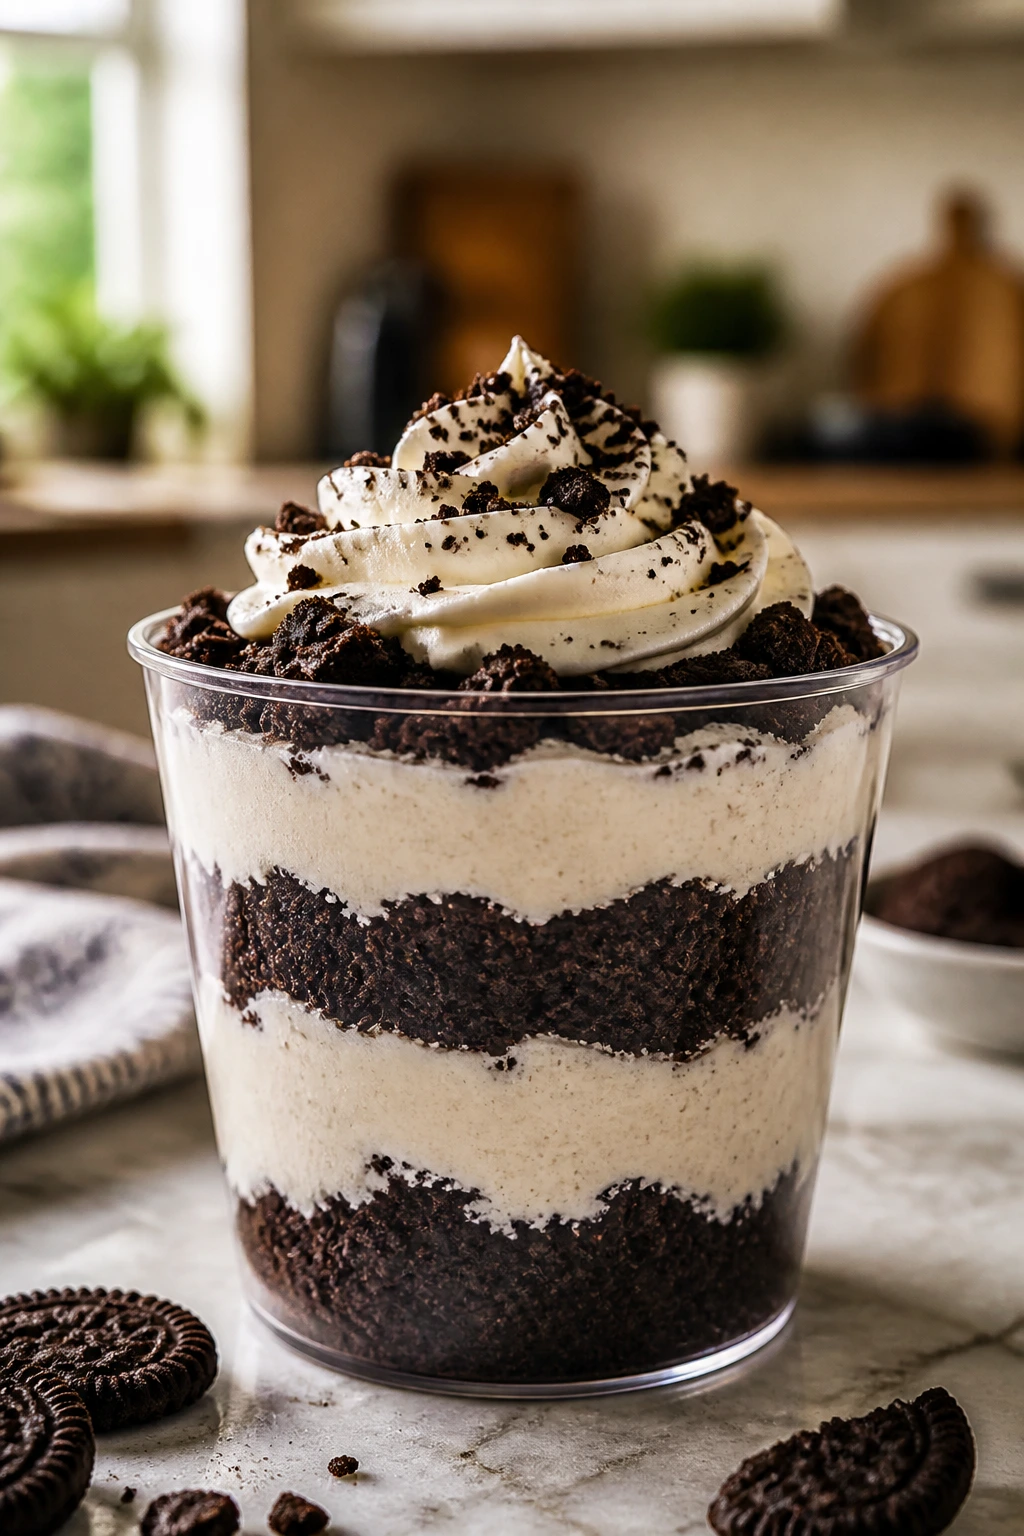
Presentation: Clear cups do half the work here, so build the layers with enough contrast that people can see them from the side. I like to end with a little mound of frosting that rises above the rim, then press a few cookie crumbs and candy eyes into the top so the cup looks playful instead of fussy.
Accompaniments: These cups do not need much beside them. A cold glass of milk works well, especially if you’re serving kids, and a strong coffee or espresso keeps the sweetness from running away with the whole dessert. If you want a bigger spread, set them beside plain butter cookies or a bowl of fresh berries.
Portions: One 8-ounce cup is a solid serving for most people. If you use 4-ounce cups, the recipe stretches into 10 to 12 smaller servings, which works better for a larger party where people want a few bites of everything.
Beverage Pairing: Cold whole milk, dark roast coffee, or even a lightly bitter iced espresso all work. If you want a non-caffeinated option, hot chocolate is a little redundant but still a good fit when the room is full of kids and the cups are loaded with candy.
Extra Tips for Better Texture and Cleaner Layers
Flavor Enhancement: A pinch of espresso powder in the cake batter, about 1 teaspoon, makes the chocolate taste deeper without turning the dessert into coffee dessert. I do this when I want the cocoa to hit harder, especially if the garnish leans sweet.
Customization: Swap part of the cookie crumb layer for crushed pretzels if you like a salty edge, or add a few chopped toasted pecans between the cake and frosting for a more grown-up bite. If you want the Halloween look to feel darker, use black cocoa in place of half the regular cocoa.
Serving Suggestions: Pipe the frosting with a large round tip so it sits in thick swirls instead of sinking flat into the cup. A few orange sprinkles, candy eyes, or a thin zigzag of ganache across the top is enough; more decoration can start to hide the layers you worked for.
Make-It-Yours: For a dairy-free version, use a plant-based cream cheese and butter substitute that is meant for frosting, then chill the bowl before piping. For a gluten-free version, use a 1:1 gluten-free flour blend in the cake and gluten-free chocolate sandwich cookies for the crumb layer.
Mistakes That Flatten the Flavor or the Layers
Using warm cake under the frosting: This is the easiest way to ruin the structure. Warm cake melts the cream cheese frosting and turns the cookie crumbs soggy before the cups even reach the table. Cool the cake all the way, not “mostly cool.”
Beating the frosting after it turns loose: Cream cheese frosting can look silky and then suddenly go slack if the cream cheese was too warm or the mixer stayed on too long. Stop once it’s fluffy, and if it feels soft, chill it for 10 minutes instead of trying to whip it into submission.
Grinding the cookies into dust: The crumb layer should crunch, not vanish. If you pulverize the cookies, they absorb moisture too fast and disappear under the frosting. Stop while you still see small pebble-like pieces.
Making the ganache too hot: Boiling cream can make chocolate seize or turn grainy. Heat until steaming, pour it over the chocolate, and let the bowl sit before you stir. That short pause makes the texture smooth instead of split.
Overfilling the cups: It’s tempting to pile everything high, but cups that reach past the rim get messy fast, especially once people start spooning through the layers. Leave a little breathing room at the top so the garnish stays put and the first spoonful comes out clean.
Assembling too far ahead: The dessert still tastes fine later, but the cookie crumbs lose their edge. If you want the layers to stay crisp, assemble the cups a few hours before serving rather than the night before.
Variations That Fit Different Moods
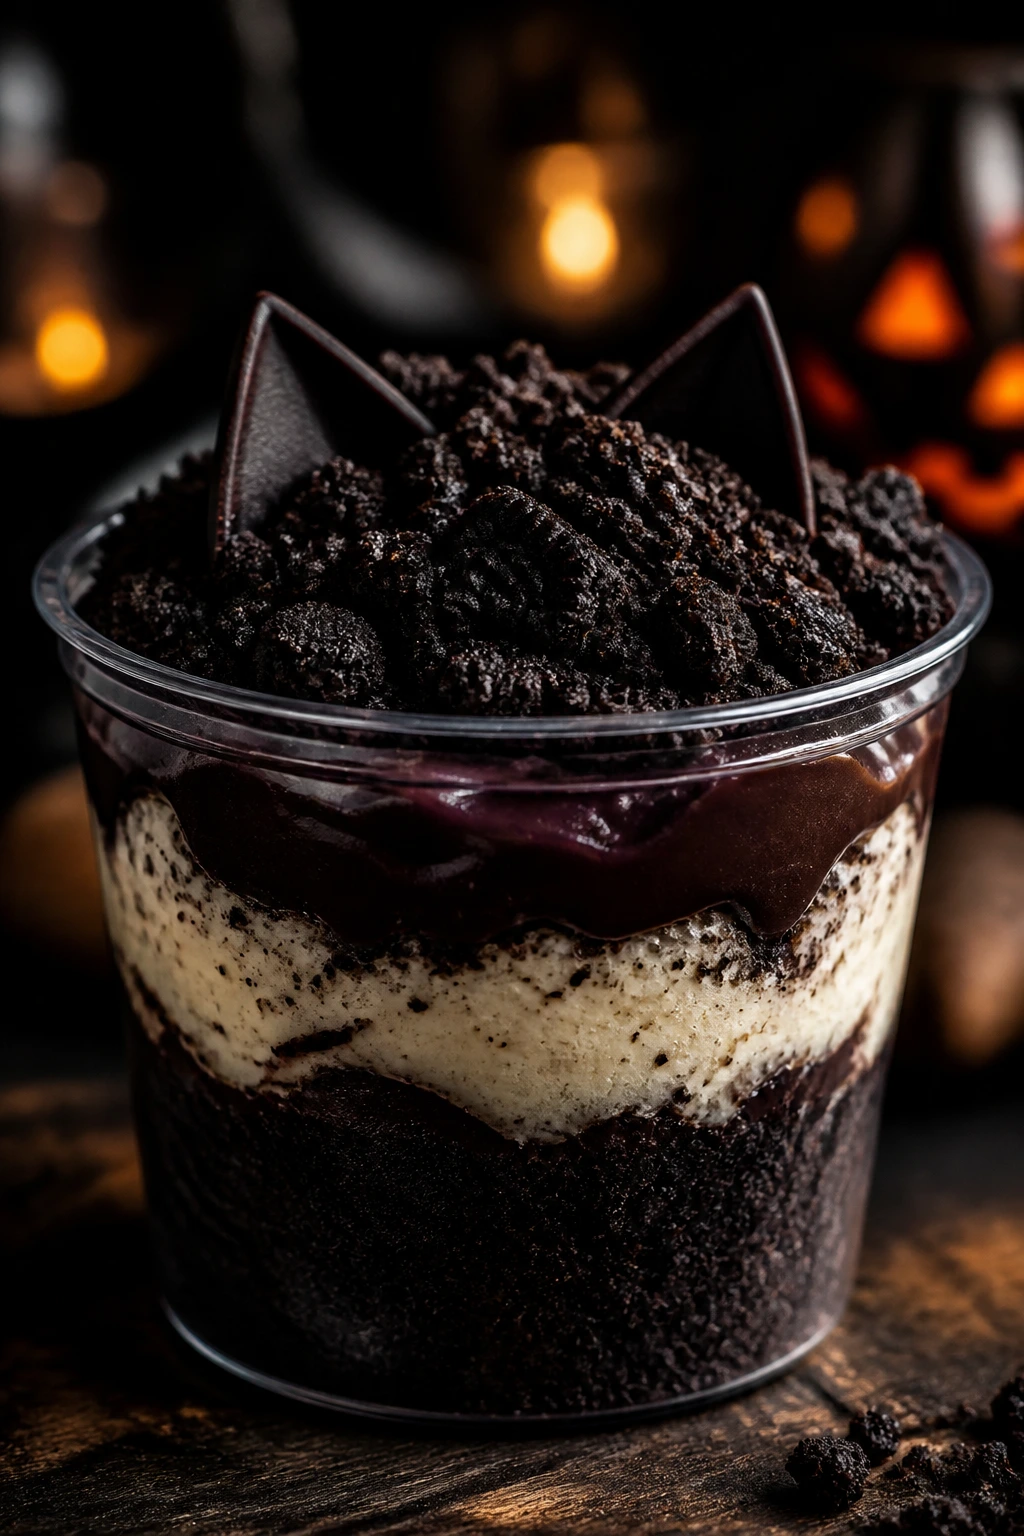
Black Cat Cocoa Cups: Replace the regular cocoa with black cocoa for a darker cake and use black cookie crumbs on top. The flavor lands deeper and slightly more bittersweet, which I prefer if the frosting is heavily sweetened or if you want the cups to look almost ink-black in clear glasses.
Pumpkin Spice Swirl Cups: Add 1 teaspoon pumpkin pie spice to the cake batter and tint the frosting a soft orange. The pumpkin spice should stay in the background, not dominate the chocolate, so use a light hand; this version works best when you want a Halloween flavor cue without turning the dessert into pumpkin pie in disguise.
Mocha Monster Cups: Stir 1 teaspoon espresso powder into the hot coffee before adding it to the batter, then drizzle the cups with a slightly darker ganache made from semisweet or bittersweet chocolate. This is the version I’d serve to adults who like their chocolate on the less sweet side.
Gluten-Free Graveyard Cups: Use a 1:1 gluten-free baking flour in place of the all-purpose flour and gluten-free chocolate sandwich cookies for the crumb layer. The cake stays soft if you do not overbake it, and the frosting and ganache need no changes at all.
No-Bake Shortcut Cups: Skip the cake and use 3 to 4 cups of cubed store-bought chocolate pound cake or brownie bites instead. It’s not quite the same as baking from scratch, but the layering idea still works, and the cream cheese frosting carries the whole thing.
Make-Ahead, Storage, and Chilling Rules
The parts of this recipe behave better when you separate them first. The cake can be baked, cooled, wrapped tightly, and kept at room temperature for 1 day, or refrigerated for up to 4 days. It also freezes well for up to 2 months if you wrap it in plastic and then foil.
The frosting keeps in an airtight container in the refrigerator for up to 4 days. Let it sit at cool room temperature for 15 to 20 minutes, then beat it briefly to bring back the texture before piping or spooning. I do not recommend freezing cream cheese frosting if you want it to stay smooth.
The ganache can be made ahead and kept in the fridge for 5 days. Warm it gently in short bursts or over warm water until it loosens again. The cookie crumbs should stay dry in a sealed container for 3 to 4 days.
Once the cups are assembled, refrigerate them for up to 3 days, but they taste best within the first 24 hours. The cookie layer softens over time, which is fine if you like a more trifle-like texture, but if you want crunch, build the cups the same day you plan to serve them. There is no real reheating step for the finished dessert; if you want the cake warmer, warm the plain cake cubes for a few seconds before assembling, not after.
Questions People Actually Ask
Can I make these Halloween dessert cups the day before?
Yes, but they are at their best if you assemble them a few hours before serving rather than the night before. If you need to get ahead, bake the cake and make the frosting the day before, then layer the cups closer to party time so the cookie crumbs stay crisp.
Can I use a boxed cake mix instead of making the cake from scratch?
You can, and the cups will still work. A dense chocolate cake mix or brownie mix is better than a fluffy one, because the cubes need to hold their shape under the frosting and ganache.
Why did my cream cheese frosting turn runny?
Usually the cream cheese was too warm, too soft, or from a tub instead of a brick. Chill the frosting for 10 to 15 minutes and beat it again briefly, then add a little more powdered sugar only if it still needs body.
Can I make this recipe gluten-free?
Yes. Use a 1:1 gluten-free flour blend for the cake and gluten-free sandwich cookies for the crumb layer. The rest of the recipe stays the same, though the cake may need an extra minute or two in the oven.
What if I do not have clear dessert cups?
Small jars, short drinking glasses, or ramekins all work. You lose a little of the visual effect, but the layers still taste the same, and the recipe becomes even more practical if you are serving a mixed crowd.
Can I turn this into one large trifle instead of individual cups?
Absolutely. Use the same components in a trifle bowl or a deep glass dish and repeat the layers twice. The only change I’d make is adding the cookie crumbs right before serving so they do not soften too much.
How do I keep the tops looking neat?
Stop filling the cup just below the rim, then pipe the frosting with the tip lifted slightly above the surface. Finish with toppings after the cups are chilled, not before, or the sprinkles and candy eyes tend to slide down the frosting.
The Last Spoonful

The nice thing about these cups is that they look more complicated than they are. Clear layers, dark chocolate, tangy frosting, a little crunch on top — that combination does most of the heavy lifting before anyone takes a bite.
I keep coming back to desserts like this because they fit the moment without feeling flimsy. They’re playful, but not childish; rich, but not heavy-handed; easy to serve, but still a little dramatic when the spoon goes in and pulls up cake, frosting, and ganache in one neat scoop. If you want a Halloween dessert that feels planned rather than patched together, this is the one I’d make first.
Rich Halloween Dessert Cups with Cream Cheese Frosting — Recipe Card
Recipe Name: Rich Halloween Dessert Cups with Cream Cheese Frosting
Description: Moist chocolate cake cubes layered with thick cream cheese frosting, glossy ganache, and cookie crumbs for a Halloween dessert cup with strong chocolate flavor and a clean, creamy finish.
Prep Time: 30 minutes
Cook Time: 25 minutes
Total Time: 1 hour 40 minutes
Course: Dessert
Cuisine: American
Servings: 8 dessert cups
Calories: About 440 kcal per cup
Ingredients
For the Chocolate Cake Layer:
- 1 cup all-purpose flour
- 1 cup granulated sugar
- 1/2 cup unsweetened cocoa powder
- 1 teaspoon baking powder
- 1/2 teaspoon baking soda
- 1/2 teaspoon fine salt
- 1 large egg, room temperature
- 1/2 cup buttermilk, room temperature
- 1/4 cup neutral oil
- 1 teaspoon vanilla extract
- 1/2 cup hot strong brewed coffee or hot water
For the Cream Cheese Frosting:
- 8 ounces full-fat cream cheese, softened
- 1/2 cup unsalted butter, softened
- 2 1/2 cups powdered sugar, sifted
- 1 teaspoon vanilla extract
- 1/4 teaspoon fine salt
- 1 to 2 tablespoons heavy cream, only if needed
- Orange gel food coloring, optional
For the Ganache and Halloween Toppings:
- 1/2 cup heavy cream
- 4 ounces semisweet chocolate chips or chopped semisweet chocolate
- 1 1/2 cups chocolate sandwich cookies, crushed into coarse crumbs
- 1/2 cup orange and black sprinkles, candy eyes, or mini chocolate chips
Instructions
-
Preheat the oven to 350°F (175°C) and line an 8-inch square baking pan with parchment paper.
-
Whisk together the flour, sugar, cocoa powder, baking powder, baking soda, and salt in one bowl.
-
In a second bowl, whisk the egg, buttermilk, oil, and vanilla until smooth.
-
Stir the dry ingredients into the wet ingredients, then whisk in the hot coffee or hot water until the batter looks glossy and thin.
-
Pour the batter into the pan and bake for 22 to 25 minutes, until the center springs back lightly. Cool completely.
-
Beat the cream cheese and butter until smooth, then add the powdered sugar, vanilla, salt, and optional food coloring. Chill briefly if the frosting is too soft.
-
Heat the heavy cream until steaming, pour it over the chocolate, wait 2 minutes, then stir into a smooth ganache.
-
Crush the cookies into coarse crumbs and cut or crumble the cooled cake into 1-inch pieces.
-
Layer cookie crumbs, cake, ganache, and cream cheese frosting in 8 dessert cups, repeating once.
-
Top with the remaining crumbs, sprinkles, candy eyes, or mini chocolate chips, then chill for 20 to 30 minutes before serving.
Notes: Use brick-style cream cheese for the frosting, not tub cream cheese. Assemble a few hours before serving for the best cookie crunch. The cake can be baked 1 day ahead and the frosting can be chilled separately for up to 4 days.