
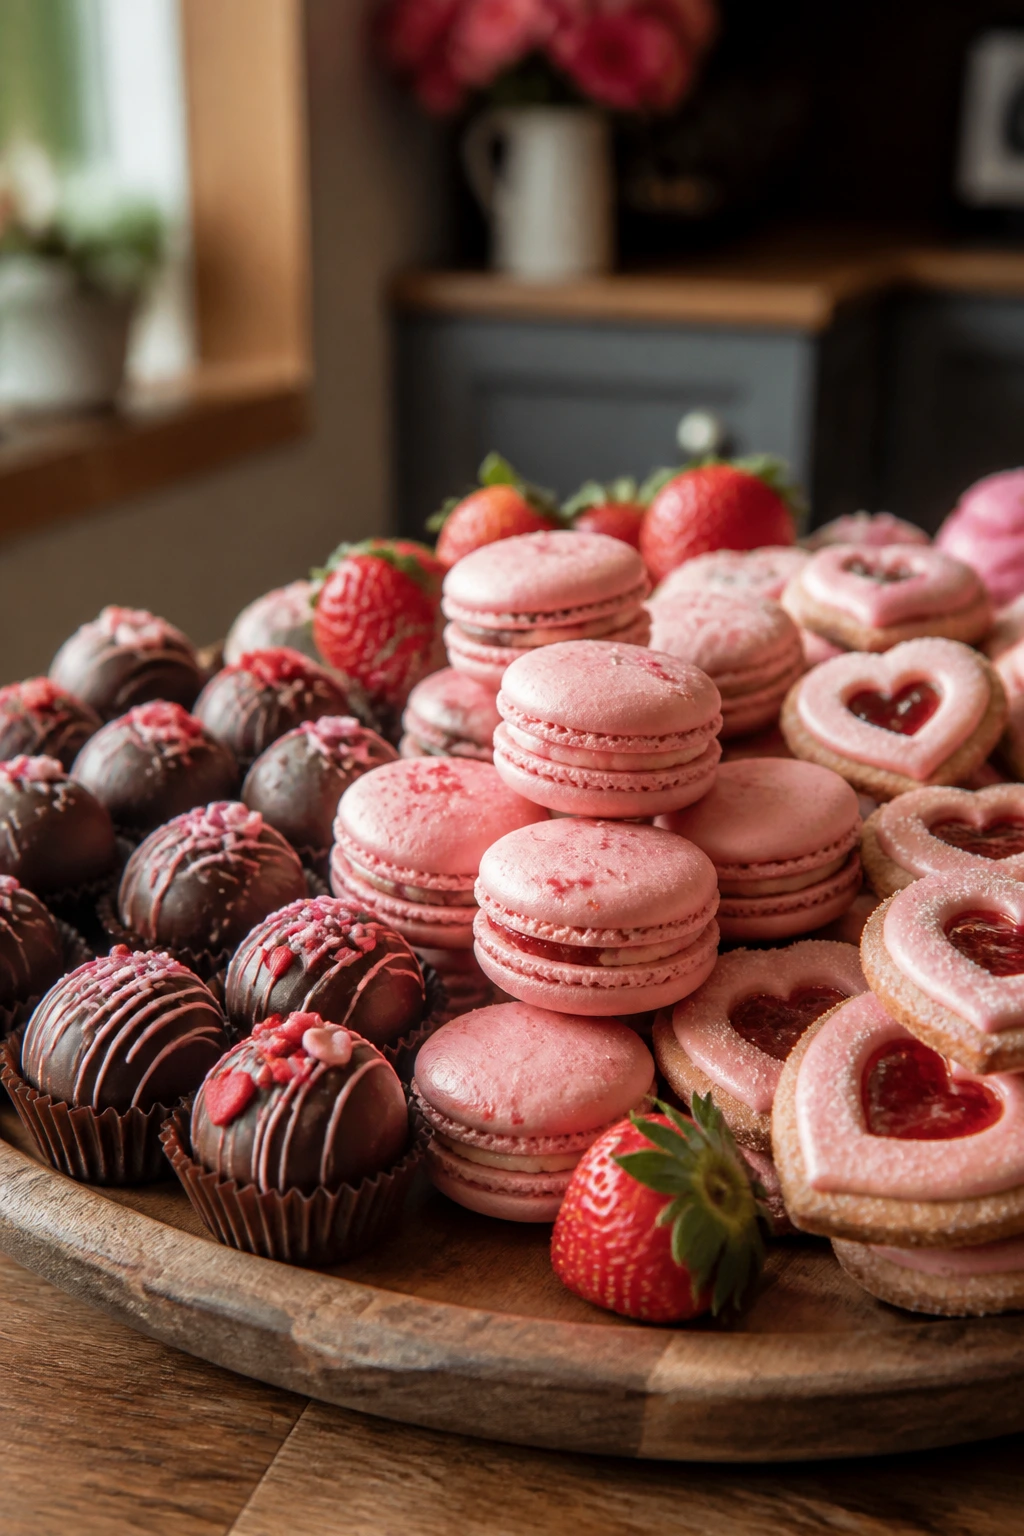
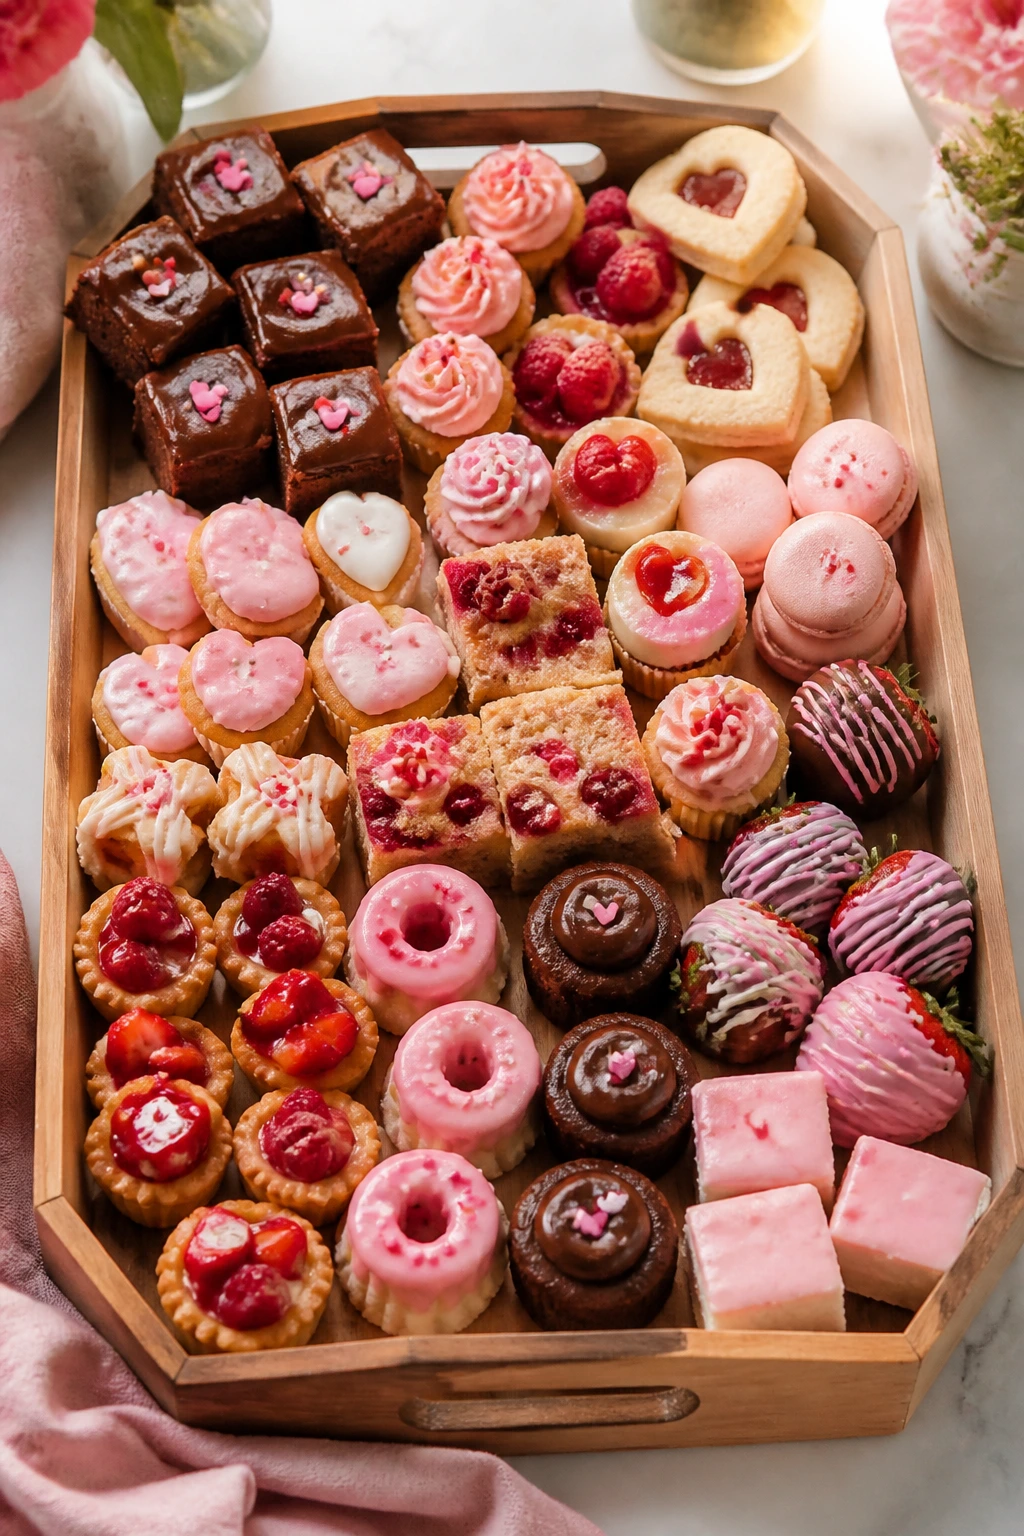
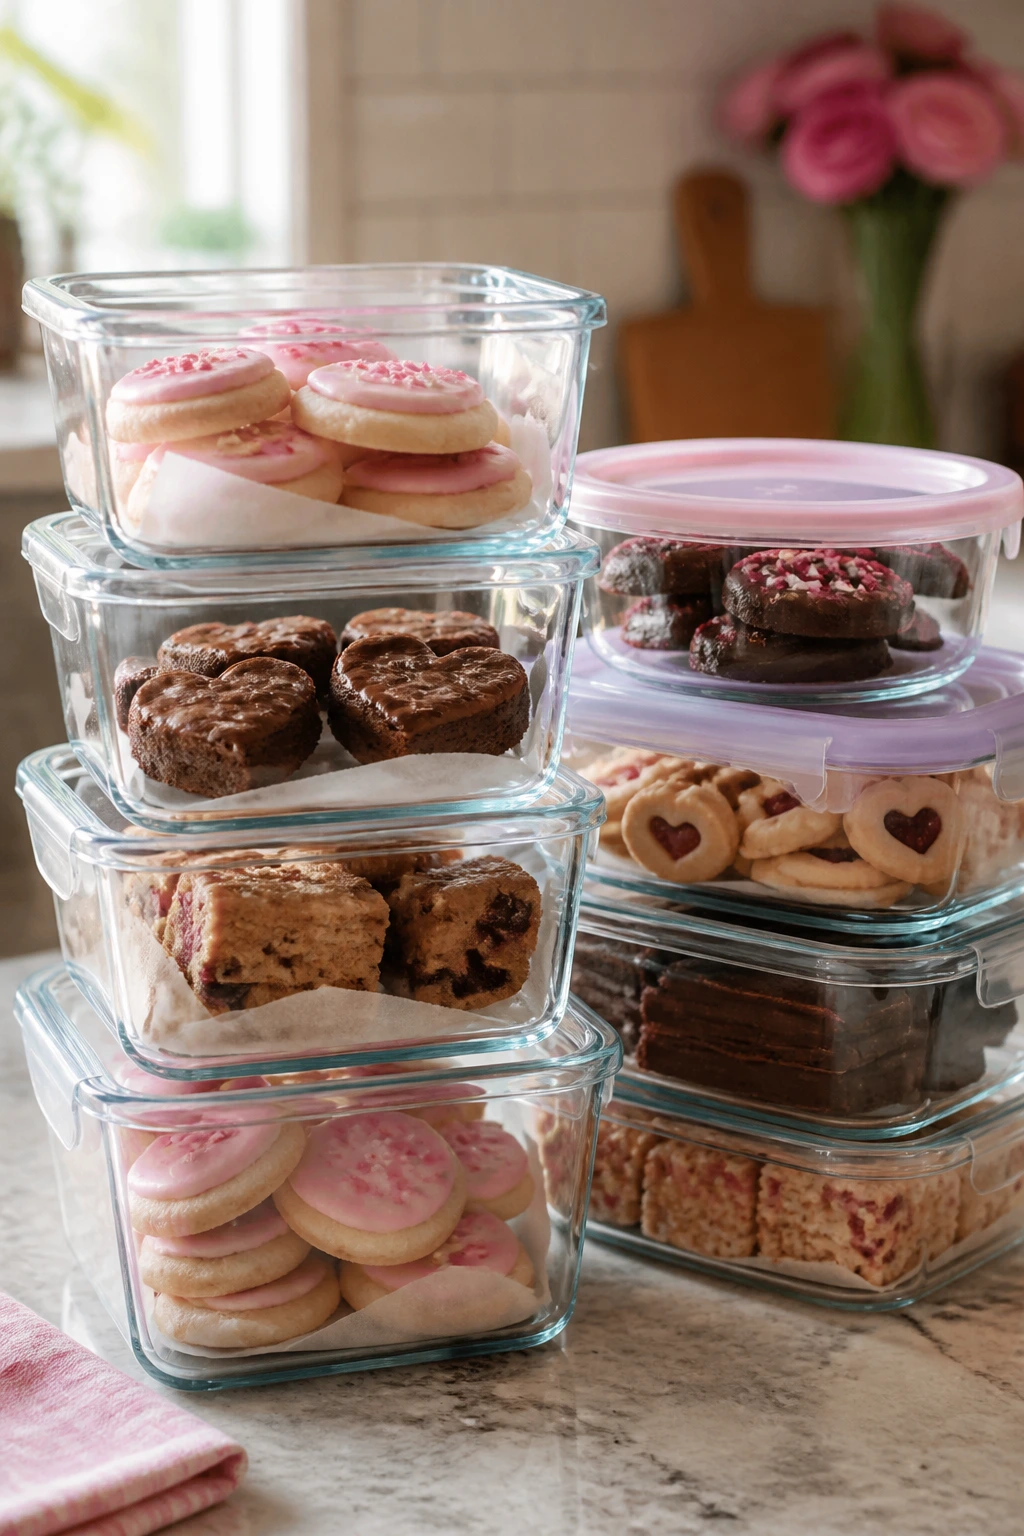
A Valentine dessert tray works best when it looks a little bit polished but doesn’t ask for a pastry degree. That’s the sweet spot these Valentine dessert ideas are aiming for: glossy chocolate, blush-pink frosting, jammy fillings, crisp edges, soft centers, and enough heart shapes to make the whole thing feel intentional without turning your kitchen into a disaster zone.
The trick is balance. A dessert that’s all sugar and no texture gets boring fast. A dessert that’s fussy enough to require twelve piping bags and a sugar thermometer will make even a willing baker sigh. What people actually remember is the contrast: a tart raspberry center inside a buttery cookie, a cool cheesecake bite beside a crunchy crust, or a strawberry dipped in dark chocolate with a pinch of salt on top.
These recipes lean into that kind of contrast. Some are baked, some are chilled, some use store-bought dough in a way that feels smart instead of lazy, and a few can be pulled together with the kind of ingredients that already live in the pantry. That’s the whole point of easy Valentine dessert ideas for holiday baking: they should look festive, taste like you put in real effort, and still leave you enough energy to wash the good plates.
Why These Valentine Desserts Earn Their Spot on the Tray
-
Fast assembly: Several of these desserts use dough, pastry, or cookie shapes that go from counter to oven in under 20 minutes, which matters when you’re baking around dinner and don’t want a second job.
-
Pretty without stress: Strawberries, raspberry jam, powdered sugar, and pink glaze do a lot of the visual work here, so you don’t need complicated decorating skills to make the platter feel finished.
-
Texture does the heavy lifting: Crisp cookies, fudgy brownies, creamy cheesecake, and flaky pastry keep the desserts from tasting one-note.
-
Easy to scale up: Most of these recipes double cleanly if you need a fuller dessert table, and the cookie and bar recipes are especially forgiving.
-
Make-ahead friendly: Several items can be baked, cooled, and tucked away a day early, then finished with glaze, powdered sugar, or a quick drizzle right before serving.
-
Works with pantry basics: Flour, sugar, butter, eggs, chocolate, jam, and vanilla show up again and again, which keeps the shopping list sane.
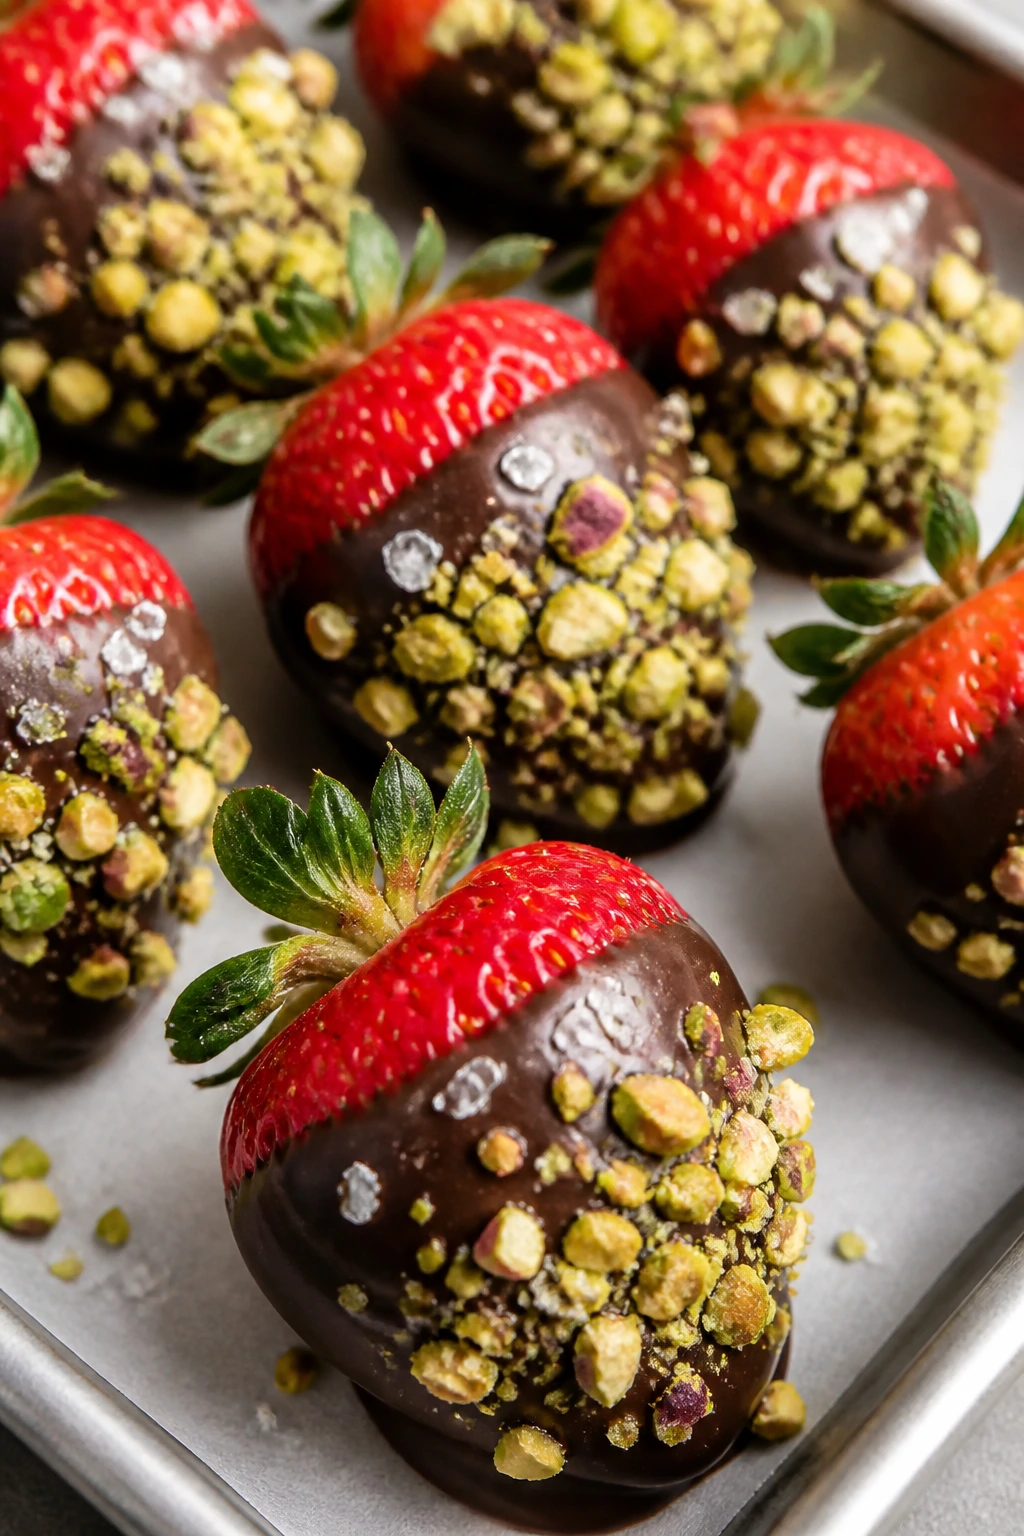
1. Chocolate-Dipped Strawberries with Sea Salt and Pistachios
A plate of glossy strawberries dipped in dark chocolate is one of those rare desserts that looks fancy before anyone has taken a bite. The berries stay juicy, the chocolate sets with a clean snap, and the pistachios bring just enough crunch to keep each bite from feeling soft all the way through.
Why It Works:
The contrast here is the whole story: cold, juicy fruit against firm chocolate and a tiny hit of salt at the end. You don’t need an oven, but you do need dry berries and chocolate that melts smoothly, which is why a touch of coconut oil helps. These are best when made close to serving, since the fruit can soften if it sits too long.
Key Ingredients:
- 1 lb fresh strawberries, stems on and dried very well
- 8 oz dark chocolate chips or chopped dark chocolate
- 2 tsp coconut oil, for a smoother dip
- 1/4 cup shelled pistachios, finely chopped
- 2 tbsp white chocolate chips, melted for drizzle if you want it
- 1 pinch flaky sea salt
- Parchment paper, for setting the berries
Quick Steps:
- Wash the strawberries and dry them completely with paper towels. Any water on the berries will make the chocolate slide off.
- Line a sheet pan with parchment paper.
- Melt the dark chocolate and coconut oil together in a microwave-safe bowl in 20-second bursts, stirring until smooth.
- Hold each berry by the stem, dip it about two-thirds into the chocolate, and let the excess drip off.
- Roll or sprinkle the wet chocolate edge with chopped pistachios, then set the berry on parchment.
- Drizzle with melted white chocolate if you like, then finish with a pinch of flaky salt.
- Chill for 10 to 15 minutes, just until the chocolate sets.
Equipment for This Recipe:
- Small microwave-safe bowl
- Sheet pan
- Parchment paper
- Paper towels
- Small spoon or fork for drizzling
How to Serve This Dish:
Pile the strawberries on a chilled white plate or a shallow platter so the glossy chocolate stands out. They work well beside a small bowl of extra pistachios or a few fresh mint leaves. Serve them the same day, ideally within a few hours of dipping.
Pro Tips for This Recipe:
- Use strawberries that are firm and deep red, not soft and overripe. They hold up better under the chocolate.
- Let the melted chocolate cool for a minute before dipping; piping-hot chocolate can make the berries weep.
- Keep the stems on if you can. They make dipping much easier.
- If your kitchen is warm, pop the finished berries in the fridge for a short set, then bring them out right before serving.
Variations on This Dish:
- Ruby Cocoa Finish: Swap dark chocolate for ruby chocolate and skip the pistachios. The flavor leans berry-forward and looks very Valentine without much effort.
- Orange-Zest Dip: Stir a little orange zest into the melted chocolate for a brighter finish that cuts the sweetness.
- Cookie Crumble Edge: Roll the dipped berries in finely crushed chocolate wafers instead of nuts for a softer crunch.
Common Mistakes to Avoid with This Dish:
- Wet berries: If the strawberries aren’t dry, the chocolate won’t cling. Pat them twice and let them air-dry for a few minutes.
- Overheating the chocolate: Grainy chocolate means it got too hot. Melt it in short bursts and stir often.
- Waiting too long to serve: These are at their best the day they’re made. If they sit overnight, the berries soften and the chocolate can sweat.
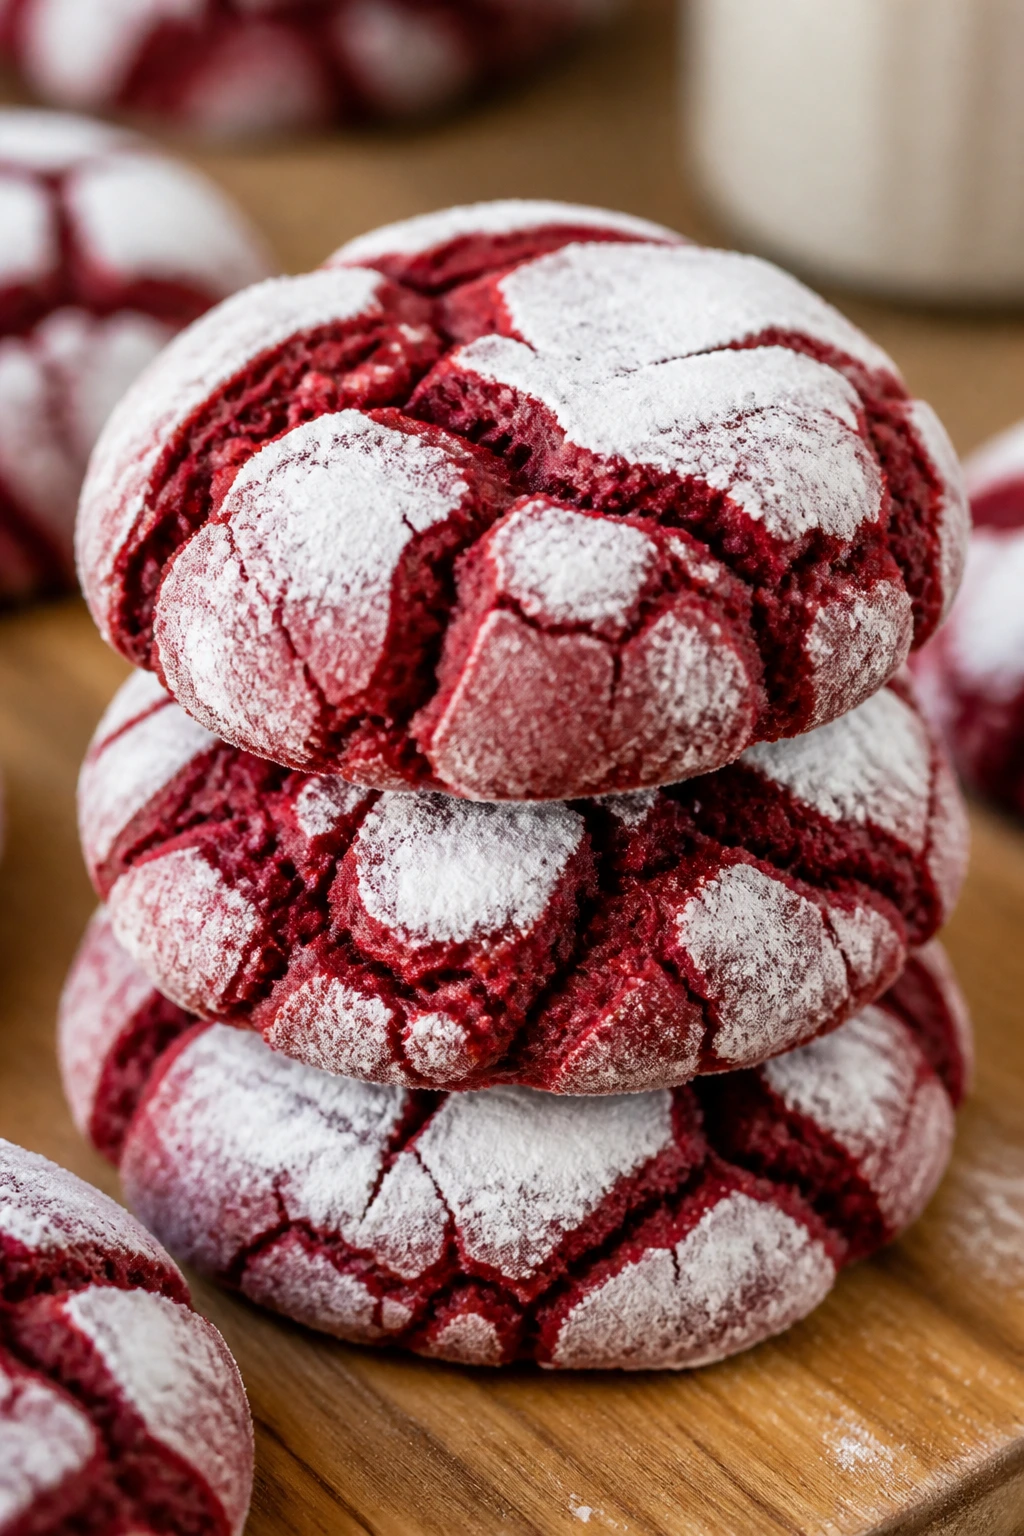
2. Red Velvet Crinkle Cookies
Red velvet crinkle cookies have the kind of cracked sugar shell that makes people grab one before they’ve even read the label. The center stays soft and brownie-like, with a faint cocoa note that keeps the cookie from tasting like tinted sugar dough.
Why It Works:
The powdered sugar coating bakes into those snowy cracks, and the cookie spreads just enough to look dramatic without losing its chewy middle. A quick chill keeps the dough from turning into flat puddles. You get the red velvet look without having to layer a cake.
Key Ingredients:
- 2 cups all-purpose flour
- 2 tbsp unsweetened cocoa powder
- 1 tsp baking powder
- 1/2 tsp fine salt
- 1/2 cup unsalted butter, softened
- 1 cup granulated sugar
- 2 large eggs
- 1 tbsp red gel food coloring
- 1 tsp vanilla extract
- 1/2 cup powdered sugar, for rolling
Quick Steps:
- Whisk the flour, cocoa powder, baking powder, and salt together.
- Beat the butter and granulated sugar until pale and fluffy, about 2 to 3 minutes.
- Mix in the eggs, vanilla, and food coloring until the dough turns evenly red.
- Stir in the dry ingredients just until no flour streaks remain, then chill the dough for 30 minutes.
- Scoop tablespoon-sized balls, roll them in powdered sugar, and place them on a lined baking sheet.
- Bake at 350°F (175°C) for 10 to 12 minutes, until the tops are cracked but the centers still look soft.
Equipment for This Recipe:
- Mixing bowls
- Hand mixer or stand mixer
- Sheet pan
- Cookie scoop
- Parchment paper
How to Serve This Dish:
Stack these cookies on a cake stand or tuck them into parchment-lined boxes for gifting. They’re good on their own, but a mug of black coffee or hot chocolate makes the cocoa flavor stand out. Serve at room temperature so the centers stay soft.
Pro Tips for This Recipe:
- Use gel food coloring, not watery liquid coloring. The dough keeps its texture better.
- Chill the dough even if you’re in a rush. Warm dough spreads too fast and loses the crinkle look.
- Pull the cookies when the centers still look slightly underdone. They finish setting on the pan.
- Roll heavily in powdered sugar so the cracks show up clearly after baking.
Variations on This Dish:
- White Chocolate Drizzle: Drizzle cooled cookies with melted white chocolate for a sweeter finish.
- Mocha Crinkle: Add 1 teaspoon instant espresso powder to the dry mix for a deeper cocoa flavor.
- Gluten-Free Batch: Use a 1:1 gluten-free flour blend and chill the dough an extra 10 minutes.
Common Mistakes to Avoid with This Dish:
- Skipping the chill: Flat cookies lose the crinkled top. Cold dough bakes more evenly.
- Under-coating with sugar: If the powdered sugar layer is thin, the red color shows through too much and the effect disappears.
- Overbaking: Dry red velvet cookies taste dull. Bake until set at the edges but still soft in the middle.
3. Heart-Shaped Sugar Cookies with Raspberry Glaze
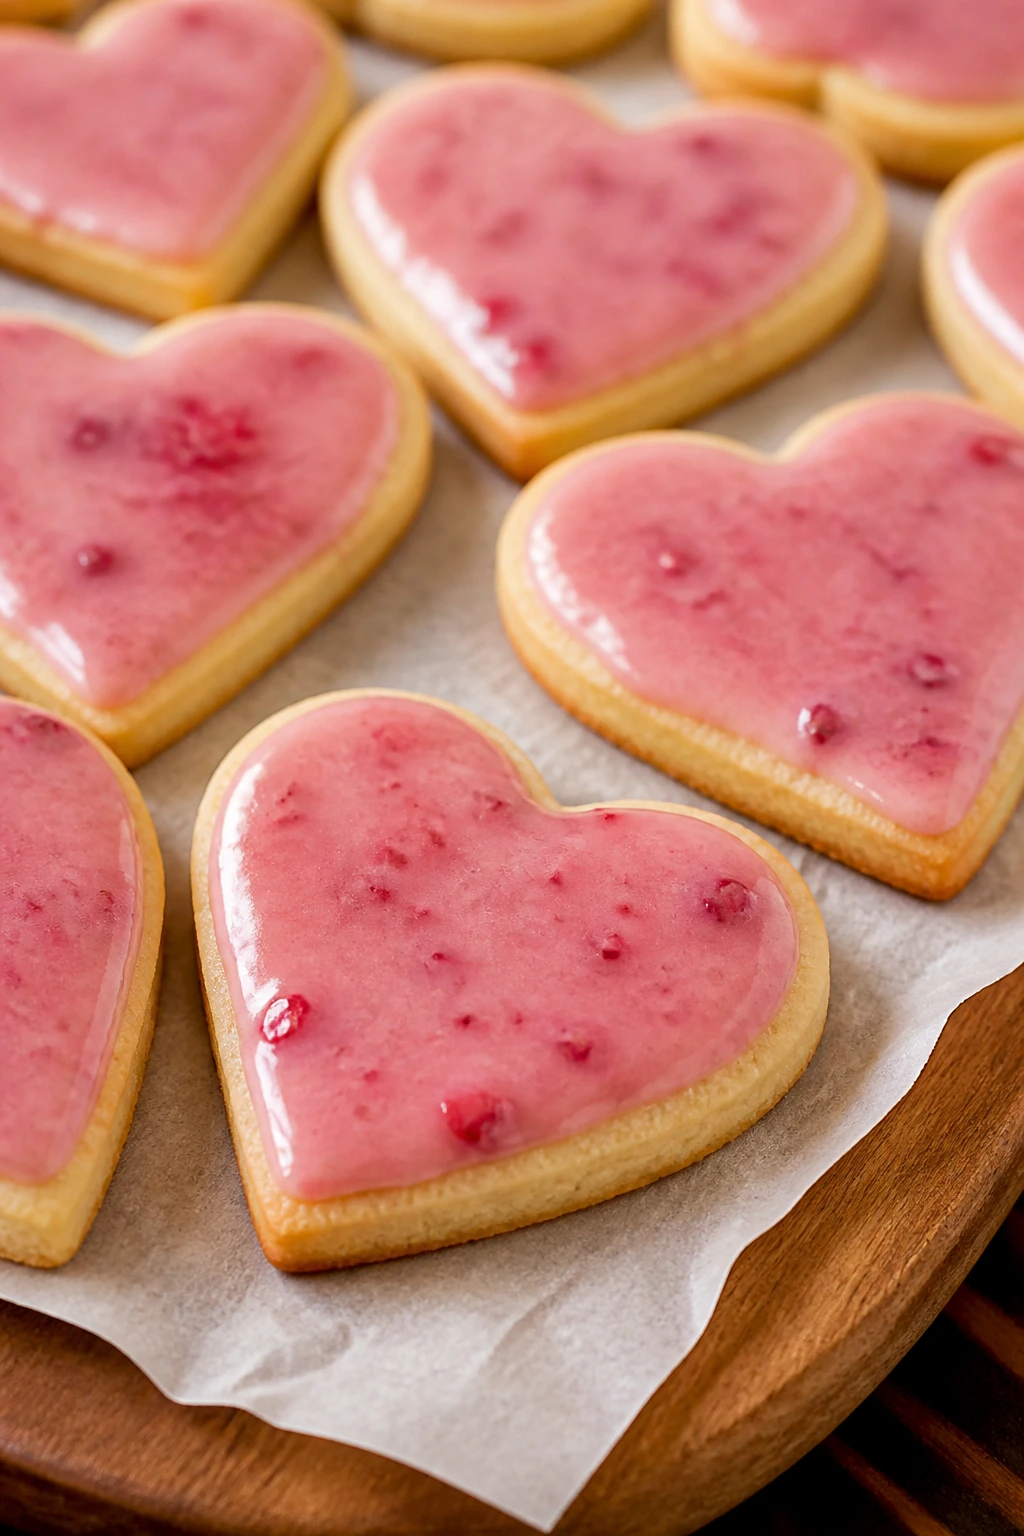
These are the cookies that make a Valentine tray look deliberate. The dough bakes into crisp edges with a tender bite, and the raspberry glaze gives you that pale pink shine without turning the cookie into a sugar bomb.
Why It Works:
Sugar cookies hold their shape when the dough is chilled and rolled thick, and a simple jam-based glaze adds both color and tartness. The raspberry cuts through the butter and sugar so each cookie tastes lighter than it looks. A heart cutter does the work for you, which is more than I can say for most holiday decorating.
Key Ingredients:
- 2 1/2 cups all-purpose flour
- 1 tsp baking powder
- 1/2 tsp salt
- 1 cup unsalted butter, softened
- 1 cup granulated sugar
- 1 large egg
- 2 tsp vanilla extract
- 1/2 cup raspberry jam, warmed and strained
- 1 cup powdered sugar
- 1 to 2 tbsp milk, as needed for glaze
Quick Steps:
- Whisk the flour, baking powder, and salt in a bowl.
- Cream the butter and sugar until light, then beat in the egg and vanilla.
- Add the dry ingredients and mix until a soft dough forms, then chill for 45 minutes.
- Roll the dough to about 1/4 inch thick and cut out heart shapes.
- Bake at 350°F (175°C) for 9 to 11 minutes, until the edges are just turning pale gold.
- Stir the raspberry jam, powdered sugar, and enough milk to make a spreadable glaze, then spoon or brush it onto the cooled cookies.
Equipment for This Recipe:
- Rolling pin
- Heart cookie cutter
- Baking sheets
- Parchment paper
- Small bowl for glaze
How to Serve This Dish:
These look nicest on a flat platter with a few fresh raspberries scattered around the edges. Put them next to tea, sparkling wine, or plain milk if the table includes kids. They’re good at room temperature and travel well in a tin.
Pro Tips for This Recipe:
- Strain the raspberry jam if it has seeds. The glaze looks cleaner.
- Roll the dough evenly so the cookies bake at the same pace.
- Chill the cut shapes for 10 minutes before baking if the dough feels soft.
- Brush the glaze thinly. Thick glaze can slide off the edges.
Variations on This Dish:
- Lemon Kiss: Add 1 teaspoon lemon zest to the dough and use a lemon glaze instead of raspberry.
- Sandwich Style: Pair two cookies with a thin layer of raspberry jam in between.
- Almond Edges: Press chopped sliced almonds around the border before baking for a little crunch.
Common Mistakes to Avoid with This Dish:
- Warm dough: The hearts puff and lose their shape. Chill before cutting and again before baking if needed.
- Too much flour on the counter: Extra flour makes the cookies dry. Use the lightest dusting possible.
- Glazing hot cookies: The glaze slides and soaks in. Let the cookies cool fully first.
4. Strawberry Shortcake Parfaits

If you want something that looks layered and generous without turning on the oven, this is the one. Sweet strawberries, soft cake cubes, and whipped cream make each spoonful feel like a little stack of spring, even if the weather outside is doing something ugly.
Why It Works:
Macerating the strawberries pulls out their juices and makes the whole dessert taste more strawberry than raw fruit ever does. The cream keeps things smooth, and the cake gives you structure so the glasses don’t collapse into pink mush. Serve these in clear cups and the layers do half the decorating.
Key Ingredients:
- 2 cups strawberries, hulled and sliced
- 2 tbsp granulated sugar
- 1 1/2 cups heavy cream, very cold
- 1/4 cup powdered sugar
- 1 tsp vanilla extract
- 8 shortcake biscuits or 2 cups pound cake cubes
- 4 oz mascarpone, optional for a richer cream
- 1 tsp lemon zest, optional
Quick Steps:
- Toss the strawberries with granulated sugar and let them sit for 15 minutes until juicy.
- Whip the heavy cream, powdered sugar, vanilla, and mascarpone if using, until soft peaks form.
- Cut the biscuits or pound cake into bite-sized pieces.
- Layer cake, strawberries, and whipped cream in glasses, repeating once or twice.
- Finish with a spoonful of strawberry syrup from the bowl and a small berry on top.
Equipment for This Recipe:
- Mixing bowl
- Hand mixer
- Sharp knife
- Clear glasses or dessert cups
- Spoon for layering
How to Serve This Dish:
Serve these right after assembling so the cake stays plush and the cream stays fluffy. A short spoon is better than a long one here; it keeps the layers from slipping around. They’re good after dinner because the portions feel light without tasting skimpy.
Pro Tips for This Recipe:
- Use very cold cream so it whips quickly and holds shape.
- Let the strawberries sit long enough to make syrup; dry berries make a dull parfait.
- Tear the cake into uneven chunks if you want a more rustic look.
- Build the layers close to serving time so the cake doesn’t soak through.
Variations on This Dish:
- Angel Food Swap: Use cubes of angel food cake for a lighter texture.
- Chocolate-Ribbon Version: Add a spoonful of chocolate sauce between layers.
- Boozy Berry Cup: Stir a teaspoon of orange liqueur into the strawberry bowl for adults only.
Common Mistakes to Avoid with This Dish:
- Overwhipping the cream: Grainy cream makes the parfait heavy. Stop at soft peaks.
- Dry cake cubes: Stale cake falls apart. Use fresh or lightly toasted cake.
- Assembling too early: The layers slump if they sit for hours. Make them close to serving.
5. Raspberry Thumbprint Cookies
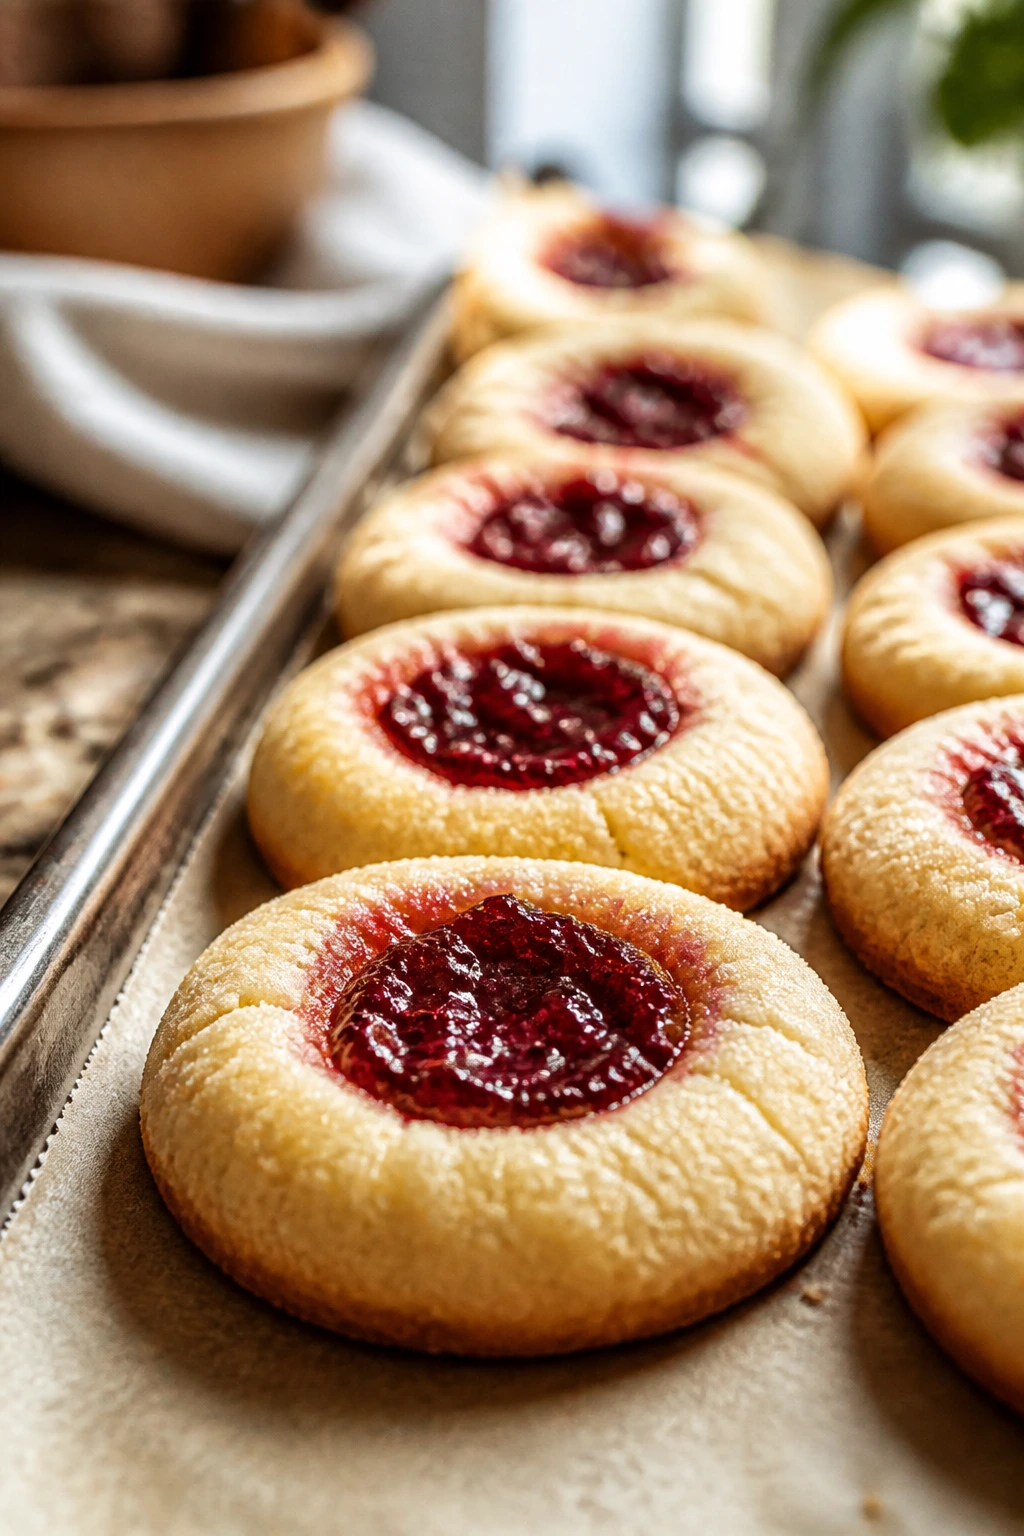
Thumbprint cookies have a way of looking old-fashioned in the best possible sense. The center pocket holds a spoonful of jam, and when the cookies bake, the edge stays buttery while the filling turns glossy and slightly sticky.
Why It Works:
The dough is rich enough to stand up to the jam, and the shallow indentation keeps the filling from running all over the pan. Raspberry is sharp enough to cut through the butter, which keeps each cookie from tasting flat. They’re small, neat, and easy to tuck onto a dessert board.
Key Ingredients:
- 1 cup unsalted butter, softened
- 2/3 cup granulated sugar
- 1 large egg yolk
- 2 tsp vanilla extract
- 2 cups all-purpose flour
- 1/2 tsp salt
- 1/2 cup raspberry jam
- 1/2 cup finely chopped almonds, optional
Quick Steps:
- Cream the butter and sugar until smooth, then mix in the egg yolk and vanilla.
- Add the flour and salt and stir until the dough comes together.
- Chill the dough for 30 minutes, then roll into 1-inch balls.
- Press a thumb or spoon into each ball to form a small well.
- Fill each center with about 1/2 teaspoon raspberry jam.
- Bake at 350°F (175°C) for 12 to 14 minutes, until the edges are pale gold.
Equipment for This Recipe:
- Mixing bowl
- Baking sheet
- Parchment paper
- Measuring spoon
- Small spoon or your thumb for indenting
How to Serve This Dish:
Arrange these in a tight ring on a plate so the jam centers face up. They go well with tea, coffee, or a bowl of fresh berries. If you’re packing them, separate layers with parchment so the jam doesn’t stick.
Pro Tips for This Recipe:
- Chilling keeps the dough from cracking too much when you press the centers.
- Use jam, not thin jelly, if you want the filling to stay put.
- If the indent puffs up in the oven, press it again halfway through baking.
- Let the cookies cool on the pan for 5 minutes before moving them.
Variations on This Dish:
- Apricot Glow: Use apricot jam and a little orange zest for a brighter flavor.
- Almond Heart: Mix the chopped almonds into the dough and use a drop of almond extract.
- Chocolate Center: Swap the jam for thick chocolate hazelnut spread.
Common Mistakes to Avoid with This Dish:
- Too much filling: Overflowing jam burns on the pan. Stick to a small spoonful.
- Skipping the chill: Warm dough spreads before the centers set.
- Pressing too deep: If the well goes all the way through, the jam leaks out.
6. Pink Velvet Cupcakes with Cream Cheese Frosting
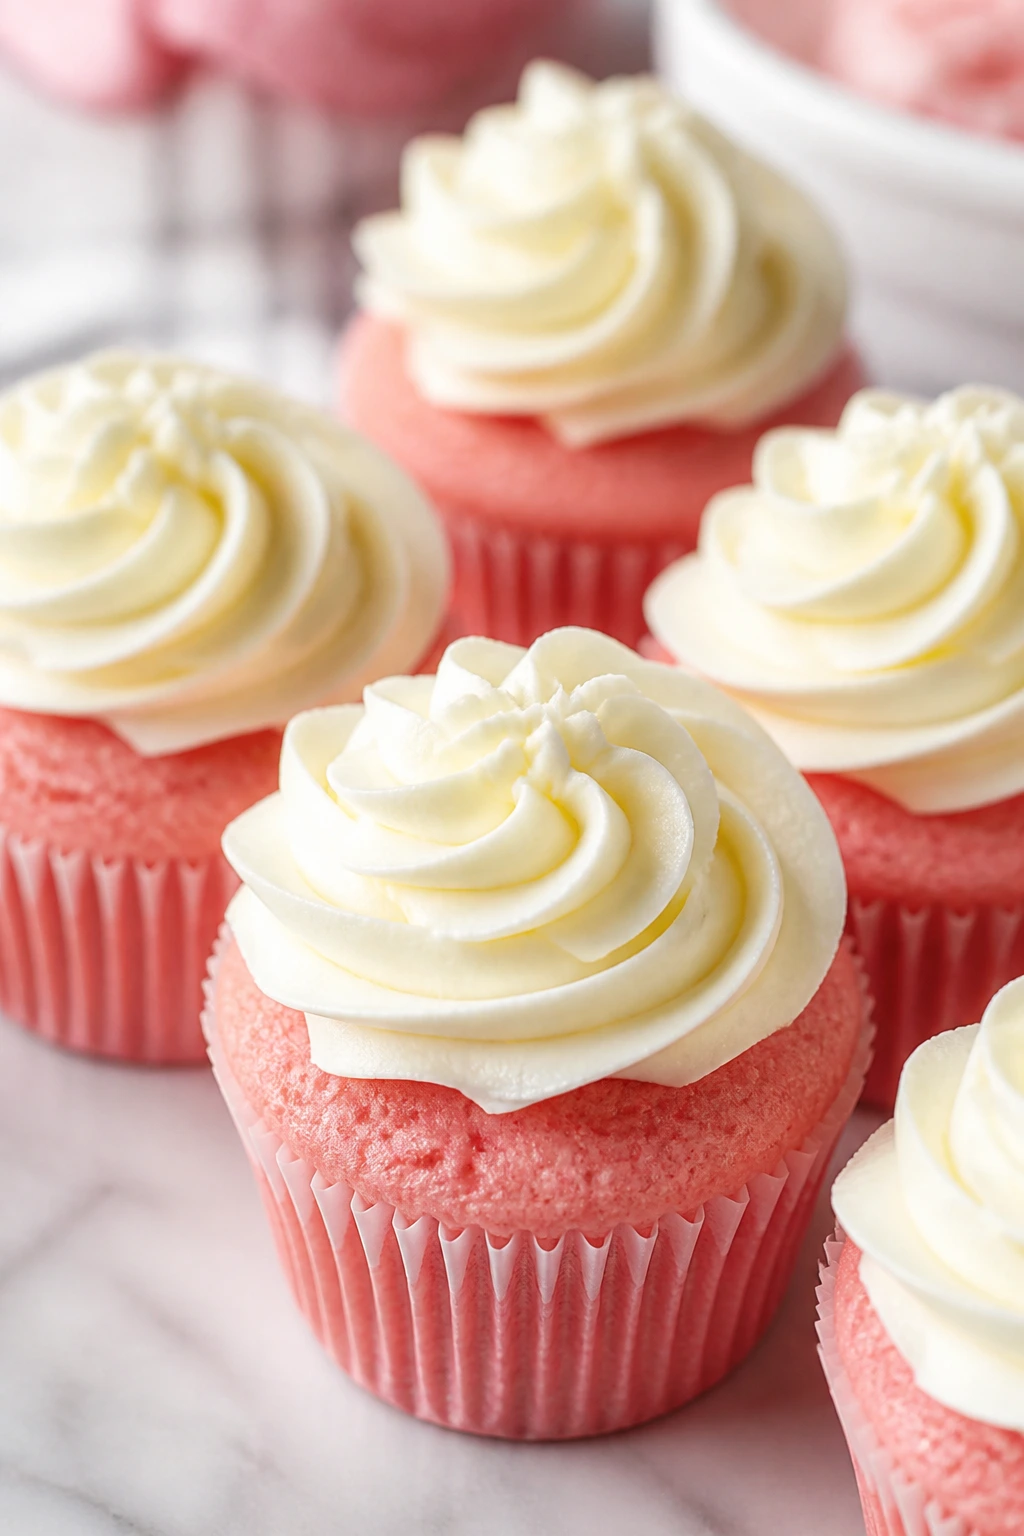
Pink velvet cupcakes are the easier cousin of red velvet, and honestly, I reach for them more often. They bake into a soft crumb with a gentle cocoa note, and the cream cheese frosting brings the kind of tang that keeps the whole cupcake from tasting flat.
Why It Works:
Buttermilk gives the cake a tender crumb, while a little cocoa keeps the flavor from leaning candy-sweet. The pink color lands softly instead of aggressively, which I prefer on a dessert tray because it looks festive without shouting. Cream cheese frosting is the right partner here because it cuts through the butter and sugar with a clean, cool edge.
Key Ingredients:
- 1 1/2 cups all-purpose flour
- 1 cup granulated sugar
- 1 1/2 tsp baking powder
- 1/2 tsp salt
- 1/2 cup unsalted butter, softened
- 2 large eggs
- 1/2 cup buttermilk
- 1 tsp vanilla extract
- 1 tbsp red gel food coloring or 1 tsp beet powder
- 8 oz cream cheese, softened
- 1/2 cup unsalted butter, softened, for frosting
- 3 cups powdered sugar
Quick Steps:
- Whisk the flour, baking powder, salt, and cocoa-free pink coloring base if using beet powder.
- Beat the butter and sugar until fluffy, then add the eggs one at a time.
- Mix in the buttermilk, vanilla, and coloring, then fold in the dry ingredients.
- Divide the batter among lined cupcake cups and bake at 350°F (175°C) for 18 to 20 minutes.
- Beat the cream cheese, butter, powdered sugar, and vanilla until smooth, then frost the cooled cupcakes.
Equipment for This Recipe:
- Muffin pan
- Cupcake liners
- Electric mixer
- Mixing bowls
- Piping bag or spatula
How to Serve This Dish:
Pipe the frosting in a tall swirl and finish with heart sprinkles or a few shaved chocolate curls. These make a pretty centerpiece on a tray because the frosting holds its shape. They’re best the day they’re frosted, though the cake itself stays soft for a day or two.
Pro Tips for This Recipe:
- Use room-temperature cream cheese so the frosting doesn’t turn lumpy.
- Fill the cupcake liners only two-thirds full.
- A tiny amount of gel coloring goes a long way. Start small.
- Chill the frosted cupcakes for 10 minutes if the frosting feels too soft.
Variations on This Dish:
- Strawberry Swirl: Fold a spoonful of strawberry jam into the batter for streaks of fruit.
- Chocolate Cap: Dip the frosted tops in melted chocolate and let it set.
- Cupcake Bites: Bake the batter in mini cupcake tins and shorten the bake time to about 11 to 13 minutes.
Common Mistakes to Avoid with This Dish:
- Cold frosting ingredients: Lumpy cream cheese frosting never smooths out properly. Let everything soften first.
- Overfilling the pan: Cupcakes spill and dome unevenly. Stop at two-thirds full.
- Frosting warm cakes: The frosting slides right off. Cool the cupcakes completely.
7. Brownie Hearts with Dark Chocolate Ganache
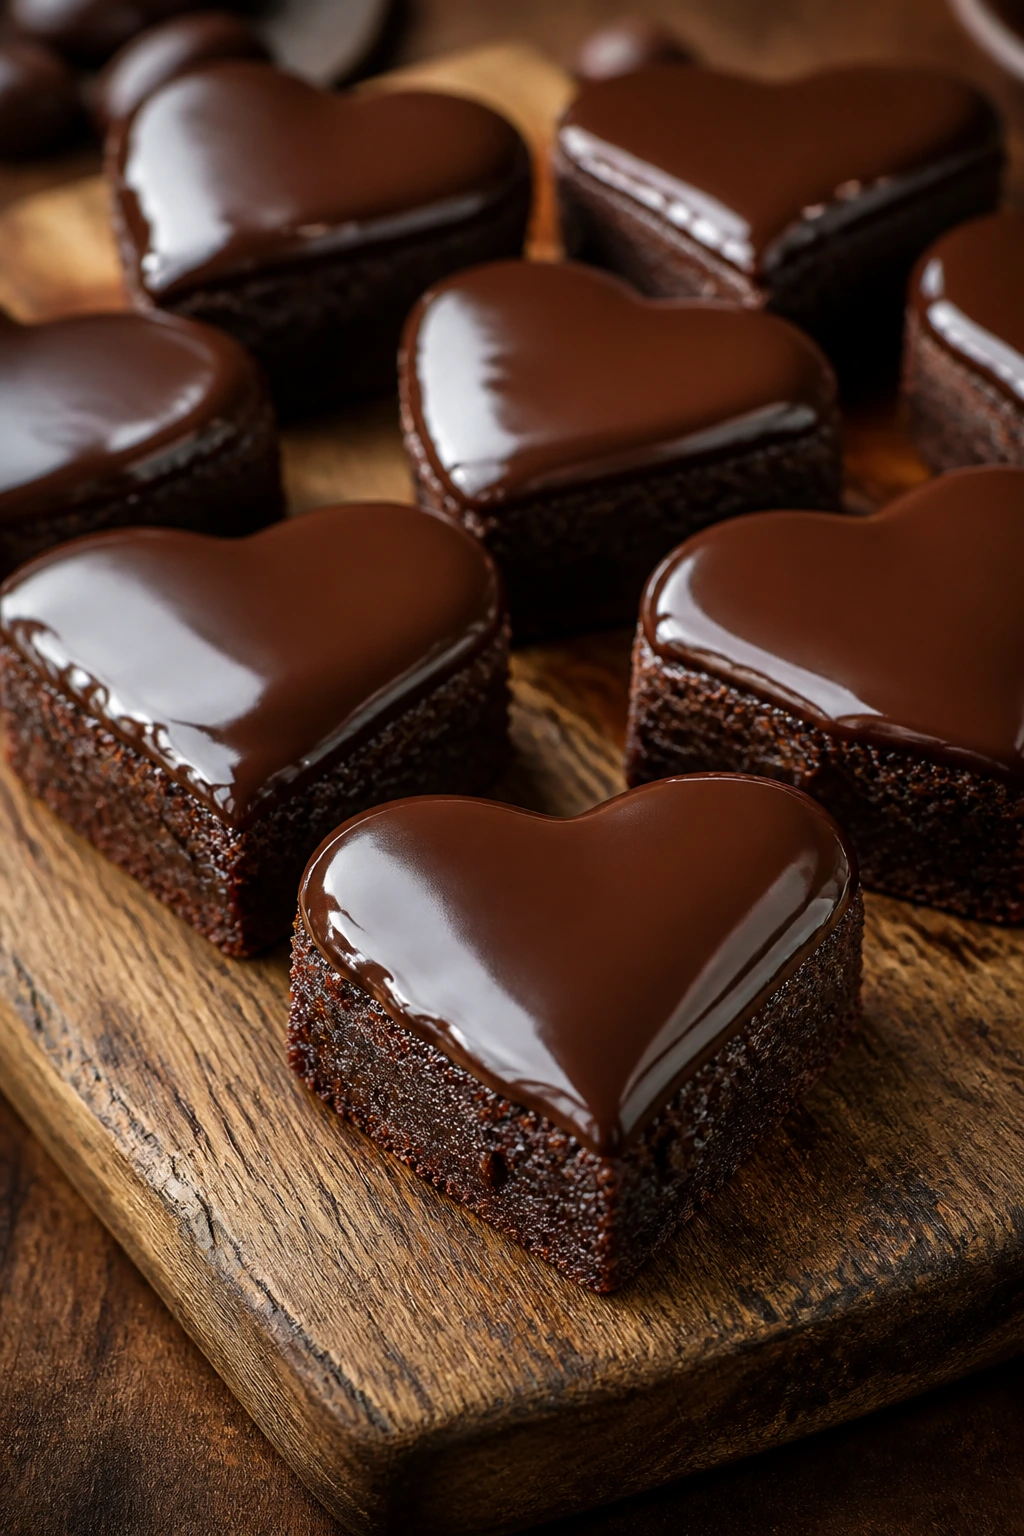
These are for the person who wants Valentine dessert ideas that lean fudgy, dark, and slightly dramatic. The brownie base bakes dense and chewy, and the ganache gives the cut hearts a glossy top that looks polished with almost no effort.
Why It Works:
Brownies slice cleanest after they’ve cooled completely, which makes them ideal for heart cutters. The ganache adds shine and a soft truffle-like finish without turning the whole dessert into frosting. If you want a tray that feels less sugary and more chocolate-forward, this is it.
Key Ingredients:
- 1 cup unsalted butter
- 2 cups granulated sugar
- 4 large eggs
- 1 tsp vanilla extract
- 1 cup all-purpose flour
- 3/4 cup unsweetened cocoa powder
- 1/2 tsp salt
- 1/2 cup chocolate chips
- 1 cup heavy cream
- 8 oz semisweet chocolate, chopped
Quick Steps:
- Melt the butter, then whisk in the sugar while the mixture is still warm.
- Add the eggs and vanilla and whisk until glossy.
- Stir in the flour, cocoa powder, salt, and chocolate chips until just combined.
- Bake in a lined 9×13-inch pan at 350°F (175°C) for 22 to 28 minutes, until the center is set but still soft.
- Cool completely, cut into heart shapes, then spoon or drizzle with warm ganache made from the cream and chopped chocolate.
Equipment for This Recipe:
- 9×13-inch baking pan
- Parchment paper
- Mixing bowl
- Saucepan or microwave-safe bowl
- Heart cutter
How to Serve This Dish:
Set the brownie hearts on a plate with a few raspberries and a dusting of cocoa powder. They’re rich, so one or two pieces per person is enough after dinner. If you want a clean plate, serve them slightly chilled.
Pro Tips for This Recipe:
- Line the pan with parchment so you can lift the brownies out cleanly.
- Do not overbake them. A brownie that bakes too long loses the fudgy center.
- Chill before cutting if you want very sharp heart edges.
- Warm the ganache just enough to flow; overheated ganache can go thin and dull.
Variations on This Dish:
- Salted Caramel Cut: Drizzle salted caramel over the ganache for a sweeter finish.
- Espresso Edge: Add 1 teaspoon espresso powder to the batter to deepen the chocolate taste.
- Walnut Crunch: Fold in 3/4 cup chopped walnuts if you want more texture.
Common Mistakes to Avoid with This Dish:
- Cutting warm brownies: The shapes tear. Cool them fully first.
- Overbaking: Dry brownies make sad hearts. Pull them when the center is still slightly soft.
- Too much ganache: A heavy pour hides the shape. Keep it thin and glossy.
8. Mini Cheesecake Hearts with Strawberry Sauce
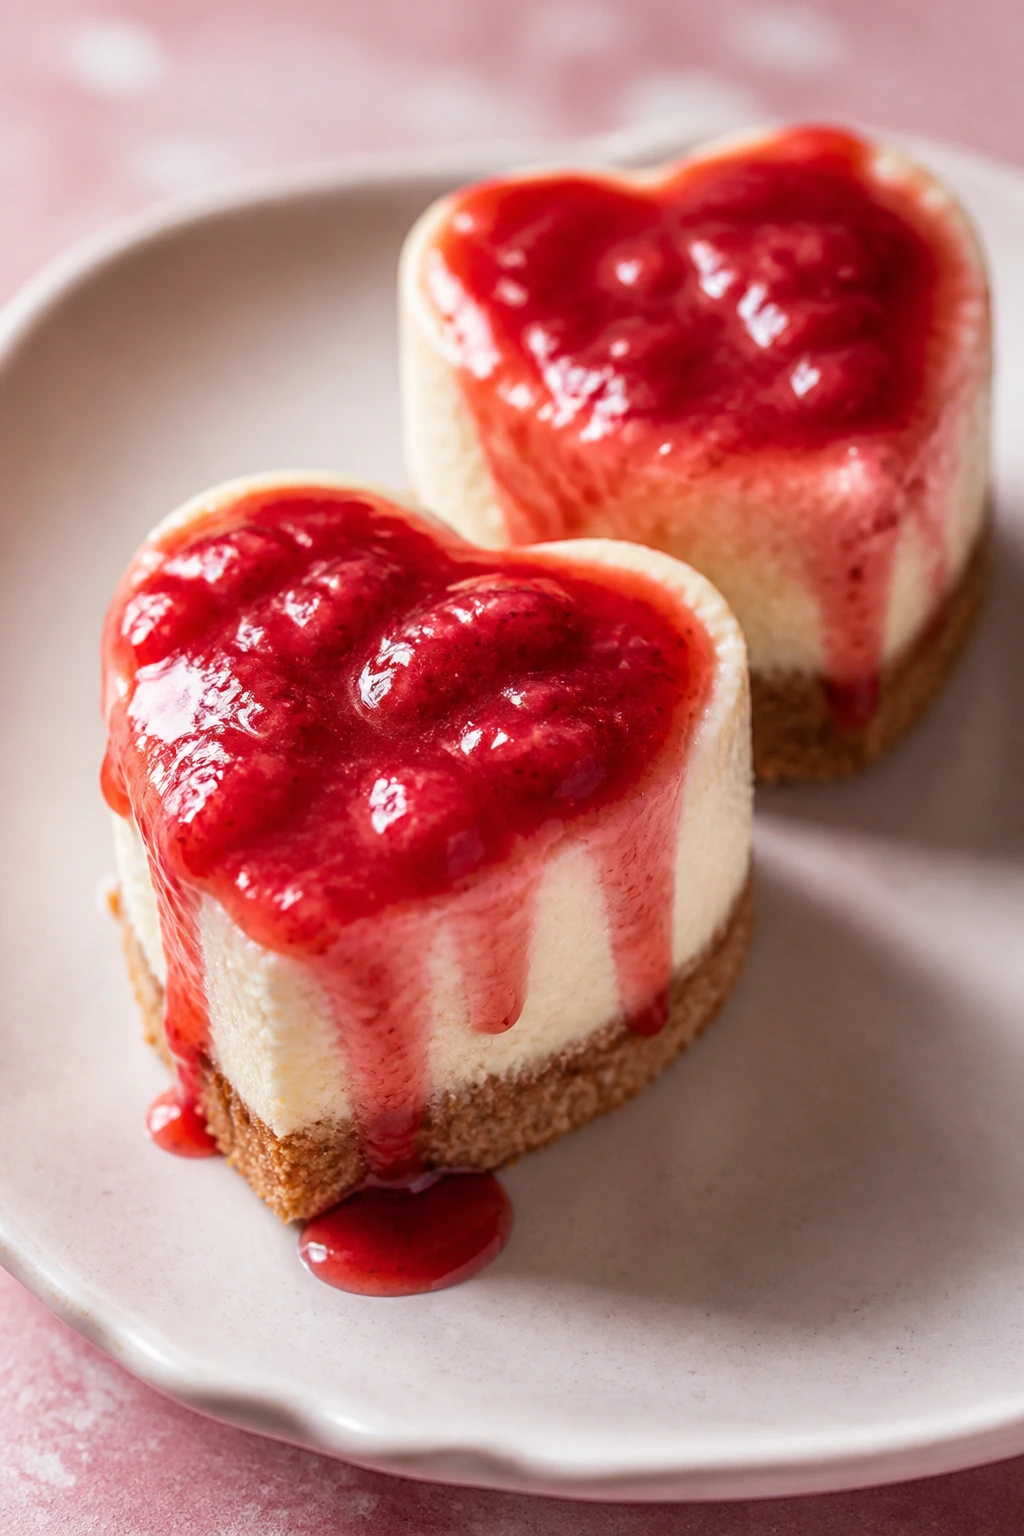
Mini cheesecake hearts have that cool, creamy finish people always reach for after a richer dessert. The crust gives you a buttery snap, the filling stays smooth and dense, and the strawberry sauce adds the bright red finish that belongs on a Valentine table.
Why It Works:
Cheesecake benefits from being baked in smaller portions because it sets more evenly and cools faster. The sour cream gives the filling a cleaner tang, which matters when the base is graham-heavy. A strawberry sauce on top keeps the whole thing from feeling heavy, even though it tastes rich.
Key Ingredients:
- 1 cup graham cracker crumbs
- 3 tbsp unsalted butter, melted
- 2 tbsp granulated sugar
- 16 oz cream cheese, softened
- 1/2 cup granulated sugar
- 1 large egg
- 1 tsp vanilla extract
- 1/4 cup sour cream
- 1 cup strawberries, chopped
- 1 tbsp sugar
- 1 tsp lemon juice
Quick Steps:
- Mix the graham crumbs, melted butter, and sugar, then press into lined mini heart molds or a muffin tin.
- Beat the cream cheese and sugar until smooth, then mix in the egg, vanilla, and sour cream.
- Spoon the filling over the crusts and bake at 325°F (165°C) for 16 to 20 minutes, until the edges are set and the centers still wobble slightly.
- Chill for at least 2 hours.
- Simmer the strawberries, sugar, and lemon juice for 5 minutes until syrupy, then spoon over the cooled cheesecakes.
Equipment for This Recipe:
- Mini heart molds or muffin tin
- Mixing bowls
- Hand mixer
- Small saucepan
- Offset spatula or spoon
How to Serve This Dish:
Serve these cold, straight from the fridge, with the strawberry sauce spooned over the top. A small mint leaf looks nice, but it’s not required. They’re neat enough for a plated dessert and small enough to stack on a tray.
Pro Tips for This Recipe:
- Beat the filling until smooth, but don’t whip in a lot of air. Air causes cracks.
- Let the cheesecakes cool slowly before chilling.
- If you don’t have heart molds, line a muffin tin and use a small cookie cutter to trim the tops after chilling.
- The sauce thickens as it cools, so don’t reduce it to jam in the pan.
Variations on This Dish:
- Chocolate Crust: Swap half the graham crumbs for chocolate cookie crumbs.
- Raspberry Topper: Use raspberries instead of strawberries for a sharper bite.
- No-Bake Cups: Spoon the filling into jars and chill without baking for a softer set.
Common Mistakes to Avoid with This Dish:
- Overbaking: The centers should still jiggle. A baked cheesecake that feels firm in the oven often turns dry later.
- Warm sauce on cold cheesecake: It can slide off. Cool the topping first.
- Skipping the chill: Cheesecake needs time to set. Rush it and you get sloppy slices.
9. Cherry Hand Pies with Vanilla Glaze
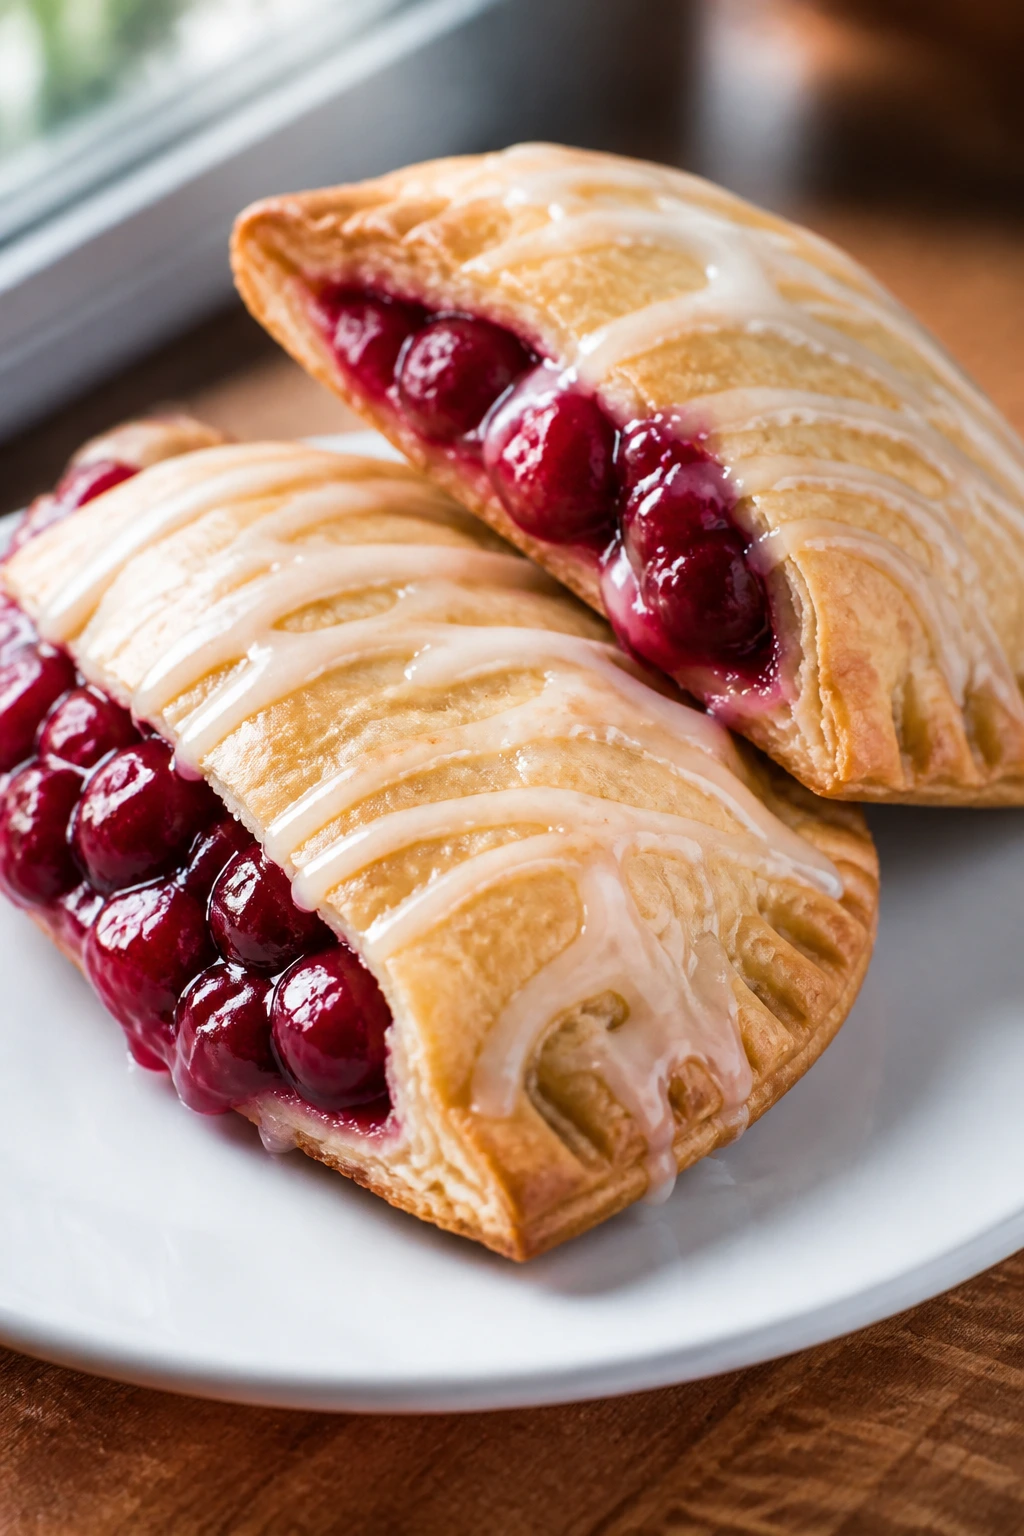
Cherry hand pies are the kind of dessert that feel old-fashioned in a good, pocket-sized way. The crust turns flaky and golden, and the cherry filling stays jammy enough to taste bright without running out all over the tray.
Why It Works:
The sealed edges keep the filling contained, which makes these easier to transport than a full pie. Using a thick cherry filling means the centers stay neat instead of leaking into burnt sugar puddles. A vanilla glaze gives them a polished finish that tastes like a bakery window without the bakery price.
Key Ingredients:
- 2 sheets pie dough, thawed if frozen
- 1 1/2 cups cherry pie filling
- 1 large egg
- 1 tbsp milk
- 2 tbsp coarse sugar
- 1 cup powdered sugar
- 1 to 2 tbsp milk, for glaze
- 1/2 tsp vanilla extract
- 1 tsp lemon zest, optional
Quick Steps:
- Roll the dough and cut out heart shapes, or use a template if you want uniform sizes.
- Spoon 1 to 2 teaspoons of cherry filling onto half the hearts.
- Brush the edges with egg wash, top with another heart, and seal with a fork.
- Brush with more egg wash, sprinkle with coarse sugar, and bake at 400°F (205°C) for 15 to 18 minutes.
- Stir the glaze ingredients together and drizzle over the cooled pies.
Equipment for This Recipe:
- Baking sheet
- Parchment paper
- Rolling pin
- Pastry brush
- Fork
How to Serve This Dish:
These are good warm or room temperature, and I like them on a tray lined with parchment because a little glaze inevitably drips. Serve them with coffee or a cold glass of milk. They’re tidy enough to hand around without forks.
Pro Tips for This Recipe:
- Keep the filling thick. Runny filling breaks the seal.
- Cut steam vents if you’re using a round top instead of a sealed second heart.
- Chill the assembled pies for 10 minutes before baking.
- Let them cool before glazing or the icing melts into the crust.
Variations on This Dish:
- Mixed Berry Pocket: Swap the cherry filling for mixed berry filling and add a pinch of lemon zest.
- Almond Cherry: Stir a tiny splash of almond extract into the filling.
- Mini Turnovers: Fold the dough into half-moons instead of hearts for a faster shape.
Common Mistakes to Avoid with This Dish:
- Overfilling: Too much filling causes leaks. Keep it modest.
- Unsealed edges: Press firmly with a fork so the pies stay shut.
- Hot glazing: Warm pies make the icing disappear. Wait until they’re cool.
10. Strawberry Pretzel Dessert Cups
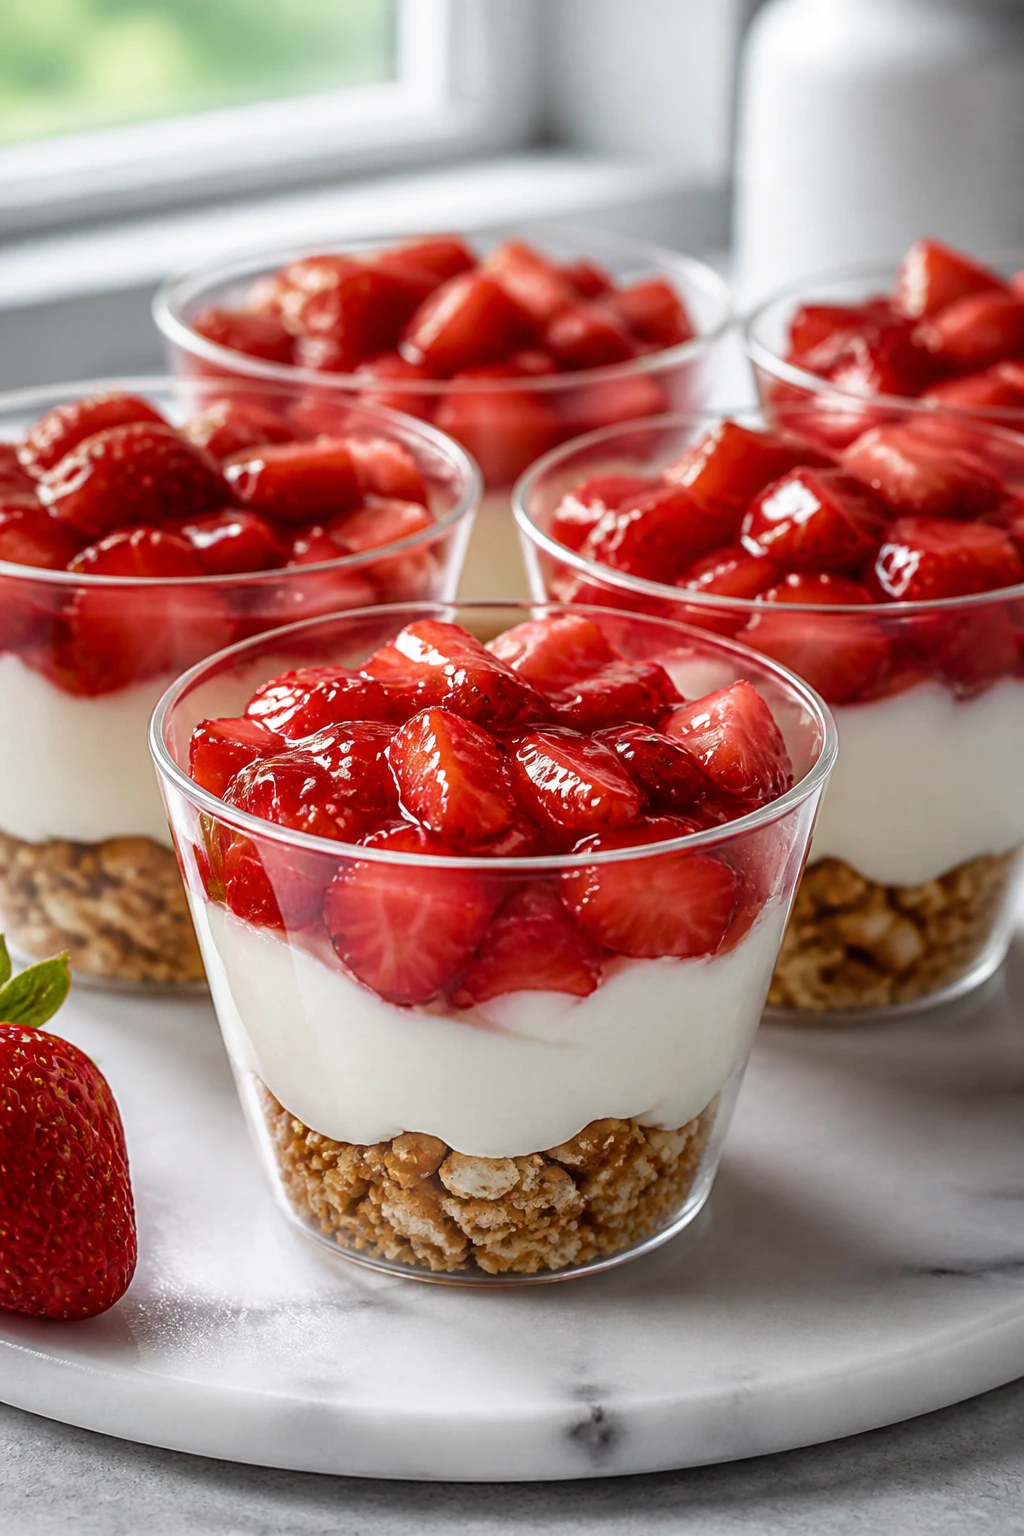
This one borrows the salty-sweet idea of a pretzel crust and turns it into individual cups, which is honestly the smarter move for a dessert tray. You get crunch, creaminess, and a strawberry topping that tastes bright instead of syrupy.
Why It Works:
Pretzel crumbs add salt and a little grit, which keeps the crust from tasting like sweet sand. The cream cheese layer stays cool and smooth, and the strawberry topping brings the color that makes the cups feel holiday-ready. Because they’re portioned out in small glasses, they’re easy to chill and serve without slicing.
Key Ingredients:
- 1 1/2 cups pretzel crumbs
- 6 tbsp unsalted butter, melted
- 3 tbsp granulated sugar
- 8 oz cream cheese, softened
- 1/2 cup powdered sugar
- 1 cup whipped cream or whipped topping
- 2 cups strawberries, chopped
- 2 tbsp sugar
- 1 tsp lemon juice
Quick Steps:
- Stir the pretzel crumbs, melted butter, and sugar together, then press a spoonful into the bottoms of small cups.
- Beat the cream cheese and powdered sugar until smooth, then fold in the whipped cream.
- Spoon the cream layer over the crusts.
- Toss the strawberries with sugar and lemon juice, then let them sit for 10 minutes until juicy.
- Spoon the strawberry topping over the cream layer and chill for 20 minutes.
Equipment for This Recipe:
- Small dessert cups or glasses
- Mixing bowl
- Spoon
- Hand mixer
- Measuring cups
How to Serve This Dish:
Serve these cold with small spoons so each bite gets crust, cream, and strawberry together. They look nicest in clear glasses where the layers show through. A little pretzel crumb sprinkled on top gives a cleaner finish than extra fruit alone.
Pro Tips for This Recipe:
- Crush the pretzels finely enough that the base packs down, but leave a few larger bits for texture.
- Don’t over-sweeten the cream layer; the strawberry topping already carries a lot of sugar.
- Chill the crust before adding the cream if you want a firmer base.
- Use smaller cups than you think. The dessert feels richer when the layers are compact.
Variations on This Dish:
- Strawberry Jam Layer: Stir a spoonful of strained strawberry jam into the fruit topping for a glossier finish.
- Chocolate Base: Swap half the pretzels for chocolate cookie crumbs.
- Lime Twist: Use a little lime juice instead of lemon for a sharper edge.
Common Mistakes to Avoid with This Dish:
- Loose crust: If the crumbs aren’t packed, the base falls apart. Press firmly with the back of a spoon.
- Watery strawberries: If the fruit sits too long, it can leak. Let it rest just enough to make syrup, not soup.
- Overloaded cups: Too much topping makes them clumsy to eat. Keep the layers even.
11. White Chocolate Cranberry Blondies

White chocolate and cranberry is one of those combinations that keeps showing up because it works. The blondies bake up chewy in the middle, slightly crisp at the edges, and just tart enough to keep the white chocolate from taking over.
Why It Works:
Brown sugar gives these blondies a caramel note, while dried cranberries bring chew and a sour pop. White chocolate melts into pockets instead of disappearing, so every square has a creamy bite. They cut cleanly, which makes them easy to arrange in neat rows on a tray.
Key Ingredients:
- 1 cup unsalted butter, melted
- 1 cup brown sugar
- 1/2 cup granulated sugar
- 2 large eggs
- 2 tsp vanilla extract
- 2 cups all-purpose flour
- 1 tsp baking powder
- 1/2 tsp salt
- 1 cup white chocolate chips
- 3/4 cup dried cranberries
Quick Steps:
- Whisk the melted butter, brown sugar, and granulated sugar together.
- Beat in the eggs and vanilla until glossy.
- Stir in the flour, baking powder, and salt, then fold in the white chocolate chips and cranberries.
- Spread the batter in a lined 9×9-inch pan and bake at 350°F (175°C) for 25 to 30 minutes.
- Cool completely before cutting into squares or heart shapes.
Equipment for This Recipe:
- 9×9-inch baking pan
- Parchment paper
- Mixing bowl
- Spatula
- Sharp knife
How to Serve This Dish:
Dust the tops with powdered sugar or leave them plain and let the cranberry flecks do the color work. These are the kind of bars that travel well in a tin and don’t need a fork. I like them cut into small squares because they’re rich.
Pro Tips for This Recipe:
- Pull the blondies when the center still looks a little soft; they firm as they cool.
- Fold the cranberries in last so they stay distributed.
- Line the pan with overhanging parchment for easy lifting.
- A pinch of flaky salt on top makes the white chocolate taste less flat.
Variations on This Dish:
- Cherry Swap: Use dried cherries instead of cranberries for a softer, sweeter tartness.
- Orange Zest Version: Add 1 tablespoon orange zest to the batter.
- Nutty Finish: Fold in 1/2 cup chopped macadamias or pecans.
Common Mistakes to Avoid with This Dish:
- Overmixing: Blondies get tough if you keep stirring after the flour goes in.
- Overbaking: Dry blondies lose their chew. Stop when the center is set but soft.
- Skipping the cooling time: Warm bars crumble when cut. Let them cool fully.
12. Chocolate Lava Cakes
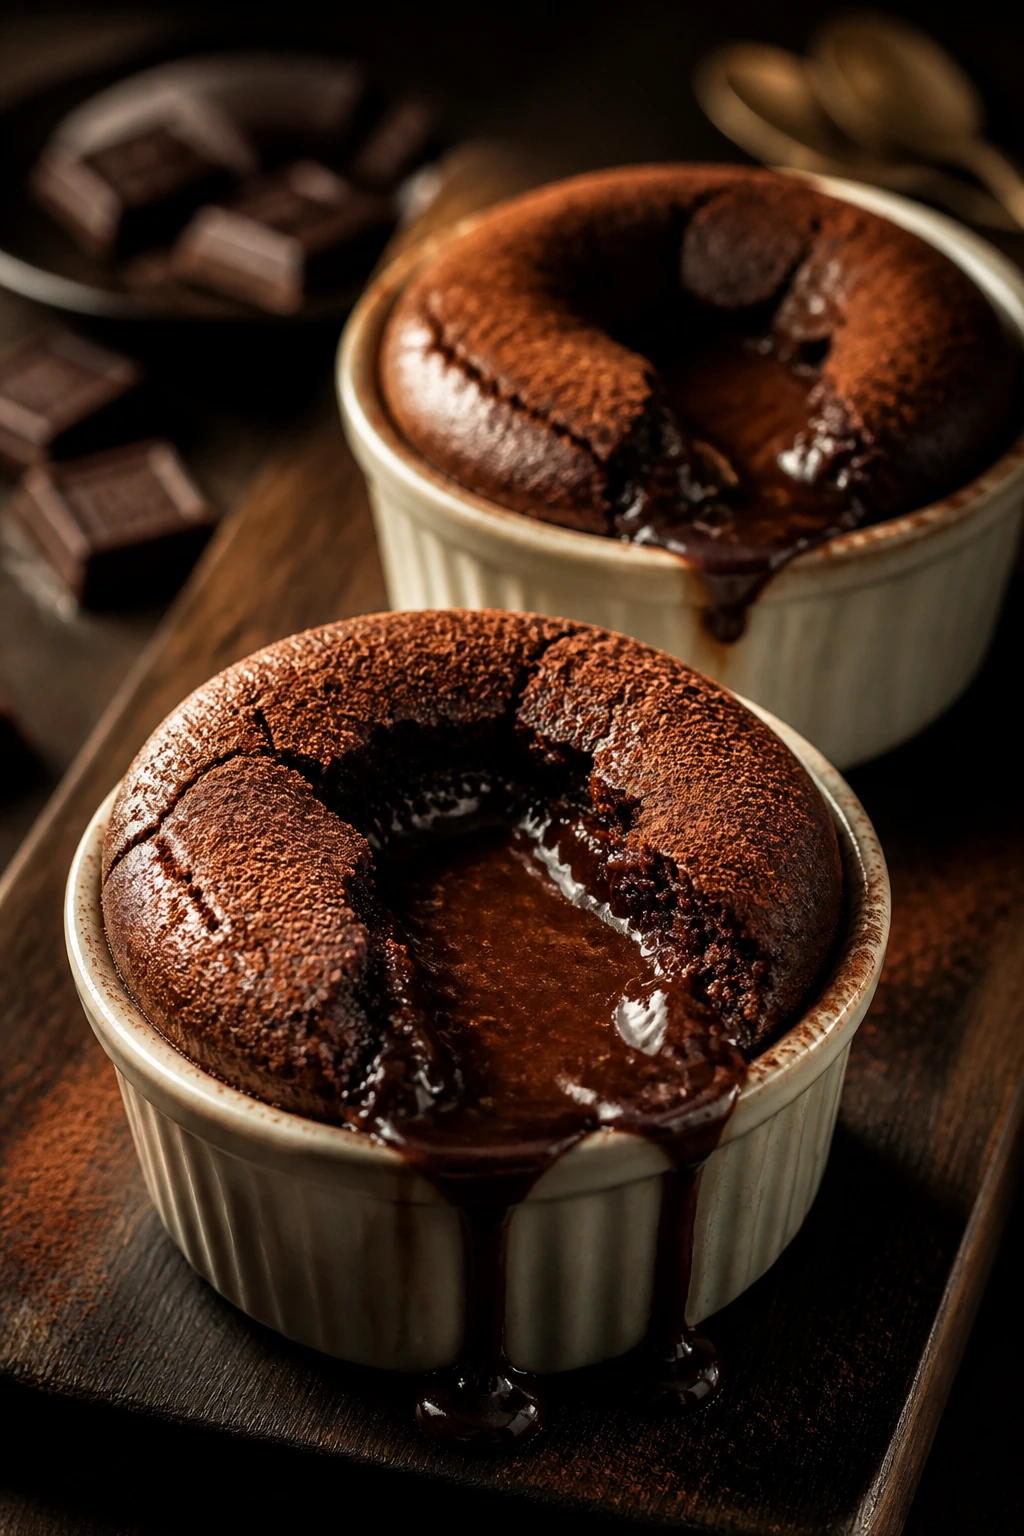
Lava cakes are a tiny bit dramatic in the best possible way. You break into the center and the warm chocolate flows out, which is a lot of payoff for a dessert that only needs ramekins and a short bake.
Why It Works:
The batter is built to set at the edges while staying soft in the middle, and that’s why the bake time is narrow. Good lava cakes are not about complexity; they’re about timing and a hot oven. Once you get that right, they feel restaurant-level without any of the fuss.
Key Ingredients:
- 4 tbsp unsalted butter, plus more for ramekins
- 6 oz semisweet chocolate, chopped
- 2 large eggs
- 2 large egg yolks
- 1/3 cup granulated sugar
- 1/4 cup all-purpose flour
- 1 pinch salt
- 1 tbsp cocoa powder, for dusting ramekins
Quick Steps:
- Butter four ramekins and dust them with cocoa powder.
- Melt the butter and chocolate together until smooth, then let the mixture cool slightly.
- Whisk the eggs, yolks, and sugar until pale and thick.
- Fold in the chocolate mixture, then the flour and salt.
- Divide the batter among the ramekins and bake at 425°F (220°C) for 8 to 10 minutes.
- Let the cakes rest for 1 minute, then invert onto plates and serve right away.
Equipment for This Recipe:
- 4 ramekins
- Whisk
- Mixing bowl
- Baking sheet
- Small spatula
How to Serve This Dish:
Serve each cake with a scoop of vanilla ice cream or a spoonful of whipped cream. A few raspberries on the plate keep the chocolate from feeling too heavy. These need to hit the table warm, so have everything else ready first.
Pro Tips for This Recipe:
- Butter and cocoa the ramekins well so the cakes release cleanly.
- Bake one test cake if your oven runs hot or cool. These are sensitive.
- Stop when the edges are firm and the center still jiggles a little.
- Invert quickly. If you wait too long, the cake can cling to the ramekin.
Variations on This Dish:
- Salted Caramel Center: Slip a frozen caramel candy into the middle before baking.
- Espresso Lava: Add 1 teaspoon instant espresso powder to the melted chocolate.
- Berry Spoon: Serve with warm raspberry sauce instead of ice cream.
Common Mistakes to Avoid with This Dish:
- Overbaking: That turns lava into regular cake. Watch the edges, not the clock alone.
- Skipping the ramekin prep: Sticky sides ruin the release.
- Serving late: The center firms fast, so plate them immediately.
13. Linzer Heart Cookies
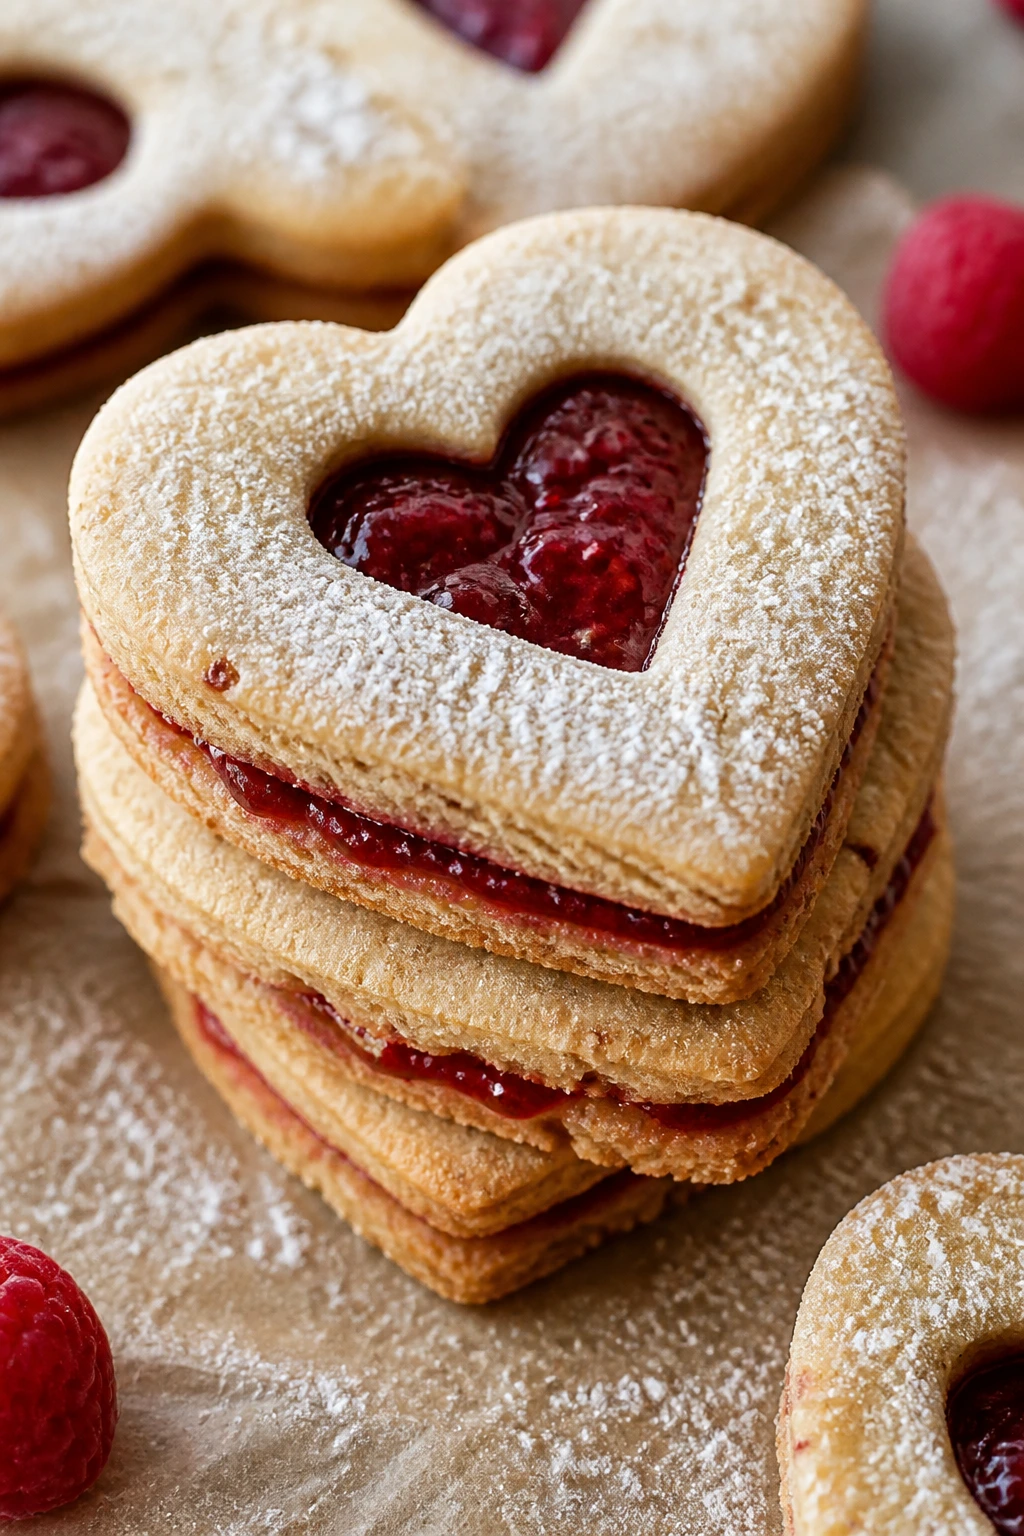
Linzer cookies bring a little bakery polish to a Valentine tray, mostly because the cutout window shows off the jam in the middle. They’re buttery, lightly nutty, and delicate enough to feel special without being fragile if you handle them calmly.
Why It Works:
Almond flour gives the dough a tender crumb and a subtle, warm flavor that suits raspberry jam. The top cutout creates a little frame, which turns a simple sandwich cookie into something prettier. A dusting of powdered sugar makes the whole thing look finished without extra decoration.
Key Ingredients:
- 1 cup unsalted butter, softened
- 3/4 cup powdered sugar
- 1 large egg yolk
- 1 tsp vanilla extract
- 2 cups all-purpose flour
- 1 cup almond flour
- 1/2 tsp salt
- 1/2 cup raspberry jam
- Extra powdered sugar, for dusting
Quick Steps:
- Cream the butter and powdered sugar until smooth.
- Mix in the egg yolk and vanilla, then add the flours and salt.
- Chill the dough for 45 minutes, then roll it out and cut hearts, cutting small centers out of half the pieces.
- Bake at 350°F (175°C) for 10 to 12 minutes, until the edges are pale gold.
- Cool, then spread jam on the solid hearts and dust the cutout tops with powdered sugar before sandwiching.
Equipment for This Recipe:
- Rolling pin
- Heart cutters in two sizes
- Baking sheet
- Parchment paper
- Fine-mesh sieve for powdered sugar
How to Serve This Dish:
These look best stacked in pairs so the jam window shows through. Set them near coffee or tea, because the almond flavor comes through more clearly with a warm drink. They also pack well if you want something that survives a gift box.
Pro Tips for This Recipe:
- Roll the dough evenly or the tops and bottoms won’t match cleanly.
- Chill the cut cookies before baking if the dough feels soft.
- Use a thick jam so the filling doesn’t squeeze out the sides.
- Dust the tops before assembling so the sugar stays crisp.
Variations on This Dish:
- Apricot Heart: Swap in apricot preserves for a sunnier color.
- Chocolate Window: Add 2 tbsp cocoa powder to the dough and use raspberry jam.
- Spiced Almond: Stir in a pinch of cinnamon for a warmer finish.
Common Mistakes to Avoid with This Dish:
- Dough too warm: The cutout shape blurs. Chill before baking.
- Too much jam: It leaks and makes the cookies slippery. Use a thin layer.
- Skipping the cooling step: Warm cookies break when you sandwich them.
14. Raspberry Swirl Cheesecake Bars

Cheesecake bars are easier to slice, easier to share, and much less nerve-wracking than a full cheesecake. The raspberry swirl gives every bite a pink ribbon of fruit, which is exactly the sort of detail that makes a tray look like you planned ahead.
Why It Works:
Bars bake more evenly than a tall cheesecake, and the graham crust gives you enough structure to cut tidy squares. Raspberry jam swirled through the filling tastes bright even after baking, which keeps the cream cheese from feeling too dense. The bars are rich, so a small square goes a long way.
Key Ingredients:
- 1 1/2 cups graham cracker crumbs
- 5 tbsp unsalted butter, melted
- 2 tbsp granulated sugar
- 16 oz cream cheese, softened
- 1/2 cup granulated sugar
- 2 large eggs
- 1 tsp vanilla extract
- 1/4 cup sour cream
- 3/4 cup raspberry jam
- 1 tsp lemon juice
Quick Steps:
- Mix the crumbs, butter, and sugar, then press into a lined 8×8-inch pan.
- Beat the cream cheese and sugar until smooth, then mix in the eggs, vanilla, and sour cream.
- Spread the filling over the crust and dollop the jam on top.
- Swirl the jam gently with a knife, then bake at 325°F (165°C) for 28 to 32 minutes.
- Chill for at least 3 hours before cutting.
Equipment for This Recipe:
- 8×8-inch baking pan
- Parchment paper
- Hand mixer
- Mixing bowl
- Butter knife for swirling
How to Serve This Dish:
Cut the bars into small squares and serve them chilled, with the swirls facing up. A few fresh raspberries beside each piece make the pink color pop. These are rich enough to stand alone, though a little whipped cream does not hurt.
Pro Tips for This Recipe:
- Don’t over-swirl the jam or the filling loses its marbled look.
- Cool the bars slowly before chilling to help prevent cracking.
- Use parchment with overhang so you can lift the slab out in one piece.
- A sharp knife wiped clean between cuts gives you neat edges.
Variations on This Dish:
- Chocolate Crust: Use chocolate cookie crumbs instead of graham crumbs.
- Strawberry Swirl: Swap raspberry jam for strawberry preserves.
- Lemon-Raspberry Bars: Add lemon zest to the filling for a brighter finish.
Common Mistakes to Avoid with This Dish:
- Cutting too early: Warm bars fall apart. Chill fully.
- Overbaking: The center should still have a soft wobble.
- Lumpy filling: Room-temperature cream cheese matters here.
15. Strawberry Galette Hearts
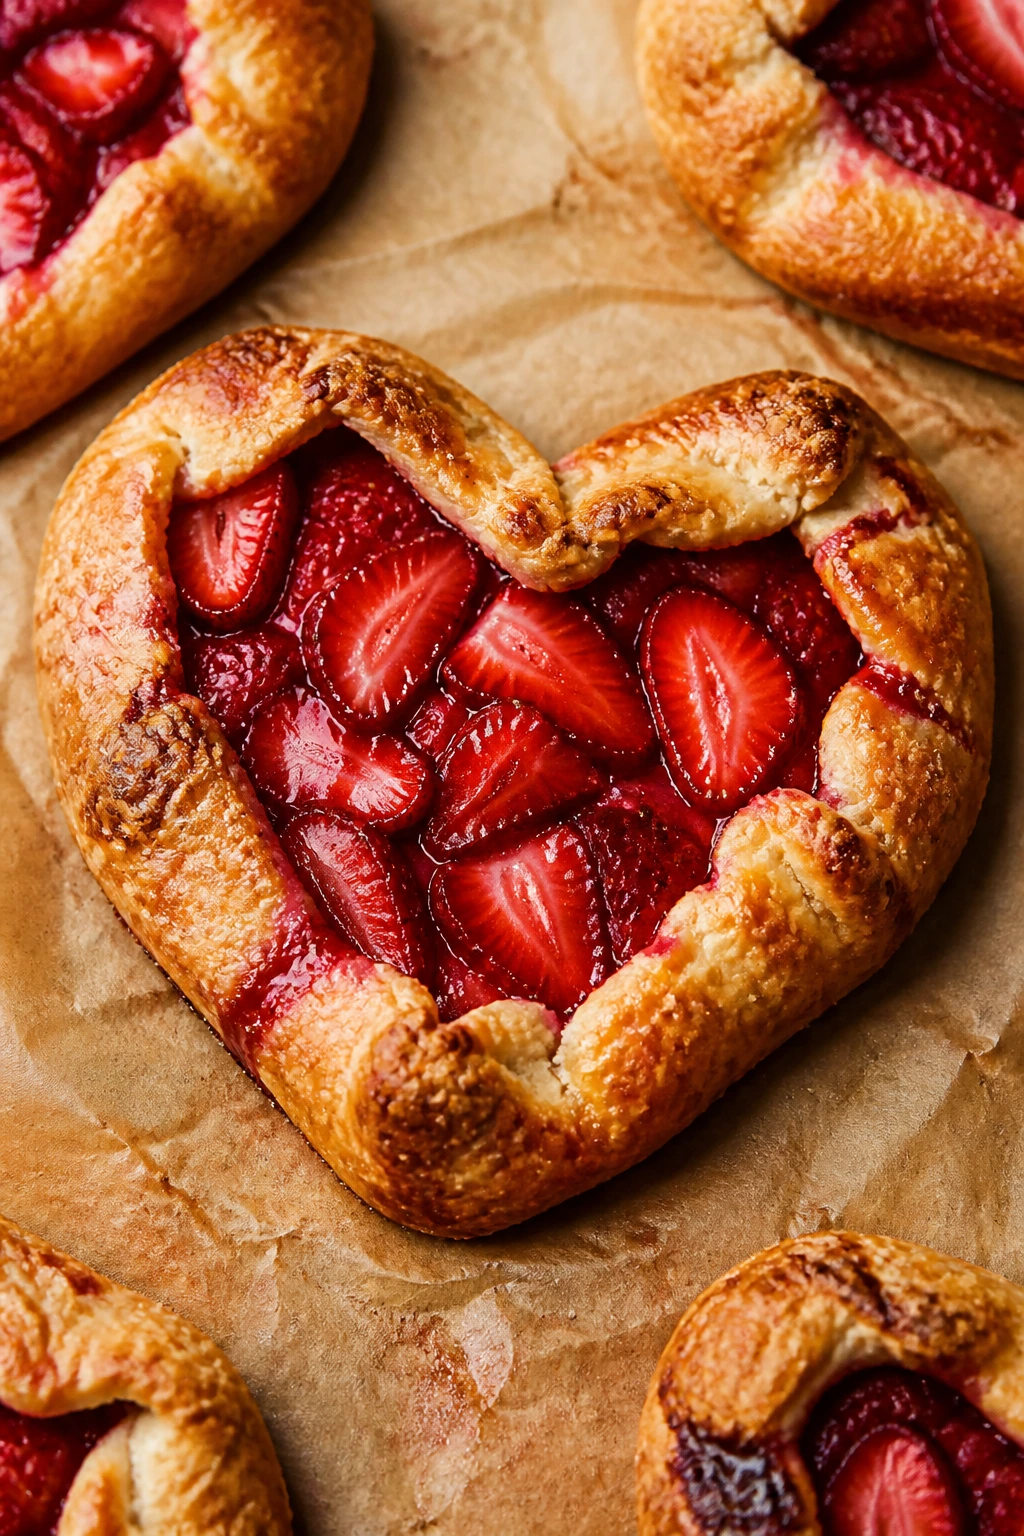
A galette feels rustic, which is useful when you want something homemade-looking without pie perfection. Shaped into hearts, it becomes a little more Valentine and a little less “I ran out of time,” which is a nice trick to have.
Why It Works:
The loose edges bake into crisp folds around the strawberries, and the fruit softens into a glossy filling with almost no extra work. A bit of cornstarch keeps the juices from spilling all over the pan. Heart shapes make the dessert feel special even if you started with store-bought dough.
Key Ingredients:
- 2 pie crusts or 1 sheet puff pastry, thawed
- 2 cups strawberries, sliced
- 2 tbsp granulated sugar
- 1 tbsp cornstarch
- 1 tbsp lemon juice
- 1 egg, beaten for wash
- 1 tbsp coarse sugar
- 2 tbsp almond flour, optional for the base
Quick Steps:
- Roll the dough and cut heart shapes large enough to hold a small pile of filling.
- Toss the strawberries with sugar, cornstarch, and lemon juice.
- Spoon a small mound of almond flour onto each heart if using, then top with the berries.
- Fold the edges up slightly, brush with egg wash, and sprinkle with coarse sugar.
- Bake at 400°F (205°C) for 18 to 22 minutes, until the crust is deep gold and the fruit is bubbling.
Equipment for This Recipe:
- Baking sheet
- Parchment paper
- Rolling pin
- Pastry brush
- Sharp knife or heart cutter
How to Serve This Dish:
Serve these warm, with a spoonful of whipped cream or a little vanilla ice cream. They’re at their best when the berries are soft and the edges are crisp. A dusting of powdered sugar right before serving makes them look fresh from the oven.
Pro Tips for This Recipe:
- Keep the fruit layer modest so the hearts don’t get soggy.
- Use chilled dough if you want sharper edges.
- The almond flour helps absorb juices and adds a subtle nutty note.
- Bake on parchment so any leaking syrup doesn’t glue the galettes to the pan.
Variations on This Dish:
- Mixed Berry Heart: Use raspberries and blueberries with the strawberries.
- Jam Booster: Spread a thin layer of strawberry jam under the fruit for a deeper red filling.
- Puff Pastry Shortcut: Use puff pastry for a flakier, faster version.
Common Mistakes to Avoid with This Dish:
- Too much filling: The fruit slides off. Keep it centered and restrained.
- Warm dough: The hearts spread and lose shape. Chill before baking.
- Skipping egg wash: The crust looks pale instead of golden.
16. Pink Lemonade Pound Cake
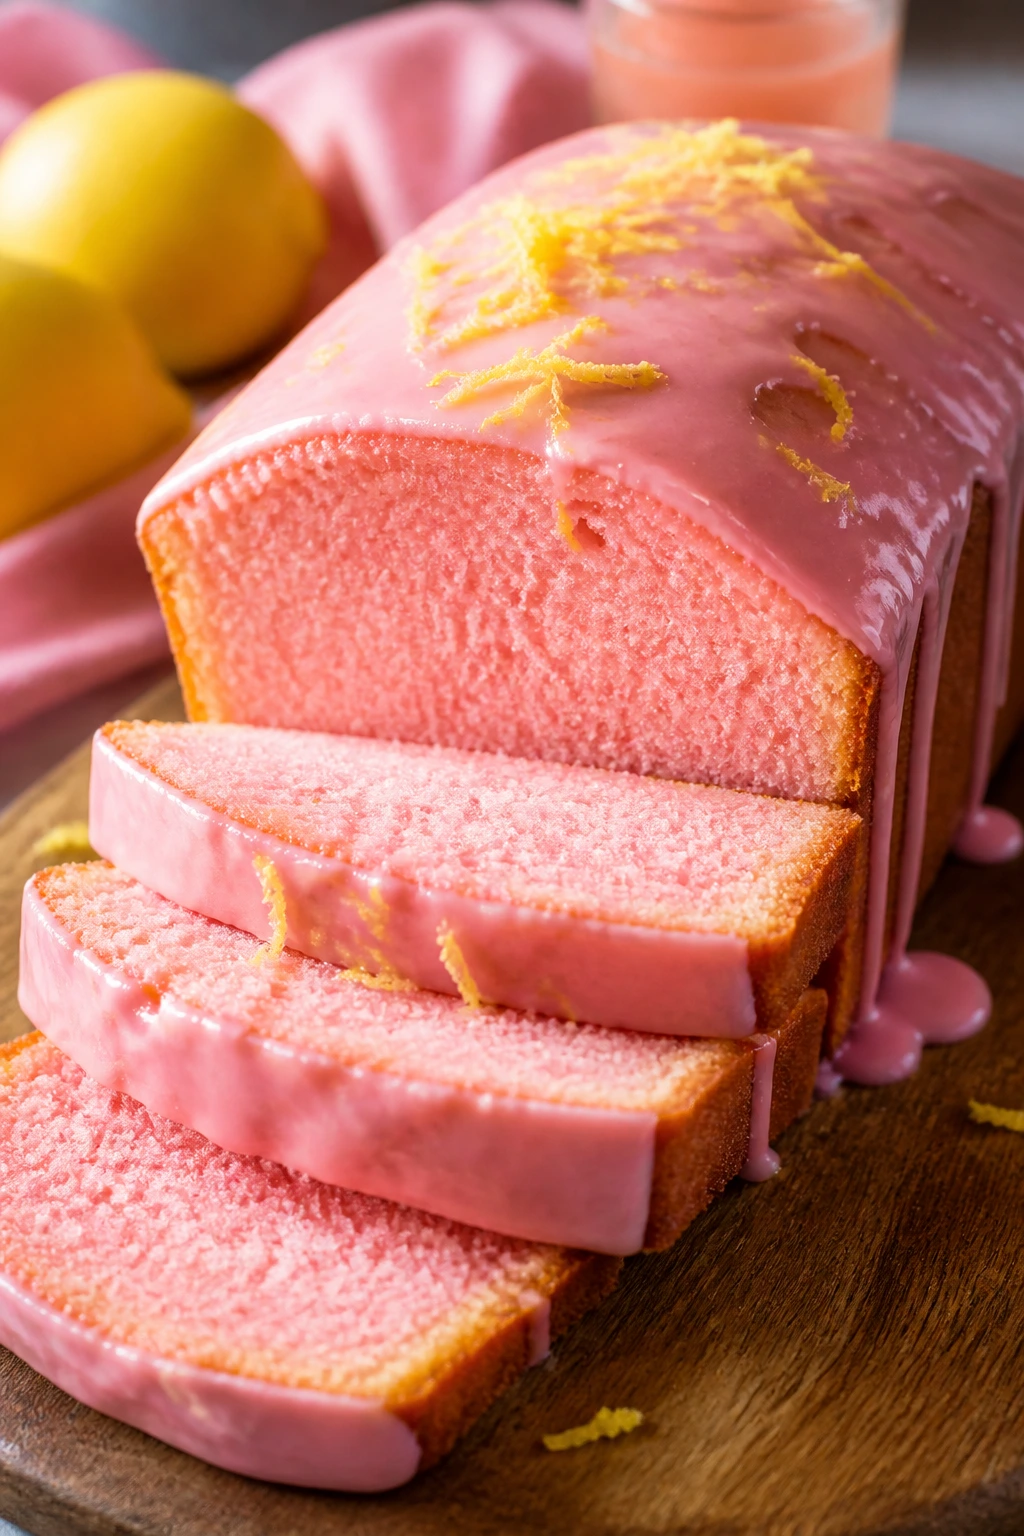
This pound cake brings a bright lemon note and a soft pink glaze that feels right for a Valentine spread without being too sweet. It slices cleanly, which makes it a good choice when you want something that looks tidy on the plate and holds up for a few hours on the buffet.
Why It Works:
Sour cream keeps the crumb dense but not heavy, and lemon zest keeps the cake fragrant all the way through. The glaze gives you the blush color without needing a complicated frosting job. It’s a good dessert for people who want cake but don’t want to babysit layers.
Key Ingredients:
- 1 cup unsalted butter, softened
- 1 3/4 cups granulated sugar
- 4 large eggs
- 3 cups all-purpose flour
- 1 tsp baking powder
- 1/2 tsp salt
- 1 cup sour cream
- Zest of 2 lemons
- 1/4 cup lemon juice
- 1 cup powdered sugar
- 1 tbsp raspberry syrup or a tiny drop of red food coloring
Quick Steps:
- Cream the butter and sugar until fluffy.
- Beat in the eggs one at a time.
- Mix in the flour, baking powder, salt, sour cream, lemon zest, and lemon juice until the batter is smooth.
- Bake in a greased loaf pan or Bundt pan at 350°F (175°C) for 50 to 60 minutes, until a tester comes out clean.
- Cool completely, then drizzle with the pink glaze made from powdered sugar and raspberry syrup.
Equipment for This Recipe:
- Loaf pan or Bundt pan
- Mixing bowls
- Hand mixer
- Cooling rack
- Whisk for glaze
How to Serve This Dish:
Slice it thick and serve with berries on the side. It looks especially nice on a long platter with the glaze dripping unevenly down the sides. A cup of tea or a glass of sparkling water with lemon fits the flavor cleanly.
Pro Tips for This Recipe:
- Grease the pan well, especially if you use a Bundt shape.
- Let the cake cool fully before glazing, or the glaze disappears.
- Don’t overmix once the flour goes in.
- Zest the lemons before juicing them; that order saves work.
Variations on This Dish:
- Strawberry Glaze: Use strawberry puree instead of raspberry syrup for a softer pink finish.
- Poppy Seed Spark: Add 1 tablespoon poppy seeds to the batter.
- Mini Loaves: Bake in small loaf pans and reduce the bake time to about 30 to 35 minutes.
Common Mistakes to Avoid with This Dish:
- Underbaking the center: Pound cake should be fully set or it sinks.
- Overmixing: That makes the crumb tight.
- Glazing a warm cake: The icing runs off and vanishes.
17. Chocolate Truffles with Sprinkles
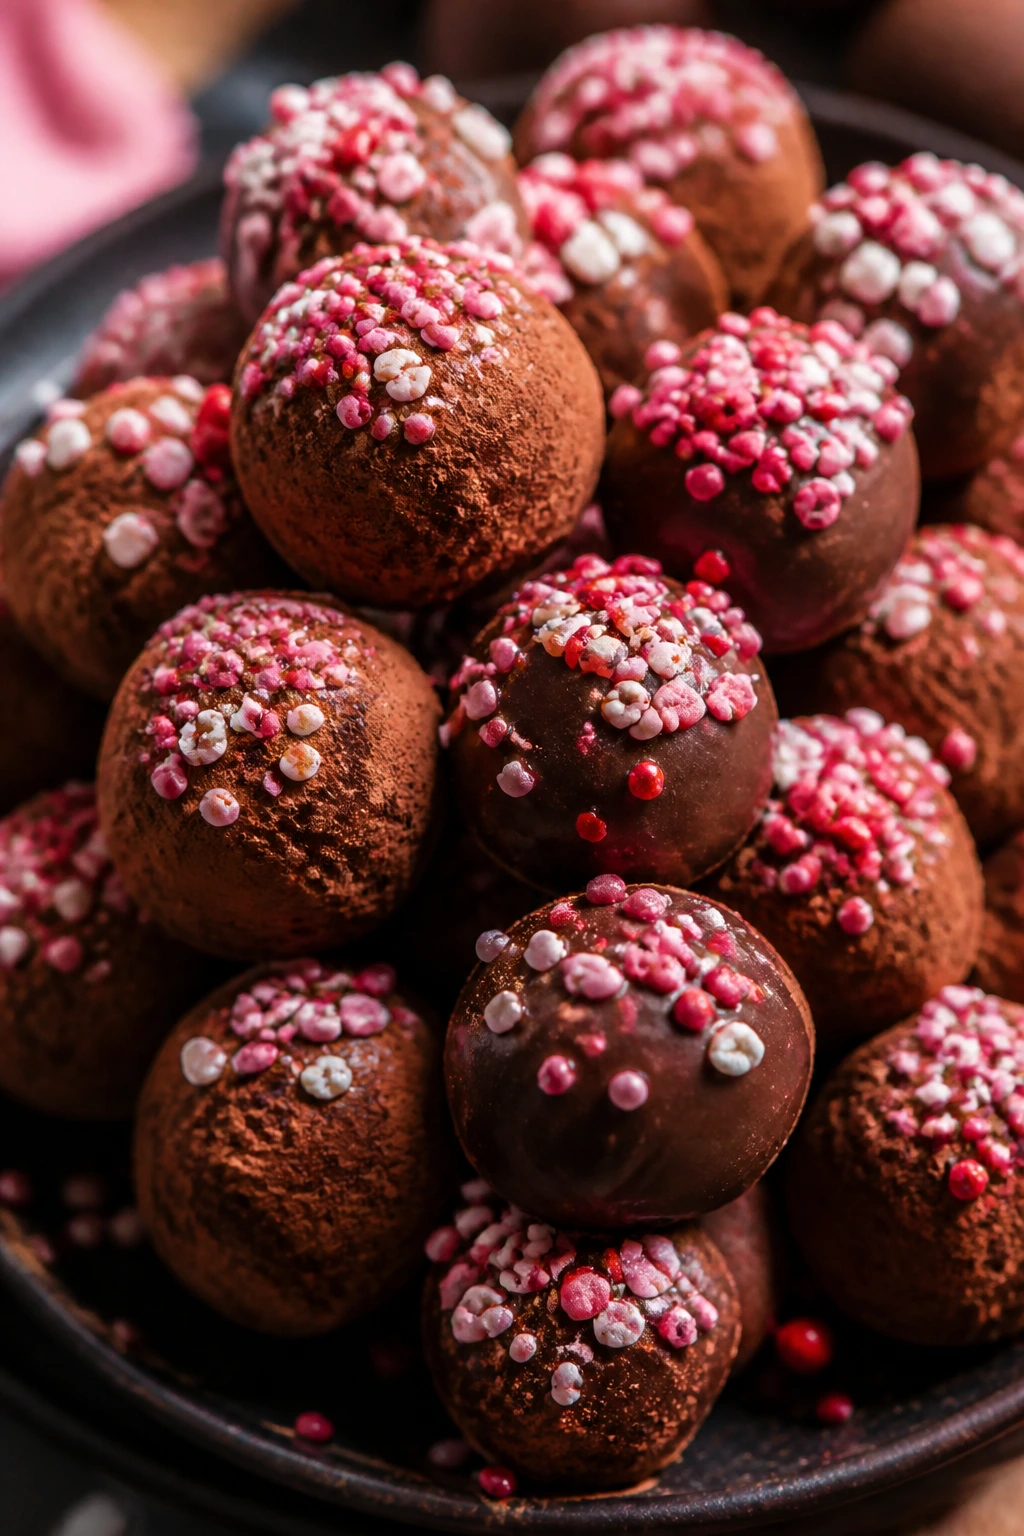
Truffles are tiny, rich, and about as low-stress as chocolate candy gets. They have a soft ganache center that rolls easily after chilling, and sprinkles or cocoa powder on the outside make them look like you bought them from a shop.
Why It Works:
Ganache is only chocolate and cream, but when you chill it to the right point, it turns into a scoopable base that feels luxurious without needing a candy thermometer. These are useful on a Valentine tray because they add a dense, bite-sized chocolate option alongside fruit and cookies. They also keep well, which matters when your oven is already full.
Key Ingredients:
- 8 oz semisweet chocolate, chopped
- 1/2 cup heavy cream
- 1 tbsp unsalted butter
- 1 tsp vanilla extract
- 1 pinch salt
- 1/2 cup cocoa powder, for rolling
- 1/2 cup Valentine sprinkles or crushed freeze-dried strawberries
Quick Steps:
- Place the chopped chocolate in a bowl.
- Heat the cream until it just begins to steam, then pour it over the chocolate and let it sit for 2 minutes.
- Stir in the butter, vanilla, and salt until smooth.
- Chill the ganache for 1 to 2 hours until firm enough to scoop.
- Roll into small balls, then coat in cocoa powder or sprinkles.
Equipment for This Recipe:
- Heatproof bowl
- Small saucepan
- Cookie scoop or spoon
- Baking sheet
- Parchment paper
How to Serve This Dish:
Serve the truffles cold or at cool room temperature in mini paper cups. They look nice in a cluster with strawberries or cookies nearby, since the texture is dense and needs contrast. One or two truffles per person is plenty.
Pro Tips for This Recipe:
- Chop the chocolate finely so it melts evenly.
- Don’t rush the chilling time. Soft ganache is messy.
- Use gloves or cold hands if the room is warm.
- Roll half in cocoa and half in sprinkles for better visual variety.
Variations on This Dish:
- Raspberry Truffle: Stir 1 teaspoon raspberry powder into the ganache.
- White Chocolate Shell: Use white chocolate ganache and roll in pink sprinkles.
- Salted Dark Bite: Finish with a tiny pinch of flaky salt on top.
Common Mistakes to Avoid with This Dish:
- Hot cream boiling over: Scalded cream can seize the chocolate. Heat it gently.
- Not chilling enough: The truffles smear instead of rolling.
- Too much coating: A thick layer of cocoa hides the chocolate flavor. Keep it light.
18. Meringue Hearts with Pink Swirl
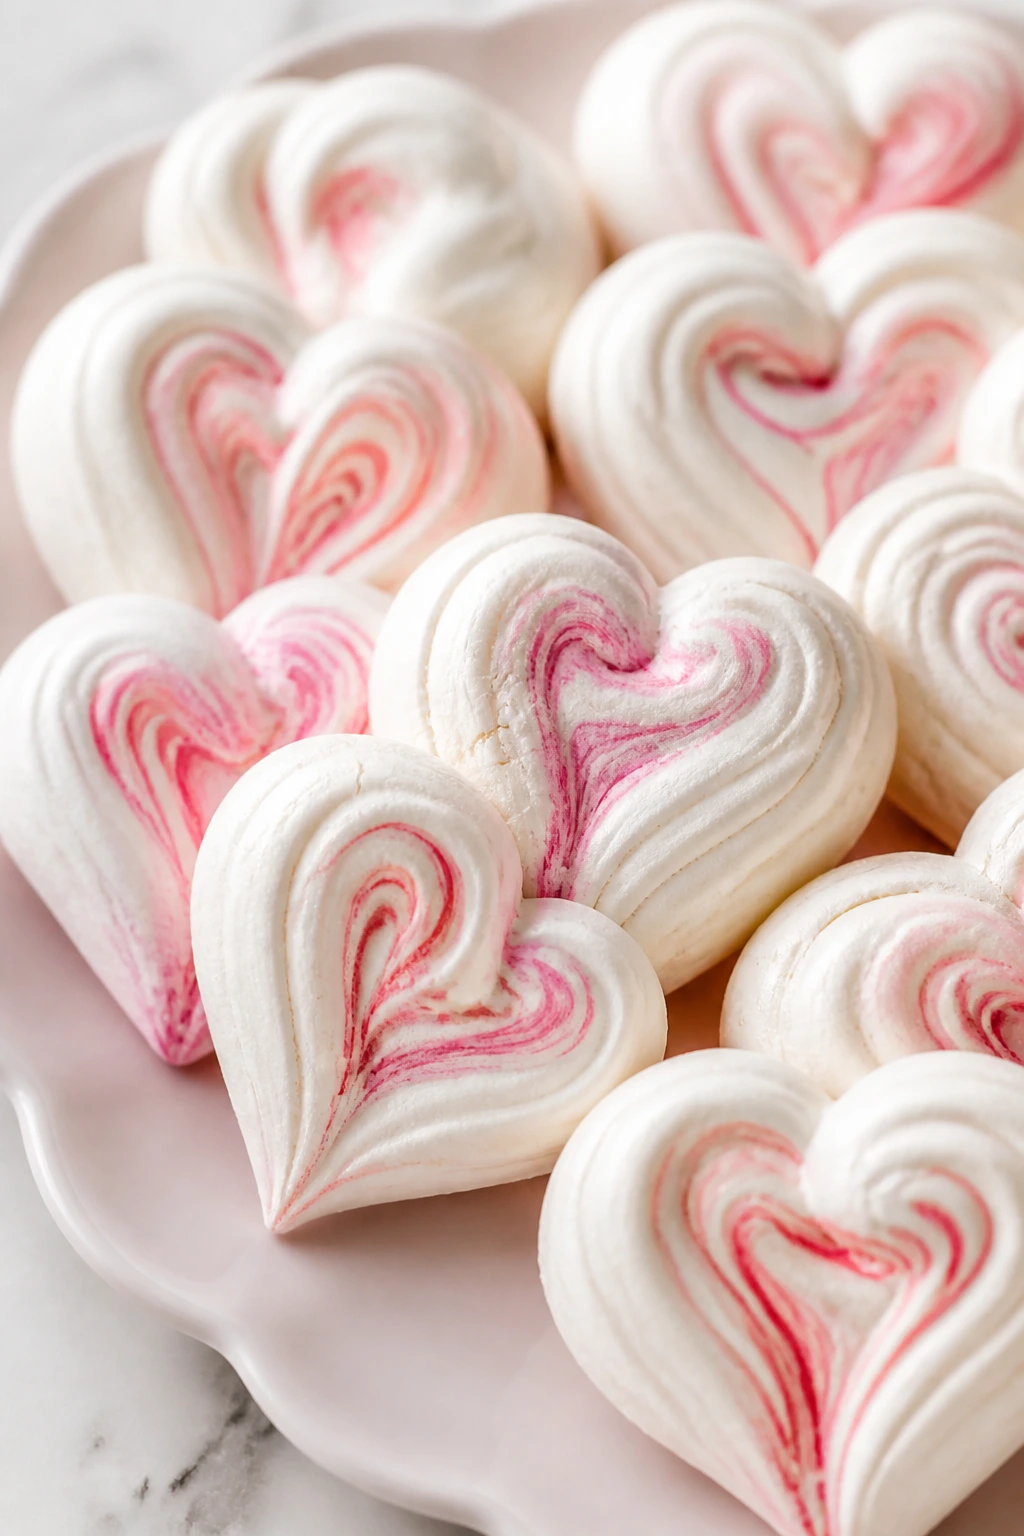
Meringue hearts are airy, crisp, and a little fragile, which is exactly why they make a lovely contrast on a dessert platter. They dissolve on the tongue with a dry snap at the edges and a marshmallow-soft center if you bake them just right.
Why It Works:
Egg whites and sugar, whipped properly, trap air and create that pale, shiny foam that bakes into a crisp shell. A low oven dries them out instead of browning them, which keeps the color clean and the texture delicate. They’re also naturally light, so they fill the “something sweet” slot without crowding the table.
Key Ingredients:
- 4 large egg whites, room temperature
- 1 cup granulated sugar
- 1/2 tsp cream of tartar
- 1 tsp vanilla extract
- Pink gel food coloring, a small amount
- 1/2 cup melted white chocolate, optional drizzle
Quick Steps:
- Beat the egg whites and cream of tartar until foamy.
- Add the sugar slowly while beating until the meringue is glossy and holds stiff peaks.
- Beat in vanilla and a tiny streak of pink coloring.
- Pipe heart shapes onto a parchment-lined sheet pan.
- Bake at 200°F (95°C) for 1 1/2 to 2 hours, then turn off the oven and let them dry inside for another hour.
Equipment for This Recipe:
- Stand mixer or hand mixer
- Piping bag or spoon
- Sheet pan
- Parchment paper
- Cooling rack
How to Serve This Dish:
Serve the hearts at room temperature, ideally the same day they’re made. They look pretty stacked with a few chocolate truffles or berries nearby. A drizzle of melted white chocolate gives them a little more sweetness if you want it.
Pro Tips for This Recipe:
- Make sure the bowl and beaters are grease-free.
- Add the sugar slowly so the meringue stays stable.
- If the meringues start browning, your oven runs too hot.
- Humid air softens meringues fast, so bake them on a dry day if possible.
Variations on This Dish:
- Berry Dust: Dust with freeze-dried strawberry powder after baking.
- Chocolate Swirl: Fold a few thin ribbons of melted chocolate through the meringue before piping.
- Mini Kisses: Pipe tiny dollops instead of hearts for a quicker bake.
Common Mistakes to Avoid with This Dish:
- Egg yolk in the whites: Even a little fat can stop the foam from building.
- High heat: Meringues brown and crack. Keep the oven low.
- Rushing the dry time: If they come out early, they’ll be sticky instead of crisp.
19. Conversation Heart Rice Krispie Treats
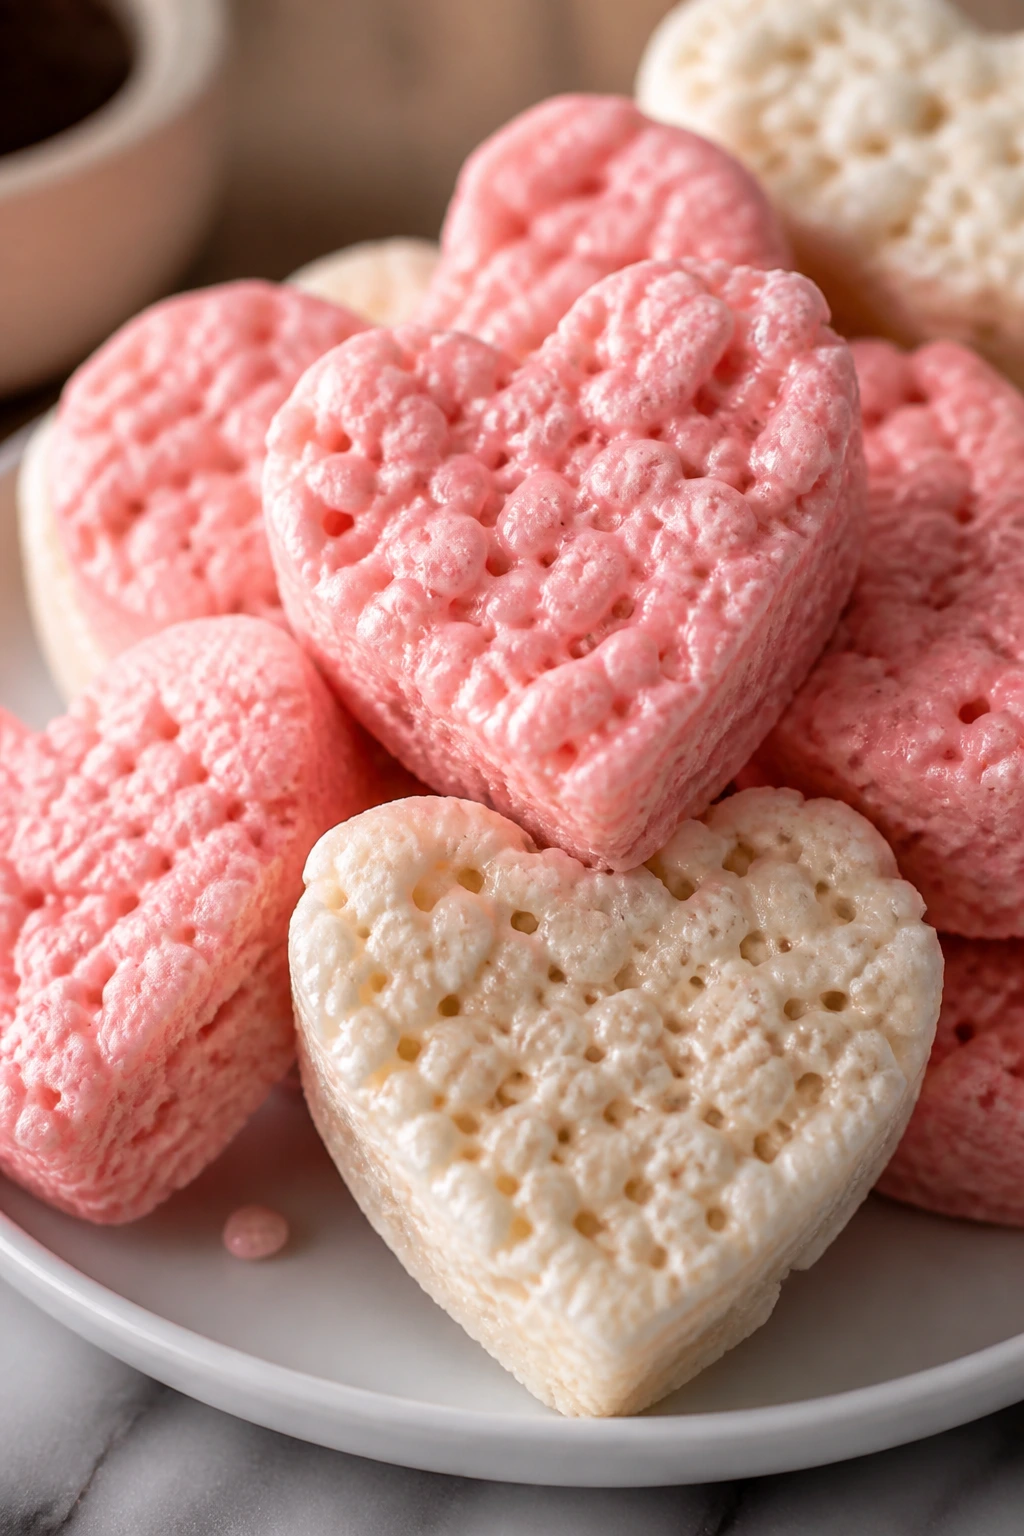
These are playful, colorful, and especially useful if you want one dessert on the table that doesn’t look too serious. They’re soft, chewy, and easy to cut into hearts, then decorate with little phrases if you’re feeling nostalgic.
Why It Works:
Marshmallows bind the cereal together fast, so you’re not waiting around for dough to chill or batter to bake. The treats stay soft if you keep the butter-to-marshmallow ratio balanced, and the pastel color makes them fit the holiday without much effort. They’re the kind of dessert that disappears while people are still pointing at the messages.
Key Ingredients:
- 3 tbsp unsalted butter
- 10 oz mini marshmallows
- 1 tsp vanilla extract
- 1 pinch salt
- 6 cups crisp rice cereal
- Pink or white gel food coloring, optional
- 1/2 cup pastel candies or icing pens for decorating
Quick Steps:
- Melt the butter in a large pot over low heat.
- Add the marshmallows and stir until smooth and glossy, then mix in vanilla and salt.
- Tint the mixture with a little food coloring if you want a pink batch.
- Fold in the cereal quickly, press into a buttered pan, and let it cool for 20 minutes.
- Cut into heart shapes and decorate with candy or icing phrases.
Equipment for This Recipe:
- Large pot
- Spatula
- 9×13-inch pan
- Heart cookie cutter
- Icing pen or candy for decoration
How to Serve This Dish:
These work best cut small because they’re sweet and chewy. Set them near the front of the tray where the color shows up immediately. Kids tend to reach for them first, which is not a mystery.
Pro Tips for This Recipe:
- Keep the heat low so the marshmallows don’t get tough.
- Butter your hands or spatula before pressing the mixture into the pan.
- Don’t pack the cereal down too hard or the treats turn dense.
- Decorate after cutting so the writing stays visible.
Variations on This Dish:
- Chocolate Drizzle Hearts: Drizzle the tops with melted chocolate.
- Strawberry Marshmallow Batch: Use strawberry-flavored marshmallows if you can find them.
- Pastel Sprinkle Crunch: Press Valentine sprinkles into the top before the treats set.
Common Mistakes to Avoid with This Dish:
- High heat: Burnt marshmallows turn the treats hard. Go low and slow.
- Overpacking the pan: Dense treats lose their chew.
- Decorating too early: Icing smears if the surface is still warm.
20. Strawberry Cream Cheese Danish Bites
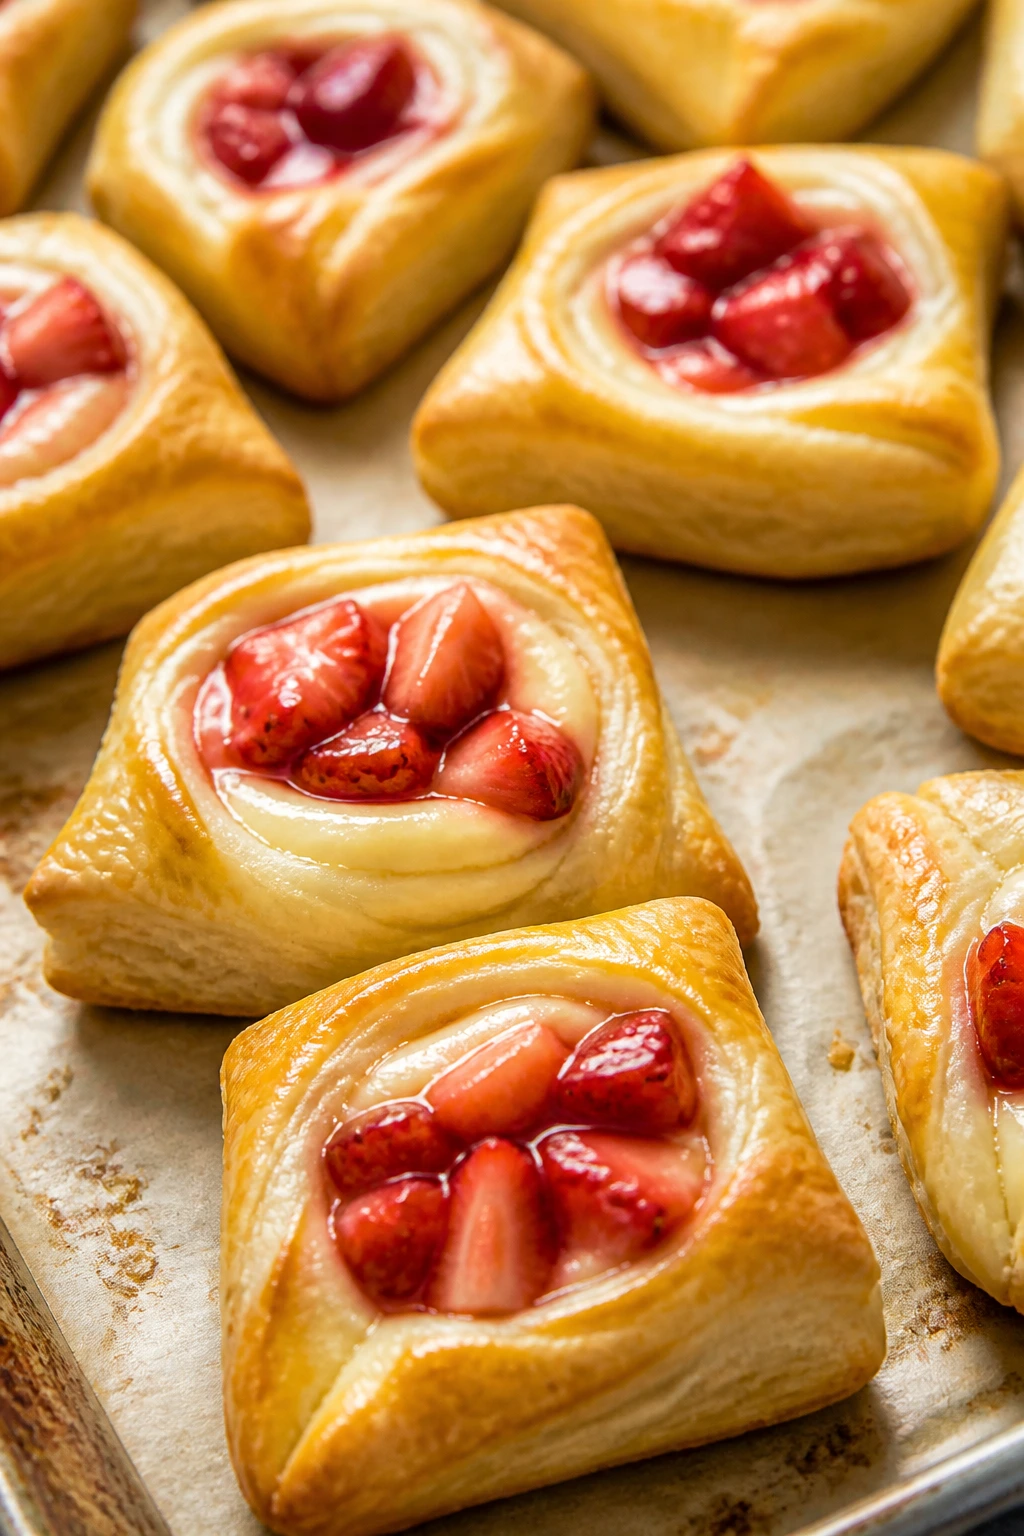
Puff pastry makes these look like they came from a bakery case, even when you pulled them together in a hurry. The pastry puffs into golden layers, the cream cheese filling stays tangy, and the strawberries soften into little ruby pockets on top.
Why It Works:
Puff pastry gives you volume without making dough from scratch, which is why these are such a smart holiday baking shortcut. Cream cheese and strawberries taste familiar in the best way, but the shape makes them feel celebratory. A little sugar on the edges helps the pastry brown and crisp instead of staying pale.
Key Ingredients:
- 1 sheet puff pastry, thawed
- 4 oz cream cheese, softened
- 2 tbsp powdered sugar
- 1 tsp vanilla extract
- 1 cup strawberries, diced
- 1 tbsp granulated sugar
- 1 large egg, beaten for wash
- 1 tbsp coarse sugar, optional
- 1 tsp lemon zest, optional
Quick Steps:
- Cut the puff pastry into squares or hearts and place them on a lined baking sheet.
- Mix the cream cheese, powdered sugar, vanilla, and lemon zest if using.
- Spoon a small dollop into the center of each piece, then top with diced strawberries mixed with granulated sugar.
- Brush the pastry edges with egg wash and sprinkle with coarse sugar.
- Bake at 400°F (205°C) for 14 to 17 minutes, until the pastry is puffed and deep golden.
Equipment for This Recipe:
- Baking sheet
- Parchment paper
- Mixing bowl
- Pastry brush
- Sharp knife or cutter
How to Serve This Dish:
Serve these warm or just slightly cooled so the pastry still crackles when you bite into it. They look good dusted with powdered sugar right before they hit the tray. A little extra strawberry on the side makes the filling feel brighter.
Pro Tips for This Recipe:
- Keep the filling small so the pastry can puff around it.
- If the puff pastry gets warm, chill the tray before baking.
- Use a sharp knife to cut clean shapes; dull edges press the pastry flat.
- Don’t overload with strawberries or the centers turn wet.
Variations on This Dish:
- Raspberry Cream Bites: Swap strawberries for raspberries and add a touch more sugar.
- Chocolate Stripe: Drizzle the cooled bites with melted chocolate.
- Savory-Sweet Version: Add a tiny pinch of black pepper to the strawberries for a subtle edge.
Common Mistakes to Avoid with This Dish:
- Warm pastry: It won’t puff properly. Keep it cold.
- Too much filling: The centers leak and sink.
- Underbaked bottoms: Make sure the pastry is deep golden, not just puffed.
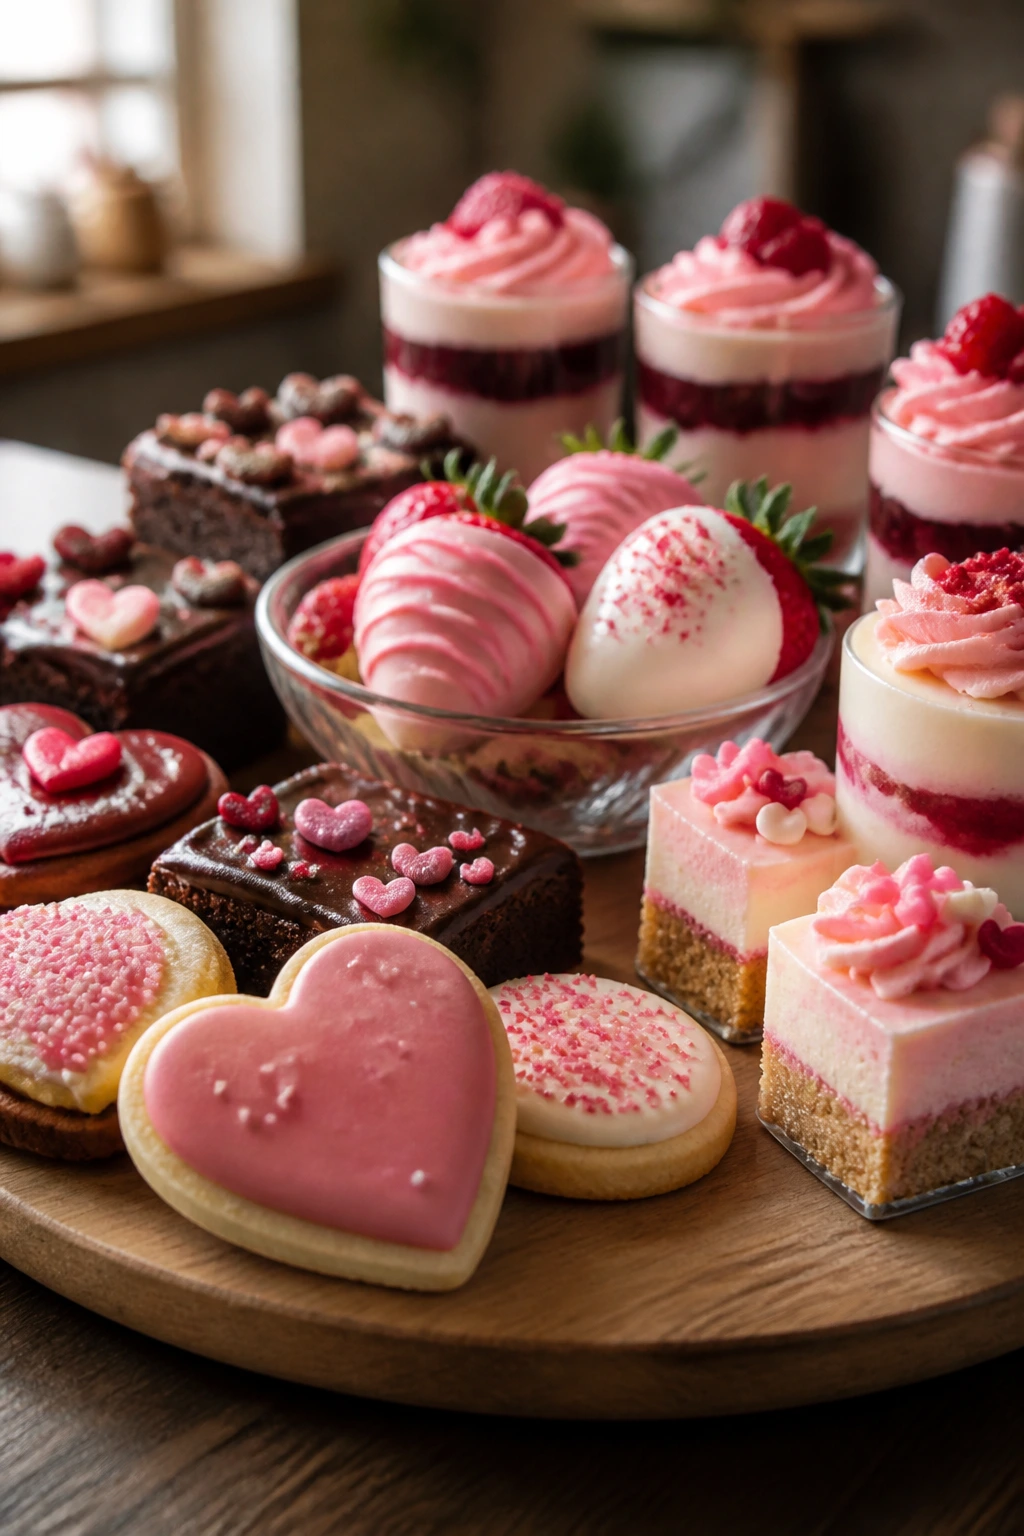
Why Small Valentine Bakes Usually Win on a Busy Tray
Big layer cakes have their place, but they ask for time, patience, and a level cutting hand that most people do not have when dinner is already on the stove. Small desserts move faster. They cool quicker, they decorate faster, and they give you more texture across the table, which matters more than a dramatic cake stand in the middle of everything.
There’s also a practical reason I keep coming back to little formats for Valentine baking: they let you mix rich desserts with bright ones. A chocolate lava cake, a meringue heart, and a strawberry parfait all feel different on the tongue. That variation matters. If every dessert is soft and sweet, the platter gets dull by the third bite.
The other quiet advantage is portion control without the preachiness. A cookie, a truffle, a cheesecake bite, and a dipped strawberry all let people sample more than one thing without leaving the table feeling like they need a nap. That’s the kind of dessert spread I trust.
Essential Equipment for These Recipes
-
Mixing bowls in two or three sizes — You’ll use them for batters, whipped cream, fillings, and glazes, so a nesting set saves time.
-
Hand mixer or stand mixer — Helpful for cookie dough, whipped cream, frosting, cheesecake filling, and meringue.
-
Sheet pans — At least two make life easier when you’re baking cookies, pastries, and brownies at the same time.
-
Parchment paper — Keeps chocolate, cookies, and bars from sticking and makes cleanup much easier.
-
Heart cookie cutters — One small and one medium cutter handle most of the Valentine shapes in this collection.
-
Measuring cups and spoons — Especially useful for the cookie doughs, glazes, and fillings where small differences matter.
-
Offset spatula or butter knife — Handy for spreading jam, smoothing frosting, and swirling cheesecake.
-
Cooling rack — Prevents soggy bottoms on cookies, brownies, cakes, and pastry.
-
Mini dessert cups or ramekins — Useful for parfaits, cheesecake cups, and lava cakes.
-
Piping bag or zip-top bag — Optional, but nice for frosting cupcakes, meringue hearts, and chocolate drizzles.
Smart Shopping and Ingredient Tips

Strawberries deserve a little respect here. Buy berries that smell sweet at the stem end and look dry on the surface, not shiny-wet or bruised. If they’re destined for dipping or layering, size matters less than firmness. Small berries can be perfect if the flavor is there.
Chocolate is where cheap shortcuts can actually help or hurt. For dipped strawberries, truffles, and ganache, use chocolate that melts smoothly and tastes good on its own. Chips work fine for some recipes, but chopped chocolate usually melts more evenly. If you’re buying white chocolate, look for one that includes cocoa butter; waxy white coating tends to taste flat.
Jam is worth paying attention to. Thick fruit preserves hold their shape better in thumbprints, hand pies, and cheesecake swirls than thin jelly does. If the jar is full of seeds and you want a smooth finish, strain it through a fine sieve after warming. That takes thirty seconds and saves you from a rough-looking glaze.
For dairy, room temperature is not a suggestion. Cream cheese, butter, and eggs mix better when they’re not cold from the fridge. Cold cream cheese leaves little lumps in frosting and cheesecake filling. Cold butter can make cookie dough uneven, and cold eggs can make batter split for a moment before it smooths out.
Puff pastry and pie dough can be store-bought without apology. In a dessert spread like this, store-bought pastry is not cheating; it’s a sensible decision. Keep it cold, work fast, and you’ll get the flaky lift you paid for.
How to Serve These Desserts
Presentation:
Mix heights and textures so the tray doesn’t look flat. Put the glazed cookies and brownies on one level, pile the dipped strawberries in a shallow bowl, and use clear cups for parfaits and cheesecake bars so the pink and white layers show through. Powdered sugar, a few raspberries, and a little chocolate curl go farther than elaborate piping.
Accompaniments:
A bowl of fresh berries, hot coffee, black tea, or sparkling water with lemon gives the sweeter desserts some breathing room. Chocolate-heavy pieces like brownie hearts and lava cakes work well beside fruit-forward items like parfaits or tart cheesecake bars. If you want a fuller dessert course, add vanilla ice cream or whipped cream in a separate bowl rather than piling it onto everything.
Portions:
For a mixed Valentine platter, plan on 2 to 3 small bites per person if there are several desserts on the table. If you’re serving one dessert after dinner, aim for one richer piece, like a lava cake or cheesecake bar, or two lighter pieces, like cookies or meringues. Small portions make the tray feel generous instead of overwhelming.
Beverage Pairing:
A dry sparkling wine works with chocolate-dipped strawberries, cheesecake bars, and berry desserts because it cuts the sweetness cleanly. For nonalcoholic pairings, strong coffee, Earl Grey, or a lightly sweetened raspberry iced tea each do a good job of keeping the flavors bright.
Additional Tips and Flavor Boosters
Flavor Enhancement:
A pinch of flaky salt on chocolate desserts, especially brownies, truffles, and dipped strawberries, sharpens the cocoa and keeps the sweetness from flattening out. On berry desserts, a little lemon zest in the filling or glaze makes the fruit taste fresher. It’s a small move, but it changes the whole plate.
Customization:
If you want the tray to lean more fruity, push raspberry jam, strawberry sauce, and fresh berries across three or four recipes instead of using chocolate everywhere. If you prefer richer desserts, lean into ganache, cream cheese frosting, and cheesecake bars. The smartest trays usually repeat one flavor thread while changing the format.
Serving Suggestions:
Use a dusting of powdered sugar on bars, cookies, and pastry right before serving. Add fresh mint only where it makes sense, because mint can look random if it’s scattered on every dessert. For a more polished finish, drizzle one dessert type with chocolate and leave the others plain so the tray has a visual lead and a supporting cast.
Make-It-Yours:
For a gluten-free spread, the easiest swaps live in cookies, brownies, truffles, and cheesecake fillings. For a dairy-free version, use coconut cream for whipped desserts and a good plant-based butter in cookies and bars. If you’re feeding kids, set out sprinkles, crushed wafers, and icing pens so they can finish a few desserts themselves.
Make-Ahead, Storage, and Reheating Guidance
Cookies, bars, blondies, and brownie hearts are the most make-ahead-friendly items in this collection. Most will keep 3 to 4 days at room temperature in an airtight container, with parchment between layers so the toppings don’t stick. If they include cream cheese, fresh fruit, or whipped cream, move them to the fridge and plan on up to 3 days refrigerated.
Chocolate-dipped strawberries are the exception. They’re best the day they’re made and hold up for only a short window before the berries start to sweat. If you need to prep ahead, wash and dry the strawberries earlier in the day, then dip them closer to serving. Keep them uncovered in the fridge for a short chill if needed, but do not seal them in a container while the chocolate is still fresh.
Cheesecake bars, mini cheesecakes, and parfait-style desserts all prefer the refrigerator. They’ll stay good for 3 to 4 days refrigerated if covered tightly. For best texture, add sauce, jam, or whipped cream just before serving. Freezing works for cheesecake bars and some brownies for up to 2 months, wrapped well, though the texture softens a little after thawing.
Cookies and pastry can also be frozen before or after baking. Unbaked cookie dough balls freeze well for up to 2 months, and baked sugar cookies or thumbprints can be thawed at room temperature. Puff pastry bites reheat best in a 325°F (165°C) oven for 5 to 8 minutes so the crust crisps back up. Avoid the microwave if you want to keep the pastry from turning limp.
For brownies, blondies, and pound cake, room-temperature reheating is often enough. If you want them warm, a short 10-second burst in the microwave softens them without drying them out. Lava cakes are the one dessert here that should be baked and served right away; they do not wait politely.
Variations and Adaptations to Try

Gluten-Free Sweet Tray:
Use a 1:1 gluten-free flour blend in the cookies, brownies, blondies, and pound cake. The structure holds well in most of these recipes, especially when there’s butter or chocolate doing some of the heavy lifting. Keep the meringues, truffles, fruit cups, and cheesecake recipes in the mix too, since they’re naturally easier to adapt.
Dairy-Free Chocolate and Berry Lineup:
Use plant-based butter in cookies and bars, coconut cream in place of whipped cream, and dairy-free chocolate for dipped strawberries and truffles. Cheesecake-style desserts can be swapped for dairy-free cream cheese, though the texture is usually a little softer. Stick to the fruit-forward recipes if you want the change to feel seamless.
Extra-Raspberry Menu:
If raspberry is the flavor you love most, echo it through the tray with raspberry jam in cookies, raspberry glaze on pound cake, raspberry powder on meringues, and raspberry sauce with brownies. Repeating the same fruit across different textures gives the spread a clear identity. It also keeps the color story cohesive without needing a single decorative flourish.
Less-Sweet Dessert Board:
Use dark chocolate instead of milk chocolate, trim the sugar in the glaze by a spoonful or two, and lean on tart fruit fillings rather than frosting-heavy bakes. Cheesecake bars, lava cakes, and chocolate truffles all taste more balanced when the sugar stays under control. This is the version I’d make for adults who don’t want a sugar wallop.
Kid-Decorating Tray:
Bake the plain cookies, brownies, rice cereal hearts, and puff pastry bites ahead of time, then put out sprinkles, icing pens, and crushed candy for a decorating station. Kids do not need a perfect finish, and frankly, the slightly messy version is often the one people remember. Just keep the frosting thick enough to hold the decorations in place.
Common Mistakes to Avoid
Making everything the same texture:
A tray full of soft desserts gets dull fast. If you already have brownies, cheesecake, and cupcakes, make room for something crisp like meringues, thumbprints, or sugar cookies so the bites don’t blur together.
Skipping chill time when the recipe needs it:
Cookie dough, cheesecake, ganache, and puff pastry all change character after a short rest. Warm dough spreads, soft ganache smears, and cheesecake slices badly if it’s rushed. The fridge does the boring work you don’t want to do by hand.
Using wet fruit without drying it:
This shows up in dipped strawberries, parfaits, and pastry filling. Moisture makes chocolate slide, cream soften, and crusts soggy. Dry the fruit well and, when needed, let it sit just long enough to release juice, not so long that it turns into soup.
Overfilling pastry and hand pies:
It’s tempting to pile in the fruit or cream, but too much filling leaks out and burns on the pan. A modest spoonful looks neater and bakes more evenly. The dessert tastes better when the crust still has room to crisp.
Trying to cut warm bars and cakes into perfect shapes:
Warm brownies, cheesecake bars, and pound cake tear instead of slicing. Let them cool fully, then use a sharp knife wiped clean between cuts. If you want heart shapes, chill the slab first.
Decorating too early:
Glaze melts on hot cookies, powdered sugar disappears into warm bars, and chocolate drizzle goes dull on steaming desserts. Finish at the end. It’s the difference between a tidy tray and a melted one.
Frequently Asked Questions
Which desserts from this list can I make the day before?
Brownies, blondies, cookies, cheesecake bars, pound cake, truffles, and hand pies all hold up well overnight. Save strawberries, whipped cream layers, and meringues for closer to serving time because those lose texture faster.
Can I use frozen strawberries or raspberries?
Yes, but mostly in sauces, fillings, and baked desserts. Frozen berries release more liquid, so they’re better for cheesecake swirls, compotes, and glazes than for dipping or fresh layering. Thaw and drain them first if the recipe needs a thick finish.
What’s the easiest dessert here for a beginner?
Chocolate-dipped strawberries and chocolate truffles are the simplest because they don’t ask for precise baking windows. Strawberry parfaits and rice cereal hearts are close behind. If you want a baked option that’s still forgiving, the blondies are a smart choice.
How do I keep chocolate-dipped strawberries from sweating?
Dry the berries very well before dipping, then chill them briefly and serve soon after. The sweating usually comes from moisture on the fruit or from keeping them sealed too long while cold. Leave them uncovered in the fridge for a short time if needed, then plate them right away.
Can I freeze any of these desserts?
Yes. Brownies, blondies, cheesecake bars, pound cake slices, and some cookies freeze well for about 2 months when wrapped tightly. Skip freezing meringues, dipped strawberries, and parfaits because the texture changes too much.
What if my chocolate seizes while melting?
Usually it got too hot or a bit of water got in. Stir in a small spoonful of warm cream or coconut oil and whisk gently until it loosens, but if it’s badly seized, start over. Chocolate is unforgiving about moisture.
How do I cut bars into heart shapes without wasting too much?
Chill the bars fully, use a metal heart cutter, and press straight down without twisting. Save the scraps for snacking or layering into dessert cups. A warm cutter helps too, but only for a moment; wipe it clean between cuts.
What should I do if I only have one baking sheet?
Bake the items in rounds and line the tray with fresh parchment each time. Cookies, meringues, and pastry can wait their turn, but keep batter-based desserts and whipped fillings moving so they don’t sit too long. One sheet is enough if you stay organized.
A Tray Worth Repeating

The easiest Valentine dessert spread is the one that gives you contrast without chaos. A few crisp cookies, something creamy, one rich chocolate bite, and one bright fruit dessert go farther than a table full of similar sweets. That mix keeps people reaching back for another piece instead of feeling weighed down after the first round.
Pick three or four of these recipes and build from there. Add the ones that fit your time, your oven space, and the kind of dessert people at your table actually eat. Then let the chocolate set, let the berries shine, and let the tray do its work.