
Bird nest cookies look like the kind of dessert that should require a pastry bag, a candy thermometer, and a calm afternoon. They don’t. Most versions are built from a short list of ingredients, a quick melt or mix, and a little shaping while the mixture is still warm enough to behave. That’s the whole trick, and it’s exactly why bird nest cookies are such a good fit for beginner bakers.
The shape does a lot of the work for you. A nest can be rustic. It can be slightly crooked. It can have a few rough edges and still look right once you tuck in candy eggs, berries, chocolate drops, or a glossy little center. If you’ve ever put off decorated cookies because the finishing step looked fussy, this collection should feel like a relief. Crunchy cereal, toasted coconut, pretzels, melted chocolate, chewy oats, crisp meringue—those textures carry the look and the flavor.
Once you make one or two, the pattern starts to click. Press a hollow, let it set, fill it, and move on. That’s the kind of baking that keeps its charm even when the cookies aren’t perfect, which is to say: almost always.
Why You’ll Love This Collection

-
Low-Stress Shapes: Most of these nests are formed with a spoon or a mini muffin tin, so you do not need piping skills or neat hands to get something that looks finished.
-
Short Ingredient Lists: The recipes lean hard on pantry staples like chocolate chips, coconut, cereal, oats, peanut butter, and vanilla, which keeps the shopping list sane.
-
Texture Does the Decorating: Crunchy noodles, chewy coconut, crisp meringue, and fudgy brownie bases make the cookies look detailed before you add a single candy egg.
-
Plenty of No-Bake Options: Several of the nests set in the fridge instead of the oven, which is useful when you want dessert without turning the kitchen into a sauna.
-
Easy to Personalize: Swap the candy eggs, change the chocolate, add citrus zest, or use different nuts without rebuilding the whole recipe from scratch.
-
Friendly for Beginners: If you can melt chocolate, stir a bowl, and use a spoon to make a dent in the center, you can make these.
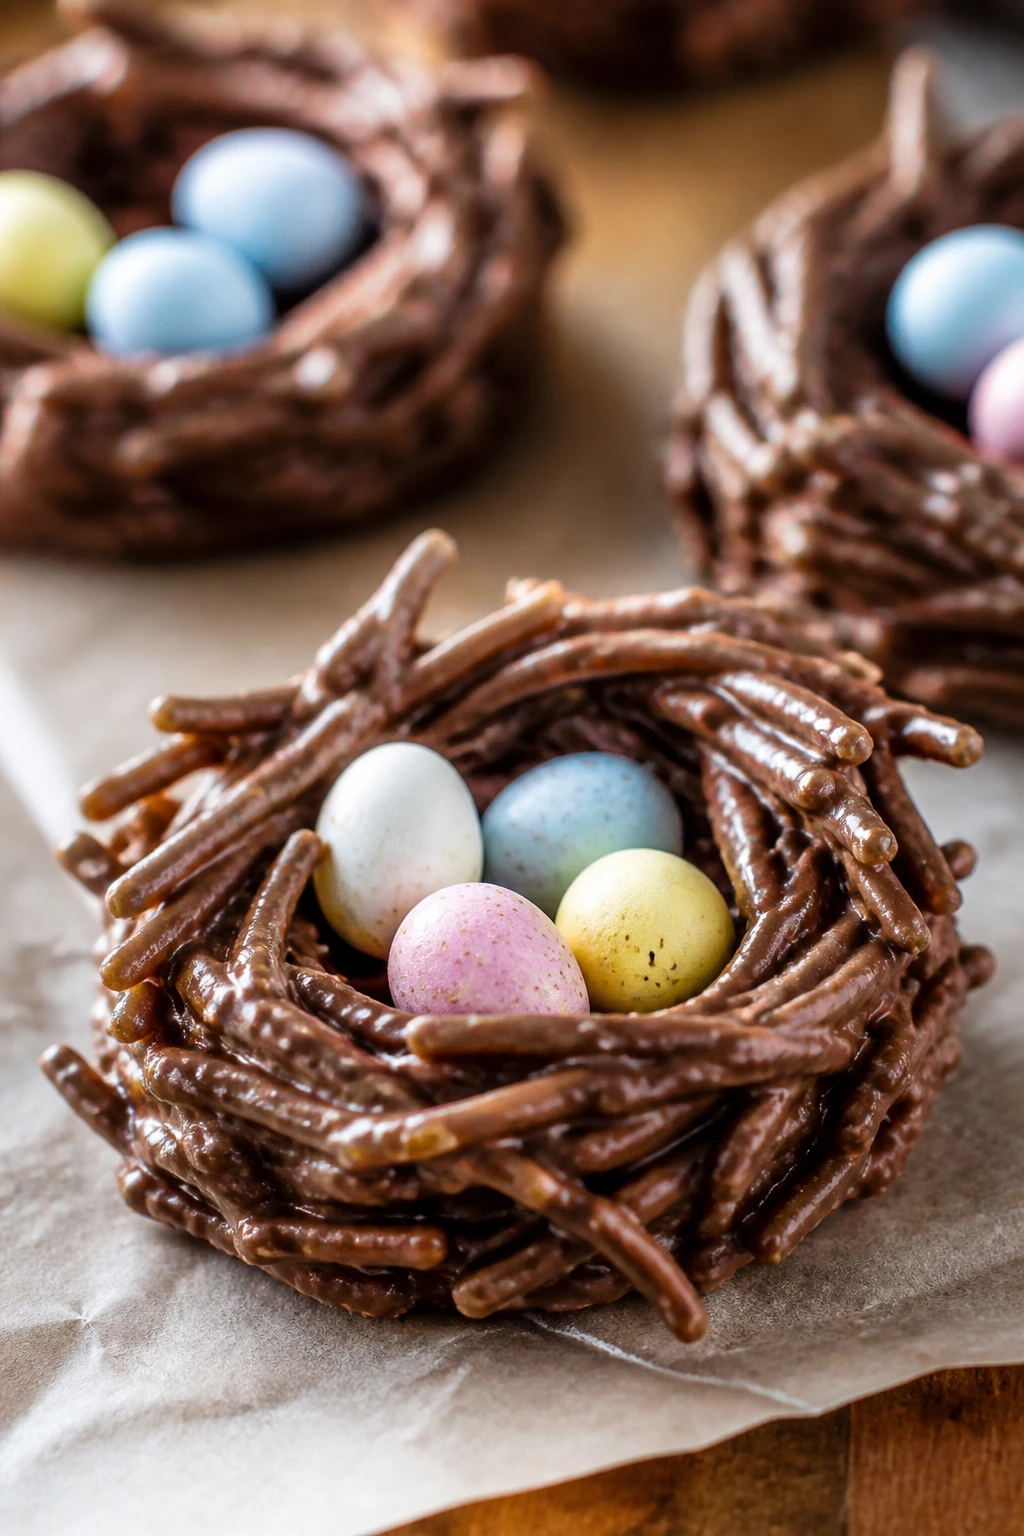
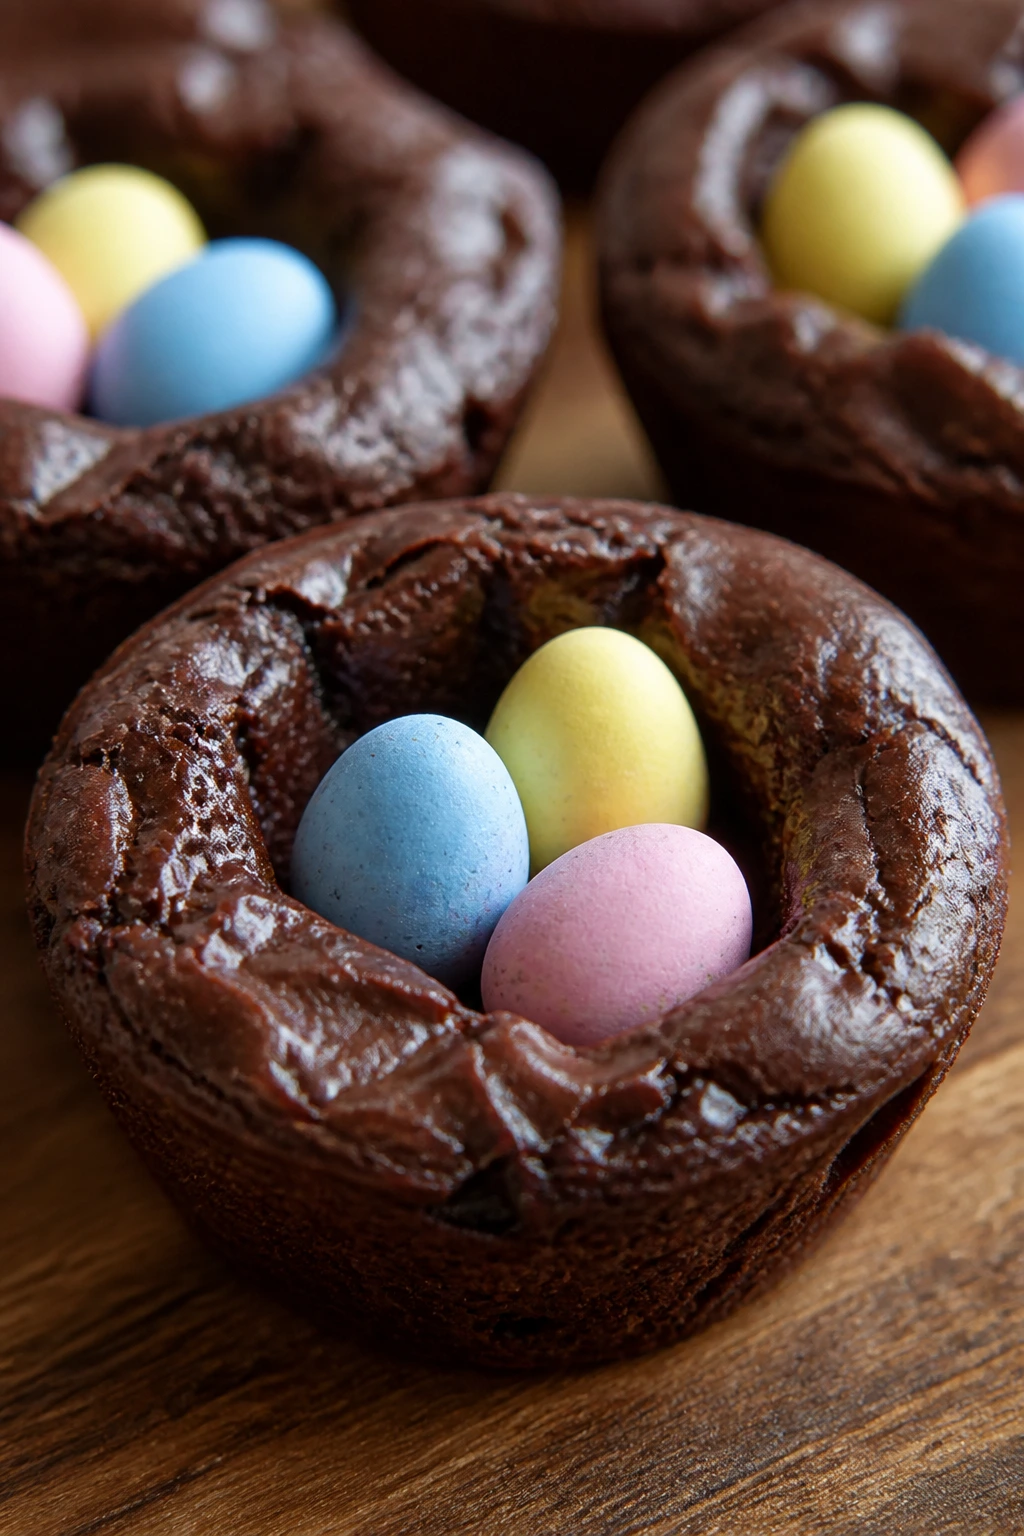
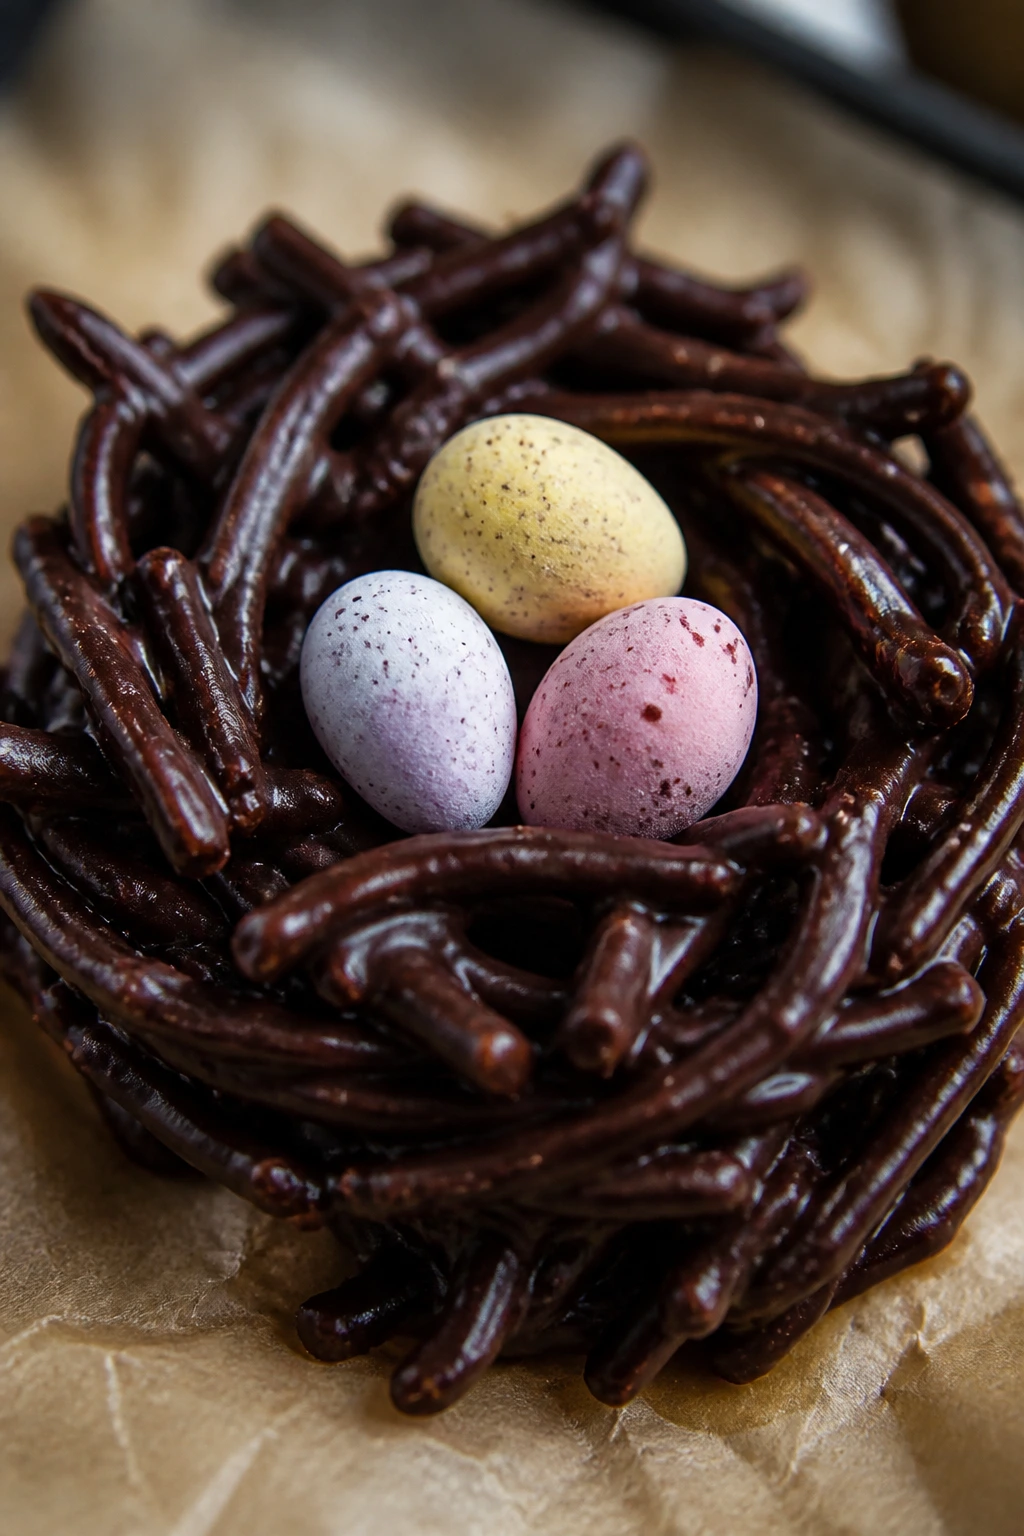
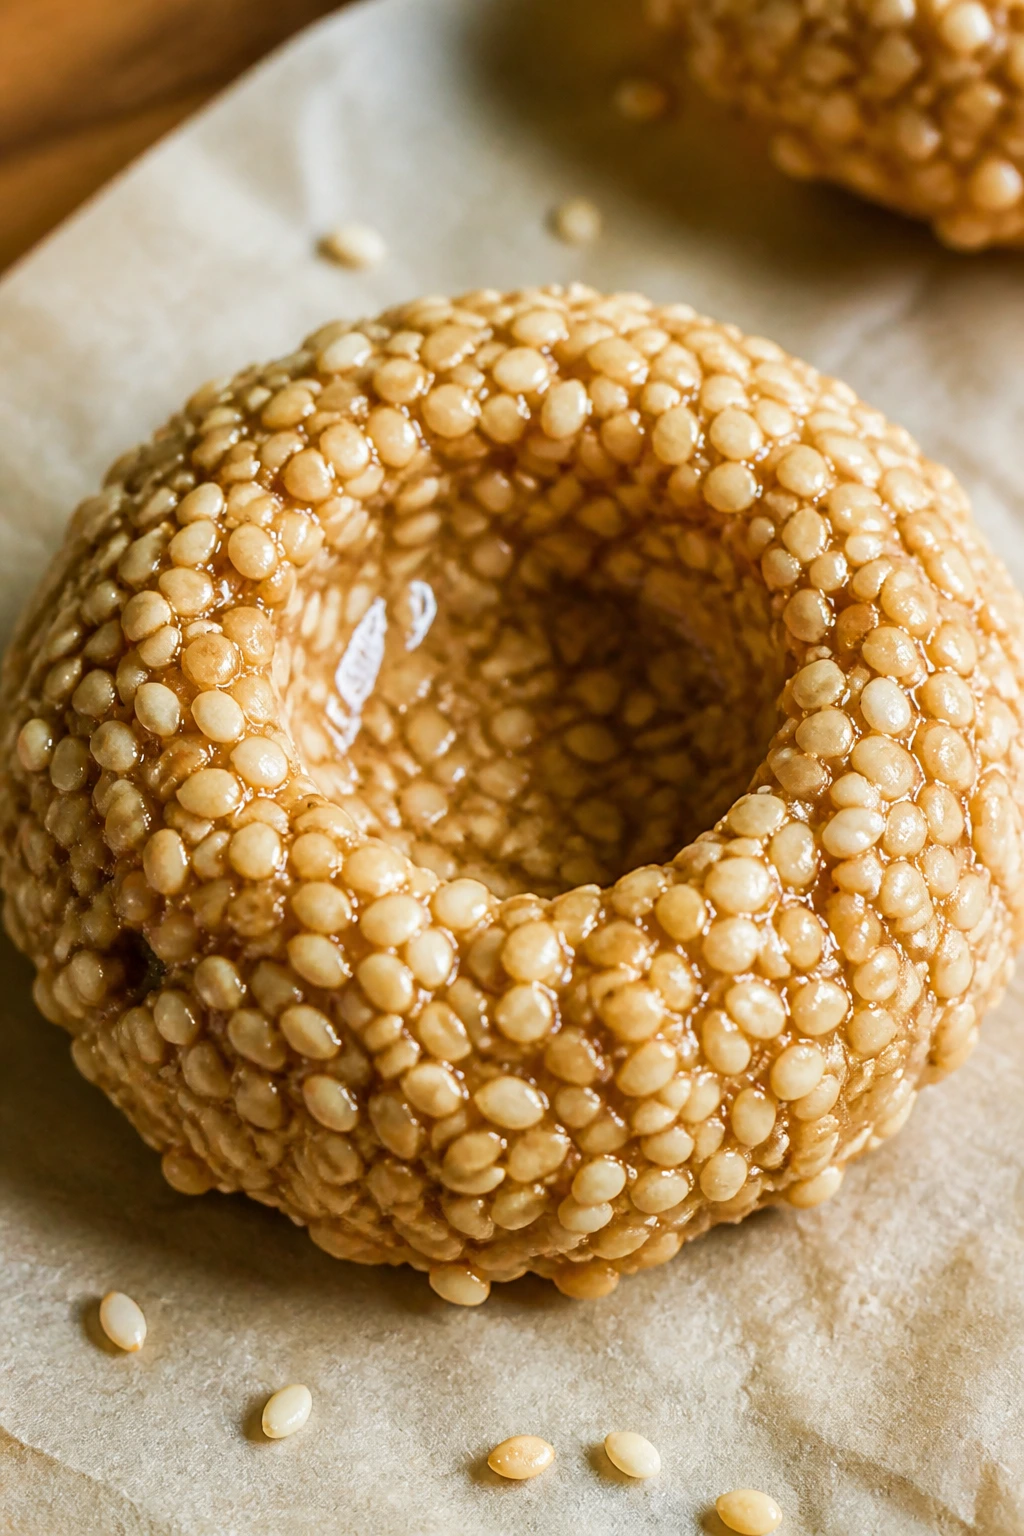
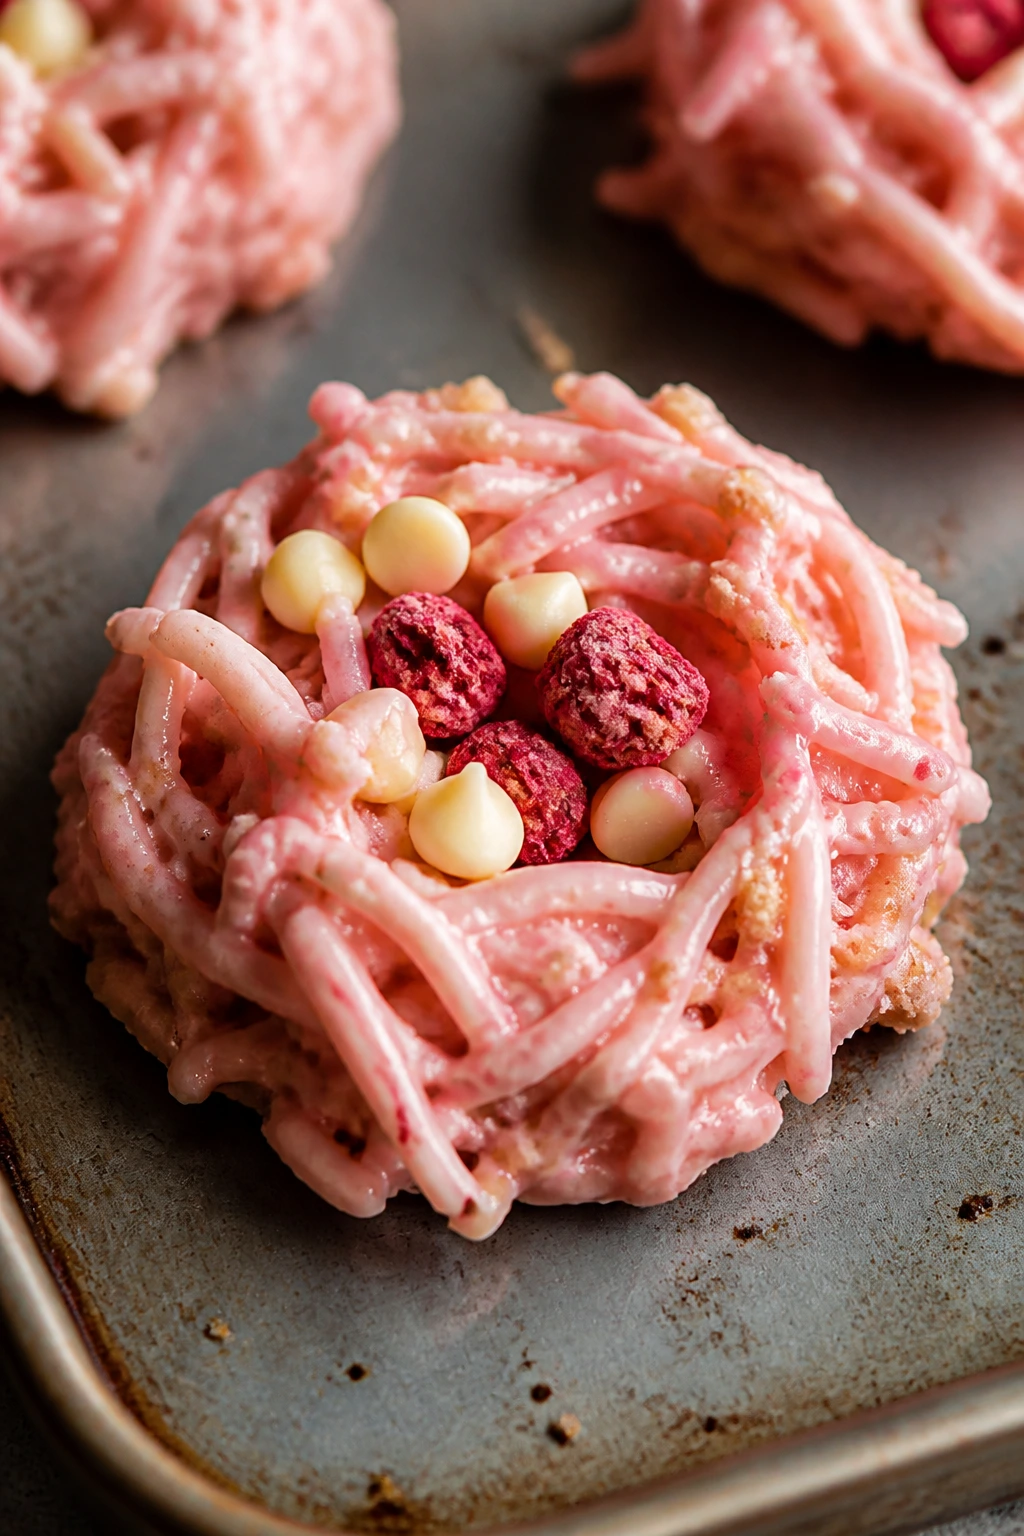
1. Classic Chow Mein Bird Nest Cookies
Crunchy noodles and glossy chocolate make the most old-school bird nest cookie, and honestly, there’s a reason it still hangs around. The texture lands somewhere between brittle and chewy, and the butterscotch gives the chocolate a warm, caramel edge that tastes bigger than the ingredient list suggests.
Why It Works: The chow mein noodles act like twigs, and the melted chocolate locks them into place once they cool. Butterscotch chips soften the flavor so the nests don’t taste flat or overly sweet.
Key Ingredients:
- 3 cups chow mein noodles — the crisp base that gives the nest its shape.
- 1 cup semisweet chocolate chips — melts into a sturdy shell.
- 1/2 cup butterscotch chips — adds that toasted caramel note.
- 1 tablespoon coconut oil — loosens the melt so it coats evenly.
- 1/2 teaspoon vanilla extract — rounds out the chocolate.
- 1/4 teaspoon fine sea salt — keeps the sweetness from running away.
- 24 to 36 mini candy eggs — the little payoff in the center.
Quick Steps:
- Line a baking sheet with parchment and set out a mini muffin tin if you want cleaner shapes.
- Melt the chocolate chips, butterscotch chips, and coconut oil together in 20-second bursts, stirring until smooth.
- Stir in vanilla, salt, and chow mein noodles until every strand is coated.
- Scoop into mounds, press a thumb or spoon into the center, and chill for 20 to 25 minutes until firm.
Equipment for This Recipe:
- Microwave-safe bowl
- Rubber spatula
- Parchment-lined baking sheet
- Mini muffin tin, optional but helpful
How to Serve This Dish: Stack these on a white plate or a parchment-lined tray and tuck the candy eggs in just before serving. They go well with coffee, cold milk, or a sharp cup of black tea.
Pro Tips for This Recipe:
- Let the melted chocolate sit for 30 seconds before adding noodles; it coats better and breaks fewer strands.
- Use dry noodles. Any moisture turns the chocolate grainy.
- Add the eggs after the nests have set so the candy shells stay shiny.
Variations on This Dish:
- Dark Chocolate Salted Nest: Swap half the semisweet chips for dark chocolate and finish with flaky salt.
- Peanut Butter Nest: Replace 1/4 cup of the chocolate chips with peanut butter chips for a softer, nuttier flavor.
- Toasted Coconut Crunch: Stir in 1/2 cup toasted coconut for a deeper, more nutty finish.
Common Mistakes to Avoid with This Dish:
- Don’t melt the chocolate too hot; scorched chocolate turns thick and sandy fast.
- Don’t overpack the center before it sets, or the nest will collapse instead of cupping.
- Don’t add the eggs to warm nests unless you want the candy coating to smear.
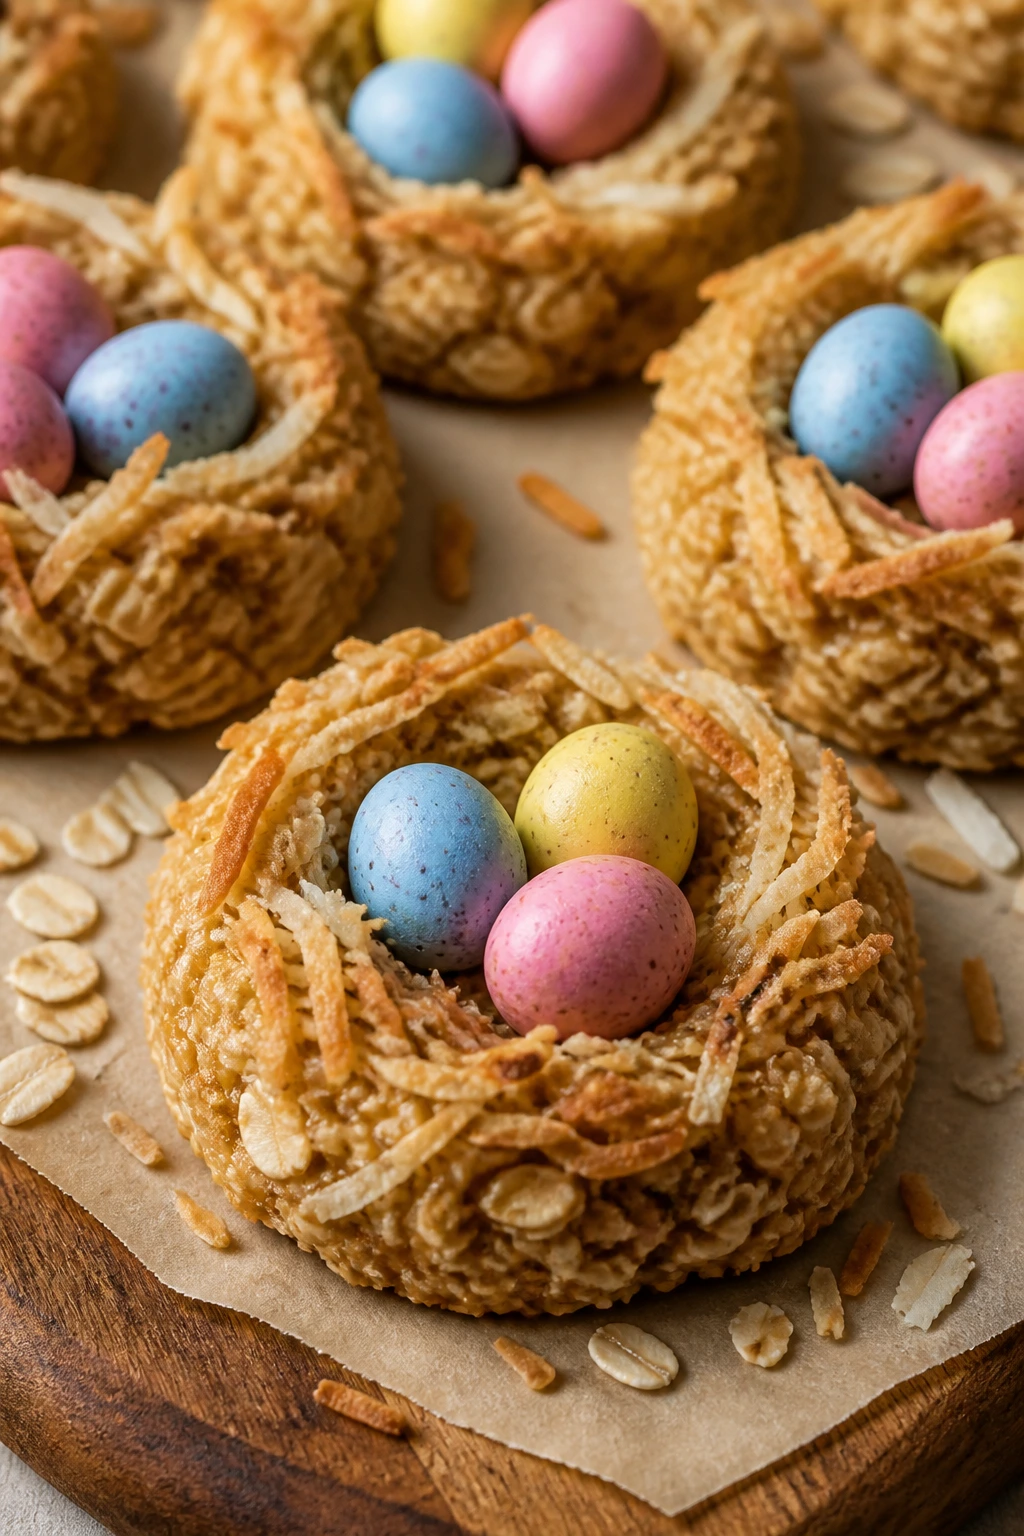
2. Toasted Coconut Macaroon Nests
These bake up with crisp edges, a chewy middle, and a coconut smell that fills the kitchen in the good old-fashioned way. If you like macaroons but wish they were a little more playful, this version gets you there without extra fuss.
Why It Works: Egg whites and condensed milk bind the coconut into a sticky dough that browns beautifully in a muffin tin. Toasted coconut gives you a deeper flavor than plain shredded coconut, and the wells stay open once the cookies cool.
Key Ingredients:
- 3 cups sweetened shredded coconut — the nest texture lives here.
- 1/2 cup sweetened condensed milk — keeps the mixture cohesive and chewy.
- 2 large egg whites — helps the nests set.
- 1 teaspoon vanilla extract — adds warmth.
- 1/4 teaspoon almond extract — gives the macaroon flavor a lift.
- 1/4 teaspoon fine sea salt — sharpens the sweetness.
- 24 mini candy eggs — the finish that makes the shape obvious.
Quick Steps:
- Preheat the oven to 325°F and line a mini muffin tin with parchment liners or grease it well.
- Stir coconut, condensed milk, egg whites, vanilla, almond extract, and salt until sticky and evenly mixed.
- Scoop into the wells, then press the center of each mound lightly with a teaspoon.
- Bake for 15 to 18 minutes until the edges are deeply golden and the tops feel set.
- Cool for 10 minutes in the pan, then move to a rack and fill once fully cool.
Equipment for This Recipe:
- Mini muffin tin
- Mixing bowl
- Teaspoon for shaping the wells
- Cooling rack
How to Serve This Dish: These look nicest on a platter with a few extra toasted coconut flakes scattered around them. Serve them with tea or espresso; the coconut sweetness likes a bitter drink beside it.
Pro Tips for This Recipe:
- Toast half the coconut in a dry skillet first if you want a stronger flavor.
- Press the centers while the cookies are still warm, not after they cool.
- Cool completely before filling, or the candy eggs will sink.
Variations on This Dish:
- Chocolate-Dipped Nest: Dip the bottoms in melted dark chocolate once cool.
- Lemon Coconut Nest: Add 1 tablespoon lemon zest for a brighter, cleaner flavor.
- Nutty Almond Nest: Fold in 1/4 cup sliced almonds for a little extra crunch.
Common Mistakes to Avoid with This Dish:
- Don’t underbake them; pale coconut nests taste sticky instead of chewy.
- Don’t skip the liners if your muffin tin tends to grab baked coconut.
- Don’t overmix the batter into paste; you want strands, not coconut sludge.
3. Pretzel Chocolate Nest Cookies
Salted pretzels make a nest with real crunch, not just sweetness pretending to be texture. This one feels a little more grown-up than the candy-only versions, especially if you leave the chocolate on the darker side.
Why It Works: Crushed pretzels mimic twigs, and the combination of peanut butter and honey helps the chocolate set without turning brittle. The salt on the pretzels makes every bite pop.
Key Ingredients:
- 3 cups mini pretzels, lightly crushed — the main structure.
- 1 cup milk chocolate chips — gives a smooth, sweet base.
- 1/2 cup creamy peanut butter — helps bind the mixture.
- 2 tablespoons honey — adds stickiness and shine.
- 1 tablespoon unsalted butter — softens the melt.
- 1/2 teaspoon vanilla extract — rounds out the flavor.
- 24 mini candy eggs — the nest filling.
Quick Steps:
- Line a tray with parchment and crush the pretzels into rough pieces, not dust.
- Melt chocolate chips, peanut butter, honey, and butter together until glossy.
- Stir in vanilla and the pretzels until every piece is coated.
- Scoop into mounds, shape each one with a spoon, and chill for 20 minutes before filling.
Equipment for This Recipe:
- Medium saucepan or microwave-safe bowl
- Parchment-lined tray
- Spoon or small scoop
- Mixing bowl
How to Serve This Dish: Serve these with a cold glass of milk or a cup of strong coffee; the salt makes both taste better. A few extra pretzel shards on the plate make the nests look more rustic.
Pro Tips for This Recipe:
- Keep the pretzel pieces coarse so the nests still look twiggy.
- Warm the honey just enough to mix; boiling it makes the coating stiff.
- Add the eggs only after the nests are firm or the centers will flatten.
Variations on This Dish:
- Dark Chocolate Pretzel Nest: Swap in dark chocolate chips for a sharper finish.
- White Chocolate Blond Nest: Use white chocolate and add 2 tablespoons crushed freeze-dried strawberries.
- Caramel Pretzel Nest: Replace the honey with caramel sauce and chill a little longer.
Common Mistakes to Avoid with This Dish:
- Don’t grind the pretzels too fine or the texture disappears.
- Don’t shape them while the mixture is still hot; it will slide apart.
- Don’t use natural peanut butter unless you’re ready to stir constantly, because separation makes the nests weaker.
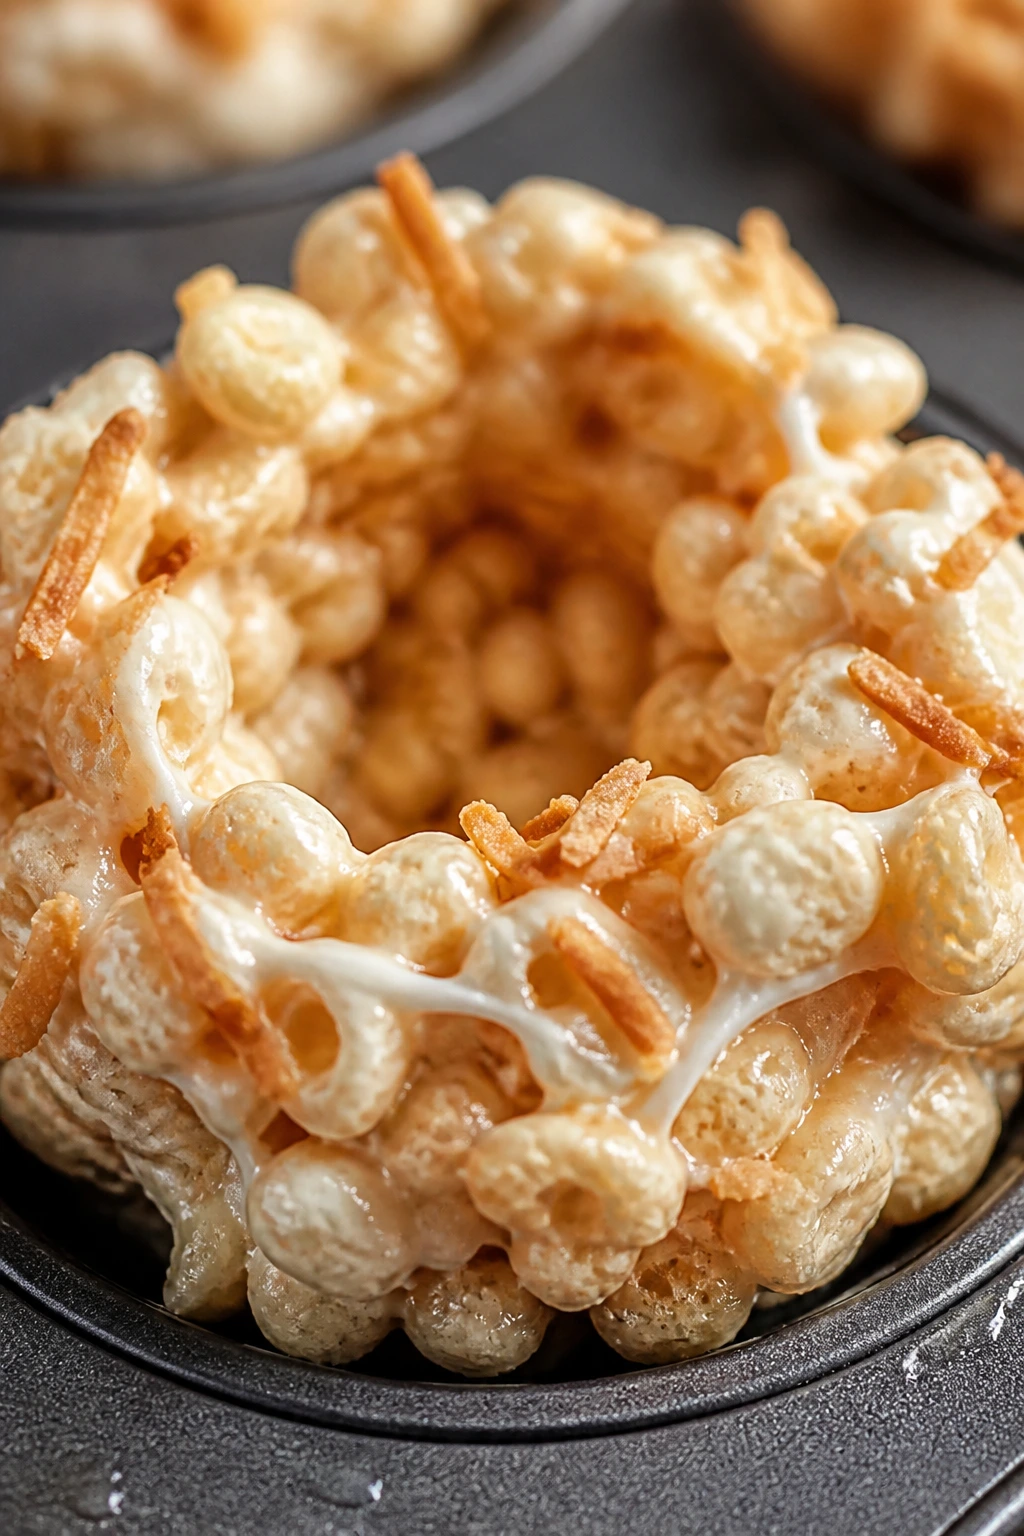
4. Peanut Butter Cornflake Nests
This is the kind of dessert that tastes like a lunchbox memory dressed up for a party. Cornflakes give the nest a sharper crunch than cereal bars, and peanut butter makes the whole thing taste toasted and familiar.
Why It Works: Peanut butter and honey make a fast binder that coats the cereal without needing a stove for long. Powdered sugar keeps the mixture from tasting sticky, and the shallow cups hold the shape nicely once chilled.
Key Ingredients:
- 4 cups cornflakes — light, crisp pieces that hold their shape.
- 1 cup creamy peanut butter — the main binder and flavor.
- 1/2 cup honey — adds sweetness and stickiness.
- 1/2 cup powdered sugar — keeps the mixture from feeling wet.
- 1 teaspoon vanilla extract — smooths the peanut flavor.
- 1/4 teaspoon salt — keeps it balanced.
- 24 mini candy eggs — the finish.
Quick Steps:
- Warm the peanut butter and honey together until loose and pourable.
- Stir in powdered sugar, vanilla, and salt until smooth.
- Fold in the cornflakes gently so they stay mostly intact.
- Spoon into a mini muffin tin, press the centers, and chill for 15 to 20 minutes.
Equipment for This Recipe:
- Saucepan or microwave-safe bowl
- Mini muffin tin
- Rubber spatula
- Spoon for pressing the wells
How to Serve This Dish: These are good on a casual dessert tray with fruit or salted nuts. The peanut flavor likes a glass of cold milk or an iced coffee with a splash of cream.
Pro Tips for This Recipe:
- Warm the binder only until fluid; overheating makes the peanut butter taste dull.
- Fold, don’t mash, or the cornflakes lose their shape.
- Grease your spoon lightly if the mixture starts to stick.
Variations on This Dish:
- Chocolate Peanut Nest: Stir in 1/3 cup mini chocolate chips after the cereal cools a bit.
- Sunflower Seed Nest: Swap the peanut butter for sunflower seed butter for a nut-free version.
- Maple Peanut Nest: Replace half the honey with maple syrup for a rounder flavor.
Common Mistakes to Avoid with This Dish:
- Don’t add the cornflakes to boiling hot binder or they’ll turn soggy.
- Don’t pack the nests so tightly that they become candy bricks.
- Don’t skip the chill time; these need a little rest to hold clean edges.
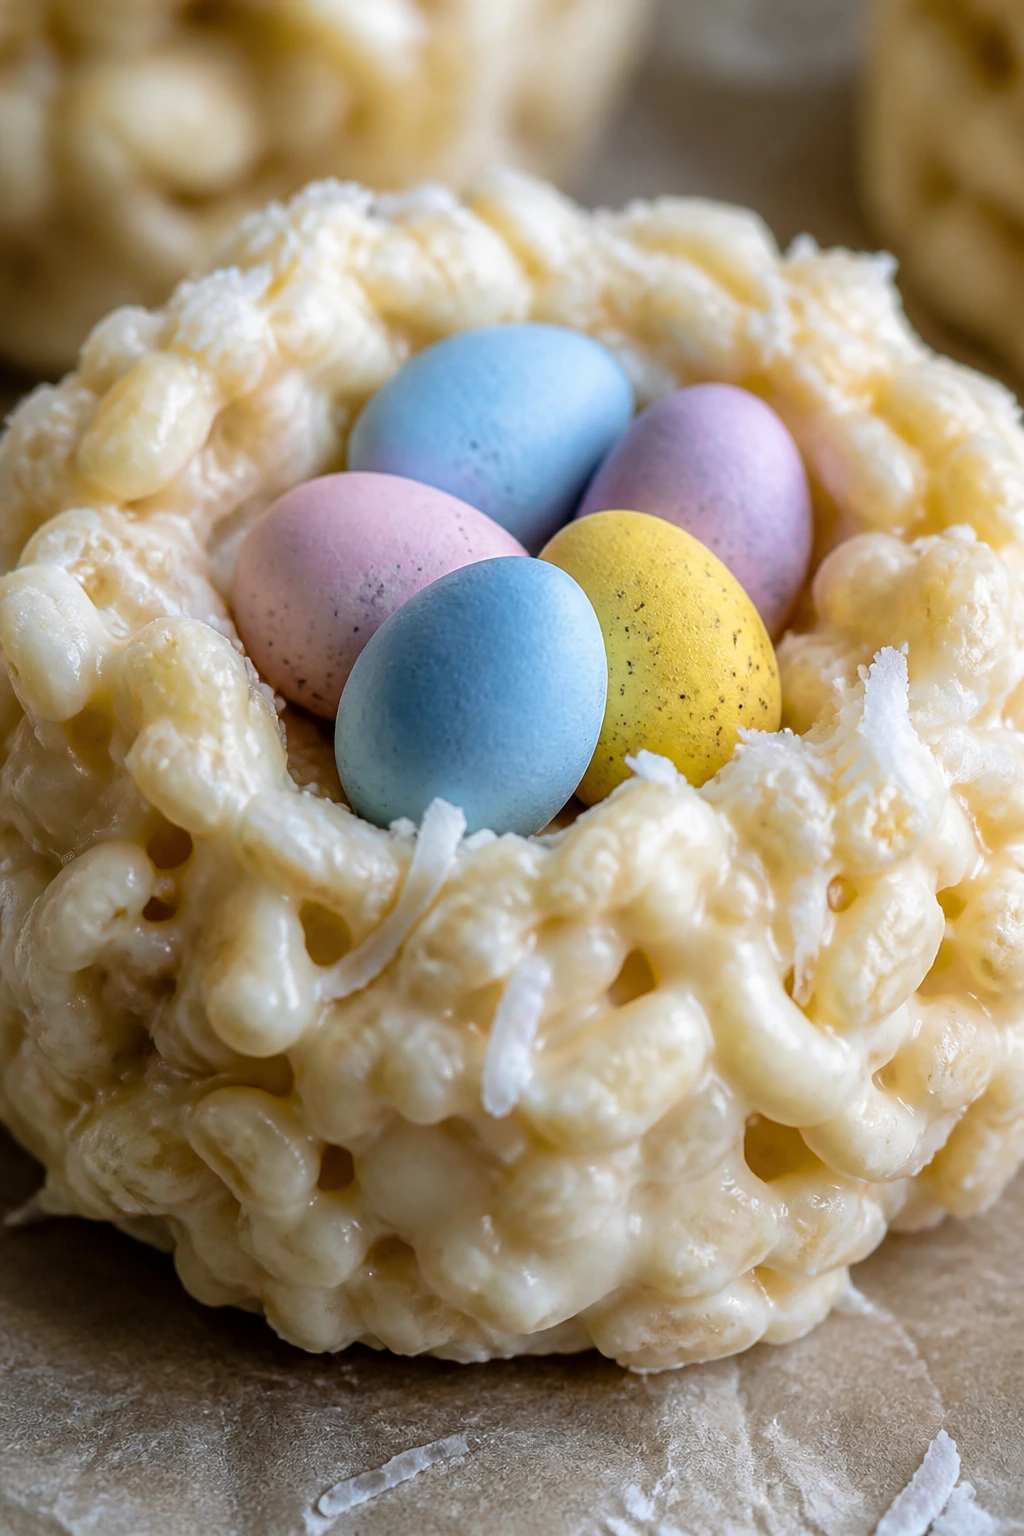
5. Marshmallow Rice Krispie Nests
If you want the easiest possible path to bird nest cookies, this is it. The marshmallow base is forgiving, the cereal stays crisp, and the nests form fast enough that you can get the pan cleaned before the last one is set.
Why It Works: Melted marshmallows create a stretchy, sticky binder that’s easy to shape while warm. A little toasted coconut adds a nestlike look and a deeper flavor, while the cereal keeps the inside light.
Key Ingredients:
- 6 cups Rice Krispies cereal — the crisp backbone.
- 4 cups mini marshmallows — melts into the binder.
- 3 tablespoons unsalted butter — keeps the mixture supple.
- 1 teaspoon vanilla extract — adds depth.
- 1/4 teaspoon salt — cuts the sweetness.
- 1/2 cup toasted shredded coconut — gives the nest a more feathered look.
- 24 mini candy eggs — to finish.
Quick Steps:
- Melt the butter in a large pot over low heat, then add the marshmallows and stir until smooth.
- Remove from the heat and stir in vanilla, salt, and toasted coconut.
- Fold in the cereal until coated, then divide into a greased mini muffin tin.
- Press a wet spoon into the center of each nest and let them set for 20 minutes.
Equipment for This Recipe:
- Large saucepan
- Mini muffin tin or parchment-lined tray
- Silicone spatula
- Small bowl of water for wetting the spoon
How to Serve This Dish: These are the least fussy nests on the tray, so I like them alongside fruit and something tart, like lemonade or black tea. They’re also the ones kids tend to grab first.
Pro Tips for This Recipe:
- Keep the heat low; burnt marshmallow tastes bitter fast.
- Wet your spoon lightly before pressing the centers so it doesn’t drag the cereal.
- Add the candy eggs after the nests cool enough to touch.
Variations on This Dish:
- Chocolate Marshmallow Nest: Stir in 1/2 cup mini chocolate chips after the heat is off.
- Peanut Butter Nest: Add 1/3 cup peanut butter to the melted marshmallow.
- Rainbow Nest: Mix in 2 tablespoons sprinkles for a more playful tray.
Common Mistakes to Avoid with This Dish:
- Don’t overcook the marshmallows or the nests get hard and chewy in the wrong way.
- Don’t cram too much mixture into each cup; the shape needs space.
- Don’t skip greasing the spoon and pan, unless you enjoy scraping glue.
6. Shredded Wheat Chocolate Nests
Shredded wheat makes a surprisingly convincing nest because the cereal already looks like little straw bundles. Add chocolate and peanut butter, and the whole thing turns into a crisp, lightly rustic cookie that feels more handmade than the no-bake classics.
Why It Works: Crumbled shredded wheat gives you long, twiggy strands without any extra effort. Chocolate and peanut butter coat those strands evenly, and a quick chill keeps the nest from slumping.
Key Ingredients:
- 6 shredded wheat biscuits — the nest texture.
- 1 cup semisweet chocolate chips — the main binder.
- 1/2 cup creamy peanut butter — adds body and flavor.
- 1 tablespoon honey — softens the mixture.
- 1 teaspoon coconut oil — helps the chocolate melt smoothly.
- 1/4 teaspoon salt — brightens the chocolate.
- 24 mini candy eggs — the center.
Quick Steps:
- Break the shredded wheat into rough strands in a large bowl.
- Melt the chocolate chips, peanut butter, honey, and coconut oil together until smooth.
- Stir in salt, then coat the shredded wheat thoroughly.
- Shape into nests on parchment, press the centers, and chill for 20 minutes.
Equipment for This Recipe:
- Large mixing bowl
- Microwave-safe bowl or double boiler
- Parchment-lined tray
- Spoon or small scoop
How to Serve This Dish: These look good piled loosely on a tray so the cereal texture stays visible. Serve them with coffee or hot chocolate; they like something warm beside them.
Pro Tips for This Recipe:
- Crush the cereal by hand so some strands stay long.
- Let the chocolate mixture cool for a minute before combining it with the cereal.
- Fill the centers only after the nests are firm, or the shape can sag.
Variations on This Dish:
- Dark Chocolate Nest: Use dark chocolate chips and skip the honey for a firmer set.
- Hazelnut Nest: Swap peanut butter for hazelnut spread.
- Coconut Nest: Stir in 1/3 cup toasted coconut for a sweeter, more fragile texture.
Common Mistakes to Avoid with This Dish:
- Don’t reduce the cereal to crumbs or you lose the nest look.
- Don’t overcoat with chocolate; a heavy mix turns into a slab.
- Don’t rush the chill time. These need that firm set.
7. Vanilla Meringue Bird Nests
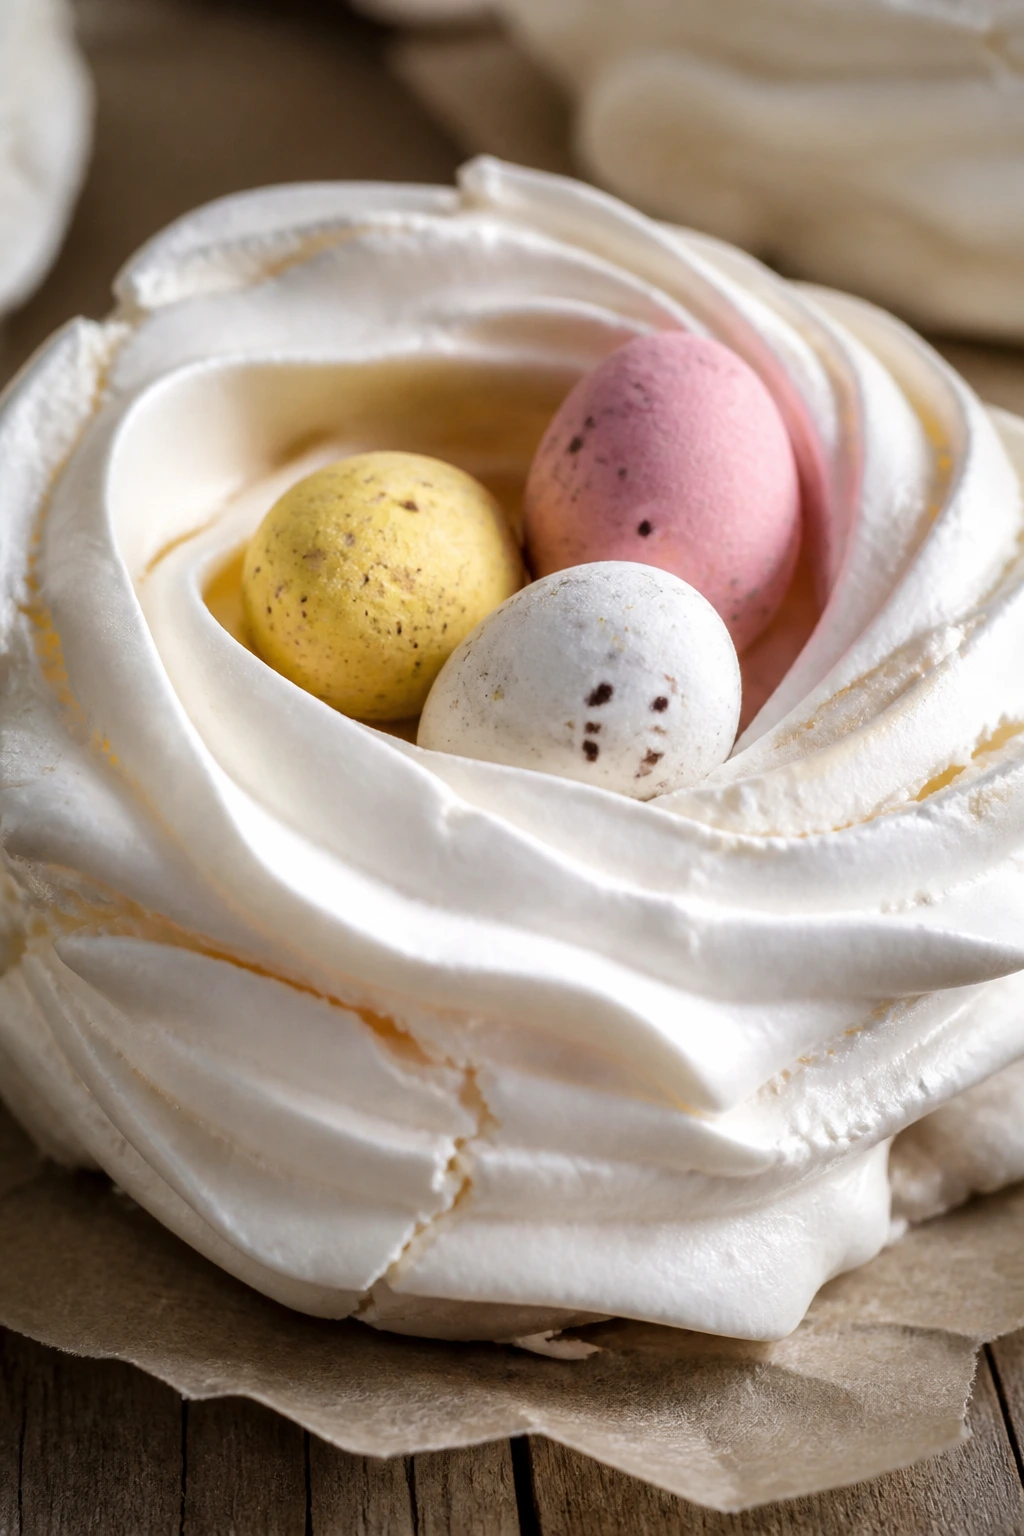
This one is light, crisp, and a little fussy in the exact ways that matter. If you want a nest cookie that looks delicate on a platter, meringue gives you that airy shell and a clean white background for the candy eggs.
Why It Works: Stiff egg whites hold their shape when baked low and slow, and a little cornstarch helps the nests dry without collapsing. Because meringue is mostly sugar and air, the texture ends up fragile and crisp rather than chewy.
Key Ingredients:
- 4 large egg whites — the structure.
- 1 cup superfine sugar — dissolves more cleanly than regular sugar.
- 1 teaspoon cornstarch — keeps the centers dry.
- 1/2 teaspoon cream of tartar — stabilizes the whites.
- 1/2 teaspoon vanilla extract — adds flavor.
- Pinch of fine salt — balances the sweetness.
- 24 mini candy eggs — the filling.
Quick Steps:
- Preheat the oven to 225°F and line a baking sheet with parchment.
- Whip the egg whites, cream of tartar, and salt until foamy, then add the sugar slowly until stiff, glossy peaks form.
- Fold in cornstarch and vanilla, then pipe or spoon 12 small nests with shallow centers.
- Bake for 60 to 70 minutes, turn the oven off, and let them dry inside for 30 minutes before cooling fully.
Equipment for This Recipe:
- Stand mixer or hand mixer
- Parchment-lined baking sheet
- Piping bag or spoon
- Cooling rack
How to Serve This Dish: Meringue nests belong on a tray where they won’t get crushed, and they look especially nice with a dusting of powdered sugar. Serve them the same day if you want the crispest texture.
Pro Tips for This Recipe:
- Make sure the bowl and beaters are completely grease-free.
- Add sugar slowly; dumping it in makes the meringue grainy.
- Don’t bake these in humid weather if you can avoid it. Meringue hates moisture.
Variations on This Dish:
- Lemon Meringue Nest: Add 1 teaspoon lemon zest to the whipped whites.
- Chocolate Drizzle Nest: Drizzle cooled nests with melted dark chocolate.
- Berry Nest: Fill the centers with a tiny spoonful of berry jam instead of candy eggs.
Common Mistakes to Avoid with This Dish:
- Don’t open the oven door early or the shells can crack.
- Don’t underwhip the whites; soft peaks collapse before they dry.
- Don’t store meringues in the fridge. They absorb moisture and lose their snap.
8. Buttery Sugar Cookie Thumbprint Nests
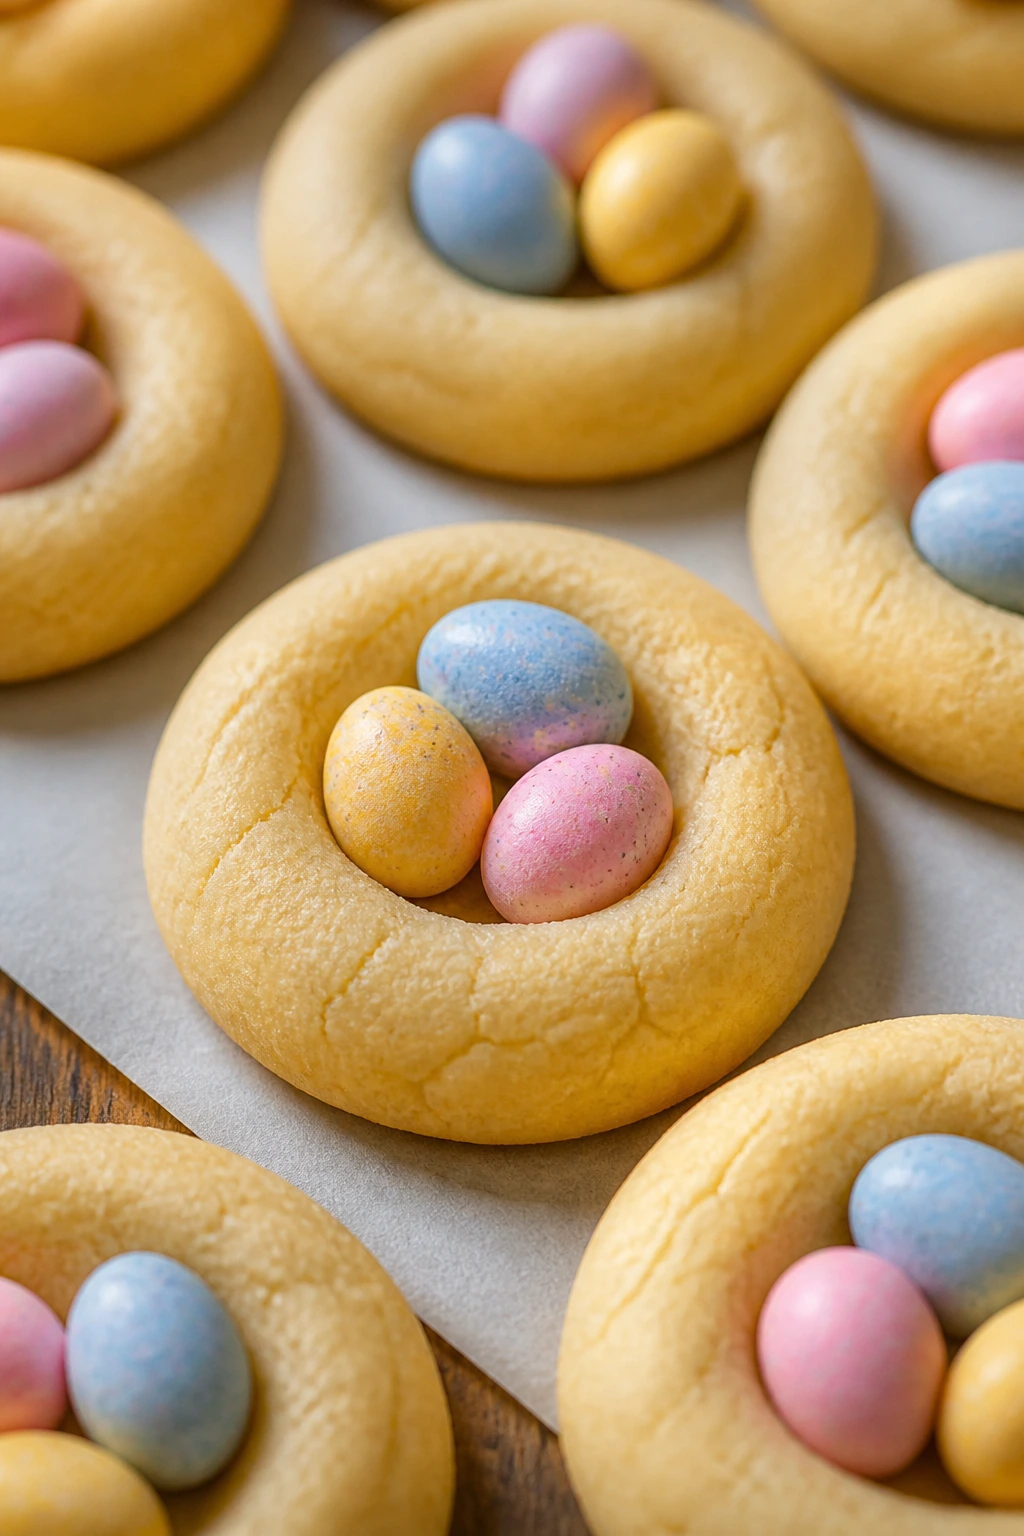
This is the most familiar cookie in the bunch, which is part of the charm. You get a tender sugar cookie base, a neat little indentation, and enough structure to hold candy eggs without any drama.
Why It Works: A classic butter cookie dough bakes into a sturdy but tender shell, and the thumbprint or spoon indent becomes the nest. Because the center is pressed before filling, the egg candy sits neatly instead of rolling off the plate.
Key Ingredients:
- 1/2 cup unsalted butter, softened — for richness.
- 3/4 cup granulated sugar — sweetens and helps with spread.
- 1 large egg — binds the dough.
- 1 teaspoon vanilla extract — the background flavor.
- 1 3/4 cups all-purpose flour — the structure.
- 1/2 teaspoon baking powder — gives a little lift.
- 1/4 teaspoon fine salt — keeps the cookie balanced.
- 24 mini candy eggs — the nest filling.
Quick Steps:
- Preheat the oven to 350°F and line a baking sheet with parchment.
- Cream butter and sugar until pale, then beat in the egg and vanilla.
- Stir in flour, baking powder, and salt just until a soft dough forms.
- Scoop into balls, bake for 10 to 12 minutes, press the centers gently, cool, and add the eggs once set.
Equipment for This Recipe:
- Mixing bowl
- Hand mixer or sturdy spoon
- Parchment-lined baking sheet
- Teaspoon for pressing the centers
How to Serve This Dish: These are the cleanest-looking cookies in the collection, so I like them on a plain platter where the shape stands out. They’re good with tea, milk, or a small scoop of vanilla ice cream if you want to turn them into dessert.
Pro Tips for This Recipe:
- Press the centers while the cookies are still warm.
- Chill the dough for 15 minutes if it feels too soft to scoop.
- Fill only after the cookies are fully cool, or the candy shells will soften.
Variations on This Dish:
- Lemon Sugar Nest: Add 1 tablespoon lemon zest to the dough.
- Almond Nest: Replace half the vanilla with almond extract.
- Sprinkle Nest: Roll the dough balls in sanding sugar before baking.
Common Mistakes to Avoid with This Dish:
- Don’t overbake them; sugar cookies go dry fast.
- Don’t press the wells too deep or the bottoms may crack through.
- Don’t fill warm cookies. That’s how you get glossy melted candy instead of neat nests.
9. Fudgy Brownie Cup Nests
If you want something richer than the cereal versions, brownie nests bring a dense, chocolatey base that feels almost like a tiny cake cup. The center stays soft enough to feel indulgent, but the edges crisp just enough to hold the shape.
Why It Works: Brownie batter bakes up thick enough to support a nest indentation, especially in a mini muffin tin. Pressing the center right after baking gives you a bowl shape without ruining the crumb.
Key Ingredients:
- 1/2 cup unsalted butter, melted — starts the brownie base.
- 1 cup granulated sugar — sweetens the batter.
- 2 large eggs — add lift and structure.
- 1 teaspoon vanilla extract — rounds out the cocoa.
- 1/2 cup unsweetened cocoa powder — the deep chocolate flavor.
- 3/4 cup all-purpose flour — keeps the brownies from turning cakey.
- 1/4 teaspoon fine salt — balances the sweetness.
- 1/2 cup chocolate chips — extra richness.
- 24 mini candy eggs — to fill the cups.
Quick Steps:
- Preheat the oven to 350°F and grease a mini muffin tin.
- Whisk butter, sugar, eggs, and vanilla until glossy, then fold in cocoa, flour, salt, and chocolate chips.
- Spoon into the tin and bake for 12 to 14 minutes, until the tops are set but the centers still look slightly soft.
- Press the center of each brownie cup with the back of a teaspoon, cool completely, and fill.
Equipment for This Recipe:
- Mini muffin tin
- Mixing bowl
- Whisk and spatula
- Teaspoon for shaping the wells
How to Serve This Dish: These belong on a dessert tray with fruit or a scoop of vanilla ice cream nearby. They’re the richest nest in the group, so one or two per person is plenty.
Pro Tips for This Recipe:
- Press the centers right away while the brownies are still warm.
- Slightly underbake them; dry brownie cups don’t carve neatly.
- Use a teaspoon coated with a little butter if the top starts sticking.
Variations on This Dish:
- Espresso Brownie Nest: Add 1 teaspoon instant espresso powder to the batter.
- Walnut Brownie Nest: Fold in 1/3 cup chopped walnuts.
- Peppermint Nest: Add a few drops peppermint extract and use dark chocolate eggs.
Common Mistakes to Avoid with This Dish:
- Don’t overfill the muffin cups or the brownies mushroom over the top.
- Don’t wait too long to press the centers; cooled brownies crack instead of cupping.
- Don’t cut the bake time too short, or the cups can sink in the middle.
10. Oatmeal Coconut Nest Cookies
Oats and coconut make a nest that tastes warm, toasty, and a little old-fashioned in the best way. The edges crisp up, the center stays chewy, and the whole cookie feels sturdier than the no-bake versions.
Why It Works: Rolled oats give the nests body, while coconut adds chew and a faint toasted note. Brown sugar keeps the cookies soft enough to press into a nest shape without falling apart.
Key Ingredients:
- 1 cup rolled oats — adds chew and structure.
- 3/4 cup all-purpose flour — holds the cookie together.
- 1/2 cup light brown sugar — gives moisture and caramel flavor.
- 1/2 cup unsalted butter, softened — for richness.
- 1 large egg — binds the dough.
- 1/2 cup sweetened shredded coconut — helps with texture.
- 1 teaspoon cinnamon — adds warmth.
- 1/2 teaspoon vanilla extract — smooths the flavor.
- 1/4 teaspoon fine salt — balances the sweetness.
- 24 mini candy eggs — the center.
Quick Steps:
- Preheat the oven to 350°F and line a baking sheet with parchment.
- Cream butter and brown sugar, then beat in egg and vanilla.
- Stir in oats, flour, coconut, cinnamon, and salt until a soft dough forms.
- Scoop, bake for 10 to 12 minutes, press the centers gently, and cool before filling.
Equipment for This Recipe:
- Mixing bowl
- Baking sheet
- Parchment paper
- Teaspoon or small scoop
How to Serve This Dish: These pair well with coffee or chai because the cinnamon and coconut already lean warm. Put them on a rustic plate and they look like they belong there.
Pro Tips for This Recipe:
- Let the dough rest for 10 minutes if the oats still feel too loose.
- Press the centers while the cookies are hot, not after cooling.
- If you want more crunch, toast the coconut first.
Variations on This Dish:
- Raisin Oat Nest: Add 1/3 cup raisins.
- Chocolate Oat Nest: Stir in 1/2 cup mini chocolate chips.
- Maple Nest: Replace 2 tablespoons of brown sugar with maple syrup.
Common Mistakes to Avoid with This Dish:
- Don’t use quick oats; they make the cookie softer and less nestlike.
- Don’t overbake or the edges get dry and crumbly.
- Don’t fill until the cookies cool, or the candy shells may melt.
11. Almond Joy Coconut Nests
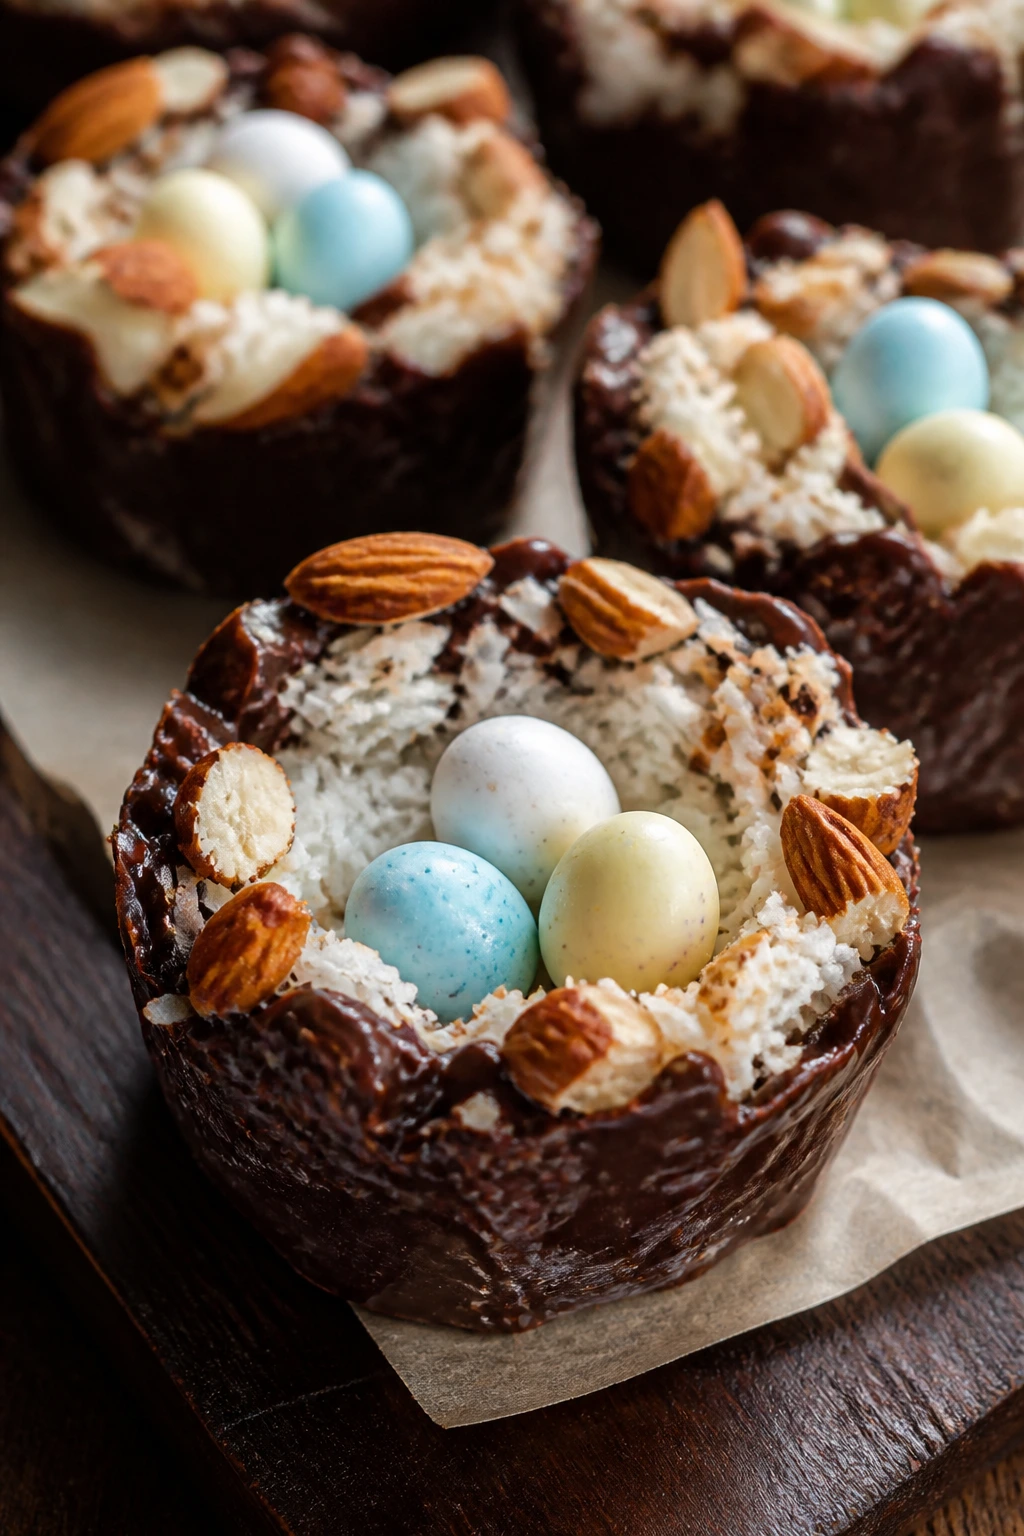
This one tastes like a candy bar decided to become a cookie. Chocolate, coconut, and almonds are a dependable trio, and the nest shape gives each cookie a little height so it doesn’t feel flat or cloying.
Why It Works: Coconut and condensed milk create a chewy base that bakes into tidy little nests. Chocolate adds a shell over the bottom or a drizzle on top, and almonds bring the flavor back toward the candy bar that inspired it.
Key Ingredients:
- 3 cups sweetened shredded coconut — the main body of the nest.
- 1/2 cup sweetened condensed milk — binds everything together.
- 1 teaspoon vanilla extract — softens the sweetness.
- 1/4 teaspoon salt — keeps the flavor from flattening.
- 1 cup semisweet chocolate chips — for dipping or drizzling.
- 1/2 cup sliced almonds — adds crunch and flavor.
- 24 mini candy eggs — the center.
Quick Steps:
- Preheat the oven to 325°F and line a mini muffin tin or tray.
- Stir coconut, condensed milk, vanilla, and salt until sticky.
- Scoop into mounds, press the centers, and bake for 14 to 16 minutes until lightly golden.
- Cool completely, drizzle or dip with melted chocolate, and add eggs once set.
Equipment for This Recipe:
- Mini muffin tin
- Mixing bowl
- Parchment-lined tray
- Small spoon for the centers
How to Serve This Dish: These are rich, so small portions work best. Serve with coffee or an unsweetened iced tea to keep the coconut and chocolate in check.
Pro Tips for This Recipe:
- Cool the nests fully before adding chocolate, or the drizzle slides off.
- Toast the almonds lightly for a better crunch.
- If the mixture feels loose, chill it for 10 minutes before shaping.
Variations on This Dish:
- Dark Chocolate Almond Nest: Dip the bottoms in dark chocolate instead of semisweet.
- Cherry Almond Nest: Add 2 tablespoons chopped dried cherries for a fruitier note.
- Nut-Free Coconut Nest: Skip the almonds and finish with toasted coconut flakes.
Common Mistakes to Avoid with This Dish:
- Don’t overbake; coconut burns faster than people expect.
- Don’t skip the salt. Without it, the cookie tastes one-note.
- Don’t add the eggs before the chocolate sets, or they’ll slide around.
12. White Chocolate Crispy Rice Nests
These nests are light, sweet, and a little cleaner in flavor than the darker chocolate versions. White chocolate gives them a creamy note that lets the cereal crunch stay front and center.
Why It Works: White chocolate melts into a thick coating that binds crisp rice cereal without weighing it down. A touch of almond extract makes the sweetness taste more finished and less candy-isle.
Key Ingredients:
- 2 cups white chocolate chips — the coating.
- 3 cups crispy rice cereal — the crunch.
- 1/2 cup sweetened shredded coconut — adds nestlike texture.
- 1/2 teaspoon almond extract — gives the flavor some shape.
- 1/4 teaspoon fine salt — keeps it from tasting sugary.
- 24 mini candy eggs — the nest filling.
Quick Steps:
- Melt the white chocolate chips slowly, stirring often so they don’t seize.
- Stir in almond extract, salt, coconut, and cereal until coated.
- Scoop into parchment-lined muffin cups or onto a tray, then press a center hollow.
- Chill for 15 to 20 minutes before filling.
Equipment for This Recipe:
- Microwave-safe bowl
- Parchment-lined tray
- Spoon or small scoop
- Mini muffin tin, optional
How to Serve This Dish: These look pretty on a pale platter because the white chocolate gives them a soft, snowy look. I like them with green tea or a light roast coffee.
Pro Tips for This Recipe:
- Use low heat; white chocolate scorches faster than dark chocolate.
- Stir in the cereal gently so it doesn’t turn into dust.
- If the mix gets too thick, add 1 teaspoon coconut oil.
Variations on This Dish:
- Lemon White Nest: Add 1 teaspoon lemon zest.
- Berry Nest: Stir in 1/4 cup freeze-dried raspberries.
- Pistachio Nest: Add 1/3 cup chopped pistachios for more crunch.
Common Mistakes to Avoid with This Dish:
- Don’t overheat white chocolate or it turns pasty.
- Don’t skip the salt; white chocolate needs it.
- Don’t shape the nests too flat, or they lose the bird’s nest look.
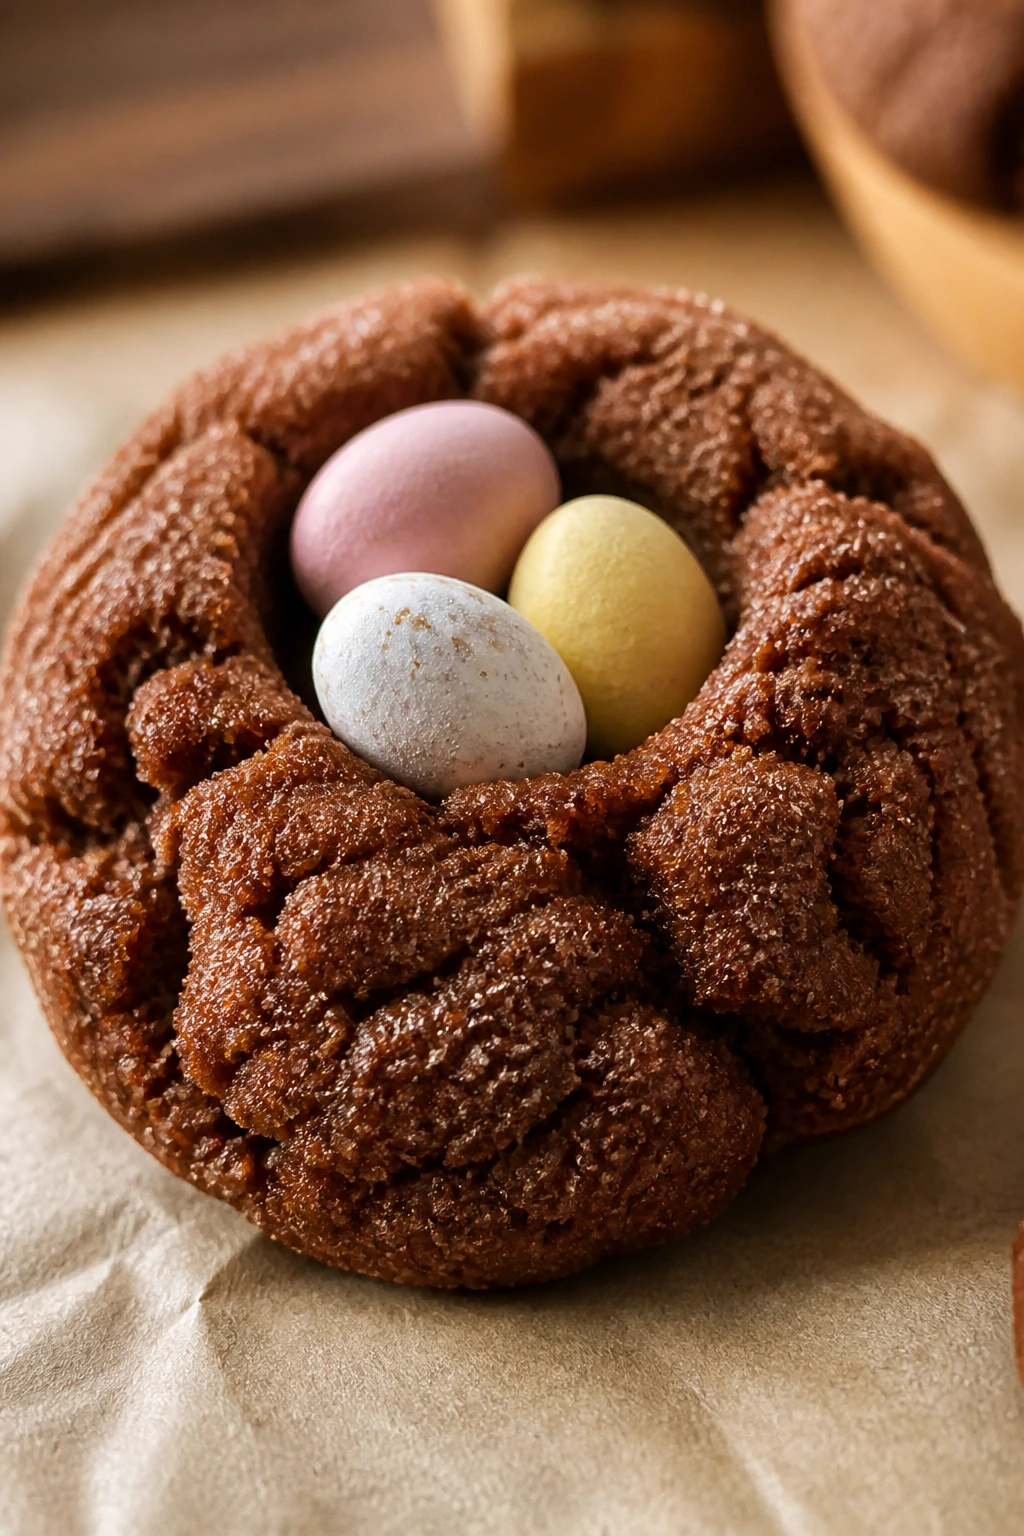
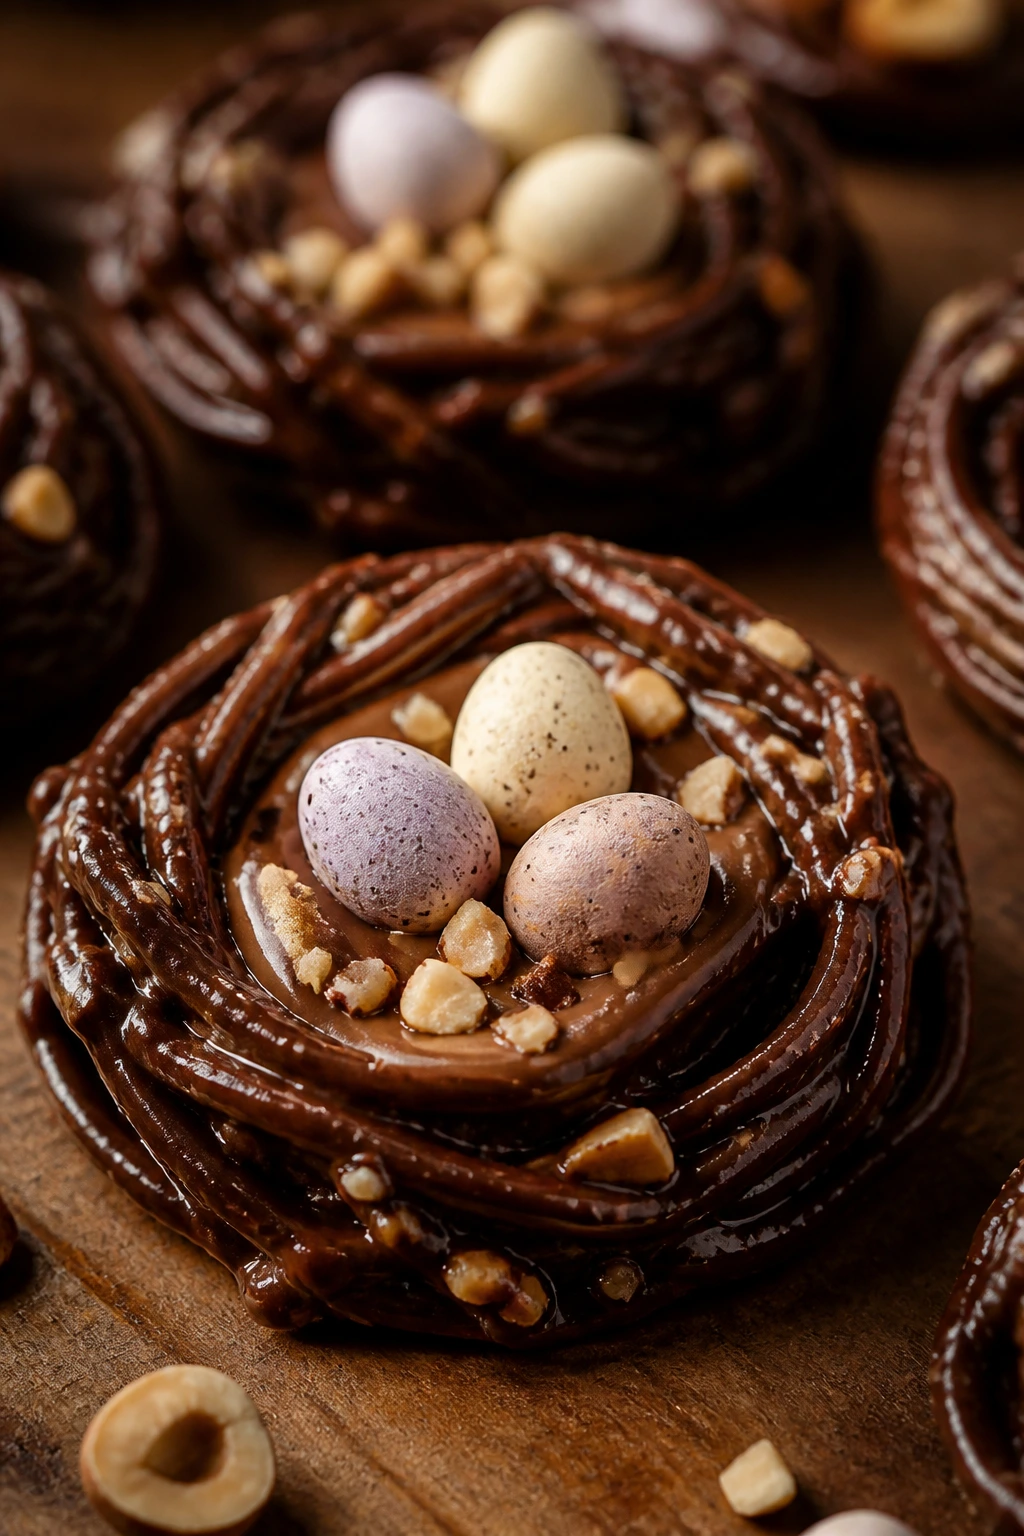
13. Dark Chocolate Espresso Nests
This is the most grown-up, least sugary version in the batch. Dark chocolate and espresso make the nests taste deeper and a little more dramatic, which is a nice change from the candy-sweet classics.
Why It Works: Espresso powder sharpens chocolate without making the cookies taste like coffee. Using chow mein noodles gives the nest a twiggy appearance, and the darker coating makes the shape read instantly on the plate.
Key Ingredients:
- 2 cups chow mein noodles — for the nest structure.
- 1 1/4 cups dark chocolate chips — the bold chocolate base.
- 1 teaspoon instant espresso powder — deepens the flavor.
- 1 tablespoon coconut oil — helps the chocolate melt smoothly.
- 1/2 teaspoon vanilla extract — rounds out the bitterness.
- Pinch of flaky salt — finish that wakes everything up.
- 24 mini candy eggs — the center.
Quick Steps:
- Melt chocolate chips, espresso powder, and coconut oil together until smooth.
- Stir in vanilla and salt, then fold in the noodles gently.
- Spoon into nest shapes on parchment and press a center well.
- Chill for 20 minutes, then fill with candy eggs.
Equipment for This Recipe:
- Microwave-safe bowl
- Parchment-lined tray
- Spoon
- Measuring spoon for the espresso
How to Serve This Dish: These are the ones I’d put on a dark platter with barely anything else around them. A cup of black coffee or a stout tea suits them better than milk.
Pro Tips for This Recipe:
- Use a good dark chocolate with at least a medium cocoa percentage.
- Add the espresso powder to the melted chocolate, not straight into the noodles.
- Flaky salt on top makes the chocolate taste sharper and cleaner.
Variations on This Dish:
- Orange Mocha Nest: Add 1/2 teaspoon orange zest.
- Hazelnut Nest: Fold in 1/4 cup chopped hazelnuts.
- Mint Nest: Add a tiny drop of peppermint extract.
Common Mistakes to Avoid with This Dish:
- Don’t add too much espresso or the nests taste harsh.
- Don’t crush the noodles too much; the twig effect matters here.
- Don’t fill them before the chocolate has set firmly.
14. Lemon Coconut Nest Cookies
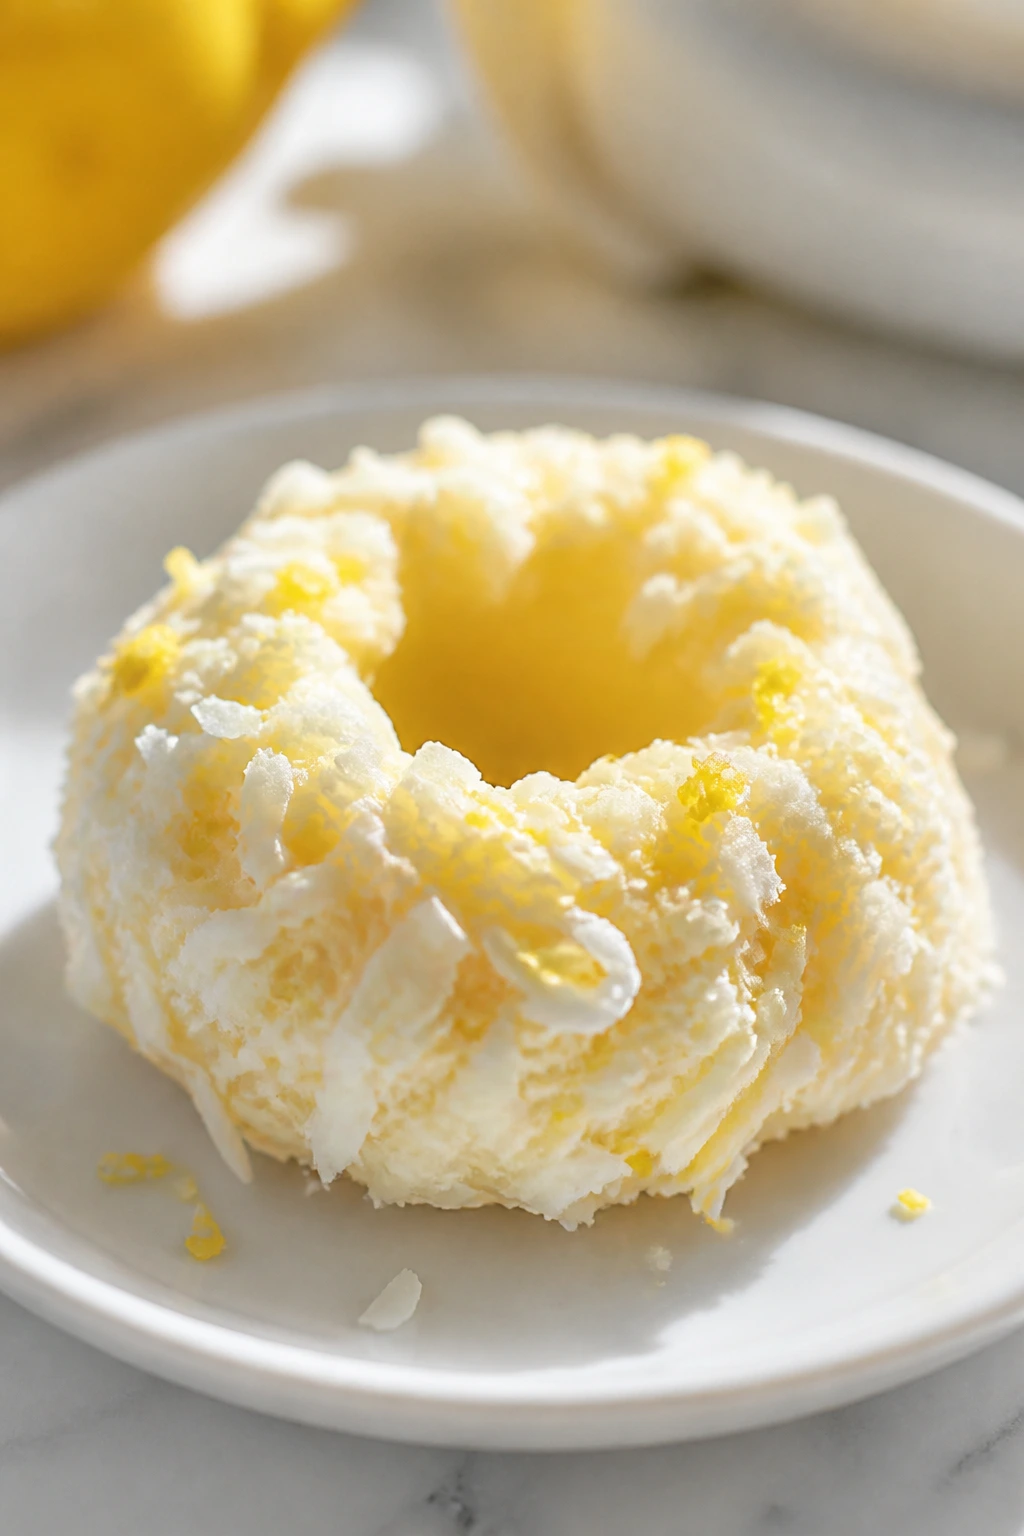
Bright lemon cuts through the sweetness and keeps the coconut from feeling heavy. These are the nests I reach for when I want something cheerful without making a whole cake.
Why It Works: Lemon zest and juice wake up the coconut, while condensed milk keeps the nests chewy and tidy. The white chocolate helps the cookies hold together and adds a soft, creamy finish.
Key Ingredients:
- 3 cups sweetened shredded coconut — the main body.
- 1/2 cup sweetened condensed milk — binds the nests.
- 1 tablespoon lemon zest — brings the bright top note.
- 1 tablespoon lemon juice — sharpens the flavor.
- 1 cup white chocolate chips — adds structure and sweetness.
- 1/4 teaspoon fine salt — balances the citrus.
- 24 mini candy eggs — the center.
Quick Steps:
- Preheat the oven to 325°F and line a mini muffin tin.
- Mix coconut, condensed milk, lemon zest, lemon juice, white chocolate chips, and salt.
- Scoop into wells and press a center hollow with a spoon.
- Bake for 14 to 16 minutes, cool fully, and add candy eggs.
Equipment for This Recipe:
- Mini muffin tin
- Mixing bowl
- Rubber spatula
- Spoon for the nest centers
How to Serve This Dish: These are pretty on a bright plate, especially if you scatter a little extra lemon zest around the tray. They’re good after a heavy meal because the citrus keeps the sweetness in line.
Pro Tips for This Recipe:
- Zest the lemon before juicing it; that’s easier and cleaner.
- Don’t add too much juice or the mixture gets loose.
- Cool completely before adding the eggs so the white chocolate holds firm.
Variations on This Dish:
- Lime Coconut Nest: Swap lemon for lime.
- Poppy Seed Nest: Add 1 teaspoon poppy seeds for a speckled look.
- Berry Lemon Nest: Tuck a dried cranberry into the center with the eggs.
Common Mistakes to Avoid with This Dish:
- Don’t pour in extra lemon juice; coconut will stop holding shape.
- Don’t bake until dark brown. Pale gold is enough.
- Don’t skip the salt. Citrus needs it.
15. Matcha White Chocolate Nests
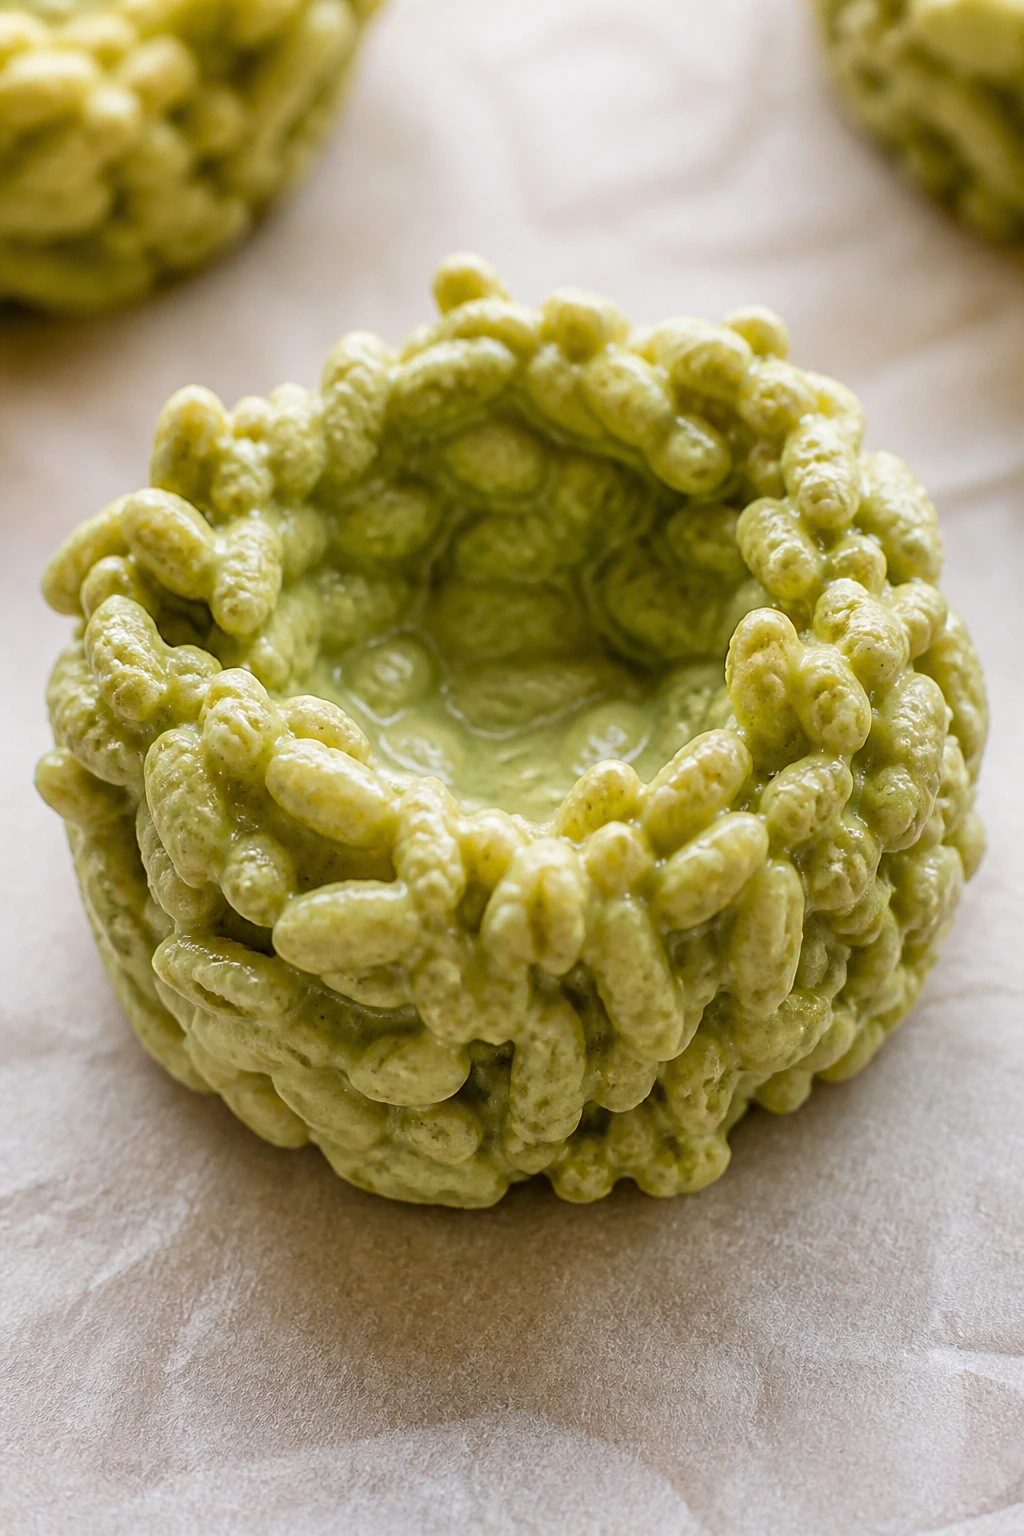
These nests are soft green, lightly grassy, and much less sugary than they look. Matcha gives the white chocolate a real backbone, and the color alone makes the tray feel different from every other cookie plate.
Why It Works: Matcha cuts the sweetness of white chocolate and gives the nests a faint tea flavor that keeps them from tasting one-note. Crispy rice cereal adds structure, so the cookies set fast and hold a clean hollow in the middle.
Key Ingredients:
- 2 cups white chocolate chips — the base binder.
- 1 1/2 teaspoons matcha powder — the flavor and color.
- 3 cups crispy rice cereal — the crunch.
- 1 teaspoon vanilla extract — softens the tea note.
- 1/4 teaspoon fine salt — keeps the sweet side in check.
- 24 mini candy eggs — for the center.
Quick Steps:
- Melt the white chocolate chips slowly, then whisk in matcha until smooth.
- Stir in vanilla, salt, and crispy rice cereal until coated.
- Shape into nests on parchment and press the centers.
- Chill for 15 minutes and fill once firm.
Equipment for This Recipe:
- Mixing bowl
- Whisk or spatula
- Parchment-lined tray
- Spoon or cookie scoop
How to Serve This Dish: These look good on a plain white plate, where the green color can do its work. I like them with jasmine tea or lightly brewed green tea, which keeps the flavor theme neat.
Pro Tips for This Recipe:
- Sift the matcha if it’s clumpy.
- Use a light hand when mixing so the cereal stays crisp.
- Keep the chocolate warm enough to coat, not so hot that the matcha turns bitter.
Variations on This Dish:
- Strawberry Matcha Nest: Add crushed freeze-dried strawberries on top.
- Coconut Matcha Nest: Fold in 1/2 cup coconut for a sweeter edge.
- Black Sesame Nest: Swap half the cereal for black sesame crunch if you want a deeper flavor.
Common Mistakes to Avoid with This Dish:
- Don’t dump the matcha in all at once or it clumps.
- Don’t use too much powder; the taste goes muddy fast.
- Don’t chill them uncovered in the fridge unless you want moisture on the surface.
16. Pistachio Cardamom Nests
These taste a little more bakery-case than the average nest cookie. Pistachios bring sweetness and color, cardamom gives the cookie a floral edge, and the whole thing feels quietly polished without becoming fussy.
Why It Works: Pistachios and coconut make a sturdy, naturally nestlike texture, while cardamom keeps the flavor warm and a little unexpected. White chocolate helps the mixture set cleanly and makes the green bits pop.
Key Ingredients:
- 1 cup chopped pistachios — for crunch and color.
- 2 cups sweetened shredded coconut — the base.
- 1/2 cup sweetened condensed milk — binds the mixture.
- 1/2 cup white chocolate chips — helps the nests hold.
- 1/2 teaspoon ground cardamom — the signature note.
- 1/4 teaspoon fine salt — balances the sweetness.
- 24 mini candy eggs — the center.
Quick Steps:
- Preheat the oven to 325°F and line a tray or mini muffin tin.
- Mix pistachios, coconut, condensed milk, white chocolate, cardamom, and salt until sticky.
- Scoop into nests, press the centers, and bake for 13 to 15 minutes.
- Cool fully, then fill.
Equipment for This Recipe:
- Mixing bowl
- Mini muffin tin or parchment-lined tray
- Spoon
- Cooling rack
How to Serve This Dish: These look best on a tray with a few extra chopped pistachios scattered around the edges. Serve them with coffee or black tea; both make the cardamom stand out.
Pro Tips for This Recipe:
- Chop the pistachios fairly small so the nests hold together.
- Toast the nuts lightly first if you want a deeper flavor.
- Add the candy eggs only after the nests cool.
Variations on This Dish:
- Rose Nest: Add 1/4 teaspoon rose water for a floral finish.
- Orange Pistachio Nest: Add 1 teaspoon orange zest.
- Honey Cardamom Nest: Replace part of the condensed milk with honey for a softer sweetness.
Common Mistakes to Avoid with This Dish:
- Don’t use salted pistachios unless you reduce the added salt.
- Don’t bake too dark; pistachios can turn bitter.
- Don’t leave the mix too wet or the nests slump.
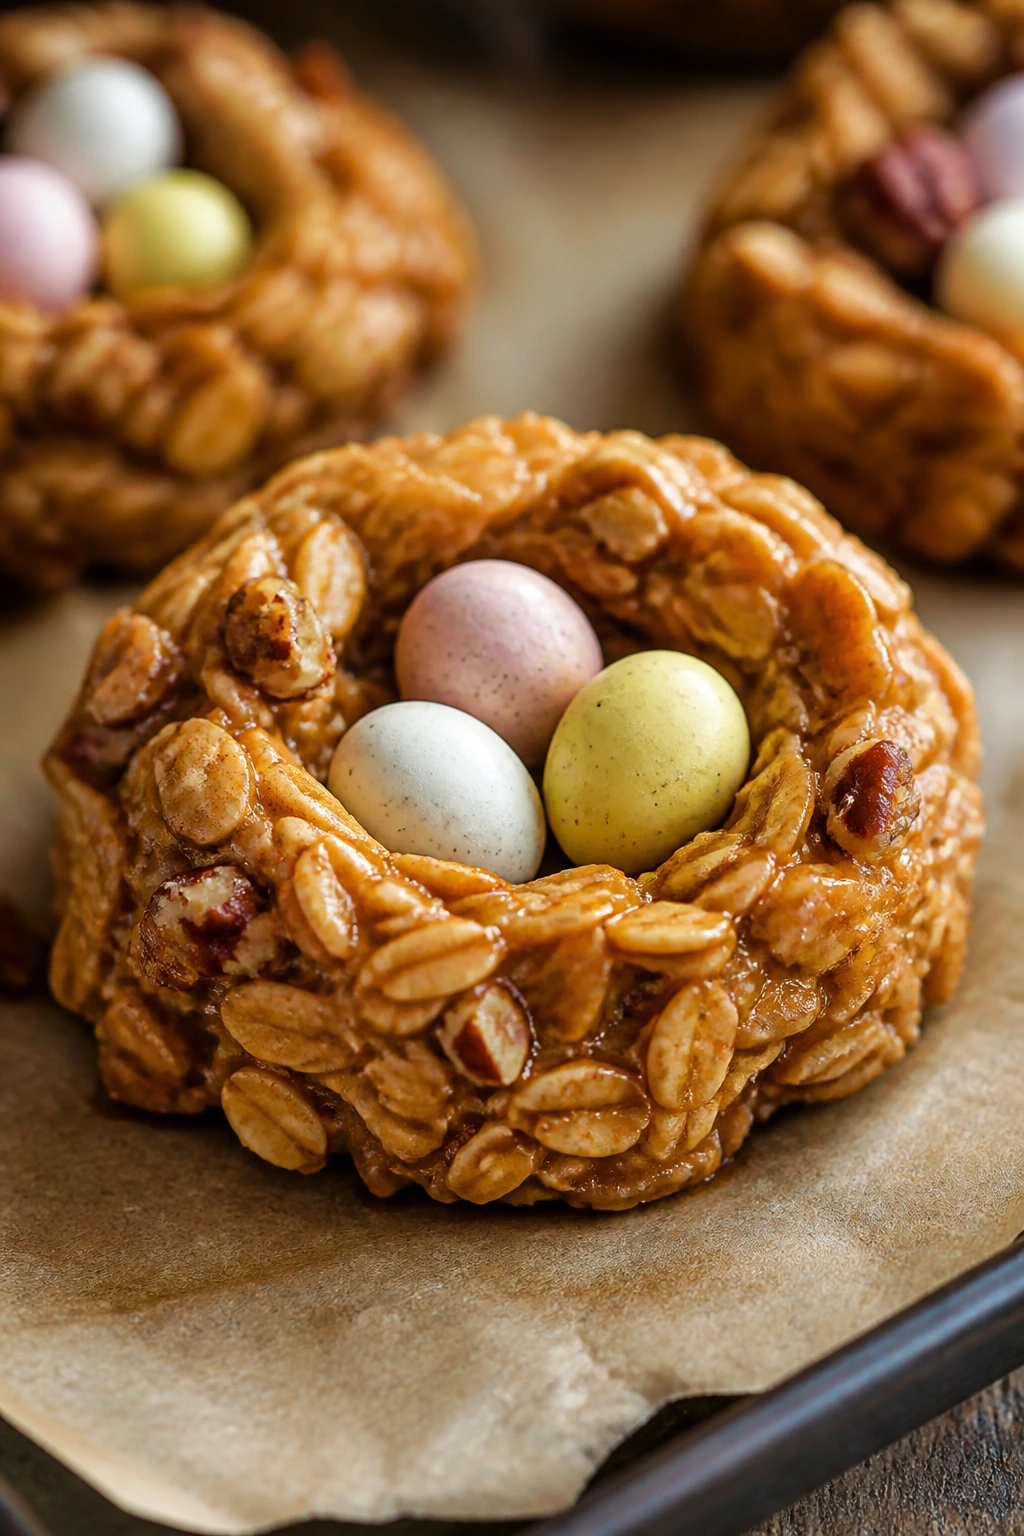
17. Maple Pecan Nest Cookies

Maple and pecans give you a cookie that tastes like a cool morning and a warm oven. The shape is still playful, but the flavor is deeper than the candy-heavy nests.
Why It Works: Brown sugar and maple syrup make the dough tender, and pecans give the nests enough crunch to hold the center. Oats help create a rough, twiggy surface that looks right without extra decorating.
Key Ingredients:
- 1 cup chopped pecans — the main crunch.
- 1 cup rolled oats — adds texture.
- 3/4 cup all-purpose flour — gives the cookie structure.
- 1/2 cup unsalted butter, softened — for richness.
- 1/2 cup light brown sugar — sweet and moist.
- 1/4 cup pure maple syrup — the flavor note.
- 1 large egg — binds the dough.
- 1/2 teaspoon cinnamon — adds warmth.
- 1/4 teaspoon fine salt — keeps it balanced.
- 24 mini candy eggs — the center.
Quick Steps:
- Preheat the oven to 350°F and line a baking sheet.
- Cream butter, brown sugar, and maple syrup, then beat in the egg.
- Stir in oats, flour, pecans, cinnamon, and salt.
- Scoop, bake for 10 to 12 minutes, press the centers, and cool before filling.
Equipment for This Recipe:
- Mixing bowl
- Baking sheet
- Teaspoon or small scoop
- Cooling rack
How to Serve This Dish: These belong beside coffee, especially something medium roast. They’re sturdy enough to pack in a tin, which is handy if you’re carrying dessert somewhere else.
Pro Tips for This Recipe:
- Use real maple syrup, not pancake syrup, or the flavor falls flat.
- Press the centers while warm, before the pecans lock the shape.
- Toast the pecans first if you want a stronger finish.
Variations on This Dish:
- Cranberry Maple Nest: Add 1/3 cup dried cranberries.
- Brown Butter Nest: Brown the butter before mixing for a deeper flavor.
- Walnut Nest: Swap pecans for walnuts if that’s what you’ve got.
Common Mistakes to Avoid with This Dish:
- Don’t pour in extra syrup or the cookies spread too much.
- Don’t skip the salt; maple needs a little edge.
- Don’t wait too long to press the nests or they crack.
18. Gingerbread Spice Nests
Gingerbread makes the most seasonal-feeling nest, but the flavor works any time you want something spiced and a little darker. The molasses gives the cookie a real backbone, and the candy eggs sit neatly in the warm brown wells.
Why It Works: Molasses and brown sugar keep the dough soft enough to shape, while ginger, cinnamon, and cloves create the classic spice profile. The cookies bake into sturdy cups that hold their indentation well.
Key Ingredients:
- 1/2 cup unsalted butter, softened — for the dough.
- 3/4 cup brown sugar — adds moisture.
- 1 large egg — binds the batter.
- 1/4 cup molasses — the gingerbread flavor.
- 1 1/2 cups all-purpose flour — the base.
- 1 teaspoon ground ginger — the lead spice.
- 1 teaspoon cinnamon — rounds it out.
- 1/4 teaspoon ground cloves — gives depth.
- 1/2 teaspoon baking soda — helps spread.
- 1/4 teaspoon salt — balances the molasses.
- 24 mini candy eggs — the filling.
Quick Steps:
- Preheat the oven to 350°F and line a baking sheet.
- Cream butter and brown sugar, then beat in the egg and molasses.
- Stir in flour, spices, baking soda, and salt until a soft dough forms.
- Scoop, bake for 9 to 11 minutes, press centers gently, and cool before filling.
Equipment for This Recipe:
- Mixing bowl
- Baking sheet
- Teaspoon for the indent
- Cooling rack
How to Serve This Dish: These are nice with tea, especially chai or black tea with milk. A tiny dusting of powdered sugar makes them look like they’ve had a light frost.
Pro Tips for This Recipe:
- Don’t overbake; molasses cookies can dry out fast.
- Press the centers right out of the oven while the dough is soft.
- Let them cool fully before adding candy eggs so the shells stay crisp.
Variations on This Dish:
- Orange Ginger Nest: Add 1 teaspoon orange zest.
- Chocolate Ginger Nest: Stir in 1/3 cup mini chocolate chips.
- Extra-Spice Nest: Add a pinch of nutmeg if you want more warmth.
Common Mistakes to Avoid with This Dish:
- Don’t use blackstrap molasses unless you want a bitter cookie.
- Don’t chill the dough too long; it can get stiff and crack.
- Don’t fill before cooling, or the candy colors can smear.
19. Funfetti Sugar Nest Cookies
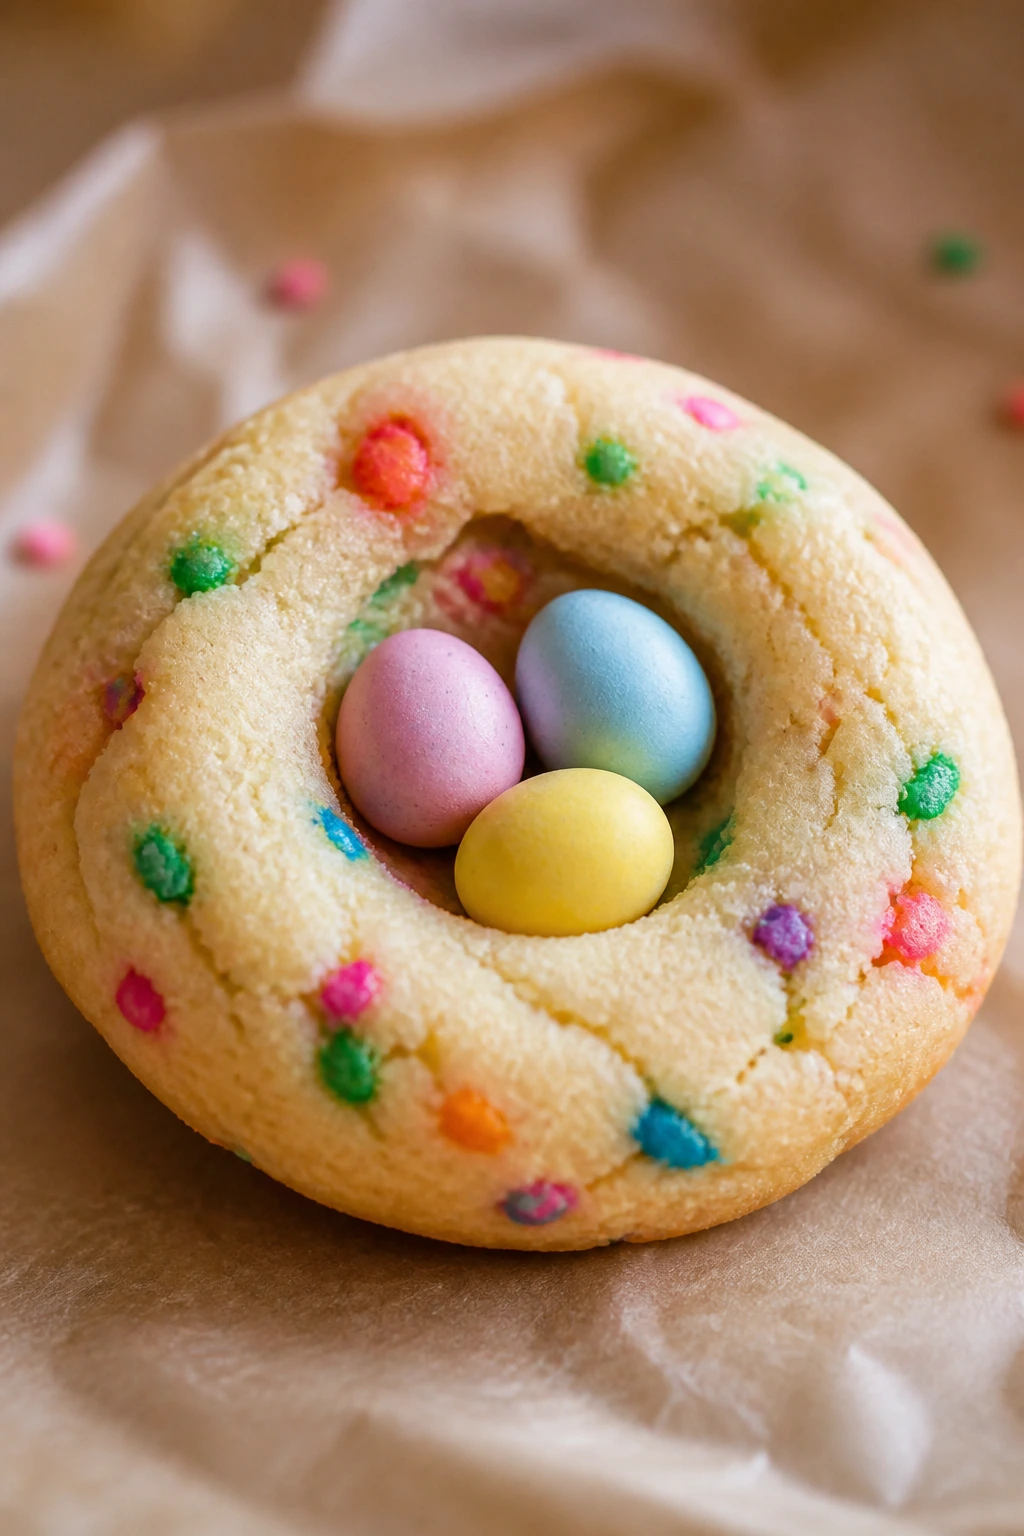
Sometimes the best answer is a plain sugar cookie with sprinkles in it. These are cheerful, soft, and easy to read on the plate, which makes them a good pick when you want the nest shape to feel playful instead of rustic.
Why It Works: A basic sugar cookie dough bakes into a tender shell that holds a pressed center beautifully. Sprinkles add color in the dough itself, so you don’t need to decorate much once the nests set.
Key Ingredients:
- 1/2 cup unsalted butter, softened — the cookie base.
- 3/4 cup granulated sugar — sweetens and aerates.
- 1 large egg — binds the dough.
- 1 teaspoon vanilla extract — the main flavor.
- 1 3/4 cups all-purpose flour — structure.
- 1/2 teaspoon baking powder — for a little lift.
- 1/4 teaspoon fine salt — balances the sweetness.
- 1/3 cup rainbow sprinkles — the funfetti look.
- 1/2 cup white chocolate chips — optional sweetness and structure.
- 24 mini candy eggs — the center.
Quick Steps:
- Preheat the oven to 350°F and line a baking sheet with parchment.
- Cream butter and sugar, then beat in the egg and vanilla.
- Stir in flour, baking powder, salt, sprinkles, and white chocolate chips.
- Scoop, bake for 10 to 12 minutes, press centers gently, and cool before filling.
Equipment for This Recipe:
- Mixing bowl
- Hand mixer or wooden spoon
- Baking sheet
- Teaspoon or small scoop
How to Serve This Dish: These fit nicely on a party tray because the sprinkle colors do half the decorating already. Serve with milk or a light vanilla latte.
Pro Tips for This Recipe:
- Fold the sprinkles in by hand so they don’t bleed.
- Press the centers while the cookies are warm and soft.
- Cool completely before you set in the eggs, or the white chocolate may soften.
Variations on This Dish:
- Chocolate Funfetti Nest: Add 1 tablespoon cocoa powder for a light chocolate base.
- Lemon Sprinkle Nest: Add lemon zest for a brighter cookie.
- Confetti Nest: Use spring-colored sprinkles if you want a more muted tray.
Common Mistakes to Avoid with This Dish:
- Don’t overmix after adding flour; the cookies get tough.
- Don’t use jumbo sprinkles that melt into streaks.
- Don’t bake until browned all over; pale edges are enough.
20. S’mores Cereal Nest Cookies
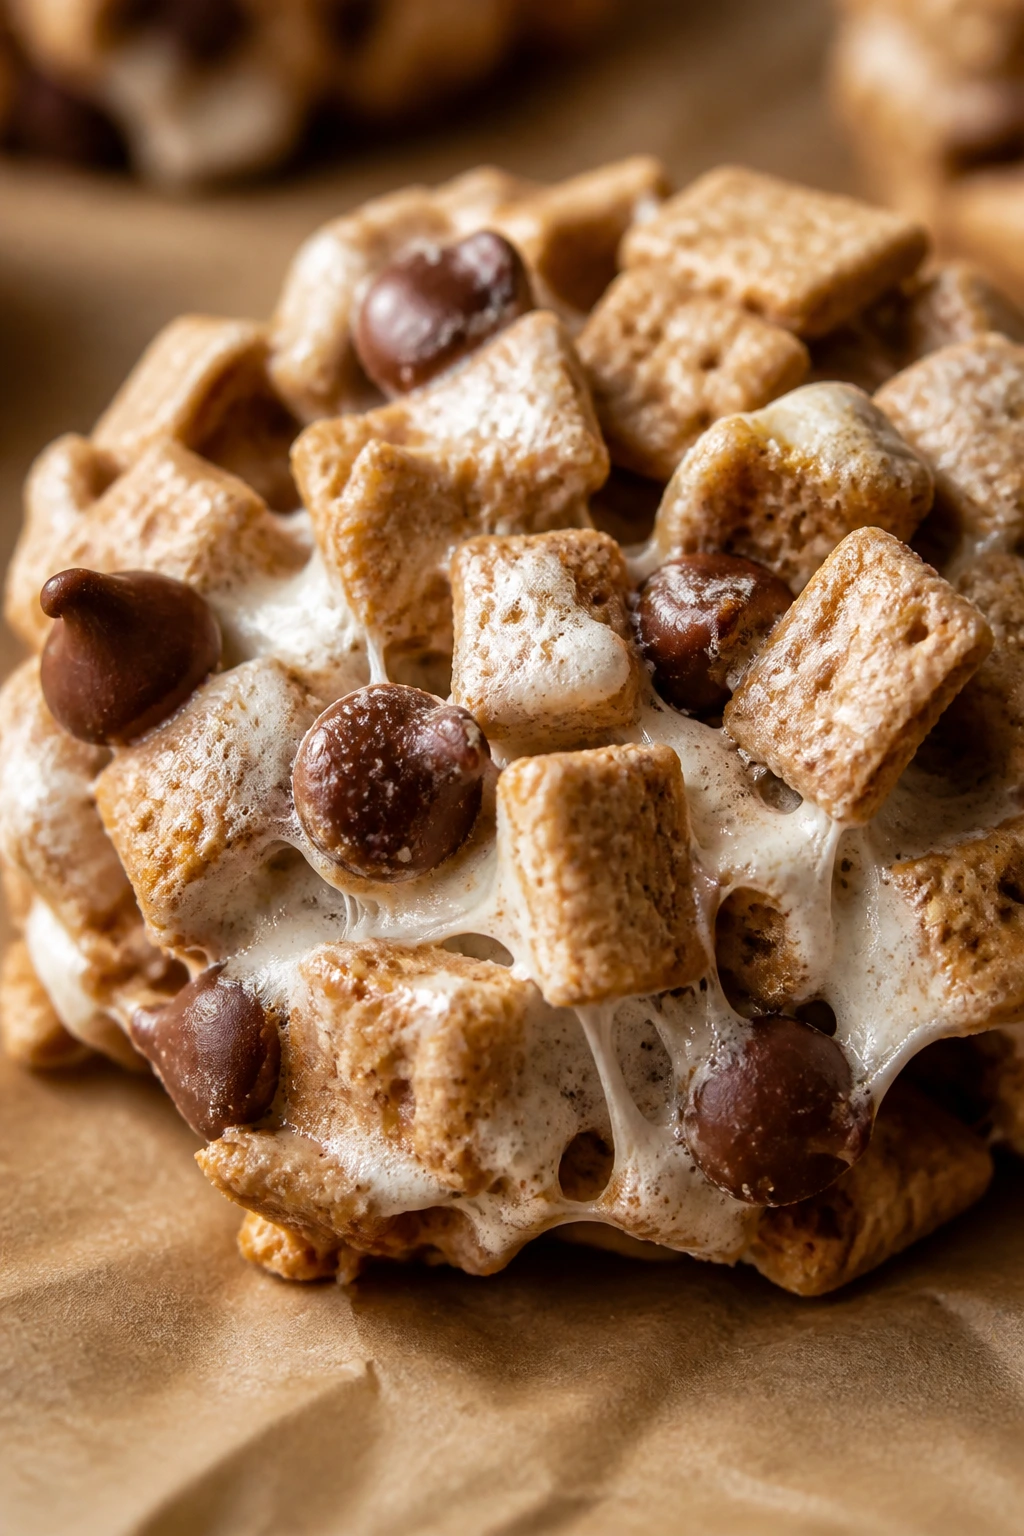
This one tastes like a campfire snack with better manners. Graham cereal, chocolate, and marshmallow make a nest that’s sticky in the right way and crisp where it needs to be.
Why It Works: Melted marshmallow binds the cereal and graham pieces together, while chocolate chips add pockets of richness. The nest shape keeps the marshmallow mix from flattening into a bar.
Key Ingredients:
- 4 cups graham cereal or crushed graham crackers — the base flavor.
- 2 cups mini marshmallows — the glue.
- 1 cup milk chocolate chips — classic s’mores flavor.
- 3 tablespoons unsalted butter — keeps the melt smooth.
- 1 teaspoon vanilla extract — rounds out the sweetness.
- Pinch of salt — keeps the flavor from going flat.
- 24 mini candy eggs or chocolate eggs — the center.
Quick Steps:
- Melt butter and marshmallows in a large pot over low heat until smooth.
- Stir in vanilla, salt, graham cereal, and chocolate chips.
- Spoon into mounds, shape centers with a spoon, and let set for 20 minutes.
- Fill once firm.
Equipment for This Recipe:
- Large saucepan
- Parchment-lined tray
- Spoon
- Heatproof spatula
How to Serve This Dish: These are the most casual nests in the bunch, so I’d serve them on parchment with a few extra marshmallows or chocolate pieces around the tray. Cold milk is the obvious drink, and it earns its place here.
Pro Tips for This Recipe:
- Keep the heat low so the marshmallows stay stretchy.
- Grease the spoon before pressing the centers.
- Add the chocolate chips at the end if you want some of them to stay partly intact.
Variations on This Dish:
- Dark Chocolate S’mores Nest: Use dark chocolate chips.
- Peanut Butter S’mores Nest: Add 1/3 cup peanut butter to the marshmallow.
- Toasted Marshmallow Nest: Brown the marshmallows slightly before mixing for a deeper flavor.
Common Mistakes to Avoid with This Dish:
- Don’t overcook the marshmallows or the nests turn hard.
- Don’t press so hard that the base becomes thin and brittle.
- Don’t use very fine crumbs; you need some chunk to keep the look.
21. Snickerdoodle Nest Cookies
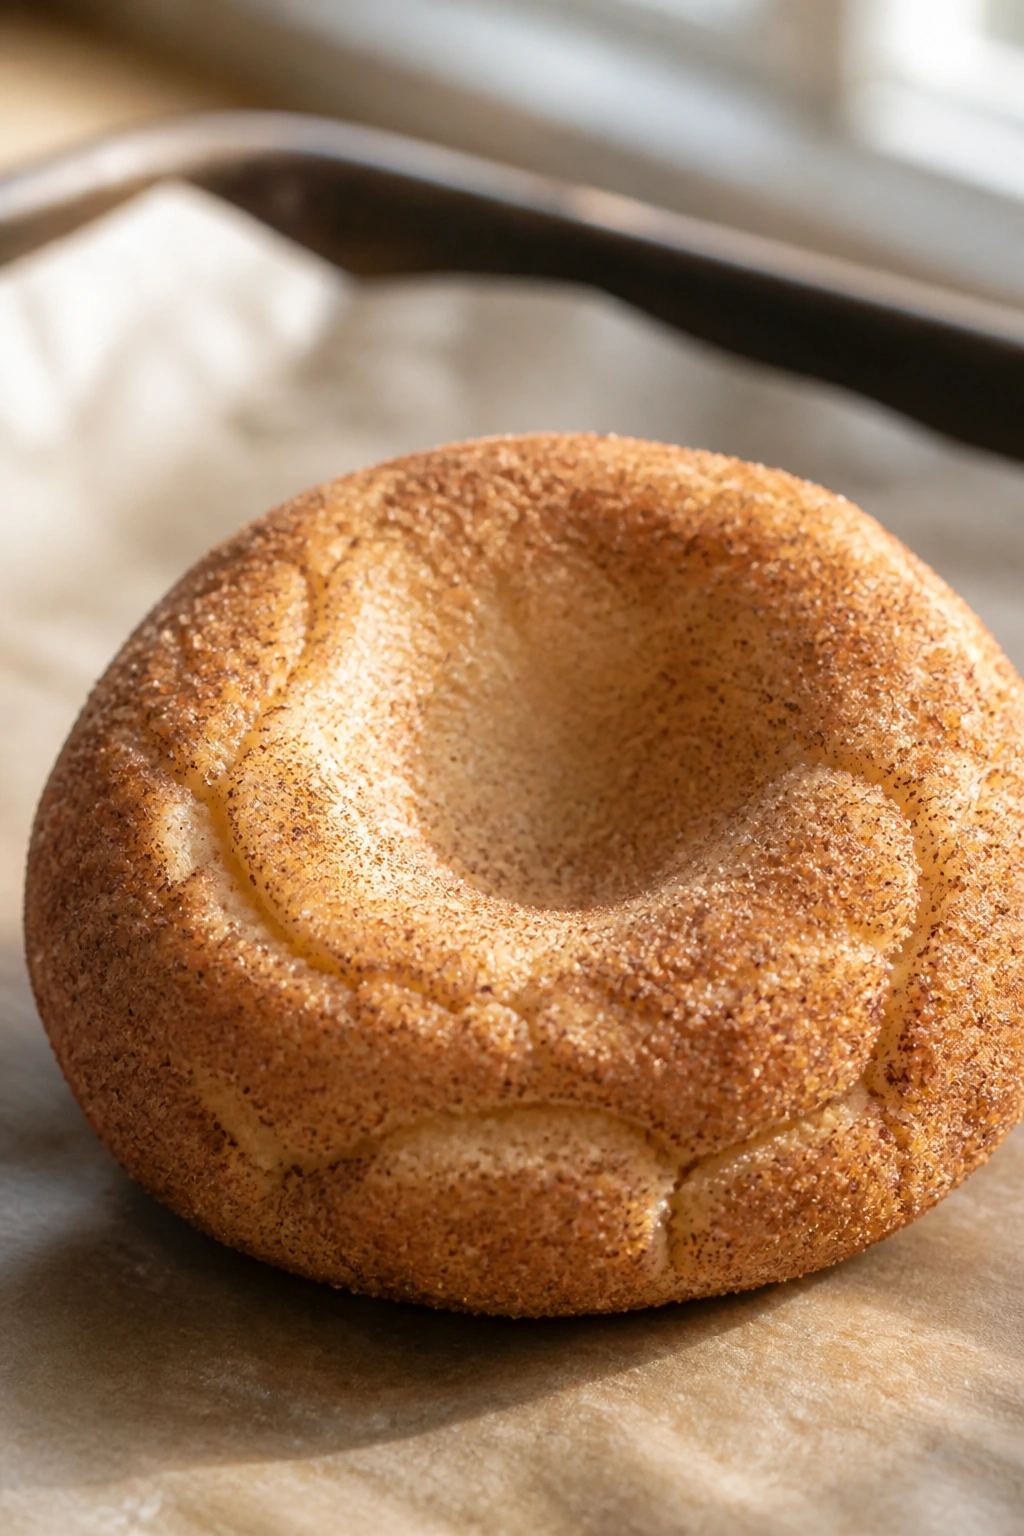
Cinnamon sugar gives these nests a warm, familiar smell the second they hit the oven. They’re soft in the center, a little crisp at the edges, and easy to make without any special shaping tools.
Why It Works: Cream of tartar gives the cookie its snickerdoodle tang, and cinnamon sugar on the outside makes the nests feel finished before the candy eggs go in. The dough is sturdy enough to hold an indentation without cracking apart.
Key Ingredients:
- 1/2 cup unsalted butter, softened — for tenderness.
- 3/4 cup granulated sugar — the sweetness.
- 1 large egg — binds the dough.
- 1 teaspoon vanilla extract — rounds the flavor.
- 1 3/4 cups all-purpose flour — structure.
- 1/2 teaspoon cream of tartar — gives the snickerdoodle tang.
- 1/2 teaspoon baking soda — helps spread.
- 1/2 teaspoon cinnamon — in the dough.
- 1/4 teaspoon salt — balances everything.
- 2 tablespoons cinnamon sugar — for rolling.
- 24 mini candy eggs — the nest filling.
Quick Steps:
- Preheat the oven to 350°F and line a tray.
- Cream butter and sugar, then beat in the egg and vanilla.
- Stir in flour, cream of tartar, baking soda, cinnamon, and salt.
- Roll into balls, coat in cinnamon sugar, bake for 10 to 12 minutes, press centers, and cool.
Equipment for This Recipe:
- Mixing bowl
- Baking sheet
- Small bowl for cinnamon sugar
- Teaspoon for the indent
How to Serve This Dish: These are best with coffee or warm milk because the cinnamon feels almost like a breakfast pastry. They look nice in a shallow bowl, not just on a flat plate.
Pro Tips for This Recipe:
- Roll the dough while it’s still soft so the cinnamon sugar sticks.
- Press the centers right after baking.
- Let them cool before filling or the candy eggs can slide.
Variations on This Dish:
- Extra Cinnamon Nest: Add 1/4 teaspoon more cinnamon to the dough.
- Apple Pie Nest: Tuck in a tiny bit of chopped dried apple.
- Creamy Vanilla Nest: Add a few white chocolate chips to the dough.
Common Mistakes to Avoid with This Dish:
- Don’t overbake or they’ll dry out.
- Don’t forget the cream of tartar; it’s part of the cookie’s flavor.
- Don’t make the centers too deep or the cookies crack through.
22. Tahini Sesame Nests
Tahini gives these nests a nutty, slightly savory edge that surprises people in a good way. They’re not candy-sweet, which makes them useful when you want one dessert cookie to taste a little different from the rest.
Why It Works: Tahini binds the mixture and brings a roasted sesame flavor that plays well with honey and dark chocolate. Sesame seeds add crunch and help the nests look like little woven bundles.
Key Ingredients:
- 3/4 cup tahini — the main flavor.
- 1/2 cup honey — the sweet binder.
- 2 cups sesame seeds — adds crunch and nest texture.
- 1 cup rolled oats — gives body.
- 1/2 teaspoon vanilla extract — smooths the flavor.
- 1/4 teaspoon salt — keeps it balanced.
- 1/2 cup dark chocolate chips — optional but very good.
- 24 mini candy eggs — the center.
Quick Steps:
- Warm tahini and honey together until loose.
- Stir in vanilla, salt, oats, sesame seeds, and chocolate chips if using.
- Shape into mounds on parchment and press the centers.
- Chill for 20 minutes until firm enough to fill.
Equipment for This Recipe:
- Mixing bowl
- Parchment-lined tray
- Spoon
- Small bowl for extra sesame seeds, optional
How to Serve This Dish: These pair well with tea or coffee that isn’t overly sweet. They’re also a nice addition to a mixed dessert tray because the sesame flavor breaks up the usual chocolate pattern.
Pro Tips for This Recipe:
- Stir the tahini well before measuring; it separates in the jar.
- Toast half the sesame seeds if you want a deeper flavor.
- Chill thoroughly before handling, because tahini stays soft at room temperature.
Variations on This Dish:
- Chocolate Tahini Nest: Increase the chocolate chips to 3/4 cup.
- Orange Sesame Nest: Add orange zest for a brighter finish.
- Nutty Seed Nest: Swap half the oats for sunflower seeds.
Common Mistakes to Avoid with This Dish:
- Don’t use too much honey or the nests turn loose.
- Don’t skip the salt; tahini needs it.
- Don’t expect them to hold immediately. They need the full chill.
23. Carrot Cake Nest Cookies
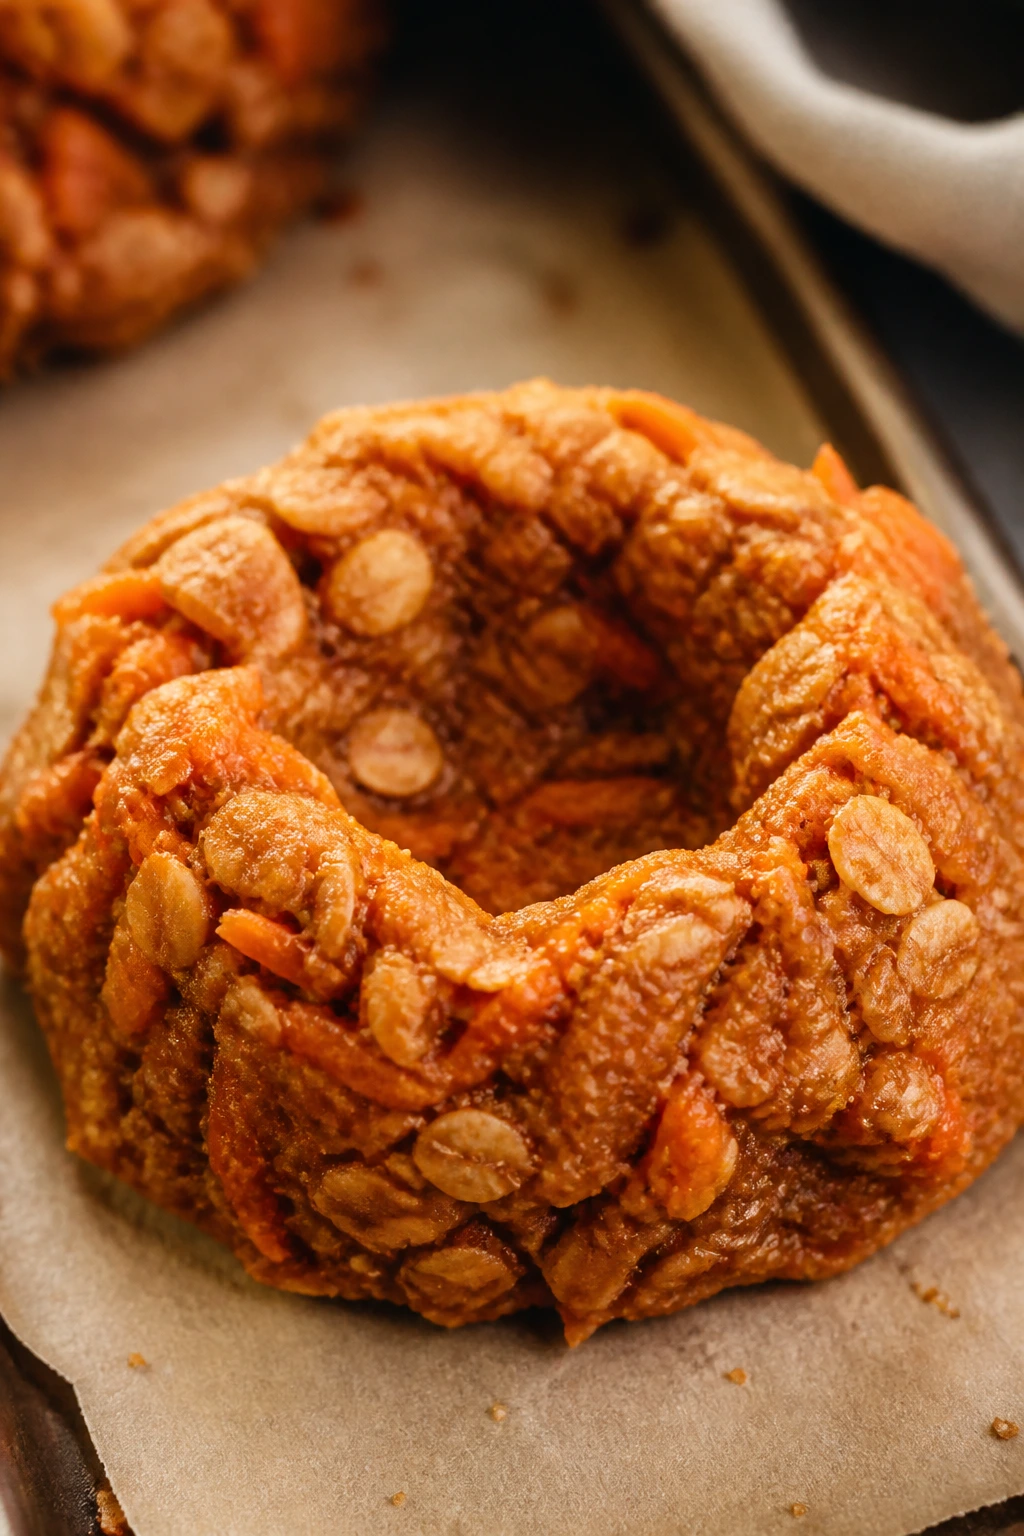
These taste like carrot cake in cookie form, minus the extra frosting work. Warm spice, a little carrot sweetness, and a soft crumb make them feel friendly and familiar.
Why It Works: Grated carrot adds moisture and a subtle sweetness, while oats and flour keep the dough from going slack. The nests bake into sturdy cups that can hold candy eggs or a tiny dab of cream cheese frosting.
Key Ingredients:
- 1 cup finely grated carrot — adds moisture and sweetness.
- 1 cup rolled oats — creates texture.
- 3/4 cup all-purpose flour — structure.
- 1/2 cup light brown sugar — keeps the cookie soft.
- 1/2 cup unsalted butter, softened — for richness.
- 1 large egg — binds the dough.
- 1 teaspoon cinnamon — the main spice.
- 1/4 teaspoon nutmeg — adds warmth.
- 1/2 teaspoon baking powder — for lift.
- 1/4 teaspoon salt — balances the sweetness.
- 1/2 cup white chocolate chips — optional sweetness.
- 24 mini candy eggs — the center.
Quick Steps:
- Preheat the oven to 350°F and line a baking sheet.
- Cream butter and sugar, then beat in the egg.
- Stir in carrot, oats, flour, cinnamon, nutmeg, baking powder, salt, and white chocolate chips.
- Scoop, bake for 11 to 13 minutes, press centers, and cool before filling.
Equipment for This Recipe:
- Mixing bowl
- Grater
- Baking sheet
- Teaspoon for the wells
How to Serve This Dish: These are lovely on a spring-colored dessert tray, especially if you leave a few visible carrot flecks on top. They go with coffee, but I like them best with tea because the spice stays gentle.
Pro Tips for This Recipe:
- Grate the carrot finely so it blends into the dough.
- Squeeze excess moisture from the carrot if it’s especially wet.
- Let them cool fully before you add frosting or candy.
Variations on This Dish:
- Raisin Carrot Nest: Add 1/4 cup raisins.
- Pineapple Carrot Nest: Add 2 tablespoons crushed pineapple, well drained.
- Cream Cheese Nest: Add a tiny swirl of cream cheese frosting before the eggs.
Common Mistakes to Avoid with This Dish:
- Don’t leave the carrot in long shreds; the dough won’t hold neatly.
- Don’t overbake, or the carrot flavor goes dull.
- Don’t add too much wet fruit without draining it first.
24. Red Velvet Nest Cookies
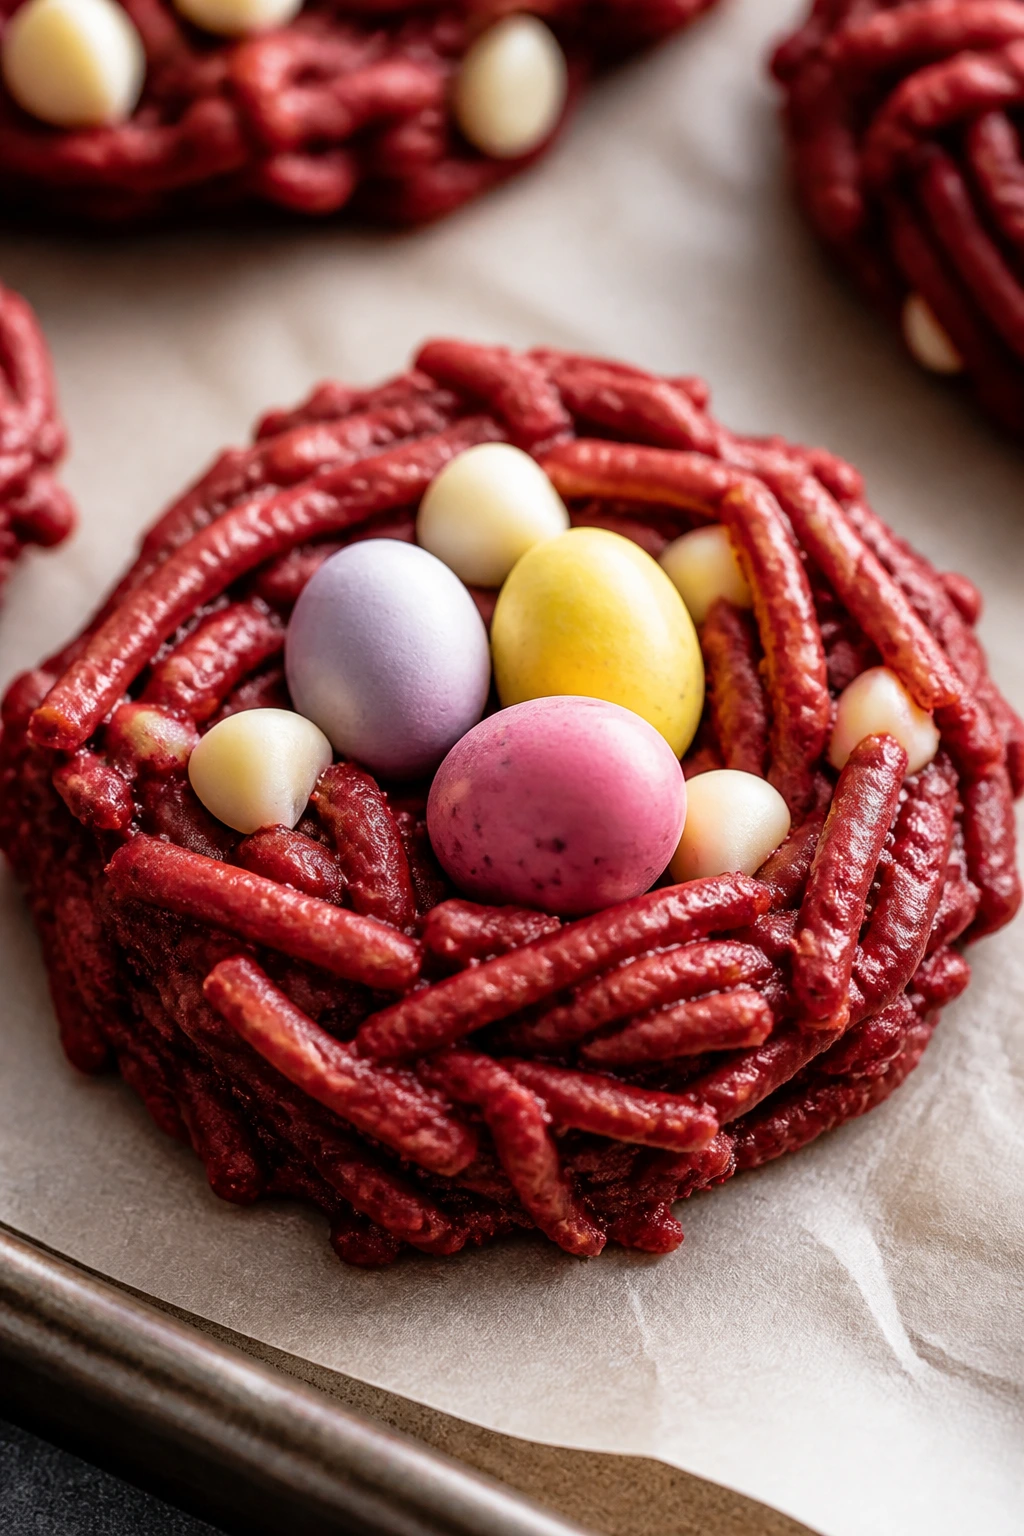
Red velvet gives the tray a deeper color and a slightly cocoa-forward flavor that makes the white chocolate eggs stand out. They’re more about color and contrast than a huge flavor change, and that’s enough here.
Why It Works: A small amount of cocoa keeps the red velvet flavor in place without turning the cookie into plain chocolate. White chocolate chips and candy eggs pop against the red dough, which helps the nest shape read clearly.
Key Ingredients:
- 1/2 cup unsalted butter, softened — for the dough.
- 3/4 cup granulated sugar — the sweetness.
- 1 large egg — binds the cookie.
- 1 teaspoon vanilla extract — balances the cocoa.
- 1 tablespoon unsweetened cocoa powder — the red velvet note.
- 1 teaspoon red food coloring — the color.
- 1 3/4 cups all-purpose flour — structure.
- 1/2 teaspoon baking powder — for light lift.
- 1/4 teaspoon fine salt — keeps it balanced.
- 1/2 cup white chocolate chips — for contrast.
- 24 mini candy eggs — the center.
Quick Steps:
- Preheat the oven to 350°F and line a baking sheet.
- Cream butter and sugar, then beat in egg, vanilla, cocoa, and food coloring.
- Stir in flour, baking powder, salt, and white chocolate chips.
- Scoop, bake for 10 to 12 minutes, press centers, and cool before filling.
Equipment for This Recipe:
- Mixing bowl
- Baking sheet
- Spatula
- Teaspoon for pressing
How to Serve This Dish: These are best on a light plate or cake stand where the color contrast shows up. Serve with milk or coffee; the cocoa wants a plain drink beside it.
Pro Tips for This Recipe:
- Use gel food coloring if you want a stronger red without thinning the dough.
- Press the centers while the cookies are still soft.
- Chill the dough for 10 minutes if it feels sticky.
Variations on This Dish:
- Cream Cheese Red Nest: Add a tiny cream cheese filling in the center.
- Chocolate Chip Red Nest: Use semisweet chips instead of white chocolate.
- Berry Red Nest: Add a few freeze-dried raspberries for tang.
Common Mistakes to Avoid with This Dish:
- Don’t overdo the food coloring or the dough can get loose.
- Don’t bake until dark; red velvet should stay soft-looking.
- Don’t add filling too early or it will melt into the cookie.
25. Pumpkin Spice Oat Nests
Pumpkin spice gives the nest a soft, cozy flavor without needing a heavy batter. Oats help keep the cookie sturdy, and the pumpkin adds a tender crumb that bakes into a surprisingly neat little cup.
Why It Works: Pumpkin puree brings moisture, so the recipe uses egg yolk and extra flour to keep the dough from spreading. Oats and pecans make the nest look textured and rustic, which suits the flavor.
Key Ingredients:
- 1/2 cup unsalted butter, softened — for richness.
- 3/4 cup brown sugar — keeps the cookie soft.
- 1 large egg yolk — binds without too much extra moisture.
- 1/4 cup pumpkin puree — for flavor and color.
- 1 3/4 cups all-purpose flour — the structure.
- 1 teaspoon pumpkin pie spice — the main flavor.
- 1/2 teaspoon baking soda — helps spread just enough.
- 1/4 teaspoon salt — balances the sweetness.
- 1/2 cup chopped pecans — adds crunch.
- 24 mini candy eggs — the center.
Quick Steps:
- Preheat the oven to 350°F and line a baking sheet.
- Cream butter and brown sugar, then beat in egg yolk and pumpkin puree.
- Stir in flour, spice, baking soda, salt, and pecans.
- Scoop, chill for 15 minutes if soft, bake for 11 to 13 minutes, press centers, and cool.
Equipment for This Recipe:
- Mixing bowl
- Baking sheet
- Teaspoon for the indent
- Cooling rack
How to Serve This Dish: These taste good with coffee or spiced tea, and they look nice on a plate with a few pecan halves around them. They’re not overly sweet, which makes them easy to put beside other desserts.
Pro Tips for This Recipe:
- Don’t use too much pumpkin; the dough gets too loose fast.
- Chill the dough if it feels sticky.
- Press the centers immediately after baking while the cookie is soft.
Variations on This Dish:
- Cranberry Pumpkin Nest: Add 1/3 cup dried cranberries.
- Chocolate Pumpkin Nest: Stir in 1/3 cup mini chocolate chips.
- Maple Pumpkin Nest: Replace 2 tablespoons brown sugar with maple syrup.
Common Mistakes to Avoid with This Dish:
- Don’t add extra puree to make it “more pumpkiny”; it backfires.
- Don’t skip the chill if the dough is soft.
- Don’t fill before the nests cool, or the candy eggs can melt.
26. Blueberry White Chocolate Nests

Dried blueberries give these nests a jammy sweetness that feels a little brighter than the usual chocolate-on-chocolate path. White chocolate keeps the flavor soft and creamy, which lets the fruit stand out.
Why It Works: Dried blueberries stay chewy during baking, so they don’t bleed into the dough the way fresh fruit would. White chocolate binds the nest and adds a smooth base that balances the berries.
Key Ingredients:
- 1 cup rolled oats — for chew.
- 1 cup all-purpose flour — structure.
- 1/2 cup brown sugar — sweetness and moisture.
- 1/2 cup unsalted butter, softened — richness.
- 1 large egg — binds the dough.
- 1/2 cup dried blueberries — the fruit note.
- 1/2 cup white chocolate chips — the creamy base.
- 1/2 teaspoon vanilla extract — softens the flavor.
- 1/4 teaspoon salt — keeps it balanced.
- 24 mini candy eggs — the nest filling.
Quick Steps:
- Preheat the oven to 350°F and line a tray.
- Cream butter and brown sugar, then beat in egg and vanilla.
- Stir in oats, flour, blueberries, white chocolate chips, and salt.
- Scoop, bake for 10 to 12 minutes, press centers, and cool.
Equipment for This Recipe:
- Mixing bowl
- Baking sheet
- Teaspoon or small scoop
- Cooling rack
How to Serve This Dish: These sit well on a mixed tray because the berry color adds contrast. Serve them with tea, lemonade, or coffee with milk.
Pro Tips for This Recipe:
- Use dried blueberries, not fresh, for a cleaner bake.
- If the dough feels stiff, let it rest for 5 minutes; oats soften it.
- Add the eggs after full cooling so the white chocolate stays firm.
Variations on This Dish:
- Lemon Blueberry Nest: Add 1 teaspoon lemon zest.
- Coconut Blueberry Nest: Fold in 1/3 cup coconut.
- Almond Blueberry Nest: Add 1/4 teaspoon almond extract.
Common Mistakes to Avoid with This Dish:
- Don’t use too many berries or the dough gets patchy.
- Don’t overbake; white chocolate can taste chalky if it’s cooked too long.
- Don’t press the nests too flat or they’ll look like ordinary cookies.
27. Strawberry Shortcake Nest Cookies
Freeze-dried strawberries give these nests a sharp, clean berry flavor without adding extra moisture. They read as playful and a little pink, which is part of the appeal when you want the tray to feel lighter.
Why It Works: Vanilla wafer crumbs and flour make a tender base that can hold a nest shape, while freeze-dried strawberries add color and fruit flavor without making the dough wet. White chocolate chips soften the tart edge and help the nests set.
Key Ingredients:
- 1 cup all-purpose flour — the structure.
- 1 cup vanilla wafer crumbs — the shortcake note.
- 1/2 cup unsalted butter, softened — for tenderness.
- 3/4 cup granulated sugar — sweetness.
- 1 large egg — binds the dough.
- 1/2 cup freeze-dried strawberries, crushed — the berry flavor.
- 1/2 cup white chocolate chips — the creamy finish.
- 1/2 teaspoon vanilla extract — rounds the cookie.
- 1/4 teaspoon salt — balances the sweetness.
- 24 mini candy eggs — the center.
Quick Steps:
- Preheat the oven to 350°F and line a baking sheet.
- Cream butter and sugar, then beat in the egg and vanilla.
- Stir in flour, wafer crumbs, strawberries, salt, and white chocolate chips.
- Scoop, bake for 10 to 11 minutes, press centers, cool, and fill.
Equipment for This Recipe:
- Mixing bowl
- Baking sheet
- Food processor or bag and rolling pin for the strawberries
- Teaspoon for shaping
How to Serve This Dish: These look nicest on a pale platter with a few crushed strawberry crumbs around the edges. They’re a good match for tea, milk, or a berry soda if you want to lean into the flavor.
Pro Tips for This Recipe:
- Crush the freeze-dried strawberries into small pieces, not powder.
- Let the cookies cool before handling; the wafer crumbs make them delicate at first.
- Press the wells while warm so they stay neat.
Variations on This Dish:
- Raspberry Shortcake Nest: Swap the strawberries for freeze-dried raspberries.
- Chocolate Shortcake Nest: Add 1 tablespoon cocoa powder.
- Creamy Berry Nest: Add 2 tablespoons cream cheese frosting in the center instead of candy.
Common Mistakes to Avoid with This Dish:
- Don’t use fresh strawberries; the moisture ruins the texture.
- Don’t overmix once the crumbs go in.
- Don’t forget to crush the berries small enough to spread through the dough.
28. Churro Cinnamon Nest Cookies
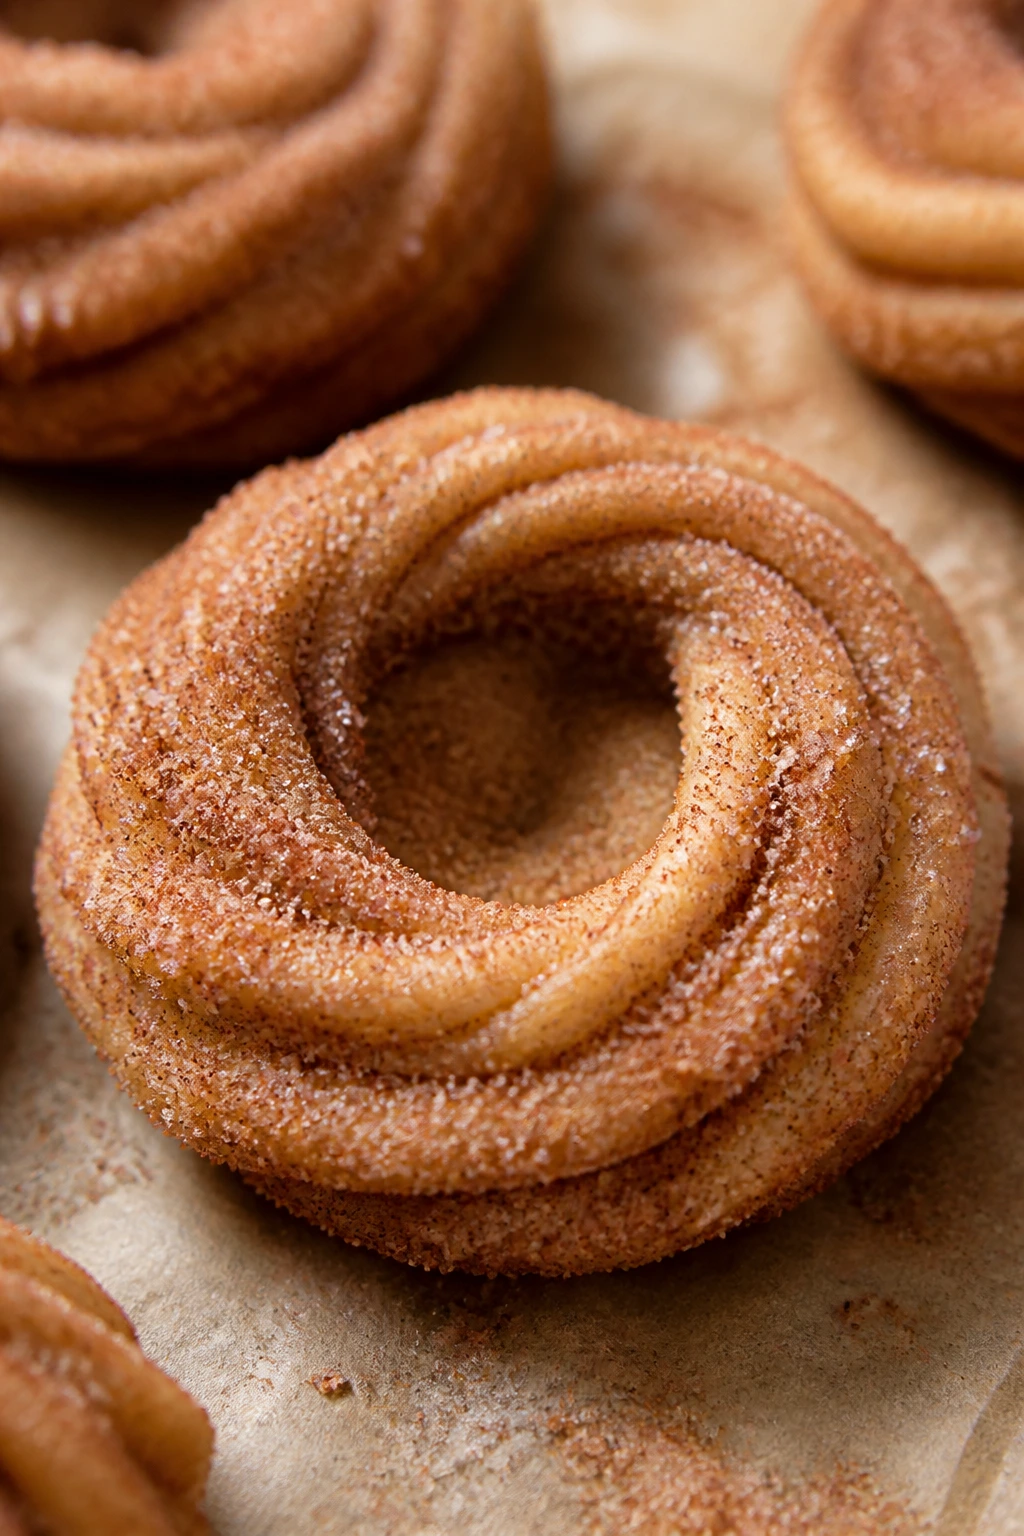
These are sugar-cookie nests with a cinnamon-sugar coat, which means they taste a little like a fairground pastry without the grease. The flavor is familiar, warm, and easy to like.
Why It Works: A buttery cookie base bakes into a tender shell, and the cinnamon sugar coating gives the nests their churro-style finish. The center presses cleanly while the cookie is still warm, so the shape stays readable.
Key Ingredients:
- 1/2 cup unsalted butter, softened — for richness.
- 3/4 cup granulated sugar — sweetness.
- 1 large egg — the binder.
- 1 teaspoon vanilla extract — the flavor base.
- 1 3/4 cups all-purpose flour — structure.
- 1/2 teaspoon baking powder — light lift.
- 1/4 teaspoon salt — balance.
- 2 teaspoons cinnamon — in the dough.
- 2 tablespoons cinnamon sugar — for rolling.
- 24 mini candy eggs — the center.
Quick Steps:
- Preheat the oven to 350°F and line a tray.
- Cream butter and sugar, then beat in egg and vanilla.
- Stir in flour, baking powder, salt, and cinnamon.
- Roll into balls, coat in cinnamon sugar, bake for 10 to 12 minutes, press centers, and cool.
Equipment for This Recipe:
- Mixing bowl
- Baking sheet
- Small bowl for cinnamon sugar
- Teaspoon for the indent
How to Serve This Dish: These are excellent with coffee, hot chocolate, or milk. A little extra cinnamon sugar dusted around the tray makes them look finished.
Pro Tips for This Recipe:
- Roll the dough while soft so the cinnamon sugar sticks.
- Press the centers right after baking.
- Use a light hand with the cinnamon sugar coating; too much makes the cookie gritty.
Variations on This Dish:
- Chocolate Churro Nest: Add 1 tablespoon cocoa powder to the dough.
- Orange Churro Nest: Add 1 teaspoon orange zest.
- Caramel Churro Nest: Add a tiny caramel drizzle after cooling.
Common Mistakes to Avoid with This Dish:
- Don’t overbake; sugar cookies dry out quickly.
- Don’t press too hard or the bottoms crack.
- Don’t add the candy eggs while the cookies are still warm.
29. Salted Caramel Pretzel Nests
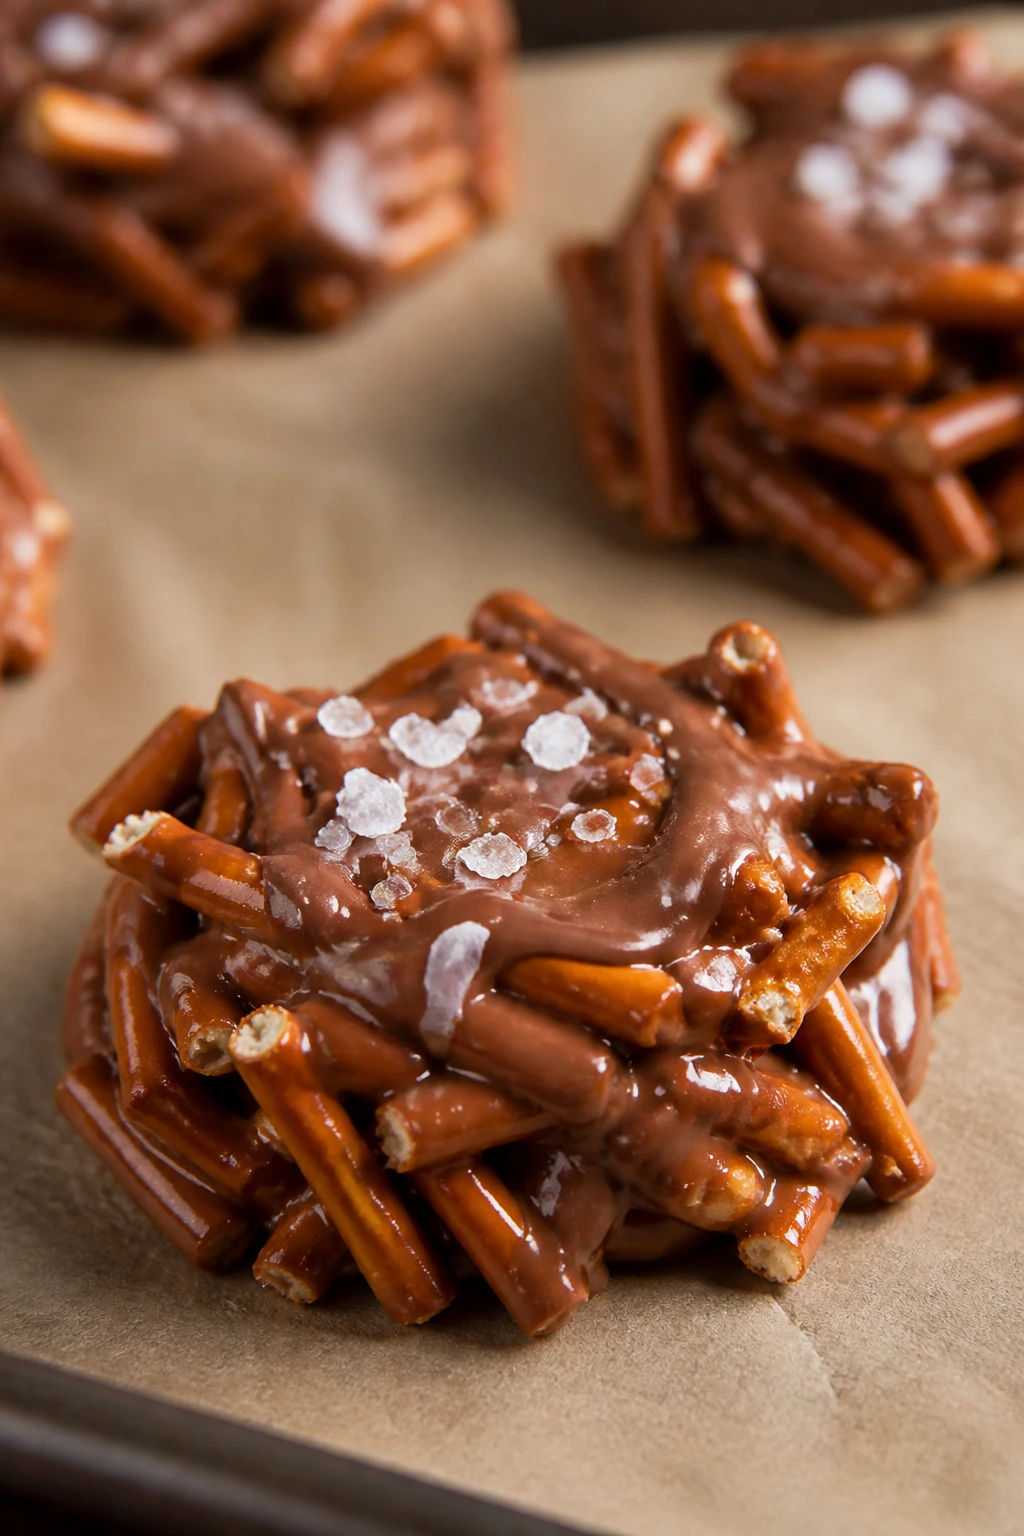
Pretzels and caramel make a nest that feels sweet, salty, and a little dangerous in the best way. The caramel bits melt into the pretzels enough to bind them, but not so much that you lose the crunch.
Why It Works: Caramel bits melt just enough to glue the crushed pretzels together, and milk chocolate smooths out the salt. A pinch of flaky salt on top turns the whole thing from snacky to dessert.
Key Ingredients:
- 3 cups mini pretzels — the crunchy base.
- 1 cup caramel bits — the sweet binder.
- 1 cup milk chocolate chips — softens the salt.
- 2 tablespoons unsalted butter — helps the melt.
- 1 teaspoon vanilla extract — rounds the flavor.
- Flaky salt — for finishing.
- 24 mini candy eggs — the center.
Quick Steps:
- Crush the pretzels lightly and line a tray with parchment.
- Melt caramel bits, chocolate chips, and butter until smooth.
- Stir in vanilla and pretzels, then form nests on the tray.
- Sprinkle with flaky salt, chill for 20 minutes, and fill once set.
Equipment for This Recipe:
- Microwave-safe bowl or saucepan
- Parchment-lined tray
- Spoon
- Small scoop, optional
How to Serve This Dish: These are best on a tray with the salt visible on top, since that’s part of the appeal. Serve with milk or coffee; both tame the caramel.
Pro Tips for This Recipe:
- Don’t crush the pretzels into powder.
- Add the salt after shaping, while the caramel is still tacky.
- Chill until firm before moving them, or they stretch.
Variations on This Dish:
- Dark Caramel Nest: Use dark chocolate chips for a sharper finish.
- Peanut Caramel Nest: Add 1/3 cup chopped peanuts.
- White Caramel Nest: Swap milk chocolate for white chocolate and reduce the salt a touch.
Common Mistakes to Avoid with This Dish:
- Don’t overheat caramel bits or they go stiff.
- Don’t skip the parchment; caramel likes to glue itself to the tray.
- Don’t fill too early or the nests flatten.
30. Toffee Pecan Nest Cookies
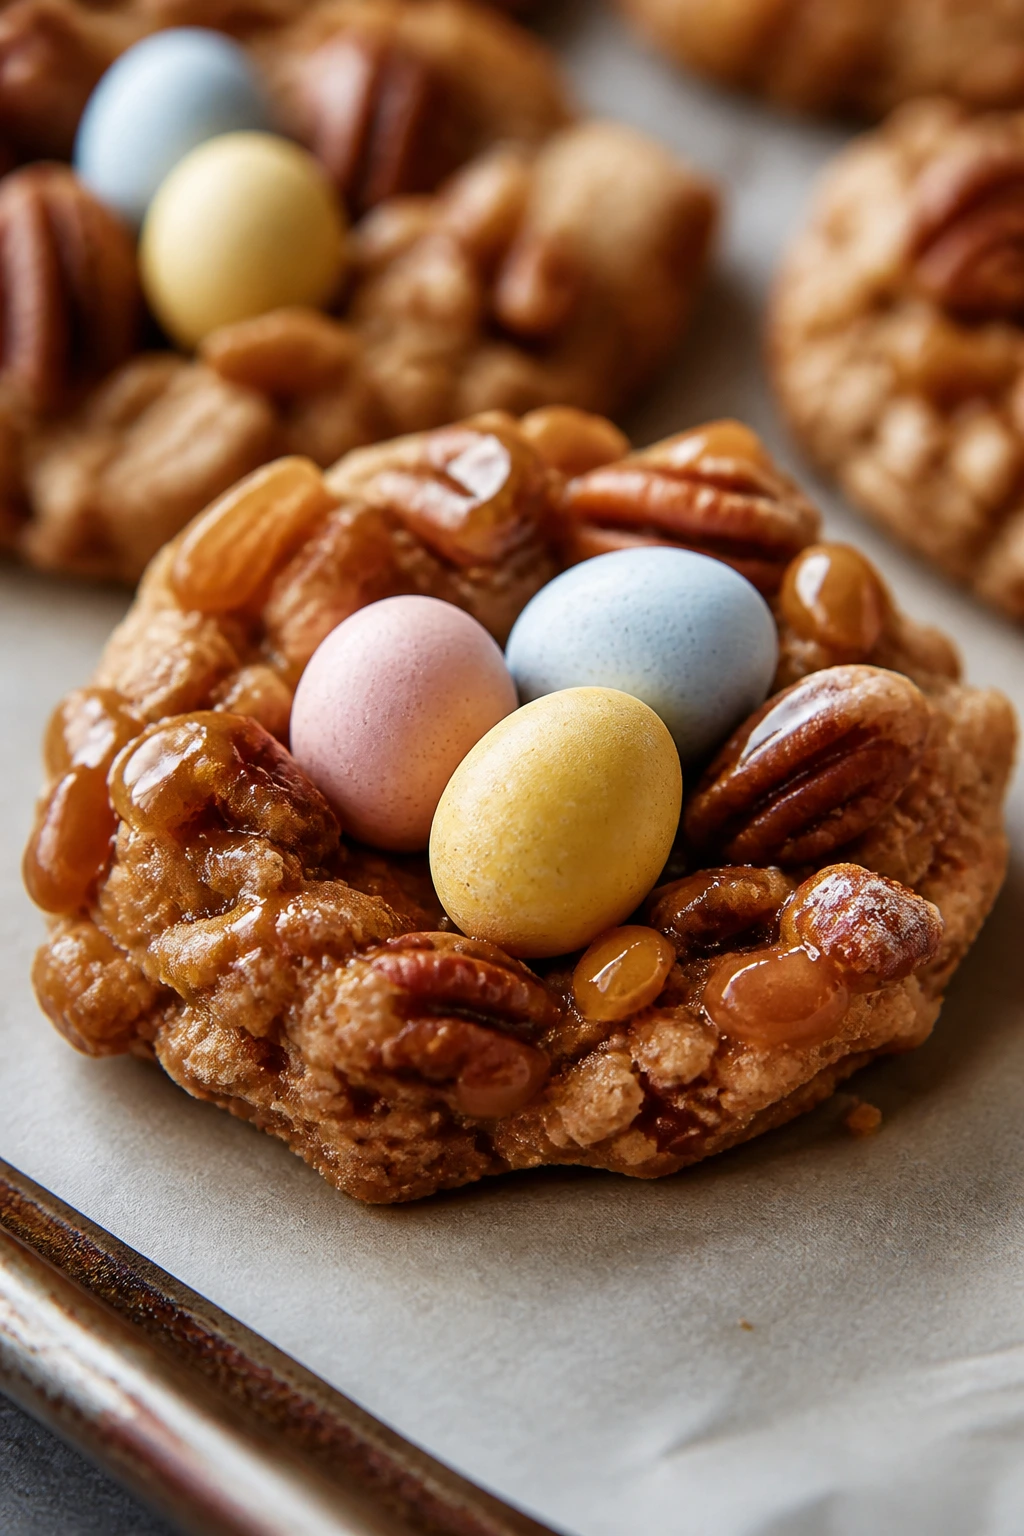
Toffee bits give these nests a buttery crunch that tastes a little like a bakery cookie from a glass case. Pecans keep them grounded and make the nest shape easy to read.
Why It Works: Butter and brown sugar create a cookie that spreads just enough to press into a nest. Toffee bits melt in little pockets, so every bite has a crisp, sugary spot tucked into the dough.
Key Ingredients:
- 1 cup chopped pecans — the crunchy body.
- 1/2 cup toffee bits — the sweet, buttery flavor.
- 1 cup all-purpose flour — the structure.
- 1/2 cup light brown sugar — sweetness and moisture.
- 1/2 cup unsalted butter, softened — richness.
- 1 large egg — binds the dough.
- 1 teaspoon vanilla extract — rounds the flavor.
- 1/4 teaspoon salt — balances the sweetness.
- 24 mini candy eggs — the center.
Quick Steps:
- Preheat the oven to 350°F and line a baking sheet.
- Cream butter and brown sugar, then beat in egg and vanilla.
- Stir in flour, salt, pecans, and toffee bits.
- Scoop, bake for 10 to 12 minutes, press centers, and cool before filling.
Equipment for This Recipe:
- Mixing bowl
- Baking sheet
- Teaspoon for the nests
- Cooling rack
How to Serve This Dish: These are good with coffee, especially if you like a sweet cookie beside a bitter drink. They also pack well into a tin without getting messy.
Pro Tips for This Recipe:
- Chop the pecans small enough to sit in the dough evenly.
- Press the centers while the cookies are hot and soft.
- Let the cookies cool before filling so the toffee bits don’t smear.
Variations on This Dish:
- Chocolate Toffee Nest: Add 1/3 cup mini chocolate chips.
- Maple Toffee Nest: Replace 2 tablespoons of sugar with maple syrup.
- Walnut Toffee Nest: Swap pecans for walnuts if that’s what you have.
Common Mistakes to Avoid with This Dish:
- Don’t overload the dough with toffee bits or it crumbles.
- Don’t overbake; toffee burns quickly.
- Don’t move the cookies before they cool a bit or the nest shape can break.
31. Mocha Hazelnut Nests
Mocha and hazelnut give these nests a coffeehouse feel without asking for any complicated technique. They’re rich, a little glossy, and worth making when you want something more adult in flavor.
Why It Works: Cocoa and espresso deepen the cookie, while chopped hazelnuts add crunch and a clean nutty finish. A little hazelnut spread helps bind the dough and gives the nests a smooth center.
Key Ingredients:
- 1/2 cup unsalted butter, softened — the dough base.
- 3/4 cup granulated sugar — sweetness.
- 1 large egg — binds the dough.
- 1 tablespoon unsweetened cocoa powder — chocolate flavor.
- 1 teaspoon instant espresso powder — the mocha note.
- 1 1/2 cups all-purpose flour — structure.
- 1/2 cup chopped hazelnuts — crunch.
- 1/4 teaspoon salt — balance.
- 1/2 cup hazelnut spread — softens the texture.
- 24 mini candy eggs — the center.
Quick Steps:
- Preheat the oven to 350°F and line a baking sheet.
- Cream butter and sugar, then beat in the egg, cocoa, espresso, and hazelnut spread.
- Stir in flour, salt, and hazelnuts.
- Scoop, bake for 10 to 12 minutes, press the centers, and cool before filling.
Equipment for This Recipe:
- Mixing bowl
- Baking sheet
- Teaspoon for pressing
- Cooling rack
How to Serve This Dish: These belong with coffee, obviously, but they’re also strong with black tea. Serve them on a dark plate or wooden board so the cocoa color stands out.
Pro Tips for This Recipe:
- Use finely chopped hazelnuts for better shaping.
- Don’t overdo the espresso powder or the flavor turns harsh.
- Press the centers before the cookies fully set.
Variations on This Dish:
- Chocolate-Hazelnut Nest: Add 1/4 cup mini chocolate chips.
- Orange Mocha Nest: Add 1 teaspoon orange zest.
- Salted Mocha Nest: Finish with a few flakes of salt on top.
Common Mistakes to Avoid with This Dish:
- Don’t use too much hazelnut spread or the dough gets greasy.
- Don’t bake until crisp all over; they should stay tender.
- Don’t skip the salt, because mocha tastes flat without it.
32. Orange Cranberry Nest Cookies
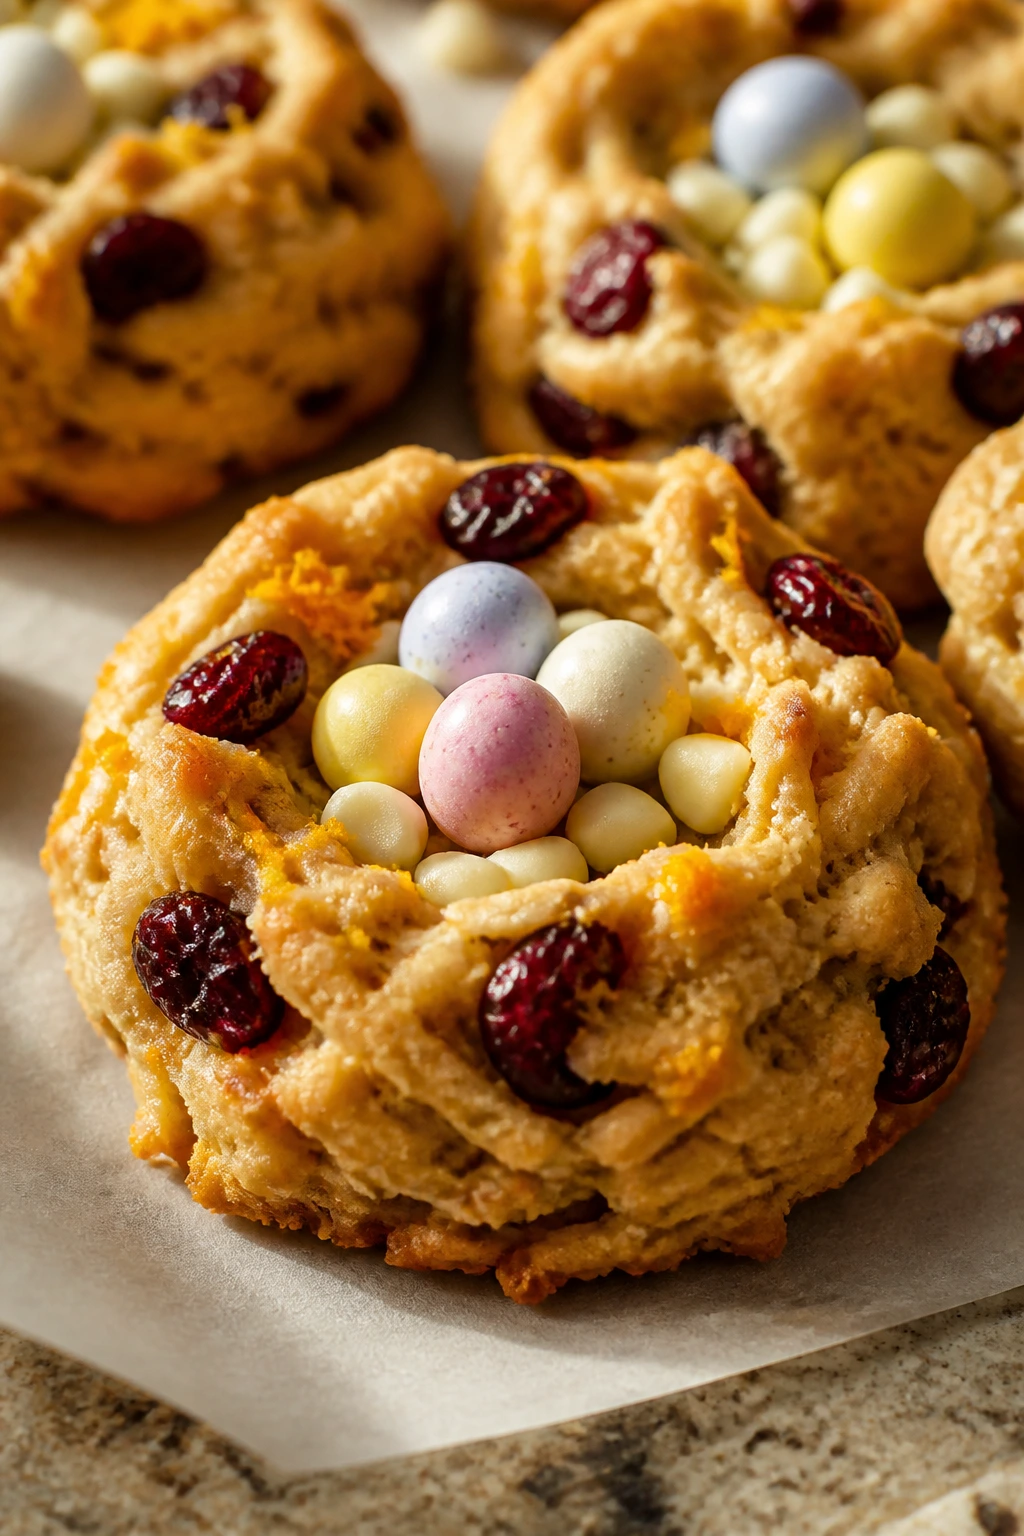
Orange zest and dried cranberries make these nests taste bright and a little tart, which is a nice break from the heavier chocolate versions. The white chocolate chips keep everything smooth and sweet enough to still feel like dessert.
Why It Works: Orange zest perfumes the dough without adding extra moisture, and dried cranberries give little chewy pockets that hold up in the bake. Oats keep the nests rustic and help the centers hold their shape.
Key Ingredients:
- 1 cup all-purpose flour — structure.
- 1 cup rolled oats — texture.
- 1/2 cup unsalted butter, softened — richness.
- 1/2 cup light brown sugar — sweetness.
- 1 large egg — binds the dough.
- 1 tablespoon orange zest — the main flavor.
- 1/2 cup dried cranberries — tart chew.
- 1/2 cup white chocolate chips — creamy contrast.
- 1/4 teaspoon salt — balance.
- 24 mini candy eggs — the center.
Quick Steps:
- Preheat the oven to 350°F and line a baking sheet.
- Cream butter and brown sugar, then beat in egg and orange zest.
- Stir in flour, oats, cranberries, white chocolate chips, and salt.
- Scoop, bake for 10 to 12 minutes, press centers, and cool before filling.
Equipment for This Recipe:
- Mixing bowl
- Baking sheet
- Teaspoon for the center
- Cooling rack
How to Serve This Dish: These look good on a spring tray with other lighter cookies because the orange color wakes everything up. Serve with tea or sparkling water with a squeeze of orange.
Pro Tips for This Recipe:
- Zest the orange first; it’s much easier than trying to do it later.
- Chop the cranberries if they’re especially large.
- Press the centers while warm so the nests stay neat.
Variations on This Dish:
- Lemon Cranberry Nest: Swap the orange zest for lemon.
- Pecan Orange Nest: Add 1/3 cup chopped pecans.
- Chocolate Orange Nest: Replace half the white chocolate chips with dark chocolate.
Common Mistakes to Avoid with This Dish:
- Don’t add orange juice; zest gives flavor without wrecking the dough.
- Don’t overbake or the cranberries turn hard.
- Don’t skip the oats; they help with the nest shape.
33. Black Forest Brownie Nests
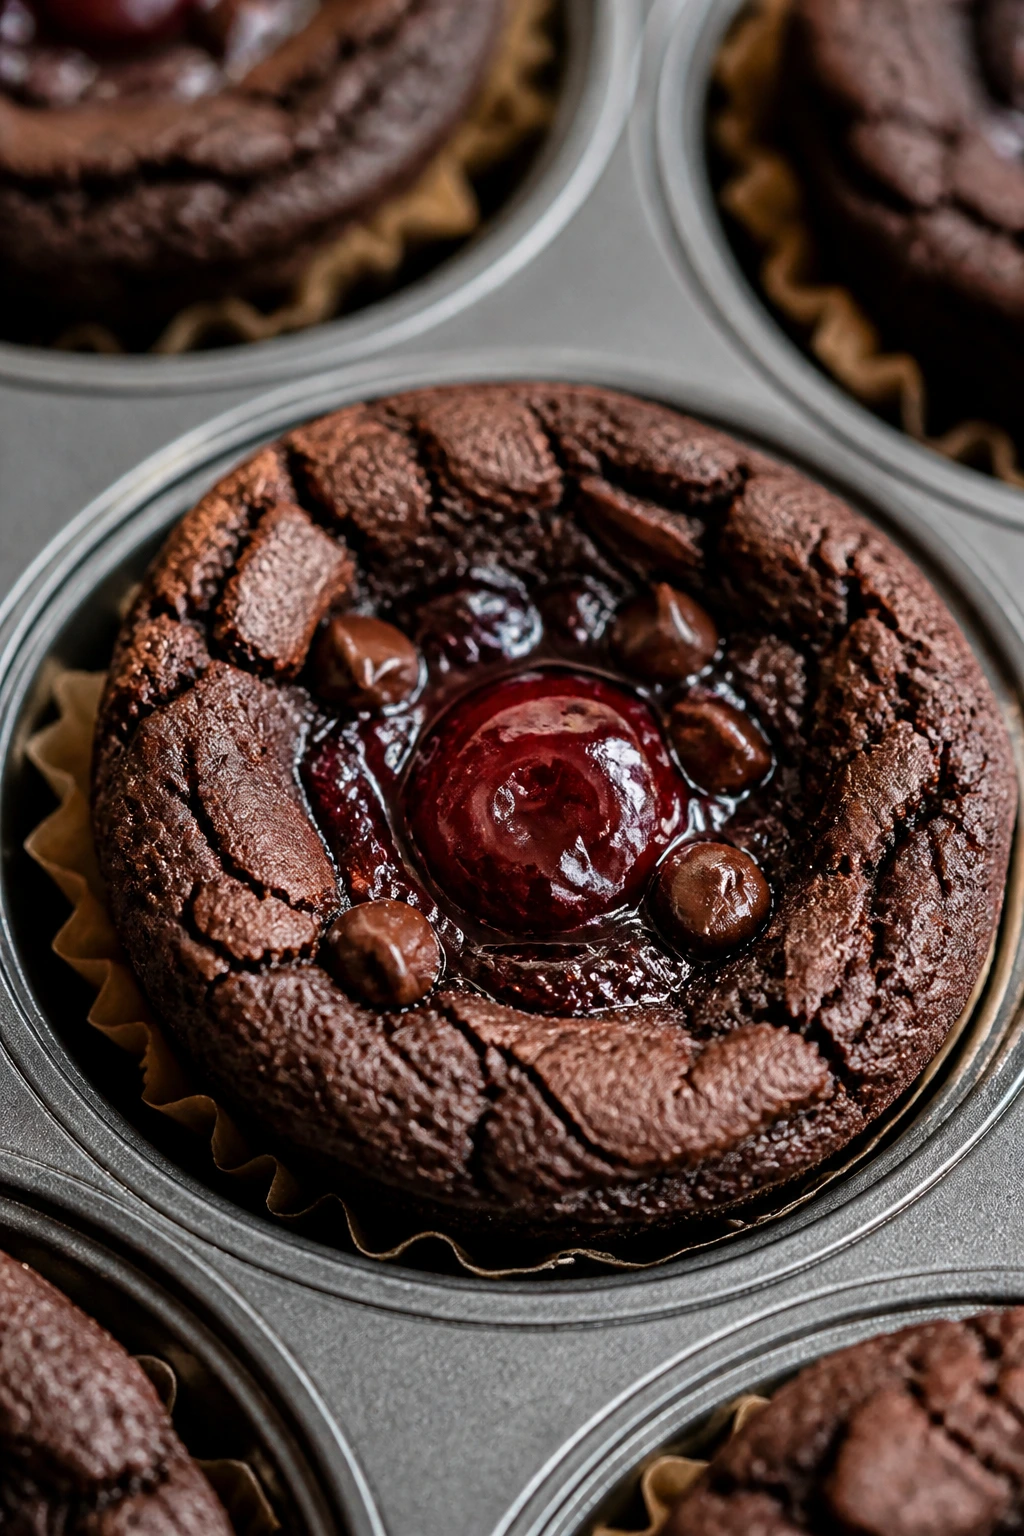
This one is deep, chocolatey, and a little dramatic. Cherry preserves tucked into a brownie-style nest give you that Black Forest feel without trying to assemble a whole layer cake.
Why It Works: Cocoa-rich dough bakes into a sturdy cup, and the cherry preserve adds a bright, tart center. Chocolate chips help the brownie nests stay moist and rich while still holding shape.
Key Ingredients:
- 1/2 cup unsalted butter, melted — the brownie base.
- 3/4 cup granulated sugar — sweetness.
- 1 large egg — structure.
- 1/2 cup unsweetened cocoa powder — the dark chocolate flavor.
- 1 1/2 cups all-purpose flour — keeps the cups stable.
- 1/2 teaspoon baking powder — a little lift.
- 1/4 teaspoon salt — balances the cocoa.
- 1/2 cup cherry preserves — the fruit center.
- 1/2 cup chocolate chips — extra richness.
- 24 mini candy eggs, optional — if you want a candy finish too.
Quick Steps:
- Preheat the oven to 350°F and grease a mini muffin tin.
- Whisk butter, sugar, egg, cocoa, flour, baking powder, and salt into a thick batter.
- Stir in chocolate chips, spoon into the tin, and bake for 12 to 14 minutes.
- Press the centers, cool completely, then add a small spoonful of cherry preserves.
Equipment for This Recipe:
- Mini muffin tin
- Mixing bowl
- Whisk and spoon
- Small spoon for the preserve
How to Serve This Dish: These are the richest nests here, so keep the portions small and the plate simple. I’d serve them with coffee or a small glass of cold milk.
Pro Tips for This Recipe:
- Use thick cherry preserves, not runny jam, or the centers slide.
- Press the wells right after baking.
- Cool fully before adding preserves so they stay neatly in the nest.
Variations on This Dish:
- Dark Cherry Nest: Use sour cherry preserves.
- Raspberry Black Forest Nest: Swap the cherry preserves for raspberry.
- Extra Chocolate Nest: Add more chocolate chips and skip the candy eggs entirely.
Common Mistakes to Avoid with This Dish:
- Don’t overbake or the brownie cups get dry.
- Don’t add too much jam or the centers leak.
- Don’t press too deeply, or the cup bottoms may tear.
34. Raspberry Almond Nests
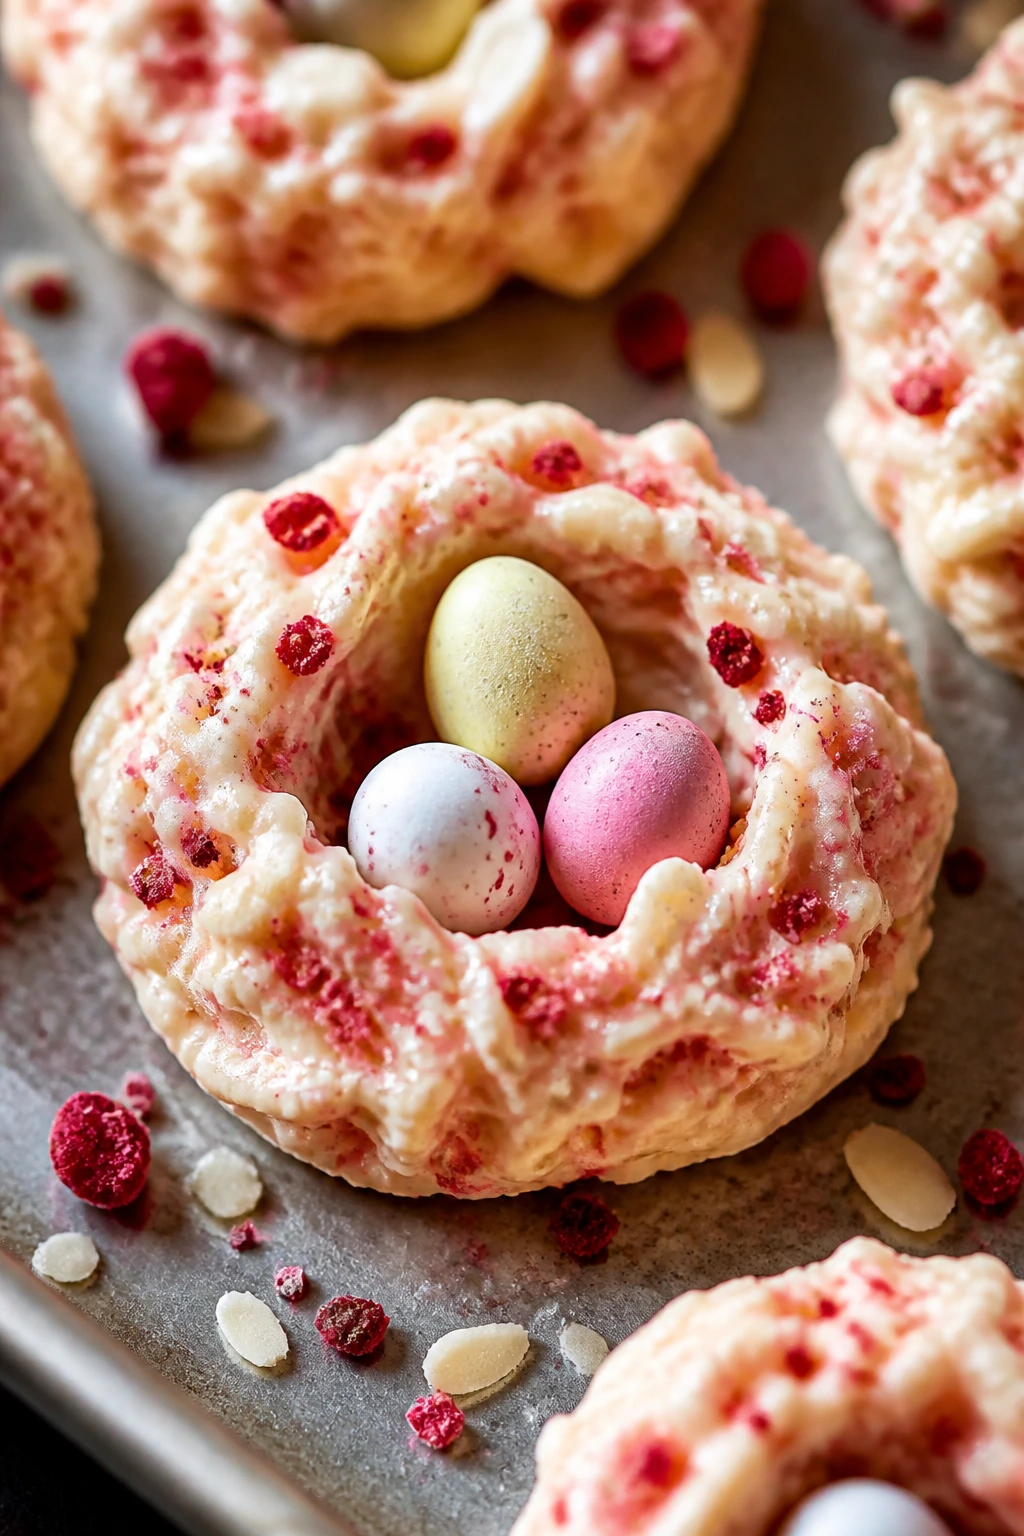
Raspberry and almond are one of those combinations that tastes polished even when the cookie itself is plain. The freeze-dried fruit keeps the dough dry enough to shape, and the almond flavor gives the nest a clean finish.
Why It Works: Freeze-dried raspberries bring bright fruit flavor without extra moisture, which is the main reason this cookie works so well. Almond flour or almond extract helps the nest taste round and bakery-like.
Key Ingredients:
- 1 cup almond flour — adds tenderness and almond flavor.
- 1 cup all-purpose flour — structure.
- 1/2 cup unsalted butter, softened — richness.
- 3/4 cup granulated sugar — sweetness.
- 1 large egg — binds the dough.
- 1/2 cup freeze-dried raspberries, crushed — the fruit note.
- 1/2 teaspoon almond extract — the signature flavor.
- 1/4 teaspoon salt — balance.
- 24 mini candy eggs — the center.
Quick Steps:
- Preheat the oven to 350°F and line a baking sheet.
- Cream butter and sugar, then beat in the egg and almond extract.
- Stir in almond flour, all-purpose flour, salt, and raspberries.
- Scoop, bake for 10 to 12 minutes, press centers, and cool before filling.
Equipment for This Recipe:
- Mixing bowl
- Baking sheet
- Spoon or small scoop
- Cooling rack
How to Serve This Dish: These look good with a little extra raspberry crumble sprinkled around them. Serve them with tea or a lightly sweet coffee drink.
Pro Tips for This Recipe:
- Crush the freeze-dried raspberries into small pieces, not powder.
- Almond extract is strong; measure it carefully.
- Press the centers while the cookies are still soft.
Variations on This Dish:
- Lemon Almond Nest: Add lemon zest for brightness.
- Chocolate Raspberry Nest: Add 1/3 cup mini chocolate chips.
- Pistachio Raspberry Nest: Replace some almond flour with chopped pistachios.
Common Mistakes to Avoid with This Dish:
- Don’t use fresh raspberries; the moisture ruins the dough.
- Don’t overmix once the flour goes in.
- Don’t bake until dark; these should stay pale-golden.
35. Coconut Lime Nest Cookies
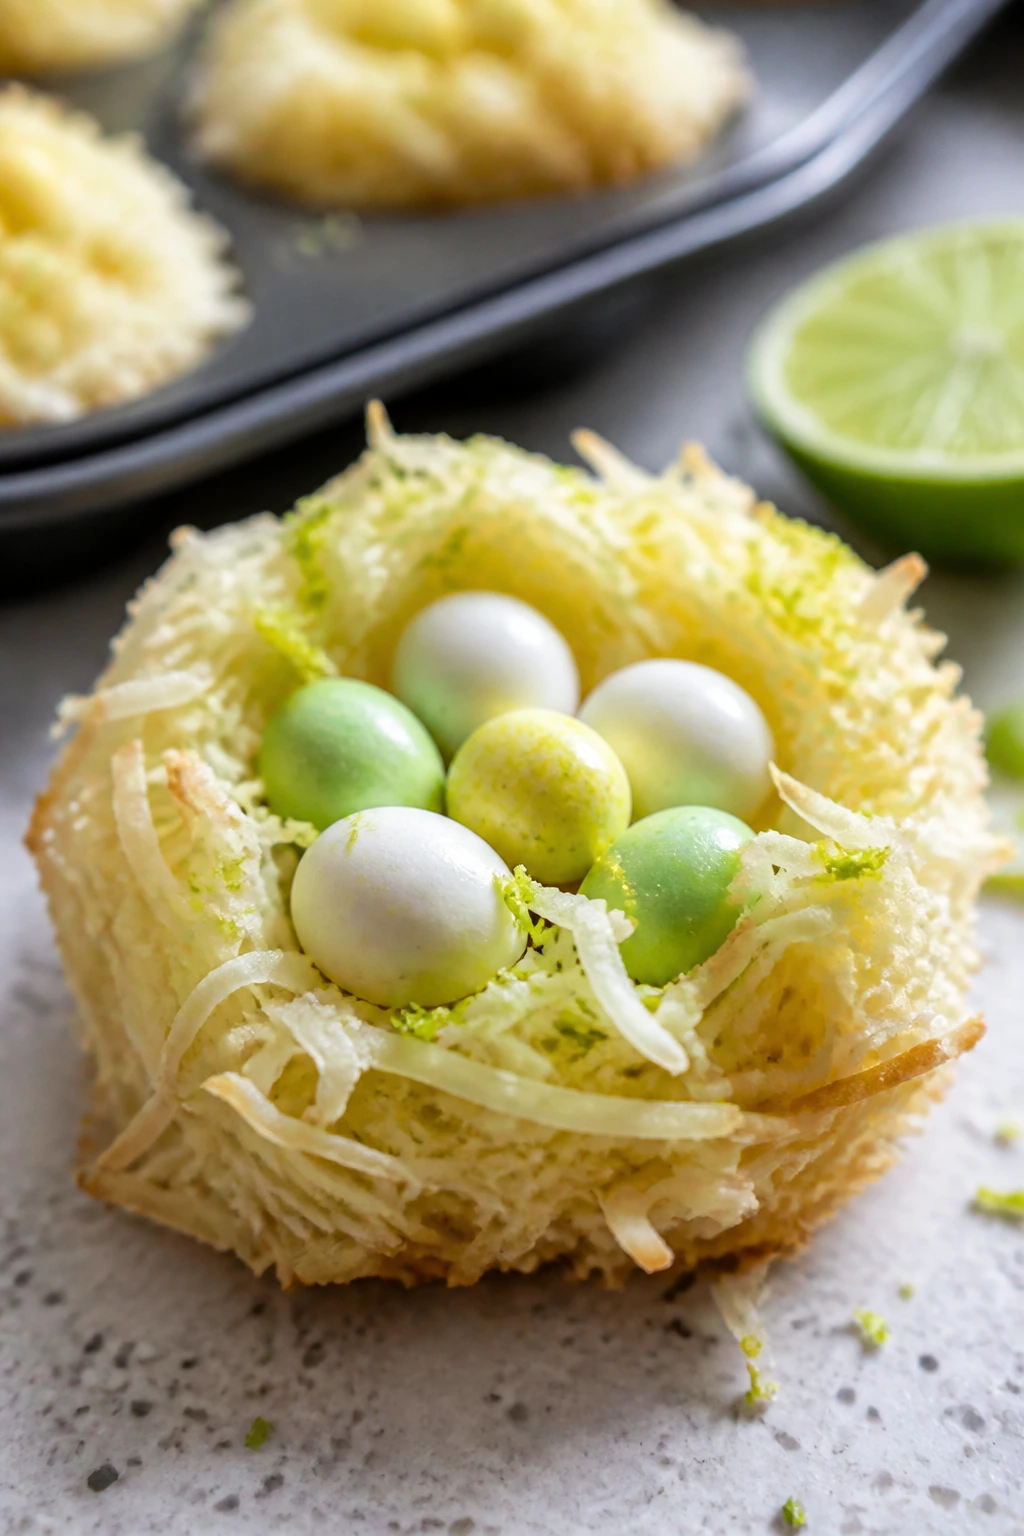
Coconut and lime make the lightest, brightest nest in the group. The lime keeps the sweetness from settling down too heavily, and the coconut gives you that instant bird nest texture.
Why It Works: Sweetened coconut gives the nests structure, while lime zest and a little juice make the flavor fresh instead of sugary. Condensed milk helps the nests set into tidy cups with very little effort.
Key Ingredients:
- 3 cups sweetened shredded coconut — the nest body.
- 1/2 cup sweetened condensed milk — the binder.
- 1 tablespoon lime zest — the main flavor.
- 1 tablespoon lime juice — the sharp edge.
- 1 cup white chocolate chips — helps the nests hold together.
- 1/4 teaspoon salt — balance.
- 24 mini candy eggs — the center.
Quick Steps:
- Preheat the oven to 325°F and line a mini muffin tin or tray.
- Stir coconut, condensed milk, lime zest, lime juice, white chocolate chips, and salt until sticky.
- Scoop into nests and press the centers.
- Bake for 14 to 16 minutes, cool completely, then fill.
Equipment for This Recipe:
- Mini muffin tin
- Mixing bowl
- Spoon or scoop
- Cooling rack
How to Serve This Dish: These look bright on a white plate, especially if you add a few extra lime zest shavings around them. They’re a good match for tea, sparkling water, or a cold dessert drink.
Pro Tips for This Recipe:
- Zest the lime before juicing it.
- Don’t add extra juice unless the mix feels dry; too much makes the nests loose.
- Cool fully before filling so the white chocolate can firm up.
Variations on This Dish:
- Coconut Lemon Nest: Swap lime for lemon.
- Coconut Orange Nest: Use orange zest for a softer citrus note.
- Coconut Almond Nest: Add a drop of almond extract for a bakery-style finish.
Common Mistakes to Avoid with This Dish:
- Don’t use unsweetened coconut without adjusting the binder.
- Don’t bake too dark or the coconut tastes bitter.
- Don’t fill warm nests, or the candy eggs can slide.
Why Bird Nest Cookies Work So Well for Beginner Bakers
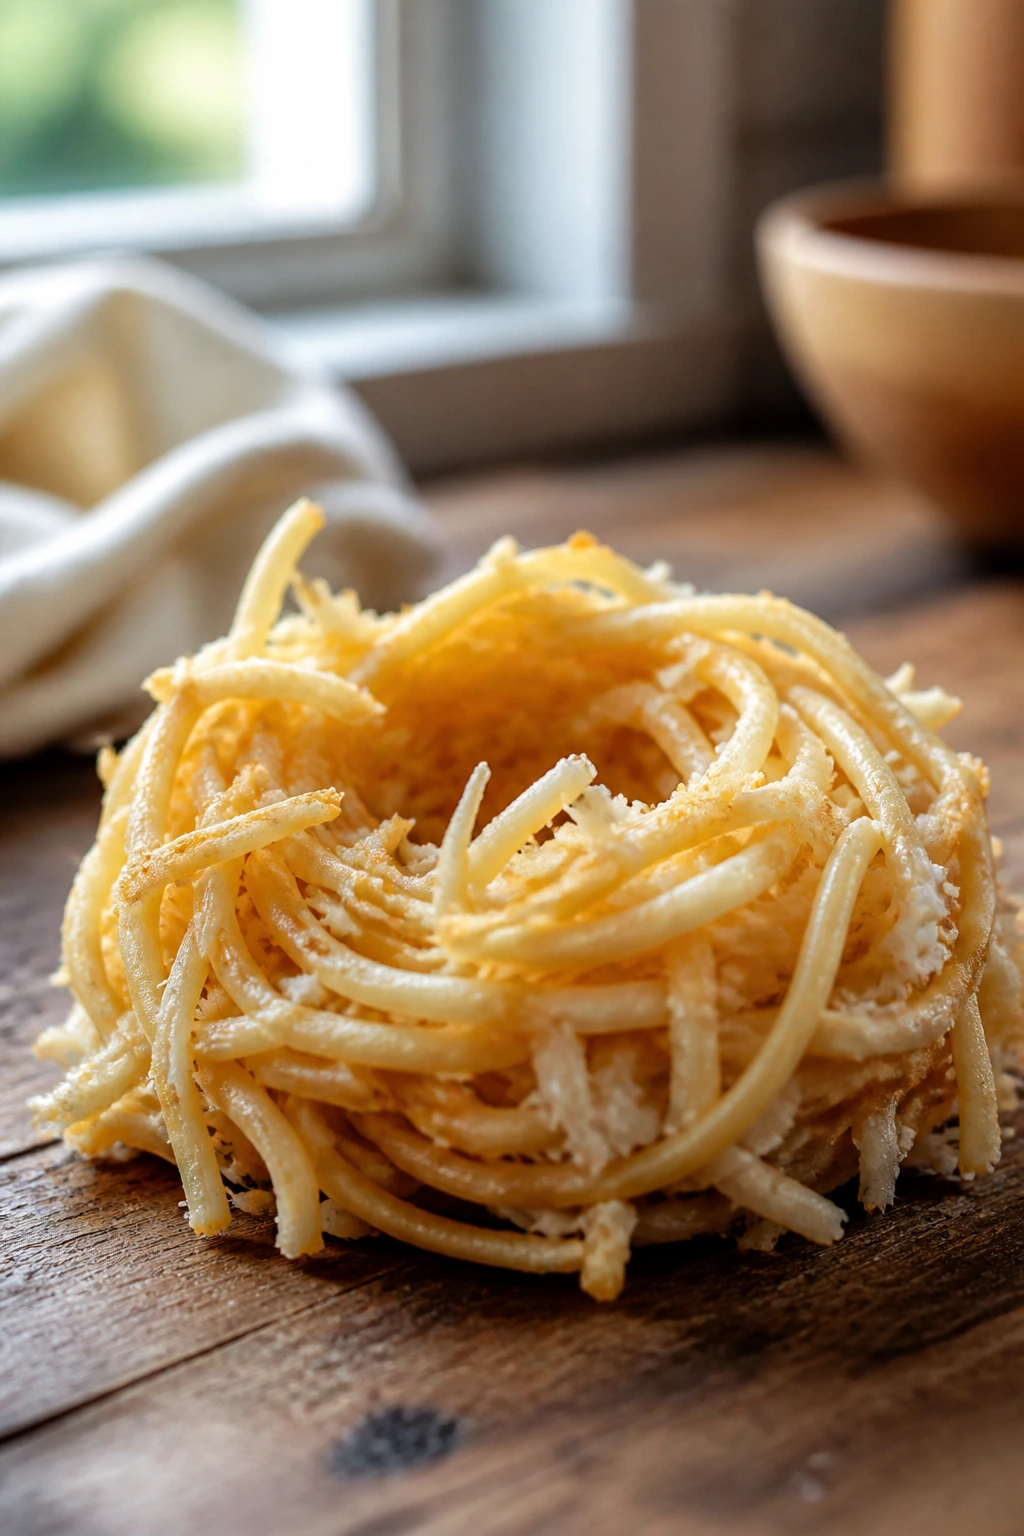
The odd little magic of bird nest cookies is that they reward shape more than precision. If a frosting border is a fussy line, a nest is a scoop with a hollow in the middle. That’s a friendlier job. It also means the cookies can survive a bit of unevenness, which is something most home bakers deal with whether they admit it or not.
Texture is the other reason these work. Crunchy noodles, coconut, oats, pretzels, cereal, and meringue all behave in predictable ways once they’re coated, baked, or chilled. You are not trying to build a perfect sugar sculpture. You’re giving a sticky base enough support to hold its own.
There’s also a practical advantage people don’t talk about enough: the nest shape hides small mistakes. A slightly cracked meringue nest still looks like a nest. A lopsided coconut mound still reads as a nest. Even a brownie cup that leans a little to one side looks intentional once the center is filled. That kind of forgiveness is worth a lot.
Essential Equipment for These Recipes
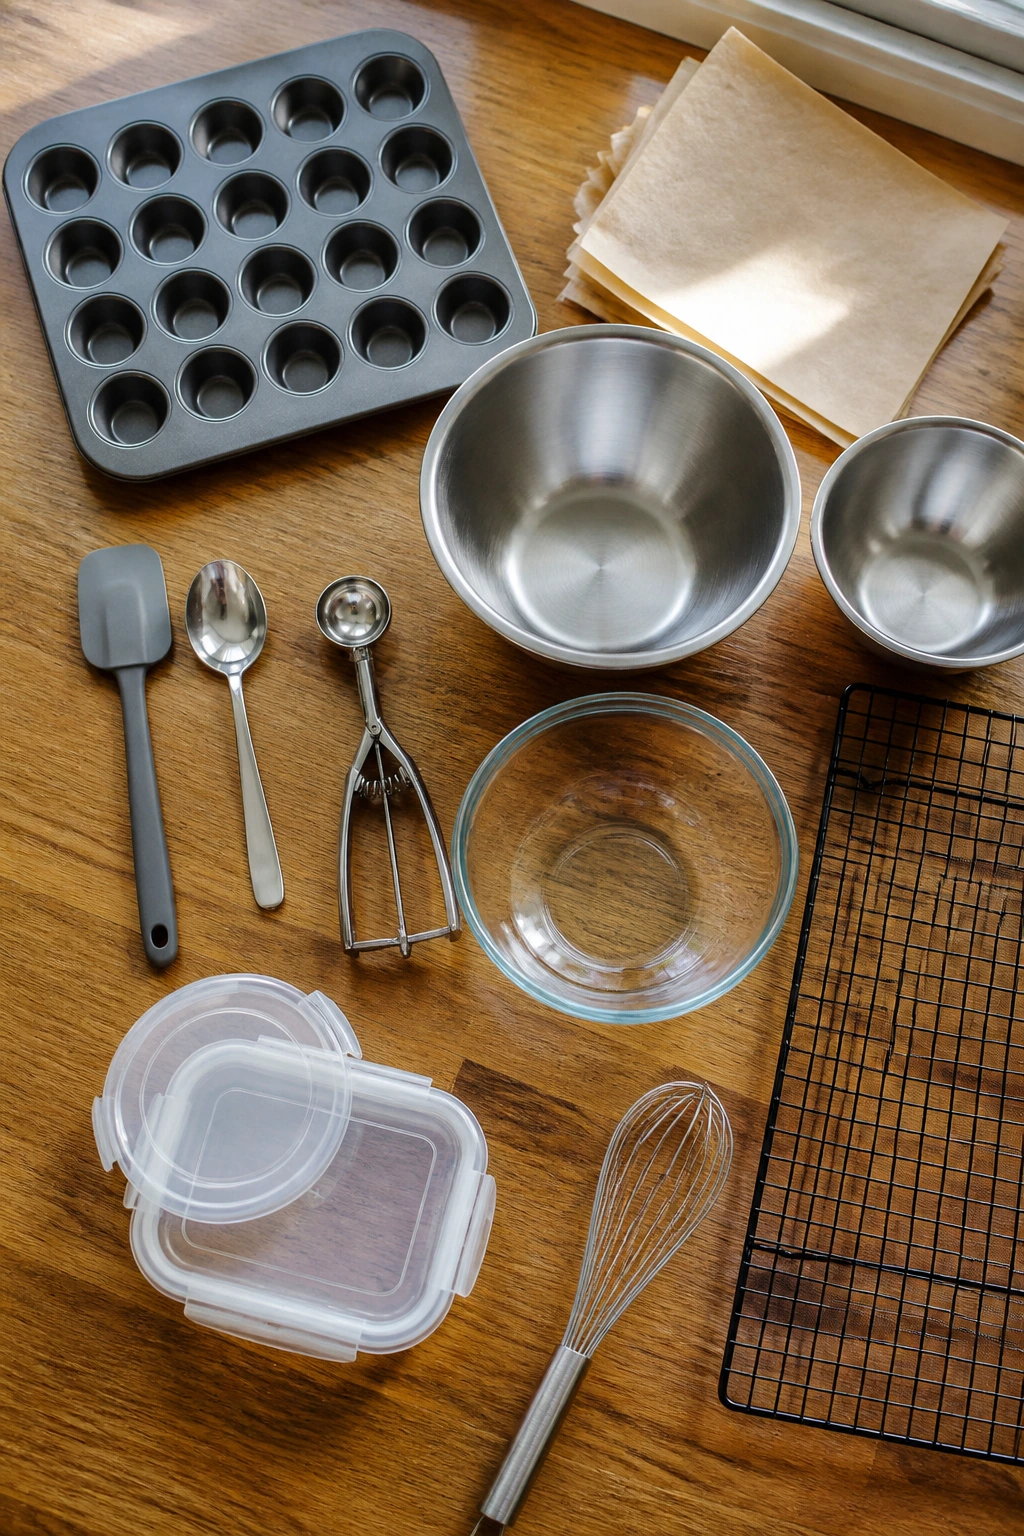
-
Mini muffin tin: The cleanest way to get uniform nests, especially for coconut, brownie, and sugar-cookie versions.
-
Parchment paper: Keeps no-bake nests from sticking and makes cleanup much faster.
-
Mixing bowls: At least two helps when you’re working with melted chocolate and dry ingredients at the same time.
-
Rubber spatula: Better than a spoon for folding noodles, cereal, or coconut without crushing them.
-
Spoon or teaspoon: Use the back of one to press the nest center while the mixture is still warm.
-
Cookie scoop: Optional, but it keeps the nests similar in size.
-
Microwave-safe bowl or small saucepan: Handy for chocolate, marshmallow, or caramel-based nests.
-
Cooling rack: Important for baked nests that need air circulation underneath.
-
Wire whisk: Useful for meringue, brownie batter, and sugar-cookie dough.
-
Airtight containers: Necessary once the nests are cool; the texture stays better when air stays out.
Smart Shopping and Ingredient Tips
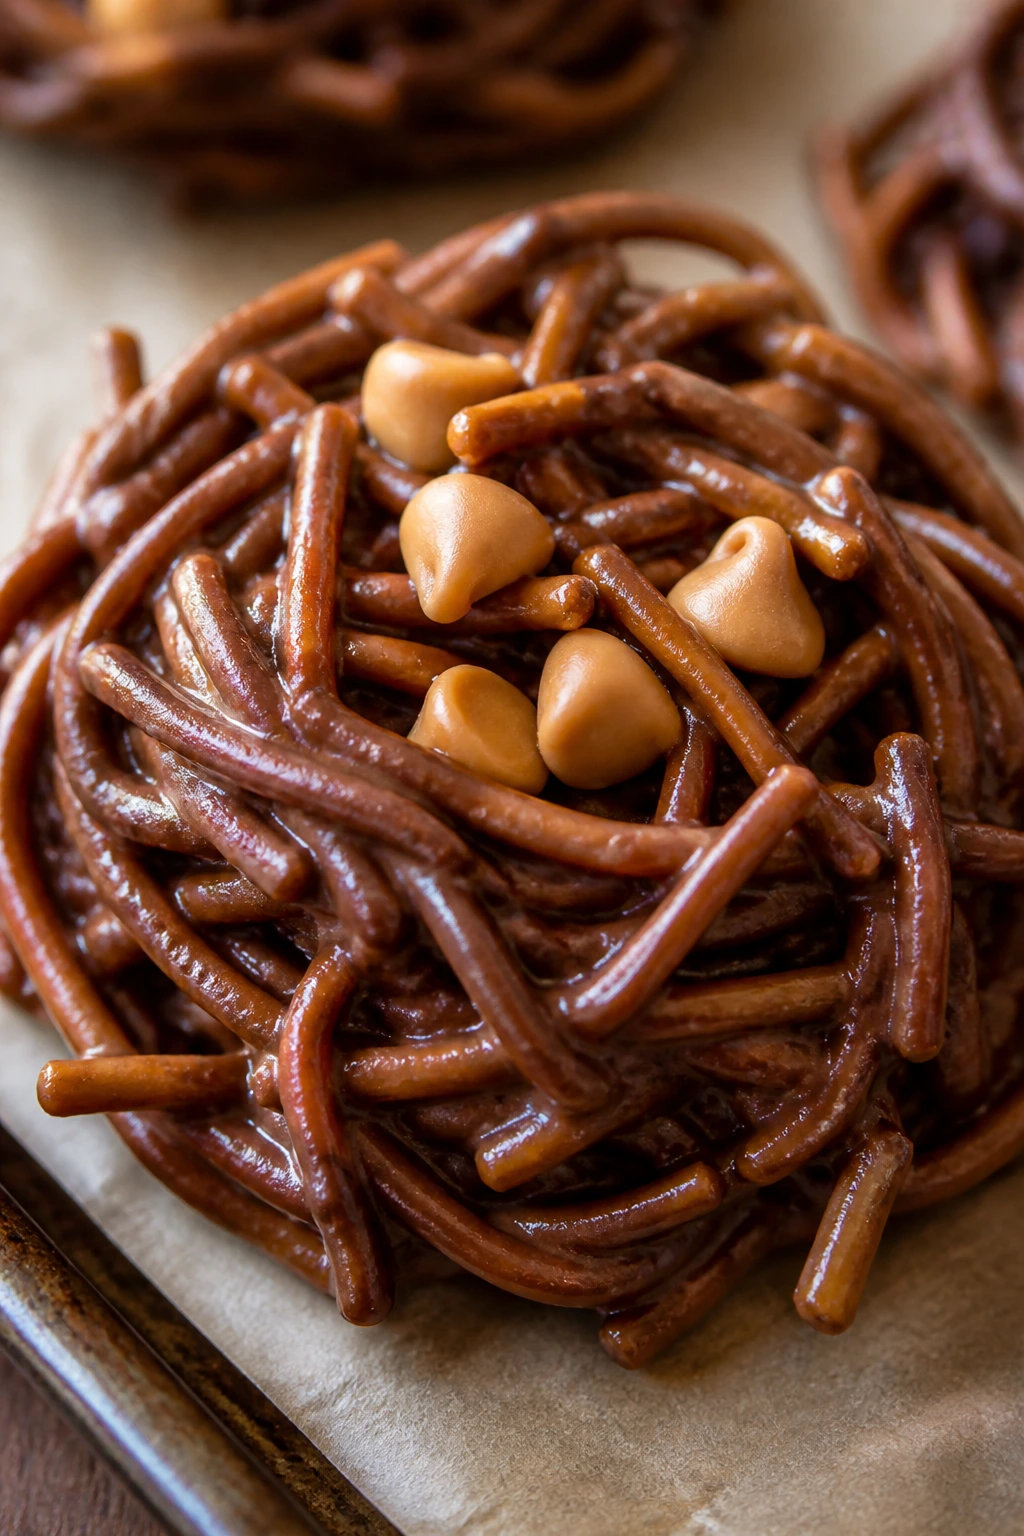
The ingredient list for bird nest cookies is short, which means the quality of each piece matters more than people expect. For chocolate-based nests, use chips if you want a thicker melt that holds shape, or a chopped bar if you want a smoother finish. Chips are more forgiving. Bars taste a little better. I use both depending on whether I’m shaping or drizzling.
For coconut nests, choose sweetened shredded coconut when you want chew and a fuller color. Unsweetened coconut works too, but it tastes drier and needs a slightly more generous binder. If you toast coconut, do it in a thin layer in a skillet or on a sheet pan at low heat. It turns from pale to too-dark in a blink.
Cereal nests need dry cereal. Not stale, not damp, not crushed to powder. If the bag has been open for a while, pour the cereal into a bowl before you start so you can see whether it’s crisp. The same goes for pretzels and chow mein noodles. Crispness is not a bonus here. It is the structure.
Candy eggs are one of the few decorative ingredients that can really vary in size. Mini eggs work best for most nests because they sit neatly without toppling the cookie. If you want a more rustic look, use chocolate-covered almonds, jelly beans, or dried cranberries. Just keep the fillings small enough to stay put.
Butter should be softened, not melted, for baked cookie doughs. Melted butter changes spread. Egg whites for meringue need a clean bowl and no trace of yolk. A tiny smear of fat will stop them from whipping the way they should.
How to Serve These Recipes
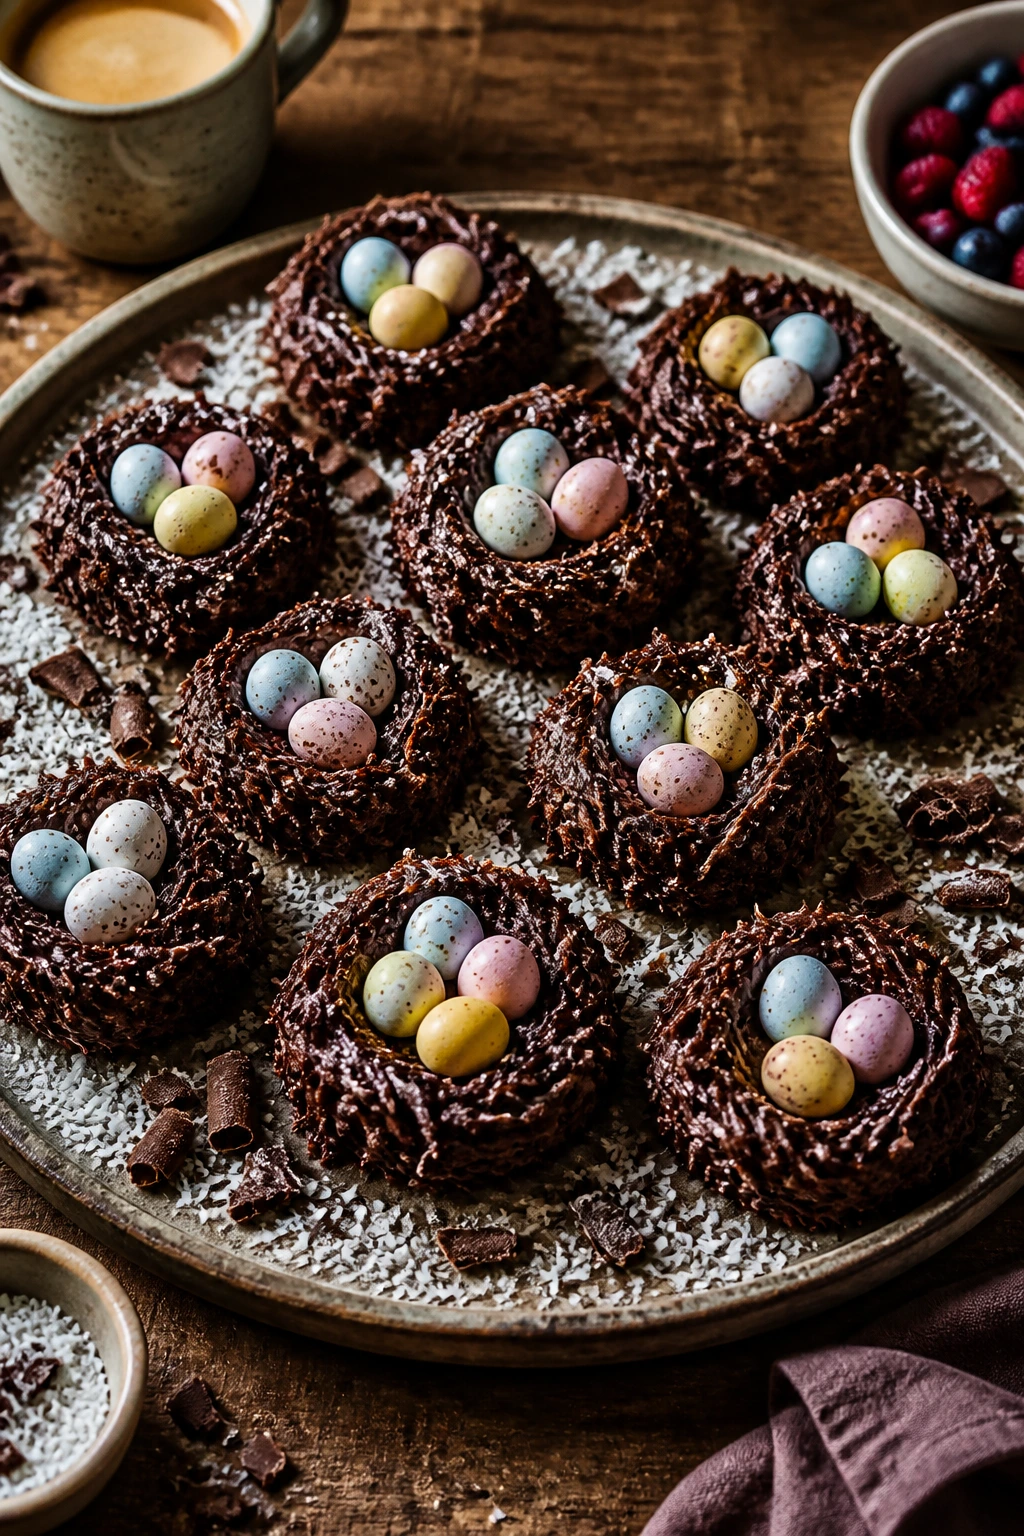
Presentation: Spread the nests on a tray in loose clusters instead of in straight rows; they look more natural that way. A little extra shredded coconut, chopped nuts, or chocolate shavings scattered around the plate makes the whole tray feel finished.
Accompaniments: Coffee, tea, and cold milk are the obvious partners, but a fruit salad or a bowl of berries works well too, especially with the sweeter nests. If you’re serving a mixed platter, pair rich chocolate versions with brighter citrus or berry ones so the tray doesn’t taste one-note.
Portions: Most bird nest cookies land best at 1 to 2 per person, depending on size and richness. Meringue nests are lighter and can stretch farther; brownie, caramel, and chocolate nests are denser, so smaller portions make more sense.
Beverage Pairing: Dark chocolate and espresso nests love black coffee or strong tea. Coconut, lemon, and berry versions do well with green tea, chamomile, or a cold glass of milk.
Additional Tips and Flavor Boosters
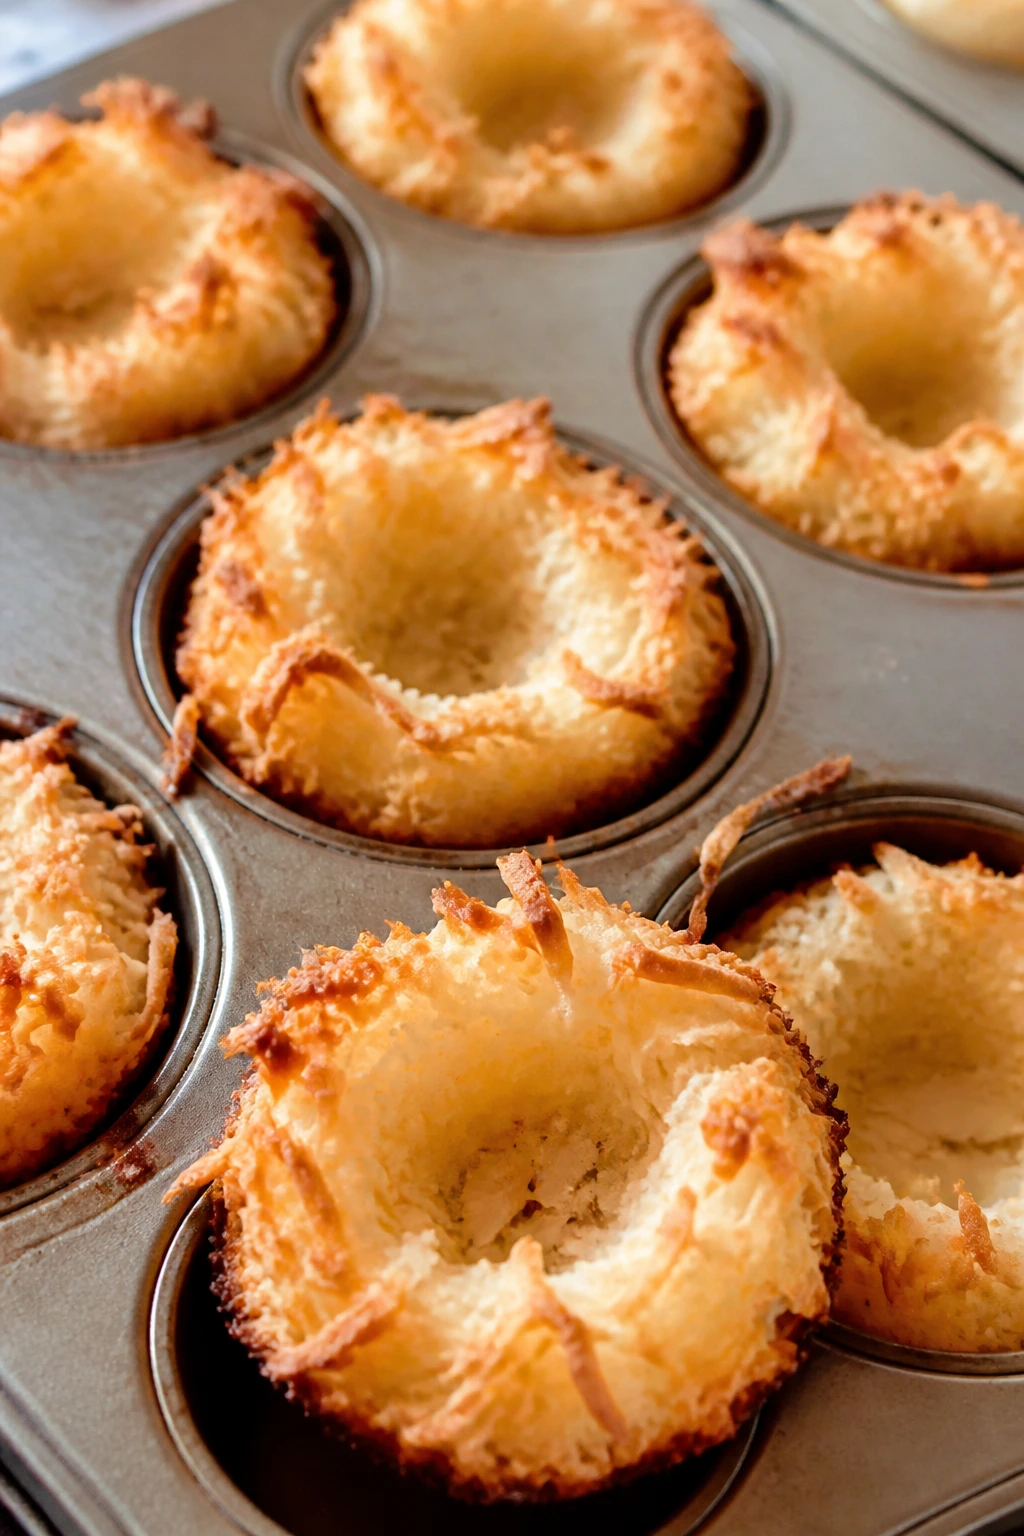
Flavor Enhancement: Toasting coconut, pecans, sesame seeds, or even cereal for a few minutes before mixing gives the nests a deeper, less sugary flavor. A tiny pinch of flaky salt on chocolate or caramel nests does more than another drizzle ever will.
Customization: Swap candy eggs for jelly beans, chocolate-covered almonds, dried cherries, or freeze-dried berries if you want a different look. For nut-free nests, sunflower seed butter is the easiest stand-in for peanut butter, and it behaves well in no-bake recipes.
Serving Suggestions: A few edible flowers, extra zest, or a scatter of crushed nuts around the serving plate makes the cookies look intentional without turning them into a decorating project. If you’re using meringue nests, fill them at the last minute so they stay crisp.
Make-It-Yours: Gluten-free versions work well with certified gluten-free oats or crispy rice cereal. Dairy-free nests usually need coconut oil or a dairy-free baking chip, and the coconut-based recipes are the least complicated place to start.
Make-Ahead, Storage, and Reheating Guidance
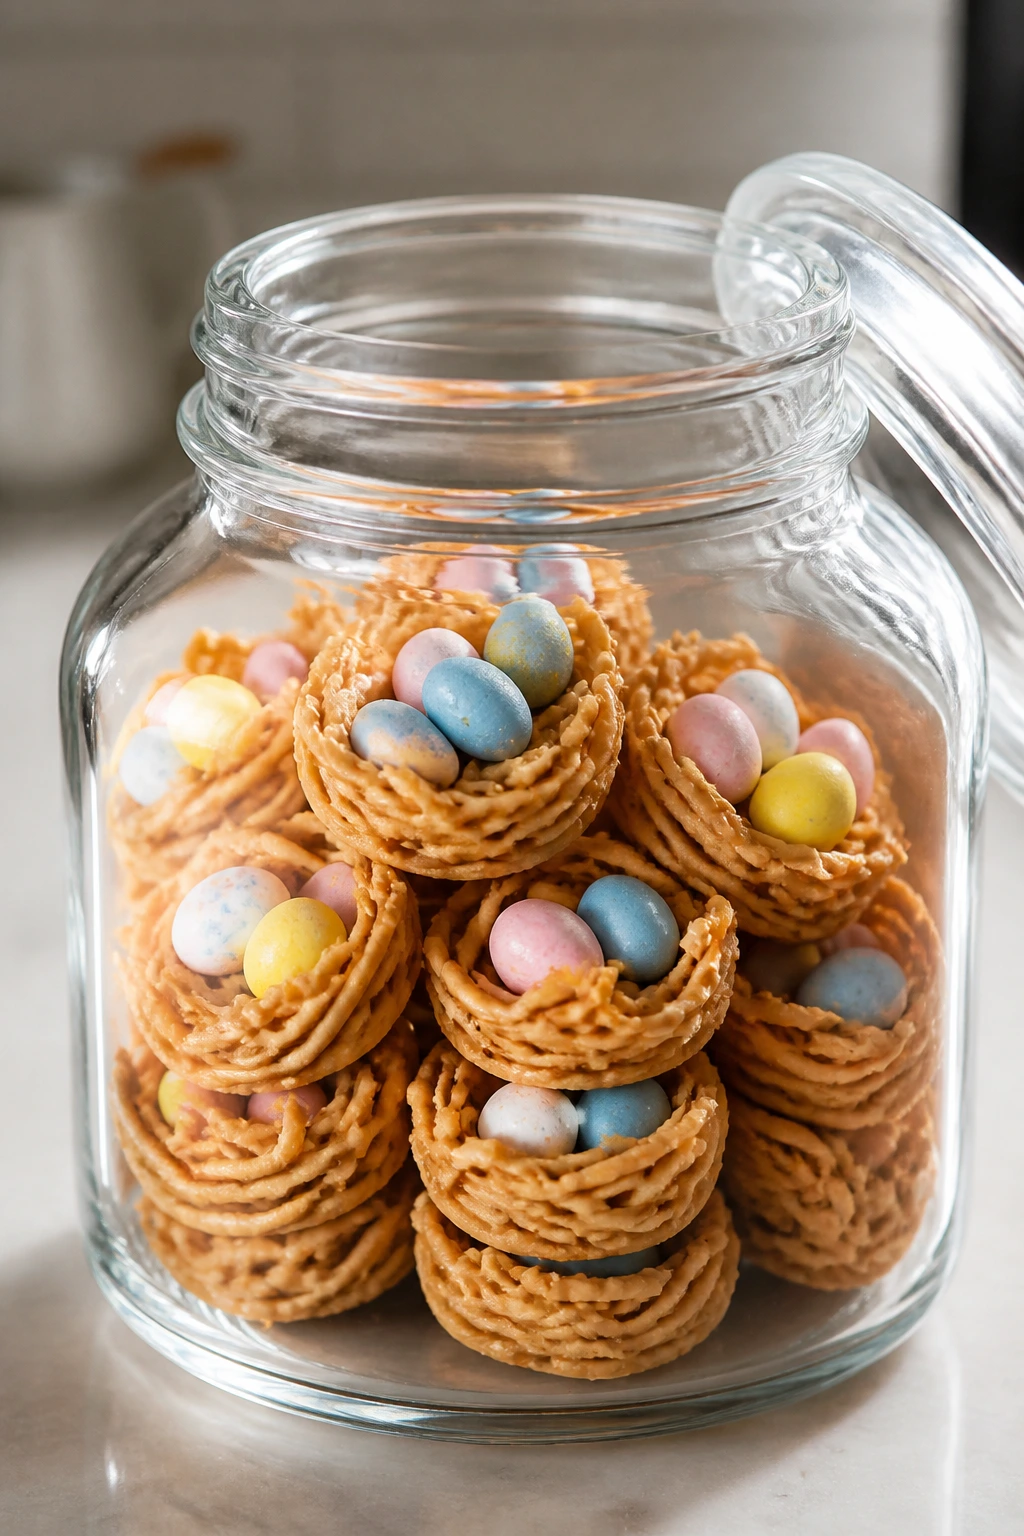
No-bake bird nest cookies are the easiest to plan ahead. Chocolate, marshmallow, caramel, and cereal-based nests keep well in an airtight container in the refrigerator for 3 to 4 days. If you layer them, place parchment between layers so the candy eggs and shiny tops do not rub off. They also freeze reasonably well for up to 1 month, though the texture of pretzels and cereal softens a little after thawing.
Baked cookies generally keep for 4 to 5 days at room temperature in a sealed tin or container, as long as they’re fully cool before packing. Coconut macaroons and sugar-cookie nests stay best when stored in a single layer if possible. Brownie cups and richer chocolate nests can be refrigerated for up to 5 days, but bring them back to room temperature before serving so the chocolate flavor opens up again.
Meringue nests are the delicate ones. Keep them in a dry, airtight container at room temperature for up to 2 days. Do not refrigerate them unless you enjoy soft, sticky shells. They absorb moisture fast.
For reheating, most bird nest cookies do not need it. If you made brownie cups or baked cookie nests and want a warmer, softer texture, 5 to 8 minutes in a 300°F oven is enough. No-bake nests should sit at room temperature for 10 to 15 minutes before serving if they’ve been in the fridge. That takes the chill off the chocolate without losing the shape.
Variations and Adaptations to Try
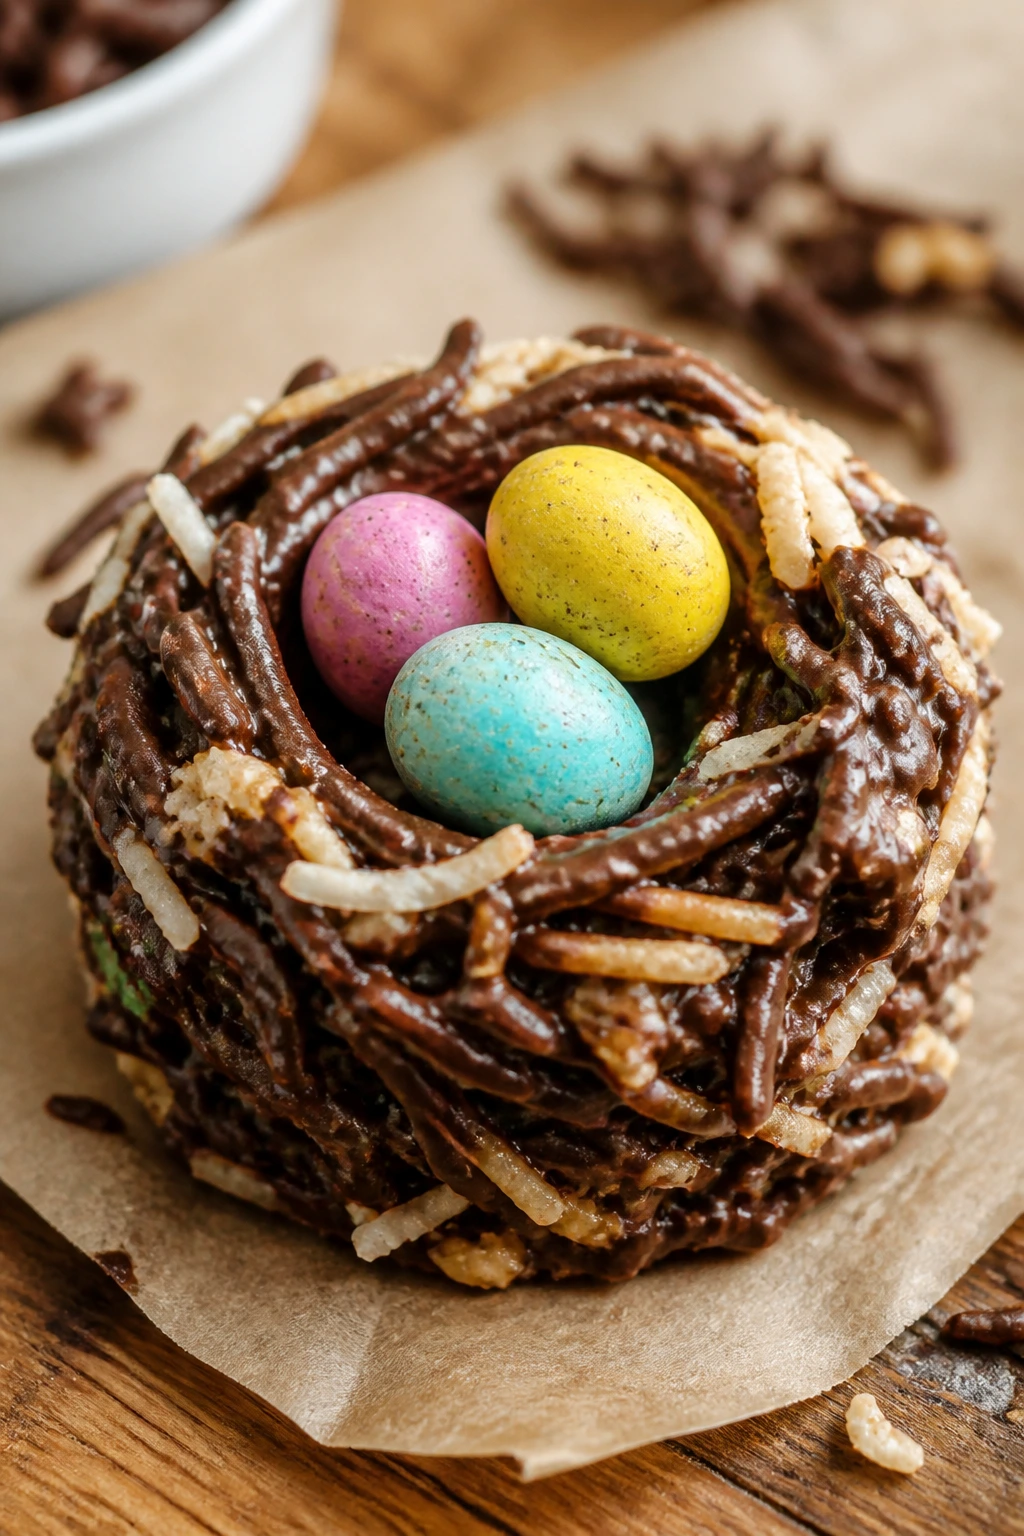
Gluten-Free Nesting: Use certified gluten-free crispy rice cereal, oats, or gluten-free pretzel pieces in the no-bake nests, and make sure your candy eggs and chocolate chips are safe too. The coconut and chocolate versions adapt especially well because the structure comes from the binder, not the flour.
Nut-Free School Tray: Replace peanut butter with sunflower seed butter, skip almond extract, and lean on cereal, marshmallow, or coconut bases. Sesame nests can stay in the mix only if sesame is allowed, which is worth checking before you commit.
Lower-Sugar Swap: Use unsweetened coconut, dark chocolate, and dried fruit instead of candy eggs. The nests still look festive, but the flavor leans less candy-shop and more dessert tray.
Berry-and-Citrus Tray: Mix lemon, lime, orange, raspberry, or blueberry versions on one plate. The brighter flavors keep the sweeter chocolate nests from feeling heavy, and the colors look good together without any extra decorating.
Kid-Assembly Version: Bake or chill the nests ahead of time, then let kids place the candy eggs after cooling. That keeps the process fun and avoids the mess of trying to shape warm chocolate with little hands.
Elegant Tea-Party Style: Use meringue, pistachio, matcha, and raspberry versions, then finish each one with a single candy egg or a few freeze-dried fruit crumbs. It turns a playful cookie into something that still feels grown-up.
Common Mistakes to Avoid
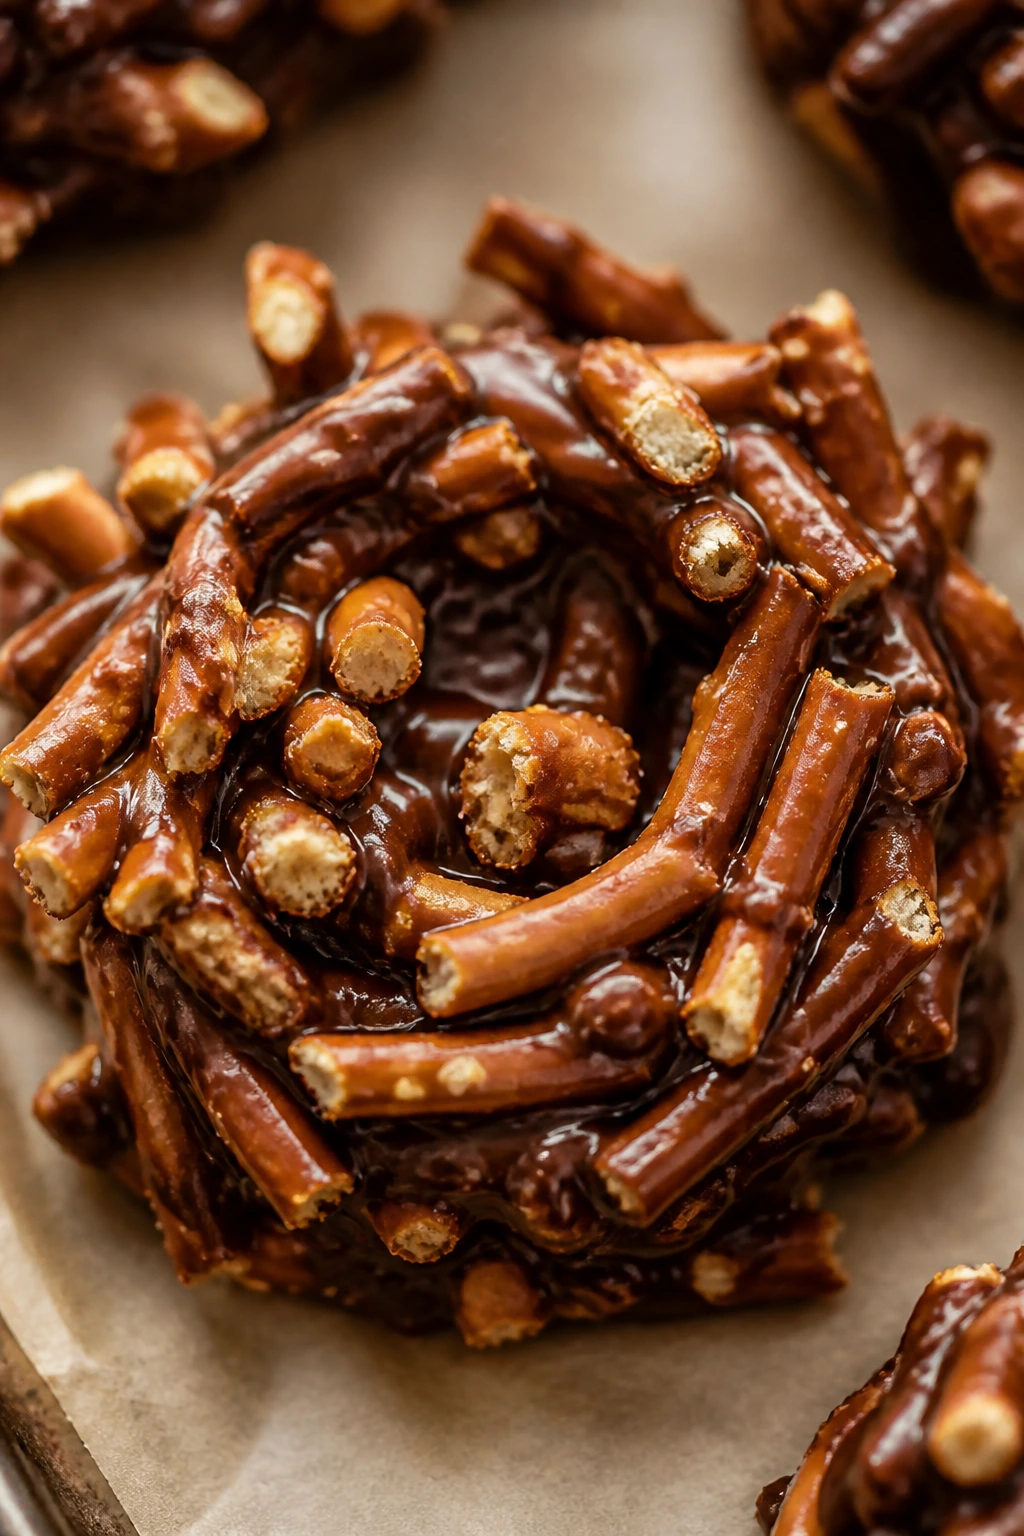
The first mistake is making the mixture too hot. Melted chocolate, caramel, and marshmallow all loosen nicely when warm, but if you go past that point, the nests slide instead of holding their shape. Let the mixture cool for 30 to 60 seconds before shaping if it looks glossy and runny.
The second mistake is pressing the center too late. Bird nest cookies need the hollow while the base is still pliable. Once the exterior firms up, you get cracks instead of a clean well. That matters in baked sugar cookies, brownies, and even coconut nests.
Wet ingredients cause more trouble than people expect. Fresh fruit, too much citrus juice, runny jam, or over-measured pumpkin puree can make the nests spread or sink. If you want fruit flavor, dried fruit, zest, or thick preserves are safer.
Another common problem is crushing the texture out of the recipe. Chow mein noodles, pretzels, shredded wheat, and cereal all need some shape left in them. Powder is for breading. Nests need strands and chunks.
Finally, don’t rush the set time. No-bake nests need chilling, and baked nests need cooling before filling. Candy eggs on a warm base can smear, sink, or lose their glossy finish. That last part is a small detail, but it changes the look more than people think.
Frequently Asked Questions
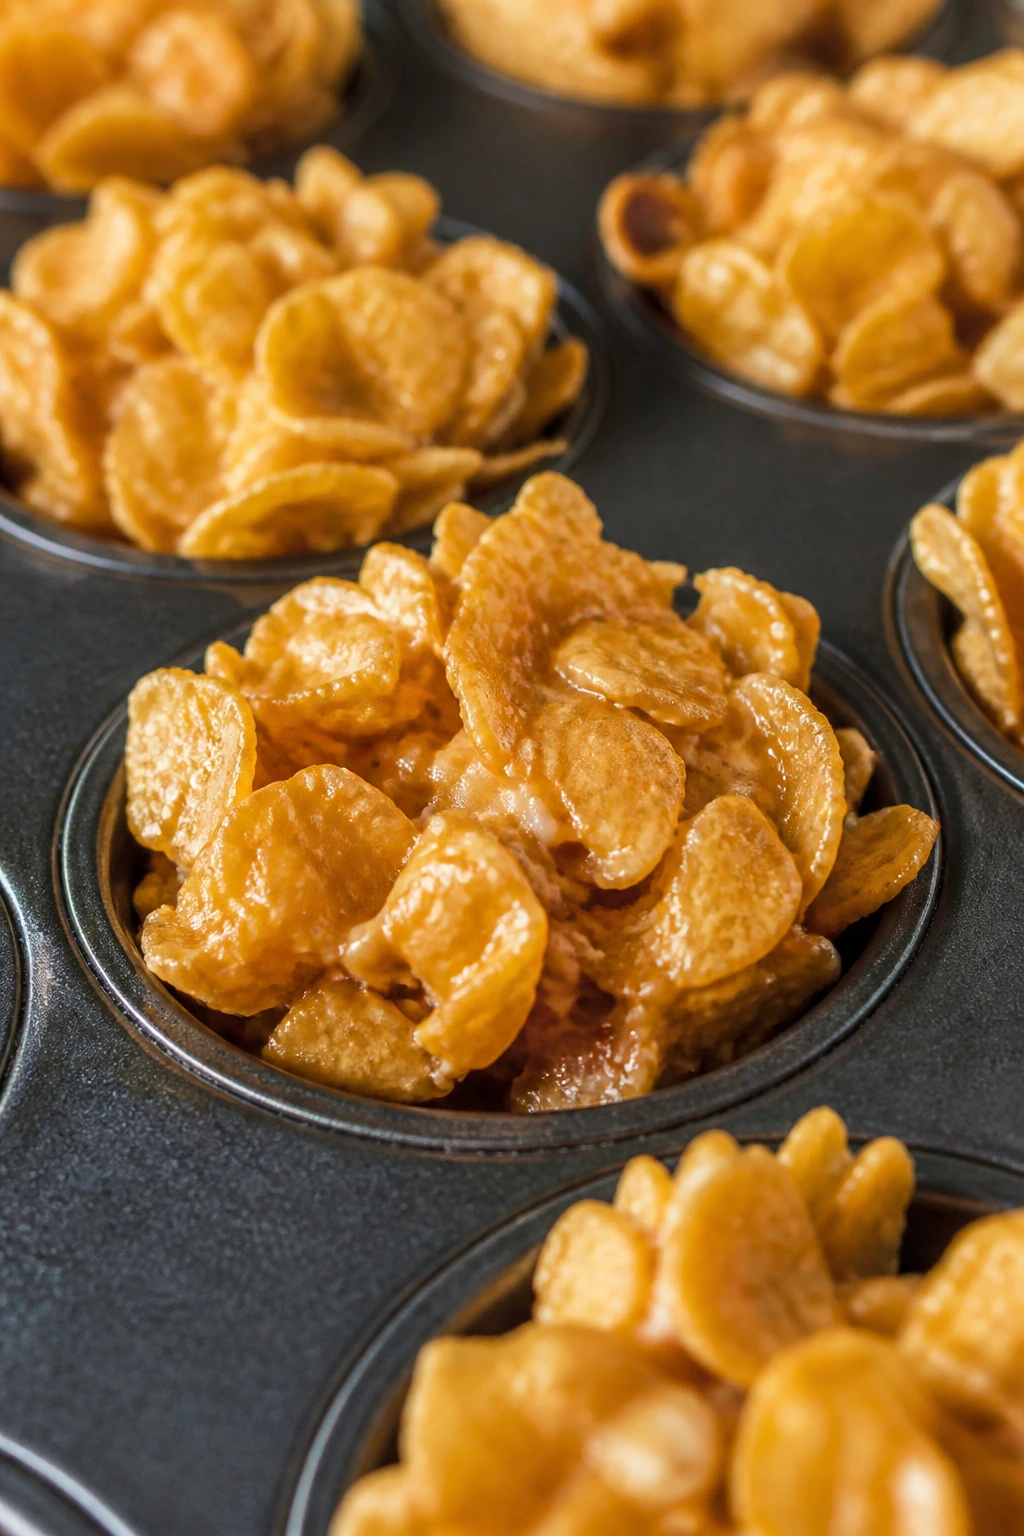
Can I make bird nest cookies without a mini muffin tin?
Yes. Use a parchment-lined baking sheet and shape the nests with a spoon, then press the center while the mixture is warm. A mini muffin tin just gives you a more even cup shape, which is handy for coconut and brownie versions.
Which bird nest cookie is easiest for a first-time baker?
The marshmallow Rice Krispie nests and the classic chow mein version are probably the least fussy. Both set quickly, both forgive uneven scooping, and neither needs a long bake.
Can I use real chocolate eggs instead of candy-coated ones?
Absolutely. Small chocolate eggs, truffles, or chocolate-covered almonds work well, though they can soften a little if the nests are stored warm. Add them after the nests are fully cool.
How do I keep no-bake nests from falling apart?
Use the right ratio of binder to crunch, and let them chill long enough to set. If the mix seems dry before shaping, you can usually add a spoonful of melted chocolate, peanut butter, or marshmallow to bring it back.
Can I freeze bird nest cookies?
Most chocolate, cereal, coconut, and brownie nests freeze well for about a month if they’re packed carefully. Meringue nests are the exception; they lose their crispness quickly after freezing or refrigerating.
What if my nests spread too much?
That usually means the mixture was too warm or too wet. Chill the mixture for 10 to 15 minutes before shaping, and make sure your add-ins are dry. For baked cookies, check whether the butter or egg count was too high.
Can I make these ahead for a party?
Yes, and that’s one of the best things about them. Most no-bake nests can be made the day before, while baked cookie nests often hold up for several days in an airtight container if they’re cooled fully first.
Are bird nest cookies good for kids to help with?
Very. Kids can crush cereal, place candy eggs, and press centers into the cookies without needing perfect technique. Just handle the hot chocolate or marshmallow mixtures yourself, because those can stay surprisingly warm.
Which nests travel best?
Pretzel, sugar-cookie, and brownie versions tend to travel the cleanest because they’re sturdy and less fragile than meringue or marshmallow nests. Use a shallow tin with parchment between layers so the tops stay neat.
Can I swap the candy eggs for something less sweet?
Yes. Dried cranberries, chopped pistachios, roasted almonds, or even a few tart berries work well, especially in coconut, citrus, and pistachio nests. The shape still reads as a nest even without candy.
Tiny Nests, No Fuss
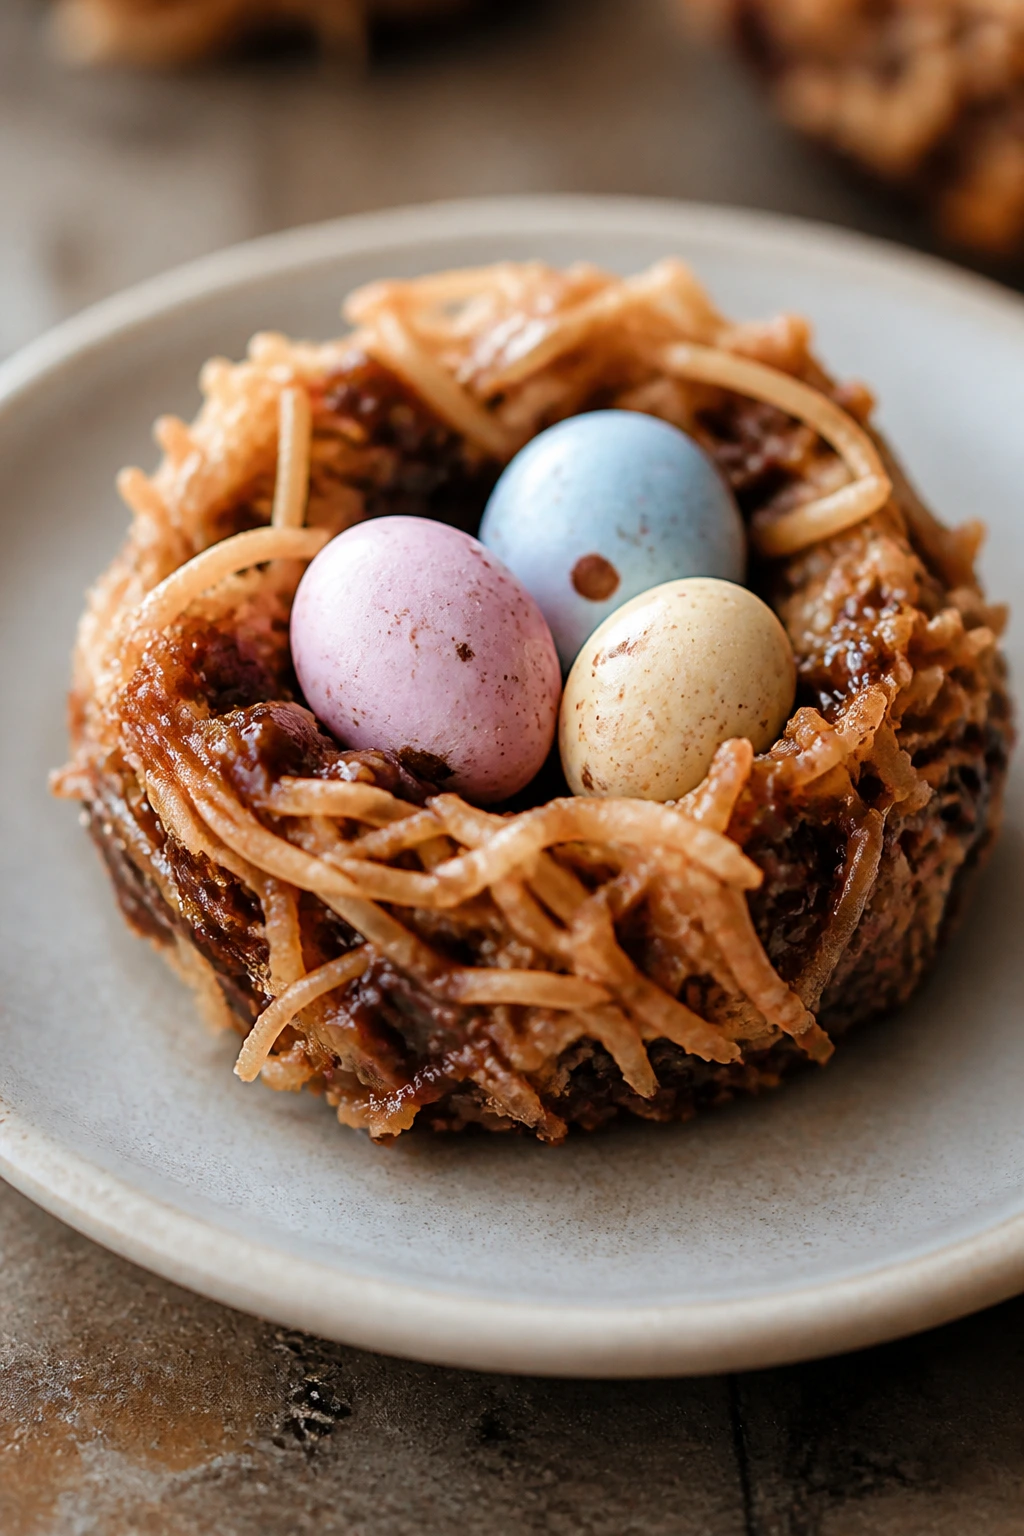
Bird nest cookies work because they leave room for a little imperfection. That’s the charm. A crooked edge, a slightly uneven hollow, a coconut strand sticking up where it shouldn’t be—none of it ruins the cookie. In fact, it helps.
If you want the fastest path, start with a no-bake chocolate or marshmallow nest. If you want the prettiest tray, go for coconut, meringue, or a neat sugar-cookie thumbprint. If you want the best flavor on the table, I’d reach for the dark chocolate espresso, the lemon coconut, or the maple pecan. Then make a second batch, because these tend to disappear while you’re still setting out the plate.