
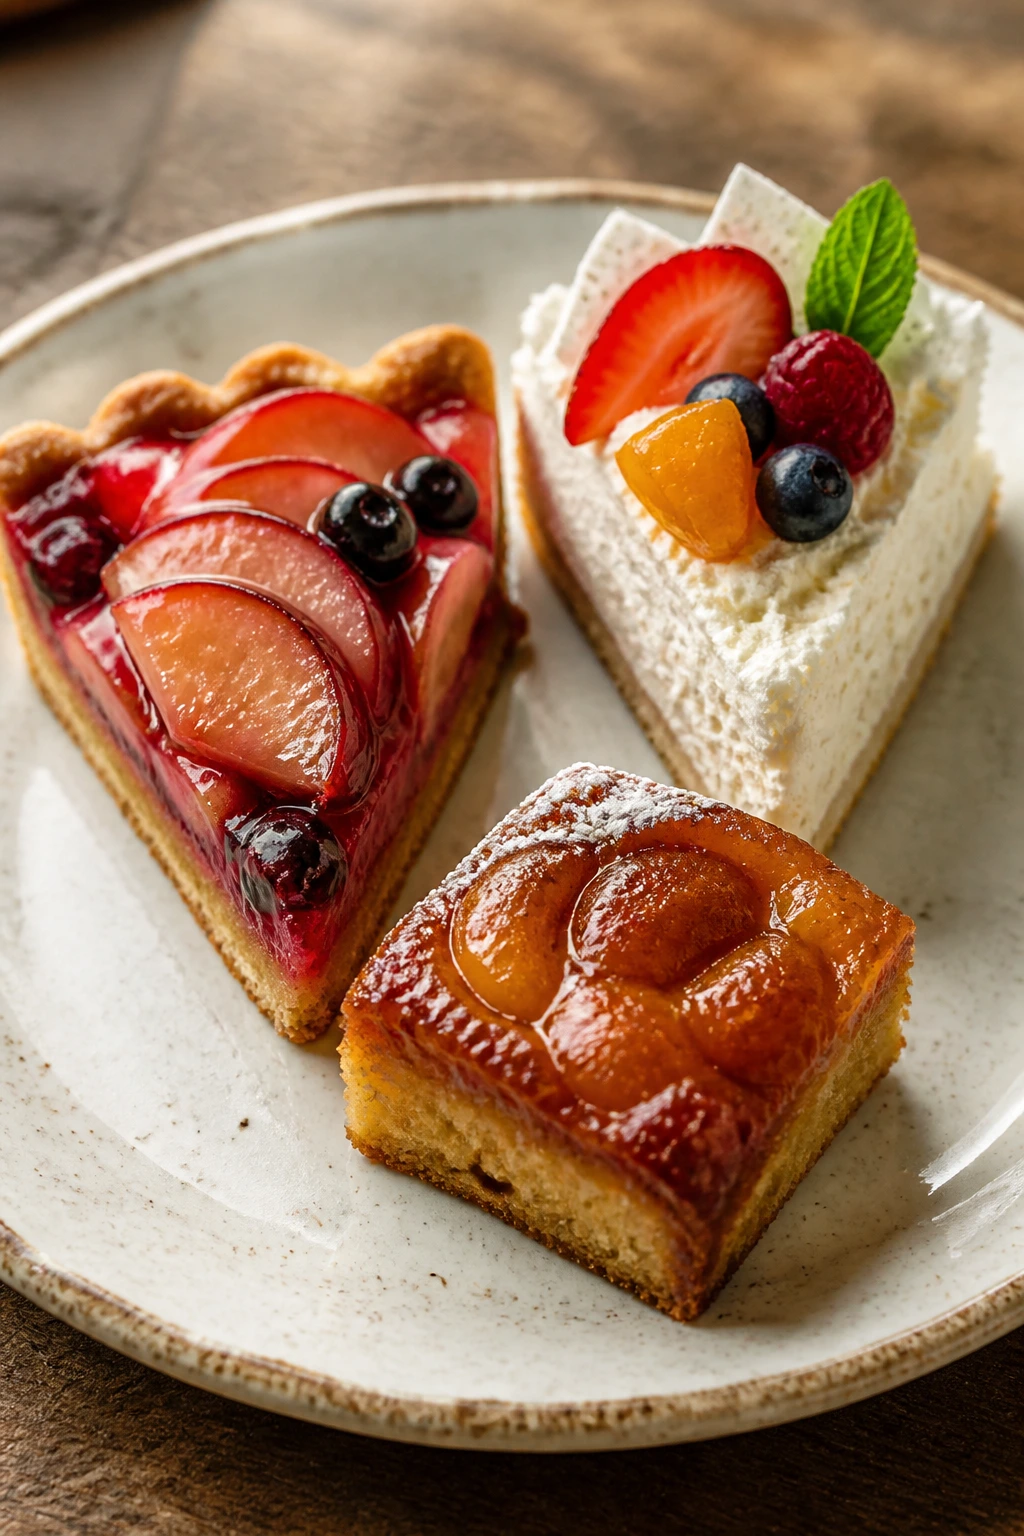
A tart that gleams with glazed fruit can stop a room cold for a second. So can a cake sliced into tidy wedges and crowned with pears, or a tray of bars with a swirl that looks painted on by hand. Seasonal desserts have that rare trick of looking delicate without feeling precious, and that’s exactly why they pull people in before the first bite.
What makes them work isn’t decoration for decoration’s sake. It’s color that already exists in the ingredients: strawberries with ruby centers, blood oranges with their dark coral flesh, plums that split into purple and gold, cranberries that turn a curd into a jewel box. A good seasonal dessert uses that color the way a good frame uses light. Quietly. Precisely. With enough structure to let the fruit do the showing off.
The nicest part is that “pretty” doesn’t have to mean fussy. A galette can look better than a pie if you let the filling spill a little. A pavlova can look extravagant with five minutes of swirling and a spoonful of cream. A glossy tart only needs a clean slice and a steady hand. The recipes below lean into that sweet spot: polished enough for a dinner table, relaxed enough that you can actually make them without a pastry school diploma.
Why These Seasonal Desserts Look So Good on the Plate
-
Natural color does the heavy lifting: ripe fruit, citrus, chocolate, and spices bring their own visual punch, so you do not need a mountain of frosting to make the dessert feel special.
-
Clean shapes read as elegant: tart rings, bars, pavlovas, upside-down cakes, and hand pies all cut into portions that look intentional the moment they hit the plate.
-
Gloss matters more than garnish: a light apricot glaze, a citrus syrup, or a spoonful of warmed jam gives fruit desserts that fresh-from-the-pastry-case shine.
-
They travel through the seasons well: strawberries, cherries, peaches, plums, pears, cranberries, citrus, figs, persimmons, and peppermint all have their own moment, and each one brings a different color story.
-
They are easier than they look: several of these rely on simple doughs, fruit arranged in slices, or a chilled filling. The pretty part comes from layout and finish, not from complicated technique.
-
They photograph like a dream but still eat well: the structure keeps slices neat, the fruit stays visible, and the flavors stay balanced instead of sugary and flat.
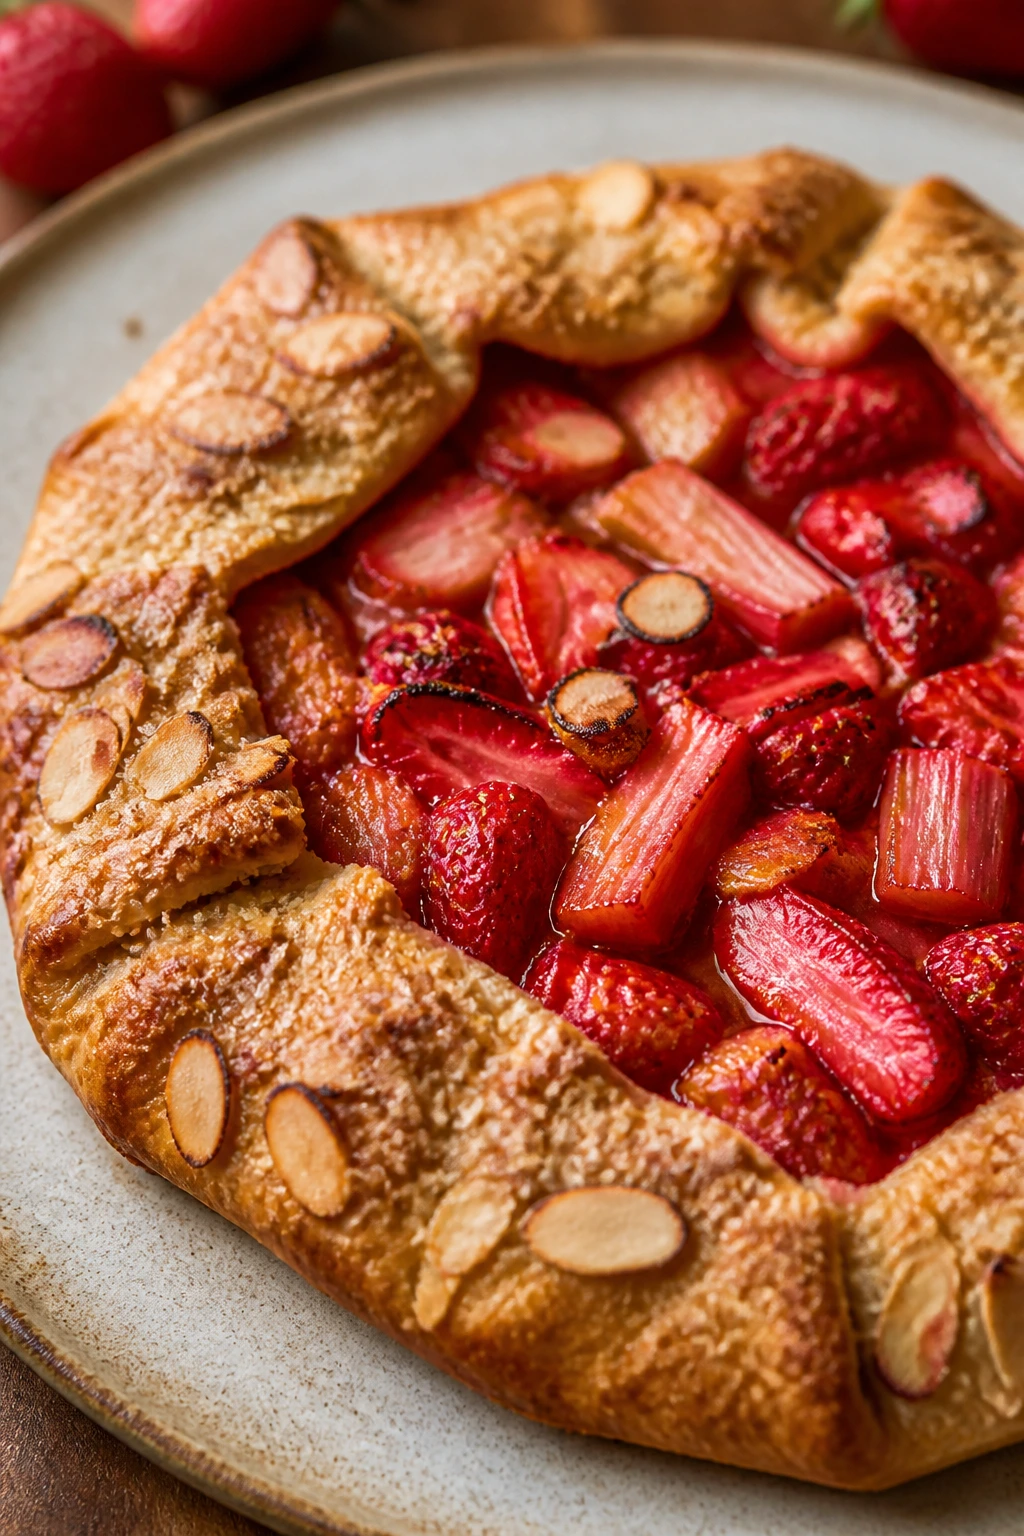
1. Strawberry-Rhubarb Galette with Almond Sugar
Strawberries and rhubarb were basically made to argue and then make up in the oven. The berries soften into jammy pockets, the rhubarb keeps a little bite, and the crust catches all those juices around the edges where they caramelize into sticky, buttery bits. A galette has a looser look than a pie, which is part of its charm. It should look hand-shaped, not factory-perfect.
Why It Works:
The free-form crust gives the fruit room to spread, which means the center stays juicy while the outer edges get crisp. Rhubarb brings sharpness, strawberries bring perfume, and a little cornstarch keeps the filling from running all over the baking sheet. The sliced almonds on top toast in the oven and give the finished dessert a delicate crackle when you cut into it.
Key Ingredients:
- 1 1/4 cups all-purpose flour, for a flaky rustic crust
- 1 tablespoon granulated sugar, to lightly sweeten the dough
- 1/2 teaspoon fine salt, to keep the crust from tasting flat
- 1/2 cup cold unsalted butter, cubed, for tender layers
- 3 to 5 tablespoons ice water, added only until the dough comes together
- 2 cups sliced strawberries, hulled and cut evenly
- 2 cups rhubarb, cut into 1/2-inch pieces
- 1/3 cup granulated sugar, to balance the tart fruit
- 2 tablespoons cornstarch, for thickening the juices
- 1 tablespoon lemon juice, to brighten the filling
- 1 teaspoon vanilla extract, for a softer finish
- 1 teaspoon lemon zest, optional but worth it
- 1 egg beaten with 1 tablespoon water, for the wash
- 1 tablespoon turbinado sugar, for crunch
- 2 tablespoons sliced almonds, for a toasted finish
Quick Steps:
- Make the crust by cutting the butter into the flour, sugar, and salt until the mixture looks like coarse crumbs with some pea-size bits. Add ice water a tablespoon at a time until the dough just holds together.
- Shape the dough into a disc, wrap it, and chill for 30 minutes. It should feel firm, not sticky.
- Toss the strawberries, rhubarb, sugar, cornstarch, lemon juice, vanilla, and zest in a bowl until the fruit is coated and glossy.
- Roll the dough into a rough 12-inch circle on parchment, mound the filling in the center, and leave a 2-inch border. Fold the edges up and over the fruit in loose pleats.
- Brush the crust with egg wash, sprinkle on the turbinado sugar and sliced almonds, and bake at 400°F for 40 to 45 minutes until the crust is deep golden and the filling is bubbling at the center. Cool for at least 20 minutes before slicing.
Equipment for This Recipe:
- Rimmed baking sheet, to catch any juice that escapes
- Parchment paper, so the galette lifts cleanly
- Rolling pin, for an even crust
- Mixing bowls, one for dough and one for filling
- Pastry brush, for the egg wash
How to Serve This Dish:
Serve the galette warm or at room temperature with a spoonful of whipped cream or a small scoop of vanilla ice cream. The fruit will still look glossy, and the crust will hold its shape better than it does straight from the oven.
Pro Tips for This Recipe:
- Keep the butter cold right up until you use it; soft butter makes the crust tough and oily.
- If the fruit seems extra juicy, add another teaspoon of cornstarch.
- Bake on the lower-middle rack so the bottom crust actually browns instead of steaming.
- Let the galette rest before cutting. The filling thickens as it cools, and the slices behave much better.
Variations on This Dish:
- Berry-Only Version: Swap the rhubarb for an extra cup of strawberries and add 1 tablespoon raspberry jam to deepen the color.
- Almond Cream Base: Spread a thin layer of almond frangipane under the fruit for a richer, more bakery-style slice.
- Lemon Thyme Twist: Add 1 teaspoon minced thyme and an extra teaspoon of lemon zest for a sharper, more savory edge.
Common Mistakes to Avoid with This Dish:
- Don’t skip the chilling time. Warm dough spreads fast and gives you a flat, greasy crust.
- Don’t pile the filling too high in the center. It looks dramatic for a minute, then leaks.
- Don’t slice it hot. The juices need time to settle, or the whole thing turns into a fruit slide.
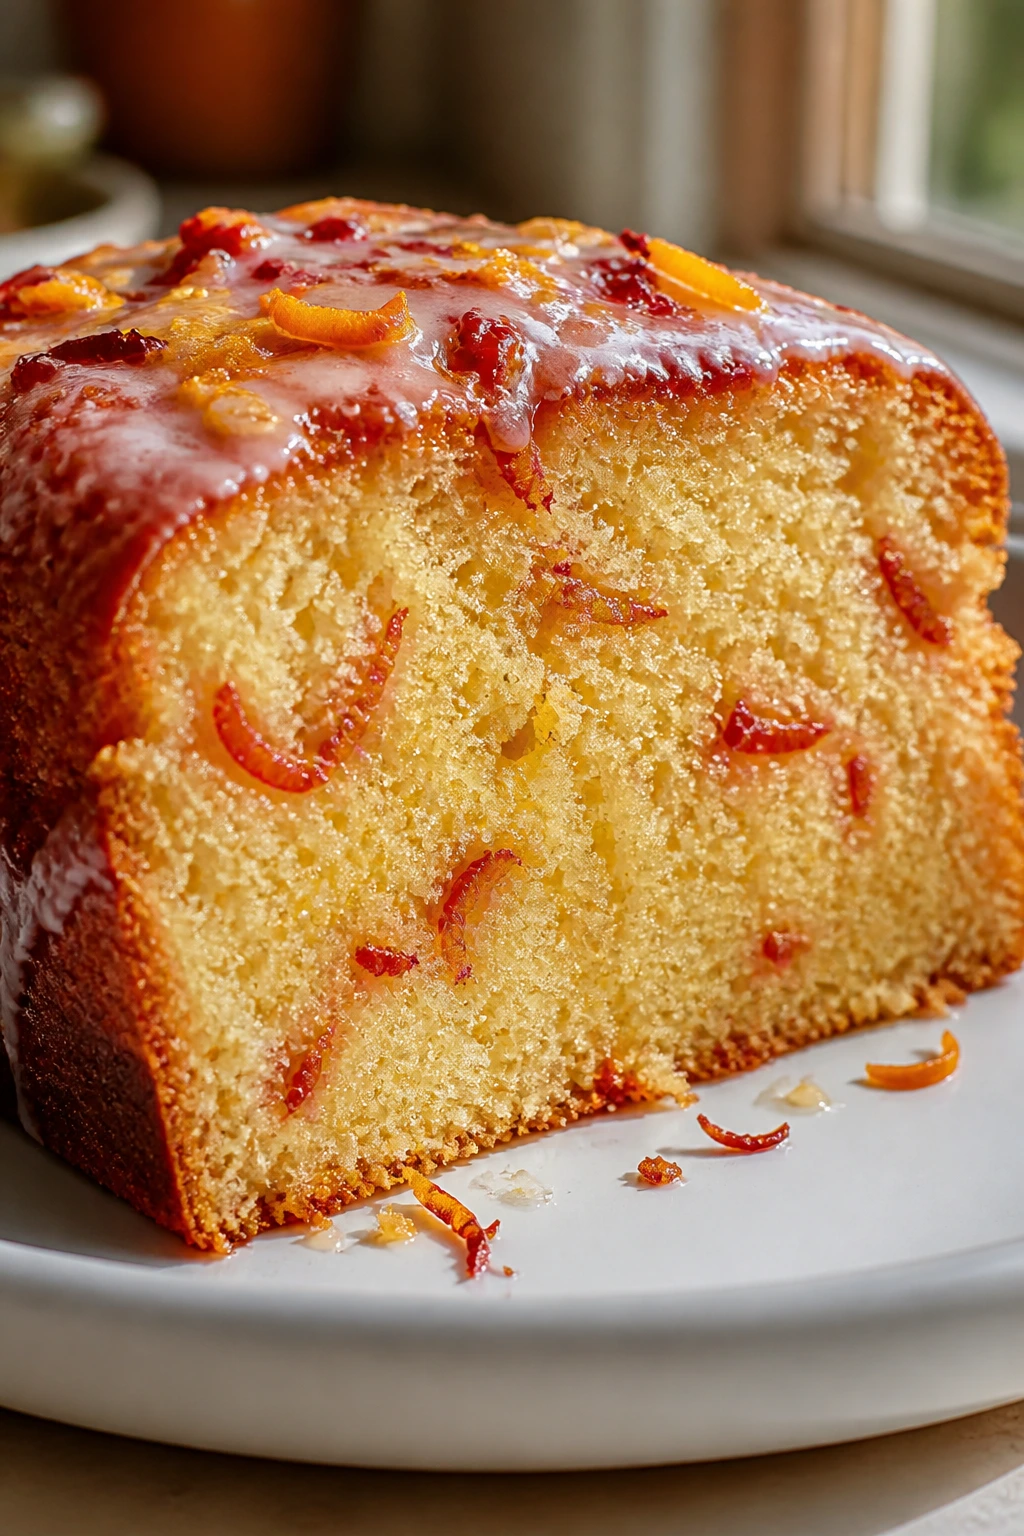
2. Blood Orange Olive Oil Cake
Blood orange makes a cake look like sunset in loaf form. The crumb stays tender and almost plush from the olive oil, while the citrus keeps the flavor bright instead of heavy. The slices are especially pretty because the color shows up in streaks and tiny freckles of zest. A dusting of glaze over the top is enough. Anything more starts to feel like trying too hard.
Why It Works:
Olive oil gives this cake a soft, even crumb that stays moist for days, which matters when you want clean slices instead of a dry pound cake. Blood orange juice and zest bring a sharper, more floral citrus note than standard navel oranges. The almond flour adds a faint nuttiness and helps the crumb feel tender without becoming fragile.
Key Ingredients:
- 1 3/4 cups all-purpose flour
- 1/2 cup almond flour
- 2 teaspoons baking powder
- 1/2 teaspoon fine salt
- 3 large eggs, at room temperature
- 1 cup granulated sugar
- 3/4 cup extra-virgin olive oil
- 1/2 cup plain yogurt
- 1/4 cup blood orange juice
- Zest of 2 blood oranges
- 1 teaspoon vanilla extract
- 1 cup powdered sugar, sifted, for the glaze
- 2 to 3 tablespoons blood orange juice, for the glaze
- 1 blood orange, sliced paper-thin, for the top
Quick Steps:
- Preheat the oven to 350°F and line a 9-inch round cake pan with parchment. Grease the sides well.
- Whisk the flour, almond flour, baking powder, and salt in one bowl. In another, beat the eggs and sugar until pale and slightly thickened.
- Stream in the olive oil, then whisk in the yogurt, blood orange juice, zest, and vanilla.
- Fold in the dry ingredients just until no flour streaks remain. The batter should look smooth and glossy, not whipped.
- Pour into the pan and bake for 40 to 45 minutes until the center springs back and a tester comes out with a few moist crumbs. Cool completely.
- Whisk the powdered sugar with blood orange juice, drizzle over the cake, and finish with blood orange slices arranged in a ring or fan.
Equipment for This Recipe:
- 9-inch round cake pan
- Parchment paper
- Whisk and rubber spatula
- Microplane zester
- Small offset spatula, helpful for the glaze
How to Serve This Dish:
Cut it into slim wedges and serve it with plain yogurt or crème fraîche if you want a sharper edge. The cake is handsome enough on its own that you can keep the plate bare and let the orange color do the work.
Pro Tips for This Recipe:
- Use room-temperature eggs so they emulsify with the oil instead of staying streaky.
- Slice the blood orange topping very thin; thick slices can slide off the glaze.
- Let the cake cool before glazing or the sugar melts into a sticky puddle.
- A pinch of flaky salt on top makes the citrus taste louder.
Variations on This Dish:
- Rosemary Citrus Cake: Steep one small rosemary sprig in the blood orange juice for 10 minutes, then strain it before mixing.
- Yogurt-Free Version: Replace the yogurt with sour cream for a richer crumb.
- Loaf Pan Slice: Bake it in a loaf pan for 50 to 60 minutes if you want neat breakfast-style slices.
Common Mistakes to Avoid with This Dish:
- Don’t overmix after adding the flour. The cake will still bake, but the crumb turns tight.
- Don’t use bitter, bitter orange pith in the topping. Thin slices matter.
- Don’t glaze a warm cake unless you want the finish to run off the sides.
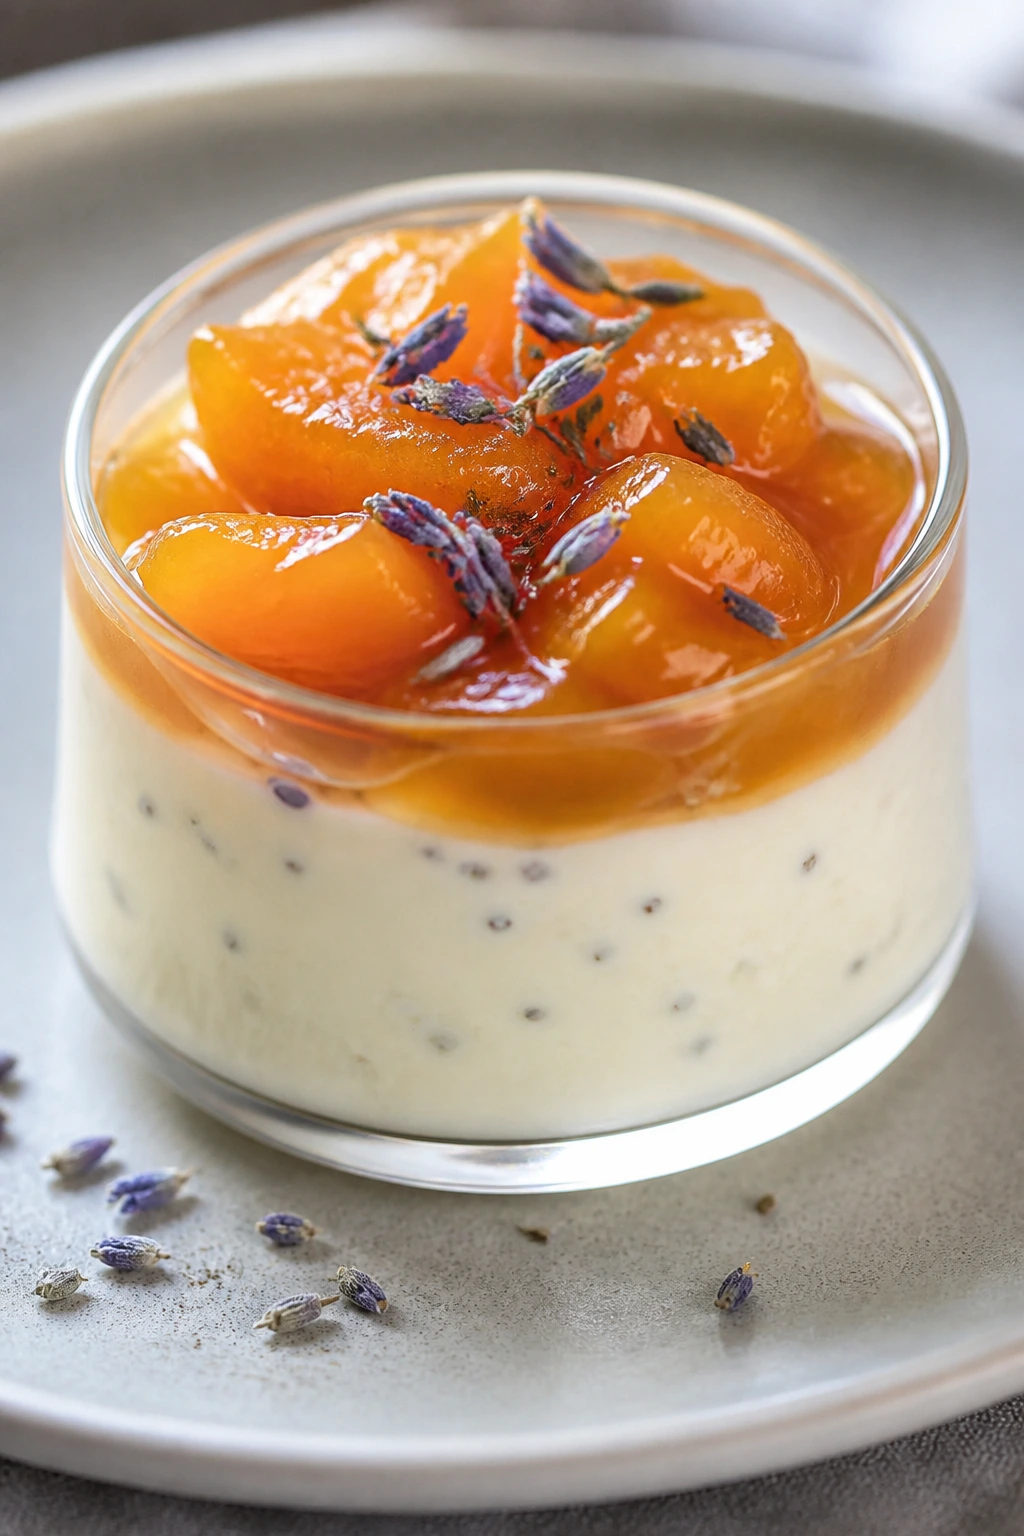
3. Lavender-Honey Panna Cotta with Apricot Compote
Panna cotta sounds fussy until you spoon into it and feel that soft wobble. This one gets a light floral note from culinary lavender and a sunny cap of apricot compote that looks almost lacquered against the cream. Served in small glasses or unmolded onto plates, it has that clean, modern dessert look that makes people lean in. And then the spoon breaks through.
Why It Works:
Gelatin gives the custard its delicate set, so the texture lands between cream and cloud. Honey smooths out the floral note from the lavender without making the whole thing taste like perfume. Apricots bring just enough acidity to keep the dessert from feeling heavy, and a little lemon juice keeps the compote bright.
Key Ingredients:
- 2 cups heavy cream
- 1 cup whole milk
- 1/2 cup honey
- 2 teaspoons dried culinary lavender
- 2 1/4 teaspoons unflavored gelatin
- 3 tablespoons cold water
- 1 teaspoon vanilla extract
- Pinch of fine salt
- 3 cups apricots, pitted and sliced
- 2 tablespoons honey, for the compote
- 1 tablespoon lemon juice
- 2 tablespoons water
- Mint leaves or edible flowers, for garnish
Quick Steps:
- Sprinkle the gelatin over the cold water in a small bowl and let it bloom for 5 minutes.
- Warm the cream, milk, honey, lavender, and salt in a saucepan over medium heat until steaming, not boiling, then turn off the heat and steep for 5 minutes.
- Strain out the lavender, whisk in the bloomed gelatin until dissolved, then stir in the vanilla.
- Pour into glasses or ramekins and chill for at least 4 hours until set with a soft wobble.
- Cook the apricots, honey, lemon juice, and water in a small pan over medium heat for 6 to 8 minutes until the fruit softens but still keeps its shape. Cool.
- Spoon the compote over the chilled panna cotta and finish with mint or a few tiny edible flowers.
Equipment for This Recipe:
- Small saucepan
- Fine-mesh strainer
- Whisk
- Ramekins or dessert glasses
- Small spoon for the compote
How to Serve This Dish:
Serve it cold, straight from the refrigerator, with the compote spooned over just before it goes out. If you unmold it, run a warm knife around the edge and dip the mold briefly in hot water.
Pro Tips for This Recipe:
- Use culinary lavender, not potpourri-grade lavender. The flavor should be gentle, not soapy.
- Don’t boil the cream or the dairy can taste cooked.
- Chill the glasses on a flat shelf so the surface stays smooth.
- If you want a firmer set for unmolding, add another 1/4 teaspoon gelatin.
Variations on This Dish:
- Vanilla Bean Version: Leave out the lavender and add half a split vanilla bean to the cream.
- Peach Compote Swap: Use ripe peaches in place of apricots during late summer.
- Dairy-Light Version: Replace half the cream with coconut milk for a softer, more tropical note.
Common Mistakes to Avoid with This Dish:
- Don’t rush the chill time. A soft set needs those hours in the fridge.
- Don’t skip straining the lavender; the tiny buds can feel gritty.
- Don’t pour warm compote over the custard until the panna cotta is fully set.
4. Cherry Clafoutis with Vanilla Sugar
A cherry clafoutis sits somewhere between custard and cake, which is part of why it feels so charming on the table. The fruit sinks and floats at the same time, leaving dark red circles under a pale, puffed top. It’s the sort of dessert that looks best in the dish it was baked in. Very French. Very unfussy.
Why It Works:
The batter is thin on purpose, so it settles around the cherries and bakes into a soft, barely sweet custard. A clafoutis does not need a lot of extra flavoring; cherries bring enough perfume on their own. A dusting of vanilla sugar or powdered sugar right before serving gives it that slightly old-world finish.
Key Ingredients:
- 2 cups cherries, pitted
- 3 large eggs
- 1/2 cup granulated sugar
- 1 tablespoon vanilla extract
- 1/2 cup all-purpose flour
- 1 cup whole milk
- 1/2 cup heavy cream
- 1/4 teaspoon fine salt
- 1 tablespoon unsalted butter, softened, for the dish
- 1 tablespoon powdered sugar or vanilla sugar, for finishing
Quick Steps:
- Preheat the oven to 350°F and butter a 9-inch pie dish or shallow baking dish.
- Scatter the cherries in the dish in a single layer.
- Whisk the eggs, sugar, and vanilla until smooth, then whisk in the flour, milk, cream, and salt until the batter looks thin and lump-free.
- Pour the batter over the cherries and bake for 35 to 40 minutes until puffed, golden at the edges, and just set in the center.
- Let it cool for at least 15 minutes, then dust with sugar and serve from the dish.
Equipment for This Recipe:
- 9-inch pie dish or gratin dish
- Whisk
- Mixing bowl
- Cherry pitter, optional but helpful
- Fine sieve for the sugar
How to Serve This Dish:
Serve it warm, when the center still trembles slightly and the top is bronzed. A spoonful of crème fraîche next to each serving adds a cool, tart contrast that the custard likes.
Pro Tips for This Recipe:
- If your cherries are very sweet, cut the sugar back by 2 tablespoons.
- Let the batter rest for 10 minutes before baking so the flour hydrates.
- Bake until the center is set but still soft; overbaking turns the custard rubbery.
- Use pitted cherries if you want easy slices, but keep some whole cherries if you enjoy a more rustic look.
Variations on This Dish:
- Apricot Clafoutis: Swap in halved apricots and add a pinch of cardamom.
- Almond Clafoutis: Add 1/4 teaspoon almond extract and sliced almonds on top.
- Mini Ramekin Version: Bake individual servings for a sharper presentation and quicker serving.
Common Mistakes to Avoid with This Dish:
- Don’t overload the dish with fruit. The batter should still be able to set.
- Don’t expect a cheesecake texture; clafoutis should be soft and custardy.
- Don’t cut it piping hot unless you want it to collapse into a puddle.
5. Peach and Basil Upside-Down Cake
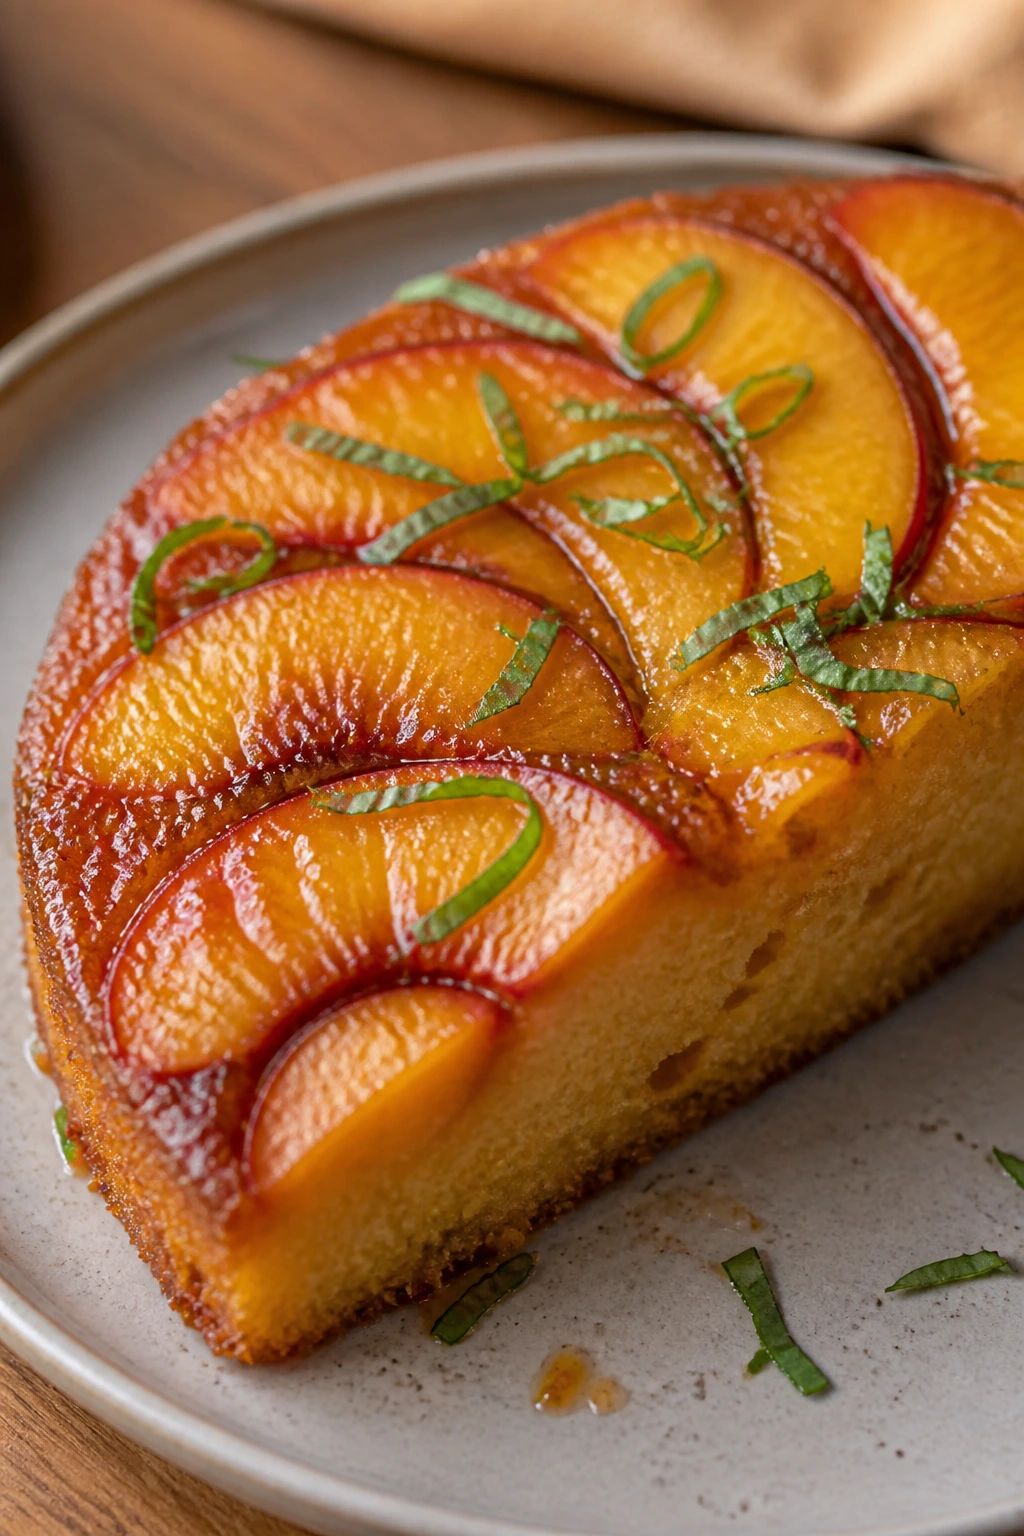
A peach upside-down cake already has color going for it, but basil gives it a little surprise. The fruit turns glossy and amber around the edges, while the herb keeps the sweetness from feeling one-note. When you flip it out of the pan, the sliced peaches sit in a pattern that looks almost floral. That part never gets old.
Why It Works:
Upside-down cakes are built around caramel, and caramel plus peach is one of those pairs that needs almost no help. Basil adds a fresh, green note that shows up just enough to make the cake taste more layered. Sour cream keeps the crumb tender and helps the cake stay moist under the fruit.
Key Ingredients:
- 3 ripe peaches, sliced into wedges
- 1/4 cup unsalted butter, melted
- 1/2 cup light brown sugar
- 6 to 8 basil leaves, finely sliced
- 1 1/2 cups all-purpose flour
- 1 1/2 teaspoons baking powder
- 1/4 teaspoon baking soda
- 1/2 teaspoon fine salt
- 1/2 cup unsalted butter, softened
- 3/4 cup granulated sugar
- 2 large eggs
- 1/2 cup sour cream
- 1 teaspoon vanilla extract
Quick Steps:
- Heat the oven to 350°F. Pour the melted butter into a 9-inch round cake pan and sprinkle the brown sugar over the top.
- Arrange the peach slices over the sugar in a tight, overlapping pattern and scatter half the basil over them.
- Whisk the flour, baking powder, baking soda, and salt in one bowl.
- Beat the softened butter and granulated sugar until fluffy, then add the eggs one at a time. Mix in the sour cream and vanilla, then fold in the dry ingredients.
- Spread the batter over the peaches and bake for 35 to 40 minutes until the center springs back.
- Cool for 10 minutes, then invert onto a serving plate. Finish with the remaining basil.
Equipment for This Recipe:
- 9-inch round cake pan
- Mixing bowls
- Hand mixer or stand mixer
- Spatula
- Serving plate with a lip, just in case the caramel runs
How to Serve This Dish:
Serve it warm with whipped cream or a scoop of vanilla ice cream. The peach slices stay glossy when the cake is fresh, and a few basil ribbons on top make the whole thing look more intentional.
Pro Tips for This Recipe:
- Use peaches that are ripe but still hold their shape. Overripe ones melt into the caramel.
- Slice the basil finely so it perfumes the cake instead of showing up in harsh bits.
- Let the cake sit after baking so the caramel loosens enough to release cleanly.
- A pinch of flaky salt on the fruit layer sharpens the flavor.
Variations on This Dish:
- Nectarine Swap: Use nectarines instead of peaches for a smoother skin and brighter color.
- Brown Butter Version: Brown the butter for the fruit layer if you want a deeper, nutty taste.
- Herb Change-Up: Replace basil with thyme for a more savory edge.
Common Mistakes to Avoid with This Dish:
- Don’t invert too soon. The cake can tear if the caramel is still raging hot.
- Don’t crowd the peaches too loosely or the top looks patchy after flipping.
- Don’t leave the basil in giant pieces; it can turn bitter in the oven.
6. Blueberry Lemon Hand Pies with Turbinado Crust
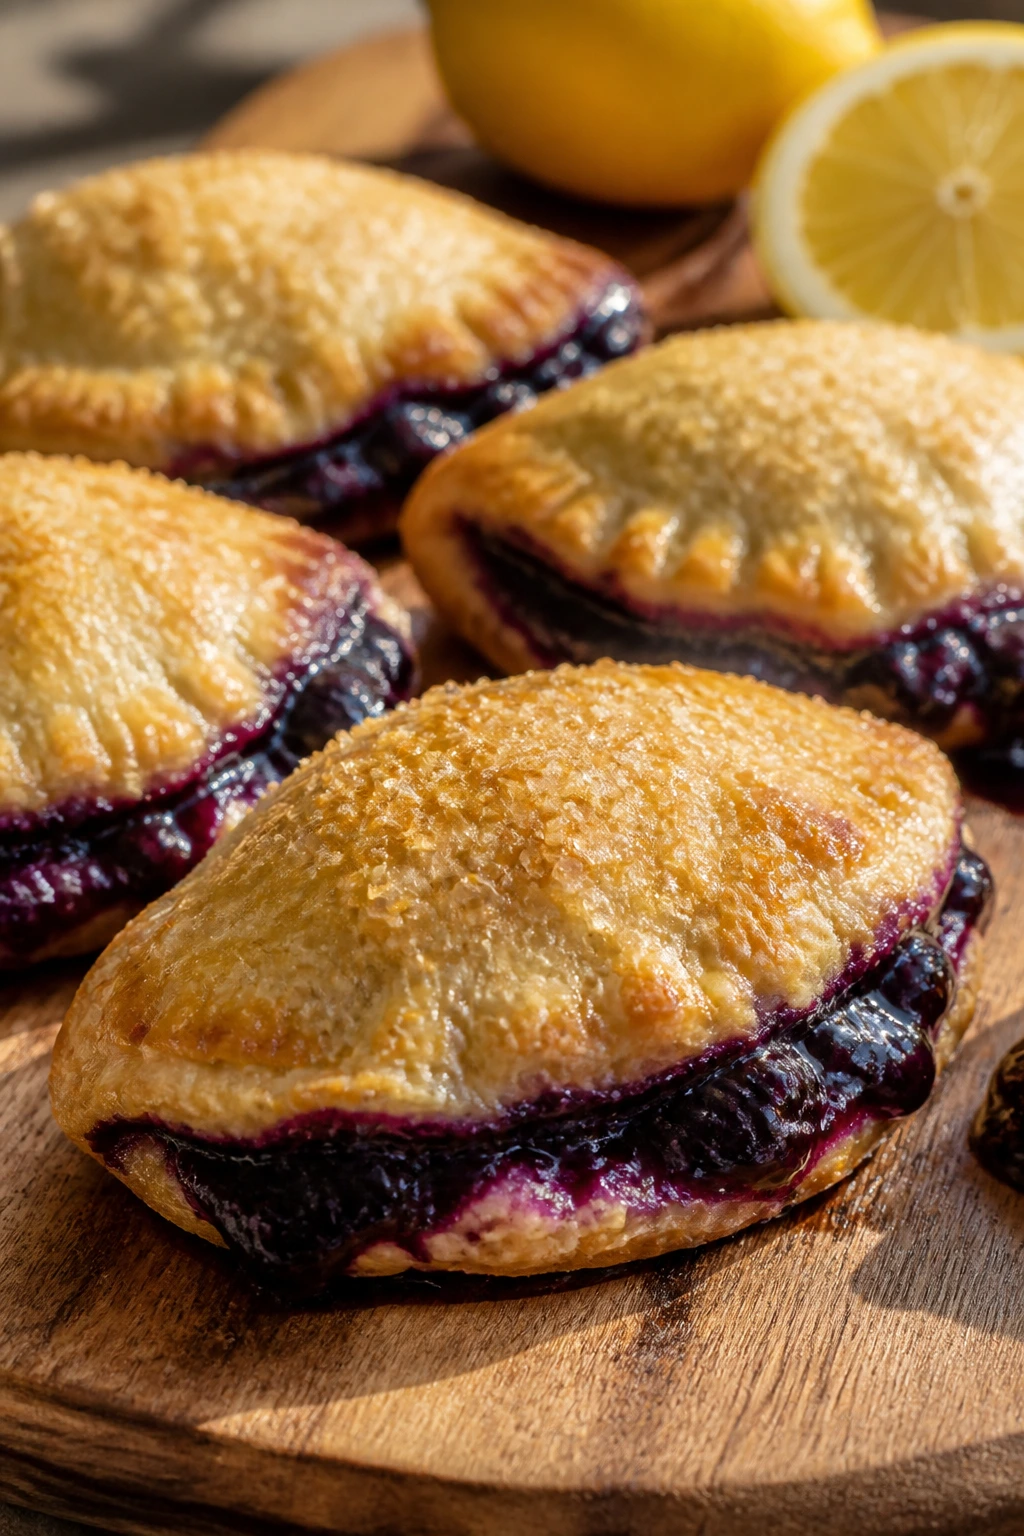
Hand pies are small, yes, but they have presence. A blueberry filling turns dark and jammy under a crisp crust, and the lemon zest keeps the whole thing bright enough to feel light on its feet. The turbinado sugar on top makes each pie sparkle a little. It’s the kind of dessert people pick up before they even ask what’s inside.
Why It Works:
Blueberries burst into a thick filling without needing much help, and lemon gives them the lift they need. The hand-held shape makes the pies easy to serve and easy to pack, which is one reason they work so well for gatherings. A small amount of cornstarch keeps the filling from seeping through the crust.
Key Ingredients:
- 2 1/2 cups all-purpose flour
- 1 tablespoon granulated sugar
- 1 teaspoon fine salt
- 1 cup cold unsalted butter, cubed
- 6 to 8 tablespoons ice water
- 2 cups blueberries
- 1/4 cup granulated sugar
- 2 teaspoons cornstarch
- Zest of 1 lemon
- 1 tablespoon lemon juice
- Pinch of cinnamon
- 1 egg beaten with 1 tablespoon water, for the wash
- 2 tablespoons turbinado sugar, for topping
Quick Steps:
- Make the dough by cutting the cold butter into the flour, sugar, and salt until the texture looks like coarse crumbs. Add ice water just until the dough comes together, then chill for 30 minutes.
- Mix the blueberries, sugar, cornstarch, lemon zest, lemon juice, and cinnamon in a bowl.
- Roll the dough to about 1/8 inch thick and cut rounds or rectangles. Spoon filling onto one side of each piece, leaving a border for sealing.
- Fold, crimp with a fork, and brush with egg wash. Sprinkle with turbinado sugar.
- Bake at 400°F for 20 to 22 minutes until the crust is deeply golden and the filling is bubbling at the seams. Cool before eating.
Equipment for This Recipe:
- Baking sheet
- Parchment paper
- Rolling pin
- Fork for crimping
- Small pastry brush
How to Serve This Dish:
Pile them on a platter while they’re still warm enough to smell like butter and lemon. They’re good plain, though a little vanilla ice cream on the side makes them feel like a proper summer dessert instead of a snack you stole from the kitchen.
Pro Tips for This Recipe:
- Chill the assembled pies before baking if the dough softens too much.
- Don’t overfill them or the seams will burst open in the oven.
- Cut a tiny steam slit if you want a cleaner release of steam.
- Blueberries that are very juicy may need an extra teaspoon of cornstarch.
Variations on This Dish:
- Mixed Berry Hand Pies: Replace half the blueberries with raspberries or blackberries.
- Lemon Cream Filling: Add a thin layer of cream cheese sweetened with powdered sugar under the berries.
- Lattice Top: Cut thin strips of dough and braid them over the top if you want a fancier finish.
Common Mistakes to Avoid with This Dish:
- Don’t let the dough warm up on the counter too long. Warm butter means flat pies.
- Don’t skip the egg wash if you want that shiny, bronzed top.
- Don’t eat them straight from the oven. The filling can be lava-hot.
7. Blackberry Cheesecake Bars with Marbled Swirl
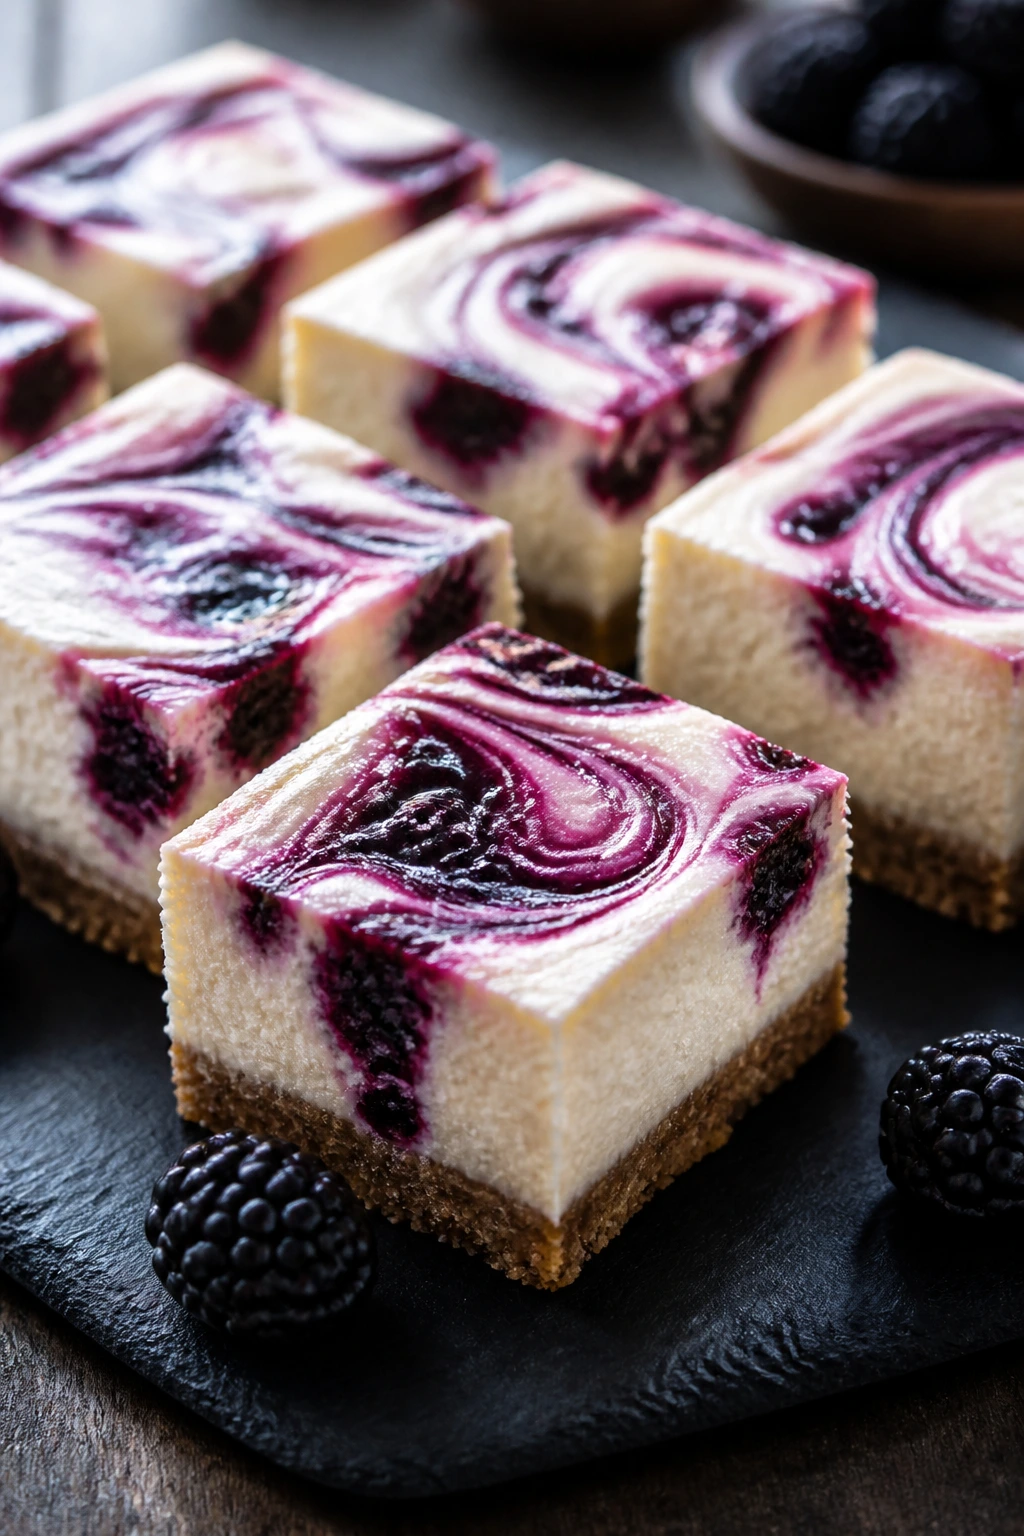
Blackberry cheesecake bars have a neat kind of drama. The crust gives you that crumbly base, the filling stays smooth and pale, and the blackberry swirl streaks through like paint dragged with the tip of a knife. Cut them cleanly and they look almost too tidy to be homemade. Almost.
Why It Works:
Cheesecake filling likes a low oven and a gentle bake, which keeps the texture dense but not heavy. Blackberries break down into a deep purple puree that looks striking against the white filling. Chilling the bars before slicing is the trick that turns them from messy squares into sharp little slabs.
Key Ingredients:
- 2 cups graham cracker crumbs
- 5 tablespoons unsalted butter, melted
- 2 tablespoons granulated sugar
- Pinch of salt
- 16 ounces cream cheese, softened
- 1/2 cup granulated sugar
- 2 large eggs
- 1/2 cup sour cream
- 1 teaspoon vanilla extract
- 1 1/2 cups blackberries
- 1 tablespoon granulated sugar, for the swirl
- 1 teaspoon lemon juice
Quick Steps:
- Heat the oven to 325°F and line an 8-inch square pan with parchment.
- Mix the graham crumbs, melted butter, sugar, and salt, then press into the pan and bake for 10 minutes.
- Cook the blackberries, sugar, and lemon juice over medium heat for 5 minutes until they collapse. Mash or blend, then cool slightly.
- Beat the cream cheese and sugar until smooth, then add the eggs one at a time. Mix in the sour cream and vanilla.
- Spread the filling over the crust, spoon the blackberry puree in ribbons across the top, and swirl lightly with a knife.
- Bake for 35 to 40 minutes until the edges are set and the center still has a slight wobble. Chill for at least 4 hours before cutting.
Equipment for This Recipe:
- 8-inch square baking pan
- Parchment paper
- Hand mixer
- Small saucepan
- Offset spatula or butter knife for swirling
How to Serve This Dish:
Serve these bars cold, straight from the fridge, with a few fresh blackberries on top if you have them. They’re easy to plate because the swirl already does the visual work.
Pro Tips for This Recipe:
- Soften the cream cheese fully or the batter will stay lumpy.
- Cool the blackberry swirl before adding it so it doesn’t thin the batter.
- Use parchment overhangs; they make lifting the chilled bars out much easier.
- Chill long enough. Warm cheesecake bars cut like soft butter.
Variations on This Dish:
- Raspberry Swirl Bars: Swap in raspberries for a brighter, sharper flavor.
- Lemon Cheesecake Base: Add more lemon zest to the filling if you want a brighter contrast.
- Graham-Free Crust: Use almond flour and melted butter for a nutty crust.
Common Mistakes to Avoid with This Dish:
- Don’t overmix after adding the eggs or the bars can puff and crack.
- Don’t cut them before chilling. The swirl needs time to set.
- Don’t use watery berries without reducing them first.
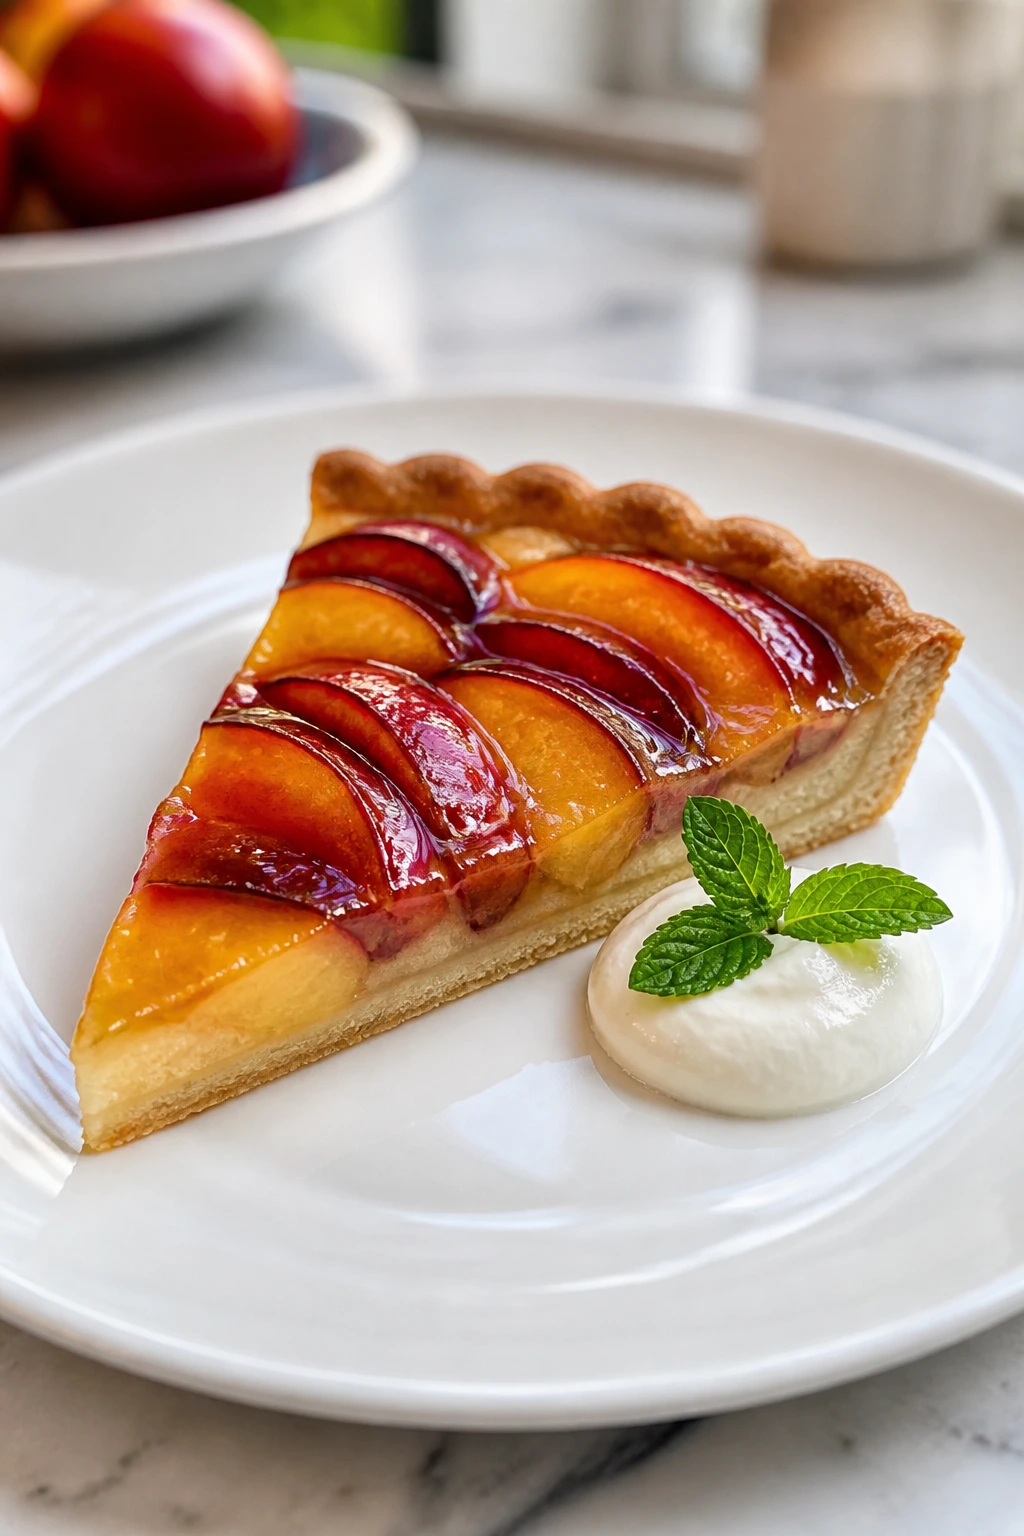
8. Plum Frangipane Tart
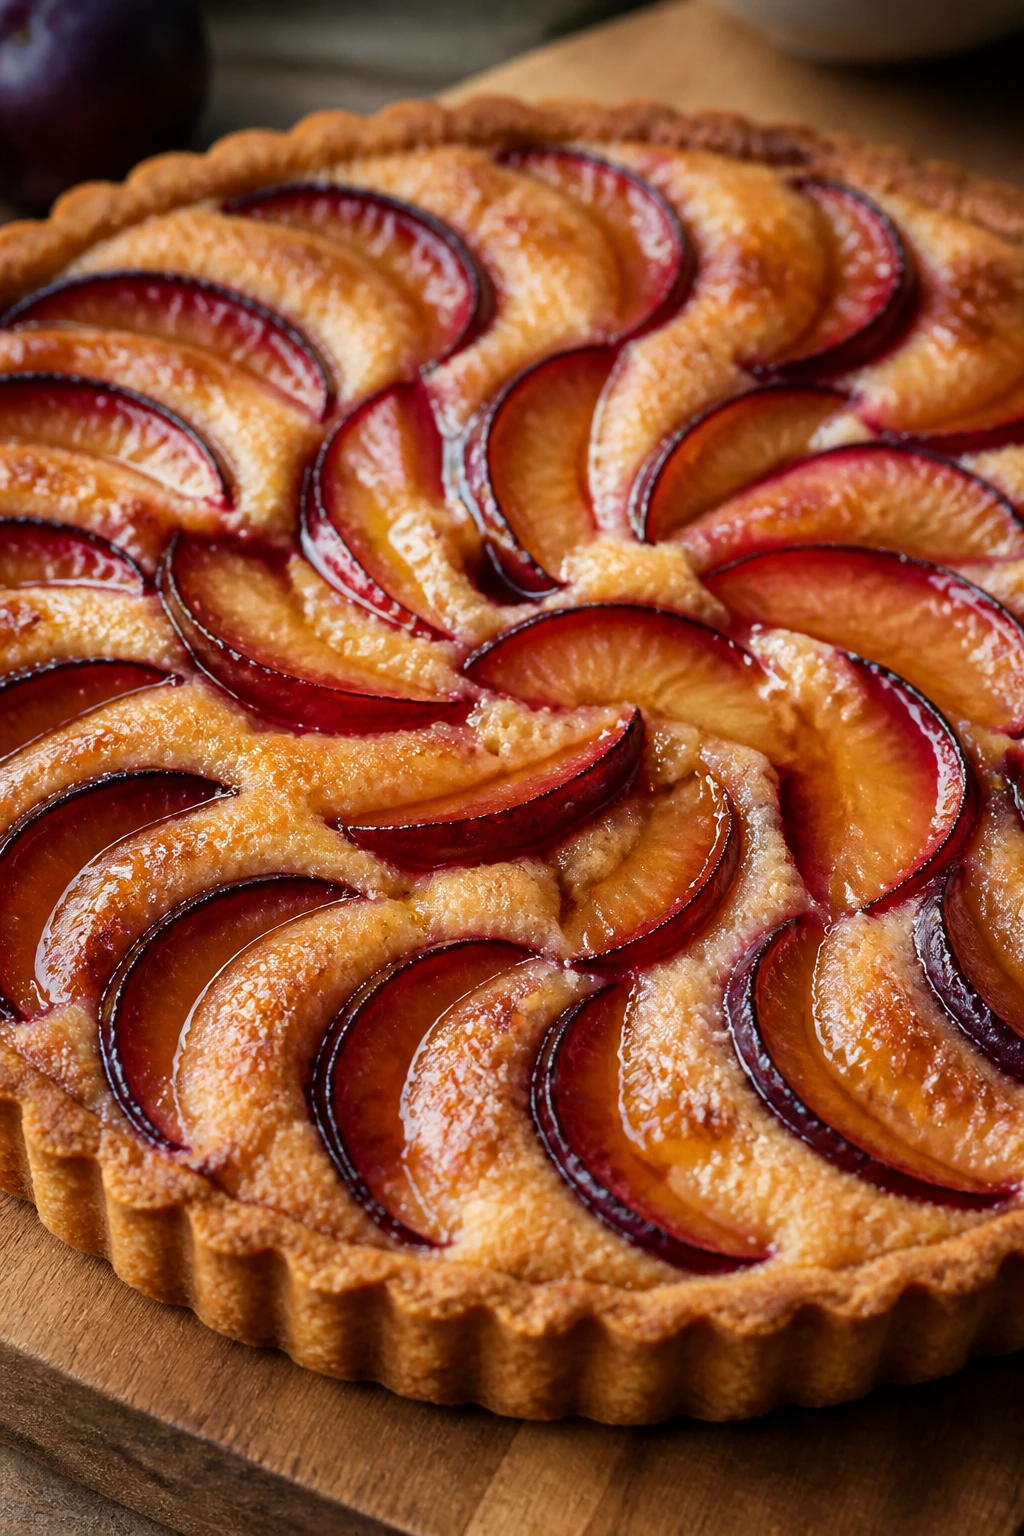
A plum frangipane tart is one of those desserts that looks like it came from a pastry case with excellent lighting. The almond filling puffs a little under the fruit, and the plum slices settle into a pattern that looks geometric without feeling stiff. When it bakes, the fruit edges darken just enough to show off their color. You don’t need much else.
Why It Works:
Frangipane gives the tart a cushion of almond richness that keeps the fruit from sinking into the shell. Plums bring acidity and perfume, and their skins stay vivid after baking, which is half the reason the tart looks so good. A thin apricot glaze adds shine and a little sweetness on top.
Key Ingredients:
- 1 1/4 cups all-purpose flour
- 1/4 cup powdered sugar
- 1/2 teaspoon fine salt
- 1/2 cup cold unsalted butter, cubed
- 1 egg yolk
- 1 to 2 tablespoons cold water
- 1/2 cup almond flour
- 1/4 cup granulated sugar
- 4 tablespoons unsalted butter, softened
- 1 large egg
- 1 teaspoon all-purpose flour
- 1/2 teaspoon vanilla extract
- Pinch of salt
- 5 to 6 plums, pitted and sliced
- 1 tablespoon granulated sugar, for the fruit
- 1 tablespoon apricot jam mixed with 1 teaspoon water, for glaze
Quick Steps:
- Make the tart dough by cutting the butter into the flour, powdered sugar, and salt, then bring it together with the egg yolk and cold water. Chill for 30 minutes.
- Press or roll the dough into a 9-inch tart pan and chill again for 15 minutes.
- Beat the almond flour, sugar, butter, egg, flour, vanilla, and salt into a smooth frangipane. Spread it in the tart shell.
- Arrange the plum slices over the filling in overlapping circles and sprinkle with sugar.
- Bake at 375°F for 35 to 40 minutes until the frangipane is puffed and set and the crust is golden.
- Brush the warm tart with apricot glaze for shine, then cool before slicing.
Equipment for This Recipe:
- 9-inch tart pan with removable bottom
- Rolling pin
- Mixing bowl
- Offset spatula
- Pastry brush
How to Serve This Dish:
Serve it at room temperature so the almond filling stays soft and the fruit flavor comes through. A small spoonful of whipped cream is enough; the tart already does most of the talking.
Pro Tips for This Recipe:
- Pick plums that are ripe but still firm so they keep their shape.
- Chill the tart shell before baking if you want a crisp bottom.
- Use a small offset spatula to level the frangipane cleanly.
- Brush on the glaze while the tart is warm, not hot.
Variations on This Dish:
- Apricot Tart: Swap the plums for halved apricots and reduce the sugar a little.
- Cardamom Frangipane: Add 1/2 teaspoon ground cardamom to the almond filling.
- Rustic Galette Form: Skip the tart pan and fold the dough around the filling for a more casual look.
Common Mistakes to Avoid with This Dish:
- Don’t overload the tart with fruit. Too much moisture makes the center soggy.
- Don’t skip the glaze if you want that glossy finish.
- Don’t slice too soon or the frangipane will slump.
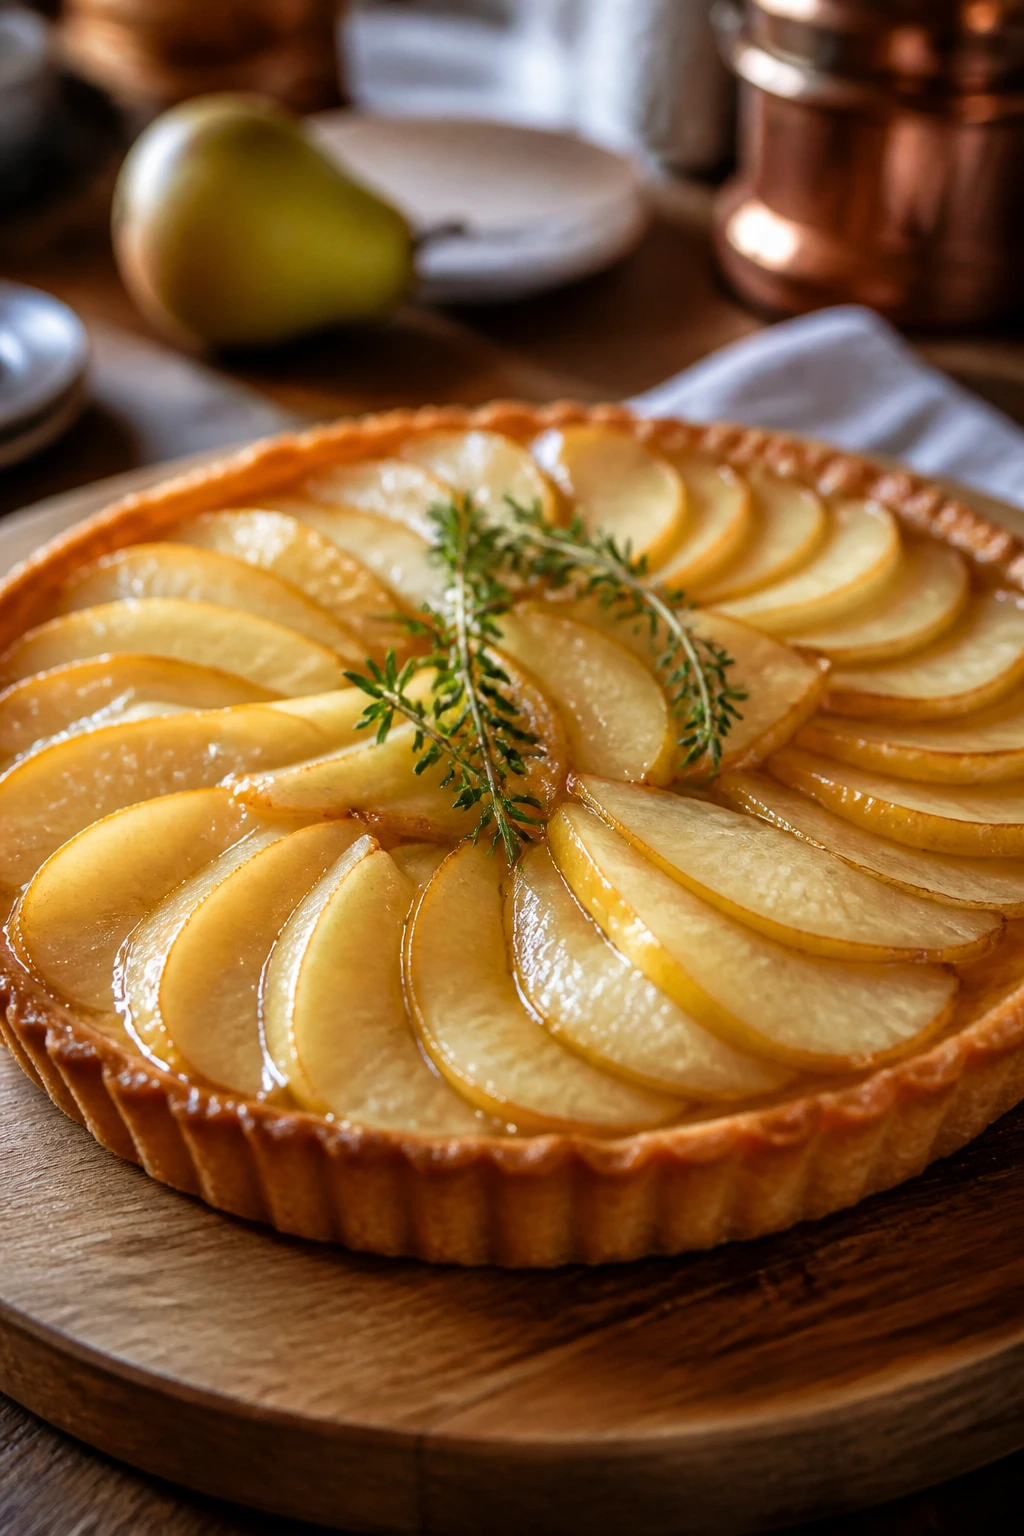
9. Apple Rose Tartlets with Apricot Glaze
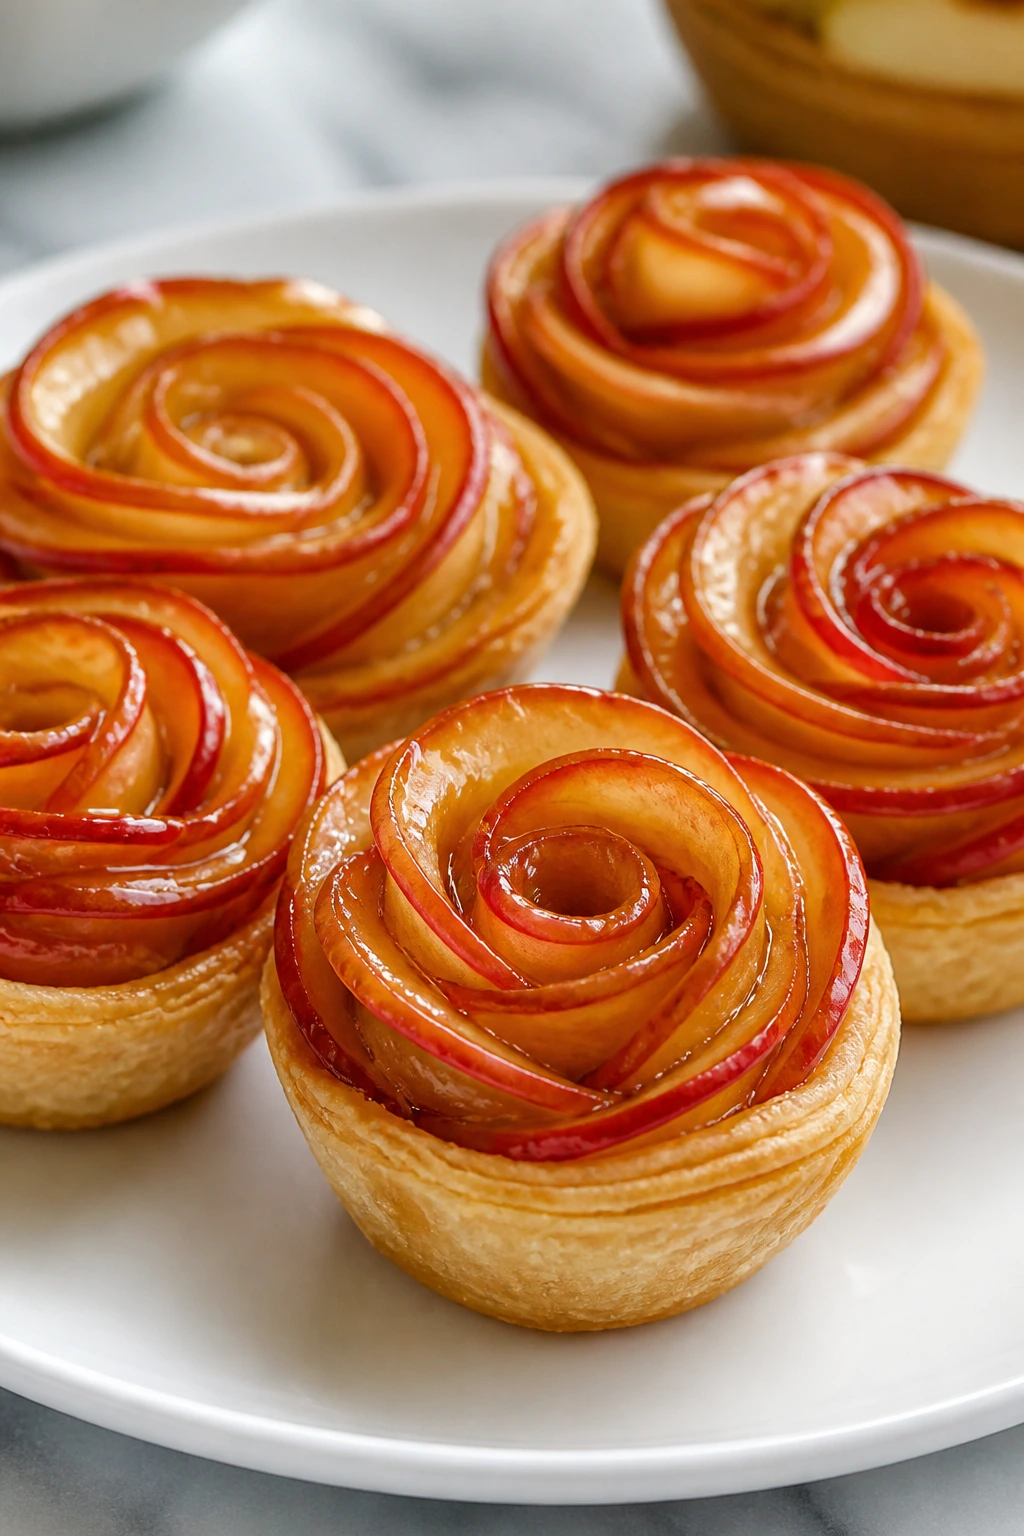
Apple roses are one of those tricks that look more complicated than they are. Thin apple slices curl into little red and gold spirals, and when they bake in pastry shells, the result looks polished enough for a bakery window. The apricot glaze gives the fruit a wet shine that catches the eye right away. There’s a reason people hover over these before dessert is even served.
Why It Works:
Thin slicing is the whole game here. The apples soften just enough to roll, but they still keep the petal shape after baking. Puff pastry gives the roses a crisp, buttery base, and apricot glaze ties the whole thing together with color and shine.
Key Ingredients:
- 1 sheet puff pastry, thawed
- 2 medium apples, cored and sliced very thin
- Juice of 1 lemon
- 2 tablespoons granulated sugar
- 1 teaspoon cinnamon
- 2 tablespoons apricot jam
- 1 tablespoon water
- 1 tablespoon melted butter
- Powdered sugar, for dusting
Quick Steps:
- Heat the oven to 400°F and grease or line a muffin tin or small tart pans.
- Toss the apple slices with lemon juice, sugar, and cinnamon, then microwave them for 30 to 45 seconds until flexible.
- Cut the puff pastry into strips or circles sized for your molds, then brush lightly with melted butter.
- Roll the apple slices into small spirals, nestle them into the pastry bases, and arrange extra slices around the edges to make the rose shape.
- Bake for 22 to 25 minutes until the pastry is puffed and deep golden and the apples are tender.
- Warm the apricot jam with water, brush it over the tops, and dust lightly with powdered sugar once cooled.
Equipment for This Recipe:
- Muffin tin or mini tart pans
- Sharp knife or mandoline
- Pastry brush
- Small saucepan or microwave-safe bowl
- Cooling rack
How to Serve This Dish:
Serve them warm or at room temperature on a cake stand or platter lined with parchment. They look especially good with a little extra glaze shining on the apple edges.
Pro Tips for This Recipe:
- Slice the apples thin enough to bend without breaking.
- Soften them just enough in the microwave; over-softening turns them mushy.
- Use red-skinned apples if you want the rose effect to stand out.
- Brush the glaze on while the tartlets are still warm so it sinks into the fruit.
Variations on This Dish:
- Pear Rose Tartlets: Use firm pears for a softer, paler version.
- Almond Base: Spread a teaspoon of almond cream under the roses for more richness.
- Mini Galette Style: Arrange the roses on free-form puff pastry circles if you want a looser look.
Common Mistakes to Avoid with This Dish:
- Don’t cut the slices too thick or they won’t roll.
- Don’t skip the lemon juice; it keeps the apples from browning too fast.
- Don’t overfill the pastry or the tartlets lose their shape.
10. Pear Cardamom Pavlovas
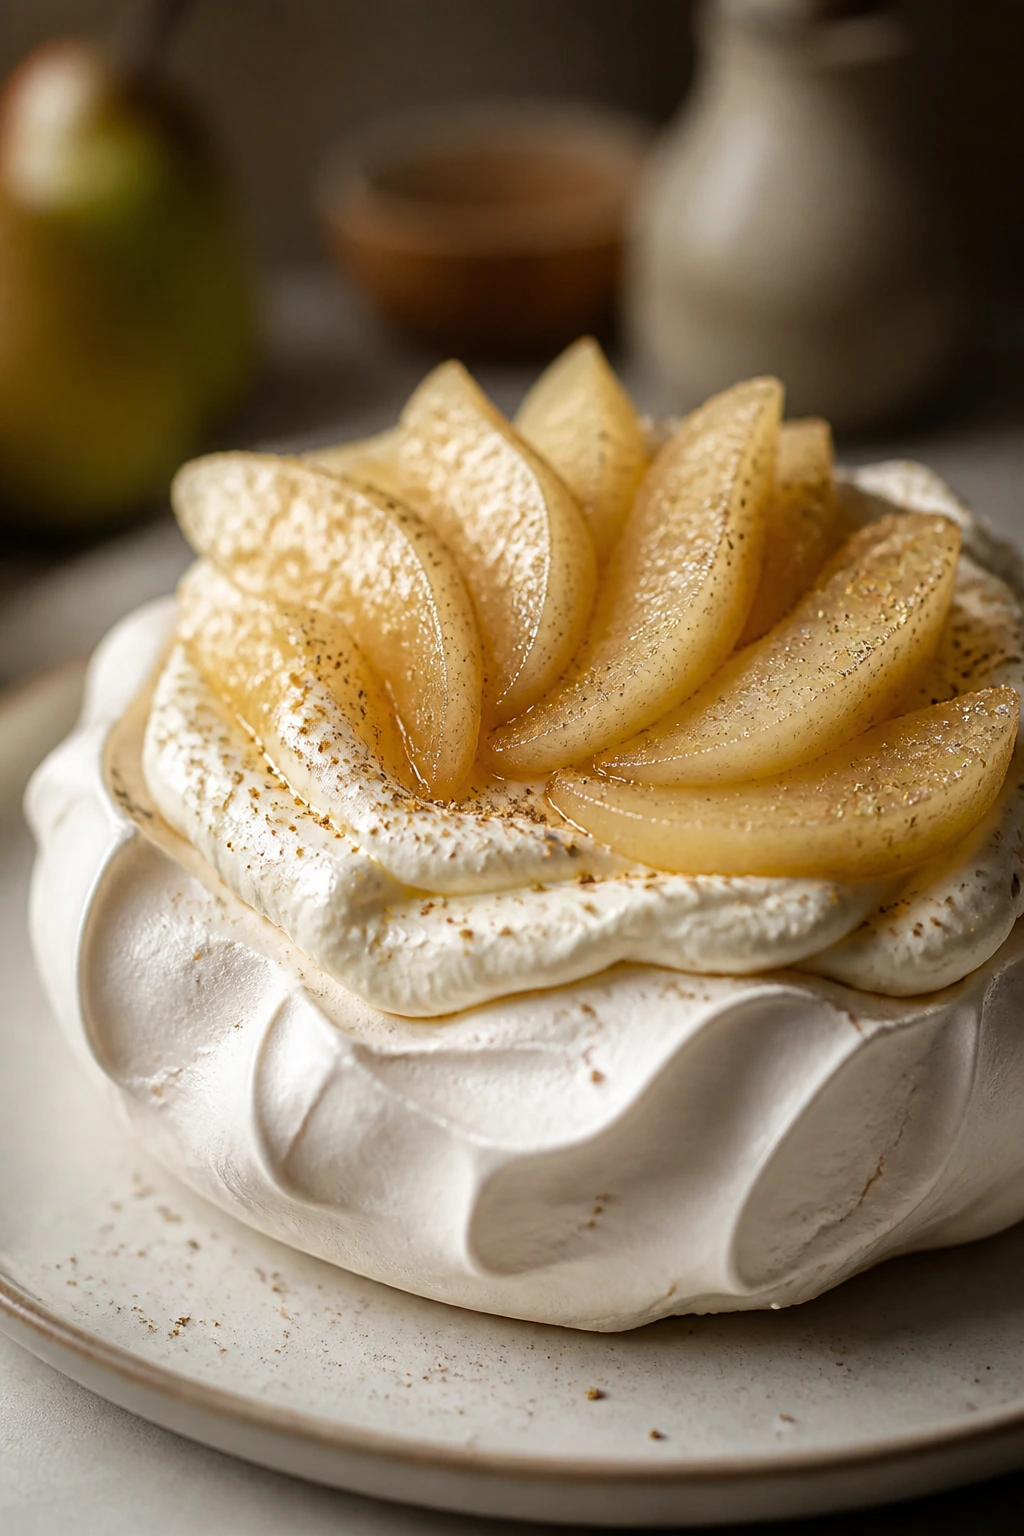
Pavlovas always look like clouds that learned how to hold cream. This version gets that pale, crisp shell and then loads on poached pears that look like translucent petals, plus a dusting of cardamom that keeps the sweetness from wandering off. The contrast is the point: crunchy outside, soft center, cool cream, glossy fruit. It’s a lot of texture in one plate, which is why it works.
Why It Works:
The meringue shell bakes low and slow so the outside dries while the center stays marshy. Cardamom gives the pears a floral spice that pairs cleanly with whipped cream. Because the toppings go on after baking, the pavlovas keep their shape and feel dramatic without being fragile right away.
Key Ingredients:
- 4 large egg whites
- 1 cup superfine sugar
- 1 teaspoon cornstarch
- 1 teaspoon white vinegar
- 1 teaspoon vanilla extract
- Pinch of fine salt
- 2 ripe but firm pears, peeled and sliced
- 2 cups water
- 1/2 cup granulated sugar
- 4 cardamom pods, lightly crushed
- 1 cinnamon stick
- Strip of lemon peel
- 1 cup heavy cream
- 2 tablespoons powdered sugar
- 1 teaspoon vanilla extract
Quick Steps:
- Heat the oven to 225°F and line a baking sheet with parchment.
- Beat the egg whites and salt to soft peaks, then add the sugar a spoonful at a time until the meringue is glossy and stiff. Fold in the cornstarch, vinegar, and vanilla.
- Spoon or pipe the meringue into 4 rounds with shallow centers and bake for 1 hour 15 minutes until dry on the outside. Turn off the oven and let them cool inside.
- Simmer the water, sugar, cardamom, cinnamon, and lemon peel, then poach the pears until tender, about 8 to 10 minutes. Cool.
- Whip the cream with the powdered sugar and vanilla.
- Fill the pavlovas with cream and spoon the pears over the top just before serving.
Equipment for This Recipe:
- Electric mixer
- Baking sheet and parchment
- Saucepan
- Piping bag, optional
- Slotted spoon
How to Serve This Dish:
Serve the pavlovas as soon as they’re assembled so the shell stays crisp. A few pear slices stacked on top and a pinch of extra cardamom make the whole plate look deliberate.
Pro Tips for This Recipe:
- Make sure the bowl and whisk are grease-free or the whites won’t whip properly.
- Let the meringue cool in the oven to avoid cracking from a sudden temperature drop.
- Poach the pears just until they yield at the tip of a knife.
- Assemble at the last minute so the cream doesn’t soften the shell.
Variations on This Dish:
- Mixed Stone Fruit Pavlovas: Use nectarines or peaches when pears aren’t the right mood.
- Citrus Cream Version: Fold a little lemon zest into the whipped cream.
- Mini Pavlova Nests: Pipe smaller rounds for individual servings and a sharper finish.
Common Mistakes to Avoid with This Dish:
- Don’t open the oven over and over during baking. Drafts make the shells collapse.
- Don’t add wet fruit too early or the meringue gets soggy.
- Don’t underbeat the egg whites; soft meringue spreads instead of standing.
11. Cranberry Orange Curd Tart
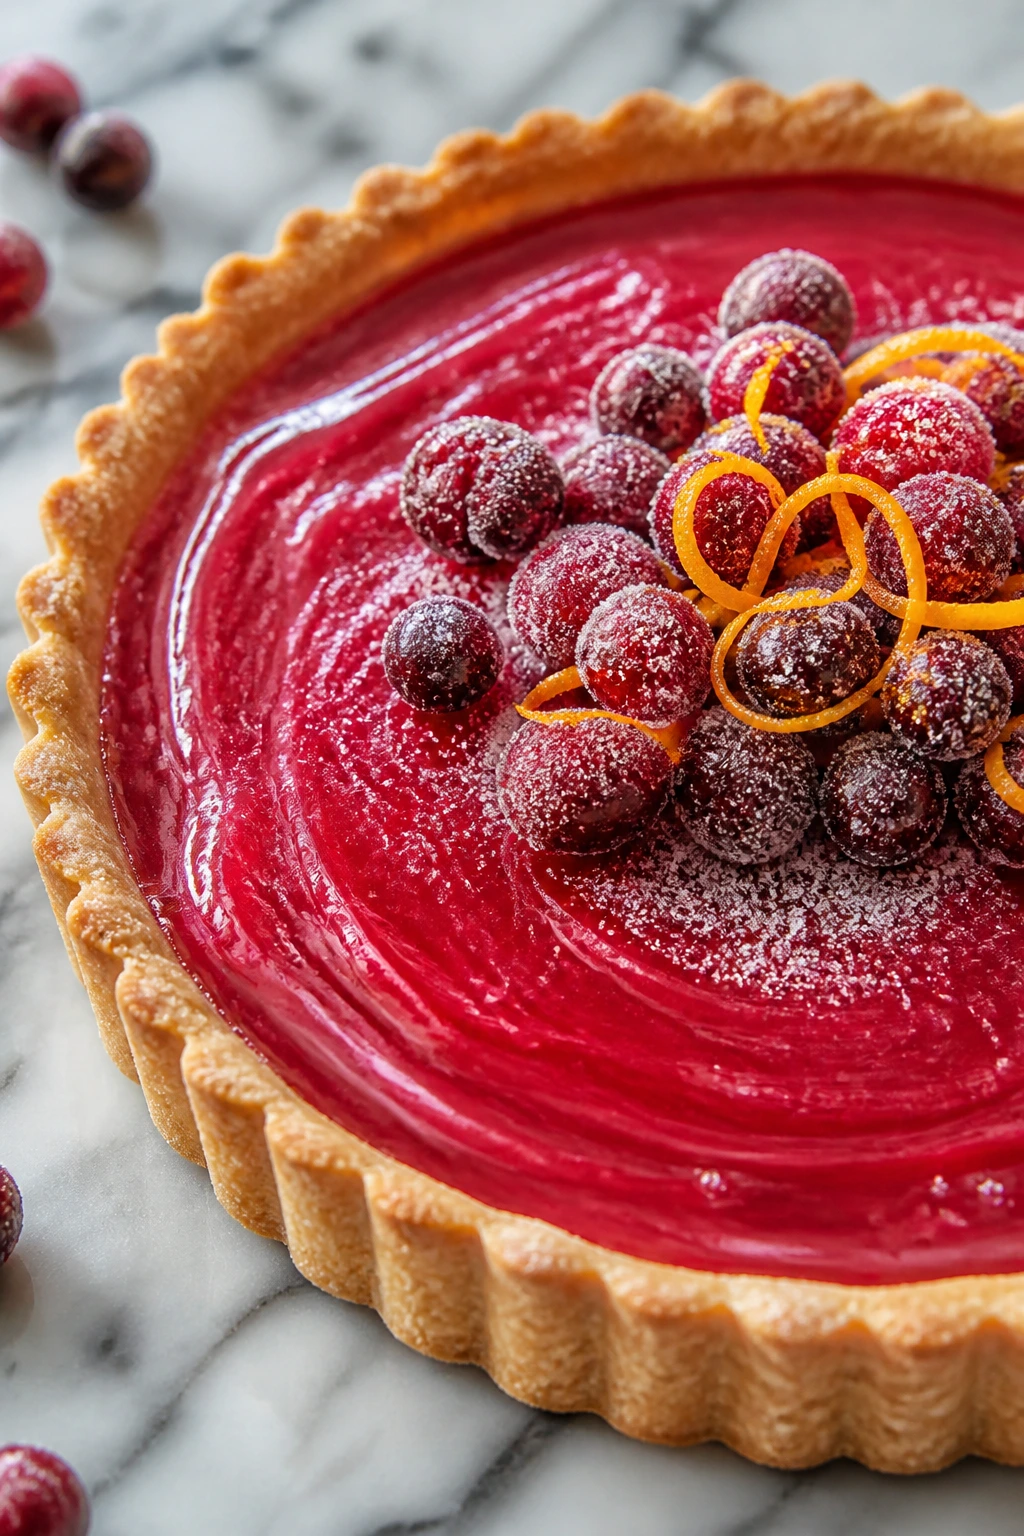
Cranberry curd is one of those fillings that seems almost unreal the first time you see it. The color lands somewhere between ruby and coral, and when it sits in a crisp tart shell, the contrast is sharp enough to make people stare for a second. A few sugared cranberries or orange zest curls on top push it from festive to polished. It has that old-fashioned holiday look without the clutter.
Why It Works:
Cranberries are naturally high in acid, which keeps the curd bright and prevents the orange from tasting one-dimensional. Eggs and butter give the filling its glossy set, while the tart shell provides the needed crunch. Because the filling is cooked on the stovetop, you can control the texture before it ever reaches the tart pan.
Key Ingredients:
- 1 1/4 cups all-purpose flour
- 1/4 cup powdered sugar
- 1/2 teaspoon fine salt
- 1/2 cup cold unsalted butter, cubed
- 1 egg yolk
- 1 to 2 tablespoons cold water
- 12 ounces fresh or frozen cranberries
- 1 cup granulated sugar
- 1/2 cup orange juice
- Zest of 2 oranges
- 4 large eggs
- 6 tablespoons unsalted butter, cut into pieces
- Pinch of salt
Quick Steps:
- Make and chill the tart shell dough, then roll it into a 9-inch tart pan and bake it at 375°F until golden, about 18 to 20 minutes.
- Simmer the cranberries, sugar, orange juice, and orange zest until the berries burst and the mixture thickens slightly.
- Push the mixture through a sieve into a saucepan. Whisk in the eggs and cook over low heat, stirring constantly, until the curd coats the back of a spoon.
- Off the heat, whisk in the butter and salt until smooth and glossy.
- Pour into the cooled tart shell and chill until set, at least 4 hours. Top with extra zest or sugared cranberries.
Equipment for This Recipe:
- 9-inch tart pan
- Saucepan
- Fine-mesh strainer
- Whisk
- Rubber spatula
How to Serve This Dish:
Slice it cold for the cleanest cuts. A dollop of lightly sweetened whipped cream softens the sharpness and makes the color pop even more.
Pro Tips for This Recipe:
- Stir constantly once the eggs go in or the curd can scramble.
- Strain the cranberry mixture for a silky texture.
- Chill the tart fully before slicing; this curd needs time to settle.
- A very thin layer of white chocolate under the curd can keep the shell crisp longer.
Variations on This Dish:
- Lime-Cranberry Tart: Swap orange for lime if you want a sharper citrus edge.
- Meringue Top: Pipe meringue over the curd and torch it lightly for extra drama.
- Individual Tartlets: Bake in small tart pans for cleaner, more formal portions.
Common Mistakes to Avoid with This Dish:
- Don’t boil the curd once the eggs are in or it will break.
- Don’t pour the filling into a warm shell if you want crisp slices.
- Don’t skip the strainer unless you like seeds in your teeth.
12. Pumpkin Spice Chiffon Pie
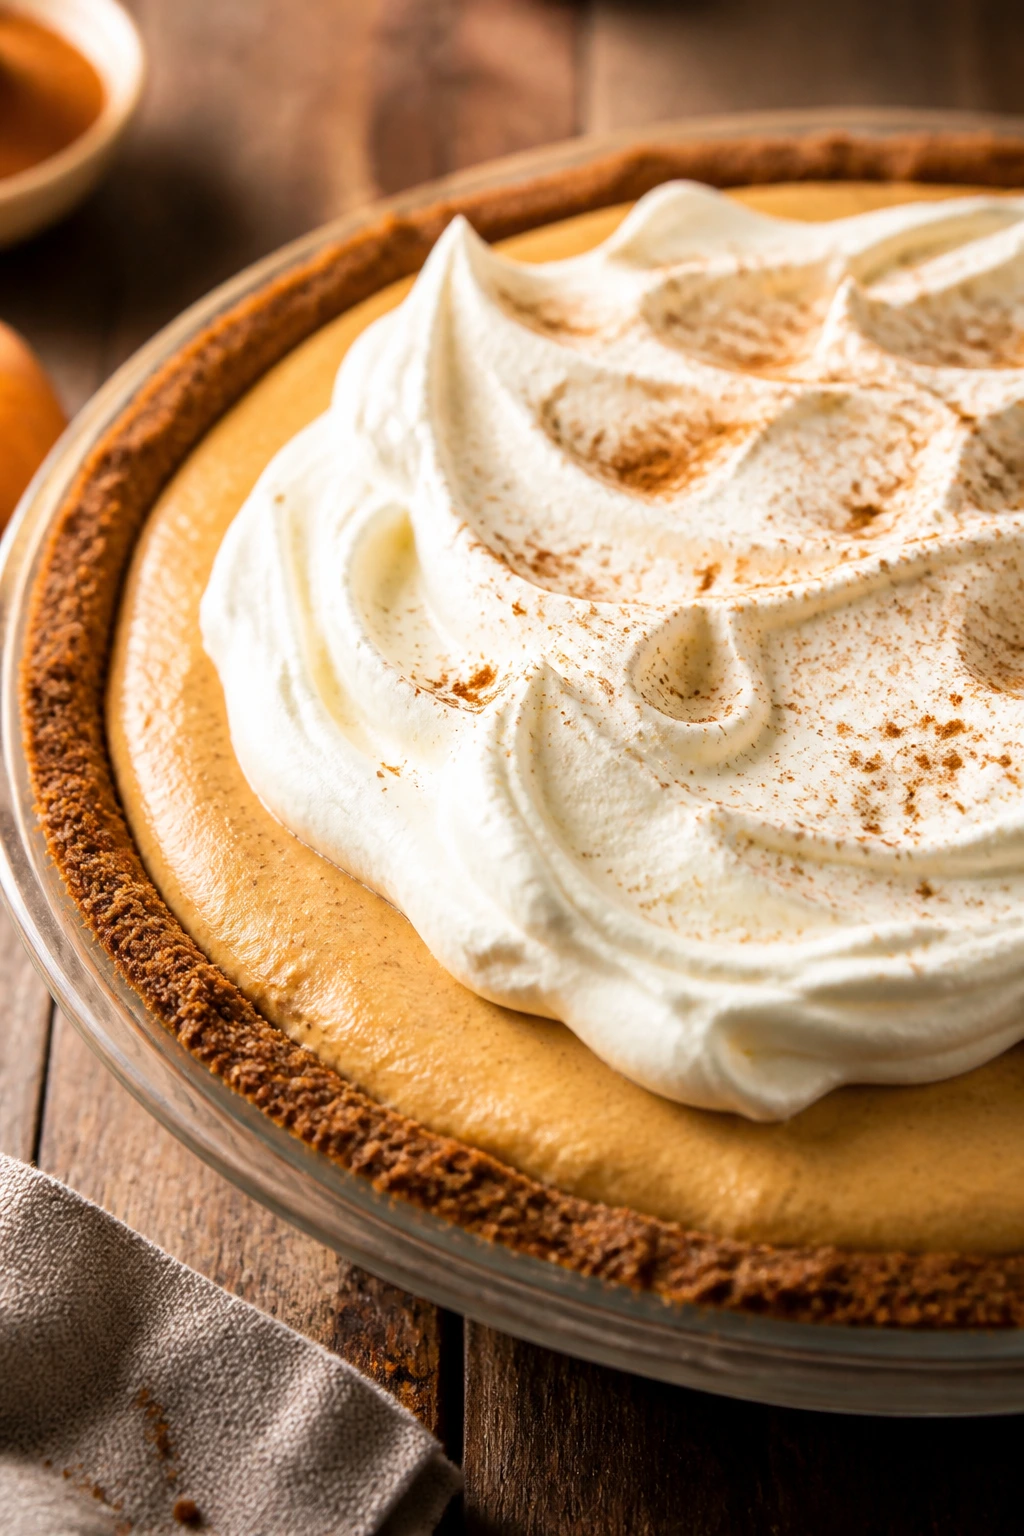
Pumpkin pie can lean dense, but chiffon pie keeps the filling light enough to wobble when you move the plate. The gingersnap crust adds a dark, crumbly edge that makes the pale orange filling look even smoother. A swipe of whipped cream across the top is enough decoration. The pie already has shape.
Why It Works:
Gelatin sets the pumpkin filling without baking it into a heavy custard, so the texture lands airy instead of leaden. Whipped cream folds in a little loft and makes each bite feel soft. The gingersnap crust contributes spice and crunch, which keeps the dessert from reading as one soft, monotonous thing.
Key Ingredients:
- 1 1/2 cups gingersnap crumbs
- 5 tablespoons unsalted butter, melted
- 2 tablespoons brown sugar
- Pinch of salt
- 1 packet unflavored gelatin
- 3 tablespoons cold water
- 1 can pumpkin puree, 15 ounces
- 3/4 cup brown sugar
- 1 1/2 teaspoons cinnamon
- 1/2 teaspoon ground ginger
- 1/4 teaspoon nutmeg
- 1/4 teaspoon fine salt
- 1 cup heavy cream
- 1 teaspoon vanilla extract
Quick Steps:
- Mix the gingersnap crumbs, melted butter, sugar, and salt, then press into a 9-inch pie plate and chill or bake at 350°F for 8 minutes to firm it up.
- Sprinkle the gelatin over cold water and let it bloom for 5 minutes.
- Warm the pumpkin puree, brown sugar, spices, and salt in a saucepan over medium heat until smooth and steaming. Stir in the bloomed gelatin until fully dissolved, then cool until slightly thickened.
- Whip the cream with vanilla to soft peaks and fold it into the pumpkin mixture.
- Spoon into the crust and chill for at least 4 hours until set.
- Top with more whipped cream and a dusting of cinnamon before serving.
Equipment for This Recipe:
- 9-inch pie plate
- Saucepan
- Mixing bowls
- Whisk or hand mixer
- Rubber spatula
How to Serve This Dish:
Serve it cold with generous clouds of whipped cream. A tiny pinch of cinnamon or nutmeg on top is enough; the crust already brings enough spice to carry the slice.
Pro Tips for This Recipe:
- Cool the pumpkin mixture before folding in the cream or the filling can loosen too much.
- Whip the cream to soft peaks, not stiff ones, so it folds without breaking.
- Use a pie plate with enough depth; this filling likes room.
- If the crust seems soft, bake it briefly before filling.
Variations on This Dish:
- Maple Pumpkin Chiffon: Replace part of the brown sugar with maple syrup.
- Chocolate Crust Version: Use chocolate cookie crumbs for a darker plate contrast.
- Dairy-Forward Finish: Add a layer of mascarpone under the whipped cream for a richer top.
Common Mistakes to Avoid with This Dish:
- Don’t rush the chill time. The filling needs to set or slices slump.
- Don’t add the cream while the pumpkin base is hot.
- Don’t crush the crust too finely; a little texture makes it better.
13. Gingerbread Layer Cake with Poached Pears
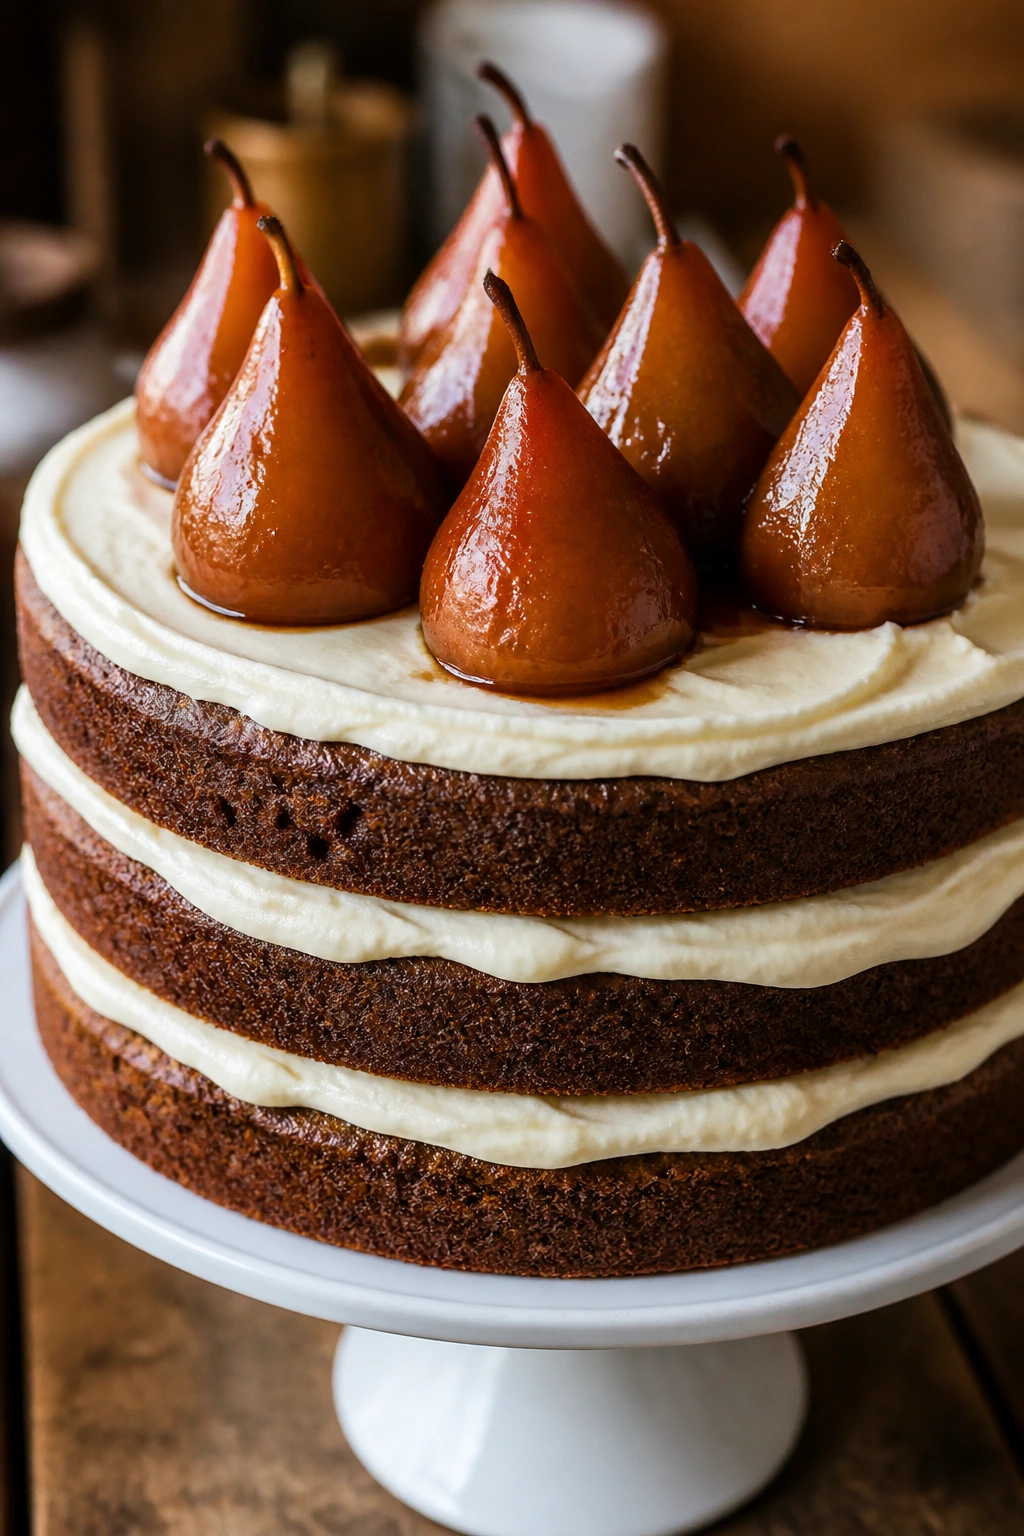
Gingerbread cake has real presence: dark, warm, and fragrant from the first slice. Put poached pears on top and it suddenly looks like something served on a winter cake stand with a napkin folded nearby. The pears add shape and a pale contrast that keeps the cake from looking too brown. Which is a real danger with gingerbread. Lovely danger, but still.
Why It Works:
Molasses gives the cake depth and keeps the crumb moist, while ginger, cinnamon, and cloves build the familiar spice profile. Buttermilk softens the texture and balances the molasses bite. Poached pears add a glossy top layer that looks elegant without asking you to pipe a single rose.
Key Ingredients:
- 2 1/2 cups all-purpose flour
- 2 teaspoons baking soda
- 2 teaspoons ground ginger
- 1 1/2 teaspoons ground cinnamon
- 1/2 teaspoon ground cloves
- 1/2 teaspoon fine salt
- 1/2 cup unsalted butter, softened
- 1 cup packed brown sugar
- 1/2 cup molasses
- 2 large eggs
- 1 cup buttermilk
- 1/2 cup hot water or hot coffee
- 3 Bosc pears, peeled and halved
- 3 cups water
- 3/4 cup granulated sugar
- 1 cinnamon stick
- 3 cardamom pods
- Strip of orange peel
- 8 ounces cream cheese, softened
- 1/2 cup unsalted butter, softened
- 3 cups powdered sugar
- 1 teaspoon vanilla extract
Quick Steps:
- Simmer the pears, water, sugar, cinnamon stick, cardamom, and orange peel for 12 to 15 minutes until the pears are tender but still intact. Cool them in the syrup.
- Heat the oven to 350°F and line two 8-inch cake pans with parchment.
- Whisk the flour, baking soda, spices, and salt. Beat the butter and brown sugar until fluffy, then add the molasses and eggs.
- Mix in the dry ingredients, alternating with the buttermilk, then stir in the hot water or coffee. Divide into pans and bake for 25 to 30 minutes.
- Cool the layers completely.
- Beat the frosting ingredients until smooth, stack and frost the cake, and top with drained pear halves and a spoonful of syrup.
Equipment for This Recipe:
- Two 8-inch cake pans
- Stand mixer or hand mixer
- Saucepan
- Parchment paper
- Offset spatula
How to Serve This Dish:
Slice it thick. Gingerbread likes a proper wedge, and the pears should perch on top like they belong there. A little extra syrup drizzled around the plate keeps the cake from feeling dry.
Pro Tips for This Recipe:
- Use hot coffee if you want deeper molasses flavor.
- Drain the pears well before placing them on the frosting.
- Cool the cake layers fully or the frosting will melt.
- If you want a cleaner look, slice the poached pears into fans instead of leaving them halved.
Variations on This Dish:
- Single-Layer Sheet Cake: Bake it in a 9×13-inch pan and top with pears scattered across the frosting.
- Orange Gingerbread: Add orange zest to the batter for a brighter spice profile.
- Mascarpone Frosting: Replace half the cream cheese with mascarpone for a softer finish.
Common Mistakes to Avoid with This Dish:
- Don’t overbake gingerbread. Dry cake fights the pears.
- Don’t frost while the layers are warm.
- Don’t poach the pears until mushy; they need to hold a slice shape.
14. Maple Pecan Tart with Rum Whipped Cream
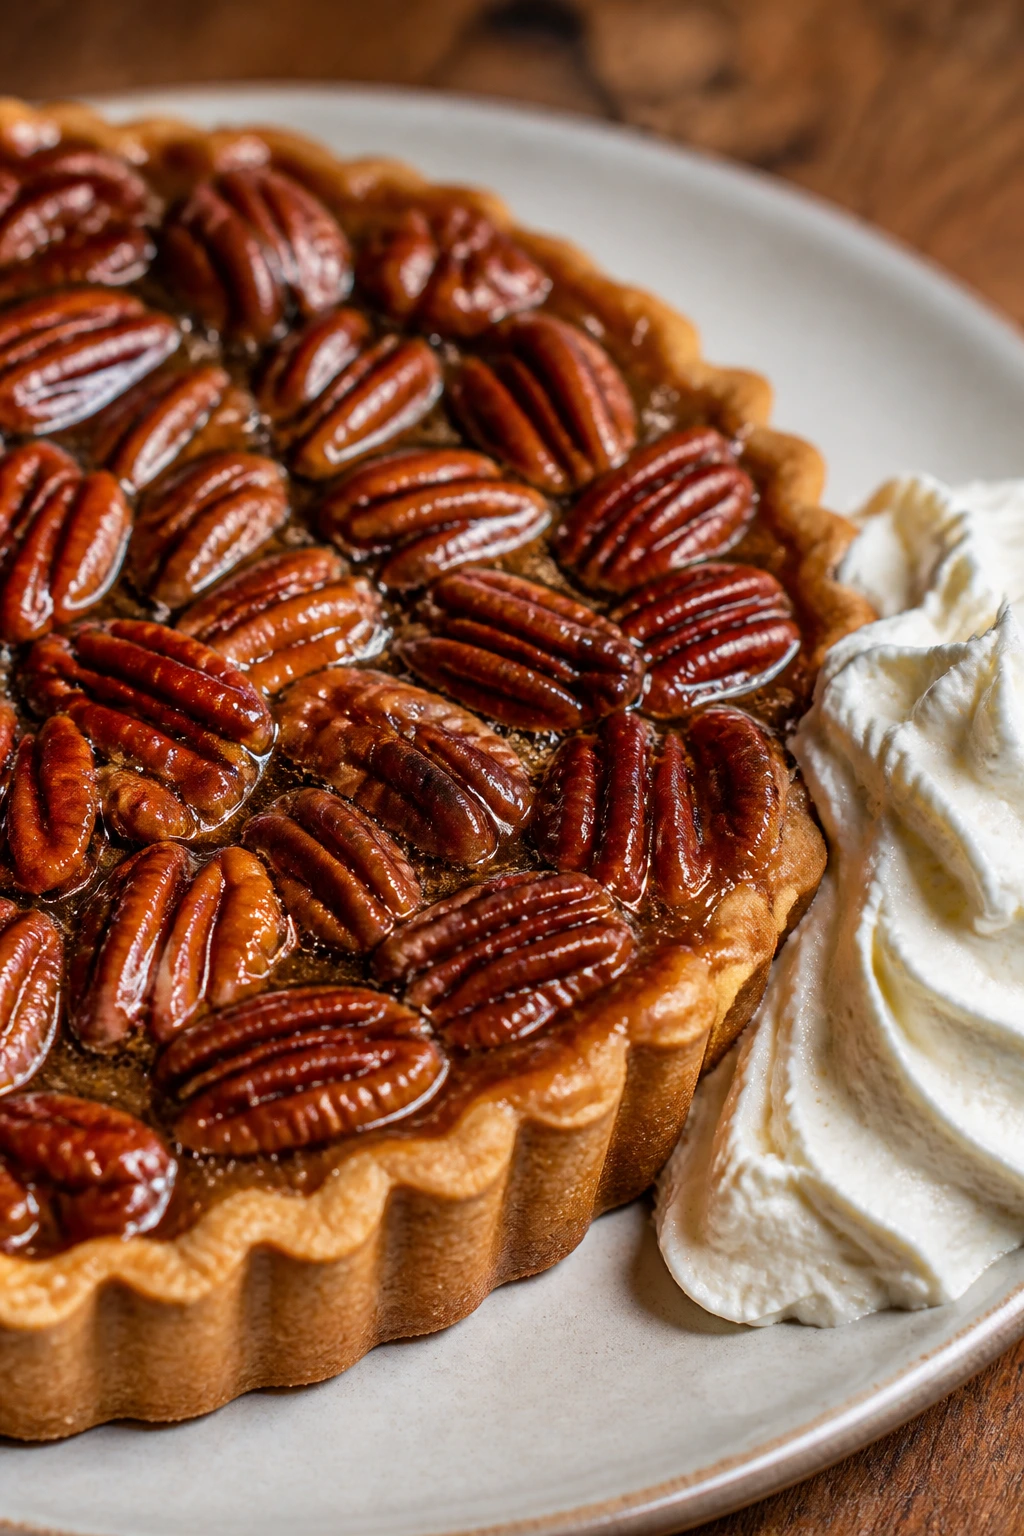
Maple and pecans have a glossy, lacquered look when baked together, and that is half the reason this tart gets attention. The top settles into a shiny mosaic of nuts, while the crust stays short and crisp beneath it. A cloud of rum whipped cream on the side keeps the whole thing from leaning too sweet. This is a dessert for people who like their slices neat and their flavors warm.
Why It Works:
The filling sets into a chewy, almost custardy layer that holds the pecans in place. Pure maple syrup gives a cleaner flavor than corn syrup and lets the nuts stay the star. A little rum in the cream adds depth without turning the dessert into a cocktail.
Key Ingredients:
- 1 1/4 cups all-purpose flour
- 1/2 cup unsalted butter, cold and cubed
- 1/4 cup granulated sugar
- 1/4 teaspoon fine salt
- 1 egg yolk
- 1 to 2 tablespoons cold water
- 1 1/2 cups pecan halves
- 3 large eggs
- 1 cup pure maple syrup
- 1/2 cup light brown sugar
- 4 tablespoons unsalted butter, melted
- 1 teaspoon vanilla extract
- 1 tablespoon bourbon or dark rum
- 1/2 teaspoon fine salt
- 1 cup heavy cream
- 1 tablespoon powdered sugar
- 1 tablespoon dark rum
Quick Steps:
- Make and chill the tart dough, then press it into a 9-inch tart pan and partially bake at 375°F for 12 minutes.
- Arrange the pecans in the tart shell.
- Whisk the eggs, maple syrup, brown sugar, melted butter, vanilla, rum, and salt until smooth.
- Pour the filling over the pecans and bake for 25 to 30 minutes until set at the edges and slightly soft in the center.
- Cool completely so the filling firms up.
- Whip the cream with powdered sugar and rum, then serve with each slice.
Equipment for This Recipe:
- 9-inch tart pan
- Mixing bowl
- Whisk
- Rolling pin
- Hand mixer
How to Serve This Dish:
Serve the tart at room temperature with a dollop of rum cream on the side. A little flaky salt on top makes the maple taste brighter and keeps each bite from feeling sticky.
Pro Tips for This Recipe:
- Use pure maple syrup, not pancake syrup. The flavor difference is obvious.
- Toast the pecans for a few minutes before baking if you want a deeper nut flavor.
- Cool the tart fully before slicing or the filling will ooze.
- A tart pan with a removable bottom makes serving much cleaner.
Variations on This Dish:
- Chocolate Pecan Tart: Add 2 ounces chopped dark chocolate under the pecans.
- Orange Maple Version: Add a teaspoon of orange zest to the filling.
- No-Rum Cream: Swap the rum for vanilla if you want a family-friendly finish.
Common Mistakes to Avoid with This Dish:
- Don’t overbake the filling until it bubbles hard. Chewy is good; burnt sugar is not.
- Don’t use chopped pecans unless you want a looser, less elegant top.
- Don’t slice while hot. The tart needs to settle into itself.
15. Clementine Olive Oil Cake with Rosemary Syrup
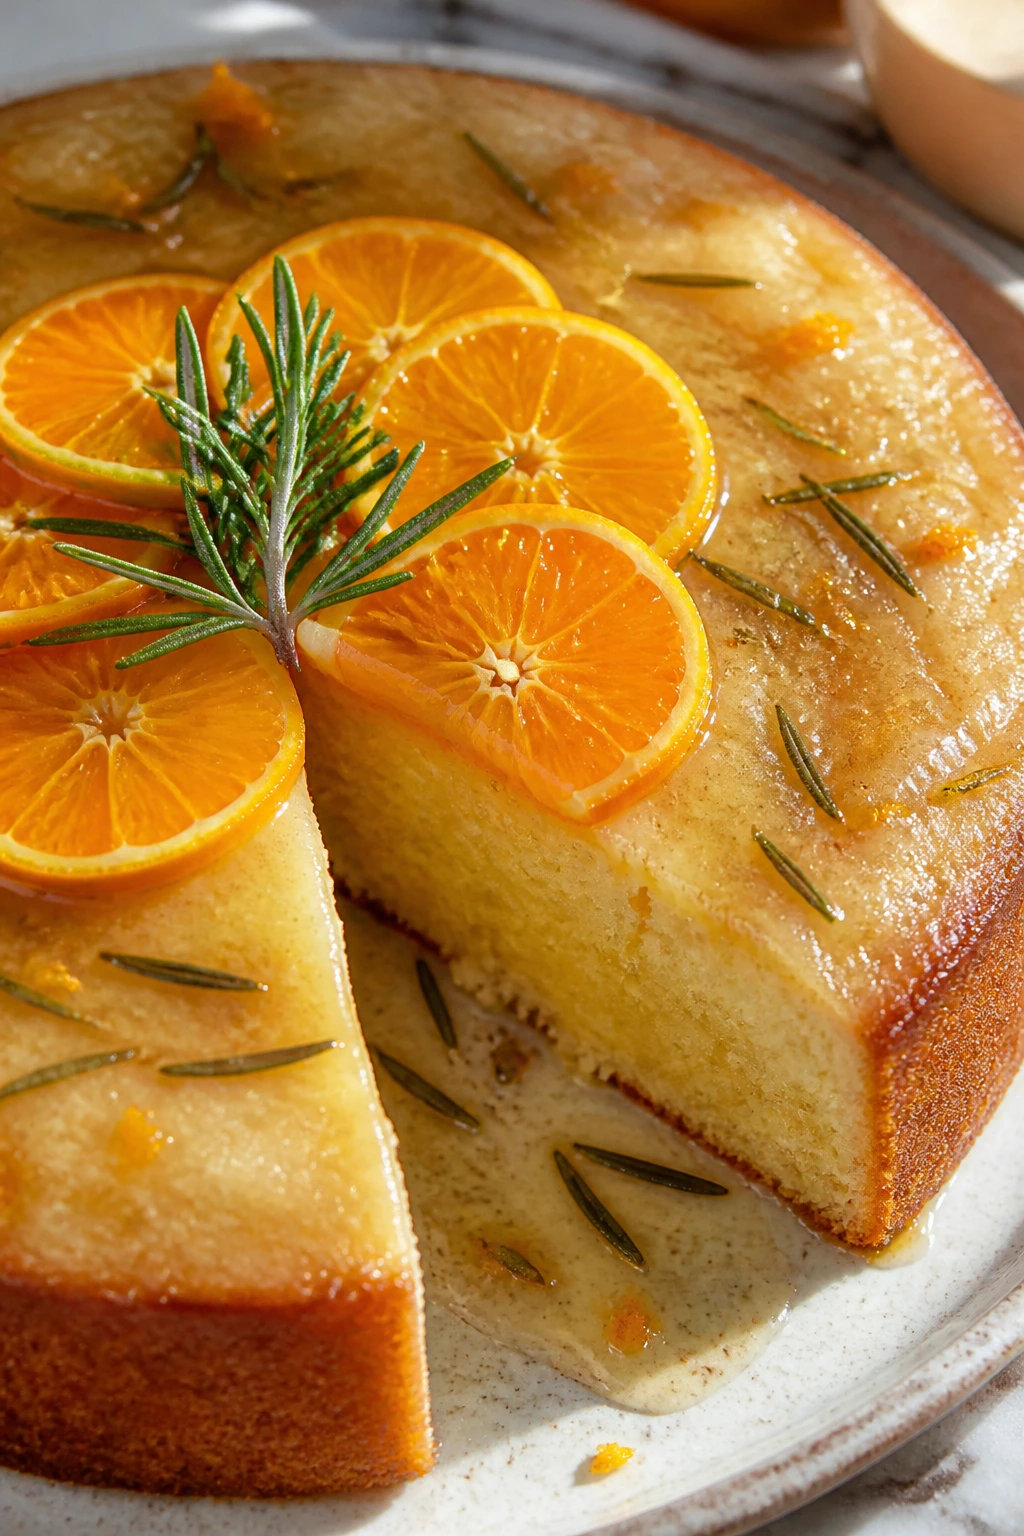
Clementines make a cake look cheerful before you even add the glaze. Their color is brighter than a standard orange, and their flavor is sweet enough to work in a cake without getting loud. The rosemary syrup adds a piney little edge that keeps each slice from tasting flat. The result is simple, but not plain. There’s a difference.
Why It Works:
Olive oil keeps the crumb moist and gives the cake a tender, almost silky bite. Clementine zest and juice bring fragrance and acidity, while yogurt adds structure without weighing things down. Rosemary syrup soaks into the top layer and leaves behind a clean herbal note that makes the fruit taste more vivid.
Key Ingredients:
- 1 3/4 cups all-purpose flour
- 1/2 cup almond flour
- 2 teaspoons baking powder
- 1/2 teaspoon fine salt
- 3 large eggs
- 1 cup granulated sugar
- 3/4 cup olive oil
- 1/2 cup plain yogurt
- Zest of 3 clementines
- 1/3 cup clementine juice
- 1 teaspoon vanilla extract
- 1/2 cup clementine juice, for the syrup
- 1/4 cup granulated sugar, for the syrup
- 1 rosemary sprig
- Clementine slices and extra rosemary, for the top
Quick Steps:
- Heat the oven to 350°F and line a 9-inch cake pan with parchment.
- Whisk the flour, almond flour, baking powder, and salt. In another bowl, beat the eggs and sugar until pale, then whisk in the olive oil, yogurt, clementine zest, juice, and vanilla.
- Fold in the dry ingredients until smooth.
- Bake for 40 to 45 minutes until the center springs back and the top is golden.
- Simmer the clementine juice, sugar, and rosemary sprig for 5 minutes to make a light syrup. Brush it over the warm cake.
- Cool completely, then decorate with thin clementine slices and a rosemary sprig.
Equipment for This Recipe:
- 9-inch cake pan
- Mixing bowls
- Whisk
- Saucepan
- Pastry brush
How to Serve This Dish:
Serve it in slim wedges with tea or coffee. A spoon of crème fraîche on the side gives the cake a cool finish and keeps the rosemary from feeling too sharp.
Pro Tips for This Recipe:
- Brush the syrup on while the cake is still warm so it absorbs evenly.
- Use clementines with a strong fragrance; the zest matters more than the juice here.
- Don’t overbake, or the cake loses its moist, olive-oil texture.
- Slice the garnish fruit thin so it stays pretty instead of slipping off.
Variations on This Dish:
- Orange Olive Oil Cake: Use standard oranges if clementines are not available.
- Lemon Rosemary Version: Swap half the clementine juice for lemon for a sharper profile.
- Bundt Pan Bake: Bake it in a 10-cup Bundt pan for a more formal shape.
Common Mistakes to Avoid with This Dish:
- Don’t pour syrup on a cake that’s falling apart hot. Warm is enough.
- Don’t skip the almond flour unless you want a drier crumb.
- Don’t use too much rosemary; it should whisper, not dominate.
16. Pomegranate Chocolate Tart
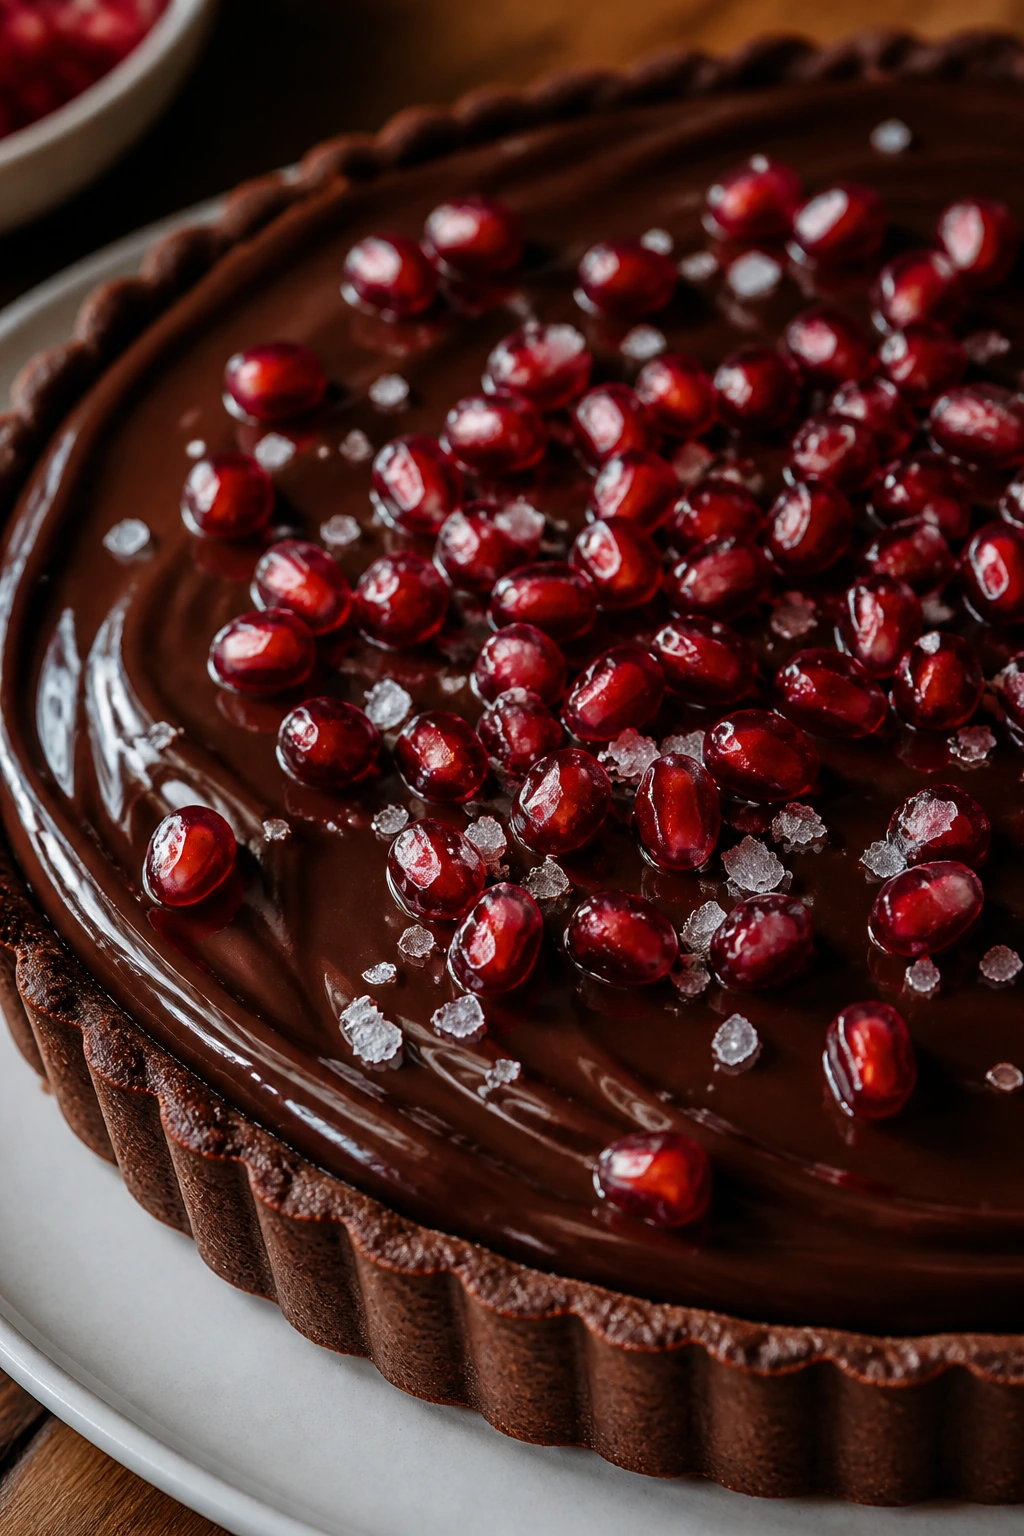
A chocolate tart topped with pomegranate arils looks like a jewelry box opened at dessert time. The ganache is dark and smooth, almost mirror-like, and the pomegranate seeds scatter across the top like tiny rubies. A pinch of flaky salt keeps it from tasting too rich. It is one of those desserts that looks expensive without asking for much drama in the kitchen.
Why It Works:
Chocolate ganache sets into a clean, sliceable layer that holds its shape well under the bright fruit. Pomegranate adds crunch and acid, which keeps the tart from feeling heavy. A cocoa crust echoes the filling and makes the whole dessert taste cohesive instead of cobbled together.
Key Ingredients:
- 1 1/2 cups all-purpose flour
- 1/4 cup unsweetened cocoa powder
- 1/3 cup powdered sugar
- 1/4 teaspoon fine salt
- 10 tablespoons unsalted butter, cold and cubed
- 1 egg yolk
- 2 tablespoons cold water
- 10 ounces bittersweet chocolate, chopped
- 1 cup heavy cream
- 2 tablespoons unsalted butter
- 1 teaspoon vanilla extract
- 1 cup pomegranate arils
- Flaky sea salt, for finishing
Quick Steps:
- Make the tart dough by cutting the butter into the flour, cocoa, powdered sugar, and salt. Bring it together with the egg yolk and water, then chill for 30 minutes.
- Roll the dough into a 9-inch tart pan and bake at 350°F for 15 to 18 minutes until set. Cool.
- Heat the cream until steaming, then pour it over the chopped chocolate. Let it sit for 2 minutes, then stir in the butter and vanilla until glossy.
- Pour the ganache into the tart shell and smooth the top. Chill for 2 to 3 hours until set.
- Scatter pomegranate arils over the surface and finish with flaky salt before serving.
Equipment for This Recipe:
- 9-inch tart pan
- Saucepan
- Heatproof bowl
- Whisk or spatula
- Offset spatula
How to Serve This Dish:
Slice it cold for the cleanest edge, then let it sit 10 minutes before eating so the ganache softens slightly. A few extra arils on the plate make the whole tart look even sharper.
Pro Tips for This Recipe:
- Don’t overbake the crust or it will taste dry against the ganache.
- Use good chocolate; the filling is only as good as the bar you chop.
- Chill thoroughly before slicing. Warm ganache smears.
- Add the pomegranate right before serving so it stays bright and crisp.
Variations on This Dish:
- Orange Chocolate Tart: Add orange zest to the ganache for a citrus note.
- Hazelnut Crust: Replace a portion of the flour with finely ground hazelnuts.
- White Chocolate Top: Drizzle a little white chocolate over the arils for contrast.
Common Mistakes to Avoid with This Dish:
- Don’t add wet fruit too early or the top turns sticky.
- Don’t skip the salt. Chocolate needs it.
- Don’t cut before chilling or the slices will sag.
17. Persimmon Upside-Down Cake
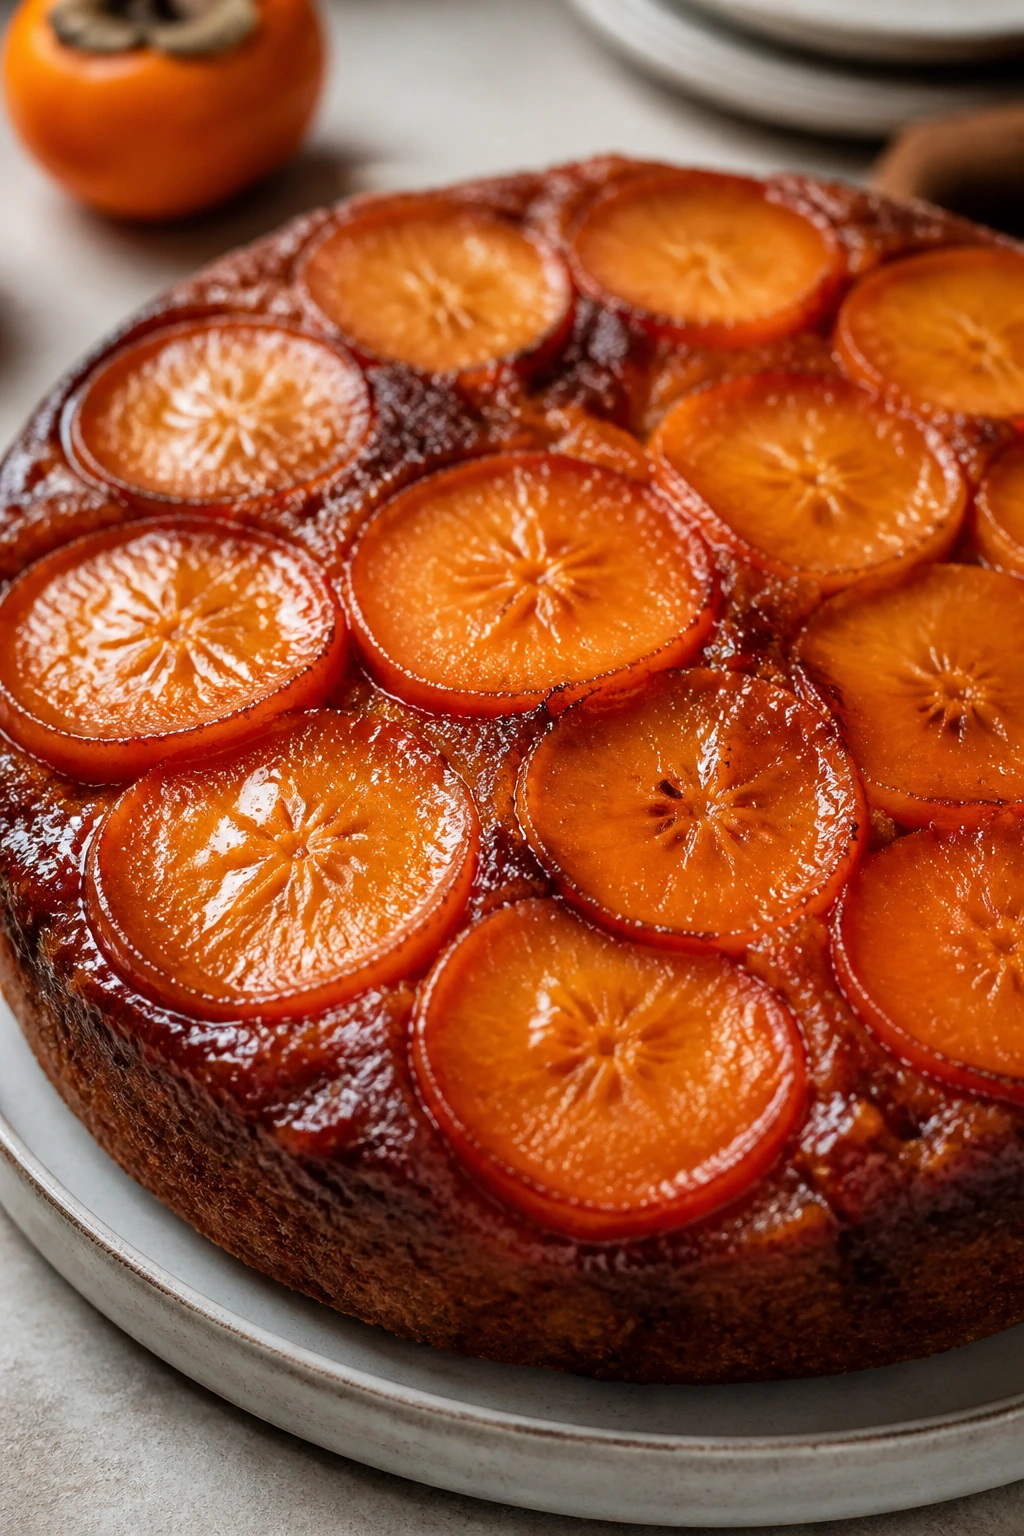
Persimmons are the sort of fruit that can look plain in the bowl and gorgeous in the pan. Sliced across the top of an upside-down cake, they turn into translucent orange circles that almost glow when the cake flips out. The brown sugar caramel underneath gives them a burnished edge. It’s a quiet show-off dessert.
Why It Works:
Fuyu persimmons hold their shape better than softer varieties, which makes them perfect for baking on top of a cake. The caramel layer keeps the fruit glossy, while the yogurt in the batter brings tenderness and a little tang. Cinnamon and nutmeg are enough spice; this dessert does not need much more.
Key Ingredients:
- 3 to 4 Fuyu persimmons, sliced into 1/4-inch rounds
- 1/4 cup unsalted butter, melted
- 1/2 cup light brown sugar
- 1 1/2 cups all-purpose flour
- 2 teaspoons baking powder
- 1/2 teaspoon fine salt
- 1/2 teaspoon ground cinnamon
- 1/4 teaspoon ground nutmeg
- 1/2 cup unsalted butter, softened
- 3/4 cup granulated sugar
- 2 large eggs
- 1/2 cup plain yogurt
- 1 teaspoon vanilla extract
Quick Steps:
- Pour the melted butter into a 9-inch round cake pan and scatter the brown sugar over it. Arrange the persimmon slices in an even layer.
- Whisk the flour, baking powder, salt, cinnamon, and nutmeg.
- Beat the softened butter and granulated sugar until fluffy, then add the eggs, yogurt, and vanilla. Fold in the dry ingredients.
- Spread the batter over the persimmons and bake at 350°F for 40 to 45 minutes until the center springs back.
- Cool for 10 minutes, then invert onto a plate.
Equipment for This Recipe:
- 9-inch round cake pan
- Hand mixer
- Mixing bowls
- Offset spatula
- Serving plate with a shallow rim
How to Serve This Dish:
Serve it warm or just slightly cooled with crème fraîche or lightly whipped cream. The fruit stays prettier if you cut it after the caramel has had a few minutes to settle.
Pro Tips for This Recipe:
- Use Fuyu persimmons only; soft varieties can collapse.
- Slice the fruit evenly so the top looks balanced after flipping.
- Give the cake its 10-minute rest before inverting.
- A tiny pinch of salt on the caramel layer sharpens the flavor.
Variations on This Dish:
- Pear Upside-Down Cake: Swap in firm pears if persimmons are unavailable.
- Orange-Spice Batter: Add orange zest for a brighter edge.
- Bundt Cake Form: Adapt the batter for a Bundt pan if you want a taller presentation.
Common Mistakes to Avoid with This Dish:
- Don’t invert too soon or the caramel will tear the top.
- Don’t use overripe fruit. It will melt into the batter.
- Don’t overmix, or the cake turns tight and heavy.
18. Fig and Honey Crostata with Ricotta
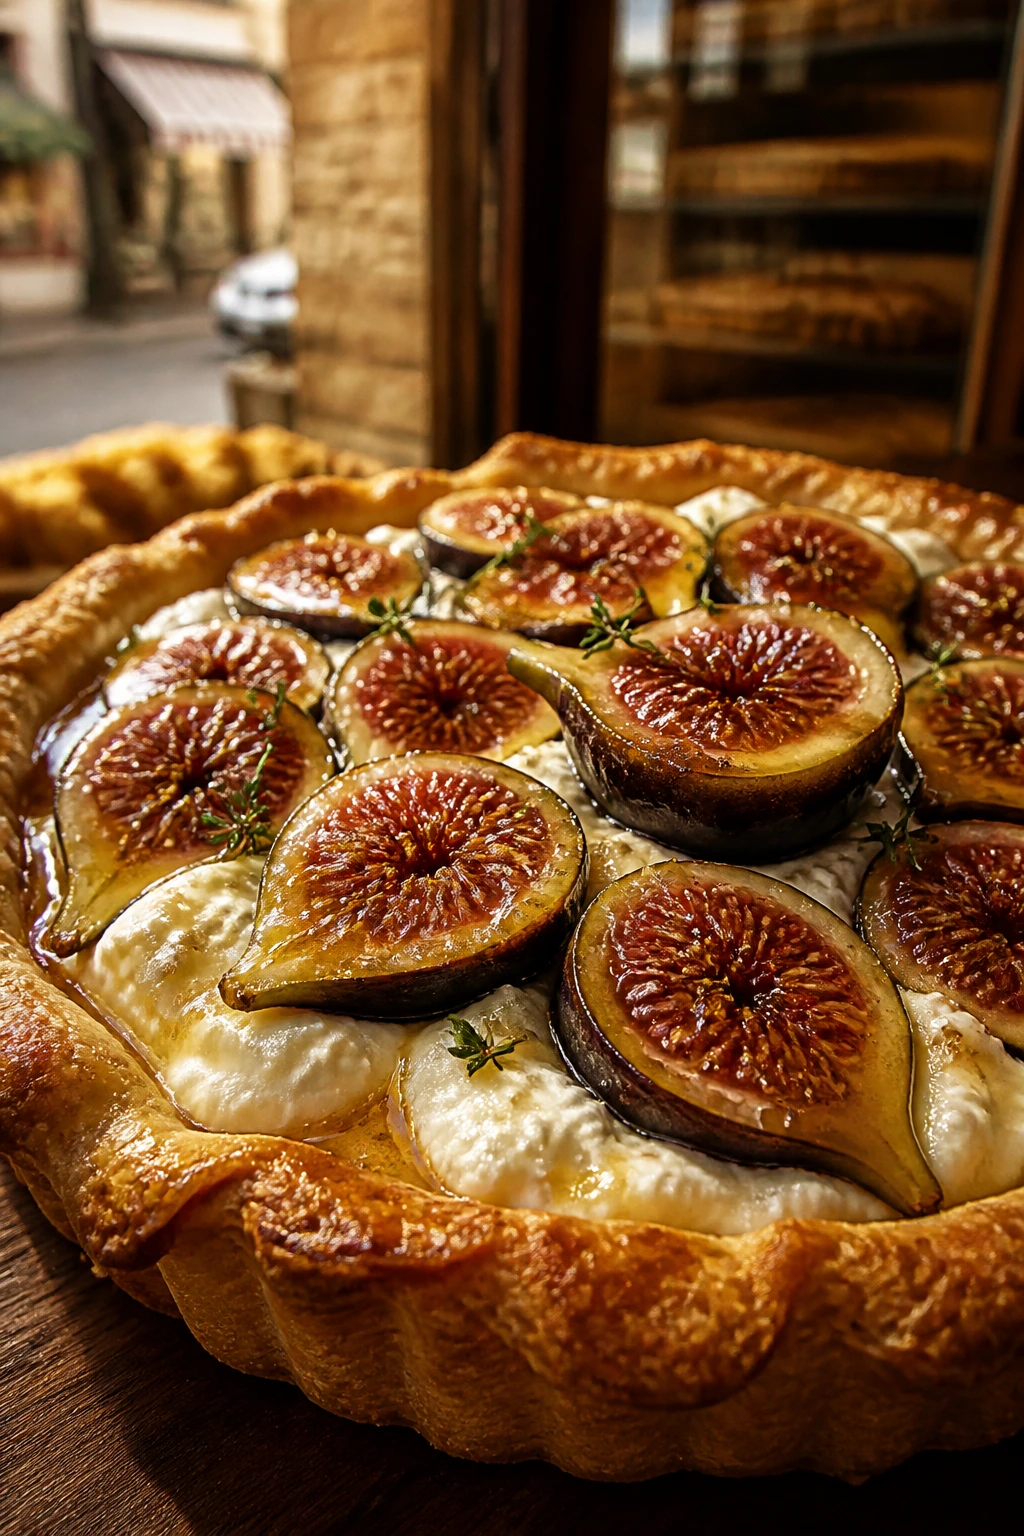
Figs are naturally theatrical. Cut them in half and the inside looks like a perfect little fan of seeds, which is why they look so good laid over a crostata. This one gets a soft ricotta base and a honey finish, so the whole thing reads like an Italian bakery window in late afternoon light. Rustic, but in a deliberate way.
Why It Works:
The crostata dough bakes into a crisp frame around the filling, which gives the soft ricotta and figs a place to sit. Honey plays twice here: once in the filling and again brushed over the top for shine. Thyme is optional, but I like the little herbal edge it gives. It keeps the sweetness in check.
Key Ingredients:
- 1 1/2 cups all-purpose flour
- 2 tablespoons granulated sugar
- 1/2 teaspoon fine salt
- 1/2 cup unsalted butter, cold and cubed
- 4 to 5 tablespoons ice water
- 1 cup ricotta
- 2 tablespoons honey
- 1 teaspoon lemon zest
- Pinch of salt
- 8 to 10 fresh figs, halved
- 2 tablespoons honey, for drizzling
- 1 teaspoon fresh thyme leaves
- 1 tablespoon chopped pistachios, optional
Quick Steps:
- Make the dough by cutting butter into the flour, sugar, and salt, then add ice water until it comes together. Chill for 30 minutes.
- Mix the ricotta, 2 tablespoons honey, lemon zest, and pinch of salt.
- Roll the dough into a rough 12-inch circle and transfer to parchment. Spread the ricotta in the center, leaving a 2-inch border.
- Arrange the figs cut-side up over the ricotta and fold the border up around the filling.
- Bake at 400°F for 30 to 35 minutes until the crust is golden and the figs are soft. Drizzle with honey, scatter thyme and pistachios, and cool slightly before slicing.
Equipment for This Recipe:
- Baking sheet
- Parchment paper
- Rolling pin
- Mixing bowl
- Pastry brush, optional for extra honey
How to Serve This Dish:
Serve it warm or room temperature with nothing more than a spoonful of lightly whipped cream if you want one. The figs already look like a garnish, so the rest of the plate can stay clean.
Pro Tips for This Recipe:
- Choose figs that are soft but not collapsing.
- Don’t spread the ricotta too thick or the bottom can turn wet.
- Bake on parchment so the crostata lifts easily.
- Add the honey after baking for the best shine.
Variations on This Dish:
- Blue Cheese Fig Crostata: Add a little blue cheese to the ricotta for a sharper, savory edge.
- Pear and Honey Version: Swap figs for thin pear slices in colder months.
- Almond Crostata: Add a spoonful of almond flour to the ricotta for more body.
Common Mistakes to Avoid with This Dish:
- Don’t overfill the center. The crust needs room to fold.
- Don’t skip the salt in the ricotta; it keeps the filling from tasting flat.
- Don’t slice while piping hot or the ricotta will smear.
19. Meyer Lemon Meringue Bars
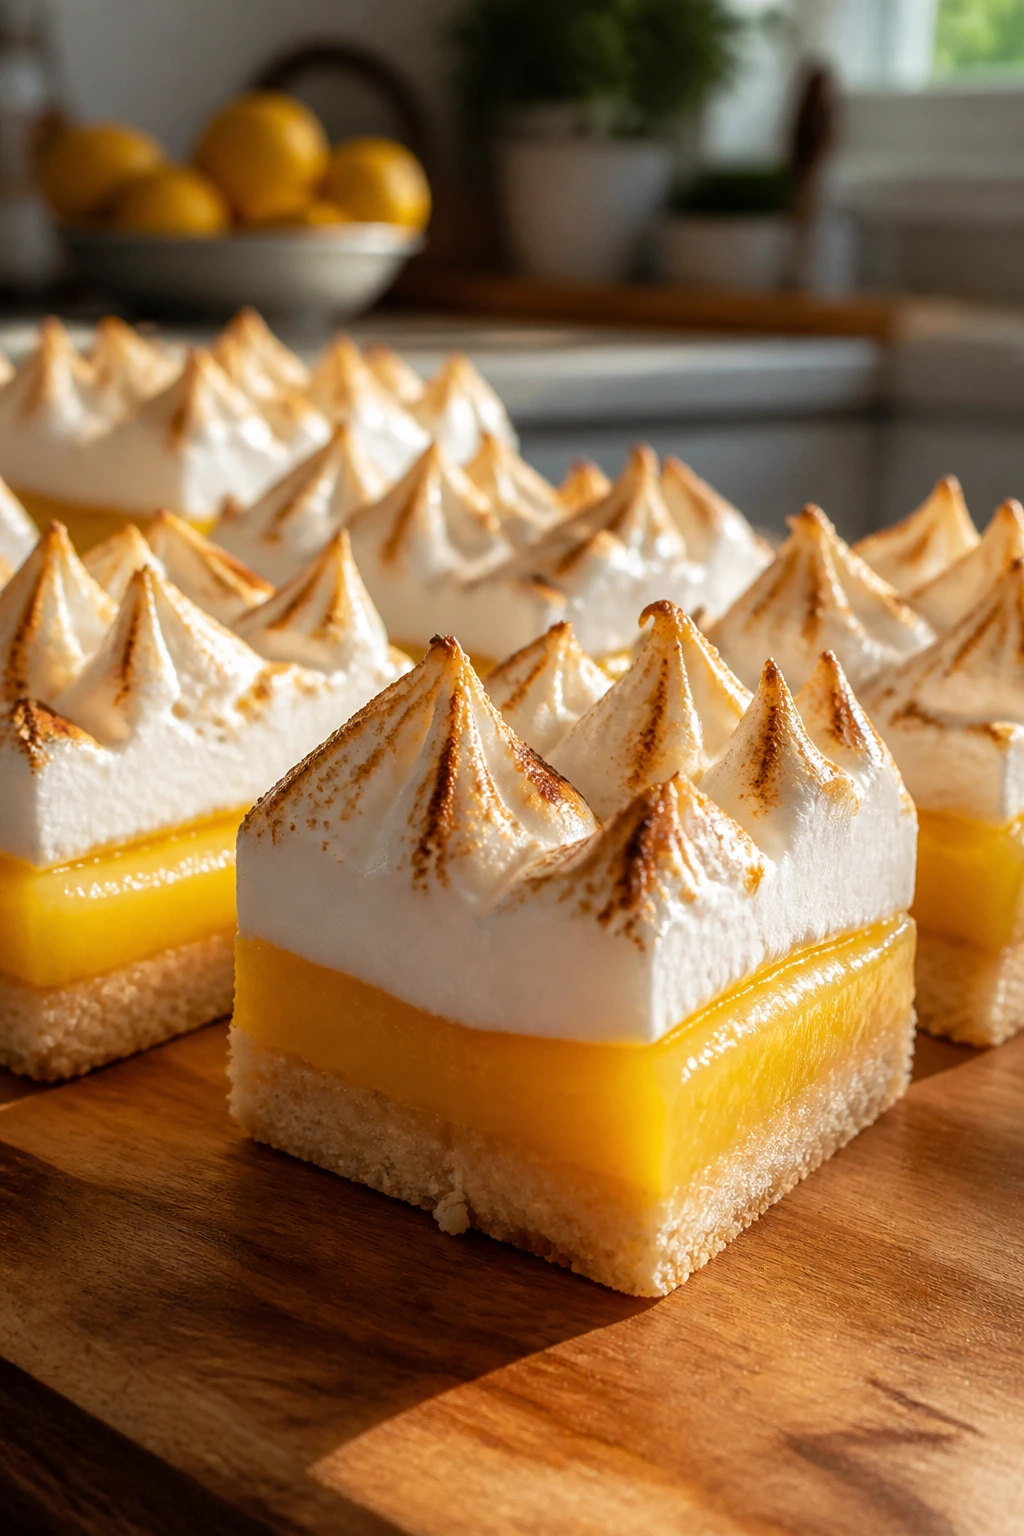
Meyer lemon bars already have a bright, sunny look, but the meringue on top gives them a finish that feels almost cloudlike. The shortbread base stays crisp under the lemon layer, and the meringue adds height without making the bars clumsy. A little torching on the peaks makes the whole pan look like it got dressed for a party.
Why It Works:
Meyer lemons are softer and slightly sweeter than standard lemons, so the filling tastes rounder and less sharp. The shortbread crust provides a sturdy base that stands up to the curd. Meringue brings a second texture and gives you the chance to add drama without extra fruit or frosting.
Key Ingredients:
- 1 1/2 cups all-purpose flour
- 1/2 cup powdered sugar
- 1/4 teaspoon fine salt
- 3/4 cup unsalted butter, cold and cubed
- 4 large eggs
- 1 cup granulated sugar
- 1/2 cup Meyer lemon juice
- Zest of 3 Meyer lemons
- 1/4 cup all-purpose flour
- Pinch of salt
- 4 large egg whites
- 1/2 cup granulated sugar
- 1/4 teaspoon cream of tartar
Quick Steps:
- Heat the oven to 350°F and line an 8-inch square pan with parchment.
- Make the crust by cutting the butter into the flour, powdered sugar, and salt, then press it into the pan and bake for 18 minutes.
- Whisk the eggs, sugar, Meyer lemon juice, zest, flour, and salt until smooth. Pour over the hot crust and bake for 20 to 22 minutes until set. Cool.
- Beat the egg whites and cream of tartar to soft peaks, then add the sugar gradually until glossy and stiff.
- Spread or pipe the meringue over the cooled lemon layer and torch or broil briefly until lightly browned.
- Chill before slicing for the cleanest bars.
Equipment for This Recipe:
- 8-inch square pan
- Parchment paper
- Hand mixer
- Whisk
- Kitchen torch, optional
How to Serve This Dish:
Serve the bars cold or just slightly cool, when the meringue is still fluffy and the lemon layer cuts cleanly. A few curls of zest on top make the yellow look brighter without crowding the pan.
Pro Tips for This Recipe:
- Cool the curd fully before adding meringue or the topping can weep.
- Torch lightly; too much heat turns the peaks bitter.
- Use parchment overhangs for neat lifting and cutting.
- Chill the bars before slicing for the sharpest edges.
Variations on This Dish:
- Lime Meringue Bars: Swap lime juice for a sharper, greener profile.
- Graham Cracker Base: Use a graham crust if you want a sweeter bottom.
- No-Torch Finish: Leave the meringue pale and swirl it with a spoon for a softer look.
Common Mistakes to Avoid with This Dish:
- Don’t underbake the lemon layer or the bars will ooze.
- Don’t pipe meringue onto a warm filling.
- Don’t cut before chilling. These bars need time to firm.
20. Peppermint Bark Brownies
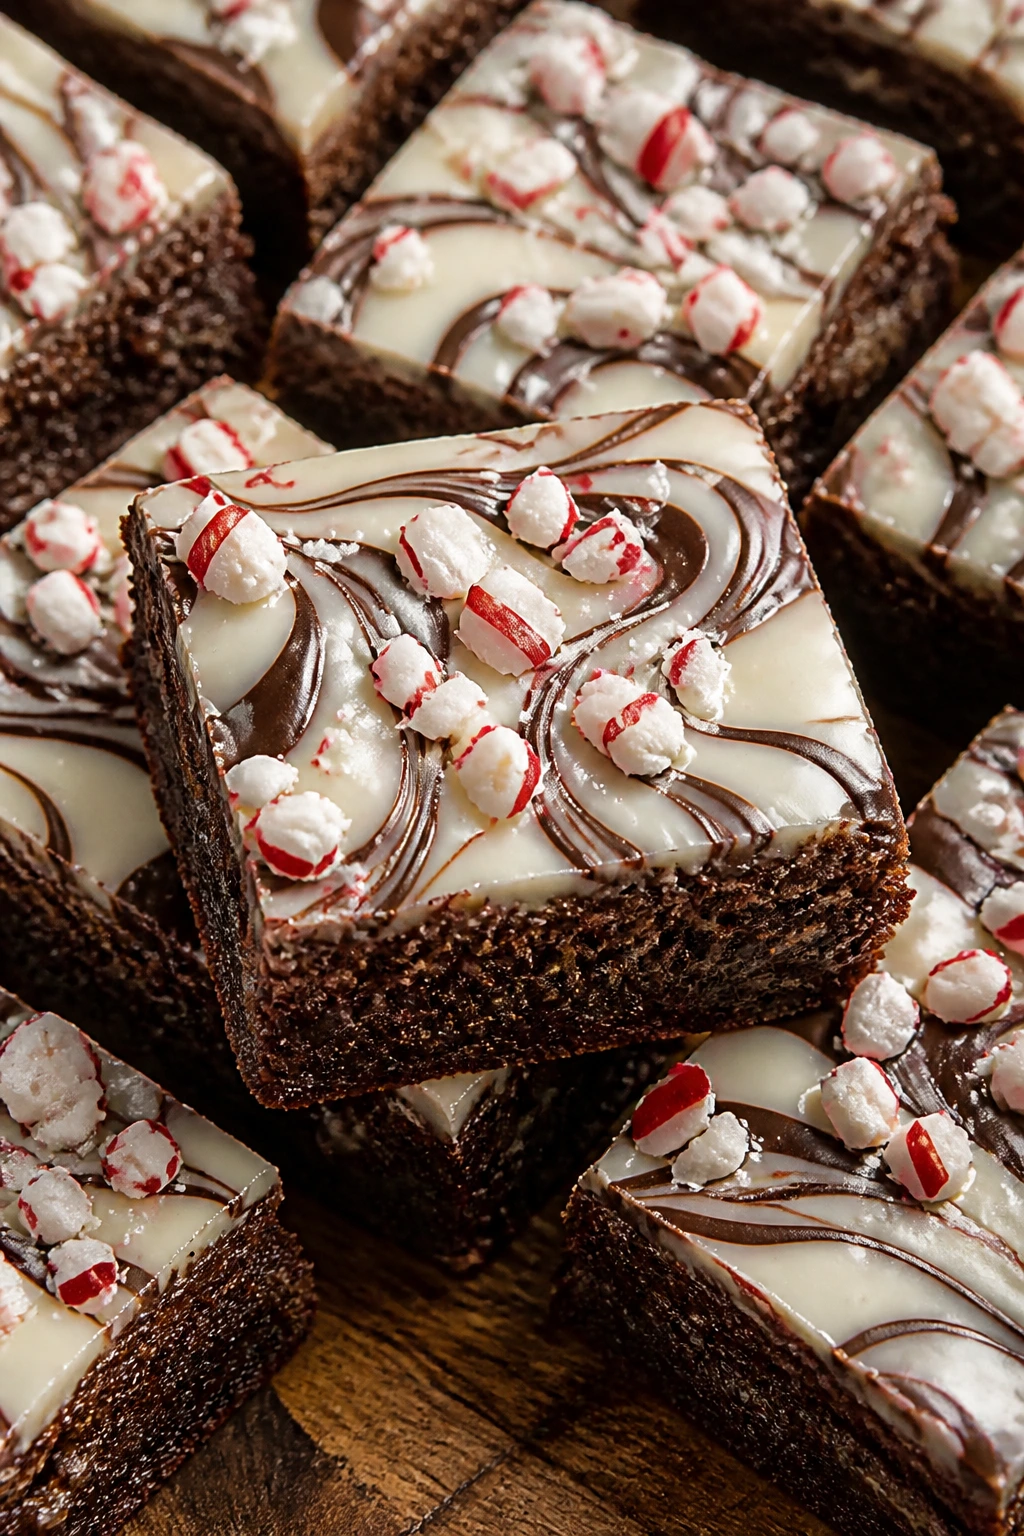
Peppermint bark brownies are the easiest proof that winter desserts can look sharp without being delicate. The brownie base is dark and glossy, the white chocolate layer streaks across the top like snow, and the crushed peppermint catches light in tiny red shards. They slice into bold squares that look festive even before anyone smells the mint.
Why It Works:
Brownies give you a dense, fudgy base that can carry a topping without collapsing. White chocolate adds contrast, and peppermint bark keeps the top crisp and colorful. Because the candy goes on after the brownies bake, the red and white stay bright instead of melting into the batter.
Key Ingredients:
- 1 cup unsalted butter
- 8 ounces semisweet chocolate, chopped
- 1 1/2 cups granulated sugar
- 3 large eggs
- 1 teaspoon vanilla extract
- 1 cup all-purpose flour
- 1/2 cup unsweetened cocoa powder
- 1/2 teaspoon fine salt
- 1/2 teaspoon baking powder
- 6 ounces white chocolate, melted
- 1/2 cup crushed candy canes
- 1/4 teaspoon peppermint extract, optional
Quick Steps:
- Heat the oven to 350°F and line an 8-inch square pan with parchment.
- Melt the butter and semisweet chocolate together until smooth, then whisk in the sugar.
- Add the eggs one at a time, then stir in the vanilla. Fold in the flour, cocoa, salt, and baking powder just until combined.
- Spread into the pan and bake for 28 to 32 minutes until the center is set but still a little soft. Cool completely.
- Drizzle or spread melted white chocolate over the top, then scatter on the crushed candy canes.
- Chill briefly if needed, then cut into squares with a warm knife.
Equipment for This Recipe:
- 8-inch square pan
- Parchment paper
- Heatproof bowl
- Whisk and spatula
- Sharp knife for clean slicing
How to Serve This Dish:
Serve them at room temperature so the brownie stays fudgy and the topping still has snap. A plain plate lets the red and white topping do all the work.
Pro Tips for This Recipe:
- Don’t overbake if you want that dense, shiny brownie center.
- Crush the candy canes into small pieces, not dust, so the top keeps texture.
- Warm the knife between cuts for the cleanest squares.
- Add peppermint extract sparingly; too much tastes like toothpaste fast.
Variations on This Dish:
- Dark Chocolate Mint Brownies: Use darker chocolate in the batter for a more intense base.
- Cookie Crust Version: Press a thin cookie crust under the brownie batter for extra crunch.
- Nutty Finish: Add chopped toasted almonds for a more bark-like feel.
Common Mistakes to Avoid with This Dish:
- Don’t pour hot white chocolate onto warm brownies or it melts into the top.
- Don’t use giant candy cane chunks unless you enjoy shards in every bite.
- Don’t slice before the topping firms up.
Why Seasonal Fruit, Curds, and Glazes Make Desserts Look Better
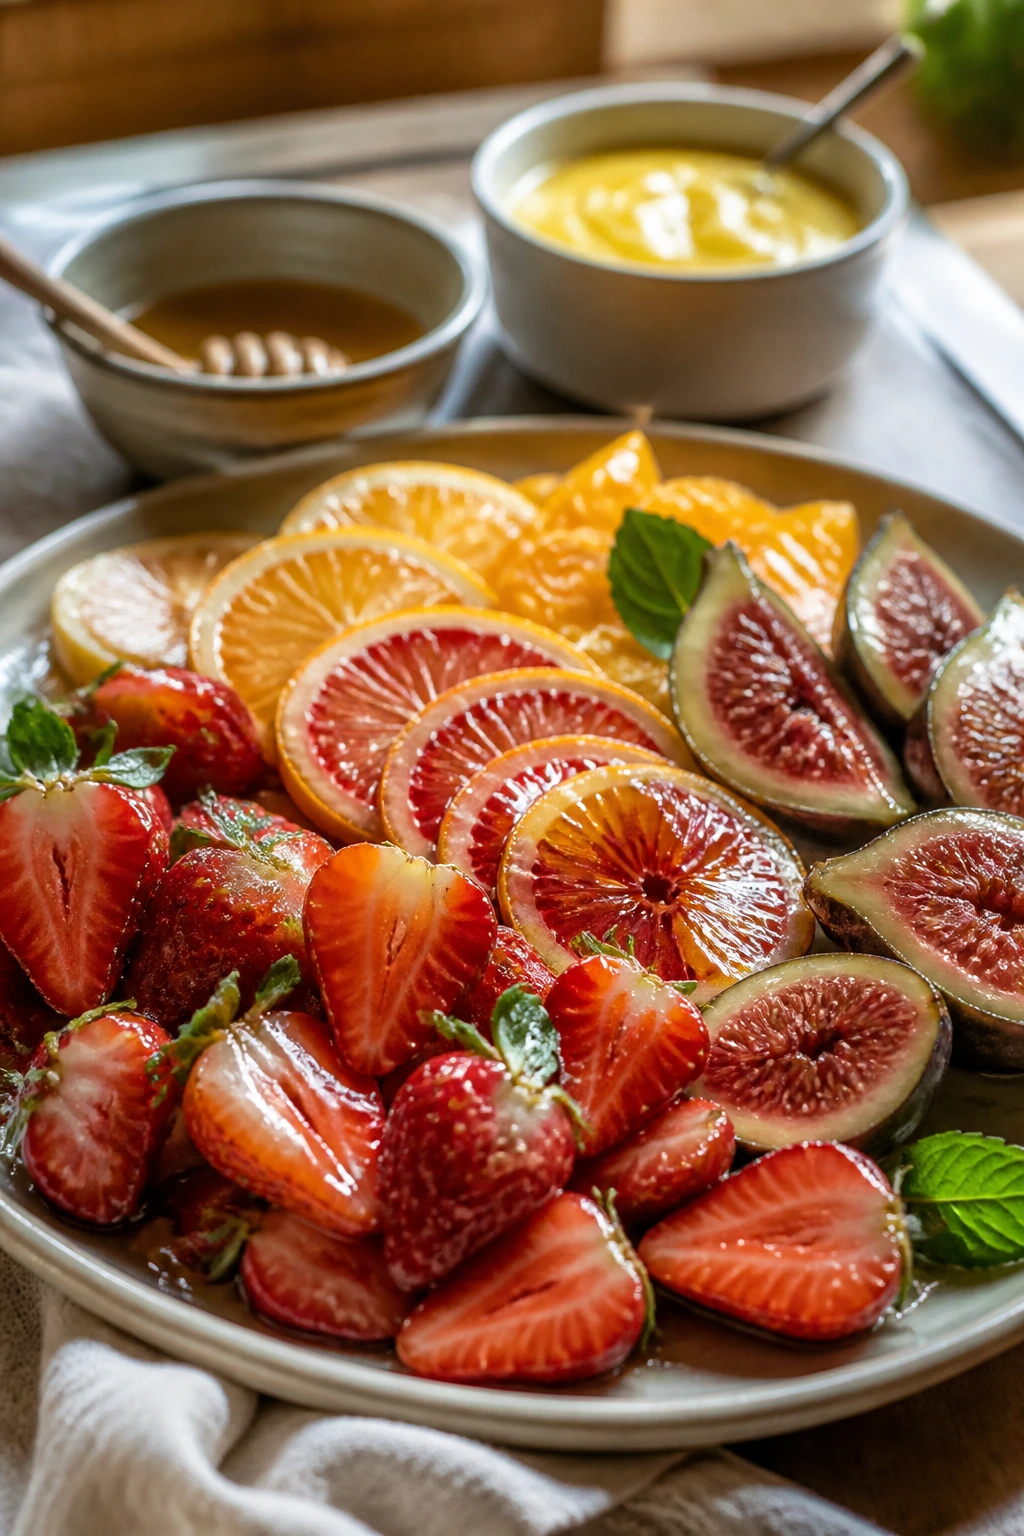
A dessert looks seasonal when the ingredients still look like themselves. Strawberries should stay red at the edges. Citrus should be sliced thin enough to show the flesh. Plums should keep their skins. That’s the difference between a fruit dessert that feels alive and one that feels like it was decorated after the fact.
Fruit also gives you shape without extra work. A tart fan, a fan of pear slices, a ring of blood orange, a pile of pomegranate arils, a few figs cut open to show their centers — these are all natural design tools. They do not need piping bags or fondant tricks. They need a steady knife, a little glaze, and a sense of restraint.
The other thing that helps is contrast. A crisp crust under soft fruit. A pale cream against dark chocolate. A glossy curd in a plain shell. That push and pull is what makes a dessert look finished instead of crowded. When the colors are strong and the structure is clean, the plate does a lot of the heavy lifting.
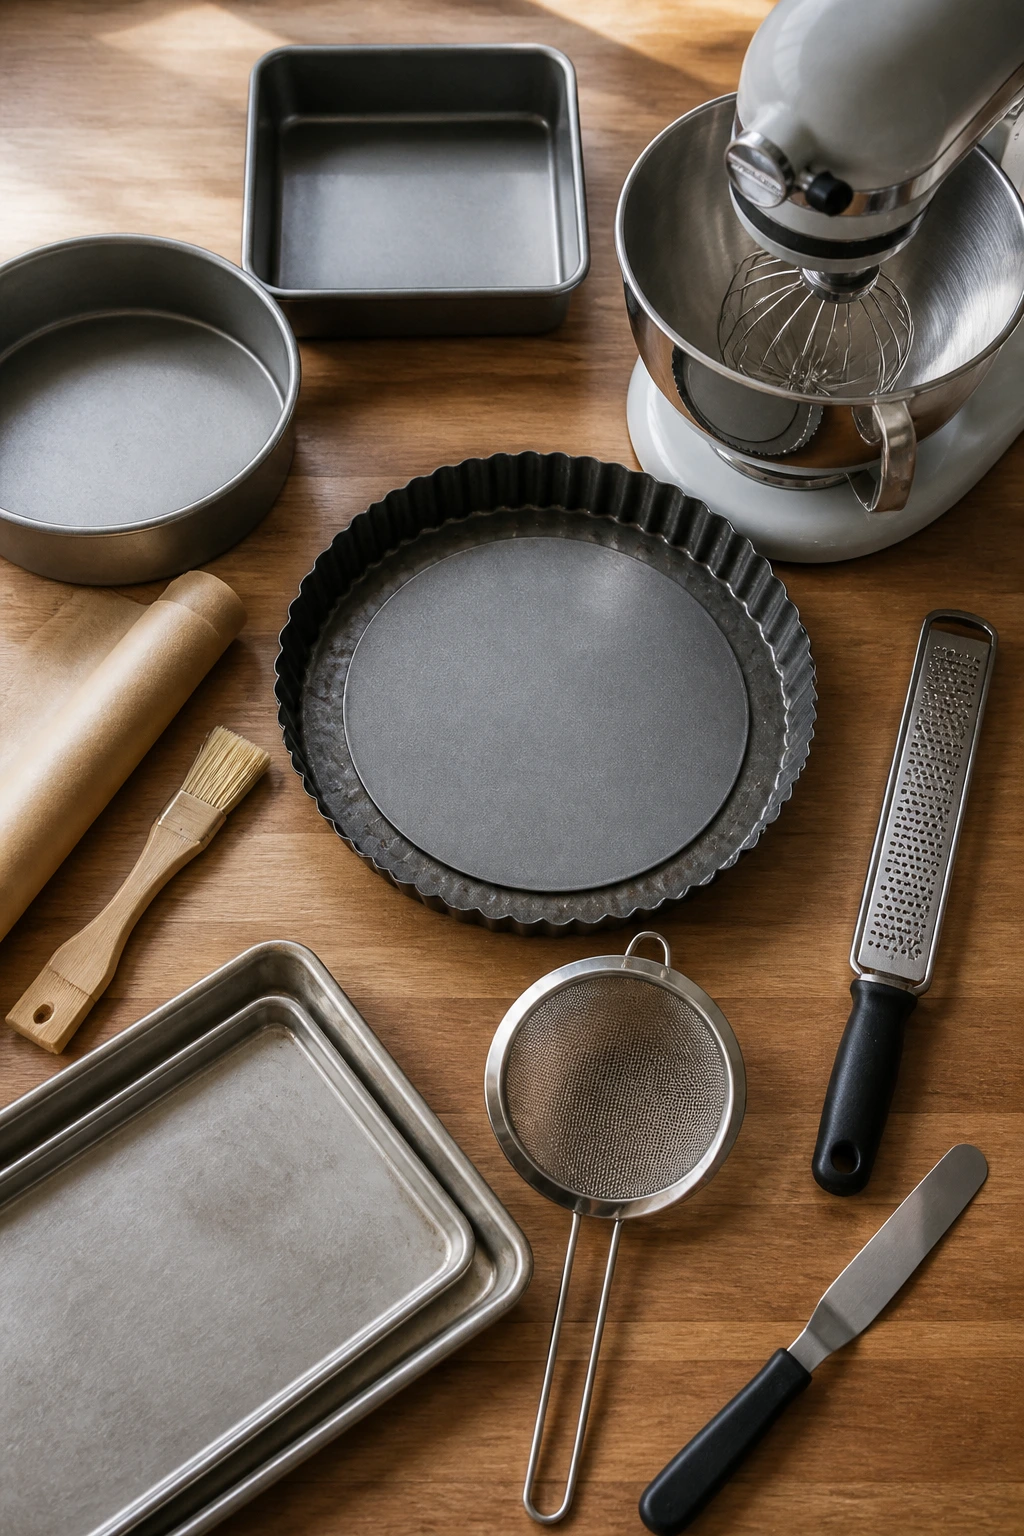
Essential Equipment for These Recipes
-
9-inch tart pan with a removable bottom: This is the easiest way to get neat edges on fruit tarts and chocolate tarts.
-
8-inch square baking pan: Bars and brownies cut cleanly in this size, and parchment overhangs make lifting simple.
-
9-inch round cake pan: Upside-down cakes and olive oil cakes release better when the pan has straight sides and a good lining.
-
Stand mixer or hand mixer: Useful for meringue, cheesecake, frosting, and any batter that needs air.
-
Microplane zester: Citrus desserts live or die on zest, and a fine grater gives you fragrance without bitter pith.
-
Parchment paper: Use it on cake pans, sheet pans, and square pans; it saves more ruined corners than people admit.
-
Pastry brush: Helpful for glazes, egg wash, and syrup.
-
Rimmed baking sheets: Galettes, hand pies, and crostatas are much easier to manage on a sheet with a lip.
-
Fine-mesh strainer: Essential for curds, compotes, and anything you want silky instead of seedy.
-
Offset spatula: Not mandatory, but it makes tart filling, frosting, and ganache behave.
Smart Shopping and Ingredient Tips
Fruit selection is doing more work here than people think. Strawberries should smell like strawberries before you cut them. Rhubarb wants crisp stalks with no limp spots. Plums need enough firmness to hold a slice, and pears should be ripe enough to yield at the stem but not collapse at the base. If the fruit is already bruised in the basket, it will look bruised in the tart.
Citrus deserves the same attention. Heavier fruit usually means more juice, and a thin, fragrant skin gives you better zest. Meyer lemons and clementines tend to bring softer sweetness, while blood oranges and standard lemons lean sharper and deeper in color. Use that to your advantage instead of treating all citrus like interchangeable yellow juice.
Dairy matters too. Full-fat yogurt, sour cream, and cream cheese give cakes and bars structure and a better mouthfeel. Butter should be cold for crusts and room temperature for cakes and frostings. Eggs at room temperature whip and blend better, especially in chiffon pies, meringues, and olive oil cakes. And if you’re making a curd, use real butter; the finish tastes cleaner and the texture sets with more sheen.
For pantry ingredients, keep an eye on your thickener choices. Cornstarch gives a glossy fruit filling, while flour makes it a little cloudier and softer. Gelatin should be bloomed in cold water first, never dumped into hot liquid. And with chocolate, buy the bar you would actually eat plain. The filling will expose it.
How to Serve These Recipes
Presentation: Put these desserts on plates with room around them. A tart slice looks cleaner on white porcelain than on a busy pattern, and a pavlova needs breathing room so the cream and fruit keep their shape. If the dessert is colorful, keep the plate simple and let the contrast work for you.
Accompaniments: A spoonful of crème fraîche, lightly whipped cream, vanilla ice cream, or plain Greek yogurt goes a long way. For richer desserts like pecan tart or chocolate tart, a little unsweetened cream keeps the sweetness in check. For fruit-forward cakes and bars, a scatter of fresh berries or a few herb leaves is enough.
Portions: Tarts usually serve 8 clean slices. Bars and brownies cut best into 9 or 12 squares. Pavlovas and clafoutis are better served individually or scooped from the dish. If you’re scaling for a larger group, make two smaller desserts instead of one giant one; the second dessert always looks fresher.
Beverage Pairing: Hot tea, black coffee, sparkling wine, and dessert wine all have a place here. Citrus desserts like Meyer lemon bars or blood orange cake work well with Earl Grey or Prosecco. Chocolate and pecan desserts ask for coffee or a small pour of tawny port. Fruit tarts like a dry sparkling rosé when the table leans festive.
Additional Tips and Flavor Boosters
Flavor Enhancement: A thin brush of warmed apricot jam thinned with a teaspoon of water gives fruit tarts and upside-down cakes a shine that looks polished in a hurry. A pinch of flaky salt on chocolate, maple, or caramel desserts sharpens the flavor without changing the mood.
Customization: Herbs can shift the whole dessert without making it strange. Basil with peach, thyme with fig, rosemary with citrus, cardamom with pears, and mint with chocolate all make sense if you keep the hand light. One teaspoon or one small sprig is usually enough.
Serving Suggestions: Edible flowers, citrus zest curls, toasted nuts, and a dusting of powdered sugar are still the easiest ways to make a plate feel finished. I’d skip heavy garnish on anything that already has strong fruit color. It starts to look crowded fast.
Make-It-Yours: For gluten-free baking, use a well-tested 1:1 flour blend in cakes and bars, and lean on almond flour for tarts and rustic galettes. For dairy-free versions, coconut cream works in panna cotta and whipped toppings, though the flavor will shift. If you want less sugar, reduce it in the filling first, not the crust; the fruit and cream still need structure.
Make-Ahead, Storage, and Reheating Guidance
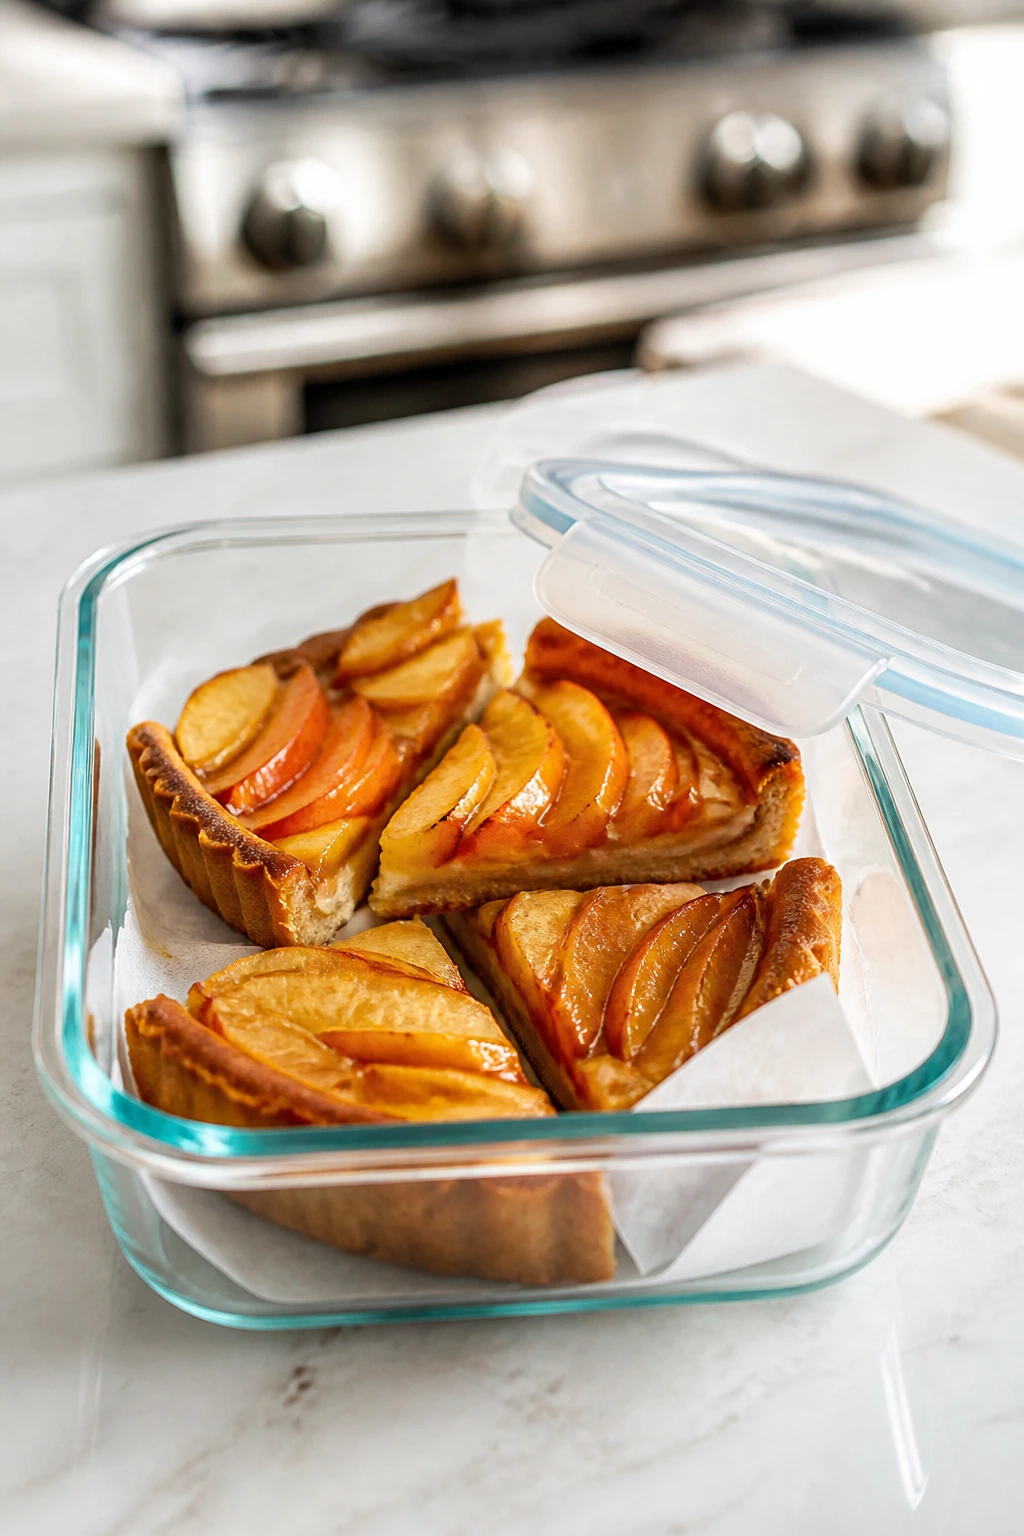
Most of these desserts keep best when the crisp and soft parts are stored separately in your head, even if they sit together on the plate. Fruit tarts, bars, brownies, and cakes generally hold for 3 to 4 days refrigerated once cut, though the crusts soften a little after the first day. Keep them in airtight containers, and if a cake has fresh fruit on top, wait to add the garnish until the day you serve it.
Creamy desserts like panna cotta, cheesecake bars, curd tarts, and chiffon pie usually need refrigeration from the start. They keep for 3 to 5 days in the fridge, depending on the topping. Pavlovas are the exception. The shells can be baked a day ahead and stored airtight, but they should be assembled right before serving or the cream will soften the meringue. That rule is annoyingly strict, but it’s also the reason pavlovas stay crisp.
Freezing works for some items and not others. Cakes, brownies, and galette dough freeze well for up to 2 months if wrapped tightly. Tarts with fresh fruit or meringue do not thaw with grace, so I would not bother unless you’re freezing components only. Fruit fillings and curds can also be made ahead and chilled for a couple of days, then assembled later. That’s the smart move when you want less work on serving day.
For reheating, warm fruit desserts like galettes, hand pies, and upside-down cakes in a 300°F oven for 8 to 12 minutes. That brings back the crust without drying out the filling. Brownies and bars usually taste better at room temperature. And if a cake seems a little dull on day two, a spoon of warm syrup or a swipe of whipped cream wakes it right back up.
Variations and Adaptations to Try
Gluten-Free Crust Swap: Use a gluten-free flour blend in galettes, tarts, and bars, but keep the dough cold and avoid overhandling it. Almond flour also helps add tenderness in fruit tarts and upside-down cakes.
Dairy-Free Finish: Coconut cream can stand in for whipped cream on citrus tarts, panna cotta, and fruit bowls. Vegan butter works in some crusts, though I’d keep the butter-heavy desserts to recipes where the crust matters more than the filling.
Lower-Sugar Fruit Forward Style: Reduce the sugar in the filling by a tablespoon or two when the fruit is very ripe, but leave enough sweetener for structure. Curd, meringue, and caramel desserts need the sugar more than people expect.
Mini Dessert Party Format: Turn tart recipes into tartlets, bake cakes in muffin tins, and cut bars into smaller squares. Mini versions look polished on a platter and let people sample more than one dessert without feeling overloaded.
Herb and Spice Shift: Basil, thyme, rosemary, cardamom, and ginger all move these desserts into a different lane. A small change in spice can make a familiar fruit taste more pointed and less predictable.
Chocolate and Citrus Pairing: If you want a sharper finish, add orange zest to chocolate desserts or a little cocoa to citrus crusts. The pairing keeps both flavors from tasting flat, and it makes the color contrast even stronger.
Common Mistakes to Avoid
The first big mistake is using fruit that’s too soft. It seems harmless at the counter, then turns watery in the oven or falls apart on the plate. Choose fruit that still holds a slice, especially for tarts, upside-down cakes, and hand pies. If it bruises when you touch it, it is probably too far gone for a pretty finish.
Another one: not cooling desserts long enough before slicing. Custards, curds, cheesecake bars, and upside-down cakes all need time to set. Cut them early and the filling smears, the layers slip, and the whole thing loses the polished look that made you want to bake it in the first place.
A third mistake is over-gilding the lily. Too much powdered sugar, too many herbs, too many edible flowers, too much glaze — it starts to look busy. These desserts already have color and shape. They do not need a confetti cannon.
One more. Skipping the crisp element. A soft filling with no crust, no shell, and no cookie base tastes pleasant enough, but it does not have the contrast that makes these desserts memorable. The visual appeal usually comes from that edge: the tart shell, the baked crust, the crackle on the meringue, the brownie square, the pie shell. Keep that texture in place and the whole dessert gets sharper.
Frequently Asked Questions

Can I use frozen fruit in these desserts?
Yes, in several of them. Frozen berries, cherries, cranberries, and some stone fruit work well if you thaw and drain them first, then add a little extra cornstarch or reduce the juices on the stove.
How far ahead can I make these desserts?
Cakes, brownies, bars, and tart shells can usually be made a day ahead, sometimes two. The prettier the fresh fruit finish, the closer to serving time you should assemble it.
What keeps fruit tarts from getting soggy?
A few things: chill the shell, use a thickener in the filling, and glaze the fruit only after baking or right before serving. A thin layer of melted chocolate or almond cream under the fruit can also act like a moisture barrier.
Do I need a tart pan for these recipes?
No, but it helps. A removable-bottom tart pan makes the edges cleaner and the release easier. If you do not have one, use a pie plate or a lined cake pan and accept a looser shape.
Why did my meringue weep or go sticky?
Usually the sugar did not dissolve fully, or the meringue sat too long against a wet filling. Add the sugar slowly, beat until glossy, and assemble pavlovas or meringue-topped bars as close to serving as you can.
Can I make these desserts dairy-free?
Some, yes. Olive oil cakes, fruit galettes, and certain chocolate tart fillings adapt well with plant-based butter or coconut cream. Cheesecake bars, panna cotta, and frosting-heavy cakes take more adjustment, so choose recipes where dairy is not carrying the whole structure.
How do I get that glossy fruit finish on top?
A light brush of warmed apricot jam mixed with water is the easiest answer. For citrus or berries, a simple syrup brushed on while the fruit is still warm gives enough shine without making the dessert sticky.
Which desserts travel best to parties?
Bars, brownies, hand pies, and sturdy cakes travel better than pavlovas or cream-filled tarts. If you need something elegant that can still ride in a box, choose a tart with a baked filling or a cake with fruit on top.
Sweet Things Worth Serving on the Good Plate
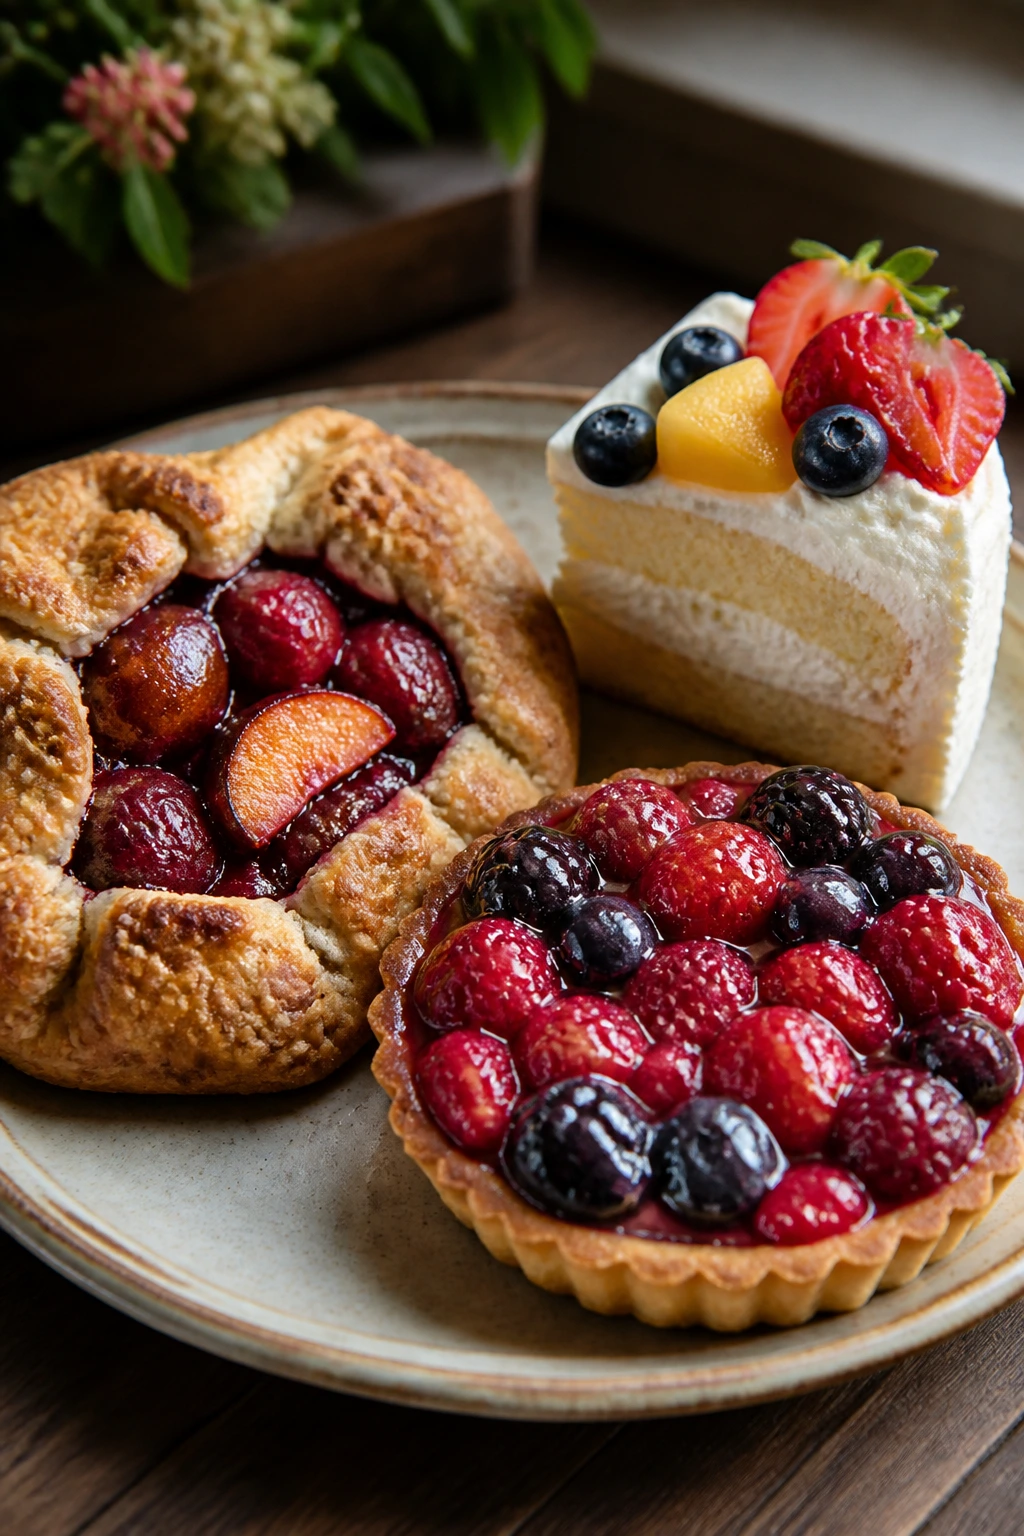
Pretty desserts can be tricky when they lean too hard on decoration and forget flavor. These ones do the opposite. They let fruit, glaze, spice, and clean structure make the case, which is why they feel generous instead of showy.
The quiet pleasure here is that none of them need to be perfect to work. A galette can wrinkle. A tart can be a little rustic around the edge. A cake can lean slightly to one side and still look lovely once the fruit lands on top. Bake with enough care to keep the slices clean, then stop before you fuss the beauty out of it.
That’s the sweet spot worth returning to: desserts that look as if they belong on the center of the table and taste even better once the plate is empty.