
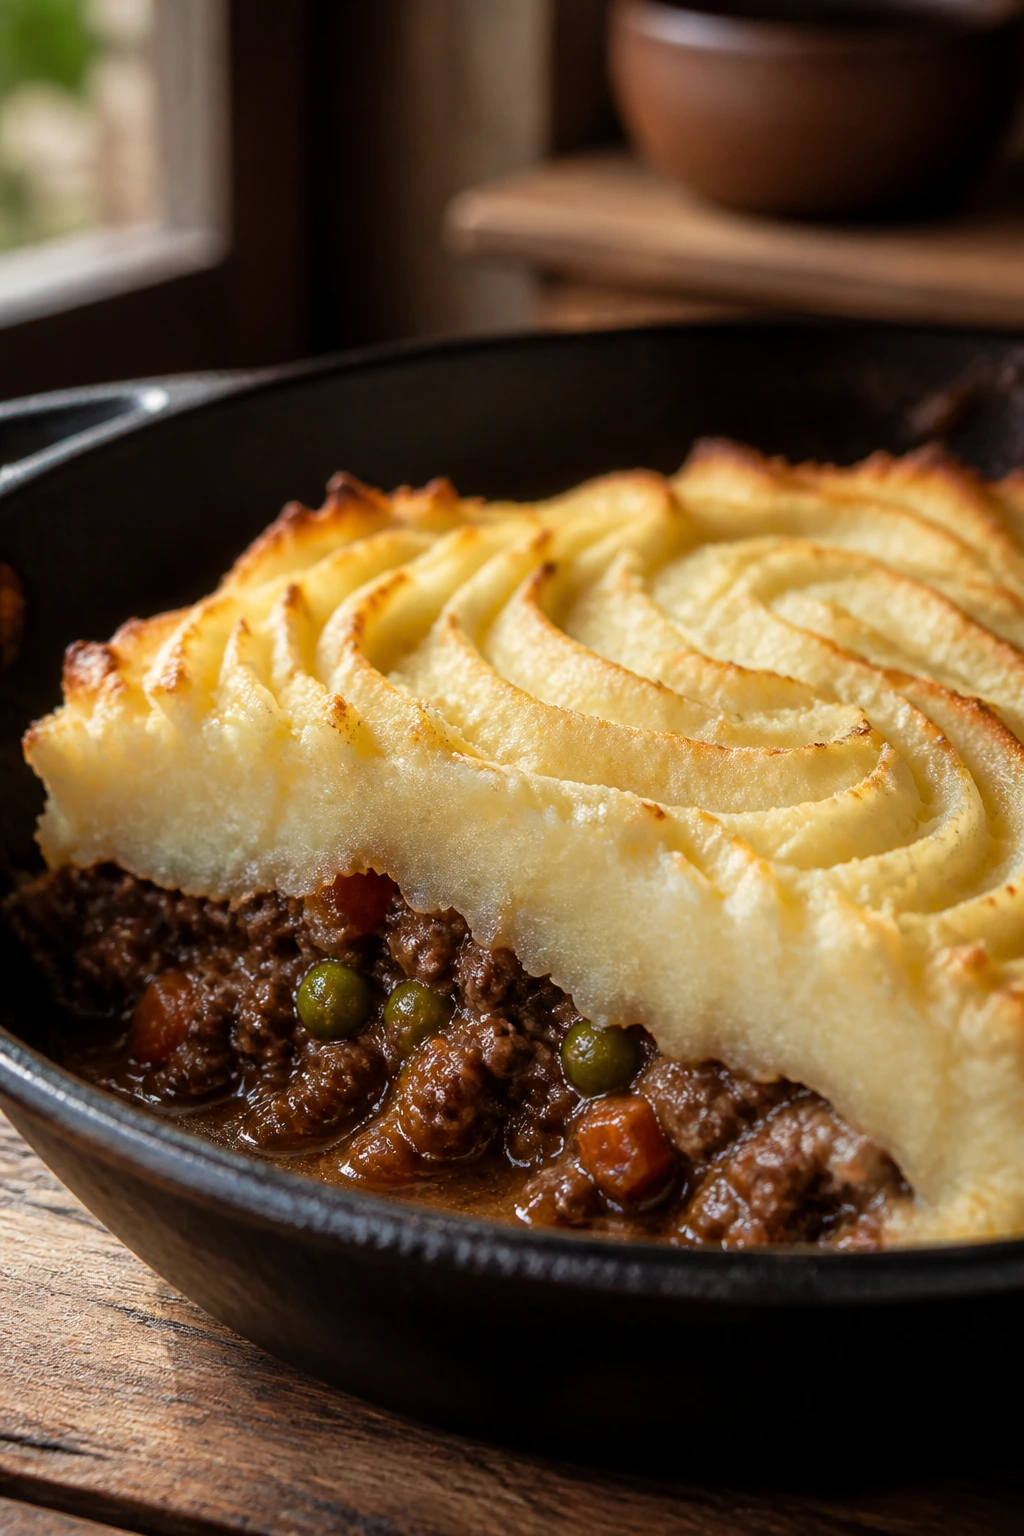
A moist cottage pie with cream cheese frosting sounds like the sort of recipe a tired cook invented at 11 p.m., but the idea makes more sense than it first looks. The beef filling should be glossy, not dry; the potato topping should be soft enough to swoop and pipe; and the cream cheese brings a clean tang that keeps the whole thing from tasting like bland mash on meat. If you’ve ever cut into a cottage pie and found a dusty top hiding a watery center, this version fixes both problems.
No sugar. No dessert tricks. Just a savory pie with the plush feel of frosting, which is a far better use of the word than most people expect. Yukon Gold potatoes matter here because they stay creamy without turning gluey, and the filling needs enough reduction to cling to the spoon before it ever sees the oven. That last part is where most home versions go wrong.
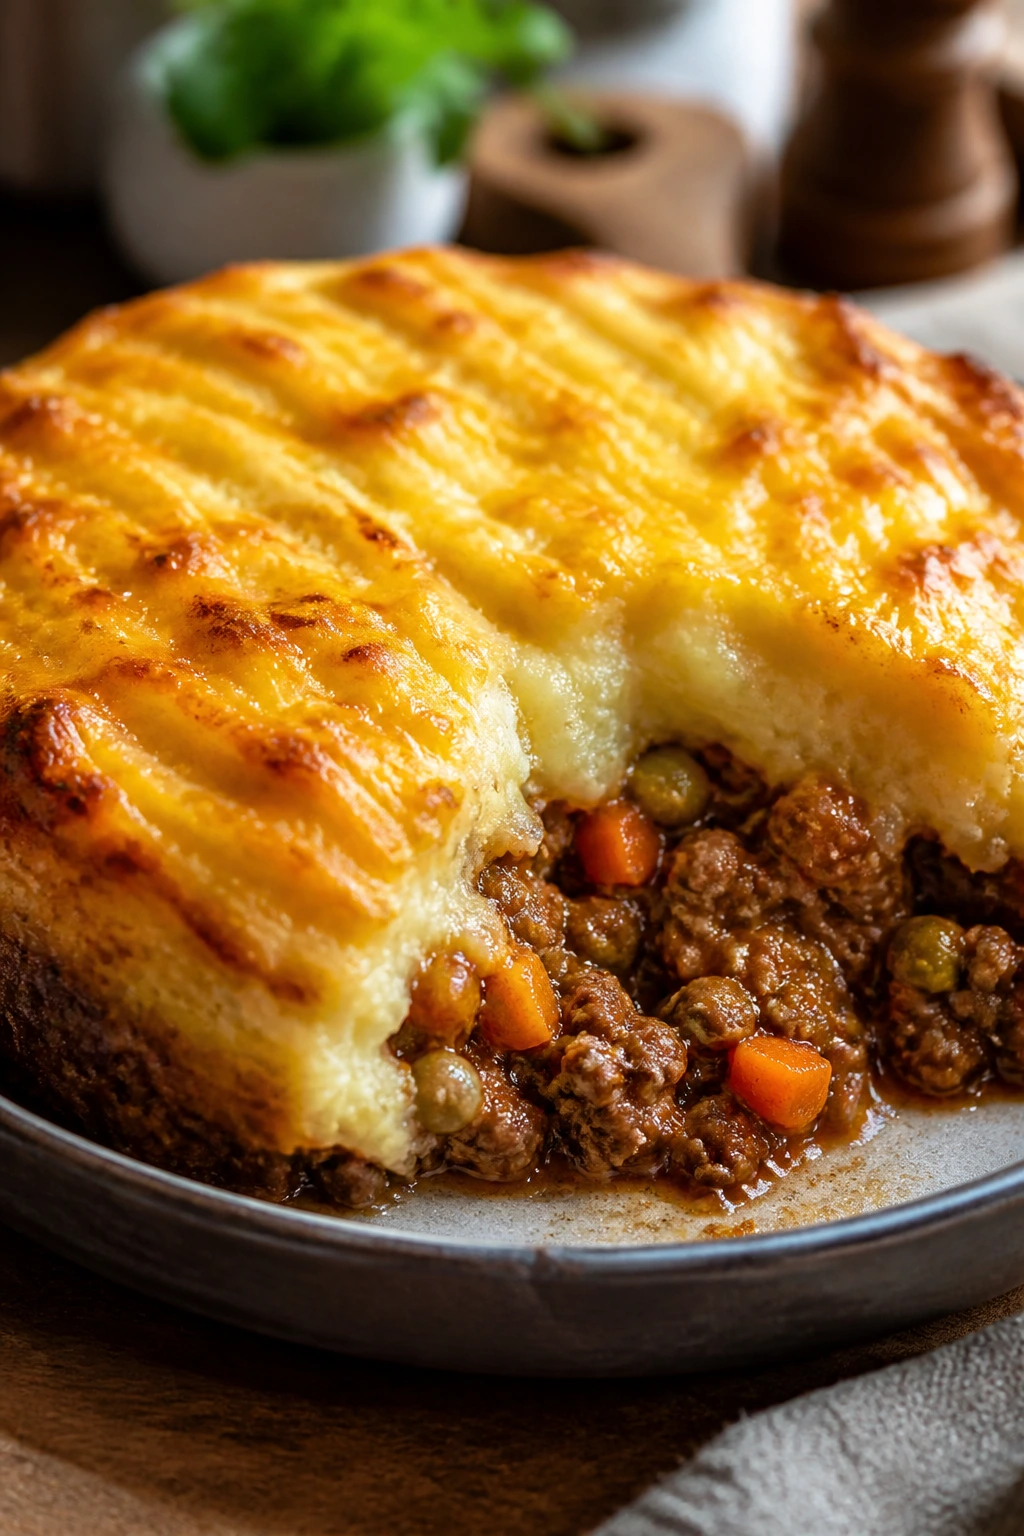
I like cottage pie when the vegetables are cut small, the gravy is dark and slightly shiny, and the topping gets roughened with a fork so the peaks go golden. This recipe leans into that. It gives you a beef-and-vegetable base that stays juicy, then caps it with cream cheese mashed potatoes that bake into a thick, lightly bronzed lid instead of a flat blanket.
The trick is restraint in the right places and generosity in the right ones. Salt the potatoes well, cook the filling until a spoon leaves a trail, and let the pie rest before you cut it. Once those pieces click, the dish stops behaving like a weeknight emergency and starts tasting like the kind of dinner people go back for seconds on.
Why This Cottage Pie Earns a Spot in the Oven Again
-
Juicy filling: The beef simmers with stock, tomato paste, and a little flour until it turns glossy and spoonable, which keeps the bottom layer from drying out under the potatoes.
-
Frosting-like top: The cream cheese in the mashed potatoes gives the topping a dense, pipeable texture that holds ridges in the oven instead of collapsing into a smooth lid.
-
Clean slices: A short rest after baking lets the filling settle, so you can cut squares that hold together instead of running across the plate.
-
Flexible pantry ingredients: Carrots, celery, onion, frozen peas, and stock do most of the work here, so you can build the pie from ordinary groceries without chasing specialty items.
-
Good leftover texture: The filling actually improves after a night in the fridge, and the topping reheats better than a loose mashed-potato cap because the cream cheese helps it stay plush.
-
One dish, many moods: Serve it plain, add chives, or brown the top under the broiler for a little extra color. It shifts easily from casual family dinner to Sunday supper without changing the recipe.
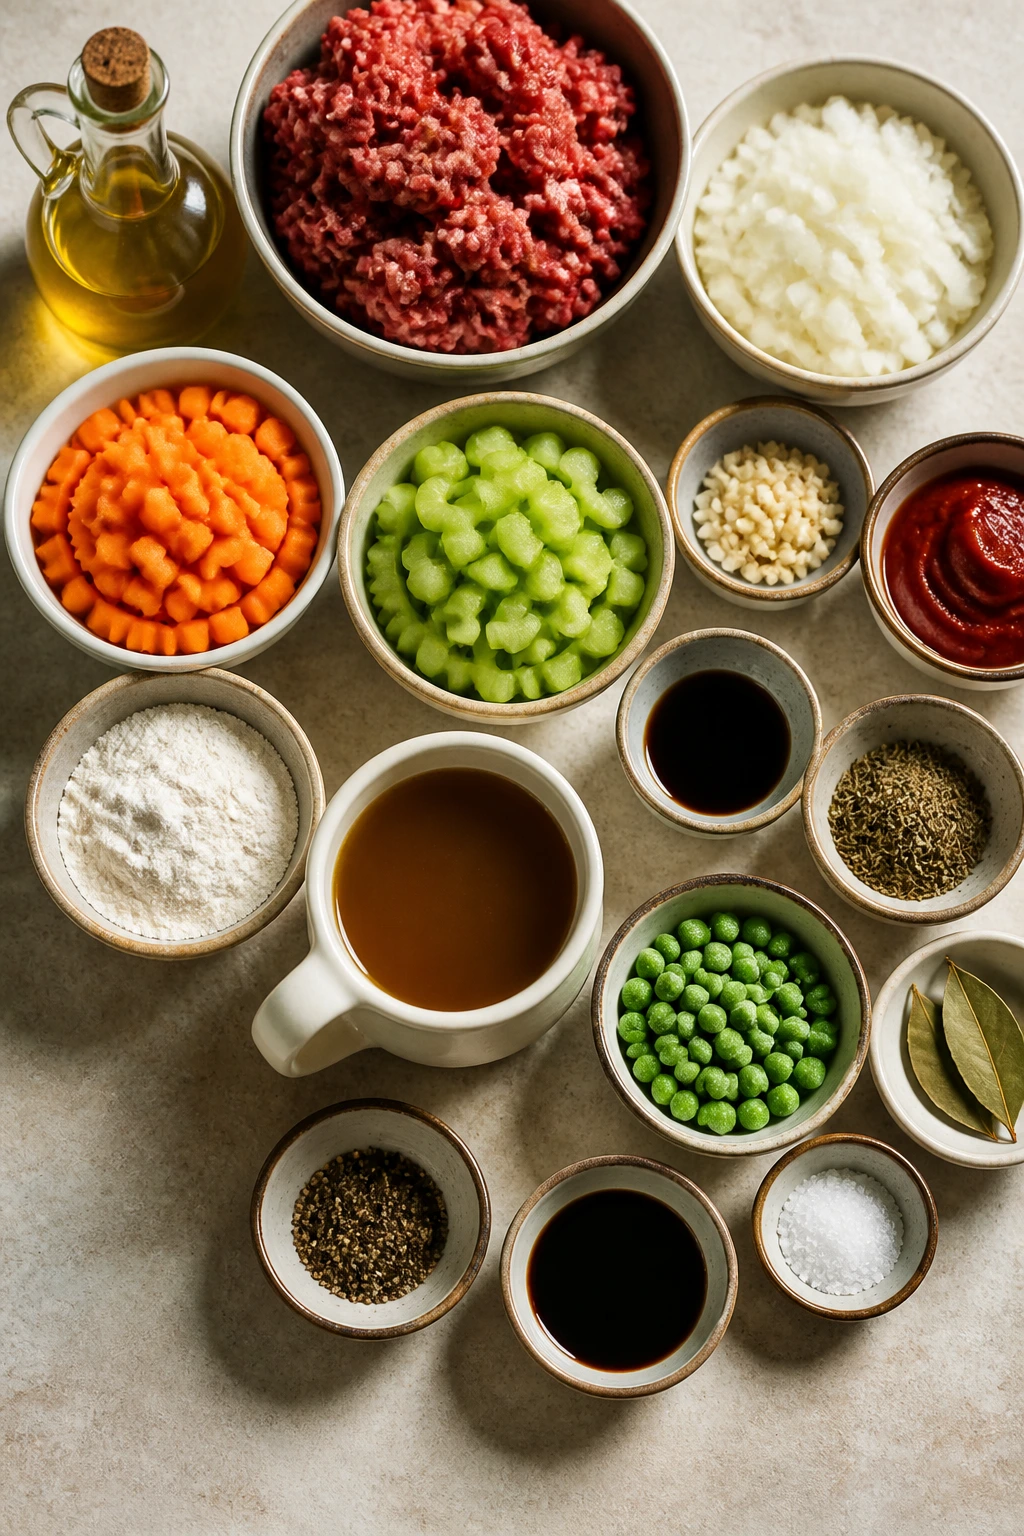
The Shopping List for the Filling and Frosting-Like Topping
Before you start cooking, line up everything on the counter. This pie moves smoothly once the beef goes into the pan, and the potatoes wait for nobody.
Yield: Serves 6
Prep Time: 25 minutes
Cook Time: 45 minutes
Total Time: 1 hour 10 minutes active, plus 10 to 15 minutes resting
Chill/Rest Time: 10 to 15 minutes after baking
Difficulty: Intermediate — the steps are straightforward, but you’re managing a filling and a topping, and both need the right texture.
Best Served: Warm, once the pie has rested long enough to slice cleanly
For the Filling:
- 2 tablespoons olive oil
- 1 1/2 pounds ground beef, preferably 85/15
- 1 large yellow onion, finely diced
- 2 medium carrots, peeled and diced into 1/4-inch pieces
- 2 celery ribs, diced into 1/4-inch pieces
- 3 garlic cloves, minced
- 2 tablespoons tomato paste
- 2 tablespoons all-purpose flour
- 1 1/2 cups beef stock
- 1 tablespoon Worcestershire sauce
- 1 teaspoon fresh thyme leaves or 1/2 teaspoon dried thyme
- 1 bay leaf
- 1 cup frozen peas
- 1 teaspoon kosher salt, plus more to taste
- 1/2 teaspoon black pepper
- 1 teaspoon soy sauce, optional, for deeper savory flavor
For the Cream Cheese Potato Frosting:
- 2 1/2 pounds Yukon Gold potatoes, peeled and cut into 1-inch chunks
- 4 ounces cream cheese, softened to room temperature
- 4 tablespoons unsalted butter
- 1/2 cup warm whole milk or half-and-half
- 1 teaspoon kosher salt, plus more to taste
- 1/4 teaspoon black pepper
- 2 tablespoons grated Parmesan, optional
- 1 tablespoon chopped chives, optional for garnish
Why Each Ingredient Has a Job
Ground Beef
What to use: 1 1/2 pounds ground beef, ideally 85/15, gives the filling enough fat for flavor without flooding the pan.
Preparation: Break it into small crumbles as it browns so the filling eats like a pie, not a loose skillet of meat.
Substitutions: Ground lamb gives you a more traditional shepherd’s pie feel; ground turkey works if you add a tablespoon of butter back to the pan.
Tips: If you use very lean beef, don’t drain the pan bone-dry. Leave a spoonful of fat or add a little oil so the filling doesn’t taste dry.
Aromatics and Vegetables
What to use: 1 large onion, 2 carrots, 2 celery ribs, and 3 garlic cloves build the base and keep the filling from tasting flat.
Preparation: Dice the carrots and celery small, about 1/4 inch, so they soften fully before the pie goes into the oven.
Substitutions: Parsnips can replace one carrot for a sweeter edge, and frozen mixed vegetables can step in when the fridge is empty.
Tips: Cook the onions until translucent and the carrots until they lose their raw crunch. If they stay hard in the skillet, they’ll stay hard in the pie.
Sauce Builders
What to use: 2 tablespoons tomato paste, 2 tablespoons flour, 1 1/2 cups beef stock, 1 tablespoon Worcestershire, thyme, bay leaf, salt, and pepper give the filling its body.
Preparation: Stir the tomato paste and flour into the beef and vegetables before adding liquid so the flour cooks out and the paste darkens slightly.
Substitutions: Cornstarch can replace flour if you need a gluten-free thickener, and a splash of soy sauce can stand in for some of the Worcestershire.
Tips: Let the sauce simmer until it coats a spoon rather than pooling like broth. That single texture check keeps the pie from slumping when you cut it.
Yukon Gold Potatoes
What to use: 2 1/2 pounds Yukon Gold potatoes are the sweet spot for a topping that stays creamy and pipes nicely.
Preparation: Peel them and cut them into even 1-inch chunks so they cook at the same rate.
Substitutions: Russets make a lighter mash, but they can turn dry faster; red potatoes work, though the topping will be a little denser.
Tips: Start the potatoes in cold salted water, not boiling water. They cook more evenly that way, and the centers won’t stay chalky.
Cream Cheese, Butter, and Finishing Seasoning
What to use: 4 ounces cream cheese, 4 tablespoons butter, 1/2 cup warm milk, salt, pepper, and optional Parmesan make the potato topping taste rich and hold shape.
Preparation: Let the cream cheese soften fully before mixing so it melts into the potatoes without leaving lumps.
Substitutions: Sour cream can replace part of the cream cheese if you want a sharper tang, and half-and-half can stand in for milk.
Tips: Warm the milk before adding it. Cold dairy cools the potatoes too fast and makes the mash stiff before you’ve finished smoothing it out.
Tools That Make Assembly Easier
A few basic tools make this pie less fussy and a lot cleaner to serve.
- Large Dutch oven or deep skillet: Best for browning the beef and building the filling in one pan.
- 9×13-inch baking dish: Gives you enough surface area for a thin, even topping and a decent amount of browned edges.
- Large pot for potatoes: Use one with room for the chunks to move; cramped potatoes cook unevenly.
- Potato masher or potato ricer: A ricer makes the topping smoother, but a sturdy masher works fine if you stop before it turns sticky.
- Wooden spoon or heatproof spatula: Good for breaking up beef and scraping the browned bits off the pan bottom.
- Colander: Needed for draining potatoes fully, which matters more here than in ordinary mashed potatoes.
- Measuring cups and spoons: This is not the place to guess at the stock or flour.
- Piping bag or zip-top bag, optional: Handy if you want the topping to look like frosting instead of a rustic spread.
- Fork: Useful for making the ridges that turn golden in the oven.
- Microplane or box grater, optional: Good for the Parmesan if you choose to use it.
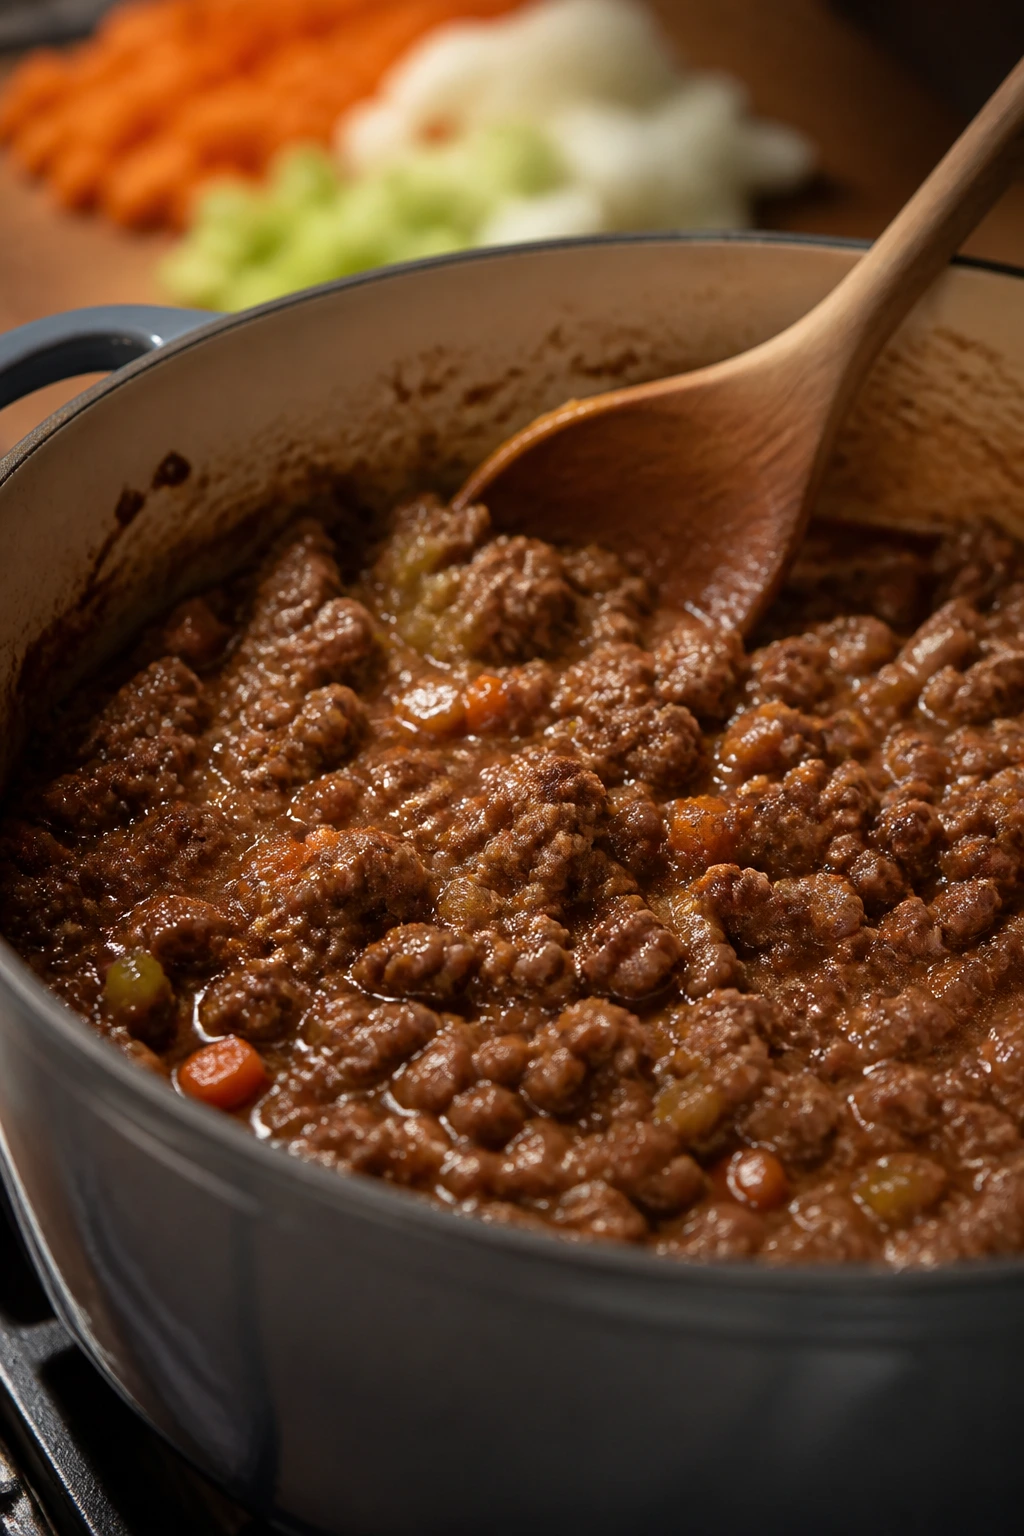
Building the Beef Filling Step by Step
The filling has to work before the potatoes ever show up. If it’s thin in the pan, it’ll be thin in the dish. No amount of creamy topping can fix soup hiding under a potato lid.
Brown and Build the Filling:
-
Preheat and prepare: Heat the oven to 400°F (200°C). Lightly grease a 9×13-inch baking dish with butter or oil and set it aside.
-
Brown the beef: Set a large Dutch oven or deep skillet over medium-high heat and add the olive oil. Add the ground beef and cook for 6 to 8 minutes, breaking it into small crumbles with a spoon, until it has lost its pink color and the edges are browned.
-
Cook the vegetables: Add the onion, carrots, and celery to the beef. Cook for 6 to 7 minutes, stirring often, until the onion looks translucent and the carrots have softened around the edges. Stir in the garlic and cook for 30 seconds, just until it smells sweet and sharp at the same time.
-
Thicken the base: Stir in the tomato paste, flour, thyme, salt, pepper, and optional soy sauce. Cook for 1 minute, stirring constantly, until the tomato paste darkens and the flour no longer looks dusty. Pour in the beef stock and Worcestershire sauce, then drop in the bay leaf.
-
Simmer until glossy: Bring the mixture to a gentle simmer, then lower the heat and cook for 6 to 8 minutes, stirring now and then, until the sauce thickens and coats the back of a spoon. The filling should look moist and shiny, not watery or stiff.
-
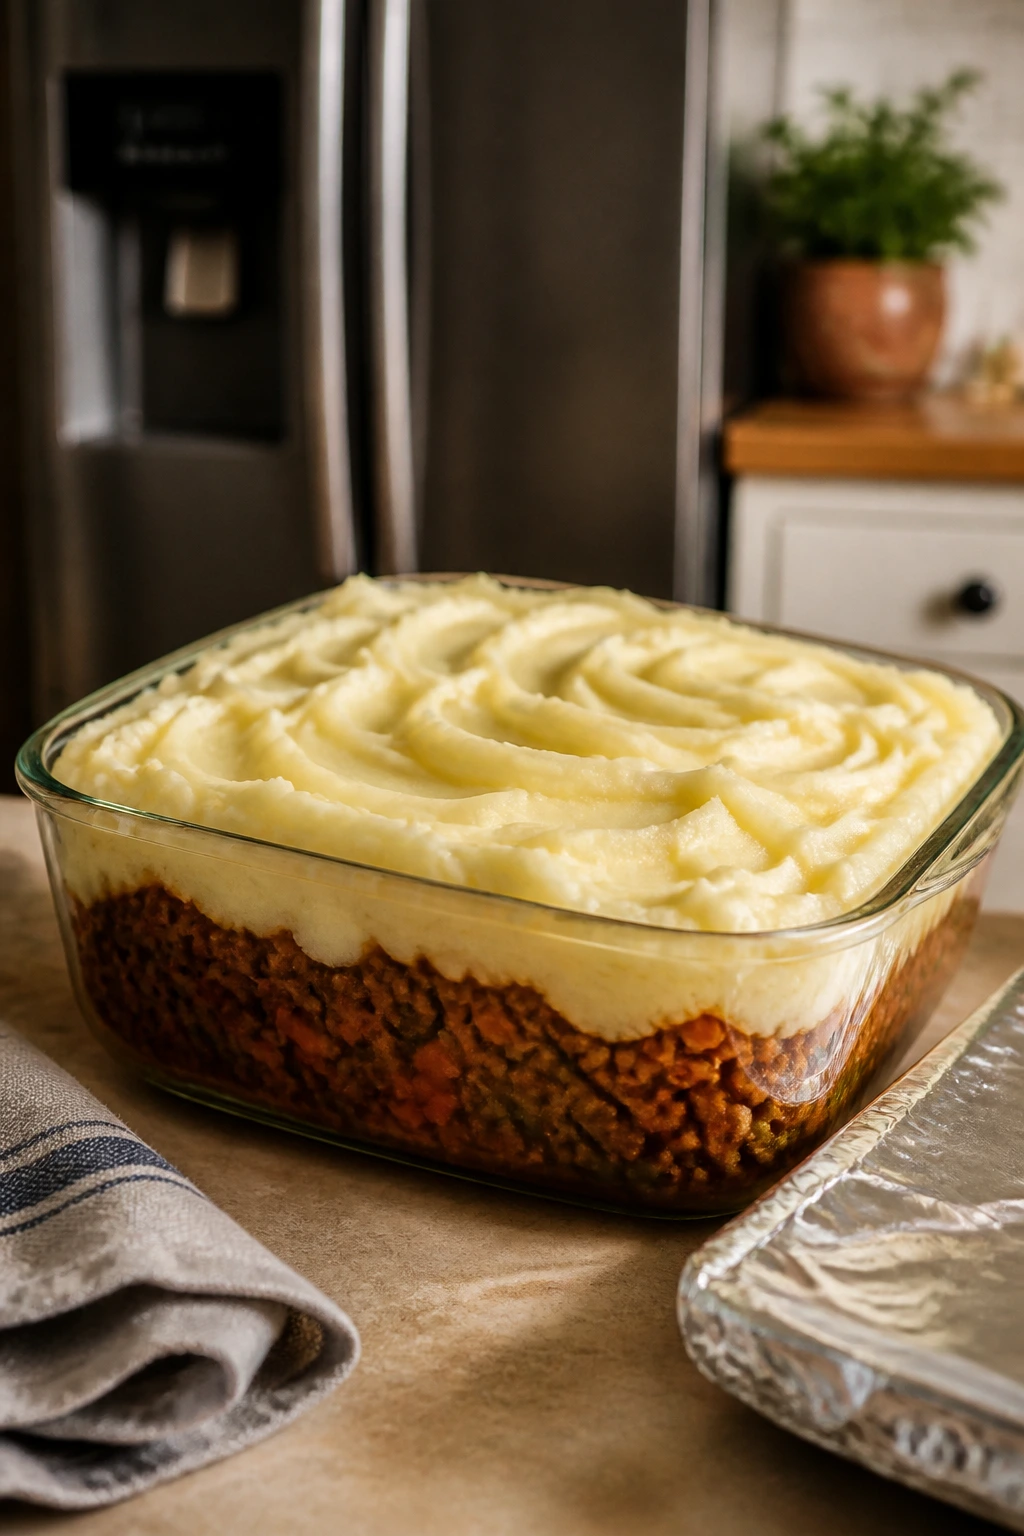
Finish the filling: Stir in the peas and cook for 1 minute more, just until they turn bright green. Taste and adjust the seasoning. Remove the bay leaf, then spoon the filling into the prepared baking dish and spread it into an even layer.
Whipping the Cream Cheese Potato Topping
The potato layer is where the “frosting” part stops being a joke and starts being useful. You want the potatoes soft enough to spread or pipe, but not so loose that they melt into the beef.
Make the Potato Frosting and Finish the Pie:
-
Cook and dry the potatoes: Put the potato chunks in a large pot and cover them with cold water by 1 inch. Add a generous pinch of salt and bring the pot to a boil over high heat. Reduce to a steady simmer and cook for 15 to 18 minutes, until the potatoes fall apart when pierced with a fork. Drain them well, then let them sit in the hot colander or pot for 1 minute so the steam can escape.
-
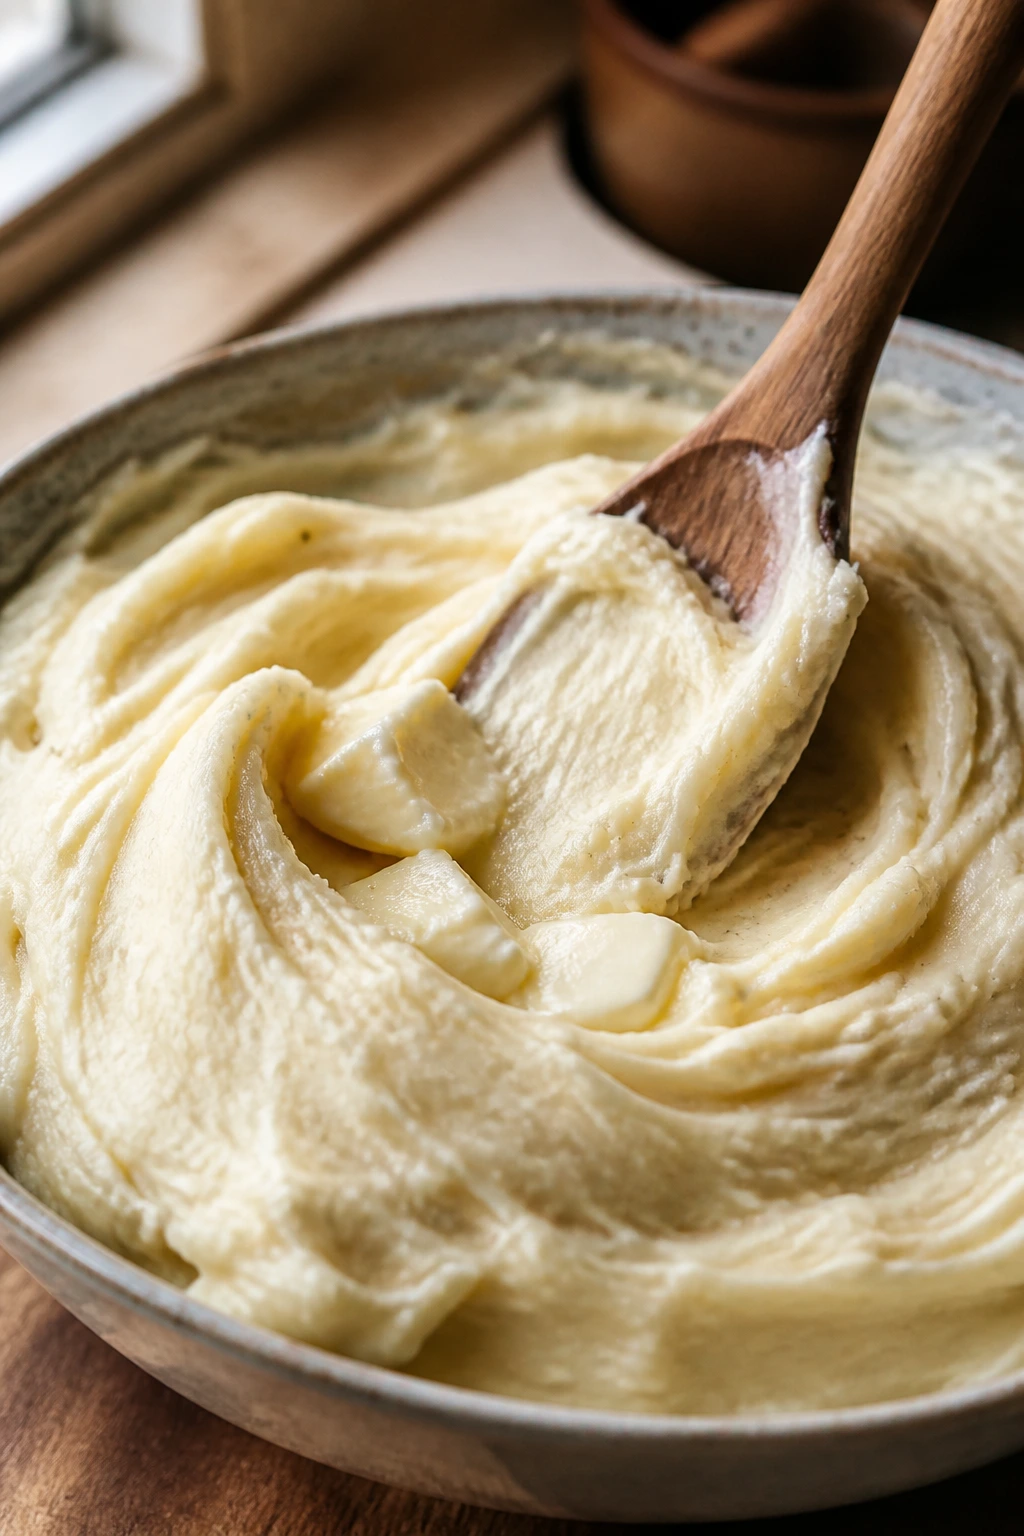
Mash with dairy: Return the potatoes to the warm pot. Add the cream cheese, butter, warm milk, salt, black pepper, and optional Parmesan. Mash until smooth and fluffy. Do not use a food processor or blender; they turn potatoes gluey in a hurry. If the mixture feels too thick to spread, add another tablespoon or two of warm milk.
-
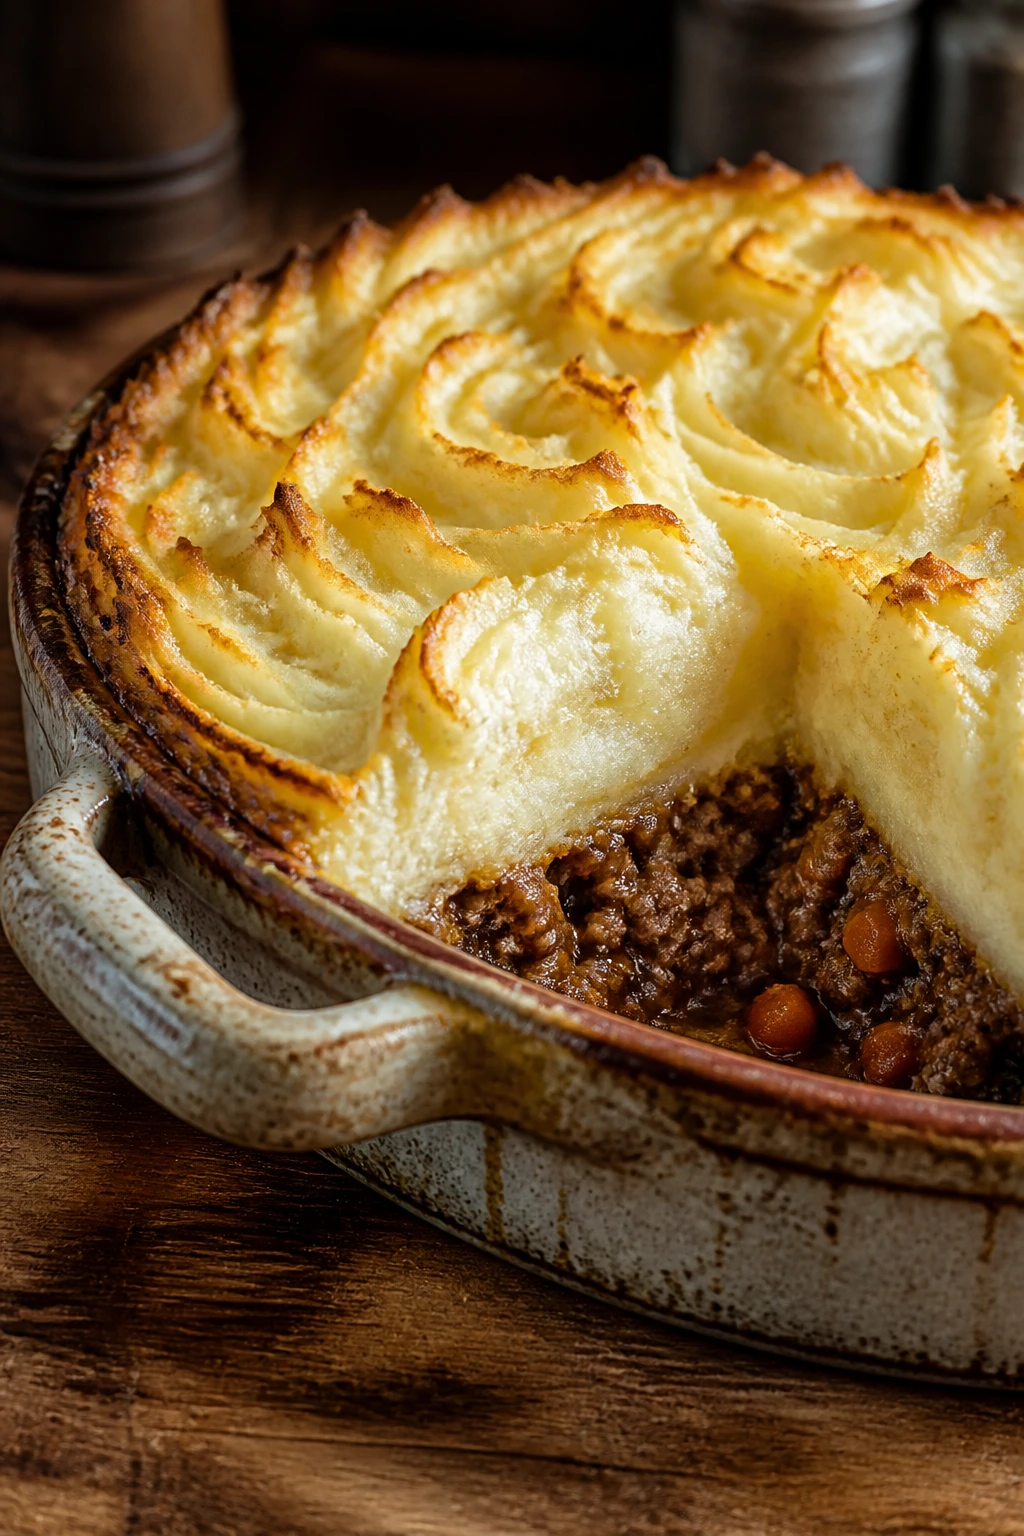
Top the filling: Spoon the potato mixture over the beef filling and spread it to the edges of the dish. For a more polished look, pipe it in swirls with a piping bag or zip-top bag with the corner snipped off. Use the back of a fork to rake the surface and make little peaks.
-
Bake and rest: Bake for 25 to 30 minutes, until the filling bubbles at the edges and the top looks lightly golden in spots. If you want deeper color, broil for 1 to 2 minutes at the end, watching the pie the entire time. Let it rest for 10 to 15 minutes before serving, then scatter chives over the top if you want a fresh finish.
How to Serve a Cottage Pie with Clean Edges
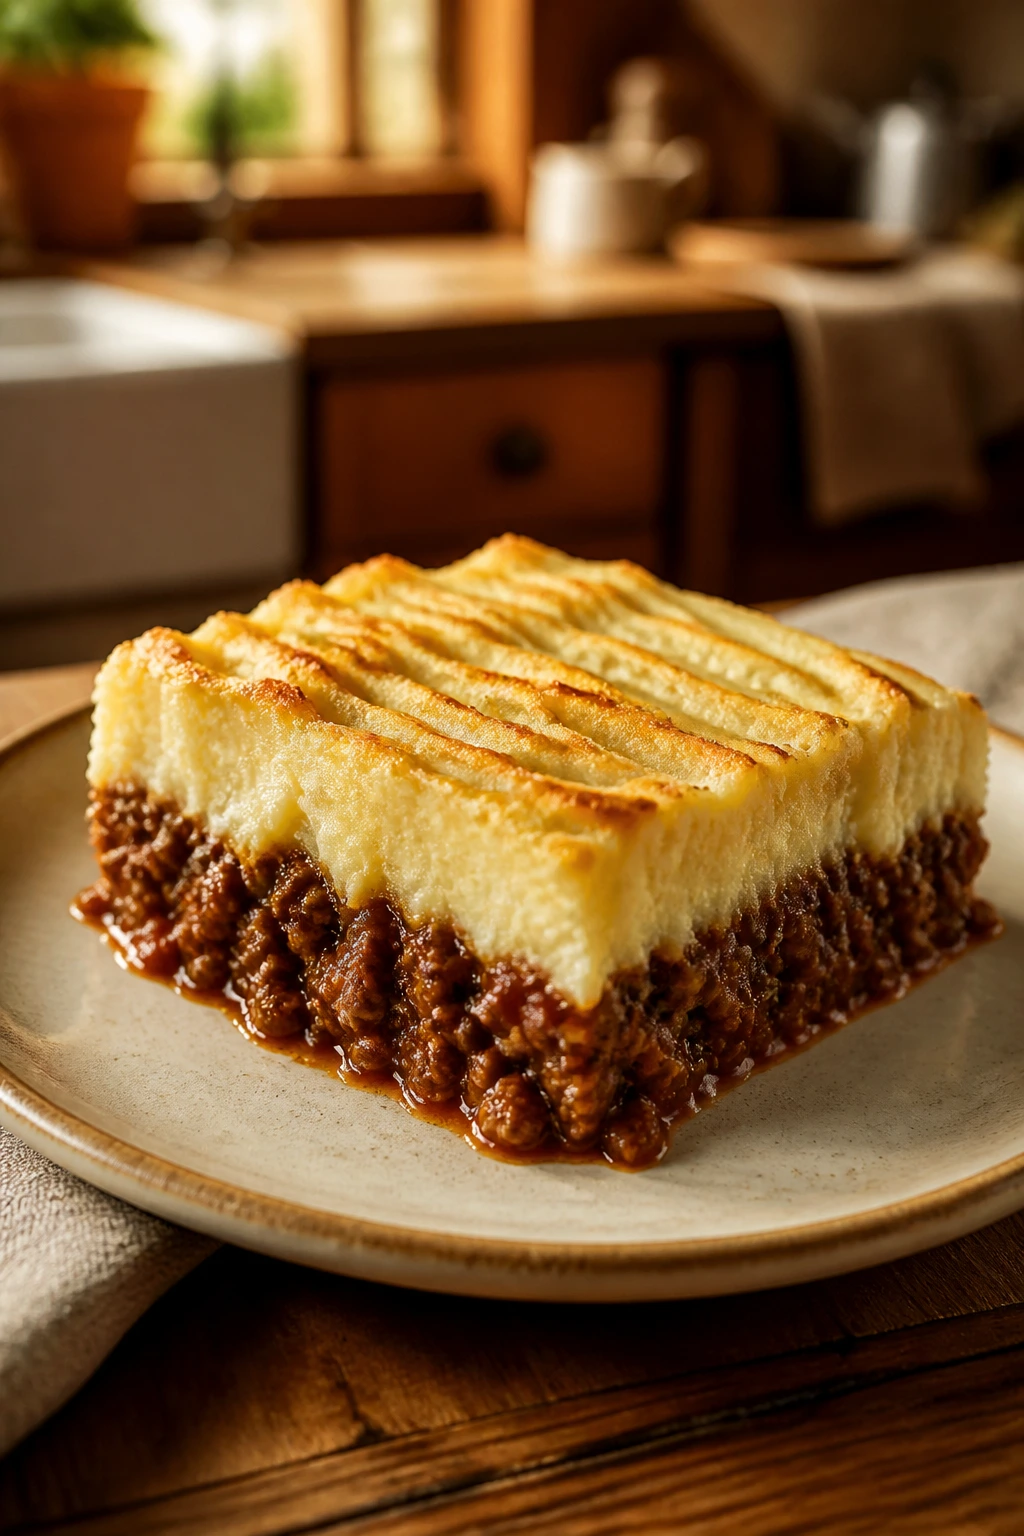
Presentation: Spoon the pie onto warm plates in thick squares rather than scooping from the middle. A little spill from the filling makes the dish look generous; a perfectly neat block can look stiff and a bit joyless.
Accompaniments: A sharp green salad with mustardy dressing cuts through the richness better than another buttery side. Buttered green beans, peas with mint, or a simple pile of sautéed cabbage also work well because they keep the plate from feeling heavy. Crusty bread is optional, but if you have a loaf with a crisp crust, someone at the table will want it.
Portions: Six solid servings is realistic from a 9×13-inch pan. If you’re feeding smaller eaters, cut it into eight slices and add a side salad; if you’re feeding hungry people, count on four substantial portions and make a second vegetable.
Beverage Pairing: A dry red wine with a little grip, like a Cabernet blend or a Syrah, stands up to the beef and the cream cheese topping. Brown ale works too, especially if you like a malty drink with savory food. For something non-alcoholic, sparkling water with lemon or a bitter lemonade keeps the richness from settling in too hard.
Small Upgrades That Add More Flavor
Flavor Enhancement: Stir 1 teaspoon of Dijon mustard into the filling right after the stock goes in. It doesn’t make the pie taste mustardy; it just sharpens the beef and makes the gravy taste deeper. A spoonful of red wine vinegar at the very end can do the same thing if the filling tastes a little sleepy.
Customization: Sauté 8 ounces of chopped mushrooms with the onions if you want a darker, earthier filling. They release a little water at first, then take on color and give the beef more body. Corn can replace the peas if you want sweetness instead of freshness, and both together are not a crime.
Serving Suggestions: Chopped chives give the potato peaks a fresh bite, but parsley works when that’s what you have. A few flakes of flaky salt on the browned ridges just before serving make the top taste more alive. Pickled onions on the side sound odd until you try them with the creamy topping.
Make-It-Yours: For a gluten-free version, swap the flour for 1 tablespoon cornstarch mixed with 2 tablespoons cold stock, then stir it into the filling near the end and simmer until thick. For dairy-free, use olive oil instead of butter, a plant-based cream cheese, and an unsweetened dairy-free milk. The pie will still work, though the top won’t brown quite the same way.
Mistakes That Make Cottage Pie Heavy or Dry
-
A watery filling: If the beef mixture still looks loose when it goes into the dish, the pie will slide apart on the plate. Fix it by simmering longer until the sauce clings to the meat and vegetables instead of pooling around them.
-
Cold, lumpy cream cheese: Straight-from-the-fridge cream cheese leaves little white bits in the potatoes. Let it soften on the counter for at least 30 to 45 minutes, then mash it in while the potatoes are still hot.
-
Overworked potatoes: If you keep mashing long after the lumps are gone, the topping turns sticky and paste-like. Stop once the mixture is smooth and spreadable. A few tiny flecks are better than glue.
-
Skipping the steam-dry step: Wet potatoes make a loose topping that sinks into the filling. Draining well and letting them sit for a minute or two makes a bigger difference than people expect.
-
Underseasoned filling: Creamy topping can hide a bland base for about one bite. Taste the filling before it goes into the dish and be bold with salt, pepper, and Worcestershire. The potato layer is mellow; the meat layer has to carry the flavor.
-
Burning the peaks under the broiler: The golden ridges look nice, but they go from bronze to black fast. Keep the pie on the middle rack and watch it closely if you broil for color. One minute can be enough.
Variations and Swaps Worth Trying
Shepherd’s-Style Lamb Swap
Use 1 1/2 pounds ground lamb in place of the beef and add 1 teaspoon chopped rosemary with the thyme. The flavor gets deeper and a little more savory, which is exactly what lamb does well in a baked pie.
Mushroom and Red Wine Version
Replace 8 ounces of the beef with finely chopped mushrooms, or add them alongside the meat if you want a fuller pan. Pour in 1/2 cup red wine after the tomato paste and let it cook down before the stock goes in. The filling gets darker, richer, and a little less sweet.
Sharp Cheddar Crown
Stir 3/4 cup shredded sharp cheddar into the potato topping along with the cream cheese. The cheddar gives the top a sharper edge and more color in the oven, and it works especially well if you want the pie to taste a little closer to pub food.
Mini Ramekin Pies
Divide the filling among six oven-safe ramekins and pipe or spoon the potato topping over each one. Bake them for 15 to 18 minutes instead of 25 to 30. The small portions are useful when you want cleaner serving sizes or a more polished table.
Lean Turkey Version
Ground turkey can replace the beef, but it needs help because it’s lean. Add an extra tablespoon of butter during the filling stage and consider a little more Worcestershire or Dijon so the flavor doesn’t fall flat.
Make-Ahead, Storage, and Reheating Without a Dry Top
This pie is forgiving if you plan ahead, but it likes a few rules. The filling can be made up to 2 days ahead and kept covered in the refrigerator, and the potato topping can be made the same day or a day ahead if you keep it tightly covered. If you want the easiest route, make the filling first, chill it, then top and bake the pie the next day.
A fully assembled unbaked pie can sit in the fridge for up to 24 hours. If you do that, let it sit on the counter for 20 minutes before baking, or add 10 to 15 minutes to the oven time so the center heats through. A cold baking dish going straight into a hot oven can slow the bake more than you’d think.
Leftovers keep well in the refrigerator for 3 to 4 days. Store them in a covered container or leave the pie in the dish and wrap the top tightly. To reheat a full pie, cover it with foil and bake at 350°F (175°C) for 20 to 25 minutes, then uncover for the last 5 minutes if you want the top to dry out a little. Single slices reheat in the microwave in 2 to 3 minutes, but the topping will soften.
Freezing works too. Cool the pie completely, then wrap it tightly and freeze for up to 2 months. For best texture, freeze it before baking if you can; thaw it overnight in the refrigerator, then bake covered at 375°F (190°C) until hot in the center, about 35 to 45 minutes, uncovering at the end to brown the top. If you freeze baked leftovers, expect the potato layer to lose a little of its original fluff, but the flavor holds up fine.
Questions People Ask Before Baking
Can I use instant mashed potatoes for the topping?
You can, but make them a little thicker than usual so they hold shape on the beef. Stir in the cream cheese while the potatoes are hot, then let them cool for a minute before spreading. The texture won’t be as plush as fresh potatoes, but it works in a pinch.
Why did my filling come out soupy?
Usually the sauce didn’t simmer long enough or the flour wasn’t cooked in properly. The filling should look thick and glossy before it goes into the baking dish. If it still looks loose in the pan, keep cooking until a spoon leaves a visible trail.
Can I pipe the potato topping instead of spreading it?
Yes, and it looks better than a flat layer if you want that frosting-like finish. Use a large piping bag or a zip-top bag with the corner cut off, then pipe swirls or rosettes over the filling. The topping should be soft enough to move but stiff enough to hold ridges.
What if I don’t have Worcestershire sauce?
A mix of soy sauce and a small splash of vinegar can replace it, though the flavor will be a little different. You want salt, depth, and a hint of tang, not sweetness. Add the substitute in small amounts and taste the filling before it goes into the oven.
Can I make this pie with lamb instead of beef?
Yes, and that version actually has a more traditional cottage-pie feel if you’re using a British definition. Lamb brings a stronger, slightly sweeter flavor, so rosemary fits nicely with it. Keep the rest of the method the same.
How do I keep the potato top from cracking?
Don’t overbake it and don’t make the potatoes too dry before mashing. A little warm milk and plenty of cream cheese keep the topping supple. If the top cracks anyway, a spoonful of melted butter or a dusting of chives hides it fast.
Can I make it gluten-free?
Yes. Replace the flour in the filling with a cornstarch slurry and make sure your Worcestershire sauce is gluten-free. The rest of the ingredients are naturally friendly to that swap.
The Pie That Keeps Its Promise
A good cottage pie should do two things at once: feed people well and hold together when you cut it. This version does both because the filling is cooked until it’s actually thick, and the potato top is rich enough to stay soft without turning sloppy. That sounds like a small distinction. It isn’t.
The cream cheese frosting-style topping is the detail that makes the dish memorable. It gives the pie a smoother, more luxurious finish than plain mashed potatoes, and it brings just enough tang to keep the beef from feeling heavy. Make it once, and you’ll probably start doing the same thing to every cottage pie after that.
Moist Cottage Pie with Cream Cheese Frosting — Recipe Card
Recipe Name: Moist Cottage Pie with Cream Cheese Frosting
Description: A savory cottage pie with a rich beef-and-vegetable filling and a cream cheese-enriched potato topping that pipes and browns like frosting. The filling stays juicy, the top stays plush, and the whole dish slices cleanly after a short rest.
Prep Time: 25 minutes
Cook Time: 45 minutes
Total Time: 1 hour 10 minutes active, plus 10 to 15 minutes resting
Course: Main Course
Cuisine: British-inspired
Servings: 6
Calories: 560 kcal per serving
Ingredients
For the Filling:
- 2 tablespoons olive oil
- 1 1/2 pounds ground beef, preferably 85/15
- 1 large yellow onion, finely diced
- 2 medium carrots, peeled and diced into 1/4-inch pieces
- 2 celery ribs, diced into 1/4-inch pieces
- 3 garlic cloves, minced
- 2 tablespoons tomato paste
- 2 tablespoons all-purpose flour
- 1 1/2 cups beef stock
- 1 tablespoon Worcestershire sauce
- 1 teaspoon fresh thyme leaves or 1/2 teaspoon dried thyme
- 1 bay leaf
- 1 cup frozen peas
- 1 teaspoon kosher salt
- 1/2 teaspoon black pepper
- 1 teaspoon soy sauce, optional
For the Cream Cheese Potato Topping:
- 2 1/2 pounds Yukon Gold potatoes, peeled and cut into 1-inch chunks
- 4 ounces cream cheese, softened
- 4 tablespoons unsalted butter
- 1/2 cup warm whole milk or half-and-half
- 1 teaspoon kosher salt
- 1/4 teaspoon black pepper
- 2 tablespoons grated Parmesan, optional
- 1 tablespoon chopped chives, optional garnish
Instructions
-
Preheat the oven to 400°F (200°C) and grease a 9×13-inch baking dish.
-
Brown the ground beef in olive oil over medium-high heat for 6 to 8 minutes, breaking it into small crumbles.
-
Add the onion, carrots, and celery; cook for 6 to 7 minutes until softened. Stir in the garlic and cook for 30 seconds.
-
Stir in the tomato paste, flour, thyme, salt, pepper, and optional soy sauce. Cook for 1 minute, then add the beef stock, Worcestershire sauce, and bay leaf.
-
Simmer for 6 to 8 minutes until the filling is thick and glossy. Stir in the peas, adjust seasoning, remove the bay leaf, and spread the filling in the baking dish.
-
Boil the potatoes in salted water until fork-tender, about 15 to 18 minutes. Drain well and let them steam dry for 1 minute.
-
Mash the potatoes with the cream cheese, butter, warm milk, salt, pepper, and optional Parmesan until smooth and fluffy.
-
Spoon or pipe the potato topping over the filling. Spread it to the edges and rough up the top with a fork.
-
Bake for 25 to 30 minutes until the filling bubbles at the edges and the top is lightly golden. Broil for 1 to 2 minutes if you want more color.
-
Rest for 10 to 15 minutes before serving. Garnish with chives if using.
Notes:
- For a sharper flavor, add 1 teaspoon Dijon mustard to the filling.
- If the topping feels too stiff, add warm milk 1 tablespoon at a time.
- Leftovers keep 3 to 4 days in the refrigerator and up to 2 months in the freezer.