
Thai tea recipes have a funny way of stealing the whole table. One glass lands in front of you, and suddenly the ice is rattling, the orange-brown tea is threading through the milk, and somebody at the other end of the table is already asking for a straw. The drink looks simple. It isn’t. Thai tea lives or dies on strong brewing, controlled sweetness, and the right dairy balance, which is why the home version can taste cleaner and more focused than the one that arrives in a paper cup.
That’s the part I like most about cooking with Thai tea at home. You get to decide how loud the tea should be, whether the milk leans coconut, evaporated, or cream, and how far you want to push the spice notes. A little extra star anise? Fine. More vanilla? Also fine. Less sugar so the tea can actually breathe? Absolutely. Once you start using it in desserts, the appeal gets even broader — custards, cakes, puddings, and chilled sweets all pick up that caramel-leaning tea flavor in a way that feels richer than plain vanilla, but not fussy.
And yes, the takeout comparison matters. Restaurant Thai tea is often built to survive a long shift and a busy service line. At home, you can make it taste sharper, colder, creamier, or more restrained. You can also turn one brewed batch into a dozen different desserts without starting over each time, which is one of those small kitchen wins I never get tired of.
Why This Collection Works So Well
-
Strong tea carries through ice and sugar. Thai tea has enough body to stay present after chilling, which is why it works in drinks, custards, and cakes instead of fading into the background.
-
Sweetened condensed milk behaves differently from plain sugar. It gives Thai tea that rounded, toffee-like finish and a thicker mouthfeel, especially in cold drinks and frozen desserts.
-
Coconut milk expands the flavor range fast. A can of full-fat coconut milk shifts Thai tea from diner-style sweet to something softer, richer, and a little more tropical.
-
One concentrated brew can do a lot of work. Brew a strong batch once, and you can use it for iced tea, boba, pudding, frosting, and even glaze.
-
The spice profile plays nice with dessert ingredients. Vanilla, cream cheese, white chocolate, mascarpone, and butter all sit well next to Thai tea’s black-tea backbone.
-
The recipes stay flexible. If you want less sugar, more tea, dairy-free swaps, or a stronger spice note, Thai tea usually tolerates the change without falling apart.
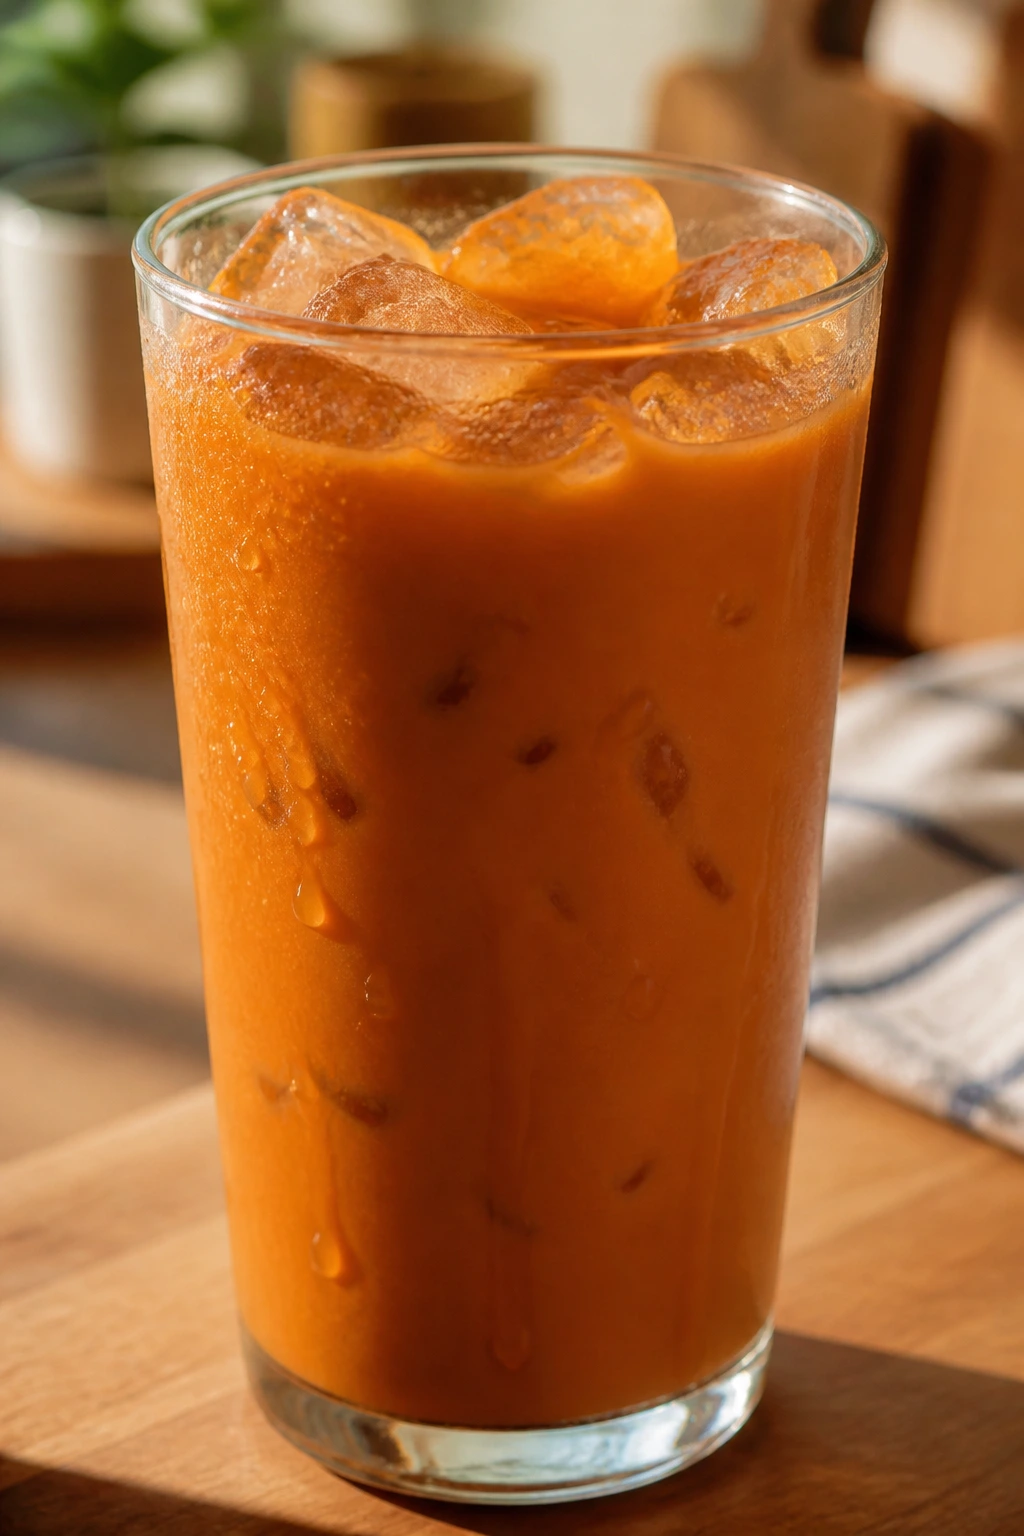
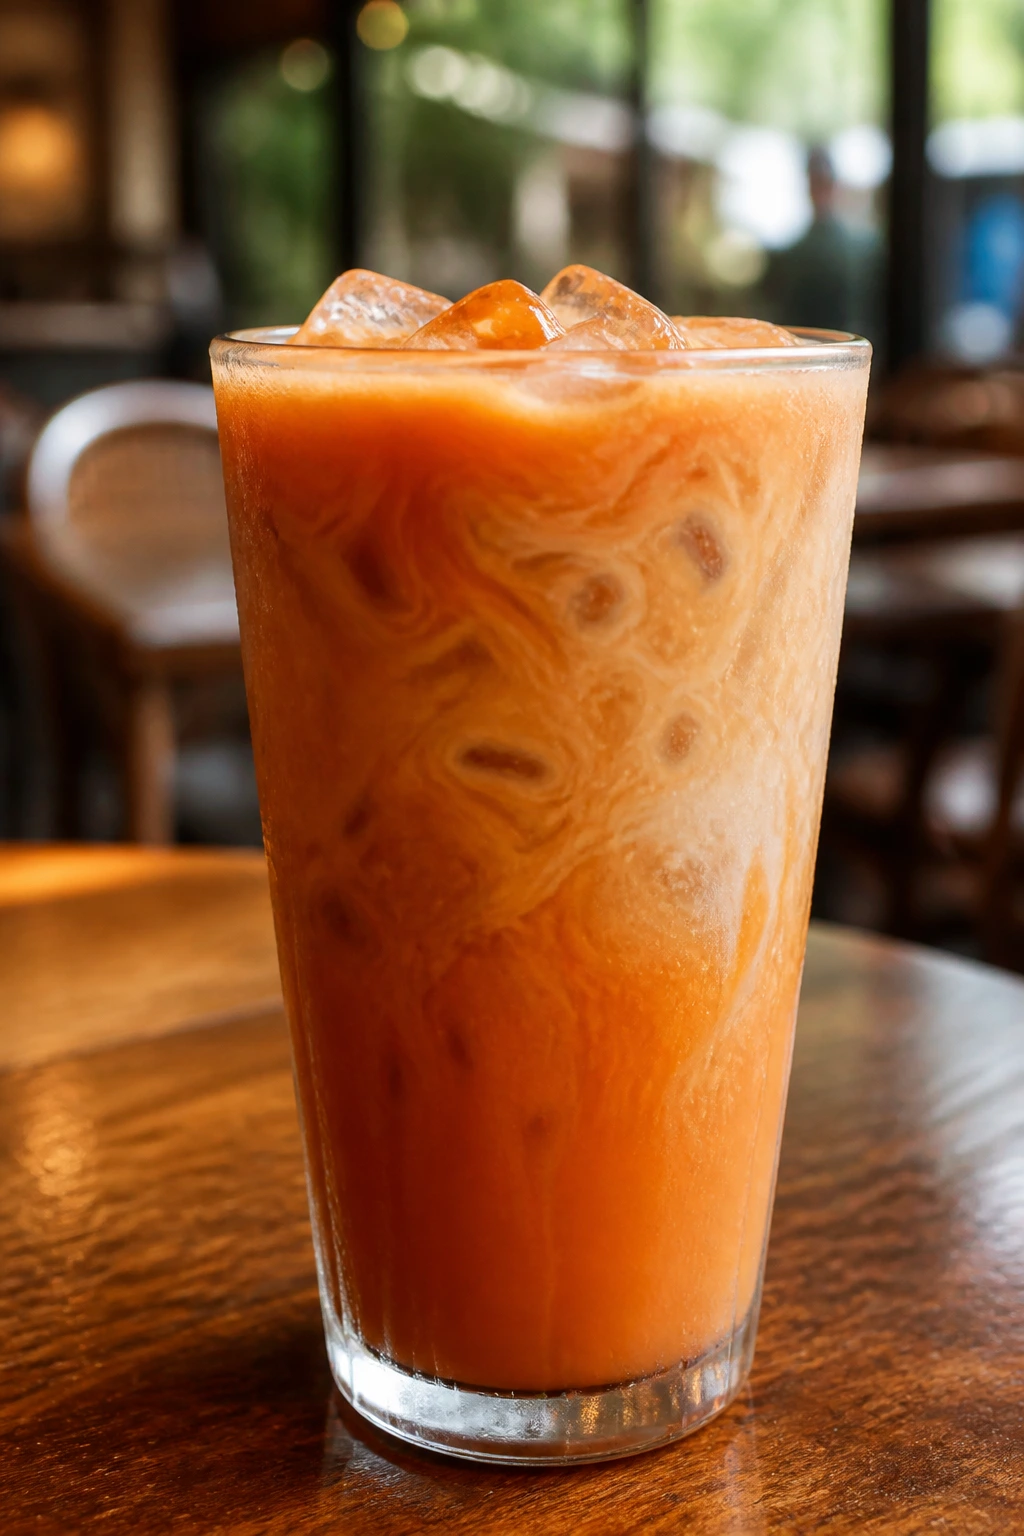
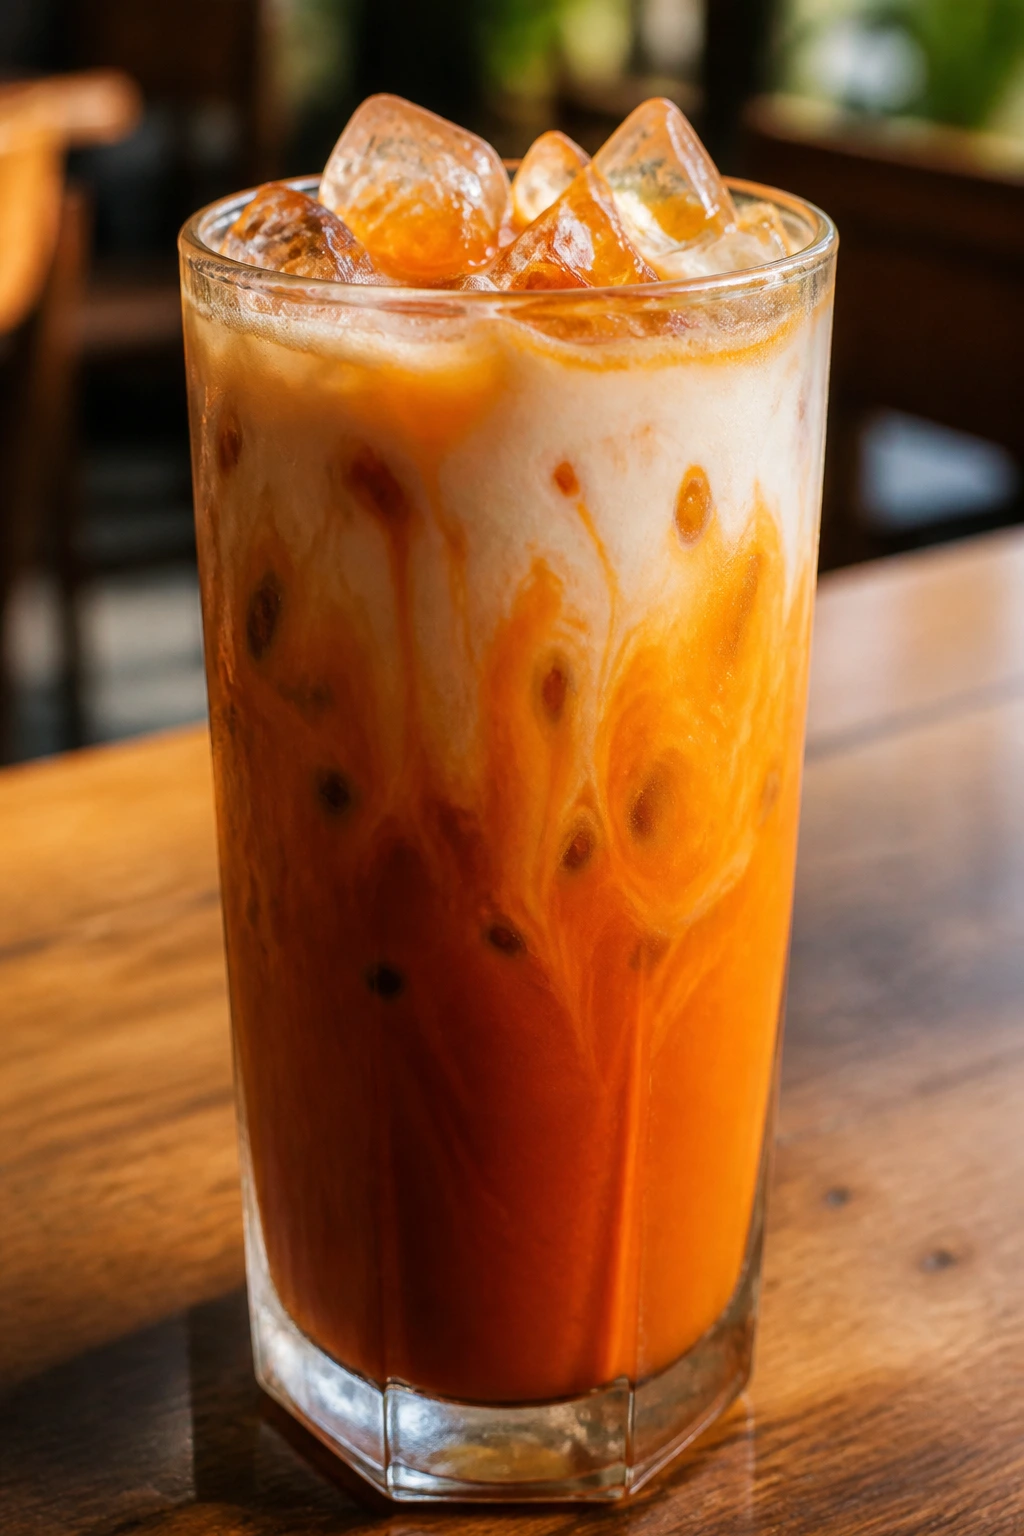
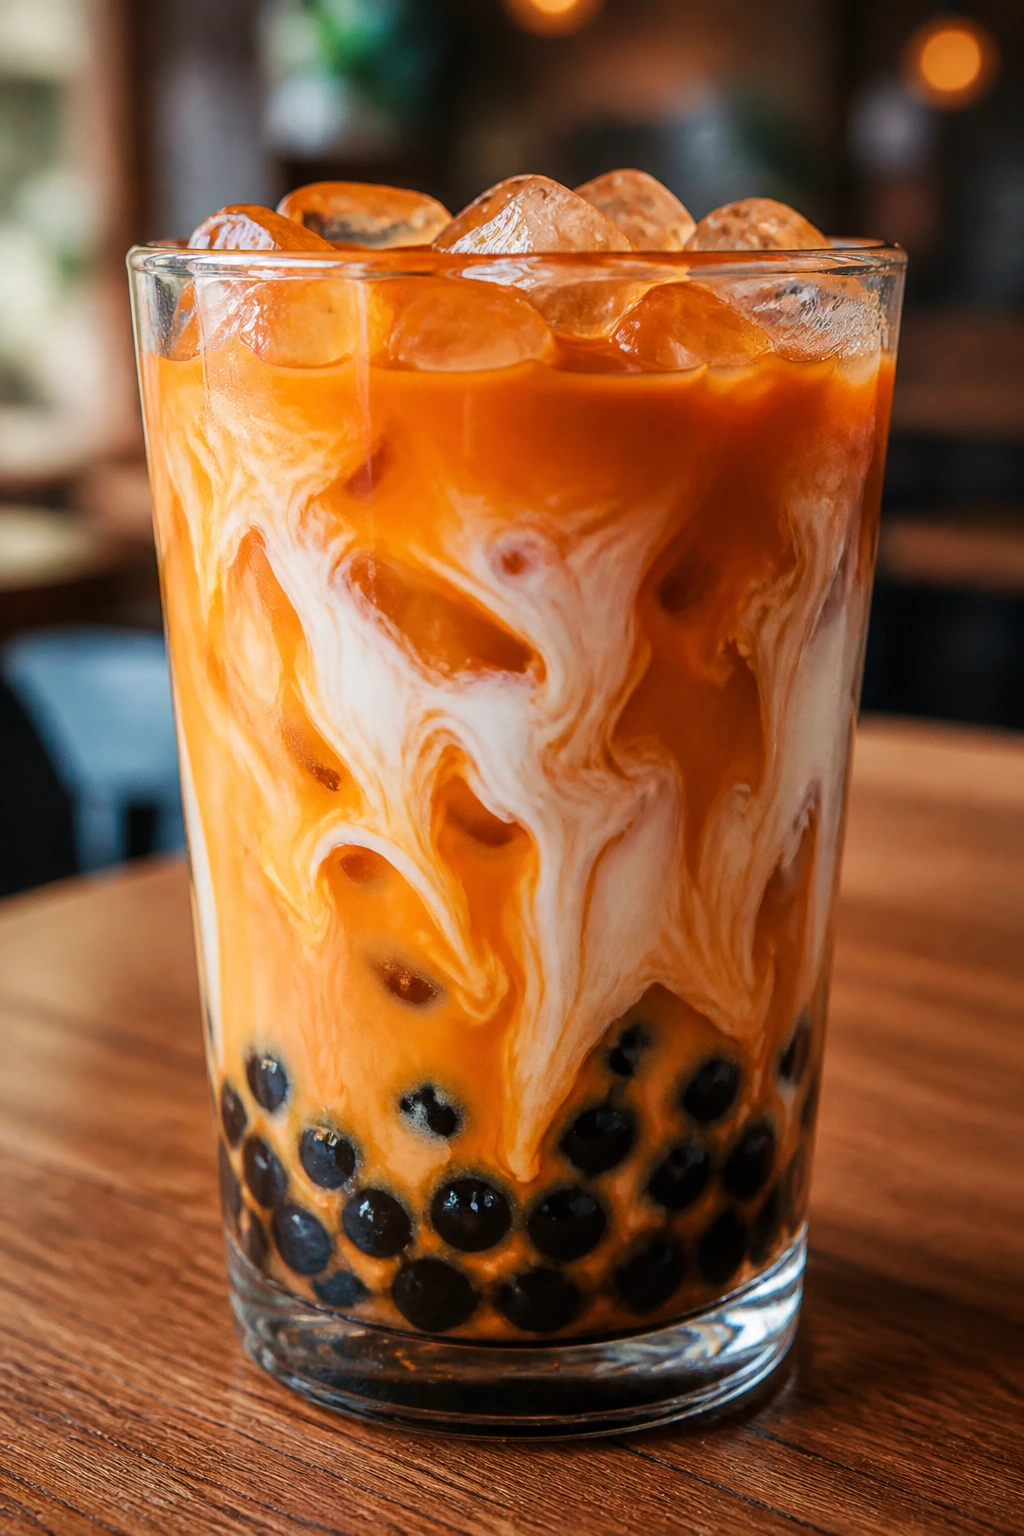
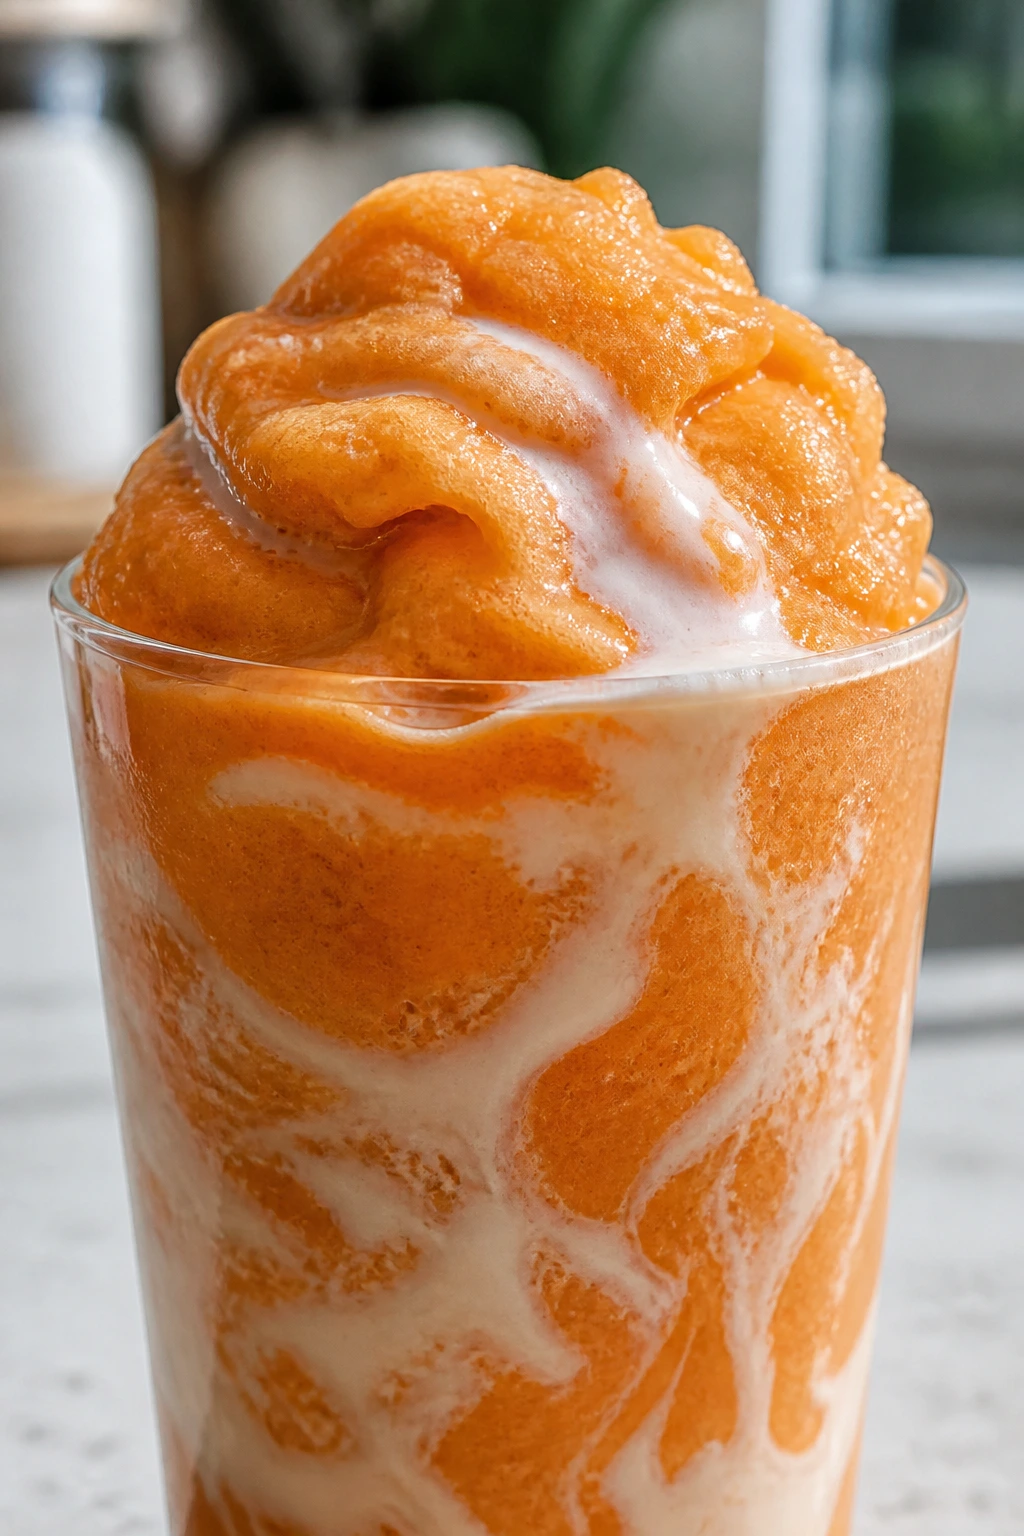
1. Classic Thai Iced Tea
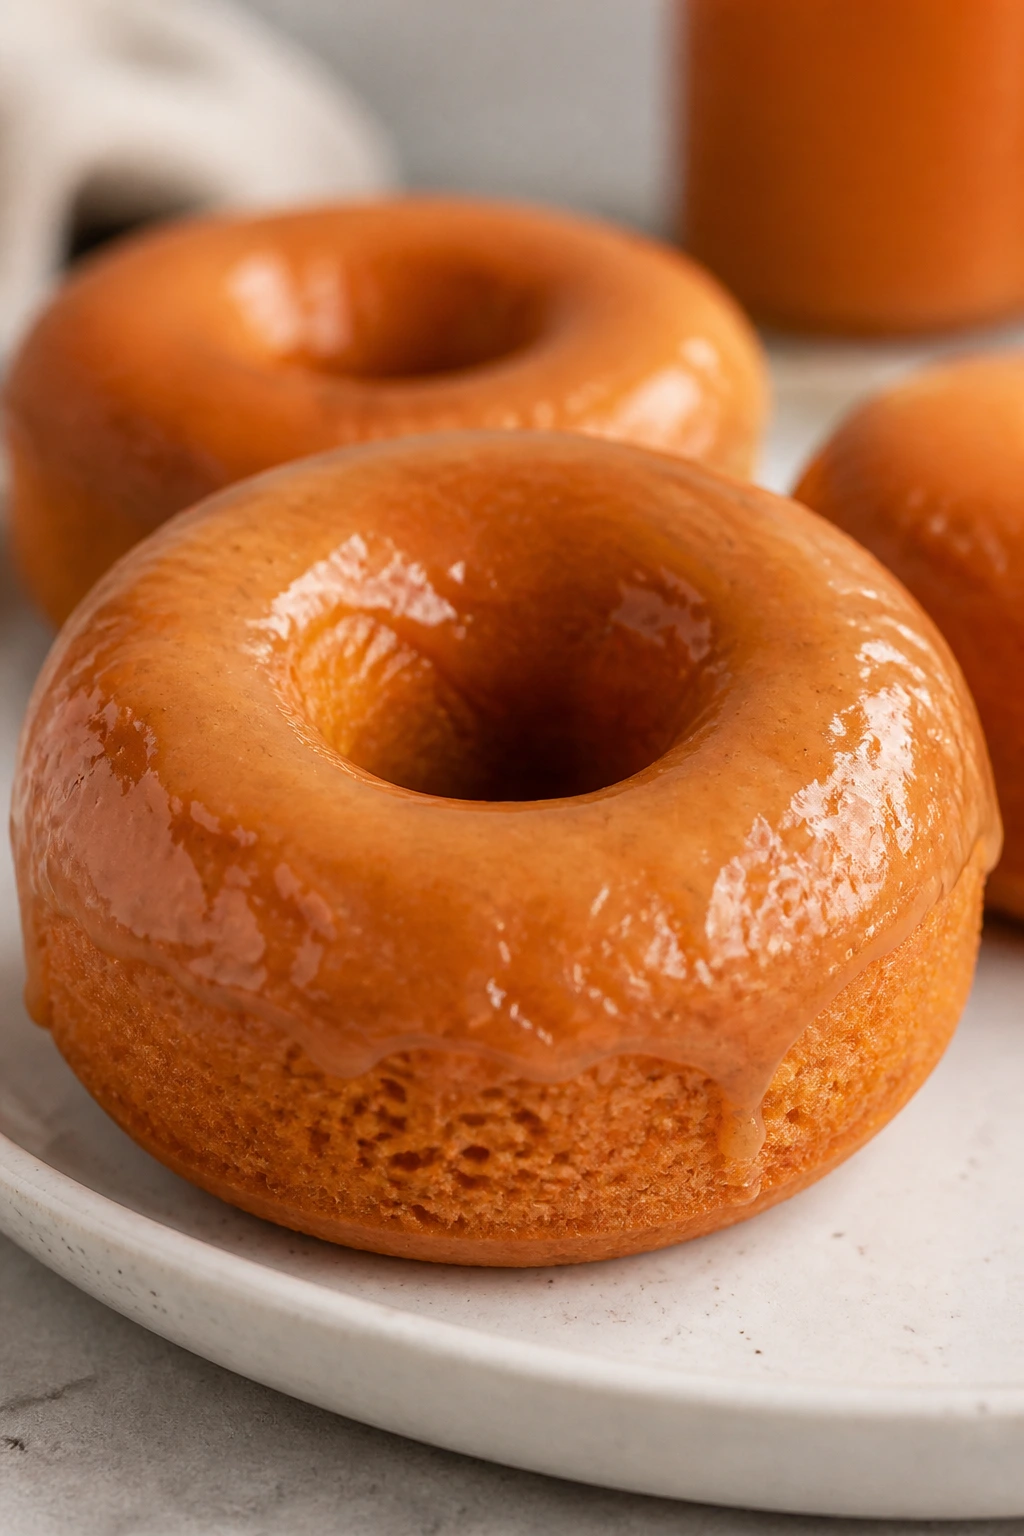
A good Thai iced tea should taste like cold silk with a backbone. The tea itself needs to be bold enough to punch through the ice, and the milk should soften the edges rather than bury them. When it’s made well, the first sip is sweet and creamy, then the tea catches up a second later. That delay is the whole point.
Why It Works:
Thai tea mix is usually built from strong black tea plus spices, so a short, hard steep gives you color and depth without a bitter finish. The evaporated milk brings a cooked-milk note that feels traditional, while the sweetened condensed milk adds body and sweetness in one shot. I prefer this version slightly stronger than most café versions; once the ice starts melting, it stays flavorful instead of watery.
Key Ingredients:
- 3 tablespoons Thai tea mix or crushed Thai tea bags
Use a mix with black tea and spices; if the leaves are coarse, crush them lightly for faster extraction. - 2 cups boiling water
This is your tea base, so keep the water hot enough to pull color quickly. - 2 tablespoons granulated sugar
Adjust later if your tea mix is already sweetened. - 1/4 teaspoon fine salt
A tiny pinch keeps the sweetness from flattening out. - 1/2 teaspoon vanilla extract
Optional, but it smooths the finish. - 1/2 cup evaporated milk
This gives the tea that classic creamy edge. - 1/4 cup sweetened condensed milk
Start here, then taste before adding more. - 1 cup ice
Use plenty. Thai tea likes a cold glass.
Quick Steps:
- Bring 2 cups of water to a boil, then add the Thai tea mix. Steep for 4 to 5 minutes, until the liquid is deep amber-orange and smells strongly of tea and spice.
- Strain the tea through a fine-mesh strainer into a heatproof pitcher. Press gently on the solids, but do not squeeze hard or you’ll push bitterness into the cup.
- Stir in the sugar, salt, and vanilla while the tea is still hot so the sugar dissolves completely.
- Chill the tea for at least 20 minutes in the refrigerator, or pour it over a handful of ice in a separate bowl and stir until cool.
- Fill a tall glass with 1 cup ice, pour in the tea, then top with evaporated milk and sweetened condensed milk. Stir once or twice so you get creamy streaks instead of a fully mixed drink.
Equipment for This Recipe:
- Small saucepan or heatproof kettle
- Fine-mesh strainer
- Tall glass
- Measuring spoons
- Pitcher or heatproof jar
How to Serve This Dish:
Serve it in a tall clear glass with a wide straw if you have one. I like it with a plate of salted peanuts or a small coconut cookie on the side, because the salt keeps the sweetness from feeling heavy.
Pro Tips for This Recipe:
- Brew it a shade stronger than you think you need; the ice will soften it fast.
- If your tea mix already contains sugar, cut the added sugar to 1 tablespoon and taste before sweetening more.
- Let the tea chill before adding the milk if you want the layers to stay defined.
- A pinch of salt matters here. It keeps the drink from tasting like melted candy.
Variations on This Dish:
- Coconut Cream Pour: Swap the evaporated milk for canned coconut milk and keep the condensed milk. The tea turns softer and more tropical.
- Extra-Spiced Glass: Add 1 whole star anise and 1 crushed green cardamom pod to the steep. Strain well.
- Less-Sweet Café Style: Cut the condensed milk to 2 tablespoons and use more evaporated milk for a lighter finish.
Common Mistakes to Avoid with This Dish:
- Steeping too long: After 6 minutes, many Thai tea mixes tip bitter. Set a timer.
- Using a weak brew: If the tea looks pale in the pitcher, it will disappear under ice.
- Pouring milk into very hot tea: You’ll lose the layered look and melt the ice too fast.
2. Thai Tea Boba Milk Tea
Boba and Thai tea are a natural pair because both bring chew, sweetness, and a little drama. The pearls add texture, the tea adds depth, and the milk keeps everything smooth enough to sip without fighting the straw. If you like your drinks with a little more chew and a little less cream, this is the one to make first.
Why It Works:
Tapioca pearls need a strong liquid around them, or they taste like dark little rubber balls. Thai tea gives them a flavor base, and a quick brown-sugar syrup clings to the pearls so the drink tastes good from the first sip to the last. The key is cooking the boba until the center is tender but still pleasantly springy — usually 20 to 25 minutes, depending on the brand.
Key Ingredients:
- 1/2 cup dried tapioca pearls
Buy the regular kind, not instant, if you want that classic chewy bite. - 4 cups water
Plenty of water keeps the pearls from sticking together. - 3 tablespoons Thai tea mix
Use a strong mix; boba drinks need bold tea. - 1 1/2 cups boiling water
This makes a concentrated tea base. - 2 tablespoons sweetened condensed milk
Adds sweetness and body. - 1/2 cup whole milk or oat milk
Whole milk gives the richest texture; oat milk works well if you want a dairy-free cup. - 2 tablespoons brown sugar
For a quick syrup around the pearls. - 1 tablespoon water
Helps dissolve the brown sugar into syrup. - 1 cup ice
Optional, but most people want this cold.
Quick Steps:
- Bring 4 cups of water to a rolling boil. Add the tapioca pearls and stir once so they don’t stick to the bottom.
- Cook for 20 to 25 minutes, stirring every few minutes, until the pearls are mostly translucent with a tiny opaque dot in the center. Turn off the heat and let them sit in the hot water for 10 minutes.
- Drain the pearls and rinse very briefly under warm water if they feel too starchy. Toss them with the brown sugar and 1 tablespoon water in a small bowl.
- Brew the Thai tea with 1 1/2 cups boiling water for 4 to 5 minutes, then strain and cool it for 10 minutes. Stir in the condensed milk and milk.
- Spoon the pearls into a glass, add ice if using, pour the tea over the top, and serve immediately.
Equipment for This Recipe:
- Medium saucepan
- Fine-mesh strainer
- Wide bubble-tea straw
- Small bowl for the pearls
- Tall glass
How to Serve This Dish:
Serve it right away while the pearls are still soft and glossy. I like it in a clear glass because the dark pearls and pale tea look good together, and you can see whether the syrup is settling at the bottom.
Pro Tips for This Recipe:
- Cook the pearls in enough water that they can move around freely. Crowded pearls clump.
- Do not let cooked boba sit for hours; the texture tightens up fast.
- If you want a more dessert-like drink, add 1 extra tablespoon condensed milk.
- Stir the drink before every sip so the syrup doesn’t stay trapped under the pearls.
Variations on This Dish:
- Brown Sugar Ribbon: Swirl 1 tablespoon extra brown sugar syrup down the glass before adding the tea.
- Coconut Boba: Use canned coconut milk instead of dairy milk and add a pinch of salt.
- Tea-and-Coffee Blend: Add 2 tablespoons strong cold brew for a darker, slightly bitter edge.
Common Mistakes to Avoid with This Dish:
- Undercooking the pearls: Hard centers ruin the drink. Bite one before draining.
- Making the tea too weak: Boba and milk dilute the glass fast, so go strong.
- Chilling the pearls in the fridge: They turn firm and dull. Keep them warm and use them quickly.
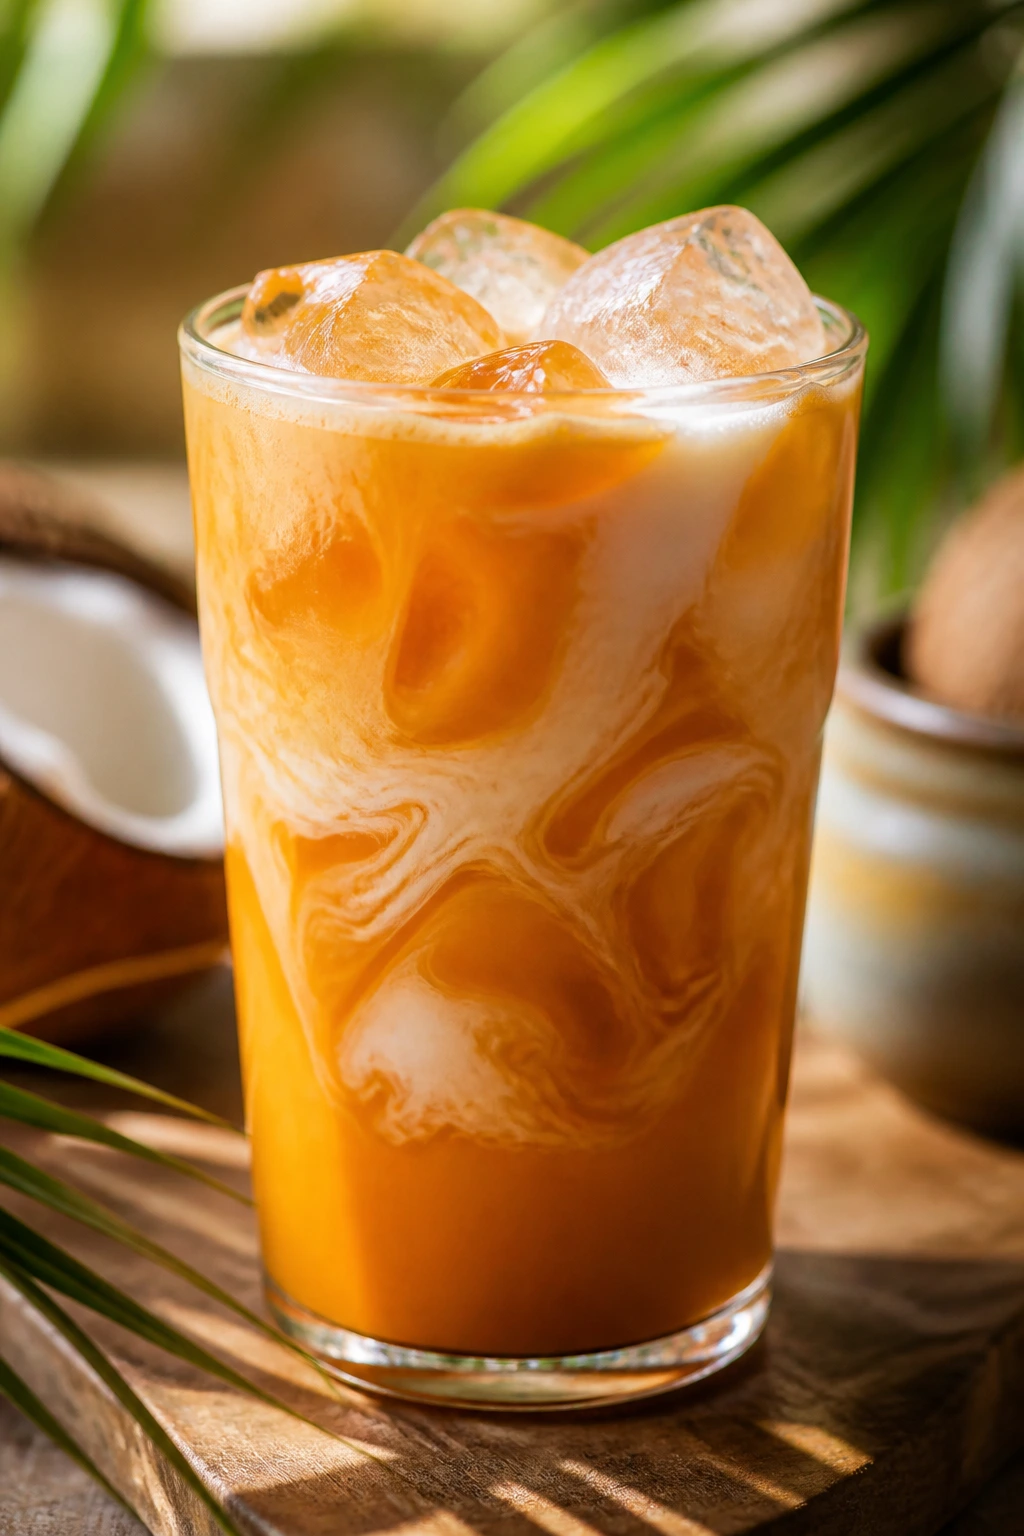
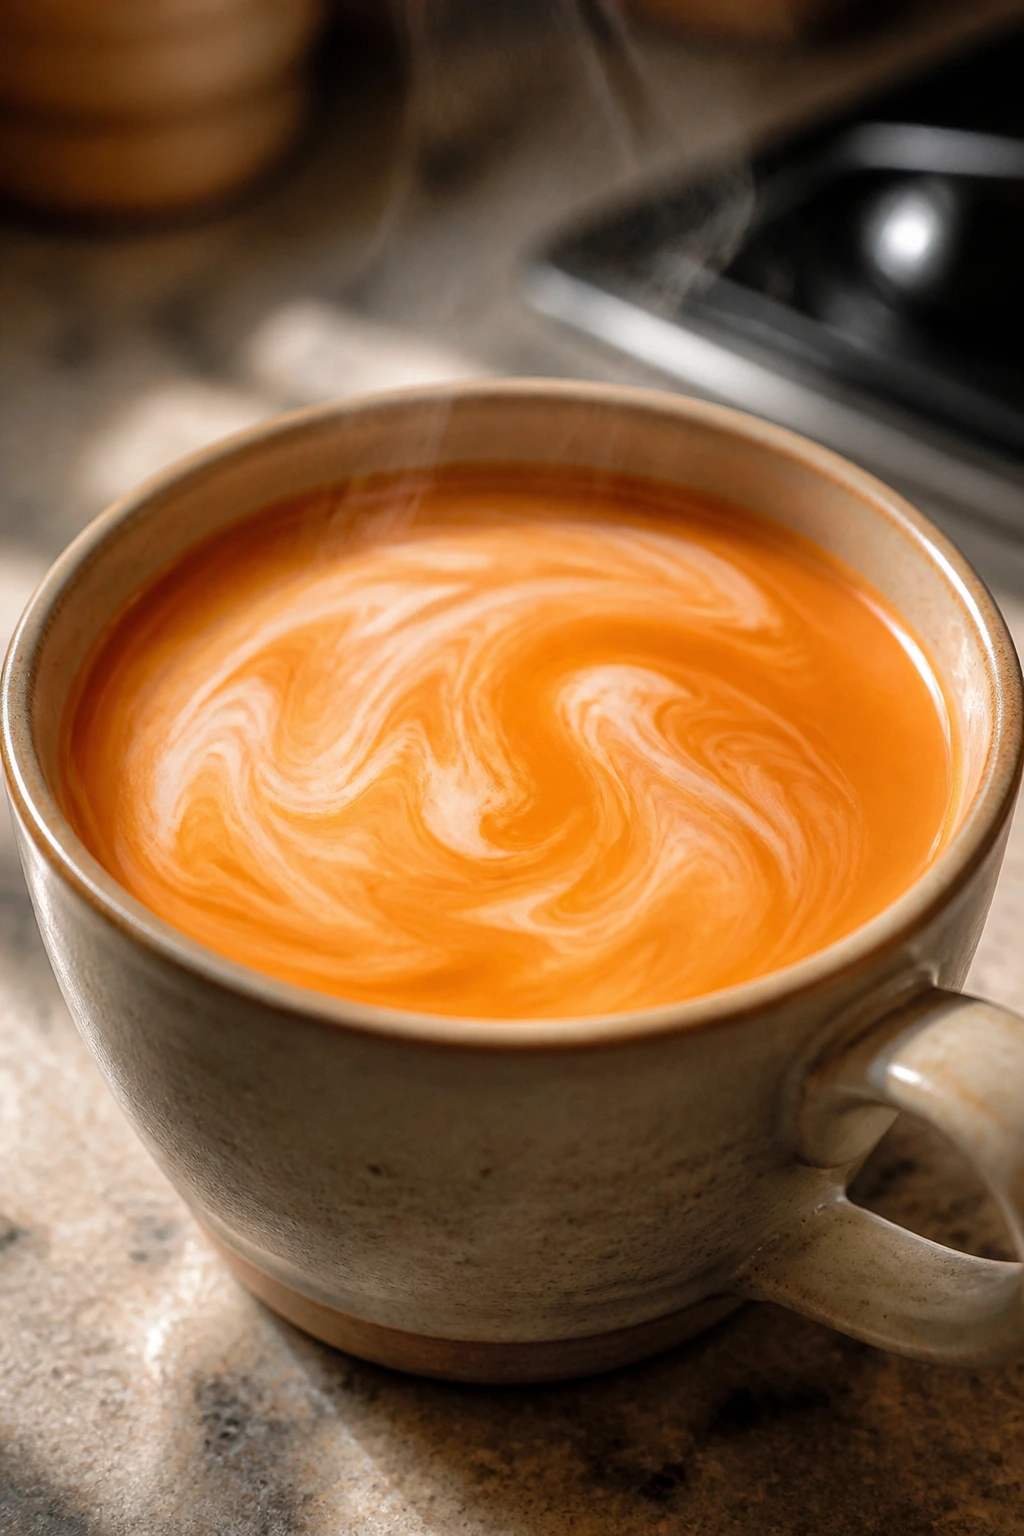
3. Hot Thai Tea Latte with Coconut Milk
Cold Thai tea gets all the attention, but the hot version is the one I reach for when I want something soothing without going bland. Warm coconut milk changes the shape of the flavor — the tea tastes rounder, the spice reads softer, and the whole mug feels calmer. It’s still Thai tea. Just quieter.
Why It Works:
Heating the coconut milk with sugar and a pinch of cardamom lets the fat carry the tea’s aroma. The tea steepes in water first, which keeps it brisk; then the warm milk folds in and rounds it out. If you’ve only had Thai tea over ice, this is the version that shows how much depth the tea mix really has.
Key Ingredients:
- 3 tablespoons Thai tea mix
- 1 1/2 cups water
- 1 cup canned coconut milk
Use full-fat coconut milk, not the thin carton beverage. - 1/2 cup whole milk
Or replace with more coconut milk if you want it fully dairy-free. - 2 tablespoons brown sugar
Adjust to taste. - 1/4 teaspoon ground cardamom
Optional, but it plays well with the tea. - 1/4 teaspoon fine salt
- 1 teaspoon vanilla extract
- Cinnamon, for serving
A light dusting is enough.
Quick Steps:
- Bring 1 1/2 cups water to a boil, add the Thai tea mix, and steep for 4 minutes.
- Strain the tea into a small saucepan or heatproof mug.
- Add the coconut milk, whole milk, brown sugar, cardamom, salt, and vanilla. Warm over low heat for 2 to 3 minutes, just until steaming; do not boil.
- Whisk gently until the surface looks silky and small bubbles appear around the edge.
- Pour into mugs and finish with a dusting of cinnamon.
Equipment for This Recipe:
- Small saucepan
- Fine-mesh strainer
- Whisk
- Measuring spoons
- Mug
How to Serve This Dish:
Serve it in a wide mug with a cookie on the saucer — a plain butter cookie or coconut shortbread works well. The drink is rich enough that you don’t need much beside it.
Pro Tips for This Recipe:
- Keep the heat low once the milk goes in. Coconut milk can separate if it boils hard.
- If you want a deeper tea note, steep the mix in the hot water for 5 minutes, not more.
- A tiny pinch of salt keeps the coconut from tasting flat.
- Froth the top with a hand frother if you want a café-style finish.
Variations on This Dish:
- Honey Cardamom Cup: Swap the brown sugar for 1 1/2 tablespoons honey.
- Extra-Creamy Mug: Replace the whole milk with half-and-half.
- Decaf Evening Version: Use decaf black tea plus 1 teaspoon crushed star anise and 1 small cinnamon stick.
Common Mistakes to Avoid with This Dish:
- Boiling the milk: That can split the coconut milk and dull the flavor.
- Using carton coconut beverage: It tastes thin and watery here.
- Skipping the straining step: Loose tea leaves ruin the smooth texture.
4. Thai Tea Coconut Slush
This is the version I make when the weather is sticky and I want Thai tea to feel more like a frozen treat than a beverage. It lands somewhere between a slush and a shake, with coconut milk softening the tea and ice making the whole thing feel almost chewy. The texture matters here. You want thick and spoonable, not a watery orange slurp.
Why It Works:
Brewed tea that’s been chilled first blends into a finer slush than hot tea dumped straight into the blender. Coconut milk gives enough fat to keep the drink from tasting sharp, and a little condensed milk helps the ice crush into a smooth, almost sandy texture. The result tastes colder than regular iced tea because the blend holds the chill on the tongue.
Key Ingredients:
- 3 tablespoons Thai tea mix
- 1 1/2 cups boiling water
- 1/2 cup canned coconut milk
- 2 tablespoons sweetened condensed milk
- 1 tablespoon simple syrup
Use more only if your tea mix is unsweetened. - 2 cups ice
- 1/8 teaspoon fine salt
- 1/2 teaspoon vanilla extract
Quick Steps:
- Brew the Thai tea in the boiling water for 4 to 5 minutes, then strain into a bowl or pitcher.
- Stir in the salt, vanilla, condensed milk, and simple syrup while the tea is still warm.
- Chill the tea for 20 minutes, or until no longer warm to the touch.
- Pour the tea, coconut milk, and ice into a blender. Blend on high for 30 to 45 seconds, until thick and slushy with no large ice chunks left.
- Serve immediately in chilled glasses.
Equipment for This Recipe:
- Blender
- Fine-mesh strainer
- Measuring cup
- Chilled glasses
- Spoon or wide straw
How to Serve This Dish:
Serve it in a frosty glass and, if you want to get a little fancy, top it with a spoonful of softly whipped cream and a pinch of toasted coconut. It drinks like dessert but still tastes like tea.
Pro Tips for This Recipe:
- Start with cold tea. Warm tea melts the ice too fast and thins the drink.
- If your blender struggles, pulse first, then blend.
- Add ice by the cup, not all at once, if you want more control over thickness.
- A pinch of salt keeps the coconut from tasting like sunscreen, which is a problem no one needs.
Variations on This Dish:
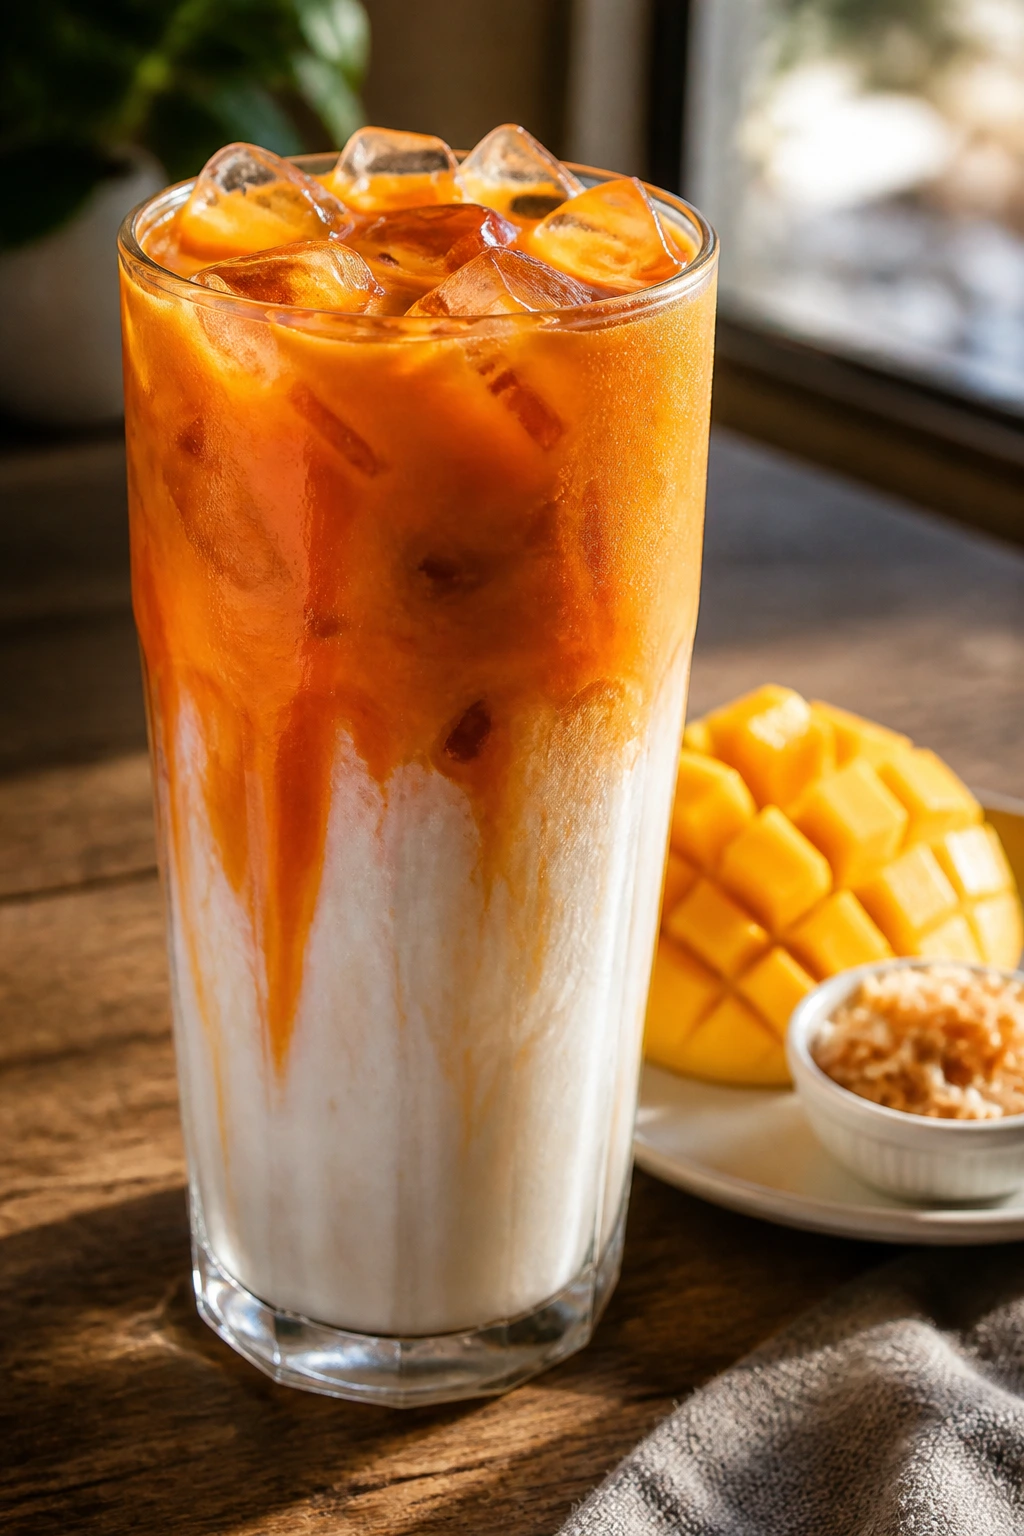
- Mango Swirl Slush: Blend in 1/4 cup mango purée for a fruitier finish.
- Lighter Drinkable Slush: Use 1/4 cup coconut milk instead of 1/2 cup.
- Boba Slush: Drop in cooked tapioca pearls right before serving.
Common Mistakes to Avoid with This Dish:
- Overblending: It turns into soup fast. Stop as soon as the texture loosens.
- Using too much ice: The drink gets pale and blunt.
- Skipping the chill step: Warm tea makes a thin slush.
5. Thai Tea Frappe with Vanilla Ice Cream
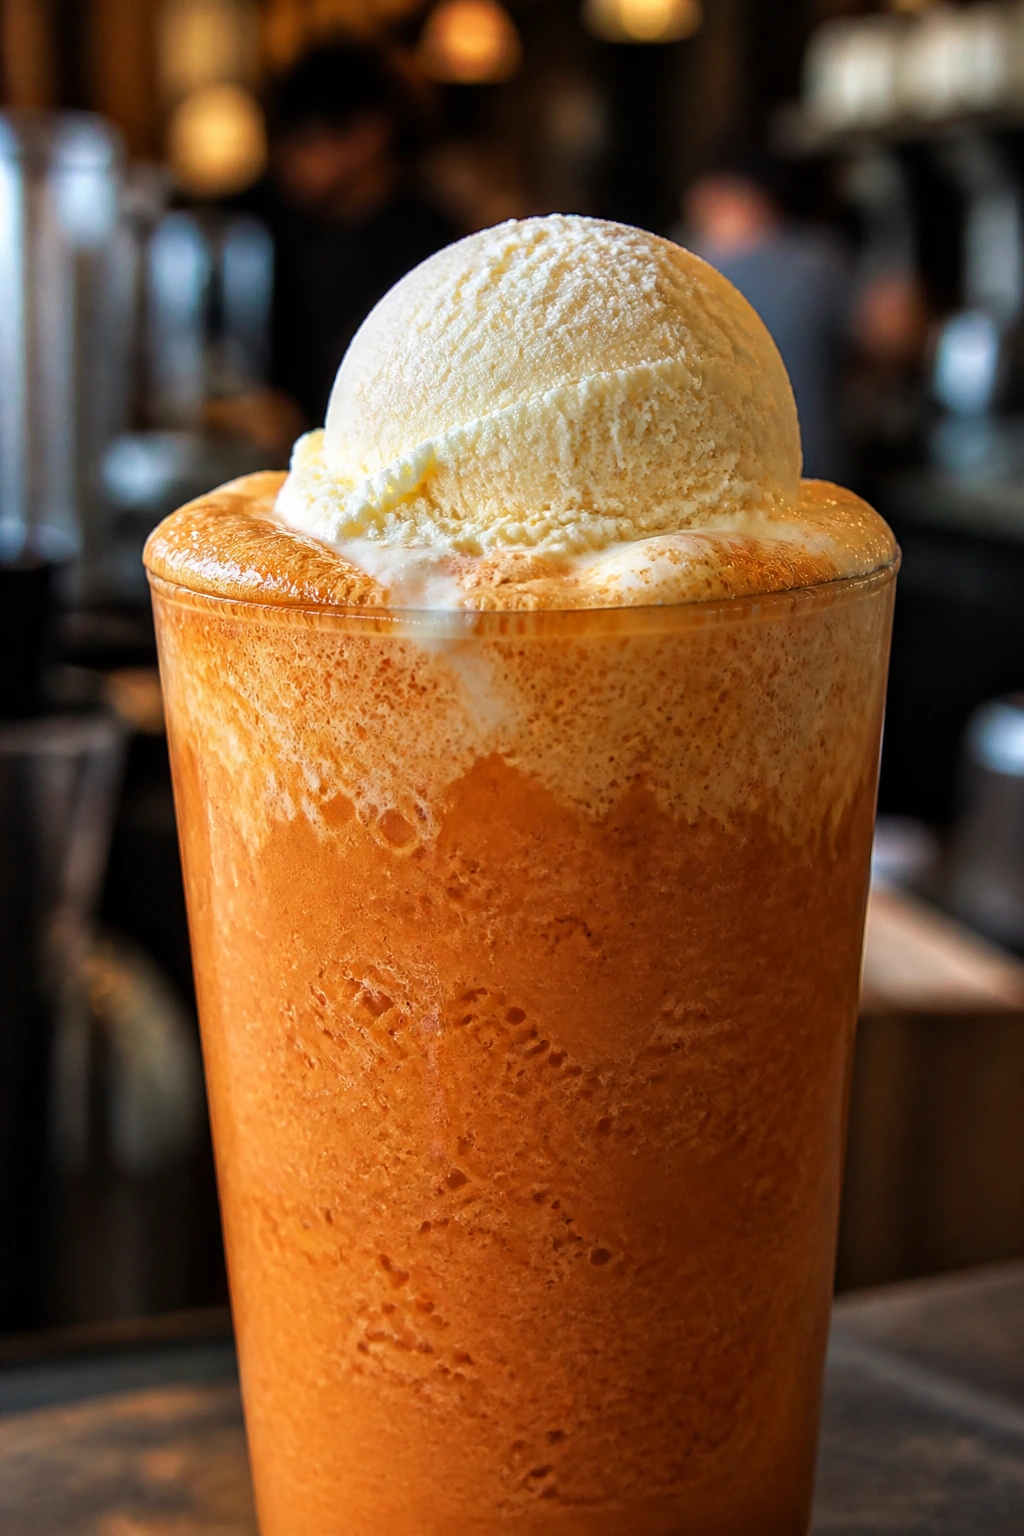
Some drinks are dessert in a glass, and this one does not pretend otherwise. Vanilla ice cream gives the Thai tea a softer, rounder shape than milk alone, and the blender makes the whole thing feel more like a café frappe than a straight milk tea. It’s cold, creamy, and a little over the top in the way a good frozen drink should be.
Why It Works:
Ice cream adds both sugar and fat, which means you can get away with a stronger tea base and less extra sweetener. The frozen texture also keeps the tea flavor from feeling thin, since the body comes from the ice cream instead of only the milk. Use a tea base that has cooled completely; otherwise the ice cream melts before it can whip into a froth.
Key Ingredients:
- 2 tablespoons Thai tea mix
- 1 cup boiling water
- 2 scoops vanilla ice cream
- 1/2 cup whole milk
- 1 cup ice
- 1 tablespoon granulated sugar
- 1/8 teaspoon fine salt
- Whipped cream, for topping
Optional, but hard to resist.
Quick Steps:
- Brew the Thai tea in 1 cup boiling water for 4 minutes, then strain and cool completely.
- Add the cooled tea, ice cream, milk, ice, sugar, and salt to a blender.
- Blend on high for 20 to 30 seconds, until smooth and thick but still pourable.
- Taste and add a little more sugar if needed, then blend for 5 more seconds.
- Pour into a tall glass and top with whipped cream.
Equipment for This Recipe:
- Blender
- Fine-mesh strainer
- Tall glass
- Ice cream scoop
- Spoon
How to Serve This Dish:
Serve it immediately with a straw and a long spoon. If you’re making it after dinner, a small cookie on the side is enough; the drink does the heavy lifting.
Pro Tips for This Recipe:
- Let the tea cool fully before blending, or the texture gets loose.
- Use good vanilla ice cream. A bland carton makes the drink taste flat.
- If it’s too thick, add milk in 2 tablespoon increments.
- If you want a stronger tea note, freeze a little extra brewed tea in ice cube trays and use those instead of plain ice.
Variations on This Dish:
- Coffee-Shop Swirl: Add 1 shot of espresso for a darker, mocha-leaning drink.
- Coconut Frappe: Use coconut ice cream and coconut milk.
- Salted Caramel Top: Drizzle 1 teaspoon caramel over the whipped cream.
Common Mistakes to Avoid with This Dish:
- Using hot tea: It melts the ice cream and kills the froth.
- Overloading with ice: The drink turns slushy instead of creamy.
- Choosing weak vanilla ice cream: The flavor vanishes under the tea.
6. Thai Tea Popsicles
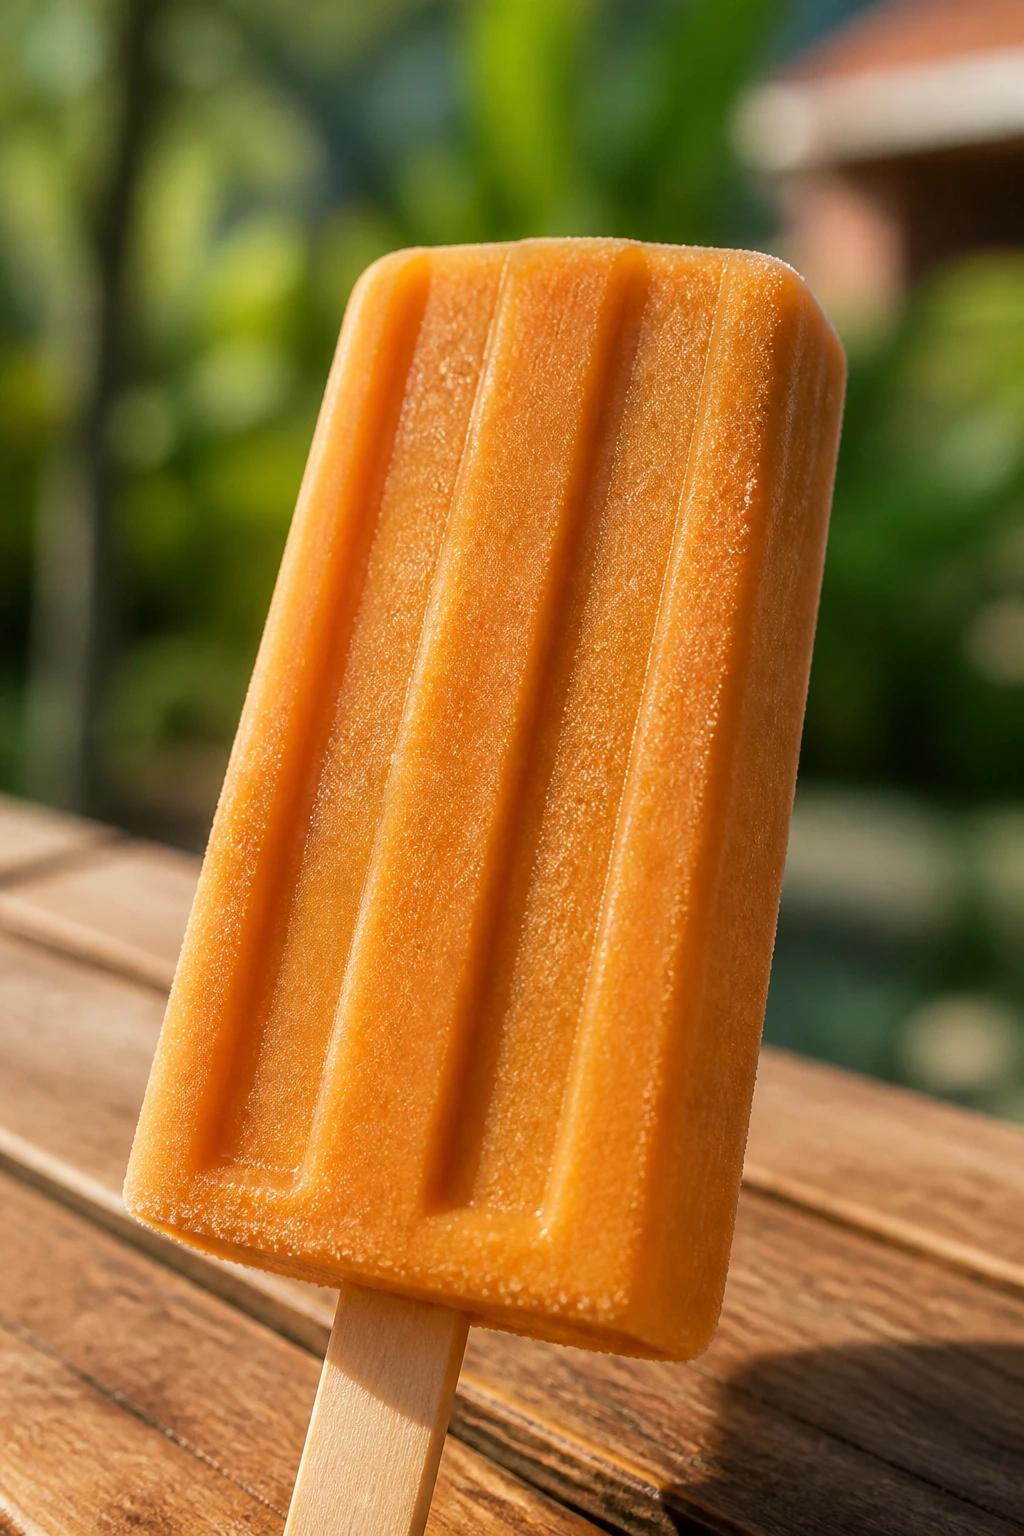
Thai tea works almost too well as a popsicle because its color, spice, and sweetness all stay intact after freezing. The texture changes, obviously, but the flavor doesn’t disappear the way some milky drinks do. These pops are creamy, cold, and sturdy enough to survive a warm afternoon without collapsing into icy shards.
Why It Works:
A mix of tea, coconut milk, and condensed milk freezes into a smoother popsicle than tea and water alone. The fat keeps the ice crystals smaller, which is why the finished pop tastes creamy instead of brittle. If you want a clean break from the mold, a little extra sweetener helps, since frozen desserts always taste less sweet than the liquid version.
Key Ingredients:
- 3 tablespoons Thai tea mix
- 1 1/2 cups boiling water
- 1/2 cup canned coconut milk
- 1/2 cup whole milk
- 1/2 cup sweetened condensed milk
- 1 teaspoon vanilla extract
- 1/8 teaspoon fine salt
- 6 popsicle molds or similar molds
Quick Steps:
- Brew the Thai tea in boiling water for 4 to 5 minutes, then strain into a mixing bowl.
- Stir in the coconut milk, whole milk, condensed milk, vanilla, and salt until smooth.
- Let the mixture cool to room temperature, then pour it into popsicle molds, leaving about 1/4 inch at the top for expansion.
- Freeze for 1 hour, then insert sticks if your molds need them.
- Freeze for at least 5 more hours, or until firm all the way through. Run the molds under warm water for 10 to 15 seconds before unmolding.
Equipment for This Recipe:
- Popsicle molds
- Mixing bowl
- Fine-mesh strainer
- Measuring cup
- Funnel, optional
How to Serve This Dish:
Serve the pops on a small plate lined with parchment so the drips don’t run everywhere. I like them with sliced mango or pineapple, because the fruit sharpens the sweetness.
Pro Tips for This Recipe:
- Leave a little space at the top of each mold; frozen liquid expands.
- Stir the base well before pouring because condensed milk likes to settle.
- If you want stripes, freeze half the mixture first, then add the rest.
- Full-fat coconut milk gives a smoother freeze than light coconut milk.
Variations on This Dish:
- Mango Marble Pops: Swirl 2 tablespoons mango purée into each mold.
- Coconut-Only Pops: Replace the whole milk with more coconut milk.
- Spice Pop: Add a pinch of ground cardamom to the base.
Common Mistakes to Avoid with This Dish:
- Freezing them too quickly without mixing: The condensed milk can pool.
- Using low-fat milk only: The pops freeze icier and less creamy.
- Unmolding too early: Give the mold that 10-second warm-water rinse.
7. Thai Tea Ice Cream
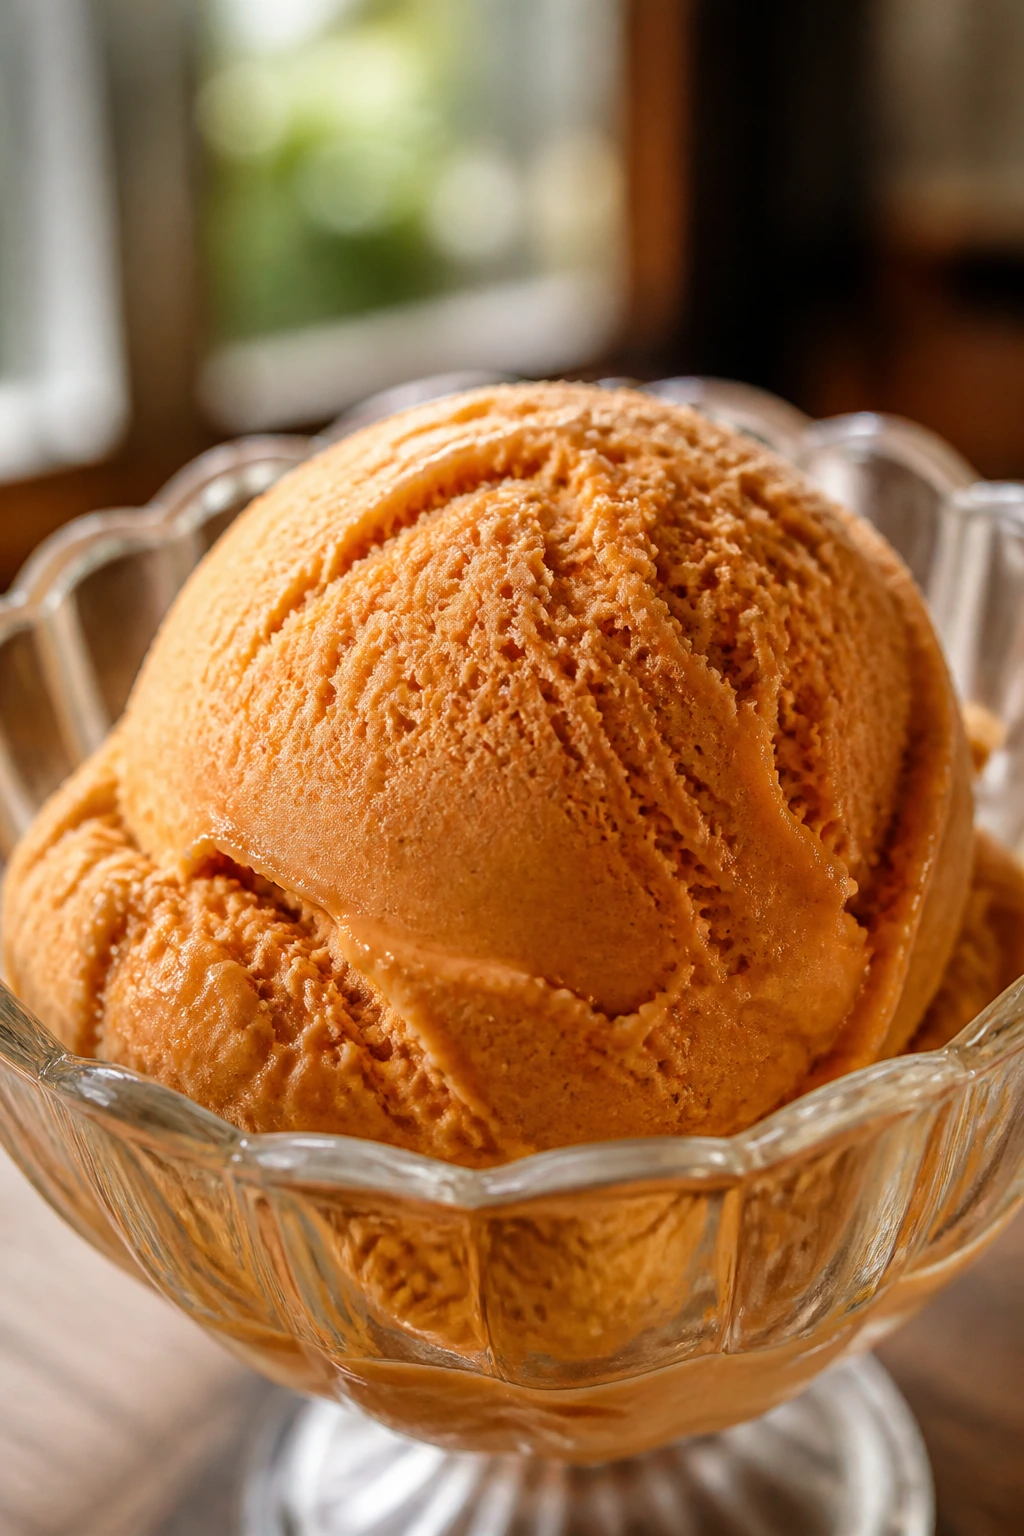
This is the rich, old-school version of Thai tea desserts, and it tastes like the inside of a very good ice cream shop. The tea comes through the cream in a slow, polished way, not as a bright top note but as something deeper and darker. If you like tea flavor that lingers on the back of the tongue, this one is worth the churn.
Why It Works:
The tea steeps directly into warm cream and milk, which pulls out enough flavor to stand up to the custard base. Egg yolks give the ice cream body so it stays scoopable after freezing, while the sugar keeps the texture soft instead of icy. I prefer to strain the tea leaves before adding the yolks; it keeps the custard smooth and makes the finish cleaner.
Key Ingredients:
- 2 cups heavy cream
- 1 cup whole milk
- 4 tablespoons Thai tea mix
- 3/4 cup granulated sugar
- 5 large egg yolks
- 1/4 teaspoon fine salt
- 1 teaspoon vanilla extract
Quick Steps:
- Warm the heavy cream and milk in a saucepan over medium heat until steaming, not boiling. Stir in the Thai tea mix and steep off the heat for 10 minutes.
- Strain the tea-infused cream back into the saucepan. Rewarm gently.
- In a bowl, whisk the egg yolks, sugar, and salt until pale and slightly thickened.
- Slowly whisk in about 1 cup of the hot cream to temper the yolks, then pour the mixture back into the saucepan. Cook over low heat, stirring constantly, until the custard reaches 170°F to 175°F and coats the back of a spoon.
- Strain the custard again, stir in vanilla, chill completely, then churn in an ice cream maker and freeze until firm.
Equipment for This Recipe:
- Saucepan
- Fine-mesh strainer
- Whisk
- Instant-read thermometer
- Ice cream maker
How to Serve This Dish:
Scoop it into chilled bowls and finish with toasted coconut or crushed sesame cookies. It also works well next to mango slices if you want a sharper, fresher contrast.
Pro Tips for This Recipe:
- Steep the tea in the cream off the heat so the milk doesn’t scorch.
- Do not rush the chilling step; a warm base churns poorly.
- If you want a darker tea flavor, add 1 extra tablespoon of tea mix.
- A pinch of salt keeps the custard from tasting too sweet.
Variations on This Dish:
- Coconut Ice Cream Base: Replace 1 cup of the cream with full-fat coconut milk.
- Vanilla Bean Finish: Add 1/2 teaspoon vanilla bean paste with the vanilla extract.
- No-Churn Shortcut: Fold the chilled custard into 2 cups whipped cream and freeze, though the texture will be a little denser.
Common Mistakes to Avoid with This Dish:
- Boiling the custard: That scrambles the yolks.
- Freezing before it’s fully chilled: You get grainier ice cream.
- Skipping the second strain: Little tea flecks can make the texture gritty.
8. Thai Tea Cheesecake Bars
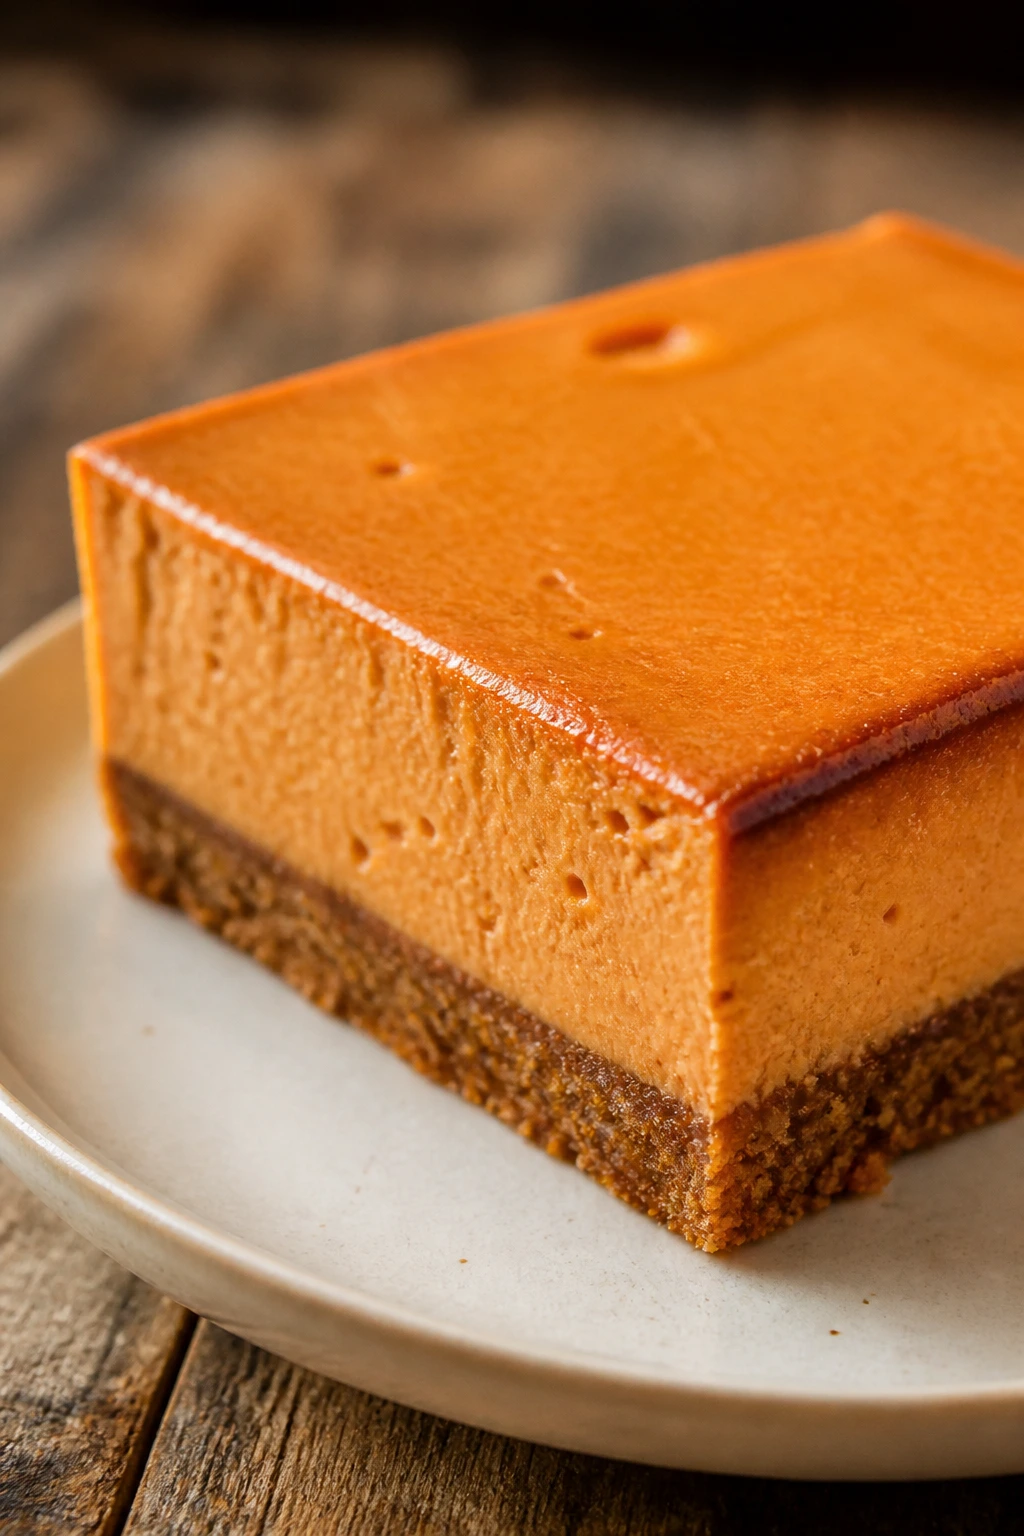
Cheesecake and Thai tea make sense together because both like richness, but Thai tea keeps the filling from tasting one-note. The bars are dense without being heavy, and the tea gives the cheesecake a warm caramel edge that plain vanilla never reaches. A buttery crust underneath gives each bite enough crunch to keep the texture moving.
Why It Works:
Cream cheese gives the filling structure, and a small amount of Thai tea concentrate brings flavor without thinning the batter. A short bake sets the filling so it slices cleanly after chilling. This is one of those desserts that tastes better after a long rest in the fridge; the tea flavor settles in and stops shouting.
Key Ingredients:
For the crust:
- 1 1/2 cups graham cracker crumbs
- 6 tablespoons unsalted butter, melted
- 2 tablespoons granulated sugar
- 1/4 teaspoon fine salt
For the filling:
- 16 ounces cream cheese, softened
- 2/3 cup granulated sugar
- 2 large eggs
- 1/4 cup sour cream
- 1/4 cup sweetened condensed milk
- 2 tablespoons strong Thai tea concentrate, cooled
- 1 teaspoon vanilla extract
- 1 tablespoon all-purpose flour
Quick Steps:
- Heat the oven to 350°F and line an 8×8-inch pan with parchment.
- Mix the crust ingredients, press them firmly into the pan, and bake for 8 minutes until the edges look slightly darker.
- Beat the cream cheese and sugar until smooth, then mix in the eggs one at a time.
- Stir in the sour cream, condensed milk, tea concentrate, vanilla, and flour just until blended. Pour over the crust.
- Bake for 25 to 30 minutes, until the center is set around the edges but still has a slight wobble in the middle. Cool completely, then chill for at least 4 hours before slicing.
Equipment for This Recipe:
- 8×8-inch baking pan
- Parchment paper
- Mixing bowls
- Electric mixer
- Spatula
How to Serve This Dish:
Cut the bars with a hot knife for the cleanest edges. A tiny swirl of whipped cream and a dusting of crushed graham crumbs is enough; the tea flavor already does plenty.
Pro Tips for This Recipe:
- Make sure the tea concentrate is cold before adding it.
- Don’t overbake; cheesecake firms up more in the fridge.
- Use room-temperature cream cheese so the batter stays smooth.
- Chill overnight if you want the cleanest slices.
Variations on This Dish:
- Mango Topper: Spoon a thin layer of mango purée over the chilled bars.
- Gluten-Free Crust: Use gluten-free graham crumbs or crushed gluten-free cookies.
- Mini Jar Cheesecakes: Bake the filling in small jars without the crust for easy serving.
Common Mistakes to Avoid with This Dish:
- Beating in too much air: That leads to cracking. Mix on low once the eggs go in.
- Skipping the chill time: The bars will smear when sliced.
- Using warm tea concentrate: It loosens the filling and can lengthen baking time.
9. Thai Tea Tiramisu Cups

Tiramisu cups are the tidy, party-ready version of a dessert that usually asks for a full dish and a sharp knife. Thai tea gives the ladyfingers a floral, malty soak, and mascarpone keeps the cream layer plush without getting heavy. Each spoonful tastes like tea, cream, and a little whisper of spice.
Why It Works:
Classic tiramisu relies on coffee and cocoa, but Thai tea brings its own bitterness and sweetness, so you don’t need much else. The tea soak has to be strong enough to flavor the ladyfingers without turning them soggy. Mascarpone and whipped cream create a filling that stays light enough to balance the tea’s richness.
Key Ingredients:
- 1 cup strong Thai tea concentrate, cooled
- 1 tablespoon granulated sugar
- 1 tablespoon dark rum or 1 teaspoon vanilla extract
- 8 to 10 ladyfingers
- 8 ounces mascarpone cheese
- 1 cup heavy cream
- 1/3 cup powdered sugar
- 1 teaspoon vanilla extract
- 1 tablespoon cocoa powder or finely ground tea, for dusting
Quick Steps:
- Stir the sugar and rum or vanilla into the cooled tea concentrate.
- Whip the heavy cream and powdered sugar to medium peaks. Fold in the mascarpone and vanilla until smooth.
- Briefly dip each ladyfinger into the tea mixture, about 1 second per side. They should be damp, not falling apart.
- Layer the soaked ladyfingers and mascarpone cream in small glasses or jars.
- Chill for at least 4 hours, then dust with cocoa powder or a little finely ground tea before serving.
Equipment for This Recipe:
- Mixing bowl
- Hand mixer
- Small glasses or jars
- Whisk
- Spoon
How to Serve This Dish:
Serve these cups chilled with a tiny spoon. They’re rich enough that a small portion feels right, and the glass layers look clean when the ladyfingers are cut to fit.
Pro Tips for This Recipe:
- Dip the ladyfingers quickly. A long soak gives you mush.
- If mascarpone is cold and stiff, let it sit for 10 minutes first.
- Chill the cups overnight if you want the flavor to mellow.
- Use clear glasses so the layers stay visible.
Variations on This Dish:
- Coconut Cream Cups: Replace half the mascarpone mixture with whipped coconut cream.
- Mango Tiramisu: Add a thin layer of diced mango between the cream layers.
- No-Rum Version: Use vanilla only; it stays family-friendly without losing depth.
Common Mistakes to Avoid with This Dish:
- Soaking the ladyfingers too long: They collapse.
- Skipping the chill time: The cream won’t set properly.
- Using weak tea: The flavor gets lost under the mascarpone.
10. Thai Tea Panna Cotta
Panna cotta is one of those desserts that looks fancy and behaves politely, which is probably why it pairs so well with Thai tea. The flavor stays clean and creamy, the texture wobbles just enough, and every spoonful tastes cool and smooth with a tea note that comes through slowly. It’s restrained, which I like.
Why It Works:
Gelatin gives the cream mixture its signature wobble, and Thai tea steeped into the dairy gives a color and flavor that feels elegant without much effort. Because panna cotta is served cold, you want the tea base to be strong enough to survive chilling. A little vanilla helps the tea taste fuller and not merely sweet.
Key Ingredients:
- 2 cups heavy cream
- 1 cup whole milk
- 1/2 cup granulated sugar
- 3 tablespoons Thai tea mix
- 2 1/4 teaspoons unflavored gelatin
- 3 tablespoons cold water
- 1 teaspoon vanilla extract
- 1/8 teaspoon fine salt
Quick Steps:
- Sprinkle the gelatin over the cold water in a small bowl and let it bloom for 5 minutes.
- Warm the cream, milk, sugar, Thai tea mix, and salt in a saucepan until steaming. Turn off the heat and steep for 8 minutes.
- Strain the tea mixture back into the saucepan. Rewarm gently if needed, then whisk in the bloomed gelatin until dissolved.
- Stir in the vanilla and pour into 4 to 6 molds or ramekins.
- Chill for at least 4 hours, then unmold or serve straight from the cup with fruit on top.
Equipment for This Recipe:
- Saucepan
- Fine-mesh strainer
- Small bowl
- Whisk
- Ramekins or molds
How to Serve This Dish:
Serve it with diced mango, lychee, or a few raspberries if you want acidity. The fruit cuts the cream and gives the plate a fresher finish.
Pro Tips for This Recipe:
- Bloom the gelatin fully before adding it to the hot cream.
- Strain the tea leaves well or the texture gets speckled.
- If unmolding, dip the ramekin base in warm water for a few seconds.
- Don’t boil after the gelatin goes in.
Variations on This Dish:
- Coconut Panna Cotta: Replace 1 cup of the milk with canned coconut milk.
- Mango Sauce Finish: Spoon on thin mango purée before serving.
- Mini Shot Cups: Set the panna cotta in small glasses for easier party service.
Common Mistakes to Avoid with This Dish:
- Using too much gelatin: It turns bouncy instead of silky.
- Pouring while the mixture is too hot: That can trap foam on top.
- Unmolding too soon: Give it the full chill time.
11. Thai Tea Crème Brûlée
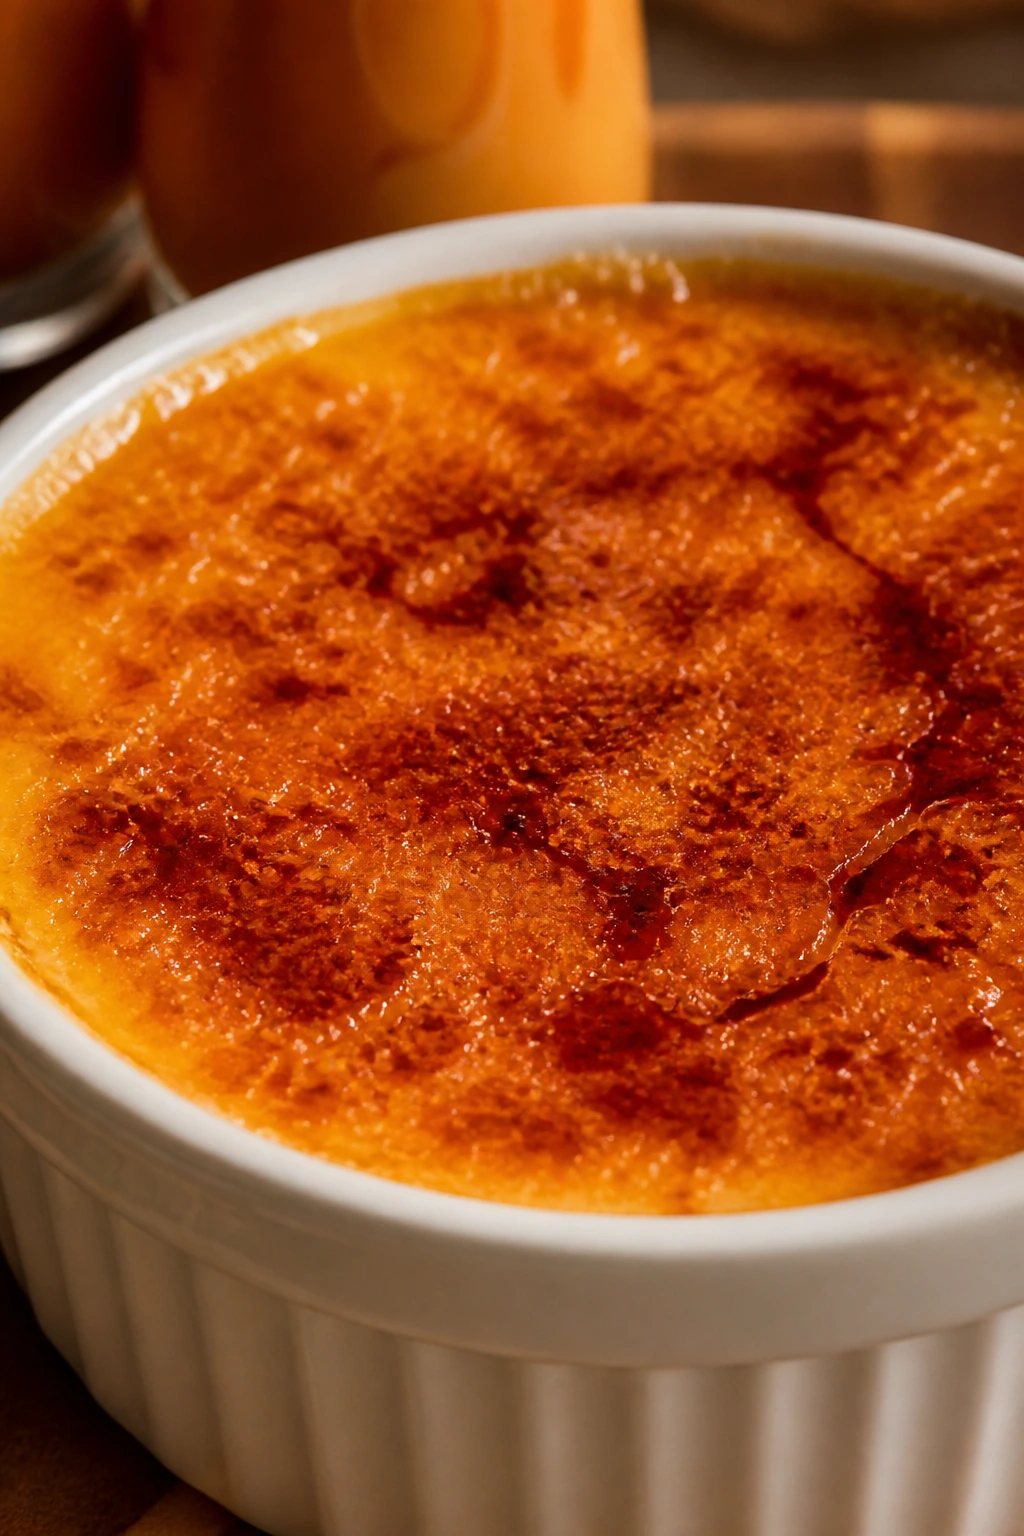
Crème brûlée and Thai tea are a sharper match than people expect. The brittle sugar top cracks first, then the custard underneath gives you creamy tea flavor that lands somewhere between caramel and black tea. If you like desserts that change texture in the mouth, this one is all about that first crack with the spoon.
Why It Works:
Infusing cream with Thai tea gives the custard enough flavor to survive the egg yolks and sugar. A water bath keeps the custard gentle, which matters because brûlée custards go from smooth to grainy fast if you blast them with heat. The sugar top adds the crisp contrast that keeps the dessert from feeling soft all the way through.
Key Ingredients:
- 2 cups heavy cream
- 1/2 cup whole milk
- 3 tablespoons Thai tea mix
- 5 large egg yolks
- 1/3 cup granulated sugar
- 1/8 teaspoon fine salt
- 1/4 cup granulated sugar, for brûlée topping
Quick Steps:
- Heat the cream and milk until steaming, stir in the Thai tea mix, and steep off the heat for 10 minutes.
- Strain the cream, then whisk the egg yolks, sugar, and salt in a bowl until smooth.
- Temper the yolks with the warm cream, pour the mixture through a strainer, and divide it among 4 ramekins.
- Place the ramekins in a baking dish, add hot water halfway up the sides, and bake at 325°F for 30 to 35 minutes until the centers still wobble slightly.
- Chill for at least 4 hours, then sprinkle each custard with a thin layer of sugar and torch until amber and glassy.
Equipment for This Recipe:
- 4 ramekins
- Baking dish
- Fine-mesh strainer
- Whisk
- Kitchen torch
How to Serve This Dish:
Serve it cold with the sugar top freshly torched. Wait a minute after torching so the caramel sets, then crack it with the back of a spoon.
Pro Tips for This Recipe:
- Strain the custard twice if you want an especially smooth finish.
- Use a thin, even layer of sugar on top before torching.
- The custard should jiggle like set gelatin, not slosh.
- Torch right before serving; the sugar top softens if it sits too long.
Variations on This Dish:
- Coconut Brûlée: Swap the milk for canned coconut milk.
- Vanilla Bean Version: Add vanilla bean paste to the cream.
- Mini Tartlet Brûlée: Bake in shallow tart shells for a pastry shell and custard combo.
Common Mistakes to Avoid with This Dish:
- Overbaking: The custard turns grainy. Pull it while the center still wobbles.
- Torching too heavily: Burnt sugar tastes bitter fast.
- Skipping the strain: Tiny cooked egg bits ruin the texture.
12. Thai Tea Rice Pudding
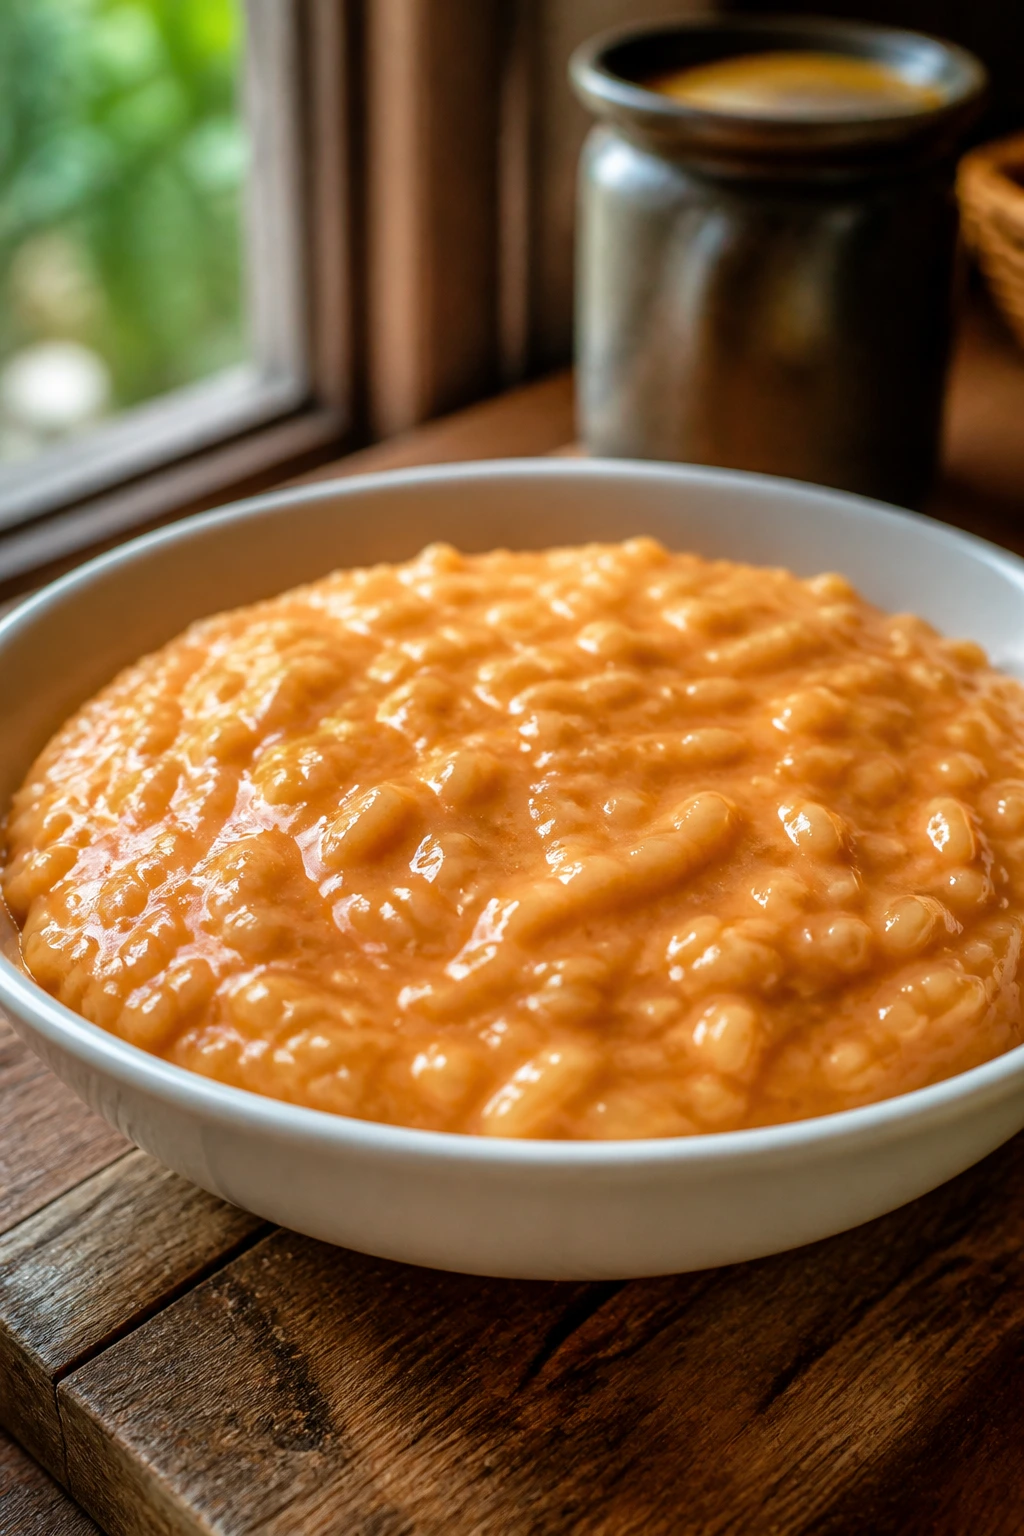
Rice pudding is the kind of dessert that looks plain in the pot and turns quietly addictive once it cools. Thai tea gives it a stronger, deeper flavor than vanilla alone, and the rice holds onto the cream so each spoonful tastes dense and comforting. If you’re the sort of person who likes a dessert you can eat with a spoon straight from the fridge, this one belongs near the top.
Why It Works:
Arborio rice releases starch as it cooks, which thickens the milk into something custardy without eggs. Thai tea concentrate adds enough flavor to keep the pudding from tasting like plain sweet milk. A little condensed milk rounds the edges and gives it that familiar Thai tea sweetness.
Key Ingredients:
- 3/4 cup arborio rice
- 4 cups whole milk
- 1 cup strong Thai tea concentrate, cooled
- 1/3 cup granulated sugar
- 1/2 cup sweetened condensed milk
- 1/2 teaspoon fine salt
- 1 teaspoon vanilla extract
- 1/2 cup toasted coconut, for serving
Quick Steps:
- Combine the rice, milk, tea concentrate, sugar, and salt in a saucepan over medium heat.
- Bring it just to a simmer, then lower the heat and cook for 35 to 40 minutes, stirring often, until the rice is tender and the pudding looks thick and glossy.
- Stir in the condensed milk and vanilla during the last 5 minutes of cooking.
- Taste for sweetness, then spoon into bowls or jars.
- Chill for 1 hour if you want it cold, or serve warm with toasted coconut on top.
Equipment for This Recipe:
- Medium saucepan
- Wooden spoon
- Measuring cups
- Bowls or jars
- Small skillet for toasting coconut
How to Serve This Dish:
Serve it warm in cooler weather or chilled in small jars when you want something more set. A few mango cubes or banana slices on top work well, but toasted coconut is the simplest finish.
Pro Tips for This Recipe:
- Stir often so the milk doesn’t catch on the bottom.
- If the pudding gets too thick, loosen it with 2 to 3 tablespoons milk.
- Keep the heat low after the first simmer.
- Rice pudding thickens as it cools, so stop cooking when it still looks a touch loose.
Variations on This Dish:
- Coconut Rice Pudding: Replace 1 cup of the milk with coconut milk.
- Mango Bowl: Top each serving with diced mango and lime zest.
- Brown Sugar Version: Swap the granulated sugar for light brown sugar for a deeper finish.
Common Mistakes to Avoid with This Dish:
- Cooking on high heat: The milk scorches fast.
- Walking away from the pot: Rice pudding needs frequent stirring.
- Serving it too hot: It always thickens after a short rest.
13. Thai Tea Chia Pudding
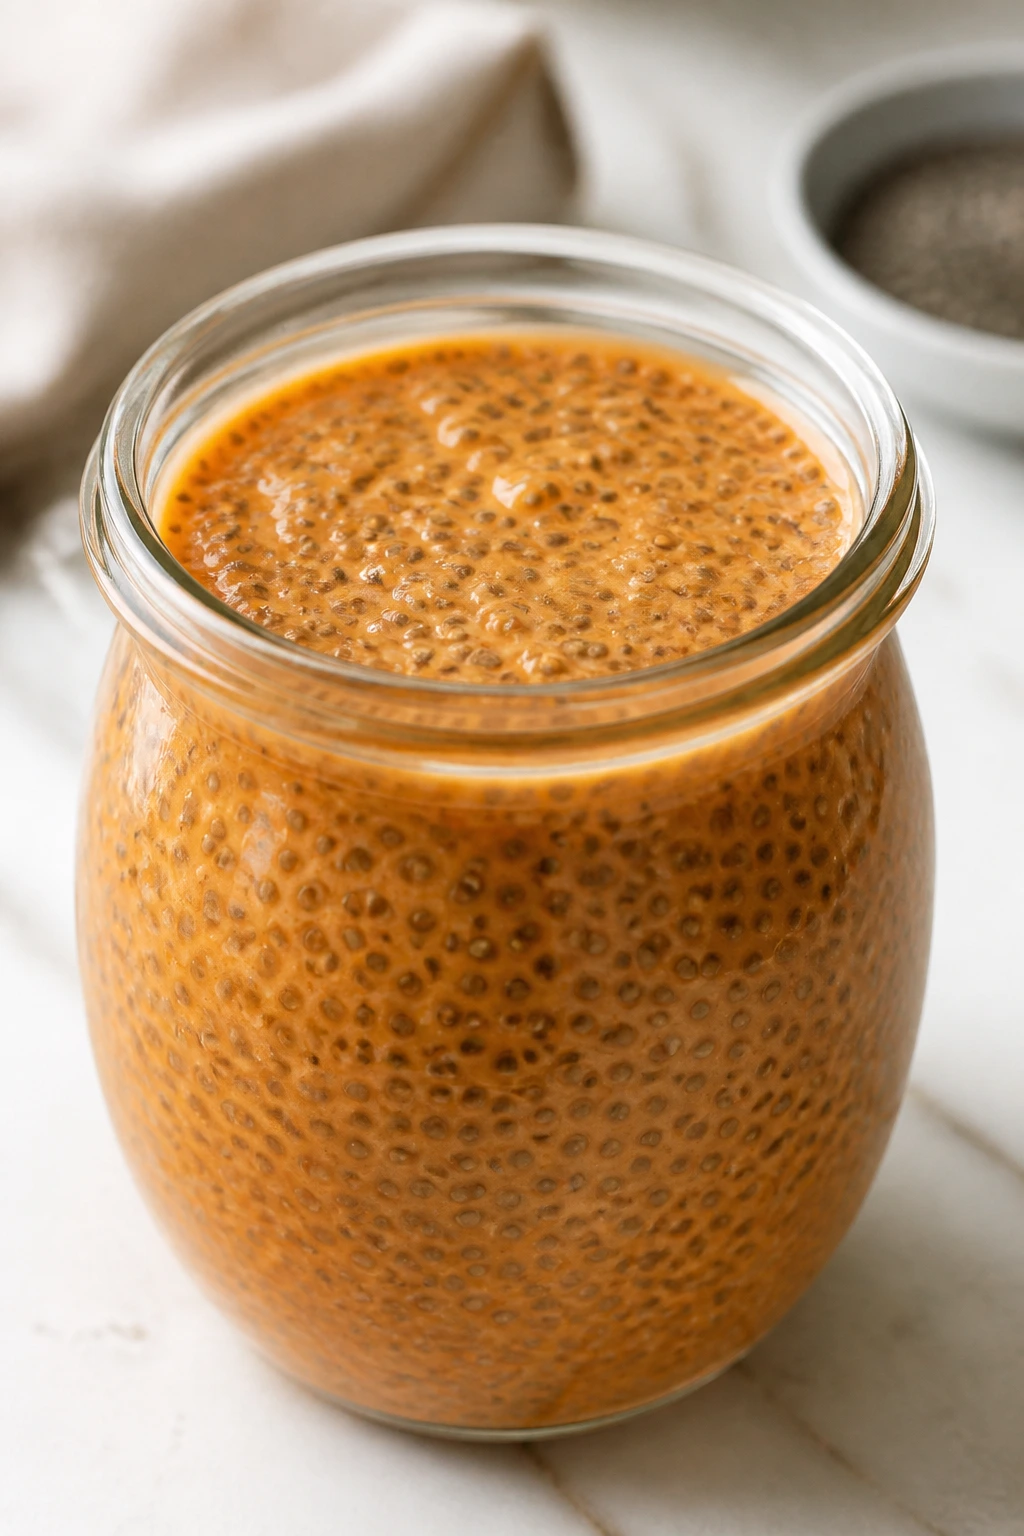
This is the easiest recipe in the bunch, and it earns its place because the flavor is still vivid. Thai tea gives the chia base a deeper color and a tea flavor that feels more grown-up than plain vanilla pudding, while coconut milk adds enough richness to make it feel finished. The texture is half pudding, half jammy spoonful, which is exactly what chia does best.
Why It Works:
Chia seeds swell in liquid and thicken without heat, so the only real job is making sure the tea base is strong enough and the sweetener is balanced before the seeds go in. Coconut milk keeps the pudding creamy after a night in the fridge. If you want it thicker, use a little less liquid; if you want it looser, add a splash more milk before serving.
Key Ingredients:
- 1 1/2 cups brewed Thai tea, cooled
- 1 cup canned coconut milk
- 1/4 cup chia seeds
- 2 tablespoons maple syrup or honey
- 1 teaspoon vanilla extract
- 1/8 teaspoon fine salt
- Fresh mango or berries, for topping
Quick Steps:
- Whisk the Thai tea, coconut milk, maple syrup, vanilla, and salt together in a bowl or jar.
- Stir in the chia seeds until evenly distributed.
- Let the mixture sit for 5 minutes, then stir again to break up any clumps.
- Cover and chill for at least 4 hours, or overnight, until thick and spoonable.
- Stir once more before serving and top with fruit.
Equipment for This Recipe:
- Mixing bowl or jar
- Whisk or spoon
- Measuring cup
- Refrigerator-safe containers
- Spoon for serving
How to Serve This Dish:
Serve it in small jars with mango on top. It’s rich enough that a half-cup portion feels right for breakfast, or a little more if you’re serving it as dessert.
Pro Tips for This Recipe:
- Stir twice in the first 10 minutes so the seeds don’t clump.
- Use full-fat coconut milk for a smoother texture.
- Add a splash of milk before serving if it thickened too much overnight.
- A little fruit on top makes the whole jar taste less heavy.
Variations on This Dish:
- Tropical Bowl: Add diced mango and toasted coconut.
- Berry Stripe: Layer with mashed strawberries for a tart contrast.
- Yogurt Blend: Swap 1/2 cup of the coconut milk for Greek yogurt.
Common Mistakes to Avoid with This Dish:
- Not stirring twice: Chia clumps are stubborn.
- Using weak tea: The flavor disappears in the fridge.
- Serving too soon: It needs the full set time.
14. Thai Tea Overnight Oats
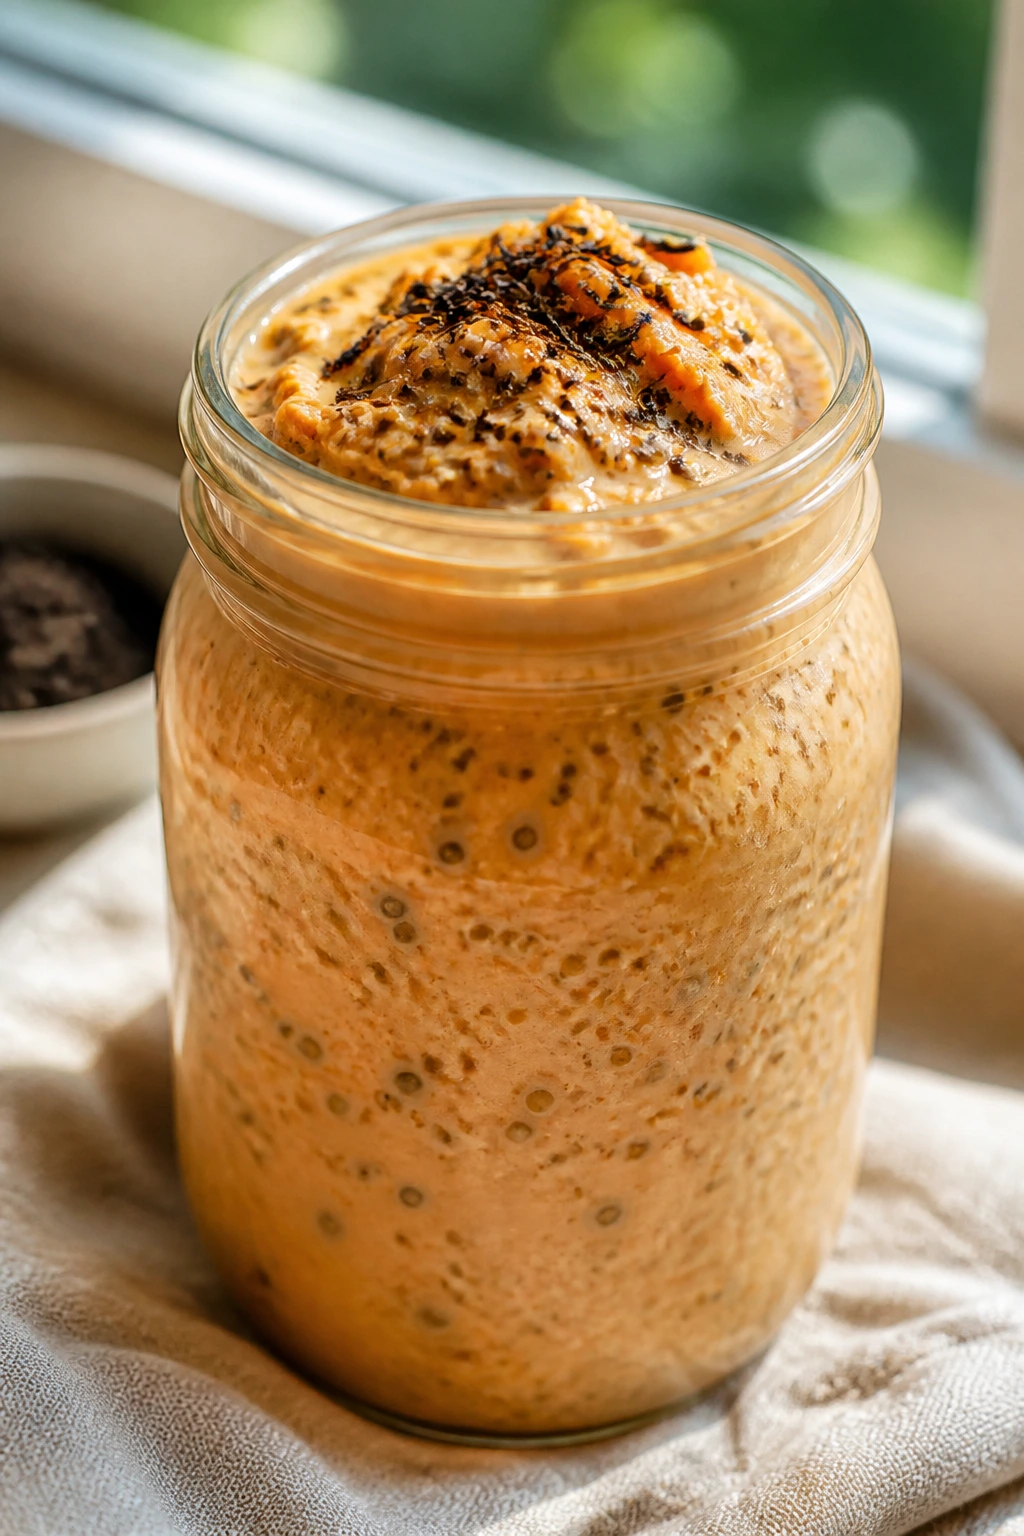
Overnight oats sound ordinary until you swap the liquid for Thai tea and add a little coconut milk. Then breakfast starts tasting like something that came from a café case instead of a jar in the fridge. The oats soften, the tea soaks in, and the whole bowl picks up a creamy, tea-and-cream flavor that’s far more interesting than plain cinnamon.
Why It Works:
Rolled oats absorb liquid slowly, which gives the tea time to flavor the whole jar. Yogurt or milk adds body, and chia seeds help thicken the mixture so it lands somewhere between oats and pudding. The result is cold, spoonable, and ready when you are.
Key Ingredients:
- 1 cup rolled oats
- 3/4 cup brewed Thai tea, cooled
- 1/2 cup milk or plain Greek yogurt
- 1 tablespoon chia seeds
- 1 tablespoon honey or maple syrup
- 1/4 teaspoon cinnamon
- 1/8 teaspoon fine salt
- 1/4 cup sliced banana or mango, for topping
Quick Steps:
- Combine the oats, Thai tea, milk or yogurt, chia seeds, sweetener, cinnamon, and salt in a jar or bowl.
- Stir well until the oats are evenly coated.
- Cover and refrigerate overnight, or at least 6 hours.
- Stir in the morning, adding a splash of milk if the oats look too thick.
- Top with fruit and eat cold, or warm gently if you prefer a softer texture.
Equipment for This Recipe:
- Jar or bowl with lid
- Spoon
- Measuring cup
- Refrigerator
- Small knife, if slicing fruit
How to Serve This Dish:
Serve it straight from the jar with banana slices or mango on top. A spoonful of toasted coconut makes it feel a little more like dessert and a little less like homework.
Pro Tips for This Recipe:
- Use rolled oats, not instant oats, or the texture gets mushy.
- Make a double batch in separate jars for grab-and-go mornings.
- If you like a sweeter breakfast, add 1 more teaspoon honey at the end.
- A tiny pinch of salt makes the tea flavor show up better.
Variations on This Dish:
- Coconut Breakfast Jar: Use coconut yogurt and coconut milk.
- Apple-Cinnamon Twist: Add a spoonful of diced apple and extra cinnamon.
- Protein Boost: Stir in 2 tablespoons powdered protein or 2 more tablespoons Greek yogurt.
Common Mistakes to Avoid with This Dish:
- Using quick oats: They turn gluey.
- Skipping the stir after mixing: Dry oats hide at the bottom.
- Adding watery fruit too early: It can thin the jar by morning.
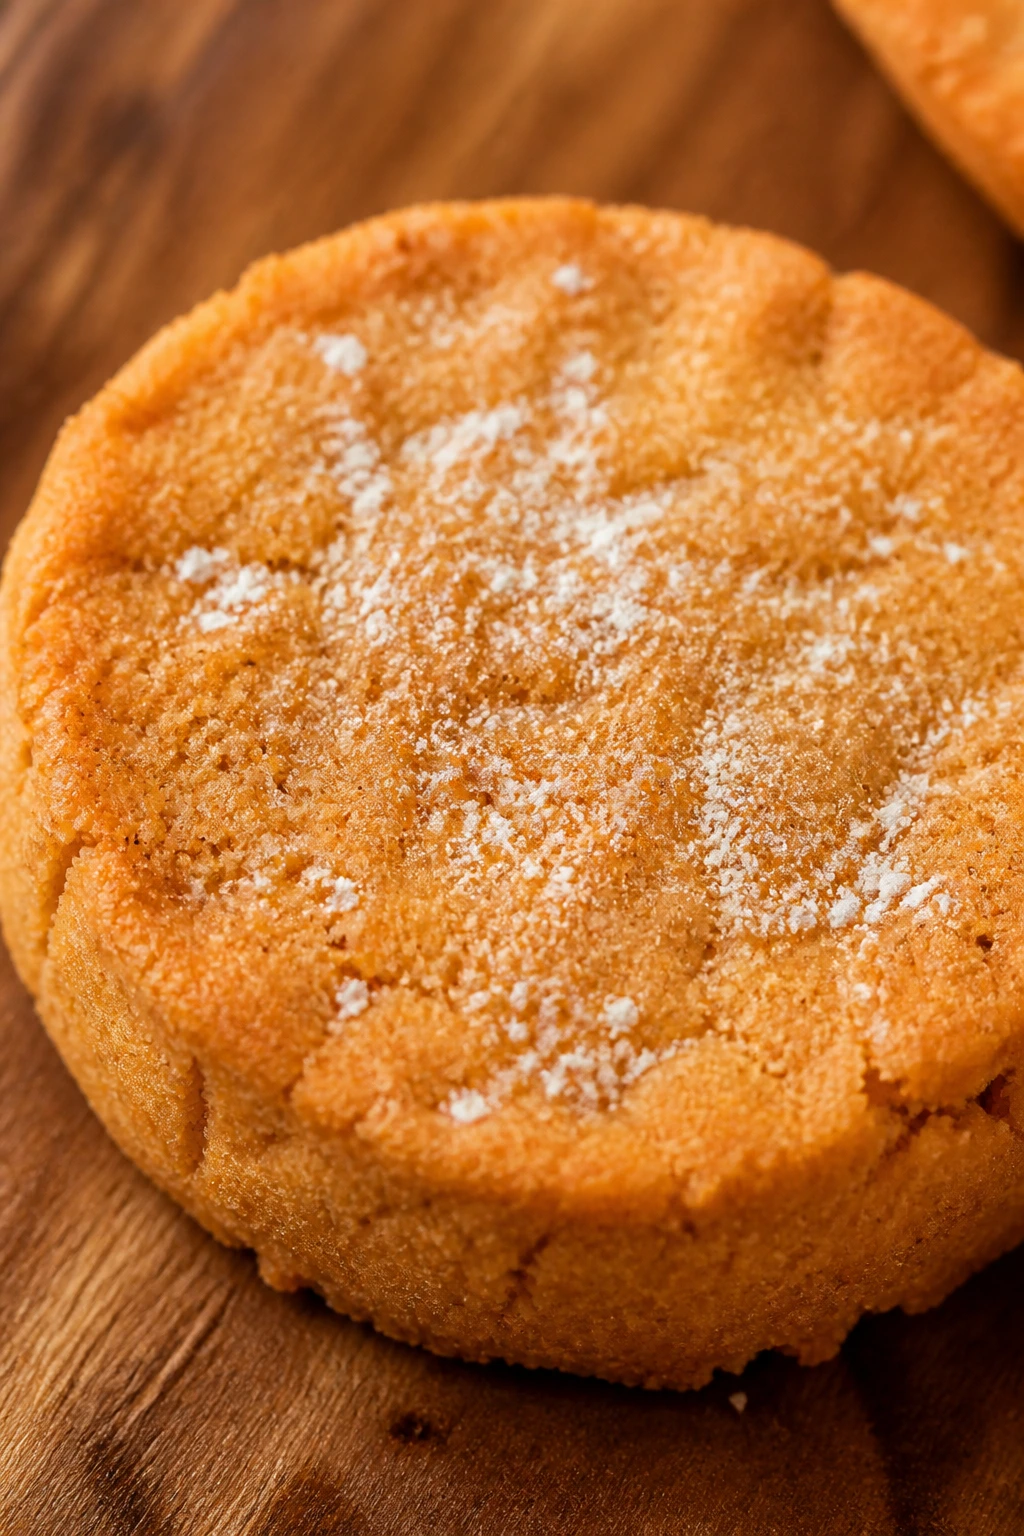
15. Thai Tea White Chocolate Cookies
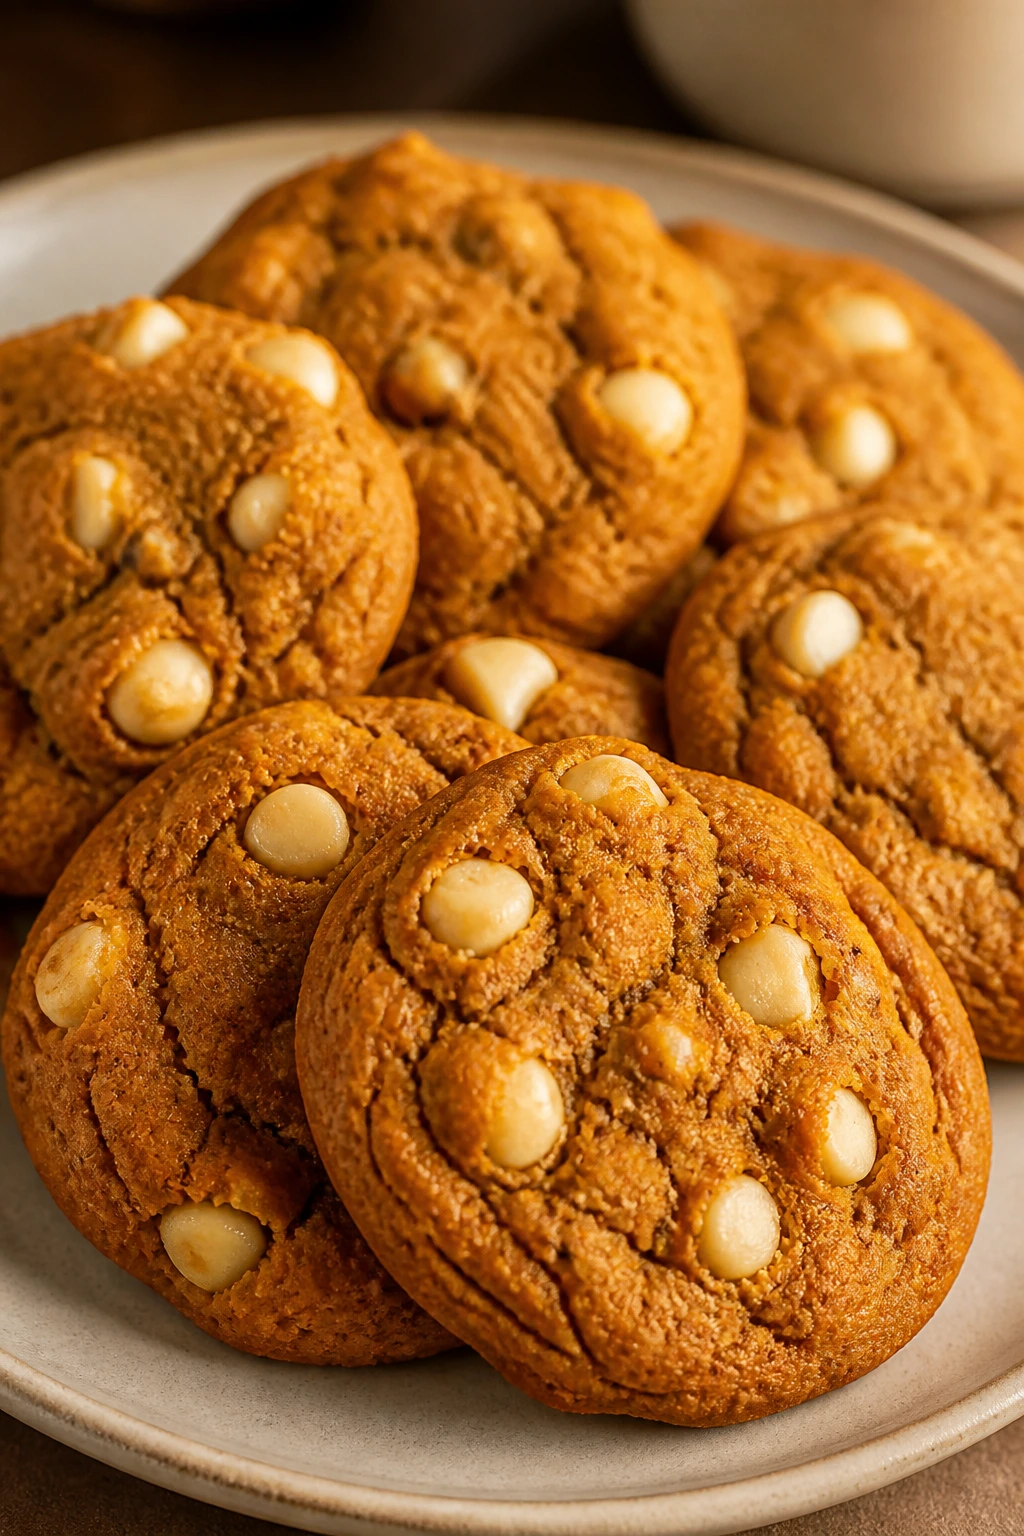
These cookies hit that sweet spot between chewy and soft, with Thai tea folded into the dough so the flavor runs all the way through instead of sitting on top. White chocolate makes sense here because it acts like cream in solid form — sweet, milky, and just rich enough to carry the tea. I like them best the day they’re baked, while the edges are set and the centers are still a little soft.
Why It Works:
Finely ground Thai tea mix gives the dough flavor without big tea flecks or bitterness. Brown sugar keeps the cookies chewy, while white chocolate chips echo the condensed-milk flavor people already expect from Thai tea. Chilling the dough for 30 minutes helps the cookies keep their shape in the oven.
Key Ingredients:
- 1 cup unsalted butter, softened
- 1 cup light brown sugar
- 1/2 cup granulated sugar
- 2 large eggs
- 2 teaspoons vanilla extract
- 2 cups all-purpose flour
- 2 tablespoons finely ground Thai tea mix
- 1 teaspoon baking soda
- 3/4 teaspoon fine salt
- 1 cup white chocolate chips
Quick Steps:
- Heat the oven to 350°F and line two baking sheets with parchment paper.
- Cream the butter, brown sugar, and granulated sugar until light and fluffy, about 2 to 3 minutes.
- Beat in the eggs one at a time, then mix in the vanilla.
- In a separate bowl, whisk the flour, ground tea, baking soda, and salt. Add to the butter mixture and mix just until combined, then fold in the white chocolate chips.
- Chill the dough for 30 minutes, scoop onto the baking sheets, and bake for 10 to 12 minutes until the edges are set and the centers still look a little soft.
Equipment for This Recipe:
- Mixing bowls
- Electric mixer
- Baking sheets
- Parchment paper
- Cookie scoop
How to Serve This Dish:
Serve them slightly warm so the white chocolate is still soft. A cold glass of milk or hot black tea works well beside them.
Pro Tips for This Recipe:
- Grind the tea as fine as you can so the dough stays smooth.
- If the dough feels greasy, chill it longer before baking.
- Pull the cookies before they look fully done; they finish on the sheet.
- Sprinkle a little flaky salt on top if you want more contrast.
Variations on This Dish:
- Macadamia Swap: Replace half the white chocolate chips with chopped macadamias.
- Brown Butter Version: Brown the butter first for a deeper, nuttier taste.
- Thicker Bakery Style: Chill the scooped dough balls for 1 hour before baking.
Common Mistakes to Avoid with This Dish:
- Using coarse tea mix: It leaves gritty bits in the cookie.
- Overbaking: The tea flavor gets dull and the centers dry out.
- Skipping the chill: The cookies spread too much.
16. Thai Tea Pound Cake
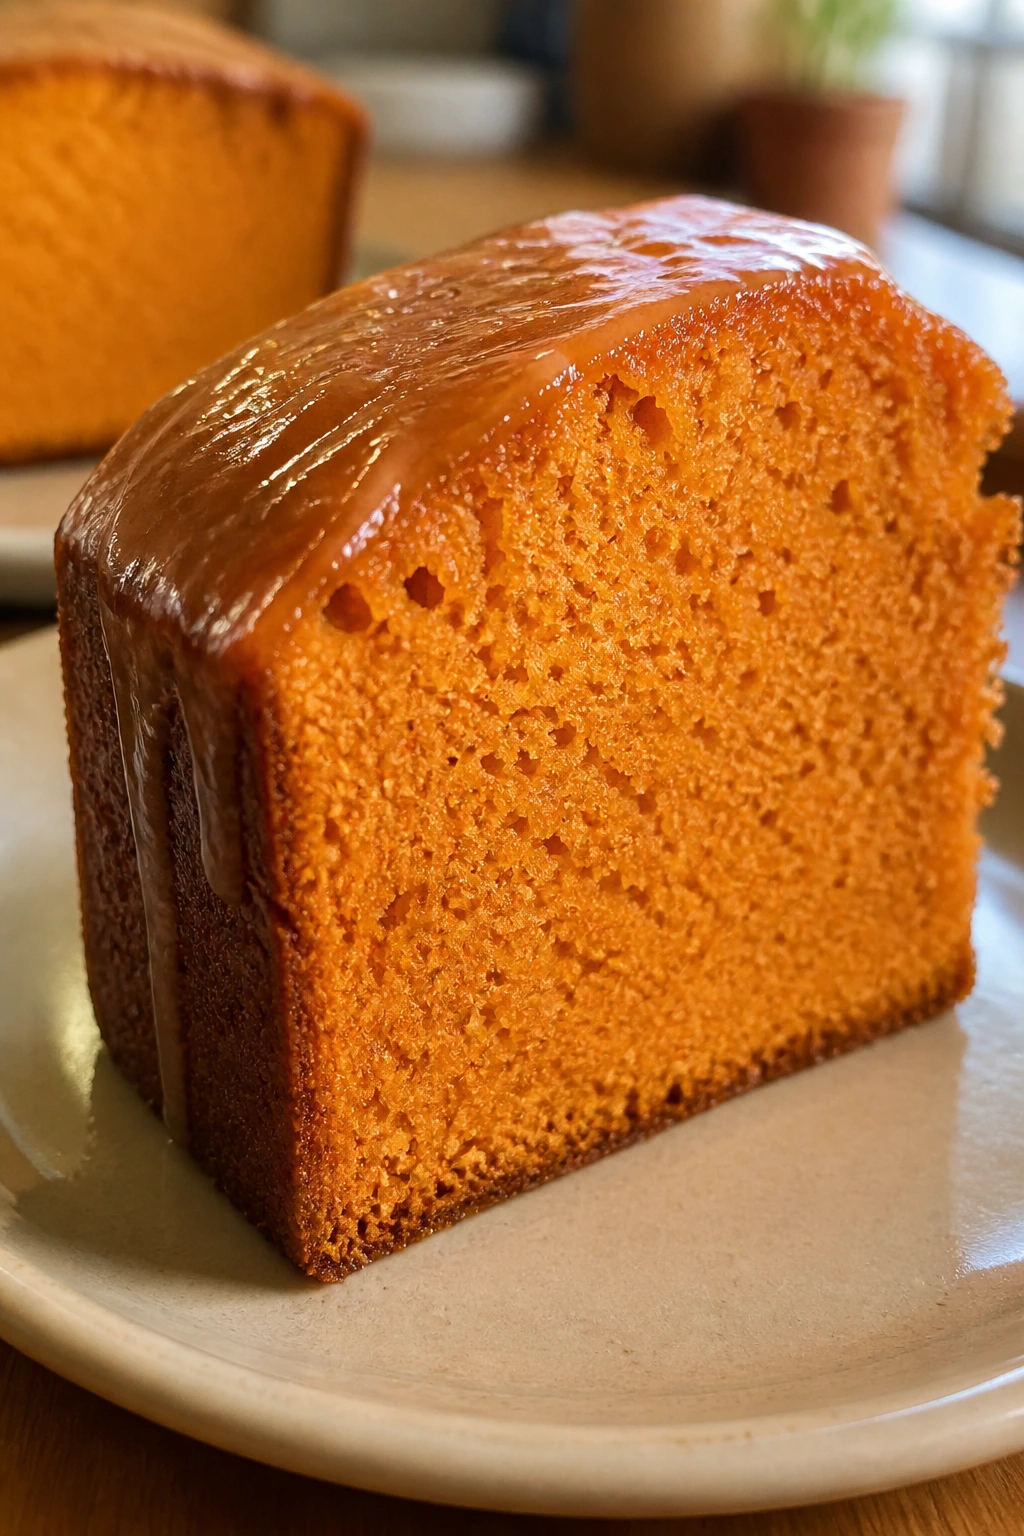
Pound cake is where Thai tea gets to show off its softer side. The loaf is buttery and tender, but the tea concentrate gives the crumb a deep amber flavor that tastes more complex than plain vanilla cake. The glaze is the part I always look forward to — thin enough to soak into the crust, sweet enough to set into a shiny finish.
Why It Works:
Sour cream keeps the crumb moist while the tea concentrate adds flavor without making the batter thin. Pound cake likes a slower bake, which gives the tea time to settle into the cake instead of disappearing. A simple tea glaze on top reinforces the flavor and keeps the loaf from feeling too plain.
Key Ingredients:
- 1 cup unsalted butter, softened
- 1 1/2 cups granulated sugar
- 4 large eggs
- 2 1/2 cups all-purpose flour
- 2 teaspoons baking powder
- 1/2 teaspoon fine salt
- 1/2 cup sour cream
- 1/2 cup strong Thai tea concentrate, cooled
- 1 teaspoon vanilla extract
For the glaze:
- 1 cup powdered sugar
- 2 to 3 tablespoons Thai tea concentrate
Quick Steps:
- Heat the oven to 325°F and grease a 9×5-inch loaf pan. Line it with parchment if you want easy lifting.
- Cream the butter and sugar until pale and fluffy, then beat in the eggs one at a time.
- Whisk the flour, baking powder, and salt together. Mix the dry ingredients into the butter mixture in batches, alternating with the sour cream and Thai tea concentrate. Stir in the vanilla at the end.
- Spread the batter into the loaf pan and bake for 55 to 65 minutes, until a toothpick comes out clean and the top is deep golden.
- Cool the cake for 15 minutes in the pan, then move it to a rack. Whisk the glaze ingredients together and drizzle over the cooled loaf.
Equipment for This Recipe:
- 9×5-inch loaf pan
- Mixing bowls
- Electric mixer
- Whisk
- Cooling rack
How to Serve This Dish:
Slice it thick and serve it with tea or coffee. It also makes a very good breakfast slice the next morning, especially if the glaze has soaked into the top crust overnight.
Pro Tips for This Recipe:
- Cool the tea concentrate before adding it so the batter stays emulsified.
- Do not overmix after the flour goes in.
- If the top browns too quickly, tent loosely with foil.
- The loaf slices best after it’s fully cool.
Variations on This Dish:
- Coconut Glaze: Mix coconut milk into the glaze instead of tea.
- Bundt Pan Version: Bake in a greased bundt pan for 45 to 55 minutes.
- Orange Twist: Add 1 teaspoon orange zest to the batter.
Common Mistakes to Avoid with This Dish:
- Baking too hot: The crust sets before the middle cooks.
- Using warm tea concentrate: It can split the batter.
- Slicing too soon: The crumb tears while it’s still hot.
17. Thai Tea Baked Donuts
Baked donuts are a smart place for Thai tea because the batter handles flavor well without needing a fryer. You get the cake-like texture people expect from baked donuts, plus a tea glaze that sets glossy and slightly sticky on top. They’re softer than the fried version, but I don’t think that’s a drawback here; it keeps the tea front and center.
Why It Works:
The batter leans on baking powder and baking soda for lift, which keeps the donuts light even though the Thai tea brings liquid into the mix. A quick glaze made with tea concentrate gives the finished donut a strong flavor hit without making the crumb wet. These are best the day you bake them, while the glaze is still set but not brittle.
Key Ingredients:
- 1 3/4 cups all-purpose flour
- 1/2 cup granulated sugar
- 1 teaspoon baking powder
- 1/2 teaspoon baking soda
- 1/2 teaspoon fine salt
- 1 teaspoon finely ground Thai tea mix
- 1 large egg
- 1/2 cup Thai tea concentrate, cooled
- 1/4 cup buttermilk
- 3 tablespoons unsalted butter, melted
- 1 teaspoon vanilla extract
For the glaze:
- 1 cup powdered sugar
- 2 to 3 tablespoons milk
- 1 tablespoon Thai tea concentrate
Quick Steps:
- Heat the oven to 350°F and grease a donut pan well.
- Whisk the flour, sugar, baking powder, baking soda, salt, and ground tea in one bowl.
- In another bowl, whisk the egg, tea concentrate, buttermilk, melted butter, and vanilla. Stir the wet ingredients into the dry just until combined.
- Spoon or pipe the batter into the donut wells, filling each about 3/4 full. Bake for 10 to 12 minutes, until the tops spring back when touched lightly.
- Cool the donuts for 5 minutes, then whisk the glaze and dip the tops once the donuts are just warm.
Equipment for This Recipe:
- Donut pan
- Mixing bowls
- Whisk
- Piping bag or spoon
- Cooling rack
How to Serve This Dish:
Serve them on a rack so the glaze can drip cleanly. They go well with plain coffee or an unsweetened iced tea, since the donuts themselves bring plenty of sweetness.
Pro Tips for This Recipe:
- Pipe the batter if you want neat rings.
- Don’t overfill the pan or the center holes close up.
- Let the donuts cool a few minutes before glazing or the glaze slides off.
- Ground tea should be powder-fine, not coarse.
Variations on This Dish:
- Cinnamon Sugar Finish: Skip the glaze and roll warm donuts in cinnamon sugar.
- Coconut Glaze: Replace the milk in the glaze with coconut milk.
- Mini Donuts: Bake in a mini donut pan for 7 to 9 minutes.
Common Mistakes to Avoid with This Dish:
- Overmixing the batter: The donuts turn tough.
- Greasing the pan poorly: They stick and tear.
- Glazing when too hot: The glaze melts into the crumb.
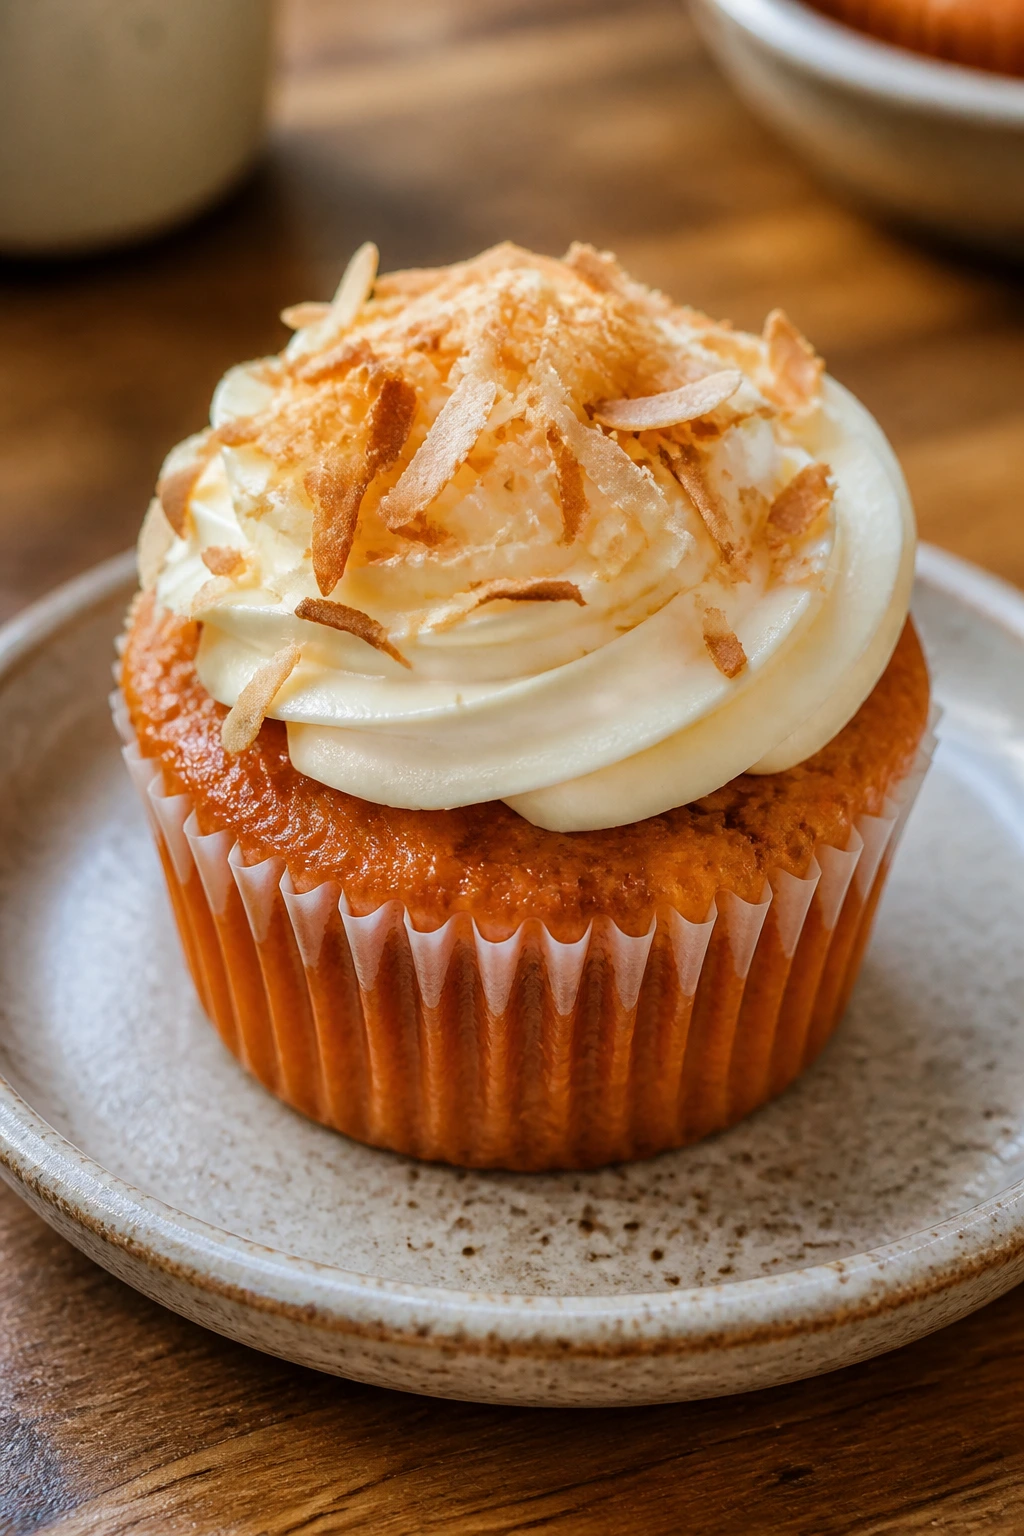
18. Thai Tea Cupcakes
Cupcakes are the easiest place to make Thai tea feel playful. The cake itself is soft and fragrant, and the cream cheese frosting catches the tea flavor without burying it in sugar. If you want a dessert that can stand on a party tray and still taste like something you’d want a second serving of, this is a good bet.
Why It Works:
The tea goes into the cake batter as both liquid and powder, which keeps the flavor present after baking. Sour cream makes the crumb tender, while cream cheese frosting adds the tang that keeps the sweetness in check. These cupcakes don’t need a lot of decoration; a little toasted coconut on top is enough.
Key Ingredients:
For the cupcakes:
- 1 1/2 cups all-purpose flour
- 1 1/2 teaspoons baking powder
- 1/2 teaspoon fine salt
- 1 tablespoon finely ground Thai tea mix
- 1/2 cup unsalted butter, softened
- 1 cup granulated sugar
- 2 large eggs
- 1/2 cup whole milk
- 1/4 cup sour cream
- 1 teaspoon vanilla extract
For the frosting:
- 8 ounces cream cheese, softened
- 1/2 cup unsalted butter, softened
- 3 cups powdered sugar
- 2 tablespoons strong Thai tea concentrate, cooled
- Pinch of fine salt
Quick Steps:
- Heat the oven to 350°F and line a 12-cup muffin tin with paper liners.
- Whisk the flour, baking powder, salt, and ground tea.
- Beat the butter and sugar until fluffy, then add the eggs one at a time. Mix in the milk, sour cream, and vanilla. Add the dry ingredients and stir just until smooth.
- Divide the batter among the liners and bake for 18 to 20 minutes, until the tops spring back and a toothpick comes out clean.
- Cool completely, then beat the frosting ingredients until smooth and pipe or spread it on top.
Equipment for This Recipe:
- Muffin tin
- Paper liners
- Mixing bowls
- Hand mixer
- Piping bag, optional
How to Serve This Dish:
Serve them at room temperature so the frosting stays soft but not runny. A few toasted coconut flakes or a tiny stripe of condensed milk on top gives them a more Thai-tea-forward finish.
Pro Tips for This Recipe:
- Cool the cupcakes fully before frosting or the cream cheese layer slips.
- Use a fine grind for the tea so the crumb stays smooth.
- If the frosting feels soft, chill it for 10 minutes before piping.
- A pinch of salt in the frosting keeps it from tasting flat.
Variations on This Dish:
- Coconut Frosting: Replace 2 tablespoons of butter with coconut cream.
- Mini Cupcakes: Bake in a mini pan for 10 to 12 minutes.
- Filled Center: Spoon a little mango curd into the middle before frosting.
Common Mistakes to Avoid with This Dish:
- Overfilling the liners: The cupcakes dome too much and spill.
- Frosting warm cakes: The cream cheese slides off.
- Using weak tea flavor: The cake tastes like plain vanilla.
19. Thai Tea Fudge
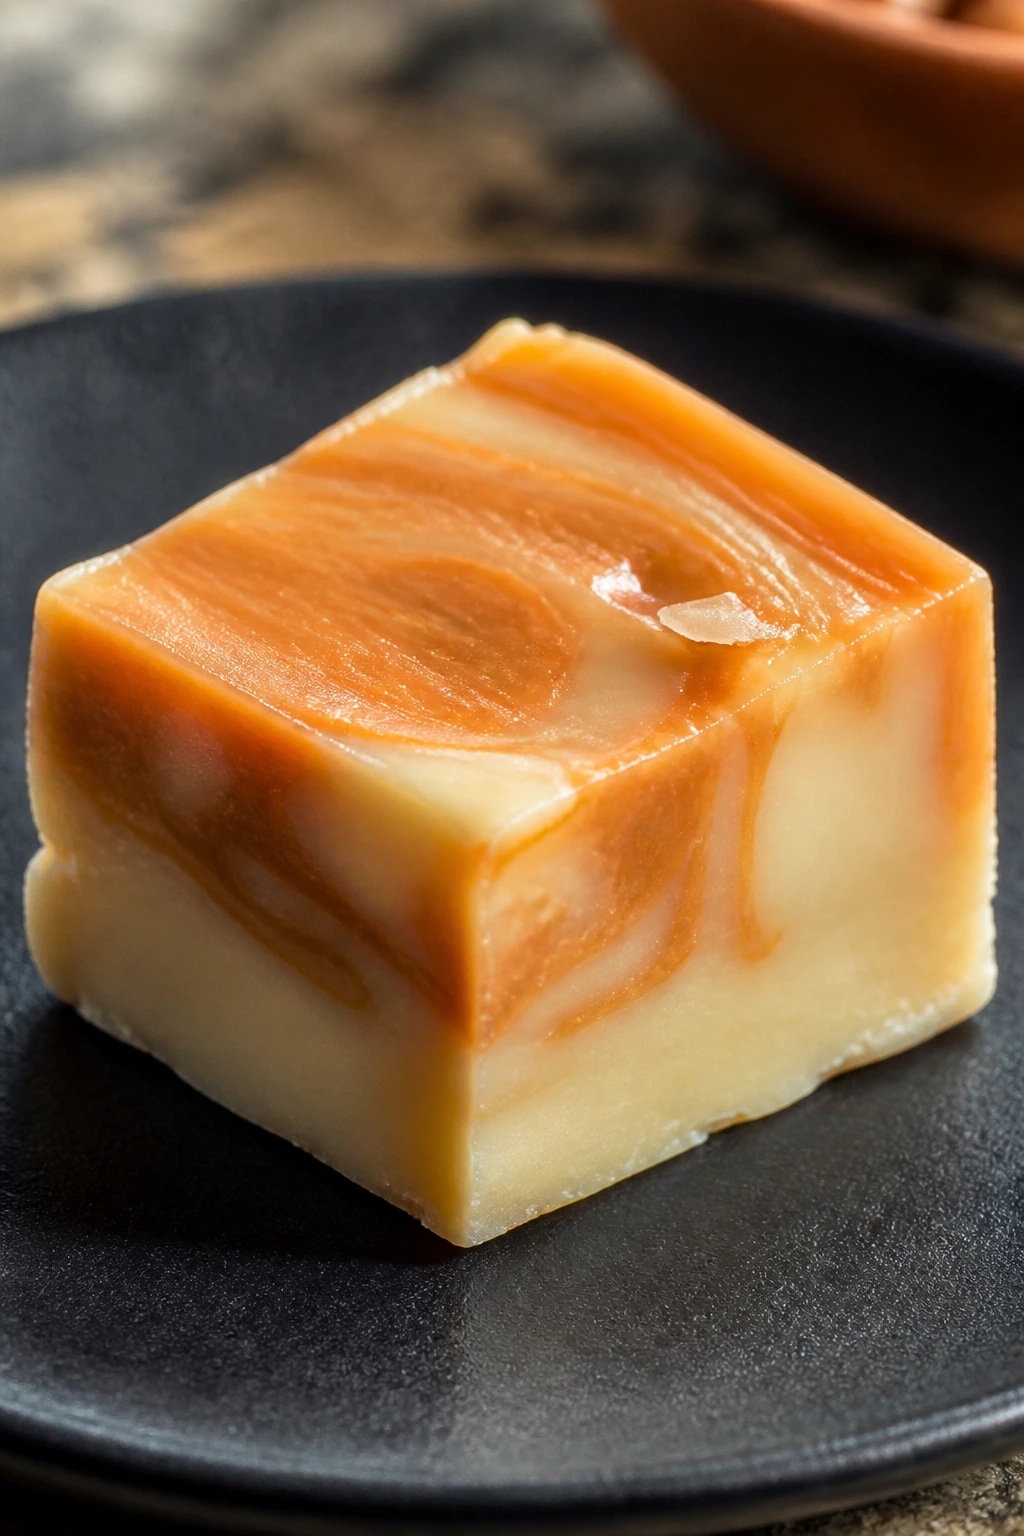
Thai tea fudge is rich, quick, and a little dangerous because it disappears in squares before anyone admits to taking more than one. White chocolate gives it a milky sweetness, and the ground tea adds that deep, slightly tannic note that keeps the fudge from tasting flat. It’s one of the easiest sweets in the whole collection, which is maybe why it gets made so often in my kitchen.
Why It Works:
Sweetened condensed milk and white chocolate create a smooth fudge base that sets without a candy thermometer. The Thai tea flavor needs to be finely ground so it disperses through the mixture instead of sinking to the bottom. A pinch of salt keeps the sugar from turning one-dimensional.
Key Ingredients:
- 3 cups white chocolate chips
- 1 can sweetened condensed milk, 14 ounces
- 2 tablespoons unsalted butter
- 2 tablespoons finely ground Thai tea mix
- 1/2 teaspoon vanilla extract
- 1/8 teaspoon fine salt
- 1/2 cup chopped macadamia nuts, optional
Quick Steps:
- Line an 8×8-inch pan with parchment paper.
- Warm the condensed milk, butter, and Thai tea mix in a saucepan over low heat for 2 to 3 minutes, stirring constantly, until fragrant.
- Stir in the white chocolate chips and keep stirring until melted and smooth. Add the vanilla, salt, and macadamias if using.
- Spread the mixture into the pan and smooth the top.
- Chill for at least 2 hours, then lift out and cut into small squares.
Equipment for This Recipe:
- 8×8-inch pan
- Parchment paper
- Saucepan
- Spatula
- Sharp knife
How to Serve This Dish:
Serve small squares at room temperature. A little goes a long way here, and the fudge tastes best when it’s soft enough to bite cleanly without crumbling.
Pro Tips for This Recipe:
- Keep the heat low so the white chocolate doesn’t seize.
- Grind the tea mix to a powder before starting.
- Chill fully before cutting for the cleanest edges.
- If the fudge feels too sweet, a pinch more salt helps.
Variations on This Dish:
- Coconut Fudge: Add 2 tablespoons toasted coconut on top.
- Nut-Free Batch: Leave out the macadamias and press crushed cookies on top.
- Dark Chocolate Stripe: Drizzle melted dark chocolate over the set fudge.
Common Mistakes to Avoid with This Dish:
- Heating too hard: White chocolate scorches fast.
- Skipping the parchment: You’ll regret it when lifting the block out.
- Cutting warm fudge: It smears and sticks to the knife.
20. Thai Tea Shortbread
Shortbread is the cleanest, butteriest way to show off Thai tea without sugar trying to run the whole show. The cookie crumbles in the right way — sandy, then tender — and the tea gives it a warm amber note that feels more grown-up than plain vanilla shortbread. If you like a cookie that doesn’t shout, this is the one.
Why It Works:
Shortbread has very few ingredients, so every one of them matters. Powdered sugar keeps the crumb fine, cornstarch softens the bite, and finely ground Thai tea mixes directly into the dough without turning it gritty. Because the cookies bake low and slow, the tea flavor stays gentle instead of bitter.
Key Ingredients:
- 1 cup unsalted butter, softened
- 1/2 cup powdered sugar
- 2 cups all-purpose flour
- 2 tablespoons cornstarch
- 2 tablespoons finely ground Thai tea mix
- 1/2 teaspoon fine salt
- 1 teaspoon vanilla extract
- 1/2 cup melted white chocolate, optional for drizzling
Quick Steps:
- Heat the oven to 325°F and line a baking sheet with parchment paper.
- Beat the butter and powdered sugar until smooth, then mix in the vanilla.
- Whisk the flour, cornstarch, ground tea, and salt together, then add it to the butter mixture and stir just until a soft dough forms.
- Shape the dough into a disc, chill for 20 minutes, then roll and cut into rounds or squares.
- Bake for 16 to 18 minutes, until the edges are just turning pale gold. Cool completely, then drizzle with white chocolate if you want a little shine.
Equipment for This Recipe:
- Mixing bowl
- Rolling pin
- Parchment-lined baking sheet
- Cookie cutter or knife
- Cooling rack
How to Serve This Dish:
Serve these with tea, obviously, but they also sit nicely beside vanilla ice cream or a cup of black coffee. The cookie is delicate, so keep the portions small and let people take a second one if they want it.
Pro Tips for This Recipe:
- Chill the dough so the cookies hold their shape.
- Grind the tea until it’s almost powder-like.
- Don’t bake until deeply golden; shortbread should stay pale.
- If you drizzle white chocolate, let it set before stacking.
Variations on This Dish:
- Slice-and-Bake Log: Roll the dough into a log, chill, then slice into rounds.
- Lime Shortbread: Add 1 teaspoon lime zest for a sharper edge.
- Sandwich Cookies: Spread a thin layer of white chocolate ganache between two cookies.
Common Mistakes to Avoid with This Dish:
- Overworking the dough: That makes the cookies tough.
- Baking too long: They lose their sandy texture.
- Using coarse tea powder: It feels gritty between the teeth.
Why Thai Tea Belongs in More Than One Kind of Recipe
Thai tea has a built-in advantage that not every flavored drink or dessert gets: it already knows how to behave around cream, sugar, ice, and spice. The black tea base gives it backbone. The spices give it shape. The sweetened milk tradition gives it a finish that feels familiar even when you push it into ice cream, cheesecake, or cookies.
That also means the same tea can be dressed up or stripped back without losing its identity. A strong brew becomes a boba drink. A gentler infusion becomes panna cotta. Ground tea in a cookie dough tastes completely different from tea steeped into cream, but the flavor family stays intact. That’s the part most people miss when they think Thai tea is only for a tall orange glass with ice. It has range. Real range.
Essential Equipment for These Recipes
- Fine-mesh strainer — Useful for keeping loose tea leaves out of drinks, custards, and glazes.
- Small saucepan — The workhorse for steeping tea, heating milk, and making custards.
- Whisk — Handy for combining milk bases, custards, and puddings without lumps.
- Blender — Needed for slushes, frappes, and any frozen drink with ice.
- Mixing bowls — A few sizes help when you’re making fillings, batters, and whipped mixtures.
- Electric mixer — Useful for cheesecake, cupcakes, frosting, and whipped fillings.
- 8×8-inch baking pan — The right size for cheesecake bars and fudge.
- Loaf pan — Best for pound cake and some quick breads.
- Muffin tin and donut pan — Needed for cupcakes and baked donuts.
- Popsicle molds — Worth owning if you plan to make frozen tea pops more than once.
- Ice cream maker — Not mandatory for everything, but ideal for custard-style Thai tea ice cream.
- Instant-read thermometer — Especially useful for custards so you don’t overshoot the temperature.
- Parchment paper — Makes lifting bars, fudge, and cookies much easier.
- Bubble tea straw — Not required, but it makes boba drinks behave like they should.
Smart Shopping and Ingredient Tips
Thai tea mix varies more than people expect. Some blends are strong and spicy; others lean sweeter or more vanilla-heavy. If you’re buying a mix for drinks, look for one that lists black tea first and has enough spice to smell fragrant even before brewing. For baking, grind the mix as fine as possible so it disappears into the batter instead of leaving gritty flecks.
Sweetened condensed milk deserves a better reputation than it gets. Buy the full can, not a squeeze bottle if you can help it, and treat it like the flavor engine it is. The canned stuff gives Thai tea its classic rounded sweetness and a thicker body than plain sugar can manage. For dairy-free recipes, coconut condensed milk works, but it reads a little softer and less caramel-like.
Coconut milk is another place where the label matters. Use canned full-fat coconut milk for popsicles, panna cotta, rice pudding, and anything you want to feel rich. Carton coconut beverage is fine for a coffee substitute, but it’s too thin for dessert. If the recipe needs structure, full-fat wins.
For boba, buy regular tapioca pearls unless the package specifically tells you otherwise. Quick-cook pearls are convenient, but they often trade chew for speed. If texture matters to you, choose the longer-cooking version and give it the full boil-and-rest treatment.
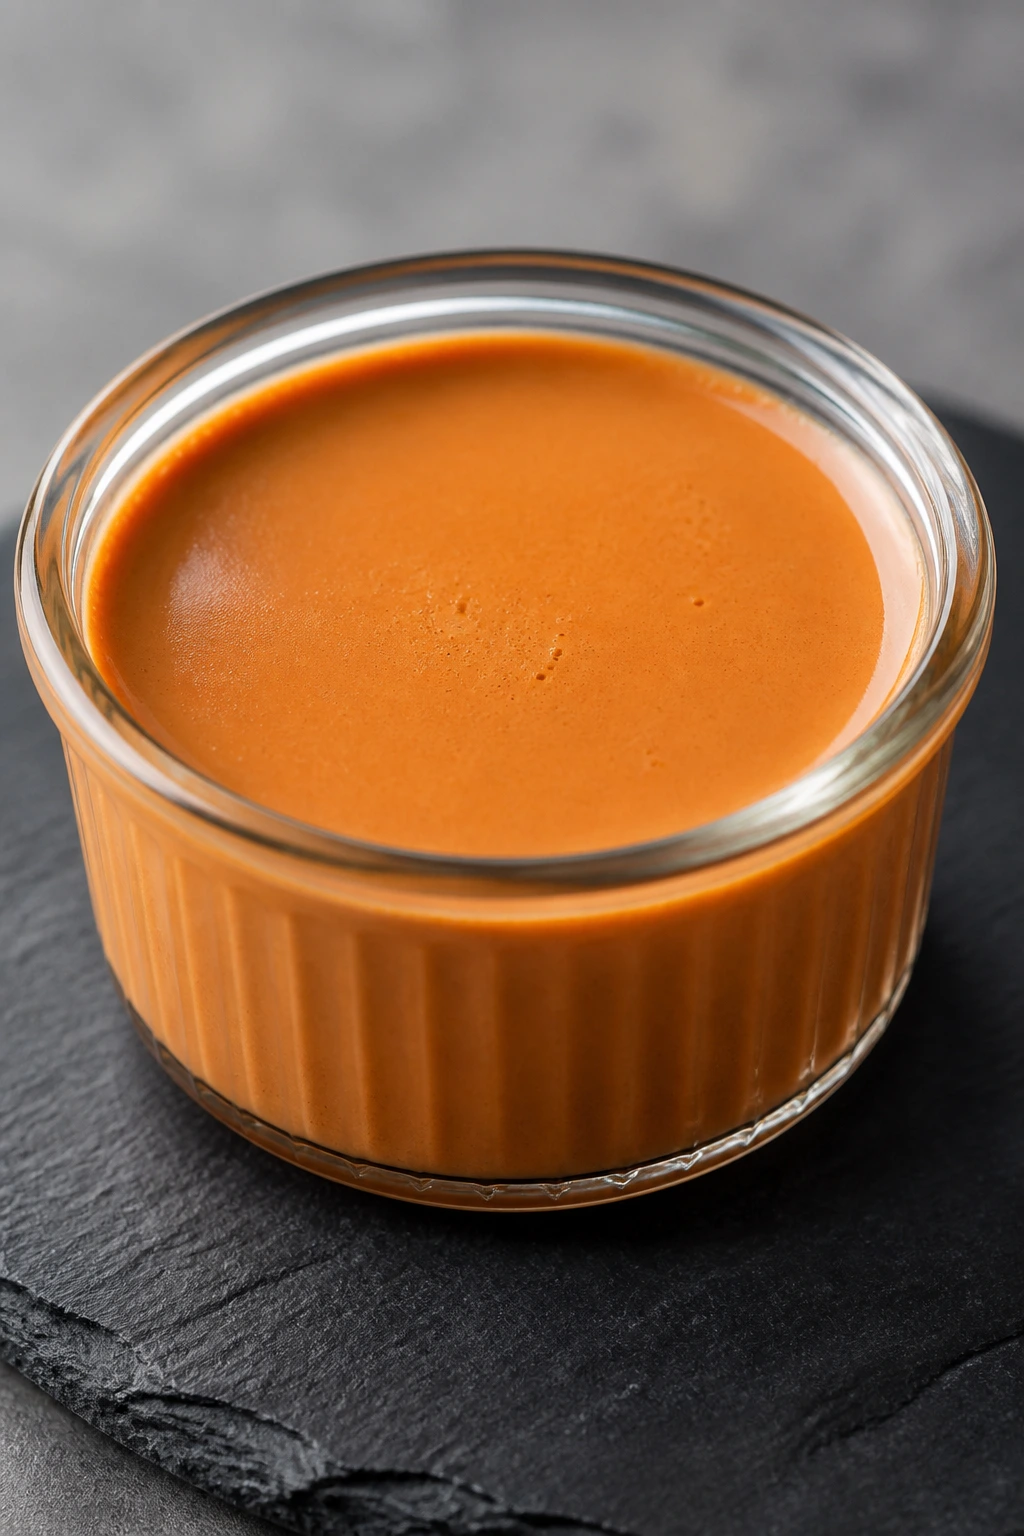
Tea concentrate should usually be stronger than plain drinking tea. That’s especially true once milk, ice, or flour gets involved. Brew it dark, then cool it before adding it to desserts or chilled drinks. Warm tea can melt dairy, loosen batter, and thin out fillings in ways that are annoying to fix.
How to Serve These Recipes
Presentation:
Use clear glasses for the drinks so the tea and milk layers show instead of hiding in a mug. For desserts, chilled white plates and shallow bowls keep the color warm and the edges clean. A little toasted coconut, mango, or whipped cream goes farther than a heavy garnish ever will.
Accompaniments:
Sweet Thai tea dishes do well with something salty or plain beside them — salted peanuts, sesame crackers, simple butter cookies, or slices of fresh mango. If you’re serving a dessert tray, mix one rich item like cheesecake bars with one light item like panna cotta so people can choose their level of sweetness.
Portions:
For drinks, aim for 12 to 16 ounces per serving, especially if there’s boba, ice cream, or cream on top. For rich desserts like fudge, brûlée, or cheesecake bars, smaller portions work better: one bar, one ramekin, or a 1-inch square of fudge. The more dairy and sugar the recipe carries, the more I’d lean toward smaller servings.
Beverage Pairing:
With desserts, plain black coffee or unsweetened iced coffee is the most useful pairing because it clears the palate. With drinks, a glass of cold water or sparkling water with lime keeps the sweetness from piling up. If you’re serving a whole Thai tea spread, one salty snack and one unsweetened drink are enough to keep it balanced.
Additional Tips and Flavor Boosters
Flavor Enhancement:
A tiny pinch of salt belongs in nearly every Thai tea recipe in this collection. It doesn’t make the food salty; it just sharpens the tea and keeps condensed milk from tasting flat. If you want a deeper spice note, add 1 small star anise or 2 cardamom pods to the brew, then strain well.
Customization:
If you like a stronger tea flavor, make the base a little darker than you think you need and add less ice or milk at the end. If you prefer a softer cup, lean on coconut milk or oat milk rather than plain water-heavy dairy. A little extra vanilla works better than extra sugar when you want the flavor to feel fuller.
Serving Suggestions:
Toasted coconut, diced mango, and crushed peanuts are the garnishes I reach for most. They all add a different texture, which matters with creamy Thai tea desserts that can otherwise blur together. For drinks, a tall glass with lots of ice looks better than a short cup stuffed to the top.
Make-It-Yours:
For dairy-free versions, use canned coconut milk, oat milk, or coconut condensed milk where the recipe allows. For lower-sugar batches, cut the sweetener by about one-quarter and keep the tea strong so the flavor doesn’t disappear. For a more floral profile, add a small strip of orange zest to the brewing step and remove it before chilling.
Make-Ahead, Storage, and Reheating Guidance
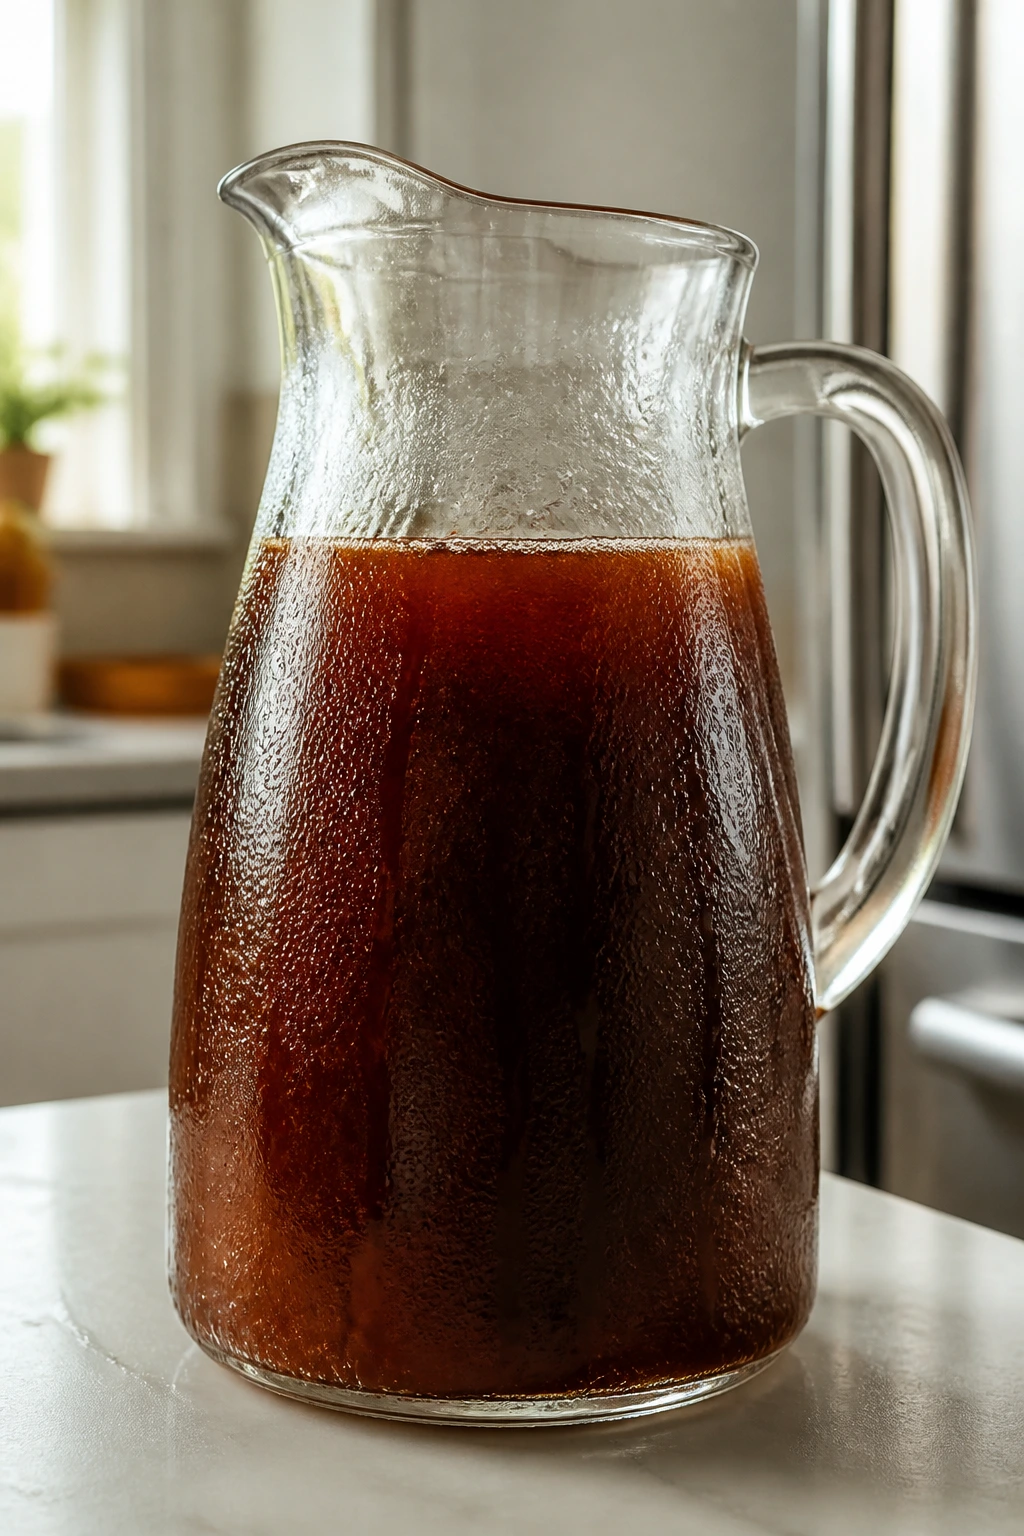
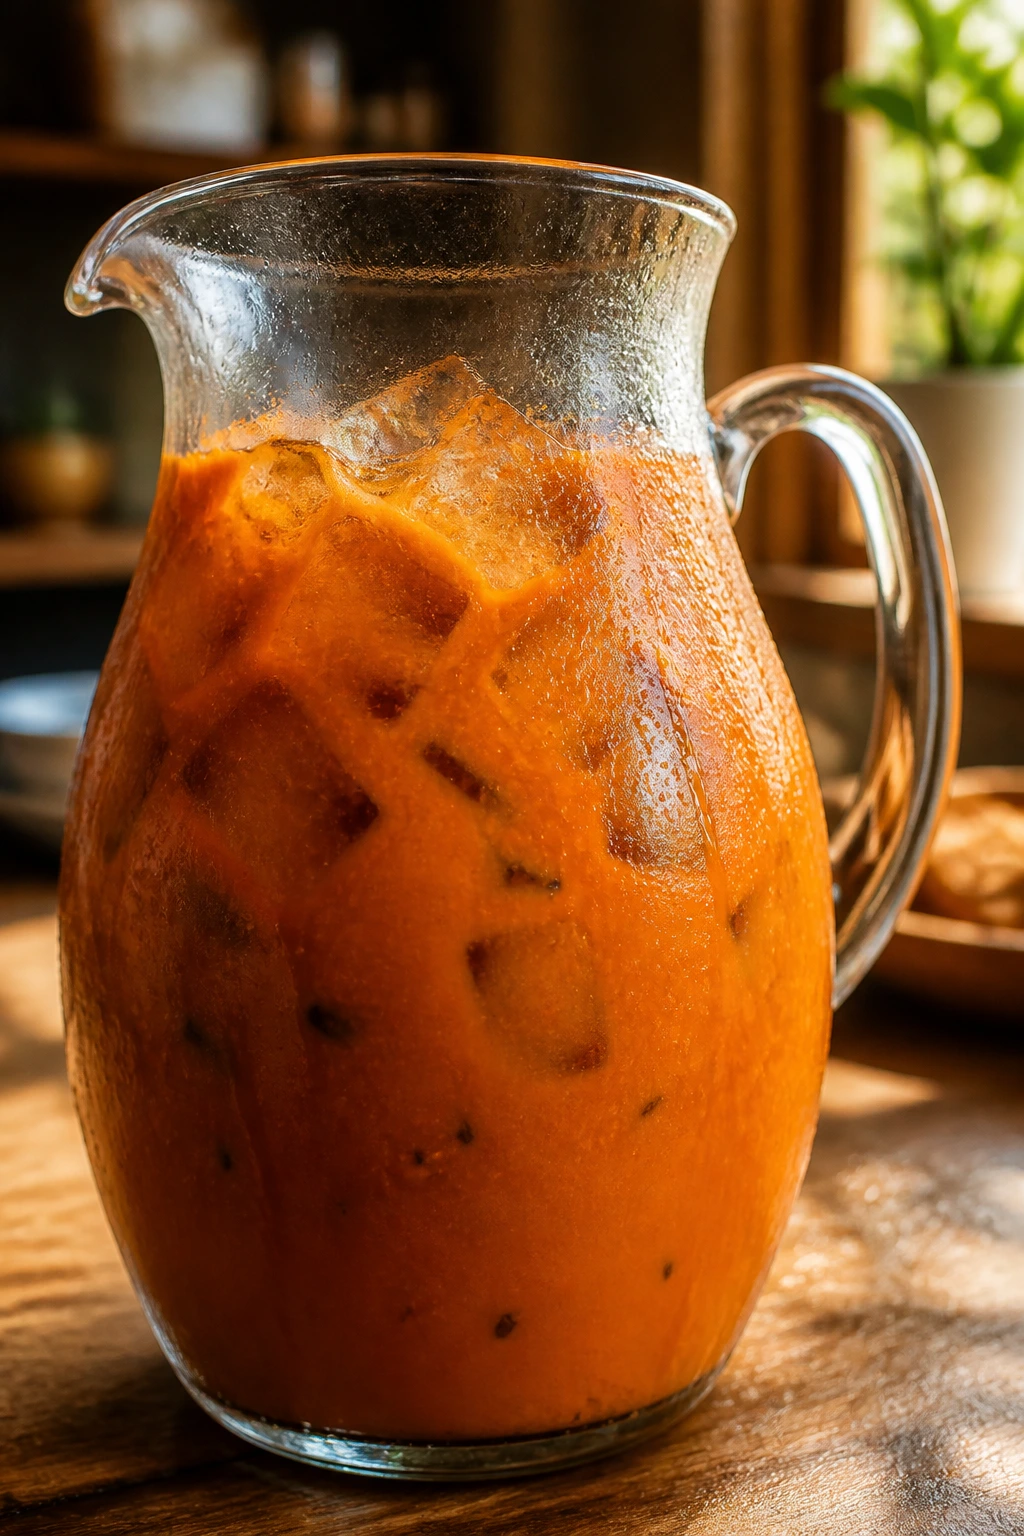
Brewed Thai tea concentrate keeps well in the refrigerator for up to 4 days if you store it in a covered pitcher or jar. In fact, I prefer making the base ahead because it gives you a cold, strong liquid to work with, and that’s especially useful for iced drinks and desserts. If you’re making boba, though, cook the pearls the same day; they start to lose their chew within a few hours.
Most creamy drinks are best the day you make them. If you must store them, keep the tea base and dairy separate in the fridge for up to 2 days, then combine with ice just before serving. Once ice is added, the drink thins out fast, and no amount of shaking fully fixes that. Boba drinks should be assembled right before drinking — pearls go hard in the refrigerator and never quite recover.
Panna cotta, cheesecake bars, tiramisu cups, rice pudding, chia pudding, and overnight oats all hold well in the fridge for 3 to 4 days. Cheesecake bars are often better on day two because the tea flavor settles into the filling. Rice pudding may thicken in the fridge, so stir in a splash of milk before serving if needed. Chia pudding and overnight oats also loosen up nicely with a spoonful of milk.
Baked goods like pound cake, cupcakes, cookies, baked donuts, and shortbread keep at room temperature for 1 to 2 days if they’re unfrosted and well covered. Frosted cupcakes and cheesecake should stay refrigerated. Pound cake freezes well for up to 2 months if wrapped tightly, and shortbread holds up nicely in a sealed tin. If you want to reheat cake or donuts, use a low oven around 300°F for 5 to 8 minutes, just until warmed through. For rice pudding, reheat gently on the stove over low heat with 1 to 2 tablespoons milk. Don’t microwave custards on high; they go from smooth to scrambled fast.
Ice cream and popsicles need the freezer, obviously, but they also benefit from airtight storage. Ice cream is best within 2 weeks for texture, though it will keep longer if tightly covered. Popsicles are at their best within a few weeks before freezer flavors creep in. Fudge can stay frozen for a month or two, but I usually keep it chilled in the fridge because it’s easier to cut cleanly that way.
Variations and Adaptations to Try
Dairy-Free Coconut Route:
Use canned coconut milk, coconut condensed milk, and oat milk wherever the recipe allows. This works especially well in popsicles, slushes, puddings, and rice pudding, where the coconut flavor feels intentional rather than like a compromise.
Less-Sweet Café Style:
Reduce the sweetened condensed milk or sugar by about 25 percent, then brew the tea a little stronger than usual. The tea needs that extra backbone if you’re cutting sweetness, especially in iced drinks where the ice will dilute the cup.
Spice-Forward Blend:
Steep the tea with 1 star anise, 2 cardamom pods, or a short cinnamon stick, then strain well. This gives the tea a more aromatic edge that works nicely in panna cotta, crème brûlée, and rice pudding.
Mango Pairing Version:
Add mango purée, diced mango, or mango glaze to cheesecake bars, cups, or pudding recipes. Mango and Thai tea are one of those pairs that make each other taste cleaner and brighter, and the contrast is worth the extra minute.
Caffeine-Light Batch:
Cut the Thai tea mix with decaf black tea at a 1:1 ratio and keep the spices the same. It softens the caffeine hit without changing the flavor identity too much, which is useful for late-night desserts or hot lattes.
Party Tray Mix:
Make one tea concentrate and split it across several recipes at once — a pitcher for drinks, a cup for glaze, and a bit for cheesecake or pudding. This saves time and keeps the flavor consistent across the whole spread.
Common Mistakes to Avoid
Brewing the tea too weak:
If the base looks pale in the pitcher, it will vanish once ice, milk, or sugar gets involved. Brew it strong enough that the liquid already looks darker than you think the final drink should be.
Steeping too long and chasing color:
More time is not always more flavor. Past about 5 to 6 minutes, many Thai tea mixes drift bitter, and the bitterness gets sharper once the drink chills.
Using the wrong dairy texture:
Thin coconut beverage or skim milk is fine for some things, but not for puddings, ice cream, or cheesecake. When the recipe wants body, give it body. Full-fat milk, canned coconut milk, cream, and cream cheese are there for a reason.
Adding dairy while the tea is still scorching hot:
This can thin the ice in cold drinks, split coconut milk, or make custard bases act weird. Cool the tea a little before mixing in milk, especially if the recipe is going into the fridge or freezer.
Ignoring texture timing:
Boba gets firm, popsicles need a full freeze, panna cotta needs hours to set, and rice pudding thickens after cooking. If you serve too early, the recipe can taste underdeveloped even when the flavors are right.
Skipping the salt:
A pinch here and there is one of the easiest ways to make Thai tea taste finished. Without it, sweetened condensed milk can flatten the whole thing into a single sugary note.
Frequently Asked Questions
Can I use regular black tea instead of Thai tea mix?
Yes, but you’ll lose some of the classic spice notes and the deeper color. If you use plain black tea, add a small piece of star anise, a pinch of cardamom, or a strip of cinnamon while steeping to bring the flavor back toward Thai tea.
Why does my Thai tea taste bitter?
It’s usually from steeping too long or squeezing the tea solids too hard when straining. Keep the steep to about 4 to 5 minutes, strain gently, and let the tea do its work without being bullied.
What milk tastes best in Thai tea?
For the classic drink, evaporated milk and sweetened condensed milk give the most familiar result. For desserts, full-fat milk, heavy cream, and canned coconut milk all work better because they hold structure and carry flavor more cleanly.
Can I make the drinks dairy-free?
Absolutely. Use full-fat coconut milk, oat milk, or coconut condensed milk depending on the recipe. Just know that carton coconut beverage is too thin for most desserts and won’t give you the same body.
How do I keep boba chewy instead of hard?
Cook the pearls fully, then use them soon after cooking. If you leave them sitting too long, they tighten up and get firm. A short soak in brown sugar syrup helps keep the texture supple for a little while.
Can I brew Thai tea concentrate ahead of time?
Yes, and I recommend it. Brew it strong, cool it, and keep it covered in the refrigerator for up to 4 days. That makes the drinks faster and keeps the flavor consistent across desserts.
Do I need food coloring for Thai tea?
No. A strong brew usually gives enough orange-amber color on its own. If your tea mix is pale, that’s a tea problem, not a color problem, and more steeping or a stronger mix usually fixes it.
Which Thai tea recipes travel best?
Shortbread, fudge, cheesecake bars, and cupcakes travel better than drinks or custards. If you’re taking something to a party, choose a recipe that can sit chilled or boxed without losing its texture in the car.
Can I make these less sweet without ruining them?
Usually, yes. Cut the sugar by about one-quarter first and keep the tea strong so the flavor doesn’t go flat. In desserts with condensed milk, I’d reduce the sugar in the other components before I touch the dairy layer.
A Pitcher Worth Keeping Cold
Thai tea does a lot more than fill a glass with milk and ice. It brings enough spice and tannin to work in custards, enough color to make desserts look warm and finished, and enough sweetness to feel familiar without becoming dull. That’s why the best Thai tea recipes don’t stop at the drink menu. They move into the freezer, the oven, and the dessert case with almost no resistance.
The easiest place to start is the plain iced tea, because once you know how strong you like the brew, the rest of the collection gets easier fast. After that, the line between beverage and dessert starts to blur in a very good way. One concentrated pitcher can carry a whole week of sweets, and that’s a habit worth keeping around.