
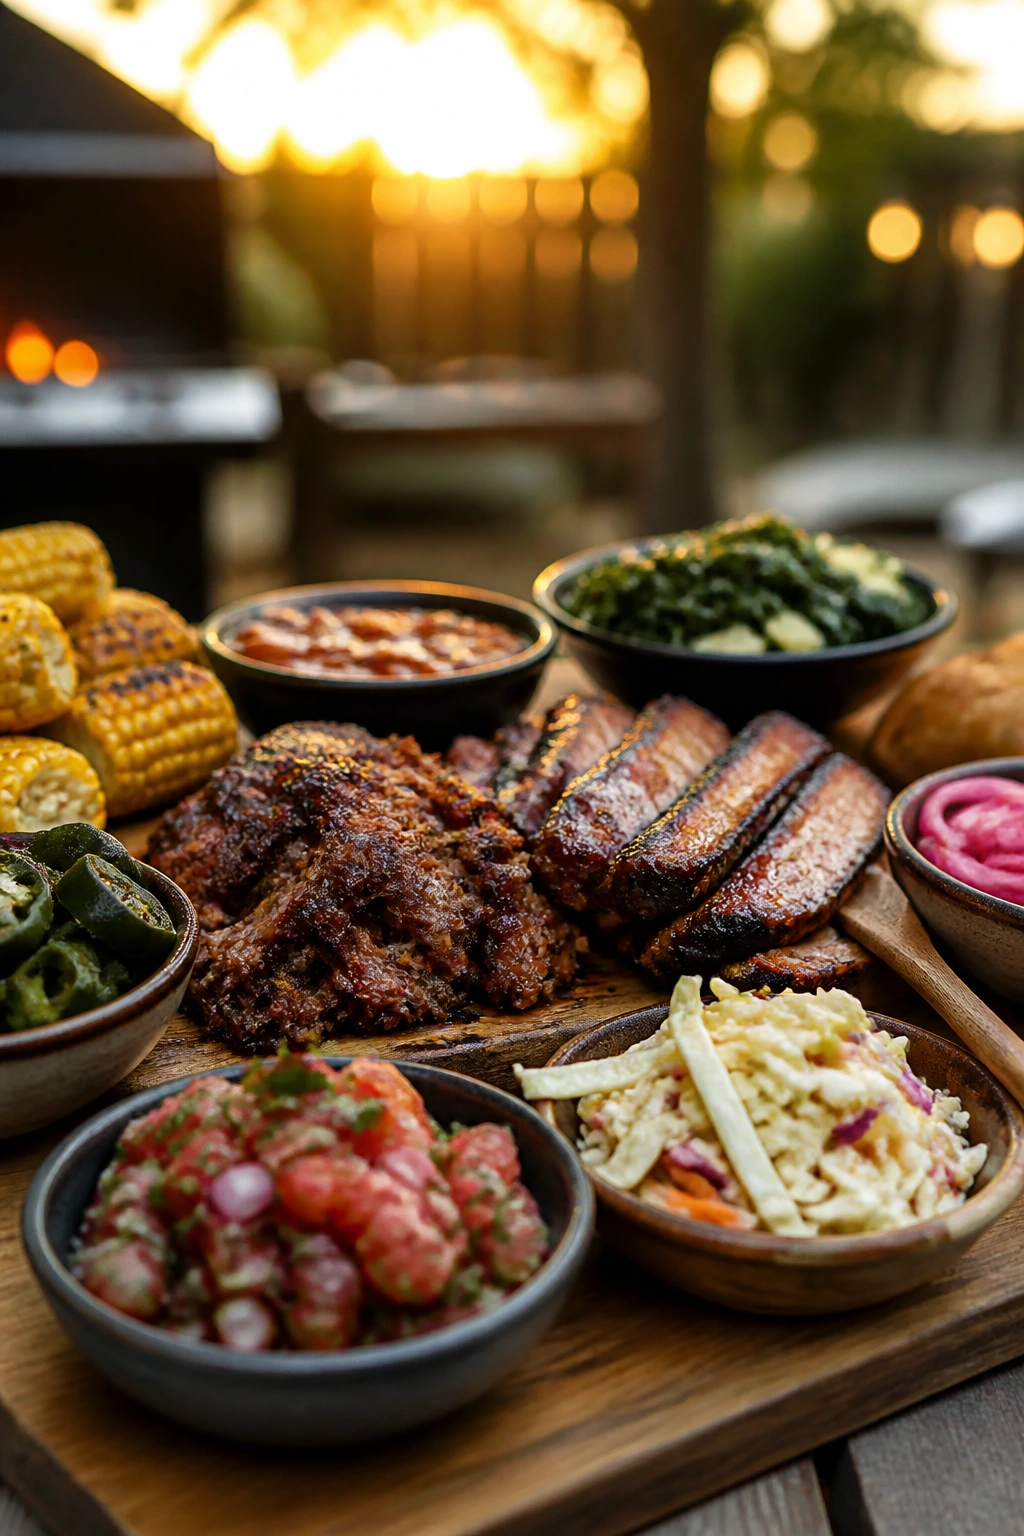
A backyard cookout falls apart fast when the grill is all heat and no plan. The best BBQ recipes for backyard cookouts are the ones that keep working when the breeze shifts, the charcoal settles, and somebody wanders in late with a plate and a hungry look.
That’s the real test. Not whether a recipe sounds good on paper. Whether the ribs still taste sticky and deep after a ten-minute rest, whether chicken thighs stay juicy instead of turning stringy, whether a side dish can sit near the grill without sulking into mush.
I’ve always had a soft spot for cookout food that knows how to hold its own. Give me charred edges, smoke on the lid, pickles on the side, and one or two dishes that can be made ahead so you’re not trapped at the grill the entire afternoon. That’s the kind of food that makes a backyard feel like a place people want to linger.
Why You’ll Love This Collection
- Built for real grills: Every recipe here works on a backyard setup with a lid, a hot zone, and a cooler zone, so you’re not relying on fancy gear.
- Mixes mains and sides on purpose: Ribs, chicken, burgers, beans, slaw, cornbread, and grilled fruit all show up, which means the whole table can feel finished.
- Heavy on make-ahead moves: Several recipes get better with a little rest, a quick chill, or an early rub, which takes pressure off the day-of cook.
- Uses ingredients that make sense: These recipes lean on pantry staples, common cuts of meat, and vegetables that actually show up at cookout season in decent shape.
- Keeps the fire doing useful work: A good cookout recipe should earn its place on the grill, whether that means smoke, char, glaze, or a quick blast of heat.
- Flexible for a mixed crowd: There are meaty centerpieces, lighter options, and a few vegetarian dishes that don’t feel like afterthoughts.
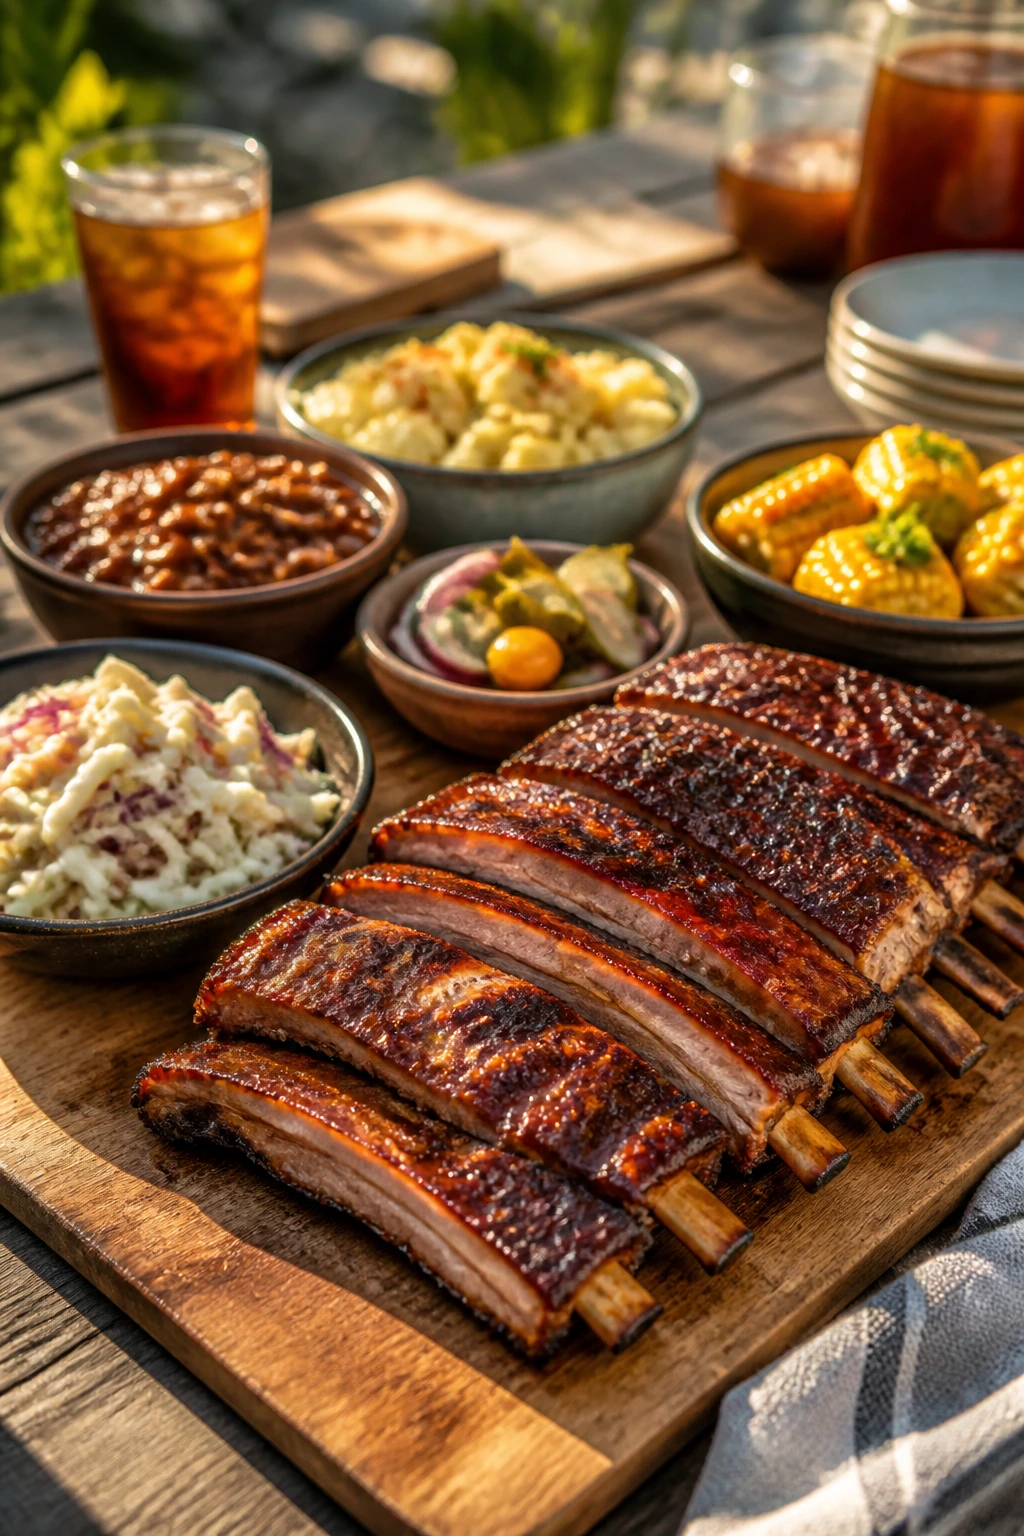
1. Brown Sugar Baby Back Ribs with Sticky Bark
These ribs hit that sweet spot where the bark turns dark and crackly, but the meat underneath still gives a little when you bite it. I like baby backs for backyard cooking because they cook faster than bigger racks, and the curved bones make them easy to slice once they’ve rested.
Why It Works:
A sugar-and-spice rub builds a dark crust while the low grill heat keeps the fat from rushing out too fast. The apple juice in the foil wrap adds just enough steam to keep the ribs from drying out, and the BBQ sauce goes on late so it thickens instead of burning. You end up with ribs that taste smoky first, then sweet, then peppery on the finish.
Key Ingredients:
- 2 racks baby back ribs, about 4 to 5 lbs total, membrane removed
- 2 tbsp yellow mustard, for the binder
- 3 tbsp brown sugar
- 1 tbsp kosher salt
- 1 tbsp smoked paprika
- 1 tsp garlic powder
- 1 tsp onion powder
- 1 tsp black pepper
- 1/2 tsp cayenne
- 1 cup apple juice
- 1 cup BBQ sauce, warmed
Quick Steps:
- Pat the ribs dry, peel off the membrane, and rub both sides with mustard.
- Mix the sugar, salt, paprika, garlic powder, onion powder, pepper, and cayenne, then coat the ribs evenly.
- Set the grill for indirect heat at 250°F and cook the ribs bone-side down for 2 to 2 1/2 hours until the bark looks set.
- Wrap the racks tightly in foil with 1/2 cup apple juice each, then cook 45 to 60 minutes more until a toothpick slides in with little resistance.
- Unwrap, brush with BBQ sauce, and finish over indirect heat for 10 to 15 minutes until the sauce is glossy and tacky.
- Rest 10 minutes before slicing between the bones.
Equipment for This Recipe:
- Covered grill or smoker
- Heavy-duty aluminum foil
- Tongs
- Instant-read thermometer
- Sharp knife
How to Serve This Dish:
Stack the ribs on a platter with pickle chips, sliced onions, and a bowl of extra sauce. They sit naturally next to slaw and cornbread, and I’d plan on half a rack per adult unless the crowd is small and hungry.
Pro Tips for This Recipe:
- Let the rub sit on the ribs for at least 30 minutes before cooking if you have the time.
- Keep the grill lid closed; peeking too often drops the temperature and stretches the cook.
- Sauce only in the final stretch, or the sugar will scorch and taste bitter.
- If the ribs bend easily when lifted in tongs and the surface starts to crack, they’re close.
Variations on This Dish:
- Memphis-Style Dry Ribs: Skip the sauce and add a little extra black pepper plus a pinch of mustard powder.
- Honey-Chipotle Finish: Stir 2 tbsp honey and 1 tbsp minced chipotle in adobo into the sauce for a smoky, sticky edge.
- Peach BBQ Glaze: Swap half the BBQ sauce for peach preserves and add a splash of cider vinegar.
Common Mistakes to Avoid with This Dish:
- Cooking over direct flame: The sugar burns before the meat softens. Keep the heat off to the side.
- Saucing too early: You’ll get blackened glaze instead of a shiny finish. Brush it on near the end.
- Skipping the rest: Slice too soon and the juices run out onto the board. Give the rack ten minutes.
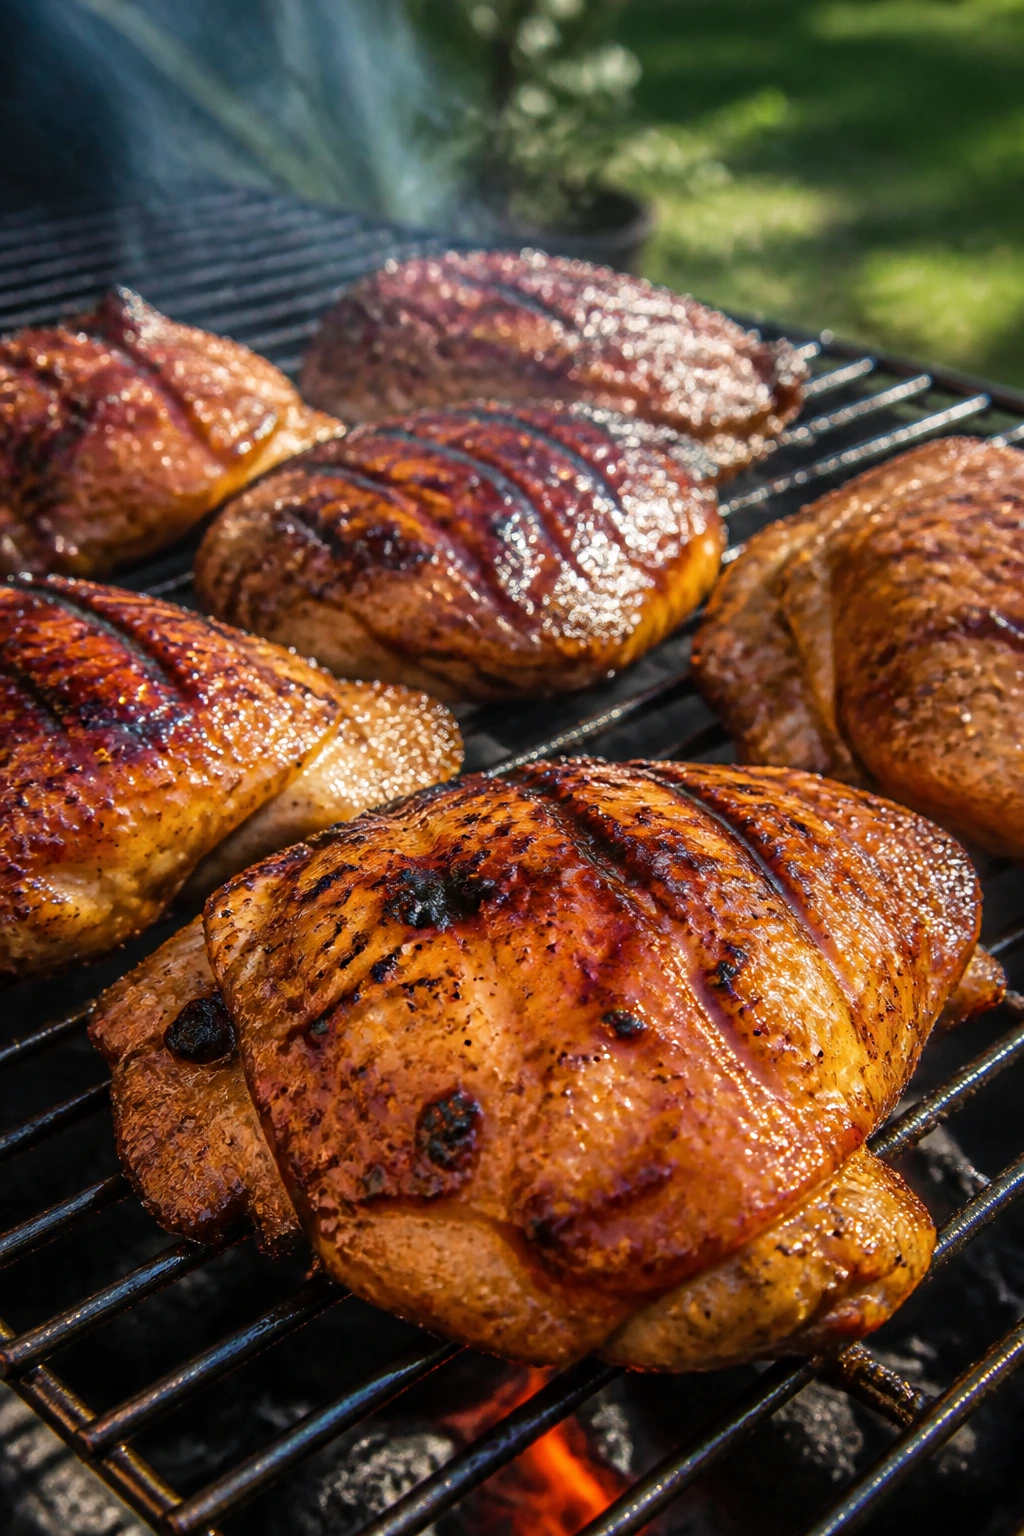
2. Honey-Lime BBQ Chicken Thighs
Chicken thighs are the cookout cut I trust most. They stay juicy on a hot grill, and the skin can turn shattery at the edges if you give it enough time over indirect heat before the sauce goes on.
Why It Works:
Bone-in, skin-on thighs forgive small temperature swings better than breasts, which matters when the grill is carrying burgers on one side and corn on the other. Honey helps the BBQ sauce cling, lime cuts through the sweetness, and a short blast of direct heat at the end gives the skin the kind of browned spots that smell like an actual cookout.
Key Ingredients:
- 2 1/2 lbs bone-in, skin-on chicken thighs
- 1 1/2 tbsp olive oil
- 2 tsp kosher salt
- 1 tsp black pepper
- 1 tsp smoked paprika
- 1 tsp garlic powder
- 1/2 tsp chili powder
- 1/2 cup BBQ sauce
- 2 tbsp honey
- 1 tbsp lime juice
- 1 tsp lime zest
Quick Steps:
- Pat the chicken dry and rub it with oil, salt, pepper, paprika, garlic powder, and chili powder.
- Mix the BBQ sauce, honey, lime juice, and zest in a small bowl.
- Heat the grill to medium, then place the thighs skin-side up over indirect heat and cook 20 minutes.
- Flip the thighs skin-side down for 5 to 7 minutes until the skin starts to crisp and pick up color.
- Brush on the glaze and move the thighs back to indirect heat for 8 to 10 minutes, until the internal temperature hits 165°F near the bone.
- Rest 5 to 8 minutes before serving.
Equipment for This Recipe:
- Covered grill
- Tongs
- Small mixing bowl
- Basting brush
- Instant-read thermometer
How to Serve This Dish:
Pile the thighs onto a platter and spoon any extra glaze over the top. They go well with grilled corn, potato salad, or a sharp slaw, and one or two thighs per person is usually right.
Pro Tips for This Recipe:
- Dry skin matters more than marinade here; wet skin steams instead of crisping.
- If flare-ups happen, move the chicken fast and close the lid.
- Use the thermometer at the thickest part near the bone, not in the middle where fat pools.
- Let the glaze warm before brushing so it spreads in a thin layer.
Variations on This Dish:
- Spicy Lime Thighs: Add 1 teaspoon cayenne or a spoonful of hot sauce to the glaze.
- Garlic-Herb Version: Swap the chili powder for chopped rosemary and thyme.
- Boneless Shortcut: Use boneless thighs and reduce the grill time by about 8 to 10 minutes total.
Common Mistakes to Avoid with This Dish:
- Saucing from the start: Honey burns fast. Wait until the chicken is nearly done.
- Cooking only over direct heat: The skin can blister before the meat cooks through. Use a two-zone fire.
- Pulling at 160°F too early: Thighs are forgiving, but the bone area needs a few more degrees for the best texture.
3. Smash Burgers with Charred Onions and Tangy Sauce
A smash burger is a loud, fast thing. Thin edges, crusty beef, melted cheese, and a bun that gives up a little when the sauce hits it. That’s the kind of burger I want standing in for backyard comfort.
Why It Works:
The high heat of a griddle or cast-iron pan creates a browned crust in under two minutes, which is where the flavor lives. Onion slices cook beside the burgers and pick up the beef drippings, while a quick sauce made from mayo, ketchup, mustard, and relish gives you that salty-tangy snap that keeps the burger from feeling heavy.
Key Ingredients:
- 2 lbs ground beef, 80/20
- 1 1/2 tsp kosher salt
- 1 tsp black pepper
- 1 large yellow onion, thinly sliced
- 4 burger buns
- 4 slices cheddar
- 1/4 cup mayonnaise
- 1 tbsp ketchup
- 1 tbsp yellow mustard
- 1 tbsp pickle relish
Quick Steps:
- Divide the beef into 8 loose balls, about 4 oz each, and keep them cold.
- Mix the mayo, ketchup, mustard, and relish for the sauce.
- Heat a cast-iron griddle or skillet on the grill until it is very hot and lightly smoking.
- Add the onions with a little oil and cook 4 to 5 minutes until browned at the edges.
- Place the beef balls on the hot surface, season, smash hard with a stiff spatula, and cook 60 to 90 seconds per side.
- Top with cheese, toast the buns, and build the burgers with onions and sauce.
Equipment for This Recipe:
- Cast-iron griddle or heavy skillet
- Stiff metal spatula
- Small bowl
- Grill or hot cooktop
- Cheese slicer or knife
How to Serve This Dish:
Serve these hot, fast, and a little messy with pickle spears and chips. Two smashed patties make a satisfying sandwich, though one is enough if the table is loaded with sides.
Pro Tips for This Recipe:
- Don’t overwork the meat. Loose balls smash better than packed patties.
- Salt right before the meat hits the pan so the crust forms cleanly.
- Toasting the buns is not optional; it keeps the sauce from soaking through.
- If the onions start to dry out, add a spoonful of water and let it steam off.
Variations on This Dish:
- Double-Stacked Backyard Burger: Use two thinner patties per burger and stack the cheese between them.
- Smoky Jalapeño Burger: Stir chopped pickled jalapeños into the sauce and add pepper jack.
- Turkey Smash Option: Use ground turkey, but keep the patties thicker and cook them longer to 165°F.
Common Mistakes to Avoid with This Dish:
- Smashing twice: Once the crust forms, leave it alone or you lose the browned edge.
- Using lean beef: 90/10 dries out fast. The fat matters here.
- Skipping the hot surface: A lukewarm pan gives you gray meat instead of a proper sear.
4. Skewered BBQ Chicken with Peppers and Red Onion
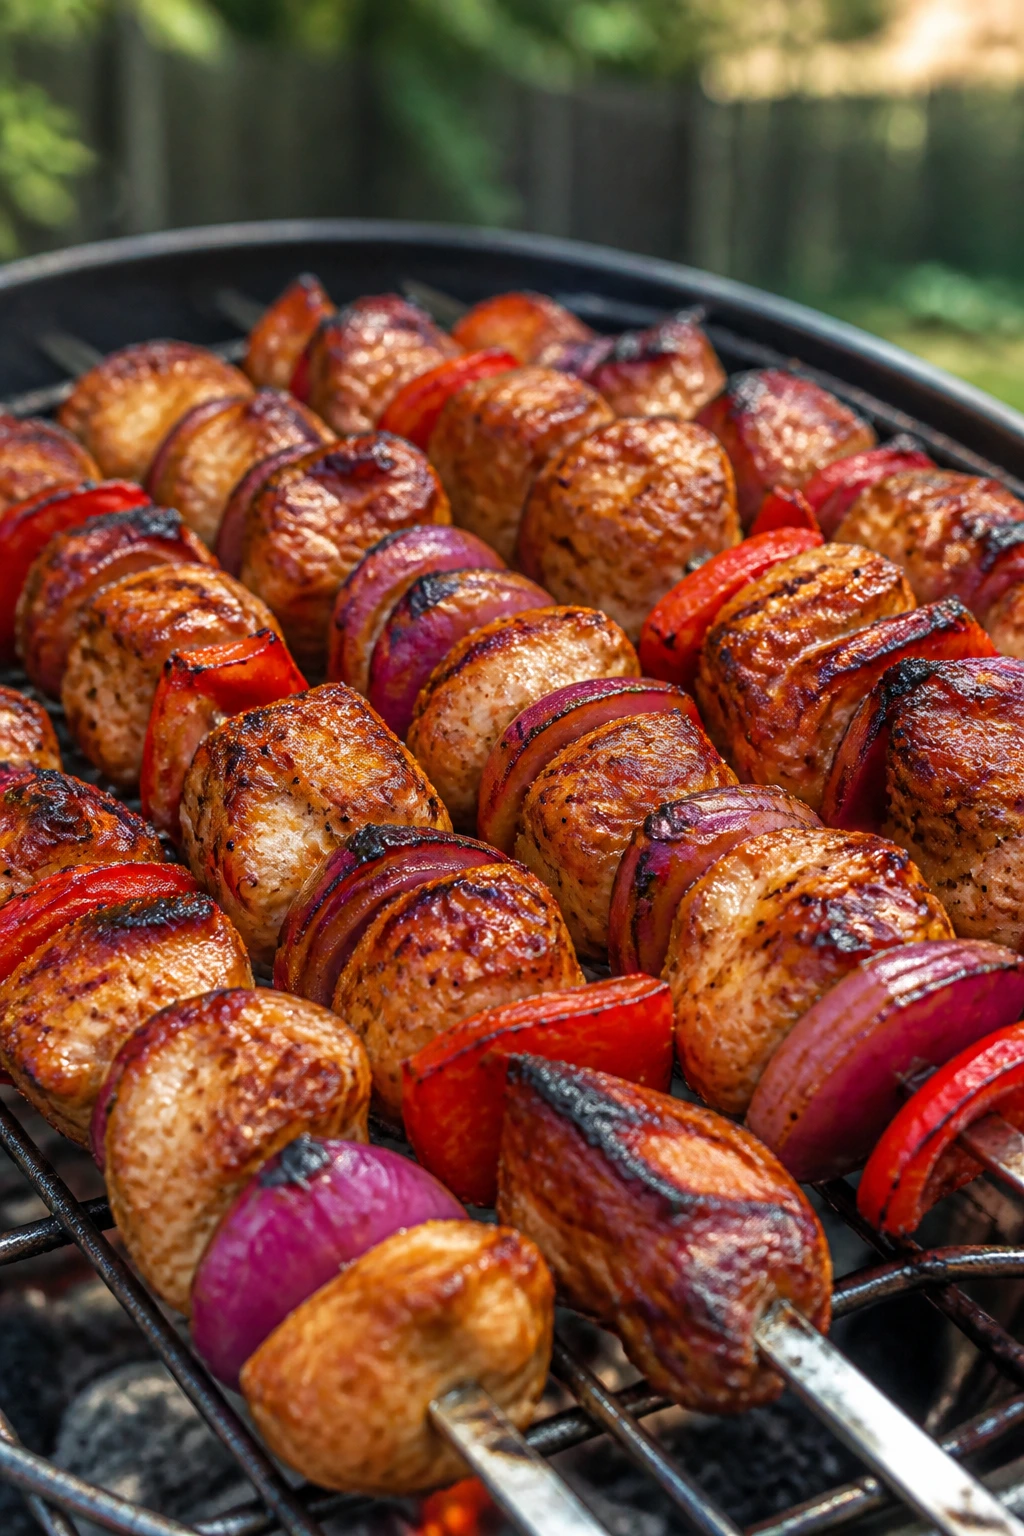
Skewers are the easy thing that still feels festive. The chicken gets little charred edges, the peppers soften at the edges, and the onion goes sweet instead of sharp.
Why It Works:
Cutting everything into similar sizes keeps the chicken and vegetables finishing at the same pace. A short marinade gives the meat flavor without making the sugars burn, and the final brush of sauce after the first turn gives you sticky spots without trapping raw glaze underneath.
Key Ingredients:
- 2 lbs boneless, skinless chicken thighs, cut into 1 1/2-inch pieces
- 1 red bell pepper, cut into chunks
- 1 yellow bell pepper, cut into chunks
- 1 red onion, cut into wedges and separated
- 2 tbsp olive oil
- 1 tsp kosher salt
- 1 tsp garlic powder
- 1/2 tsp black pepper
- 1/2 cup BBQ sauce
- 8 to 10 skewers, metal or soaked wooden
Quick Steps:
- Toss the chicken with oil, salt, garlic powder, and pepper, then let it sit 15 to 30 minutes.
- Thread chicken, peppers, and onion onto the skewers, keeping the pieces snug but not crushed.
- Heat the grill to medium-high and oil the grates.
- Grill the skewers for 10 minutes, turning every 3 minutes until the chicken has grill marks and the vegetables have softened.
- Brush with BBQ sauce and grill 2 to 3 minutes more until the sauce turns glossy and the chicken reaches 165°F.
- Rest the skewers for 3 minutes before serving.
Equipment for This Recipe:
- Grill
- Skewers
- Tongs
- Basting brush
- Instant-read thermometer
How to Serve This Dish:
Slide the chicken off the skewers onto rice or serve them whole over a big platter of herb salad. They’re also good tucked into warm flatbread with a spoonful of yogurt or extra sauce.
Pro Tips for This Recipe:
- Soak wooden skewers for at least 30 minutes if you’re not using metal.
- Don’t pack the pieces too tightly; a little breathing room gives you better char.
- If the peppers are cooking too fast, move the skewers to indirect heat for a minute.
- Use thighs if you can. They stay juicier than breast meat on the grill.
Variations on This Dish:
- Pineapple-Forward Version: Add pineapple chunks between the chicken pieces and use a sweeter sauce.
- All-Veggie Skewers: Replace the chicken with halloumi and extra zucchini.
- Spicy Gochujang Glaze: Swap half the BBQ sauce for gochujang mixed with honey.
Common Mistakes to Avoid with This Dish:
- Uneven pieces: Big chicken chunks and tiny pepper bits won’t finish together. Cut carefully.
- Glazing too early: The sauce can burn before the chicken is done.
- Using only breast meat: It works, but it needs closer attention or it dries fast.
5. Cedar-Plank Salmon with Maple BBQ Glaze
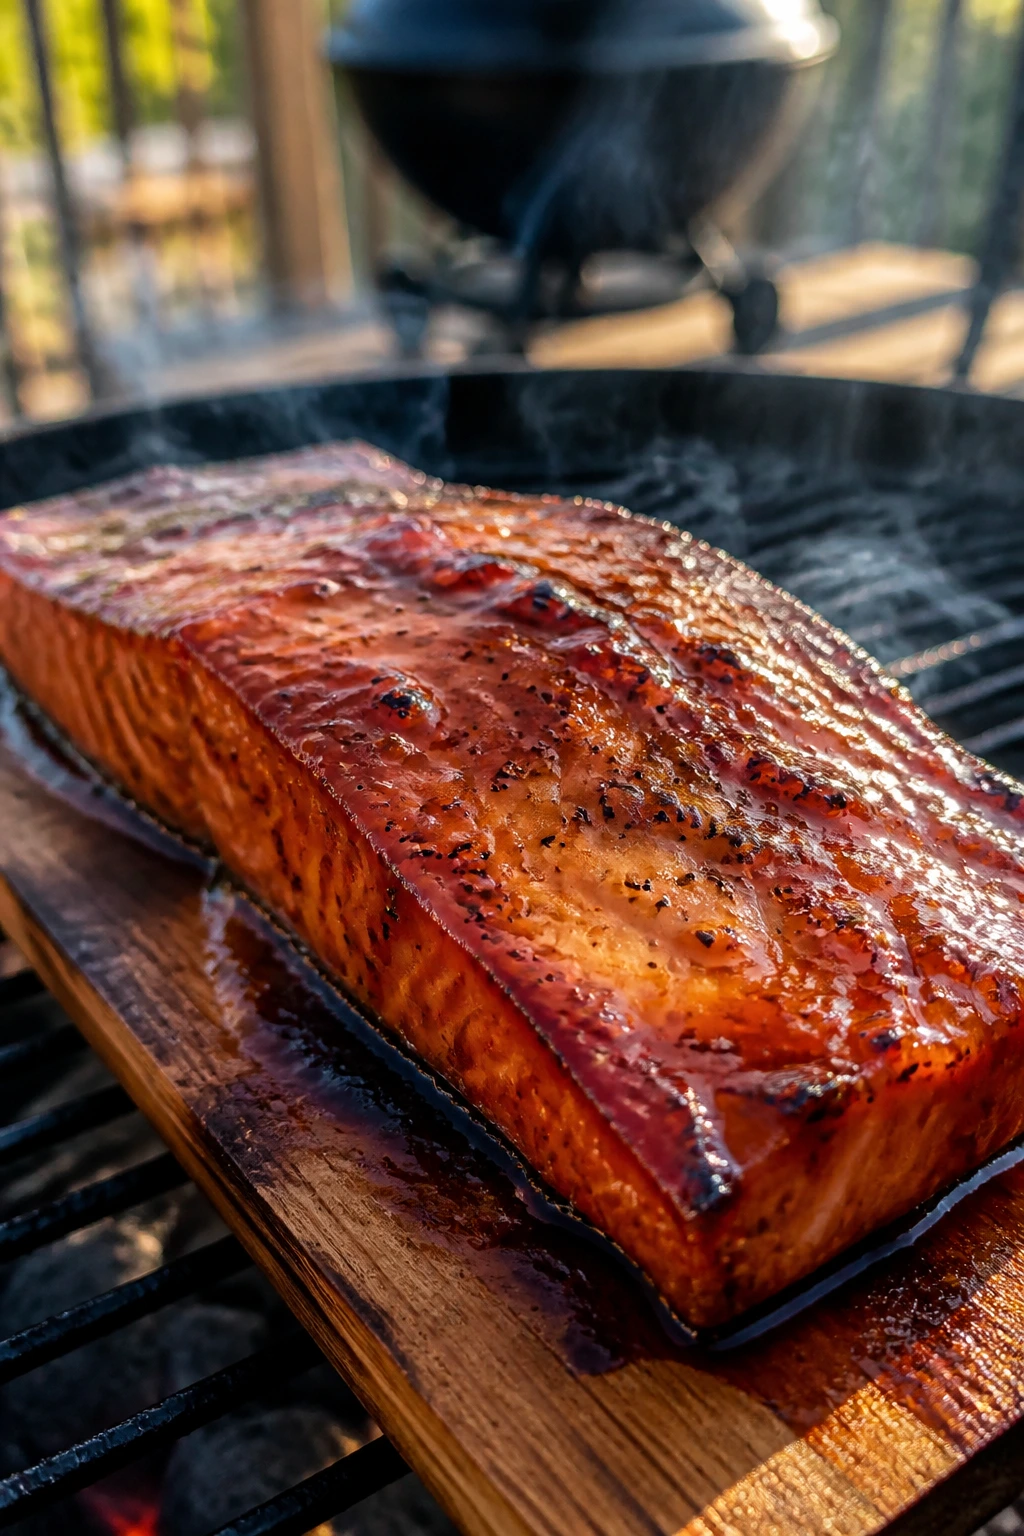
Fish on the grill sounds delicate until you try it on a cedar plank. Then it becomes one of the easiest things you can cook outdoors, because the plank gives the salmon a little shelter from direct flame and a soft wood smoke note.
Why It Works:
The plank acts like a buffer, so the salmon cooks more evenly and doesn’t stick to the grates. Maple brings a round sweetness that plays well with a BBQ sauce base, and Dijon keeps the glaze from tasting flat or syrupy.
Key Ingredients:
- 2 cedar planks, soaked for at least 1 hour
- 2 salmon fillets, about 2 lbs total, skin on
- 1 tbsp olive oil
- 1 tsp kosher salt
- 1/2 tsp black pepper
- 1/3 cup BBQ sauce
- 2 tbsp maple syrup
- 1 tbsp Dijon mustard
- 1 lemon, cut into wedges
Quick Steps:
- Soak the cedar planks in water for 1 hour, then drain them well.
- Rub the salmon with oil, salt, and pepper.
- Stir the BBQ sauce, maple syrup, and Dijon together.
- Heat the grill to medium and place the planks on the grates for 2 minutes, just until they start to smoke.
- Set the salmon on the planks, brush lightly with glaze, and grill with the lid closed for 12 to 15 minutes until the fish flakes and reaches 125°F for medium or 145°F if you prefer it fully cooked.
- Serve with lemon wedges and another spoonful of glaze.
Equipment for This Recipe:
- Cedar planks
- Covered grill
- Tongs
- Small bowl
- Fish spatula
How to Serve This Dish:
Serve the salmon straight from the plank if you like the look of it, or slide it onto a platter with lemon and herbs. I’d pair it with grilled asparagus, slaw, or new potatoes.
Pro Tips for This Recipe:
- Buy salmon fillets that are even in thickness so they cook at the same rate.
- If the plank catches flame, mist it lightly with water and close the lid.
- Don’t drown the fish in glaze at the start; a thin coat is enough.
- Wild salmon tends to cook a bit faster than farmed, so watch the edges closely.
Variations on This Dish:
- Bourbon Maple Glaze: Add 1 tablespoon bourbon to the glaze for a deeper finish.
- Herb-Mustard Salmon: Use chopped dill and parsley instead of maple.
- Spicy Honey Salmon: Add a teaspoon of chili flakes or hot sauce to the glaze.
Common Mistakes to Avoid with This Dish:
- Dry planks: A dry plank can char too fast and taste acrid. Soak it fully.
- Overcooking: Salmon turns chalky when it goes much past done. Pull it early and let carryover heat work.
- Using too much sauce: A heavy layer slides off and burns on the plank.
6. Pulled Pork Sandwiches with Vinegar Slaw
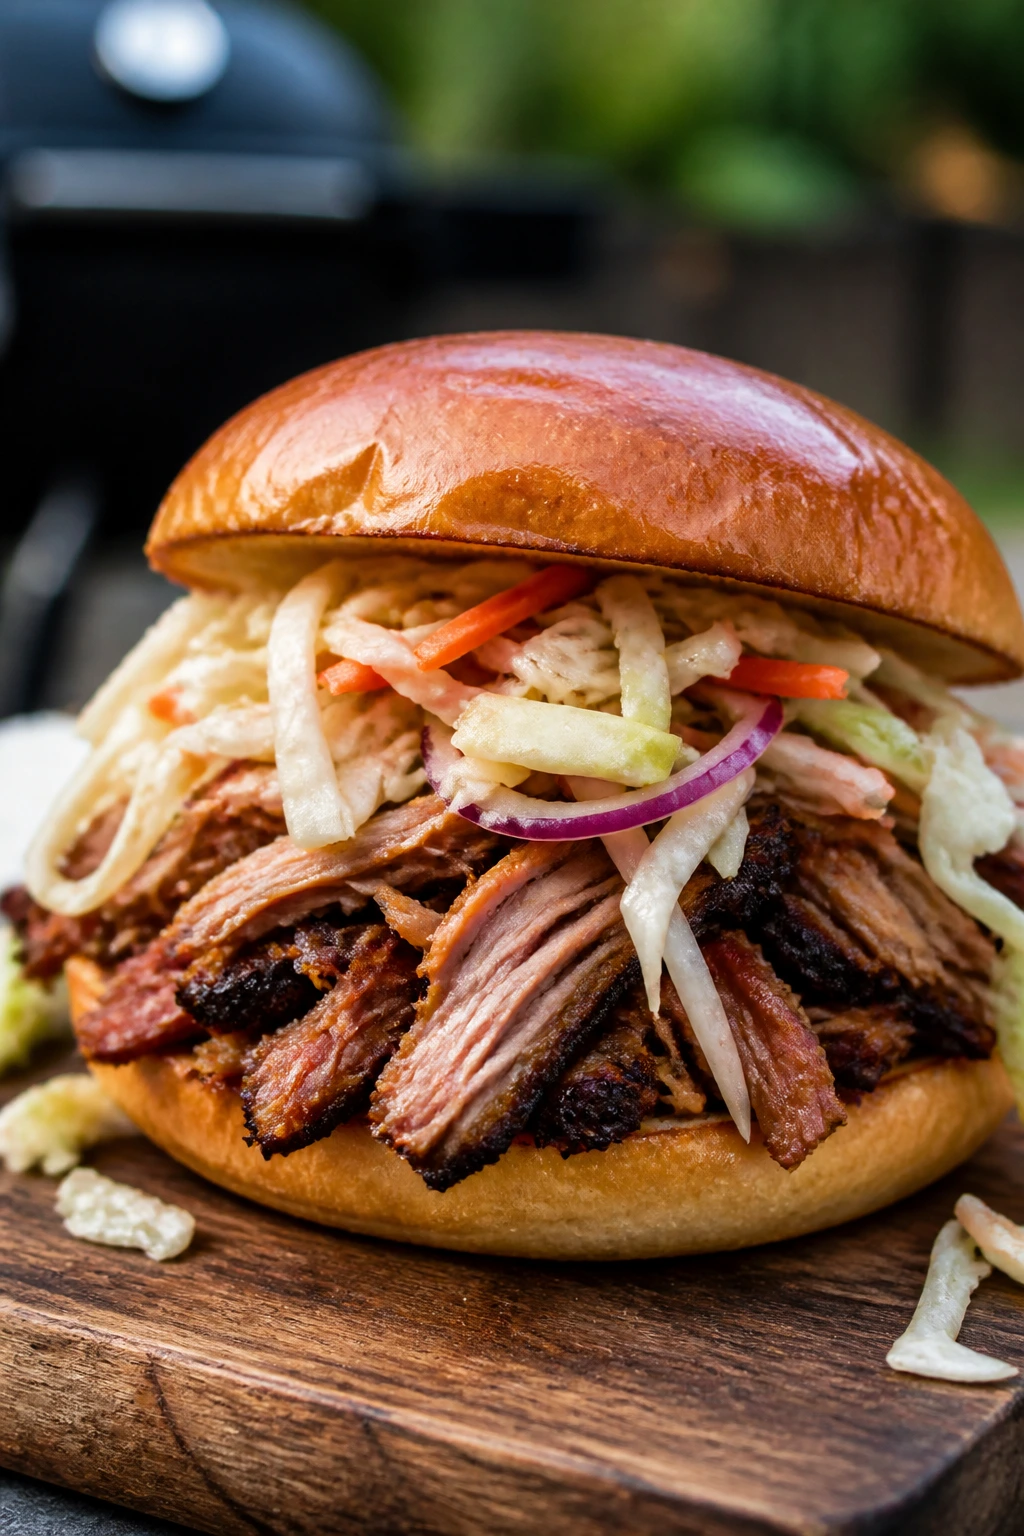
Pulled pork is slow food, which is exactly why it belongs at a cookout. Once the shoulder starts to soften, the smell changes from raw pork and spice to something deeper and almost sweet, and you know you’re headed somewhere good.
Why It Works:
Pork shoulder has enough fat and connective tissue to survive a long cook without drying out. A vinegar-based finishing sauce cuts through the richness, and the slaw keeps the sandwich from collapsing into one soft, heavy bite.
Key Ingredients:
- 1 pork shoulder, 4 to 5 lbs
- 2 tbsp yellow mustard
- 3 tbsp brown sugar
- 1 tbsp kosher salt
- 1 tbsp smoked paprika
- 1 tsp black pepper
- 1 tsp garlic powder
- 1 cup apple cider vinegar
- 1/2 cup chicken broth
- 1/2 cup BBQ sauce
- 8 brioche buns
- 4 cups shredded cabbage
- 1/3 cup mayonnaise
- 1 tbsp cider vinegar
- 1 tsp sugar
Quick Steps:
- Rub the pork shoulder with mustard, then coat it with the sugar, salt, paprika, pepper, and garlic powder.
- Cook it over indirect heat at 250°F or in a smoker until the bark is dark and the internal temperature reaches 195 to 203°F, usually 6 to 8 hours.
- Wrap the pork in foil with vinegar and broth once the bark is set, then finish cooking until a fork twists in easily.
- Rest the meat at least 30 minutes, then shred it with forks or gloved hands.
- Mix the cabbage, mayo, vinegar, sugar, and a pinch of salt for the slaw.
- Toss the pork with a little BBQ sauce and a splash of the cooking juices, then pile it on buns with slaw.
Equipment for This Recipe:
- Smoker or covered grill
- Foil
- Instant-read thermometer
- Shredding forks
- Large tray or cutting board
How to Serve This Dish:
Serve the pork on soft buns with pickles and a spoonful of slaw right on top. It’s filling, so one sandwich per person is plenty when the table also has beans or cornbread.
Pro Tips for This Recipe:
- Choose a shoulder with a visible fat cap; it helps protect the meat during the long cook.
- Wrap only after the bark sets or you’ll lose the texture.
- Save the cooking juices. They’re gold.
- Shred the pork while it’s still warm enough to pull apart cleanly.
Variations on This Dish:
- Carolina Gold Style: Use mustard-heavy sauce and skip the sweet BBQ finish.
- Spicy Red Slaw Version: Add hot sauce and a little cayenne to the slaw.
- Smaller Crowd Cut: Use a 3-lb shoulder and trim the cook down a little, but still watch tenderness, not the clock.
Common Mistakes to Avoid with This Dish:
- Stopping at the wrong temperature: Pork shoulder needs time after the collagen starts breaking down. A thermometer helps, but tenderness is the real test.
- Serving it dry: Toss in a few spoonfuls of cooking liquid before assembling.
- Too much sauce in the sandwich: The bread should hold the meat, not dissolve under it.
7. Beef Brisket Sandwiches with Pickles
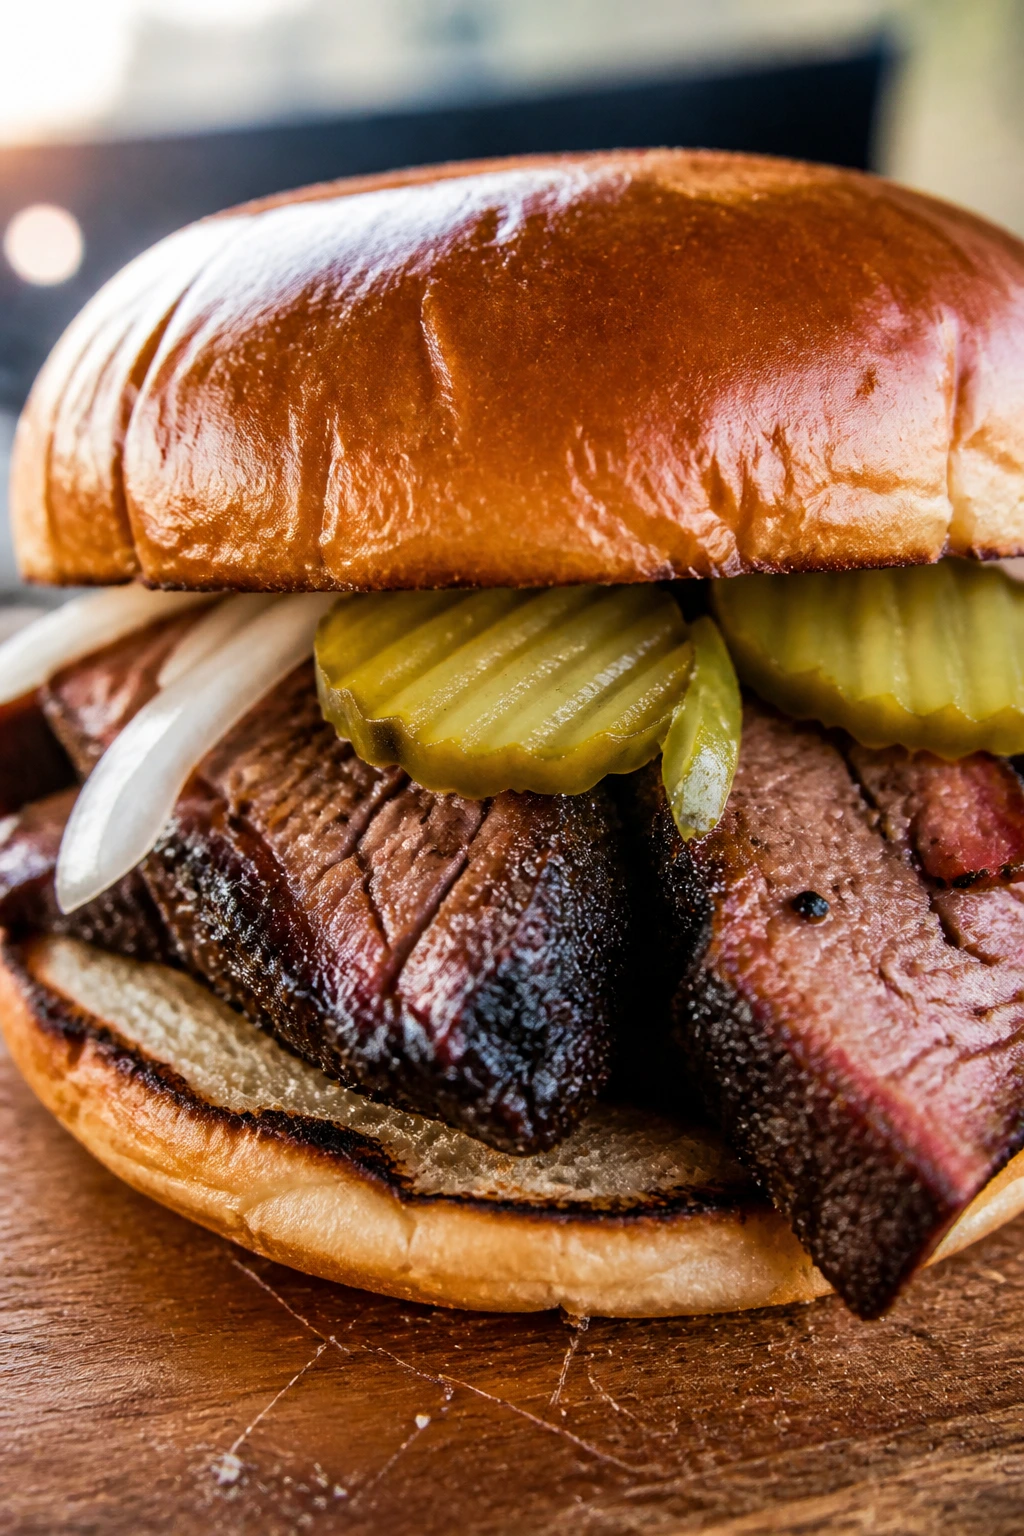
Brisket is the cookout cut that makes people slow down and look at the board before they take a bite. It asks for patience, but the payoff is slices with a deep peppery bark and meat that bends instead of snapping.
Why It Works:
Brisket needs steady heat and a long rest, not drama. A simple salt-and-pepper rub lets the beef flavor stay front and center, while the wrap period keeps the flat from drying out once the bark has set.
Key Ingredients:
- 1 brisket flat, 4 to 5 lbs
- 2 tbsp kosher salt
- 2 tbsp coarse black pepper
- 1 tbsp garlic powder
- 1 cup beef broth
- 1/2 cup BBQ sauce
- 8 sandwich buns
- Dill pickle chips
- Sliced white onion
Quick Steps:
- Trim any thick hard fat, then rub the brisket with salt, pepper, and garlic powder.
- Smoke or grill it over indirect heat at 250°F until the bark is dark and the internal temperature reaches about 160°F.
- Wrap the brisket in foil with beef broth and keep cooking until it reaches 195 to 203°F and feels tender when probed.
- Rest it at least 1 hour, then slice it against the grain into thin pieces.
- Pile the slices on toasted buns with a spoonful of BBQ sauce, pickles, and onion.
Equipment for This Recipe:
- Smoker or covered grill
- Foil
- Long slicing knife
- Thermometer
- Cutting board with a groove
How to Serve This Dish:
Brisket sandwiches are best with pickles and a little raw onion, not a mountain of sauce. If you want to stretch the meat, serve it open-faced on toast with slaw on the side.
Pro Tips for This Recipe:
- Slice against the grain or the meat feels chewy even when it’s cooked properly.
- Don’t skip the rest; brisket needs time to settle and reabsorb its juices.
- A little beef broth in the wrap keeps the flat from drying.
- If you can only cook one piece of brisket, the flat is easier to slice cleanly than a huge whole packer.
Variations on This Dish:
- Burnt-End Sandwiches: Cube the point end and glaze it heavily before a final hot finish.
- Pepper-Crusted Version: Double the black pepper for a sharper bark.
- Slaw-Topped Brisket: Add creamy slaw for a softer, sweeter sandwich.
Common Mistakes to Avoid with This Dish:
- Slicing with the grain: Long fibers make the meat feel tough.
- Cutting too soon: Brisket slices cleaner after a long rest.
- Over-saucing: You want beef first, sauce second.
8. Grilled Bratwurst with Peppers, Onions, and Mustard
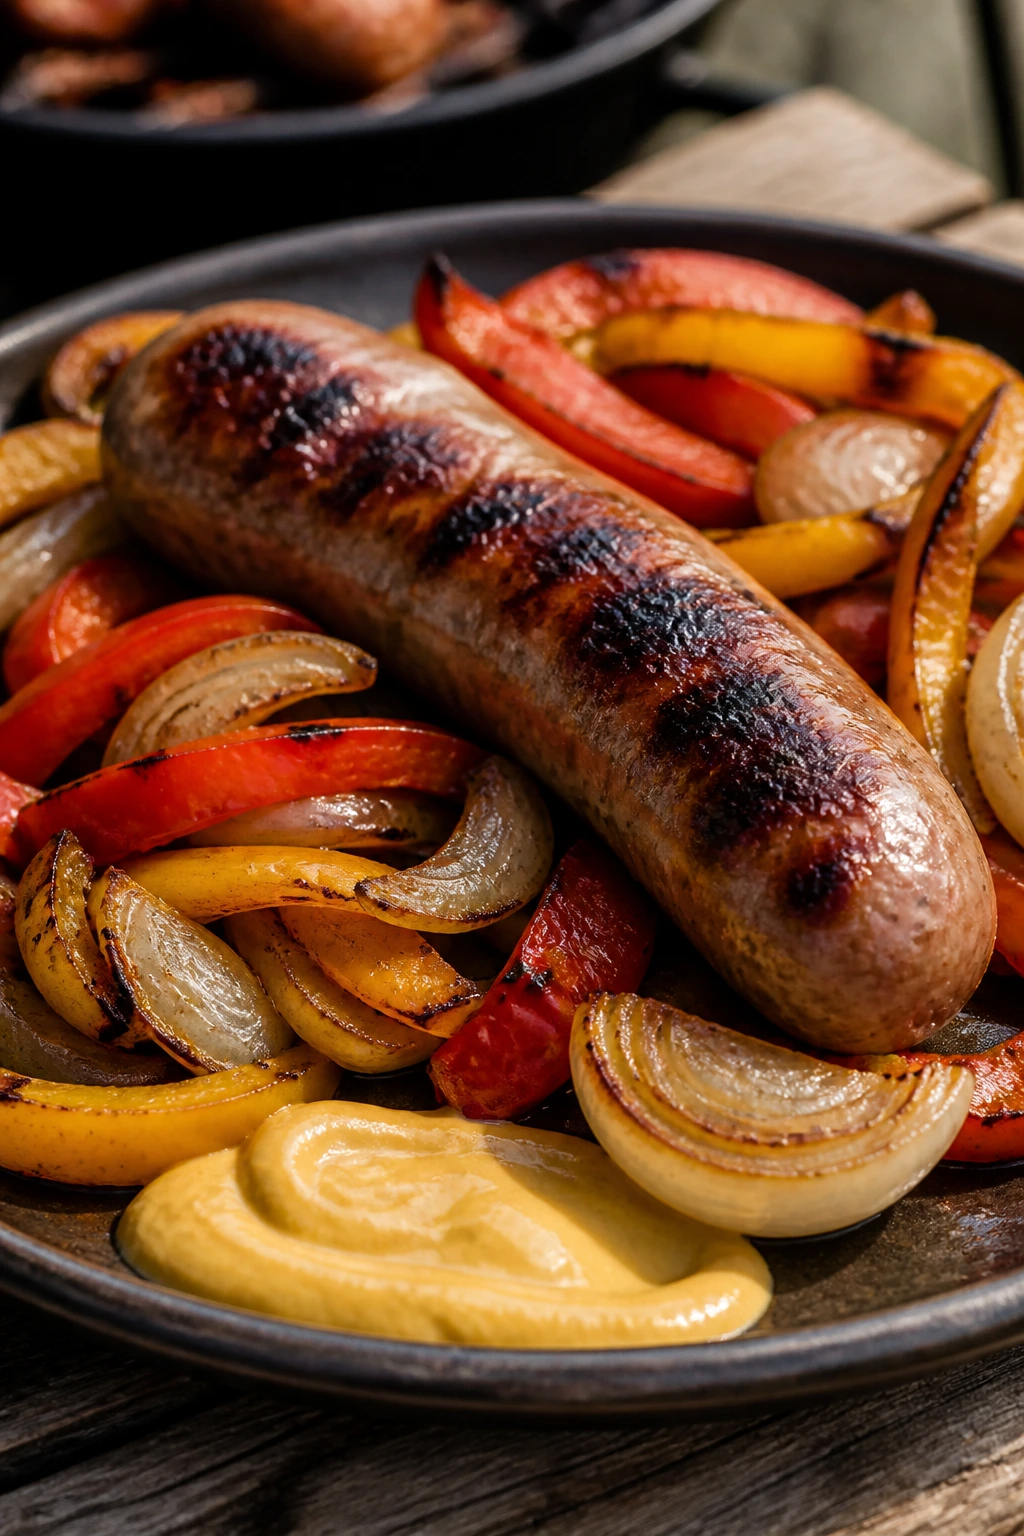
Bratwurst is backyard food that doesn’t try too hard. The casing snaps, the onions soften, the peppers pick up char, and the whole thing feels like the kind of meal you can stand and eat without ceremony.
Why It Works:
A short simmer in beer or broth gently cooks the sausage through before the grill adds color. That two-step method keeps the casing from splitting and gives the vegetables enough time to soften without turning greasy.
Key Ingredients:
- 8 bratwursts
- 1 cup beer or chicken broth
- 2 bell peppers, sliced
- 2 yellow onions, sliced
- 2 tbsp oil
- 1 tsp kosher salt
- 1/2 tsp black pepper
- 8 sturdy hot dog buns
- Mustard, for serving
- Sauerkraut, optional
Quick Steps:
- Simmer the brats in beer or broth with half the onions for 8 to 10 minutes; do not boil hard.
- Toss the peppers and remaining onions with oil, salt, and pepper.
- Grill the brats over medium heat for 4 to 6 minutes, turning until browned.
- Grill or sauté the vegetables until soft and lightly charred.
- Split the buns, toast them quickly, and serve the brats with peppers, onions, mustard, and sauerkraut if you like.
Equipment for This Recipe:
- Grill
- Skillet or grill pan
- Tongs
- Pot or deep pan for simmering
- Bun knife
How to Serve This Dish:
Serve these in warm buns with a stripe of mustard and a forkful of peppers over the top. Potato salad, chips, or a cold cucumber salad all make sense here.
Pro Tips for This Recipe:
- Keep the simmer gentle so the casings stay intact.
- Use buns with some structure; soft supermarket buns can split under the juices.
- If you want more browning, finish the brats over a hotter part of the grill for the last minute.
- Sauerkraut adds acid, which helps cut the sausage fat.
Variations on This Dish:
- Spicy Brat Version: Use hot Italian sausage and swap the mustard for horseradish sauce.
- Beer-Free Method: Simmer in broth with sliced onions and a bay leaf.
- Cheese-Brat Upgrade: Add a slice of Swiss or provolone on the bun before the brat goes in.
Common Mistakes to Avoid with This Dish:
- Boiling the sausages: Hard heat can split the casings.
- Skipping the grill finish: The simmer cooks them, but the grill gives you the browned flavor.
- Using thin buns: They turn soggy fast.
9. Turkey Burgers with Pickle Relish
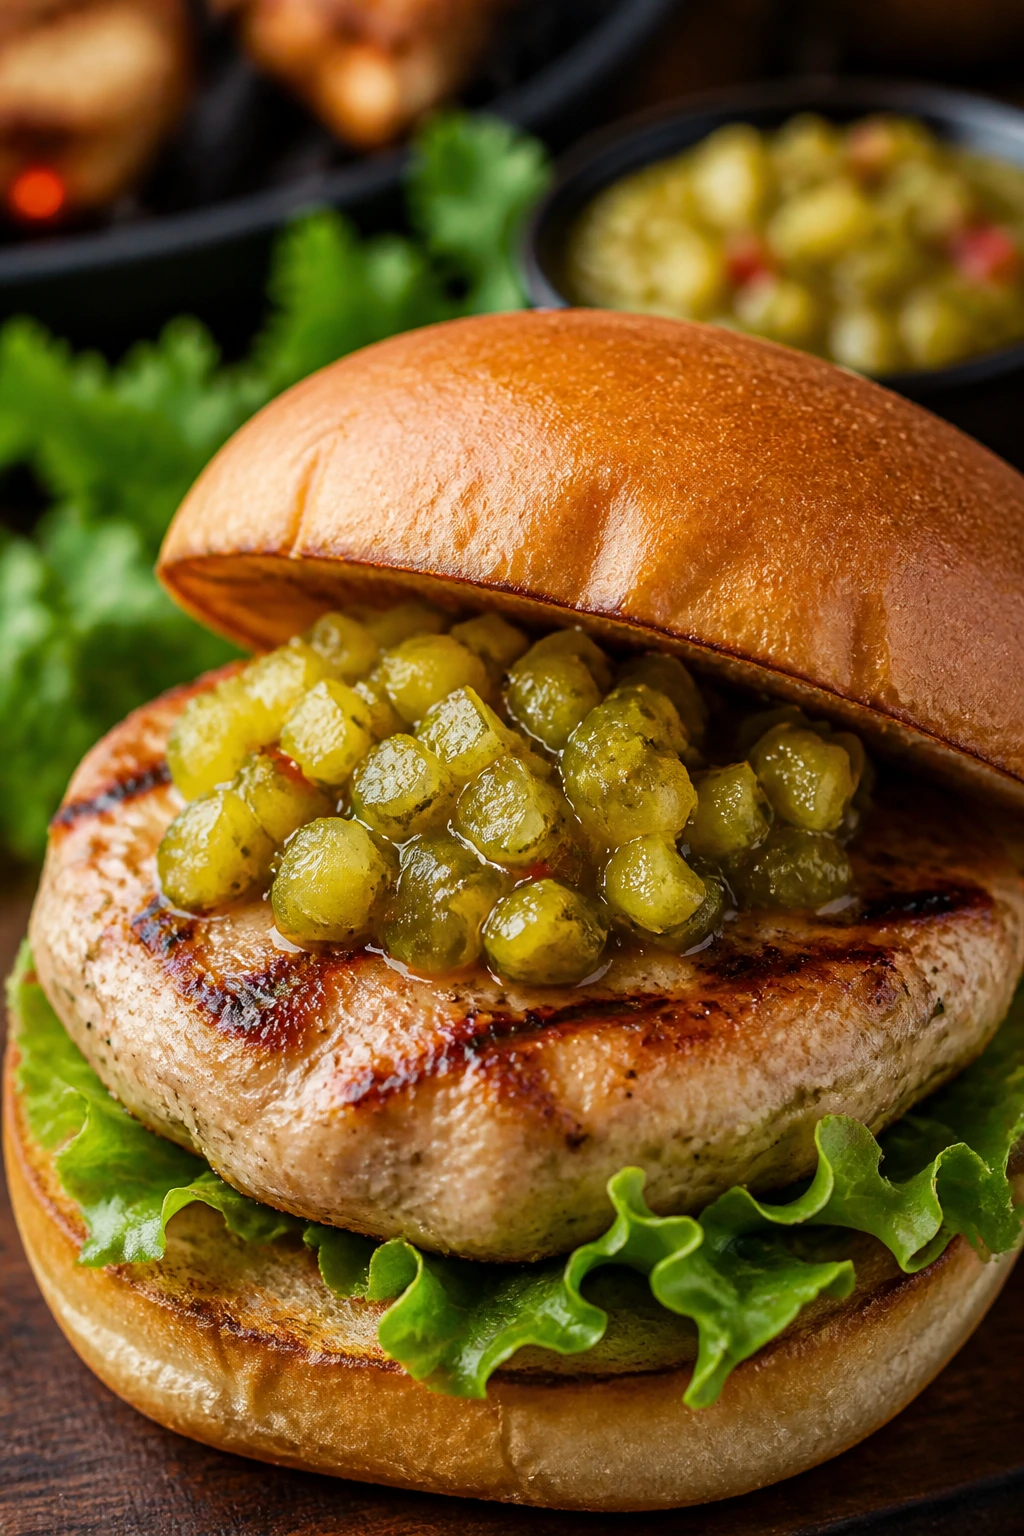
Turkey burgers get blamed for a lot, usually because they’re cooked too hard and treated like beef. Handle them gently, and they stay juicy enough to make sense at a cookout.
Why It Works:
Ground turkey needs moisture and a little fat from egg, breadcrumbs, and grated onion. The relish gives the finished burger a sharp, briny bite, which keeps the lean meat from tasting flat.
Key Ingredients:
- 2 lbs ground turkey
- 1/2 cup plain breadcrumbs
- 1 egg
- 1/2 small onion, grated
- 1 tbsp Worcestershire sauce
- 1 tsp kosher salt
- 1/2 tsp black pepper
- 4 burger buns
- 4 slices cheese, optional
- 1/4 cup pickle relish
Quick Steps:
- Mix the turkey, breadcrumbs, egg, grated onion, Worcestershire, salt, and pepper until just combined.
- Form 4 patties and press a shallow dimple in the center of each one.
- Grill over medium heat for 5 to 6 minutes per side until the burgers reach 165°F.
- Add cheese in the last minute if using, then let it melt under the lid.
- Rest the burgers 3 minutes and serve on buns with relish.
Equipment for This Recipe:
- Grill
- Mixing bowl
- Spatula
- Thermometer
- Cheese slicer or knife
How to Serve This Dish:
These burgers like lettuce, tomato, and a spoonful of relish rather than a pile of sauce. I’d serve them with chips or a potato salad, especially if the meal already has richer meat dishes.
Pro Tips for This Recipe:
- Grated onion adds moisture without leaving chunky bits.
- A dimple keeps the burger from puffing into a dome.
- Don’t press on the patties while they cook or you’ll squeeze out the juices.
- Turkey needs to hit 165°F, so a thermometer is worth the extra second.
Variations on This Dish:
- Feta and Herb Burger: Mix in crumbled feta and chopped parsley.
- Buffalo Turkey Burger: Brush with hot sauce and top with blue cheese.
- Lettuce-Wrapped Option: Skip the bun and serve on crisp romaine leaves.
Common Mistakes to Avoid with This Dish:
- Overmixing: The texture turns dense and bouncy.
- Undercooking: Turkey needs full doneness for safety and texture.
- Treating it like beef: It needs help staying moist.
10. Chipotle-Lime Grilled Shrimp

Shrimp are a tiny act of kindness at a cookout. They cook fast, they take on smoke well, and they don’t tie up the grill for half the afternoon.
Why It Works:
Shrimp need hot, fast heat and a short marinade. Chipotle gives them smoke without needing a smoker, lime brightens the flavor, and honey helps the edges caramelize just enough before the shrimp turn tight.
Key Ingredients:
- 2 lbs large shrimp, peeled and deveined
- 2 tbsp olive oil
- 1 tbsp lime juice
- 1 tsp lime zest
- 1 tsp chipotle powder
- 1 tsp garlic powder
- 1 tsp honey
- 1 tsp kosher salt
- 2 tbsp chopped cilantro
- Skewers, if desired
Quick Steps:
- Toss the shrimp with oil, lime juice, zest, chipotle, garlic powder, honey, and salt.
- Marinate for 15 to 20 minutes only.
- Thread onto skewers or place in a grill basket.
- Grill over high heat for 2 to 3 minutes per side until the shrimp are pink, opaque, and curled into a loose C.
- Finish with cilantro and a squeeze of fresh lime.
Equipment for This Recipe:
- Grill
- Skewers or grill basket
- Mixing bowl
- Tongs
- Microplane or zester
How to Serve This Dish:
Serve the shrimp over rice, in tacos, or on a platter with grilled corn and slaw. They’re also good as a starter with extra lime and a little BBQ sauce on the side.
Pro Tips for This Recipe:
- Use large shrimp so they don’t overcook before you get color.
- Keep the marinade short; citrus can make shrimp go soft if it sits too long.
- Oil the grates or basket so the shrimp release cleanly.
- Pull them as soon as they turn opaque. A minute too long changes the texture fast.
Variations on This Dish:
- Garlic-Butter Shrimp: Finish with melted butter, parsley, and a pinch of paprika.
- Pineapple Shrimp Skewers: Add pineapple chunks for sweetness and extra grill marks.
- Mild Lime Shrimp: Skip the chipotle and use smoked paprika instead.
Common Mistakes to Avoid with This Dish:
- Overmarinating: The acid can make the shrimp mushy.
- Overcooking: Shrimp go from tender to rubbery fast.
- Using tiny shrimp: They cook too quickly to manage easily on a hot grill.
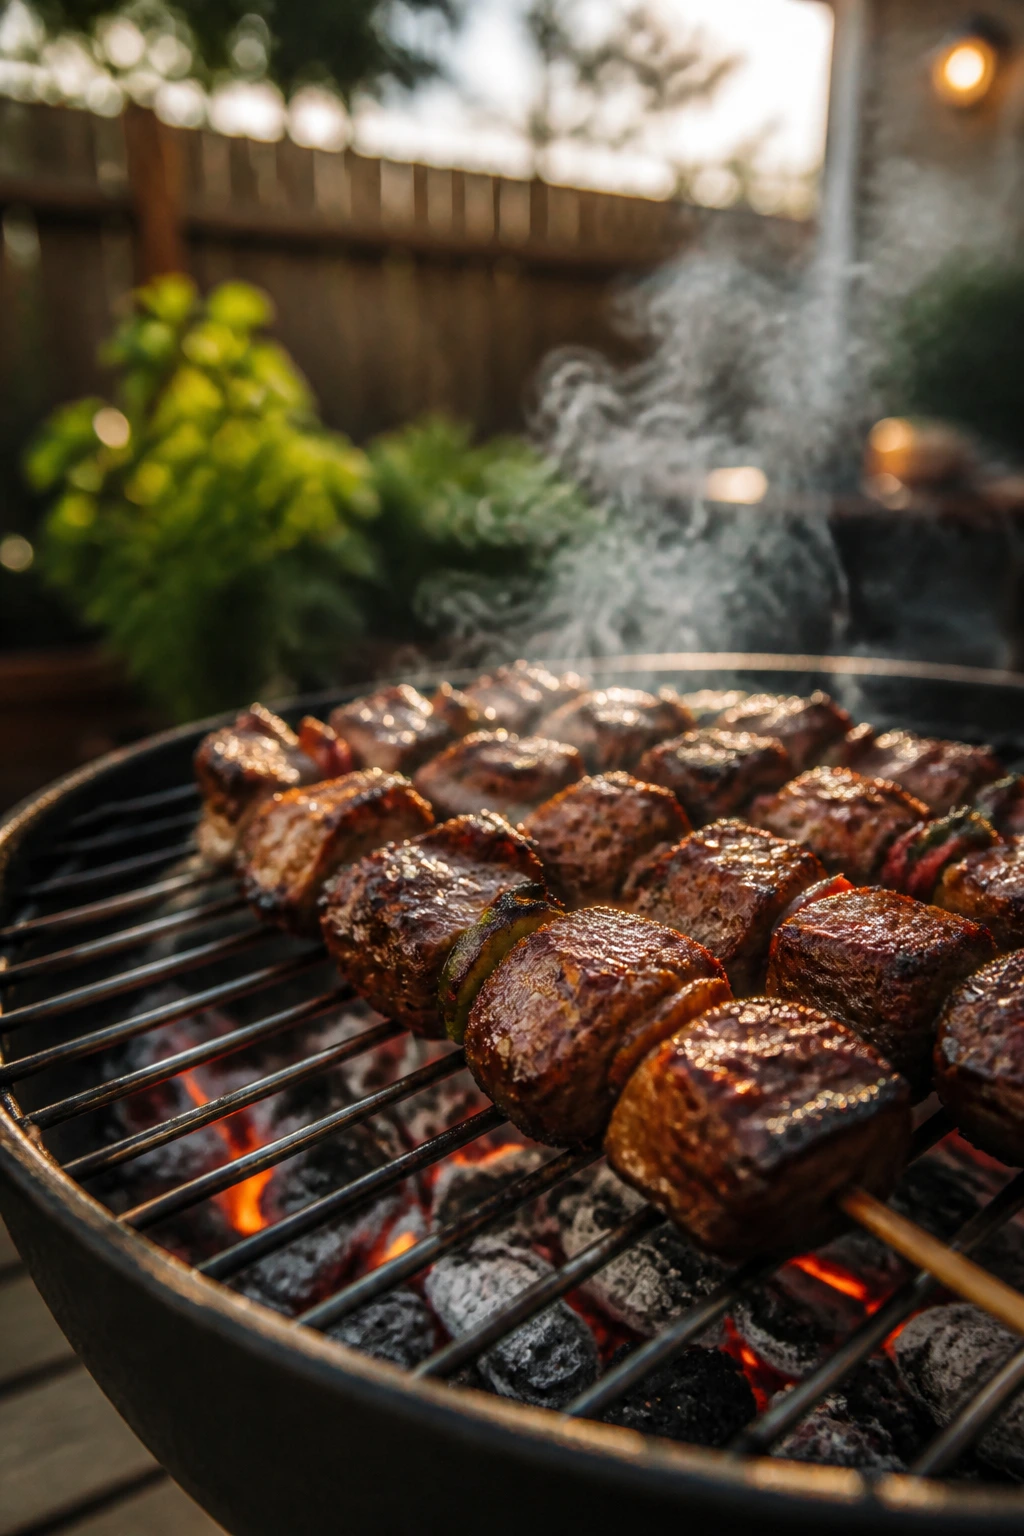
11. BBQ Meatball Skewers

Meatballs on skewers sound a little playful, and that’s fair. Cook them properly, though, and they become a sturdy little bite with smoky edges and a sticky sauce coat.
Why It Works:
A mix of beef and pork gives the meatballs enough fat to stay tender over the grill. Threading them with vegetables keeps the skewers from feeling heavy, and the sauce glazes in the last minute so it doesn’t burn onto the meat.
Key Ingredients:
- 1 lb ground beef
- 1 lb ground pork
- 1/2 cup breadcrumbs
- 1 egg
- 1 small onion, finely grated
- 2 cloves garlic, minced
- 1 tsp kosher salt
- 1/2 tsp black pepper
- 1 cup BBQ sauce
- Bell pepper chunks and zucchini chunks, for skewering
Quick Steps:
- Mix the beef, pork, breadcrumbs, egg, onion, garlic, salt, and pepper until just combined.
- Shape into 1 1/2-inch meatballs.
- Thread the meatballs and vegetables onto skewers, leaving a little space between each piece.
- Grill over medium heat for 10 to 12 minutes, turning carefully until the meatballs are browned and reach 160°F.
- Brush with BBQ sauce and grill 1 to 2 minutes more until shiny and sticky.
Equipment for This Recipe:
- Skewers
- Grill
- Mixing bowl
- Instant-read thermometer
- Basting brush
How to Serve This Dish:
These work as an appetizer on a platter or as part of a casual buffet with toothpicks nearby. Set out extra sauce for dipping and expect people to keep reaching for one more.
Pro Tips for This Recipe:
- Wet your hands before shaping the meatballs; the mixture won’t stick as badly.
- Chill the meatballs for 15 minutes if they feel too soft.
- Use two skewers per row if the meatballs wobble.
- Cut vegetables a little larger than you think they need to be so they don’t collapse.
Variations on This Dish:
- Chicken Meatball Skewers: Use ground chicken and add a tablespoon of oil.
- Spicy BBQ Version: Add crushed red pepper or minced jalapeño to the mix.
- Vegetarian Swap: Use firm mushroom or lentil balls that can hold their shape.
Common Mistakes to Avoid with This Dish:
- Making them too big: Large meatballs take too long and can char before the center cooks.
- Saucing at the start: The sugar burns and leaves you with a bitter glaze.
- Loose shaping: Meatballs that aren’t packed gently but firmly can fall apart.
12. Smoked Mac and Cheese with Bacon Crumb
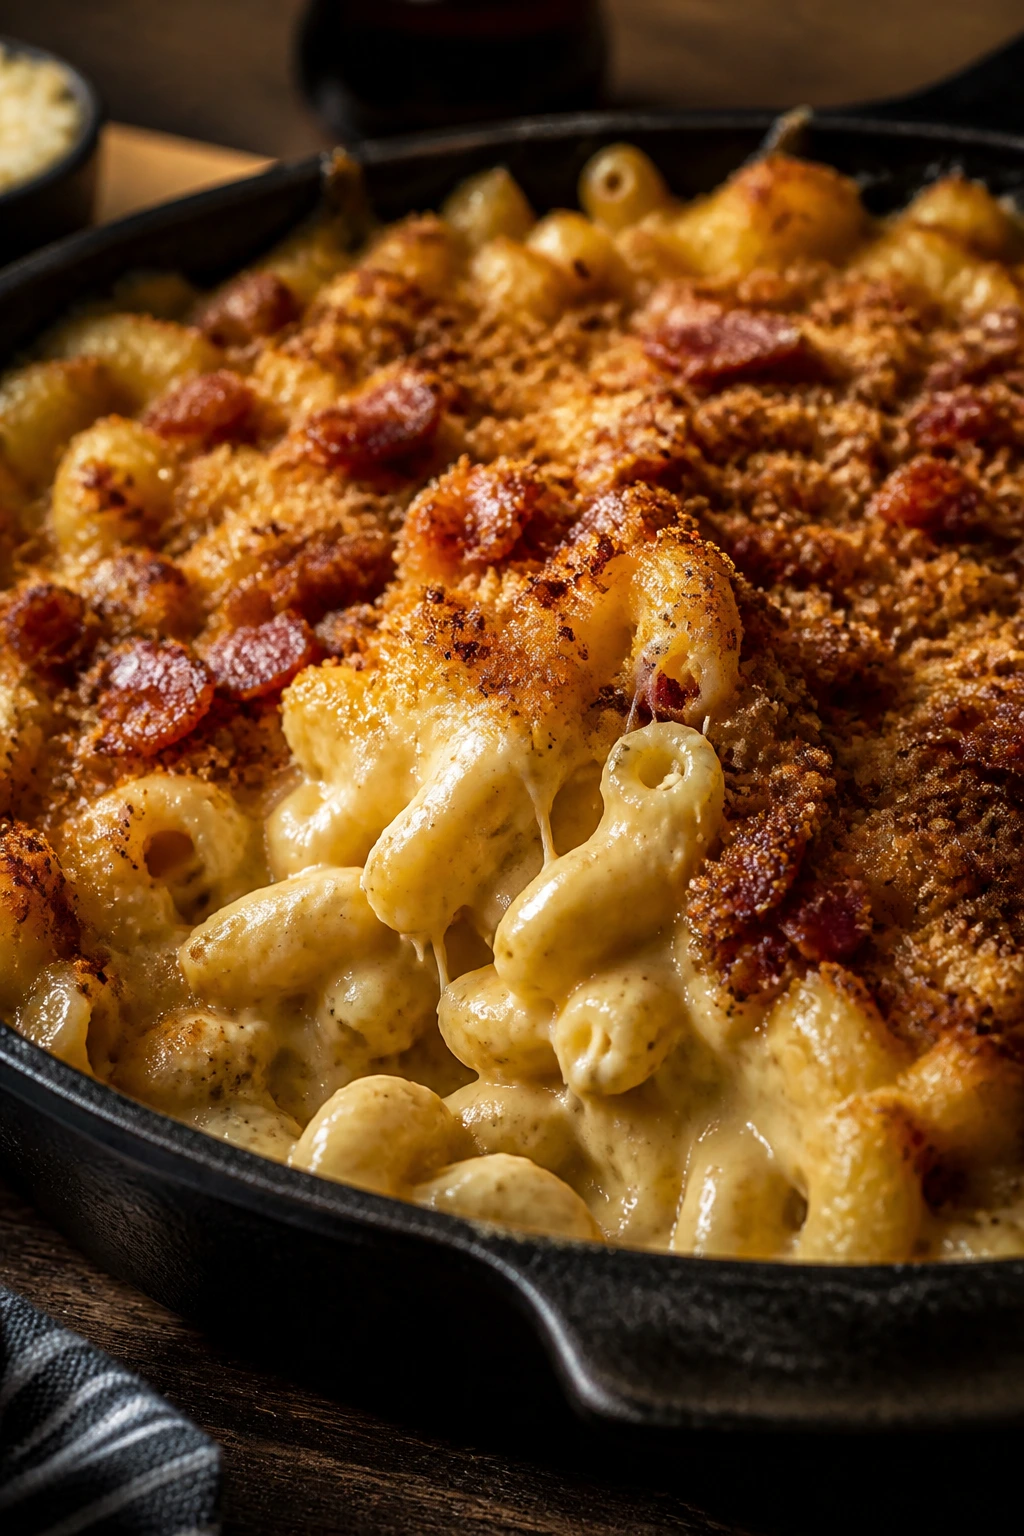
Mac and cheese on the grill is exactly the kind of side dish I’ll fight to keep on the table. The smoke adds depth, the edges brown, and the bacon crumb gives you a salty crunch that breaks up all the creaminess.
Why It Works:
Cooking the mac in cast iron gives you direct contact with heat, so the top gets a browned crust while the center stays creamy. A mix of cheddar and smoked gouda melts smoothly, and the breadcrumb topping catches the smoke in a way that makes the whole pan taste like it spent more time outside than it did.
Key Ingredients:
- 1 lb elbow macaroni
- 4 tbsp butter
- 1/4 cup all-purpose flour
- 3 cups whole milk
- 1 cup evaporated milk
- 3 cups shredded sharp cheddar
- 1 1/2 cups shredded smoked gouda
- 6 slices bacon, cooked and crumbled
- 1 cup panko breadcrumbs
- 1/2 tsp smoked paprika
- 1 tsp kosher salt
- 1/2 tsp black pepper
Quick Steps:
- Cook the pasta for 2 minutes less than the package says, then drain.
- Melt the butter in a saucepan, whisk in the flour, and cook for 1 minute until it smells a little nutty.
- Whisk in the milk and evaporated milk, then cook until the sauce thickens enough to coat a spoon.
- Off the heat, stir in the cheeses, salt, pepper, and paprika until smooth, then fold in the pasta.
- Pour into a cast-iron skillet, top with panko and bacon, and smoke or grill at 300°F for 35 to 45 minutes until the top is browned and the edges bubble.
- Rest 10 minutes before scooping.
Equipment for This Recipe:
- Cast-iron skillet
- Saucepan
- Whisk
- Grill or smoker
- Box grater
How to Serve This Dish:
Serve it in generous scoops beside ribs, chicken, or brisket. It’s rich, so a little goes a long way, and I like to balance it with something sharp or vinegary on the plate.
Pro Tips for This Recipe:
- Slightly undercook the pasta or it goes soft in the smoker.
- Grating your own cheese helps it melt smoothly.
- Keep the heat around 300°F so the top browns before the sauce splits.
- Let the pan sit after smoking; the sauce settles and thickens a bit.
Variations on This Dish:
- Jalapeño Mac: Add chopped pickled jalapeños to the cheese sauce.
- No-Bacon Version: Use buttered breadcrumbs and a little extra smoked paprika.
- Extra-Smoke Option: Add a small handful of wood chips or use smoked cheddar.
Common Mistakes to Avoid with This Dish:
- Boiling the sauce hard: Dairy can split and turn grainy.
- Overcooking the pasta first: It will turn mushy in the skillet.
- Skipping the rest: The pan needs a few minutes to set up before serving.
13. Chili-Lime Grilled Corn
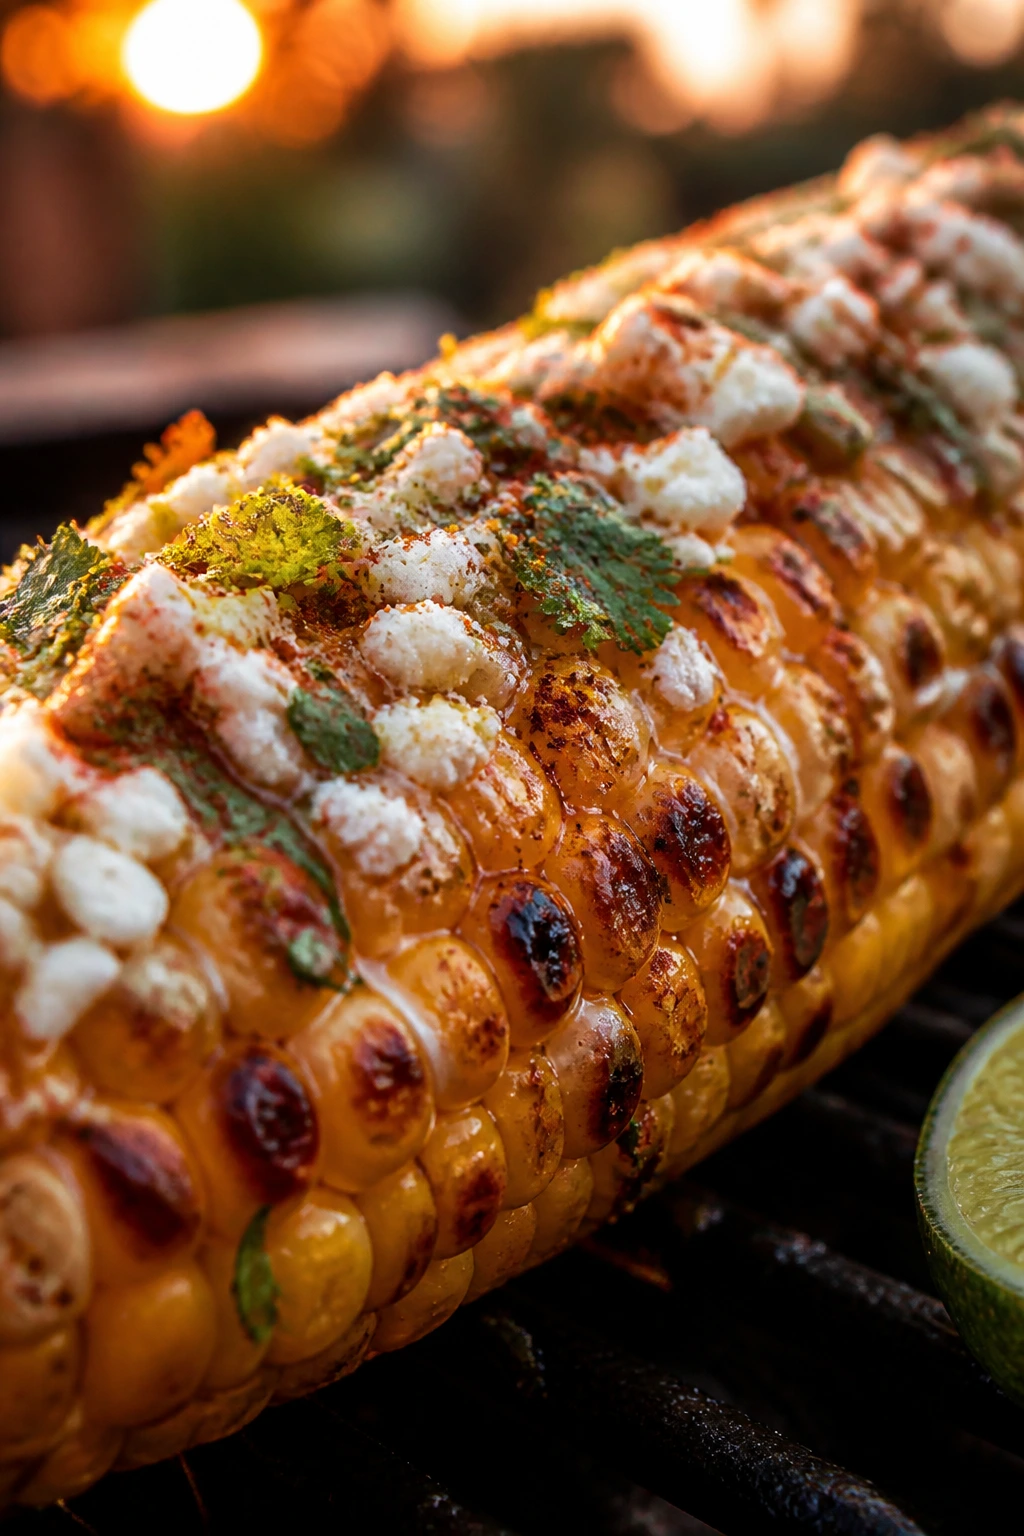
Grilled corn smells like summer before the first bite even happens. The kernels blister a little, the butter melts into the grooves, and the lime wakes everything up.
Why It Works:
Corn takes grill flavor fast because the sugars on the outside caramelize before the inside dries out. Chili and lime give it the same salty-sour snap you’d want from a good street-corn setup, and cotija adds a dry, crumbly finish that clings to the butter.
Key Ingredients:
- 6 ears corn, husked
- 3 tbsp butter, melted
- 1 tbsp lime juice
- 1 tsp lime zest
- 1 tsp chili powder
- 1/2 tsp kosher salt
- 1/3 cup crumbled cotija cheese
- 2 tbsp chopped cilantro
Quick Steps:
- Heat the grill to medium-high.
- Brush the corn with melted butter and grill for 8 to 10 minutes, turning every couple of minutes until the kernels are speckled and tender.
- Mix the lime juice, zest, chili powder, and salt.
- Brush the hot corn with the chili-lime mixture, then sprinkle with cotija and cilantro.
- Serve immediately while the butter is still clinging.
Equipment for This Recipe:
- Grill
- Basting brush
- Tongs
- Small bowl
- Serving platter
How to Serve This Dish:
Serve the corn alongside anything smoky or rich — ribs, burgers, chicken, even mac and cheese. One ear per person is fine, though people tend to reach for a second if the corn is sweet.
Pro Tips for This Recipe:
- Fresh corn matters here. Old ears turn starchy and dull.
- If you like deeper char, leave the corn on a hotter spot for a minute longer.
- Salt after grilling, not before, so the butter doesn’t slide off.
- Cotija gives the best salty crumble, but feta can step in if needed.
Variations on This Dish:
- Street-Corn Style: Add a little mayo before the cheese.
- Garlic-Butter Corn: Swap chili powder for minced garlic and parsley.
- Dairy-Free Version: Use olive oil and skip the cheese.
Common Mistakes to Avoid with This Dish:
- Cooking too long: The corn loses its pop and gets chewy.
- Leaving off the salt: The butter alone isn’t enough.
- Using pale, old ears: Good corn should smell sweet and feel plump under the husk.
14. Bacon-Dijon Potato Salad
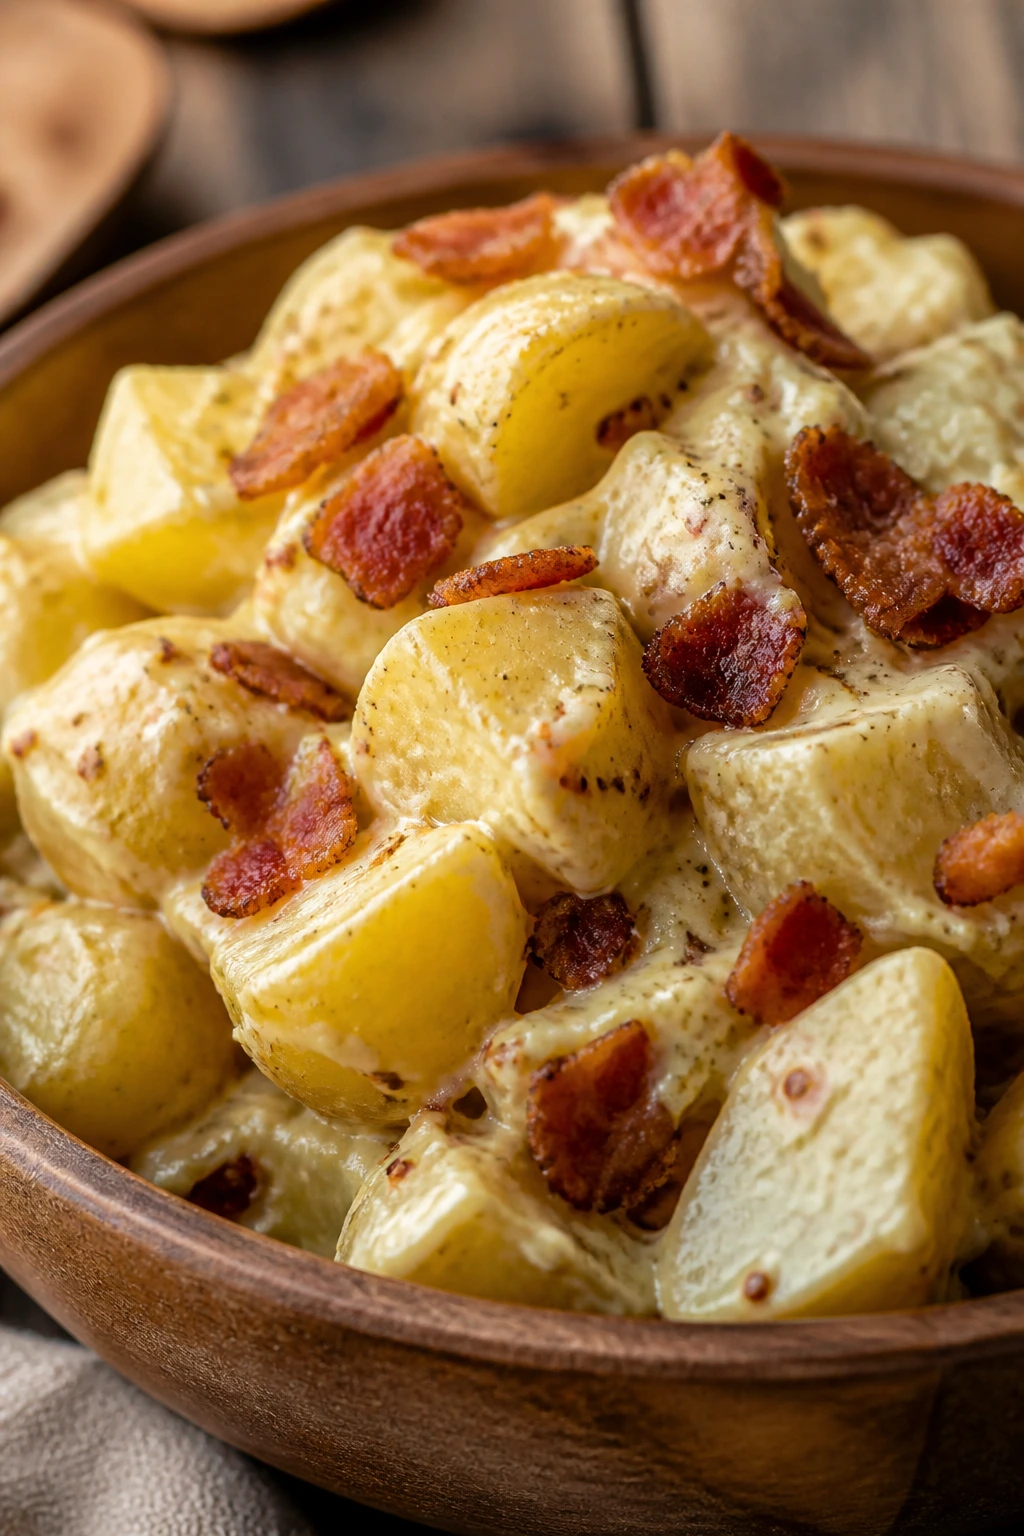
Potato salad is the side dish that can quietly steal a cookout. This version stays sharp and savory instead of veering into bland creaminess, and the bacon gives it a smoky backbone.
Why It Works:
Waxy potatoes hold their shape after boiling, which means the salad doesn’t turn to paste when you toss it. Dressing the potatoes while they’re still warm helps the vinegar and mustard soak in, and the bacon brings a salty crunch that keeps the whole bowl awake.
Key Ingredients:
- 2 1/2 lbs baby potatoes
- 6 slices bacon
- 1/3 cup mayonnaise
- 2 tbsp Dijon mustard
- 1 tbsp apple cider vinegar
- 2 scallions, sliced
- 2 tbsp chopped dill
- 1 tsp kosher salt
- 1/2 tsp black pepper
Quick Steps:
- Boil the potatoes in salted water until just tender, about 12 to 15 minutes, then drain and let them cool slightly.
- Cook the bacon until crisp, then crumble it.
- Whisk the mayo, Dijon, vinegar, salt, and pepper.
- Toss the warm potatoes with the dressing, scallions, dill, and bacon.
- Chill for at least 20 minutes or serve at room temperature.
Equipment for This Recipe:
- Large pot
- Colander
- Mixing bowl
- Whisk
- Sharp knife
How to Serve This Dish:
Serve it in a wide bowl next to grilled meat, not buried under it. It’s especially good with ribs, sausages, or chicken thighs because the mustard cuts through fat.
Pro Tips for This Recipe:
- Salt the boiling water well; potatoes need more seasoning than people think.
- Dress while warm so the flavor gets inside the potatoes, not just on top.
- If the salad gets too thick after chilling, loosen it with a spoonful of vinegar or mayo.
- Fresh dill matters here; dried dill tastes dusty in this dish.
Variations on This Dish:
- Herb-Heavy Version: Add parsley and chives with the dill.
- No-Bacon Option: Swap in chopped celery and a pinch of smoked paprika.
- Tangier Style: Increase the vinegar and cut back the mayo.
Common Mistakes to Avoid with This Dish:
- Boiling the potatoes until they burst: They’ll fall apart when mixed.
- Serving it fridge-cold: The flavor gets muted.
- Using starchy potatoes: They can turn gluey instead of creamy.
15. Grilled Peach, Burrata, and Basil Salad
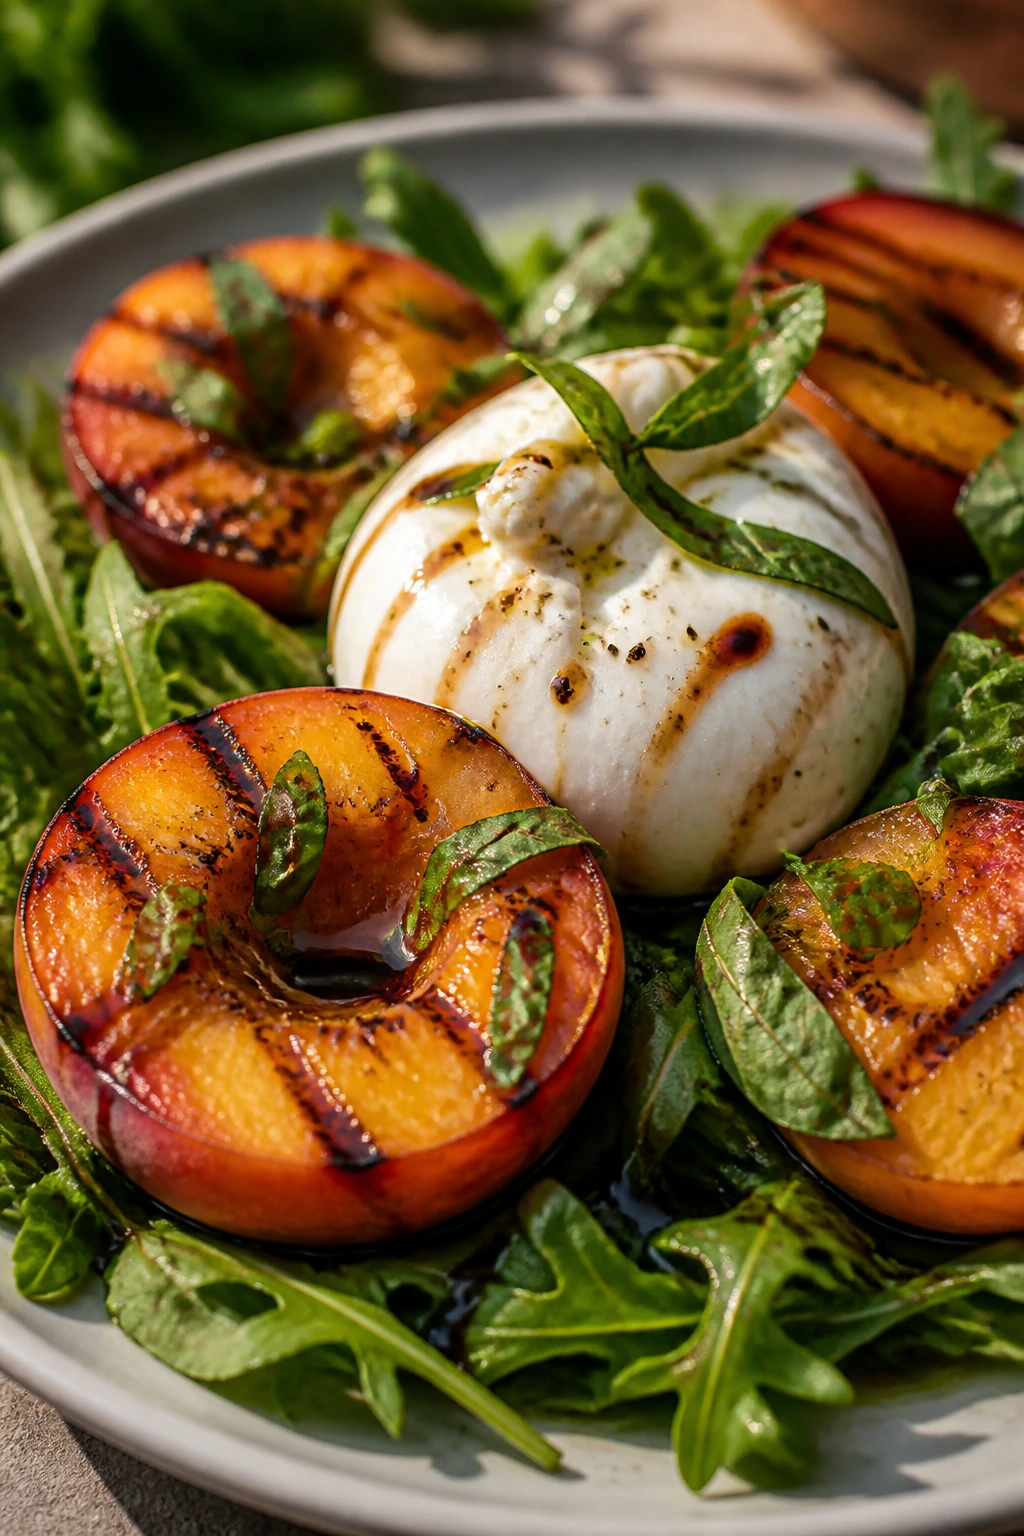
This is the kind of salad that makes a cookout feel planned in a good way. The peaches get warmer and syrupy at the edges, the burrata goes soft in the middle, and basil brings a green snap that keeps the whole plate from feeling sugary.
Why It Works:
Grilling peaches concentrates their flavor and gives them a little smoke, which is exactly what burrata needs to stay interesting. A drizzle of balsamic and olive oil adds acid and richness without burying the fruit.
Key Ingredients:
- 4 ripe but firm peaches, halved and pitted
- 2 tbsp olive oil
- 8 oz burrata
- 3 cups arugula
- 1 tbsp balsamic vinegar
- 1 tsp honey
- 1/4 cup fresh basil leaves
- Flaky salt and black pepper
- 2 tbsp toasted almonds or pistachios
Quick Steps:
- Brush the peaches with olive oil.
- Grill cut-side down for 3 to 4 minutes until char marks appear and the fruit softens slightly.
- Whisk the balsamic and honey together.
- Arrange the arugula on a platter, add the peaches and burrata, then tear the burrata open.
- Drizzle with the balsamic mix, scatter basil and nuts over the top, and finish with salt and pepper.
Equipment for This Recipe:
- Grill
- Tongs
- Sharp knife
- Serving platter
- Small bowl
How to Serve This Dish:
Serve this at the start of the meal or alongside grilled chicken or salmon. It looks best on a flat platter so the peaches and burrata can spread out instead of crowding.
Pro Tips for This Recipe:
- Choose peaches that are ripe but still firm enough to hold together on the grill.
- Don’t overgrill; a little color is enough.
- Tear the burrata right before serving so the creamy center stays loose.
- A few flaky salt crystals matter more than extra dressing.
Variations on This Dish:
- Prosciutto Version: Add thin slices of prosciutto for a salty edge.
- Goat Cheese Swap: Use soft goat cheese if burrata isn’t available.
- Nectarine Change-Up: Nectarines grill almost the same way and hold shape well.
Common Mistakes to Avoid with This Dish:
- Overripe peaches: They collapse on the grate.
- Too much dressing: The salad turns watery.
- Assembling too early: Burrata and fruit both lose their best texture if they sit.
16. BBQ Cauliflower Steaks with Garlic Yogurt
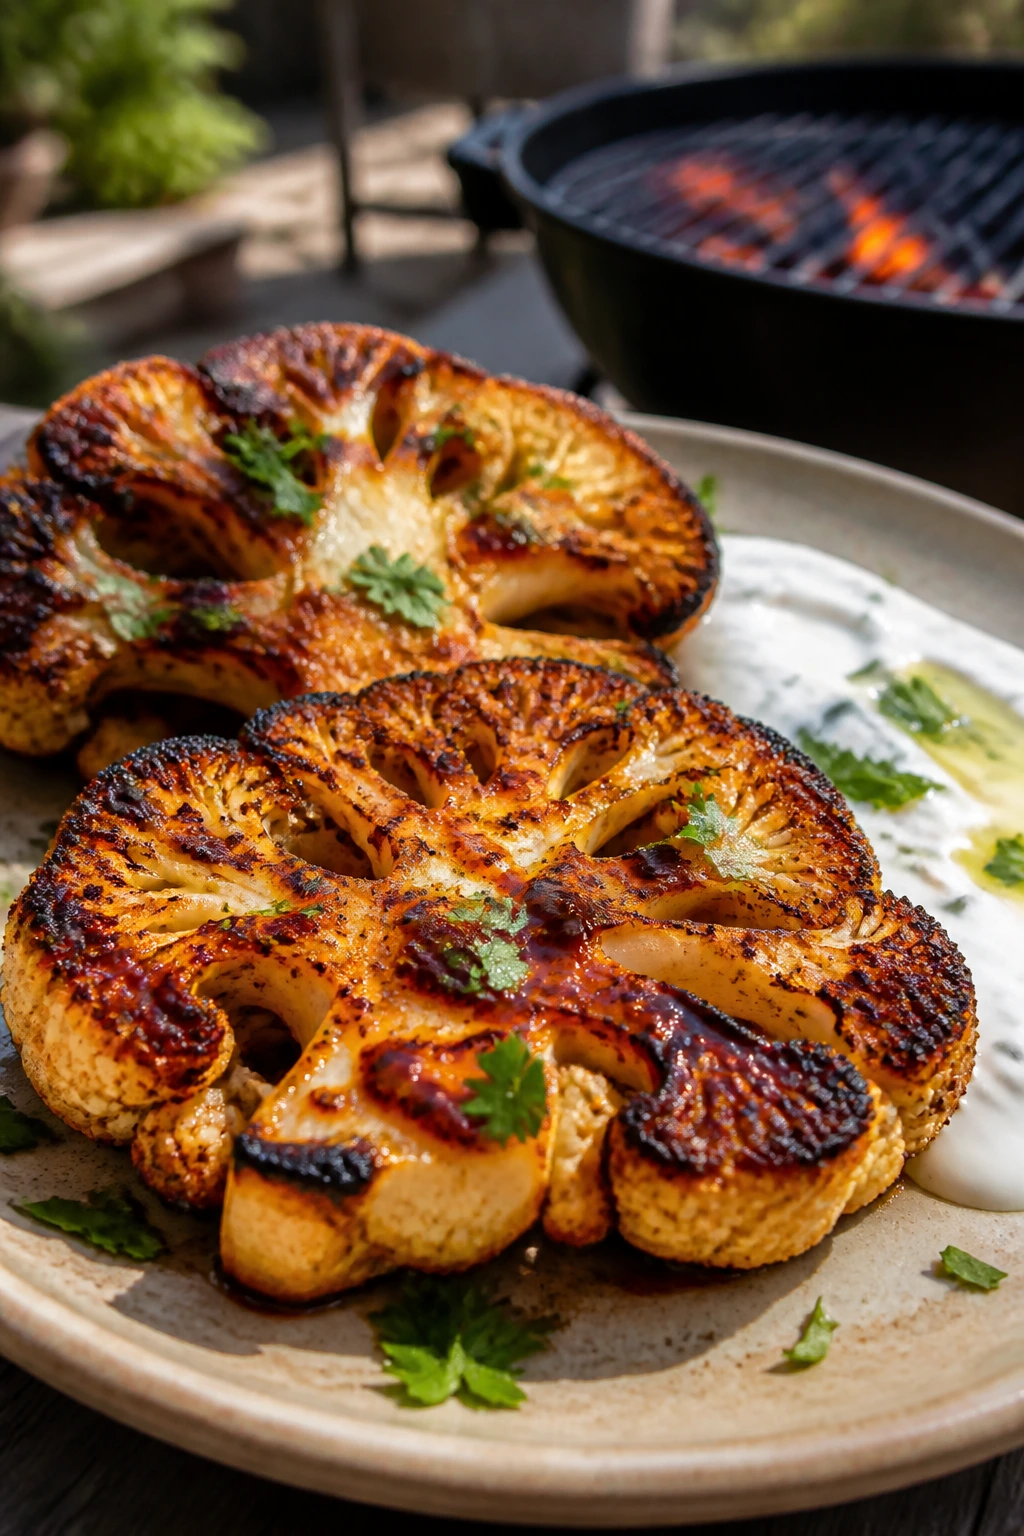
Cauliflower steaks can be bland if you treat them like a substitute instead of a centerpiece. Give them smoke, a sticky glaze, and a cool garlic sauce, and they hold their own next to meat without pretending to be anything else.
Why It Works:
Keeping the cauliflower in thick slabs helps it stay intact on the grill. BBQ sauce brushes on near the end so it caramelizes without burning, and the yogurt sauce adds a cold, garlicky contrast that makes each bite feel complete.
Key Ingredients:
- 2 large cauliflower heads
- 3 tbsp olive oil
- 1 tsp kosher salt
- 1 tsp smoked paprika
- 1/2 tsp black pepper
- 1/2 cup BBQ sauce
- 1 cup plain Greek yogurt
- 1 clove garlic, finely grated
- 1 tbsp lemon juice
- 1 tbsp chopped parsley
Quick Steps:
- Trim the cauliflower leaves and cut each head into 2 or 3 thick steaks, keeping the core attached.
- Brush both sides with oil and season with salt, paprika, and pepper.
- Grill over medium heat for 4 to 5 minutes per side until the edges char and the center turns tender.
- Brush with BBQ sauce and cook 2 minutes more per side.
- Stir the yogurt, garlic, lemon juice, and parsley, then spoon it over the cauliflower.
Equipment for This Recipe:
- Grill
- Sharp chef’s knife
- Spatula
- Small bowl
- Basting brush
How to Serve This Dish:
Serve the steaks whole on a platter with yogurt sauce spooned over the top. They work well as a vegetarian main or alongside chicken and ribs for the people who want something lighter on the plate.
Pro Tips for This Recipe:
- Keep the core intact or the steaks fall apart.
- If the grill grates are wide, use a grill pan or a flat skillet.
- Brush on the sauce late so it sticks instead of smoking off.
- A squeeze of lemon right before serving wakes up the whole dish.
Variations on This Dish:
- Buffalo Version: Swap BBQ sauce for hot sauce mixed with melted butter.
- Tahini Drizzle: Use tahini, lemon, and water instead of yogurt.
- Vegan Plate: Use a dairy-free yogurt and check the sauce for honey.
Common Mistakes to Avoid with This Dish:
- Cutting the steaks too thin: They break apart on the grate.
- Saucing too early: The sugar burns.
- Using high flame the whole time: The outside blackens before the center softens.
17. Molasses Baked Beans with Bacon
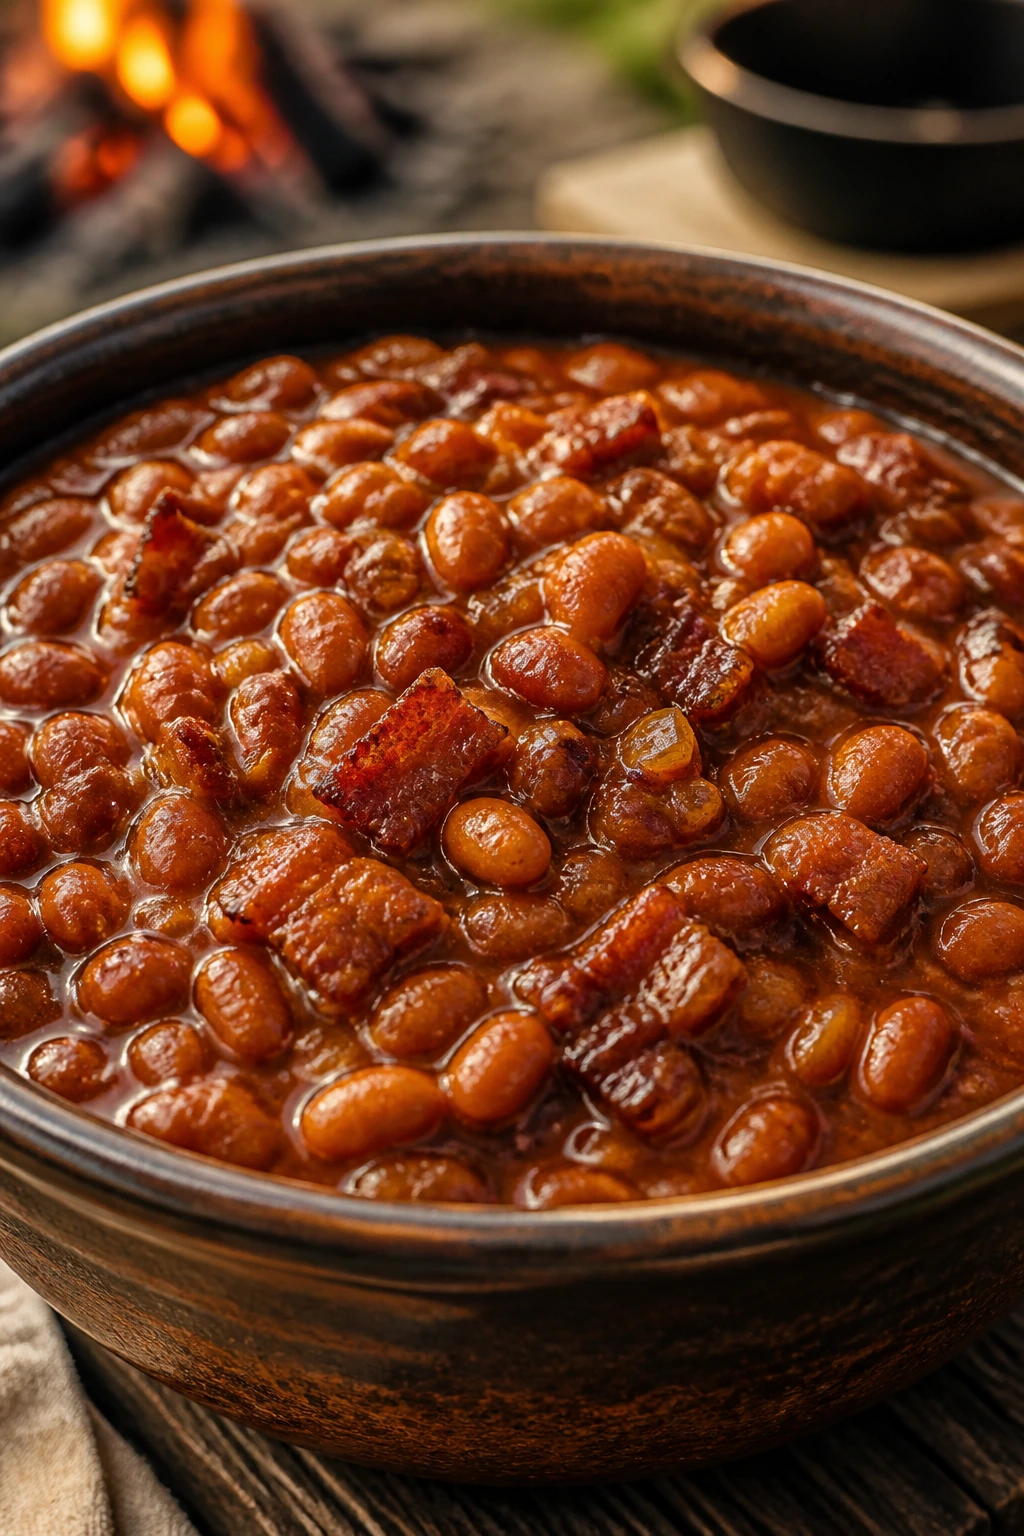
Baked beans from a can get a bad reputation, but they’re one of the easiest places to build real cookout flavor. Bacon, onion, molasses, and mustard turn them from sweet sludge into something you actually want near the ribs.
Why It Works:
The long simmer or bake lets the beans absorb the smoky fat and vinegar. Molasses gives the sauce a dark, almost toasty sweetness, while mustard keeps it from leaning into dessert territory.
Key Ingredients:
- 4 slices bacon, chopped
- 1 small onion, diced
- 2 cans navy beans, 15 oz each, drained and rinsed
- 1/3 cup ketchup
- 1/4 cup molasses
- 2 tbsp brown sugar
- 1 tbsp yellow mustard
- 1 tbsp apple cider vinegar
- 1/2 tsp black pepper
- 1/2 cup water or bean liquid
Quick Steps:
- Cook the bacon in a Dutch oven until it starts to crisp.
- Add the onion and cook 4 to 5 minutes until soft.
- Stir in the beans, ketchup, molasses, brown sugar, mustard, vinegar, pepper, and water.
- Bake covered at 325°F for 45 minutes, then uncover and bake 15 to 20 minutes more until glossy and thick.
- Stir once before serving.
Equipment for This Recipe:
- Dutch oven or foil pan
- Oven or covered grill
- Wooden spoon
- Measuring cups
- Knife and cutting board
How to Serve This Dish:
Serve the beans warm in a deep bowl with a spoon that can reach the bottom. They’re especially good with ribs, brisket, or bratwurst, and a little cornbread beside them never hurts.
Pro Tips for This Recipe:
- Use some bean liquid if the mix looks too dry before baking.
- Taste before the second bake; the sweetness can be adjusted with vinegar.
- Let the beans sit 10 minutes after baking so the sauce thickens.
- Bacon should be cooked first so it adds flavor instead of grease lumps.
Variations on This Dish:
- Bourbon Beans: Add 1 to 2 tablespoons bourbon for a deeper flavor.
- Vegetarian Version: Skip the bacon and add smoked paprika plus a little olive oil.
- Spicy Beans: Stir in chopped jalapeño or a few dashes of hot sauce.
Common Mistakes to Avoid with This Dish:
- Too much sugar: The beans end up cloying. Vinegar fixes the balance.
- Watery sauce: Bake uncovered near the end.
- Undercooked onion: It should melt into the sauce, not stay crunchy.
18. Grilled Pineapple with Cinnamon Rum Glaze
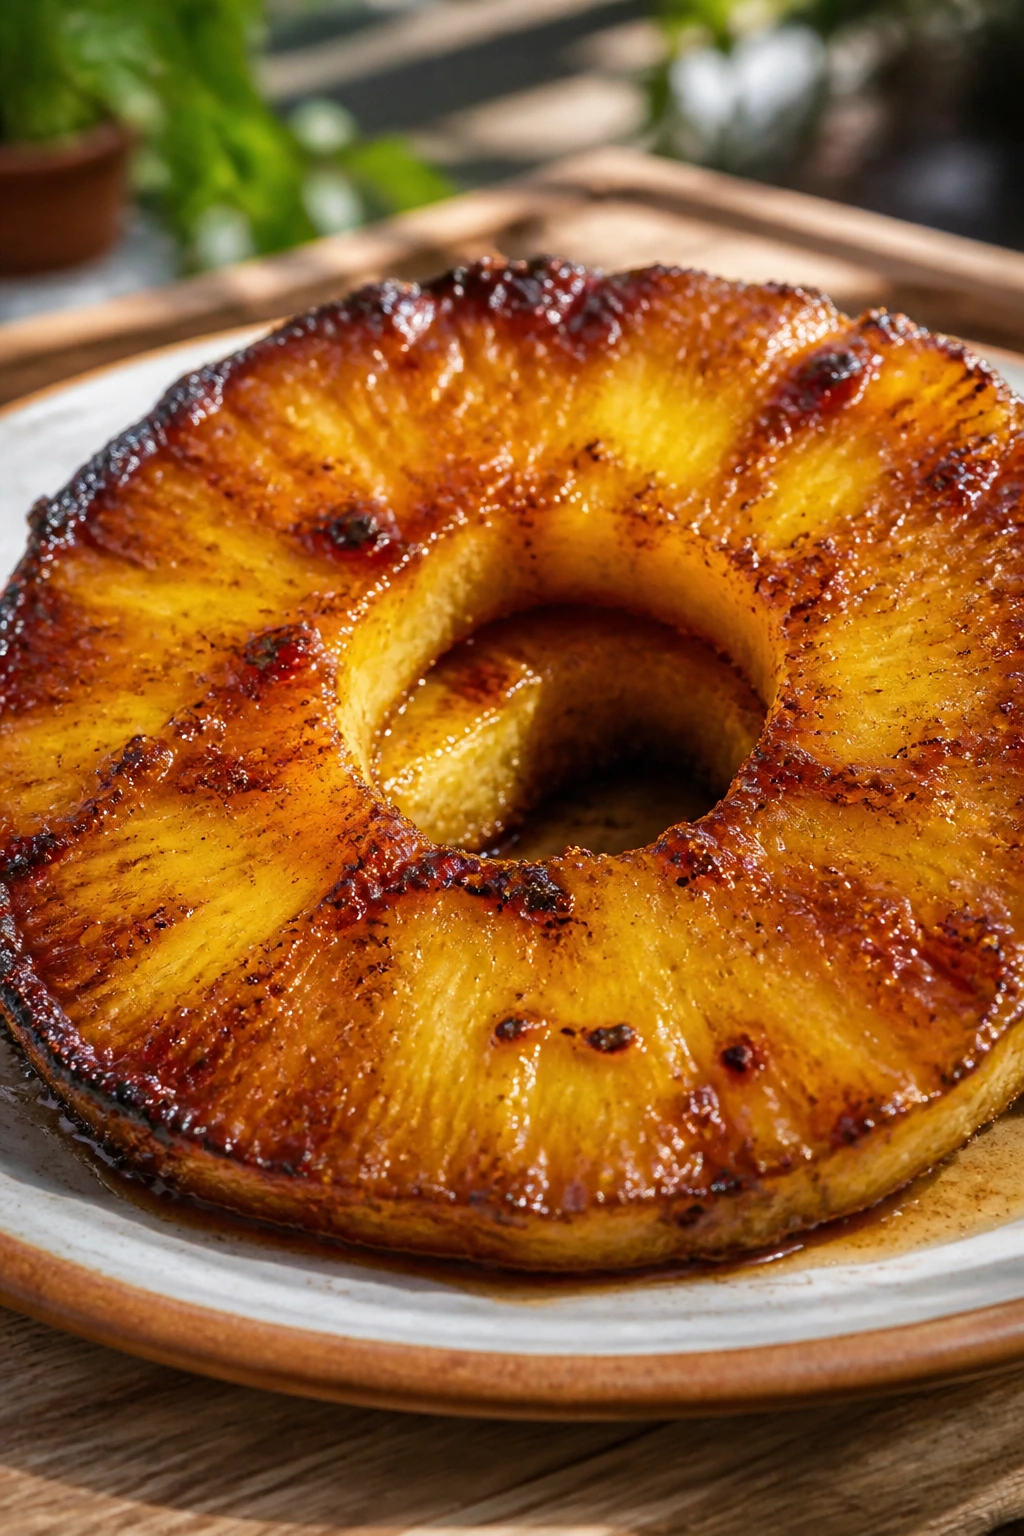
Grilled pineapple is one of those low-effort moves that makes a meal feel finished. The edges brown, the juice gets more concentrated, and the cinnamon-rum glaze turns it into something between dessert and a side dish.
Why It Works:
Pineapple already brings acid and sugar; the grill just concentrates both. A quick glaze gives it warmth and shine, and a little lime at the end keeps the sweetness from sticking on the tongue too long.
Key Ingredients:
- 1 large pineapple, peeled, cored, and sliced into rings or planks
- 2 tbsp brown sugar
- 1 tsp cinnamon
- 1 tbsp butter, melted
- 1 tbsp rum, optional
- 1 tsp lime juice
- Pinch of salt
Quick Steps:
- Mix the brown sugar, cinnamon, butter, rum, lime juice, and salt.
- Brush the pineapple with the glaze.
- Grill over medium-high heat for 2 to 3 minutes per side until marked and warmed through.
- Brush with a little more glaze right after it comes off the grill.
Equipment for This Recipe:
- Grill
- Basting brush
- Tongs
- Sharp knife
- Serving plate
How to Serve This Dish:
Serve the pineapple warm on its own, with vanilla ice cream, or beside smoky pork. A few mint leaves make it look and taste brighter.
Pro Tips for This Recipe:
- Use firm pineapple so it doesn’t slump through the grates.
- Thicker slices are easier to flip.
- If you want extra char, leave it on the hotter side for a minute longer.
- A pinch of salt keeps the sweetness from turning flat.
Variations on This Dish:
- Chile-Lime Pineapple: Replace cinnamon with chili powder and add more lime.
- Coconut Finish: Add toasted coconut after grilling.
- No-Rum Option: Use pineapple juice instead.
Common Mistakes to Avoid with This Dish:
- Overripe fruit: It breaks apart on the grill.
- Too much glaze: It drips and burns.
- Flipping too soon: Let the first side set before turning it.
19. Jalapeño Cheddar Cornbread
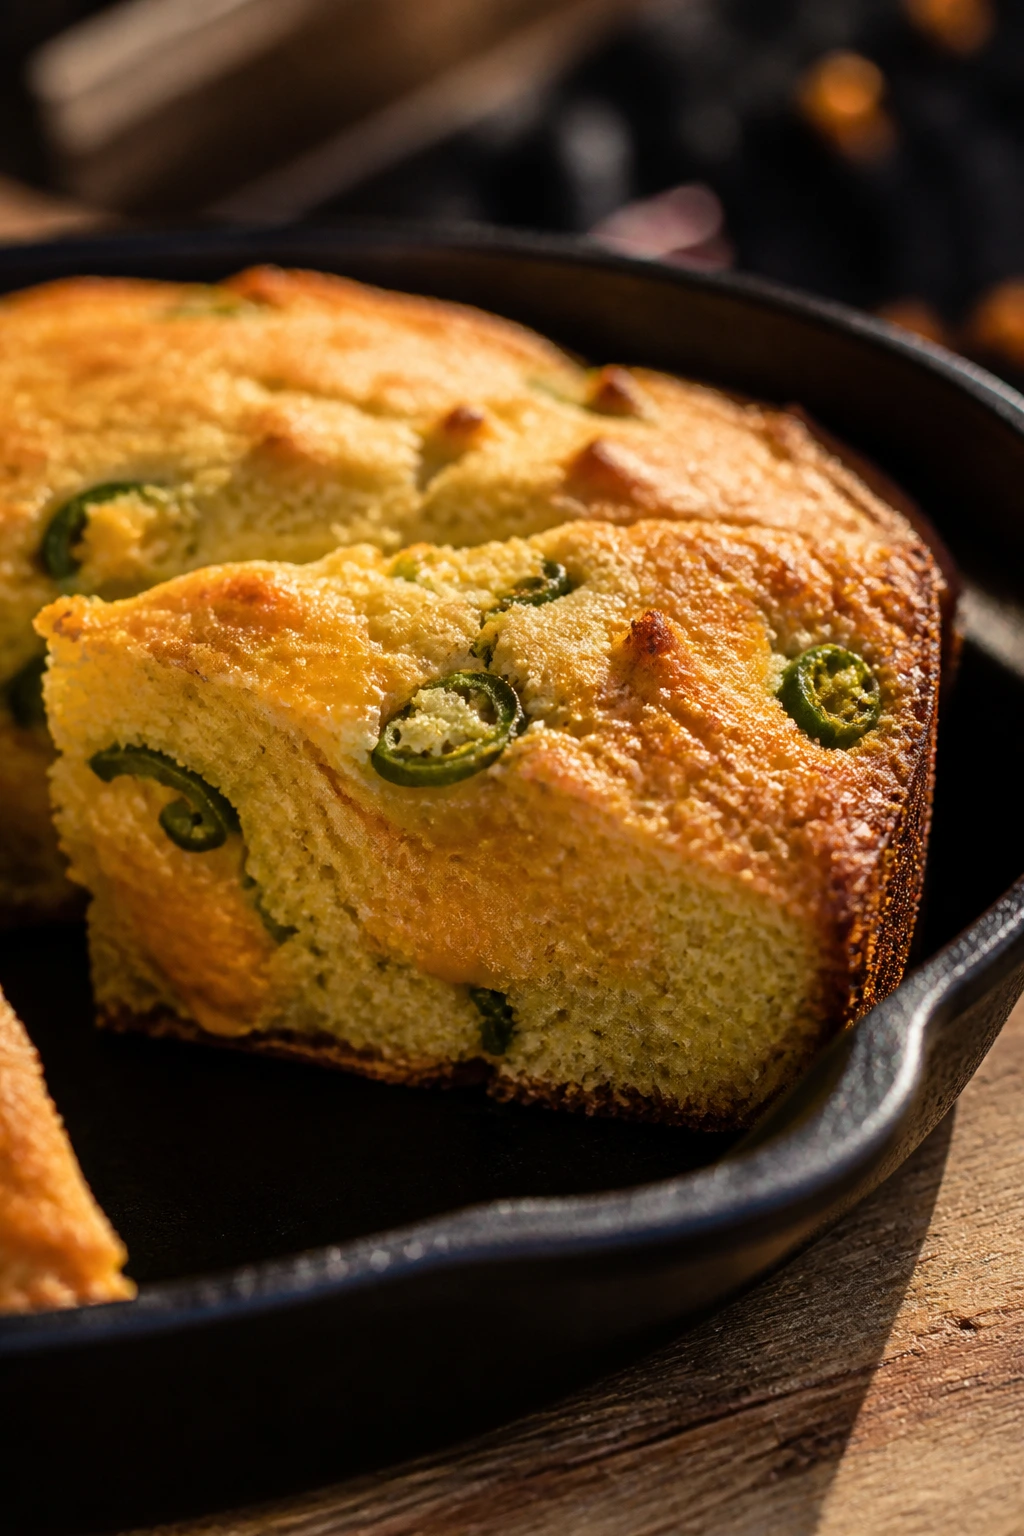
Cornbread belongs at a cookout because it can sit next to beans, ribs, or chicken and not feel out of place for a second. The jalapeños bring a little heat, and the cheddar gives you those salty, melty pockets in the crumb.
Why It Works:
A hot cast-iron skillet creates a crisp bottom and edges, which is the part of cornbread most people secretly want. Buttermilk keeps the crumb tender, and cheddar plus jalapeños keep each slice from tasting one-note.
Key Ingredients:
- 1 cup yellow cornmeal
- 1 cup all-purpose flour
- 1 tbsp baking powder
- 1 tsp kosher salt
- 2 tbsp sugar
- 1 cup buttermilk
- 2 eggs
- 1/2 cup melted butter
- 1 cup shredded cheddar
- 2 jalapeños, seeded and diced
Quick Steps:
- Preheat the grill or oven to 425°F with a cast-iron skillet inside if using.
- Whisk the cornmeal, flour, baking powder, salt, and sugar.
- Mix the buttermilk, eggs, and melted butter, then stir into the dry ingredients.
- Fold in the cheddar and jalapeños.
- Pour into the hot skillet and bake 18 to 22 minutes until the top is golden and a toothpick comes out clean.
- Cool 10 minutes before cutting.
Equipment for This Recipe:
- Cast-iron skillet
- Mixing bowl
- Whisk
- Oven or covered grill
- Spatula
How to Serve This Dish:
Serve warm with butter and a little honey, or alongside beans and pulled pork. The crisp edge is the best part, so cut wedges instead of tiny squares.
Pro Tips for This Recipe:
- Heat the skillet first for a better crust.
- Don’t overmix or the crumb gets tough.
- Seed the jalapeños if you want mild heat; leave some ribs in for more kick.
- Let the bread rest before slicing or it falls apart.
Variations on This Dish:
- Honey Cornbread: Add another tablespoon of sugar and a honey drizzle.
- Bacon Cheddar Version: Stir in cooked crumbled bacon.
- Corn Kernels Inside: Add 1/2 cup fresh or frozen corn for extra texture.
Common Mistakes to Avoid with This Dish:
- Cold skillet: You lose the crispy bottom.
- Too much mixing: The bread turns dense.
- Cutting too soon: It needs a short rest to set.
20. BBQ Chicken Flatbread with Red Onion

Flatbread is what I make when I want barbecue flavor without waiting for a whole chicken to do the slow dance. It’s quick, crisp around the edges, and easy to cut into pieces for a crowd.
Why It Works:
Flatbread gives you a thin, sturdy base that stays crisp under sauce and cheese. The BBQ chicken brings the smoke, red onion adds bite, and cilantro brightens the whole thing right at the end.
Key Ingredients:
- 2 cooked chicken breasts, shredded, or 3 cups shredded chicken
- 1/2 cup BBQ sauce
- 2 naan or flatbreads
- 1 1/2 cups shredded mozzarella
- 1/4 red onion, thinly sliced
- 1/4 cup cilantro leaves
- 1 jalapeño, thinly sliced, optional
Quick Steps:
- Toss the chicken with BBQ sauce.
- Heat the grill or oven to 450°F.
- Place the flatbreads on a sheet pan or pizza stone, then spread the chicken over them.
- Top with mozzarella, red onion, and jalapeño if using.
- Cook 6 to 8 minutes until the cheese melts and the edges crisp.
- Finish with cilantro and slice into wedges.
Equipment for This Recipe:
- Baking sheet or pizza stone
- Grill or oven
- Knife
- Cutting board
- Spatula
How to Serve This Dish:
Cut it into thin wedges and serve as a snack or light main. It works well with a simple green salad or grilled corn, and it disappears fast when people are standing around.
Pro Tips for This Recipe:
- Keep the sauce layer thin or the crust gets soggy.
- Pre-cook the onion if you want it softer and sweeter.
- If using a grill, watch the bottom closely; flatbread burns fast.
- A mix of mozzarella and a little cheddar gives better flavor.
Variations on This Dish:
- Pulled Pork Flatbread: Swap the chicken for shredded pork.
- Vegetarian Mushroom Version: Use sautéed mushrooms and smoked mozzarella.
- Spicy Ranch Finish: Drizzle with ranch mixed with hot sauce.
Common Mistakes to Avoid with This Dish:
- Too much topping: The flatbread turns limp.
- Low oven heat: The cheese melts before the crust crisps.
- Skipping the finish: Fresh cilantro or onion makes the flavor pop.
21. Halloumi and Vegetable Skewers
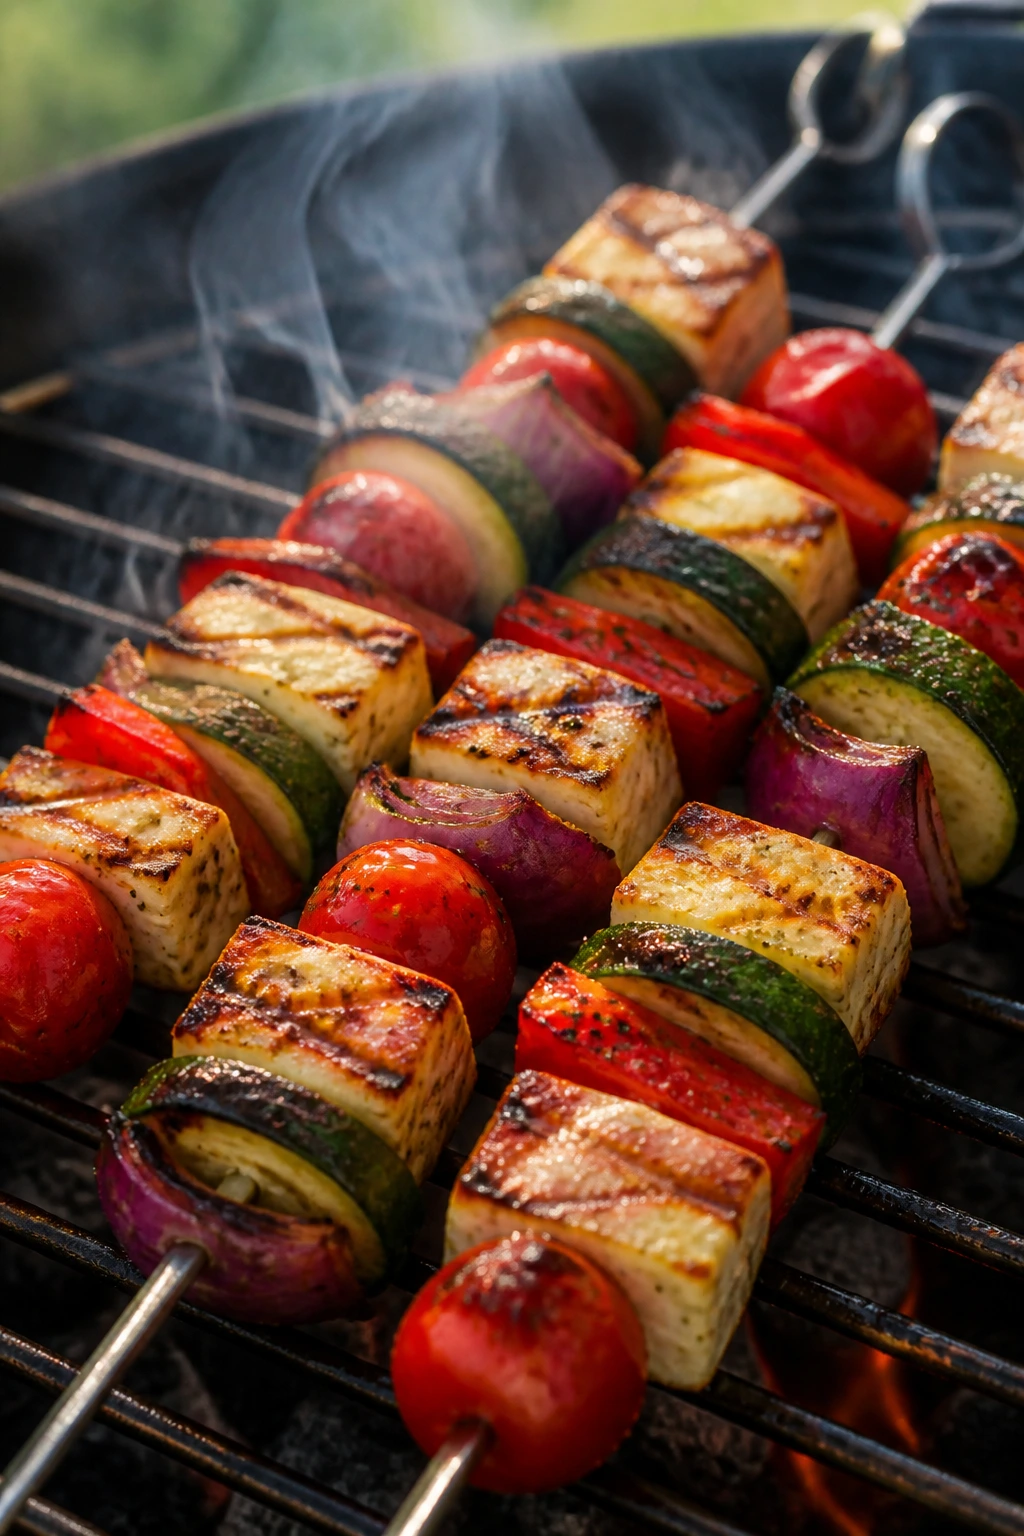
Halloumi is one of those ingredients that behaves like it was made for the grill. It holds its shape, browns fast, and gives you a salty bite that feels satisfying instead of apologetic.
Why It Works:
Halloumi doesn’t melt away like softer cheese, so it can sit between vegetables without falling off the skewer. Zucchini, peppers, and cherry tomatoes bring color and moisture, while lemon and oregano keep the whole thing bright.
Key Ingredients:
- 8 oz halloumi, cut into cubes
- 1 zucchini, sliced into thick half-moons
- 1 red bell pepper, cut into squares
- 1 red onion, cut into chunks
- 1 cup cherry tomatoes
- 2 tbsp olive oil
- 1 tsp dried oregano
- 1 tbsp lemon juice
- Salt and black pepper
- Skewers
Quick Steps:
- Toss the vegetables with oil, oregano, lemon juice, salt, and pepper.
- Pat the halloumi dry so it browns instead of steaming.
- Thread halloumi and vegetables onto skewers.
- Grill over medium-high heat for 6 to 8 minutes, turning until the vegetables are tender and the cheese has browned in spots.
- Serve right away with extra lemon.
Equipment for This Recipe:
- Skewers
- Grill
- Tongs
- Mixing bowl
- Paper towels
How to Serve This Dish:
Serve these with couscous, pita, or a yogurt sauce. They’re good as a meatless main or as a second skewer beside chicken or lamb.
Pro Tips for This Recipe:
- Dry the halloumi well before grilling.
- Don’t cut the vegetables too small or they’ll soften too fast.
- If using wooden skewers, soak them first.
- A squeeze of lemon right at the end makes the salt taste cleaner.
Variations on This Dish:
- Harissa Version: Brush the skewers with harissa for heat.
- Mediterranean Add-Ins: Add olives or artichoke hearts if they’re firm enough to skewer.
- Tofu Swap: Use extra-firm tofu pressed and cubed for a dairy-free option.
Common Mistakes to Avoid with This Dish:
- Wet cheese: Halloumi should be patted dry before it hits the grill.
- Overcrowding: Tight skewers steam instead of char.
- Too much heat: Halloumi can brown fast; keep an eye on it.
22. Creamy Coleslaw with Apple Cider Vinegar
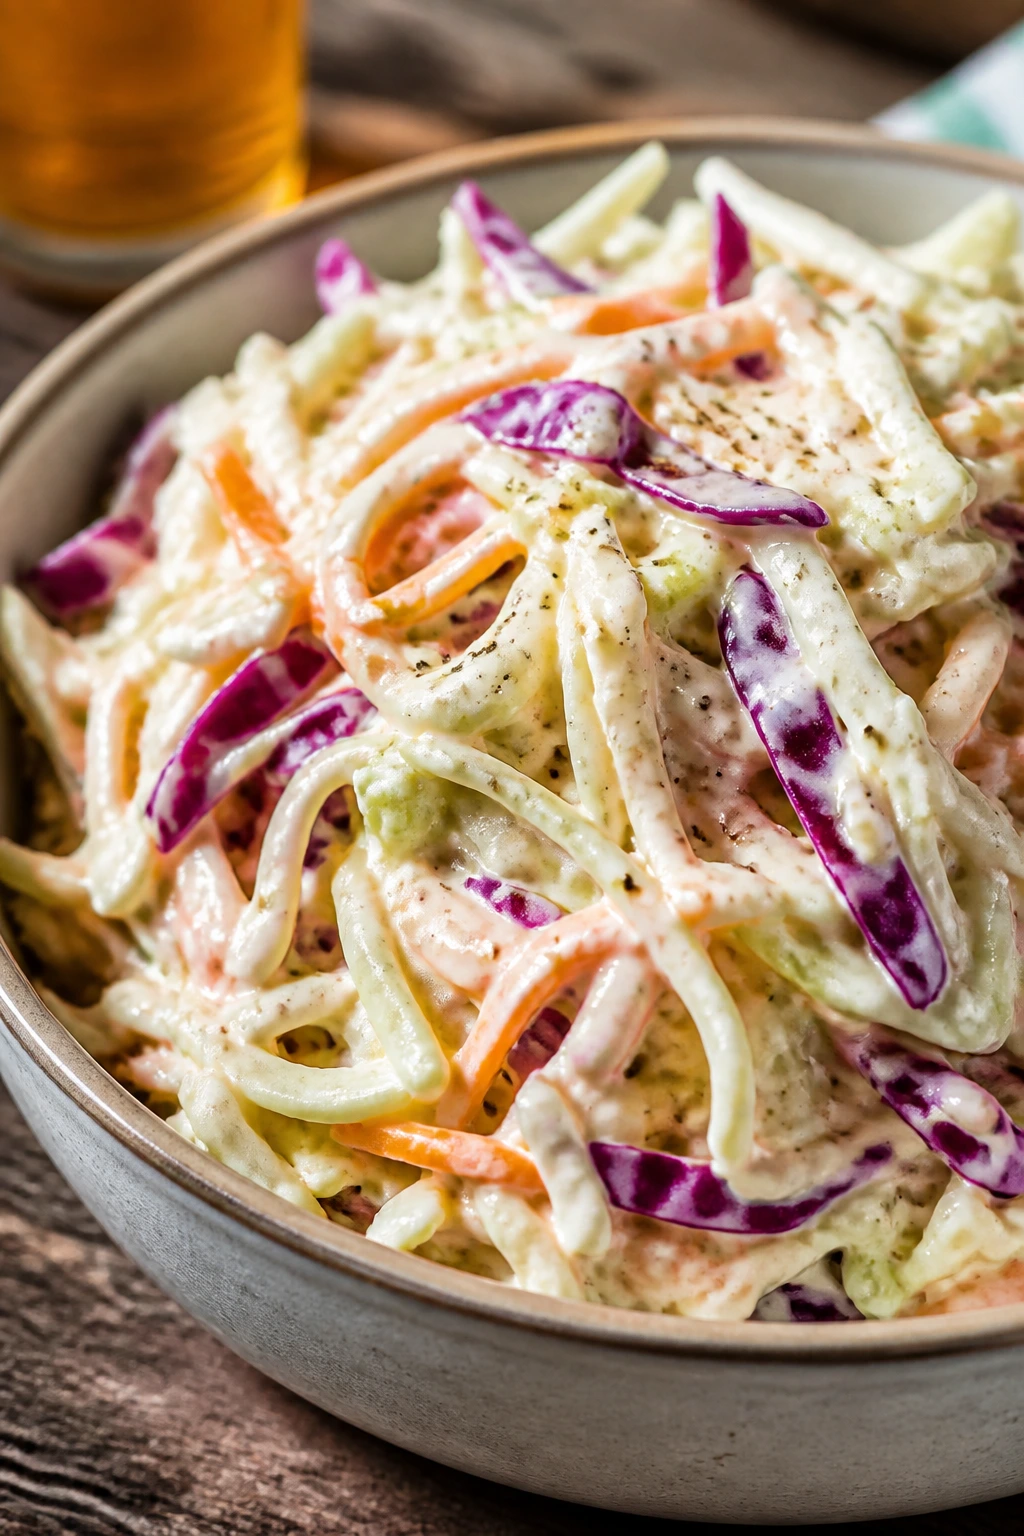
Coleslaw is the dish that saves a heavy plate from becoming monotonous. Crisp cabbage, a cool creamy dressing, and a little vinegar bite make it the side I keep coming back to when the meal leans rich.
Why It Works:
Cabbage stays crunchy longer than lettuce, which makes it a smart cookout side. Apple cider vinegar sharpens the dressing so it doesn’t taste flat, and a short chill gives the flavors time to settle without softening the vegetables too much.
Key Ingredients:
- 6 cups shredded green cabbage
- 2 cups shredded red cabbage
- 1 large carrot, shredded
- 1/2 cup mayonnaise
- 2 tbsp apple cider vinegar
- 1 tbsp sugar
- 1 tsp Dijon mustard
- 1/2 tsp celery seed
- 3/4 tsp kosher salt
- 1/4 tsp black pepper
Quick Steps:
- Combine the cabbage and carrot in a large bowl.
- Whisk the mayonnaise, vinegar, sugar, Dijon, celery seed, salt, and pepper.
- Toss the dressing with the vegetables until evenly coated.
- Chill for 20 to 30 minutes, then toss again before serving.
Equipment for This Recipe:
- Large mixing bowl
- Whisk
- Box grater or knife
- Measuring cups
- Serving spoon
How to Serve This Dish:
Serve it beside ribs, pulled pork, burgers, or fried chicken. It also belongs on sandwiches, where the crunch and acidity keep the bread and meat from feeling too dense.
Pro Tips for This Recipe:
- Shred the cabbage thinly so it feels crisp, not bulky.
- Taste after chilling, because the vinegar softens a little as it sits.
- If the slaw looks dry after a while, add a spoonful of mayo or a splash of vinegar.
- Salt the cabbage lightly before dressing if you want it to soften just a touch.
Variations on This Dish:
- Vinegar Slaw: Cut the mayo in half and add more vinegar for a sharper finish.
- Dairy-Free Version: The base already works without dairy; just check your mayo.
- Creamier Picnic Slaw: Add a spoonful of sour cream or yogurt for extra body.
Common Mistakes to Avoid with This Dish:
- Too much dressing: The slaw should coat, not drown.
- Chopping too coarsely: Big shards feel rough and awkward.
- Serving it immediately without a pause: A short chill helps the flavors settle.
Why These BBQ Recipes Work on a Backyard Grill

Backyard cookouts succeed when the menu respects the grill instead of fighting it. A hot grate gives you char and speed; indirect heat gives you room for ribs, chicken, and pork shoulder; a skillet on the side lets you cheat a little and make burgers, mac and cheese, or beans without pretending every dish has to sit over flame.
That balance matters. Fatty cuts like ribs, thighs, brisket, and shoulder want time. Fast-cooking things like shrimp, skewers, corn, and flatbread want heat and attention. A good cookout menu mixes those tempos so the food lands at the same time instead of coming out in a stressful parade of half-done meat and cold side dishes.
The recipes here are also built around finishes that taste better outdoors. Sauce goes on late. Pickles and vinegar show up on purpose. Cheese gets browned, not buried. Even the fruit and vegetables get a little smoke, which is what keeps the whole table from tasting one-dimensional.
Essential Equipment for These Recipes
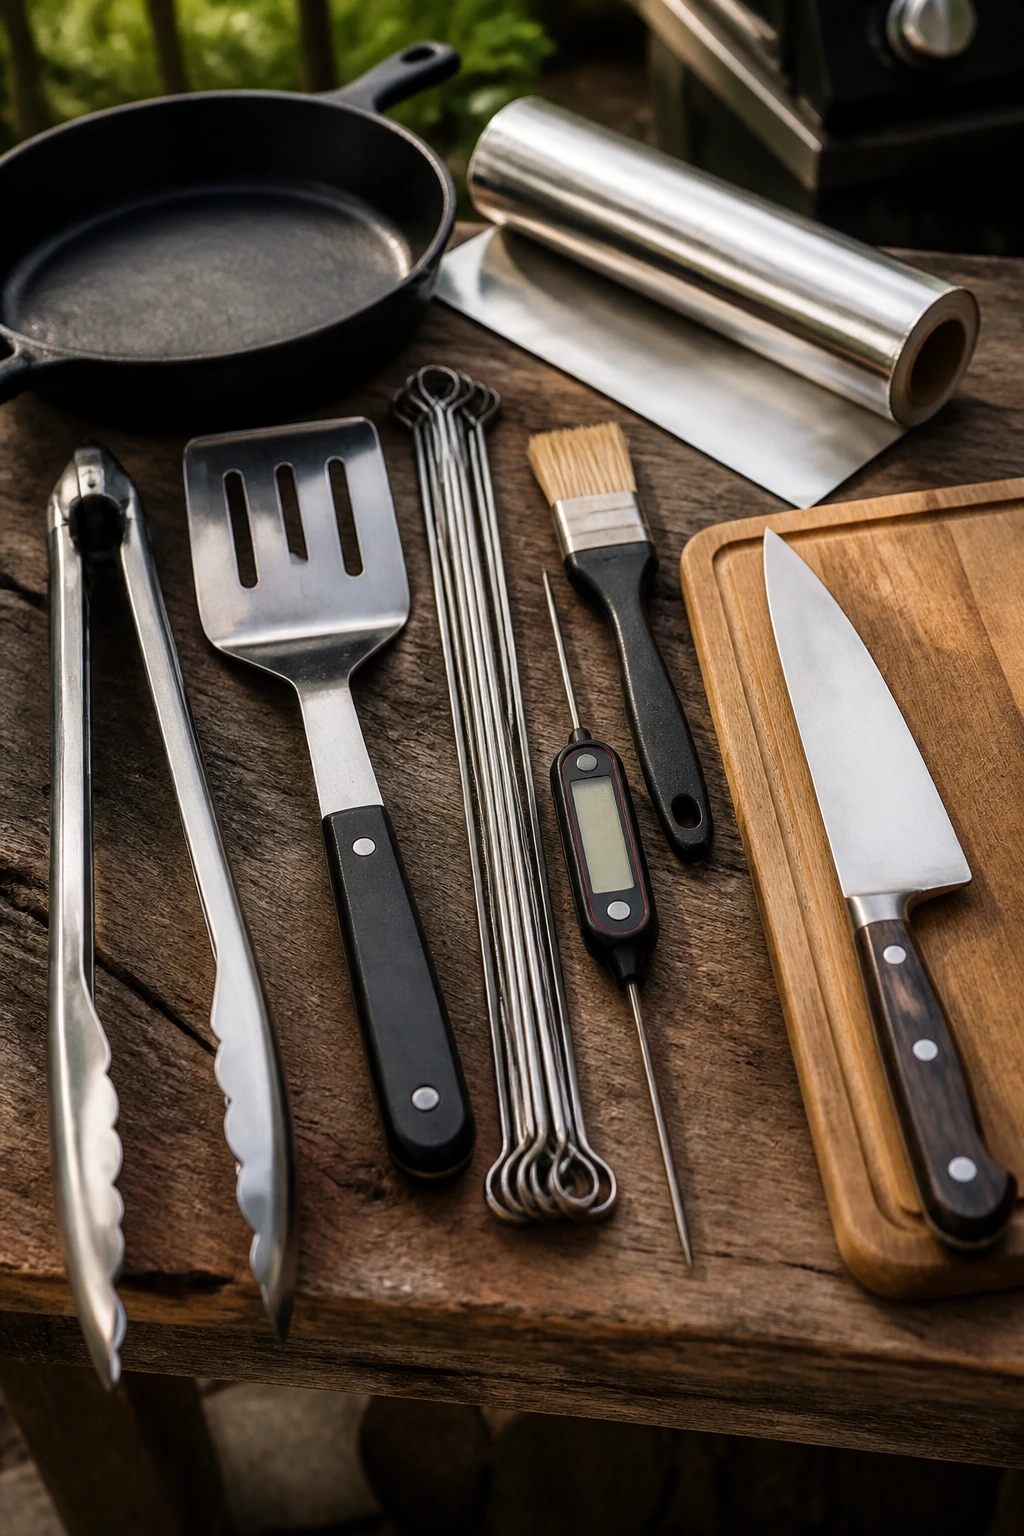
- Covered grill: Gas or charcoal both work; the lid matters more than brand names.
- Instant-read thermometer: Ribs, chicken, pork, salmon, and turkey all cook better when you stop guessing.
- Long tongs: Short tools put your knuckles too close to the heat.
- Stiff metal spatula: Especially useful for smash burgers and anything that needs a hard scrape.
- Cast-iron skillet or griddle: A lot of these recipes improve when you can add a searing surface.
- Heavy-duty foil: Helpful for ribs, pork shoulder wraps, and keeping food warm.
- Basting brush: Thin glaze goes on cleaner than spooned sauce.
- Skewers: Metal is easiest; wooden skewers need soaking.
- Sharp chef’s knife: You’ll use it for slicing ribs, vegetables, onions, and brisket.
- Cutting board with a groove: Keeps juices from running across the counter.
- Mixing bowls in two sizes: One for dry rubs, one for sauces or slaws.
- Serving platters and shallow bowls: Backyard food looks better when it can spread out.
Smart Shopping and Ingredient Tips
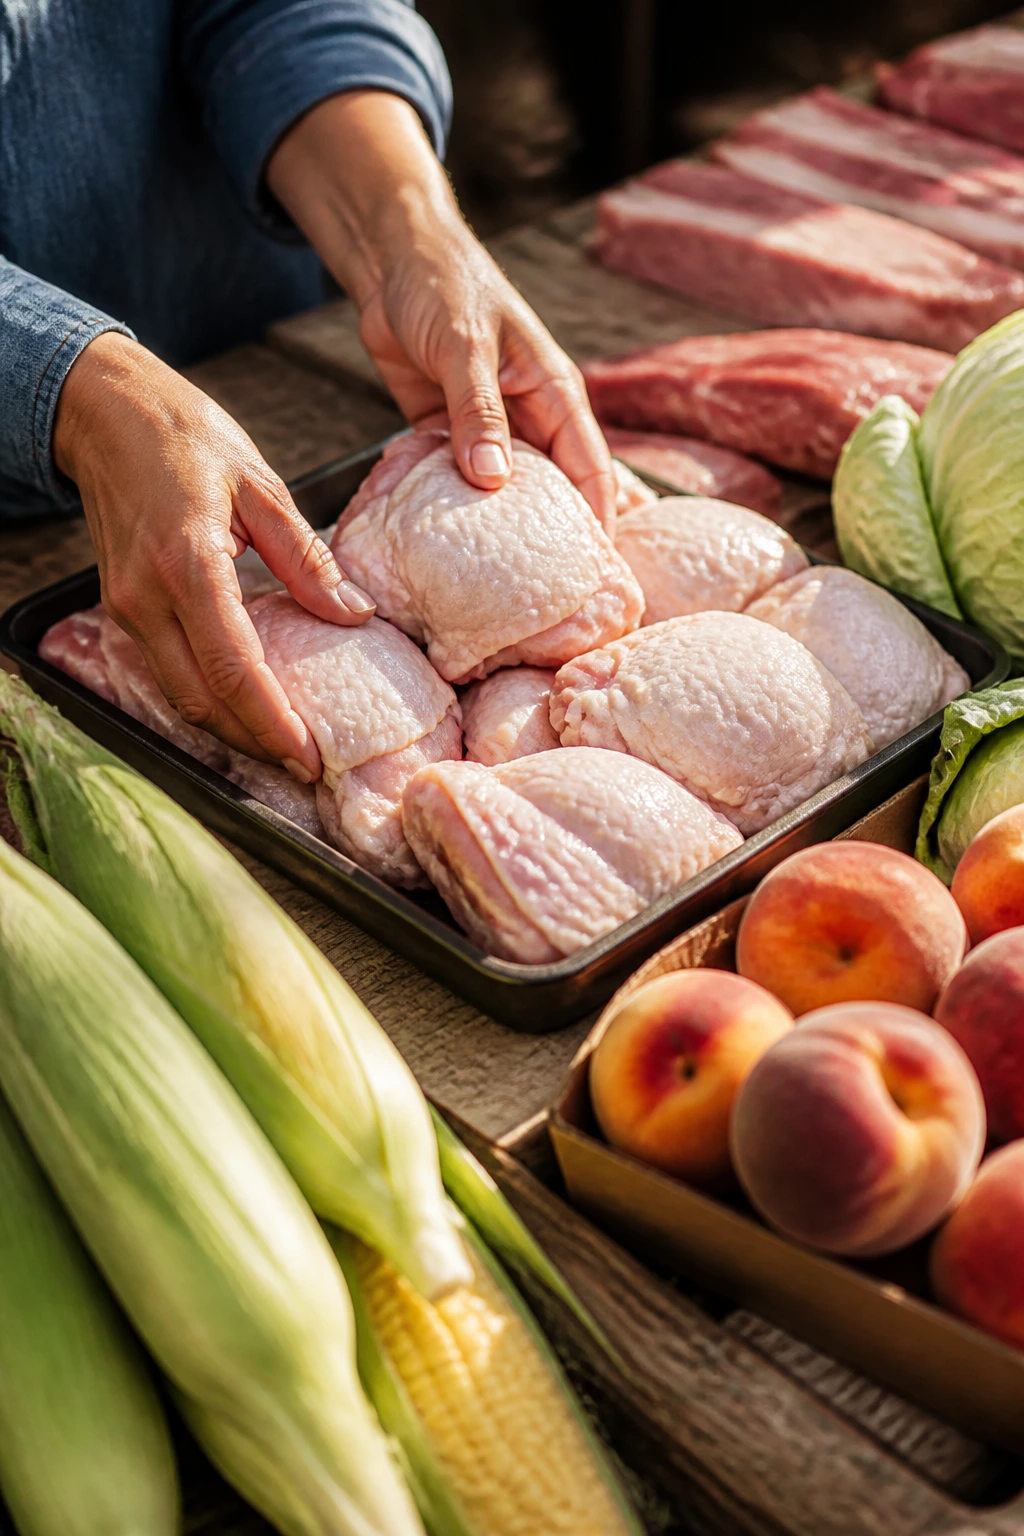
A cookout menu rises or falls on the cuts you buy. For chicken, choose thighs when you can; they handle heat swings better than breasts and stay juicy if the grill runs a little hot. For ribs, baby backs cook a bit faster and are easier to manage than bigger racks, which is handy when the rest of the menu is already busy.
Look for pork shoulder with some fat on the outside and a shape that feels even, not lopsided. Brisket flat is easier for a smaller cookout than a whole packer, and it slices better when you don’t need a smoker the size of a shed. For shrimp, buy large or extra-large; tiny shrimp overcook before they get any color.
Veg and fruit need the same honesty. Corn should smell sweet and feel full under the husk. Peaches need to be ripe but still firm, or they’ll collapse on the grate. Pineapple should be fragrant and heavy for its size, with a little spring when you press the shell. Cabbage for slaw should feel dense and crisp, not dry at the edges.
As for sauce, I’m picky in one specific way: buy one you’d actually eat on its own. A thin, sugary sauce with no acid tends to burn or taste flat. If the bottle lists vinegar, tomato, spices, and maybe a little mustard, you’re probably in good territory. The same goes for cheese. Block cheese melts better for mac and cheese than the bagged stuff, which often has a powdery coating that slows the melt.
How to Serve These Recipes
Presentation:
Backyard food looks best when it isn’t crowded into a stack. Use one platter for the meat, one bowl for slaw or beans, and a separate board or skillet for corn, cornbread, or flatbread. A few pickle chips, onion slices, lemon wedges, or herb leaves go a long way.
Accompaniments:
Ribs like slaw and cornbread. Pulled pork wants pickles, beans, and soft buns. Chicken thighs and burgers do well with potato salad or grilled corn. Salmon and shrimp like something crisp and acidic, while richer dishes — mac and cheese, beans, brisket — benefit from a bright salad or vinegar slaw.
Portions:
Plan on 1 to 2 ribs per person if the menu is full, 1 chicken thigh per adult with sides, and about 1/3 to 1/2 lb of cooked pulled pork or brisket per sandwich eater. For sides, I’d rather have a little extra slaw or beans than run short; people keep snacking while they talk.
Beverage Pairing:
Cold lager works with nearly everything here because it clears the fat and smoke. I also like iced tea with lemon, sparkling water with lime, or a dry cider for pork and chicken. For the sweeter dishes, a slightly bitter drink — lemonade with extra ice, or unsweetened tea — keeps the meal from tipping too sweet.
Additional Tips and Flavor Boosters

Flavor Enhancement: A spoonful of vinegar at the end of ribs, beans, or pulled pork wakes up the whole dish. Smoke and sugar need acid to stay interesting.
Customization: If you like heat, add chopped pickled jalapeños to burgers, coleslaw, or mac and cheese. If you like sweeter BBQ, use peach preserves, honey, or maple syrup in small amounts, not a flood.
Serving Suggestions: Finish chicken, corn, and shrimp with chopped herbs right before serving. Fresh cilantro, parsley, dill, or basil gives the plate a green edge that smoke alone can’t supply.
Make-It-Yours: For a lower-dairy spread, lean on vinegar slaw, grilled fruit, and cauliflower steaks. For a gluten-free menu, use cornmeal cornbread, potato salad, rice, lettuce wraps, or gluten-free buns without changing the cookout feel.
A little char is good. A little sauce is good. A little restraint is usually better than trying to make every dish loud at once.
Make-Ahead, Storage, and Reheating Guidance
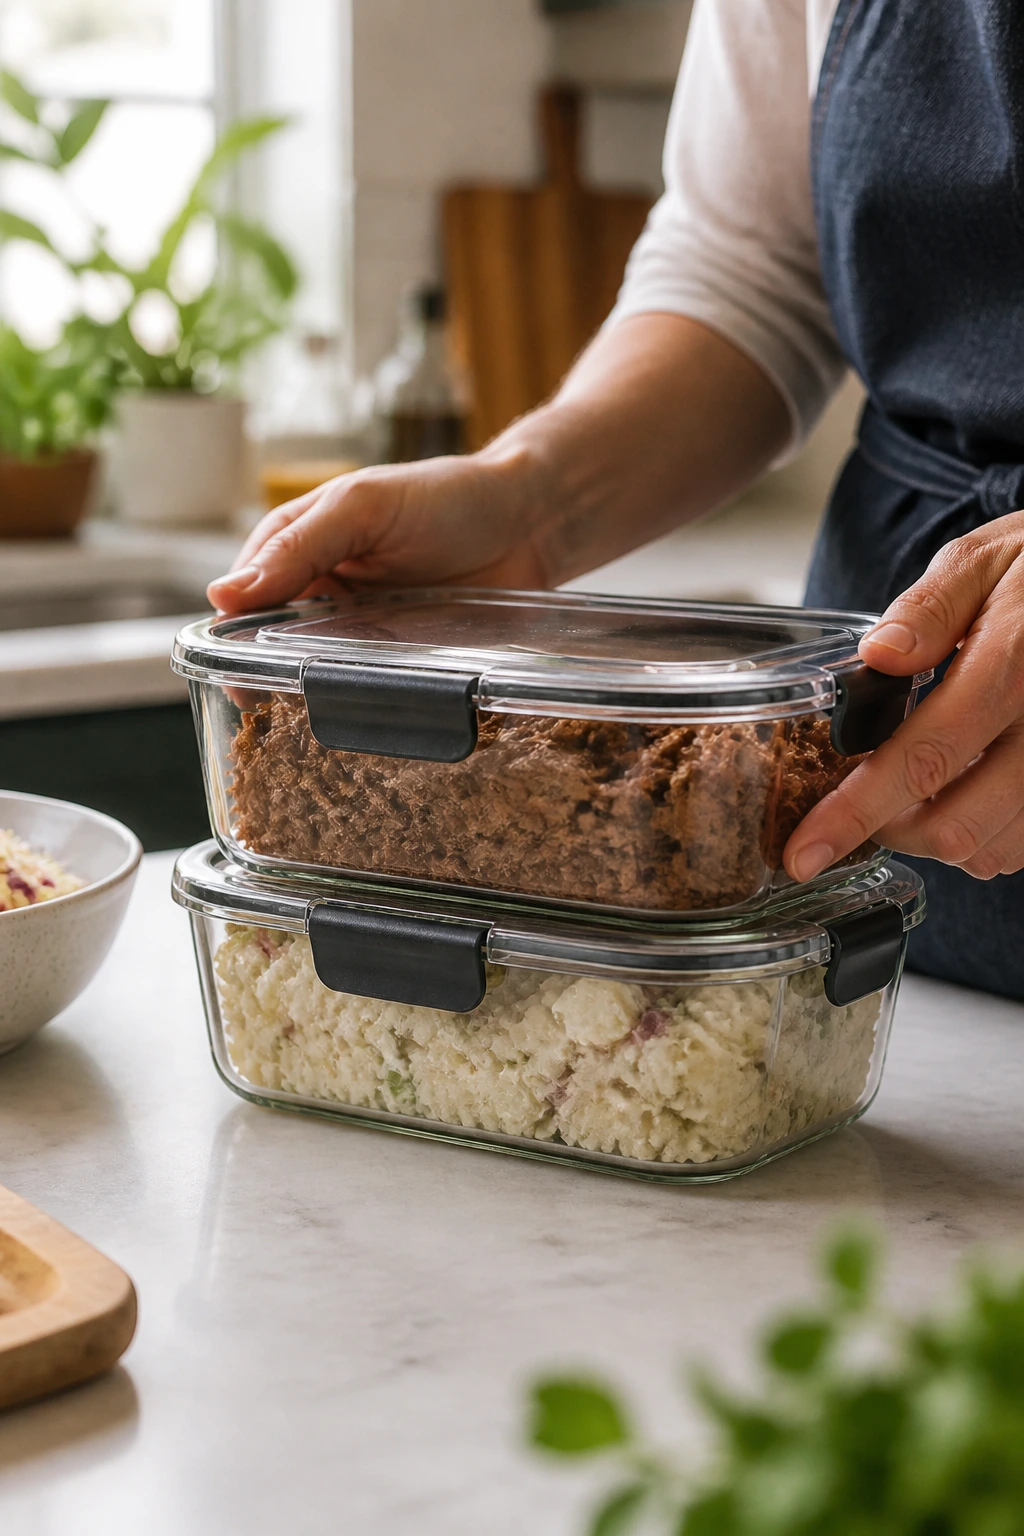
A lot of these recipes are better when one piece is made ahead and another is finished fresh. Ribs, pulled pork, brisket, baked beans, slaw, and potato salad all benefit from advance work. Dry rubs can go on the night before, and sauces or dressings can be mixed a day ahead so they taste less sharp and more settled.
Cooked meats keep well in the fridge for 3 to 4 days in airtight containers. Pulled pork and brisket freeze well for up to 2 months if you wrap them tightly with a little cooking liquid or sauce. Chicken thighs and meatballs also freeze well, though the texture is best if you reheat them gently rather than blasting them in the microwave.
Shrimp and salmon are fussier. They’re best cooked close to serving time, though leftover salmon can be flaked into salads the next day. Shrimp should be eaten within 2 days, and I’d reheat them only briefly in a skillet with a splash of water or butter so they don’t tighten up.
For sides, beans and mac and cheese reheat well in a 325°F oven with a splash of liquid and a loose foil cover. Cornbread is best wrapped and reheated in the oven for a few minutes, not the microwave if you want the crust back. Slaw should be kept cold and dressed close to serving; if it sits overnight, give it a stir and a spoonful of vinegar or mayo to freshen it up.
Variations and Adaptations to Try
Gluten-Free Cookout Board:
Use gluten-free buns, skip flour-thickened sauces where needed, and lean on cornmeal, potatoes, rice, slaw, and grilled meat. Most of the grill recipes already fit that direction with only small changes.
Dairy-Free Smokehouse Menu:
Choose oil-based slaws, skip cheese on burgers or flatbread, and use a dairy-free yogurt for the cauliflower steaks. The flavor still lands if you keep acid, salt, and smoke in the mix.
Lower-Sugar BBQ Spread:
Cut back on honey, brown sugar, and sweet sauces, then lean harder on mustard, vinegar, herbs, and spice. This works especially well for chicken, pork, slaw, and beans.
Mild Kid-Friendly Table:
Keep the heat in separate bowls, use sweet BBQ sauce, skip jalapeños, and make the flatbread or burgers with sauce on the side. Kids usually want the same food with less fire, not a separate menu.
Charcoal-to-Gas Conversion:
Run one burner high and one off for indirect heat, or create a hot side and cool side on the charcoal grate. Every recipe here can adapt if you respect those zones and use a thermometer instead of guesswork.
Southern-Style Swap:
Add more mustard, pickles, and vinegar to the pork, beans, slaw, and potato salad. The whole spread gets sharper and less sugary, which I think is a better fit for a long, hot cookout.
Common Mistakes to Avoid with These Recipes
Trying to cook everything over the hottest part of the grill: That works for burgers and shrimp, then wrecks ribs, chicken thighs, and pork shoulder. Build hot and cool zones so the food has somewhere to go.
Saucing too early: Sweet sauces burn faster than people expect. Put them on near the end unless the recipe specifically says otherwise.
Skipping the thermometer: A lot of backyard food looks done before it is. Chicken, turkey, brisket, salmon, and pork all benefit from a quick check rather than a hopeful guess.
Crowding the grate: If the food is jammed together, you lose airflow and end up steaming instead of grilling. Leave space, even if it means cooking in batches.
Serving everything straight from the flame: Meat needs a few minutes to settle, and sides like slaw or potato salad need time to relax after mixing. A short rest often improves texture more than extra seasoning does.
Forgetting balance: A table full of rich, smoky, sweet food gets tiring fast. Put vinegar, pickles, herbs, citrus, or something crisp on the side so the meal keeps moving.
Frequently Asked Questions

Can I make these BBQ recipes on a gas grill instead of charcoal?
Yes. Use a two-zone setup by lighting one side for direct heat and leaving the other side cooler for indirect cooking. That setup is enough for ribs, chicken thighs, pork shoulder, salmon on planks, and even beans in a pan.
Which recipes are best for making ahead?
Pulled pork, brisket, baked beans, potato salad, slaw, and dry rubs are the easiest to prep early. Chicken, shrimp, and flatbread are better finished close to serving because their texture fades faster.
What internal temperatures should I watch for?
Chicken and turkey need 165°F, shrimp are done when they turn opaque and curl into a loose C, salmon is often best around 125 to 145°F depending on how you like it, and pork shoulder or brisket becomes tender somewhere in the 195 to 203°F range. For ribs, tenderness matters more than one single number.
How do I stop BBQ sauce from burning?
Cook the meat first and glaze it late. Sugar browns fast, so a thin layer in the final stretch is usually enough.
Can I use chicken breasts in place of thighs?
You can, but they need tighter timing and a closer eye. Breast meat dries out much faster, so I’d use indirect heat and pull it promptly at 165°F.
What if I only have a small grill?
Cook in batches and lean on make-ahead sides. Ribs, pork, and brisket can hold in foil or a low oven, while burgers, shrimp, and skewers can be done quickly right before serving.
Do I need to soak wooden skewers?
Yes, if you’re using wood. A 30-minute soak helps keep them from scorching, especially on a hot grill. Metal skewers are easier if you cook skewers often.
How do I keep coleslaw crisp?
Shred the cabbage finely, chill the dressing separately if needed, and don’t overdress it. If it gets watery after sitting, a quick toss with a spoonful of vinegar and a little mayo brings it back.
Fire Up the Grill
Backyard cookouts work best when the menu has some range in it. A smoky rib rack, a quick shrimp skewer, a bowl of tangy slaw, a pan of beans, and one dessert with char on the fruit can carry a whole afternoon without feeling repetitive.
I’d start with one slow item, one fast item, and one cold side. That combination keeps the grill busy, keeps the table moving, and leaves room for people to graze while the rest of the food catches up. Once you do that a few times, the whole thing starts to feel less like hosting and more like a rhythm.
And that’s the part worth chasing: food that gives you enough smoke, crunch, sauce, and contrast to make the backyard feel like the center of the day. Pick a few recipes, light the fire, and let the rest of the menu fall into place around them.