
A picnic can go sideways in one bite. Soggy bread. Limp lettuce. Tomatoes that dump half their juice into the napkin pile before you’ve even found the forks. The best summer picnic recipes avoid all that by leaning into what actually survives a blanket, a cooler, and a long stretch of warm evening air: sturdy breads, dressed-at-the-last-minute greens, chilled salads that taste better after a short rest, and desserts that don’t melt into regret.
Summer picnic recipes also have a specific job to do. They need to travel well, hold their shape, and still taste like someone cared when they were made. That means a chicken salad sandwich that stays creamy without turning wet, a pasta salad that stays bright after the first scoop, and fruit that’s cut in a way that doesn’t flood the bowl by the time you reach the park bench. I’ve made enough of these to know the difference between “looks pretty in a photo” and “survives the ride home.” The second one wins every time.
There’s a sweet spot here, and it’s not complicated. Pack things that improve after a little chill. Keep the wet stuff separate when it matters. Use herbs, vinegar, citrus, pickles, mustard, and salty cheese to keep the flavors awake even after they’ve sat a while. That’s the whole trick, and once you start cooking that way, easy summer nights get a lot less fussy.
Why This Picnic Spread Works So Well
Portable by design: Every recipe here can be packed in a container, wrapped in parchment, or portioned into jars without falling apart on the ride.
Built for warm weather: You’ll see a lot of cool salads, sturdy sandwiches, handheld bites, and bars that stay neat even after an hour or two out of the fridge.
Good at room temperature: These recipes don’t rely on piping-hot serving temperatures, which is exactly why they fit a picnic blanket better than a formal dinner table.
Flexible for mixed appetites: There are meaty mains, vegetarian options, snacky sides, and sweets that can all live in the same basket without fighting each other.
Make-ahead friendly: Most of these taste better after 30 minutes to a few hours in the fridge, which is a much nicer way to spend an evening than scrambling at the stove.
Easy to scale: A lot of these recipes double cleanly, and a few get even better in a bigger bowl because the seasoning has more space to settle in.
1. Lemon-Herb Chicken Salad Sandwiches
Intro: Cold chicken salad can be dull, or it can taste like you actually wanted lunch. This version stays crisp with celery, bright with lemon, and a little herbal from dill and parsley, so the mayo never feels heavy. I like it on soft sandwich bread or split brioche rolls, where the filling stays creamy without sliding around.
Why It Works: Shredded chicken gives you a loose texture that soaks up the dressing without turning pasty. A small spoonful of Greek yogurt cuts the mayo and keeps the mixture lighter after chilling for 20 minutes. The lemon zest does more work than people expect; it makes the whole bowl smell fresh before the first bite.
Key Ingredients:
- 3 cups shredded cooked chicken
- 1/2 cup mayonnaise
- 2 tablespoons plain Greek yogurt
- 1 celery stalk, finely diced
- 2 tablespoons chopped dill
- 2 tablespoons chopped parsley
- 1 tablespoon lemon juice
- 1 teaspoon lemon zest
- 1/2 teaspoon kosher salt
- 1/4 teaspoon black pepper
- 8 slices soft sandwich bread or 4 brioche rolls
Quick Steps:
- Whisk the mayonnaise, yogurt, lemon juice, zest, salt, and pepper in a bowl.
- Fold in the chicken, celery, dill, and parsley until evenly coated.
- Chill the mixture for 20 to 30 minutes so the flavor settles.
- Toast the bread lightly if you want more structure.
- Spoon on the chicken salad, add lettuce if you like, and close the sandwiches.
- Wrap tightly in parchment or foil for the picnic.
Equipment for This Recipe:
- Medium mixing bowl
- Rubber spatula
- Sharp knife
- Measuring spoons
- Parchment or foil for wrapping
How to Serve This Dish: Slice the sandwiches in half and pack them cut-side down so the filling stays put. A handful of kettle chips and a few cornichons make the plate feel finished without extra work.
Pro Tips for This Recipe:
- Use chicken that’s cooled before mixing; warm chicken makes the dressing loose.
- Dice the celery small enough that it adds crunch without poking through the bread.
- If the bread is very soft, butter the inside lightly before filling.
- Pack tomato slices separately. They leak. Every time.
Variations on This Dish:
- Dill Pickle Chicken Salad: Swap 1 tablespoon of the celery for chopped dill pickles and add 1 teaspoon pickle brine.
- Curry Picnic Chicken: Stir in 1 teaspoon curry powder and 2 tablespoons golden raisins.
- Lettuce Wrap Version: Spoon the filling into romaine leaves for a lighter, less bread-heavy picnic.
Common Mistakes to Avoid with This Dish:
- Don’t drown the chicken in mayo; the filling should look coated, not soupy.
- Don’t skip chilling if you can help it. The flavor is flatter right after mixing.
- Don’t use wet, overripe celery. It makes the filling watery and the bread soft fast.
2. Charred Corn Pesto Pasta Salad
Intro: This is the pasta salad I make when I want people to reach for a second spoonful before they’ve finished the first. Sweet corn, short pasta, cherry tomatoes, and pesto make a bowl that tastes like a cookout without requiring you to stand over the grill for an hour. The char on the corn matters. It gives the whole salad a smoky edge.
Why It Works: Short pasta catches pesto in the ridges and folds, so every forkful has seasoning instead of just a slick coating. Blistered corn brings sweetness and a little bitterness from the pan, which keeps the salad from reading flat. A splash of lemon juice at the end wakes up the cheese and tomatoes.
Key Ingredients:
- 12 ounces rotini or fusilli
- 2 ears corn, kernels cut off
- 1 tablespoon olive oil
- 1 cup halved cherry tomatoes
- 1/2 cup basil pesto
- 1/3 cup grated Parmesan
- 2 tablespoons lemon juice
- 2 tablespoons sliced scallions
- 1/2 teaspoon salt
- 1/4 teaspoon black pepper
Quick Steps:
- Cook the pasta in salted water until just al dente, then drain and cool slightly.
- Sauté the corn in olive oil over medium-high heat for 4 to 5 minutes until lightly charred.
- Toss the pasta with pesto, lemon juice, salt, and pepper.
- Fold in corn, tomatoes, Parmesan, and scallions.
- Chill for 30 minutes before packing so the pesto settles onto the pasta.
Equipment for This Recipe:
- Large pot
- Colander
- Large skillet
- Mixing bowl
- Wooden spoon
How to Serve This Dish: Serve it cold or cool, not icy. It sits well beside grilled chicken, sliced mozzarella, or a pile of simple greens, and it packs neatly into a shallow lidded bowl.
Pro Tips for This Recipe:
- Salt the pasta water well; bland pasta makes the whole bowl taste tired.
- Cool the pasta just enough that the pesto doesn’t turn greasy when you mix it in.
- Use a spoon to scrape the pasta clumps apart before adding the dressing.
- If the pesto is thick, thin it with 1 tablespoon of olive oil.
Variations on This Dish:
- Sun-Dried Tomato Twist: Add 1/4 cup chopped sun-dried tomatoes for a darker, sweeter note.
- Mozzarella Garden Version: Fold in 1 cup small mozzarella balls just before serving.
- No-Cheese Option: Replace the Parmesan with 2 tablespoons toasted sunflower seeds.
Common Mistakes to Avoid with This Dish:
- Don’t overcook the pasta. Soft noodles turn mushy once they sit with pesto.
- Don’t add the tomatoes too early if they’re very juicy; they can make the bowl watery.
- Don’t skip the char on the corn. Raw sweet corn tastes fine, but it misses the whole point.
3. Deviled Eggs with Smoked Paprika
Intro: A picnic without deviled eggs feels a little underdressed. These are the clean, old-school kind: creamy yolk filling, a sharp little hit of mustard, and enough smoked paprika on top to make them look like they were made by someone who pays attention. I like them cold from the fridge, straight from the container.
Why It Works: Eggs hold their shape better when they’re cooked just to set and cooled fast. Mayo and mustard build the filling’s richness, while a teaspoon of vinegar keeps it from tasting heavy. The smoked paprika is not decoration; it gives the eggs that familiar picnic smell before anyone opens the lid.
Key Ingredients:
- 6 large eggs
- 3 tablespoons mayonnaise
- 1 teaspoon Dijon mustard
- 1 teaspoon white vinegar
- 1/4 teaspoon salt
- 1/8 teaspoon black pepper
- Smoked paprika, for dusting
- Chopped chives, for garnish
Quick Steps:
- Boil the eggs for 10 to 11 minutes, then move them to ice water.
- Peel and halve the eggs lengthwise.
- Scoop the yolks into a bowl and mash with mayo, mustard, vinegar, salt, and pepper.
- Spoon or pipe the filling back into the whites.
- Dust with smoked paprika and chives, then chill until serving.
Equipment for This Recipe:
- Medium saucepan
- Slotted spoon
- Small bowl
- Fork or mini whisk
- Piping bag or zip-top bag, optional
How to Serve This Dish: Nestle the eggs in a shallow container with a paper towel under the lid to catch condensation. A few dill sprigs and a pinch of flaky salt make the platter look deliberate.
Pro Tips for This Recipe:
- Older eggs peel more easily than very fresh ones.
- Cool the eggs in ice water for at least 10 minutes so the yolks stay pale.
- If you want a smoother filling, press the yolks through a fine sieve.
- Pack them in a single layer so the tops don’t smear.
Variations on This Dish:
- Pickle-Brined Filling: Add 1 tablespoon finely chopped pickle for a sharper bite.
- Bacon-Topped Version: Crumble 2 slices crisp bacon over the finished eggs.
- Herb Garden Eggs: Mix in 1 tablespoon minced dill or tarragon.
Common Mistakes to Avoid with This Dish:
- Don’t overboil the eggs; gray yolks taste chalky and look rough.
- Don’t skip cooling before peeling. The shells cling harder when the eggs are warm.
- Don’t overfill the whites or the halves will slide around in the container.
4. Watermelon-Feta Mint Salad
Intro: This is the salad that disappears first when the evening gets hot and everyone wants something cold, salty, and bright. Watermelon brings the juice, feta brings the salt, and mint keeps the whole bowl from feeling one-note. I like a little black pepper here too. Sounds odd. Works.
Why It Works: Watermelon is mostly water, so it needs salt and acid to taste like more than pink ice. Feta gives each bite a hard, savory edge that keeps the fruit from reading candy-sweet. A squeeze of lime helps the mint smell sharper and stops the salad from going sleepy after ten minutes.
Key Ingredients:
- 6 cups cubed seedless watermelon
- 1 cup crumbled feta
- 1/4 cup torn mint leaves
- 1 tablespoon lime juice
- 1 teaspoon honey
- 1/4 teaspoon black pepper
- Pinch of flaky salt
Quick Steps:
- Whisk the lime juice, honey, and black pepper in a large bowl.
- Add the watermelon and toss gently.
- Fold in the feta and mint.
- Sprinkle with flaky salt right before serving.
- Chill for 15 minutes, then pack carefully.
Equipment for This Recipe:
- Large bowl
- Sharp knife
- Cutting board
- Small whisk
- Serving spoon
How to Serve This Dish: Serve in a shallow bowl so the cubes don’t crush each other. It’s excellent beside grilled meat, but I also like it with pita chips, because the salty crunch keeps the texture lively.
Pro Tips for This Recipe:
- Cut the watermelon into firm cubes, not tiny dice, or it turns watery fast.
- Add the mint at the end so it stays bright green.
- Use a block of feta if you can; it holds shape better than the soft tubs.
- Pack the dressing separately if the salad needs to wait more than an hour.
Variations on This Dish:
- Cucumber Splash: Add 1 cup sliced cucumber for extra crunch.
- Basil Swap: Use torn basil instead of mint for a softer herb note.
- Chili-Lime Edge: Add a pinch of chili flakes for heat.
Common Mistakes to Avoid with This Dish:
- Don’t salt the watermelon too early. It pulls out juice fast.
- Don’t stir hard once the feta is in. The cubes collapse.
- Don’t use overripe watermelon; it tastes mushy and turns the bowl slack.
5. Ham, Cheddar, and Pickle Pinwheels
Intro: Pinwheels are a little nostalgic, sure, but they’re also practical in a way that deserves more respect. Tortillas hold steady, the filling stays tidy, and you can eat one with one hand while balancing a paper plate in the other. The pickle gives the whole thing a sharp crunch that keeps it from tasting like lunchbox filler.
Why It Works: Cream cheese glues the layers together, which matters when the roll gets sliced. Cheddar brings a sturdy saltiness that stands up to the ham, and pickles keep each bite from going mushy. Chilling the roll before slicing is the difference between neat spirals and filling squished onto the board.
Key Ingredients:
- 4 large flour tortillas
- 8 ounces cream cheese, softened
- 1 tablespoon Dijon mustard
- 8 slices deli ham
- 1 cup shredded cheddar
- 6 dill pickles, thinly sliced
- 1 tablespoon chopped chives
Quick Steps:
- Mix the cream cheese and Dijon until smooth.
- Spread the mixture on each tortilla.
- Layer ham, cheddar, pickles, and chives across the center.
- Roll tightly, wrap, and chill for 30 minutes.
- Slice into 1-inch pinwheels with a sharp knife.
Equipment for This Recipe:
- Cutting board
- Butter knife or offset spatula
- Plastic wrap or parchment
- Sharp serrated knife
- Mixing bowl
How to Serve This Dish: Arrange them cut-side up so the spirals show. They work well with grapes, baby carrots, or a handful of kettle chips, and they’re easy to portion by the half dozen.
Pro Tips for This Recipe:
- Pat the pickles dry or the tortillas slip.
- Use thin-sliced ham so the roll stays compact.
- Chill before slicing; warm cream cheese smears.
- A serrated knife cuts cleaner than a straight blade.
Variations on This Dish:
- Turkey Ranch Roll-Ups: Swap the ham for turkey and add a teaspoon of ranch seasoning.
- Spicy Pickle Version: Use hot pickles and a pinch of cayenne in the cream cheese.
- Veggie Lunchbox Roll: Replace the ham with roasted peppers and shredded carrots.
Common Mistakes to Avoid with This Dish:
- Don’t overfill the tortillas. That’s how the ends burst open.
- Don’t slice before chilling or the spiral falls apart.
- Don’t use thick pickle slices; they make the center slippery.
6. Caprese Skewers with Basil Oil
Intro: A skewered Caprese is a small thing, which is exactly why it works so well at a picnic. Cherry tomatoes, mozzarella, and basil stay separate long enough to keep their shape, then come together in one clean bite with the basil oil. It tastes like the best parts of a tomato sandwich, minus the mess.
Why It Works: Skewers solve the biggest Caprese problem, which is soggy stacking. The basil oil clings to the cheese and tomato without flooding the tray, and the balsamic glaze adds a sticky sweet edge. Because the ingredients are small and dry on the surface, they hold up better than a sliced salad.
Key Ingredients:
- 24 cherry tomatoes
- 24 mini mozzarella balls
- 24 small basil leaves
- 2 tablespoons olive oil
- 1 teaspoon lemon juice
- 1/4 teaspoon salt
- 2 tablespoons balsamic glaze
- 12 small skewers or toothpicks
Quick Steps:
- Whisk the olive oil, lemon juice, and salt.
- Thread tomato, basil, and mozzarella onto each skewer.
- Brush lightly with the basil oil.
- Drizzle with balsamic glaze just before serving.
- Chill in a single layer.
Equipment for This Recipe:
- Small bowl
- Skewers or toothpicks
- Pastry brush, optional
- Tray or platter
- Measuring spoons
How to Serve This Dish: Lay the skewers in one neat row and spoon any extra glaze over the tray, not the skewers. They’re excellent as a first bite before heavier salads or sliders.
Pro Tips for This Recipe:
- Dry the mozzarella after draining so the glaze sticks.
- Use basil leaves that are small enough to fold neatly.
- Add the glaze at the end or it can stain the cheese.
- If your tomatoes are huge, halve them instead of forcing the skewer.
Variations on This Dish:
- Peach Caprese: Replace half the tomatoes with peach chunks.
- Pesto Brush-On: Swap the basil oil for thinned pesto.
- Olive Bite: Add one pitted olive to each skewer for a briny twist.
Common Mistakes to Avoid with This Dish:
- Don’t make the skewers too far ahead if the tomatoes are very juicy.
- Don’t drown them in glaze; a little sticky drizzle is enough.
- Don’t use oversized skewers for tiny ingredients or the whole thing looks loose.
7. Dijon Potato Salad with Herbs
Intro: Potato salad gets pushed around a lot, but a mustardy version with fresh herbs is the one I keep making. It’s less heavy than the mayo-only kind and has actual flavor all the way through the bowl. The potatoes should taste warm, tangy, and a little earthy, with parsley and dill cutting through the starch.
Why It Works: Waxy potatoes hold their shape after boiling, so the salad stays spoonable instead of turning mashed. A vinaigrette-style dressing soaks in better while the potatoes are still slightly warm. That’s the moment they drink up the Dijon, vinegar, and olive oil.
Key Ingredients:
- 2 pounds baby Yukon Gold potatoes
- 1/4 cup olive oil
- 2 tablespoons Dijon mustard
- 2 tablespoons red wine vinegar
- 1/2 teaspoon salt
- 1/4 teaspoon black pepper
- 2 tablespoons chopped parsley
- 1 tablespoon chopped dill
- 2 scallions, sliced
Quick Steps:
- Boil the potatoes in salted water until tender, about 12 to 15 minutes.
- Drain and cut the warm potatoes in half.
- Whisk the olive oil, mustard, vinegar, salt, and pepper.
- Toss the potatoes with the dressing, herbs, and scallions.
- Chill for 30 minutes before packing.
Equipment for This Recipe:
- Large pot
- Colander
- Mixing bowl
- Whisk
- Sharp knife
How to Serve This Dish: Serve it beside grilled chicken, burgers, or cold ham. A final scatter of herbs on top makes it look fresher than it has any right to.
Pro Tips for This Recipe:
- Salt the cooking water so the potatoes season from the inside out.
- Dress them while warm, not hot, so they soak up flavor without breaking.
- Slice large potatoes after cooking; small ones can stay halved.
- Add a spoonful of mayo only if you want a creamier texture.
Variations on This Dish:
- Dill Pickle Potato Salad: Add 1/4 cup chopped pickles and 1 tablespoon brine.
- Bacon-Scallion Version: Fold in 4 strips crisp bacon.
- Sour Cream Herb Salad: Replace half the oil with sour cream for a richer bowl.
Common Mistakes to Avoid with This Dish:
- Don’t start with starchy potatoes; they fall apart fast.
- Don’t drown the salad in dressing. The potatoes should be glossy, not flooded.
- Don’t serve it piping hot. It tastes better after a short chill.
8. BBQ Pulled Pork Sliders
Intro: These are the kind of sliders people hover over without pretending not to. Soft buns, smoky pork, a little tang from coleslaw, and sauce that clings instead of running everywhere. They’re picnic food with a pulse.
Why It Works: Pork shoulder shreds well because it has enough fat to stay juicy after slow cooking. A little vinegar in the sauce keeps the meat from feeling sticky-sweet, and the slaw adds crunch so the bun doesn’t carry the whole job. Sliders also portion neatly, which is handy when everyone’s standing around with no real table.
Key Ingredients:
- 2 pounds cooked pulled pork
- 1 cup BBQ sauce
- 1 tablespoon apple cider vinegar
- 12 slider buns
- 2 cups coleslaw mix
- 1/3 cup mayonnaise
- 1 teaspoon sugar
- 1 teaspoon lemon juice
Quick Steps:
- Warm the pulled pork with BBQ sauce and vinegar over low heat.
- Mix the coleslaw mix, mayo, sugar, and lemon juice.
- Split the buns and toast lightly if you want extra structure.
- Fill each bun with pork and a spoonful of slaw.
- Wrap individually for easy packing.
Equipment for This Recipe:
- Skillet or saucepan
- Mixing bowl
- Spoon
- Knife
- Foil or parchment
How to Serve This Dish: Stack them on a tray and keep extra sauce on the side for the people who want a messier sandwich. They go well with chips, baked beans, or sliced pickles.
Pro Tips for This Recipe:
- Drain the pork a little before saucing if it’s very rich.
- Keep the slaw dry-ish; too much dressing makes the buns slide.
- Toast the cut sides of the buns for a minute or two.
- Pack sauce separately if the sliders will sit a while.
Variations on This Dish:
- Spicy Carolina Style: Add hot sauce and extra vinegar to the pork.
- Cheddar Melt Version: Add a slice of cheddar before the bun top.
- Chicken Slider Swap: Use shredded chicken if pork isn’t the plan.
Common Mistakes to Avoid with This Dish:
- Don’t soak the meat in sauce until it’s soupy.
- Don’t skip the slaw. The crunch matters.
- Don’t use dry buns; they crack as soon as you bite them.
9. Cold Sesame Noodle Salad
Intro: This is the picnic noodle bowl that never feels tired. Sesame, soy, rice vinegar, cucumbers, and scallions give the noodles a cold-savory shine that holds up for hours. It tastes even better after a short rest, which is a lovely thing when the evening is already busy.
Why It Works: Noodles pick up dressing fast, especially when they’re rinsed and drained well after cooking. Sesame oil adds perfume in a way olive oil just can’t, and cucumber brings the crunch that keeps the texture from going soft. A little sugar balances the vinegar so the bowl tastes rounded, not sharp.
Key Ingredients:
- 12 ounces spaghetti or soba noodles
- 3 tablespoons soy sauce
- 2 tablespoons rice vinegar
- 1 tablespoon sesame oil
- 1 tablespoon neutral oil
- 1 teaspoon sugar
- 1 cucumber, julienned
- 2 scallions, sliced
- 1 tablespoon sesame seeds
Quick Steps:
- Cook the noodles until al dente, then rinse under cold water.
- Whisk soy sauce, vinegar, sesame oil, neutral oil, and sugar.
- Toss the noodles with the dressing.
- Fold in cucumber and scallions.
- Top with sesame seeds and chill for 20 minutes.
Equipment for This Recipe:
- Large pot
- Colander
- Large bowl
- Whisk
- Tongs
How to Serve This Dish: Serve it in a shallow bowl so the noodles don’t clump. It pairs well with grilled chicken, tofu, or a few cold slices of melon on the side.
Pro Tips for This Recipe:
- Rinse the noodles well to stop the cooking.
- Toss with dressing while the noodles are still a little warm so they absorb flavor.
- Cut the cucumber thin so it blends into the bowl instead of dominating it.
- Add chili oil only at the table if people like heat.
Variations on This Dish:
- Peanut Version: Stir in 2 tablespoons peanut butter for a thicker sauce.
- Edamame Bowl: Add 1 cup shelled edamame for extra heft.
- Herb Finish: Add torn cilantro or mint right before serving.
Common Mistakes to Avoid with This Dish:
- Don’t leave noodles wet in the colander; they dilute the sauce.
- Don’t use too much sesame oil. It can take over fast.
- Don’t pack it hot. The cucumber goes limp and the dressing gets greasy.
10. Strawberry Spinach Salad with Poppy Seed Dressing
Intro: Strawberries and spinach belong together in a bowl when the fruit is sweet and the greens are dry. The poppy seed dressing gives the salad a little gloss without burying the berries, and toasted almonds bring the crunch that makes every forkful feel finished. This is one of those dishes that looks light but still disappears fast.
Why It Works: Baby spinach has a soft enough leaf to take dressing without bruising. Strawberries give acidity and sweetness in the same bite, which means the dressing can stay simple. The almonds matter because they keep the salad from collapsing into one soft texture.
Key Ingredients:
- 6 cups baby spinach
- 2 cups sliced strawberries
- 1/4 cup sliced almonds, toasted
- 2 tablespoons crumbled goat cheese
- 1 tablespoon poppy seeds
- 2 tablespoons olive oil
- 1 tablespoon apple cider vinegar
- 1 tablespoon honey
- 1/4 teaspoon salt
Quick Steps:
- Whisk olive oil, vinegar, honey, salt, and poppy seeds.
- Toast the almonds in a dry pan for 2 to 3 minutes.
- Toss spinach with just enough dressing to coat.
- Add strawberries, almonds, and goat cheese.
- Serve right away or pack dressing separately.
Equipment for This Recipe:
- Large salad bowl
- Small whisk
- Skillet
- Salad tongs
- Knife
How to Serve This Dish: Pile it on a wide platter if you want the berries to show. It fits nicely beside grilled chicken, quiche, or a slice of crusty bread.
Pro Tips for This Recipe:
- Dry the spinach well or the dressing slides off.
- Slice berries thick enough that they don’t melt in the bowl.
- Add goat cheese last so it stays in soft crumbles.
- Toast the almonds until you smell them, not until they burn.
Variations on This Dish:
- Blueberry Swap: Use blueberries when strawberries aren’t at their best.
- Feta Version: Replace goat cheese with feta for a saltier bite.
- Pecan Crunch: Swap almonds for toasted pecans.
Common Mistakes to Avoid with This Dish:
- Don’t dress the whole salad too early. Spinach wilts fast.
- Don’t use underripe strawberries; the salad tastes thin and sour.
- Don’t skip the nuts. Without them, the bowl feels soft and unfinished.
11. Greek Orzo Salad
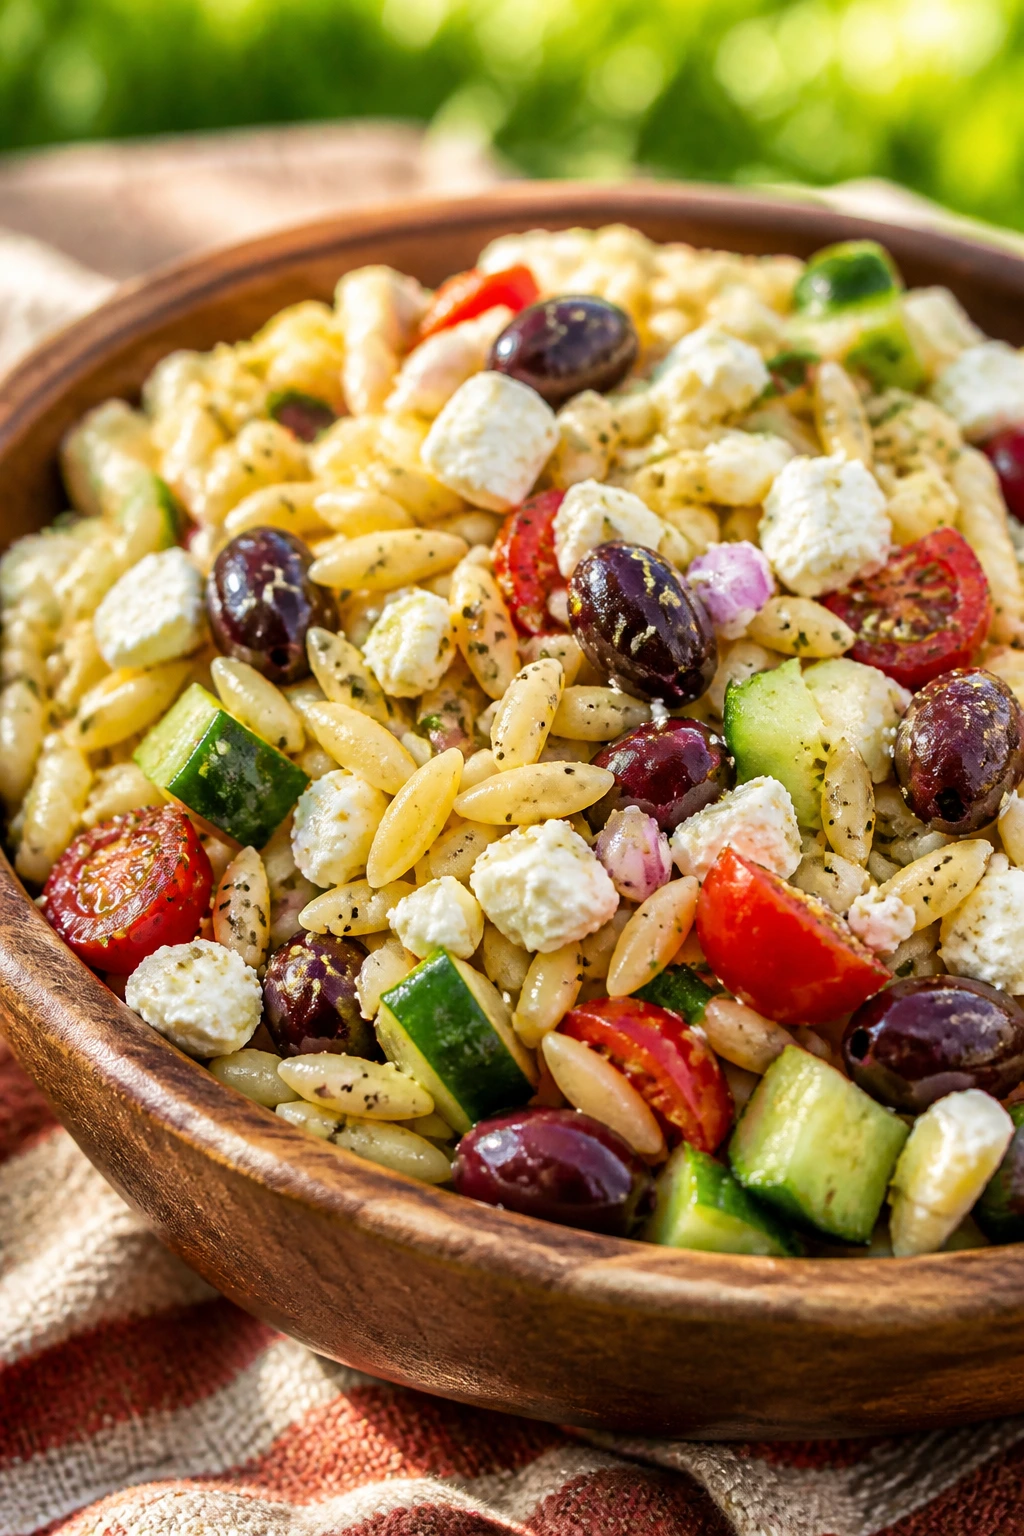
Intro: Orzo is tiny enough to feel casual, but it takes on Mediterranean flavors with almost no effort. Cucumber, tomato, olives, feta, and oregano turn it into a bowl that tastes clean and salty in the best way. I like this one because it’s sturdy enough for a picnic and still bright enough to eat standing up.
Why It Works: Orzo traps dressing in its small shape, so every spoonful carries flavor. The brine from feta and olives keeps the salad from being bland after chilling. A little red wine vinegar sharpens the olive oil and makes the tomatoes taste like tomatoes, which sounds obvious until you taste a salad that forgot to do it.
Key Ingredients:
- 12 ounces orzo
- 1 cup cherry tomatoes, halved
- 1 cucumber, diced
- 1/2 cup kalamata olives, sliced
- 1/2 cup crumbled feta
- 3 tablespoons olive oil
- 2 tablespoons red wine vinegar
- 1 teaspoon dried oregano
- 1/2 teaspoon salt
Quick Steps:
- Cook the orzo until al dente, then drain and cool.
- Whisk olive oil, vinegar, oregano, and salt.
- Toss the orzo with the dressing.
- Fold in tomatoes, cucumber, olives, and feta.
- Chill for 30 minutes before serving.
Equipment for This Recipe:
- Pot
- Colander
- Large bowl
- Whisk
- Cutting board
How to Serve This Dish: Spoon it into a shallow container so the feta stays visible on top. It’s strong enough to sit next to grilled fish, chicken skewers, or a handful of stuffed grape leaves.
Pro Tips for This Recipe:
- Cool the orzo before adding feta so it doesn’t turn soft.
- Seed the cucumber a little if it’s especially watery.
- Taste after chilling; a pinch more salt often helps.
- Use good olives. Cheap, flat olives make the whole bowl flatter.
Variations on This Dish:
- Pepperoncini Punch: Add sliced pepperoncini for extra tang.
- Chicken Orzo Bowl: Fold in chopped leftover chicken for a fuller meal.
- Dairy-Free Version: Skip the feta and add more olives and herbs.
Common Mistakes to Avoid with This Dish:
- Don’t overcook the orzo. Soft pasta turns gummy when chilled.
- Don’t add the tomatoes while the pasta is hot if they’re very ripe.
- Don’t underseason. Orzo drinks salt.
12. Hummus Veggie Wraps
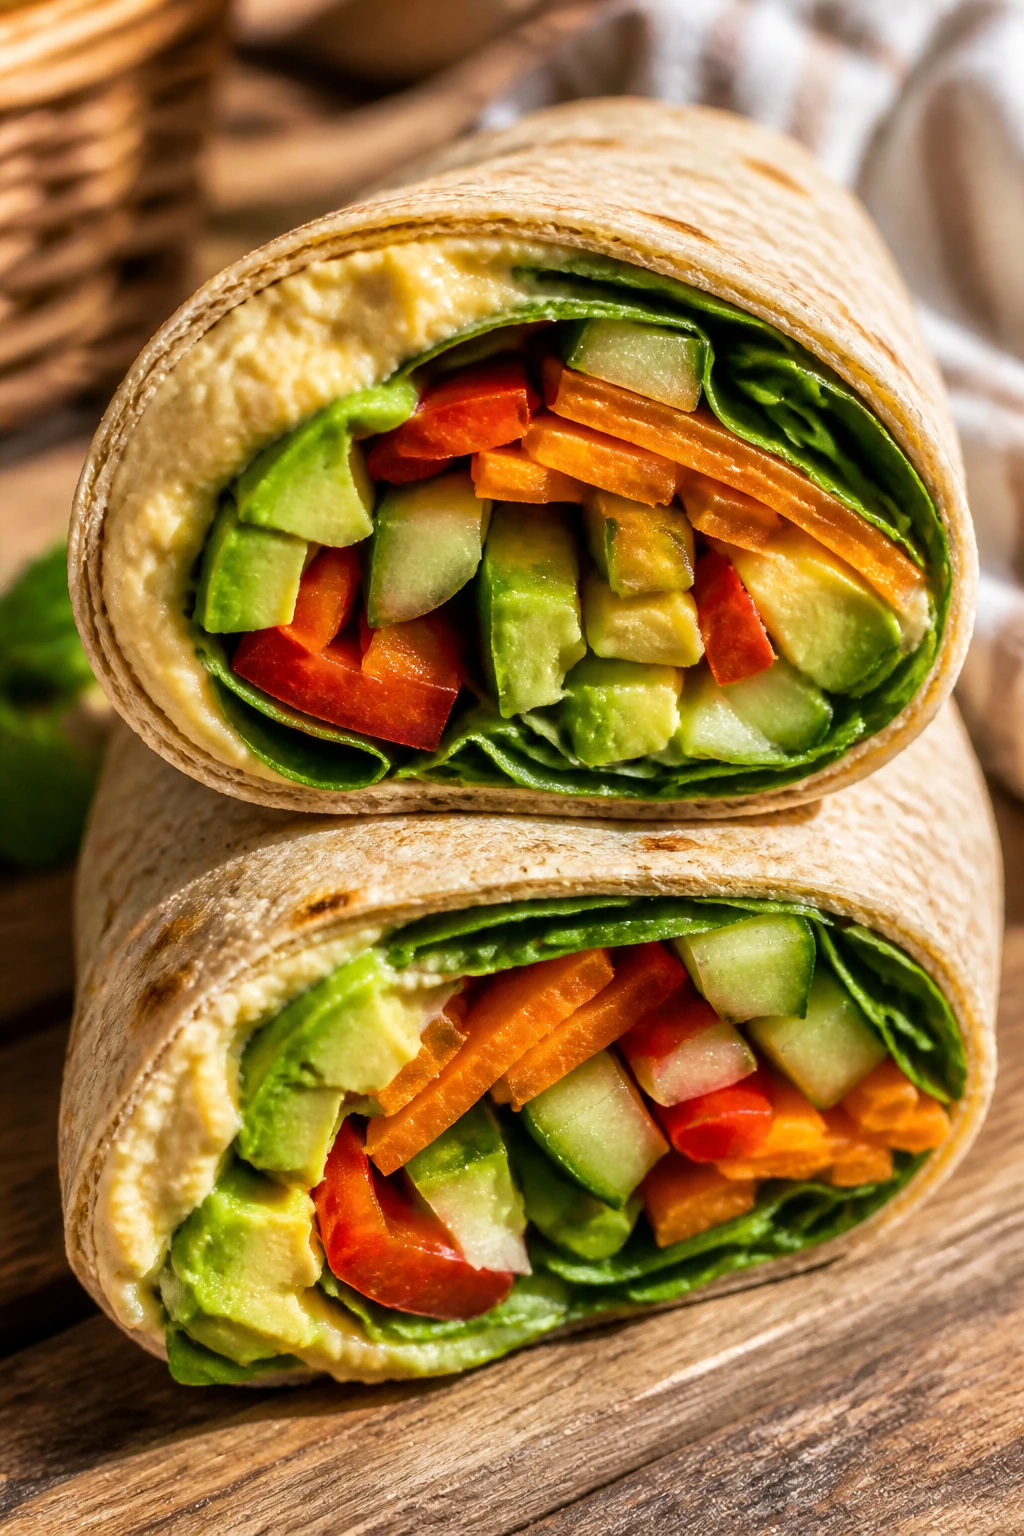
Intro: These are the wrap I make when I want something fresh without assembling a small circus. Hummus gives the bread a creamy base, and the vegetables keep the bite crisp so the whole thing still feels alive after a few hours in the cooler. A good wrap should bend, not split. That’s the target.
Why It Works: Hummus acts like both spread and glue, which is why the filling stays in place. Thin-cut vegetables are easier to roll and less likely to tear the tortilla. Roasted peppers add a sweet note that balances the raw crunch of cucumber and carrot.
Key Ingredients:
- 4 large flour tortillas
- 1 cup hummus
- 1 carrot, julienned
- 1 cucumber, thinly sliced
- 1 red bell pepper, sliced
- 1 cup baby spinach
- 1/2 avocado, sliced
- 1 tablespoon lemon juice
- Pinch of salt
Quick Steps:
- Warm the tortillas for 10 to 15 seconds so they bend easily.
- Spread hummus across each tortilla.
- Layer vegetables in the center and drizzle with lemon juice.
- Roll tightly, tucking the sides in as you go.
- Wrap and chill before slicing.
Equipment for This Recipe:
- Cutting board
- Sharp knife
- Small bowl
- Clean towel or wrap
- Measuring cup
How to Serve This Dish: Slice into halves or pinwheels and serve with extra hummus on the side. A few olives and cherry tomatoes make the plate look complete.
Pro Tips for This Recipe:
- Pat the vegetables dry so the tortilla doesn’t get soggy.
- Don’t overload the center; a little restraint makes a cleaner roll.
- If the avocado is ripe, use it the same day.
- Wrap tightly in parchment to keep the seams closed.
Variations on This Dish:
- Mediterranean Wrap: Add feta and chopped olives.
- Green Goddess Style: Spread herb dip in place of hummus.
- Protein Boost: Add sliced grilled chicken or chickpeas.
Common Mistakes to Avoid with This Dish:
- Don’t use cold, stiff tortillas; they crack on the first roll.
- Don’t pile the filling too high or the wrap bursts open.
- Don’t pack wet tomatoes unless they’re seeded first.
13. Cornbread Muffins with Honey Butter
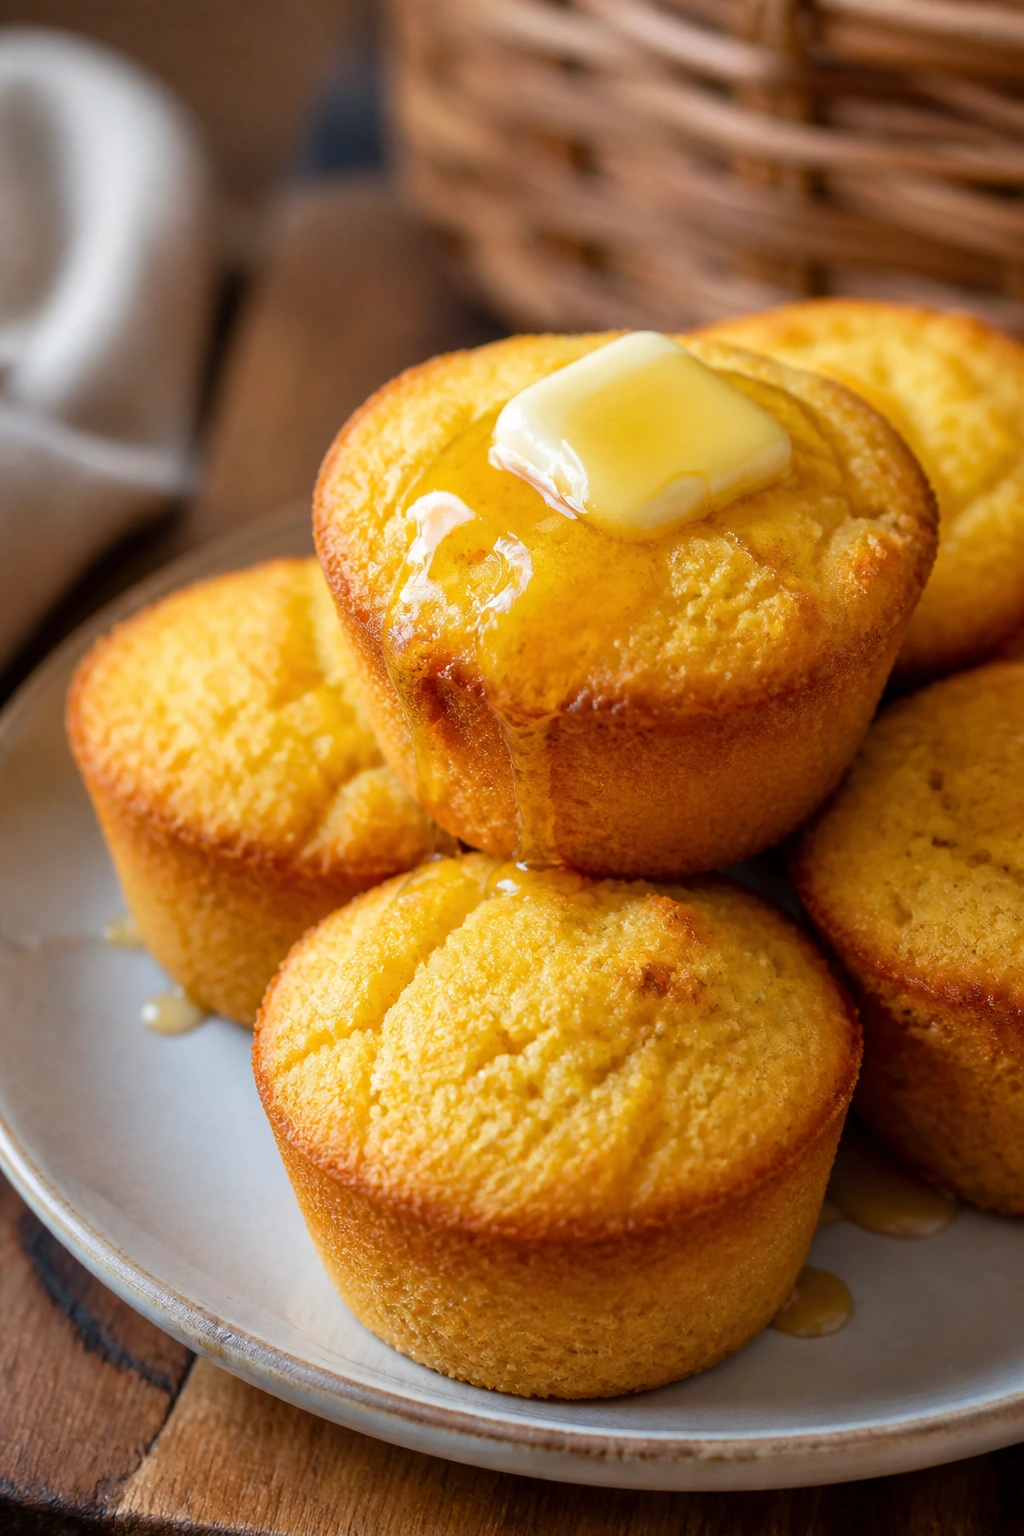
Intro: Cornbread muffins are the kind of side that vanish when nobody is paying attention. They’re a little sweet, a little savory, and sturdy enough to sit next to barbecue, salad, or a pile of sliced peaches. The honey butter on top is not optional in my book. That’s the good part.
Why It Works: Muffins are easier to pack than a big pan of cornbread, and the craggy tops catch butter better. A touch of honey softens the crumb without making the muffins cake-like. Bake them until the edges are golden; pale cornbread tastes flat.
Key Ingredients:
- 1 cup yellow cornmeal
- 1 cup all-purpose flour
- 1/4 cup sugar
- 1 tablespoon baking powder
- 1/2 teaspoon salt
- 1 cup milk
- 1/3 cup melted butter
- 1 large egg
- 2 tablespoons honey
- 4 tablespoons softened butter, for topping
Quick Steps:
- Heat the oven to 400°F and grease a 12-cup muffin tin.
- Whisk the dry ingredients in one bowl and the wet ingredients in another.
- Stir the wet into the dry until just combined.
- Divide into the muffin cups and bake 15 to 18 minutes.
- Mix honey into softened butter and serve with warm muffins.
Equipment for This Recipe:
- Muffin tin
- Two bowls
- Whisk
- Spoon or scoop
- Cooling rack
How to Serve This Dish: Split warm muffins and spread them with honey butter. They’re especially good with barbecue pork, grilled chicken, or sliced tomatoes with salt.
Pro Tips for This Recipe:
- Don’t overmix or the muffins get tough.
- Pull them when a toothpick comes out with a few crumbs, not wet batter.
- Brush the tops with melted butter after baking for extra shine.
- If you like more grain, swap in coarse cornmeal for half the fine cornmeal.
Variations on This Dish:
- Jalapeño Cheddar Muffins: Add diced jalapeño and 3/4 cup shredded cheddar.
- Maple Version: Replace honey with maple syrup.
- Gluten-Free Batch: Use a 1:1 gluten-free flour blend.
Common Mistakes to Avoid with This Dish:
- Don’t bake at too low a temperature or the tops stay pale.
- Don’t leave muffins in the tin too long; steam softens the bottoms.
- Don’t skip greasing the pan well if you want clean release.
14. Tuna Niçoise Mason Jar Salad
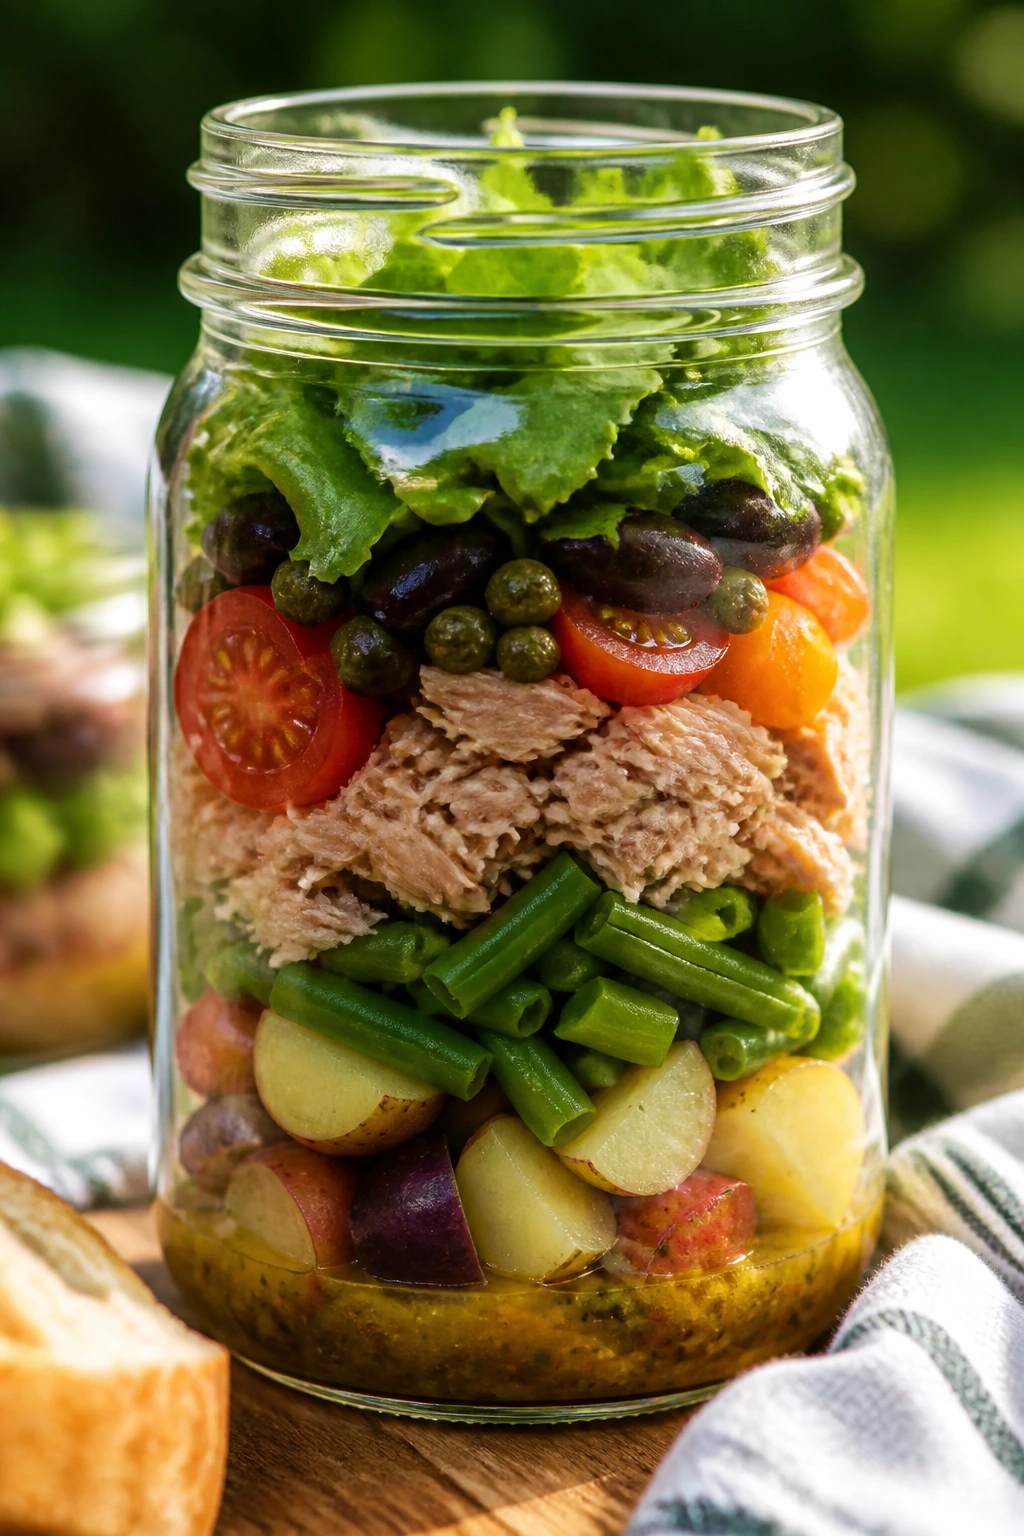
Intro: Mason jar salads can be gimmicky, but a well-built Niçoise jar earns its place. The layers keep the greens dry, the tuna anchored, and the dressing where it belongs until you shake the whole thing into a bowl. It’s a tidy picnic lunch that still feels grown-up.
Why It Works: The dressing at the bottom and greens at the top create a built-in barrier against sogginess. Potatoes, beans, eggs, and tuna give you enough protein and heft that this doesn’t feel like a side dish pretending to be lunch. The olives and capers are sharp enough to keep every layer awake.
Key Ingredients:
- 1/4 cup vinaigrette
- 1 cup cooked baby potatoes, halved
- 1 cup blanched green beans
- 1 can tuna, drained
- 2 hard-boiled eggs, halved
- 1 cup cherry tomatoes
- 1/4 cup olives
- 2 cups mixed greens
- 2 tablespoons capers
Quick Steps:
- Spoon vinaigrette into the bottom of each jar.
- Layer potatoes, green beans, tuna, tomatoes, olives, and capers.
- Place eggs near the top, then add greens last.
- Seal and chill.
- Shake into a bowl when ready to eat.
Equipment for This Recipe:
- Wide-mouth mason jars
- Small saucepan
- Knife
- Cutting board
- Tongs
How to Serve This Dish: Dump the jar into a bowl or eat straight from the jar if you’re in a hurry. Crackers or a piece of crusty bread make it feel less like prep work and more like lunch.
Pro Tips for This Recipe:
- Cool the potatoes before layering or they soften the greens.
- Use oil-packed tuna if you want a richer jar.
- Keep the greens at the top every time.
- Don’t overfill the jar; shaking space matters.
Variations on This Dish:
- Salmon Niçoise: Swap tuna for cooked salmon.
- Vegetarian Jar: Replace tuna with chickpeas and extra potatoes.
- Creamy Dressing: Use a mustardy yogurt dressing instead of vinaigrette.
Common Mistakes to Avoid with This Dish:
- Don’t put greens near the dressing.
- Don’t use a narrow jar; layering gets messy.
- Don’t forget to drain the tuna well or the jar tastes fishy and loose.
15. BLT Pasta Salad
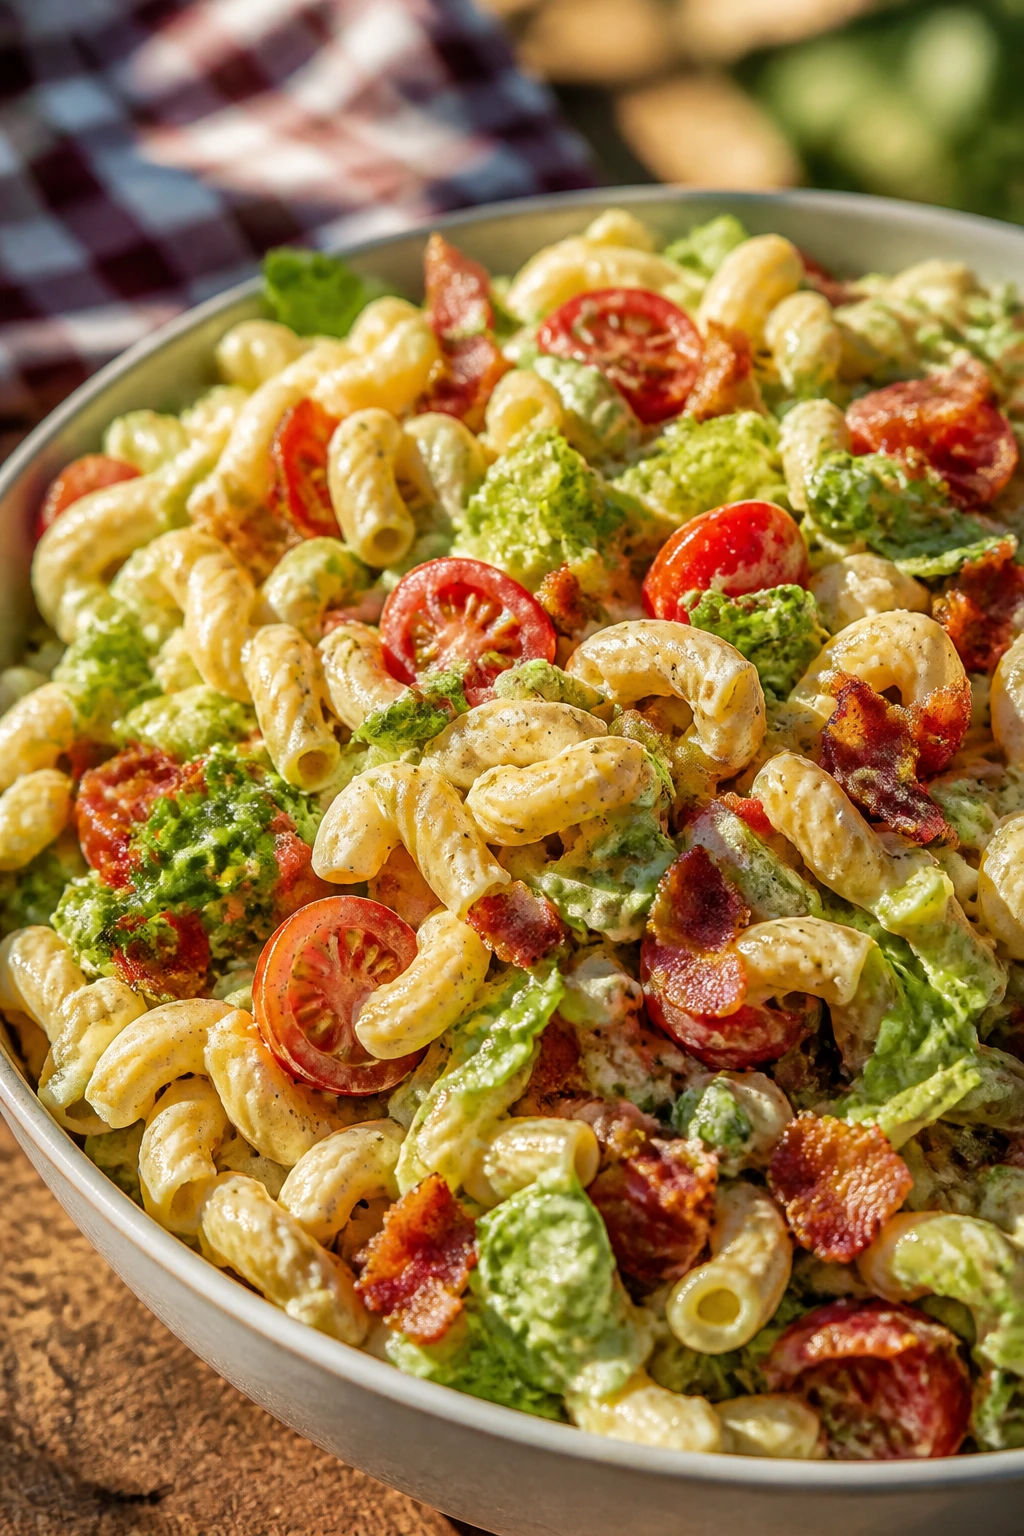
Intro: BLT pasta salad tastes like a diner sandwich that learned how to behave at a picnic. Bacon, lettuce, tomato, and a creamy dressing all show up, but the pasta turns it into something spoonable and easy to pack. I like this one chilled, with the bacon added at the end so it keeps its crunch.
Why It Works: Pasta gives the salad enough body to carry the creamy dressing. Bacon brings salt and smoke, which are doing a lot of work here, and the lettuce goes in late so it stays crisp. Cherry tomatoes are better than big sliced ones because they leak less.
Key Ingredients:
- 12 ounces rotini
- 6 slices bacon, cooked and crumbled
- 1 1/2 cups cherry tomatoes, halved
- 2 cups chopped romaine
- 1/2 cup mayonnaise
- 2 tablespoons sour cream
- 1 tablespoon lemon juice
- 1/2 teaspoon salt
- 1/4 teaspoon black pepper
Quick Steps:
- Cook and cool the pasta.
- Stir mayonnaise, sour cream, lemon juice, salt, and pepper.
- Toss the pasta with the dressing.
- Fold in tomatoes and bacon.
- Add romaine just before serving.
Equipment for This Recipe:
- Pot
- Skillet
- Large bowl
- Colander
- Spoon
How to Serve This Dish: Serve it in a wide bowl so the bacon and tomatoes stay visible. A few extra bacon crumbles on top never hurt anyone.
Pro Tips for This Recipe:
- Let the pasta cool so the dressing stays creamy.
- Add lettuce at the last minute to keep it crisp.
- Save a little bacon for the top.
- If the salad sits overnight, revive it with a squeeze of lemon.
Variations on This Dish:
- Turkey BLT Pasta: Use turkey bacon or chopped deli turkey.
- Avocado Version: Add diced avocado right before serving.
- Dill Dressing Swap: Use dill yogurt dressing instead of mayo.
Common Mistakes to Avoid with This Dish:
- Don’t add the lettuce too early or it collapses.
- Don’t use soggy bacon. It needs to stay crisp.
- Don’t overdo the dressing; the salad should look coated, not wet.
16. Peach, Prosciutto, and Arugula Flatbread

Intro: Sweet peaches and salty prosciutto are one of those combinations that seems too simple until you taste it. On a thin flatbread, they turn into picnic food with a little swagger. Arugula brings a peppery bite that keeps the peaches from taking over.
Why It Works: Flatbread travels better than a saucy pizza because it stays firm and slices neatly. The peaches soften just enough in the oven to release their juice, while the prosciutto stays salty and a little crisp at the edges. Arugula added after baking keeps the whole thing from feeling heavy.
Key Ingredients:
- 1 pound pizza dough or store-bought flatbread
- 2 peaches, sliced
- 4 ounces prosciutto
- 1 cup shredded mozzarella
- 1 cup arugula
- 1 tablespoon olive oil
- 1 tablespoon balsamic glaze
- Pinch of salt
Quick Steps:
- Heat the oven to 450°F and stretch the dough on a sheet pan.
- Brush with olive oil and sprinkle with mozzarella.
- Arrange peaches and prosciutto on top.
- Bake 10 to 12 minutes until the edges are golden.
- Top with arugula, balsamic glaze, and a pinch of salt.
Equipment for This Recipe:
- Sheet pan
- Oven
- Knife
- Cutting board
- Pizza cutter, optional
How to Serve This Dish: Slice into strips or squares for easy handheld bites. It tastes best warm or room temperature, which makes it perfect for a late picnic supper.
Pro Tips for This Recipe:
- Choose peaches that are ripe but still firm.
- Don’t overload the flatbread or the center gets soggy.
- Add arugula after baking so it stays fresh.
- Let it rest 2 minutes before slicing so the cheese settles.
Variations on This Dish:
- Fig and Prosciutto Swap: Replace peaches with sliced figs.
- Goat Cheese Version: Use goat cheese instead of mozzarella.
- Tomato Summer Flatbread: Swap peaches for thin tomato slices.
Common Mistakes to Avoid with This Dish:
- Don’t bake on a cold pan if you want a crisp bottom.
- Don’t add the arugula before the oven.
- Don’t slice too soon or the toppings slide around.
17. Lemon Bars with Shortbread Crust
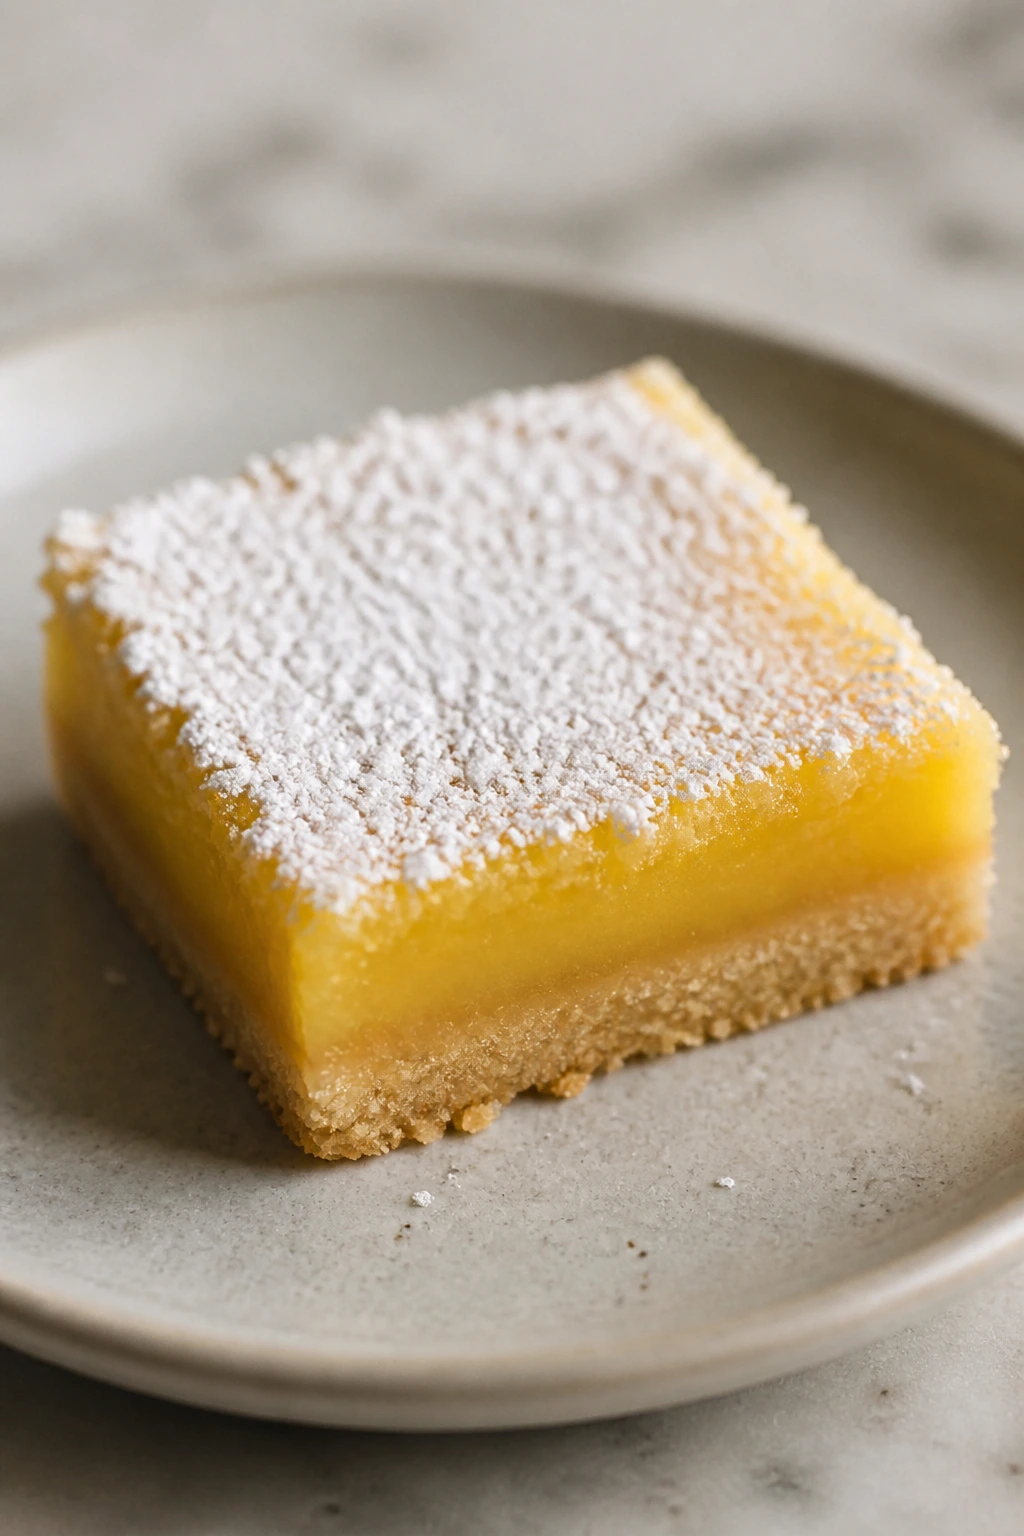
Intro: Lemon bars are the dessert I reach for when I want something sharp enough to wake people up after a rich picnic meal. The crust should be sandy and buttery, the filling bright and set, with enough powdered sugar on top to look finished without turning messy. They cut clean if you chill them well. That’s the whole game.
Why It Works: Shortbread gives the bars a stable base, and the lemon filling sets firmly when baked at the right temperature. A little extra zest makes the bars smell louder than straight juice alone. Chilling before slicing gives you the neat edges people always hope for.
Key Ingredients:
- 1 cup all-purpose flour
- 1/2 cup butter, softened
- 1/4 cup powdered sugar
- 2 large eggs
- 3/4 cup sugar
- 1/3 cup lemon juice
- 1 tablespoon lemon zest
- 2 tablespoons flour
- Extra powdered sugar for dusting
Quick Steps:
- Bake the shortbread crust at 350°F for 18 to 20 minutes.
- Whisk the eggs, sugar, lemon juice, zest, and flour.
- Pour over the hot crust.
- Bake 18 to 22 minutes until set at the center.
- Cool fully, chill, and dust with powdered sugar.
Equipment for This Recipe:
- 8-inch square pan
- Mixing bowls
- Whisk
- Zester
- Parchment paper
How to Serve This Dish: Cut into small squares and pack between parchment layers. A few berries on the side keep the plate from looking too one-note.
Pro Tips for This Recipe:
- Line the pan with parchment for easy lifting.
- Strain the filling if you want a smoother top.
- Chill before cutting or the bars slump.
- Dust with sugar right before serving so it doesn’t melt.
Variations on This Dish:
- Lime Bars: Swap lime juice and zest for a sharper green citrus note.
- Berry Lemon Bars: Scatter a handful of raspberries over the crust before baking.
- Graham Cracker Crust: Use crumbs for a deeper, sweeter base.
Common Mistakes to Avoid with This Dish:
- Don’t underbake the filling. It should jiggle slightly, not slosh.
- Don’t cut while warm unless you want a sticky mess.
- Don’t add the powdered sugar too early if the bars are going into a warm cooler.
18. Brown Butter Rice Krispie Treats
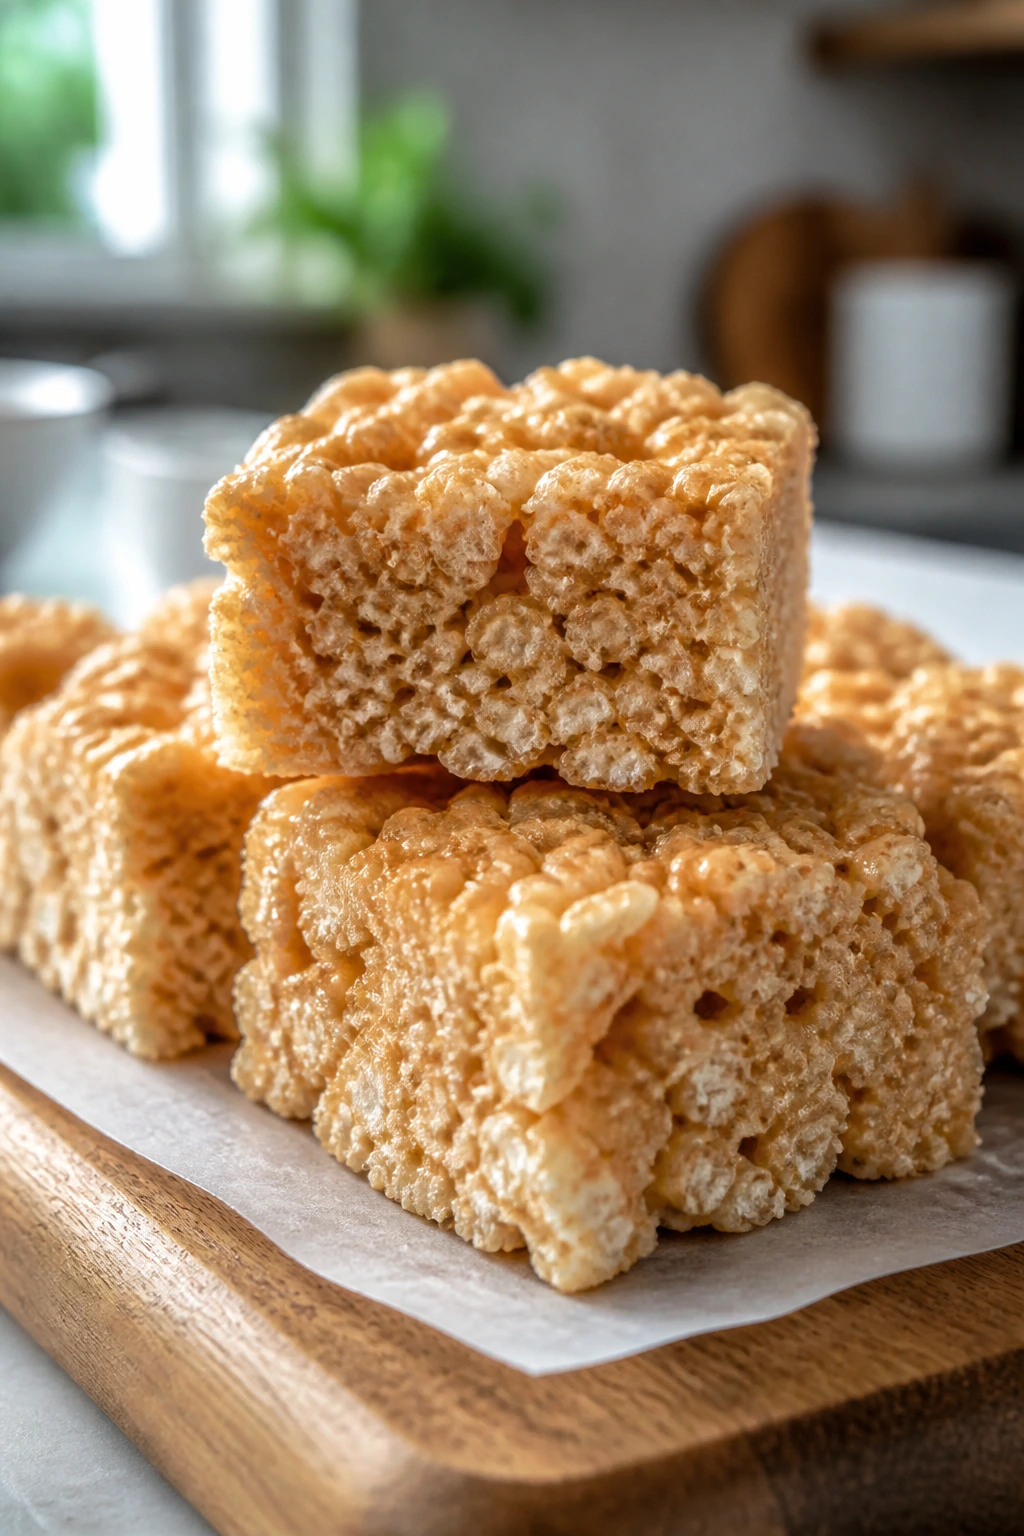
Intro: Regular Rice Krispie treats are fine. Brown butter Rice Krispie treats are the version that makes people stop mid-conversation. The browned butter adds a nutty smell that turns a childhood snack into something more grown-up without making it fussy. They also travel like champs, which is not nothing.
Why It Works: Browning the butter adds depth without changing the texture of the bars. Marshmallows bind the cereal into a chewy square, and a pinch of salt keeps the sweetness from getting muddy. Pressing them into the pan gently preserves the air pockets, which is what keeps them soft.
Key Ingredients:
- 6 tablespoons butter
- 10 ounces mini marshmallows
- 1/4 teaspoon salt
- 6 cups crispy rice cereal
- 1 teaspoon vanilla extract
Quick Steps:
- Brown the butter in a large pot until nutty and golden.
- Stir in the marshmallows and salt until melted.
- Remove from heat and add vanilla.
- Fold in the cereal.
- Press into a greased pan and cool before slicing.
Equipment for This Recipe:
- Large pot
- Spatula
- 9×13-inch pan
- Measuring cups
- Parchment
How to Serve This Dish: Cut into tidy squares and stack them in a container with parchment between layers. They’re good beside fruit, cookies, or the last handful of chips.
Pro Tips for This Recipe:
- Don’t brown the butter too far; dark brown tastes bitter.
- Grease the spatula and your hands before pressing the mix into the pan.
- Fold, don’t crush, the cereal.
- A tiny extra pinch of salt helps a lot.
Variations on This Dish:
- Chocolate Drizzle: Drizzle melted chocolate over the cooled bars.
- Peanut Butter Swirl: Stir in 1/4 cup peanut butter with the marshmallows.
- Sprinkle Top: Add rainbow sprinkles for a kid-friendlier look.
Common Mistakes to Avoid with This Dish:
- Don’t pack the mixture too hard or the bars turn dense.
- Don’t cook the marshmallows on high heat.
- Don’t slice before fully cooled unless you like sticky edges.
19. No-Bake Cheesecake Jars
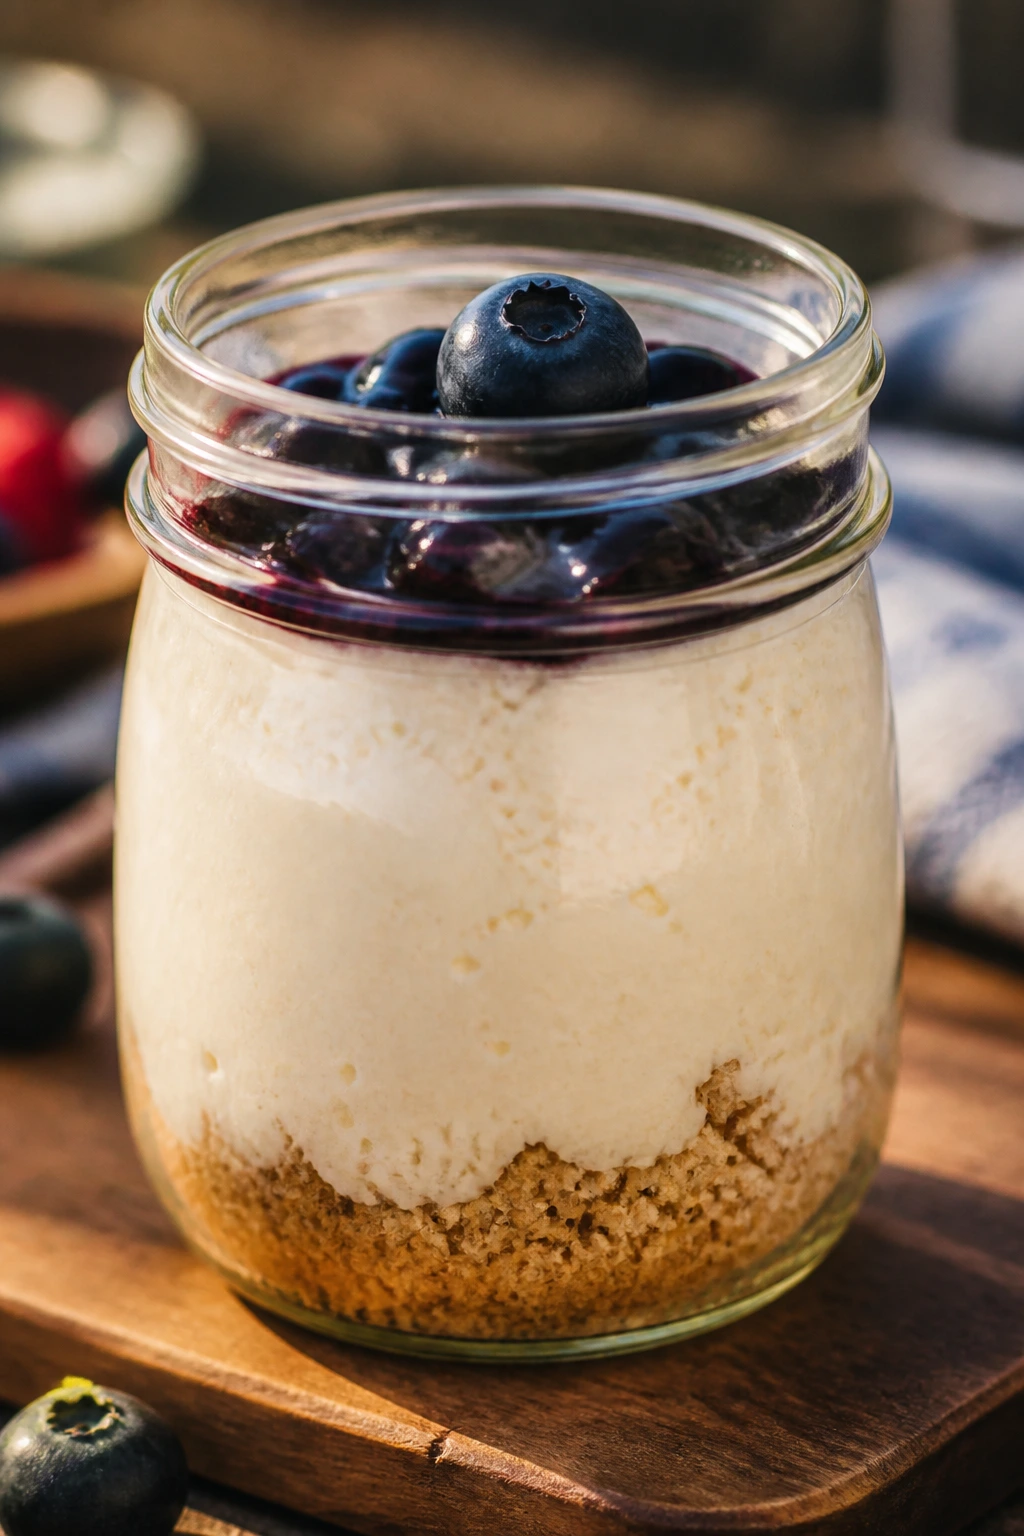
Intro: These jars are neat, cold, and a little indulgent without requiring an oven. Crumbled cookies at the bottom, tangy cream cheese filling in the middle, fruit on top. It’s dessert with good manners. And the jar lids make transport painless, which is a bigger deal than people admit.
Why It Works: The jar keeps the crust from absorbing moisture too fast. Cream cheese, whipped cream, and a touch of lemon give the filling enough lift to feel light, not dense. Fruit on top adds freshness and a clean finish after rich picnic food.
Key Ingredients:
- 8 ounces cream cheese, softened
- 1/2 cup powdered sugar
- 1 teaspoon vanilla extract
- 1 cup whipped cream
- 1 cup crushed graham crackers
- 3 tablespoons melted butter
- 1 cup berries
Quick Steps:
- Mix graham crackers with melted butter and press into jars.
- Beat cream cheese, powdered sugar, and vanilla until smooth.
- Fold in whipped cream.
- Spoon filling over the crust.
- Top with berries and chill.
Equipment for This Recipe:
- Mason jars or small cups
- Mixing bowl
- Hand mixer
- Spoon
- Measuring cups
How to Serve This Dish: Serve straight from the jar with a small spoon. If you want to dress them up, add a mint leaf or a crumble of extra cookie on top.
Pro Tips for This Recipe:
- Soften the cream cheese fully or the filling stays lumpy.
- Don’t overwhip the cream or it turns grainy.
- Add fruit close to serving time if it’s very juicy.
- Use wide jars for easier layering.
Variations on This Dish:
- Chocolate Crust Jars: Use chocolate cookies instead of grahams.
- Lemon Cheesecake Jars: Add extra zest and swap berries for blueberries.
- Peach Version: Use diced peaches and a touch of cinnamon.
Common Mistakes to Avoid with This Dish:
- Don’t use cold cream cheese from the fridge.
- Don’t soak the crust with too much butter.
- Don’t overfill the jars or the lids smear the top.
20. Fresh Fruit Salad with Lime-Honey Syrup
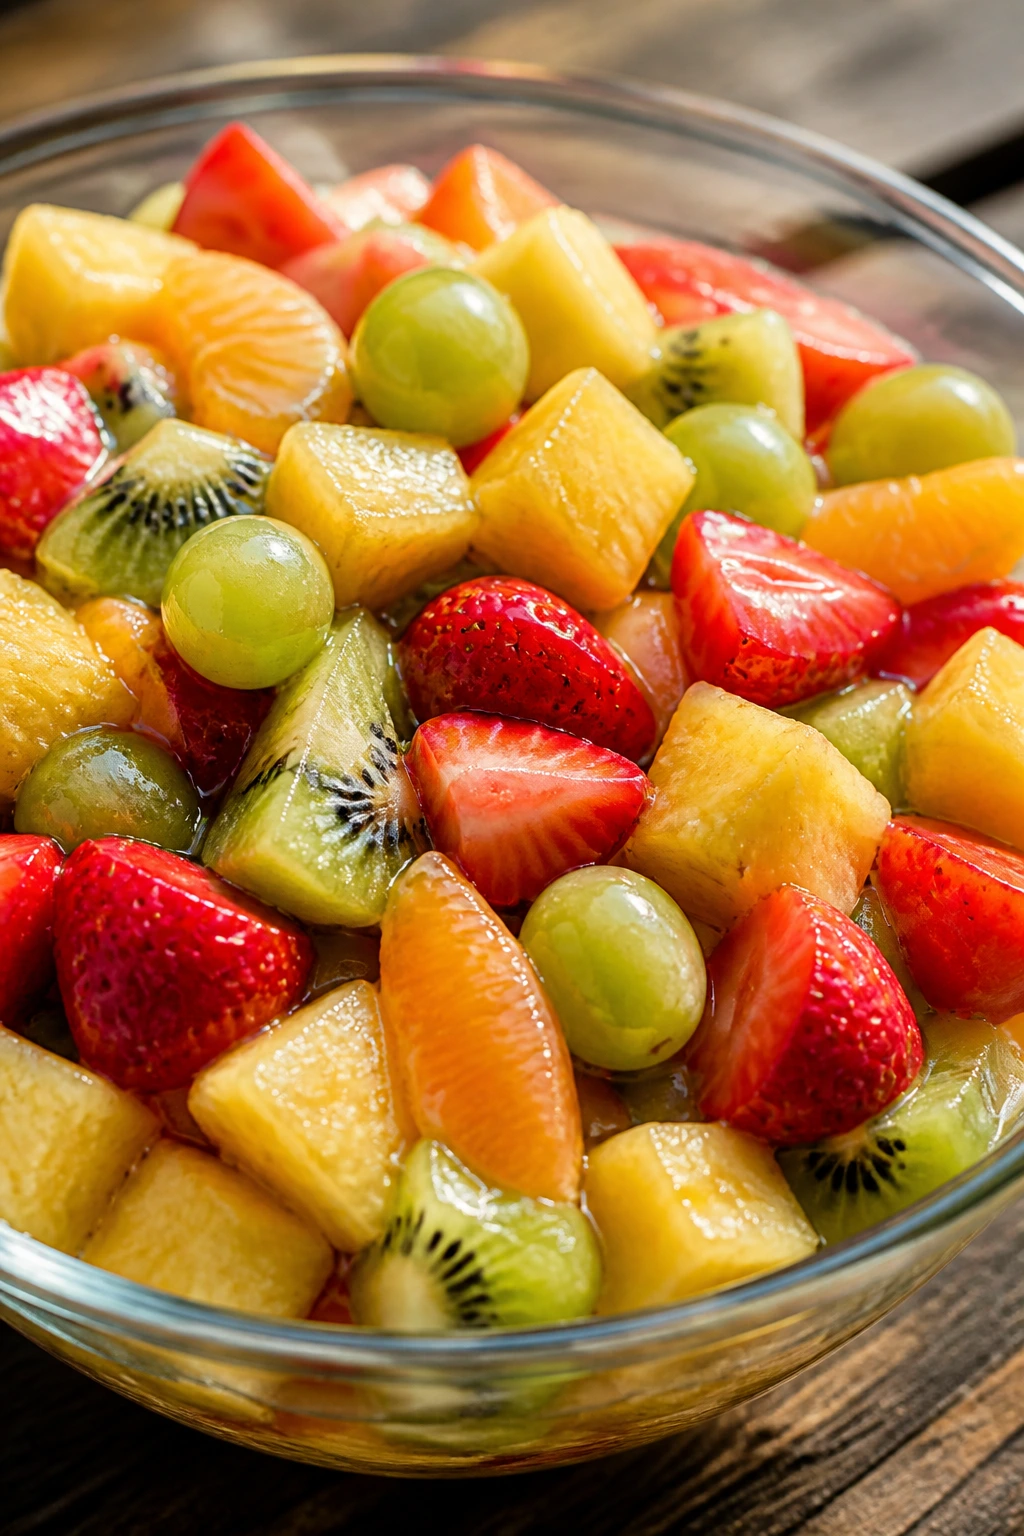
Intro: Good fruit salad is not an accident. It needs balance, shape, and a dressing that helps without turning the bowl into syrup. Lime and honey give this version a bright edge, and the trick is to cut everything into pieces that feel roughly the same size. That sounds fussy until you bite into it.
Why It Works: A little acid keeps fruit flavors from collapsing into one sweet note. Firm fruits like pineapple and grapes hold up well, while softer berries go in gently so they don’t break apart. The syrup clings lightly instead of flooding the bowl if you toss it just before serving.
Key Ingredients:
- 2 cups strawberries, halved
- 2 cups pineapple chunks
- 1 cup seedless grapes, halved
- 2 kiwis, sliced
- 1 orange, segmented
- 1 tablespoon lime juice
- 1 teaspoon lime zest
- 1 tablespoon honey
- 6 mint leaves
Quick Steps:
- Whisk lime juice, zest, and honey.
- Combine the fruit in a large bowl.
- Drizzle with the lime-honey syrup.
- Add torn mint and toss gently.
- Chill briefly or serve right away.
Equipment for This Recipe:
- Large bowl
- Small whisk
- Sharp knife
- Citrus zester
- Cutting board
How to Serve This Dish: Spoon it into a chilled bowl and keep a slotted spoon nearby if the fruit gets juicy. It’s a clean finish after savory sandwiches or barbecue.
Pro Tips for This Recipe:
- Cut fruit to similar sizes so every bite feels balanced.
- Add bananas only at the last second if you want them.
- Chill the fruit before mixing for a colder finish.
- Use mint sparingly; too much makes the bowl taste like gum.
Variations on This Dish:
- Berry-Lime Bowl: Use blueberries and raspberries instead of kiwi and orange.
- Watermelon Edition: Add watermelon cubes and a pinch of flaky salt.
- Coconut Sprinkle: Top with toasted coconut for texture.
Common Mistakes to Avoid with This Dish:
- Don’t cut everything too far ahead if the fruit bruises easily.
- Don’t drown the salad in syrup.
- Don’t use fruit of wildly different ripeness or the texture gets uneven.
21. Smashed Cucumber Salad with Sesame
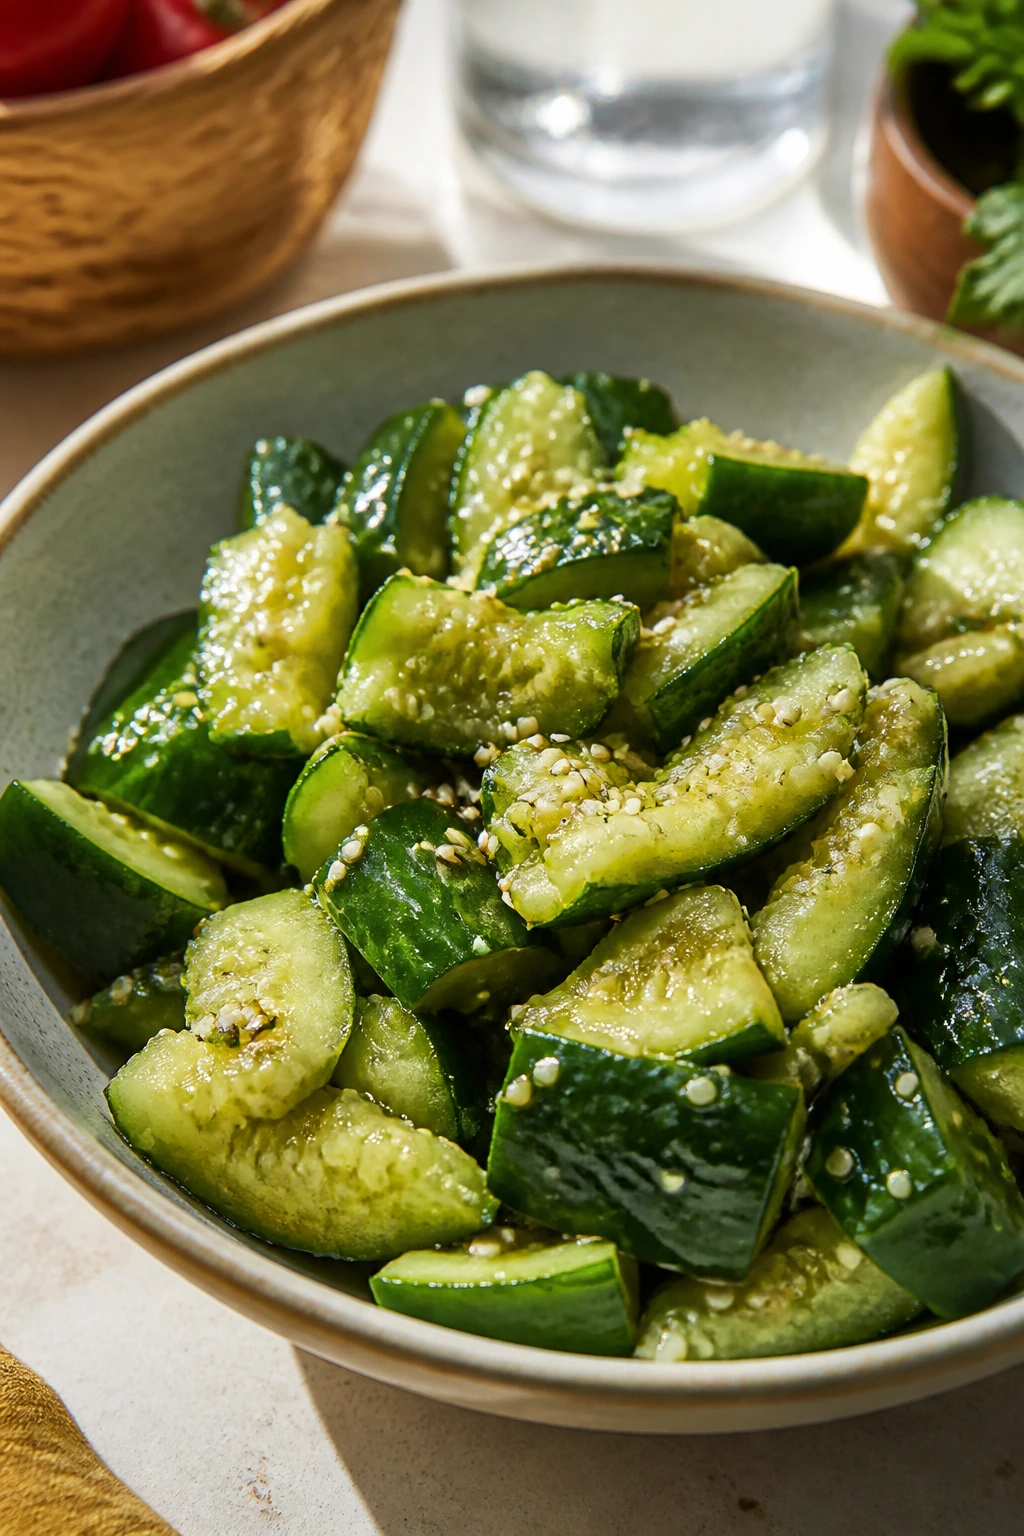
Intro: Cucumbers are at their best when they’re cold, crunchy, and a little salty. Smashing them gives the dressing more rough edges to cling to, which is why this salad tastes louder than plain sliced cucumber ever could. Sesame oil, rice vinegar, and chili flakes keep it sharp.
Why It Works: Smashing opens up the cucumber flesh and creates ridges. That means more surface area for dressing, and more crunch in the end. A short salt rest pulls out some water, which keeps the salad from becoming a puddle in the bottom of the bowl.
Key Ingredients:
- 2 large cucumbers
- 1 teaspoon salt
- 1 tablespoon rice vinegar
- 1 tablespoon soy sauce
- 1 teaspoon sesame oil
- 1 teaspoon sugar
- 1 teaspoon sesame seeds
- Pinch of chili flakes
Quick Steps:
- Smash the cucumbers with the flat side of a knife.
- Cut into bite-size pieces and salt for 10 minutes.
- Whisk vinegar, soy sauce, sesame oil, and sugar.
- Drain the cucumbers and toss with dressing.
- Finish with sesame seeds and chili flakes.
Equipment for This Recipe:
- Cutting board
- Chef’s knife
- Colander
- Mixing bowl
- Spoon
How to Serve This Dish: Serve it cold in a small bowl beside grilled meat or noodles. It works as a palate reset between richer picnic dishes.
Pro Tips for This Recipe:
- Remove some seeds if the cucumbers are large and watery.
- Don’t skip the salt rest; it matters more than you think.
- Use a sharp knife so the cucumber breaks cleanly.
- Add sesame seeds last so they stay crisp.
Variations on This Dish:
- Garlic Version: Add 1 small grated garlic clove.
- Herb Mix: Stir in cilantro or dill.
- Spicy Chili Oil Swap: Replace chili flakes with chili oil.
Common Mistakes to Avoid with This Dish:
- Don’t serve it straight after tossing if it’s still watery.
- Don’t slice the cucumbers too small; they lose their crunch.
- Don’t overdo the soy sauce or the salad turns muddy.
22. Turkey Avocado Club Wraps
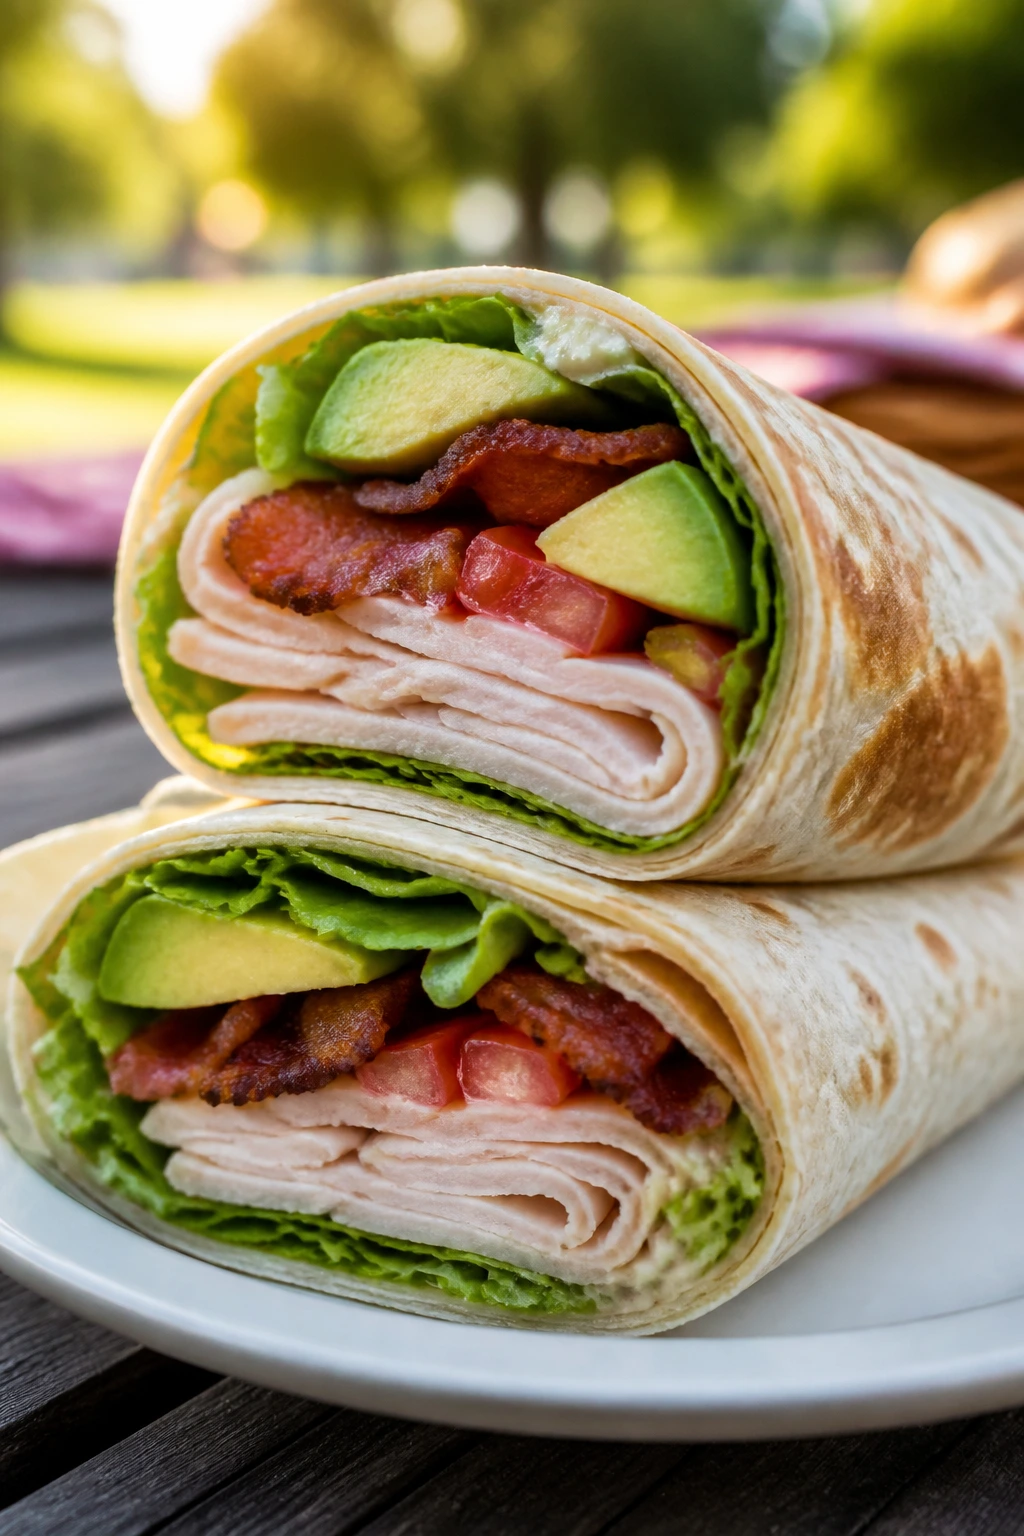
Intro: This is the wrap I trust when I want something filling that still feels clean on a warm evening. Turkey, avocado, lettuce, bacon, and tomato make a classic club profile, but the tortilla keeps the whole thing picnic-ready. The key is restraint. Too much filling and the wrap fights back.
Why It Works: Turkey gives the wrap a lean base, while avocado adds richness so it doesn’t feel dry. Bacon brings salt and crunch, and lettuce separates the wet tomato from the tortilla. A little mayo on the tortilla acts as a moisture shield, which is more useful than people realize.
Key Ingredients:
- 4 large tortillas
- 8 slices deli turkey
- 1 avocado, sliced
- 4 strips cooked bacon
- 1 cup shredded romaine
- 1 tomato, sliced thin
- 2 tablespoons mayonnaise
- 1 teaspoon lemon juice
- Pinch of salt
Quick Steps:
- Spread mayo on each tortilla.
- Layer turkey, lettuce, avocado, bacon, and tomato.
- Add lemon juice and a pinch of salt.
- Roll tightly, folding in the sides.
- Wrap and chill before slicing.
Equipment for This Recipe:
- Knife
- Cutting board
- Small bowl
- Parchment
- Skillet, if cooking bacon fresh
How to Serve This Dish: Slice into halves and pack cut-side down. A handful of chips or cucumber spears fits nicely alongside.
Pro Tips for This Recipe:
- Use firm avocado, not mushy, or the wrap gets slippery.
- Pat tomato slices dry before layering.
- Roll tightly and let it rest for 10 minutes before cutting.
- Toasting the tortilla slightly makes it less likely to split.
Variations on This Dish:
- Chipotle Club: Add chipotle mayo for smoke and heat.
- Chicken Club Wrap: Swap turkey for sliced chicken.
- Veggie Club: Replace turkey and bacon with roasted vegetables.
Common Mistakes to Avoid with This Dish:
- Don’t overstuff the center.
- Don’t use very wet tomatoes.
- Don’t skip the wrap rest before slicing.
23. Peanut Chicken Skewers
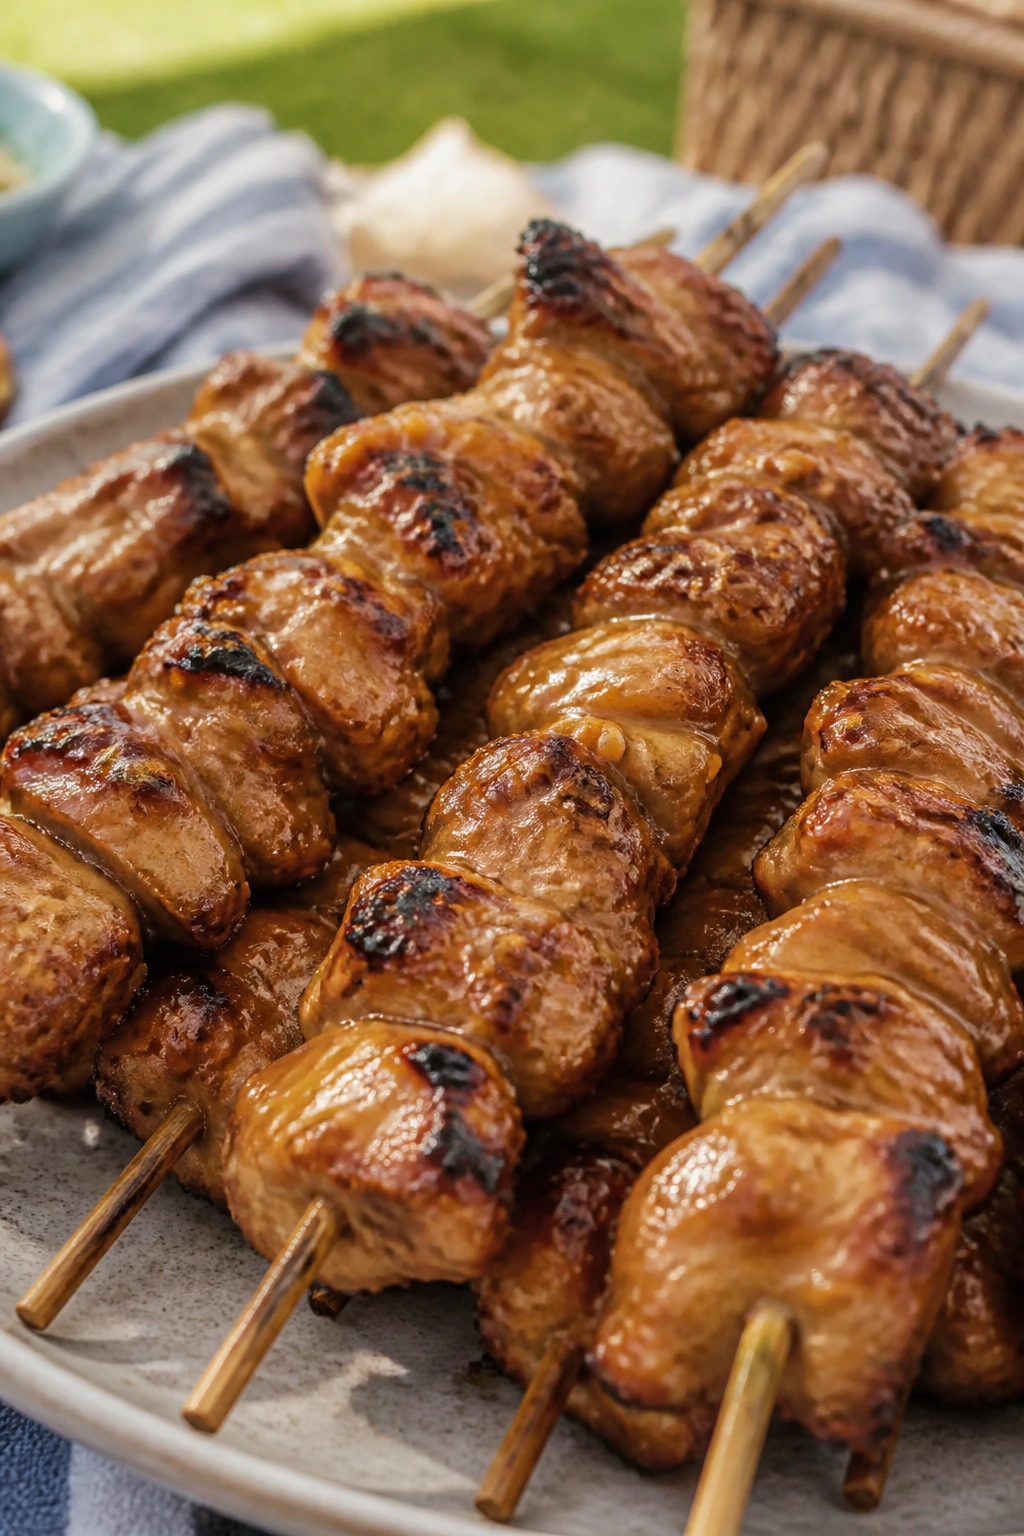
Intro: These skewers are built for easy eating off a paper plate. Chicken gets marinated in peanut, lime, soy, and garlic, then grilled or broiled until the edges pick up a little char. The sauce is nutty, salty, and bright enough to keep you going back for one more piece.
Why It Works: Chicken thighs stay juicier on a skewer than breasts do. Peanut butter gives the marinade body, while lime juice cuts through the richness. A short cook over high heat gives the outside enough color before the inside dries out.
Key Ingredients:
- 1 1/2 pounds boneless chicken thighs, cubed
- 1/4 cup peanut butter
- 2 tablespoons soy sauce
- 1 tablespoon lime juice
- 1 tablespoon honey
- 2 garlic cloves, grated
- 1 tablespoon oil
- Wooden skewers, soaked
Quick Steps:
- Whisk peanut butter, soy sauce, lime juice, honey, garlic, and oil.
- Toss the chicken in the marinade for 20 minutes.
- Thread onto skewers.
- Grill or broil 8 to 10 minutes, turning once.
- Rest 3 minutes before packing.
Equipment for This Recipe:
- Mixing bowl
- Grill, broiler, or grill pan
- Skewers
- Tongs
- Basting brush
How to Serve This Dish: Serve warm or room temperature with extra peanut sauce on the side. A cucumber salad or cold noodles makes a solid plate.
Pro Tips for This Recipe:
- Cut the chicken evenly so it cooks at the same speed.
- Soak wooden skewers for at least 30 minutes.
- Don’t over-marinate or the lime starts to toughen the surface.
- Save a little marinade before adding raw chicken if you want a dipping sauce.
Variations on This Dish:
- Coconut Peanut Skewers: Add 2 tablespoons coconut milk to the marinade.
- Spicy Satay Style: Stir in chili paste or sriracha.
- Tofu Version: Use firm tofu cubes instead of chicken.
Common Mistakes to Avoid with This Dish:
- Don’t crowd the skewers too tightly.
- Don’t cook over low heat or the chicken dries out before browning.
- Don’t pack them hot without a little airflow or the coating softens.
24. Macaroni Salad with Pickles
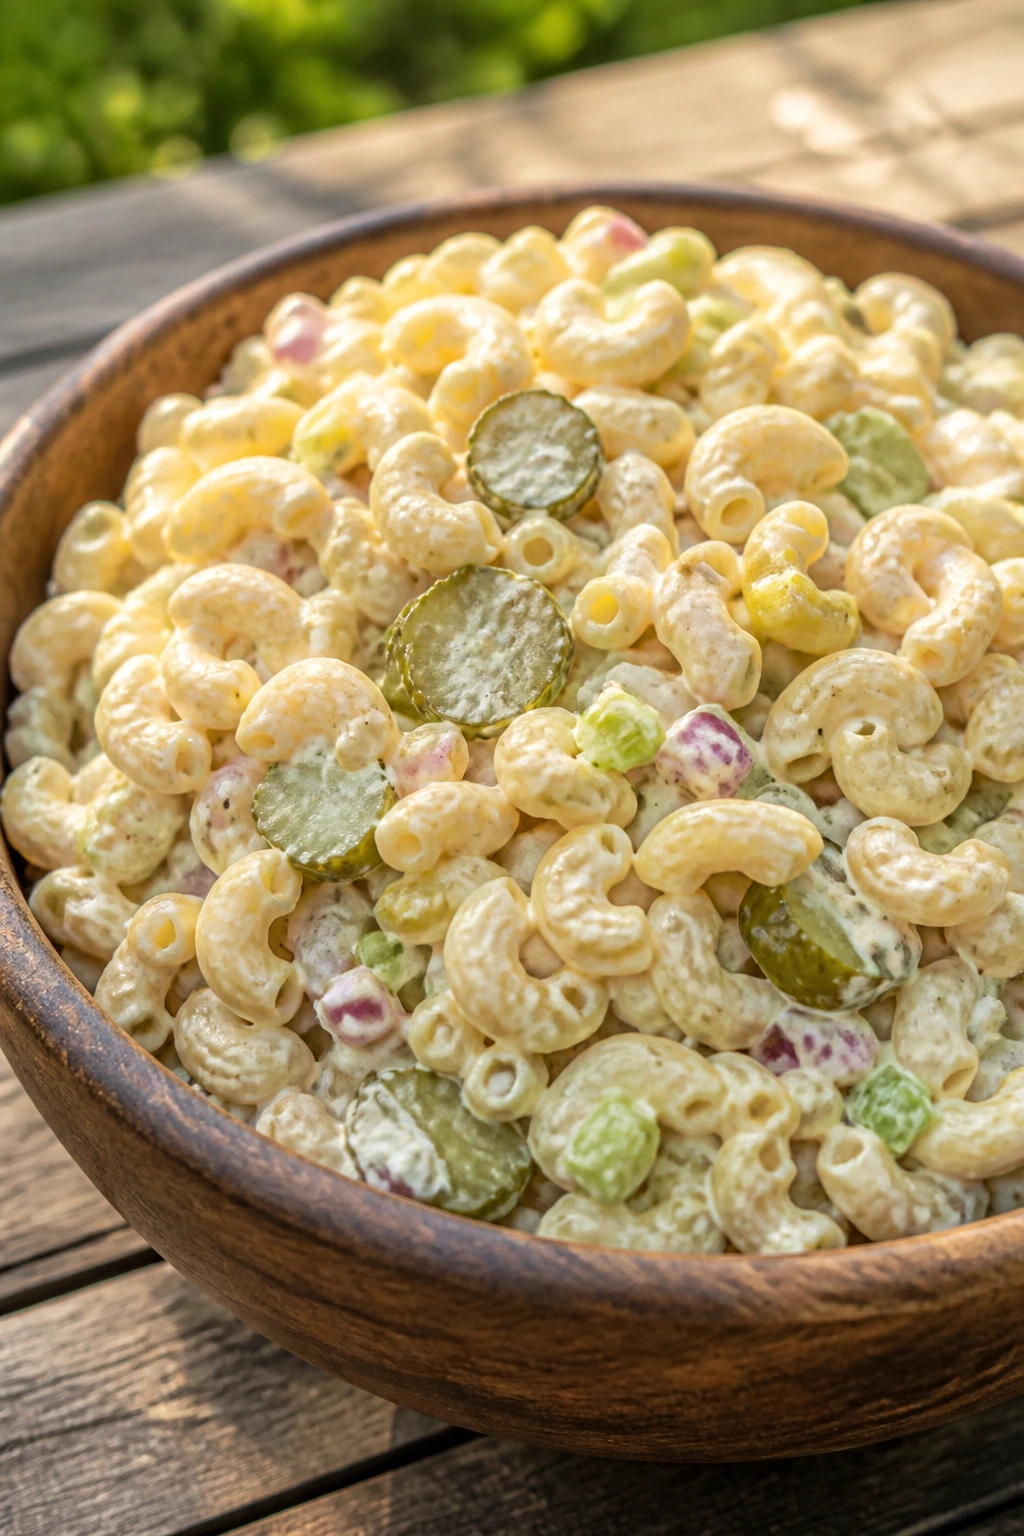
Intro: Macaroni salad lives or dies on texture. The pasta needs to stay firm, the dressing needs to cling, and the pickles need to bring enough bite to keep the bowl interesting. This version is creamy, sharp, and not shy about its crunch.
Why It Works: Elbow macaroni holds dressing in the little curves. Pickles and their brine cut the richness so the mayo doesn’t weigh everything down. Celery and onion add snap, which is the difference between a salad and a soft scoop of starch.
Key Ingredients:
- 12 ounces elbow macaroni
- 3/4 cup mayonnaise
- 2 tablespoons pickle juice
- 1 cup chopped dill pickles
- 1 celery stalk, diced
- 2 tablespoons minced red onion
- 1 teaspoon mustard
- 1/2 teaspoon salt
- 1/4 teaspoon black pepper
Quick Steps:
- Cook the macaroni until just tender, then rinse and cool.
- Whisk mayo, pickle juice, mustard, salt, and pepper.
- Stir in pickles, celery, and onion.
- Fold in the pasta.
- Chill for at least 30 minutes.
Equipment for This Recipe:
- Pot
- Colander
- Bowl
- Whisk
- Spoon
How to Serve This Dish: Serve cold in a wide bowl with a spoon that can reach the bottom. It works with fried chicken, burgers, or sliced tomatoes on the side.
Pro Tips for This Recipe:
- Rinse the macaroni briefly to stop the cooking, but not so much that it turns cold and bland.
- Add a splash of pickle juice after chilling if it needs more bite.
- Dice the pickles fine enough that they spread through the bowl.
- Chill before serving; the dressing settles better.
Variations on This Dish:
- Egg Version: Add chopped hard-boiled eggs.
- Relish Swap: Use sweet relish if you prefer a softer pickle flavor.
- Herb Lift: Add dill and parsley for a fresher finish.
Common Mistakes to Avoid with This Dish:
- Don’t overcook the pasta.
- Don’t skip the acid, or the dressing feels dull.
- Don’t use huge pickle chunks unless you want them to dominate every bite.
25. Stuffed Mini Bell Peppers with Herbed Cheese
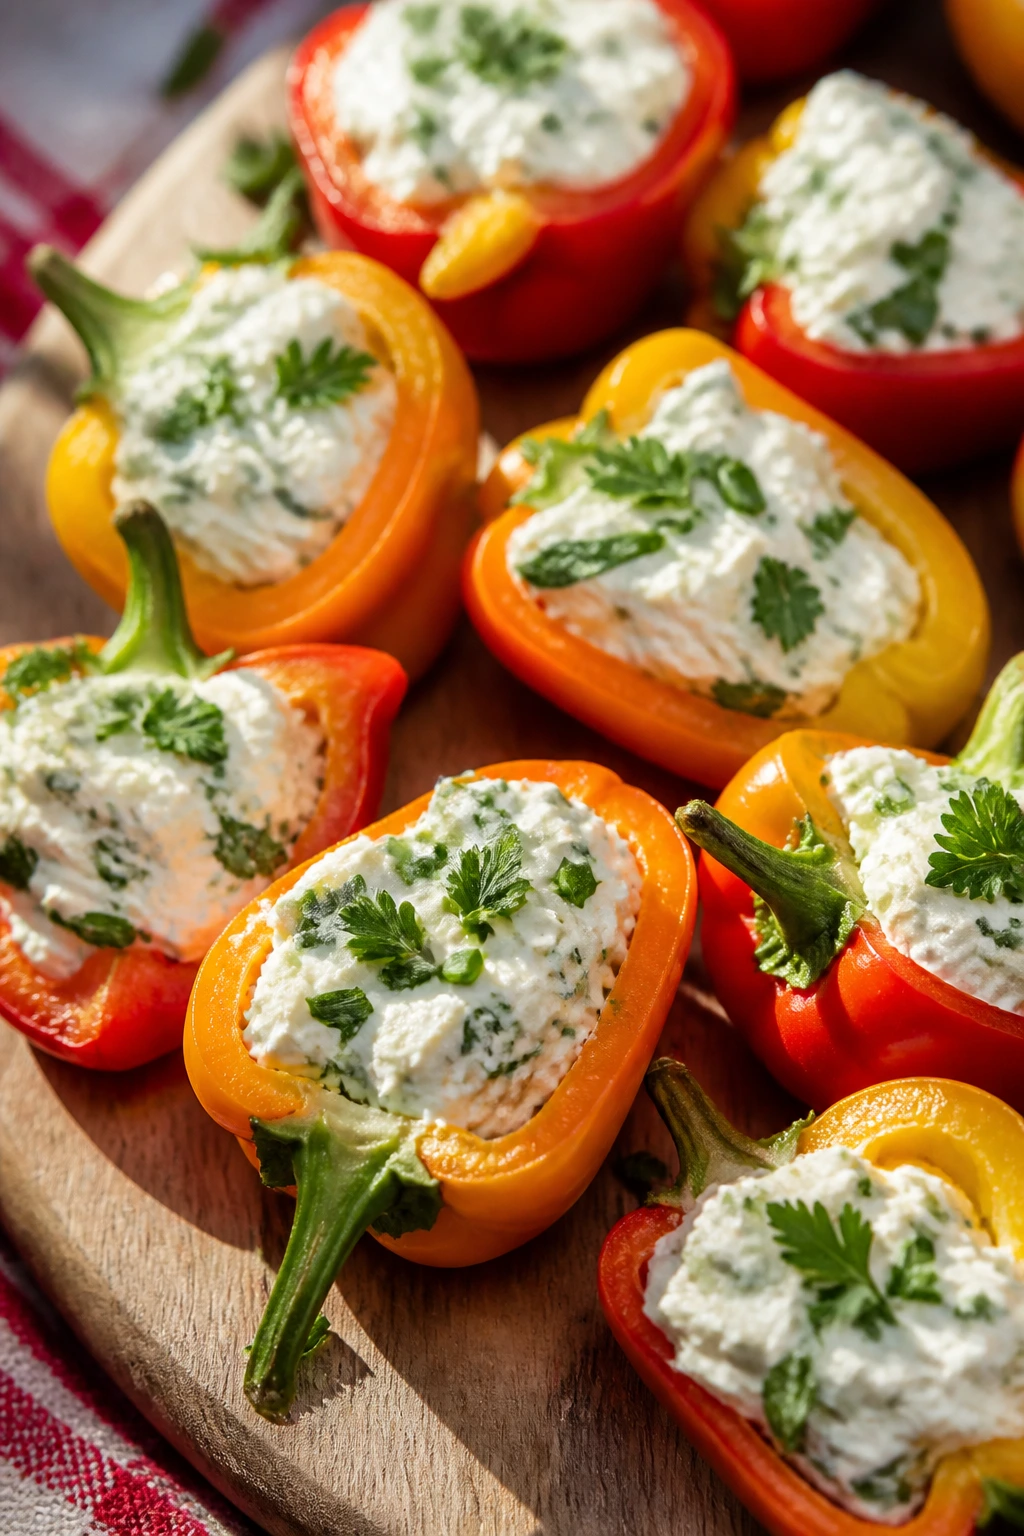
Intro: Mini bell peppers are one of those low-effort picnic snacks that look more polished than they are. Fill them with herbed cheese and they become crisp, creamy little bites that don’t need plates or forks. The peppers bring sweetness, and the cheese brings the rest.
Why It Works: Mini peppers are sturdy and naturally cup-shaped, so they hold filling well. Cream cheese gives the stuffing body, while herbs and lemon keep it from tasting dense. Because they’re eaten cold, the texture stays snappy, which is half the appeal.
Key Ingredients:
- 12 mini bell peppers
- 8 ounces cream cheese, softened
- 2 tablespoons chopped chives
- 1 tablespoon chopped parsley
- 1 teaspoon lemon juice
- 1/2 teaspoon garlic powder
- 1/4 teaspoon salt
- 1/4 teaspoon black pepper
Quick Steps:
- Halve the peppers lengthwise and remove the seeds.
- Mix the cream cheese, herbs, lemon juice, garlic powder, salt, and pepper.
- Spoon or pipe the filling into the peppers.
- Chill until firm.
- Pack in a single layer.
Equipment for This Recipe:
- Knife
- Cutting board
- Small bowl
- Spoon or piping bag
- Storage container
How to Serve This Dish: Arrange them cut-side up so the filling is visible. They work as a snacky side with sandwiches or as the first thing people pick up while they’re deciding what else to eat.
Pro Tips for This Recipe:
- Use peppers with flat bottoms if you want them to sit neatly.
- Dry the pepper halves before filling.
- Add a pinch of paprika if you want more color.
- Keep them cold; the filling softens fast in heat.
Variations on This Dish:
- Everything Bagel Version: Roll the filling in everything seasoning.
- Smoked Salmon Stuffing: Fold in minced smoked salmon.
- Dairy-Light Swap: Use whipped ricotta for a lighter texture.
Common Mistakes to Avoid with This Dish:
- Don’t leave seeds or white ribs in the peppers.
- Don’t overfill or the cheese smears when you close the lid.
- Don’t let them sit out too long in warm air.
26. Tomato Pie Squares

Intro: Tomato pie is one of those recipes that makes sense the moment you taste a warm slice. The crust stays sturdy, the tomatoes are salted and drained so they don’t flood the filling, and the cheese turns bubbly without becoming greasy. Cut into squares, it’s picnic food with a little Southern backbone.
Why It Works: Salted tomato slices lose excess water before baking, which is the whole battle here. Mayonnaise and cheese bind into a savory topping that keeps the pie rich but not runny. Baking it until the top browns a little gives the tomatoes a deeper flavor.
Key Ingredients:
- 1 pie crust or 1 sheet pastry dough
- 4 medium tomatoes, sliced
- 1 teaspoon salt
- 1 cup shredded cheddar
- 1/2 cup mayonnaise
- 1/4 cup chopped basil
- 1/4 teaspoon black pepper
Quick Steps:
- Salt the tomato slices and let them drain for 15 minutes.
- Bake the crust until lightly golden.
- Mix cheddar, mayo, basil, and pepper.
- Layer tomatoes in the crust and spread the cheese mixture on top.
- Bake at 375°F until bubbly and browned, about 25 minutes.
Equipment for This Recipe:
- Pie dish or square baking dish
- Knife
- Bowl
- Spoon
- Paper towels
How to Serve This Dish: Cut it into squares once it cools a bit. It tastes excellent warm or room temperature with a simple green salad or sliced cucumbers.
Pro Tips for This Recipe:
- Drain the tomatoes well or the crust goes limp.
- Use ripe but firm tomatoes.
- Let the pie rest before cutting so the filling sets.
- Bake on the lower rack if the top browns too quickly.
Variations on This Dish:
- Corn Tomato Pie: Add 1 cup fresh corn kernels.
- Herbed Goat Cheese Version: Swap some cheddar for goat cheese.
- Onion Layer: Add thin sautéed onions under the tomatoes.
Common Mistakes to Avoid with This Dish:
- Don’t skip draining the tomatoes.
- Don’t cut while piping hot.
- Don’t use a flimsy crust that can’t hold moisture.
27. Cold Peanut Soba Noodles
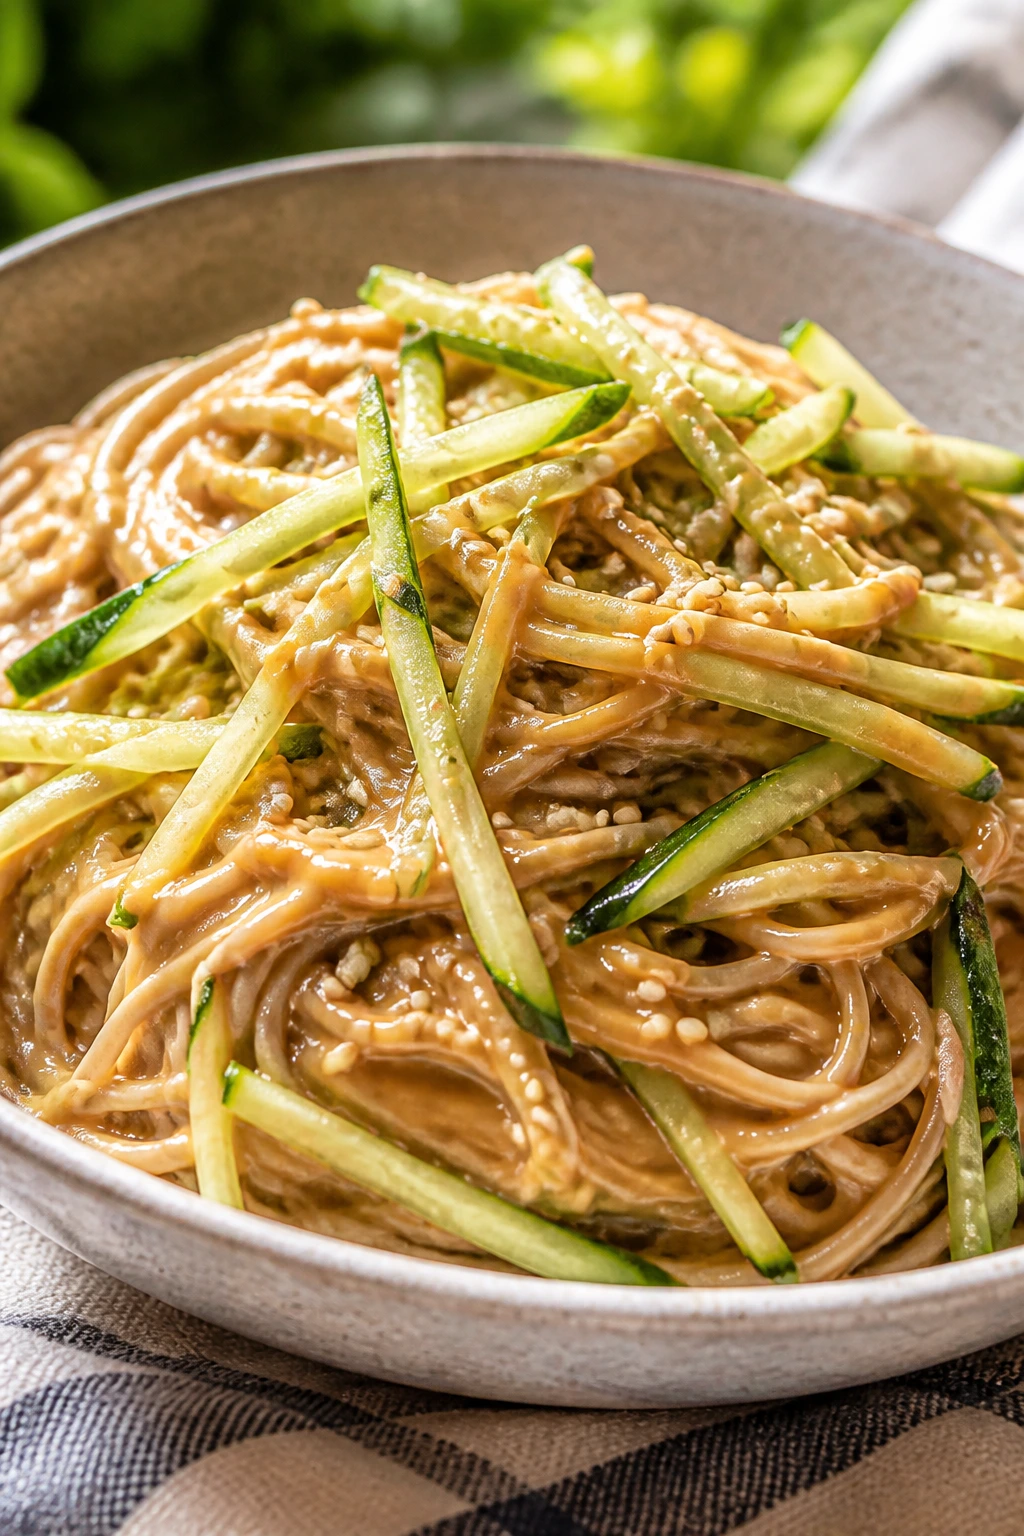
Intro: Soba noodles have the right kind of chew for a picnic dinner. Toss them with peanut butter, soy, lime, and a little honey, and you get a cold noodle bowl that’s rich without being heavy. It’s one of the easiest dishes here to make ahead, which is why I keep it in the rotation.
Why It Works: Soba absorbs sauce quickly but still keeps a firm bite when cooked right. Peanut butter gives the dressing body, and lime keeps it from feeling sticky. Cucumber and scallions cut through the richness so the bowl stays balanced.
Key Ingredients:
- 8 ounces soba noodles
- 1/4 cup peanut butter
- 2 tablespoons soy sauce
- 1 tablespoon lime juice
- 1 tablespoon honey
- 1 teaspoon sesame oil
- 1 cucumber, julienned
- 2 scallions, sliced
- 1 tablespoon sesame seeds
Quick Steps:
- Cook the soba until just tender, then rinse cold.
- Whisk peanut butter, soy sauce, lime juice, honey, and sesame oil.
- Toss noodles with the dressing.
- Fold in cucumber and scallions.
- Finish with sesame seeds.
Equipment for This Recipe:
- Pot
- Colander
- Bowl
- Whisk
- Tongs
How to Serve This Dish: Serve in small bowls or lunch containers with chopsticks or forks. It plays nicely with grilled chicken, tofu, or crisp vegetables.
Pro Tips for This Recipe:
- Rinse the noodles thoroughly so they don’t clump.
- Thin the dressing with a spoonful of hot noodle water if needed.
- Add cucumbers at the end so they stay crisp.
- Taste before packing; soba likes more seasoning than you think.
Variations on This Dish:
- Miso Peanut Sauce: Add 1 teaspoon miso for extra depth.
- Spicy Sriracha Noodles: Stir in chili paste.
- Crunch Top: Add chopped peanuts right before serving.
Common Mistakes to Avoid with This Dish:
- Don’t overcook soba or it turns mushy after chilling.
- Don’t let the sauce sit too thick without thinning.
- Don’t pack it warm if you want the cucumber crisp.
28. Antipasto Pasta Salad
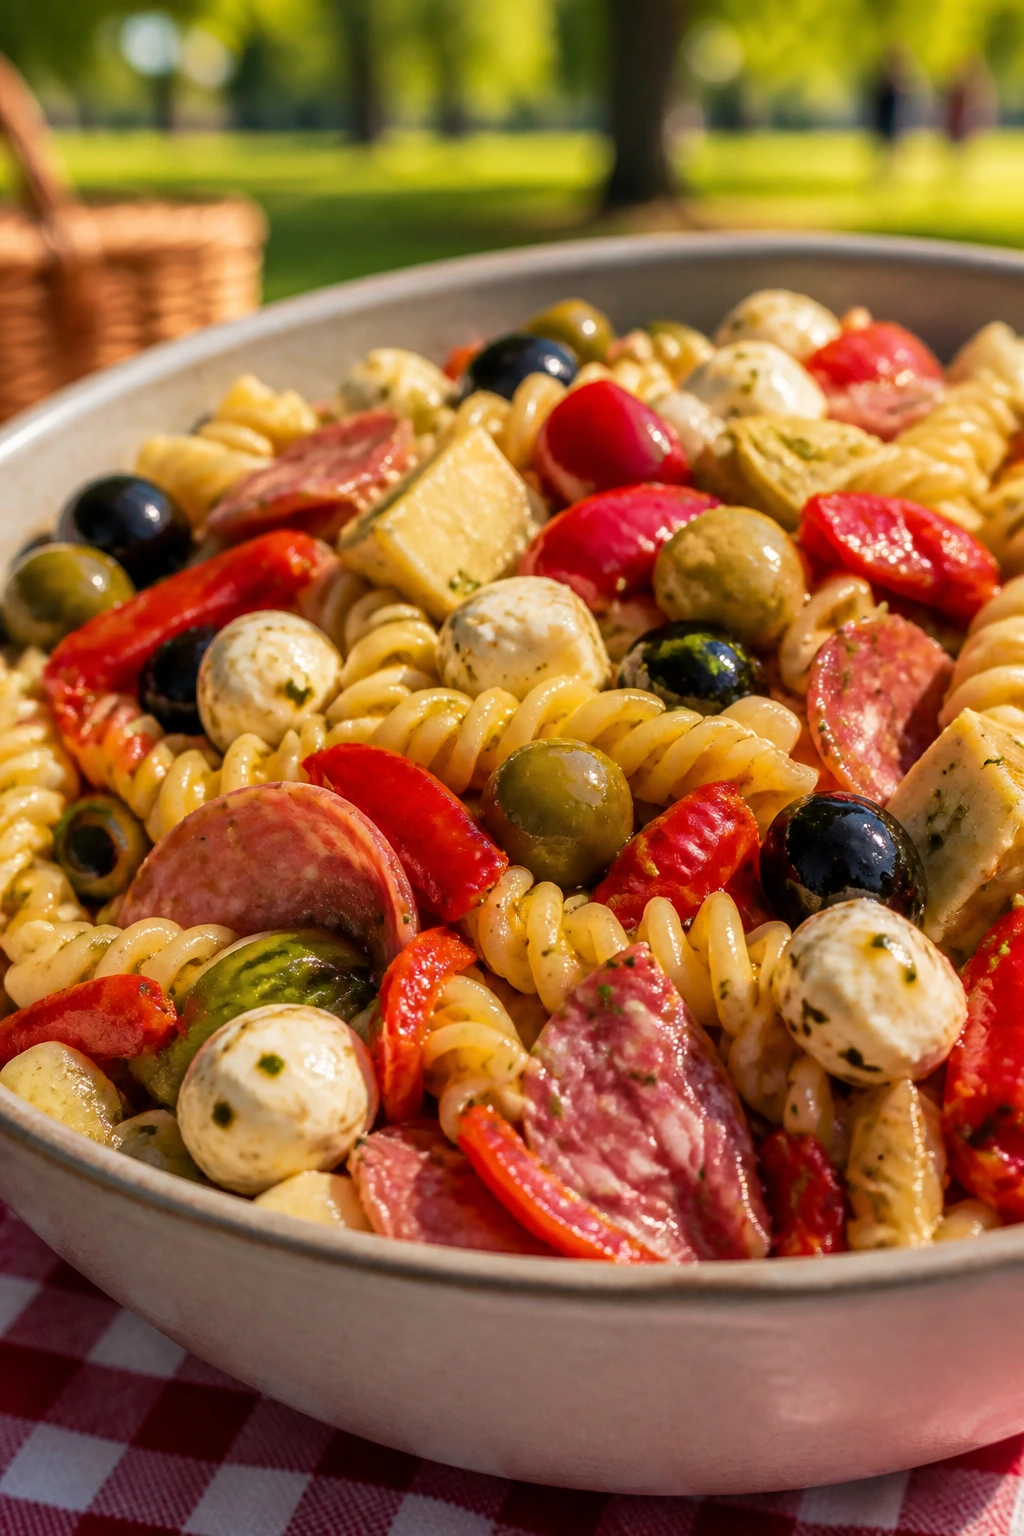
Intro: Antipasto pasta salad is the loud friend in the cooler. Salami, olives, peppers, cheese, pasta, and a sharp vinaigrette make it feel like a deli tray got organized into a bowl. It’s salty, tangy, and sturdy enough to sit for a while without getting sad.
Why It Works: The cured meat and olives keep the flavor strong even after chilling. Pasta gives the bowl heft, and vinegar-based dressing helps prevent it from reading oily. A handful of chopped pepperoncini gives the salad bite that wakes up the cheese.
Key Ingredients:
- 12 ounces rotini
- 4 ounces salami, chopped
- 1/2 cup olives, sliced
- 1/2 cup roasted red peppers, chopped
- 1 cup mozzarella pearls
- 1/4 cup pepperoncini, sliced
- 3 tablespoons olive oil
- 2 tablespoons red wine vinegar
- 1 teaspoon Italian seasoning
Quick Steps:
- Cook and cool the pasta.
- Whisk oil, vinegar, and Italian seasoning.
- Toss pasta with dressing.
- Fold in salami, olives, peppers, mozzarella, and pepperoncini.
- Chill before serving.
Equipment for This Recipe:
- Pot
- Colander
- Large bowl
- Whisk
- Knife
How to Serve This Dish: Scoop it into a bowl with a big spoon so the good bits don’t stay at the bottom. It’s excellent with crusty bread or as part of a sandwich-heavy picnic.
Pro Tips for This Recipe:
- Use a vinaigrette, not a thick dressing, or the salad gets heavy.
- Chop the salami small so it spreads through the bowl.
- Let it rest 20 minutes so the flavors blend.
- Add fresh basil if you want a brighter finish.
Variations on This Dish:
- Chicken Antipasto: Replace salami with chopped grilled chicken.
- Pasta-Free Version: Turn it into a chopped salad over lettuce.
- Extra Sharp: Add marinated artichokes for more tang.
Common Mistakes to Avoid with This Dish:
- Don’t use too much oil.
- Don’t overcook the pasta.
- Don’t skip chilling, because the salad tastes rougher right away.
29. Mini Spinach-Cheddar Quiches

Intro: Mini quiches are the rare picnic item that still feel polished when eaten cold. The filling is soft, the crust stays neat, and spinach with cheddar gives them a familiar, savory flavor that doesn’t fade after chilling. They’re especially handy when you want something that eats like brunch but travels like snack food.
Why It Works: Eggs set into a sturdy custard, which means the quiches can be baked ahead and sliced cleanly. Spinach adds moisture without flooding the filling, and cheddar melts into the eggs instead of sitting on top. A muffin tin makes the portions even, which helps with packing.
Key Ingredients:
- 1 pie crust or 1 sheet pastry dough
- 4 large eggs
- 1/2 cup milk
- 1 cup chopped spinach, squeezed dry
- 3/4 cup shredded cheddar
- 1/4 teaspoon salt
- 1/8 teaspoon black pepper
Quick Steps:
- Heat the oven to 375°F and grease a muffin tin.
- Cut the dough into circles and line the cups.
- Whisk eggs, milk, salt, and pepper.
- Add spinach and cheddar, then pour into the crusts.
- Bake 18 to 20 minutes until set.
Equipment for This Recipe:
- Muffin tin
- Mixing bowl
- Whisk
- Round cutter or glass
- Cooling rack
How to Serve This Dish: Serve warm, room temperature, or chilled. A few cherry tomatoes or a simple green salad makes them feel less like a snack and more like a meal.
Pro Tips for This Recipe:
- Squeeze the spinach dry or the custard loosens.
- Don’t overfill the cups.
- Let them rest before lifting from the tin.
- Reheat briefly if you want the crust crisp again.
Variations on This Dish:
- Ham and Cheese Quiche: Add chopped ham.
- Mushroom Version: Sauté mushrooms first so they don’t leak.
- Crustless Cup: Skip the crust for a lighter bake.
Common Mistakes to Avoid with This Dish:
- Don’t add wet vegetables straight from the pan.
- Don’t underbake the centers.
- Don’t try to unmold them while hot and fragile.
30. Ranch Pretzel Snack Mix
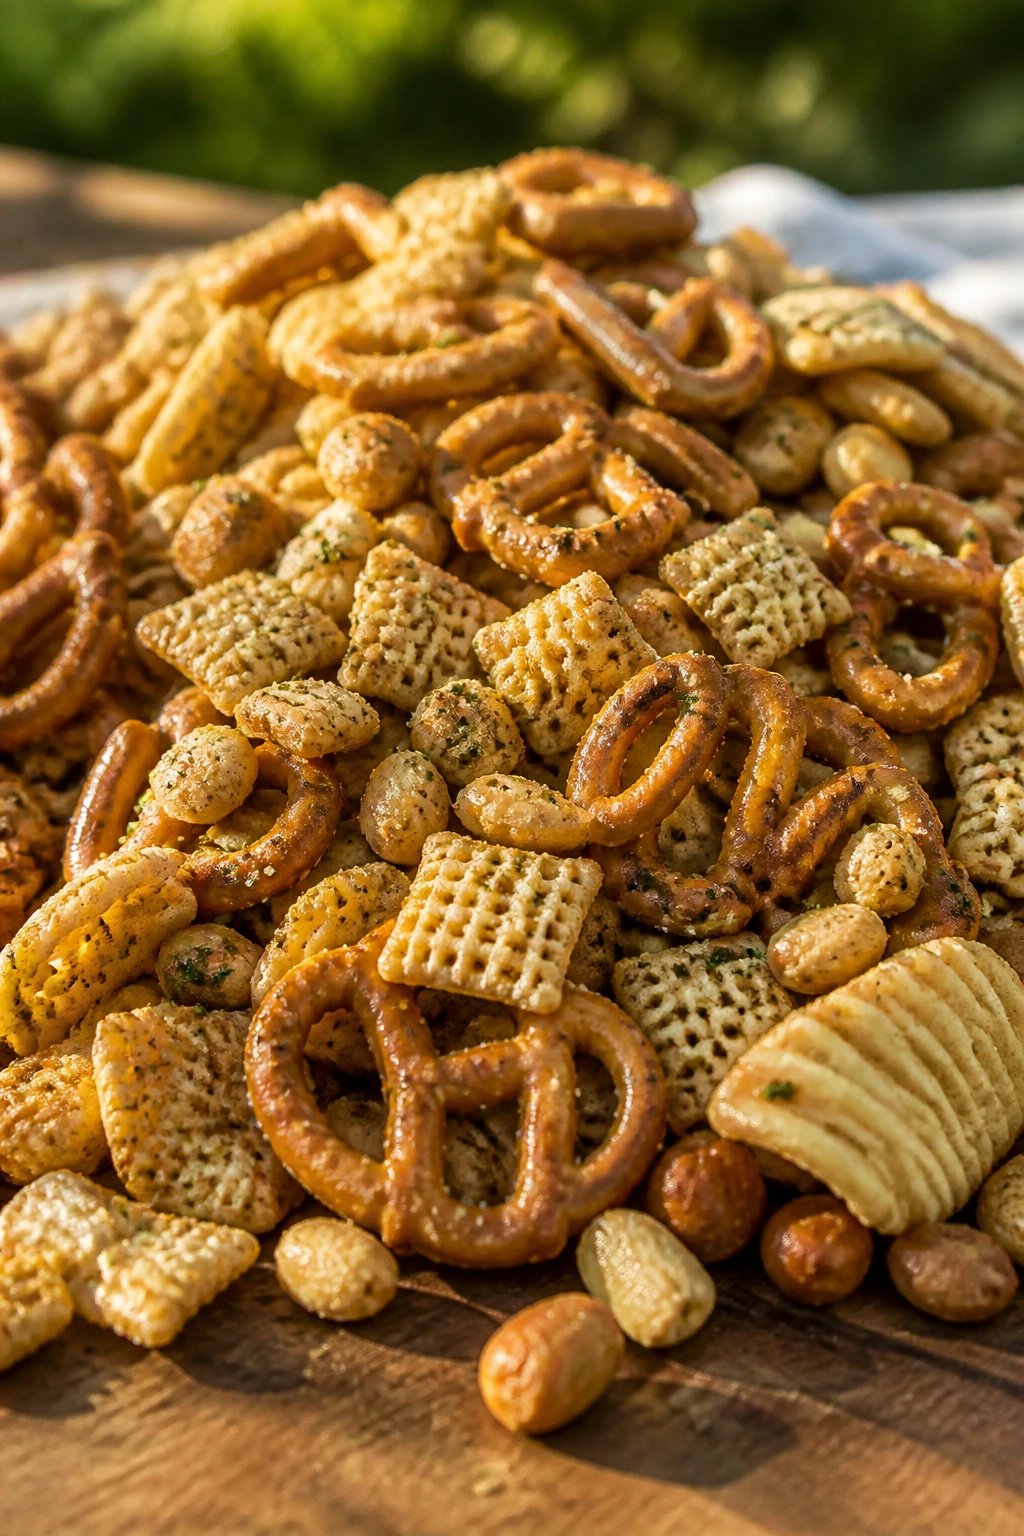
Intro: Snack mix is the thing that fills the long gap between arrival and dinner. This one is salty, herby, crunchy, and shamelessly easy. The ranch seasoning clings to pretzels, cereal, and nuts so every handful tastes more deliberate than it has any right to.
Why It Works: A light coating of oil helps the seasoning stick. Baking the mix briefly dries it out and deepens the ranch flavor, while the pretzels and cereal keep the texture crisp for days. It’s also easy to scale, which is useful when the basket keeps getting larger.
Key Ingredients:
- 4 cups pretzel twists
- 3 cups cereal squares
- 2 cups mixed nuts
- 2 tablespoons oil
- 1 packet ranch seasoning
- 1/2 teaspoon garlic powder
- 1/4 teaspoon black pepper
Quick Steps:
- Heat the oven to 300°F.
- Toss pretzels, cereal, and nuts with oil and seasonings.
- Spread on a sheet pan.
- Bake 15 to 20 minutes, stirring once.
- Cool fully before packing.
Equipment for This Recipe:
- Large bowl
- Sheet pan
- Spatula
- Measuring cups
- Airtight container
How to Serve This Dish: Pour into small cups or a bowl with a spoon. It’s the snack people reach for when they’re standing around waiting for the main food.
Pro Tips for This Recipe:
- Stir once halfway so the seasoning doesn’t burn on the bottom.
- Cool completely before sealing or condensation softens it.
- Add popcorn after baking if you want more volume.
- Use unsalted nuts if the ranch packet is already salty enough.
Variations on This Dish:
- Spicy Ranch Mix: Add cayenne or hot sauce powder.
- Cheddar Snack Mix: Toss in cheese crackers.
- Sweet-Salty Version: Add a handful of raisins after baking.
Common Mistakes to Avoid with This Dish:
- Don’t bake too hot or the seasoning turns bitter.
- Don’t pack it while warm.
- Don’t overload with oil or the mix gets greasy.
31. Prosciutto-Wrapped Melon
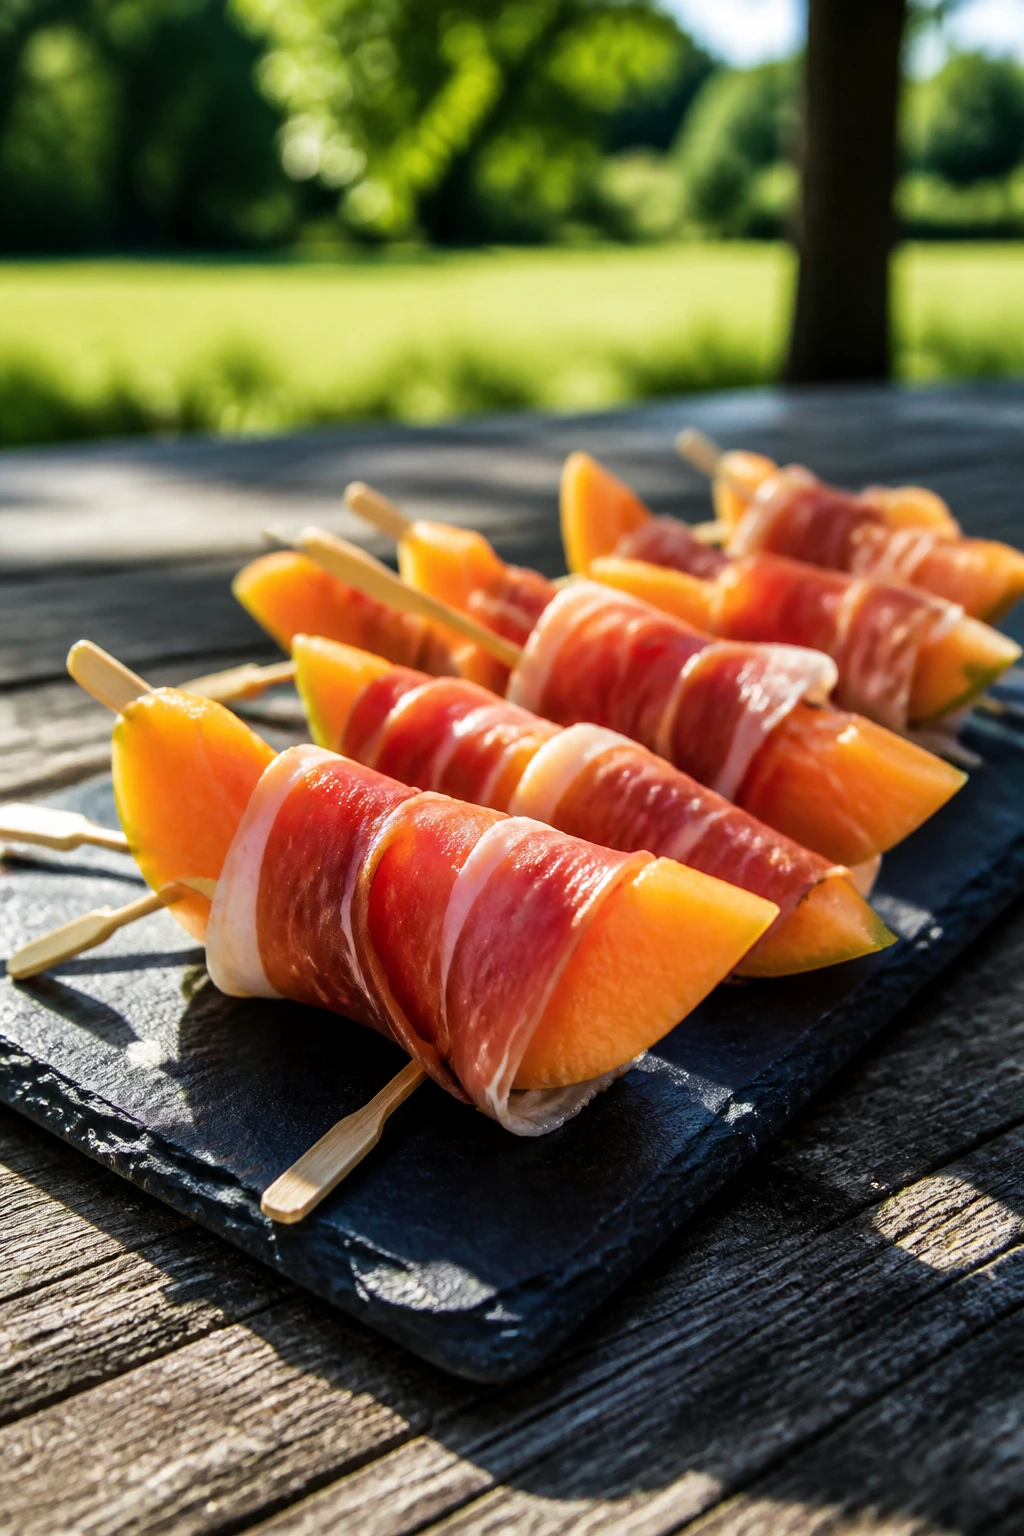
Intro: Prosciutto-wrapped melon sounds almost too simple, but that’s why it works. The fruit should be cold and firm, the ham thin and salty, and the whole bite should disappear before it has time to drip. It’s a no-cook opener that still feels elegant in a very practical way.
Why It Works: Melon and prosciutto do the sweet-salty balance thing better than most appetizers because the textures are so different. The melon’s cool juiciness offsets the dry saltiness of the meat. Keep the pieces small and the skewers tight, and they’ll hold up far better than people expect.
Key Ingredients:
- 1 small cantaloupe or honeydew
- 8 slices prosciutto, halved
- 1 tablespoon lime juice
- 1/4 teaspoon black pepper
- Toothpicks, optional
- Fresh basil leaves, optional
Quick Steps:
- Cut the melon into 1-inch wedges or cubes.
- Pat dry and drizzle lightly with lime juice.
- Wrap each piece with prosciutto.
- Add basil or a toothpick if needed.
- Chill until serving.
Equipment for This Recipe:
- Knife
- Melon baller, optional
- Cutting board
- Paper towels
- Serving tray
How to Serve This Dish: Serve cold on a flat tray so the pieces don’t slide. It’s a natural starter before heavier food like sliders or pasta salad.
Pro Tips for This Recipe:
- Choose melon that’s ripe but still firm enough to cut cleanly.
- Pat the melon dry or the prosciutto slips.
- Use very thin slices of prosciutto for better wrapping.
- Add black pepper at the end if you want a little bite.
Variations on This Dish:
- Basil Melon Bites: Tuck a basil leaf under the prosciutto.
- Grilled Melon: Briefly grill melon wedges before wrapping.
- Mozzarella Add-On: Pair each bite with a mini mozzarella ball.
Common Mistakes to Avoid with This Dish:
- Don’t use overripe melon.
- Don’t wrap wet fruit.
- Don’t let it sit out too long in heat; the melon gets loose.
32. Corn Salad with Cotija and Lime
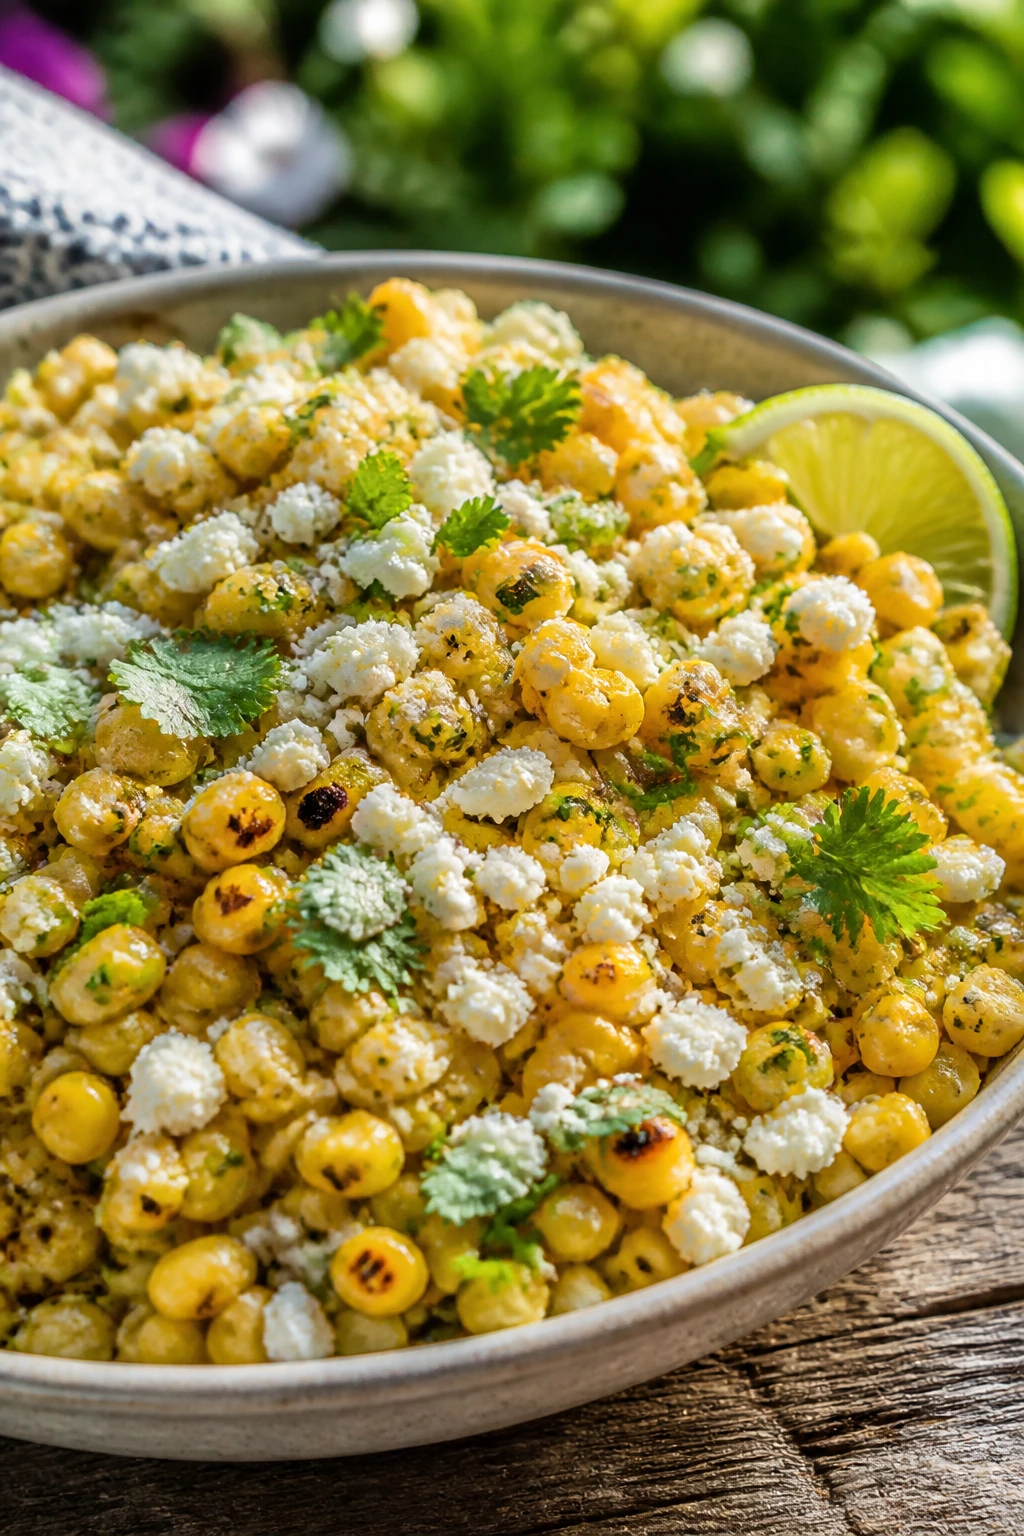
Intro: Corn salad is summer in a bowl when the corn is sweet and the lime is bright. Cotija brings the salty crumble, and a little jalapeño gives the bowl a slow, clean heat. I like this one because it tastes like it was meant to sit next to grilled food, which is exactly what picnic food should do.
Why It Works: Corn has enough sugar to take on acid without tasting flat. A quick char deepens the flavor, and Cotija stays crumbly instead of melting, which keeps the salad textured. Cilantro and lime keep the dish fresh and sharp.
Key Ingredients:
- 4 cups corn kernels, fresh or frozen
- 1 tablespoon olive oil
- 1/2 cup crumbled Cotija
- 2 tablespoons lime juice
- 1 tablespoon chopped cilantro
- 1 jalapeño, minced
- 1/2 teaspoon salt
- 1/4 teaspoon chili powder
Quick Steps:
- Sauté the corn in olive oil until lightly charred.
- Cool slightly, then toss with lime juice, cilantro, jalapeño, salt, and chili powder.
- Fold in Cotija last.
- Chill or serve warm.
- Finish with extra lime if needed.
Equipment for This Recipe:
- Skillet
- Bowl
- Spoon
- Knife
- Cutting board
How to Serve This Dish: Serve it in a shallow bowl so the Cotija stays visible. It’s excellent with grilled chicken, tortilla chips, or spooned into tacos later.
Pro Tips for This Recipe:
- Use frozen corn straight from the bag if fresh corn isn’t around.
- Char the corn just enough to spot brown edges.
- Add Cotija at the end so it doesn’t dissolve.
- Adjust jalapeño to taste; one pepper can vary a lot.
Variations on This Dish:
- Mayo Esquites Style: Add 1 tablespoon mayo for a creamier version.
- Avocado Corn Salad: Fold in avocado right before serving.
- Black Bean Mix: Add black beans for more heft.
Common Mistakes to Avoid with This Dish:
- Don’t overcook the corn until it goes mushy.
- Don’t add avocado too early if you choose that variation.
- Don’t skimp on lime; the salad needs the acid.
33. Blackberry Cobbler Bars
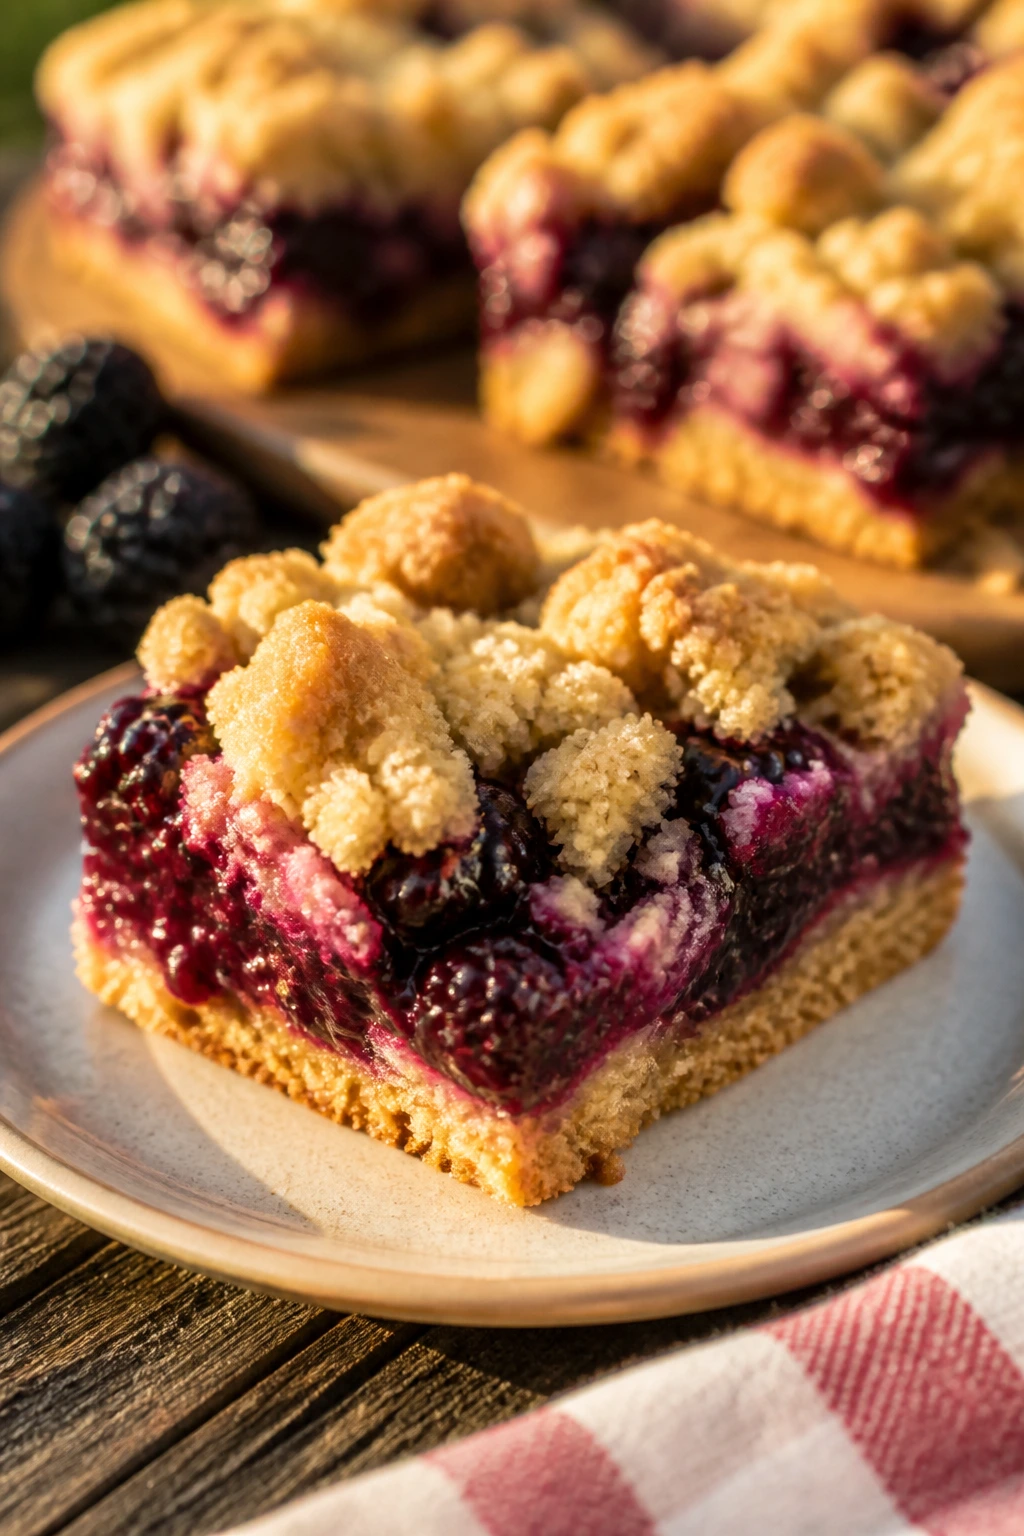
Intro: Blackberry cobbler bars bring the fruit-dessert feeling of a cobbler without the serving drama. You get a buttery base, jammy berries, and a crumb topping that survives transport much better than a spoonable bake. They’re messy in the best way, but still clean enough for a napkin and a blanket.
Why It Works: A sturdy crust gives the bars structure, while the berry filling thickens as it bakes so it doesn’t run everywhere. Blackberries have enough tartness to keep the sugar in check. Once cooled, the bars slice neatly and hold together better than a traditional cobbler.
Key Ingredients:
- 1 1/2 cups flour
- 1/2 cup sugar
- 1/2 teaspoon baking powder
- 1/2 cup butter, cold and cubed
- 2 cups blackberries
- 2 tablespoons sugar
- 1 tablespoon cornstarch
- 1 teaspoon lemon juice
Quick Steps:
- Mix flour, sugar, and baking powder with butter to form crumbs.
- Press half into a lined pan and bake 10 minutes.
- Toss blackberries with sugar, cornstarch, and lemon juice.
- Spread berries over the crust and top with remaining crumbs.
- Bake until bubbling and golden, then cool fully.
Equipment for This Recipe:
- Square baking pan
- Parchment paper
- Mixing bowl
- Fork or pastry cutter
- Cooling rack
How to Serve This Dish: Cut into bars once fully cool and dust lightly with sugar if you want. They’re good cold, room temperature, or just barely warm.
Pro Tips for This Recipe:
- Use cornstarch to keep the berry layer from running.
- Cool completely before slicing for the cleanest edges.
- A little lemon juice sharpens the berries.
- If berries are very juicy, add an extra teaspoon of cornstarch.
Variations on This Dish:
- Mixed Berry Bars: Combine blackberries with raspberries.
- Peach Blackberry Version: Add diced peaches for softness.
- Oat Crumble Top: Replace part of the crumb topping with oats.
Common Mistakes to Avoid with This Dish:
- Don’t cut before the filling sets.
- Don’t underbake the base.
- Don’t use frozen berries without a bit more thickener.
34. Spinach and Feta Hand Pies
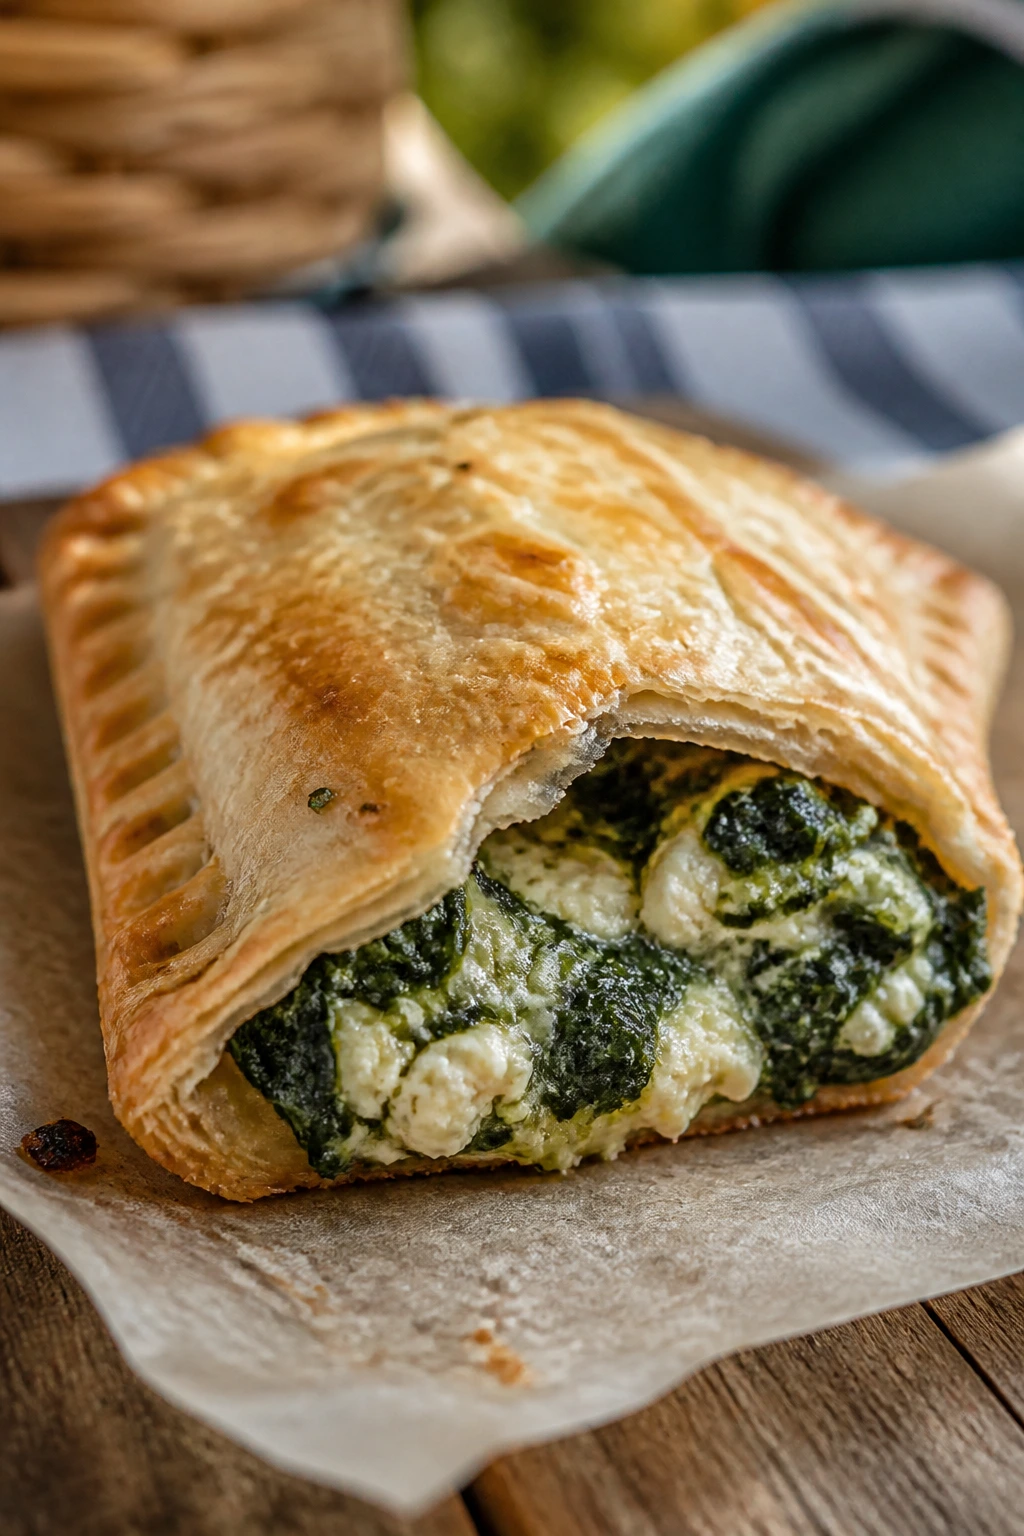
Intro: Hand pies solve one of the oldest picnic problems: how to pack a meal that tastes good without requiring a fork. The pastry shields the filling, spinach and feta stay savory and compact, and the edges seal into little half-moons that feel like they were designed for one hand and a plate-less evening.
Why It Works: Cooked spinach gets squeezed dry, which keeps the pastry from turning wet. Feta stays salty and tangy inside the crust, and egg wash gives the tops a burnished finish. Because they’re baked individually, each pie gets a crisp shell instead of the soggy middle a larger pie can develop.
Key Ingredients:
- 1 sheet pastry dough
- 1 cup spinach, cooked and squeezed dry
- 1/2 cup feta
- 1 tablespoon chopped dill
- 1 egg, beaten
- 1 tablespoon milk
- 1/4 teaspoon pepper
Quick Steps:
- Mix spinach, feta, dill, and pepper.
- Cut dough into circles or squares.
- Fill, fold, and seal the edges with a fork.
- Brush with egg wash and bake at 400°F for 18 to 20 minutes.
- Cool slightly before packing.
Equipment for This Recipe:
- Baking sheet
- Fork
- Mixing bowl
- Pastry brush
- Parchment paper
How to Serve This Dish: Serve warm or room temperature with a little yogurt dip or nothing at all. They’re good as a main, snack, or side, which is a nice range for a picnic.
Pro Tips for This Recipe:
- Squeeze spinach hard until no water drips out.
- Don’t overfill the pies or they burst open.
- Seal the edges well with fork tines.
- Chill before baking if the dough gets soft.
Variations on This Dish:
- Mushroom Feta Pie: Add sautéed mushrooms.
- Cheddar Herb Version: Swap some feta for cheddar.
- Tomato Addition: Add chopped sun-dried tomatoes in small amounts.
Common Mistakes to Avoid with This Dish:
- Don’t skip the egg wash if you want color.
- Don’t let wet filling touch the edges.
- Don’t bake on a thin tray that bends in the oven.
35. Sparkling Berry Lemonade
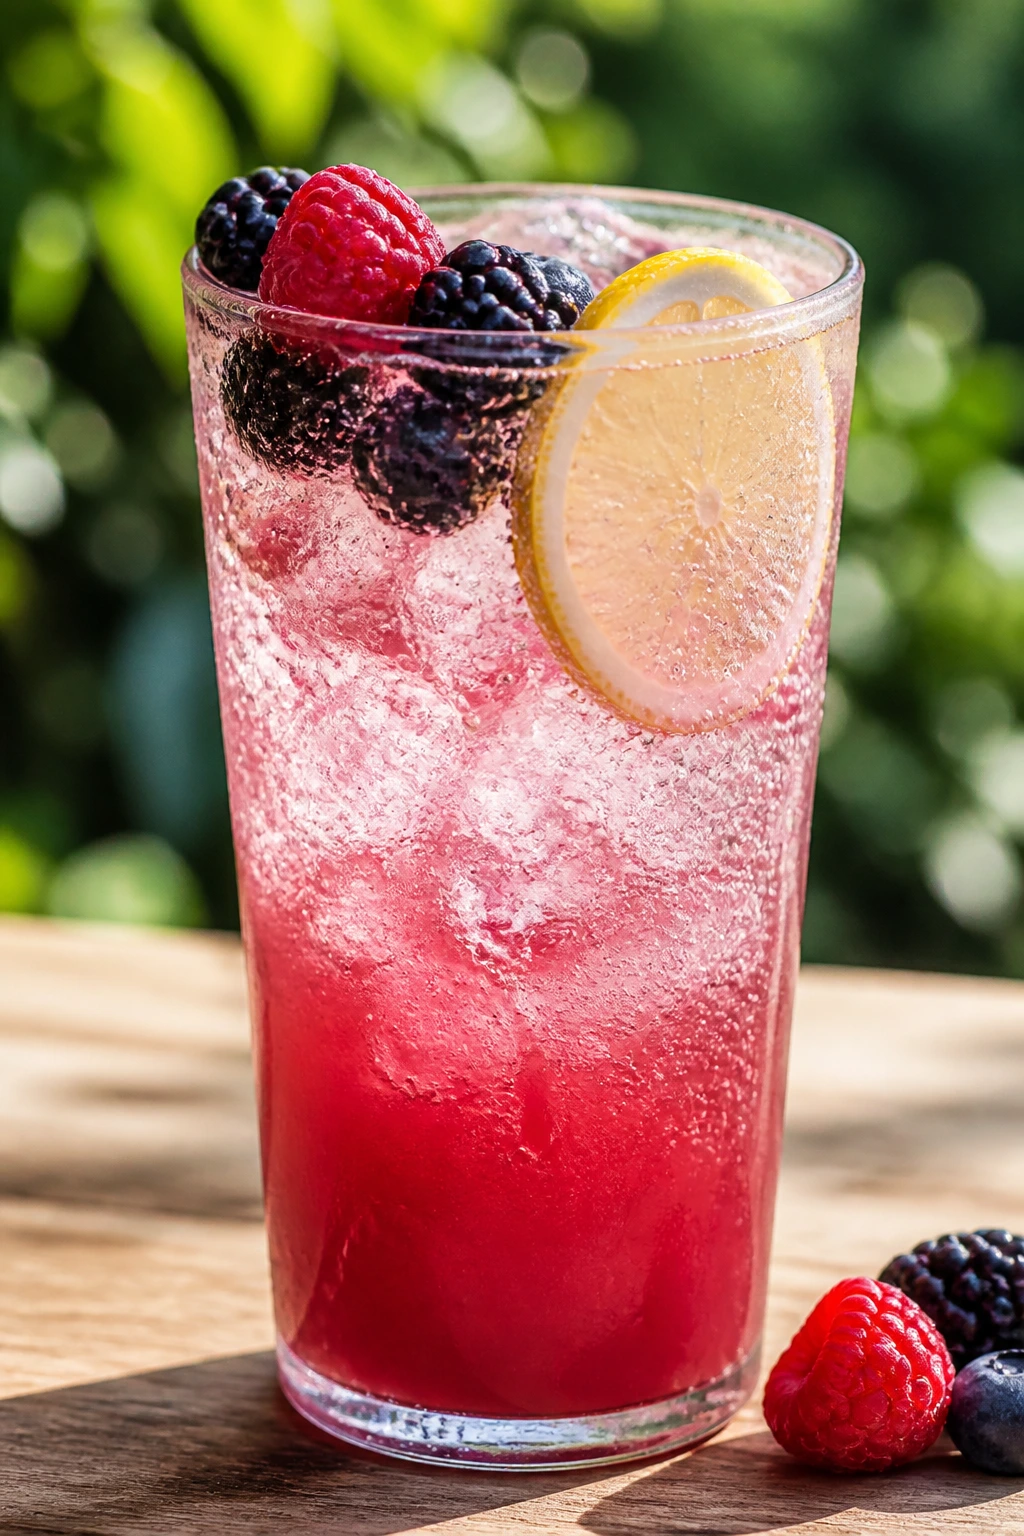
Intro: A picnic drink should be cold, bright, and not too sweet, because nobody wants syrup on a warm evening. This lemonade gets its color and flavor from mashed berries, then a splash of sparkling water keeps it lively. It tastes like summer without leaning into candy territory.
Why It Works: Lemon juice gives the drink backbone, while berries round out the sharpness. Sparkling water lightens the texture so the drink feels more refreshing than heavy syrup. If you strain the berries, the lemonade stays clean and easy to pour.
Key Ingredients:
- 1 cup mixed berries
- 1/2 cup lemon juice
- 2 tablespoons honey
- 3 cups cold water
- 1 cup sparkling water
- Ice
- Mint, optional
Quick Steps:
- Mash the berries with honey.
- Stir in lemon juice and cold water.
- Strain if you want a smoother drink.
- Add sparkling water just before serving.
- Serve over ice with mint.
Equipment for This Recipe:
- Pitcher
- Spoon
- Fine-mesh strainer, optional
- Measuring cup
- Citrus juicer
How to Serve This Dish: Pour into tall glasses or insulated bottles. A few whole berries in the pitcher make it look cheerful without extra effort.
Pro Tips for This Recipe:
- Chill the base first so the bubbles last longer.
- Add sparkling water at the last minute.
- Taste and adjust honey after straining.
- Frozen berries work well if fresh ones are soft.
Variations on This Dish:
- Strawberry Basil Lemonade: Add torn basil.
- Blueberry Lime Sparkler: Swap lemon for lime and use blueberries.
- Ginger Fizz: Add a small splash of ginger beer.
Common Mistakes to Avoid with This Dish:
- Don’t mix in the sparkling water too early.
- Don’t over-sweeten; the drink should stay sharp.
- Don’t let the berries sit crushed too long or they turn bitter.
36. Grilled Halloumi-Zucchini Skewers
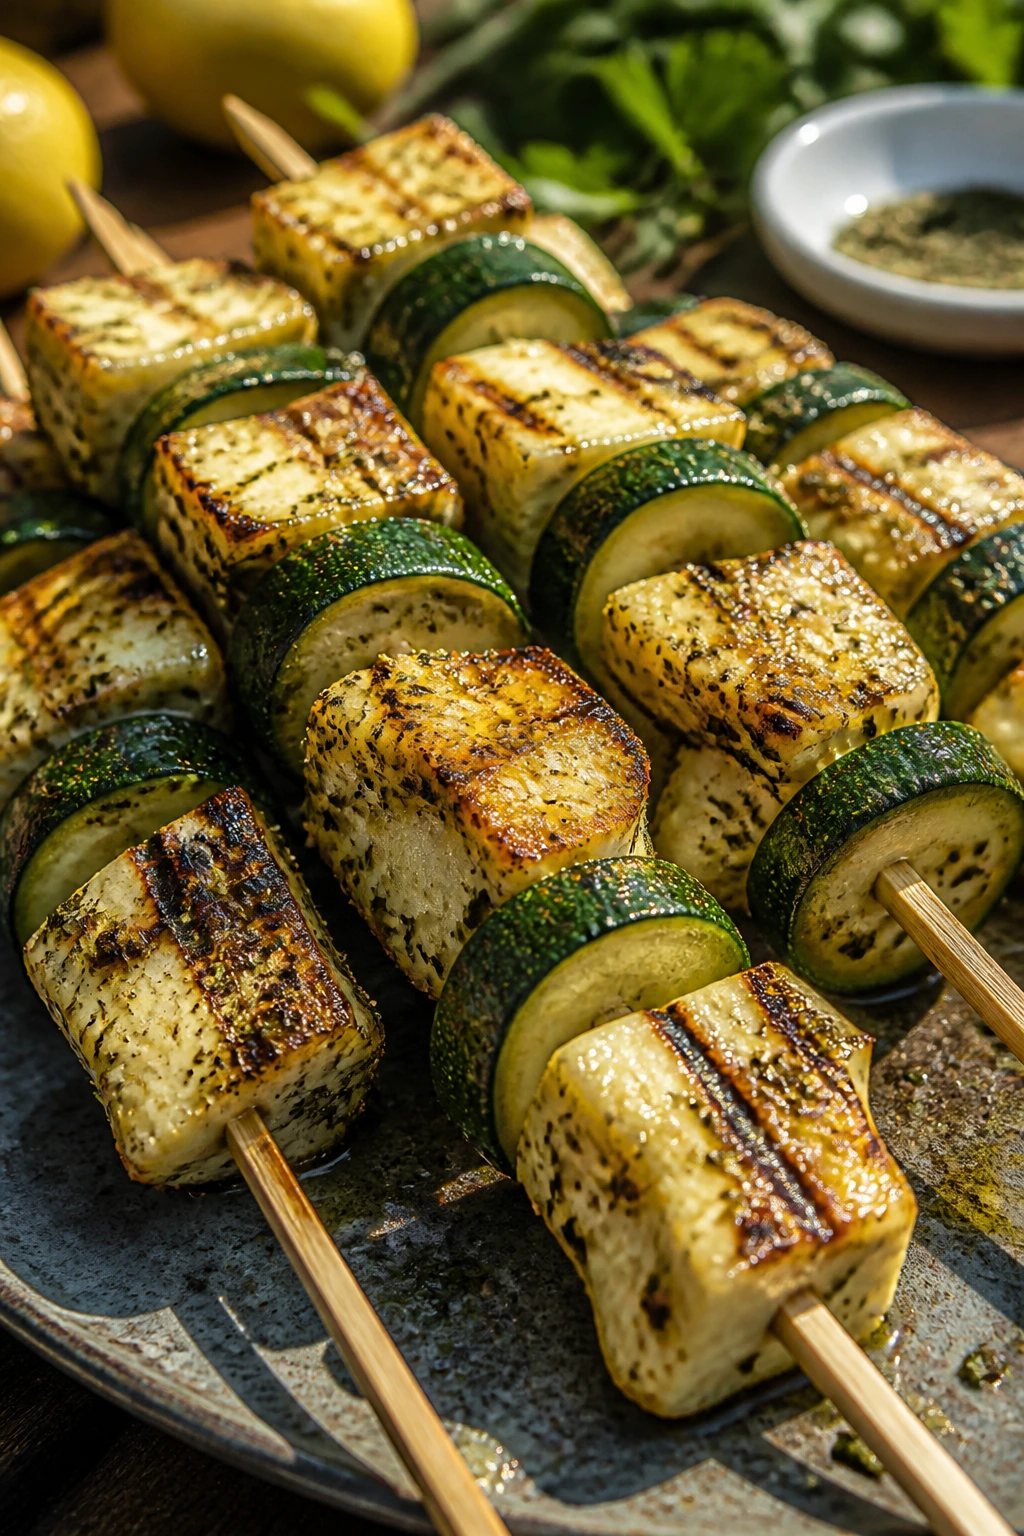
Intro: Halloumi is the cheese that knows how to keep its shape on a grill. Paired with zucchini, it makes skewers that are salty, smoky, and tidy enough to eat without a knife. I like these because they work hot off the grill or later at room temperature, which is picnic gold.
Why It Works: Halloumi doesn’t melt into a puddle, so it browns instead. Zucchini cooks quickly, and when cut thick enough, it stays tender rather than collapsing. A lemon-herb marinade gives the skewers enough brightness to cut through the salt.
Key Ingredients:
- 8 ounces halloumi, cubed
- 2 zucchini, thickly sliced
- 2 tablespoons olive oil
- 1 tablespoon lemon juice
- 1 teaspoon dried oregano
- 1 garlic clove, minced
- 1/4 teaspoon black pepper
- Skewers
Quick Steps:
- Toss halloumi and zucchini with oil, lemon juice, oregano, garlic, and pepper.
- Thread onto skewers.
- Grill over medium-high heat for 6 to 8 minutes, turning once.
- Cook until the halloumi is browned and the zucchini has grill marks.
- Cool slightly before packing.
Equipment for This Recipe:
- Grill or grill pan
- Skewers
- Mixing bowl
- Tongs
- Basting brush
How to Serve This Dish: Serve with extra lemon wedges and a spoonful of yogurt dip if you want one. They sit nicely beside couscous, flatbread, or a cold bean salad.
Pro Tips for This Recipe:
- Cut zucchini thick enough that it doesn’t break on the skewer.
- Don’t marinate the halloumi too long; it can get too salty.
- Soak wooden skewers before grilling.
- Use medium-high heat for color without burning.
Variations on This Dish:
- Peppers Added: Thread in bell peppers for more color.
- Herb Yogurt Finish: Serve with dill yogurt.
- Tomato Skewer: Add cherry tomatoes between the cheese and zucchini.
Common Mistakes to Avoid with This Dish:
- Don’t grill halloumi over low heat; it won’t brown well.
- Don’t cut zucchini too thin.
- Don’t overcook until the cheese gets rubbery.
37. Buffalo Chicken Pinwheels
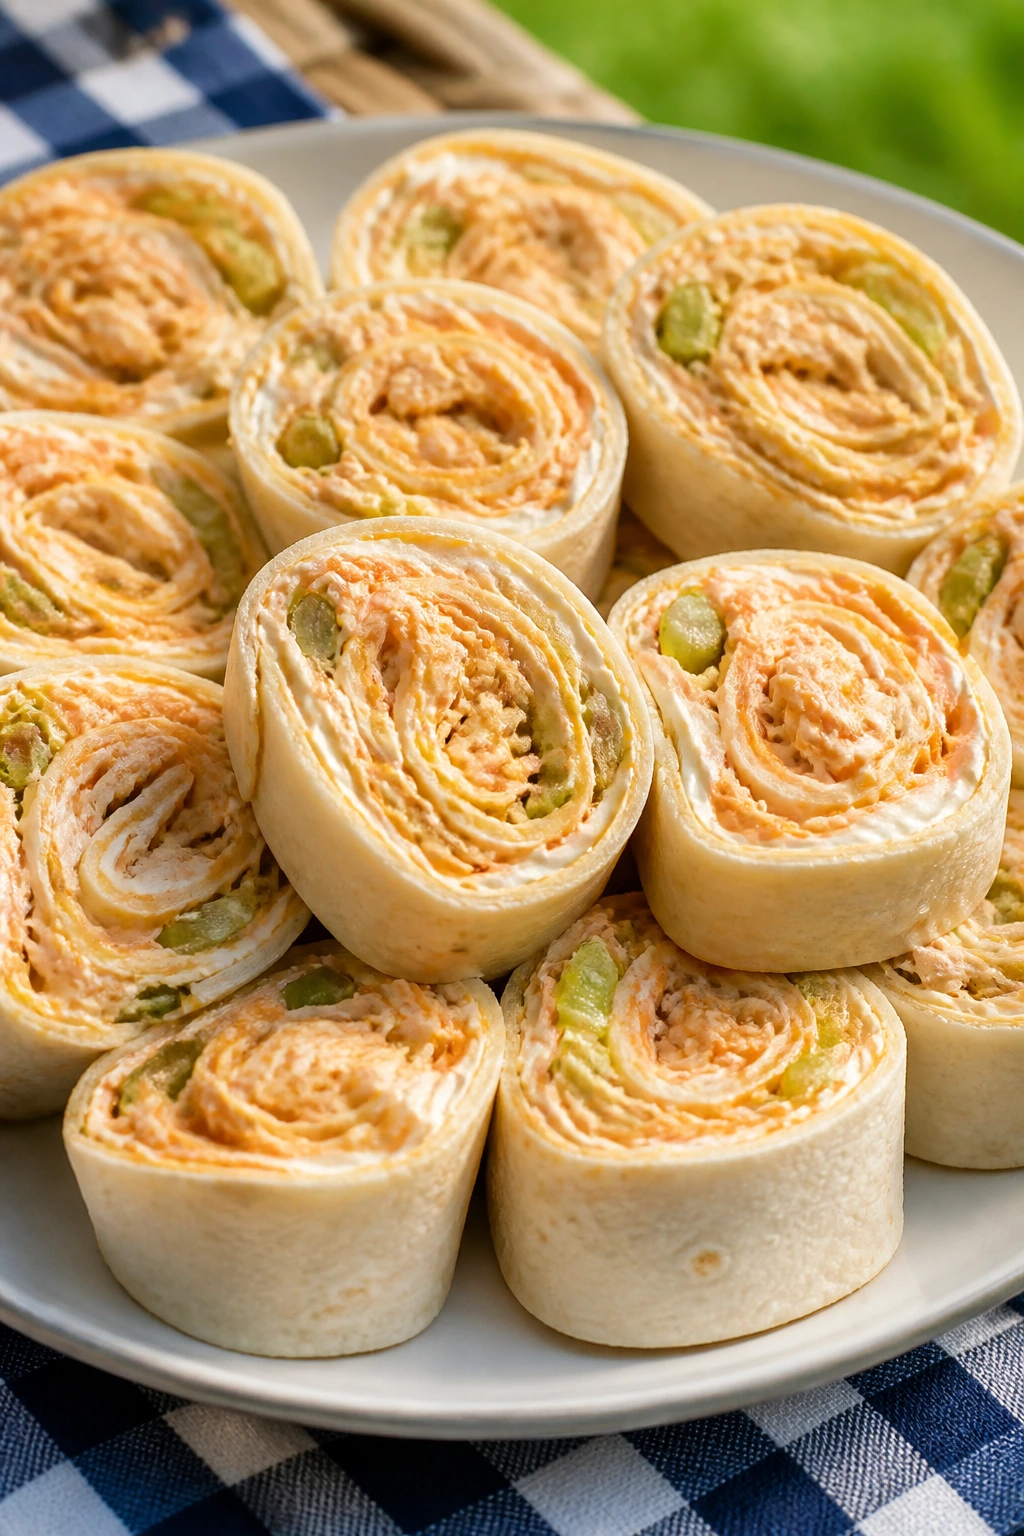
Intro: These are the louder cousin of the ham-and-cheese roll-up. Buffalo sauce, cream cheese, chicken, and a little celery turn into a spicy, creamy spiral that disappears fast when people want something with heat. It’s messy in the container and neat in the hand, which is a nice trade.
Why It Works: Cream cheese softens the buffalo sauce and keeps the filling spreadable. Celery adds a cool crunch that matters more than it sounds like it should. Chilling before slicing helps the pinwheels hold their shape so the spirals stay visible.
Key Ingredients:
- 4 large flour tortillas
- 1 1/2 cups shredded cooked chicken
- 4 ounces cream cheese, softened
- 1/4 cup buffalo sauce
- 1 celery stalk, finely diced
- 1/2 cup shredded cheddar
- 1 tablespoon chopped chives
Quick Steps:
- Mix cream cheese and buffalo sauce until smooth.
- Stir in chicken, celery, cheddar, and chives.
- Spread on tortillas and roll tightly.
- Chill for 30 minutes.
- Slice into 1-inch rounds.
Equipment for This Recipe:
- Bowl
- Spatula
- Knife
- Cutting board
- Wrap or parchment
How to Serve This Dish: Serve with ranch or blue cheese dressing if you want a dip. They’re a good fit for a basket that also has something cool and sweet, like fruit or lemonade.
Pro Tips for This Recipe:
- Let the chicken cool before mixing so the filling doesn’t loosen.
- Use enough cream cheese that the filling spreads cleanly.
- Chill before slicing or the edges smear.
- Add extra celery if you like more crunch.
Variations on This Dish:
- Blue Cheese Version: Fold blue cheese into the filling.
- Milder Ranch Roll-Up: Swap half the buffalo sauce for ranch.
- Vegetarian Heat Roll: Use chopped cauliflower or chickpeas instead of chicken.
Common Mistakes to Avoid with This Dish:
- Don’t overdo the buffalo sauce or the wraps get soggy.
- Don’t slice warm rolls.
- Don’t use dry chicken; the filling needs moisture.
38. Chilled Cantaloupe Soup

Intro: Chilled melon soup sounds fancier than it is. Blend ripe cantaloupe with lime, a little yogurt, and mint, and you get a cold starter that tastes smooth, light, and a bit surprising. It’s a nice way to start a picnic when the weather has already started doing too much.
Why It Works: Cantaloupe has enough natural sweetness to stand on its own, but lime keeps it from becoming flat. Yogurt adds body and a little tang, so the soup feels more like a real dish than a smoothie in a bowl. Chilling before serving lets the mint settle in without taking over.
Key Ingredients:
- 4 cups cantaloupe chunks
- 1/2 cup plain yogurt
- 2 tablespoons lime juice
- 1 tablespoon honey
- 4 mint leaves
- Pinch of salt
- Extra mint, for garnish
Quick Steps:
- Blend cantaloupe, yogurt, lime juice, honey, mint, and salt until smooth.
- Taste and adjust sweetness or acid.
- Chill for at least 1 hour.
- Pour into bowls or cups.
- Garnish with mint.
Equipment for This Recipe:
- Blender
- Measuring cups
- Spoon
- Knife
- Chilled bowls, optional
How to Serve This Dish: Serve in small cups or bowls as a starter. A few berries or a thin slice of melon on top keeps it from looking too plain.
Pro Tips for This Recipe:
- Use very ripe melon for the best texture.
- Chill the melon first if you want a colder soup without watering it down.
- Start with a little mint; too much tastes grassy.
- Strain if you want an extra-smooth finish.
Variations on This Dish:
- Honeydew Soup: Swap cantaloupe for honeydew.
- Ginger Note: Add a small slice of fresh ginger.
- Coconut Version: Replace yogurt with coconut yogurt.
Common Mistakes to Avoid with This Dish:
- Don’t overblend until it gets foamy.
- Don’t skip the salt; it helps the melon taste like itself.
- Don’t serve it warm. The whole point is the chill.
39. Sausage Rolls with Mustard

Intro: Sausage rolls are one of the most useful picnic foods ever made. Puff pastry gives you the crisp shell, sausage filling stays savory inside, and mustard on the side gives the whole thing a sharp edge. They can be eaten warm, room temperature, or cool, which is hard to beat.
Why It Works: Puff pastry bakes into flaky layers that hold the sausage filling neatly. The meat mixture benefits from a little mustard or herbs so it doesn’t taste heavy. Cutting the rolls before baking helps steam escape and gives you better browning.
Key Ingredients:
- 1 sheet puff pastry, thawed
- 1 pound sausage meat
- 1 teaspoon Dijon mustard
- 1 teaspoon chopped thyme
- 1 egg, beaten
- 1 tablespoon milk
- Sesame seeds, optional
Quick Steps:
- Heat the oven to 400°F and line a sheet pan.
- Mix sausage, mustard, and thyme.
- Roll the pastry into a rectangle and form the sausage into a log.
- Wrap, seal, and cut into smaller rolls.
- Brush with egg wash and bake 20 to 25 minutes.
Equipment for This Recipe:
- Sheet pan
- Parchment paper
- Knife
- Mixing bowl
- Pastry brush
How to Serve This Dish: Serve with whole-grain mustard or ketchup, depending on the crowd. They’re good as a main snack or a side with salad and fruit.
Pro Tips for This Recipe:
- Keep the pastry cold before baking for maximum flake.
- Don’t overwork the sausage mix.
- Seal the edge with a little egg wash.
- Let them cool slightly before packing so the bottoms don’t steam soft.
Variations on This Dish:
- Apple Sausage Roll: Add a little grated apple to the filling.
- Spicy Fennel Version: Use hot sausage and fennel seed.
- Chicken Sausage Swap: Use chicken sausage for a lighter bite.
Common Mistakes to Avoid with This Dish:
- Don’t let the pastry warm up too much before baking.
- Don’t stuff too much filling inside.
- Don’t pack them airtight while hot or the crust softens.
40. Panzanella with Tomatoes and Cucumbers
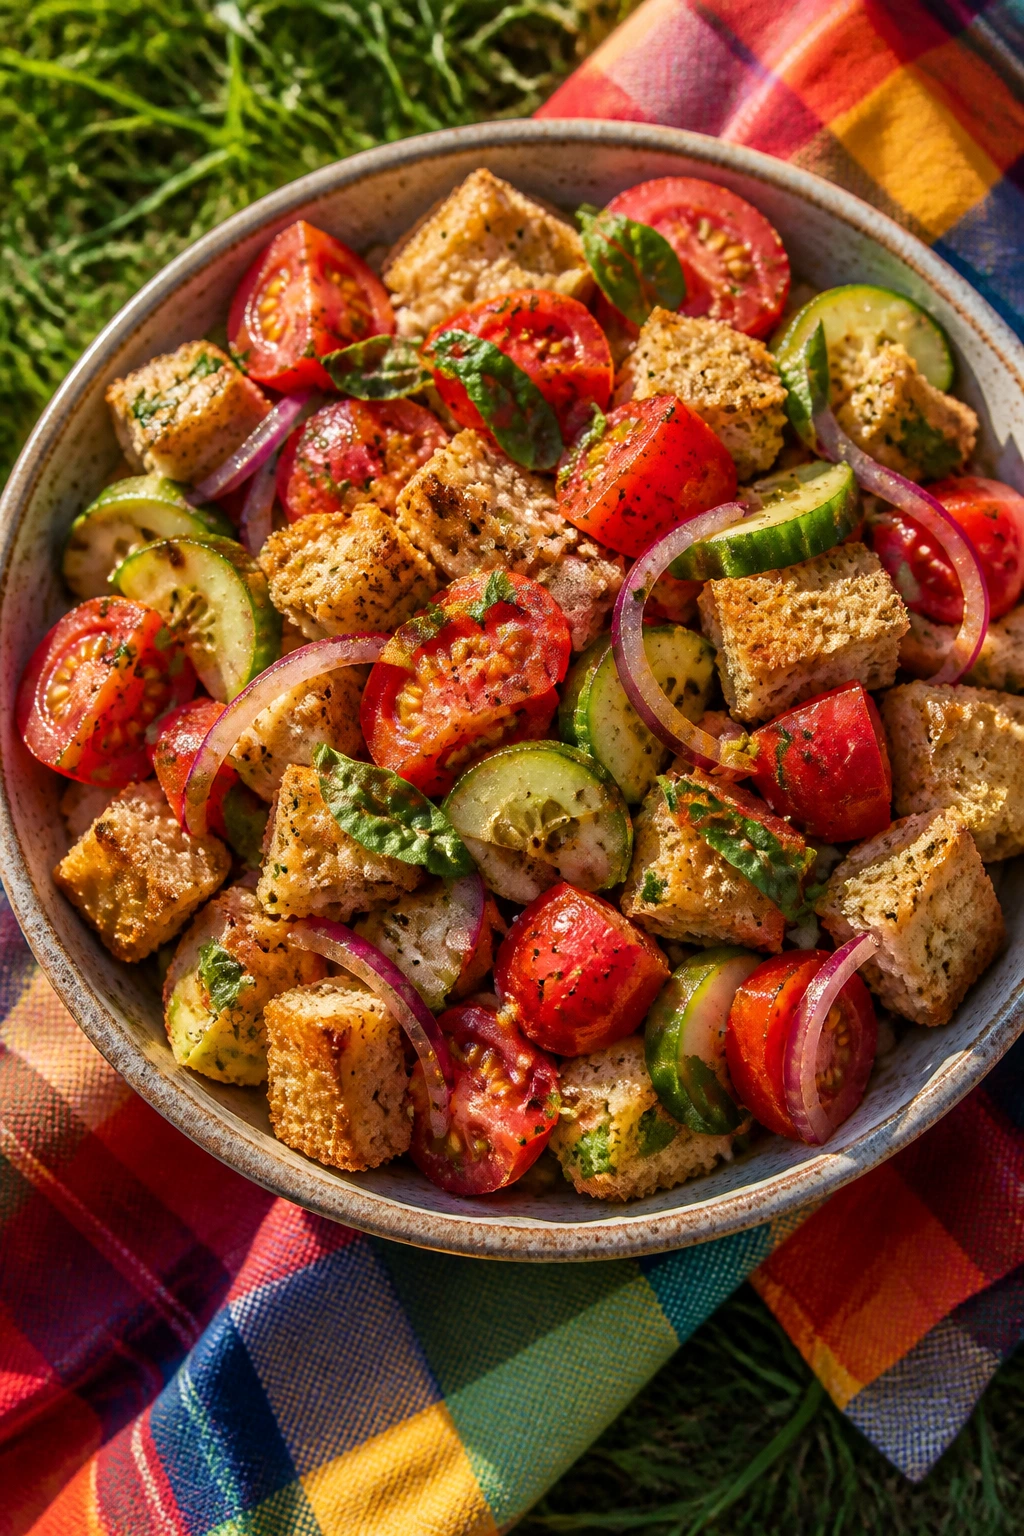
Intro: Panzanella is the rare bread salad that knows exactly what it is. Stale or toasted bread soaks up tomato juice and vinaigrette, cucumbers add crunch, and basil gives the bowl a smell that says summer without trying too hard. It’s a brilliant way to use good tomatoes without making a sandwich.
Why It Works: Bread cubes need enough structure to absorb dressing without turning to mush, which is why toasted bread helps. Tomatoes and cucumbers bring moisture and freshness, while vinegar keeps the whole bowl from getting sleepy. If you toss it and wait a little, the bread catches the good stuff without falling apart.
Key Ingredients:
- 5 cups bread cubes, toasted
- 3 cups chopped tomatoes
- 1 cucumber, sliced
- 1/4 red onion, thinly sliced
- 1/4 cup olive oil
- 2 tablespoons red wine vinegar
- 1/2 teaspoon salt
- 1/4 teaspoon black pepper
- 1/4 cup basil leaves
Quick Steps:
- Toast the bread cubes until crisp at the edges.
- Whisk olive oil, vinegar, salt, and pepper.
- Toss tomatoes, cucumber, and onion with the dressing.
- Add bread and basil, then toss gently.
- Let sit 10 minutes before serving.
Equipment for This Recipe:
- Sheet pan
- Large bowl
- Whisk
- Knife
- Cutting board
How to Serve This Dish: Serve in a wide bowl so the bread doesn’t get crushed. It works as a side for grilled fish, chicken, or anything that needs a little juicy freshness beside it.
Pro Tips for This Recipe:
- Use sturdy bread, not soft sandwich bread.
- Toast the cubes until dry on the outside.
- Add basil near the end so it stays bright.
- Season after the bread softens a bit; the first toss is never the final word.
Variations on This Dish:
- Mozzarella Panzanella: Add torn mozzarella for a softer, richer version.
- Grilled Veggie Version: Swap some tomatoes for grilled zucchini.
- Capers and Olives: Add briny extras for more punch.
Common Mistakes to Avoid with This Dish:
- Don’t use fresh, soft bread if you want texture.
- Don’t drown the salad in dressing.
- Don’t serve it immediately after tossing unless you like very crunchy bread.
Why These Summer Picnic Recipes Work on a Blanket, Not Just a Plate
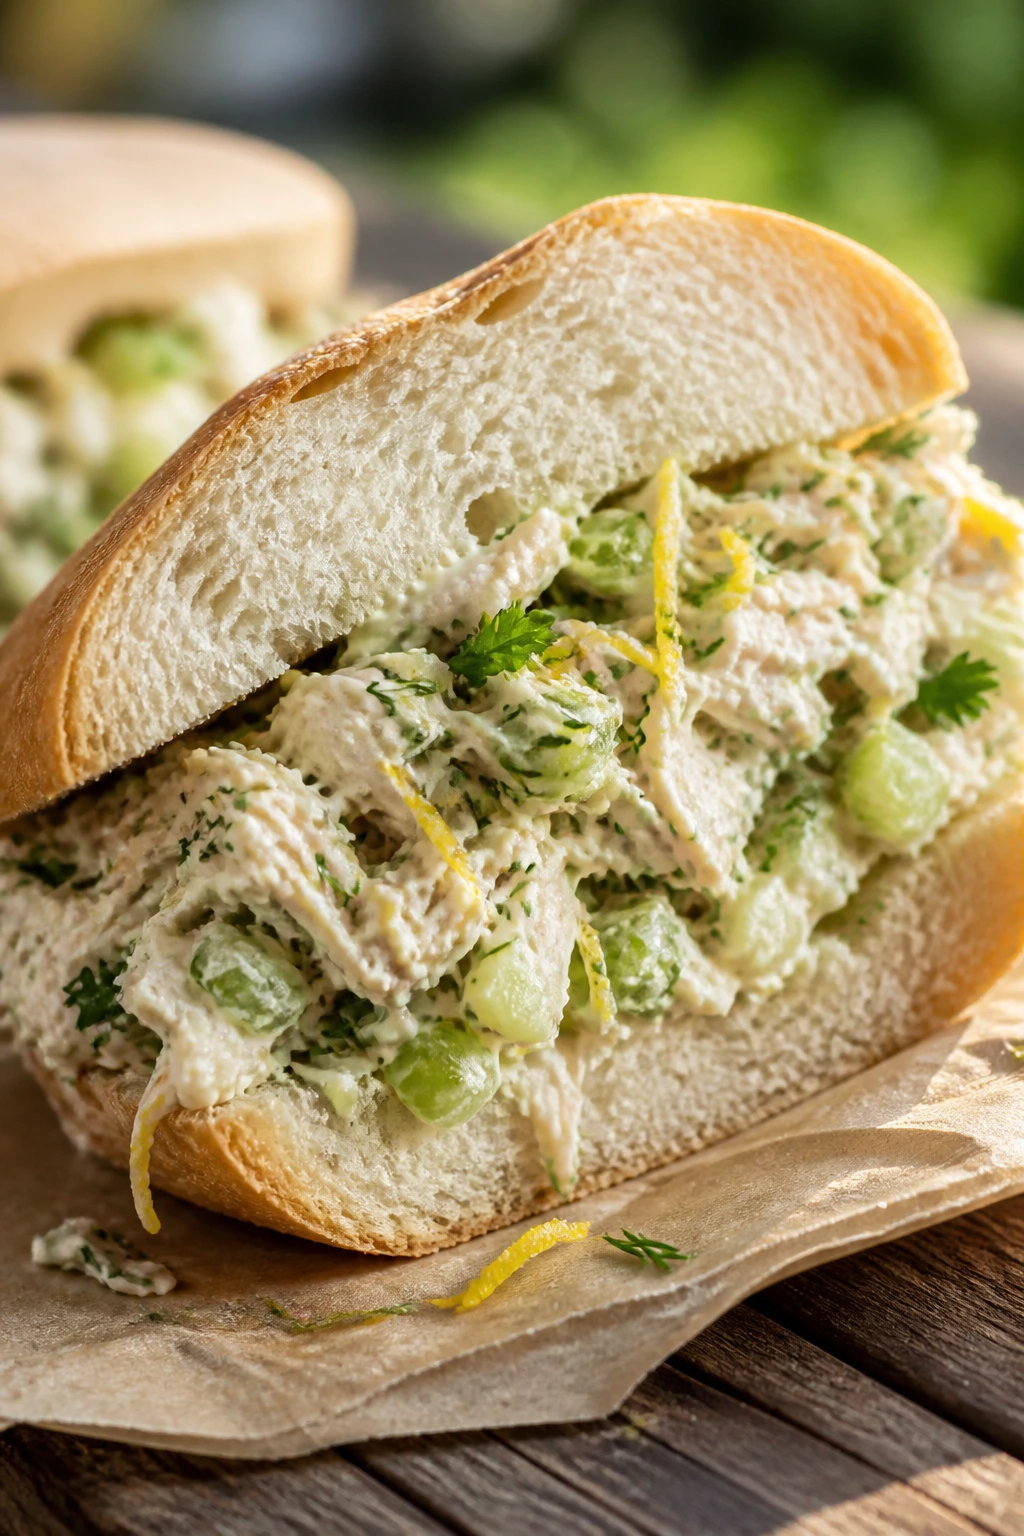
Picnic food lives or dies by restraint. The dishes that do best are the ones that can sit for a bit, travel without drama, and still taste like themselves when you unfold the blanket. That means choosing sturdy breads over fragile ones, dressing greens at the right moment, and leaning on ingredients that taste better after a short chill: herbs, mustard, vinegar, citrus, pickles, grilled vegetables, and chilled fruit.
There’s also the matter of temperature, and this is where a lot of picnic food goes wrong. Cold dishes should stay cold in a cooler with ice packs, and perishable food should not sit out too long once it’s unpacked. The safe rule is simple: keep the cold things cold and don’t leave them lounging in the heat. That matters more for chicken salad, egg dishes, dairy-rich fillings, and anything with mayonnaise than it does for bars, fruit, or crackers.
Picnics are not about perfection. They’re about foods that behave well in real life.
Essential Equipment for These Recipes
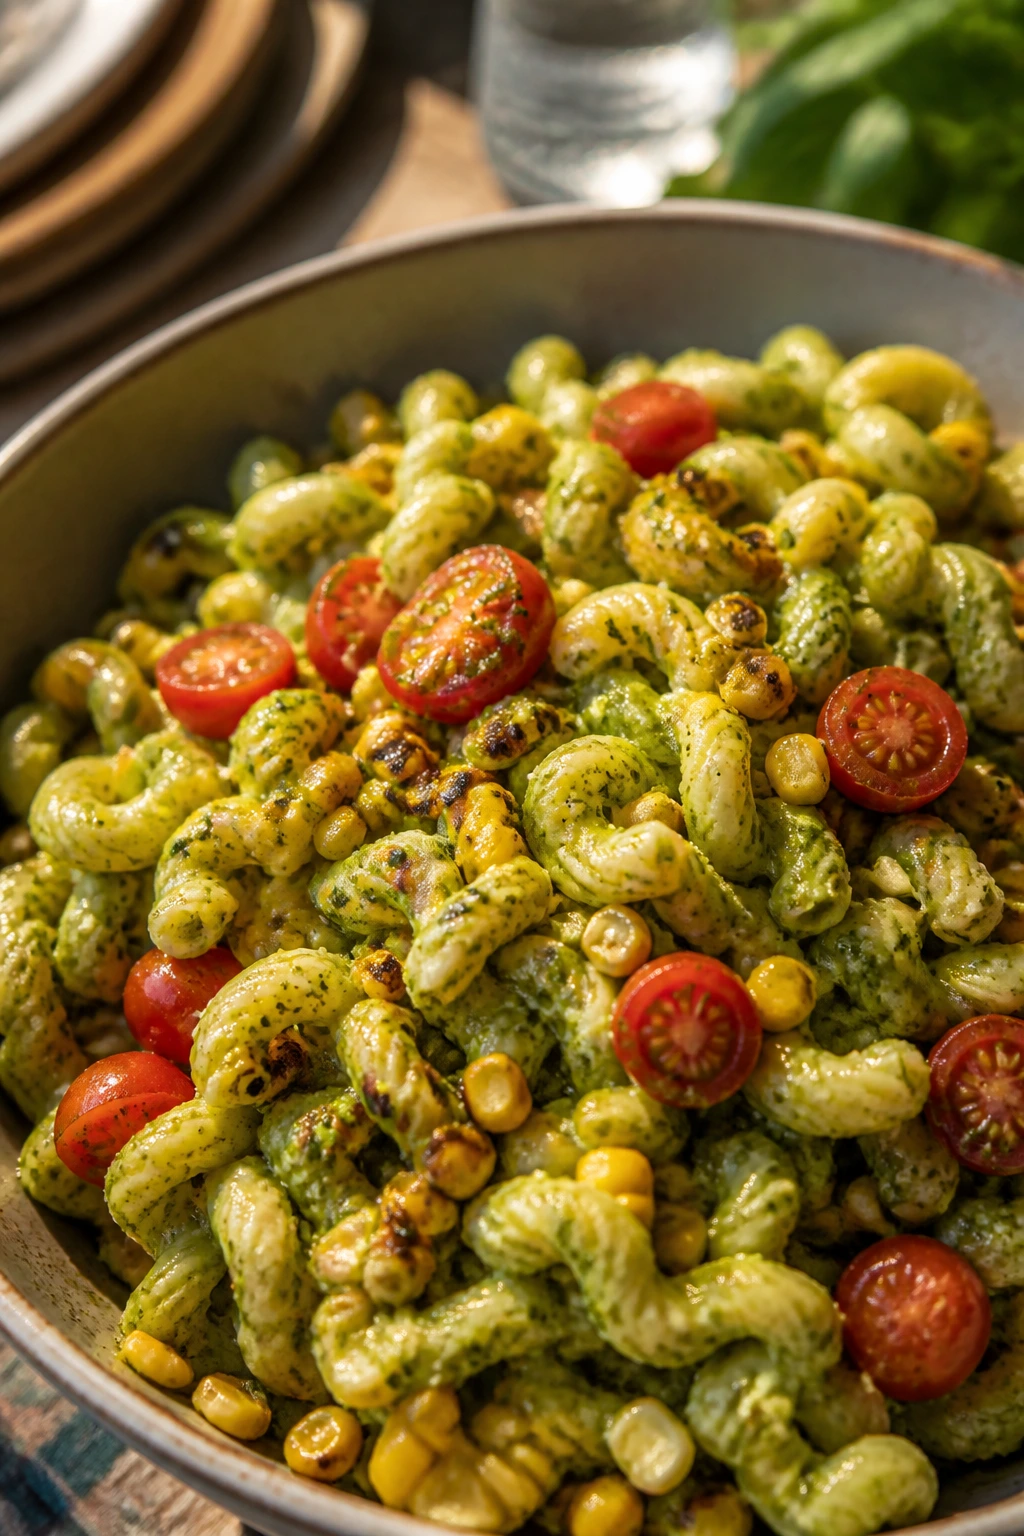
- Insulated cooler: Keeps sandwiches, salads, dairy fillings, and fruit cold enough to travel safely.
- Ice packs or frozen water bottles: They pull double duty by chilling the food and giving you cold drinks later.
- Airtight containers: Best for pasta salad, potato salad, fruit, and anything with dressing.
- Mason jars or lidded cups: Handy for layered salads, desserts, and drinks that need a clean seal.
- Parchment paper: Helps wrap sandwiches, bars, and pinwheels without smearing them.
- Sharp chef’s knife: Clean cuts matter for tomatoes, melon, wraps, bars, and herbs.
- Cutting board with a damp towel underneath: Stops the board from skating around while you slice.
- Sheet pans: Useful for bars, hand pies, snacks, and anything that needs to cool in a single layer.
- Mixing bowls in 2 or 3 sizes: One big bowl is not enough when you’re making several picnic pieces.
- Small whisk or fork: Good for vinaigrettes, dressings, and quick sauces.
- Serving spoon and tongs: Makes packing and serving easier when you’re away from the kitchen.
- Reusable cold packs: Better than loose ice for keeping containers dry.
Smart Shopping and Ingredient Tips
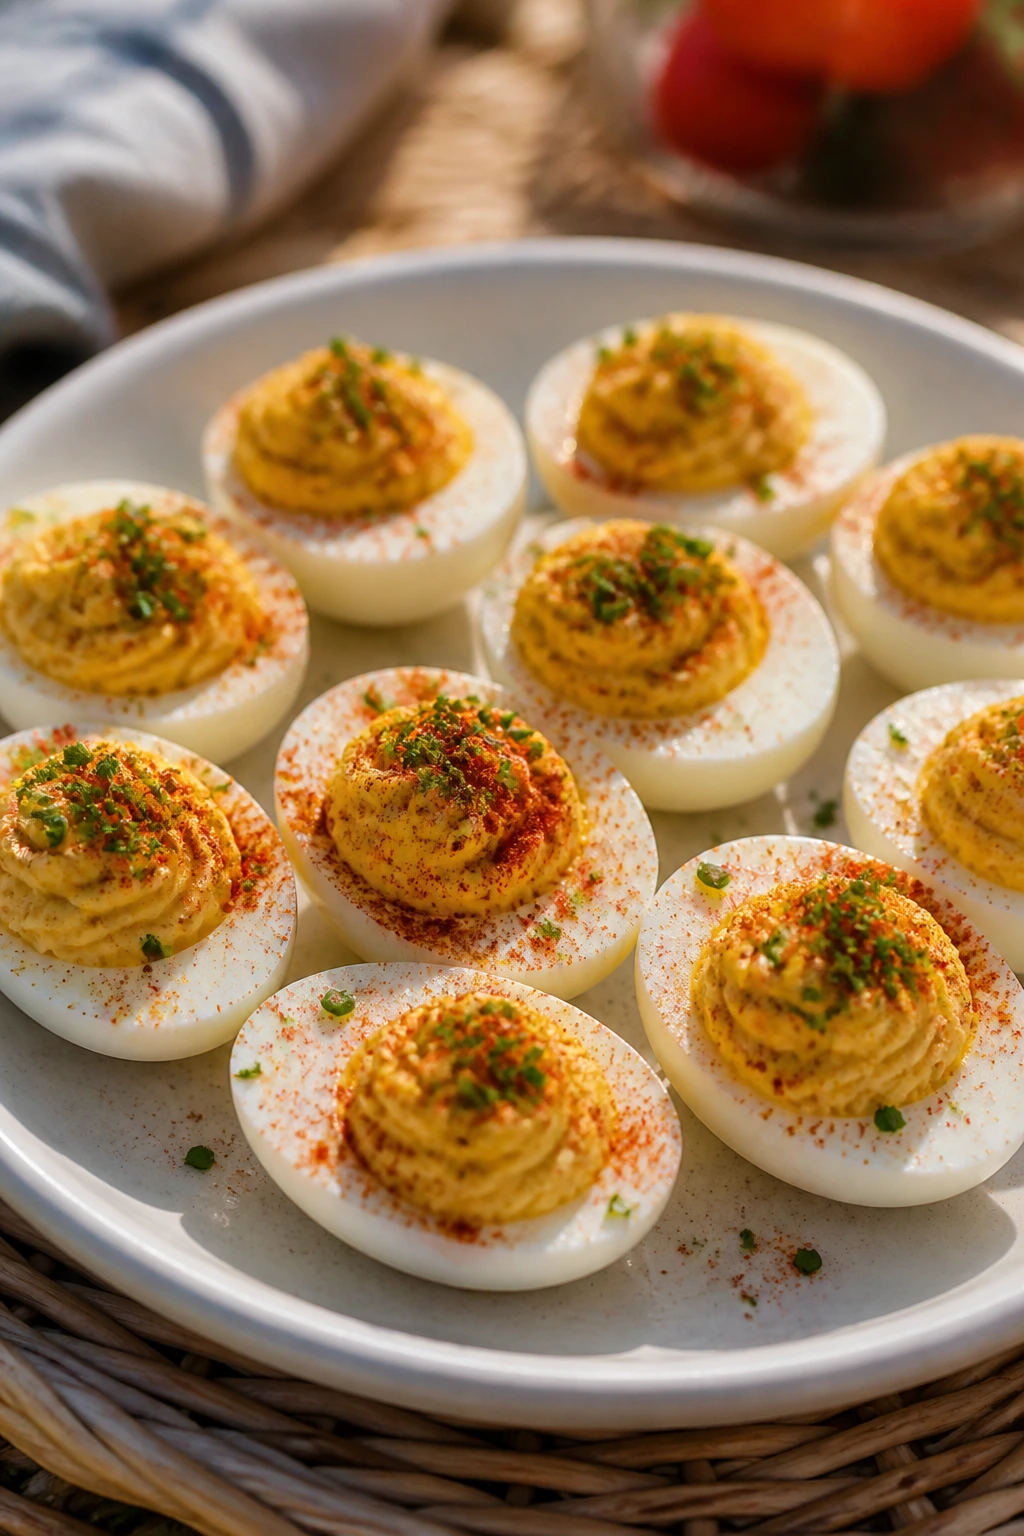
Fresh summer food rewards a little pickiness. Buy tomatoes that smell like tomatoes, not just red ones that look fine from a distance. For picnic salads, cherry or grape tomatoes are often safer than big slicing tomatoes because they leak less and keep their shape better in a container. If you’re making anything with bread, choose something sturdy: brioche rolls for soft sandwiches, ciabatta or country bread for panzanella, and tortillas that bend without cracking.
Cheese matters too. Block feta, cheddar you shred yourself, and halloumi that still feels firm in the package all behave better than the softest pre-crumbled or pre-shredded versions. Pre-shredded cheese can work in a pinch, but for recipes where you want a clean melt or a fresh bite, the block gives you more control.
For proteins, chicken thighs stay juicier than breasts in skewers, sliders, and cold salads. Deli turkey and ham should be sliced thin so wraps roll cleanly. If you’re buying canned tuna, choose one that looks solid and doesn’t smell aggressively fishy when opened. And for fruit, go slightly firmer than you would for dessert eating at home; a peach that feels perfect on the counter can turn mushy after an hour in a picnic basket.
Herbs are worth spending on. Dill, mint, basil, parsley, chives, and cilantro are doing the heavy lifting in a lot of these recipes, and tired herbs make everything taste dull. Pick bunches with clean stems and leaves that don’t look limp at the edges.
How to Serve These Recipes

Presentation: Use shallow bowls, trays, and parchment-lined containers so the food looks intentional when it comes out of the cooler. Sandwiches cut on the diagonal, skewers lined up neatly, and salads finished with herbs or crumbled cheese all read better than a big jumble in one deep bowl.
Accompaniments: Pair richer items like BBQ sliders, sausage rolls, and quiches with cool sides such as fruit salad, cucumber salad, or tomato panzanella. Leaner wraps and salads benefit from crunchy extras like pretzels, kettle chips, or cornbread muffins. A picnic basket gets better when each dish has one texture beside it that does the opposite.
Portions: Plan 1 to 2 sandwiches or wraps per adult, about 1 cup of pasta or potato salad, and 2 to 4 pieces of a snack item like deviled eggs, pinwheels, or skewers. For desserts, bars and treats are easiest when cut into small squares; people take more when the pieces are modest, which is half the charm.
Beverage Pairing: Sparkling berry lemonade fits the whole spread, as does cold brewed iced tea with lemon. If you want something less sweet, cucumber water or lime seltzer keeps the meal feeling crisp.
Additional Tips and Flavor Boosters
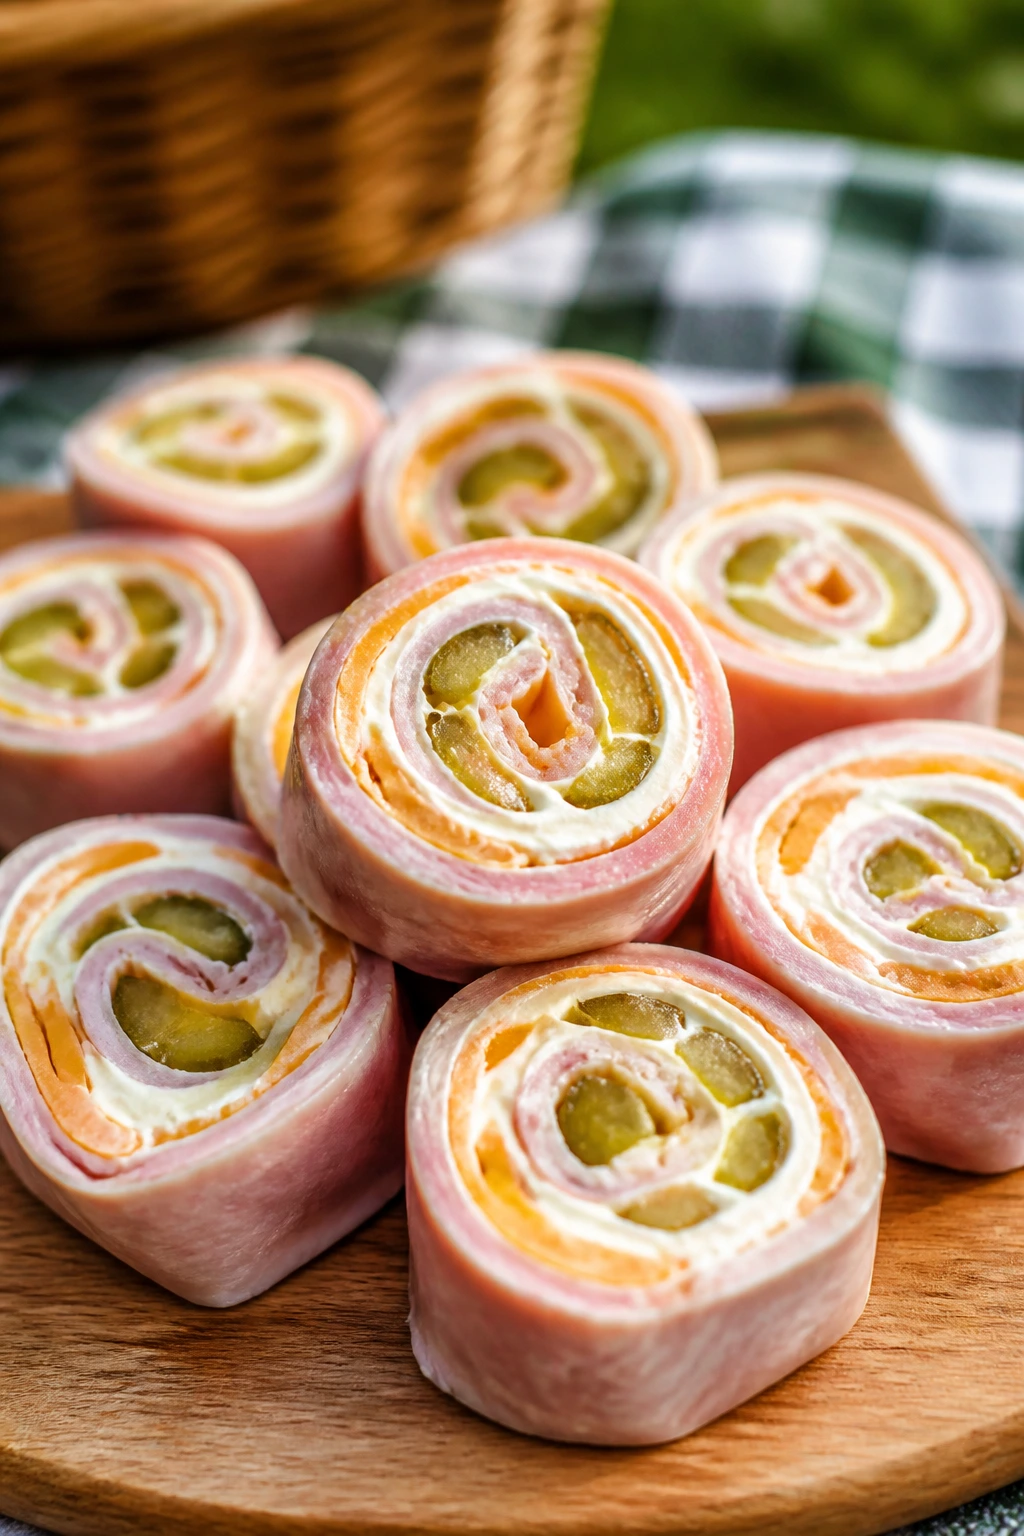
Flavor Enhancement: Salt and acid are your two best picnic tools. A squeeze of lemon on chicken salad, a splash of vinegar in potato salad, or a little lime on fruit can wake up a dish that sat in the fridge for an hour too long.
Customization: Build your basket around what’s already good in the produce aisle. Swap strawberries for blueberries in the spinach salad, peaches for nectarines on the flatbread, or use roasted peppers instead of raw ones in wraps if you want a sweeter note.
Serving Suggestions: Keep a tiny container of flaky salt, pepper, or extra herbs in the cooler. A final pinch of salt over watermelon, cucumber salad, or tomatoes right before eating is one of those small moves that makes food taste more expensive than it was.
Make-It-Yours: For dairy-free eaters, use hummus, vinaigrette, or olive oil-based fillings instead of cream cheese and mayo-heavy options. For gluten-free baskets, lean hard on skewers, salads, stuffed peppers, fruit, and rice or noodle dishes made with gluten-free pasta. For kids, keep heat low and choose simpler flavors: pinwheels, fruit bars, muffins, and mild chicken salads usually vanish first.
Make-Ahead, Storage, and Reheating Guidance
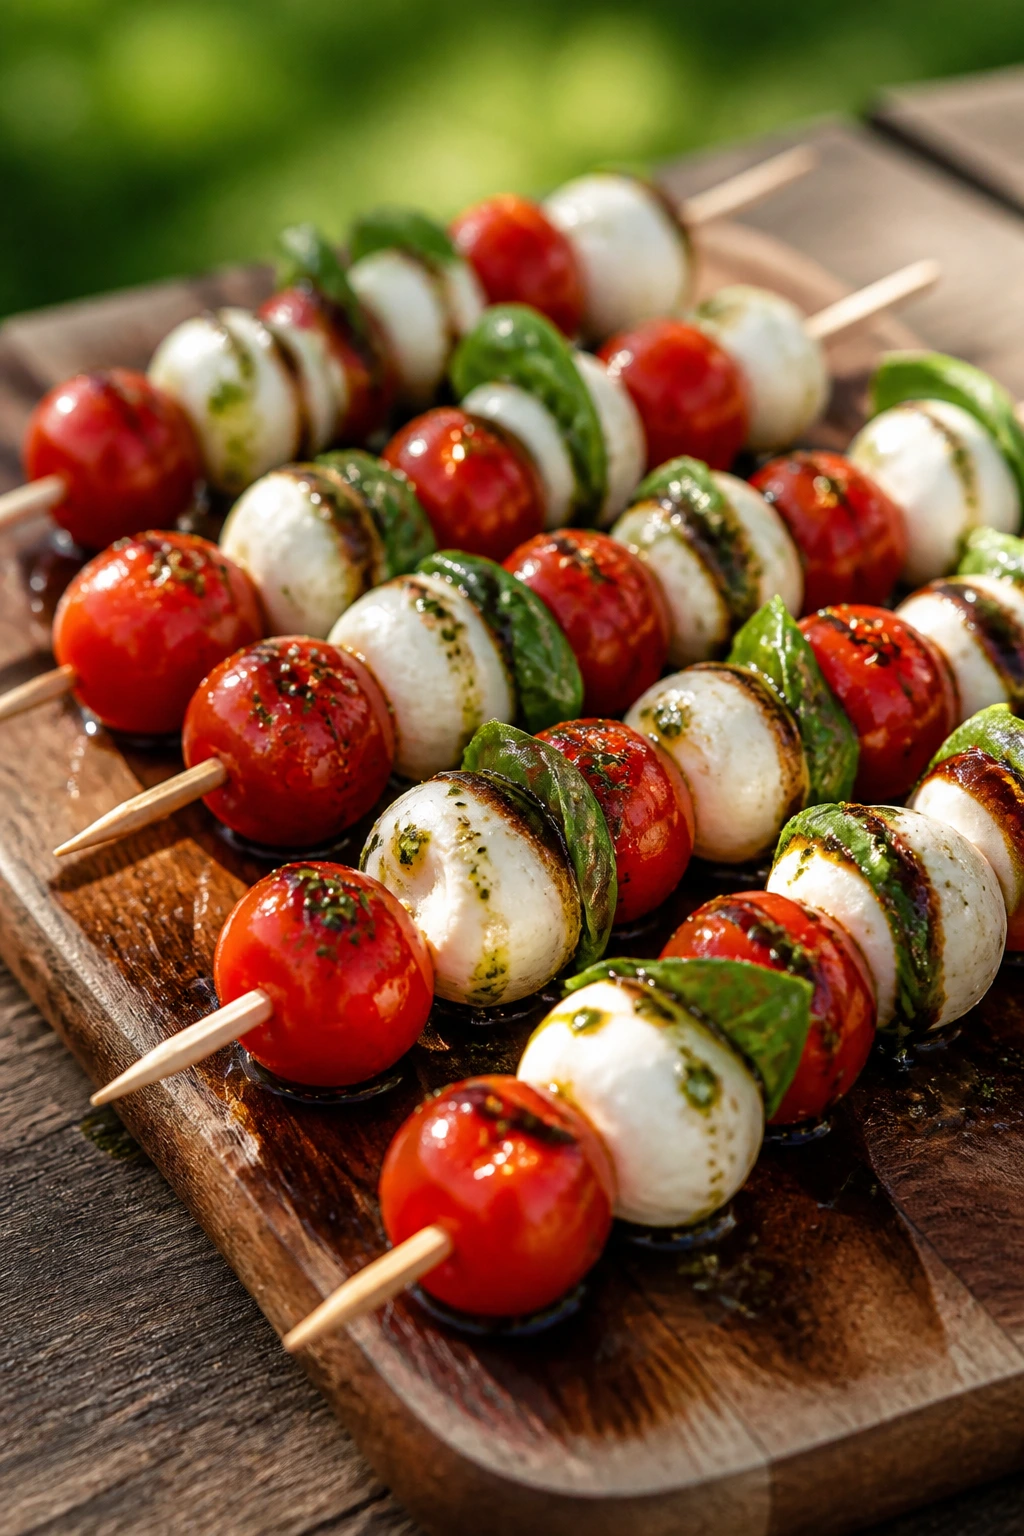
Most of these recipes keep best when the wet and dry parts are handled separately until the last possible minute. Chicken salad, pasta salad, potato salad, macaroni salad, and noodle salads usually hold for 3 to 4 days in the refrigerator if they’re stored in airtight containers. Wraps and sandwiches are best within 24 hours, though they can survive a little longer if the tomatoes, greens, and dressings are packed separately and assembled on site.
Bars, snack mix, Rice Krispie treats, and cookies can usually sit at room temperature for 2 to 3 days if the weather is cool and the container stays sealed. If you’re packing them for a picnic, line the container with parchment so the pieces don’t stick together. Fruit-based desserts like lemon bars and cheesecake jars should be refrigerated until serving and kept cold in a cooler with ice packs.
For reheating, use gentle heat. Mini quiches and sausage rolls do well in a 325°F oven for about 8 to 12 minutes, just until warm and crisp again. Tomato pie squares can be warmed the same way, though many people prefer them room temperature. Skewers are fine at room temp if they were cooked through, but if you want them hot, a quick 300°F oven or a few minutes in a covered skillet works better than blasting them in the microwave. If a dish gets soggy, the oven is your friend; if it gets dry, a small splash of dressing or a dab of sauce usually fixes it.
A cooler helps, but it isn’t magic. Keep cold food below 40°F when you can, and once perishable dishes are out, aim to serve and pack them back up promptly. If the evening is hot, shorten the time on the blanket and keep a backup ice pack nearby. That single habit saves more picnic food than any fancy recipe trick.
Variations and Adaptations to Try
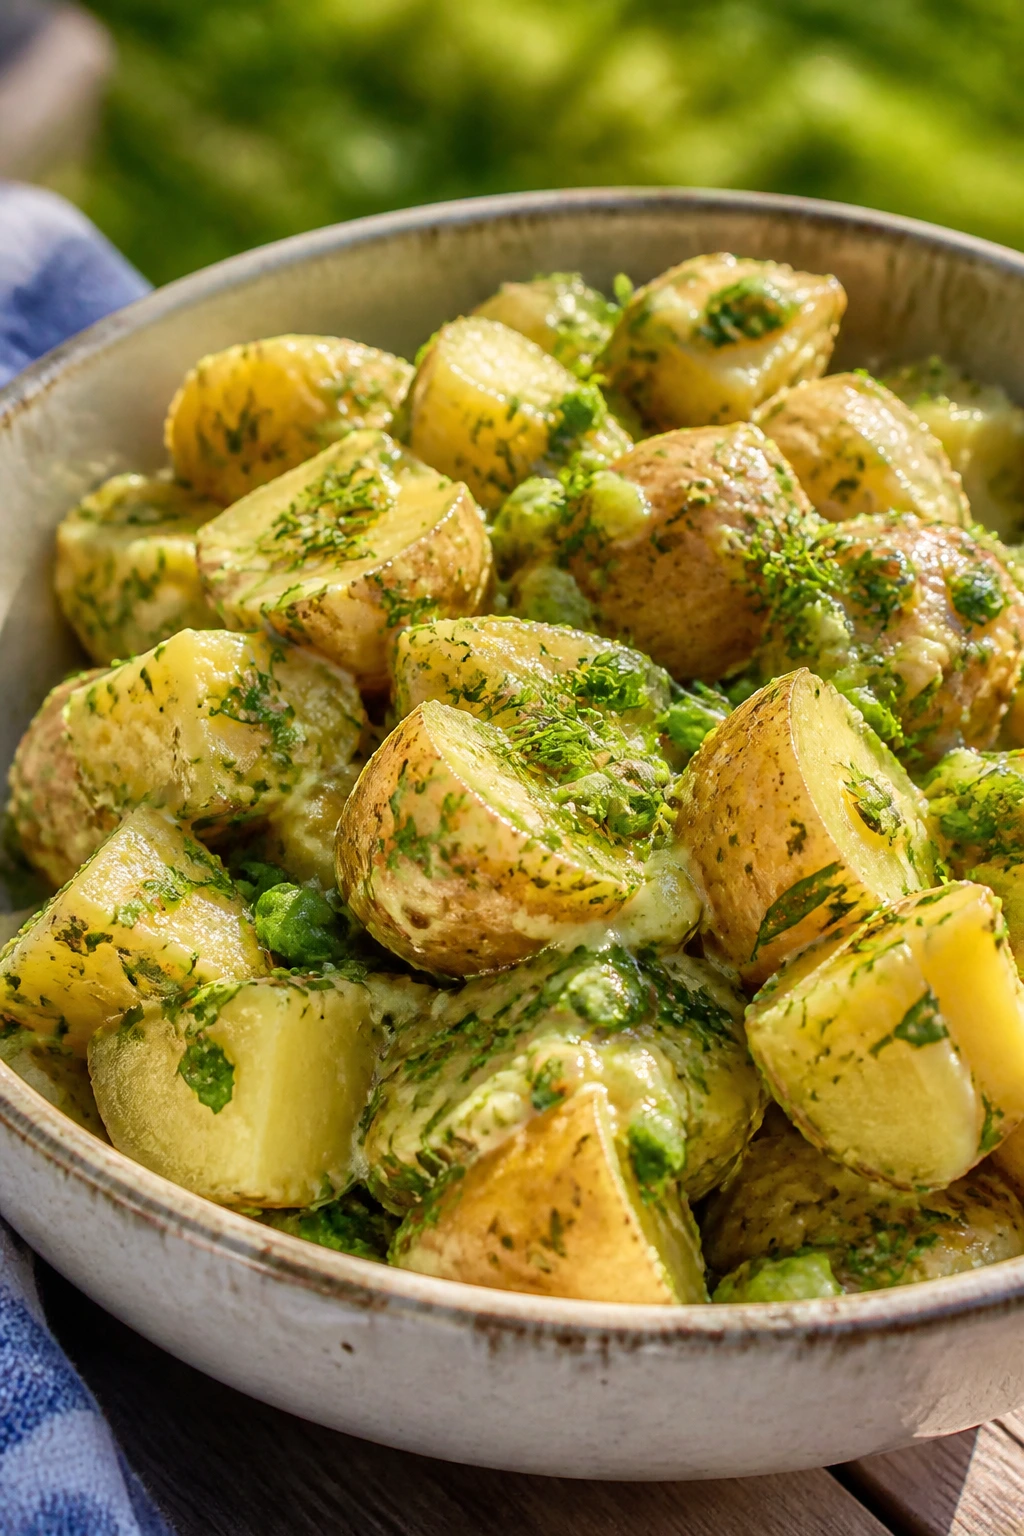
The No-Dairy Basket: Lean on fruit salad, panzanella, hummus wraps, cucumber salad, chicken skewers, and vinaigrette-based pasta salads. Skip cream cheese, yogurt sauces, and cheesier fillings, or replace them with olive oil, avocado, or tahini where the recipe allows.
The Gluten-Free Route: Build the meal around deviled eggs, stuffed peppers, Caprese skewers, corn salad, melon bites, fruit salad, and grilled skewers. Use gluten-free pasta for the noodle salads and swap the tortilla wraps for lettuce cups or rice paper if you want handheld options.
The Kid-Friendly Spread: Stick with mild pinwheels, cornbread muffins, Rice Krispie treats, fruit salad, honey butter, and chicken salad with the herbs dialed back. Leave the chili flakes and jalapeños on the side instead of mixing them into the base.
The Heat-Lover’s Basket: Add buffalo pinwheels, chili-lime fruit, spicy snack mix, jalapeño corn salad, and skewers with a little cayenne or hot sauce in the marinade. Keep one cool dish nearby, because heat tastes better when it has something cold to stand next to.
The Mostly-Plant-Based Lineup: Hummus wraps, panzanella, cucumber salad, corn salad, Caprese skewers, fruit salad, and cheese-stuffed peppers make a strong spread. Add tofu or halloumi skewers if you want more protein without leaning on meat.
The Big-Batch Picnic Plan: Pick 2 salads, 2 handheld items, 1 snack, 1 dessert, and 1 drink, then repeat the easiest item if the crowd is large. Pasta salad, potato salad, bars, and snack mix are the pieces that scale with the least fuss.
Common Mistakes to Avoid
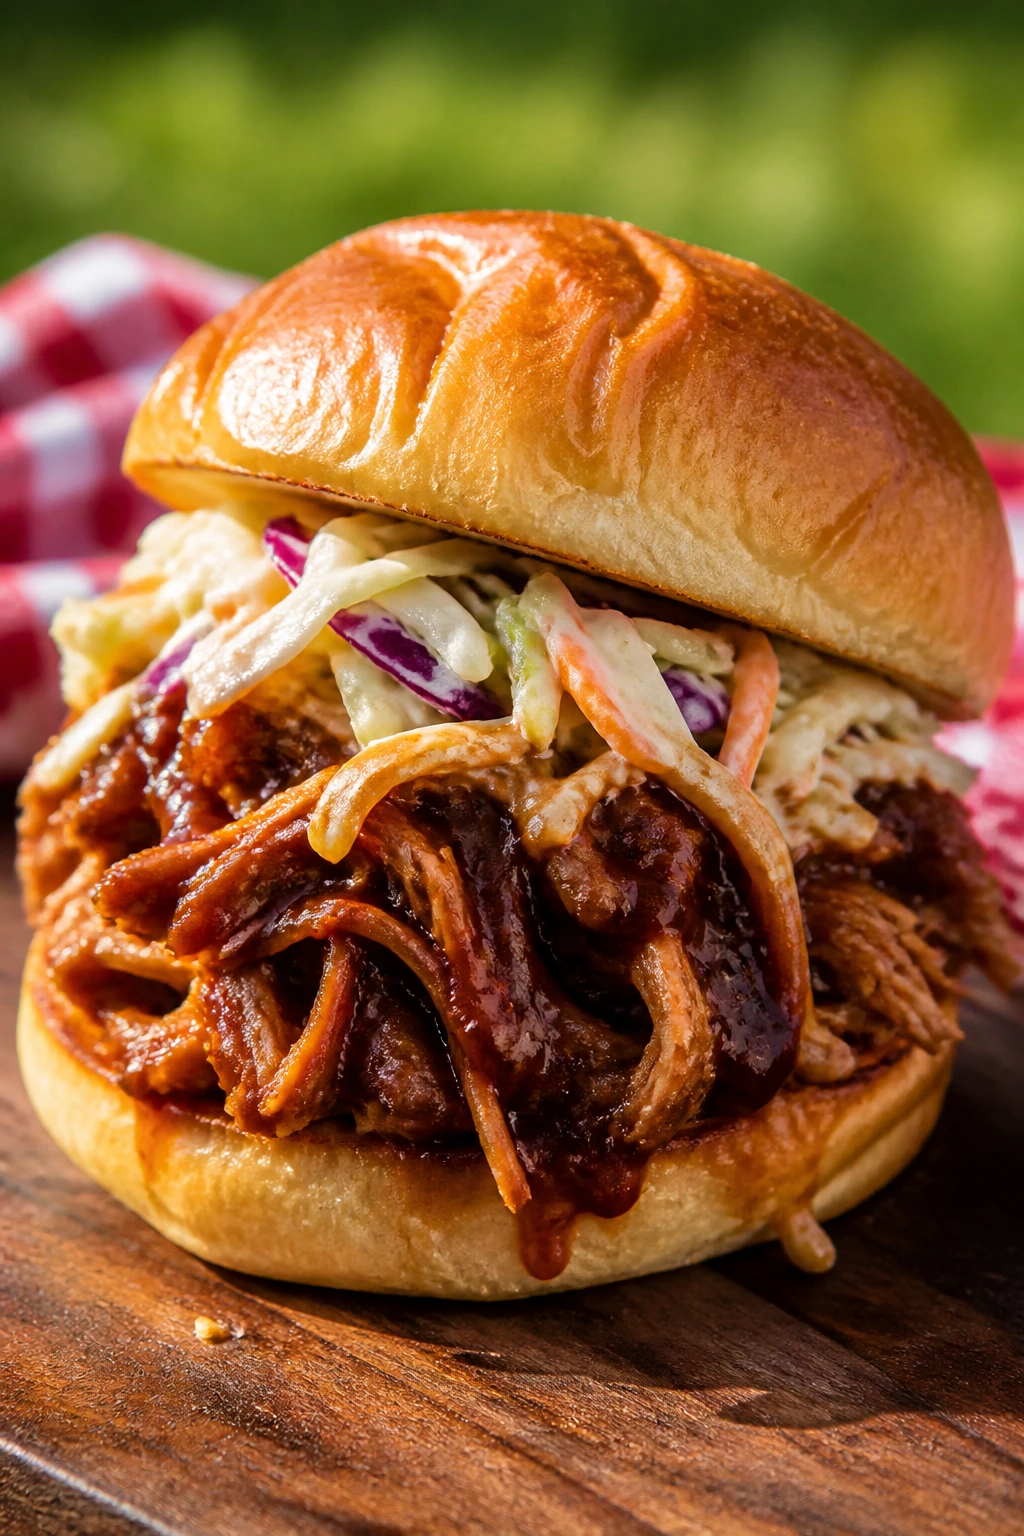
Soggy bread is the first enemy. If tomatoes, cucumbers, or dressed greens touch the bread too early, the whole sandwich turns limp and sad. Fix it by adding a moisture barrier like mayo, butter, lettuce, or parchment, and pack juicy fillings separately whenever possible.
Overcooked pasta shows up in almost every picnic salad mistake. Soft noodles keep drinking dressing until they turn bloated and gluey, so cook them to just al dente and rinse only enough to stop the cooking. The same logic applies to soba and orzo: a little bite is what keeps the bowl alive later.
Warm cooler, warm food, warm regrets. If dairy, eggs, chicken, or cut fruit are left out too long, they lose both safety margin and texture. Pack cold items with ice packs, keep the cooler closed, and return perishables to cold storage as soon as the meal winds down.
Another classic misstep: too much dressing too soon. Pasta salad, potato salad, and noodle bowls often look dry at first, then loosen up after 15 to 20 minutes. Start with less than you think you need, taste after chilling, and add more only if the dish asks for it.
Using the wrong bread matters more than people expect. Soft sandwich bread can be lovely for chicken salad, but it is a bad match for juicy tomatoes or loaded wraps. Choose the bread for the filling, not the other way around.
And don’t ignore texture. A basket full of soft foods feels flat, even if everything tastes fine. You want contrast: crunchy nuts beside creamy dips, crisp cucumbers beside rich sliders, flaky pastry beside cold fruit. That’s the picnic rhythm.
Frequently Asked Questions
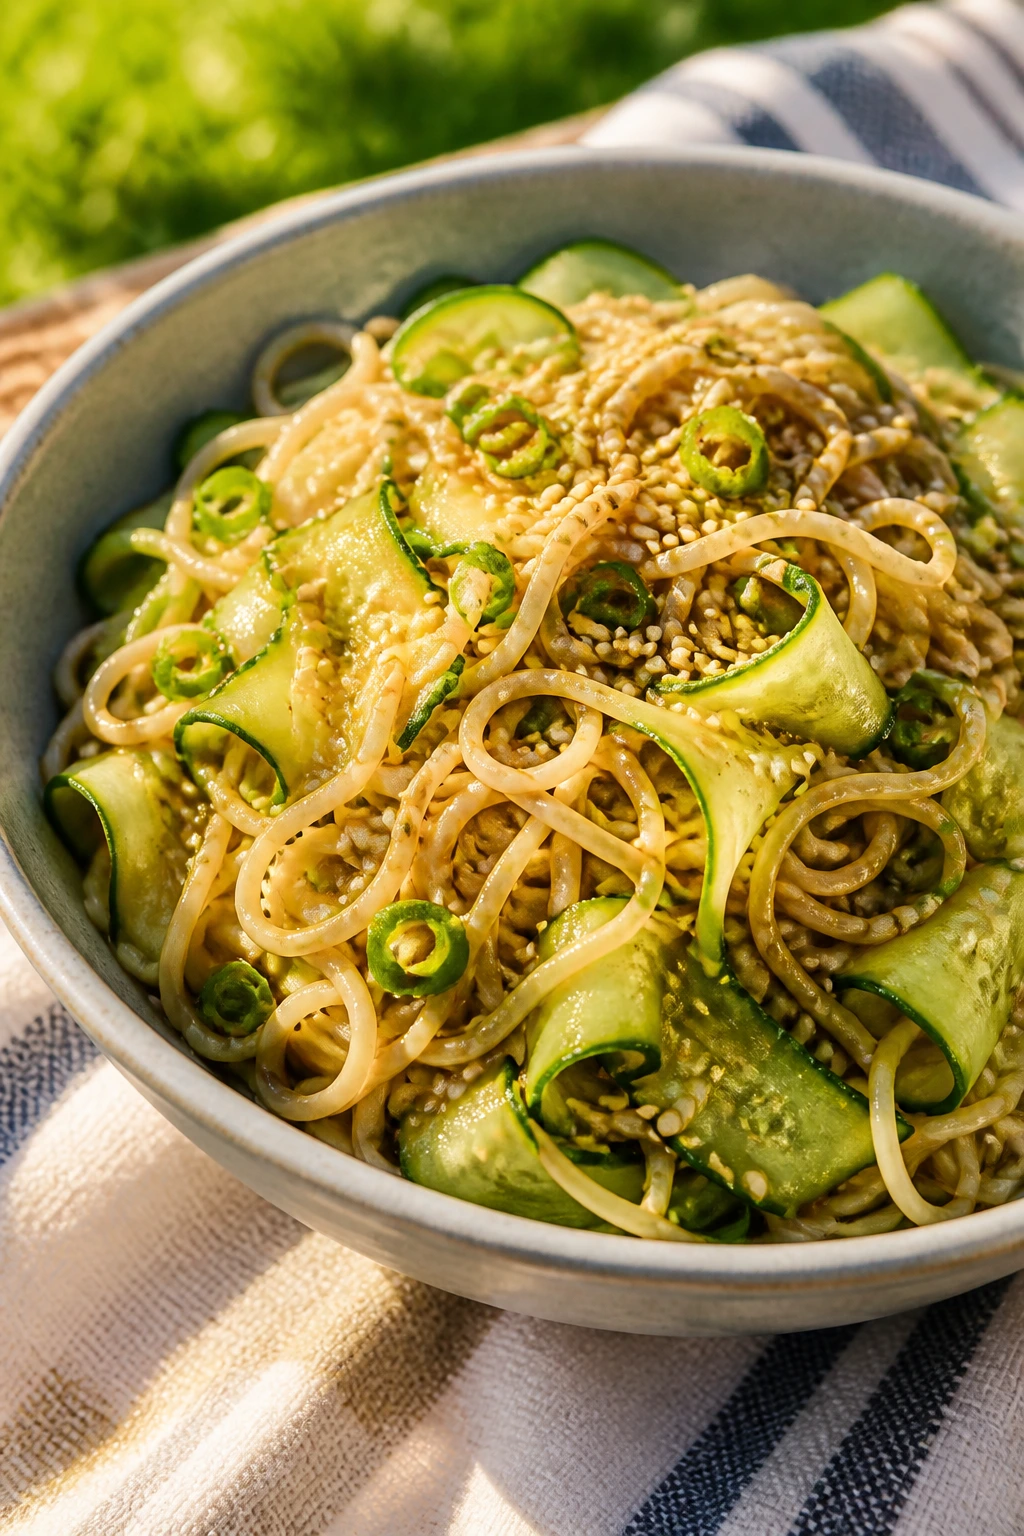
Can I make these recipes the day before a picnic?
Yes, and a lot of them improve overnight. Pasta salads, potato salad, bars, snack mix, quiches, and marinated vegetables are usually even better after a few hours in the fridge. Sandwiches and wraps are the ones that need more caution, so keep the wet parts separate until closer to serving.
What foods hold up best in a cooler?
Cold salads in airtight containers, wrapped pinwheels, bars, deviled eggs in a single layer, and sturdy fruit like grapes, berries, and melon do well. Keep a few ice packs on top and bottom of the cooler load so the chill doesn’t pool in just one spot. Loose, warm food is where things start sliding downhill.
How do I keep sandwiches from getting soggy?
Use a barrier layer like mayo, butter, cream cheese, or a thick spread, then put lettuce, cheese, or sliced meat between the bread and any juicy fillings. Tomato slices should be patted dry and packed separately when possible. Toasting the bread lightly also helps, especially for chicken salad and turkey wraps.
Can I substitute store-bought ingredients without ruining the recipe?
Absolutely. Store-bought pesto, rotisserie chicken, bottled vinaigrette, and pre-made pie dough all have a place here. The trick is to taste as you go, because packaged ingredients vary more in salt and richness than homemade versions do.
Which recipes are best for a crowd?
Pasta salad, potato salad, snack mix, bars, pinwheels, and sliders are the easiest crowd pieces because they scale cleanly. A good rule is to make one hearty salad, one handheld item, one snack, and one sweet so people can graze without opening every container at once.
What if my pasta salad turns dry after chilling?
Stir in a spoonful or two of olive oil, vinaigrette, or a little more dressing right before serving. Pasta absorbs liquid as it rests, so a salad that looked perfect at first may need a refresh after an hour. Taste again after adding the extra dressing, because the salt may need a small bump too.
Can I make picnic food without mayo?
Yes. Use vinaigrettes, hummus, yogurt, pesto, olive oil, or avocado-based spreads depending on the dish. Potato salad, cucumber salad, noodle salad, fruit, skewers, and many wraps work well without mayo at all.
What’s the easiest dessert to carry?
Bars travel better than anything soft or frosted. Lemon bars, blackberry cobbler bars, Rice Krispie treats, and snack-size cheesecake jars all pack neatly and don’t melt into a mess. If the weather is hot, keep the dessert in the cooler until the last possible minute.
How long can picnic food sit out?
Perishable food should not sit out long once it leaves the cooler. Keep it out as briefly as you can, and put leftovers back into cold storage promptly. If the air is hot, shorten that window even more and use extra ice packs rather than guessing.
A Cooler Full of Easy Evenings

The nicest thing about a good picnic is that it doesn’t need to be complicated to feel complete. A few smart salads, a couple of handheld bites, one sweet thing, and a cold drink can carry an entire evening without a stove full of pans or a kitchen that looks like a storm passed through it.
These summer picnic recipes work because they respect the setting. They travel well. They taste good cold. They keep their shape long enough for people to actually eat them. That’s the standard, and honestly, it’s a pretty good one to cook by whenever the evening is warm and the table is somewhere near the grass.