
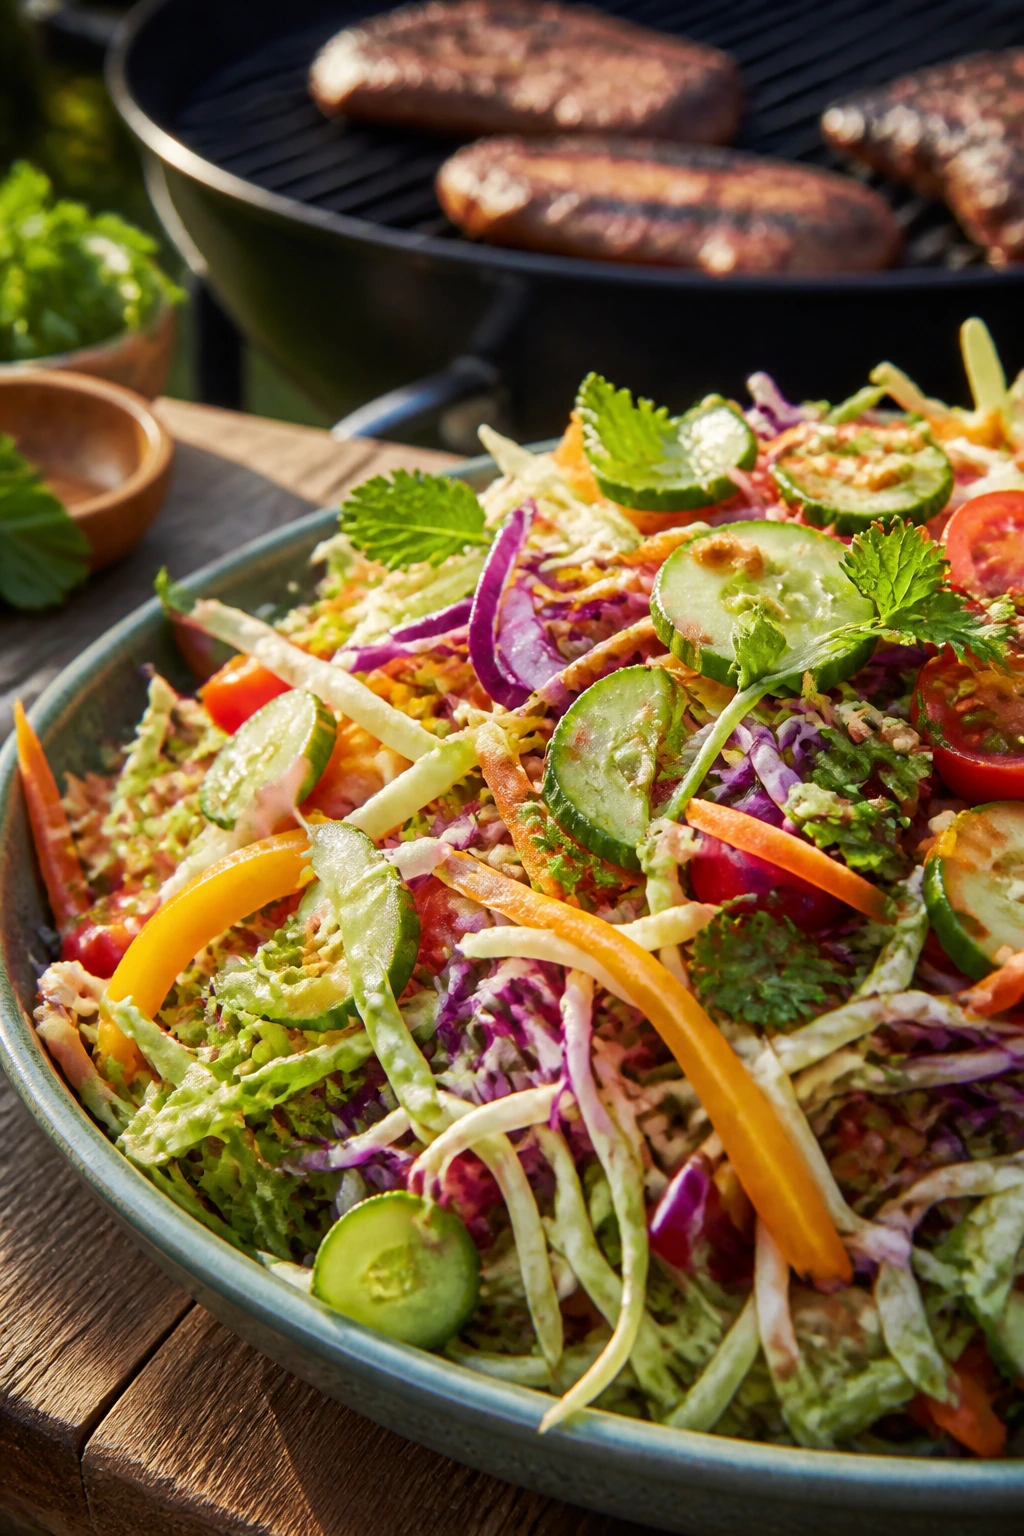
The best side salad for summer cookouts is the bowl that still tastes alive after thirty minutes near a smoking grill. Not limp. Not drowned. Bright, cold, crunchy where it should be crunchy, and salty enough to wake up a plate of ribs or a burger dripping with cheese.
That’s why a good side salad for summer cookouts has to do more than look cheerful in a serving bowl. It has to survive a cooler, hold its own next to charred meat, and still taste like someone actually seasoned it, not like they waved a bottle of dressing over a pile of lettuce.
Some of the salads here are creamy and old-school. Some lean hard on vinegar, lemon, lime, or balsamic. A few bring fruit, herbs, or grilled vegetables into the mix, which is where cookout food gets interesting. You want contrast on the plate, not another heavy thing that sits there like a brick.
The smart move is to build the bowl around texture first, then let the dressing do the rest.
Why These Salads Earn a Spot Next to the Grill
- They stay interesting after chilling: A vinegar-heavy slaw or a grain salad can sit in the fridge long enough to come to life, not collapse into mush.
- They cut through smoke and fat: Lemon, lime, mustard, and sharp herbs keep burgers, sausages, and brisket from taking over the whole plate.
- They travel without drama: Most of these salads pack well in a cooler, and several get better after a short rest.
- They cover every craving: You’ve got creamy, crisp, fruity, starchy, and bean-based options here, so the table doesn’t lean in one direction.
- They work with a messy cookout menu: Hot dogs, chicken thighs, ribs, grilled vegetables, and sandwiches all need a cold side that knows when to step in and when to stay quiet.
- They don’t all depend on lettuce: That matters. Romaine goes soft fast in heat. Cabbage, potatoes, beans, pasta, cucumber, and fruit behave much better.
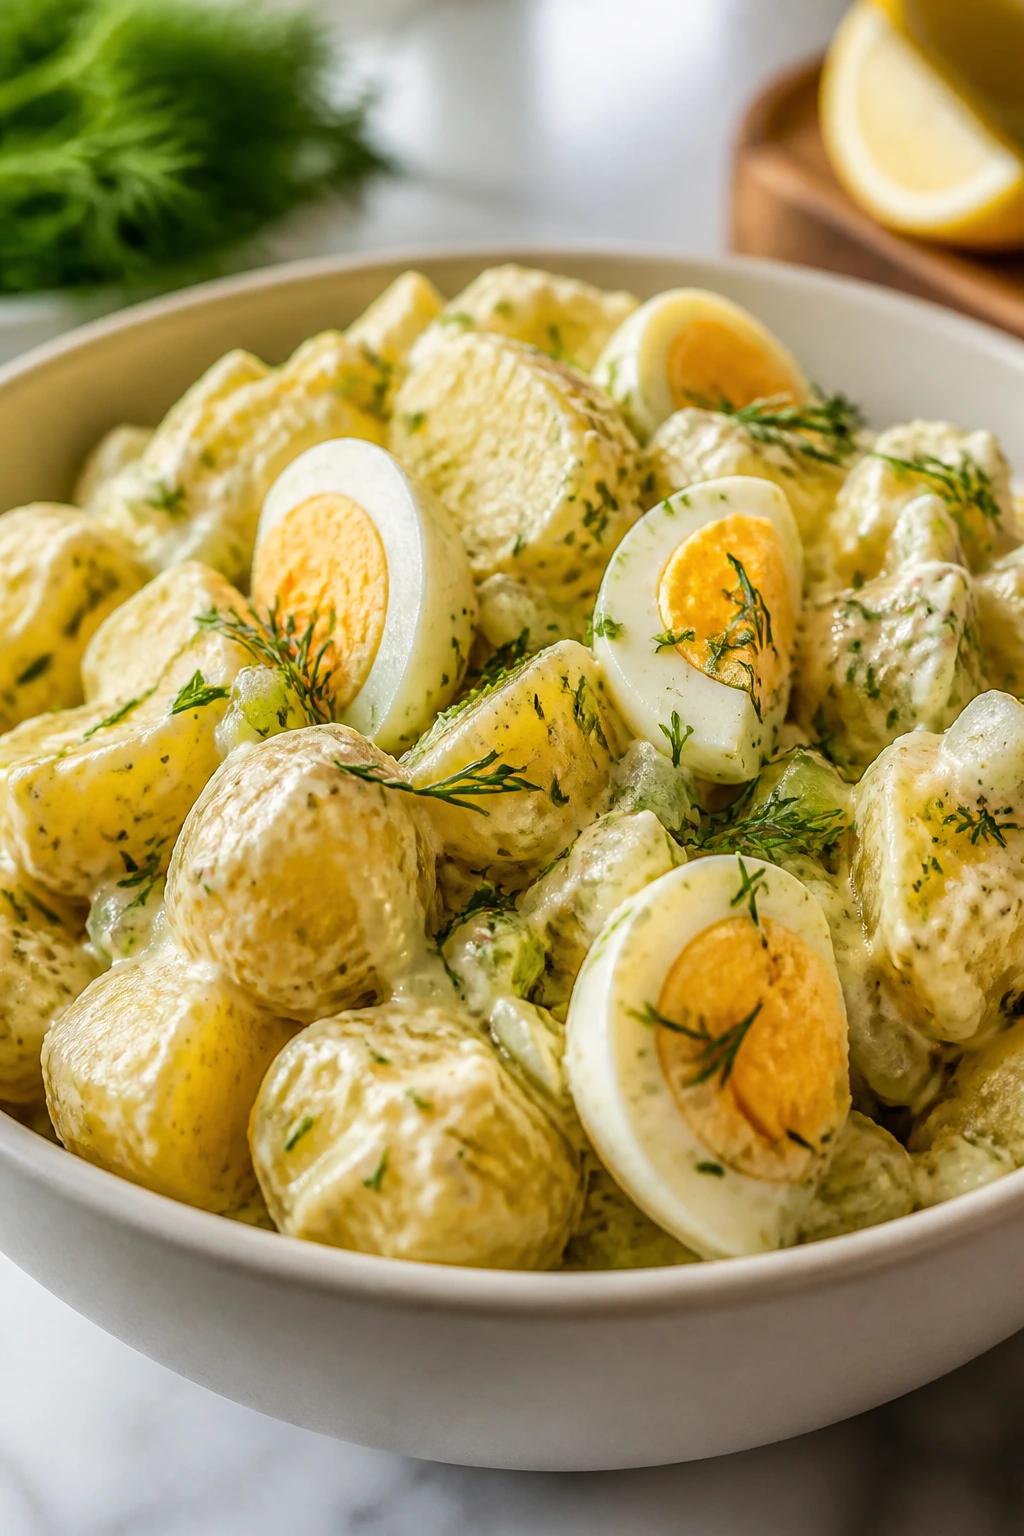
1. Classic Creamy Potato Salad with Dill and Mustard
A good creamy potato salad should feel cool and slightly plush on the fork, with enough mustard to keep the mayo from turning sleepy. This version leans on Yukon Gold potatoes, celery, dill, and hard-boiled eggs, so each bite has a little softness, a little crunch, and a clean mustard edge. It’s the bowl that disappears fast when the burgers are stacked on paper plates.
Why It Works:
Yukon Golds hold their shape without turning waxy or gluey, which is exactly what you want after boiling. The dressing has both mayonnaise and Dijon, so it tastes round but not heavy, and the splash of vinegar keeps the salad from tasting flat after it chills. A short rest in the fridge lets the potatoes absorb salt and mustard instead of just wearing them on the surface.
Key Ingredients:
- 2 pounds Yukon Gold potatoes, cut into 1-inch chunks
- 4 large eggs
- 1 cup mayonnaise
- 2 tablespoons Dijon mustard
- 2 tablespoons apple cider vinegar
- 1/2 cup celery, finely diced
- 1/4 cup red onion, finely diced
- 1/4 cup sweet pickle relish
- 2 tablespoons fresh dill, chopped
- 1 teaspoon kosher salt, plus more to taste
- 1/2 teaspoon black pepper
- Paprika, for finishing
Quick Steps:
- Boil the potatoes: Put the potato chunks in salted water, bring them to a simmer, and cook 10 to 12 minutes until a knife slides in with almost no resistance.
- Cook the eggs: Hard-boil the eggs for 10 to 11 minutes, then move them straight into ice water so the yolks stay bright and the shells peel cleanly.
- Mix the dressing: Whisk the mayonnaise, Dijon, vinegar, salt, and pepper in a large bowl until smooth.
- Fold everything together: Add the warm drained potatoes, chopped eggs, celery, onion, relish, and dill. Stir gently so the potatoes don’t break apart.
- Chill and finish: Refrigerate for at least 1 hour, then taste again and adjust salt before dusting the top with paprika.
Equipment for This Recipe:
- Large pot for boiling potatoes and eggs
- Colander for draining
- Large mixing bowl
- Sharp knife and cutting board
How to Serve This Dish:
Spoon it into a shallow bowl so the paprika shows up against the pale dressing. It sits best beside grilled chicken, burgers, or sliced tomato sandwiches, and it’s fine cold or just barely cool. A 1/2-cup scoop is enough next to a heavy main; go up to 3/4 cup if the rest of the plate is simple.
Pro Tips for This Recipe:
- Salt the potato water like you mean it; bland potatoes stay bland even after plenty of dressing.
- Let the potatoes steam-dry for 2 minutes in the colander before dressing them.
- Chop the eggs last if you want cleaner pieces instead of yellow crumbs.
- If you like a sharper bite, add another teaspoon of vinegar right before serving.
Variations on This Dish:
- Pickle-Heavy Version: Swap the relish for 1/3 cup chopped dill pickles and 1 tablespoon pickle brine.
- Herb Garden Version: Add 2 tablespoons chopped chives and 1 tablespoon parsley for a greener finish.
- Lighter Bowl: Replace half the mayonnaise with plain Greek yogurt.
Common Mistakes to Avoid with This Dish:
- Boiling the potatoes until they crumble: If they fall apart in the pot, they’ll mash in the bowl. Pull them the moment a knife meets only slight resistance.
- Dressing the potatoes when they’re ice-cold: Warm potatoes absorb salt and mustard better than chilled ones.
- Skipping the second taste test: Potato salad almost always needs one more pinch of salt after chilling.
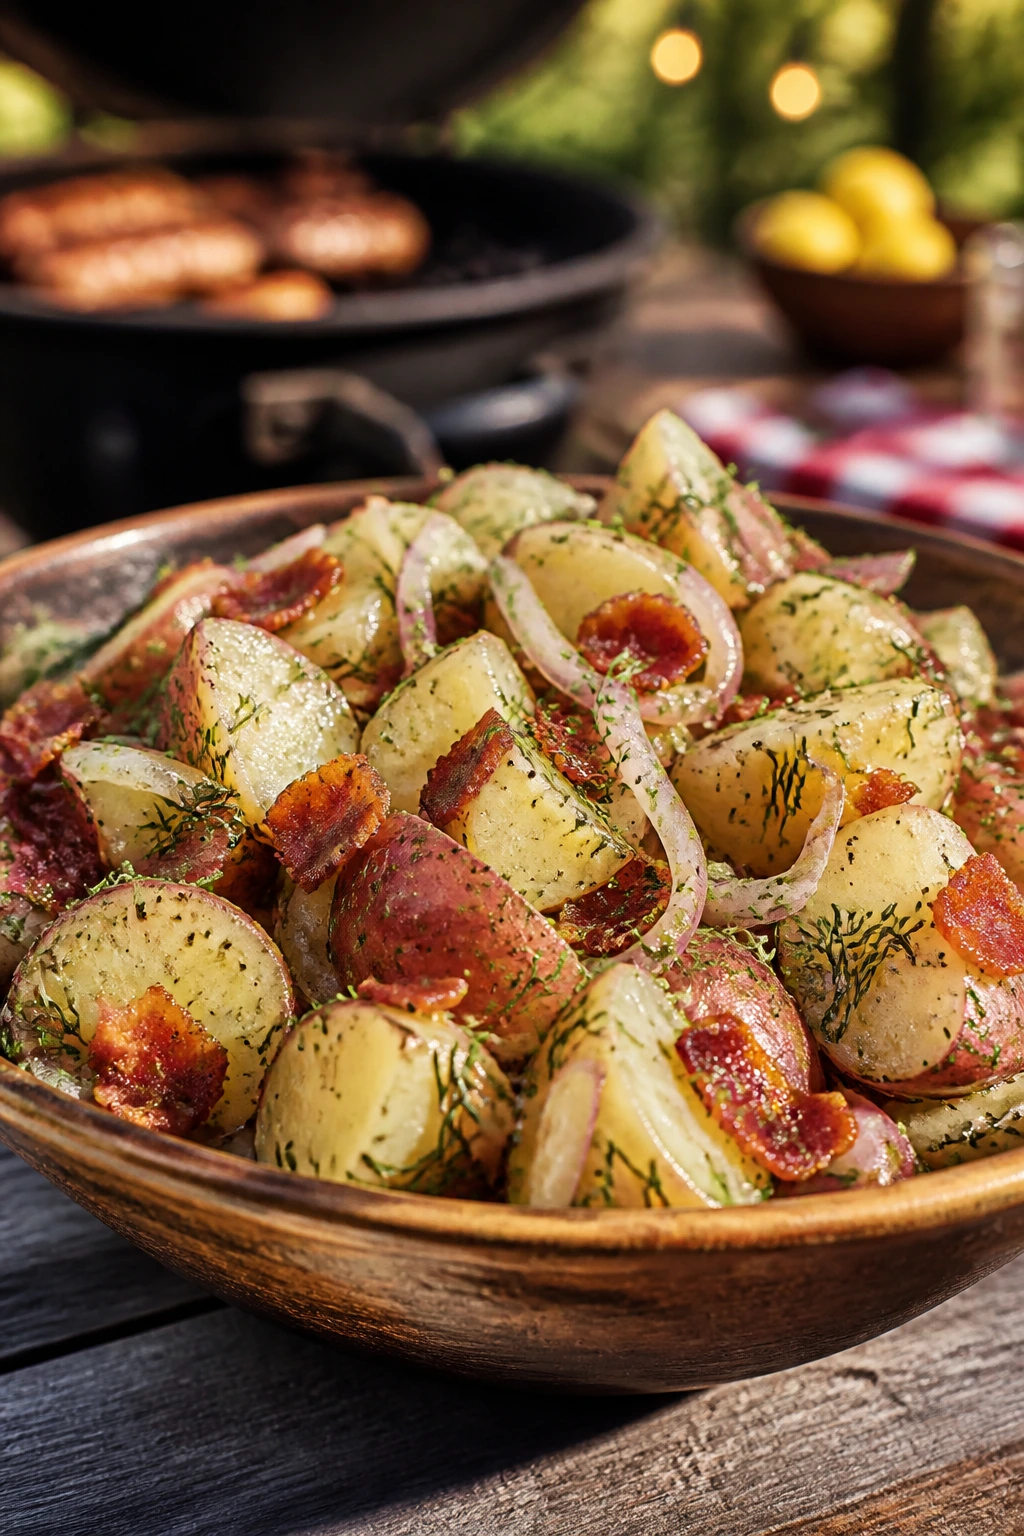
2. Warm Vinegar Potato Salad with Bacon and Dill
This is the potato salad for people who don’t want mayo leaning into the heat. The potatoes get tossed in a warm, tangy dressing made with bacon drippings, cider vinegar, mustard, and onion, so the whole bowl tastes sharp, salty, and a little smoky. It’s excellent with grilled sausages and even better when served just warm, not hot.
Why It Works:
Red potatoes hold their shape and give you thin-skinned bites that don’t need peeling. The vinegar dressing coats the potatoes while they’re still warm, which helps them drink in flavor instead of letting it sit on the surface. Bacon adds a smoky note, but the real trick is the balance between vinegar, mustard, and a touch of sugar.
Key Ingredients:
- 2 pounds red potatoes, cut into 1 1/2-inch chunks
- 4 slices bacon, chopped
- 1 small yellow onion, thinly sliced
- 1/3 cup apple cider vinegar
- 2 tablespoons whole-grain mustard
- 1 tablespoon sugar
- 1/4 cup chicken broth
- 2 tablespoons fresh dill, chopped
- 2 tablespoons fresh parsley, chopped
- 1 teaspoon kosher salt
- 1/2 teaspoon black pepper
Quick Steps:
- Cook the potatoes: Simmer the potato chunks in salted water for 12 to 15 minutes until tender but not falling apart.
- Crisp the bacon: Cook the bacon in a skillet over medium heat until browned and crisp, then set it aside on paper towels.
- Soften the onion: Leave 2 tablespoons of bacon fat in the pan and cook the onion for 3 to 4 minutes until it softens.
- Build the dressing: Whisk in the vinegar, mustard, sugar, broth, salt, and pepper, then simmer for 30 seconds.
- Toss and finish: Add the warm potatoes and bacon, fold gently, then scatter dill and parsley over the top.
Equipment for This Recipe:
- Large pot
- Large skillet
- Slotted spoon or spider
- Serving bowl
How to Serve This Dish:
Serve it warm or at room temperature, not straight from the fridge. It’s a strong match for smoked chicken, sausages, or anything with barbecue sauce, and a 1/2-cup portion goes a long way because the dressing is bold. A little extra black pepper on top helps.
Pro Tips for This Recipe:
- Don’t rinse the potatoes after cooking; the surface starch helps the dressing cling.
- Slice the onion thinly so it melts into the vinaigrette instead of staying crunchy in a distracting way.
- If the salad tastes too sharp, add 1 teaspoon more broth before reaching for sugar.
- Chop the herbs right before serving so they stay bright.
Variations on This Dish:
- Mustard-Bomb Version: Increase the whole-grain mustard to 3 tablespoons for a louder, grainy finish.
- Smoky Paprika Version: Add 1/2 teaspoon smoked paprika to the dressing.
- No-Bacon Bowl: Skip the bacon and use olive oil instead of drippings; the salad still works, just less smoky.
Common Mistakes to Avoid with This Dish:
- Using cold potatoes: Cold potatoes don’t absorb the dressing well.
- Boiling the vinaigrette too long: A short simmer is enough; reduce it too much and it gets sticky.
- Overloading the bowl with bacon: Bacon should season the potatoes, not turn the salad into a pile of crumbs.
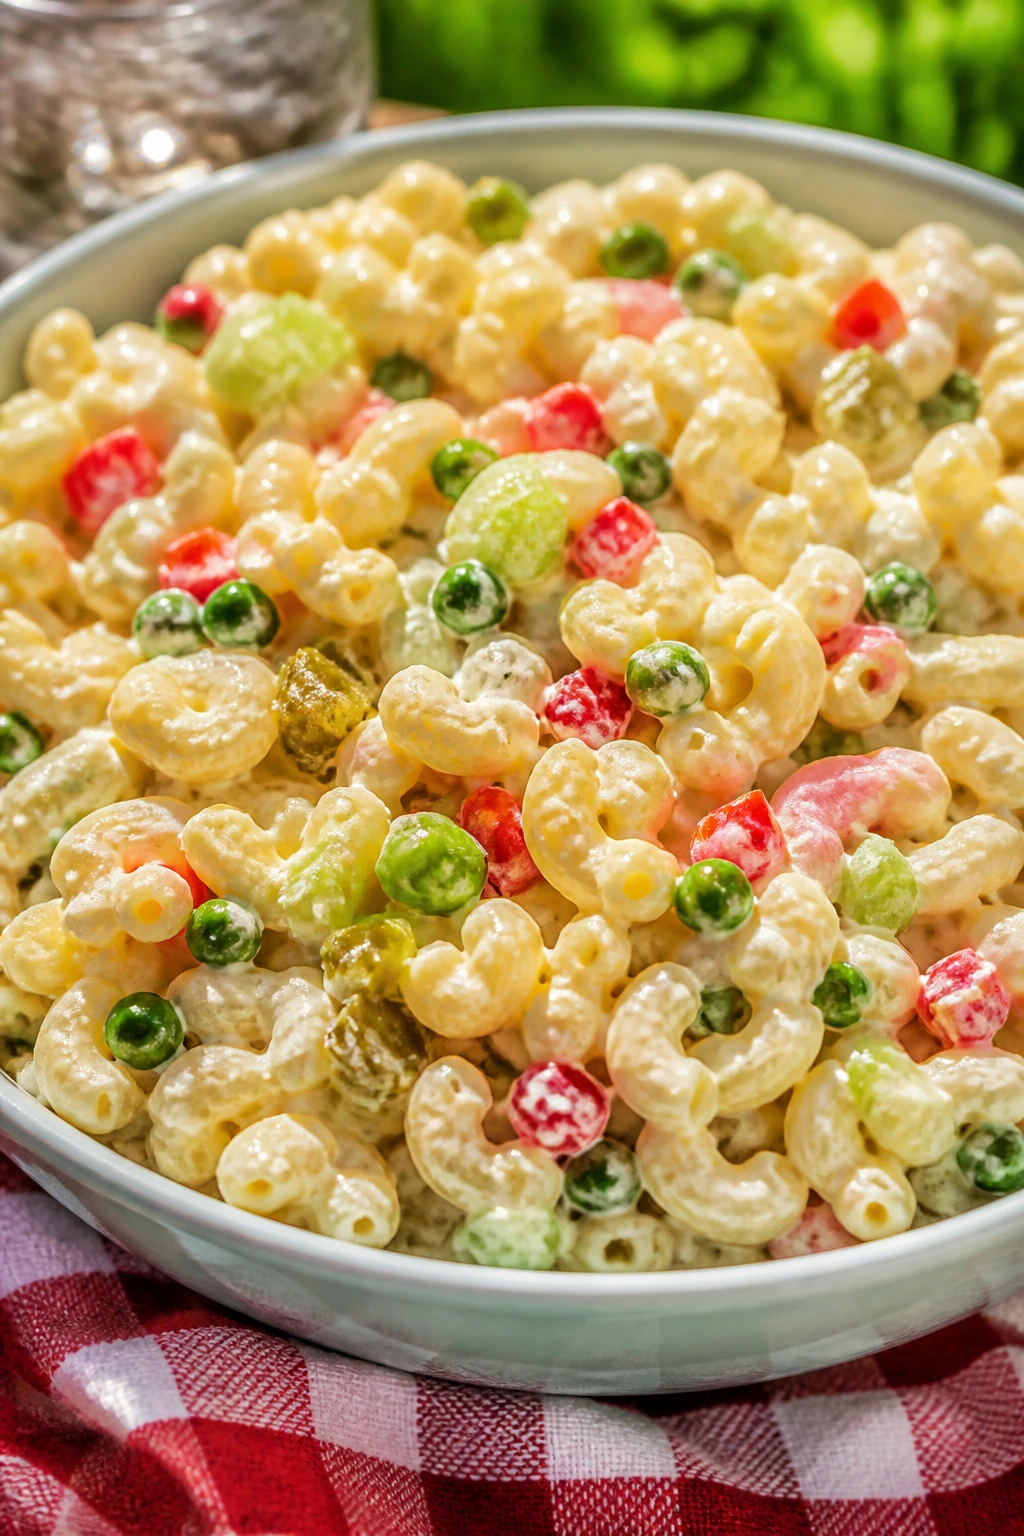
3. Classic Macaroni Salad with Celery and Peas
Macaroni salad is a cookout regular for a reason: it’s soft, cool, and easy to eat with one hand while balancing a paper plate in the other. This version keeps the dressing creamy but not gloopy, with celery, peas, red pepper, and dill pickles giving each forkful some snap. It tastes like the kind of side people quietly refill before the grill cook notices.
Why It Works:
Elbow macaroni traps dressing in the ridges and curves, which means every bite gets coated instead of slicked. The trick is cooling the pasta until it’s just warm before mixing, so it absorbs flavor without turning the dressing oily. A small amount of vinegar wakes up the mayonnaise and keeps the salad from tasting like cold paste.
Key Ingredients:
- 12 ounces elbow macaroni
- 1 cup mayonnaise
- 1/4 cup sour cream
- 2 tablespoons white vinegar
- 1 tablespoon yellow mustard
- 1 cup celery, diced
- 3/4 cup frozen peas, thawed
- 1/2 cup red bell pepper, diced
- 1/3 cup dill pickles, chopped
- 1 teaspoon kosher salt
- 1/2 teaspoon black pepper
- Paprika, for garnish
Quick Steps:
- Cook the pasta: Boil the macaroni in salted water until al dente, about 7 to 8 minutes.
- Cool it fast: Drain and rinse briefly under cool water, then spread it on a tray for 5 minutes so it stops steaming.
- Whisk the dressing: Mix the mayonnaise, sour cream, vinegar, mustard, salt, and pepper in a large bowl.
- Fold in the mix-ins: Add the macaroni, celery, peas, bell pepper, and pickles, then stir until everything is coated.
- Chill before serving: Refrigerate for at least 30 minutes and finish with paprika right before it hits the table.
Equipment for This Recipe:
- Large pot
- Colander
- Large mixing bowl
- Rubber spatula
How to Serve This Dish:
Pile it into a chilled bowl and keep the garnish simple; paprika and a little chopped dill are enough. It works with fried chicken, hot dogs, pulled pork, or grilled corn, and the sweet-pea bite makes it especially good with salty mains. Serve 2/3 cup per person if the cookout has a lot of sides.
Pro Tips for This Recipe:
- Cook the pasta one minute shy of the package time so it stays firm after chilling.
- Thaw the peas completely and pat them dry; watery peas dilute the dressing.
- Taste again after 30 minutes in the fridge, because macaroni absorbs salt faster than you expect.
- If the salad thickens overnight, loosen it with 1 to 2 tablespoons of milk or water.
Variations on This Dish:
- Relish Lover’s Version: Swap the pickles for sweet relish and add 1 tablespoon pickle brine.
- Southern-Style Version: Add 2 chopped hard-boiled eggs and 1/4 teaspoon celery seed.
- Dairy-Light Version: Use all mayonnaise and skip the sour cream.
Common Mistakes to Avoid with This Dish:
- Rinsing the pasta until it’s icy cold: Cold pasta won’t take on flavor as well.
- Overcrowding with add-ins: Too many vegetables make the dressing disappear.
- Serving it straight from the fridge without tasting: Mac salad often needs a final pinch of salt after chilling.
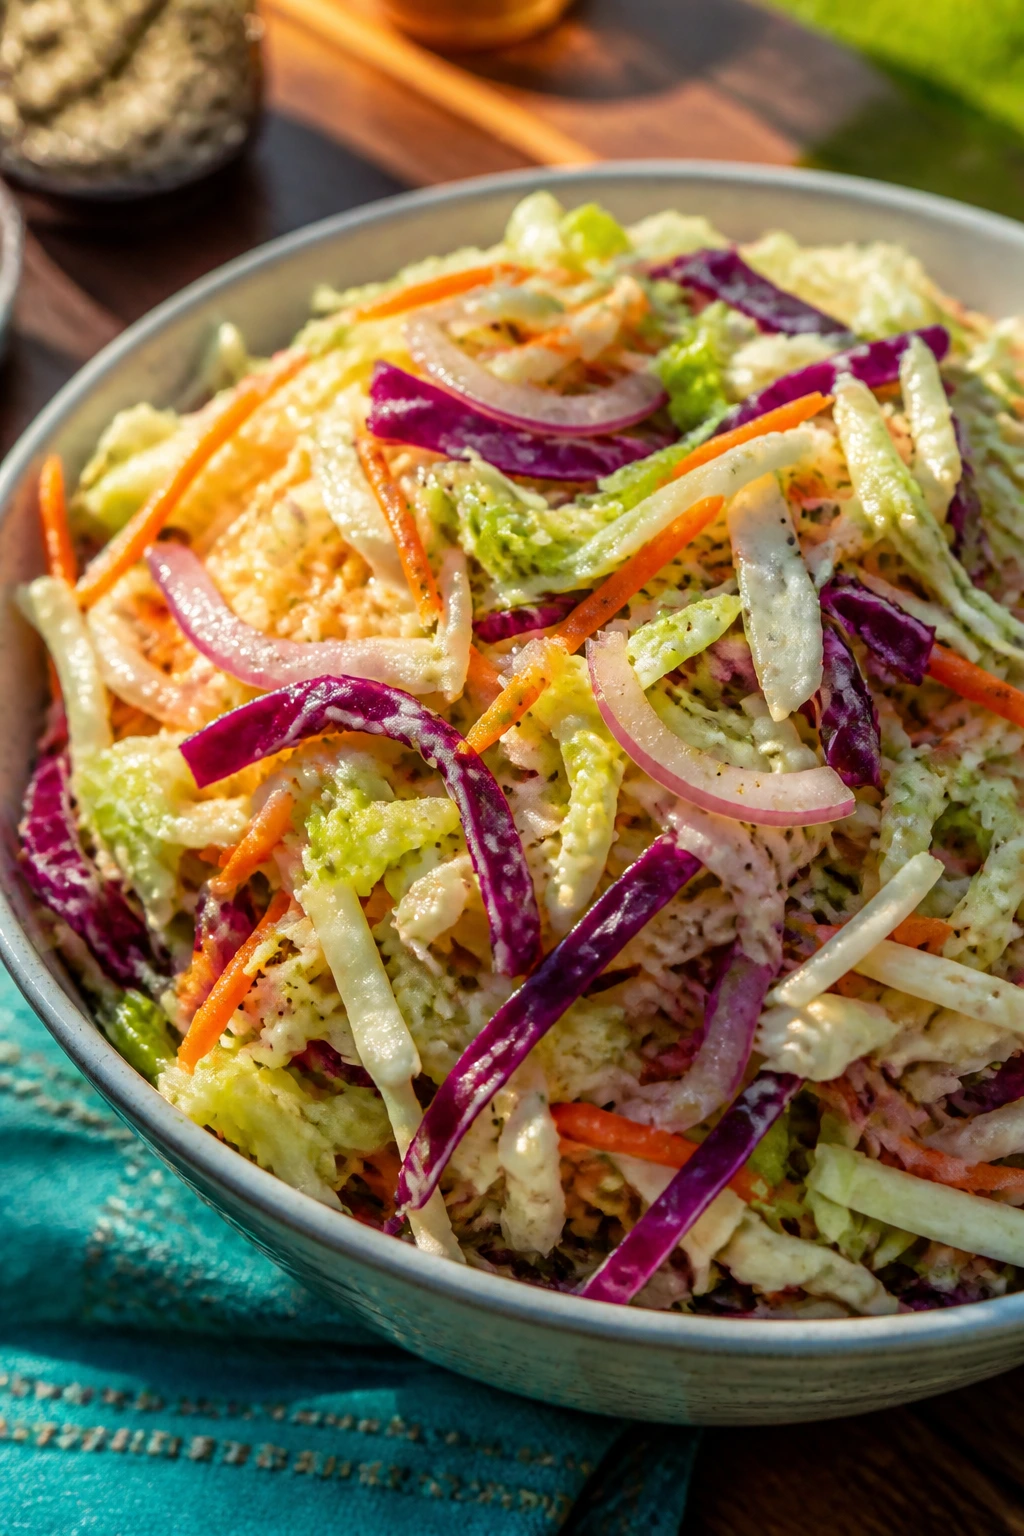
4. Crunchy Vinegar Coleslaw with Carrot and Celery Seed
This is the slaw I reach for when the rest of the menu is heavy and the table needs something crisp and pointed. There’s no mayonnaise to cloud it up; just cabbage, carrot, onion, and a vinegar dressing with celery seed and Dijon. It’s sharp enough to wake up pulled pork, but it also works beside grilled fish or chicken.
Why It Works:
Cabbage keeps its crunch far better than lettuce, which makes it the safest salad move for a hot outdoor table. The vinegar-sugar balance gives you a quick pickle effect without turning the vegetables soggy. Celery seed tastes old-fashioned in the best way, bringing that unmistakable deli-slaw note that makes people take a second spoonful.
Key Ingredients:
- 6 cups green cabbage, thinly shredded
- 2 cups red cabbage, thinly shredded
- 1 large carrot, grated
- 1/2 red onion, thinly sliced
- 1/3 cup apple cider vinegar
- 3 tablespoons sugar or honey
- 2 tablespoons olive oil
- 1 tablespoon Dijon mustard
- 1 teaspoon celery seed
- 1 teaspoon kosher salt
- 1/2 teaspoon black pepper
Quick Steps:
- Prep the vegetables: Shred the cabbages thinly and slice the onion as fine as you can manage.
- Make the dressing: Whisk the vinegar, sugar, olive oil, Dijon, celery seed, salt, and pepper until the sugar dissolves.
- Combine everything: Toss the cabbage, carrot, and onion with the dressing in a big bowl.
- Rest briefly: Let the slaw sit for 15 to 20 minutes so the cabbage softens just a touch.
- Toss again and serve: Give it one last stir and check the seasoning before it goes out.
Equipment for This Recipe:
- Large bowl
- Sharp knife or mandoline
- Box grater
- Whisk
How to Serve This Dish:
Serve it alongside anything fatty or smoky. Ribs, burgers, sausages, and fried chicken all benefit from a few forkfuls of this bright slaw. A 1/2-cup serving is enough unless the rest of the plate is very rich.
Pro Tips for This Recipe:
- Slice the cabbage thinly so it softens evenly instead of staying tough at the core.
- Salt the slaw lightly at the start and again right before serving if needed.
- A mandoline gives you the cleanest cut, but a sharp knife works fine.
- If you like a sweeter slaw, add another teaspoon of honey instead of piling on sugar.
Variations on This Dish:
- Mustard-Forward Slaw: Double the Dijon and cut the sugar in half.
- Caraway Version: Add 1/2 teaspoon caraway seeds for a deli-style edge.
- No-Sugar Version: Use unsweetened apple juice in place of the sugar and vinegar mixture’s sweet note.
Common Mistakes to Avoid with This Dish:
- Shredding cabbage too thick: Thick strips stay stiff and awkward on the fork.
- Dressing it hours too early: It will still taste good, but the crunch fades fast.
- Forgetting the final taste test: Vinegar slaw needs adjustment right before serving.
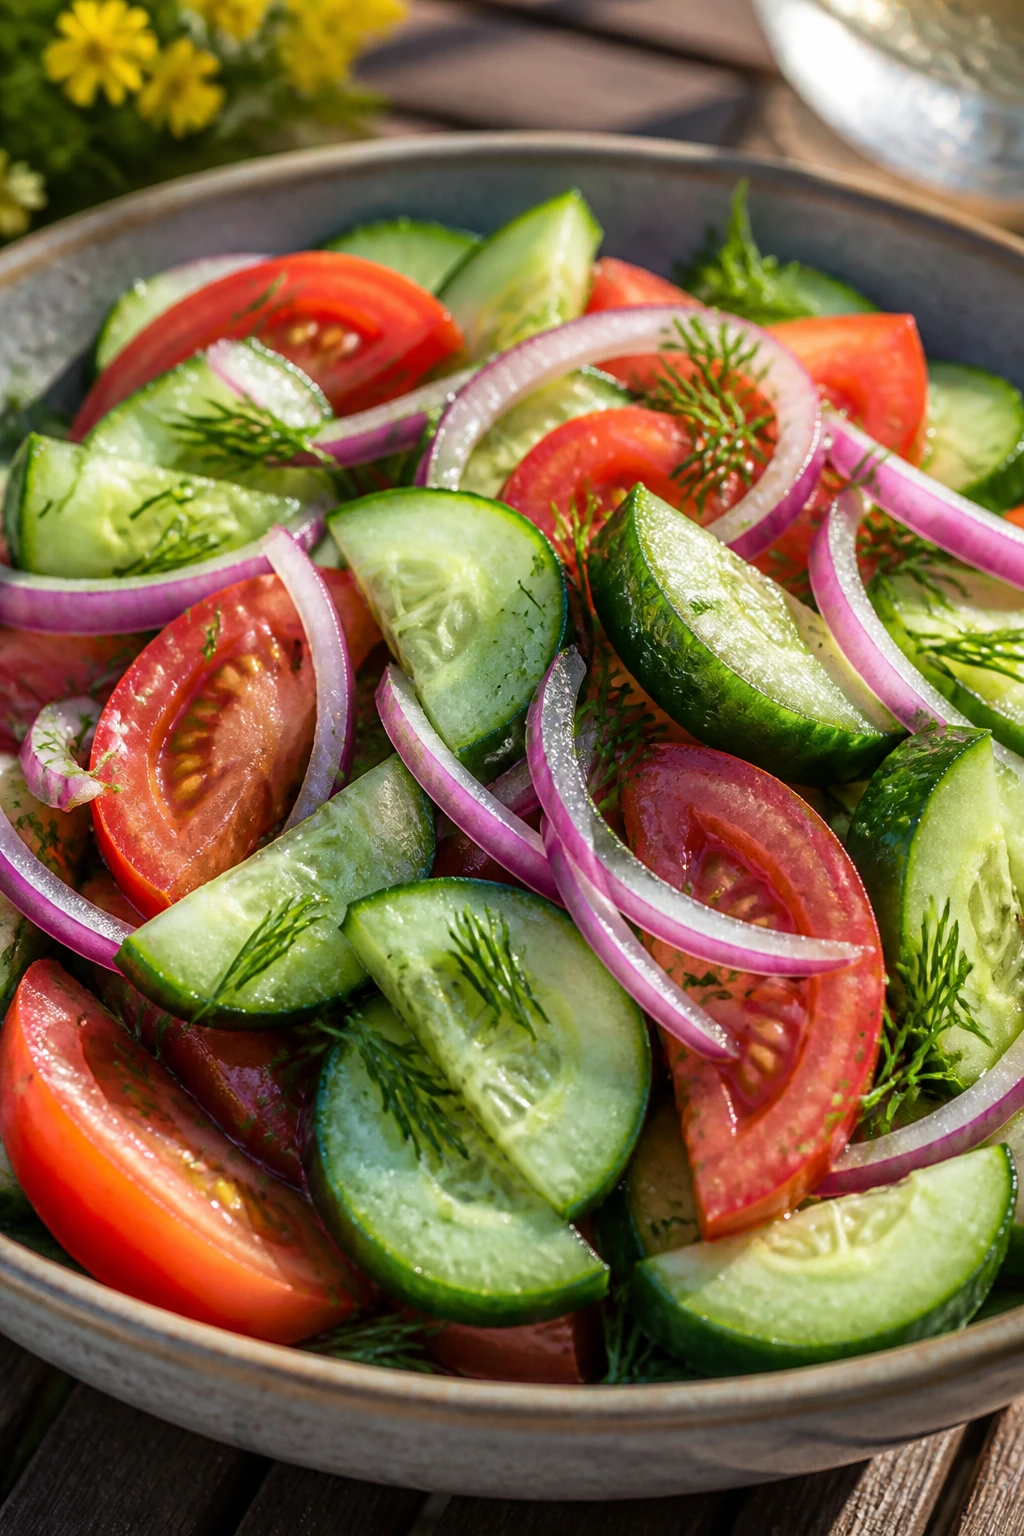
5. Cucumber Tomato Red Onion Salad with Dill
This salad smells like summer before you even sit down. Ripe tomatoes, cool cucumbers, red onion, dill, and a simple vinegar dressing make a bowl that tastes fresh without asking for much effort. It’s the side I make when the grill is already busy and the tomatoes are actually good enough to show off.
Why It Works:
Cucumbers bring water and crunch, tomatoes bring sweetness and juice, and the onion gives the whole bowl a sharp bite. Salting the cucumbers first pulls out extra moisture, which keeps the dressing from turning into pink water at the bottom of the bowl. Dill is the anchor here; without it, the salad tastes plain.
Key Ingredients:
- 3 large cucumbers, sliced into half-moons
- 4 ripe tomatoes, cut into wedges
- 1/2 small red onion, thinly sliced
- 3 tablespoons olive oil
- 2 tablespoons red wine vinegar
- 1 clove garlic, grated or minced
- 2 tablespoons fresh dill, chopped
- 1/2 teaspoon sugar
- 1 teaspoon kosher salt
- 1/2 teaspoon black pepper
Quick Steps:
- Salt the cucumbers: Toss the cucumber slices with 1/2 teaspoon salt and let them sit for 10 minutes.
- Drain the excess water: Pat the cucumbers dry with a towel or paper towel.
- Mix the dressing: Whisk olive oil, vinegar, garlic, dill, sugar, pepper, and the remaining salt.
- Combine the salad: Toss cucumbers, tomatoes, and onion with the dressing in a large bowl.
- Serve cold: Let it rest 5 minutes, then taste and adjust the vinegar if the tomatoes are very sweet.
Equipment for This Recipe:
- Cutting board
- Chef’s knife
- Large bowl
- Small whisk or fork
How to Serve This Dish:
Serve it in a shallow bowl so the tomatoes don’t crush themselves under their own juice. It plays especially well with grilled chicken, skewers, or anything rich enough to welcome acidity. Keep servings modest—about 1/2 cup—because the juices invite people back for another scoop.
Pro Tips for This Recipe:
- Use tomatoes that smell like tomatoes. That sounds obvious, but pale supermarket tomatoes need more salt and vinegar to wake up.
- Slice the onion thin enough that it bends when you lift it.
- If the cucumbers are especially watery, seed them first.
- Add the dill at the end so it stays fragrant.
Variations on This Dish:
- Feta Finish: Add 1/2 cup crumbled feta just before serving.
- Garden Herb Version: Swap half the dill for chopped parsley and mint.
- Sharp Bistro Style: Use white wine vinegar and 1 teaspoon whole-grain mustard.
Common Mistakes to Avoid with This Dish:
- Skipping the cucumber drain: You’ll end up with a puddle.
- Using under-ripe tomatoes: They taste dusty, not juicy.
- Overmixing: Tomatoes bruise fast; fold gently.
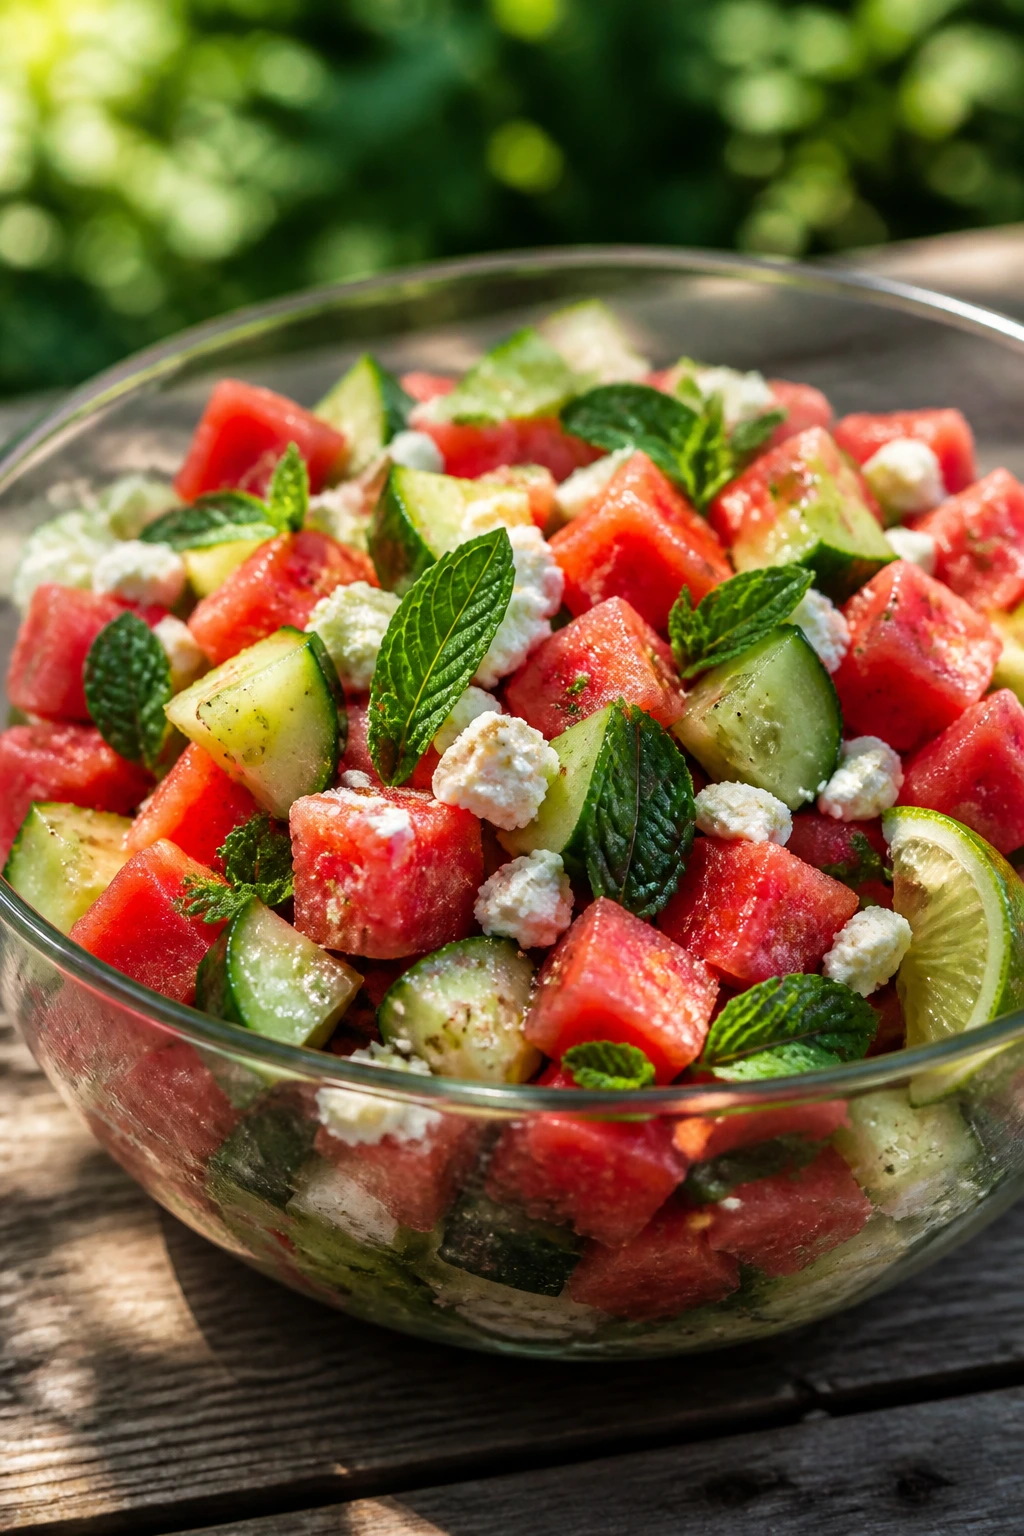
6. Watermelon Feta Mint Salad with Lime
This is the salad that disappears first when the weather gets sticky and everyone is standing around in the shade. Sweet watermelon, salty feta, cool mint, and a squeeze of lime make a bowl that tastes cold even before the ice packs come out of the cooler. It’s a nice reset after smoky meat and potato-heavy sides.
Why It Works:
Watermelon gives you sweetness and moisture, which sounds simple until you put it next to something salty and charred; then it becomes the whole point. Feta adds the bite, mint keeps the aroma bright, and lime sharpens everything without overpowering the fruit. The trick is to keep the cubes dry so the bowl doesn’t turn watery.
Key Ingredients:
- 8 cups seedless watermelon, cubed
- 2 cups cucumber, cubed
- 8 ounces feta, crumbled
- 1/4 cup fresh mint leaves, torn
- 2 tablespoons lime juice
- 1 tablespoon olive oil
- Pinch of flaky salt
- Pinch of chili flakes, optional
Quick Steps:
- Chill the fruit: Refrigerate the watermelon before assembling if you can.
- Combine the base: Add watermelon and cucumber to a large bowl.
- Dress lightly: Drizzle with lime juice and olive oil, then toss once.
- Finish with cheese and mint: Scatter feta, mint, salt, and chili flakes over the top.
- Serve right away: This one tastes best within 20 to 30 minutes of assembling.
Equipment for This Recipe:
- Sharp knife
- Large mixing bowl
- Citrus juicer
- Serving spoon
How to Serve This Dish:
Serve it in a wide bowl so the feta stays visible and the fruit doesn’t crush itself. It works well next to ribs, grilled chicken, or salty skewers, and a 1/2-cup serving is enough because the fruit is so juicy. If the rest of the meal is rich, this bowl feels like a cold drink on a plate.
Pro Tips for This Recipe:
- Cut the watermelon into sturdy cubes, not tiny dice.
- Tear the mint instead of chopping it; chopped mint bruises fast.
- Use feta packed in brine if you want a cleaner salty bite.
- Assemble at the last minute or the cucumber starts to leak.
Variations on This Dish:
- Peach Swap: Replace half the watermelon with sliced peaches.
- Basil Version: Swap mint for basil if you want something more savory.
- Spicy Lime Bowl: Add a dusting of Tajín or chili-lime seasoning.
Common Mistakes to Avoid with This Dish:
- Adding too much lime: It can drown the fruit.
- Using wet feta straight from a tub: Pat it dry so the salad doesn’t get sloppy.
- Making it too early: Watermelon releases juice fast once cut.
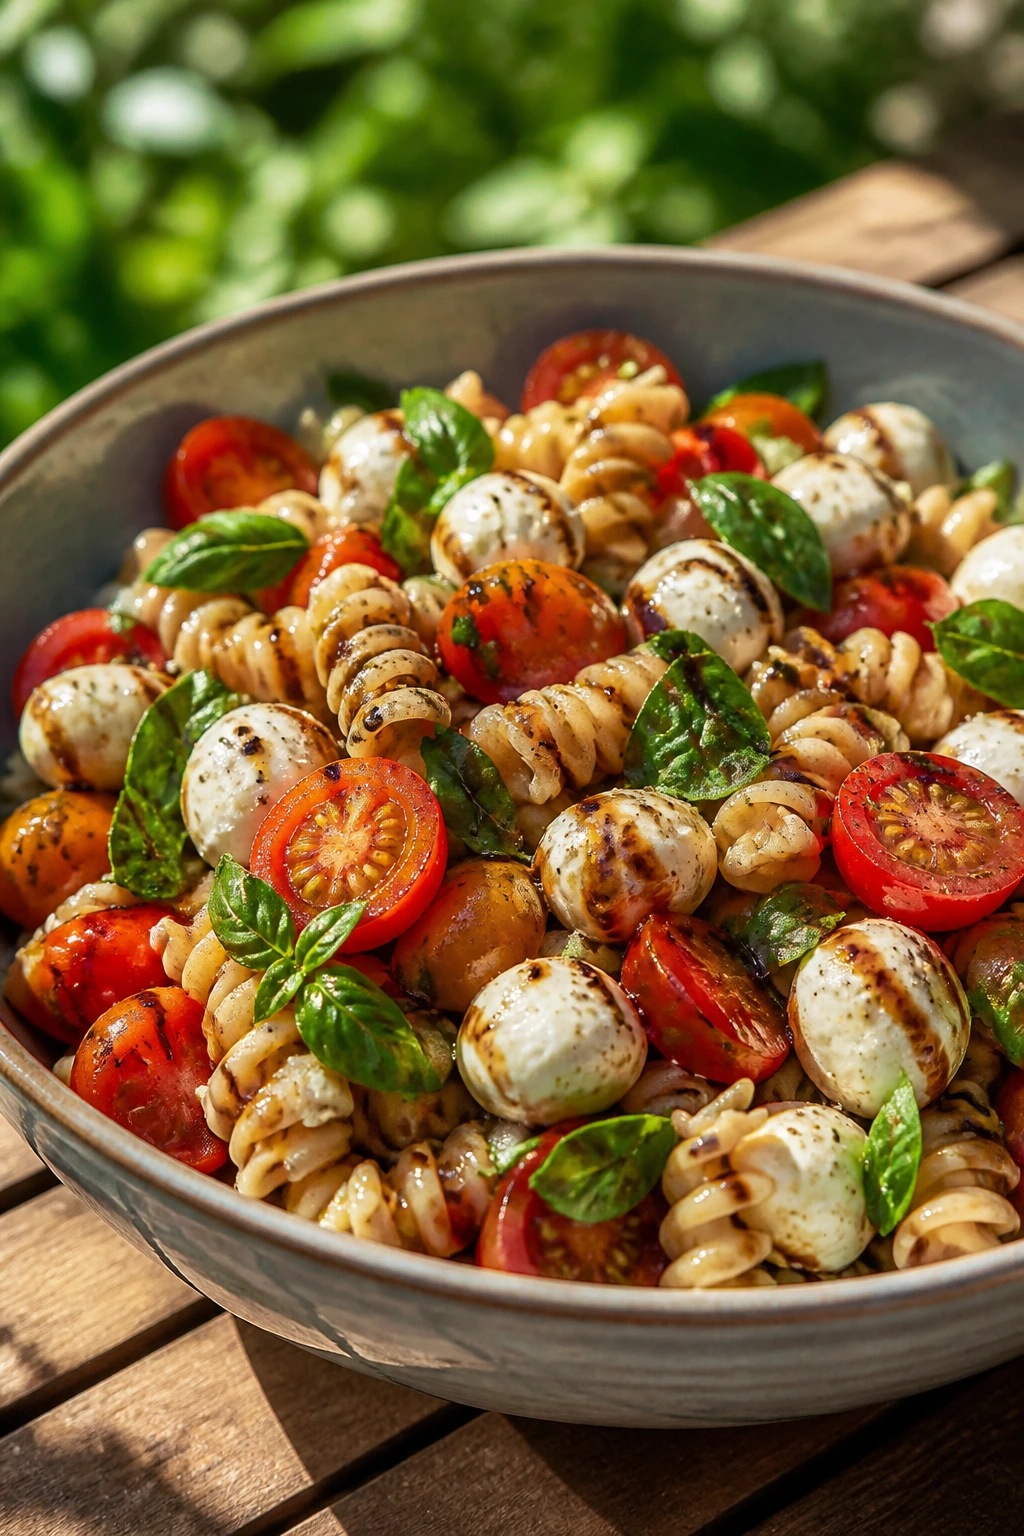
7. Caprese Pasta Salad with Basil and Balsamic
Caprese salad gets a little sturdier when you fold it into pasta, which is why this bowl works so well beside burgers and grilled sausages. Cherry tomatoes, mozzarella, basil, and balsamic get tangled with rotini so every forkful tastes like tomato season with better manners. It’s familiar, but not boring.
Why It Works:
Rotini catches the dressing in its spirals and gives the tomatoes and mozzarella something to cling to. A little balsamic and lemon sharpen the pesto-free version here, so the basil doesn’t fade into the background. The salad tastes best after a short rest, which gives the pasta time to soak up the olive oil.
Key Ingredients:
- 12 ounces rotini
- 2 cups cherry tomatoes, halved
- 8 ounces mozzarella pearls
- 1 cup fresh basil leaves
- 1/4 cup olive oil
- 2 tablespoons balsamic vinegar
- 1 tablespoon lemon juice
- 1 small garlic clove, grated
- 1 teaspoon kosher salt
- 1/2 teaspoon black pepper
Quick Steps:
- Cook the pasta: Boil rotini until al dente, about 8 to 9 minutes.
- Cool it down: Drain and rinse briefly, then spread it on a tray to stop the cooking.
- Whisk the dressing: Mix olive oil, balsamic, lemon juice, garlic, salt, and pepper.
- Toss everything together: Combine pasta, tomatoes, mozzarella, and dressing.
- Add basil last: Tear in the basil just before serving so it stays fragrant.
Equipment for This Recipe:
- Large pot
- Colander
- Mixing bowl
- Wooden spoon
How to Serve This Dish:
Serve it chilled or room temperature in a broad bowl with extra basil on top. It’s a clean match for grilled chicken, steak, or vegetables, and a 2/3-cup portion feels right because the cheese and pasta both count as substantial. A few tomato halves on top help the bowl look fresh, not mashed.
Pro Tips for This Recipe:
- Cool the pasta before adding basil; hot pasta bruises the leaves.
- If the tomatoes are very juicy, salt them lightly and drain for 5 minutes first.
- Use mozzarella pearls if possible; they distribute better than one large ball.
- A spoonful of pesto is fine if you want a greener version.
Variations on This Dish:
- Pesto Caprese: Swap the balsamic dressing for 1/3 cup pesto thinned with olive oil.
- Sun-Dried Tomato Version: Add 1/4 cup chopped sun-dried tomatoes.
- Gluten-Free Bowl: Use gluten-free rotini and cool it a little longer so it doesn’t break.
Common Mistakes to Avoid with This Dish:
- Overcooking the pasta: Soft pasta turns sticky once dressed.
- Adding basil too early: It wilts and darkens.
- Skipping salt on the tomatoes: They’ll taste flat next to the pasta.
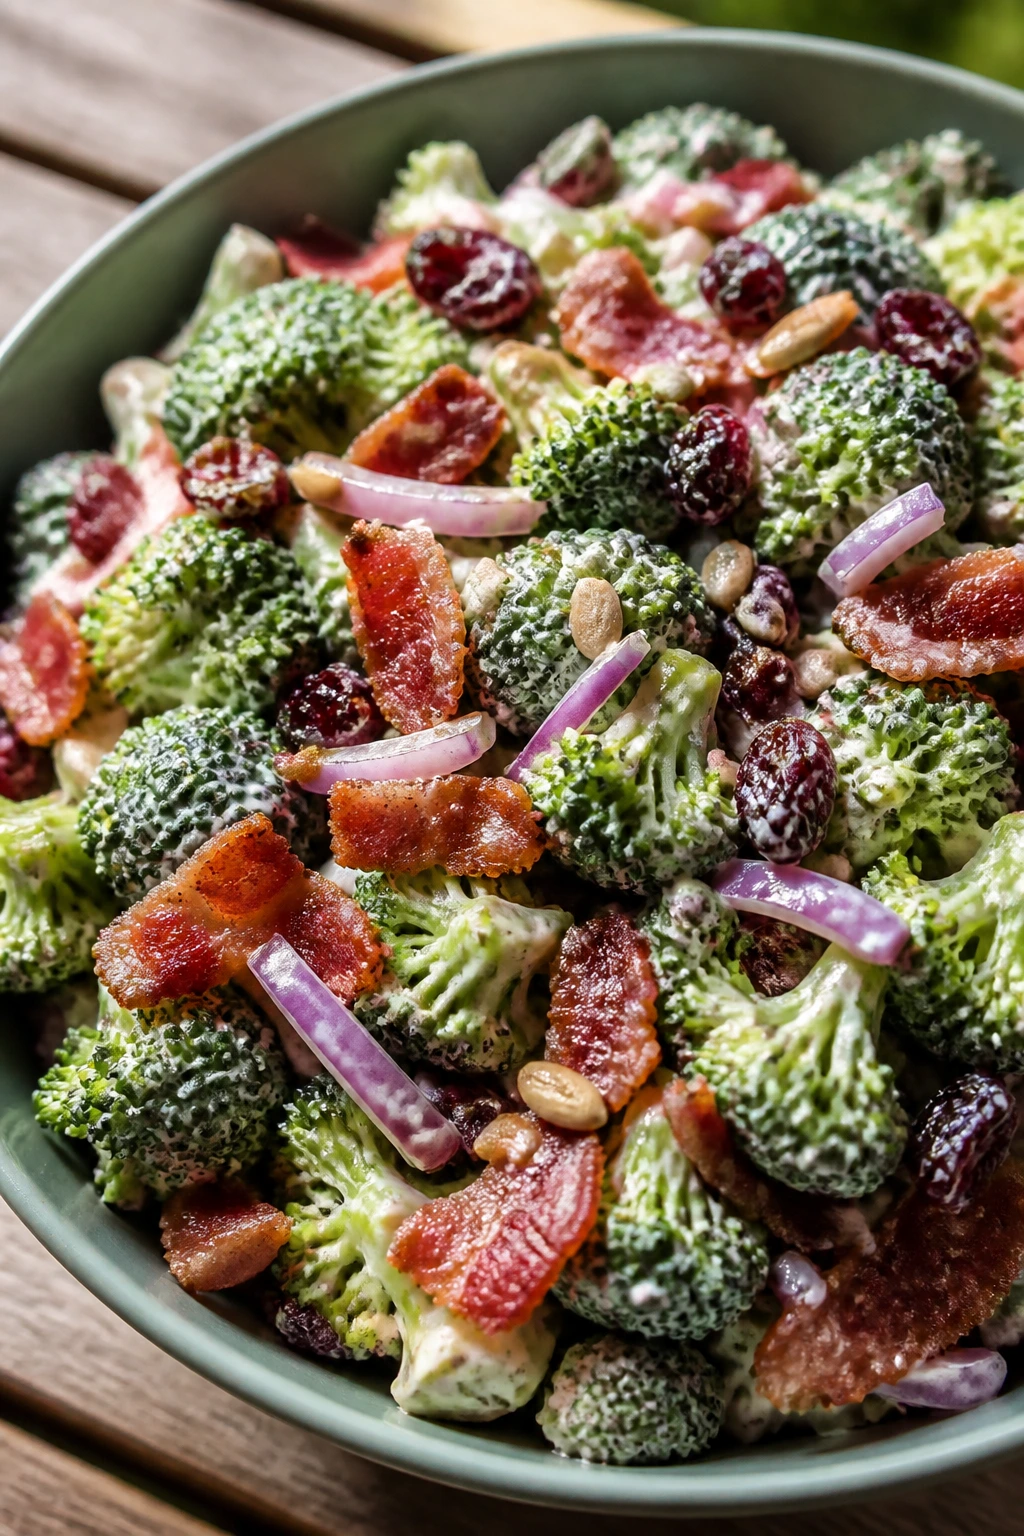
8. Broccoli Salad with Bacon, Cranberries, and Sunflower Seeds
This is the salad people pretend they’re only taking a spoonful of, then go back for more. Raw broccoli gives the bowl a crunch that never fades, while bacon, cranberries, and sunflower seeds add salt, sweet chew, and a little nuttiness. The creamy dressing holds the whole thing together without making it heavy.
Why It Works:
Broccoli holds texture better than nearly any other green vegetable, which makes it one of the safest cold sides for a cookout table. The bacon brings smoke, the cranberries bring pop, and the sunflower seeds stop the salad from feeling one-note. A brief rest softens the broccoli’s edge just enough.
Key Ingredients:
- 6 cups broccoli florets, cut small
- 6 slices bacon, cooked crisp and crumbled
- 1/2 cup red onion, finely chopped
- 1/2 cup dried cranberries
- 1/3 cup sunflower seeds
- 3/4 cup mayonnaise
- 2 tablespoons apple cider vinegar
- 1 tablespoon honey
- 1 teaspoon Dijon mustard
- 1 teaspoon kosher salt
- 1/2 teaspoon black pepper
Quick Steps:
- Prep the broccoli: Cut the florets into bite-size pieces so the dressing reaches every edge.
- Make the dressing: Whisk mayonnaise, vinegar, honey, mustard, salt, and pepper until smooth.
- Combine the bowl: Add broccoli, bacon, onion, cranberries, and sunflower seeds.
- Dress and toss: Stir until everything is coated.
- Chill briefly: Rest for 20 to 30 minutes before serving so the broccoli softens slightly.
Equipment for This Recipe:
- Large bowl
- Small whisk
- Knife and cutting board
- Skillet, if cooking bacon from raw
How to Serve This Dish:
Serve it cold, in a medium bowl, with the bacon and cranberries visible on top instead of buried below. It fits grilled chicken, burgers, and anything with a sweet barbecue glaze. A 1/2-cup serving is enough because the dressing and bacon make it dense.
Pro Tips for This Recipe:
- Cut the broccoli smaller than you think you need to.
- Pat the bacon dry so the salad doesn’t turn greasy.
- Let the broccoli sit with the dressing for at least 20 minutes; raw broccoli tastes harsh when it’s freshly dressed.
- Toast the sunflower seeds for a minute or two if you want more flavor.
Variations on This Dish:
- Raisin Swap: Use raisins instead of cranberries for a softer sweet note.
- Cheddar Version: Add 1/2 cup sharp cheddar cubes.
- Vegetarian Bowl: Skip the bacon and add smoked almonds.
Common Mistakes to Avoid with This Dish:
- Leaving the broccoli in giant florets: Big pieces trap dressing badly.
- Using watery bacon: It makes the dressing slide off.
- Serving it immediately: The flavor is better after a short chill.
9. Corn, Avocado, and Lime Salad with Jalapeño
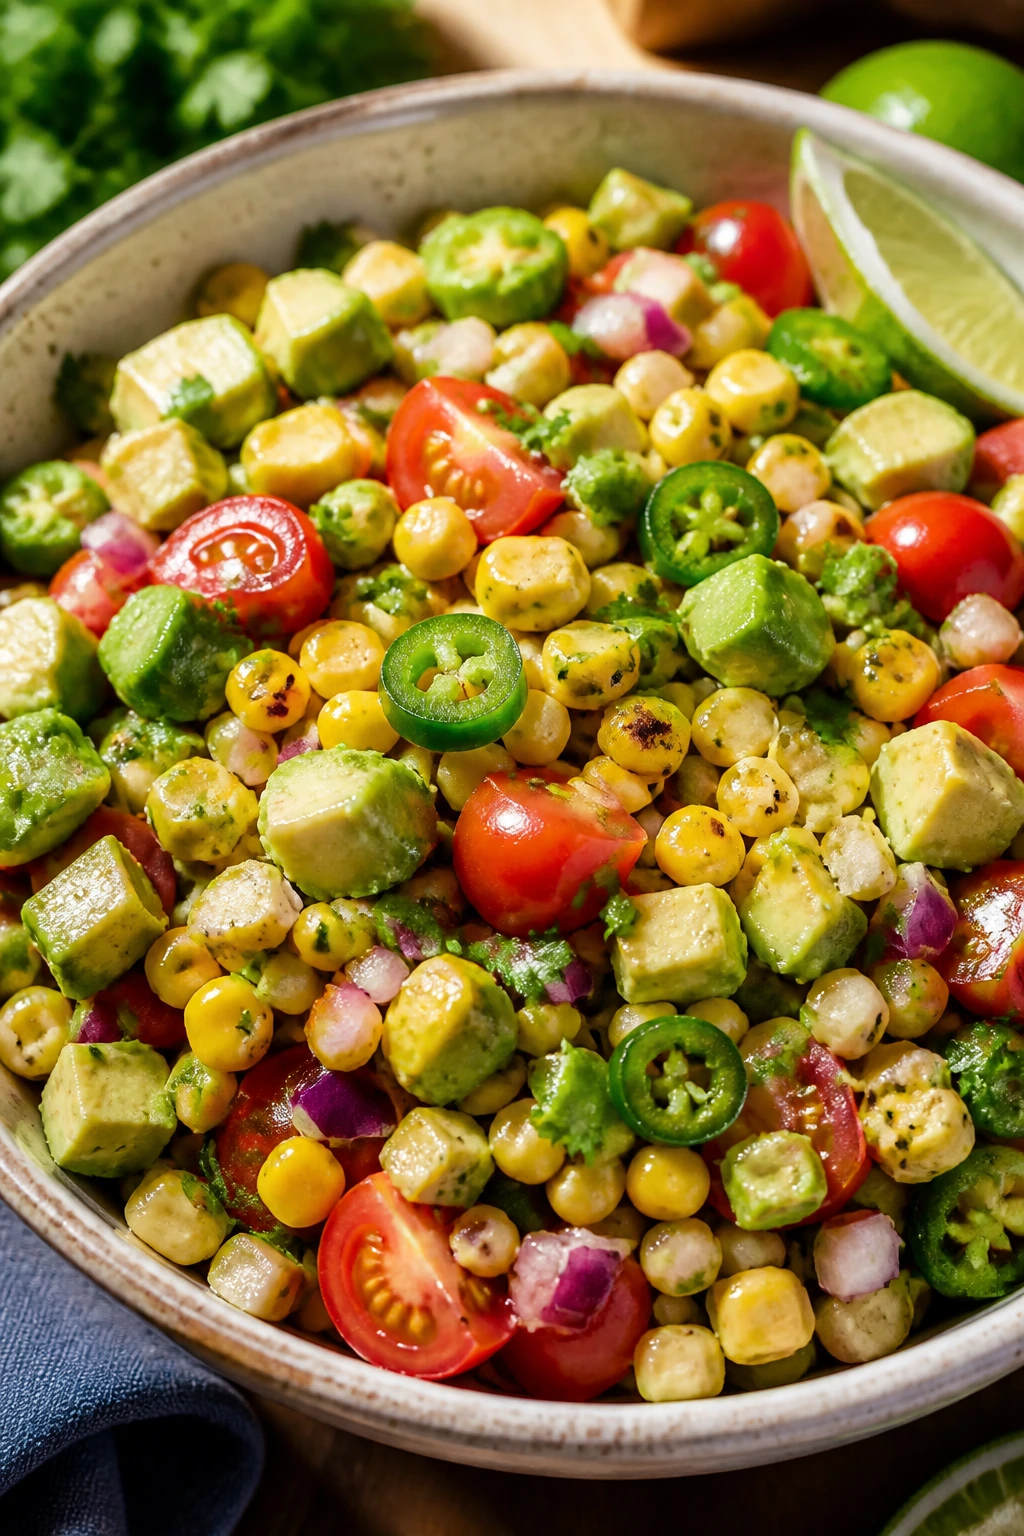
Corn and avocado make a naturally good pair: one sweet and crisp, the other soft and rich. Add lime, cilantro, jalapeño, and a little red onion, and you’ve got a bowl that tastes like the grill came with a fresh sidecar. If you char the corn first, the whole salad picks up a smoky edge that fits a cookout perfectly.
Why It Works:
Corn brings sweetness and a little chew, while avocado adds a creamy texture that doesn’t feel heavy the way mayonnaise does. Lime keeps the avocado from tasting flat, and jalapeño gives the bowl a little heat without taking over. It’s also one of the few salads that feels equally good with tacos, burgers, or grilled fish.
Key Ingredients:
- 4 ears corn, kernels cut off, or 4 cups frozen corn, thawed
- 2 ripe avocados, diced
- 1 cup cherry tomatoes, halved
- 1/4 red onion, finely chopped
- 1 jalapeño, seeded and minced
- 1/4 cup cilantro, chopped
- 3 tablespoons lime juice
- 2 tablespoons olive oil
- 1 teaspoon ground cumin
- 1 teaspoon kosher salt
- 1/2 teaspoon black pepper
Quick Steps:
- Char the corn: Cook the kernels in a hot skillet or on the grill until some edges brown, about 5 minutes.
- Cool slightly: Let the corn sit for 5 minutes so it doesn’t soften the avocado.
- Mix the dressing: Whisk lime juice, olive oil, cumin, salt, and pepper.
- Toss the vegetables: Combine corn, tomatoes, onion, jalapeño, and cilantro in a bowl.
- Add avocado last: Fold it in gently, then serve right away.
Equipment for This Recipe:
- Skillet or grill basket
- Large bowl
- Sharp knife
- Rubber spatula
How to Serve This Dish:
Serve it cold or just cool, not icy. It makes a bright side for grilled chicken, carne asada, or simple burgers, and the avocado means 1/2-cup to 3/4-cup portions feel right. A few extra cilantro leaves on top keep it looking fresh.
Pro Tips for This Recipe:
- If using frozen corn, dry it well before charring or it will steam instead of brown.
- Ripe avocados should yield slightly when pressed, not collapse.
- Add the avocado at the very end so it stays in chunks.
- A pinch of smoked paprika works if the corn never touched a grill.
Variations on This Dish:
- Cotija Finish: Add 1/3 cup crumbled cotija.
- Black Bean Version: Fold in 1 cup drained black beans.
- Mild Bowl: Skip the jalapeño and add extra lime zest.
Common Mistakes to Avoid with This Dish:
- Over-mashing the avocado: You want cubes, not guacamole.
- Using bland corn: If the kernels aren’t sweet, the salad falls flat.
- Adding salt too late: Avocado and corn both need seasoning at the start.
10. Three-Bean Salad with Red Onion and Herb Vinaigrette
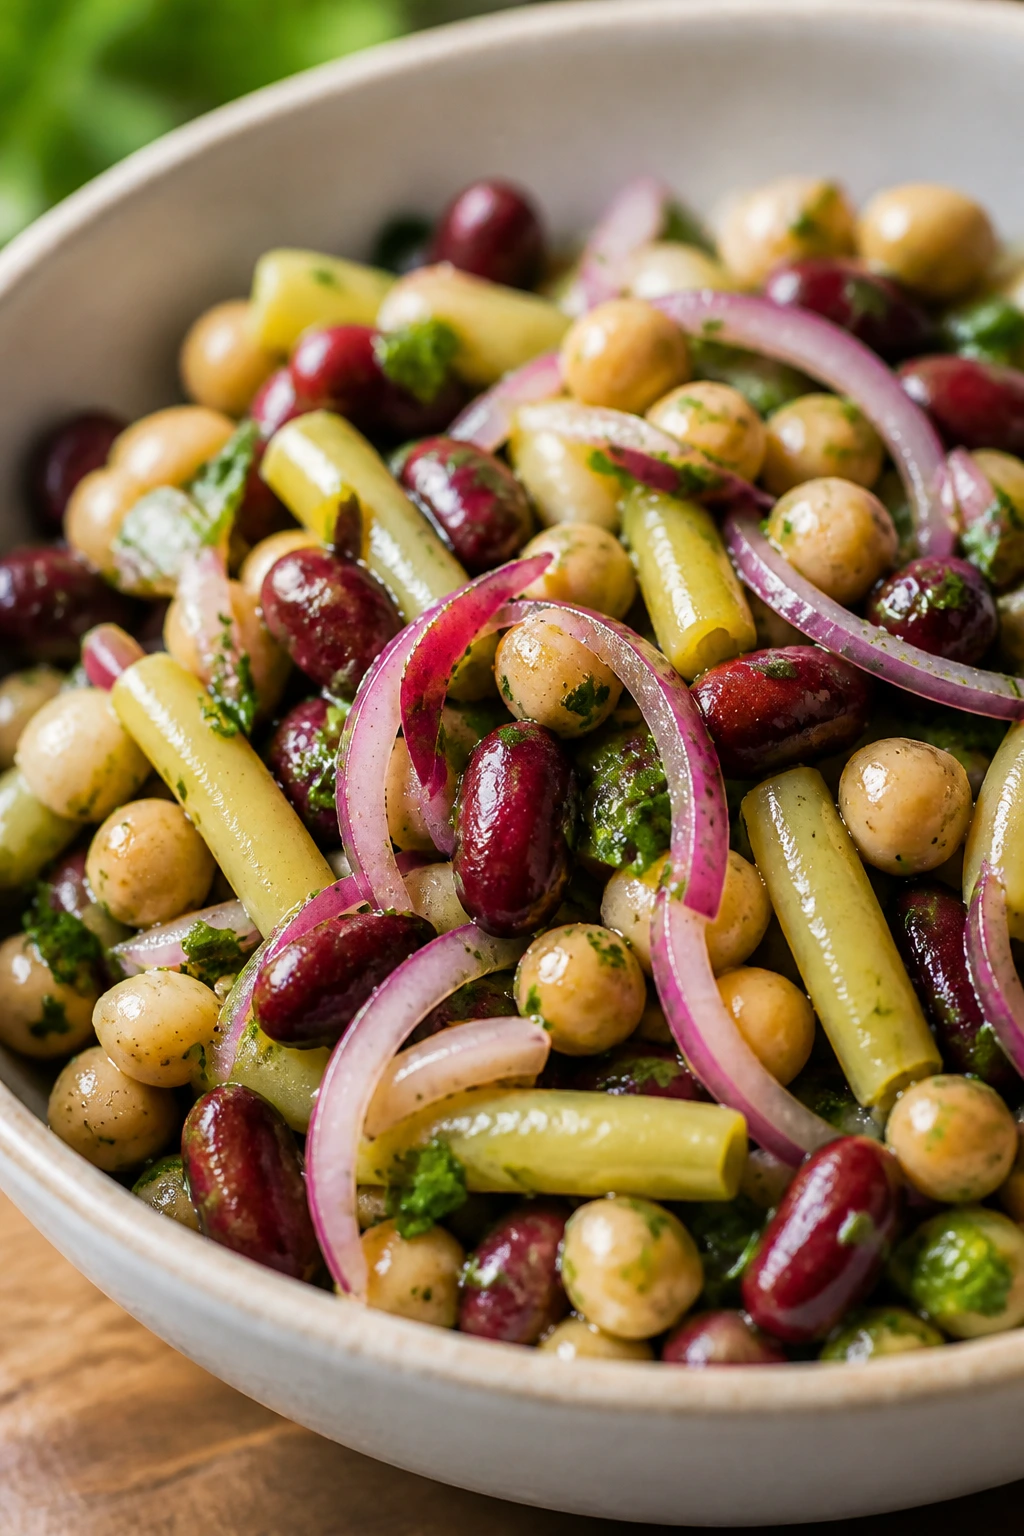
Three-bean salad is the old picnic standby that still earns its place because it’s sturdy, cheap, and better after a little time in the fridge. The mix of beans gives you different textures, and the vinaigrette turns the bowl from canned and dull into bright and tangy. It’s one of the few sides that gets better while you’re busy with everything else.
Why It Works:
Beans absorb vinaigrette slowly, which means the flavor keeps developing instead of drying out. Using a mix of shapes—kidney, chickpea, and wax or green beans—keeps each bite a little different. A bit of onion and celery seed gives the salad the old-school picnic flavor people remember.
Key Ingredients:
- 1 can (15 ounces) kidney beans, drained and rinsed
- 1 can (15 ounces) chickpeas, drained and rinsed
- 1 can (15 ounces) wax beans or green beans, drained and rinsed
- 1/2 red onion, thinly sliced
- 1/4 cup parsley, chopped
- 1/3 cup apple cider vinegar
- 3 tablespoons olive oil
- 2 tablespoons sugar
- 1 teaspoon Dijon mustard
- 1 teaspoon celery seed
- 1 teaspoon kosher salt
- 1/2 teaspoon black pepper
Quick Steps:
- Rinse the beans well: Drain the cans and rinse until the liquid runs clear.
- Whisk the dressing: Mix vinegar, oil, sugar, mustard, celery seed, salt, and pepper.
- Toss the salad: Combine beans, onion, and parsley in a large bowl.
- Dress it thoroughly: Stir until the beans are evenly coated.
- Chill before serving: Rest for at least 30 minutes so the beans can pick up flavor.
Equipment for This Recipe:
- Colander
- Large mixing bowl
- Whisk
- Serving spoon
How to Serve This Dish:
Serve it cold with grilled meats, fried chicken, or sandwiches. The bean mix makes it more filling than a leafy salad, so 1/2 cup is plenty beside a full plate. A little extra parsley on top keeps the canned-bean look from taking over.
Pro Tips for This Recipe:
- Rinse canned beans thoroughly so the salad doesn’t taste metallic.
- Slice the onion thin enough that it softens in the dressing.
- Let it rest overnight if you can; the flavor gets deeper.
- If the vinaigrette tastes sharp, add 1 teaspoon more sugar rather than more oil.
Variations on This Dish:
- Tomato Version: Add 1 cup cherry tomatoes, halved, just before serving.
- Fennel Note: Swap half the onion for thin fennel slices.
- Herb-Heavy Bowl: Add dill and chives along with the parsley.
Common Mistakes to Avoid with This Dish:
- Skipping the rinse: Bean liquid makes the salad cloudy and salty in the wrong way.
- Underseasoning the vinaigrette: Beans need more salt than people expect.
- Serving it too soon: The flavor is flat without a short rest.
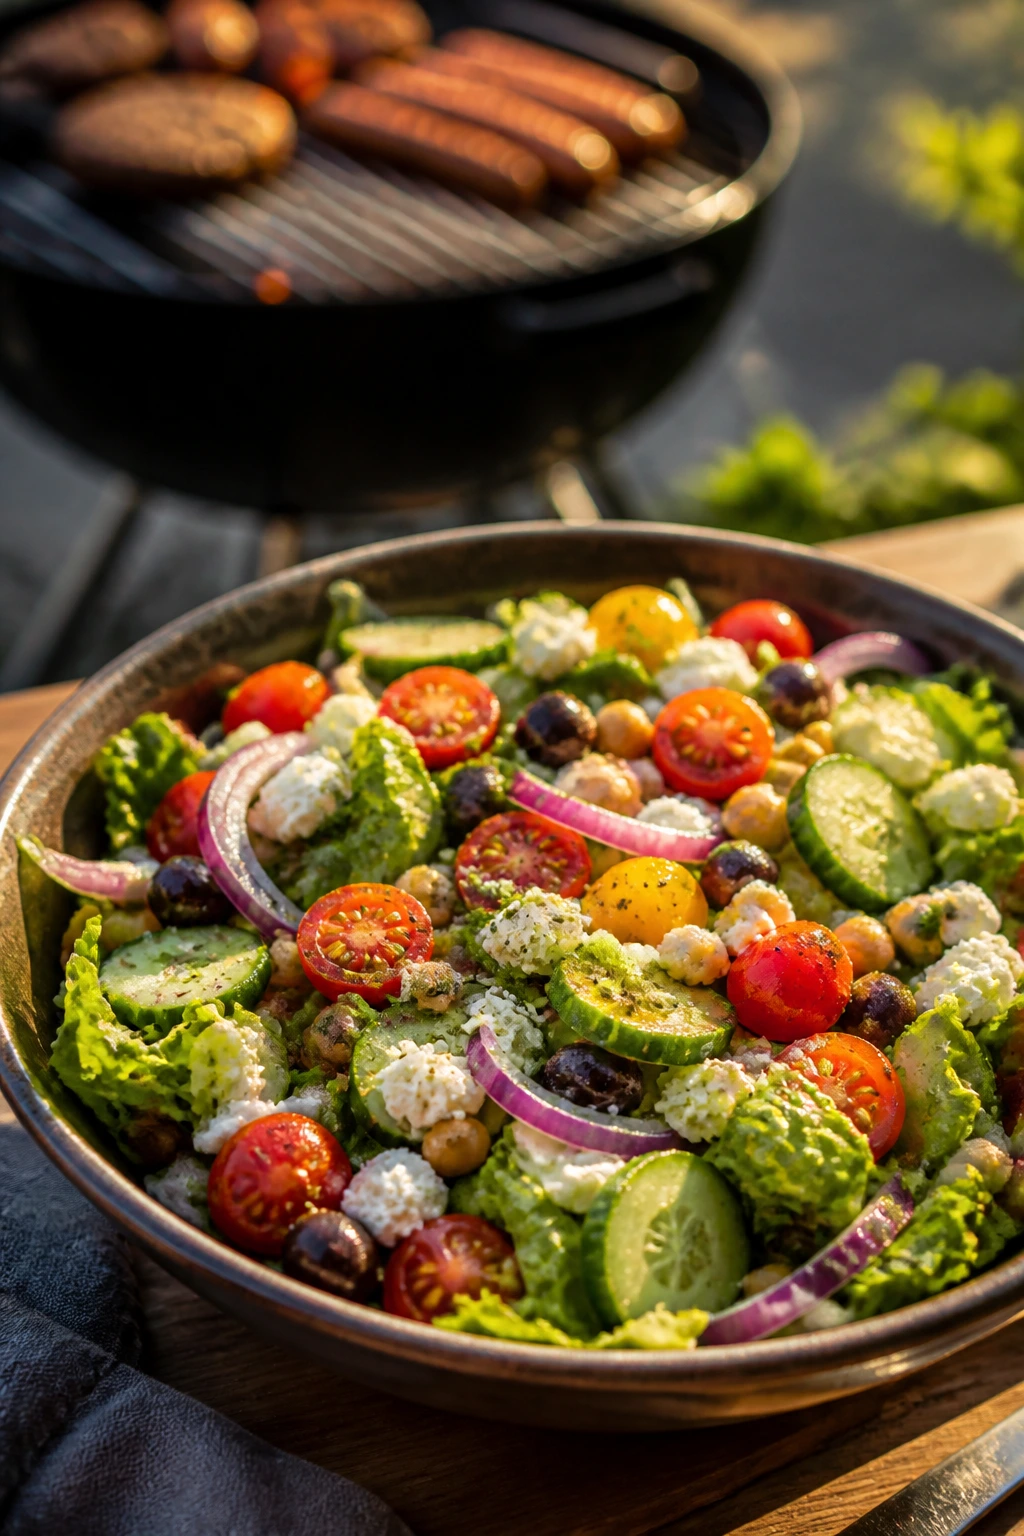
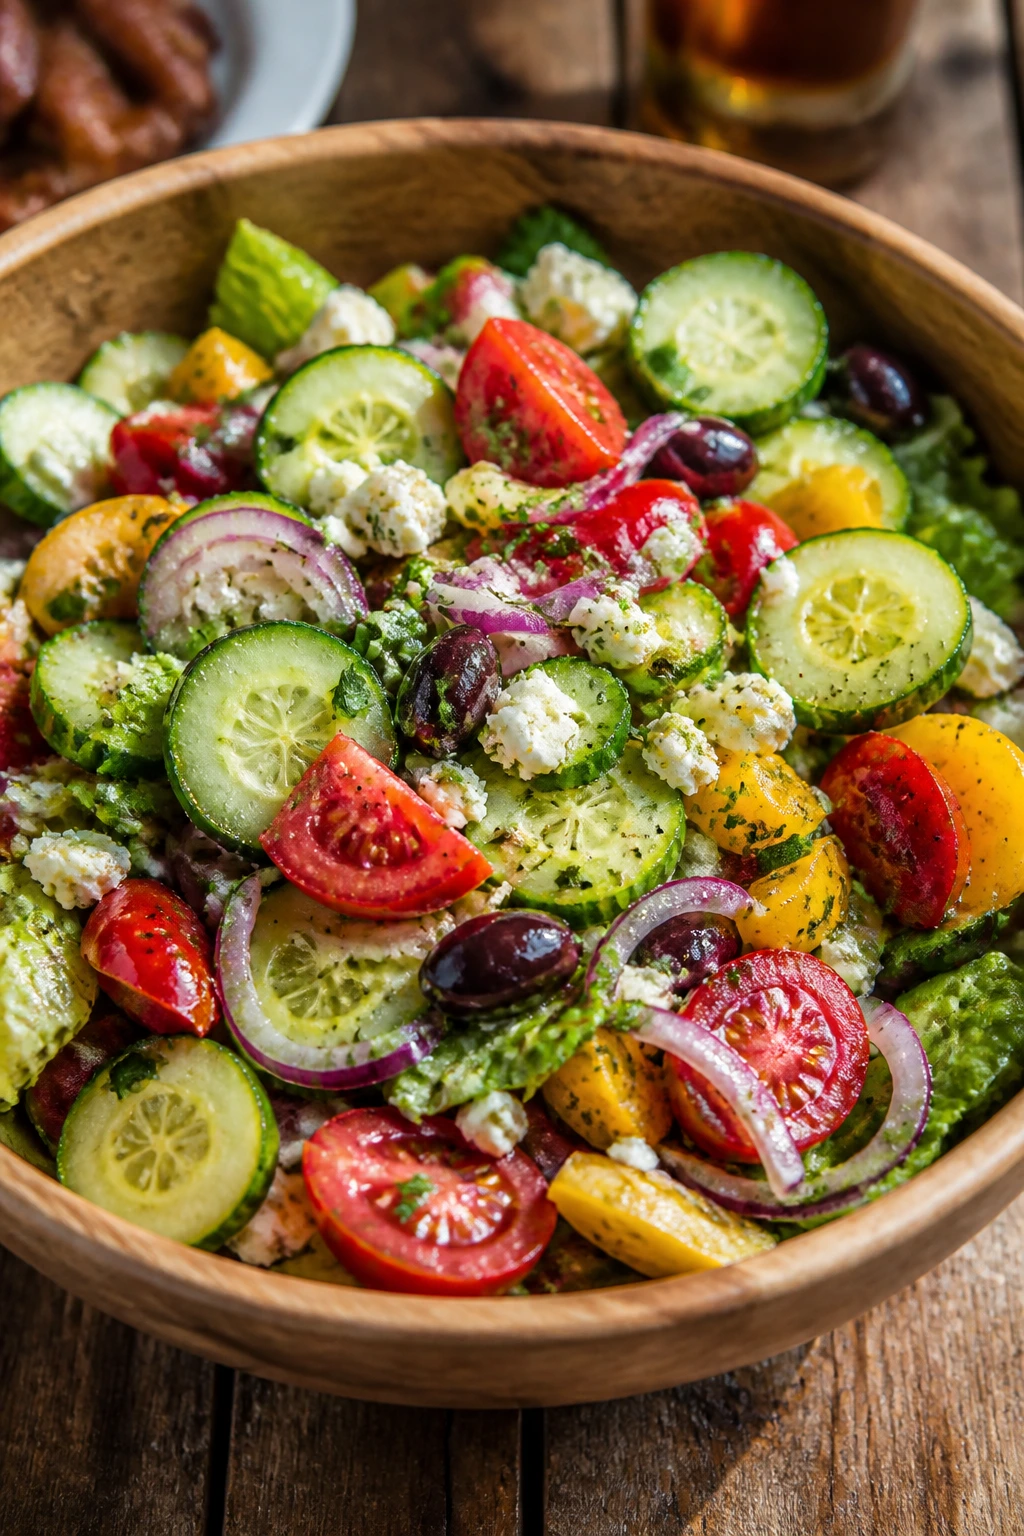
11. Greek Chickpea Salad with Olives and Feta
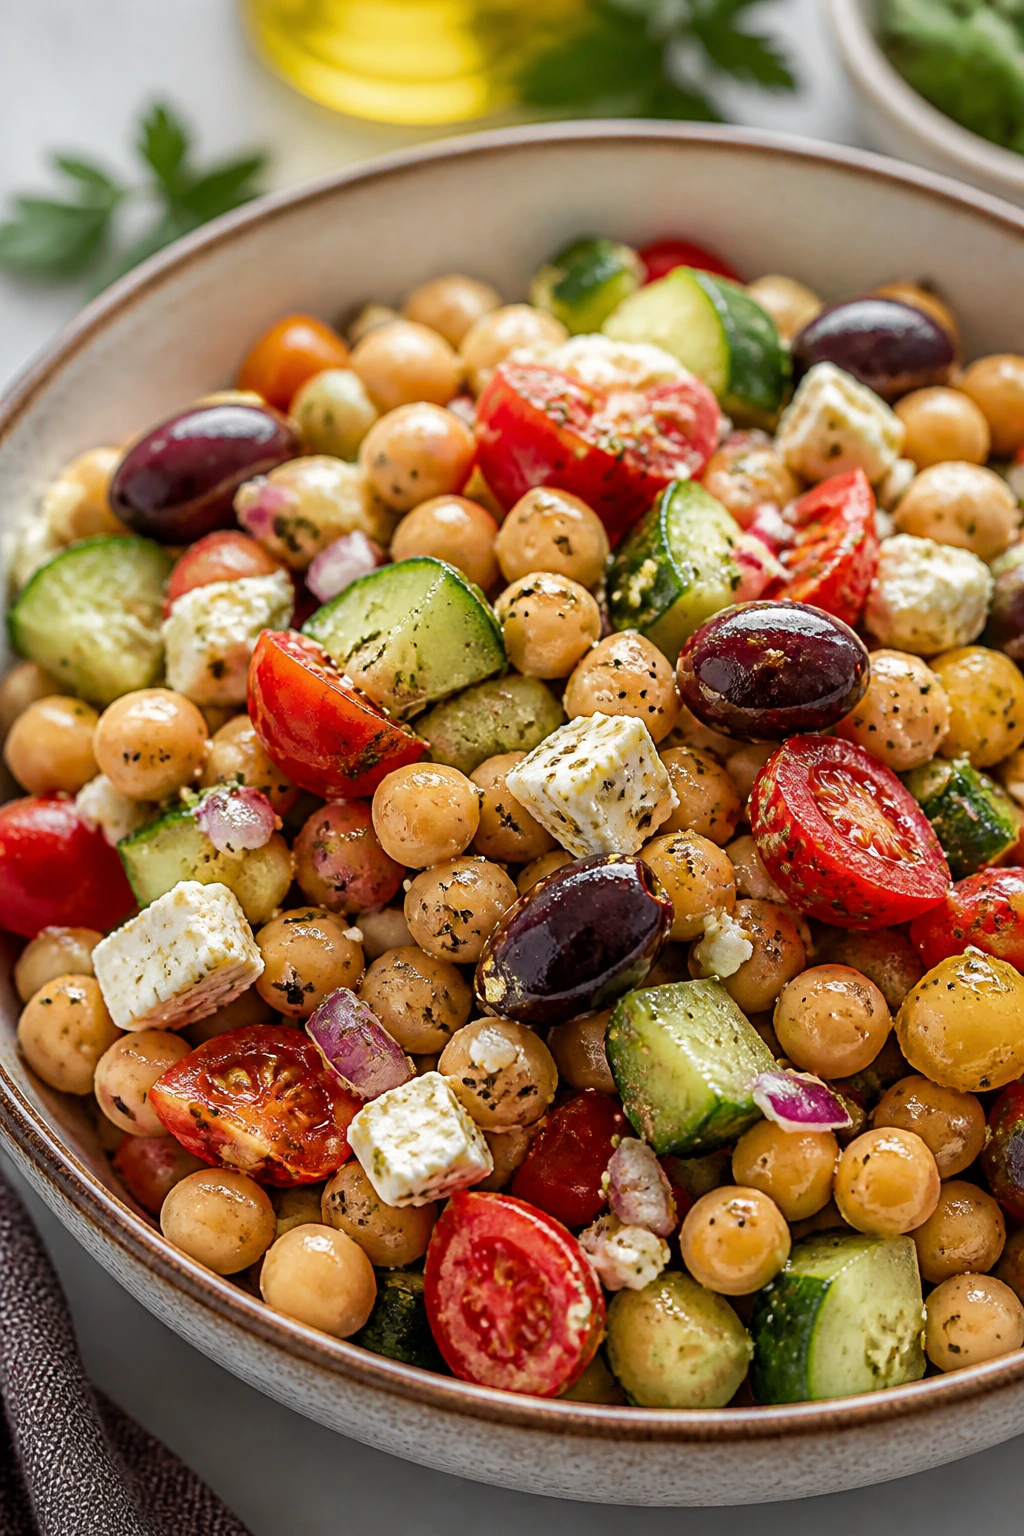
This salad is sturdy enough to sit in a cooler and still taste lively hours later. Chickpeas, cucumber, tomatoes, olives, feta, and oregano make a bowl that tastes salty, lemony, and clean. It’s the side I make when I want something with more substance than lettuce but less weight than pasta.
Why It Works:
Chickpeas give the salad backbone, so it can handle a heavier dressing and still feel balanced. Feta and olives supply salt, which means the lemon and olive oil taste brighter instead of dull. The chopped vegetables stay crisp, and the salad doesn’t collapse into itself the way some grain bowls do.
Key Ingredients:
- 2 cans (15 ounces each) chickpeas, drained and rinsed
- 1 cucumber, diced
- 2 cups cherry tomatoes, halved
- 1 red bell pepper, diced
- 1/2 red onion, thinly sliced
- 3/4 cup Kalamata olives, pitted and halved
- 4 ounces feta, crumbled
- 3 tablespoons olive oil
- 2 tablespoons lemon juice
- 1 teaspoon dried oregano
- 1 teaspoon kosher salt
- 1/2 teaspoon black pepper
Quick Steps:
- Rinse and dry the chickpeas: Pat them dry so the dressing clings better.
- Chop the vegetables: Keep the cucumber and pepper pieces small and even.
- Whisk the dressing: Combine olive oil, lemon juice, oregano, salt, and pepper.
- Toss the bowl: Add chickpeas, vegetables, olives, and feta.
- Rest briefly: Let it sit 15 minutes before serving so the lemon can sink in.
Equipment for This Recipe:
- Large mixing bowl
- Knife and cutting board
- Colander
- Spoon or spatula
How to Serve This Dish:
Spoon it into a wide bowl and finish with a few extra feta crumbs. It works with grilled lamb, chicken, or veggie skewers, and a 2/3-cup serving feels right because the chickpeas are filling. A few torn oregano leaves on top make it look sharper.
Pro Tips for This Recipe:
- Dry the chickpeas well or the dressing won’t stick.
- Use a block of feta if you want cleaner, thicker crumbles.
- Add the tomatoes last if you want to keep the salad less juicy.
- A splash of red wine vinegar can sharpen the bowl if the lemons are weak.
Variations on This Dish:
- No-Dairy Version: Skip the feta and add extra olives.
- Grain Add-On: Fold in 1 cup cooked farro or quinoa.
- Peppery Version: Add arugula for a sharper green note.
Common Mistakes to Avoid with This Dish:
- Cutting the cucumber too large: The salad feels clumsy.
- Using too much onion: It can drown out the chickpeas.
- Forgetting the salt: Chickpeas are blank without it.
12. Cabbage Apple Slaw with Yogurt-Lime Dressing
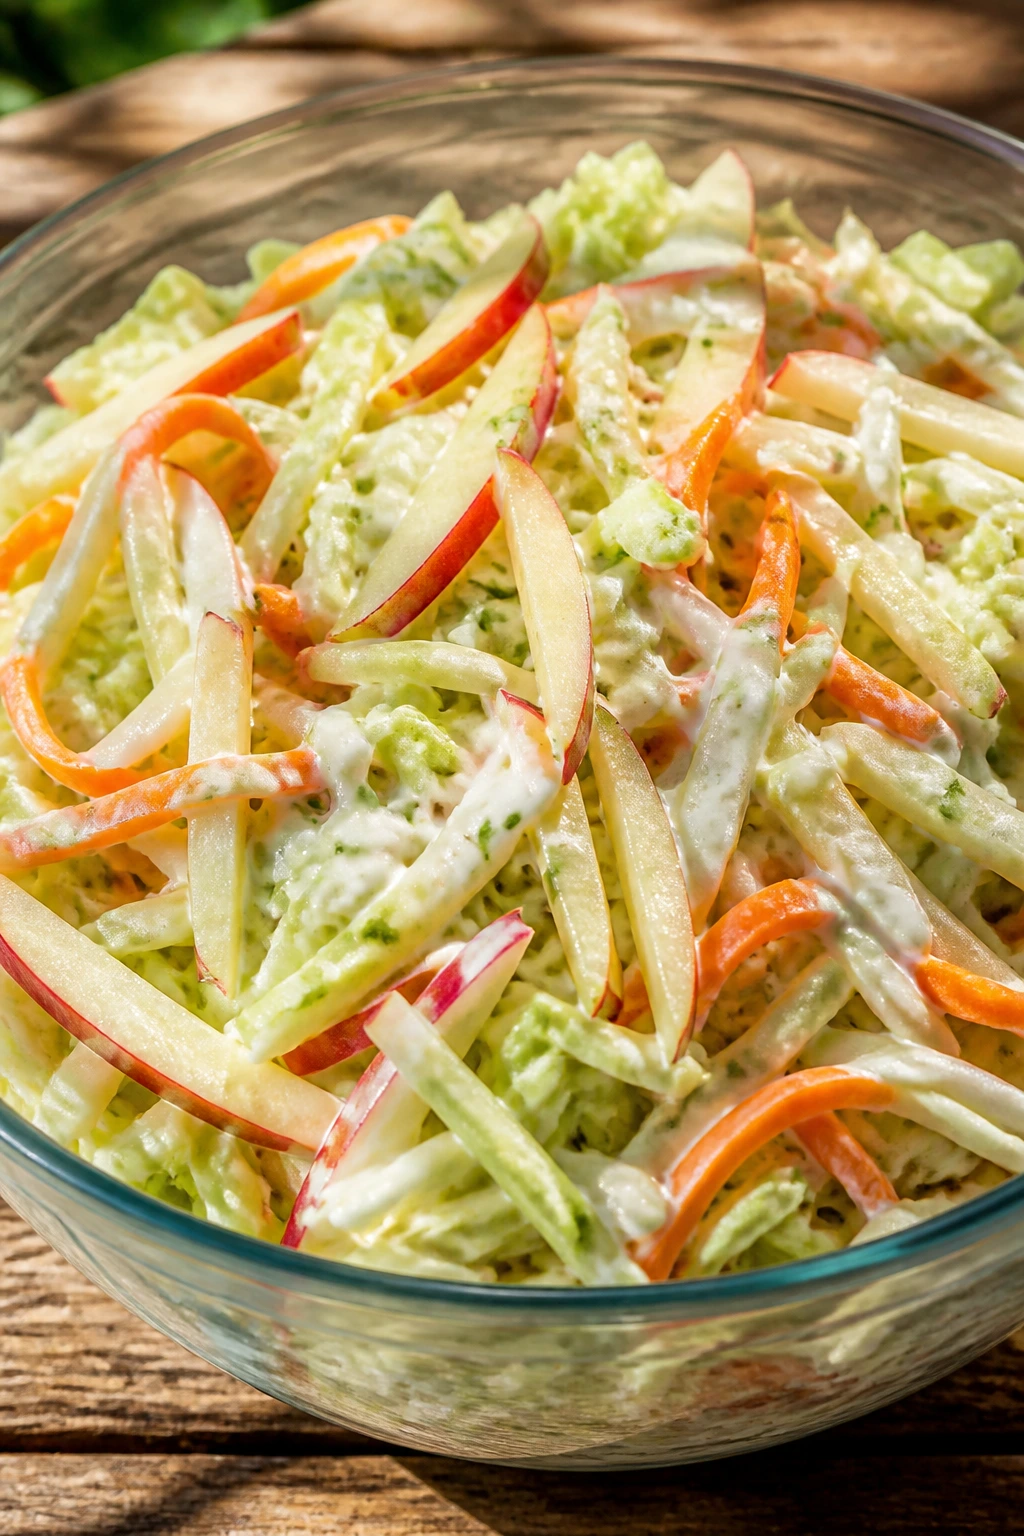
This slaw is crisp, cool, and a little sweet, which makes it useful when the rest of the cookout leans savory. Shredded cabbage, tart apples, carrot, and a yogurt-lime dressing give you crunch with a softer, fresher finish than mayonnaise alone. It’s the bowl you want when you need something bright but not sugary.
Why It Works:
Cabbage and apples both hold their texture well, even after dressing. Yogurt gives the sauce a tangy body without the heaviness of a full mayo slaw, and lime keeps the whole thing sharp. It’s one of those salads that still tastes clean after sitting around for a bit, which matters at a cookout.
Key Ingredients:
- 5 cups green cabbage, thinly shredded
- 2 crisp apples, julienned or thinly sliced
- 1 large carrot, shredded
- 1/2 cup plain Greek yogurt
- 2 tablespoons mayonnaise
- 2 tablespoons lime juice
- 1 tablespoon honey
- 1 teaspoon kosher salt
- 1/2 teaspoon black pepper
- 2 tablespoons chopped chives or dill
Quick Steps:
- Shred the cabbage finely: Thin strands toss better and soften faster.
- Prep the apples last: Cut them right before mixing so they stay crisp.
- Whisk the dressing: Stir yogurt, mayo, lime juice, honey, salt, and pepper until smooth.
- Combine everything: Toss cabbage, apples, carrot, and herbs with the dressing.
- Chill briefly: Rest for 10 to 15 minutes before serving.
Equipment for This Recipe:
- Large bowl
- Box grater or food processor
- Sharp knife
- Whisk
How to Serve This Dish:
Serve it cold with pork sandwiches, grilled chicken, or fried fish. It’s especially good on top of a pulled pork sandwich if you want a crunchy layer instead of a separate side. A 1/2-cup serving is enough because it’s refreshing and sharp.
Pro Tips for This Recipe:
- Use apples with firm flesh, not soft ones that bruise immediately.
- Toss the apples in a little lime juice if you’re making them a few minutes ahead.
- If you want more body, add 1 tablespoon extra yogurt.
- A mandoline makes the slaw prettier, but a knife works.
Variations on This Dish:
- Creamier Bowl: Increase the mayo to 1/4 cup.
- Honey-Lime Version: Add lime zest and 1 teaspoon more honey.
- Seeded Crunch: Add 2 tablespoons sunflower seeds.
Common Mistakes to Avoid with This Dish:
- Using soft apples: They turn mealy and dull.
- Oversalting early: The cabbage softens and can taste briny.
- Waiting too long to serve after dressing: The apples lose their snap.
13. Grilled Zucchini Herb Salad with Feta and Pine Nuts
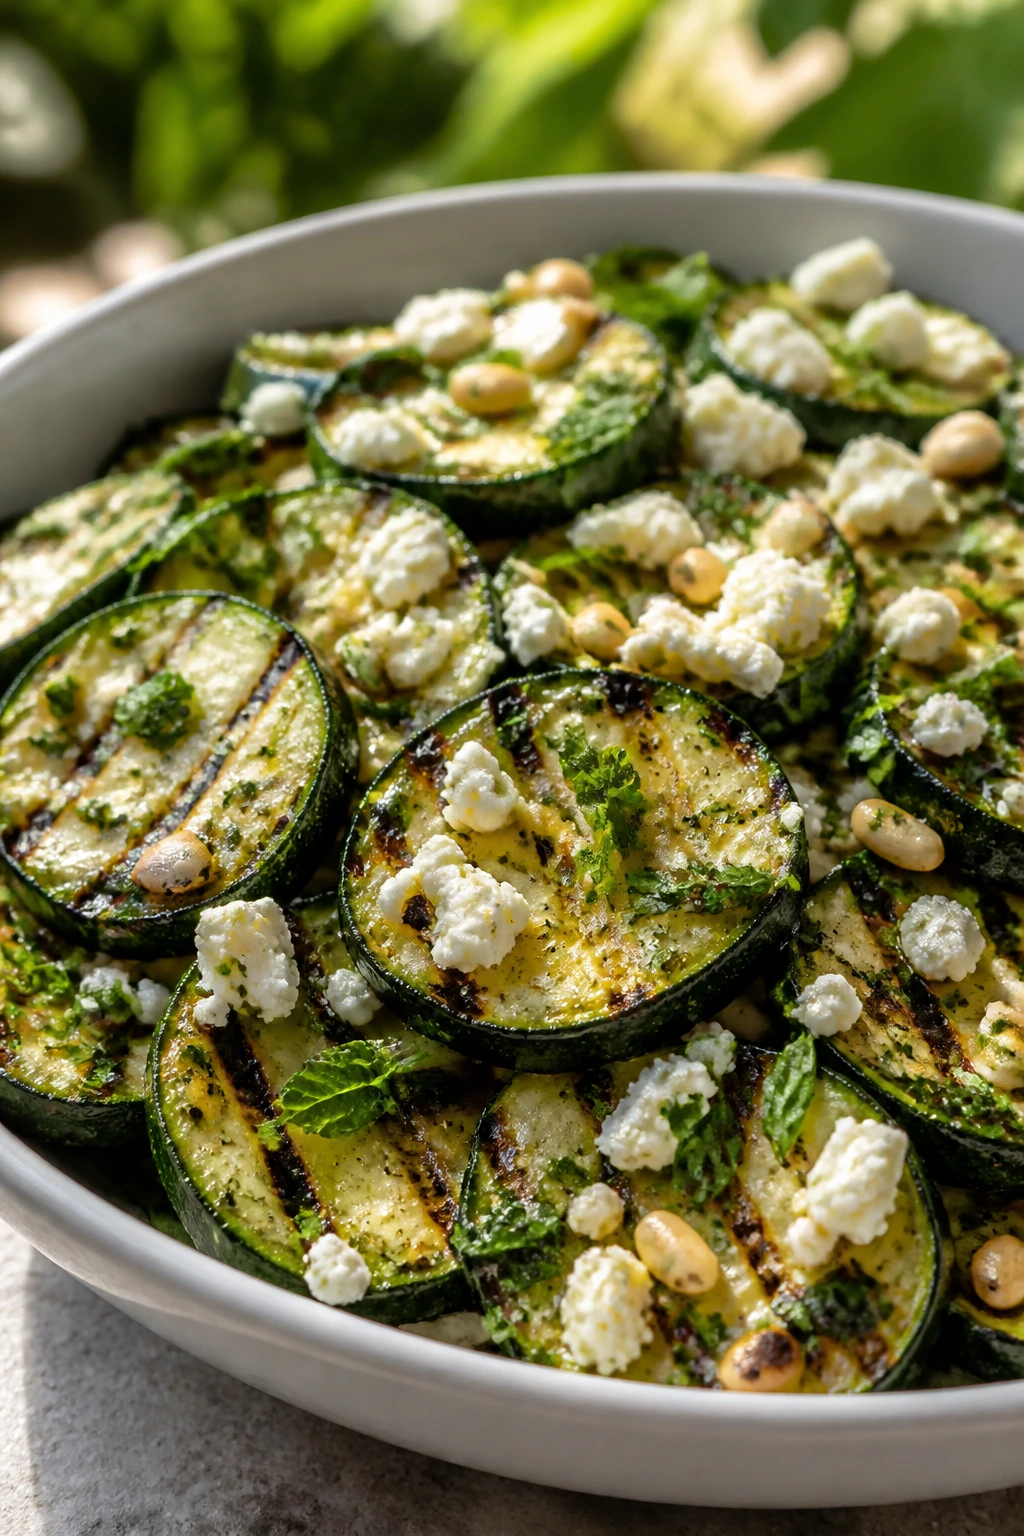
Zucchini is one of those vegetables that behaves better once it sees the grill. It gets a little smoky, a little tender, and a lot more interesting than raw slices in a bowl. Tossed with lemon, herbs, feta, and pine nuts, it becomes a side that tastes grown-up without trying too hard.
Why It Works:
Grilling removes some water from zucchini, so the salad doesn’t turn swampy. Lemon and herbs lift the mild squash, while feta and pine nuts add salt and crunch. Because the zucchini is cooked only briefly, it stays structured enough to handle a serving spoon.
Key Ingredients:
- 4 medium zucchini, sliced lengthwise
- 2 tablespoons olive oil
- 1 teaspoon kosher salt
- 1/2 teaspoon black pepper
- 3 tablespoons lemon juice
- 1 teaspoon lemon zest
- 2 tablespoons parsley, chopped
- 2 tablespoons mint, chopped
- 4 ounces feta, crumbled
- 1/4 cup pine nuts, toasted
Quick Steps:
- Oil and season the zucchini: Brush the slices with olive oil and sprinkle with salt and pepper.
- Grill the slices: Cook over medium-high heat for 2 to 3 minutes per side until grill marks show and the flesh softens.
- Cut into chunks: Let them cool for 5 minutes, then chop into bite-size pieces.
- Dress the salad: Toss with lemon juice, zest, parsley, and mint.
- Finish and serve: Add feta and pine nuts right before the bowl goes out.
Equipment for This Recipe:
- Grill or grill pan
- Tongs
- Sharp knife
- Mixing bowl
How to Serve This Dish:
Serve it warm or room temperature beside grilled fish, chicken, or steak. The salad looks nicest spread on a platter rather than piled high, and a 2/3-cup portion works well because the zucchini has some weight. A few extra mint leaves on top make the bowl smell fresh.
Pro Tips for This Recipe:
- Grill the zucchini in long slabs before chopping; it’s easier to manage than small pieces.
- Don’t overcook it or the slices collapse.
- Toast the pine nuts in a dry skillet for 2 to 3 minutes until fragrant.
- Add feta last so it doesn’t melt into the herbs.
Variations on This Dish:
- Garlic-Lemon Version: Add 1 small grated garlic clove to the dressing.
- No-Feta Version: Use shaved parmesan or skip the cheese entirely.
- Summer Squash Mix: Swap half the zucchini for yellow squash.
Common Mistakes to Avoid with This Dish:
- Grilling zucchini too long: It turns soft and watery.
- Adding herbs before the squash cools: They wilt fast.
- Using raw zucchini slices: The salad tastes flat and a little squeaky.
14. Pesto Tortellini Salad with Cherry Tomatoes
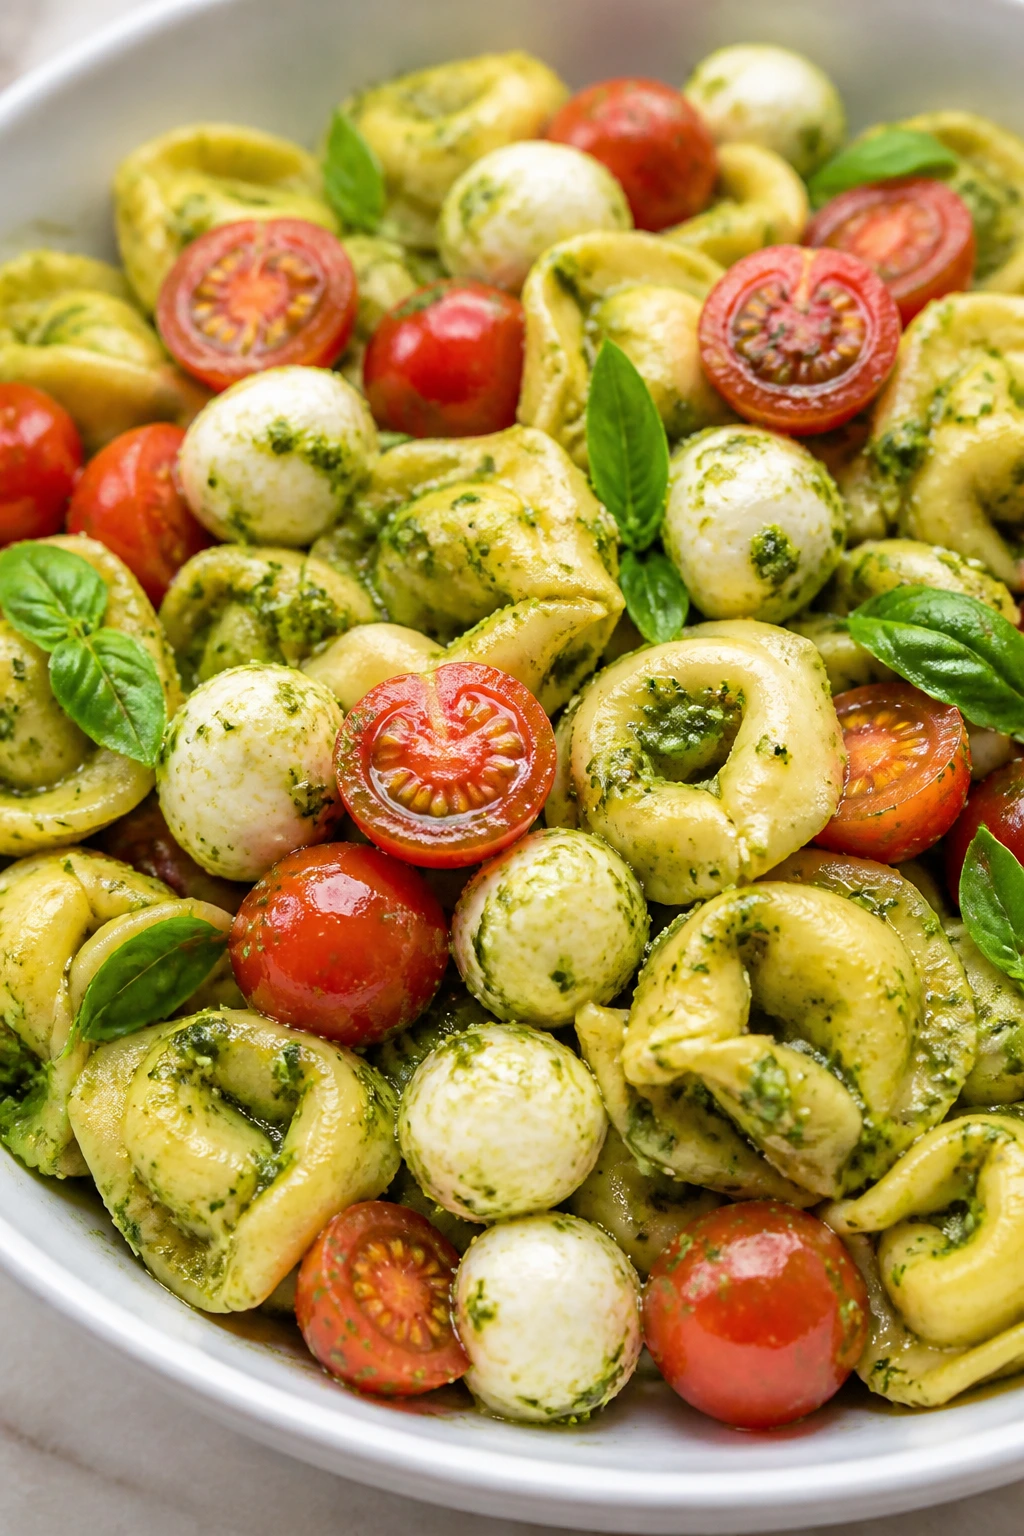
This is the richer cousin in the salad lineup, and honestly, it earns the slot. Cheese tortellini, pesto, cherry tomatoes, mozzarella, and basil make a bowl that feels like lunch and side dish at the same time. It’s the one that does especially well when you need something hearty for guests who arrive hungry.
Why It Works:
Tortellini has enough body to hold up under pesto without getting lost. The tomatoes add juiciness, mozzarella adds soft richness, and basil keeps the whole thing green and fragrant. A squeeze of lemon helps the pesto taste less heavy, which matters when the bowl is sitting beside grilled meat.
Key Ingredients:
- 20 ounces cheese tortellini
- 1 1/2 cups cherry tomatoes, halved
- 8 ounces mozzarella balls, drained
- 1/2 cup basil pesto
- 2 tablespoons lemon juice
- 1/4 cup olive oil
- 1/4 cup pine nuts, toasted
- 1 teaspoon kosher salt
- 1/2 teaspoon black pepper
- 1 cup baby spinach, optional
Quick Steps:
- Cook the tortellini: Boil until just tender, following the package timing closely.
- Cool it gently: Drain and rinse briefly, then let it steam off for a few minutes.
- Loosen the pesto: Whisk pesto, lemon juice, olive oil, salt, and pepper.
- Toss the salad: Combine tortellini, tomatoes, mozzarella, and spinach if using.
- Finish with nuts: Stir in pine nuts just before serving so they stay crisp.
Equipment for This Recipe:
- Large pot
- Colander
- Large mixing bowl
- Whisk
How to Serve This Dish:
Serve it chilled or just barely cool, with extra basil scattered on top. It stands in nicely for bread or a starch, so keep portions around 2/3 cup unless the side table is thin. It’s especially good next to grilled vegetables or simple chicken.
Pro Tips for This Recipe:
- Cool the tortellini before adding pesto so the cheese filling stays intact.
- If the pesto is thick, thin it with a spoonful of pasta water or olive oil.
- Drain the mozzarella well or the bowl gets watery.
- Add spinach only if you’re serving soon; it softens overnight.
Variations on This Dish:
- Sun-Dried Tomato Version: Add chopped sun-dried tomatoes for a deeper bite.
- Chicken Add-On: Fold in 2 cups diced cooked chicken if you want the salad to serve as a main.
- Dairy-Light Version: Use a dairy-free pesto and skip the mozzarella.
Common Mistakes to Avoid with This Dish:
- Overcooking the tortellini: It splits when tossed.
- Using too much pesto: The bowl turns greasy fast.
- Skipping the lemon: Pesto alone can taste heavy.
15. Mexican Street Corn Salad with Cotija and Chili

This salad borrows the best parts of elote and puts them in a bowl that’s easier to scoop at a backyard table. Charred corn, cotija, lime, cilantro, and chili powder make every bite salty, smoky, creamy, and a little tangy. It’s loud in the right way.
Why It Works:
Corn is sweet enough to handle dairy and spice without becoming cloying. Charring the kernels gives the salad a smoky note that feels made for grill food, and the cotija breaks into salty little bursts instead of melting away. A squeeze of lime keeps the dressing from feeling thick.
Key Ingredients:
- 6 cups corn kernels, fresh or thawed frozen
- 1/3 cup mayonnaise
- 1/4 cup sour cream
- 1/2 cup cotija cheese, crumbled
- 1 jalapeño, minced
- 1/4 cup cilantro, chopped
- 2 tablespoons lime juice
- 1 teaspoon chili powder
- 1/2 teaspoon smoked paprika
- 1 teaspoon kosher salt
Quick Steps:
- Char the corn: Cook the kernels in a hot skillet or grill pan until browned in spots, about 5 minutes.
- Mix the dressing: Whisk mayo, sour cream, lime juice, chili powder, paprika, and salt.
- Toss the corn: Combine the warm or cooled corn with the dressing.
- Add the toppings: Fold in jalapeño, cilantro, and half the cotija.
- Finish before serving: Sprinkle the remaining cotija over the top.
Equipment for This Recipe:
- Skillet or grill pan
- Mixing bowl
- Whisk
- Serving bowl
How to Serve This Dish:
Serve it warm or room temperature, with a spoon rather than a salad fork. It belongs next to grilled steak, tacos, chicken thighs, or burgers, and about 1/2 cup per person is right because the richness adds up quickly. A little extra lime wedge on the side helps.
Pro Tips for This Recipe:
- Dry frozen corn well before charring or it steams.
- Use cotija if you can; feta works, but the flavor is different and saltier in a cleaner way.
- Add jalapeño gradually if your crowd likes milder heat.
- Taste after chilling because corn often wants one more pinch of salt.
Variations on This Dish:
- Avocado Version: Fold in diced avocado just before serving.
- Hot Version: Add minced serrano pepper and extra chili powder.
- No-Mayo Version: Use crema or plain Greek yogurt instead.
Common Mistakes to Avoid with This Dish:
- Skipping the char: Plain corn tastes flat here.
- Adding all the cheese early: Some should stay on top.
- Overloading the dressing: The corn should still read as corn.
16. Strawberry Spinach Salad with Poppy Seed Dressing

This salad brings color to the table fast: dark green spinach, red berries, pale feta, and a pale dressing with poppy seeds that looks almost as good as it tastes. It’s sweet, tangy, and light enough to sit beside richer cookout food without competing. If your berries are ripe, the whole bowl wakes up.
Why It Works:
Strawberries and spinach share a natural sweetness-and-bitterness contrast, and poppy seed dressing bridges the gap with a little honey. The almonds give the bowl some crunch so it doesn’t go soft under the fruit. Feta adds a salty edge that keeps the salad from feeling like dessert.
Key Ingredients:
- 8 cups baby spinach
- 2 cups strawberries, hulled and sliced
- 1/2 red onion, very thinly sliced
- 1/2 cup sliced almonds
- 1/3 cup feta, crumbled
- 1/4 cup olive oil
- 2 tablespoons apple cider vinegar
- 1 tablespoon honey
- 1 tablespoon poppy seeds
- 1 teaspoon Dijon mustard
Quick Steps:
- Make the dressing: Whisk olive oil, vinegar, honey, poppy seeds, and Dijon until smooth.
- Toast the almonds: Warm them in a dry skillet for 2 to 3 minutes until fragrant.
- Assemble the salad base: Layer spinach, strawberries, onion, and feta in a large bowl.
- Dress lightly: Add just enough dressing to coat the leaves.
- Top with almonds: Sprinkle them on right before serving.
Equipment for This Recipe:
- Large salad bowl
- Small whisk or jar
- Skillet
- Sharp knife
How to Serve This Dish:
Serve it immediately after dressing, because spinach softens quickly. It makes a bright side for grilled chicken, ham, or salty barbecue dishes, and a 1/2-cup portion is usually enough. Keep extra dressing on the side so the bowl doesn’t drown.
Pro Tips for This Recipe:
- Slice the onion paper-thin so it doesn’t dominate the fruit.
- Use dry spinach; wet leaves dilute the dressing.
- Dress only what you plan to serve right away.
- A little black pepper on the berries is better than it sounds.
Variations on This Dish:
- Berry Mix Version: Swap half the strawberries for blueberries.
- Nut-Free Bowl: Use pumpkin seeds instead of almonds.
- Creamier Finish: Add avocado slices and reduce the feta slightly.
Common Mistakes to Avoid with This Dish:
- Dressing the spinach too early: It collapses fast.
- Using underripe berries: They taste sour and brittle.
- Pouring on too much dressing: A light coat is enough.
17. Dill Pickle Pasta Salad with Cheddar and Peas
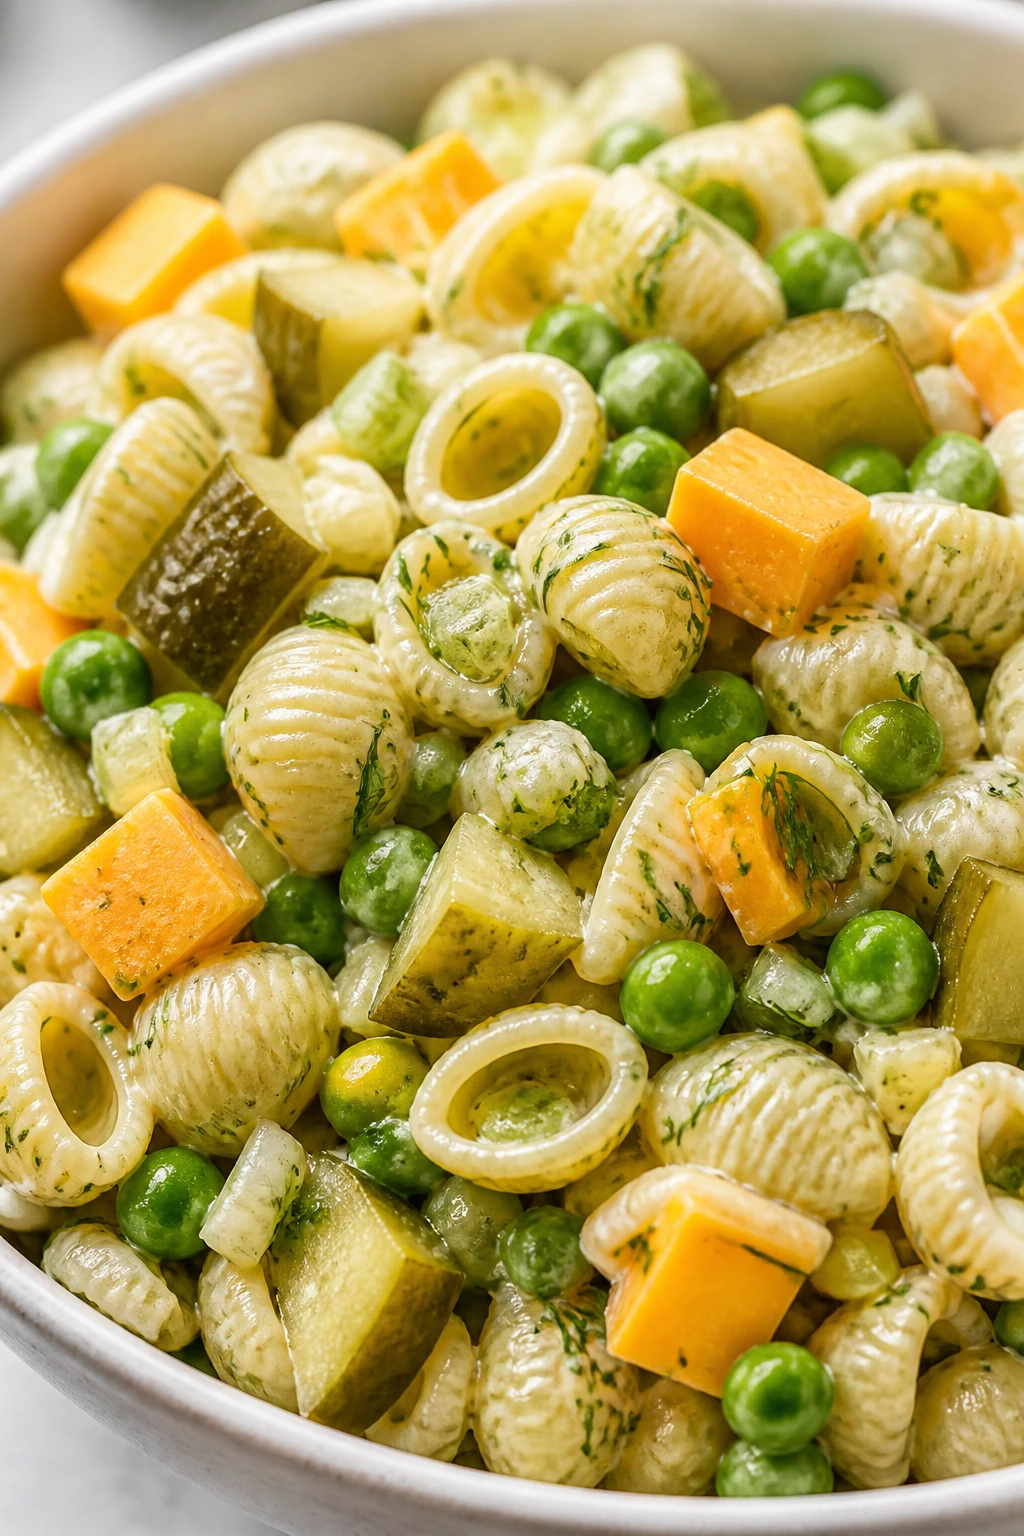
This one is for the pickle people, and there are always pickle people. The briny bite from chopped pickles and pickle brine makes the pasta taste sharper, while cheddar cubes and peas keep it from becoming one-dimensional. It’s oddly addictive, especially beside grilled hot dogs or burgers.
Why It Works:
Pickle brine seasons the pasta from the inside out, which gives the salad a built-in tang that plain mayonnaise can’t. Cheddar brings a firm, salty chew, and peas add sweetness so the whole bowl doesn’t read as sour. Pasta shells or elbows hold onto the dressing and the chopped pickle pieces.
Key Ingredients:
- 12 ounces small pasta shells
- 3/4 cup dill pickles, chopped
- 1/2 cup dill pickle brine
- 3/4 cup mayonnaise
- 1/4 cup sour cream
- 1 cup sharp cheddar, cubed
- 1/2 cup peas, thawed
- 2 tablespoons fresh dill, chopped
- 1/2 teaspoon black pepper
- 1 teaspoon kosher salt, plus more if needed
Quick Steps:
- Cook and cool the pasta: Boil until al dente, then rinse briefly and let it drain well.
- Whisk the dressing: Stir mayonnaise, sour cream, pickle brine, salt, and pepper together.
- Fold in the mix-ins: Add pasta, pickles, cheddar, peas, and dill.
- Chill: Let the salad rest for at least 30 minutes.
- Taste before serving: Add more brine if it needs a sharper punch.
Equipment for This Recipe:
- Large pot
- Colander
- Mixing bowl
- Spoon or spatula
How to Serve This Dish:
Serve it cold in a sturdy bowl because this salad is more substantial than it looks. It goes well with smoked sausage, burgers, or fried chicken, and 2/3 cup is a fair portion because of the cheese. A few pickle slices on top make the theme obvious.
Pro Tips for This Recipe:
- Use a sharp cheddar, not mild.
- Dry the pickles a bit before chopping so the dressing doesn’t get watery.
- Cook the pasta just shy of done so it stays springy.
- Add extra dill at the end if you want a louder herbal note.
Variations on This Dish:
- Mustard Pickle Version: Add 1 tablespoon yellow mustard.
- Bacon Version: Fold in 4 slices cooked, crumbled bacon.
- No-Sour-Cream Version: Use all mayonnaise and a splash of milk to loosen it.
Common Mistakes to Avoid with This Dish:
- Using sweet pickles by accident: They change the whole flavor profile.
- Letting the pasta get too soft: It turns mushy fast.
- Underestimating the salt: Pickles are salty, but the pasta still needs seasoning.
18. Farro Salad with Roasted Red Peppers and Cucumber

Farro brings a chewy, nutty bite that makes a salad feel more substantial without turning it into a brick. Roasted red peppers, cucumber, parsley, feta, and lemon keep it bright, while the grain gives the bowl enough structure to handle sitting out for a while. It’s a fine choice when you want something less familiar than pasta.
Why It Works:
Farro stays pleasantly chewy after cooking, so it doesn’t slump under dressing the way some grains do. Roasted peppers add sweetness, cucumber adds snap, and feta gives the salad a salty center. The lemon-red wine vinaigrette sharpens the grain and keeps the bowl from tasting dry.
Key Ingredients:
- 1 cup farro
- 2 1/2 cups water or broth
- 1 cup roasted red peppers, sliced
- 1 cucumber, diced
- 1/2 cup parsley, chopped
- 1/3 cup feta, crumbled
- 1/4 cup pumpkin seeds
- 3 tablespoons olive oil
- 2 tablespoons lemon juice
- 1 tablespoon red wine vinegar
- 1 small garlic clove, grated
- 1 teaspoon kosher salt
Quick Steps:
- Cook the farro: Simmer in water or broth for 25 to 30 minutes until chewy but tender.
- Drain and cool: Spread the farro on a tray so it stops steaming.
- Whisk the dressing: Combine olive oil, lemon juice, vinegar, garlic, and salt.
- Mix the salad: Toss farro with peppers, cucumber, parsley, feta, and pumpkin seeds.
- Rest briefly: Let it sit 15 minutes so the grain soaks up the dressing.
Equipment for This Recipe:
- Saucepan
- Fine-mesh strainer
- Large bowl
- Spoon
How to Serve This Dish:
Serve it room temperature or lightly chilled. It pairs well with grilled vegetables, chicken, or salmon, and a 2/3-cup serving is about right because the farro fills the plate more than lettuce would. A little parsley on top keeps it looking fresh.
Pro Tips for This Recipe:
- Salt the cooking water or broth so the farro itself tastes good.
- Use jarred roasted peppers if you’re short on time, but pat them dry.
- Toast the pumpkin seeds for a minute or two if you want more depth.
- If the farro is still warm, add the feta last so it stays in neat crumbles.
Variations on This Dish:
- Mediterranean Bowl: Add olives and chopped sun-dried tomatoes.
- Herby Lemon Version: Double the parsley and add dill.
- Gluten-Free Swap: Use quinoa or brown rice instead of farro.
Common Mistakes to Avoid with This Dish:
- Overcooking the farro: It should chew, not collapse.
- Skipping the rest time: The salad tastes more blended after 15 minutes.
- Using too much garlic: It can swamp the peppers.
19. Green Bean and Cherry Tomato Salad with Almonds
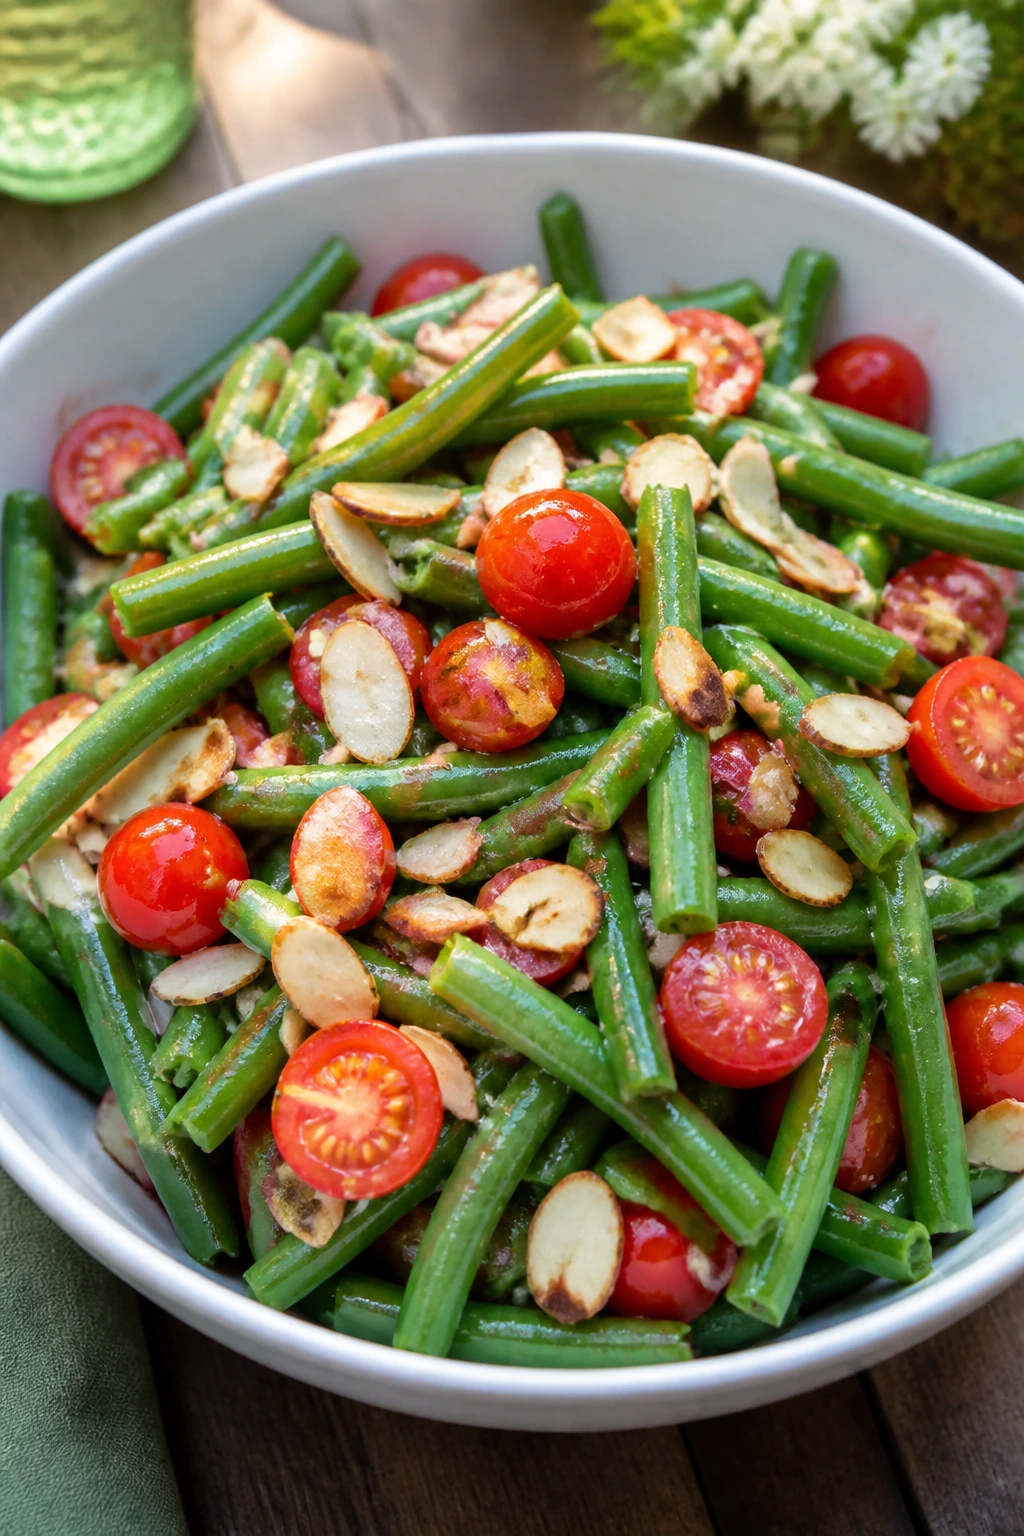
Green beans are a sleeper hit at cookouts because they stay crisp after a quick blanch and take on dressing without turning limp. Cherry tomatoes add sweetness, almonds add crunch, and the red wine vinaigrette keeps the bowl clean and sharp. It’s one of the few salads here that still feels light after a big meal.
Why It Works:
Blanching green beans for just a few minutes keeps their color bright and their texture crisp-tender. Tomatoes bring juice and acidity, while almonds create a dry crunch that offsets the soft parts. The vinaigrette is simple, which is the right move when the vegetables already have strong flavor.
Key Ingredients:
- 1 1/2 pounds green beans, trimmed
- 2 cups cherry tomatoes, halved
- 1 shallot, thinly sliced
- 1/4 cup sliced almonds, toasted
- 3 tablespoons olive oil
- 2 tablespoons red wine vinegar
- 1 teaspoon Dijon mustard
- 1 teaspoon honey
- 1 teaspoon kosher salt
- 1/2 teaspoon black pepper
Quick Steps:
- Blanch the beans: Boil for 2 to 3 minutes until bright green and just tender.
- Shock them in ice water: Stop the cooking so they stay crisp.
- Whisk the dressing: Mix olive oil, vinegar, mustard, honey, salt, and pepper.
- Toss the salad: Combine beans, tomatoes, shallot, and dressing.
- Finish with almonds: Add the nuts right before serving so they stay crunchy.
Equipment for This Recipe:
- Large pot
- Bowl of ice water
- Mixing bowl
- Slotted spoon
How to Serve This Dish:
Serve it at room temperature or slightly cool. It sits well beside steak, chicken, or grilled fish, and a 1/2-cup serving keeps the plate from getting overloaded. The toasted almonds should stay visible on top.
Pro Tips for This Recipe:
- Cut the beans to the same length if you want a tidy bowl.
- Don’t skip the ice bath; it protects the color and crunch.
- Use shallot instead of onion for a softer bite.
- Toast the almonds just until they smell nutty.
Variations on This Dish:
- Herb Version: Add parsley and tarragon.
- Feta Finish: Sprinkle 1/3 cup feta over the top.
- Garlic-Lemon Version: Use lemon juice instead of vinegar and add a small garlic clove.
Common Mistakes to Avoid with This Dish:
- Overblanching the beans: They go dull and floppy.
- Adding almonds too early: They soften in the dressing.
- Using huge tomato halves: Smaller pieces mix better.
20. Peach and Burrata Salad with Basil and Pistachios
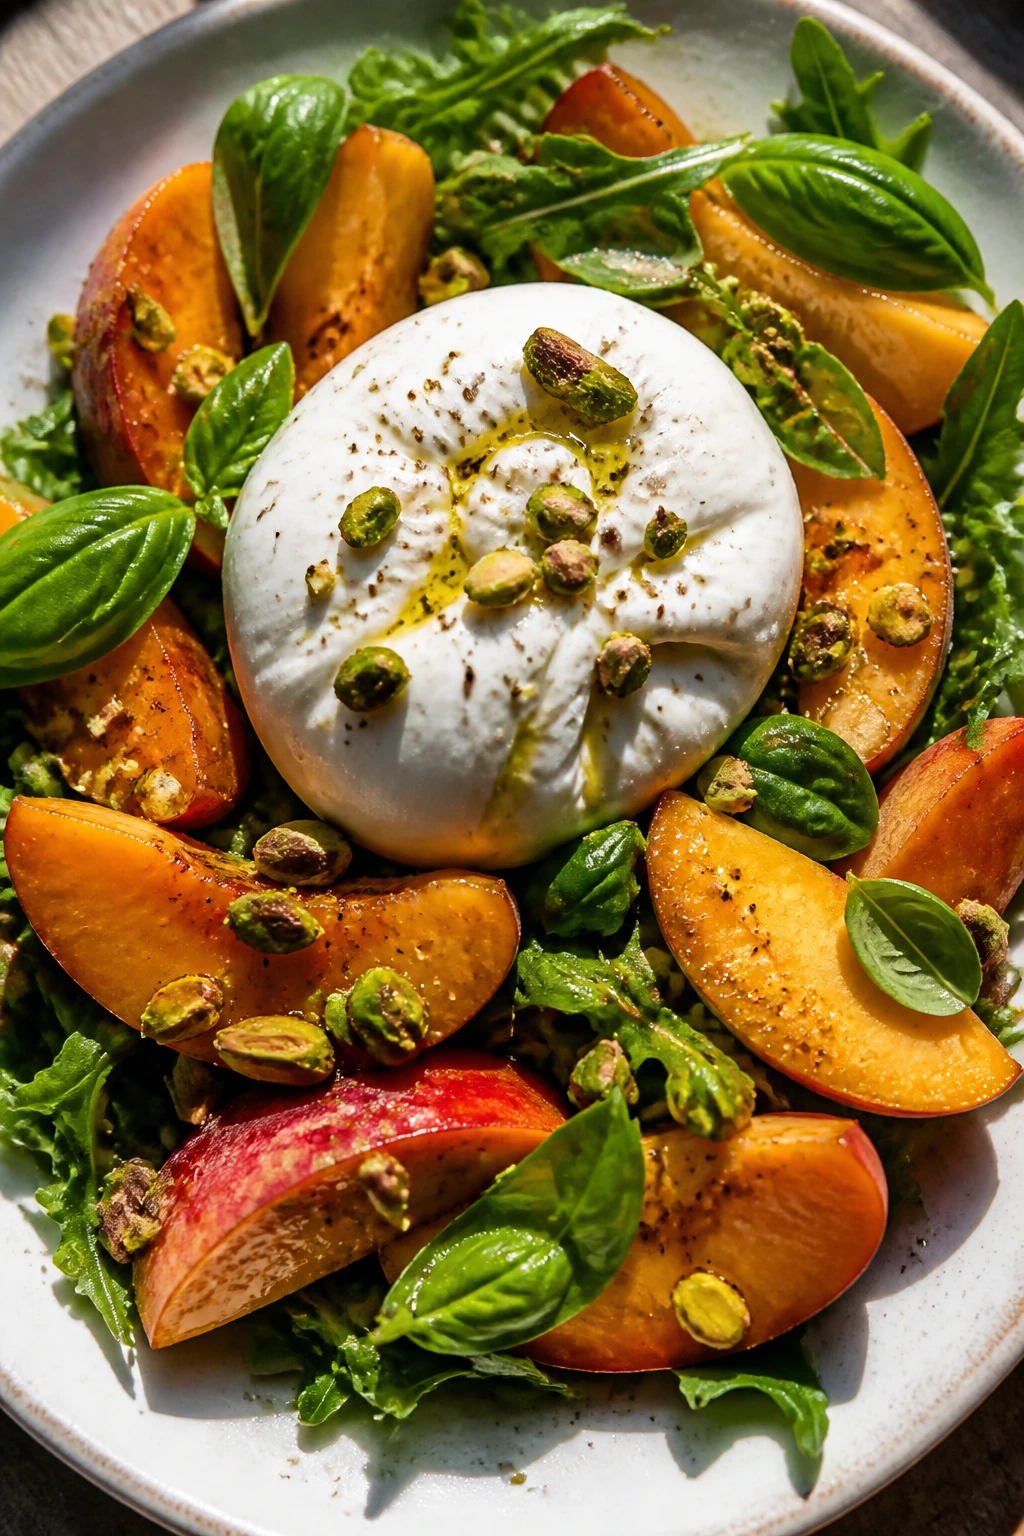
This salad is a little richer than the others, and that’s part of the appeal. Sweet peaches, creamy burrata, basil, pepper, and pistachios make a bowl that feels like it belongs at a cookout where someone also knows how to buy good fruit. It’s simple, but the ingredients have to be right.
Why It Works:
Peaches bring sweetness and perfume, burrata brings a milky center that spreads into the plate, and pistachios keep the texture from turning soft. Basil gives the salad a savory-green note, and a tiny hit of balsamic glaze ties the fruit to the cheese. If the peaches are ripe, you barely need anything else.
Key Ingredients:
- 4 ripe peaches, sliced
- 2 balls burrata
- 4 cups arugula or baby greens
- 1/4 cup fresh basil leaves
- 2 tablespoons olive oil
- 1 tablespoon balsamic glaze
- 1/4 cup pistachios, roughly chopped
- Flaky salt, to taste
- Black pepper, to taste
Quick Steps:
- Slice the peaches: Keep the slices sturdy enough to hold their shape.
- Arrange the greens: Spread arugula or baby greens on a platter.
- Add the burrata: Tear it open so the creamy center shows.
- Layer the fruit and herbs: Scatter peaches, basil, and pistachios over the top.
- Finish and serve: Drizzle olive oil and balsamic glaze, then season with flaky salt and pepper.
Equipment for This Recipe:
- Sharp knife
- Serving platter
- Small spoon for burrata
- Cutting board
How to Serve This Dish:
Serve it right away on a platter, not in a deep bowl. It’s best beside grilled chicken, prosciutto, or simple flatbread, and 1/2 to 3/4 cup per person is plenty because burrata is rich. A crack of black pepper on top sharpens the peaches.
Pro Tips for This Recipe:
- Buy peaches that smell fragrant near the stem.
- Keep the burrata cold until the last minute.
- Use a light hand with the glaze; too much makes the salad syrupy.
- Add the basil after the peaches are plated so it stays perky.
Variations on This Dish:
- Nectarine Version: Swap in nectarines if they’re firmer.
- Tomato-Peach Mix: Add sliced heirloom tomatoes for more acidity.
- Prosciutto Version: Lay a few thin ribbons of prosciutto across the platter.
Common Mistakes to Avoid with This Dish:
- Using hard peaches: They taste flat and starchy.
- Burying the burrata: Let the center be part of the show.
- Overdressing: The fruit should still taste like fruit.
21. Beet, Orange, and Goat Cheese Salad
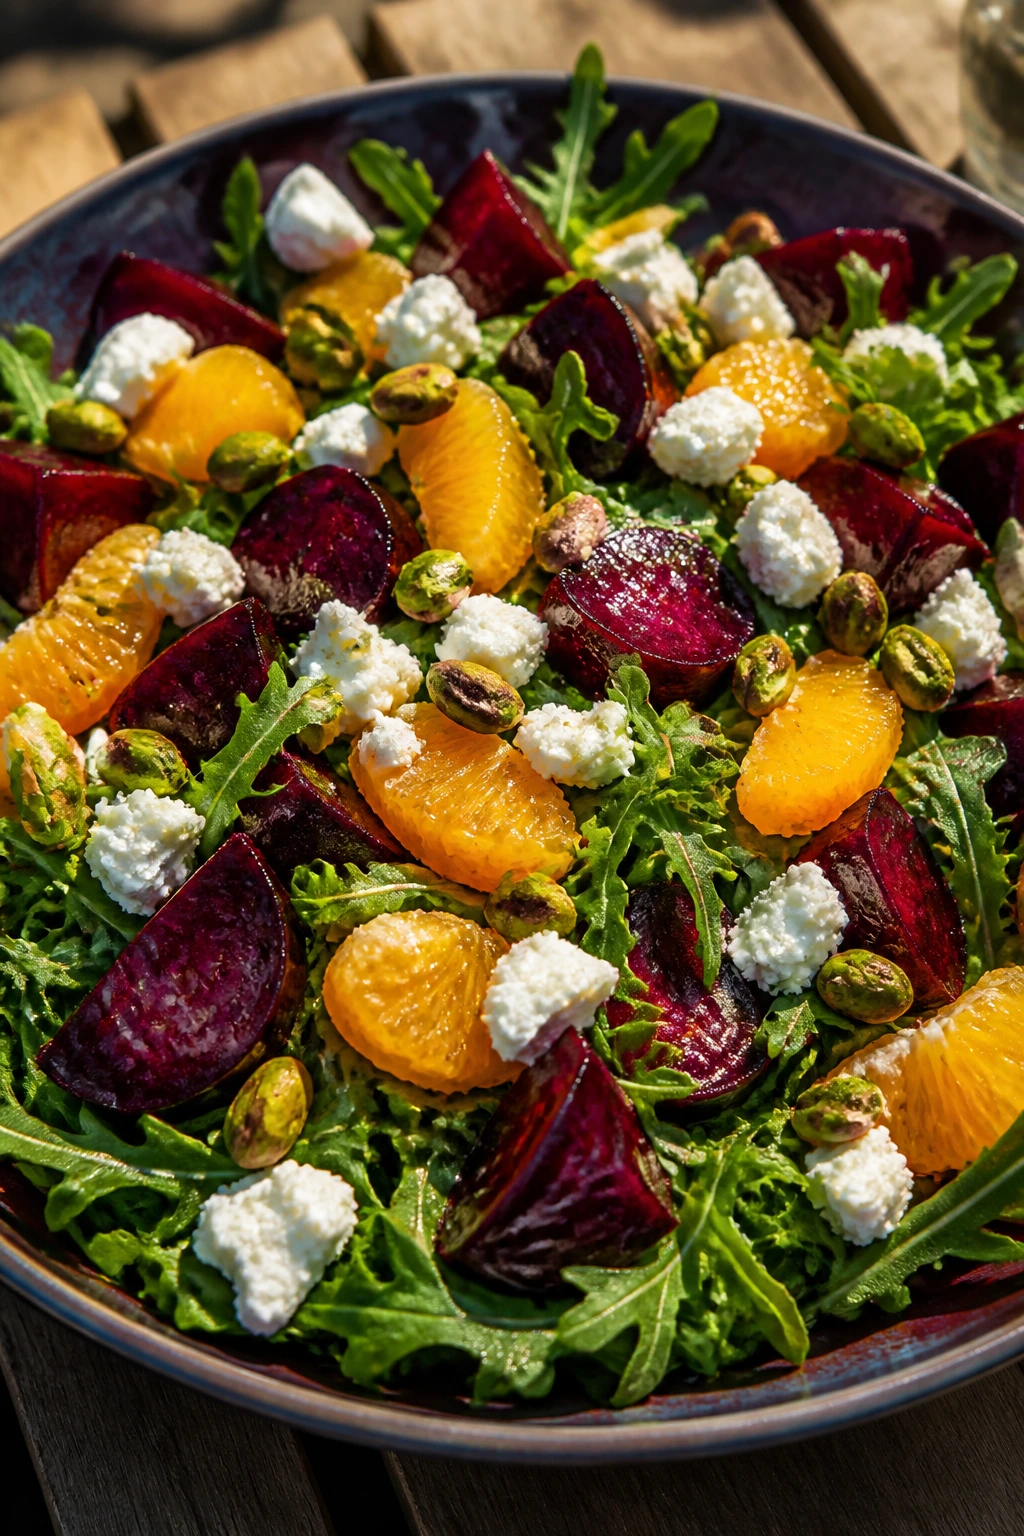
This salad is the deepest-colored bowl in the lineup, and it eats like it looks: earthy, bright, creamy, and a little tangy. Roasted beets, orange segments, goat cheese, and pistachios make a clean contrast that feels especially good when the cookout table is leaning brown and smoky. It’s a sturdy salad with some drama.
Why It Works:
Beets bring sweetness and earthiness, and oranges pull the flavor upward with acid and juice. Goat cheese melts slightly against the warm beets, giving you creamy pockets instead of a flat dressing. Arugula adds pepper, which keeps the whole salad from feeling too soft.
Key Ingredients:
- 4 medium beets, roasted and peeled
- 2 oranges, segmented
- 4 cups arugula
- 4 ounces goat cheese, crumbled
- 1/4 cup pistachios, chopped
- 3 tablespoons olive oil
- 1 tablespoon orange juice
- 1 tablespoon sherry vinegar
- 1 teaspoon honey
- 1 teaspoon kosher salt
- 1/2 teaspoon black pepper
Quick Steps:
- Roast the beets: Wrap in foil and bake at 400°F for 45 to 60 minutes until tender.
- Cool and peel: Let them sit until easy to handle, then slip off the skins.
- Whisk the dressing: Mix olive oil, orange juice, sherry vinegar, honey, salt, and pepper.
- Build the salad: Arrange arugula, beets, oranges, goat cheese, and pistachios.
- Dress lightly: Drizzle over the top right before serving.
Equipment for This Recipe:
- Baking sheet
- Foil
- Sharp knife
- Serving platter
How to Serve This Dish:
This one looks best on a flat platter so the colors don’t bury each other. Serve it beside grilled steak, chicken, or a simple grain salad, and keep portions around 1/2 cup because the beets and cheese are filling. A few extra pistachios on top add some crunch.
Pro Tips for This Recipe:
- Roast the beets ahead; they hold well in the fridge.
- Segment the oranges over a bowl so you catch the juice.
- Wear gloves if you don’t want red hands.
- Add goat cheese last so it stays in visible crumbles.
Variations on This Dish:
- Feta Swap: Use feta for a saltier edge.
- Citrus Mix: Replace one orange with grapefruit segments.
- Walnut Version: Swap pistachios for toasted walnuts.
Common Mistakes to Avoid with This Dish:
- Not roasting the beets long enough: They should be fully tender.
- Using too much dressing: The beets already bring moisture.
- Assembling too early: Arugula wilts if it sits dressed.
22. Shaved Fennel, Cucumber, and Dill Salad with Lemon
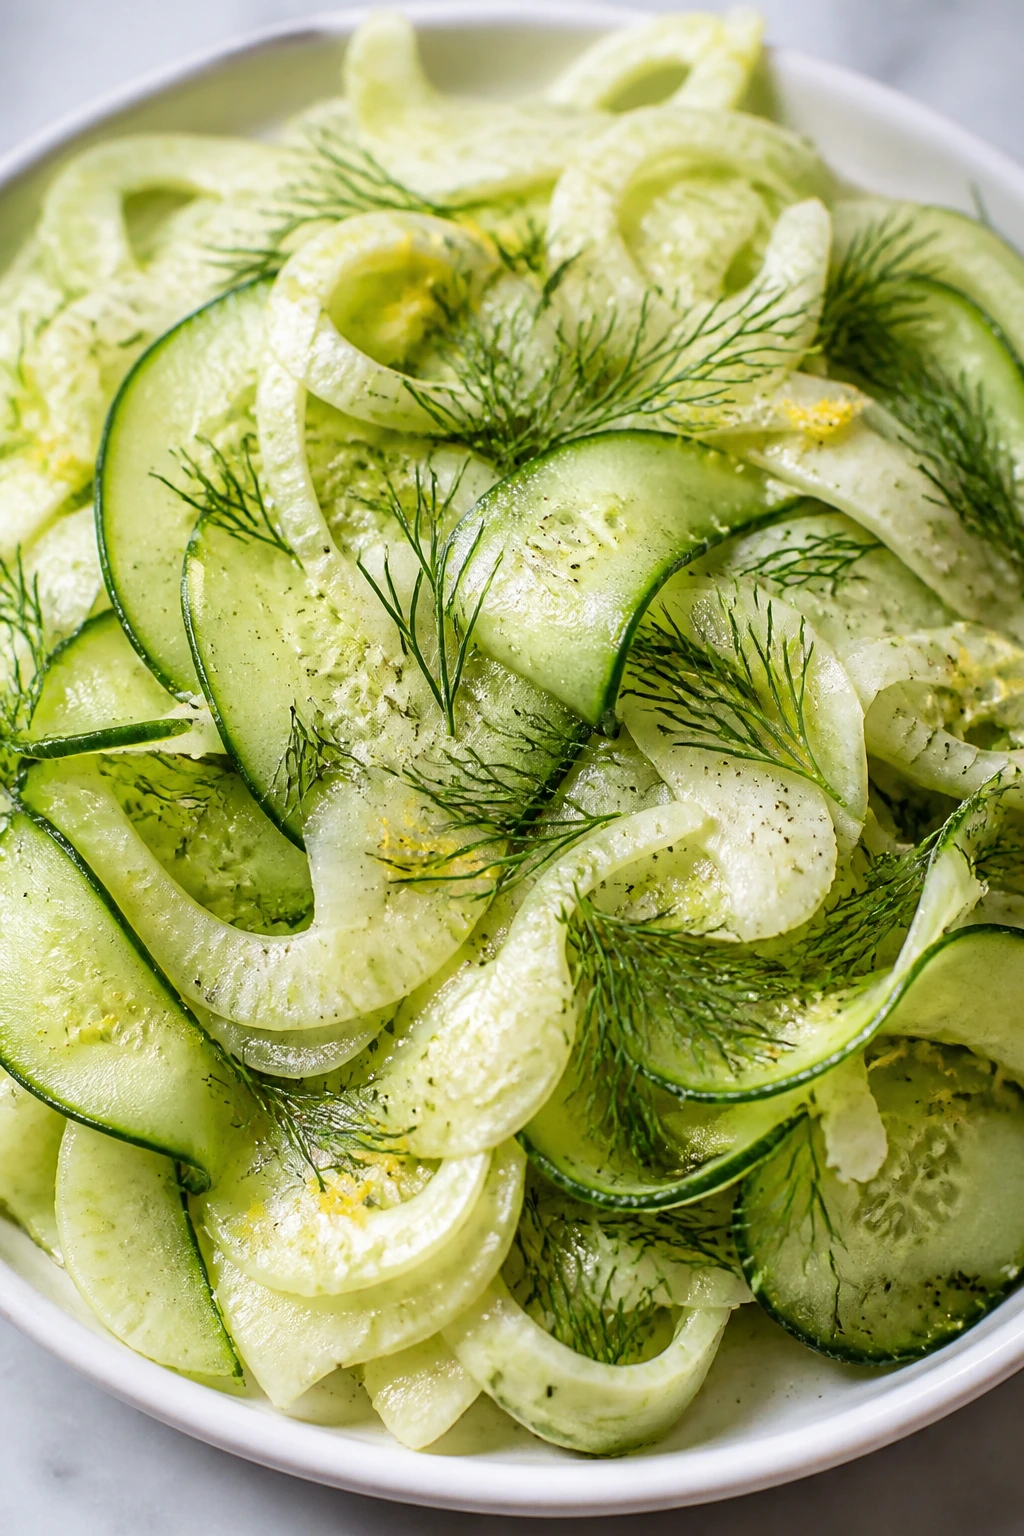
This salad is all about crunch and clean flavor. Shaved fennel gives a faint licorice note, cucumber adds cold snap, dill keeps the aroma bright, and lemon brings the whole bowl into focus. It’s the kind of side that resets your palate after a plate of smoky meat and creamy potatoes.
Why It Works:
Fennel behaves a lot like cabbage in a cookout setting: it stays crisp and doesn’t turn floppy right away. Cucumber cools the bite, lemon keeps the fennel from tasting too sweet, and dill ties the whole thing together. A brief rest softens the fennel just enough without killing the crunch.
Key Ingredients:
- 2 fennel bulbs, thinly shaved
- 2 cucumbers, thinly sliced
- 1/2 red onion, sliced very thin
- 1/4 cup fresh dill, chopped
- 3 tablespoons lemon juice
- 2 tablespoons olive oil
- 1 teaspoon Dijon mustard
- 1/4 cup feta or shaved parmesan
- 1 teaspoon kosher salt
- 1/2 teaspoon black pepper
Quick Steps:
- Shave the fennel: Slice it as thinly as you can, using a knife or mandoline.
- Slice the cucumbers and onion: Keep everything paper-thin for the best texture.
- Whisk the dressing: Mix lemon juice, olive oil, Dijon, salt, and pepper.
- Toss the vegetables: Combine fennel, cucumber, onion, and dill with the dressing.
- Finish with cheese: Add feta or parmesan just before serving.
Equipment for This Recipe:
- Mandoline or sharp knife
- Large bowl
- Whisk
- Vegetable peeler, optional for fancy ribbons
How to Serve This Dish:
Serve it cold, piled lightly so the fennel strands don’t compact. It’s especially good with grilled fish, chicken, or anything heavy on spices, and a 1/2-cup portion is enough because the flavor is sharp and clean. A few fennel fronds on top make the bowl look fresher.
Pro Tips for This Recipe:
- Keep the fennel core in place while slicing so the bulb doesn’t fall apart.
- If the onion is too strong, soak it in ice water for 5 minutes.
- Add the cheese at the end so it doesn’t disappear into the dressing.
- A pinch of sugar helps if your lemon is very sharp.
Variations on This Dish:
- Apple Fennel Version: Add thin apple slices for sweetness.
- Herb Garden Version: Mix in parsley and mint with the dill.
- No-Cheese Bowl: Skip the cheese and add toasted sunflower seeds.
Common Mistakes to Avoid with This Dish:
- Slicing fennel too thick: The texture gets woody.
- Using too much onion: It overpowers the whole bowl.
- Dressing it hours ahead: The salad softens too much.
Why These Salads Hold Up Beside Hot Grills
The best cookout salads do one thing that gets overlooked all the time: they survive contact with heat, smoke, and a crowded table. Lettuce-based bowls often struggle here. They wilt, they bruise, they leak dressing, and they start looking tired after the first round of plates goes out.
Cabbage, potatoes, beans, pasta, corn, farro, fennel, cucumbers, and fruit all behave differently, and that’s the point. Some hold crunch for hours. Some get better after a short chill. Some need to be dressed at the very last second because they’re fragile and soft by nature. Once you know which camp a salad lives in, the whole menu gets easier to plan.
Acid matters too. Vinegar, lemon, lime, and even pickle brine keep a side salad from tasting sleepy beside grilled meat. Salt matters just as much. If the dressing tastes bright in the bowl but bland on the tongue, it usually needs a pinch more salt, not another spoonful of sweetness.
And yes, mayo has a place here. It just needs structure around it. That’s why the creamy salads in this list lean on potatoes, pasta, broccoli, or beans instead of trying to use lettuce as a base. Lettuce is fine for a weekday lunch. For a cookout, it’s a fragile little thing near a hot grill, and it often loses the fight.
Essential Equipment for These Recipes
- Large mixing bowls: You’ll want at least two, because one salad bowl is never enough once the dressing comes out.
- Sharp chef’s knife: Thin slices matter in slaws, cucumber salads, and fruit salads; dull knives crush more than they cut.
- Cutting board with a damp towel underneath: Keeps the board from skating around when you’re shaving fennel or slicing tomatoes.
- Colander: Essential for pasta, potatoes, beans, and anything that needs to drain fully.
- Pot and saucepan: A big pot for potatoes, pasta, or beans makes the whole process calmer.
- Whisk or fork: Small dressings need a fast stir to pull the oil and acid together.
- Sheet pan or tray: Useful for cooling pasta or farro fast so it doesn’t keep steaming.
- Mandoline, optional: Great for cabbage, fennel, and apples if you’re careful with your fingers.
- Salad spinner, optional: Not required, but it helps with spinach, herbs, and greens that need to be dry.
- Airtight storage containers: Useful for make-ahead chilling and for keeping leftovers from smelling like the fridge.
Smart Shopping and Ingredient Tips
The difference between a good cookout salad and a forgettable one usually starts at the store. Potatoes should feel firm and smooth, not soft or damp around the eyes. For potato salad, choose Yukon Gold or red potatoes; they stay intact better than russets, which break apart too easily.
Tomatoes are tricky. You want the ones that smell like tomatoes when you lean in. If they’re pale, hard, and odorless, use them in a cooked dish and save this article for another day. Cucumbers should be tight and unwrinkled, and if the skins are thick, English or Persian cucumbers are often the better move for cold salads.
Herbs deserve more respect than they usually get at a cookout. Dill, mint, basil, parsley, and chives go soft fast if they’re left in a warm kitchen too long, so buy them close to when you plan to serve. If a bunch looks tired at the store, skip it; wilted herbs do not recover well in cold salads.
For corn, sweet ears with pale green husks and plump kernels are the safest bet. Frozen corn works too, and sometimes it’s better than sad out-of-season fresh corn. Just dry it well before charring. With cheese, buy feta, cotija, or mozzarella in pieces you can crumble or cut yourself; pre-shredded cheese usually brings more starch than flavor.
And one more thing: if a salad depends on fruit, buy fruit that’s ripe enough to smell sweet but still firm enough to hold shape. Peaches and strawberries can go from perfect to mushy fast. Timing matters.
How to Serve These Recipes
Presentation:
Cold salads look best in shallow bowls or on wide platters, not in deep tubs where the good parts sink to the bottom. Let the most colorful ingredients sit on top—tomato halves, feta crumbles, herbs, toasted nuts, bacon, or shaved cheese. A final dusting of paprika, black pepper, or fresh dill makes the bowl look finished.
Accompaniments:
These salads pair cleanly with grilled chicken, burgers, hot dogs, ribs, sausages, pulled pork, corn on the cob, kebabs, and simple sandwiches. Creamy salads sit especially well next to smoky meat, while cucumber, fennel, citrus, and fruit salads help reset the palate between heavier bites. If the main is rich, pick one bright salad and one starch-based side.
Portions:
For a mixed cookout table, plan on 1/2 cup per person for the lighter salads and 2/3 cup for pasta, potato, or bean-based bowls. Fruit and cucumber salads are often eaten in smaller amounts because they’re refreshing, not filling. If you’re feeding a crowd with big appetites, make at least one extra cold side; it goes faster than people admit.
Beverage Pairing:
Iced tea with lemon is the safest all-around match. Cold lager, pilsner, or a crisp nonalcoholic sparkling drink also works because the bubbles lift the acid and salt in the salads. For fruit-heavy bowls, sparkling water with lime or a dry rosé fits well without fighting the food.
Additional Tips and Flavor Boosters
Flavor Enhancement:
A little acid at the end changes everything. A teaspoon of vinegar, lemon juice, or lime juice right before serving often wakes up a salad that tasted fine five minutes earlier but dull after chilling.
Customization:
Want more crunch? Add toasted seeds, chopped nuts, or extra celery. Want more body? Fold in chickpeas, farro, pasta, or diced avocado. Want more heat? A small spoonful of minced jalapeño, chili flakes, or hot sauce is enough; don’t turn the whole bowl into a dare.
Serving Suggestions:
Fresh herbs should go on top, not just inside the bowl. Dill, basil, parsley, mint, and chives keep their shape better when they’re visible. A few reserved tomato halves, cheese crumbles, or sunflower seeds on top make the salad look intentional.
Make-It-Yours:
For dairy-free plates, lean on vinegar dressings, olive oil, and herbs. For gluten-free guests, use potato, bean, corn, rice, quinoa, or certified gluten-free pasta. For meatless tables, add chickpeas, farro, or extra cheese so the salad has some staying power.
Make-Ahead, Storage, and Reheating Guidance
Most of these salads are built for advance prep, but they do not all behave the same way. Mayo-based salads like potato salad, macaroni salad, and broccoli salad usually keep 3 to 4 days refrigerated in a covered container. Vinegar-dressed slaws, bean salads, and grain salads often last 4 to 5 days, and some taste better on day two than they do right after mixing. Fruit salads and burrata salads are a different story; they’re best eaten the same day, or within 24 hours if you’re careful.
Keep cold salads at 40°F or below as much as possible. At a cookout, that means setting the serving bowl over another bowl filled with ice, especially if the table will sit outside for more than 30 minutes. Once a mayo-based salad has been out for 2 hours or more in warm conditions, it belongs in the compost, not back in the fridge. That rule sounds boring until you’ve seen a potato salad sit beside the grill all afternoon.
Freezing is only useful for a few components. Cooked farro or beans can freeze well on their own, but dressed salads usually do not. Mayo separates, cucumbers go limp, tomatoes turn watery, and herbs lose their shape. If you want to get ahead, freeze the grains or cook the potatoes and chill them separately, then dress the salad later.
For reheating, most of these salads should not be reheated at all. Grain salads can come back to room temperature nicely, and warm potato salads can be refreshed gently in a skillet with a splash of broth or vinegar. Pasta salads and coleslaws are better served cold. If a dressed salad thickens in the fridge, loosen it with a spoonful or two of yogurt, mayo, olive oil, or acid depending on the style.
Variations and Adaptations to Try
The Dairy-Free Route:
Use vinegar, citrus, and olive oil as your base instead of mayo, yogurt, feta, burrata, or sour cream. Potato salad, bean salad, cucumber salad, and slaw all adapt easily. The trick is to increase salt a little and lean on herbs so the bowl still has character.
The Gluten-Free Picnic:
Choose potato salad, bean salad, corn salad, fruit salad, or grain salads made with quinoa or rice. If you want pasta salad, use a certified gluten-free pasta and cool it a little longer so it firms up before dressing. The rest of the ingredients in this list are mostly already friendly to gluten-free guests.
The Heat-Lovers’ Bowl:
Add jalapeño, serrano, chili flakes, Tajín, hot sauce, or smoked paprika to corn salads, cucumber salads, and bean salads. Keep the heat in the dressing or sprinkled on top so people can control how much they get. A cookout needs at least one bowl with some spark in it.
The Kid-Friendly Crunch:
Use sweeter dressings, smaller vegetable pieces, and familiar ingredients like pasta, peas, corn, apples, cheddar, or mild cheese. Skip too much raw onion and heavy heat. Kids usually go for bowls that are easy to scoop and don’t look too green.
The Protein-Boosted Side:
Add chickpeas to Greek salads, hard-boiled eggs to potato salad, mozzarella to pasta salad, or beans to grain bowls. That turns a side into something closer to lunch without changing the basic flavor. Handy when people arrive hungry and the grill is behind schedule.
The Low-Sodium Fix:
Rely on lemon, lime, vinegar, herbs, and char for flavor before reaching for more salt. Use unsalted nuts, rinse canned beans well, and choose feta or olives sparingly. The bowl will still taste bright if the acid is doing its job.
Common Mistakes to Avoid
The first mistake is overdressing. Cookout salads can drown in their own sauce fast, especially if you’re working with tomatoes, cucumbers, or lettuce. Start with less dressing than you think you need, toss, rest, and add more only if the bowl looks dry.
The second mistake is mixing everything while it’s still hot. Hot pasta, hot potatoes, and hot roasted vegetables keep steaming inside the bowl, which turns herbs limp and creates a watery dressing. Let the food cool until it’s warm at most.
Watery vegetables are another problem. Cucumbers, tomatoes, and watermelon can leak enough liquid to dilute the whole salad. Salting cucumbers, draining tomatoes, patting feta dry, and assembling fruit salads late solves most of that mess.
People also underseason after chilling. Cold food tastes flatter than food at room temperature, so a salad that seemed sharp during mixing may taste dull an hour later. Taste again before serving, then adjust salt, pepper, vinegar, or lemon in tiny steps.
The last mistake is forgetting texture. A salad needs something soft and something firm, or it turns monotonous. If your bowl is all creamy, add celery, seeds, onions, herbs, or nuts. If it’s all crisp, add beans, cheese, avocado, or pasta to give it some body.
Frequently Asked Questions
Which of these salads is best to make the day before?
Potato salad, bean salad, coleslaw, farro salad, and macaroni salad all handle overnight chilling well. In fact, the vinegar-based ones often taste better after they’ve rested. Save fruit, burrata, and leafy spinach salads for the last minute.
How do I keep cucumbers from watering down the salad?
Salt the slices and let them sit for 10 minutes, then blot them dry with a towel. If the cucumber has big seeds, scoop some out first. English and Persian cucumbers also leak less than thick-skinned garden cucumbers.
Can I use bottled dressing instead of making my own?
You can, but the salad will taste more generic and often less balanced. If you use bottled dressing, brighten it with lemon, vinegar, fresh herbs, or a spoonful of mustard so it doesn’t taste flat. That little adjustment helps more than most people expect.
Which salads travel best in a cooler?
Bean salads, potato salads, broccoli salad, pasta salads, and grain salads travel well because they don’t rely on tender greens. Pack them in sealed containers and keep them on ice or alongside frozen water bottles. Delicate fruit and burrata salads should travel only if you can assemble them on arrival.
How long can a mayo-based salad sit out at a cookout?
No more than 2 hours at room temperature, and less if the weather is hot. If the bowl sits in direct sun or near the grill, shorten that window. Use a chilled serving bowl over ice if the salad needs to stay out longer.
What if my salad tastes flat after chilling?
Add salt first, then a little acid. Cold food often wakes up with an extra teaspoon of lemon juice, vinegar, or pickle brine rather than more dressing. Taste between each tiny addition so you don’t overshoot.
Can I make these salads without a lot of tools?
Yes. Most of them need only a knife, cutting board, bowl, and whisk or spoon. A mandoline or salad spinner helps, but neither one is required for a good result.
What should I do if the dressing gets too thick in the fridge?
Stir in a small splash of water, lemon juice, olive oil, milk, or yogurt depending on the recipe style. For mayo salads, a teaspoon or two usually fixes the texture. For grain or bean salads, loosen them just enough to coat the spoon again.
Can I double these recipes for a big crowd?
Absolutely, but don’t double the dressing blindly. Mix 1.5 times the dressing first, toss, then decide whether the bowl needs the rest. Some vegetables and grains hold more liquid than others, and you don’t want to cross the line from dressed to soggy.
How do I keep herbs from turning dark and wilted?
Chop them right before serving whenever possible. If they need to go into the bowl earlier, keep them whole or torn until the last minute. Basil, mint, and dill all look and smell better when they’re added near the end.
The Bowl Everyone Reaches For First
A good cookout salad doesn’t act like a side note. It cuts the smoke, cools the heat, and gives the rest of the plate somewhere to go when the meat gets rich or the grill runs a little dark. That’s why the best bowls in this group have a clear point of view: creamy or sharp, crisp or soft, bright or savory.
If you’re planning a cookout menu, pick at least one salad that leans creamy and one that leans acidic. That’s the small trick that keeps the table from feeling heavy halfway through the meal. After that, add one fruit or herb-driven bowl if you want the spread to feel awake.
Bring one of these chilled, and bring a serving spoon that can handle people going back for more. It won’t sit there for long.