
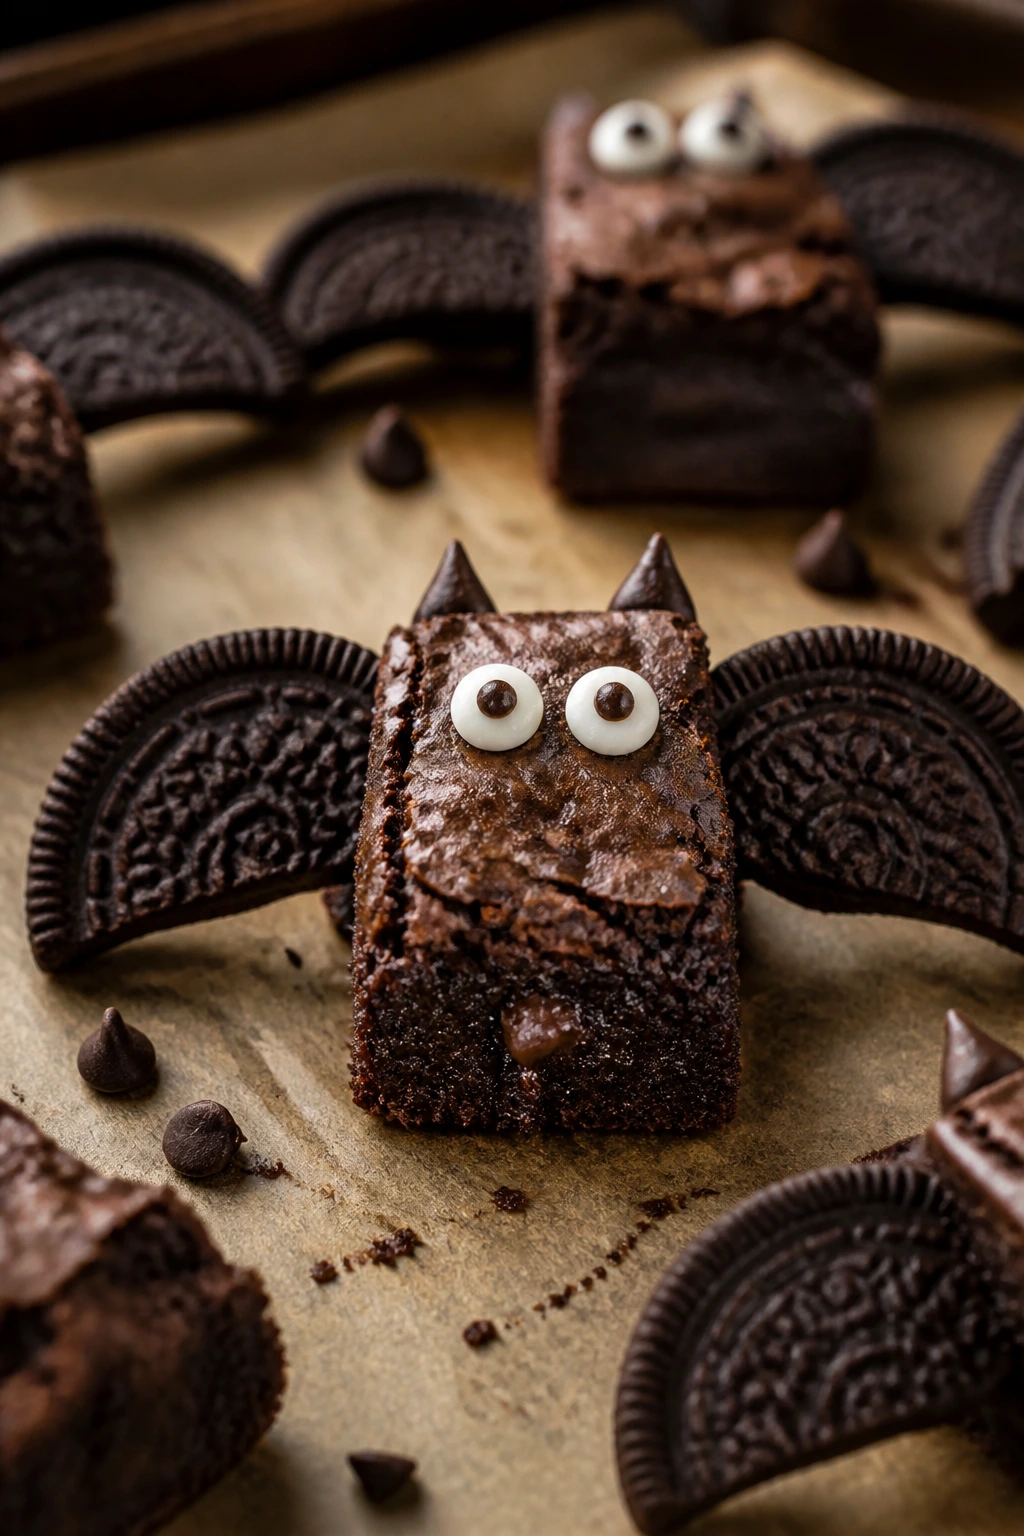
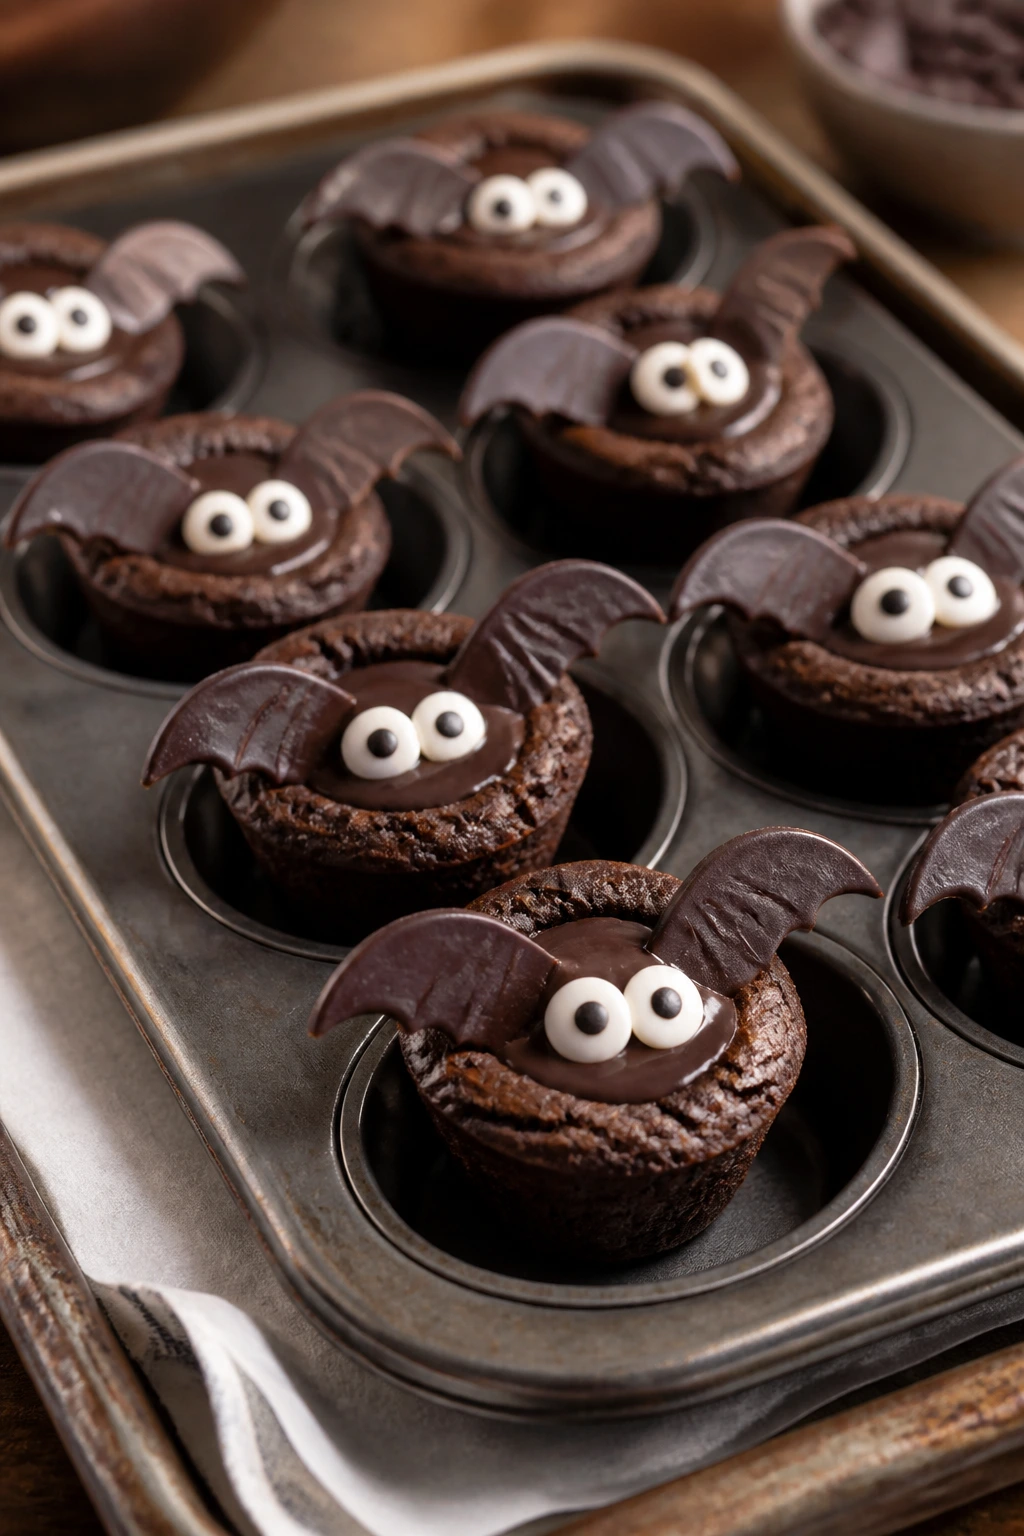
A tray of bat brownie Halloween treats can rescue a plain weeknight in a way a bag of candy never quite does. There’s the smell first — warm cocoa, melted butter, a faint burnt-sugar edge if you’ve baked them right — and then the part that gets people leaning over the counter: a row of glossy brownie squares waiting for cookie wings, candy eyes, and a little melted chocolate to turn them mischievous.
Brownies are the right kind of forgiving for this job. They cut cleanly when chilled, they hide a swirl or two without complaint, and they give you a sturdy base for decorations that would fall off a softer cake. If you’ve ever tried to dress up cupcakes after a long day and ended up with frosting on your wrists, you already know why brownies are the better bet. A dense square, a few smart toppings, and you’re done.
The best part is how far you can push the idea without making it fussy. One pan can become classic Oreo-wing bats, peanut butter bats, mint bats, brownie pops, brownie cups, or a flourless tray with the same little black silhouette on top. You don’t need an elaborate Halloween setup. You need a good pan, a few cookies, and enough patience to let the brownies cool before you start attaching the wings.
Why These Bat Brownie Treats Earn Their Keep
- One brownie base goes a long way: A solid chocolate batter can turn into bars, bites, cups, pops, or bark without changing your whole evening.
- The decorating is fast, not fiddly: Cookie wings, candy eyes, and a dab of melted chocolate take minutes once the brownies are cool.
- Kids can help without wrecking the tray: Pressing on eyes and arranging wings is a safe, low-mess job for small hands.
- Most versions hold well for a few days: Brownies stay fudgy, and the decorations don’t collapse if you store them flat and dry.
- The flavors can swing in any direction: Peanut butter, mint, caramel, espresso, citrus, tahini, and coconut all fit the same chocolate base.
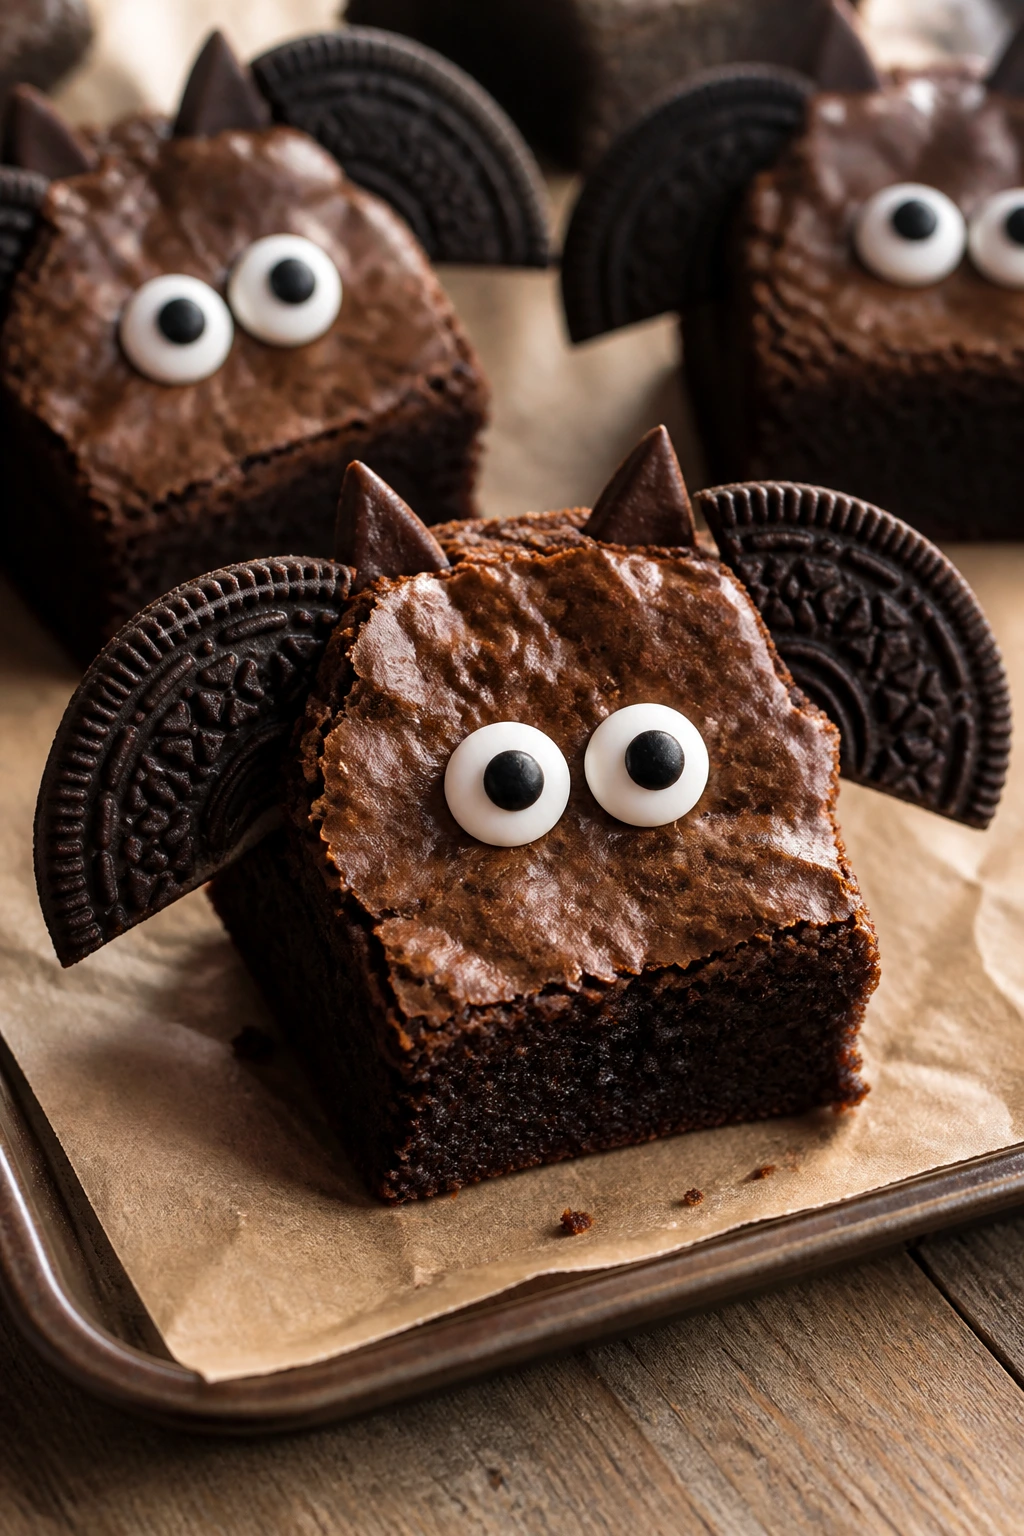
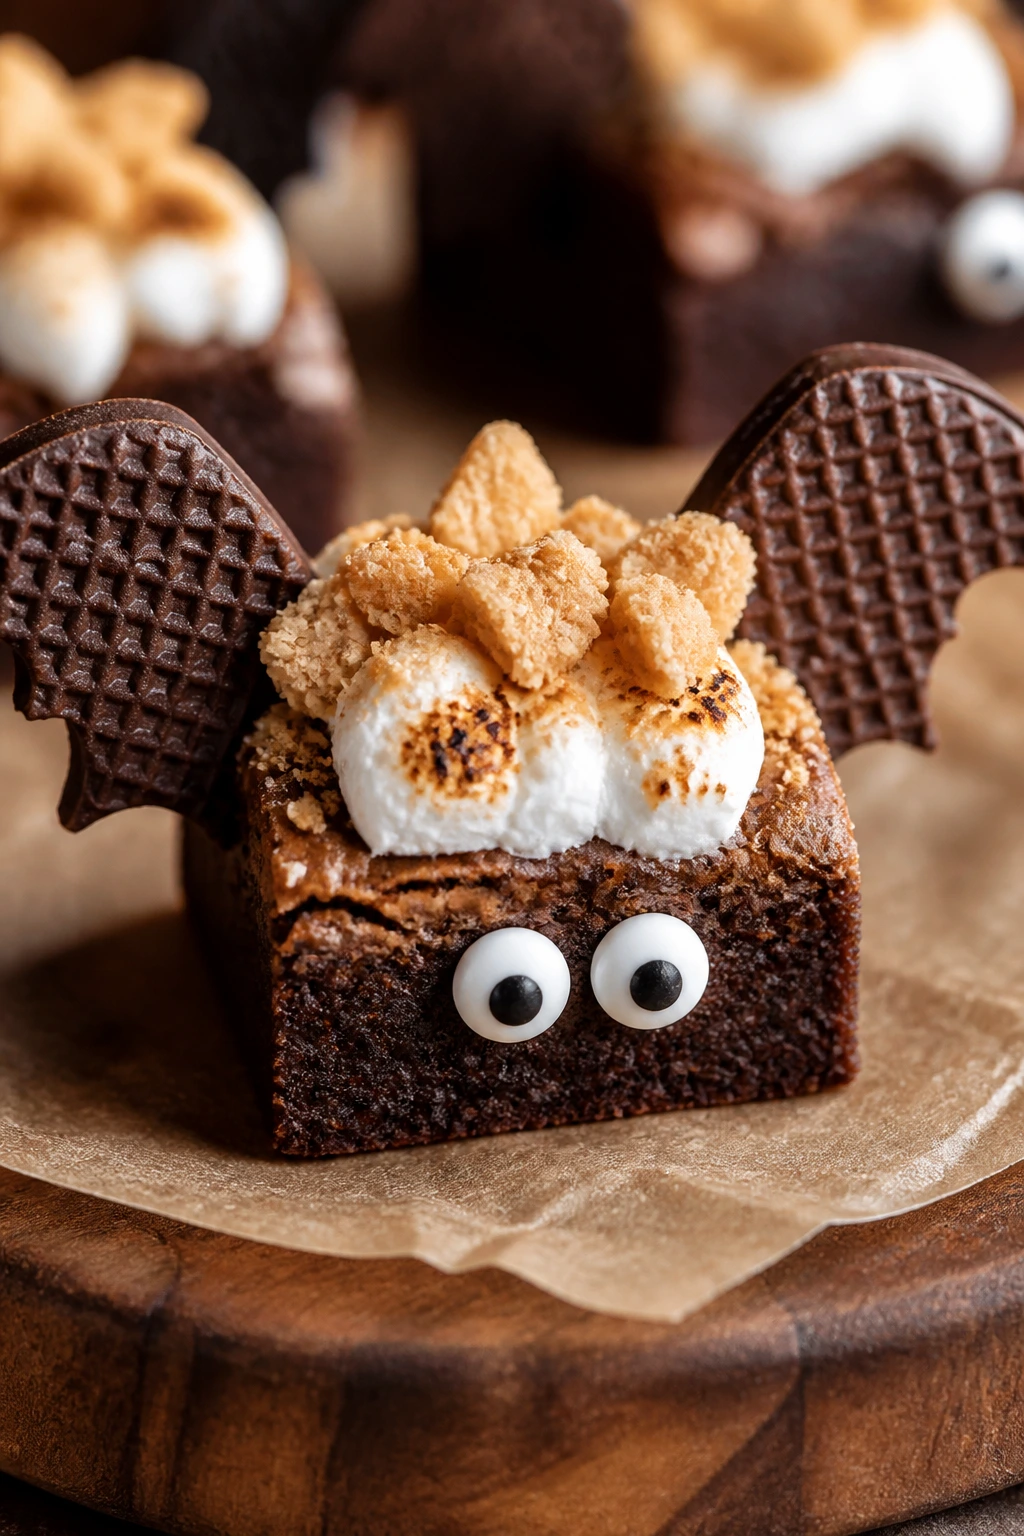
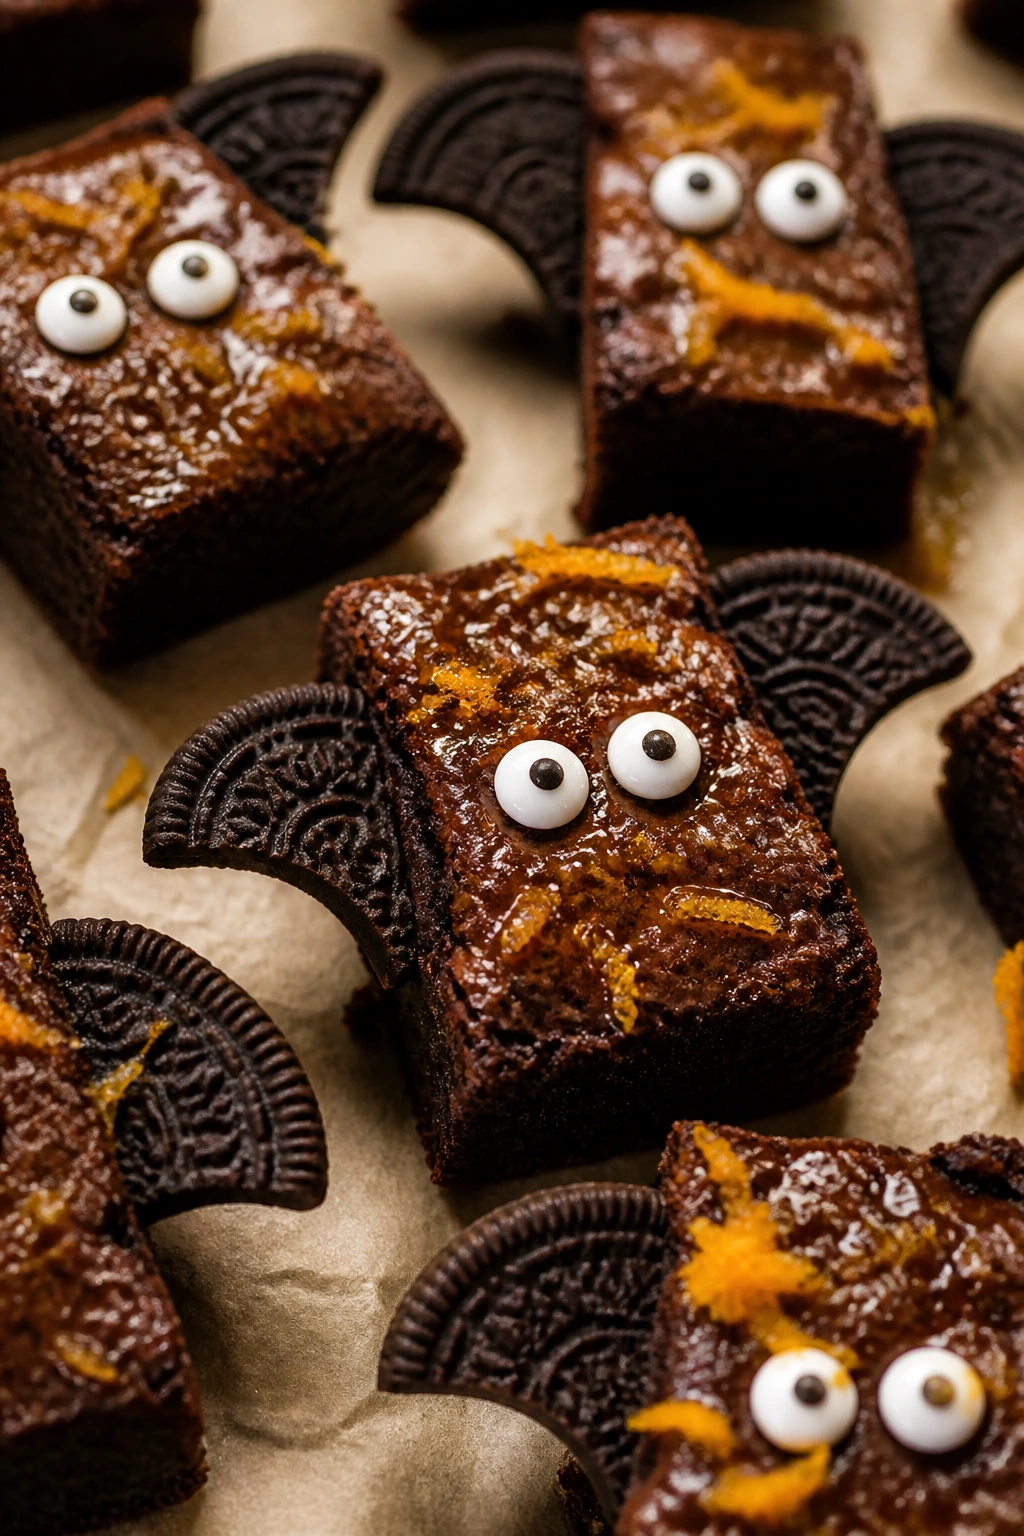
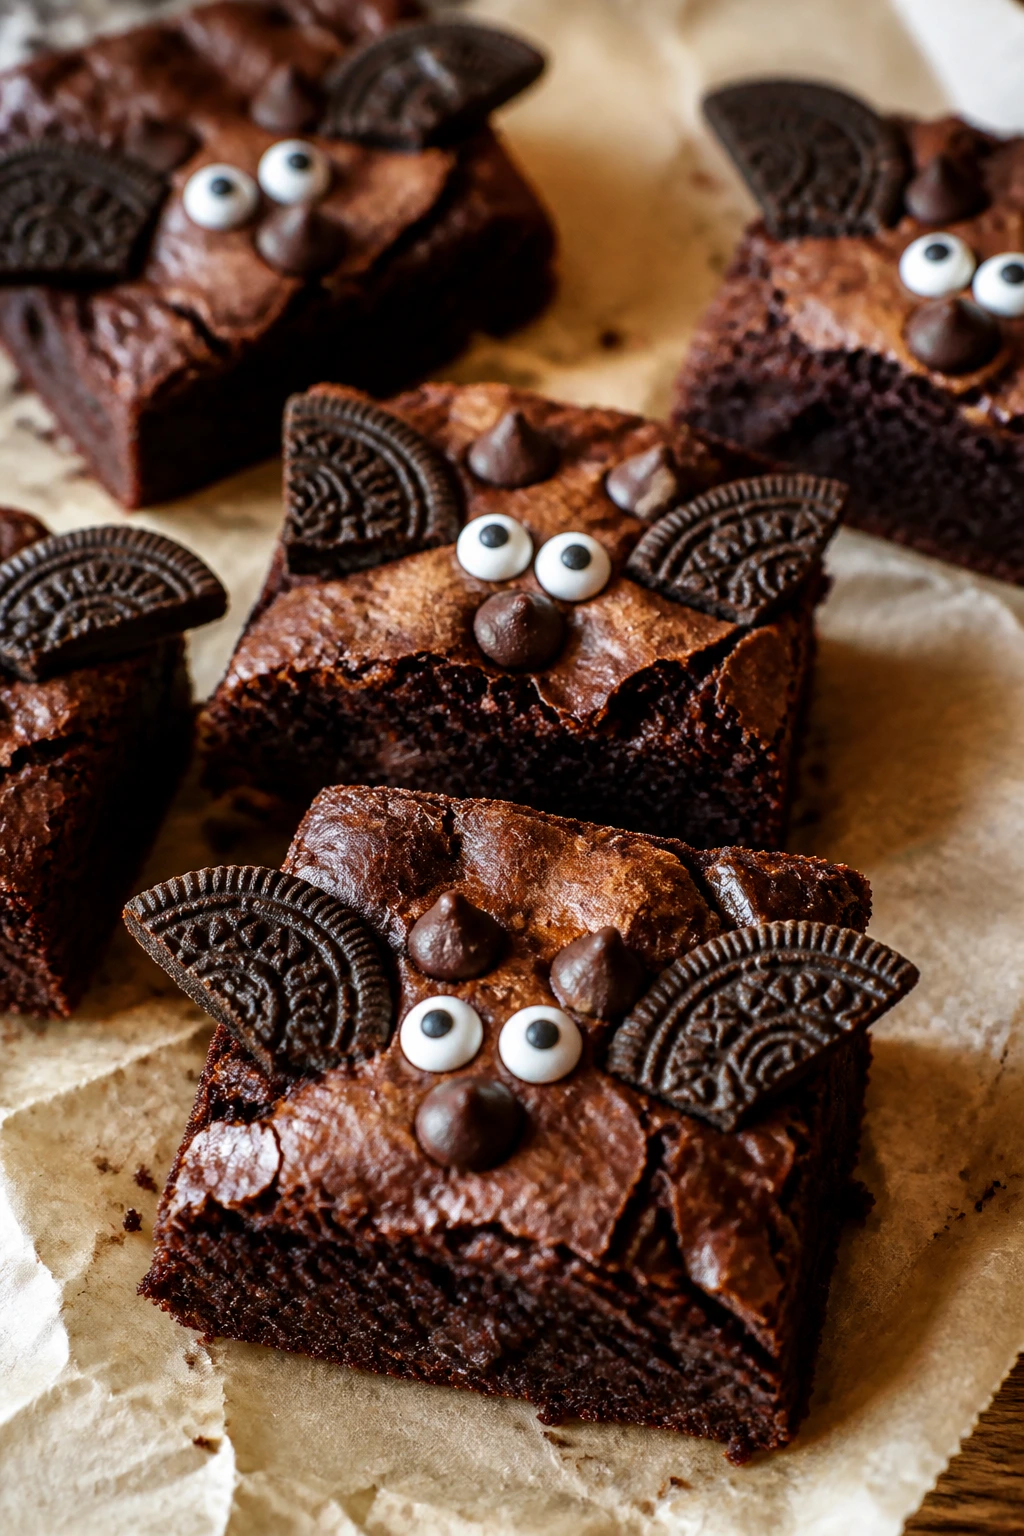
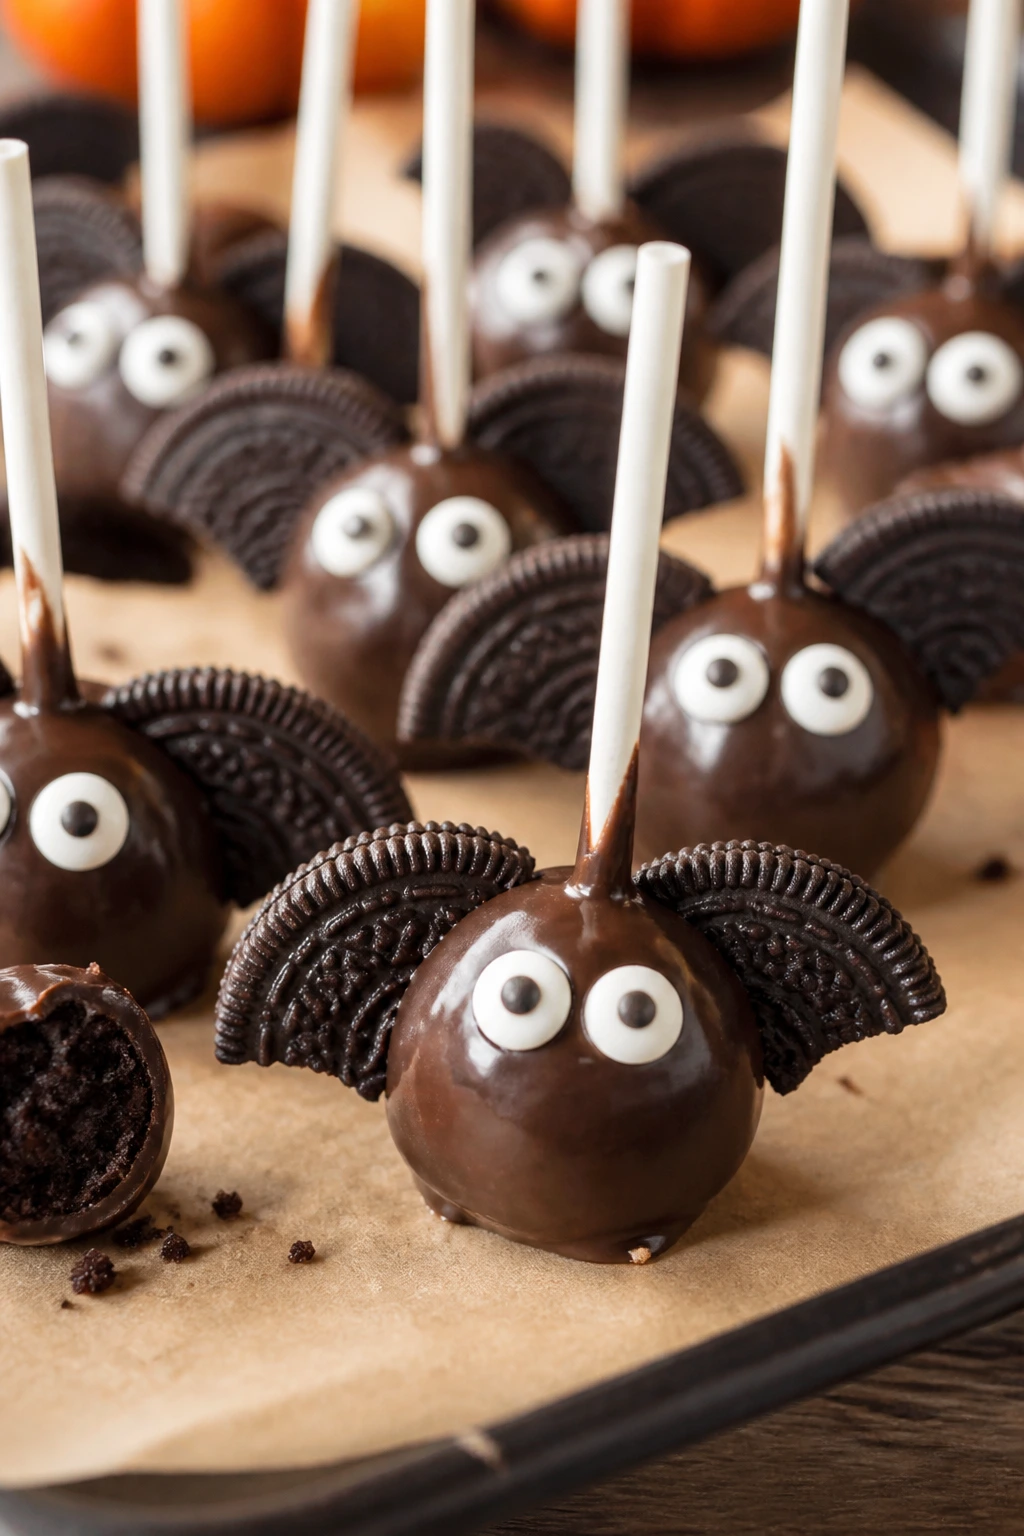
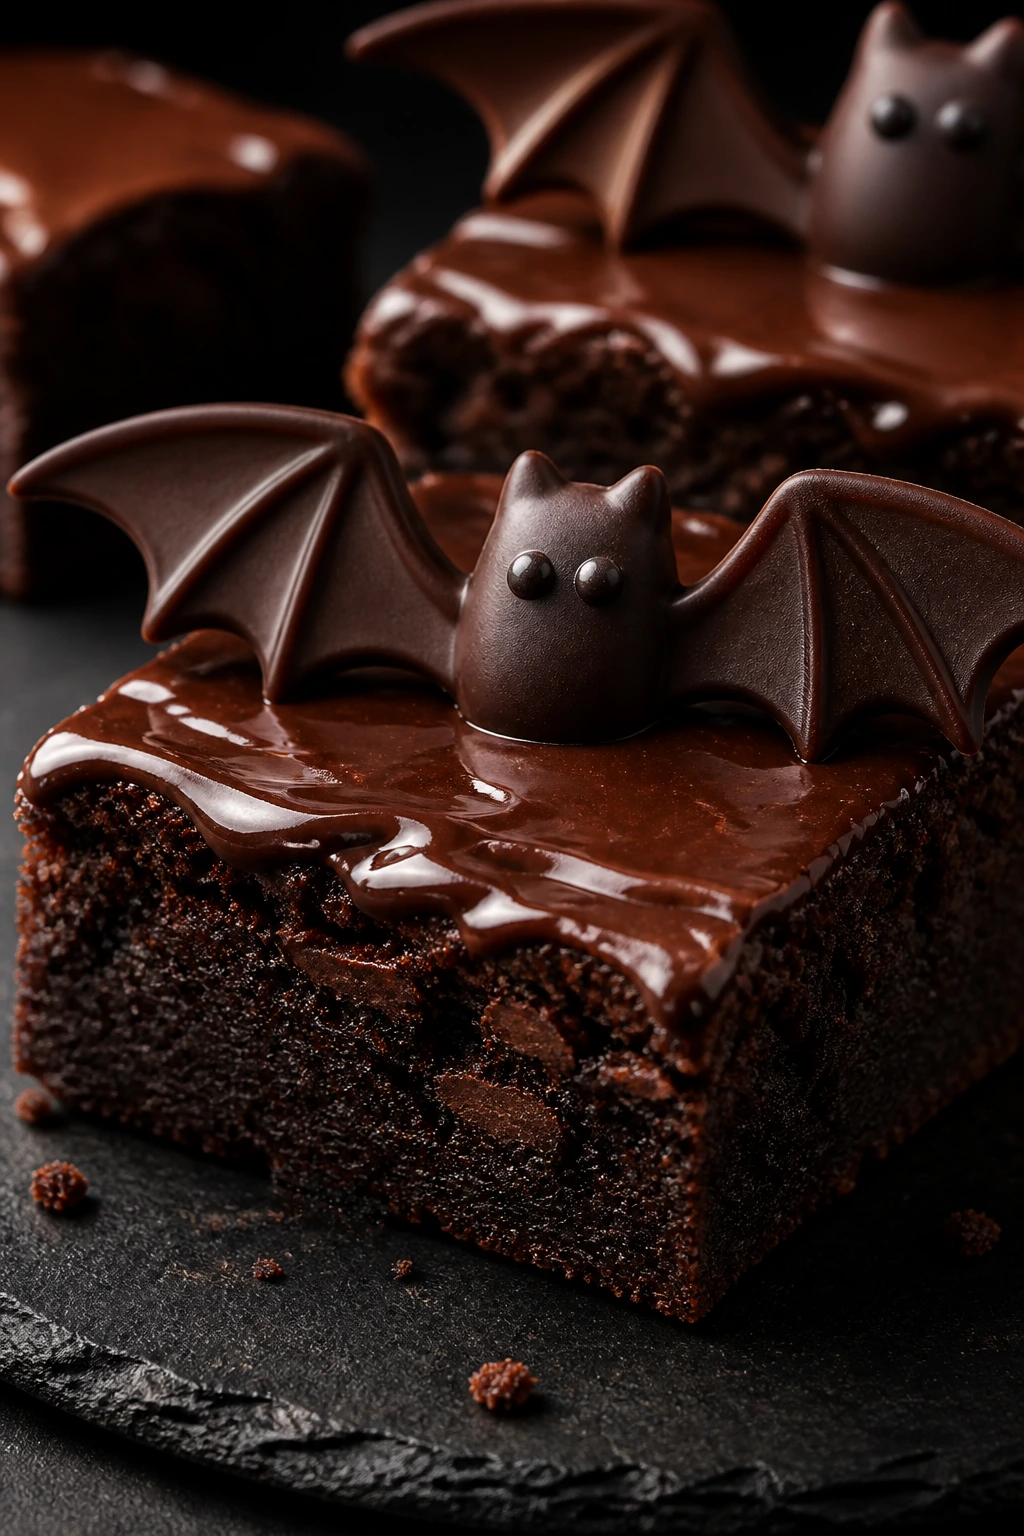
1. Classic Oreo Wing Bat Brownies
Intro paragraph
If you want the cleanest, most dependable version, start here. These bat brownie Halloween treats are all about the contrast: dark, fudgy squares with cookie wings that crack slightly when you bite them and candy eyes that make the whole tray look like it’s plotting something. I like this version because it behaves exactly the way you want on a busy night. No swirl to babysit. No filling to chill. Just a straight chocolate pan and a fast decorating finish.
Why It Works:
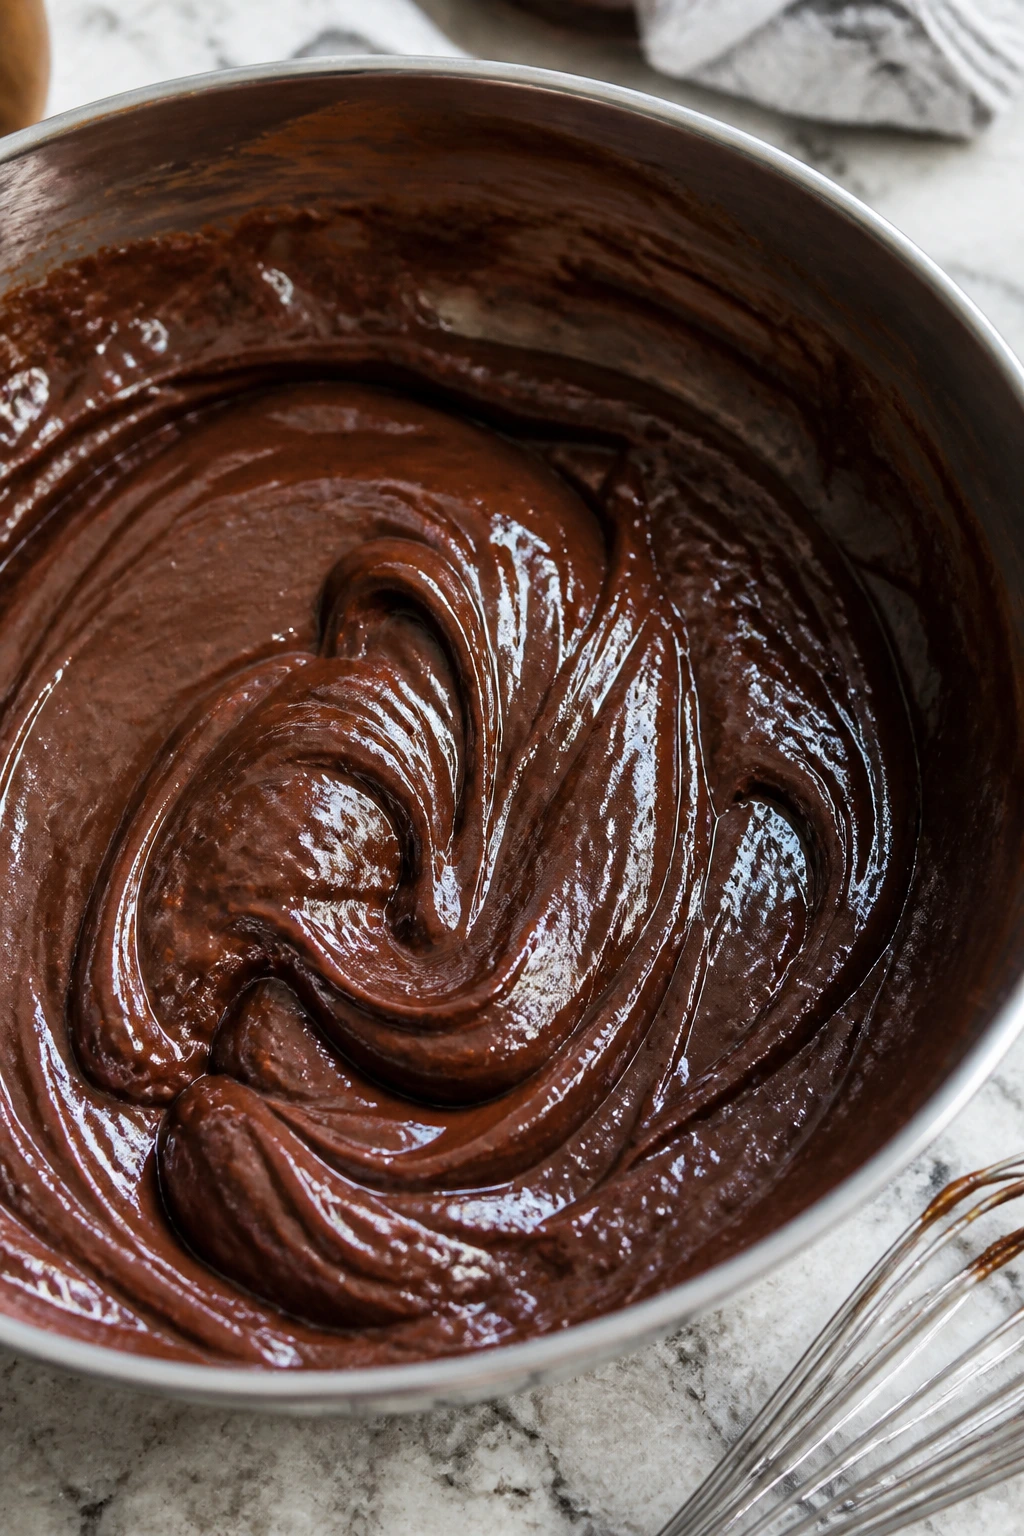
A standard fudgy brownie base gives you enough structure to hold the wings without turning dry or crumbly. Oreos split neatly into two wings each, and the melted chocolate acts like glue once the brownies are fully cool. Bake them until the center has a few moist crumbs — usually 24 to 28 minutes in a 9×13-inch pan — and you get a square that cuts clean but still tastes rich.
Key Ingredients:
- 1 cup unsalted butter, melted and cooled 5 minutes
- 1 3/4 cups granulated sugar
- 3 large eggs, room temperature
- 2 teaspoons vanilla extract
- 3/4 cup unsweetened cocoa powder
- 1 cup all-purpose flour
- 1/2 teaspoon fine sea salt
- 12 Oreo cookies, split for wings
- 24 candy eyes
- 1/2 cup melted dark chocolate, for attaching the decorations
Quick Steps:
- Preheat the oven to 350°F (175°C) and line a 9×13-inch baking pan with parchment, leaving overhang on two sides.
- Whisk the melted butter, sugar, eggs, and vanilla in a large bowl until glossy and thick.
- Fold in the cocoa powder, flour, and salt until the batter looks smooth and dark, then spread it in the pan.
- Bake for 24 to 28 minutes, until the edges are set and the center has moist crumbs, not wet batter.
- Cool completely, cut into 12 squares, and use tiny dots of melted chocolate to attach two Oreo halves and two candy eyes to each brownie.
Equipment for This Recipe:
- 9×13-inch metal baking pan
- Parchment paper
- Mixing bowl and whisk
- Rubber spatula
- Small spoon or piping bag for the melted chocolate
How to Serve This Dish:
Serve these squares on a black platter or a parchment-lined sheet pan so the cookie wings stay crisp. A cold glass of milk is the obvious move, but a small bowl of vanilla ice cream makes the fudginess feel even more dramatic.
Pro Tips for This Recipe:
- Chill the brownies for 20 to 30 minutes before cutting if you want sharp edges.
- Break the Oreo wings cleanly with a gentle twist; crushed wings look messy fast.
- Put the eyes on after the wings, not before. It keeps your hands out of the chocolate glue.
- If your brownies bake a little too fast, pull them early and let carryover heat finish the center.
Variations on This Dish:
- Blackout Bat Squares: Swap 1/4 cup of the flour for black cocoa powder for a darker, almost charcoal-colored brownie.
- Double-Cookie Wings: Use chocolate sandwich cookies on the outside and wafer cookie shards on the inside for a more layered wing look.
- Frosting Glue Fix: If you do not want to melt chocolate, use a tiny dot of thick chocolate frosting to hold the wings in place.
Common Mistakes to Avoid with This Dish:
- Decorating while warm: The wings slide right off. Wait until the brownies feel fully cool to the touch.
- Overbaking the base: Dry brownies crack when you press the cookies in. Pull them when the center still looks slightly soft.
- Using too much glue: A big blob of melted chocolate oozes around the eyes. Use a pea-sized dot, not a puddle.
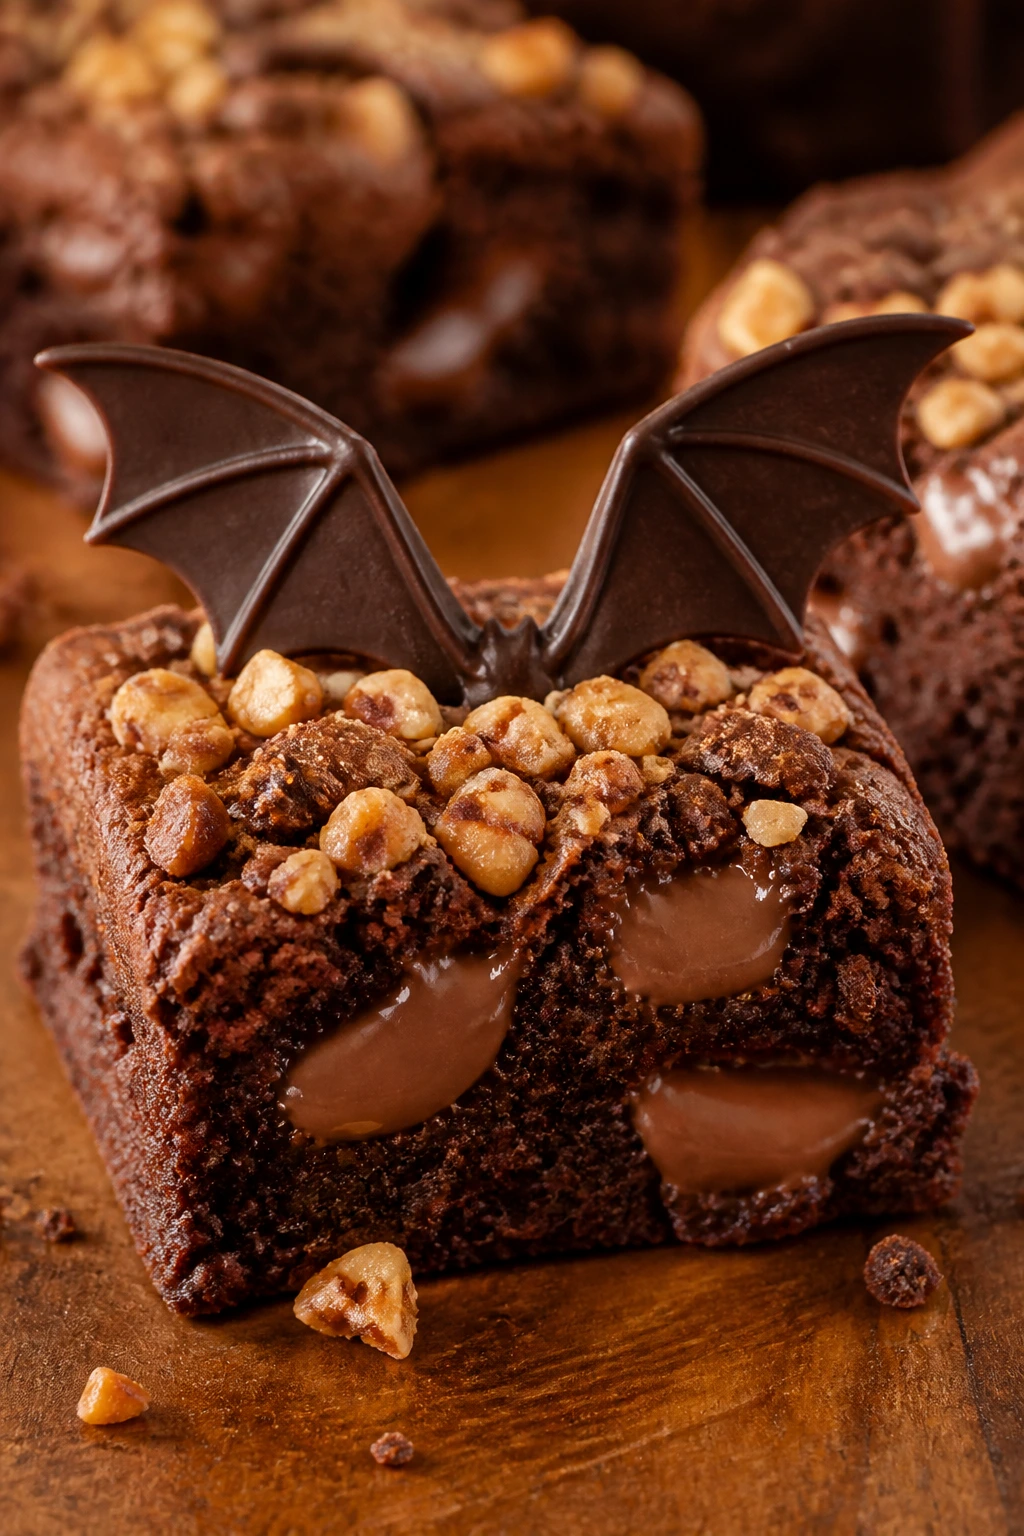
2. Peanut Butter Cup Swirl Bat Brownies
Intro paragraph
Peanut butter and chocolate do the heavy lifting here, and they do it fast. These brownies are a little saltier, a little richer, and a little more playful than the classic version, with peanut butter ribbons running through the dark crumb and chopped peanut butter cups tucked on top like little candy stones. The bat shape keeps the whole thing from feeling too sweet.
Why It Works:
Peanut butter softens the bitter edge of cocoa without making the brownie taste heavy. Swirling it into the batter before baking gives you pockets of salty richness that stay creamy even after the squares cool. A small amount of powdered sugar in the peanut butter helps it swirl instead of sinking.
Key Ingredients:
- 1 cup unsalted butter, melted
- 1 3/4 cups granulated sugar
- 3 large eggs
- 2 teaspoons vanilla extract
- 3/4 cup unsweetened cocoa powder
- 1 cup all-purpose flour
- 1/2 teaspoon fine sea salt
- 1/2 cup creamy peanut butter
- 2 tablespoons powdered sugar
- 1 tablespoon milk
- 8 mini peanut butter cups, halved
- 12 chocolate wafer cookies, split for wings
- 24 candy eyes
Quick Steps:
- Preheat the oven to 350°F and line a 9×13-inch pan with parchment.
- Whisk butter, sugar, eggs, and vanilla until thick and shiny.
- Fold in cocoa, flour, and salt, then stir peanut butter, powdered sugar, and milk together in a small bowl.
- Dollop the peanut butter mixture over the brownie batter, swirl lightly with a knife, and bake for 25 to 29 minutes.
- Cool, cut into squares, then attach cookie wings, candy eyes, and halved peanut butter cups with small dots of melted chocolate.
Equipment for This Recipe:
- 9×13-inch baking pan
- Small bowl for the peanut butter swirl
- Offset spatula or butter knife
- Cooling rack
- Piping bag or zip-top bag for glue
How to Serve This Dish:
These are the ones I’d set next to salty snacks, because the peanut butter makes them feel more snacky than dessert-heavy. A few squares on a tray with pretzels on the side is a smart move.
Pro Tips for This Recipe:
- Warm the peanut butter for 10 seconds in the microwave if it feels stiff.
- Swirl once or twice only; too much mixing turns the top muddy.
- Press the peanut butter cup halves on after baking so they keep their shape.
- A sprinkle of flaky salt right before serving sharpens the chocolate.
Variations on This Dish:
- Reese’s Overload Bats: Add chopped mini peanut butter cups to the batter for pockets of peanut butter throughout.
- Crunchy Wing Bats: Use chocolate-coated rice cereal clusters for a little extra crunch.
- No-Milk Swirl: Thin the peanut butter with 1 tablespoon of oat milk instead of dairy milk.
Common Mistakes to Avoid with This Dish:
- Over-swirl the batter: The peanut butter disappears into the brownie instead of making ribbons. Stop while the streaks still show.
- Add the cups too early: They melt into puddles if you bake them in from the start. Press them on after cooling.
- Skip the salt: Peanut butter brownies taste flat without it.
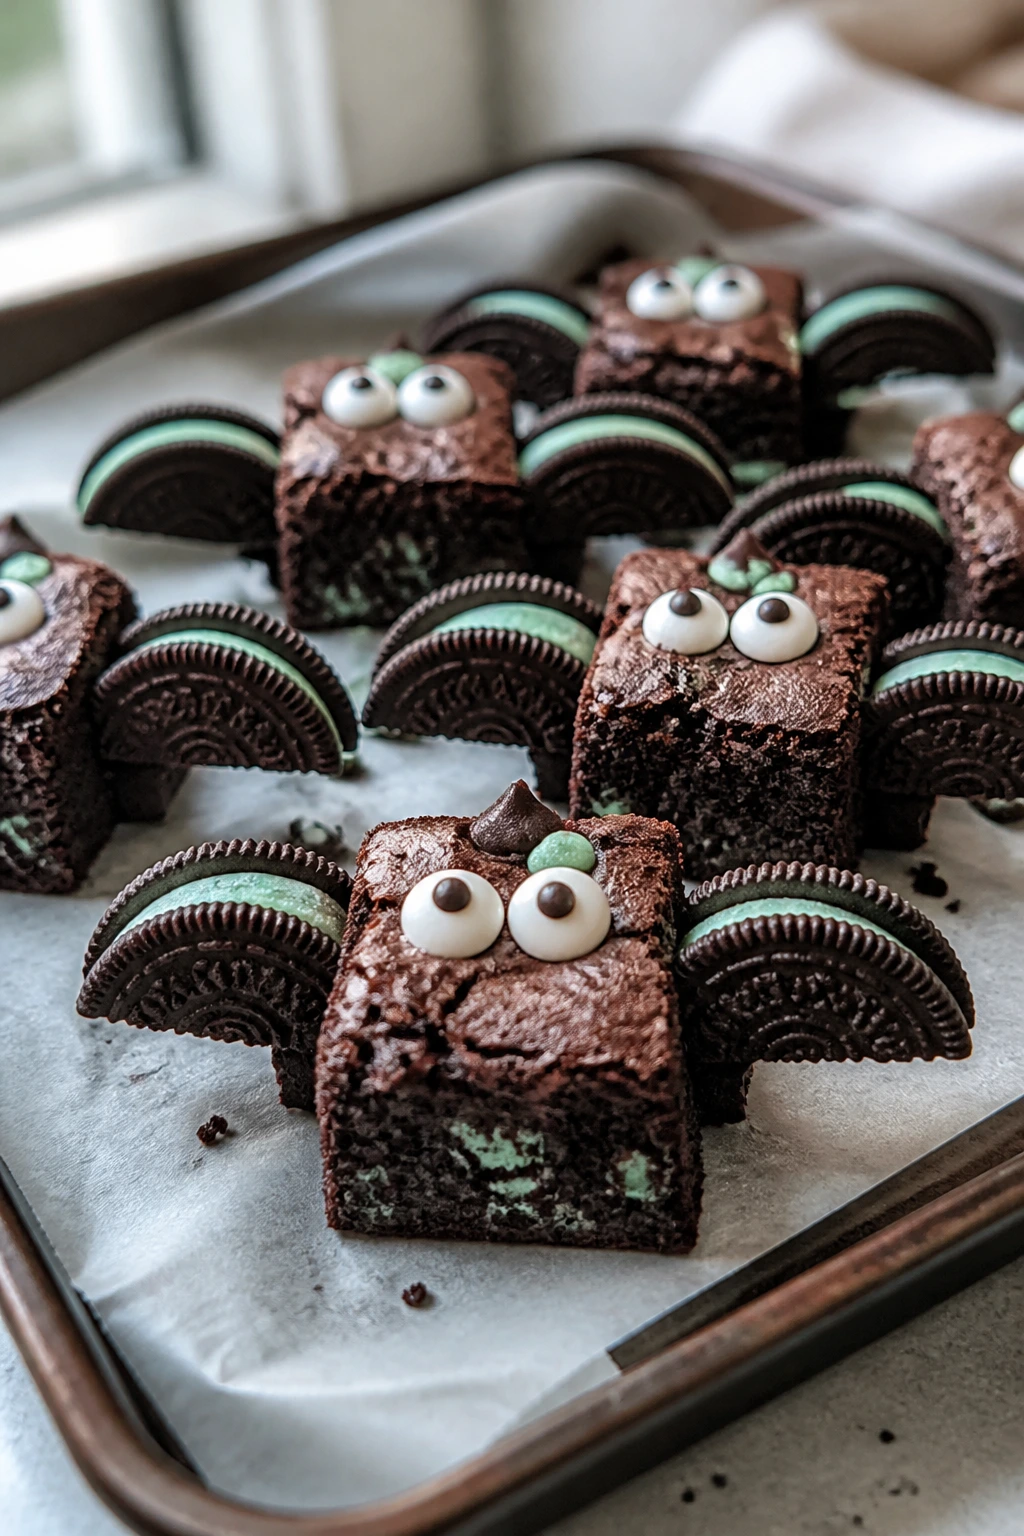
3. Mint-Chip Bat Brownies
Intro paragraph
Mint-chocolate brownies can go toothpaste-y in a hurry if you’re careless. These don’t. The peppermint stays cool and clean, the chocolate chips melt into little dark pockets, and the mint Oreo wings give the whole tray a crisp finish that feels made for black napkins and paper plates.
Why It Works:
Peppermint extract is potent, so a small dose is enough to brighten the brownie without overpowering the cocoa. Mint Oreos carry the flavor into the decoration layer, which makes the whole treat taste coherent instead of random. The chocolate chips help the brownie stay soft in the middle even after a full cool-down.
Key Ingredients:
- 1 cup unsalted butter, melted
- 1 3/4 cups granulated sugar
- 3 large eggs
- 1 teaspoon peppermint extract
- 2 teaspoons vanilla extract
- 3/4 cup unsweetened cocoa powder
- 1 cup all-purpose flour
- 1/2 teaspoon fine sea salt
- 1 cup semisweet chocolate chips
- 12 mint Oreo cookies, split for wings
- 24 candy eyes
- 1/4 cup melted dark chocolate
Quick Steps:
- Preheat the oven to 350°F and line a 9×13-inch pan with parchment.
- Whisk butter, sugar, eggs, peppermint extract, and vanilla until smooth.
- Fold in cocoa, flour, salt, and chocolate chips, then spread the batter evenly in the pan.
- Bake for 23 to 27 minutes, until the top is set and the middle still gives a little when pressed.
- Cool, cut, and attach the mint Oreo wings and candy eyes with melted chocolate.
Equipment for This Recipe:
- 9×13-inch baking pan
- Mixing bowl
- Rubber spatula
- Small spoon for chocolate dots
- Wire rack
How to Serve This Dish:
Serve these chilled for the cleanest mint snap. They look especially sharp on a pale plate, where the dark brownie and green cookie cream show up without any extra fuss.
Pro Tips for This Recipe:
- Use peppermint, not spearmint, for the cleanest flavor.
- Mint extract is strong; do not pour in extra because it smells good in the bowl.
- Chill the brownies before cutting if you want the mint cookie wings to sit flat.
- If the Oreo filling smears while splitting, freeze the cookies for 10 minutes first.
Variations on This Dish:
- Chocolate-Mint Freeze Bats: Add 1/2 cup chopped peppermint bark on top after baking.
- After-Dinner Mint Bats: Drizzle with dark chocolate ganache instead of melted chocolate glue.
- Cookie-Crumb Bats: Crush a handful of mint Oreos and sprinkle the crumbs over the top before baking.
Common Mistakes to Avoid with This Dish:
- Too much peppermint: The brownie starts tasting sharp and cold instead of chocolatey.
- Warm-cutting the pan: The center squishes, and the cookie wings slide out of place.
- Using thin glue lines: A tiny smear of melted chocolate is enough; a flood makes the eyes drift.
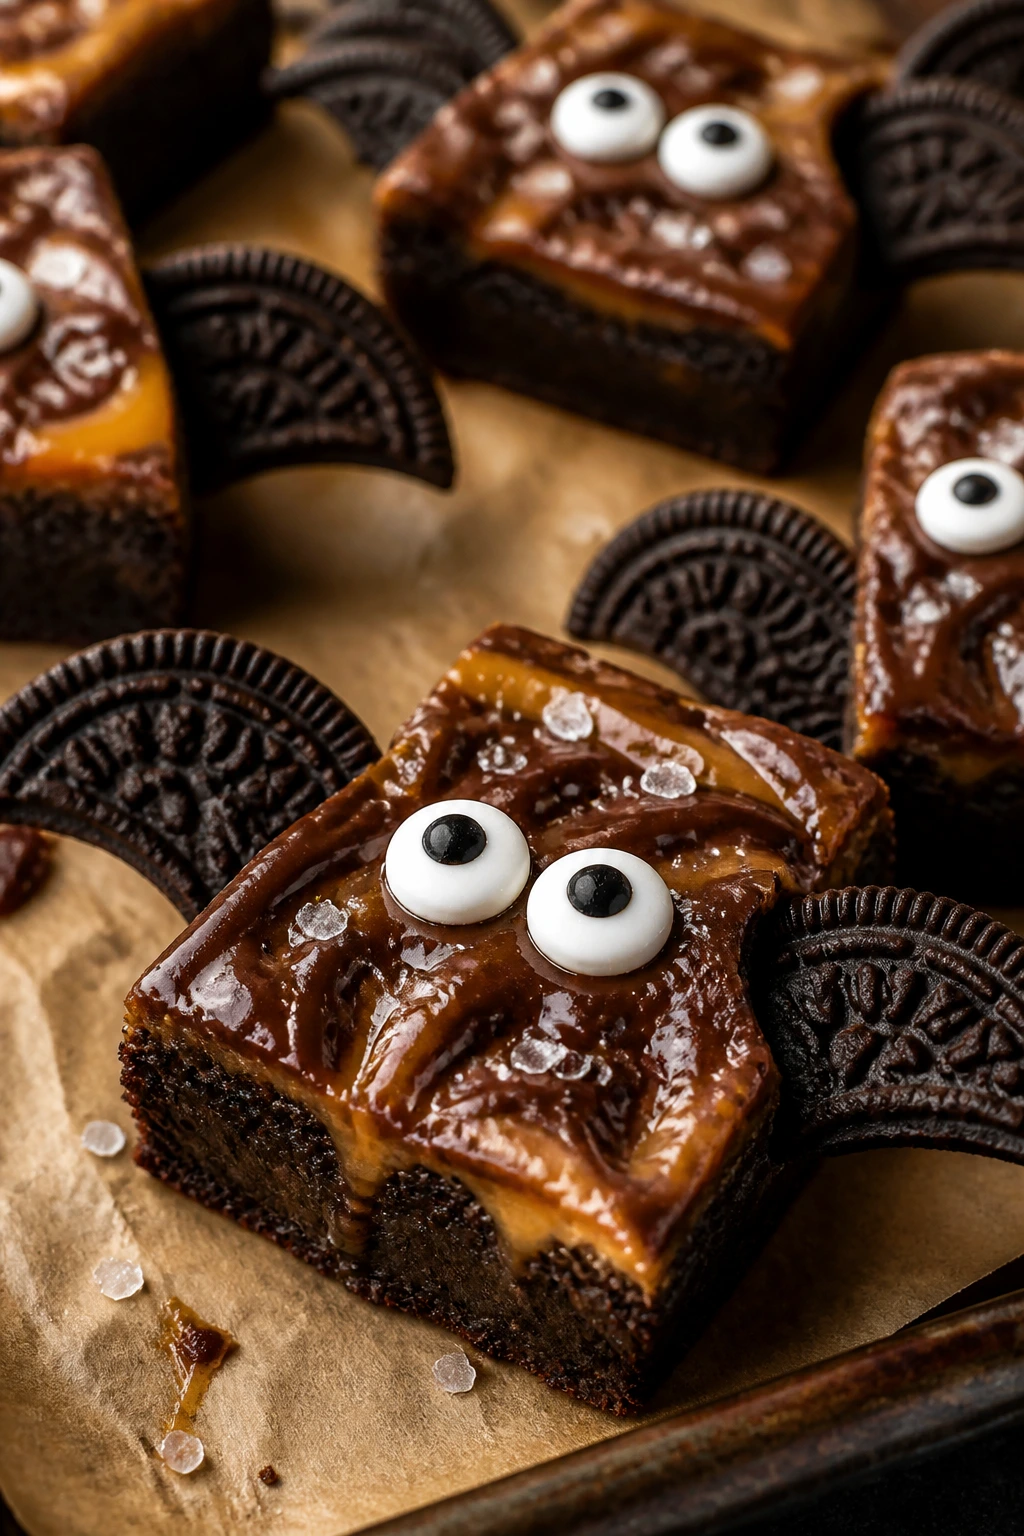
4. Salted Caramel Bat Brownies
Intro paragraph
Caramel gives the brownies a glossy, almost sticky richness that feels a little more dressed up, even though the method stays simple. These bat brownie Halloween treats are the ones I’d bring out when the crowd wants something that tastes bakery-made but still came together without a standing mixer or a long ingredient hunt. The salt on top keeps the caramel from turning candy-sweet.
Why It Works:
Brown sugar deepens the base and gives you a softer, chewier crumb than plain white sugar alone. Thick caramel sauce stays in place if you add it as a swirl or a drizzle after baking, and a pinch of flaky salt cuts through the sugar so every bite tastes cleaner. The wings and eyes give the glossy top enough contrast to read as a bat, not just a caramel brownie.
Key Ingredients:
- 1 cup unsalted butter, melted
- 1 1/2 cups light brown sugar
- 3 large eggs
- 2 teaspoons vanilla extract
- 3/4 cup unsweetened cocoa powder
- 1 cup all-purpose flour
- 1/2 teaspoon fine sea salt
- 1/2 cup thick caramel sauce
- 1/2 teaspoon flaky sea salt
- 12 Oreo cookies, split for wings
- 24 candy eyes
- 1/4 cup melted chocolate
Quick Steps:
- Preheat the oven to 350°F and line a 9×13-inch pan with parchment.
- Whisk butter, brown sugar, eggs, and vanilla until the mixture looks silky and slightly lighter.
- Fold in cocoa, flour, and fine salt, then pour the batter into the pan.
- Drizzle caramel sauce over the top, drag a knife through once or twice, and bake for 25 to 29 minutes.
- Cool, sprinkle flaky salt across the top, cut into squares, and add Oreo wings and eyes with melted chocolate.
Equipment for This Recipe:
- 9×13-inch pan
- Mixing bowl and whisk
- Butter knife for the caramel swirl
- Parchment paper
- Small spoon or piping bag
How to Serve This Dish:
These taste best at room temperature, when the caramel is soft but not runny. I like them on a dark tray with a little extra caramel zigzagged over the plate, though that is purely for the people who enjoy a shiny dessert.
Pro Tips for This Recipe:
- Use thick caramel, not a thin ice cream sauce, or it sinks.
- Add flaky salt after baking so it stays crisp.
- If the top gets too dark before the center sets, tent loosely with foil for the last 5 minutes.
- Let the brownies cool all the way before cutting through the caramel layer.
Variations on This Dish:
- Bourbon-Style Caramel Bats: Stir 1 teaspoon vanilla bourbon extract into the caramel for a deeper aroma.
- Caramel Pretzel Bats: Press crushed pretzels over the top before baking for crunch.
- Dulce de Leche Bats: Swap the caramel sauce for dulce de leche and swirl it lightly.
Common Mistakes to Avoid with This Dish:
- Using thin caramel: It disappears into the batter and leaves no top layer.
- Salting too early: The salt melts and loses its snap.
- Cutting before the caramel sets: The squares smear instead of slicing clean.
5. Espresso Fudge Bat Brownies
Intro paragraph
Coffee makes chocolate taste deeper, not more caffeinated in any aggressive way, and that’s why this version works so well. The espresso powder is tucked into the batter, where it sharpens the cocoa and makes the brownies taste darker than they actually are. It’s a nice trick for a night when you want dessert that feels grown-up without becoming precious.
Why It Works:
Instant espresso powder dissolves completely in the warm butter, so you do not get gritty little coffee specks. Dark chocolate chunks give the brownie uneven pockets of melt, which pair well with the crisp cookie wings. The finish stays fudgy if you stop baking while the center still has a soft wobble.
Key Ingredients:
- 1 cup unsalted butter, melted
- 1 3/4 cups granulated sugar
- 3 large eggs
- 2 teaspoons vanilla extract
- 1 tablespoon instant espresso powder
- 3/4 cup unsweetened cocoa powder
- 1 cup all-purpose flour
- 1/2 teaspoon fine sea salt
- 1 cup dark chocolate chunks
- 12 Oreo cookies, split for wings
- 24 candy eyes
Quick Steps:
- Preheat the oven to 350°F and line a 9×13-inch pan with parchment.
- Whisk the butter, sugar, eggs, vanilla, and espresso powder until smooth and glossy.
- Fold in cocoa, flour, salt, and dark chocolate chunks, then spread the batter into the pan.
- Bake for 24 to 27 minutes, until the edges are set and the center still looks slightly soft.
- Cool, cut, and finish each square with Oreo wings and eyes attached with melted chocolate.
Equipment for This Recipe:
- 9×13-inch pan
- Mixing bowl
- Whisk
- Rubber spatula
- Cooling rack
How to Serve This Dish:
A small square next to a mug of coffee or cold milk is enough. These are the brownies I’d put on a platter when I want people to pause for the first bite and then go back for a second one faster than they planned.
Pro Tips for This Recipe:
- Dissolve the espresso powder in the warm butter so it disappears cleanly.
- Use dark chocolate chunks, not chips, if you want bigger melt pockets.
- A pinch of cinnamon deepens the coffee note without making the brownie taste like spice cake.
- Cool fully before cutting; espresso brownies can seem softer while warm.
Variations on This Dish:
- Mocha Bat Brownies: Stir 1 tablespoon cocoa into 2 tablespoons of warm milk and brush it on the cut edges for a stronger mocha look.
- Salted Mocha Bats: Finish with a tiny pinch of flaky salt on each square.
- Cold-Brew Bats: Add 1 tablespoon concentrated cold brew to the butter mixture if you want a smoother coffee note.
Common Mistakes to Avoid with This Dish:
- Overdoing the espresso: One tablespoon is enough. More can make the flavor bitter.
- Using milk chocolate chunks: They disappear too fast and make the brownie taste flat.
- Skipping the cool-down: Warm brownies absorb the wings unevenly and turn messy.
6. Raspberry Ribbon Bat Brownies
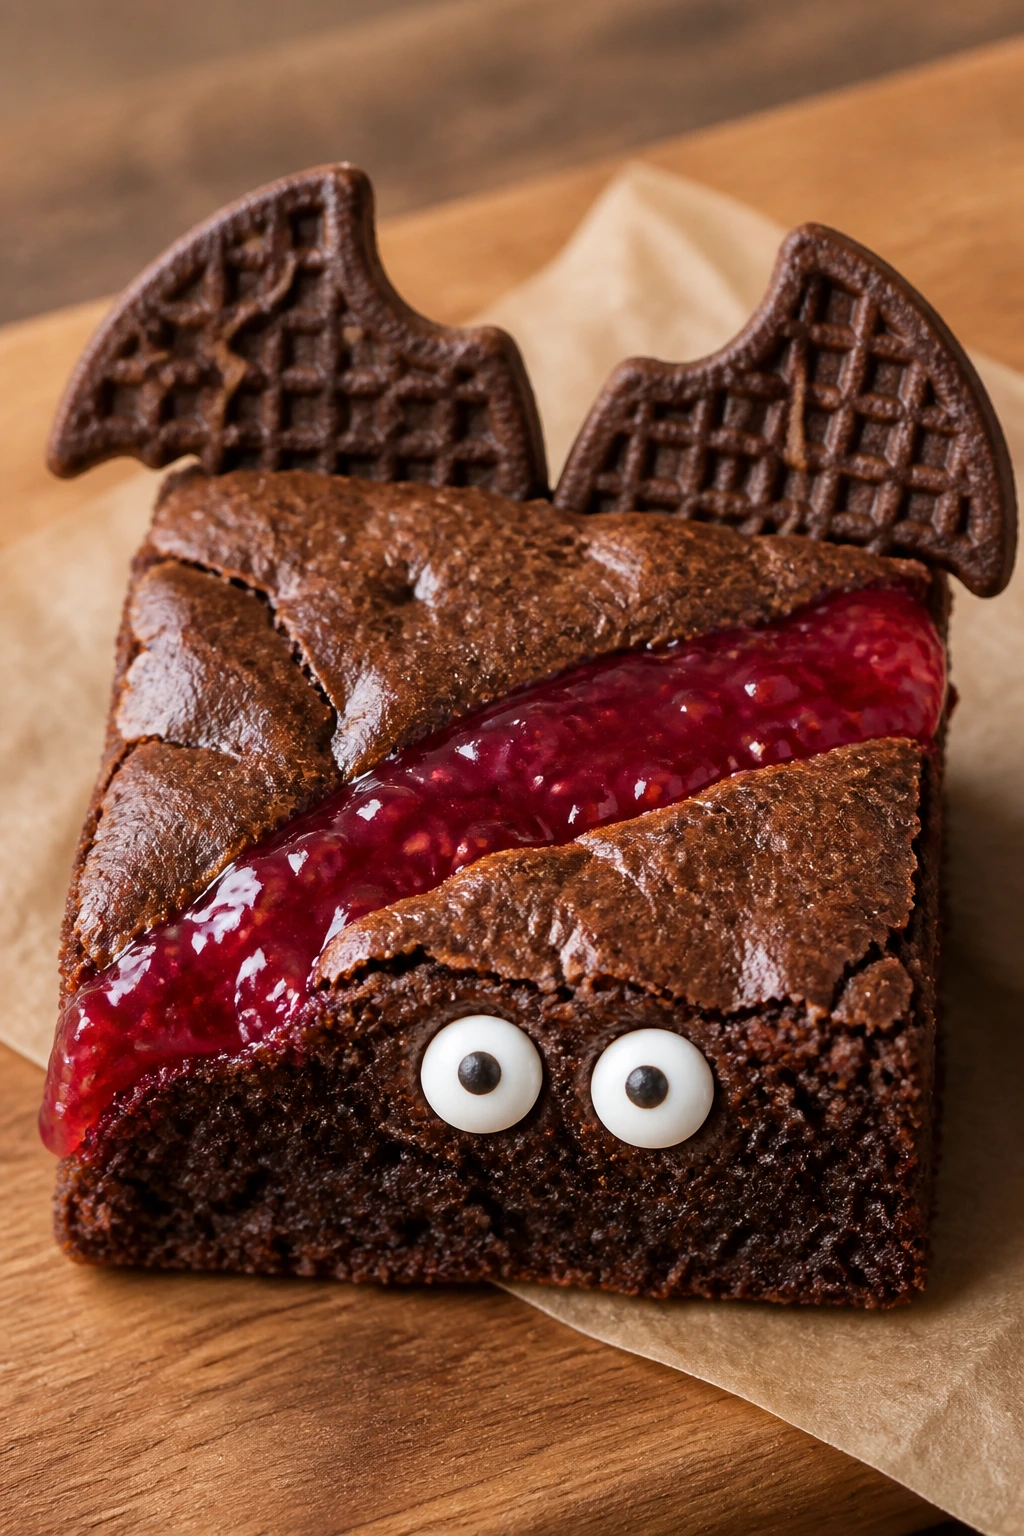
Intro paragraph
Raspberry and chocolate can be a little showy together, which is exactly why I like them here. The tart jam cuts through the richness, and the dark red streaks give the brownies a slightly spooky look before you even add the cookie wings. If your weeknight needs something that feels more dramatic than difficult, this one fits.
Why It Works:
Seedless raspberry jam swirls better than fresh berries, which means the brownie top stays clean instead of waterlogged. The fruit sharpens the chocolate without adding much extra work. Once the tray cools, the jam ribbon settles into the crumb and stays where you left it.
Key Ingredients:
- 1 cup unsalted butter, melted
- 1 3/4 cups granulated sugar
- 3 large eggs
- 2 teaspoons vanilla extract
- 3/4 cup unsweetened cocoa powder
- 1 cup all-purpose flour
- 1/2 teaspoon fine sea salt
- 1/2 cup seedless raspberry jam
- 12 chocolate wafer cookies, split for wings
- 24 candy eyes
- 1/4 cup melted chocolate
Quick Steps:
- Preheat the oven to 350°F and line a 9×13-inch pan with parchment.
- Whisk butter, sugar, eggs, and vanilla until thick and smooth.
- Fold in cocoa, flour, and salt, then spread the batter in the pan.
- Dollop the raspberry jam across the top and swirl once with a butter knife.
- Bake for 24 to 28 minutes, cool completely, cut into squares, and decorate with wafer wings and eyes.
Equipment for This Recipe:
- 9×13-inch pan
- Mixing bowl
- Butter knife for the jam swirl
- Rubber spatula
- Small spoon for the melted chocolate
How to Serve This Dish:
These look sharp on a white plate because the jam streaks stand out better. A few fresh raspberries on the side are optional, though I usually skip them and let the brownie do the talking.
Pro Tips for This Recipe:
- Use seedless jam so the swirl stays smooth.
- Do not over-stir the jam or you’ll lose the red ribbon effect.
- Let the brownies chill before cutting if you want clean jam lines.
- Wafer cookies are less sweet than Oreos here, which helps the fruit flavor show up.
Variations on This Dish:
- Blackberry Bat Brownies: Swap the raspberry jam for blackberry preserves.
- Raspberry Ganache Bats: Add a thin layer of chocolate ganache after baking and before decorating.
- Jam-Swirled Bite Bats: Bake the batter in a mini muffin tin for smaller, neater squares.
Common Mistakes to Avoid with This Dish:
- Using chunky jam: Seeds and bits can tear the top.
- Over-swirling: The fruit streaks vanish into the batter.
- Decorating too soon: Sticky jam makes the cookie wings slide around.
7. Pumpkin Spice Marble Bat Brownies
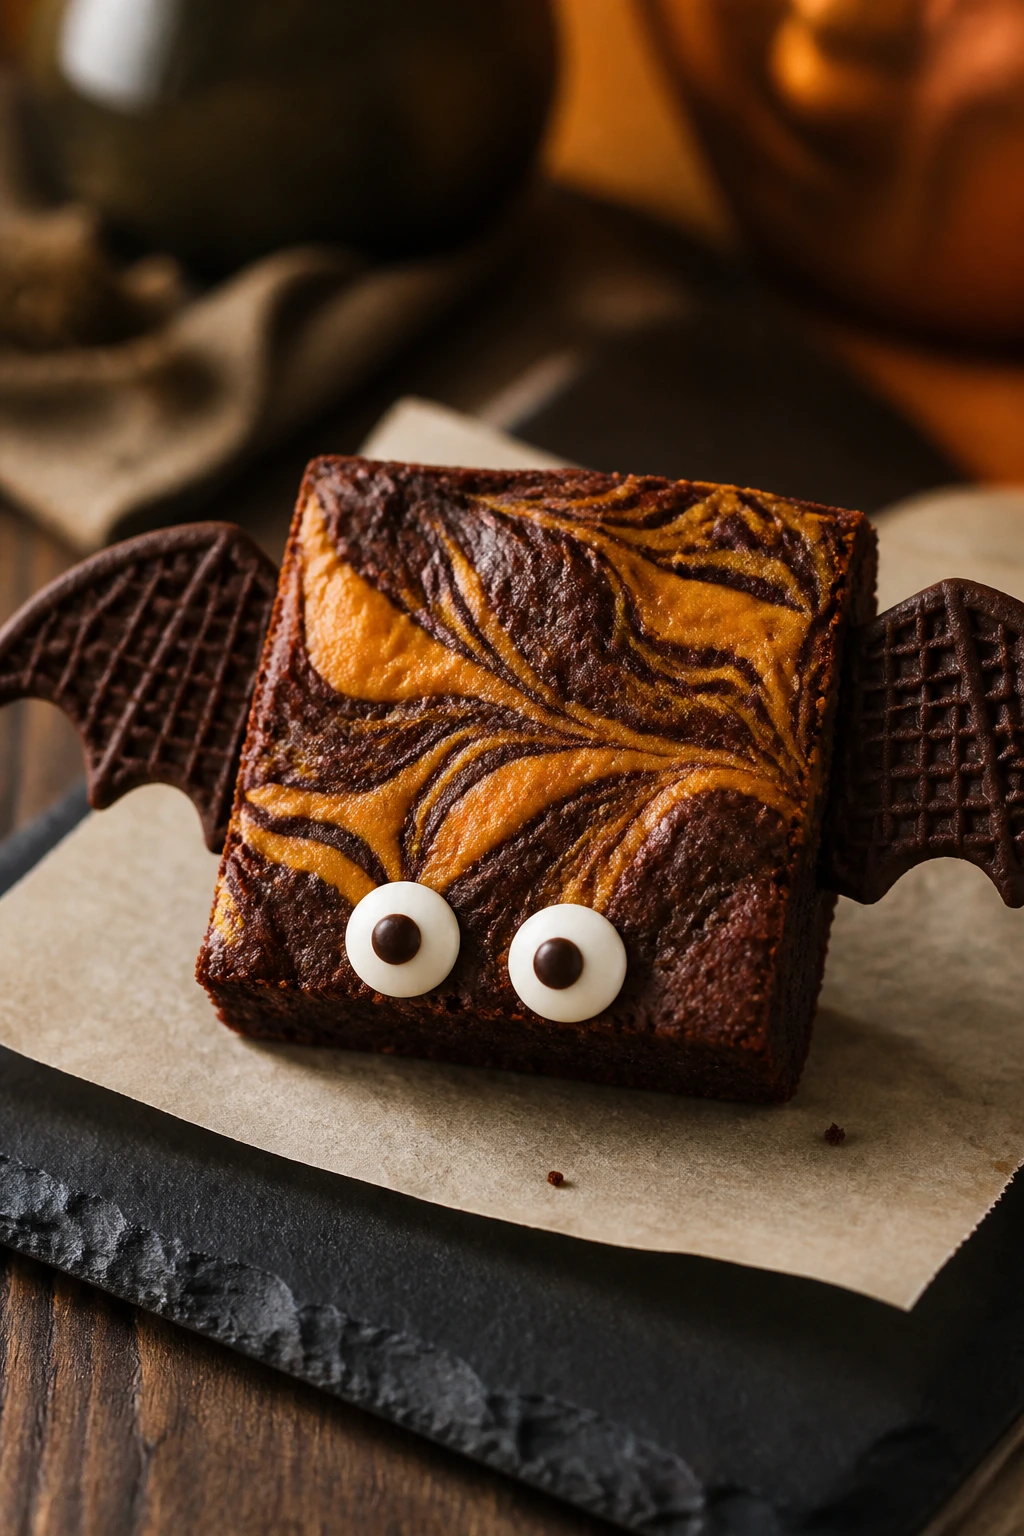
Intro paragraph
Pumpkin in brownies is a little bit of a trick, and I mean that in the good sense. You get the familiar chocolate base, then a pale pumpkin swirl that reads almost like a moonlit streak across the surface. Add bat wings and candy eyes, and the whole thing turns into a Halloween tray that still tastes like dessert, not a craft project.
Why It Works:
Pumpkin puree brings moisture, but it needs help from cream cheese and egg yolk so the swirl bakes into a soft, custardy ribbon instead of a watery layer. A little pumpkin pie spice is enough; too much makes the brownie taste like a candle. The chocolate base stays dominant, which is exactly what you want.
Key Ingredients:
- 1 cup unsalted butter, melted
- 1 1/2 cups granulated sugar
- 3 large eggs
- 2 teaspoons vanilla extract
- 2/3 cup unsweetened cocoa powder
- 3/4 cup all-purpose flour
- 1/2 teaspoon fine sea salt
- 1/2 cup pumpkin puree
- 4 ounces cream cheese, softened
- 1 egg yolk
- 2 tablespoons granulated sugar
- 1 teaspoon pumpkin pie spice
- 12 chocolate wafer cookies, split for wings
- 24 candy eyes
Quick Steps:
- Preheat the oven to 350°F and line a 9×13-inch pan with parchment.
- Whisk butter, sugar, eggs, and vanilla until thick, then fold in cocoa, flour, and salt.
- Beat the pumpkin puree, cream cheese, egg yolk, sugar, and spice in a separate bowl until smooth.
- Spoon the pumpkin mixture over the brownie batter and swirl gently with a knife.
- Bake for 26 to 30 minutes, cool fully, cut into squares, and attach the cookie wings and eyes.
Equipment for This Recipe:
- 9×13-inch pan
- Two mixing bowls
- Hand mixer or sturdy whisk
- Butter knife
- Cooling rack
How to Serve This Dish:
Serve these slightly cool rather than cold so the pumpkin swirl stays soft. They look especially good on a platter with a few orange napkins nearby, though the brownies themselves already do most of the decorating.
Pro Tips for This Recipe:
- Soften the cream cheese fully or the swirl turns lumpy.
- Keep the pumpkin layer light; too much makes the brownie too wet.
- Use a gentle hand when swirling so you can still see both colors.
- Wait for a full cool-down before cutting, since the pumpkin layer is softer than the brownie.
Variations on This Dish:
- Maple Pumpkin Bats: Replace 1 tablespoon sugar in the swirl with maple syrup.
- Spiced Cocoa Bats: Add 1/4 teaspoon cinnamon to the brownie batter for a warmer chocolate base.
- Cup Version: Bake the same batter in a mini muffin tin for bite-size moon-and-bat treats.
Common Mistakes to Avoid with This Dish:
- Too much pumpkin puree: The swirl can slump and bleed into the brownie.
- Rushing the cool time: The pumpkin layer tears before it sets.
- Using full-strength spice: Pumpkin pie spice should whisper, not shout.
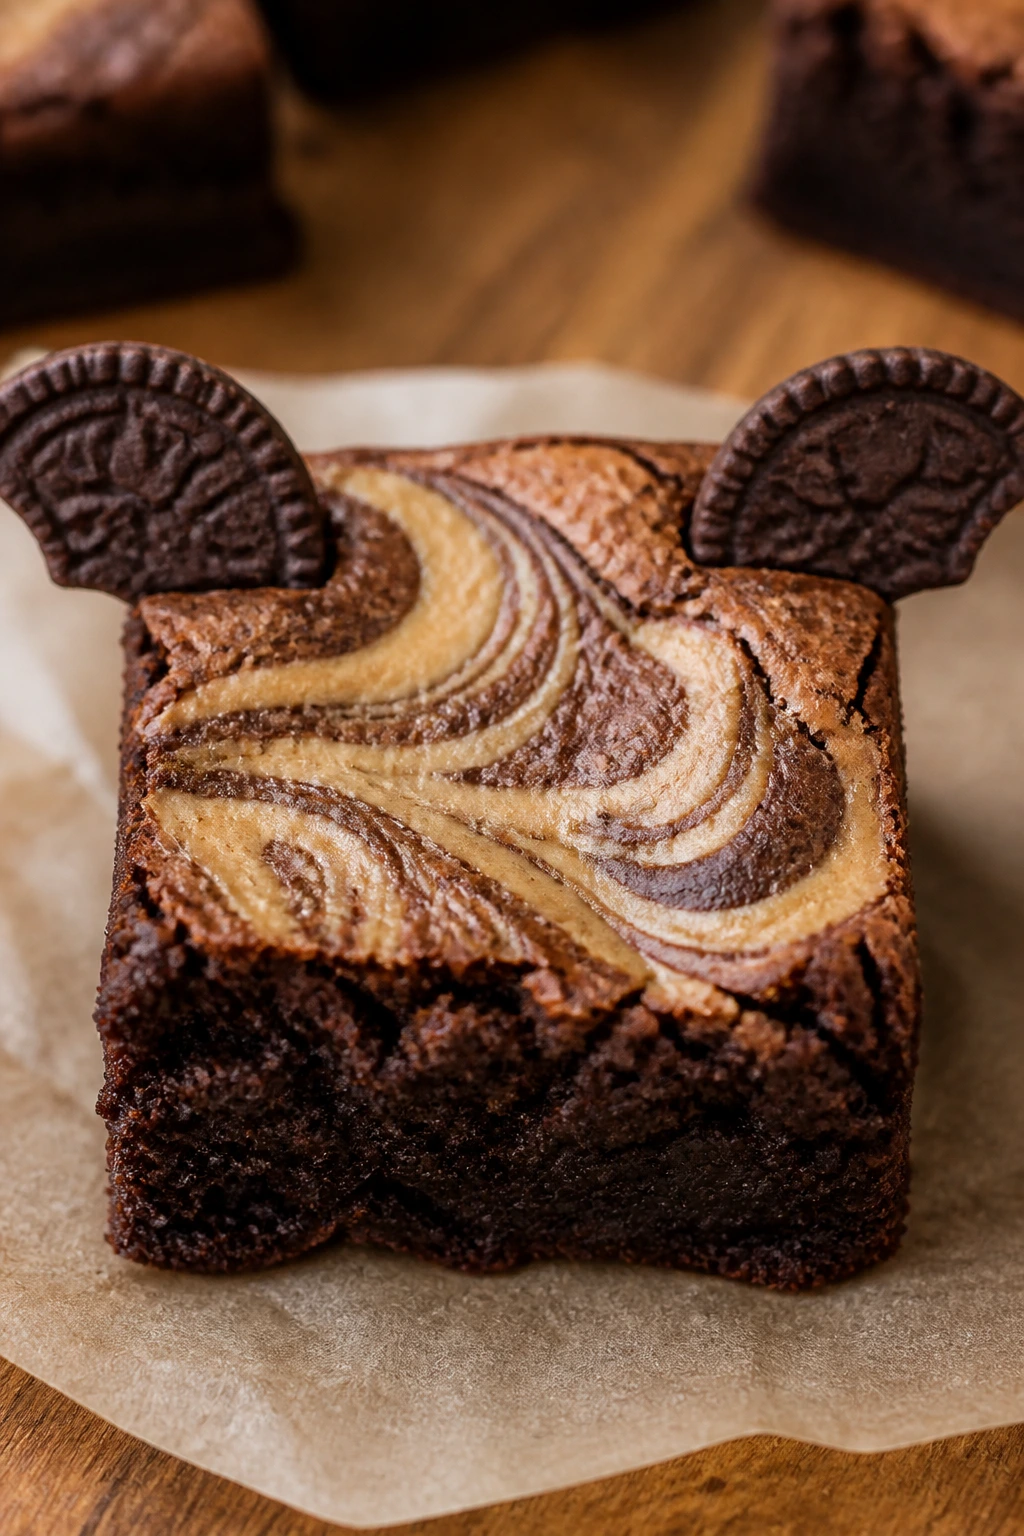
8. Cheesecake Swirl Bat Brownies
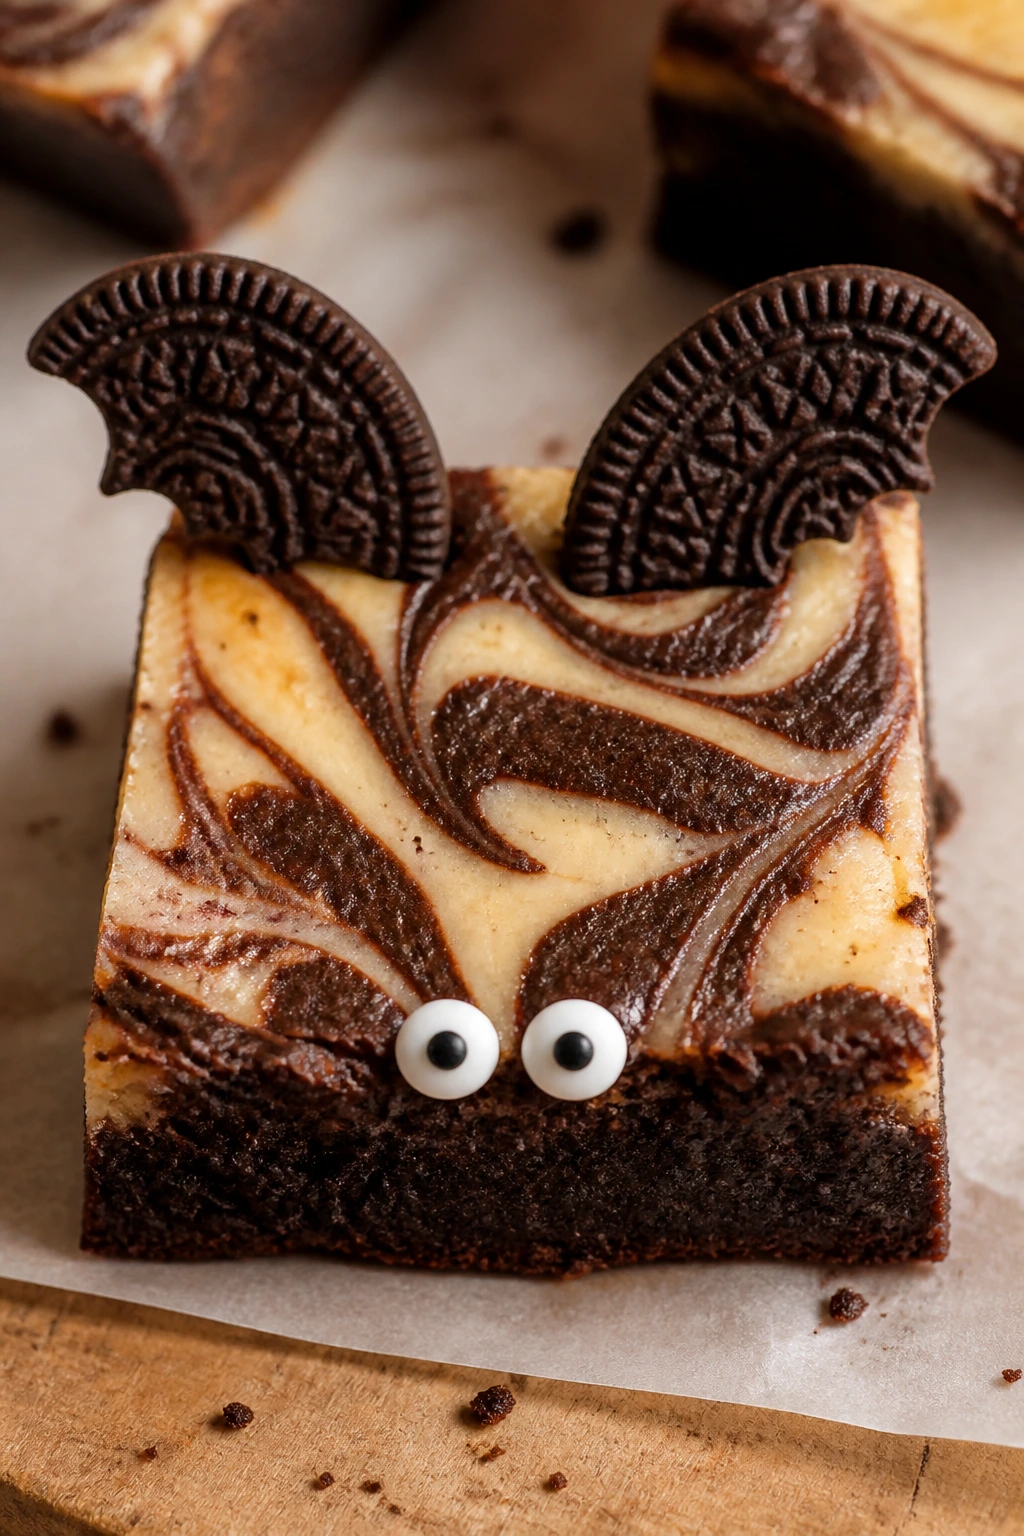
Intro paragraph
Cheesecake and brownie is one of those pairings that should feel heavy but doesn’t, as long as you keep the swirl restrained. The tang of cream cheese wakes up the chocolate, and the pale ribbons on top make the finished pan look a little more polished than the average square. It’s still weeknight-friendly. Just a bit more dressed.
Why It Works:
The cheesecake layer adds a cool, tangy contrast and gives the top of the brownie a marbled look that makes the bat decorations pop. Because the batter bakes in one pan, you get two textures without adding a separate crust. The cream cheese mixture stays distinct if it’s dolloped and swirled lightly.
Key Ingredients:
- 1 cup unsalted butter, melted
- 1 3/4 cups granulated sugar
- 3 large eggs
- 2 teaspoons vanilla extract
- 3/4 cup unsweetened cocoa powder
- 1 cup all-purpose flour
- 1/2 teaspoon fine sea salt
- 8 ounces cream cheese, softened
- 1/3 cup granulated sugar
- 1 large egg
- 1 teaspoon vanilla extract
- 12 Oreo cookies, split for wings
- 24 candy eyes
Quick Steps:
- Preheat the oven to 350°F and line a 9×13-inch pan with parchment.
- Whisk the brownie batter ingredients together until smooth, then spread the batter in the pan.
- Beat the cream cheese, sugar, egg, and vanilla until creamy and lump-free.
- Dollop the cheesecake mixture over the brownie batter and swirl once or twice with a knife.
- Bake for 28 to 32 minutes, cool completely, cut into squares, and decorate with Oreo wings and eyes.
Equipment for This Recipe:
- 9×13-inch pan
- Two bowls
- Hand mixer or sturdy whisk
- Rubber spatula
- Cooling rack
How to Serve This Dish:
These are the squares I’d serve after dinner if I wanted something that feels richer without being fussy. Keep them chilled until the last minute, then let them sit 10 minutes so the cheesecake layer softens slightly.
Pro Tips for This Recipe:
- Make sure the cream cheese is soft enough to beat smooth.
- Do not swirl so much that the cheesecake disappears.
- Chill before slicing if you want the marbling to stay visible.
- A tiny pinch of salt on top makes the tang stand out.
Variations on This Dish:
- Chocolate Chip Cheesecake Bats: Add 1/2 cup mini chips to the brownie batter.
- Lemon-Spark Bats: Add 1 teaspoon lemon zest to the cheesecake layer for a sharper bite.
- Brownie Cup Bats: Bake the batter in a muffin tin for single-serve portions.
Common Mistakes to Avoid with This Dish:
- Overbeating the cheesecake layer: Too much air makes it puff and crack.
- Adding the swirl in thick slabs: It won’t marble well and can sink.
- Skipping the cool-down: The cheesecake layer needs time to settle before decorating.
9. Rocky Road Bat Brownies
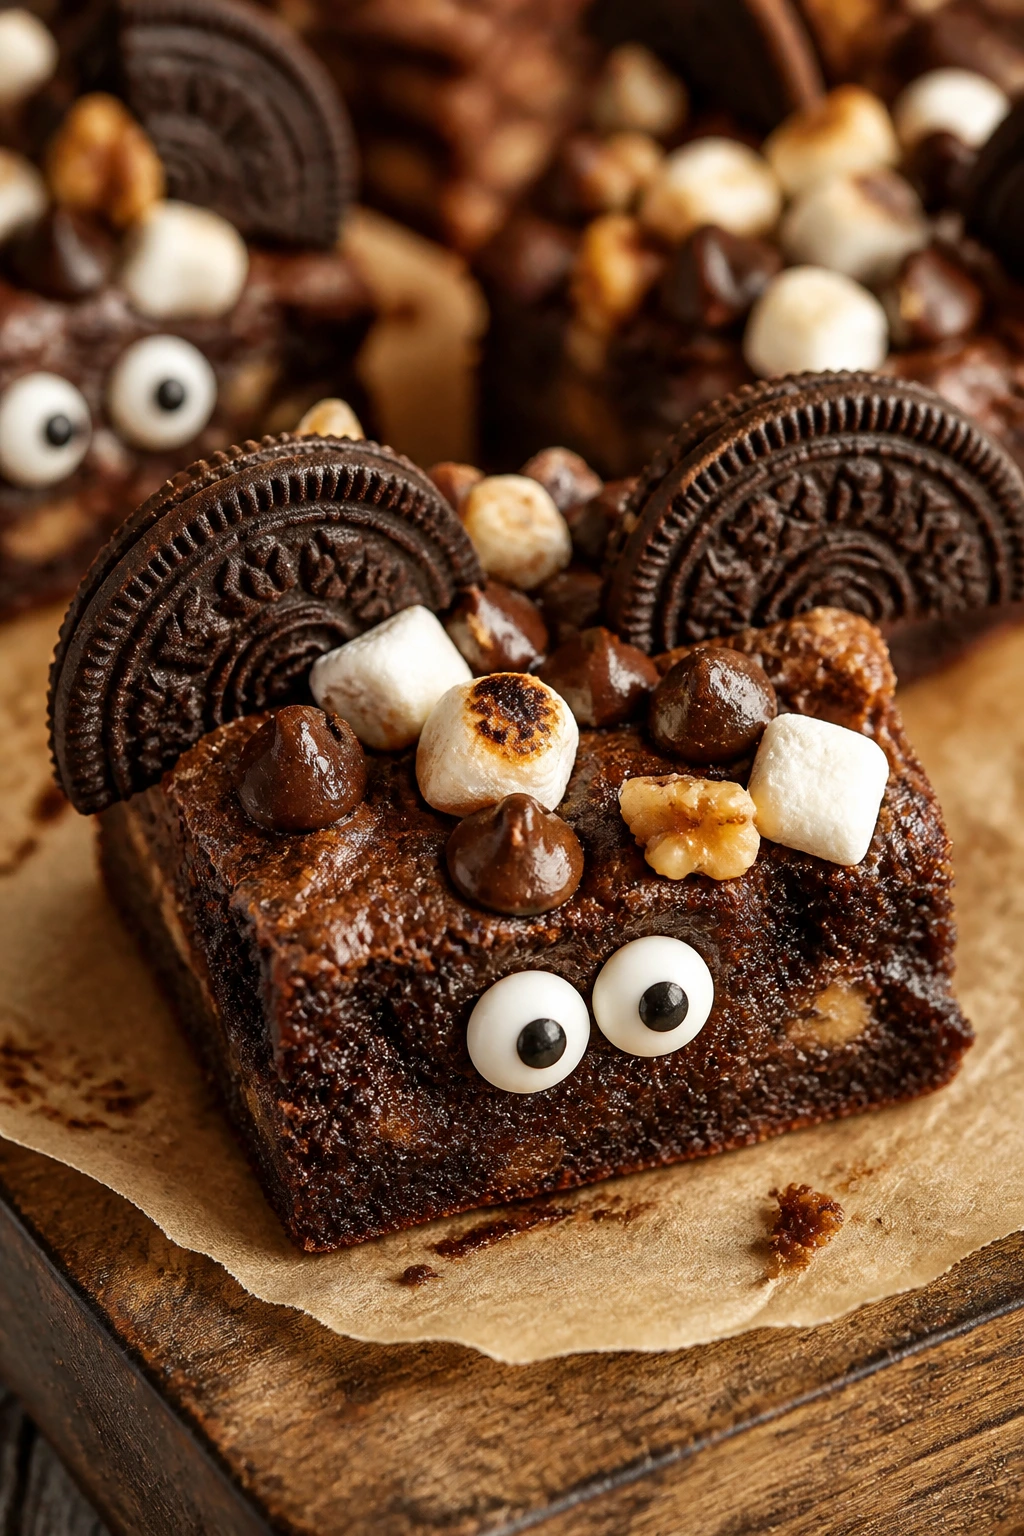
Intro paragraph
Rocky road is messy in the right way. Marshmallows, walnuts, and chocolate chips break up the brownie surface so every square looks a little different, which suits bat brownie Halloween treats better than a perfect, uniform pan ever would. The wings and eyes feel almost calm by comparison.
Why It Works:
Mini marshmallows soften in the oven and toast at the edges, while walnuts add crunch that keeps each bite from turning one-note. The toppings are sturdy enough to sit on the brownie without sinking if you add most of them near the end of baking. It’s a texture-heavy brownie, and that’s the point.
Key Ingredients:
- 1 cup unsalted butter, melted
- 2 cups granulated sugar
- 4 large eggs
- 2 teaspoons vanilla extract
- 3/4 cup unsweetened cocoa powder
- 1 cup all-purpose flour
- 1/2 teaspoon fine sea salt
- 1 cup semisweet chocolate chips
- 3/4 cup chopped walnuts
- 1 cup mini marshmallows
- 12 Oreo cookies, split for wings
- 24 candy eyes
Quick Steps:
- Preheat the oven to 350°F and line a 9×13-inch pan with parchment.
- Whisk butter, sugar, eggs, and vanilla until the mixture looks glossy and thick.
- Fold in cocoa, flour, salt, chocolate chips, and walnuts, then spread the batter in the pan.
- Scatter the mini marshmallows over the top for the last 5 minutes of baking, then finish baking until the center is set.
- Cool, cut, and decorate each square with cookie wings and eyes.
Equipment for This Recipe:
- 9×13-inch pan
- Mixing bowl
- Rubber spatula
- Cooling rack
- Small spoon for melted chocolate
How to Serve This Dish:
Serve these with a napkin, because the marshmallows make them a little sticky around the edges. A square of rocky road brownie next to a glass of milk is about as straightforward as dessert gets.
Pro Tips for This Recipe:
- Toast the walnuts first if you want a deeper flavor.
- Add the marshmallows late so they do not dissolve completely.
- Use mini marshmallows, not large ones, or the top gets uneven.
- Let the brownies cool before decorating so the marshmallow layer firms up.
Variations on This Dish:
- Almond Rocky Road Bats: Swap walnuts for toasted almonds.
- Peanut Rocky Road Bats: Use salted peanuts for a more candy-bar feel.
- Chocolate Marshmallow Bites: Bake the same batter in a mini muffin tin for smaller servings.
Common Mistakes to Avoid with This Dish:
- Adding marshmallows too early: They melt into a sticky blanket.
- Using raw walnuts without tasting them first: Stale nuts can flatten the whole tray.
- Decorating on a hot surface: The wings stick to marshmallow and slide around.
10. S’mores Bat Brownies
Intro paragraph
S’mores brownies bring campfire flavor to a clean indoor pan, which is a nice trade when the oven is already on. You get graham crumb, marshmallow, and chocolate all packed into a fudgy square, then the bat wings make the whole thing look a little more theatrical than a standard s’mores bar. The flavor is familiar. The shape is not.
Why It Works:
Crushed graham crackers soak up just enough moisture to stay soft without disappearing. Mini marshmallows toast fast, so they give you the browned top people expect from s’mores without requiring a broiler. The milk chocolate pieces melt into sweet pockets that soften the cocoa.
Key Ingredients:
- 1 cup unsalted butter, melted
- 1 3/4 cups granulated sugar
- 3 large eggs
- 2 teaspoons vanilla extract
- 3/4 cup unsweetened cocoa powder
- 1 cup all-purpose flour
- 1/2 teaspoon fine sea salt
- 1 cup crushed graham crackers
- 1 cup mini marshmallows
- 1/2 cup milk chocolate pieces
- 12 chocolate wafer cookies, split for wings
- 24 candy eyes
Quick Steps:
- Preheat the oven to 350°F and line a 9×13-inch pan with parchment.
- Whisk the butter, sugar, eggs, and vanilla until thick and smooth.
- Fold in cocoa, flour, salt, graham crumbs, and milk chocolate pieces.
- Top with mini marshmallows and bake for 24 to 27 minutes, until the marshmallows are puffed and the center is just set.
- Cool, cut, and attach the cookie wings and eyes with melted chocolate.
Equipment for This Recipe:
- 9×13-inch pan
- Mixing bowl
- Rubber spatula
- Parchment paper
- Small piping bag or spoon
How to Serve This Dish:
These are especially good served warm-ish, not hot, so the marshmallow stays soft but the wings still hold. I like them as a one-square dessert after a heavier meal because they scratch the sweet tooth without needing a fork.
Pro Tips for This Recipe:
- Crush the graham crackers into small crumbs, not sand, so you still get texture.
- Add the marshmallows on top; do not bury them in the batter.
- Watch the last 3 minutes closely because marshmallows go from golden to burnt fast.
- If the top is too sticky, cool the brownies on a rack before decorating.
Variations on This Dish:
- Chocolate-Hazelnut S’mores Bats: Add 1/4 cup chocolate-hazelnut spread in small dollops.
- Gingersnap S’mores Bats: Replace half the graham crumbs with crushed gingersnaps.
- Mini Muffin S’mores Bats: Bake in a muffin tin for individual portions.
Common Mistakes to Avoid with This Dish:
- Overtoasting the marshmallows: They can turn bitter fast.
- Using large graham chunks: They make cutting ragged.
- Attaching wings before cooling: Marshmallow heat softens the cookies and the bats slump.
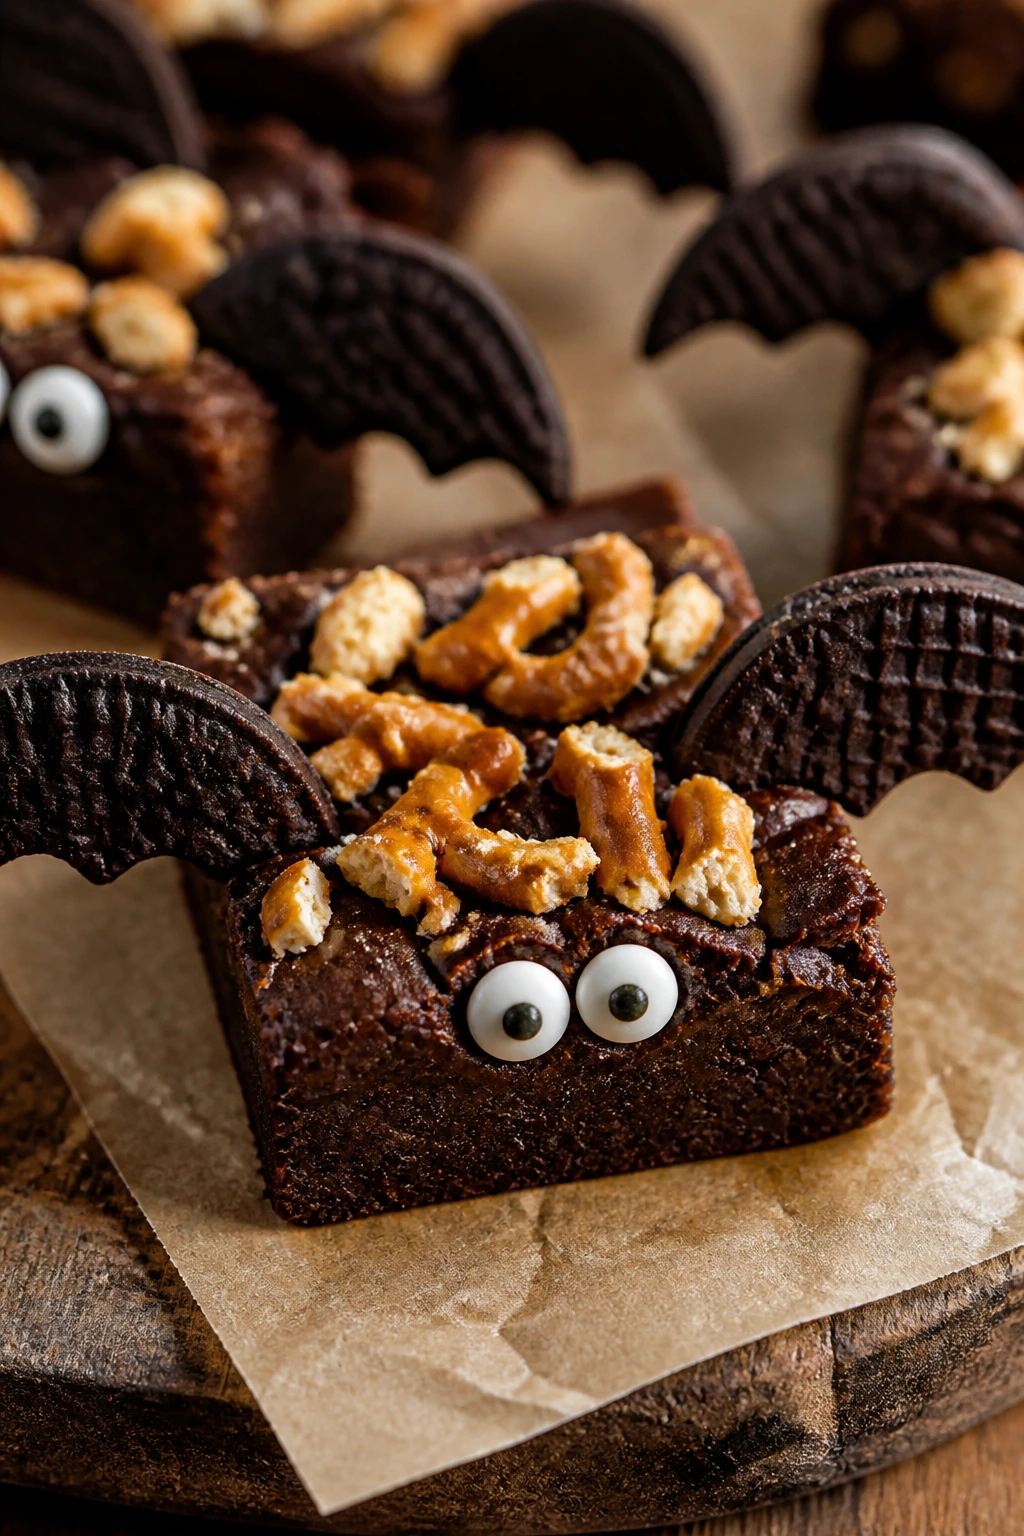
11. Pretzel Crunch Bat Brownies
Intro paragraph
Pretzels in brownies are for people who want a little snap in the middle of all that chocolate. The salt hits first, then the fudgy crumb, then the cookie wings, and the whole tray tastes more awake than a plain brownie pan. I like this one on nights when I want the dessert to read as snacky instead of formal.
Why It Works:
Crushed pretzels stay crisp longer than most add-ins, so they give the brownie a built-in crunch that survives cooling. Salt sharpens the chocolate and keeps the brownie from leaning too sweet. If you want the bat silhouette to stand out, the salty top also gives the candy eyes a dark, clean background.
Key Ingredients:
- 1 cup unsalted butter, melted
- 1 3/4 cups granulated sugar
- 3 large eggs
- 2 teaspoons vanilla extract
- 3/4 cup unsweetened cocoa powder
- 1 cup all-purpose flour
- 1/2 teaspoon fine sea salt
- 1 cup crushed pretzels
- 12 Oreo cookies, split for wings
- 24 candy eyes
- 1/2 cup melted dark chocolate
- 1 teaspoon flaky salt, for finishing
Quick Steps:
- Preheat the oven to 350°F and line a 9×13-inch pan with parchment.
- Whisk butter, sugar, eggs, and vanilla until the mixture thickens slightly.
- Fold in cocoa, flour, salt, and pretzels, then spread the batter into the pan.
- Bake for 23 to 27 minutes, until the center has a few moist crumbs and the edges are firm.
- Cool, sprinkle flaky salt over the top, cut, and finish with cookie wings and eyes.
Equipment for This Recipe:
- 9×13-inch pan
- Mixing bowl
- Whisk and spatula
- Cooling rack
- Small bowl for melted chocolate
How to Serve This Dish:
These work well on a tray with other salty snacks because the flavor bridge is already there. They also travel well, which is handy if the evening plan involves one kitchen and three different places to stand.
Pro Tips for This Recipe:
- Crush the pretzels by hand so you keep some larger crunchy pieces.
- Use thin pretzel sticks only if you want a sharper, more broken-up texture.
- Add flaky salt after baking, not before, or it dissolves.
- Let the brownies cool fully so the pretzels stay crisp instead of softening.
Variations on This Dish:
- Chocolate-Caramel Pretzel Bats: Drizzle caramel over the top after baking.
- Dark Rye Pretzel Bats: Swap 1/4 cup flour for rye flour for a deeper flavor.
- Mini Bite Bats: Bake the same batter in a square mini muffin pan.
Common Mistakes to Avoid with This Dish:
- Using too much pretzel: The batter turns dry and crumbly.
- Salting the batter too hard: A little salt helps; a lot makes the brownie taste harsh.
- Decorating while warm: Steam softens the pretzel crunch and makes the wings slide.
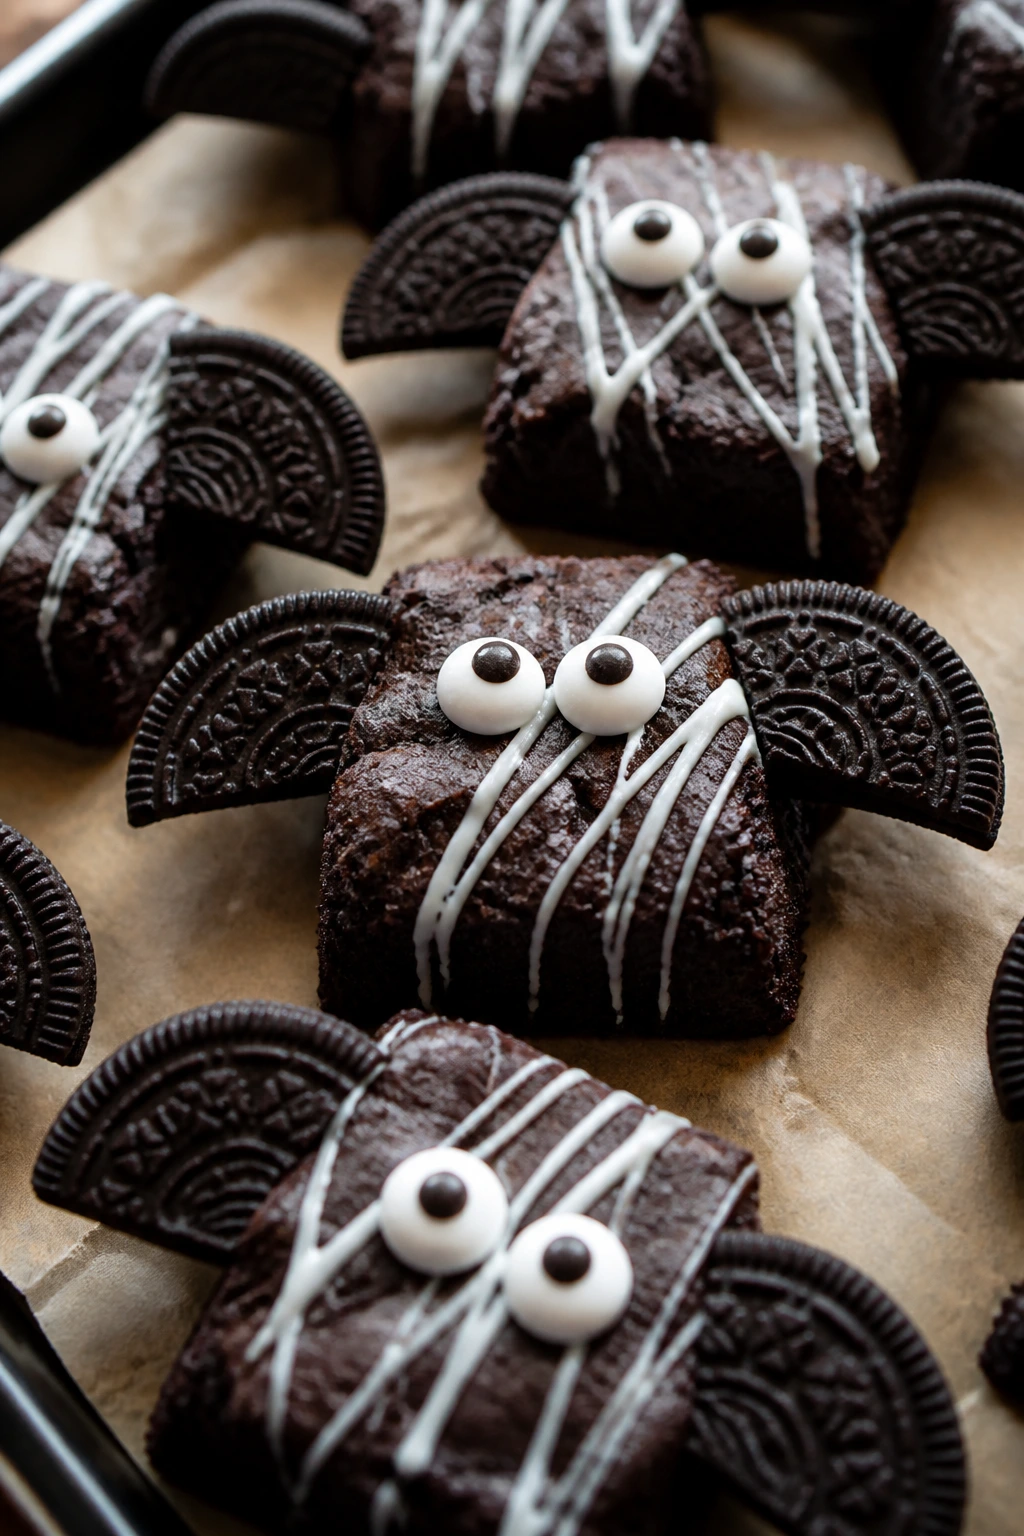
12. Black Cocoa and White Chocolate Bat Brownies
Intro paragraph
Black cocoa gives you the kind of deep, near-black brownie that makes candy eyes look almost neon. White chocolate drizzle breaks up the darkness and keeps the tray from feeling flat. If you want the bats to look dramatic without extra work, this is the sharpest-looking pan in the bunch.
Why It Works:
Black cocoa has a bold color and a mellow, Oreo-like flavor that makes the brownie taste darker without becoming bitter. A little Dutch-process cocoa rounds out the flavor, and the white chocolate drizzle gives you contrast with almost no fuss. The result feels intentional even though the method is plain.
Key Ingredients:
- 1 cup unsalted butter, melted
- 1 3/4 cups granulated sugar
- 3 large eggs
- 2 teaspoons vanilla extract
- 1/2 cup black cocoa powder
- 1/4 cup Dutch-process cocoa powder
- 1 cup all-purpose flour
- 1/2 teaspoon fine sea salt
- 1 cup white chocolate chips, melted
- 12 chocolate sandwich cookies, split for wings
- 24 candy eyes
Quick Steps:
- Preheat the oven to 350°F and line a 9×13-inch pan with parchment.
- Whisk butter, sugar, eggs, and vanilla until smooth.
- Fold in the black cocoa, Dutch cocoa, flour, and salt, then spread the batter into the pan.
- Bake for 22 to 26 minutes, cool completely, and drizzle with melted white chocolate.
- Cut, then attach cookie wings and eyes after the drizzle sets.
Equipment for This Recipe:
- 9×13-inch pan
- Mixing bowl
- Whisk
- Small piping bag or spoon
- Cooling rack
How to Serve This Dish:
Serve these on a pale or orange plate so the contrast does the work for you. The white drizzle looks cleaner if the brownies are cut before you decorate, which saves you from trying to pipe over a crumbling edge.
Pro Tips for This Recipe:
- Black cocoa is strong-looking but mild tasting; it’s worth seeking out for this one.
- Melt the white chocolate slowly so it stays smooth enough to drizzle.
- Cut the brownies cold for the straightest lines.
- A tiny extra dot of white chocolate helps the candy eyes stay put on the dark surface.
Variations on This Dish:
- Moonlight Bat Brownies: Add a little silver sanding sugar before the drizzle sets.
- Orange-White Bat Brownies: Stir in 1 teaspoon orange zest for a citrus lift.
- Peppermint Blackout Bats: Add 1/2 teaspoon peppermint extract to the batter.
Common Mistakes to Avoid with This Dish:
- Overbaking dark cocoa brownies: The color hides dryness, so check the texture carefully.
- Using overheated white chocolate: It can seize fast and turn grainy.
- Adding wings before the drizzle sets: The cookies skid across the glossy top.
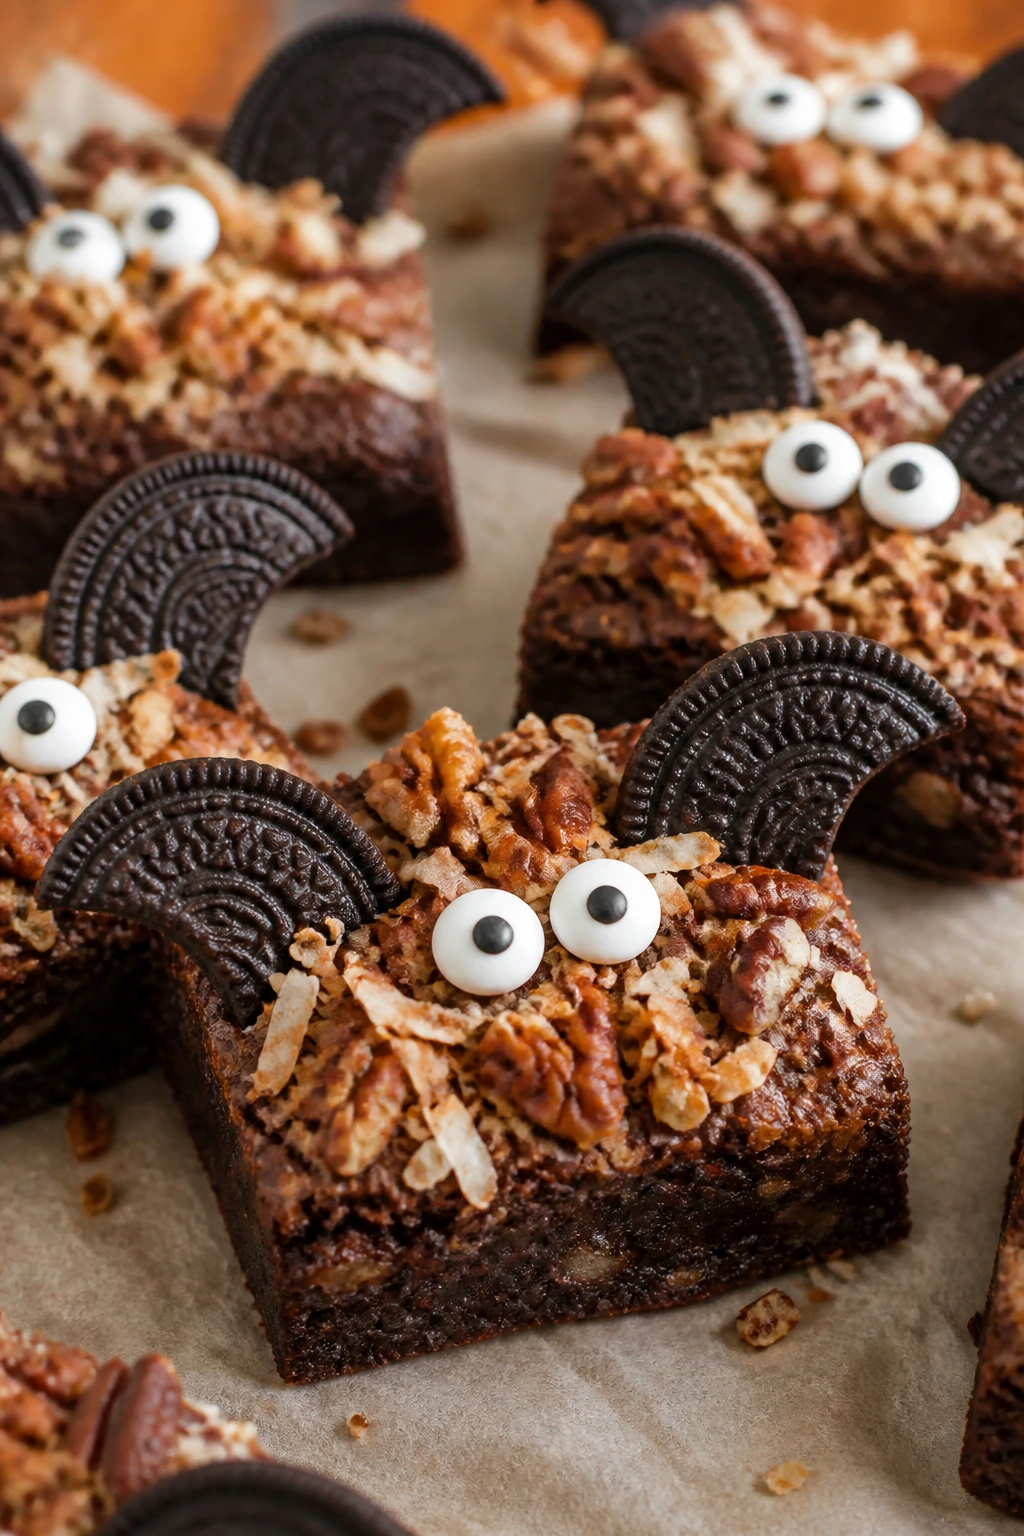
13. Coconut Pecan Bat Brownies
Intro paragraph
Coconut and pecans give the brownies a little old-school diner energy, and I mean that as praise. The coconut toasts on top, the pecans add crunch, and the bat decorations sit over a tray that already has enough texture to feel interesting before you cut into it. This one is nutty, chewy, and a touch chewy in the best way.
Why It Works:
Brown sugar deepens the base, while coconut and pecans bring both sweetness and bite. Toasted coconut adds flavor fast, so you do not need a long ingredient list to make the tray taste layered. The wings settle on top of the rough surface without sliding around much.
Key Ingredients:
- 1 cup unsalted butter, melted
- 1 3/4 cups light brown sugar
- 3 large eggs
- 2 teaspoons vanilla extract
- 3/4 cup unsweetened cocoa powder
- 1 cup all-purpose flour
- 1/2 teaspoon fine sea salt
- 1 cup sweetened shredded coconut
- 3/4 cup toasted pecans, chopped
- 12 Oreo cookies, split for wings
- 24 candy eyes
Quick Steps:
- Preheat the oven to 350°F and line a 9×13-inch pan with parchment.
- Whisk butter, brown sugar, eggs, and vanilla until smooth and slightly thickened.
- Fold in cocoa, flour, salt, coconut, and pecans, then spread the batter in the pan.
- Bake for 24 to 28 minutes, until the top looks set and the center still has a little softness.
- Cool, cut, and attach cookie wings and eyes with melted chocolate.
Equipment for This Recipe:
- 9×13-inch pan
- Mixing bowl
- Rubber spatula
- Knife for chopping pecans
- Cooling rack
How to Serve This Dish:
These are good at room temperature, where the coconut keeps its chew and the pecans still have bite. If you want to be extra neat, brush away loose coconut crumbs before attaching the wings.
Pro Tips for This Recipe:
- Toast the pecans first; raw pecans taste flat here.
- Use sweetened coconut for the chewier texture.
- Chop the pecans small enough that cutting the brownies stays easy.
- Let the brownies cool before decorating or the coconut will smear into the chocolate glue.
Variations on This Dish:
- German-Style Coconut Bats: Add a drizzle of caramel over the top after baking.
- Pecan Pie Bats: Stir in 2 tablespoons chopped pecans on top for extra crunch.
- Coconut-Milk Bats: Replace 2 tablespoons of butter with coconut oil for a softer coconut note.
Common Mistakes to Avoid with This Dish:
- Skipping the toast on the nuts: The flavor gets lost under the chocolate.
- Using giant pecan pieces: They make the cut edges messy.
- Adding wings to a warm pan: The coconut surface shifts and the decorations tilt.
14. Orange Zest Bat Brownies
Intro paragraph
Orange and chocolate have a sharp, clean edge that wakes the whole tray up. The zest perfumes the batter, the chocolate stays dark and fudgy, and the finished brownies taste like they belong next to a bowl of clementines and a stack of black napkins. It is one of those flavor combinations that sounds simple because it is.
Why It Works:
Orange zest carries the fragrance; orange juice alone usually gets lost in brownie batter. A little marmalade on top gives you both shine and a citrus note without making the brownies wet. The result tastes brighter than a standard chocolate square but still unmistakably brownie.
Key Ingredients:
- 1 cup unsalted butter, melted
- 1 3/4 cups granulated sugar
- 3 large eggs
- 2 teaspoons vanilla extract
- 2 teaspoons finely grated orange zest
- 3/4 cup unsweetened cocoa powder
- 1 cup all-purpose flour
- 1/2 teaspoon fine sea salt
- 1/2 cup dark chocolate chips
- 1/4 cup orange marmalade, warmed
- 12 chocolate wafer cookies, split for wings
- 24 candy eyes
Quick Steps:
- Preheat the oven to 350°F and line a 9×13-inch pan with parchment.
- Whisk butter, sugar, eggs, vanilla, and orange zest until fragrant and glossy.
- Fold in cocoa, flour, salt, and chocolate chips, then spread the batter in the pan.
- Drizzle warmed marmalade on top and swirl lightly with a knife.
- Bake for 24 to 28 minutes, cool fully, cut into squares, and decorate with wafer wings and eyes.
Equipment for This Recipe:
- 9×13-inch pan
- Microplane or fine grater for zest
- Mixing bowl
- Butter knife
- Cooling rack
How to Serve This Dish:
These look especially good on a tray with a few orange peels curled on the side. A little citrus garnish goes a long way here; the brownies already carry enough aroma on their own.
Pro Tips for This Recipe:
- Zest the orange before you cut and juice it, or you’ll make extra work.
- Warm the marmalade just enough to loosen it.
- Use a light hand with zest if your oranges are very strong.
- Wafer cookies keep the citrus flavor cleaner than a very sweet sandwich cookie.
Variations on This Dish:
- Orange-Pepper Bats: Add a tiny pinch of black pepper for a sharper finish.
- Blood Orange Bats: Use blood orange zest if you want a deeper citrus scent.
- Orange Ganache Bats: Top with a spoonful of orange-scented ganache instead of marmalade.
Common Mistakes to Avoid with This Dish:
- Using juice instead of zest: The citrus flavor gets watery and weak.
- Over-swirling the marmalade: It disappears into the batter.
- Cutting before cooling: The marmalade layer makes soft brownies tear.
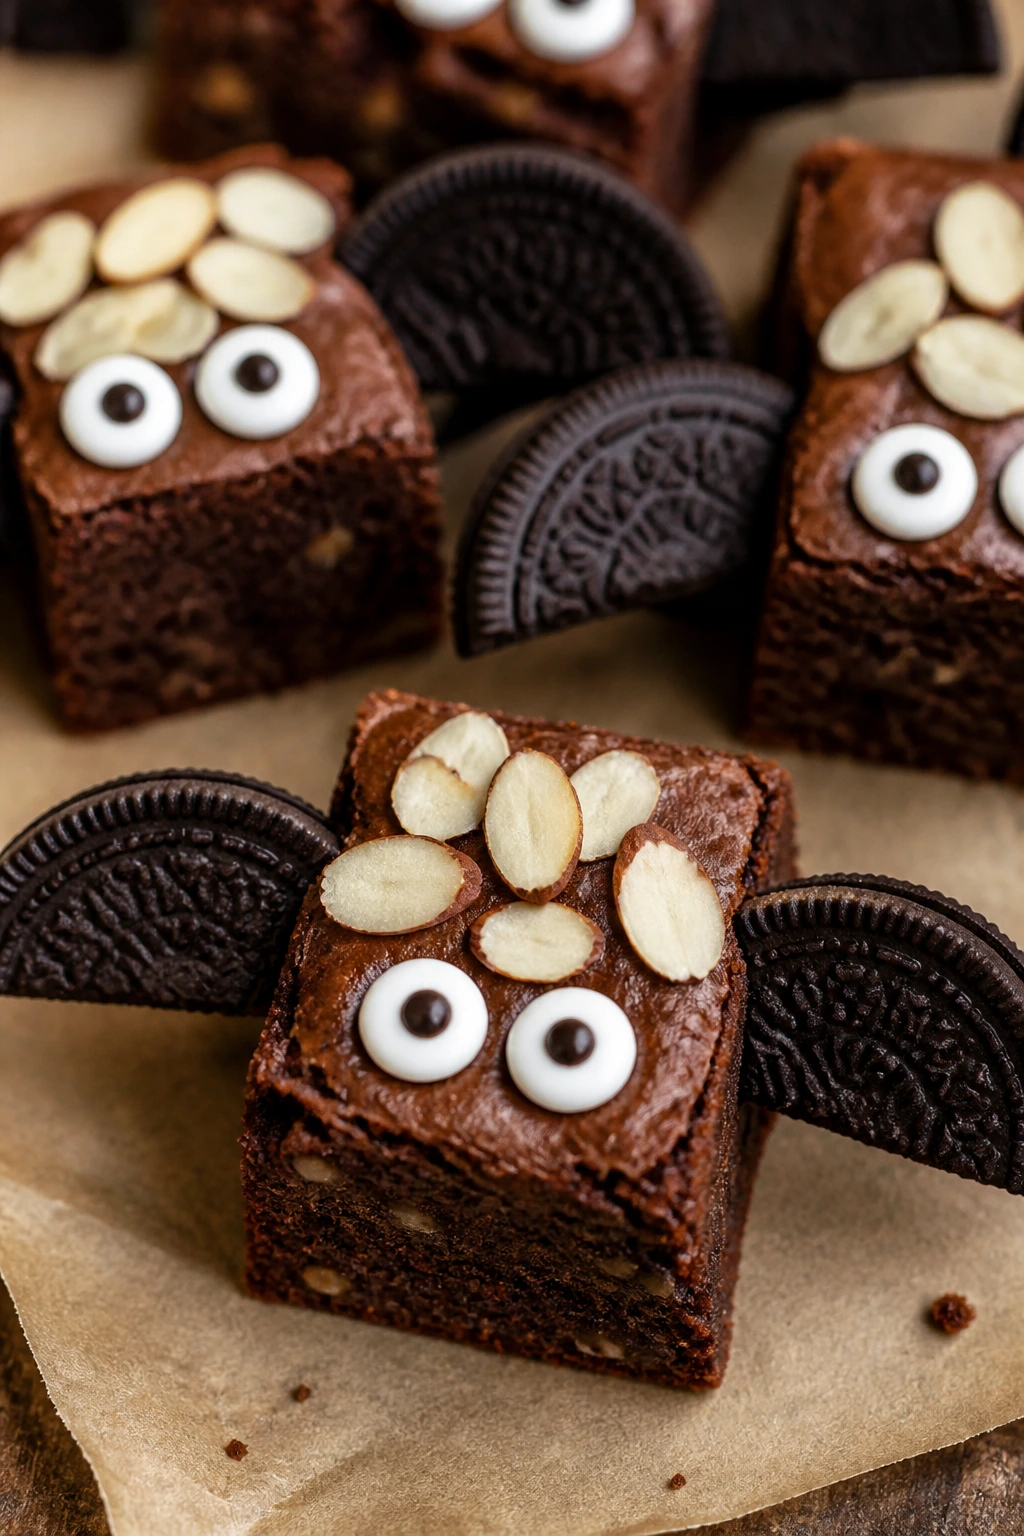
15. Cherry-Almond Bat Brownies
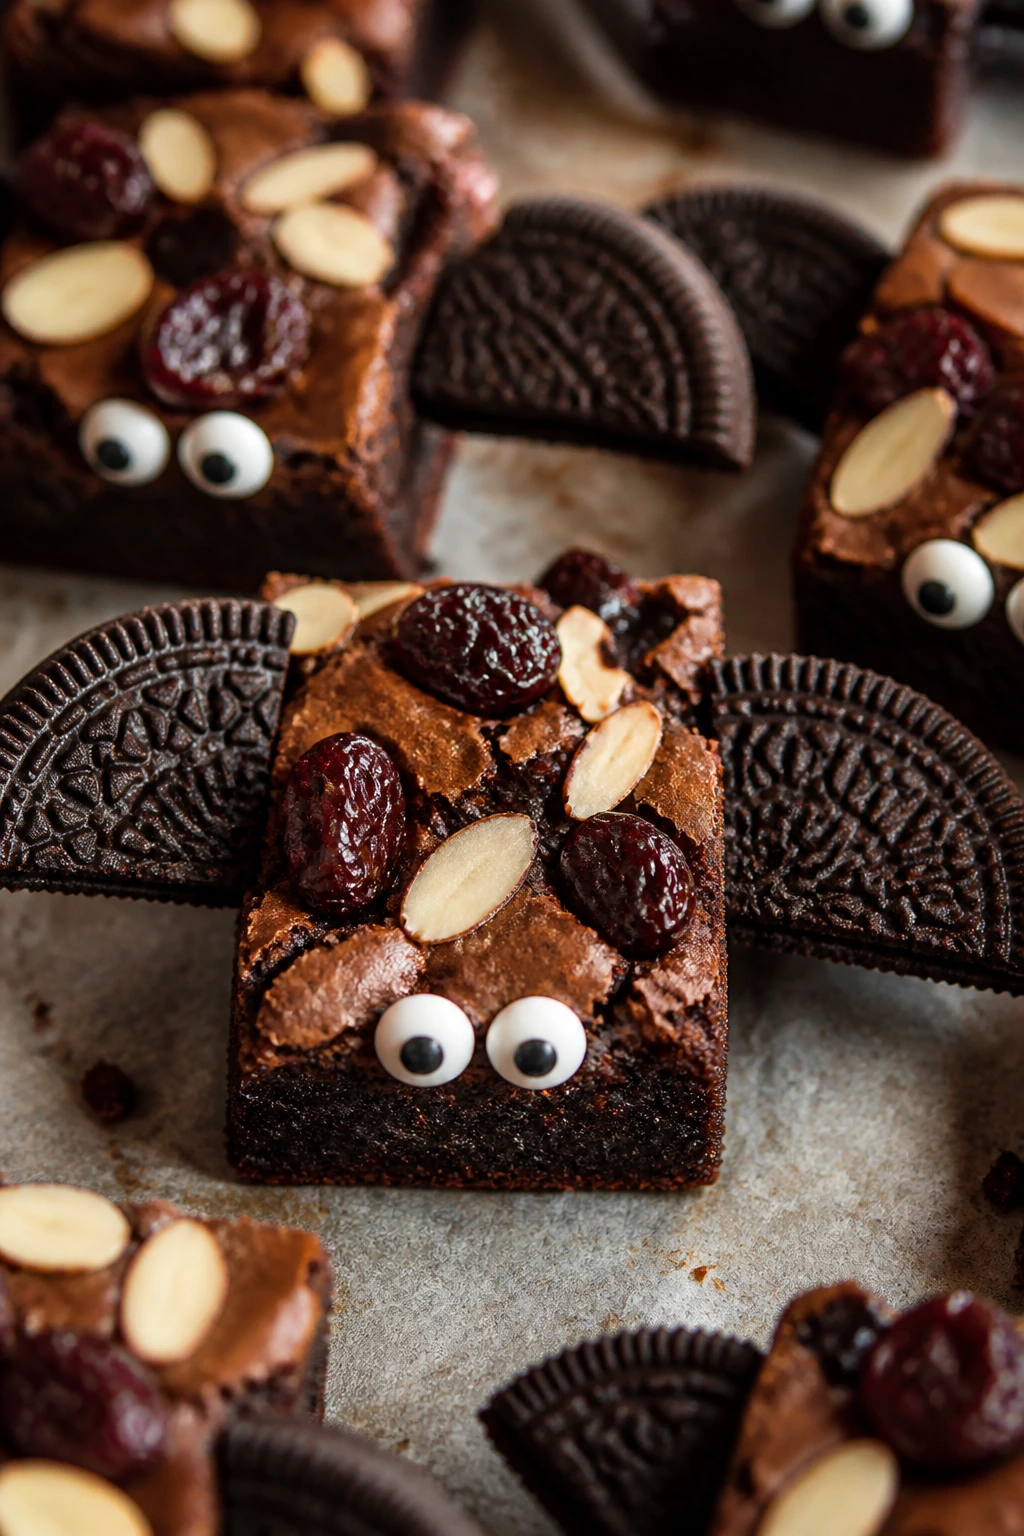
Intro paragraph
Cherry and almond brings a dessert-shop smell to the kitchen fast. The cherries give the brownie little tart bursts, the almond extract sharpens the flavor, and the sliced almonds add a pale crunch that makes the dark squares look more finished. It’s a good one when you want something a little more grown-up without making the recipe difficult.
Why It Works:
Dried tart cherries hold up better than fresh ones in brownie batter because they do not bleed juice all over the pan. Almond extract is strong, so a teaspoon is enough to make the cherry flavor read more clearly. Sliced almonds toast a bit in the oven and add enough texture that the cookie wings have something to sit against.
Key Ingredients:
- 1 cup unsalted butter, melted
- 1 3/4 cups granulated sugar
- 3 large eggs
- 1 teaspoon almond extract
- 2 teaspoons vanilla extract
- 3/4 cup unsweetened cocoa powder
- 1 cup all-purpose flour
- 1/2 teaspoon fine sea salt
- 3/4 cup dried tart cherries
- 1/2 cup sliced almonds
- 12 Oreo cookies, split for wings
- 24 candy eyes
Quick Steps:
- Preheat the oven to 350°F and line a 9×13-inch pan with parchment.
- Whisk butter, sugar, eggs, almond extract, and vanilla until smooth.
- Fold in cocoa, flour, salt, cherries, and sliced almonds.
- Bake for 24 to 27 minutes, until the top is set and the middle still looks soft in the center.
- Cool, cut, and decorate with cookie wings and eyes.
Equipment for This Recipe:
- 9×13-inch pan
- Mixing bowl
- Rubber spatula
- Knife for chopping cherries if needed
- Cooling rack
How to Serve This Dish:
These are tidy squares for a platter because the dried fruit keeps the crumb from getting too sticky. They work well next to coffee, tea, or a glass of milk if you want to keep the sweetness in check.
Pro Tips for This Recipe:
- If the cherries are very dry, chop them and toss them with a teaspoon of warm water first.
- Use a light hand with almond extract; too much tastes like soap.
- Toast the sliced almonds if you want a deeper flavor.
- Let the brownies cool all the way so the cherries do not pull at the knife.
Variations on This Dish:
- Cherry-Chocolate Chip Bats: Add 1/2 cup chocolate chips for extra melt pockets.
- Marzipan Bats: Add 2 tablespoons marzipan crumbs for a bakery-style almond note.
- Cherry Bite Bats: Bake in a mini muffin tin for small, neat servings.
Common Mistakes to Avoid with This Dish:
- Using fresh cherries: The extra moisture can wreck the crumb.
- Overusing almond extract: The flavor gets harsh fast.
- Decorating before full cooling: The fruit makes the center softer than it looks.
16. Gluten-Free Almond Bat Brownies
Intro paragraph
Gluten-free brownies can be a little dry if the flour blend is wrong, which is why almond flour earns its place here. It keeps the crumb tender, gives the brownies a faint nutty richness, and plays well with the chocolate instead of fighting it. You still get the same bat treatment on top. The texture underneath is simply softer and more lush.
Why It Works:
Almond flour adds fat and moisture, which helps replace the tenderness that regular flour usually provides. A small amount of gluten-free 1:1 flour keeps the batter stable enough to slice. The result is dense enough to hold the bat decorations without feeling heavy.
Key Ingredients:
- 1/2 cup unsalted butter, melted
- 1 cup granulated sugar
- 3 large eggs
- 1 teaspoon vanilla extract
- 1/2 cup unsweetened cocoa powder
- 1 1/2 cups almond flour
- 1/4 cup gluten-free 1:1 flour
- 1/2 teaspoon baking powder
- 1/2 teaspoon fine sea salt
- 12 gluten-free chocolate sandwich cookies, split for wings
- 24 candy eyes
Quick Steps:
- Preheat the oven to 350°F and line a 9×13-inch pan with parchment.
- Whisk butter, sugar, eggs, and vanilla until the mixture looks smooth and thick.
- Fold in cocoa, almond flour, gluten-free flour, baking powder, and salt, then spread it in the pan.
- Bake for 22 to 26 minutes, until the top is set and the center feels slightly springy.
- Cool completely, cut into squares, and attach the gluten-free cookie wings and eyes with melted chocolate.
Equipment for This Recipe:
- 9×13-inch pan
- Mixing bowl
- Rubber spatula
- Cooling rack
- Parchment paper
How to Serve This Dish:
These are best once they’ve had a full cool-down because almond flour brownies can seem fragile while warm. Keep the tray simple and let the darker brownies and pale cookie cream do the visual work.
Pro Tips for This Recipe:
- Use a certified gluten-free cookie for the wings if cross-contact matters.
- Do not overbake; almond flour brownies dry out faster than all-purpose versions.
- Let the pan cool in the tin before lifting it out.
- If the batter feels loose, give it 5 minutes to rest before baking.
Variations on This Dish:
- Almond-Orange Bats: Add 1 teaspoon orange zest for a brighter note.
- Hazelnut GF Bats: Swap half the almond flour for hazelnut flour.
- Mini GF Bats: Bake the batter in a mini muffin tin for single bites.
Common Mistakes to Avoid with This Dish:
- Using the wrong cookie wings: Not every sandwich cookie is gluten-free.
- Pulling them too soon: Almond flour brownies need full cooling to set.
- Overmixing the batter: It can turn dense and oily if you beat it too hard.
17. Dairy-Free Olive Oil Bat Brownies
Intro paragraph
Olive oil brownies sound unusual until you taste them. The crumb stays soft for days, the chocolate tastes clean and intense, and you do not miss the butter at all if you use a good cocoa powder. This version is especially handy for a weeknight because the batter comes together fast and the texture stays dependable after cooling.
Why It Works:
Oil keeps brownies tender because it stays liquid at room temperature, which means the squares remain soft even after a full cool-down. Olive oil adds a faint fruitiness that disappears under the cocoa in the good way. Dairy-free chocolate cookies and dairy-free chips keep the whole tray consistent.
Key Ingredients:
- 3/4 cup olive oil
- 1 3/4 cups granulated sugar
- 3 large eggs
- 2 teaspoons vanilla extract
- 3/4 cup unsweetened cocoa powder
- 1 cup all-purpose flour
- 1/2 teaspoon fine sea salt
- 3/4 cup dairy-free chocolate chips
- 12 dairy-free chocolate sandwich cookies, split for wings
- 24 candy eyes
Quick Steps:
- Preheat the oven to 350°F and line a 9×13-inch pan with parchment.
- Whisk olive oil, sugar, eggs, and vanilla until the mixture looks thick and smooth.
- Fold in cocoa, flour, salt, and dairy-free chocolate chips, then spread the batter in the pan.
- Bake for 24 to 27 minutes, until the center has a few moist crumbs.
- Cool, cut, and add cookie wings and eyes with melted dairy-free chocolate.
Equipment for This Recipe:
- 9×13-inch pan
- Mixing bowl
- Whisk
- Rubber spatula
- Cooling rack
How to Serve This Dish:
These work well at room temperature or slightly chilled. Since the brownies stay soft, a clean cut and a dry serving tray matter more here than on the butter-based versions.
Pro Tips for This Recipe:
- Use a mild olive oil, not a very peppery one.
- Stick with a cocoa powder you already like because the chocolate flavor does most of the talking.
- Let the brownies cool fully so the oil-based crumb firms up enough to cut.
- Dairy-free melted chocolate can seize fast, so melt it slowly.
Variations on This Dish:
- Coconut-Oil Bats: Swap half the olive oil for melted coconut oil for a softer fragrance.
- Orange-Olive Bats: Add orange zest for a bright finish.
- Sugar-Reduced Bats: Reduce the sugar by 1/4 cup if you want the brownie less sweet.
Common Mistakes to Avoid with This Dish:
- Using a harsh olive oil: The flavor can dominate the brownie.
- Overbaking oil brownies: They go from soft to dry quickly.
- Adding wings before the surface cools: The cookie bases soften and slip.
18. Brownie Bite Bat Pops
Intro paragraph
These are the most playful option in the whole spread, and they’re also the messiest if you rush them. Brownie pops use crumbled brownie, cream cheese, and melted chocolate to make a bite-size treat that can stand on a stick, which makes the bat wings feel almost obvious once you see them. They’re a smart choice when you want something that looks like a project but isn’t one.
Why It Works:
The brownie crumbs and cream cheese make a moldable mixture that chills firmly, so the pops hold their shape in chocolate. A little cocoa powder in the mix boosts the chocolate flavor that can get muted once you add the binder. Because they’re small, they chill fast and decorate quickly.
Key Ingredients:
- 1 pan cooled brownies, crumbled into fine pieces
- 4 ounces cream cheese, softened
- 1/4 cup unsweetened cocoa powder
- 2 tablespoons powdered sugar
- 8 ounces dark chocolate, melted
- 25 lollipop sticks
- 25 Oreo cookies, split for wings
- 50 candy eyes
Quick Steps:
- Mix the brownie crumbs, cream cheese, cocoa powder, and powdered sugar in a bowl until the mixture holds together when pressed.
- Roll into 25 balls and chill on a parchment-lined tray for 20 minutes.
- Dip the tip of each lollipop stick into melted chocolate, insert it into a brownie ball, and chill for 10 minutes.
- Coat each pop in melted chocolate, tap off the excess, then press on Oreo wings and candy eyes before the shell sets.
- Chill another 10 minutes until firm.
Equipment for This Recipe:
- Mixing bowl
- Sheet pan lined with parchment
- Lollipop sticks
- Tall cup for dipping chocolate
- Spoon or fork for tapping off excess coating
How to Serve This Dish:
Stand the pops in a glass or foam block so the wings do not flatten on a tray. They are the easiest thing to serve if the room is crowded and people are moving around with drinks in hand.
Pro Tips for This Recipe:
- Start with crumbs that are fine, not chunky, or the balls crack.
- Chill between every stage; warm pops are a headache.
- Use a deep cup for the chocolate so dipping is easier.
- Attach the wings while the coating is still tacky, not after it sets.
Variations on This Dish:
- White-Coat Bat Pops: Dip the finished pops in white chocolate for a moonlit look.
- Peanut Butter Bat Pops: Add 2 tablespoons peanut butter to the crumb mixture.
- Sprinkle-Edge Bats: Roll the wet coating edge in black or orange sprinkles before it sets.
Common Mistakes to Avoid with This Dish:
- Skipping the chill time: The sticks twist out.
- Making the mixture too wet: The balls slouch off the stick.
- Waiting too long to add wings: The chocolate shell hardens and the cookies will not stick.
19. Mini Brownie Cup Bat Treats
Intro paragraph
Brownie cups are the neat little cousins in this lineup. You bake them in a mini muffin tin, and they rise into tidy bite-size rounds that can hold a little ganache or frosting in the center before you add the bat wings. They’re a good answer when you want portion control without turning dessert into a lecture.
Why It Works:
The mini muffin tin gives each brownie a crisp edge and a soft center, which makes the tops naturally domed and easy to decorate. A small ganache or frosting cap helps the wings stay in place and gives each bite a richer finish. Because the pieces are small, they bake fast and cool quickly.
Key Ingredients:
- 1/2 cup unsalted butter, melted
- 1 cup granulated sugar
- 2 large eggs
- 1 teaspoon vanilla extract
- 1/2 cup unsweetened cocoa powder
- 3/4 cup all-purpose flour
- 1/2 teaspoon fine sea salt
- 1/2 cup mini chocolate chips
- 1/2 cup chocolate ganache or thick frosting
- 12 chocolate wafer cookies, split for wings
- 24 candy eyes
Quick Steps:
- Preheat the oven to 350°F and grease a 24-cup mini muffin tin.
- Whisk butter, sugar, eggs, and vanilla until smooth, then fold in cocoa, flour, salt, and mini chips.
- Spoon the batter into the muffin cups, filling each about two-thirds full.
- Bake for 11 to 14 minutes, until the tops are set and a toothpick comes out with a few moist crumbs.
- Cool, add a dab of ganache or frosting on each cup, then press on wings and eyes.
Equipment for This Recipe:
- Mini muffin tin
- Mixing bowl
- Small spoon or cookie scoop
- Cooling rack
- Piping bag for frosting
How to Serve This Dish:
Pile these in a shallow bowl or on a tray with cupcake liners underneath so they do not roll around. They’re easy to hand out one at a time, which is useful when you don’t want people crowding the counter.
Pro Tips for This Recipe:
- A small cookie scoop keeps the cups the same size.
- Do not overfill the tin or the tops will mushroom too much.
- Let the cups cool in the pan for 5 minutes before lifting them out.
- Thick frosting or ganache makes a better glue than thin glaze.
Variations on This Dish:
- Filled Cup Bats: Press a mini peanut butter cup into the center before baking.
- Blackout Cups: Use black cocoa in half the batter for a darker shell.
- Frosted Cup Bats: Pipe a tiny swirl of chocolate frosting on top before adding the wings.
Common Mistakes to Avoid with This Dish:
- Overbaking the cups: Tiny brownies dry out fast.
- Forcing them out too soon: They tear if you lift while hot.
- Using runny topping: Wings slide off a glaze that has not thickened.
20. Brownie Bark Bat Clusters
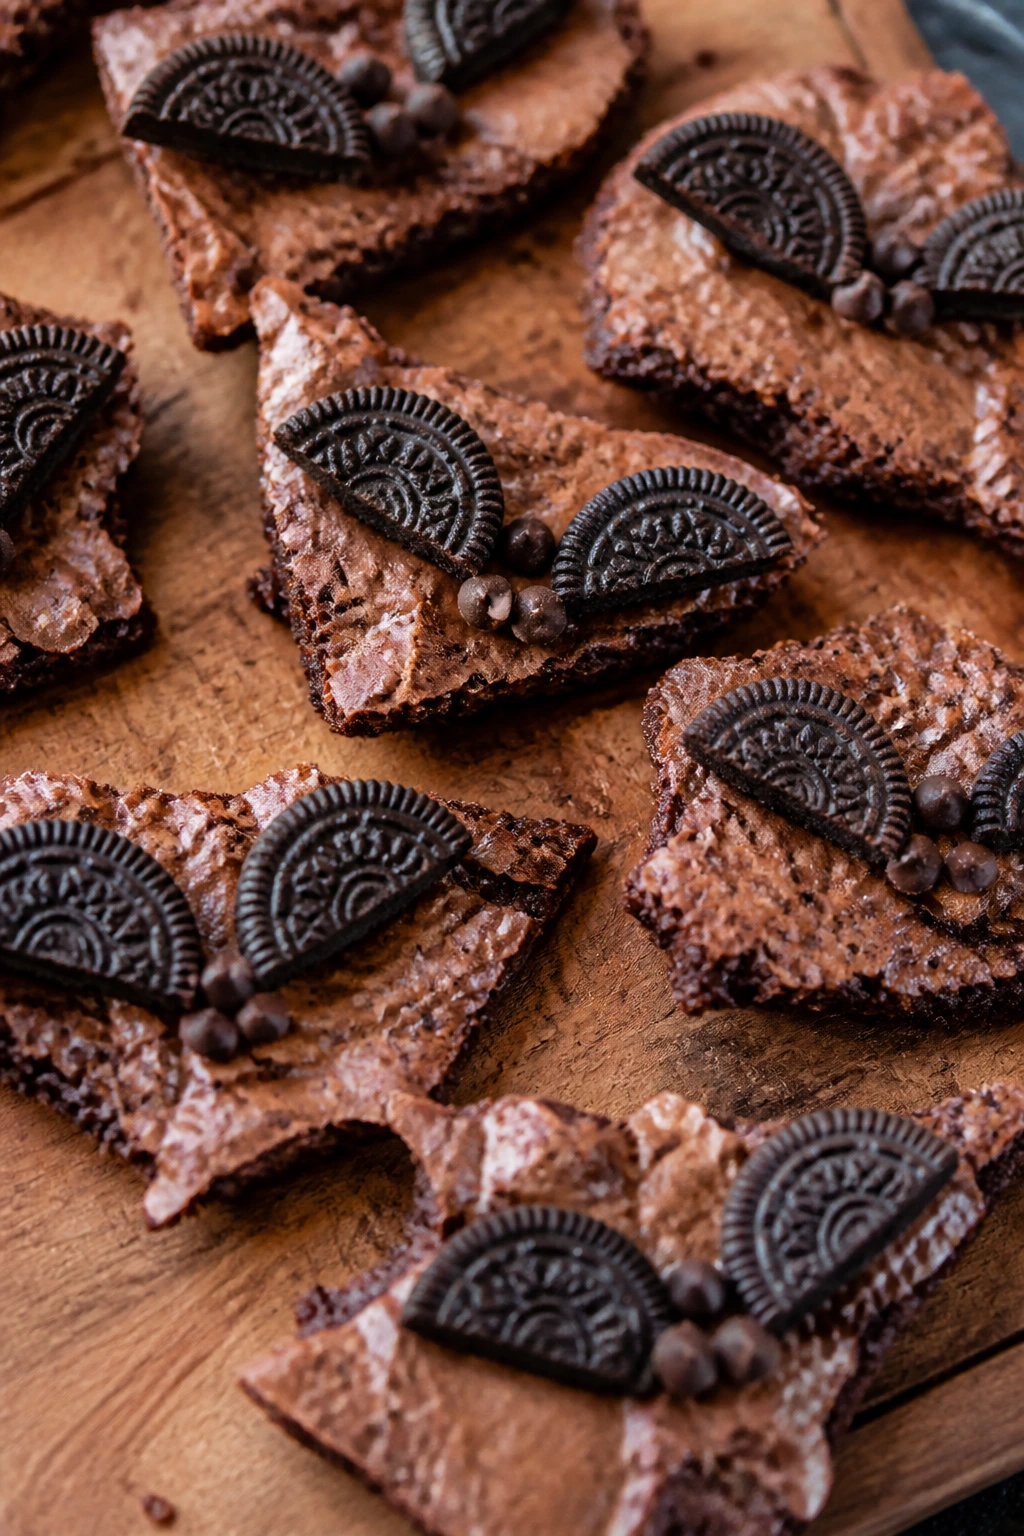
Intro paragraph
Brownie bark is what you make when you want brownie flavor with less precision. Spread it thin, bake it, break it, and decorate the pieces after the fact. It gives you irregular chunks that look a little wild in a very Halloween way, and the bat wings make each shard feel like a finished candy instead of a crumbly leftover.
Why It Works:
A thinner brownie bakes faster and dries out just enough to break into sharp-edged pieces. That shape is ideal for bark because the pieces don’t need to be perfect to look intentional. Melting chocolate on top helps the bats read clearly even when the base is broken into uneven clusters.
Key Ingredients:
- 1 cup unsalted butter, melted
- 1 3/4 cups granulated sugar
- 3 large eggs
- 2 teaspoons vanilla extract
- 3/4 cup unsweetened cocoa powder
- 1 cup all-purpose flour
- 1/2 teaspoon fine sea salt
- 1 cup chopped pretzels or toffee bits
- 1 cup melted dark chocolate, for drizzling
- 12 Oreo cookies, split for wings
- 24 candy eyes
Quick Steps:
- Preheat the oven to 325°F and line a 10×15-inch rimmed sheet pan with parchment.
- Whisk butter, sugar, eggs, and vanilla until smooth, then fold in cocoa, flour, salt, and pretzel bits.
- Spread the batter in a thin even layer and bake for 18 to 22 minutes, until set.
- Cool, drizzle with melted chocolate, then break into large shards.
- Attach wing halves and eyes to the biggest pieces using extra melted chocolate.
Equipment for This Recipe:
- 10×15-inch rimmed sheet pan
- Parchment paper
- Mixing bowl
- Offset spatula
- Small spoon for chocolate glue
How to Serve This Dish:
Scatter the bark pieces on a tray instead of stacking them. The jagged edges look best when they’re not crushed together, and the broken pieces are easy to grab without needing a knife.
Pro Tips for This Recipe:
- Keep the batter thin and even or the bark bakes unevenly.
- Cool completely before breaking so the pieces crack cleanly.
- Save the largest shards for the bat decorations.
- Use thicker chocolate dots under the eyes; bark has a rougher surface.
Variations on This Dish:
- Toffee Bark Bats: Use toffee bits instead of pretzels for a sweeter crunch.
- Peppered Bark Bats: Add a pinch of black pepper to the batter for a sharper finish.
- Cookie-Streak Bats: Press crushed cookie crumbs into the top before baking.
Common Mistakes to Avoid with This Dish:
- Baking too thick a layer: The bark won’t break cleanly.
- Decorating the small scraps: Save yourself the frustration and use the biggest pieces.
- Skipping parchment: The thin brownie layer sticks hard to a bare pan.
21. Brownie Sandwich Bat Treats
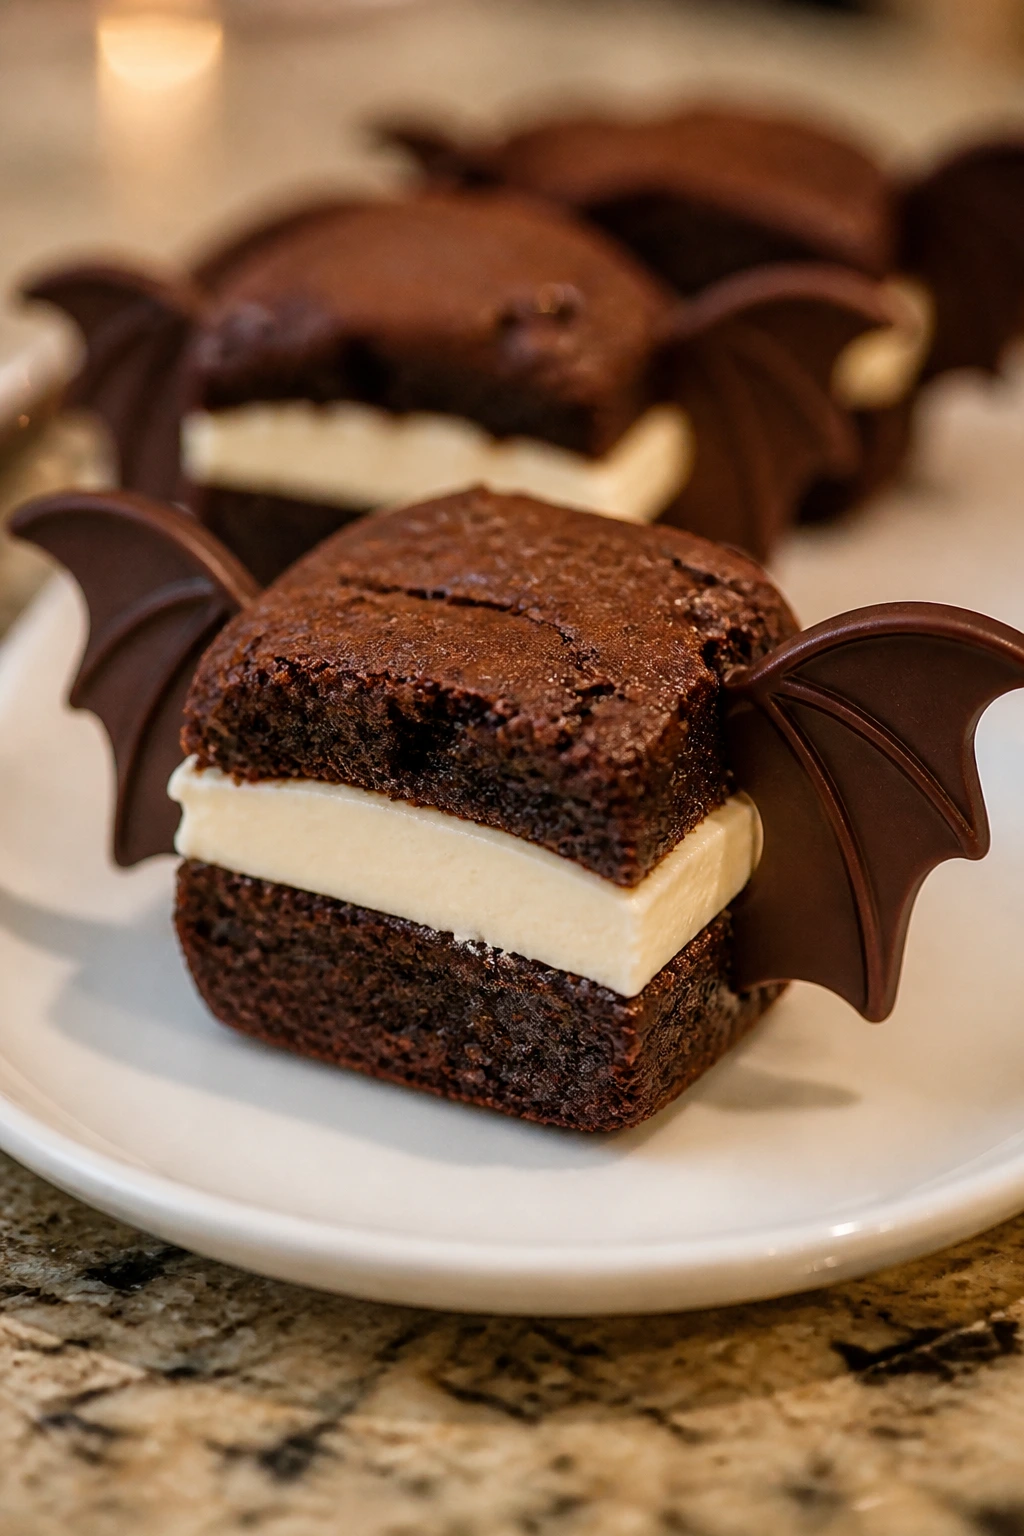
Intro paragraph
These are for the people who want something handheld and a little more substantial than a square. Think brownie-cookie sandwich with a soft filling in the middle and bat wings on the outside, so the whole thing eats like a tiny dessert sandwich with a costume on. They’re cute, yes, but more than that, they’re tidy.
Why It Works:
A thicker brownie cookie format gives you a surface that can handle filling without collapsing. The filling acts like a cushion and makes the texture less dense than a plain brownie square. Because the pieces are smaller and individually assembled, they’re easy to serve in a line or pack into a box.
Key Ingredients:
- 1 cup unsalted butter, melted
- 2 cups granulated sugar
- 4 large eggs
- 2 teaspoons vanilla extract
- 1 cup unsweetened cocoa powder
- 2 cups all-purpose flour
- 1 teaspoon fine sea salt
- 1 cup chocolate frosting or vanilla buttercream
- 12 chocolate sandwich cookies or wafer cookies, split for wings
- 24 candy eyes
Quick Steps:
- Preheat the oven to 350°F and line two baking sheets with parchment.
- Whisk butter, sugar, eggs, and vanilla until smooth, then fold in cocoa, flour, and salt.
- Drop tablespoon-sized rounds onto the baking sheets and bake for 9 to 11 minutes, until set at the edges.
- Cool completely, then spread a little frosting on the flat side of one cookie and sandwich with another.
- Attach wing halves and candy eyes to the top cookie with a small dab of melted chocolate.
Equipment for This Recipe:
- Two baking sheets
- Parchment paper
- Mixing bowl
- Small offset spatula
- Cooling rack
How to Serve This Dish:
These are the best choice when you need something that can be picked up and eaten without a plate. Arrange them in a single layer, since the frosting middle makes stacking a bad idea.
Pro Tips for This Recipe:
- Keep the cookies on the slightly soft side so they bend without breaking.
- Let them cool fully before sandwiching, or the filling melts out.
- A thin filling layer is enough; too much makes the top cookie slip.
- If the wings feel heavy, trim them smaller with kitchen scissors.
Variations on This Dish:
- Chocolate-Fudge Sandwich Bats: Use chocolate frosting in the middle for a richer bite.
- Peanut Butter Sandwich Bats: Spread peanut butter cream between the cookies.
- Mini Sandwich Bats: Make teaspoon-sized rounds for party trays.
Common Mistakes to Avoid with This Dish:
- Baking the cookies too long: Dry brownie cookies crack when you sandwich them.
- Using too much filling: The sandwich slides apart in your hand.
- Decorating before the filling firms: The wings rotate around on the top cookie.
22. Double Chocolate Ganache Bat Brownies
Intro paragraph
This is the richest pan in the whole spread, and it does not apologize. There’s chocolate in the batter, chocolate in the ganache, and then the bat wings and eyes sitting on top of all that gloss. If you want the brownies to look like they came from a bakery case, this is the one to make.
Why It Works:
Semisweet chips in the batter give you little melt pockets, while the ganache on top seals in moisture and creates a smooth surface for the decorations. The brownies slice especially neatly once the ganache sets, which makes the bat shapes look more precise. It’s indulgent, but not fussy.
Key Ingredients:
- 1 cup unsalted butter, melted
- 1 3/4 cups granulated sugar
- 3 large eggs
- 2 teaspoons vanilla extract
- 3/4 cup unsweetened cocoa powder
- 1 cup all-purpose flour
- 1/2 teaspoon fine sea salt
- 1 cup semisweet chocolate chips
- 1/2 cup heavy cream
- 6 ounces bittersweet chocolate, chopped
- 12 Oreo cookies, split for wings
- 24 candy eyes
Quick Steps:
- Preheat the oven to 350°F and line a 9×13-inch pan with parchment.
- Whisk butter, sugar, eggs, and vanilla until thick, then fold in cocoa, flour, salt, and chocolate chips.
- Bake for 24 to 28 minutes, then cool completely.
- Heat the cream until steaming, pour it over the chopped chocolate, and stir until glossy ganache forms.
- Spread the ganache over the cooled brownies, let it set for 15 to 20 minutes, then decorate with wings and eyes.
Equipment for This Recipe:
- 9×13-inch pan
- Heatproof bowl for ganache
- Small saucepan
- Offset spatula
- Cooling rack
How to Serve This Dish:
These should be served in smaller squares because the ganache makes them rich. A cold glass of milk or plain coffee is enough to balance the sweetness.
Pro Tips for This Recipe:
- Chop the chocolate finely so the cream melts it evenly.
- Let the ganache thicken a little before spreading if you want a cleaner top.
- Use a hot knife to slice through the set topping.
- Chill 10 minutes before adding the wings if the ganache feels loose.
Variations on This Dish:
- Sea-Salt Ganache Bats: Finish with a few flakes of salt on top.
- Orange Ganache Bats: Stir a little orange zest into the warm cream.
- Triple-Chocolate Bats: Add white chocolate chips to the batter for extra contrast.
Common Mistakes to Avoid with This Dish:
- Pouring hot ganache on hot brownies: The top layer never sets cleanly.
- Using too much cream: The ganache stays soft and messy.
- Cutting before the ganache firms: The squares smear and lose their edges.
23. Hazelnut Crunch Bat Brownies
Intro paragraph
Hazelnut and chocolate feels a little like a candy bar in brownie form, which is not a complaint. The nuttiness sits under the cocoa, the crunch keeps the squares from feeling heavy, and the bat decorations ride on top of a flavor that already tastes finished. This one has a toasty, almost café-style edge.
Why It Works:
Hazelnut spread melts into little pockets that stay soft after baking, while chopped toasted hazelnuts give the brownie structure. The combination tastes deeper than plain chocolate and gives you a slightly glossy surface for the wings. It’s the kind of brownie that seems more complicated than it really is.
Key Ingredients:
- 1 cup unsalted butter, melted
- 1 3/4 cups granulated sugar
- 3 large eggs
- 1 teaspoon vanilla extract
- 3/4 cup unsweetened cocoa powder
- 1 cup all-purpose flour
- 1/2 teaspoon fine sea salt
- 1/2 cup hazelnut spread
- 3/4 cup toasted hazelnuts, chopped
- 12 Oreo cookies, split for wings
- 24 candy eyes
Quick Steps:
- Preheat the oven to 350°F and line a 9×13-inch pan with parchment.
- Whisk butter, sugar, eggs, and vanilla until thick and glossy.
- Fold in cocoa, flour, salt, and hazelnuts, then dollop the hazelnut spread over the batter and swirl lightly.
- Bake for 24 to 28 minutes, until the edges are set and the center still looks soft.
- Cool, cut, and finish with cookie wings and eyes.
Equipment for This Recipe:
- 9×13-inch pan
- Mixing bowl
- Knife for swirling the spread
- Cooling rack
- Small spoon for the decorations
How to Serve This Dish:
These look good on a dark tray with a few extra toasted hazelnuts scattered nearby. They taste best after a full cool-down, when the nutty swirl has settled into the brownie rather than still looking wet.
Pro Tips for This Recipe:
- Toast the hazelnuts before chopping for deeper flavor.
- Warm the hazelnut spread slightly if it’s too thick to swirl.
- Keep the swirl light so the brownie still bakes evenly.
- Use a sharp knife wiped clean between cuts for tidy squares.
Variations on This Dish:
- Chocolate-Hazelnut Bats: Add more spread in smaller dollops for a sweeter version.
- Espresso Hazelnut Bats: Add 1 teaspoon espresso powder to the batter.
- Mini Nut Bats: Bake in a mini muffin pan for bite-size pieces.
Common Mistakes to Avoid with This Dish:
- Using raw hazelnuts: The flavor stays flat.
- Over-swirling the spread: The brownie top turns muddy.
- Cutting while warm: The nut pieces tear the crumb.
24. Tahini Swirl Bat Brownies
Intro paragraph
Tahini in brownies sounds unusual until you taste the result: nutty, a little earthy, and very good against dark chocolate. The sesame flavor keeps the pan from feeling sugary, and the pale swirl gives the brownies a marbled top that works beautifully with the bat decorations. This one is for people who like their sweets with a little edge.
Why It Works:
Tahini brings a savory note and a creamy texture that cuts through the chocolate. A touch of honey or maple in the swirl softens the bitterness without turning the brownie into dessert candy. Sesame seeds on top add a little crunch and make the surface look finished even before the wings go on.
Key Ingredients:
- 1 cup unsalted butter, melted
- 1 3/4 cups granulated sugar
- 3 large eggs
- 2 teaspoons vanilla extract
- 3/4 cup unsweetened cocoa powder
- 1 cup all-purpose flour
- 1/2 teaspoon fine sea salt
- 1/3 cup tahini
- 2 tablespoons honey or maple syrup
- 1 tablespoon sesame seeds
- 12 Oreo cookies, split for wings
- 24 candy eyes
Quick Steps:
- Preheat the oven to 350°F and line a 9×13-inch pan with parchment.
- Whisk butter, sugar, eggs, and vanilla until smooth, then fold in cocoa, flour, and salt.
- Stir tahini and honey together in a small bowl, then dollop it over the brownie batter and swirl lightly.
- Sprinkle sesame seeds over the top and bake for 24 to 28 minutes.
- Cool, cut, and add the wing halves and eyes with melted chocolate.
Equipment for This Recipe:
- 9×13-inch pan
- Mixing bowl
- Small bowl for the tahini swirl
- Knife
- Cooling rack
How to Serve This Dish:
Serve these with coffee or tea rather than milk if you want the sesame note to stay front and center. They make a smart contrast piece on a tray full of sweeter brownies.
Pro Tips for This Recipe:
- Stir the tahini well before measuring so the oil is evenly mixed in.
- Keep the honey or maple syrup low; too much makes the swirl runny.
- Sesame seeds should be lightly scattered, not buried.
- Let the brownies cool fully before cutting because the swirl stays tender.
Variations on This Dish:
- Black Sesame Bats: Swap part of the tahini for black sesame paste if you like a deeper nutty flavor.
- Halva Bats: Crumble a little halva over the top before baking.
- Chocolate-Tahini Bites: Bake the batter in a mini muffin tin for small bites.
Common Mistakes to Avoid with This Dish:
- Using dry tahini: It won’t swirl smoothly.
- Adding too much sweetener: The sesame flavor gets buried.
- Decorating too soon: The soft swirl needs to set before the wings go on.
25. Flourless Fudge Bat Brownies
Intro paragraph
Flourless brownies can taste almost truffle-like when they’re done right, and that texture suits a Halloween tray better than a cake-like version ever could. They’re dense, dark, and deeply chocolatey, with a crackly top that takes cookie wings nicely. If you need something naturally gluten-free and aggressively fudgy, this is the pan to end on.
Why It Works:
Without flour, the brownies rely on eggs for structure and melted chocolate for body, which creates a dense, silky center. Cocoa powder reinforces the chocolate flavor and helps the batter set without turning cakey. The result is sturdy enough to cut and decorate, but soft enough to feel luxurious.
Key Ingredients:
- 8 ounces bittersweet chocolate, chopped
- 1/2 cup unsalted butter
- 3/4 cup granulated sugar
- 4 large eggs
- 1/4 cup unsweetened cocoa powder
- 1 teaspoon vanilla extract
- 1/2 teaspoon fine sea salt
- 12 chocolate sandwich cookies, split for wings
- 24 candy eyes
Quick Steps:
- Preheat the oven to 350°F and line an 8×8-inch pan with parchment.
- Melt the chocolate and butter together until smooth, then whisk in sugar, eggs, vanilla, cocoa, and salt.
- Pour the batter into the prepared pan and smooth the top.
- Bake for 25 to 29 minutes, until the top is set and the center still has a little wobble.
- Cool completely, cut into smaller squares, and decorate with wing halves and eyes.
Equipment for This Recipe:
- 8×8-inch pan
- Heatproof bowl
- Whisk
- Spatula
- Cooling rack
How to Serve This Dish:
Cut these smaller than the other versions because they’re richer. A few squares on a dark tray look elegant enough for a party and easy enough for a random Tuesday, which is part of the appeal.
Pro Tips for This Recipe:
- Use good chocolate here; there is nowhere for a weak flavor to hide.
- Let the brownies cool all the way, or the center will seem underdone.
- Keep the squares on the small side because flourless brownies are dense.
- A light dusting of cocoa on the plate makes the dark color look even deeper.
Variations on This Dish:
- Espresso Flourless Bats: Add 1 teaspoon espresso powder to the melted chocolate.
- Orange Flourless Bats: Stir in 1 teaspoon orange zest for brightness.
- Walnut Flourless Bats: Add 1/2 cup chopped walnuts for crunch.
Common Mistakes to Avoid with This Dish:
- Adding flour by accident: It changes the texture more than people expect.
- Overbaking: Flourless brownies dry out fast once the center loses its wobble.
- Cutting warm: The crumb needs time to settle or it smears.
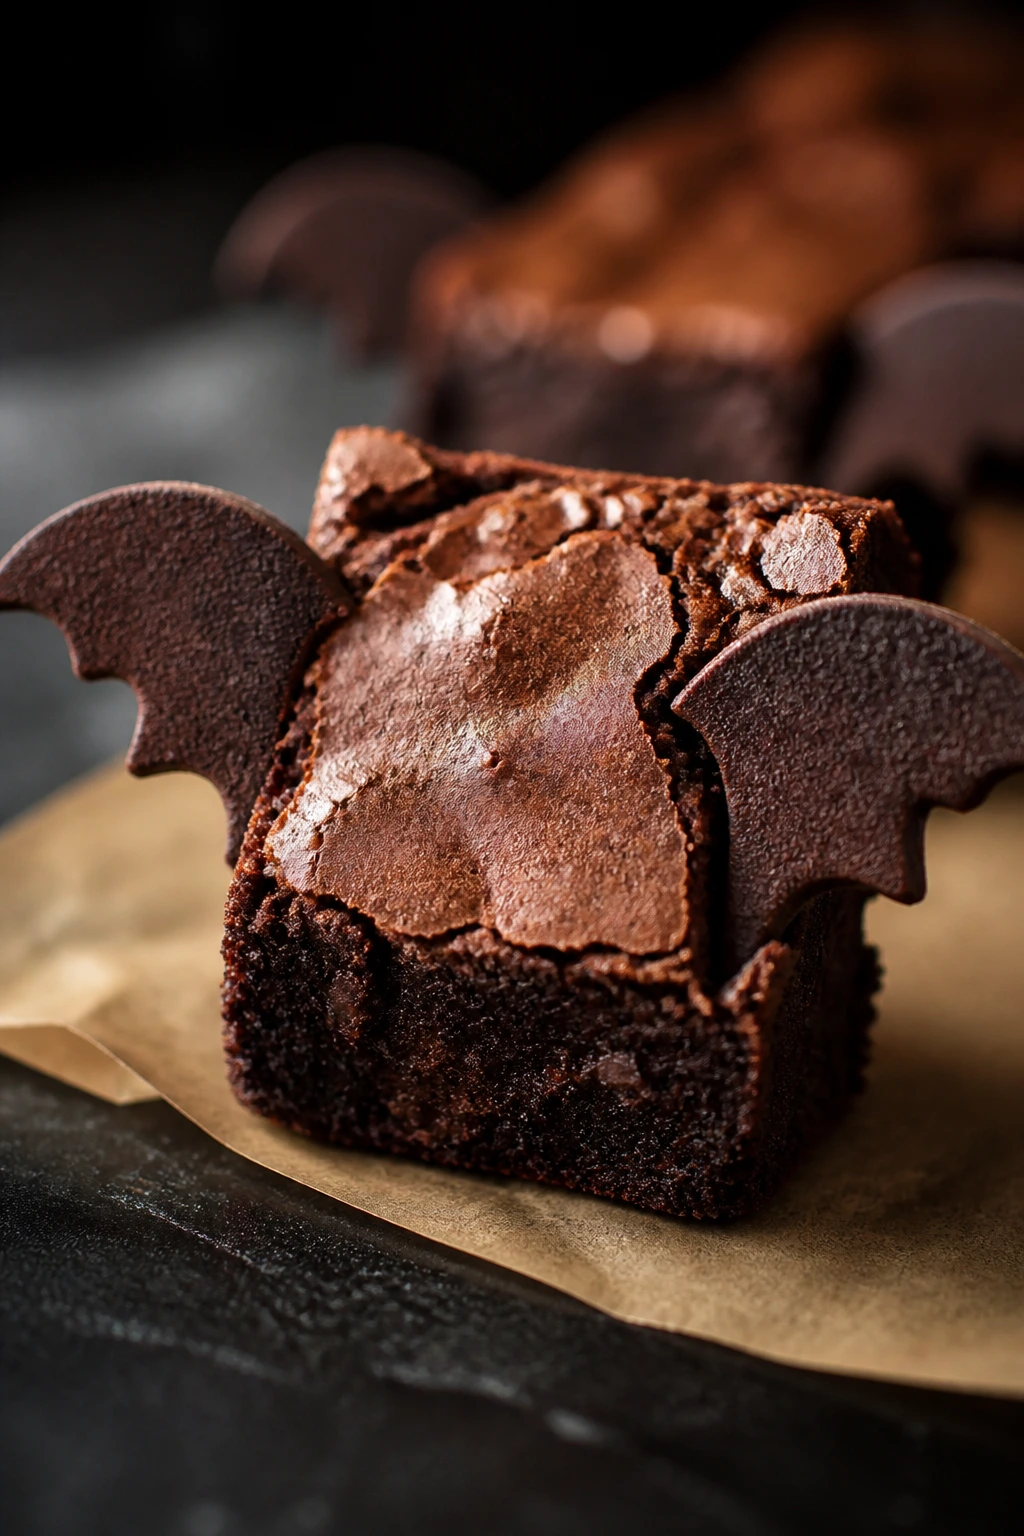
Why Brownie Batter Makes Bat Shapes So Easy to Pull Off
Brownies are one of those rare desserts that reward being a little rough around the edges. The batter is thick enough to hold swirls, chips, nuts, marshmallows, or jam without sinking into a mess, and the finished squares are sturdy enough to carry cookie wings and candy eyes without collapsing. That makes them perfect for bat brownie Halloween treats, especially when the evening is already busy and nobody has the patience for a full layer cake.
The other thing brownies do well is cool into a clean, sliceable slab. A cookie wing needs a surface that isn’t too soft, and a brownie gives you that if you let it set properly. Metal pans help with sharper edges than glass, parchment gives you a clean lift, and a chilled pan cuts much neater than a warm one. Those small details matter more here than people think.
There’s also a practical reason to favor brownies over other Halloween desserts: they travel. A brownie square can go in a lunch container, a cookie box, or a paper tray without losing its shape. A cupcake with tall frosting and candy pieces? That’s asking for trouble in the back seat.
The Shared Toolkit for Every Tray of Bat Brownie Treats
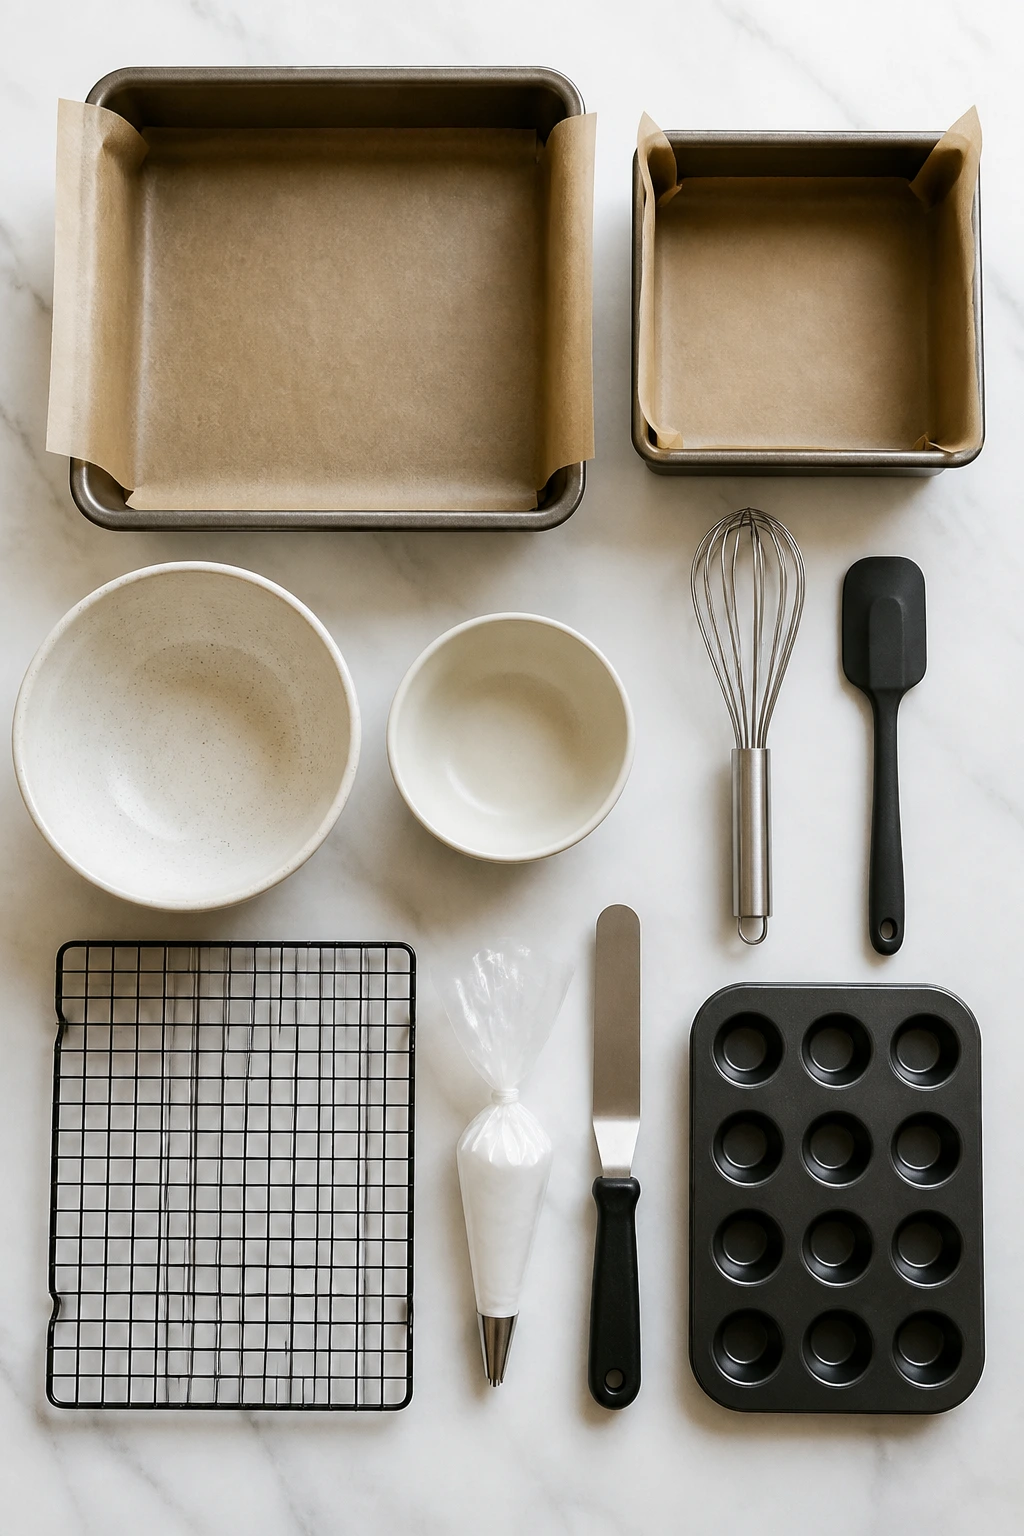
- 9×13-inch metal baking pan: The standard size for most bar-style versions; it gives you even baking and cleaner edges than glass.
- 8×8-inch square pan: Best for flourless or richer brownies that need a thicker cut.
- 10×15-inch rimmed sheet pan: Useful for brownie bark or thin slab-style batches.
- Parchment paper with overhang: Makes it easy to lift the brownies out without scraping the bottom.
- Mixing bowls, at least two: One for the brownie batter and one for swirls, ganache, or fillings.
- Whisk and rubber spatula: A whisk for the batter base, a spatula for folding in chips, nuts, or cookies.
- Cooling rack: Keeps the bottom from steaming soggy while the pan cools.
- Small spoon or piping bag: Handy for melted chocolate “glue” and tidy decoration.
- Offset spatula or butter knife: Better than a regular spoon for spreading batter and swirls evenly.
- Mini muffin tin or lollipop sticks: Only needed for cup or pop versions, but worth having if you like variety.
Smart Shopping and Ingredient Tips
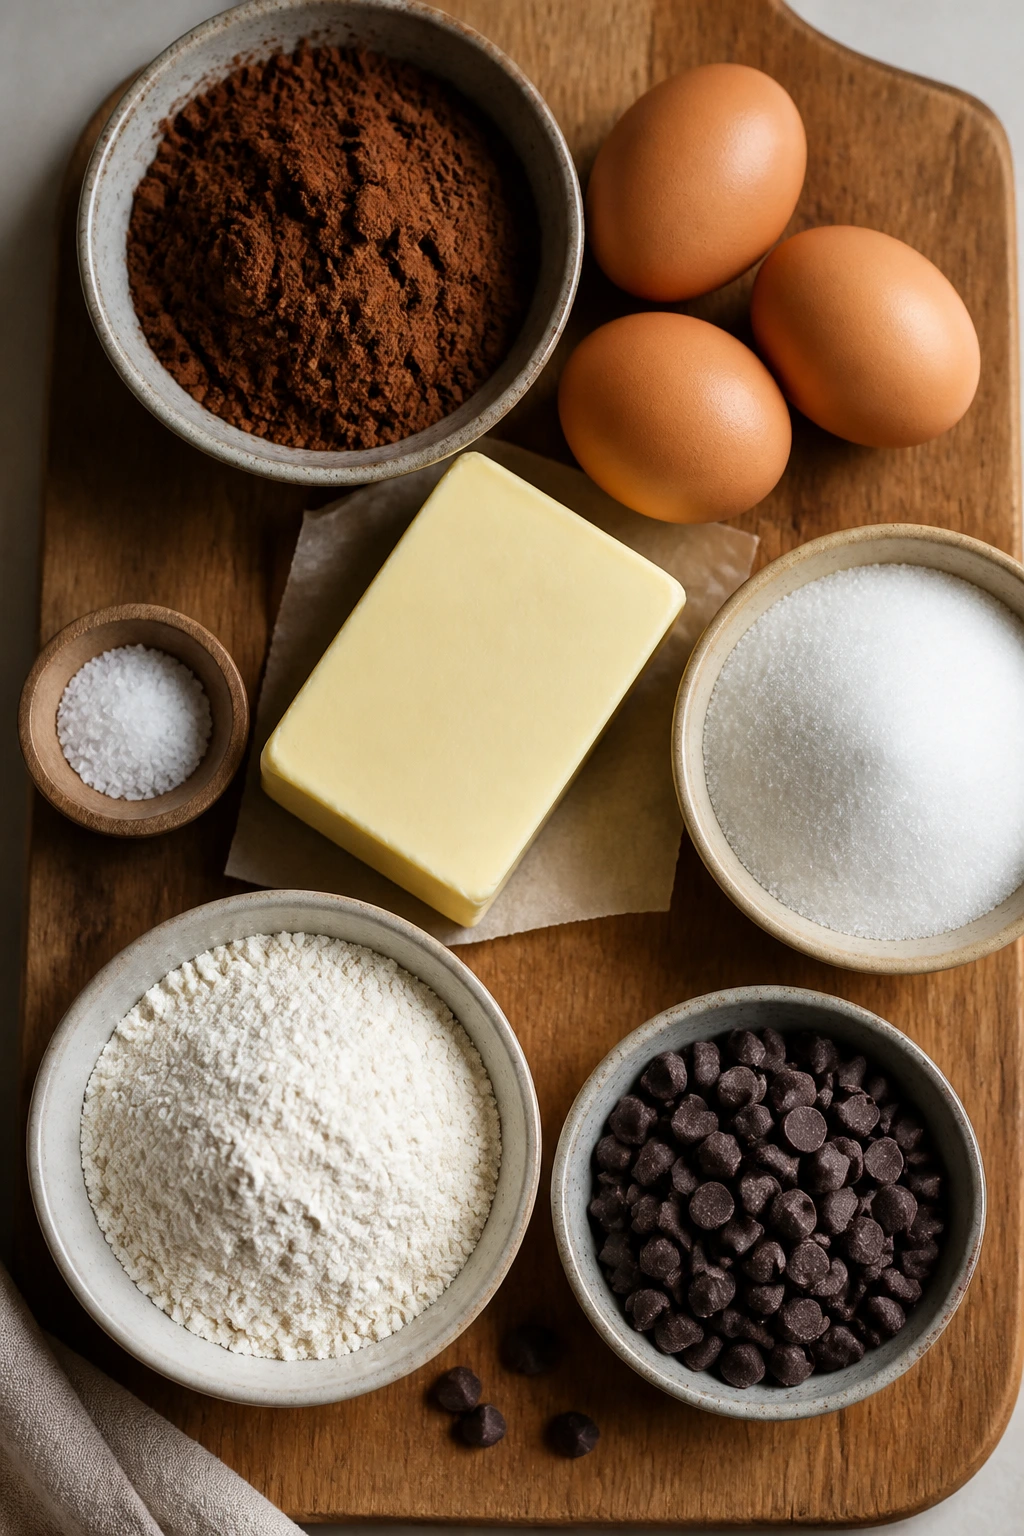
A good brownie starts with three things: decent cocoa, fresh eggs, and chocolate that tastes like chocolate. If the cocoa in your pantry smells dusty or weak, the brownies will too. Dutch-process cocoa is darker and softer in flavor, while natural cocoa has a sharper edge; either works, but black cocoa is the one that gives the most dramatic Halloween look.
Cookie wings are easier than people expect, but the cookie matters. Regular chocolate sandwich cookies work for almost everything, while mint, peanut butter, or gluten-free versions let you tailor the flavor without changing the method. If the wings seem fragile, chill the cookies before splitting them. Cold cookies crack less cleanly.
Candy eyes are worth buying if you can find them, mostly because they save time. If you cannot get them, pipe tiny white chocolate dots and add a smaller dark chocolate dot in the center. Not as cute. Still works.
For caramel, pick a thick sauce, not a pourable syrup. For jam, seedless spreads behave best. For nuts, toast them first. And if you’re reaching for chocolate chips, remember that mini chips disappear into the batter while chunks leave visible pockets of melt. That choice changes the finished brownie more than most people expect.
How to Serve These Recipes

Presentation:
Set the brownies on a matte black tray, a parchment-lined sheet pan, or a plain white platter if you want the bat shapes to stand out in a sharper way. Keep the wings facing outward so the tray reads as a group of bats instead of a random pile of squares.
Accompaniments:
Cold milk is the safest pairing, but black coffee, espresso, hot chocolate, or vanilla ice cream all work across the collection. For the salted and nutty versions, a small bowl of pretzels or roasted nuts beside the tray makes sense.
Portions:
Bar brownies usually cut into 12 to 16 squares, brownie cups into 24 bites, and brownie pops into 25 to 30 pieces depending on size. If the recipe is rich — flourless, ganache-topped, caramel-heavy — cut smaller. Nobody complains about a neat two-bite square.
Beverage Pairing:
Milk for the classic and peanut butter versions. Coffee for espresso, hazelnut, or tahini. Sparkling water with orange or berry notes works better than soda if you want to keep the sweetness in check.
Additional Tips and Flavor Boosters
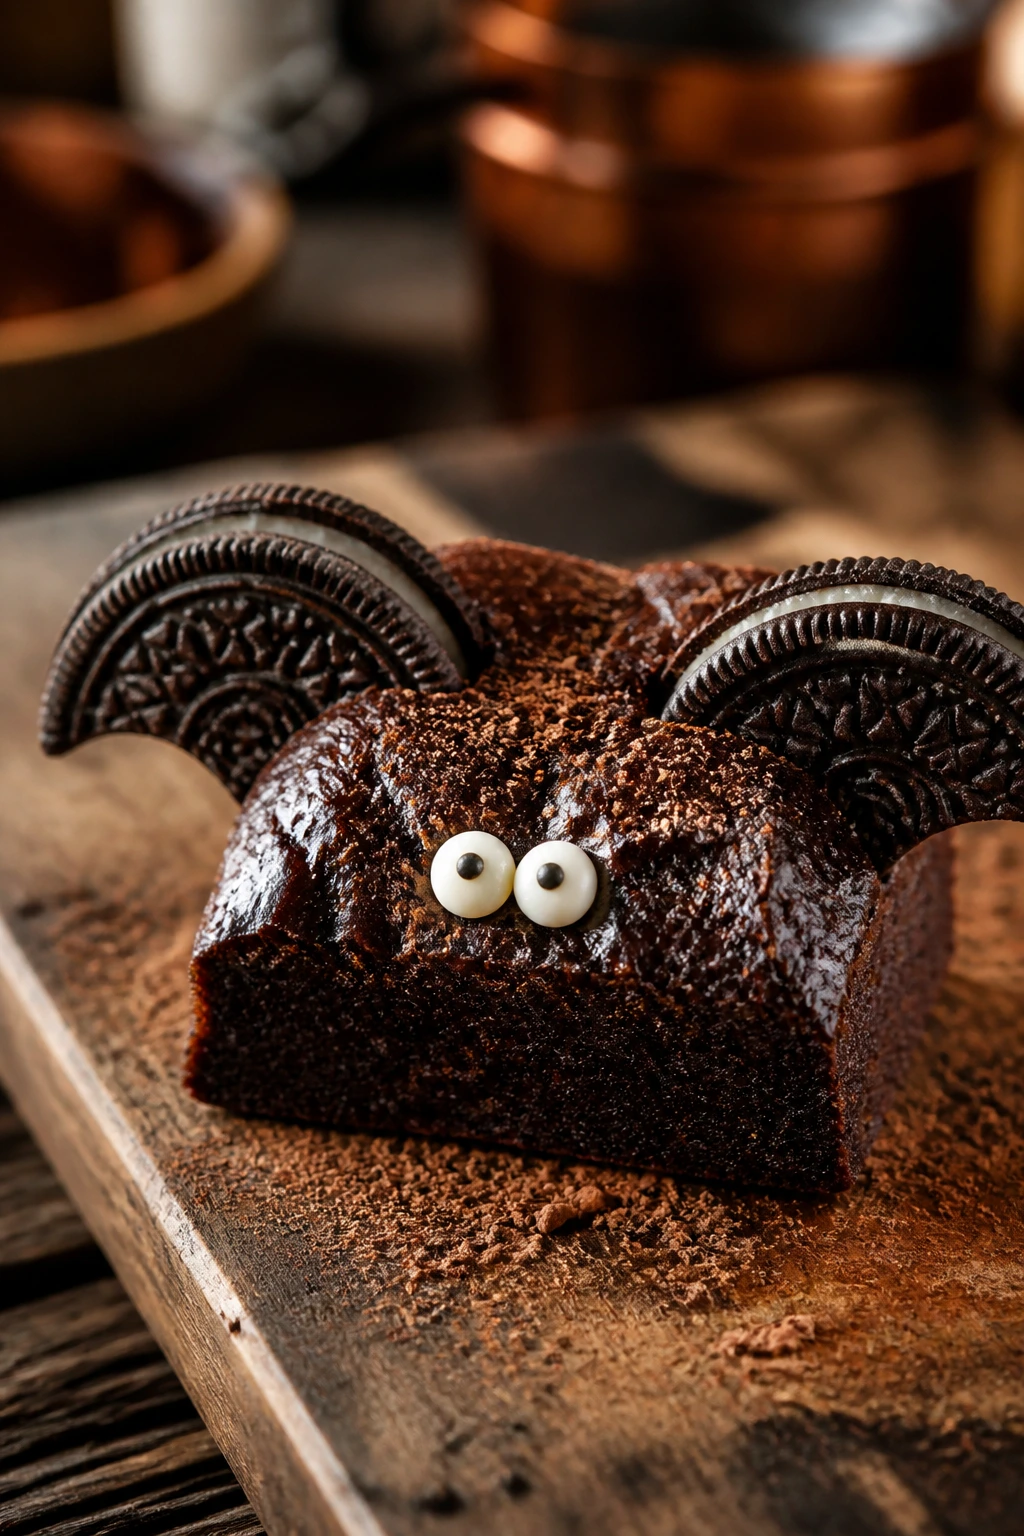
Flavor Enhancement: A half-teaspoon of espresso powder in any chocolate batter deepens the cocoa without making the brownies taste like coffee. It’s the easiest upgrade in the whole article, and it works in almost every version.
Customization: Swap Oreo wings for chocolate wafer cookies, mint cookies, or gluten-free sandwich cookies depending on the base flavor. For a sharper bat look, trim the wings slightly with kitchen scissors so they angle back more cleanly.
Serving Suggestions: A light dusting of cocoa, a few flakes of sea salt, or a few orange sugar crystals on the plate makes the tray feel finished. If you want to get a little fancier, pipe tiny chocolate dots under the eyes instead of using frosting.
Make-It-Yours: Use dairy-free chocolate and olive oil for a dairy-free tray, almond flour or a certified gluten-free blend for a gluten-free version, or add chopped nuts and dried fruit for a less sweet finish. The bat shape stays the same. The personality can change.
Make-Ahead, Storage, and Reheating Guidance
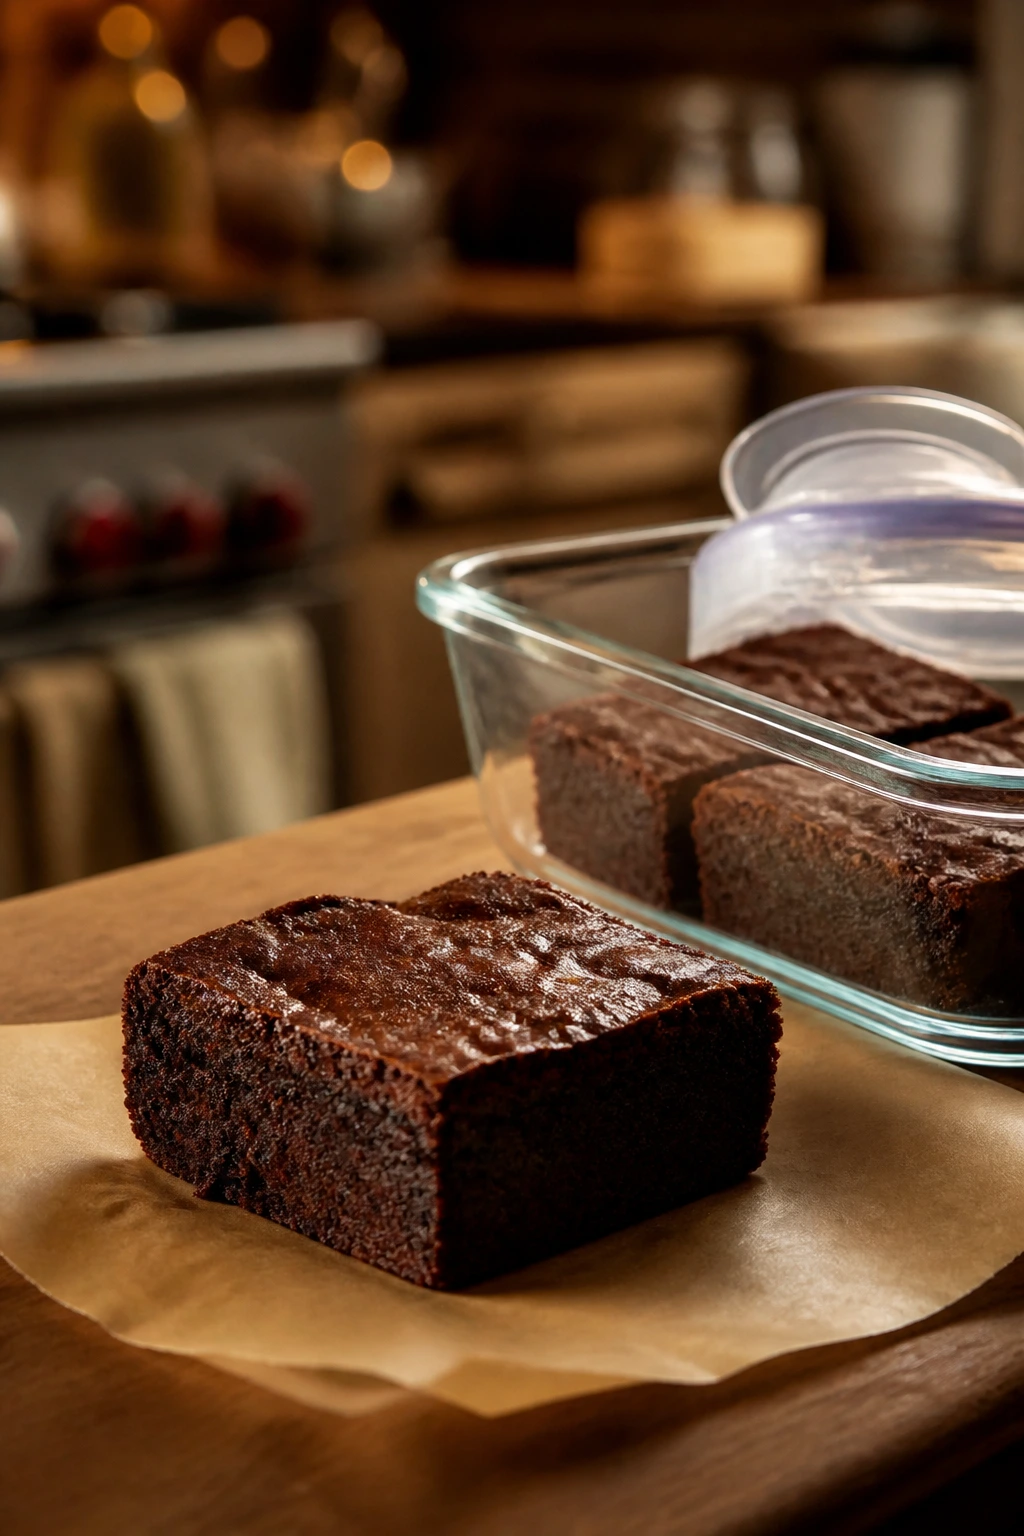
Plain brownies store better than decorated ones, and that’s the rule that saves the most trouble. If you know you’re making the brownies ahead, bake the base, cool it completely, and keep the decorations separate until the last possible minute. Undecorated bars hold at room temperature for about 3 days in an airtight container, or up to 5 days in the fridge if your kitchen runs warm.
Once the bat wings and candy eyes are on, the brownies still keep well, but the decoration layer likes a dry environment. Store decorated brownies in a single layer if you can, or separate layers with parchment so the wings do not crush. They’ll stay good in the fridge for about 4 days. Let them sit out for 20 minutes before serving so the brownie softens and the chocolate glue isn’t too firm.
Freezing works best for undecorated brownies, brownie bites, and brownie pops. Wrap them tightly and freeze for up to 2 months. Thaw overnight in the fridge, then decorate the next day. Brownie bark also freezes well, though the cookie wings should be added after thawing, not before. Reheating is only worth it for bare brownie squares; 8 to 10 seconds in the microwave gives you a soft center again. Decorated versions should not be reheated much, or the eyes slide and the wings loosen.
Variations and Adaptations to Try
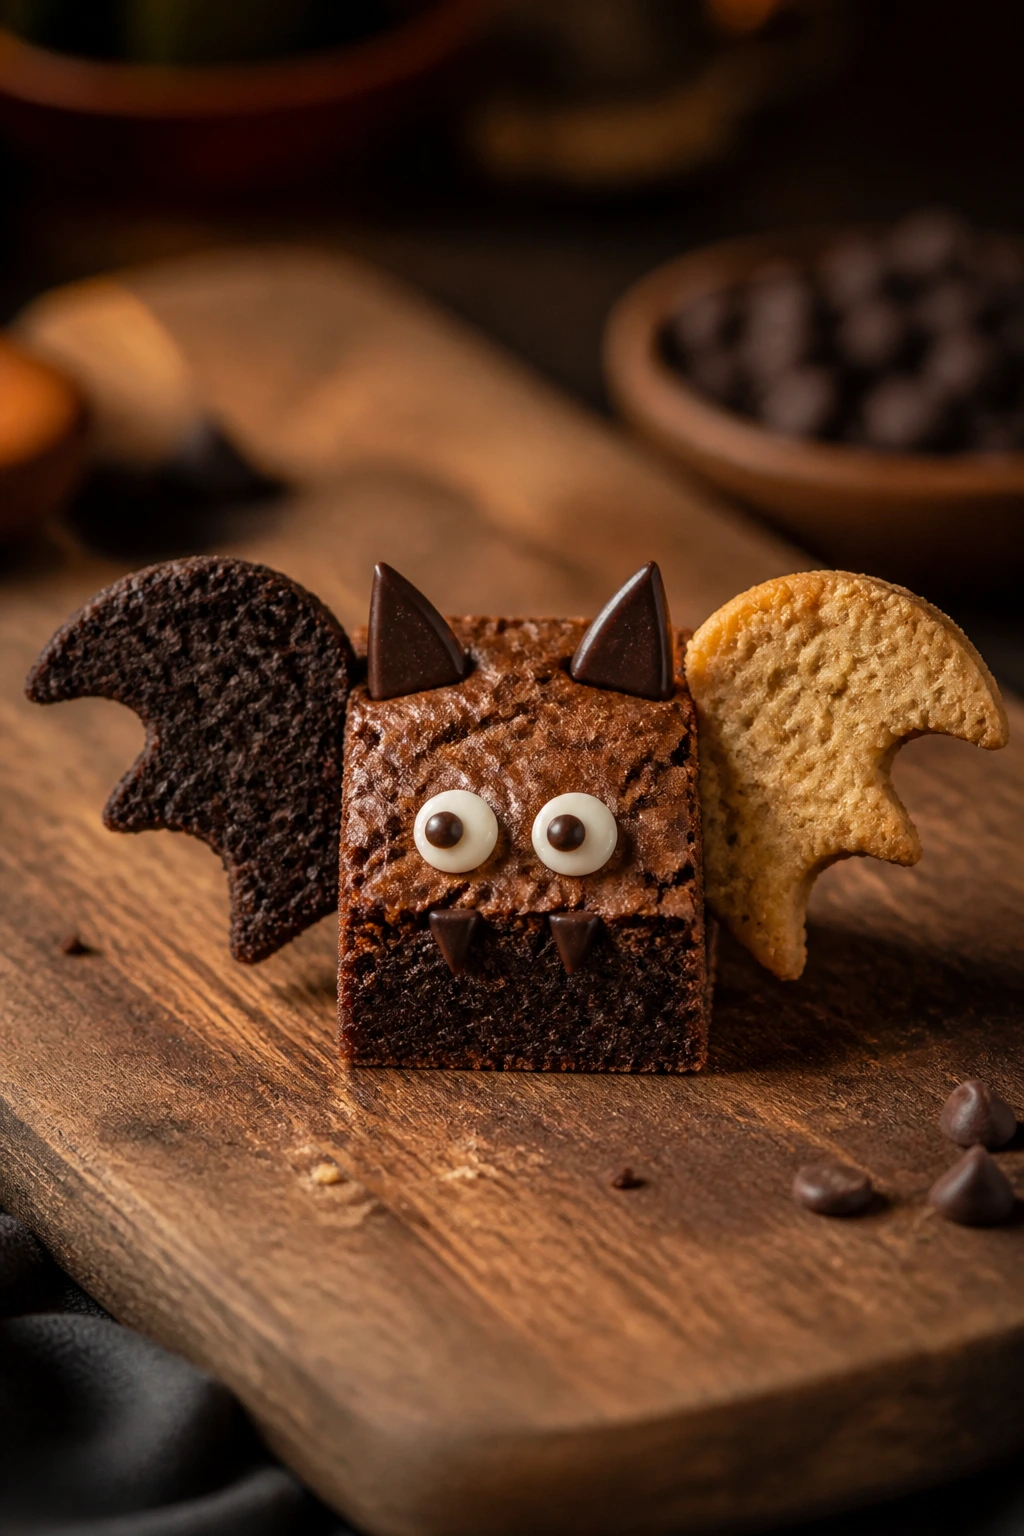
Box-Mix Bat Shift:
Use a boxed brownie mix when you want the fastest route to a tray of bats. Add the mix-ins and decorations from whichever variation you like, then stop baking as soon as the center is set. It’s not the most romantic option, but it absolutely gets dinner done.
Lower-Sugar Midnight Bats:
Choose dark chocolate chips, reduce the sugar by 1/4 cup, and lean on salted or citrusy toppings to keep the brownies tasting lively. This works best with espresso, orange zest, or tahini, where the flavor has something to do besides chase sweetness.
Dairy-Free Dark Bats:
Use olive oil or coconut oil in the base and dairy-free chocolate for the decorations. Chocolate sandwich cookies made without dairy give the wings the same familiar shape, and nobody misses the butter once the cocoa kicks in.
Gluten-Free Moonlit Tray:
Use almond flour or a gluten-free 1:1 blend and swap in certified gluten-free cookies for the wings. Brownies made this way usually slice a little more delicately, so chill them before cutting and keep the squares on the smaller side.
Party-Size Bat Bark:
Spread the batter thin in a rimmed sheet pan, bake it just until set, and break it into jagged pieces after cooling. It’s easier to serve than bars and faster to decorate because you can attach the wings to the biggest shards and leave the rest rustic.
Kid-Help Bat Tray:
Bake a plain brownie base and keep the decorating simple: cookie halves, candy eyes, and melted chocolate in a squeeze bag. Kids can handle the faces; adults can handle the pan. That division of labor keeps the kitchen from turning into a sticky argument.
Common Mistakes to Avoid

Decorating too early:
Warm brownies look finished, but they aren’t ready for wings. The cookie halves slide off, the eyes sink, and the whole bat shifts out of shape. Wait until the brownies are fully cool, or even slightly chilled, before you start decorating.
Overbaking the base:
Dry brownies crack when you cut them and taste dull under all the decorations. Pull the pan when the center still shows a few moist crumbs. The brownies keep setting as they cool, and that carryover heat is doing useful work.
Using wet toppings without a plan:
Caramel sauce, jam, and cheesecake swirl all add moisture, which is fine if you balance them with the right bake time. Too much liquid and the brownie surface turns slippery. Use thick fillings, not loose ones, and let the tray cool before touching it.
Forgetting the glue:
Cookie wings need something to cling to. A tiny dab of melted chocolate or thick frosting is enough, but if you skip it and just press the cookies onto the brownie, they will fall off the second the tray moves.
Cutting with a dull knife:
A dull blade drags through fudge and tears the top. Warm the knife under hot water, wipe it dry, and cut cleanly. Wipe again between slices if the pan is sticky.
Frequently Asked Questions
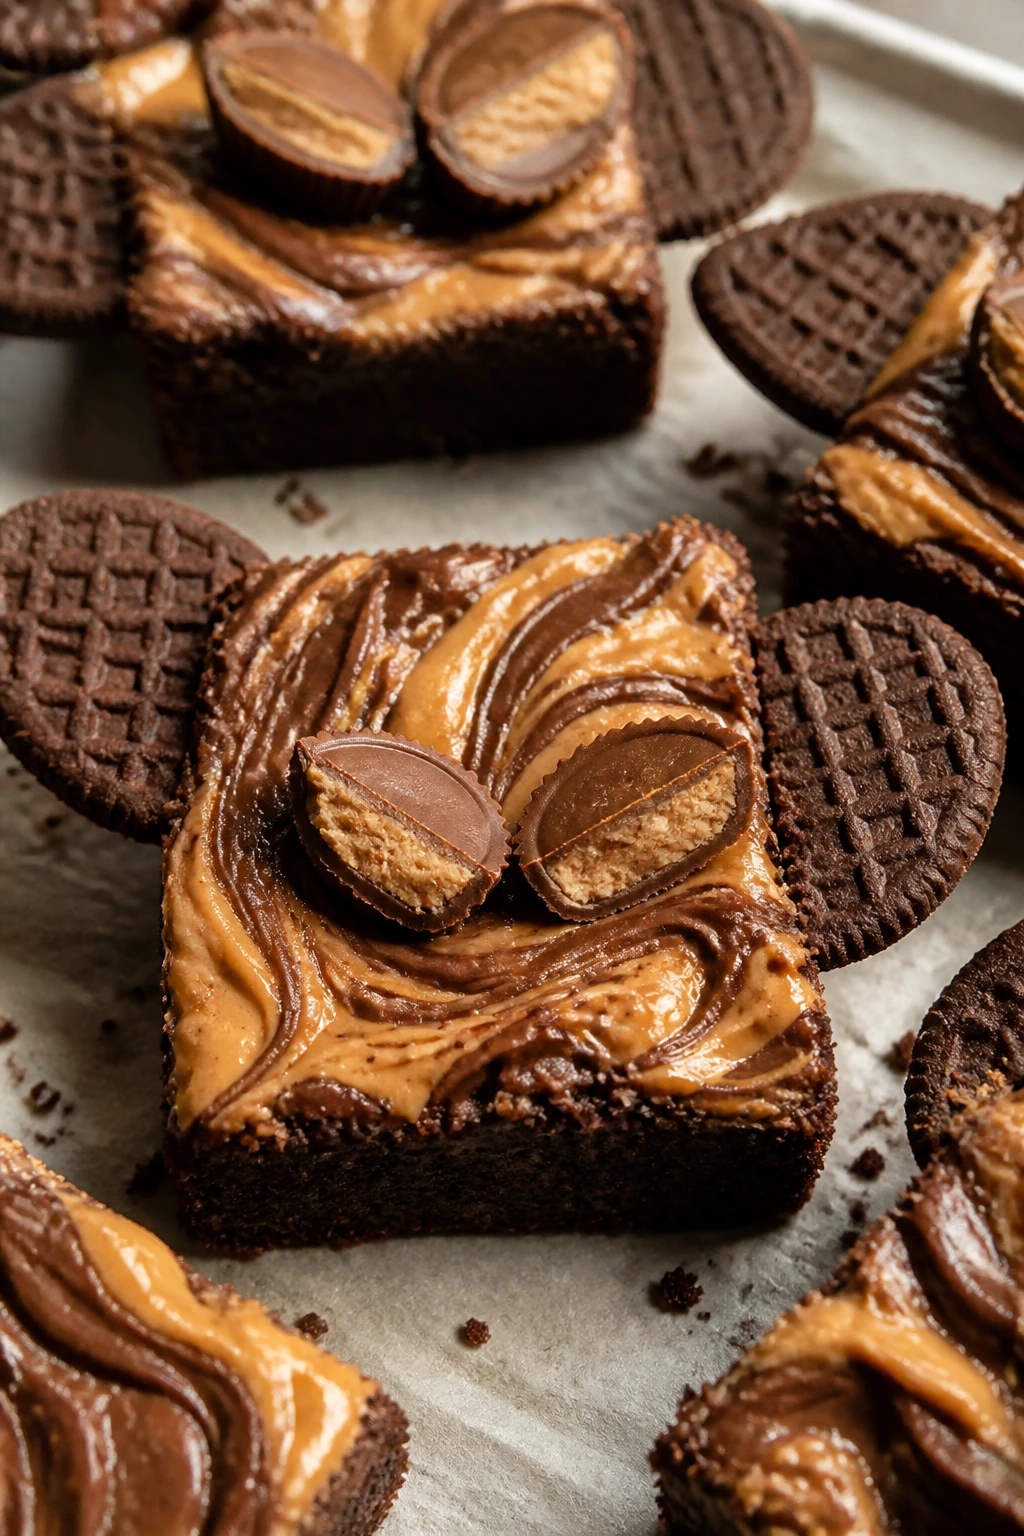
Can I use a boxed brownie mix for these bat treats?
Yes, and honestly, it’s a smart shortcut on a crowded night. Bake the mix in a 9×13-inch pan, cool it well, and use the decorations from any of the versions above. A boxed mix works best when you add one extra egg or a spoonful of cocoa so the base tastes richer.
How do I keep the cookie wings from falling off?
Use a tiny dot of melted chocolate or thick frosting on the back of each wing and press it onto a fully cooled brownie. If the surface is glossy from ganache or caramel, chill the tray for 10 minutes first so the glue sets faster.
What can I use instead of candy eyes?
Mini white chocolate chips with a dot of melted dark chocolate work nicely, and so do tiny dots of vanilla frosting. If you want the bats to look a little more homemade, two small chocolate chips can stand in as eyes too.
Can I freeze decorated bat brownies?
You can, but plain brownies freeze better than fully decorated ones. If you do freeze a decorated tray, freeze it in a single layer until firm, then wrap carefully so the wings do not get crushed. Thaw in the fridge, not on the counter.
How do I get neat squares when the top has swirls or toppings?
Chill the brownies first, use a long sharp knife, and wipe the blade between cuts. A parchment sling helps too, because you can lift the whole slab out of the pan before slicing.
Can I make these without nuts?
Absolutely. Skip the nut-heavy versions and go with classic Oreo, mint, caramel, orange, or flourless brownies. If you’re avoiding cross-contact, check the labels on the cookies and chocolate because some brands process them near nuts.
What if my brownies turn out cakey instead of fudgy?
That usually means too much flour, too much mixing, or too long in the oven. Mix until the flour disappears and stop there, then bake only until the center still has a little softness. Cakey brownies can still work, but they hold decorations less neatly.
Do brownie cups and pops follow the same decorating rules as bars?
Mostly yes, but the timing changes because the pieces are smaller and cool faster. Decorate cups once they’re fully cool in the tin, and decorate pops as soon as the chocolate shell is tacky so the wings stick before the coating hardens.
Dark Chocolate Nights Done Right
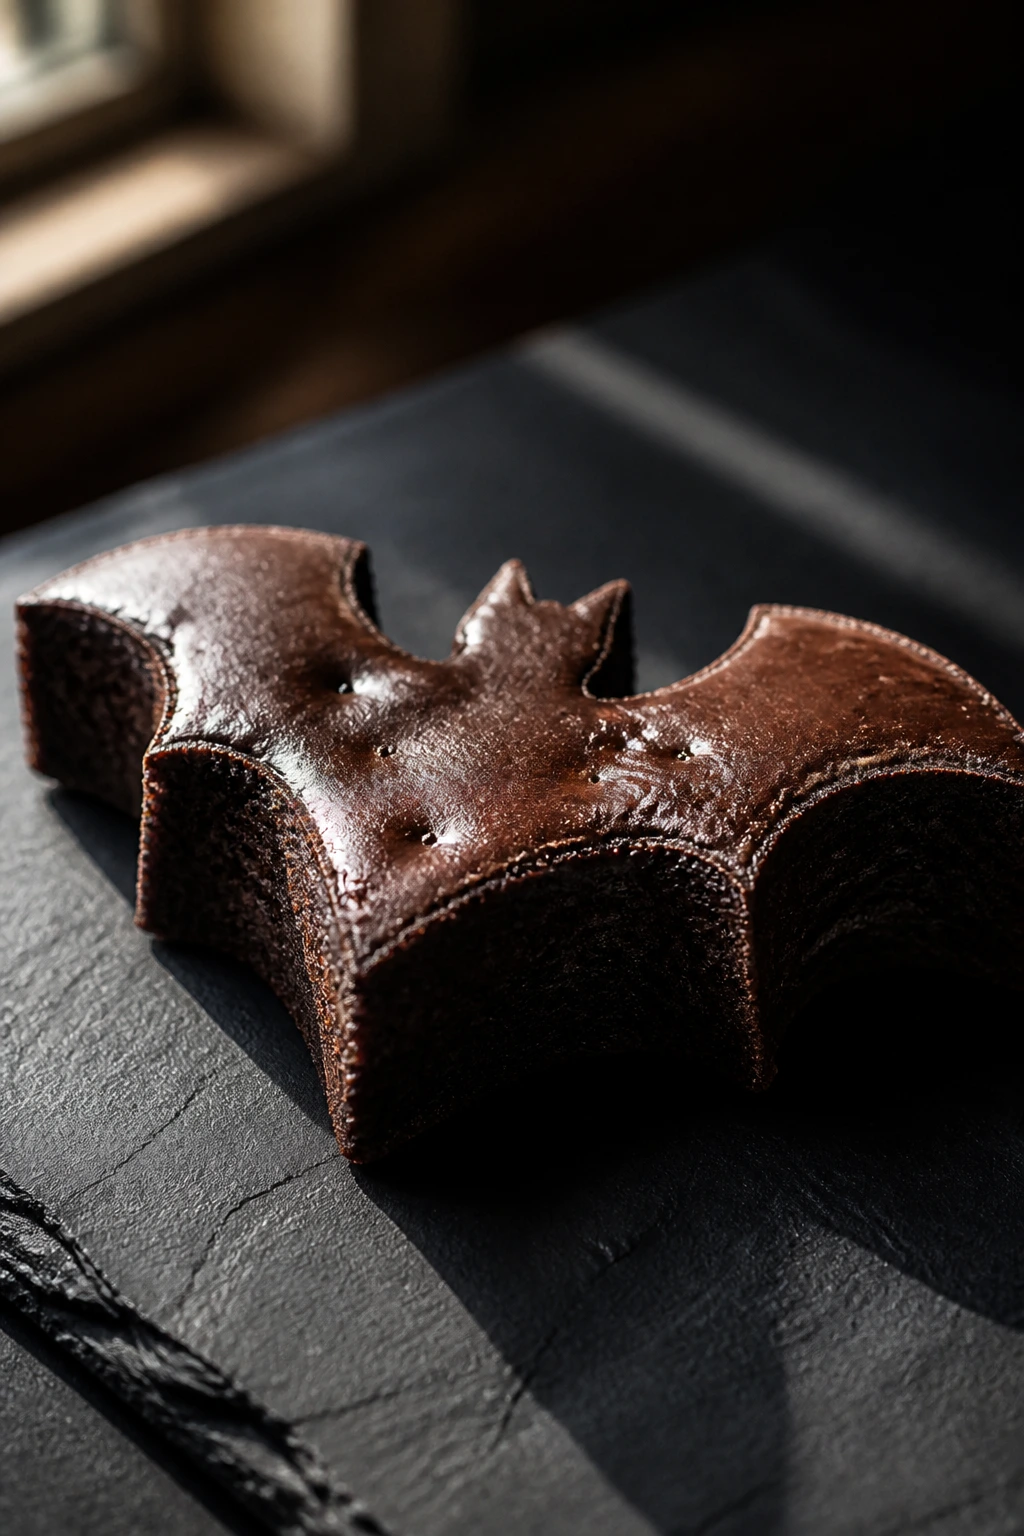
A good tray of bat brownies doesn’t need a lot of drama. It needs a batter that bakes fudgy, a decoration that sticks, and enough contrast to make the bat shape read from across the room. Once you’ve made one or two versions, the whole idea stops feeling like a Halloween project and starts feeling like a reliable trick you can pull out whenever the evening needs dessert without the fuss.
The simplest pan is still the one that disappears first. That tells you everything.