
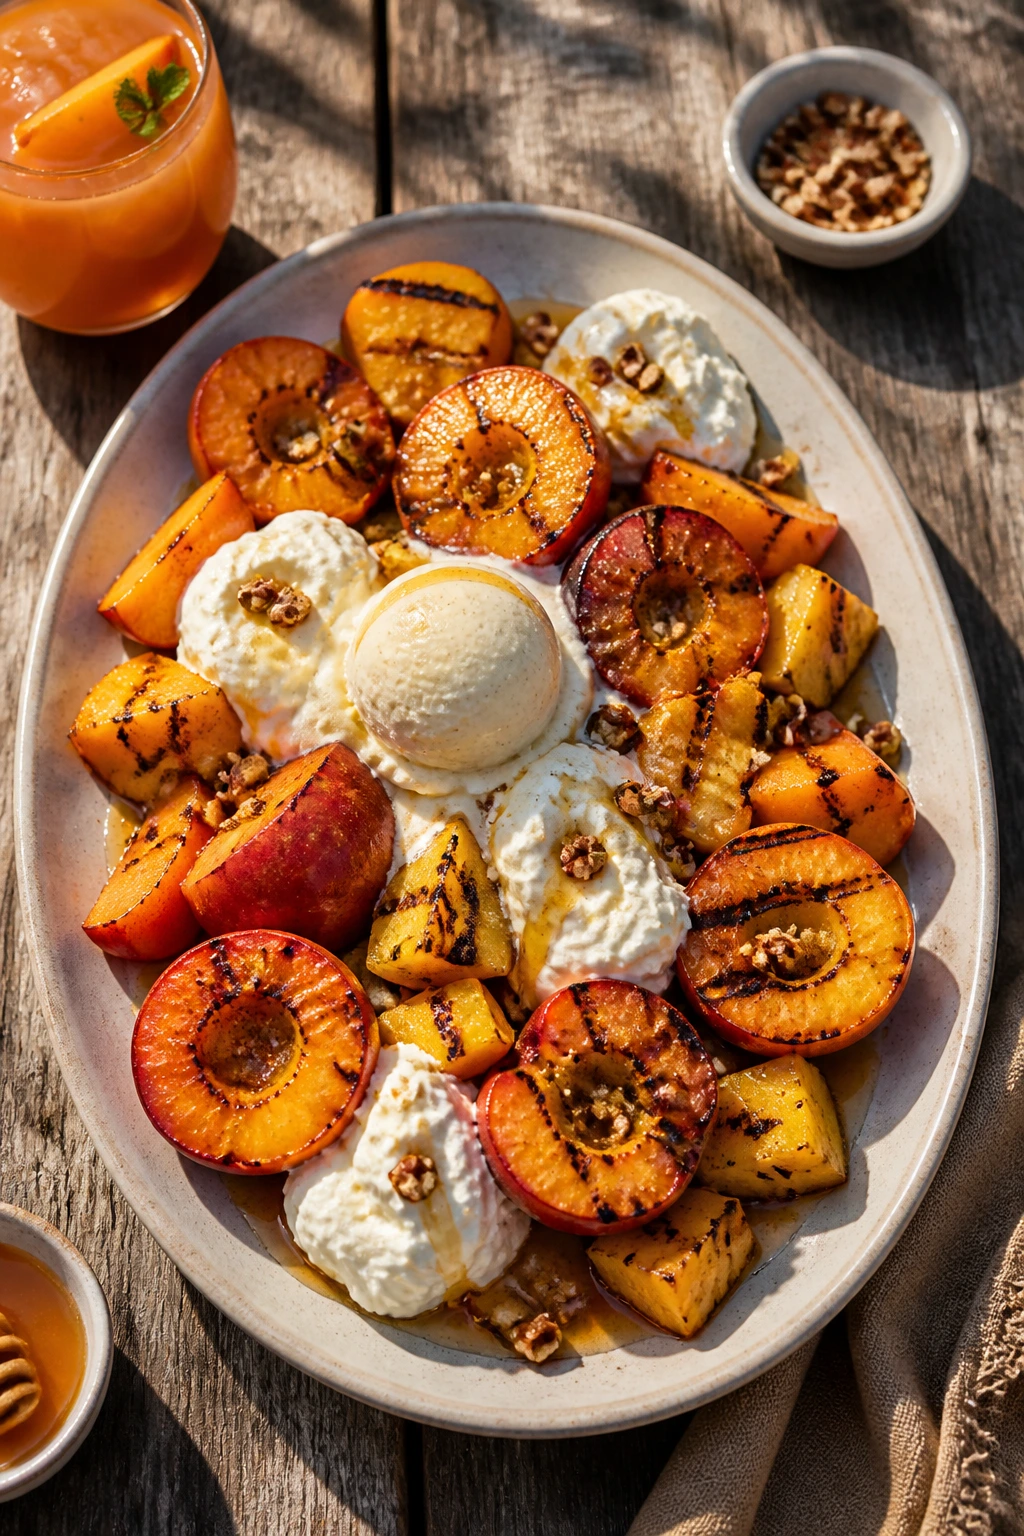
The best summer desserts are the ones that make a little noise. A peach hits a hot grate and hisses. Pineapple picks up a dark edge and smells like brown sugar without ever touching a spoon. Even a plain donut becomes something else after 30 seconds over flame — warmer, toastier, a little richer around the cut side. That’s the whole charm of summer treats for the grill: they turn fruit, bread, cake, and a few pantry sweets into something with smoke, caramel, and texture in a way the oven never quite manages.
These are not fussy recipes. They rely on ripe fruit, moderate heat, and a willingness to stop before things go too far. Sugar burns fast. Fruit softens faster than people expect. And yet that’s exactly why grilling works here: the high heat gives you contrast, not just warmth. A cold scoop of vanilla ice cream, a spoonful of yogurt, or a drizzle of honey lands better when the base underneath has a few charred marks and a little snap at the edges.
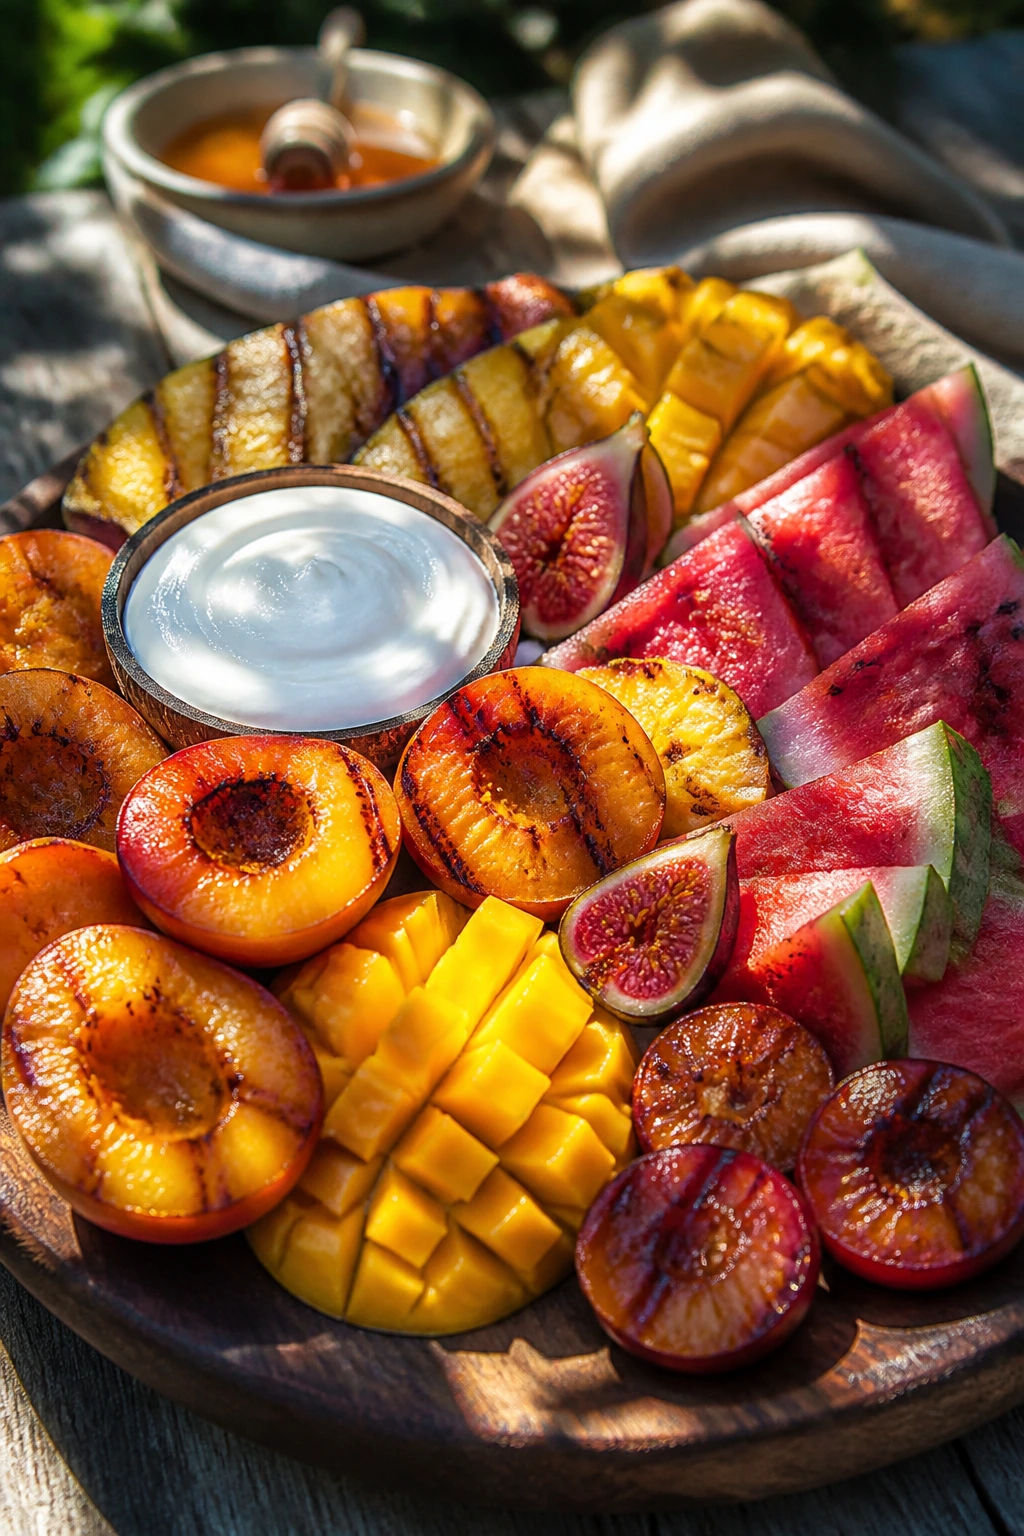
I like this kind of cooking because it feels spontaneous without being careless. You can make one treat for two people or spread out four or five options on a single platter and let everybody pick their favorite. Some of these want direct heat for under two minutes. Others need foil so the filling turns soft before the sugar scorches. A few are barely more than fruit plus garnish, which is exactly why they earn a spot on the weekend grill.
Why These Grilled Treats Earn a Spot on the Fire
- Fast payoff: Most of these need 15 minutes or less of active work, and the grill does the rest while you set out bowls, spoons, and napkins.
- Low ingredient count: A lot of the recipes below use fruit, butter or oil, a sweetener, and one finishing element like yogurt, chocolate, or nuts.
- Good use of ripe fruit: Peaches, plums, pineapple, mango, and nectarines all soften and caramelize instead of going mushy if you catch them at the right stage.
- Flexible serving style: You can plate one recipe at a time or build a mixed dessert board with two or three of them side by side.
- Weekend-friendly cleanup: Foil packs, skewers, and simple brushing beats pulling out a stack of baking pans and waiting for the oven to preheat.
- Easy to scale: Most of these recipes double cleanly for a crowd, and the grill surface usually becomes the limiting factor long before the ingredient list does.
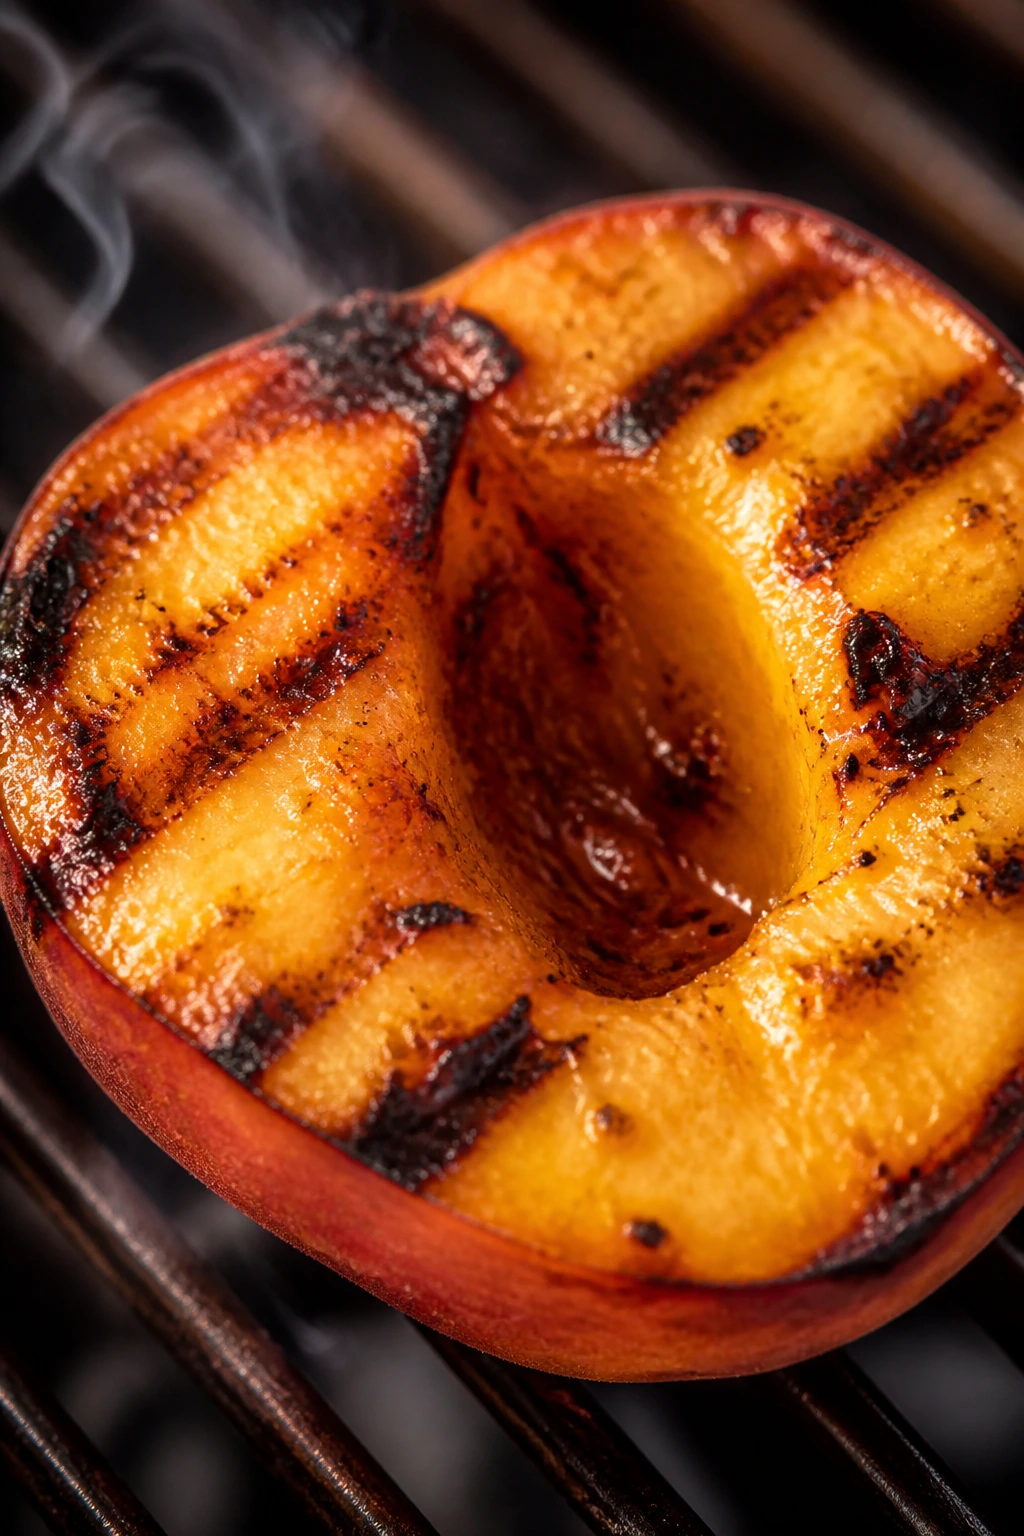
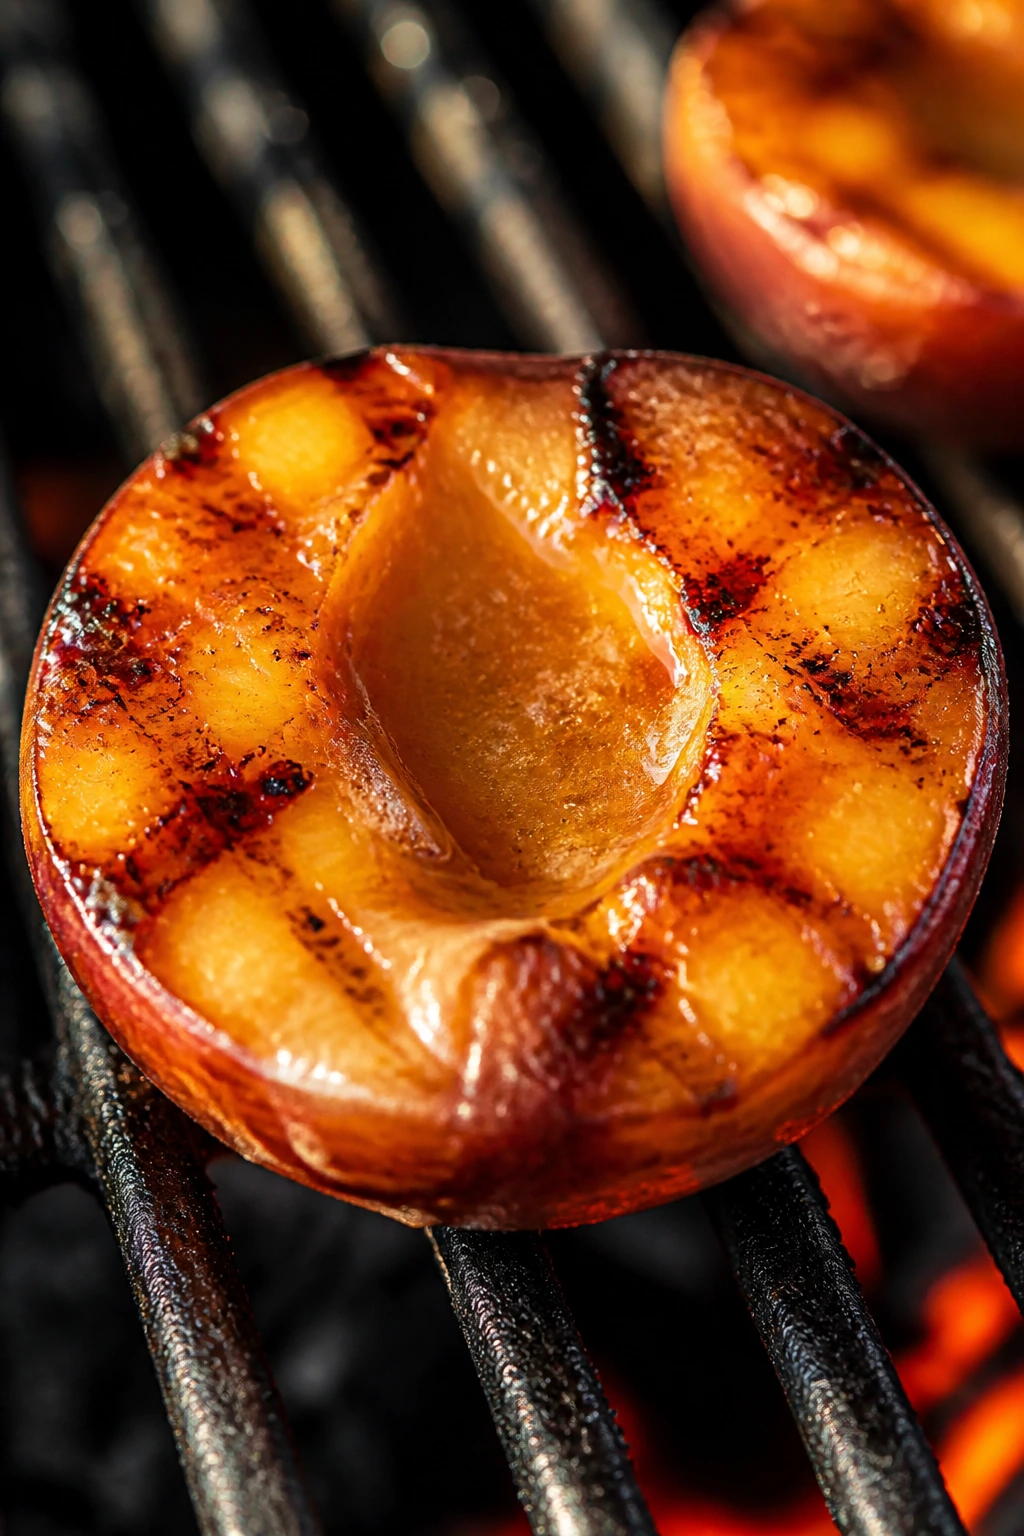
1. Honey-Butter Grilled Peaches
The first peach that comes off the grill should smell like jam meeting toast. When the flesh softens just enough to release juice but still keeps its shape, you get that sweet spot where the fruit tastes deeper, not just hotter. I like this one with a small scoop of ice cream and a pinch of salt.
Why It Works:
Peaches have enough natural sugar to caramelize in under five minutes, which means you get color fast without cooking the fruit into mush. The butter helps the cut side brown evenly, while honey gives the surface a glossy finish that clings to the hot flesh.
Key Ingredients:
- 4 ripe but firm peaches, halved and pitted
- 2 tablespoons unsalted butter, melted
- 1 tablespoon honey
- 1/2 teaspoon ground cinnamon
- Pinch of fine salt
- 1/2 teaspoon vanilla extract
- Vanilla ice cream or Greek yogurt, for serving
Quick Steps:
- Preheat a grill to medium heat, about 375°F to 400°F, and clean the grates well.
- Stir the melted butter, honey, cinnamon, salt, and vanilla together in a small bowl.
- Brush the cut sides of the peaches with the mixture.
- Set the peaches cut side down on the grill for 3 to 4 minutes, until deep grill marks appear and the fruit gives slightly when nudged.
- Flip and grill the skin side for 1 minute, just to warm through, then serve right away.
Equipment for This Recipe:
- Outdoor grill or grill pan
- Pastry brush
- Long tongs
How to Serve This Dish:
Serve two peach halves per person with ice cream in the center of the platter or yogurt on the side. A few mint leaves and a tiny sprinkle of flaky salt make the plate look finished without turning it fussy.
Pro Tips for This Recipe:
- Use peaches that yield a little at the stem end but still feel firm; overripe fruit collapses fast.
- If your peaches are small, reduce the first side by 30 seconds.
- A grill basket keeps halved peaches steady if your grate spacing is wide.
Variations on This Dish:
- Bourbon Honey Peaches: Add 1 teaspoon bourbon to the butter mixture for a deeper, toasty note.
- Goat Cheese Finish: Swap ice cream for a spoonful of whipped goat cheese.
- Dairy-Free Version: Use melted coconut oil instead of butter.
Common Mistakes to Avoid with This Dish:
- Don’t grill peaches that are soft to the touch all over; they’ll split and drip before they brown.
- Don’t leave them face-down too long. Once the sugars go dark and sticky, they cross the line fast.
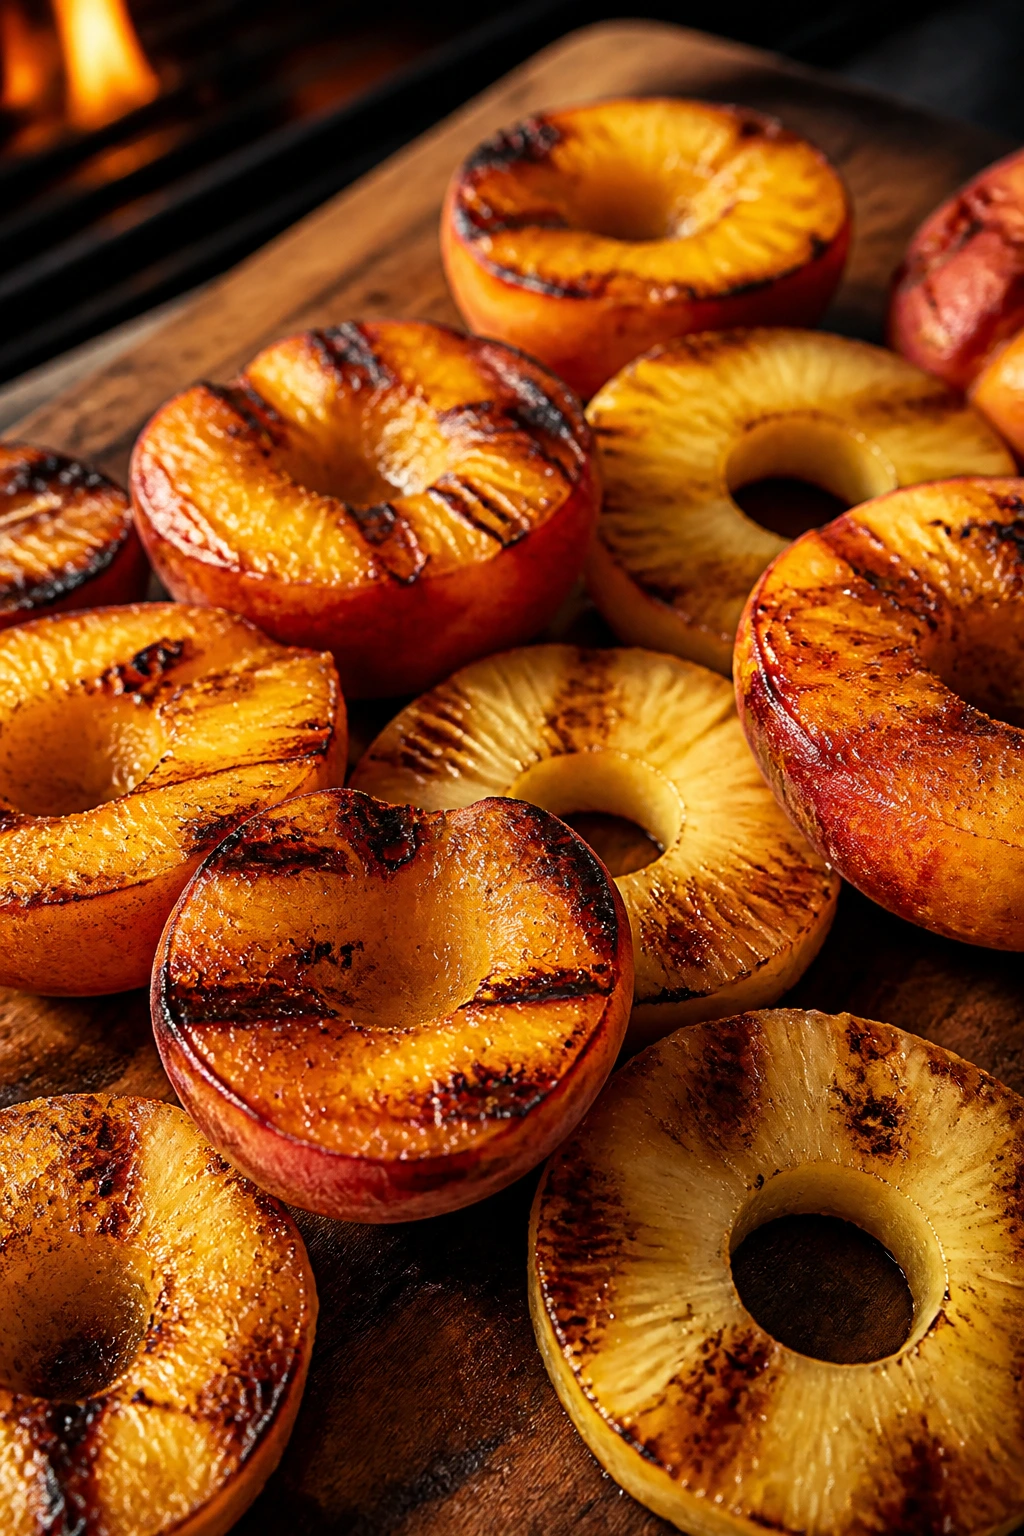
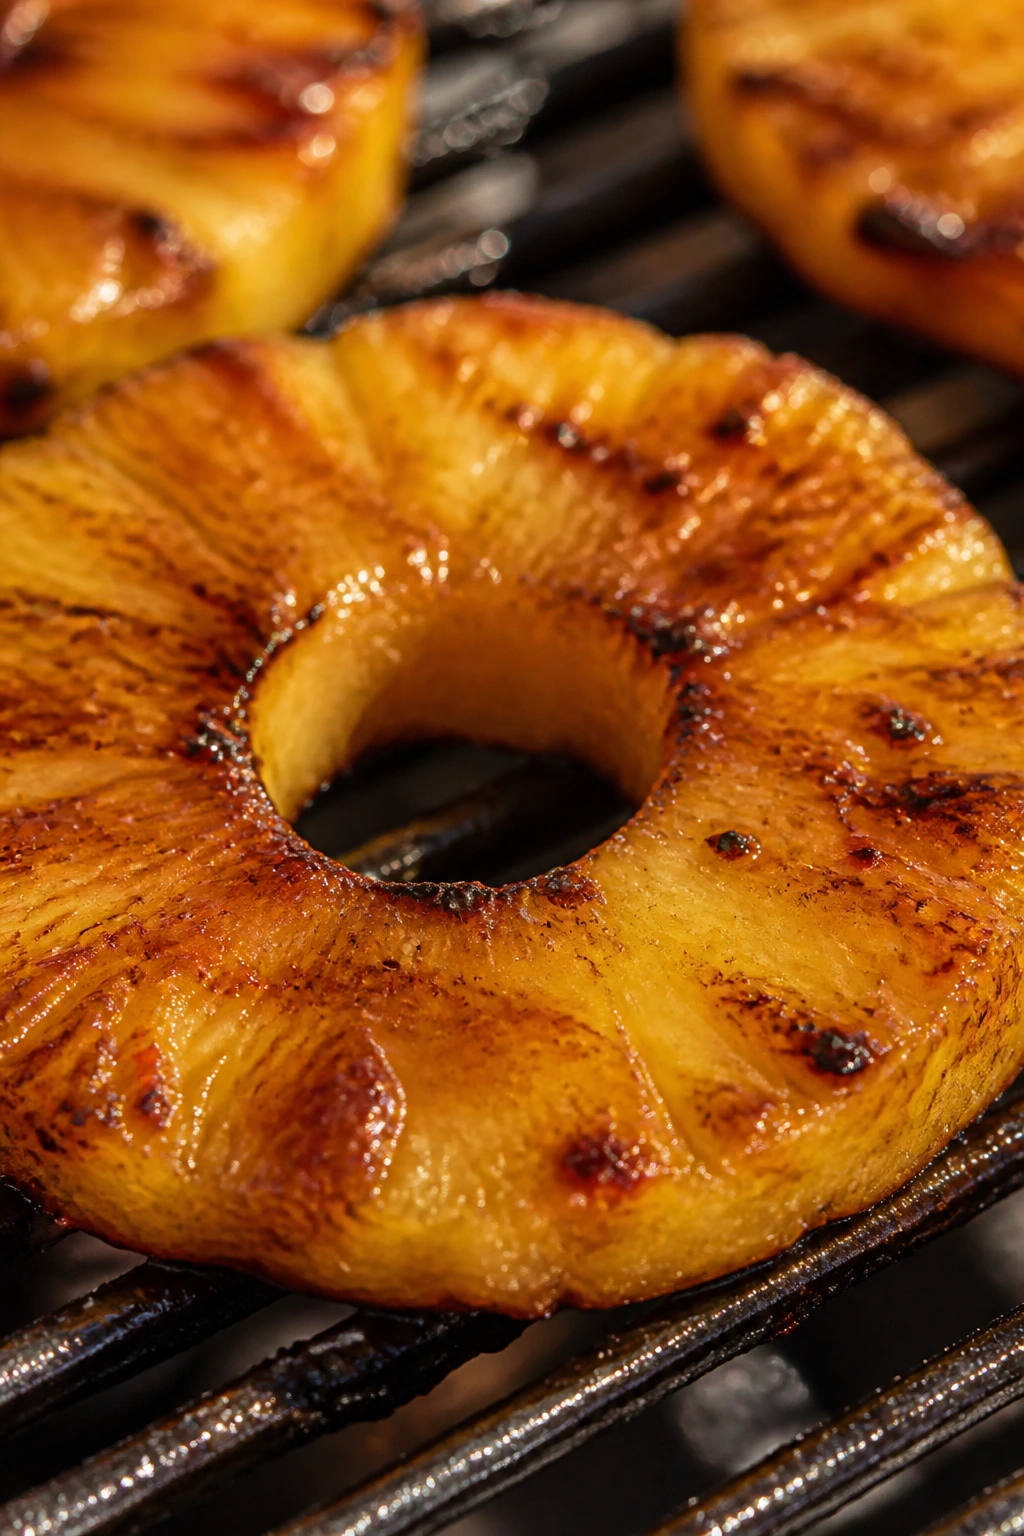
2. Brown Sugar Pineapple Rings
Pineapple on the grill tastes brighter than pineapple in a bowl. The edges pick up a faint bitterness that keeps the fruit from leaning too sweet, and that brown sugar glaze sinks into every ridge. If you like a little heat, a tiny pinch of chili powder changes the whole thing.
Why It Works:
Pineapple is sturdy, so it tolerates direct heat better than most fruit. The natural acids wake up the brown sugar, and the result is sharp, sticky, and a little smoky instead of candy-sweet.
Key Ingredients:
- 1 fresh pineapple, peeled, cored, and sliced into 1/2-inch rings
- 2 tablespoons brown sugar
- 1 tablespoon melted butter or coconut oil
- 1 tablespoon lime juice
- 1/4 teaspoon chili powder
- Pinch of salt
- Toasted coconut or vanilla yogurt, for serving
Quick Steps:
- Heat the grill to medium-high and oil the grates lightly.
- Mix the brown sugar, butter, lime juice, chili powder, and salt into a loose glaze.
- Brush both sides of the pineapple rings.
- Grill for 2 to 3 minutes per side until char marks appear and the fruit loosens slightly.
- Serve warm with yogurt or coconut.
Equipment for This Recipe:
- Grill
- Sharp chef’s knife
- Tongs
How to Serve This Dish:
Pile the rings on a platter and spoon yogurt into the center of each one if you want a dessert feel. If you want more crunch, scatter toasted coconut over the top.
Pro Tips for This Recipe:
- Cut the rings thick enough to handle flipping; thin slices tear.
- Fresh pineapple works better than canned because it holds its shape.
- Keep the grill clean. Pineapple sugar loves to glue itself to old residue.
Variations on This Dish:
- Coconut-Lime Pineapple: Add lime zest and toasted coconut at the end.
- Rum-Style Finish: Brush with a teaspoon of dark rum mixed into the glaze.
- Spicy Snack Version: Use a pinch of cayenne instead of chili powder.
Common Mistakes to Avoid with This Dish:
- Don’t soak the fruit in sugar before grilling. It draws out too much juice and makes the rings slippery.
- Don’t crank the heat to blistering levels; the outside will burn before the center warms.
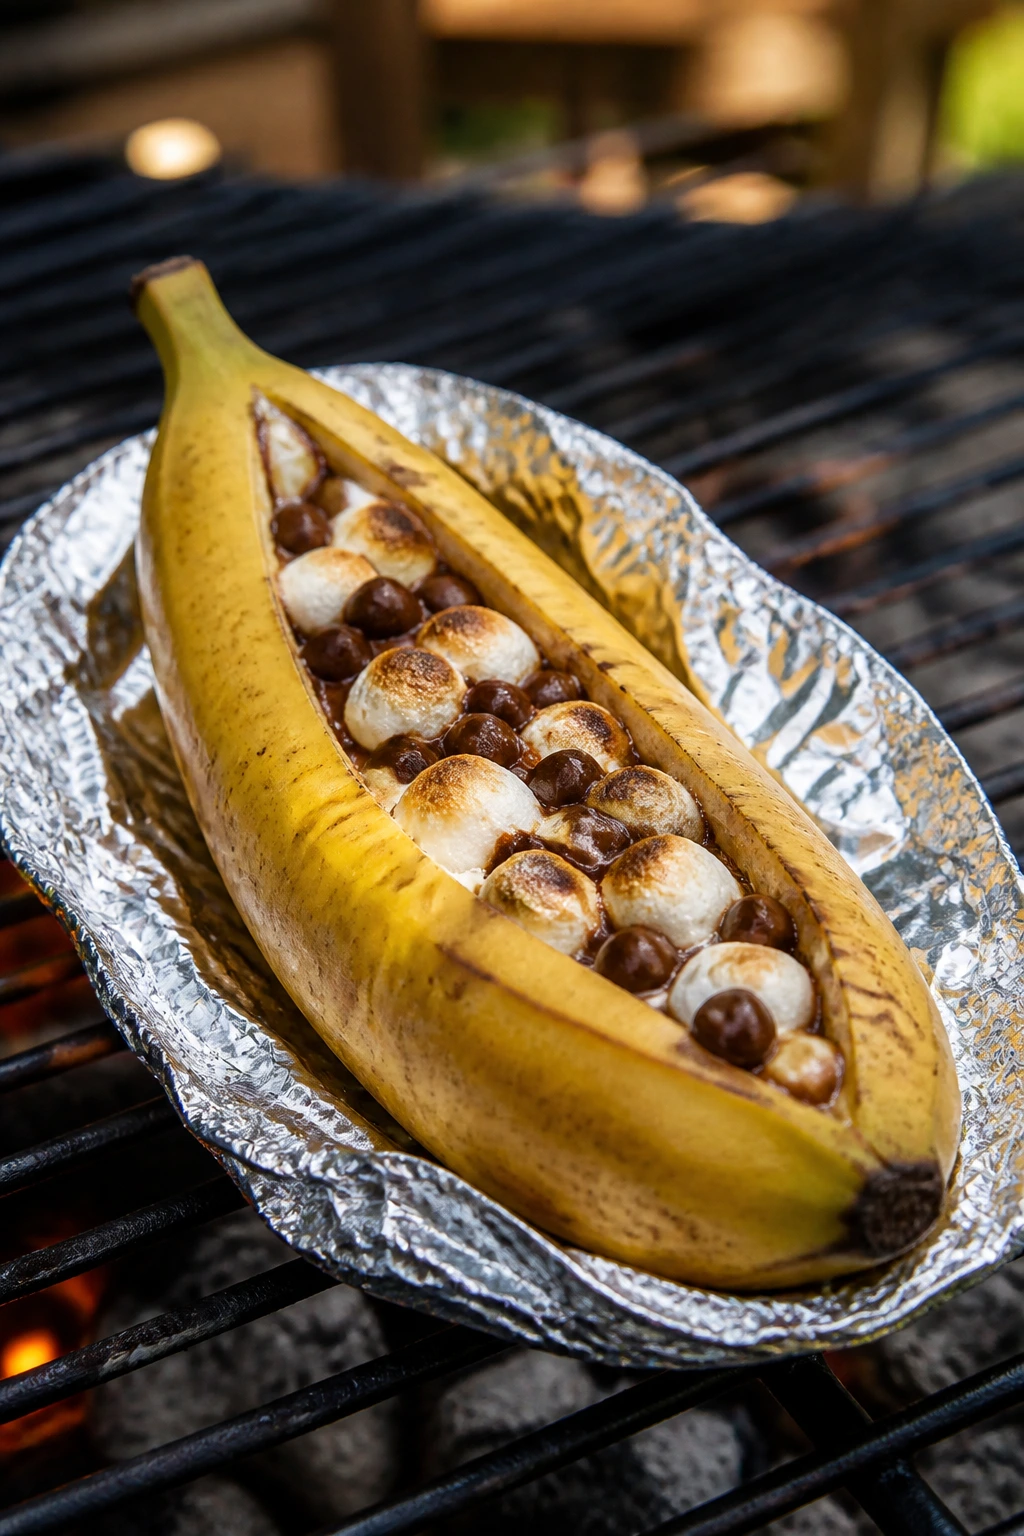
3. Chocolate-Mallow Banana Boats
This is the grilled dessert I make when I want something messy in a good way. The banana softens into a custardy texture, the chocolate melts into puddles, and the marshmallows blister just enough to go sticky at the top. It tastes like a campfire without needing a campfire.
Why It Works:
Bananas steam themselves inside the peel, so the grill doesn’t need to do much more than loosen the fruit and melt the fillings. The foil keeps the chocolate from falling through the grate and gives the marshmallows time to puff.
Key Ingredients:
- 4 bananas, unpeeled
- 1/2 cup mini chocolate chips
- 1/2 cup mini marshmallows
- 2 tablespoons peanut butter, optional
- 4 teaspoons crushed graham crackers
- 1 tablespoon butter, softened
- Pinch of salt
Quick Steps:
- Heat the grill to medium-low.
- Slice each banana lengthwise through the peel, stopping just before the bottom so the banana stays attached.
- Open the slit slightly and tuck in chocolate chips, marshmallows, peanut butter, and a pinch of salt.
- Wrap each banana loosely in foil and grill for 6 to 8 minutes, until the fruit is soft and the filling is melted.
- Unwrap carefully, top with graham crackers, and eat with a spoon.
Equipment for This Recipe:
- Grill
- Heavy-duty foil
- Small spoon
How to Serve This Dish:
Serve each banana in its foil packet on a plate, because the filling moves around when it’s hot. A cold scoop of vanilla ice cream on the side makes the whole thing feel like a sunda.
Pro Tips for This Recipe:
- Use bananas with yellow skins and a few brown freckles, not fully black ones.
- If the peel splits while grilling, move the packet to indirect heat.
- Peanut butter makes the filling thicker and less runny.
Variations on This Dish:
- Nut-Free Camp Banana: Skip the peanut butter and add extra graham crackers.
- Nutella Version: Replace the chocolate chips with 2 tablespoons Nutella per banana.
- Salted Caramel Swap: Use caramel bits instead of marshmallows for a deeper finish.
Common Mistakes to Avoid with This Dish:
- Don’t cut the banana all the way through. It needs the bottom side to hold the filling.
- Don’t use high heat. The peel blackens fast while the inside is still cool.
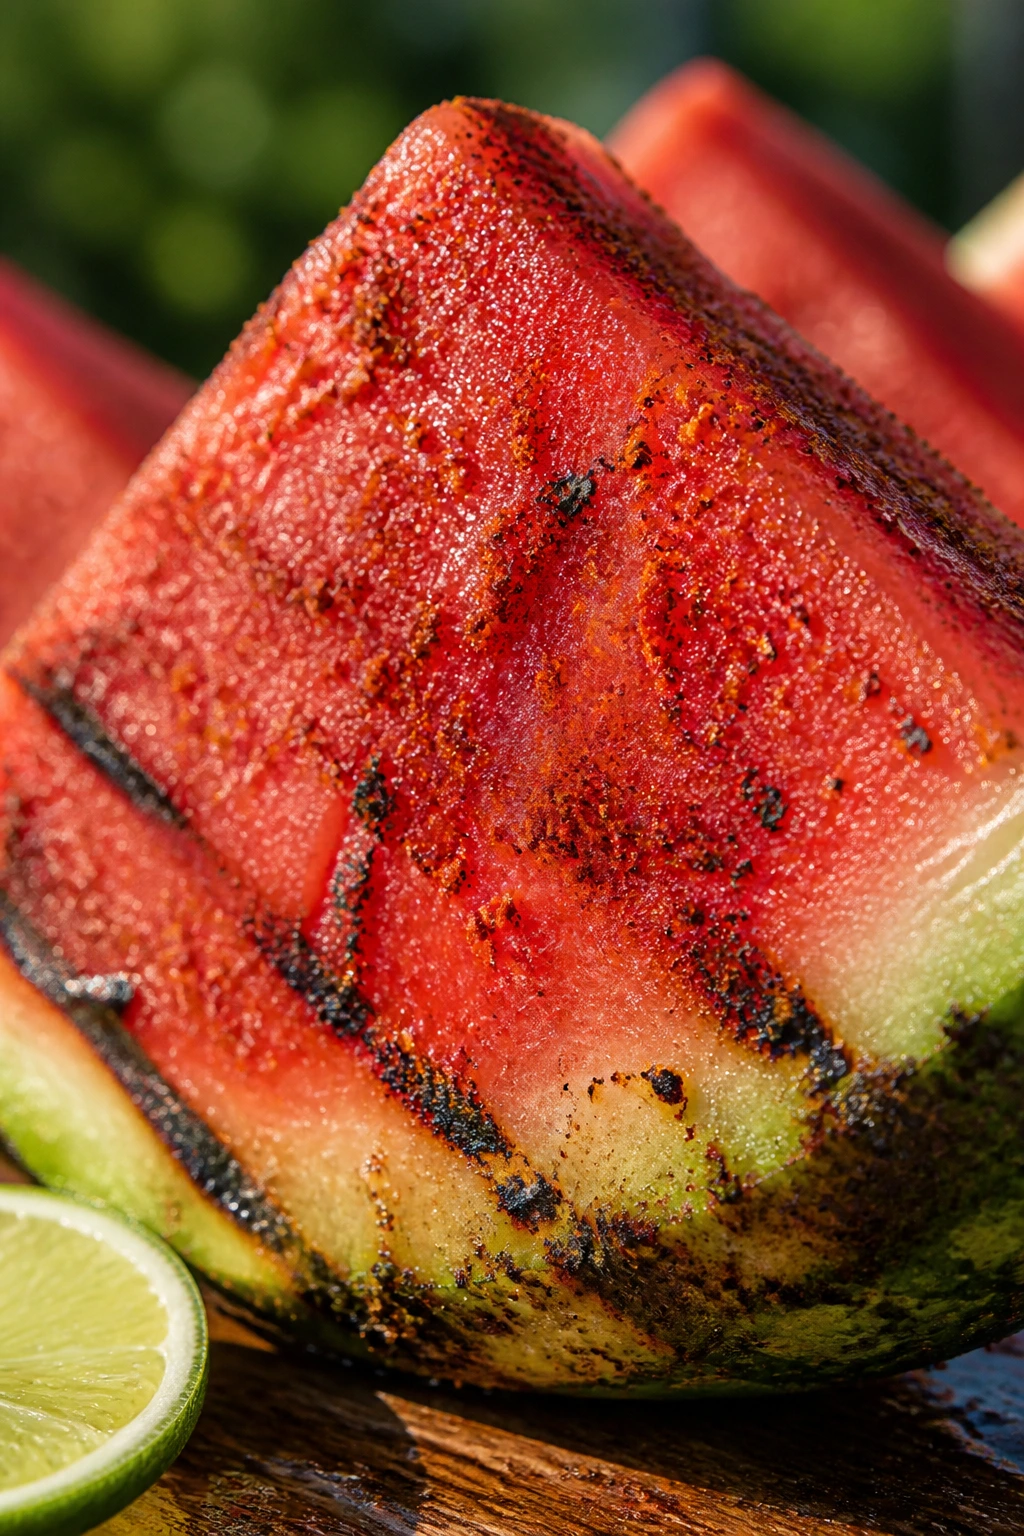
4. Tajín Watermelon Wedges
Cold watermelon is nice. Grilled watermelon is louder. The surface picks up faint char, the texture stays juicy, and the lime and Tajín push the fruit toward snack territory instead of dessert. I like this one when the grill is already hot and everybody wants something sharp between richer treats.
Why It Works:
Watermelon has so much water that it won’t behave like peaches or pineapple. A quick sear on dry fruit gives you a smoky edge without forcing the center to collapse, and the seasoning wakes up the fruit’s mild sweetness.
Key Ingredients:
- 1 small seedless watermelon, cut into 8 wedges
- 1 tablespoon olive oil
- 1 to 2 teaspoons Tajín seasoning
- 1 tablespoon lime juice
- Flaky salt, to taste
- Fresh mint leaves, for serving
Quick Steps:
- Preheat the grill to high heat and oil the grates well.
- Pat the watermelon wedges dry and brush lightly with olive oil.
- Grill for 45 to 60 seconds per side, just until dark grill marks appear.
- Move the wedges to a platter, squeeze with lime juice, and dust with Tajín and flaky salt.
- Finish with torn mint and serve immediately.
Equipment for This Recipe:
- Grill
- Paper towels
- Tongs
How to Serve This Dish:
Serve as a bright palate reset between richer desserts or as a snack with cold drinks. I like stacking the wedges slightly off-center so the pink flesh and charred lines both show.
Pro Tips for This Recipe:
- Dry the fruit well; moisture stops the marks from forming.
- Use firm watermelon. Overripe fruit turns mealy on the grill.
- A grill basket is useful if your wedges are narrow.
Variations on This Dish:
- Sweet-Spice Version: Swap Tajín for cinnamon sugar.
- Feta Finish: Add crumbled feta for a salty contrast.
- Honey-Lime Drizzle: Use honey in place of salt for a sweeter plate.
Common Mistakes to Avoid with This Dish:
- Don’t leave the wedges on long enough to soften. The goal is a surface mark, not a cooked melon.
- Don’t season before grilling; the powder can burn and turn bitter.
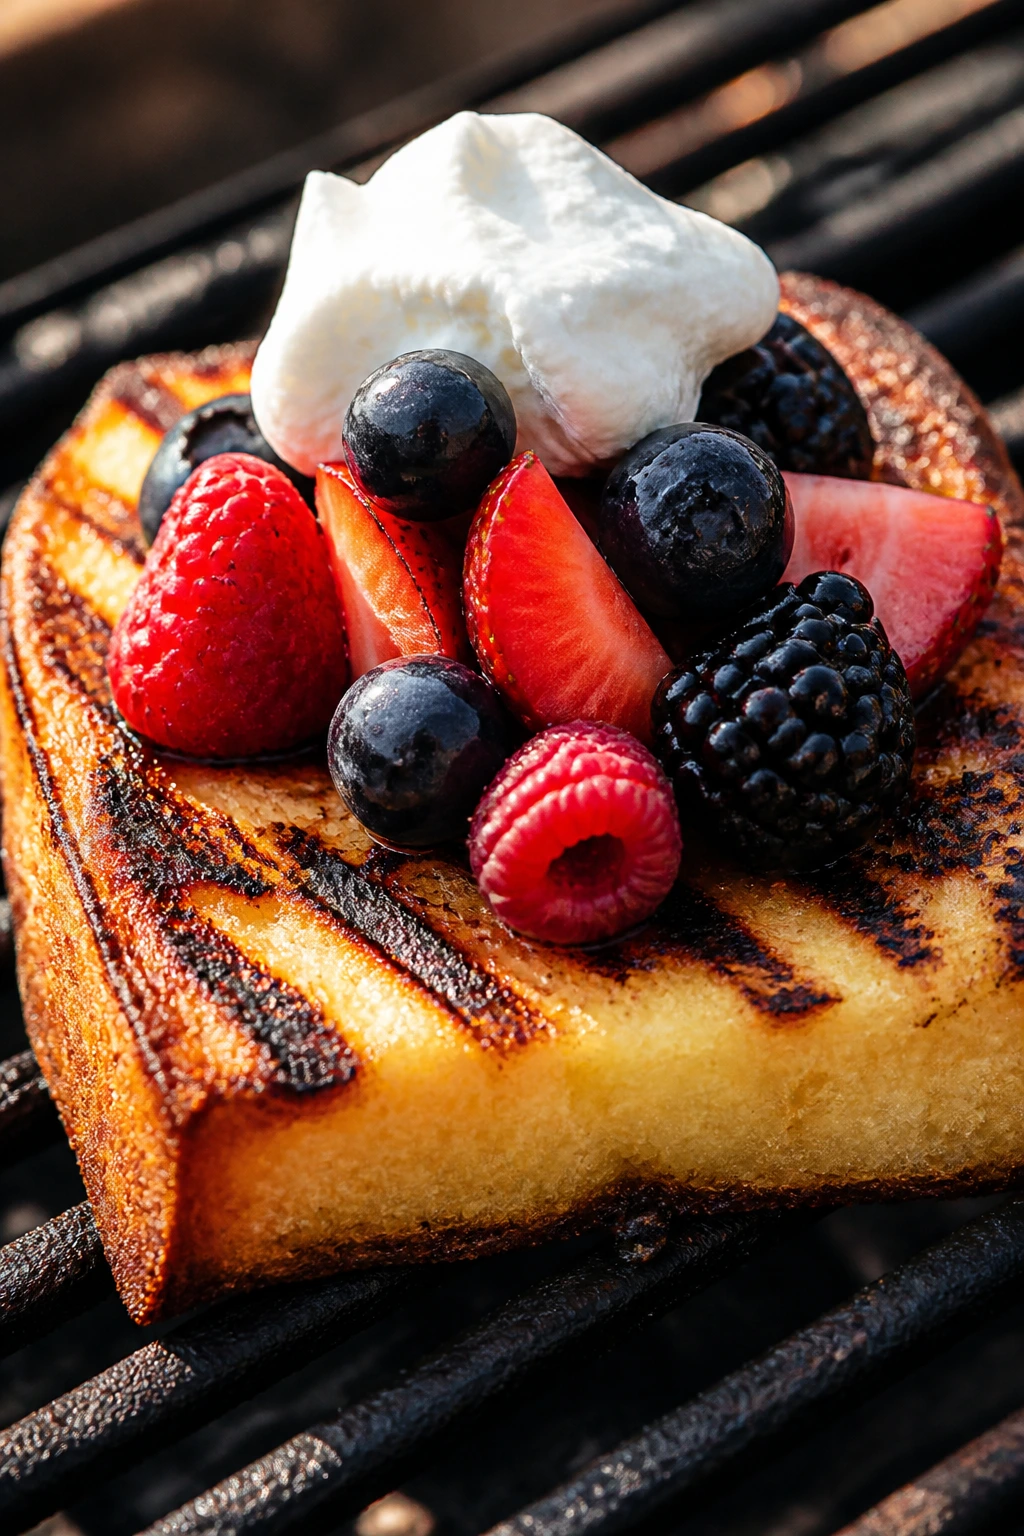
5. Grilled Pound Cake with Berries
Pound cake gets better with a little smoke. The outside crisps into a buttery shell while the inside stays dense and tender, which means it can carry berries, cream, or whatever fruit you’ve got sitting in the fridge. Honestly, this is one of the easiest ways to make a store-bought cake feel like a plan.
Why It Works:
Dense cake holds up on the grill because it does not absorb heat as quickly as soft sponge. A light coat of butter creates a browned crust in under a minute, and the berries bring acidity that keeps the dessert from feeling heavy.
Key Ingredients:
- 8 slices pound cake, 1/2 inch thick
- 2 tablespoons melted butter
- 2 cups mixed berries
- 1 tablespoon sugar
- 1 teaspoon lemon juice
- 1/2 teaspoon vanilla extract
- Whipped cream or mascarpone, for serving
Quick Steps:
- Toss the berries with sugar, lemon juice, and vanilla, then let them sit while you grill.
- Heat the grill to medium and butter the cake slices on both sides.
- Grill the cake for 45 to 60 seconds per side until marked and lightly crisped.
- Spoon berries over the warm cake.
- Finish with cream or mascarpone and serve.
Equipment for This Recipe:
- Grill
- Wide spatula
- Mixing bowl
How to Serve This Dish:
Put two slices on each plate and spoon the berries over the top so the juices soak into the cake edges. If you want a cleaner look, serve the cream beside the cake instead of underneath.
Pro Tips for This Recipe:
- Day-old pound cake grills better than fresh, because it’s a little firmer.
- Keep the slices thick enough to flip cleanly.
- If the cake is browning too fast, move it to a cooler section of the grill.
Variations on This Dish:
- Peach Version: Swap the berries for sliced grilled peaches.
- Chocolate Finish: Drizzle warm chocolate sauce over the top.
- Lemon Cream Version: Add lemon zest to mascarpone.
Common Mistakes to Avoid with This Dish:
- Don’t grill soft, airy cake. It tears and sticks.
- Don’t walk away. Cake goes from toasted to burnt with almost no warning.
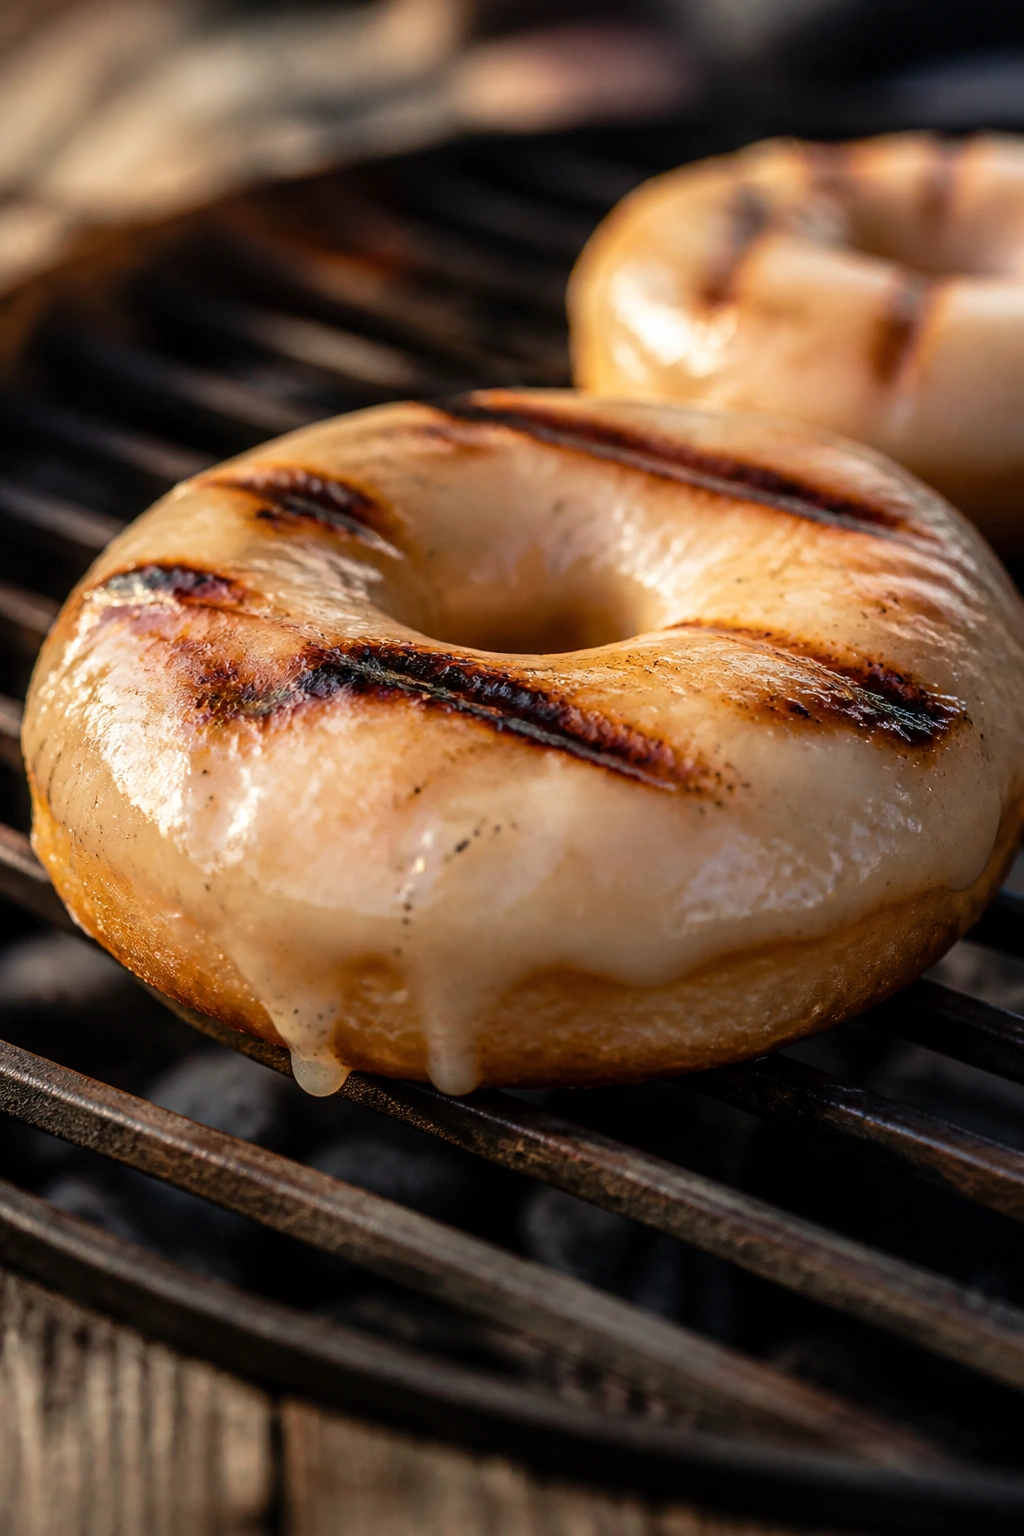
6. Grilled Vanilla Glazed Donuts
A grilled donut sounds odd until you try the first warm bite. The outside turns lightly crisp, the glaze melts into a thin shell, and the center stays plush. Use plain cake donuts here; fancy ones fight the grill.
Why It Works:
Cake donuts are dense enough to hold together over direct heat, and a brief grill session warms the crumb without drying it out. The glaze goes on after grilling so it stays glossy instead of burning.
Key Ingredients:
- 6 plain cake donuts, halved horizontally
- 2 tablespoons melted butter
- 1 cup powdered sugar
- 2 tablespoons milk
- 1 teaspoon vanilla extract
- Pinch of salt
- Sprinkles, optional
Quick Steps:
- Heat the grill to medium-low and oil it lightly.
- Whisk the powdered sugar, milk, vanilla, and salt into a smooth glaze.
- Brush the cut sides of the donuts with melted butter.
- Grill cut side down for 20 to 30 seconds, then flip for 10 seconds.
- Drizzle with glaze and serve while warm.
Equipment for This Recipe:
- Grill
- Small whisk
- Pastry brush
How to Serve This Dish:
Set the donuts on a rack or platter and glaze them right before serving. A few fresh berries beside them cut through the sweetness and keep the plate from feeling sticky.
Pro Tips for This Recipe:
- Use day-old donuts; they hold their shape better.
- Keep the grill heat modest. Sugar burns fast on donuts.
- If you want a cleaner finish, use a squeeze bottle for the glaze.
Variations on This Dish:
- Cinnamon-Sugar Donuts: Skip the glaze and toss with cinnamon sugar after grilling.
- Berry Glaze Donuts: Replace half the milk with berry puree.
- Maple Version: Swap vanilla glaze for maple icing.
Common Mistakes to Avoid with This Dish:
- Don’t use filled donuts; the filling leaks out and scorches.
- Don’t grill over hot flames. A short scorch ruins the whole thing.
7. Ricotta-Stuffed Grilled Apricots
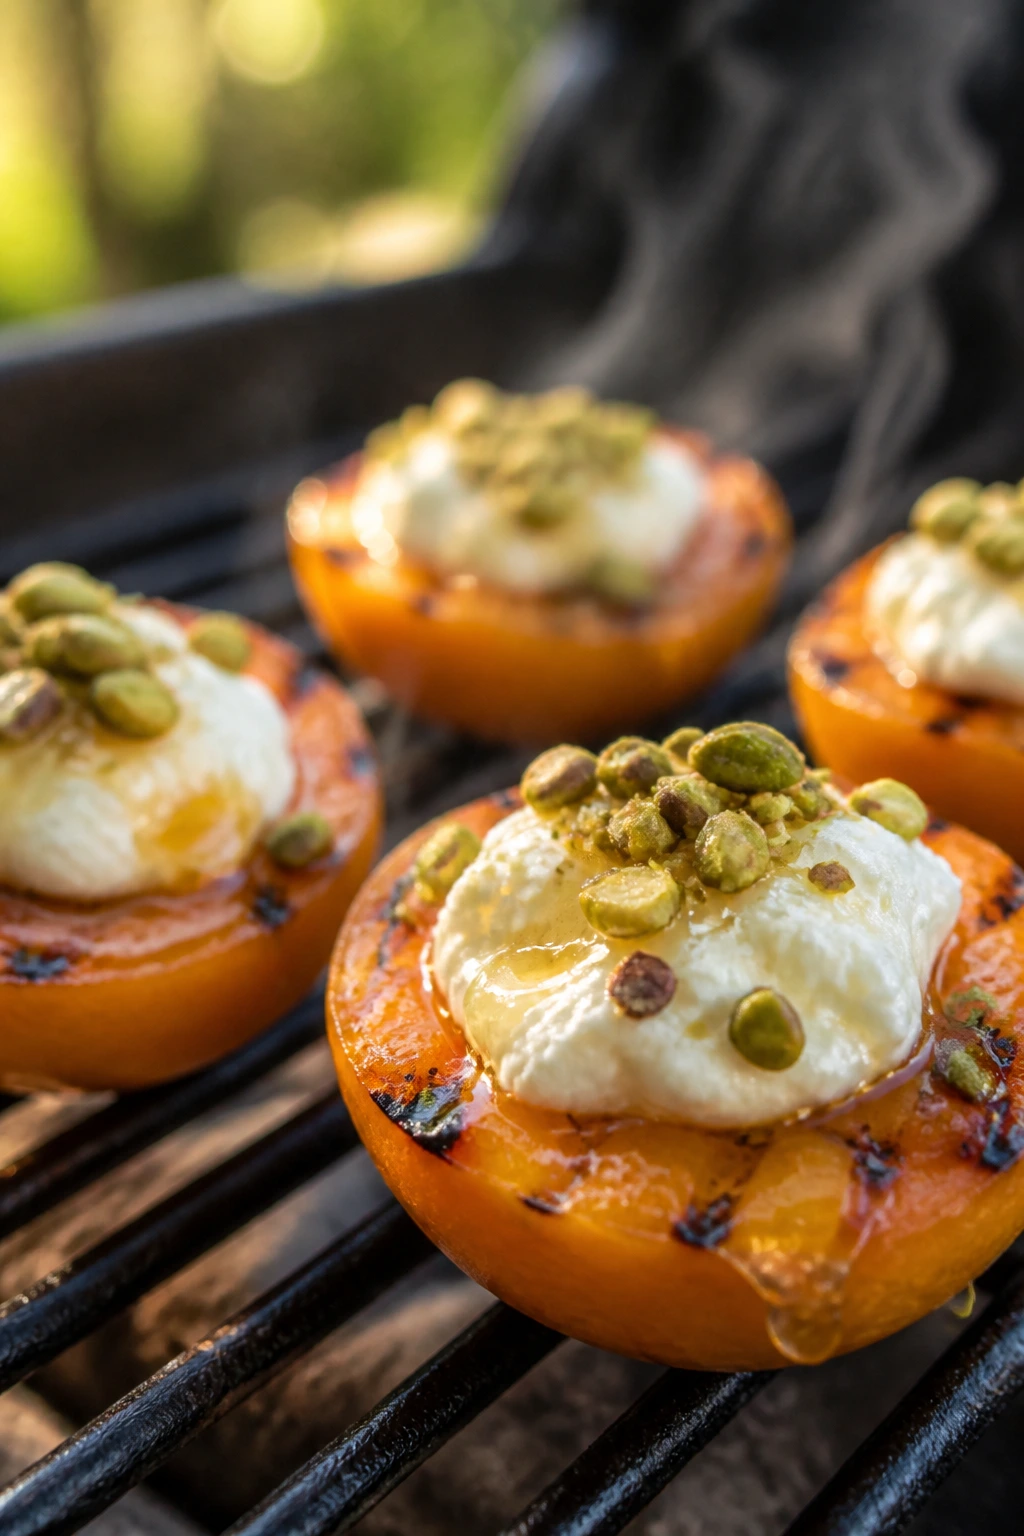
Apricots are one of the best grill fruits because they’re small, fragrant, and willing to caramelize fast. The ricotta turns the dish creamy, the honey makes the filling shine, and the pistachios give you a little crunch at the end. It’s a tidy dessert, which is nice for once.
Why It Works:
Apricots soften quickly, so they need only a short time cut side down. Filling them after grilling keeps the ricotta from weeping and lets the fruit keep its shape.
Key Ingredients:
- 8 ripe apricots, halved and pitted
- 1 cup whole-milk ricotta
- 2 tablespoons honey
- 1 teaspoon lemon zest
- 1/4 teaspoon vanilla extract
- 2 tablespoons chopped pistachios
- Olive oil, for brushing
Quick Steps:
- Mix the ricotta, honey, lemon zest, and vanilla.
- Brush the apricot halves with a little olive oil.
- Grill cut side down for 2 to 3 minutes until marked and just softened.
- Spoon the ricotta mixture into each apricot half.
- Finish with pistachios and a drizzle of honey.
Equipment for This Recipe:
- Grill
- Spoon
- Small bowl
How to Serve This Dish:
Serve three or four apricot halves per person as a light dessert. A tiny drizzle of extra honey right before serving makes the filling look glossy and warm.
Pro Tips for This Recipe:
- Choose apricots that are ripe but still hold a firm edge.
- Chill the ricotta filling if you want a thicker, neater spoonful.
- A grill basket helps if your apricots are small and prone to rolling.
Variations on This Dish:
- Goat Cheese Swap: Use whipped goat cheese instead of ricotta.
- Almond Version: Add almond extract and sliced almonds.
- Berry Stuffed Version: Fold chopped strawberries into the filling.
Common Mistakes to Avoid with This Dish:
- Don’t overfill the apricots before grilling. The cheese can slide out.
- Don’t wait until the fruit is collapsing; apricots need structure.
8. Vanilla Yogurt Grilled Plums
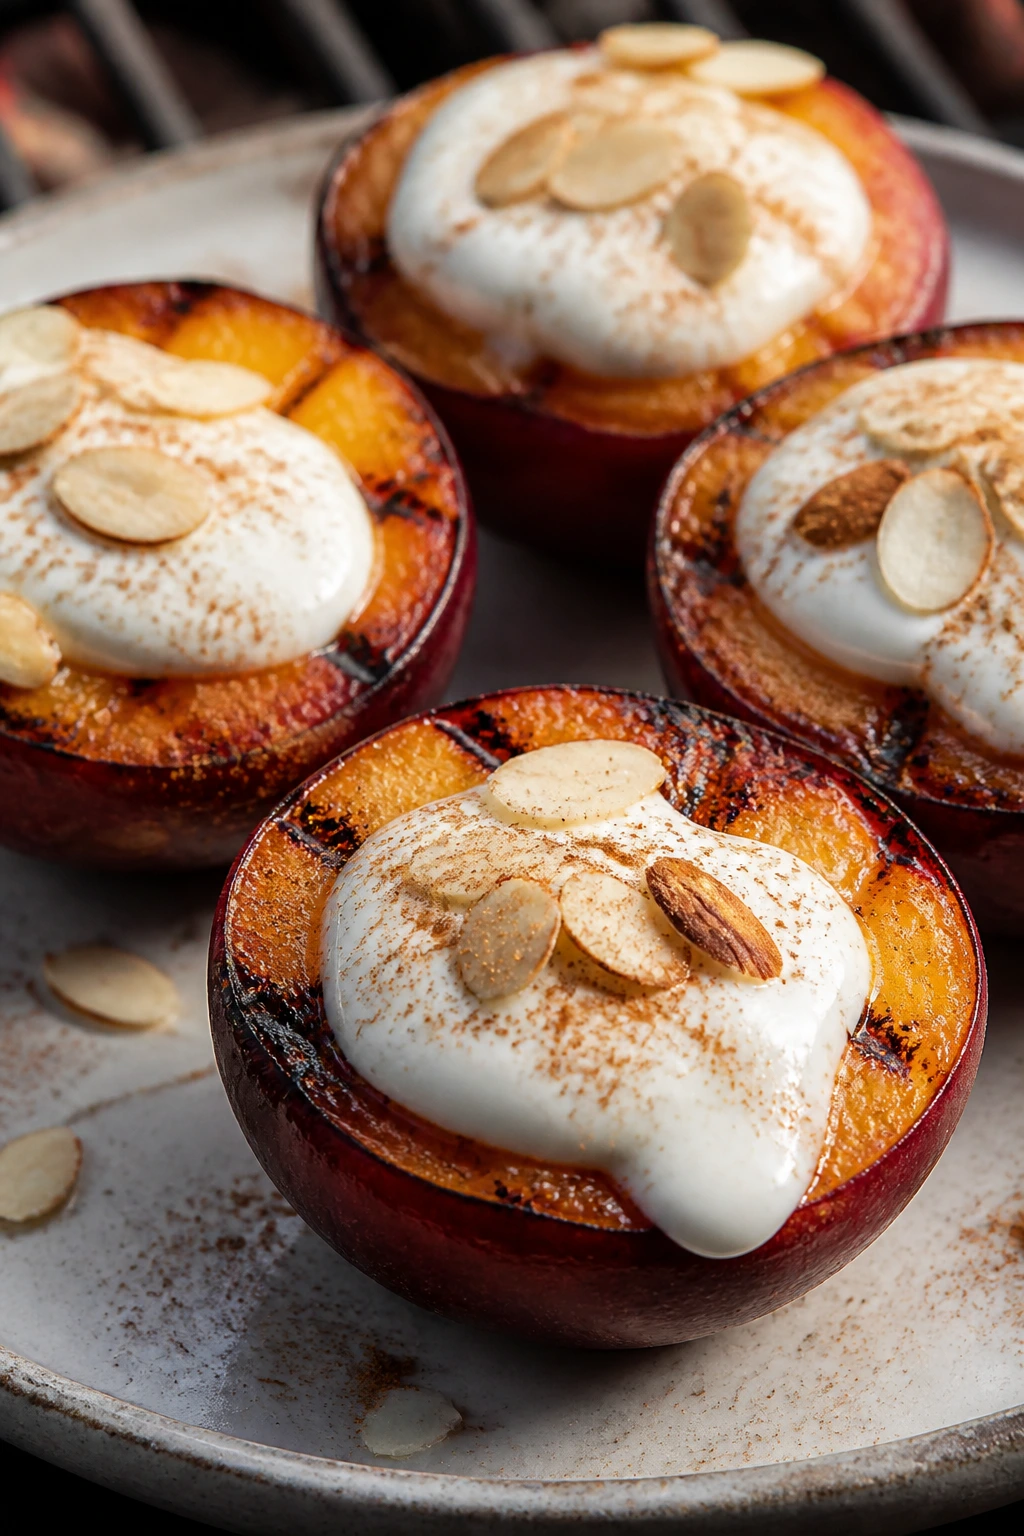
Plums on the grill smell faintly floral and taste deeper than you’d expect from such a small fruit. The skins tighten a bit, the flesh softens, and the vanilla yogurt gives the plate a cool, creamy edge. I like this one when I want something that feels light but not thin.
Why It Works:
Plums have enough sugar and acid to hold up to heat without becoming bland. The grill concentrates the juices, and the yogurt adds a cold contrast that makes each bite feel balanced.
Key Ingredients:
- 6 ripe plums, halved and pitted
- 1 tablespoon melted butter or neutral oil
- 1 cup vanilla Greek yogurt
- 1 tablespoon honey
- 1/2 teaspoon cinnamon
- 2 tablespoons sliced almonds
- Pinch of salt
Quick Steps:
- Whisk the yogurt, honey, cinnamon, and salt together.
- Brush the plum halves with butter or oil.
- Grill cut side down for 2 minutes, then flip for 1 minute.
- Spoon yogurt onto a platter or into bowls.
- Top with warm plums and sliced almonds.
Equipment for This Recipe:
- Grill
- Spoon
- Small bowl
How to Serve This Dish:
Serve warm plums over a smear of yogurt, or let people build their own bowls. A few extra almond slices on top help the dish finish with crunch instead of turning soft all the way through.
Pro Tips for This Recipe:
- Plums should feel firm enough to cut cleanly.
- If they’re very juicy, grill them cut side down only and stop there.
- Toast the almonds for a minute in a dry pan if you want more aroma.
Variations on This Dish:
- Maple Yogurt Plums: Use maple syrup instead of honey.
- Cardamom Version: Add a pinch of cardamom to the yogurt.
- Dairy-Free Bowl: Swap in coconut yogurt.
Common Mistakes to Avoid with This Dish:
- Don’t use overly soft plums; they fall apart when flipped.
- Don’t drown the fruit in yogurt. The grill flavor gets lost.
9. Coconut-Lime Mango Halves
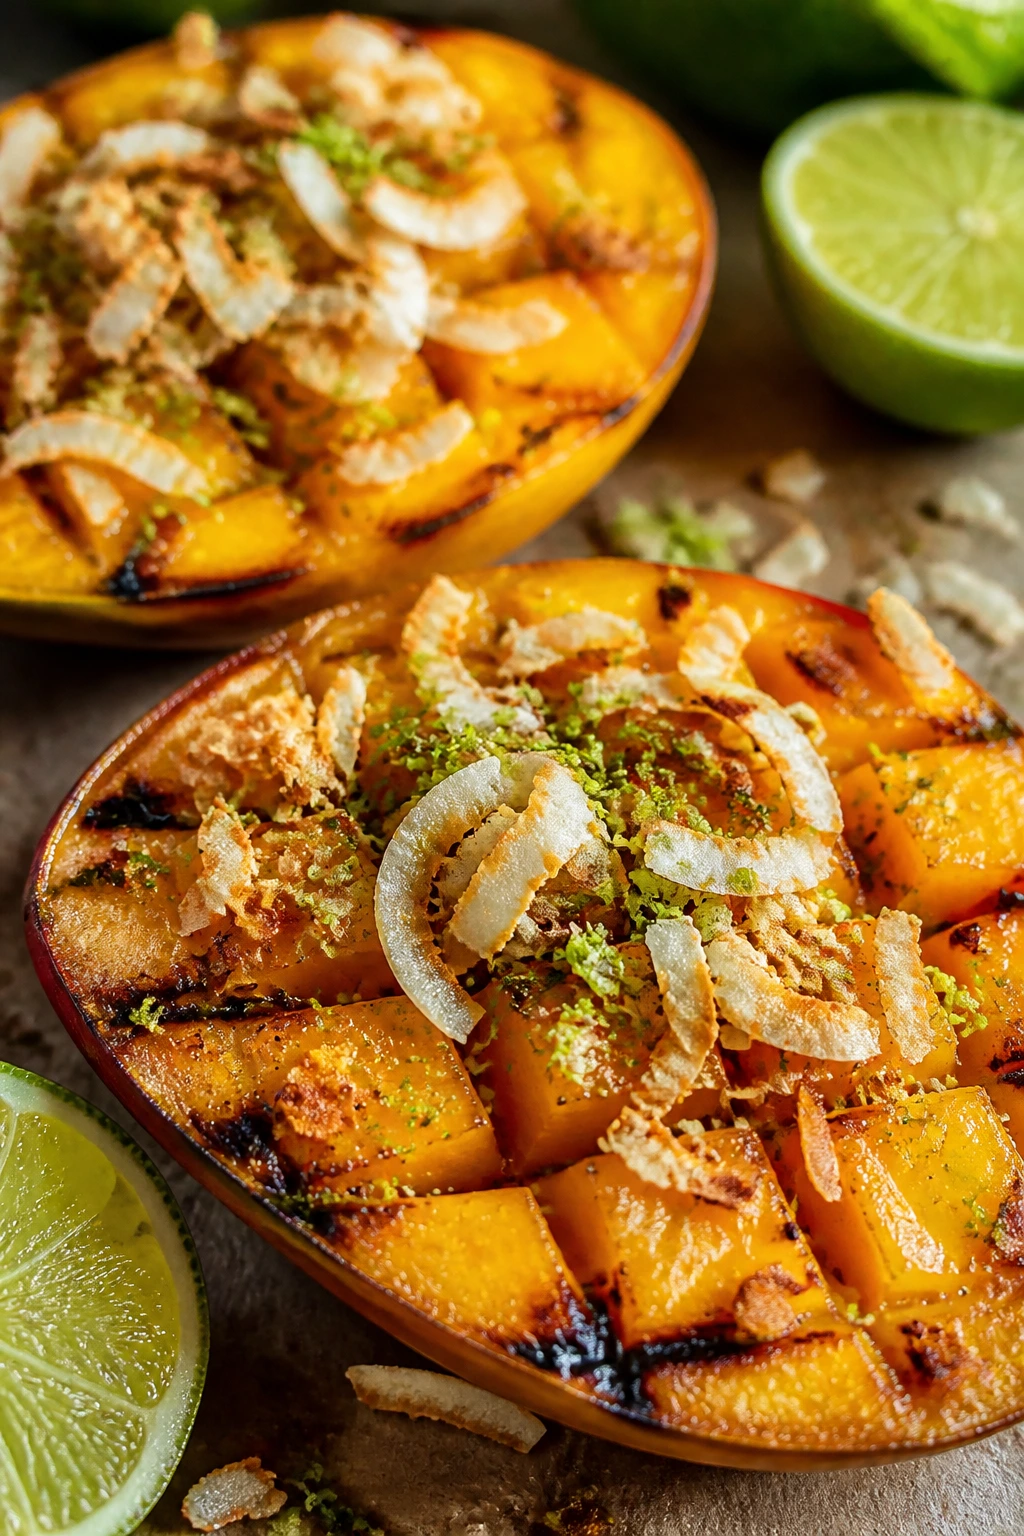
Mango on the grill is sticky, fragrant, and a little wild. The flesh picks up a smoky edge, then the lime cuts straight through with brightness. Coconut gives it a tropical finish that still tastes like food, not perfume, which matters.
Why It Works:
Mango’s high sugar content browns fast, so short contact with the grill is enough. Coconut oil helps the fruit release cleanly, and lime keeps the sweetness from flattening.
Key Ingredients:
- 2 large mangoes, peeled and halved or cut into thick cheeks
- 1 tablespoon coconut oil, melted
- 1 tablespoon lime juice
- 2 tablespoons toasted shredded coconut
- 1 teaspoon honey
- Pinch of flaky salt
Quick Steps:
- Preheat the grill to medium-high and oil the grate.
- Brush the mango pieces with coconut oil.
- Grill cut side down for 2 minutes, until marked and warm.
- Transfer to a plate, drizzle with lime juice and honey.
- Finish with toasted coconut and flaky salt.
Equipment for This Recipe:
- Grill
- Pastry brush
- Tongs
How to Serve This Dish:
Serve the mango warm with a spoonful of coconut yogurt or plain yogurt. If you want a cleaner presentation, slice the cheeks after grilling and fan them on the plate.
Pro Tips for This Recipe:
- Choose mangoes that are ripe but not collapsing.
- Keep the pieces large so they don’t fall through the grate.
- Toast the coconut beforehand; it tastes flat if it goes on raw.
Variations on This Dish:
- Chili-Lime Mango: Add a pinch of chili powder.
- Ice Cream Version: Serve with coconut or vanilla ice cream.
- Mint Finish: Add torn mint after grilling.
Common Mistakes to Avoid with This Dish:
- Don’t grill mango too long; it turns mushy fast.
- Don’t skip the oil. Mango sticks harder than people expect.
10. S’mores Foil-Pack Nachos
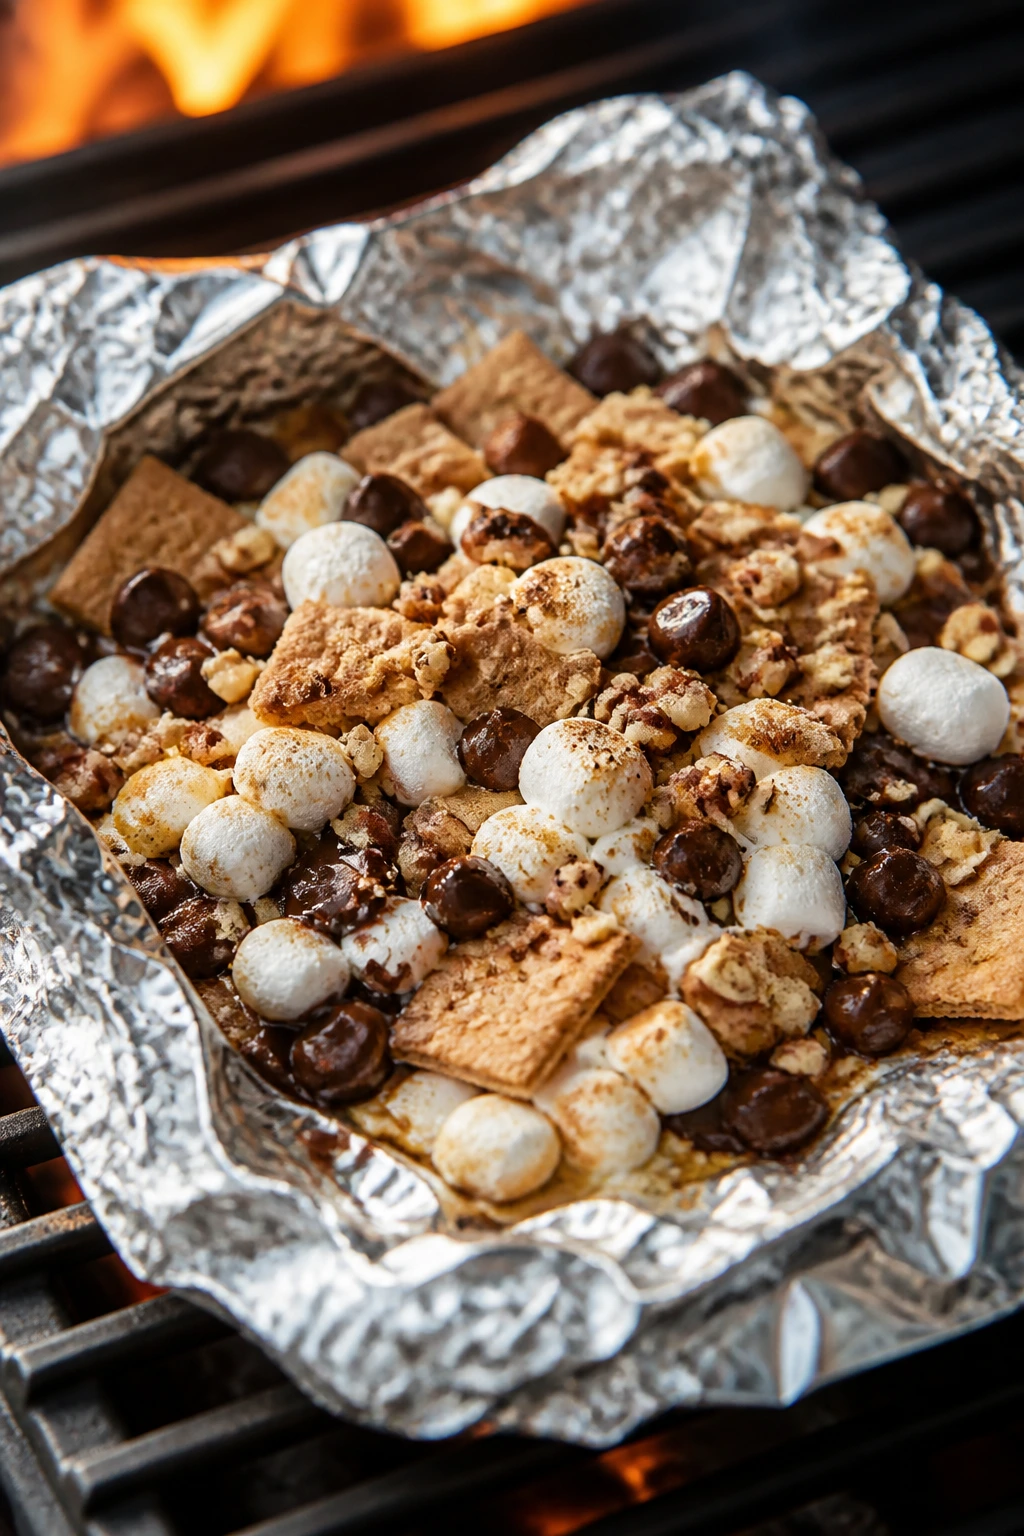
This is the messy dessert that disappears first. Broken graham crackers become the base, chocolate melts into the cracks, and the marshmallows puff and brown just enough to feel toasted instead of scorched. The foil keeps everything contained, which means you get all the fun without losing half the batch through the grate.
Why It Works:
Foil gives the ingredients a shallow oven effect while still picking up a little grill flavor. The mix of textures — crisp cracker, molten chocolate, sticky marshmallow — is what makes the whole thing work.
Key Ingredients:
- 8 graham crackers, broken into chunks
- 1 cup mini marshmallows
- 1 cup chocolate chips
- 2 tablespoons chopped peanuts or pecans
- 1 tablespoon butter, melted
- 1/4 teaspoon flaky salt
- Strawberries or banana slices, optional
Quick Steps:
- Lay a large sheet of heavy-duty foil flat and brush lightly with butter.
- Scatter the graham crackers, chocolate chips, marshmallows, nuts, and salt in the center.
- Fold the foil into a loose packet, leaving a little air inside.
- Grill over medium heat for 5 to 7 minutes until the marshmallows puff and the chocolate softens.
- Open carefully and eat with spoons.
Equipment for This Recipe:
- Heavy-duty foil
- Grill
- Heatproof spatula
How to Serve This Dish:
Set the foil packet in the middle of the table and let people scoop straight from it. If you want to dress it up, add sliced strawberries or banana around the edges before closing the packet.
Pro Tips for This Recipe:
- Use a double layer of foil if your packet sits near strong flames.
- Keep the packet shallow so the heat reaches the top evenly.
- Add fruit only if you want extra moisture; too much makes the crackers soggy.
Variations on This Dish:
- Peanut Butter Swirl: Drizzle peanut butter over the chips before closing.
- Cookies and Cream Version: Use crushed chocolate sandwich cookies instead of grahams.
- Salted Pretzel Twist: Swap half the crackers for pretzel pieces.
Common Mistakes to Avoid with This Dish:
- Don’t overfill the foil. The chocolate needs space to melt.
- Don’t open the packet with your face directly over it; the steam is hot.
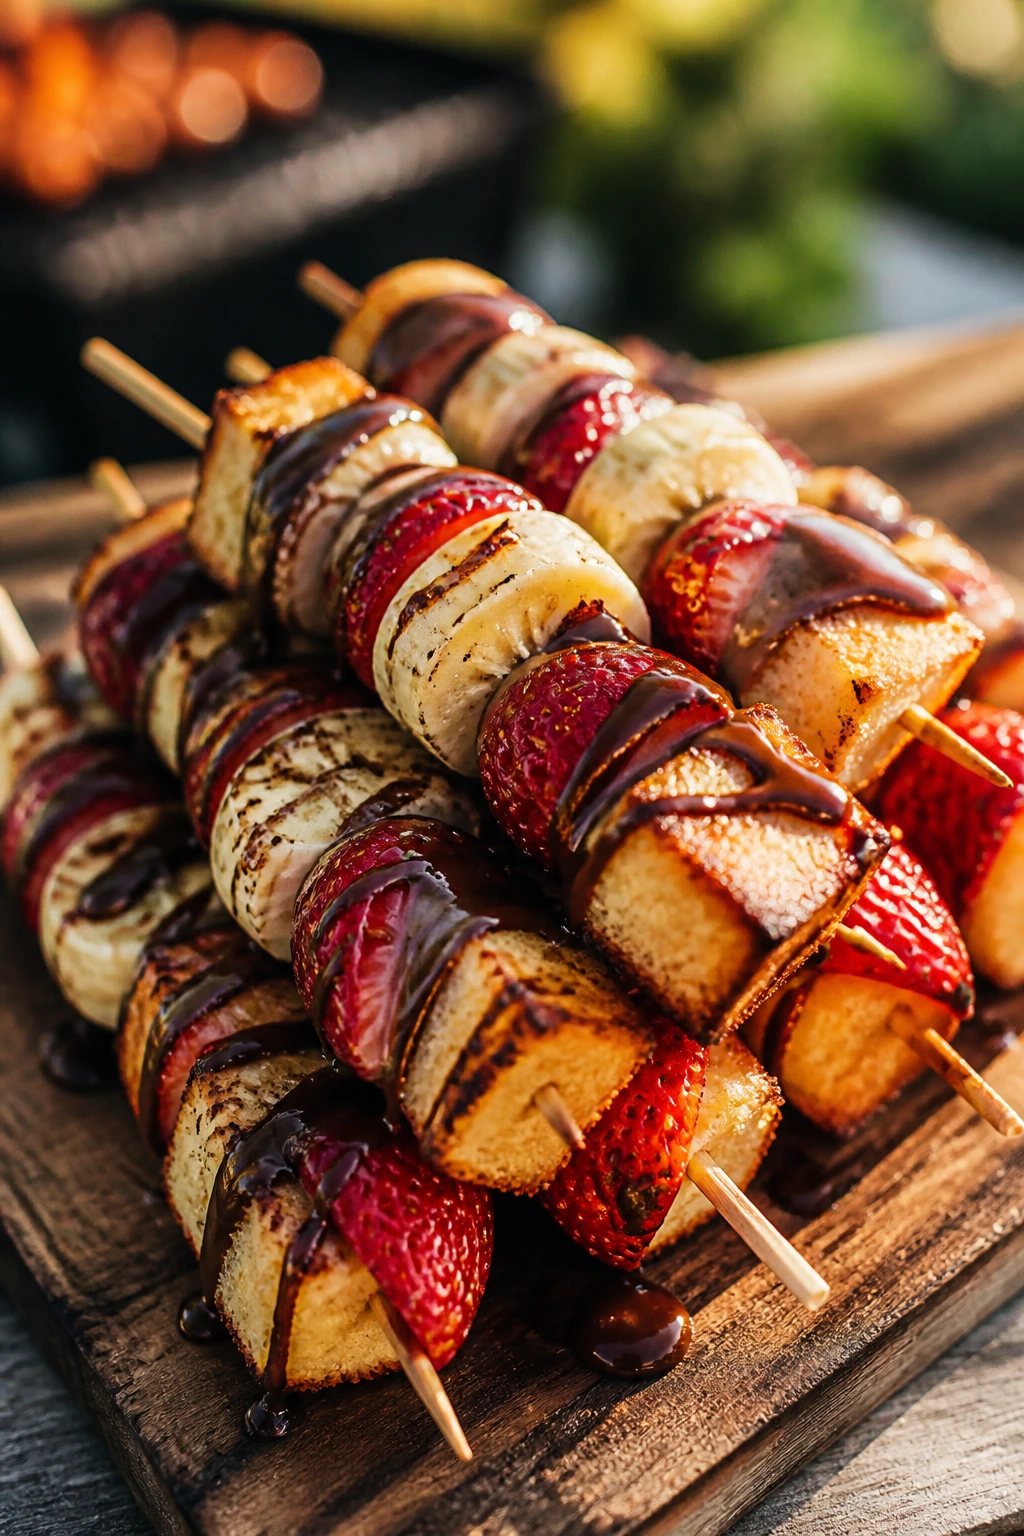
11. Strawberry Shortcake Skewers
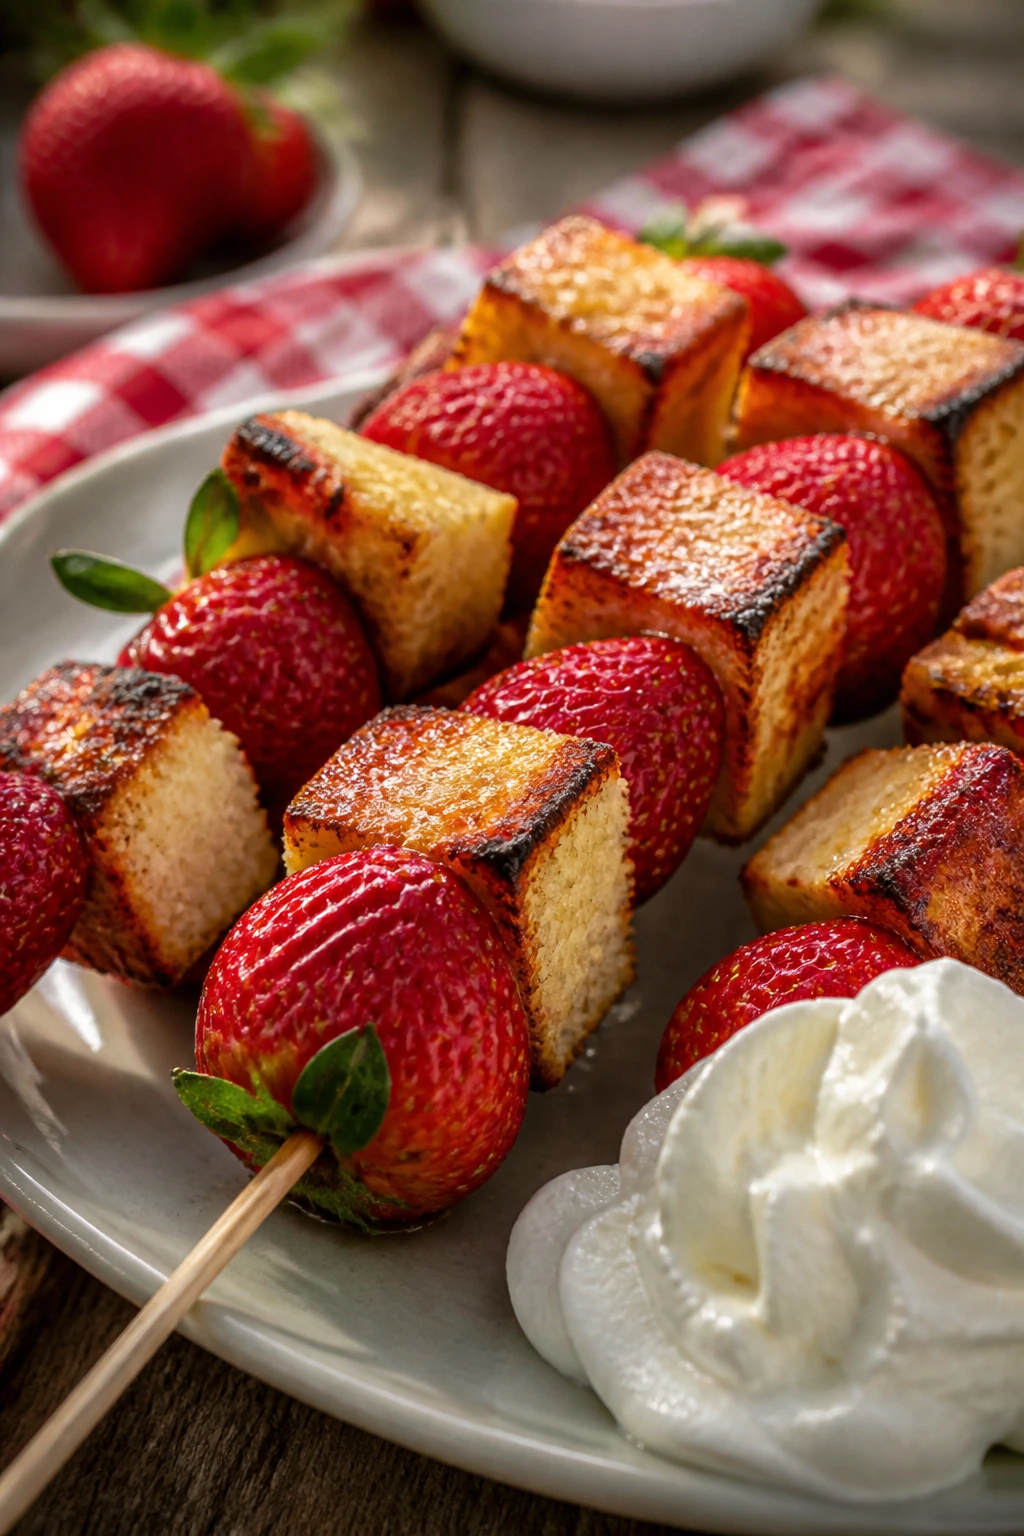
Shortcake on a stick sounds a little playful, and that’s the point. Warm cake, juicy strawberries, and cream on the side make a dessert that feels built for a cookout platter. The grill gives the cake edges a toasted finish so the whole skewer tastes layered instead of flat.
Why It Works:
Skewers keep the pieces easy to handle and give you quick, even browning on the cake. Strawberries don’t need much heat, just enough to perfume the fruit and soften the surface.
Key Ingredients:
- 8 strawberries, hulled
- 8 cubes pound cake, about 1 inch each
- 2 tablespoons melted butter
- 1 tablespoon sugar
- 1 cup whipped cream
- 1 teaspoon lemon zest
- Wooden skewers, soaked if using bamboo
Quick Steps:
- Toss the strawberries with sugar and lemon zest.
- Thread strawberries and pound cake cubes onto skewers, alternating pieces.
- Brush the cake lightly with melted butter.
- Grill over medium heat for 1 minute per side, turning once.
- Serve with whipped cream.
Equipment for This Recipe:
- Skewers
- Grill
- Pastry brush
How to Serve This Dish:
Serve two skewers per person with whipped cream in a bowl for dipping. A handful of extra berries on the side makes the plate look fuller without extra work.
Pro Tips for This Recipe:
- Use firm cake cubes so they stay on the skewer.
- Cut the strawberries to a similar size so the skewers cook evenly.
- If the fruit is very juicy, pat it dry before threading.
Variations on This Dish:
- Chocolate Dip Version: Serve with melted chocolate instead of cream.
- Blueberry Swap: Mix blueberries in with the strawberries.
- Lemon Cake Version: Use lemon pound cake for a sharper finish.
Common Mistakes to Avoid with This Dish:
- Don’t use too much butter on the cake; it can drip and flare.
- Don’t crowd the skewers so tightly that the heat can’t reach the middle.
12. Brown Sugar Nectarines with Mascarpone
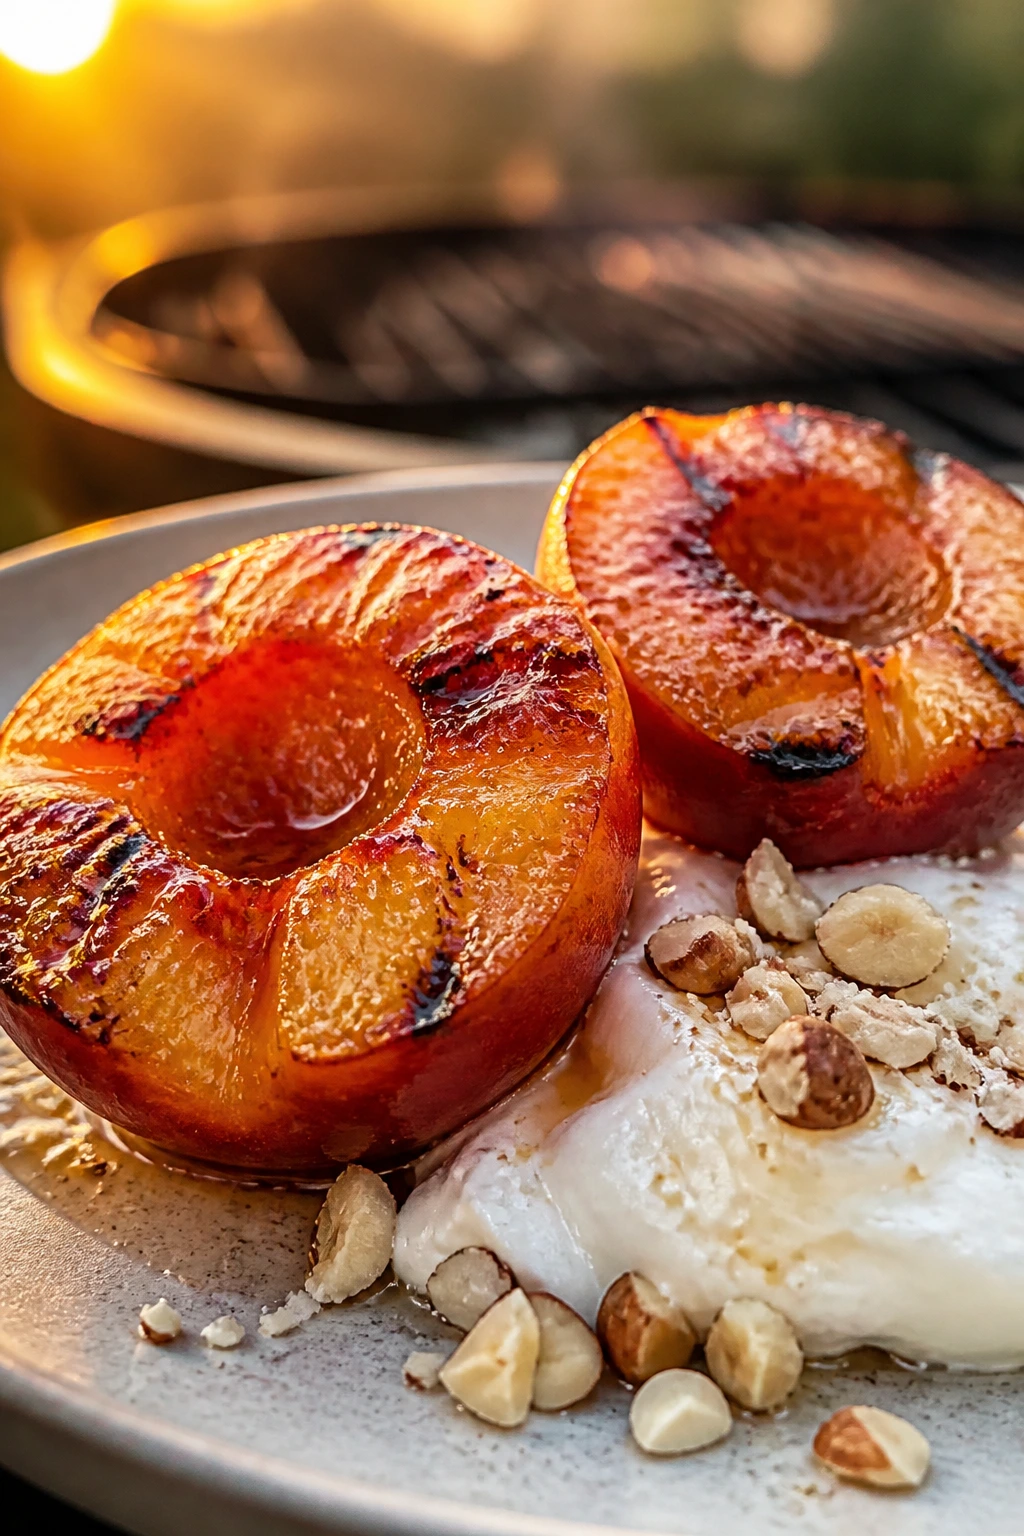
Nectarines give you the same sugar-and-heat pleasure as peaches, but without the fuzz and with a slightly firmer bite. Once they hit the grill, the edges go glossy and the flesh turns almost jammy near the center. Mascarpone underneath is a smart move; it keeps the dessert cool and rich.
Why It Works:
Nectarines caramelize quickly, and brown sugar helps pull the flavor toward butterscotch. The mascarpone softens the char and gives you a creamy base that doesn’t taste too sweet.
Key Ingredients:
- 4 nectarines, halved and pitted
- 2 tablespoons brown sugar
- 1 tablespoon melted butter
- 1/2 teaspoon vanilla extract
- 1 cup mascarpone
- 1 tablespoon honey
- 2 tablespoons chopped hazelnuts or pistachios
Quick Steps:
- Mix the mascarpone with honey and vanilla.
- Stir the brown sugar into the melted butter.
- Brush the nectarines with the brown sugar mixture.
- Grill cut side down for 2 to 3 minutes until marked and softened.
- Spoon mascarpone onto plates and set the nectarines on top, then finish with nuts.
Equipment for This Recipe:
- Grill
- Small bowl
- Spoon
How to Serve This Dish:
Serve one nectarine half over a thick swipe of mascarpone, then scatter nuts around the plate. If you want it less rich, thin the mascarpone with a teaspoon of milk.
Pro Tips for This Recipe:
- Choose nectarines that smell sweet at the stem end.
- Chill the mascarpone slightly so it holds its shape.
- If the grill is running hot, move the fruit to indirect heat after the first mark.
Variations on This Dish:
- Maple Cream Version: Use maple syrup instead of honey in the mascarpone.
- Cinnamon Nut Version: Add cinnamon to the brown sugar mix.
- Dairy-Free Version: Use coconut cream with a little honey.
Common Mistakes to Avoid with This Dish:
- Don’t use nectarines that are bruised or too soft.
- Don’t overdo the sugar; a thin coating is enough for browning.
13. Honey Pistachio Grilled Figs
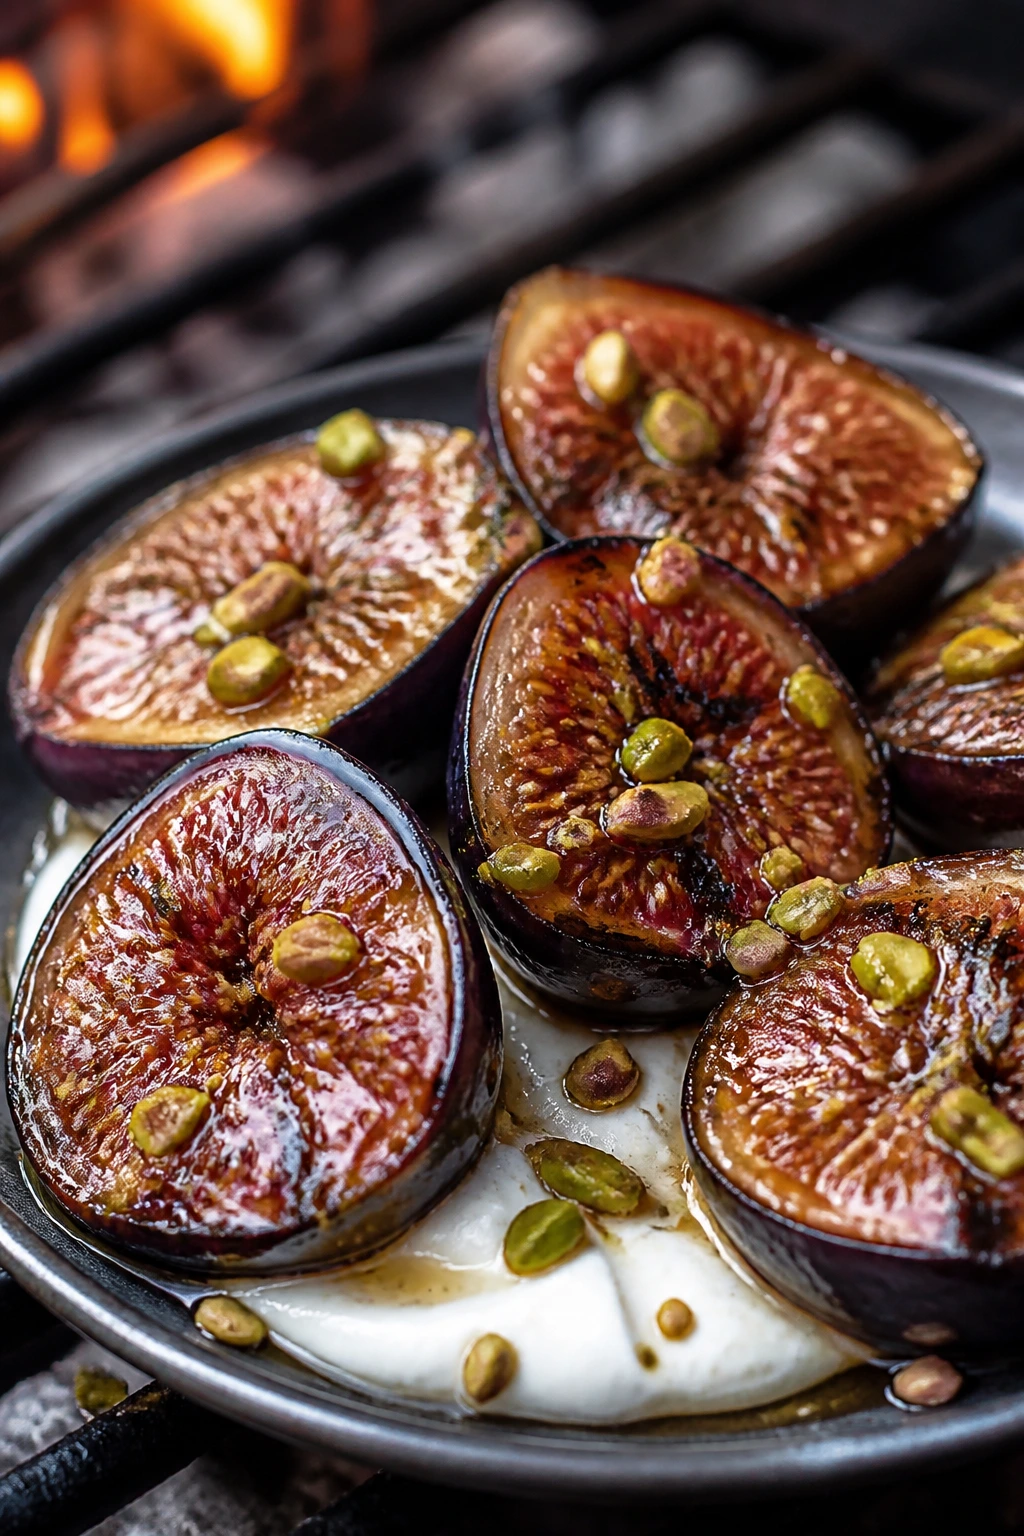
Figs on the grill are tiny, dramatic little things. The centers go soft and jammy, the skins wrinkle, and honey turns into a shiny glaze that catches on the edges. Pistachios give the plate some bite, which is useful because fig flesh can get very soft.
Why It Works:
Figs have delicate skins but rich flesh, so short heat is enough to wake them up. Grill them cut side down and you get a concentrated sweetness without them falling apart.
Key Ingredients:
- 12 fresh figs, halved
- 1 tablespoon olive oil
- 2 tablespoons honey
- 2 tablespoons chopped pistachios
- 1/2 cup plain Greek yogurt or mascarpone
- Pinch of salt
- 1/2 teaspoon lemon zest
Quick Steps:
- Whisk the honey with lemon zest and a pinch of salt.
- Brush the cut figs lightly with olive oil.
- Grill cut side down for 1 to 2 minutes until marked and warm.
- Spoon yogurt or mascarpone onto a plate.
- Arrange the figs on top, drizzle with honey, and finish with pistachios.
Equipment for This Recipe:
- Grill
- Pastry brush
- Small spoon
How to Serve This Dish:
Serve as a light dessert or a rich snack with strong coffee. A little extra honey at the end makes the figs gleam, but stop before the plate becomes syrupy.
Pro Tips for This Recipe:
- Pick figs that are ripe but still intact at the stem.
- Use a clean, well-oiled grate; figs stick fast.
- If the figs are tiny, use a grill basket.
Variations on This Dish:
- Blue Cheese Finish: Add a crumble of mild blue cheese instead of yogurt.
- Walnut Version: Swap pistachios for toasted walnuts.
- Citrus Honey Version: Add orange zest to the honey.
Common Mistakes to Avoid with This Dish:
- Don’t flip figs over and over; they bruise quickly.
- Don’t keep them on the heat long enough to burst open.
14. Peanut Butter Banana Sandwiches
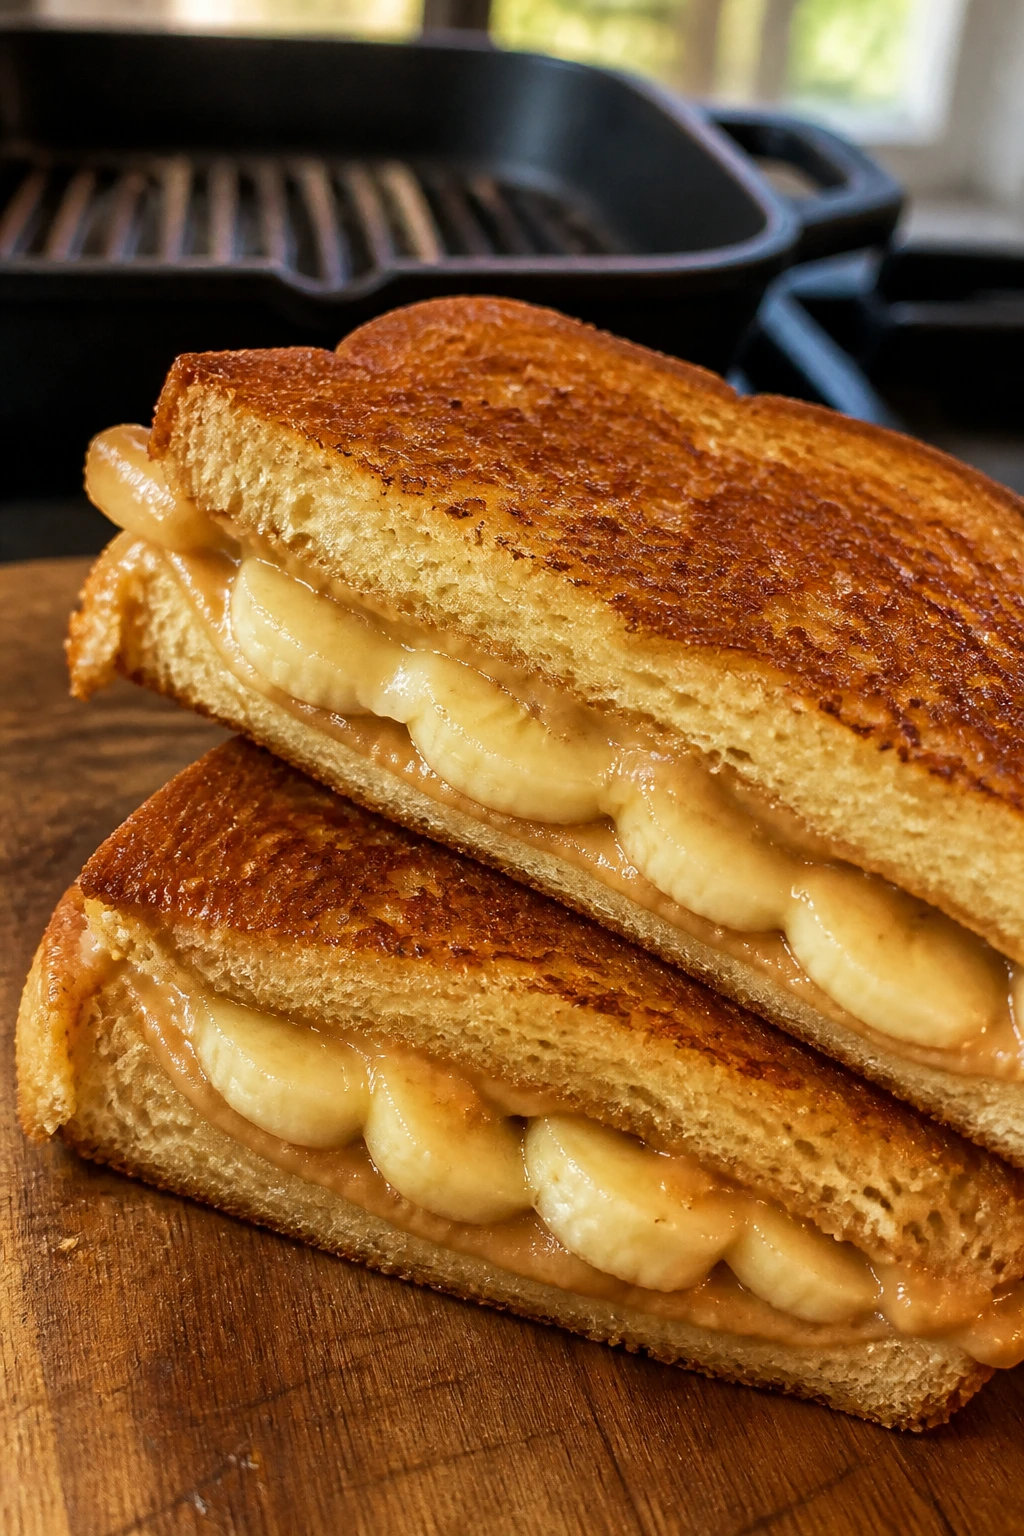
This one feels like a childhood snack dressed up for the grill. The bread gets crisp, the peanut butter turns warm and loose, and the banana softens into a sweet, almost custard-like layer. Cut them diagonally and they look a little more intentional, which helps.
Why It Works:
Banana and peanut butter already make sense together; grilling adds texture. The bread protects the filling and browns before the banana breaks down.
Key Ingredients:
- 8 slices brioche or thick sandwich bread
- 1/2 cup peanut butter
- 2 bananas, sliced
- 2 tablespoons butter, softened
- 1 teaspoon honey
- 1/4 teaspoon cinnamon
- Pinch of salt
Quick Steps:
- Spread peanut butter on 4 slices of bread.
- Top with banana slices, honey, cinnamon, and a pinch of salt.
- Close the sandwiches and butter the outsides.
- Grill over medium heat for 2 to 3 minutes per side until golden and crisp.
- Slice and serve warm.
Equipment for This Recipe:
- Grill or grill pan
- Spatula
- Butter knife
How to Serve This Dish:
Serve half a sandwich per person with cold milk, iced coffee, or fruit on the side. If you want a dessert version, dust the outside with powdered sugar after grilling.
Pro Tips for This Recipe:
- Use thick bread so the sandwich doesn’t collapse.
- A thin peanut butter layer is enough; too much leaks.
- If you prefer, grill the sandwich in a cast-iron skillet set on the grill.
Variations on This Dish:
- Chocolate Banana Version: Add chocolate chips.
- Almond Butter Swap: Use almond butter and a little orange zest.
- Savory-Sweet Version: Add bacon and skip the honey.
Common Mistakes to Avoid with This Dish:
- Don’t use very soft bread; it compresses and tears.
- Don’t grill too hot or the bread burns before the banana warms.
15. Pineapple Sundae Boats
Pineapple boats feel playful in a way rings never do. You grill the fruit in larger slabs, then top the warm surface with ice cream, yogurt, or coconut cream so the heat and cold meet in one bite. It’s a little theatrical, which is part of the fun.
Why It Works:
A wider cut gives you more surface for char and more room for toppings. The pineapple holds a shape like a shallow bowl, which makes it useful for sundaes without needing extra dishes.
Key Ingredients:
- 1 fresh pineapple, peeled and cored into 4 long slabs
- 2 tablespoons brown sugar
- 1 tablespoon melted butter
- 1 teaspoon lime juice
- Vanilla ice cream or coconut yogurt
- Toasted coconut and maraschino cherries, optional
Quick Steps:
- Mix the brown sugar, butter, and lime juice.
- Brush the pineapple slabs with the mixture.
- Grill over medium heat for 2 to 3 minutes per side until marked and warm.
- Transfer to plates and top with ice cream or yogurt.
- Add toasted coconut or cherries if you want the full sundae feel.
Equipment for This Recipe:
- Grill
- Tongs
- Sharp knife
How to Serve This Dish:
Serve one pineapple slab per person, or slice each slab into smaller portions after grilling. It works best with a fork and spoon, because the fruit leaks a little as the ice cream melts.
Pro Tips for This Recipe:
- Keep the slabs thick enough to hold toppings.
- Grill over clean grates; pineapple sugar can stick like glue.
- Chill the serving plates if the weather is warm.
Variations on This Dish:
- Rum-Coconut Version: Add a teaspoon of rum to the glaze.
- Berry Sundae Version: Top with berry compote.
- Spice Version: Sprinkle with cinnamon and chili powder.
Common Mistakes to Avoid with This Dish:
- Don’t cut the pineapple too thin or the boats collapse.
- Don’t add ice cream too early if you want a neat plate.
16. Charred Cherry Skewers with Almond Cream
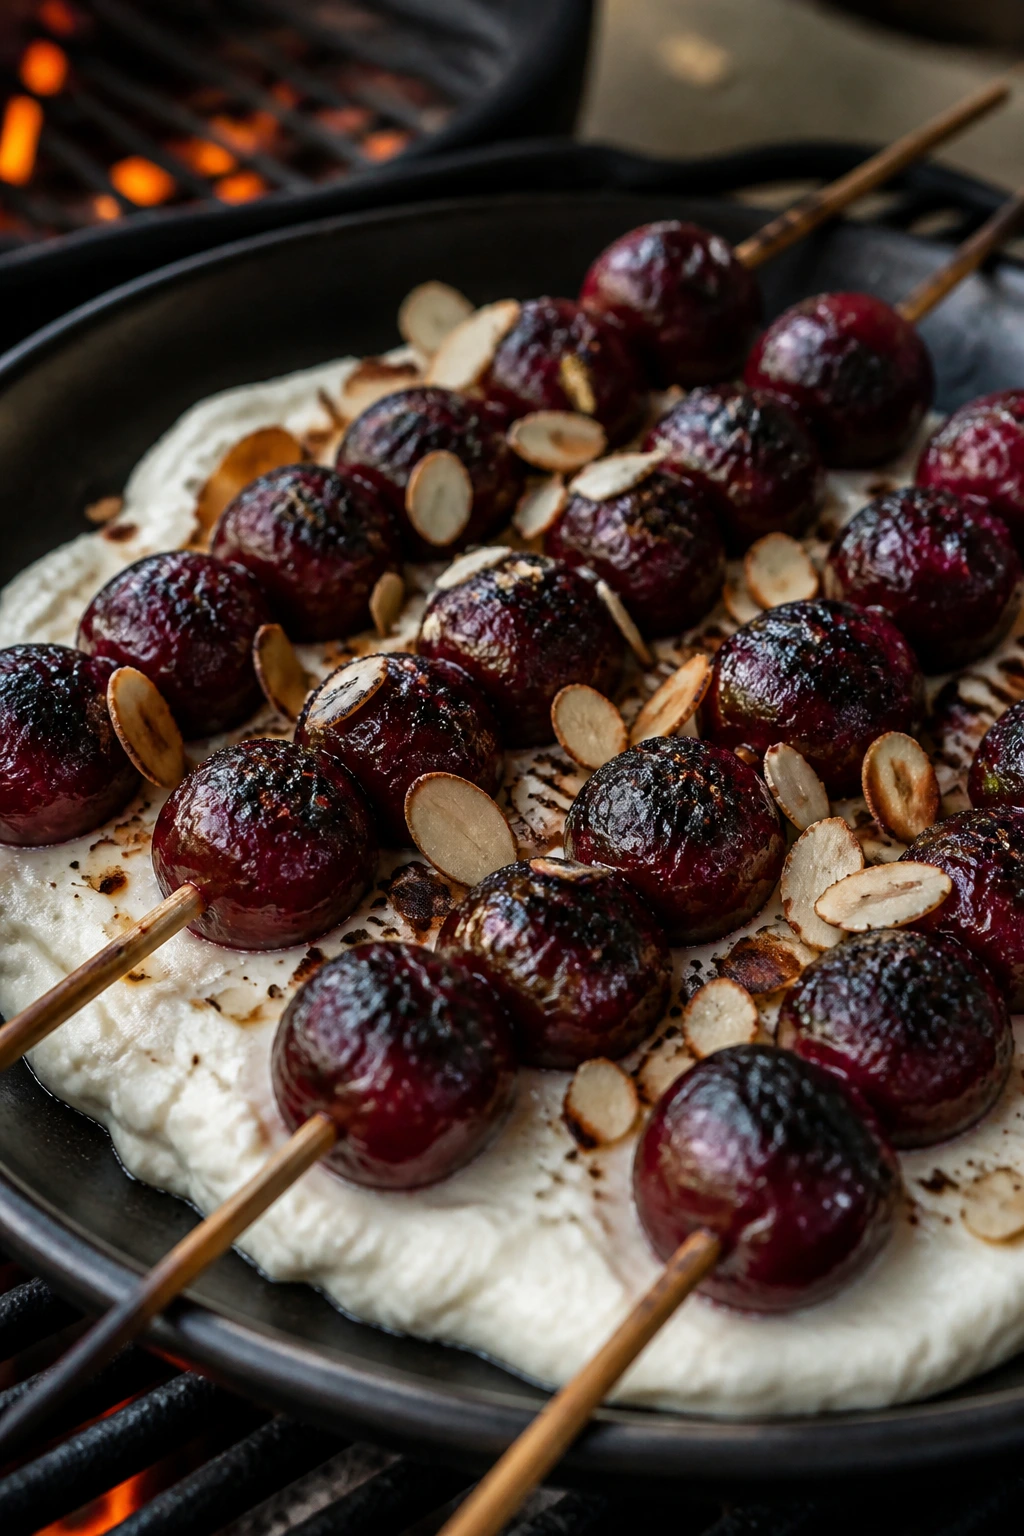
Cherries are a little unusual on the grill, which is exactly why they work. A short kiss of heat intensifies the juices, and the almond cream gives you a soft, nutty landing spot. If you’ve only eaten cherries raw, this will feel like a small surprise.
Why It Works:
Pitted cherries can take direct heat for a minute or two without falling apart. The almond cream gives structure, while a brush of honey helps the fruit gloss up instead of drying out.
Key Ingredients:
- 24 cherries, pitted
- 1 tablespoon honey
- 1 teaspoon olive oil
- 1 cup mascarpone
- 1/2 teaspoon almond extract
- 2 tablespoons sliced almonds, toasted
- Wooden skewers, soaked if needed
Quick Steps:
- Whisk the mascarpone with almond extract.
- Toss the cherries with honey and olive oil.
- Thread 4 to 6 cherries onto each skewer.
- Grill over medium heat for 1 to 2 minutes, turning once.
- Serve over almond cream and top with sliced almonds.
Equipment for This Recipe:
- Skewers
- Grill
- Small bowl
How to Serve This Dish:
Lay the skewers over a shallow pool of almond cream or serve them beside it for dipping. A few mint leaves keep the plate from feeling too heavy.
Pro Tips for This Recipe:
- Pit the cherries carefully so they stay intact.
- Use a grill basket if the skewers are short.
- Toast the almonds for a minute or two before serving.
Variations on This Dish:
- Vanilla Cream Version: Replace almond extract with vanilla.
- Yogurt Version: Use thick Greek yogurt instead of mascarpone.
- Balsamic Finish: Add a tiny splash of balsamic after grilling.
Common Mistakes to Avoid with This Dish:
- Don’t overcook the cherries; they turn jammy fast.
- Don’t skip the oil or they can stick to the skewer.
17. Watermelon-Feta-Mint Skewers
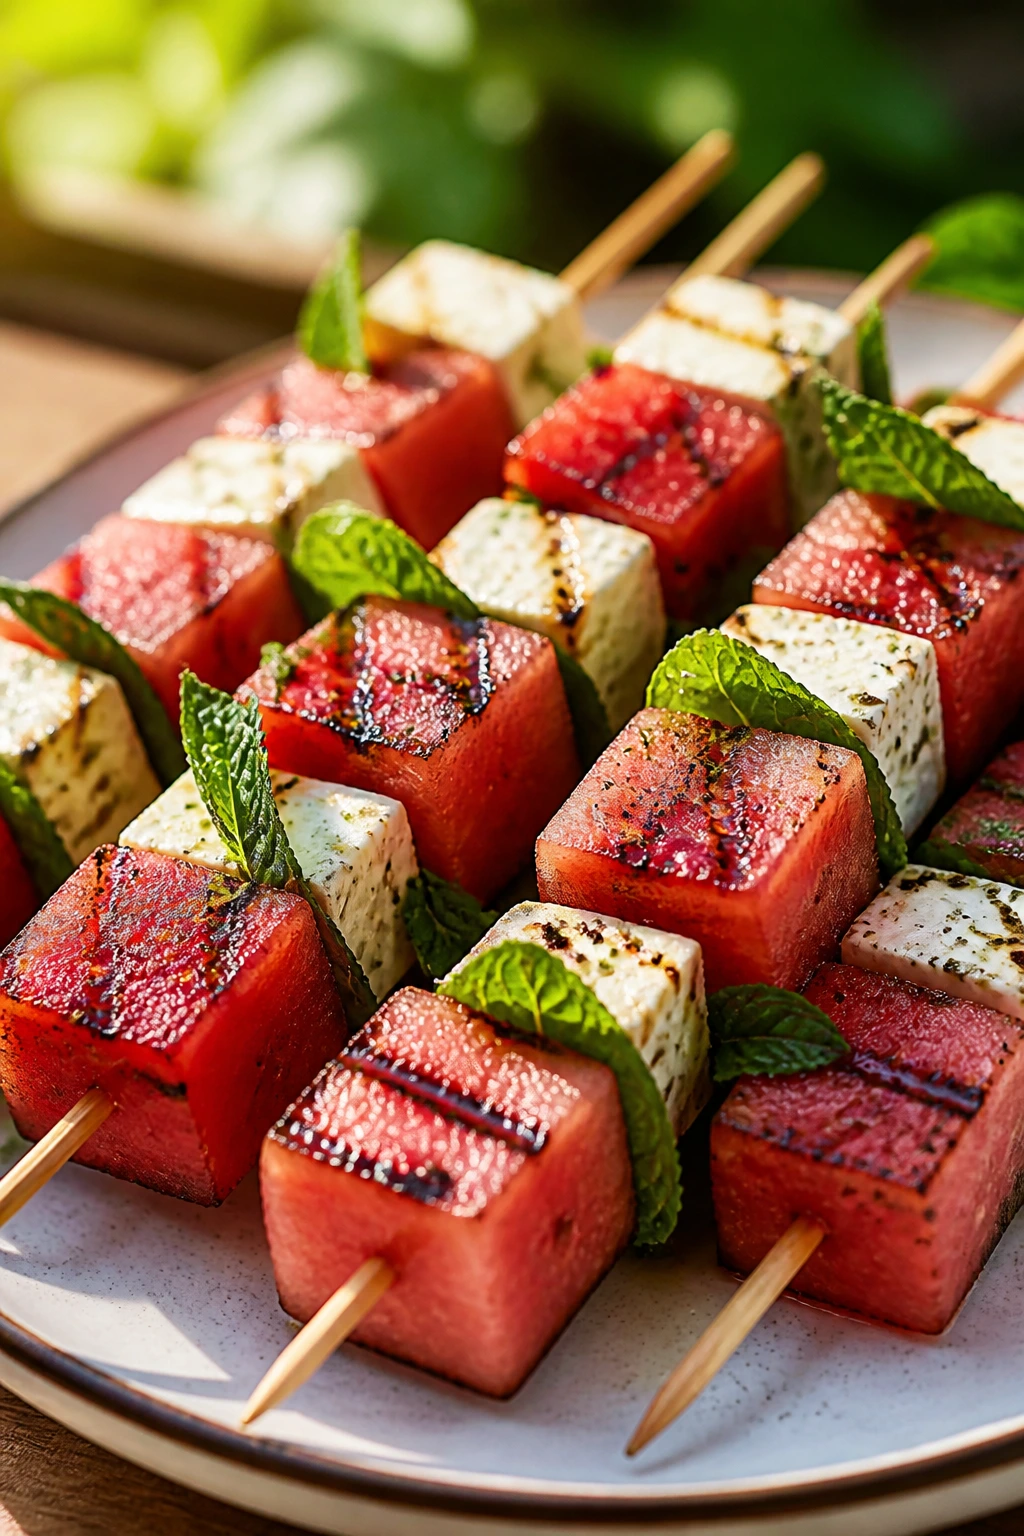
This is the snack that lands between savory and sweet, and I like that it refuses to pick a side. Grilling the watermelon deepens its flavor without taking away the snap, while feta and mint keep the whole thing bright. It’s the easiest item on the list to assemble while people are already standing around the grill.
Why It Works:
A quick sear pulls out the watermelon’s sweetness and gives the surface just enough texture to hold salt. Feta adds fat and sharpness, which is why the combination tastes more complete than a plain fruit skewer.
Key Ingredients:
- 2 cups watermelon cubes, 1-inch pieces
- 6 ounces feta, cut into 1-inch cubes
- 2 tablespoons olive oil
- 1 tablespoon lime juice
- 2 tablespoons torn mint
- Flaky salt and black pepper
Quick Steps:
- Thread watermelon onto skewers, leaving a little space between pieces.
- Brush lightly with olive oil.
- Grill over high heat for 30 to 45 seconds per side.
- Slide the cubes onto a platter and add feta.
- Finish with lime juice, mint, salt, and pepper.
Equipment for This Recipe:
- Skewers
- Grill
- Tongs
How to Serve This Dish:
Serve as a starter or a side snack before the richer desserts. A white platter makes the pink watermelon and white feta pop without any extra effort.
Pro Tips for This Recipe:
- Pat the watermelon dry so it sears instead of steaming.
- Use feta that’s firm enough to cube cleanly.
- If you want less salt, use only half the feta and keep the mint.
Variations on This Dish:
- Basil Version: Swap mint for basil.
- Balsamic Version: Drizzle with a thick balsamic glaze.
- Cucumber Add-In: Add grilled cucumber chunks for extra crunch.
Common Mistakes to Avoid with This Dish:
- Don’t keep the watermelon on the grill long enough to melt.
- Don’t use very soft feta; it crumbles before it plates.
18. Pound Cake Kebabs with Chocolate Sauce
Cake on a skewer is a useful idea because it turns soft dessert into something you can grill and carry. The edges toast, the fruit adds moisture, and the chocolate sauce gives you a finishing line that feels a little richer than whipped cream. This is a good one for people who want dessert to be eaten with one hand.
Why It Works:
Pound cake is dense enough to survive skewering and grilling. Alternate it with fruit so the cake doesn’t dry out, and use a quick chocolate sauce at the end rather than trying to grill anything coated in sugar.
Key Ingredients:
- 8 cubes pound cake, about 1 inch each
- 8 strawberries, halved
- 1 banana, cut into thick coins
- 2 tablespoons melted butter
- 1/2 cup chocolate chips
- 1/4 cup heavy cream
- Pinch of salt
Quick Steps:
- Thread cake, strawberries, and banana onto skewers.
- Brush the cake lightly with butter.
- Grill over medium heat for 1 minute per side until lightly toasted.
- Warm the chocolate chips, cream, and salt together until smooth.
- Drizzle sauce over the skewers and serve.
Equipment for This Recipe:
- Skewers
- Grill
- Small saucepan or microwave-safe bowl
How to Serve This Dish:
Serve two skewers per plate with the chocolate sauce in a small bowl for dipping. A scoop of vanilla ice cream turns it from snacky to dessert-fast.
Pro Tips for This Recipe:
- Use firm fruit so the skewer stays balanced.
- Don’t overcrowd the stick or the cake won’t brown.
- A little salt in the chocolate sauce keeps it from tasting flat.
Variations on This Dish:
- Peach Version: Replace banana with peach wedges.
- White Chocolate Version: Use white chocolate sauce.
- Coconut Version: Sprinkle toasted coconut over the finished skewers.
Common Mistakes to Avoid with This Dish:
- Don’t use fresh cake that’s too soft.
- Don’t leave the skewers on one side for too long; the cake dries fast.
19. Peach Cobbler Foil Packets
This is what happens when cobbler gets lazy in the best possible way. The peaches soften in their own juices, the oats and butter make a rough topping, and the whole packet smells like a bakery after it opens. If you want a dessert that feels warm and homey without turning on the oven, this is the one.
Why It Works:
Foil traps steam, which softens the peaches before the sugar cooks onto the top. The top layer never becomes a full crust, but it does get enough texture to echo cobbler without needing a baking dish.
Key Ingredients:
- 4 peaches, sliced
- 2 tablespoons brown sugar
- 2 tablespoons rolled oats
- 2 tablespoons all-purpose flour
- 2 tablespoons cold butter, cubed
- 1/2 teaspoon cinnamon
- 1/2 teaspoon vanilla extract
- Vanilla ice cream, for serving
Quick Steps:
- Toss the peaches with brown sugar, cinnamon, and vanilla.
- Mix the oats, flour, and butter with your fingers until crumbly.
- Divide the peach mixture among 4 foil packets and top with the crumble.
- Seal loosely and grill over medium heat for 10 to 12 minutes.
- Open carefully and serve with ice cream.
Equipment for This Recipe:
- Heavy-duty foil
- Grill
- Small bowl
How to Serve This Dish:
Serve the packets on plates and let people spoon the filling out themselves. A scoop of ice cream on top melts into the warm peaches and fills in the rough edges of the topping.
Pro Tips for This Recipe:
- Leave a little space in each packet so steam can circulate.
- Cut the peaches evenly or some pieces will turn to jam before others soften.
- If the topping seems pale, leave the packets open for 1 extra minute on the grill.
Variations on This Dish:
- Berry Cobbler Packets: Add blueberries or blackberries.
- Ginger Version: Add grated fresh ginger to the peaches.
- Gluten-Free Version: Use almond flour in place of regular flour.
Common Mistakes to Avoid with This Dish:
- Don’t seal the packets too tightly; they need some air.
- Don’t overfill them or the juices spill when opened.
20. Ricotta Grilled Toast with Blueberries
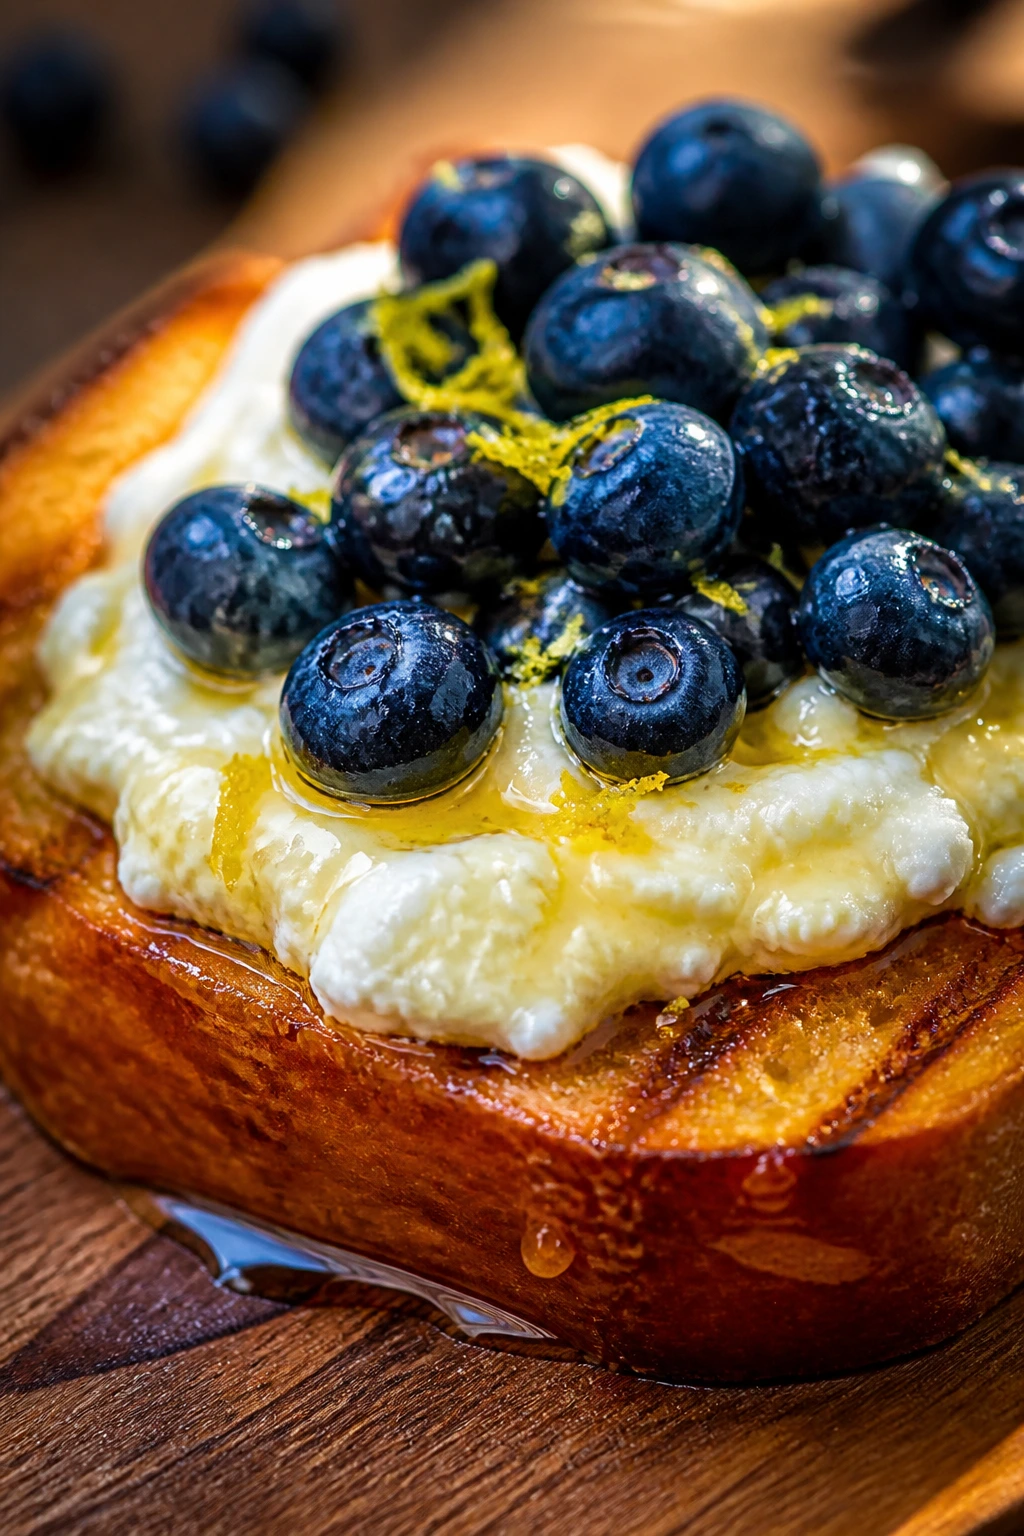
This is less a dessert than a very good excuse to grill bread. The toast gets crisp, the ricotta stays cool and creamy, and the blueberries burst just enough to stain the top in the best way. It’s one of those treats that can slide from snack to breakfast without changing a thing.
Why It Works:
Thick bread holds up under heat and gives you a sturdy base for creamy cheese. The berries don’t need much cooking; a quick warm-up is enough to coax out juice and make them taste fuller.
Key Ingredients:
- 4 thick slices brioche or sourdough
- 1 tablespoon butter, melted
- 1 cup ricotta
- 1 tablespoon honey
- 1 teaspoon lemon zest
- 1 cup blueberries
- Pinch of salt
Quick Steps:
- Stir the ricotta with honey, lemon zest, and salt.
- Brush the bread slices lightly with butter.
- Grill each slice for 1 to 2 minutes per side until marked and crisp.
- Warm the blueberries in a small foil packet or on the cool side of the grill for 2 minutes.
- Spread ricotta on the toast and spoon blueberries over the top.
Equipment for This Recipe:
- Grill or grill pan
- Spoon
- Small bowl
How to Serve This Dish:
Serve as a dessert toast or a late-night snack with iced tea. A drizzle of extra honey and a few torn basil leaves make it look much more deliberate than it is.
Pro Tips for This Recipe:
- Use thick bread so the cheese doesn’t overwhelm it.
- If the blueberries are very tart, warm them with a teaspoon of sugar.
- Toast the bread first, then top; don’t try to load it on the grill.
Variations on This Dish:
- Peach Ricotta Toast: Swap blueberries for grilled peach slices.
- Cinnamon Version: Add cinnamon to the ricotta.
- Mascarpone Swap: Use mascarpone for a richer finish.
Common Mistakes to Avoid with This Dish:
- Don’t put the ricotta on before grilling.
- Don’t use thin sandwich bread; it gets flimsy fast.
21. Coconut-Lime Cake Slices

Cake gets a nicer life on the grill when the outside gets a little crisp and the coconut starts smelling toasted. Lime keeps the sweetness from feeling heavy, and the whole thing tastes like a beach snack that learned some manners. I’d use a dense coconut loaf or snack cake here, not sponge.
Why It Works:
Dense cake tolerates brief direct heat and gains texture from the caramelized edges. Coconut and lime are already a built-in pair, so the grill only has to sharpen them, not invent the flavor.
Key Ingredients:
- 8 slices coconut cake, 1/2 to 3/4 inch thick
- 2 tablespoons melted butter
- 1 tablespoon honey
- 1 teaspoon lime zest
- 2 tablespoons toasted shredded coconut
- Whipped cream or coconut yogurt, for serving
Quick Steps:
- Stir the butter, honey, and lime zest together.
- Brush the cake slices lightly on both sides.
- Grill over medium heat for 30 to 45 seconds per side until marked.
- Sprinkle with toasted coconut.
- Serve with whipped cream or yogurt.
Equipment for This Recipe:
- Grill
- Pastry brush
- Spatula
How to Serve This Dish:
Serve one slice per person with a spoonful of cream on the side. A wedge of lime on the plate is useful for people who want more brightness.
Pro Tips for This Recipe:
- Use chilled cake if it’s crumbly; it slices cleaner.
- Toast the coconut in a dry pan before topping.
- Keep the grill heat moderate so the sugar doesn’t scorch.
Variations on This Dish:
- Pineapple Version: Add a grilled pineapple ring on top.
- Lemon Version: Swap lime for lemon zest.
- Dairy-Free Version: Use coconut whipped topping.
Common Mistakes to Avoid with This Dish:
- Don’t grill too long; cake dries before it browns.
- Don’t use a crumbly cake that can’t hold together.
22. Citrus Halves with Maple and Mint
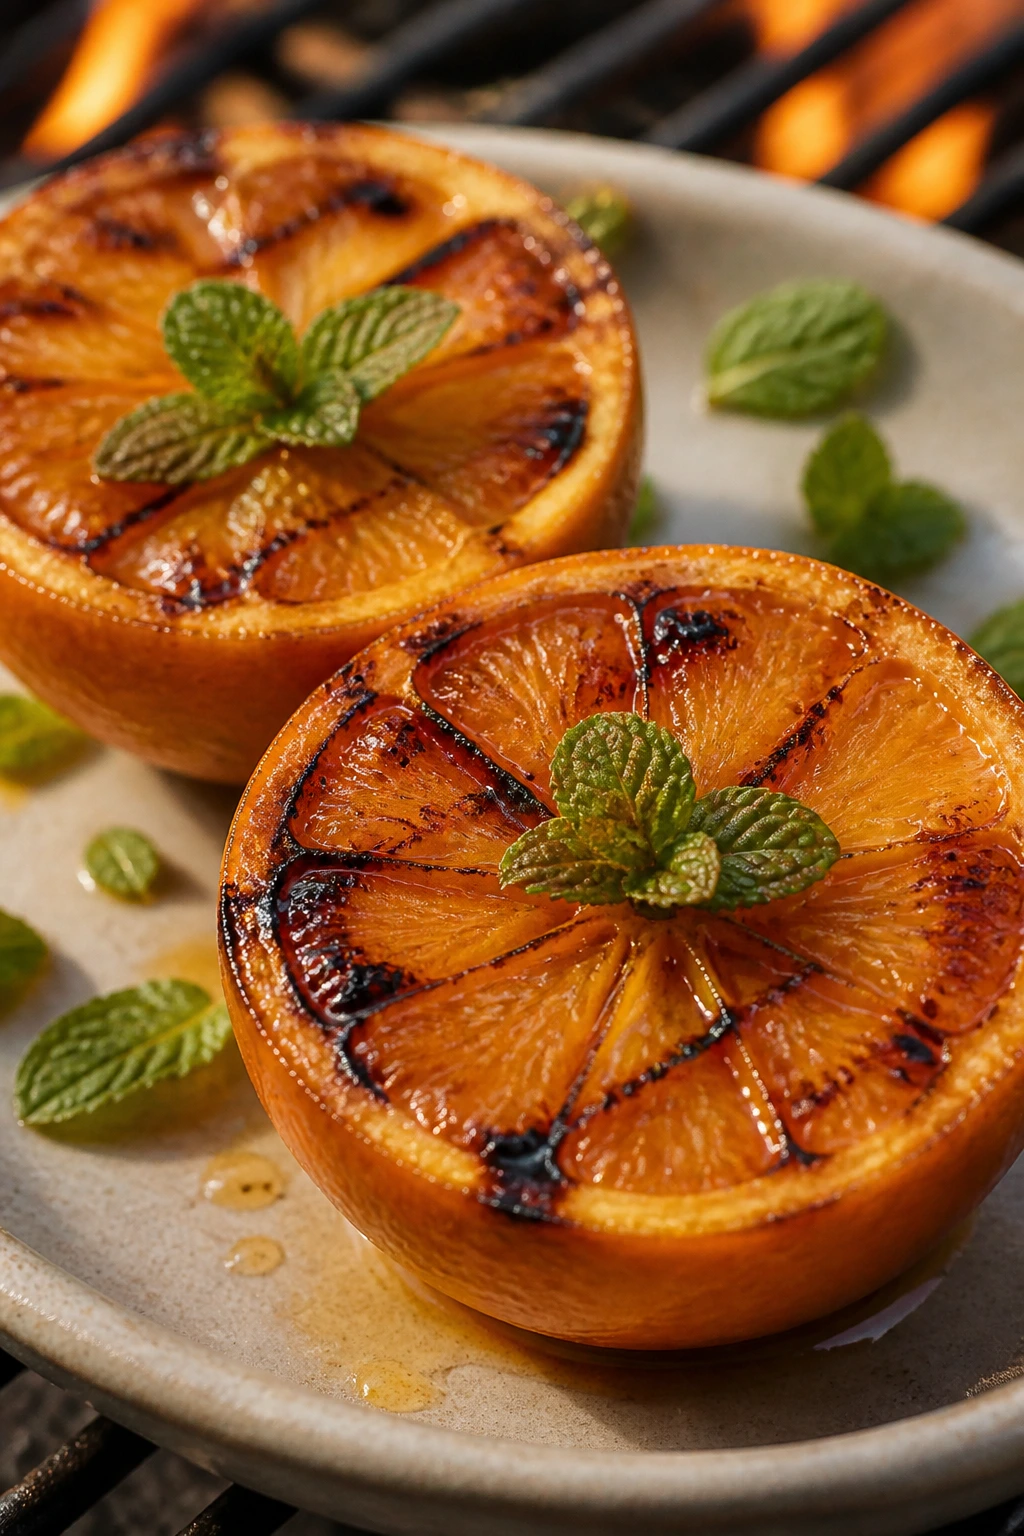
This one is a little odd and very good. Grapefruit, oranges, or blood oranges all pick up a warm edge on the grill, and maple syrup softens the sharpness without hiding it. Mint at the end wakes the whole plate up. It’s the kind of thing that clears your mouth after richer desserts.
Why It Works:
Citrus sugars concentrate under heat, and the cut surface caramelizes just enough to take on color. A small amount of maple syrup makes the fruit taste rounder without turning syrupy.
Key Ingredients:
- 2 oranges or grapefruits, halved
- 2 teaspoons maple syrup
- 1 teaspoon melted butter
- Pinch of flaky salt
- 1 tablespoon chopped mint
- Greek yogurt, optional
Quick Steps:
- Preheat the grill to medium-high.
- Brush the cut sides of the citrus with butter and maple syrup.
- Grill cut side down for 2 to 3 minutes until marked and slightly softened.
- Transfer to a plate and sprinkle with salt.
- Finish with mint and yogurt if you want a creamier plate.
Equipment for This Recipe:
- Grill
- Pastry brush
- Knife
How to Serve This Dish:
Serve as a palate-cleanser between richer grilled sweets or as a light ending on a heavy meal. A spoonful of yogurt in the center gives the fruit a creamy landing place.
Pro Tips for This Recipe:
- Use citrus with thick enough flesh to survive the heat.
- A little salt makes the sweet parts pop.
- If the fruit is very juicy, let it rest for a minute before plating.
Variations on This Dish:
- Cinnamon Citrus: Add cinnamon to the maple.
- Brown Sugar Version: Swap maple for light brown sugar.
- Berry Garnish: Add fresh berries on the side.
Common Mistakes to Avoid with This Dish:
- Don’t grill citrus too long or the flesh turns dry.
- Don’t overload it with syrup; the fruit should still taste bright.
23. Grilled Brownie S’more Sandwiches
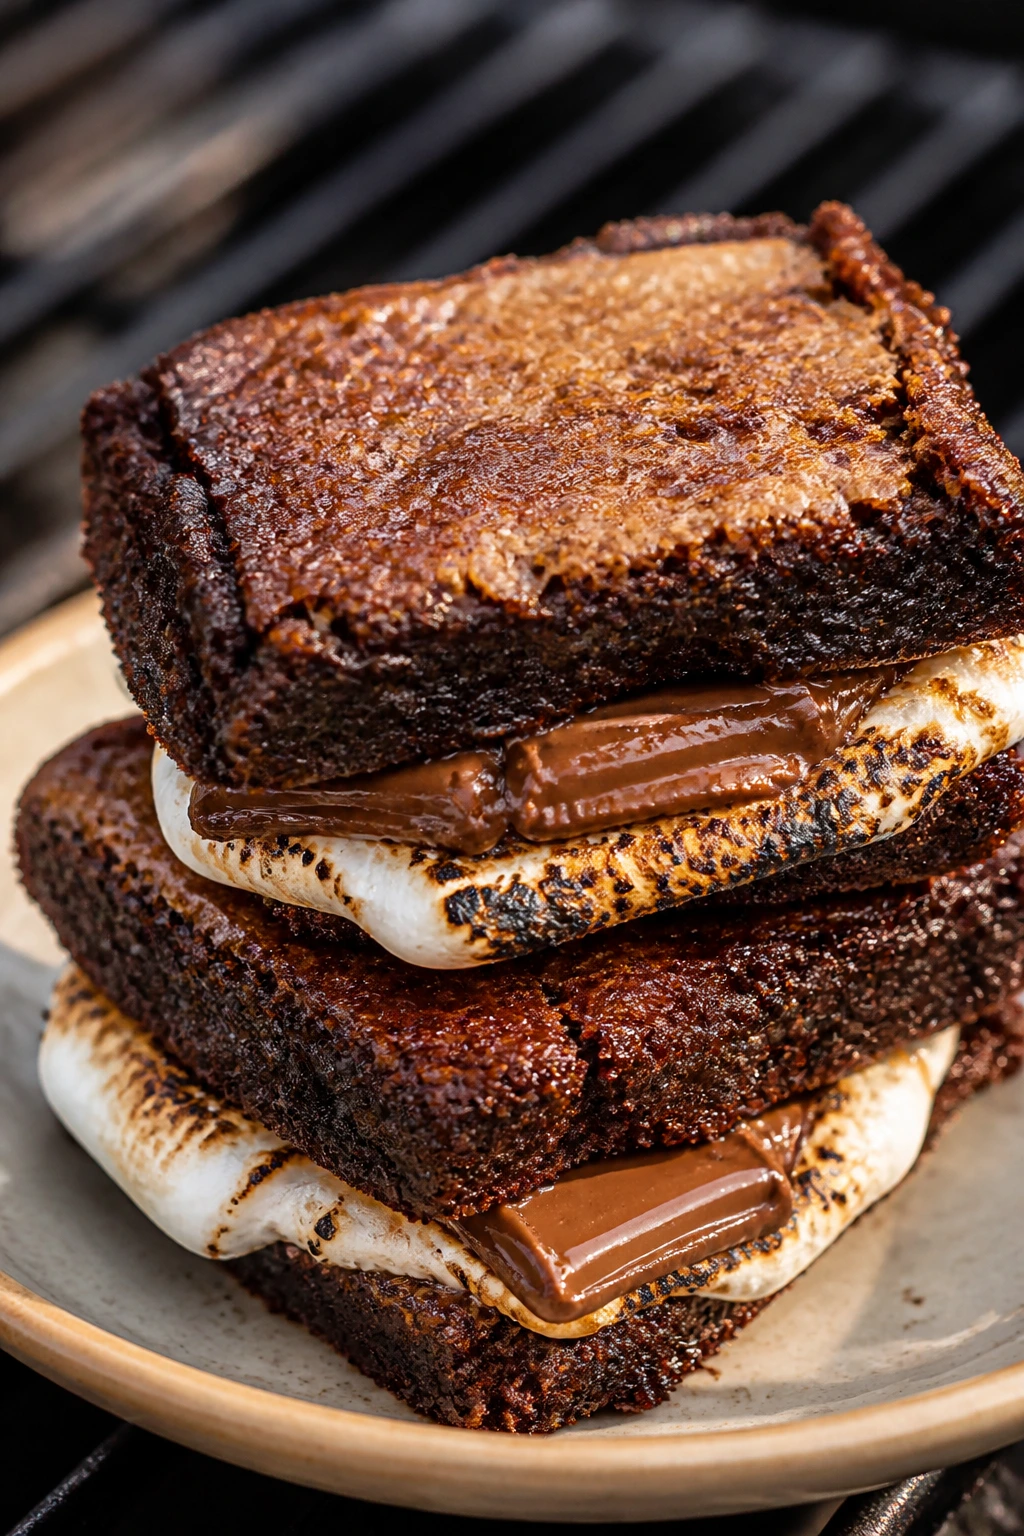
This is the richest thing on the list, and I’m not sorry about that. Brownie slices replace the usual graham base, which makes the whole sandwich fudgier, denser, and more chaotic in a good way. The grill warms the chocolate and softens the marshmallow into a molten middle.
Why It Works:
Brownies are sturdy enough to handle a brief toast, especially if they’re chilled first. The marshmallow needs just enough heat to puff, not liquefy completely, and the brownie gives you something more substantial than crackers.
Key Ingredients:
- 8 brownie squares, chilled
- 8 large marshmallows
- 4 squares chocolate
- 2 tablespoons butter, softened
- 4 graham crackers, crushed, optional
- Pinch of salt
Quick Steps:
- Slice each brownie square in half horizontally if thick enough.
- Sandwich a marshmallow and chocolate square between two brownie pieces.
- Butter the outsides lightly.
- Grill over low to medium-low heat for 1 minute per side, using foil if needed.
- Finish with crushed graham crackers and salt.
Equipment for This Recipe:
- Grill or grill pan
- Spatula
- Foil, optional
How to Serve This Dish:
Serve immediately, because the marshmallow changes texture fast. A small plate and a fork help when the filling squeezes out the sides, which it probably will.
Pro Tips for This Recipe:
- Chill the brownies so they don’t crumble.
- Keep the heat low; brownie sugar burns before the filling melts.
- If the sandwich feels too loose, wrap it in foil for the last minute.
Variations on This Dish:
- Peanut Butter Version: Add a thin smear of peanut butter.
- Berry Version: Tuck in a slice of strawberry.
- Salted Pretzel Version: Roll the edges in crushed pretzels.
Common Mistakes to Avoid with This Dish:
- Don’t use warm brownies; they fall apart in your hands.
- Don’t use marshmallows that are too large or they split the sandwich.
24. Peach and Halloumi Skewers
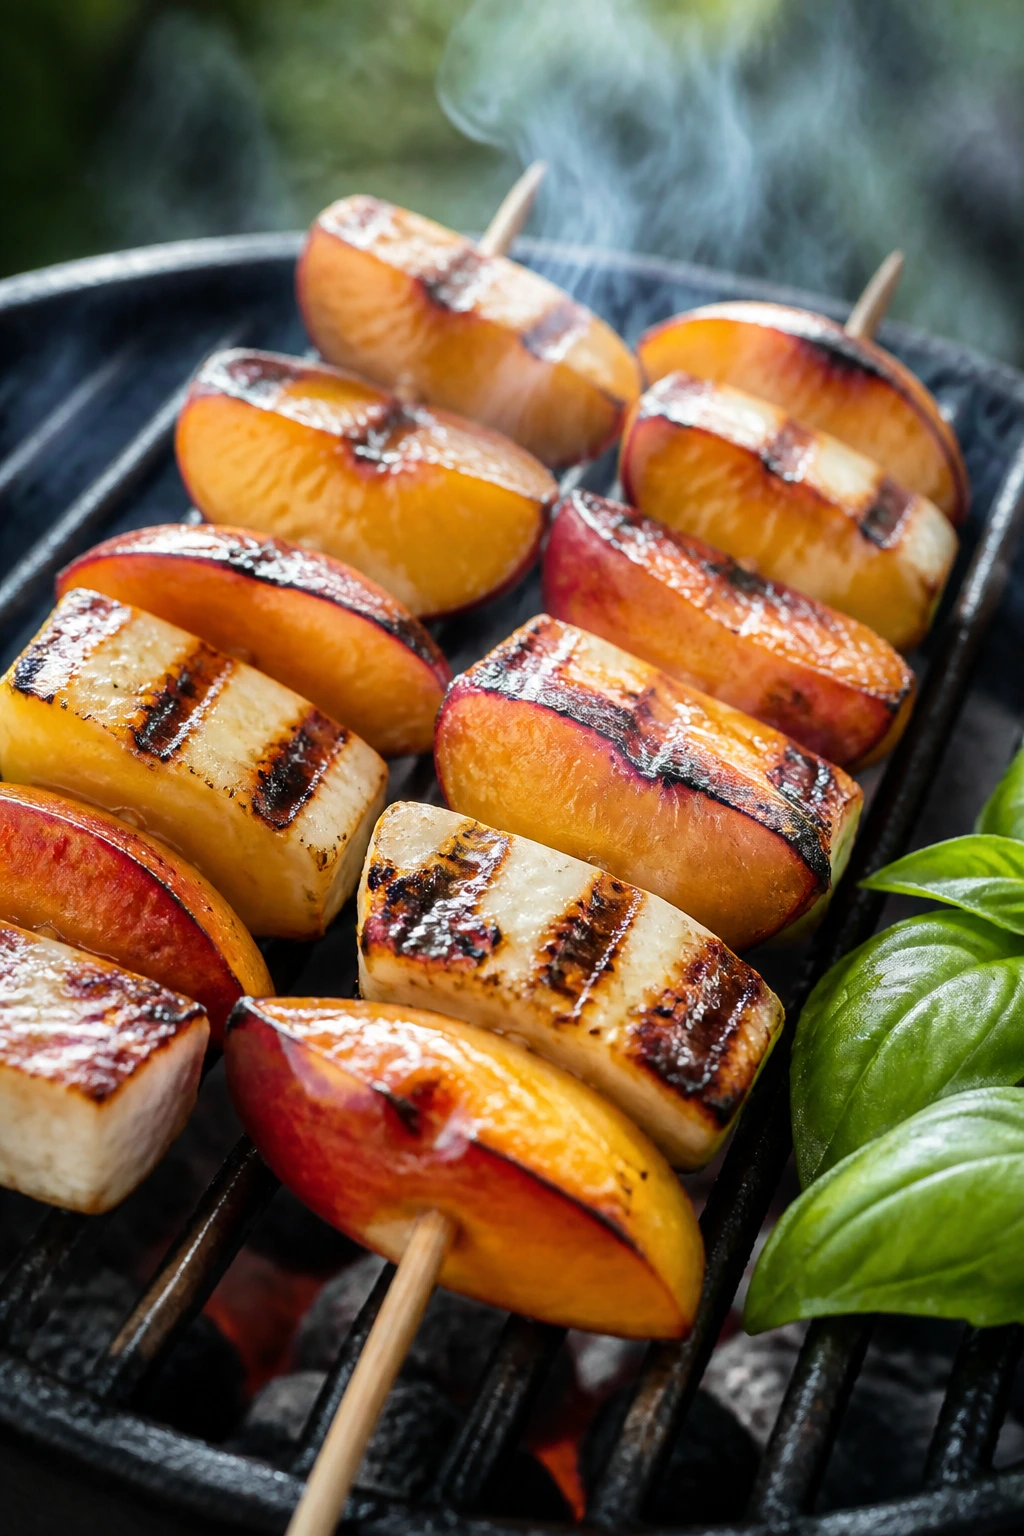
Peaches and halloumi sound like a salad idea until they hit the grill, then they become dessert-adjacent in a way that works. The peach softens and the cheese develops a salty crust, so the honey at the end lands like a finish instead of a cover-up. This is the savory-sweet one for people who don’t want everything to taste like frosting.
Why It Works:
Halloumi is one of the few cheeses that can take direct heat without melting away. The peaches bring sugar, the cheese brings salt and chew, and the combination feels balanced instead of obvious.
Key Ingredients:
- 2 peaches, cut into wedges
- 8 ounces halloumi, cut into cubes
- 1 tablespoon olive oil
- 1 tablespoon honey
- 1/4 teaspoon chili flakes
- Fresh basil, for serving
Quick Steps:
- Thread peach wedges and halloumi cubes onto skewers.
- Brush lightly with olive oil.
- Grill over medium heat for 2 to 3 minutes per side until the cheese is browned.
- Drizzle with honey and chili flakes.
- Finish with basil.
Equipment for This Recipe:
- Skewers
- Grill
- Tongs
How to Serve This Dish:
Serve as a starter or a less-sweet grill treat alongside fruit-heavy desserts. A little basil on top makes the whole thing feel brighter.
Pro Tips for This Recipe:
- Pat the halloumi dry before skewering so it browns better.
- Use firm peaches that won’t split when threaded.
- Honey should go on after grilling, not before.
Variations on This Dish:
- Mint Version: Swap basil for mint.
- Watermelon Swap: Alternate halloumi with watermelon cubes.
- Black Pepper Finish: Add a few twists of pepper with the honey.
Common Mistakes to Avoid with This Dish:
- Don’t use very soft peaches; they break off the skewer.
- Don’t over-oil the cheese or it can slide around.
25. Grilled Apple Rings with Caramel Dip
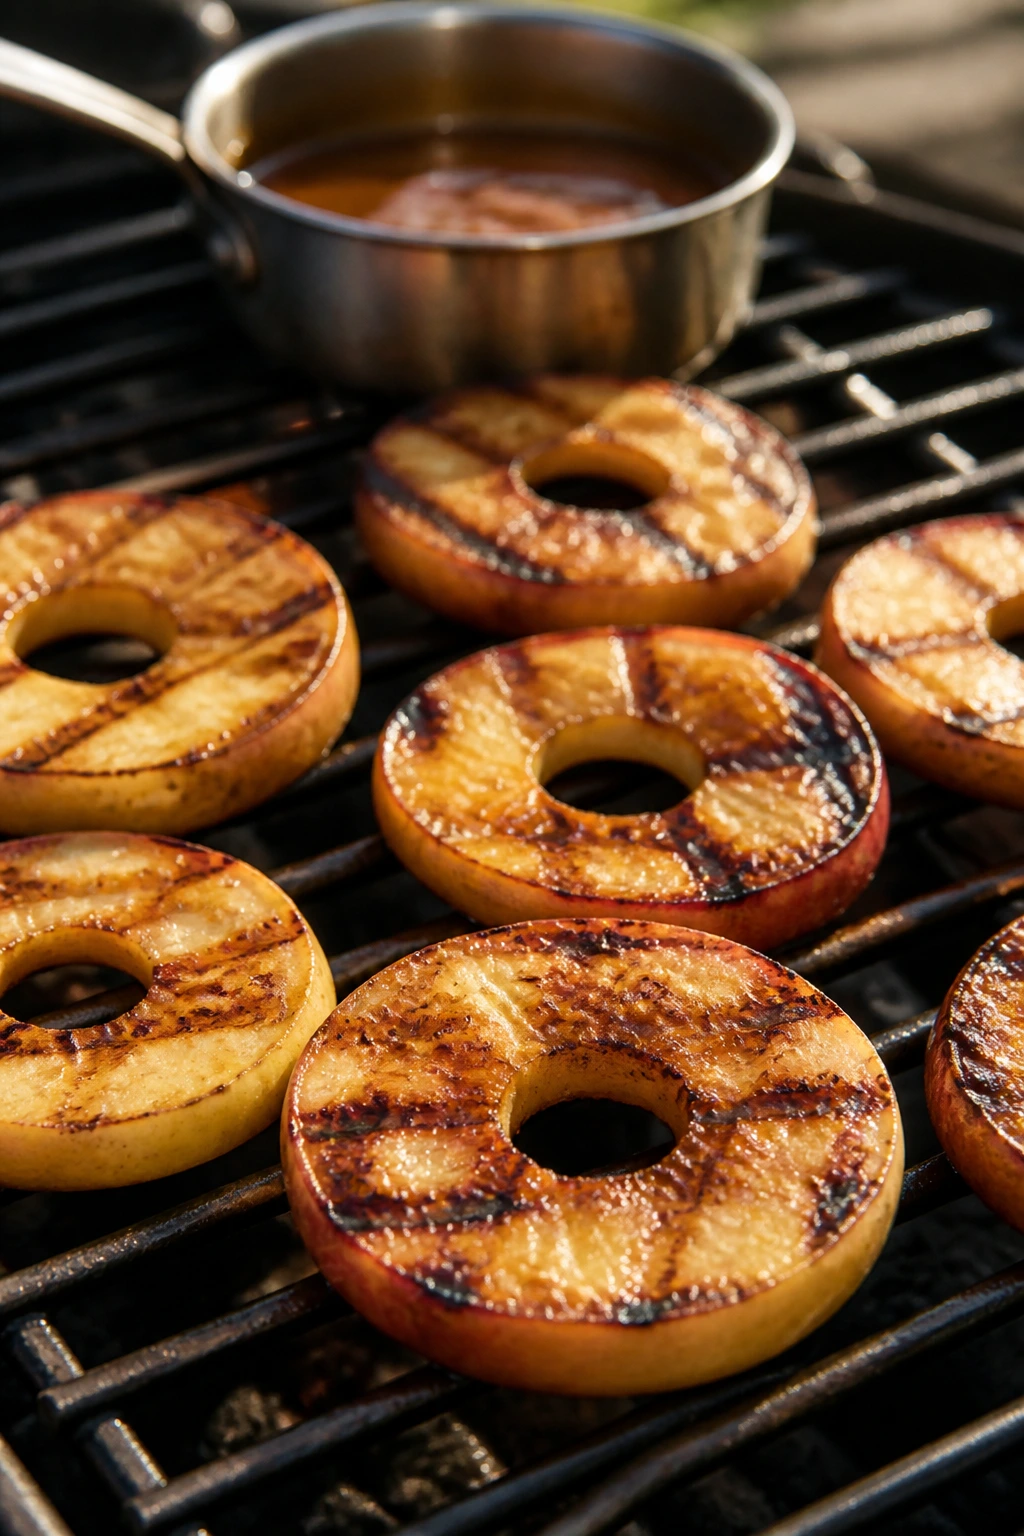
Apples may not scream summer, but on the grill they behave beautifully, especially if you want something a little more familiar at the end of a long day. The rings soften at the edges, take on a faint smoky note, and pair neatly with a caramel dip that can be made in five minutes. It’s a good closing recipe because it asks for almost nothing.
Why It Works:
Firm apples hold their shape over heat, and cutting them into rings gives you a larger surface for browning. The caramel dip adds the kind of sweetness that works best in small amounts, especially after all the fruit and chocolate above it.
Key Ingredients:
- 4 firm apples, cored and sliced into 1/2-inch rings
- 1 tablespoon melted butter
- 1 teaspoon cinnamon sugar
- 1/2 cup caramel sauce
- Pinch of flaky salt
- Vanilla yogurt, optional
Quick Steps:
- Brush the apple rings with melted butter.
- Sprinkle lightly with cinnamon sugar.
- Grill over medium heat for 2 to 3 minutes per side until marked and just tender.
- Warm the caramel sauce and stir in a pinch of salt.
- Serve apples with caramel for dipping and yogurt, if using.
Equipment for This Recipe:
- Apple corer or small knife
- Grill
- Small saucepan
How to Serve This Dish:
Set out the rings on a platter with the caramel in the middle and let people dip as they go. If you want a softer landing, spoon yogurt onto the plate first and place the apples on top.
Pro Tips for This Recipe:
- Use apples that stay crisp, like Honeycrisp or Granny Smith.
- Keep the slices thick enough to flip.
- If the apples brown too fast, lower the heat and close the lid briefly.
Variations on This Dish:
- Cheddar Finish: Add a thin slice of sharp cheddar for a sweet-salty bite.
- Maple Version: Replace caramel with maple syrup and butter.
- Nut Version: Add chopped pecans over the top.
Common Mistakes to Avoid with This Dish:
- Don’t use apples that are already mealy.
- Don’t caramelize the sugar too much before serving; it should stay pourable.
Why the Grill Changes Dessert for the Better
The grill gives dessert something the oven usually can’t: speed with edges. That matters more than people think. Fruit sugars begin to brown almost immediately over direct heat, and once that happens, the flavor shifts from plain sweet to layered and slightly smoky. A peach doesn’t just become warm; it picks up a browned surface that tastes deeper than the fruit alone.
There’s also a practical side to it. The grill handles heat in zones, which means you can put berries, cake, or foil packets on different parts of the grate and move them around before things go too far. That flexibility helps with summer cooking, especially when you’re already outside and don’t want to heat the kitchen or juggle three baking sheets.
I also like the way grill desserts force you to pay attention in a useful way. You can’t walk away for 20 minutes and hope for the best. A donut needs 30 seconds. A foil packet wants a lid and a little patience. A watermelon wedge wants almost no time at all. That range is part of the appeal, and it’s why the same grill can handle fruit, bread, cheese, and a marshmallow mess without feeling repetitive.
Essential Equipment for These Recipes
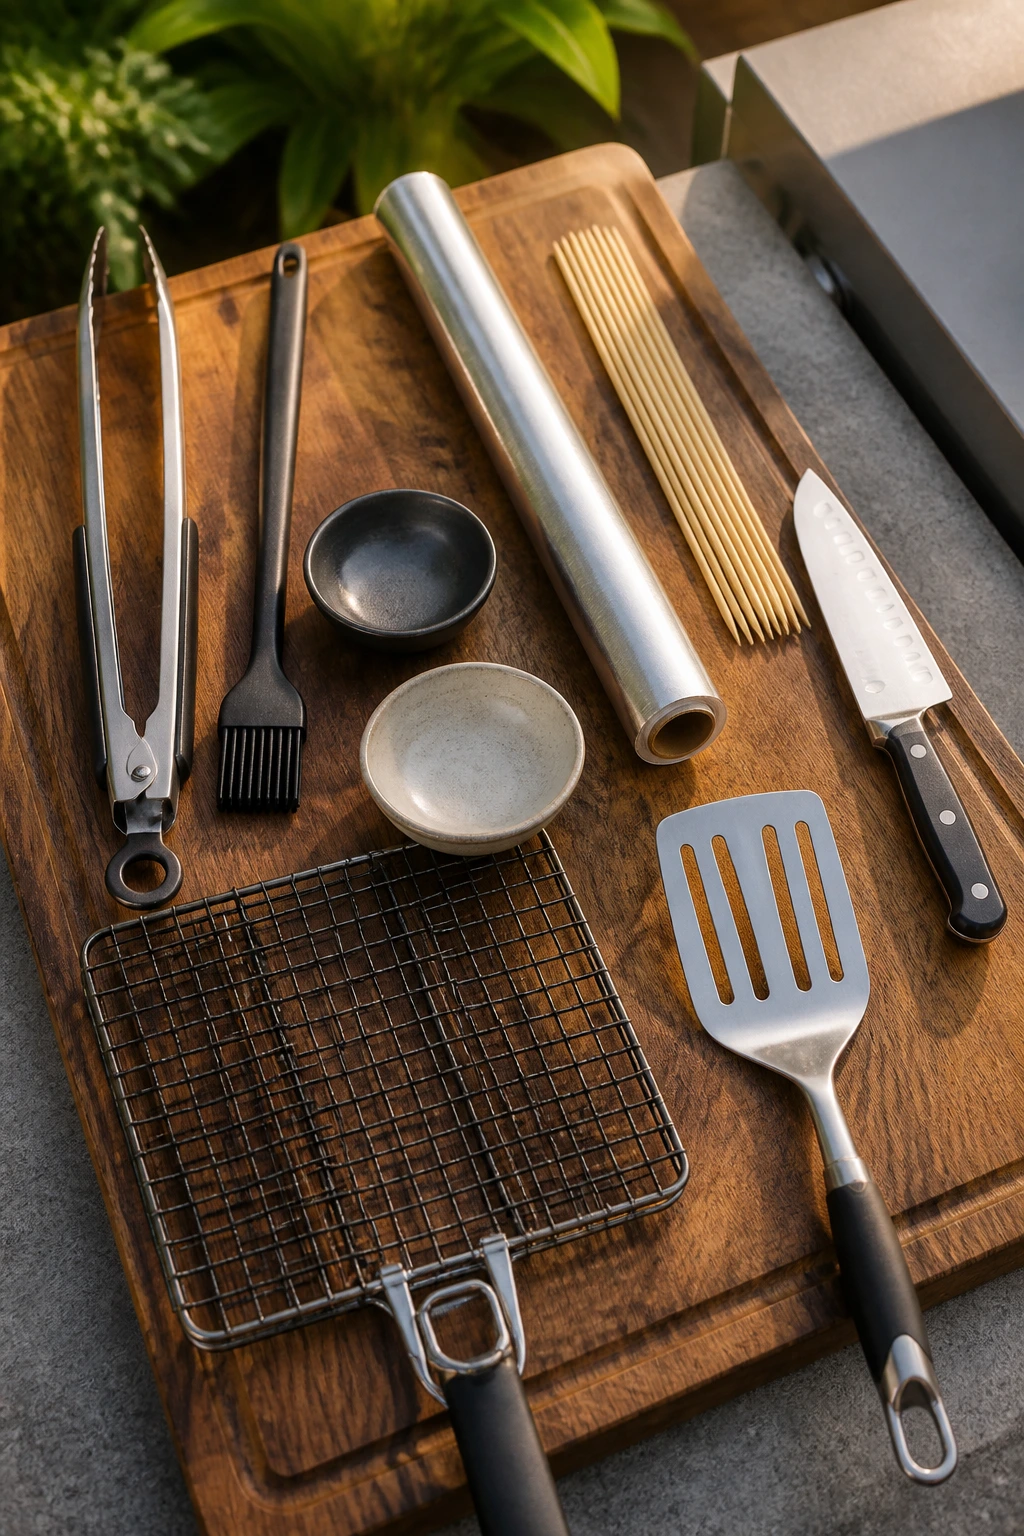
- Outdoor grill or grill pan: Gas, charcoal, or a sturdy grill pan can handle most of these recipes; just keep the heat controlled.
- Long tongs: Helpful for flipping fruit, skewers, and cake without tearing the surface.
- Pastry brush: Best for butter, oil, honey, and maple mixtures that need a thin coat.
- Heavy-duty foil: Necessary for banana boats, cobbler packets, and any treat that needs steam.
- Skewers: Use bamboo skewers soaked in water or metal skewers for fruit and cake kebabs.
- Sharp chef’s knife: Clean cuts matter here, especially for peaches, pineapples, and apples.
- Cutting board with a damp towel underneath: Keeps slippery fruit from sliding while you slice.
- Small mixing bowls: Useful for glazes, spice blends, and quick cream toppings.
- Grill basket: Optional, but very handy for small fruit pieces and halved figs that want to roll.
- Heatproof spatula: Good for cake slices, donuts, and anything more delicate than a peach half.
Smart Shopping and Ingredient Tips
Pick fruit that is ripe, not fragile. That sounds obvious, but there’s a difference. You want peaches and nectarines that yield slightly at the stem end, pineapples that smell sweet at the base, and plums that feel full without leaving a dent when you press them. If fruit is bruised or leaking juice in the bag, it will fall apart on the grill.
Cake matters more than people assume. Dense pound cake, coconut loaf, or day-old brioche behaves better than airy sponge. The same goes for donuts: cake donuts hold up, filled ones do not. If you’re buying a bakery item, look for a tight crumb and a slice that can survive a flip without breaking apart.
For dairy toppings, buy the thickest version you can get. Whole-milk ricotta, mascarpone, Greek yogurt, and halloumi all play better with heat and fruit than thin, watery versions. If a yogurt looks loose in the tub, it’ll slide off warm fruit and make the plate look sloppy in a hurry.
Chocolate chips, marshmallows, graham crackers, honey, brown sugar, cinnamon, lime, mint, and flaky salt are the pantry pieces that keep showing up across this collection. Keep those on hand and the rest becomes a fruit run and maybe a bakery stop. That’s the point. Weekend dessert should not require three stores.
How to Serve These Recipes
Presentation:
Use one big platter and mix hot and cold items with intention. Put grilled fruit in one section, creamy toppings in a small bowl, and anything drippy — like cobbler packets or s’mores nachos — on parchment or foil so the plate doesn’t become a cleanup problem before anyone eats. A few herbs, a dusting of powdered sugar, or a line of toasted nuts makes the spread look finished.
Accompaniments:
Vanilla ice cream is the safest match for peaches, pineapple, apples, and cake, but Greek yogurt and mascarpone work better when you want the fruit to stay brighter. Whipped cream suits shortcake skewers and pound cake kebabs. For a little contrast, add salty snacks like pretzels or roasted nuts beside sweeter treats.
Portions:
Plan on one to two fruit halves or four to six pieces per person, depending on the recipe. Foil packets and s’mores-style desserts are richer, so smaller portions go farther. If you’re serving a mixed platter, count on people sampling three or four items rather than eating a full portion of each one.
Beverage Pairing:
Iced tea with lemon works across most of this board, and sparkling lemonade keeps the sweeter recipes from feeling heavy. For a colder, richer pairing, cold brew coffee or iced espresso is excellent with grilled cake, donuts, and brownie desserts.
Additional Tips and Flavor Boosters
Flavor Enhancement:
Finish grilled fruit with flaky salt. Not a lot. Just enough to catch the sweet edge and keep the dessert from flattening out. A little lemon zest over peaches, plums, or apricots does the same thing in a brighter key.
Customization:
If you want a more dessert-heavy plate, add ice cream, whipped cream, or chocolate sauce. If you want these treats to lean fresher, use yogurt, ricotta, or mascarpone and skip the extra syrup. Both versions work, but they give a very different mood.
Serving Suggestions:
Fresh mint, basil, chopped pistachios, toasted almonds, crushed graham crackers, and coconut flakes all add quick texture. Use one garnish, not five. One good finish looks sharper than a crowded top.
Make-It-Yours:
For dairy-free plates, lean on coconut yogurt, coconut cream, and coconut oil. For gluten-free serving, use GF cake, GF grahams, or plain fruit with yogurt and nuts. For a lower-sugar version, keep the grill marks and cut the honey, glaze, or caramel in half; the char carries more flavor than people expect.
Make-Ahead, Storage, and Reheating Guidance
Some of these recipes are best grilled and eaten right away. Watermelon wedges, shortcake skewers, grilled donuts, and s’mores nachos lose their edge fast once they sit. Those should be treated as last-minute items, not make-ahead projects.
Other pieces can be prepped a few hours ahead without trouble. Fruit can be washed, pitted, cored, or sliced earlier in the day and kept covered in the fridge for up to 24 hours. If you’re making peach, plum, apricot, or apple desserts, toss the cut fruit with a little lemon juice so it doesn’t brown before grilling. Cake cubes, crumb toppings, and chocolate sauce can also be prepped a day ahead and stored separately.
Leftover grilled fruit keeps in an airtight container in the fridge for 2 to 3 days. Reheat it gently in a 300°F oven for 5 to 8 minutes or in a covered foil packet on the cooler side of the grill. Cake slices and pound cake kebabs hold for about 3 days refrigerated, and they warm up well in a low oven or on a grill pan for 1 to 2 minutes per side.
Dairy toppings are the exception. Whipped cream should be made fresh. Ricotta and mascarpone fillings hold for 2 to 3 days in the fridge, but they’re best stirred before serving because they can loosen a little. If a dessert already has ice cream or yogurt on it, don’t try to save the assembled version. Store the components separately and build the plate again later.
Variations and Adaptations to Try
- All-Fruit Board: Keep the whole spread fruit-forward by using peaches, pineapple, plums, mango, watermelon, and figs with yogurt or coconut cream on the side. This works well when you want something lighter and don’t want to juggle cakes or donuts.
- Dairy-Free Plate: Swap butter for coconut oil, use coconut yogurt or whipped coconut cream, and choose dark chocolate without milk solids. The flavor leans tropical, which suits grilled fruit better than people expect.
- Gluten-Free Swap-Set: Use gluten-free pound cake, gluten-free graham crackers, and skip bread-based items in favor of fruit skewers and foil packets. The grill doesn’t care what flour you used if the structure stays firm.
- Low-Sugar Finish: Cut the sweeteners in half and use cinnamon, citrus zest, mint, or salt to do more of the work. Grilled fruit carries more flavor than raw fruit, so you can lean on browning instead of syrup.
- Charcoal-Heavy Version: If you like a stronger smoke note, use a charcoal grill and keep one cooler zone ready. Fruit, cake, and foil packets each benefit from that smoky edge, but you’ll want a gentler spot for anything with sugar.
- Kid-Table Style: Make banana boats, donut halves, and pound cake skewers with small bowls of chocolate, sprinkles, and fruit on the side. It keeps the assembly hands-on without turning the grill into a sugar bomb.
Common Mistakes to Avoid
The first mistake is using fruit that’s too soft. If a peach or plum leaves a deep thumbprint before it even hits the grate, it’s going to split, leak, and stick. Pick fruit that smells ripe but still has some tension in the flesh.
The second mistake is running the grill too hot. Sugar scorches faster than the inside warms, which is why donuts, cake, and even pineapple need medium or medium-high heat instead of a raging fire. If you see black spots within seconds, the grate is too hot or too dirty.
The third mistake is skipping oil or butter where it matters. That light coating isn’t there for richness alone; it’s a release layer. Without it, peaches tear, cake clings, and mango skin sticks in one frustrating sheet.
The fourth mistake is flipping too soon. Fruit needs a moment on the grate to release naturally. If you force it, the surface tears and leaves half the fruit behind. Wait for the marks to appear and use a clean spatula or tongs, not impatience.
The fifth mistake is adding sugary toppings before the grill. Glazes, chocolate drizzle, caramel, and powdered sugar all have their place, but not over direct heat. Finish after grilling unless the recipe specifically calls for a foil packet.
Frequently Asked Questions
Can I make these grilled treats on a grill pan instead of an outdoor grill?
Yes. A grill pan gives you the same stripes and much of the same browning, especially for peaches, cake, donuts, and sandwiches. Keep the heat at medium and work in batches so the pan doesn’t cool down too much between pieces.
What fruit works best on the grill?
Peaches, pineapple, nectarines, plums, figs, mango, and firm apples all grill well because they keep some structure under heat. Watermelon works too, but only for a very short time. Softer berries are better as toppings or fillings than as direct grill candidates.
How do I keep fruit from sticking to the grates?
Start with a clean grill, brush the fruit with a thin coat of oil or butter, and let it sit long enough to release on its own. Most sticking problems come from turning too early or using fruit that’s too wet. Patting the cut surface dry makes a bigger difference than people expect.
Can I prep the fruit ahead of time?
Yes, with a few guardrails. Cut fruit up to 24 hours ahead, cover it tightly, and keep it chilled. For peaches, apples, and nectarines, toss the cut sides with a little lemon juice so they don’t discolor before they hit the grill.
What if my marshmallows or chocolate melt too fast?
Lower the heat and move the packet farther from the flame. Chocolate and marshmallows only need enough heat to soften, not boil. Foil packets help a lot because they trap warmth without exposing the fillings directly to the flame.
Do charcoal and gas grills behave differently for dessert?
They do, mostly in how quickly they brown the surface. Charcoal gives a stronger smoke note and hotter spots, so fruit and cake can color fast. Gas is easier to control, which helps if you’re grilling donuts, sandwich desserts, or anything that can burn in a hurry.
Can I grill dessert right after dinner without cleaning the grates much?
You can, but only if the grates are mostly free of grease and charred bits. Scrub them first, then oil lightly. Leftover savory residue can make fruit taste oddly smoky in a bad way, especially with delicate items like plums or peaches.
Which treats travel best if I’m bringing dessert to someone else’s place?
Pineapple rings, grilled peaches, cobbler packets, and pound cake slices hold up best if you transport the components separately. Bring cold toppings in a small cooler and grill or rewarm the fruit on arrival. Assembled sundaes and shortcake skewers don’t travel nearly as well.
A Sweet Ending by the Grill
The nicest thing about grilling dessert is that it doesn’t ask for perfection. A peach can be a little too soft and still taste good with ice cream. A slice of pound cake can brown unevenly and still disappear fast. Even the messy recipes — the banana boats, s’mores packets, brownie sandwiches — work because the grill adds shape to something soft and sweet.
Pick two or three of these and keep the rest in your back pocket. The grill is already hot; that’s half the work. After that, you just need ripe fruit, a few good toppings, and enough restraint to pull the sweet things off before they turn black.