
Picky eaters can sniff out a stray onion from across the house. They can also turn a full grocery bag into a fight over one green fleck, one sauce with too many specks, or one dinner that looks “mixed up” instead of separate and familiar. Budget family meals for picky eaters have to solve both problems at once: they need to stay cheap enough for an ordinary shopping cart and plain enough that the plate doesn’t feel like a surprise.
The trick is not cleverness. It’s pattern recognition. Pasta, rice, potatoes, eggs, beans, shredded cheese, tomato sauce, ground meat, and chicken thighs show up again and again because they stretch well, reheat well, and don’t scare off a kid who wants dinner to look like dinner, not an experiment. You can dress those staples a little differently each night, but the bones stay familiar. That matters.
And honestly, that’s where the real win sits. If a meal can be broken apart, dipped, tucked into a tortilla, or scooped with bread, you’ve already lowered the odds of a dinner-table standoff. The recipes below lean into that logic hard — mild flavors, low-cost ingredients, and enough flexibility that you can serve the same pan to a child who wants everything separate and an adult who wants a little more seasoning.
Why This Collection Makes Weeknights Easier
Cheap pantry overlap: Pasta, rice, potatoes, tortillas, canned tomatoes, beans, and eggs pull double duty across these meals, so one shopping trip can feed several nights without a fancy ingredient list.
Picky-eater friendly by design: Most of these dishes keep the seasoning gentle and the textures obvious, which matters when a child gets suspicious the second a sauce looks speckled.
Built for leftovers: A casserole, bowl, or sandwich that still tastes fine after a night in the fridge is worth its weight in gold when lunchboxes and second suppers are part of the plan.
Easy to separate on the plate: A lot of these recipes can be served deconstructed — chicken on one side, potatoes on the other, sauce in a little pile — and that small detail saves a lot of negotiations.
Flexible protein choices: Ground beef, turkey, beans, tuna, eggs, and chicken all appear here, so you can buy what’s on sale instead of chasing one expensive cut.
No weird detours: Nothing here needs a specialty sauce or a spice cabinet that looks like a small grocery store. Familiar food wins. Usually.
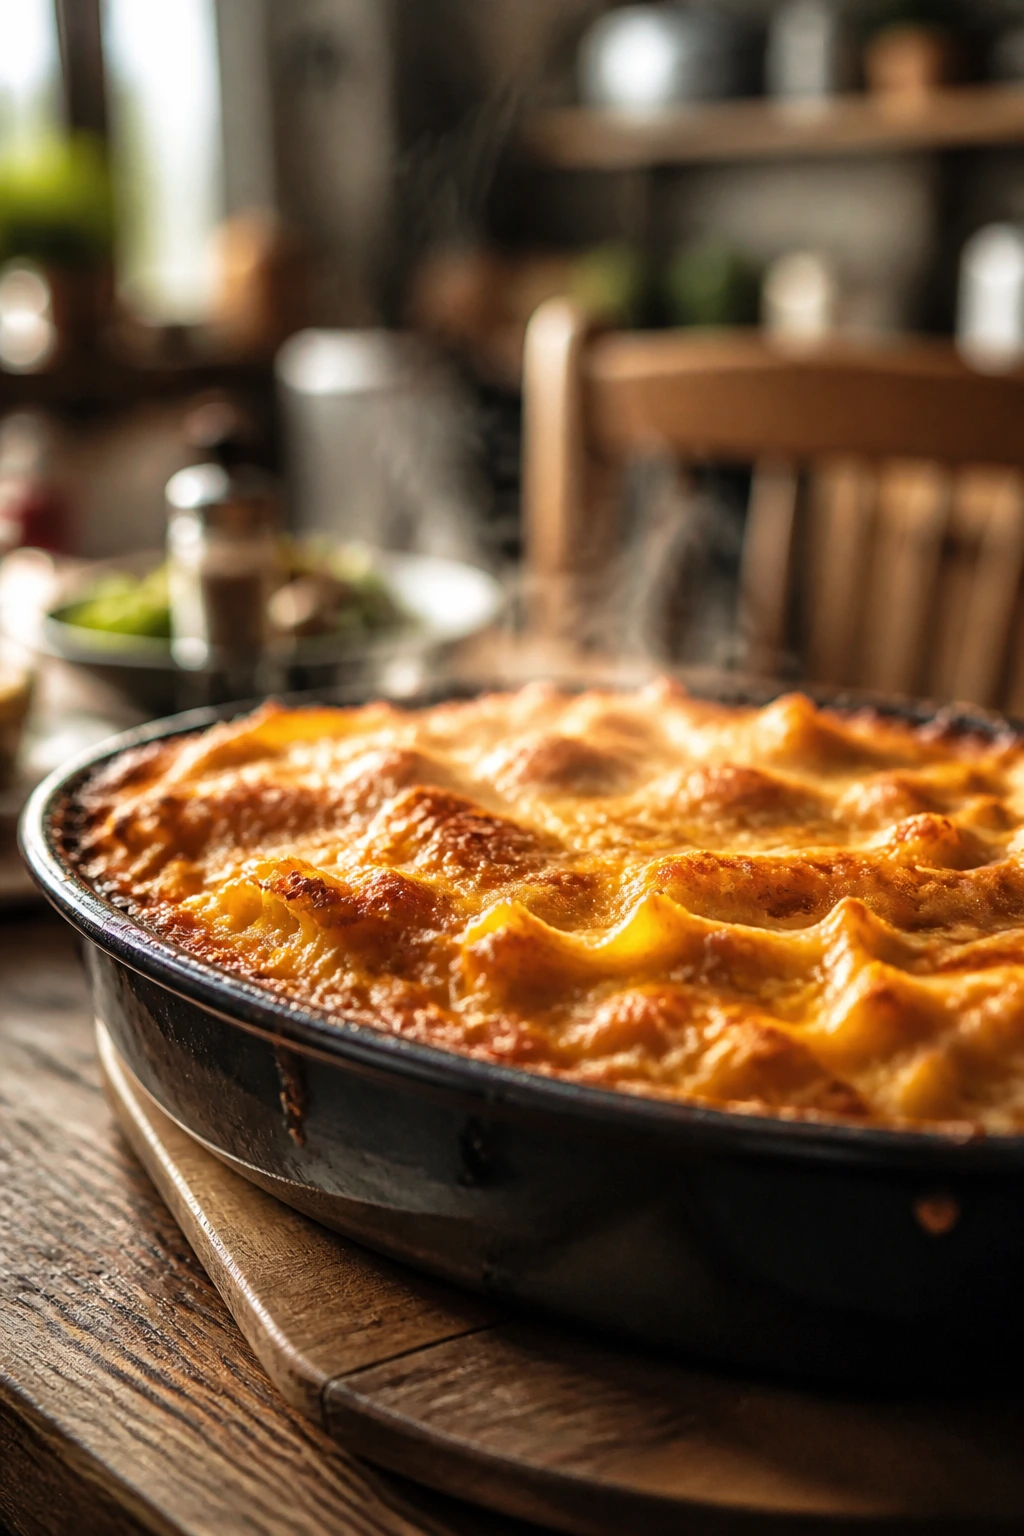
1. Cheesy Baked Ziti
A pan of baked ziti has a way of looking like you spent more money than you did. The pasta holds on to the sauce, the mozzarella melts into those stretchy little pockets, and the edges get a little crisp where the cheese meets the baking dish. It’s the kind of dinner that feels friendly before anyone sits down.
Why It Works:
Ziti uses cheap pasta, and pasta is one of the easiest ways to stretch a pound into a full family meal. The tomato sauce stays mild here, so picky eaters see red sauce, not a pile of herbs or vegetables hiding in the pan. Baking the whole thing at 375°F gives the cheese enough heat to melt without turning greasy.
Key Ingredients:
- 1 pound ziti pasta — Holds sauce well; penne works if that’s what’s in the pantry.
- 2 tablespoons olive oil — Helps the sauce taste round instead of thin.
- 1 jar (24 ounces) marinara sauce — Pick a plain one with no big chunks.
- 1 cup ricotta cheese — Makes the middle creamy without tasting heavy.
- 2 cups shredded mozzarella cheese — Use part-skim or whole milk; both melt well.
- 1/2 cup grated Parmesan cheese — Adds salty depth on top.
- 1 teaspoon garlic powder — Keeps the flavor simple and kid-friendly.
Quick Steps:
- Boil the ziti in salted water until it is just shy of tender, about 1 minute less than the package says. Drain it well.
- Stir the pasta with olive oil and marinara in a large bowl so every piece gets coated.
- Spread half the pasta into a greased 9×13-inch baking dish, then spoon ricotta over the top in little dollops.
- Add the remaining pasta and finish with mozzarella and Parmesan.
- Bake at 375°F for 20 to 25 minutes, until the cheese is melted and the edges are bubbling.
- Rest for 10 minutes before cutting. If you skip the rest, the pan slides apart.
Equipment for This Recipe:
- Large pot — For boiling the pasta.
- 9×13-inch baking dish — Gives the ziti enough surface area for browning.
- Mixing bowl — Helps coat the pasta evenly.
- Colander — Drains the noodles fast so they don’t overcook.
How to Serve This Dish:
Scoop it into wide bowls so the sauce stays put. A plain green salad or sliced cucumbers on the side keeps the plate from feeling too heavy, and garlic bread works if you want to stretch the meal a little farther. Small portions hold nicely, but the second serving is usually the one that disappears first.
Pro Tips for This Recipe:
- Salt the pasta water well; bland noodles make the whole pan taste flat.
- If your marinara is thick, loosen it with 1/4 cup of pasta water before mixing.
- A handful of mozzarella on top and a smaller handful in the middle gives you better melt and less dry pasta.
Variations on This Dish:
- Meat-Sauce Ziti: Brown 1 pound of ground beef or turkey and stir it into the marinara.
- White Ziti Bake: Swap the red sauce for alfredo and add cooked chicken.
- Mild Veggie Version: Stir in finely chopped spinach only if your crowd accepts tiny green flecks.
Common Mistakes to Avoid with This Dish:
- Don’t overcook the pasta first; mushy ziti turns gluey after baking.
- Don’t drown it in sauce; the noodles should look coated, not floating.
- Don’t cut it hot from the oven; the layers need time to settle.
2. Sloppy Joe Rice Bowls
This is what happens when you take the sticky, sweet-savory parts of sloppy joes and put them over rice instead of buns. The rice catches the sauce like a sponge, and the whole bowl feels familiar enough for kids who like ground beef but don’t always want a sandwich to drip down their hands.
Why It Works:
Rice costs little, fills people up, and gives the beef mixture something plain to sit on. The sauce stays mild and a little sweet, which matters more than most people think when you’re feeding cautious eaters. A bowl format also lets everyone decide how much beef they want versus how much rice they want.
Key Ingredients:
- 1 pound ground beef — 80/20 gives good flavor without needing much extra fat.
- 1 small yellow onion, finely diced — Cook it soft so it almost disappears.
- 1 cup ketchup — Brings the classic sloppy joe taste.
- 2 tablespoons tomato paste — Makes the sauce taste fuller.
- 1 tablespoon brown sugar — Balances the tang.
- 2 tablespoons Worcestershire sauce — Adds depth without heat.
- 3 cups cooked white rice — Use day-old rice if you have it.
Quick Steps:
- Brown the beef in a large skillet over medium-high heat until no pink remains. Drain off excess grease.
- Add the onion and cook for 4 to 5 minutes, until soft and glossy.
- Stir in ketchup, tomato paste, brown sugar, Worcestershire sauce, and 1/4 cup water.
- Simmer for 5 to 7 minutes, stirring often, until the sauce is thick and spoonable.
- Spoon the mixture over warm rice and serve right away.
Equipment for This Recipe:
- Large skillet — Wide enough to brown the meat without crowding.
- Wooden spoon — Good for breaking the beef into small bits.
- Saucepan or rice cooker — For the rice.
- Colander or paper towels — For draining grease if needed.
How to Serve This Dish:
Serve the rice first, then ladle the beef over one side so the bowl doesn’t look soupy. A few pickles on the side work well for adults, while kids can keep the bowl plain. If you want extra volume, add a spoonful of corn or peas in a separate pile.
Pro Tips for This Recipe:
- Brown the beef well; pale meat makes a flat sauce.
- Keep the sauce on the thick side so it doesn’t soak through the rice into mush.
- Day-old rice holds shape better than freshly steamed rice.
Variations on This Dish:
- Cheesy Joe Bowls: Stir in 1 cup shredded cheddar at the end.
- Turkey Joe Bowls: Use ground turkey and add an extra teaspoon of oil.
- Bun Swap Night: Serve the same filling on hamburger buns if that feels easier for the kids.
Common Mistakes to Avoid with This Dish:
- Don’t skip draining extra grease; the sauce gets oily fast.
- Don’t leave the onion crunchy; hard bits stand out in a bowl like this.
- Don’t add too much water; sloppy joe filling should cling, not pool.
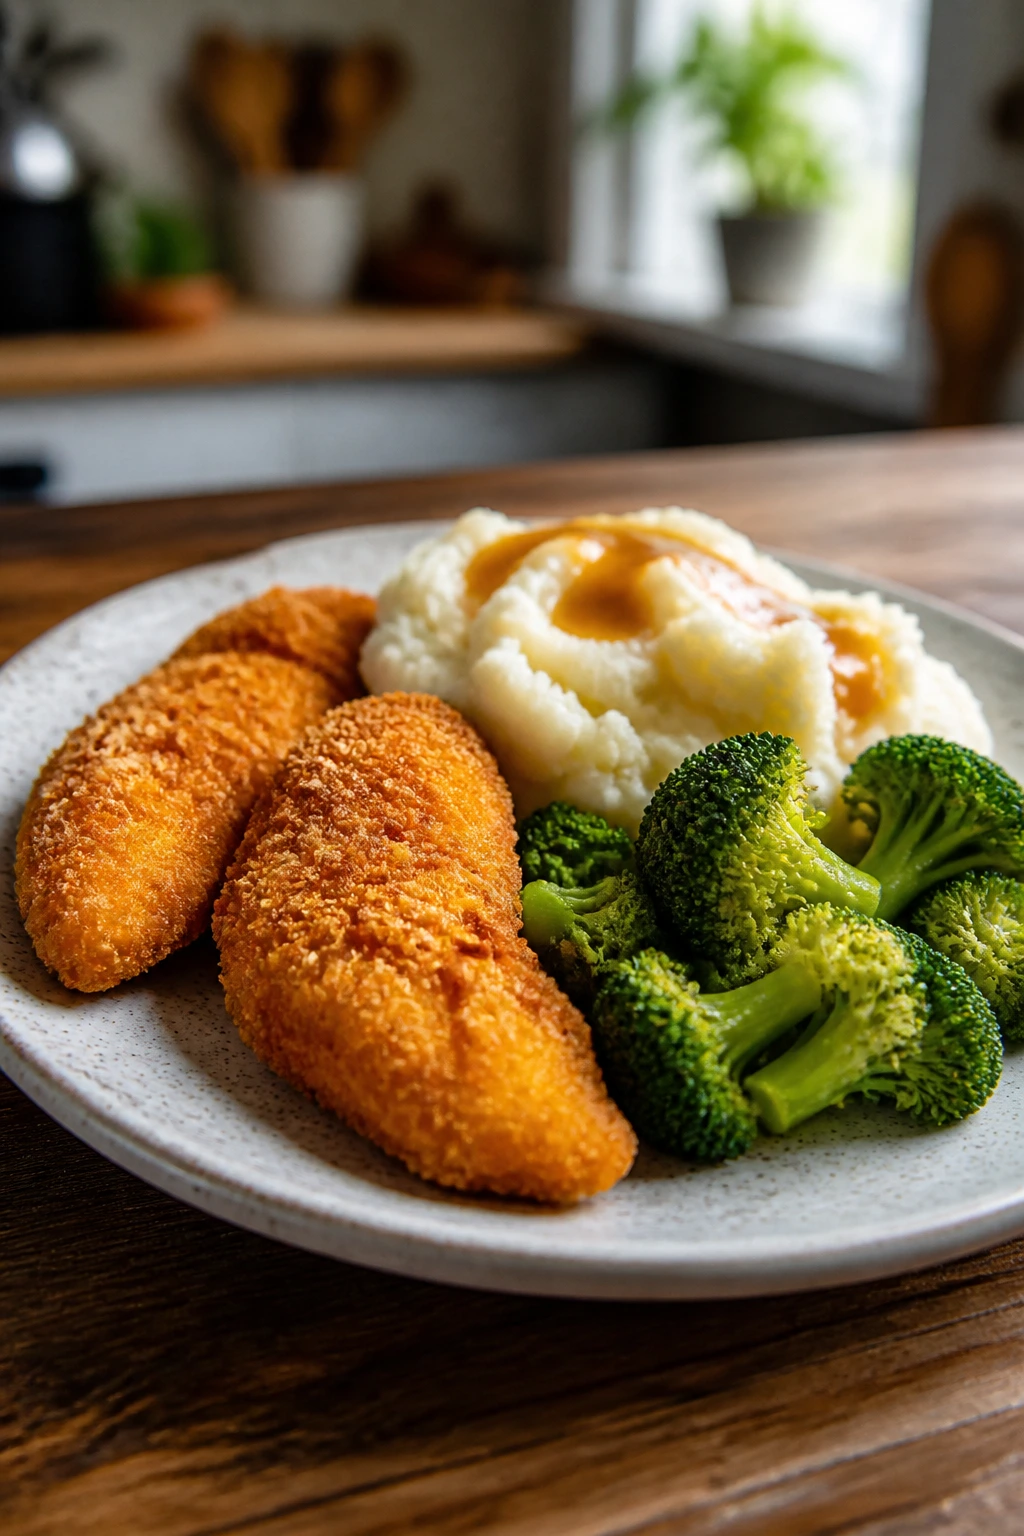
3. Oven-Baked Chicken Drumsticks with Potatoes
Chicken drumsticks are cheap, forgiving, and built for families who want dinner to look simple. Put them on a sheet pan with potatoes, and you get crisp skin, soft potatoes, and one of those dinners where the food looks honest. No one has to wonder what happened in the kitchen.
Why It Works:
Drumsticks stay juicy better than lean chicken breasts, which is useful when you’re feeding a crowd and can’t babysit the oven. Potatoes roast in the same pan, soaking up the chicken drippings and salt. Everything cooks at 425°F, so the skin crisps while the potatoes turn tender.
Key Ingredients:
- 8 chicken drumsticks — Look for a family pack to keep the cost down.
- 1 1/2 pounds Yukon Gold potatoes, cut into wedges — They roast creamy and soft.
- 2 tablespoons olive oil — Helps the seasonings stick.
- 1 1/2 teaspoons salt — More than you think, less than a brine.
- 1 teaspoon garlic powder — Simple and familiar.
- 1 teaspoon paprika — Adds color, not heat.
- 1/2 teaspoon black pepper — Keep it light for picky eaters.
Quick Steps:
- Heat the oven to 425°F and line a sheet pan with foil or parchment.
- Toss the potato wedges with half the oil, salt, garlic powder, paprika, and pepper.
- Rub the chicken with the remaining oil and season it well on all sides.
- Arrange the potatoes around the edges and the drumsticks in the center.
- Roast for 35 to 40 minutes, turning the potatoes once, until the chicken reaches 165°F and the skin looks browned.
- Rest 5 minutes before serving.
Equipment for This Recipe:
- Rimmed sheet pan — Keeps the oil and juices contained.
- Instant-read thermometer — The easiest way to avoid dry chicken.
- Mixing bowl — For tossing the potatoes.
- Tongs — Helpful for turning the drumsticks.
How to Serve This Dish:
Plate two drumsticks per adult and one per younger child, then pile the potatoes next to them. A spoonful of ketchup or ranch on the side usually settles the debate. If you need more food, add steamed carrots or frozen peas in a separate bowl.
Pro Tips for This Recipe:
- Dry the drumsticks with paper towels before seasoning; that helps the skin crisp.
- Cut the potatoes the same size so they finish together.
- If the potatoes brown too fast, tuck them under the chicken a bit for the last 10 minutes.
Variations on This Dish:
- Lemon Herb Version: Add lemon zest and dried thyme to the oil.
- BBQ Drumsticks: Brush with barbecue sauce during the last 10 minutes.
- Garlic Butter Potatoes: Toss the potatoes with melted butter instead of olive oil.
Common Mistakes to Avoid with This Dish:
- Don’t crowd the pan; tight spacing steams the potatoes.
- Don’t guess on doneness; drumsticks need to hit 165°F at the thickest part.
- Don’t use tiny potatoes without cutting them; they can dry out before the chicken finishes.
4. Tuna Noodle Casserole
Tuna noodle casserole is old-school in the best way: creamy noodles, soft peas, and a crunchy top if you want one. It’s mild, cheap, and uses canned tuna in a way that doesn’t feel like thrift-store food. The trick is keeping the tuna subtle and the sauce creamy, not watery.
Why It Works:
Canned tuna is one of the lowest-cost proteins around, and egg noodles make the casserole feel soft enough for cautious eaters. A simple cream sauce keeps the flavor gentle. The baked top gives a little texture, which helps the dish feel complete even though the ingredient list stays short.
Key Ingredients:
- 12 ounces egg noodles — Their soft texture works well here.
- 2 cans tuna in water, drained — Flake it well so there are no big chunks.
- 1 can cream of mushroom soup — The shortcut that makes the sauce thick.
- 1 cup milk — Loosens the soup into a casserole sauce.
- 1 cup frozen peas — Optional for some kids, but they fit the classic version.
- 1 cup shredded cheddar cheese — Adds familiar flavor.
- 1/2 cup crushed potato chips or breadcrumbs — For the top.
Quick Steps:
- Cook the noodles until just tender, then drain.
- Stir together soup and milk in a large bowl until smooth.
- Fold in tuna, peas, half the cheese, and the noodles.
- Spread into a greased baking dish and top with the remaining cheese and chips.
- Bake at 375°F for 20 to 25 minutes, until the edges bubble and the top turns golden.
- Rest 10 minutes before scooping.
Equipment for This Recipe:
- Large pot — For boiling noodles.
- Mixing bowl — To combine the casserole.
- 9×13-inch baking dish — Standard size works best.
- Colander — For draining pasta without breaking it.
How to Serve This Dish:
Serve it with a spoon, not a knife. The casserole should land in soft mounds with a few crunchy bits on top. A side of sliced apples or a simple cucumber salad keeps the whole meal from feeling too heavy.
Pro Tips for This Recipe:
- Drain the tuna very well or the casserole turns loose.
- If the sauce looks too thick, add milk 1 tablespoon at a time before baking.
- Crush the chips lightly; big shards can scorch on top.
Variations on This Dish:
- Cheddar-Tuna Version: Use cream of cheddar soup if you like a stronger cheese note.
- Plain-Noodle Kid Version: Leave out the peas and keep the top to breadcrumbs only.
- No-Soup Swap: Make a quick white sauce with butter, flour, milk, and a little broth.
Common Mistakes to Avoid with This Dish:
- Don’t overcook the noodles; they keep softening in the oven.
- Don’t expect the casserole to look elegant. It should look creamy and rustic.
- Don’t forget to season lightly; canned soup and tuna need a little salt and pepper to wake up.
5. Chicken and Rice Casserole
Chicken and rice casserole is the sort of dinner that works because nothing in it argues with anything else. The rice turns soft and savory, the chicken stays tender, and the whole pan tastes like home in the plainest, most useful sense of the word.
Why It Works:
Uncooked rice absorbs broth and soup while baking, so one dish becomes a full meal without extra pots. Chicken thighs are cheaper and stay juicier than breasts, which matters in a casserole that bakes covered first. The flavors stay mild, and the texture stays soft enough for picky kids to accept without much drama.
Key Ingredients:
- 1 1/2 cups long-grain white rice — Rinse it if you want a cleaner texture.
- 1 1/2 pounds boneless, skinless chicken thighs — Cut into bite-size pieces.
- 1 can cream of chicken soup — Gives the casserole body.
- 2 1/2 cups chicken broth — Needed for the rice to cook.
- 1 cup frozen peas and carrots — Optional, but they blend in well.
- 1 teaspoon garlic powder — Keeps the seasoning mild.
- 1 cup shredded cheddar cheese — For the top.
Quick Steps:
- Heat the oven to 375°F and grease a 9×13-inch baking dish.
- Stir rice, soup, broth, garlic powder, and vegetables together in the dish.
- Nestle the chicken pieces into the rice mixture and season lightly with salt.
- Cover tightly with foil and bake for 45 minutes.
- Remove the foil, sprinkle on cheese, and bake 10 to 15 minutes more, until the rice is tender and the chicken is cooked through.
- Rest 10 minutes before serving.
Equipment for This Recipe:
- 9×13-inch baking dish — The rice needs a broad, even layer.
- Foil — Keeps steam trapped so the rice cooks evenly.
- Mixing spoon — For stirring the base.
- Sharp knife — For trimming the chicken thighs.
How to Serve This Dish:
Spoon it into shallow bowls so the rice and chicken stay in one place. A piece of buttered toast or a biscuit on the side makes the meal feel fuller without costing much. If peas are a hard sell, leave them on top instead of mixing them in.
Pro Tips for This Recipe:
- Use long-grain rice, not instant rice; the texture holds up better.
- Seal the foil well so the rice doesn’t dry out in the oven.
- Cut the chicken into similar pieces so nothing comes out overcooked.
Variations on This Dish:
- Broccoli Rice Casserole: Swap peas and carrots for small broccoli florets.
- Mushroom Version: Stir in sliced mushrooms if your family accepts them.
- Rotisserie Shortcut: Use shredded cooked chicken and reduce the bake time by 15 minutes.
Common Mistakes to Avoid with This Dish:
- Don’t use the wrong rice; quick-cooking rice can turn mushy.
- Don’t skimp on foil coverage or the top dries before the rice cooks.
- Don’t skip the rest period; the casserole needs time to settle and finish absorbing liquid.
6. Bean and Cheese Burritos
Bean and cheese burritos are one of those rare meals that stay cheap, fill people up, and don’t ask for much from the cook. Warm tortilla, creamy beans, melty cheese. That’s the whole pitch, and for a picky eater, that’s often enough.
Why It Works:
Beans stretch a small amount of cheese into a proper dinner, and tortillas make the whole thing feel hand-held and manageable. The filling stays soft and mild, with no strange textures if you mash the beans enough. You can serve each burrito plain or with dip on the side, which gives kids some control.
Key Ingredients:
- 2 cans refried beans — Choose plain, not spicy.
- 2 cups shredded cheddar cheese — Mild cheese wins here.
- 8 medium flour tortillas — Burrito-size or taco-size both work.
- 2 tablespoons butter — For browning the burritos.
- 1/2 teaspoon garlic powder — Optional, but helpful.
- 1/4 cup salsa — Keep it on the side if needed.
- 1/4 cup sour cream — Good for serving.
Quick Steps:
- Warm the beans in a saucepan over low heat until smooth and spreadable.
- Stir in garlic powder if using.
- Spread beans down the center of each tortilla, then top with cheese.
- Roll the tortillas tightly, folding in the sides as you go.
- Cook seam-side down in a skillet with butter over medium heat for 2 to 3 minutes per side, until golden and crisp.
- Serve with salsa and sour cream.
Equipment for This Recipe:
- Skillet — For crisping the burritos.
- Saucepan — For warming the beans.
- Spatula — To turn the tortillas without tearing them.
- Spoon — For spreading the filling evenly.
How to Serve This Dish:
Serve the burritos whole, then cut them in half if that makes them feel easier to eat. Rice or corn on the side rounds out the plate, though plain fruit works too if dinner needs to stay very simple. Extra salsa in a tiny dish lets the adults add heat without changing the main pan.
Pro Tips for This Recipe:
- Don’t overfill the tortillas or they split while browning.
- Warm tortillas for 15 seconds in the microwave so they roll without cracking.
- Browning seam-side down first helps the burritos stay shut.
Variations on This Dish:
- Rice-Bean Burritos: Add 1/2 cup cooked rice to each burrito for more bulk.
- Chicken Burritos: Mix in shredded cooked chicken.
- Breakfast Burritos: Swap refried beans for scrambled eggs and potatoes.
Common Mistakes to Avoid with This Dish:
- Don’t use cold beans; they’re harder to spread and tear the tortilla.
- Don’t drown the burritos in salsa before cooking or they go soggy.
- Don’t skip the skillet step if you want the outside to hold together.
7. Creamy Tomato Soup with Grilled Cheese
Tomato soup and grilled cheese is a low-cost dinner that never needs a sales pitch. The soup is smooth and mellow, the sandwich comes out crisp and buttery, and the whole plate tastes like you remember it. That memory matters. Kids trust it.
Why It Works:
Tomato soup can be made from pantry staples, and grilled cheese uses bread and cheese in a way almost nobody argues with. The soup stays mild if you keep the seasoning simple, and the sandwich gives the meal enough crunch to feel complete. Dipping turns dinner into something interactive instead of negotiable.
Key Ingredients:
- 2 tablespoons butter — For the soup base and the sandwiches.
- 1 small onion, diced — Cook until soft so it blends in.
- 2 tablespoons tomato paste — Deepens the tomato flavor.
- 2 cans crushed tomatoes, 28 ounces total — The body of the soup.
- 2 cups chicken broth or vegetable broth — Thins the soup to spoonable texture.
- 1/2 cup heavy cream or whole milk — Makes it creamy.
- 8 slices bread and 8 slices cheese — For the grilled cheese.
Quick Steps:
- Cook onion in butter over medium heat until soft, about 5 minutes.
- Stir in tomato paste and cook 1 minute.
- Add tomatoes and broth, then simmer for 15 minutes.
- Blend the soup until smooth, then stir in cream.
- Make grilled cheese in a skillet over medium heat until the bread is golden and the cheese melts.
- Serve together while the sandwich is still crisp.
Equipment for This Recipe:
- Medium pot — For the soup.
- Blender or immersion blender — Smooths the texture.
- Skillet or griddle — For the sandwiches.
- Spatula — For flipping without burning the bread.
How to Serve This Dish:
Pour the soup into mugs or wide bowls and cut the sandwiches into triangles. That triangle shape is not decorative; it makes dunking easier. A few crackers on the side help younger kids who want something extra to crunch.
Pro Tips for This Recipe:
- Blend carefully if the soup is hot; steam can splash.
- Use medium heat for grilled cheese so the bread browns before the cheese burns.
- A pinch of sugar can soften overly sharp canned tomatoes.
Variations on This Dish:
- Extra-Cheesy Soup: Stir in a handful of shredded cheddar at the end.
- Crouton Swap: Serve with buttery toast cubes instead of a sandwich.
- Dairy-Light Version: Use olive oil in the soup and skip the cream.
Common Mistakes to Avoid with This Dish:
- Don’t rush the onion; raw onion makes the soup taste harsh.
- Don’t crank the heat on grilled cheese or the bread burns before the center melts.
- Don’t skip the blender step if you want that classic smooth texture.
8. Turkey Meatloaf Muffins
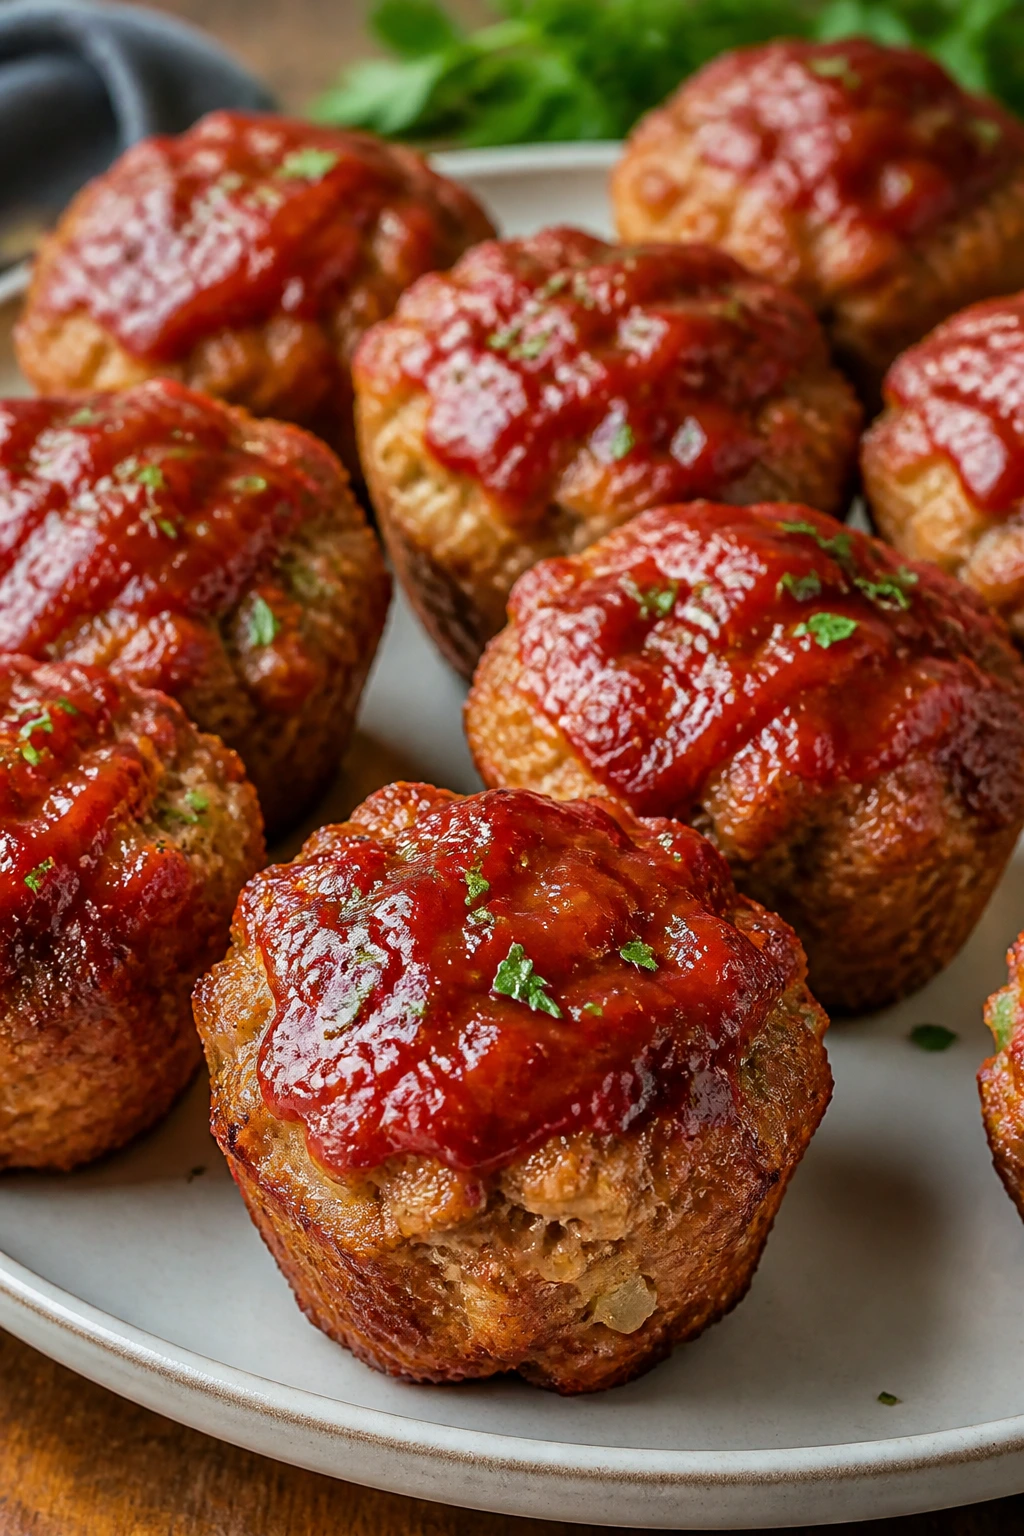
Meatloaf can be a hard sell to picky eaters, mostly because the big loaf shape feels formal and a little suspicious. Muffin tins fix that. Suddenly each portion looks like a small, tidy round that cooks faster and gets a little more browned edge.
Why It Works:
Ground turkey is usually cheaper than full cuts of meat, and the muffin shape keeps the portions small and less intimidating. Breadcrumbs and egg hold everything together without making the texture heavy. A little ketchup glaze on top gives the familiar meatloaf flavor kids usually recognize.
Key Ingredients:
- 1 1/2 pounds ground turkey — Not too lean or it dries out.
- 1 cup breadcrumbs — Helps the muffins hold shape.
- 1 egg — Binds the mixture.
- 1/2 cup milk — Keeps the texture soft.
- 1/4 cup ketchup — Goes in the mix and on top.
- 1 teaspoon salt — Enough for a mild but real flavor.
- 1 teaspoon onion powder — A quiet background note.
Quick Steps:
- Heat the oven to 375°F and grease a 12-cup muffin tin.
- Mix turkey, breadcrumbs, egg, milk, ketchup, salt, and onion powder in a large bowl.
- Divide the mixture among the muffin cups and press lightly.
- Spread a thin layer of ketchup on top of each one.
- Bake for 20 to 25 minutes, until the centers reach 165°F and the tops look set.
- Rest 5 minutes before lifting out.
Equipment for This Recipe:
- 12-cup muffin tin — Gives the meatloaf its shape.
- Mixing bowl — For combining the meat.
- Spoon or small scoop — Helps portion evenly.
- Instant-read thermometer — Best way to check doneness.
How to Serve This Dish:
Serve two muffins per adult and one or two per child, with mashed potatoes or buttered noodles on the side. A little extra ketchup or barbecue sauce on the table doesn’t hurt. These are easy to pack into lunch the next day if there are any left.
Pro Tips for This Recipe:
- Mix just until combined; overmixing makes the muffins dense.
- Add a teaspoon of olive oil if your turkey is very lean.
- Let them rest before removing from the tin or they can break apart.
Variations on This Dish:
- Cheddar Meatloaf Muffins: Fold in 1 cup shredded cheddar.
- BBQ Muffins: Swap ketchup for barbecue sauce on top.
- Beef-Turkey Blend: Use half ground beef and half turkey for a richer flavor.
Common Mistakes to Avoid with This Dish:
- Don’t pack the meat tightly into the cups; they cook more evenly when loosely filled.
- Don’t underbake the centers; turkey needs to hit 165°F.
- Don’t use extra-lean turkey without adding moisture or the muffins get chalky.
9. Breakfast Quesadillas
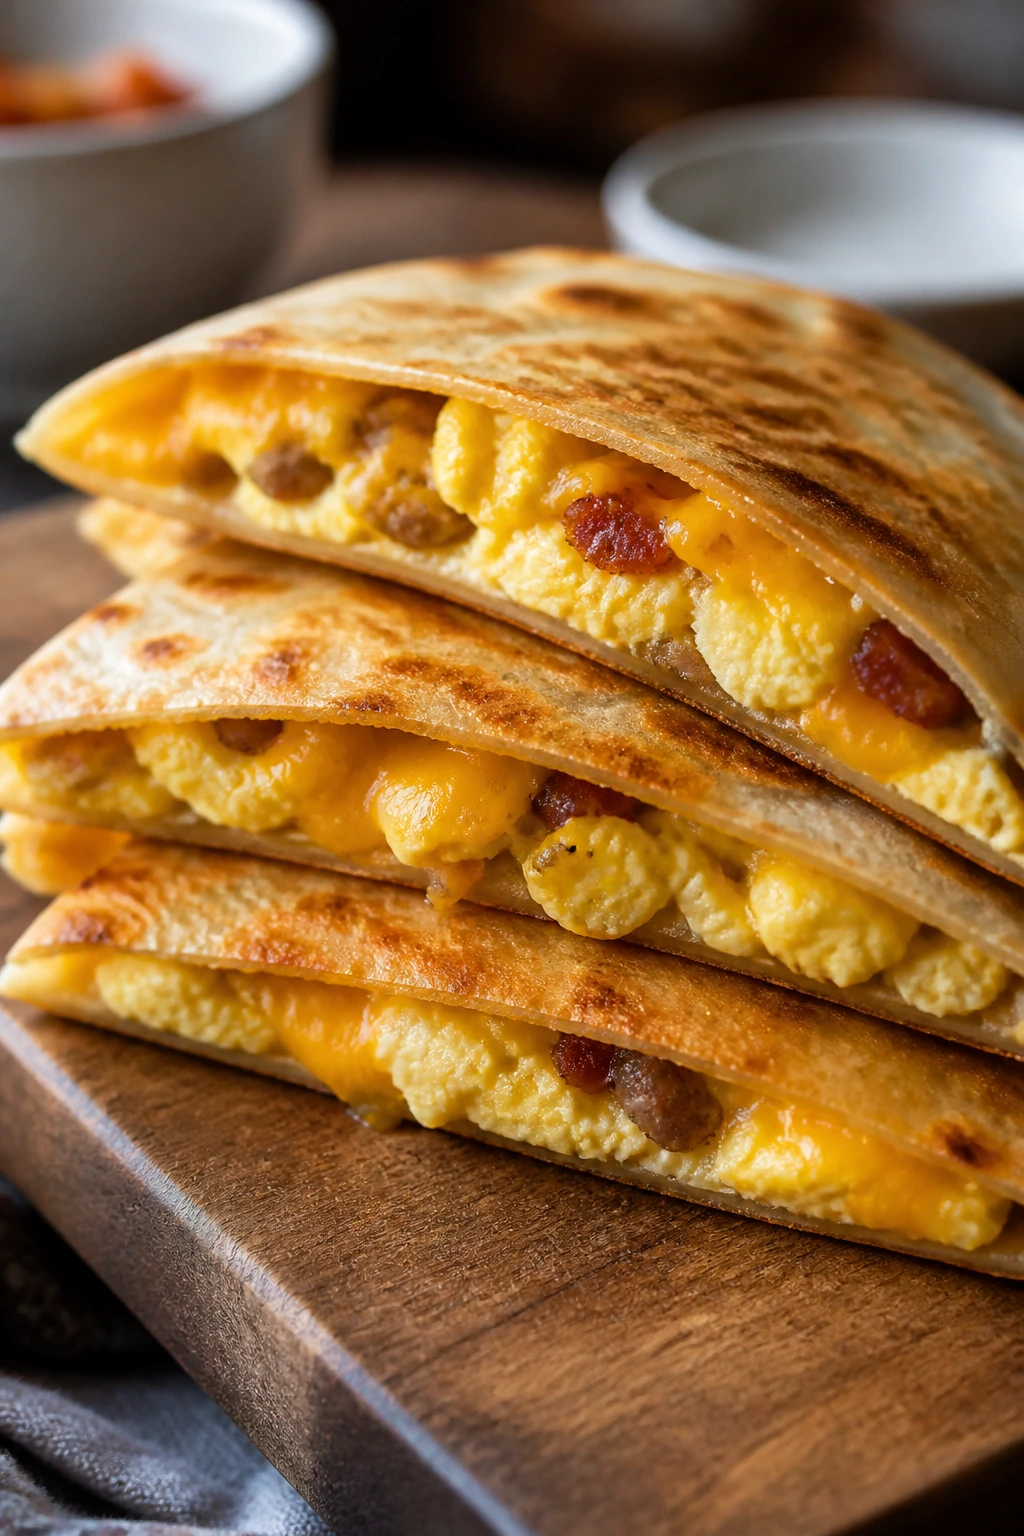
Breakfast for dinner gets easier when the food folds into a tortilla. Eggs, cheese, and a little ham or potato turn into something handheld and familiar. No knives. No complicated sides. Just a warm pan and a stack of tortillas.
Why It Works:
Eggs are cheap, tortillas are cheap, and the whole meal can be built from leftovers if you already have cooked potatoes or diced ham. The texture stays soft inside and crisp outside, which is a nice combination when a child is picky about wet fillings. It also cooks quickly enough for a weeknight.
Key Ingredients:
- 6 large eggs — Scrambled before filling.
- 1 tablespoon butter — For the eggs and the skillet.
- 1 cup shredded cheddar cheese — Melts fast and tastes familiar.
- 4 flour tortillas — Medium size works best.
- 1 cup diced cooked ham or cooked potatoes — Optional, but filling.
- 1 tablespoon milk — Keeps the eggs soft.
- Salt and pepper to taste — Use lightly.
Quick Steps:
- Whisk eggs with milk, salt, and pepper.
- Scramble them in butter over medium-low heat until just set and still soft.
- Lay tortillas flat and sprinkle cheese over one half of each.
- Add eggs and ham or potatoes, then fold the tortillas closed.
- Cook in a dry skillet over medium heat for 2 minutes per side, until the tortilla is golden and the cheese melts.
- Cut into wedges and serve warm.
Equipment for This Recipe:
- Nonstick skillet — Best for eggs and quesadillas.
- Bowl and whisk — For the eggs.
- Spatula — For folding and flipping.
- Knife or pizza cutter — For slicing wedges cleanly.
How to Serve This Dish:
These are easiest on a plate with salsa or sour cream on the side, not poured on top. Fruit or a few hash browns turn them into a fuller meal. If your family is sensitive to texture, keep the filling simple: eggs and cheese only.
Pro Tips for This Recipe:
- Scramble the eggs softly; they keep cooking inside the tortilla.
- Use medium heat so the tortilla browns before the cheese burns.
- Shred your own cheese if you want a smoother melt.
Variations on This Dish:
- Potato Breakfast Quesadillas: Use diced leftover potatoes instead of ham.
- Sausage Version: Replace ham with cooked breakfast sausage.
- Plain Cheese Egg Quesadilla: Leave out the meat entirely for the pickiest eaters.
Common Mistakes to Avoid with This Dish:
- Don’t overfill the tortilla or it won’t close cleanly.
- Don’t cook the eggs dry; they get rubbery after folding.
- Don’t crank the skillet heat up too high or the outside browns before the cheese softens.
10. Taco Pasta Skillet
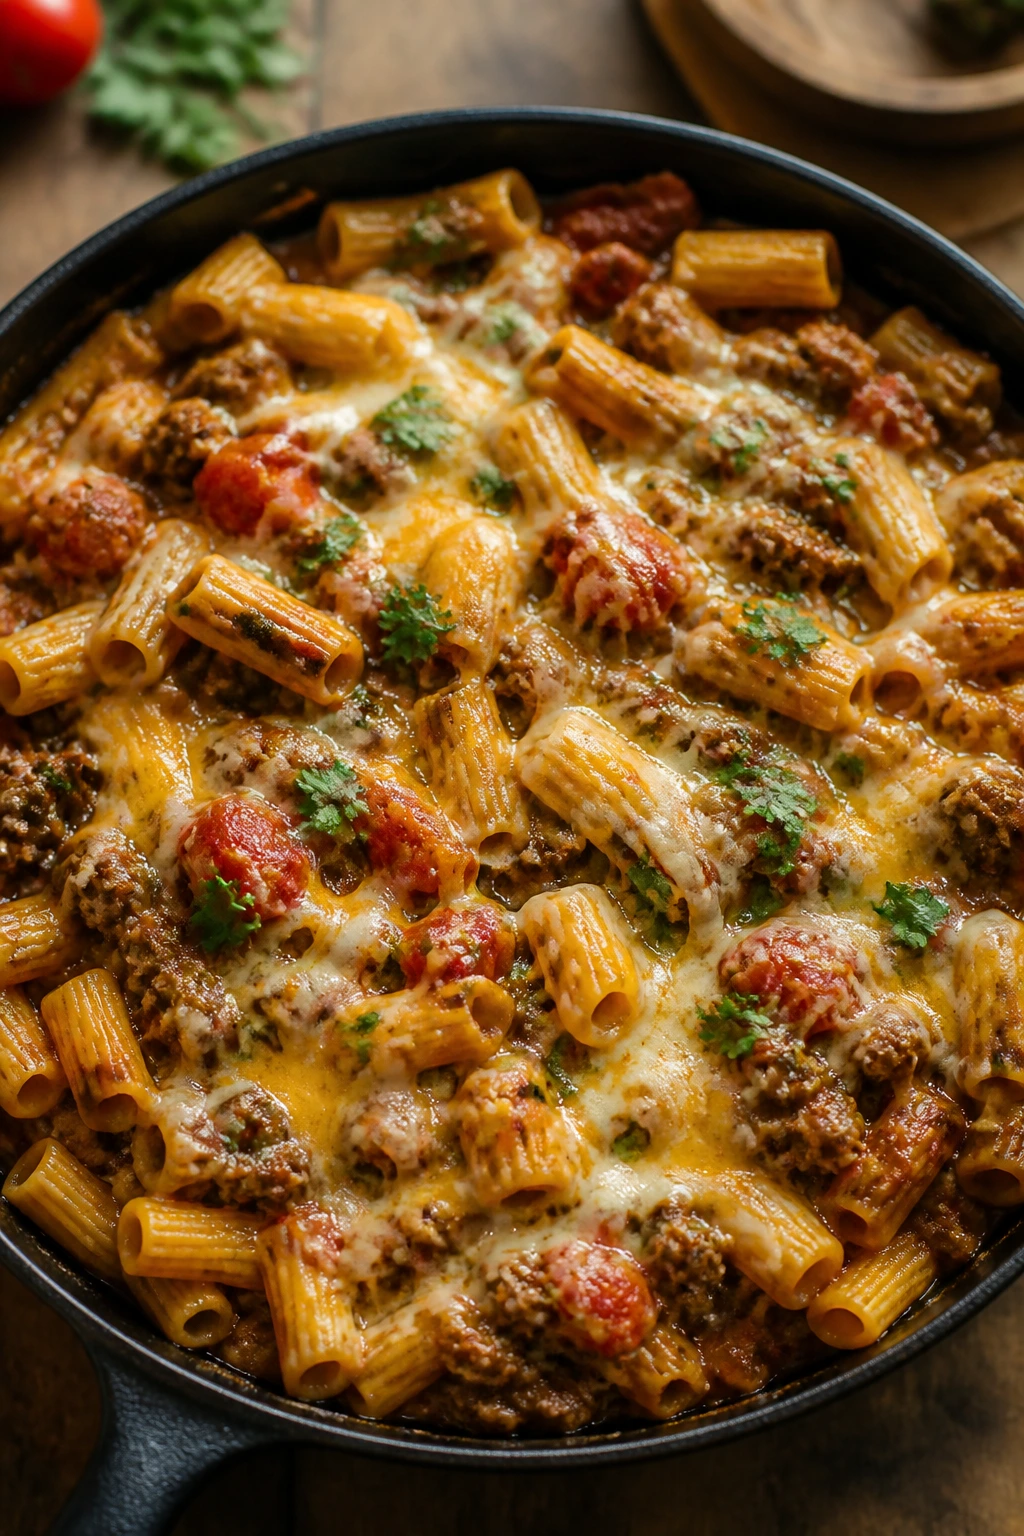
Taco pasta skillet sits in the sweet spot between taco night and pasta night, which means fewer arguments and fewer dishes. The noodles soak up the sauce, the cheese melts through, and the seasoning stays gentle if you keep the taco mix mild. It tastes like something familiar that got rearranged.
Why It Works:
Ground beef stretches farther when you mix it with pasta and sauce, and one skillet keeps cleanup cheap. The taco seasoning gives enough flavor to feel distinct without pushing the dish into spicy territory. A little cheese on top smooths out the tomato edges.
Key Ingredients:
- 1 pound ground beef — Browned and drained.
- 8 ounces short pasta, like rotini — The curves hold sauce well.
- 1 small onion, diced — Optional, but useful.
- 1 packet mild taco seasoning — Or 2 tablespoons from a jar.
- 1 can diced tomatoes, 14.5 ounces — Keep the juice.
- 2 cups beef broth — Cooks the pasta right in the skillet.
- 1 1/2 cups shredded cheddar — Melted at the end.
Quick Steps:
- Brown the beef and onion in a large skillet, then drain excess grease.
- Stir in taco seasoning and tomatoes.
- Add pasta and broth, then bring to a boil.
- Reduce heat, cover, and simmer for 12 to 15 minutes until the pasta is tender and most of the liquid is absorbed.
- Stir in cheese until melted and creamy.
- Rest for 2 minutes before serving.
Equipment for This Recipe:
- Large deep skillet — Needs enough room for the pasta.
- Lid — Helps the pasta cook evenly.
- Wooden spoon — For stirring without breaking noodles.
- Measuring cup — For the broth.
How to Serve This Dish:
Serve it in bowls and let each person add shredded cheese or a spoonful of sour cream. Tortilla chips on the side give a little crunch, which kids usually love more than another vegetable. If someone wants a fresher bite, chopped lettuce can sit on the side of the plate.
Pro Tips for This Recipe:
- Keep the taco seasoning mild unless you know the family likes heat.
- Stir once or twice while simmering so the pasta doesn’t stick.
- If the skillet looks dry before the pasta is tender, add 1/4 cup broth.
Variations on This Dish:
- Chicken Taco Pasta: Swap ground beef for shredded cooked chicken.
- Bean Boost Version: Add a can of drained black beans.
- Creamy Taco Pasta: Stir in 1/2 cup sour cream at the end.
Common Mistakes to Avoid with This Dish:
- Don’t use too little liquid or the pasta stays hard in the center.
- Don’t walk away once the broth boils down; it can catch on the bottom.
- Don’t use hot taco seasoning if the goal is a kid-friendly dinner.
11. Loaded Baked Potato Soup
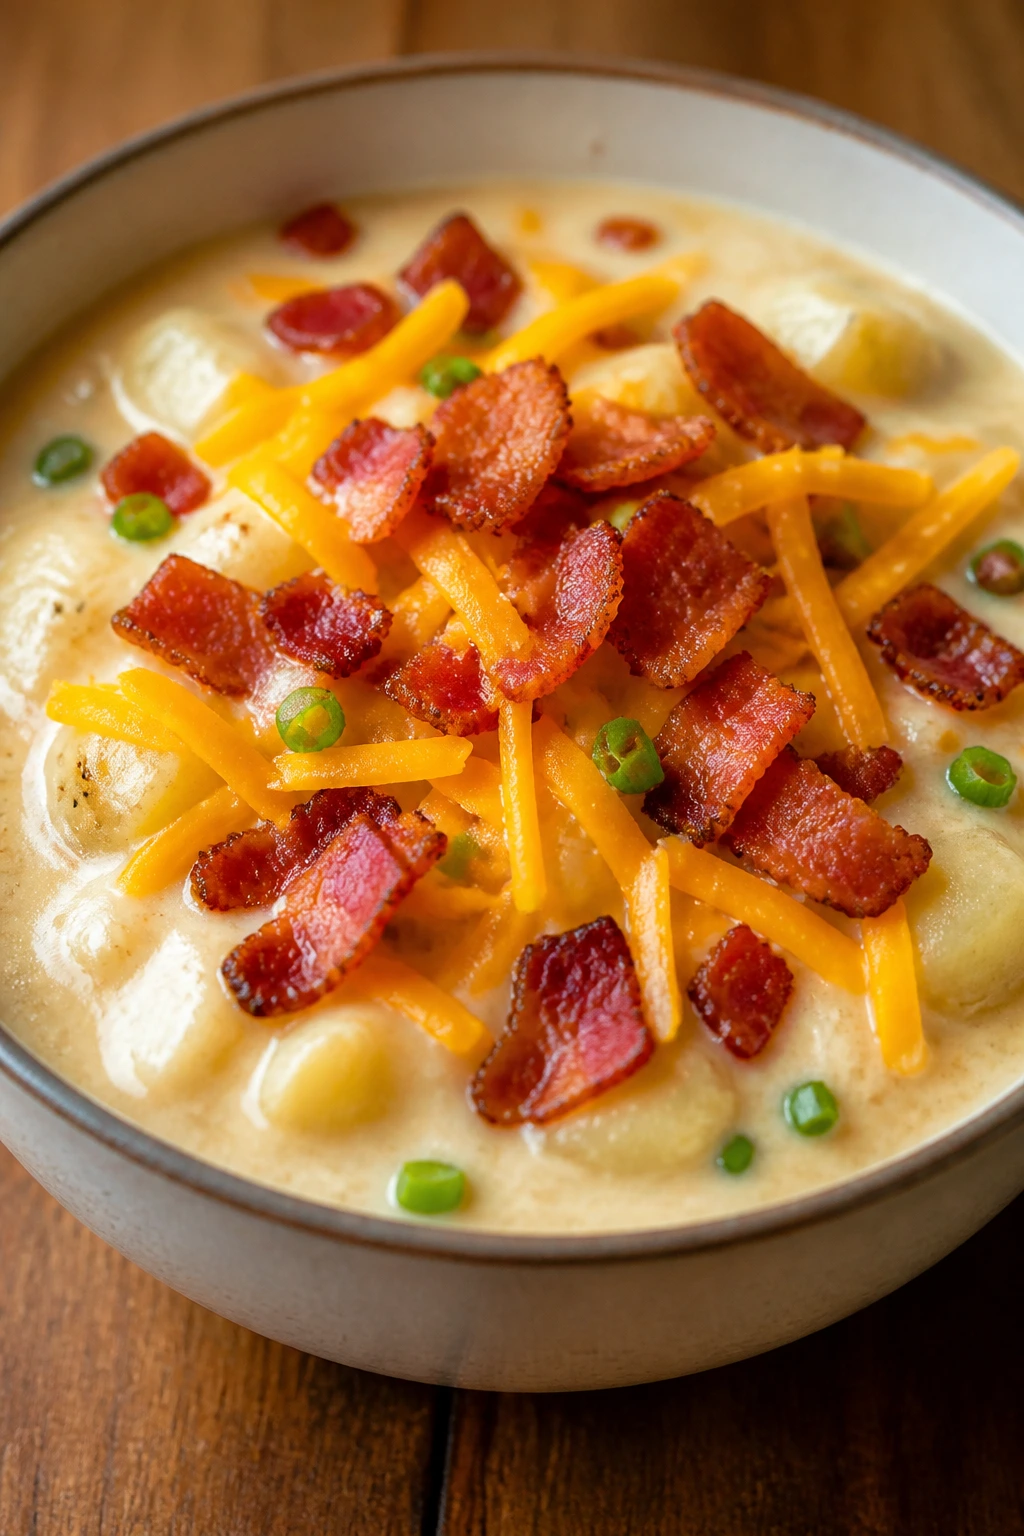
Loaded baked potato soup is budget comfort food that doesn’t feel skimpy. The potatoes make it thick, the milk softens the texture, and the toppings — cheese, bacon, chives if you want them — turn a simple pot into dinner that looks deliberate.
Why It Works:
Potatoes are cheap, filling, and naturally creamy when cooked down. The soup stays familiar because the flavor profile is basically a baked potato in a bowl. Kids can keep it plain, while adults can add toppings without changing the whole pot.
Key Ingredients:
- 2 pounds russet potatoes, peeled and diced — They break down into a creamy base.
- 4 cups chicken broth — Cooks the potatoes.
- 2 tablespoons butter — For flavor and body.
- 1 small onion, finely diced — Cooked until soft.
- 2 cups milk — Makes the soup rich.
- 1 cup shredded cheddar cheese — For the finish.
- 4 slices cooked bacon, crumbled — Optional topping.
Quick Steps:
- Cook onion in butter in a large pot until soft.
- Add potatoes and broth, then simmer for 15 to 20 minutes until the potatoes are tender.
- Mash some of the potatoes right in the pot for a thicker texture.
- Stir in milk and cheese, then warm gently without boiling.
- Ladle into bowls and add bacon on top if using.
Equipment for This Recipe:
- Large soup pot — Enough room for stirring.
- Potato masher — Helps build a thicker texture.
- Sharp knife — For cutting potatoes evenly.
- Ladle — For serving.
How to Serve This Dish:
Serve it with toast, crackers, or a warm biscuit. Keep the toppings on the side so the soup stays friendly for kids who want it plain. A little extra cheese on top melts into a tidy puddle that makes the bowl look more substantial than the ingredient list.
Pro Tips for This Recipe:
- Don’t boil after adding milk or the soup can split.
- Peel russet potatoes if you want a smoother texture; leave skins on if your family doesn’t mind them.
- Mash only part of the pot so the soup stays thick but not paste-like.
Variations on This Dish:
- Cheddar-Only Version: Skip the bacon and keep the topping simple.
- Ham and Potato Soup: Add diced cooked ham for extra protein.
- Dairy-Lighter Soup: Use evaporated milk or a lighter milk, though it won’t taste as rich.
Common Mistakes to Avoid with This Dish:
- Don’t let the soup boil once the milk goes in.
- Don’t cut the potatoes too small or they disappear before thickening the soup.
- Don’t oversalt at the start; the cheese and bacon add salt later.
12. Spaghetti with Butter, Garlic, and Parmesan
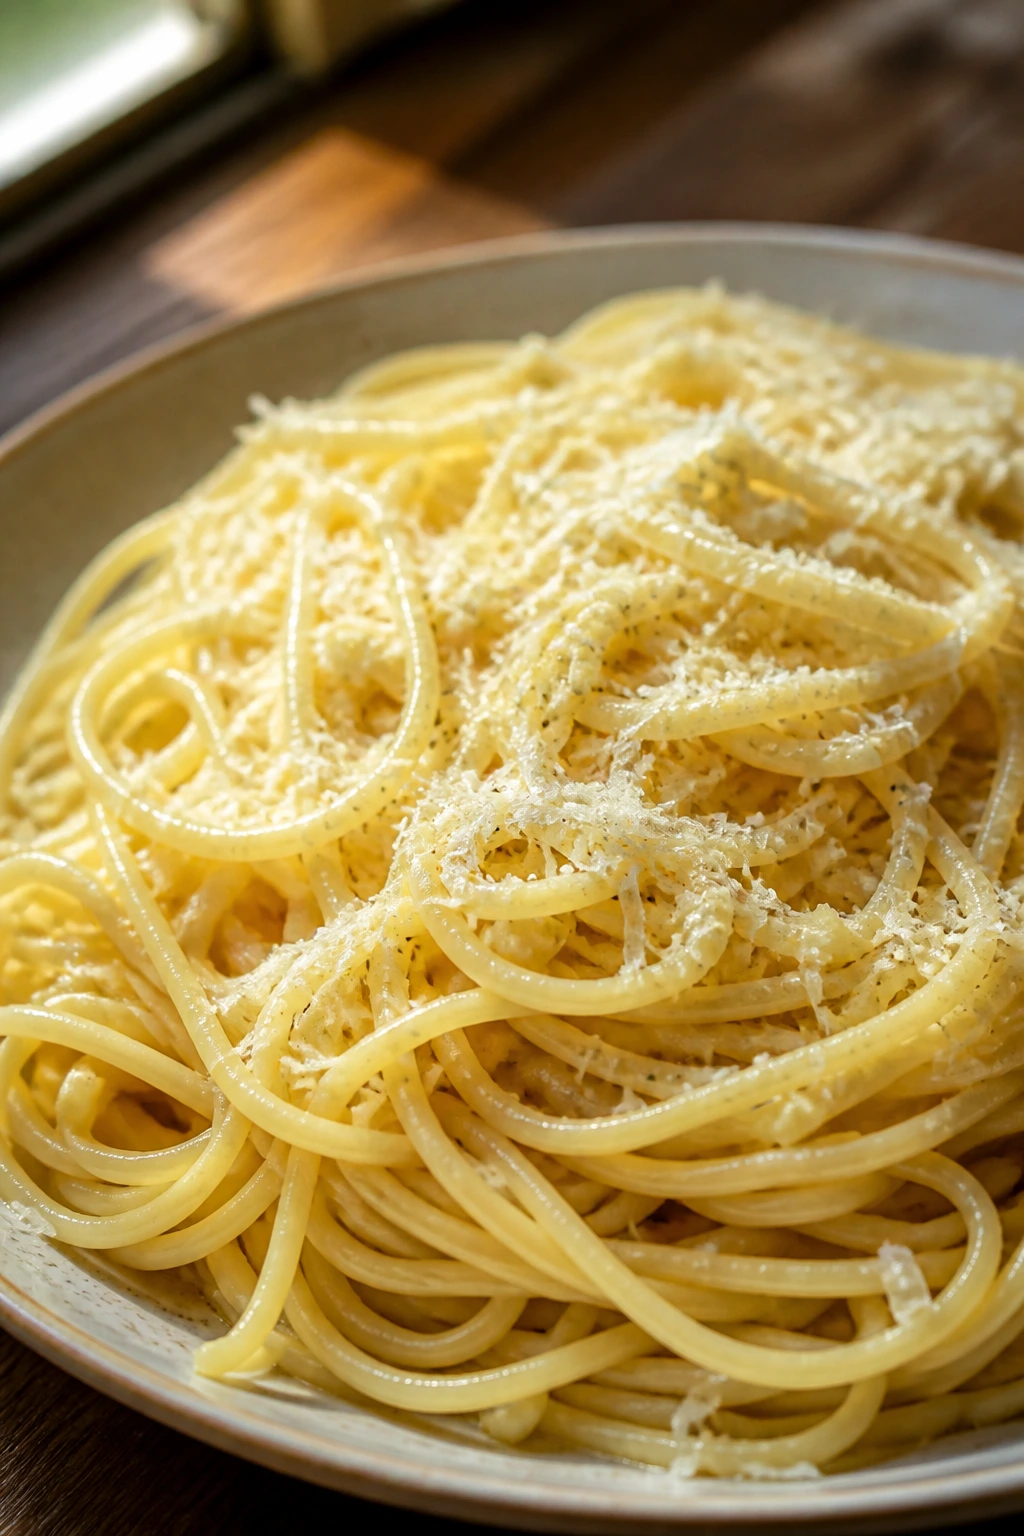
Not every budget dinner needs a heavy sauce. Sometimes plain spaghetti with butter, garlic, and Parmesan is enough, especially when the people at the table prefer food that doesn’t come with surprises. The noodles stay silky, the garlic smells sweet instead of sharp, and the whole thing takes almost no effort.
Why It Works:
This is pasta in its most dependable form. Butter coats the strands, garlic adds flavor without turning the dish red or chunky, and Parmesan gives salt and a little nuttiness. It’s cheap, fast, and easy to serve with chicken or bread if you need to stretch it.
Key Ingredients:
- 1 pound spaghetti — Cheap, filling, and familiar.
- 4 tablespoons butter — Builds the sauce.
- 3 cloves garlic, minced — Keep it fine so no one bites a big piece.
- 1/2 cup grated Parmesan — Freshly grated melts best.
- 1/4 cup reserved pasta water — Helps the sauce cling.
- Salt and black pepper — Use lightly.
- Chopped parsley — Optional garnish.
Quick Steps:
- Cook spaghetti in salted water until al dente, then reserve 1/2 cup pasta water and drain.
- Melt butter in a large skillet over medium heat.
- Add garlic and cook 30 seconds, just until fragrant.
- Toss in spaghetti, Parmesan, and a splash of pasta water.
- Stir until the sauce clings to the noodles.
- Season and serve immediately.
Equipment for This Recipe:
- Large pot — For the pasta.
- Large skillet or sauté pan — For tossing the sauce.
- Tongs — Makes it easier to coat the noodles.
- Microplane or grater — For Parmesan.
How to Serve This Dish:
Plate it with more Parmesan on top and a little black pepper if the kids allow it. A side of chicken nuggets, meatballs, or a piece of toast turns it into a fuller meal without changing the pasta itself. Keep the garnish minimal; this dish works because it stays plain.
Pro Tips for This Recipe:
- Save the pasta water before draining or you’ll forget it.
- Use low heat when adding Parmesan so it melts smoothly.
- Mince garlic finely; large pieces burn fast.
Variations on This Dish:
- Lemon Butter Pasta: Add 1 teaspoon lemon zest at the end.
- Cheesy Noodle Bowl: Stir in a handful of mozzarella for a softer sauce.
- Protein Add-In: Top with sliced grilled chicken or meatballs.
Common Mistakes to Avoid with This Dish:
- Don’t brown the garlic; it turns bitter fast.
- Don’t forget the pasta water or the sauce feels dry.
- Don’t use too little salt in the pasta water; bland noodles make this dish fall flat.
13. Ham and Cheese Sliders
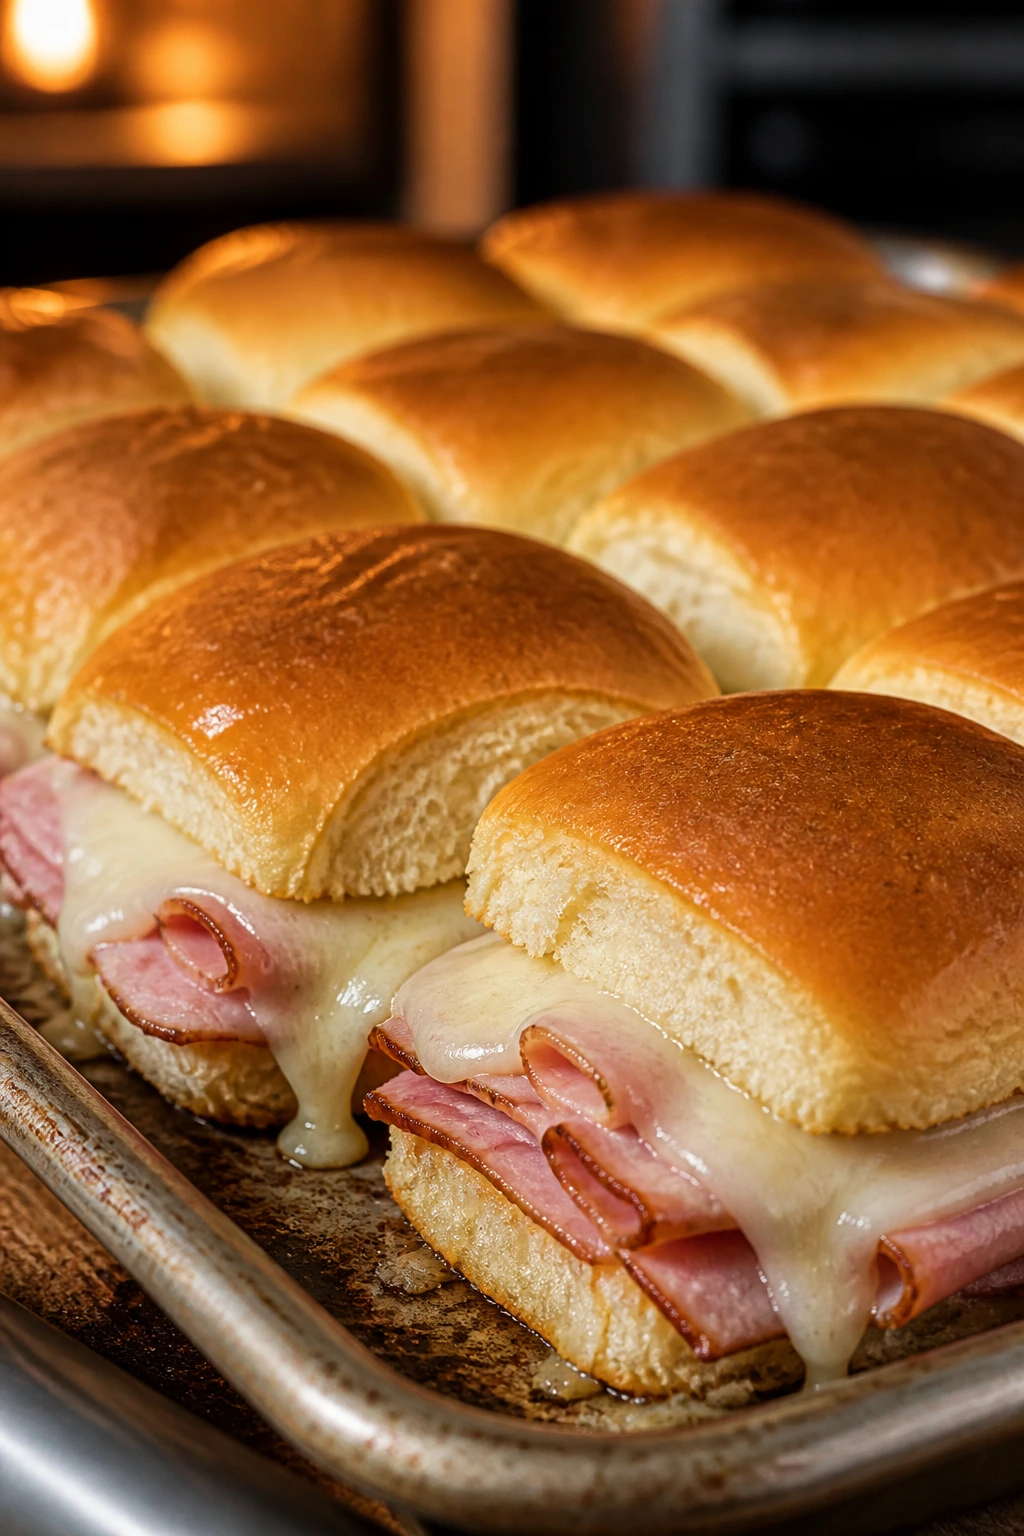
Ham and cheese sliders are the sort of meal that disappears before anyone asks if it’s “real dinner.” Soft rolls, salty ham, melted cheese, and a buttery top bake into a tray that feels almost like snack food, except it fills people up. That makes them dangerous in the best way.
Why It Works:
Dinner on rolls is easier for picky eaters because the shape feels small and manageable. The sweet-savory butter topping browns on top of the buns and keeps the sandwiches from drying out. You can make a full pan for less than a lot of takeout sides.
Key Ingredients:
- 12 slider rolls — Soft dinner rolls work too.
- 1 pound sliced ham — Ask for thin slices so it layers well.
- 8 slices Swiss or mild cheddar cheese — Swiss is traditional, cheddar is kid-friendlier.
- 1/2 cup butter, melted — For the topping.
- 1 tablespoon Dijon mustard — Optional, and easy to reduce.
- 1 tablespoon poppy seeds — Optional.
- 1 teaspoon onion powder — Helps the topping taste fuller.
Quick Steps:
- Heat the oven to 350°F and slice the rolls in half as a connected sheet.
- Layer ham and cheese on the bottom halves, then replace the tops.
- Stir melted butter, mustard, poppy seeds, and onion powder together.
- Brush the butter mixture over the tops of the rolls.
- Bake for 15 to 20 minutes until the cheese melts and the tops turn golden.
- Slice apart and serve warm.
Equipment for This Recipe:
- 9×13-inch baking dish — Holds the rolls snugly.
- Pastry brush or spoon — For the butter topping.
- Knife — For slicing the rolls cleanly.
- Foil — Handy if the tops brown too quickly.
How to Serve This Dish:
Set the sliders out whole or cut them apart at the table. A bowl of chips, baby carrots, or fruit keeps the meal budget-friendly and easy. If you’re feeding bigger eaters, pair them with soup and count on two sliders per adult.
Pro Tips for This Recipe:
- Leave the rolls attached when you slice them; it saves time and keeps the bottoms aligned.
- Cover with foil for the first 10 minutes if your oven runs hot.
- Brush the butter all the way to the edges so the tops bake evenly.
Variations on This Dish:
- Turkey Sliders: Use sliced turkey instead of ham.
- Plain Cheese Sliders: Skip the meat for a snacky dinner.
- Honey Mustard Version: Swap Dijon for honey mustard in the butter mix.
Common Mistakes to Avoid with This Dish:
- Don’t use thick deli meat; it makes the sliders slide apart.
- Don’t drown the tops in butter or the bottoms get soggy.
- Don’t walk away during the last few minutes; the tops can go from golden to too dark fast.
14. Mini Pita Pizzas
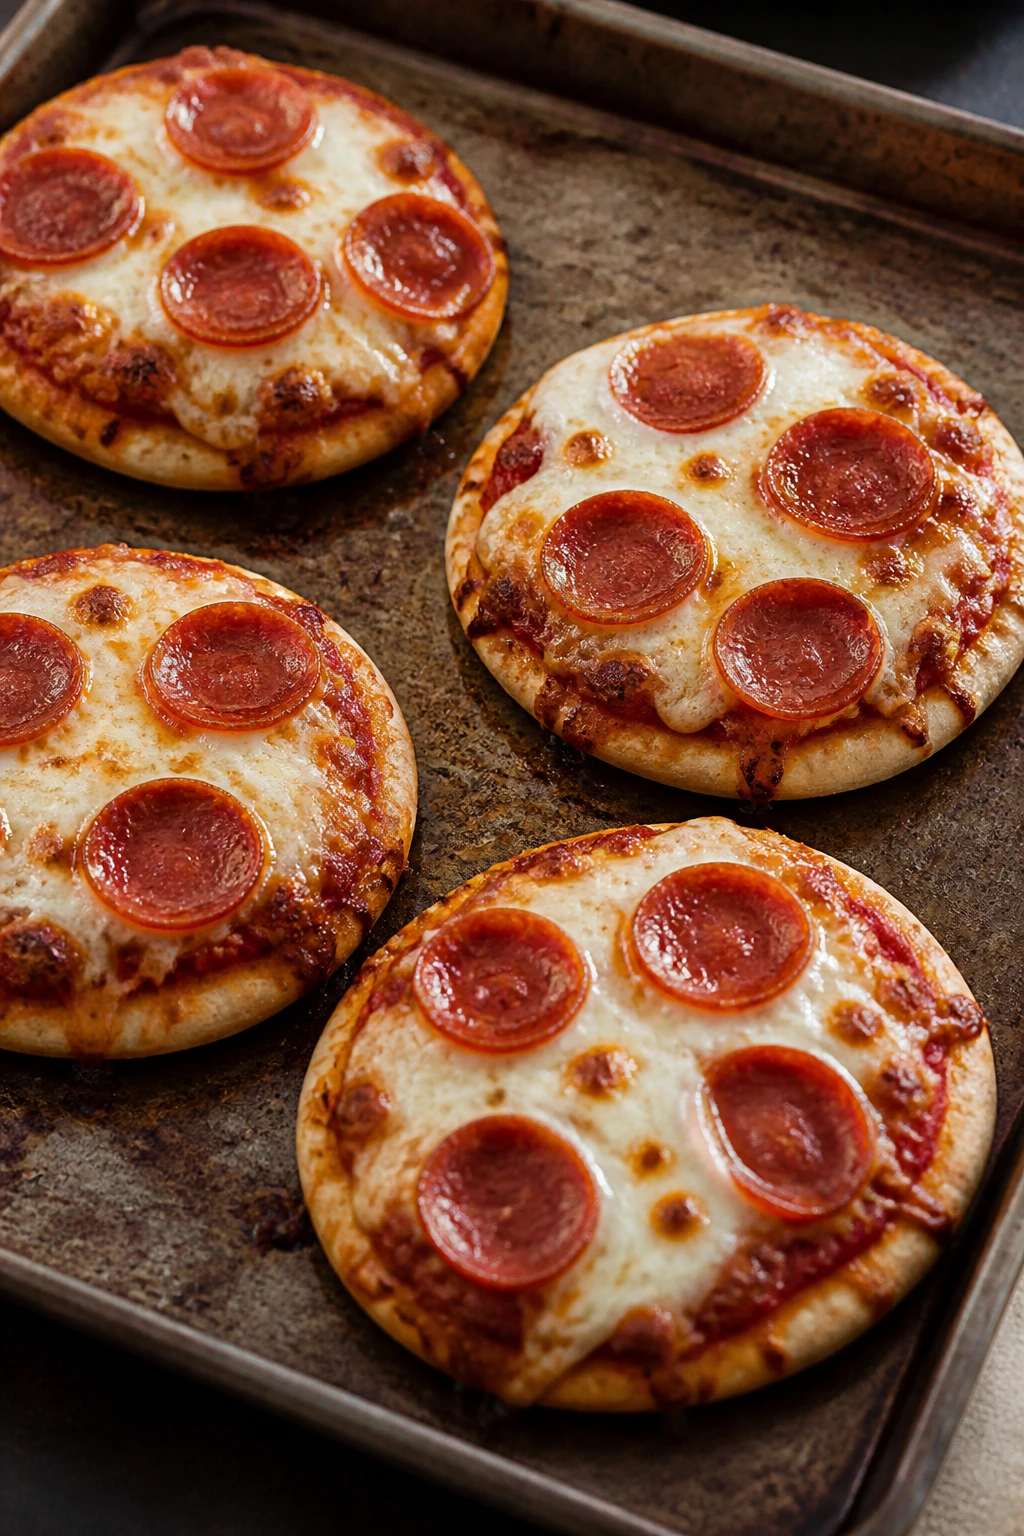
Mini pita pizzas are one of the easiest ways to satisfy a kid who wants pizza and a parent who wants dinner fast. The pita crisps at the edges, the sauce stays gentle, and the cheese melts into little browned spots that look more exciting than the effort it took to make them.
Why It Works:
Pita breads are cheap enough to use as an individual crust, and everyone can top their own. That matters when a child won’t touch mushrooms but an adult wants pepperoni or extra cheese. The pizzas bake fast, so the crust stays crisp instead of going soft.
Key Ingredients:
- 4 pita breads — Pocket or flat pitas both work.
- 1 cup pizza sauce — Keep it smooth and not too chunky.
- 2 cups shredded mozzarella — The main event.
- 1/2 cup mini pepperoni — Optional.
- 1/4 cup sliced black olives — Optional, and easy to leave off.
- 1 tablespoon olive oil — Helps the edges crisp.
- 1 teaspoon dried oregano — Optional, but nice.
Quick Steps:
- Heat the oven to 425°F.
- Brush the pitas lightly with olive oil and place them on a baking sheet.
- Spread a thin layer of pizza sauce over each pita.
- Add cheese and any toppings.
- Bake for 8 to 10 minutes until the cheese melts and the edges are crisp.
- Slice and serve right away.
Equipment for This Recipe:
- Baking sheet — For crisping the pitas.
- Spoon — For spreading sauce evenly.
- Pizza cutter or knife — For slicing.
- Pastry brush — Handy for the oil.
How to Serve This Dish:
Serve them whole for small hands or cut into wedges for sharing. A simple salad is nice for adults, but most kids will happily take the pizza and a piece of fruit. If toppings are a source of conflict, set up a tray and let people build their own.
Pro Tips for This Recipe:
- Use a thin layer of sauce so the pita doesn’t get soggy.
- Pre-bake the pita for 2 minutes if you want an even crisper crust.
- Keep toppings light; overloaded mini pizzas bake unevenly.
Variations on This Dish:
- Pepperoni Classic: Use only sauce, cheese, and pepperoni.
- Breakfast Pizza: Top with scrambled eggs and a little sausage.
- White Pizza Pita: Swap red sauce for a thin layer of ricotta and garlic.
Common Mistakes to Avoid with This Dish:
- Don’t use too much sauce or the pita softens.
- Don’t pile on wet toppings; they weigh the crust down.
- Don’t underbake the edges if you want a pizza-like bite instead of a soft flatbread.
15. Fried Rice with Egg and Ham
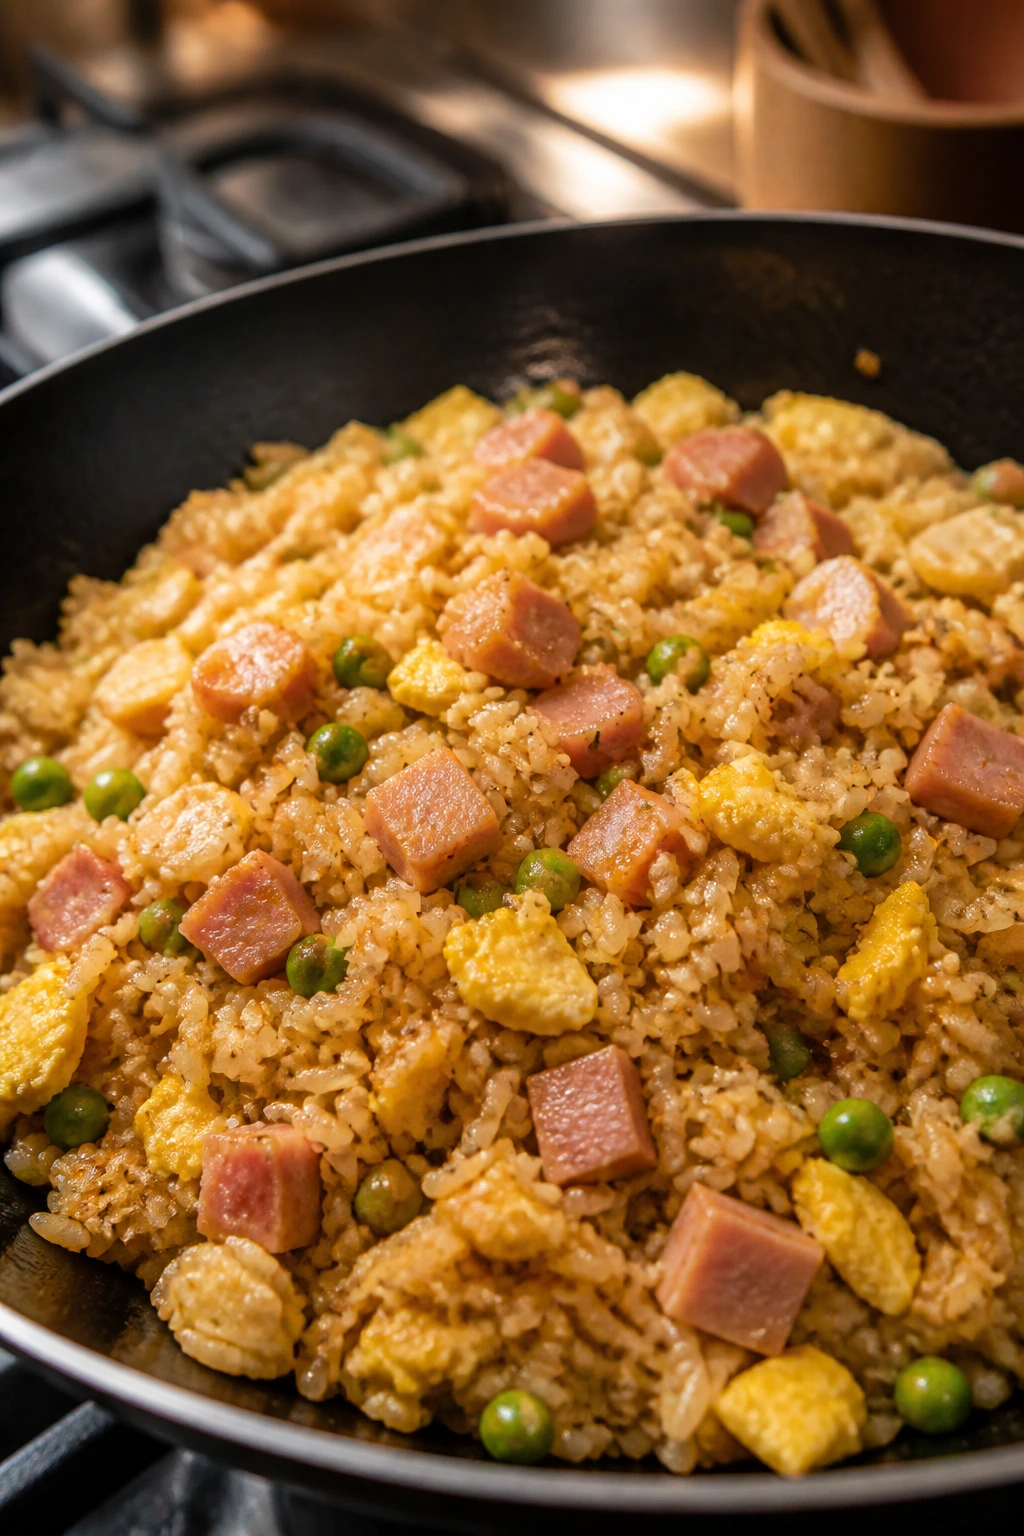
Fried rice is one of those meals that quietly rescues leftover rice and a little ham from the back of the fridge. It cooks fast, feels warm and savory, and can be kept very plain if that’s what the table needs. The eggs make it feel complete.
Why It Works:
Day-old rice fries better than fresh rice because the grains stay separate instead of clumping. Eggs and diced ham add protein without making the dish fussy. The soy sauce should stay light and balanced so the whole pan tastes familiar instead of strongly seasoned.
Key Ingredients:
- 3 cups cooked and chilled white rice — Cold rice is the secret.
- 2 tablespoons oil — Use a neutral one like canola.
- 3 eggs, beaten — Scramble into the rice.
- 1 cup diced ham — Small cubes are best.
- 1/2 cup frozen peas and carrots — Optional, but classic.
- 2 tablespoons soy sauce — Start small.
- 2 green onions, sliced — Optional garnish.
Quick Steps:
- Heat oil in a large skillet or wok over medium-high heat.
- Scramble the eggs, then push them to the side.
- Add ham and vegetables, cooking until warmed through.
- Stir in rice and break up any clumps with the spoon.
- Add soy sauce and cook for 2 to 3 more minutes until the rice is hot and lightly browned.
- Finish with green onions if using.
Equipment for This Recipe:
- Large skillet or wok — Needs room to stir.
- Spatula — For tossing the rice.
- Bowl — To beat the eggs.
- Measuring spoons — For the soy sauce.
How to Serve This Dish:
Serve it in bowls with extra soy sauce on the side for adults who want more salt. A few cucumber slices or mandarin oranges can make the plate feel fresher without adding much cost. If you need a larger dinner, add a fried egg on top.
Pro Tips for This Recipe:
- Use cold rice, not warm rice, or the pan turns sticky.
- Keep the vegetables small so they don’t stand out.
- Don’t soak the rice in soy sauce; add a little at a time.
Variations on This Dish:
- Chicken Fried Rice: Use leftover cooked chicken instead of ham.
- Plain Egg Rice: Leave out the ham and keep it very simple.
- Butter Fried Rice: Swap half the oil for butter for a milder flavor.
Common Mistakes to Avoid with This Dish:
- Don’t overcrowd the pan or the rice steams instead of frying.
- Don’t use freshly cooked rice; it clumps badly.
- Don’t add the soy sauce all at once if you want control over the salt.
16. Chicken Alfredo Bake
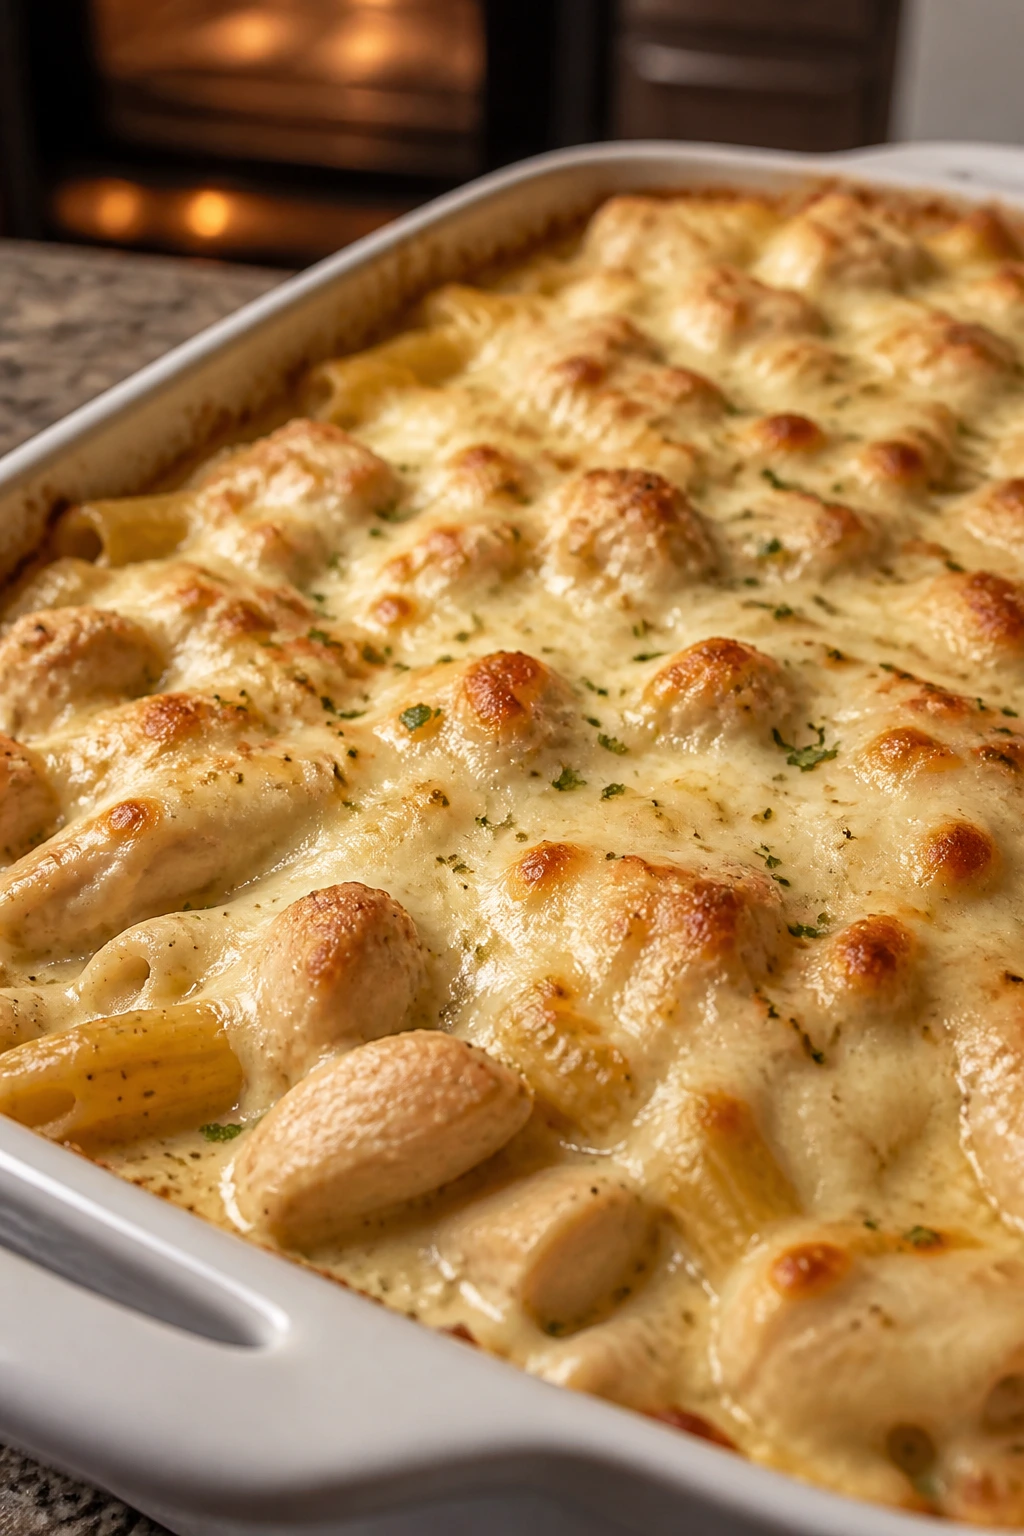
Chicken Alfredo Bake is one of those dinners that feels a little richer than its grocery list suggests. Pasta, creamy sauce, and chicken all pull together into a pan that kids usually trust because it looks like noodles first and a casserole second. That order matters.
Why It Works:
Creamy sauces are often easier for picky eaters than red sauces because they don’t bring chunks or sharp acid. Using cooked chicken keeps the bake fast, and the pasta absorbs a bit of sauce in the oven without drying out. A little mozzarella on top gives it the kind of melted finish people expect from a baked pasta dish.
Key Ingredients:
- 12 ounces pasta, like penne — Holds sauce well.
- 2 cups cooked chicken, shredded or diced — Rotisserie chicken is fine.
- 2 cups Alfredo sauce — Store-bought saves time.
- 1 cup milk — Loosens the sauce so it coats the pasta.
- 1 1/2 cups shredded mozzarella — For the top.
- 1/2 cup grated Parmesan — Adds salt and finish.
- 1 tablespoon butter — For the baking dish.
Quick Steps:
- Cook the pasta until just al dente, then drain.
- Stir together Alfredo sauce and milk in a large bowl.
- Fold in pasta and chicken until coated.
- Spread into a buttered baking dish and top with mozzarella and Parmesan.
- Bake at 375°F for 20 minutes until bubbly and lightly browned.
- Rest 10 minutes before serving.
Equipment for This Recipe:
- Large pot — For the pasta.
- Mixing bowl — For combining everything.
- 9×13-inch baking dish — Best for even baking.
- Colander — For draining the pasta.
How to Serve This Dish:
Serve it with a simple green vegetable on the side if anyone will eat one, or just some bread and fruit if that’s the safer route. A smaller portion goes a long way because the sauce is rich. The bake also reheats well for lunch.
Pro Tips for This Recipe:
- Use cooked chicken that isn’t dry; rotisserie is an easy choice.
- Keep the pasta a little firm before baking or it can go soft.
- If the sauce seems thick before baking, thin it with a splash more milk.
Variations on This Dish:
- Broccoli Alfredo Bake: Add small broccoli florets if your family accepts them.
- Bacon Alfredo Bake: Stir in cooked bacon for extra salt.
- Garlic Chicken Bake: Add 1 teaspoon garlic powder for more flavor.
Common Mistakes to Avoid with This Dish:
- Don’t overcook the pasta before it goes in the oven.
- Don’t use too little sauce or the bake turns dry.
- Don’t bake it uncovered too long or the top hardens before the center heats through.
17. Chili Mac
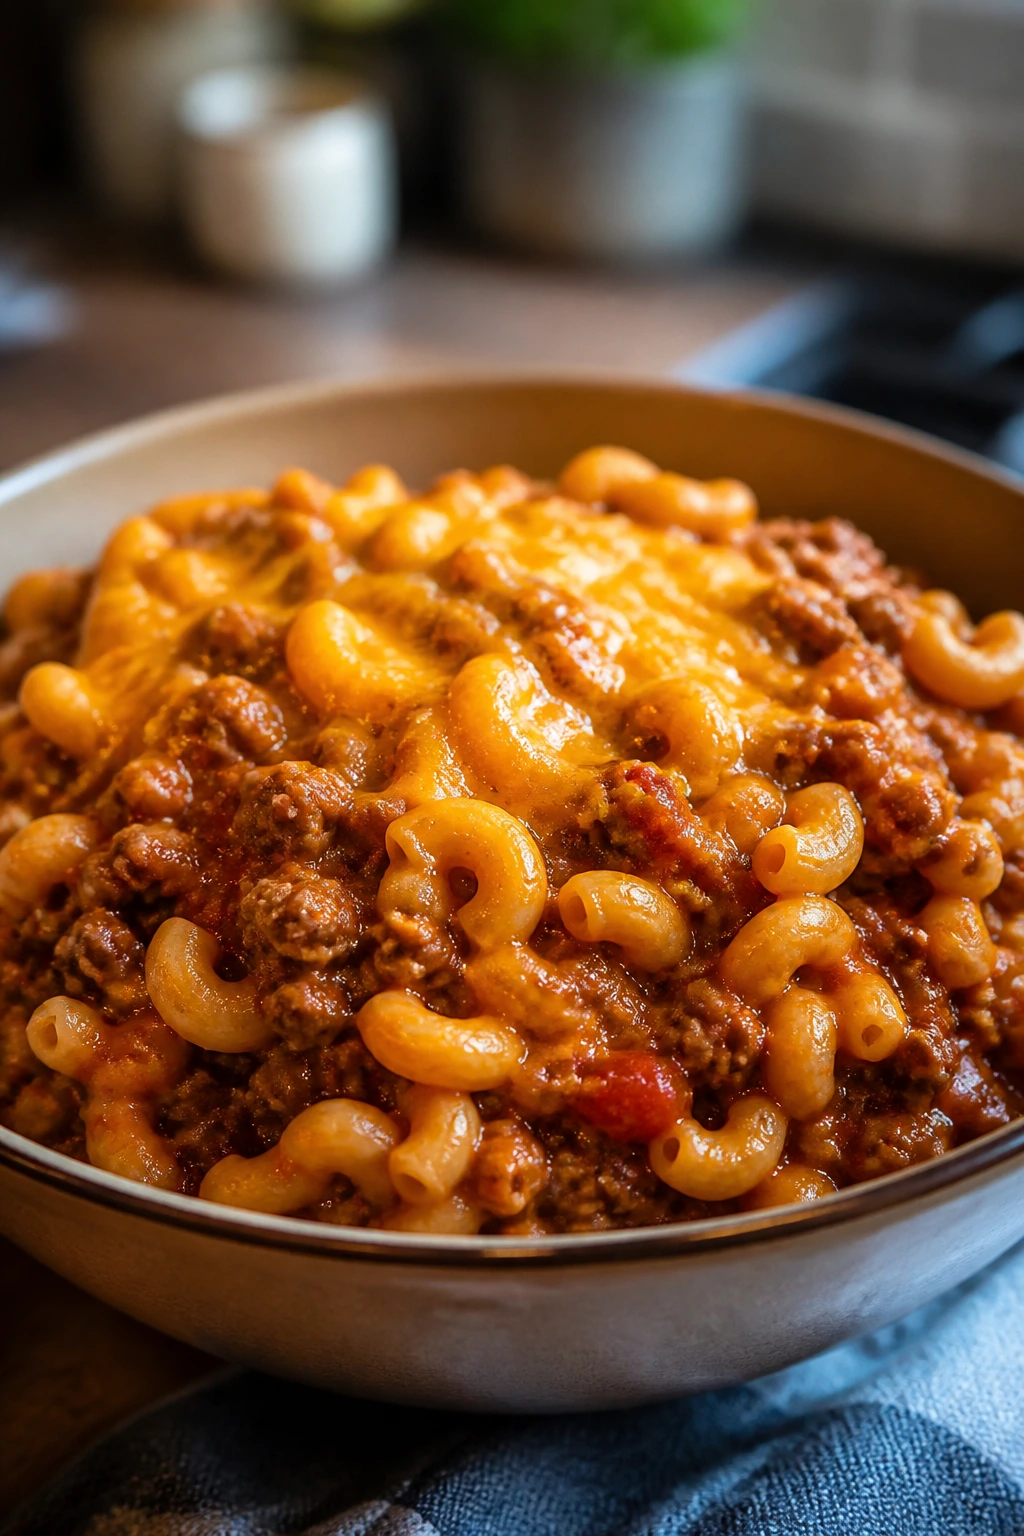
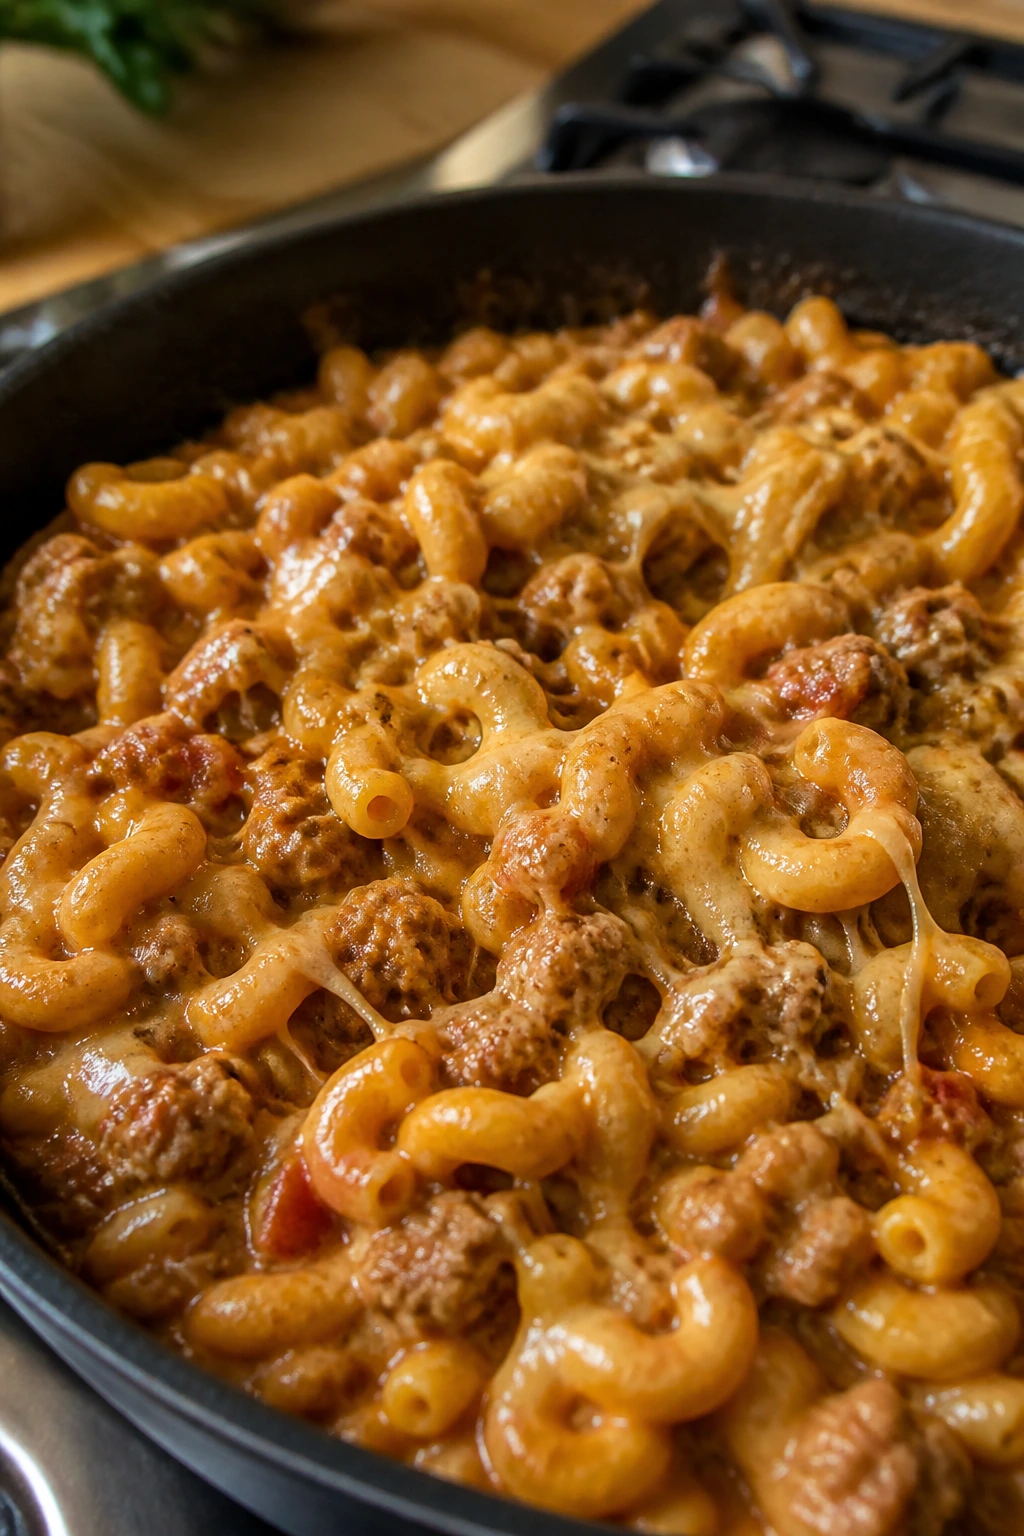
Chili mac is what happens when budget chili and a box of pasta decide to share a pot. It’s thick, filling, and easy to keep mild if spice is the problem. The cheese at the end softens the tomato edge and makes the whole thing feel more like comfort food than a shortcut.
Why It Works:
Pasta stretches the chili, which means one pound of ground beef feeds more people. Beans add bulk and keep the texture soft. The dish works for picky eaters because the flavor can stay closer to meat, tomato, and cheese than to a heavily spiced chili.
Key Ingredients:
- 1 pound ground beef — Browned and drained.
- 1 small onion, diced — Cook until soft.
- 1 packet mild chili seasoning — Or 2 tablespoons homemade mix.
- 1 can kidney beans, drained — Optional, but useful for bulk.
- 1 can crushed tomatoes, 15 ounces — Forms the sauce.
- 8 ounces elbow macaroni — The classic pasta choice.
- 1 cup shredded cheddar — For the finish.
Quick Steps:
- Brown beef and onion in a large pot, then drain grease.
- Stir in chili seasoning, tomatoes, beans, and 2 cups water.
- Bring to a simmer, then add macaroni.
- Cook uncovered for 8 to 10 minutes, stirring now and then, until the pasta is tender.
- Stir in cheddar until melted.
- Serve hot.
Equipment for This Recipe:
- Large pot or Dutch oven — Needs enough depth for the pasta.
- Wooden spoon — For stirring.
- Colander — Optional if you pre-cook pasta.
- Measuring cup — For water.
How to Serve This Dish:
Ladle it into bowls and top with a little extra cheese or crushed tortilla chips. Cornbread makes a cheap and cheerful side, though the chili mac stands on its own pretty well. Keep hot sauce at the table instead of in the pot.
Pro Tips for This Recipe:
- Use mild seasoning unless everyone at the table likes heat.
- Stir often after the pasta goes in; the bottom can catch.
- If it thickens too much, add a splash of water or broth.
Variations on This Dish:
- Turkey Chili Mac: Use ground turkey instead of beef.
- Bean-Heavy Version: Use two cans of beans and less meat.
- Extra-Cheesy Mac: Add an extra 1/2 cup cheddar right before serving.
Common Mistakes to Avoid with This Dish:
- Don’t forget to stir once the pasta cooks in the sauce.
- Don’t overcook the macaroni or the texture gets mushy.
- Don’t make it too spicy if the goal is kid-friendly dinner.
18. Meatball Subs
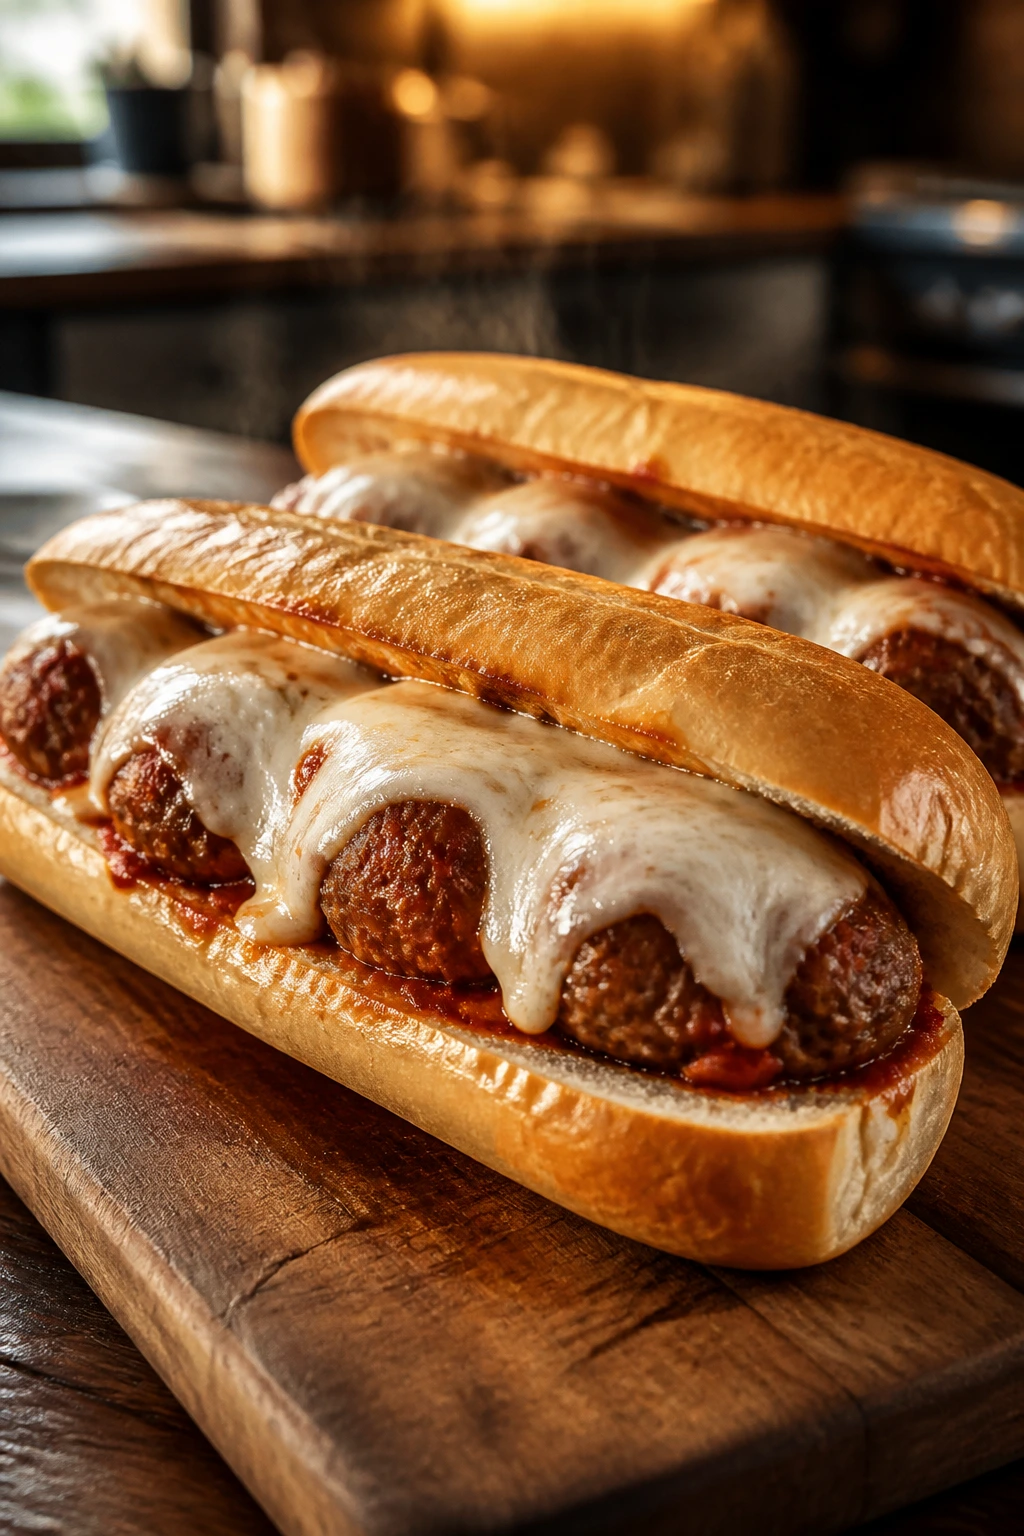
Meatball subs feel like something from a deli, but they’re easy to make at home with frozen meatballs and a jar of sauce. The roll soaks up just enough tomato, the cheese melts into the meatballs, and dinner suddenly looks like it took more planning than it did.
Why It Works:
Frozen meatballs keep the meal cheap and fast, and sub rolls turn a simple filling into something handheld. The sauce keeps the meatballs moist, while the cheese gives picky eaters a familiar, mild finish. It’s also easy to leave the rolls open-faced if someone doesn’t want a full sandwich.
Key Ingredients:
- 1 pound frozen meatballs — Use plain or mild Italian-style.
- 2 cups marinara sauce — Smooth sauce keeps things simple.
- 4 sub rolls — Split but not all the way through.
- 2 cups shredded mozzarella — For melting.
- 2 tablespoons butter — Optional for toasting the rolls.
- 1 teaspoon garlic powder — Optional.
- 1/4 cup grated Parmesan — Optional topping.
Quick Steps:
- Warm the meatballs in marinara over low heat until hot throughout.
- Split the rolls and toast them lightly with butter if you want extra structure.
- Spoon meatballs and sauce into each roll.
- Top with mozzarella and Parmesan.
- Broil 1 to 2 minutes until the cheese melts and bubbles.
- Serve immediately.
Equipment for This Recipe:
- Saucepan — For heating meatballs and sauce.
- Baking sheet — For broiling the sandwiches.
- Tongs or spoon — For portioning.
- Oven mitts — Broiling gets hot fast.
How to Serve This Dish:
Set them on a tray with plenty of napkins. Potato chips, carrot sticks, or a simple salad can round out the meal without adding much work. If younger kids struggle with a full sub, serve the meatballs and sauce over bread instead.
Pro Tips for This Recipe:
- Toast the rolls lightly so they don’t collapse under the sauce.
- Don’t overload each sandwich or the filling slides out.
- Broil in sight; the cheese goes from melted to browned in a flash.
Variations on This Dish:
- Meatball Melt Bowls: Serve the same filling over mashed potatoes.
- Turkey Meatball Subs: Use turkey meatballs for a lighter option.
- Plain Cheese Version: Skip Parmesan if the table wants less salt.
Common Mistakes to Avoid with This Dish:
- Don’t use soggy rolls; they break under the sauce.
- Don’t underheat the meatballs. Cold centers make the sandwich fall flat.
- Don’t broil too long or the bread dries out fast.
19. Sheet Pan Pancakes
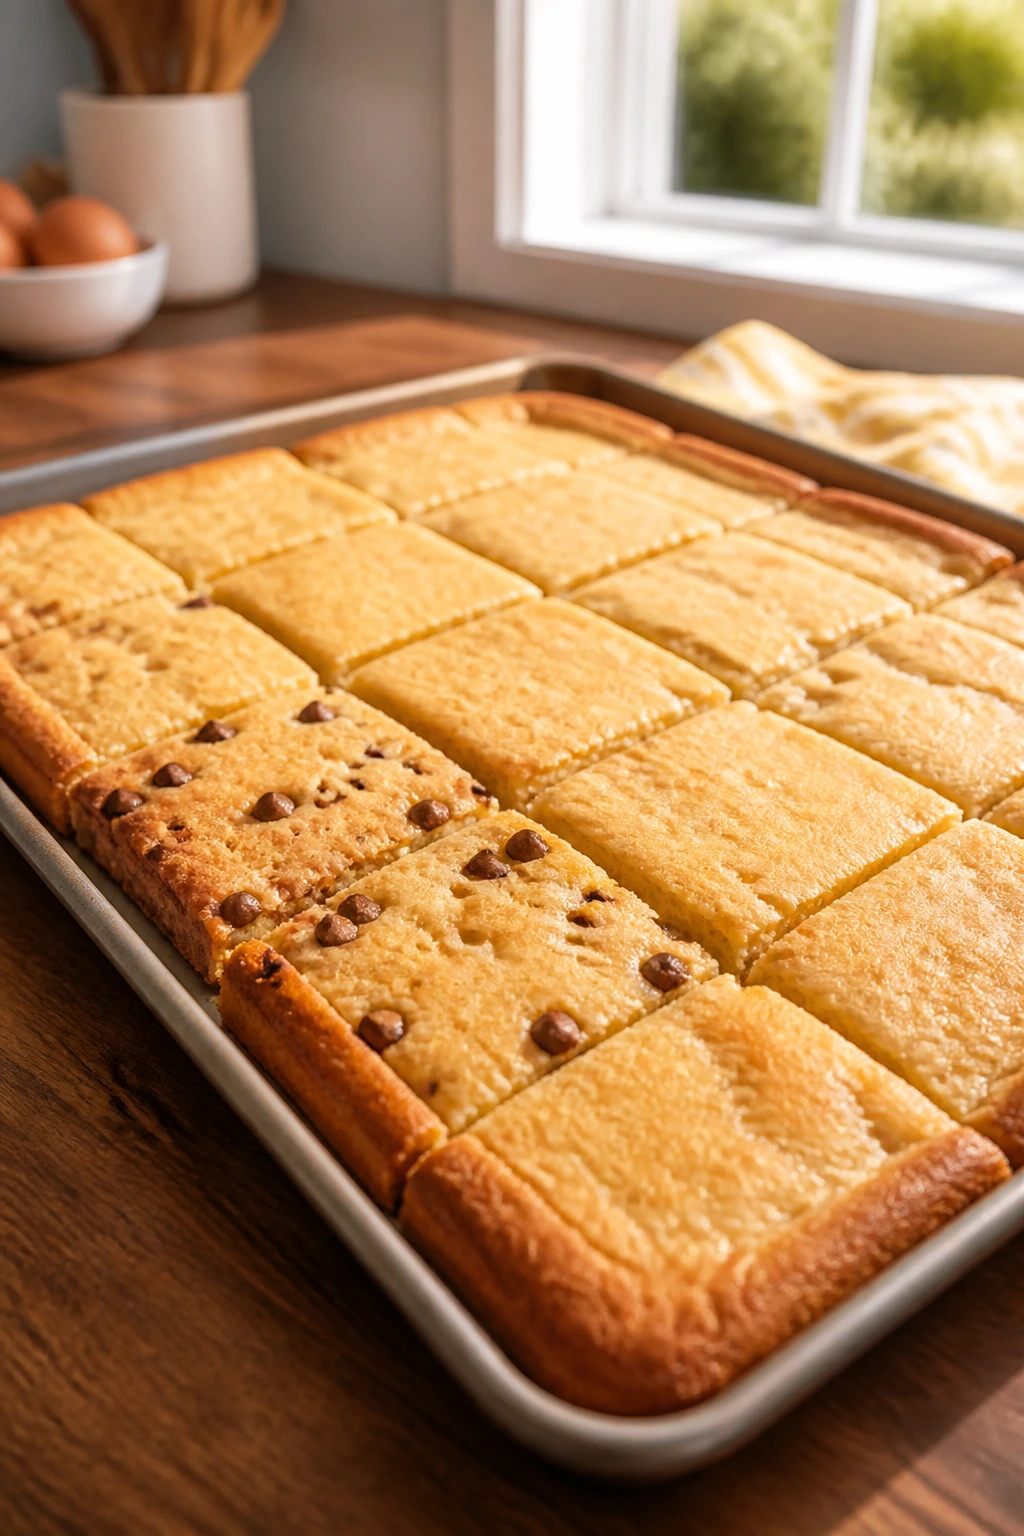
Sheet pan pancakes turn breakfast into a single tray that slices cleanly and feeds a crowd without standing over a skillet. The edges go a little golden, the center stays soft, and each slice can be plain or topped differently. That flexibility is the whole point.
Why It Works:
A sheet pan creates one batch fast, and you can cut it into squares that feel like portions instead of a stack you have to babysit. Kids who want plain pancakes can get them, while everyone else can add chocolate chips or berries after the fact. It also frees up the stove for eggs or bacon.
Key Ingredients:
- 2 cups all-purpose flour — The base.
- 2 tablespoons sugar — Keeps the batter lightly sweet.
- 1 tablespoon baking powder — For lift.
- 1/2 teaspoon salt — Balances the batter.
- 2 cups milk — Whole milk works best.
- 2 large eggs — For structure.
- 4 tablespoons melted butter — For richness.
Quick Steps:
- Heat the oven to 425°F and grease a rimmed sheet pan.
- Whisk flour, sugar, baking powder, and salt in a bowl.
- Whisk milk, eggs, and melted butter in another bowl.
- Combine wet and dry ingredients until just mixed, then spread into the pan.
- Add toppings if using and bake for 12 to 15 minutes until the center springs back.
- Cut into squares and serve warm.
Equipment for This Recipe:
- Rimmed sheet pan — The batter needs shallow sides.
- Mixing bowls — One for dry and one for wet.
- Whisk — For a smooth batter.
- Spatula — To spread the batter evenly.
How to Serve This Dish:
Serve the squares stacked or lined up like bars, with syrup on the side. Scrambled eggs or sausage links make the plate feel complete, but fruit alone works if breakfast needs to stay light. The squares also pack well for later.
Pro Tips for This Recipe:
- Don’t overmix the batter or the pancakes get tough.
- Spread the batter evenly so the edges don’t overbake.
- Add toppings gently so they don’t sink in clumps.
Variations on This Dish:
- Chocolate Chip Sheet Pan Pancakes: Scatter chips over half the pan.
- Blueberry Version: Fold in fresh or frozen berries.
- Banana Bread Style: Add mashed banana and a pinch of cinnamon.
Common Mistakes to Avoid with This Dish:
- Don’t use a deep casserole dish; the batter won’t bake evenly.
- Don’t wait too long after mixing or the batter loses lift.
- Don’t overbake; the center should stay soft, not dry.
20. Beef and Cheese Stuffed Shells
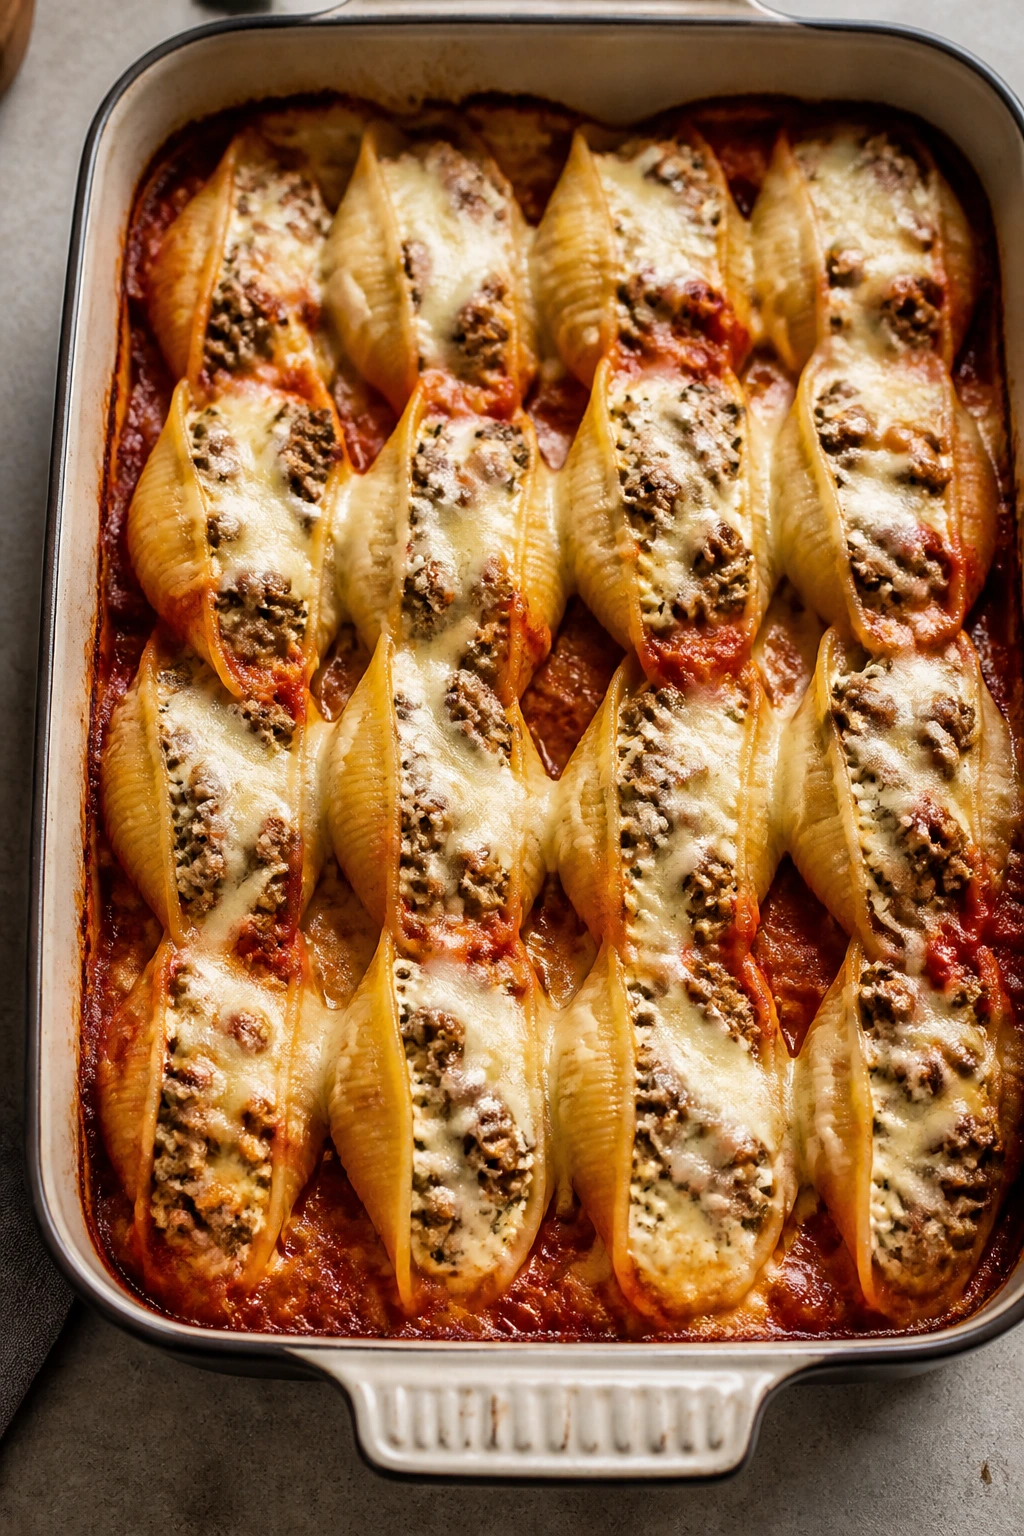
Stuffed shells look fancier than the effort they ask for, which is one reason they belong in a budget family rotation. Pasta shells filled with beef and cheese feel sturdy and familiar, and the tomato sauce keeps the whole thing from drying out in the oven.
Why It Works:
The pasta shells act like little containers, so picky eaters can see exactly what’s inside. Ground beef stretches through the ricotta filling and adds enough savory flavor to make the dish feel like a full meal. Everything bakes together, which keeps cleanup easy.
Key Ingredients:
- 20 jumbo pasta shells — Cook a few extra in case some tear.
- 1 pound ground beef — Browned and drained.
- 1 cup ricotta cheese — Makes the filling creamy.
- 1 cup shredded mozzarella — Mixed in and sprinkled on top.
- 1/2 cup grated Parmesan — For salt and finish.
- 2 cups marinara sauce — Keeps the shells moist.
- 1 egg — Helps bind the filling.
Quick Steps:
- Boil the shells until just tender, then drain carefully.
- Brown the beef and let it cool slightly.
- Mix beef, ricotta, half the mozzarella, Parmesan, and egg.
- Fill each shell and place them in a sauced baking dish.
- Cover with remaining sauce and cheese, then bake at 375°F for 25 minutes.
- Rest 10 minutes before serving.
Equipment for This Recipe:
- Large pot — For the shells.
- Baking dish — A 9×13-inch dish works well.
- Spoon — For filling the shells.
- Colander — To drain pasta gently.
How to Serve This Dish:
Serve three to four shells per adult and two to three per child, depending on the sides. Garlic bread is the obvious partner, but buttered peas or a simple salad work too. A little extra sauce in the bottom of the plate helps keep each bite moist.
Pro Tips for This Recipe:
- Cook extra shells because some always split.
- Let the beef cool before mixing so the egg doesn’t scramble.
- Pack the shells loosely; overstuffing makes them burst.
Variations on This Dish:
- Spinach Cheese Shells: Replace the beef with chopped cooked spinach.
- Sausage Shells: Use mild Italian sausage instead of ground beef.
- Plain Cheese Shells: Leave out the meat for a lighter version.
Common Mistakes to Avoid with This Dish:
- Don’t overcook the shells or they tear when filling.
- Don’t skip the sauce layer under the shells or they stick.
- Don’t bake uncovered too long or the exposed pasta dries out.
21. Simple Baked Mac and Cheese
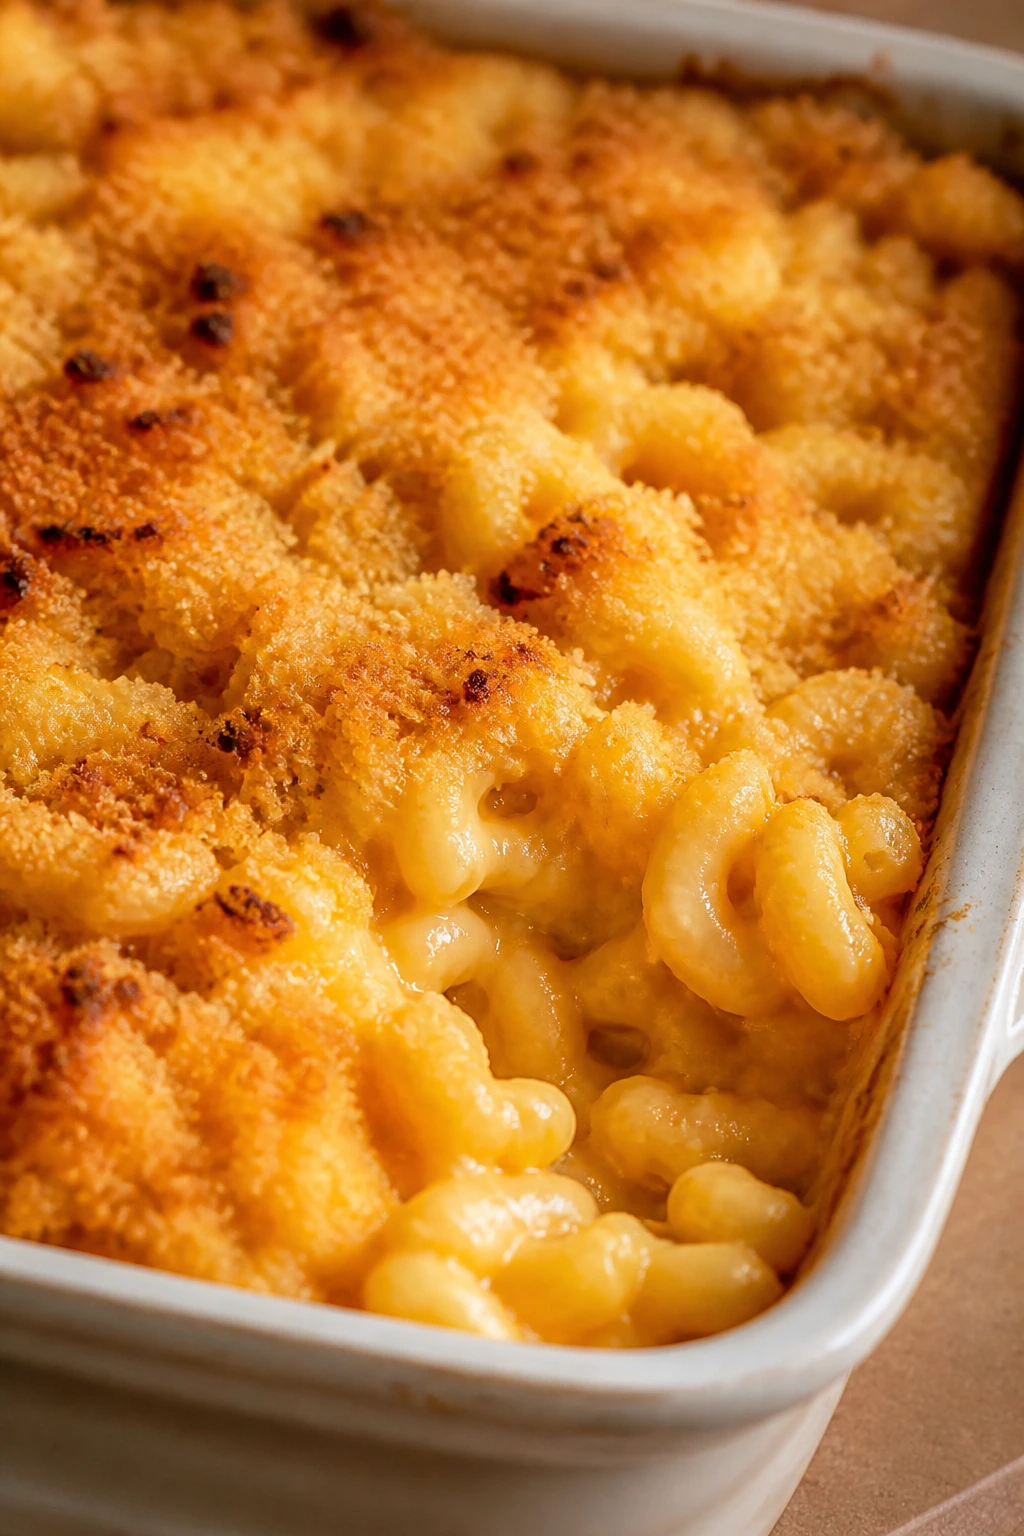
Baked mac and cheese doesn’t need a long introduction. It’s macaroni, cheese, milk, and a crunchy top if you want one. For picky eaters, the appeal is obvious: soft noodles, nothing weird, and a flavor that tastes like the inside of a grilled cheese sandwich in casserole form.
Why It Works:
This version stays budget-friendly because it uses cheddar as the main flavor, not a pile of specialty cheeses. A simple roux keeps the sauce smooth, and baking it for a short time gives the top a little color without drying the noodles. Kids usually accept this one faster than baked pasta with tomato sauce.
Key Ingredients:
- 1 pound elbow macaroni — The classic shape.
- 4 tablespoons butter — For the sauce.
- 1/4 cup all-purpose flour — Thickens the cheese sauce.
- 3 cups milk — Whole milk makes it richer.
- 3 cups shredded cheddar cheese — The main cheese.
- 1/2 teaspoon salt — Start small.
- 1 cup breadcrumbs — Optional for the top.
Quick Steps:
- Cook macaroni until just tender, then drain.
- Melt butter in a saucepan and whisk in flour for 1 minute.
- Slowly whisk in milk and cook until thickened.
- Stir in cheddar and salt until smooth.
- Fold in macaroni, pour into a baking dish, top with breadcrumbs, and bake at 375°F for 20 minutes.
- Rest 5 minutes before serving.
Equipment for This Recipe:
- Pot — For the pasta.
- Saucepan — For the cheese sauce.
- Whisk — Keeps the roux smooth.
- Baking dish — For finishing in the oven.
How to Serve This Dish:
Serve it hot and creamy, with a scoop that holds together but still looks soft around the edges. A side of hot dogs, broccoli, or sliced apples can round it out depending on the crowd. Most children need nothing else.
Pro Tips for This Recipe:
- Shred the cheese yourself if you want the sauce to melt smoothly.
- Warm the milk a little before adding it; the sauce comes together faster.
- Don’t bake too long or the macaroni dries out.
Variations on This Dish:
- Extra-Cheesy Bake: Add 1 cup mozzarella to the cheddar.
- Ham Mac: Stir in diced ham before baking.
- No-Breadcrumb Version: Leave the top plain for a softer finish.
Common Mistakes to Avoid with This Dish:
- Don’t let the cheese sauce boil once the cheese goes in.
- Don’t overcook the pasta before baking.
- Don’t use too little salt; macaroni needs seasoning even when it’s plain.
22. Potato Taco Casserole
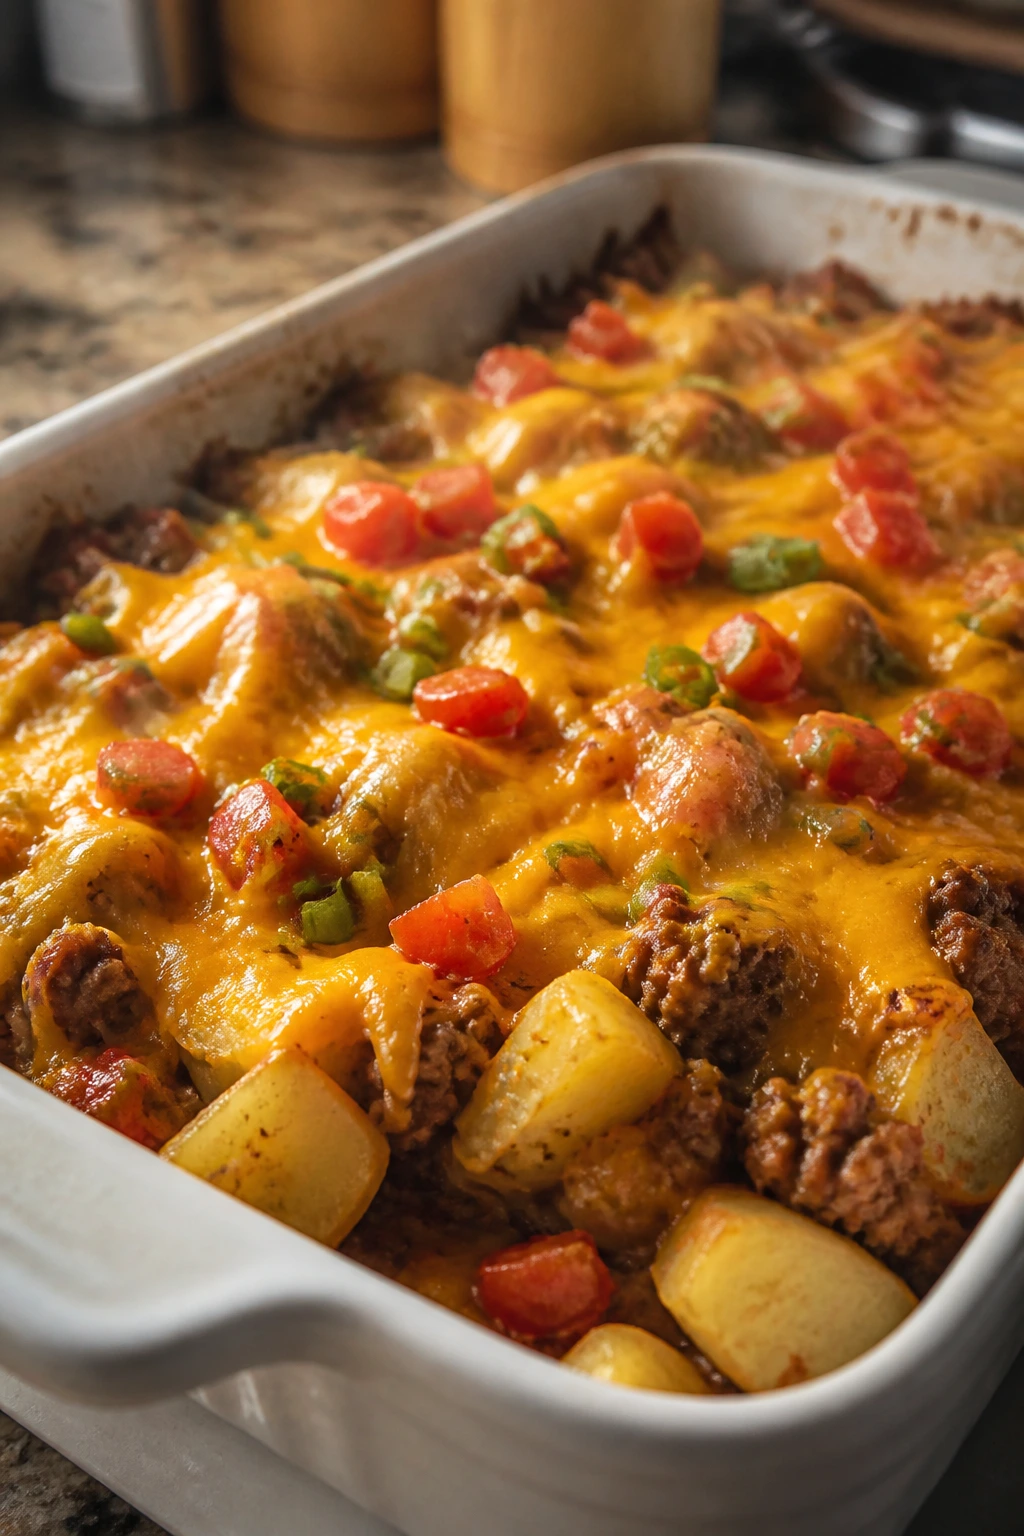
Potato taco casserole takes cheap potatoes and turns them into a dinner that feels layered and filling. The potatoes soften under the meat and cheese, and the taco seasoning keeps things recognizable without making the dish hot. It’s one of those pans that looks like work and tastes like relief.
Why It Works:
Potatoes are a low-cost base that stretches ground beef very far. The mild taco flavor gives it enough personality to keep dinner from feeling repetitive. Since the toppings sit on top, picky eaters can lift off what they don’t want and still eat the rest.
Key Ingredients:
- 2 pounds russet potatoes, diced — Keep the cubes small.
- 1 pound ground beef — Browned and drained.
- 1 packet mild taco seasoning — Or 2 tablespoons homemade.
- 1 cup salsa — Choose a smooth, mild one.
- 1 cup sour cream — For creaminess.
- 2 cups shredded cheddar cheese — For the top.
- 1 cup frozen corn — Optional.
Quick Steps:
- Boil the potatoes until just tender, about 8 to 10 minutes, then drain.
- Brown the beef and stir in taco seasoning and salsa.
- Spread potatoes in a greased baking dish.
- Spoon the beef over the potatoes, then dollop with sour cream and top with cheese.
- Bake at 375°F for 15 to 20 minutes until hot and bubbly.
- Add corn if using, either mixed in or served on the side.
Equipment for This Recipe:
- Pot — For the potatoes.
- Skillet — For the beef.
- Baking dish — To finish the casserole.
- Colander — For draining potatoes.
How to Serve This Dish:
Serve it with tortilla chips or warm tortillas if you want more of a taco feel. Lettuce, tomatoes, or diced avocado can go on the side, not in the casserole, which helps picky eaters. A spoonful of sour cream on top keeps the dish soft and familiar.
Pro Tips for This Recipe:
- Dice the potatoes evenly so they all cook at the same speed.
- Keep the salsa mild and smooth.
- Drain the beef well or the casserole gets greasy.
Variations on This Dish:
- Chicken Taco Casserole: Use shredded chicken instead of beef.
- Bean Version: Replace half the beef with drained black beans.
- Breakfast Taco Bake: Swap beef for scrambled eggs and breakfast sausage.
Common Mistakes to Avoid with This Dish:
- Don’t leave the potatoes undercooked or they stay firm in the casserole.
- Don’t overdo the salsa or the pan gets watery.
- Don’t bake too long after adding cheese or it turns oily.
23. Cheeseburger Pasta
Cheeseburger pasta tastes like the inside of a burger, but gentler. Ground beef, noodles, tomato, and cheese combine into a skillet meal that kids usually trust on sight. It’s creamy, savory, and much easier to portion than actual burgers when dinner needs to move fast.
Why It Works:
The flavors are familiar — beef, cheese, a little tomato — and the pasta stretches the meat so one pound goes farther. A mild sauce helps it feel comforting rather than heavy. If a child likes cheeseburgers, this tends to land fast.
Key Ingredients:
- 1 pound ground beef — Browned and drained.
- 8 ounces elbow macaroni or shells — Holds the sauce well.
- 1 small onion, diced — Cook until soft.
- 1 can tomato sauce, 15 ounces — Gives that burger-like base.
- 2 cups beef broth — For cooking the pasta if making one-pan style.
- 1 1/2 cups shredded cheddar cheese — Stirred in at the end.
- 1 teaspoon mustard — Optional, and use lightly.
Quick Steps:
- Brown beef and onion in a deep skillet, then drain.
- Add tomato sauce, broth, pasta, and mustard if using.
- Simmer covered until the pasta is tender, stirring once or twice.
- Stir in cheddar until melted and creamy.
- Let it sit for 2 minutes before serving.
Equipment for This Recipe:
- Deep skillet or Dutch oven — Needs depth for the pasta.
- Wooden spoon — For stirring.
- Lid — Helps the pasta cook.
- Measuring cups — For the broth.
How to Serve This Dish:
Spoon it into bowls and keep pickles or diced tomatoes on the side if someone wants the burger feeling without mixing them in. A few potato chips work oddly well here. It’s also a good one to serve with cucumber slices when you want something cold next to the hot pan.
Pro Tips for This Recipe:
- Keep the mustard faint; it should whisper, not shout.
- Stir once while the pasta simmers to prevent sticking.
- If the sauce thickens too much, add a splash of broth.
Variations on This Dish:
- Double-Cheese Burger Pasta: Add a little mozzarella with the cheddar.
- Pickle Burger Version: Stir in chopped pickles at the table, not in the pot.
- Turkey Burger Pasta: Swap ground turkey for beef.
Common Mistakes to Avoid with This Dish:
- Don’t make the sauce too thin or the pasta goes soupy.
- Don’t overcook the noodles; they should hold some shape.
- Don’t add too much mustard unless the table likes it.
24. Egg and Cheese Breakfast Burritos

Egg and cheese burritos are cheap, fast, and easy to wrap in foil for later. The filling stays soft and mild, and you can keep the whole thing plain enough for picky eaters or add potatoes and sausage if the appetite runs bigger. Either way, they’re useful.
Why It Works:
Eggs are one of the best budget proteins, and tortillas help them feel like a real meal instead of a breakfast side. Cheese keeps the filling creamy and gives it a familiar taste. These burritos also reheat well, which is half the battle with breakfast food.
Key Ingredients:
- 8 large eggs — Scrambled gently.
- 1 tablespoon butter — For the pan.
- 1 cup shredded cheddar cheese — Mild and melty.
- 6 flour tortillas — Medium size works best.
- 1/4 cup milk — Keeps eggs soft.
- Salt to taste — Go light.
- 1 cup cooked diced potatoes or sausage — Optional add-in.
Quick Steps:
- Whisk eggs, milk, and salt together.
- Scramble in butter over medium-low heat until soft and just set.
- Warm tortillas so they fold easily.
- Add eggs, cheese, and any add-ins to each tortilla.
- Roll tightly into burritos and toast seam-side down in a dry skillet for 1 to 2 minutes per side.
- Serve warm or wrap for later.
Equipment for This Recipe:
- Skillet — For scrambling and toasting.
- Bowl and whisk — For the eggs.
- Spatula — For folding and turning.
- Foil or parchment — For holding burritos later.
How to Serve This Dish:
Serve them whole with salsa on the side so each person decides how much to use. If breakfast is being stretched into dinner, pair them with fruit or hash browns. They’re also easy to cut in half for smaller hands.
Pro Tips for This Recipe:
- Pull the eggs off the heat while they still look a little soft.
- Don’t overfill or the burritos split.
- Toasting the seam helps lock everything in place.
Variations on This Dish:
- Potato Burritos: Add cooked breakfast potatoes.
- Sausage Burritos: Mix in crumbled cooked sausage.
- Bean Breakfast Burritos: Add refried beans for more bulk.
Common Mistakes to Avoid with This Dish:
- Don’t use cold tortillas or they crack.
- Don’t cook the eggs too hard before rolling.
- Don’t skip the toast step if you want the burrito to hold its shape.
25. Simple Beef Stroganoff
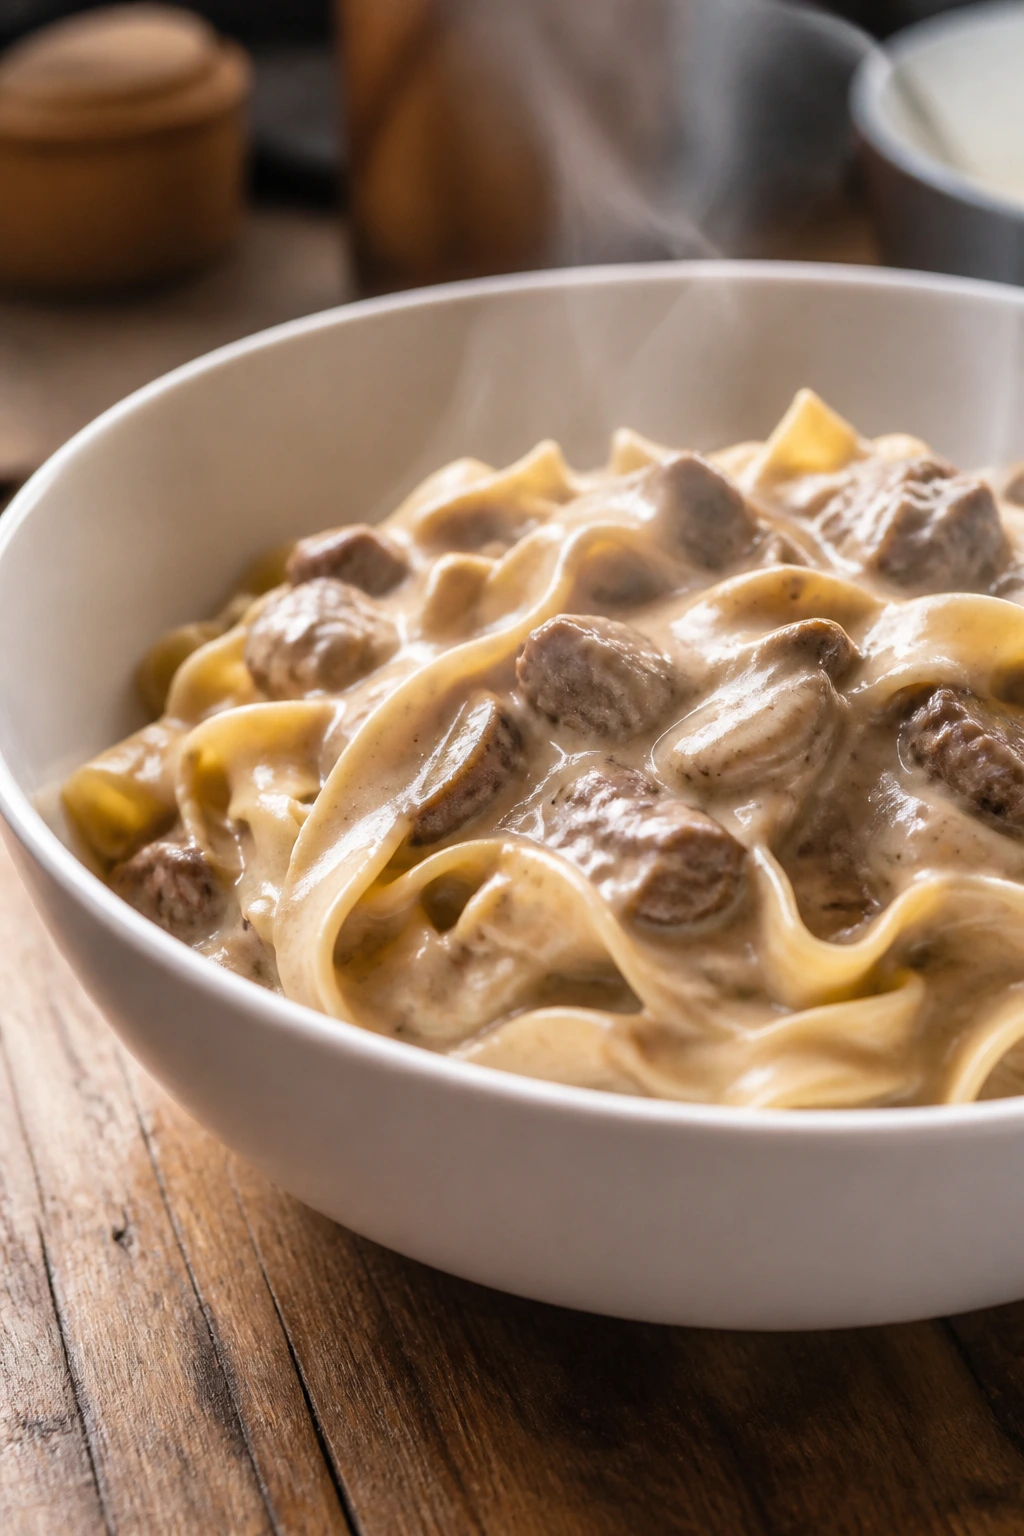
Beef stroganoff can sound fancy, but at its simplest it’s just beef, noodles, and a creamy sauce. That creamy sauce softens the whole dish enough for children who dislike strong tomato flavor, and the noodles make it feel like a proper bowl meal. It’s a good use for budget cuts and ground beef alike.
Why It Works:
Ground beef or thin-sliced beef gives you savory flavor without a large grocery bill. Sour cream rounds out the sauce and keeps it mild. Egg noodles are the right shape for soaking up the gravy without turning heavy.
Key Ingredients:
- 1 pound ground beef or thinly sliced beef — Ground beef is the easiest budget choice.
- 1 small onion, diced — Cook until soft.
- 8 ounces egg noodles — The classic base.
- 2 cups beef broth — For the sauce.
- 1 can cream of mushroom soup — Helps thicken the gravy.
- 1/2 cup sour cream — Stirred in at the end.
- 1 tablespoon butter — For the pan.
Quick Steps:
- Cook noodles until tender, then drain.
- Brown beef and onion in butter, draining if needed.
- Stir in broth and cream of mushroom soup.
- Simmer until slightly thickened.
- Remove from heat and stir in sour cream, then toss with noodles.
- Serve right away.
Equipment for This Recipe:
- Large skillet — For the sauce and beef.
- Pot — For the noodles.
- Colander — For draining.
- Wooden spoon — For stirring the sauce.
How to Serve This Dish:
Serve it in shallow bowls so the sauce settles around the noodles instead of disappearing. Buttered peas or soft green beans work on the side if your family accepts them. A slice of bread is enough for a full dinner when budgets are tight.
Pro Tips for This Recipe:
- Add sour cream off the heat so it stays smooth.
- Don’t boil once the cream goes in or the sauce can curdle.
- If using sliced beef, cut it thin across the grain so it stays tender.
Variations on This Dish:
- Mushroom-Heavy Version: Add extra sautéed mushrooms if they’re welcome.
- Turkey Stroganoff: Use ground turkey and a little extra butter.
- Plain Cream Sauce Version: Skip mushrooms entirely for a smoother flavor.
Common Mistakes to Avoid with This Dish:
- Don’t let the sauce boil after adding sour cream.
- Don’t use too little broth or the gravy gets too stiff.
- Don’t overcook the noodles; they should still have some bite.
26. Chicken Quesadilla Bake
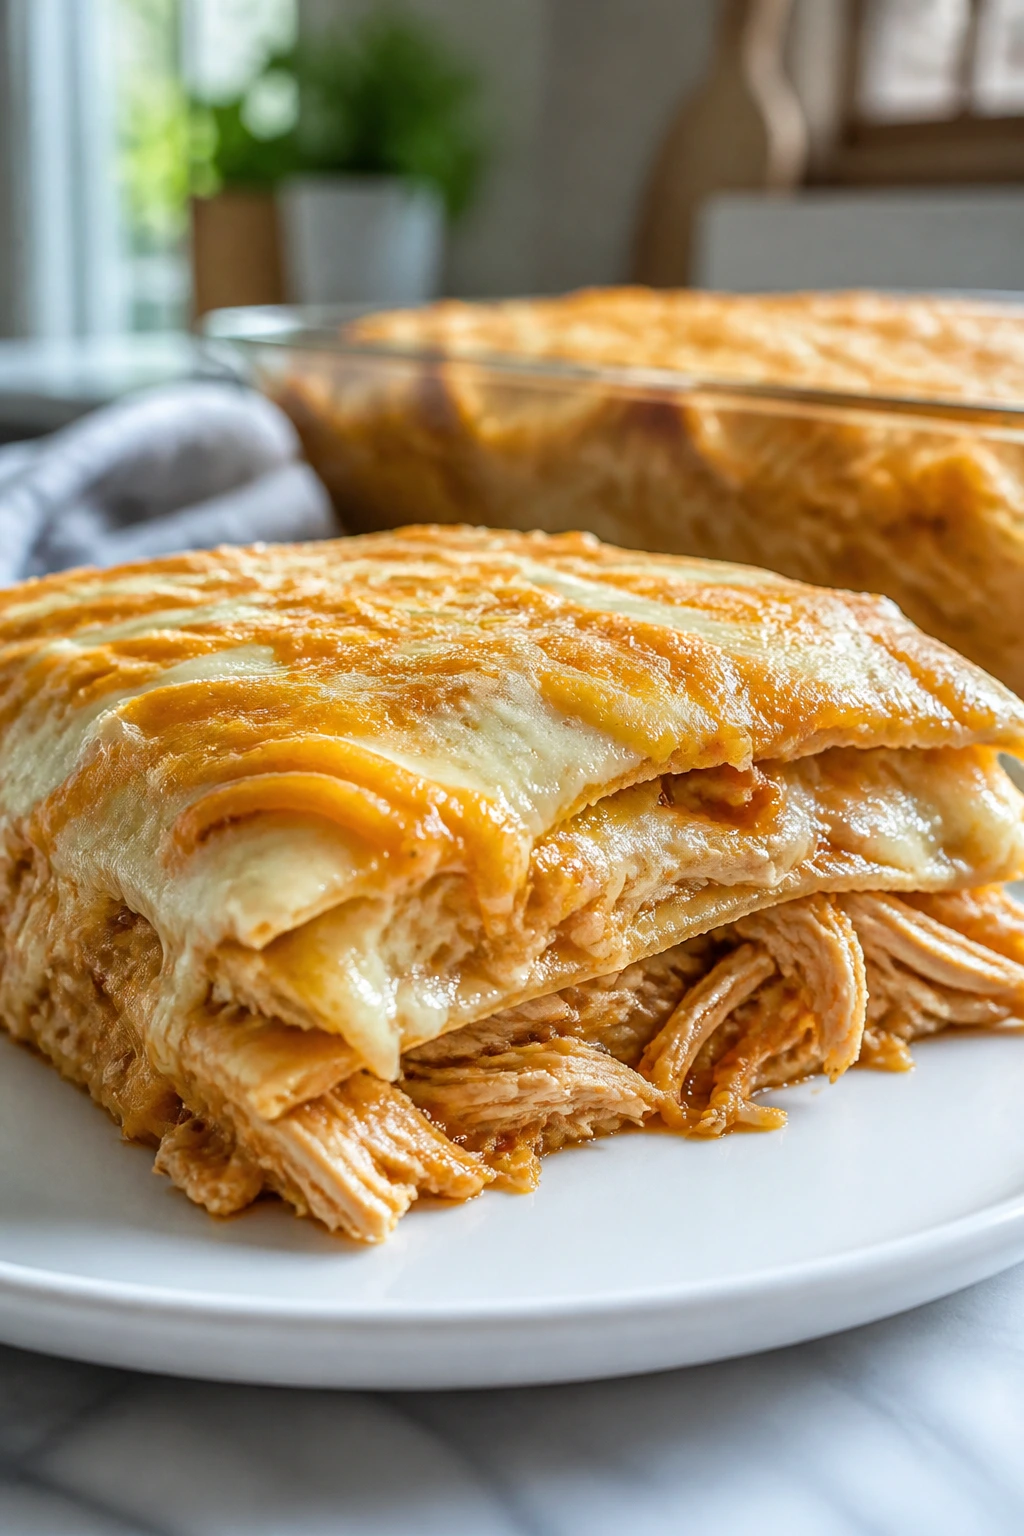
Chicken quesadilla bake gives you the flavor of pan-fried quesadillas without standing at the stove making them one at a time. Layers of tortillas, chicken, and cheese bake into a sliceable casserole, which is useful when dinner needs to feed more than two people and nobody wants to wait.
Why It Works:
The casserole format keeps the tortillas soft in the middle and crisp at the edges, which gives you the quesadilla taste in a more family-sized shape. Cooked chicken stretches easily, and the cheese binds everything together. It’s mild enough to be kid-safe and flexible enough to serve with salsa on the side.
Key Ingredients:
- 3 cups cooked shredded chicken — Rotisserie chicken works well.
- 8 flour tortillas — Medium size, cut if needed.
- 3 cups shredded cheddar or Monterey Jack — Use a mild mix.
- 1 cup sour cream — Helps form the filling.
- 1 cup salsa — Mild and smooth.
- 1 teaspoon taco seasoning — Optional and light.
- 1 tablespoon butter — For greasing the dish.
Quick Steps:
- Heat the oven to 375°F and butter a baking dish.
- Mix chicken, sour cream, salsa, and taco seasoning.
- Layer tortillas, chicken mixture, and cheese in the dish.
- Repeat the layers and finish with cheese on top.
- Bake for 20 to 25 minutes until hot and bubbly.
- Rest 10 minutes before slicing.
Equipment for This Recipe:
- Baking dish — A 9×13-inch dish is ideal.
- Mixing bowl — For the chicken filling.
- Sharp knife — For slicing the finished bake.
- Spoon or spatula — For layering.
How to Serve This Dish:
Cut it into squares and serve with extra sour cream or salsa on the side. A scoop of rice makes the plate bigger, while fruit or corn keeps things simple. It’s easy to hold together once it rests, so use that pause.
Pro Tips for This Recipe:
- Don’t use watery salsa or the bake turns loose.
- Let it rest before slicing so the layers stay neat.
- Shred the chicken finely for easier cutting.
Variations on This Dish:
- Bean and Chicken Bake: Add a layer of refried beans.
- Cheesy Beef Version: Swap chicken for cooked ground beef.
- Plain Chicken Cheese Bake: Leave out salsa for a very mild version.
Common Mistakes to Avoid with This Dish:
- Don’t overfill each layer or the bake slides apart.
- Don’t slice hot from the oven.
- Don’t use large chunks of chicken if you want clean squares.
27. Skillet Cornbread Chili
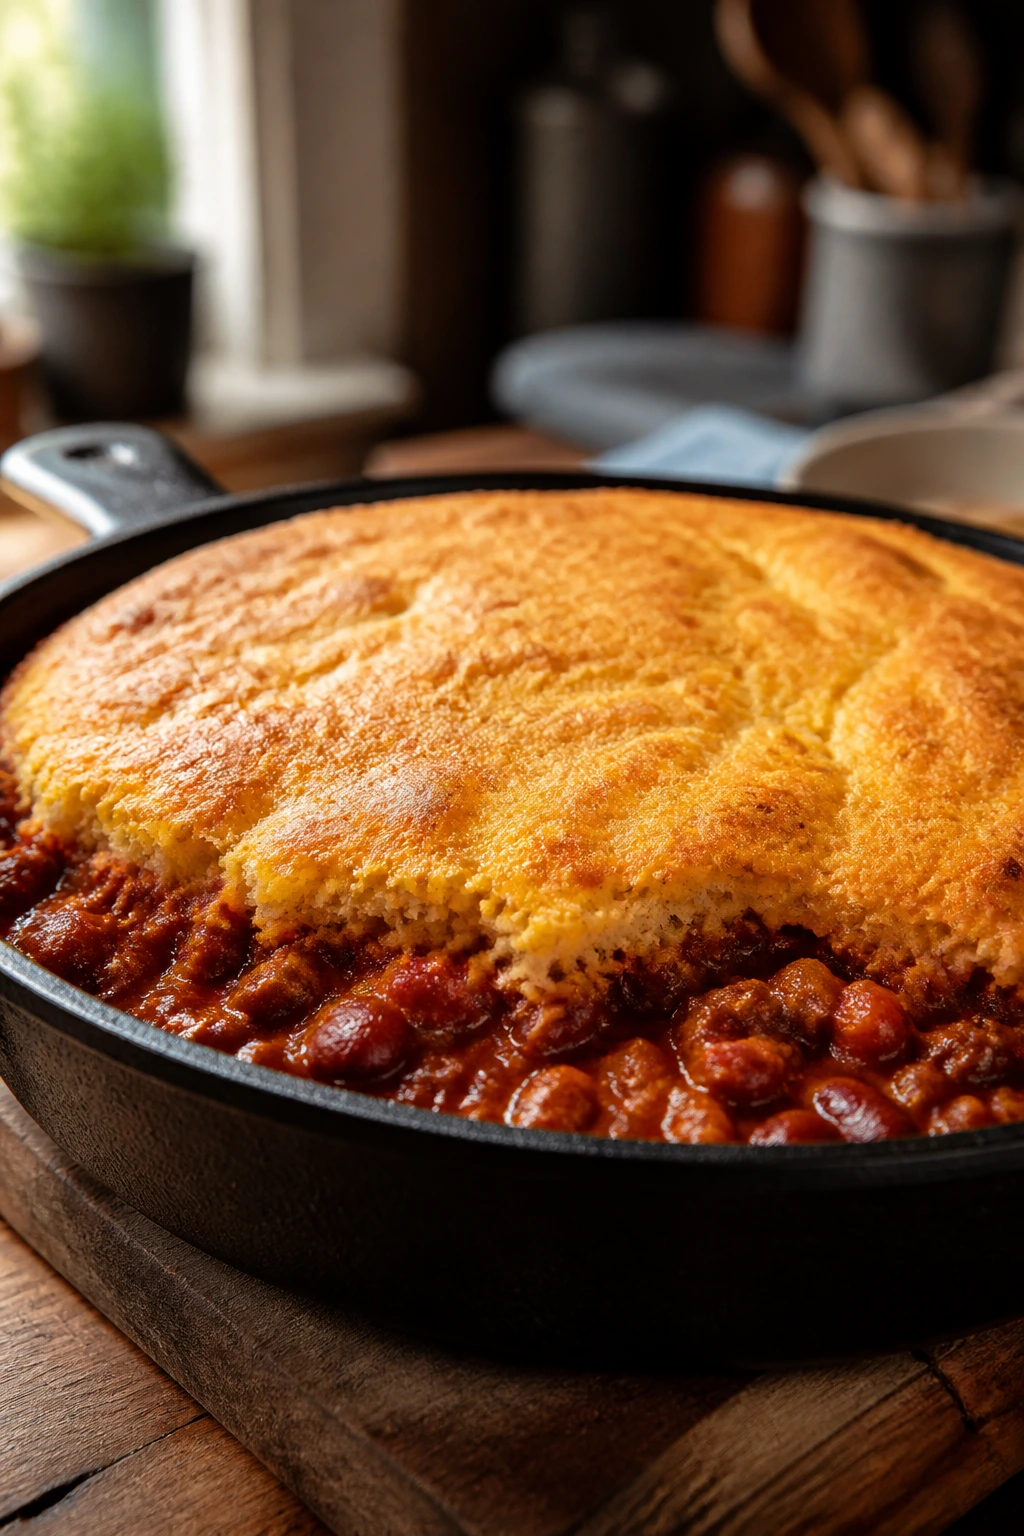
Cornbread chili is a hearty budget dinner that gives you a bowl and a topping in one pan. The chili stays mild, the cornbread bakes over the top, and the whole dish feels like something that was meant to be eaten with a spoon. It’s especially useful when the family wants comfort food without fuss.
Why It Works:
Beans and ground beef make a chili base that stretches well, and cornbread on top reduces the need for a separate side. The bread soaks up a little chili as it bakes, which gives the top a tender bottom and a crumbly finish. Picky eaters often accept this because the cornbread is the first thing they see.
Key Ingredients:
- 1 pound ground beef — Browned and drained.
- 1 can kidney beans — Drained.
- 1 can diced tomatoes, 15 ounces — Adds body.
- 1 packet mild chili seasoning — Or 2 tablespoons mix.
- 1 cup cornmeal — For the topping.
- 1 cup all-purpose flour — For the topping.
- 1 egg and 1 cup milk — For the cornbread batter.
Quick Steps:
- Brown the beef in an oven-safe skillet, then stir in beans, tomatoes, and chili seasoning.
- Simmer 5 minutes to thicken slightly.
- Mix cornbread batter in a bowl with cornmeal, flour, egg, milk, and a little salt.
- Spoon the batter over the chili in the skillet.
- Bake at 400°F for 20 to 25 minutes until the cornbread is golden and cooked through.
- Rest 10 minutes before serving.
Equipment for This Recipe:
- Oven-safe skillet — Cast iron works well.
- Mixing bowl — For cornbread batter.
- Whisk or spoon — For mixing.
- Oven mitts — The skillet gets hot.
How to Serve This Dish:
Scoop it straight from the skillet into bowls, making sure each serving gets both chili and cornbread. A little shredded cheese on top works for the cheese-loving crowd. If the chili itself is too thick for a child, add a spoon of sour cream on top to soften it.
Pro Tips for This Recipe:
- Make the chili slightly thicker than normal so the cornbread sits on top.
- Use an oven-safe skillet; switching pans wastes time.
- Don’t stir the cornbread into the chili or you lose the layer effect.
Variations on This Dish:
- Turkey Chili Skillet: Use ground turkey instead of beef.
- Bean-Only Version: Leave out the meat and add another can of beans.
- Cheddar Cornbread Top: Stir shredded cheese into the batter.
Common Mistakes to Avoid with This Dish:
- Don’t make the chili too watery or the cornbread sinks.
- Don’t underbake the center of the topping.
- Don’t skip the rest time; the skillet will still be very loose when it comes out.
28. Sausage and Egg Biscuit Casserole

Sausage and egg biscuit casserole tastes like breakfast got organized. Biscuit pieces puff underneath the eggs, sausage brings salt and heft, and cheese ties it together so each square can be served like a neat little slab. That neatness helps with picky eaters more than people admit.
Why It Works:
Canned biscuits or biscuit dough are cheaper than a full bakery breakfast, and eggs hold the casserole into slices. Sausage gives enough flavor that you don’t need a long seasoning list. It also reheats well, which matters if breakfast gets pushed into dinner or lunch.
Key Ingredients:
- 1 pound breakfast sausage — Mild sausage keeps it kid-friendly.
- 1 can refrigerated biscuits, 8-count — Cut into quarters.
- 8 large eggs — Whisked with milk.
- 1 cup milk — Softens the egg layer.
- 2 cups shredded cheddar cheese — Melts into the casserole.
- 1/2 teaspoon salt — Use lightly because the sausage is salty.
- 1/2 teaspoon black pepper — Optional.
Quick Steps:
- Brown the sausage in a skillet and drain excess grease.
- Whisk eggs, milk, salt, and pepper in a bowl.
- Scatter biscuit pieces in a greased baking dish.
- Add sausage and cheese, then pour the egg mixture over the top.
- Bake at 375°F for 30 to 35 minutes until the center is set and the top is golden.
- Rest 10 minutes before cutting into squares.
Equipment for This Recipe:
- Skillet — For browning the sausage.
- Baking dish — A 9×13-inch dish works well.
- Mixing bowl — For the eggs.
- Whisk — Helps the egg mixture stay smooth.
How to Serve This Dish:
Cut it into squares and serve warm, with fruit or hash browns if you want a bigger breakfast-style plate. Ketchup or hot sauce can stay on the table for the adults, but the casserole itself should stay plain. It holds together best after resting, so don’t rush the first slice.
Pro Tips for This Recipe:
- Drain the sausage well or the bottom gets greasy.
- Cut the biscuits into smaller pieces so they bake through evenly.
- Let the casserole sit before slicing or the eggs won’t hold.
Variations on This Dish:
- Ham and Biscuit Bake: Use diced ham instead of sausage.
- Veggie Breakfast Casserole: Add very small diced peppers or spinach if your family accepts them.
- Plain Cheese Biscuit Bake: Skip the meat for a softer, milder version.
Common Mistakes to Avoid with This Dish:
- Don’t leave the biscuit pieces too large or the centers stay doughy.
- Don’t underseason the egg mixture completely; it can taste flat.
- Don’t cut into it right away or the layers fall apart.
Why Cheap, Familiar Food Wins at the Family Table
There’s a reason these kinds of meals keep showing up in real homes. They lean on ingredients that behave well under pressure: rice that stretches, pasta that swells, potatoes that fill out a pan, cheese that glues a plate together, and chicken or ground meat that can be portioned without much drama. That combination matters more than fancy technique when the job is to feed a crowd that doesn’t all want the same thing.
Picky eaters usually react less to cost than to surprise. A sauce with visible chunks, a casserole with too many layers, or a spice blend that smells unfamiliar can stop dinner cold. These recipes stay on the friendly side of the line. Mild tomato. Soft noodles. Crispy bread. Eggs that still look like eggs. There’s a lot of value in food that doesn’t demand a speech before the first bite.
And there’s a practical side people forget: a cheap family meal has to work twice, once at dinner and once as leftovers. That’s why the texture choices here matter so much. A casserole that reheats without breaking, a soup that tastes better after sitting, a burrito that can be wrapped and saved — those are the meals that keep a week from unraveling.
Essential Equipment for These Recipes
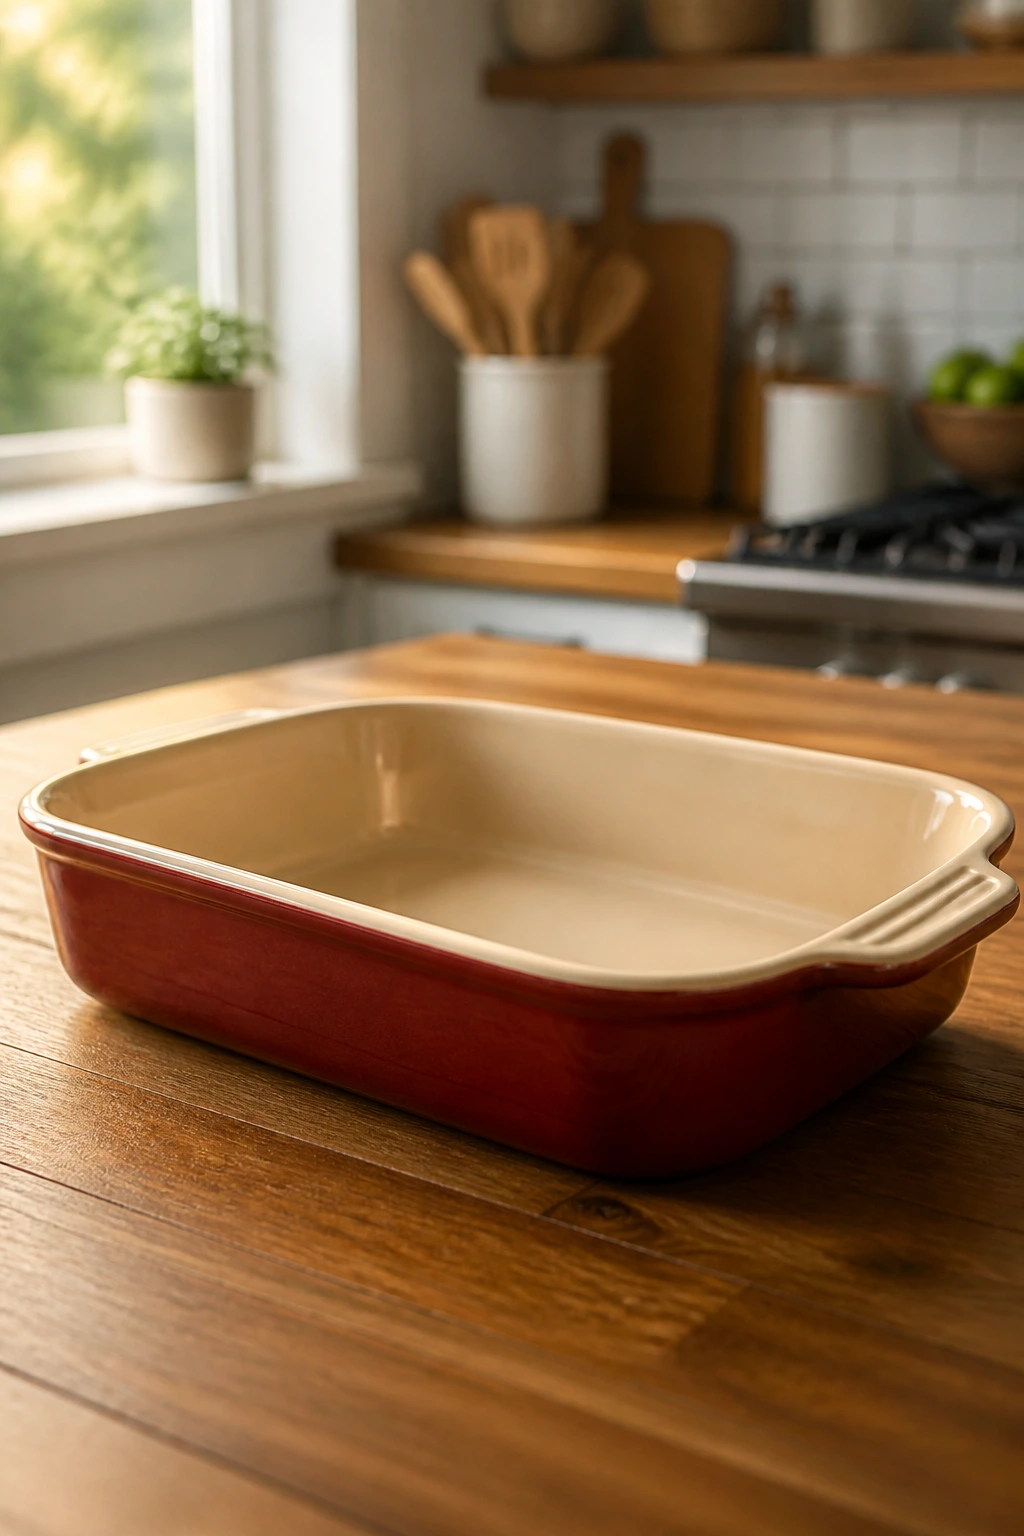
- 9×13-inch baking dish: The workhorse for ziti, casseroles, and baked pasta; one good dish covers more dinners than you’d expect.
- Large skillet or deep sauté pan: Needed for skillet meals like taco pasta, cheeseburger pasta, and sloppy joe bowls.
- Large pot or Dutch oven: Best for soups, boiled pasta, and anything that needs room to simmer.
- Sheet pan with rim: Useful for drumsticks, pancakes, and quick roasted meals; the rim catches drips.
- Colander: Keeps pasta and potatoes from sitting in hot water and turning soft.
- Mixing bowls in two sizes: One for wet ingredients, one for dry, and one big enough for a casserole mix.
- Wooden spoon or spatula: Better than a fork for stirring pasta, breaking up meat, and scraping the bottom of a pan.
- Whisk: Helps eggs, sauces, and pancake batter stay smooth.
- Instant-read thermometer: Especially handy for chicken, turkey, and sausage casseroles; guessing leads to dry meat.
- Foil or parchment: Not glamorous, but it saves cleanup and helps sheet-pan meals roast cleanly.
- Sharp knife and cutting board: For potatoes, onions, chicken, and anything that needs a clean cut before cooking.
- Measuring cups and spoons: A little too much liquid or salt changes these simple dishes fast.
Smart Shopping and Ingredient Tips
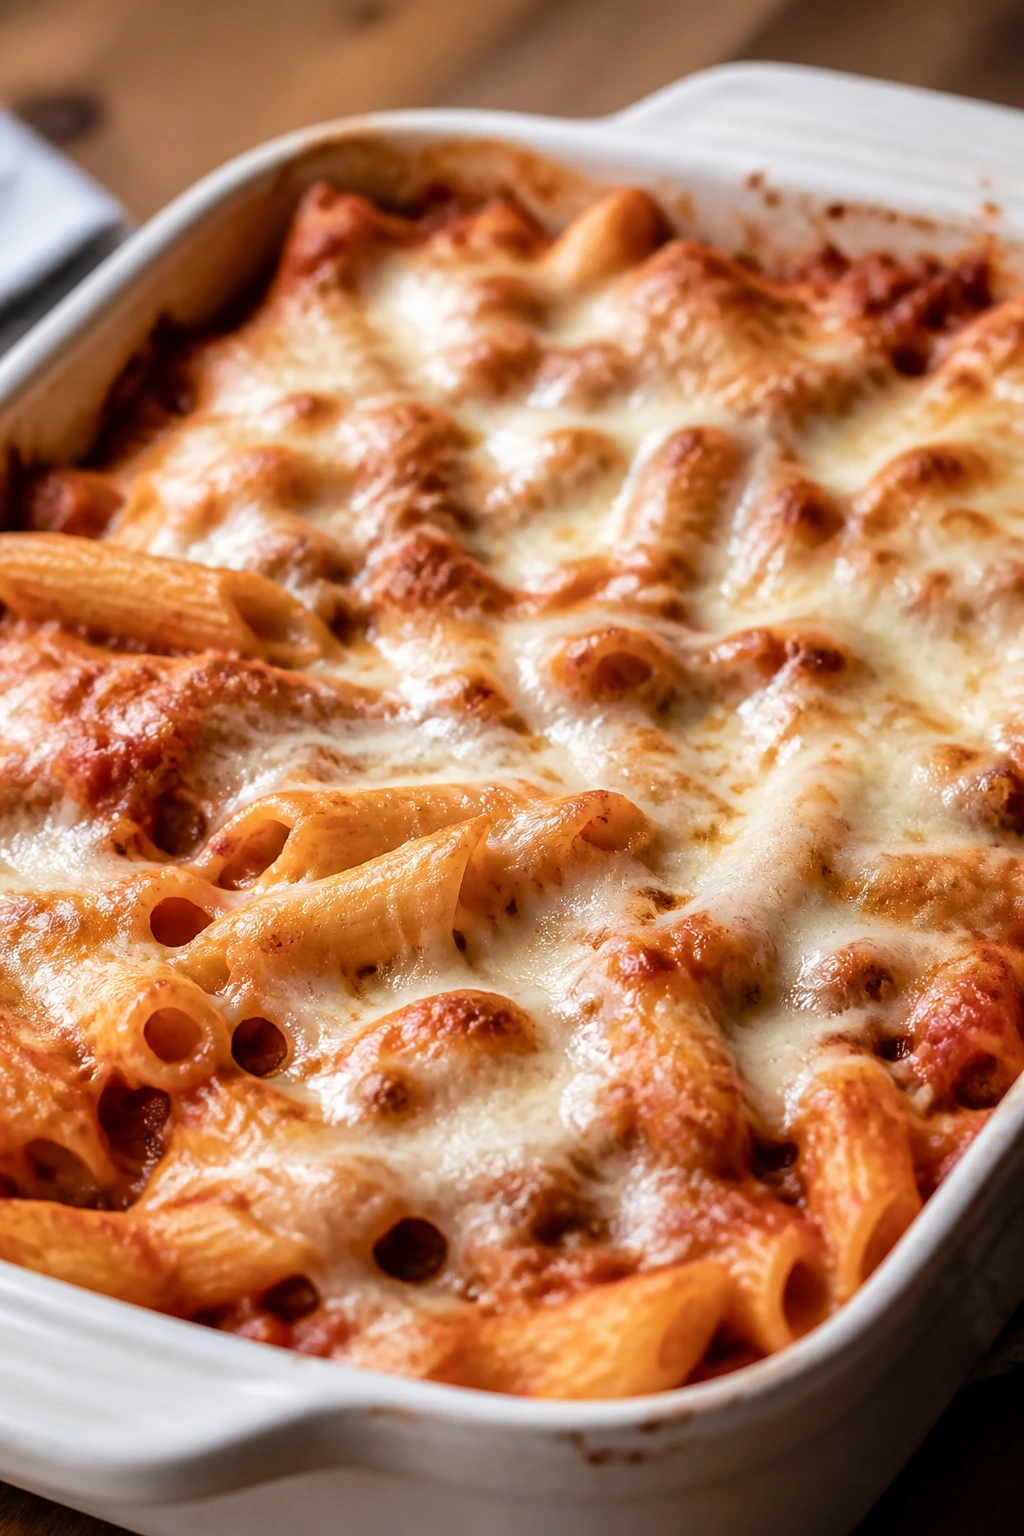
The cheapest cart usually starts with store-brand basics: pasta, rice, flour, canned tomatoes, beans, eggs, and tortillas. Those are the items that can anchor three or four dinners without complaining. Buy them in the sizes you’ll actually finish — a giant bag of rice is only a bargain if it doesn’t sit in the pantry forever.
Ground meat is worth watching. A package with a little fat tastes better in casseroles and skillet meals than ultra-lean meat that cooks dry and grainy. Chicken thighs usually give more flavor for the money than breasts, especially in baked dishes where moisture matters. Frozen chicken drumsticks are often a strong buy too, since they stay juicy and don’t need fancy trimming.
Cheese is where a lot of budgets quietly leak. A block of cheddar usually stretches farther than pre-shredded, and it melts smoother in sauces and casseroles. That said, if the budget is tight and convenience wins the day, the bagged stuff still works. I’d spend my best money on cheese for the meals where melt and texture matter most: mac and cheese, baked ziti, stuffed shells, and grilled cheese.
Canned soup and jarred sauce can be useful shortcuts, but pick the plain versions. “Cream of” soups, marinara, and salsa all vary wildly in salt and sweetness. A mild jar of sauce can be the difference between a pan of baked pasta that kids eat and one they push around for twenty minutes. When in doubt, buy the simplest version and season it yourself.
Frozen vegetables are worth keeping around even if only half the table wants them. Peas, corn, and mixed vegetables can be stirred into casseroles, served on the side, or left out until the end. They’re usually cheaper than fresh produce that bruises before you use it.
How to Serve These Recipes
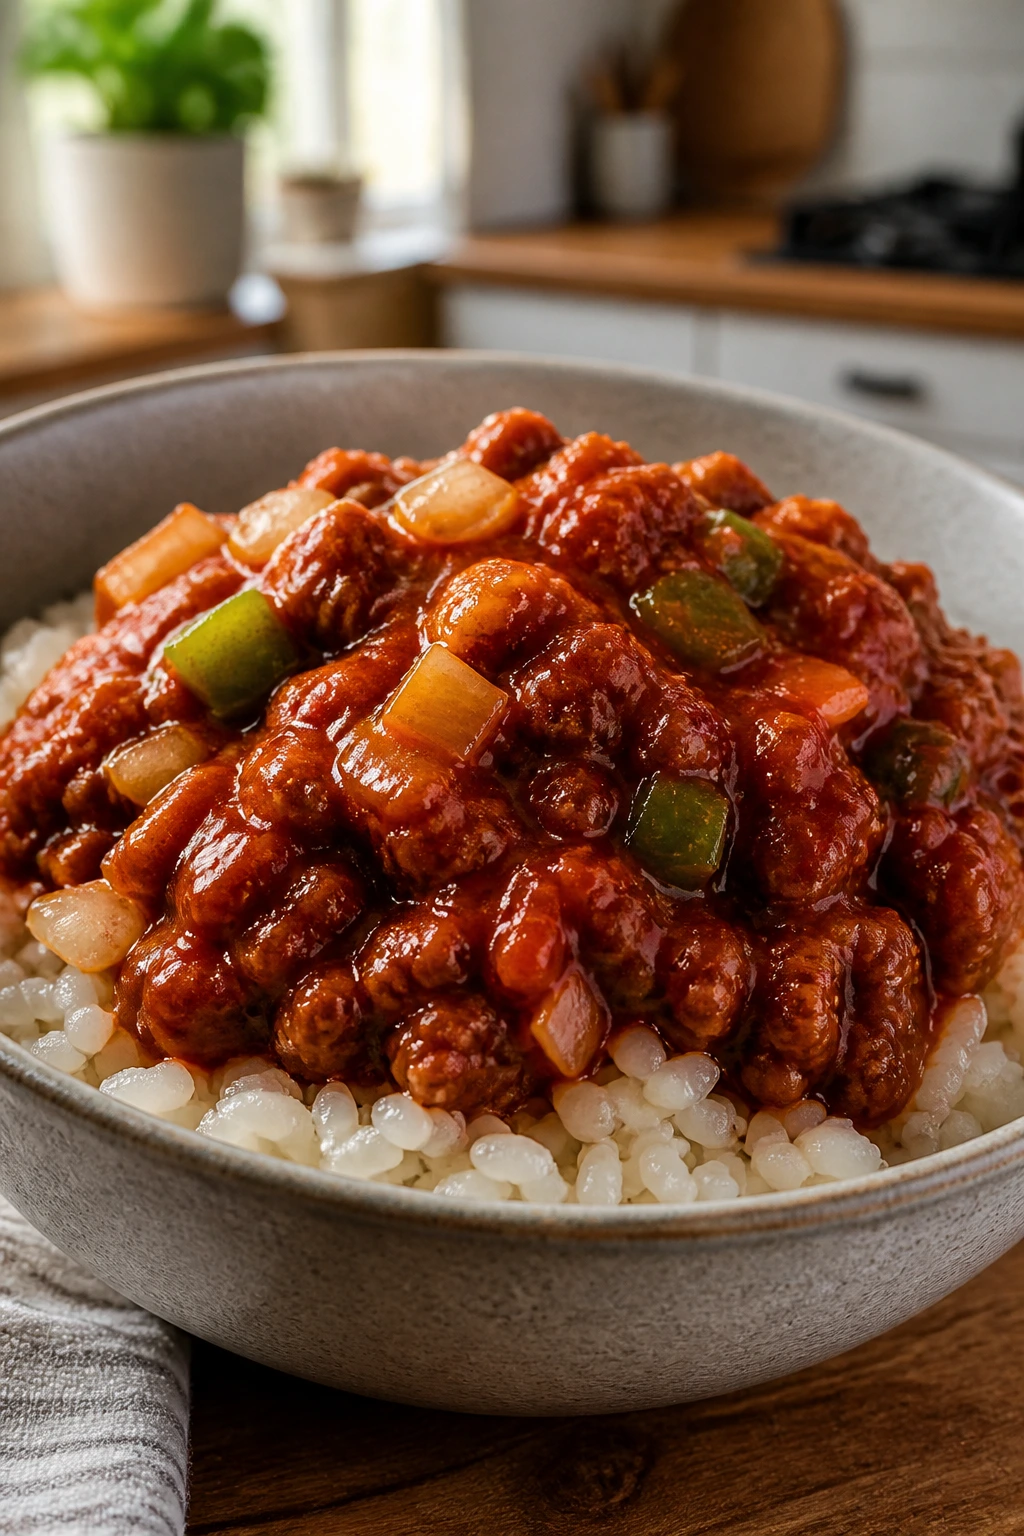
Presentation: Keep the serving style clean and recognizable. Bowls for soups and skillet meals, squares for casseroles, halves for burritos and sandwiches, and neat scoops for baked pasta make dinner feel organized even when the ingredients are simple.
Accompaniments: Bread is the safest side in this entire category — garlic bread, toast, biscuits, dinner rolls, or tortillas. Fruit, cucumber slices, baby carrots, peas, and corn are easy add-ons that don’t compete with the main dish. If you need a bigger plate, pair a soup with a sandwich or a casserole with a light salad.
Portions: Most of these meals feed 4 to 6 people, with casseroles and pasta dishes stretching a little farther if you add bread or a side. For smaller kids, start with half-portions and let them ask for more. For hungrier adults, add a second starch rather than trying to force every recipe to be gigantic.
Beverage Pairing: Cold milk still works with a lot of these dishes, especially pasta bakes and quesadillas. Iced tea or simple lemonade fits the tomato and cheese meals without fighting them. For adults who want something less sweet, sparkling water with lemon is a clean match.
Additional Tips and Flavor Boosters
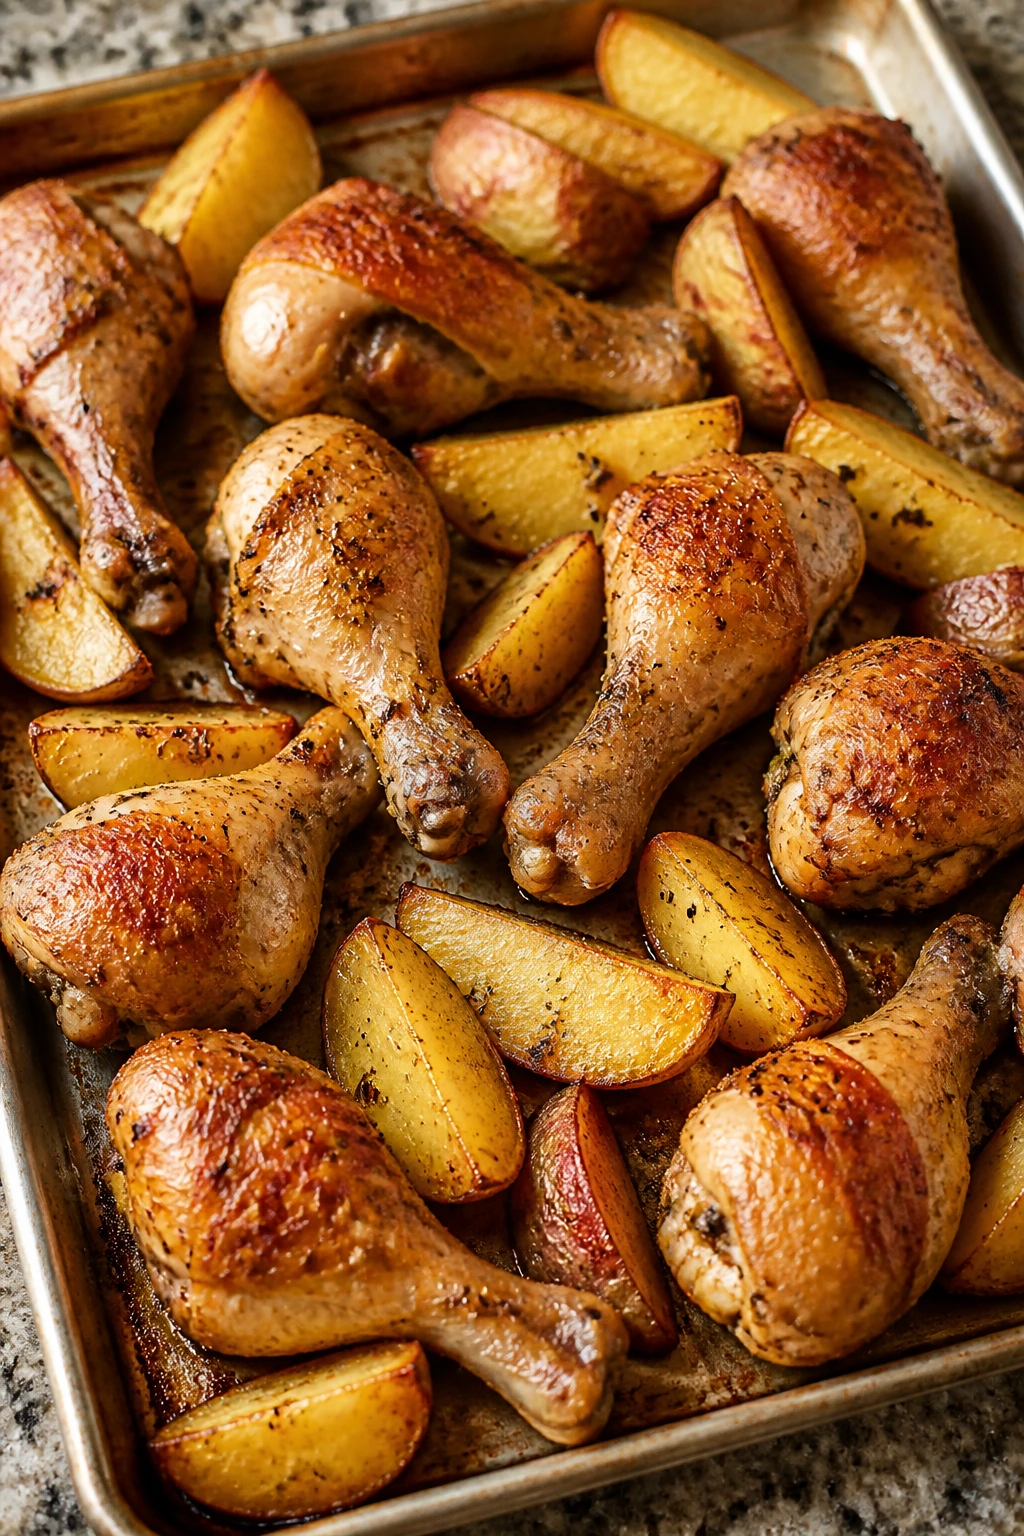
Flavor Enhancement: A small finishing move matters more than a flashy spice list. A pinch of Parmesan on baked pasta, a dab of butter on potatoes, or a little extra cheese under the top layer can make a cheap meal feel deliberate.
Customization: Serve toppings on the side whenever possible. Salsa, hot sauce, sour cream, pickles, chopped tomatoes, and sliced green onions let the adults build a louder plate while the kids keep theirs plain.
Serving Suggestions: Use separate little bowls for add-ons. That one habit — cheese here, peppers there, sauce over there — cuts down on dinner-time negotiations because the base meal stays untouched.
Make-It-Yours: If you’re feeding dairy-free eaters, lean on tomato-based meals, rice bowls, and burritos with beans. If gluten-free is part of the picture, tacos, rice bowls, chili, soups, and potato casseroles are the easiest places to start. For extra protein, add eggs, beans, or shredded chicken before you reach for expensive specialty products.
Make-Ahead, Storage, and Reheating Guidance
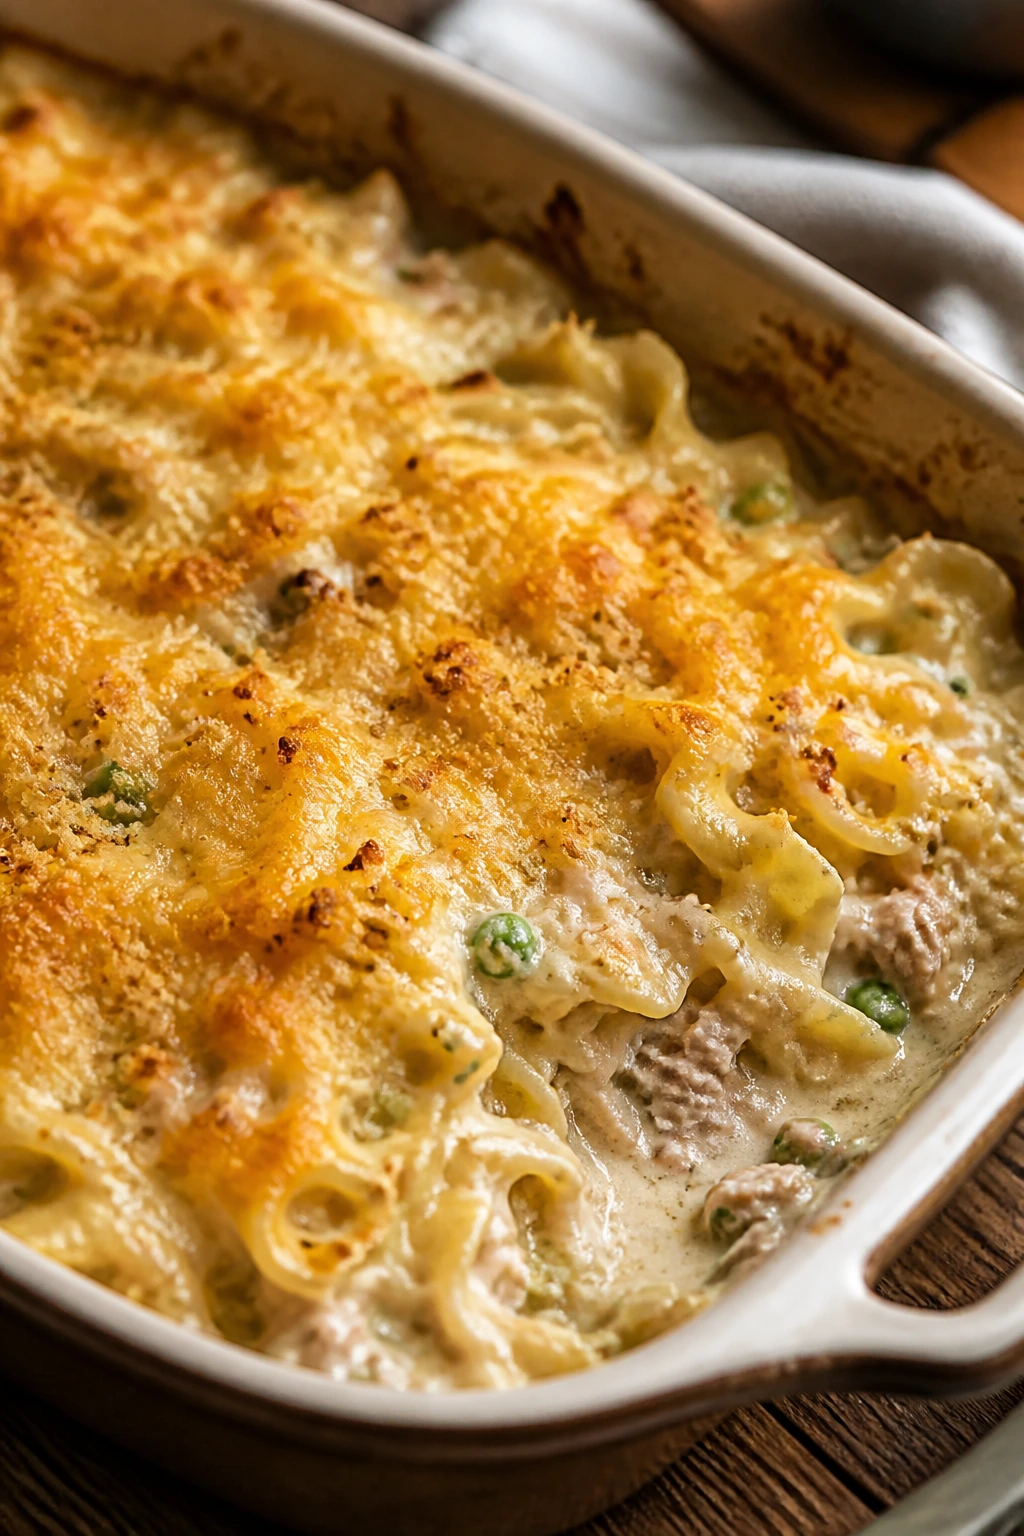
Most of these meals keep well for 3 to 4 days in the refrigerator when stored in airtight containers. Casseroles, pasta bakes, soups, and skillet meals are the strongest leftovers because the flavors settle in overnight. Sandwiches and burritos are more of a texture gamble, but they still do fine for a day or two if wrapped tightly.
Freezing works best for the saucy dishes. Cheesy baked ziti, chili mac, chicken and rice casserole, meatloaf muffins, and stroganoff all freeze well for up to 2 months. Let them cool fully before freezing, then wrap in a double layer or portion into containers so you can thaw only what you need. Soups freeze well too, though cream-based soups sometimes need a brisk whisk after reheating.
Reheat casseroles and baked pasta in a 350°F oven covered with foil until hot, usually 15 to 25 minutes depending on the portion size. Add a splash of milk or broth if the dish looks dry. Skillet meals and rice bowls do well in a covered pan over low heat with a tablespoon or two of water stirred in. Burritos and quesadillas are better in a skillet or toaster oven than in the microwave because the tortilla stays firmer.
Breakfast casseroles and sheet-pan pancakes can be reheated in the oven or toaster oven for better texture. The microwave works in a hurry, but use short bursts and stop before the eggs or batter get rubbery. If a meal has been sauced heavily, expect it to soften a little after storage. That’s normal. Some of these dishes almost improve after a night in the fridge, especially chili mac and baked ziti.
Variations and Adaptations to Try
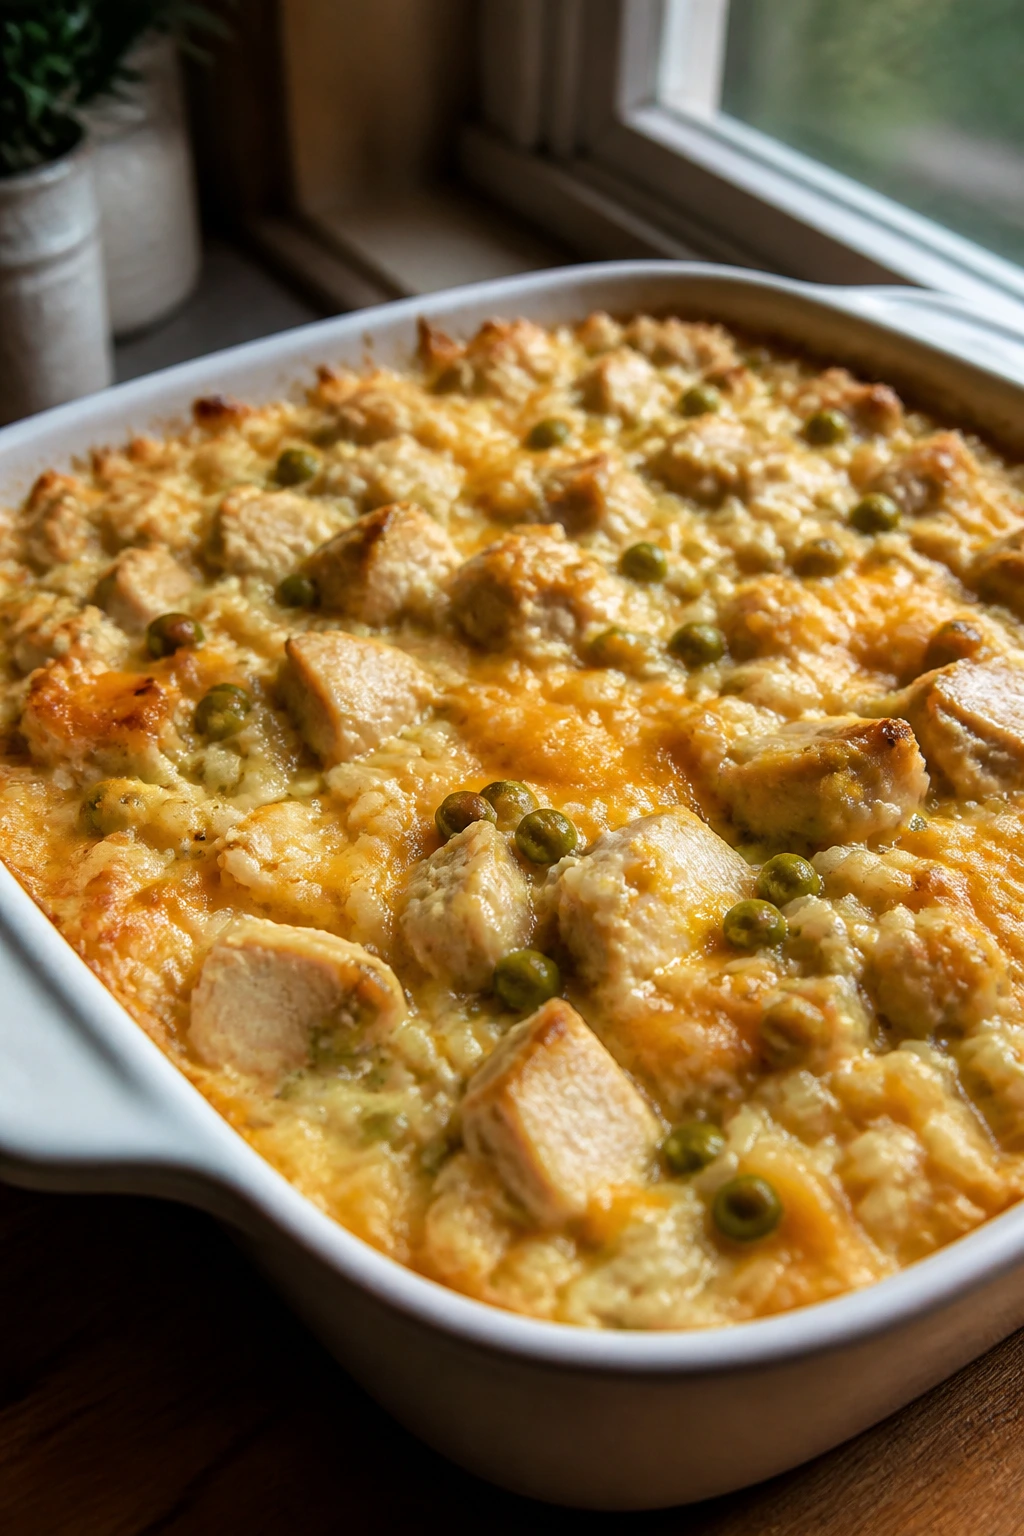
No-Mix Plate Night: Serve meat, rice, pasta, cheese, and vegetables as separate piles instead of combining everything. That approach helps with children who want control over each bite and works especially well for sloppy joes, chicken and rice, and taco bowls.
Budget Protein Swap: Rotate between ground beef, ground turkey, chicken thighs, eggs, beans, and tuna based on what’s on sale. The flavor profile changes a little, but the meal structure stays the same, which is the whole point.
Mild-First, Heat-on-the-Side: Keep the base dish plain, then put hot sauce, chili flakes, or spicy salsa on the table. That keeps the kids calm and gives adults the option to wake up their own plates.
Dairy-Light Dinner Plan: Use tomato-based meals, broth-based soups, burrito fillings, and egg dishes when you need to cut back on milk and cheese. A little olive oil and extra seasoning can carry a surprising amount of flavor when dairy is off the table.
Vegetarian Pantry Rotation: Beans, rice, eggs, pasta, potatoes, and cheese can carry several meals without meat at all. Bean burritos, tomato soup, mac and cheese, breakfast burritos, and potato casseroles all fit nicely here.
Lunchbox Leftover Strategy: Choose at least two dinners each week that reheat cleanly — baked pasta, meatloaf muffins, rice bowls, chili mac, or quesadilla bake. Those are the meals that make tomorrow easier without asking for a separate cooking session.
Common Mistakes to Avoid
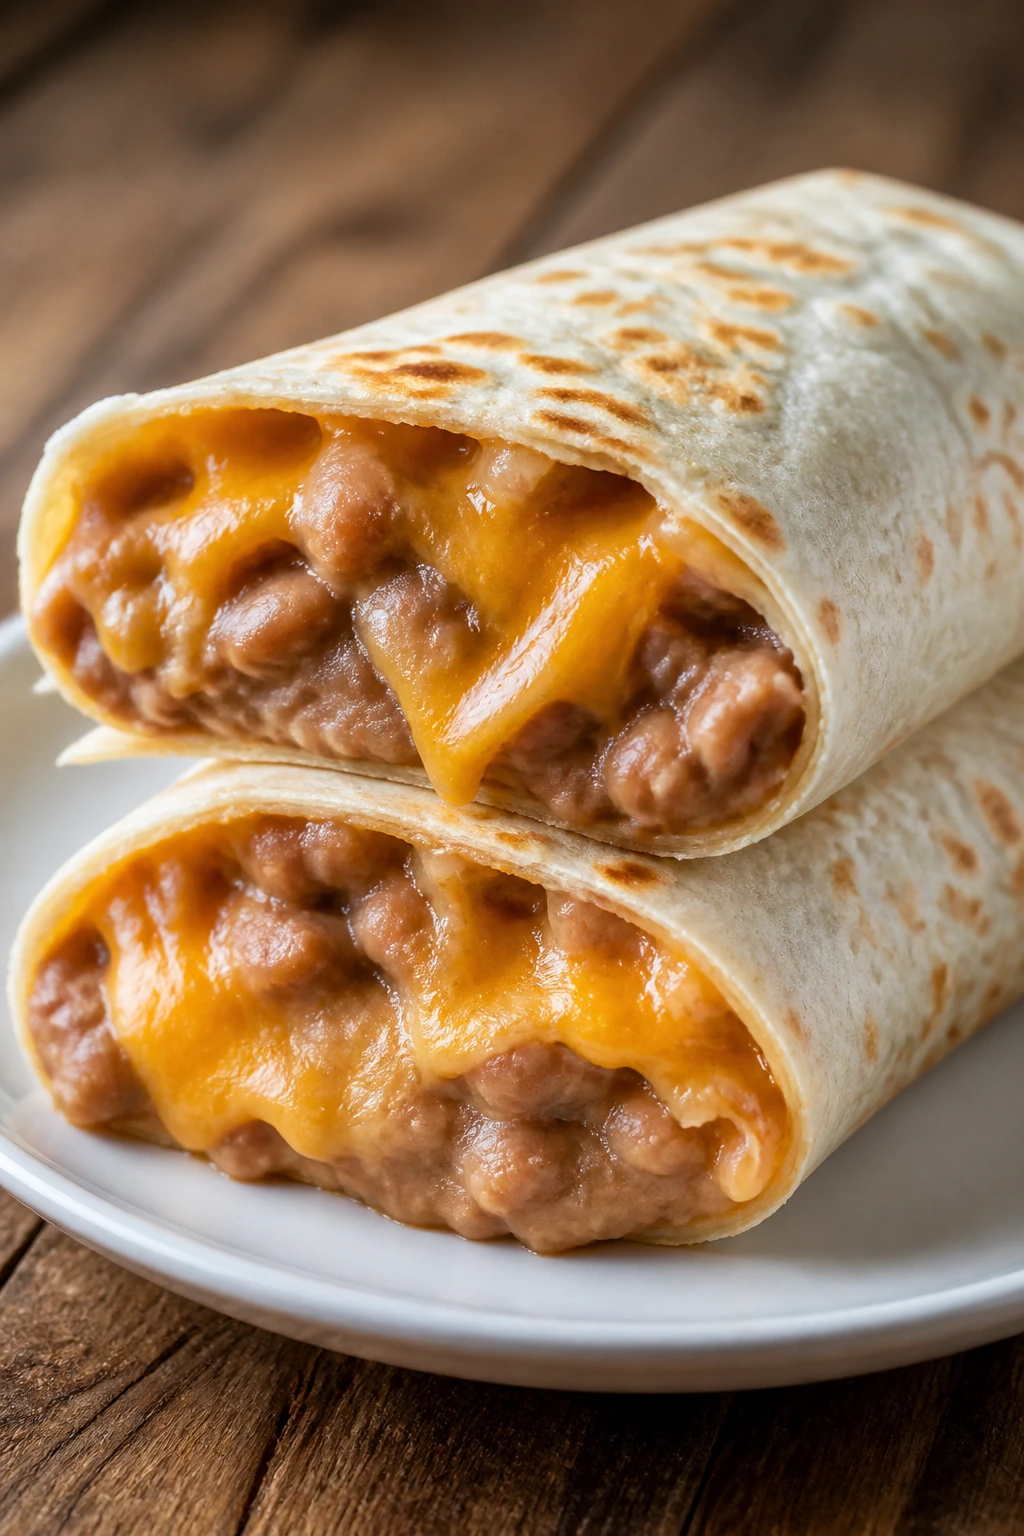
One mistake shows up all the time: trying to make budget food too complicated. A recipe with seven sauces and three spice blends stops being cheap the second you buy the extras. Pick one flavor lane and stay in it. Tomato, cheese, rice, chicken, beans — that’s enough.
Another trap is overcooking the starch. Pasta goes mushy if boiled too long before baking, rice turns gluey if it’s drowned in liquid, and potatoes disappear if the pieces are cut too small. The texture is the whole game in kid-friendly meals. If the base turns soft in the wrong way, the whole dish feels off.
People also underseason because they think “plain” means “barely salted.” That’s not it. Plain food still needs enough salt to taste like something. The better move is to season gently, then put extra sauce or spice on the table for the people who want it.
Too much liquid is another classic problem. Soupy casseroles slide apart, burritos get soggy, and skillet pasta turns into stew. If a dish should be sliceable, spoonable, or wrap-able, keep the sauce thicker than you think and let the food rest before serving.
The last one is serving everything mixed together when the family clearly prefers parts separate. If one child hates onions, don’t bury them in the pan and hope for the best. Put the onions in the adult portion or leave them out. That tiny bit of flexibility saves more dinner peace than a fancier recipe ever will.
Frequently Asked Questions
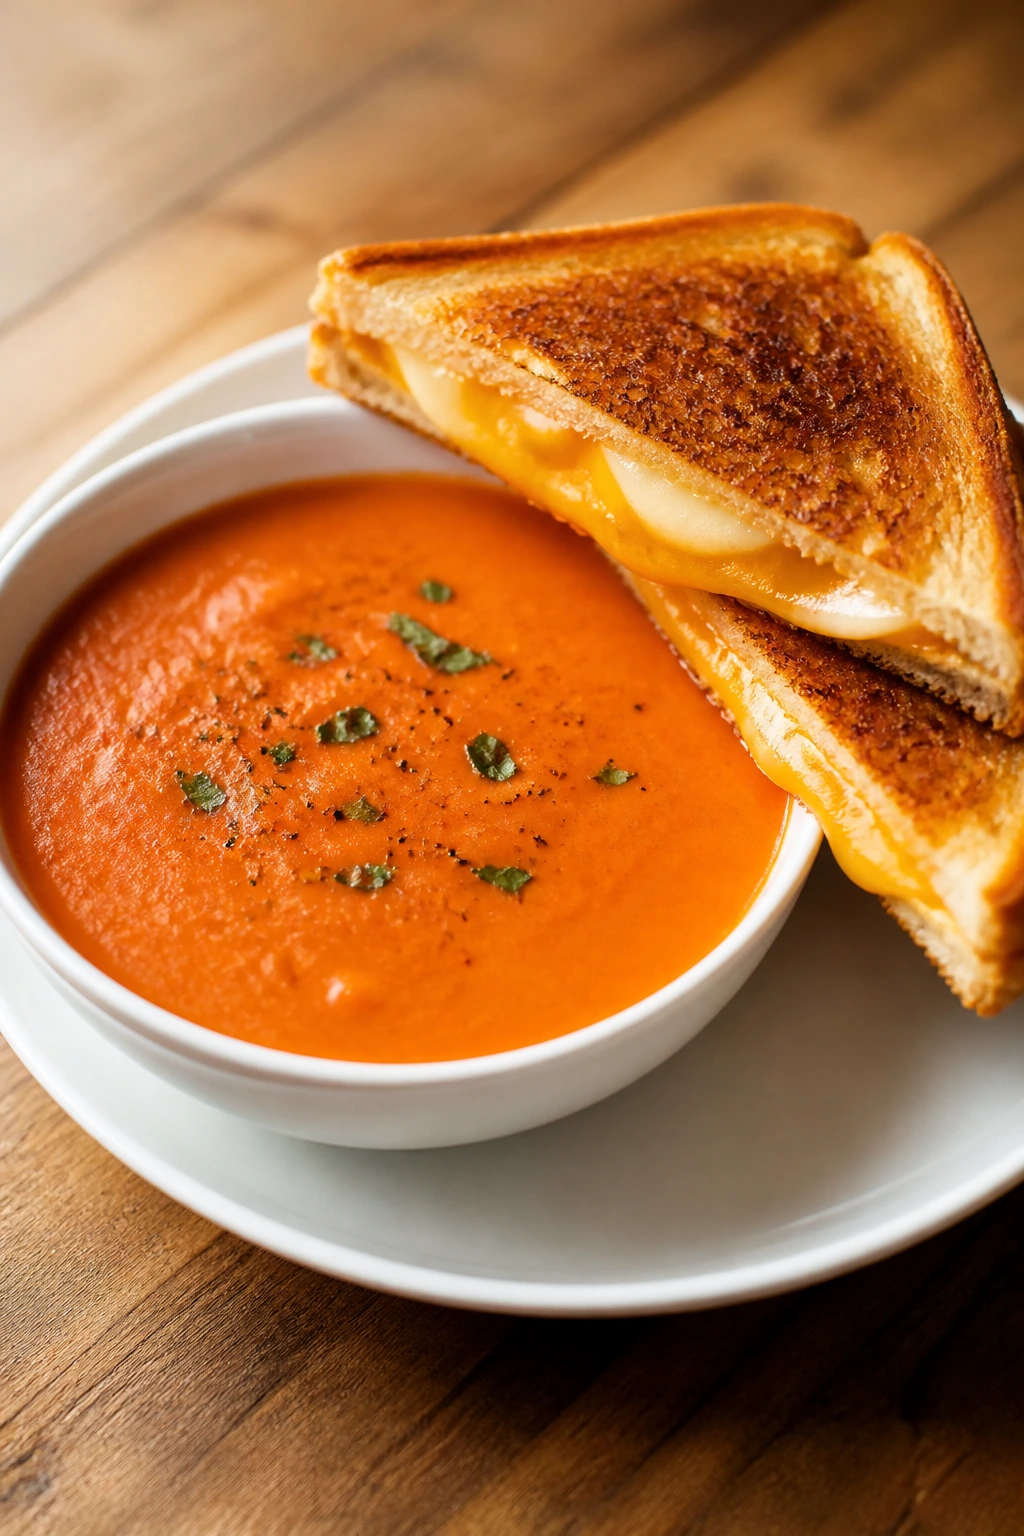
How do I keep picky eaters from rejecting a meal before the first bite?
Start with food they already recognize: pasta, rice, potatoes, cheese, eggs, chicken, or bread. Keep sauces smooth, avoid visible pepper flakes or big vegetable chunks, and let people add toppings at the table instead of mixing everything into the main pan.
What’s the cheapest protein to buy for these meals?
Eggs, beans, canned tuna, ground turkey on sale, and chicken thighs usually give the best mix of cost and flexibility. Ground beef can work too, especially when it’s stretched with pasta, rice, or potatoes.
Can I make these dinners ahead of time?
Yes, and several of them improve after a night in the fridge. Baked pasta, casseroles, chili, meatloaf muffins, and soups are the strongest make-ahead choices. Keep sandwiches and burritos wrapped tightly and crisp them again before serving if you want better texture.
What if my child only eats plain pasta or rice?
Serve the main dish in parts. Put pasta, sauce, cheese, and chicken in separate piles, or offer rice with the meat mixture on the side. A lot of kids are fine with familiar ingredients as long as they aren’t all fused together.
Can I freeze these meals?
Most saucy casseroles, chili-based dishes, meatloaf muffins, and soups freeze well for up to 2 months. Pasta with lots of cream can soften a bit after freezing, but it still works. Wrap tightly and reheat slowly with a splash of liquid.
How do I make these meals less salty for kids?
Use low-sodium broth, mild cheese, and less packaged seasoning. Then season the adult plates at the table. That approach works better than making the whole pan bland and hoping people won’t notice.
Are frozen vegetables okay here, or do they make the food watery?
Frozen vegetables are fine if you use them in the right place. Peas, corn, and mixed vegetables go into casseroles, soups, and skillet meals without trouble. If they’re going into a bake, thaw and drain them first when possible.
What can I do if a casserole comes out dry?
Stir in a little broth, milk, or sauce before reheating, then cover it so the steam softens the edges. Dry casseroles usually need less time in the oven next time, not more liquid at the start. Rest time also helps them hold moisture better.
Do I need special spices to make budget food taste good?
No. Garlic powder, onion powder, paprika, black pepper, oregano, and mild taco seasoning will take you far. The meals in this list depend more on heat, salt, fat, and texture than on complicated spice blends.
Plates That Come Back Empty

Good family meals do not need to be loud. They need to show up warm, taste familiar, and leave just enough room for different tastes at the same table. That’s the quieter skill these recipes aim for: feeding a crowd without turning dinner into a negotiation.
Keep a few of these pans, bowls, and burritos in rotation, and the week starts to feel less expensive and less chaotic at the same time. A box of pasta, a bag of rice, a pack of eggs, and a couple of budget proteins can carry more dinners than most people expect. The best part is what happens after everyone eats — not a lot of leftovers, which is usually the real compliment.