
A weekend grill can rescue dinner without turning the evening into a small construction project. A hot grate, a few sharp marinades, and food that cooks at a sensible pace do most of the work. I like grill dinners that leave you with one cutting board, one tongs set, and enough time to sit down before the sun drops and the smoke starts drifting sideways.
These easy dinner recipes for the grill work because they lean on direct heat, fast marinades, and ingredients that don’t panic when the fire gets lively. Chicken thighs stay juicy, shrimp cook in minutes, burgers only need a good crust, and vegetables pick up real flavor instead of fading into the background. The trick is not overthinking it. Keep the prep tight, keep the heat managed, and let the grill do the part it was built for.
You’ll also notice there’s range here. Some recipes are built for a blistering-hot grate and a quick flip. Others use indirect heat, foil packets, or a skillet on the grill so you can handle thicker cuts, sticky glazes, and cheesy fillings without crossing your fingers and hoping. That mix matters. It means you can cook for picky eaters, bigger crowds, or a table that wants chicken, seafood, and a vegetarian option without turning dinner into three separate projects.
Why This Collection Earns Its Spot on the Grill
Fast prep: Most of these recipes need 10 to 20 minutes of hands-on work, then the grill takes over while you set the table or slice the sides.
Real variety: Chicken, pork, steak, seafood, tofu, vegetables, flatbreads, and burgers all show up here, so you can build a full weekend menu from one method.
Low-fuss cleanup: Foil packets, skewers, and direct-grill mains keep the sink from filling up with bowls and pans.
Built for fire and smoke: These recipes use marinades, rubs, and finishing sauces that taste better with a little char on them.
Flexible with heat zones: Several dishes rely on direct and indirect heat, which makes it easier to cook sticky glazes and thicker cuts without burning the outside.
Easy to mix and match: You can pair steak with grilled corn, shrimp with tortillas, or chicken with a salad and call it dinner without repeating the same plate twice.
1. Lemon-Garlic Chicken Thighs
Chicken thighs are the kind of grill meat that forgives a distracted minute. They stay juicy even when the grate runs hotter than you planned, and lemon, garlic, and oregano give them a bright, smoky edge that tastes like the food was made outside on purpose.
Why It Works: Thighs have enough fat to handle direct heat, so they sear well without drying out. The lemon lifts the flavor, the garlic gives it bite, and the oregano hangs on after the smoke settles. Boneless thighs cook fast enough for a simple dinner, but they still feel meaty on the plate.
Key Ingredients:
- 2 lbs boneless, skinless chicken thighs
- 3 tbsp olive oil
- 3 cloves garlic, minced
- Zest and juice of 1 lemon
- 1 tsp kosher salt
- 1 tsp dried oregano
- 1 tsp black pepper
- 1 tbsp chopped parsley
Quick Steps:
- Whisk the olive oil, garlic, lemon zest, lemon juice, salt, oregano, and pepper in a large bowl.
- Add the chicken thighs and turn them until every piece looks glossy; rest for 20 to 30 minutes.
- Preheat the grill to medium-high, about 425°F, and oil the grates.
- Grill the thighs for 5 to 6 minutes per side, until the edges are browned and the center reaches 165°F.
- Transfer to a plate, rest 5 minutes, and scatter parsley over the top.
Equipment for This Recipe:
- Gas or charcoal grill
- Large mixing bowl
- Tongs
- Instant-read thermometer
How to Serve This Dish: Serve the thighs with grilled zucchini, corn, or a simple rice pilaf. A squeeze of fresh lemon at the table makes the char pop. I like cutting the thighs on a bias and piling them on a warm platter so the juices stay where they belong.
Pro Tips for This Recipe:
- Pat the chicken dry before marinating if it came from the package wet; that helps it brown instead of steam.
- If your lemon is small, use a little extra zest rather than more juice. Too much acid makes the surface taste sharp.
- Let the thighs sit on the counter for 15 minutes before grilling so they don’t seize up over the fire.
Variations on This Dish:
- Smoky Paprika Version: Add 1 tsp smoked paprika to the marinade for a deeper, campfire-style flavor.
- Honey-Lemon Finish: Stir 1 tbsp honey into the marinade and brush a little more on during the last minute of grilling.
- Bone-In Swap: Use bone-in thighs and cook over medium heat for 25 to 30 minutes, turning often.
Common Mistakes to Avoid with This Dish:
- Don’t grill the thighs straight from a heavy lemon bath for hours. The surface can turn mushy. Keep the marinade under 1 hour.
- Don’t flip too early. If the chicken sticks, it’s not ready to release.
- Don’t cut into the meat the second it leaves the grill. The juices need that 5-minute rest.
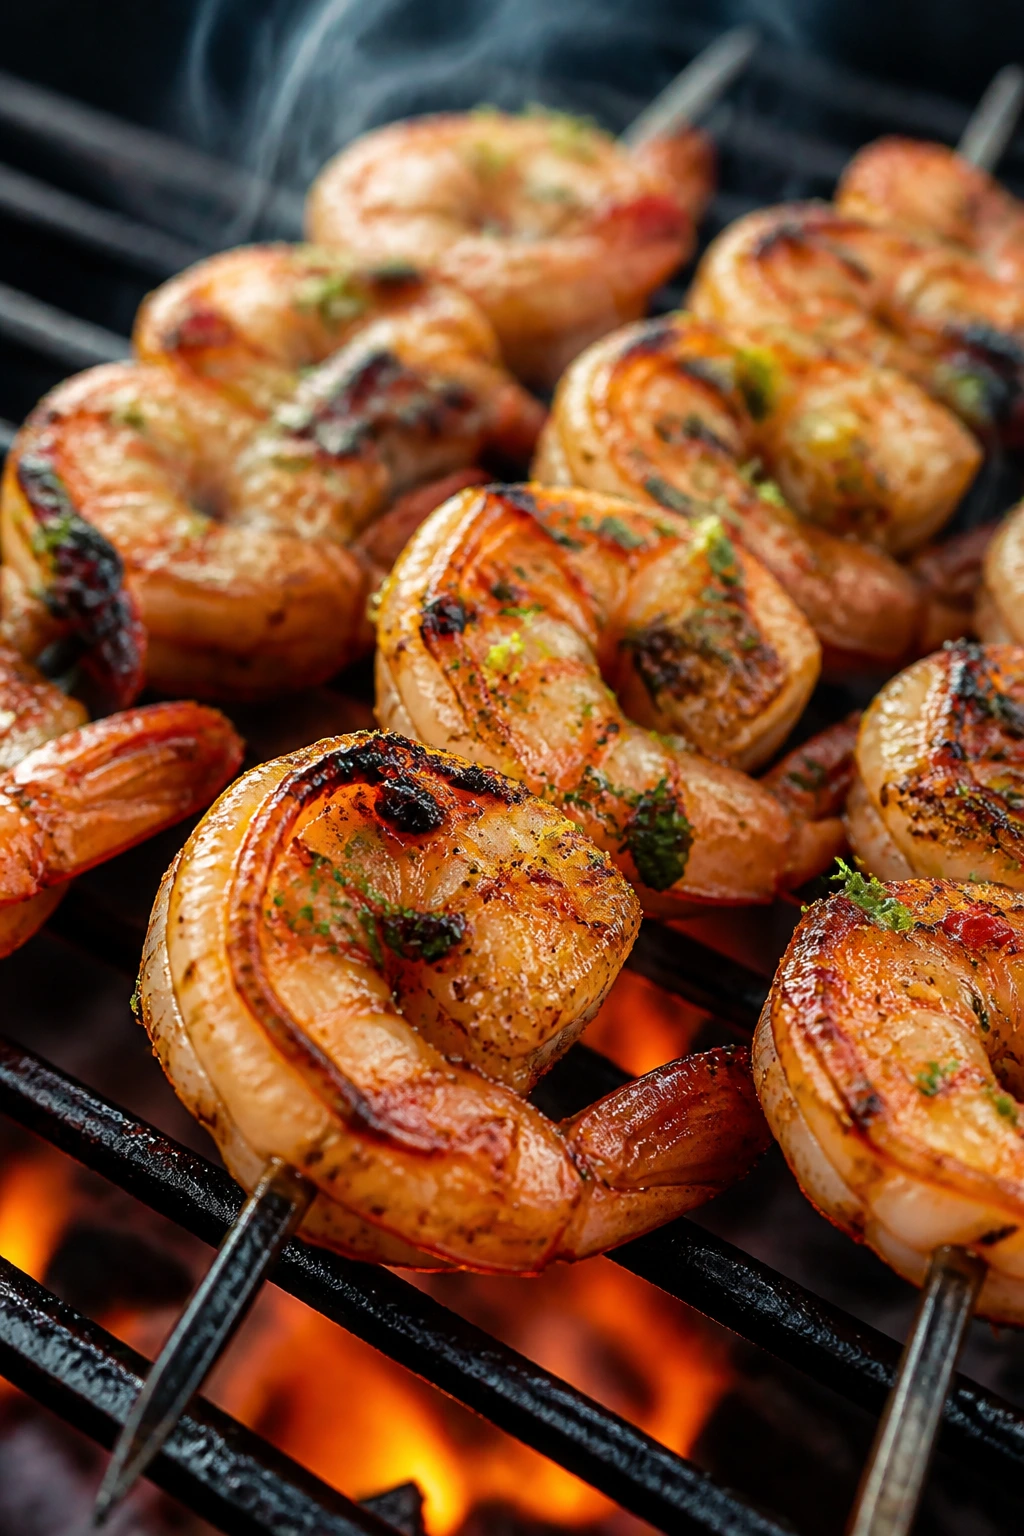
2. Chili-Lime Shrimp Skewers
Shrimp on the grill should smell like lime peel, chili, and a little smoke hitting hot metal. These skewers cook so fast that you can go from raw shrimp to dinner before the side dish has even lost its steam.
Why It Works: Large shrimp handle direct heat better than the tiny ones that curl into rubber. Chili powder and cumin give you warmth without a long spice list, and lime keeps the flavor bright. A little honey helps the edges caramelize fast, which is the part people usually miss.
Key Ingredients:
- 1½ lbs large shrimp, peeled and deveined
- 2 tbsp olive oil
- Juice and zest of 2 limes
- 1 tbsp chili powder
- 1 tsp cumin
- 1 tsp kosher salt
- 1 tbsp honey
- 2 cloves garlic, minced
Quick Steps:
- Stir the olive oil, lime juice, zest, chili powder, cumin, salt, honey, and garlic in a bowl.
- Toss the shrimp in the marinade and let them sit for 10 to 15 minutes only.
- Thread the shrimp onto skewers, keeping them flat and snug.
- Grill over medium-high heat for 2 to 3 minutes per side, until pink and just opaque.
- Pull them off the grill the moment they curl into a loose C shape.
Equipment for This Recipe:
- Metal skewers or soaked wooden skewers
- Grill
- Mixing bowl
- Tongs
How to Serve This Dish: Put the skewers over cilantro rice, tuck them into warm tortillas, or serve them with a crunchy cabbage slaw. A spoonful of crema or plain yogurt cools the chili without burying it. These also work well on a platter with lime wedges piled around the edges.
Pro Tips for This Recipe:
- Don’t marinate shrimp for more than 15 minutes. The lime starts to cook the surface.
- Use the biggest shrimp you can find; they stay tender after the grill and are easier to flip.
- Oil the grates, not the shrimp, if you want to avoid flare-ups.
Variations on This Dish:
- Chipotle Version: Swap chili powder for 1 tsp chipotle powder if you want smoke plus heat.
- Pineapple Party Skewers: Add 1-inch pineapple chunks to the skewers and brush with extra honey at the end.
- Garlic-Butter Finish: Toss the cooked shrimp in 2 tbsp melted butter and another squeeze of lime.
Common Mistakes to Avoid with This Dish:
- Don’t use small salad shrimp. They overcook before you can turn them.
- Don’t leave the skewers on the fire once they’ve gone opaque. Shrimp turn chewy in a minute.
- Don’t forget to pat the shrimp dry before marinating if they look watery.
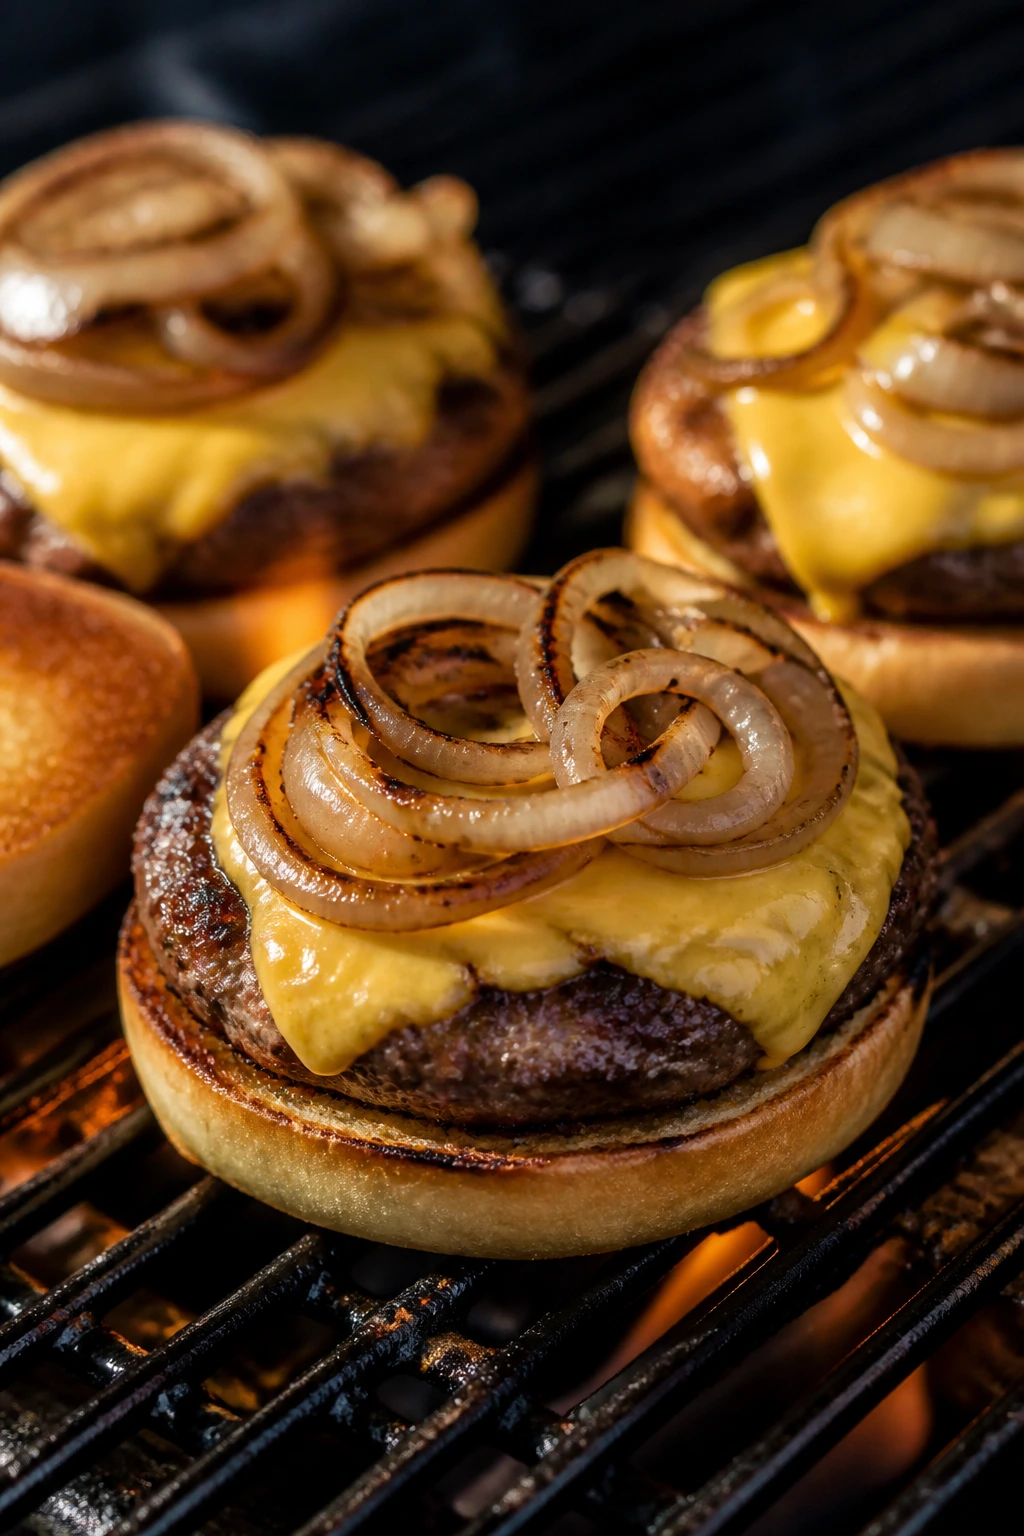
3. Classic Cheeseburgers with Grilled Onions
A burger on the grill needs a decent crust, melted cheese, and onions that pick up a little sweetness without turning limp. This version keeps the toppings simple and lets the beef do what it does best over open heat.
Why It Works: An 80/20 beef blend holds together and stays juicy. Grilled onions soften and pick up char, which gives the burger a savory edge that raw onions can’t match. Toasted buns matter here more than people admit; they keep the bottom from going soggy under the juices.
Key Ingredients:
- 2 lbs ground beef, 80/20
- 1 large yellow onion, sliced into rings
- 1 tbsp neutral oil
- 1½ tsp kosher salt
- 1 tsp black pepper
- 8 slices cheddar or American cheese
- 4 burger buns
- 2 tbsp butter, softened
Quick Steps:
- Shape the beef into 4 patties, each about ½ inch thick, and season both sides with salt and pepper.
- Toss the onion rings with oil.
- Grill the onions over medium heat for 8 to 10 minutes, turning once, until browned at the edges.
- Grill the burgers for 3 to 4 minutes per side for medium, add cheese during the last minute, and close the lid to melt it.
- Butter and toast the buns for 30 to 45 seconds, then stack the burgers with onions on top.
Equipment for This Recipe:
- Grill
- Tongs
- Spatula
- Mixing bowl
How to Serve This Dish: Set the burgers on a tray with pickles, tomato slices, and a bowl of potato salad nearby. I like serving them open-faced for a minute so the cheese stays visible and doesn’t smear the bun into a mess. A pile of grilled onions on top looks better than a heavy stack of extras.
Pro Tips for This Recipe:
- Make the patties wider than the buns; they shrink as they cook.
- Press a small thumb dent into the center so the burgers don’t puff up.
- If the cheese won’t melt, close the lid for 30 to 60 seconds instead of cooking the burger longer.
Variations on This Dish:
- Mushroom-Swiss Version: Sauté sliced mushrooms on the grill in a foil pan and swap in Swiss cheese.
- Spicy Burger Night: Add sliced jalapeños and pepper jack.
- Lettuce-Wrapped Style: Skip the bun and use two butter lettuce leaves for a lighter plate.
Common Mistakes to Avoid with This Dish:
- Don’t smash the patties while they cook. That squeezes out the juices.
- Don’t salt the beef and let it sit for hours before shaping. The texture gets tight.
- Don’t move the burgers too soon. Let the crust form before you flip.
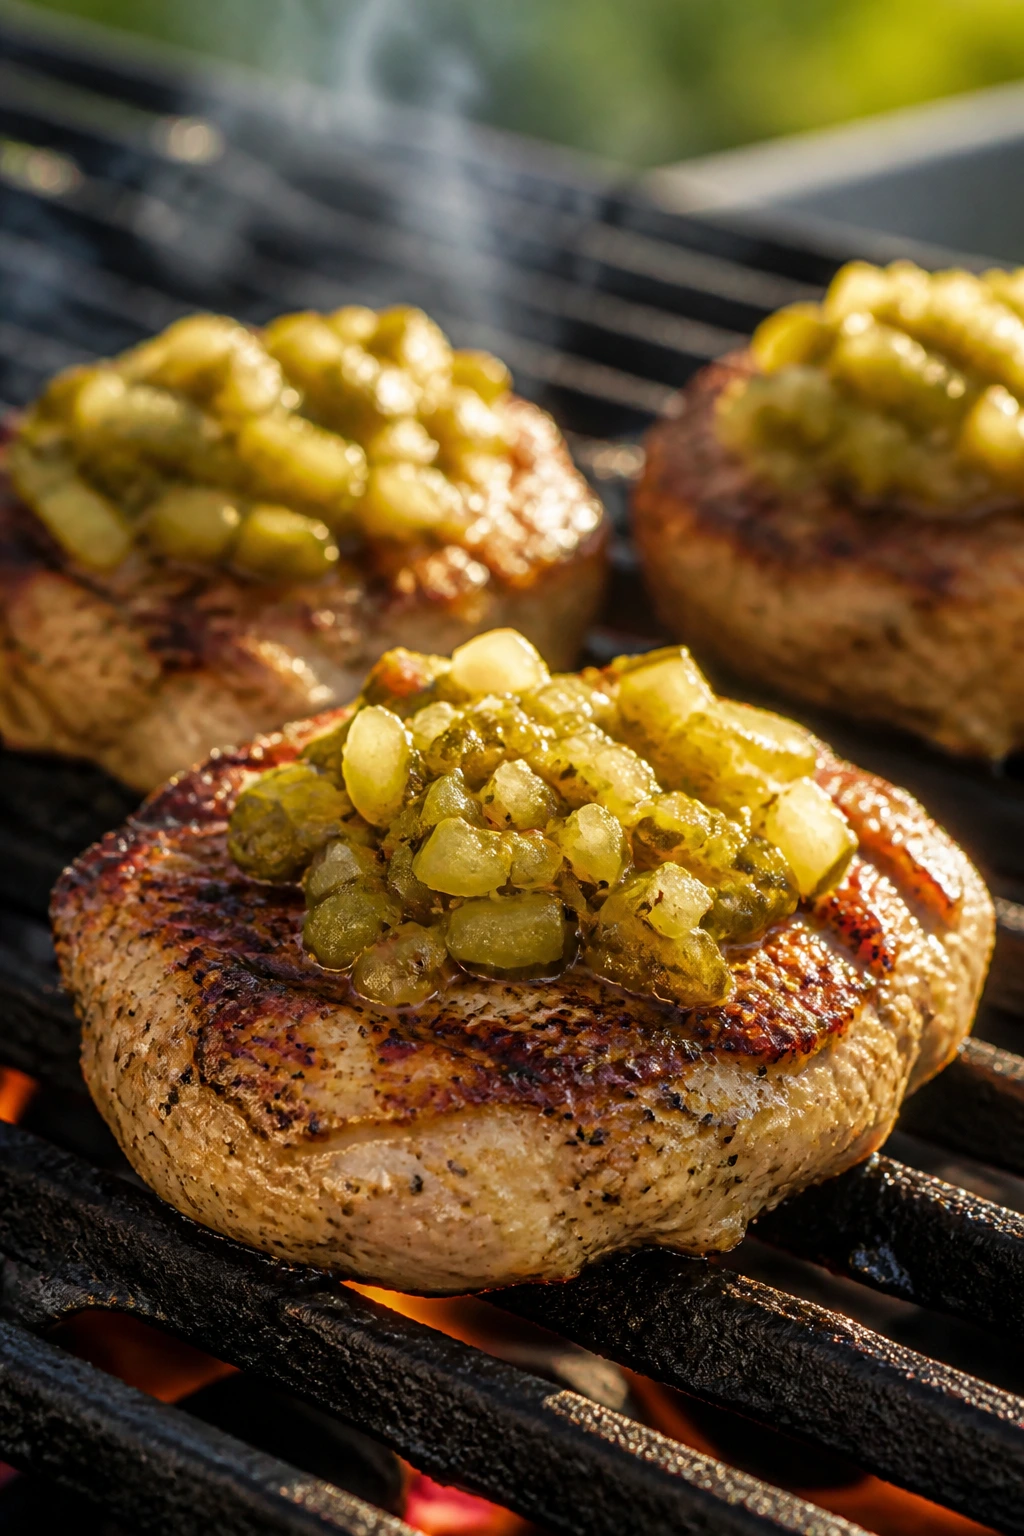
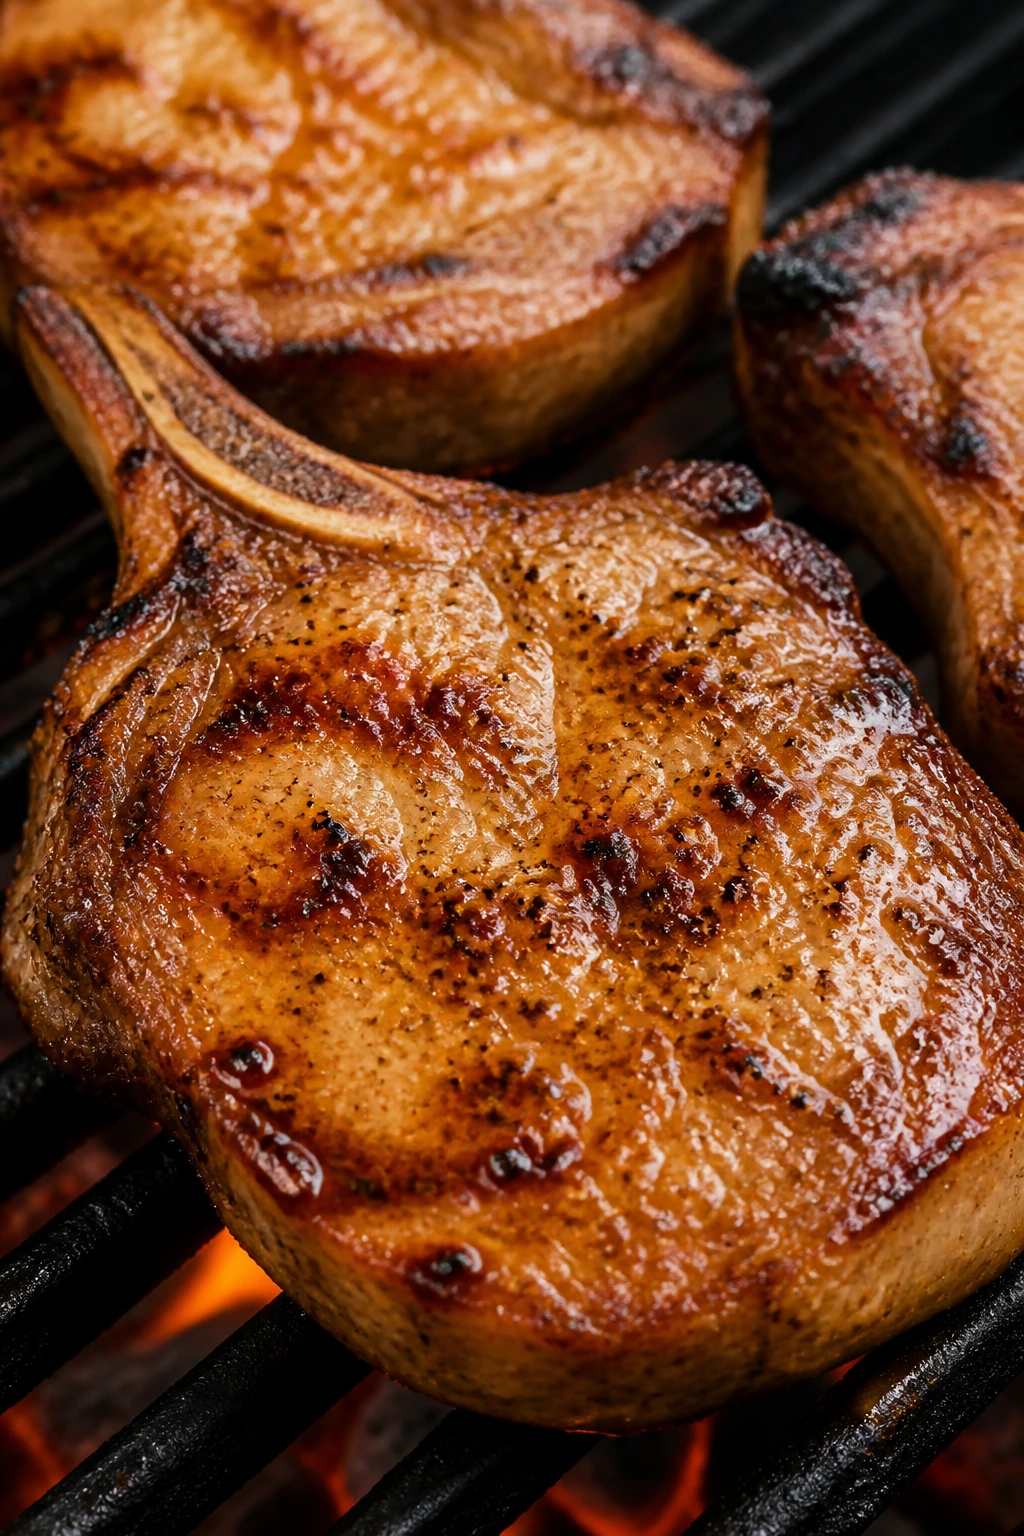
4. Honey-Mustard Pork Chops
Pork chops can be dry and forgettable, or they can be the best thing on the grill. Honey, Dijon, and a quick hot sear push these chops toward the second option, especially if you keep an eye on the thermometer.
Why It Works: Pork chops love a sweet-sharp glaze because the edges brown fast while the center stays mild. Dijon gives the marinade some bite, honey helps it caramelize, and a splash of vinegar keeps the whole thing from tasting flat. A 1-inch chop gives you enough time to build color without overcooking the middle.
Key Ingredients:
- 4 bone-in pork chops, about 1 inch thick
- 3 tbsp Dijon mustard
- 2 tbsp honey
- 1 tbsp olive oil
- 1 tsp kosher salt
- 1 tsp black pepper
- 1 tsp garlic powder
- 1 tsp apple cider vinegar
Quick Steps:
- Whisk the Dijon, honey, olive oil, salt, pepper, garlic powder, and vinegar in a bowl.
- Coat the pork chops and rest them for 15 to 30 minutes.
- Preheat the grill to medium-high and oil the grates.
- Grill the chops for 4 to 6 minutes per side, until the outside is browned and the center reads 145°F.
- Rest the chops for 5 minutes before serving.
Equipment for This Recipe:
- Grill
- Mixing bowl
- Tongs
- Instant-read thermometer
How to Serve This Dish: These chops like grilled peaches, slaw, or smashed potatoes. Spoon a little extra glaze over the sliced pork, but keep the plate neat; the sweetness should read as a sheen, not a puddle. A cabbage-heavy side works well because it handles the pork’s richness.
Pro Tips for This Recipe:
- Bone-in chops stay juicier than boneless in a hot grill situation.
- Pull them at 140°F if you know your grill runs hot; carryover heat will finish the job.
- If the honey starts to darken too quickly, move the chops to a cooler part of the grill.
Variations on This Dish:
- Maple-Dijon Chop: Swap honey for maple syrup and add ½ tsp smoked paprika.
- Herb Garden Version: Add chopped rosemary or thyme to the marinade.
- Garlic-Chive Finish: Stir minced chives into the glaze right before serving.
Common Mistakes to Avoid with This Dish:
- Don’t cook pork chops until they’re gray all the way through. That’s how they turn dry.
- Don’t use a sugary glaze too early. It can scorch before the meat is done.
- Don’t skip the rest. The juices need a few minutes to settle back into the meat.
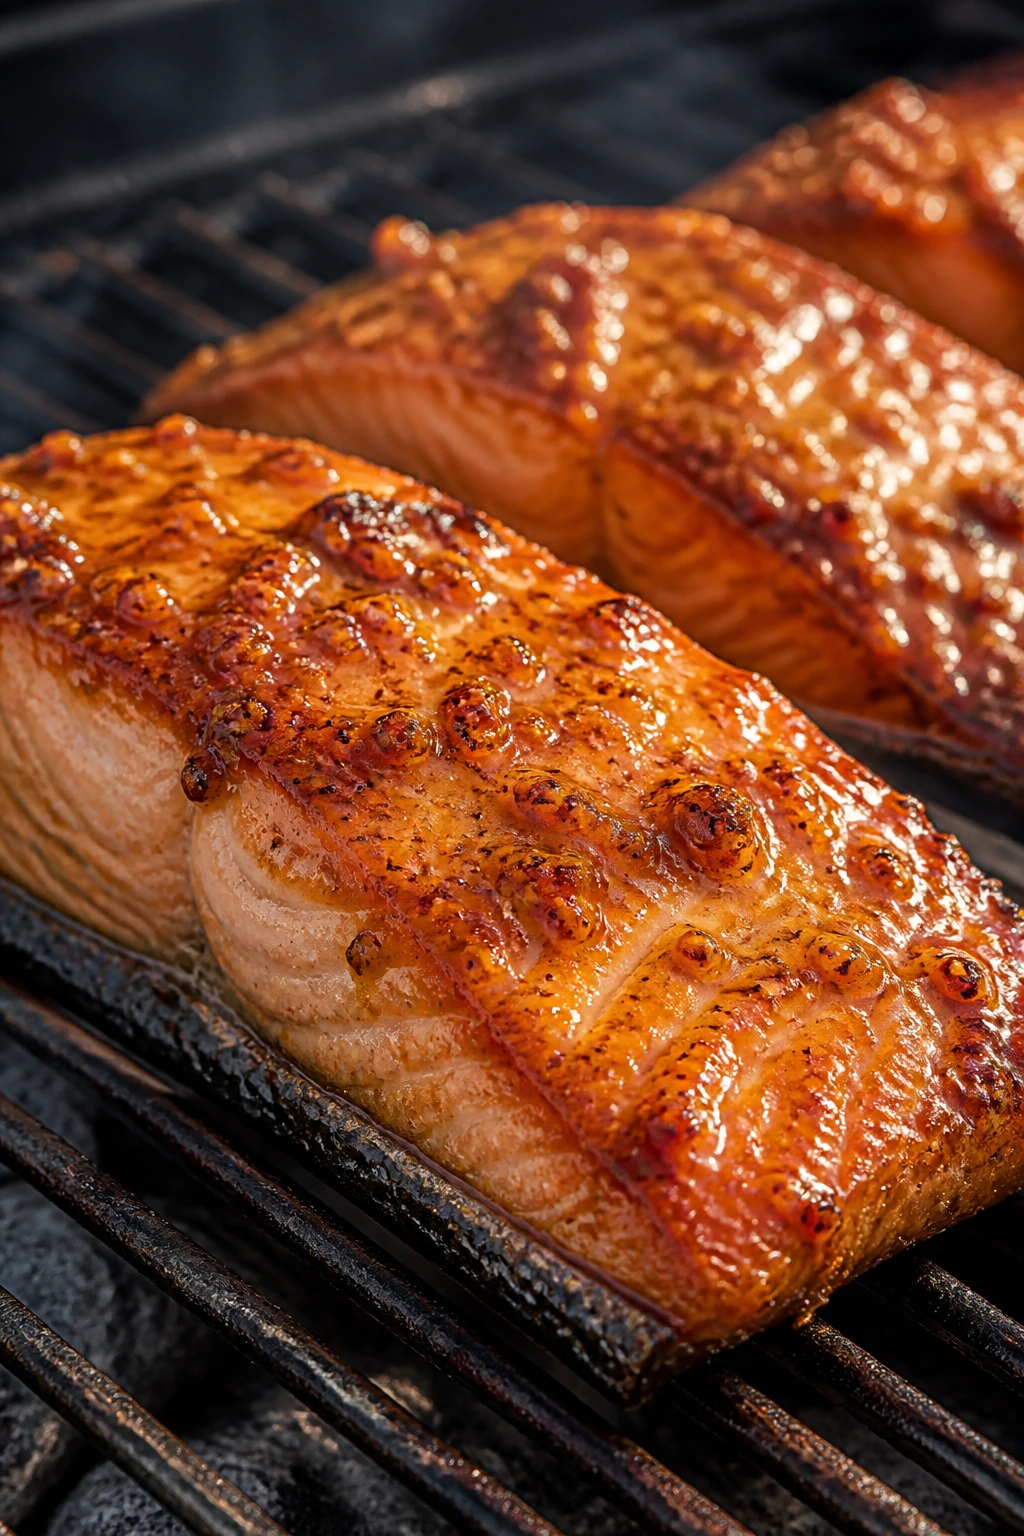
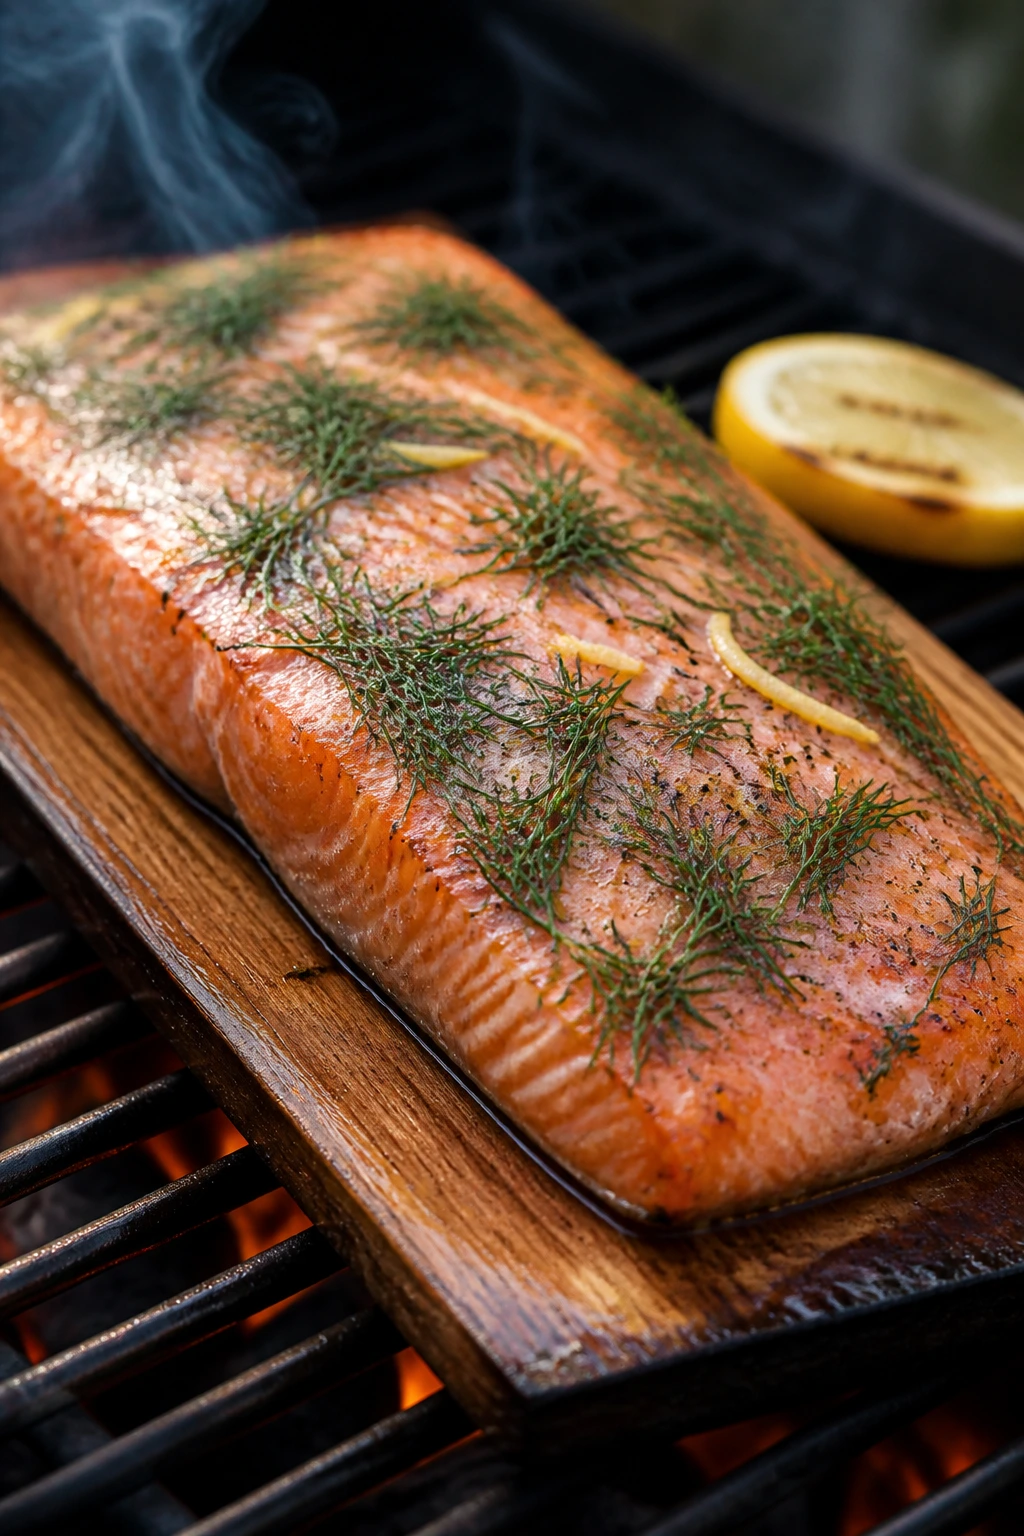
5. Cedar-Plank Salmon with Dill
Salmon on a cedar plank smells like the grill learned how to dress up a little. The wood gives the fish a soft smoky note, and dill plus lemon keep the whole thing clean and bright instead of heavy.
Why It Works: Salmon cooks gently over indirect heat, which keeps the fat from running out and the flesh from flaking into a mess. The plank protects the skin and adds aroma. Dill makes the fish taste fresher, not fancier, and that matters here.
Key Ingredients:
- 1 cedar plank, soaked for 1 hour
- 1½ lbs salmon fillet, skin on
- 2 tbsp olive oil
- 1 tsp kosher salt
- 1 tsp black pepper
- Zest and juice of 1 lemon
- 2 tbsp chopped fresh dill
- 1 tsp Dijon mustard
Quick Steps:
- Soak the cedar plank in water for at least 1 hour and keep it weighted down.
- Mix the olive oil, salt, pepper, lemon zest, lemon juice, dill, and Dijon.
- Brush the salmon with the mixture and place it skin-side down on the wet plank.
- Put the plank over medium heat, close the lid, and cook for 12 to 15 minutes until the fish flakes at the thickest point.
- Slide the salmon off the plank and rest it for 2 to 3 minutes before serving.
Equipment for This Recipe:
- Cedar plank
- Grill with lid
- Fish spatula
- Instant-read thermometer
How to Serve This Dish: Serve the salmon with grilled asparagus or baby potatoes, and keep the lemon wedges close. I like plating it on a long board or platter so the plank can stay part of the presentation. A spoonful of dill yogurt on the side works if you want more cooling contrast.
Pro Tips for This Recipe:
- Soak the plank for a full hour; a dry plank can catch too fast.
- Don’t use high heat here. Salmon cooks better when the lid traps gentler heat.
- If the fish is thin at one end, tuck that end under slightly so it doesn’t overcook first.
Variations on This Dish:
- Maple-Dill Salmon: Brush with 1 tbsp maple syrup for a softer glaze.
- Mustard-Herb Salmon: Add 1 tbsp whole-grain mustard to the topping.
- Foil Swap: If you do not have a plank, use a double layer of foil with a few holes punched in it.
Common Mistakes to Avoid with This Dish:
- Don’t place a dry plank on the grill. It burns fast and makes a mess.
- Don’t keep lifting the lid every minute. You’ll lose the steady heat salmon needs.
- Don’t overcook it until it turns chalky. Salmon should still look a little glossy in the thickest part.
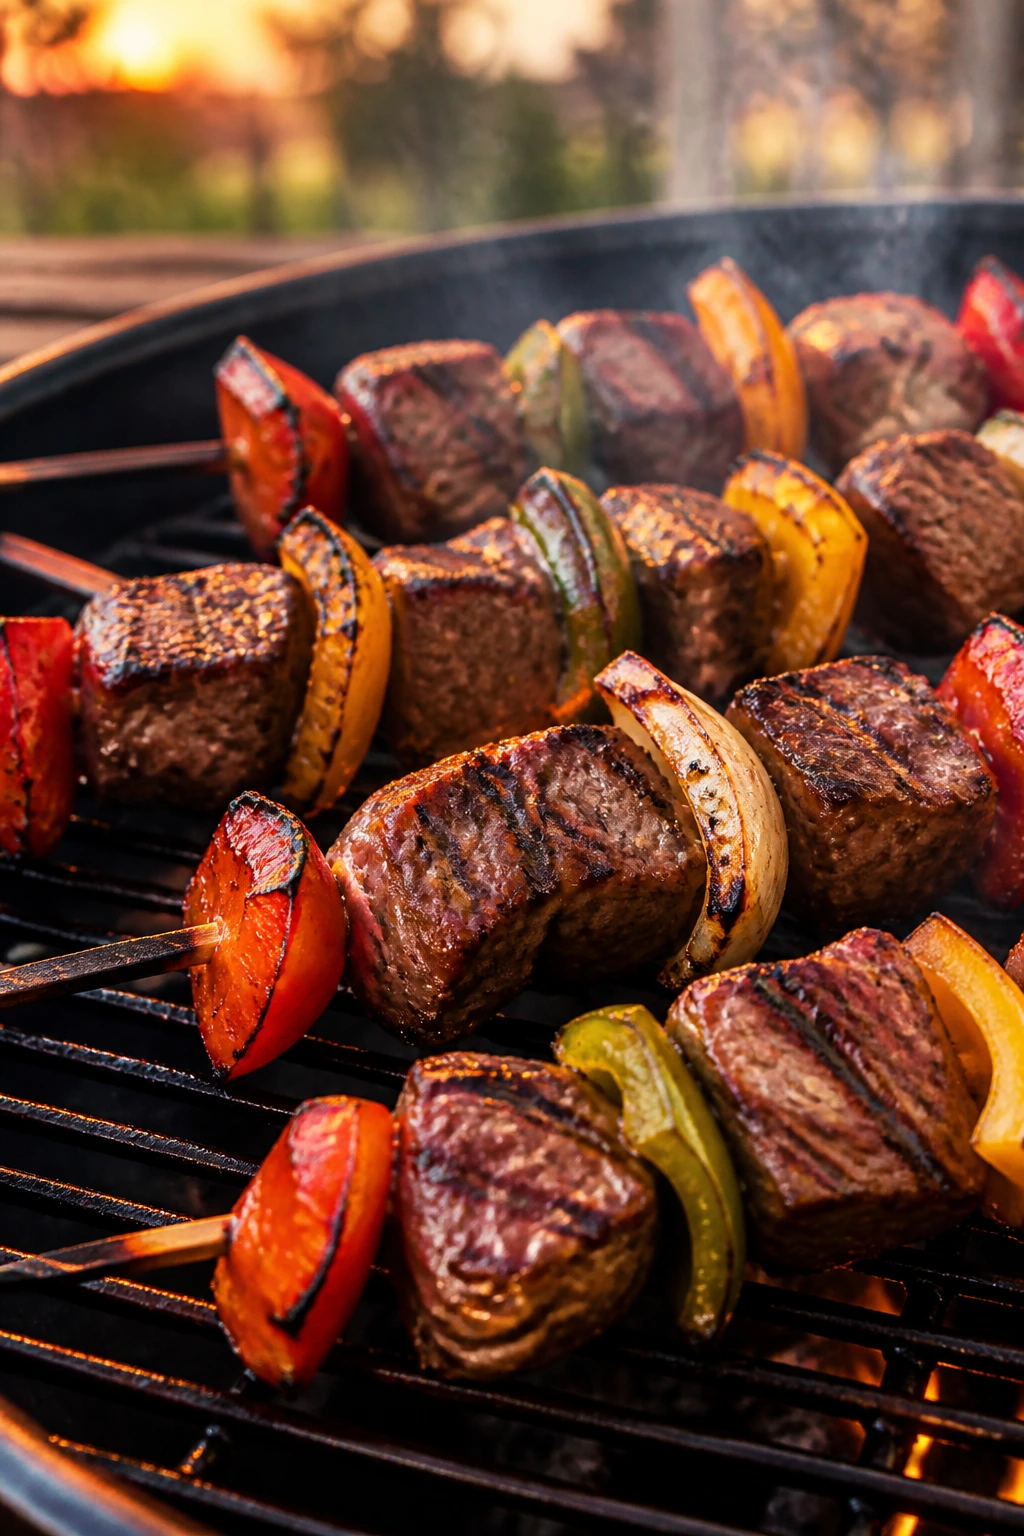
6. Steak Fajita Skewers
These skewers give you steak, peppers, and onions with a little char on every side. They taste like fajitas without the skillet smoke alarm moment, which is a trade I’ll take every time.
Why It Works: Cutting the steak into even cubes means it cooks at the same pace as the vegetables. Lime and cumin bring that fajita backbone, and the peppers soften just enough to sweeten around the edges. Skewers also make the whole thing easier to flip, which is half the battle on a busy grill.
Key Ingredients:
- 1½ lbs sirloin steak, cut into 1½-inch cubes
- 2 bell peppers, cut into chunks
- 1 red onion, cut into wedges
- 2 tbsp olive oil
- 2 tbsp lime juice
- 1 tbsp chili powder
- 1 tsp cumin
- 1 tsp kosher salt
Quick Steps:
- Toss the steak, peppers, and onion with olive oil, lime juice, chili powder, cumin, and salt.
- Let everything sit for 20 minutes.
- Thread the steak and vegetables onto skewers, keeping the pieces tight but not smashed together.
- Grill over medium-high heat for 8 to 10 minutes, turning every few minutes, until the steak is browned and the vegetables have soft edges.
- Rest 3 minutes, then pull the pieces off the skewers and serve.
Equipment for This Recipe:
- Skewers
- Grill
- Large bowl
- Tongs
How to Serve This Dish: Warm flour tortillas, sour cream, and avocado slices make the obvious move here. You can also serve the skewers over rice with salsa on the side if you want a bowl instead of tacos. I like a squeeze of lime right before serving; it wakes up the char.
Pro Tips for This Recipe:
- Choose sirloin or flank steak and cut against the grain after grilling if you skip skewers.
- If you use wooden skewers, soak them for 30 minutes.
- Keep the pepper chunks large enough that they don’t fall apart over the fire.
Variations on This Dish:
- Chicken Fajita Skewers: Swap steak for boneless chicken thighs and grill until 165°F.
- Spicy Chipotle Version: Add 1 tsp chipotle powder to the marinade.
- Bowl Night Version: Serve the finished skewers over cilantro rice with black beans.
Common Mistakes to Avoid with This Dish:
- Don’t cut the steak into tiny cubes. They dry out before the vegetables are done.
- Don’t crowd the skewers so tightly that the center pieces steam.
- Don’t skip the rest before slicing. The juices need a minute to stay inside the meat.
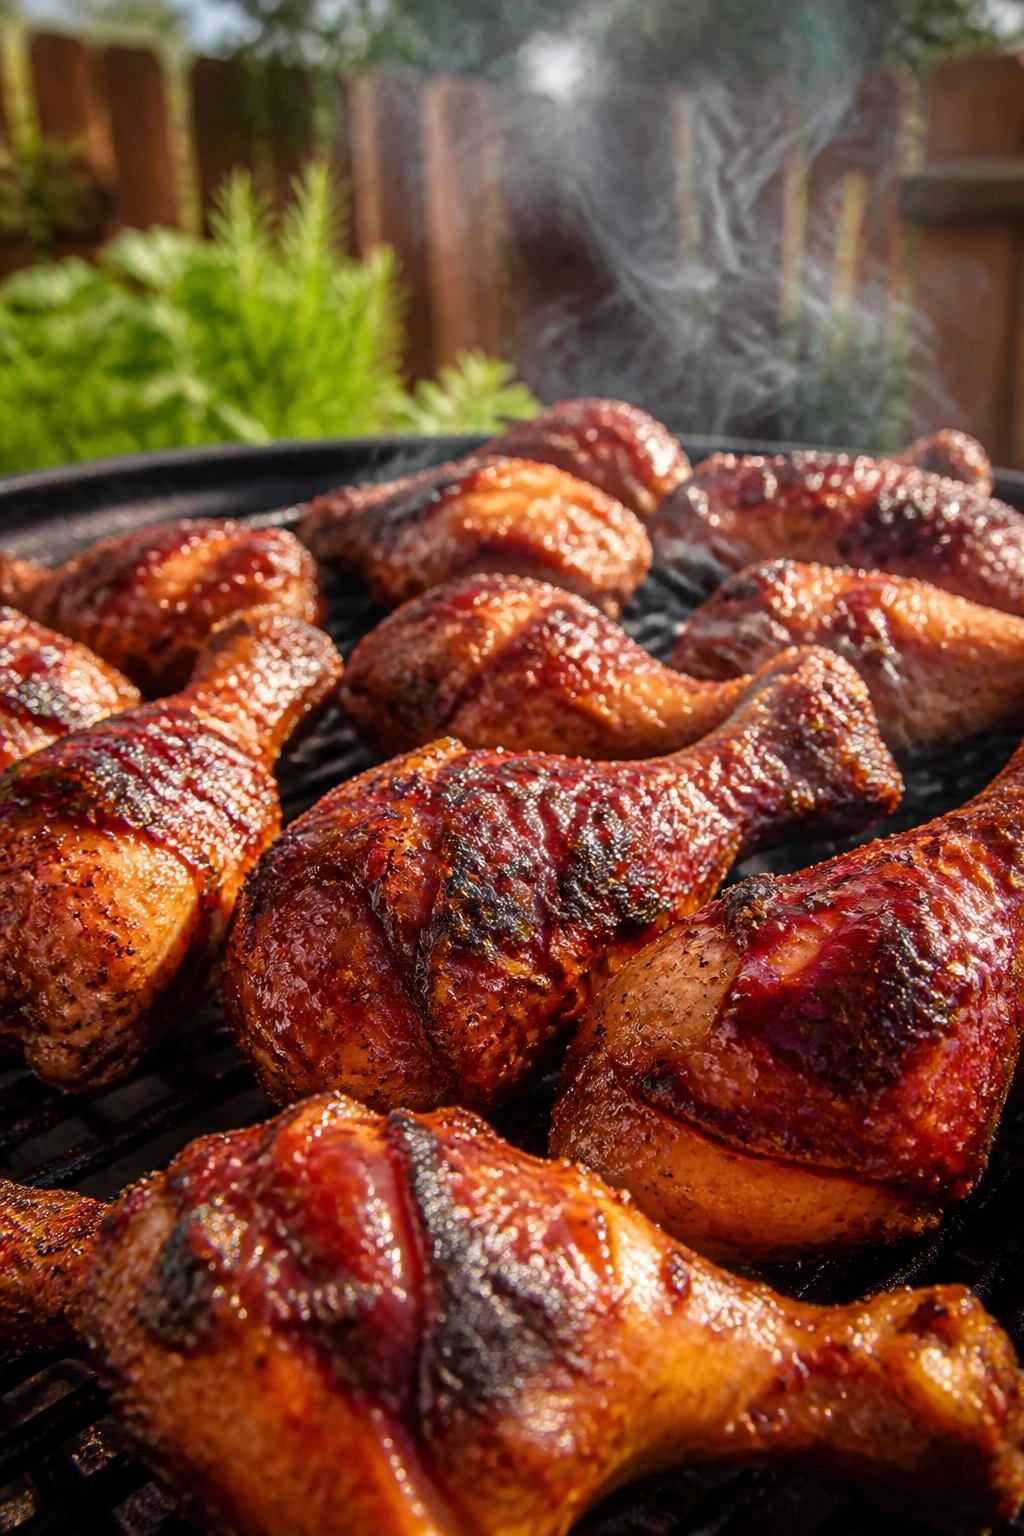
7. BBQ Chicken Drumsticks
Drumsticks are honest grill food. The skin crisps, the meat stays juicy, and barbecue sauce gets sticky in the best way if you wait until the end to brush it on.
Why It Works: Chicken drumsticks have enough fat and connective tissue to handle a longer cook over the grill. That means the skin can brown without the meat going stringy. Sauce in the final minutes gives you shine and flavor without burning sugar onto the grate.
Key Ingredients:
- 3 lbs chicken drumsticks
- 2 tbsp neutral oil
- 1 tbsp paprika
- 1 tsp garlic powder
- 1 tsp onion powder
- 1 tsp kosher salt
- ½ tsp black pepper
- 1 cup BBQ sauce
Quick Steps:
- Rub the drumsticks with oil, paprika, garlic powder, onion powder, salt, and pepper.
- Preheat the grill to medium, setting up one cooler zone if you can.
- Grill the drumsticks for 25 to 30 minutes, turning every 5 minutes so the skin browns evenly.
- Brush with BBQ sauce during the last 5 minutes and move them to the cooler side if the sauce starts to darken too fast.
- Cook until the thickest part reaches 175°F, then rest 5 minutes.
Equipment for This Recipe:
- Grill
- Tongs
- Basting brush
- Instant-read thermometer
How to Serve This Dish: Pair the drumsticks with corn on the cob, coleslaw, and baked beans. Serve them on a tray with extra sauce on the side so people can decide how sticky they want their fingers. A few pickle spears cut through the sweetness nicely.
Pro Tips for This Recipe:
- Dry the drumsticks before seasoning if they’re wet from the package.
- Use indirect heat if your grill tends to flame up under chicken skin.
- Sauce late. Earlier than that, and the sugar can blacken before the meat is done.
Variations on This Dish:
- Spicy BBQ Version: Stir hot sauce into the BBQ sauce before brushing.
- Dry-Rub Only: Skip the sauce and finish with a squeeze of lemon and a little extra salt.
- Honey-Garlic Version: Use honey BBQ sauce and add minced garlic to the oil rub.
Common Mistakes to Avoid with This Dish:
- Don’t judge drumsticks by color alone. Check the temperature near the bone.
- Don’t cook them on blazing-high heat the whole time or the skin burns before the inside catches up.
- Don’t pile them on a platter straight off the grill. Give the juices a minute to settle.
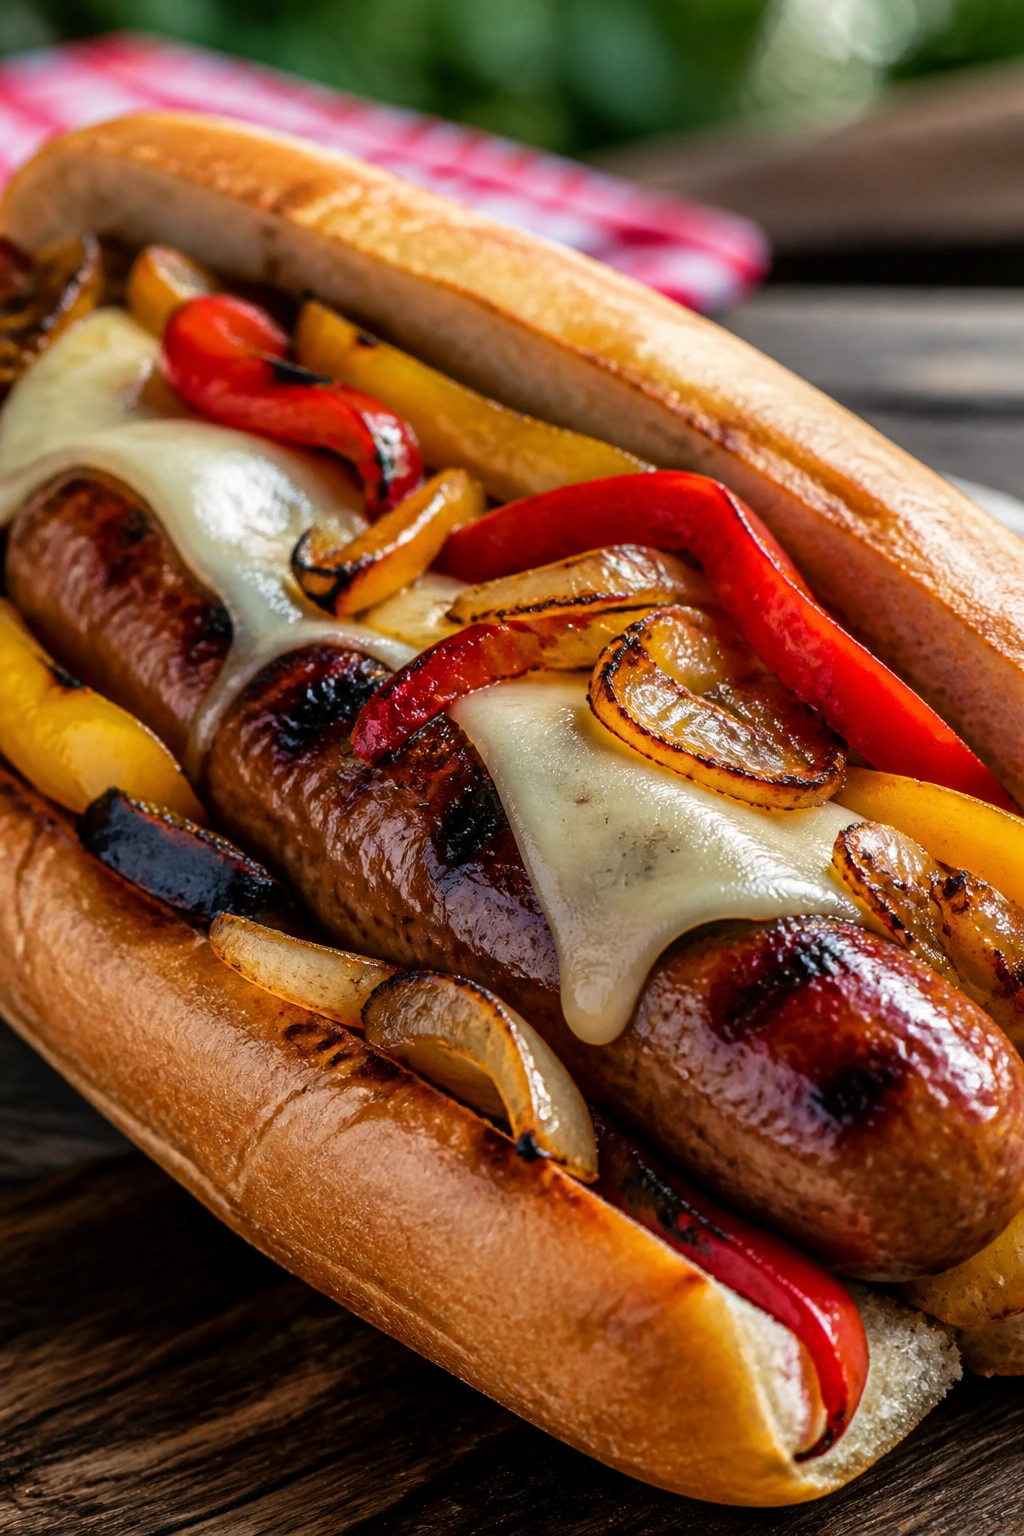
8. Grilled Sausage and Peppers Hoagies
This is the kind of dinner that makes the grill smell like a neighborhood cookout. The sausage gets snappy, the peppers soften into something sweet, and the roll soaks up all the juices without falling apart.
Why It Works: Sausage is already seasoned, so the grill only has to brown it and warm it through. Peppers and onions take on a sweeter, softer shape after a few minutes over the flame. Toasted rolls keep the sandwich from going soggy once the filling lands inside.
Key Ingredients:
- 6 Italian sausage links
- 3 bell peppers, sliced
- 1 large yellow onion, sliced
- 2 tbsp olive oil
- 1 tsp Italian seasoning
- 1 tsp kosher salt
- 4 hoagie rolls
- 1 cup shredded provolone
Quick Steps:
- Toss the peppers and onion with olive oil, Italian seasoning, and salt.
- Grill the sausages over medium heat for 15 to 18 minutes, turning often, until browned and cooked through.
- Grill the peppers and onions in a grill basket or foil pan for 10 to 12 minutes, stirring once or twice.
- Split and toast the hoagie rolls for about 1 minute.
- Slice the sausage, load it into the rolls, and top with peppers, onions, and provolone.
Equipment for This Recipe:
- Grill
- Grill basket or foil pan
- Tongs
- Knife and cutting board
How to Serve This Dish: Serve the hoagies with potato chips or a chopped salad. I like wrapping them in parchment for a few minutes so the bread softens just enough around the edges. A little mustard on the roll is enough; the sausage should carry the rest.
Pro Tips for This Recipe:
- Do not pierce the sausage links while they cook unless you want the juices in the fire.
- Use a basket for the peppers if your grates are wide.
- Toast the rolls cut-side down so they don’t turn limp under the filling.
Variations on This Dish:
- Spicy Hot Links Version: Swap in hot Italian sausage and add sliced cherry peppers.
- Cheesy Bake Finish: After assembling, close the grill lid for 30 seconds to melt the provolone.
- No-Roll Bowl: Serve the sausage and peppers over polenta or rice.
Common Mistakes to Avoid with This Dish:
- Don’t cook the sausage so hot that the outside splits before the inside reaches temperature.
- Don’t skip seasoning the vegetables. They need salt to wake up.
- Don’t overload the rolls. One sausage and a good scoop of peppers beats a sandwich that falls apart.
9. Halloumi and Vegetable Skewers
Halloumi is the grill cheese that actually fights back a little, which is why it works. It stays firm, picks up crisp edges, and gives the vegetables something salty and chewy to sit beside.
Why It Works: Halloumi doesn’t melt into the grates, so you get browning without collapse. Zucchini, peppers, mushrooms, and onion all cook around the same pace once cut into similar pieces. A little lemon at the end keeps the cheese from tasting too heavy.
Key Ingredients:
- 12 oz halloumi cheese, cut into 1-inch cubes
- 2 zucchini, sliced into thick rounds
- 1 red bell pepper, cut into chunks
- 8 oz cremini mushrooms
- 1 red onion, cut into wedges
- 2 tbsp olive oil
- Juice of ½ lemon
- 1 tsp dried oregano
Quick Steps:
- Pat the halloumi dry with paper towels.
- Toss the vegetables with olive oil, lemon juice, and oregano.
- Thread the halloumi and vegetables onto skewers.
- Grill over medium heat for 8 to 10 minutes, turning gently, until the halloumi is golden and the vegetables have soft, charred edges.
- Serve right away while the cheese is still warm and springy.
Equipment for This Recipe:
- Skewers
- Grill
- Mixing bowl
- Tongs
How to Serve This Dish: These skewers are good with pita, hummus, or a yogurt dip. You can slide everything off into a grain bowl if you want more dinner and less skewer. A little chopped mint on top brings the whole thing into focus.
Pro Tips for This Recipe:
- Dry the halloumi well or it will steam instead of brown.
- Keep the vegetable pieces large enough that they don’t crumble on the skewer.
- Turn the skewers gently; halloumi softens before it firms back up.
Variations on This Dish:
- Mediterranean Bowl Version: Serve over couscous with chopped cucumber and tomatoes.
- Herby Yogurt Finish: Add dill and garlic to plain yogurt for dipping.
- Spicy Pepper Swap: Use poblano or jalapeño pieces if you want more heat.
Common Mistakes to Avoid with This Dish:
- Don’t use high heat so fierce that the cheese scorches before the vegetables soften.
- Don’t overcrowd the skewers; air helps the edges brown.
- Don’t let the skewers sit after grilling. Halloumi is best when it’s still hot from the grate.
10. Teriyaki Chicken Skewers
Sweet, salty teriyaki belongs on the grill because the edges caramelize into something sticky and dark. Add pineapple if you want a little blast of juice between bites, which I usually do.
Why It Works: Chicken thighs stay tender under a sugary glaze, and the grill gives the sauce a lacquered finish. Teriyaki brings salt and sweetness in one step, which keeps the prep short. Pineapple and bell pepper add enough freshness to keep the skewers from feeling heavy.
Key Ingredients:
- 1½ lbs boneless chicken thighs, cut into chunks
- 1 cup teriyaki sauce
- 1 tbsp soy sauce
- 1 tsp grated fresh ginger
- 2 cloves garlic, minced
- 1 red bell pepper, cut into chunks
- 1 cup pineapple chunks
- 1 tsp sesame seeds
Quick Steps:
- Mix the teriyaki sauce, soy sauce, ginger, and garlic.
- Reserve ¼ cup of the sauce for brushing, then marinate the chicken in the rest for 30 minutes.
- Thread the chicken, pepper, and pineapple onto skewers.
- Grill over medium-high heat for 10 to 12 minutes, turning every few minutes and brushing with the reserved sauce during the last 2 minutes.
- Sprinkle sesame seeds over the finished skewers.
Equipment for This Recipe:
- Skewers
- Grill
- Mixing bowl
- Pastry brush
How to Serve This Dish: Serve these over steamed rice with sliced scallions or next to a simple cucumber salad. They also work well with noodles if you want a fuller plate. I like extra sauce on the side, but only the reserved kind, not the raw marinade.
Pro Tips for This Recipe:
- Always reserve a clean portion of sauce before it touches raw chicken.
- If using wooden skewers, soak them so they don’t char too fast.
- Keep the chicken pieces close in size so the whole skewer finishes together.
Variations on This Dish:
- Spicy Teriyaki: Add 1 tsp chili paste to the sauce.
- Sesame-Ginger Version: Stir in 1 tbsp toasted sesame oil for a deeper finish.
- Vegetable-Heavy Skewers: Add mushrooms or zucchini for more grill time and less meat.
Common Mistakes to Avoid with This Dish:
- Don’t brush raw marinade on at the end. Use the reserved sauce only.
- Don’t crowd the pieces too tightly or the chicken steams.
- Don’t walk away once the sauce starts to darken. Sugar can flip from glossy to bitter fast.
11. Pesto Chicken and Tomato Foil Packets

Foil packets are the easiest way to keep the grill dinner moving without extra pans. Pesto, cherry tomatoes, and chicken make a juicy bundle that tastes like the grill did more work than it actually did.
Why It Works: The foil traps steam, which keeps chicken breasts from drying out. Pesto brings garlic, herbs, and oil in one swipe, while tomatoes break down just enough to make their own sauce. Zucchini softens inside the packet without turning mushy if you cut it thick.
Key Ingredients:
- 2 lbs boneless chicken breasts, cut into 1-inch pieces
- ½ cup basil pesto
- 2 cups cherry tomatoes
- 1 zucchini, sliced thick
- 2 tbsp olive oil
- 1 tsp kosher salt
- ½ tsp black pepper
- 1 cup shredded mozzarella
Quick Steps:
- Divide the chicken, tomatoes, and zucchini among 4 large sheets of heavy-duty foil.
- Toss each portion with pesto, olive oil, salt, and pepper.
- Seal the packets tightly, leaving a little air space inside.
- Grill over medium heat for 18 to 22 minutes, until the chicken reaches 165°F and the vegetables are tender.
- Open carefully, top with mozzarella, and close the lid for 1 minute to melt the cheese.
Equipment for This Recipe:
- Heavy-duty foil
- Grill
- Tongs
- Mixing bowl
How to Serve This Dish: Spoon the packet contents over rice, pasta, or crusty bread to catch the sauce. If you want a neater plate, use a wide bowl and let the tomatoes sit on top of the chicken. It’s one of those recipes that looks casual and still feels finished.
Pro Tips for This Recipe:
- Cut the chicken into even pieces so nothing cooks ahead of the rest.
- Use heavy-duty foil or double-layer standard foil.
- Don’t overstuff the packets; they need room for steam to move.
Variations on This Dish:
- Sun-Dried Tomato Version: Add 2 tbsp chopped sun-dried tomatoes to the packet.
- Dairy-Free Pesto Swap: Use a pesto without cheese and skip the mozzarella.
- Mozzarella-Basil Finish: Add torn basil after grilling for a cleaner herb note.
Common Mistakes to Avoid with This Dish:
- Don’t seal the packet so loosely that the juices leak out.
- Don’t cut into the chicken the second the packet opens; let the steam settle for a minute.
- Don’t use paper-thin zucchini slices or they’ll vanish into the sauce.
12. Turkey Burgers with Pickle Relish
Turkey burgers can be dry, bland, and annoying if you treat them like beef. Give them a little binder, a little Dijon, and a spoonful of relish, and they become a fast grill dinner worth repeating.
Why It Works: Ground turkey needs moisture and fat help, which the egg, breadcrumbs, and relish provide. Dijon sharpens the flavor so the burger doesn’t taste flat after grilling. A thumb indent in the center keeps the patties from doming into little footballs.
Key Ingredients:
- 1½ lbs ground turkey
- ¼ cup plain breadcrumbs
- 1 egg
- 1 tbsp Dijon mustard
- 1 tsp kosher salt
- ½ tsp black pepper
- ½ tsp onion powder
- ¼ cup pickle relish
- 4 burger buns
Quick Steps:
- Gently mix the turkey, breadcrumbs, egg, Dijon, salt, pepper, onion powder, and relish.
- Shape into 4 patties and press a small indent in the center of each one.
- Preheat the grill to medium and oil the grates well.
- Grill the burgers for 5 to 6 minutes per side, until they reach 165°F.
- Toast the buns and serve right away.
Equipment for This Recipe:
- Grill
- Mixing bowl
- Spatula
- Instant-read thermometer
How to Serve This Dish: Add lettuce, tomato, and a little extra relish or mustard. Turkey burgers play well with sweet potato wedges or a cucumber salad. If you want them to feel less lean, add a slice of cheese in the last minute and cover the grill.
Pro Tips for This Recipe:
- Mix gently; overworking turkey makes the texture tight.
- Oil the grate well because turkey patties are more likely to stick than beef.
- Use medium heat, not high heat, or the outside dries before the center finishes.
Variations on This Dish:
- Cheddar-Dill Version: Mix chopped dill and shredded cheddar into the meat.
- Spicy Burger: Add minced jalapeño and a spoonful of hot sauce.
- Lettuce Wrap: Skip the bun and serve the patties on romaine leaves.
Common Mistakes to Avoid with This Dish:
- Don’t assume turkey burgers behave like beef burgers. They need a gentler hand.
- Don’t press them with a spatula while they cook.
- Don’t stop at color alone; check the temperature.
13. Garlic Butter Steak Tips
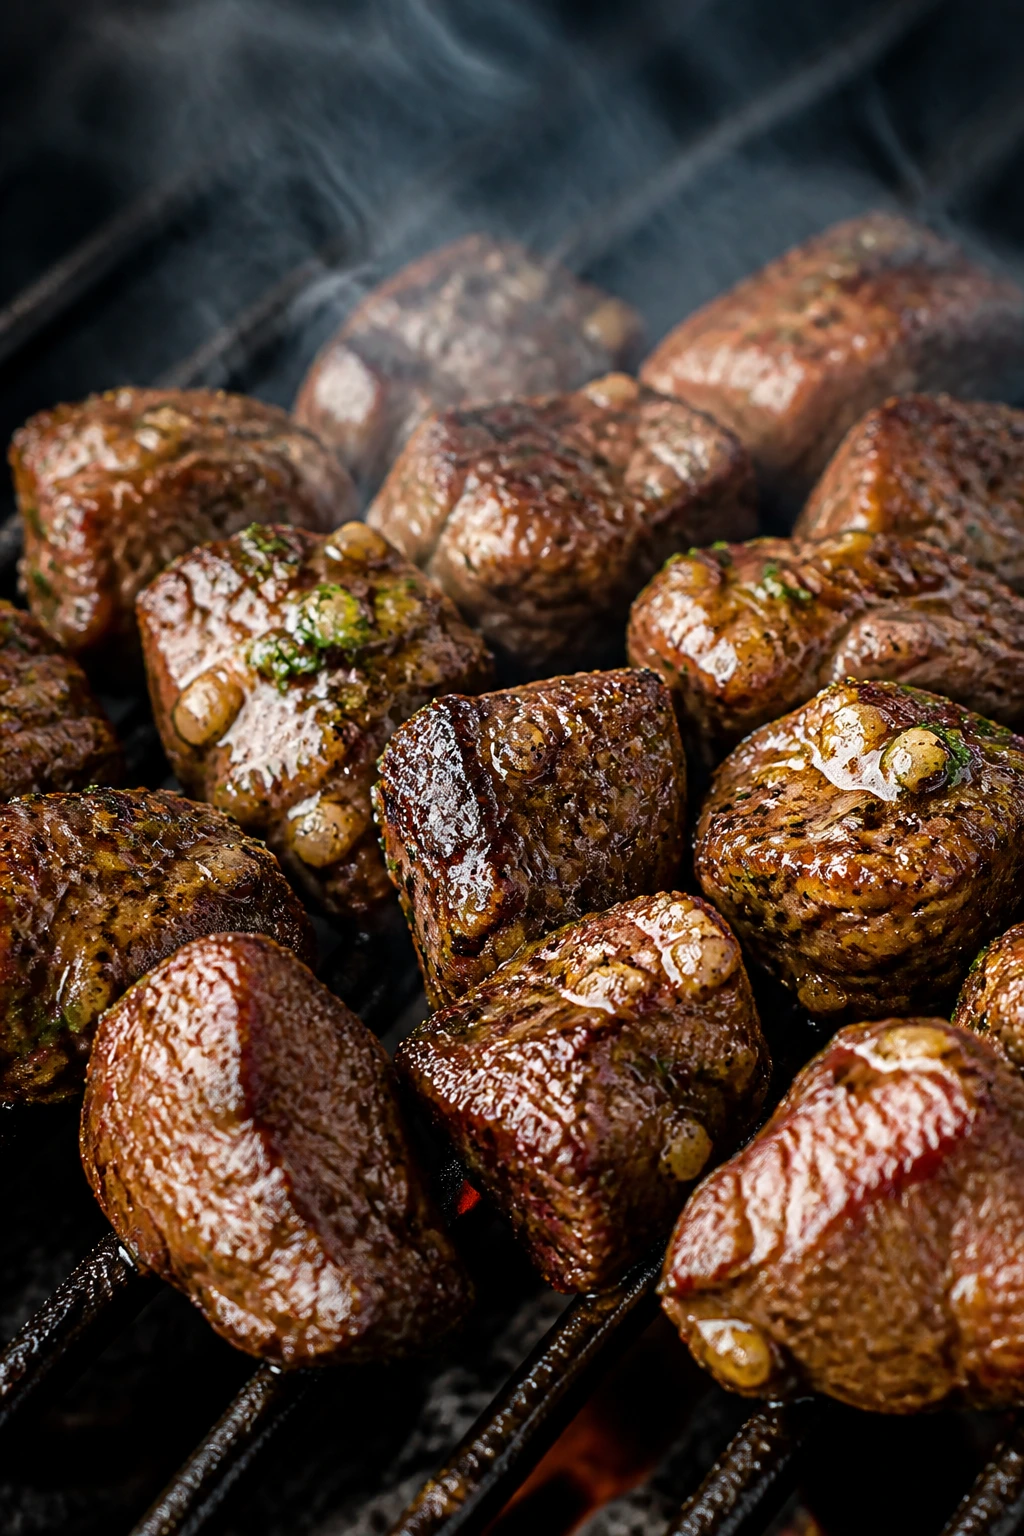
Steak tips are made for direct heat and a quick butter finish. They get a little char, a little smoke, and then that garlic butter pulls everything back together.
Why It Works: Bite-size steak pieces cook fast and brown well, which is exactly what you want on the grill. Garlic butter gives them a restaurant-style finish without a long sauce list. Worcestershire adds depth, and parsley keeps the whole thing from feeling too heavy.
Key Ingredients:
- 1½ lbs sirloin steak tips
- 2 tbsp neutral oil
- 1 tsp kosher salt
- 1 tsp black pepper
- 3 tbsp butter, melted
- 3 cloves garlic, minced
- 1 tsp Worcestershire sauce
- 1 tbsp chopped parsley
Quick Steps:
- Toss the steak tips with oil, salt, and pepper.
- Mix the butter, garlic, Worcestershire, and parsley in a small bowl.
- Grill the steak tips over high heat for 2 to 3 minutes per side, until browned outside and medium-rare to medium inside.
- Transfer the steak to a bowl, pour the garlic butter over it, and toss gently.
- Serve immediately while the butter is still glossy.
Equipment for This Recipe:
- Grill
- Mixing bowl
- Tongs
- Small bowl for butter
How to Serve This Dish: These are good with grilled potatoes, corn, or a simple green salad. You can also pile them over rice and let the butter act like a built-in sauce. If the pieces are large, I like slicing them before serving so everyone gets some charred edges.
Pro Tips for This Recipe:
- Don’t cut the steak tips too small or they’ll overcook in a hurry.
- Resting in the bowl after grilling helps the butter cling to the meat.
- If the garlic tends to burn in the butter, warm the butter gently instead of melting it hard.
Variations on This Dish:
- Chimichurri Finish: Replace the butter with a spoonful of chimichurri.
- Peppercorn Style: Add crushed peppercorns before grilling.
- Mushroom Pan Finish: Toss in grilled mushrooms for a fuller plate.
Common Mistakes to Avoid with This Dish:
- Don’t overcrowd the grill surface; the tips need space to brown.
- Don’t drown the meat in butter before grilling or it will flare.
- Don’t cook past medium unless that’s truly your preference; steak tips tighten fast.
14. Mediterranean Lamb Chops
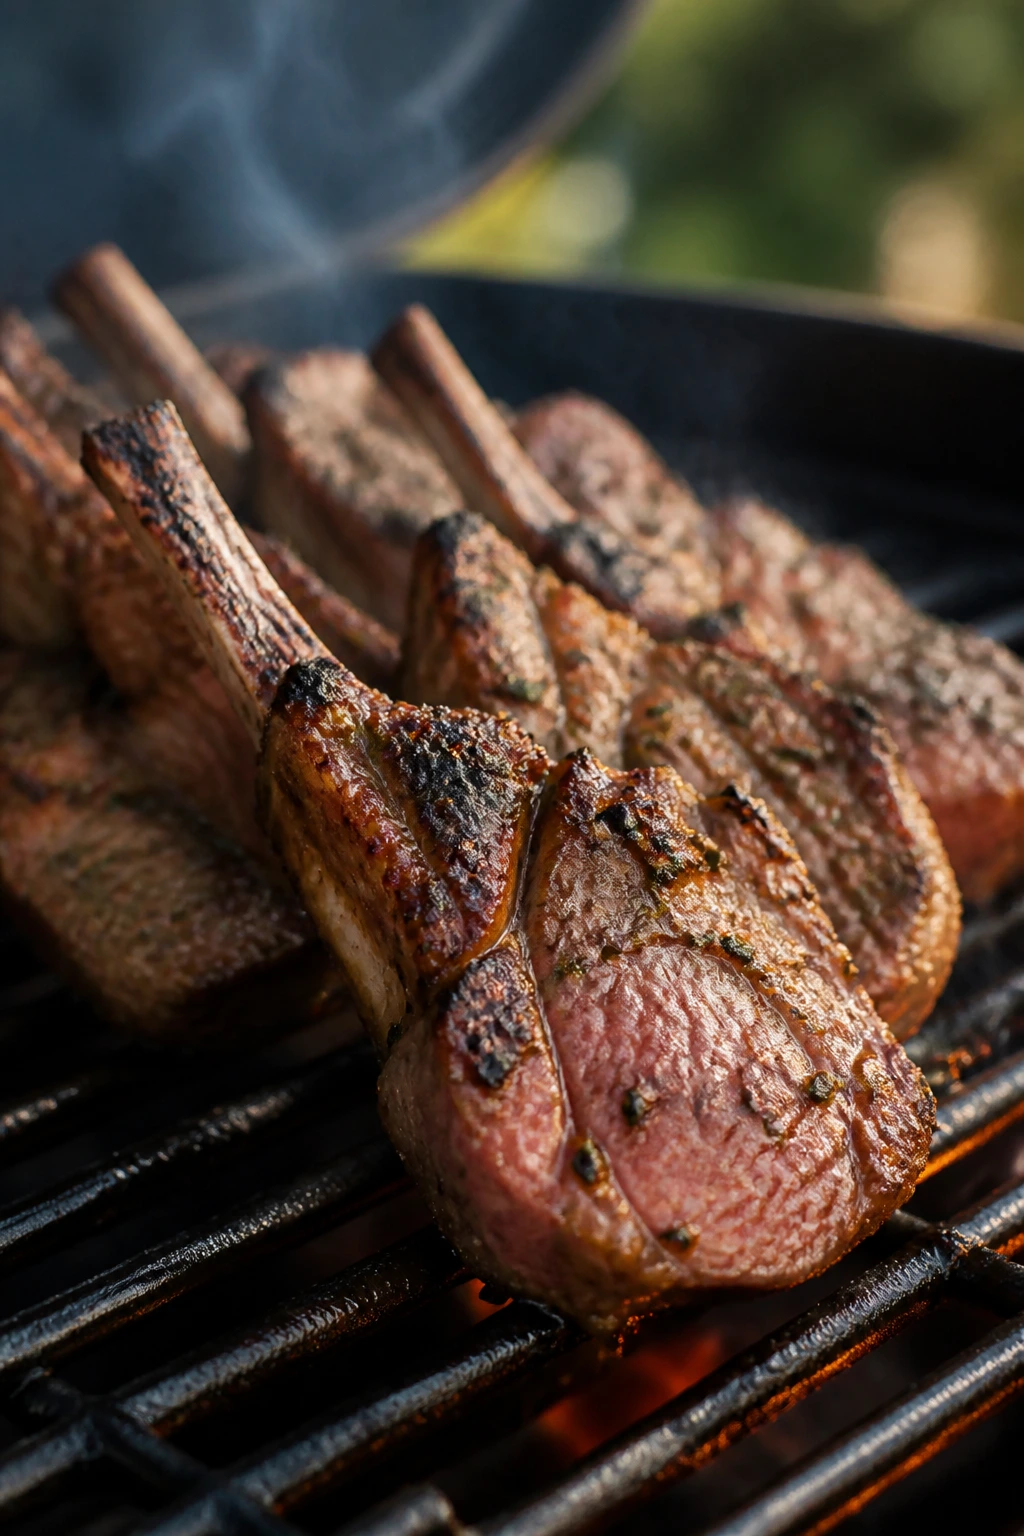
Lamb chops on the grill smell bold in a way chicken never does. A little lemon, garlic, and rosemary is enough to keep them bright while the fire handles the rest.
Why It Works: Lamb chops are small enough to cook quickly but rich enough to stand up to strong seasoning. Lemon and garlic cut through the fat, and rosemary gives the meat a woodsy note that fits grill smoke well. A short marinade is enough; lamb doesn’t need a long soak.
Key Ingredients:
- 8 lamb loin chops
- 2 tbsp olive oil
- Juice of 1 lemon
- 3 cloves garlic, minced
- 1 tsp chopped rosemary
- 1 tsp dried oregano
- 1 tsp kosher salt
- ½ tsp black pepper
Quick Steps:
- Stir the oil, lemon juice, garlic, rosemary, oregano, salt, and pepper together.
- Coat the lamb chops and marinate for 20 to 30 minutes.
- Preheat the grill to medium-high and oil the grates.
- Grill the chops for 3 to 4 minutes per side for medium-rare, a little longer if you want them more done.
- Rest 5 minutes before serving.
Equipment for This Recipe:
- Grill
- Tongs
- Mixing bowl
- Instant-read thermometer
How to Serve This Dish: Serve with lemony couscous, roasted potatoes, or a tomato-cucumber salad. A spoonful of plain yogurt or tzatziki on the side cools the richness nicely. I like arranging the chops in a loose fan on the plate rather than stacking them up.
Pro Tips for This Recipe:
- Let the lamb sit at room temperature for 15 minutes before grilling.
- Use a hot grate so the outside gets color quickly.
- Don’t overdo the marinade time; lamb can get metallic if the acid sits too long.
Variations on This Dish:
- Minted Version: Add chopped mint to the yogurt or sauce.
- Spiced Version: Add ½ tsp coriander and a pinch of cinnamon.
- Skewer Swap: Cut the lamb into cubes and thread onto skewers with onion.
Common Mistakes to Avoid with This Dish:
- Don’t grill lamb chops over low heat. They need quick color.
- Don’t keep poking them. Let the crust form.
- Don’t skip the rest or the juices will run onto the cutting board instead of the plate.
15. Grilled Tofu Steaks
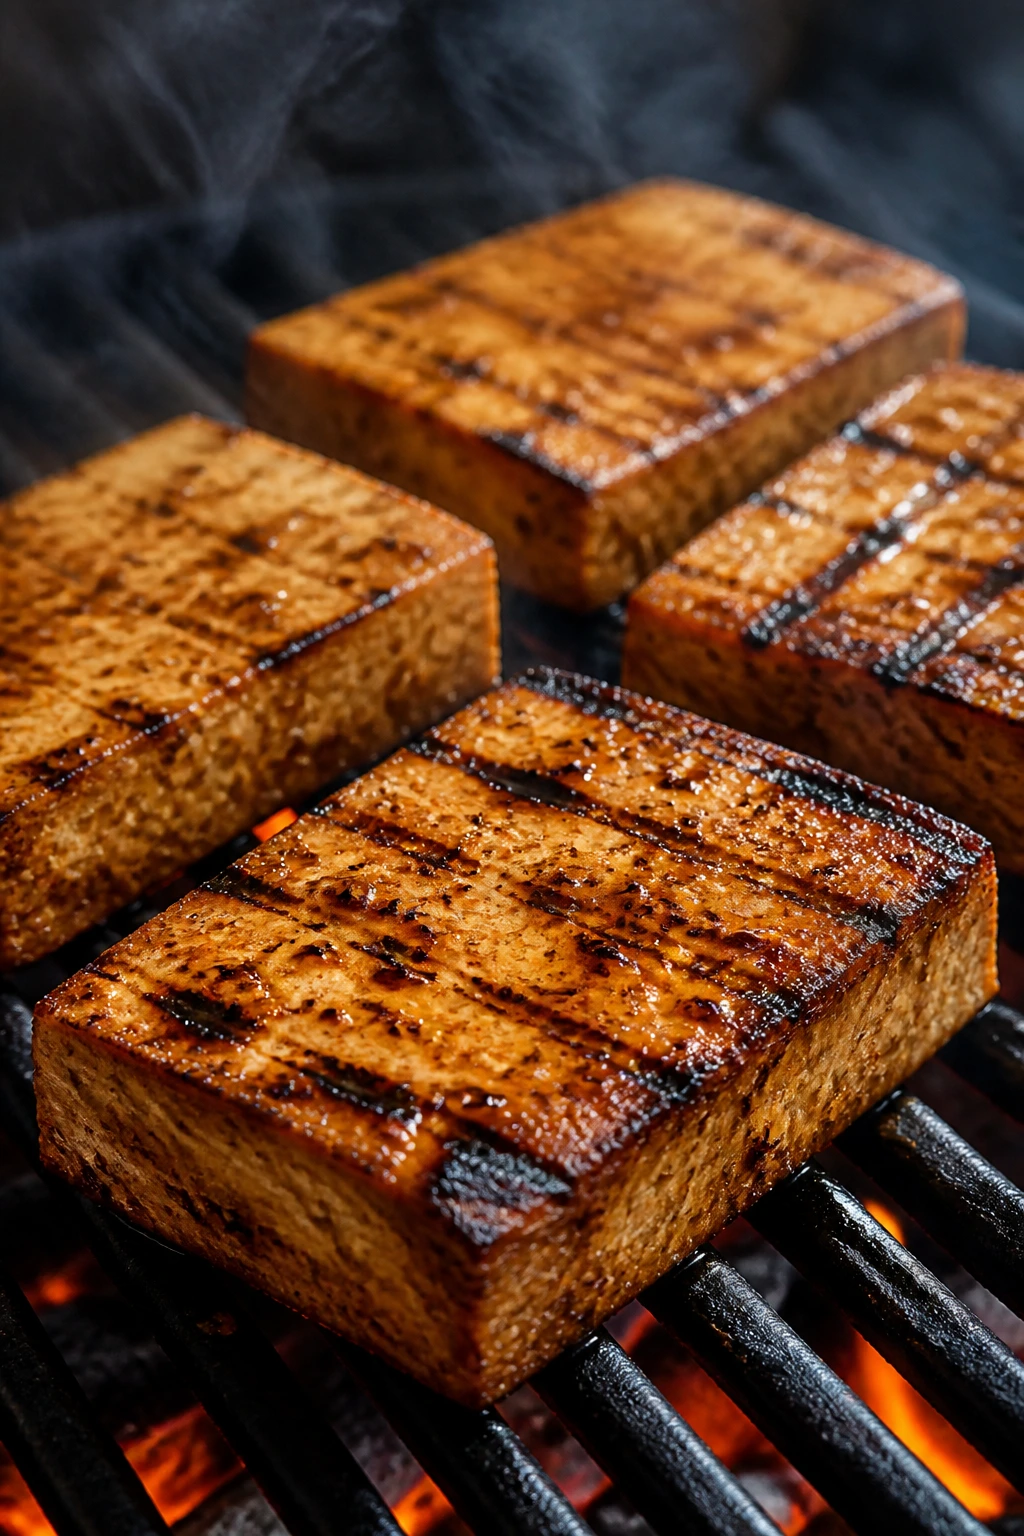
Tofu gets a bad reputation from people who never pressed it hard enough or grilled it long enough. Treat it like a real main, and the grill gives you crisp edges, a chewy center, and smoke where you need it.
Why It Works: Extra-firm tofu holds together once pressed and sliced into thick slabs. A soy-maple marinade seasons it deeply, while the grill gives the outside the kind of browning that makes tofu worth cutting into. Smoked paprika adds a little edge, which tofu likes.
Key Ingredients:
- 2 blocks extra-firm tofu, 14 oz each
- 3 tbsp soy sauce
- 2 tbsp olive oil
- 1 tbsp maple syrup
- 1 tsp smoked paprika
- 2 cloves garlic, minced
- 1 tbsp cornstarch
- 1 tbsp chopped scallions
Quick Steps:
- Press the tofu for 20 minutes, then slice each block into 4 thick steaks.
- Whisk the soy sauce, oil, maple syrup, smoked paprika, garlic, and cornstarch.
- Brush the tofu with the marinade and let it sit for 10 to 15 minutes.
- Grill over medium heat for 4 to 5 minutes per side, until the edges are browned and the surface feels firm.
- Top with scallions and serve warm.
Equipment for This Recipe:
- Grill
- Tofu press or heavy plates
- Mixing bowl
- Tongs
How to Serve This Dish: Serve the tofu over rice, noodles, or a pile of grilled vegetables. A sesame cucumber salad works especially well because it adds crunch. If you want more protein, add a fried egg on top and let the yolk slide into the marinade.
Pro Tips for This Recipe:
- Pressing matters more than the marinade here.
- Use medium heat so the sugar in the maple syrup doesn’t burn too quickly.
- A grill basket can help if your grates are wide.
Variations on This Dish:
- Sesame-Ginger Tofu: Add grated ginger and sesame oil to the marinade.
- BBQ Tofu: Swap soy sauce for barbecue sauce and finish with chopped scallions.
- Spicy Lime Tofu: Add lime juice and chili flakes for a brighter profile.
Common Mistakes to Avoid with This Dish:
- Don’t grill tofu straight from the package. The water needs to come out first.
- Don’t move it too early or it will tear.
- Don’t use soft tofu. It won’t hold a steak shape.
16. Corn and Black Bean Quesadillas
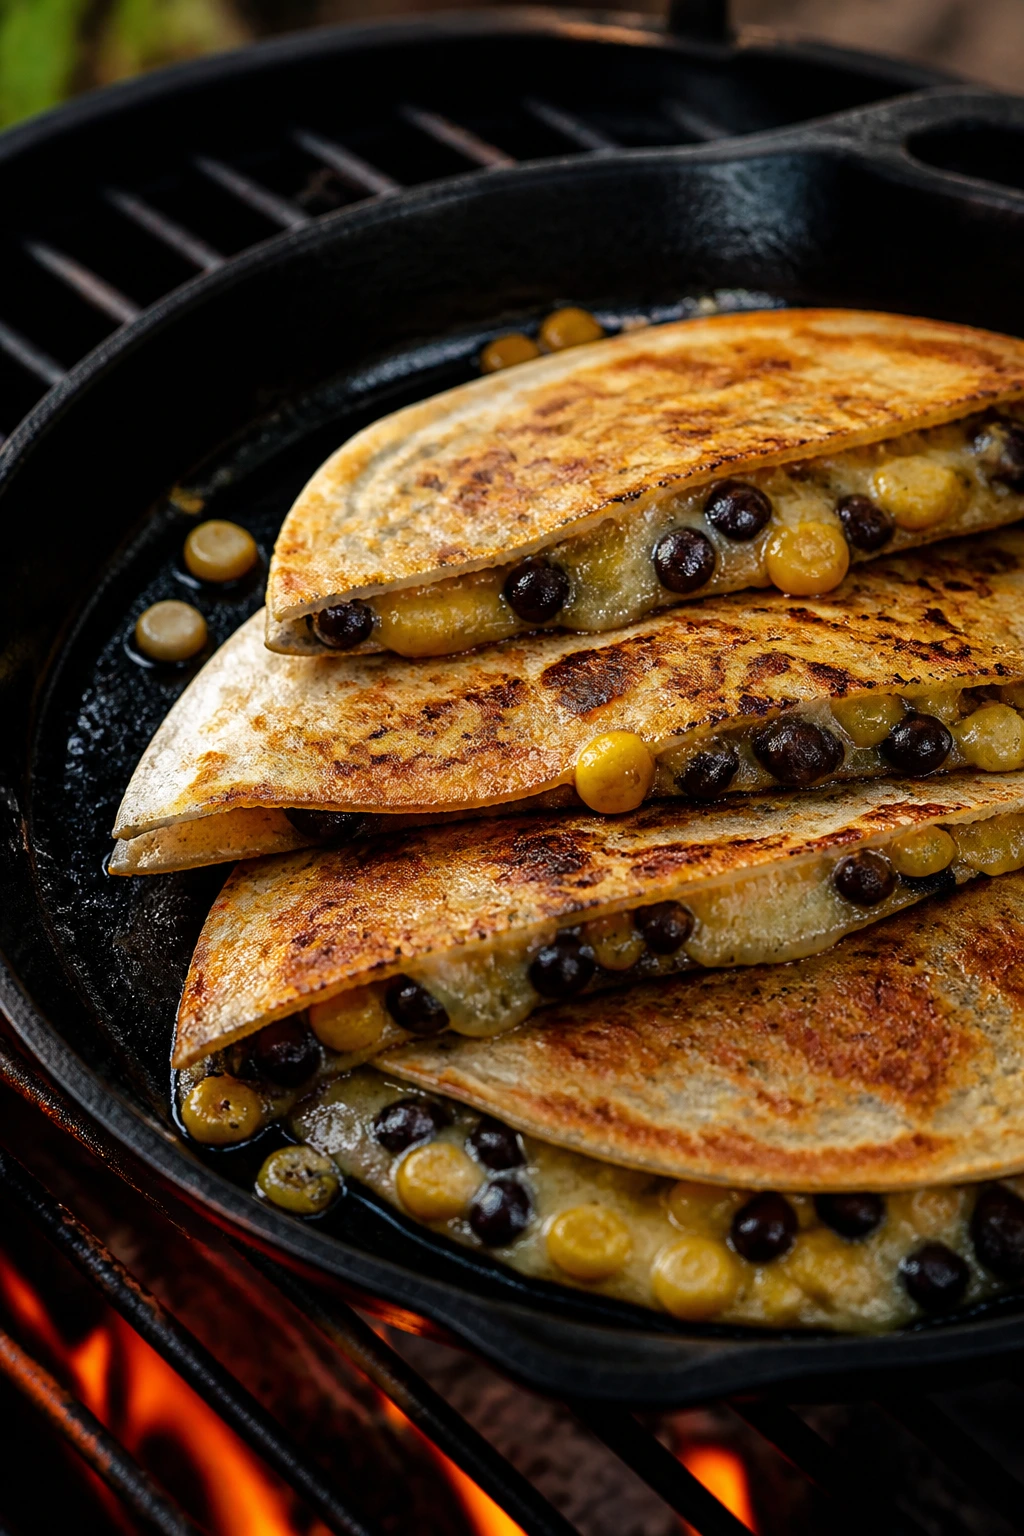
Quesadillas on the grill need a little help, and a cast-iron skillet on the grates gives them exactly that. The tortillas crisp, the cheese melts, and the corn-black bean filling tastes like it spent more time than it did.
Why It Works: Cast iron holds heat, which helps tortillas brown evenly without burning in patches. Corn adds sweetness, black beans give the filling heft, and cumin keeps the flavor grounded. You can cook these without turning on the stove, which is the part I always notice first.
Key Ingredients:
- 8 flour tortillas
- 2 cups shredded Monterey Jack or cheddar
- 1 can black beans, drained and rinsed
- 2 cups corn kernels, fresh or thawed
- 1 cup salsa
- 1 jalapeño, seeded and finely chopped
- 1 tsp cumin
- 2 tbsp butter or oil
Quick Steps:
- Mix the beans, corn, salsa, jalapeño, and cumin in a bowl.
- Heat a cast-iron skillet on the grill over medium heat and melt the butter or oil in it.
- Lay 4 tortillas in the skillet, add cheese and filling, then top with the remaining tortillas.
- Cook for 3 to 4 minutes per side, pressing lightly with a spatula, until the tortillas are golden and the cheese is fully melted.
- Rest 1 minute, then cut into wedges.
Equipment for This Recipe:
- Cast-iron skillet or griddle
- Grill
- Spatula
- Mixing bowl
How to Serve This Dish: Serve with sour cream, avocado, and extra salsa. They work as a main dish if you add a salad or grilled peppers on the side. I like stacking the wedges in a fan so the melted cheese shows at the edges.
Pro Tips for This Recipe:
- Don’t stuff them too full or the filling will spill out before the cheese sets.
- Preheat the skillet well; lukewarm cast iron makes soggy tortillas.
- Use medium heat, not high heat, or the tortillas brown before the cheese melts.
Variations on This Dish:
- Chicken Quesadilla Version: Add 1 cup chopped grilled chicken.
- Pepper-Jack Heat: Swap in pepper jack for more bite.
- Vegetarian Crowd-Pleaser: Add chopped grilled peppers and onions.
Common Mistakes to Avoid with This Dish:
- Don’t use a floppy skillet that cools too fast.
- Don’t slice them immediately or the filling spills everywhere.
- Don’t forget to butter or oil the outside of the tortillas.
17. BBQ Pork Tenderloin
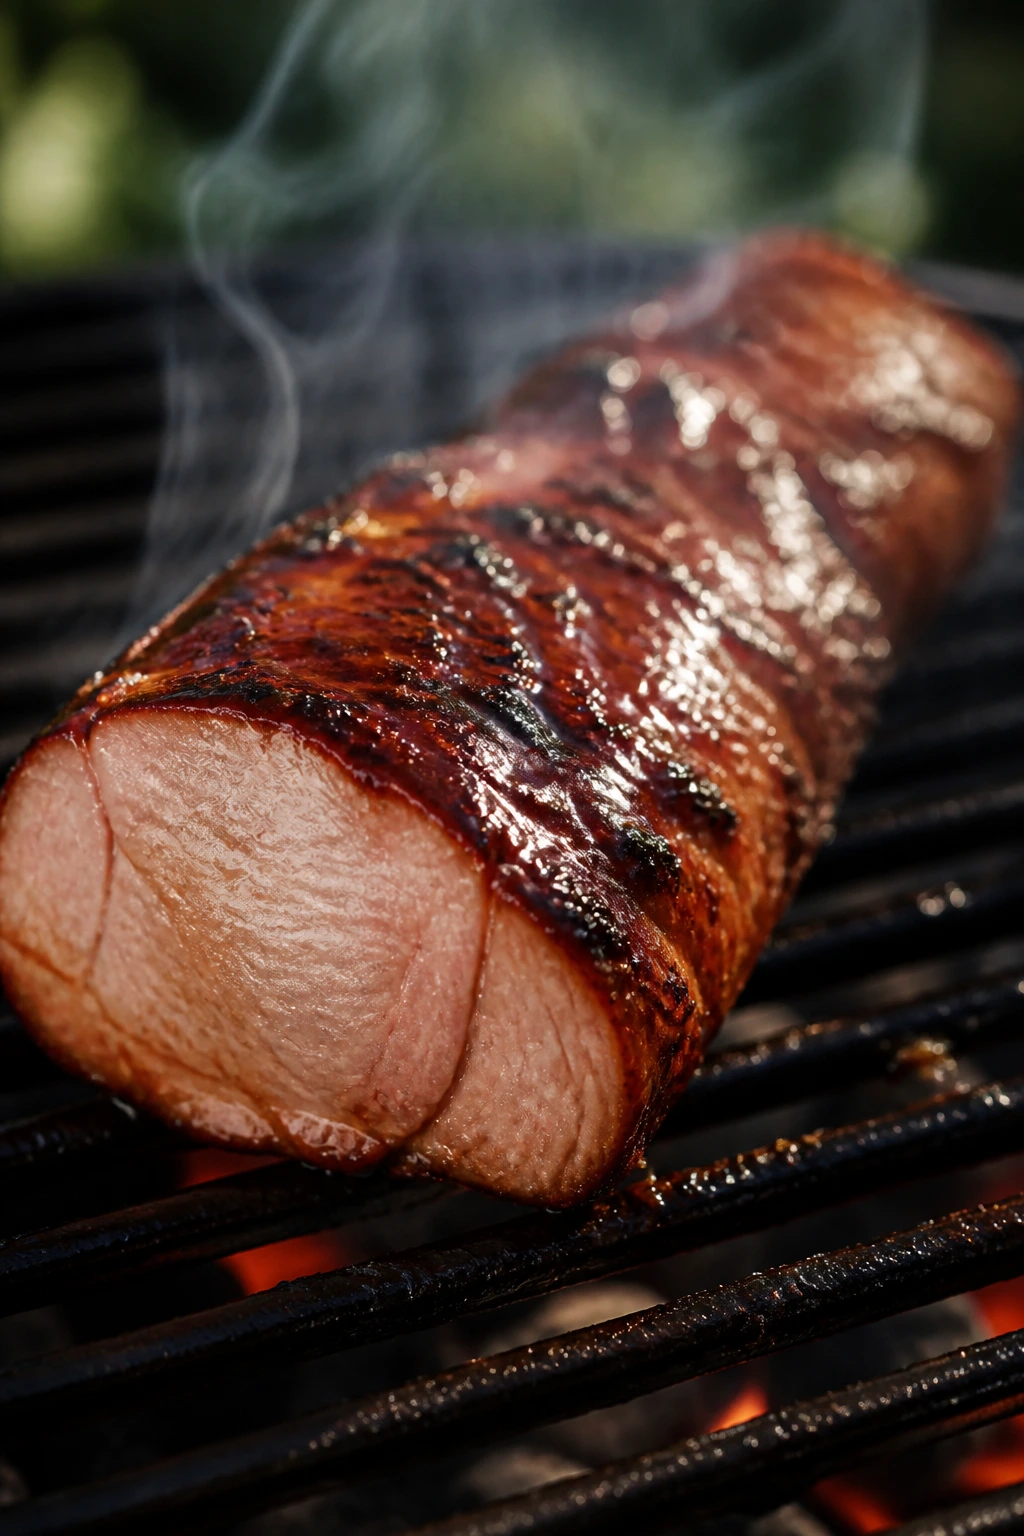
Pork tenderloin is lean, fast, and easy to ruin if you overcook it. The grill gives it a light crust, and BBQ sauce keeps the surface glossy without drowning the meat.
Why It Works: Pork tenderloin cooks quickly but benefits from both direct heat and a cooler zone. A dry rub builds flavor before the sauce goes on, and the tenderloin’s shape makes slicing easy once it rests. You get a clean, neat dinner with less effort than it looks.
Key Ingredients:
- 1¾ lbs pork tenderloin
- 2 tbsp olive oil
- 2 tbsp BBQ rub
- 1 tsp garlic powder
- 1 tsp smoked paprika
- ½ tsp kosher salt
- ½ cup BBQ sauce
- 1 tbsp apple cider vinegar
Quick Steps:
- Rub the pork with olive oil, BBQ rub, garlic powder, paprika, and salt.
- Preheat the grill to medium-high, then create a cooler zone.
- Grill the tenderloin for 3 to 4 minutes per side to brown it, then move it to the cooler side and close the lid.
- Brush with BBQ sauce mixed with apple cider vinegar during the last 5 minutes, cooking until the center reaches 145°F.
- Rest 5 to 7 minutes, then slice thickly.
Equipment for This Recipe:
- Grill
- Tongs
- Basting brush
- Instant-read thermometer
How to Serve This Dish: Serve with grilled corn, baked beans, or vinegar slaw. Sliced pork tenderloin looks better on a board than in a deep bowl, because the glaze stays visible. A little extra sauce on the side is enough.
Pro Tips for This Recipe:
- Use a thermometer. Tenderloin goes from juicy to dry faster than most cuts.
- Rest the meat before slicing or the glaze runs off the board.
- If the sauce is thick, thin it with a spoon of vinegar so it brushes on cleanly.
Variations on This Dish:
- Honey-Heat Version: Stir 1 tbsp honey and a little hot sauce into the glaze.
- Mustard Rub Version: Add mustard powder to the dry rub.
- No-Sauce Style: Skip the BBQ sauce and finish with a squeeze of lemon and chopped herbs.
Common Mistakes to Avoid with This Dish:
- Don’t confuse tenderloin with loin chops; they cook differently.
- Don’t leave it over direct heat the whole time.
- Don’t slice it the second it comes off the grill.
18. Salmon Burgers with Lemon Aioli
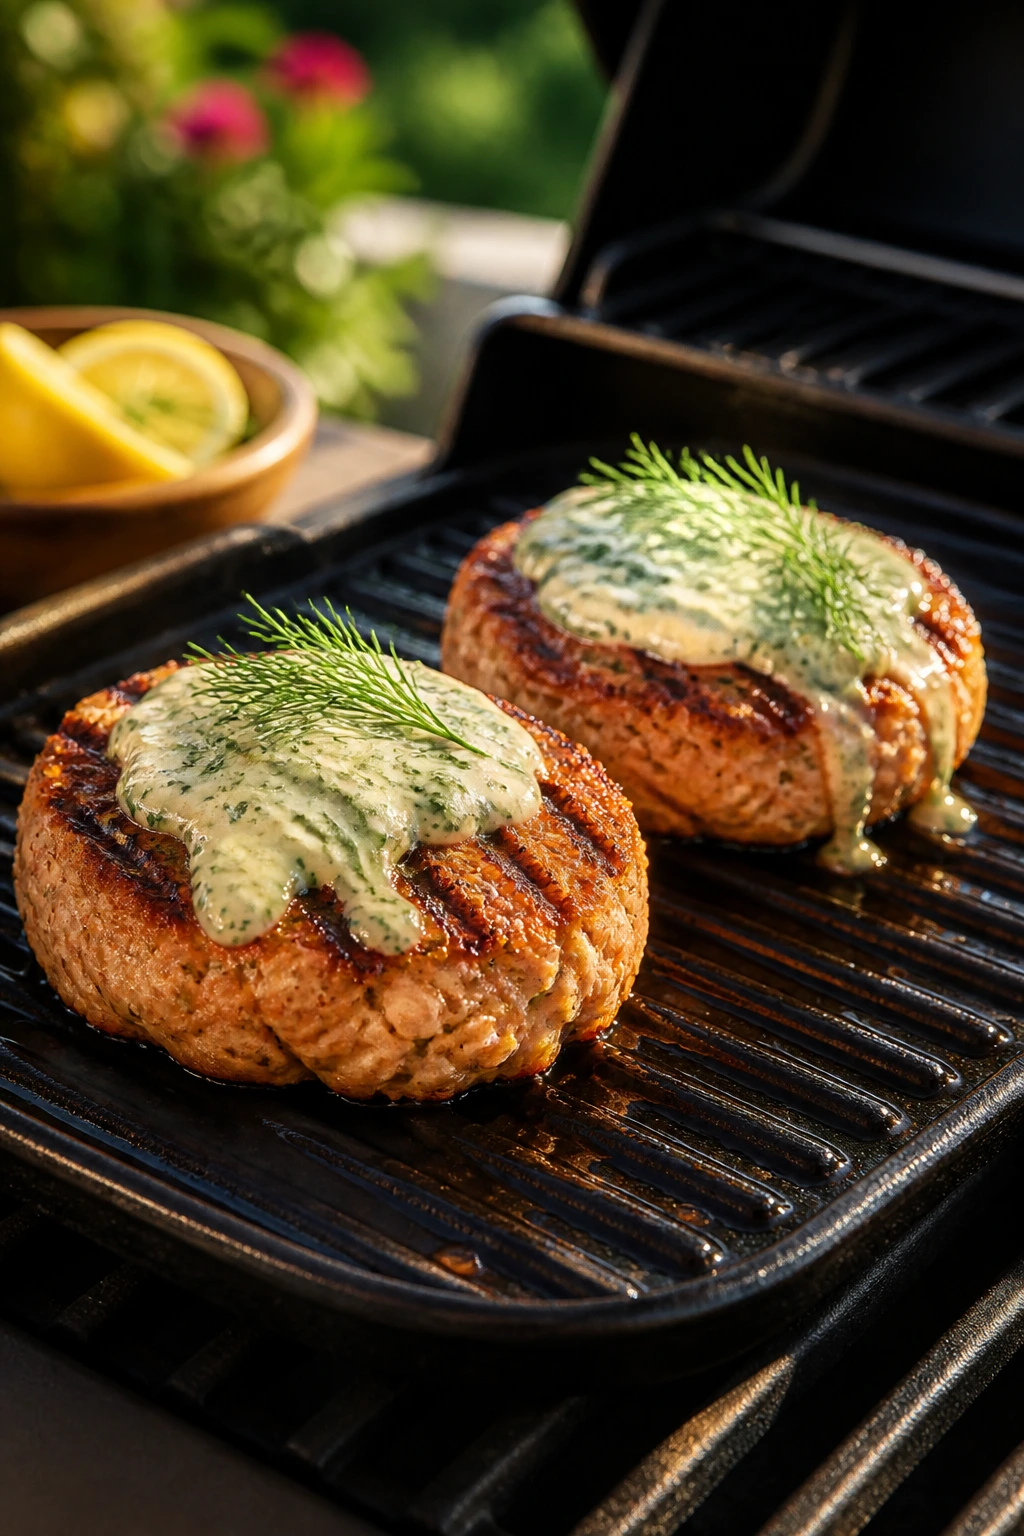
Salmon burgers are a nice fix when you want seafood without a fork-and-knife plate. A little binder keeps them together, and lemon aioli gives them the zip they need after the grill.
Why It Works: Canned salmon makes the patties fast and affordable, and the egg plus breadcrumbs help them hold together on a hot surface. Dill and lemon keep the flavor clean, while a simple aioli adds richness without burying the fish. The grill gives the outside a light crust that a skillet can do too, but the grill feels cleaner here.
Key Ingredients:
- 2 cans salmon, 6 oz each, drained
- 1 egg
- ½ cup breadcrumbs
- 2 tbsp mayonnaise
- 1 tbsp Dijon mustard
- 1 tbsp chopped dill
- Zest of 1 lemon
- 4 buns
Quick Steps:
- Mix the salmon, egg, breadcrumbs, Dijon, dill, and lemon zest.
- Form 4 patties and chill them for 10 minutes.
- Stir ¼ cup mayonnaise with 1 tbsp lemon juice and a little garlic for the aioli.
- Grill the patties over medium heat on a lightly oiled grill pan or well-oiled grate for 3 to 4 minutes per side.
- Serve on buns with the aioli and lettuce.
Equipment for This Recipe:
- Grill pan or grill-safe skillet
- Mixing bowl
- Spatula
- Tongs
How to Serve This Dish: Add lettuce, sliced tomato, and a few red onion rings if you want more crunch. These burgers also work on toasted English muffins if you want a different texture. Serve the aioli on the side so the bun doesn’t turn slick before the first bite.
Pro Tips for This Recipe:
- Chill the patties so they firm up before grilling.
- Oil the pan or grates well; salmon patties are delicate.
- Don’t make them too thick or the middle won’t set before the outside browns.
Variations on This Dish:
- Fresh Salmon Version: Use chopped cooked salmon instead of canned.
- Herbed Aioli: Add chopped parsley or tarragon to the sauce.
- Spicy Burger: Stir a little hot sauce into the aioli.
Common Mistakes to Avoid with This Dish:
- Don’t flip the patties too soon or they’ll break apart.
- Don’t use too much binder; the salmon should still taste like salmon.
- Don’t skip the chill time.
19. Chicken Caesar Wraps with Grilled Romaine
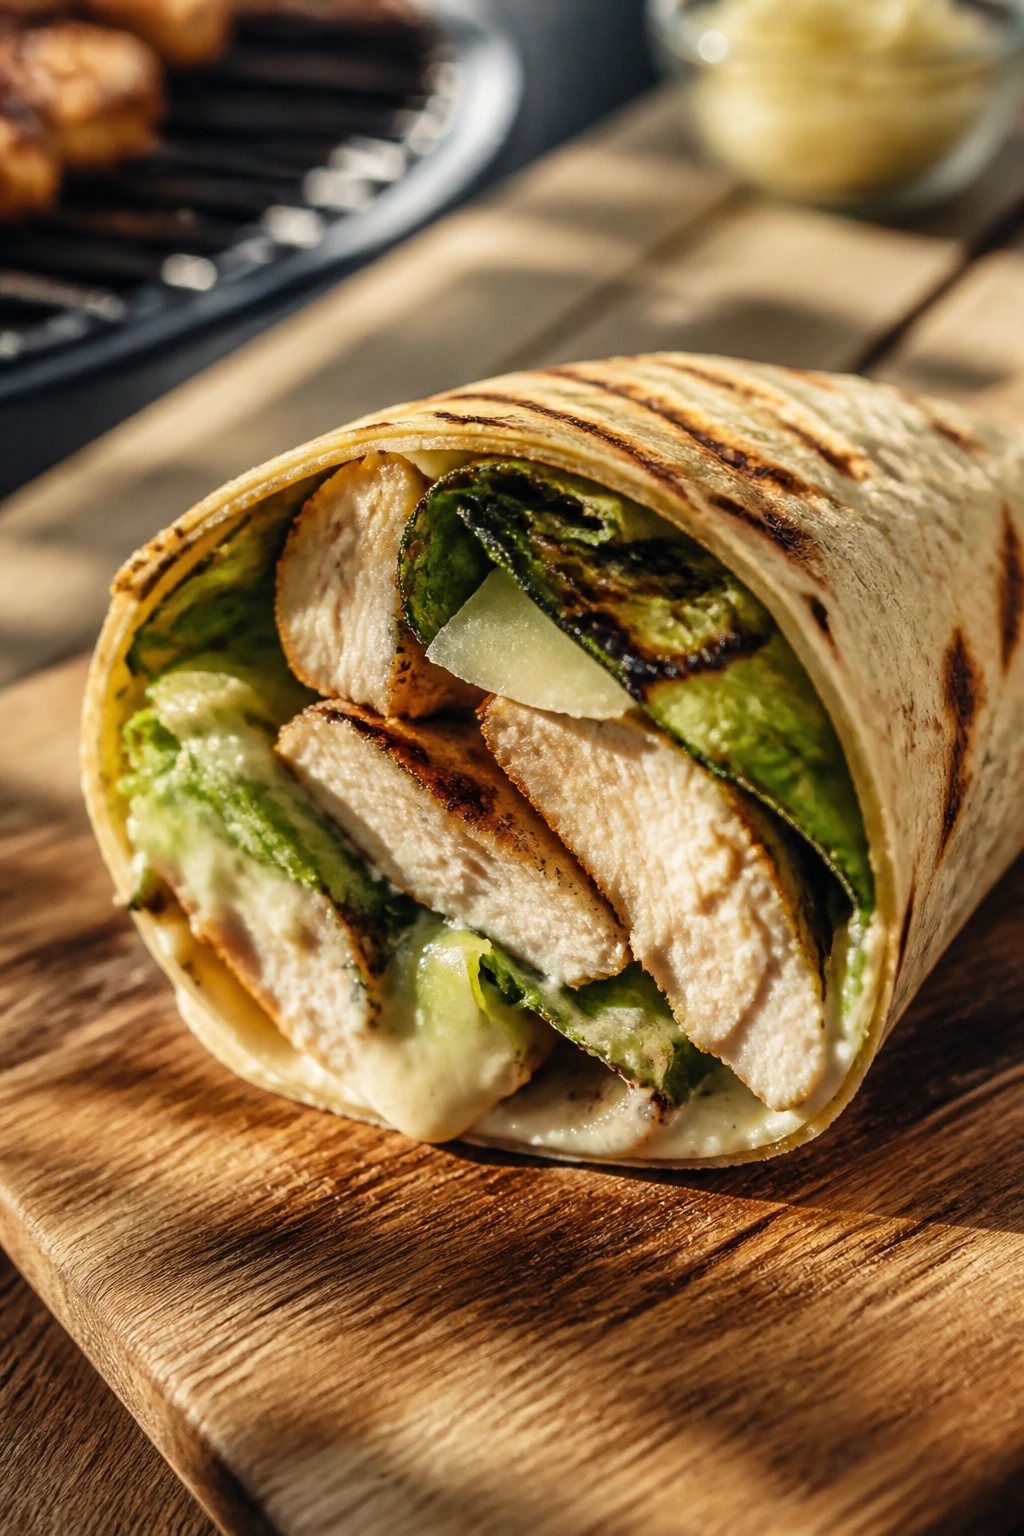
Grilled romaine sounds odd until you try it. The outer leaves pick up a smoky edge, the chicken brings the heft, and the Caesar dressing turns the whole thing into a dinner wrap that feels sharper than a plain sandwich.
Why It Works: Chicken breasts grill quickly when pounded to even thickness. Romaine takes only a minute or two on the grate, just enough for char without collapse. Caesar dressing and Parmesan give the wrap its familiar backbone, and the grill adds something the bowl version never gets.
Key Ingredients:
- 2 chicken breasts, about 1½ lbs total
- 2 romaine hearts, halved lengthwise
- 1 tbsp olive oil
- 1 tsp kosher salt
- ½ tsp black pepper
- ½ cup Caesar dressing
- ¼ cup grated Parmesan
- 4 large tortillas
Quick Steps:
- Pound the chicken to even thickness and season with olive oil, salt, and pepper.
- Grill the chicken for 5 to 6 minutes per side until it reaches 165°F.
- Brush the romaine with a little olive oil and grill cut-side down for 1 to 2 minutes.
- Slice the chicken and chop the romaine.
- Toss with Caesar dressing and Parmesan, then wrap in tortillas.
Equipment for This Recipe:
- Grill
- Tongs
- Cutting board
- Knife
How to Serve This Dish: These wraps go well with chips, roasted potatoes, or a bowl of tomato soup if you want a fuller plate. Slice them in half on the diagonal so the grilled romaine shows. The cut edge looks better than a whole wrap ever could.
Pro Tips for This Recipe:
- Pound the chicken evenly so the thin edge doesn’t dry out.
- Grill the romaine briefly; it should have char, not collapse.
- Warm the tortillas before wrapping or they crack at the fold.
Variations on This Dish:
- Crouton Crunch: Add crushed croutons for texture.
- Bacon Caesar Version: Add chopped grilled bacon.
- Spicy Caesar: Stir a little hot sauce into the dressing.
Common Mistakes to Avoid with This Dish:
- Don’t overgrill the lettuce; it needs seconds, not minutes.
- Don’t soak the wrap in dressing or it falls apart.
- Don’t slice the chicken before it rests.
20. Pizza on the Grill with Mozzarella and Basil
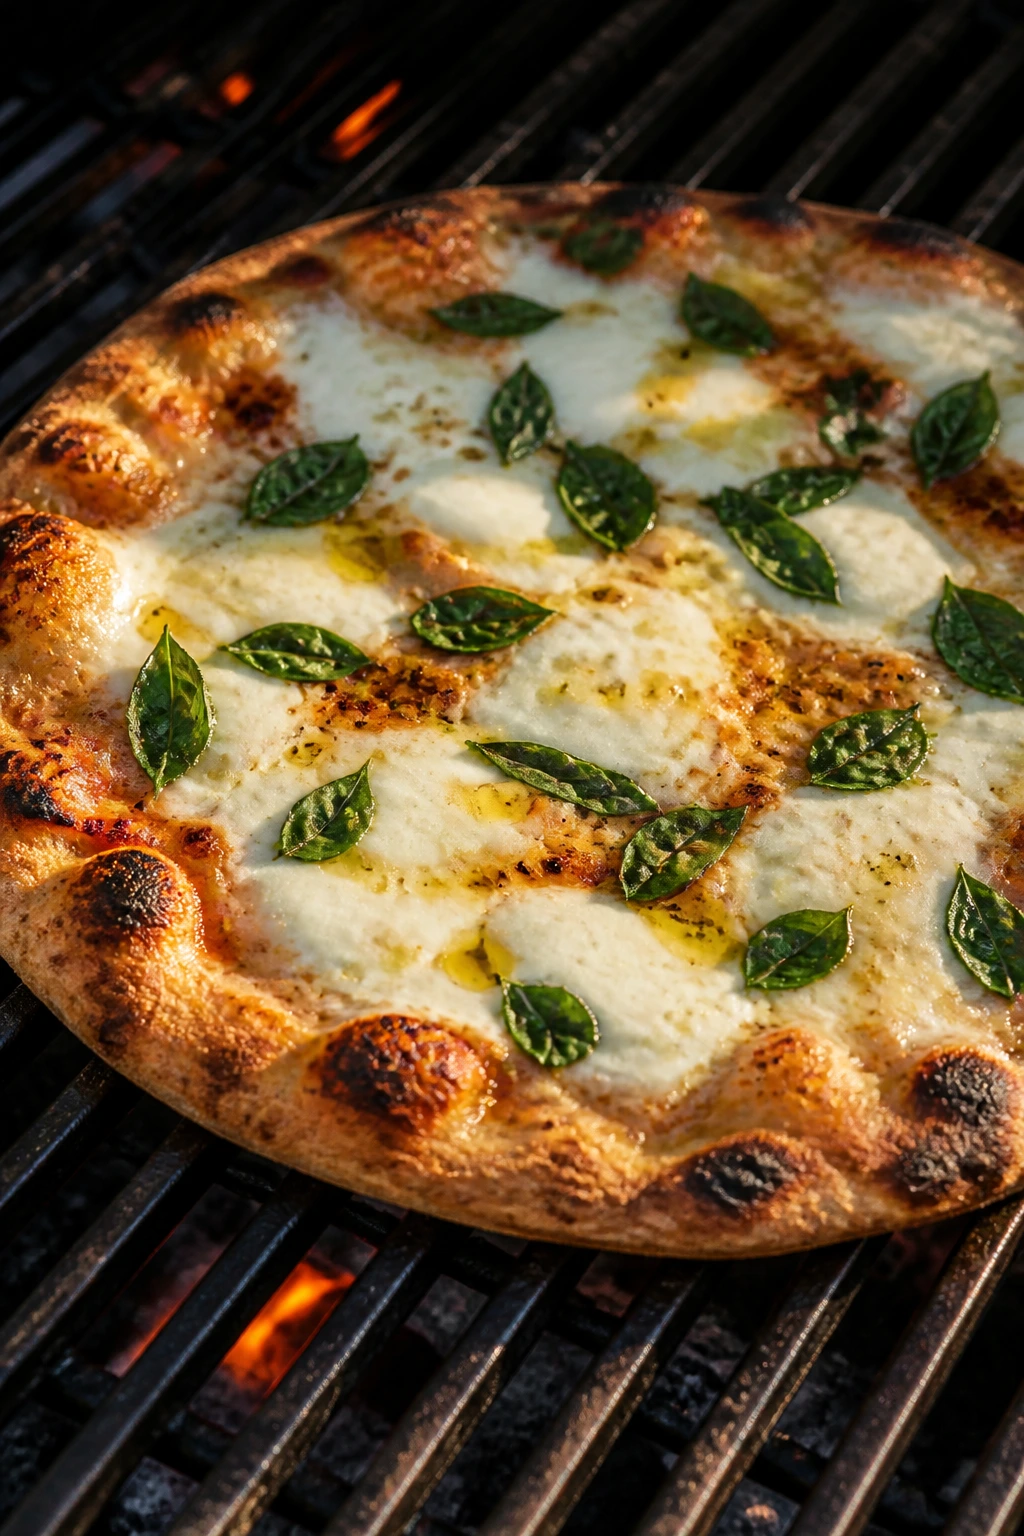
Grilled pizza is one of those dinners that feels slightly excessive and still somehow easy. The crust gets crisp spots, the cheese melts fast, and basil at the end keeps it from tasting like a campfire lunch.
Why It Works: Pizza dough loves direct heat for a short first pass, then gentler heat to finish with toppings. The grill gives the crust bubbles and char spots you can’t fake in a home oven. Keeping toppings simple is the whole trick; too much sauce turns the dough soggy.
Key Ingredients:
- 1 lb pizza dough
- 2 tbsp olive oil
- ½ cup pizza sauce
- 8 oz shredded mozzarella
- ¼ cup grated Parmesan
- 1 tsp garlic powder
- ¼ cup fresh basil leaves
- 2 tbsp cornmeal
Quick Steps:
- Preheat the grill to medium-high and oil the grates well.
- Stretch the dough into a thin round, brush one side with olive oil, and dust a tray with cornmeal.
- Place the dough oil-side down on the grill for 2 to 3 minutes until the bottom has grill marks.
- Flip it, spread sauce, add mozzarella, Parmesan, and garlic powder, then close the lid for 3 to 5 minutes until the cheese melts.
- Top with basil and slice immediately.
Equipment for This Recipe:
- Grill
- Pizza peel or rimless baking sheet
- Tongs
- Pizza cutter
How to Serve This Dish: Put the pizza on a cutting board, not a plate, so the crust stays crisp. A simple green salad makes a clean side, and a drizzle of olive oil at the end gives the basil a little shine. I like slicing it into smaller pieces than usual if it’s going on a mixed table.
Pro Tips for This Recipe:
- Oil the dough and the grates well to prevent sticking.
- Keep the toppings light; grilled pizza punishes overloading.
- Have everything ready before the dough hits the fire. It moves fast.
Variations on This Dish:
- Sausage-Basil Version: Add cooked sausage slices and a pinch of red pepper flakes.
- Margherita Style: Use only sauce, mozzarella, basil, and olive oil.
- White Pizza: Skip the sauce and use ricotta and Parmesan.
Common Mistakes to Avoid with This Dish:
- Don’t stretch the dough too thin in the middle or it tears on the grill.
- Don’t walk away after the flip. The topping side finishes quickly.
- Don’t use too much sauce. Wet crust is the enemy here.
21. Stuffed Portobello Mushrooms
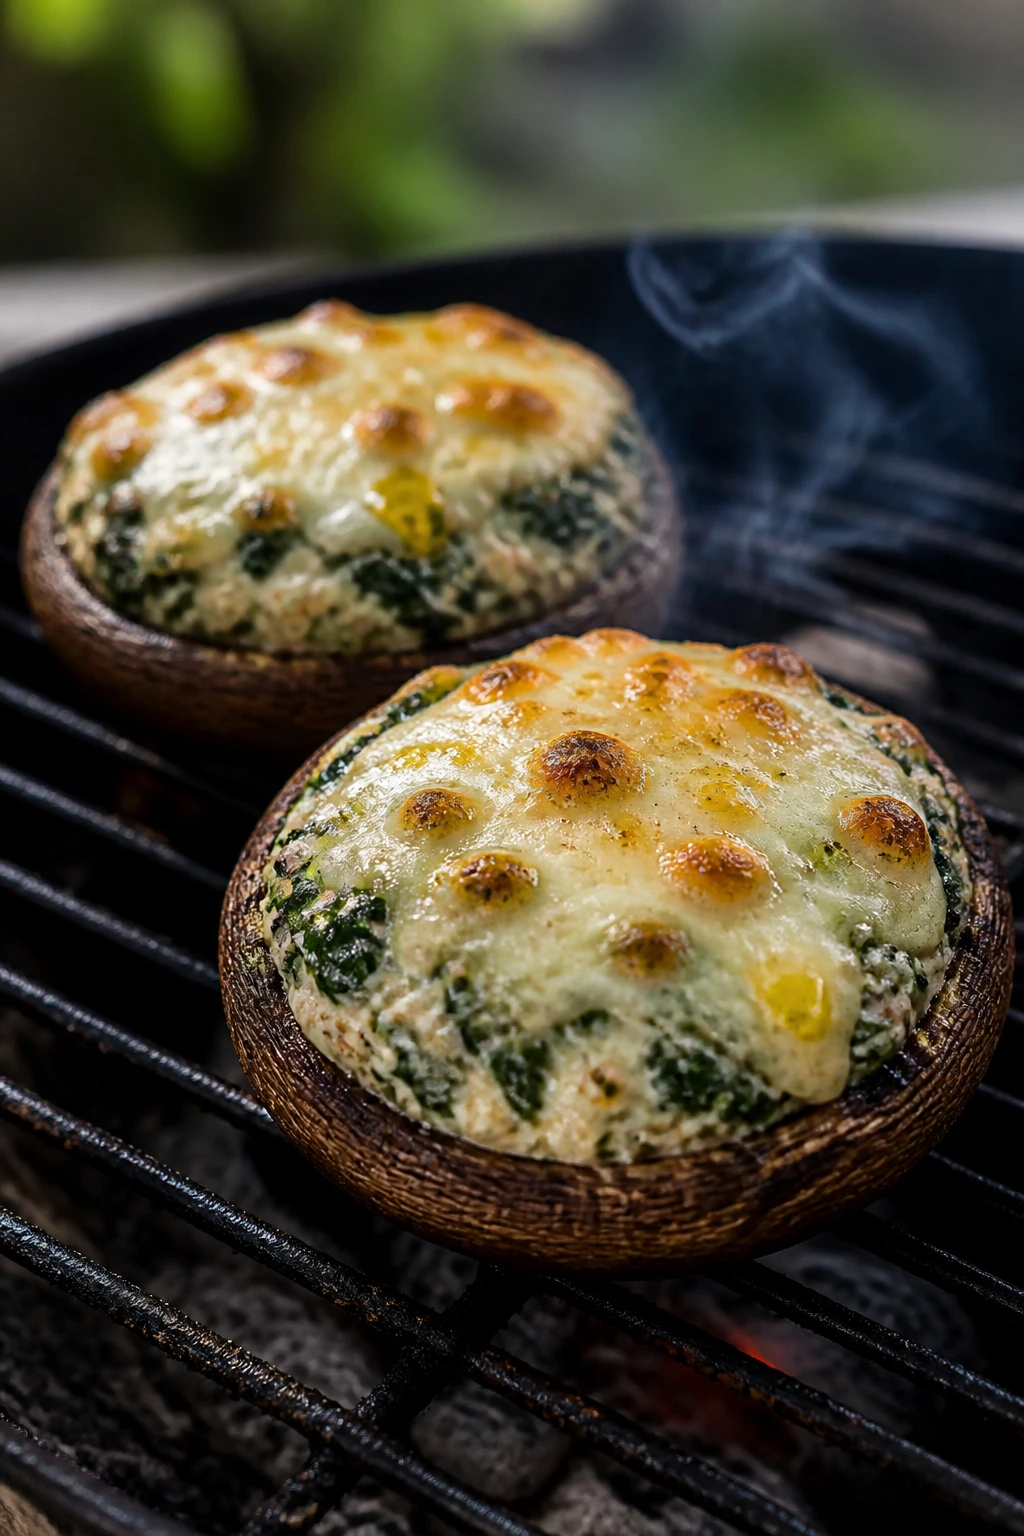
Portobellos make a solid grill dinner when you want something earthy and filling without turning on the oven. The mushroom caps soften, the filling turns creamy, and the grill adds just enough smoke to keep it from tasting like a side dish.
Why It Works: Portobellos are sturdy enough to hold a filling and absorb grill flavor without falling apart. Ricotta and spinach make the center creamy, while mozzarella gives you that melty top people expect from a baked dish. A quick pre-grill on the caps keeps the mushrooms from flooding the filling later.
Key Ingredients:
- 4 large portobello mushroom caps
- 1 cup ricotta
- 2 cups spinach, chopped
- 2 cloves garlic, minced
- ½ cup breadcrumbs
- ½ cup shredded mozzarella
- 2 tbsp olive oil
- 1 tsp kosher salt
Quick Steps:
- Remove the stems and scrape out the gills if they’re very dark.
- Brush the caps with olive oil and season with salt.
- Grill the caps gill-side down for 4 minutes, then flip.
- Mix the ricotta, spinach, garlic, breadcrumbs, and mozzarella, then spoon the filling into the caps.
- Close the grill lid and cook for 5 to 7 minutes until the filling is hot and the tops are lightly browned.
Equipment for This Recipe:
- Grill
- Small bowl
- Spoon
- Tongs
How to Serve This Dish: Serve the mushrooms with a salad and grilled bread if you want a full vegetarian dinner. They also work beside grilled chicken or steak if you’re feeding mixed eaters. A little balsamic drizzle at the end is useful, but only a little.
Pro Tips for This Recipe:
- Dry the mushroom caps after brushing them if they seem wet.
- Use a grill-safe tray if your mushrooms are very large and floppy.
- Don’t overload the filling or it will slump out as it heats.
Variations on This Dish:
- Feta-Spinach Version: Swap some ricotta for crumbled feta.
- Italian Sausage Swap: Add cooked sausage to the filling for a heavier meal.
- Dairy-Light Version: Use hummus and breadcrumbs instead of ricotta.
Common Mistakes to Avoid with This Dish:
- Don’t grill the caps too long before filling them or they’ll collapse.
- Don’t leave the gills in if they’re holding a lot of moisture.
- Don’t skip seasoning the mushrooms themselves.
22. Shrimp Tacos with Charred Pineapple Salsa
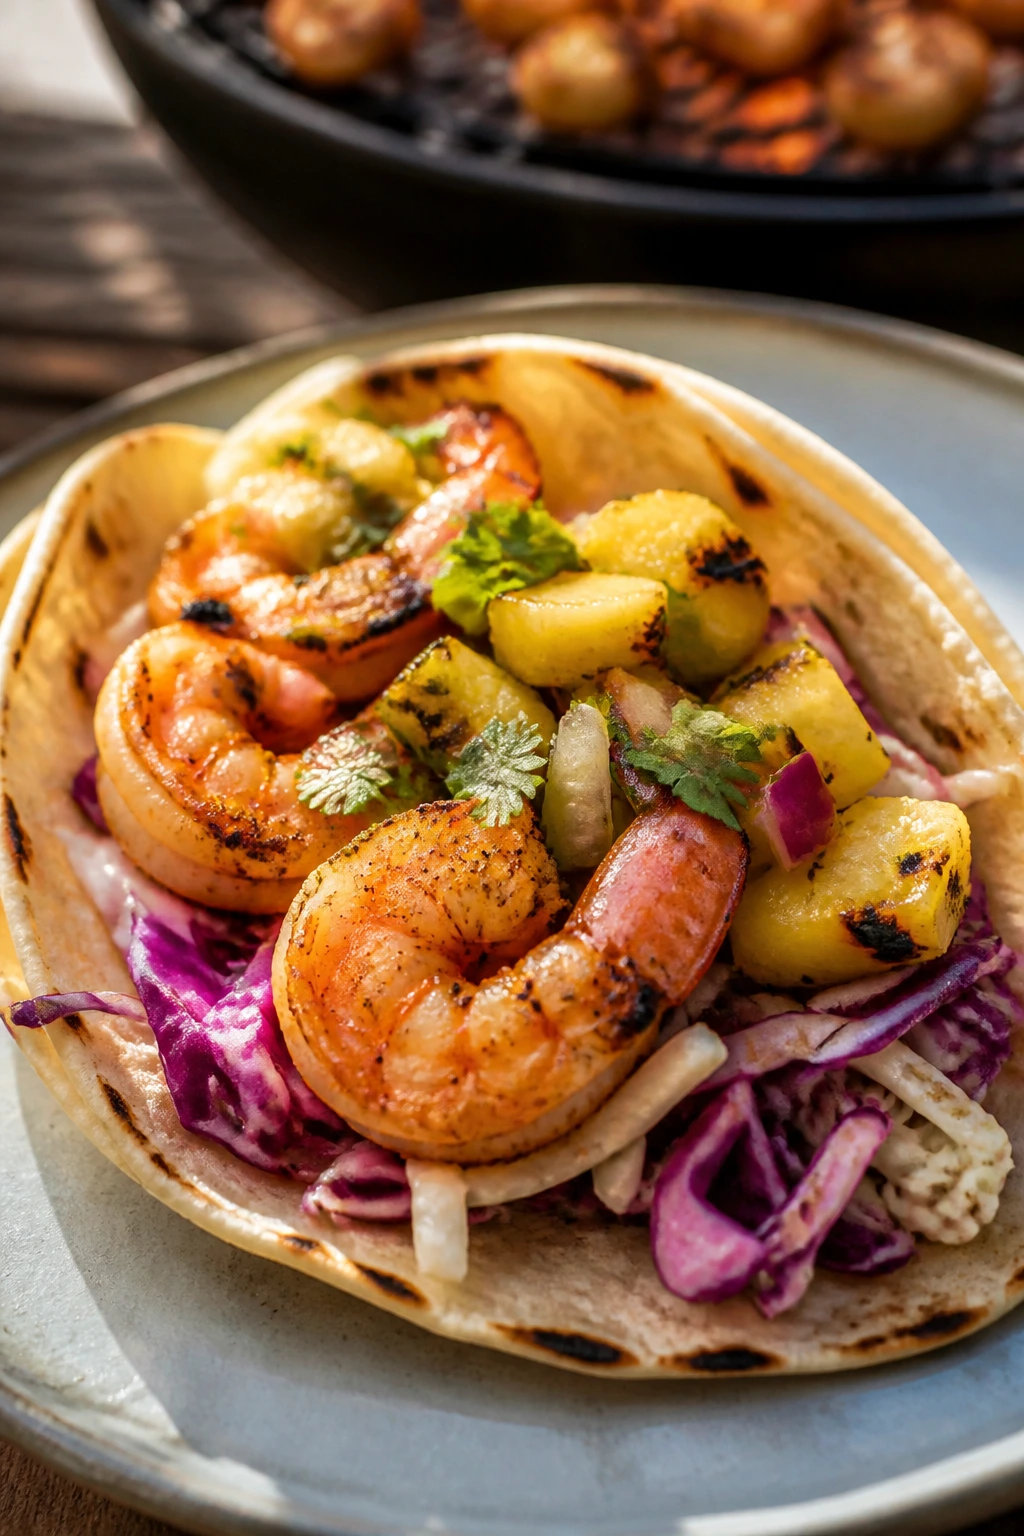
Shrimp tacos with pineapple salsa taste like warm weather without needing a lot of effort. The shrimp cook in minutes, the fruit picks up a little char, and the cabbage keeps the whole thing crisp.
Why It Works: Shrimp and fruit both cook fast, which keeps the grill session short and tidy. Charred pineapple brings sweetness with a little bitterness at the edges, and lime cuts through the richness of the shrimp. Cabbage gives the tacos enough crunch that they don’t feel soft all the way through.
Key Ingredients:
- 1½ lbs shrimp, peeled and deveined
- 1 tbsp olive oil
- 1 tsp chili powder
- 1 tsp cumin
- 1 tsp kosher salt
- 1 pineapple, sliced into rings or spears
- 8 corn tortillas
- 2 cups shredded cabbage
- 1 lime, cut into wedges
Quick Steps:
- Toss the shrimp with oil, chili powder, cumin, and salt.
- Grill the pineapple for 2 to 3 minutes per side until marked, then chop it with a little red onion and cilantro if you like.
- Grill the shrimp for 2 to 3 minutes per side until pink and opaque.
- Warm the tortillas on the grill for about 30 seconds per side.
- Build the tacos with cabbage, shrimp, pineapple salsa, and lime.
Equipment for This Recipe:
- Grill
- Tongs
- Cutting board
- Mixing bowl
How to Serve This Dish: Keep the tacos simple and pile the salsa high. A spoonful of sour cream or crema can soften the chili if you want that contrast. I like serving them family-style so people can build their own instead of fighting over the biggest shrimp.
Pro Tips for This Recipe:
- Use large shrimp so they don’t overcook in a blink.
- Char the pineapple first, then chop it while it cools.
- Warm the tortillas last so they stay flexible.
Variations on This Dish:
- Chipotle Crema Version: Add chipotle to sour cream for a smoky sauce.
- Mango Swap: Use grilled mango instead of pineapple.
- Cabbage Slaw Version: Toss the cabbage with lime and a little salt before assembling.
Common Mistakes to Avoid with This Dish:
- Don’t leave the shrimp on the grill once they’re pink.
- Don’t skip the lime. The tacos need that sharp finish.
- Don’t chop the pineapple before grilling or you lose the char.
23. Greek Chicken Kabobs
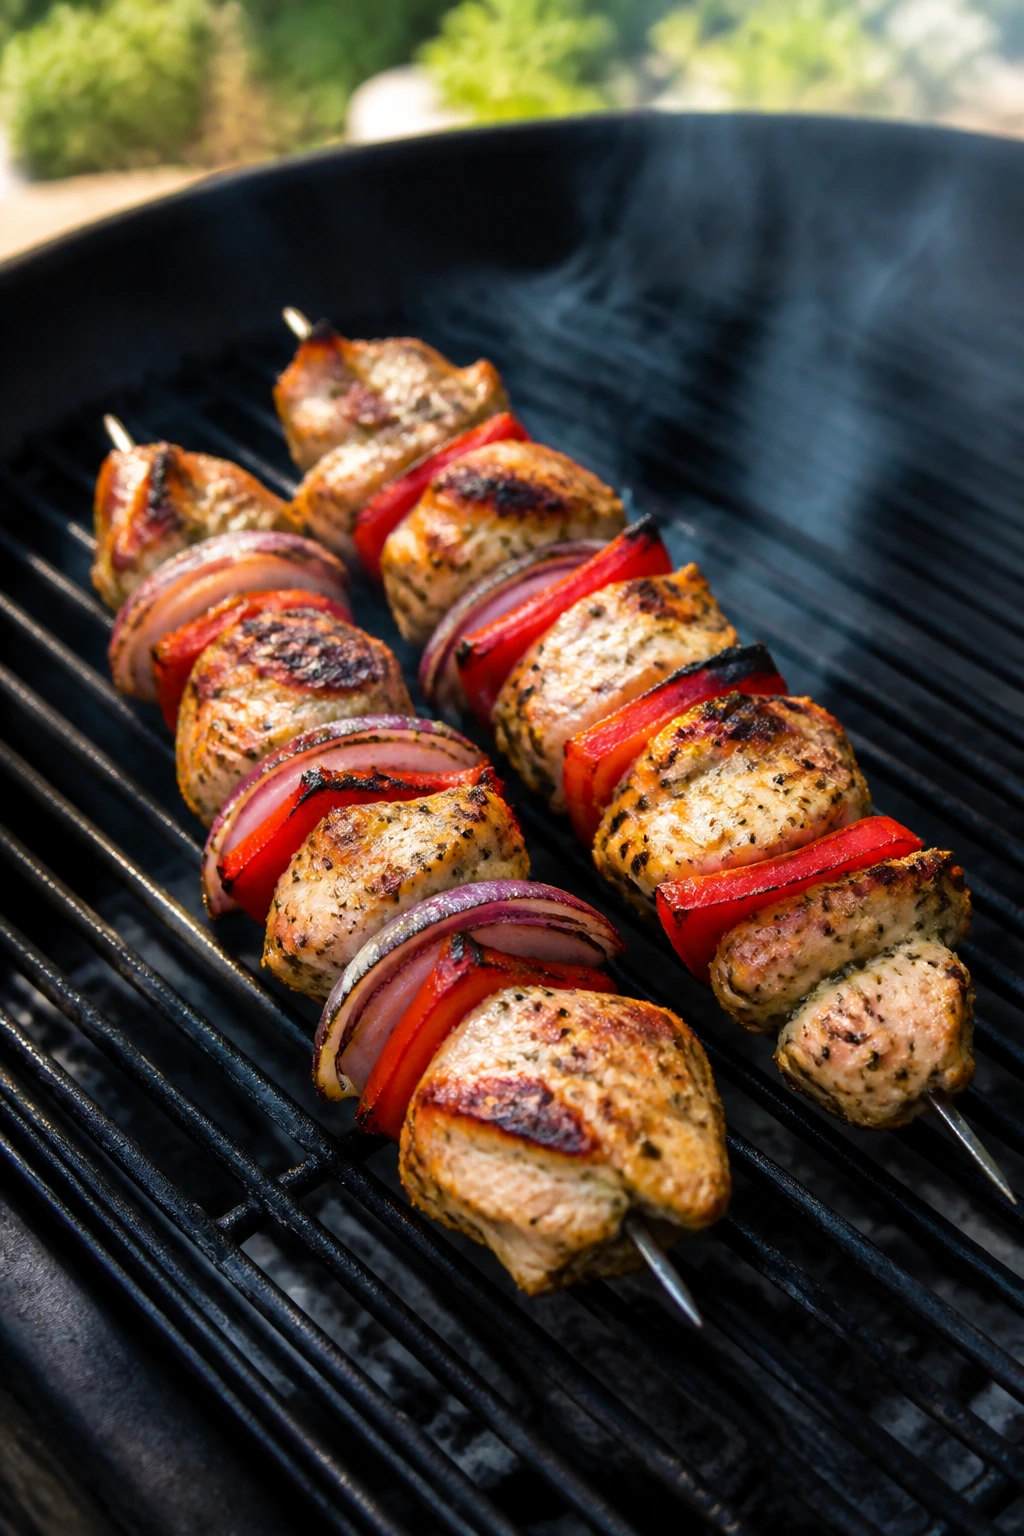
Greek chicken kabobs bring together the kind of things the grill handles best: lemon, oregano, onion, and chicken that wants a little char. The result is bright, savory, and much easier than a full sheet-pan dinner.
Why It Works: A yogurt and lemon marinade tenderizes the chicken while giving it a tangy edge. Oregano and garlic do the heavy lifting on flavor, and the skewers make it easy to cook the chicken and vegetables at the same pace. The feta at the end adds salt without needing another sauce.
Key Ingredients:
- 1½ lbs boneless chicken thighs, cut into chunks
- ½ cup plain Greek yogurt
- 2 tbsp lemon juice
- 2 cloves garlic, minced
- 1 tsp dried oregano
- 1 red bell pepper, cut into chunks
- 1 red onion, cut into wedges
- ¼ cup crumbled feta
Quick Steps:
- Mix the yogurt, lemon juice, garlic, oregano, salt, and pepper.
- Coat the chicken and marinate for 30 minutes.
- Thread the chicken, pepper, and onion onto skewers.
- Grill over medium-high heat for 10 to 12 minutes, turning every few minutes, until the chicken reaches 165°F.
- Sprinkle with feta and serve.
Equipment for This Recipe:
- Skewers
- Grill
- Mixing bowl
- Tongs
How to Serve This Dish: Serve the kabobs with rice, pita, or a cucumber-tomato salad. A spoonful of tzatziki works well if you want more coolness. These are also good served off the skewer, which saves fingers when the table gets crowded.
Pro Tips for This Recipe:
- Cut the chicken into even pieces so the kabobs finish together.
- Don’t let the yogurt marinade drip all over the grill; shake off excess before cooking.
- If the vegetables cook slower than the chicken, start them a minute earlier on their own skewers.
Variations on This Dish:
- Lemon-Herb Version: Add dill and parsley to the marinade.
- Spicy Version: Stir in ½ tsp crushed red pepper.
- Veg-Heavy Kabobs: Use more peppers and onion, less chicken.
Common Mistakes to Avoid with This Dish:
- Don’t marinate too long in yogurt or the surface can get a little pasty.
- Don’t cram the skewers full.
- Don’t forget to rest the chicken before serving.
24. Maple-Mustard Salmon Fillets
Maple and mustard are an easy pair for salmon because they bring sweetness, sharpness, and enough gloss to make the fillets look finished. On the grill, the glaze turns shiny at the edges and the fish stays tender.
Why It Works: Salmon likes bold but clean flavors. Maple syrup caramelizes fast, Dijon cuts the sweetness, and soy sauce adds salt and depth without making the glaze thick or sticky in the wrong way. Skin-on fillets hold together better on the grill and make flipping less risky.
Key Ingredients:
- 4 salmon fillets, about 6 oz each, skin on
- 2 tbsp Dijon mustard
- 2 tbsp maple syrup
- 1 tbsp soy sauce
- 1 tbsp olive oil
- ½ tsp black pepper
- Lemon wedges for serving
Quick Steps:
- Whisk the Dijon, maple syrup, soy sauce, olive oil, and pepper.
- Brush the salmon fillets with the glaze.
- Preheat the grill to medium and oil the grates well.
- Grill skin-side down for 6 to 8 minutes, brushing once more near the end, until the salmon flakes and reaches about 125°F to 130°F in the center for medium.
- Rest briefly and serve with lemon wedges.
Equipment for This Recipe:
- Grill
- Pastry brush
- Tongs
- Instant-read thermometer
How to Serve This Dish: Salmon fillets look best on a plate with something green beside them, like grilled asparagus or snap peas. A little rice or potatoes helps catch the glaze. I usually keep the lemon wedges visible because they make the plate look brighter and give people control over the sweetness.
Pro Tips for This Recipe:
- Oil the grates well; salmon skin sticks if the grill is dry.
- Don’t flip unless you really need to. Skin-side down is the safer route.
- Brush the glaze near the end so the maple doesn’t darken too much.
Variations on This Dish:
- Spicy Maple Version: Add a pinch of cayenne.
- Herb Mustard Version: Stir chopped dill into the glaze.
- Foil Boat Version: Grill the fillets on a foil-lined tray if your grates are tricky.
Common Mistakes to Avoid with This Dish:
- Don’t cook salmon to death. Dry fish is not redeemed by glaze.
- Don’t start with sauce that’s too thick.
- Don’t try to lift the fillet before it has formed a crust.
25. Sausage and Pepper Flatbread
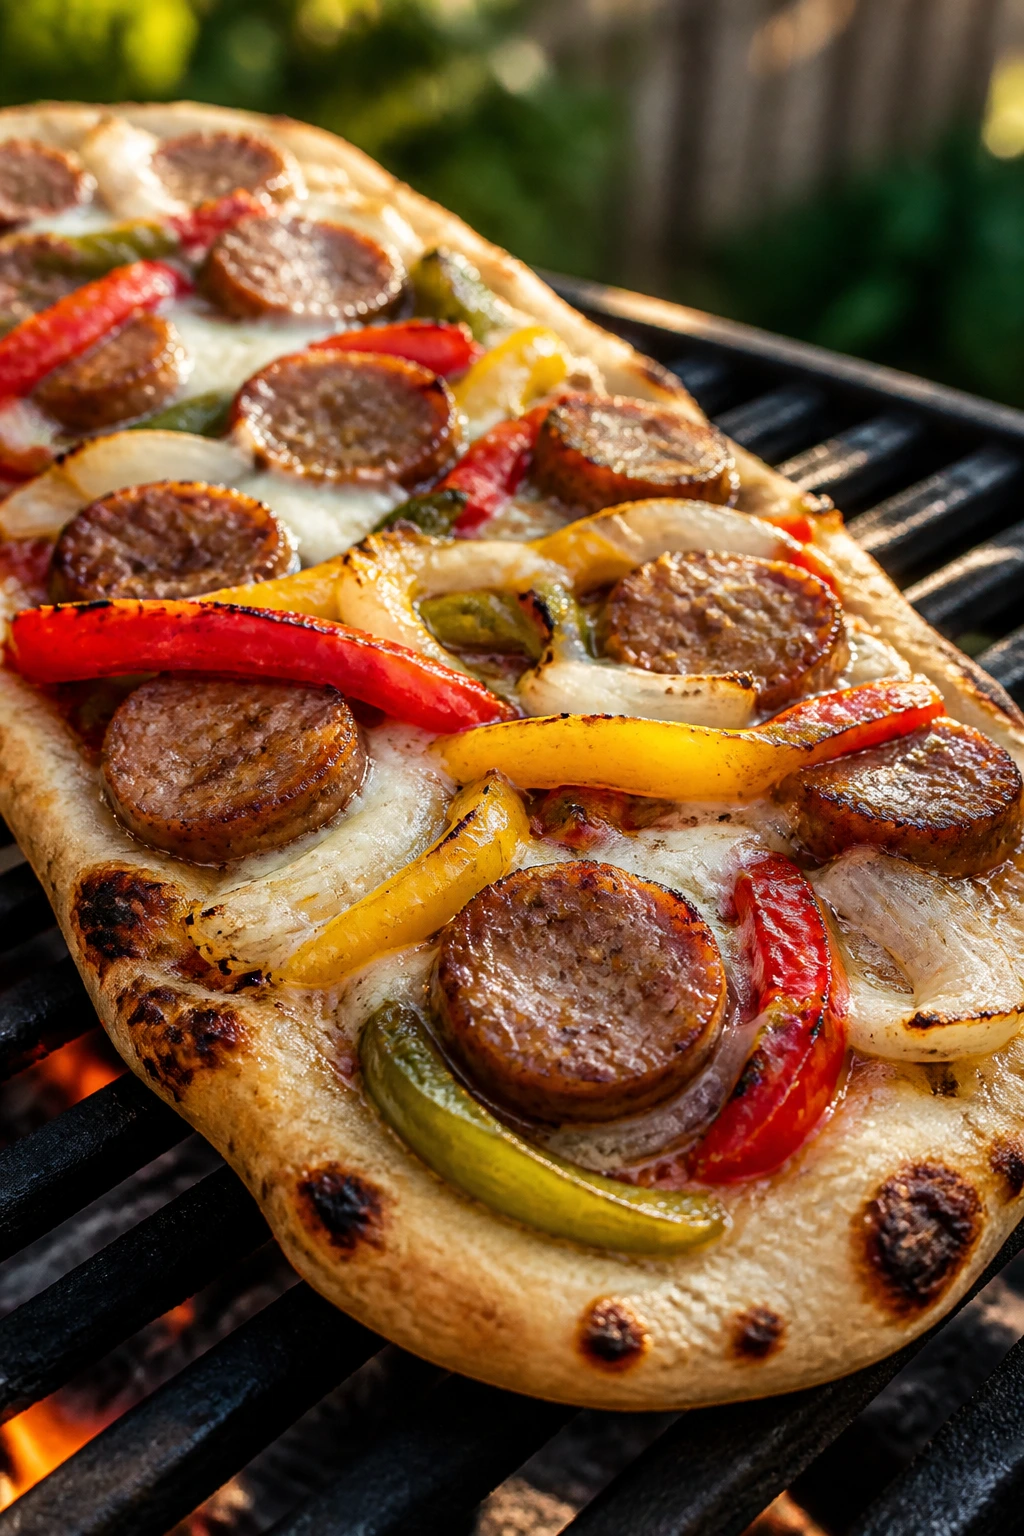
Flatbread on the grill feels like cheating in the best possible way. You get char, melty cheese, and sausage without waiting for dough to rise or an oven to preheat.
Why It Works: Flatbreads are thin enough to handle the grill, and the toppings cook quickly once the base is hot. Sausage brings salt and fat, peppers and onions add sweetness, and mozzarella ties the whole thing together. It’s pizza-adjacent but looser, which I think makes it better for a casual dinner.
Key Ingredients:
- 2 store-bought flatbreads or naan
- 4 Italian sausage links, cooked and sliced
- 2 bell peppers, sliced
- 1 small onion, sliced
- 1 cup shredded mozzarella
- ½ cup pizza sauce
- 1 tbsp olive oil
- 1 tsp Italian seasoning
Quick Steps:
- Grill the peppers and onion with olive oil and seasoning for 6 to 8 minutes until softened.
- Grill the flatbreads for 1 minute per side to warm and mark them.
- Spread sauce over the flatbreads, add mozzarella, sausage, and vegetables.
- Return to the grill and close the lid for 2 to 3 minutes until the cheese melts.
- Slice and serve hot.
Equipment for This Recipe:
- Grill
- Tongs
- Spatula
- Knife
How to Serve This Dish: Cut it into strips or squares and pass it around like pizza. A green salad or a bowl of olives fits naturally beside it. I like finishing with a small drizzle of olive oil because it keeps the top from tasting dry.
Pro Tips for This Recipe:
- Use cooked sausage so the flatbread doesn’t need to stay on the grill too long.
- Keep the sauce layer thin.
- Warm the flatbread first so it doesn’t turn stiff under the toppings.
Variations on This Dish:
- White Flatbread: Use ricotta instead of pizza sauce.
- Spicy Sausage Version: Add crushed red pepper and hot sausage.
- Veggie-Only: Skip the sausage and add mushrooms or zucchini.
Common Mistakes to Avoid with This Dish:
- Don’t drown the flatbread in sauce.
- Don’t overload it with toppings.
- Don’t forget the quick pre-grill step on the bread.
26. Peach-Glazed Chicken Breasts
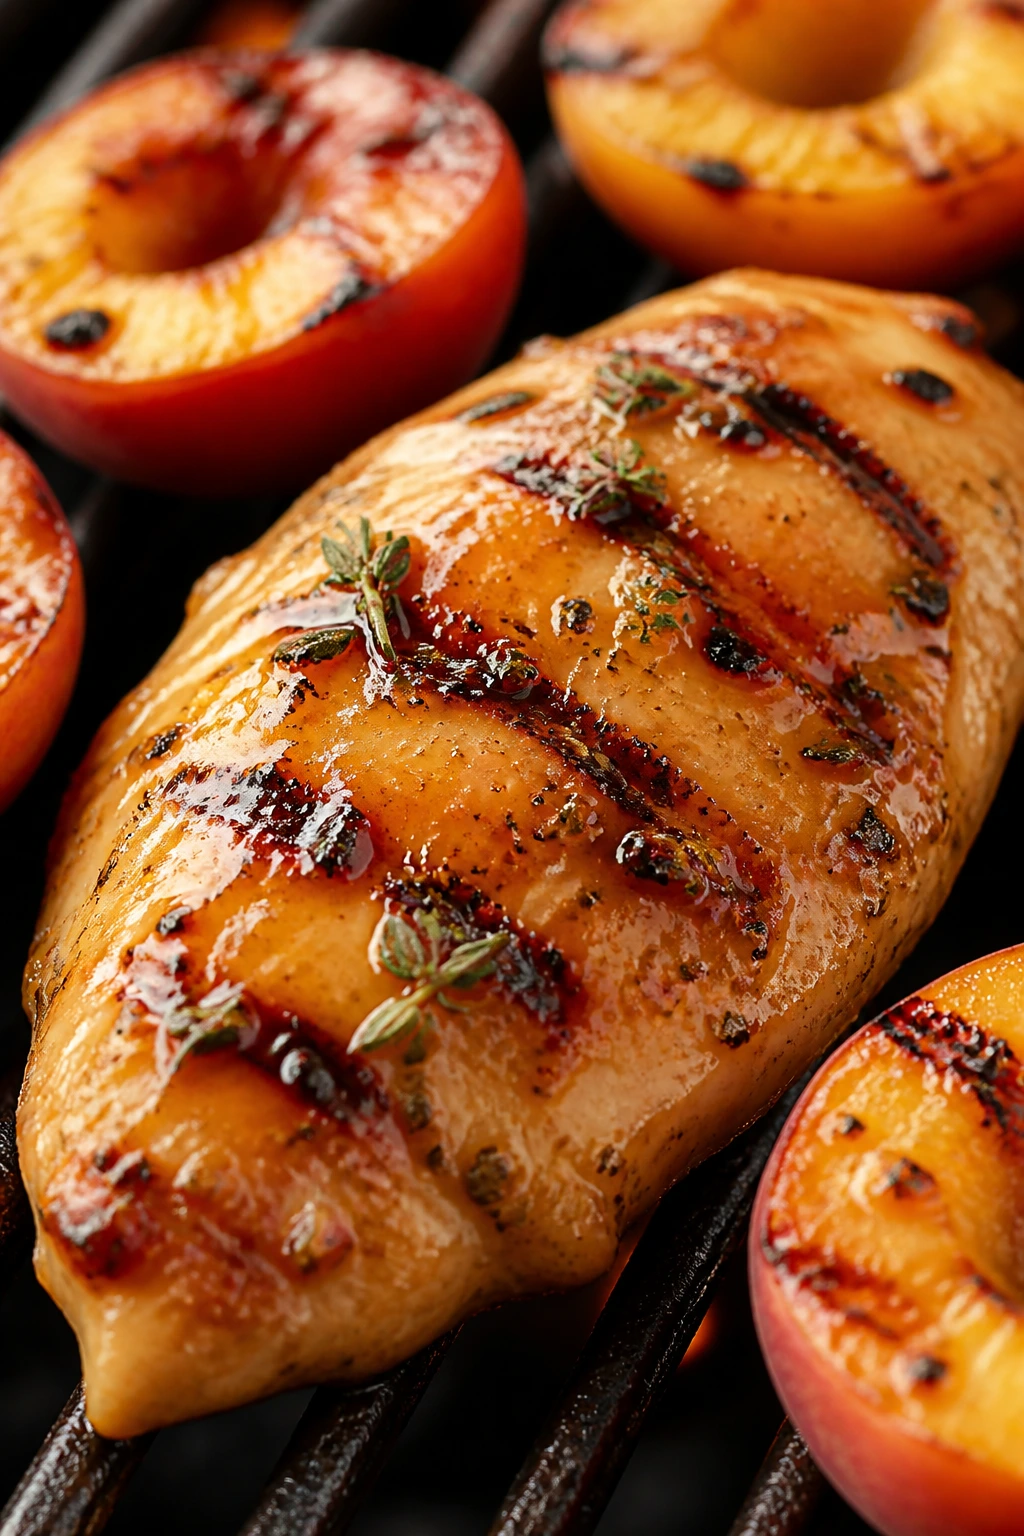
Peaches on the grill are a small reward for very little effort. Add them to chicken breasts and a honey-vinegar glaze, and the result lands somewhere between dinner and a backyard dessert course.
Why It Works: Chicken breasts need moisture help, and peaches bring sweetness plus a little juice. Vinegar keeps the glaze from tasting syrupy, while thyme pulls it back toward savory territory. Grilling the peaches first deepens their flavor and gives the glaze a softer fruit note.
Key Ingredients:
- 4 chicken breasts, about 1½ lbs total
- 2 ripe peaches, halved and pitted
- 2 tbsp honey
- 1 tbsp apple cider vinegar
- 1 tsp fresh thyme leaves
- 2 tbsp olive oil
- 1 tsp kosher salt
- ½ tsp black pepper
Quick Steps:
- Whisk the honey, vinegar, thyme, olive oil, salt, and pepper.
- Brush the chicken and peaches with the mixture.
- Grill the peaches cut-side down for 3 to 4 minutes, then the chicken for 5 to 6 minutes per side over medium heat.
- Brush the chicken with extra glaze during the last 2 minutes, cooking until it reaches 165°F.
- Slice the peaches and serve them beside or on top of the chicken.
Equipment for This Recipe:
- Grill
- Pastry brush
- Tongs
- Instant-read thermometer
How to Serve This Dish: Put the chicken on a platter and tuck the peach halves around it or slice them over the top. Rice, couscous, or grilled green beans all work here. I like keeping the presentation a little loose so the fruit looks rustic instead of fussy.
Pro Tips for This Recipe:
- Pound thick chicken breasts to even thickness so they finish together.
- Use ripe but not mushy peaches.
- Brush glaze near the end so the honey doesn’t burn.
Variations on This Dish:
- Balsamic Peach Version: Swap vinegar for balsamic.
- Herby Version: Add chopped basil to the finish.
- Pork Swap: The same glaze works on pork chops.
Common Mistakes to Avoid with This Dish:
- Don’t use unripe peaches; they stay sharp and dry.
- Don’t grill the chicken over blazing heat the whole time.
- Don’t slice the breasts before they rest.
27. Flank Steak with Chimichurri
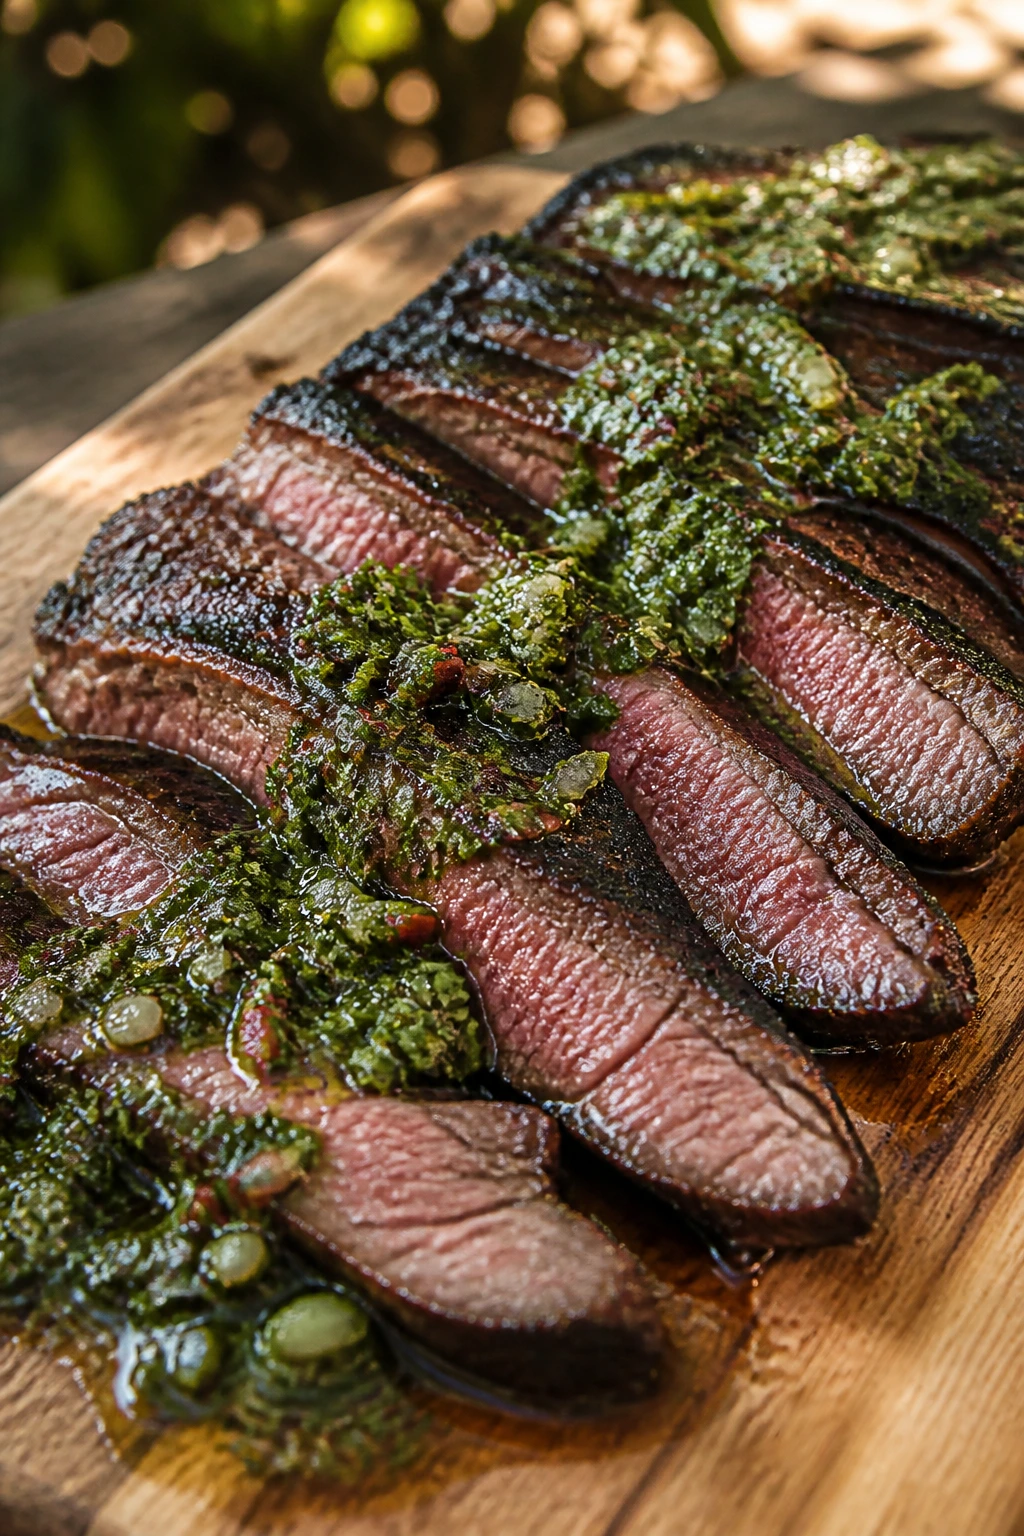
Flank steak is one of the best examples of why the grill still matters. You get a charred crust, a juicy middle, and a sauce that tastes alive because you made it with fresh herbs instead of a bottled shortcut.
Why It Works: Flank steak has a bold grain that slices beautifully when you cut it against the grain. Chimichurri is sharp, herb-heavy, and oily enough to cling to the meat without burying it. The grill handles flank steak quickly, which is exactly what the cut wants.
Key Ingredients:
- 1¾ lbs flank steak
- 1 cup parsley leaves
- ½ cup cilantro leaves
- 3 cloves garlic
- ⅓ cup olive oil
- 2 tbsp red wine vinegar
- 1 tsp red pepper flakes
- 1 tsp kosher salt
Quick Steps:
- Chop the parsley, cilantro, and garlic, then stir them with olive oil, vinegar, red pepper flakes, and salt.
- Let the chimichurri sit while you season the steak with a little salt and pepper.
- Preheat the grill to high and oil the grates.
- Grill the flank steak for 4 to 6 minutes per side for medium-rare, then rest 10 minutes.
- Slice thinly against the grain and spoon the chimichurri over the top.
Equipment for This Recipe:
- Grill
- Knife
- Cutting board
- Small bowl
How to Serve This Dish: Serve it with grilled potatoes, rice, or a tomato salad. Chimichurri also makes leftovers better, which is a nice little bonus. I like serving the sauce on the side and spooning more over the sliced meat at the table.
Pro Tips for This Recipe:
- Let the steak rest a full 10 minutes before slicing.
- Cut thin slices against the grain or the steak feels chewy.
- Make the chimichurri first so it has time to loosen and brighten.
Variations on This Dish:
- Mint Chimichurri: Add a little mint for a fresher edge.
- Spicy Version: Double the red pepper flakes.
- Skewer Version: Cube the steak and use the same sauce on kebabs.
Common Mistakes to Avoid with This Dish:
- Don’t slice flank steak with the grain.
- Don’t overcook it unless you mean to.
- Don’t skip the salt on the meat itself; the sauce is not a replacement.
28. Grilled Veggie and Hummus Pitas
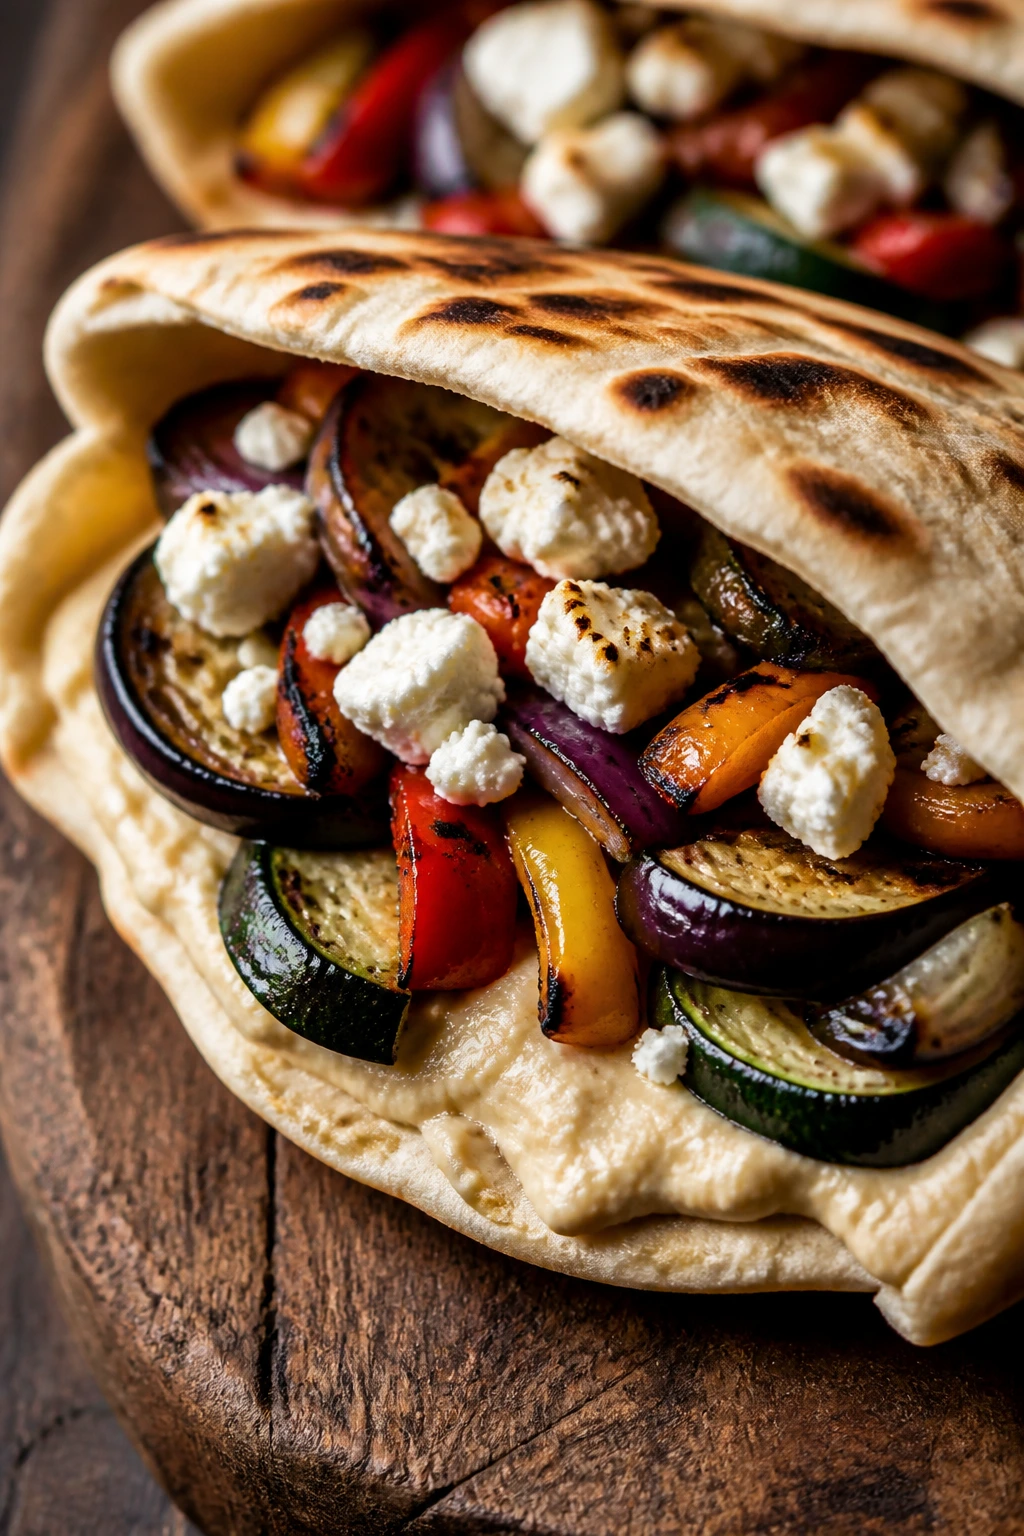
Vegetable pitas are the quiet member of the grill dinner group, and they hold their own if you treat the vegetables like the main event. The char, the hummus, and the warm bread make this feel like dinner instead of a side plate.
Why It Works: Eggplant, zucchini, peppers, and onions all take well to high heat and finish with a sweet, smoky edge. Hummus gives the pita a creamy base without any cooking at all. Feta and lemon keep the sandwich from tasting like a pile of warm vegetables, which is where a lot of versions go wrong.
Key Ingredients:
- 2 zucchini, sliced lengthwise
- 1 small eggplant, sliced into rounds
- 2 bell peppers, cut into wide strips
- 1 red onion, sliced into thick rounds
- 3 tbsp olive oil
- 1 tsp kosher salt
- 1 cup hummus
- 4 pitas
- ½ cup crumbled feta
- Juice of ½ lemon
Quick Steps:
- Toss the zucchini, eggplant, peppers, and onion with olive oil and salt.
- Grill the vegetables over medium-high heat for 3 to 4 minutes per side until browned and tender.
- Warm the pitas on the grill for about 30 seconds per side.
- Spread hummus inside each pita, add the vegetables, then finish with feta and lemon juice.
- Serve right away while the bread is still soft and warm.
Equipment for This Recipe:
- Grill
- Tongs
- Mixing bowl
- Knife and cutting board
How to Serve This Dish: These pitas are good as-is, or you can tuck in a few olives and cucumber slices. They also work beside grilled chicken if you want a mixed spread. I like wrapping them in parchment for a minute so the pita softens around the filling.
Pro Tips for This Recipe:
- Slice the vegetables thick enough that they hold shape on the grill.
- Don’t overoil them or they’ll slip and flare.
- Warm the pitas last so they don’t dry out.
Variations on This Dish:
- Falafel Style: Add store-bought falafel if you want more heft.
- Tzatziki Version: Swap hummus for tzatziki and add cucumbers.
- Spicy Spread: Stir harissa into the hummus.
Common Mistakes to Avoid with This Dish:
- Don’t underseason the vegetables; salt matters here.
- Don’t let the pitas sit on the grill too long or they turn brittle.
- Don’t pile the filling so high that the sandwich tears before the first bite.
Why the Grill Makes Dinner Feel Easier

The grill cuts out a lot of the clutter that comes with indoor cooking. You don’t need three pans warming on the stove, and you don’t need to hover over a pot while a sauce threatens to break. What you need is heat control, timing, and a little trust in the grate. That’s why these dinners work so well together: the same piece of equipment can handle lemony chicken thighs, quick shrimp, a sticky pork tenderloin, and a flatbread with melted cheese if you set it up the right way.
Direct heat is the fast lane. Indirect heat is the safety net. Once you know how to use both, the rest of grill cooking gets easier to read. Chicken thighs can take the hottest spot, salmon can sit a little farther away, and sausages or tenderloin can move around as the cook develops. That flexibility is what keeps the food from feeling rushed.
I also like the way the grill makes seasoning more honest. Salt, acid, herbs, sugar, and fat all show up more clearly when there’s a little char underneath them. A bland marinade stays bland. A good one gets louder in the right places. That’s why citrus, mustard, garlic, soy, and fresh herbs appear so often in these recipes; they all stand up to smoke without turning muddy.
And yes, cleanup matters. A grill basket, a foil packet, a skewer, or a single cast-iron skillet can keep the mess down enough that you don’t resent the meal by the time it’s over. That part counts.
Essential Equipment for These Recipes
- Gas or charcoal grill: Either works; charcoal gives more smoke, gas gives tighter heat control.
- Long-handled tongs: You need a pair that can flip chicken, shrimp, and vegetables without crowding your hands.
- Instant-read thermometer: The best insurance against dry chicken, undercooked pork, and overcooked fish.
- Skewers: Metal is easiest, but wooden skewers work if you soak them first.
- Grill basket or grill-safe skillet: Useful for peppers, onions, mushrooms, shrimp, and anything small enough to fall through the grates.
- Heavy-duty foil: Foil packets need a thicker sheet so the seams don’t split.
- Pastry brush: Handy for glaze, sauce, and oiling the grates.
- Sharp chef’s knife: You’ll use it on onions, peppers, chicken, and steak, so dull blades become a headache fast.
- Cutting board with a moat if you have one: Juicy meat and fruit both leak.
- Serving platter or rimmed tray: Keeps hot food contained and makes the final transfer easier.
Smart Shopping and Ingredient Tips
The easiest way to make grill dinner better is to buy ingredients that already know how to cook well. Chicken thighs are more forgiving than breasts, especially if your grill has hot spots. Pork chops should be at least 1 inch thick so they don’t dry out before the middle catches up. Salmon fillets with the skin on are easier to move and less likely to tear when you slide them off the grate. Shrimp should be large enough that you can turn them without losing the whole meal to a 60-second mistake.
For vegetables, choose pieces that hold shape: zucchini that feels firm, peppers with tight skin, onions that aren’t sprouting, and mushrooms that are dry rather than slick. Halloumi should be pleasantly springy in the package, not wet and loose. With fruit, pick peaches or pineapple that smell like something before you cut them open. Weak fruit tastes weak on the grill. That sounds blunt, but it’s true.
Sauces and condiments matter too. Pick a BBQ sauce you’d eat from a spoonful if you had to, because grill heat makes cheap sauce taste cheaper. Dijon, soy sauce, pesto, teriyaki, hummus, and Caesar dressing all do better when they’re not fighting bland protein. If you’re buying tortillas or pitas, go for the soft ones that don’t crack immediately when folded. And if you’re using buns or rolls, toast them. Every time.
One last thing: don’t buy the smallest package of everything just because it seems neat. Grilling likes some margin. Extra lemon, an extra bell pepper, a backup onion, and a second lime save you when one piece of produce is duller than expected.
How to Serve These Recipes
Presentation: Put grilled meats on a warm platter and keep the sliced edges visible. Salmon, steak, and pork look better when the cut surface faces up, while skewers and kabobs benefit from a scatter of herbs or lemon wedges that break up the lines.
Accompaniments: Grilled corn, potato salad, slaw, rice, couscous, cucumber salad, roasted potatoes, and simple greens all play well with this whole set. Bread matters too: toasted buns, pitas, flatbread, and warm tortillas turn the grilled fillings into complete dinners without much extra work.
Portions: Plan on 6 to 8 oz of meat or fish per adult for the richer mains, 2 skewers for shrimp or chicken kabobs, and 1 to 2 burgers per person depending on size. Vegetable dishes and flatbreads tend to disappear faster than you expect, so make a little extra if that’s the centerpiece.
Beverage Pairing: Crisp lager, sparkling water with lime, dry rosé, iced tea with lemon, and light beer all sit comfortably beside grilled food. If the meal is heavy on smoke or spice, keep the drink cold and clean rather than sweet.
Additional Tips and Flavor Boosters
Flavor Enhancement: A finishing squeeze of lemon, lime, or vinegar does more work than another half-hour of marinating. Add the acid right at the end so the grilled flavors stay sharp.
Customization: Keep a small bowl of chopped herbs, sliced scallions, or crumbled cheese on the side and let people finish their own plates. That one move makes the same dinner feel different without extra cooking.
Serving Suggestions: Use a little texture. Crunchy slaw, toasted bread, pickled onions, or a handful of herbs can keep grilled dinners from feeling too soft or too smoky.
Make-It-Yours: Want lower dairy? Skip the cheese and lean on herb sauces or hummus. Need gluten-free? Use corn tortillas, rice bowls, lettuce wraps, or grilled potatoes instead of buns and pita. Want more heat? Add chili crisp, jalapeño, crushed red pepper, or chipotle powder in small amounts so the smoke stays readable.
Make-Ahead, Storage, and Reheating Guidance
Most grilled chicken, pork, and beef keep well in the refrigerator for 3 to 4 days in a shallow container. Shrimp and salmon are better used within 2 days, because the texture starts to slide sooner. Grilled vegetables hold for about 3 days, while sauces like chimichurri, glaze, pesto, and yogurt dressings usually keep for 4 to 5 days if stored separately in sealed containers.
For freezing, cooked chicken thighs, pork tenderloin, sausage, and steak tips can hold for up to 2 months if wrapped tightly and packed with the air pressed out. Salmon and shrimp freeze less gracefully, but if you must, keep them for no more than 1 month and expect a softer texture after thawing. Flatbreads and quesadillas are best fresh, though you can freeze the filling parts and assemble later.
Reheating needs a gentler hand than people often give it. Chicken and pork warm well in a 300°F oven, covered loosely with foil and with a spoon of water or sauce nearby to keep the edges from drying. Steak is best sliced and warmed briefly in a skillet over low heat. Seafood should be reheated only until just warm; a 275°F oven for a few minutes works better than a hard blast. For pizza, flatbread, and quesadillas, use a dry skillet or a hot oven rather than the microwave, which turns the crust soft and strange.
Make-ahead prep works well for almost everything in this collection. You can marinate chicken and pork the night before, chop vegetables a day ahead, and mix sauces a few days in advance. I would not marinate shrimp for long, and I would not cook salmon too far ahead unless you’re fine eating it chilled the next day.
Variations and Adaptations to Try
Gluten-Free Grill Board: Swap buns for lettuce cups, tortillas for corn tortillas, and flatbread for grilled vegetables, rice bowls, or potatoes. The grilling itself doesn’t change much; the finishing starch does all the work.
Dairy-Free Dinner Lineup: Skip cheese-heavy recipes or replace them with hummus, avocado, chimichurri, or a simple herb oil. The grilled food still tastes complete if the finishing sauce has enough salt and acid.
Low-Sodium Smoke and Citrus: Cut back on packaged sauces and lean harder on lemon, lime, garlic, onion, smoked paprika, cumin, and fresh herbs. The grill adds flavor on its own, which means you don’t need to over-salt to get something worthwhile.
Heat-Lover’s Version: Add jalapeños, hot sauce, chipotle powder, red pepper flakes, or chili crisp in small, focused amounts. The goal is warmth with a shape to it, not a plate that tastes like hot sauce poured over everything.
Family-Mild Swap: Keep the main protein simply seasoned, then put extra sauce, pickled onions, and chili oil on the table so adults can add more at will. That saves you from making two separate dinners.
Vegetable-Forward Night: Build the meal around halloumi, tofu, grilled mushrooms, pitas, flatbreads, and big salads. You can still use the grill for high flavor without relying on meat to carry the plate.
Common Mistakes to Avoid
Starting on a dirty or cold grate: Food sticks, tears, and leaves half its crust behind. Preheat the grill long enough to burn off residue, then oil the grates right before the food goes on.
Using sauce too early: Sugar-heavy barbecue sauce, maple glazes, and teriyaki can blacken before the inside is done. Brush them on near the end, not at the beginning.
Crowding the surface: Chicken thighs, shrimp, vegetables, and skewers all need some breathing room. When they’re packed too tightly, they steam instead of browning, and the grill loses the very thing that makes it useful.
Ignoring the thermometer: Color lies. Pork can look done and still be under temperature. Chicken can look pale and be perfectly safe. Fish can flake early and still need a minute. A thermometer cuts through guesswork.
Skipping the rest: Steak, pork, and chicken need a pause after grilling or the juices run straight out when you cut them. Even 5 minutes helps. More for flank steak. Less for shrimp and flatbread, which don’t need it.
Treating every cut the same: Salmon wants gentler heat than burgers. Shrimp need minutes, not patience. Halloumi and tofu want oil and dry surfaces. If you force everything into one grilling pace, something gets sacrificed.
Frequently Asked Questions
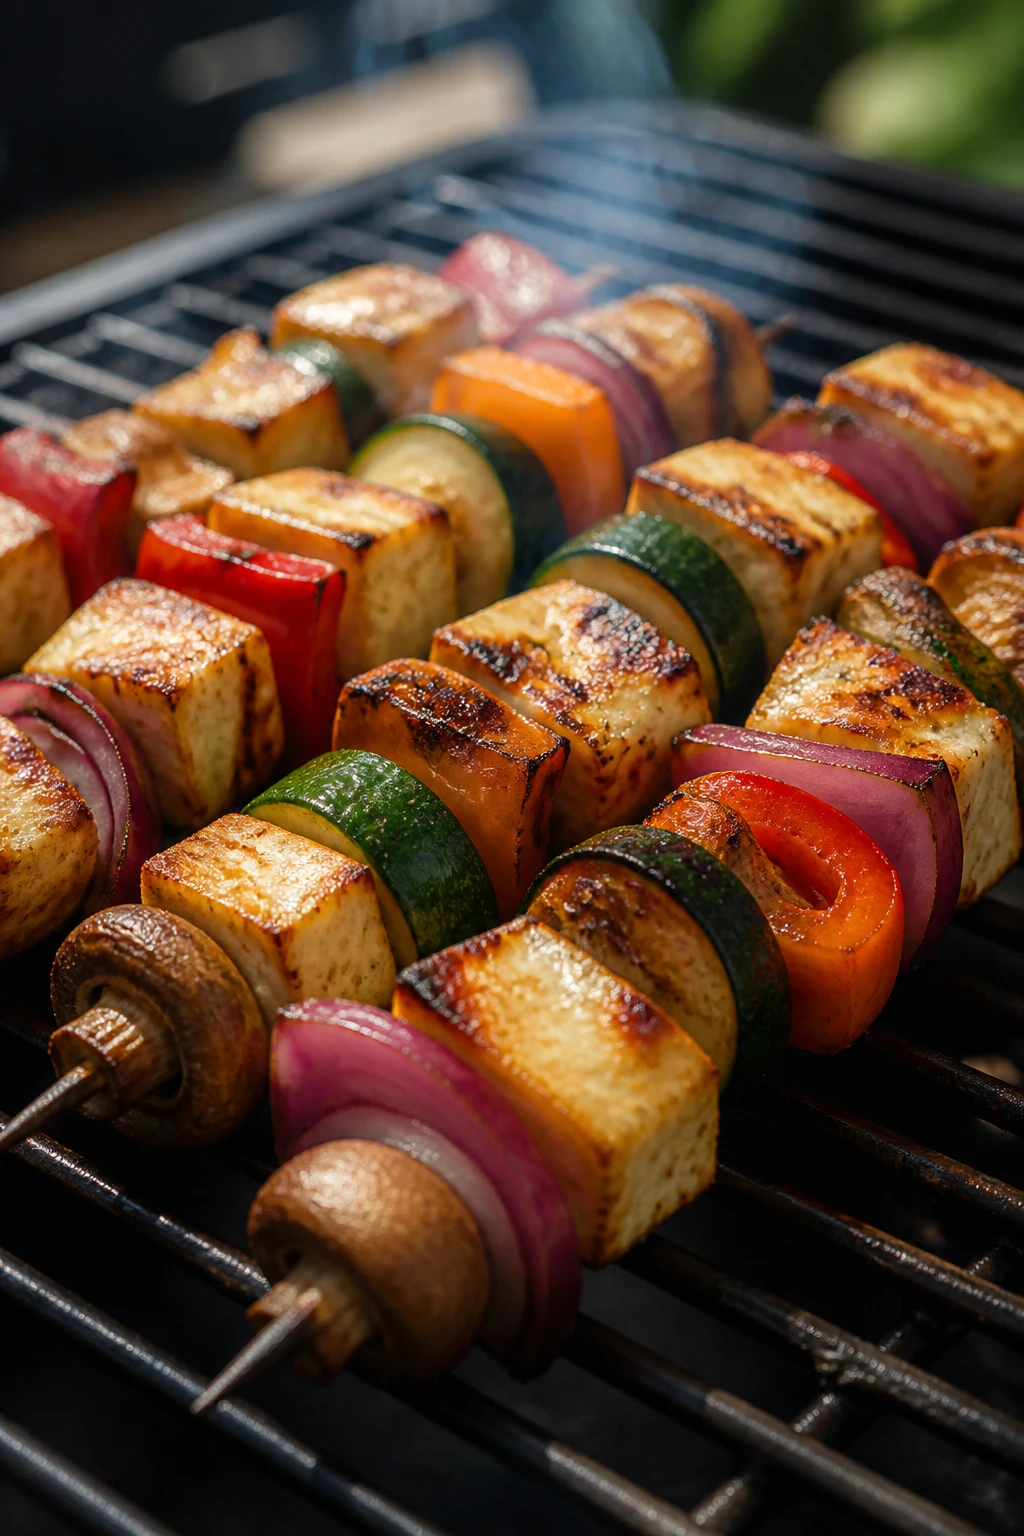
Can I cook all of these on a gas grill instead of charcoal?
Yes. Gas grills make it easier to control hot and cool zones, which helps a lot with chicken, pork, and salmon. If you want more smoke, use wood chips or a cedar plank, but the recipes still work well without them.
What if I only have a grill pan or cast-iron skillet?
You can still make most of these indoors on a very hot grill pan or skillet. Use the same temperatures and timing cues, but expect less smoke and a little more splatter. Foil packets, burgers, shrimp, and quesadillas adapt especially well.
How do I keep chicken from sticking to the grates?
Preheat the grill, oil the grates, and let the chicken sear before you try to flip it. If it fights you, give it another minute. Once it browns, it usually releases on its own.
Can I make the marinades the night before?
Yes for chicken, pork, steak, and tofu. Shrimp should only sit in acid for a short time, and fish should be seasoned closer to grilling time. Sauces can usually be mixed a day or two ahead and stored cold.
What’s the safest way to tell chicken and pork are done?
Use an instant-read thermometer. Chicken should reach 165°F in the thickest part, while pork chops and tenderloin should reach 145°F and rest before slicing. That one tool saves you from both dry meat and guesswork.
How do I keep shrimp from turning rubbery?
Use large shrimp, marinate briefly, and grill them only until they turn opaque and form a loose C shape. If they curl into tight little rings, they’ve gone too far.
Can I freeze leftover grilled food?
Chicken, pork, beef, and sausage freeze well for a couple of months if packed tightly. Fish and shrimp are less forgiving, so I’d treat them as short-term leftovers instead. Reheat gently to protect the texture.
What sides work best if I’m feeding a mixed crowd?
Grilled corn, potato salad, rice, slaw, and a big green salad work with almost everything here. If you want one side that fits nearly all 28 recipes, do a crisp slaw with lemon or vinegar instead of a creamy dressing. It sits next to smoky food without getting lost.
A Better Weekend Grill Routine
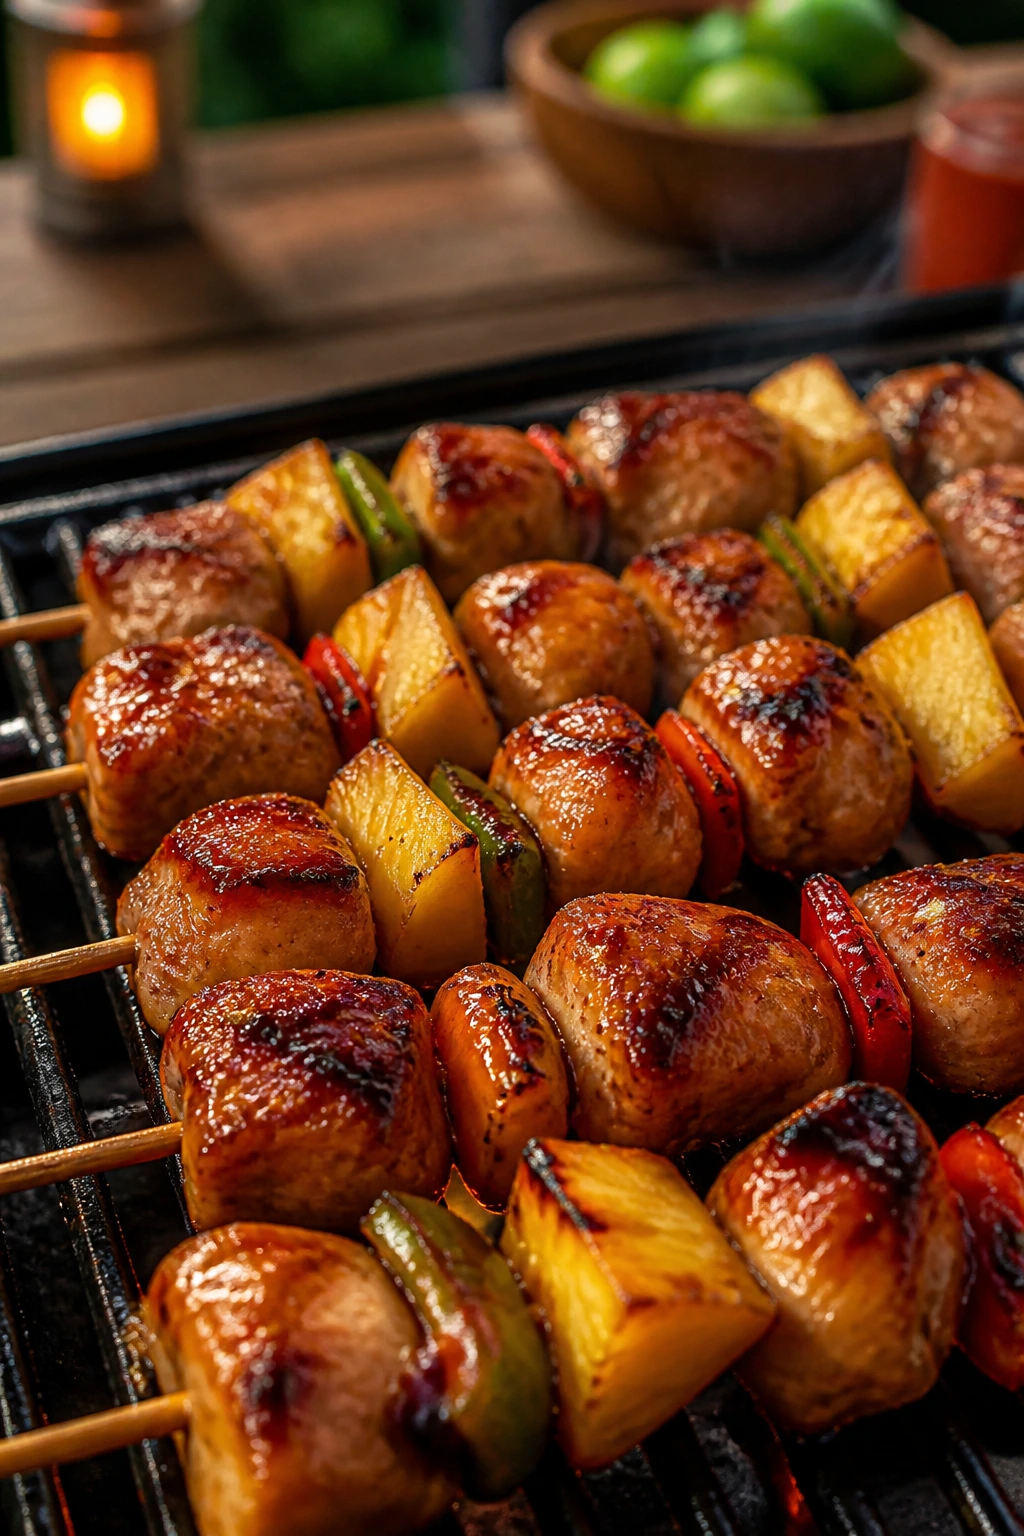
The best part of grill dinner is not the smoke or the char. It’s the way the whole meal can feel relaxed without being careless. A good grate, a sharp thermometer, and a few smart marinades turn plain ingredients into something people actually remember, even if they only remember the crisp edge on the salmon or the sticky glaze on the drumsticks.
If you keep a few of these recipes on repeat, the grill stops feeling like a special event and starts acting like a very efficient dinner machine. That’s the sweet spot: food with enough personality to justify lighting the fire, but simple enough that you’re not stuck washing pans when everyone else is already eating.