
The best easy summer meals for backyard cookouts are the ones that keep the grill busy, the plates moving, and the cook out of the kitchen. You want smoke, char, and food that still tastes good after it has sat on a platter for five minutes while everybody hunts for napkins, ketchup, and a clean fork.
That’s the real test. Not whether a recipe looks polished in a photo. Whether it survives a hot grate, a few hungry hands, and the awkward pause while the last batch finishes cooking. The strongest cookout meals do exactly that: they use simple ingredients, short cooking times, and flavors that hold up when the sun is still warm and the food has to travel from grill to table without drama.
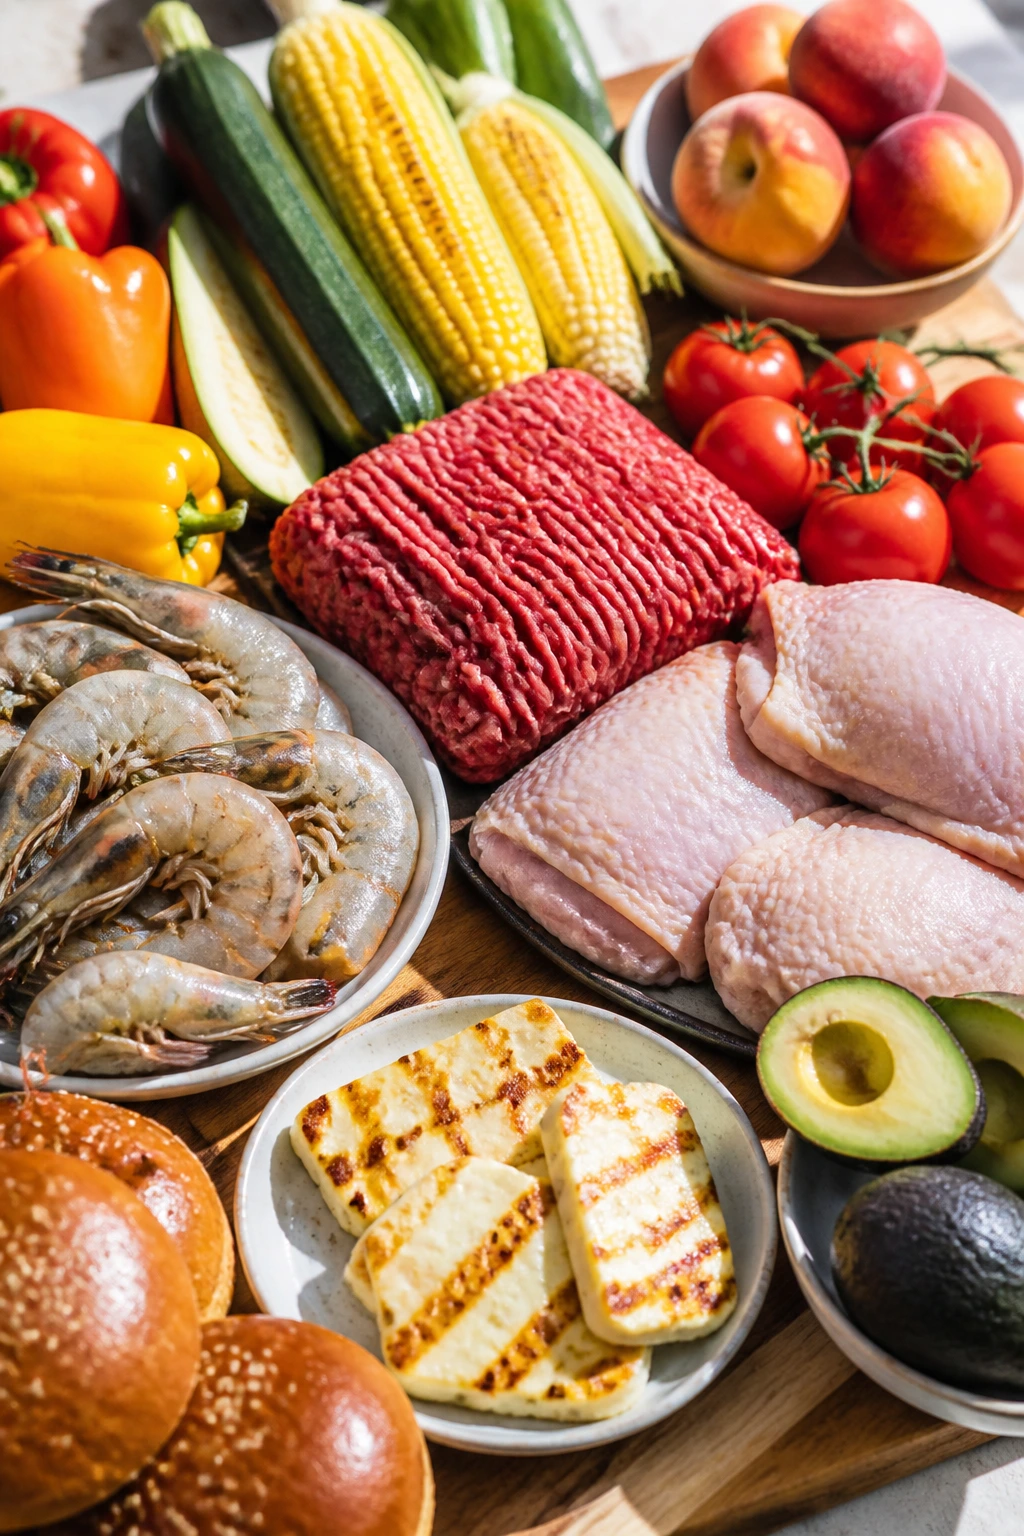
I like recipes that behave. Give me burgers that sear fast, chicken that can take a little char, foil packets that cook while I deal with the buns, and tacos that assemble without turning soggy before the first bite. These 28 recipes lean that way on purpose, and they cover the whole spread — meat, seafood, vegetarian mains, handhelds, and a few smart backups for the people who always arrive hungry.
Why This Cookout Lineup Works

-
Fast on the grill: Most of these meals cook in under 30 minutes, which means you spend more time eating and less time babysitting flames.
-
Easy to batch: Burgers, skewers, sliders, foil packets, and tacos all scale well when the guest count grows by two or three people.
-
Built for heat: These recipes use sauces, marinades, slaws, and toppings that stay lively even after the food leaves the grate.
-
Flexible with sides: Corn, potato salad, chips, grilled fruit, pasta salad, and slaw all fit next to these dishes without clashing.
-
Real crowd variety: Beef, chicken, pork, shrimp, salmon, halloumi, black beans, and pasta show up here, so nobody gets stuck eating the same thing twice.
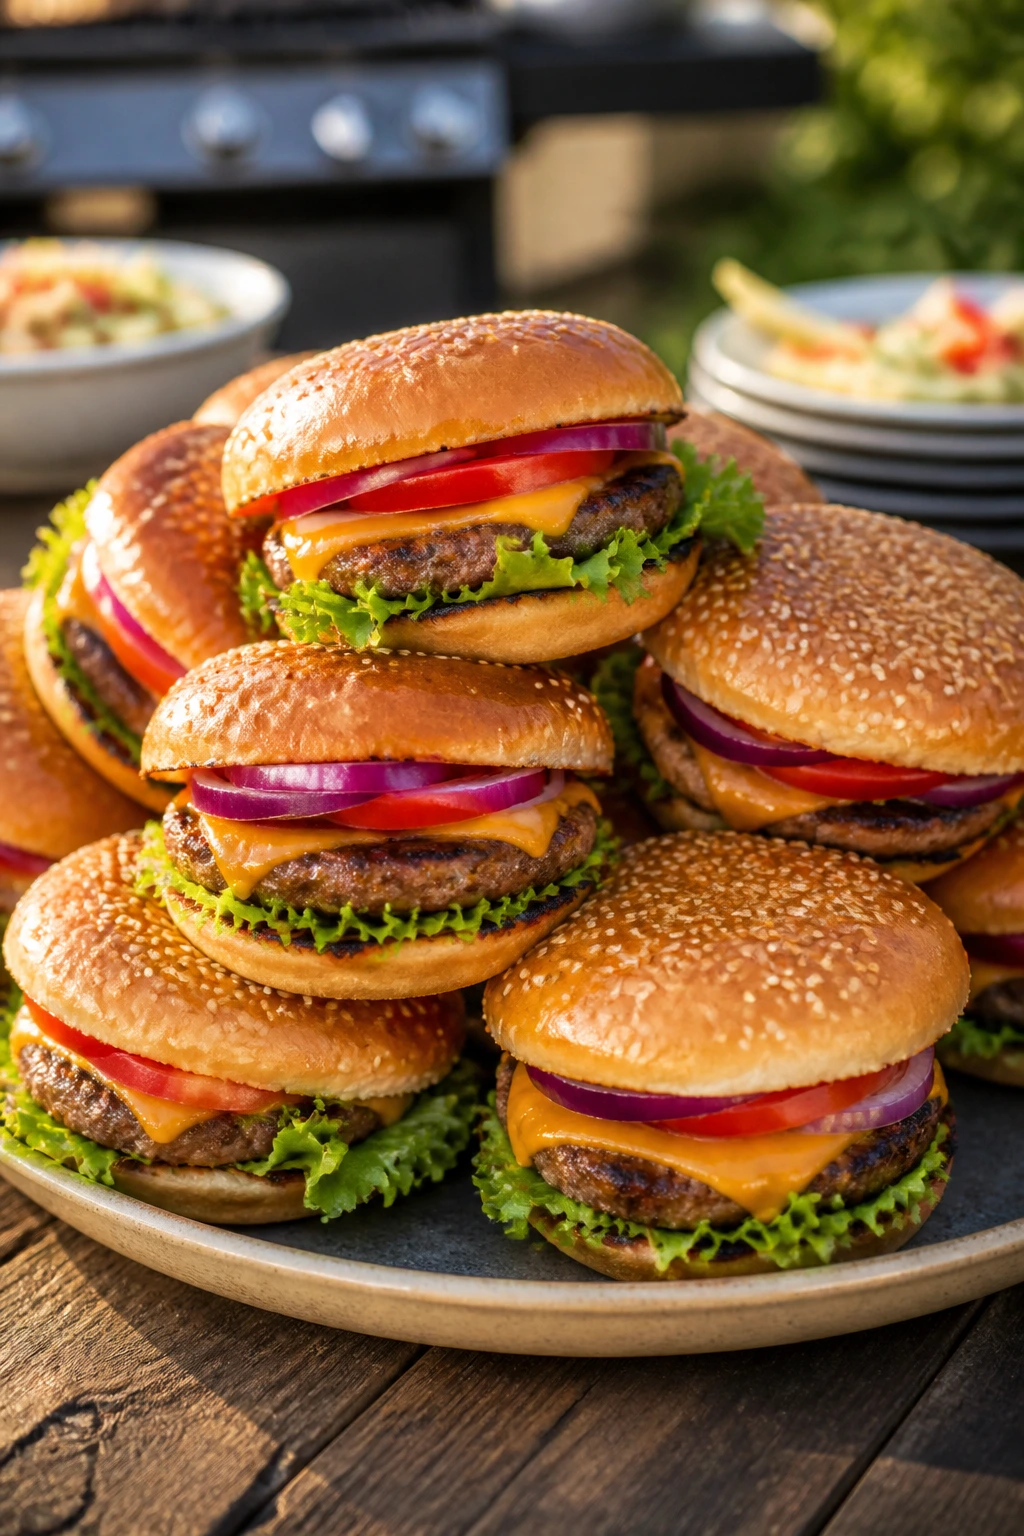
1. Smash Burgers with Special Sauce
A good smash burger smells like beef fat hitting a hot surface and turning nutty at the edges. The patties get thin and crisp fast, which is exactly why they work so well at a backyard cookout — no one stands around waiting on a thick burger to cook through.
Why It Works:
The smash gives you a browned crust in about 2 minutes, and that crust is the whole point. Thin patties cook evenly, the buns toast fast, and the sauce brings enough tang to cut through the beef. This is one of those recipes that looks casual but feels organized once the burgers start landing on the platter.
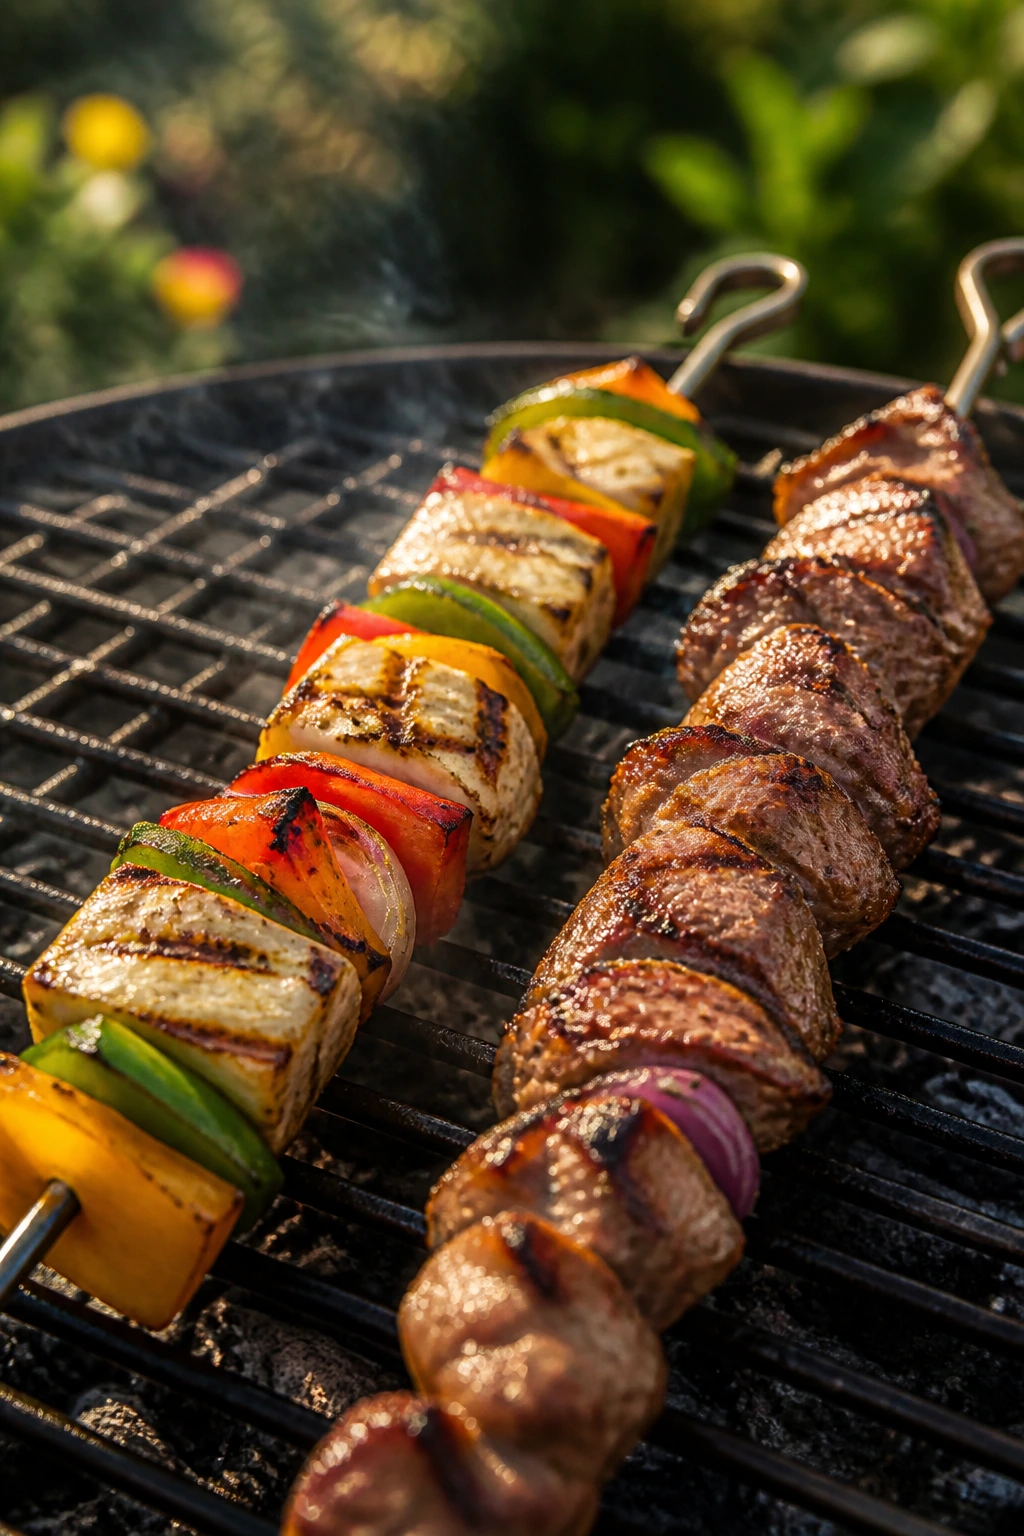
Key Ingredients:
- 1 1/2 lb ground beef, 80/20
- 1 1/2 tsp kosher salt
- 1 tsp black pepper
- 1 large yellow onion, thinly sliced
- 1 tbsp neutral oil
- 4 slices American cheese
- 4 soft burger buns
- 1/4 cup mayonnaise
- 2 tbsp ketchup
- 1 tbsp sweet pickle relish
- 1 tsp yellow mustard
Quick Steps:
- Mix the mayo, ketchup, relish, and mustard in a small bowl. Chill it while you cook.
- Preheat a grill with a cast-iron griddle or skillet to high heat, about 450°F.
- Form the beef into 8 loose balls and season them with salt and pepper right before cooking.
- Cook the onions with the oil until soft and browned at the edges, about 8 minutes.
- Smash the beef balls onto the hot surface and cook 2 minutes, flip, add cheese, and cook 30 to 45 seconds more.
- Toast the buns and assemble with sauce and onions.
Equipment for This Recipe:
- Grill with a flat griddle or cast-iron skillet
- Wide metal spatula
- Small mixing bowl
- Tongs
How to Serve This Dish:
Stack the burgers on a tray with pickles and extra sauce on the side. A pile of kettle chips or a chopped iceberg salad keeps the plate from feeling too heavy.
Pro Tips for This Recipe:
- Smash once. Don’t press after the flip or you lose the crust.
- Salt the beef right before it hits the heat so it stays juicy.
- If the onions are sticking, add a teaspoon more oil and lower the heat for a minute.
- Use soft buns. Brioche or potato buns hold the sauce better than crusty rolls.
Variations on This Dish:
- Bacon-Backyard Version: Add a strip or two of crisp bacon and swap the sauce for barbecue mayo.
- Pepper Jack Heat: Use pepper jack instead of American and add sliced jalapeños.
- Lettuce-Wrapped Option: Skip the buns and use two sturdy lettuce leaves for a lighter, messier, better-for-hot-weather version.
Common Mistakes to Avoid with This Dish:
- Smashing too late: If you wait until the beef starts cooking, the patty won’t spread evenly. Smash immediately.
- Using medium heat: The crust needs high heat. A lukewarm griddle gives you gray burgers.
- Skipping the sauce balance: Too much mayo makes the burger flat. The relish and mustard matter.
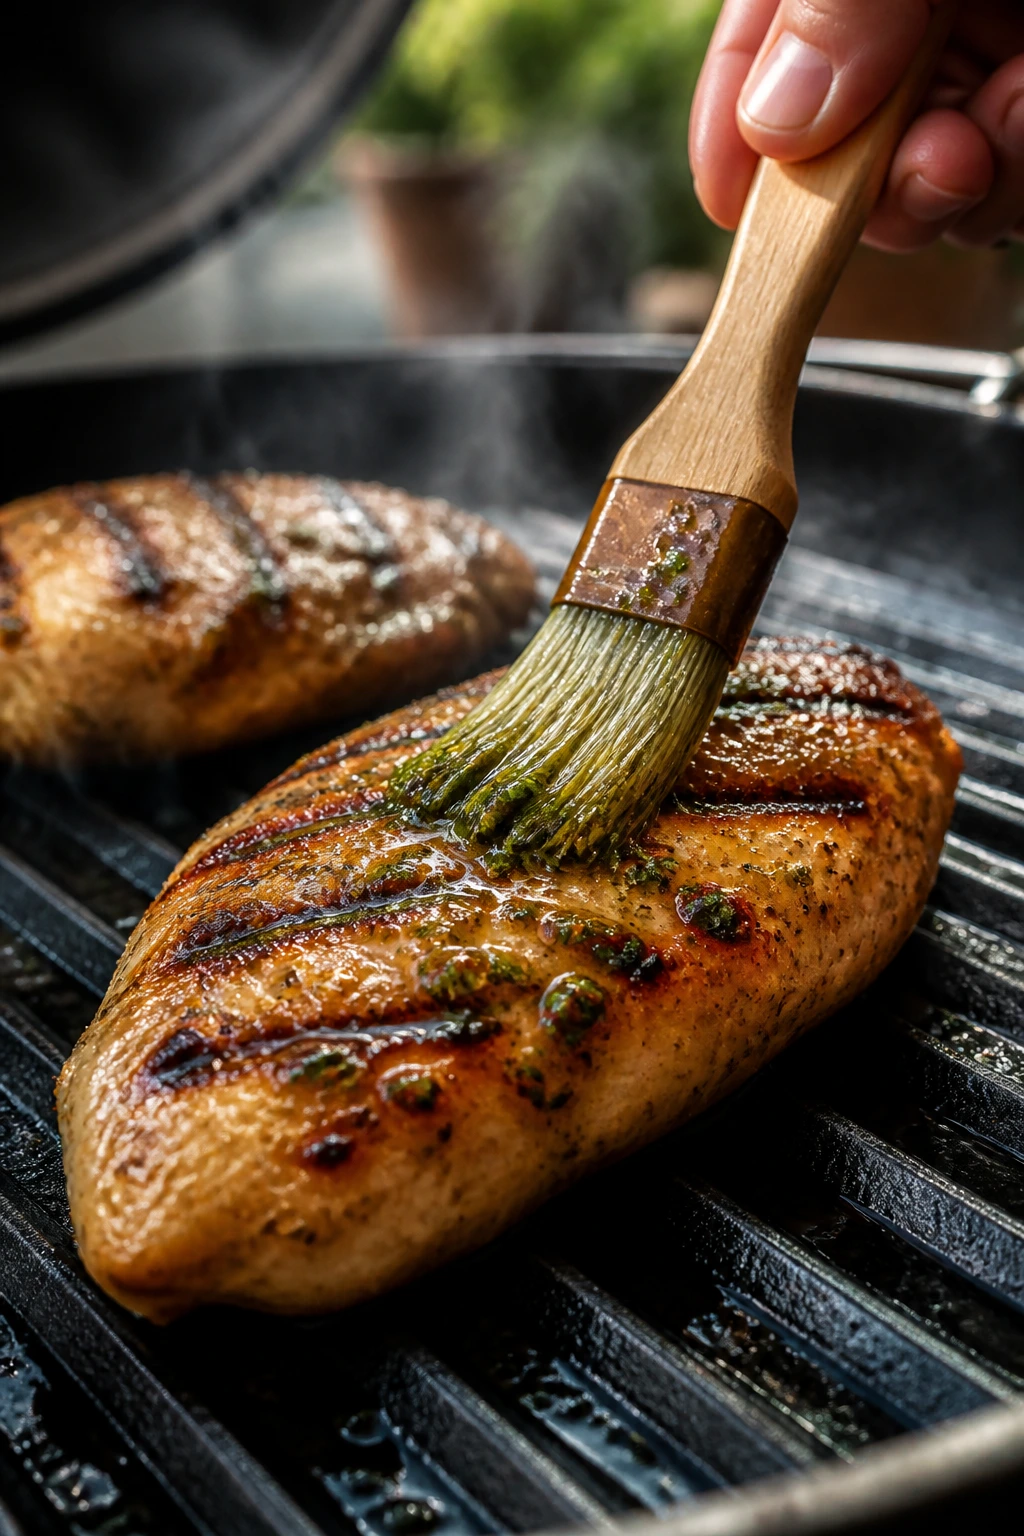
2. Lemon-Garlic Chicken Skewers
These skewers smell like lemon peel and garlic the second they hit the grill. They cook fast, they look tidy on a platter, and they’re the kind of thing people actually reach for when the table is crowded.
Why It Works:
Chicken thighs stay tender over high heat, which is a gift on a busy grill. The lemon loosens the richness, the garlic brings sharpness, and the skewers give you built-in portioning. I like recipes that make serving easier before the first bite even happens.
Key Ingredients:
- 1 1/2 lb boneless, skinless chicken thighs, cut into 1 1/2-inch pieces
- 3 tbsp olive oil
- 2 tbsp lemon juice
- 2 tsp lemon zest
- 3 garlic cloves, grated
- 1 1/2 tsp dried oregano
- 1 tsp kosher salt
- 1/2 tsp black pepper
- 2 bell peppers, cut into squares
- 1 red onion, cut into chunks
Quick Steps:
- Whisk the oil, lemon juice, zest, garlic, oregano, salt, and pepper.
- Toss the chicken with the marinade and rest it 20 to 30 minutes.
- Thread the chicken, peppers, and onion onto skewers.
- Preheat the grill to medium-high, about 425°F.
- Grill the skewers 10 to 12 minutes, turning every 2 to 3 minutes, until the chicken reaches 165°F and the edges are lightly charred.
- Rest 3 minutes before serving.
Equipment for This Recipe:
- Grill
- Skewers, metal or soaked bamboo
- Mixing bowl
- Instant-read thermometer
How to Serve This Dish:
Serve the skewers over rice, warm pita, or a chopped cucumber salad. A spoon of garlicky yogurt or tzatziki on the side helps catch the juices.
Pro Tips for This Recipe:
- Cut the chicken the same size so it cooks at the same pace.
- Leave a little space between pieces on the skewer; crowded chicken steams.
- If using bamboo skewers, soak them for at least 30 minutes.
- Keep one skewer for peppers and onion only if you want a meatless backup.
Variations on This Dish:
- Herby Greek Style: Add dill and parsley, then finish with feta and olives.
- Spicy Chili-Lime: Swap oregano for chili powder and add a pinch of cayenne.
- Yogurt-Marinated Tenderness: Stir 1/2 cup plain yogurt into the marinade for a softer, tangier bite.
Common Mistakes to Avoid with This Dish:
- Over-marinating with lemon: Too much acid for too long can make the chicken chalky. Keep it under an hour.
- Cooking on low heat: You want color before the chicken dries out.
- Forgetting the thermometer: Thighs forgive a little, but 165°F is still the target.
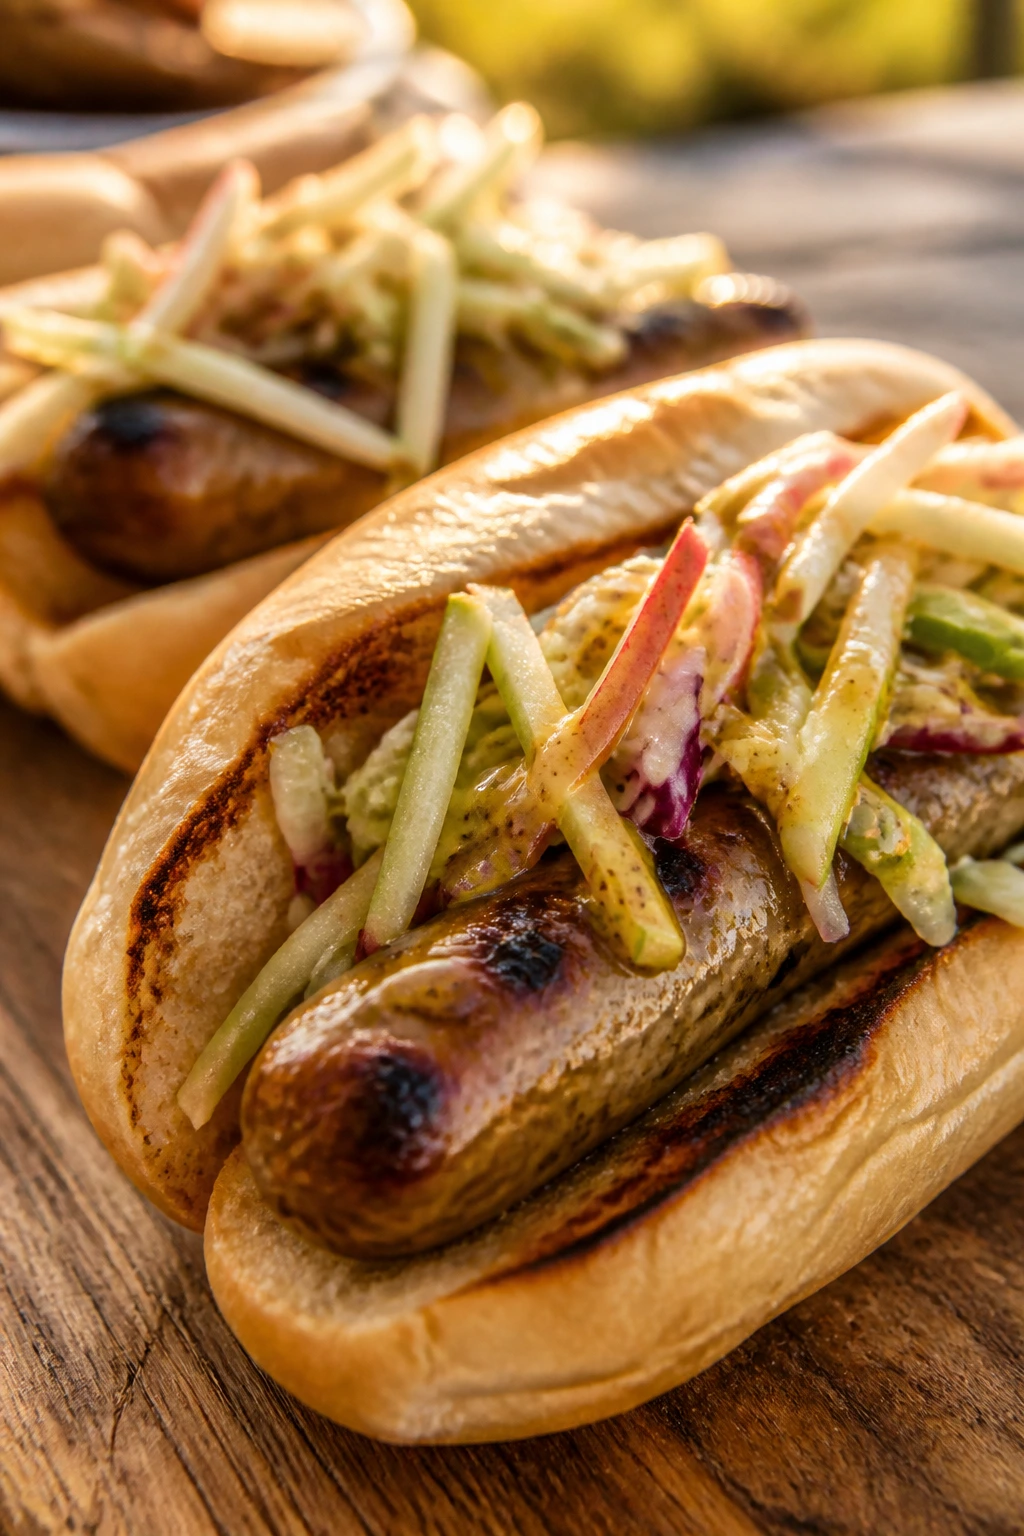
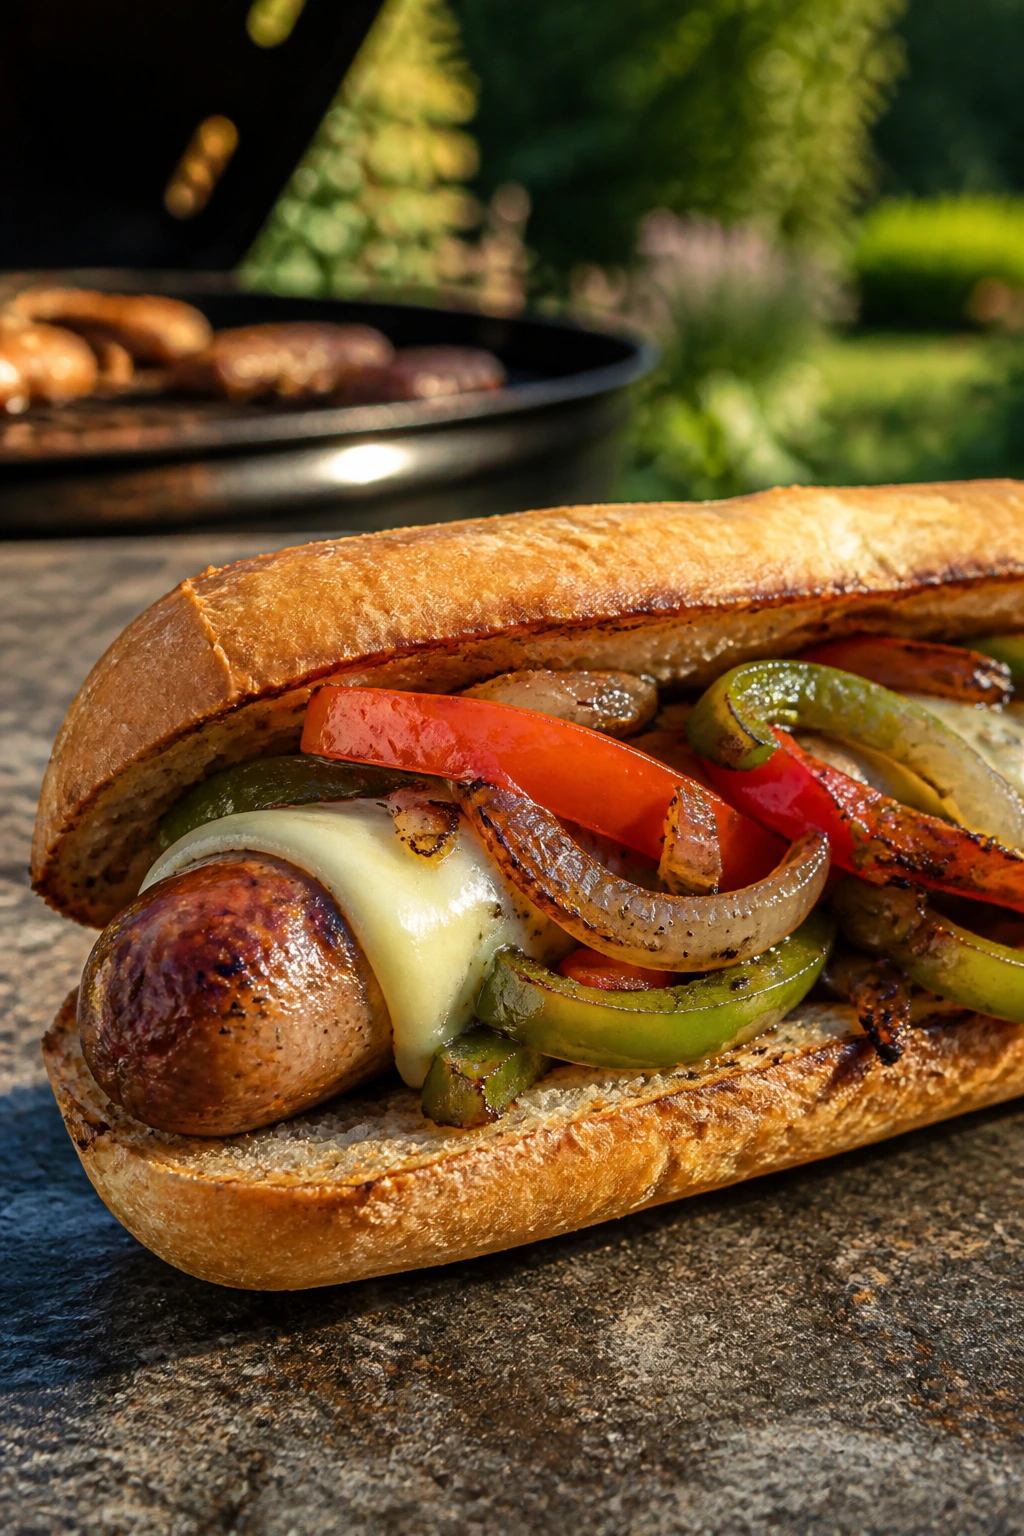
3. Sausage and Peppers Hoagies
The first thing you notice is the smell — sweet peppers, onions, and sausage smoke all mixing together. These hoagies feel like cookout food in the most direct sense: simple, bold, and easy to hold in one hand.
Why It Works:
Sausage brings its own seasoning, which cuts prep time in half. Peppers and onions soften on the grill and soak up the drippings, and toasted rolls keep the sandwich from turning soggy. It’s a low-stress meal that still looks like you planned ahead.
Key Ingredients:
- 6 Italian sausage links, sweet or hot
- 2 bell peppers, sliced
- 1 large onion, sliced
- 2 tbsp olive oil
- 1 tbsp balsamic vinegar
- 1/2 tsp kosher salt
- 1/4 tsp black pepper
- 4 hoagie rolls
- 4 slices provolone cheese
Quick Steps:
- Toss the peppers and onion with olive oil, balsamic, salt, and pepper.
- Grill the sausages over medium heat for 12 to 15 minutes, turning often, until browned and cooked through.
- Put the peppers and onion in a grill basket or cast-iron pan and cook 10 minutes until soft and lightly charred.
- Split the rolls and toast them cut-side down for 1 minute.
- Fill each roll with sausage, peppers, onions, and provolone.
Equipment for This Recipe:
- Grill
- Grill basket or cast-iron skillet
- Tongs
- Knife and cutting board
How to Serve This Dish:
Put the hoagies on a sheet pan and wrap them loosely in foil for 2 minutes so the cheese softens. A side of potato chips and a sharp pickle makes the sandwich feel finished.
Pro Tips for This Recipe:
- Don’t pierce the sausage; you lose juices.
- If the peppers start to scorch before they soften, move them to indirect heat.
- Toast the rolls. Always.
- A little extra balsamic at the end gives the onions a deeper finish.
Variations on This Dish:
- Chicken Sausage Swap: Use chicken sausage and add extra olive oil to the vegetables.
- Spicy Fresno Version: Add sliced Fresno chiles with the peppers.
- Melted Mozzarella Finish: Trade provolone for mozzarella if you want a softer, stringier sandwich.
Common Mistakes to Avoid with This Dish:
- Crowding the basket: The vegetables need room or they steam.
- Undercooking the sausage: Browned outside does not always mean done inside.
- Serving on soft buns: A roll with some structure keeps everything from collapsing.
4. Honey-Lime Shrimp Foil Packets
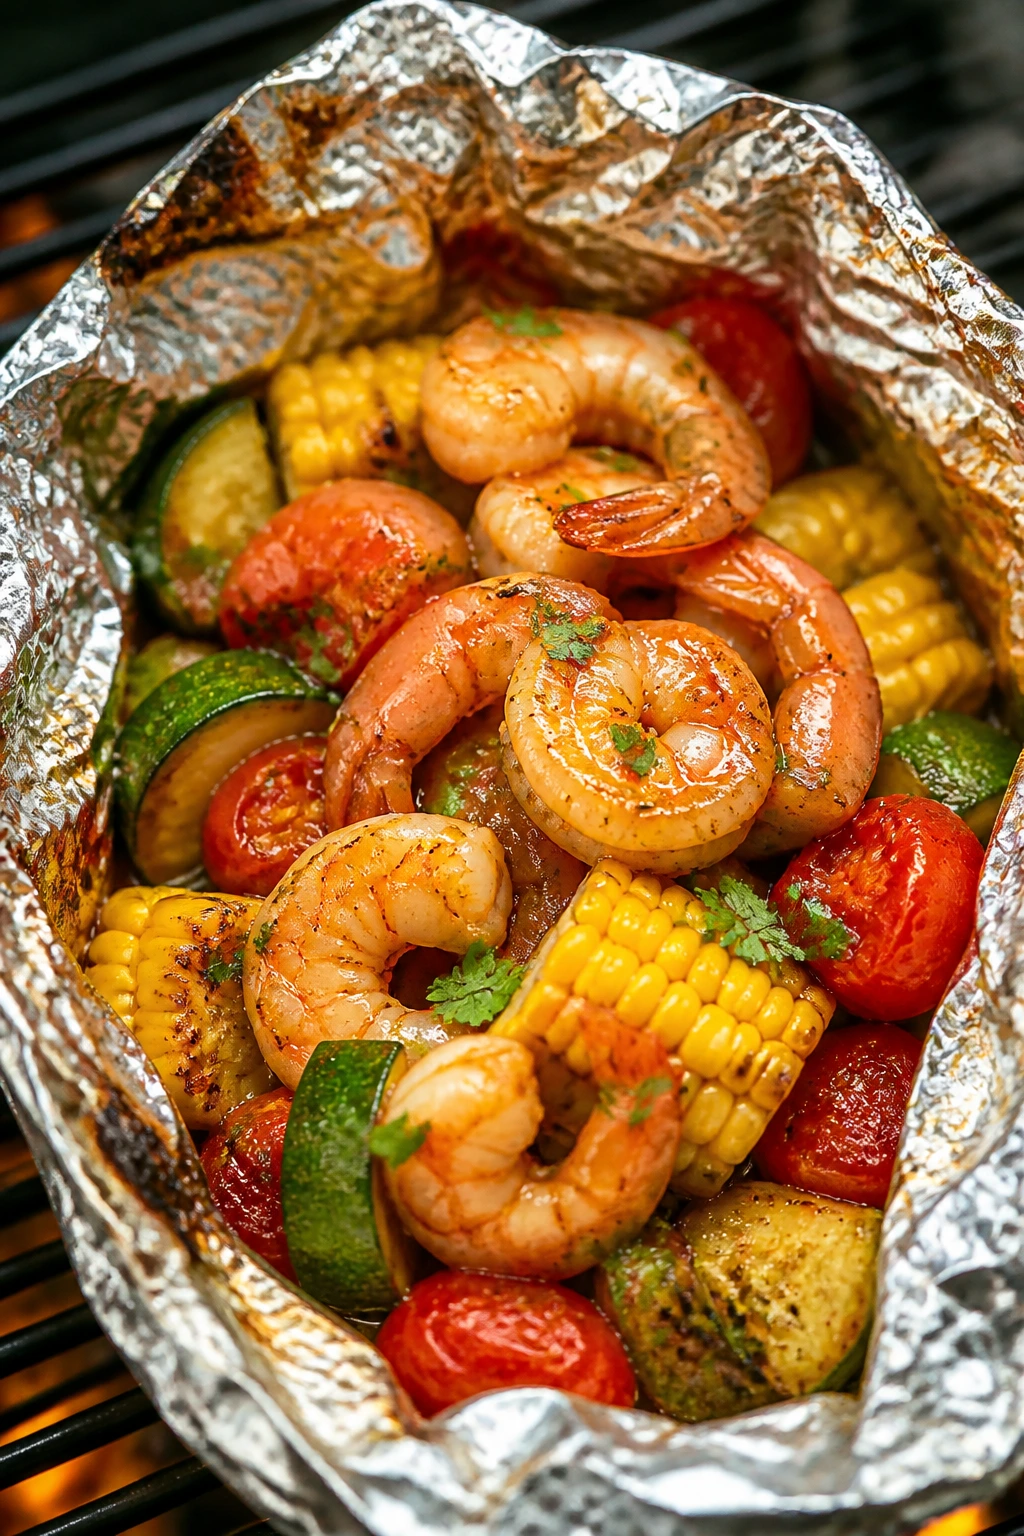
Foil packets are a gift on a hot evening. They keep the shrimp glossy, the corn sweet, and the cleanup almost insultingly easy, which is exactly the sort of thing I want from backyard cookout food.
Why It Works:
Shrimp cooks fast, and foil traps just enough steam to keep it tender without turning mushy. Honey and lime give the sauce a bright, sticky edge, while corn and zucchini add bulk so the packets eat like a full meal. You open the foil, and dinner is already done.
Key Ingredients:
- 2 lb large shrimp, peeled and deveined
- 2 zucchini, sliced into half-moons
- 2 ears corn, kernels cut off
- 1 pint cherry tomatoes
- 3 tbsp olive oil
- 2 tbsp honey
- 2 tbsp lime juice
- 2 garlic cloves, minced
- 1/2 tsp chili flakes
- 1 tsp kosher salt
Quick Steps:
- Toss the zucchini, corn, and tomatoes with oil, honey, lime juice, garlic, chili flakes, and salt.
- Fold four large foil sheets into packets and divide the vegetables between them.
- Add the shrimp on top and seal the packets tightly.
- Grill over medium-high heat for 8 to 10 minutes until the shrimp turn pink and opaque.
- Open carefully — the steam is hot — and serve right away.
Equipment for This Recipe:
- Grill
- Heavy-duty foil
- Mixing bowl
- Tongs
How to Serve This Dish:
Spoon the contents into shallow bowls with rice or grilled bread. A few cilantro leaves and extra lime wedges make the packets taste brighter.
Pro Tips for This Recipe:
- Use large shrimp so they don’t overcook before the vegetables finish.
- Seal the packets well, but leave a little room for steam.
- If your grill runs hot, set the packets over indirect heat.
- Add the shrimp last if your vegetables are cut thick.
Variations on This Dish:
- Cajun Kick: Use Cajun seasoning instead of chili flakes and add sliced sausage.
- Butter-Garlic Version: Swap half the olive oil for melted butter.
- Dairy-Free Green Finish: Finish with chopped cilantro and scallions instead of butter or cheese.
Common Mistakes to Avoid with This Dish:
- Using tiny shrimp: They go rubbery before the corn cooks.
- Overfilling the packets: Too much food traps liquid and slows everything down.
- Opening too soon: The steam can burn your hands badly.
5. BBQ Chicken Drumsticks
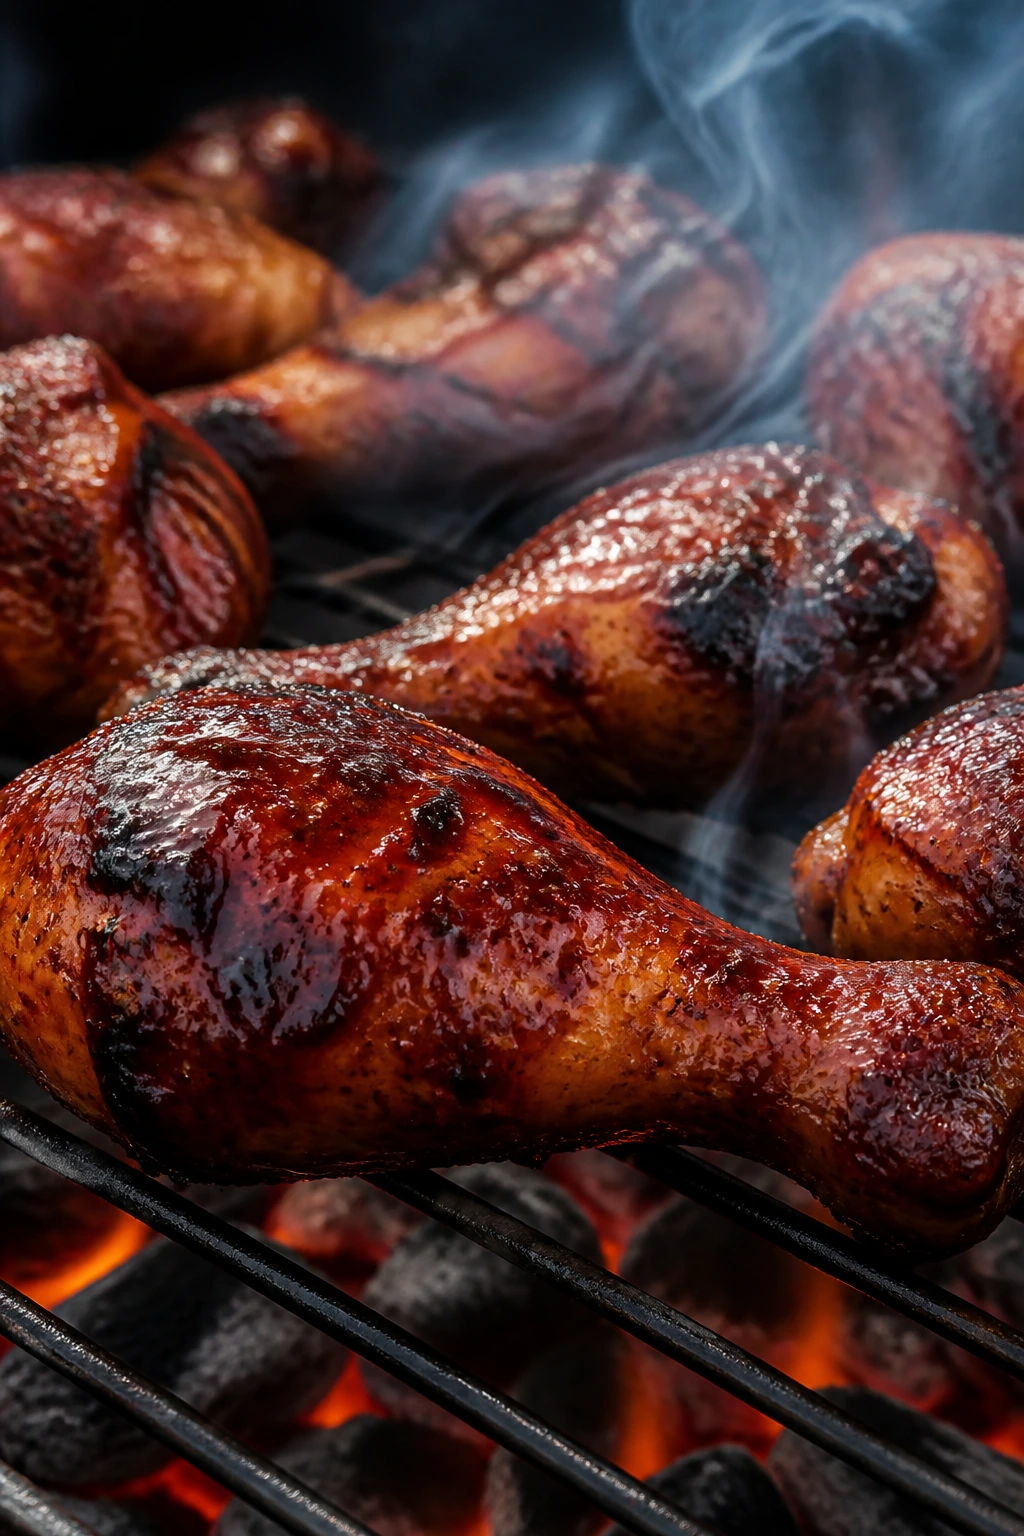
Drumsticks are one of the easiest summer dinner moves on a grill. They’re cheap, forgiving, and they taste better when the skin gets lacquered with barbecue sauce and a little char at the edges.
Why It Works:
Dark meat handles heat better than chicken breast, and drumsticks give you a built-in handle for cookout eating. A dry rub builds flavor under the skin, then barbecue sauce goes on near the end so it doesn’t scorch. That timing matters. A lot.
Key Ingredients:
- 3 lb chicken drumsticks
- 1 1/2 tsp kosher salt
- 1 tsp smoked paprika
- 1 tsp garlic powder
- 1 tsp onion powder
- 1 tbsp brown sugar
- 1/2 tsp black pepper
- 1 cup barbecue sauce
Quick Steps:
- Pat the drumsticks dry and rub them with salt, paprika, garlic powder, onion powder, brown sugar, and pepper.
- Preheat the grill to medium, about 375°F, and set up indirect heat.
- Grill the drumsticks for 25 to 30 minutes, turning every 5 minutes, until the skin starts to tighten and brown.
- Brush with barbecue sauce and cook 5 to 8 minutes more, just until glossy and sticky.
- Check for 165°F at the thickest part near the bone.
Equipment for This Recipe:
- Grill
- Tongs
- Small bowl for rub
- Instant-read thermometer
How to Serve This Dish:
Pile the drumsticks on a platter with extra sauce in a bowl. Coleslaw, grilled corn, and potato salad make a plate that feels complete without extra work.
Pro Tips for This Recipe:
- Dry skin browns better than damp skin.
- Sauce late so the sugar doesn’t burn black.
- Rotate the drumsticks; the heat around the grill is not even.
- A brief rest after grilling keeps the juices in the meat, not on the platter.
Variations on This Dish:
- Mustard-BBQ Version: Add 1 tbsp mustard to the sauce for sharper flavor.
- Spicy Honey Finish: Stir hot sauce into the barbecue sauce and brush lightly.
- Dry-Rub Only: Skip sauce and serve with lemon wedges and herb salt.
Common Mistakes to Avoid with This Dish:
- Cooking over direct high heat the whole time: The outside burns before the inside is done.
- Saucing too early: Burnt barbecue sauce tastes bitter.
- Skipping the thermometer: Drumsticks look done before they are.
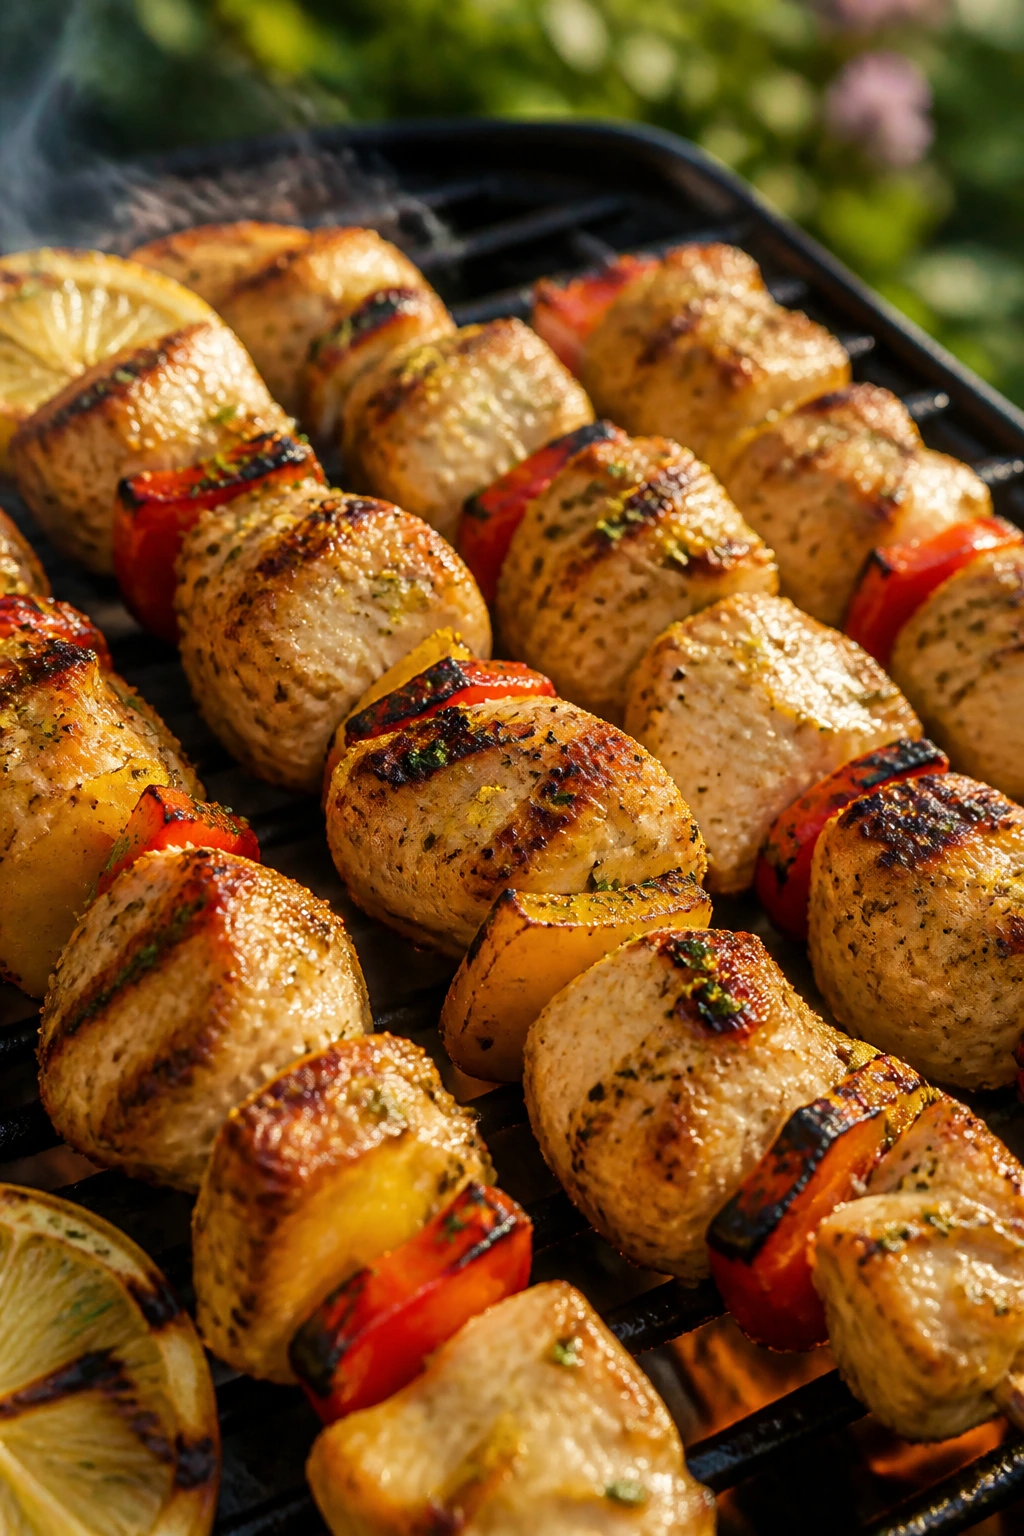
6. Street Corn Chicken Tacos
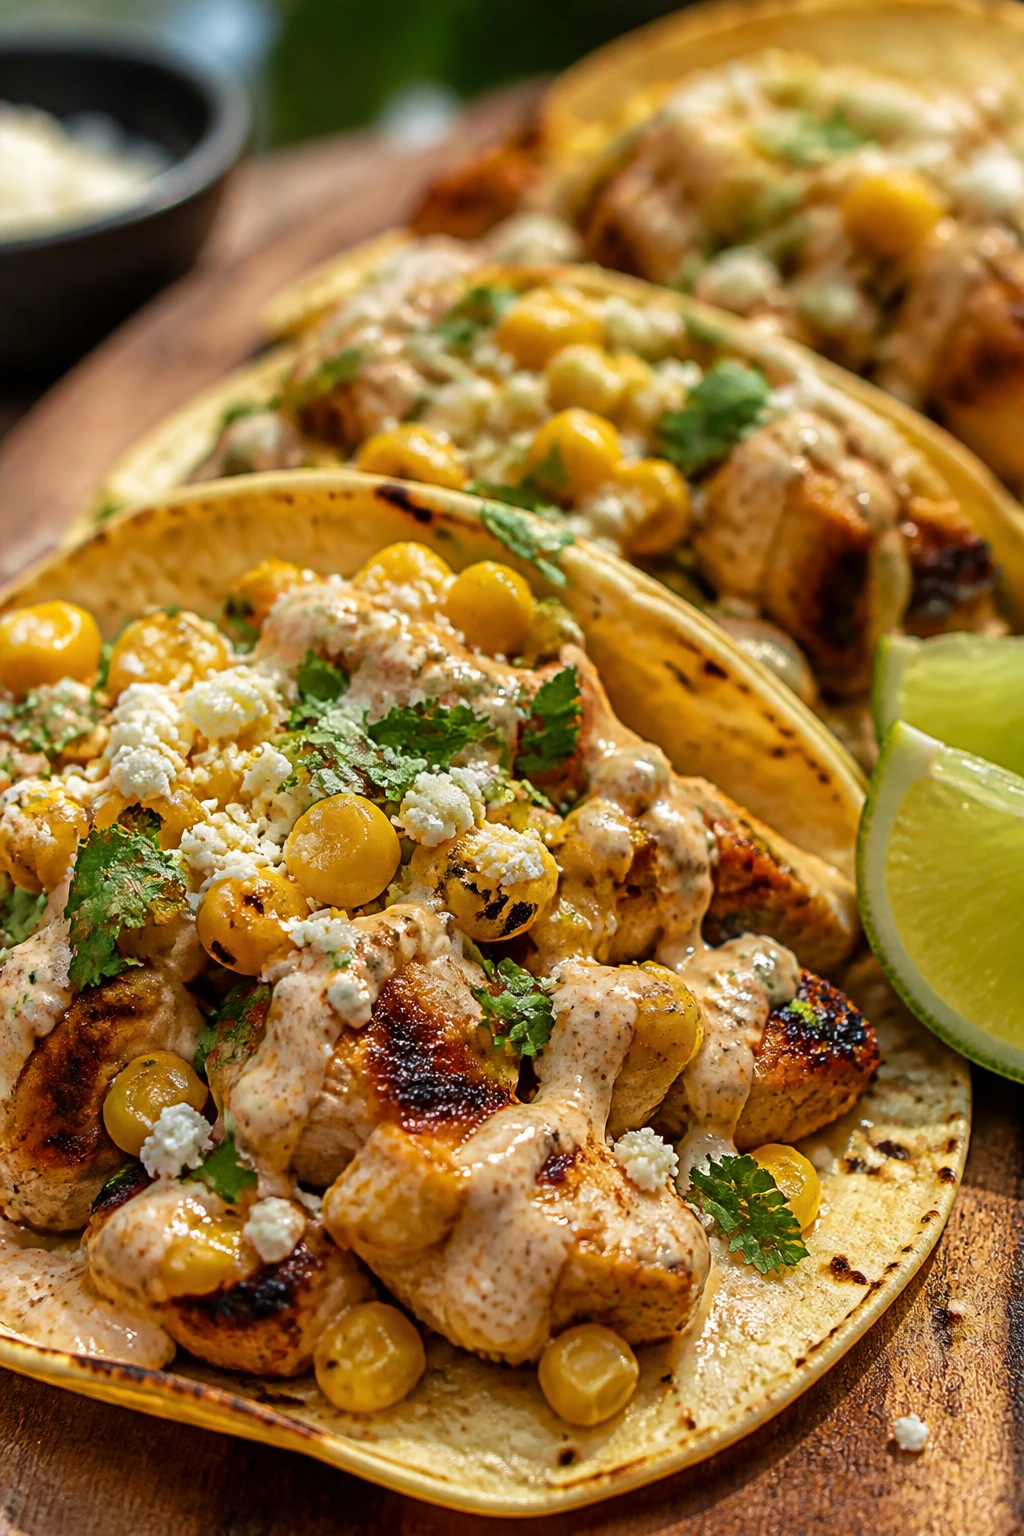
These tacos are messy in the best way. The corn brings sweetness, the cotija brings salt, and the chicken carries enough smoke to make the whole thing feel like it came from a proper street cart, just without the traffic.
Why It Works:
Grilled chicken gives the tacos a savory base, but the street corn topping is what makes the bite memorable. Lime, mayo, cotija, and chili powder hit four different notes at once. No one calls that boring, and I wouldn’t want them to.
Key Ingredients:
- 1 1/2 lb boneless chicken thighs
- 1 tbsp taco seasoning
- 2 ears corn
- 1 tbsp olive oil
- 1/4 cup mayonnaise
- 1/3 cup crumbled cotija cheese
- 1 lime, cut into wedges
- 8 small corn tortillas
- 2 tbsp chopped cilantro
Quick Steps:
- Rub the chicken with taco seasoning and oil.
- Grill the corn and chicken over medium-high heat, turning the corn until lightly charred and cooking the chicken 10 to 12 minutes to 165°F.
- Cut the corn kernels off the cob and mix with mayo, cotija, cilantro, and a squeeze of lime.
- Warm the tortillas on the grill for 20 seconds per side.
- Slice the chicken and build tacos with corn topping and extra lime.
Equipment for This Recipe:
- Grill
- Tongs
- Knife
- Small bowl
How to Serve This Dish:
Serve the tacos immediately so the tortillas stay soft. A bowl of sliced radishes or a cucumber salad keeps the plate crisp and cold.
Pro Tips for This Recipe:
- Thighs stay juicier than breasts here.
- Char the corn enough to bring out sweetness.
- Warm tortillas directly on the grate, not in a dry skillet if the grill is already on.
- Keep the corn topping thick, not runny.
Variations on This Dish:
- Chipotle Street Corn: Stir in chipotle in adobo for smoke and heat.
- Grilled Veggie Swap: Replace the chicken with grilled mushrooms and zucchini.
- Feta Shortcut: If cotija is hard to find, use crumbled feta.
Common Mistakes to Avoid with This Dish:
- Making the topping too loose: Wet corn slides right out of the taco.
- Overheating tortillas: They crack when they dry out.
- Cutting chicken before it rests: The juices spill out, and the taco gets dry.
7. Veggie and Halloumi Skewers
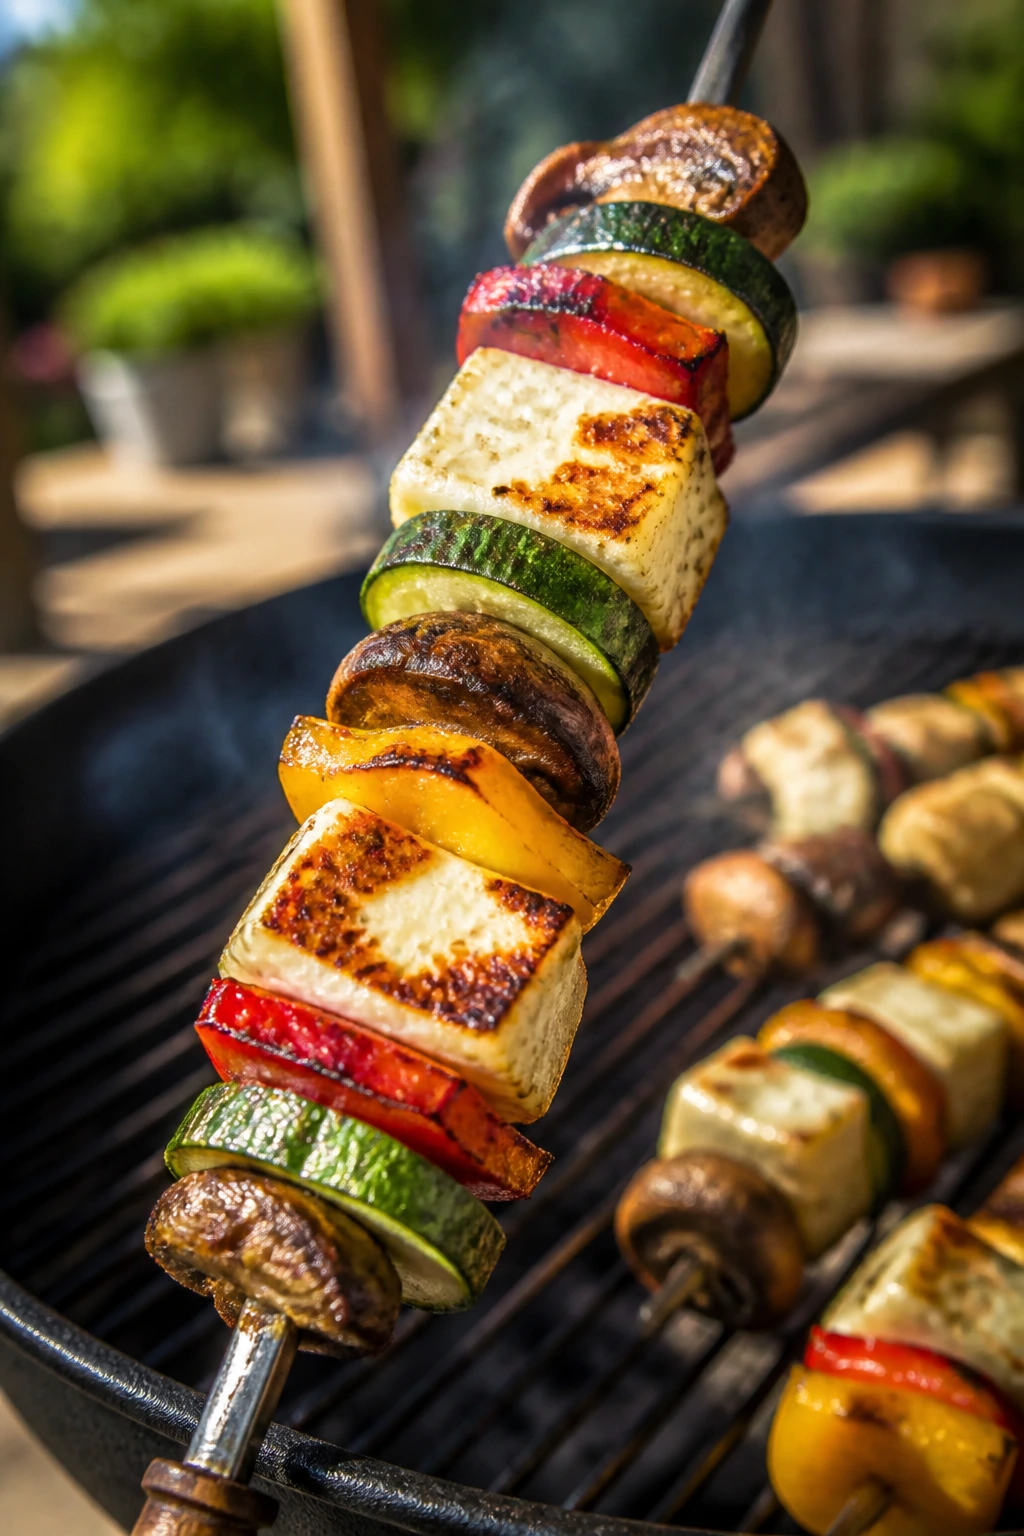
Halloumi is one of the few cheeses that belongs on a grill. It softens, browns, and holds its shape instead of melting into a mess, which makes it a natural fit for summer cookouts.
Why It Works:
The saltiness of halloumi gives the skewers a real main-dish feel. Zucchini, peppers, and mushrooms add color and texture, and a lemon finish keeps the whole thing from tasting heavy. It’s meatless without feeling like an afterthought.
Key Ingredients:
- 8 oz halloumi, cut into chunks
- 2 zucchini, cut into thick rounds
- 2 bell peppers, cut into squares
- 1 red onion, cut into wedges
- 8 oz mushrooms
- 3 tbsp olive oil
- 1 tbsp lemon juice
- 1 tsp dried oregano
- 1/2 tsp black pepper
Quick Steps:
- Toss the vegetables with olive oil, lemon juice, oregano, and pepper.
- Thread the halloumi and vegetables onto skewers.
- Preheat the grill to medium-high, about 425°F.
- Grill 8 to 10 minutes, turning every few minutes, until the vegetables are charred in spots and the halloumi is golden.
- Serve immediately with another squeeze of lemon.
Equipment for This Recipe:
- Grill
- Skewers
- Mixing bowl
- Tongs
How to Serve This Dish:
These skewers go well with couscous, warm pita, or herbed rice. A spoonful of tahini or yogurt sauce on the side gives the vegetables a little extra body.
Pro Tips for This Recipe:
- Cut the halloumi large enough that it doesn’t fall apart.
- Use thick vegetable cuts so they finish at the same time.
- Don’t over-marinate the cheese; it doesn’t need much.
- If the onions are burning fast, move the skewers to a cooler part of the grill.
Variations on This Dish:
- Pesto Finish: Brush with pesto after grilling.
- All-Veg Option: Leave out the cheese and add more mushrooms.
- Mediterranean Bowl: Serve over quinoa with olives and cucumber.
Common Mistakes to Avoid with This Dish:
- Using too much oil: The vegetables can turn greasy instead of browned.
- Cutting everything too small: Thin pieces fall through the grates.
- Waiting to serve: Halloumi gets firmer as it cools.
8. Caprese Chicken Burgers

This is the burger you make when you want something that tastes like summer tomatoes instead of a heavy stack of condiments. Basil, mozzarella, and balsamic bring the whole thing together without making it fussy.
Why It Works:
Ground chicken takes on seasoning well, but it needs moisture and a little help from cheese. Mozzarella melts over the patty, tomato adds juice, and the balsamic glaze gives a sweet-sour edge that keeps the sandwich awake. It’s lighter than beef, but it still feels like a full meal.
Key Ingredients:
- 1 1/2 lb ground chicken
- 1/3 cup plain breadcrumbs
- 1/4 cup grated Parmesan
- 1 garlic clove, grated
- 1 tsp kosher salt
- 1/2 tsp black pepper
- 4 slices fresh mozzarella
- 2 large tomatoes, sliced
- 1/4 cup basil leaves
- 2 tbsp balsamic glaze
- 4 burger buns
Quick Steps:
- Mix ground chicken, breadcrumbs, Parmesan, garlic, salt, and pepper.
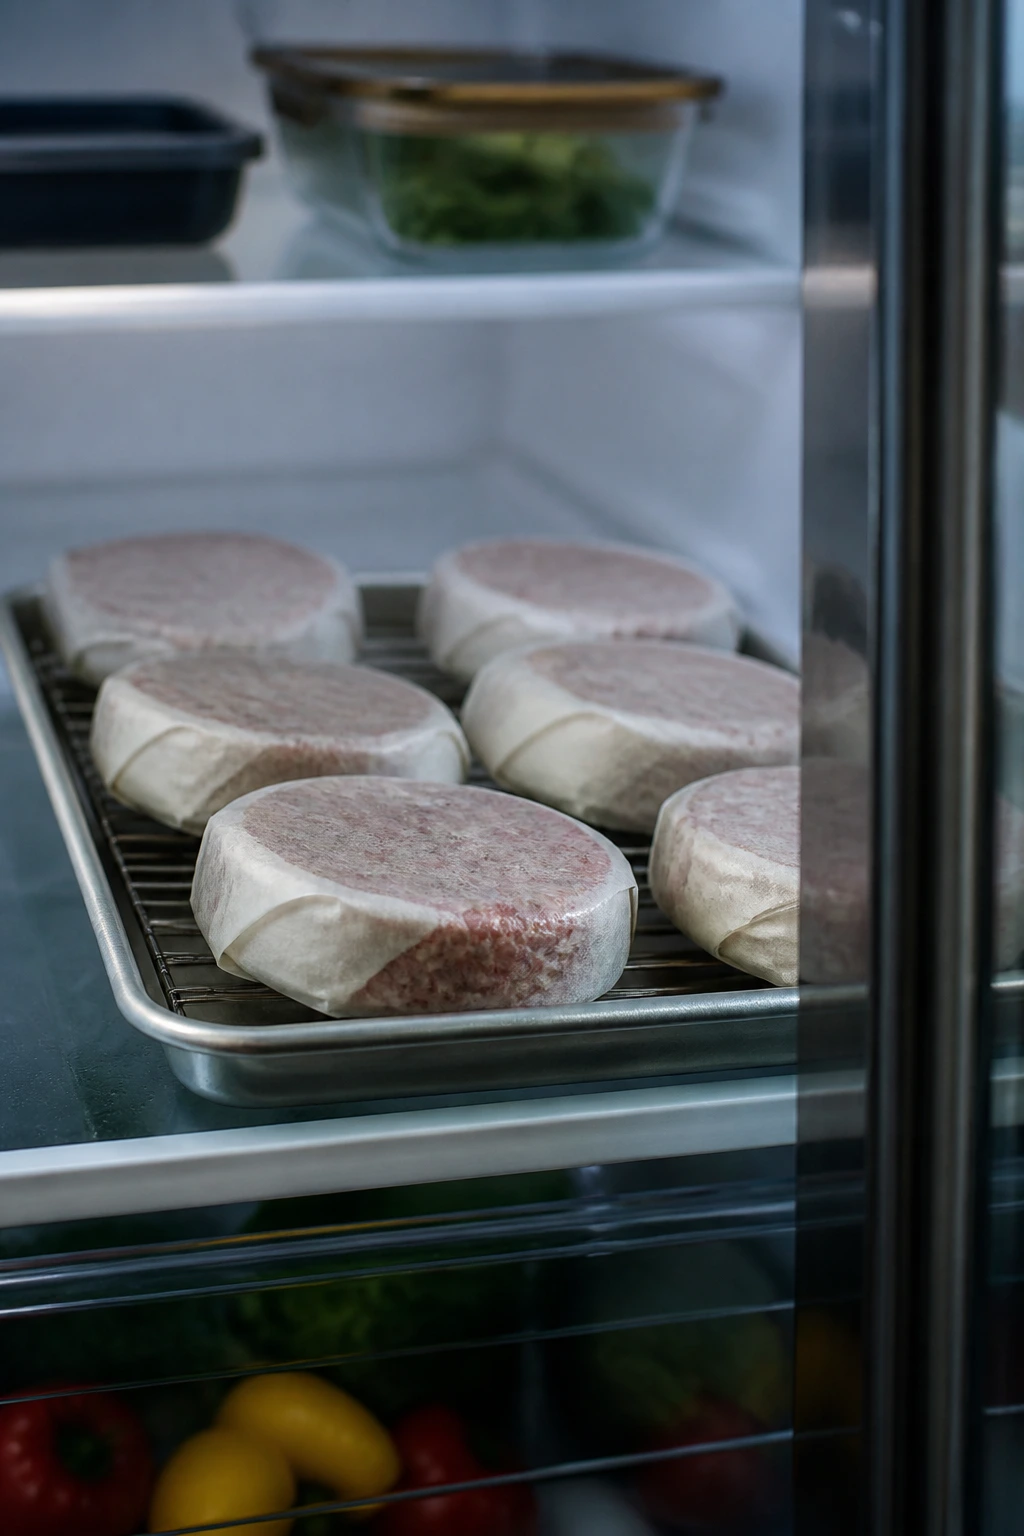
- Form 4 patties and chill them 10 minutes so they hold together.
- Grill over medium heat for 5 to 6 minutes per side until the patties reach 165°F.
- Add mozzarella during the last minute so it softens.
- Top with tomato, basil, and balsamic glaze on toasted buns.
Equipment for This Recipe:
- Grill
- Spatula
- Mixing bowl
- Thermometer
How to Serve This Dish:
Serve with grilled zucchini or a simple arugula salad. A few thick tomato slices on the side make the plate look clean and intentional.
Pro Tips for This Recipe:
- Chill the patties so they don’t fall apart on the grill.
- Handle the chicken mixture gently; packing it tight makes the burgers dense.
- Use the ripest tomatoes you can find.
- Toast the buns after the mozzarella comes off the grill so everything lands warm at once.
Variations on This Dish:
- Pesto Burger: Swap balsamic glaze for pesto.
- Spicy Tomato Version: Add sliced pepperoncini and red pepper flakes.
- Lettuce-Leaf Serve: Use romaine leaves instead of buns for a lighter plate.
Common Mistakes to Avoid with This Dish:
- Flipping too soon: The patties need time to set.
- Using wet tomatoes straight from the fridge: They taste dull and make the bun soggy.
- Overcooking chicken: Dry chicken burgers are the worst kind of dry.
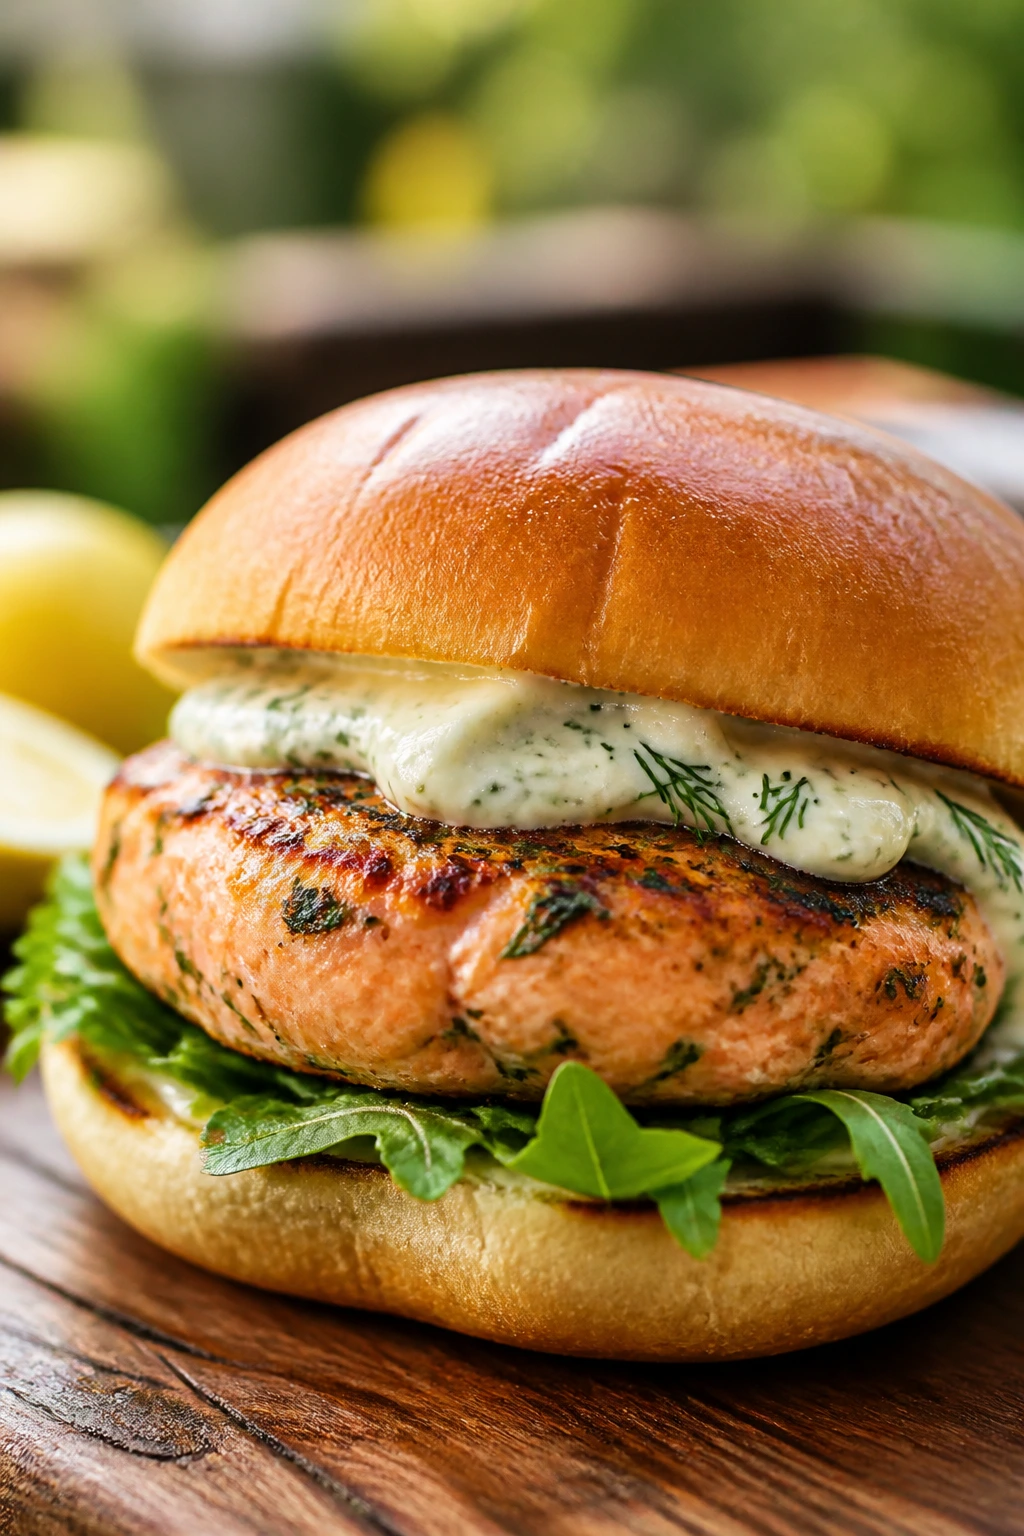
9. Grilled Salmon with Dill Yogurt Sauce

Salmon on a grill has a certain sound to it — a quiet sizzle, then a skin that crisps just enough to lift away cleanly. The dill yogurt sauce cools everything down and makes the fish feel like a proper meal, not just a piece of protein on a plate.
Why It Works:
Salmon brings enough fat to handle open flame, and the skin protects the flesh while it cooks. Yogurt, dill, lemon, and garlic give you a cold, sharp sauce that plays against the warm fish. You don’t need much else.
Key Ingredients:
- 1 1/2 to 2 lb salmon fillet, skin on
- 1 tbsp olive oil
- 1 tsp kosher salt
- 1/2 tsp black pepper
- 1 cup plain Greek yogurt
- 2 tbsp chopped dill
- 1 tbsp lemon juice
- 1 small garlic clove, grated
Quick Steps:
- Mix the yogurt, dill, lemon juice, and garlic.
- Rub the salmon with olive oil, salt, and pepper.
- Preheat the grill to medium, about 375°F, and oil the grates well.
- Grill skin-side down for 8 to 10 minutes, until the flesh flakes and the center reads 125 to 130°F for moist salmon.
- Serve with the sauce spooned over the top.
Equipment for This Recipe:
- Grill
- Fish spatula
- Small bowl
- Thermometer
How to Serve This Dish:
Plate the salmon with grilled potatoes, asparagus, or a cucumber salad. The sauce should sit in a cool ribbon over the fish, not drown it.
Pro Tips for This Recipe:
- Oil the grates and the salmon skin to stop sticking.
- Don’t force a flip; salmon releases when it’s ready.
- If you want the fish more cooked, leave it on until 140°F.
- Keep the sauce cold until the last second.
Variations on This Dish:
- Caper Dill Sauce: Add chopped capers for a briny bite.
- Maple-Mustard Glaze: Brush the fish with a thin glaze in the last 2 minutes.
- Cedar-Plank Version: Cook on a soaked cedar plank for a softer smoke note.
Common Mistakes to Avoid with This Dish:
- Starting on a dirty grate: The skin sticks and tears.
- Turning too early: The fish falls apart.
- Letting the sauce warm up too much: It loses its fresh edge.
10. Steak Fajita Foil Packs
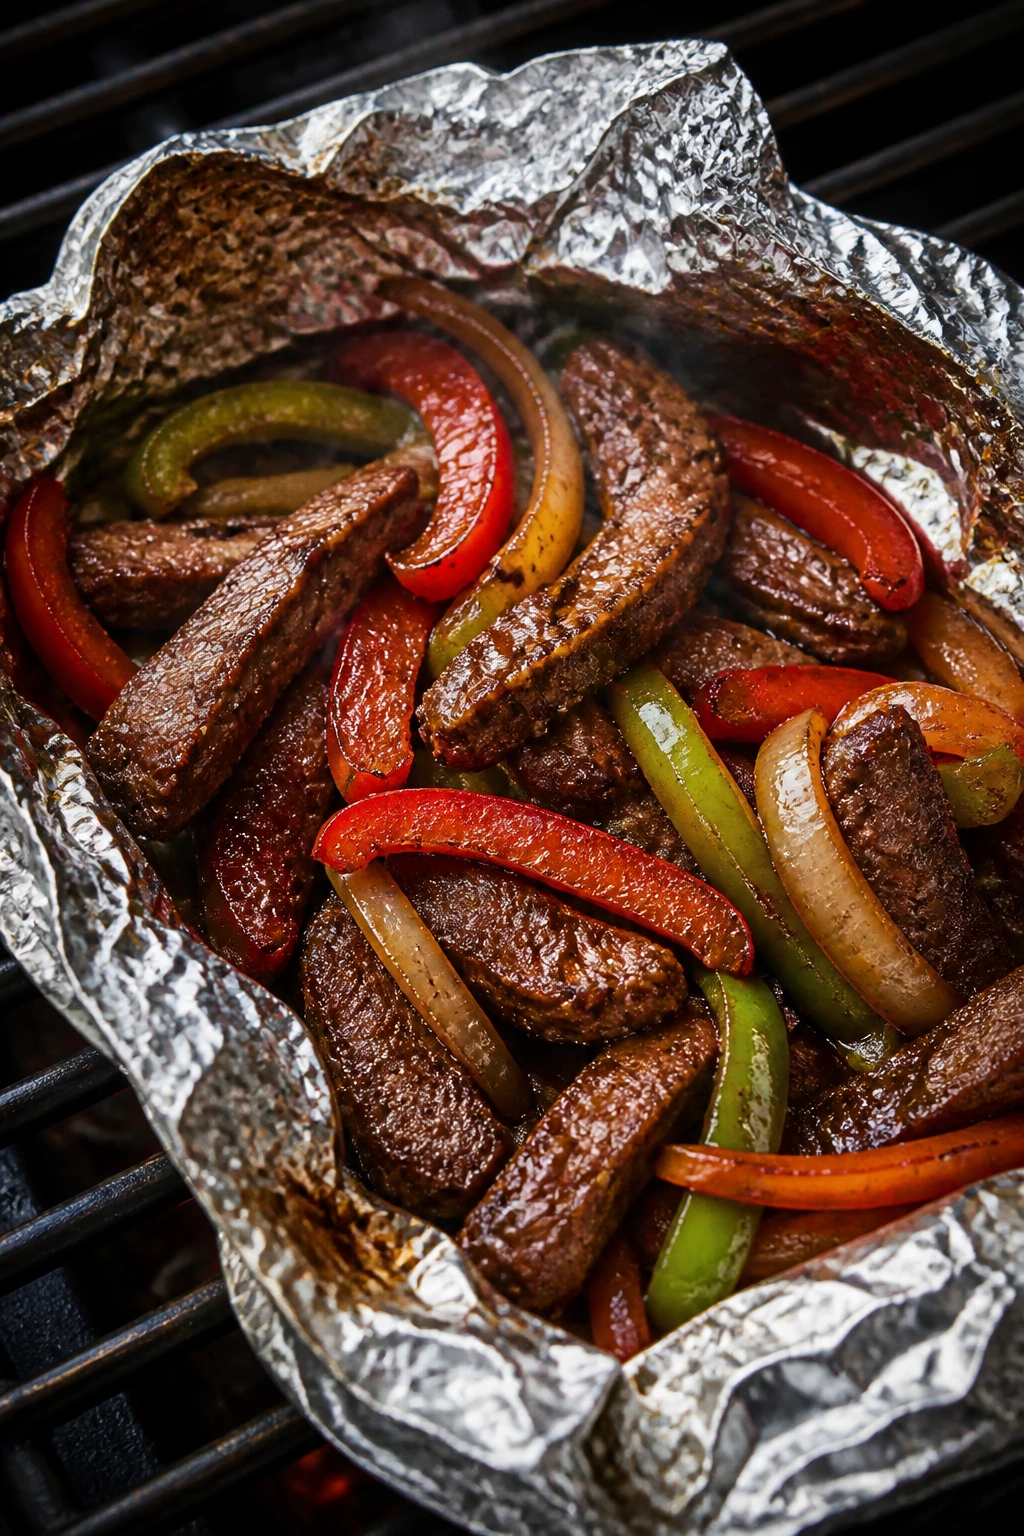
Foil packs turn steak night into a one-hand meal. The peppers get sweet, the onions go soft, and the steak stays juicy because everything cooks together for a short, controlled stretch of time.
Why It Works:
Flank steak or skirt steak takes well to quick heat and bold seasoning. The foil traps the juices, and lime at the end wakes up the whole packet. It’s neat, fast, and easy to serve with warm tortillas.
Key Ingredients:
- 1 1/2 lb flank steak, sliced thin against the grain
- 2 bell peppers, sliced
- 1 large onion, sliced
- 2 tbsp olive oil
- 2 tbsp fajita seasoning
- 1 lime, juiced
- 8 small flour or corn tortillas
- 1/4 cup chopped cilantro
Quick Steps:
- Toss the steak, peppers, and onion with oil and fajita seasoning.
- Divide into foil packets and seal tightly.
- Grill over medium-high heat for 10 to 12 minutes, shaking once halfway through.
- Open the packets and squeeze lime over the top.
- Serve in warm tortillas with cilantro.
Equipment for This Recipe:
- Grill
- Heavy-duty foil
- Tongs
- Knife
How to Serve This Dish:
Serve with guacamole, salsa, or sour cream on the side. A plate of charred corn or black beans makes the meal feel complete.
Pro Tips for This Recipe:
- Slice the steak thin so it stays tender.
- Keep the vegetables in wide strips, not tiny bits.
- If you want more char, finish the opened packets over direct heat for 1 minute.
- Rest the steak 3 minutes before serving.
Variations on This Dish:
- Chicken Fajita Packets: Swap in chicken thighs and cook until 165°F.
- Shrimp Fajitas: Add shrimp in the last 5 minutes.
- Chipotle Version: Add chipotle powder to the seasoning blend.
Common Mistakes to Avoid with This Recipe:
- Cutting against the grain wrong: The steak gets chewy.
- Sealing weak foil packets: They leak juices onto the grill.
- Overcooking flank steak: It doesn’t get better the longer it sits over heat.
11. Grilled Pork Chops with Peach Salsa
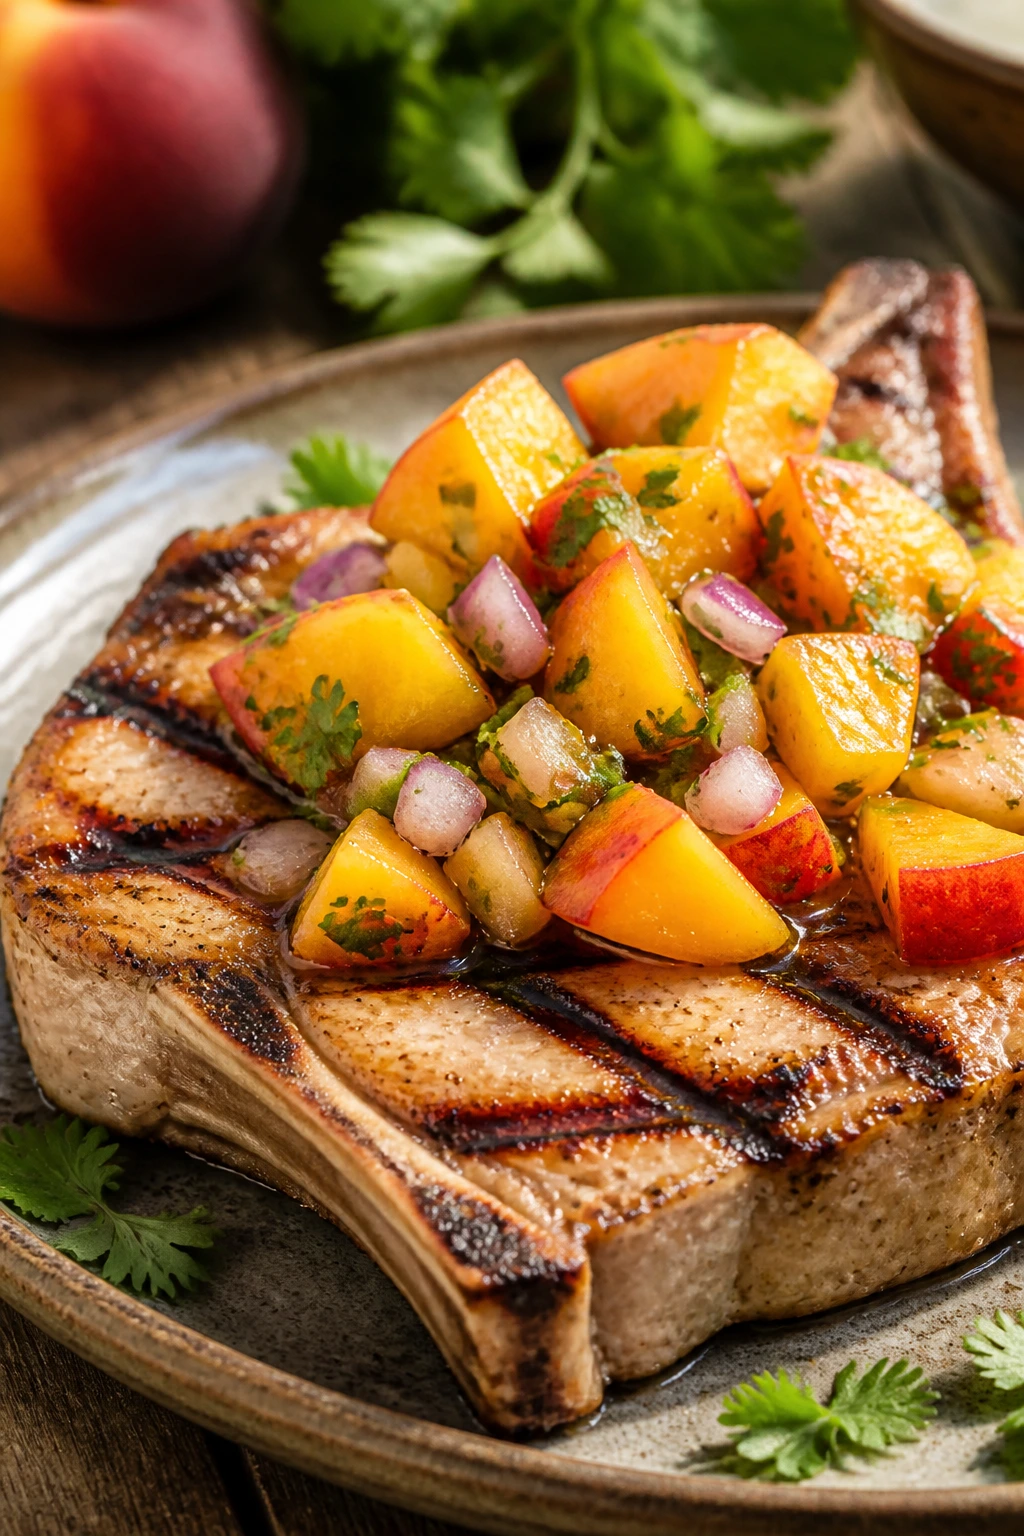
Pork chops and peaches belong together in the same way tomatoes and basil do — not because it sounds clever, but because the sweet fruit actually flatters the meat. A hot grill gives the chops a browned edge, and the salsa cools everything back down.
Why It Works:
Bone-in pork chops stay juicier than lean, boneless ones. A simple seasoning rub builds flavor, while the peach salsa adds acidity and a little sweetness without turning the plate into dessert. This is the kind of meal that tastes like someone knew what they were doing.
Key Ingredients:
- 4 bone-in pork chops, about 1 inch thick
- 1 tbsp olive oil
- 1 tsp kosher salt
- 1/2 tsp black pepper
- 1/2 tsp smoked paprika
- 2 ripe peaches, diced
- 1/4 red onion, finely diced
- 1 small jalapeño, minced
- 2 tbsp chopped cilantro
- 1 tbsp lime juice
Quick Steps:
- Rub the pork chops with oil, salt, pepper, and paprika.
- Mix the peaches, onion, jalapeño, cilantro, and lime for the salsa.
- Grill the chops over medium-high heat for 4 to 5 minutes per side.
- Cook until the center reaches 145°F, then rest 5 minutes.
- Spoon the salsa over the chops and serve.
Equipment for This Recipe:
- Grill
- Small mixing bowl
- Tongs
- Thermometer
How to Serve This Dish:
Serve with grilled potatoes, green beans, or corn on the cob. The salsa should sit over the chop and spill a little onto the plate; that’s the good part.
Pro Tips for This Recipe:
- Pick peaches that smell sweet at the stem.
- Don’t cut into the chops early; the juices need a minute to settle.
- If the grill is running hot, move the chops to indirect heat after the first sear.
- A pinch of flaky salt on the salsa sharpens the fruit.
Variations on This Dish:
- Nectarine Salsa: Swap peaches for nectarines.
- Spicy Mango Version: Use mango and add a pinch of cayenne.
- Herb-Rubbed Chops: Add rosemary to the dry rub for a deeper savory note.
Common Mistakes to Avoid with This Dish:
- Using thin chops: They dry out fast.
- Putting salsa on too early: The fruit gets mushy.
- Skipping the rest: The pork loses its juices the moment you slice it.
12. Turkey Burgers with Avocado and Pickled Onion
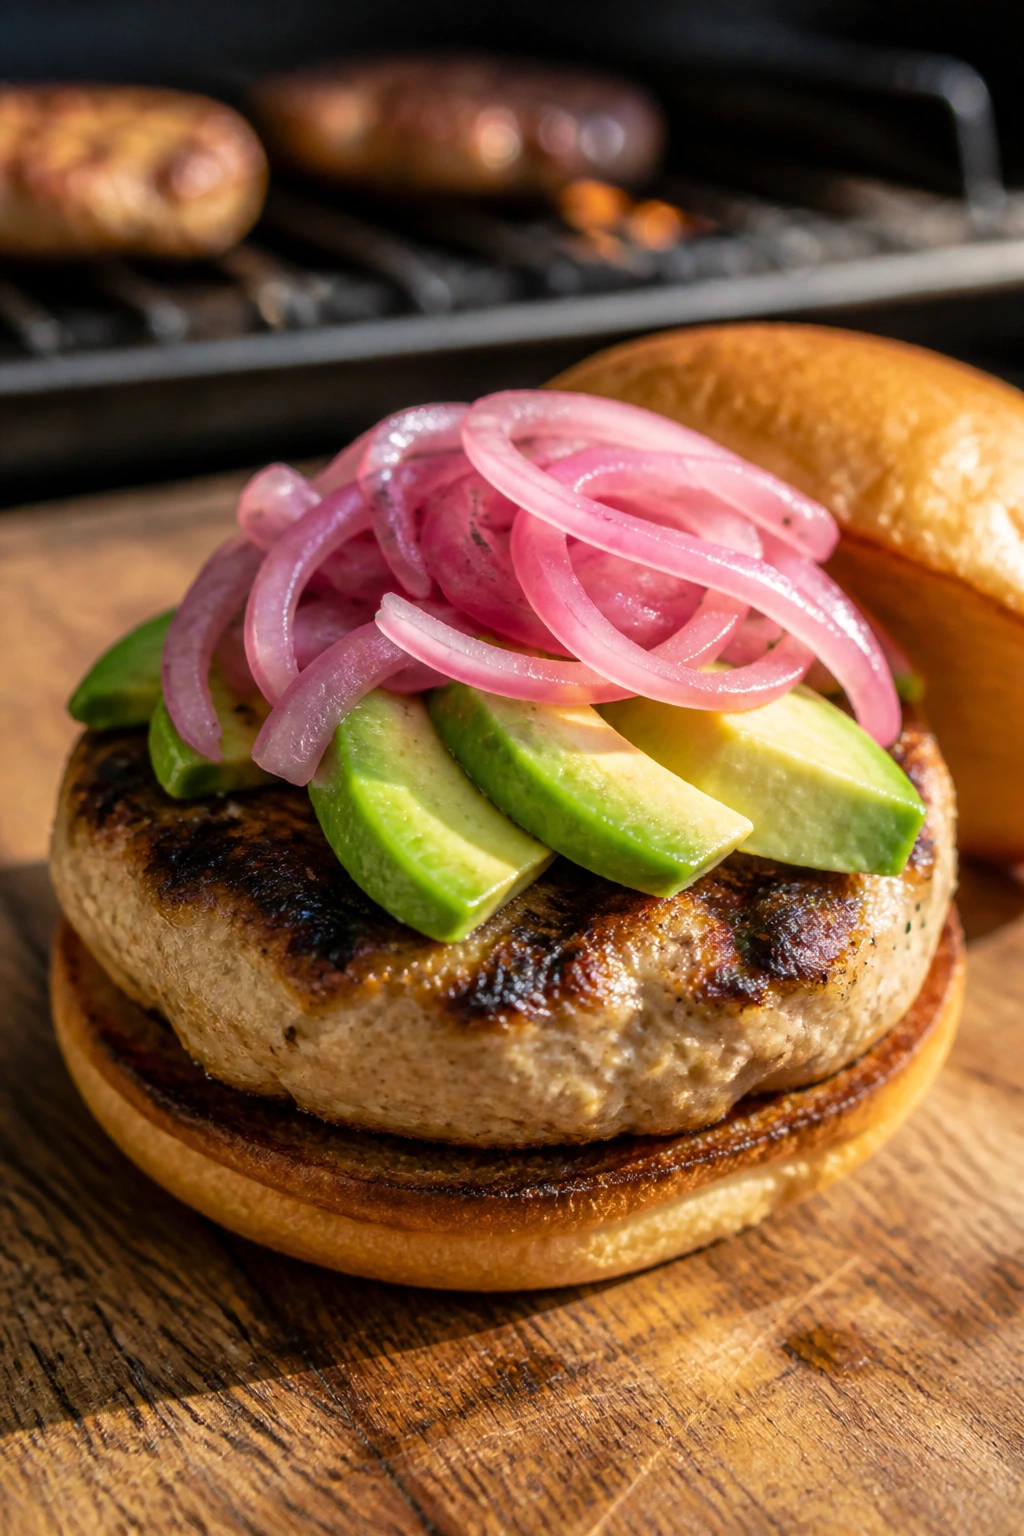
Turkey burgers can be bland if you treat them like beef. Season them properly, add moisture, and give them something sharp and creamy on top, and they become a whole different animal.
Why It Works:
Ground turkey needs fat, salt, and a little texture so it doesn’t cook into a dry puck. Avocado softens the edges, pickled onion cuts through the richness, and a toasted bun keeps the whole thing steady. It’s a clean, balanced cookout burger.
Key Ingredients:
- 1 1/2 lb ground turkey
- 1/3 cup breadcrumbs
- 2 tbsp mayonnaise
- 1 tsp onion powder
- 1 tsp kosher salt
- 1/2 tsp black pepper
- 1 avocado, sliced
- 1 small red onion, quick-pickled
- 4 burger buns
- Lettuce leaves
Quick Steps:
- Mix the turkey, breadcrumbs, mayo, onion powder, salt, and pepper.
- Form 4 patties and chill them 10 minutes.
- Grill over medium heat for 5 to 6 minutes per side until 165°F.
- Toast the buns.
- Stack with lettuce, turkey, avocado, and pickled onion.
Equipment for This Recipe:
- Grill
- Spatula
- Mixing bowl
- Thermometer
How to Serve This Dish:
Serve with sweet potato wedges or a tomato salad. The avocado should sit in thick slices, not mashed into the bun.
Pro Tips for This Recipe:
- Use mayo in the mix to keep the turkey moist.
- Make a shallow thumbprint in the center of each patty so it cooks flat.
- Chill the patties before grilling.
- Pickled onion can be made earlier in the day.
Variations on This Dish:
- Spicy Sriracha Burger: Mix sriracha into the mayo and spread it on the bun.
- Feta Turkey Burger: Add feta and oregano to the patty mix.
- Lettuce Cup Version: Skip the buns and use large lettuce leaves.
Common Mistakes to Avoid with This Dish:
- Using ultra-lean turkey: The burgers dry out.
- Pressing the patties while they cook: Juice goes straight into the fire.
- Forgetting the toppings need contrast: Turkey loves something creamy and something sharp.
13. Chicken Caesar Wraps on the Grill
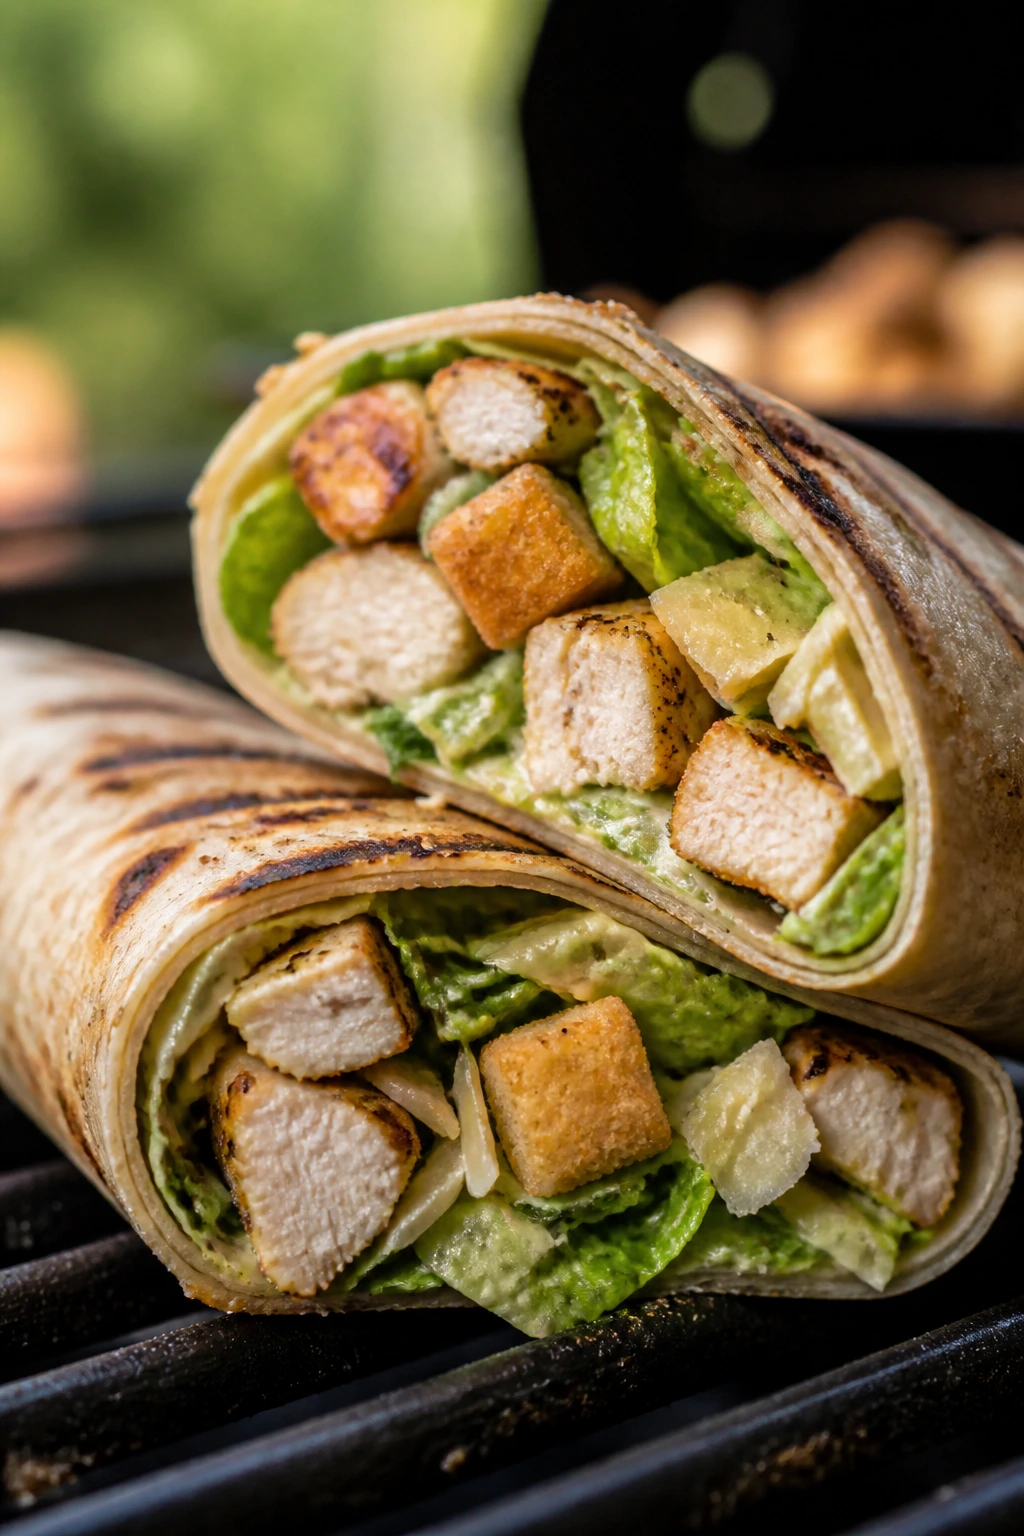
This is the kind of meal that looks casual and still eats like lunch from a good deli. The chicken gets smoky, the romaine keeps a little crunch, and the wrap is easy enough to hold with one hand while the other one manages a paper plate.
Why It Works:
Caesar dressing is rich, so the grilled chicken and charred tortilla need only a small amount to taste full. The croutons add crunch inside the wrap, which sounds small until you realize they keep the whole thing from becoming soft. That texture matters.
Key Ingredients:
- 1 1/2 lb boneless chicken breast or thighs
- 1 tbsp olive oil
- 1 tsp kosher salt
- 1/2 tsp black pepper
- 4 large flour tortillas
- 4 cups chopped romaine
- 1/2 cup Caesar dressing
- 1/3 cup grated Parmesan
- 1 cup croutons
Quick Steps:
- Rub the chicken with oil, salt, and pepper.
- Grill over medium-high heat until 165°F, about 5 to 6 minutes per side for breasts or a little longer for thighs.
- Warm the tortillas on the grill for 20 seconds per side.
- Toss the romaine with Caesar dressing, Parmesan, and croutons.
- Slice the chicken, add it to the tortillas, and roll tightly.
Equipment for This Recipe:
- Grill
- Tongs
- Knife
- Mixing bowl
How to Serve This Dish:
Cut the wraps in half and serve with extra dressing for dipping. A bowl of grapes or watermelon wedges fits the same warm-weather mood without much effort.
Pro Tips for This Recipe:
- Don’t overdress the lettuce or the wrap gets soggy.
- Slice the chicken across the grain so it stays tender.
- Warm tortillas first so they fold cleanly.
- Keep the croutons in large pieces; tiny crumbs disappear.
Variations on This Dish:
- Bacon Caesar Wrap: Add crisp bacon pieces.
- Shrimp Caesar Version: Swap in grilled shrimp.
- Parmesan Herb Wrap: Add chopped parsley and a little lemon zest.
Common Mistakes to Avoid with This Dish:
- Dressing the lettuce too soon: The crunch disappears fast.
- Using cold tortillas: They crack when rolled.
- Skipping the rest time for chicken: The slices dry out.
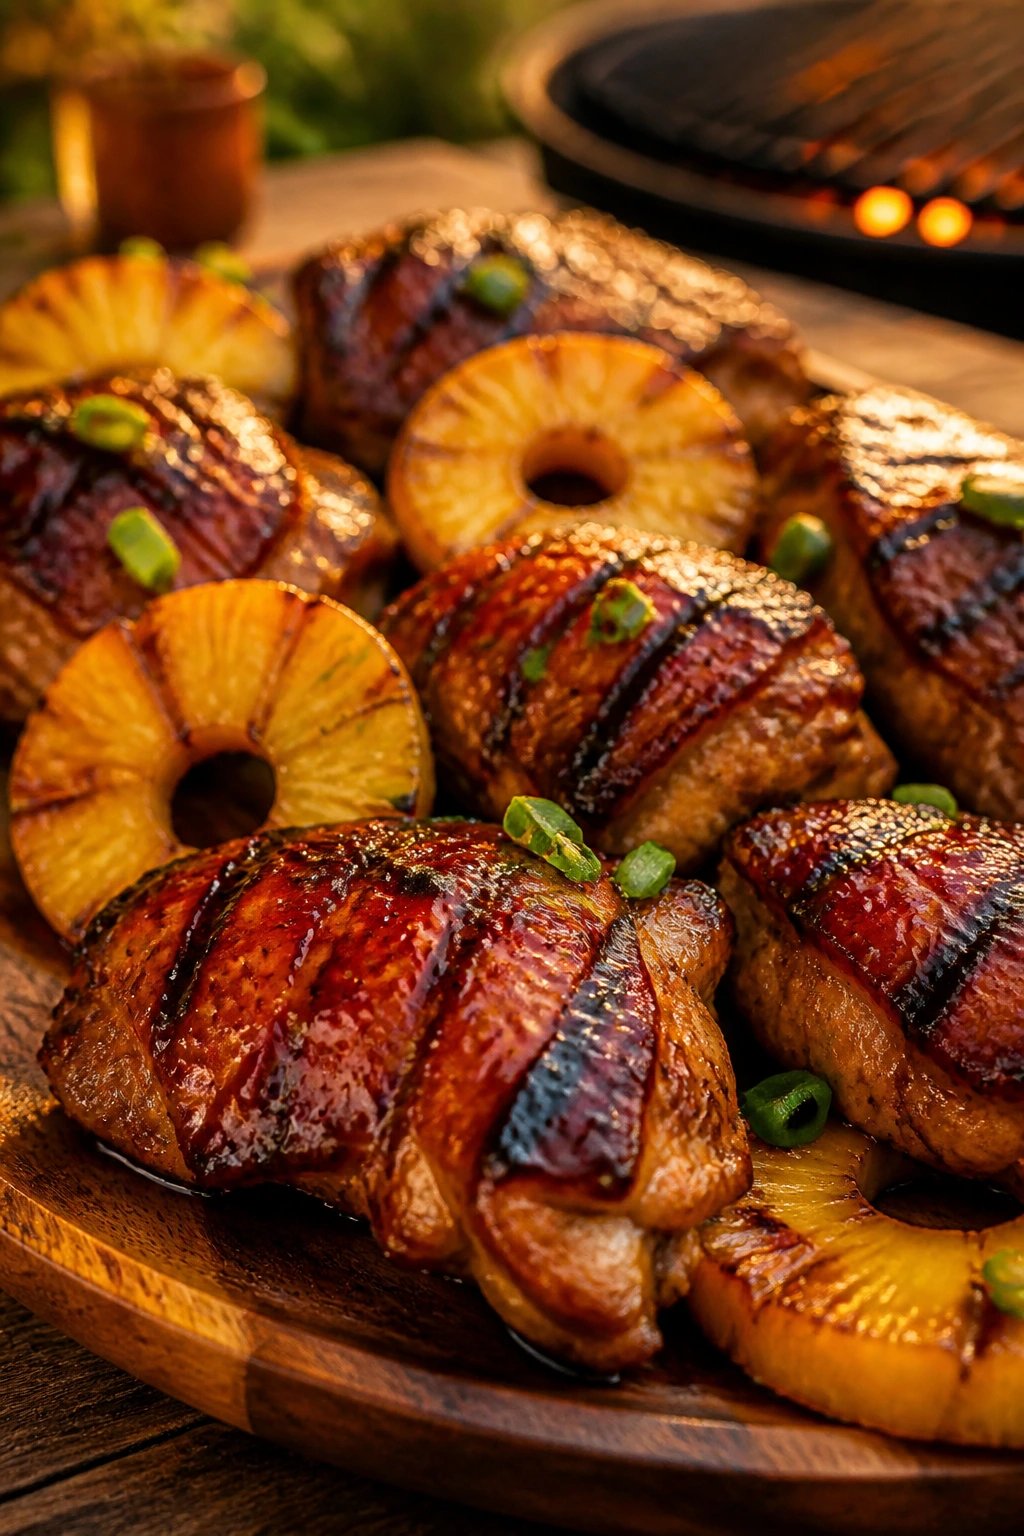
14. Hawaiian Chicken Kabobs
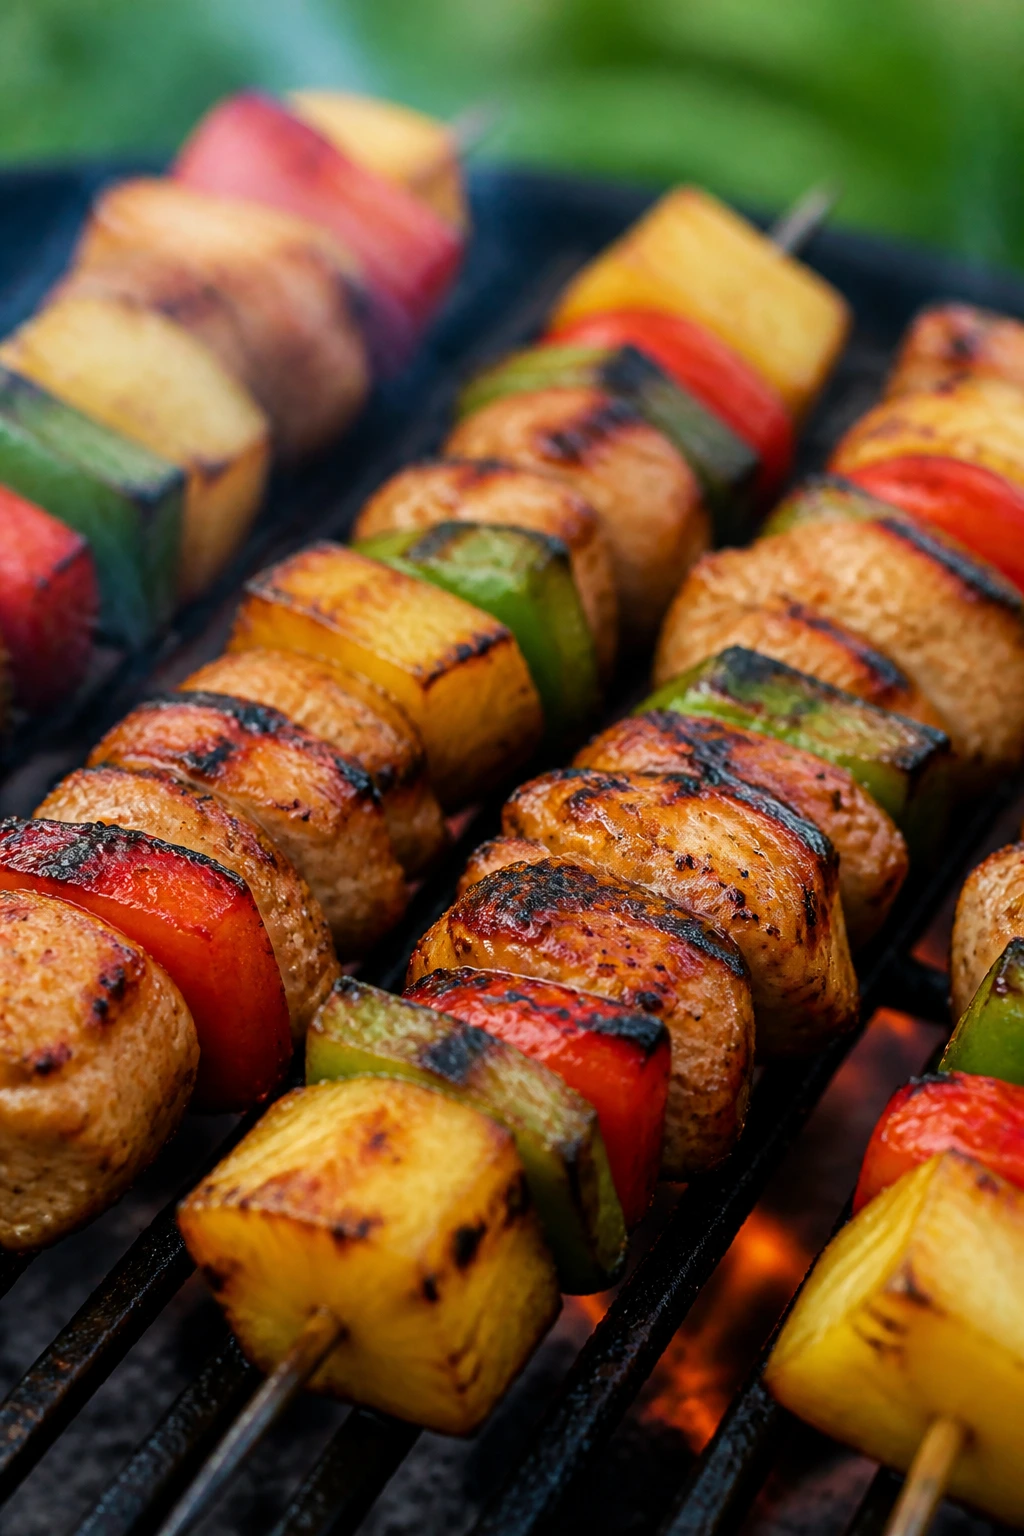
Pineapple on the grill turns sticky at the edges in the best possible way. Paired with chicken and peppers, it gives you that sweet-salty thing people love without needing a complicated sauce.
Why It Works:
The natural sugar in pineapple caramelizes fast, so the kabobs taste like they took more work than they did. Soy sauce, ginger, and garlic build a quick marinade that clings to the chicken. The result is bright, sweet, and smoky.
Key Ingredients:
- 1 1/2 lb chicken thighs, cut into cubes
- 1 cup pineapple chunks
- 1 red bell pepper, cut into squares
- 1 green bell pepper, cut into squares
- 1/4 cup soy sauce
- 2 tbsp brown sugar
- 1 tbsp grated ginger
- 2 garlic cloves, grated
- 1 tbsp oil
Quick Steps:
- Mix the soy sauce, brown sugar, ginger, garlic, and oil.
- Toss the chicken in the marinade for 20 to 30 minutes.
- Thread the chicken, pineapple, and peppers onto skewers.
- Grill over medium-high heat for 10 to 12 minutes, turning often, until the chicken reaches 165°F.
- Brush with leftover marinade only if it has not touched raw chicken, or use a reserved portion.
Equipment for This Recipe:
- Grill
- Skewers
- Mixing bowl
- Tongs
How to Serve This Dish:
Serve the kabobs over rice or with coconut rice if you want the sweeter edge to carry through. A squeeze of lime right before serving keeps the pineapple from feeling one-note.
Pro Tips for This Recipe:
- Cut the chicken and pineapple into similar sizes.
- Don’t use a marinade that’s too sugary too early or it will burn.
- Leave a little space between pieces on the skewer.
- Keep a separate brush for clean glaze if you want to finish them at the end.
Variations on This Dish:
- Spicy Pineapple Version: Add chili flakes or sriracha to the marinade.
- Pork Kabobs: Use pork tenderloin chunks instead of chicken.
- Teriyaki Shortcut: Swap the marinade for bottled teriyaki and a squeeze of lime.
Common Mistakes to Avoid with This Dish:
- Using canned pineapple syrup: It gets cloying fast.
- Packing the skewer too tightly: The chicken steams.
- Letting the kabobs char too fast: Move them to a cooler spot if the sugar starts to blacken.
15. Black Bean Burgers with Chipotle Mayo
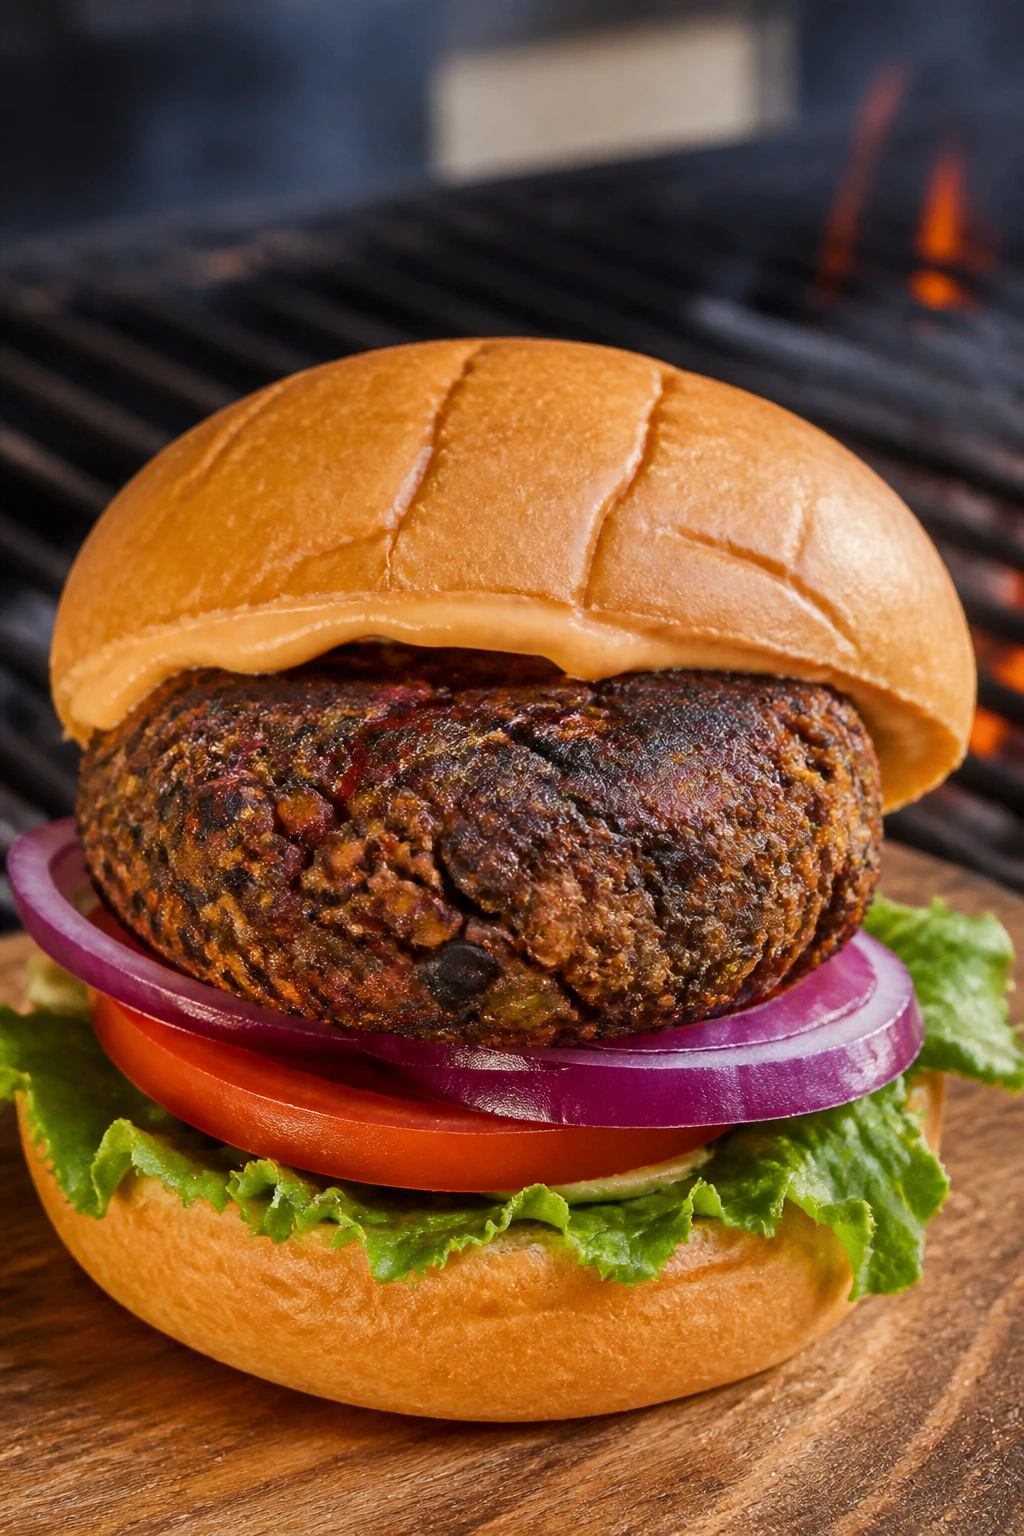
Black bean burgers are easy to get wrong when they’re too soft or too dry. Get the texture right, and you have a smoky, sturdy burger that can stand on its own without pretending to be beef.
Why It Works:
Mashed beans give body, breadcrumbs hold things together, and egg helps the patties keep shape on the grill. Chipotle mayo adds the smoke these burgers need, and a toasted bun makes the whole thing feel complete instead of polite.
Key Ingredients:
- 2 cans black beans, rinsed and drained
- 1/2 cup breadcrumbs
- 1 egg
- 1/4 cup finely diced onion
- 1 tsp cumin
- 1 tsp smoked paprika
- 1/2 tsp salt
- 1/4 cup mayonnaise
- 1 tsp minced chipotle in adobo
- 4 burger buns
Quick Steps:
- Mash most of the beans, leaving some whole for texture.
- Mix in breadcrumbs, egg, onion, cumin, paprika, and salt.
- Shape into 4 patties and chill 15 minutes.
- Grill on a lightly oiled grate or cast-iron skillet over medium heat for 4 to 5 minutes per side.
- Stir the mayo and chipotle, then serve on toasted buns.
Equipment for This Recipe:
- Grill or cast-iron skillet
- Spatula
- Mixing bowl
- Brush for oil
How to Serve This Dish:
Serve with slaw, tomato slices, or avocado. The chipotle mayo should be spread thin; the burger already has enough going on.
Pro Tips for This Recipe:
- Leave some beans whole so the burger doesn’t turn pasty.
- Chill the patties so they firm up.
- Oil the grates carefully; black bean burgers stick if you rush.
- If the mix feels loose, add another spoonful of breadcrumbs.
Variations on This Dish:
- Quinoa Bean Burger: Add 1/2 cup cooked quinoa for a firmer bite.
- Vegan Binder Swap: Use a flax egg instead of egg.
- Cheddar Version: Fold in shredded cheddar for a richer burger.
Common Mistakes to Avoid with This Dish:
- Making the mix too wet: The patties collapse.
- Flipping before the crust forms: They tear apart.
- Expecting beef texture: This burger has its own thing going on.
16. Grilled Margherita Pizzas
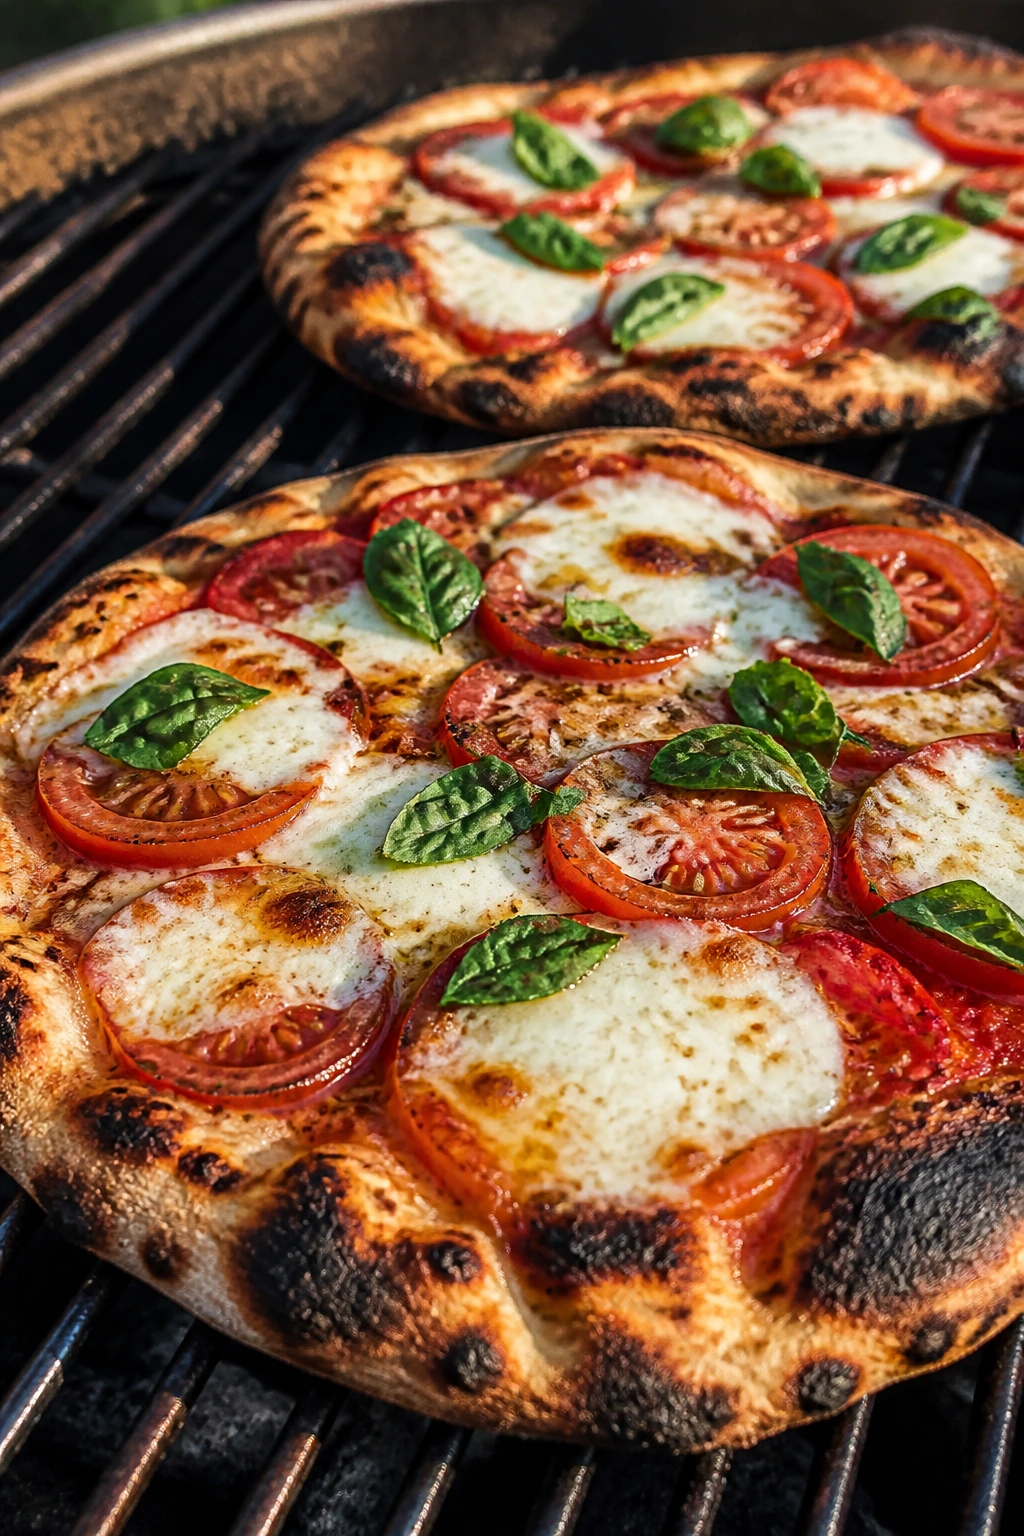
Pizza on the grill has a rough, smoky edge that an oven can’t quite copy. The crust picks up char in spots, the mozzarella melts fast, and the basil goes on at the end so it stays bright and green.
Why It Works:
A simple margherita pizza keeps the topping load light, which helps the dough cook through before the cheese burns. Grilling the crust first gives you structure, and the sauce-to-cheese ratio stays clean. It’s one of the smartest ways to feed people fast at a cookout.
Key Ingredients:
- 1 lb pizza dough, at room temperature
- 1/4 cup olive oil
- 1/2 cup pizza sauce
- 8 oz mozzarella, sliced or torn
- 1 large tomato, thinly sliced
- 1/2 tsp salt
- 1/4 cup basil leaves
- Flour for dusting
Quick Steps:
- Preheat the grill to medium-high, about 450°F.
- Stretch the dough into two rounds and brush one side with oil.
- Grill the oiled side for 2 minutes, flip, then top with sauce, mozzarella, tomato, and salt.
- Close the lid and grill 3 to 5 minutes more until the cheese melts and the crust has dark spots.
- Finish with basil and a drizzle of olive oil.
Equipment for This Recipe:
- Grill
- Pizza peel or rimless sheet pan
- Tongs
- Brush
How to Serve This Dish:
Slice and serve with a big green salad or grilled vegetables. A little extra olive oil and flaky salt at the table make the pizza taste finished.
Pro Tips for This Recipe:
- Keep the dough at room temperature so it stretches without snapping back.
- Go light on sauce.
- Use low-moisture mozzarella if fresh mozzarella seems too wet.
- Watch the crust closely; grill pizza goes from golden to burned fast.
Variations on This Dish:
- Pesto Margherita: Swap sauce for basil pesto.
- White Pizza Version: Use ricotta and mozzarella instead of tomato sauce.
- Naan Shortcut: Grill naan or flatbread if you don’t want to stretch dough.
Common Mistakes to Avoid with This Recipe:
- Using too much topping: The center turns soggy.
- Turning the heat too high: The bottom burns before the cheese melts.
- Walking away: Grill pizza needs eyes on it the whole time.
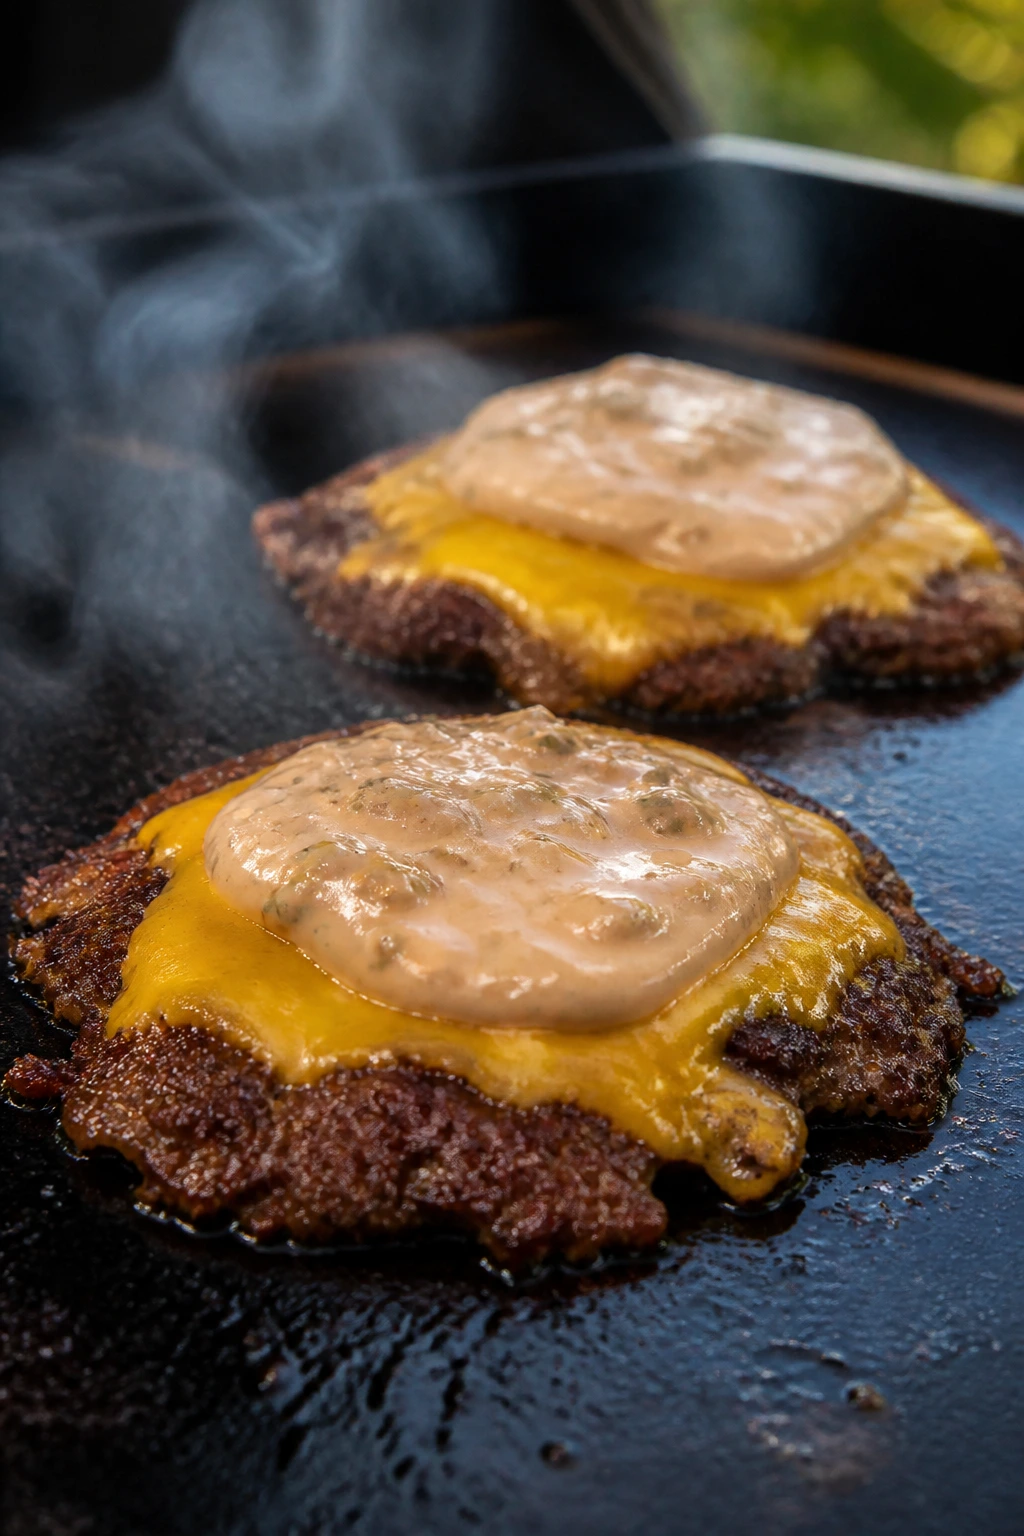
17. Cheeseburger Quesadillas on the Griddle
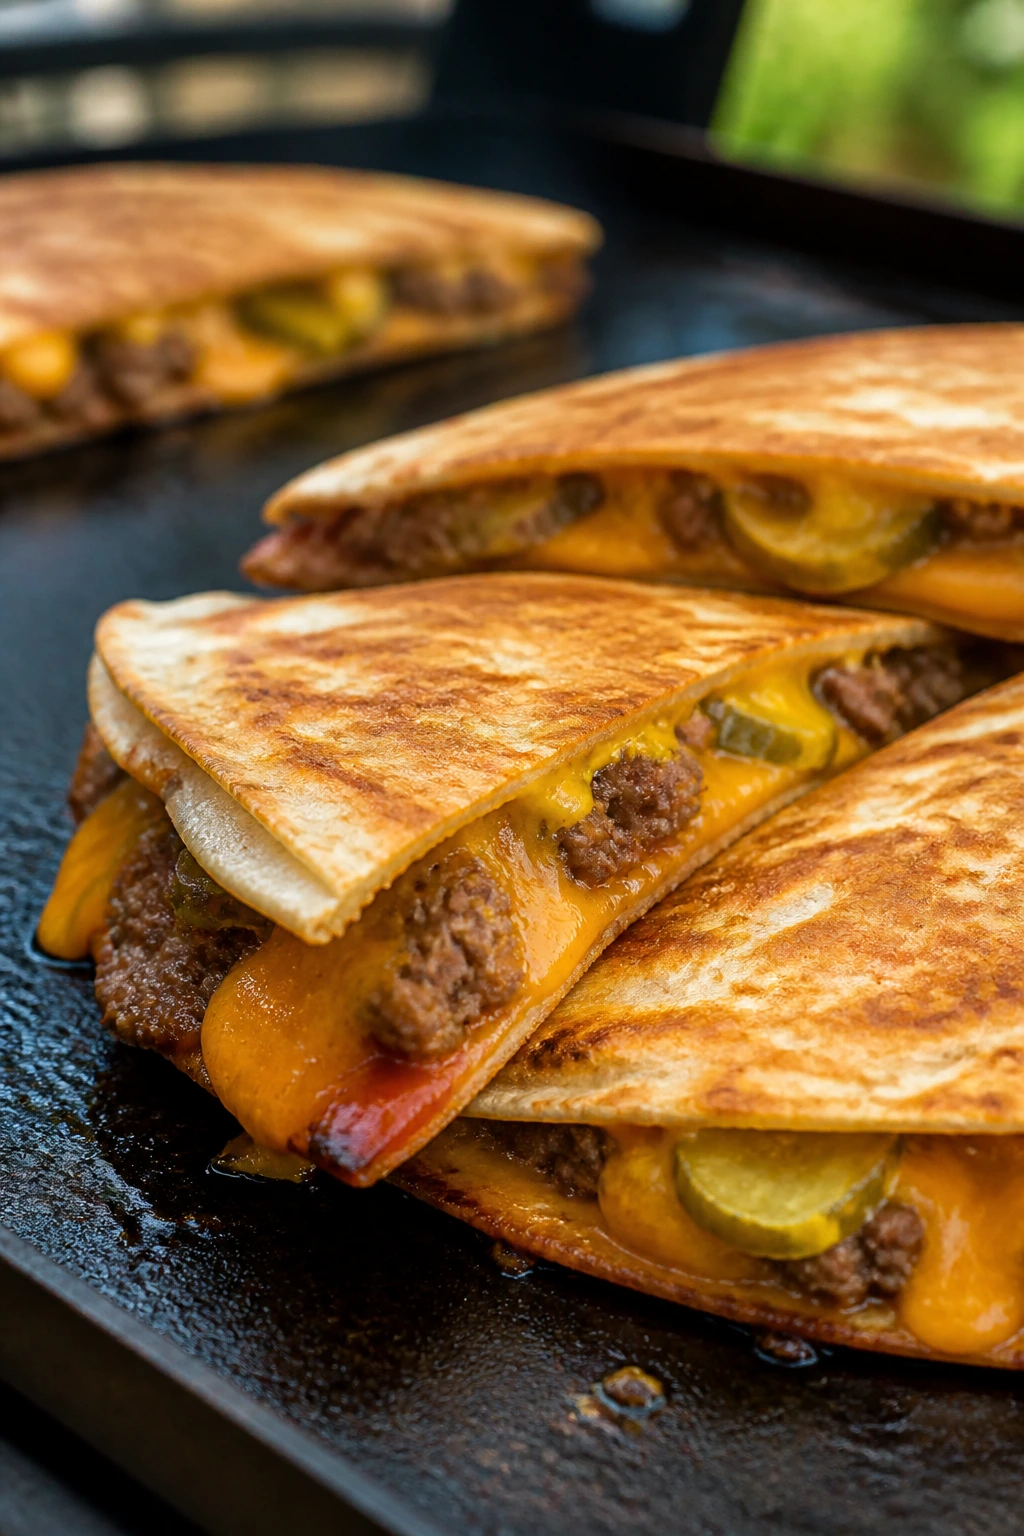
This is fast-food flavor with backyard smoke on top. The beef, cheese, pickles, ketchup, and mustard all show up, but the tortilla gives it a crisp shell that makes each wedge easy to eat standing up.
Why It Works:
Cooking the beef first lets you control the moisture, which matters because quesadillas hate wet fillings. The tortilla browns fast on the griddle, the cheese melts into everything, and the pickle adds the bite that keeps the whole thing from tasting flat.
Key Ingredients:
- 1 lb ground beef
- 1/2 small onion, finely diced
- 1 tsp salt
- 1/2 tsp black pepper
- 1 cup shredded cheddar
- 4 large flour tortillas
- 2 tbsp ketchup
- 1 tbsp yellow mustard
- 1/4 cup chopped dill pickles
- 1 tbsp butter or oil
Quick Steps:
- Brown the beef and onion in a skillet or griddle with salt and pepper until the meat is cooked through.
- Stir in ketchup and mustard, then cook until the filling looks glossy, not wet.
- Lay out the tortillas, add cheese, beef, pickles, and more cheese, then fold.
- Cook on a buttered griddle over medium heat for 2 to 3 minutes per side until crisp and golden.
- Slice into wedges and serve hot.
Equipment for This Recipe:
- Grill griddle or skillet
- Spatula
- Knife
- Mixing spoon
How to Serve This Dish:
Serve with extra pickles, ranch, or burger sauce for dipping. A few tomato slices on the side keep it from feeling too heavy.
Pro Tips for This Recipe:
- Drain excess fat from the beef before filling the tortillas.
- Use enough cheese to glue the quesadilla together.
- Medium heat works better than high heat, which burns the tortilla before the cheese melts.
- Cut after a minute of rest so the filling stays put.
Variations on This Dish:
- Bacon Burger Quesadilla: Add cooked bacon pieces.
- Jalapeño Version: Stir chopped pickled jalapeños into the filling.
- Cheeseburger Wrap: Skip the fold and roll it burrito-style for a softer bite.
Common Mistakes to Avoid with This Dish:
- Overfilling the tortilla: It tears and leaks.
- Using high heat: The outside burns too fast.
- Serving immediately after cutting: The cheese spills out.
18. Beef and Mushroom Kabobs

Beef kabobs sound old-school because they are, and that’s part of the charm. Mushrooms soak up the marinade, peppers stay sweet, and the beef gets enough char to taste like it belongs on a grill.
Why It Works:
Sirloin or ribeye pieces cook quickly and stay tender if you cut them right. Mushrooms act like little flavor sponges, and the marinade gives the whole skewer a savory backbone. This is a good recipe when you want meat, vegetables, and no extra side drama.
Key Ingredients:
- 1 1/2 lb sirloin steak, cut into 1 1/2-inch cubes
- 8 oz mushrooms
- 1 bell pepper, cut into chunks
- 1 red onion, cut into wedges
- 1/4 cup olive oil
- 2 tbsp soy sauce
- 1 tbsp Worcestershire sauce
- 2 garlic cloves, minced
- 1 tsp black pepper
Quick Steps:
- Whisk the oil, soy sauce, Worcestershire, garlic, and pepper.
- Toss the beef with half the marinade and the vegetables with the other half.
- Thread the beef and vegetables onto skewers.
- Grill over medium-high heat for 8 to 10 minutes, turning often, until the beef reaches your preferred doneness.
- Rest 3 minutes before serving.
Equipment for This Recipe:
- Grill
- Skewers
- Mixing bowl
- Tongs
How to Serve This Dish:
Serve with roasted potatoes, rice, or a tomato-cucumber salad. A sprinkle of flaky salt right before serving sharpens the beef.
Pro Tips for This Recipe:
- Cut the beef evenly so the pieces finish together.
- Use mushrooms with caps that are firm, not slimy.
- Don’t crowd the skewers.
- A short rest after grilling keeps the juices inside the meat.
Variations on This Dish:
- Rosemary Balsamic Kabobs: Swap Worcestershire for balsamic and add rosemary.
- Spicy Steak Version: Add crushed red pepper to the marinade.
- All-Veg Skewer: Replace beef with extra mushrooms and zucchini.
Common Mistakes to Avoid with This Dish:
- Using stew meat: It stays tough on the grill.
- Uneven cuts: Some pieces overcook while others stay raw.
- Soaking the vegetables too long in salt-heavy marinade: They lose texture.
19. Lemon-Herb Salmon Burgers
Salmon burgers can go wrong if they’re dry or fishy. Keep them moist, season them with lemon and herbs, and serve them with a cool sauce, and they become one of the cleanest cookout meals on the table.
Why It Works:
Salmon has enough richness to hold a patty together without a ton of filler. Lemon zest, dill, and a little mayo keep the texture soft, while the grill gives the outside a crisp edge. The result is lighter than beef but still feels like dinner.
Key Ingredients:
- 1 1/2 lb salmon, skin removed and chopped, or drained canned salmon
- 1/3 cup breadcrumbs
- 2 tbsp mayonnaise
- 1 egg
- 1 tbsp lemon zest
- 2 tbsp chopped dill
- 1 tsp salt
- 1/2 tsp black pepper
- 4 burger buns
- Tartar sauce or lemon mayo, for serving
Quick Steps:
- Mix salmon, breadcrumbs, mayo, egg, lemon zest, dill, salt, and pepper.
- Form 4 patties and chill 15 minutes.
- Grill over medium heat on oiled grates or in a grill pan for 4 to 5 minutes per side.
- Cook until firm and just opaque through the middle.
- Serve on toasted buns with tartar sauce.
Equipment for This Recipe:
- Grill or grill pan
- Spatula
- Mixing bowl
- Brush for oil
How to Serve This Dish:
Serve with cucumber salad, chips, or grilled asparagus. A squeeze of lemon over the bun keeps the flavor bright.
Pro Tips for This Recipe:
- Chill the patties before grilling so they hold shape.
- Use moist salmon, not dry flakes from the back of the fridge.
- Keep the heat moderate; salmon burger patties need time to set.
- Toast the buns or they’ll go soft fast.
Variations on This Dish:
- Caper Burger: Add chopped capers for a briny finish.
- Herb-Dill Sauce: Mix dill into the tartar sauce for extra freshness.
- Open-Faced Serve: Put the patty on toasted sourdough instead of a bun.
Common Mistakes to Avoid with This Dish:
- Overmixing the patty mixture: The burgers turn dense.
- Using too little binder: The patties break apart.
- Cooking on a screaming-hot grate: The outside burns before the center sets.
20. Grilled Shrimp Tacos with Cabbage Slaw
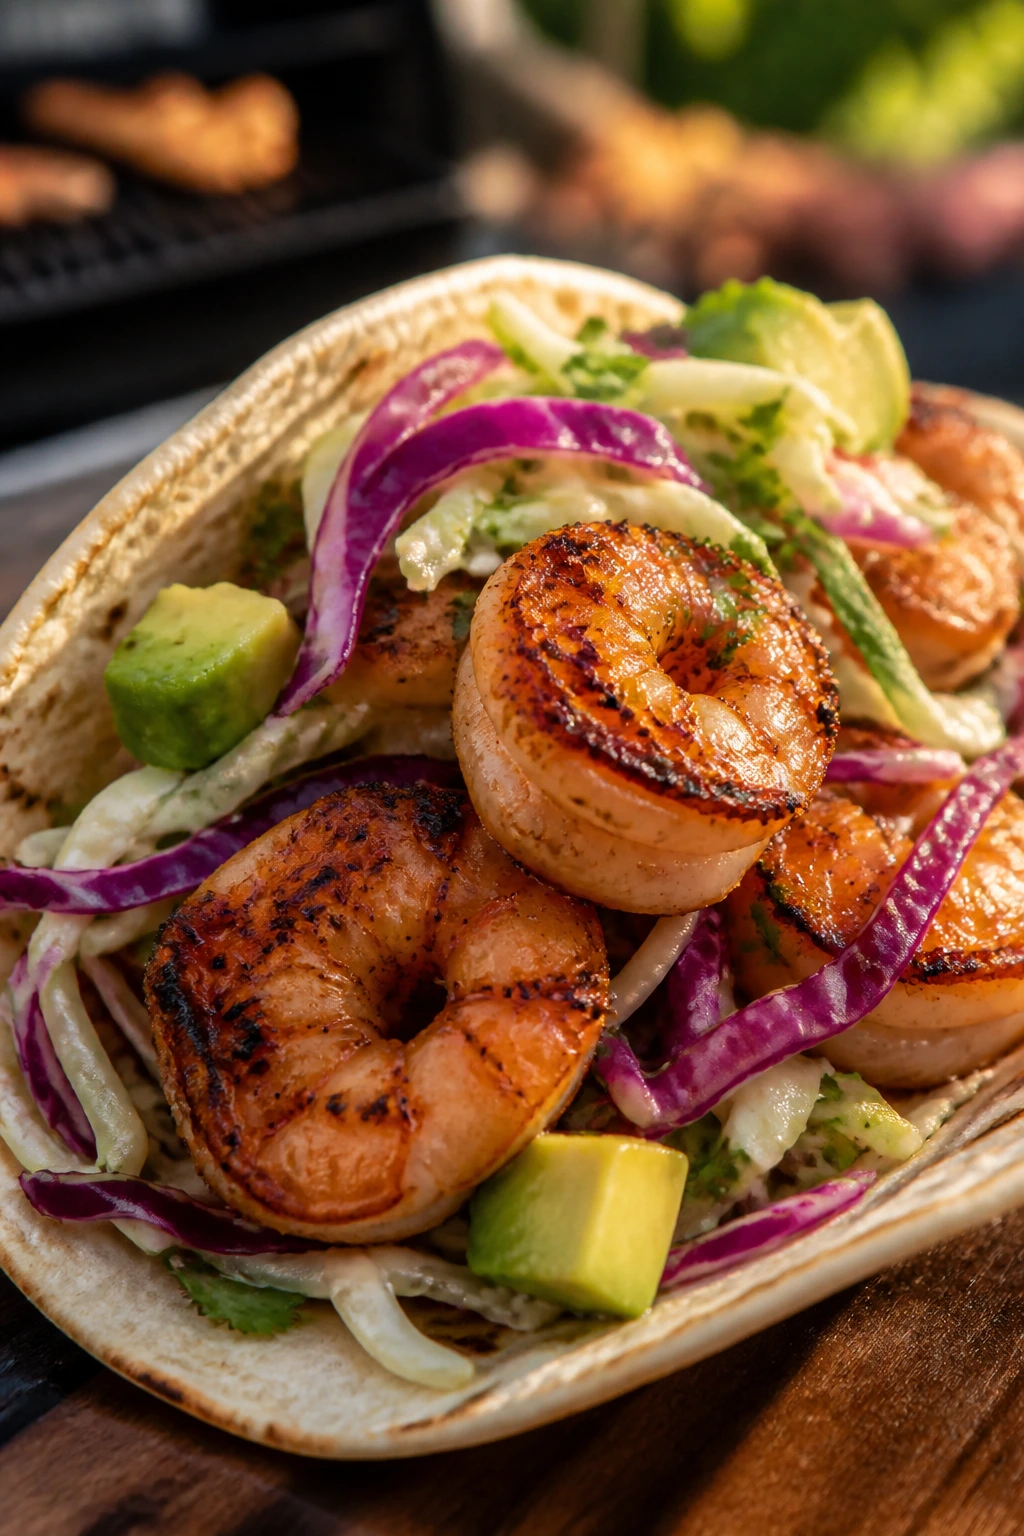
Shrimp tacos are quick enough to keep up with the cookout, which is the whole trick. The slaw stays crunchy, the shrimp pick up smoke in minutes, and the tortillas get warm before anyone has time to drift away.
Why It Works:
Shrimp cooks almost suspiciously fast, so it fits neatly between everything else on the grill. A citrusy slaw gives the tacos crunch and acidity, and avocado turns the bite creamy without making it heavy. This is easy summer food with good pacing.
Key Ingredients:
- 2 lb large shrimp, peeled and deveined
- 1 tbsp olive oil
- 1 tsp chili powder
- 1 tsp cumin
- 1 tsp kosher salt
- 4 cups shredded cabbage
- 1/4 cup mayonnaise or Greek yogurt
- 1 tbsp lime juice
- 1/4 cup chopped cilantro
- 8 small tortillas
- 1 avocado, sliced
Quick Steps:
- Toss the shrimp with oil, chili powder, cumin, and salt.
- Mix cabbage, mayo or yogurt, lime juice, and cilantro for the slaw.
- Grill the shrimp over medium-high heat for 2 to 3 minutes per side until pink and firm.
- Warm the tortillas on the grill for 20 seconds per side.
- Fill with slaw, shrimp, and avocado.
Equipment for This Recipe:
- Grill
- Tongs
- Mixing bowls
- Skewers or grill basket, optional
How to Serve This Dish:
Serve with extra lime wedges and hot sauce. A side of black beans or grilled corn makes the tacos feel like a full meal.
Pro Tips for This Recipe:
- Use large shrimp so they don’t overcook in a blink.
- Keep the slaw dry enough to stay crunchy.
- If the shrimp are sticking, the grate isn’t hot enough yet.
- Don’t leave the tortillas on the grill too long; they stiffen fast.
Variations on This Dish:
- Mango Slaw: Add diced mango to the cabbage mix.
- Chipotle Shrimp: Add chipotle powder to the spice rub.
- Garlic-Lime Version: Add grated garlic to the shrimp marinade.
Common Mistakes to Avoid with This Recipe:
- Overcooking shrimp: They turn rubbery fast.
- Using too much slaw dressing: The tacos fall apart.
- Stacking tacos too early: Warm tortillas tear when overloaded.
21. Loaded Grilled Hot Dogs
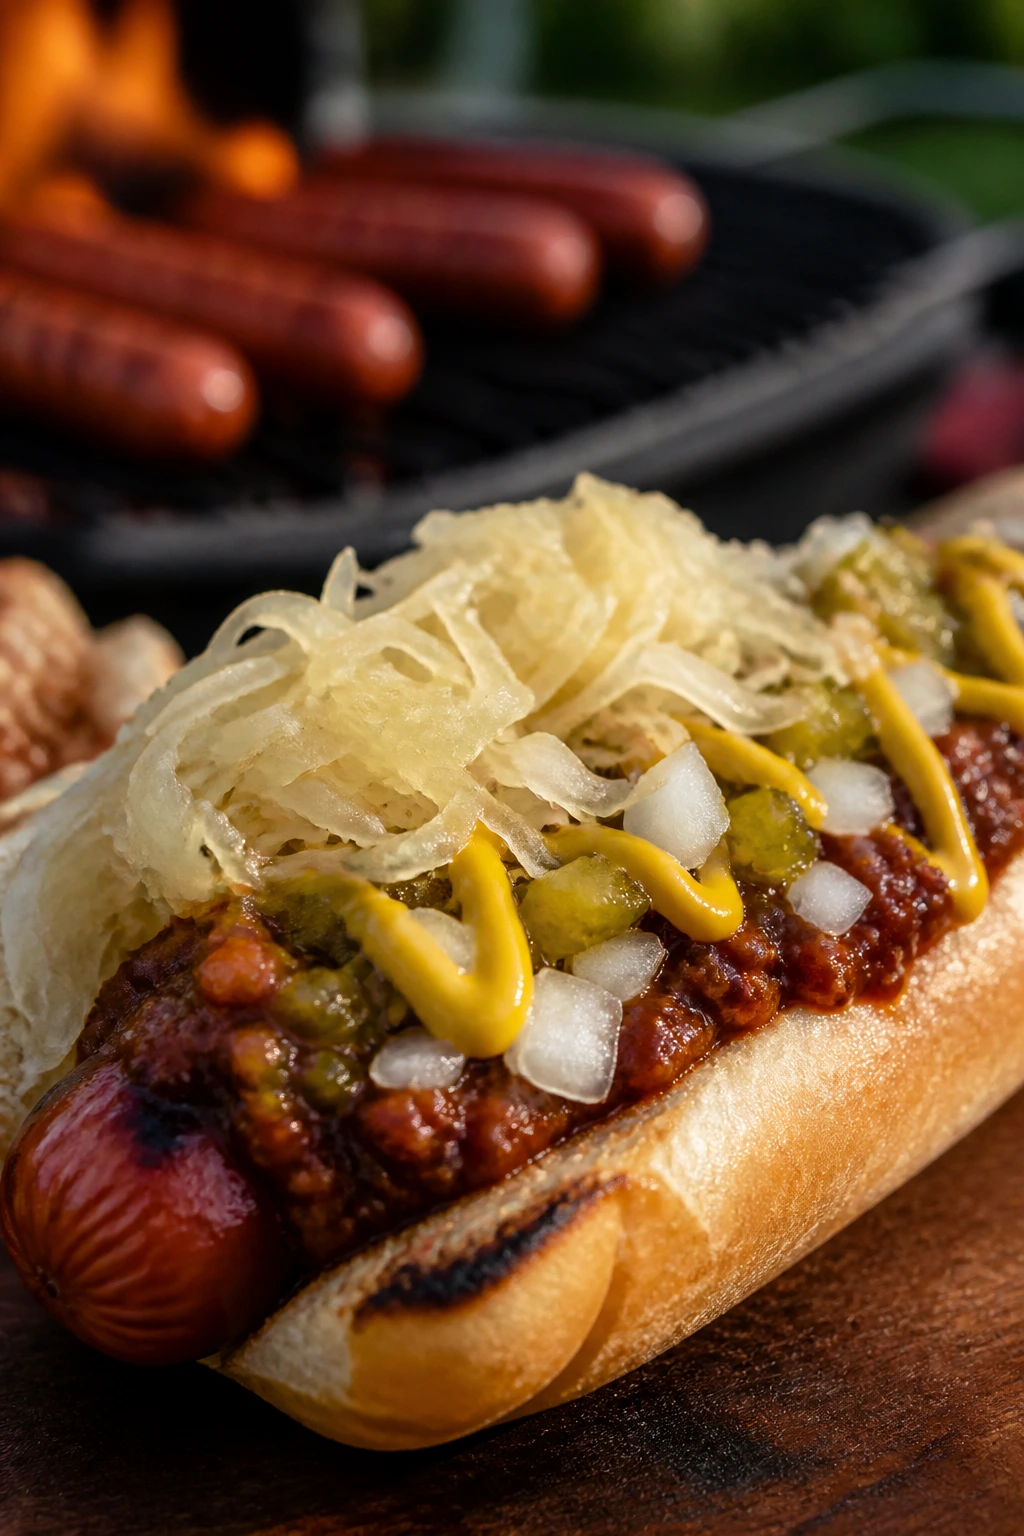
Hot dogs don’t need reinventing. They need heat, a toasted bun, and toppings that taste like somebody bothered to set them out with intent instead of tossing them in a bowl and hoping for the best.
Why It Works:
A grilled hot dog has a snappy skin and a smoky edge that boiling never gives you. Once you add chili, onions, mustard, relish, or sauerkraut, you get enough variety to make the meal feel custom without making the grill work harder than it should.
Key Ingredients:
- 8 all-beef hot dogs
- 8 hot dog buns
- 1 cup quick chili or canned chili, warmed
- 1/2 cup diced onions
- 1/4 cup dill relish
- 1/4 cup yellow mustard
- 1/2 cup sauerkraut
- 1 cup shredded cheddar
Quick Steps:
- Preheat the grill to medium-high.
- Grill the hot dogs for 5 to 7 minutes, turning until blistered and hot.
- Toast the buns for 20 to 30 seconds.
- Warm the chili in a small pan or foil tray on the grill.
- Assemble with your choice of toppings and serve immediately.
Equipment for This Recipe:
- Grill
- Tongs
- Small pan or foil tray
- Topping bowls
How to Serve This Dish:
Set the toppings out buffet-style so everybody builds their own. Chips, baked beans, or a cold pasta salad make a hot dog plate feel like a real cookout dinner.
Pro Tips for This Recipe:
- Split a few dogs lengthwise if you want extra char.
- Toasting the buns matters more than people think.
- Keep the chili warm, not boiling.
- Set out a separate spoon for each topping or the board gets messy fast.
Variations on This Dish:
- Chicago-Style Lane: Add mustard, relish, onion, tomato, pickles, and celery salt.
- Chili Cheese Dog: Go heavy on warm chili and cheddar.
- Sauerkraut Dog: Keep it sharp and simple with mustard and kraut.
Common Mistakes to Avoid with This Dish:
- Using cold buns: The dog feels disconnected from the bread.
- Overloading toppings: The hot dog turns into a slippery pile.
- Letting the dogs burst and dry out: Medium heat is enough.
22. Greek Chicken Pita Pockets
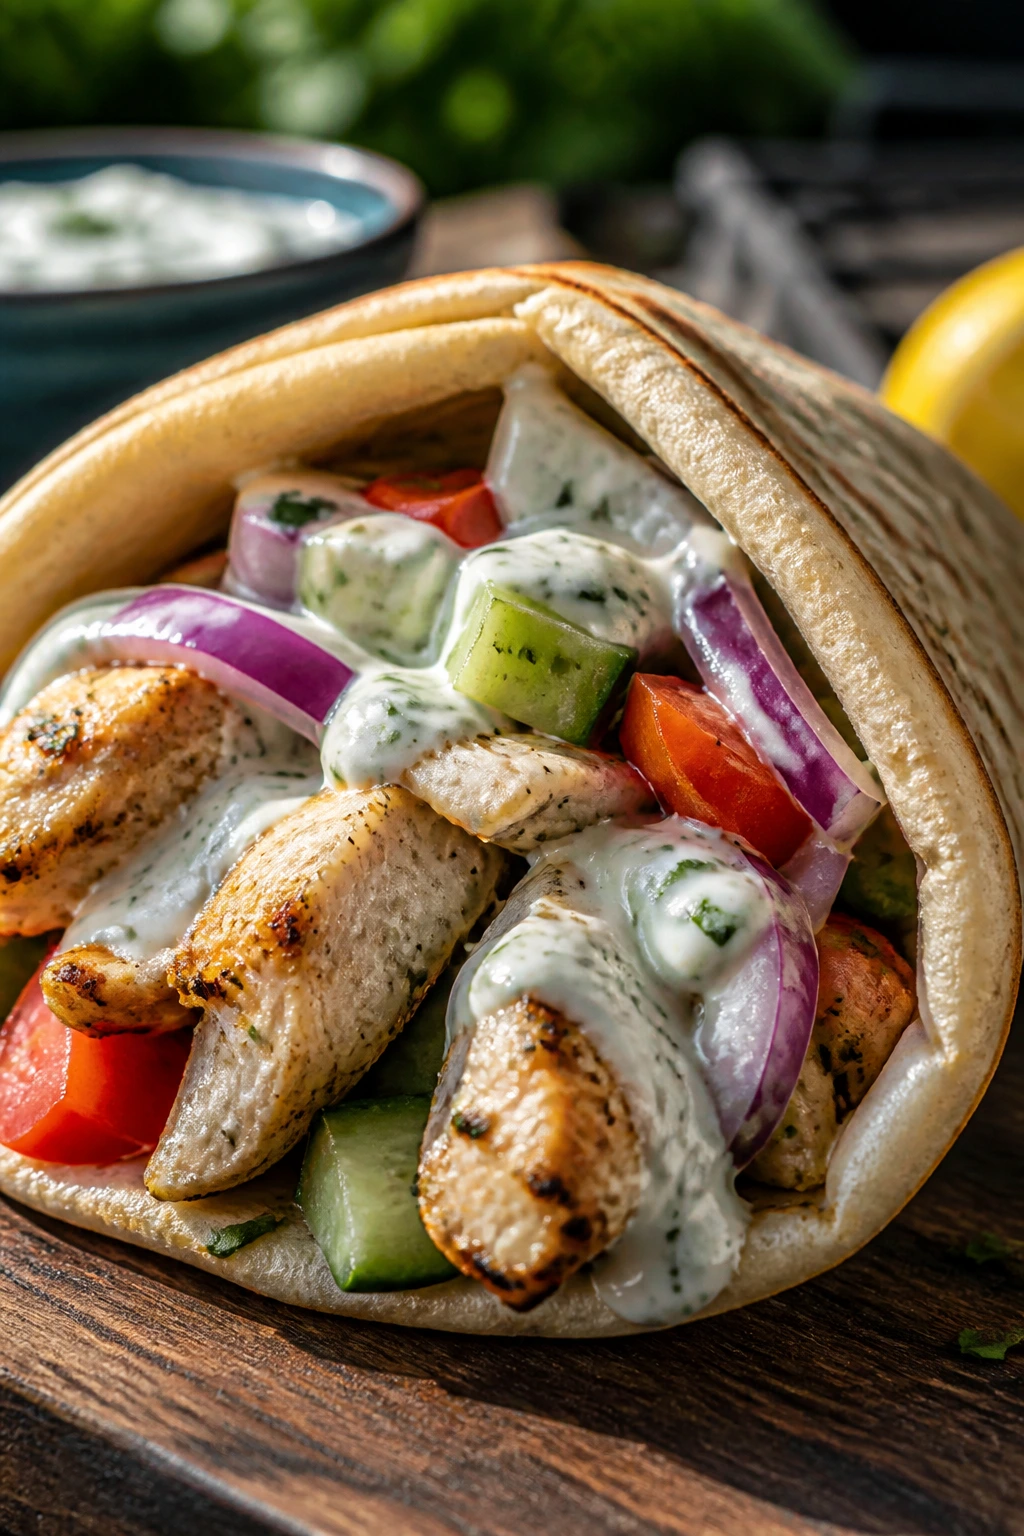
These pita pockets taste like a grilled chicken salad decided to wear better clothes. The lemon, oregano, cucumber, and yogurt sauce keep everything cool and sharp, which is exactly what summer cookout food should do.
Why It Works:
Chicken thighs or breasts can both work, but the Greek marinade keeps the meat from tasting flat. Cucumbers and tomatoes bring freshness, pita holds the filling without falling apart, and tzatziki gives you one cold, creamy layer that does real work.
Key Ingredients:
- 1 1/2 lb chicken thighs or breasts
- 3 tbsp olive oil
- 2 tbsp lemon juice
- 2 garlic cloves, grated
- 1 tsp dried oregano
- 1 tsp kosher salt
- 4 pita rounds
- 1 cucumber, diced
- 1 cup diced tomato
- 1/2 red onion, thinly sliced
- 1/2 cup tzatziki
Quick Steps:
- Mix olive oil, lemon juice, garlic, oregano, and salt.
- Marinate the chicken for 20 to 30 minutes.
- Grill over medium-high heat until the chicken reaches 165°F, then rest and slice.
- Warm the pita for 20 seconds on the grill.
- Fill with chicken, cucumber, tomato, onion, and tzatziki.
Equipment for This Recipe:
- Grill
- Knife
- Tongs
- Mixing bowl
How to Serve This Dish:
Serve the pita pockets wrapped in parchment or folded foil so they’re easy to hold. A small pile of olives or a tomato salad fits right beside them.
Pro Tips for This Recipe:
- Slice the chicken after resting so the juices stay in the meat.
- Drain the tomatoes a bit if they’re extra juicy.
- Warm pita is easier to fold and less likely to crack.
- A pinch of dill in the tzatziki makes the whole thing pop.
Variations on This Dish:
- Lamb Pita: Swap in grilled lamb for a deeper flavor.
- Chickpea Pita: Use spiced chickpeas instead of chicken.
- Feta-Focused Version: Add extra feta and fewer tomatoes for a saltier bite.
Common Mistakes to Avoid with This Recipe:
- Overstuffing the pita: It tears.
- Using watery vegetables without draining them: The pocket gets soggy.
- Skipping the marinade: The chicken ends up plain and dry.
23. Teriyaki Chicken Thighs with Pineapple
Teriyaki on a grill gets sticky in the best possible way. The glaze clings to the chicken, the pineapple chars at the edges, and the whole plate tastes sweet, salty, and smoky without needing a pile of extra sauce.
Why It Works:
Chicken thighs stay juicy under a glossy glaze, and pineapple gives you a built-in sweet side. The key is brushing the sauce on late enough that it thickens instead of burning. That’s the line that separates glossy from bitter.
Key Ingredients:
- 1 1/2 lb boneless chicken thighs
- 1/3 cup soy sauce
- 2 tbsp brown sugar
- 1 tbsp grated ginger
- 2 garlic cloves, grated
- 1 tbsp sesame oil
- 1 cup pineapple rings or chunks
- 1 tbsp sesame seeds
- 2 scallions, sliced
Quick Steps:
- Whisk soy sauce, brown sugar, ginger, garlic, and sesame oil.
- Marinate the chicken for 20 to 30 minutes.
- Grill the pineapple for 2 to 3 minutes per side until marked.
- Grill the chicken over medium-high heat for 10 to 12 minutes, brushing with marinade in the last few minutes only, until 165°F.
- Serve with pineapple, sesame seeds, and scallions.
Equipment for This Recipe:
- Grill
- Tongs
- Bowl
- Small brush
How to Serve This Dish:
Serve with steamed rice or sesame noodles. The pineapple should sit beside the chicken, not buried under it, so the char stays visible.
Pro Tips for This Recipe:
- Reserve a portion of the marinade before it touches raw chicken if you want extra glaze.
- Keep the heat medium-high, not raging.
- Scallions added at the end stay sharper and fresher.
- Thighs are more forgiving than breasts here.
Variations on This Dish:
- Spicy Teriyaki: Add chili paste to the marinade.
- Salmon Version: Brush salmon with the same glaze and cook a little less time.
- Soy-Free Swap: Use coconut aminos in place of soy sauce.
Common Mistakes to Avoid with This Recipe:
- Brushing on marinade too early: The sugar burns.
- Using very thin chicken pieces: They dry out before the glaze sets.
- Skipping the rest: The glaze needs a minute to settle on the meat.
24. Grilled Pork Tenderloin Sliders
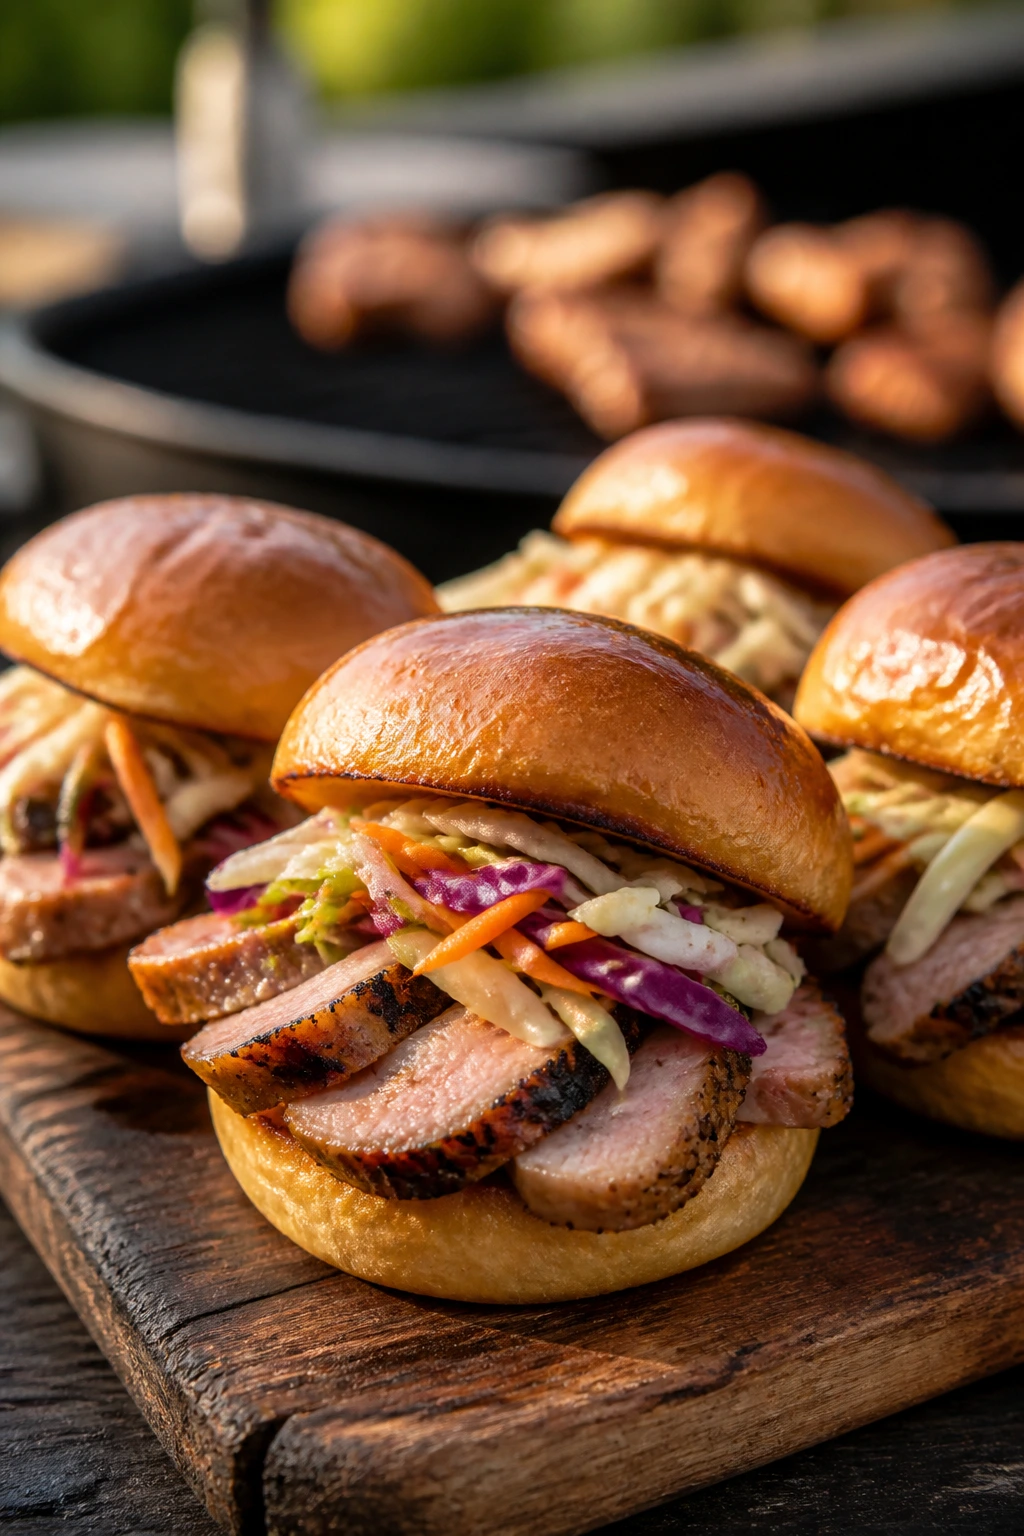
Pork tenderloin is lean, quick, and friendly to grilling if you don’t overthink it. Slice it thin, tuck it into small buns, and add something crunchy on top, and it turns into a meal that disappears fast.
Why It Works:
Tenderloin cooks quickly and stays elegant when sliced across the grain. A mustard-garlic rub gives it enough depth to stand up to soft slider buns, and slaw keeps the sandwich from feeling dry. This is a good cookout recipe when you want something a little different from burgers.
Key Ingredients:
- 2 pork tenderloins, about 1 1/2 lb total
- 1 tbsp olive oil
- 1 tbsp Dijon mustard
- 2 garlic cloves, minced
- 1 tsp kosher salt
- 1/2 tsp black pepper
- 8 slider buns
- 2 cups coleslaw mix
- 2 tbsp mayo or vinegar dressing
Quick Steps:
- Rub the pork with oil, mustard, garlic, salt, and pepper.
- Grill over medium-high heat for 15 to 20 minutes, turning occasionally, until the center reaches 145°F.
- Rest 5 minutes, then slice thin.
- Toss the slaw with mayo or vinegar dressing.
- Fill slider buns with pork and slaw.
Equipment for This Recipe:
- Grill
- Tongs
- Knife
- Cutting board
How to Serve This Dish:
Serve on a tray with pickles and extra slaw. A little barbecue sauce on the side works too, but don’t drown the pork.
Pro Tips for This Recipe:
- Rest the tenderloin before slicing or the juices run out.
- Slice against the grain for tenderness.
- Toast the slider buns lightly so they don’t collapse.
- Keep the slaw crisp and only dress it right before serving.
Variations on This Dish:
- BBQ Slider Version: Brush the pork with sauce in the last 2 minutes.
- Apple Slaw Swap: Use shredded apple in the slaw for a sweeter crunch.
- Mustard-Herb Version: Add thyme or rosemary to the rub.
Common Mistakes to Avoid with This Recipe:
- Cooking past 145°F: Tenderloin dries out fast.
- Slicing too soon: The meat loses its juices.
- Using a soggy slaw: The bun goes soft before the first bite.
25. Grilled Veggie Pasta Salad
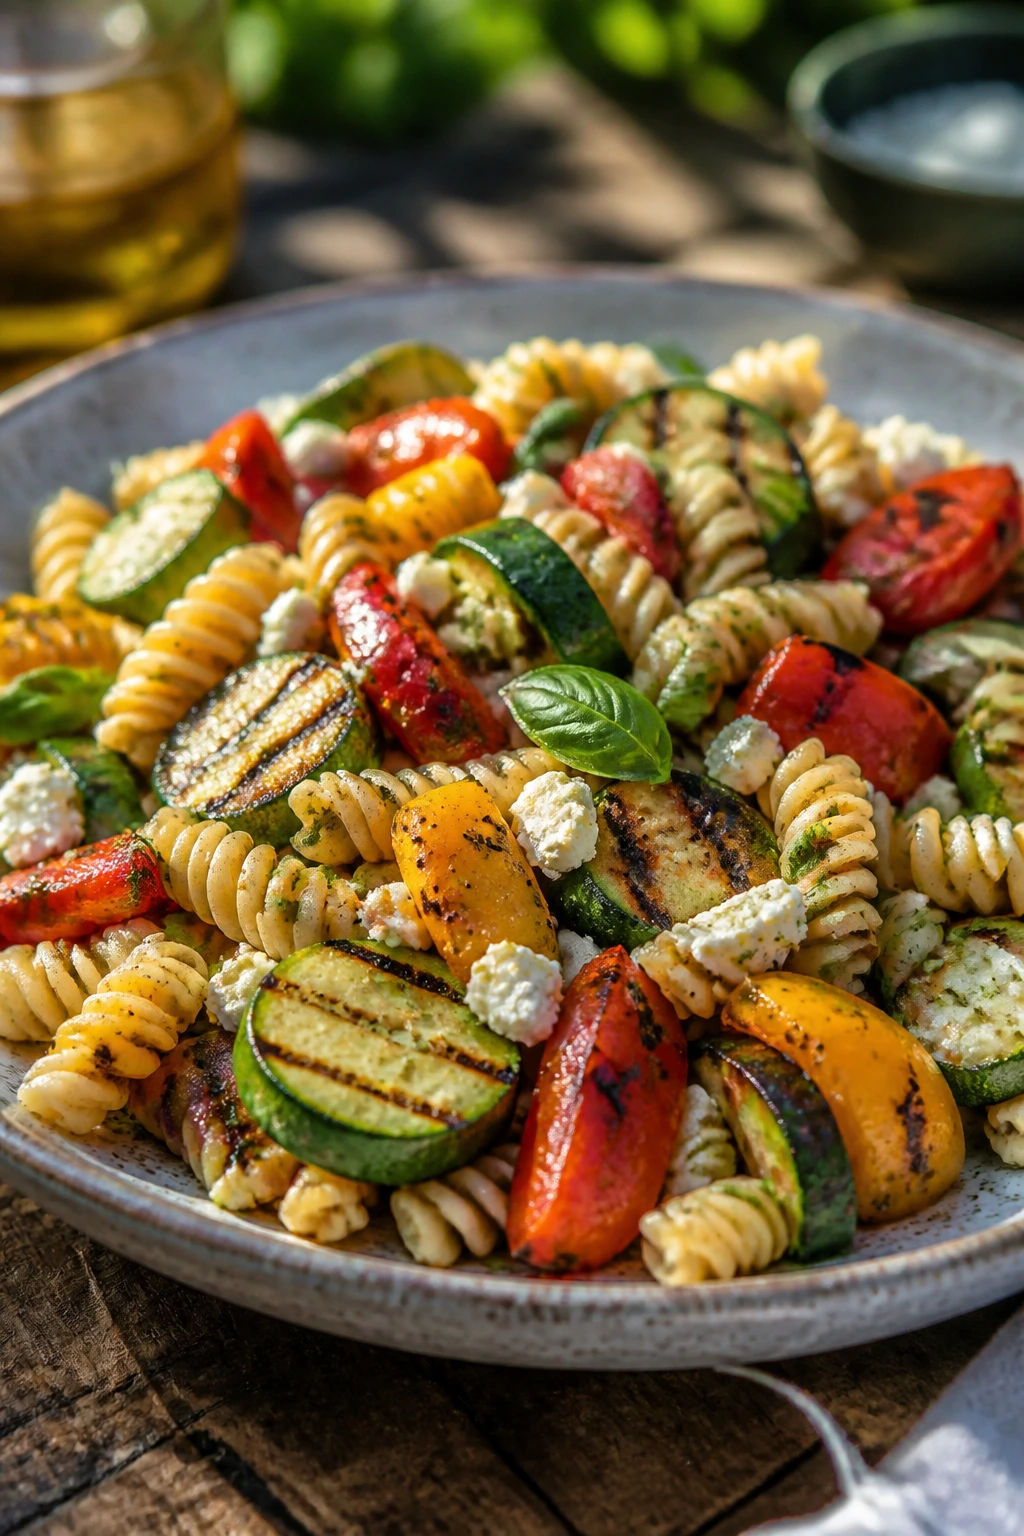
Pasta salad can be limp and forgettable, or it can have charred zucchini, sweet peppers, and enough dressing to taste alive. Grilling the vegetables gives this version a smoky note that makes it feel like part of the cookout instead of something dragged in from the side table.
Why It Works:
Grilled vegetables bring more flavor than raw ones, and the pasta catches the dressing better once it has cooled a little. Feta, basil, and a sharp vinaigrette keep it from tasting heavy. It can be a side, but honestly, it eats like a meal.
Key Ingredients:
- 12 oz short pasta
- 2 zucchini, sliced lengthwise
- 1 red bell pepper, halved
- 1 yellow bell pepper, halved
- 1 small red onion, sliced
- 3 tbsp olive oil
- 1/4 cup vinaigrette
- 1/2 cup crumbled feta
- 1/4 cup chopped basil
- Salt and pepper
Quick Steps:
- Cook the pasta in salted water until al dente, then rinse briefly and cool.
- Brush the vegetables with olive oil, salt, and pepper.
- Grill until charred in spots and tender, about 8 to 10 minutes.
- Chop the vegetables and toss with pasta, vinaigrette, feta, and basil.
- Taste and adjust salt before serving.
Equipment for This Recipe:
- Grill
- Pot for pasta
- Colander
- Large bowl
How to Serve This Dish:
Serve chilled or at room temperature in a wide bowl. It plays well next to chicken, sausages, or burgers, which makes it the sort of side that quietly does a lot.
Pro Tips for This Recipe:
- Undercook the pasta by a minute so it stays firm after dressing.
- Dress while slightly warm so the pasta absorbs flavor.
- Add basil last so it stays green.
- A splash of lemon juice wakes up leftovers.
Variations on This Dish:
- Chickpea Pasta Salad: Add drained chickpeas for more heft.
- Pesto Version: Swap vinaigrette for pesto thinned with olive oil.
- Mozzarella Swap: Use small mozzarella balls instead of feta.
Common Mistakes to Avoid with This Recipe:
- Using overcooked pasta: It turns mushy fast.
- Skipping seasoning on the vegetables: They taste flat.
- Adding dressing too early when the pasta is hot: The salad goes limp.
26. Chicken Bacon Ranch Burgers
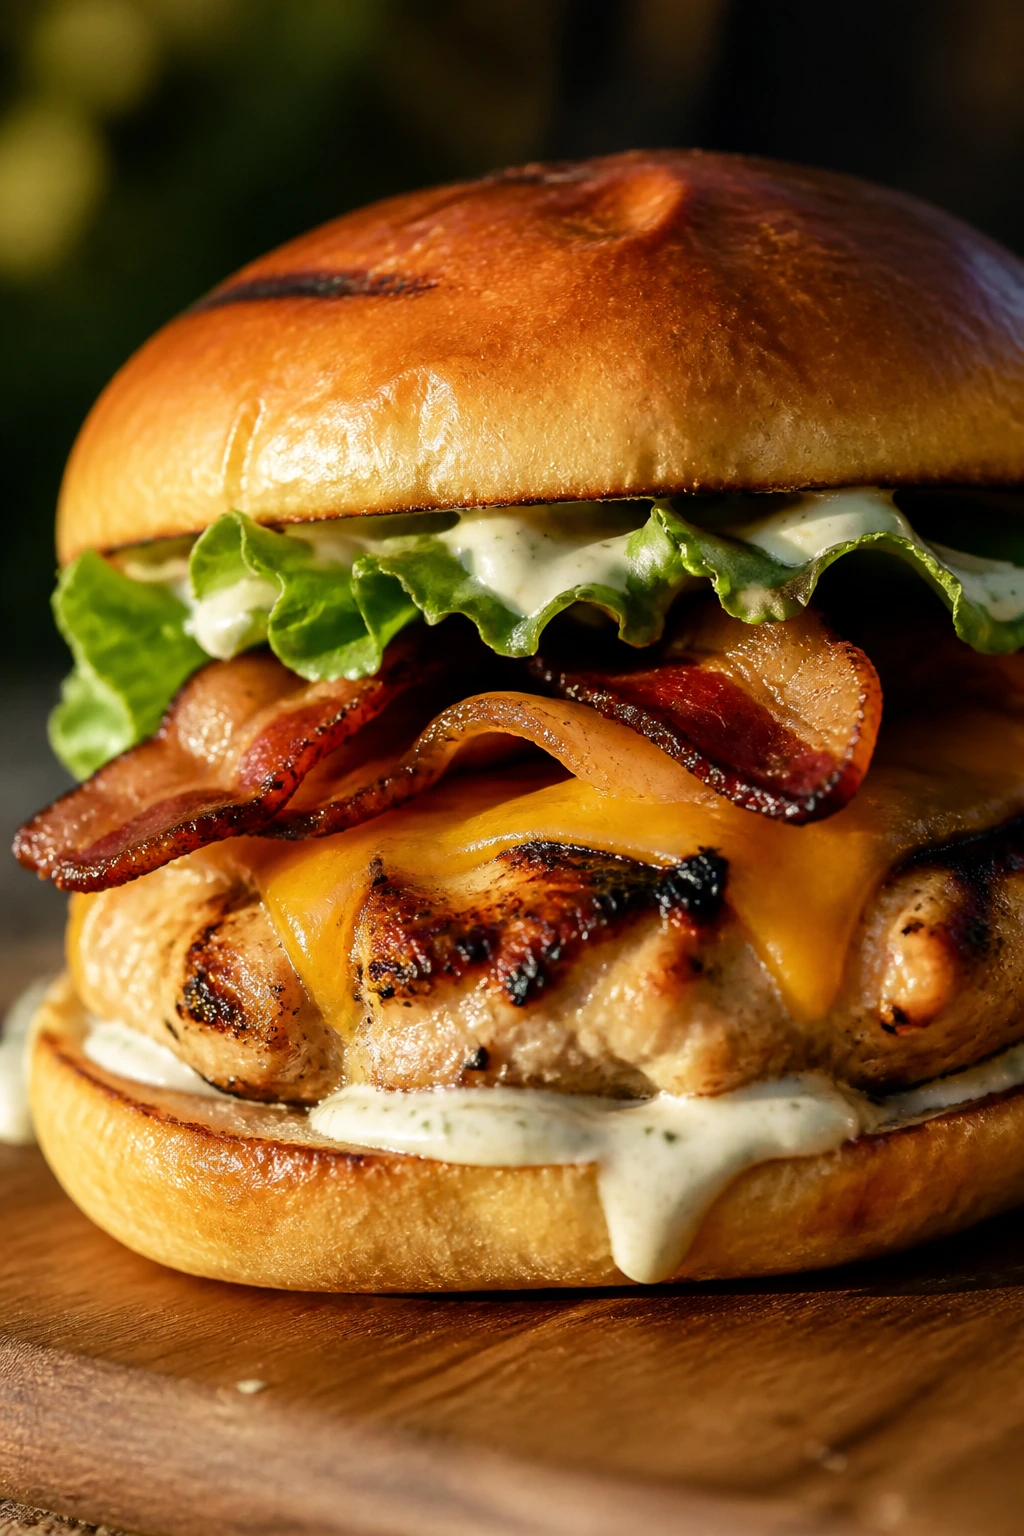
This burger is straightforward in the best way: chicken, bacon, ranch, cheddar, and a toasted bun. Nothing subtle. Nothing wrong with that when the grill is hot and people are hungry.
Why It Works:
Ground chicken needs fat and seasoning, and bacon fills that gap while ranch brings tang and salt. Cheddar melts into the patty, lettuce adds crunch, and the whole thing eats like a diner sandwich with better smoke.
Key Ingredients:
- 1 1/2 lb ground chicken
- 4 slices cooked bacon, chopped
- 1 tbsp ranch seasoning
- 1/3 cup breadcrumbs
- 1 egg
- 1/2 tsp black pepper
- 4 slices cheddar
- 4 burger buns
- Lettuce and tomato for serving
Quick Steps:
- Mix chicken, bacon, ranch seasoning, breadcrumbs, egg, and pepper.
- Form 4 patties and chill 10 minutes.
- Grill over medium heat for 5 to 6 minutes per side until 165°F.
- Add cheddar near the end and let it melt.
- Serve on toasted buns with lettuce and tomato.
Equipment for This Recipe:
- Grill
- Spatula
- Mixing bowl
- Thermometer
How to Serve This Dish:
Serve with fries, chips, or a corn salad. If you like extra sauce, a thin layer of ranch on the bun works better than dumping it on top.
Pro Tips for This Recipe:
- Cook the bacon until crisp so it doesn’t turn rubbery inside the patty.
- Use wet hands to shape the patties.
- Chill them so the mixture holds together.
- Toast the buns after the cheese melts so the timing stays tight.
Variations on This Dish:
- Jalapeño Ranch Burger: Add chopped jalapeños to the mix.
- Pepper Jack Swap: Use pepper jack instead of cheddar.
- Lettuce-Stack Version: Skip the bun and serve on lettuce with tomato.
Common Mistakes to Avoid with This Recipe:
- Using raw, soft bacon: It won’t hold up.
- Overmixing the chicken: The burger gets dense.
- Cooking too hot: Chicken dries before the cheese melts.
27. Honey Mustard Bratwurst with Apple Slaw
Brats are one of the easiest backyard cookout anchors because they bring their own richness. The apple slaw gives you crunch and a little sweetness, which is exactly what a brat in a toasted bun needs.
Why It Works:
Bratwurst loves medium heat and slow browning. Honey mustard adds a glossy sweet-sharp note, and apple slaw keeps the bite fresh instead of greasy. The whole plate feels organized even though it takes almost no effort.
Key Ingredients:
- 6 bratwurst links
- 1 tbsp oil
- 1/4 cup honey mustard
- 4 buns
- 2 cups shredded cabbage
- 1 apple, julienned
- 2 tbsp mayo
- 1 tbsp apple cider vinegar
- 1/4 tsp salt
Quick Steps:
- Toss the cabbage, apple, mayo, vinegar, and salt to make the slaw.
- Grill the brats over medium heat for 12 to 15 minutes, turning often, until browned and cooked through.
- Brush with honey mustard in the last 2 minutes.
- Toast the buns lightly.
- Fill the buns with brats and top with slaw.
Equipment for This Recipe:
- Grill
- Tongs
- Bowl
- Knife
How to Serve This Dish:
Set the brats on a platter with extra honey mustard for dipping. Potato salad or grilled onions fit right alongside them.
Pro Tips for This Recipe:
- Keep the heat moderate so the casings don’t split.
- Dress the slaw right before serving if you want extra crunch.
- Slice the apple thin so it mixes evenly.
- Toast the buns; soft buns make the brat feel soggy.
Variations on This Dish:
- Beer Onion Brat: Top with grilled onions simmered in a splash of beer.
- Spicy Mustard Version: Use whole-grain mustard with a little hot sauce.
- Chicken Brat Swap: Use chicken brats if you want a lighter option.
Common Mistakes to Avoid with This Dish:
- Using high heat: The outside bursts before the inside is cooked.
- Overdressing the slaw: It turns watery.
- Skipping the toast on the bun: The brat slips around and feels unfinished.
28. Sweet Corn and Bean Quesadilla Stack
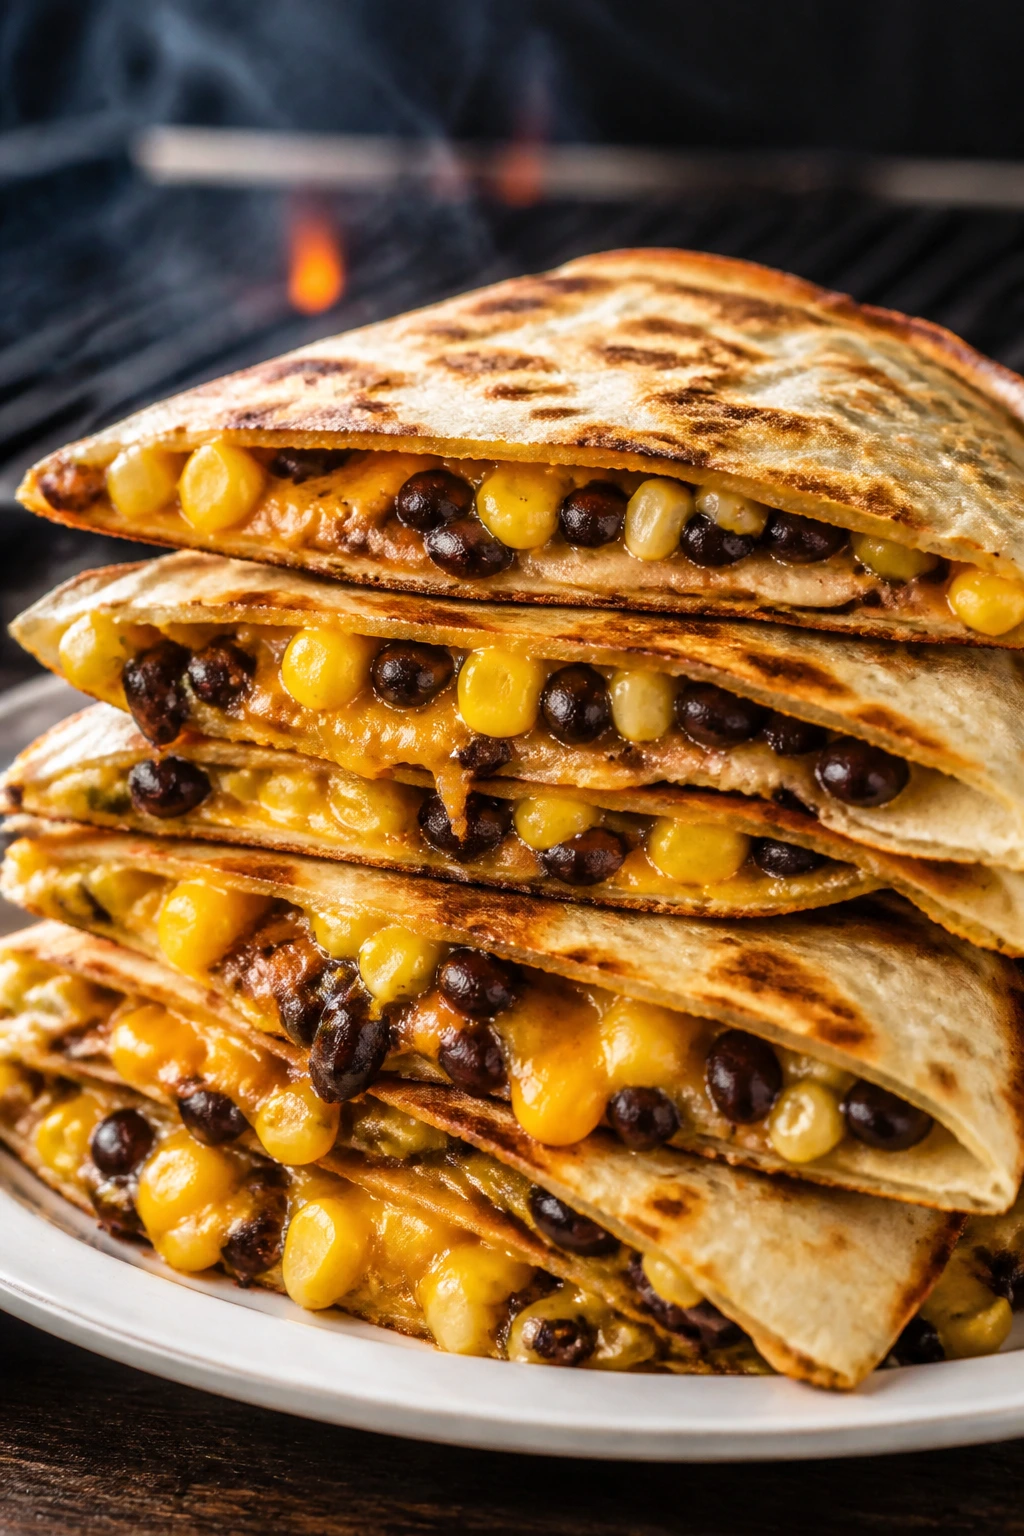
This is the recipe I’d make when the grill is still hot but I’m done thinking hard. Sweet corn, black beans, and cheese stacked in tortillas give you something crisp, melty, and easy to slice into wedges for a crowd.
Why It Works:
The corn brings sweetness, the beans bring heft, and the cheese glues everything together. A stacked quesadilla gets more filling than a single layer without turning floppy, which is why it works so well as a quick cookout meal. It’s fast. It feeds people. It disappears.
Key Ingredients:
- 4 large flour tortillas
- 1 1/2 cups cooked or canned black beans, drained
- 1 cup corn kernels
- 2 cups shredded pepper jack or cheddar
- 2 scallions, sliced
- 1 small jalapeño, finely chopped
- 1 tbsp oil or butter
- Salsa and sour cream for serving
Quick Steps:
- Warm the corn and beans in a skillet or on the griddle with a pinch of salt.
- Lay one tortilla down, add cheese, beans, corn, scallions, jalapeño, more cheese, and another tortilla on top.
- Brush the outside lightly with oil or butter.
- Cook on medium heat for 2 to 3 minutes per side until crisp and golden.
- Slice into wedges and serve with salsa.
Equipment for This Recipe:
- Grill griddle or skillet
- Spatula
- Knife
- Cutting board
How to Serve This Dish:
Serve the wedges with salsa, sour cream, or guacamole. A simple tomato salad or sliced melon keeps the meal bright.
Pro Tips for This Recipe:
- Keep the filling layer thin so the tortillas seal.
- Use medium heat so the cheese melts before the tortilla burns.
- Let it rest 1 minute before slicing.
- Sharp cheddar gives a cleaner bite than mild cheese alone.
Variations on This Dish:
- Chicken Quesadilla Stack: Add chopped grilled chicken.
- Veggie Loaded Version: Add peppers and zucchini.
- Hot Pepper Finish: Use pickled jalapeños for more bite.
Common Mistakes to Avoid with This Dish:
- Packing in too much filling: The stack falls apart.
- Cooking on high heat: The outside browns before the center melts.
- Cutting too soon: The cheese spills everywhere.
Why the Grill Feels Easier Than the Stove
A backyard cookout works best when the grill does the heavy lifting. Heat is the whole point, and once the fire is hot enough, it can handle burgers, chicken, shrimp, vegetables, pizza, foil packets, and even quesadillas without turning your kitchen into a sauna. That’s the real win here: one heat source, a few good tools, and a menu that doesn’t need constant babysitting.
The recipes above lean on direct heat, quick marinades, and short resting times because those are the things that make cookout food behave. Chicken thighs stay tender, shrimp finish before they toughen, salmon gets a crisp edge without losing moisture, and vegetables pick up the smoky edge that makes people ask for seconds. If a dish needs a long braise or a fussy sauce, it probably belongs somewhere else.
I also like the rhythm of it. One batch of skewers cooks while the buns toast. One foil packet gets moved to indirect heat while the burgers finish. That kind of pacing keeps the table full and the cook from feeling trapped.
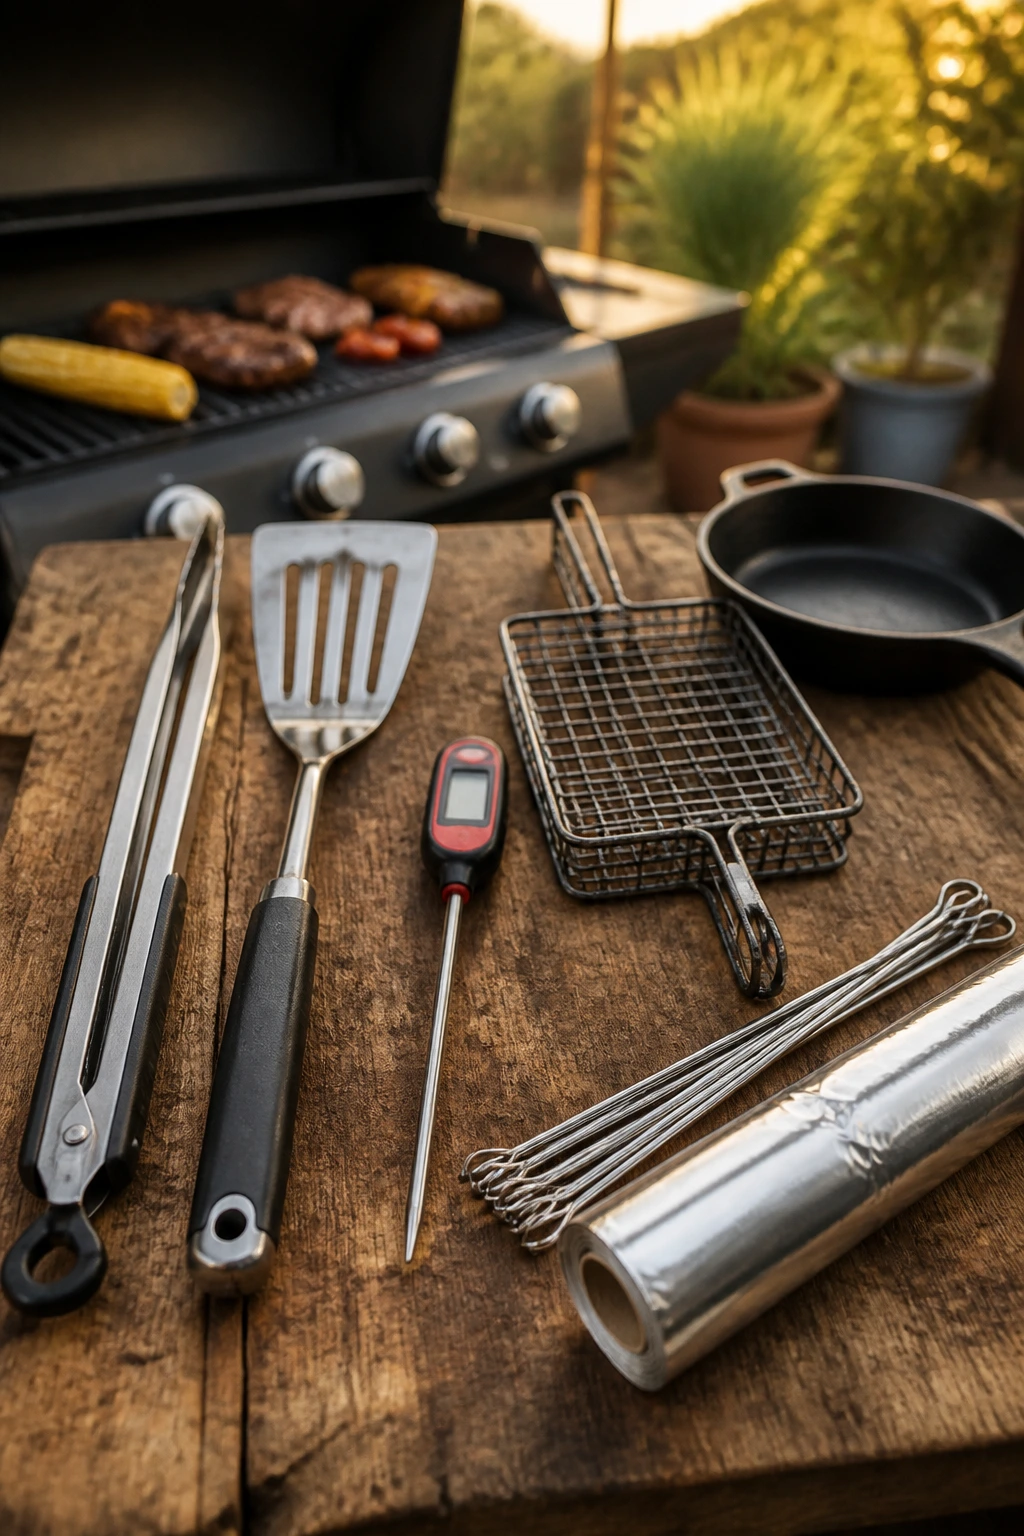
Essential Equipment for These Recipes
-
A reliable grill: Gas or charcoal both work, as long as you can control one hot zone and one cooler zone.
-
Instant-read thermometer: The fastest way to avoid dry chicken, undercooked pork, or overdone salmon.
-
Long-handled tongs: Short tongs get you too close to the heat and make turning food awkward.
-
Wide metal spatula: Essential for smash burgers, quesadillas, and anything that needs a clean flip.
-
Grill basket: Handy for peppers, onions, mushrooms, and smaller vegetables that slip through the grates.
-
Skewers: Metal skewers are easiest; bamboo works if you soak them well.
-
Heavy-duty foil: Foil packets need thicker foil so they don’t leak or tear.
-
Cast-iron skillet or griddle: Useful for onions, burgers, quesadillas, and anything that needs flat contact.
-
Mixing bowls: Keep one for raw protein and one for sauces or slaw.
-
Sharp knife and sturdy cutting board: A clean cut makes a better skewer, burger topping, or taco filling.
Smart Shopping and Ingredient Tips
Burgers and grill recipes start with the right protein. For beef burgers, 80/20 ground beef gives you enough fat for a good crust and a juicy center. For chicken, thighs are easier to grill than breasts because they stay moist after a few extra minutes over heat. Shrimp should be large enough to hold up on the grill — the 16-20 or 21-25 count size is easier to handle than tiny shrimp that overcook in a blink.
For vegetables, look for firm peppers, zucchini with tight skin, onions that feel heavy for their size, and corn with husks that still cling tightly. Peaches should smell sweet at the stem, tomatoes should feel heavy and give a little when pressed, and avocados should have some give without feeling soft at the stem end. Halloumi needs to come packed in brine; if it feels dry in the package, leave it alone.
Buns matter more than people admit. Soft buns are fine for smash burgers and chicken sandwiches, but if you’re making loaded hot dogs or saucy sliders, choose buns with a little structure. Brioche, potato buns, hoagie rolls, and slider rolls all do different jobs. Use the one that fits the filling instead of forcing a single style to carry every meal.
How to Serve These Recipes
Presentation:
Use one large platter for each main recipe and keep the garnishes visible. Burgers should be stacked slightly off-center, skewers should be fanned out, and tacos should be lined up in a row with lime wedges tucked around them. Food looks better when it has a little breathing room.
Accompaniments:
Coleslaw, potato salad, grilled corn, chips, cucumber salad, pasta salad, and fruit all fit naturally next to these meals. If the main dish is rich — smash burgers, brats, bacon burgers, quesadillas — choose something crisp or acidic on the side. If the main dish is lighter — salmon, shrimp, veggie skewers — add a starch or bread so the plate feels full.
Portions:
Plan on 1 burger per adult, 2 skewers for lighter meals, 2 to 3 tacos per person, or 1 to 2 sliders if there are several sides. Shrimp and salmon usually need fewer sides than burgers because they feel lighter on the plate, while sausages, quesadillas, and pizzas can carry a meal with less extra food.
Beverage Pairing:
Iced tea with lemon, cold lager, sparkling water with citrus, and light lemonade all work across this whole list. For the richer meals, a bitter beer or plain sparkling water cuts the fat. For the seafood and chicken dishes, a crisp, citrusy drink keeps the plate from feeling heavy.
Extra Tricks for Bigger Flavor
Flavor Enhancement:
A finishing squeeze of lemon, lime, or vinegar wakes up grilled food in a way salt alone cannot. I also like a brush of herb oil — parsley, garlic, olive oil — on chicken, salmon, or vegetables right before serving. It gives you shine and smell at the same time.
Customization:
Keep a small topping bar instead of trying to build one “perfect” sandwich. Pickles, sliced jalapeños, red onion, shredded lettuce, tomato, tzatziki, and chipotle mayo let people adjust their own plates without asking you to remake anything. That alone saves a lot of trouble.
Serving Suggestions:
If a dish feels too rich, add something cold and crisp next to it: slaw, cucumber salad, sliced melon, or raw onions soaked in vinegar for 10 minutes. That contrast matters more than people think. It keeps the meal from flattening out.
Make-It-Yours:
For gluten-free eaters, swap in corn tortillas, lettuce wraps, or gluten-free buns. For dairy-free plates, lean on olive oil, salsa, mustard, and herb sauces instead of cheese-heavy finishes. For heat lovers, keep hot sauce, chili flakes, or pickled peppers on the table so the cookout can tilt spicy without changing the whole menu.
Make-Ahead, Storage, and Reheating Guidance
A little prep goes a long way here. You can marinate chicken, pork, or beef up to 24 hours ahead, and most burger patties can be formed and chilled between sheets of parchment for a few hours before grilling. Shrimp is the exception — keep it marinated for 15 to 30 minutes, not overnight, or the texture gets soft and odd.
Cooked leftovers keep in the refrigerator for 3 to 4 days in shallow airtight containers. Grilled chicken, pork chops, burgers, salmon, cooked vegetables, and pasta salad all do fine for that window as long as they’re cooled quickly and stored separately when possible. Foil packet leftovers are best transferred out of the foil so they don’t taste metallic the next day.
Freezing works well for a few of these meals. Cooked burger patties, chicken thighs, and pork tenderloin slices freeze for up to 2 months if wrapped well. Reheat them in a 300°F oven until warmed through, or use a skillet with a splash of water or broth to keep them from drying out. Shrimp and salmon can be reheated, but they’re better the next day when served gently and not blasted with heat.
Buns, tortillas, and pita are best fresh, but you can toast them briefly and hold them wrapped in a clean kitchen towel for 10 to 15 minutes. Slaw should stay undressed if possible until serving time. Pasta salad often tastes better after it has had a short rest in the fridge because the dressing settles into the pasta.
Easy Swaps for Different Diets and Grill Setups
Gluten-Free Grill Night:
Use corn tortillas, lettuce wraps, or gluten-free buns across the burger, taco, and slider recipes. Check sauces and seasonings for hidden wheat, then keep a separate cutting board for any breaded or gluten-containing items. The food doesn’t need to feel second-best to work without gluten.
Dairy-Light Swap:
Skip mozzarella, cheddar, feta, and halloumi where needed and lean on avocado, salsa, olive oil, and herb sauces instead. The grilled chicken skewers, salmon, shrimp tacos, and teriyaki chicken still taste complete without a heavy cheese finish. A squeeze of citrus helps replace some of the richness.
Low-Sodium Version:
Use fresh garlic, citrus, herbs, and vinegar to build flavor before you reach for the salt shaker. Bratwurst, sausage, and packaged sauces can be salt-heavy, so pair them with a low-salt slaw or unsalted vegetables to keep the whole plate balanced. Taste before you season the sides.
Vegetarian Main Plate:
Halloumi skewers, black bean burgers, grilled margherita pizza, veggie pasta salad, and sweet corn quesadillas can all stand in as the main event. Add a protein-rich side like beans or Greek yogurt dip if you want more staying power. Meatless cookout food should feel planned, not like a compromise.
Spice-Lover’s Upgrade:
Keep hot sauce, pickled jalapeños, chipotle mayo, or chili flakes on hand for tacos, burgers, wraps, and quesadillas. It’s easier to add heat at the table than to make the whole batch fiery. That way the mild eaters stay happy, too.
No-Charcoal-or-Gas Backup:
A grill pan, cast-iron skillet, or broiler can handle almost all of these recipes if outdoor weather gets in the way. You won’t get the same smoke, but you’ll keep the texture and timing close enough to matter. Some nights, that’s the difference between cooking outside and ordering takeout.
Common Cookout Mistakes That Cause Trouble
The first mistake is running the grill too hot and trying to cook everything the same way. Burgers can take a blast; chicken thighs, sausages, and pork need a little more control; shrimp only need a few minutes. If the outside is blackening before the center finishes, move food to a cooler spot and let the grate do less work.
Another common issue is saucing too early. Barbecue sauce, teriyaki glaze, and honey mustard all contain sugar, and sugar burns faster than meat cooks. Put those on near the end, not from the first minute. If you want a glossy finish, brush lightly and let the last minute do the work.
Skipping the rest time is another one. Cut into burgers, pork, chicken, or salmon the second they come off the grill and the juices run everywhere except where you want them. Give most proteins 3 to 5 minutes to settle, and give thicker cuts a little longer.
Crowding the grill causes more trouble than most people expect. Food packed too tightly steams instead of browning, and the cook loses control of the heat. Leave room around burgers, skewers, and vegetables so you can turn them cleanly. The difference shows up in the crust.
The last mistake is serving without a landing zone. If you don’t have a platter, a tray, or a foil-covered pan ready, the first batch cools down while you fumble. Set the table for the food before the food hits the grill. That one habit saves more meals than any trick marinade.
Backyard Cookout Questions, Answered
Can I prep these meals the day before?
Yes, and it helps. You can marinate chicken, pork, and beef ahead, make slaw without dressing, mix sauces, and chop vegetables earlier in the day. Keep shrimp marinated only briefly, though, because acid changes the texture fast.
What if I don’t have a thermometer?
You can still cook with timing and visual cues, but the thermometer removes guesswork. Chicken should reach 165°F, pork tenderloin and chops 145°F, and ground meats should be cooked through with no pink in the center if you’re not measuring. For fish and burgers, a thermometer is the cleanest way to avoid overcooking.
How do I keep burgers from falling apart on the grill?
Use the right fat ratio, chill the patties, and don’t flip too early. If the mixture is soft, add breadcrumbs or an egg where the recipe calls for it. And don’t press them down with the spatula after the first flip.
Can I make these recipes without a grill?
Absolutely. A grill pan, cast-iron skillet, or broiler works for almost everything here. You won’t get the same open-flame flavor, but the timing and texture stay close enough that the recipes still make sense.
How do I keep buns from getting soggy?
Toast them, then add sauce sparingly and build with a dry layer like lettuce or cheese between the bun and the wet filling. For sliders and hoagies, wrapping them in foil for a minute after assembly helps the cheese soften without soaking the bread.
Which recipes travel best to another yard or park?
Foil packets, pasta salad, grilled chicken skewers, and sliders hold up well if you keep the components separate until serving. Hot dogs and quesadillas are better when assembled on site. Seafood wants to be eaten quickly, not hauled around for an hour.
How do I scale these recipes for a bigger group?
Double the proteins and sauces first, then increase the bread, tortillas, and toppings by feel. Don’t double the grill space, because that’s not how grills work. Cook in batches and keep the first round warm on a tray covered loosely with foil.
What should I do if the grill starts flaring up?
Move the food to a cooler part of the grate and close the lid for a few seconds if needed. Fat drips are normal with burgers, sausages, and bacon-heavy recipes, but flames that lick the food too long will ruin the outside before the inside is done. Keep a small spray bottle of water nearby only if you know how to use it without blasting ash everywhere.
Built for the Grill
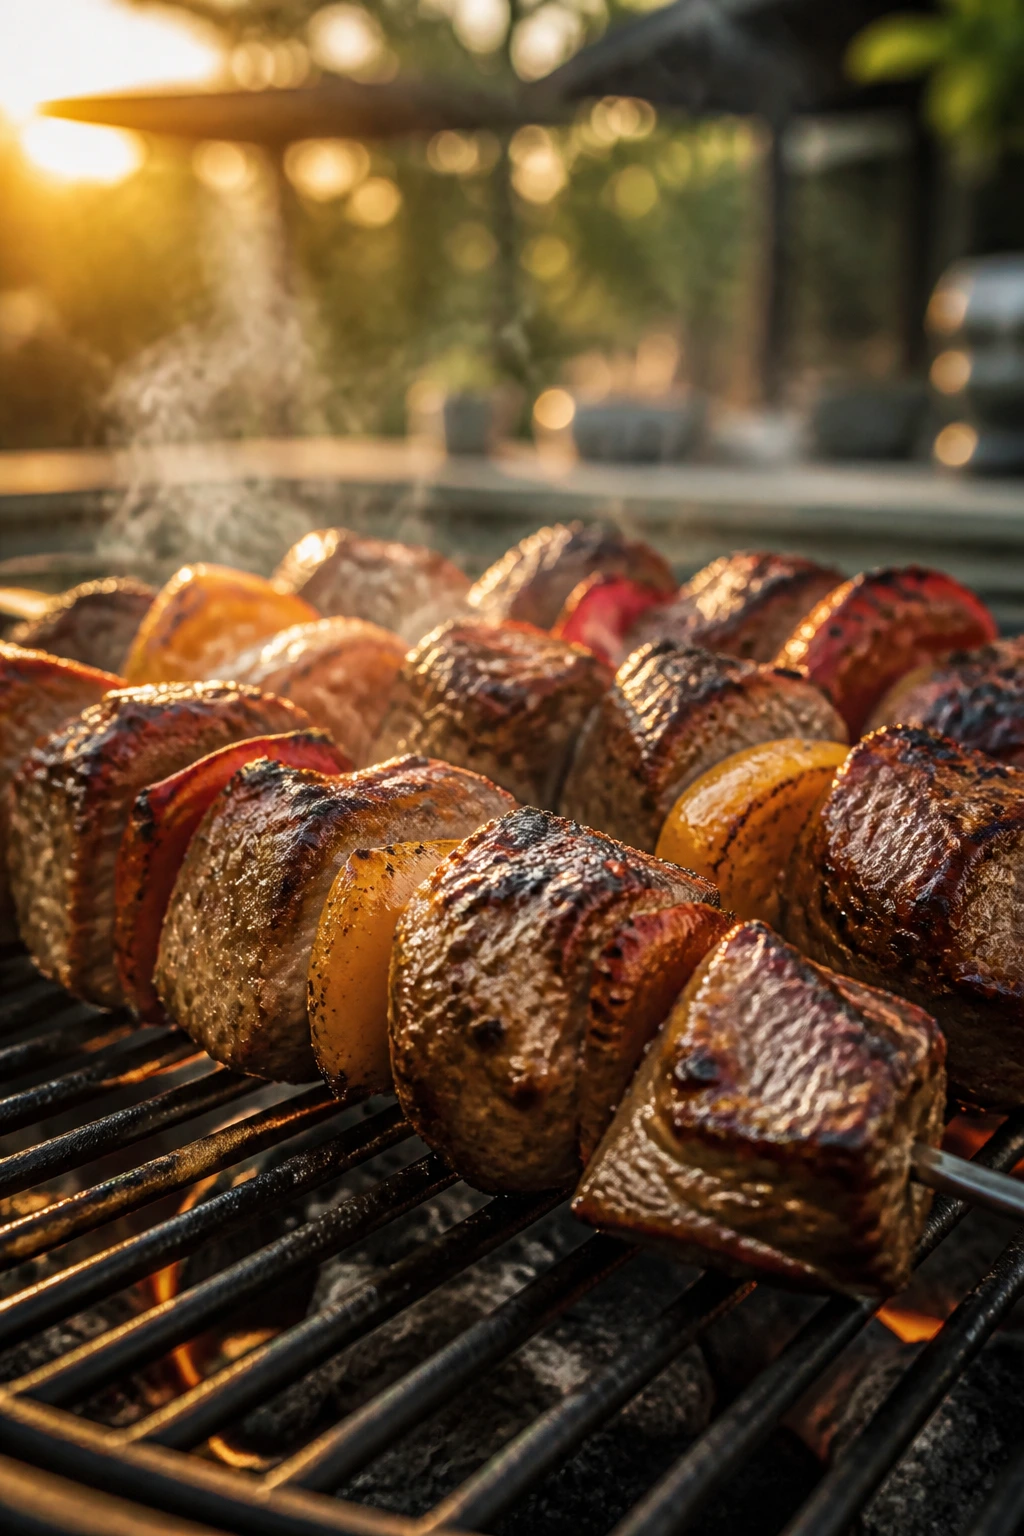
Backyard cookouts work best when the food feels easy but still tastes like someone cared. That’s the sweet spot these recipes live in: enough smoke, enough char, enough freshness to keep the plate moving without turning the host into a short-order cook.
Pick two or three from the list, add a cold side and something bright and crunchy, and the whole meal comes together without fuss. That’s the pattern I trust most on a hot evening. Good grill food should smell like dinner before it reaches the table — and stay worth eating after everybody has found a seat.