
A good picnic sandwich has one job: survive the trip from cutting board to folding table without turning limp, greasy, or awkward. That sounds simple until you’ve watched a bun soak through with barbecue sauce, or seen a tomato slice slip out the back of a hoagie and land in the grass. These sandwich recipes for picnic lunches and backyard cookouts are built around the opposite problem: structure first, flavor second, and then the little sharp details that make people reach for a second half.
The best versions always seem to know what the weather is doing. Soft brioche works when the filling is juicy but not runny. Ciabatta gives you a chew that holds up under pesto and mozzarella. Rye brings enough backbone for corned beef and sauerkraut, while a split biscuit behaves better than it has any right to when you stuff it with bacon and egg. That’s the part a lot of sandwich lists miss. A sandwich is not just filling between bread. It’s a small engineering job.
I tend to pack sandwiches the way I’d pack glasses for a move: everything gets a buffer. Lettuce goes where it can block moisture, tomatoes get salted and drained, saucy fillings chill before they meet bread, and anything crisp gets added as late as possible. That makes the whole spread easier to carry, easier to eat, and far less likely to collapse into a sad paper-wrapped pile the moment people start circling the cooler.
Why These Sandwiches Earn Their Place at a Picnic Table
-
Built for hands, not forks: Every recipe here can be eaten standing up, sitting on a blanket, or halfway through a conversation without falling apart in your lap.
-
Bread choice matters: Soft rolls, sturdy loaves, pitas, biscuits, and croissants each show up for a reason, not just because they look nice in a photo.
-
Hot and cold both work: Some fillings hold heat well on a tray; others taste better chilled after a short rest, which is exactly what you want when the grill is already busy.
-
Easy to scale: Most of these recipes can be doubled without turning into a kitchen disaster, which matters when the guest list grows by three at the last minute.
-
Good leftovers, if you plan right: A few of the fillings improve after a night in the fridge, while the hot sandwiches can be reheated without losing their shape if you keep the bread separate.
-
Crowd-friendly flavors: Pickles, mustard, cheese, herbs, slaw, and smoked meat show up again and again because they cut through fat and keep the whole plate lively.
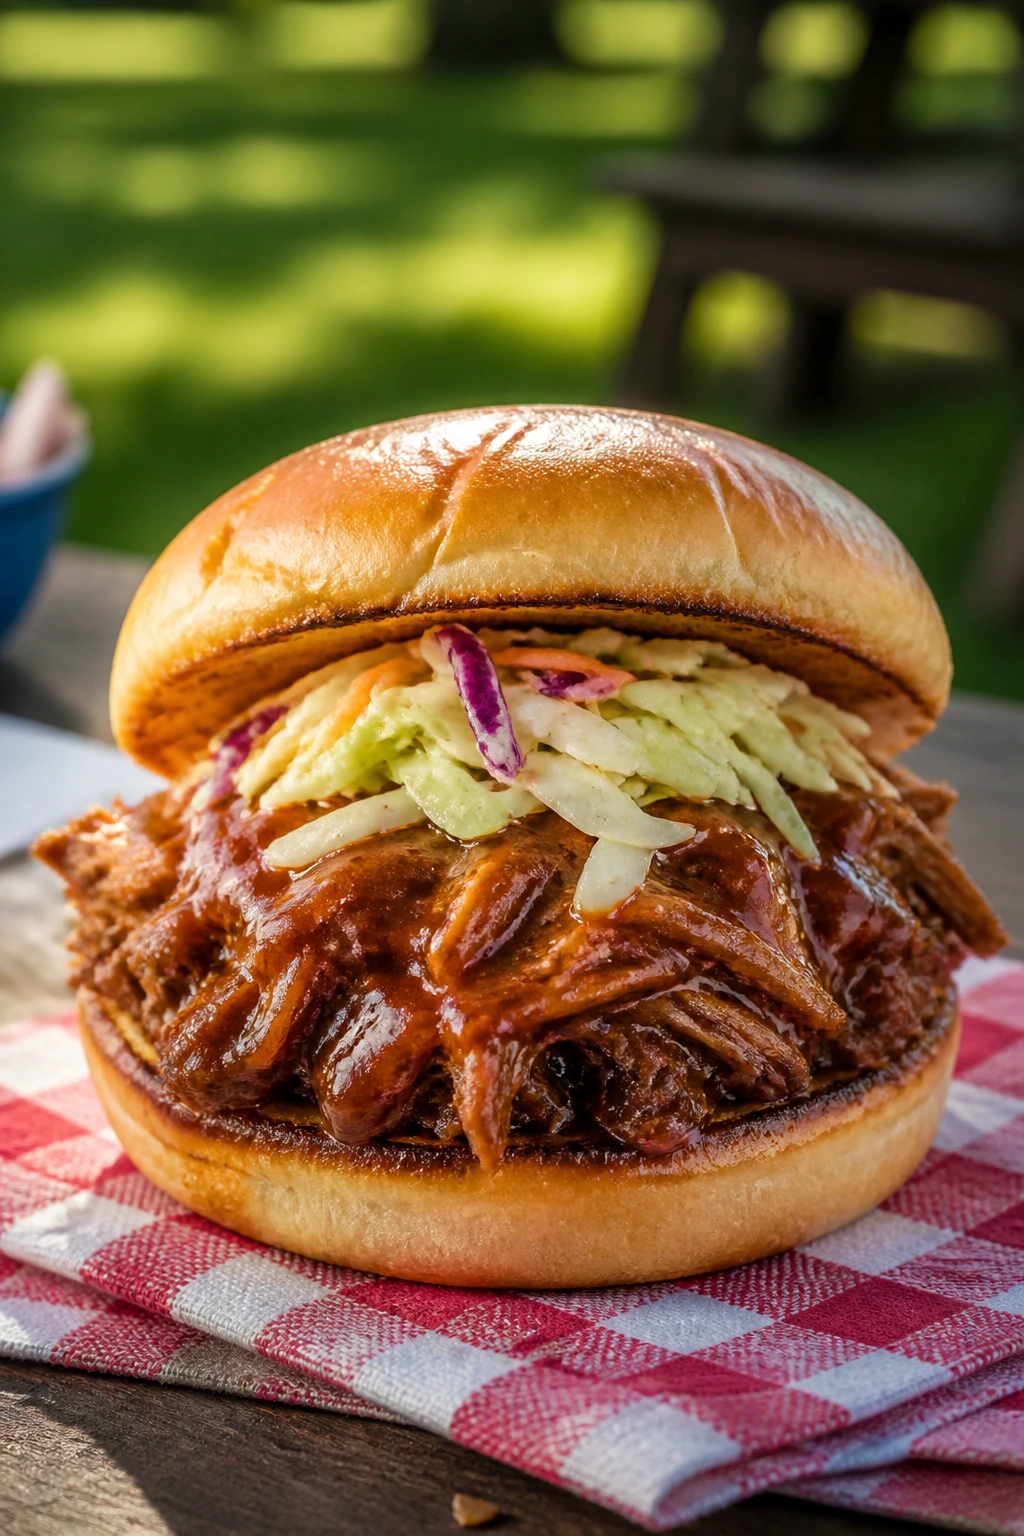
1. Slow-Cooker Pulled Pork Sandwiches
This is the sandwich I make when I want the house to smell like smoke and brown sugar before anyone even gets hungry. The pork turns silky enough to pull apart with two forks, and the barbecue sauce clings to the shredded meat instead of pooling underneath it. Piled onto toasted brioche with a scoop of crunchy slaw, it eats like a proper cookout sandwich, not a sloppy afterthought.
Why It Works:
The slow cooker gives pork shoulder enough time to break down without drying out, which is the whole trick. A little vinegar keeps the sauce from tasting flat, and the onion underneath the meat melts into the juices so you get depth without having to babysit a pot. This is also one of the easiest ways to feed a crowd because the pork can sit on warm for a while without going stringy or tough.
Key Ingredients:
- 3 pounds pork shoulder, trimmed of only the loose surface fat
- 1 tablespoon kosher salt
- 2 teaspoons smoked paprika
- 1 teaspoon black pepper
- 1 large yellow onion, sliced into half-moons
- 1 cup barbecue sauce
- 1/2 cup apple cider vinegar
- 8 brioche buns, split
- 2 cups coleslaw, dressed lightly
Quick Steps:
- Rub the pork shoulder with salt, smoked paprika, and black pepper. Let it sit 15 minutes while you slice the onion.
- Scatter the onion in the bottom of a 6-quart slow cooker, then set the pork on top.
- Pour in the barbecue sauce and apple cider vinegar. Cover and cook on low for 8 hours, until the pork shreds with almost no resistance.
- Move the pork to a bowl, shred it with two forks, and stir in enough cooking liquid to keep it glossy, not soupy.
- Toast the brioche buns for 1 to 2 minutes per side and fill with pork and coleslaw.
Equipment for This Recipe:
- 6-quart slow cooker
- Two forks for shredding
- Cutting board and chef’s knife
- Rimmed baking sheet for toasting buns
How to Serve This Dish:
Serve the pork on the bottom bun first, then the slaw on top so the crunch survives the first bite. I like kettle chips or vinegar slaw on the side, plus pickles if the barbecue sauce runs sweet. Two sandwiches usually feed four people when you add sides, and the meat stretches farther than you’d think.
Pro Tips for This Recipe:
- Toast the buns lightly: Brioche goes from soft to mushy fast, so give it just enough heat to dry the cut sides.
- Hold back some sauce: Stir in only part of the cooking liquid at the end; you can always add more, but you cannot pull excess out.
- Finish with acid: A few drops of extra vinegar wake the pork back up after long cooking.
Variations on This Dish:
- Carolina Vinegar Pull: Swap half the barbecue sauce for extra cider vinegar and a pinch of sugar for a sharper, cleaner finish.
- Smoky Chipotle Pork: Add 1 chopped chipotle in adobo to the cooker for a deeper, warmer heat that works especially well with cheddar slaw.
Common Mistakes to Avoid with This Dish:
- Using a lean cut: Pork loin dries out here. Pork shoulder gives you the fat and collagen that make the meat pull apart cleanly.
- Adding too much sauce too early: If the slow cooker gets flooded, the pork tastes boiled instead of roasted.
- Skipping the bun toast: Soft bread with wet pork turns to paste in about three bites.
2. Crispy Fried Chicken Sandwiches
A fried chicken sandwich has to do a lot. The crust needs to stay rough and crunchy, the chicken has to stay juicy, and the pickle-mayo balance has to be sharp enough to cut through the richness. Get those three things right and the sandwich has that loud, satisfying first bite that people remember more than the rest of the meal.
Why It Works:
Buttermilk tenderizes the chicken and gives the flour something to cling to, which helps the crust stay attached during frying. Cornstarch keeps the coating lighter and craggier than flour alone. A hot enough oil temperature means the crust sets before the meat overcooks, and that matters more than almost anything else in fried chicken.
Key Ingredients:
- 1 1/2 pounds boneless chicken thighs
- 1 cup buttermilk
- 1 1/2 cups all-purpose flour
- 1/2 cup cornstarch
- 2 teaspoons kosher salt
- 1 teaspoon paprika
- 1/2 teaspoon black pepper
- 1/2 teaspoon garlic powder
- 1/2 cup mayonnaise
- 8 dill pickle chips
- 4 brioche buns, split
Quick Steps:
- Stir the chicken into the buttermilk and chill for at least 30 minutes, or up to 4 hours.
- Mix the flour, cornstarch, salt, paprika, black pepper, and garlic powder in a wide bowl.
- Lift each thigh from the buttermilk, let the excess drip off, and press it into the flour mixture until the surface looks shaggy.
- Fry in 1 1/2 inches of oil at 350°F for 6 to 7 minutes per side, until the crust is deep golden and the chicken reaches 165°F.
- Rest the chicken on a wire rack for 5 minutes, then build on toasted buns with mayo and pickles.
Equipment for This Recipe:
- Heavy Dutch oven or deep skillet
- Instant-read thermometer
- Wire rack set over a sheet pan
- Tongs
How to Serve This Dish:
Put the pickles directly on the chicken, not under the bun, so their brine stays bright. A little potato salad or slaw works well beside it, but the sandwich also stands on its own if you want less clutter. One thigh makes one full sandwich, and that’s the size I’d keep unless you’re serving very hungry people.
Pro Tips for This Recipe:
- Keep the oil steady: If the temperature falls under 340°F, the crust drinks oil and goes greasy.
- Press the flour on firmly: A loose dredge falls off in the pan. Shaggy is good; bare patches are not.
- Salt after frying only if needed: The coating already carries salt, so taste one piece before you reach for the shaker.
Variations on This Dish:
- Nashville Heat: Toss the fried chicken in a cayenne-spiked oil after frying, then finish with bread-and-butter pickles.
- Oven-Crisped Version: Bake the dredged chicken on a rack at 425°F until crisp if you want less splatter and a lighter finish.
Common Mistakes to Avoid with This Dish:
- Frying cold chicken straight from the fridge: The crust browns too fast before the center cooks through.
- Stacking the chicken on paper towels: Steam softens the crust; use a rack instead.
- Adding sauce under the bread: Wet bread dies fast. Mayo on both slices is fine, but keep the chicken itself crisp.
3. Smash Burgers with Caramelized Onions
This is the burger I reach for when I want grilled flavor without fooling around with giant patties. The smash gives you those lacy, browned edges, and the onions bring sweetness that behaves better than raw onion ever will at a picnic table. A good smash burger is messy in a controlled way. That’s the appeal.
Why It Works:
Thin patties cook fast and brown hard because more surface touches the hot pan. Caramelized onions add sweetness and moisture, but they stay tucked inside the burger instead of rolling out like raw slices. A slice of cheese melted over the meat acts like glue, which keeps the stack together when you carry it to the yard with one hand and a drink in the other.
Key Ingredients:
- 2 pounds ground beef, 80/20
- 2 teaspoons kosher salt
- 1 teaspoon black pepper
- 2 large yellow onions, thinly sliced
- 2 tablespoons butter
- 8 slices American cheese or cheddar
- 4 burger buns, split
- 2 tablespoons mayonnaise
- 2 tablespoons ketchup
- 1 tablespoon yellow mustard
- 8 dill pickle chips
Quick Steps:
- Cook the onions in butter over medium-low heat for 20 to 25 minutes, stirring often, until they turn soft and deep golden.
- Mix the mayo, ketchup, and mustard for a quick burger sauce.
- Form the beef into 8 loose 4-ounce balls and keep them cold until you cook.
- Heat a cast-iron skillet or griddle until smoking, place a beef ball down, smash it hard with a spatula, salt it, and cook for 90 seconds. Flip, add cheese, and cook 45 seconds more.
- Stack two patties per bun with onions, sauce, and pickles.
Equipment for This Recipe:
- Cast-iron skillet or flat-top griddle
- Sturdy metal spatula
- Small bowl for burger sauce
- Knife and cutting board
How to Serve This Dish:
Serve these hot, right after assembly, while the cheese is still soft at the edges. I like potato chips, corn on the cob, or a bright dill pickle spear next to them. One double patty burger is enough for most adults, and you can halve the recipe without changing the method.
Pro Tips for This Recipe:
- Don’t overwork the beef: Loose balls make better smash burgers than tidy patties.
- Use a very hot surface: The browning happens in the first minute.
- Salt after the smash: Salt drawn into raw ground beef can make the texture tighter than you want.
Variations on This Dish:
- Pepper Jack Smash: Swap the cheddar for pepper jack and add sliced jalapeños to the onions.
- Mushroom Burger Style: Sauté 8 ounces of sliced mushrooms with the onions for a deeper, earthier filling.
Common Mistakes to Avoid with This Dish:
- Moving the patties too soon: Leave them alone long enough to form a crust, or you’ll tear off the browned bits.
- Using thick buns: Bulky bread buries the beef. Soft, medium-size buns work better.
- Skipping the sauce: A little fat and acid help the burger taste finished, not bare.
4. Italian Deli Subs
An Italian sub should taste cold, sharp, and a little salty in the best way. The meat needs to fold over itself, the cheese should be smooth instead of rubbery, and the dressing should show up in the background, not soak the bread into a soggy mess. This is one of those sandwiches that seems simple until you make one that actually holds together.
Why It Works:
Layering the meat first and the lettuce last keeps the moisture away from the bread. A light oil-and-vinegar dressing gives you tang without turning the loaf into a sponge. Wrapping the finished sub for 10 minutes is a smart move because it lets the flavors settle and makes slicing cleaner, which matters when you’re feeding people outside.
Key Ingredients:
- 1 large Italian loaf, about 18 inches long
- 4 ounces salami, thinly sliced
- 4 ounces ham, thinly sliced
- 4 ounces pepperoni, thinly sliced
- 6 ounces provolone, sliced
- 1 cup shredded lettuce
- 2 tomatoes, sliced and lightly salted
- 1/4 cup sliced pepperoncini
- 2 tablespoons olive oil
- 1 tablespoon red wine vinegar
- 1 teaspoon dried oregano
- 2 tablespoons mayonnaise
Quick Steps:
- Whisk the olive oil, vinegar, oregano, and mayonnaise into a loose dressing.
- Split the loaf lengthwise, leaving one side attached if the bread is sturdy enough.
- Layer the meats, then the provolone, then the tomatoes, pepperoncini, and lettuce.
- Drizzle on just enough dressing to coat the fillings lightly.
- Wrap the sub in parchment, press it gently for 10 minutes, and slice with a serrated knife.
Equipment for This Recipe:
- Serrated bread knife
- Parchment or wax paper
- Cutting board
- Small whisk or fork
How to Serve This Dish:
Cut the sub into 4 or 6 pieces and serve it with kettle chips or marinated vegetables. This is one of the best make-ahead picnic sandwiches because the wrap time helps the loaf grip the fillings. If the loaf is extra fluffy, make smaller portions so the first bite stays controlled.
Pro Tips for This Recipe:
- Salt the tomatoes first: A minute or two of salting keeps them from flooding the bread.
- Keep the dressing light: You want shine, not drip.
- Press the wrapped sandwich gently: Too much weight crushes the loaf; just enough pressure helps it slice cleanly.
Variations on This Dish:
- Turkey Sub Swap: Use sliced turkey, mozzarella, and a touch of pesto for a milder version.
- Vegan Deli Sub: Roasted peppers, marinated artichokes, sliced tofu, and vegan provolone work better than most people expect.
Common Mistakes to Avoid with This Dish:
- Putting wet lettuce against bare bread: Always let meat or cheese shield the loaf first.
- Cutting too soon: A wrapped rest gives you a tighter slice.
- Using bland bread: This sandwich needs a loaf with some chew and structure.
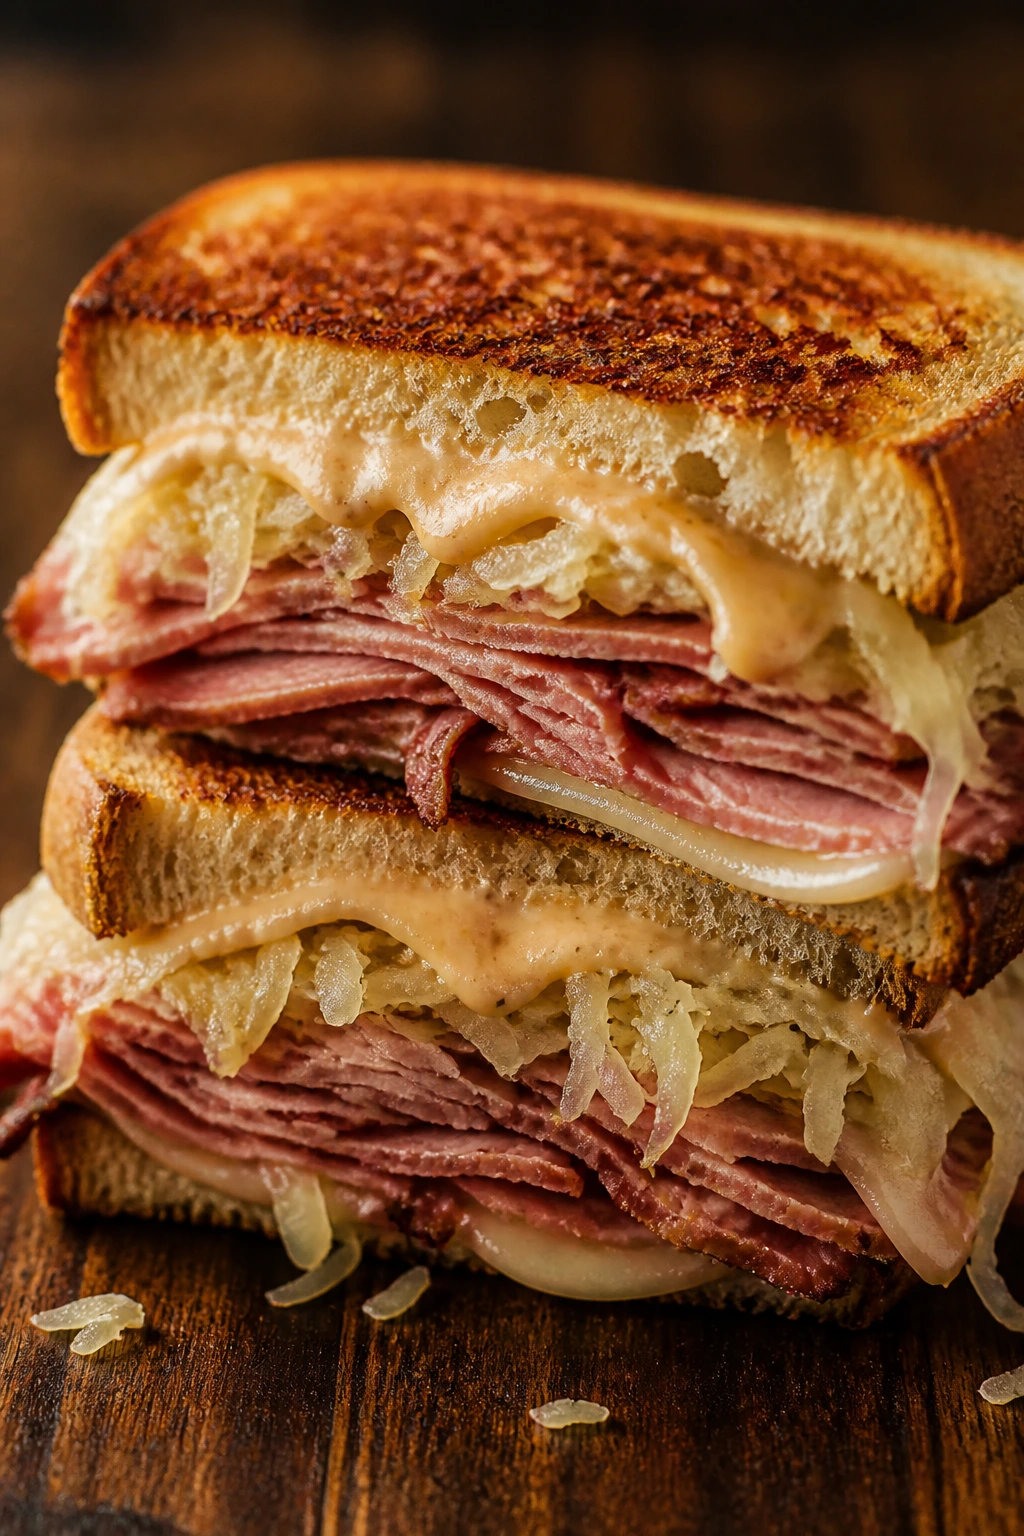
5. Cuban Sandwiches
A Cuban sandwich is all about press and balance. You want hot, crisp bread, mustard that stays sharp, and enough pickle to cut through the pork and ham without turning the whole thing sour. When it works, the crust crackles under the spatula and the cheese makes a thin, molten line between layers. That’s a pretty good return on a few ingredients.
Why It Works:
The combination of roasted pork and ham gives you two different kinds of salt and fat, which keeps the sandwich from tasting one-note. Swiss melts smoothly, while pickles and mustard keep the sandwich from going heavy. Pressing the bread in a skillet gives the loaf a tight crust and helps the fillings fuse together, which is the part that makes a Cuban feel like a single object instead of a stack.
Key Ingredients:
- 1 Cuban loaf or 4 sturdy hoagie rolls
- 12 ounces roasted pork, sliced thin
- 8 ounces ham, sliced thin
- 8 slices Swiss cheese
- 1/2 cup dill pickle chips
- 3 tablespoons yellow mustard
- 2 tablespoons softened butter
- 1 tablespoon mayonnaise, optional
Quick Steps:
- Split the bread and spread mustard on the cut sides.
- Layer pork, ham, pickles, and Swiss cheese.
- Close the sandwich and butter the outside lightly.
- Cook in a skillet over medium heat for 3 to 4 minutes per side, pressing with a heavy pan or sandwich press, until the bread is crisp and the cheese melts.
- Rest for 2 minutes before slicing.
Equipment for This Recipe:
- Large skillet
- Heavy pan or sandwich press
- Spatula
- Serrated knife
How to Serve This Dish:
Serve with plantain chips or a simple cucumber salad so the plate stays lively. A Cuban is best warm, not scorching, because the bread can shear if you cut too early. One half-sandwich is plenty for a side dish crowd, while a full sandwich feeds a hungry adult.
Pro Tips for This Recipe:
- Drain the pickles well: Extra brine softens the bread from the inside.
- Press evenly: A heavy skillet on top works if you don’t have a press.
- Use thin-sliced pork: Thick chunks make the press uneven and the sandwich bulky.
Variations on This Dish:
- Spicy Cuban: Add sliced jalapeños and a dab of hot mustard.
- Turkey Cuban: Use sliced turkey and keep the pickles and Swiss; it still presses beautifully.
Common Mistakes to Avoid with This Dish:
- Skipping the press: The pressed crust is the whole personality of the sandwich.
- Adding too many pickles: A few chips go a long way here.
- Cooking too hot: The bread burns before the cheese loosens.
6. Philly Cheesesteaks
A proper cheesesteak should be hot, soft, and a little greasy in the best possible way. The beef cooks fast, the onions soften into the meat, and the cheese melts into the seams so every bite feels coherent. This sandwich is not subtle. It should not be.
Why It Works:
Thin-sliced ribeye gives you flavor and tenderness without long cooking. High heat browns the meat fast, and onions cooked in the same pan catch the drippings, which deepens the flavor without making extra work. Provolone gives a cleaner melt than a lot of people expect, but if you want the more classic gooey pull, sandwich cheese sauce works too.
Key Ingredients:
- 1 1/2 pounds ribeye steak, very thinly sliced
- 2 tablespoons neutral oil
- 2 large yellow onions, sliced
- 1 green bell pepper, sliced, optional
- 2 teaspoons kosher salt
- 1 teaspoon black pepper
- 8 slices provolone
- 4 hoagie rolls, split
- 2 tablespoons mayonnaise, optional
Quick Steps:
- Cook the onions and bell pepper in oil over medium-high heat for 8 to 10 minutes, until soft and lightly browned.
- Push the vegetables to the side and add the steak, salt, and pepper. Cook for 2 to 3 minutes, stirring, until the meat is no longer pink.
- Lay provolone over the meat and cover the skillet for 30 to 45 seconds so the cheese melts.
- Split the rolls and warm them in the oven or on the grill for 1 minute.
- Fill the rolls while the steak is still hot.
Equipment for This Recipe:
- Large skillet or griddle
- Metal spatula
- Sharp knife
- Baking sheet for warming rolls
How to Serve This Dish:
Serve cheesesteaks immediately, with napkins on standby. They pair well with salty chips, dill pickles, or roasted peppers on the side. One sandwich feeds an adult easily, but if you slice them smaller, they disappear fast at a crowd table.
Pro Tips for This Recipe:
- Freeze the steak 20 minutes before slicing: That firms it up and makes thin slices easier.
- Don’t crowd the pan: Too much beef steams instead of browning.
- Warm the rolls: Cold bread against hot filling feels flat and dry.
Variations on This Dish:
- Whiz Style: Swap provolone for cheese sauce if you want the old-school gooey version.
- Mushroom Cheesesteak: Add 8 ounces of sliced mushrooms with the onions for a deeper, meatier flavor.
Common Mistakes to Avoid with This Dish:
- Slicing the meat too thick: Thin steak cooks fast and stays tender.
- Letting the rolls go stale: Fresh, soft rolls matter here.
- Overcooking the steak: Once the pink is gone, stop. Tough beef ruins the whole thing.
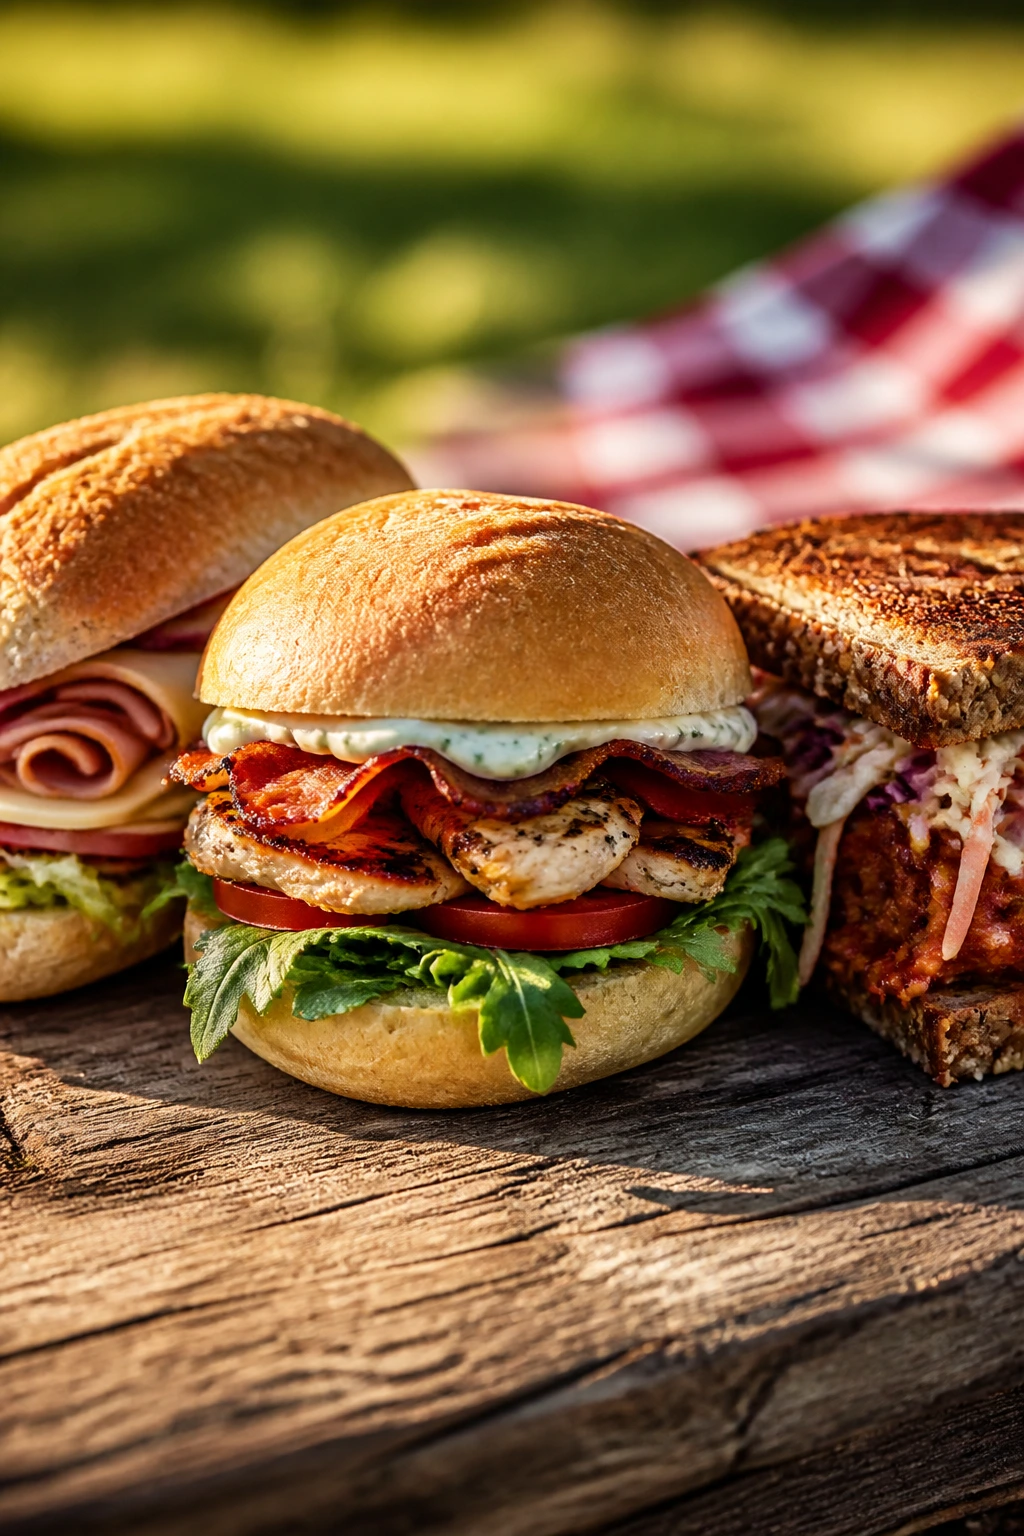
7. BLT Sandwiches with Herb Mayo
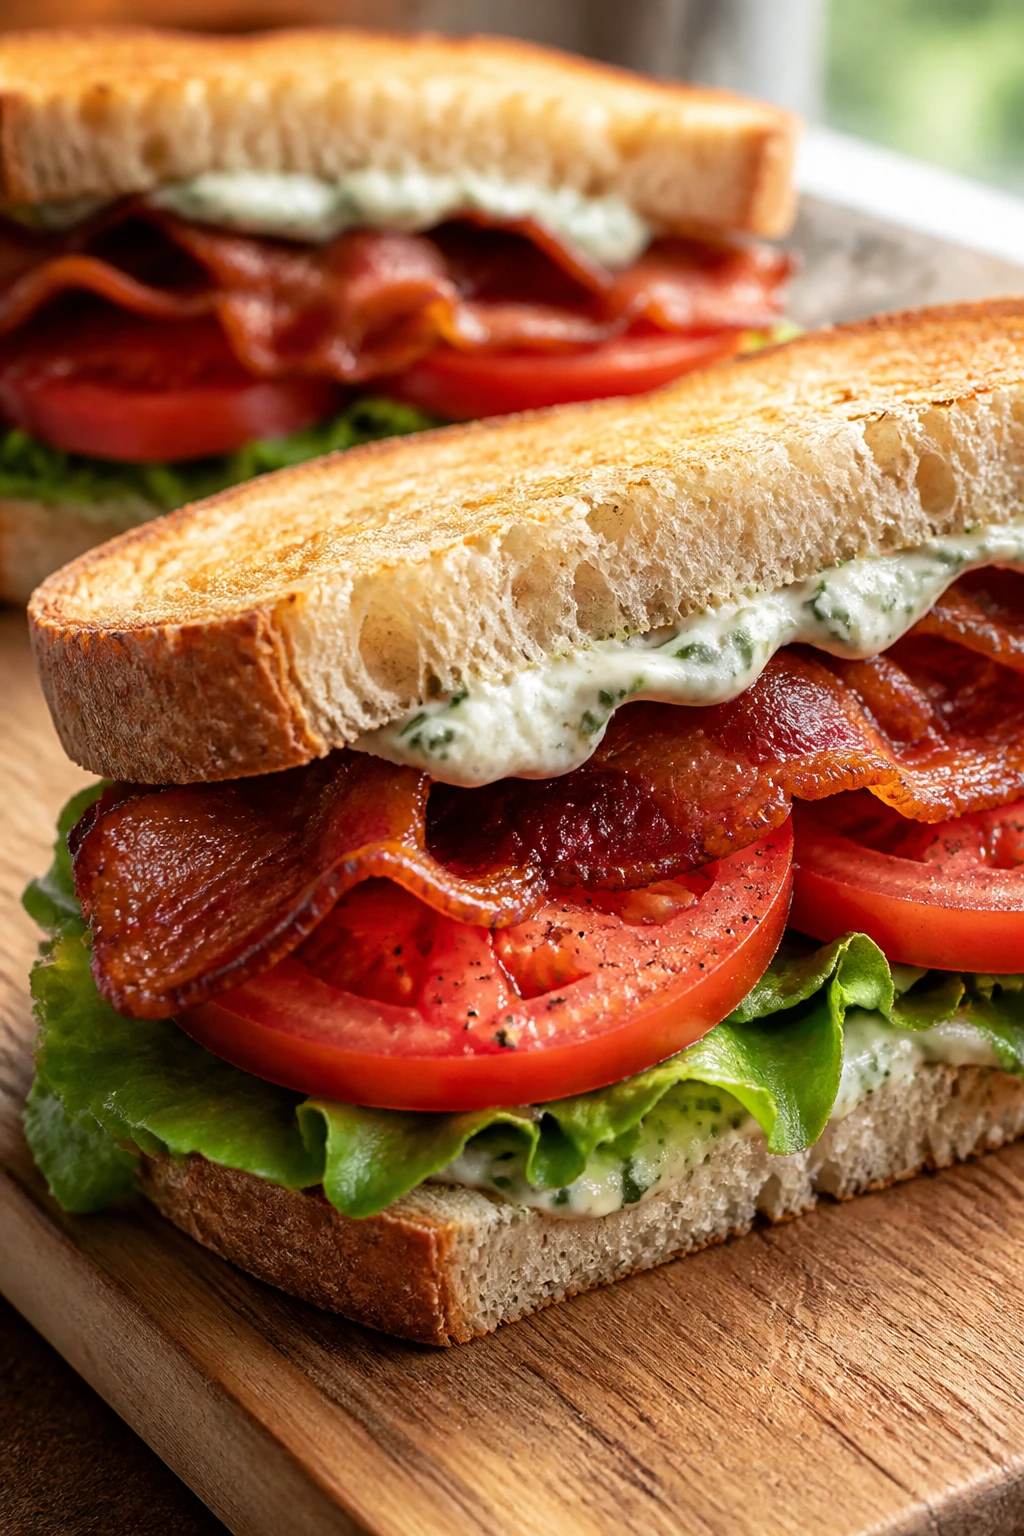
A BLT lives or dies on the tomato. You can use excellent bacon and still end up with a forgettable sandwich if the tomato is watery or the bread is under-toasted. When it’s done right, though, the first bite gives you salty bacon, cool lettuce, sweet tomato, and a slick of herb mayo that keeps everything moving.
Why It Works:
Herbs in the mayo make a simple sandwich taste more deliberate without adding another wet ingredient. Toasted bread gives the sandwich enough grip to handle the tomato juice, and thick-cut bacon carries more flavor than thin rashers that disappear under the other fillings. Salting the tomato slices for a minute before assembly draws off extra water and sharpens the flavor.
Key Ingredients:
- 12 slices bacon
- 8 slices sourdough or sturdy white bread
- 2 large ripe tomatoes, sliced
- 4 leaves iceberg or butter lettuce
- 1/2 cup mayonnaise
- 1 tablespoon chopped chives
- 1 tablespoon chopped dill
- 1 teaspoon lemon juice
- 1/2 teaspoon black pepper
Quick Steps:
- Bake or fry the bacon until crisp, then drain it well.
- Mix the mayo, chives, dill, lemon juice, and black pepper.
- Toast the bread until lightly golden on both sides.
- Salt the tomato slices for 1 minute, then pat them dry.
- Build each sandwich with herb mayo, lettuce, tomato, and bacon.
Equipment for This Recipe:
- Baking sheet or skillet
- Paper towels
- Small bowl
- Toaster or skillet
How to Serve This Dish:
Cut BLTs in half on the diagonal and serve them right away so the toast stays firm. They’re excellent next to corn salad, chips, or cold watermelon. I’d plan on one sandwich per person if the rest of the spread is light, or half a sandwich if there are three or four other mains.
Pro Tips for This Recipe:
- Use the best tomatoes you can find: The sandwich depends on them.
- Toast both sides of the bread: One pale side goes soft too fast.
- Build just before serving: A BLT waits for nobody.
Variations on This Dish:
- Avocado BLT: Add sliced avocado and reduce the mayo a little.
- Smoked Paprika Mayo: Stir 1/2 teaspoon smoked paprika into the herb mayo for a deeper finish.
Common Mistakes to Avoid with This Dish:
- Skipping the tomato salt: Wet tomatoes flood the bread.
- Using floppy lettuce: Iceberg or butter lettuce gives you more structure.
- Assembling too early: The sandwich turns limp before it reaches the table.
8. Turkey Club Sandwiches
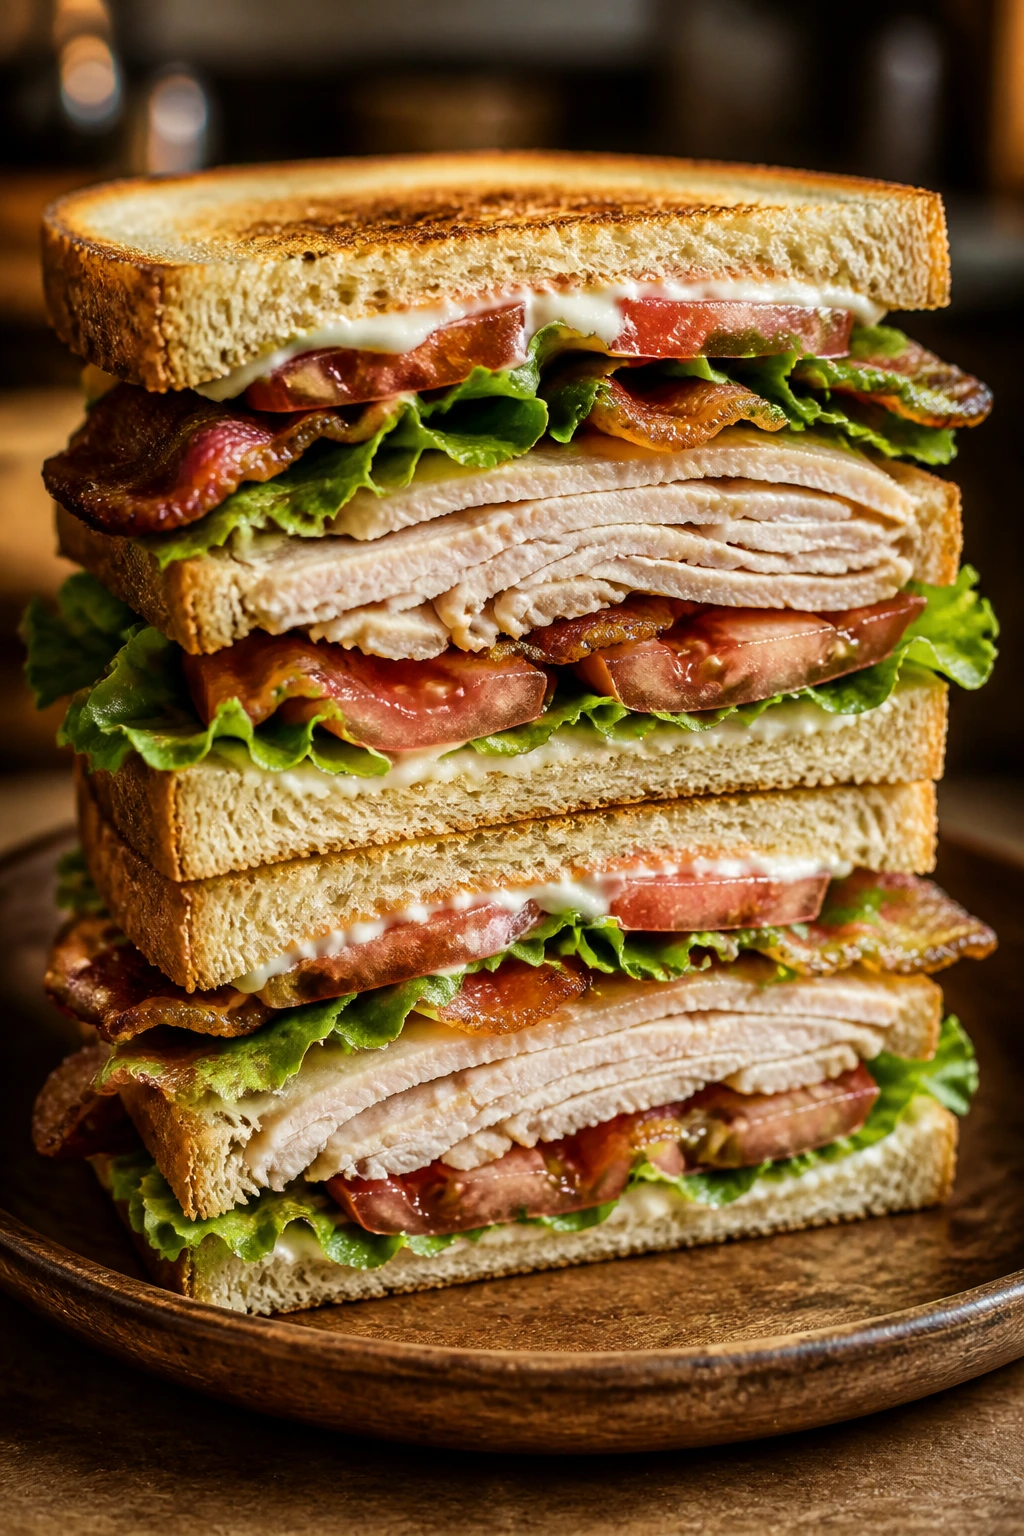
A club sandwich is basically a clean stacking exercise. You get toasted bread, crisp bacon, sliced turkey, lettuce, and tomato, but the triple-decker shape only works if every layer has a job. When the ratio is right, the club feels crisp, cold, and a little luxurious without being fussy.
Why It Works:
Three slices of toast create structure, which is why clubs travel better than most deli sandwiches. Turkey gives you a mild base that lets bacon and mayo do the louder talking. The sandwich also rewards careful slicing because the layers stay visible and easier to handle once you cut them into quarters.
Key Ingredients:
- 12 slices deli turkey
- 8 slices bacon
- 6 slices sandwich bread
- 4 lettuce leaves
- 2 tomatoes, sliced
- 1/2 cup mayonnaise
- 4 slices cheddar or Swiss, optional
- 1/2 teaspoon black pepper
Quick Steps:
- Cook the bacon until crisp and let it drain.
- Toast the bread slices until golden.
- Spread mayo on each slice of toast, then build the first layer with turkey, lettuce, and tomato.
- Add the second slice of toast, then more turkey, bacon, and cheese if using.
- Cap with the third slice, press gently, and cut into quarters.
Equipment for This Recipe:
- Skillet or oven for bacon
- Toaster or skillet for bread
- Serrated knife
- Toothpicks, optional
How to Serve This Dish:
Serve the club with chips and a few pickle spears. The quartered shape makes it easy to pack in parchment and hand around. I like these best cold or only slightly warm, because the bread keeps its crisp edge longer that way.
Pro Tips for This Recipe:
- Use thin, even slices of tomato: Thick slabs make the sandwich slide.
- Toast the bread well: Soft toast collapses under the triple stack.
- Cut after a short rest: One minute helps the layers settle.
Variations on This Dish:
- Cranberry Club: Add a thin smear of cranberry sauce for a sweet-tart note.
- Ranch Club: Swap half the mayo for ranch dressing if you want a sharper herb flavor.
Common Mistakes to Avoid with This Dish:
- Packing in too much filling: A club should stack cleanly, not burst sideways.
- Skipping the toothpick during transport: It keeps the layers from drifting.
- Using bread that’s too soft: White sandwich bread can work, but it needs a serious toast.
9. Tuna Salad Sandwiches
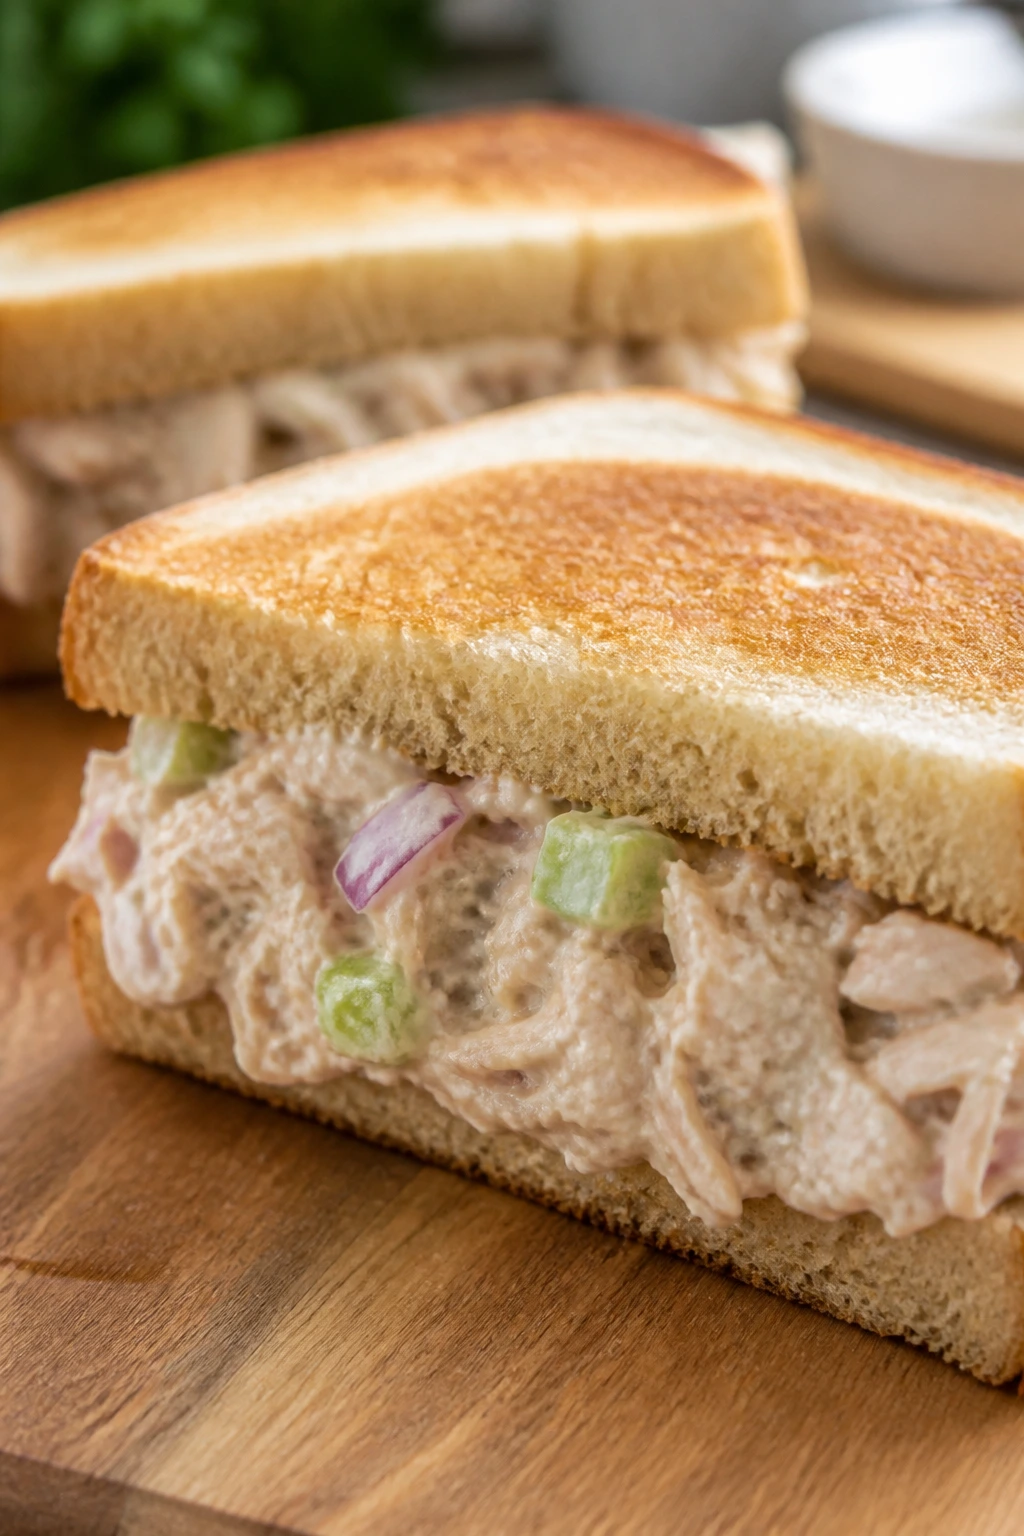
Tuna salad is one of those picnic sandwiches that can be boring or genuinely good depending on how you handle the texture. Celery gives crunch, a little Dijon keeps the mayo from tasting flat, and a splash of pickle relish makes the filling feel awake. The trick is to stop before it turns into a paste.
Why It Works:
Drained tuna, not watery tuna, is the whole starting point. A mix of mayo and Dijon gives creaminess with a bit of bite, while celery and onion keep the filling from feeling soft all the way through. Chilling the tuna salad for a short time lets the flavors settle and makes the filling easier to spread.
Key Ingredients:
- Two 5-ounce cans tuna, drained well
- 1/3 cup mayonnaise
- 1 tablespoon Dijon mustard
- 1/4 cup celery, finely diced
- 2 tablespoons red onion, minced
- 1 tablespoon sweet pickle relish
- 1 teaspoon lemon juice
- 8 slices sandwich bread or 4 rolls
- 4 lettuce leaves
Quick Steps:
- Flake the tuna into a bowl with a fork.
- Stir in the mayo, Dijon, celery, onion, relish, and lemon juice until just combined.
- Chill for 15 to 20 minutes if you have time.
- Toast the bread lightly if you want extra structure.
- Spoon on the tuna salad and add lettuce before closing the sandwich.
Equipment for This Recipe:
- Mixing bowl
- Fork
- Spatula or spoon
- Knife and cutting board
How to Serve This Dish:
Serve tuna salad sandwiches cold, with potato chips or cucumber slices. They do well packed in parchment and tucked into a cooler, but don’t stack them directly on ice or the bread will sweat. One sandwich per adult is enough, unless the rest of the cookout is light.
Pro Tips for This Recipe:
- Drain the tuna aggressively: Press it against the can lid if needed.
- Dice the celery finely: Big chunks make the sandwich fall apart.
- Use fresh lemon juice: A few drops sharpen the whole bowl.
Variations on This Dish:
- Curry Tuna: Add 1/2 teaspoon curry powder and a spoonful of chopped raisins.
- Avocado Tuna: Replace half the mayo with mashed avocado for a softer, greener filling.
Common Mistakes to Avoid with This Dish:
- Overmixing the tuna: A few visible flakes are better than a smooth paste.
- Using wet bread: Toast or lightly dry the bread first.
- Skipping the acid: Lemon or relish keeps the filling from tasting dull.
10. Egg Salad Croissant Sandwiches
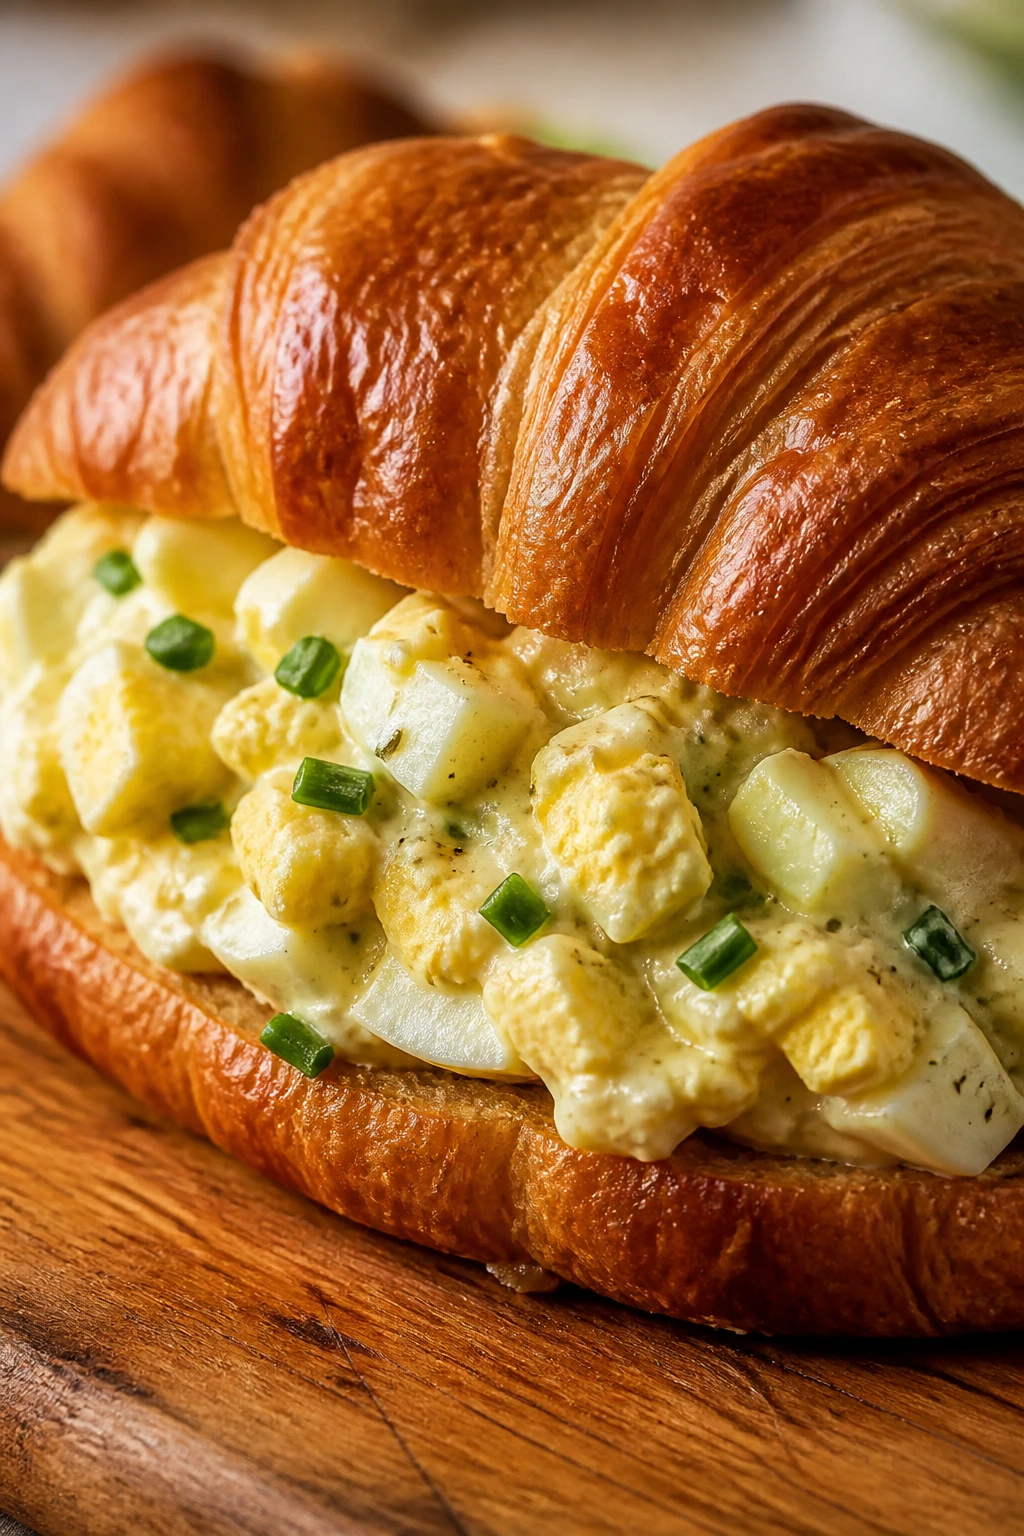
Egg salad can go wrong fast. Too much mayo and it gets heavy; too little and it turns crumbly. Croissants are a lovely match because they’re soft and buttery, but they need a filling that’s been cooled and seasoned properly or the whole thing just tastes like breakfast foam.
Why It Works:
Hard-cooked eggs give you a tender, rich base, and a touch of Dijon cuts the richness so the sandwich doesn’t feel dense. Chives add a green bite that wakes up the filling. Croissants are delicate, so the egg salad has to be chilled before assembly, which also helps it hold shape when you slice the sandwich.
Key Ingredients:
- 8 large eggs
- 1/3 cup mayonnaise
- 1 teaspoon Dijon mustard
- 2 tablespoons chopped chives
- 1 tablespoon lemon juice
- 1/2 teaspoon kosher salt
- 1/4 teaspoon black pepper
- 4 croissants, split
- 4 lettuce leaves
- Pinch of paprika for garnish
Quick Steps:
- Cover the eggs with cold water, bring to a boil, then turn off the heat and cover for 10 minutes.
- Cool the eggs in ice water, peel, and chop them.
- Mix the eggs with mayo, Dijon, chives, lemon juice, salt, and pepper.
- Chill the salad for 20 minutes.
- Fill the croissants with lettuce and egg salad, then dust with paprika.
Equipment for This Recipe:
- Saucepan
- Slotted spoon
- Mixing bowl
- Ice bath bowl
How to Serve This Dish:
These are best cold, cut in half, and packed in a chilled container. They’re perfect with kettle chips or a simple fruit salad. I’d keep them on the smaller side because croissants are rich and can feel heavy if you overfill them.
Pro Tips for This Recipe:
- Don’t boil the eggs too hard: A gray ring around the yolk tastes fine, but it looks sloppy.
- Cool the salad before stuffing: Warm egg salad softens the croissant fast.
- Use a fork, not a blender: Texture matters here.
Variations on This Dish:
- Dill Egg Salad: Swap chives for dill and add chopped pickle.
- Avocado Egg Salad: Replace half the mayo with mashed avocado for a softer filling.
Common Mistakes to Avoid with This Dish:
- Overcooking the eggs: Rubbery whites and dry yolks make the salad chalky.
- Filling the croissants too early: They lose their flakes and go limp.
- Underseasoning: Egg salad needs more salt than most people think.
11. Pimento Cheese Sandwiches
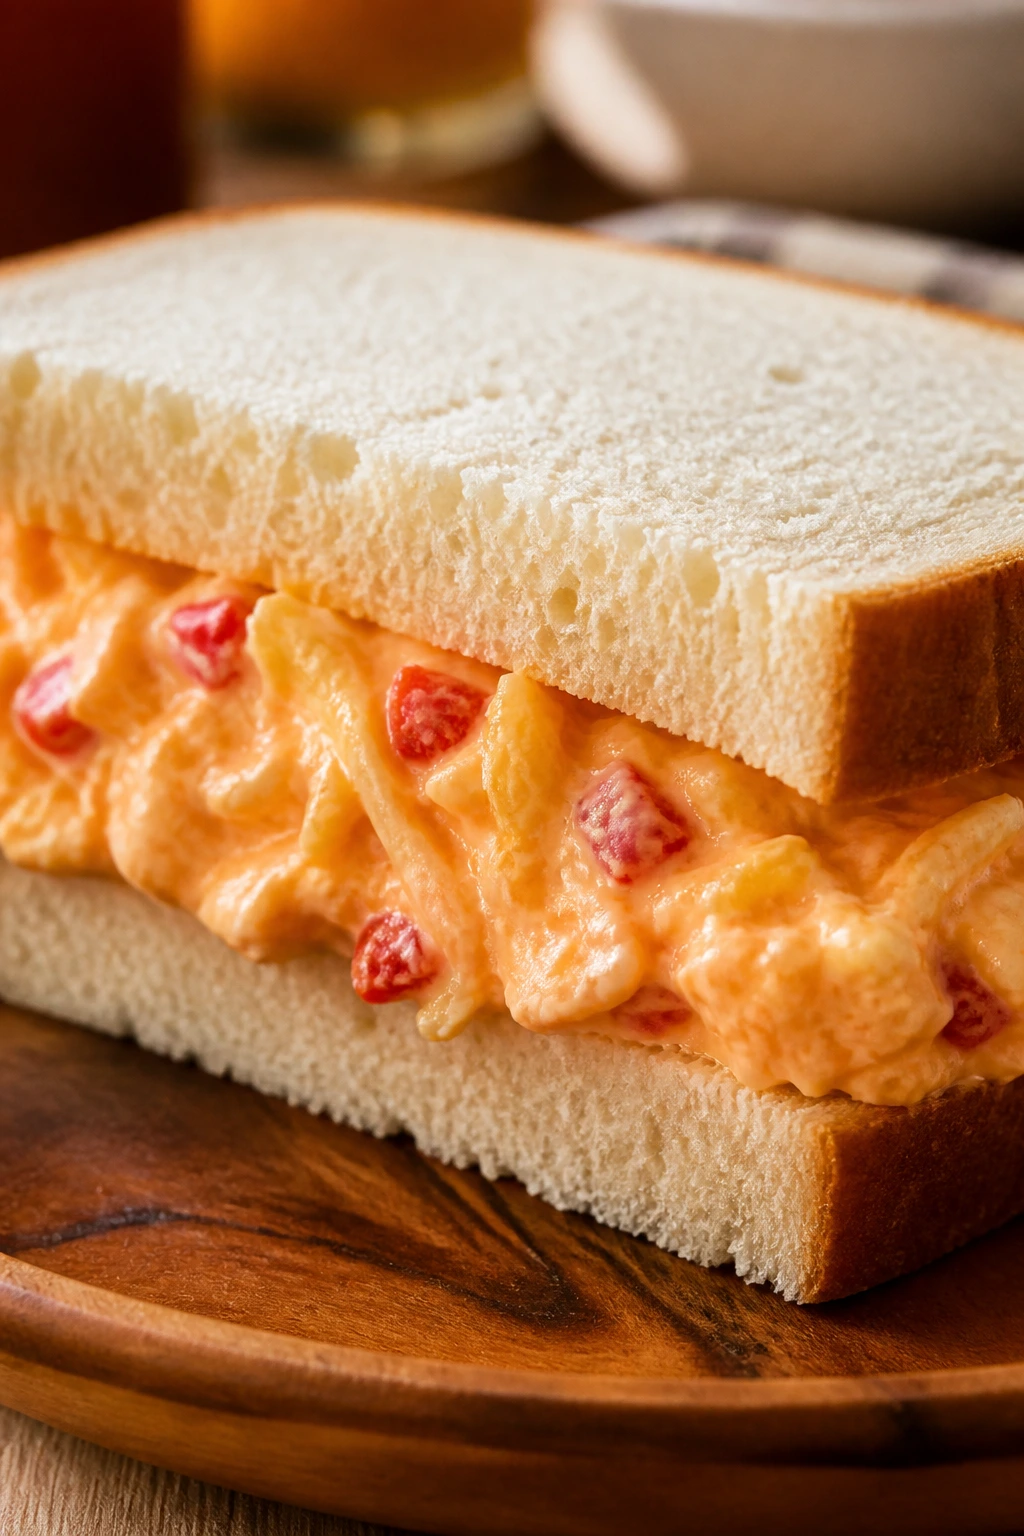
Pimento cheese is one of those spreads that looks modest and tastes louder than expected. Sharp cheddar, cream cheese, mayo, and pimentos give you a filling that spreads easily, keeps in the fridge well, and tastes better after a short rest. On soft white bread, it’s pure picnic comfort with a little bite.
Why It Works:
Freshly grated cheese melts into the spread more smoothly than pre-shredded cheese, which can feel dusty. Pimentos bring gentle sweetness and a little red color without making the filling wet. A hint of garlic powder and black pepper gives the sandwich enough edge that it doesn’t disappear under the bread.
Key Ingredients:
- 8 ounces sharp cheddar, finely grated
- 4 ounces pepper jack, finely grated
- 4 ounces cream cheese, softened
- 1/3 cup mayonnaise
- 1 jar pimentos, 4 ounces drained
- 1 teaspoon garlic powder
- 1/2 teaspoon black pepper
- 8 slices soft white bread or 4 rolls
- 1/4 teaspoon cayenne, optional
Quick Steps:
- Stir the cream cheese and mayo until smooth.
- Fold in the cheddar, pepper jack, pimentos, garlic powder, black pepper, and cayenne if using.
- Chill the spread for 20 minutes so it firms up slightly.
- Spread thickly on bread or rolls.
- Slice and serve as-is, or toast lightly if you want a warm version.
Equipment for This Recipe:
- Mixing bowl
- Box grater
- Rubber spatula
- Serrated knife
How to Serve This Dish:
Serve pimento cheese sandwiches cut small; they’re rich and a little goes a long way. A pickle spear, cherry tomatoes, or celery sticks make sense beside them. They’re one of the best make-ahead sandwich fillings in the whole spread.
Pro Tips for This Recipe:
- Grate the cheese yourself: It melts into the spread better.
- Let it chill before serving: The texture gets tighter and cleaner.
- Use soft bread: Crusty bread fights the filling.
Variations on This Dish:
- Bacon Pimento: Fold in 1/2 cup chopped cooked bacon.
- Jalapeño Pimento: Add 2 tablespoons diced pickled jalapeños for extra heat.
Common Mistakes to Avoid with This Dish:
- Using dry pre-shredded cheese: The texture gets grainy.
- Overloading on mayo: The spread should hold a spoon, not run off it.
- Serving it straight from the fridge: Give it 10 minutes so it spreads more easily.
12. Caprese Ciabatta Sandwiches
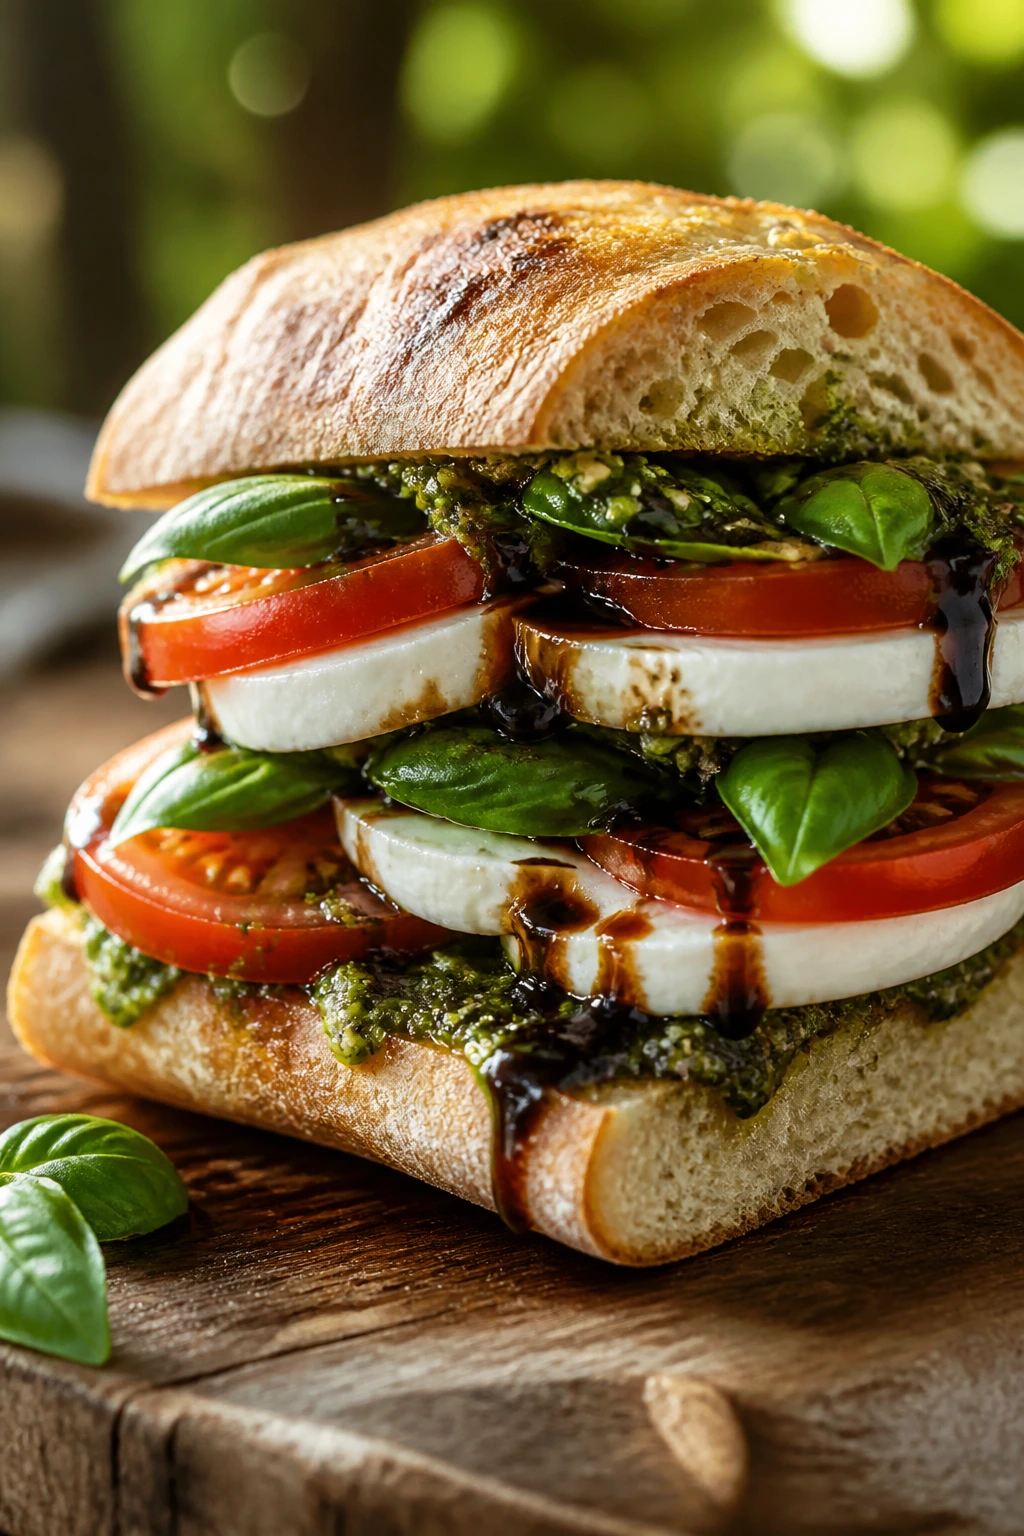
A Caprese sandwich depends on ingredients that actually taste like something. Juicy tomatoes, fresh mozzarella, basil, olive oil, and a little balsamic glaze do the work, but only if the bread can carry them. Ciabatta is the right kind of stubborn here. It holds the fillings without going stiff.
Why It Works:
Ciabatta has enough chew to handle tomato slices and soft cheese without collapsing. Salting the tomatoes briefly tightens their flavor and keeps excess juice off the bread. Pesto adds an herb and garlic layer that makes the sandwich taste less like a plate assembly and more like a proper lunch.
Key Ingredients:
- 1 large ciabatta loaf
- 2 large ripe tomatoes, sliced
- 8 ounces fresh mozzarella, sliced
- 1 cup fresh basil leaves
- 1/4 cup pesto
- 2 tablespoons balsamic glaze
- 1 tablespoon olive oil
- 1/2 teaspoon kosher salt
- 1/4 teaspoon black pepper
Quick Steps:
- Slice the tomatoes and salt them lightly for 5 minutes, then pat dry.
- Cut the ciabatta in half and toast the cut sides briefly.
- Spread pesto on both sides of the bread.
- Layer mozzarella, tomatoes, and basil, then drizzle with olive oil and balsamic glaze.
- Close the loaf, press lightly, and slice.
Equipment for This Recipe:
- Serrated bread knife
- Cutting board
- Small spoon for pesto
- Grill pan or toaster, optional
How to Serve This Dish:
Serve at room temperature, not ice cold, so the mozzarella tastes soft and the tomato flavor opens up. It goes well with grilled vegetables or a handful of olives. Cut it into small wedges if you’re putting it on a larger picnic spread.
Pro Tips for This Recipe:
- Dry the tomatoes well: Extra moisture is the enemy.
- Use real balsamic glaze sparingly: A thin drizzle is enough.
- Add basil at the last minute: It bruises fast and turns dark.
Variations on This Dish:
- Prosciutto Caprese: Add thin slices of prosciutto for a saltier, meatier version.
- Grilled Caprese: Grill the sandwich in a press for a warm, melty take.
Common Mistakes to Avoid with This Dish:
- Using watery tomatoes: Flavor fades and the bread suffers.
- Skipping the salt: Tomatoes need it.
- Overdoing the pesto: Too much makes the sandwich slippery.
13. Roast Beef and Cheddar Sandwiches
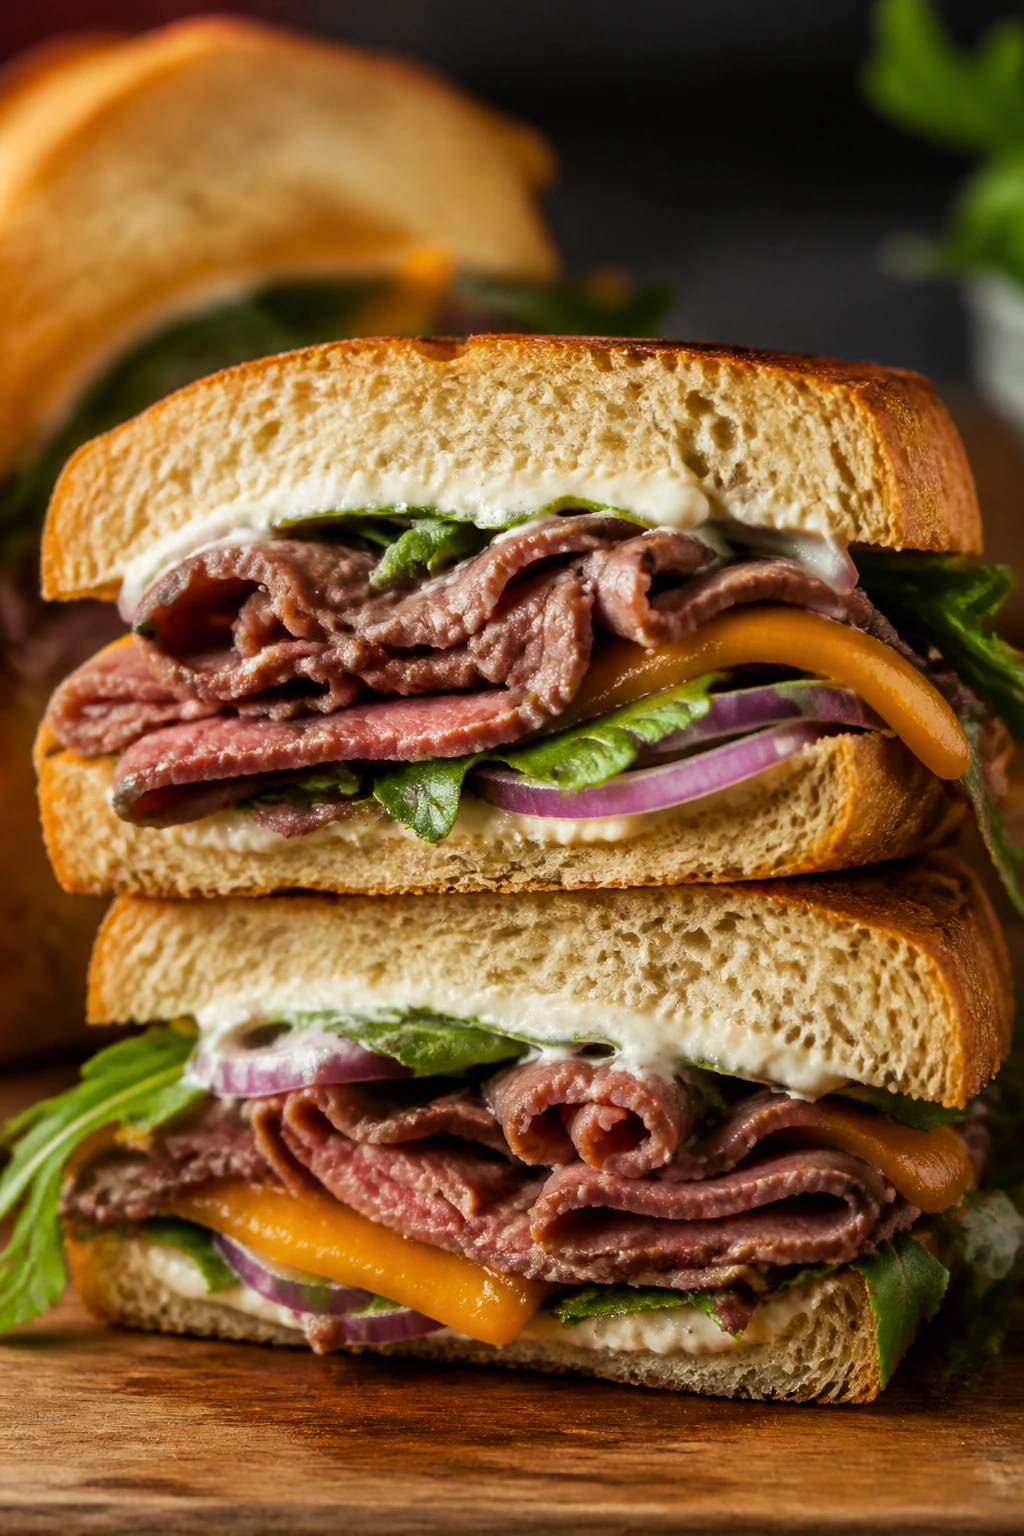
Roast beef sandwiches are at their best when the meat feels tender and the cheddar has enough sharpness to keep up. A little horseradish mayo or caramelized onion gives the sandwich direction, which is handy because plain roast beef can go dull in a hurry. This one tastes like a deli counter that knows how to behave outside.
Why It Works:
Roast beef carries a lot of flavor but needs a bright partner to keep it from tasting flat. Sharp cheddar or horseradish brings that bite, while sturdy rolls keep the sandwich from tearing when the meat is piled high. Warming the beef for just a minute makes the fat loosen and the flavor show up without cooking it again.
Key Ingredients:
- 1 pound sliced roast beef
- 8 ounces sharp cheddar, sliced
- 4 sandwich rolls or hoagie rolls
- 1/4 cup mayonnaise
- 1 tablespoon prepared horseradish
- 1 cup arugula
- 1 small red onion, thinly sliced
- 1 tablespoon butter
Quick Steps:
- Mix the mayo and horseradish.
- Warm the roast beef in a skillet over low heat for 1 to 2 minutes, just until it loosens.
- Toast the rolls with a little butter.
- Spread the horseradish mayo on the bread, then layer roast beef, cheddar, arugula, and onion.
- Close and serve while the meat is still warm.
Equipment for This Recipe:
- Skillet
- Spatula
- Serrated knife
- Small bowl
How to Serve This Dish:
Serve with onion chips, pickle spears, or a simple green salad if you want to keep the plate from getting too heavy. The sandwich works warm or room temperature, which helps when the grill and the cooler are both crowded. One sandwich usually feeds one person well.
Pro Tips for This Recipe:
- Use thinly sliced roast beef: Thick slices chew badly in a sandwich.
- Warm only briefly: You want loosened meat, not dry meat.
- Keep the arugula dry: Wet greens slide around.
Variations on This Dish:
- French Dip Style: Serve with a small cup of warm beef broth for dipping.
- Pepper Jack Roast Beef: Swap the cheddar for pepper jack and add pickled jalapeños.
Common Mistakes to Avoid with This Dish:
- Overheating the beef: The texture turns tough fast.
- Using weak bread: Soft rolls crush under the fillings.
- Going easy on the horseradish: A bland spread leaves the sandwich flat.
14. Ham and Swiss Melts
There’s a reason ham and Swiss keep showing up at cookouts and picnics. The salt in the ham, the mild nutty melt of the cheese, and the bread that goes crisp in butter all line up without drama. When you grill these in a skillet, the edges turn golden and the cheese slips just enough to hold the sandwich together.
Why It Works:
Ham and Swiss are naturally balanced, so the job is mostly about heat and bread. Butter on the outside creates a crisp shell, while Dijon inside keeps the filling from tasting too soft. A covered skillet traps just enough heat to melt the cheese before the bread burns.
Key Ingredients:
- 8 ounces sliced ham
- 8 slices Swiss cheese
- 4 ciabatta rolls or sandwich rolls
- 2 tablespoons Dijon mustard
- 4 tablespoons softened butter
- 4 dill pickle chips, optional
Quick Steps:
- Split the rolls and spread Dijon on the cut sides.
- Layer ham and Swiss, then close the sandwiches.
- Butter the outside of each sandwich.
- Grill in a skillet over medium heat for 3 to 4 minutes per side, covering the pan briefly if needed so the cheese melts.
- Rest 1 minute before cutting.
Equipment for This Recipe:
- Skillet with lid
- Spatula
- Butter knife
- Serrated knife
How to Serve This Dish:
Serve these warm with chips, pickles, or a cold cucumber salad. They’re easy to halve, which makes them handy when you want a few sandwiches on a larger picnic tray. Eat them shortly after grilling while the crust is still crisp.
Pro Tips for This Recipe:
- Use medium heat: Too hot and the bread scorches before the cheese melts.
- Cover the pan for 30 seconds: That speeds up melting.
- Keep the butter thin: Too much pools and fries the bread unevenly.
Variations on This Dish:
- Honey Ham Melt: Add a thin layer of honey mustard for sweetness.
- Spicy Swiss Melt: Use Dijon plus a few sliced pepperoncini.
Common Mistakes to Avoid with This Dish:
- Turning the heat up too high: The bread browns before the center warms.
- Packing in too much ham: The sandwich gets bulky and shifts.
- Using bread that tears easily: Choose a roll with some structure.
15. Grilled Sausage and Pepper Hoagies
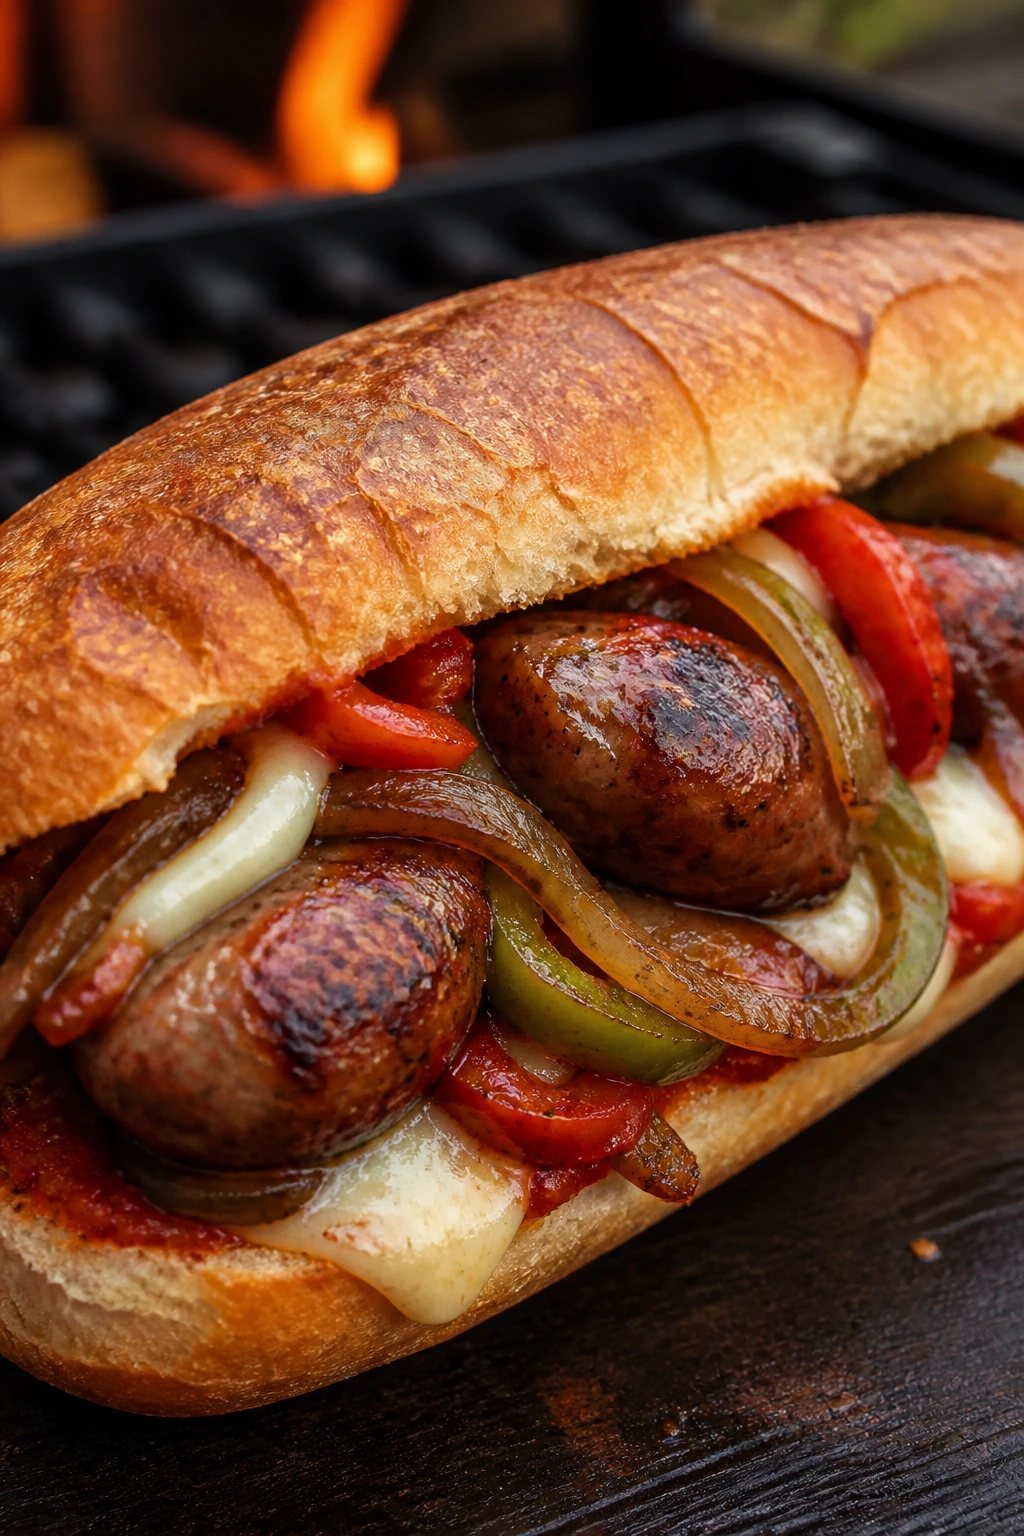
If you’ve ever stood near a grill while sausage, peppers, and onions sizzled together, you already know why this sandwich belongs here. The sausage brings fat and smoke, the peppers soften into sweetness, and the marinara ties everything together without making the bread soggy if you keep the sauce light. It tastes like a cookout that took a small detour through an Italian street fair.
Why It Works:
Whole sausages stay juicy better than pre-sliced meat, and grilling them first gives the hoagie a real charred edge. Peppers and onions soften in the same heat, picking up the sausage drippings. A thin layer of marinara plus provolone keeps the sandwich cohesive, but not wet.
Key Ingredients:
- 6 Italian sausages, sweet or hot
- 2 bell peppers, sliced
- 1 large onion, sliced
- 1 tablespoon olive oil
- 1 teaspoon kosher salt
- 1/2 teaspoon black pepper
- 4 hoagie rolls
- 1 cup marinara sauce
- 4 slices provolone
Quick Steps:
- Toss the peppers and onion with olive oil, salt, and pepper.
- Grill the sausages over medium heat for 12 to 15 minutes, turning often, until they reach 160°F.
- Grill or sauté the peppers and onion until soft and lightly charred.
- Slice the sausages lengthwise if you want more surface area, then set them in the rolls with peppers, onions, marinara, and provolone.
- Return the sandwiches to the grill or under a broiler for 1 to 2 minutes to melt the cheese.
Equipment for This Recipe:
- Grill or grill pan
- Tongs
- Sheet pan
- Aluminum foil
How to Serve This Dish:
Serve with roasted potatoes, chips, or a crisp slaw to keep the plate from feeling too soft. These are excellent wrapped in foil for transport, and they hold their heat better than most sandwiches. One hoagie is a full meal.
Pro Tips for This Recipe:
- Cook the sausage first, then slice if needed: It stays juicier that way.
- Keep the marinara thin: Thick sauce belongs on pizza, not in a hoagie.
- Toast the roll lightly: A little char helps the bread hold.
Variations on This Dish:
- Chicken Sausage Version: Use chicken sausages for a leaner filling.
- Spicy Arrabbiata Hoagie: Swap marinara for a spicy tomato sauce.
Common Mistakes to Avoid with This Dish:
- Undercooking the sausage: Juices need time to render.
- Drowning the bread in sauce: A little goes farther than it seems.
- Skipping the char on the peppers: That edge is where the flavor lives.
16. Chicken Salad Sandwiches
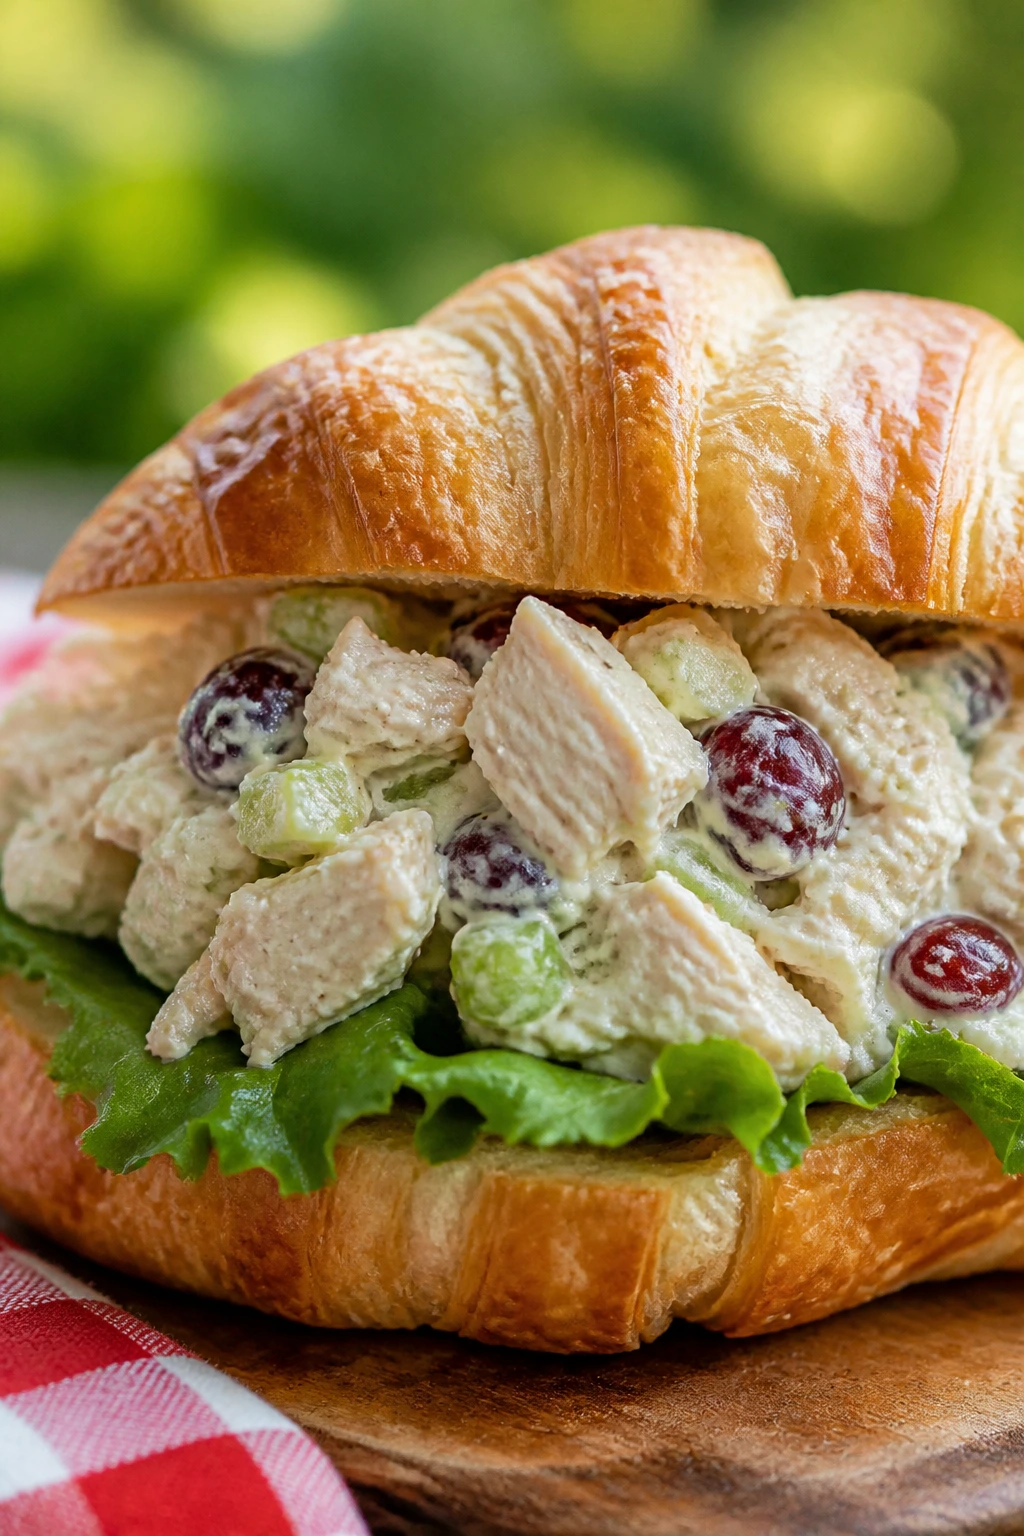
Chicken salad can be dry, too sweet, or oddly slick if it’s built carelessly. The version I like has chopped celery, a little tang, and just enough mayo to hold the chicken together without turning it into a scoopable cloud. Croissants make it feel indulgent, but it works on plain sandwich bread too.
Why It Works:
Cooked chicken gives you a neutral base that can take on acid, crunch, and herb flavor. Celery and a little fruit, whether grapes or diced apple, keep each bite moving. A short chill time helps the dressing settle into the chicken, which is one reason chicken salad often tastes better after a rest.
Key Ingredients:
- 3 cups cooked chicken, diced or shredded
- 1/2 cup mayonnaise
- 1 tablespoon plain Greek yogurt or sour cream
- 1/2 cup celery, diced
- 1/4 cup grapes, halved, or diced apple
- 1 tablespoon lemon juice
- 1 teaspoon Dijon mustard
- 1/2 teaspoon kosher salt
- 1/4 teaspoon black pepper
- 4 croissants or 8 slices bread
Quick Steps:
- Stir together the mayo, yogurt, lemon juice, Dijon, salt, and pepper.
- Fold in the chicken, celery, and grapes or apple.
- Chill for 30 minutes if possible.
- Split the croissants and line them with lettuce if you want extra crunch.
- Fill and serve cold.
Equipment for This Recipe:
- Mixing bowl
- Spoon or spatula
- Knife and cutting board
- Refrigerator-safe container
How to Serve This Dish:
Chicken salad belongs cold, with chips or a little fruit on the side. Croissants make the richest version, but bread keeps it more picnic-friendly because it packs flatter. If you’re feeding a crowd, this is one of the easiest sandwiches to make in advance and chill.
Pro Tips for This Recipe:
- Dice the chicken evenly: Big chunks make the sandwich lumpy.
- Taste after chilling: Cold food hides salt, so adjust before serving.
- Use one crunchy element: Celery, nuts, or apple keep it lively.
Variations on This Dish:
- Curry Chicken Salad: Add 1 teaspoon curry powder and a spoonful of raisins.
- Dill Pickle Chicken Salad: Use chopped pickles and a splash of pickle brine instead of fruit.
Common Mistakes to Avoid with This Dish:
- Making it too wet: The filling should mound, not slide.
- Using hot chicken: Warm chicken melts the dressing and turns the salad slick.
- Skipping salt: Chicken salad needs seasoning more than people expect.
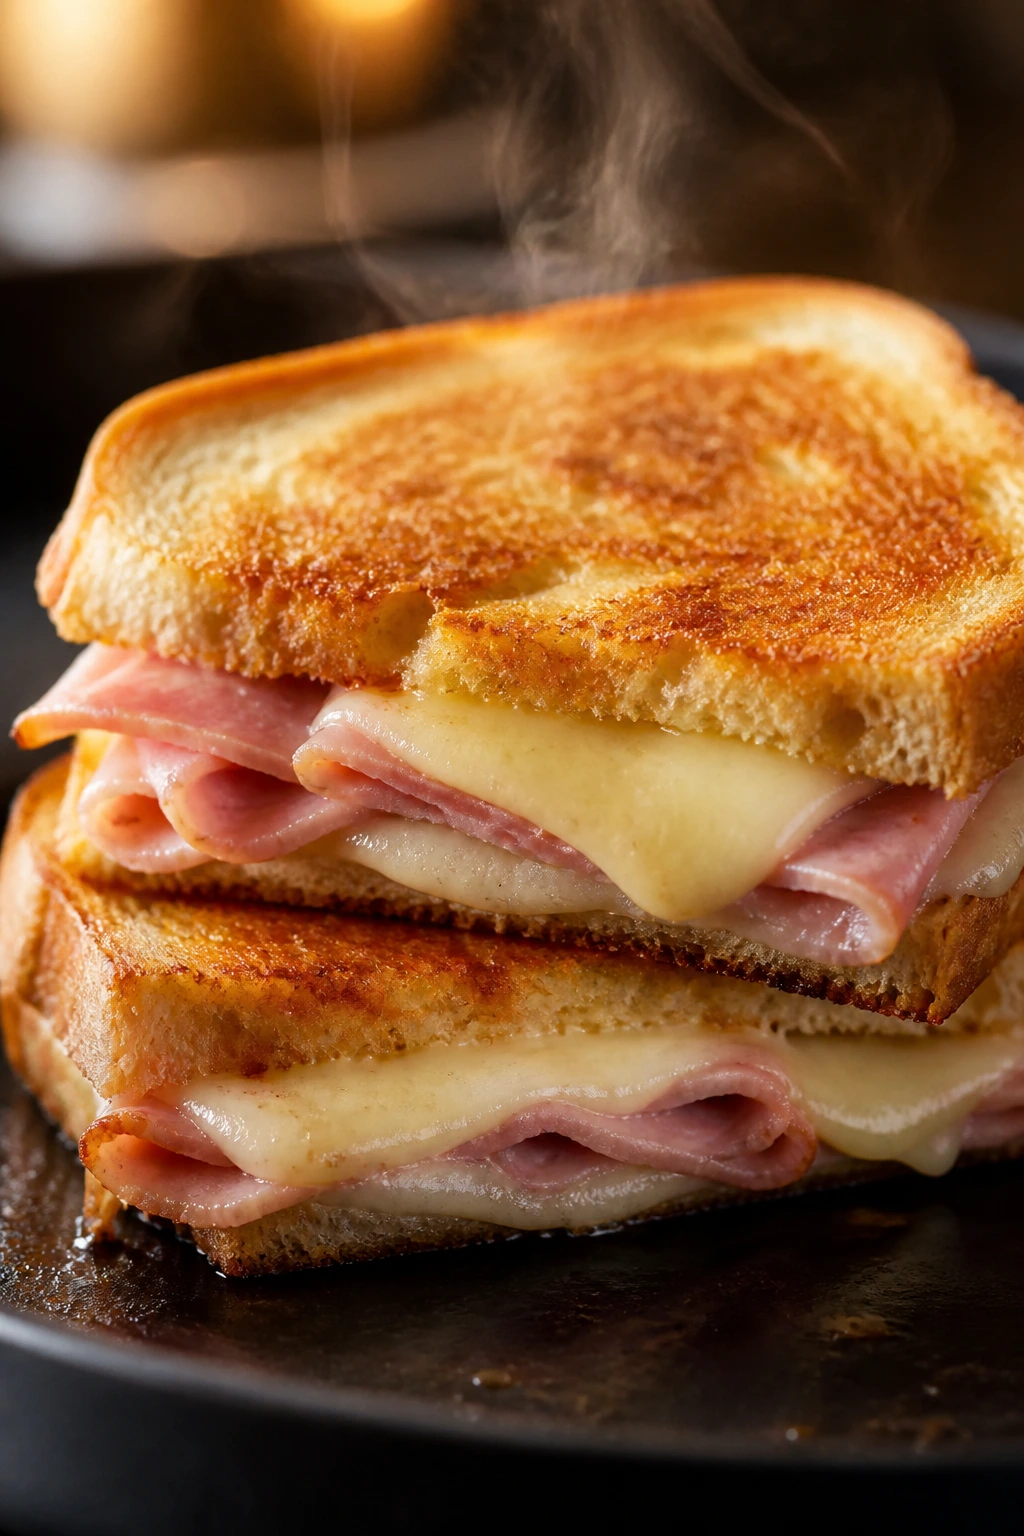
17. Reuben Sandwiches
A Reuben is a sandwich with a strong opinion. The rye is toasty and sharp, the corned beef is salty, the sauerkraut brings acidity, and the Swiss plus dressing pull it all together. It can absolutely work at a cookout if you keep the kraut drained and the pan hot enough to crisp the bread.
Why It Works:
The sandwich depends on contrast: rich meat, sour kraut, creamy dressing, and dark rye. Draining the sauerkraut is not optional; excess liquid turns the sandwich limp fast. Griddling the Reuben also warms the corned beef just enough to soften the fat, which is the difference between a dense sandwich and a tight, hot one.
Key Ingredients:
- 1 pound sliced corned beef
- 8 slices rye bread
- 8 slices Swiss cheese
- 1 cup sauerkraut, drained well
- 1/3 cup Russian or Thousand Island dressing
- 4 tablespoons softened butter
Quick Steps:
- Drain the sauerkraut and press it lightly with paper towels.
- Butter one side of each bread slice.
- Build with dressing, corned beef, sauerkraut, and Swiss, then close the sandwiches.
- Grill over medium heat for 3 to 4 minutes per side until the bread is crisp and the cheese melts.
- Rest 1 minute, then cut.
Equipment for This Recipe:
- Skillet or griddle
- Spatula
- Paper towels
- Butter knife
How to Serve This Dish:
Serve warm, with pickles or a crisp dill salad. Reubens are substantial, so half a sandwich can be enough if the rest of the table is busy. They also travel better than you’d think if you wrap them in foil and keep them warm for a short stretch.
Pro Tips for This Recipe:
- Drain the kraut thoroughly: This is the difference between crisp and soggy.
- Don’t overfill the sandwich: Rye can only take so much.
- Use medium heat: Rye burns before the cheese melts if the pan runs too hot.
Variations on This Dish:
- Rachel Sandwich: Swap corned beef for turkey and keep everything else similar.
- Spicy Reuben: Add sliced pickled jalapeños and a sharper dressing.
Common Mistakes to Avoid with This Dish:
- Using wet sauerkraut: The bread will slump.
- Skipping the butter on the outside: That crisp crust is the point.
- Crowding the pan: Reubens need room so the heat reaches the center.
18. Shrimp Po’ Boy Sandwiches
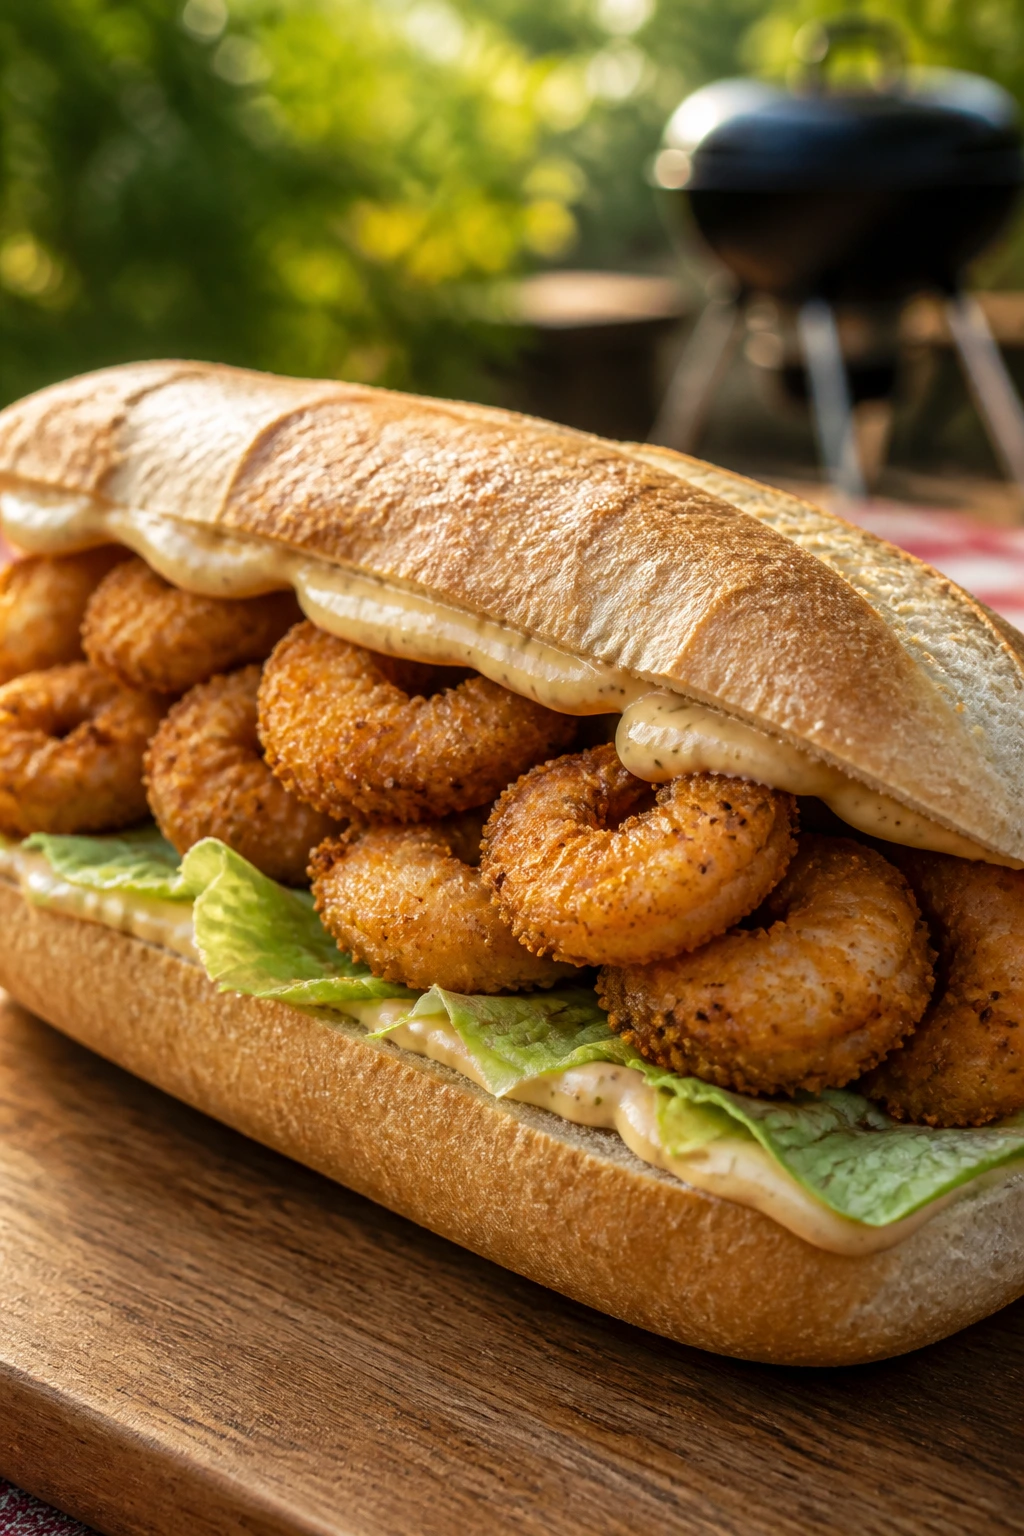
A shrimp po’ boy should be crunchy, bright, and a little messy in a way that feels controlled. The shrimp need a crisp coating, the bread needs enough chew to hold the filling, and the remoulade should taste sharp enough to keep the fried shrimp from feeling heavy. This is one of the best sandwiches here if you want something that reads as special without being fussy.
Why It Works:
Cornmeal in the breading gives the shrimp more texture than flour alone. Buttermilk helps the coating cling and keeps the shrimp tender. A long, crusty roll is a smart choice as long as the inside isn’t too hollow, because you need bread that can hold sauce without shattering.
Key Ingredients:
- 1 1/2 pounds large shrimp, peeled and deveined
- 1 cup buttermilk
- 1 cup all-purpose flour
- 1/2 cup fine cornmeal
- 2 teaspoons Cajun seasoning
- 1/2 teaspoon kosher salt
- 1/2 teaspoon black pepper
- 4 sandwich rolls or baguette-style rolls
- 1 cup shredded lettuce
- 1 tomato, sliced
- 1/2 cup remoulade or mayo mixed with hot sauce and relish
Quick Steps:
- Soak the shrimp in buttermilk for 10 to 15 minutes.
- Mix flour, cornmeal, Cajun seasoning, salt, and pepper in a bowl.
- Dredge the shrimp, then fry in 350°F oil for 2 to 3 minutes until golden and curled.
- Split and toast the rolls lightly.
- Spread remoulade on the bread, then add lettuce, tomato, and shrimp.
Equipment for This Recipe:
- Deep skillet or fryer
- Thermometer
- Tongs
- Wire rack
How to Serve This Dish:
Serve shrimp po’ boys right away so the coating stays crisp. Potato salad, slaw, or corn on the cob all make sense beside them. I like these cut in half for easier handling, especially when they’re packed for a picnic.
Pro Tips for This Recipe:
- Dry the shrimp before dredging if needed: Excess water loosens the coating.
- Fry in batches: Crowd the pan and the oil temperature drops.
- Keep the sauce moderate: Too much remoulade steals the crunch.
Variations on This Dish:
- Grilled Shrimp Po’ Boy: Toss shrimp with Cajun seasoning and grill instead of frying.
- Oyster Po’ Boy: Use oysters if you want the more classic Louisiana-style version.
Common Mistakes to Avoid with This Dish:
- Overcooking the shrimp: They curl fast and turn rubbery if you leave them in too long.
- Using bread that flakes apart: You need a roll with some strength.
- Saturating the sandwich with sauce: Keep it sharp, not drenched.
19. Nashville Hot Chicken Sandwiches

This sandwich has a very specific personality: crunchy, spicy, sticky, and hard to stop eating even when your mouth tells you to slow down. The heat should sit on the crust, not bury the chicken, and the pickles need to be cold and briny enough to reset your palate between bites. It’s a loud sandwich. That’s exactly the point.
Why It Works:
The seasoning oil clings to the fried coating, so the chicken stays crunchy while picking up heat and flavor at the same time. Buttermilk marinade keeps the meat tender. A soft bun, a few pickles, and maybe a little honey are enough to keep the spice from running off into pure punishment.
Key Ingredients:
- 1 1/2 pounds boneless chicken thighs
- 1 cup buttermilk
- 1 1/2 cups flour
- 2 teaspoons paprika
- 1 teaspoon kosher salt
- 1/2 teaspoon black pepper
- 1/2 teaspoon cayenne in the breading
- 1/4 cup neutral oil
- 1 tablespoon cayenne for the hot oil
- 1 teaspoon brown sugar
- 4 brioche buns
- 8 dill pickle chips
Quick Steps:
- Marinate the chicken in buttermilk for at least 30 minutes.
- Mix the flour, paprika, salt, pepper, and cayenne. Dredge the chicken.
- Fry at 350°F until the crust is deep golden and the chicken reaches 165°F.
- Stir the hot oil with cayenne and brown sugar, then brush or spoon it over the fried chicken.
- Build on buns with pickles and a little honey if you want to soften the heat.
Equipment for This Recipe:
- Deep skillet or Dutch oven
- Thermometer
- Wire rack
- Pastry brush or spoon
How to Serve This Dish:
Serve immediately with extra pickles and a cold drink nearby. Coleslaw makes sense if you want something creamy beside it, but I’d keep the rest of the plate simple so the heat stays the center of the story. One sandwich is plenty.
Pro Tips for This Recipe:
- Let the hot oil sit a minute before applying: You want spice, not burnt cayenne.
- Pick buns that are soft but not airy: They need to contain the chicken.
- Use pickles generously: They’re not decoration here.
Variations on This Dish:
- Mild Hot Chicken: Cut the cayenne in half and lean on paprika for flavor.
- Honey Heat Version: Drizzle honey over the finished sandwich for a sweeter finish.
Common Mistakes to Avoid with This Dish:
- Applying the spice oil before frying ends: The heat can scorch.
- Using boneless breasts that are too thick: They dry out before the crust is ready.
- Forgetting the pickles: The acid matters just as much as the heat.
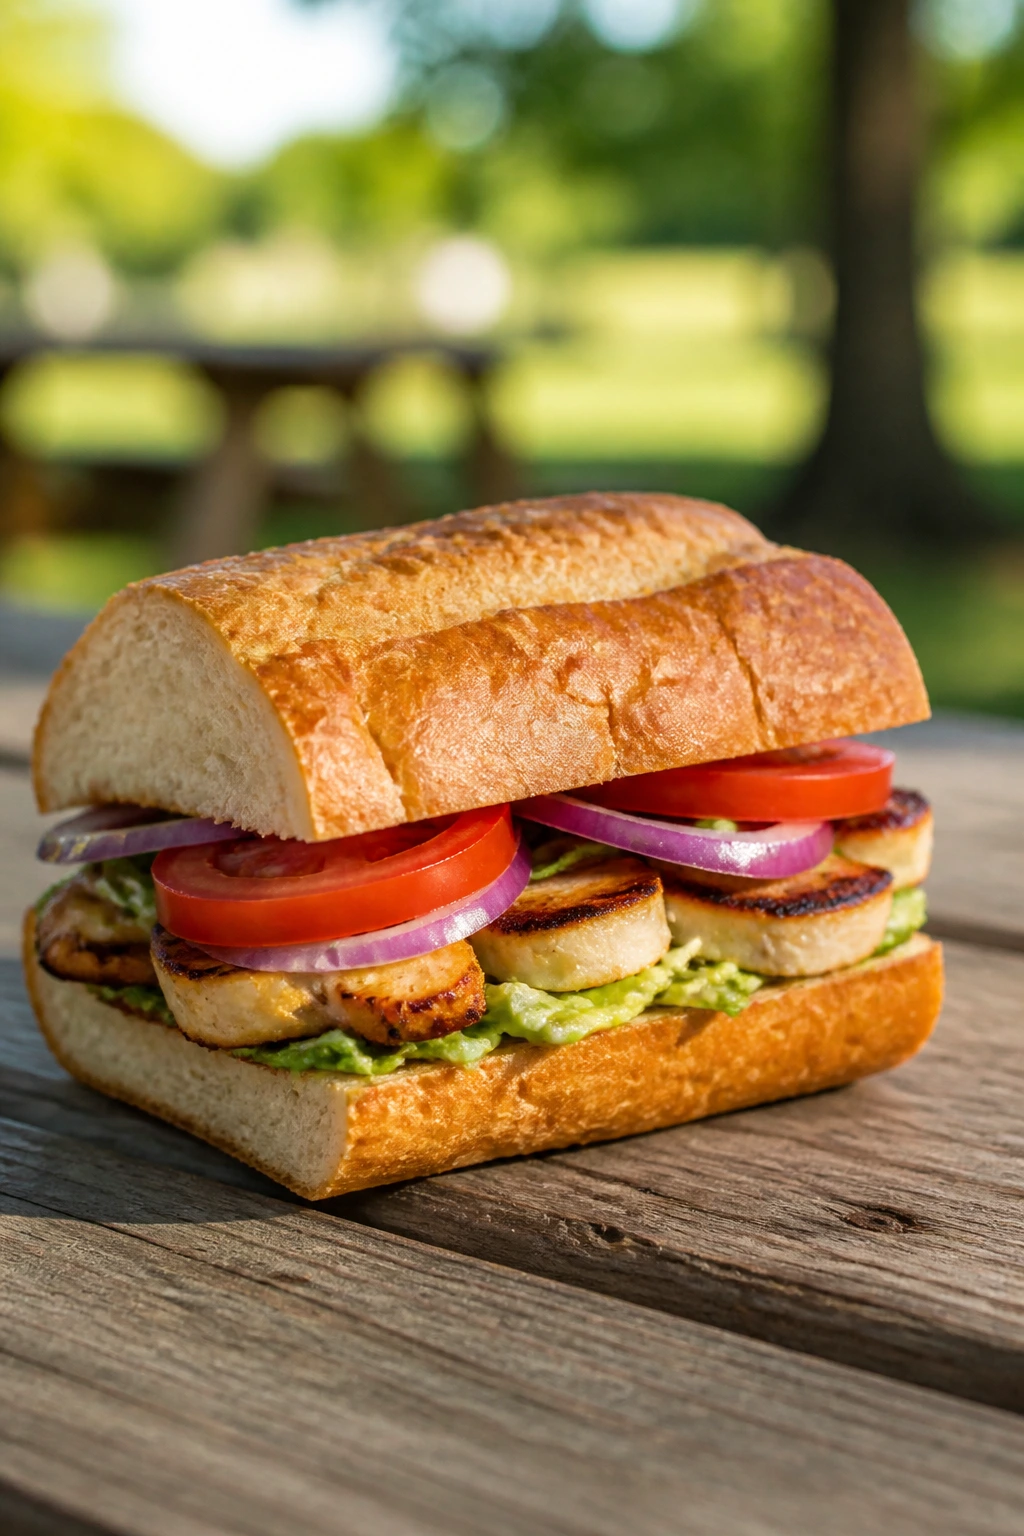
20. Hummus and Grilled Veggie Sandwiches
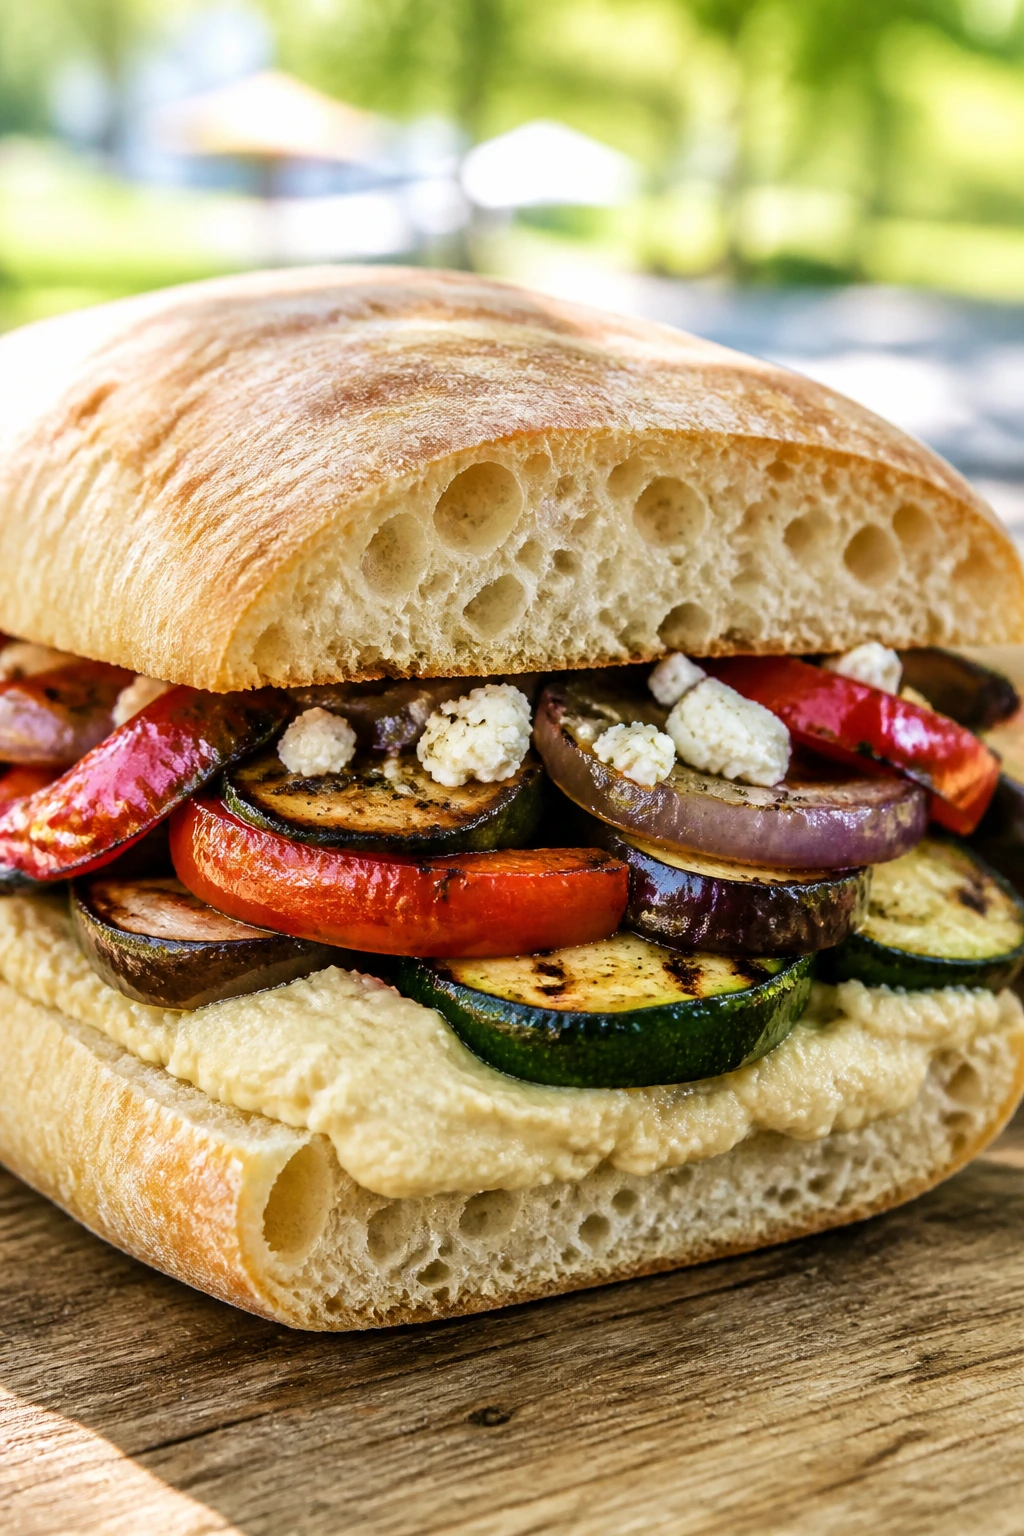
This sandwich proves you do not need meat to make a picnic lunch feel finished. Grilled zucchini, eggplant, peppers, and onion bring smoke and sweetness, hummus handles the creaminess, and feta adds enough salt to make the whole thing feel awake. It’s the kind of sandwich that disappears faster than the meatier options when the vegetables are treated well.
Why It Works:
Hummus gives you spread and protein in one step, so the bread stays coated without needing mayo. Grilling the vegetables dries them out just enough to prevent dripping, which is the main problem with veggie sandwiches. A sturdy bread like ciabatta helps because the filling has both moisture and weight.
Key Ingredients:
- 1 cup hummus
- 1 medium zucchini, sliced lengthwise
- 1 small eggplant, sliced into rounds
- 1 red bell pepper, quartered
- 1/2 red onion, sliced thick
- 2 tablespoons olive oil
- 1/2 teaspoon kosher salt
- 1/4 teaspoon black pepper
- 4 ciabatta rolls
- 1 cup arugula
- 4 ounces feta, crumbled
Quick Steps:
- Brush the vegetables with olive oil, salt, and pepper.
- Grill them over medium-high heat until charred and tender, about 3 to 5 minutes per side.
- Split and toast the ciabatta rolls.
- Spread hummus on both sides, then layer arugula, grilled vegetables, and feta.
- Press gently and slice.
Equipment for This Recipe:
- Grill or grill pan
- Tongs
- Cutting board
- Serrated knife
How to Serve This Dish:
Serve at room temperature or slightly warm, with olives or a tomato salad beside it. This one packs well because hummus acts like a moisture barrier between bread and vegetables. Half a sandwich is a good side portion; a full one is lunch.
Pro Tips for This Recipe:
- Grill the veg until the edges brown: Pale vegetables taste bland here.
- Spread hummus to the edges: That keeps the bread protected.
- Use a salty feta: It keeps the sandwich from tasting soft.
Variations on This Dish:
- White Bean Spread Version: Swap hummus for a white bean spread and keep the vegetables the same.
- Vegan Finish: Use vegan feta or skip the cheese and add more olive oil and lemon.
Common Mistakes to Avoid with This Dish:
- Using raw vegetables: They bring too much water and too little flavor.
- Skipping the salt on the vegetables: Salt helps them taste like themselves.
- Choosing flimsy bread: The filling needs a sturdy shell.
21. Bánh Mì Pork Sandwiches
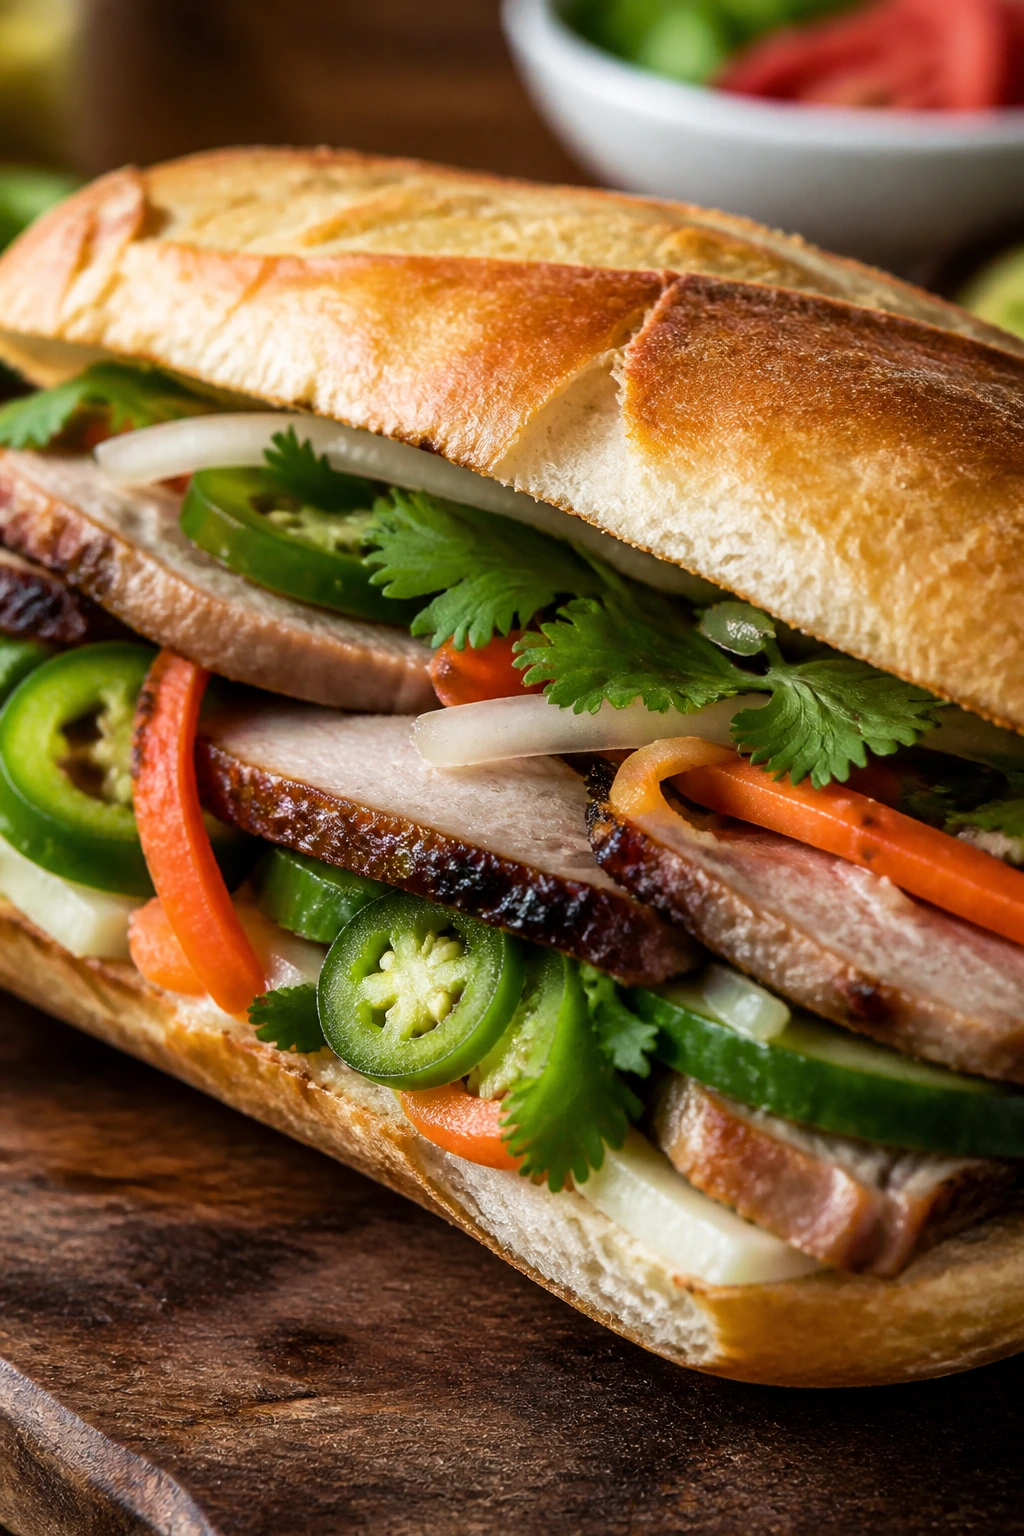
A good bánh mì is all contrast: crisp bread, savory pork, bright pickles, herbs, chili, and a little mayo to smooth the edges. If one element is missing, the sandwich feels oddly unfinished. When it’s all there, it’s one of the most exciting sandwiches on the table.
Why It Works:
The sweet-salty pork marinade gives you depth before the bread even touches the pan. Quick pickled carrot and daikon bring acidity and crunch, which are necessary because the pork and mayo carry weight. A baguette with a crackly crust and a slightly airy middle gives you the right mix of crunch and chew.
Key Ingredients:
- 1 pound pork tenderloin or thin-cut pork shoulder
- 2 tablespoons soy sauce
- 1 tablespoon fish sauce
- 1 tablespoon sugar
- 3 cloves garlic, minced
- 1 tablespoon neutral oil
- 1 cup quick pickled carrot and daikon
- 1 cucumber, sliced thin
- 1 jalapeño, sliced thin
- 1/2 cup cilantro leaves
- 1/4 cup mayonnaise
- 4 small baguettes
Quick Steps:
- Mix soy sauce, fish sauce, sugar, garlic, and oil, then coat the pork for 30 minutes.
- Sear or grill the pork over medium-high heat until browned and cooked through, about 10 to 12 minutes depending on thickness.
- Slice the pork thinly.
- Split and toast the baguettes briefly. Spread mayo, then layer pork, pickled vegetables, cucumber, jalapeño, and cilantro.
- Press the sandwich lightly and serve.
Equipment for This Recipe:
- Grill or skillet
- Sharp knife
- Cutting board
- Small bowl for marinade
How to Serve This Dish:
Serve bánh mì with extra herbs and, if you like, a few chili slices on the side. The sandwich is best within a short window after assembly because the bread starts to soften under the pickles and mayo. It’s a strong candidate for picnic lunches where you want something with more snap than a deli sub.
Pro Tips for This Recipe:
- Keep the pickle vegetables crisp: Soft pickles flatten the whole sandwich.
- Toast the baguette lightly: You want crunch, not shattering crumbs.
- Slice the pork thin against the grain: That keeps it tender.
Variations on This Dish:
- Chicken Bánh Mì: Use grilled chicken thighs with the same marinade profile.
- Tofu Bánh Mì: Crisp pressed tofu and use the same pickles and herbs.
Common Mistakes to Avoid with This Dish:
- Using a dense baguette: You need a bread with a light middle.
- Skipping the herbs: Cilantro is part of the sandwich’s shape, not an extra.
- Making the pork too thick: Thin slices eat better and stay tender.
22. Brisket Sandwiches with Pickles
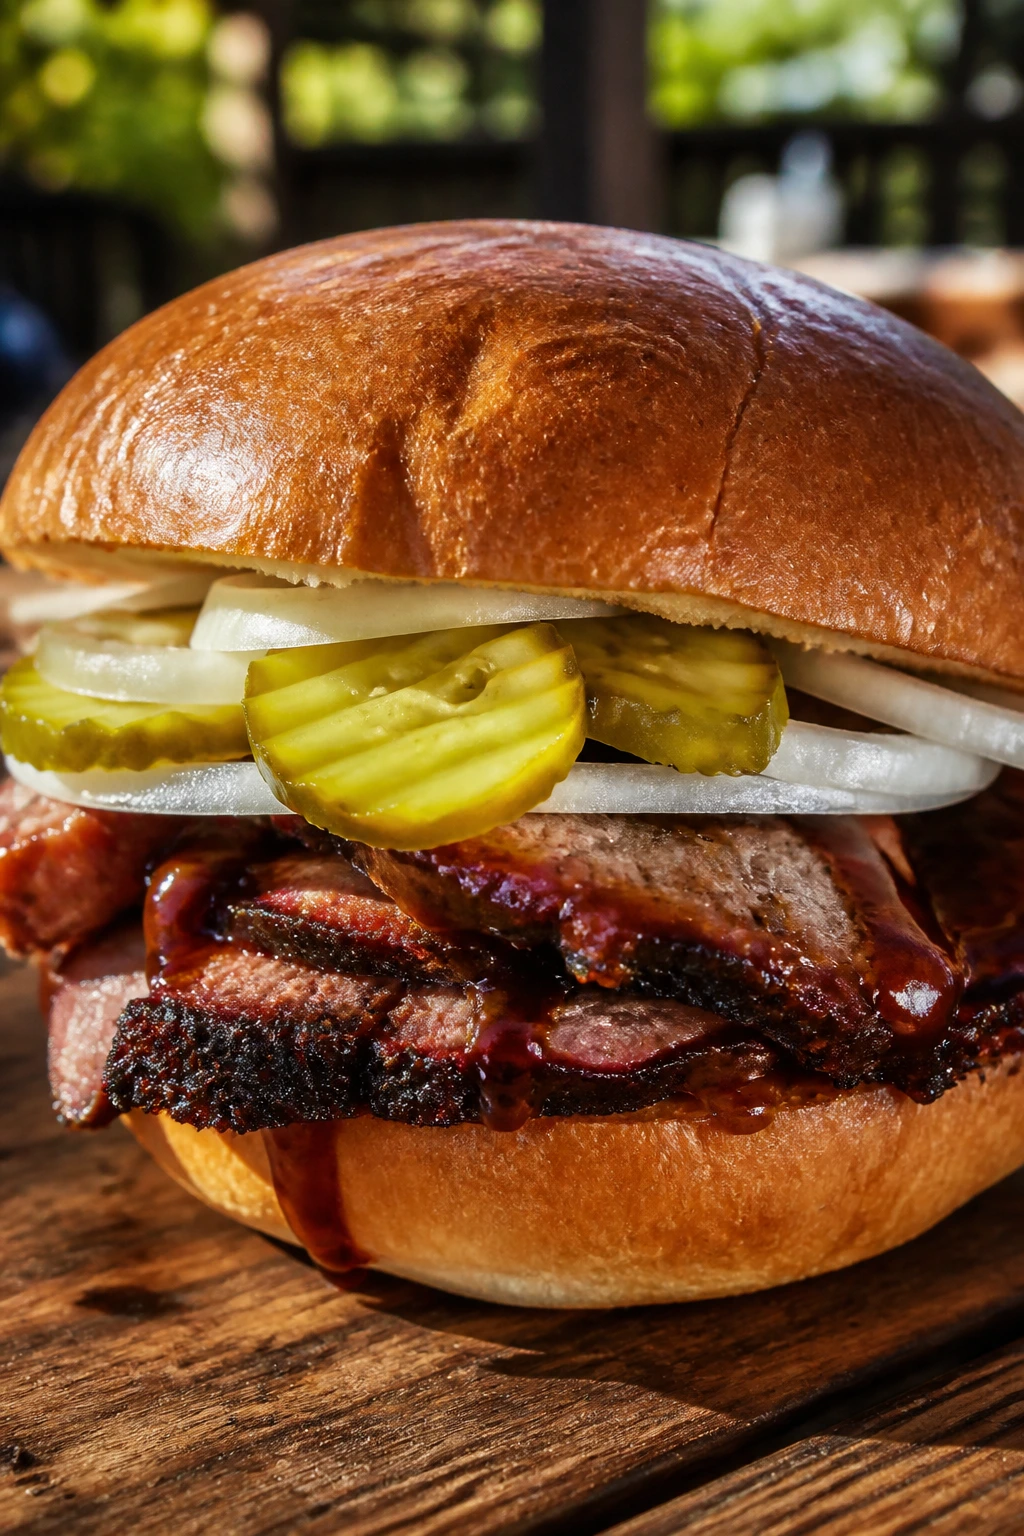
Brisket sandwiches are a little smug in the best way. They know the meat is already doing heavy lifting, so the rest of the job belongs to the bun, the sauce, and the pickles. If you’ve got cooked brisket on hand, this is one of the easiest high-reward sandwiches in the set.
Why It Works:
Cooked brisket has enough fat and smoke to stand up to barbecue sauce without losing character. Pickles and sliced onion cut through the richness so the sandwich doesn’t slump into heaviness. A soft but sturdy bun catches the juices, while a quick toast keeps the bottom from going wet.
Key Ingredients:
- 2 pounds cooked brisket, sliced
- 1 cup barbecue sauce
- 4 sandwich buns
- 1/2 red onion, sliced very thin
- 1/2 cup dill pickle chips
- 2 tablespoons butter
- 1 cup coleslaw, optional
Quick Steps:
- Warm the brisket in barbecue sauce over low heat until hot but not boiling, about 5 to 8 minutes.
- Toast the buns in butter until lightly golden.
- Pile brisket onto the buns and top with pickles, onion, and coleslaw if using.
- Serve hot, with extra sauce on the side if needed.
Equipment for This Recipe:
- Skillet or saucepan
- Tongs
- Butter knife
- Sheet pan for toasting buns
How to Serve This Dish:
Serve brisket sandwiches immediately, with chips or baked beans beside them. They also pack well if you keep the brisket and buns separate and assemble at the last minute. A generous half-pound of brisket per sandwich is plenty when the meat is rich.
Pro Tips for This Recipe:
- Warm the brisket gently: High heat dries out sliced brisket fast.
- Use pickles that stay crisp: They need to cut, not melt, through the meat.
- Toast the bun bottoms: That tiny layer of insulation matters.
Variations on This Dish:
- Mustard Brisket: Swap barbecue sauce for a mustard-based sauce if you want a sharper profile.
- Burnt Ends Sandwich: Use chopped brisket ends for extra caramelized edges.
Common Mistakes to Avoid with This Dish:
- Reheating brisket until it boils: The meat tightens up.
- Using flimsy buns: Brisket is too heavy for weak bread.
- Forgetting acid: Pickles are not optional here.
23. Muffuletta Sandwiches
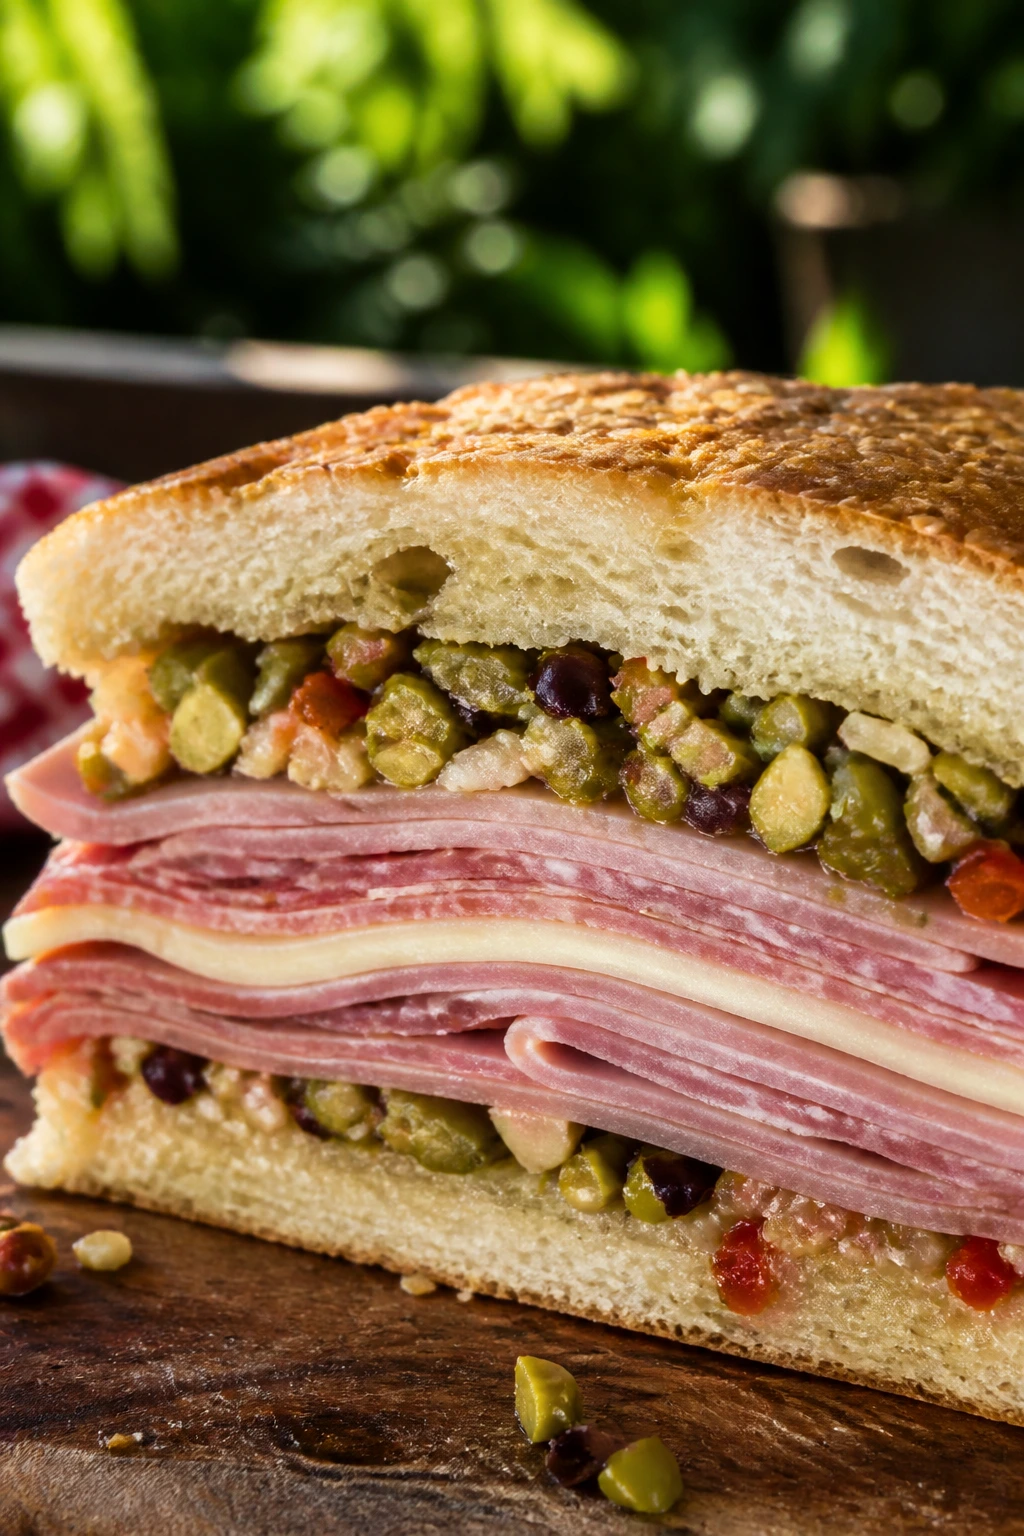
A muffuletta is a picnic sandwich with serious backbone. The olive salad is briny, the cured meats are stacked in layers, and the round loaf gets better after it rests, which is a nice change from most sandwiches that demand immediate attention. Slice it into wedges and it behaves more like a portable platter than a single lunch.
Why It Works:
The olive salad is the engine here. It delivers salt, acid, and oil in one mixture, which wakes up the meats and cheese without requiring extra condiments. Resting the finished sandwich for at least 30 minutes gives the bread time to absorb the olive oil evenly, which makes the whole thing slice cleaner.
Key Ingredients:
- 1 round sesame loaf or large round Italian loaf
- 4 ounces salami
- 4 ounces ham
- 4 ounces mortadella
- 6 ounces provolone
- 1 cup olive salad
- 1 tablespoon olive oil, if needed
Quick Steps:
- If needed, drain excess liquid from the olive salad lightly.
- Split the loaf and layer the meats, then the provolone.
- Spread the olive salad across the top half or middle layers.
- Close the sandwich, wrap it tightly, and press it with a plate for 30 minutes.
- Slice into wedges and serve.
Equipment for This Recipe:
- Serrated knife
- Plastic wrap or parchment
- Plate or small cutting board for pressing
- Sharp sandwich knife
How to Serve This Dish:
Serve muffuletta wedges at room temperature with chips or a simple bean salad. The sandwich is large enough to feed a group if you cut it into 6 or 8 pieces. It’s one of the best picnic sandwiches because it doesn’t panic when it sits for a bit.
Pro Tips for This Recipe:
- Let it rest: Muffuletta gets better as the bread absorbs the oil.
- Don’t flood it with salad liquid: You want flavor, not a leak.
- Use a firm loaf: Soft bread falls apart under the olive mixture.
Variations on This Dish:
- Vegetarian Muffuletta: Load it with roasted peppers, artichokes, and extra cheese.
- Spicy Olive Salad: Add chopped pepperoncini or calabrian chiles.
Common Mistakes to Avoid with This Dish:
- Serving it too soon: The sandwich hasn’t settled yet.
- Using too much oil: The loaf should be moist, not soaked.
- Cutting with a dull knife: You’ll crush the layers instead of slicing them.
24. Falafel Pita Sandwiches

Falafel in pita is one of those sandwiches that solves the picnic vegetarian problem without acting like a compromise. The falafel gives you crunch and spice, the vegetables stay cool and fresh, and the tahini sauce pulls everything together. If the pita is warm and flexible, the whole sandwich feels generous instead of fragile.
Why It Works:
Falafel brings the crisp, browned edges that keep a sandwich from feeling soft all the way through. Tahini sauce gives you richness without mayo, and fresh vegetables bring the clean snap you need around the fried or baked chickpeas. Pita works because it contains the filling without turning into a heavy loaf.
Key Ingredients:
- 18 falafel balls, homemade or good store-bought
- 4 pita breads
- 1 cup shredded lettuce
- 1 cucumber, diced
- 1 tomato, diced
- 1/4 red onion, thinly sliced
- 1/2 cup tahini sauce
- 1/4 cup pickled turnips or pickled onions
- 1/2 teaspoon salt
Quick Steps:
- Warm or bake the falafel until crisp outside and hot through.
- Warm the pita for 30 seconds so it opens without cracking.
- Fill each pita with lettuce, cucumber, tomato, onion, and pickles.
- Add falafel and drizzle with tahini sauce.
- Serve right away.
Equipment for This Recipe:
- Skillet or oven
- Small bowl for sauce
- Knife and cutting board
- Clean kitchen towel for warming pita
How to Serve This Dish:
Serve with extra tahini on the side and a lemon wedge if you like more brightness. This is a good sandwich to cut in half and pack carefully in parchment. A couple of pitas can serve as a full meal, especially if there’s hummus or salad on the table too.
Pro Tips for This Recipe:
- Keep the pita warm: Cold pita cracks at the seam.
- Drain the vegetables if they’re juicy: You don’t want a puddle in the bottom.
- Use enough sauce: Tahini keeps the falafel from tasting dry.
Variations on This Dish:
- Spicy Tahini Falafel: Stir chili paste into the tahini sauce.
- Baked Falafel Version: Bake instead of fry if you want less oil and a slightly drier finish.
Common Mistakes to Avoid with This Dish:
- Stuffing the pita too full: It tears open and spills.
- Using cold falafel: Warmth helps the sandwich feel complete.
- Skipping the acid: Pickles or lemon keep the filling from going flat.
25. Steak and Caramelized Onion Sandwiches
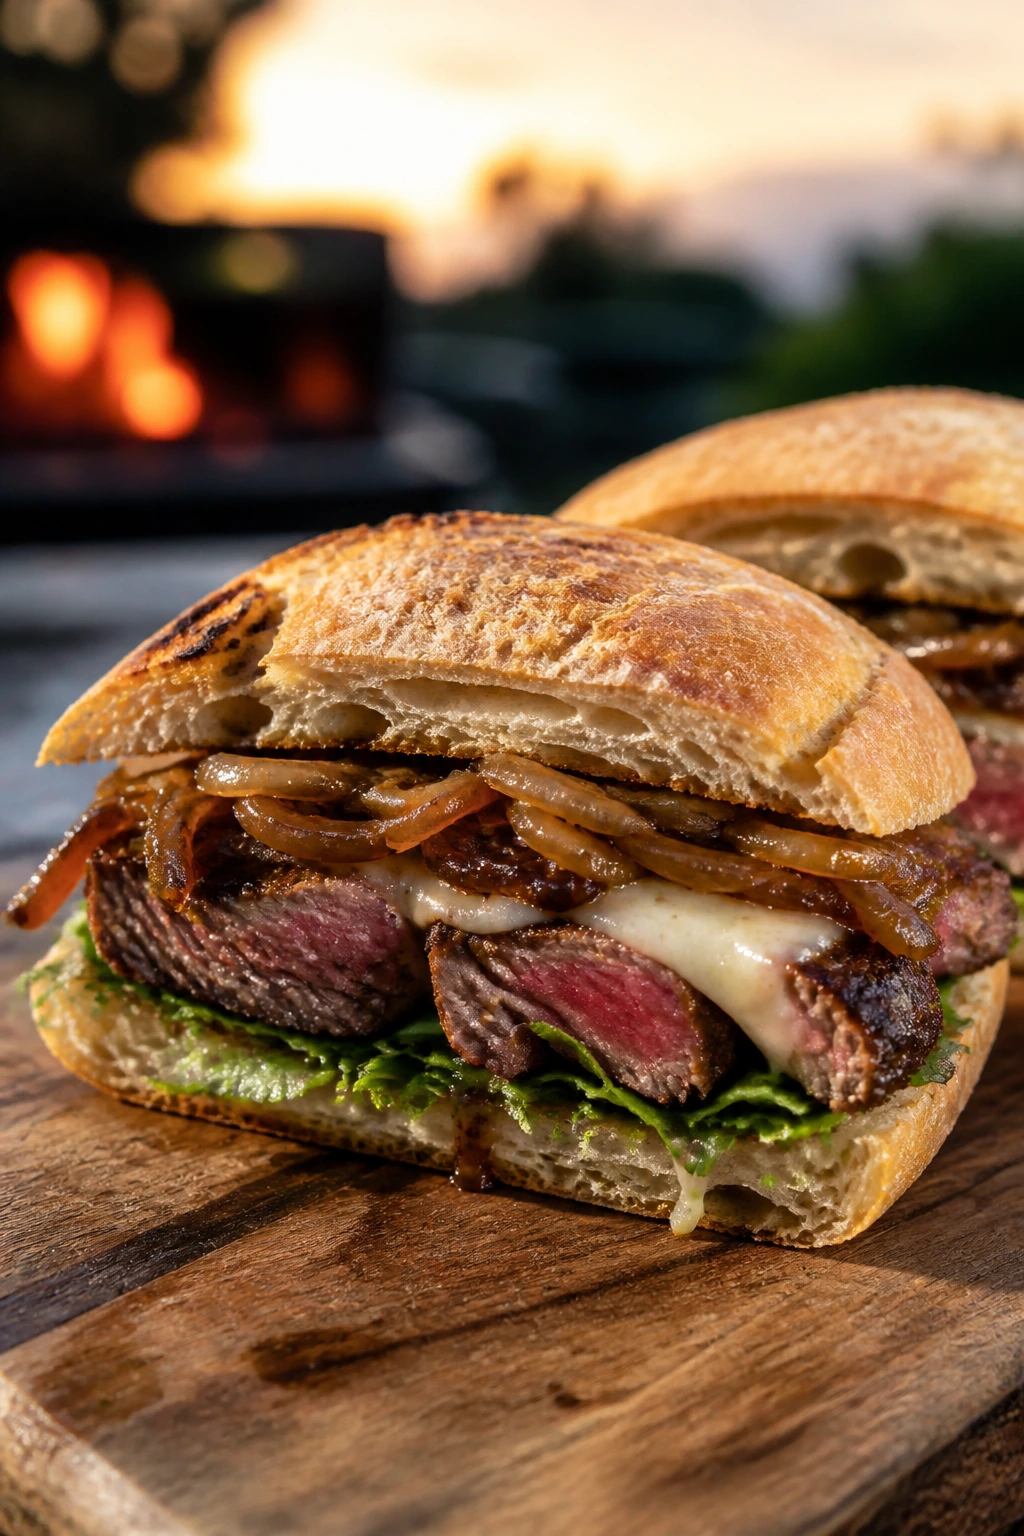
This is the sandwich for people who like grilled flavor but want something a little more elegant than a burger. The steak brings char and chew, the onions go sweet and soft, and a sharp cheese or a swipe of mustard keeps the flavors from drifting apart. It’s the kind of sandwich that earns a second look on the platter.
Why It Works:
Flank steak takes a quick sear well and slices neatly against the grain, which is the difference between tender and chewy. Caramelized onions add sweetness and give the sandwich a softer middle without making it soggy. A toasted ciabatta roll gives enough resistance to hold the steak without bullying it.
Key Ingredients:
- 1 1/2 pounds flank steak
- 2 large yellow onions, sliced
- 1 tablespoon butter
- 1 tablespoon olive oil
- 1 tablespoon Worcestershire sauce
- 1 teaspoon kosher salt
- 1/2 teaspoon black pepper
- 4 ciabatta rolls
- 4 slices provolone or blue cheese
- 1 cup arugula
Quick Steps:
- Cook the onions in butter over medium-low heat for 20 to 25 minutes, until deep golden.
- Season the steak with salt, pepper, and Worcestershire sauce.
- Sear in a hot skillet or on the grill for 3 to 5 minutes per side, depending on thickness, then rest for 10 minutes.
- Slice the steak thinly against the grain.
- Fill the toasted rolls with steak, onions, cheese, and arugula.
Equipment for This Recipe:
- Grill or cast-iron skillet
- Tongs
- Sharp slicing knife
- Cutting board
How to Serve This Dish:
Serve warm with a simple green salad or roasted potato wedges. The sandwich is sturdy enough to pack if you keep the steak and bread separate until just before serving. One sandwich is a full meal, especially with a side or two.
Pro Tips for This Recipe:
- Rest the steak before slicing: The juices stay in the meat instead of spilling out.
- Slice thinly across the grain: That gives the steak the right bite.
- Toast the rolls lightly: They need structure, not a hard shell.
Variations on This Dish:
- Chimichurri Steak Sandwich: Spoon chimichurri over the sliced steak for a bright herb finish.
- Mushroom Steak Version: Add sautéed mushrooms to the onions for a deeper flavor.
Common Mistakes to Avoid with This Dish:
- Slicing with the grain: The meat chews too long.
- Skipping the rest time: Juices flood the cutting board.
- Using a weak roll: Heavy steak needs real bread.
26. Greek Chicken Pita Sandwiches
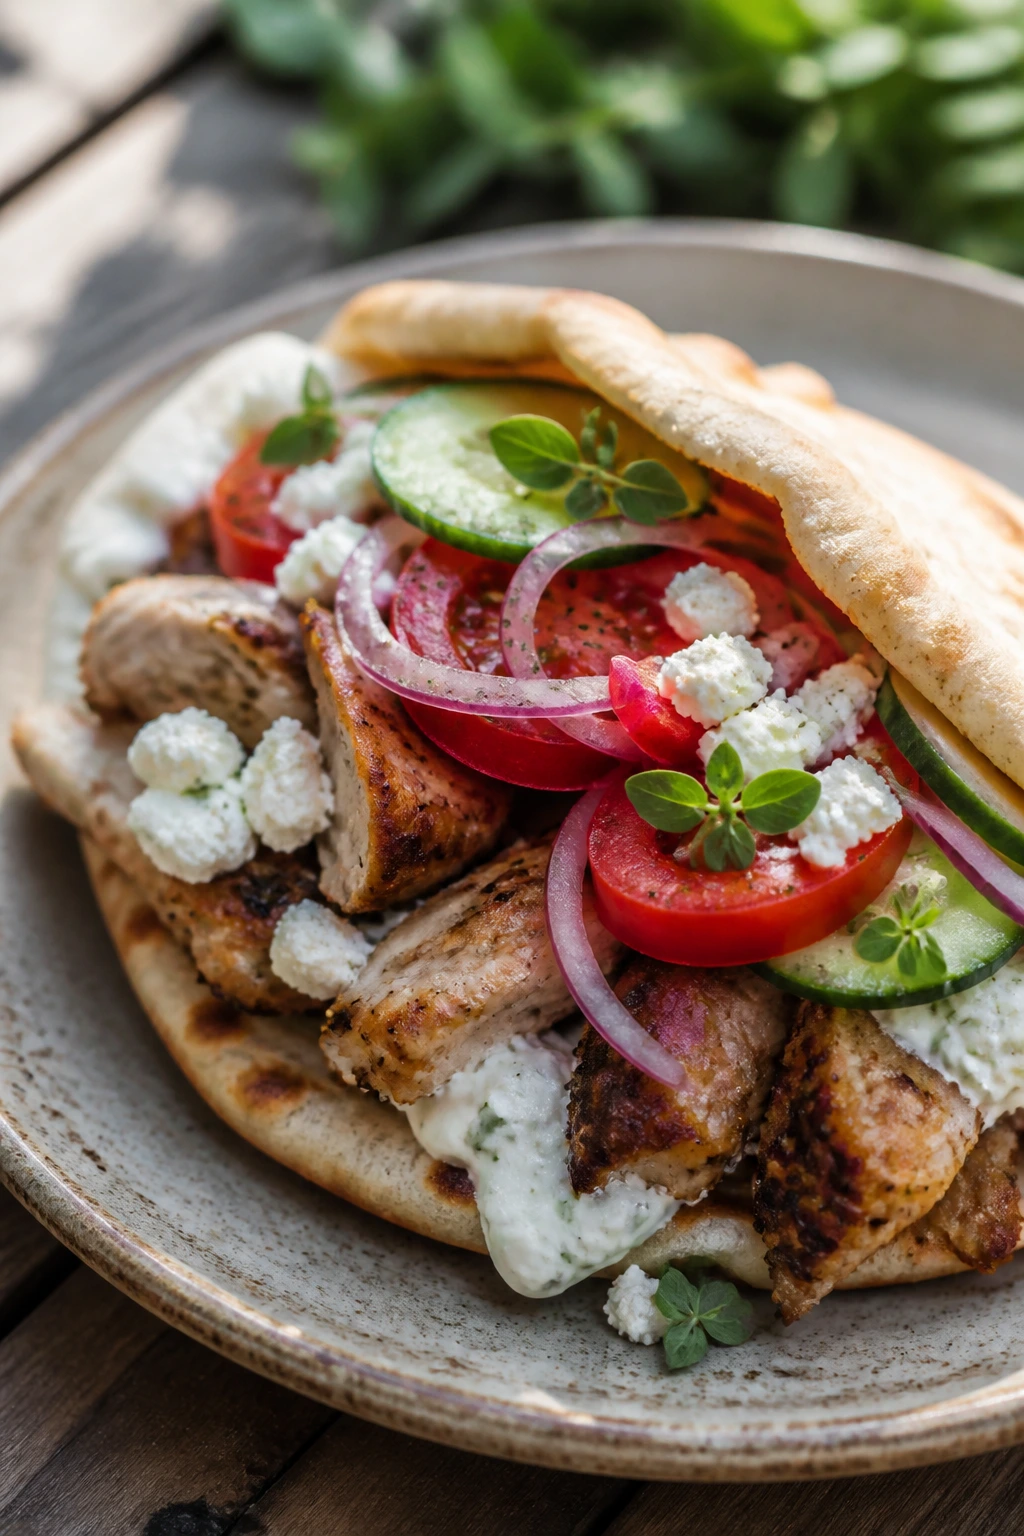
Greek chicken pita sandwiches are built around the idea that fresh can still be filling. Lemon, oregano, garlic, cucumber, tomato, and tzatziki bring a cool, clean flavor that works well in warm weather. If the chicken is grilled properly, the whole sandwich feels bright rather than heavy.
Why It Works:
The yogurt and lemon marinade tenderize the chicken and season it all the way through. Tzatziki adds creaminess with cucumber and dill, which keeps the sandwich from feeling dry. Warm pita makes the filling easier to tuck in without cracking, and feta gives you a salty finish that ties the whole thing together.
Key Ingredients:
- 1 1/2 pounds boneless chicken thighs
- 1/2 cup Greek yogurt
- 2 tablespoons lemon juice
- 2 cloves garlic, minced
- 2 teaspoons dried oregano
- 1 teaspoon kosher salt
- 1/2 teaspoon black pepper
- 4 pita breads
- 1 cup diced cucumber
- 1 cup diced tomato
- 1/2 cup sliced red onion
- 1/2 cup tzatziki
- 1/2 cup crumbled feta
Quick Steps:
- Mix yogurt, lemon juice, garlic, oregano, salt, and pepper, then coat the chicken for at least 30 minutes.
- Grill or pan-cook the chicken over medium-high heat until browned and cooked to 165°F, about 5 to 7 minutes per side.
- Rest the chicken for 5 minutes, then slice.
- Warm the pita, then fill with chicken, cucumber, tomato, onion, tzatziki, and feta.
- Serve warm or room temperature.
Equipment for This Recipe:
- Grill or skillet
- Mixing bowl
- Tongs
- Sharp knife
How to Serve This Dish:
Serve with lemon potatoes, olives, or a cucumber salad. These are easy to turn into a make-ahead picnic lunch because the chicken can be cooked earlier and sliced once cool. One pita or two halves makes a solid serving.
Pro Tips for This Recipe:
- Use thighs, not breasts if you can: They stay juicier on the grill.
- Don’t overload the tzatziki: Too much makes the pita slippery.
- Warm the pita briefly: It should bend, not crack.
Variations on This Dish:
- Lamb Gyro-Style: Swap the chicken for seasoned lamb if you want a richer sandwich.
- Halloumi Version: Grill slices of halloumi for a meat-free version with serious chew.
Common Mistakes to Avoid with This Dish:
- Using dry chicken breast without care: It overcooks fast.
- Skipping the rest after grilling: The slices lose juice.
- Stuffing the pita cold from the fridge: It tastes flatter than it should.
27. Turkey Cranberry Brie Sandwiches

This sandwich leans into contrast in a very polite, very effective way. Turkey stays mild, brie melts into the bread, and cranberry sauce brings sweet-tart brightness that cuts through the richness. It’s the kind of sandwich I like when the cookout spread needs one quieter option that still feels thoughtful.
Why It Works:
Brie melts quickly, so a little heat softens the center without turning the sandwich greasy. Cranberry sauce gives you sugar and acidity in one spoonful, which helps the turkey taste fuller. Arugula adds a peppery edge and keeps the whole thing from becoming too soft.
Key Ingredients:
- 12 ounces sliced turkey
- 8 ounces brie, sliced
- 1/3 cup cranberry sauce
- 4 rolls or 8 slices bread
- 1 cup arugula
- 2 tablespoons Dijon mustard
- 2 tablespoons softened butter
Quick Steps:
- Split the bread and spread Dijon on the cut sides.
- Layer turkey, brie, cranberry sauce, and arugula.
- Butter the outside of the bread if you want a warm, griddled version.
- Heat in a skillet over medium heat for 2 to 3 minutes per side, or serve cold if you prefer the brie firm.
- Slice and serve.
Equipment for This Recipe:
- Skillet or griddle
- Butter knife
- Serrated knife
- Spatula
How to Serve This Dish:
Serve warm with chips or a simple apple salad. This sandwich does well as a smaller portion because the brie and cranberry can feel rich if you make it oversized. If you’re packing it for a picnic, assemble it close to serving so the bread doesn’t soften.
Pro Tips for This Recipe:
- Use a thin layer of cranberry sauce: You want a note, not a flood.
- Choose brie with a soft rind: It melts more evenly.
- Warm just enough: Too much heat makes the bread greasy.
Variations on This Dish:
- Apple Brie Version: Add thin apple slices for a crisp fruit note.
- Leftover Turkey Sandwich: This is a perfect use for sliced turkey after a big meal.
Common Mistakes to Avoid with This Dish:
- Using too much cranberry sauce: The sandwich turns sweet and messy.
- Skipping the arugula: You need that peppery bite.
- Griddling too long: Brie should soften, not fully escape.
28. Breakfast Biscuit Sandwiches

A breakfast sandwich may not be the first thing people think of for a backyard cookout, which is exactly why it’s worth keeping around. Buttermilk biscuits, bacon, egg, and cheddar come together fast, and the result is portable enough to hand across a patio before the coffee gets cold. It works best when the biscuit is warm and the egg is still a little soft.
Why It Works:
The biscuit brings fat and tenderness, which makes it a better base than a standard bun for breakfast fillings. Bacon adds crunch and salt, while cheddar melts into the egg and helps hold the sandwich together. A runny yolk is nice if you’re eating immediately, but a set yolk travels better for a picnic.
Key Ingredients:
- 4 buttermilk biscuits
- 4 large eggs
- 8 slices bacon or 4 sausage patties
- 4 slices cheddar
- 1 tablespoon butter
- 1/2 teaspoon kosher salt
- 1/4 teaspoon black pepper
- Hot sauce, optional
Quick Steps:
- Bake or warm the biscuits until hot.
- Cook the bacon until crisp, or cook the sausage patties through.
- Fry the eggs in butter, seasoning with salt and pepper, until the whites are set.
- Split each biscuit and layer on bacon or sausage, egg, and cheddar.
- Close the sandwiches and serve warm.
Equipment for This Recipe:
- Skillet
- Baking sheet
- Spatula
- Knife for splitting biscuits
How to Serve This Dish:
Serve immediately, wrapped in parchment if you need to move them. These go well with fruit, hash browns, or a little hot sauce on the side. One biscuit sandwich is enough for breakfast or an early lunch, and it packs well if you keep it warm.
Pro Tips for This Recipe:
- Warm the biscuits first: Cold biscuits feel dense.
- Cook the egg to match the plan: Runny for eating now, set for travel.
- Use a slice of cheese on the hot egg: It helps the sandwich hold together.
Variations on This Dish:
- Sausage and Gravy Biscuit: Spoon a little sausage gravy inside if you want a richer version.
- Veggie Breakfast Biscuit: Replace the meat with a thick slice of tomato and sautéed spinach.
Common Mistakes to Avoid with This Dish:
- Assembling while everything is steaming hot: The biscuit turns wet.
- Overcooking the egg: Dry yolk makes the sandwich less tender.
- Using biscuits that are too small: The fillings need a little room.
Why These Sandwiches Hold Up at a Picnic Table
The reason these sandwich recipes work for picnics and backyard cookouts has less to do with novelty than with structure. The sandwiches that survive outside are the ones that respect moisture, heat, and time. A crusty loaf helps a saucy filling. Toasted bread keeps mayo and tomato from soaking through. Wraps, pitas, and biscuits each solve different problems, but they all do the same basic thing: hold the filling together long enough for you to eat it without a fork and a rescue plan.
There’s also the flavor issue, which is where a lot of outdoor food goes sideways. Food outside tends to taste a little flatter than food eaten at the stove, probably because the heat pulls your attention away and because cold drinks, wind, and chatter all blunt the edges. That’s why pickles, mustard, vinegar slaw, herbs, and sharp cheese show up so often in the best cookout sandwiches. They keep the sandwich from going vague.
I’m also a fan of sandwiches that can be held in one hand while the other hand lifts a paper cup or flips a burger. That small convenience matters more than people admit. A sandwich that needs a plate is fine. A sandwich that stays intact without one is better.
Essential Equipment for These Recipes
-
Cast-iron skillet or flat griddle: Useful for smash burgers, melts, Reubens, and anything that needs a hard sear.
-
Grill or grill pan: Handy for chicken, steak, sausages, vegetables, and pita warming.
-
Instant-read thermometer: The easiest way to avoid dry chicken, undercooked sausage, or overdone pork.
-
Sharp serrated knife: Necessary for slicing subs, ciabatta, baguettes, and anything with a crust.
-
Tongs: Better than a fork for flipping meat and moving hot sandwiches without tearing them.
-
Mixing bowls: You’ll need at least two: one for fillings, one for sauces or marinades.
-
Wire rack: Keeps fried chicken, shrimp, and toasted buns crisp by letting steam escape.
-
Sheet pan: Good for toasting bread, warming rolls, and moving assembled sandwiches.
-
Paper or parchment wrap: Helps subs, muffulettas, and picnic sandwiches hold together during a short rest.
-
Cooler with ice packs: Essential for mayo-based fillings, sliced meats, and anything that needs to stay cold before serving.
Smart Shopping and Ingredient Tips
Bread is where most people underthink these sandwiches. Soft buns are great for pulled pork and fried chicken, but they need to be toasted if the filling is juicy. Ciabatta, rye, baguettes, and hoagie rolls each behave differently, and the crumb matters more than the shape. Look for bread that feels springy and looks tight around the edges; airy bread with huge holes lets sauce leak out before the sandwich reaches the table.
For meat, choose the cut based on how long it cooks and how much fat it brings. Chicken thighs stay forgiving on the grill. Pork shoulder needs time and fat to become pull-apart tender. Ribeye and flank steak should be sliced thin so they don’t chew like tire rubber. Deli meat can work well too, but it needs a sharper condiment and sturdier bread because it won’t bring much texture by itself.
Cheese is doing more work than it gets credit for. Swiss, provolone, cheddar, brie, pimento cheese, and American each solve a different problem. Swiss melts smoothly for Cubans and Reubens. Sharp cheddar holds its own in roast beef or pimento cheese sandwiches. Fresh mozzarella and brie need bread that can absorb their softness without giving up.
For vegetables and condiments, I like to keep one eye on water. Tomatoes should be salted and blotted. Cucumbers should be sliced thin. Sauerkraut needs draining. Pickles should be patted dry if they’ve been sitting in brine. That little bit of restraint saves more sandwiches than any fancy trick.
How to Serve These Recipes
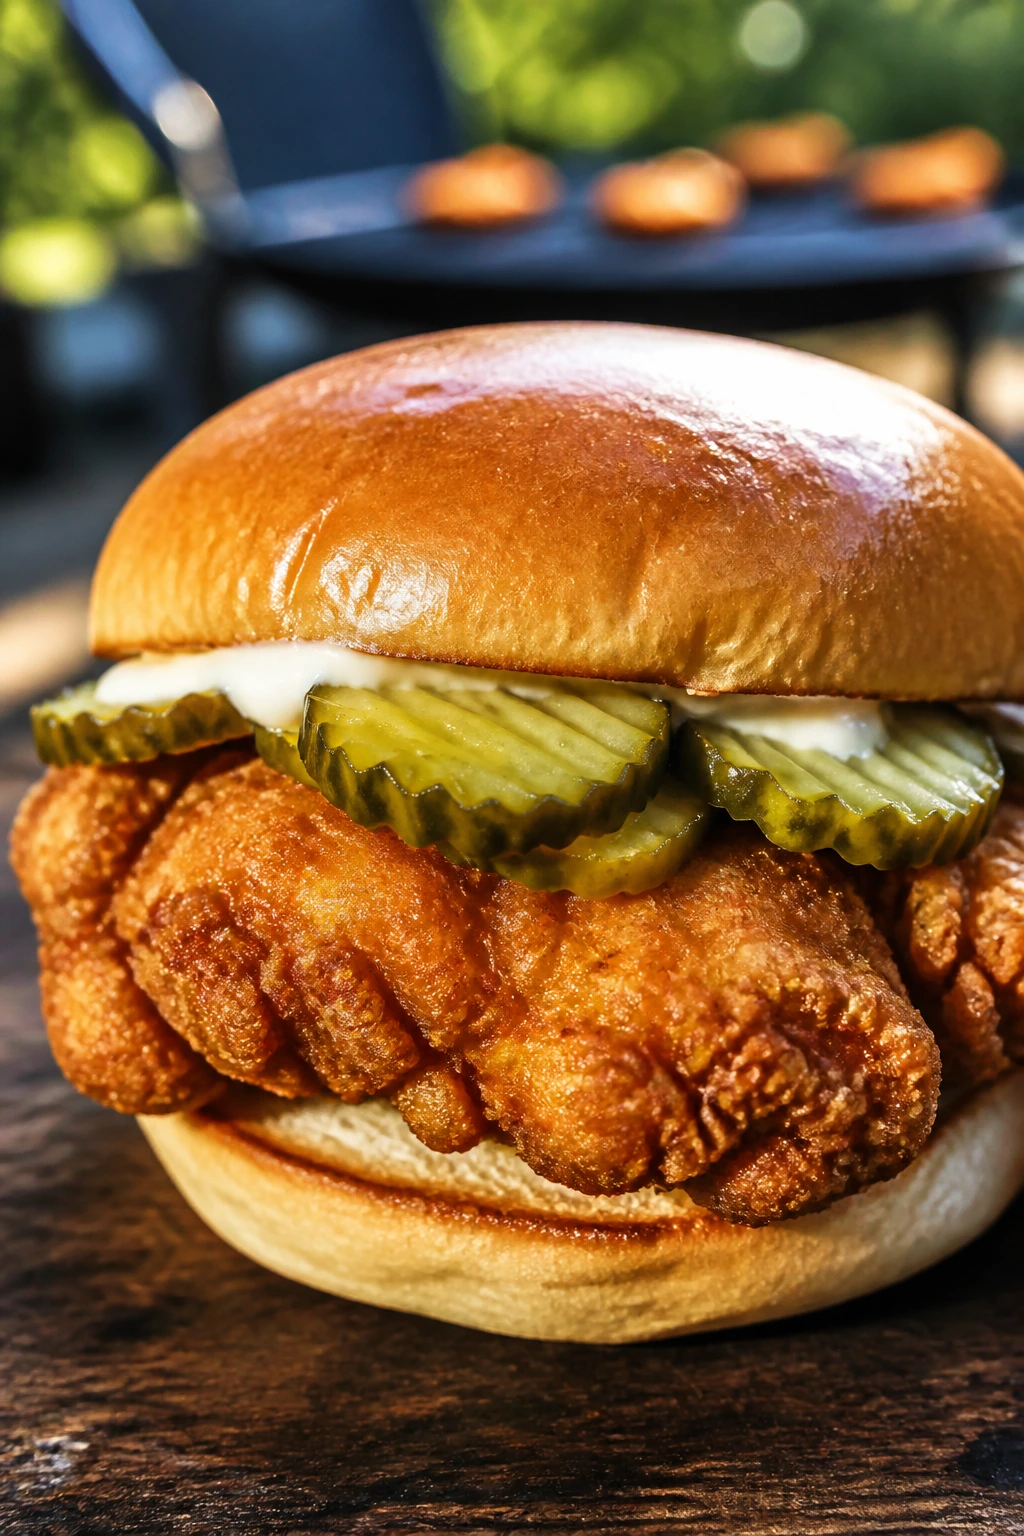
Presentation:
Stack the hot sandwiches on a parchment-lined tray and keep the cold ones wrapped in neat parcels so people can grab and go. Slice heavier sandwiches like muffuletta, Italian subs, and clubs into smaller wedges or halves; they look better that way and eat cleaner. A scattering of pickles, chips, and herb sprigs makes the whole spread feel intentional without turning it into catering.
Accompaniments:
Kettle chips, potato salad, corn on the cob, dill pickles, watermelon wedges, cucumber salad, coleslaw, and roasted potato chunks all fit this theme. For the sharper sandwiches, I like something crisp and acidic beside them. For the richer ones, I prefer a plain side that doesn’t fight for attention.
Portions:
Plan on one full sandwich for a main meal if the filling is lean or light, like chicken salad or Caprese. Rich sandwiches with brisket, pulled pork, fried chicken, or steak can be cut smaller when there are several other dishes on the table. Half sandwiches are useful for big spreads; full sandwiches make sense when lunch is the whole event.
Beverage Pairing:
Iced tea with lemon, sparkling water with lime, cold beer, lemonade, and citrusy hard seltzer all work with different corners of this list. The smoky sandwiches like pork, brisket, and sausage handle beer well. The bright ones — Caprese, bánh mì, Greek chicken — like something colder and cleaner.
Additional Tips and Flavor Boosters
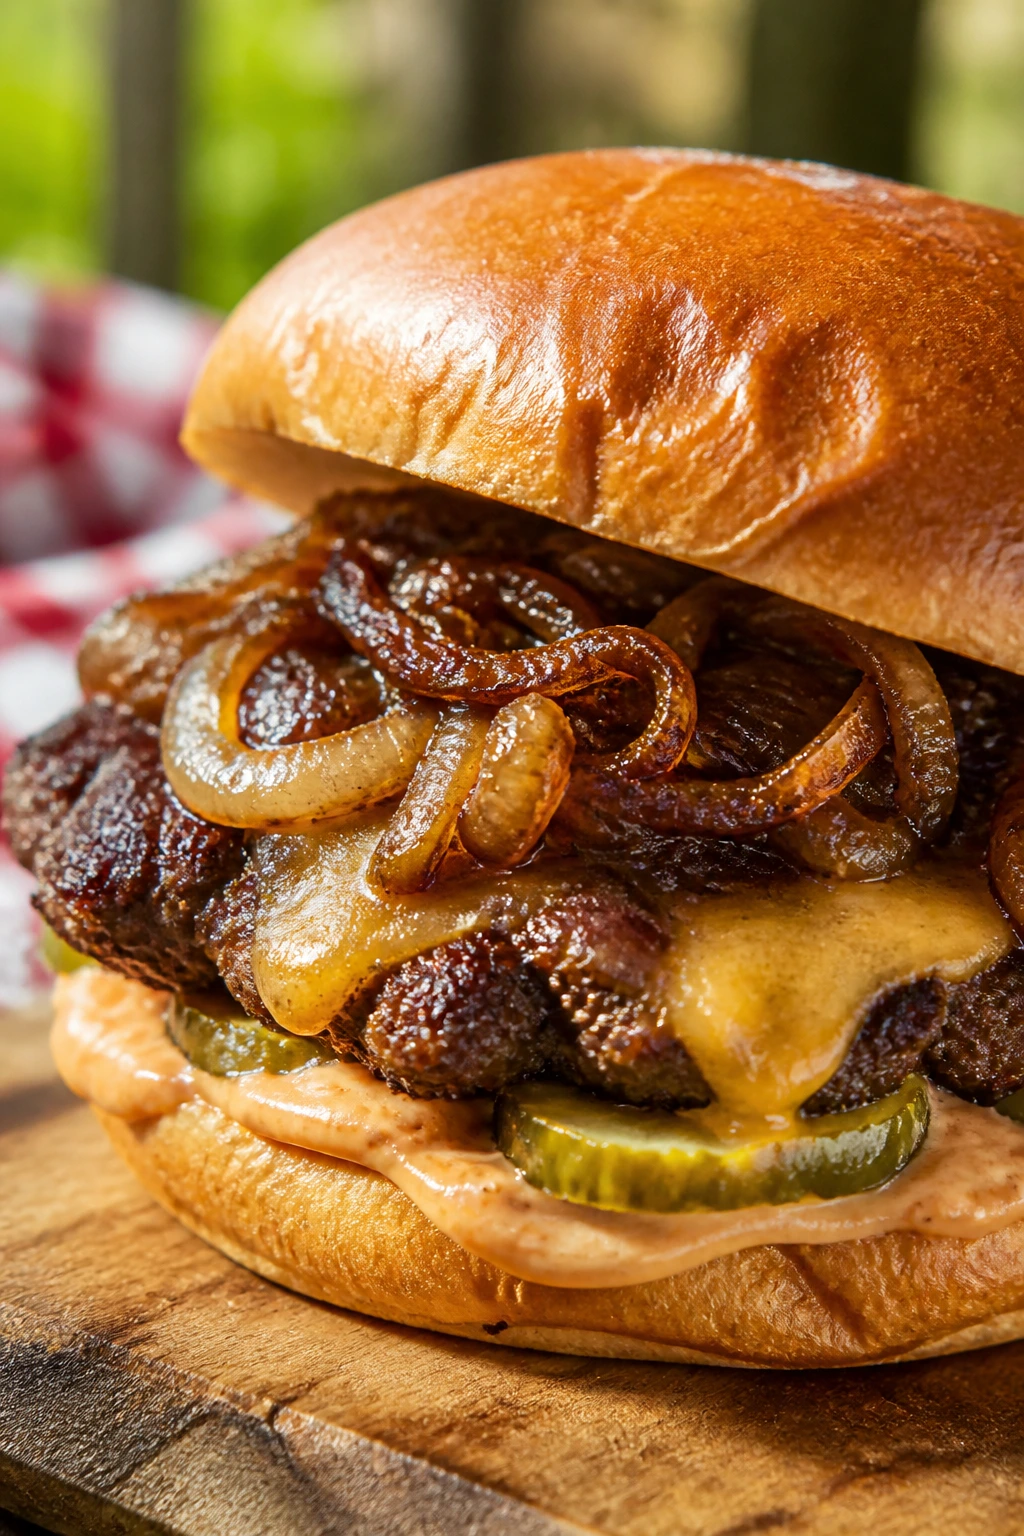
Flavor Enhancement:
A small amount of acid changes everything outdoors. Pickle brine, lemon juice, a swipe of mustard, or a spoonful of vinegar slaw can keep a sandwich from feeling flat after it’s been wrapped for a while.
Customization:
If you want more heat, add pickled jalapeños, hot sauce, or spicy mustard to sandwiches that can carry it. If you want a softer flavor, lean on herbed mayo, avocado, or mellow cheeses like mozzarella and brie.
Serving Suggestions:
Garnish the platter with extra pickles, pepperoncini, or herb leaves instead of decorative nonsense. Those little extras get eaten. They also remind people which sandwich has the sharpest bite.
Make-It-Yours:
For vegetarian eaters, grilled vegetables, falafel, hummus, pimento cheese, and caprese are the easiest wins. For dairy-free versions, use mustard, hummus, or olive oil dressings and keep the cheese out of the equation instead of trying to fake it badly. For kid-friendly plates, cut the spice, go lighter on onion, and use softer breads that are easy to chew.
Make-Ahead, Storage, and Reheating Guidance
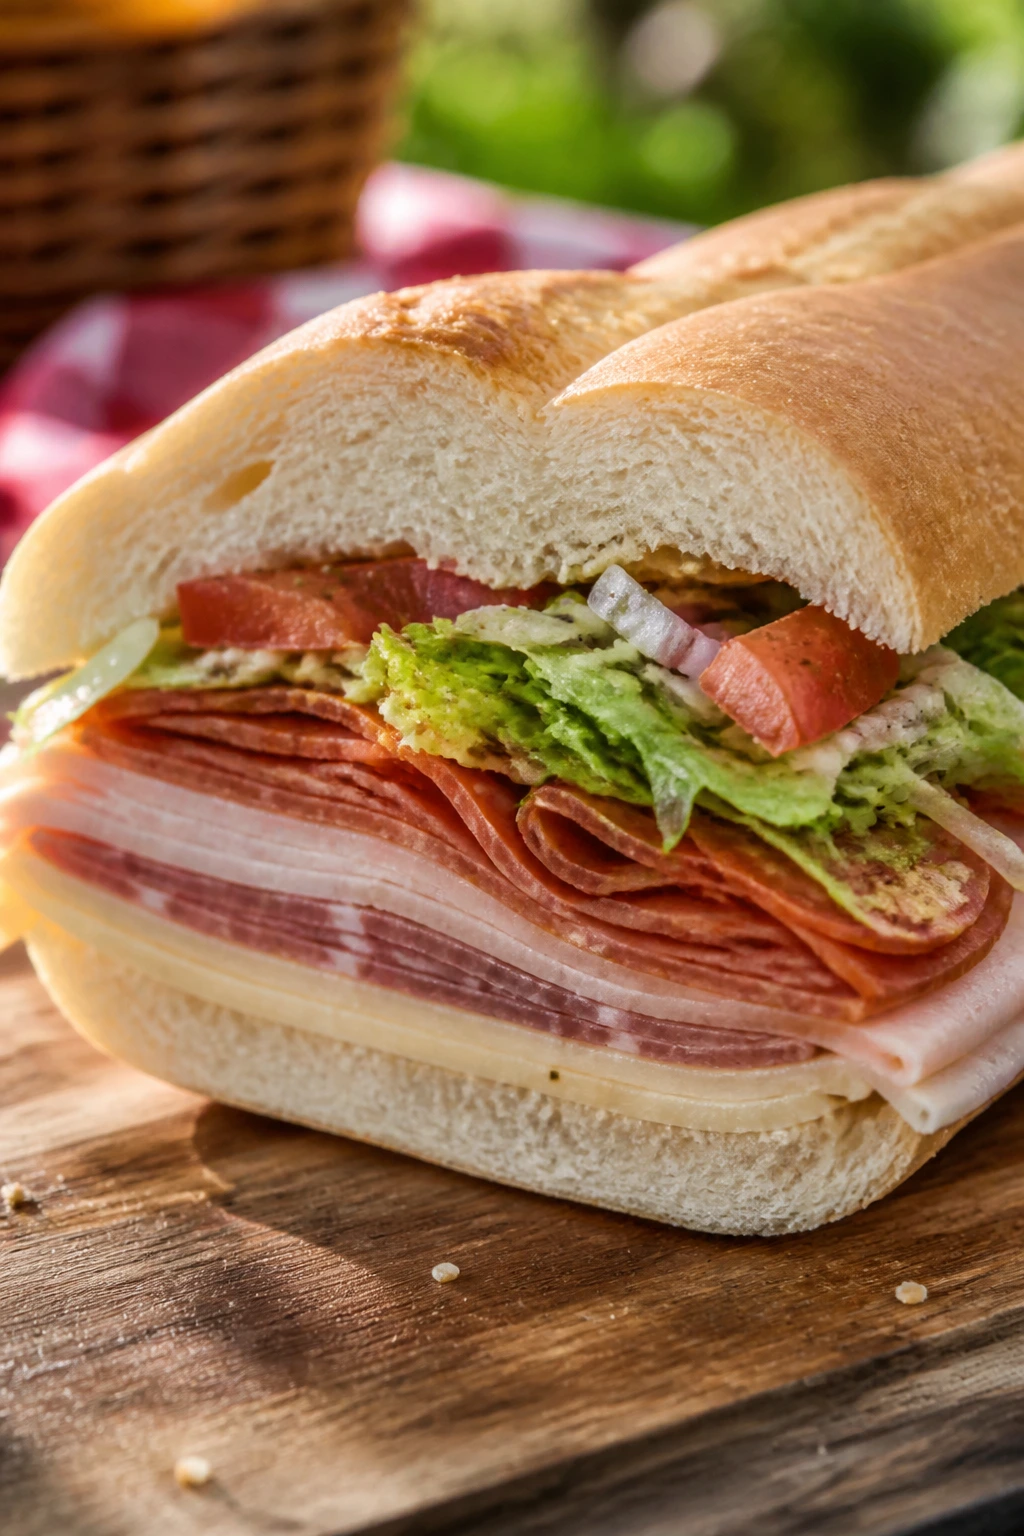
The best make-ahead strategy depends on the sandwich. Meat fillings like pulled pork, brisket, chicken salad, tuna salad, egg salad, and pimento cheese keep well in the refrigerator for 3 to 4 days in sealed containers. Grilled vegetables and marinated chicken usually hold for 3 days if they’re cooled quickly. Saucy fillings should go into shallow containers so they chill faster and stay safer.
Cold sandwiches are best assembled close to serving, but you can still prep them ahead in layers. Build them without the tomatoes, lettuce, or other watery ingredients, then add those at the last minute. Muffuletta and Italian subs are exceptions; they actually improve after 30 minutes to a few hours because the bread firms up around the filling. Just don’t let them sit long enough to dry out.
For hot sandwiches, reheat the filling separately when possible. Pulled pork and brisket do well in a covered skillet over low heat with a spoonful of liquid. Fried chicken and shrimp should be reheated in a 375°F oven on a wire rack until hot and crisp again, about 10 to 12 minutes for chicken and less for shrimp. Burgers and cheesesteaks are better fresh, but they can be brought back in a skillet if you keep the bread separate.
If you need to hold mayo-based fillings at a cookout, keep them in a cooler at or below 40°F and avoid direct sun. Once the food is assembled, don’t let it sit out for more than 2 hours, or 1 hour if the day is hot enough to make the table feel like a skillet. That’s the part nobody enjoys talking about, but it matters more than the garnish.
Variations and Adaptations to Try
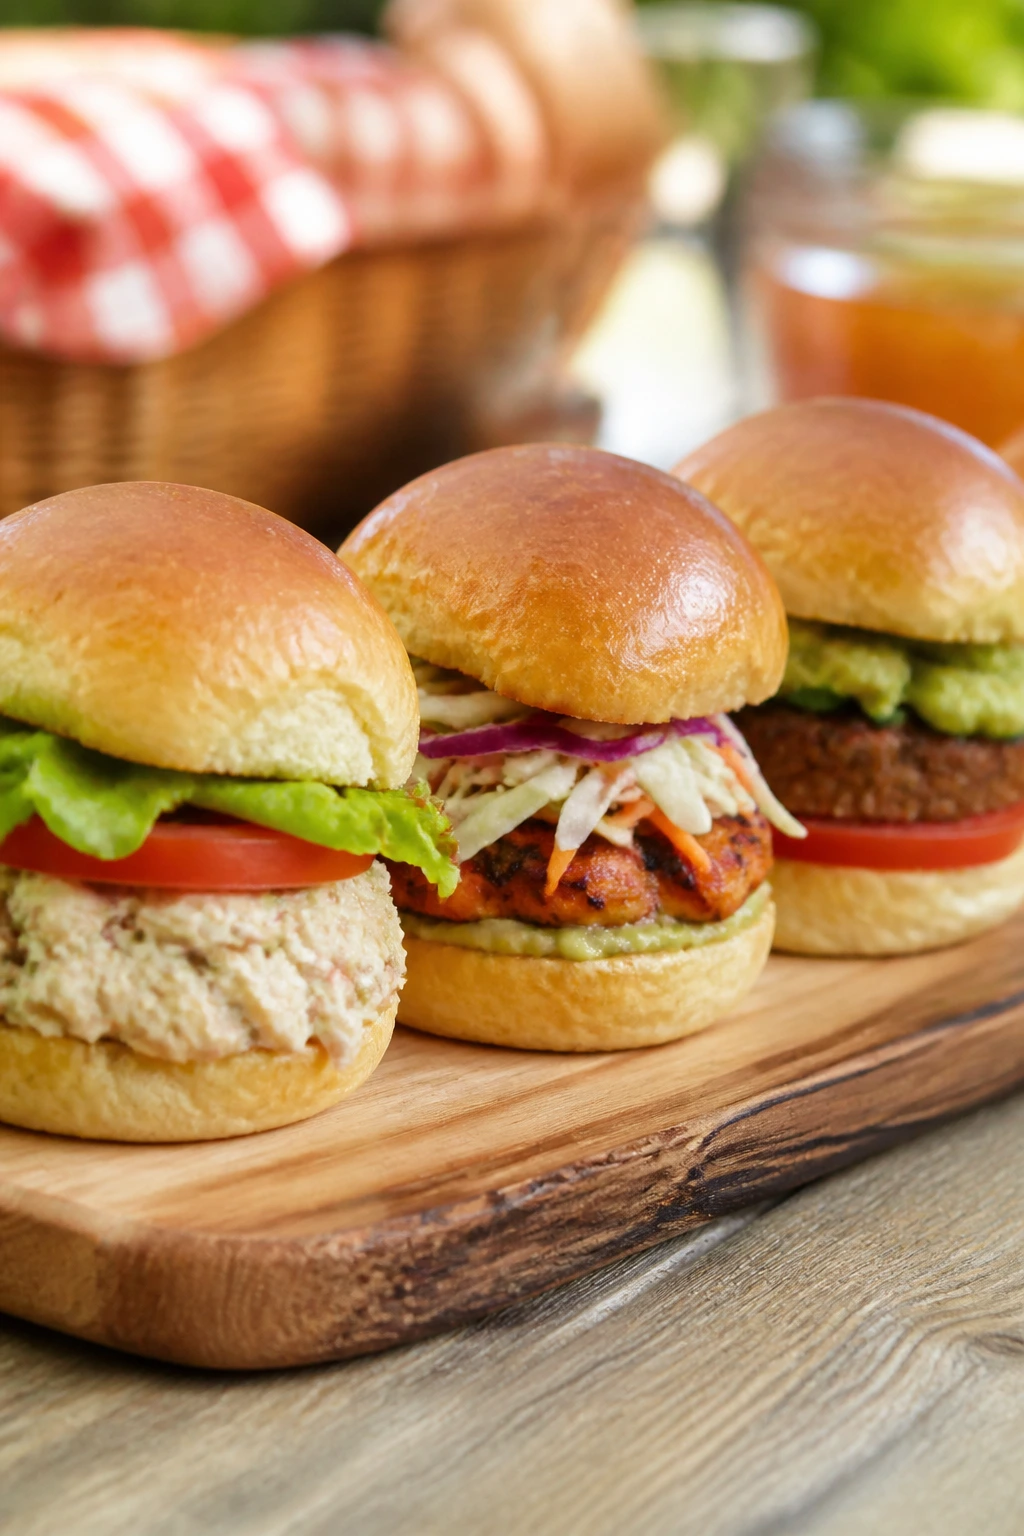
-
Gluten-Free Roll Swap: Use gluten-free buns, sliced gluten-free bread, or lettuce wraps for the sandwich fillings that don’t need a crusty shell. Pulled pork, chicken salad, tuna salad, and burger fillings adapt well if you keep the bread strong enough to handle moisture.
-
Dairy-Free Build: Skip the cheese and lean on mustard, hummus, avocado, olive oil, and herb spreads instead. Cuban, Italian sub, bánh mì, and veggie sandwiches can still taste complete without dairy if you add acid and salt in the right places.
-
Lower-Sodium Picnic Box: Use unsalted chicken, roast your own meat, and go lighter on deli meats and pickles. Add more fresh herbs, lemon, and black pepper so the sandwiches don’t taste stripped down.
-
Kid-Friendly Mild Plate: Keep the spice out of the hot chicken, sausage, and bánh mì, and use milder cheeses like American, mozzarella, or Swiss. Cut onions and pickles smaller so the sandwiches feel less sharp and easier to eat.
-
Big-Crowd Slider Lineup: Turn pulled pork, smash burgers, roast beef, and ham melts into slider size and keep the fillings simple. Smaller sandwiches let people sample more than one type without committing to a full plate.
-
Spice-Forward Table: Add pepper jack, hot mustard, pickled jalapeños, chile oil, or cayenne mayo to the sandwiches that can take it. This works especially well with fried chicken, steak, sausage, and turkey.
Common Mistakes to Avoid

The first mistake is soggy bread, and it usually starts before the sandwich is even assembled. Wet tomatoes, saucy meat, or warm fillings placed on soft bread will soak through fast. Fix it by toasting the cut sides, draining watery ingredients, and adding lettuce or cheese as a moisture barrier.
The second mistake is overstuffing. A sandwich that looks generous on the cutting board can turn into a landslide once you pick it up. Keep fillings even and leave a little room for the bread to close. If the sandwich needs two hands just to survive the wrap, it’s too full.
Another one is underseasoning cold fillings. Tuna salad, chicken salad, egg salad, and pimento cheese taste flatter when they’re cold, so season them a touch more than seems natural before chilling. A little lemon juice, mustard, pepper, or pickle brine goes a long way here.
People also cook the bread too hard, especially on melts and grilled sandwiches. The goal is crisp and golden, not dark brown and brittle. Medium heat gives the cheese time to melt without the crust breaking apart under the first bite.
Frequently Asked Questions
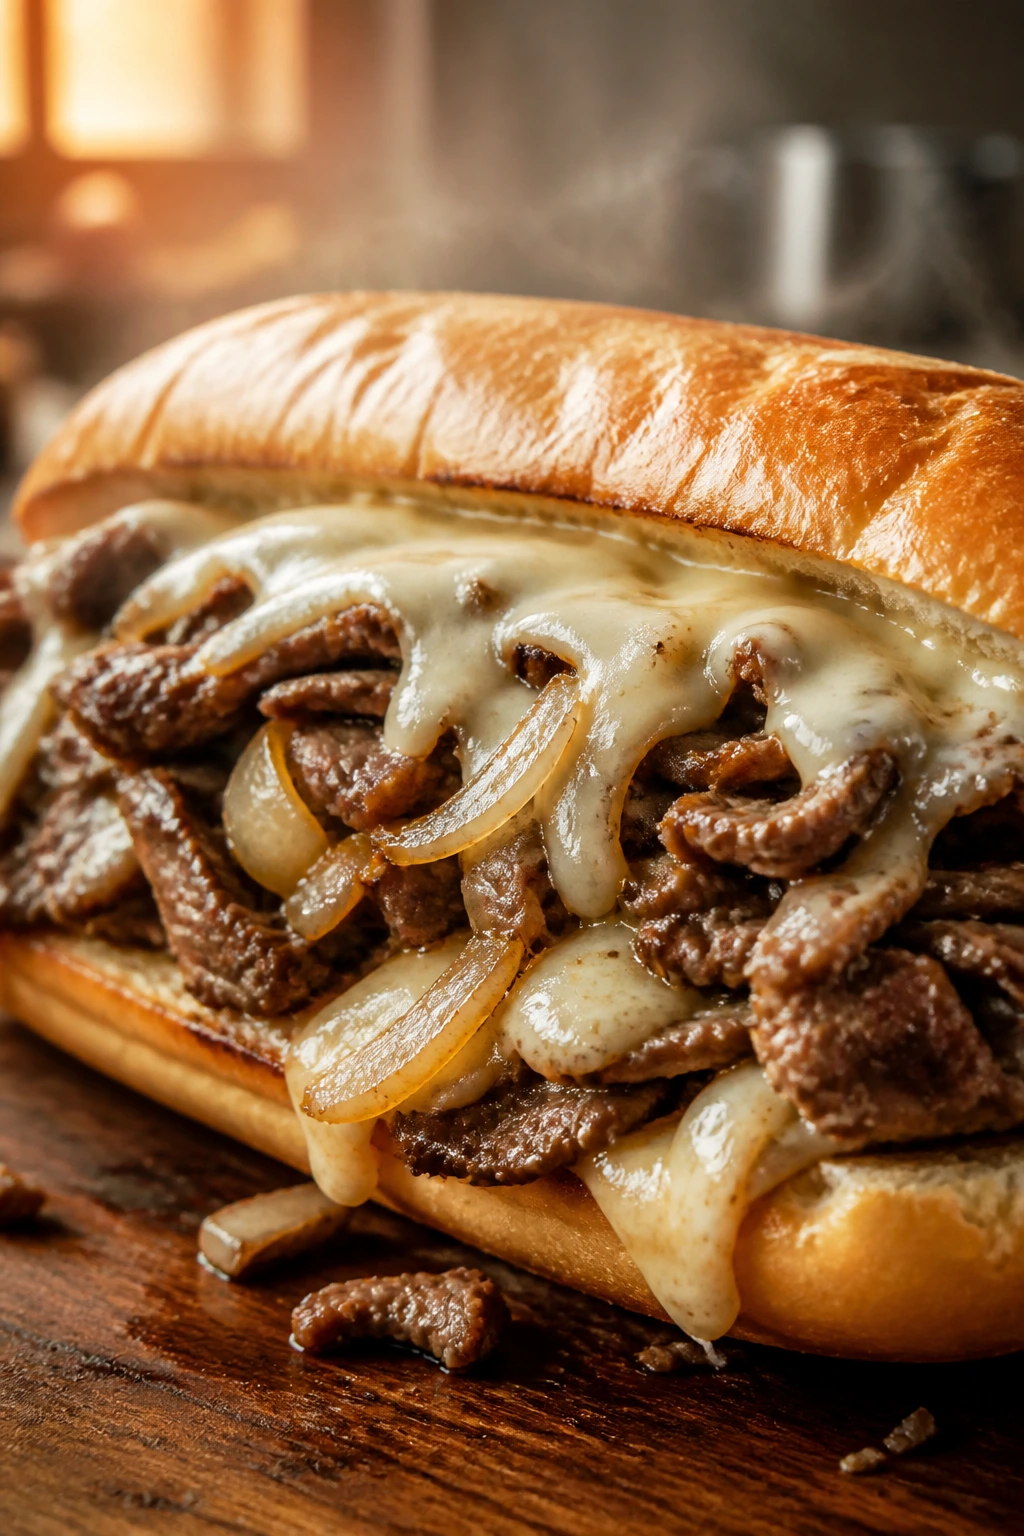
Which breads hold up best for picnic sandwiches?
Ciabatta, hoagie rolls, rye, baguettes, and well-toasted sandwich bread all behave well because they have enough structure. Soft breads like brioche and croissants also work, but they need lighter fillings or a better moisture barrier.
Can I make these sandwiches the night before?
Some fillings can be made ahead easily, especially pulled pork, chicken salad, tuna salad, egg salad, pimento cheese, and brisket. Assemble the bread and fresh vegetables closer to serving unless you’re making a muffuletta or sub that benefits from a short rest.
How do I keep sandwiches from getting soggy in a cooler?
Cool the fillings first, drain tomatoes and pickles, toast the bread when needed, and keep wet ingredients off bare bread. Wrapping the sandwich in parchment first helps it hold shape without trapping steam the way plastic wrap can.
What’s the best way to transport hot sandwiches to a cookout?
Wrap them in foil after a short rest so the steam calms down, then keep them in an insulated bag or cooler without ice packs touching the bread. Hot fillings should stay warm, but the bread should not sit in its own steam for too long.
Which sandwiches are best for a large crowd?
Pulled pork, Italian subs, muffuletta, chicken salad, and pimento cheese scale up cleanly because they can be made in batches. Smash burgers and fried chicken are also crowd favorites, but they work better when cooked in rounds rather than all at once.
Can I freeze any of the fillings?
Pulled pork, brisket, and some cooked chicken fillings freeze well for about 2 months if sealed tightly. Tuna salad, egg salad, and mayo-heavy fillings do not freeze well because the texture breaks when thawed.
What if my bread keeps tearing when I slice it?
Use a serrated knife and a gentle sawing motion. If the bread is especially soft, chill the loaf for 10 minutes before slicing so the crumb firms up a little.
Do I need a grill for these recipes?
No. A cast-iron skillet, oven, or stovetop griddle can handle most of them. The grill adds smoke and char, but the structure of the sandwich matters more than the cooking surface.
How long can assembled sandwiches sit out?
Two hours is the safe general limit, and less if the weather is hot. Mayo-based or meat-filled sandwiches should be kept cold until serving and packed away once the table slows down.
A Cooler Full of Better Sandwiches
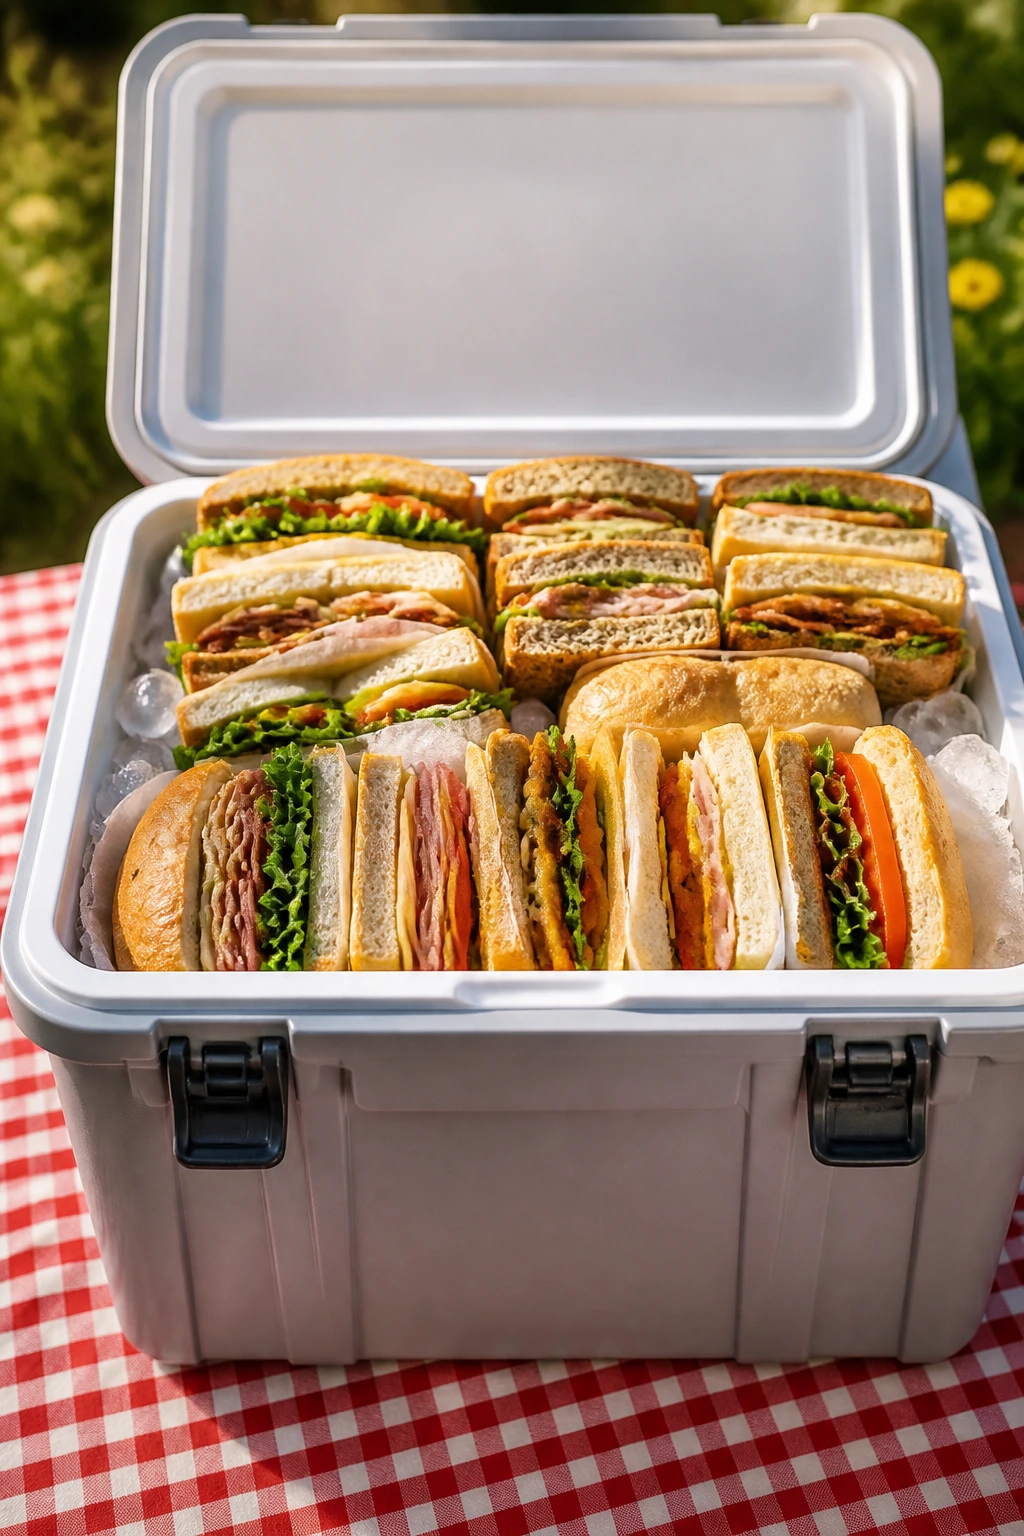
The nicest thing about a spread like this is how much it rewards planning without making the cook feel trapped. A good mix of hot and cold, rich and bright, soft and sturdy gives you options when the grill gets busy or the picnic table fills up faster than expected. You do not need every sandwich here. You need a few that fit the people, the weather, and the bread you’re willing to toast.
If I were building a backyard cookout menu from this list, I’d pick one smoky sandwich, one fresh one, one cheesy one, and one cold sandwich that can sit quietly in the cooler until it’s called up. That way the table keeps moving, and nobody gets stuck eating the same flavor three times in a row. Which, honestly, is the whole point.