
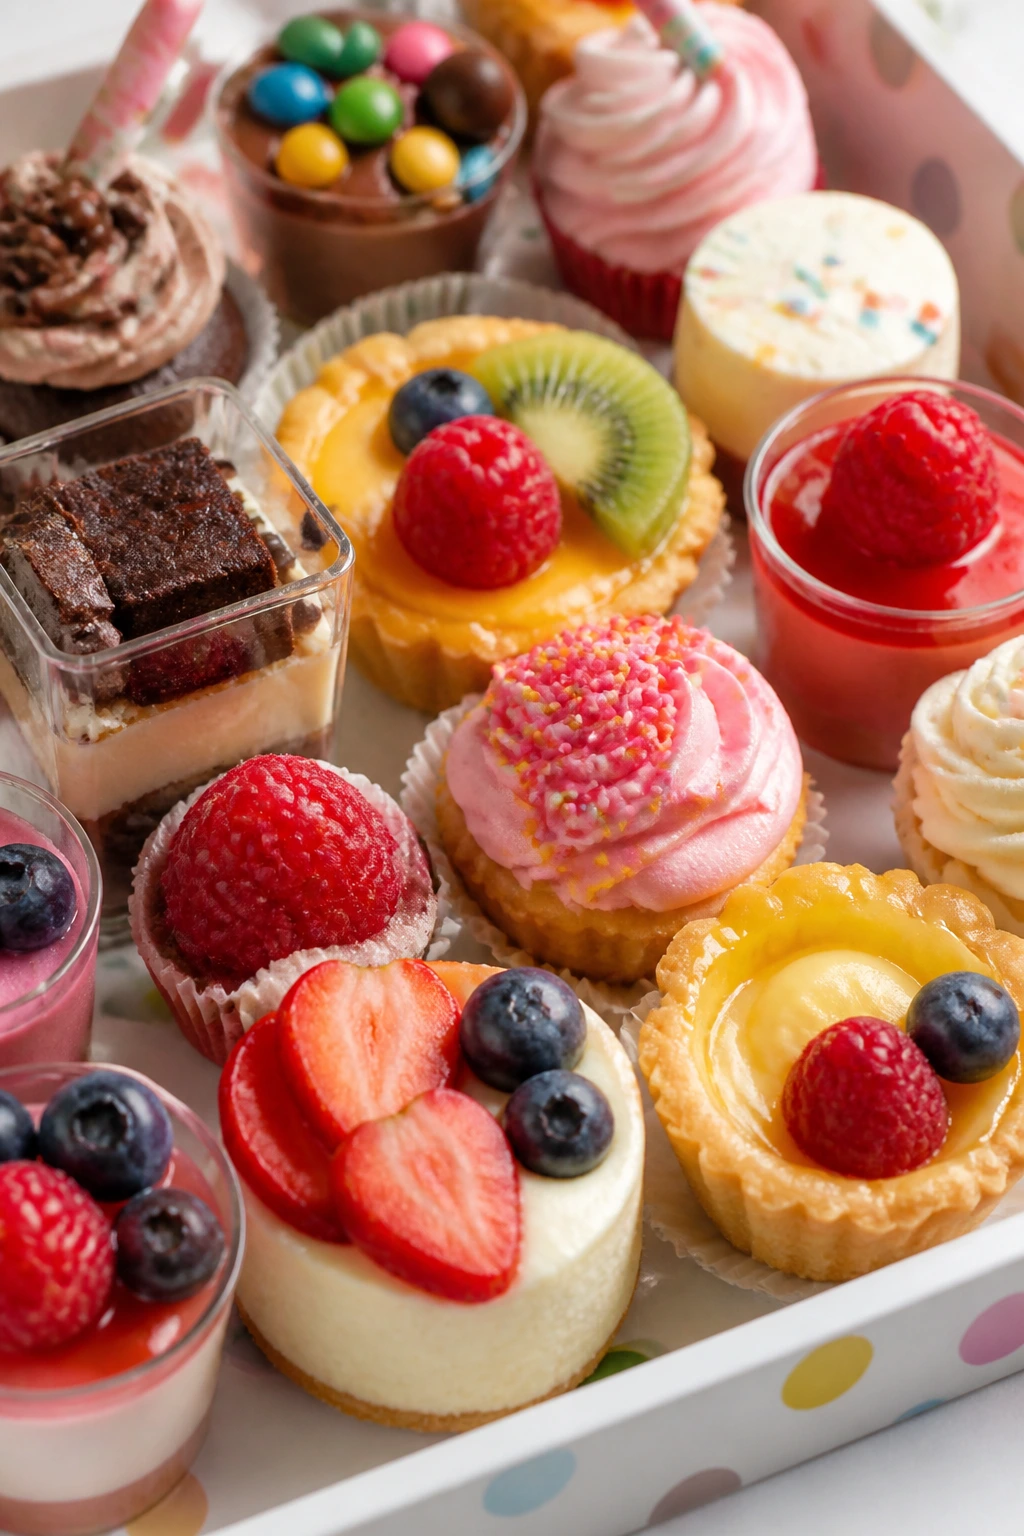
A kid’s dessert doesn’t need a sugar sculpture and a pastry degree to get a little gasp from the table. Sometimes it’s the sliced strawberries lined up like roof tiles, the blue swirls in a yogurt bark, or the way a tray of tiny tartlets looks like it came from a bakery even though it was assembled on a Tuesday with one eye on homework pickup.
Dessert recipes for kids live in a sweet spot that grown-up baking often forgets: the treat has to look playful before anyone takes a bite. Bright colors help. Small portions help more. And if a dessert can survive a sticky fingertip, a short attention span, and one child announcing “I helped!” before the icing has set, it’s already ahead of most party food.
The best part is that pretty kid desserts are not all about fuss. Some of the best-looking ones are little more than good fruit, clean layers, and a smart finish — a drizzle, a sprinkle, a glossy glaze, or a neat row of berries. That’s the kind of detail that sticks in a child’s memory. And, if we’re being honest, it does a number on the adults too.
Why These Desserts Work on a Kids’ Table
-
Color does half the work: Bright fruit, pastel frosting, and shiny chocolate make a dessert look special before anyone asks what’s inside.
-
Small portions feel more exciting: Mini cups, bites, and skewers fit tiny hands better than a huge slab cake and usually travel with fewer messes.
-
Decorating becomes part of the fun: Sprinkles, fruit slices, candy toppers, and cookie crumbs give kids something to help with, even if the baking itself is done ahead.
-
Texture matters more than people think: A dessert that mixes soft cream, crisp cookie, juicy fruit, or chewy candy gets a second look every time.
-
You can scale them up fast: Most of these recipes work on a tray, in a cup, or on a skewer, which makes last-minute birthday tables a lot less stressful.
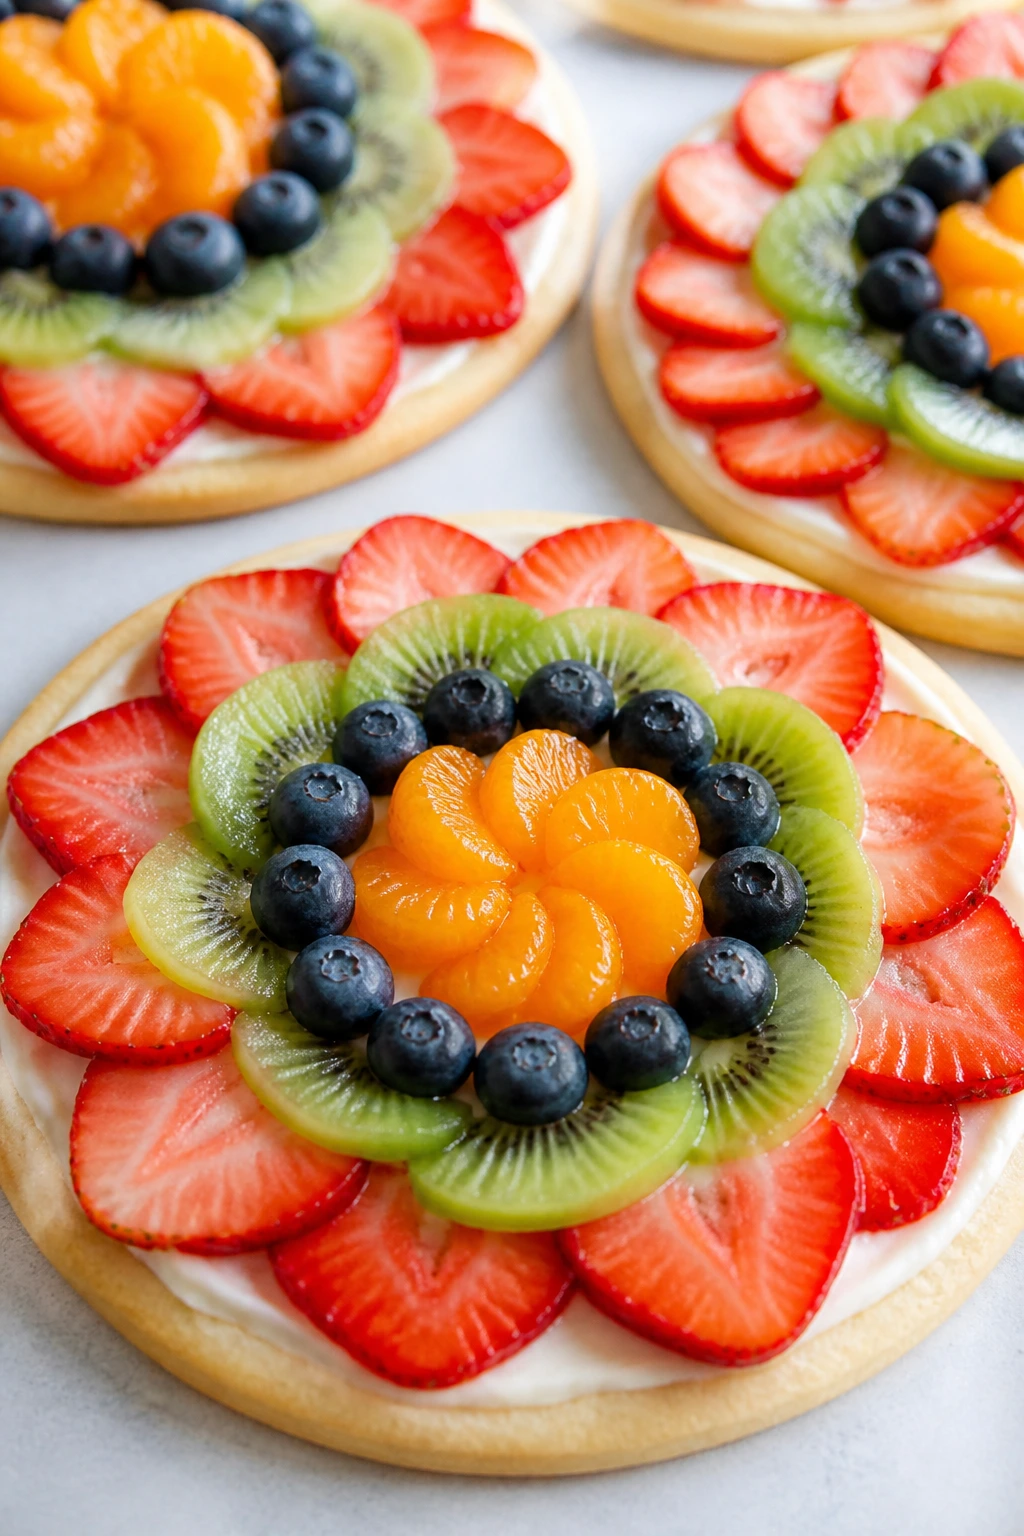
1. Rainbow Fruit Pizza Cookies
Intro: These look like little bakery windows made of fruit. A soft sugar cookie base, a smooth cream-cheese spread, and a tight ring of berries and kiwi make each cookie feel finished, not crowded.
Why It Works: The cookie bakes flat enough to hold toppings without sagging, and the cream cheese layer gives you that cool, tangy bite that keeps the fruit from tasting one-note. Fruit pizza tends to look fussy, but the cookie version keeps the decorating manageable. Use fruit that’s dry and sliced small; wet chunks slide off and make the top messy.
Key Ingredients:
- 1 batch sugar cookie dough, enough for 18 to 20 cookies
- 8 oz cream cheese, softened
- 1/3 cup powdered sugar
- 1 teaspoon vanilla extract
- 1 cup sliced strawberries
- 1 kiwi, peeled and thinly sliced
- 1/2 cup blueberries
- 1/2 cup mandarin orange segments, well drained
Quick Steps:
- Preheat the oven to 350°F and line two sheet pans with parchment.
- Scoop dough into 2-inch rounds and flatten slightly; bake 10 to 12 minutes until the edges are pale gold.
- Cool the cookies completely on a rack.
- Beat cream cheese, powdered sugar, and vanilla until smooth; spread a thin layer on each cookie.
- Arrange fruit on top and chill 20 minutes to set.
Equipment for This Recipe:
- Two sheet pans
- Parchment paper
- Hand mixer
- Small offset spatula
How to Serve This Dish: Stack them on a white platter so the fruit colors do the talking. They’re best with cold milk or a berry spritz, and two cookies per child is usually plenty.
Pro Tips for This Recipe:
- Pat the mandarin segments dry with paper towels.
- Slice kiwi thin enough to bend, not flop.
- Chill before moving them to a tray; the topping holds better.
Variations on This Dish:
- Peach Patch Version: Swap the citrus for peach slices and raspberries.
- Chocolate Drizzle Finish: Add a thin zigzag of melted white chocolate over the fruit.
- Birthday Confetti Base: Mix sprinkles into the cookie dough for a louder look.
Common Mistakes to Avoid with This Dish:
- Don’t spread the cream cheese on warm cookies; it melts into the crumb.
- Don’t pile fruit high in the center only; the edges look bare.
- Don’t use syrupy canned fruit straight from the can unless it’s drained very well.
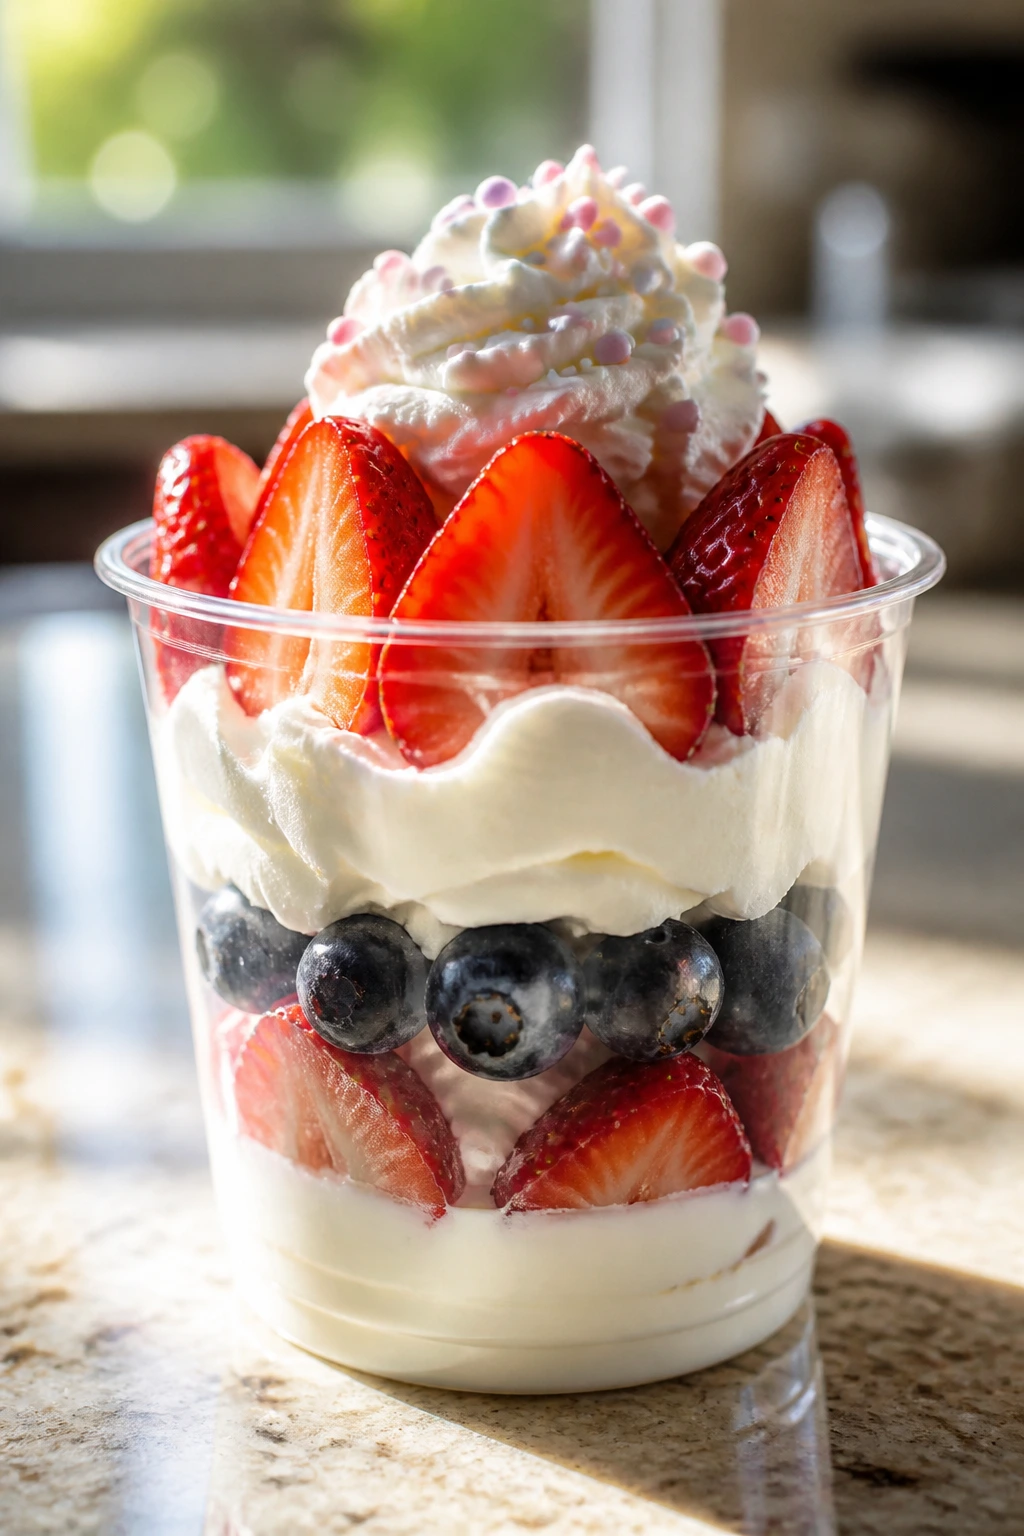
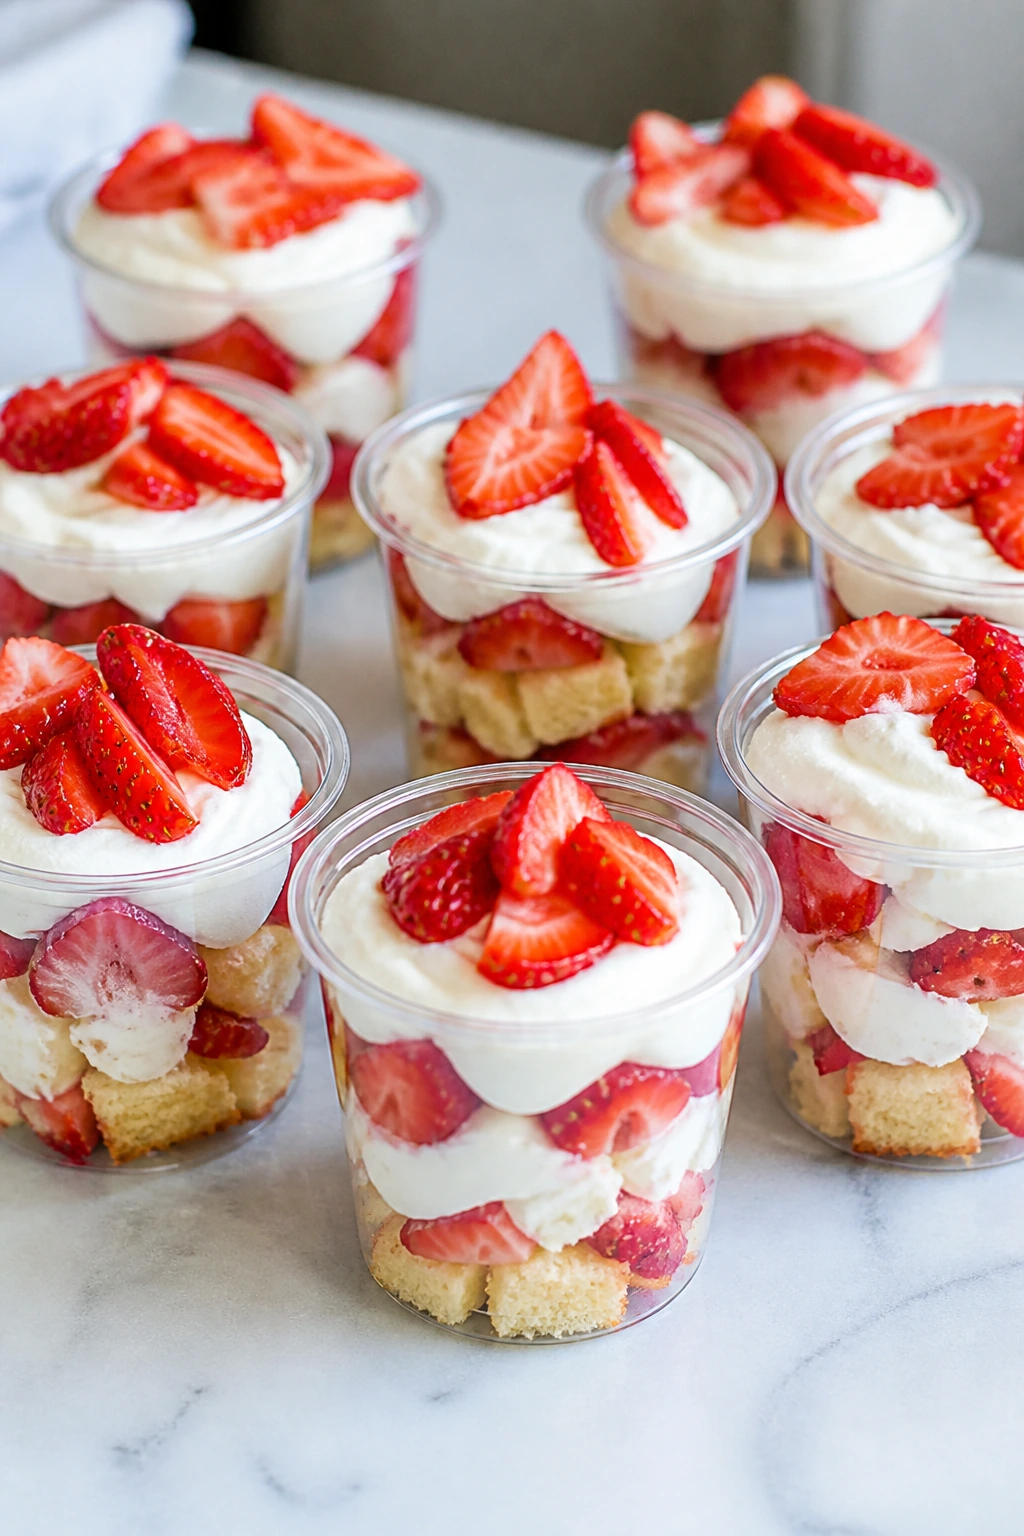
2. Strawberry Shortcake Trifles in Cups
Intro: Clear cups turn this old-school dessert into something that feels a bit more special. You get soft cake cubes, juicy strawberries, and whipped cream in neat layers that show off every stripe.
Why It Works: Trifles are forgiving, which is one reason they’re so useful for kid desserts. The cake can be homemade or store-bought, and the berries actually improve after sitting in sugar for 10 to 15 minutes because they release a little juice. The clear cup matters more than people admit; it turns a simple dessert into a tiny display.
Key Ingredients:
- 4 cups pound cake or sponge cake, cut into 1-inch cubes
- 2 cups sliced strawberries
- 2 tablespoons granulated sugar
- 2 cups heavy whipping cream
- 1/4 cup powdered sugar
- 1 teaspoon vanilla extract
Quick Steps:
- Toss strawberries with granulated sugar and let them sit 10 minutes.
- Whip cream, powdered sugar, and vanilla to soft peaks.
- Spoon cake cubes into the bottom of 8 small clear cups.
- Add strawberries and their juice, then a layer of whipped cream.
- Repeat once more and chill 30 minutes.
Equipment for This Recipe:
- Mixing bowls
- Hand mixer or stand mixer
- 8 small clear cups or jars
- Paring knife
How to Serve This Dish: Serve with tiny spoons and a few extra strawberry slices on top. They work well after a picnic lunch or as a birthday dessert when you want something neat enough to carry.
Pro Tips for This Recipe:
- Cut the cake cubes the same size so the layers stay even.
- Use very cold cream; it whips faster and holds better.
- Add the final strawberry slice right before serving.
Variations on This Dish:
- Blueberry Meadow: Swap half the strawberries for blueberries.
- Chocolate Cake Shortcut: Use chocolate cake cubes for a darker, richer version.
- Lemon Whip Twist: Add 1 teaspoon lemon zest to the cream.
Common Mistakes to Avoid with This Dish:
- Don’t overwhip the cream or it turns grainy.
- Don’t build the cups too far ahead if the cake is very soft; it can go soggy.
- Don’t use huge cake chunks; small bites make the layers look cleaner.
3. Chocolate-Dipped Banana Pops
Intro: These are the kind of dessert that looks fancy because of the stick. Once the chocolate shell hardens, the banana looks polished and neat, especially with sprinkles or chopped nuts clinging to one side.
Why It Works: Frozen banana stays firm enough to dip cleanly, and a little coconut oil in the chocolate gives you a thinner coating that sets with a smooth snap. The stick keeps the whole thing hand-held, which is the real magic for kids. You can decorate them fast, and no one needs a fork.
Key Ingredients:
- 3 ripe but firm bananas, halved crosswise
- 6 wooden popsicle sticks
- 12 oz milk or semisweet chocolate, chopped
- 1 tablespoon coconut oil
- 1/4 cup rainbow sprinkles
- 1/4 cup crushed peanuts or toasted coconut
Quick Steps:
- Insert a stick into each banana half and freeze 45 minutes.
- Melt chocolate with coconut oil in short bursts until smooth.
- Dip each banana halfway into the chocolate.
- Roll the wet side in sprinkles or coconut.
- Set on parchment and freeze 15 minutes until firm.
Equipment for This Recipe:
- Sheet pan
- Parchment paper
- Microwave-safe bowl
- Popsicle sticks
How to Serve This Dish: Pile them on a chilled tray so they do not soften too fast. They’re a good choice for warm weather parties or as a dessert after a noodle dinner when you want something cold.
Pro Tips for This Recipe:
- Use bananas that are yellow with only a few freckles.
- Keep the bananas frozen until the second before dipping.
- Work with one banana at a time so the others stay firm.
Variations on This Dish:
- Peanut Butter Stripe: Drizzle melted peanut butter over the chocolate shell.
- White Chocolate Snow Cap: Use white chocolate and blue sprinkles.
- Coconut Cream Version: Roll the dipped banana in toasted coconut only.
Common Mistakes to Avoid with This Dish:
- Don’t use overripe bananas; they slide off the stick more easily.
- Don’t overheat the chocolate or it can seize.
- Don’t skip the first freeze, or the coating will smear instead of setting.
4. Unicorn Yogurt Bark
Intro: This one looks like broken stained glass, but with marshmallows and berries. The swirl of pastel yogurt gives each shard its own pattern, which is half the fun when kids start picking pieces off the tray.
Why It Works: Thick yogurt freezes into a brittle sheet that snaps cleanly once it’s fully set. The white base is a blank canvas, which makes food coloring, berries, and tiny candies pop in a way that feels cheerful without much work. Keep the layer thin; bark that’s too thick turns icy and hard to bite.
Key Ingredients:
- 3 cups plain Greek yogurt
- 3 tablespoons honey
- 1 teaspoon vanilla extract
- Pink, blue, and purple gel food coloring
- 1/2 cup sliced strawberries
- 1/4 cup blueberries
- 1/4 cup mini marshmallows
- 2 tablespoons rainbow sprinkles
Quick Steps:
- Line a sheet pan with parchment.
- Stir yogurt, honey, and vanilla until smooth.
- Divide into bowls and tint each one lightly.
- Spoon the colors onto the pan and swirl with a knife.
- Top with fruit, marshmallows, and sprinkles; freeze 3 hours and break into pieces.
Equipment for This Recipe:
- Rimmed sheet pan
- Parchment paper
- Small bowls
- Butter knife
How to Serve This Dish: Serve straight from the freezer on a cold platter. It’s best as a snacky dessert after school, though it also works as part of a dessert board with berries and cookies.
Pro Tips for This Recipe:
- Use gel color, not watery liquid color.
- Don’t overload with toppings or the bark breaks unevenly.
- Break it by hand for bigger, prettier shards.
Variations on This Dish:
- Berry Cloud Bark: Skip the food coloring and use only berries.
- Chocolate Swirl Bark: Drizzle melted white chocolate over the top before freezing.
- Cereal Crunch Bark: Add a small handful of puffed cereal for more texture.
Common Mistakes to Avoid with This Dish:
- Don’t spread the yogurt too thick; it becomes hard to eat.
- Don’t leave it out long after breaking.
- Don’t use very juicy fruit unless you’ve patted it dry.
5. Funfetti Cupcakes with Swirl Frosting
Intro: These are the cupcakes people remember from childhood parties because they look like confetti in cake form. The real charm is the frosting swirl — a little messy in a good way, with the kind of bright stripes that make kids point before they bite.
Why It Works: Sprinkles inside the batter make the crumb look festive, while the frosting swirl gives you a bakery-style top without any special decorating skill. Mini cupcakes bake fast and stay moist longer than big ones. The trick is to stop mixing as soon as the flour disappears; overmixed batter turns the crumb tight.
Key Ingredients:
- 1 1/2 cups all-purpose flour
- 1 1/2 teaspoons baking powder
- 1/2 teaspoon fine salt
- 1/2 cup unsalted butter, softened
- 3/4 cup granulated sugar
- 2 large eggs
- 1/2 cup whole milk
- 1 teaspoon vanilla extract
- 1/3 cup rainbow sprinkles
- 2 cups buttercream frosting, tinted in 2 or 3 colors
Quick Steps:
- Preheat the oven to 350°F and line a 12-cup muffin pan.
- Cream butter and sugar until pale, then beat in eggs and vanilla.
- Mix in dry ingredients with milk, alternating, then fold in sprinkles.
- Fill liners two-thirds full and bake 16 to 18 minutes.
- Cool fully, pipe on swirled frosting, and finish with more sprinkles.
Equipment for This Recipe:
- Muffin pan
- Paper liners
- Hand mixer
- Piping bag with a large star tip
How to Serve This Dish: Put them on a cake stand or a tray with a ring of sprinkles around the base. One cupcake per child is enough unless you’re dealing with a serious frosting situation.
Pro Tips for This Recipe:
- Coat the sprinkles in a spoonful of flour so they do not bleed as much.
- Pipe frosting only after the cupcakes are fully cool.
- Use room-temperature eggs for a softer crumb.
Variations on This Dish:
- Lemon Confetti: Add 1 tablespoon lemon zest to the batter.
- Chocolate Chip Celebration: Swap half the sprinkles for mini chocolate chips.
- Mini Party Bites: Bake the batter in mini muffin cups for 10 to 12 minutes.
Common Mistakes to Avoid with This Dish:
- Don’t overfill the liners or the tops crown too much.
- Don’t frost warm cupcakes; the swirl slides.
- Don’t use jimmies inside and nonpareils on top if you hate color bleeding.
6. Berry Parfait Jars
Intro: Parfaits look like dessert with good posture. The stripes of yogurt, berries, and granola show through the jar, and that neat stack gives even a plain bowl of fruit a little ceremony.
Why It Works: A parfait is built on contrast: soft yogurt, juicy berries, crunchy granola. Clear jars turn that contrast into decoration. The key is keeping the granola separate until serving if you want it crisp; once it sits in yogurt for too long, it softens and loses the point.
Key Ingredients:
- 3 cups vanilla yogurt
- 2 cups mixed berries
- 1 1/2 cups granola
- 2 tablespoons honey
- 1 teaspoon lemon zest
- 6 small jars or cups
Quick Steps:
- Stir lemon zest into the yogurt.
- Spoon yogurt into the bottom of each jar.
- Add a layer of berries, then a layer of granola.
- Repeat the layers once more.
- Drizzle with honey and serve right away or chill 20 minutes.
Equipment for This Recipe:
- Small jars or clear cups
- Spoon
- Zester
- Measuring cups
How to Serve This Dish: These make a nice after-school dessert or a light finish after a heavier meal. If you’re serving them at a party, leave the top granola layer until the last minute so it stays crunchy.
Pro Tips for This Recipe:
- Use berries that are dry, not wet from rinsing.
- Spoon the yogurt gently to keep the layers clean.
- Choose a granola with clusters for better texture.
Variations on This Dish:
- Chocolate Crunch Jar: Use chocolate granola and add banana slices.
- Peach Cobbler Jar: Swap berries for diced peaches and cinnamon granola.
- Tropical Jar: Use pineapple, mango, and toasted coconut.
Common Mistakes to Avoid with This Dish:
- Don’t make them too far ahead unless you’re okay with soft granola.
- Don’t use watery yogurt that runs into the berry layer.
- Don’t pack the jars to the rim if little hands need to carry them.
7. Decorated Sugar Cookies with Royal Icing
Intro: A sugar cookie with sharp icing edges looks like a tiny badge of honor. These are the cookies kids stare at before they choose one, which is half the fun of making them in the first place.
Why It Works: Sugar cookies hold crisp edges, and royal icing dries hard enough to stack or package. That matters if you’re making a batch for a party table or a lunchbox treat. The cookie flavor stays simple, so the icing can carry the color and design work.
Key Ingredients:
- 3 cups all-purpose flour
- 1 teaspoon baking powder
- 1/2 teaspoon salt
- 1 cup unsalted butter, softened
- 1 cup granulated sugar
- 1 large egg
- 2 teaspoons vanilla extract
- 2 cups powdered sugar
- 2 to 3 tablespoons milk or water
- Gel food coloring
Quick Steps:
- Make the dough and chill it 1 hour.
- Roll to 1/4-inch thickness and cut shapes.
- Bake at 350°F for 8 to 10 minutes until the edges barely color.
- Cool completely before icing.
- Mix royal icing, tint it, and decorate with outlines, dots, and fills.
Equipment for This Recipe:
- Rolling pin
- Cookie cutters
- Sheet pans
- Piping bags or zip-top bags
How to Serve This Dish: Stack the cookies in a shallow basket lined with parchment. They’re best with cold milk, and they travel well if the icing has dried for a few hours.
Pro Tips for This Recipe:
- Chill the dough so the shapes keep their edges.
- Thin the icing a drop at a time; it’s easier than fixing runny icing.
- Let the first layer dry before adding dots or stripes.
Variations on This Dish:
- Pastel Garden Set: Use flower and butterfly cutters with soft pastel colors.
- Chocolate Cookie Base: Add 1/4 cup cocoa powder to the dough.
- Citrus Sparkle: Add lemon or orange zest to the cookie dough.
Common Mistakes to Avoid with This Dish:
- Don’t roll warm dough; it sticks and tears.
- Don’t ice warm cookies or the glaze loosens.
- Don’t make the icing too thin if you want crisp edges.
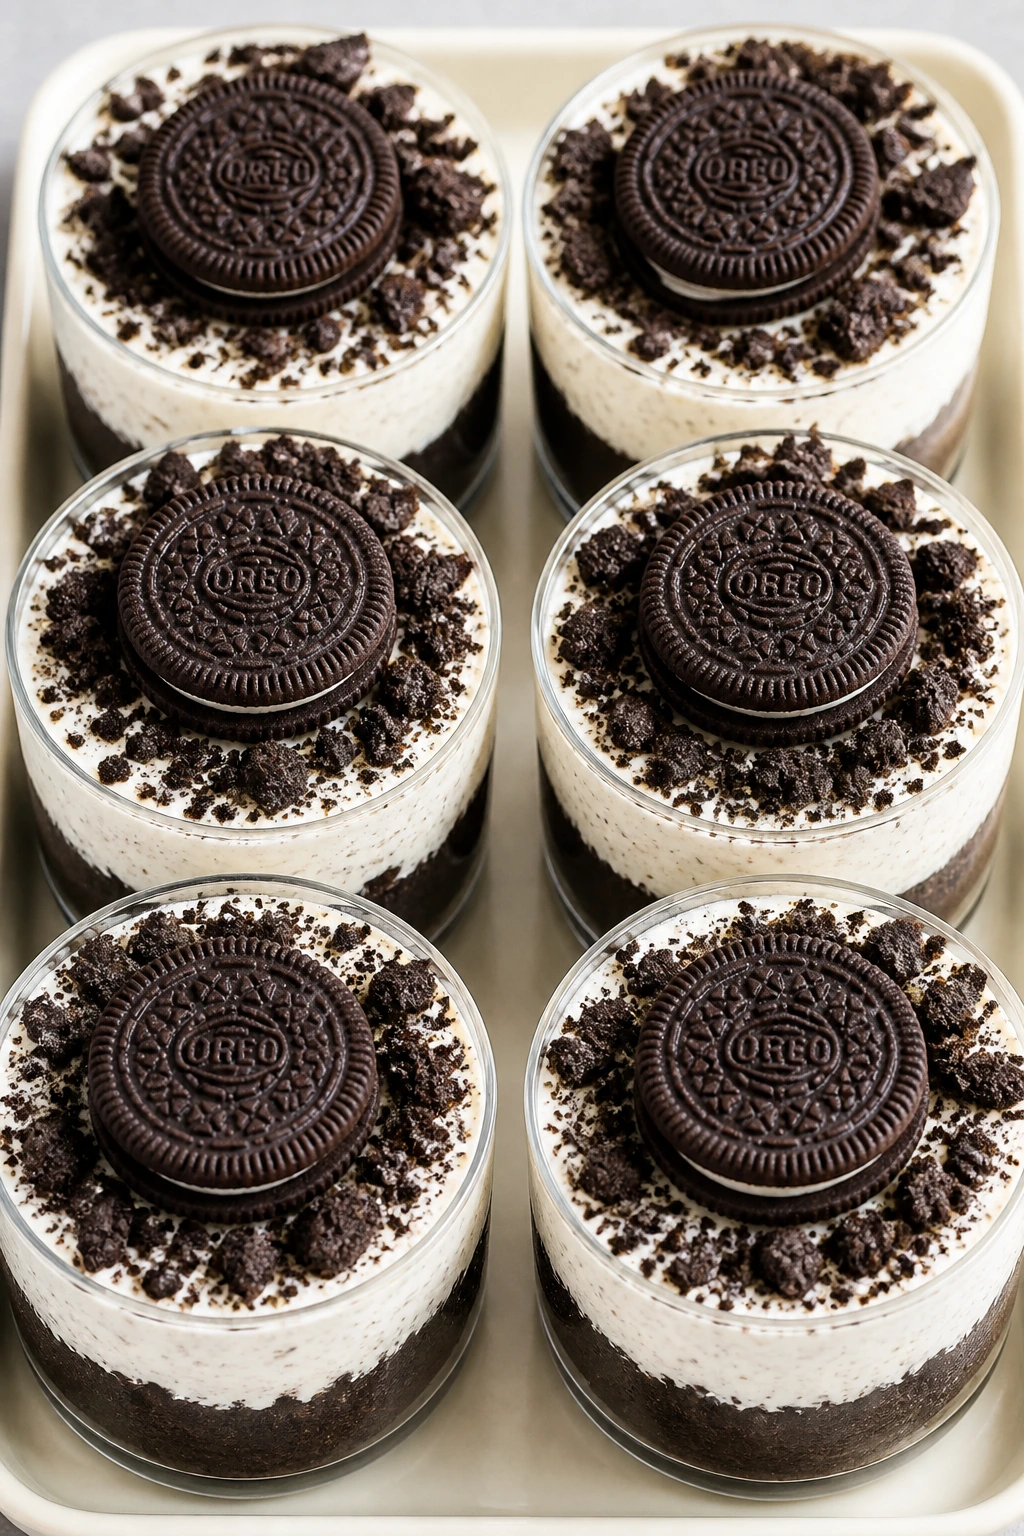
8. Oreo Dirt Cups with Gummy Worms
Intro: Dirt cups are still cute even when they’re supposed to look messy. That’s the joke, and kids get it immediately: chocolate pudding, cookie crumbs, and a gummy worm poking out like it’s trying to escape.
Why It Works: Layered pudding and crushed cookies give you a dessert that looks like a tiny edible garden bed. It’s also one of the easiest ways to make a dessert look playful without decorating skill. Use cups with straight sides so the layers show clearly.
Key Ingredients:
- 2 (3.9 oz) boxes chocolate instant pudding mix
- 3 cups cold milk
- 8 oz whipped topping, thawed
- 20 Oreo cookies, crushed
- 12 gummy worms
Quick Steps:
- Whisk pudding mix with milk for 2 minutes.
- Fold in whipped topping.
- Spoon cookie crumbs into the bottom of 6 to 8 cups.
- Add pudding, then more crumbs.
- Finish with gummy worms and chill 1 hour.
Equipment for This Recipe:
- Mixing bowl
- Whisk
- Clear cups
- Spoon
How to Serve This Dish: Set them on a tray with little spoons tucked beside each cup. They’re a strong pick for classroom parties because nothing needs slicing.
Pro Tips for This Recipe:
- Crush the cookies into fine crumbs and a few bigger bits.
- Use cold milk or the pudding stays loose.
- Add the worms right before serving so they keep their shape.
Variations on This Dish:
- Cookie Garden: Swap gummy worms for candy flowers.
- Mint Dirt Cups: Use mint sandwich cookies for the crumbs.
- Strawberry Patch: Use vanilla pudding, strawberry crumbs, and berry gummies.
Common Mistakes to Avoid with This Dish:
- Don’t skip the chill time or the pudding feels loose.
- Don’t overload the top with crumbs; a thick layer hides the pudding.
- Don’t use too much milk in the pudding or the layers slump.
9. Mini Cheesecake Bites with Berry Swirl
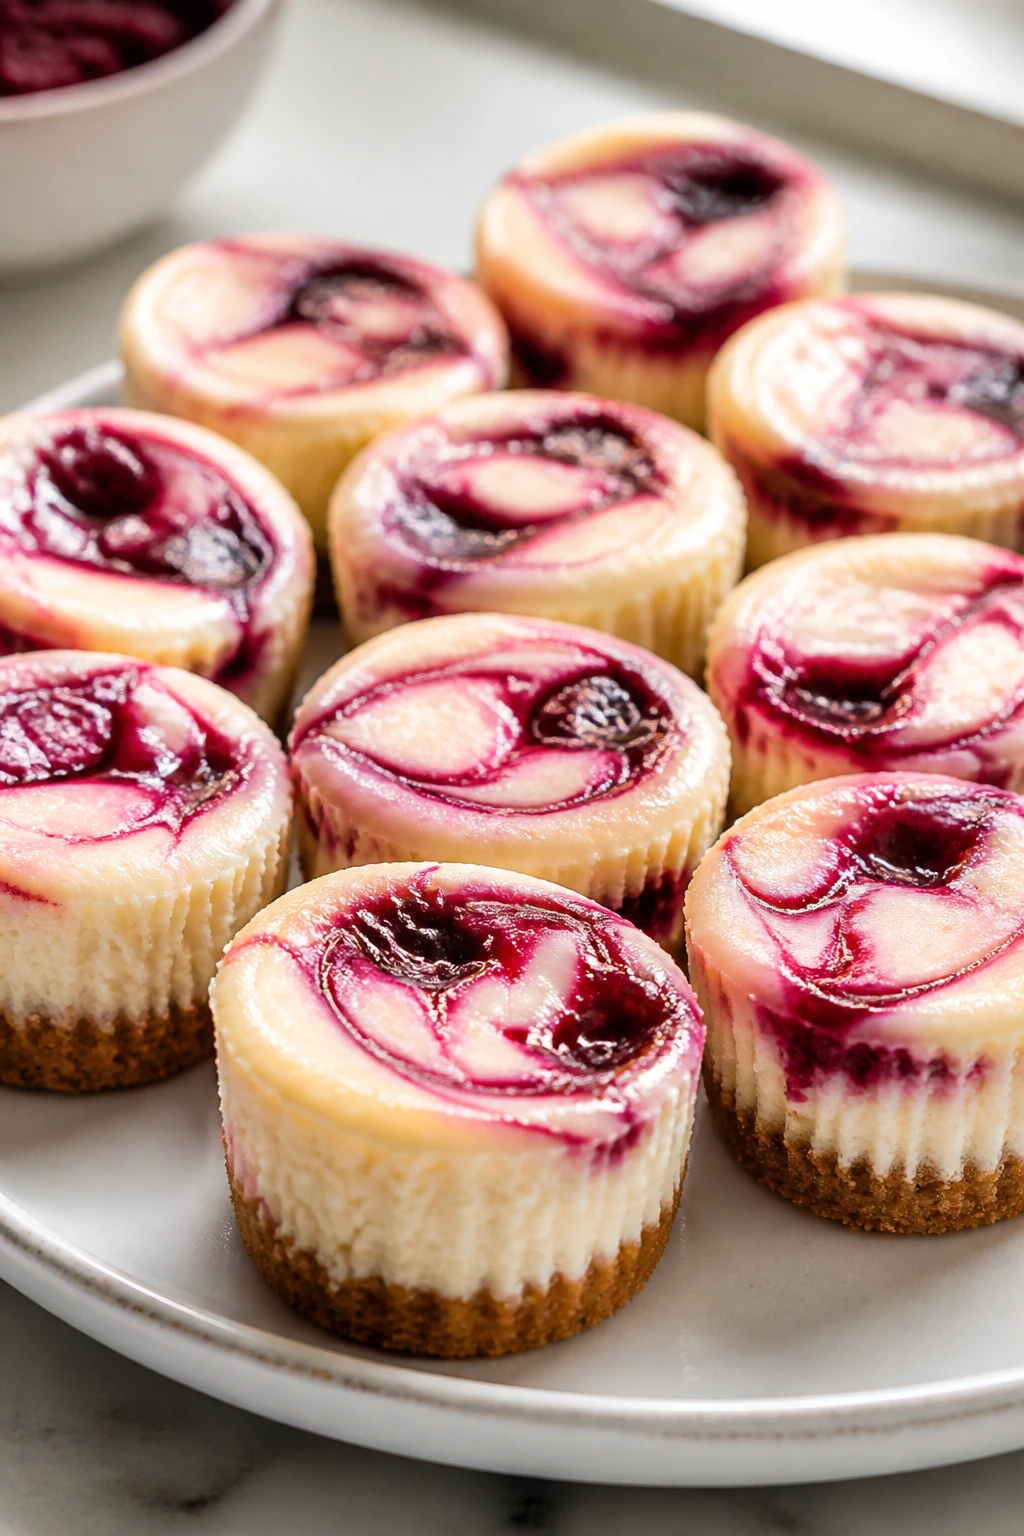
Intro: These little cheesecakes look polished in a way that makes people slow down. A berry swirl on top gives each bite a marble pattern, and that’s enough to make them feel special before anyone notices how rich they are.
Why It Works: Baking cheesecake in mini muffin tins gives you tidy portions and faster cooling, which matters when a full cheesecake feels like too much. The crust stays crisp if you press it firmly and bake it for a few minutes before filling. A spoonful of berry sauce on top adds color and a little brightness against the cream cheese.
Key Ingredients:
- 1 cup graham cracker crumbs
- 3 tablespoons melted butter
- 16 oz cream cheese, softened
- 1/2 cup granulated sugar
- 2 large eggs
- 1 teaspoon vanilla extract
- 1/2 cup sour cream
- 1/3 cup berry jam or thick berry sauce
Quick Steps:
- Preheat the oven to 325°F and line a mini muffin pan.
- Mix crumbs and butter, then press into the bottoms.
- Beat cream cheese and sugar until smooth, then mix in eggs, vanilla, and sour cream.
- Spoon into the cups and swirl berry jam on top.
- Bake 16 to 18 minutes, cool, then chill 2 hours.
Equipment for This Recipe:
- Mini muffin pan
- Paper liners or parchment strips
- Hand mixer
- Small spoon
How to Serve This Dish: Serve them cold on a white platter with a few fresh berries scattered around the edges. They fit nicely on dessert boards because they’re neat and don’t crumble much.
Pro Tips for This Recipe:
- Beat the filling only until smooth; too much air can cause cracks.
- Use thick jam so the swirl stays visible.
- Chill long enough for the centers to firm up.
Variations on This Dish:
- Chocolate Crust Bites: Use chocolate cookie crumbs instead of graham crumbs.
- Lemon Berry Bites: Add 1 teaspoon lemon zest to the filling.
- Blueberry Crown: Top each bite with a single blueberry after chilling.
Common Mistakes to Avoid with This Dish:
- Don’t use cold cream cheese; it leaves lumps.
- Don’t overbake until the tops brown; they should still wobble slightly.
- Don’t try to remove them before chilling or they fall apart.
10. Apple Rose Puff Pastry Tartlets
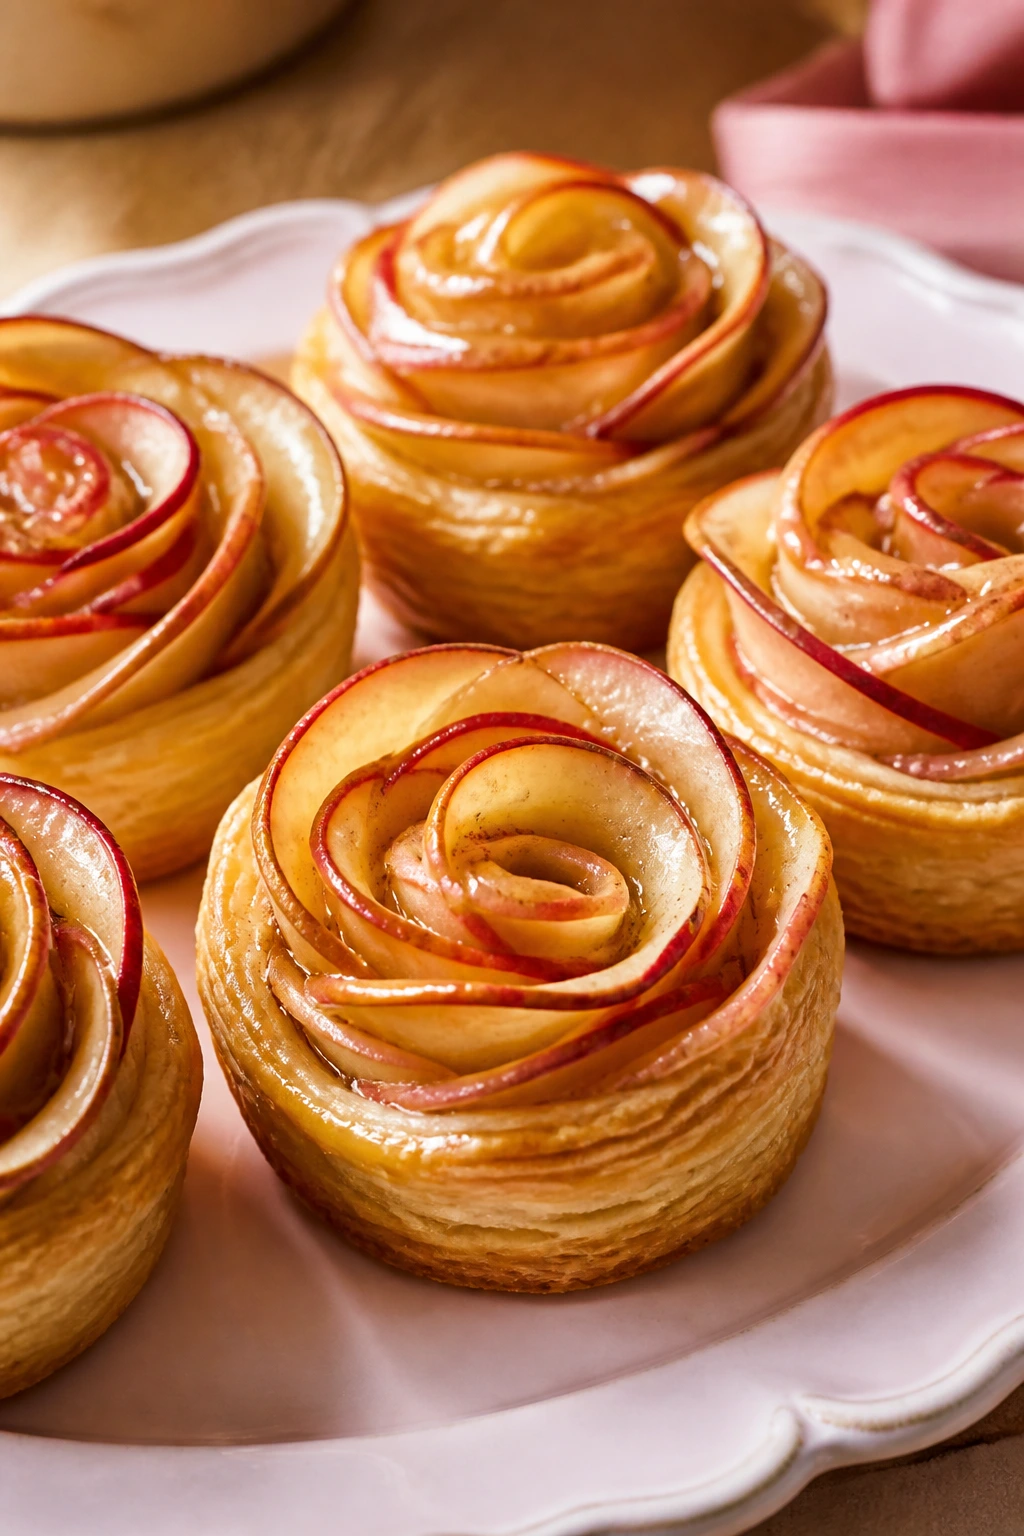
Intro: Apple roses look like you spent an hour on them, which is why people love them. The trick is mostly thin apple slices and a little patience while you roll them into spirals that look far fancier than they are.
Why It Works: Puff pastry gives you a flaky, golden base that holds the fruit without getting heavy. Soaking the apples briefly softens them enough to bend, which is the part most people skip. Apricot jam gives the tartlets a glossy finish and keeps the apples from looking dry.
Key Ingredients:
- 1 sheet puff pastry, thawed
- 2 red apples
- 2 tablespoons lemon juice
- 3 tablespoons sugar
- 1 teaspoon cinnamon
- 3 tablespoons apricot jam
- Powdered sugar for dusting
Quick Steps:
- Preheat the oven to 375°F and grease a muffin tin.
- Slice apples very thin and microwave with lemon juice and 2 tablespoons water for 1 minute.
- Cut puff pastry into 6 strips.
- Spread jam on each strip, line up apple slices, and roll into roses.
- Bake 25 to 30 minutes until puffed and golden.
Equipment for This Recipe:
- Muffin tin
- Sharp knife or mandoline
- Pastry brush
- Small saucepan or microwave-safe bowl
How to Serve This Dish: Dust with powdered sugar and place each tartlet in a paper cupcake liner. They’re a little more grown-up in flavor, but kids love the flower shape.
Pro Tips for This Recipe:
- Use apples with red skins for the strongest color.
- Slice thin enough that the pieces bend without cracking.
- Bake until the pastry under the fruit is cooked through, not pale.
Variations on This Dish:
- Pear Rose Tartlets: Swap apples for pears and reduce the cinnamon a touch.
- Berry Jam Base: Use raspberry jam under the fruit.
- Crescent Roll Shortcut: If puff pastry is missing, use crescent dough in a pinch.
Common Mistakes to Avoid with This Dish:
- Don’t leave apple slices too thick or they won’t roll.
- Don’t overfill the pastry strip; the rose unravels.
- Don’t underbake the bottoms, or they stay doughy.
11. Rainbow Jello Cups
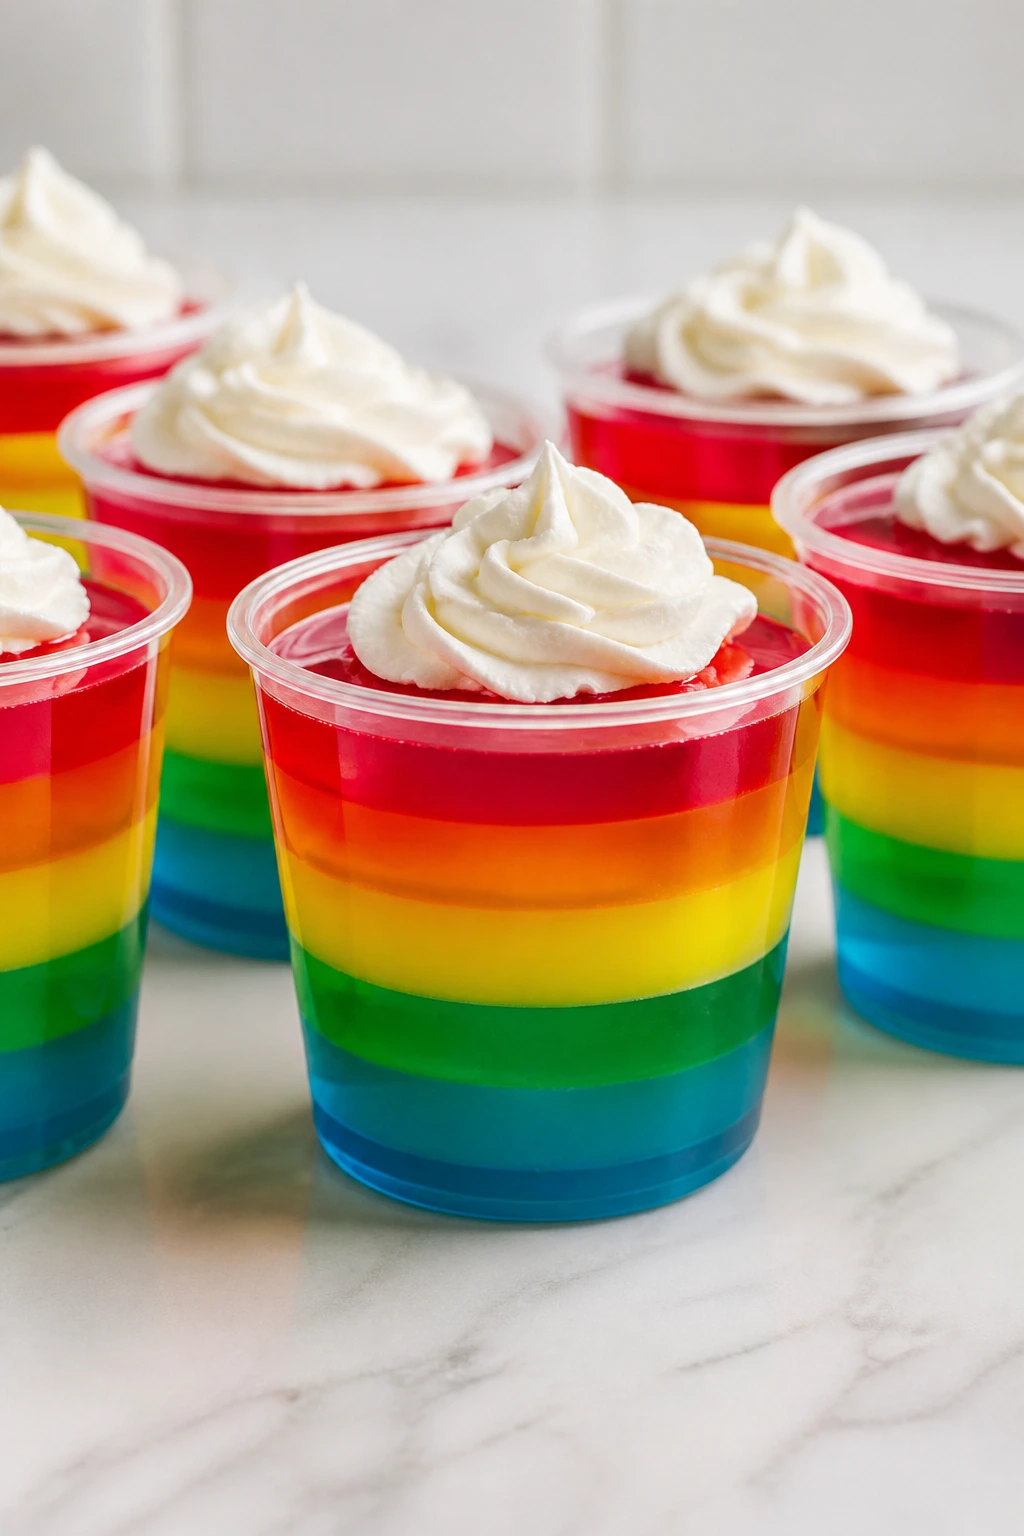
Intro: Rainbow jello cups are pure nostalgia with better layering. The colors stack like school supplies, and the whipped topping on top gives the whole cup a clean finish instead of a wobbly look.
Why It Works: Jello sets in distinct layers if each one chills enough before the next goes in. That’s the whole game here. Small cups let you show off the colors without needing a giant slab mold, and they portion neatly for parties.
Key Ingredients:
- 3 small boxes flavored gelatin in different colors
- 3 cups boiling water, divided
- 3 cups cold water, divided
- 1 cup whipped topping
- 1/4 cup rainbow sprinkles
Quick Steps:
- Dissolve one gelatin flavor in 1 cup boiling water, then stir in 1 cup cold water.
- Pour a shallow layer into cups and chill 30 minutes.
- Repeat with the next color, then the third, chilling between layers.
- Top with whipped topping.
- Finish with sprinkles and chill until fully set, about 3 hours.
Equipment for This Recipe:
- Small clear cups
- Mixing bowl
- Measuring cup
- Spoon or ladle
How to Serve This Dish: Serve them on a tray with no lids so the colors stay bright. They’re a good choice when you want a dessert that feels playful and is easy to carry with a spoon.
Pro Tips for This Recipe:
- Let each layer jiggle-firm before adding the next.
- Pour gently over the back of a spoon if you want clean lines.
- Use clear cups; the color stripes are the point.
Variations on This Dish:
- Fruit Gems: Add tiny fruit bits only to the top layer.
- Creamy Layer Version: Replace the top whipped topping with vanilla yogurt.
- Popsicle Mold Rainbow: Set the same mixture in molds for frozen treats.
Common Mistakes to Avoid with This Dish:
- Don’t rush the chilling between layers or the colors blur.
- Don’t add too much topping to the first layer; it can float.
- Don’t use cups that are too wide if you want tall stripes.
12. S’mores Brownie Bites
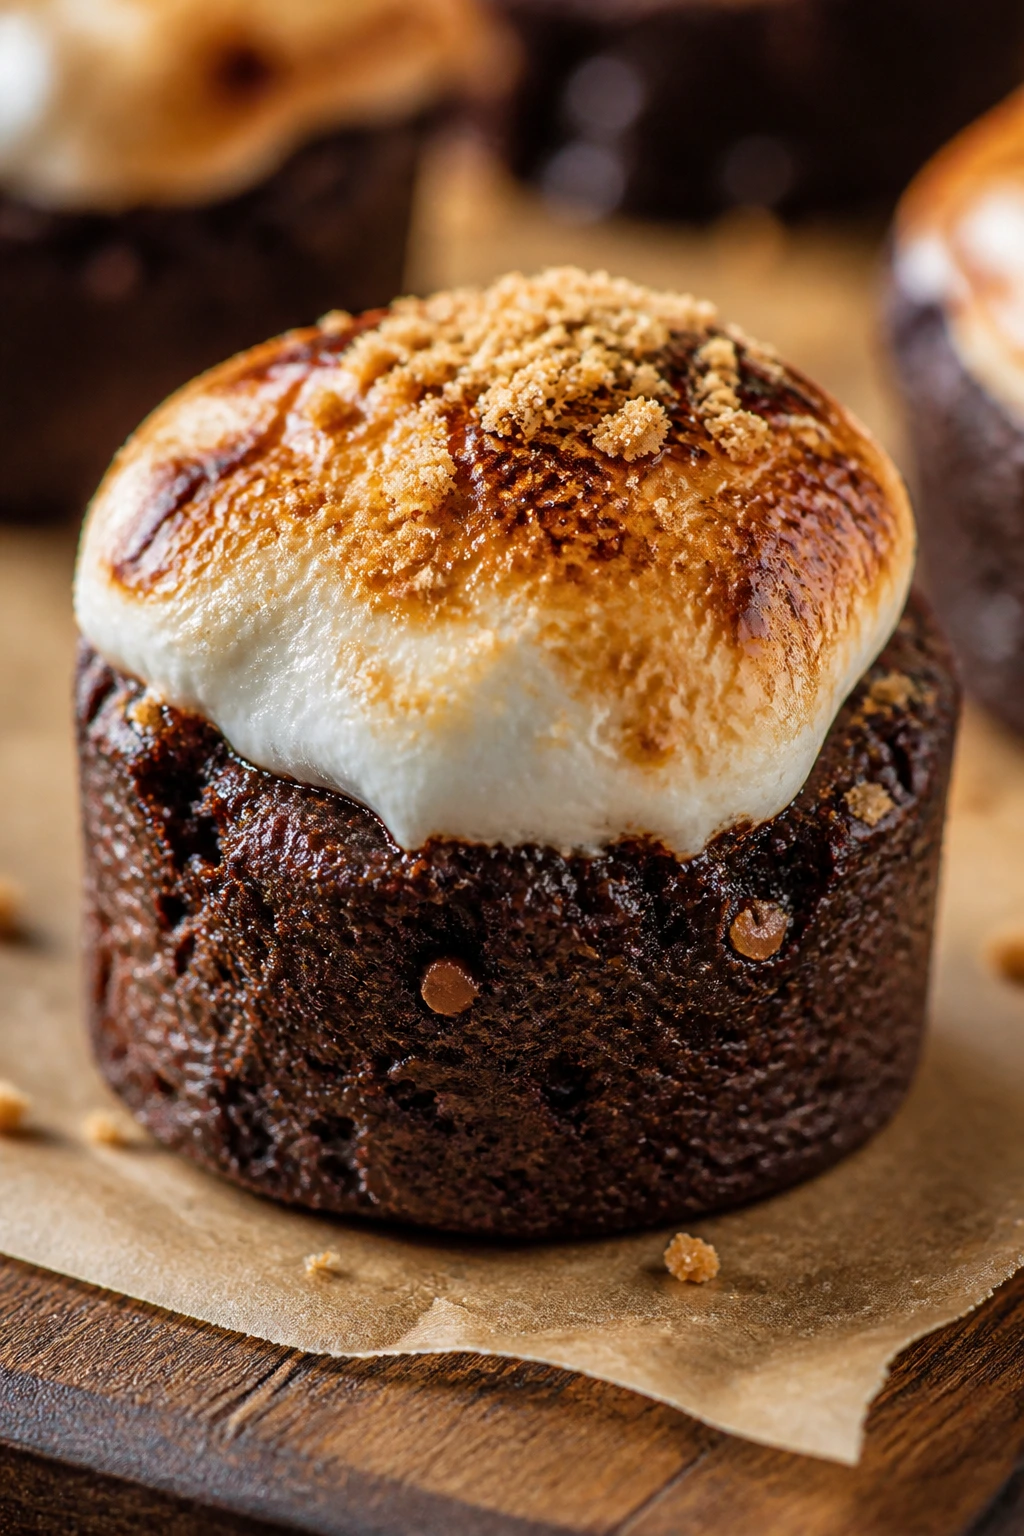
Intro: These are the brownies that look like a campfire dessert got dressed up for a birthday. The marshmallow top puffs and blisters a little, the graham crumbs catch the light, and the chocolate center stays fudgy underneath.
Why It Works: Brownie batter baked in mini muffin tins gives you tidy bites with a chewy edge on every side. A marshmallow pressed into the center near the end of baking melts enough to look soft but still holds shape. The graham cracker crumbs add the s’mores clue without making the whole thing dry.
Key Ingredients:
- 1 batch brownie batter, enough for 24 mini bites
- 12 large marshmallows, halved
- 1/2 cup graham cracker crumbs
- 1/4 cup mini chocolate chips
Quick Steps:
- Preheat the oven to 350°F and grease a mini muffin pan.
- Fill each cup halfway with brownie batter.
- Bake 10 minutes.
- Press half a marshmallow onto each bite, then bake 3 to 4 minutes more.
- Cool slightly, sprinkle with crumbs and chips, and remove from the pan.
Equipment for This Recipe:
- Mini muffin pan
- Small spoon or scoop
- Cooling rack
- Butter knife for loosening edges
How to Serve This Dish: Serve warm if you want the marshmallow soft, or fully cooled if you want cleaner edges. A scoop of vanilla ice cream makes the pan look like a tiny bakery case.
Pro Tips for This Recipe:
- Grease the pan well; brownie edges stick.
- Add the marshmallows late so they don’t disappear.
- Sprinkle the crumbs while the tops are still warm.
Variations on This Dish:
- Peanut Butter Swirl: Drop a tiny bit of peanut butter into the batter before baking.
- Caramel Campfire: Add a caramel drizzle after cooling.
- Cookie Dough Finish: Top each bite with a tiny cube of edible cookie dough.
Common Mistakes to Avoid with This Dish:
- Don’t overbake before adding the marshmallow.
- Don’t try to move them too soon or they tear.
- Don’t skip the crumbs; they keep the s’mores look clear.
13. Peanut Butter Pretzel Bird Nests

Intro: These are cute in the bluntest possible way, and that’s why they work. Pretzel nests, chocolate coating, and candy eggs create a tiny scene kids can recognize immediately.
Why It Works: The salty pretzel base keeps the candy from tasting too sweet, and peanut butter gives the nest a thick, sturdy texture that sets in the fridge. They’re no-bake, which helps when you want something sculptural without turning on the oven. Small clusters are easier to eat than giant nests that collapse in the first bite.
Key Ingredients:
- 2 cups pretzel sticks, lightly crushed
- 1/2 cup creamy peanut butter
- 1 cup butterscotch or milk chocolate chips
- 2 cups chow mein noodles
- 1/2 cup mini candy eggs
Quick Steps:
- Melt chocolate and peanut butter together until smooth.
- Fold in pretzels and chow mein noodles.
- Scoop into parchment-lined mounds and shape into nests.
- Press 3 to 4 candy eggs into each center.
- Chill 30 minutes until firm.
Equipment for This Recipe:
- Mixing bowl
- Spoon
- Sheet pan
- Parchment paper
How to Serve This Dish: Set them in paper muffin cups so the nests keep their shape. They’re a strong pick for spring parties, but the candy-egg look works whenever you need something whimsical.
Pro Tips for This Recipe:
- Crush the pretzels lightly; some bigger pieces make the nest look more real.
- Chill long enough for the chocolate to set before moving them.
- Work with damp hands if the mixture sticks.
Variations on This Dish:
- Sunflower Nest: Swap candy eggs for sunflower seeds and dried fruit.
- Chocolate Almond Nest: Use almond butter and sliced almonds.
- Rice Cereal Nest: Replace chow mein noodles with crisp rice cereal for a lighter texture.
Common Mistakes to Avoid with This Dish:
- Don’t use runny peanut butter; the nests won’t hold.
- Don’t make them too large or they fall apart.
- Don’t press the candy eggs in before the mixture sets a little.
14. Mini Donut Kabobs
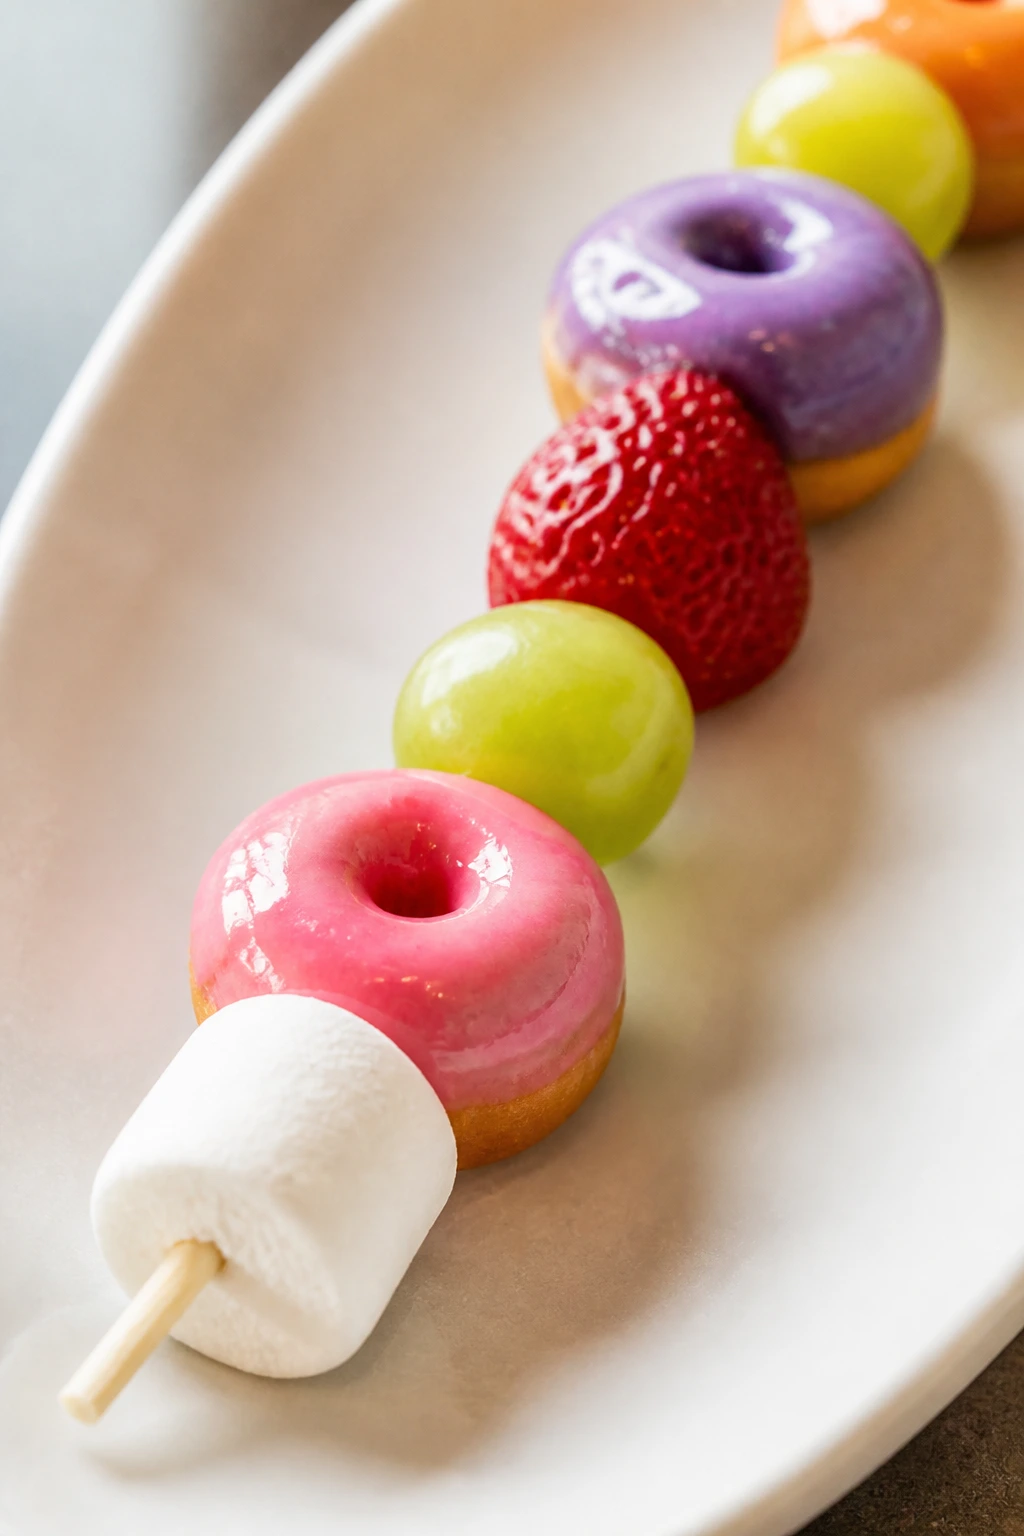
Intro: If you want dessert to look instantly cheerful, put it on a stick. Mini donuts threaded with fruit and marshmallows turn into a striped little skewer that’s as cute on a tray as it is in a child’s hand.
Why It Works: The format is doing most of the visual work here, and that’s a good thing. Small donuts are soft enough to skew without crumbling, while fruit gives color and freshness. A light glaze drizzle ties the whole thing together and makes the fruit look like part of the dessert instead of an afterthought.
Key Ingredients:
- 12 mini donuts
- 12 strawberries, hulled
- 12 green grapes
- 12 mini marshmallows
- 6 wooden skewers
- 1/2 cup powdered sugar
- 1 to 2 tablespoons milk
- 1 teaspoon vanilla extract
Quick Steps:
- Stir powdered sugar, milk, and vanilla into a thin glaze.
- Thread donuts, strawberries, grapes, and marshmallows onto skewers.
- Arrange on parchment.
- Drizzle with glaze.
- Let sit 10 minutes so the glaze sets slightly.
Equipment for This Recipe:
- Wooden skewers
- Small bowl
- Spoon
- Serving platter
How to Serve This Dish: Lay them across a long platter so the colors alternate. They work well for birthday spreads because each skewer feels like a built-in serving.
Pro Tips for This Recipe:
- Use small fruit so the skewers stay balanced.
- Alternate colors for the best look.
- Keep them refrigerated if the fruit is very soft.
Variations on This Dish:
- Chocolate Drizzle Kabob: Use melted chocolate instead of glaze.
- Berry Only Version: Swap grapes for blueberries and raspberries.
- Cinnamon Sugar Ring: Toss plain donuts in cinnamon sugar before skewering.
Common Mistakes to Avoid with This Dish:
- Don’t force the skewer through a donut that’s too dense.
- Don’t overload one side with fruit.
- Don’t make the glaze too thick or it clumps.
15. Watermelon Pizza Slices
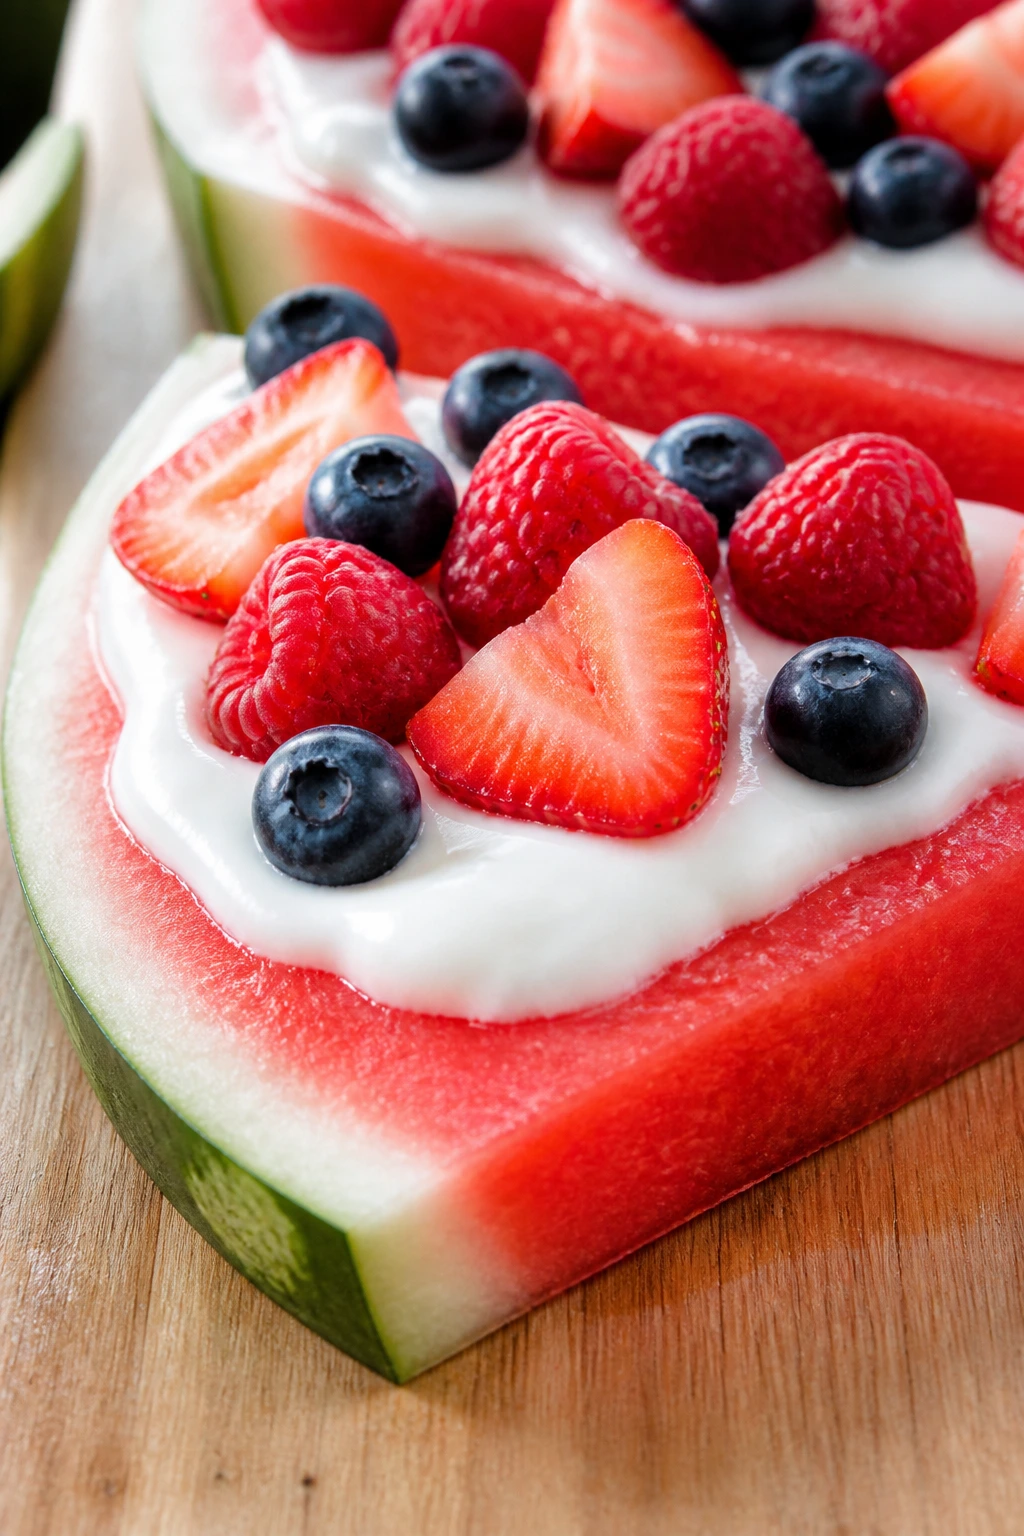
Intro: This is the dessert that gets laughs before it gets eaten. Watermelon cut into wedges and topped like pizza looks a little silly in the best way, and kids tend to lean in for that reason alone.
Why It Works: Watermelon gives you a clean, juicy base that needs almost no work. Once you add a yogurt spread and a few berries, it stops being fruit salad and starts acting like dessert. The trick is drying the surface so the yogurt sticks instead of sliding off.
Key Ingredients:
- 1 large round watermelon
- 1 cup thick vanilla yogurt or Greek yogurt
- 1 tablespoon honey
- 1 cup strawberries, sliced
- 1/2 cup blueberries
- 1/4 cup shredded coconut or mini chocolate chips
Quick Steps:
- Cut the watermelon into thick wedges.
- Pat the surface dry with paper towels.
- Mix yogurt and honey, then spread a thin layer over each slice.
- Top with strawberries, blueberries, and coconut.
- Slice into smaller pieces if needed and serve immediately.
Equipment for This Recipe:
- Large knife
- Cutting board
- Small bowl
- Spoon or offset spatula
How to Serve This Dish: Serve on a chilled tray with napkins nearby. It’s best when you want a bright, low-mess dessert that still looks like it belongs at the party.
Pro Tips for This Recipe:
- Leave the rind on for easy handling.
- Use thick yogurt so the topping stays put.
- Assemble right before serving; watermelon gives off juice.
Variations on This Dish:
- Chocolate Chip Pizza: Use chocolate yogurt and banana slices.
- Tropical Slice: Add kiwi and pineapple.
- Berry Snow: Finish with a dusting of coconut for a snowy look.
Common Mistakes to Avoid with This Dish:
- Don’t make the yogurt layer thick.
- Don’t prep it too far ahead or the fruit slides.
- Don’t skip the paper towels; wet watermelon makes a mess.
16. Frozen Yogurt Fruit Bites
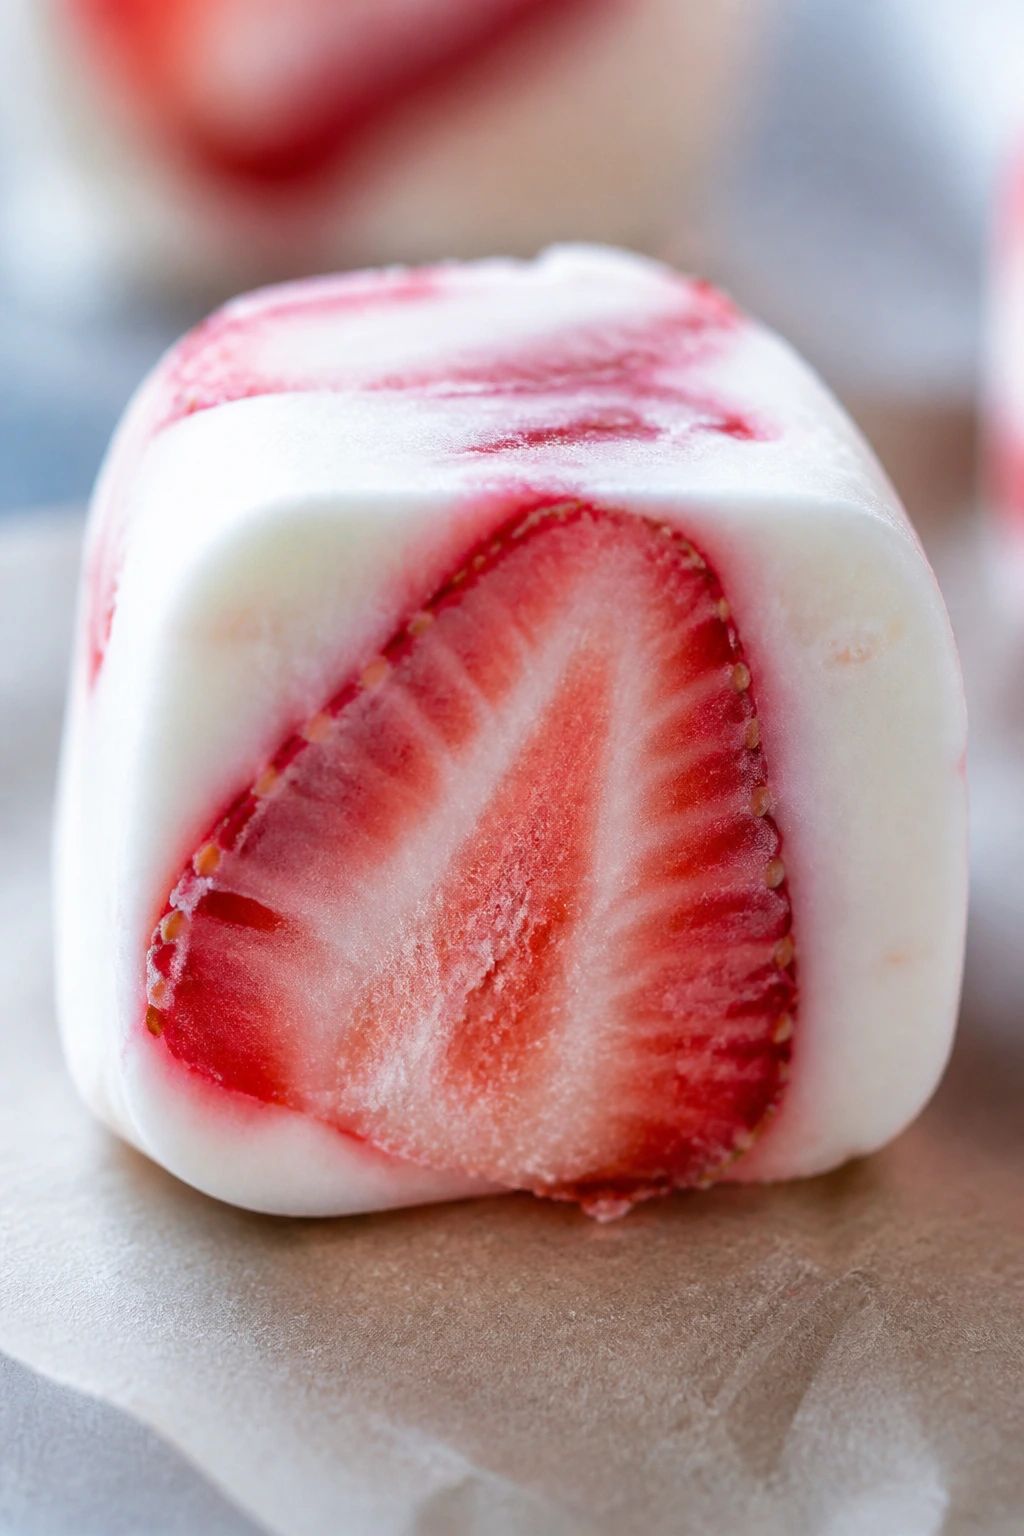
Intro: These little bites are tiny, cold, and almost too neat. Piped or spooned onto a tray, they freeze into little drops that look like candy coins with fruit inside.
Why It Works: Freezing yogurt in small rounds gives you a dessert that feels like a snack but looks polished when arranged in rows. The fruit bits add color in the middle, and the size keeps them from becoming a freezer brick. They’re ideal when you want something that can live in the freezer and come out fast.
Key Ingredients:
- 2 cups Greek yogurt
- 2 tablespoons honey
- 1 teaspoon vanilla extract
- 1/2 cup finely diced strawberries or blueberries
- 1/4 cup mini chocolate chips
Quick Steps:
- Mix yogurt, honey, and vanilla.
- Line a tray with parchment.
- Spoon or pipe 1-inch rounds onto the tray.
- Sprinkle fruit and a few chocolate chips on top.
- Freeze 2 to 3 hours, then store in a container.
Equipment for This Recipe:
- Sheet pan
- Parchment paper
- Spoon or piping bag
- Freezer-safe container
How to Serve This Dish: Serve them straight from the freezer in a shallow bowl. They make a good hot-weather dessert or a small sweet finish after lunch.
Pro Tips for This Recipe:
- Dice the fruit very small so the bites freeze evenly.
- Use thick yogurt, not runny yogurt.
- Freeze in a single layer before storing.
Variations on This Dish:
- Peach Cream Bites: Use diced peaches and vanilla yogurt.
- Cocoa Chip Version: Stir 1 teaspoon cocoa into the yogurt.
- Berry Swirl Drops: Swirl a little fruit puree into the yogurt before freezing.
Common Mistakes to Avoid with This Dish:
- Don’t make the bites too big or they melt fast.
- Don’t stack them before they’re fully frozen.
- Don’t use watery fruit pieces that ice over.
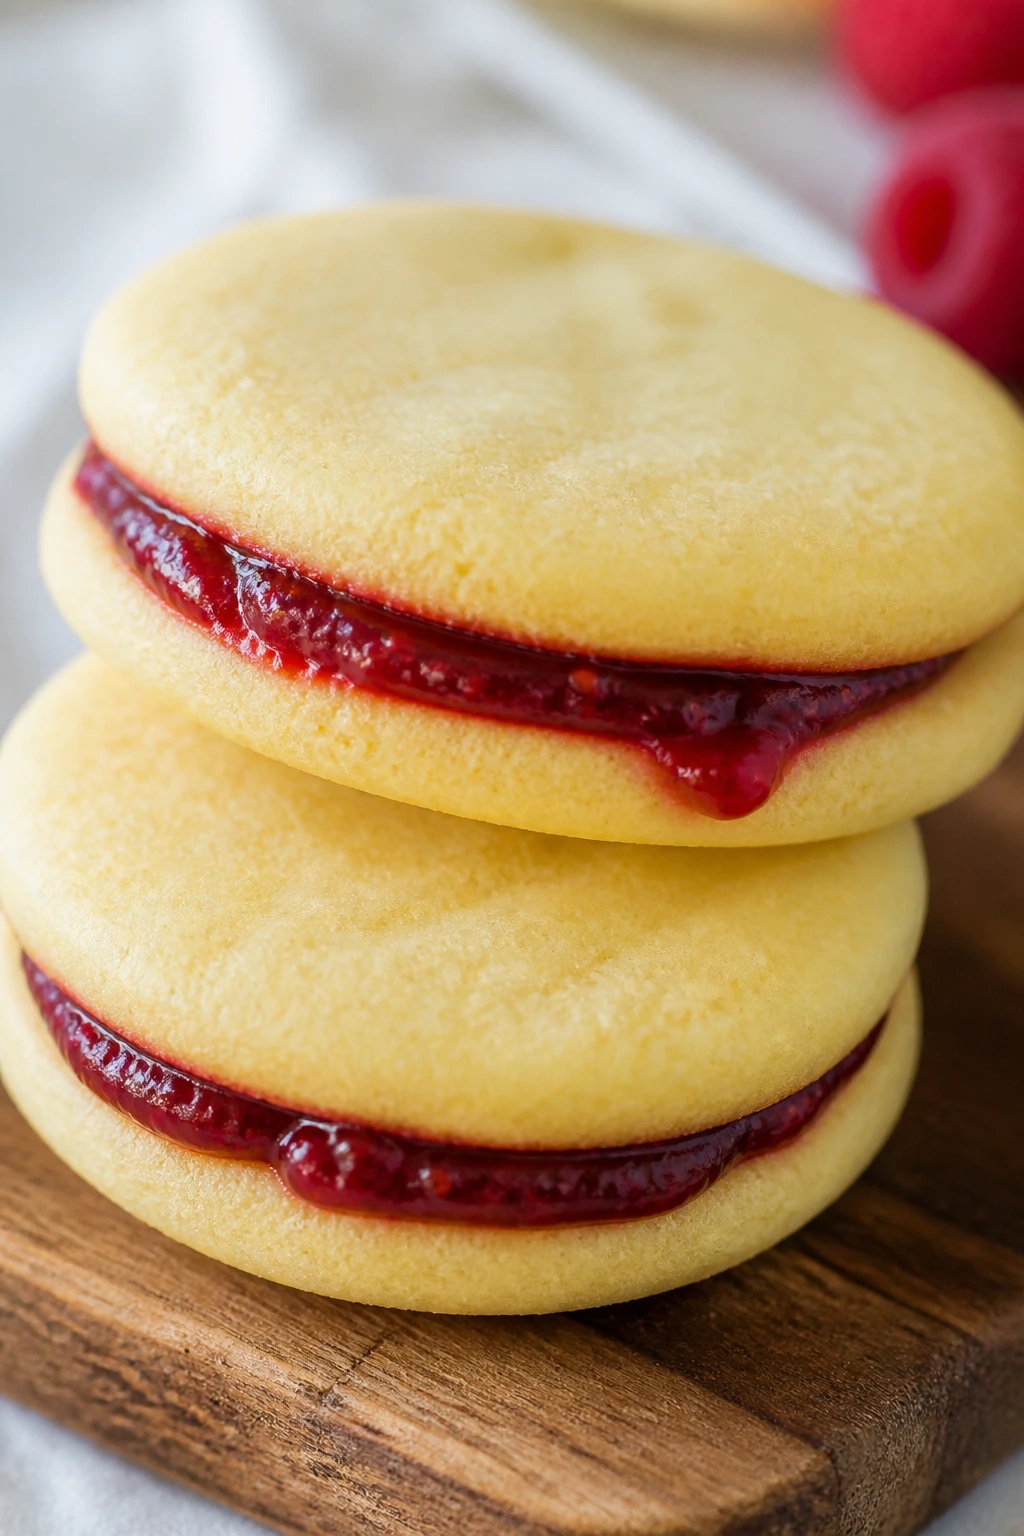
17. Raspberry Thumbprint Cookies
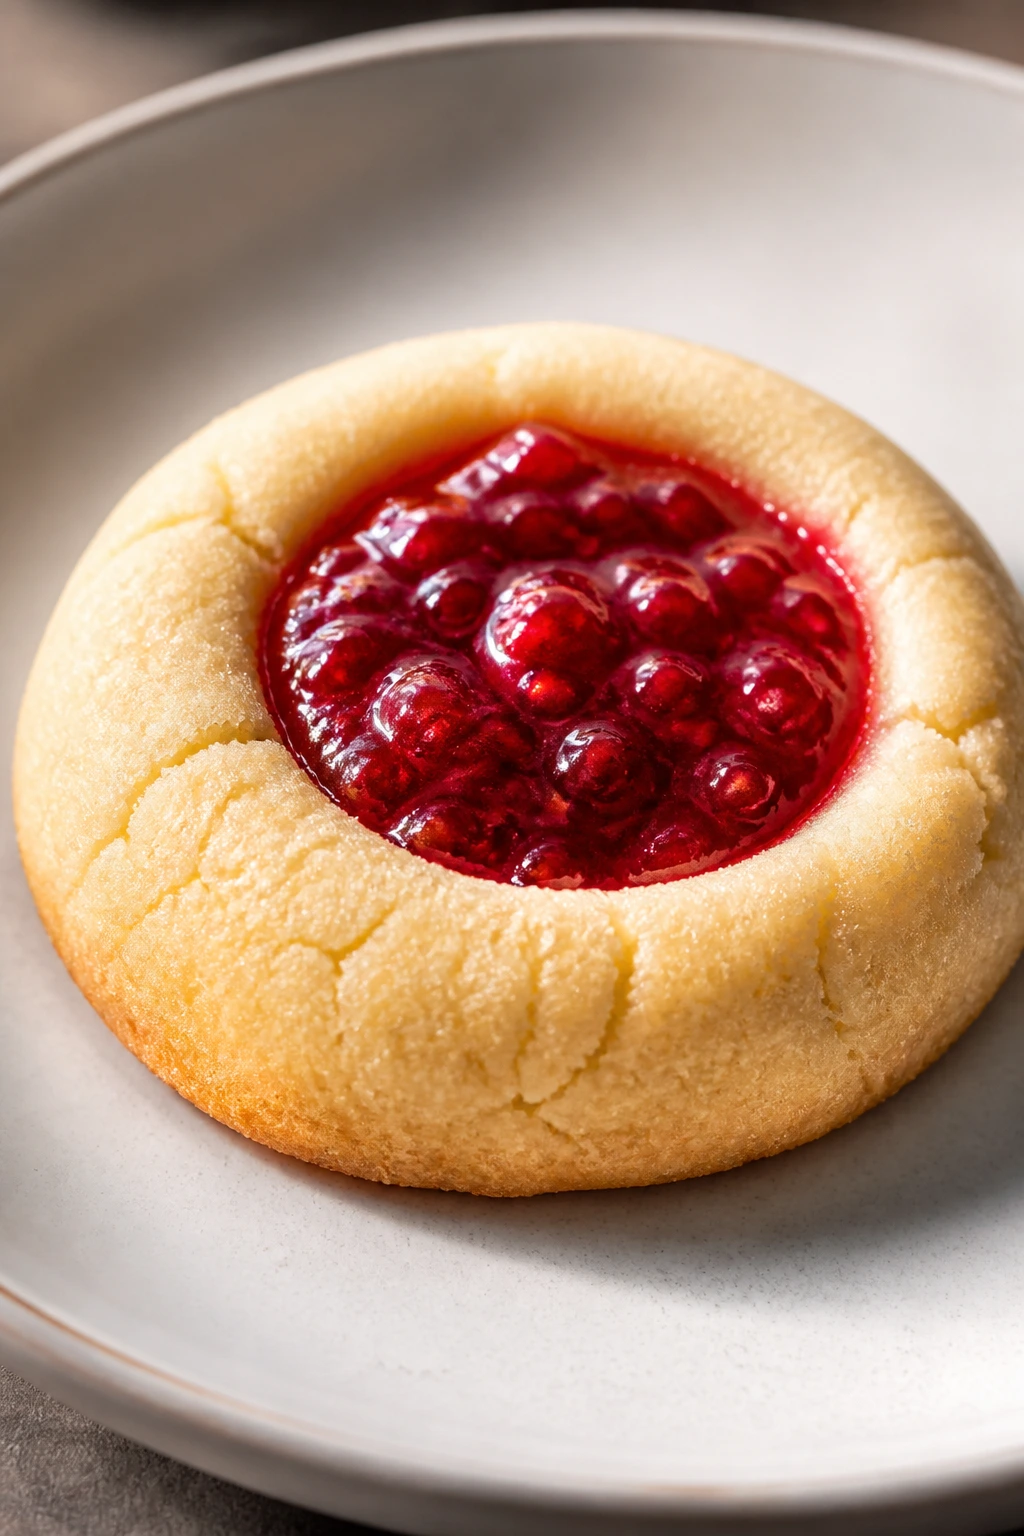
Intro: Thumbprints are tiny, tidy, and a little old-fashioned, which is part of their appeal. The jam center looks like a jewel in the middle of a buttery cookie, and that alone makes the tray look cared for.
Why It Works: The shortbread-style dough holds a clean indentation, and raspberry jam stays bright after baking. A cookie this small is easy for kids to grab, and the shape naturally controls portion size. If the dough chills, the cookies keep their round shape instead of flattening into puddles.
Key Ingredients:
- 1 cup unsalted butter, softened
- 2/3 cup granulated sugar
- 1 large egg yolk
- 1 teaspoon vanilla extract
- 2 cups all-purpose flour
- 1/4 teaspoon salt
- 1/2 cup raspberry jam
Quick Steps:
- Heat the oven to 350°F and line a baking sheet.
- Cream butter and sugar, then mix in yolk and vanilla.
- Add flour and salt to form a soft dough.
- Roll into balls, press centers with your thumb, and fill with jam.
- Bake 12 to 14 minutes until the edges are pale gold.
Equipment for This Recipe:
- Baking sheet
- Parchment paper
- Mixing bowl
- Small spoon
How to Serve This Dish: Arrange them in little rings on a plate so the jam centers show. They work well with tea, milk, or apple juice depending on the crowd.
Pro Tips for This Recipe:
- Make the thumbprint before baking, then press again gently if it puffs.
- Use thick jam to keep the center from spilling over.
- Cool on the tray for 5 minutes before moving them.
Variations on This Dish:
- Apricot Spark: Swap raspberry jam for apricot preserves.
- Lemon Thumbprint: Add lemon zest to the dough.
- Chocolate Center: Fill the wells with chocolate hazelnut spread after baking.
Common Mistakes to Avoid with This Dish:
- Don’t overfill the centers or the jam runs.
- Don’t skip the cooling time; they’re fragile hot.
- Don’t overmix the dough or the cookies turn tough.
18. Marshmallow Popcorn Balls
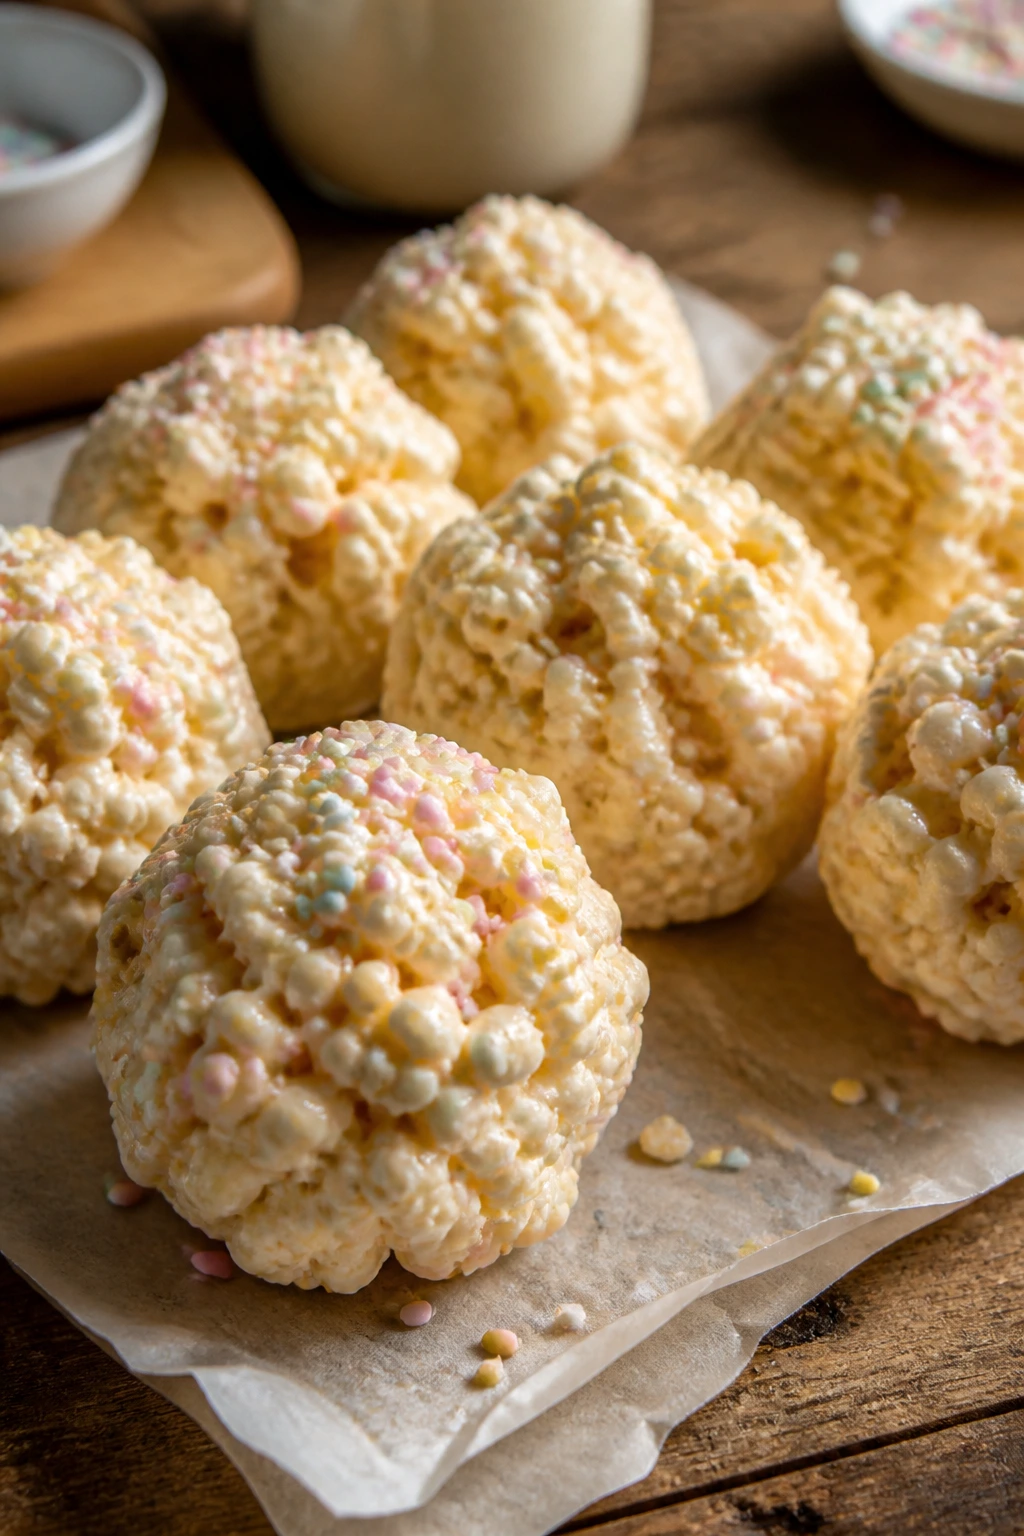
Intro: Popcorn balls are a little chaotic, which kids usually appreciate. Once you add pastel sprinkles and a glossy marshmallow coating, the rough shape starts looking intentional.
Why It Works: Marshmallow syrup binds popcorn together without making it rock-hard, and the candy shell finish gives the balls a shiny, party-ready look. They’re lighter than most candy clusters, and the irregular shape makes them look homemade in a nice way. Use plain popcorn so the color coating has room to show.
Key Ingredients:
- 10 cups popped popcorn
- 3 tablespoons butter
- 1 package mini marshmallows, about 10 oz
- 1/2 cup rainbow sprinkles
- 1/2 teaspoon vanilla extract
- Pinch of salt
Quick Steps:
- Grease your hands and a bowl.
- Melt butter and marshmallows together over low heat.
- Stir in vanilla and salt.
- Fold in popcorn and sprinkles.
- Shape into balls while warm and cool on parchment.
Equipment for This Recipe:
- Large pot
- Heatproof spoon
- Parchment paper
- Measuring cups
How to Serve This Dish: Wrap each ball in wax paper for a party tray. They’re easy to hand out and hold up better than a frosted dessert if the room is warm.
Pro Tips for This Recipe:
- Work quickly once the marshmallow melts.
- Grease your hands or the mixture will stick.
- Use fresh popcorn so it doesn’t taste stale.
Variations on This Dish:
- Cocoa Crunch Balls: Add 2 tablespoons cocoa powder to the marshmallow mix.
- Caramel Popcorn Style: Stir in a spoonful of caramel sauce.
- Birthday Cake Version: Use cake-flavored sprinkles and vanilla extract.
Common Mistakes to Avoid with This Dish:
- Don’t cook the marshmallow over high heat.
- Don’t use too much popcorn or the balls crumble.
- Don’t shape them after they cool; they won’t hold together.
19. Mini Peach Galettes
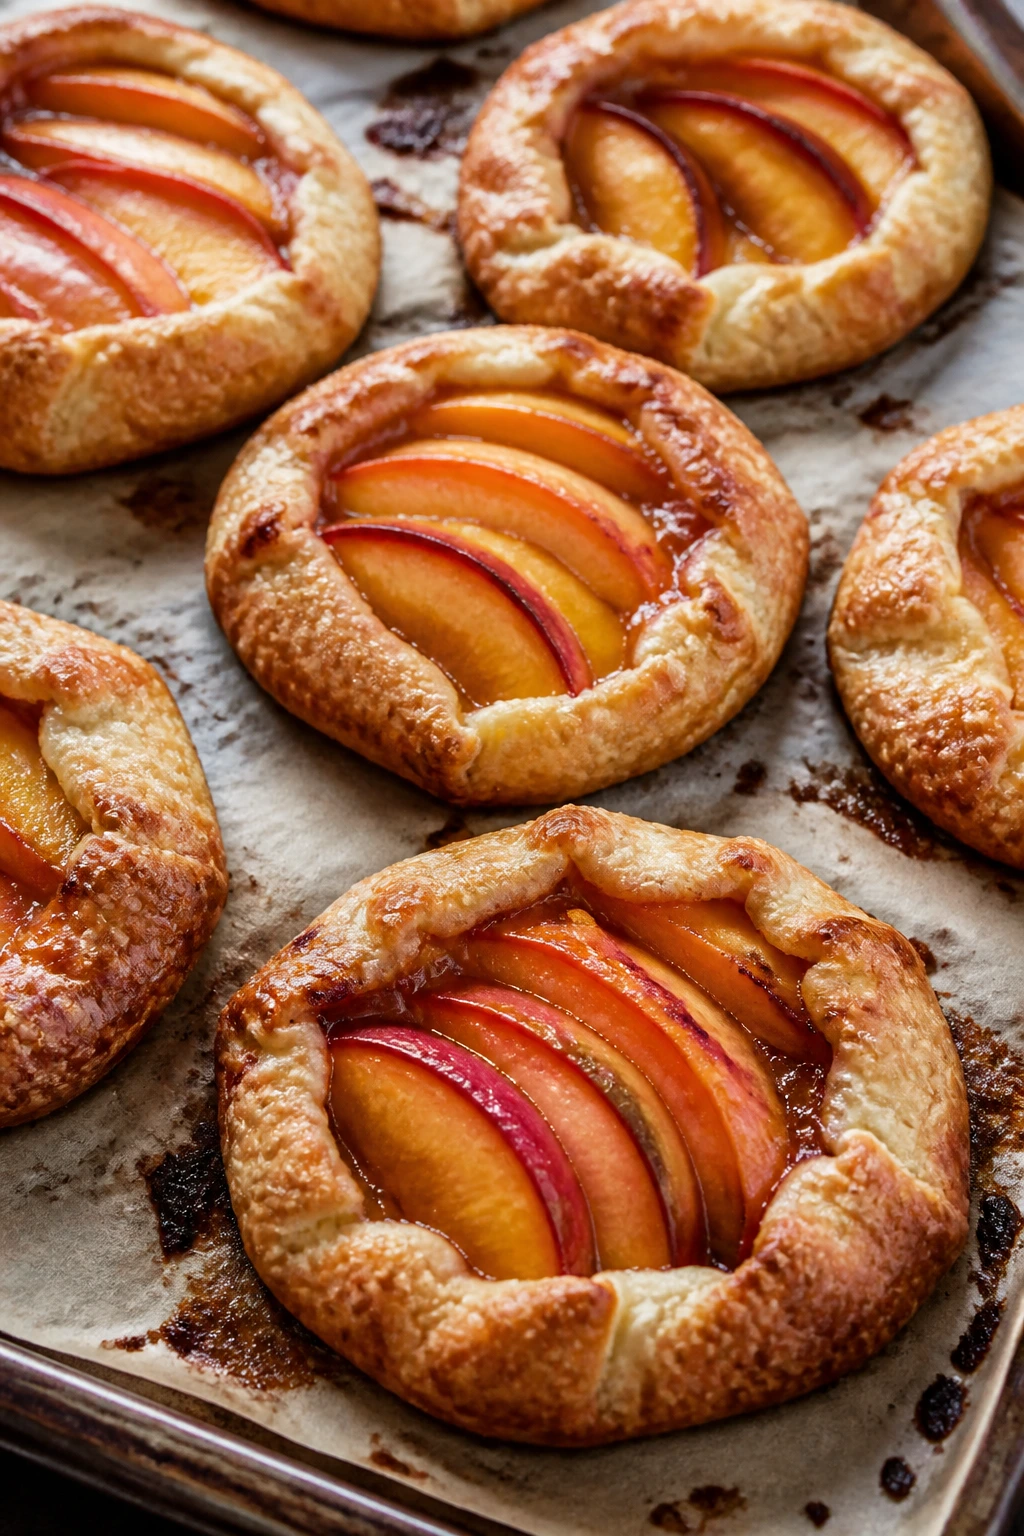
Intro: A galette has the relaxed look of a pie that didn’t try too hard, and that’s part of the charm. The peach slices fan out in the center, with the rough pastry edge folding around them like a frame.
Why It Works: Galettes forgive uneven edges, which makes them friendlier than a full pie. The fruit softens in the oven and the exposed filling browns just enough to smell like a bakery. A little flour or almond meal under the peaches helps soak up juice so the crust stays crisp.
Key Ingredients:
- 1 sheet pie dough or puff pastry
- 3 ripe peaches, sliced thin
- 2 tablespoons sugar
- 1 tablespoon cornstarch
- 1/2 teaspoon cinnamon
- 1 egg, beaten
- 1 tablespoon coarse sugar
Quick Steps:
- Heat the oven to 400°F and line a sheet pan.
- Mix peaches, sugar, cornstarch, and cinnamon.
- Roll dough into a 10-inch circle.
- Spoon peaches into the center and fold edges over.
- Brush with egg, sprinkle with coarse sugar, and bake 28 to 32 minutes.
Equipment for This Recipe:
- Sheet pan
- Rolling pin
- Pastry brush
- Mixing bowl
How to Serve This Dish: Serve warm with a scoop of vanilla ice cream or plain whipped cream. Slice into wedges, but keep in mind the rustic edge is the whole point.
Pro Tips for This Recipe:
- Use peaches that are ripe but still firm.
- Keep the filling centered so the edges can fold neatly.
- Chill the shaped galette for 10 minutes before baking if the dough feels soft.
Variations on This Dish:
- Berry Peach Mix: Add a handful of blueberries.
- Plum Galette: Swap peaches for sliced plums.
- Cinnamon Cream Finish: Serve with lightly sweetened sour cream.
Common Mistakes to Avoid with This Dish:
- Don’t skip the cornstarch or the middle gets watery.
- Don’t overload the fruit; the crust won’t fold.
- Don’t underbake the base if you want crisp edges.
20. Chocolate-Covered Strawberry Skewers

Intro: Strawberries on sticks are already pleasant. Dip them in chocolate, line them up like little soldiers, and suddenly the dessert table looks put together.
Why It Works: Skewers keep the berries tidy and give you a controlled way to decorate with chocolate drizzle, sprinkles, or white chocolate stripes. The stemless berry-on-a-stick look is neat enough for a party but still easy for kids to grab. Dry berries matter here more than in almost any other dessert.
Key Ingredients:
- 18 large strawberries, washed and dried
- 6 wooden skewers
- 8 oz semisweet chocolate
- 4 oz white chocolate
- 1 tablespoon coconut oil
- 2 tablespoons sprinkles
Quick Steps:
- Pat strawberries dry and thread 3 per skewer.
- Melt semisweet chocolate with coconut oil.
- Dip the lower half of each skewer and place on parchment.
- Drizzle with melted white chocolate.
- Finish with sprinkles and chill 15 minutes.
Equipment for This Recipe:
- Skewers
- Parchment-lined tray
- Microwave-safe bowls
- Spoon
How to Serve This Dish: Lean the skewers across the edge of a platter so they look like a bouquet. They’re a nice finish for chocolate lovers, and they’re easy to scale up without extra baking.
Pro Tips for This Recipe:
- Wash strawberries ahead of time so they dry fully.
- Melt chocolate slowly to keep it glossy.
- Use the driest berries in the batch for dipping.
Variations on This Dish:
- Coconut Stripe: Roll the wet chocolate edge in toasted coconut.
- Dark and Gold: Use dark chocolate with a light dusting of gold sugar.
- Mixed Berry Skewers: Add banana slices between berries if serving quickly.
Common Mistakes to Avoid with This Dish:
- Don’t dip wet strawberries or the chocolate slips.
- Don’t let melted chocolate overheat.
- Don’t store them too long once dipped; berries soften.
21. Confetti Rice Krispie Treat Bars
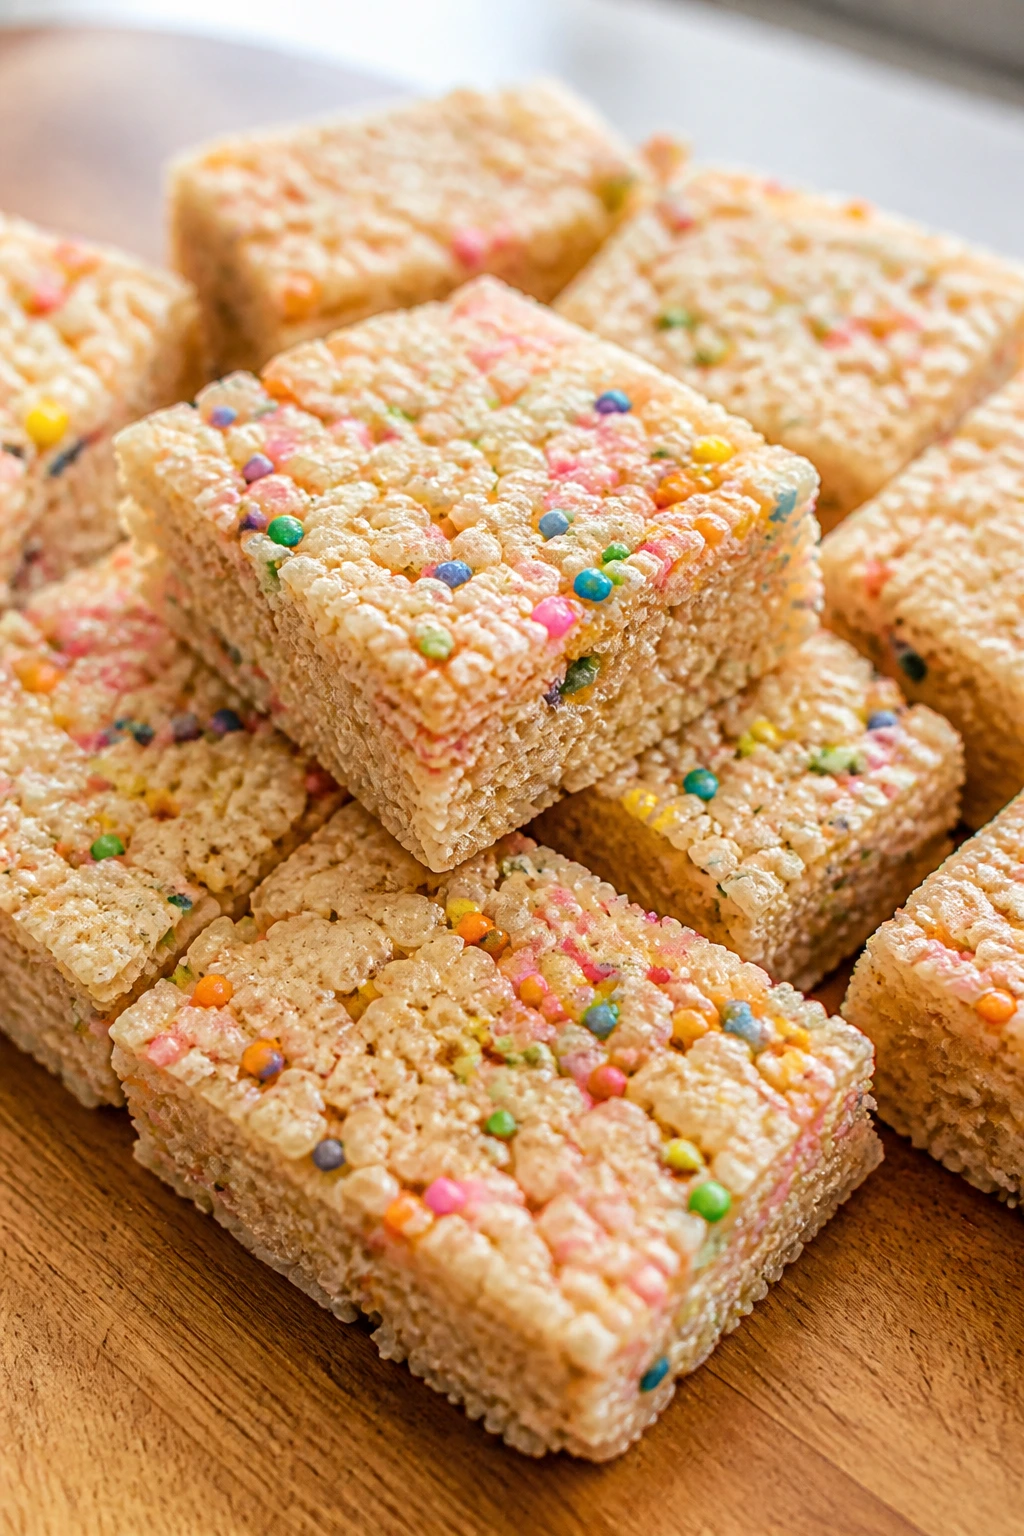
Intro: These bars are bright enough to look like they’re already decorated. A square of cereal treats with sprinkles baked into the marshmallow mix has a neat, cheerful look that kids spot from across the room.
Why It Works: Rice Krispie treats set fast, slice cleanly, and take color well without frosting. Folding in sprinkles after the marshmallow cools just a little keeps them from melting into the mix. Press the bars gently, not hard; compressed treats turn dense and lose the airy snap.
Key Ingredients:
- 6 cups crisp rice cereal
- 4 tablespoons butter
- 1 package mini marshmallows, about 10 oz
- 1/2 cup rainbow sprinkles
- 1 teaspoon vanilla extract
Quick Steps:
- Grease a 9-inch square pan.
- Melt butter and marshmallows over low heat.
- Stir in vanilla, then fold in cereal and sprinkles.
- Press into the pan with greased hands.
- Cool 30 minutes and cut into squares.
Equipment for This Recipe:
- 9-inch square pan
- Large pot
- Spatula
- Parchment paper
How to Serve This Dish: Cut them into neat squares or use cookie cutters for stars and hearts. They’re good for school parties because they hold shape and don’t need refrigeration.
Pro Tips for This Recipe:
- Remove the pan from heat before adding sprinkles if the mix is very hot.
- Press lightly with wax paper, not a heavy hand.
- Add a handful of mini marshmallows at the end for pockets of chew.
Variations on This Dish:
- Birthday Cake Bars: Use cake-flavored cereal if you can find it, or add vanilla extra.
- Chocolate Confetti: Drizzle melted chocolate over the cooled bars.
- Peanut Butter Puff: Stir in 1/4 cup peanut butter with the marshmallows.
Common Mistakes to Avoid with This Dish:
- Don’t overcook the marshmallow or the bars go hard.
- Don’t pack them down too tightly.
- Don’t wait too long to cut them once cooled; they can get stubborn.
22. No-Bake Oreo Cheesecake Cups
Intro: Oreo cheesecake in a cup has a very specific appeal: it looks layered, tidy, and much more involved than it is. The dark crumb against pale filling gives each cup a clear stripe that reads instantly.
Why It Works: No-bake cheesecake depends on a whipped filling that firms up in the fridge, which is why the cup format helps. You get clean layers without worrying about a cracked top or a water bath. Cookie crumbs at the bottom keep the dessert from feeling too soft.
Key Ingredients:
- 16 Oreo cookies, crushed
- 4 tablespoons melted butter
- 8 oz cream cheese, softened
- 1/2 cup powdered sugar
- 1 teaspoon vanilla extract
- 1 cup whipped cream or whipped topping
- 1/2 cup chopped Oreos for topping
Quick Steps:
- Mix crumbs and butter, then press into 6 cups.
- Beat cream cheese, powdered sugar, and vanilla until smooth.
- Fold in whipped cream.
- Spoon over the crumb layer.
- Top with cookie pieces and chill 2 hours.
Equipment for This Recipe:
- Mixing bowls
- Hand mixer
- Serving cups
- Spoon
How to Serve This Dish: Serve with a dusting of extra cookie crumbs on top. These cups are rich enough that smaller portions usually win.
Pro Tips for This Recipe:
- Soften the cream cheese fully so the filling is smooth.
- Fold, don’t stir, once the whipped cream goes in.
- Chill long enough for the cups to hold a clean spoonful.
Variations on This Dish:
- Mint Cookie Cups: Swap in mint Oreos.
- Strawberry Oreo Cups: Add a spoonful of strawberry jam between the layers.
- Mini Jar Version: Make them in tiny jam jars for a picnic.
Common Mistakes to Avoid with This Dish:
- Don’t use cold cream cheese or the filling stays lumpy.
- Don’t overfill the cups unless you want a messy rim.
- Don’t skip the chill time; the layers need to set.
23. Candy-Studded Blondie Bars
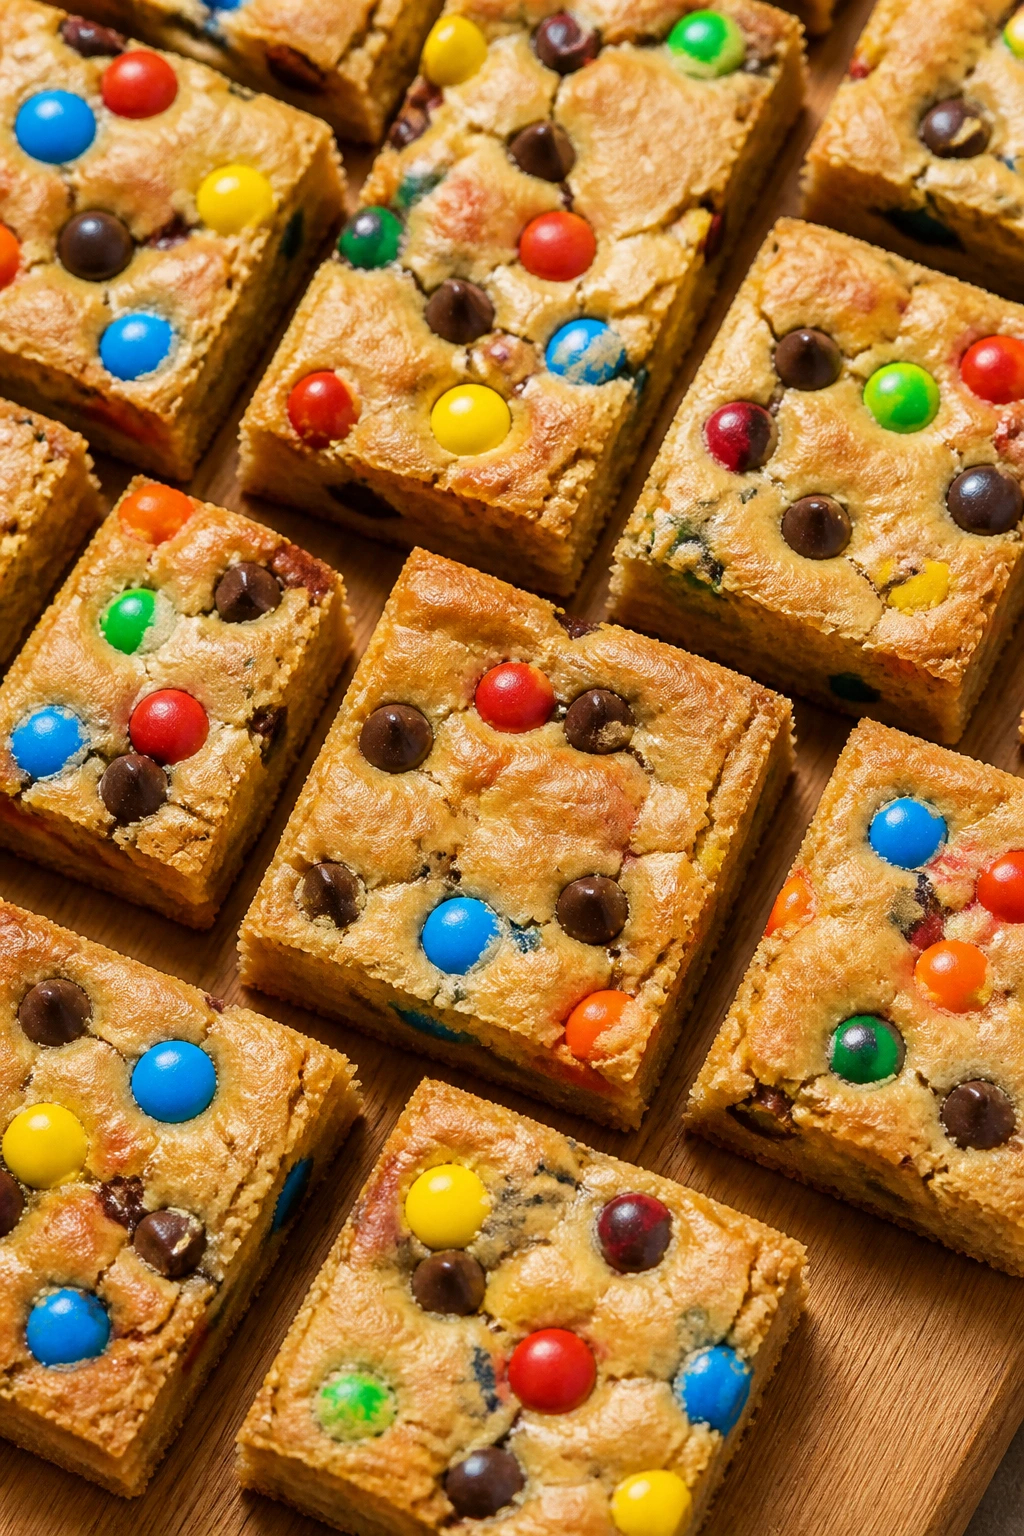
Intro: Blondies are the soft, brown-sugar cousin of a brownie, and they make a very good canvas. Add candy pieces on top, and you get a bar that looks colorful but still tastes like something baked rather than assembled.
Why It Works: Brown sugar keeps blondies chewy, while candy on top gives you color without extra frosting. They cut into clean squares and hold their shape better than a frosted dessert in a lunchbox or on a picnic tray. The top stays a little crinkly, which is half the appeal.
Key Ingredients:
- 1 cup unsalted butter, melted
- 2 cups brown sugar
- 2 large eggs
- 2 teaspoons vanilla extract
- 2 cups all-purpose flour
- 1 teaspoon baking powder
- 1/2 teaspoon salt
- 1 cup candy-coated chocolates or chopped candy bars
Quick Steps:
- Heat the oven to 350°F and line a 9×13-inch pan.
- Whisk butter and brown sugar, then add eggs and vanilla.
- Stir in flour, baking powder, and salt.
- Fold in half the candy, then press the batter into the pan.
- Top with the rest of the candy and bake 22 to 26 minutes.
Equipment for This Recipe:
- 9×13-inch pan
- Parchment paper
- Mixing bowl
- Spatula
How to Serve This Dish: Cut into small squares and serve at room temperature. They look good stacked in a loose pile, especially if the candy colors vary.
Pro Tips for This Recipe:
- Pull them when the center is just set; they finish as they cool.
- Reserve some candy for the top so the bars look bright.
- Use parchment overhang to lift the whole slab out cleanly.
Variations on This Dish:
- White Chocolate Blondies: Swap candies for white chocolate chips.
- Pretzel Crunch Bars: Fold in crushed pretzels for a salty edge.
- Nut-Free Party Bars: Use only candy-coated chocolates or sunflower chips.
Common Mistakes to Avoid with This Dish:
- Don’t overbake until the edges are dark.
- Don’t add too many mix-ins or the bars crumble.
- Don’t cut while hot unless you want ragged squares.
24. Lemon Blueberry Loaf with Glaze
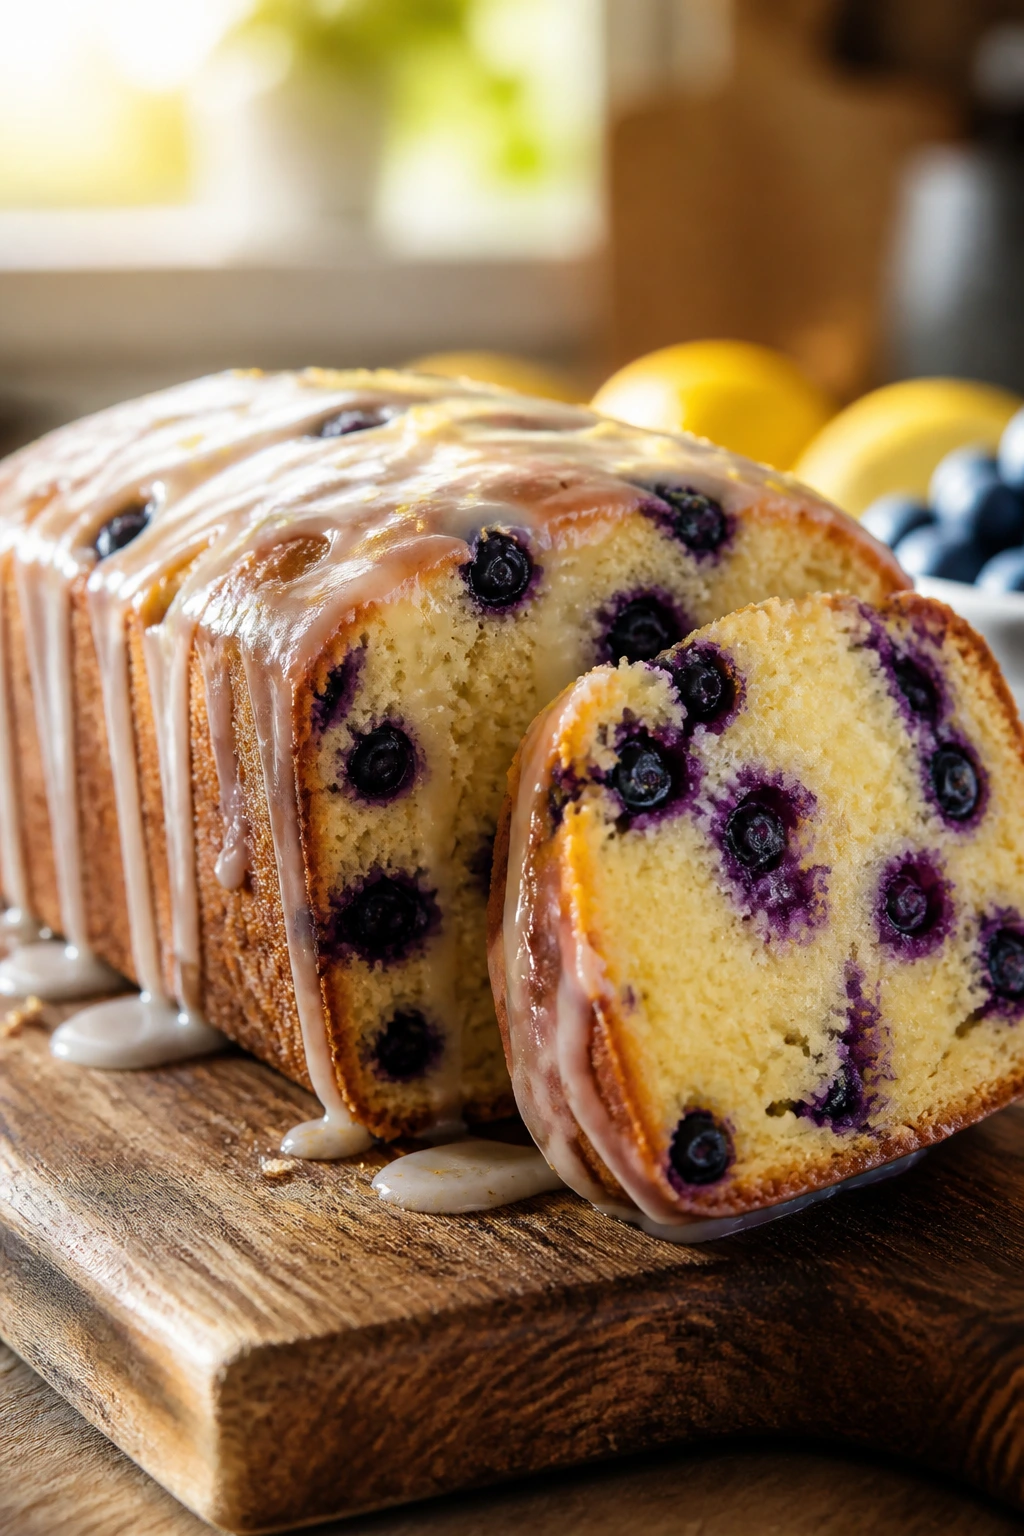
Intro: A glazed loaf can look plain from across the room and gorgeous up close. Blueberries dot the crumb like little paint marks, and the lemon glaze drips down the sides in a way that feels neat rather than messy.
Why It Works: Lemon and blueberry are already a strong pairing, but the loaf format lets the fruit stay suspended instead of sinking into a tray cake. A thick glaze gives you the visual finish that turns a breakfast-style loaf into dessert. The crumb should stay moist, not dense, so you want the batter mixed only until the flour disappears.
Key Ingredients:
- 1 1/2 cups all-purpose flour
- 1 teaspoon baking powder
- 1/2 teaspoon salt
- 1/2 cup butter, softened
- 3/4 cup sugar
- 2 large eggs
- 1/2 cup plain yogurt
- 1 tablespoon lemon zest
- 1 cup blueberries
- 1 cup powdered sugar
- 2 tablespoons lemon juice
Quick Steps:
- Heat the oven to 350°F and line a loaf pan.
- Cream butter and sugar, then add eggs, yogurt, and zest.
- Stir in dry ingredients and fold in blueberries.
- Bake 50 to 55 minutes until a toothpick comes out with a few crumbs.
- Cool, drizzle with glaze, and let it set.
Equipment for This Recipe:
- Loaf pan
- Mixing bowls
- Zester
- Wire rack
How to Serve This Dish: Slice it thick and serve on a cake stand with extra blueberries around the base. It works as dessert, snack, or the sweet ending after a brunch table.
Pro Tips for This Recipe:
- Toss blueberries with a spoonful of flour so they stay suspended.
- Cool before glazing or the icing melts off.
- Use fresh lemon juice, not bottled, for a sharper finish.
Variations on This Dish:
- Raspberry Lemon Loaf: Swap blueberries for raspberries.
- Mini Loaves: Divide the batter into mini pans and shorten the bake time.
- Lemon Poppy Seed: Add 1 tablespoon poppy seeds for more texture.
Common Mistakes to Avoid with This Dish:
- Don’t overmix once flour goes in.
- Don’t glaze the loaf while it’s hot.
- Don’t pull it too early; the center can still be wet.
25. Cotton Candy Cupcakes

Intro: Cotton candy cupcakes are pure showmanship, which is useful when you want the dessert table to look playful before anyone sits down. Pastel frosting and a tuft of cotton candy on top do most of the visual work.
Why It Works: The cupcake itself can stay simple — vanilla is enough — because the frosting and topper carry the theme. Cotton candy is fragile and melts fast, so it belongs on top at the last minute, not hours ahead. The rest of the cupcake should be sturdy enough to hold a generous swirl without slumping.
Key Ingredients:
- 1 batch vanilla cupcake batter, enough for 12 cupcakes
- 2 cups vanilla buttercream
- Cotton candy flavoring, a few drops
- Pink and blue gel food coloring
- 1 1/2 cups cotton candy, for topping
- Pastel sprinkles
Quick Steps:
- Bake the cupcakes at 350°F and cool fully.
- Tint the buttercream pale pink or blue.
- Pipe tall swirls on the cupcakes.
- Add sprinkles.
- Top with a small tuft of cotton candy right before serving.
Equipment for This Recipe:
- Muffin pan
- Piping bag
- Star tip
- Cooling rack
How to Serve This Dish: Serve immediately after adding the cotton candy topper. If you want them to stay crisp on the outside and airy on top, don’t let them sit under humid air for long.
Pro Tips for This Recipe:
- Use only a little cotton candy flavoring; it can get sharp fast.
- Keep the topper loose and small.
- Pipe the frosting high enough to support the cotton candy nest.
Variations on This Dish:
- Cloud Cupcakes: Use white frosting with pearl sprinkles.
- Pink-Blue Swirl: Pipe two frosting colors in one bag for a striped effect.
- Cotton Candy Filling: Add a little raspberry jam inside the cupcake for color.
Common Mistakes to Avoid with This Dish:
- Don’t add cotton candy too early.
- Don’t use too much flavoring or the frosting tastes perfumed.
- Don’t frost warm cupcakes.
26. Butterfly Cupcakes

Intro: Butterfly cupcakes are a good example of a dessert that earns its place through shape alone. Cut the top, tuck in the wings, and the whole thing suddenly looks like a little creature sitting on the plate.
Why It Works: This design uses the cupcake itself as part of the decoration, which means you don’t need fancy tools or sculpted fondant. A little frosting in the center acts like glue, and the cut-out cake pieces become wings. Kids love the fact that the “flaps” are edible.
Key Ingredients:
- 12 vanilla cupcakes, cooled
- 2 cups buttercream frosting
- 12 strawberry halves or candy pieces
- 24 small fruit slices or chocolate chips for spots
- Food coloring, optional
Quick Steps:
- Frost the cupcakes with a small dome in the center.
- Cut a small circle from the top of each cupcake and slice it in half.
- Place the two halves in the frosting at an angle to make wings.
- Add a strawberry half or candy in the middle as the body.
- Finish with tiny spots or sprinkles.
Equipment for This Recipe:
- Small knife
- Piping bag or spoon
- Cupcake tray
- Serrated knife, optional
How to Serve This Dish: Arrange them in a loose cluster so the wings face different directions. They make a very cheerful party tray because every cupcake looks a little different.
Pro Tips for This Recipe:
- Cut the top gently so you don’t tear it.
- Use thick frosting to hold the wings in place.
- Add the wings close to serving time if the room is warm.
Variations on This Recipe:
- Berry Butterfly: Use a raspberry in the center and blueberry spots.
- Chocolate Wing Version: Make chocolate cupcakes and vanilla frosting.
- Lemon Garden Butterfly: Add lemon zest to the batter.
Common Mistakes to Avoid with This Dish:
- Don’t cut the wings too big or they topple.
- Don’t frost the top too thinly.
- Don’t use very soft cupcakes; the wings sink.
27. Chocolate Mousse Cups with Raspberries

Intro: Chocolate mousse in a small cup looks smooth and deliberate, like dessert wearing a nice shirt. A few raspberries on top break the darkness with a sharp red contrast that children notice immediately.
Why It Works: Mousse gives you a rich texture without needing a cake layer or crust. The cups keep the portions under control, and the fruit on top makes the dessert feel brighter and less heavy. Chill time matters here; mousse tastes flat if it hasn’t had time to firm up.
Key Ingredients:
- 6 oz semisweet chocolate, chopped
- 2 tablespoons butter
- 2 large eggs, separated
- 2 tablespoons sugar
- 1 cup heavy cream
- 1/2 cup raspberries
Quick Steps:
- Melt chocolate and butter, then cool slightly.
- Whisk egg yolks into the chocolate.
- Beat cream to soft peaks.
- Whip egg whites with sugar to glossy peaks and fold everything together gently.
- Spoon into cups and chill 2 hours; top with raspberries.
Equipment for This Recipe:
- Heatproof bowl
- Hand mixer
- Rubber spatula
- Serving cups
How to Serve This Dish: Serve cold with one or two raspberries per cup and maybe a shaving of chocolate. These are a nice choice when you want something darker and less candy-like on a dessert spread.
Pro Tips for This Recipe:
- Fold slowly to keep the mousse airy.
- Let the melted chocolate cool before adding eggs.
- Use ripe raspberries that still hold shape.
Variations on This Recipe:
- White Chocolate Mousse: Swap in white chocolate and strawberries.
- Orange Chocolate Cups: Add orange zest for a bright note.
- Layered Parfait Style: Alternate mousse with crushed cookies.
Common Mistakes to Avoid with This Dish:
- Don’t overfold and knock out the air.
- Don’t use hot chocolate mixture or the eggs may scramble.
- Don’t serve before the mousse is chilled through.
28. Mini Pavlovas with Berries
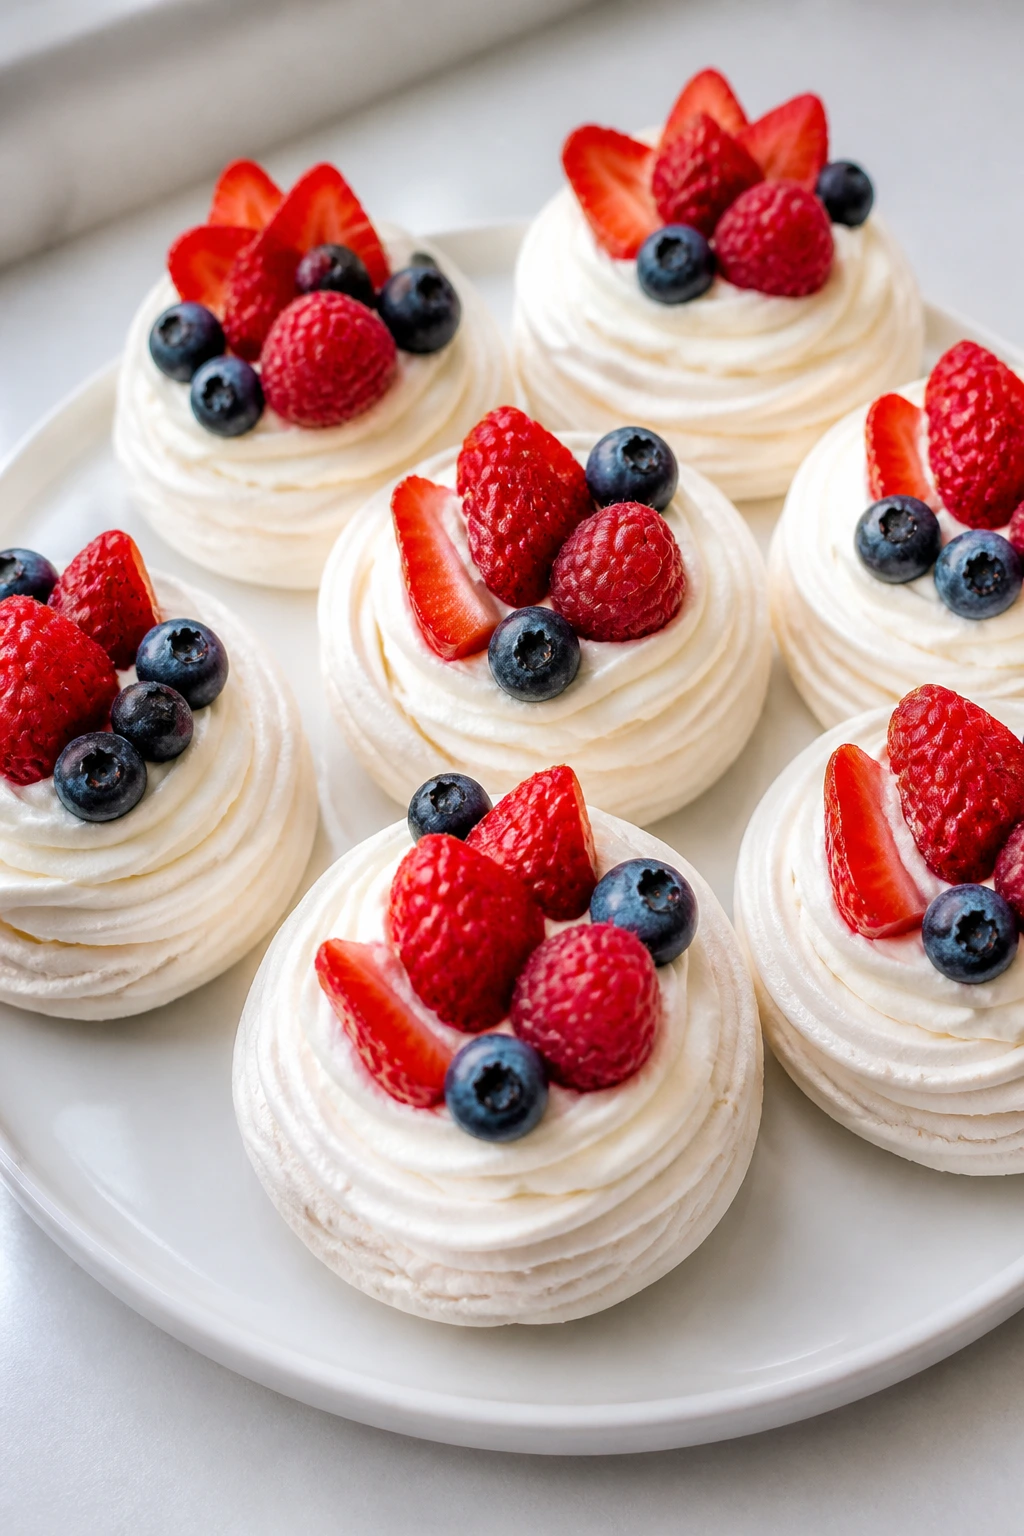
Intro: Mini pavlovas look fancy in the same way a cloud looks fancy: all curves, no hard edges. The crisp shell and marshmallow-soft center make them feel fragile and special, which kids tend to find amusing.
Why It Works: Egg white meringue bakes into a shell with a soft center if you dry it slowly in a low oven. The shape makes a natural nest for whipped cream and berries, so the dessert looks finished without much decoration. Individual meringues also solve the slicing problem that full pavlova brings.
Key Ingredients:
- 4 egg whites
- 1 cup granulated sugar
- 1 teaspoon cornstarch
- 1 teaspoon vanilla extract
- 1 cup heavy cream
- 2 cups mixed berries
Quick Steps:
- Heat the oven to 225°F and line a baking sheet.
- Whip egg whites to soft peaks, then add sugar slowly until glossy.
- Fold in cornstarch and vanilla.
- Spoon into 6 to 8 mounds and bake 75 minutes, then cool in the oven.
- Top with whipped cream and berries.
Equipment for This Recipe:
- Stand mixer or hand mixer
- Baking sheet
- Parchment paper
- Spoon
How to Serve This Dish: Serve them just after topping so the shell keeps some crunch. They look especially nice on a flat white platter with berries tumbling around the base.
Pro Tips for This Recipe:
- Make sure the bowl is grease-free.
- Add sugar slowly so the meringue doesn’t collapse.
- Cool inside the turned-off oven to reduce cracking.
Variations on This Dish:
- Chocolate Pavlova: Add cocoa to the meringue base.
- Citrus Berry Nest: Add lemon zest to the cream.
- Tiny Party Nest: Make smaller meringues for bite-size servings.
Common Mistakes to Avoid with This Dish:
- Don’t bake at too high a temperature.
- Don’t make the cream topping too early.
- Don’t add berries until you’re ready to serve.
29. Raspberry Lemon Sandwich Cookies
Intro: A sandwich cookie with jam peeking out the side looks neat and a little bit old-fashioned. The lemon cookie and bright raspberry middle give you a color contrast that reads clearly on a platter.
Why It Works: Tender cookies hold the filling without cracking, and raspberry jam stays vivid between layers. Lemon keeps the sweetness in check, which is useful when the filling is already sugary. If the cookies chill after assembly, they firm up and look cleaner when stacked.
Key Ingredients:
- 2 cups all-purpose flour
- 1/2 teaspoon baking powder
- 1/4 teaspoon salt
- 1 cup butter, softened
- 3/4 cup sugar
- 1 egg
- 1 tablespoon lemon zest
- 1/2 cup raspberry jam
- 1/2 cup powdered sugar for dusting
Quick Steps:
- Mix dough and chill 30 minutes.
- Roll and cut into 2-inch rounds.
- Bake at 350°F for 10 to 12 minutes.
- Cool completely.
- Spread jam between two cookies and dust lightly with powdered sugar.
Equipment for This Recipe:
- Cookie cutters
- Sheet pan
- Rolling pin
- Small spoon
How to Serve This Dish: Stack them in twos or threes with a little powdered sugar drifted over the top. They hold well in a box and look tidy on a dessert tray.
Pro Tips for This Recipe:
- Keep the cookie thickness even.
- Let the cookies cool fully before sandwiching.
- Use a thick jam so it does not leak out.
Variations on This Recipe:
- Apricot Lemon Cookies: Swap the raspberry jam for apricot preserves.
- Berry Cream Filling: Mix jam with a little whipped cream cheese.
- Orange Sandwich Cookies: Use orange zest in the dough.
Common Mistakes to Avoid with This Recipe:
- Don’t bake until dark; pale cookies taste softer.
- Don’t fill while warm or the jam melts out.
- Don’t use too much jam in the center.
30. Strawberry Pretzel Dessert Cups
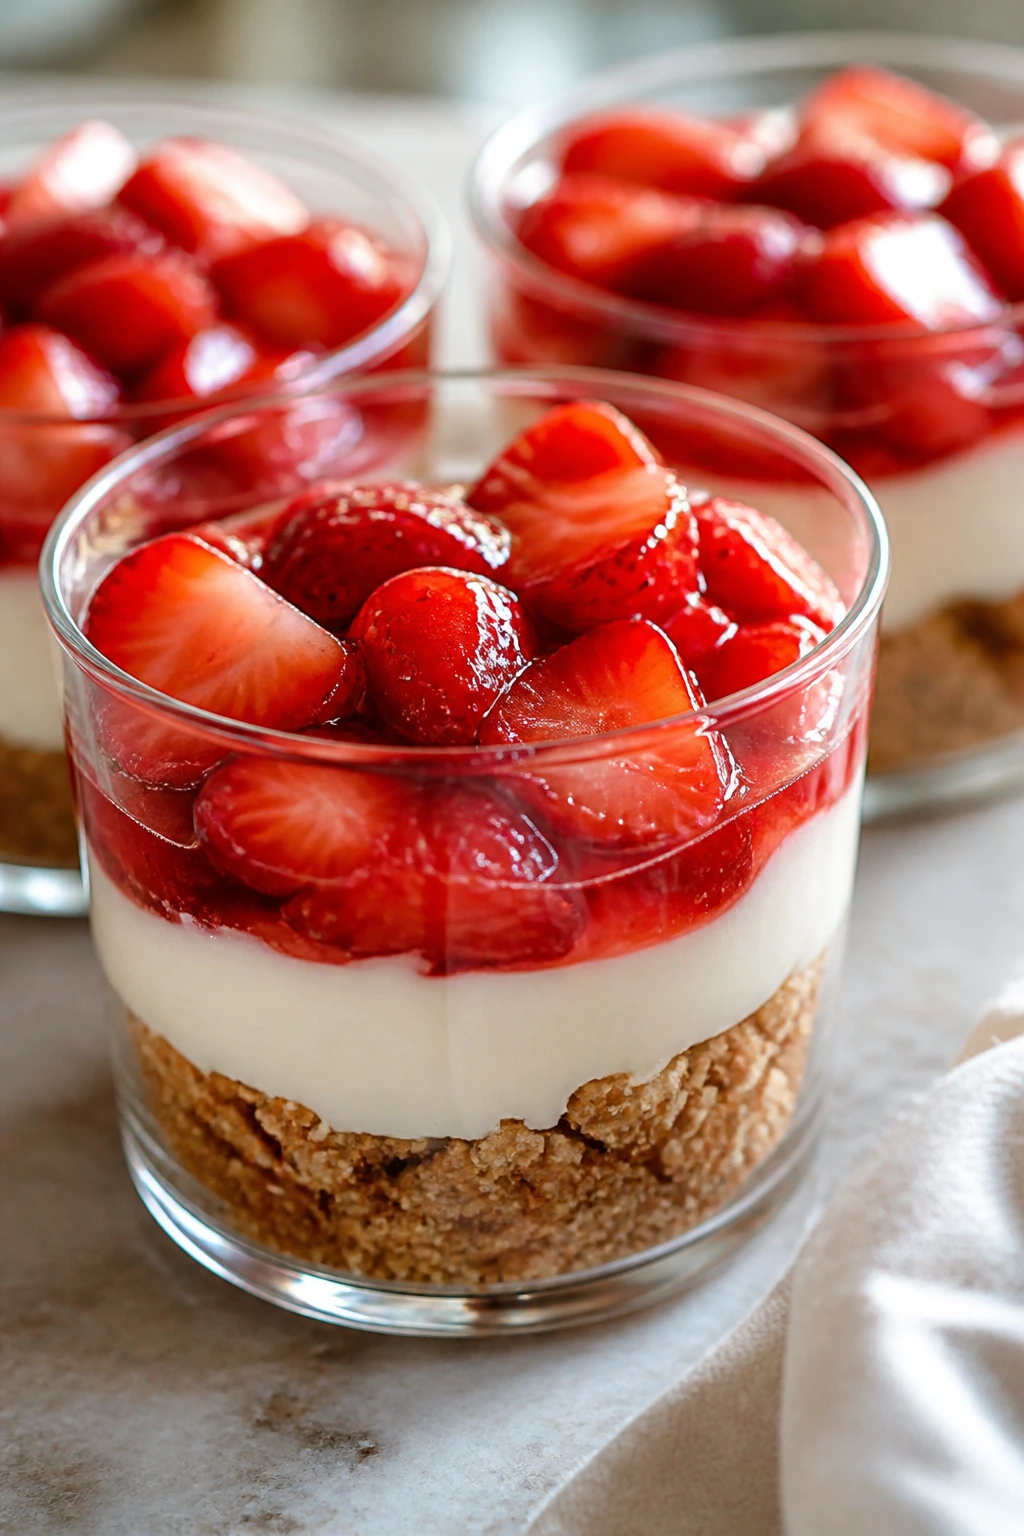
Intro: Sweet-salty desserts wear well on a kids’ table, and this one proves the point. The pretzel crumb looks like sand, the cream layer stays pale and smooth, and the strawberry topping gives the whole cup a bright red cap.
Why It Works: The salt in the pretzel base keeps the dessert from reading as straight sugar. Cream cheese stabilizes the middle layer, while the strawberry topping adds shine and color. In cup form, the classic casserole gets cleaner edges and better portion control.
Key Ingredients:
- 2 cups crushed pretzels
- 1/4 cup melted butter
- 2 tablespoons sugar
- 8 oz cream cheese, softened
- 1/2 cup powdered sugar
- 1 cup whipped topping
- 1 1/2 cups strawberry topping or sliced strawberries with glaze
Quick Steps:
- Mix pretzels, butter, and sugar; press into 6 cups.
- Chill 15 minutes.
- Beat cream cheese and powdered sugar, then fold in whipped topping.
- Spoon over the crust.
- Add strawberries and chill 1 hour.
Equipment for This Recipe:
- Small cups
- Mixing bowls
- Hand mixer
- Spoon
How to Serve This Dish: Serve cold with tiny spoons and a few extra pretzel pieces sprinkled on top. They’re good for make-ahead party trays because the cups keep the layers neat.
Pro Tips for This Recipe:
- Crush pretzels to a mix of fine and coarse crumbs.
- Chill the crust before adding the cream layer.
- Add the topping close to serving if it’s very juicy.
Variations on This Recipe:
- Blueberry Pretzel Cups: Swap in blueberry topping.
- Chocolate Pretzel Cups: Use chocolate crust crumbs instead.
- Lemon Pretzel Cups: Add lemon zest to the cream layer.
Common Mistakes to Avoid with This Recipe:
- Don’t use thick salted pretzel chunks only; the crust won’t pack well.
- Don’t skip chilling the crust.
- Don’t overload with fruit juice or the bottom softens fast.
31. Ice Cream Sandwich Cake Squares
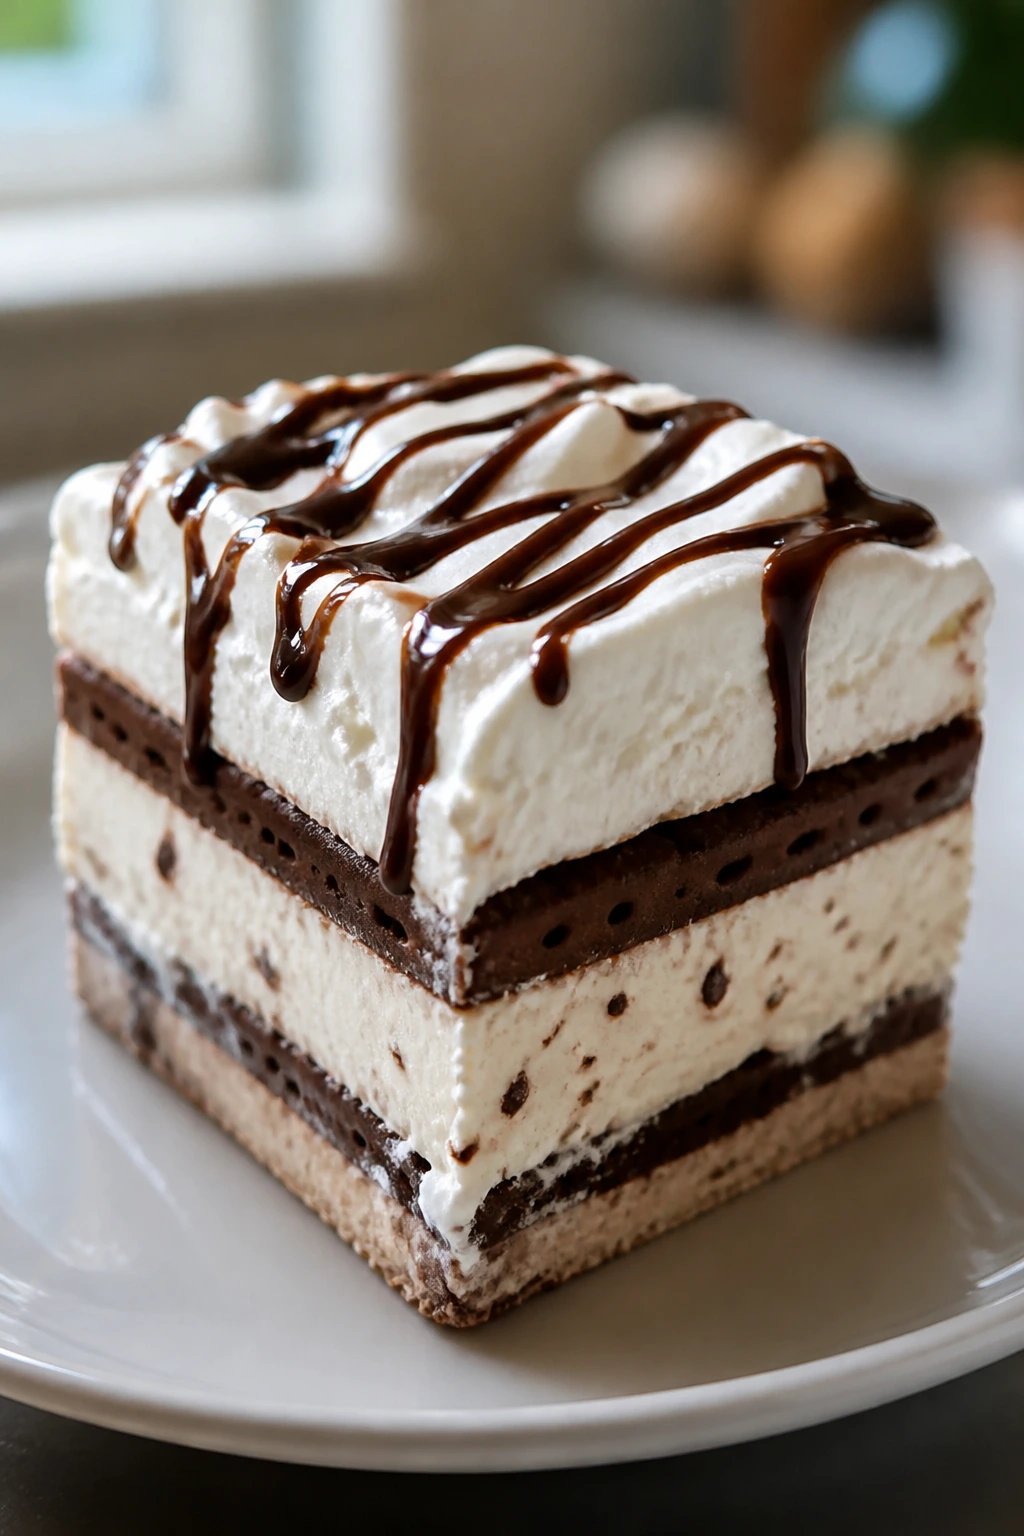
Intro: Ice cream sandwich cake is a cheat code for dessert parties. It looks layered and festive once it’s cut, but the ingredients are familiar enough that kids recognize the pieces immediately.
Why It Works: The sandwich layer gives you instant structure, the whipped topping smooths the edges, and the drizzle on top makes the pan look finished. Because it freezes solid, you can make it ahead and slice it when you need it. It’s also a reliable way to feed a crowd without baking a full cake.
Key Ingredients:
- 12 ice cream sandwiches
- 8 oz whipped topping, thawed
- 1/2 cup chocolate syrup
- 1/4 cup crushed cookies or sprinkles
- 1/4 cup chopped strawberries or cherries, optional
Quick Steps:
- Line a 9×13-inch pan with plastic wrap.
- Arrange 6 sandwiches in the pan, then spread half the whipped topping over them.
- Add a second layer of sandwiches and the rest of the topping.
- Drizzle with syrup and decorate.
- Freeze 4 hours, then cut into squares.
Equipment for This Recipe:
- 9×13-inch pan
- Plastic wrap
- Offset spatula
- Sharp knife
How to Serve This Dish: Slice with a hot knife and serve right away. It’s one of the prettiest desserts for a hot-day party because the layers show up in neat stripes when cut.
Pro Tips for This Recipe:
- Freeze between layers if the sandwiches start sliding.
- Wipe the knife between cuts for cleaner squares.
- Add decorations after the top layer firms up a little.
Variations on This Recipe:
- Strawberry Crunch Cake: Use strawberry sandwiches and crushed vanilla cookies.
- Cookies and Cream Stack: Use cookie ice cream sandwiches and Oreo crumbs.
- Birthday Sprinkle Cake: Cover the top with rainbow sprinkles.
Common Mistakes to Avoid with This Recipe:
- Don’t let it soften too much before slicing.
- Don’t overload with syrup or the top slides.
- Don’t store uncovered in the freezer or it picks up ice crystals.
32. Pineapple Upside-Down Cupcakes
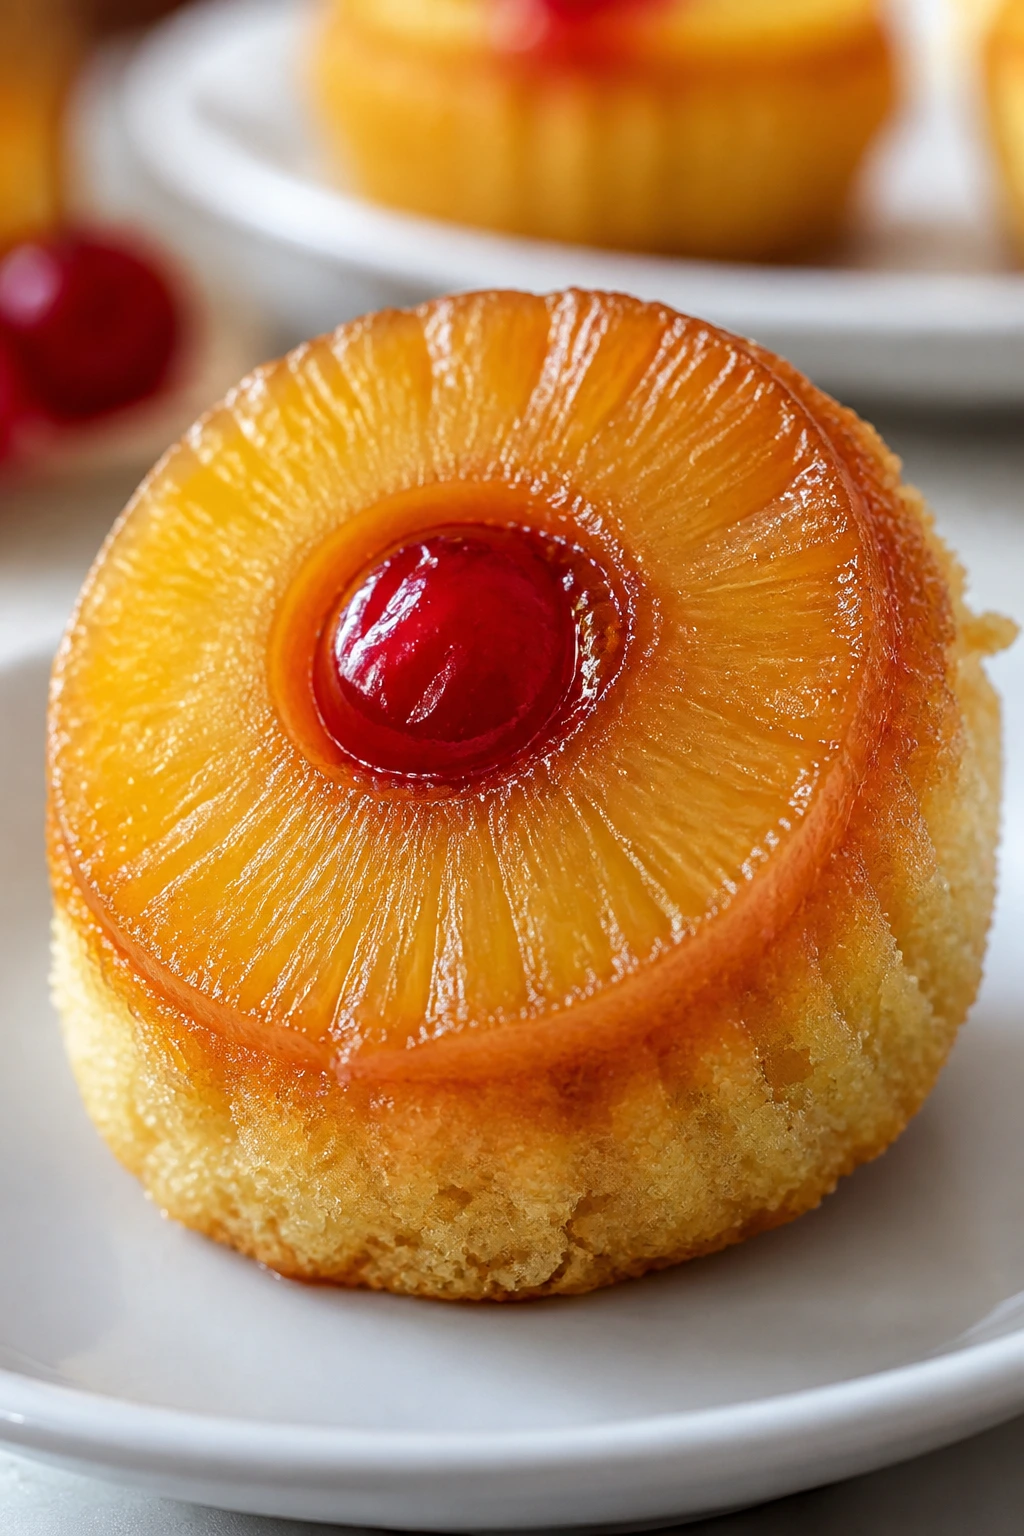
Intro: These cupcakes have one of the best reveal moments in dessert. Once you flip them out, the pineapple ring and cherry sit on top like a built-in decoration, and that’s hard to beat for visual payoff.
Why It Works: Baking the fruit at the bottom creates a caramelized top once the cupcakes are turned over. The portion size makes the classic cake feel lighter and easier to serve, and every cupcake gets its own pineapple badge. Brown sugar and butter do the heavy lifting here; the fruit just finishes the picture.
Key Ingredients:
- 1/4 cup butter, melted
- 1/2 cup brown sugar
- 6 pineapple rings, cut to fit
- 6 maraschino cherries
- 1 batch yellow cupcake batter, enough for 12 cupcakes
Quick Steps:
- Heat the oven to 350°F and line a muffin pan.
- Put butter and brown sugar in the bottom of each cup.
- Add pineapple pieces and a cherry.
- Spoon cupcake batter over the fruit.
- Bake 18 to 20 minutes, cool 5 minutes, then flip out.
Equipment for This Recipe:
- Muffin pan
- Paper liners or none, depending on the pan
- Small spoon
- Cooling rack
How to Serve This Dish: Serve them upside down, of course, and let the glossy fruit top face up. They’re especially good warm with a spoonful of whipped cream.
Pro Tips for This Recipe:
- Pat pineapple dry before adding it.
- Don’t wait too long before turning them out.
- Use a pan that releases cleanly or line only the cupcake batter portion.
Variations on This Recipe:
- Cherry Only Version: Skip the pineapple and use cherries with brown sugar.
- Pineapple Coconut: Add coconut to the batter.
- Mini Upside-Down Bites: Bake in mini muffin tins for shorter bake time.
Common Mistakes to Avoid with This Recipe:
- Don’t add too much fruit or the batter can’t bake through.
- Don’t flip too early or the topping sticks.
- Don’t let the sugar layer burn; watch the bake closely.
33. Cherry Hand Pies
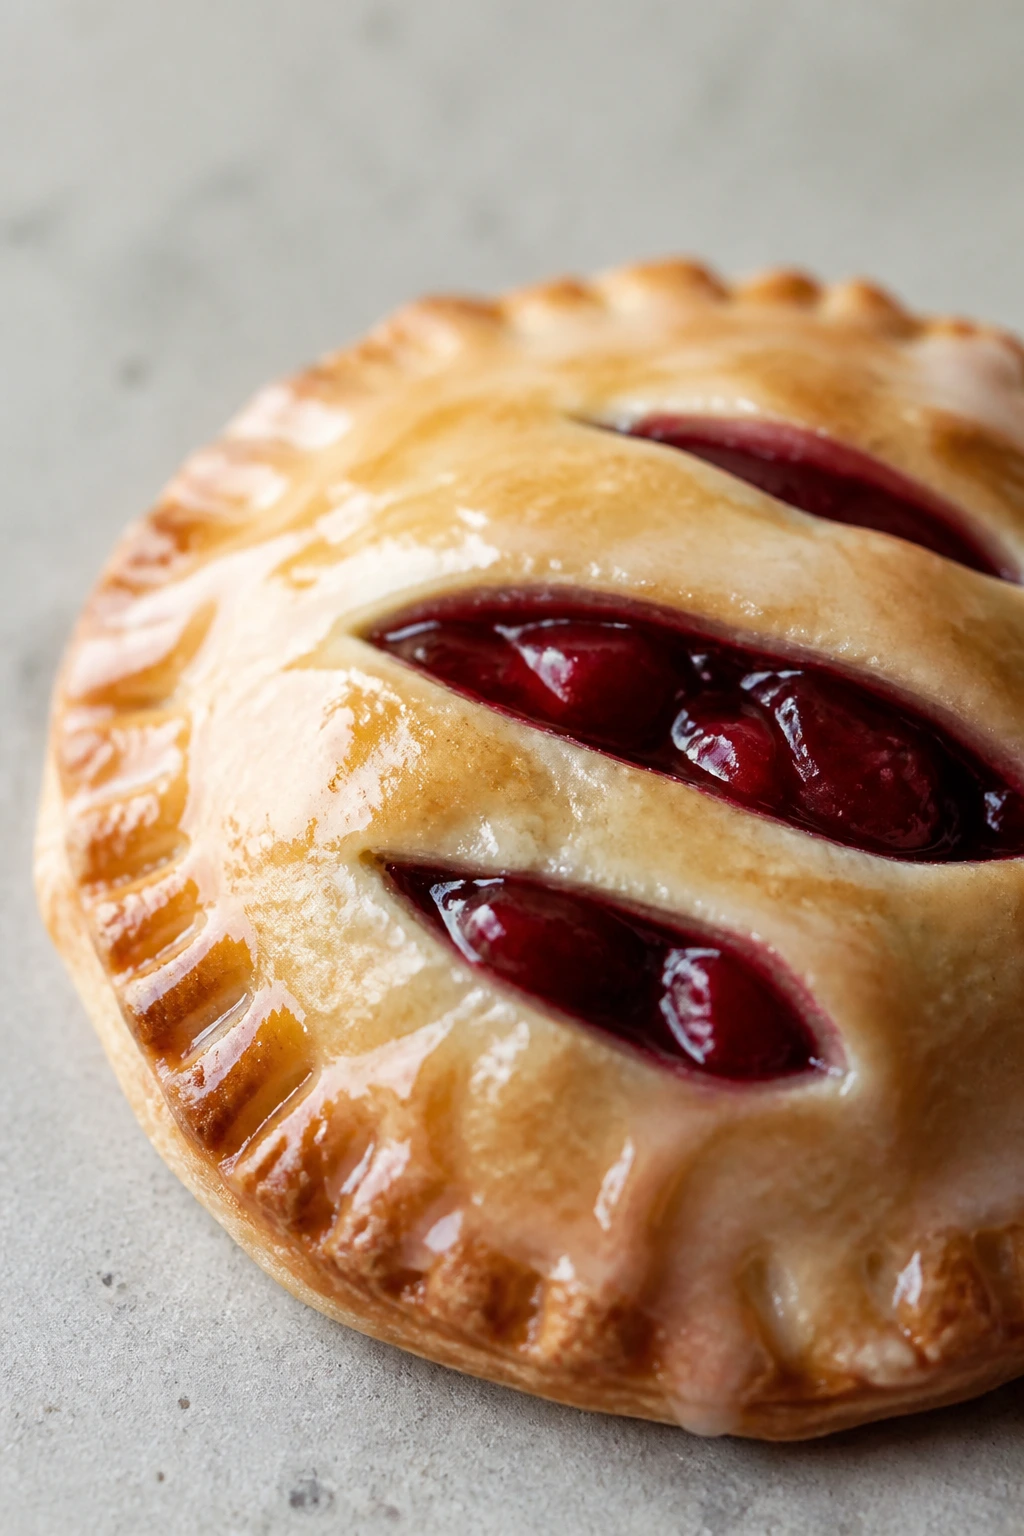
Intro: Hand pies look like tiny sealed letters, which gives them a neat little charm before the first bite. The cherry filling peeks through the cut slits, and the glaze on top makes them look finished without extra effort.
Why It Works: The sealed pastry keeps the fruit inside, so you get a clean handheld dessert instead of a slice-and-plate situation. Cherry filling gives strong color and a bold look, and the edges brown into a neat frame. These also travel better than a whole pie, which is useful if the dessert has to leave the house.
Key Ingredients:
- 2 sheets pie dough or puff pastry
- 1 1/2 cups cherry pie filling
- 1 egg, beaten
- 1 tablespoon coarse sugar
- 1/2 cup powdered sugar
- 1 to 2 tablespoons milk
Quick Steps:
- Heat the oven to 400°F and line a sheet pan.
- Cut dough into 4-inch rounds or squares.
- Spoon cherry filling onto half, then fold and seal edges.
- Brush with egg and sprinkle with coarse sugar.
- Bake 18 to 22 minutes, then glaze after cooling.
Equipment for This Recipe:
- Sheet pan
- Fork
- Pastry brush
- Small bowl
How to Serve This Dish: Stack them in a basket or line them on a tray in rows. They’re a nice dessert for lunches, picnics, or a party where you do not want forks.
Pro Tips for This Recipe:
- Chill the filled pies 10 minutes before baking if the dough gets soft.
- Seal edges with a fork so filling doesn’t leak.
- Let the filling cool if you make it from scratch.
Variations on This Recipe:
- Apple Hand Pies: Swap cherry for cinnamon apples.
- Blueberry Glaze Pies: Use blueberry filling and lemon glaze.
- Mini Heart Pies: Cut heart shapes for birthdays or Valentine-style spreads.
Common Mistakes to Avoid with This Recipe:
- Don’t overfill the pies or they burst.
- Don’t skip the egg wash if you want shine.
- Don’t glaze before they cool or it runs off.
34. Neapolitan Ice Cream Parfaits
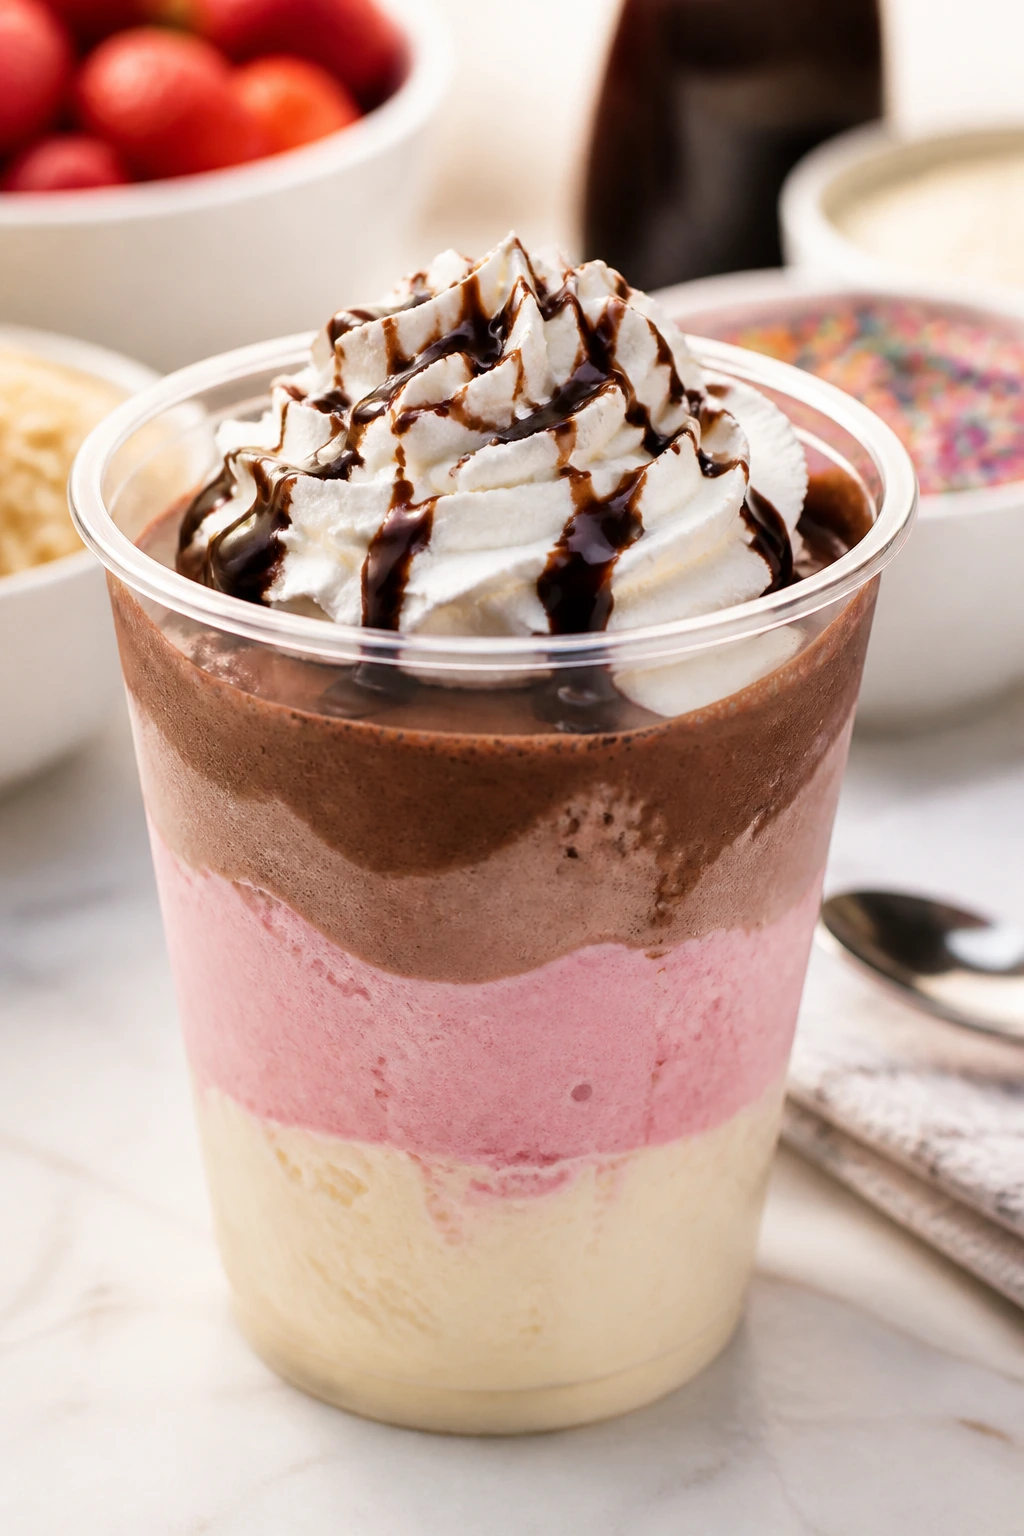
Intro: Three flavors in one cup always look organized, even when dessert is having a playful moment. The pink, white, and brown layers give you a clean stripe pattern that feels more polished than a single scoop.
Why It Works: Neapolitan is built on contrast, and the parfait format turns that contrast into a visible stack. Crushed cookies or cake crumbs between the layers keep the dessert from feeling too soft, and the clear cup shows off every stripe. It’s a good way to use store-bought ice cream without making it look plain.
Key Ingredients:
- 2 cups vanilla ice cream
- 2 cups strawberry ice cream
- 2 cups chocolate ice cream
- 1 cup crushed chocolate cookies or wafers
- 1/2 cup whipped cream
- 1/4 cup chocolate sauce
Quick Steps:
- Soften ice cream for 5 minutes.
- Layer cookie crumbs in the bottom of 6 cups.
- Add vanilla, then strawberry, then chocolate ice cream in stripes.
- Top with whipped cream and chocolate sauce.
- Freeze 30 minutes before serving.
Equipment for This Recipe:
- Clear cups
- Spoon or ice cream scoop
- Small bowl
- Freezer-safe tray
How to Serve This Dish: Serve immediately after a short freezer rest so the layers stay clean. Add a wafer stick or a cherry on top if you want the cups to look more like a sundae bar.
Pro Tips for This Recipe:
- Soften the ice cream only enough to scoop.
- Use a straight-edged spoon for cleaner layers.
- Freeze the cups briefly before adding sauce.
Variations on This Recipe:
- Cookies and Cream Trio: Use vanilla, cookies-and-cream, and chocolate.
- Berry Trio: Swap strawberry for raspberry ice cream.
- Mini Scoop Glasses: Make tiny dessert glasses for younger kids.
Common Mistakes to Avoid with This Recipe:
- Don’t let the ice cream melt too far.
- Don’t press the layers down hard or they blend.
- Don’t skip the crumb layer if you want texture.
35. Chocolate Bark with Sprinkles and Pretzels
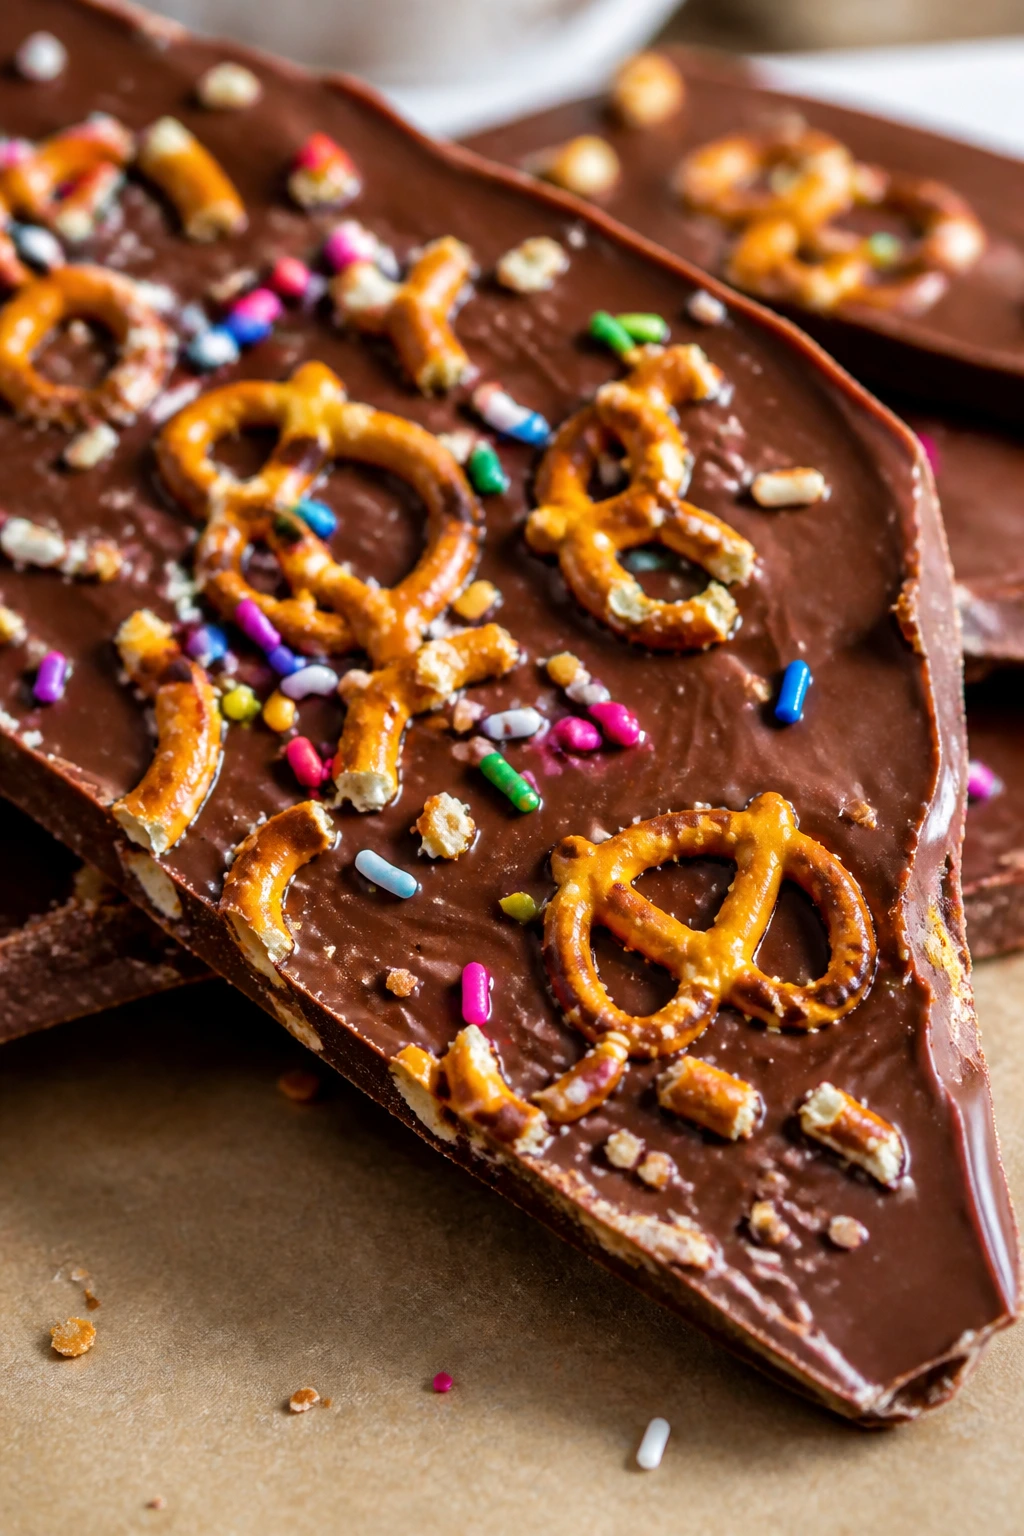
Intro: Bark is the easiest dessert that still looks decorated. A sheet of chocolate scattered with pretzels, sprinkles, and a few crushed cookies breaks into shiny shards that feel handmade in a good way.
Why It Works: Chocolate bark sets flat, so every topping stays visible. The mix of salty pretzels and sweet sprinkles gives kids a little contrast in each bite, and the broken edges make every piece look different. It’s also the kind of dessert that can be made fast and still look deliberate.
Key Ingredients:
- 12 oz semisweet or milk chocolate
- 4 oz white chocolate
- 1/2 cup pretzels, broken
- 1/4 cup rainbow sprinkles
- 1/4 cup crushed cookies
Quick Steps:
- Line a sheet pan with parchment.
- Melt the chocolate and spread it into a thin layer.
- Drizzle white chocolate over the top.
- Scatter pretzels, sprinkles, and cookie crumbs.
- Chill 30 minutes, then break into pieces.
Equipment for This Recipe:
- Sheet pan
- Parchment paper
- Microwave-safe bowls
- Spatula
How to Serve This Dish: Pile the shards in a bowl or tuck them into paper cups. They’re a good last-minute dessert because they look finished without any slicing or frosting work.
Pro Tips for This Recipe:
- Keep the chocolate layer thin or the bark is hard to bite.
- Add toppings while the chocolate is still wet.
- Use a mix of small and large pieces for better texture.
Variations on This Recipe:
- Rainbow Candy Bark: Add candy-coated chocolates instead of cookies.
- Nut-Free Party Bark: Use pretzels and sprinkles only.
- White Chocolate Bark: Make the whole slab white and add freeze-dried berries.
Common Mistakes to Avoid with This Recipe:
- Don’t make the bark too thick.
- Don’t let water touch the melted chocolate.
- Don’t store it in a warm spot or the shine softens.
Why Pretty Desserts Win on a Kids’ Table
A dessert that looks playful buys you attention before the first bite. That matters more than most people think, especially with kids who are deciding in about two seconds whether they’re interested. Clear cups, bright fruit, sprinkle-heavy frosting, and small portions create a visual path that’s easy to follow. The dessert feels friendly. Less formal. More doable.
There’s also a practical side that gets overlooked. Mini desserts stack better in the fridge, travel better in a carrier, and let you offer choices without turning the table into a buffet that sags under its own ambition. A dozen small treats often feels richer than one giant cake because each piece has its own shape and finish. That little bit of separation makes the dessert table feel curated instead of crowded.
Essential Equipment for These Recipes
- Two rimmed sheet pans: Most of the bakes, barks, and chilled items need a flat surface that fits parchment well.
- Parchment paper: It keeps chocolate, bark, cookies, and bars from sticking and makes clean lifting easier.
- Hand mixer: Useful for frosting, whipped cream, cheesecake cups, mousse, and quick batters.
- Piping bags or sturdy zip-top bags: Good for frosting cupcakes, yogurt dots, and neat cheesecake cups.
- Muffin pans, standard and mini: Mini cheesecakes, brownie bites, cupcake shapes, and upside-down cupcakes all benefit from these.
- Clear cups or small jars: They matter for trifles, parfaits, mousse, dirt cups, and layered ice cream desserts.
- Offset spatula or butter knife: Helpful for smoothing frosting, spreading bark, and leveling filling.
- Cooling racks: Cookies, cupcakes, and bars set better when air can move underneath.
- Sharp knife or mandoline: Thin fruit slices make the rose tartlets and sandwich cookies look polished.
- Freezer-safe containers: Bark, yogurt bites, and ice cream desserts need tight storage to avoid frost.
Smart Shopping and Ingredient Tips
Buy berries that look dry and firm, with no crushed corners in the clamshell. Wet berries are the enemy of clean frosting and bright fruit layers. If strawberries are giant, slice them smaller than you think you need; a big slice looks nice on a board but awkward on a cookie or cupcake.
For chocolate, look for bars or chips that melt smoothly rather than candy coating if you want a glossy finish. White chocolate is the fussy one. If you overheat it, it goes grainy in a hurry, so keep the heat low and stop early. For colorful desserts, gel food coloring gives stronger color with less liquid, which matters in frosting, bark, and yogurt.
Use thick yogurt, plain Greek yogurt, or strained yogurt for anything that needs to hold shape. Regular yogurt is fine for eating with a spoon, but it runs when you try to pipe it. The same goes for cream cheese — full-fat cream cheese gives a smoother, richer result and stands up better in cups and frostings.
Sprinkles are not all the same. Jimmies hold their shape better inside batter and frosting; nonpareils look sharper on top but bleed more quickly into wet surfaces. And if you’re baking for younger kids, skip hard candies, big nuts, and anything that creates a choking hazard. Cute should still be chewable.
How to Serve These Recipes
Presentation: Build height and color first. Stack cookies in rings, stand skewers upright in a jar, and use clear cups for anything layered because the stripes do half the decorating for you. If you’re setting out several desserts, group them by color family so the table feels intentional instead of random.
Accompaniments: Cold milk is the safe answer for cupcakes, cookies, bark, and bars. For fruit-heavy desserts, lemonade, berry spritzers, or plain sparkling water keeps the finish light. A scoop of vanilla ice cream turns the peach galettes, brownies, and loaf cake into a fuller plate without taking over the dessert itself.
Portions: Mini desserts do the balancing for you. Plan on one to two cupcakes, one cup dessert, or two small cookies per child, then leave a little room for seconds if the table includes fruit or bark. For richer treats like cheesecake cups or mousse, smaller portions look smarter and get eaten faster.
Beverage Pairing: Milk for anything chocolate-forward. Lemonade for berry, citrus, and fruit desserts. If you want one easy option that works across the board, a lightly fizzy berry punch or sparkling water with lemon slices keeps the table bright.
Additional Tips and Flavor Boosters
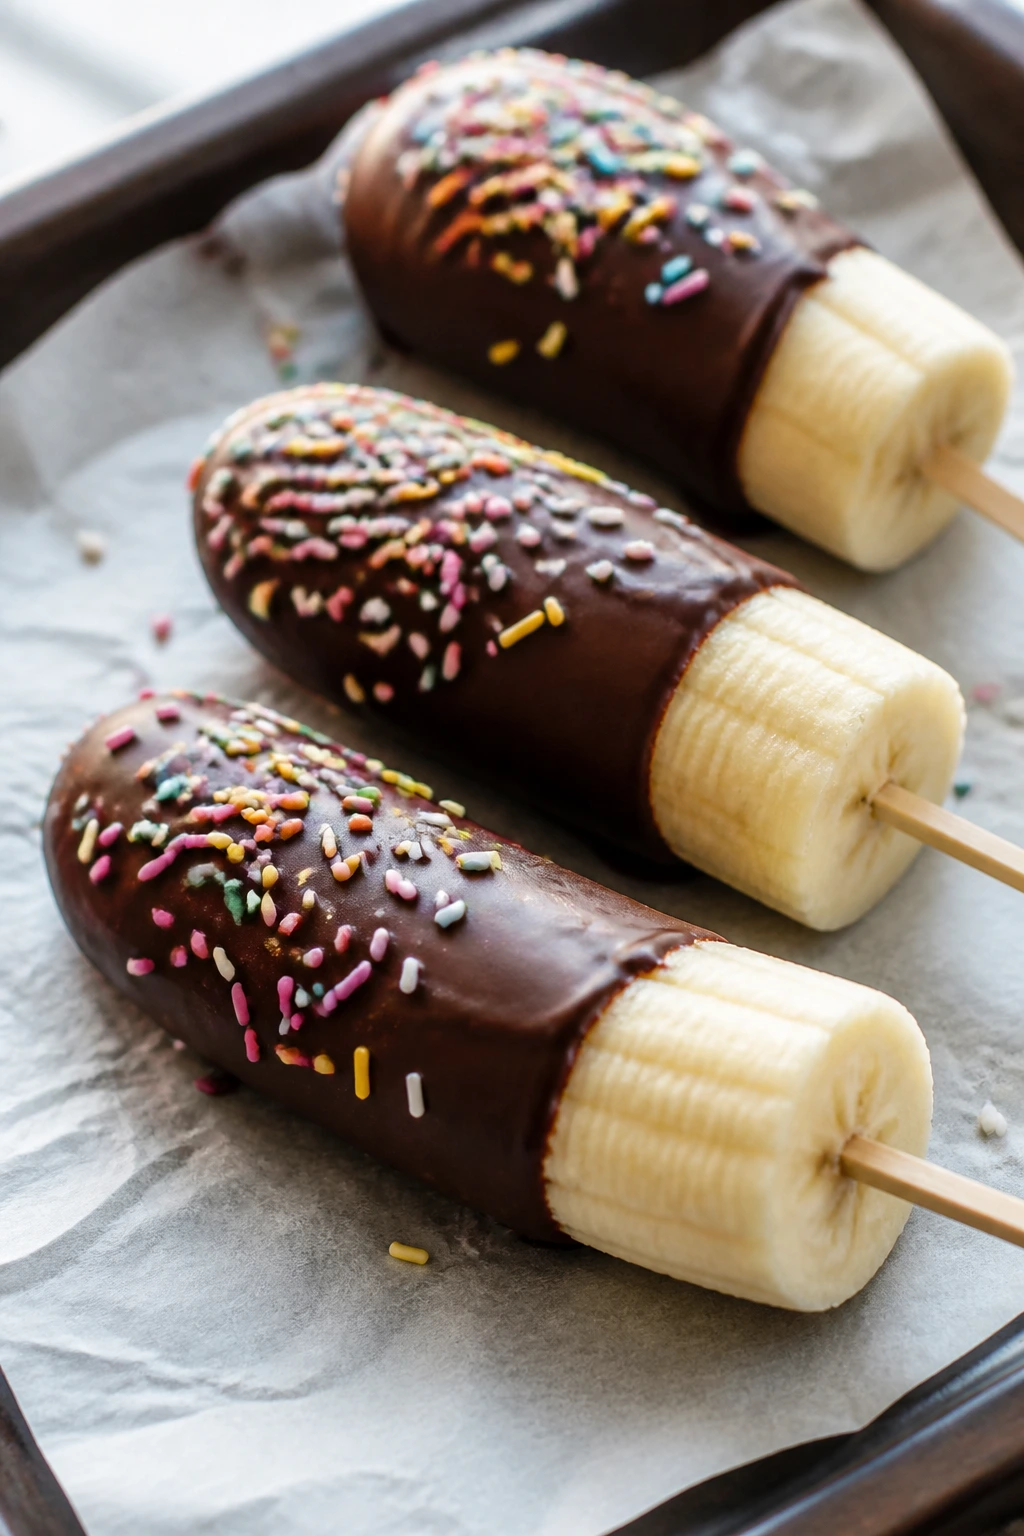
Flavor Enhancement: A tiny pinch of salt in whipped cream, frosting, or chocolate glaze helps more than extra sugar ever will. It sharpens the finish and keeps desserts from tasting flat. Lemon zest in berry desserts, orange zest in chocolate ones, and vanilla bean paste in plain creams are the little moves that make people pause.
Customization: Add a second texture wherever you can. Crushed cookies in parfaits, chopped pretzels on bark, toasted coconut on fruit cups, or graham crumbs on brownie bites keep the dessert from feeling one-note. Kids notice crunch fast. Faster than they notice a complicated technique.
Serving Suggestions: Use parchment liners, paper cupcake wrappers, or tiny spoons to make the whole table feel like a dessert counter. A dusting of powdered sugar on loafs and tartlets, a few berries around the platter, or a ribbon of chocolate sauce under the cups changes the look without changing the recipe.
Make-It-Yours: For nut-free versions, choose seeds, coconut, pretzels, or extra fruit instead of chopped nuts. For lower-sugar versions, lean on fruit-forward desserts like watermelon pizza, parfait jars, and fruit pizza cookies, then keep the added sugar in the frosting or glaze modest. For dairy-free swaps, use coconut yogurt, dairy-free cream cheese, and plant-based whipped topping where the structure allows it.
Make-Ahead, Storage, and Reheating Guidance
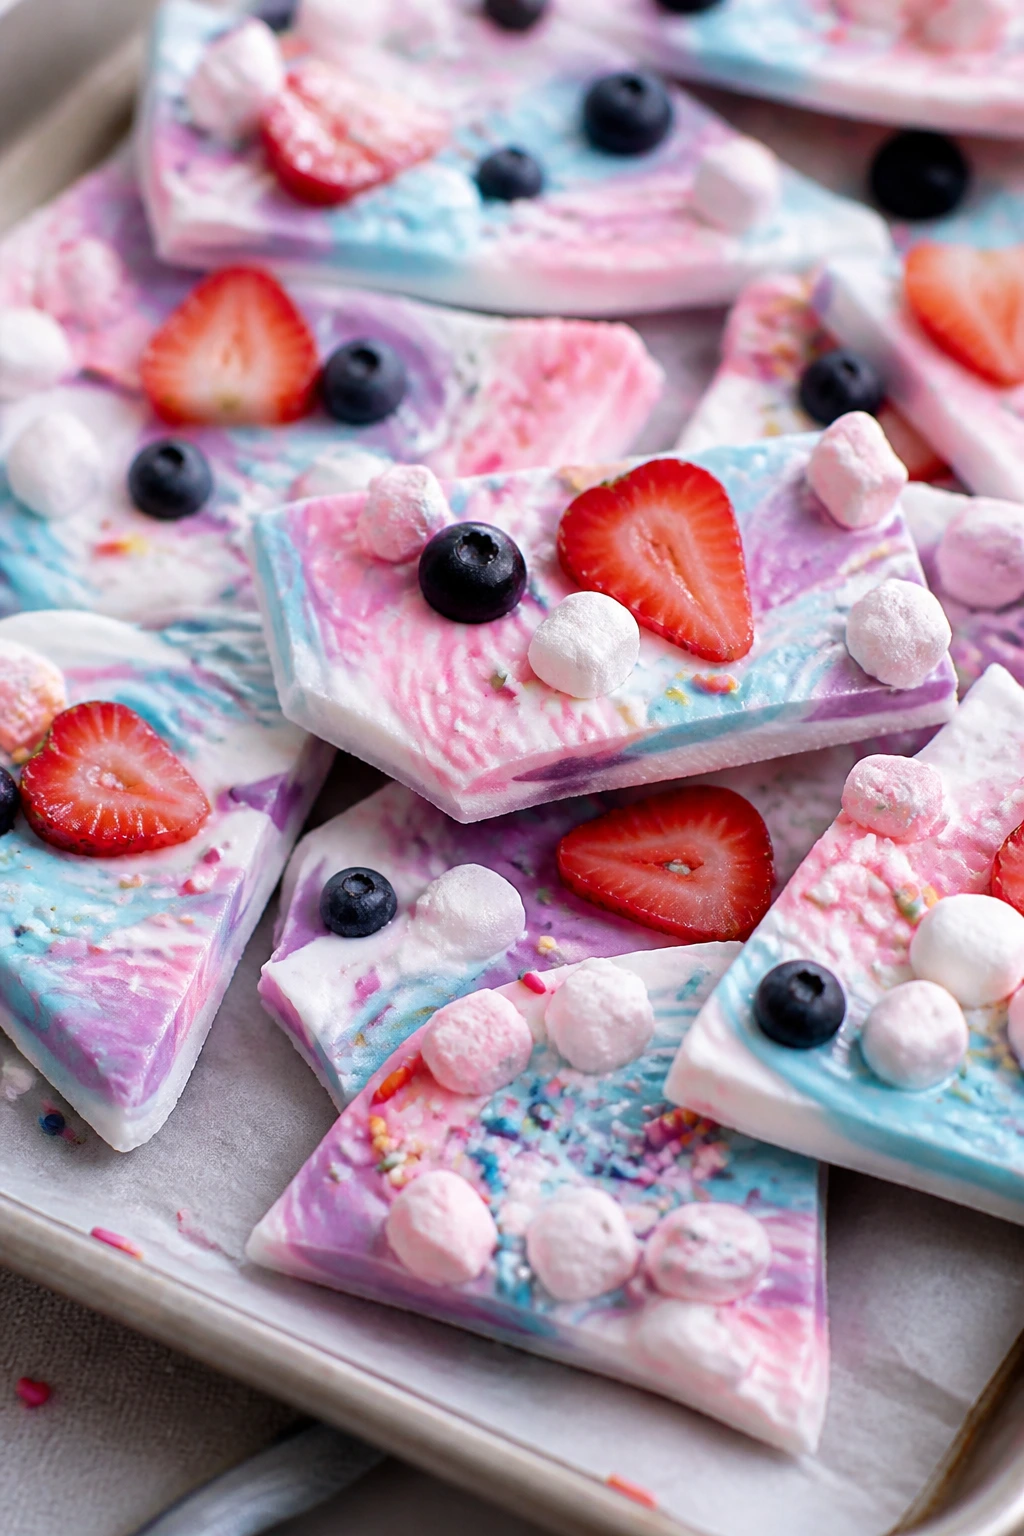
Most of these desserts fall into neat storage groups, which is one reason they’re so useful. Cookies, bars, blondies, and bark keep well in airtight containers at room temperature for 2 to 3 days, or in the fridge for up to 5 days if they have cream cheese or fresh fruit on top. Bring chilled bars back to room temperature for 15 to 20 minutes before serving so the texture softens.
Cup desserts, trifles, mousse cups, cheesecake cups, and parfait jars usually hold for 2 to 3 days in the refrigerator, though the crunchy layers soften as they sit. If that crunch matters, store the crisp component separately and add it right before serving. Fruit-topped desserts are the most fragile; once the fruit is sliced, they usually look best the same day.
Frozen desserts such as yogurt bark, frozen yogurt bites, and ice cream sandwich cake squares keep for about 1 month in the freezer if they’re wrapped tightly. Use parchment between layers if you’re stacking pieces. For best texture, let frozen treats sit at room temperature for 2 to 5 minutes before serving — not long enough to melt, just long enough to take the edge off the cold.
Reheating applies mainly to baked items. Brownie bites, hand pies, and galettes can be warmed in a 300°F oven for 5 to 8 minutes, or in short microwave bursts if you do not mind a softer crust. Skip reheating for meringues, cream desserts, and bark; they’re meant to stay cold or crisp.
Variations and Adaptations to Try
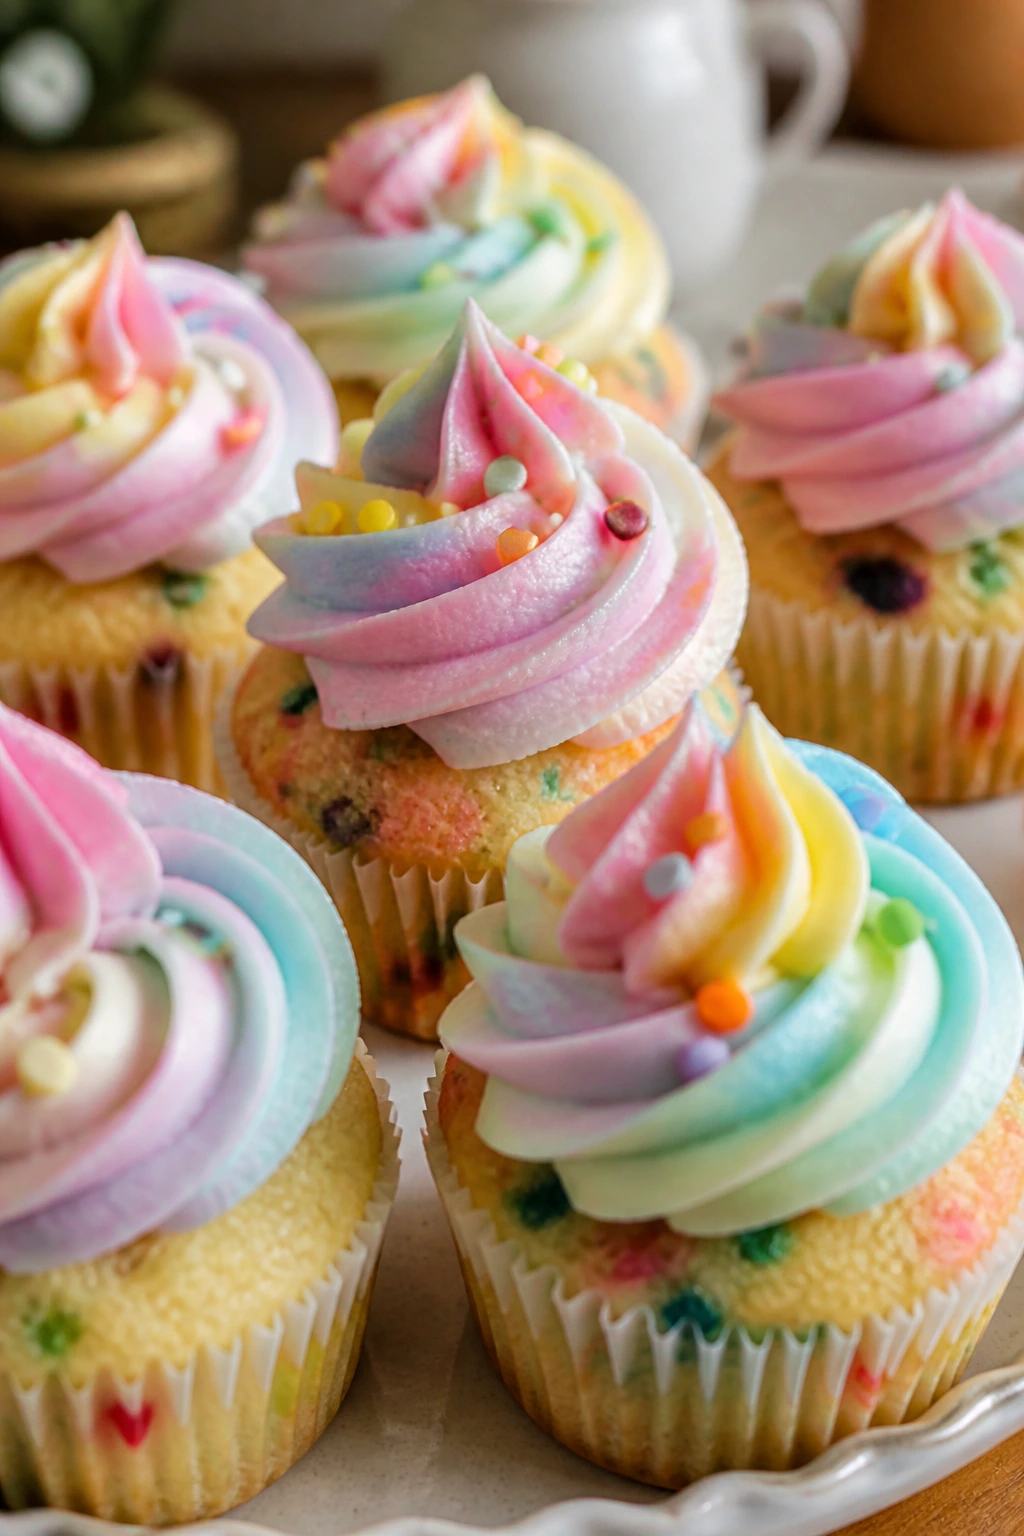
Gluten-Free Crumb Swap: Use gluten-free cookie crumbs, almond flour crusts, or certified gluten-free graham crackers in parfaits, cheesecake cups, and pretzel-style desserts. The look barely changes, but the texture stays friendly for kids who need the swap. For baked bars, a 1:1 gluten-free flour blend usually works better than trying to rebuild the recipe from scratch.
Dairy-Free Cream Layers: Coconut yogurt, dairy-free cream cheese, and whipped coconut topping can stand in for the creamier desserts. The flavor shifts a little, so keep the fruit brighter — berries, lemon zest, and pineapple help. In chocolate desserts, dairy-free chocolate can keep the finish just as glossy.
Lower-Sugar Fruit-First Set: Cut the sugar in frostings and glazes by a third, then let the fruit take more of the visual load. Watermelon pizza, fruit pizza cookies, berry parfaits, and chocolate-dipped strawberries all do well with a lighter hand on the sweet stuff. The desserts still look dressed up, just less candy-heavy.
Birthday-Party Color Theme: Pick one color family and repeat it across the table. Pink and red with strawberries and raspberry jam, pastel with cotton candy and marshmallows, or blue-purple with blueberries and grape jelly all create a cleaner look than a rainbow that tries to do everything at once.
School-Safe Plate: Skip nuts, whole seeds, and hard candy toppers if the dessert has to travel to a classroom. Use sprinkles, fruit, cookie crumbs, and chocolate drizzle instead. That keeps the shapes cute and avoids the awkward cleanup of a half-eaten candy crown.
Common Mistakes to Avoid
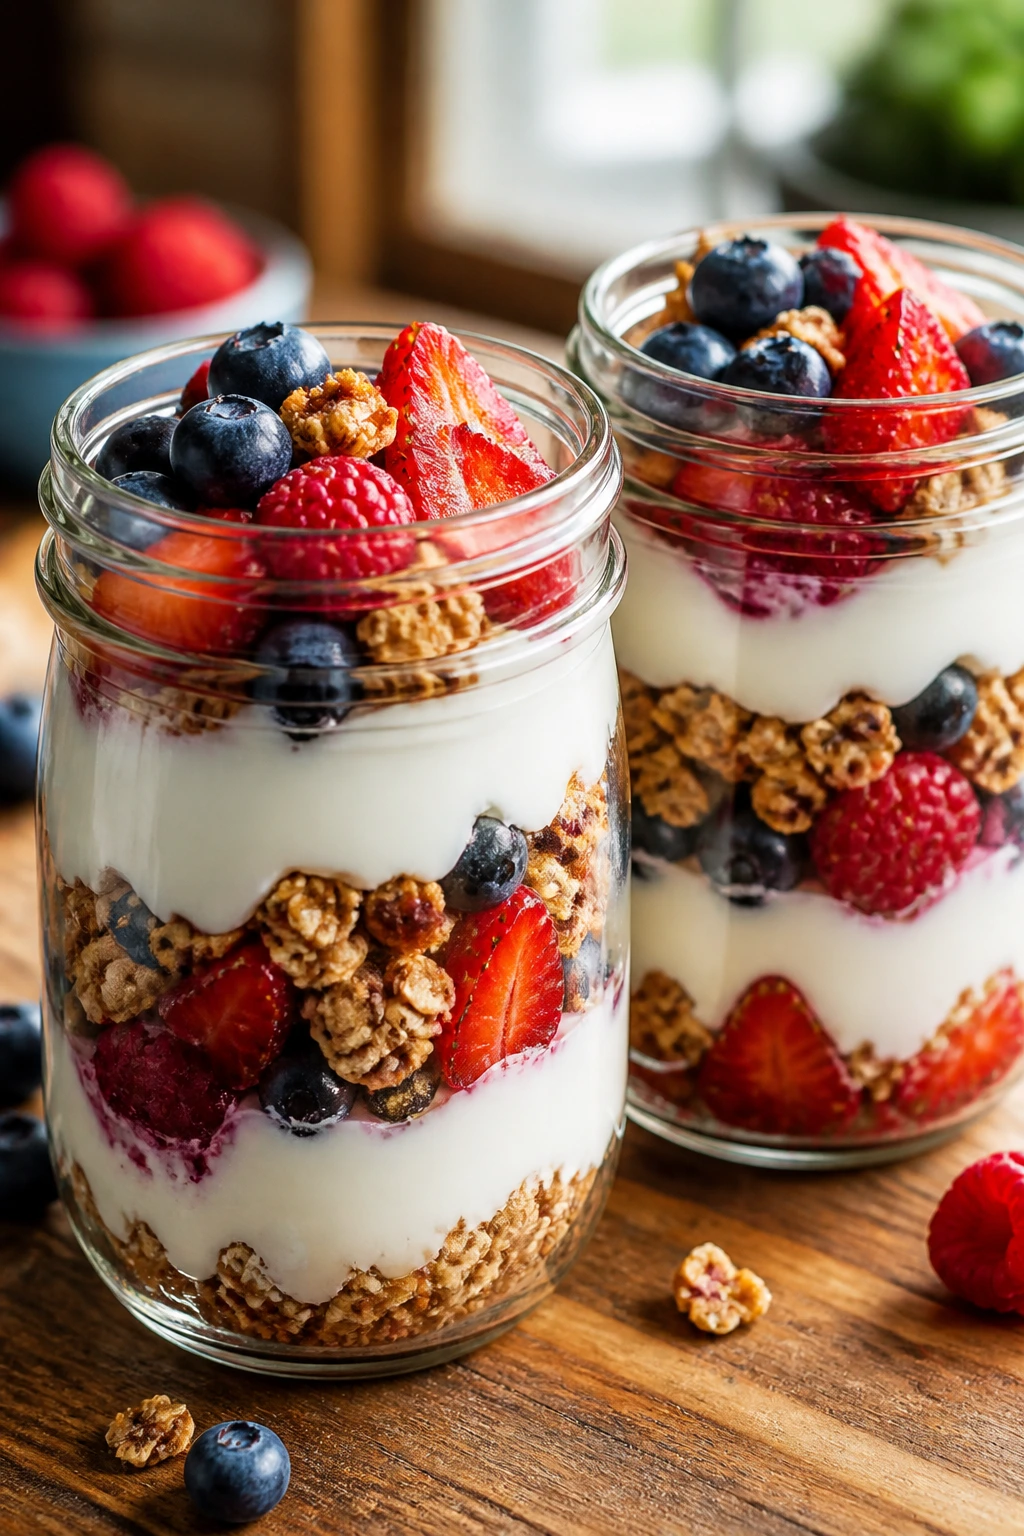
The first mistake is building pretty desserts with wet toppings and hoping they behave. They usually don’t. Sliced fruit sitting on frosting, whipped cream, or yogurt will bleed juice, slide around, and make the plate look tired. Pat fruit dry, chill layers before stacking, and choose thick fillings when the dessert needs structure.
Another common problem is decorating before the base is ready. Warm cupcakes melt frosting. Warm cookies melt icing. Even bark can lose its sheen if the tray is too warm when toppings go on. Let the base cool all the way, then decorate. The wait feels annoying, but it saves the whole dessert from looking sloppy.
Overloading the dessert is a sneaky one. A cupcake with too many sprinkles, a tart with too much fruit, or a bark sheet buried under toppings starts to look messy instead of festive. Leave some open space. A little blank area lets the colors breathe and makes the design easier to read.
The last one is choosing textures that fight the age of the child. Hard candies, giant nuts, and very chewy toppers can be a problem for younger kids. Pretty should still mean easy to bite. If you’re unsure, reach for berries, soft cookies, chocolate drizzle, and small marshmallows instead.
Frequently Asked Questions
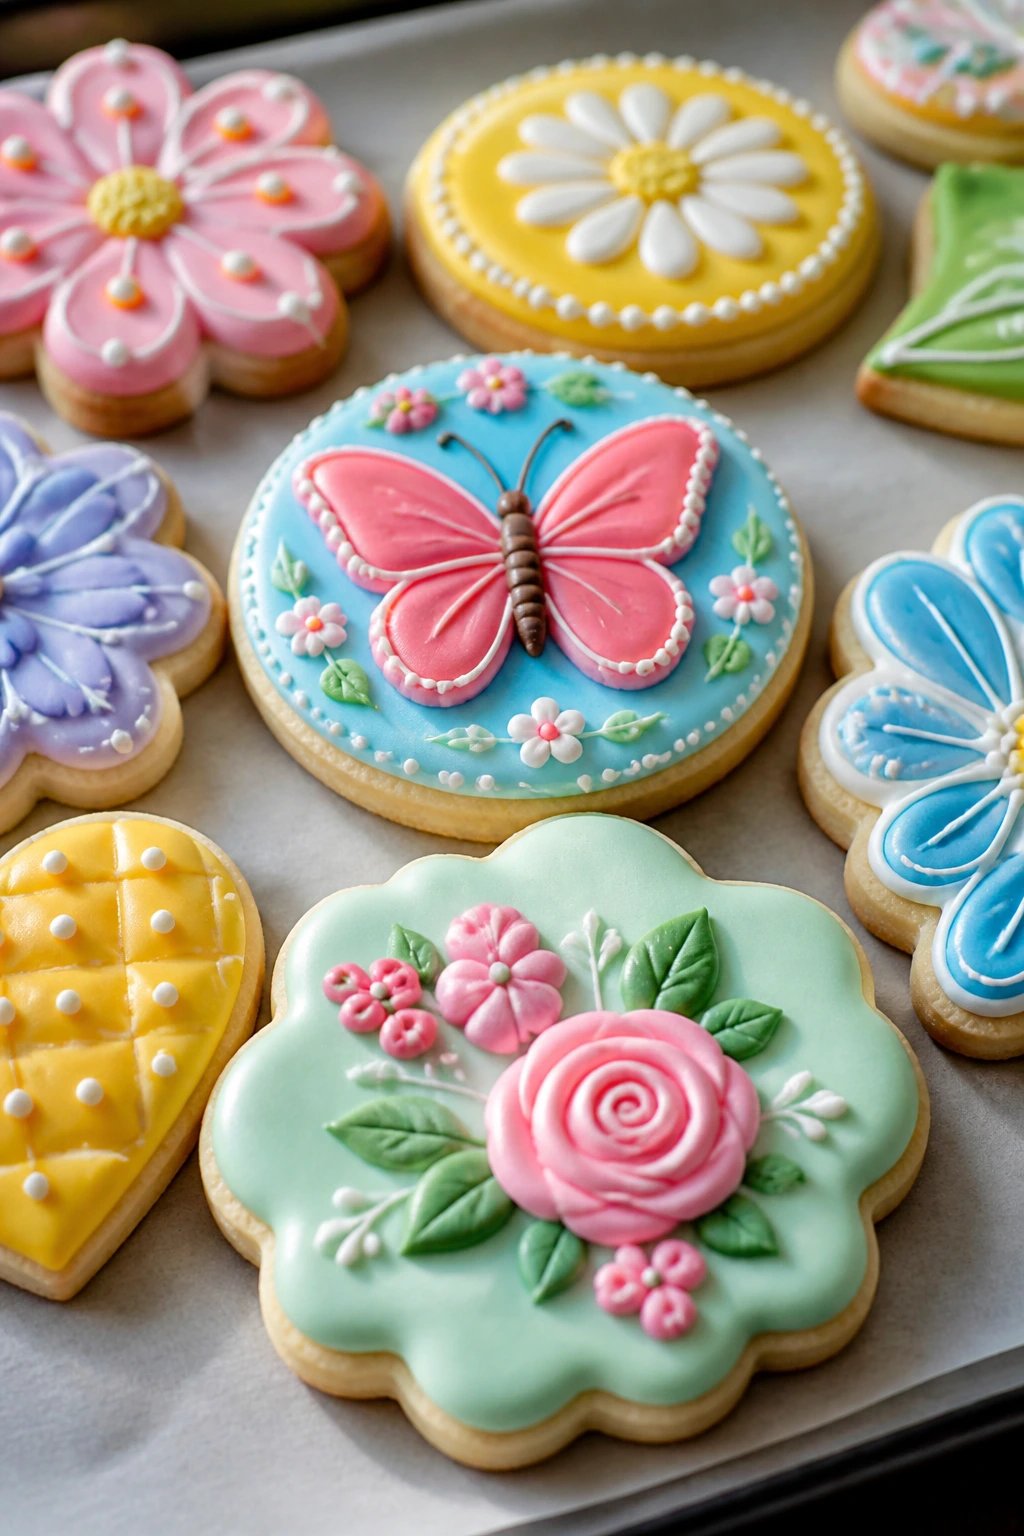
Which desserts on this list travel best?
The strongest travelers are bark, blondie bars, sugar cookies, hand pies, and brownie bites. Anything with fruit or cream should either be packed cold in a sealed container or assembled at the destination so the look stays sharp.
Can I use boxed cake mix and store-bought frosting?
Yes, and sometimes that’s the smarter move. Boxed mix works well for cupcakes, loaf cake, and cake-based trifles, especially when you’re using the decoration as the main event. Add one extra egg or a spoonful of sour cream if you want a softer crumb.
What can kids actually help with safely?
Kids can scatter sprinkles, place fruit, crush cookies in a sealed bag, and spoon toppings into cups. Older kids can also cut soft fruit with a butter knife or help swirl yogurt bark. Save the hot sugar, sharp blades, and chocolate tempering for adults.
How do I keep fruit from making desserts soggy?
Dry fruit as well as you can, and use it close to serving time. Thick yogurt, cream cheese, or jam helps create a barrier, and a thin cookie crumb layer underneath fruit keeps moisture from soaking straight in. For extra wet fruit, cook it down into a topping first.
What if I don’t have piping bags?
Use a sturdy zip-top bag with a corner snipped off. It works for frosting cupcakes, adding cheesecake filling to cups, and drizzling glaze. If the mixture is thick, cut the opening a little larger than you think you need.
Which desserts can I make a day ahead?
Cheesecake cups, mousse cups, blondie bars, cookies, and bark all hold up well overnight. Fruit-heavy desserts are the ones that get fussy. If they rely on bright slices for the look, assemble them as late as you reasonably can.
How do I make these less sweet without ruining the look?
Let fruit do more of the visual work and ease up on frosting, glaze, or candy toppings. Lemon zest, a pinch of salt, and plain yogurt can pull desserts back into balance without making them dull. A good fruit-forward dessert usually needs less sugar than people assume.
Can I freeze the baked desserts?
Yes for many bars, cookies, hand pies, and loaf slices. Wrap them well and freeze for up to 2 months, then thaw at room temperature in a single layer. Skip freezing anything with whipped cream, fresh berries on top, or soft meringue.
What if the decoration starts sliding off?
That usually means the base is too warm or the topping is too thin. Chill the base first, thicken the frosting or glaze, and use a small amount of topping instead of a heavy one. A thin layer that stays put always looks better than a thick one that slumps.
Sweet Little Showpieces
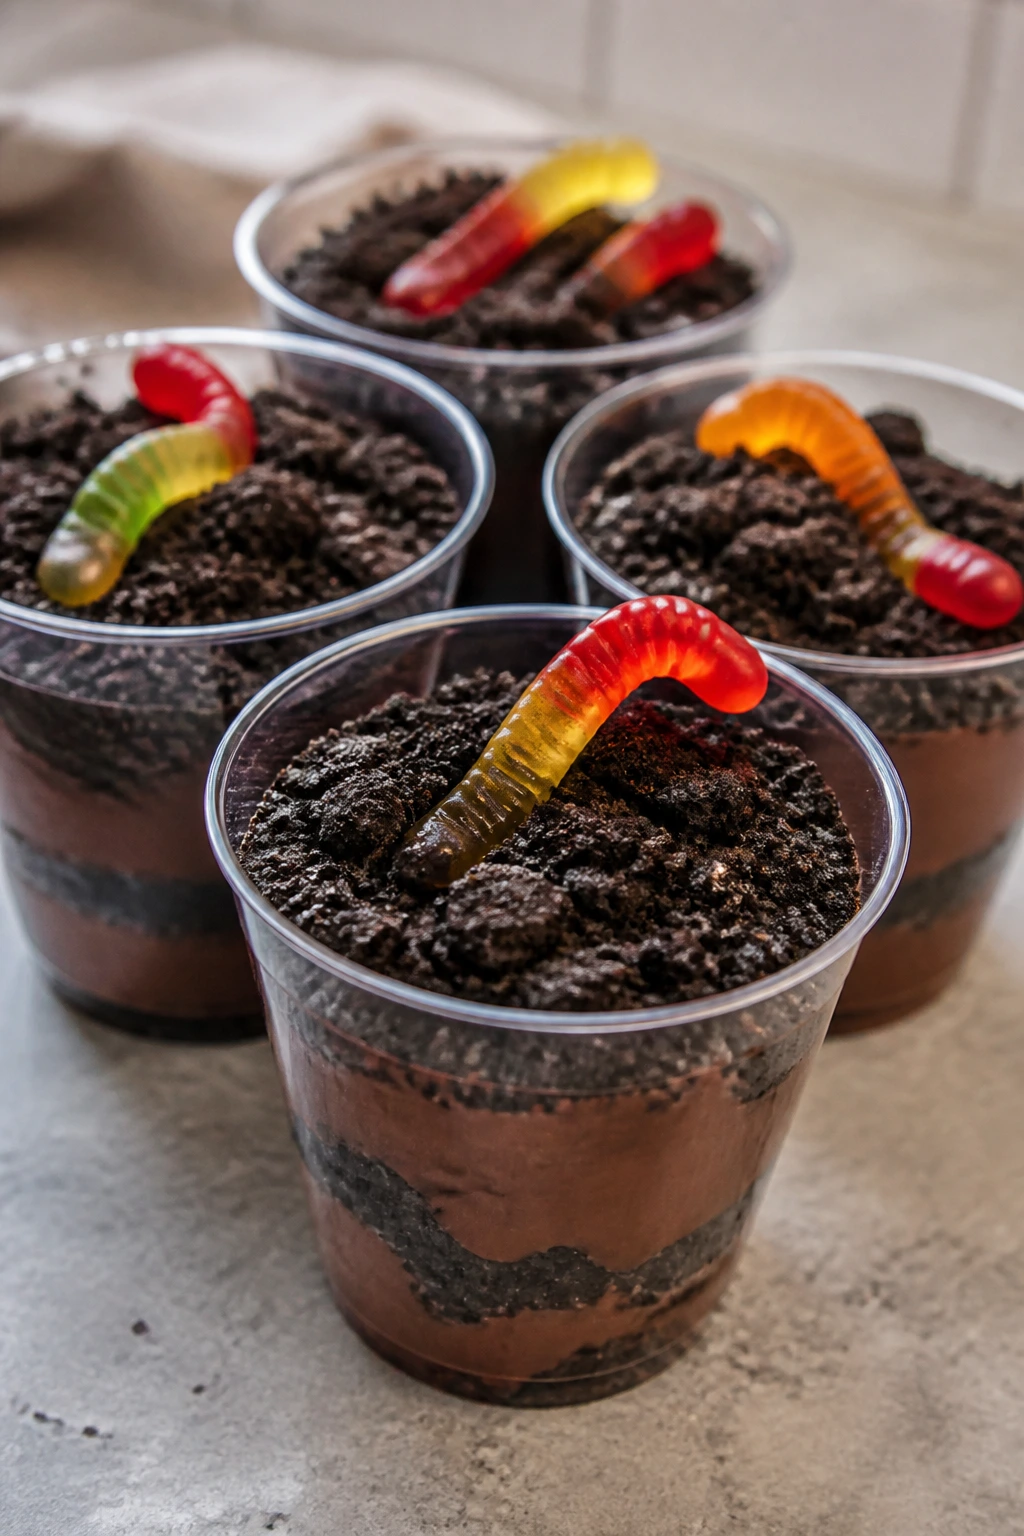
Pretty desserts for kids work because they feel like an event before the first bite. A neat stripe of jam, a row of berries, a sprinkle storm on top — these are small things, but they change the whole mood of the table. You do not need to make every dessert elaborate. You need one clean idea and enough restraint to let it show.
The nicest part is how flexible this kind of baking can be. A clear cup, a drizzle of chocolate, or a bright fruit topping can make a familiar dessert feel new again without asking for extra hours in the kitchen. That’s the sweet spot: playful enough for children, tidy enough for adults, and sturdy enough to survive the walk from counter to table.