
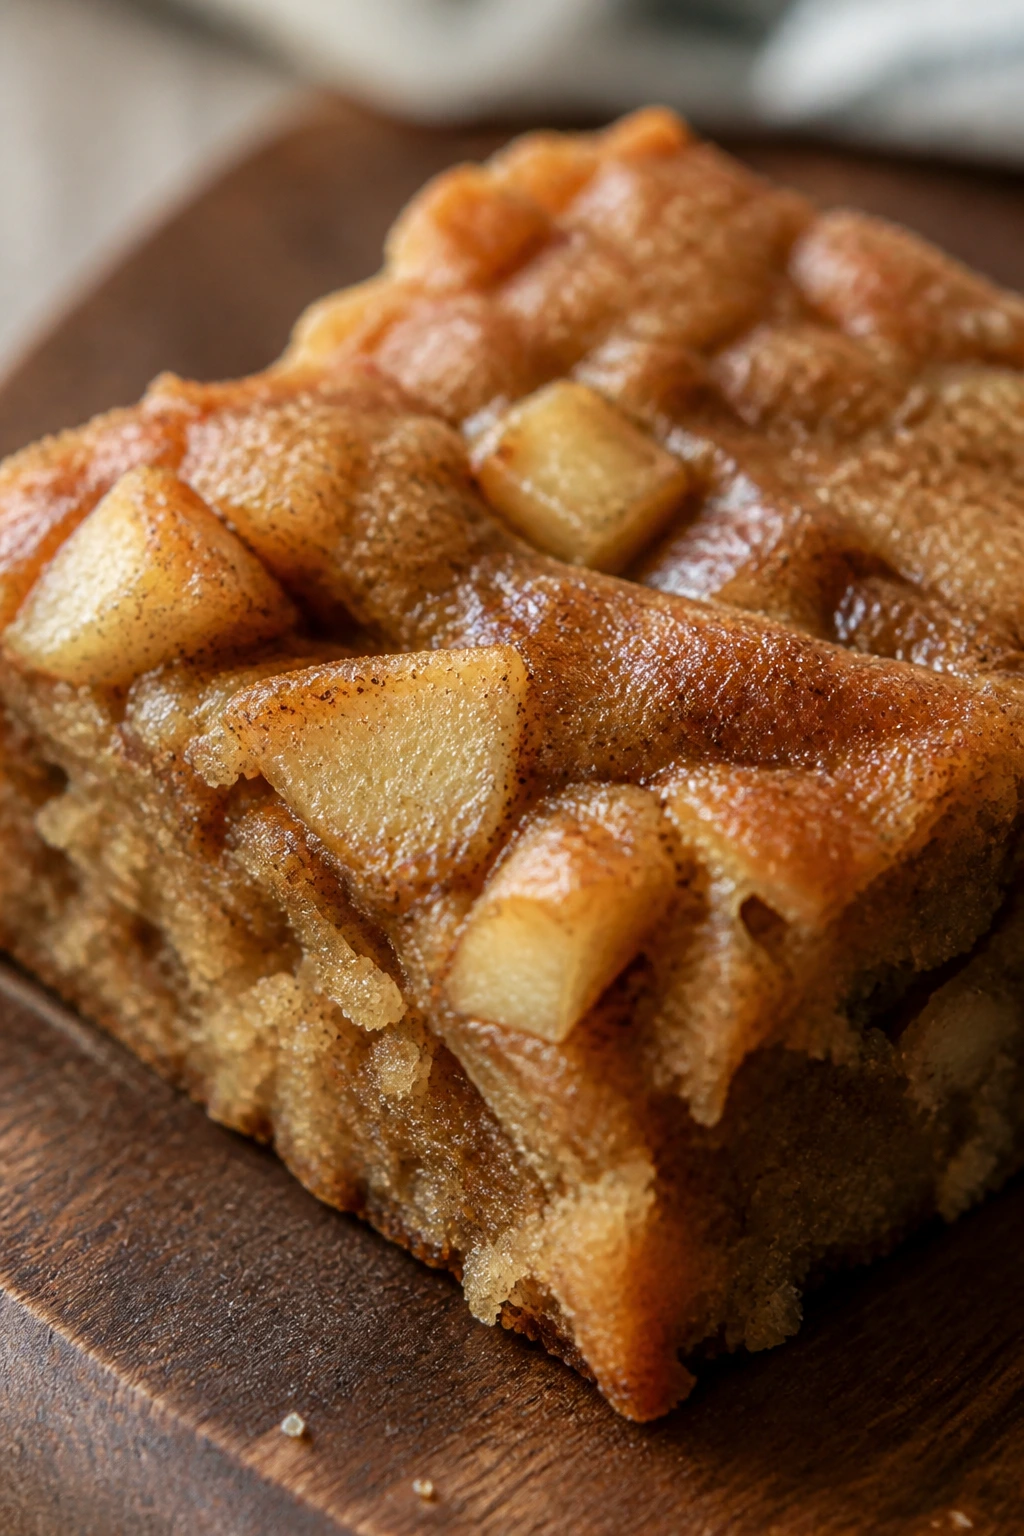
Apple brownies are the kind of bake that makes a plain kitchen smell like cinnamon, butter, and warm fruit in under half an hour. You get soft crumb, browned edges, and little apple bits that stay juicy instead of melting into mush. If you’ve ever worried that fruit desserts are fussy, this is the one that quietly proves otherwise.
What makes apple brownies so useful for beginner bakers is the structure. Most of these batters are stirred by hand, the pan is a simple square one, and the apples cover a lot of small sins — a slightly rough mix, a minute too long in the oven, a pan lined a little crooked. That is not a promise that anything goes. It’s more like a sturdy recipe with some give in it.
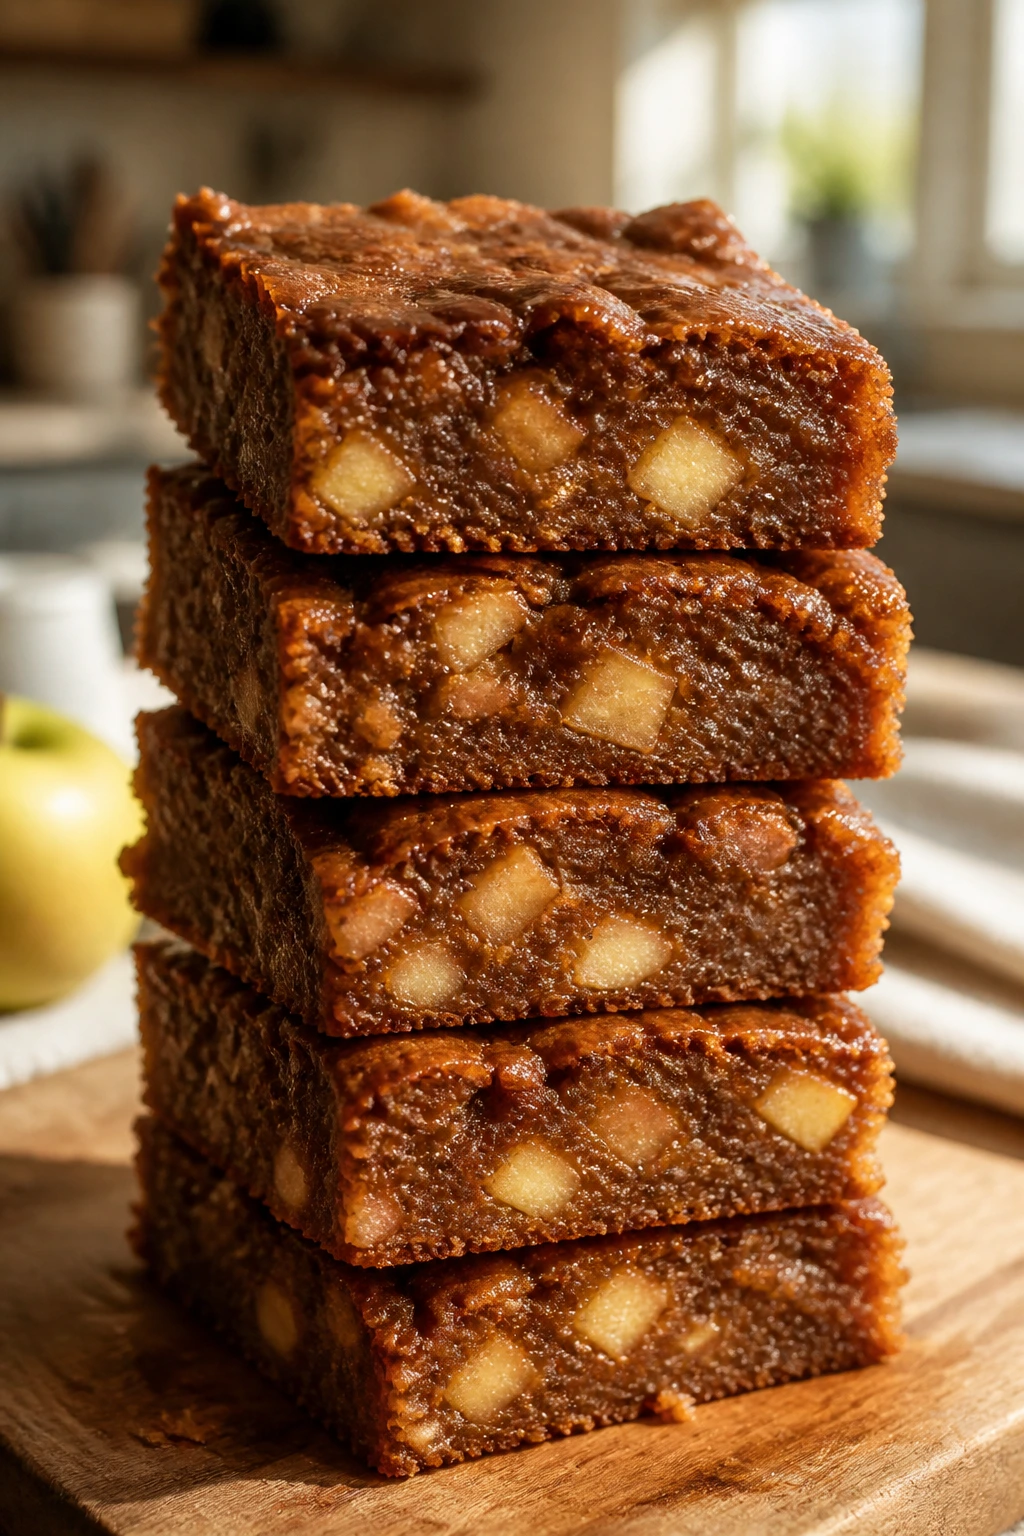
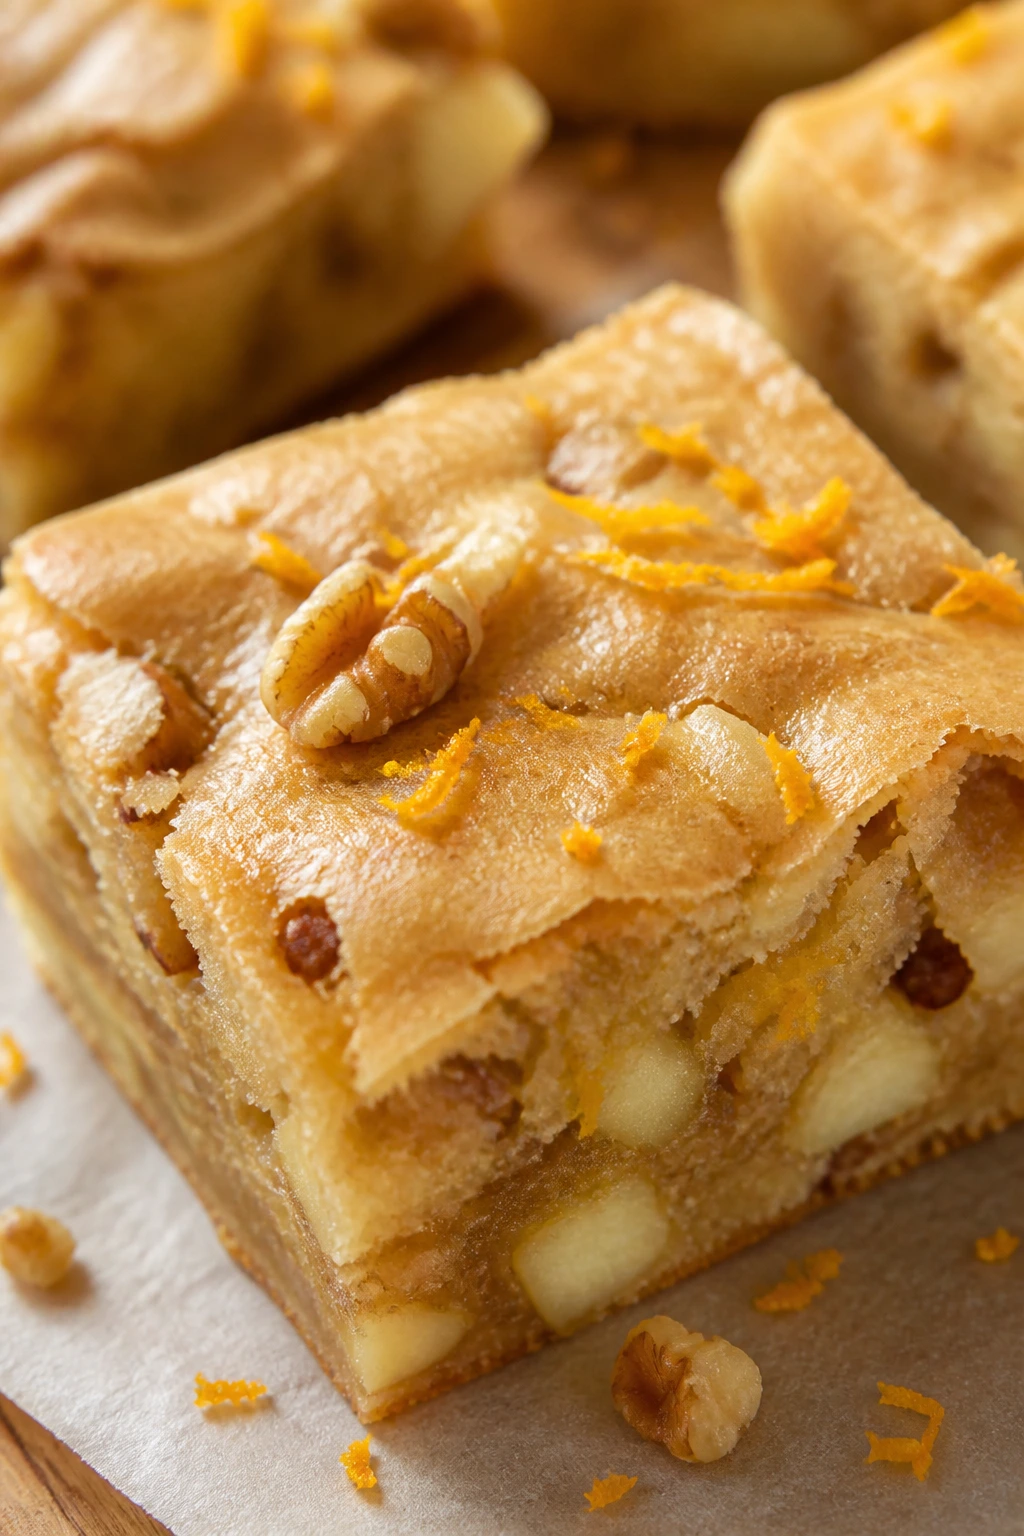
I like apple brownie bars best when the apples are diced small, about 1/4 inch, so every square gets a few soft pockets instead of one watery chunk. That detail matters more than people think. Grated apple can work too, but it pushes the texture toward dense and cake-like, while diced apple keeps a little bite.
Some of the recipes below lean blondie, some lean chocolate brownie, and a few bring in cream cheese, streusel, or a salty crunch. Start with the easiest pan you’d happily make on a Tuesday, then wander into the richer ones once you’ve got the feel of the batter.
Why This Stack of Apple Brownies Makes Sense
Small pans, small stakes: An 8×8-inch pan is forgiving, and if the edges bake a little faster than the center, you can still get neat squares.
Fruit does more than flavor: Apples add moisture, so these bars stay tender even when you’re not using a mixer or fancy technique.
Most of the batters use pantry staples: Flour, sugar, cinnamon, eggs, butter, and one good apple are enough for a long run of these recipes.
Beginner mistakes are easy to spot: If the batter looks dry, the apples were cut too big; if the middle jiggles too much, it needs a few more minutes.
The variations teach real skills: Brown butter, streusel, cream cheese ribbons, and glazes all show up in ways that stay manageable for a first-time baker.
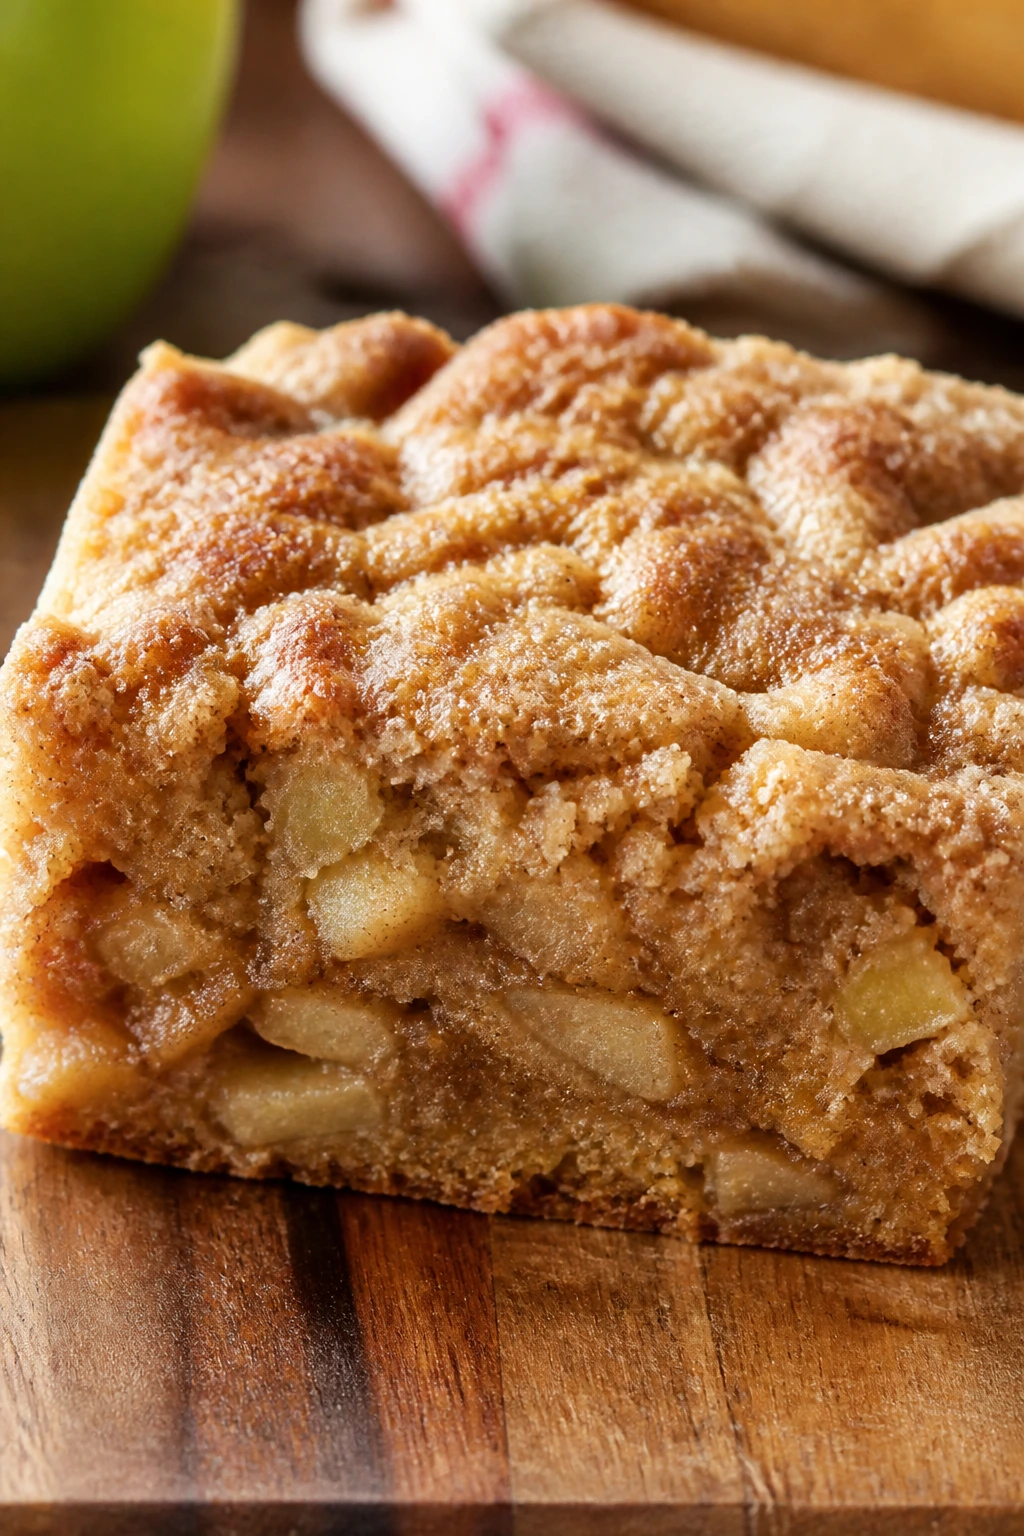
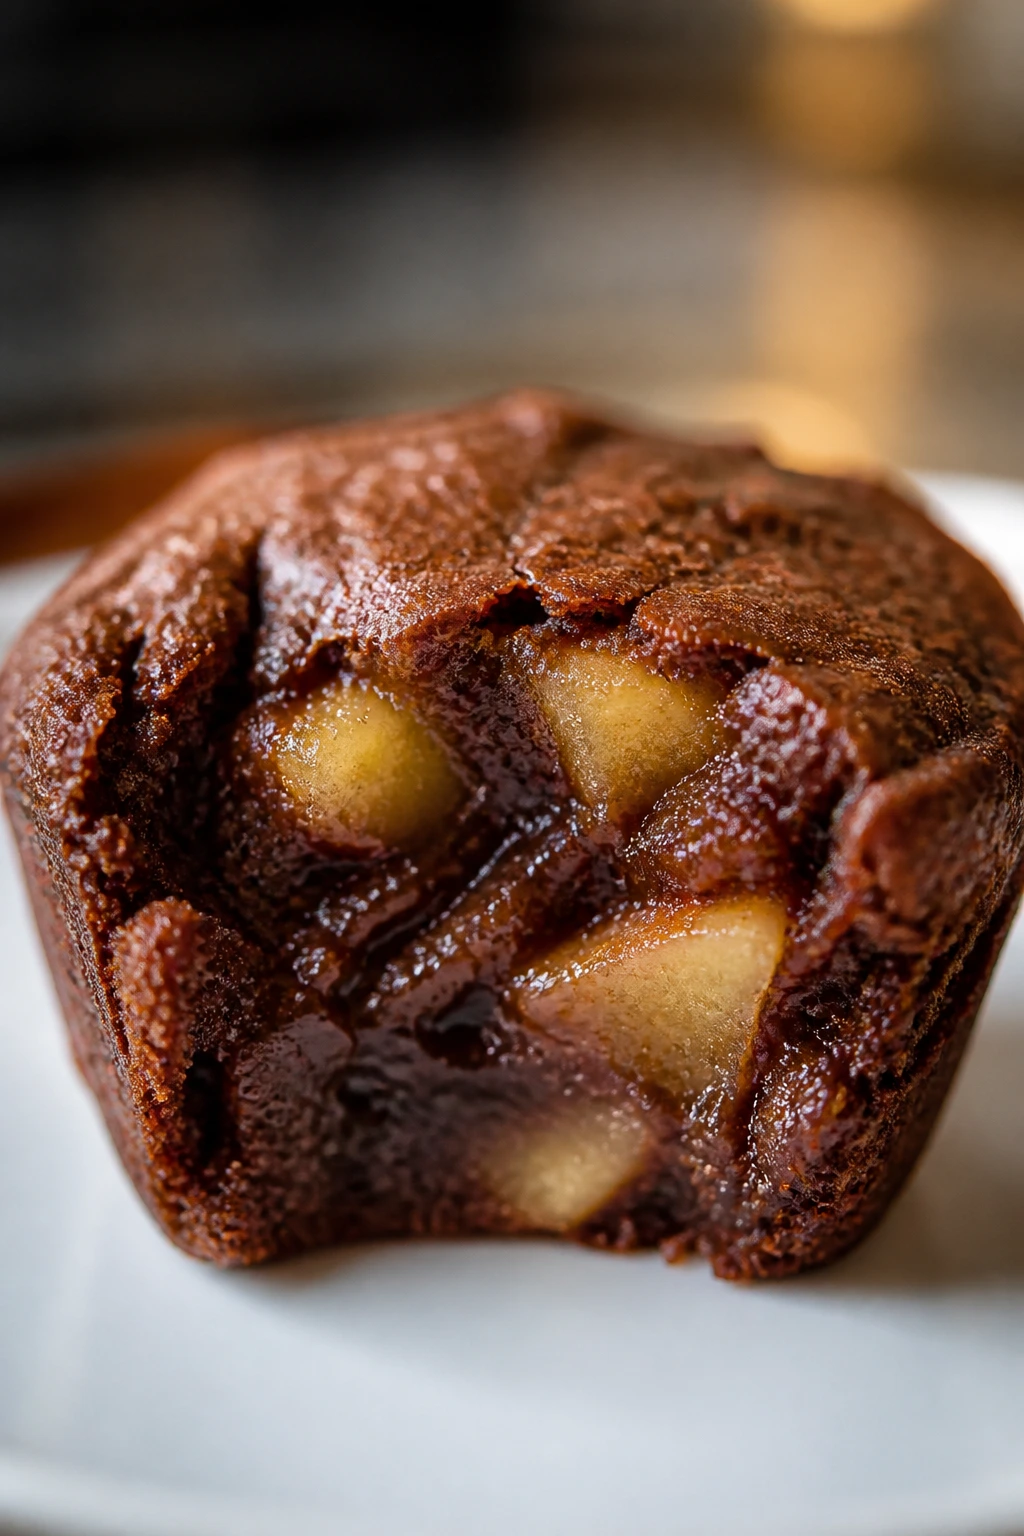
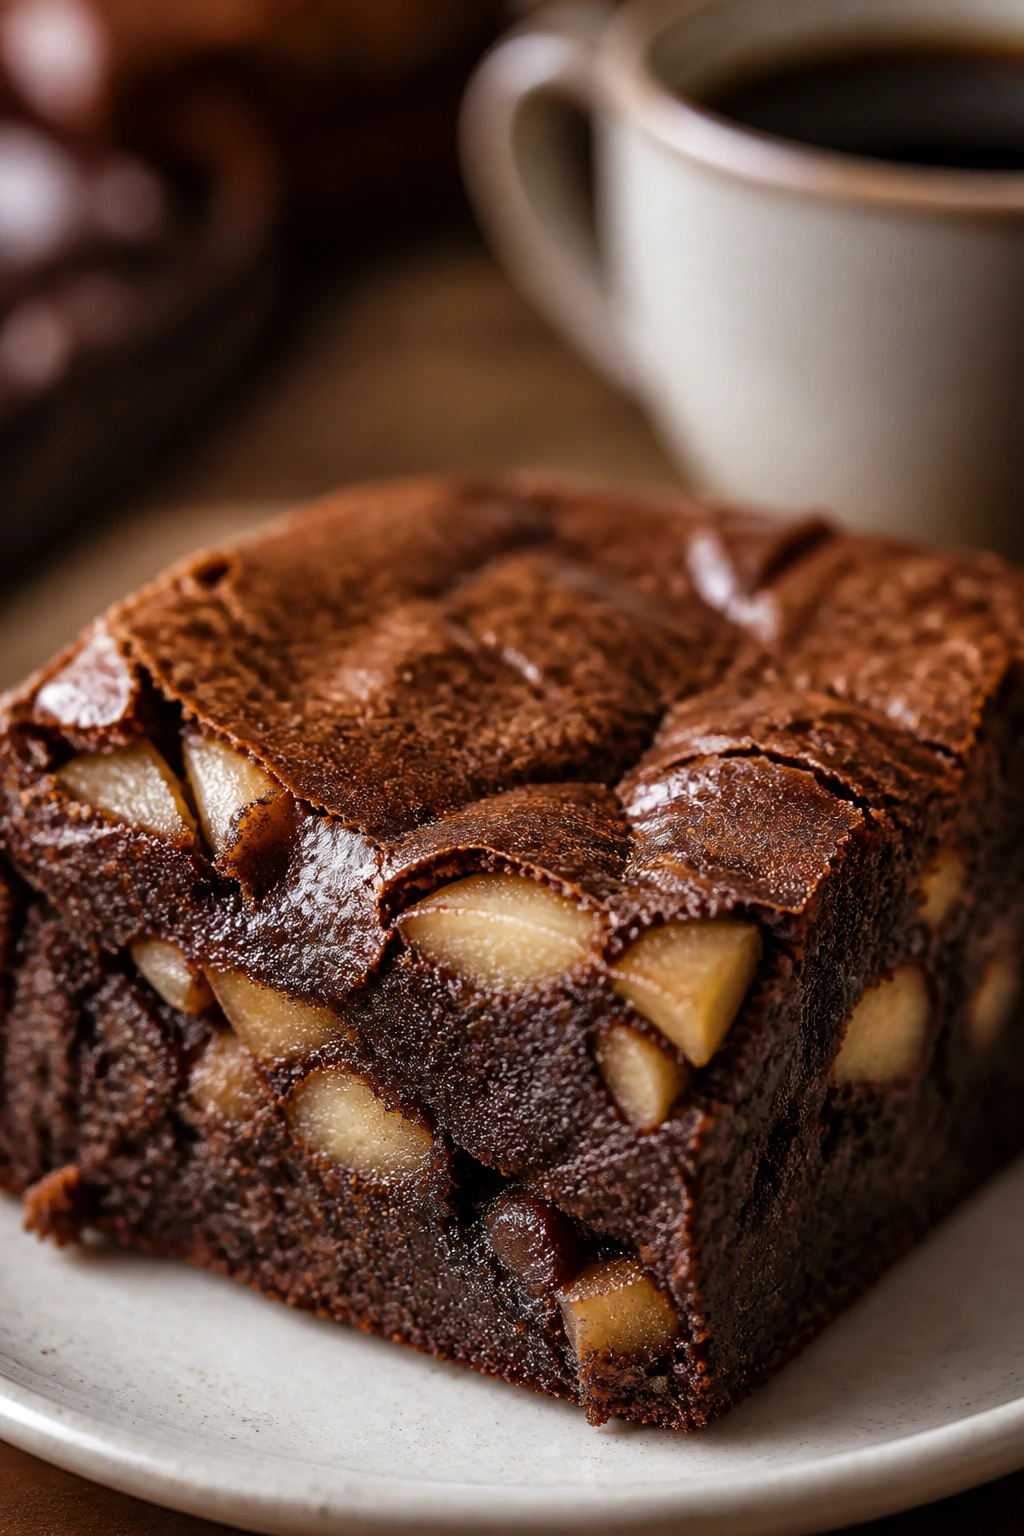
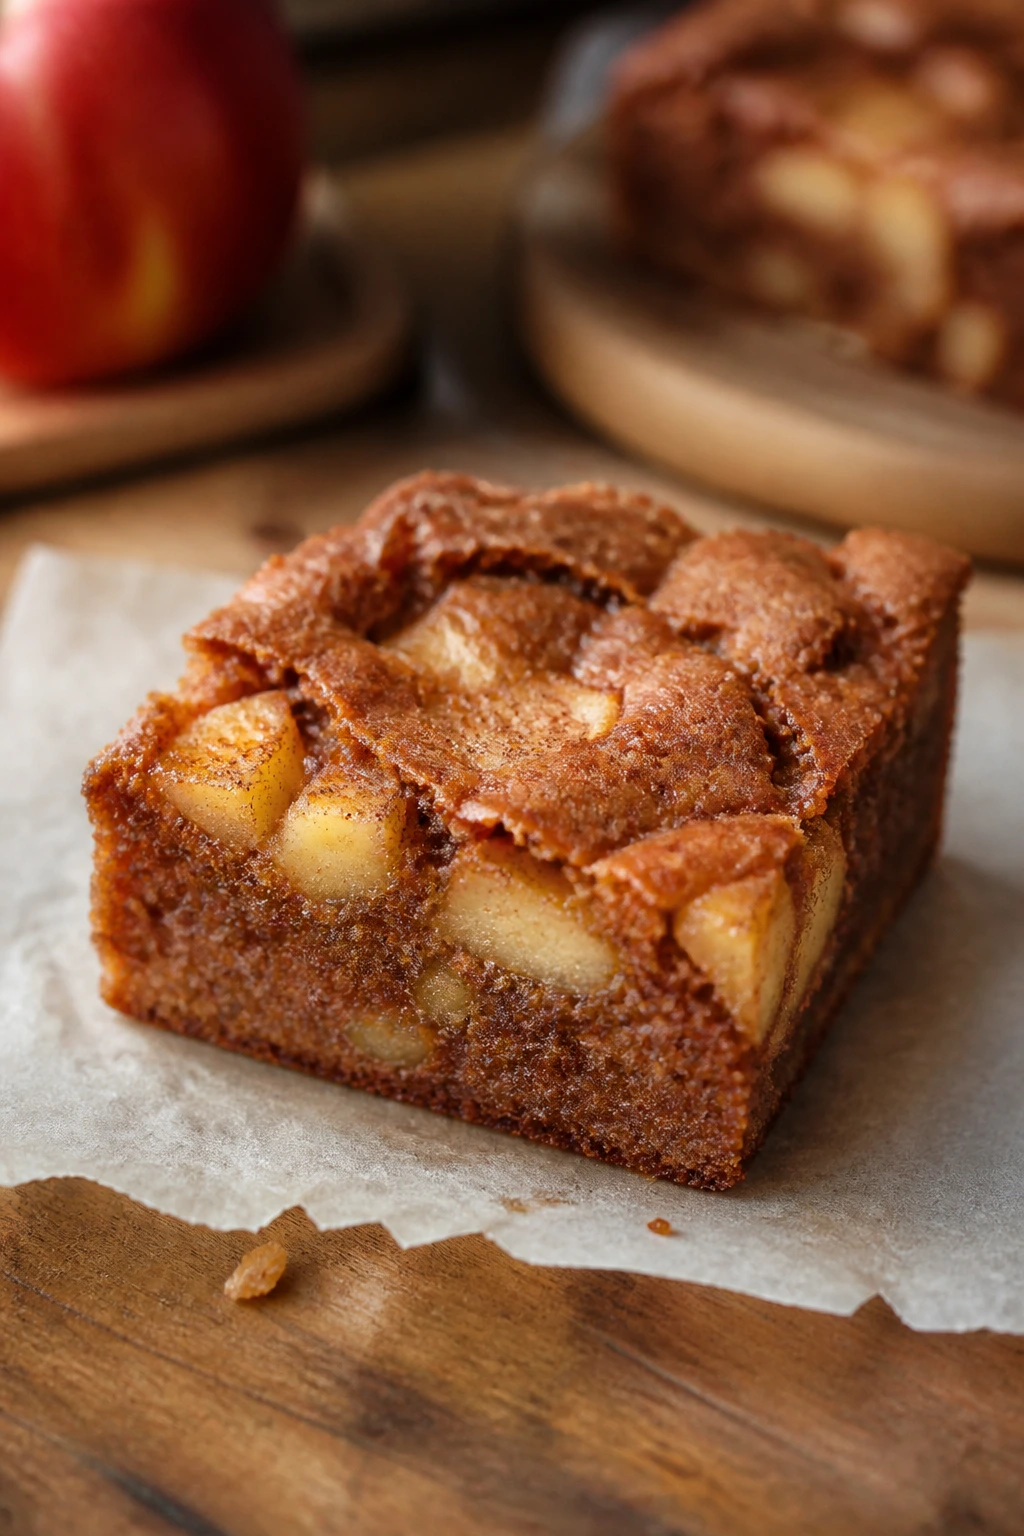
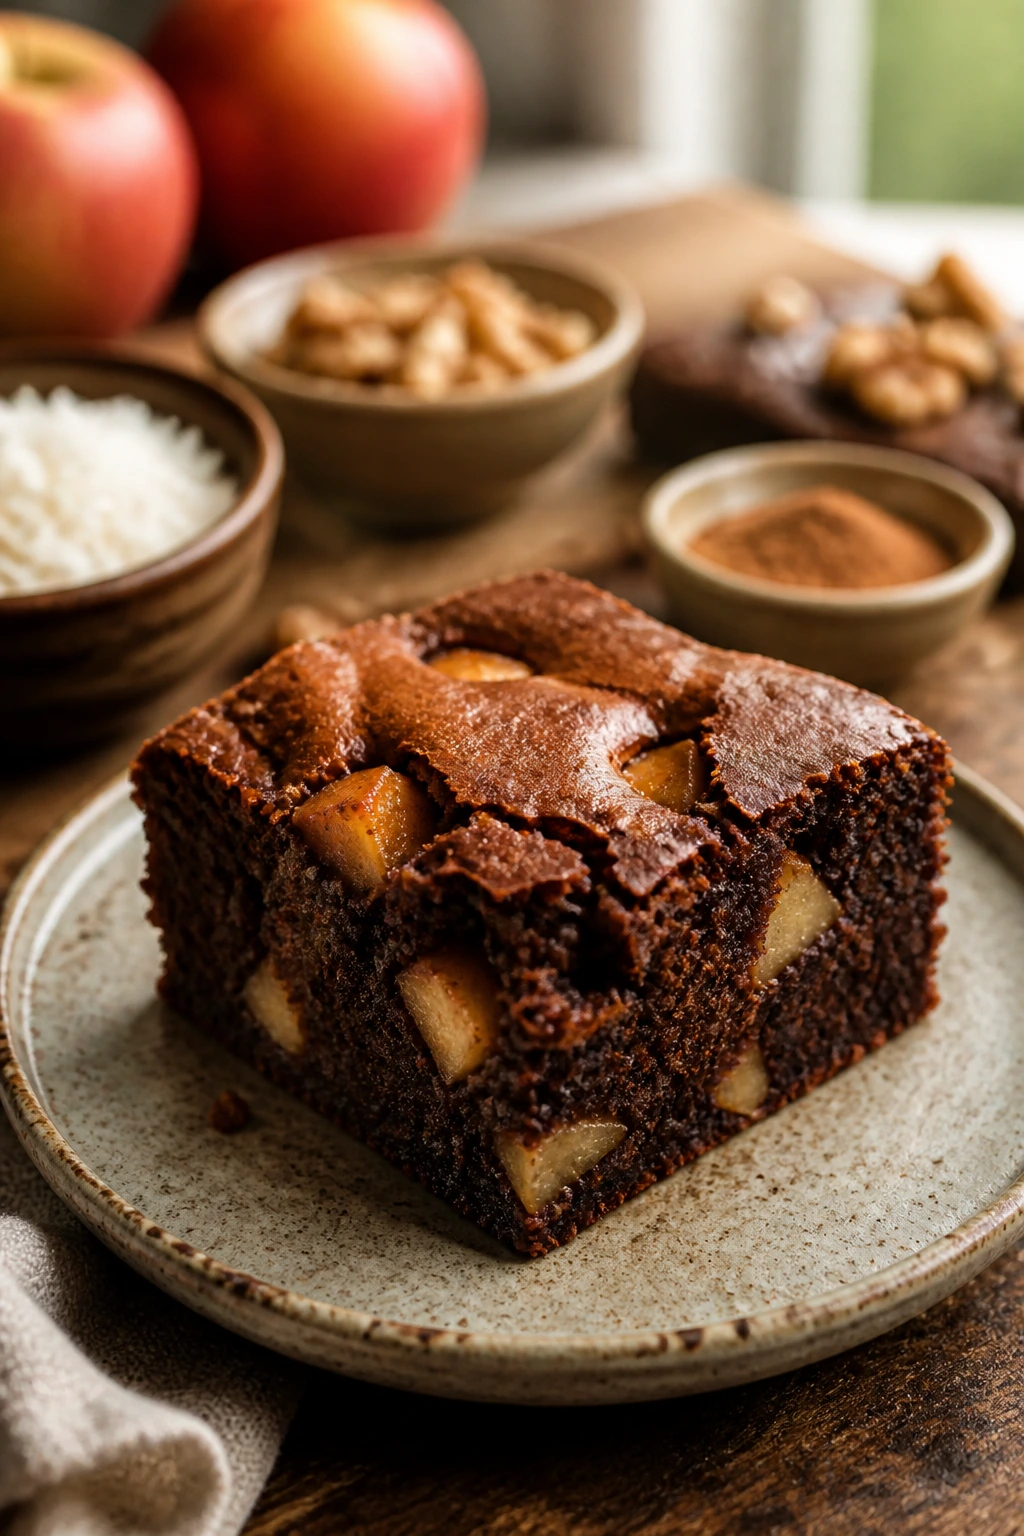
1. Classic Cinnamon Apple Brownies
Intro: This is the cleanest place to start: a pan of cinnamon-scented apple brownies with a soft center, browned edges, and little apple cubes that stay bright instead of disappearing.
Why It Works: Brown sugar keeps the crumb soft, while diced apples bring moisture without turning the pan wet. Cinnamon gives the whole batch that warm bakery smell, and the batter is simple enough to mix with a spoon. Pull it when the center has just set and a toothpick shows a few moist crumbs.
Key Ingredients:
- 1/2 cup unsalted butter, melted
- 3/4 cup packed light brown sugar
- 1 large egg
- 1 teaspoon vanilla extract
- 1 cup all-purpose flour
- 1 teaspoon ground cinnamon
- 1/2 teaspoon baking powder
- 1/4 teaspoon fine salt
- 1 cup peeled Granny Smith apples, cut into 1/4-inch dice
Quick Steps:
- Preheat the oven to 350°F and line an 8×8-inch pan with parchment.
- Whisk the butter, brown sugar, egg, and vanilla until smooth and glossy.
- Stir in the flour, cinnamon, baking powder, and salt until no dry streaks remain.
- Fold in the apples, spread the batter in the pan, and smooth the top.
- Bake for 24 to 28 minutes, until the center is set and the edges are lightly browned.
Equipment for This Recipe:
- 8×8-inch baking pan
- Parchment paper
- Medium mixing bowl
- Rubber spatula
How to Serve This Dish: Cut these into 9 squares and serve them warm with vanilla ice cream or plain yogurt. A dusting of powdered sugar looks nice, but I usually skip it and let the cinnamon do the work.
Pro Tips for This Recipe:
- Pat the diced apples dry if they look damp; extra surface moisture softens the top.
- Leave a little parchment overhang so the bars lift out cleanly.
- Cool the pan for 20 minutes before slicing, or the squares will smear.
Variations on This Dish:
- Walnut Crunch: Fold in 1/2 cup chopped walnuts for a nutty bite.
- Honey Swap: Replace 1/4 cup of the brown sugar with honey for a softer sweetness.
- Tart Apple Version: Use Granny Smith for sharpness or Braeburn for a mellower finish.
Common Mistakes to Avoid with This Dish:
- Don’t cut the apples into big wedges; they sink and create wet pockets.
- Don’t bake until the top is dry all over; the center should still feel slightly soft.
- Don’t slice while hot unless you like messy edges and a sticky pan.
2. Brown Butter Apple Blondies
Intro: Brown butter gives these blondies a toasted, nutty smell that starts stealing attention the minute it hits the bowl. The apples soften into little pockets, and the walnuts add a crackle on top.
Why It Works: Browning the butter cooks off the watery edge and leaves behind a deep, hazelnut-like flavor. That extra depth means the bars taste finished even with a short ingredient list. If you let the butter cool for 10 minutes before mixing, the batter stays smooth instead of scrambling the egg.
Key Ingredients:
- 10 tablespoons unsalted butter
- 3/4 cup packed light brown sugar
- 1 large egg
- 1 teaspoon vanilla extract
- 1 1/4 cups all-purpose flour
- 1/2 teaspoon baking powder
- 1/2 teaspoon ground cinnamon
- 1/4 teaspoon fine salt
- 1 cup diced Honeycrisp apples
- 1/2 cup chopped walnuts
Quick Steps:
- Brown the butter in a small saucepan until amber flecks appear and it smells nutty.
- Whisk the butter with brown sugar, egg, and vanilla.
- Stir in flour, baking powder, cinnamon, and salt.
- Fold in the apples and walnuts, then spread the batter into a parchment-lined 8×8-inch pan.
- Bake at 350°F for 25 to 30 minutes, until the center springs back lightly.
Equipment for This Recipe:
- Small saucepan
- 8×8-inch baking pan
- Whisk
- Heatproof bowl
How to Serve This Dish: These are good at room temperature with coffee or hot tea. I like them plain because the brown butter already gives enough flavor, but a thin maple glaze works if you want extra sweetness.
Pro Tips for This Recipe:
- Watch the butter closely; a few seconds too long and it burns.
- Scrape the browned bits into the bowl. That’s where the flavor lives.
- Use firm apples so they hold their shape inside the thick batter.
Variations on This Dish:
- Maple Brown Butter: Swap 2 tablespoons of the brown sugar for maple syrup.
- Pecan Kitchen Swap: Use pecans instead of walnuts for a softer, richer crunch.
- Extra Cinnamon Edge: Add another 1/4 teaspoon cinnamon if you want a spicier finish.
Common Mistakes to Avoid with This Dish:
- Don’t pour the batter into the pan while the butter is scorching hot; it loosens the structure.
- Don’t skip the parchment. Brown butter blondies love to stick.
- Don’t use soft apples that collapse into the crumb.
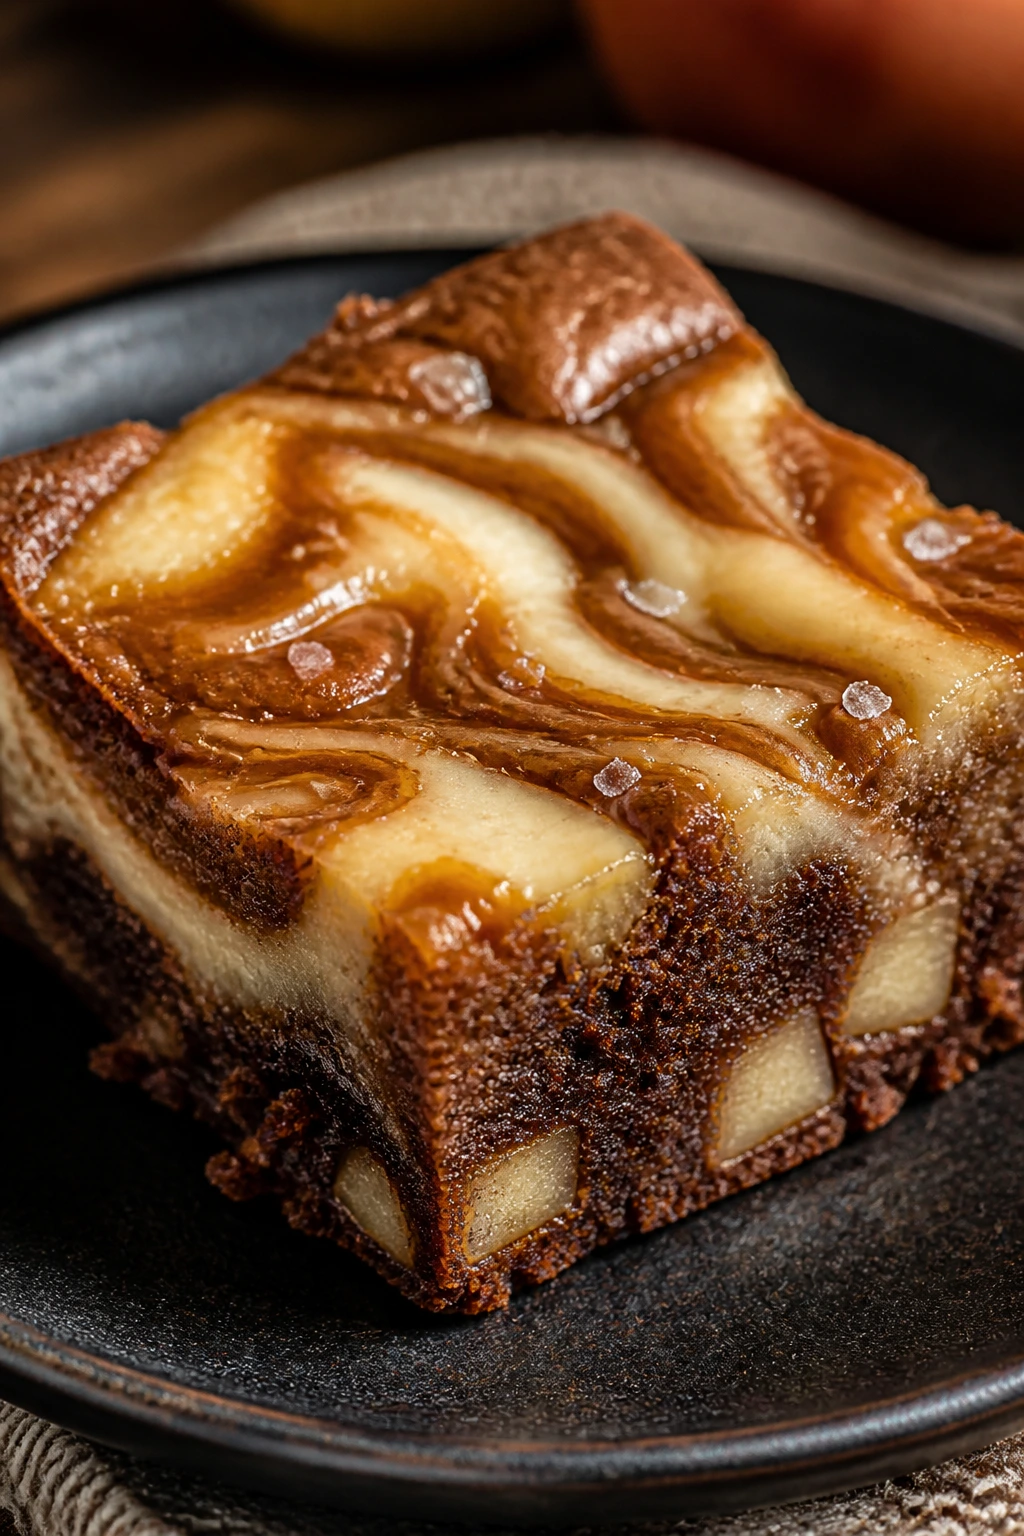
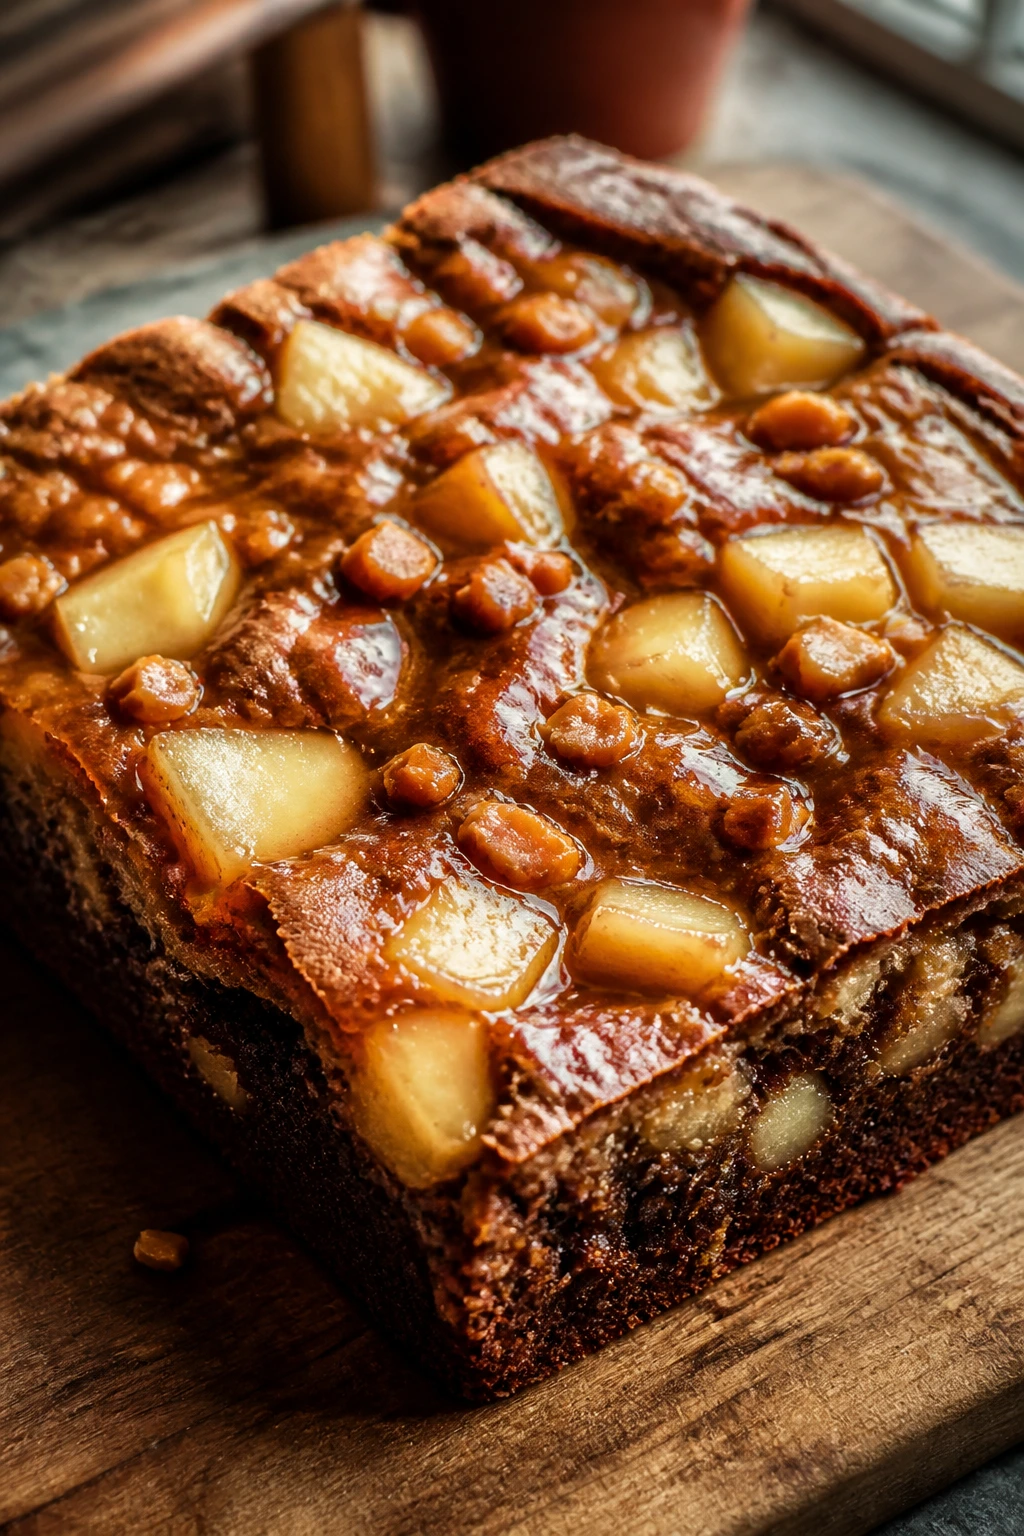
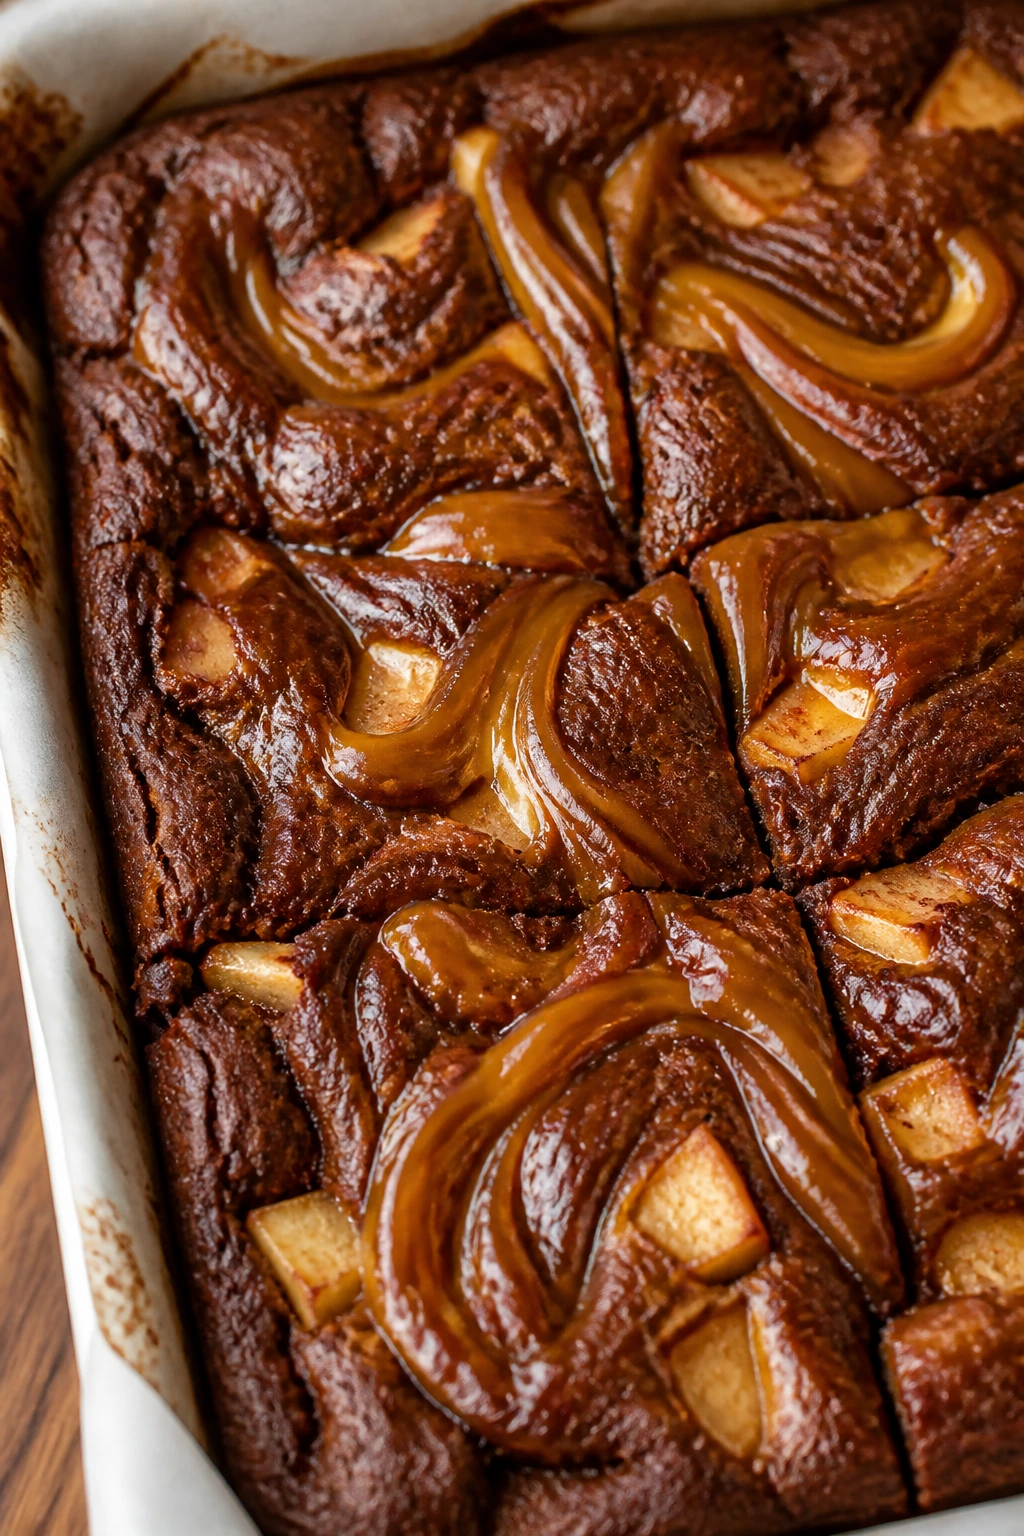
3. Caramel Swirl Apple Brownies
Intro: A caramel swirl changes the mood fast. These bars bake up with a glossy top, soft apple pockets, and sweet ribbons that settle into the crumb instead of running everywhere.
Why It Works: Thick caramel sauce adds a chewy edge without making the batter soupy. The trick is to keep the caramel in small ribbons and not over-swirl it. If you drag a knife through the top once or twice, the pattern stays defined and the bars cut much cleaner.
Key Ingredients:
- 1/2 cup unsalted butter, melted
- 2/3 cup packed brown sugar
- 1 large egg
- 1 teaspoon vanilla extract
- 1 cup all-purpose flour
- 1 teaspoon ground cinnamon
- 1/2 teaspoon baking powder
- 1/4 teaspoon fine salt
- 1 cup diced apples
- 1/3 cup thick caramel sauce
Quick Steps:
- Heat the oven to 350°F and line an 8×8-inch pan with parchment.
- Whisk butter, brown sugar, egg, and vanilla until smooth.
- Stir in flour, cinnamon, baking powder, and salt.
- Fold in the apples, spread the batter in the pan, and drizzle caramel over the top.
- Swirl once or twice with a knife and bake for 26 to 30 minutes.
Equipment for This Recipe:
- 8×8-inch baking pan
- Parchment paper
- Spatula
- Butter knife or skewer for swirling
How to Serve This Dish: Serve these slightly warm with a spoonful of whipped cream. They also sit well beside a strong cup of coffee, which helps cut the sweetness.
Pro Tips for This Recipe:
- Use a thick caramel sauce, not a thin pourable one.
- Chill homemade caramel a bit before swirling so it sits on top.
- Let the bars cool fully before slicing or the swirl will smear.
Variations on This Dish:
- Salted Caramel Finish: Sprinkle flaky salt over the top right after baking.
- Dulce de Leche Twist: Use dulce de leche for a thicker, richer swirl.
- Walnut Caramel: Add 1/2 cup chopped walnuts for a nutty contrast.
Common Mistakes to Avoid with This Dish:
- Don’t drown the batter in caramel. You want ribbons, not a sauce pan.
- Don’t swirl too deeply or the caramel sinks to the bottom.
- Don’t underbake the center; the caramel makes it look softer than it is.
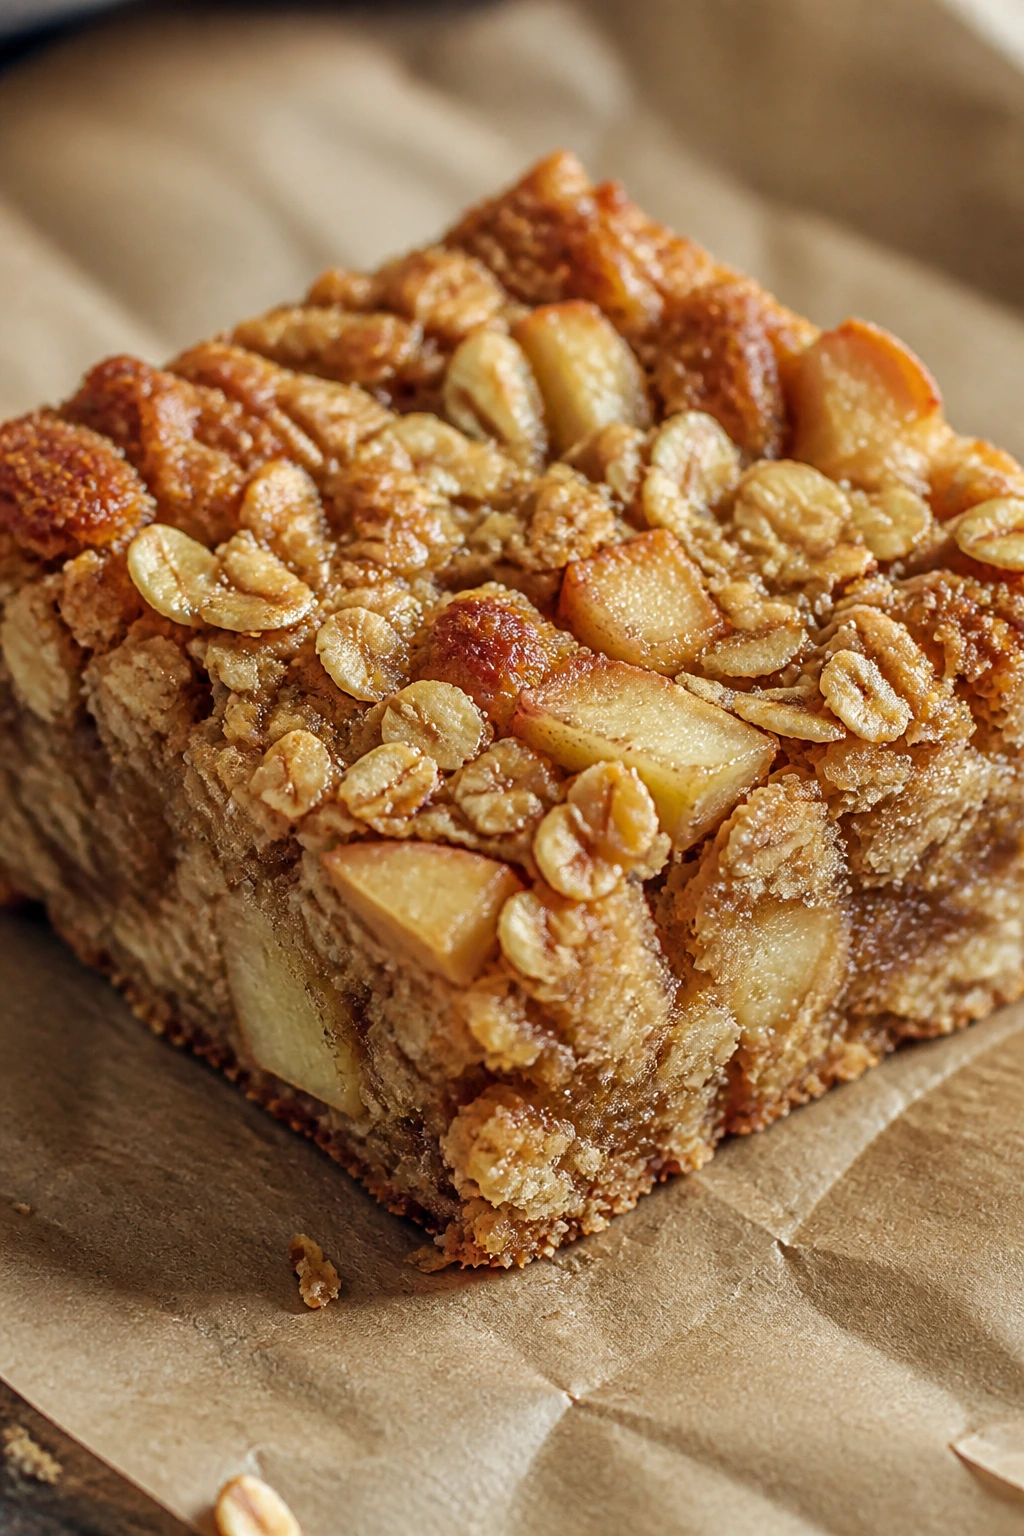
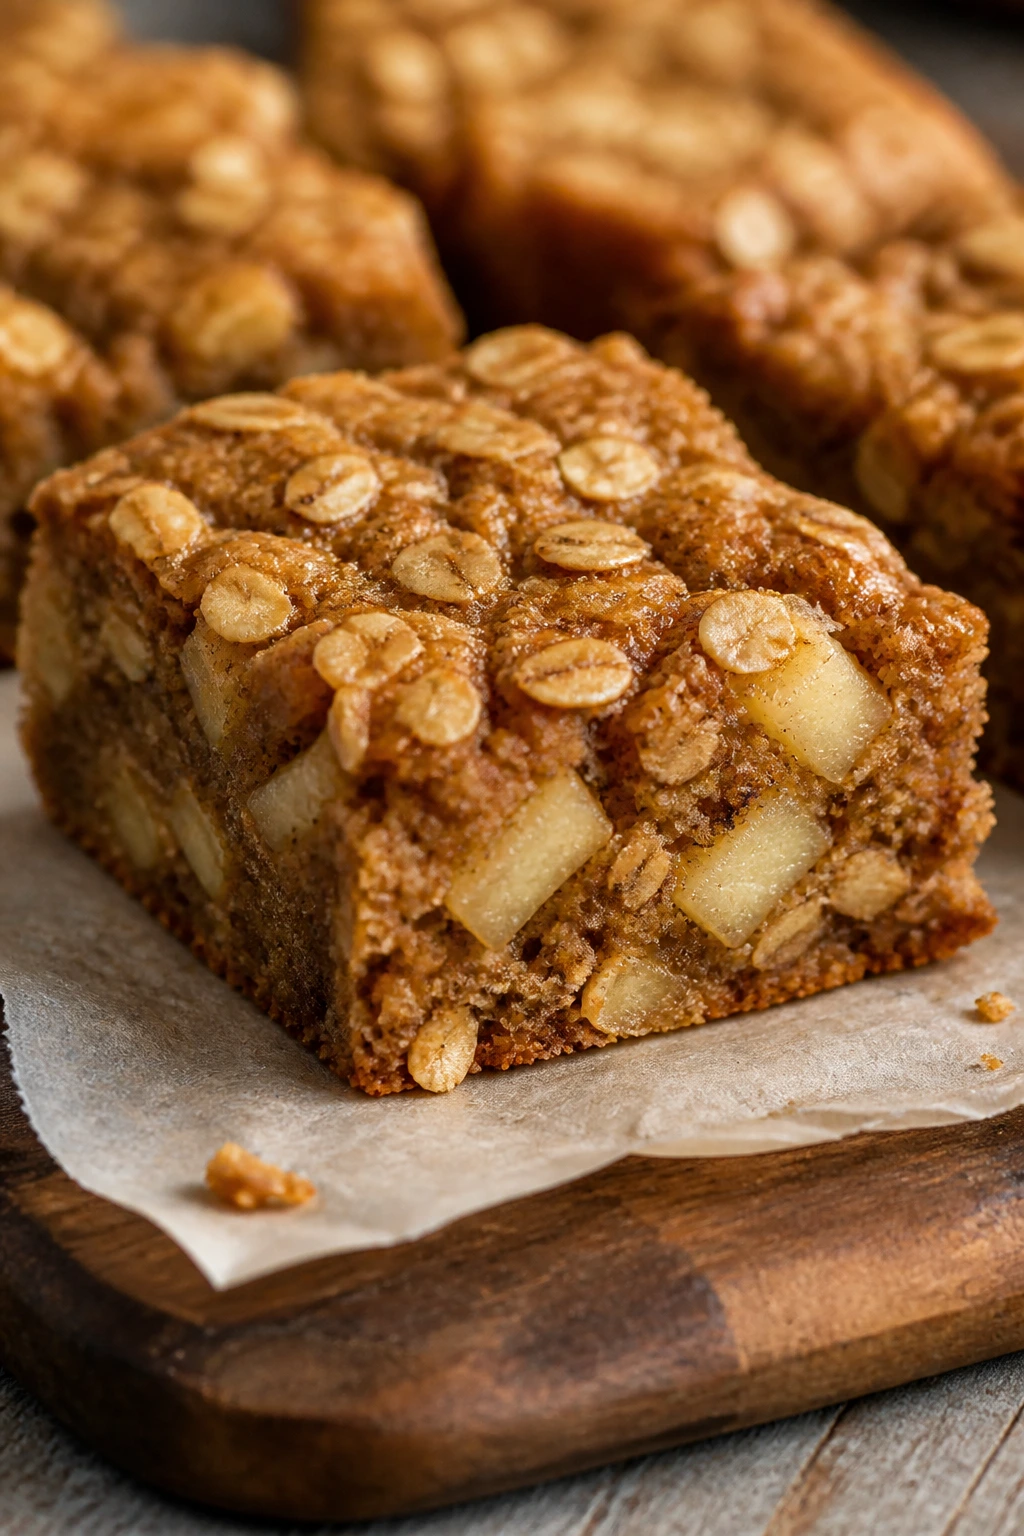
4. Applesauce Oat Apple Bars
Intro: Oats make this batch feel sturdy and a little rustic, with a soft chew that lands somewhere between snack cake and breakfast bar. Applesauce keeps the crumb moist, and diced apple gives it some texture instead of turning it flat.
Why It Works: Applesauce handles part of the moisture job, so the batter doesn’t need much butter or oil. That makes the bars easy to stir by hand, and the oats help them slice cleanly once they cool. If you’re nervous about dry baked goods, this is one of the safest places to start.
Key Ingredients:
- 1/2 cup unsweetened applesauce
- 1/3 cup neutral oil or melted butter
- 3/4 cup packed brown sugar
- 1 large egg
- 1 teaspoon vanilla extract
- 1 cup all-purpose flour
- 1 cup old-fashioned oats
- 1 teaspoon ground cinnamon
- 1/2 teaspoon baking powder
- 1/4 teaspoon fine salt
- 1 cup diced apple
Quick Steps:
- Preheat the oven to 350°F and line an 8×8-inch pan.
- Whisk applesauce, oil, brown sugar, egg, and vanilla until combined.
- Stir in flour, oats, cinnamon, baking powder, and salt.
- Fold in the apple pieces and spread the batter in an even layer.
- Bake for 24 to 28 minutes, until the center no longer looks wet.
Equipment for This Recipe:
- 8×8-inch baking pan
- Mixing bowl
- Wooden spoon
- Cooling rack
How to Serve This Dish: These bars are good with a cup of tea, especially when they’re still a little warm. I like them plain for breakfast and with a little cream for dessert.
Pro Tips for This Recipe:
- Use unsweetened applesauce so you control the sugar.
- Let the bars cool before cutting; oats need time to settle.
- If the batter seems loose, wait 5 minutes. The oats will thicken it.
Variations on This Dish:
- Raisin Oat Version: Add 1/3 cup raisins for a sweeter chew.
- Walnut Breakfast Bar: Fold in 1/2 cup chopped walnuts.
- Cinnamon Sugar Top: Sprinkle 1 tablespoon cinnamon sugar before baking.
Common Mistakes to Avoid with This Dish:
- Don’t use quick oats unless you want a softer, less chewy texture.
- Don’t add sweetened applesauce without trimming the sugar.
- Don’t skip the cooling time; warm oat bars fall apart fast.
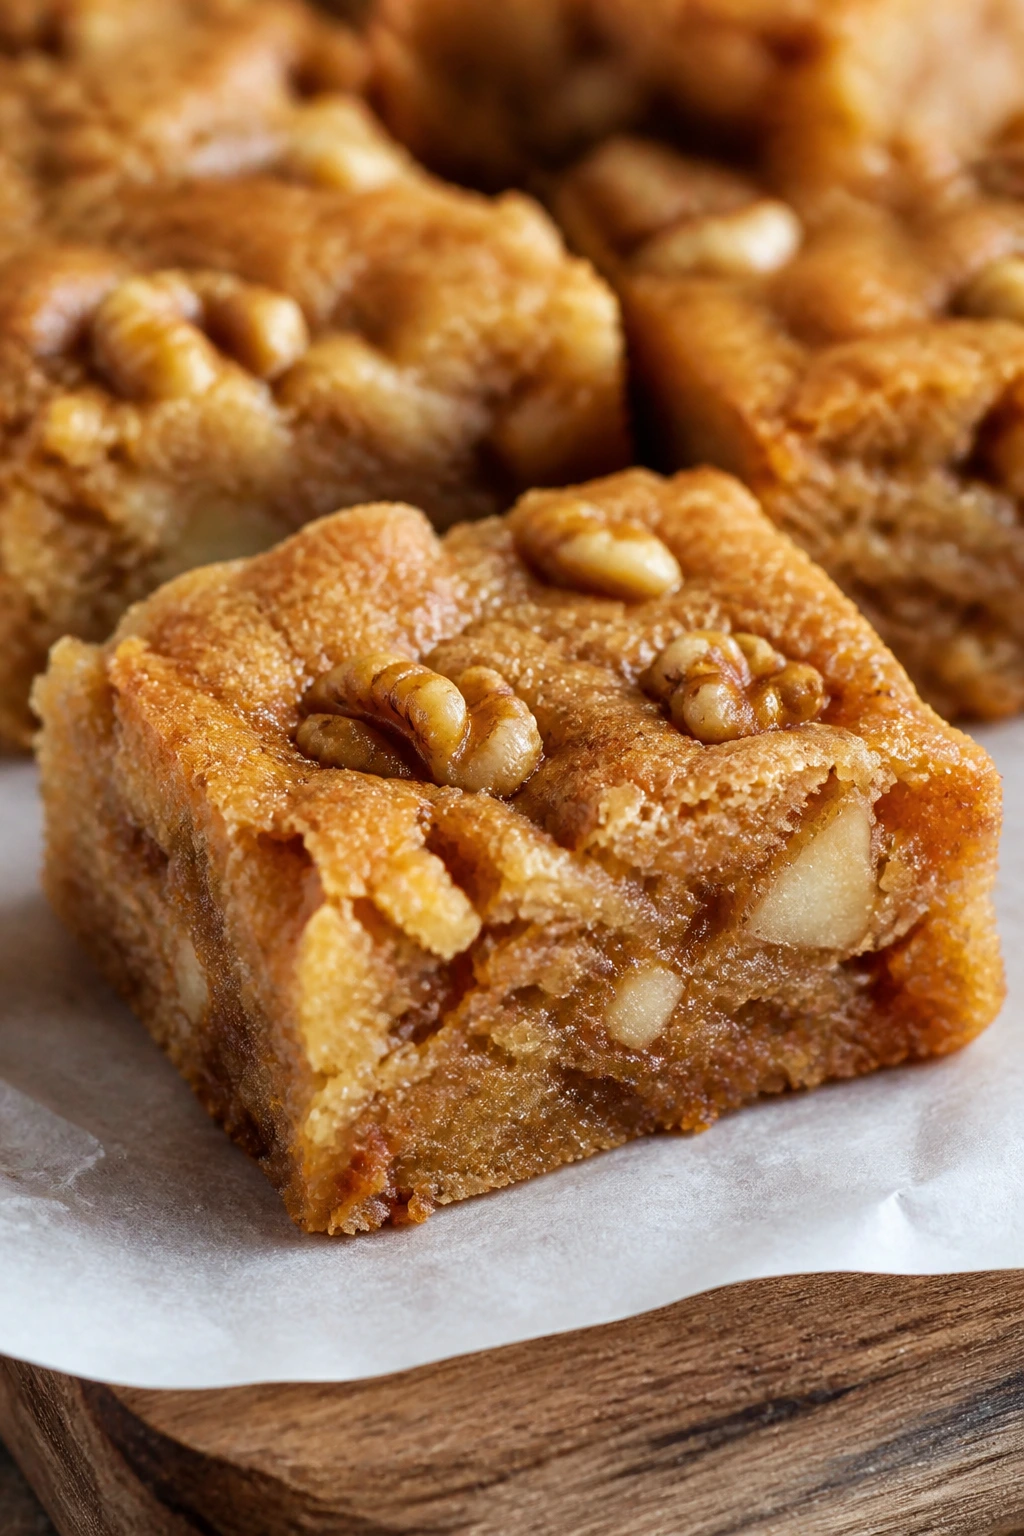
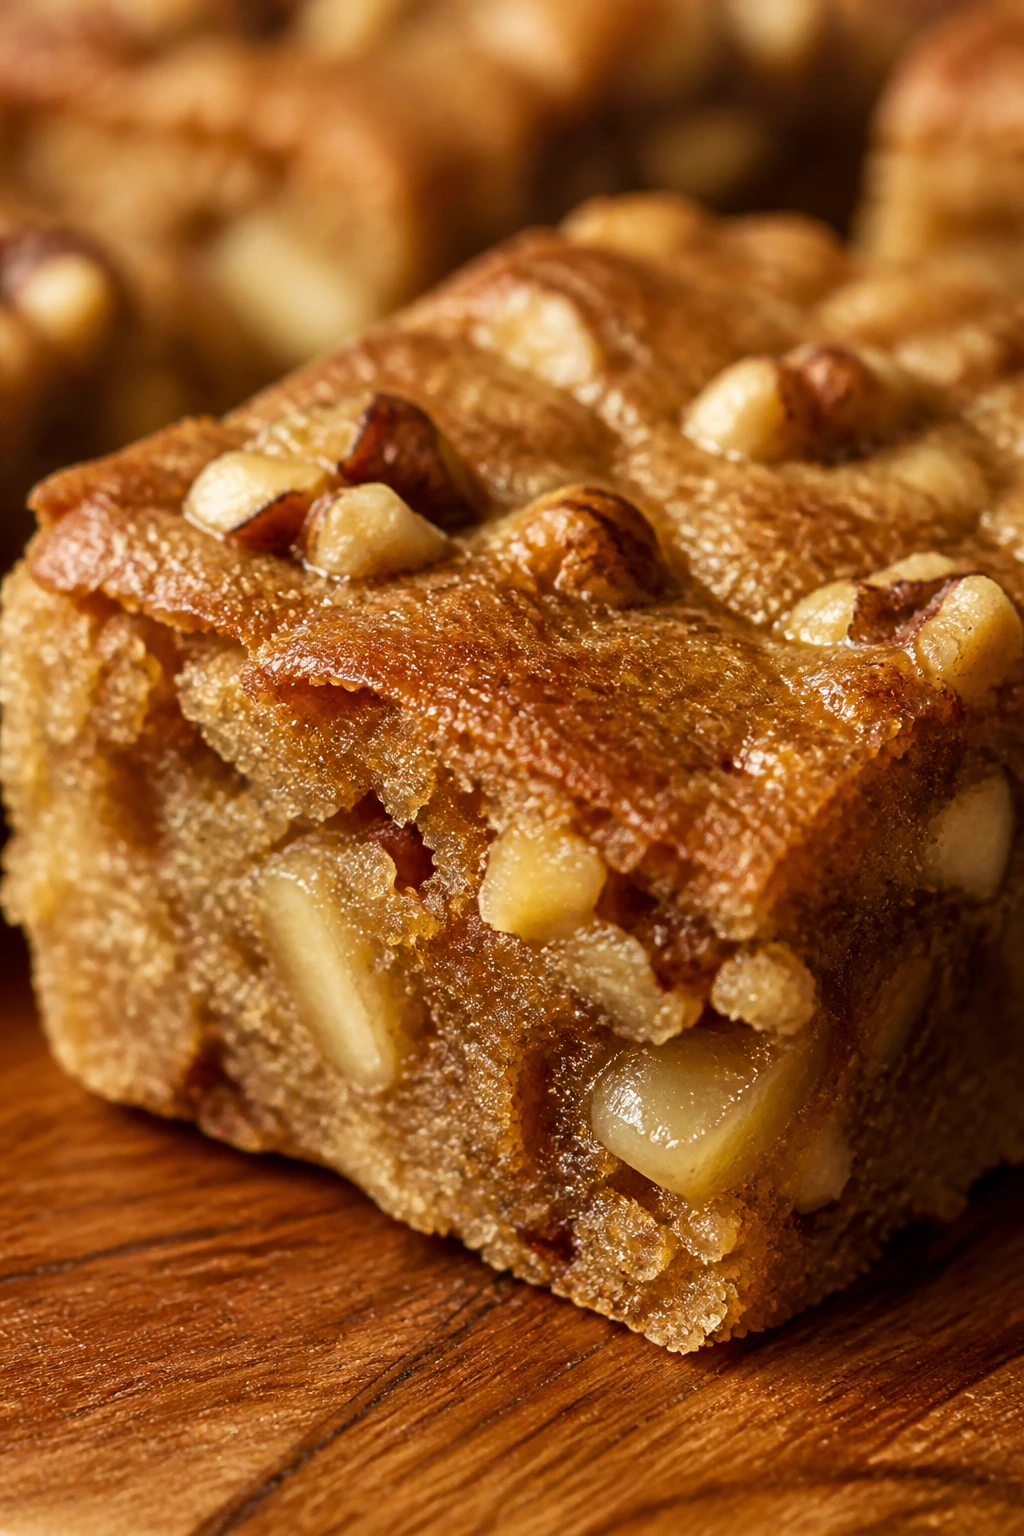
5. Maple Pecan Apple Brownies
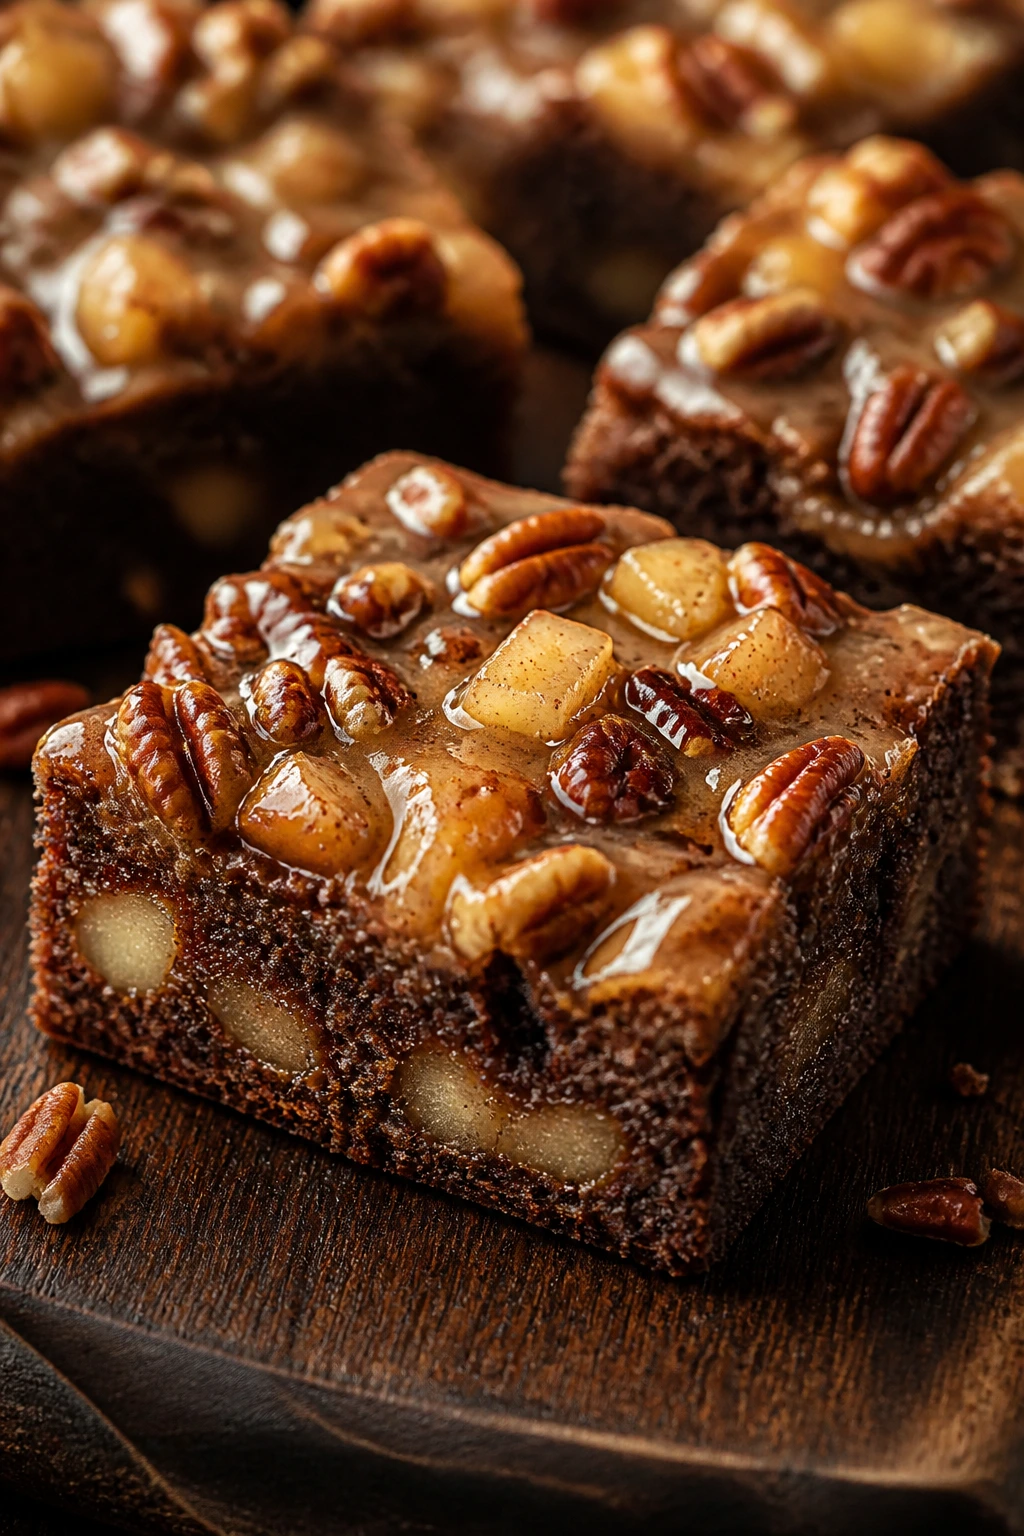
Intro: Maple and pecans pull these bars in a deeper, almost toasted direction. The apples stay soft but distinct, and every square tastes like it spent a little time near a hot oven and a wood spoon.
Why It Works: Pure maple syrup brings flavor that plain sugar cannot fake. Because it adds liquid, the batter needs just a touch more flour to stay balanced. Pecans also toast quickly in the oven, so they bring a crisp edge without any extra work.
Key Ingredients:
- 1/2 cup unsalted butter, melted
- 1/2 cup packed brown sugar
- 1/4 cup pure maple syrup
- 1 large egg
- 1 teaspoon vanilla extract
- 1 cup all-purpose flour
- 1 teaspoon ground cinnamon
- 1/2 teaspoon baking powder
- 1/4 teaspoon fine salt
- 1 cup diced apples
- 1/2 cup chopped pecans
Quick Steps:
- Heat the oven to 350°F and line an 8×8-inch pan.
- Whisk butter, brown sugar, maple syrup, egg, and vanilla.
- Stir in flour, cinnamon, baking powder, and salt.
- Fold in apples and pecans, then spread the batter evenly.
- Bake for 25 to 29 minutes, until the top is set and lightly browned.
Equipment for This Recipe:
- 8×8-inch pan
- Mixing bowl
- Spatula
- Paring knife for the apples
How to Serve This Dish: These are excellent warm with whipped cream or a spoonful of crème fraîche. The maple reads best when the bars are still a little soft in the middle.
Pro Tips for This Recipe:
- Use pure maple syrup, not pancake syrup.
- Toast the pecans for 5 minutes if you want extra crunch.
- Dice the apples small so they don’t crowd the maple batter.
Variations on This Dish:
- Pecan-Free Version: Leave out the nuts and add 2 tablespoons maple sugar if you have it.
- Apple Cider Maple: Replace 1 tablespoon of the syrup with reduced cider.
- Extra-Spice Version: Add 1/4 teaspoon nutmeg for a warmer finish.
Common Mistakes to Avoid with This Dish:
- Don’t use too much syrup or the bars turn gummy.
- Don’t forget to cool the pan a bit before cutting.
- Don’t leave the pecans raw if you want a deeper flavor.
6. Cream Cheese Ribbon Apple Brownies
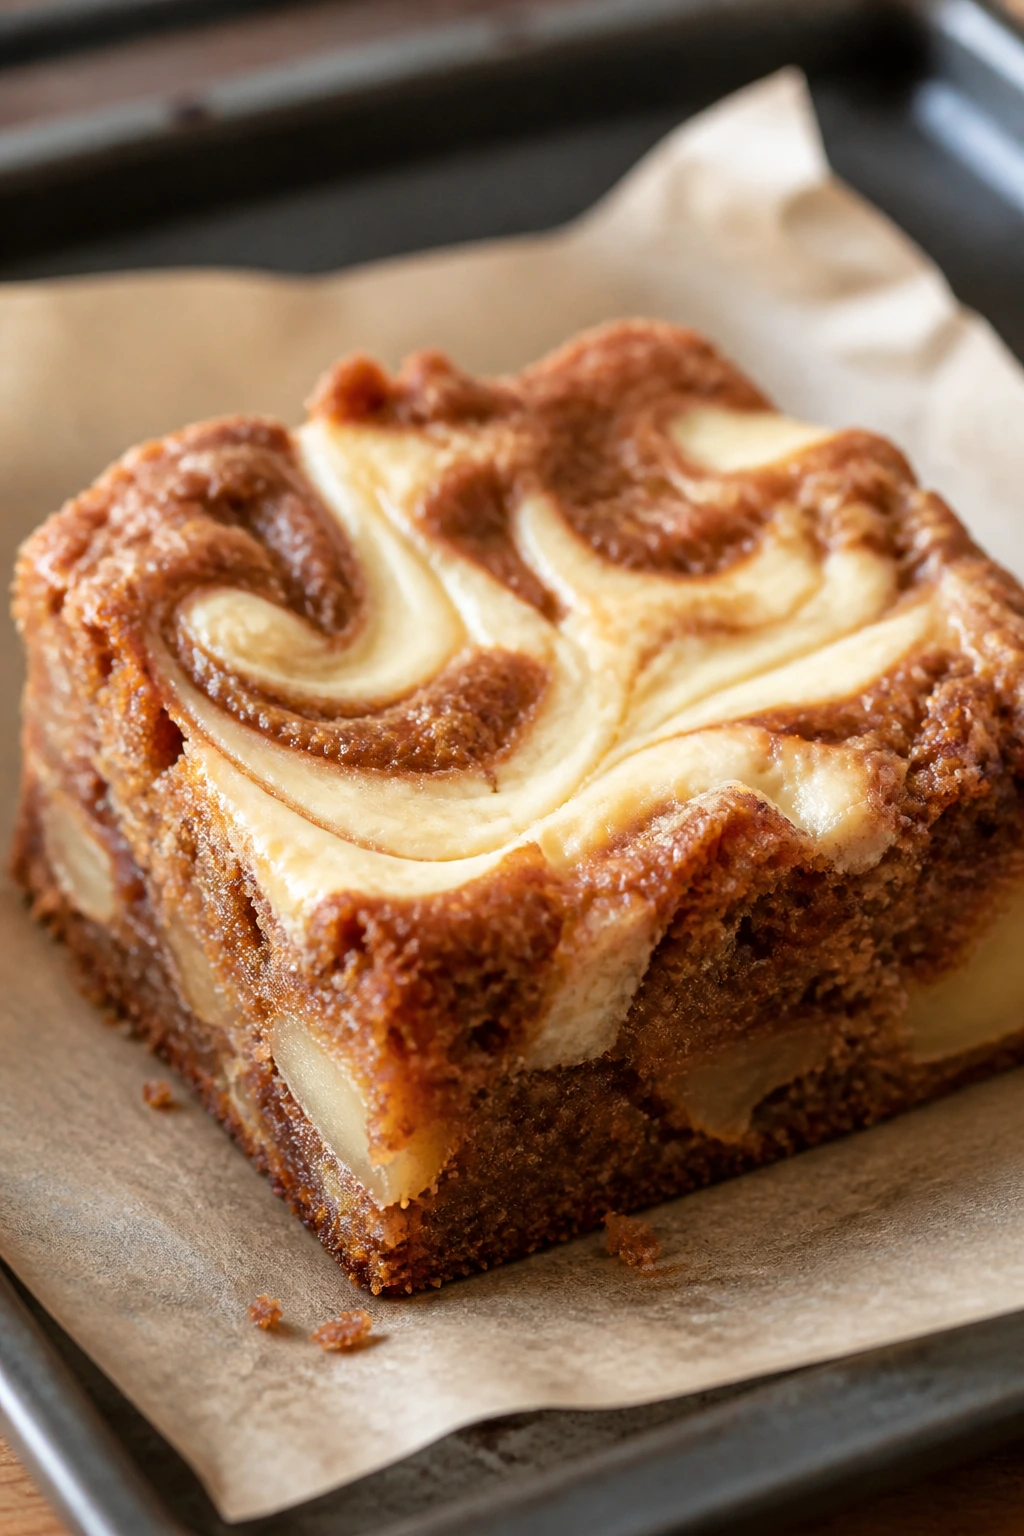
Intro: The cream cheese ribbon looks fancier than it is. Once the batter is in the pan, you just drop the filling on top and drag a knife through it a few times.
Why It Works: Cream cheese adds tang, which keeps the sweet apple batter from tasting flat. The ribbon bakes into soft, pale streaks that cut through the bars and give every square a little contrast. Because the filling is thick, it doesn’t soak the batter unless you overmix it.
Key Ingredients:
- 1/2 cup unsalted butter, melted
- 3/4 cup packed brown sugar
- 1 large egg
- 1 teaspoon vanilla extract
- 1 cup all-purpose flour
- 1 teaspoon ground cinnamon
- 1/2 teaspoon baking powder
- 1/4 teaspoon fine salt
- 1 cup diced apples
- 4 ounces cream cheese, softened
- 2 tablespoons granulated sugar
- 1 egg yolk
- 1/2 teaspoon vanilla extract
Quick Steps:
- Preheat the oven to 350°F and line an 8×8-inch pan with parchment.
- Mix the brownie batter ingredients until just combined, then fold in the apples.
- In another bowl, beat cream cheese, sugar, egg yolk, and vanilla until smooth.
- Spread the batter in the pan, dollop the cream cheese mixture on top, and swirl gently.
- Bake for 25 to 30 minutes until the center is set with a slight wobble.
Equipment for This Recipe:
- 8×8-inch baking pan
- Two mixing bowls
- Hand mixer or sturdy whisk
- Knife for swirling
How to Serve This Dish: Serve chilled or room temperature; the cream cheese ribbon tastes cleaner when it’s cool. A few sliced strawberries on the side look nice, but these bars do fine on their own.
Pro Tips for This Recipe:
- Let the cream cheese soften fully so the ribbon blends smoothly.
- Swirl only once or twice; too much turns the layers muddy.
- Refrigerate leftovers because of the cream cheese layer.
Variations on This Dish:
- Lemon Cream Cheese: Add 1 teaspoon lemon zest to the filling.
- Cinnamon Roll Style: Mix 1 teaspoon cinnamon into the cream cheese layer.
- Walnut Topper: Sprinkle 1/4 cup chopped walnuts over the swirl before baking.
Common Mistakes to Avoid with This Dish:
- Don’t use cold cream cheese; it leaves little lumps.
- Don’t swirl all the way to the bottom of the pan.
- Don’t leave the bars at room temperature for days because of the dairy filling.
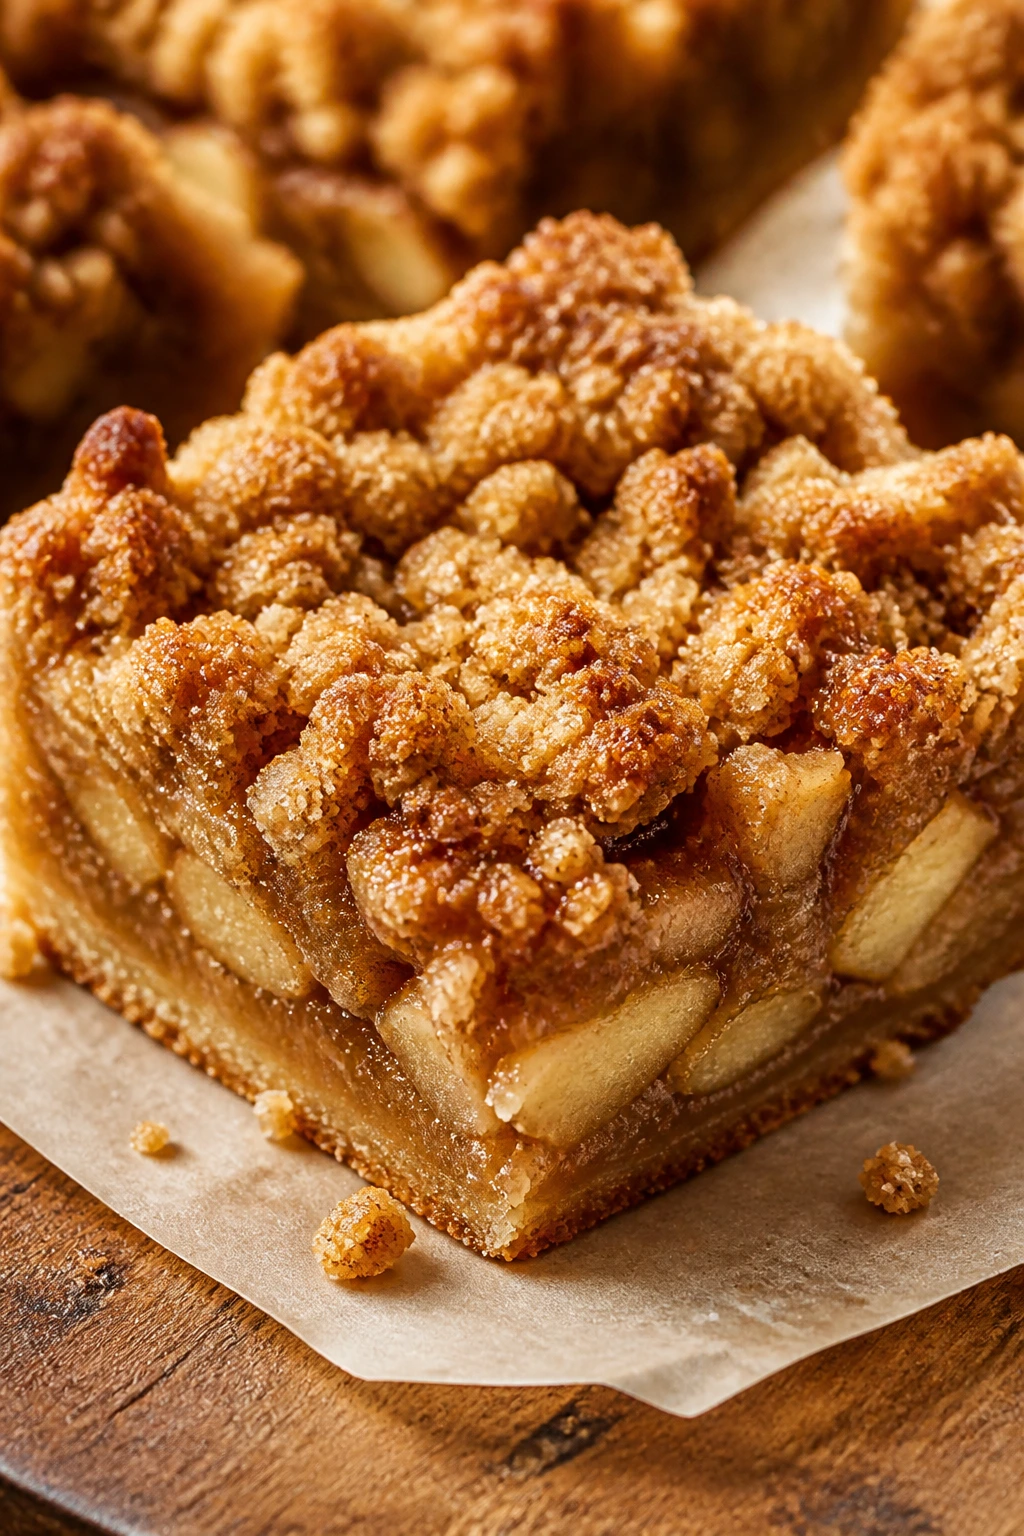
7. Apple Pie Crumble Bars
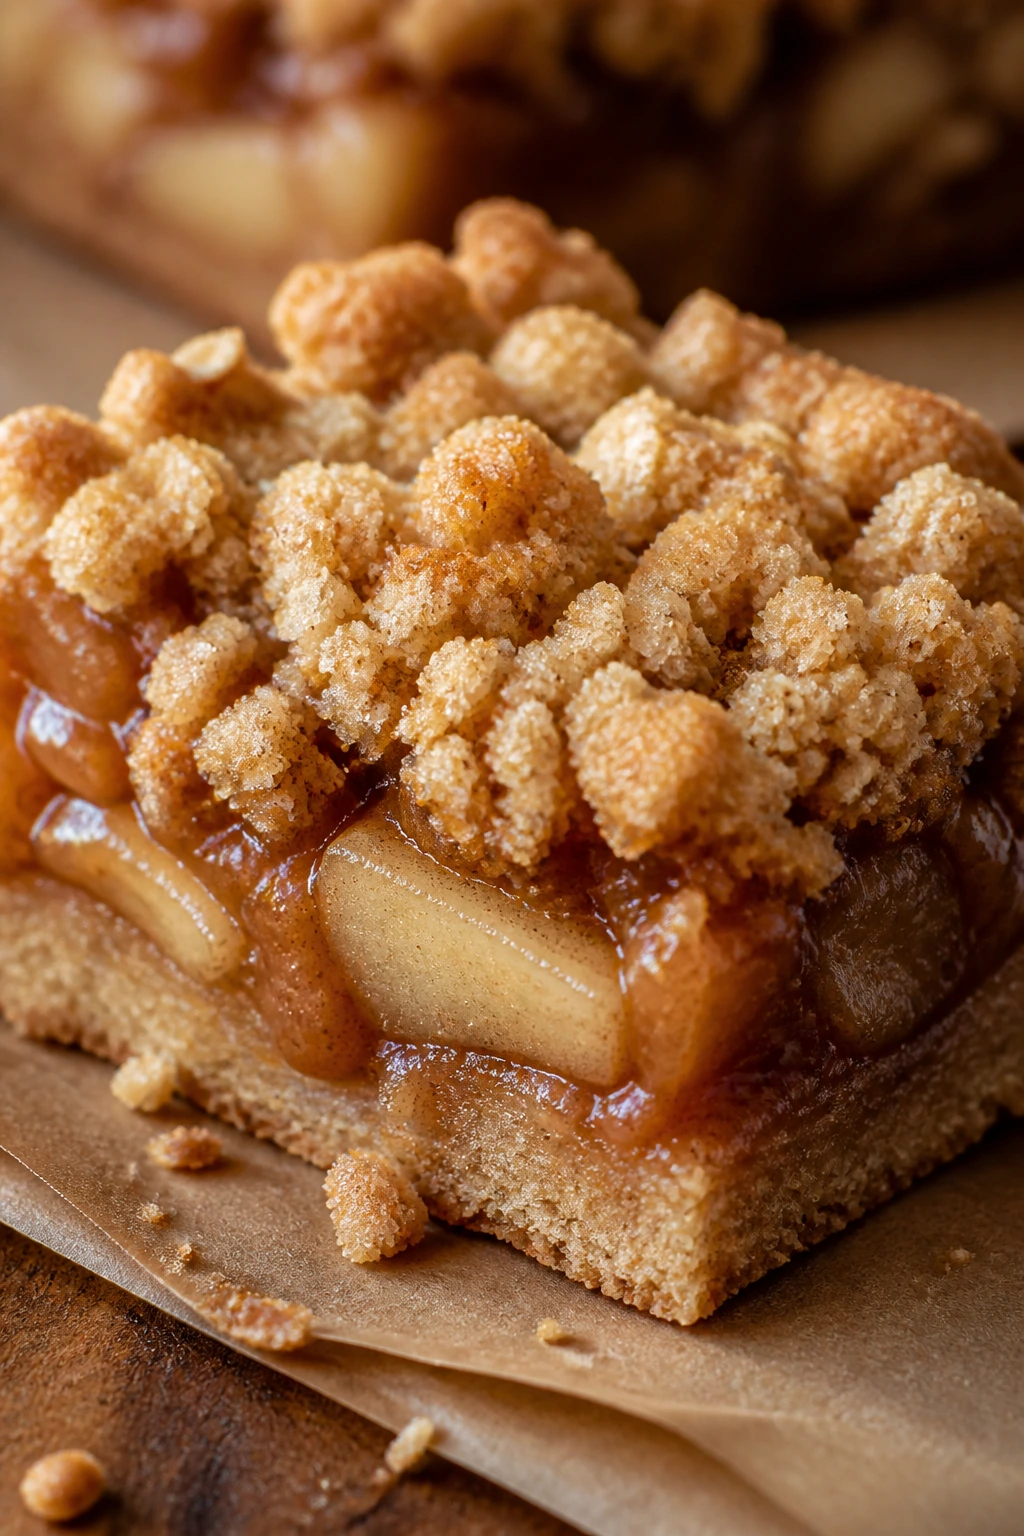
Intro: This is apple pie in bar form, minus the lattice and the pie dish. The crumble bakes into a sandy top that stays crisp for a while, which is half the fun.
Why It Works: A quick apple filling keeps the center juicy, while the crumble gives you a dry, crumbly contrast on top. The base and topping use the same flour-butter-sugar mix, so once you’ve made the topping, the rest feels easy. A little lemon juice keeps the apples from tasting flat.
Key Ingredients:
- 1/2 cup unsalted butter, melted
- 3/4 cup packed brown sugar
- 1 large egg
- 1 teaspoon vanilla extract
- 1 1/4 cups all-purpose flour
- 1/2 teaspoon baking powder
- 1 teaspoon ground cinnamon
- 1/4 teaspoon fine salt
- 1 1/2 cups diced apples
- 1 tablespoon lemon juice
- 1 tablespoon flour
- 1/2 cup all-purpose flour
- 1/3 cup brown sugar
- 1/2 teaspoon cinnamon
- 4 tablespoons cold butter
- 1/3 cup old-fashioned oats
Quick Steps:
- Heat the oven to 350°F and line an 8×8-inch pan.
- Mix the base batter and press about two-thirds into the pan.
- Toss the apples with lemon juice and flour, then spread them over the base.
- Mix the crumble ingredients until pebbly and sprinkle over the apples.
- Bake for 28 to 32 minutes until the top is golden and the filling bubbles at the edges.
Equipment for This Recipe:
- 8×8-inch baking pan
- Mixing bowl
- Fork or pastry cutter
- Parchment paper
How to Serve This Dish: These bars are best once the filling has set, about 30 minutes after baking. I like them with whipped cream or a scoop of vanilla ice cream, especially when the crumble is still a little warm.
Pro Tips for This Recipe:
- Keep the crumble butter cold so the topping stays crumbly.
- Cut the apples small; large chunks make the bars hard to slice.
- Let the pan cool fully or the filling will ooze.
Variations on This Dish:
- Nutty Crumble: Add 1/4 cup chopped pecans to the topping.
- Extra-Cinnamon Filling: Add another 1/2 teaspoon cinnamon to the apples.
- Tart-Sweet Balance: Use half Granny Smith and half Honeycrisp.
Common Mistakes to Avoid with This Dish:
- Don’t press the crumble layer down; it should sit loosely.
- Don’t skip the flour on the apples or the filling turns runny.
- Don’t cut while hot, or the squares collapse.
8. Honey Walnut Apple Blondies
Intro: Honey softens the crumb and gives these blondies a rounder sweetness than plain sugar alone. The walnuts add a little bite, and the apples tuck into the batter like tiny soft pockets.
Why It Works: Honey brings moisture, so the bars stay tender for a few days. Because honey browns faster than sugar, a moderate oven and a short bake matter here. Walnut pieces also hold their crunch better than many nuts, which is why I reach for them in blondies.
Key Ingredients:
- 1/2 cup unsalted butter, softened
- 1/2 cup packed brown sugar
- 1/3 cup honey
- 1 large egg
- 1 teaspoon vanilla extract
- 1 1/4 cups all-purpose flour
- 1/2 teaspoon baking powder
- 1 teaspoon ground cinnamon
- 1/4 teaspoon fine salt
- 1 cup diced apples
- 1/2 cup chopped walnuts
Quick Steps:
- Preheat the oven to 350°F and line an 8×8-inch pan.
- Beat butter, brown sugar, honey, egg, and vanilla until smooth.
- Stir in flour, baking powder, cinnamon, and salt.
- Fold in apples and walnuts, then spread into the pan.
- Bake for 25 to 28 minutes until the top is golden and the center springs back.
Equipment for This Recipe:
- 8×8-inch pan
- Mixing bowl
- Whisk or hand mixer
- Spatula
How to Serve This Dish: These blondies are good at room temperature with tea, especially black tea or chai. I’d serve them plain first; honey has a habit of disappearing if you pile on too many extras.
Pro Tips for This Recipe:
- Cream the butter well so the honey distributes evenly.
- Don’t overbake; honey can make the top look done early.
- Use walnuts that smell fresh, not dusty.
Variations on This Dish:
- Pecan Honey Version: Swap the walnuts for pecans.
- Orange Honey Blondies: Add 1 teaspoon orange zest to the batter.
- Seeded Top: Sprinkle sesame seeds over the top before baking.
Common Mistakes to Avoid with This Dish:
- Don’t add too much flour or the honey loses its softness.
- Don’t rely on color alone; test the center for a light spring.
- Don’t use thin honey sauces or blends meant for tea sweetening.
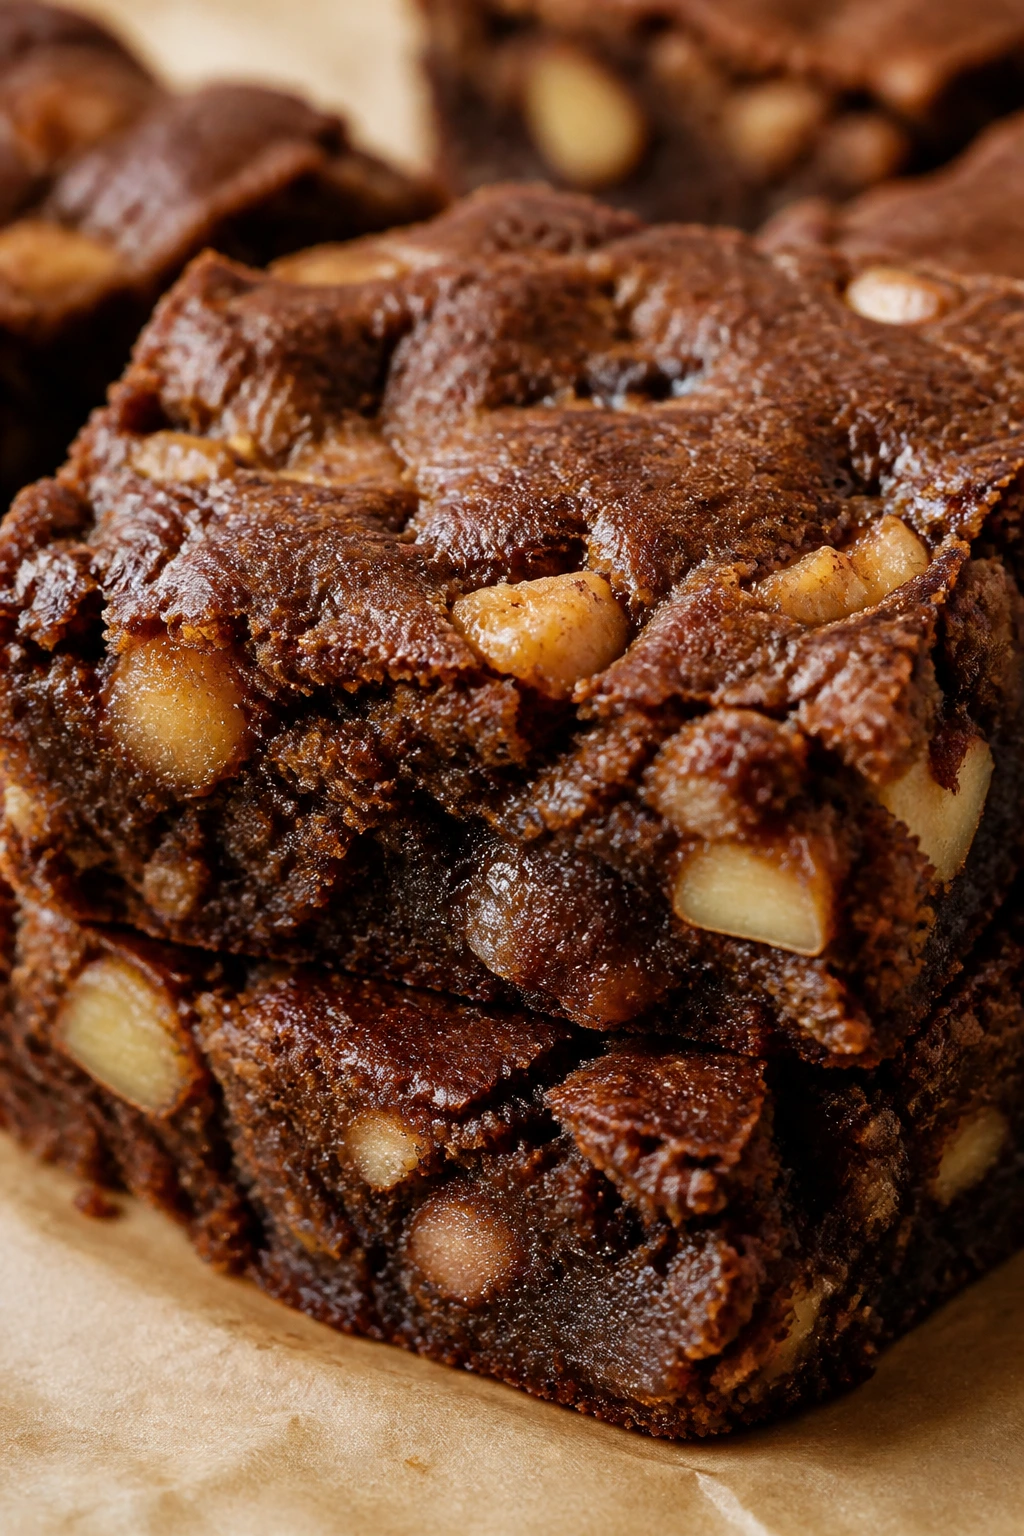
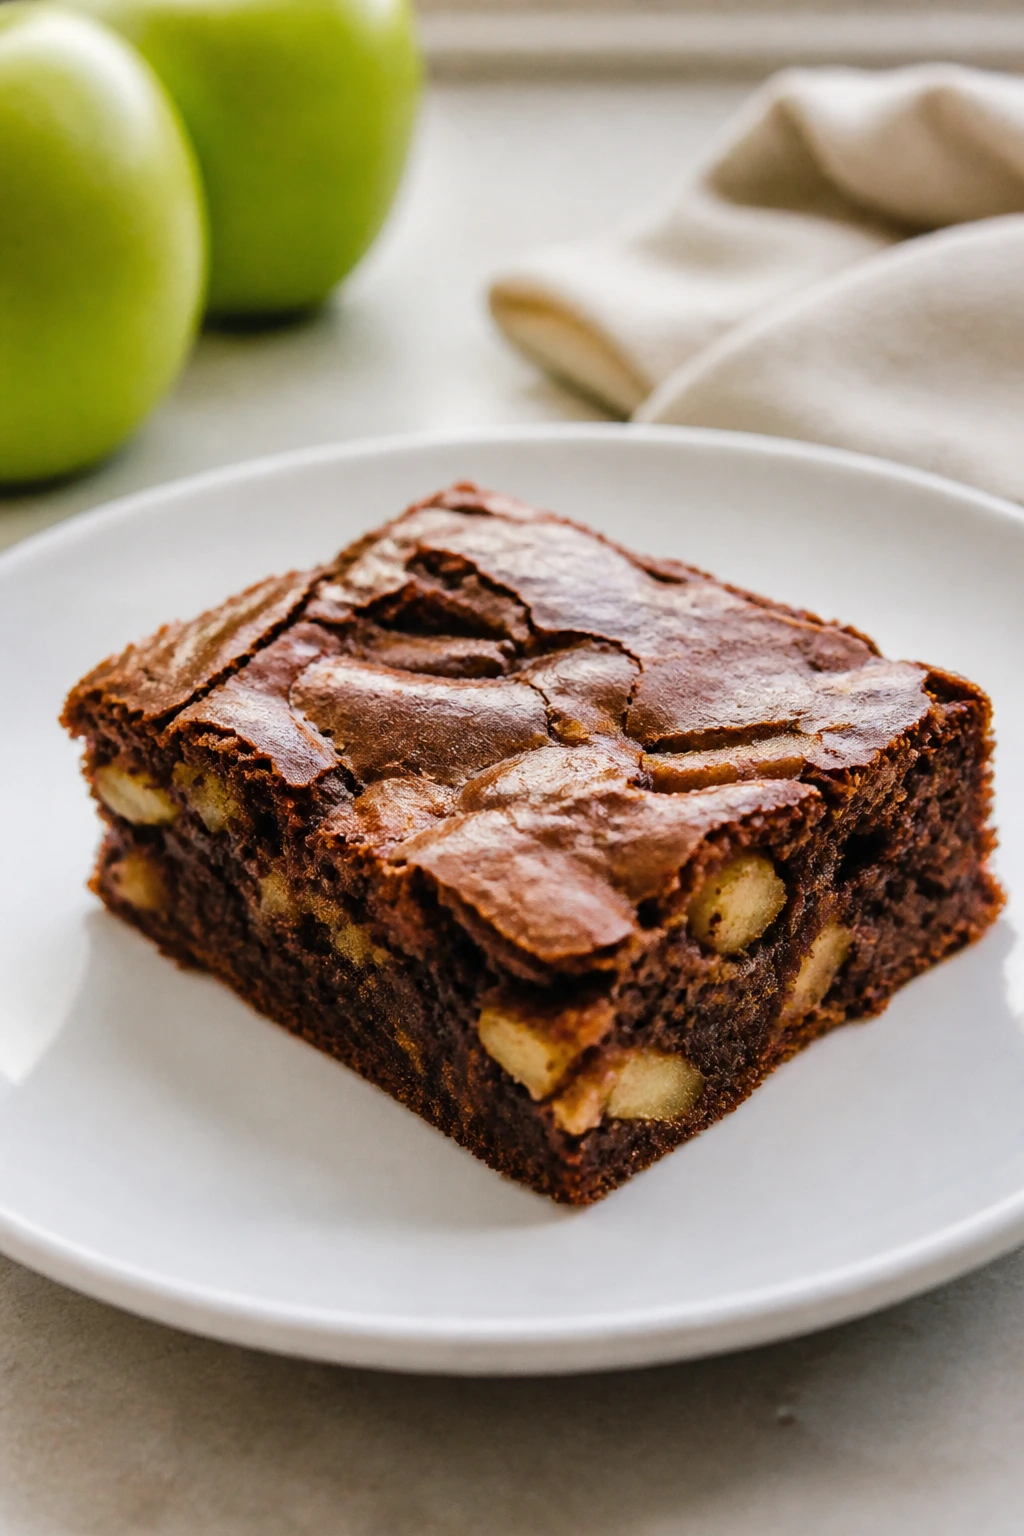
9. Chocolate Chip Apple Brownies
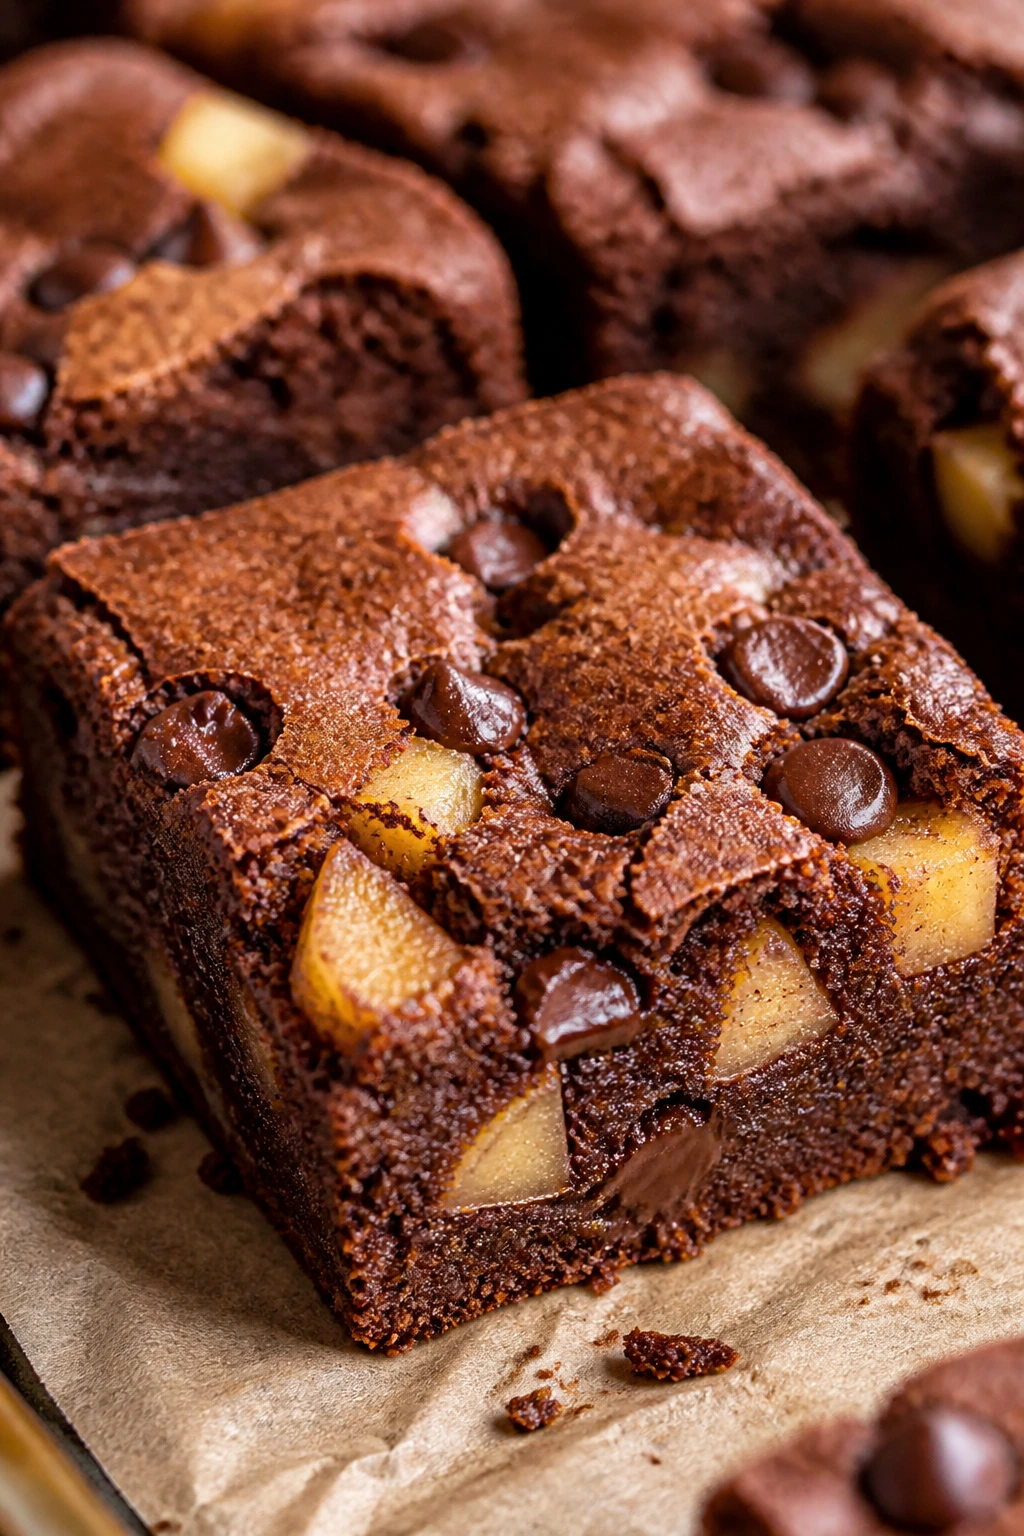
Intro: Chocolate chips turn the pan into something halfway between brownie and snack cake. The apples keep the center soft, and the chocolate melts into small pockets instead of a full heavy layer.
Why It Works: Cocoa powder gives the batter structure, while apples keep it from drying out. The chocolate chips should be folded in last so they don’t sink all the way to the bottom. A little extra flour keeps the crumb set enough to slice.
Key Ingredients:
- 1/2 cup unsalted butter, melted
- 1 cup packed brown sugar
- 2 large eggs
- 1 teaspoon vanilla extract
- 3/4 cup all-purpose flour
- 1/3 cup unsweetened cocoa powder
- 1/2 teaspoon baking powder
- 1/4 teaspoon fine salt
- 1 cup diced apples
- 3/4 cup semisweet chocolate chips
Quick Steps:
- Heat the oven to 350°F and line an 8×8-inch pan.
- Whisk butter, brown sugar, eggs, and vanilla until glossy.
- Stir in flour, cocoa powder, baking powder, and salt.
- Fold in the apples and chocolate chips, then spread the batter in the pan.
- Bake for 27 to 31 minutes until the top looks set and a toothpick comes out with moist crumbs.
Equipment for This Recipe:
- 8×8-inch baking pan
- Mixing bowl
- Rubber spatula
- Cooling rack
How to Serve This Dish: These are best warm enough to make the chocolate soft, but not so hot that the squares fall apart. I like them with cold milk or a scoop of vanilla ice cream.
Pro Tips for This Recipe:
- Pat the apples dry so the chocolate stays defined.
- Use semisweet chips; milk chocolate can make the bars too sweet.
- Chill the pan for 20 minutes before slicing for cleaner squares.
Variations on This Dish:
- Dark Chocolate Version: Use dark chips and add 1 tablespoon espresso powder.
- Nutty Crunch: Fold in 1/2 cup chopped pecans.
- Double Chip: Use half semisweet and half white chocolate chips.
Common Mistakes to Avoid with This Dish:
- Don’t overmix once the cocoa goes in; it tightens the crumb.
- Don’t crowd the batter with too many chips.
- Don’t underbake just because the top looks dry; the center still matters.
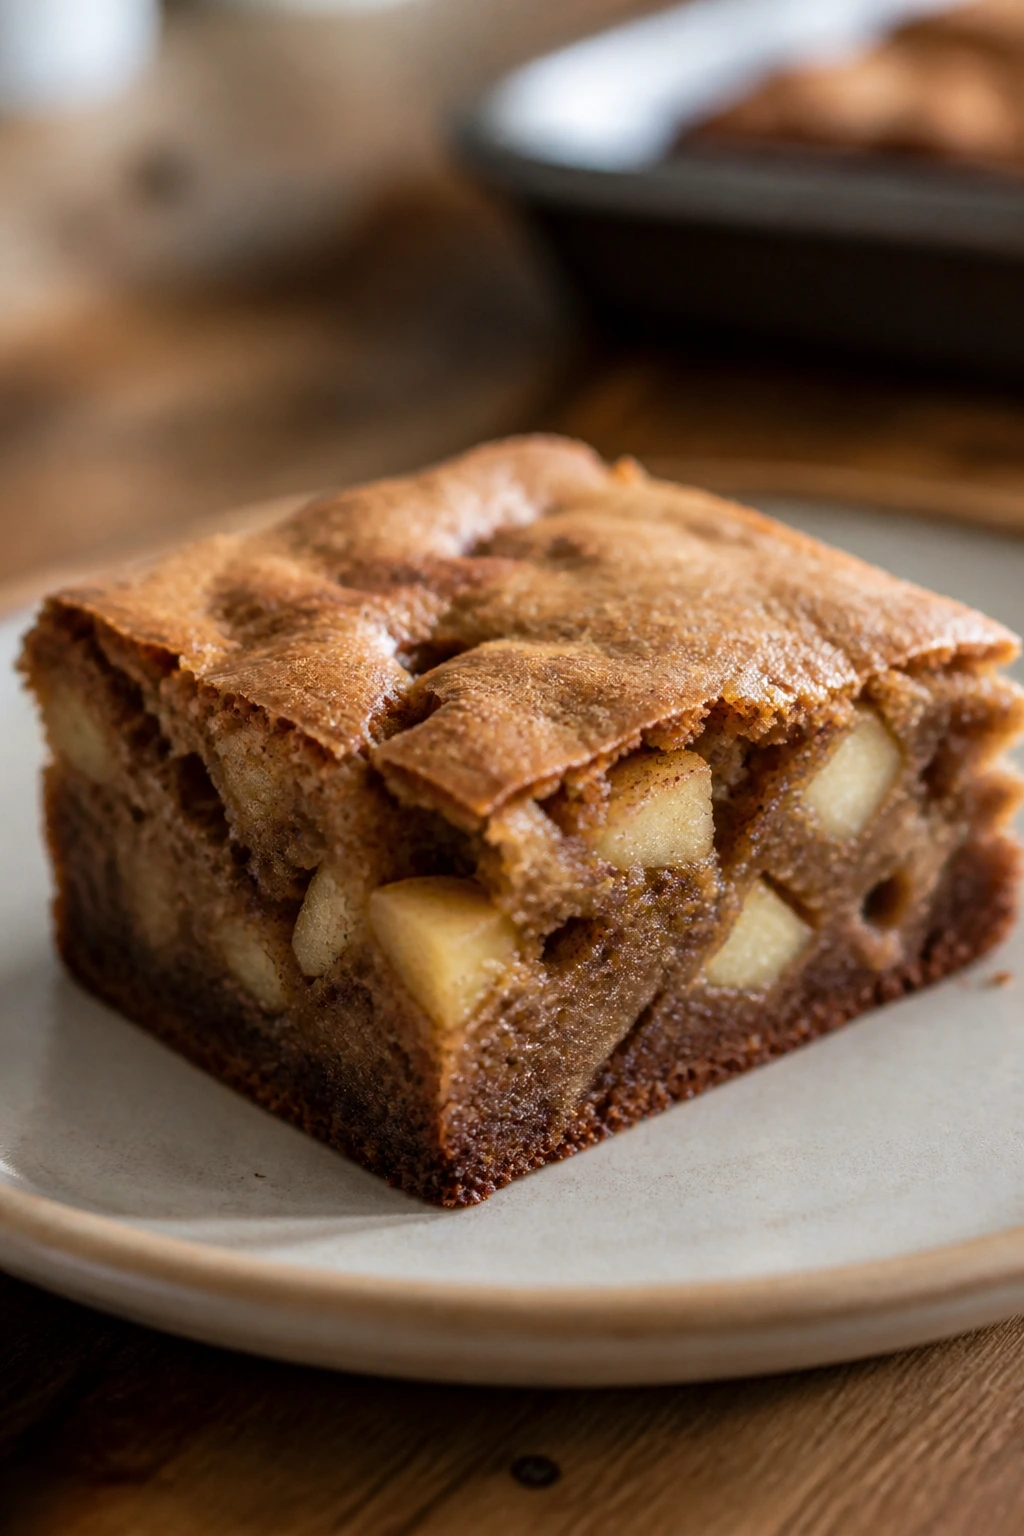
10. Ginger Molasses Apple Brownies
Intro: Molasses brings depth that plain cinnamon cannot. These bars smell warm and dark, with a sticky edge and a little ginger heat that wakes up the apples.
Why It Works: Molasses is thick and intense, so a little goes a long way. Ginger, cinnamon, and cloves turn the fruit into something bolder than the usual soft apple bar. The texture stays soft because the brown sugar and butter balance the molasses instead of letting it dominate.
Key Ingredients:
- 1/2 cup unsalted butter, melted
- 1/2 cup packed brown sugar
- 1/4 cup molasses
- 1 large egg
- 1 cup all-purpose flour
- 1 teaspoon ground ginger
- 1 teaspoon ground cinnamon
- 1/4 teaspoon ground cloves
- 1/2 teaspoon baking powder
- 1/4 teaspoon fine salt
- 1 cup diced apples
Quick Steps:
- Preheat the oven to 350°F and line an 8×8-inch pan.
- Whisk butter, brown sugar, molasses, egg, and vanilla until smooth.
- Stir in flour, ginger, cinnamon, cloves, baking powder, and salt.
- Fold in the apples and spread the batter evenly.
- Bake for 24 to 28 minutes until the center is just set.
Equipment for This Recipe:
- 8×8-inch pan
- Mixing bowl
- Whisk
- Rubber spatula
How to Serve This Dish: These bars are good with black tea or coffee. A spoonful of lightly sweetened whipped cream works well if you want to soften the spice.
Pro Tips for This Recipe:
- Measure molasses carefully; too much makes the bars heavy.
- Use fresh spices if yours have been in the cabinet for years.
- Dice the apples small so the spice hits every bite.
Variations on This Dish:
- Blackstrap Edge: Use 1 tablespoon blackstrap molasses for a deeper, more bitter note.
- Pecan Spice: Add 1/2 cup chopped pecans.
- Orange Ginger: Stir in 1 teaspoon orange zest.
Common Mistakes to Avoid with This Dish:
- Don’t overdo the cloves; they can take over fast.
- Don’t use a tiny pan, or the bars bake too thick in the middle.
- Don’t cut before the bars cool a bit; molasses sets slowly.
11. Apple Cider Glaze Bars
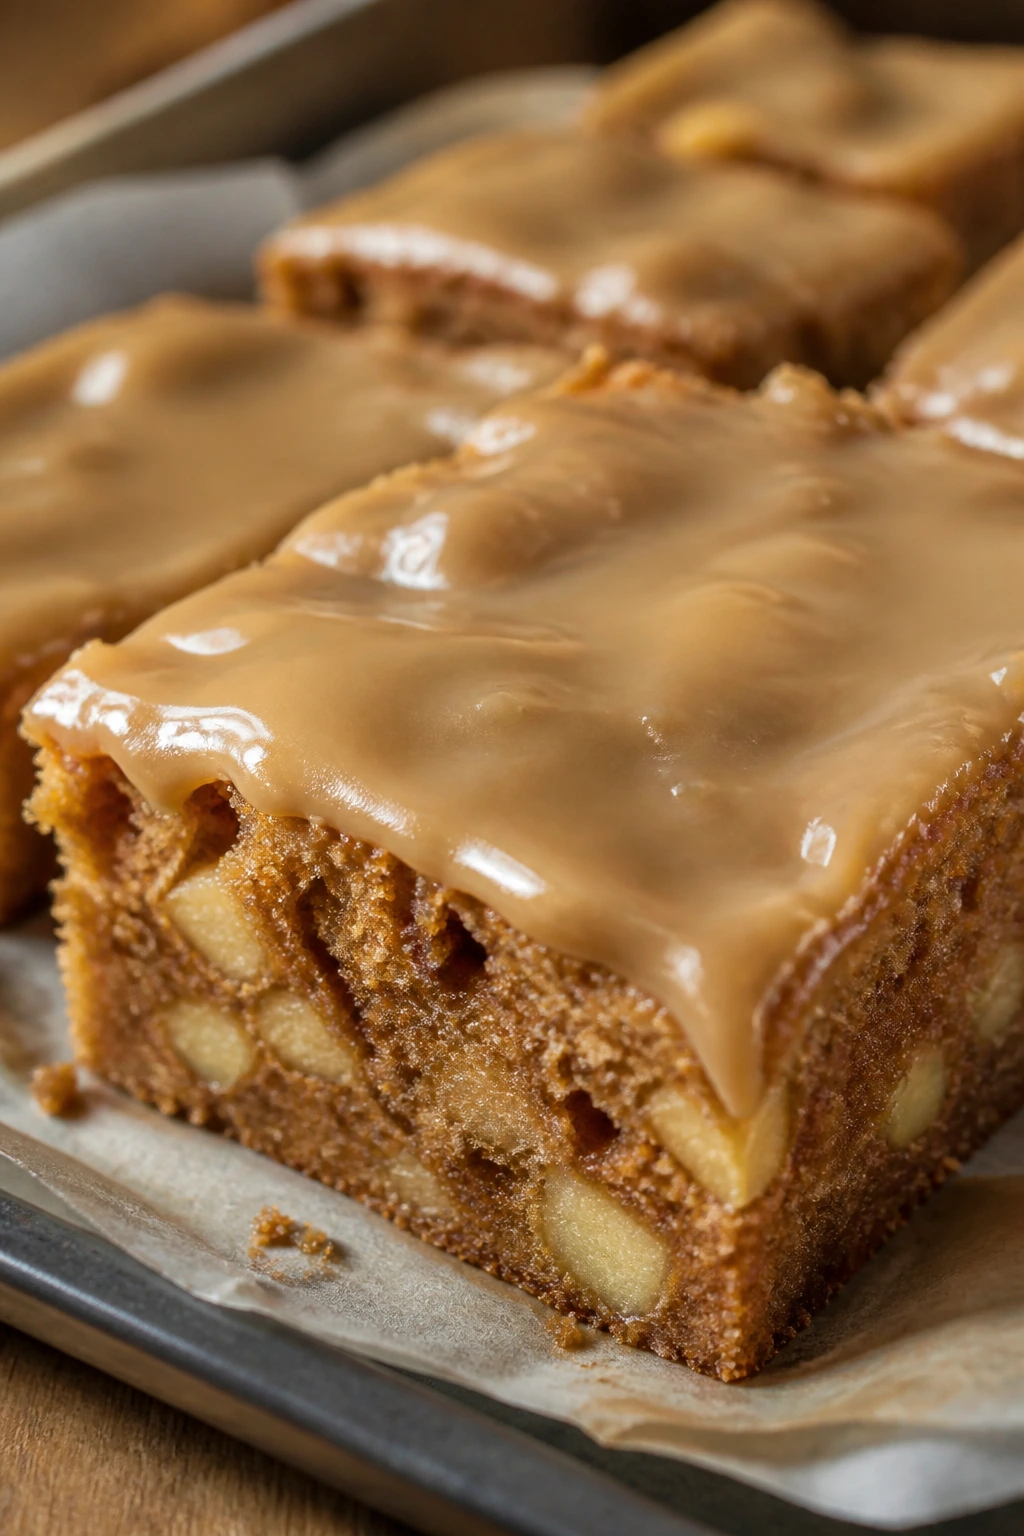
Intro: Reduce the cider first, or the glaze tastes thin. That one extra step gives these bars a bright apple finish that sits on top instead of disappearing into the crumb.
Why It Works: Apple cider glaze tastes sharper and more aromatic than plain powdered sugar icing. The bars underneath stay simple so the glaze can do the heavy lifting. Reducing the cider concentrates the flavor and keeps the topping from sliding off.
Key Ingredients:
- 1/2 cup unsalted butter, melted
- 3/4 cup packed brown sugar
- 1 large egg
- 1 teaspoon vanilla extract
- 1 cup all-purpose flour
- 1 teaspoon ground cinnamon
- 1/2 teaspoon baking powder
- 1/4 teaspoon fine salt
- 1 cup diced apples
- 1 cup apple cider, reduced to 1/4 cup
- 1 cup powdered sugar
- Pinch fine salt
Quick Steps:
- Simmer the cider in a small saucepan until it reduces to 1/4 cup, then cool it.
- Heat the oven to 350°F and line an 8×8-inch pan.
- Mix the batter ingredients and fold in the apples.
- Bake for 22 to 26 minutes, then cool completely.
- Whisk the reduced cider with powdered sugar and a pinch of salt, then drizzle over the bars.
Equipment for This Recipe:
- Small saucepan
- 8×8-inch baking pan
- Whisk
- Cooling rack
How to Serve This Dish: These look best with the glaze drizzled in loose lines, not a thick flood. Serve them with cider, tea, or a plain cup of coffee.
Pro Tips for This Recipe:
- Reduce the cider slowly so it doesn’t scorch.
- Wait until the bars are cool before glazing, or the icing melts.
- Use parchment under the bars because glaze makes sticky edges.
Variations on This Dish:
- Maple Cider Glaze: Replace half the powdered sugar liquid with maple syrup.
- Spiced Glaze: Add a pinch of cinnamon to the icing.
- Thicker Frosted Version: Double the glaze if you want a more iced top.
Common Mistakes to Avoid with This Dish:
- Don’t skip the cider reduction.
- Don’t glaze warm bars.
- Don’t add too much liquid to the icing or it runs right off.
12. Almond Flour Apple Brownies
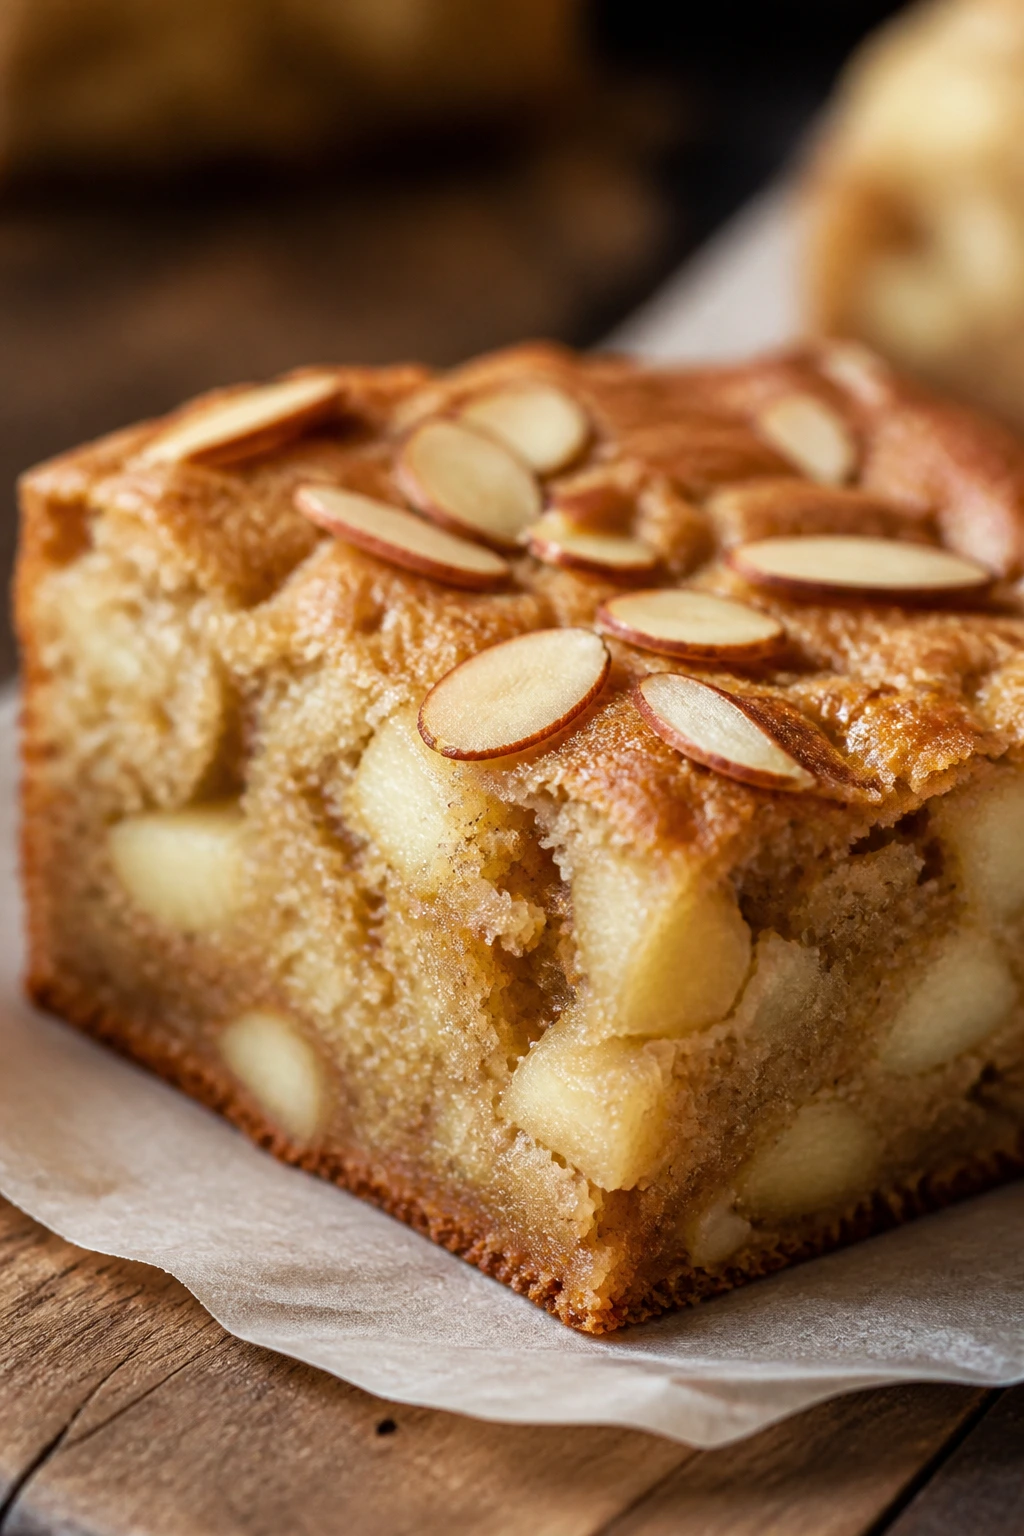
Intro: Almond flour makes the crumb tender and a little nubbly, with edges that brown faster than all-purpose flour versions. The apples keep the middle soft, and the almond flavor quietly fits the fruit.
Why It Works: Almond flour brings fat and structure at the same time, so the bars bake up rich without needing a mixer. Tapioca starch helps them hold together when sliced. Because almond flour browns quickly, these need careful timing and a pan that doesn’t run too hot.
Key Ingredients:
- 1 1/2 cups almond flour
- 2 tablespoons tapioca starch
- 1/2 teaspoon baking powder
- 1/2 teaspoon ground cinnamon
- 1/4 teaspoon fine salt
- 1/3 cup brown sugar or coconut sugar
- 1/4 cup melted butter or coconut oil
- 2 large eggs
- 1 teaspoon vanilla extract
- 1 cup diced apples
- 2 tablespoons sliced almonds
Quick Steps:
- Preheat the oven to 325°F and line an 8×8-inch pan.
- Whisk almond flour, tapioca starch, baking powder, cinnamon, and salt.
- Stir in sugar, butter, eggs, and vanilla until a thick batter forms.
- Fold in the apples and pour into the pan.
- Top with sliced almonds and bake for 23 to 27 minutes.
Equipment for This Recipe:
- 8×8-inch pan
- Mixing bowl
- Whisk
- Spatula
How to Serve This Dish: These are good slightly warm with yogurt or mascarpone. I like them sliced small because almond flour bars feel richer than flour-based ones.
Pro Tips for This Recipe:
- Bake at 325°F, not 350°F, or the edges brown too fast.
- Let the batter sit 5 minutes; almond flour absorbs slowly.
- Use apples that are firm and dry to the touch.
Variations on This Dish:
- Nut-Free Swap: Use sunflower seed flour, but expect a greener tint.
- Maple Almond Bars: Swap the sugar for maple syrup and add 2 tablespoons more starch.
- Lemon Almond: Add 1 teaspoon lemon zest for a brighter finish.
Common Mistakes to Avoid with This Dish:
- Don’t expect the batter to look like wheat flour batter; it should be thicker.
- Don’t overbake or the bars turn sandy.
- Don’t skip the tapioca if you want clean slices.
13. Gluten-Free Oat Apple Bars
Intro: Certified gluten-free oats keep these bars sturdy, chewy, and easy to slice. The apple pieces soften inside the oat base, giving every square a little sweet burst.
Why It Works: Oats and oat flour create a texture that feels hearty without being heavy. Because there’s no wheat gluten to develop, you don’t need to mix for long. That keeps the bars tender and helps beginner bakers avoid the usual “stir until uncertain” trap.
Key Ingredients:
- 1 1/2 cups certified gluten-free rolled oats
- 3/4 cup oat flour
- 1/2 cup packed brown sugar
- 1/3 cup melted butter or coconut oil
- 2 large eggs
- 1 teaspoon vanilla extract
- 1 teaspoon ground cinnamon
- 1/2 teaspoon baking powder
- 1/4 teaspoon fine salt
- 1 cup diced apples
Quick Steps:
- Heat the oven to 350°F and line an 8×8-inch pan.
- Whisk the butter, brown sugar, eggs, and vanilla.
- Stir in oats, oat flour, cinnamon, baking powder, and salt.
- Fold in the apples and spread the batter into the pan.
- Bake for 24 to 28 minutes until the center feels set.
Equipment for This Recipe:
- 8×8-inch baking pan
- Mixing bowl
- Spatula
- Measuring cups
How to Serve This Dish: These bars are easy to pack for lunch or serve as a snack with coffee. A spoonful of nut butter on the side makes them more filling.
Pro Tips for This Recipe:
- Use certified gluten-free oats if cross-contact matters.
- Let the bars cool fully; oat batters stay soft while warm.
- If the batter looks thick, that’s fine. Oats need that structure.
Variations on This Dish:
- Raisin Oat Version: Add 1/3 cup raisins.
- Pecan Oat Version: Fold in 1/2 cup chopped pecans.
- Apple Cranberry Oat: Swap half the apples for dried cranberries.
Common Mistakes to Avoid with This Dish:
- Don’t use regular oats if you need a gluten-free pan.
- Don’t bake in a smaller pan without adjusting the time.
- Don’t slice before the bars have cooled and set.
14. Vegan Applesauce Apple Brownies
Intro: A flax egg gives these bars enough structure to slice cleanly, and applesauce keeps the crumb soft. They bake into the kind of snack you can hand to almost anyone without getting into a long ingredient discussion.
Why It Works: Flaxseed and water create a gel that behaves a bit like egg, which is enough here because the batter also has applesauce and oil. The result is soft, slightly chewy, and not at all fragile. Walnuts add a little body so the bars don’t feel too plain.
Key Ingredients:
- 2 tablespoons ground flaxseed
- 5 tablespoons water
- 1/3 cup neutral oil
- 3/4 cup packed brown sugar
- 1/2 cup unsweetened applesauce
- 1 teaspoon vanilla extract
- 1 cup all-purpose flour
- 1 teaspoon ground cinnamon
- 1/2 teaspoon baking powder
- 1/4 teaspoon fine salt
- 1 cup diced apples
- 1/4 cup chopped walnuts
Quick Steps:
- Stir the flaxseed and water together and let it gel for 5 minutes.
- Preheat the oven to 350°F and line an 8×8-inch pan.
- Whisk oil, brown sugar, applesauce, flax gel, and vanilla.
- Stir in flour, cinnamon, baking powder, and salt, then fold in apples and walnuts.
- Bake for 26 to 30 minutes until the center is set.
Equipment for This Recipe:
- 8×8-inch pan
- Mixing bowl
- Whisk
- Spatula
How to Serve This Dish: These bars are good at room temperature and pack well for lunch boxes. A drizzle of dairy-free yogurt or a spoonful of almond butter works if you want to dress them up.
Pro Tips for This Recipe:
- Let the flax gel sit the full 5 minutes.
- Use unsweetened applesauce so the bars don’t turn cloying.
- Cool fully before slicing; vegan bars can seem soft when hot.
Variations on This Dish:
- Pecan Swap: Use chopped pecans instead of walnuts.
- Cinnamon Raisin: Add 1/3 cup raisins.
- Lemon Lift: Add 1 teaspoon lemon zest to brighten the batter.
Common Mistakes to Avoid with This Dish:
- Don’t skip the flax rest time.
- Don’t use applesauce with chunks unless you want a looser texture.
- Don’t expect the top to crack the same way egg-based bars do.
15. Whole Wheat Apple Snack Bars
Intro: Whole wheat flour adds a nutty edge and a denser crumb that feels more like a proper snack bar than a soft cake square. The apples keep the middle from turning dry, which is the whole point here.
Why It Works: Whole wheat flour drinks more liquid than all-purpose flour, so a splash of milk keeps the batter balanced. That extra hydration helps the bars stay tender rather than chalky. A mix of whole wheat and all-purpose flour also keeps the flavor earthy without making the texture heavy.
Key Ingredients:
- 1 cup whole wheat flour
- 1/2 cup all-purpose flour
- 3/4 cup packed brown sugar
- 1/3 cup melted butter
- 1 large egg
- 1/4 cup milk
- 1 teaspoon vanilla extract
- 1 teaspoon ground cinnamon
- 1/2 teaspoon baking powder
- 1/4 teaspoon fine salt
- 1 cup diced apples
Quick Steps:
- Preheat the oven to 350°F and line an 8×8-inch pan.
- Whisk brown sugar, butter, egg, milk, and vanilla.
- Stir in both flours, cinnamon, baking powder, and salt.
- Fold in the apples and spread the batter level.
- Bake for 25 to 30 minutes until the center is set and the edges are golden.
Equipment for This Recipe:
- 8×8-inch baking pan
- Mixing bowl
- Whisk
- Spatula
How to Serve This Dish: I like these as an afternoon snack with milk or coffee. If you want breakfast energy, spread a thin layer of nut butter on top after cooling.
Pro Tips for This Recipe:
- Don’t overmix once the flour goes in.
- Use milk, not cream; this batter doesn’t need extra richness.
- Let the pan sit 15 minutes before cutting so the crumb settles.
Variations on This Dish:
- Raisin Whole Wheat: Add 1/3 cup raisins.
- Walnut Snack Bars: Fold in 1/2 cup walnuts.
- Honey Wheat Version: Replace 2 tablespoons of brown sugar with honey.
Common Mistakes to Avoid with This Dish:
- Don’t use all whole wheat flour unless you want a much firmer bar.
- Don’t overbake trying to dry them out.
- Don’t slice too early; whole wheat bars need time to set.
16. Salted Caramel Cheesecake Apple Brownies
Intro: Cheesecake swirl recipes scare some beginners for no reason. This one is just brownie batter, a quick cream cheese mixture, and a spoonful of caramel dragged across the top.
Why It Works: Cream cheese adds tang and keeps the pan from tasting overly sweet. The salted caramel cuts through the richness and gives every bite a little sharpness. The key is keeping the swirl shallow so the layers bake together without merging into one blurry middle.
Key Ingredients:
- 1/2 cup unsalted butter, melted
- 3/4 cup packed brown sugar
- 1 large egg
- 1 teaspoon vanilla extract
- 1 cup all-purpose flour
- 1 teaspoon ground cinnamon
- 1/2 teaspoon baking powder
- 1/4 teaspoon fine salt
- 1 cup diced apples
- 8 ounces cream cheese, softened
- 1/4 cup granulated sugar
- 1 egg yolk
- 1 teaspoon vanilla extract
- 1/3 cup caramel sauce
- Flaky salt for finishing
Quick Steps:
- Preheat the oven to 350°F and line an 8×8-inch pan.
- Mix the brownie batter and fold in the apples.
- Beat cream cheese, sugar, egg yolk, and vanilla until smooth.
- Spread the batter in the pan, dollop the cheesecake mixture on top, and swirl lightly with caramel.
- Bake for 28 to 32 minutes, then finish with a pinch of flaky salt.
Equipment for This Recipe:
- 8×8-inch pan
- Two mixing bowls
- Hand mixer
- Knife for swirling
How to Serve This Dish: These are best chilled or very cool, when the cheesecake layer is clean and firm. A small square goes a long way, so I cut them smaller than the rest of the batch.
Pro Tips for This Recipe:
- Soften the cream cheese fully or it won’t swirl smoothly.
- Use thick caramel so it stays visible.
- Refrigerate before slicing for the neatest edges.
Variations on This Dish:
- More Salted: Add a few extra flakes of salt after baking.
- Cinnamon Cheesecake: Beat 1/2 teaspoon cinnamon into the filling.
- Pecan Crunch: Scatter chopped pecans over the swirl before baking.
Common Mistakes to Avoid with This Dish:
- Don’t over-swirl the layers.
- Don’t leave the cream cheese cold from the fridge.
- Don’t skip the chill time if you want tidy squares.
17. Cranberry Apple Brownies
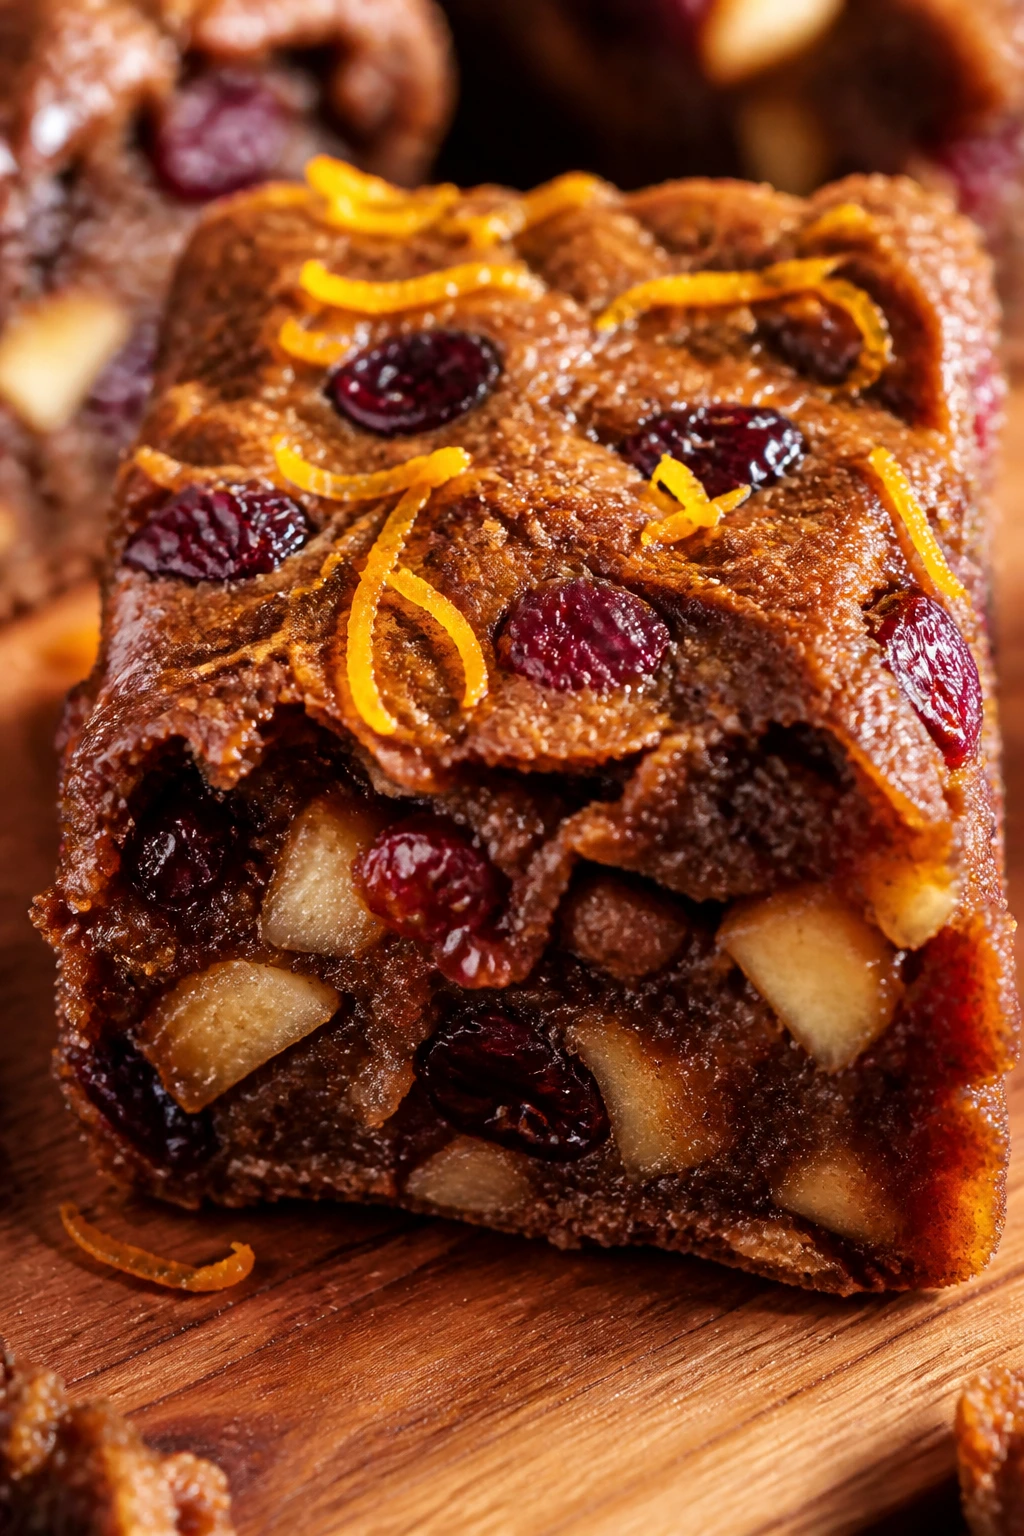
Intro: Dried cranberries sharpen the apple flavor and give these bars a little chew. Orange zest helps too, and together they make the whole pan taste brighter than a standard cinnamon square.
Why It Works: Apples and cranberries balance each other: one soft and sweet, one tart and chewy. A little citrus zest keeps the flavor from feeling heavy. This is also a good recipe for using a firmer apple because the dried fruit carries some of the moisture burden.
Key Ingredients:
- 1/2 cup unsalted butter, melted
- 3/4 cup packed brown sugar
- 1 large egg
- 1 teaspoon vanilla extract
- 1 cup all-purpose flour
- 1 teaspoon ground cinnamon
- 1/2 teaspoon baking powder
- 1/4 teaspoon fine salt
- 1 cup diced apples
- 1/2 cup dried cranberries
- 1 tablespoon orange zest
Quick Steps:
- Heat the oven to 350°F and line an 8×8-inch pan.
- Whisk butter, brown sugar, egg, vanilla, and orange zest.
- Stir in flour, cinnamon, baking powder, and salt.
- Fold in apples and cranberries, then spread into the pan.
- Bake for 25 to 29 minutes until the center is set.
Equipment for This Recipe:
- 8×8-inch pan
- Mixing bowl
- Citrus zester or fine grater
- Spatula
How to Serve This Dish: Serve these at room temperature with tea or a small dollop of whipped cream. They also work well on a dessert plate next to sliced pears or grapes.
Pro Tips for This Recipe:
- Zest the orange before you juice it, or you’ll miss the oils.
- Use dried cranberries that are still soft, not leathery.
- Cool the bars fully so the fruit doesn’t pull the crumb apart.
Variations on This Dish:
- Pistachio Cranberry: Add 1/3 cup chopped pistachios.
- Lemon Cranberry: Swap the orange zest for lemon zest.
- Extra Chewy: Add 1/4 cup raisins alongside the cranberries.
Common Mistakes to Avoid with This Dish:
- Don’t use sweetened dried cranberries if you want a sharper finish.
- Don’t overbake; dried fruit can trick you into thinking the bars are dry.
- Don’t skip the zest, because that’s what wakes the apples up.
18. Chai-Spiced Apple Blondies
Intro: Chai spice makes the whole pan smell like a tea shop. Cardamom, ginger, cinnamon, and cloves give the apples a layered warmth that plain cinnamon alone cannot cover.
Why It Works: Brown sugar and butter create a soft blondie base that can carry stronger spice without tasting harsh. Cardamom is the note that makes people pause and figure out what’s different. If you keep the clove small, the blend stays round instead of medicinal.
Key Ingredients:
- 1/2 cup unsalted butter, melted
- 3/4 cup packed brown sugar
- 1 large egg
- 1 teaspoon vanilla extract
- 1 cup all-purpose flour
- 1/2 teaspoon ground cinnamon
- 1/2 teaspoon ground cardamom
- 1/2 teaspoon ground ginger
- 1/8 teaspoon ground cloves
- 1/2 teaspoon baking powder
- 1/4 teaspoon fine salt
- 1 cup diced apples
Quick Steps:
- Preheat the oven to 350°F and line an 8×8-inch pan.
- Whisk butter, brown sugar, egg, and vanilla until glossy.
- Stir in flour, spices, baking powder, and salt.
- Fold in apples and spread the batter into the pan.
- Bake for 24 to 28 minutes until the center springs back lightly.
Equipment for This Recipe:
- 8×8-inch baking pan
- Mixing bowl
- Whisk
- Spatula
How to Serve This Dish: These are lovely with hot tea and even better with a little honey butter on the side. A light dusting of cinnamon sugar on top gives them a neat finish.
Pro Tips for This Recipe:
- Measure the cloves carefully; they go bitter fast.
- Use freshly ground cardamom if you have it.
- Dice the apples small so the spice hits every bite.
Variations on This Dish:
- Black Tea Chai: Add 1 teaspoon finely ground black tea leaves if you like a deeper tea note.
- Pear Swap: Replace half the apples with ripe pear.
- Maple Chai: Replace 2 tablespoons of brown sugar with maple syrup.
Common Mistakes to Avoid with This Dish:
- Don’t over-spice the batter; chai should smell warm, not sharp.
- Don’t use a huge pinch of cloves.
- Don’t cut while the bars are still steaming.
19. Skillet Apple Brownies
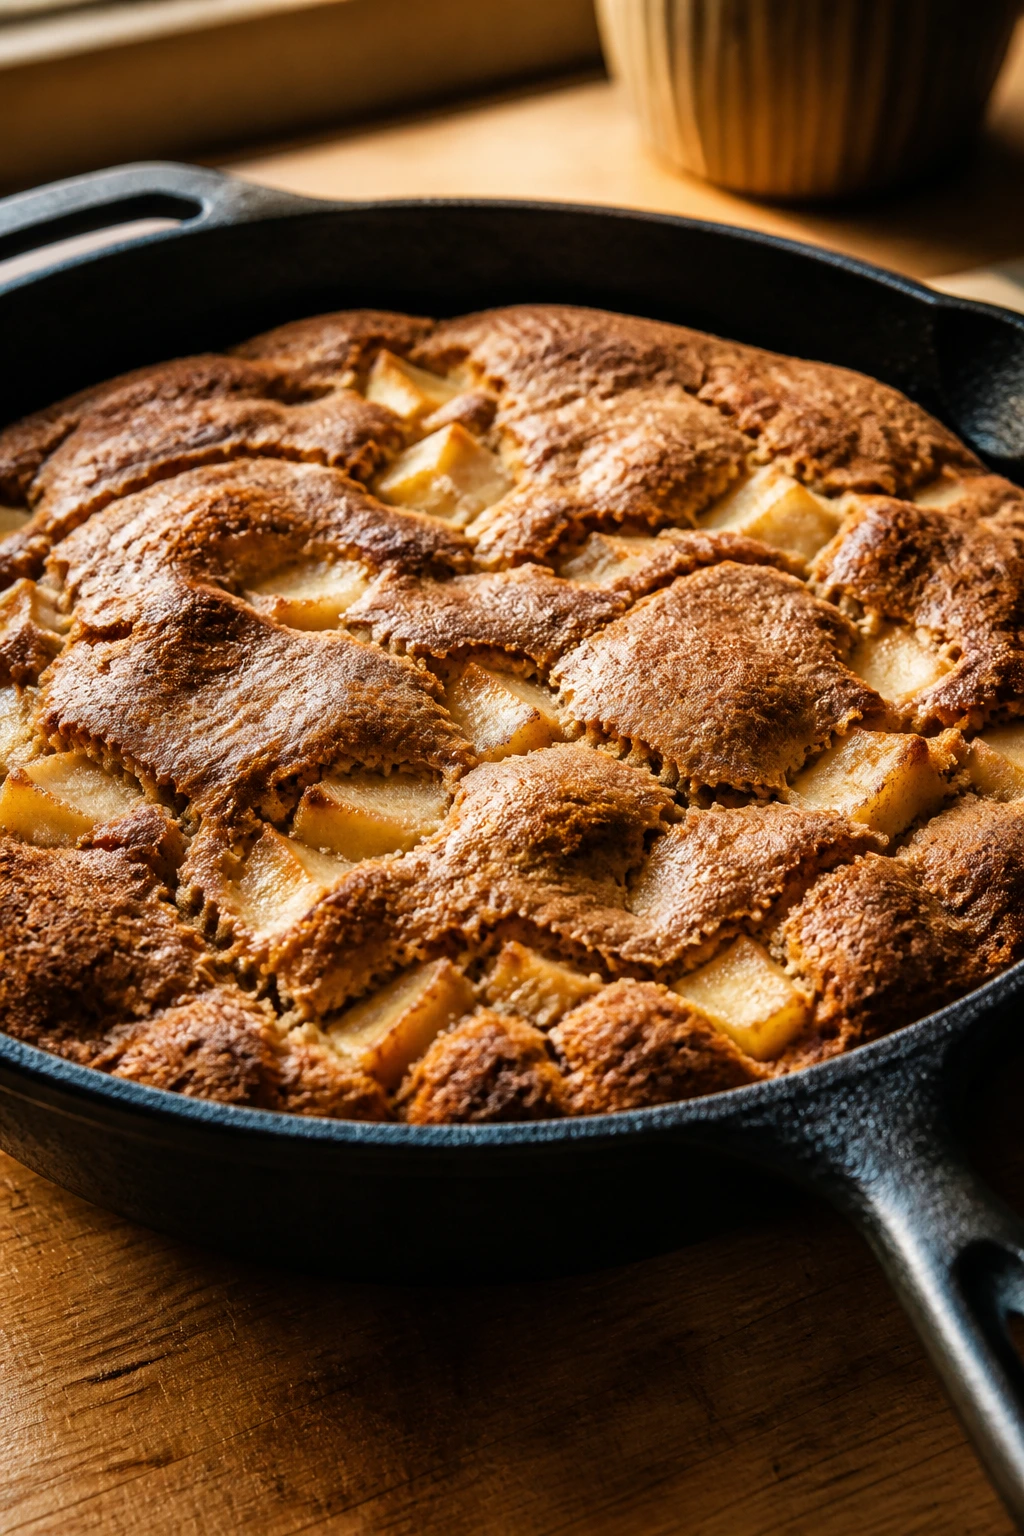
Intro: Cast iron does something useful here: the edges bronze hard while the center stays soft. It gives these skillet apple brownies a crisp ring that a baking pan can’t quite match.
Why It Works: A prepped skillet holds heat well, so the batter starts setting right away around the edges. That gives you a chewy outer edge and a tender middle. Because the skillet is a little more forgiving than a thin metal pan, this is a nice one for new bakers who want a dramatic finish without extra steps.
Key Ingredients:
- 1/2 cup unsalted butter, melted
- 3/4 cup packed brown sugar
- 1 large egg
- 1 teaspoon vanilla extract
- 1 cup all-purpose flour
- 1 teaspoon ground cinnamon
- 1/2 teaspoon baking powder
- 1/4 teaspoon fine salt
- 1 cup diced apples
- 1/4 cup chopped pecans
Quick Steps:
- Heat the oven to 350°F and grease a 10-inch cast-iron skillet.
- Whisk butter, sugar, egg, and vanilla in a mixing bowl.
- Stir in flour, cinnamon, baking powder, and salt.
- Fold in apples and pecans, then spread the batter in the skillet.
- Bake for 22 to 26 minutes until the edges are dark gold and the center is set.
Equipment for This Recipe:
- 10-inch cast-iron skillet
- Mixing bowl
- Wooden spoon
- Oven mitts
How to Serve This Dish: Bring the skillet to the table and spoon out warm wedges. Vanilla ice cream melts into the edges in a way that makes the whole thing feel a little theatrical, which I do not mind.
Pro Tips for This Recipe:
- Grease the skillet well so the edges release cleanly.
- Don’t use a screaming-hot skillet unless you want overdone edges.
- Let it rest for 10 minutes before scooping.
Variations on This Dish:
- Maple Skillet: Add 2 tablespoons maple syrup to the batter.
- Cinnamon Sugar Top: Sprinkle the top with cinnamon sugar before baking.
- Apple Walnut Skillet: Replace pecans with walnuts.
Common Mistakes to Avoid with This Dish:
- Don’t forget the skillet is hot after baking.
- Don’t overload it with apples or the center turns dense.
- Don’t slice immediately; cast iron holds heat longer than a pan.
20. Mini Apple Brownie Bites
Intro: Mini muffin tins make portion control absurdly easy. You get little apple brownie bites with crisp edges all around, which means nobody fights over the corner pieces.
Why It Works: Small portions bake fast and evenly, so the apples cook through without making the centers raw. The mini size also gives you more browned surface area, which is where the sugar and cinnamon taste strongest. This is the batch I’d hand to a first-time baker who worries about underbaking.
Key Ingredients:
- 1/2 cup unsalted butter, melted
- 1/2 cup packed brown sugar
- 1 large egg
- 1 teaspoon vanilla extract
- 1 cup all-purpose flour
- 1 teaspoon ground cinnamon
- 1/2 teaspoon baking powder
- 1/4 teaspoon fine salt
- 1 cup very finely diced apples
- 1/3 cup mini chocolate chips or chopped walnuts
Quick Steps:
- Preheat the oven to 350°F and grease a mini muffin tin.
- Whisk butter, brown sugar, egg, and vanilla until smooth.
- Stir in flour, cinnamon, baking powder, and salt.
- Fold in apples and chips or nuts, then spoon into the tin.
- Bake for 12 to 15 minutes until the tops spring back.
Equipment for This Recipe:
- Mini muffin tin
- Mixing bowl
- Small spoon or cookie scoop
- Cooling rack
How to Serve This Dish: These are excellent for lunch boxes or a dessert platter. I like them plain, but a tiny drizzle of caramel makes them feel more like a party snack.
Pro Tips for This Recipe:
- Dice the apples extra small so the bites release cleanly.
- Use a cookie scoop for even portions.
- Let them sit in the tin for 5 minutes before turning out.
Variations on This Dish:
- Plain Cinnamon Bites: Skip the chips or nuts and keep them simple.
- Caramel Nut Bites: Add a few chopped pecans and a caramel drizzle.
- Chocolate Mini Bites: Use mini semisweet chips for the easiest win.
Common Mistakes to Avoid with This Dish:
- Don’t overfill the cups or they mushroom over the edge.
- Don’t leave them in the tin too long; steam softens the bottoms.
- Don’t chop the apples lazily. Tiny dice matter here.
21. Peanut Butter Apple Brownies
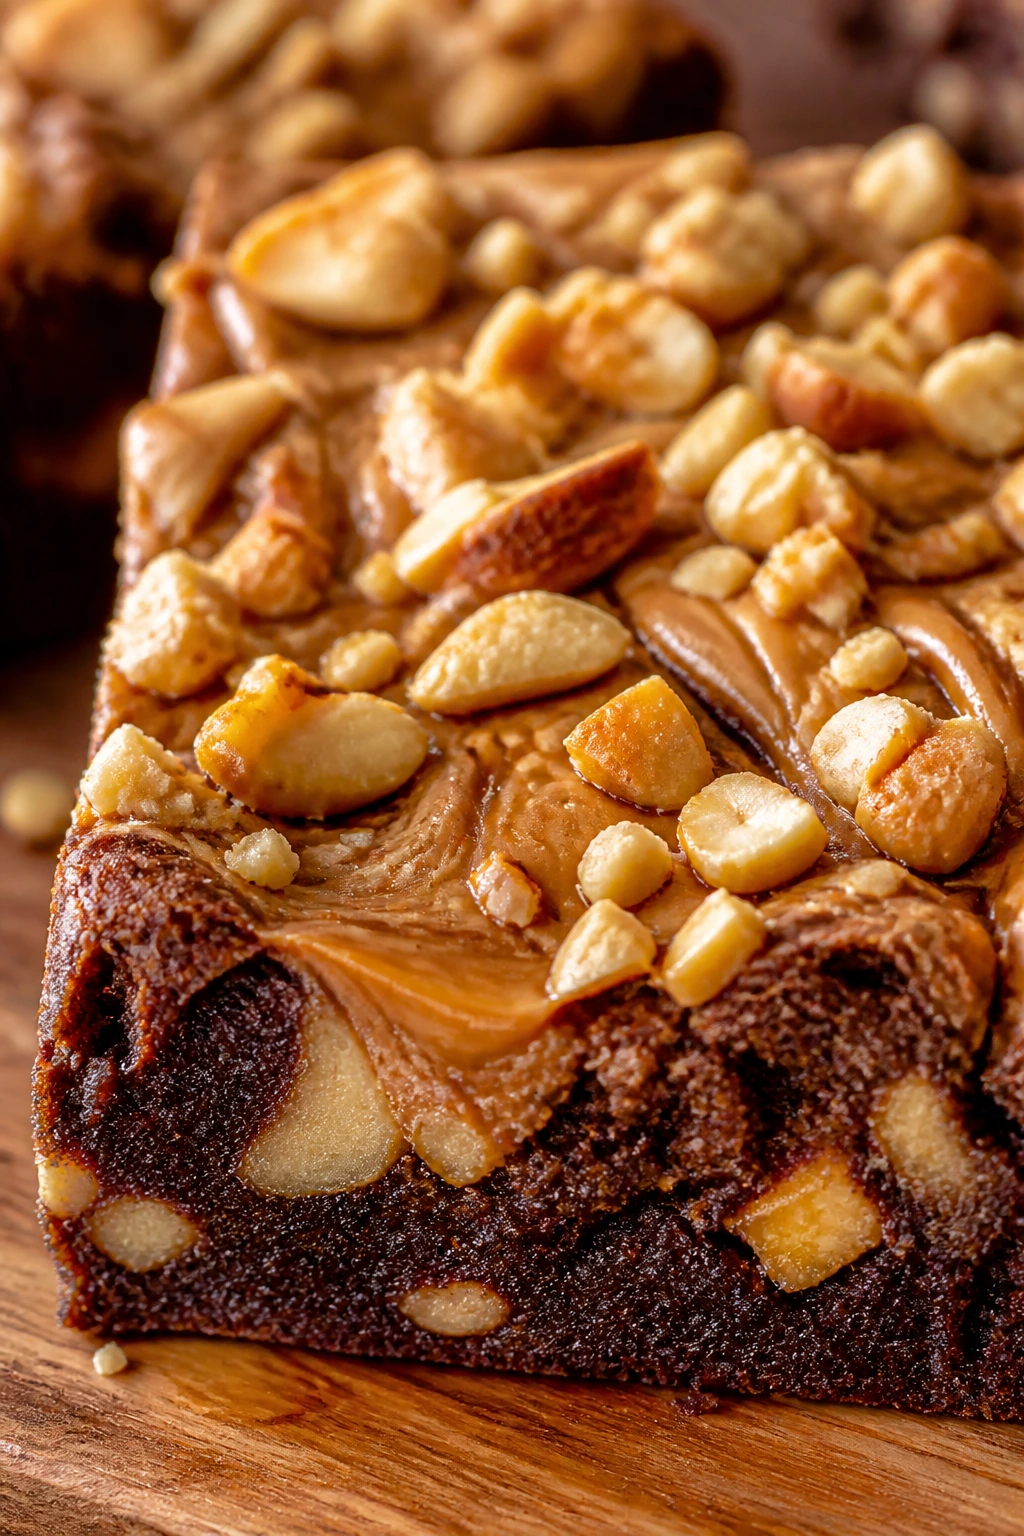
Intro: Peanut butter pulls the apples toward a nutty, salty edge that tastes more interesting than it sounds on paper. The bars end up soft, slightly chewy, and a little sticky in the best way.
Why It Works: Peanut butter brings fat and flavor, so you can use a fairly simple batter and still get a rich result. Apples keep it from tasting heavy, and chopped peanuts on top give a blunt crunch that plays well against the soft center. A modest amount of cinnamon keeps the whole thing grounded.
Key Ingredients:
- 1/2 cup unsalted butter or neutral oil
- 1/2 cup packed brown sugar
- 1/4 cup creamy peanut butter
- 1 large egg
- 1 teaspoon vanilla extract
- 1 cup all-purpose flour
- 1 teaspoon ground cinnamon
- 1/2 teaspoon baking powder
- 1/4 teaspoon fine salt
- 1 cup diced apples
- 1/4 cup chopped roasted peanuts
Quick Steps:
- Heat the oven to 350°F and line an 8×8-inch pan.
- Whisk butter, brown sugar, peanut butter, egg, and vanilla.
- Stir in flour, cinnamon, baking powder, and salt.
- Fold in apples and peanuts, then spread the batter in the pan.
- Bake for 25 to 29 minutes until the top is set.
Equipment for This Recipe:
- 8×8-inch pan
- Mixing bowl
- Spatula
- Measuring cups
How to Serve This Dish: These bars taste good with cold milk or a cup of tea. I’d cut them smaller than a standard brownie because peanut butter makes them feel richer.
Pro Tips for This Recipe:
- Use smooth peanut butter so the batter stays even.
- Salted roasted peanuts give the best contrast.
- Don’t overbake; peanut butter dries out faster than plain butter batter.
Variations on This Dish:
- Crunchy Peanut Butter: Use crunchy peanut butter and skip the chopped peanuts.
- PB&Apple Drizzle: Add a thin peanut butter glaze after cooling.
- Banana-Style Swap: Add 2 tablespoons mashed banana for a softer crumb.
Common Mistakes to Avoid with This Dish:
- Don’t use old peanut butter that smells stale.
- Don’t add too many peanuts or the bars turn crumbly.
- Don’t bake until the top is hard; it should still spring lightly.
22. Tahini Apple Brownies
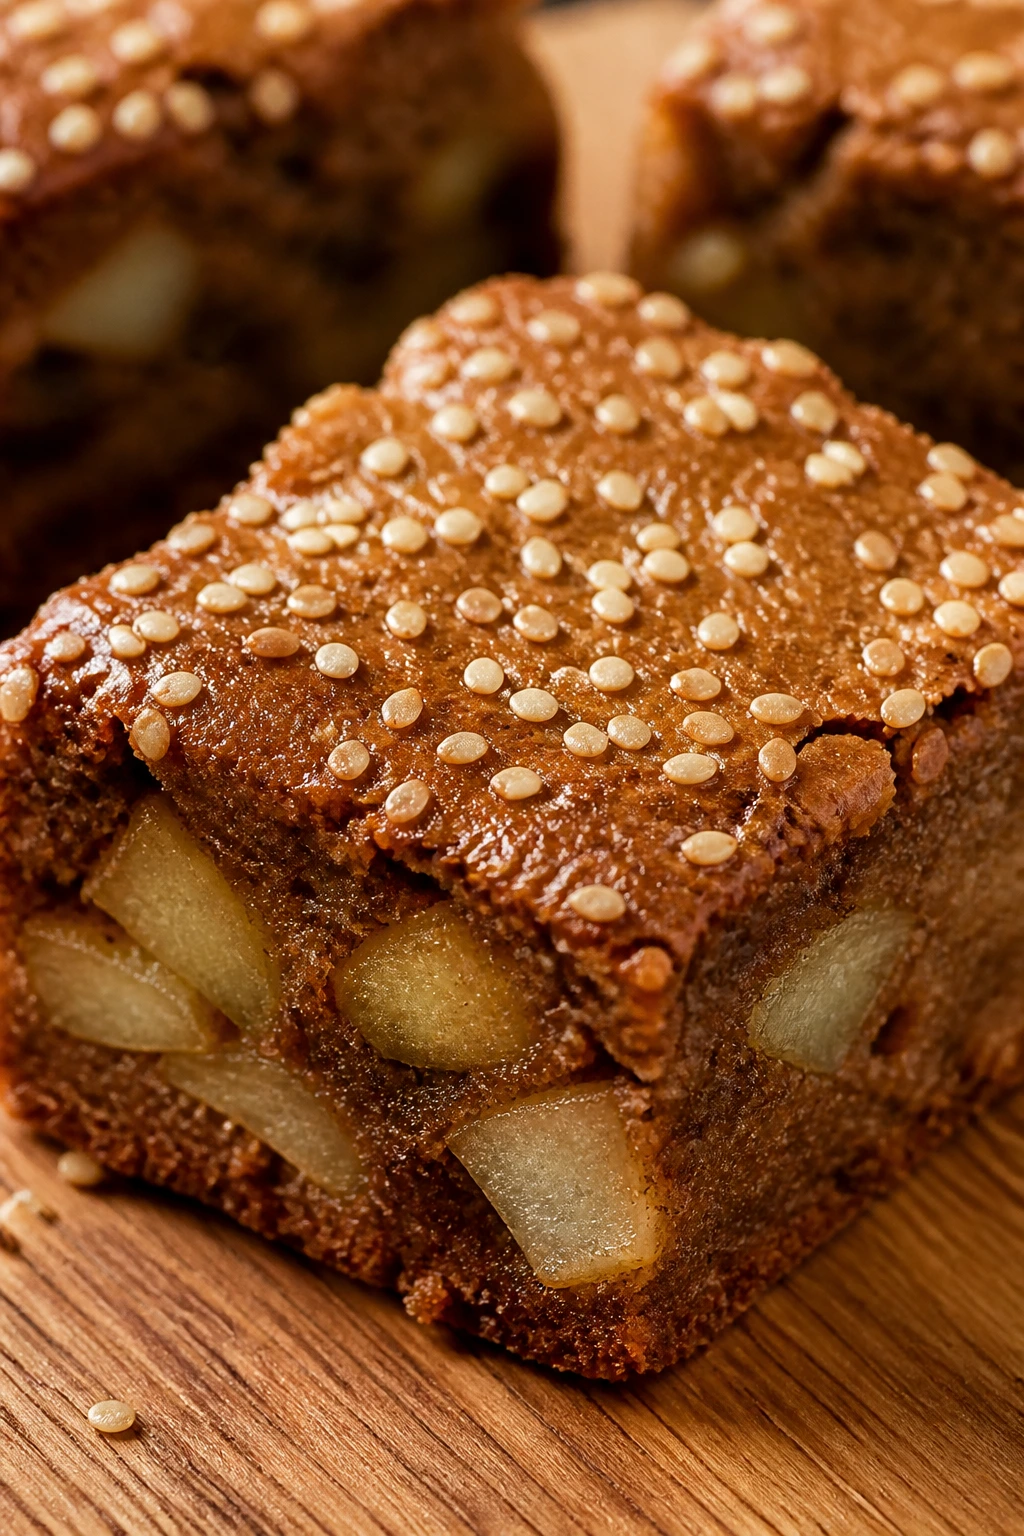
Intro: Tahini sounds left-field until you taste the sesame note next to baked apple. The result is earthy, faintly nutty, and much more interesting than a standard sweet bar.
Why It Works: Tahini has enough fat to replace some of the butter while adding a toasted, savory edge. Maple syrup helps keep the sweetness soft, and apples bring the familiar fruit note back to center. If you’ve never baked with tahini, this is a friendly place to start.
Key Ingredients:
- 1/2 cup tahini
- 1/2 cup packed brown sugar
- 1/4 cup pure maple syrup
- 1 large egg
- 1 teaspoon vanilla extract
- 1 cup all-purpose flour
- 1 teaspoon ground cinnamon
- 1/2 teaspoon baking powder
- 1/4 teaspoon fine salt
- 1 cup diced apples
- 2 tablespoons sesame seeds
Quick Steps:
- Preheat the oven to 350°F and line an 8×8-inch pan.
- Whisk tahini, brown sugar, maple syrup, egg, and vanilla until smooth.
- Stir in flour, cinnamon, baking powder, and salt.
- Fold in apples, spread into the pan, and scatter sesame seeds on top.
- Bake for 24 to 28 minutes until the center is just set.
Equipment for This Recipe:
- 8×8-inch pan
- Mixing bowl
- Whisk
- Spatula
How to Serve This Dish: Serve these at room temperature with coffee or plain yogurt. A drizzle of honey is nice, but I’d stop there; tahini already brings enough flavor.
Pro Tips for This Recipe:
- Stir tahini well before measuring so the oil is evenly mixed.
- Use apples with a tart edge to balance the sesame.
- Watch the top closely near the end; tahini browns fast.
Variations on This Dish:
- Black Sesame Twist: Sprinkle black sesame seeds with the white ones.
- Honey Tahini Bars: Swap the maple syrup for honey.
- Citrus Tahini: Add 1 teaspoon orange zest for a brighter top note.
Common Mistakes to Avoid with This Dish:
- Don’t use dry, separated tahini straight from the jar.
- Don’t overload the bars with seeds.
- Don’t assume the sesame flavor will hide overbaking; it won’t.
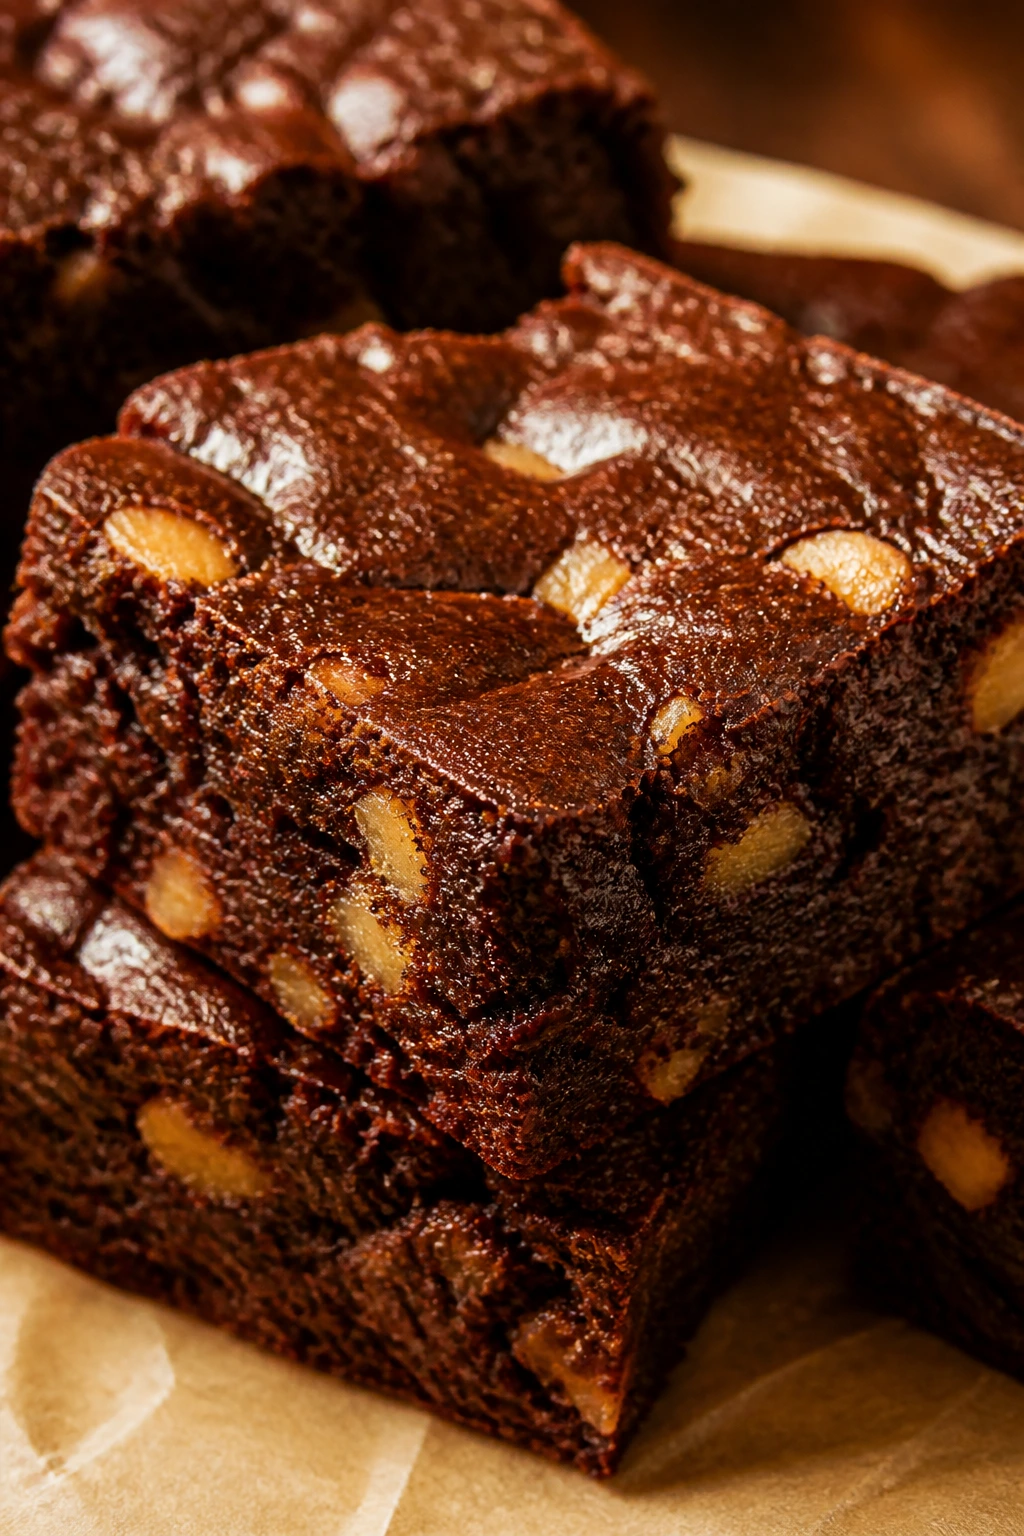
23. Espresso Apple Brownies
Intro: Espresso powder deepens the chocolate without making the bars taste like coffee. You get a darker, richer brownie with apple pockets tucked into the middle.
Why It Works: Coffee and chocolate have the same habit of making each other taste fuller. The apples add moisture and a little brightness, which keeps the bars from feeling heavy. This is a good recipe for people who want a stronger, more grown-up flavor without a long ingredient list.
Key Ingredients:
- 1/2 cup unsalted butter, melted
- 3/4 cup packed brown sugar
- 1 large egg
- 1 teaspoon vanilla extract
- 1 cup all-purpose flour
- 2 tablespoons unsweetened cocoa powder
- 1 tablespoon instant espresso powder
- 1/2 teaspoon baking powder
- 1/4 teaspoon fine salt
- 1 cup diced apples
- 1/2 cup semisweet chocolate chips
Quick Steps:
- Heat the oven to 350°F and line an 8×8-inch pan.
- Whisk butter, brown sugar, egg, vanilla, and espresso powder.
- Stir in flour, cocoa, baking powder, and salt.
- Fold in apples and chocolate chips, then spread into the pan.
- Bake for 25 to 30 minutes until a toothpick shows moist crumbs.
Equipment for This Recipe:
- 8×8-inch pan
- Mixing bowl
- Whisk
- Spatula
How to Serve This Dish: These are especially good with coffee, which sounds redundant until you taste the pairing. A spoonful of whipped cream softens the espresso edge if you want a gentler dessert.
Pro Tips for This Recipe:
- Dissolve the espresso powder in the melted butter if you want a smoother flavor.
- Use apples that are firm enough to stay distinct against the chocolate.
- Don’t overbake or the cocoa gets dry and chalky.
Variations on This Dish:
- Mocha Apple Bars: Add 1 more teaspoon espresso powder for a stronger note.
- White Chocolate Finish: Swap some chips for white chocolate.
- Hazelnut Version: Add 1/3 cup chopped hazelnuts.
Common Mistakes to Avoid with This Dish:
- Don’t use sweetened cocoa mix; it throws off the sugar.
- Don’t add too much espresso powder or the bars go bitter.
- Don’t let the apples get too wet before folding them in.
24. Brown Sugar Streusel Apple Bars
Intro: Streusel-topped bars work because the topping stays crisp for a day, which is more than most crumb tops can say. The brown sugar gives the whole pan a caramel edge.
Why It Works: The base is simple and sturdy, while the streusel provides texture and a little extra sweetness on top. Using cold butter in the topping creates little pebbles that brown instead of melting flat. That contrast is the whole point.
Key Ingredients:
- 1/2 cup unsalted butter, melted
- 2/3 cup packed brown sugar
- 1 large egg
- 1 teaspoon vanilla extract
- 1 cup all-purpose flour
- 1 teaspoon ground cinnamon
- 1/2 teaspoon baking powder
- 1/4 teaspoon fine salt
- 1 cup diced apples
- 1/2 cup all-purpose flour
- 1/3 cup brown sugar
- 1/2 teaspoon cinnamon
- 4 tablespoons cold butter
Quick Steps:
- Preheat the oven to 350°F and line an 8×8-inch pan.
- Mix the base batter and spread it in the pan.
- Toss the apples with a little cinnamon if you like, then scatter them over the batter.
- Mix the streusel ingredients with your fingers until crumbly.
- Sprinkle the topping over the apples and bake for 25 to 30 minutes.
Equipment for This Recipe:
- 8×8-inch pan
- Mixing bowl
- Fork or pastry cutter
- Parchment paper
How to Serve This Dish: These bars are best when the topping is still crisp, so I serve them the same day if possible. They don’t need much else — maybe coffee and a small plate.
Pro Tips for This Recipe:
- Keep the topping butter cold.
- Don’t press the streusel down or it bakes into the base.
- Let the bars cool so the topping doesn’t crumble off.
Variations on This Dish:
- Oat Streusel: Add 1/3 cup oats to the topping.
- Nut Streusel: Fold in 1/4 cup chopped walnuts.
- Spiced Streusel: Add a pinch of nutmeg.
Common Mistakes to Avoid with This Dish:
- Don’t make the crumble too fine.
- Don’t overload the bars with apples or the topping sinks.
- Don’t expect the streusel to stay crisp forever; it softens overnight.
25. Cardamom Apple Brownies

Intro: Cardamom can read sharp if you overdo it, but in the right amount it gives apples a fragrant lift that feels clean and a little fancy without any extra work.
Why It Works: Cardamom’s citrusy, floral edge makes baked apple taste brighter. Brown sugar keeps that spice from going cold or harsh, and sliced almonds on top add a neat little finish. This is one of those recipes where a small amount of spice does more than a heavy hand ever could.
Key Ingredients:
- 1/2 cup unsalted butter, melted
- 3/4 cup packed brown sugar
- 1 large egg
- 1 teaspoon vanilla extract
- 1 cup all-purpose flour
- 1 teaspoon ground cinnamon
- 3/4 teaspoon ground cardamom
- 1/2 teaspoon baking powder
- 1/4 teaspoon fine salt
- 1 cup diced apples
- 1/4 cup sliced almonds
Quick Steps:
- Heat the oven to 350°F and line an 8×8-inch pan.
- Whisk butter, brown sugar, egg, and vanilla.
- Stir in flour, cinnamon, cardamom, baking powder, and salt.
- Fold in apples and spread the batter in the pan.
- Top with sliced almonds and bake for 24 to 28 minutes.
Equipment for This Recipe:
- 8×8-inch baking pan
- Mixing bowl
- Spatula
- Measuring spoons
How to Serve This Dish: These bars are good with tea, especially something plain that won’t fight the cardamom. I like them cut into neat squares because the spice feels more deliberate that way.
Pro Tips for This Recipe:
- Measure cardamom carefully; 3/4 teaspoon is enough.
- Use fresh almonds so the topping doesn’t taste flat.
- Cool completely before slicing to keep the almond top intact.
Variations on This Dish:
- Orange Cardamom: Add 1 teaspoon orange zest.
- Pistachio Swap: Use chopped pistachios instead of almonds.
- Lighter Spice: Reduce the cardamom to 1/2 teaspoon if you want a softer note.
Common Mistakes to Avoid with This Dish:
- Don’t overspice and lose the apple flavor.
- Don’t use stale cardamom.
- Don’t slice while warm if you want the almond top to stay neat.
26. Pretzel-Topped Apple Brownies
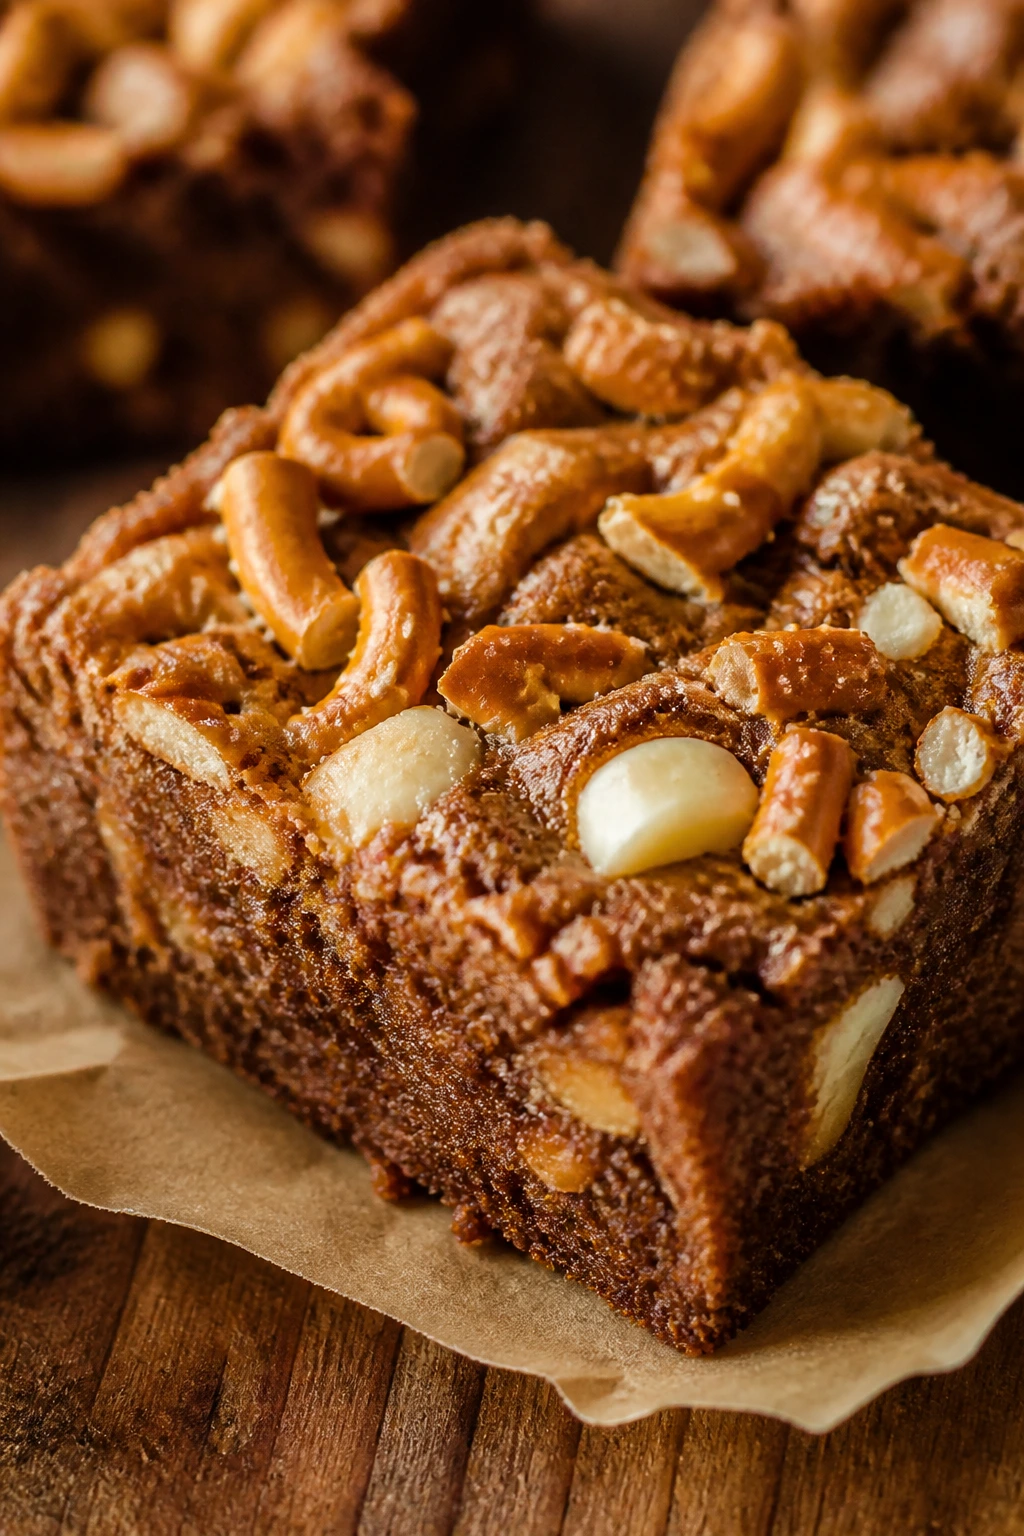
Intro: Pretzels bring a blunt, salty crunch that keeps the sweet side honest. Once they bake into the top, you get a fast contrast between soft apple crumb and crisp salt.
Why It Works: Salt changes the way sugar reads, so the apples taste fuller and less sugary. The pretzels also keep the top from becoming all one texture, which is a common problem in bar desserts. If you crush them by hand instead of pulverizing them, you keep the bite.
Key Ingredients:
- 1/2 cup unsalted butter, melted
- 3/4 cup packed brown sugar
- 1 large egg
- 1 teaspoon vanilla extract
- 1 cup all-purpose flour
- 1 teaspoon ground cinnamon
- 1/2 teaspoon baking powder
- 1/4 teaspoon fine salt
- 1 cup diced apples
- 3/4 cup crushed mini pretzels
- 1/3 cup white chocolate chips
Quick Steps:
- Preheat the oven to 350°F and line an 8×8-inch pan.
- Whisk butter, brown sugar, egg, and vanilla.
- Stir in flour, cinnamon, baking powder, and salt.
- Fold in apples and white chocolate chips, then spread into the pan.
- Scatter pretzels on top and bake for 24 to 28 minutes.
Equipment for This Recipe:
- 8×8-inch pan
- Mixing bowl
- Spatula
- Small bag or rolling pin for crushing pretzels
How to Serve This Dish: These bars are best once the top has cooled enough to stay crunchy. I’d serve them with milk or a very plain coffee because the salty-sweet balance already does a lot.
Pro Tips for This Recipe:
- Crush the pretzels into uneven pieces, not dust.
- Add the pretzels on top right before baking so they stay crisp.
- Use firm apples so the topping doesn’t sink.
Variations on This Dish:
- Dark Chocolate Pretzel: Swap white chocolate for semisweet chips.
- Caramel Pretzel: Add a caramel drizzle after baking.
- Mini Peanut Butter Pretzel: Stir 2 tablespoons peanut butter into the batter.
Common Mistakes to Avoid with This Dish:
- Don’t crush the pretzels too fine.
- Don’t add a heavy pretzel layer that blocks the batter underneath.
- Don’t leave the bars wrapped while warm, or the pretzels soften fast.
27. Bourbon Butterscotch Apple Bars
Intro: A spoonful of bourbon gives butterscotch a warm, caramel edge that reads rich without becoming clumsy. The alcohol bakes out, leaving a deep flavor that fits apple very neatly.
Why It Works: Butterscotch chips melt into pockets of sweetness, while bourbon adds a little oak and warmth. The apples keep the bars from tasting one-note. If you want a dessert that feels a touch more grown-up but still uses a straightforward pan method, this is the one.
Key Ingredients:
- 1/2 cup unsalted butter, melted
- 3/4 cup packed brown sugar
- 1 tablespoon bourbon
- 1 large egg
- 1 teaspoon vanilla extract
- 1 cup all-purpose flour
- 1 teaspoon ground cinnamon
- 1/2 teaspoon baking powder
- 1/4 teaspoon fine salt
- 1 cup diced apples
- 1/2 cup butterscotch chips
Quick Steps:
- Preheat the oven to 350°F and line an 8×8-inch pan.
- Whisk butter, brown sugar, bourbon, egg, and vanilla.
- Stir in flour, cinnamon, baking powder, and salt.
- Fold in apples and butterscotch chips, then spread the batter in the pan.
- Bake for 25 to 30 minutes until the top is set and the edges are golden.
Equipment for This Recipe:
- 8×8-inch pan
- Mixing bowl
- Spatula
- Measuring spoons
How to Serve This Dish: These are excellent with coffee or a small glass of milk. I like them warm, when the butterscotch chips are still soft and the bourbon note is easiest to catch.
Pro Tips for This Recipe:
- Use a tablespoon of bourbon, not a pour-and-hope measure.
- Pat the apple dice dry before folding them in.
- Let the bars cool before cutting so the chips don’t smear.
Variations on This Dish:
- No-Bourbon Version: Replace the bourbon with 1 tablespoon milk.
- Salted Butterscotch: Sprinkle flaky salt on top after baking.
- Pecan Butterscotch: Add 1/3 cup chopped pecans.
Common Mistakes to Avoid with This Dish:
- Don’t add too much bourbon or the batter loosens too much.
- Don’t use thin butterscotch sauce in place of chips.
- Don’t slice while the chips are still molten.
28. Coconut Apple Brownies
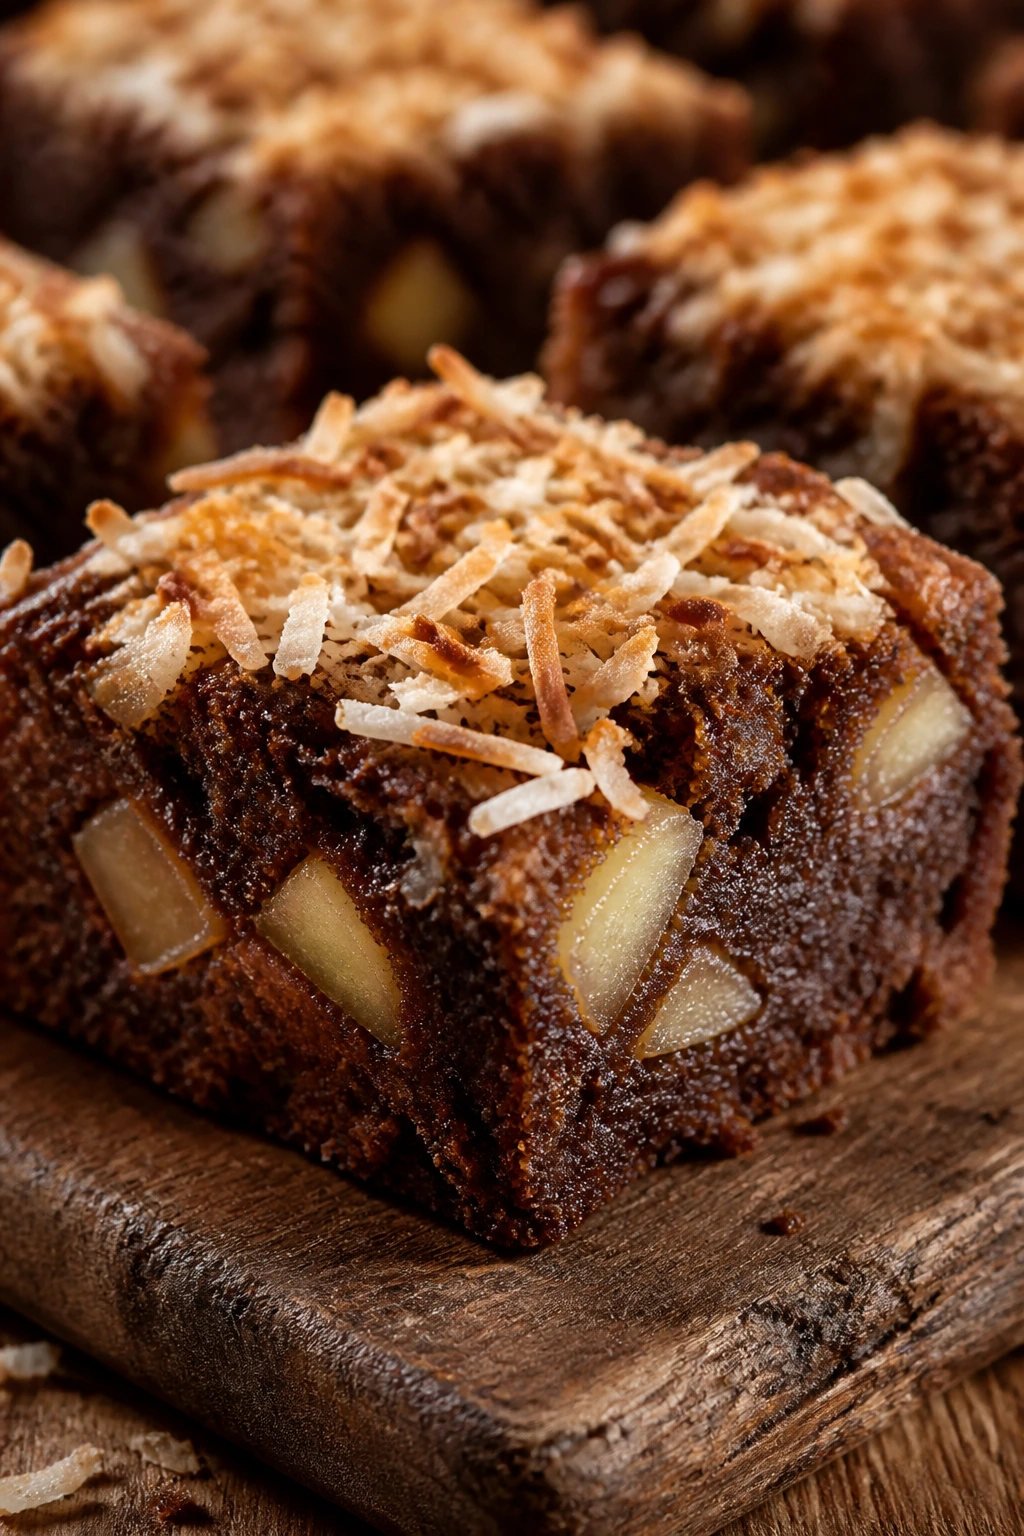
Intro: Coconut changes the texture more than the flavor. It brings a little chew and a toasty top, which sits nicely against soft apple pieces.
Why It Works: Shredded coconut soaks up moisture and helps the bars hold together, especially if the apples are juicy. Coconut oil can replace butter here without making the bars feel dry. The result is sweet, warm, and a little chewy around the edges.
Key Ingredients:
- 1/2 cup melted butter or coconut oil
- 3/4 cup packed brown sugar
- 1 large egg
- 1 teaspoon vanilla extract
- 1 cup all-purpose flour
- 1 teaspoon ground cinnamon
- 1/2 teaspoon baking powder
- 1/4 teaspoon fine salt
- 1 cup diced apples
- 3/4 cup sweetened shredded coconut
- 1/4 cup chopped macadamia nuts or almonds
Quick Steps:
- Heat the oven to 350°F and line an 8×8-inch pan.
- Whisk butter or coconut oil, brown sugar, egg, and vanilla.
- Stir in flour, cinnamon, baking powder, and salt.
- Fold in apples, coconut, and nuts, then spread into the pan.
- Bake for 24 to 28 minutes until the center is set and the top is lightly golden.
Equipment for This Recipe:
- 8×8-inch pan
- Mixing bowl
- Spatula
- Cooling rack
How to Serve This Dish: These are good with tea or a mild coffee. If you want dessert energy, a little whipped cream and toasted coconut on top does the job.
Pro Tips for This Recipe:
- Use sweetened coconut for better browning.
- Don’t overbake; coconut can go dry quickly.
- Chop the apples fine so the coconut and fruit stay balanced.
Variations on This Dish:
- Pineapple-Coconut Style: Add 2 tablespoons finely chopped dried pineapple.
- Almond Coconut: Use sliced almonds instead of macadamias.
- Lighter Coconut: Cut the coconut to 1/2 cup if you want a subtler texture.
Common Mistakes to Avoid with This Dish:
- Don’t use huge apple chunks; coconut batter is denser.
- Don’t let the top brown too hard.
- Don’t skip the cooling time or the crumb will smear.
29. Orange Zest Apple Blondies
Intro: Orange zest wakes up the apples without crowding them. The bars stay soft and buttery, but the citrus gives the whole pan a brighter edge.
Why It Works: Orange oils sit right on the surface of the zest, so a little goes a long way. Mixed with brown sugar and cinnamon, the flavor lands clean rather than perfumed. This is a nice choice when you want something lighter than caramel or chocolate.
Key Ingredients:
- 1/2 cup unsalted butter, melted
- 3/4 cup packed brown sugar
- 1 large egg
- 1 teaspoon vanilla extract
- Zest of 1 orange
- 1 cup all-purpose flour
- 1 teaspoon ground cinnamon
- 1/2 teaspoon baking powder
- 1/4 teaspoon fine salt
- 1 cup diced apples
- 1/4 cup chopped walnuts
Quick Steps:
- Preheat the oven to 350°F and line an 8×8-inch pan.
- Whisk butter, brown sugar, egg, vanilla, and orange zest.
- Stir in flour, cinnamon, baking powder, and salt.
- Fold in apples and walnuts, then spread the batter evenly.
- Bake for 25 to 29 minutes until the top is set and fragrant.
Equipment for This Recipe:
- 8×8-inch pan
- Microplane or fine grater
- Mixing bowl
- Spatula
How to Serve This Dish: These bars are nice at room temperature with tea or a lighter roast coffee. I like them with a few extra strands of orange zest on top, but only if you want the citrus to show.
Pro Tips for This Recipe:
- Zest the orange before juicing it.
- Use the fine side of the grater so the zest spreads evenly.
- Don’t overdo the cinnamon or it crowds the orange.
Variations on This Dish:
- Lemon Orange Blend: Use half lemon zest, half orange zest.
- Pecan Orange: Swap walnuts for pecans.
- Cranberry Orange Apple: Add 1/3 cup dried cranberries.
Common Mistakes to Avoid with This Dish:
- Don’t zest the bitter white pith.
- Don’t skip the nut or fruit contrast if you want more texture.
- Don’t bake until the top is dark; citrus loses its edge.
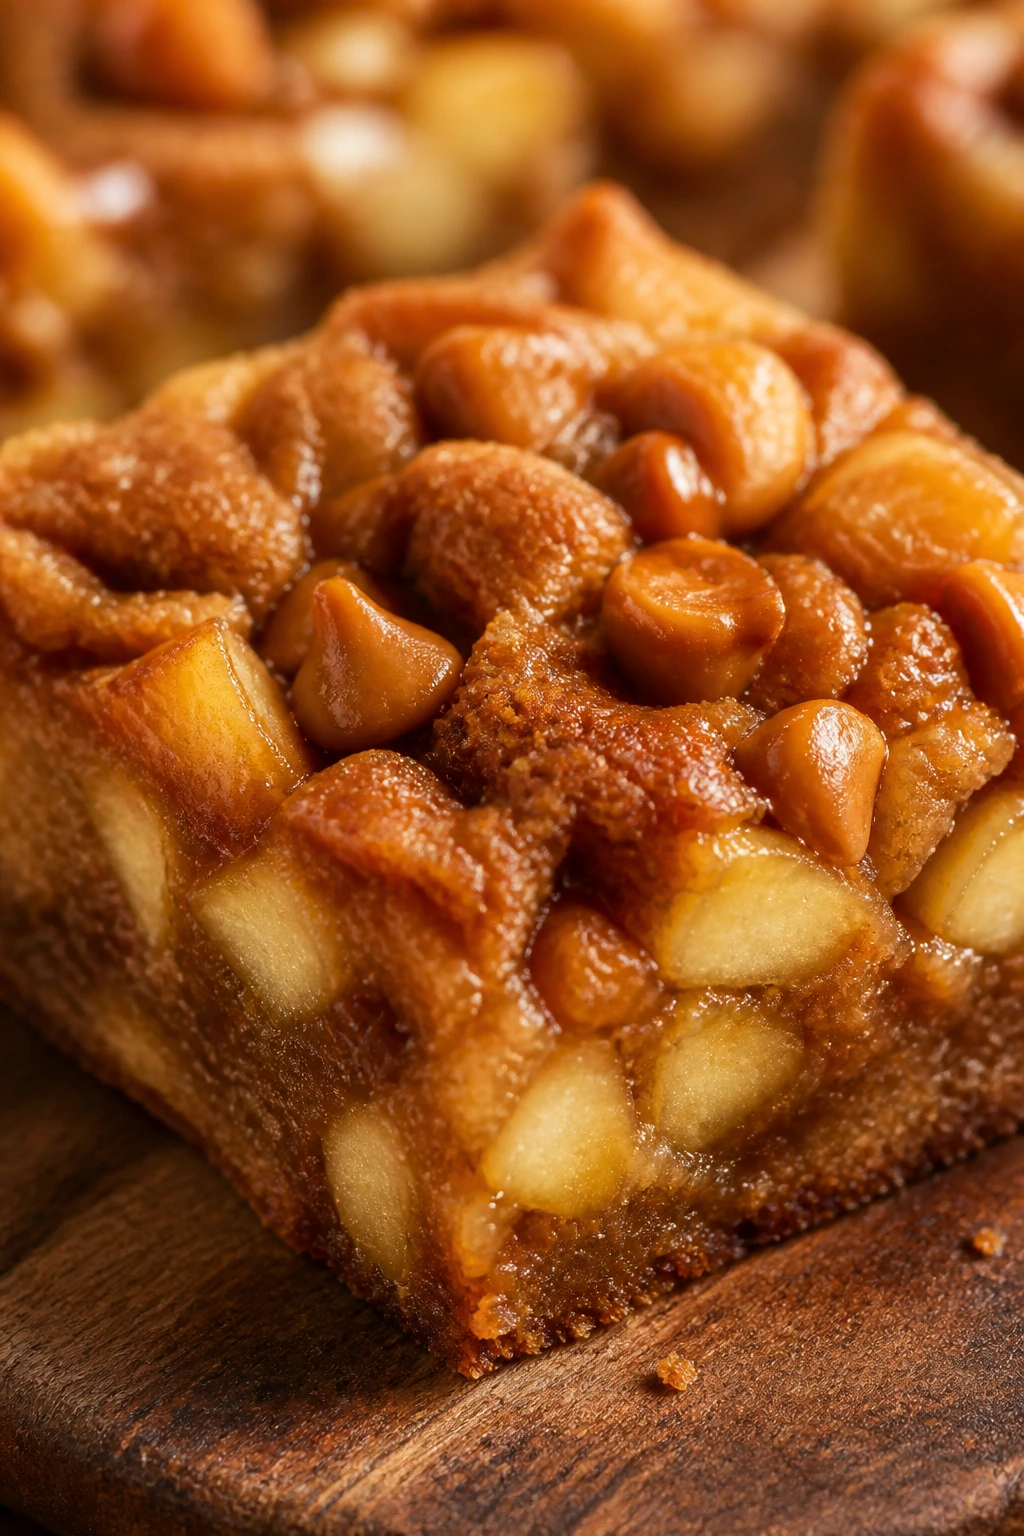
30. Toffee Apple Brownies
Intro: Toffee bits melt into sticky pockets if you don’t bury them too deep. The result is a pan with soft apple crumb, caramel notes, and tiny crunchy spots that keep each square moving.
Why It Works: Toffee brings both sweetness and texture, so you don’t need a complicated batter underneath it. Apples cut through the candy-like edge and keep the bars from tasting flat. This is a strong finish to the list because it rewards all the basic skills used in the earlier recipes.
Key Ingredients:
- 1/2 cup unsalted butter, melted
- 3/4 cup packed brown sugar
- 1 large egg
- 1 teaspoon vanilla extract
- 1 cup all-purpose flour
- 1 teaspoon ground cinnamon
- 1/2 teaspoon baking powder
- 1/4 teaspoon fine salt
- 1 cup diced apples
- 1/2 cup toffee bits
- 1/4 cup chopped pecans
Quick Steps:
- Heat the oven to 350°F and line an 8×8-inch pan.
- Whisk butter, brown sugar, egg, and vanilla until smooth.
- Stir in flour, cinnamon, baking powder, and salt.
- Fold in apples, toffee bits, and pecans, then spread into the pan.
- Bake for 26 to 30 minutes until the center is set and the top is golden.
Equipment for This Recipe:
- 8×8-inch pan
- Mixing bowl
- Spatula
- Measuring cups
How to Serve This Dish: These are best once the toffee has had a few minutes to firm up. Serve them with coffee or a scoop of vanilla ice cream if you want to lean all the way into dessert.
Pro Tips for This Recipe:
- Keep some toffee bits near the top so they show after baking.
- Chop the pecans small enough that they don’t cut the bars apart.
- Let the pan cool fully; toffee gets sticky when hot.
Variations on This Dish:
- Chocolate Toffee: Add 1/3 cup chocolate chips.
- Salted Toffee: Finish with flaky salt right after baking.
- Nut-Free Toffee: Skip the pecans and add 2 tablespoons extra toffee bits.
Common Mistakes to Avoid with This Dish:
- Don’t use giant toffee pieces that turn hard at the edges.
- Don’t cut while the caramelized bits are still molten.
- Don’t underbake; toffee can hide a soft center.
Why Apple Brownies Are So Friendly for Beginner Bakers
The thing I like most about apple brownie bars is that they reward simple habits instead of fancy technique. A decent bowl, a square pan, and a willingness to stop stirring the second the flour disappears will get you farther than any complicated trick. That’s rare in dessert baking, where one rushed step can usually ruin the texture.
Apples help more than people expect. They bring moisture, a little acidity, and tiny pockets of softness, which means the bars can survive a slightly rough mix or a slightly warm oven without turning into bricks. They also give you a built-in visual cue: once the top is golden and the fruit at the edges looks soft, you’re close.
The best part is how many directions the same base can go. Brown butter makes it nutty. Cider glaze makes it sharper. Cream cheese turns it into something layered. Even one pan can teach you how sugar browns, how fruit bakes, and why a square dessert is often the easiest place to learn.
Essential Equipment for These Recipes
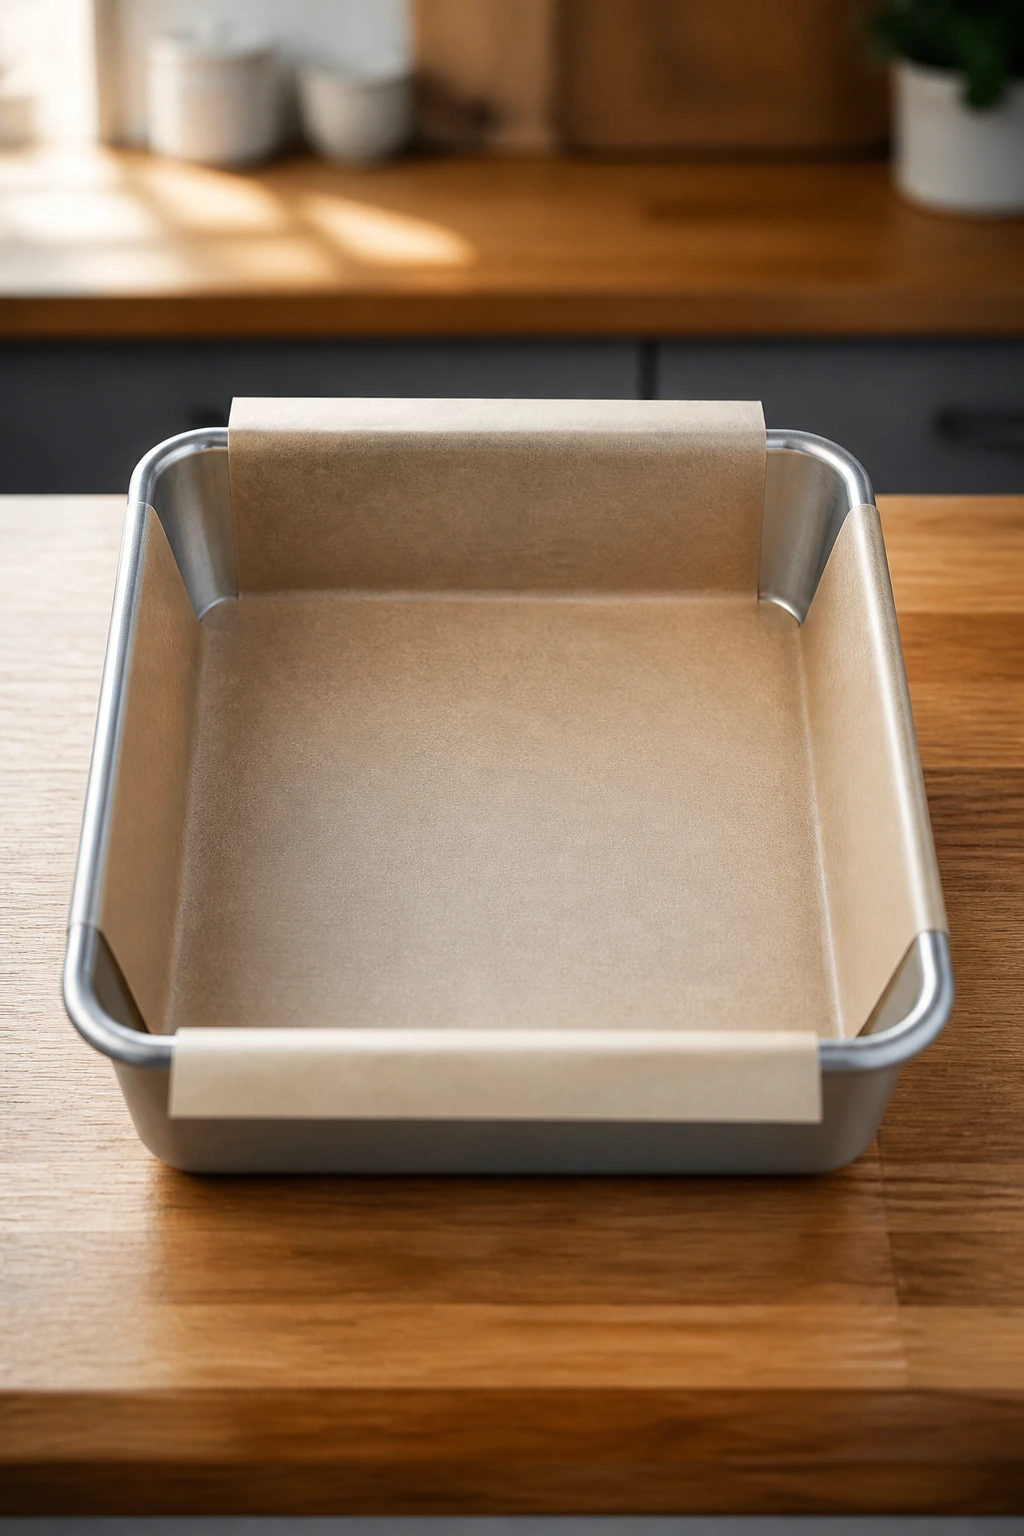
- 8×8-inch baking pan: The workhorse size for most of these bars; it gives you a good ratio of browned edge to soft center.
- Parchment paper: Use it with a little overhang so the bars lift out without tearing.
- Mixing bowls: One medium bowl handles most batters; two bowls help when a swirl or glaze is involved.
- Whisk and rubber spatula: The whisk smooths the wet ingredients, and the spatula folds in apples without smashing them.
- Small saucepan: Handy for brown butter, cider reduction, caramel, or any quick glaze.
- Knife and cutting board: You’ll want a sharp knife for clean 1/4-inch apple dice.
- Cooling rack: Bars set better when air can move under the pan.
- Microplane or fine grater: Useful for orange zest and any spice work that needs a fine touch.
Smart Shopping and Ingredient Tips
The apple matters more than people think. Granny Smith gives you a tart bite and holds its shape well, which is why it shows up in the classic and chocolate versions. Honeycrisp and Braeburn stay a little sweeter and softer, so they work when the recipe already has caramel, brown sugar, or molasses. If your apples are very juicy, blot the diced pieces with a towel before folding them in.
Butter quality shows up in a quiet way here. Salted butter can work if that’s what you keep on hand, but unsalted butter lets you control the finish better, especially in caramel, cream cheese, and brown butter recipes. When a recipe calls for melted butter, let it cool for a minute before mixing; hot butter can make the batter look greasy and loose.
Brown sugar does more than sweeten. It helps the bars stay soft and gives apple desserts that slightly chewy edge people love in blondies and brownie bars. If you only have granulated sugar, the texture shifts lighter and drier, so I’d reserve that swap for recipes that already include applesauce or cream cheese.
For spice, buy less than you think you need and replace it when it smells flat. Cinnamon that’s been sitting around forever tastes dusty, and cardamom turns sad faster than most spices. That matters here because the recipes are simple; stale spice has nowhere to hide.
How to Serve These Recipes
Presentation:
Cut the bars with a sharp knife that’s been wiped clean between slices. A light dusting of powdered sugar works on plain bars, while caramel, glaze, or cream cheese versions look better left alone so the layers stay visible.
Accompaniments:
Vanilla ice cream is the easy answer, but plain Greek yogurt, whipped cream, coffee, chai, or even a small wedge of sharp cheddar can make sense with certain batches. The chocolate and espresso versions like cold milk; the chai and maple bars do well with tea.
Portions:
Most 8×8-inch pans cut neatly into 9 squares if you want a dessert-sized serving, or 12 smaller pieces for snacking. Mini muffin bites can be served two or three at a time, which is useful when you’re setting out a platter.
Beverage Pairing:
A medium-roast coffee works across almost all of these. For the spiced bars, black tea or chai is a better match, and for the sweeter caramel or toffee versions, cold milk keeps the plate from feeling too rich.
Additional Tips and Flavor Boosters
Flavor Enhancement: A tiny pinch of flaky salt on top of caramel, chocolate, or toffee bars sharpens the apple flavor and keeps the sweetness from flattening out. It sounds small. It isn’t.
Customization: If you want more texture, add 1/4 to 1/2 cup of walnuts, pecans, pretzels, or chopped almonds depending on the recipe’s flavor lane. If you want a softer crumb, fold in 2 tablespoons applesauce and reduce the flour by 2 tablespoons in the plain bars.
Serving Suggestions: A spoonful of whipped cream, a drizzle of cider glaze, or a dusting of cinnamon sugar can finish the bars without burying the apple flavor. I like to keep the garnish modest; these bars are already carrying enough.
Make-It-Yours: For dairy-free baking, use coconut oil or neutral oil in the simpler bars. For gluten-free baking, stick to the almond flour and oat versions rather than forcing a one-to-one swap into every recipe. For a less sweet dessert, reduce the sugar by 2 tablespoons and use a tart apple.
Make-Ahead, Storage, and Reheating Guidance
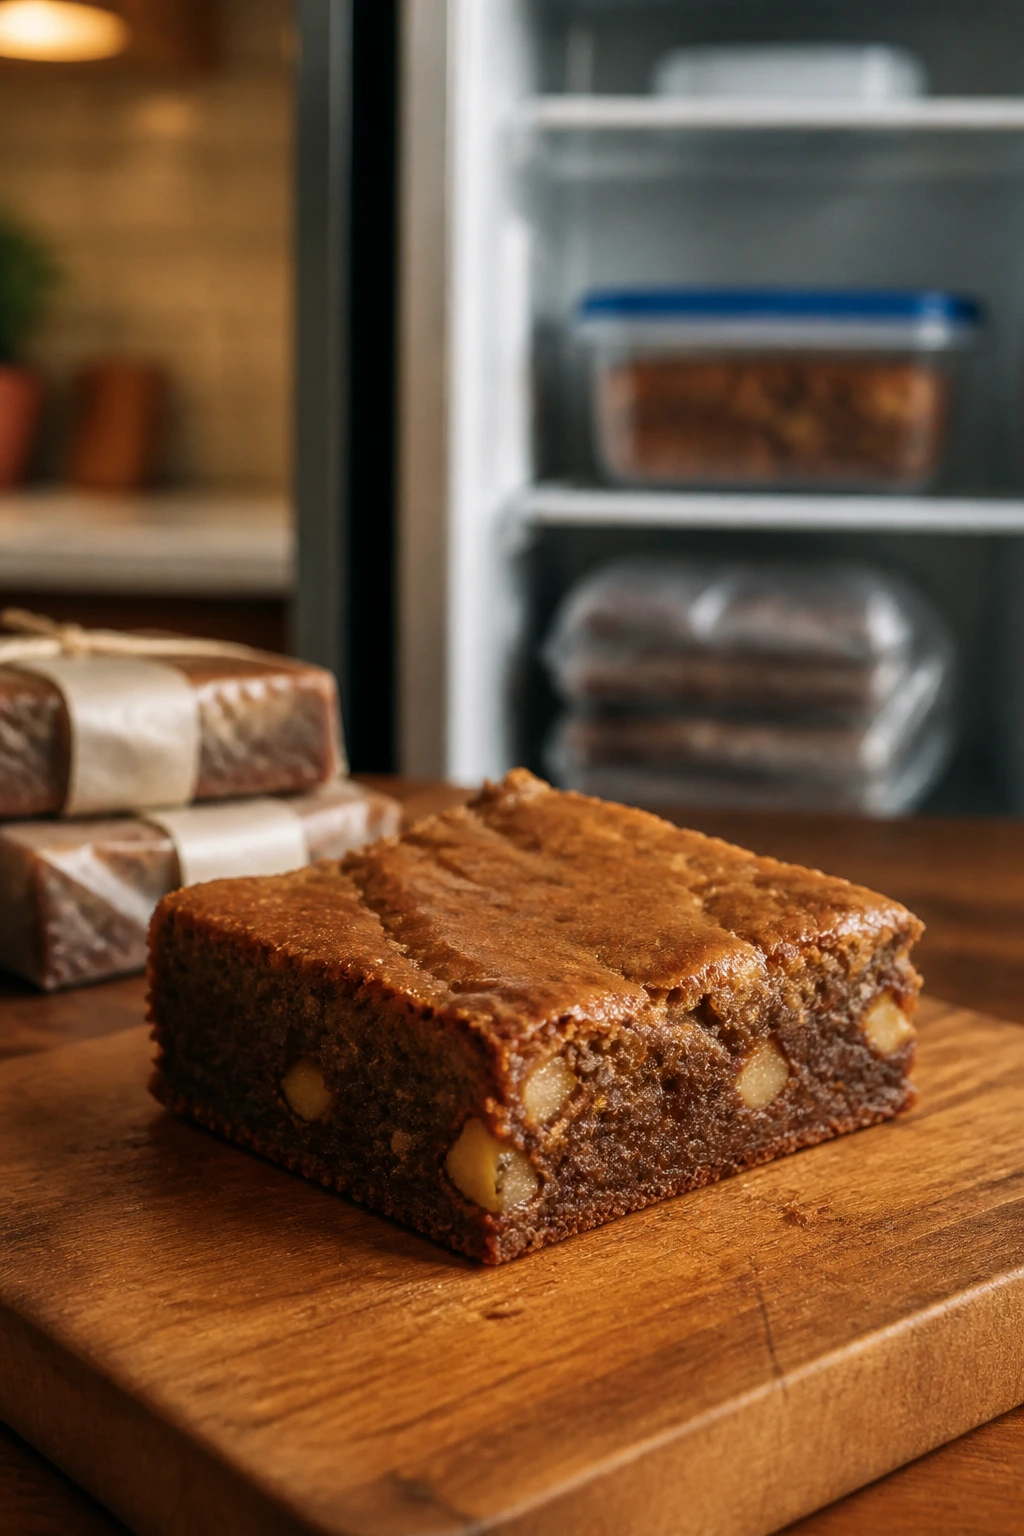
Most of these bars keep well for 2 days at room temperature in an airtight container, as long as they do not include cream cheese or a fresh dairy glaze. The cream cheese bars need the fridge, and I would treat any batch with heavy frosting or dairy filling the same way. In the refrigerator, they stay good for 4 to 5 days.
Freezing works better than people expect. Wrap individual squares in parchment, then place them in a freezer bag or container for up to 2 months. Thaw at room temperature for about 45 minutes, or overnight in the fridge if you want the texture to stay tighter. Cream cheese versions freeze too, though the swirl softens a little after thawing.
For reheating, use 300°F for 6 to 8 minutes if you want the edges warm and the center soft again. A microwave works for a single square, but keep it to 10 to 15 seconds or the apples turn rubbery. Glazed bars and pretzel-topped bars should be reheated gently or not at all; the toppings lose their best texture if you rush them.
If you want to make ahead, most batters can be mixed and baked the same day without fuss. The only real prep shortcut worth doing early is dicing the apples and tossing them with a tiny bit of lemon juice so they stay fresh-looking for a few hours.
Variations and Adaptations to Try
Gluten-Free Pantry Swap: Use the almond flour bars or oat bars as your base instead of trying to force a flour blend into every recipe. They already know how to behave.
Dairy-Free Batch: Use coconut oil or neutral oil in the simple bars and skip cream cheese or buttery glazes. Coconut oil gives the bars a faint tropical note, so it works best with coconut, orange, or chai versions.
Lower-Sugar Trim: Reduce the sugar by 2 tablespoons and lean on tart apples, cinnamon, and a pinch of salt. The bars will be a little less chewy, but the apple flavor comes forward faster.
Kid-Friendly Squares: Keep the spice to cinnamon only and choose chocolate chip, toffee, or plain apple versions. Mini muffin bites also make the whole thing easier to hand out.
Sharper Apple Flavor: Use Granny Smith or a half-and-half mix of Granny Smith and Honeycrisp, especially in caramel, maple, and chocolate recipes. The tartness keeps the dessert from tasting blurry.
Regional Spice Shift: Add cardamom for a chai feel, orange zest for a brighter profile, or a little molasses for a deeper, darker bar. Each one changes the same apple base in a way that feels intentional rather than random.
Common Mistakes to Avoid
The first mistake is cutting the apples too large. Big chunks stay wet, sink, and make the bars slice badly. A small dice is the safer bet for nearly every recipe here.
The second problem is overmixing once the flour goes in. Stir until you no longer see dry patches, then stop. If you keep going, the bars get tight and the crumb turns rubbery around the edges.
Another trap is baking by color alone. Some of these bars — especially cream cheese, caramel, or chocolate versions — look finished before the middle is set. Use the toothpick test and the center’s spring back, not your guess, to make the call.
Pan size matters too. If you use a smaller pan than the recipe calls for, the bars turn thicker and need a longer bake, which often means dry edges before the middle is done. A proper 8×8-inch pan gives you the easiest path.
Finally, people slice too early. Apples keep steaming after they leave the oven, and that steam needs a few minutes to settle. If you want neat squares, wait.
Frequently Asked Questions
Can I use applesauce instead of fresh apples?
Yes, but only in recipes that already have enough structure, like the oat bars or vegan bars. Applesauce adds moisture but removes the little fruit pockets that make these bars feel like apple brownies instead of snack cake.
Which apples work best for apple brownies?
Granny Smith, Honeycrisp, Braeburn, and Pink Lady are the safest picks. Granny Smith gives the sharpest bite, while Honeycrisp and Braeburn stay sweet and firm.
Do I have to peel the apples?
Not always, but I usually do for cleaner texture. Thin skins can show up in the bite, especially in mini bites or blondies, where the crumb is softer and the apple pieces are more noticeable.
Why did my bars turn dry?
They were probably baked a little too long or mixed too heavily once the flour went in. The fix is simple: pull the pan when the center is set but still soft, and let the bars finish on the cooling rack.
Can I make these in a 9×13-inch pan?
Yes, but you’ll need to double most of the recipes and shorten the bake slightly if the batter is thinner. If you keep the original amounts, the bars spread too thin and can overbake fast.
Can I freeze apple brownie bars?
Absolutely. Wrap individual squares well and freeze for up to 2 months. Bars without cream cheese or glaze freeze the cleanest, but most of them thaw well enough for regular dessert use.
Is grating the apples better than dicing them?
Grated apples make the crumb softer and more cake-like. Diced apples give you a more obvious fruit bite and cleaner slices, which is why I prefer them in almost every version here.
What if I only have sweet apples?
Use them, but add a pinch more salt or a little lemon zest to keep the flavor balanced. Very sweet apples like Gala can work, though the bars may taste softer and less sharp than versions made with tart fruit.
Can I make these without nuts because of allergies?
Yes. Leave the nuts out and, if you want texture, add pretzels, coconut, or a few extra apple dice depending on the recipe. The bars still hold together well without them.
A Pan Worth Repeating
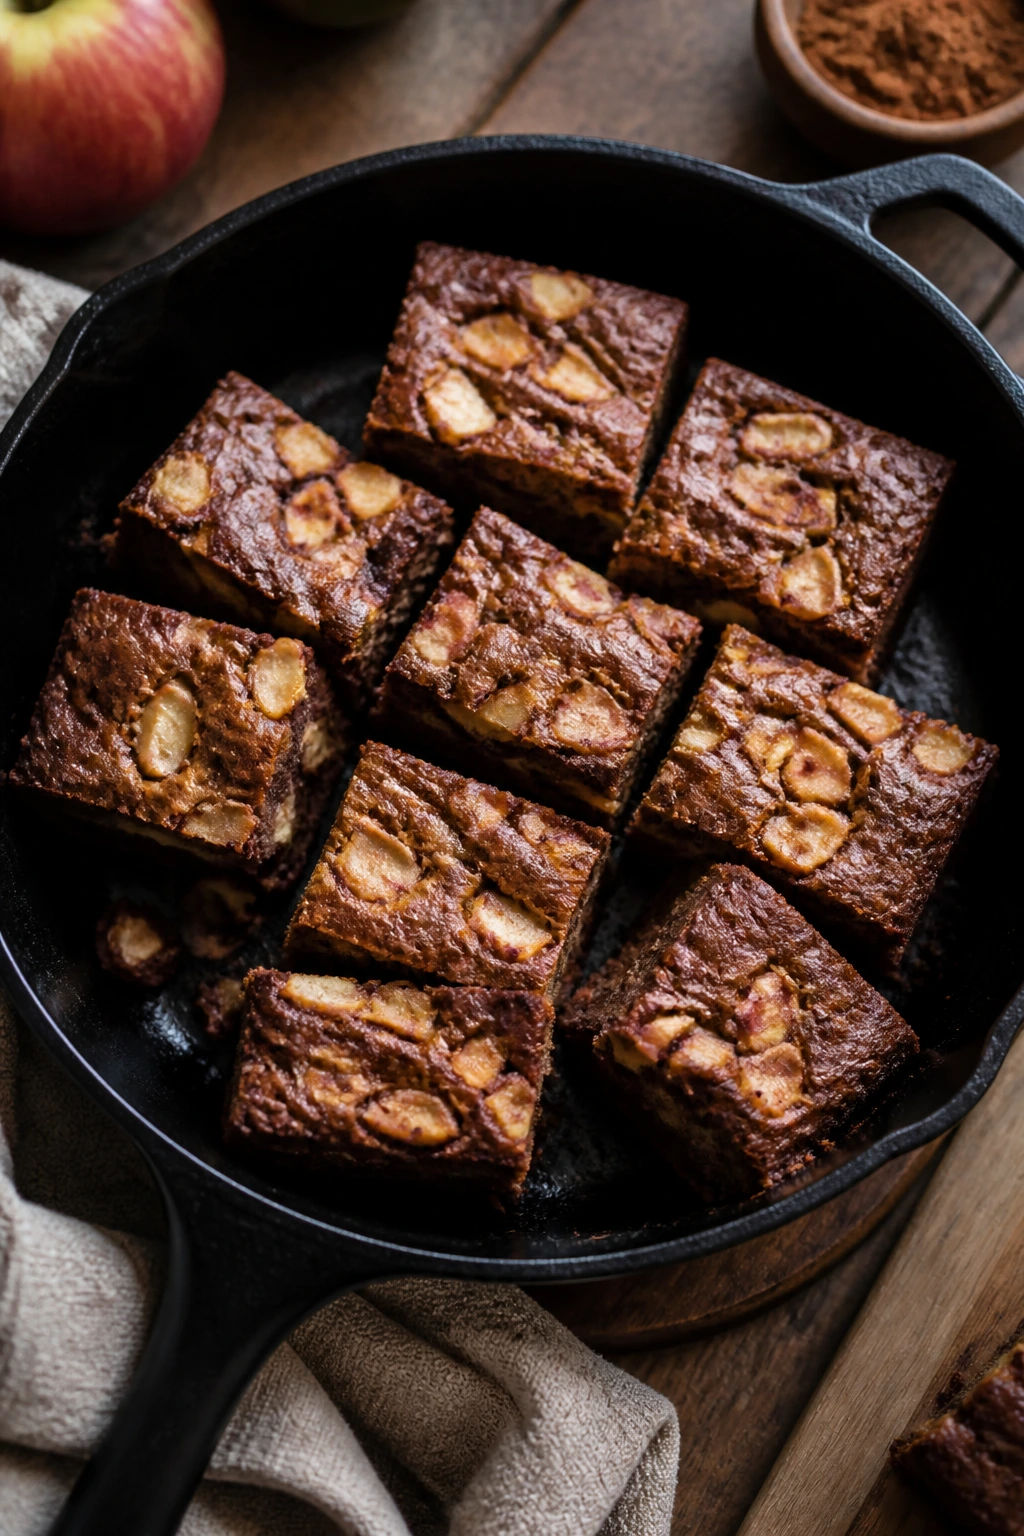
Apple brownies earn their place because they don’t ask for much and still give back a lot: a warm smell, a soft crumb, and a square dessert that can move from breakfast table to coffee break to after-dinner plate without changing clothes. That’s a useful recipe category, not a cute one.
If you start with one simple pan and learn how the apples behave, you can move through the rest of these variations almost by instinct. Brown butter next. Caramel after that. Then maybe the skillet version, because once you’ve had browned edges with soft fruit in the middle, it’s hard to go back.