
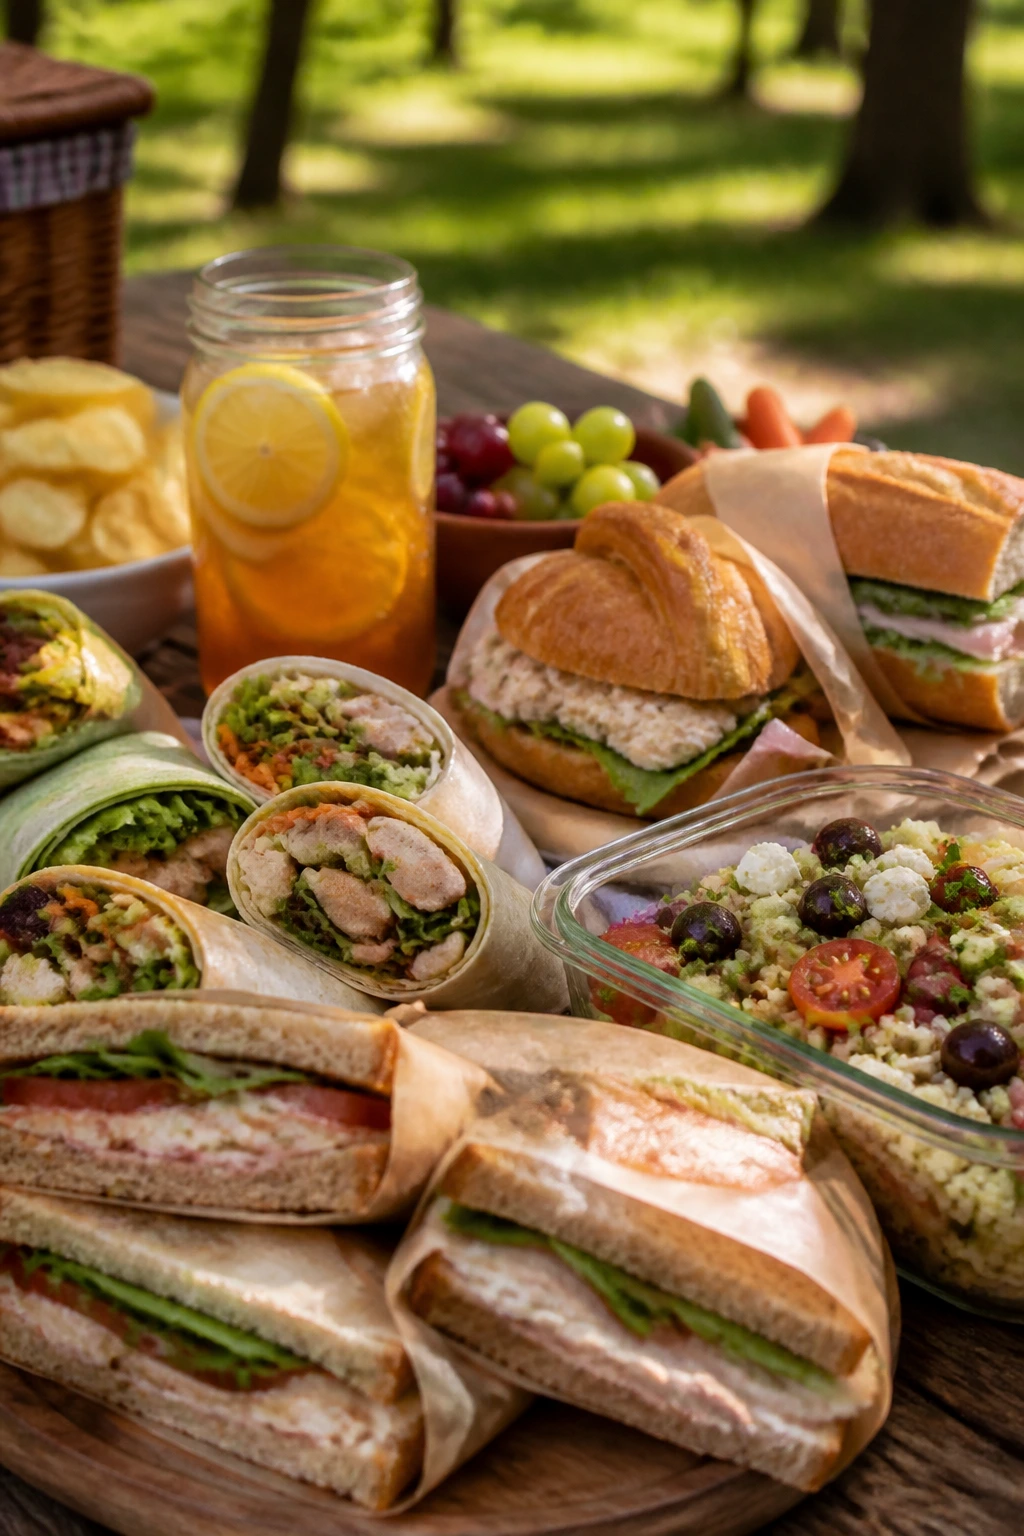
A picnic lunch only works if it survives the trip. Bread that turns damp in the bag, lettuce that wilts against warm chicken, a wrap that unrolls halfway through the park — those are the little failures that ruin an otherwise good basket. The best picnic lunch ideas solve that before you even leave the kitchen. They stay neat, taste sharp when cold, and pair cleanly with an iced drink instead of fighting it.
The trick is not fancy cooking. It’s choosing fillings with structure, sauces that don’t seep everywhere, and breads or crackers that can take a little travel. A chicken salad croissant hits differently from a soggy deli sandwich. A chickpea pita pocket behaves differently from a soft tortilla wrap. A pasta salad can sit in a cooler and still eat like lunch, which is exactly why it earns space in the basket.
This collection leans into that reality. You’ll find handheld sandwiches, wraps, salad-style lunches, savory bakes, and a few boxes you can pack without stress. Some are bright and acidic, some are creamy and rich, and some are salty enough to make a cold lemonade taste even colder. That’s the whole point.
Why These Picnic Lunches Travel Better Than a Hot Meal

- Built for the Cooler: These lunches hold texture after a few hours on ice, so you’re not gambling on a sad, limp sandwich.
- Easy to Portion: Most of them pack cleanly into halves, cups, triangles, or boxes, which makes serving at a blanket or picnic table much less clumsy.
- Cold-Drink Friendly: Tangy fillings, herbs, herbs, pickles, and salty cheeses all make iced tea, lemonade, or sparkling water taste more refreshing.
- Mix of Handheld and Fork-Ready: You get both styles here, which matters when some people want a sandwich and others want a container they can eat with one hand.
- Make-Ahead Friendly: Several of these taste better after a short chill, once the herbs settle in and the flavors stop shouting over one another.
- Flexible for Real Life: You can swap breads, change the protein, or make a vegetarian version without breaking the whole lunch.
1. Lemon-Herb Chicken Salad Croissant Sandwiches
Chicken salad behaves well at a picnic when it leans bright instead of heavy. The lemon, dill, and celery keep the filling crisp-tasting, and the croissant gives you a buttery bite that feels a little more polished than ordinary sandwich bread.
Why It Works:
This chicken salad stays tidy because the mayo is cut with Greek yogurt and lemon juice, so it tastes fresh even after an hour in a cooler. The celery adds a snap that holds up better than soft add-ins like chopped grapes, and the croissants are sturdy enough if you fill them just before packing. Keep the salad chilled for at least 15 minutes before assembly; it firms up and spreads more cleanly.
Key Ingredients: For the Chicken Salad:
- 3 cups shredded cooked chicken — rotisserie chicken works well here; cut it into short shreds so the filling doesn’t fall out.
- 1/3 cup mayonnaise — enough for creaminess without turning the salad loose.
- 2 tablespoons plain Greek yogurt — gives the filling a cooler, lighter tang.
- 1 tablespoon Dijon mustard — sharpens the flavor and keeps the salad from tasting flat.
- 1/4 cup finely diced celery — use the pale inner stalks for the best crunch.
- 2 tablespoons minced dill pickle — a little briney bite makes the chicken taste less heavy.
- 1 tablespoon chopped fresh dill — fresh dill matters here; dried dill tastes dusty.
- 1 tablespoon lemon juice — adds the clean, picnic-ready brightness.
- 1/2 teaspoon kosher salt — season the chicken salad so it doesn’t taste washed out.
- 1/4 teaspoon black pepper — enough to keep the filling lively.
For Assembly:
- 4 croissants, split — choose ones with a firm shell, not ultra-soft bakery croissants.
- 4 lettuce leaves — butter lettuce or romaine both work as a moisture barrier.
Quick Steps:
- In a medium bowl, mix the chicken, mayonnaise, Greek yogurt, Dijon, celery, pickle, dill, lemon juice, salt, and pepper until evenly coated.
- Taste and adjust the salt or lemon. Chill the salad for 15 to 20 minutes so the flavors settle.
- Split the croissants and line each one with a lettuce leaf.
- Spoon the chicken salad into the croissants, press the top on gently, then wrap each sandwich in parchment for the cooler.
Equipment for This Recipe:
- Medium mixing bowl
- Rubber spatula
- Sharp knife
- Parchment paper
How to Serve This Dish:
Serve these with kettle chips, sliced cucumbers, or a small container of grapes. A cold glass of iced black tea or lemonade works especially well because the citrus cuts through the mayo. Cut the croissants in half if you want easier sharing.
Pro Tips for This Recipe:
- Dry the chicken well if it came from the fridge with a little liquid on it; wet chicken makes the salad loose.
- Add the filling right before packing. Croissants absorb moisture faster than sandwich rolls.
- If you want a firmer lunch, tuck a lettuce leaf on both the top and bottom.
Variations on This Dish:
- Curry Chicken Picnic Version: Add 1 teaspoon curry powder and 2 tablespoons chopped raisins for a sweeter, warmer flavor.
- Avocado Swap: Replace half the mayonnaise with mashed avocado and add extra lemon to keep the color and flavor bright.
- Gluten-Free Option: Serve the chicken salad in lettuce cups or with seed crackers instead of croissants.
Common Mistakes to Avoid with This Dish:
- Don’t overdo the mayo. The filling should cling, not puddle.
- Don’t build these too early. Croissants get soft fast if they sit stuffed for hours.
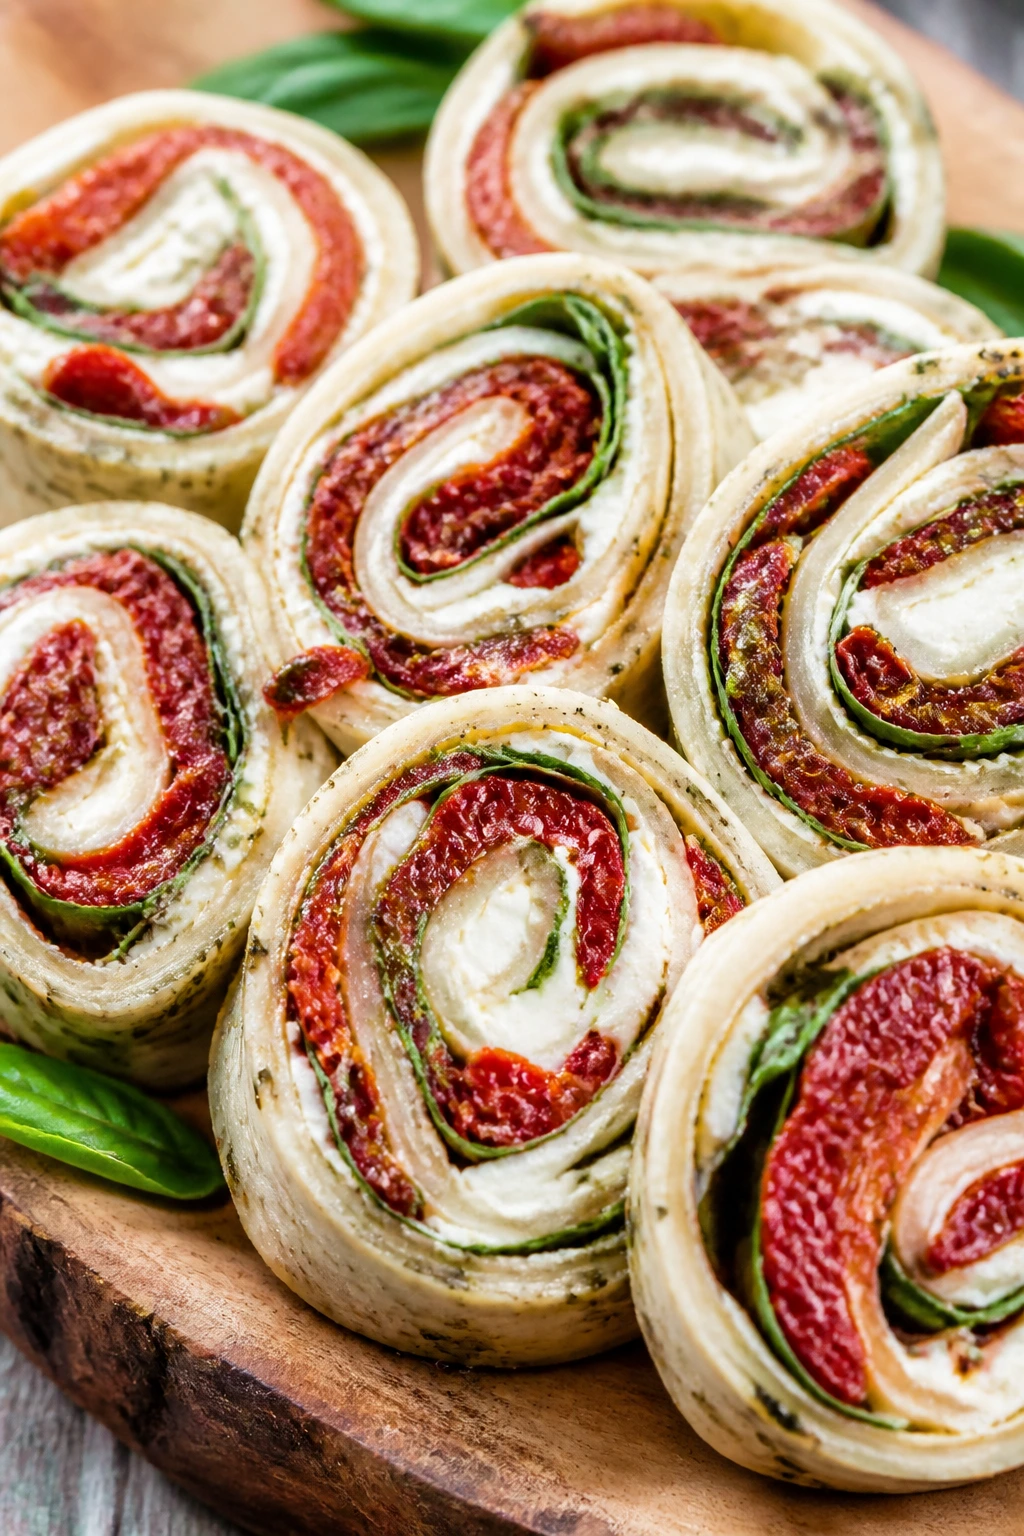
2. Tomato-Mozzarella Basil Pinwheels
These pinwheels look like something you’d keep reaching for without thinking. They taste like a cold Caprese salad wrapped in a tortilla, which is a very good use of a tortilla.
Why It Works:
Cream cheese gives you a stable base that doesn’t slide, and pesto brings garlic and basil in one swipe. The main trick is drying the tomatoes well; once you do that, the roll slices neatly instead of collapsing. Chill the rolled tortillas for 20 minutes before cutting, and you’ll get cleaner spirals.
Key Ingredients: For the Filling:
- 8 ounces cream cheese, softened — soft enough to spread without tearing the tortilla.
- 2 tablespoons pesto — use a thick pesto, not a watery jarred one.
- 1/4 teaspoon salt — only if your pesto is low-salt.
- 1/4 teaspoon black pepper — optional, but it wakes up the cheese.
For the Wraps:
- 4 large flour tortillas, 10-inch — choose soft tortillas without cracks.
- 8 ounces fresh mozzarella, finely chopped or shredded — mozzarella pearls also work if you chop them.
- 1 cup cherry tomatoes, halved and patted dry — the drying step matters.
- 1/4 cup basil leaves, thinly sliced — chiffonade the leaves so they spread evenly.
- 1 tablespoon balsamic glaze, optional — a light drizzle adds sweetness, but don’t drown the filling.
Quick Steps:
- Stir the cream cheese, pesto, salt, and pepper in a bowl until smooth.
- Lay out the tortillas and spread the filling almost to the edges, leaving a 1/2-inch border.
- Scatter the mozzarella, tomatoes, and basil over each tortilla, then drizzle lightly with balsamic glaze if you’re using it.
- Roll tightly, wrap in parchment, and chill for 20 minutes before slicing into 1-inch pinwheels.
Equipment for This Recipe:
- Mixing bowl
- Offset spatula or butter knife
- Sharp serrated knife
- Parchment paper
How to Serve This Dish:
Pile the pinwheels on a platter with a few extra basil leaves tucked around the edges. They’re good with sparkling water and lemon or a cold basil-infused lemonade if you want to lean into the herb flavor. Two or three pinwheels make a light lunch; more than that and they become the whole meal.
Pro Tips for This Recipe:
- Pat the tomatoes dry after cutting. One damp tomato can loosen the whole roll.
- Chill before slicing. Warm tortillas squash instead of spiraling.
- Use a very sharp knife and wipe it between cuts for the cleanest edges.
Variations on This Dish:
- Prosciutto Version: Add thin slices of prosciutto for a saltier, more filling lunch.
- Sun-Dried Tomato Swap: Replace the fresh tomatoes with chopped sun-dried tomatoes for a less watery roll.
- Gluten-Free Wrap: Use a large gluten-free tortilla that bends without cracking.
Common Mistakes to Avoid with This Dish:
- Don’t overfill the tortilla. If the fillings poke out before rolling, the slices will fall apart.
- Don’t skip the chill time. A firm roll slices far better.
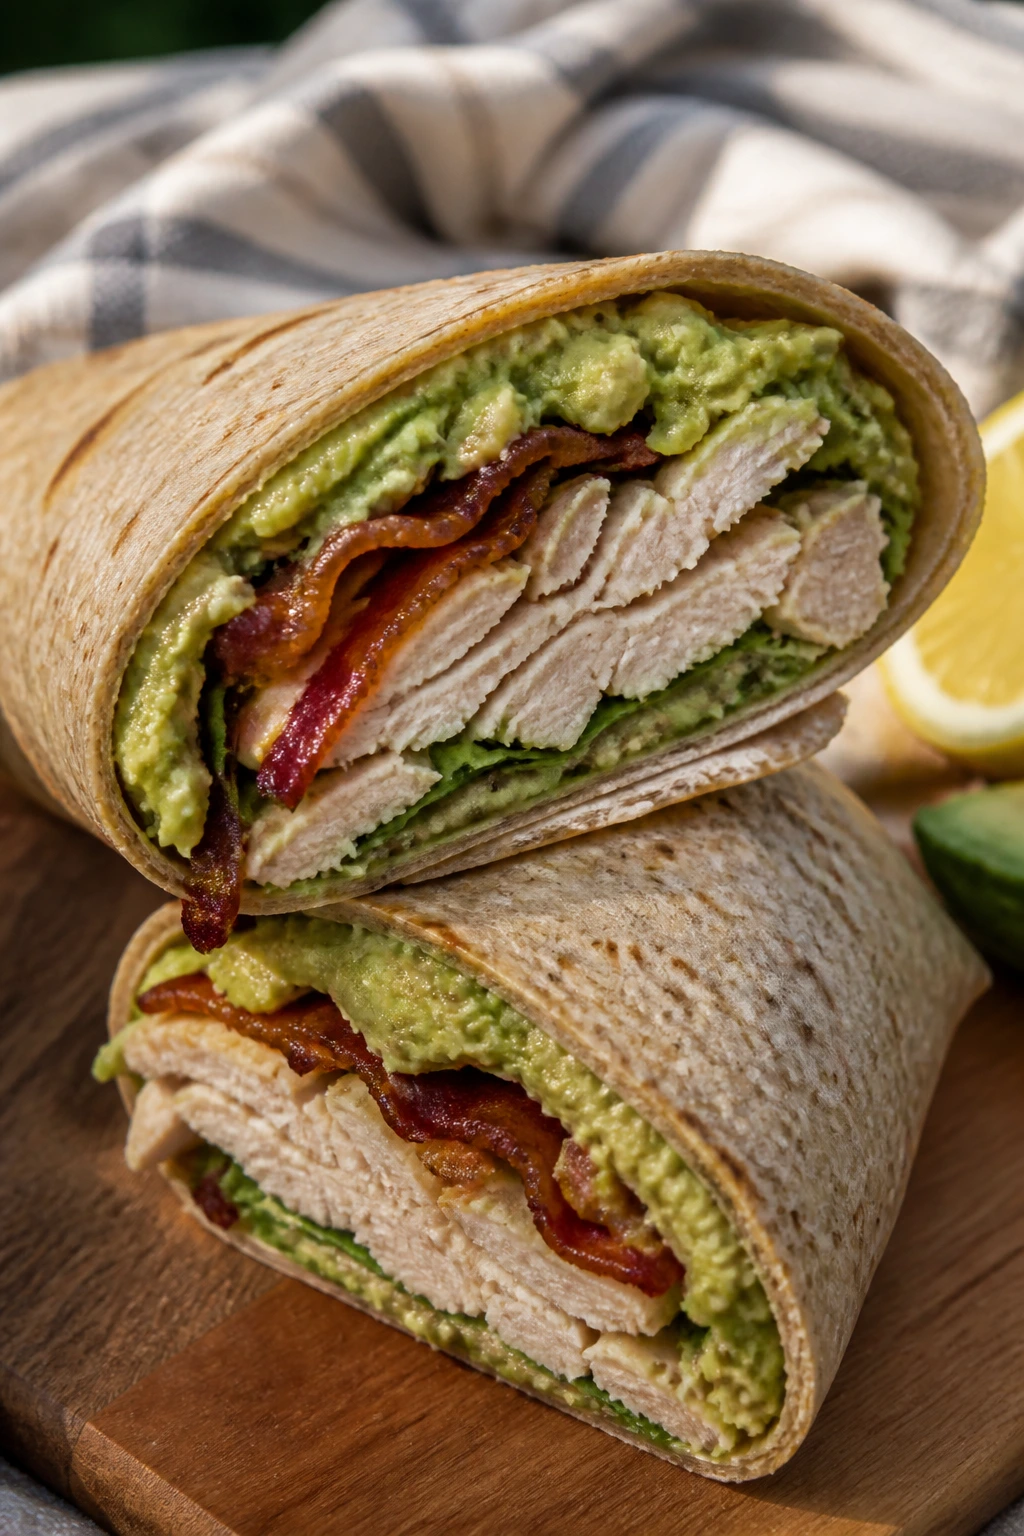
3. Turkey, Avocado, and Bacon Wraps
This is the wrap for people who want something sturdy, salty, and still easy to eat with one hand. The avocado softens the turkey, the bacon gives you crunch, and the lemon keeps the avocado from turning dull in the lunch bag.
Why It Works:
The best part of this wrap is balance. Turkey alone can be dry, but mashed avocado and a thin swipe of mustard-mayo give it a smoother bite without turning it heavy. Keep the tomato slices thin and the lettuce dry, and the wrap stays together longer than you’d expect.
Key Ingredients: For the Spread:
- 1 ripe avocado — choose one that gives slightly when pressed.
- 2 tablespoons mayonnaise — adds body.
- 1 teaspoon Dijon mustard — sharpens the spread.
- 1 teaspoon lemon juice — keeps the avocado from browning.
- 1/4 teaspoon salt — enough to bring the avocado to life.
For the Wraps:
- 4 large flour tortillas
- 8 ounces sliced turkey — thicker deli slices are easier to layer.
- 6 slices bacon, cooked and crumbled — let it cool before crumbling.
- 1 cup shredded romaine lettuce — dry it well so the tortilla doesn’t slip.
- 1 medium tomato, sliced very thin
- 1/4 teaspoon black pepper
Quick Steps:
- Mash the avocado with mayonnaise, Dijon, lemon juice, salt, and pepper until mostly smooth.
- Spread the mixture across each tortilla, leaving the edge clean.
- Layer turkey, lettuce, tomato, and bacon down the center of each wrap.
- Fold in the sides, roll tightly, and wrap in foil or parchment for transport.
Equipment for This Recipe:
- Small bowl
- Fork or spoon for mashing
- Cutting board
- Foil or parchment
How to Serve This Dish:
These wraps go well with potato chips, pickles, or a handful of cherry tomatoes. Cold ginger ale, iced tea, or a crisp lime seltzer all work. If you’re packing for a long afternoon, slice the wrap after chilling so the filling firms up.
Pro Tips for This Recipe:
- Blot the tomato slices with paper towel before wrapping.
- Roll the tortilla tight enough that it holds, but not so tight that the avocado squeezes out.
- If the avocado is a little under-ripe, mash in an extra spoonful of mayo to smooth it out.
Variations on This Dish:
- Club Sandwich Style: Add a slice of cheddar and a little more bacon for a more filling wrap.
- Spicy Mayo Version: Stir 1 teaspoon hot sauce into the spread.
- Lettuce-Wrap Alternative: Use large romaine leaves for a lighter, lower-carb lunch.
Common Mistakes to Avoid with This Dish:
- Don’t use wet lettuce. A soggy wrap starts slipping almost immediately.
- Don’t add too much tomato. The juice leaks into the tortilla faster than people expect.
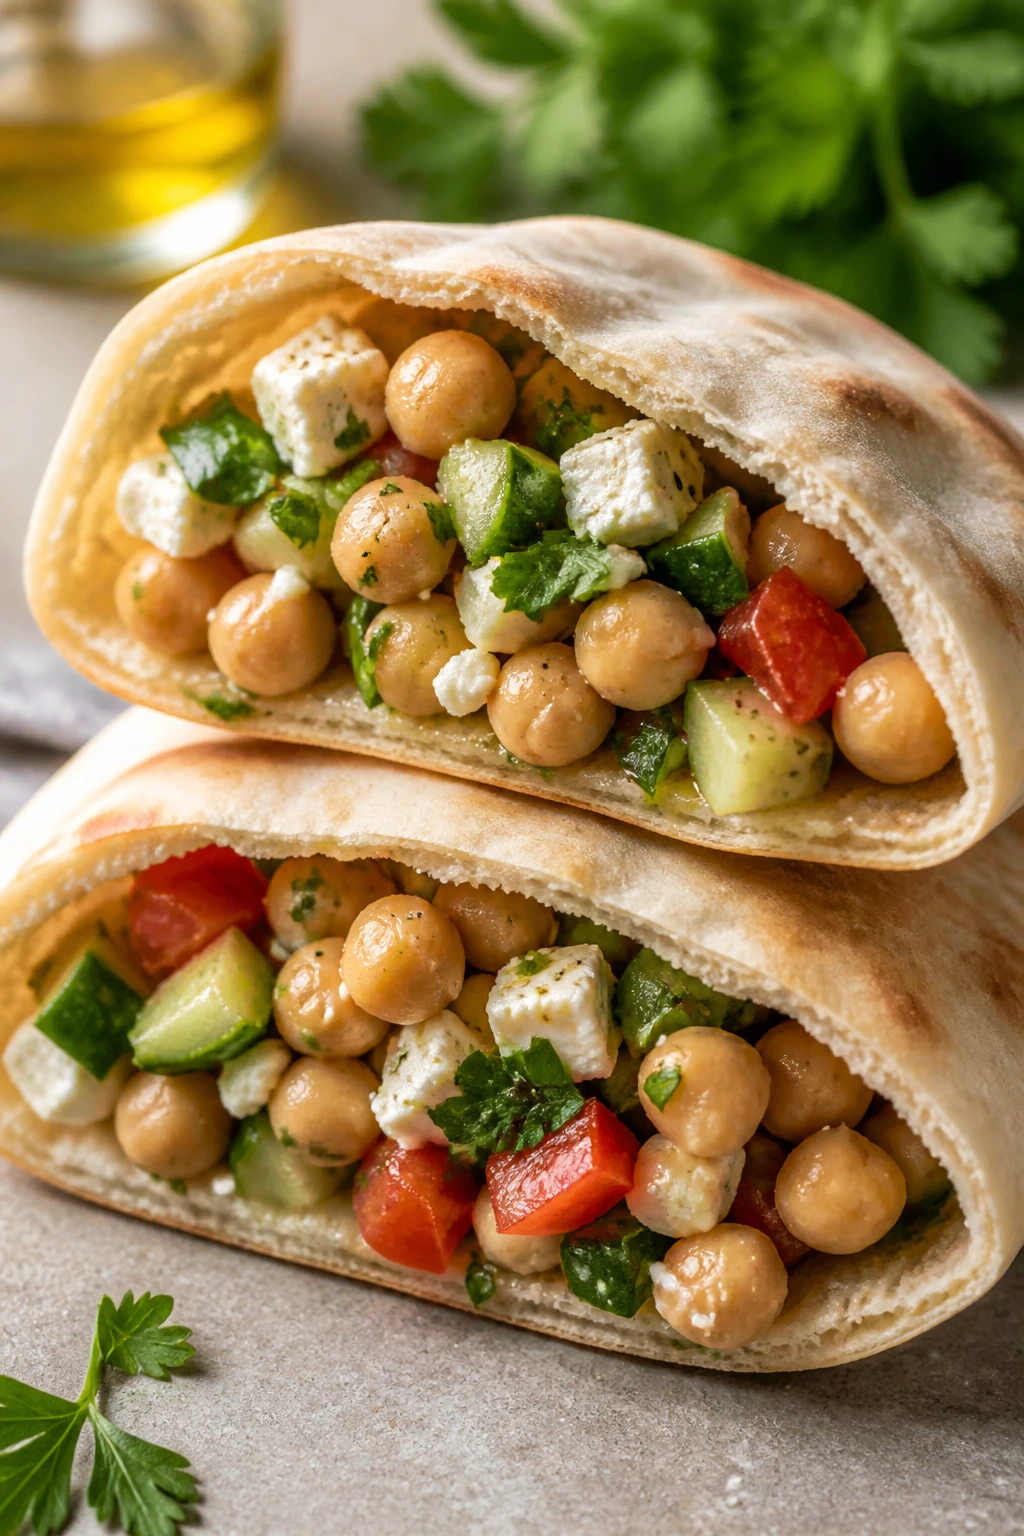
4. Mediterranean Chickpea Pita Pockets
This is the lunch I reach for when I want something cold, salty, and full of bite. Chickpeas soak up lemon and olive oil well, and the pita gives you a pocket that holds together better than a loose salad in a container.
Why It Works:
Chickpeas are sturdy enough to sit in dressing without turning mushy, which makes them a picnic gift. Cucumber, tomato, and red onion bring crunch and acid, while feta adds salty edges that keep the whole thing from tasting soft. If you pack the hummus separately and fill the pitas right before eating, they stay much cleaner.
Key Ingredients: For the Chickpea Salad:
- 2 cups canned chickpeas, drained and rinsed
- 1 cup diced cucumber — seedless cucumber makes the least mess.
- 1 cup diced tomato, seeded if possible
- 1/4 cup finely minced red onion
- 1/3 cup crumbled feta
- 2 tablespoons chopped parsley
- 2 tablespoons olive oil
- 1 tablespoon lemon juice
- 1 teaspoon dried oregano
- 1/2 teaspoon kosher salt
- 1/4 teaspoon black pepper
For Assembly:
- 4 pita pockets
- 1/2 cup hummus
Quick Steps:
- Toss the chickpeas, cucumber, tomato, onion, feta, parsley, olive oil, lemon juice, oregano, salt, and pepper in a bowl.
- Let the salad rest for 10 minutes so the chickpeas soak up some flavor.
- Split each pita pocket and spread 2 tablespoons of hummus inside.
- Spoon in the chickpea mixture and pack the pitas snugly without crushing them.
Equipment for This Recipe:
- Large mixing bowl
- Spoon
- Sharp knife
- Plastic bag or container for the pitas
How to Serve This Dish:
Serve the pitas with olives, carrot sticks, or a few crackers on the side. Mint lemonade or sparkling water with cucumber suits the herbs and lemon well. If you want a heavier lunch, add a piece of fruit or a handful of roasted nuts.
Pro Tips for This Recipe:
- Seed the tomatoes if they’re especially juicy.
- Warm the pita for a few seconds only if you’re eating at home; for a picnic, cool pita is easier to pack.
- Use a thick hummus so it acts like glue inside the pocket.
Variations on This Dish:
- Chicken Upgrade: Add 1 cup chopped grilled chicken for a more protein-heavy lunch.
- Vegan Version: Skip the feta and add 2 tablespoons chopped olives for more salt.
- Herby Version: Add mint and dill for a sharper, greener flavor.
Common Mistakes to Avoid with This Dish:
- Don’t over-dress the chickpeas. Too much liquid turns the filling into a puddle.
- Don’t use cracked pita. Once the pocket splits, the salad falls out fast.
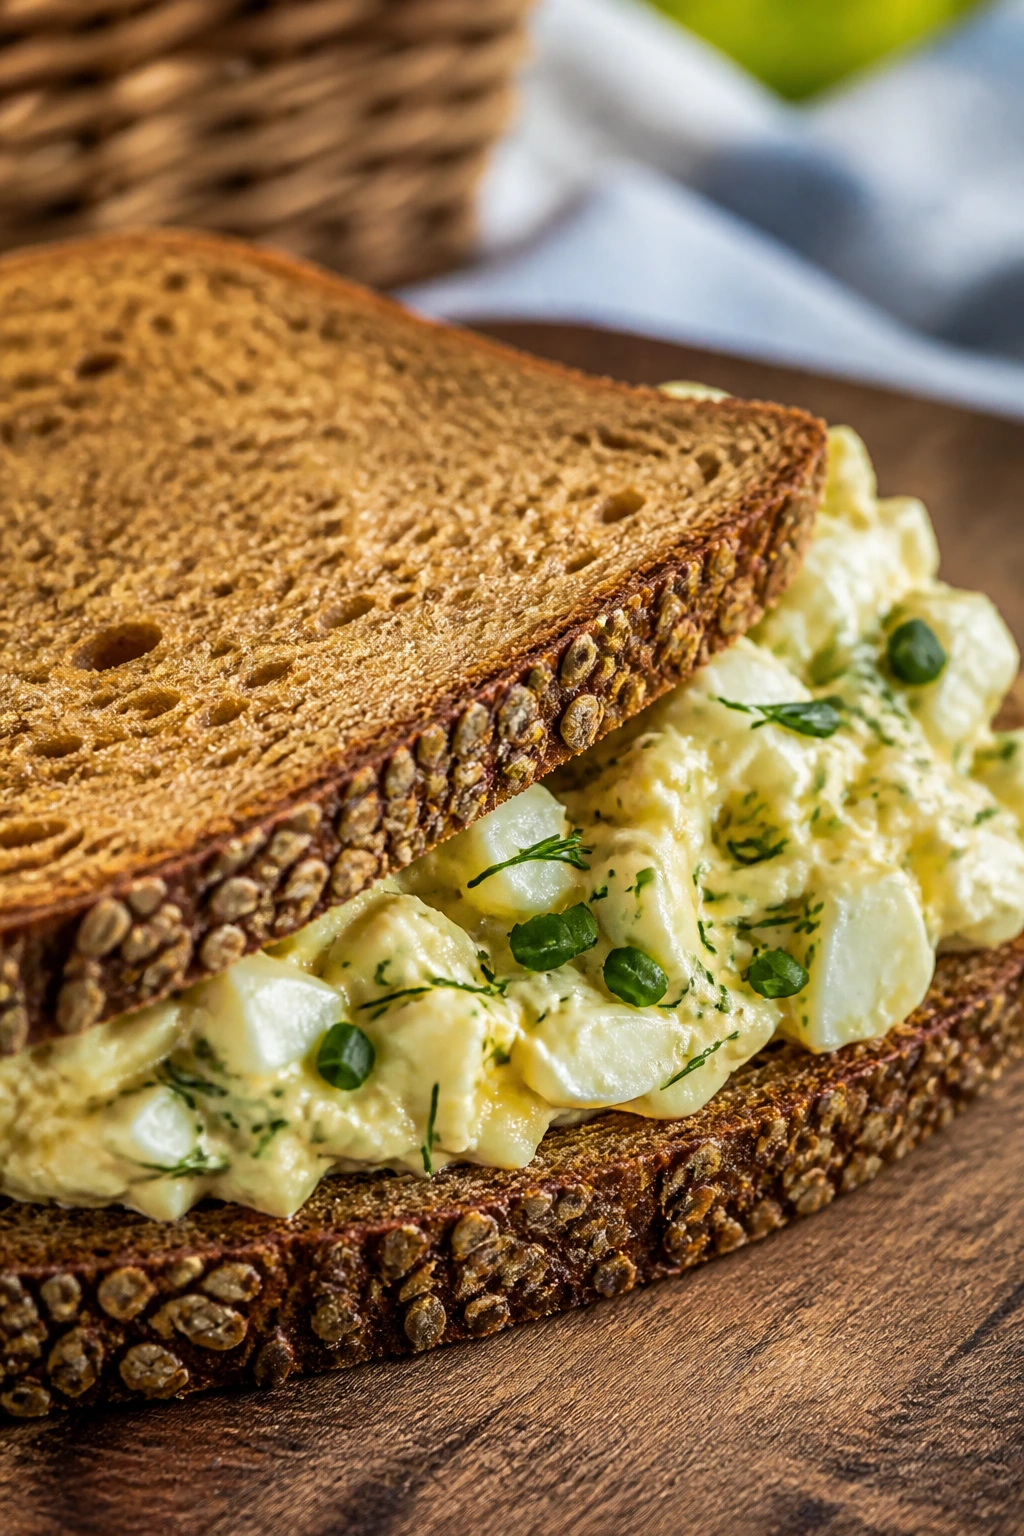
5. Dill Egg Salad on Rye
Egg salad can be excellent at a picnic if it stays cold and is seasoned enough. Dill pickle, chives, and rye bread keep this version from tasting like the bland cafeteria version people expect.
Why It Works:
Egg salad needs enough acid and salt to feel bright after chilling, and this one gets both from Dijon, pickle, and dill. Rye bread handles the filling better than soft white bread because it has more structure and a little chew. Boil the eggs properly and cool them fast; rubbery yolks are the easiest way to ruin the whole sandwich.
Key Ingredients: For the Egg Salad:
- 6 large eggs
- 1/4 cup mayonnaise
- 1 tablespoon Dijon mustard
- 2 tablespoons finely chopped dill pickle
- 1 tablespoon chopped celery
- 1 tablespoon chopped chives
- 1 tablespoon chopped fresh dill
- 1/2 teaspoon kosher salt
- 1/4 teaspoon black pepper
For Assembly:
- 8 slices rye bread
- 4 lettuce leaves, optional
Quick Steps:
- Place the eggs in a saucepan, cover with water, bring to a boil, then cook for 10 to 11 minutes.
- Transfer the eggs to ice water for 5 minutes, peel, and chop them into small pieces.
- Stir the eggs with mayonnaise, Dijon, pickle, celery, chives, dill, salt, and pepper.
- Chill for 15 minutes, then pile onto rye bread and add lettuce if you want extra crunch.
Equipment for This Recipe:
- Saucepan
- Slotted spoon
- Mixing bowl
- Sharp knife
How to Serve This Dish:
Cut the sandwiches into halves or fingers and serve with dill pickles, potato chips, or sliced radishes. I like iced tea with this one because the tannin cuts the richness. If the rye is very dense, toast it lightly at home and let it cool before assembling.
Pro Tips for This Recipe:
- Peel the eggs while they’re still a little warm; shells come off more cleanly.
- Chop the eggs small for a neater sandwich.
- Pack the egg salad in a separate container if you won’t assemble until later.
Variations on This Dish:
- Avocado Egg Salad: Replace half the mayo with mashed avocado.
- Smoked Paprika Version: Add 1/2 teaspoon smoked paprika for a deeper flavor.
- Open-Faced Rye: Serve it on one slice of rye with cucumber on top if you want a lighter lunch.
Common Mistakes to Avoid with This Dish:
- Don’t overcook the eggs. Gray, chalky yolks make the salad taste flat.
- Don’t leave egg salad warm in the sun. It needs the cooler, not the back seat.
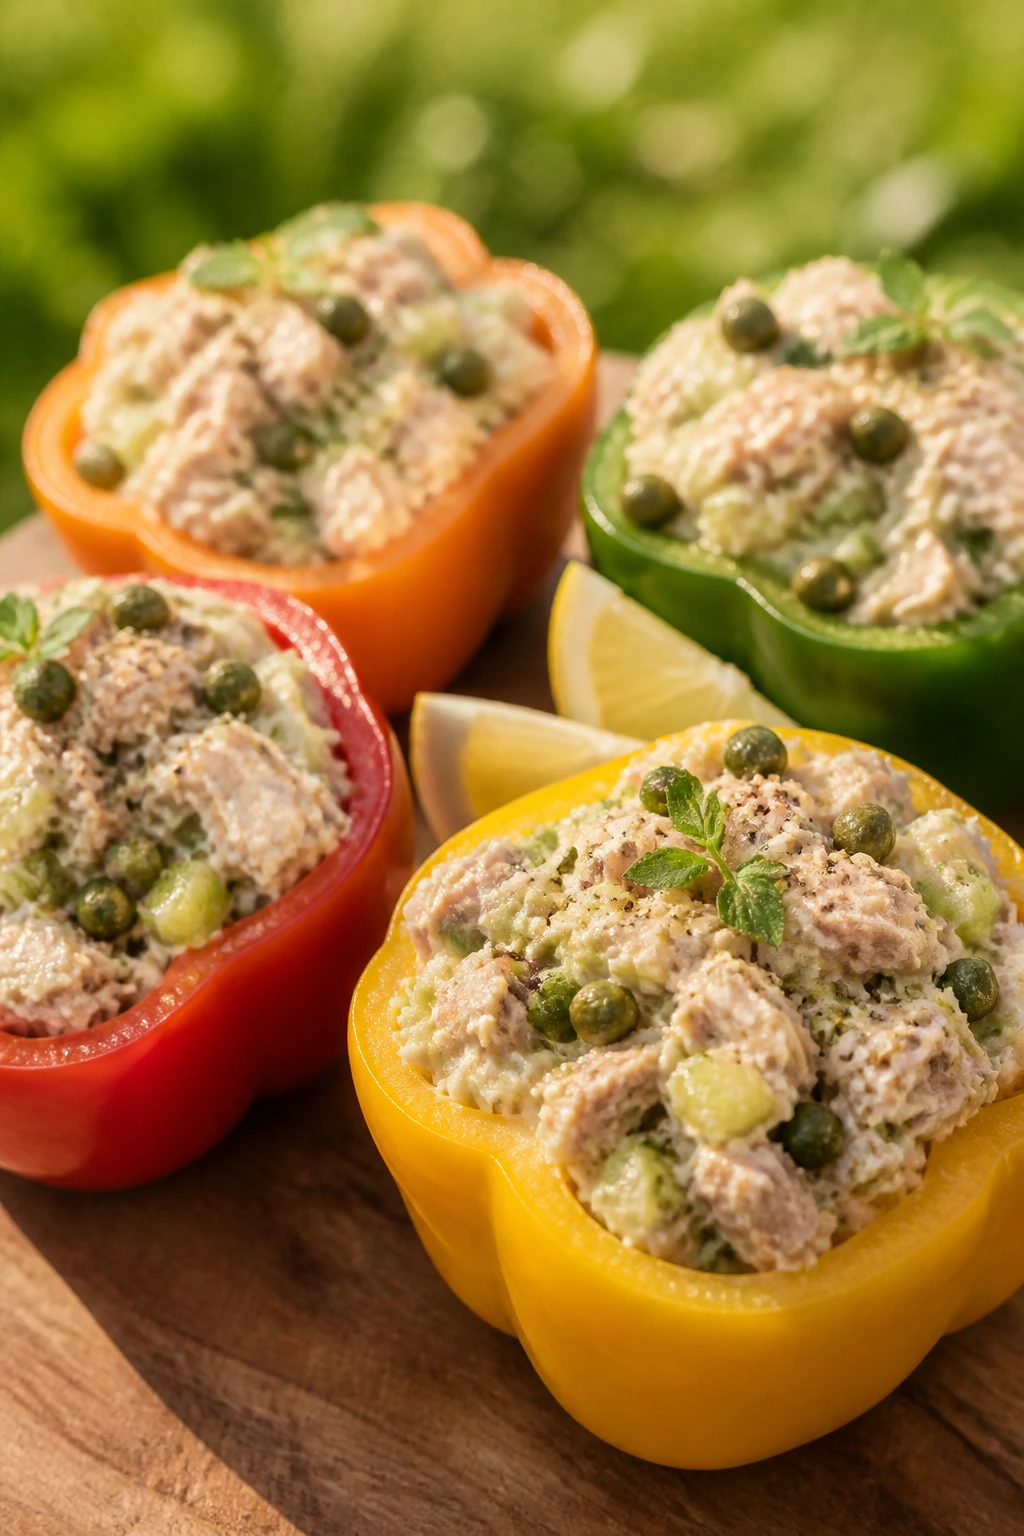
6. Tuna Salad Stuffed Bell Peppers
This is one of those picnic lunches that feels smarter than it is. Bell peppers act like edible containers, which means you get crunch, color, and less bread to worry about.
Why It Works:
The pepper halves keep the tuna salad contained, and the flavor stays clean because the filling is bright with lemon, celery, and capers. It’s a good choice when you want something cold and protein-heavy without making a sandwich that can smear everywhere. Use tuna packed in water or olive oil, but drain it well either way.
Key Ingredients: For the Tuna Salad:
- 2 cans tuna, 5 ounces each, drained
- 1/4 cup mayonnaise
- 1 tablespoon lemon juice
- 1 tablespoon finely chopped celery
- 1 tablespoon capers, chopped
- 1 tablespoon minced red onion
- 1 tablespoon chopped dill
- 1/4 teaspoon black pepper
- Pinch of kosher salt, if needed
For Serving:
- 4 bell peppers, halved and seeded
- Crackers, for the side
Quick Steps:
- Mix the tuna, mayonnaise, lemon juice, celery, capers, red onion, dill, and pepper in a bowl.
- Taste and add a small pinch of salt only if the tuna needs it.
- Dry the bell pepper halves with paper towel and spoon the tuna mixture into them.
- Pack the peppers in a container with crackers stored separately so they stay crisp.
Equipment for This Recipe:
- Medium bowl
- Fork
- Knife and cutting board
- Leakproof container
How to Serve This Dish:
Serve the stuffed peppers with crackers, olives, or a few cucumber spears. Sparkling water with lemon is a clean match, though iced green tea also works. Mini peppers make a nice bite-size version if you want less knife work at the picnic table.
Pro Tips for This Recipe:
- Dry the inside of the peppers before filling them.
- Use chopped capers sparingly; they’re strong.
- Chill the tuna salad before filling the peppers for better texture.
Variations on This Dish:
- Chickpea “Tuna” Version: Mash chickpeas with the same seasonings for a vegetarian lunch.
- Corn and Tuna Mix: Add 1/2 cup thawed corn for a sweeter bite.
- Mini Pepper Cups: Use small sweet peppers and pack two or three per person.
Common Mistakes to Avoid with This Dish:
- Don’t leave the tuna wet. Extra liquid makes the filling slide around.
- Don’t pack crackers inside the same container unless you want them soft.
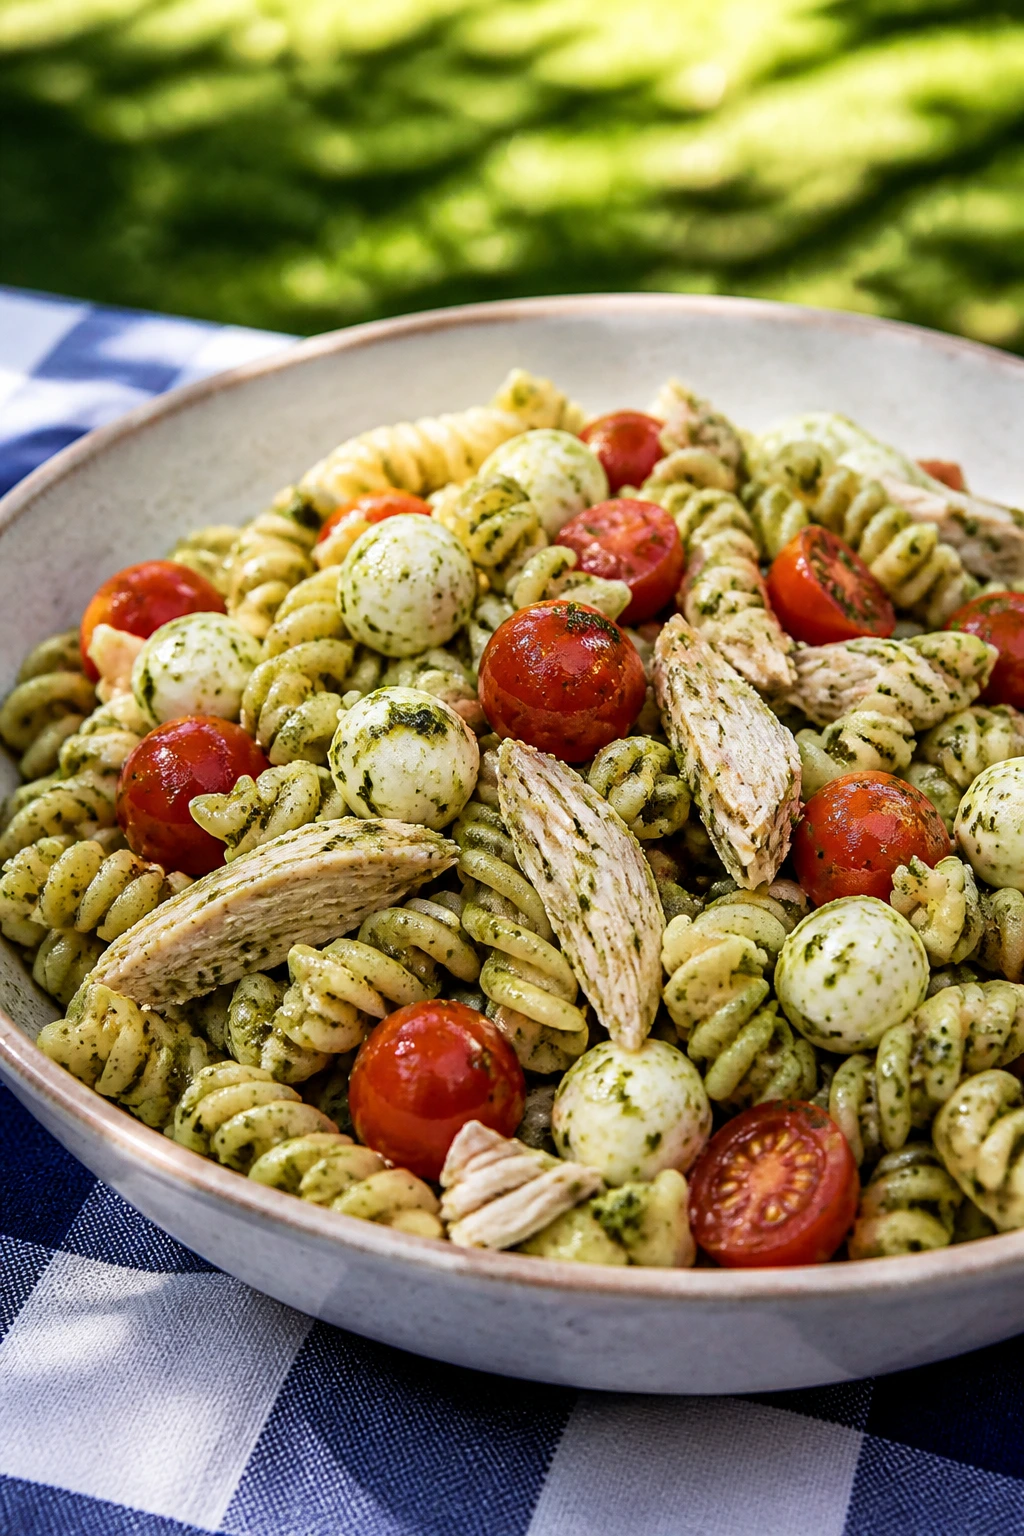
7. Pesto Chicken Pasta Salad
Pasta salad earns its place at a picnic when it tastes good cold, not just lukewarm and hopeful. Pesto, chicken, and mozzarella give this one enough weight to count as lunch, not a side dish pretending to be lunch.
Why It Works:
Short pasta holds the pesto in every curve, which means you get flavor in each bite instead of a slick coating that slides off. The chicken adds staying power, and the baby spinach wilts just enough from the residual heat to soften without going limp. Let the pasta cool completely before tossing in the greens; that’s the difference between a fresh salad and a sad one.
Key Ingredients: For the Salad:
- 8 ounces short pasta, such as rotini or farfalle
- 2 cups shredded cooked chicken
- 1/2 cup basil pesto
- 1 cup cherry tomatoes, halved
- 1 cup mozzarella pearls
- 2 cups baby spinach
- 1 tablespoon lemon juice
- 1 to 2 tablespoons olive oil, only if the pesto is very thick
- 1/2 teaspoon kosher salt
- 1/4 teaspoon black pepper
Quick Steps:
- Cook the pasta in salted water until al dente, then drain and rinse under cold water.
- Toss the cooled pasta with pesto, lemon juice, olive oil if needed, salt, and pepper.
- Fold in the chicken, tomatoes, mozzarella, and spinach.
- Chill for at least 20 minutes before packing so the flavors settle and the salad firms up.
Equipment for This Recipe:
- Medium pot
- Colander
- Large bowl
- Spoon or spatula
How to Serve This Dish:
Pack it in a wide container so the pasta doesn’t get smashed. A cold lemonade or sparkling water with a squeeze of lime cuts the richness of the pesto well. If you want a fuller picnic plate, add peach slices or a handful of crackers on the side.
Pro Tips for This Recipe:
- Rinse the pasta cold or the pesto will turn greasy.
- Salt the pasta water well; cold pasta needs seasoning inside, not just on top.
- Add the spinach after the pasta cools so it stays bright.
Variations on This Dish:
- Dairy-Free Pesto Pasta: Use a dairy-free pesto and skip the mozzarella.
- Roasted Pepper Version: Add chopped roasted red peppers for more sweetness.
- Cold Lunch Bowl: Serve it in a bowl with cucumber slices instead of packing it as a true salad.
Common Mistakes to Avoid with This Dish:
- Don’t dress hot pasta. It can soak up the pesto unevenly and turn oily.
- Don’t pack it warm in a sealed container. Condensation makes the whole thing soggy.
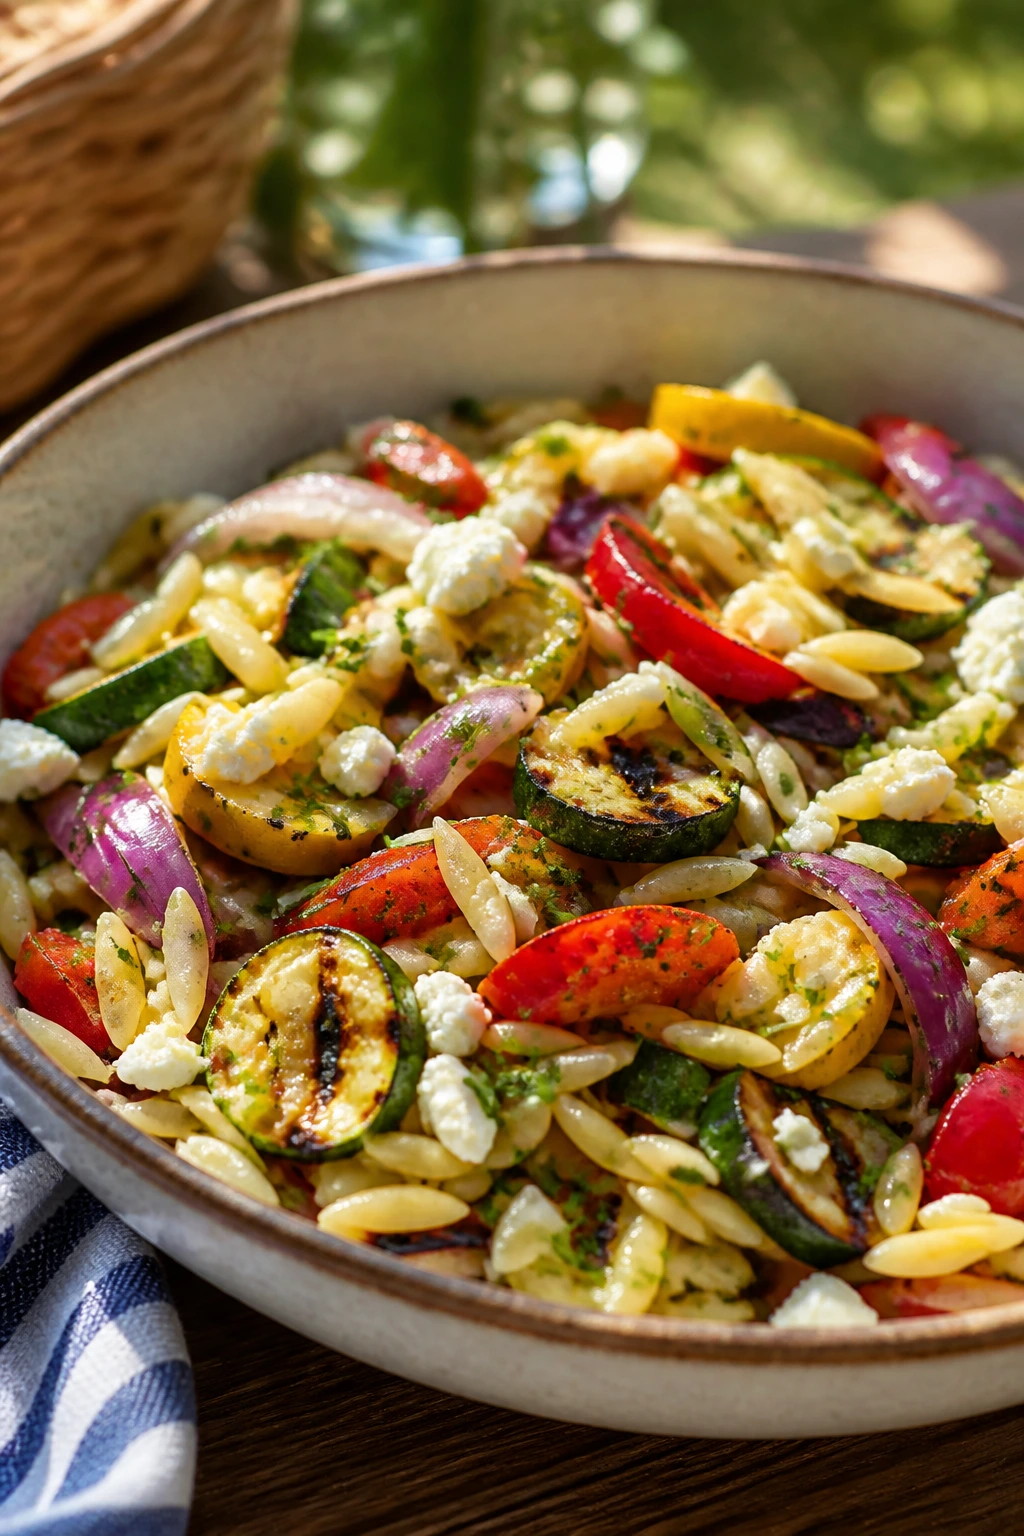
8. Grilled Vegetable Orzo Salad
This salad tastes like summer cookout leftovers, which is a compliment when the vegetables are actually cooked well. Grilled zucchini, peppers, and red onion give the orzo a smoky edge that still feels light enough for a blanket lunch.
Why It Works:
Orzo acts like a tiny sponge for the lemon vinaigrette, while the grilled vegetables keep the salad from feeling soft or one-note. Feta adds salt, parsley adds lift, and the whole bowl holds up better than a leafier salad on a hot day. If you’re packing this for later, let it chill fully so the flavors get sharper.
Key Ingredients: For the Salad:
- 1 1/2 cups dry orzo
- 1 zucchini, sliced lengthwise
- 1 yellow squash, sliced lengthwise
- 1 red bell pepper, cut into wide strips
- 1 small red onion, cut into wedges
- 2 tablespoons olive oil
- 1/3 cup crumbled feta
- 2 tablespoons chopped parsley
- 1 tablespoon lemon juice
- 1 tablespoon red wine vinegar
- 1/2 teaspoon kosher salt
- 1/4 teaspoon black pepper
Quick Steps:
- Toss the zucchini, squash, pepper, and onion with olive oil, then grill or sear them until lightly charred and tender, about 3 to 4 minutes per side.
- Cook the orzo in salted water until just tender, then drain and cool.
- Chop the vegetables into bite-size pieces and toss them with the orzo, feta, parsley, lemon juice, vinegar, salt, and pepper.
- Chill for 20 minutes before packing.
Equipment for This Recipe:
- Grill pan or outdoor grill
- Pot
- Colander
- Large mixing bowl
How to Serve This Dish:
This is good in a lidded bowl with extra parsley scattered on top. It pairs well with sparkling water and lime or a dry iced tea. Add a piece of grilled chicken on the side if you want to stretch the lunch into something larger.
Pro Tips for This Recipe:
- Grill the vegetables in wide strips so they don’t disappear into the pasta.
- Salt the orzo water well; the salad needs seasoning in both the pasta and the dressing.
- Chill before serving so the feta doesn’t melt into the grains.
Variations on This Dish:
- Chickpea Addition: Add 1 cup chickpeas for more protein and a heartier bowl.
- Farro Swap: Use farro if you want a chewier base.
- Vegan Version: Skip the feta and add chopped olives for salt.
Common Mistakes to Avoid with This Dish:
- Don’t overcook the orzo. Mushy orzo turns the salad gluey.
- Don’t cut the vegetables too small or they’ll disappear into the grains.
9. Ham and Cheddar Biscuit Sliders
These are the picnic sandwiches for people who want something a little richer than deli bread. Ham and cheddar inside a tender biscuit is a strong move, especially if you brush the tops with a little mustard butter before packing.
Why It Works:
Biscuit sliders hold their shape better than soft rolls once they cool, and the salty ham keeps the cheese from tasting one-dimensional. A quick brush of butter, Dijon, and poppy seeds adds flavor without making the top soggy. Bake them, cool them, and wrap them well; they travel better than most hot sandwiches.
Key Ingredients: For the Sliders:
- 8 small biscuits, homemade or refrigerated
- 8 ounces sliced ham
- 6 ounces sharp cheddar, sliced or shredded
- 2 tablespoons Dijon mustard
- 2 tablespoons melted butter
- 1 teaspoon poppy seeds
- 1 teaspoon honey
Quick Steps:
- Bake the biscuits according to package or recipe directions until golden, about 12 to 15 minutes for refrigerated dough.
- Split the biscuits and layer ham and cheddar between the halves.
- Stir the Dijon, melted butter, honey, and poppy seeds together, then brush the tops lightly.
- Return the assembled sliders to a warm oven for 4 to 5 minutes, just until the cheese softens, then cool before packing.
Equipment for This Recipe:
- Baking sheet
- Pastry brush
- Sharp knife
- Foil or container
How to Serve This Dish:
Serve them with potato salad, pickles, or crunchy slaw. Sweet iced tea is a natural match, though sparkling water with lemon works if you want to keep the plate less heavy. They’re good warm, but they also hold up at room temperature for a picnic lunch.
Pro Tips for This Recipe:
- Let the sliders cool before wrapping or steam will soften the biscuits.
- Use sharp cheddar; mild cheese gets lost next to the ham.
- Slice the ham thinly so the sliders close cleanly.
Variations on This Dish:
- Turkey and Swiss Version: Swap the ham for turkey and use Swiss cheese.
- Spicy Mustard Slider: Add 1 teaspoon whole-grain mustard to the butter mix.
- Herbed Biscuit Twist: Add chopped chives to the biscuit dough if you’re baking from scratch.
Common Mistakes to Avoid with This Dish:
- Don’t pack them while hot. Steam softens the biscuit bottoms.
- Don’t overload the filling or the sandwich layers will slide apart.
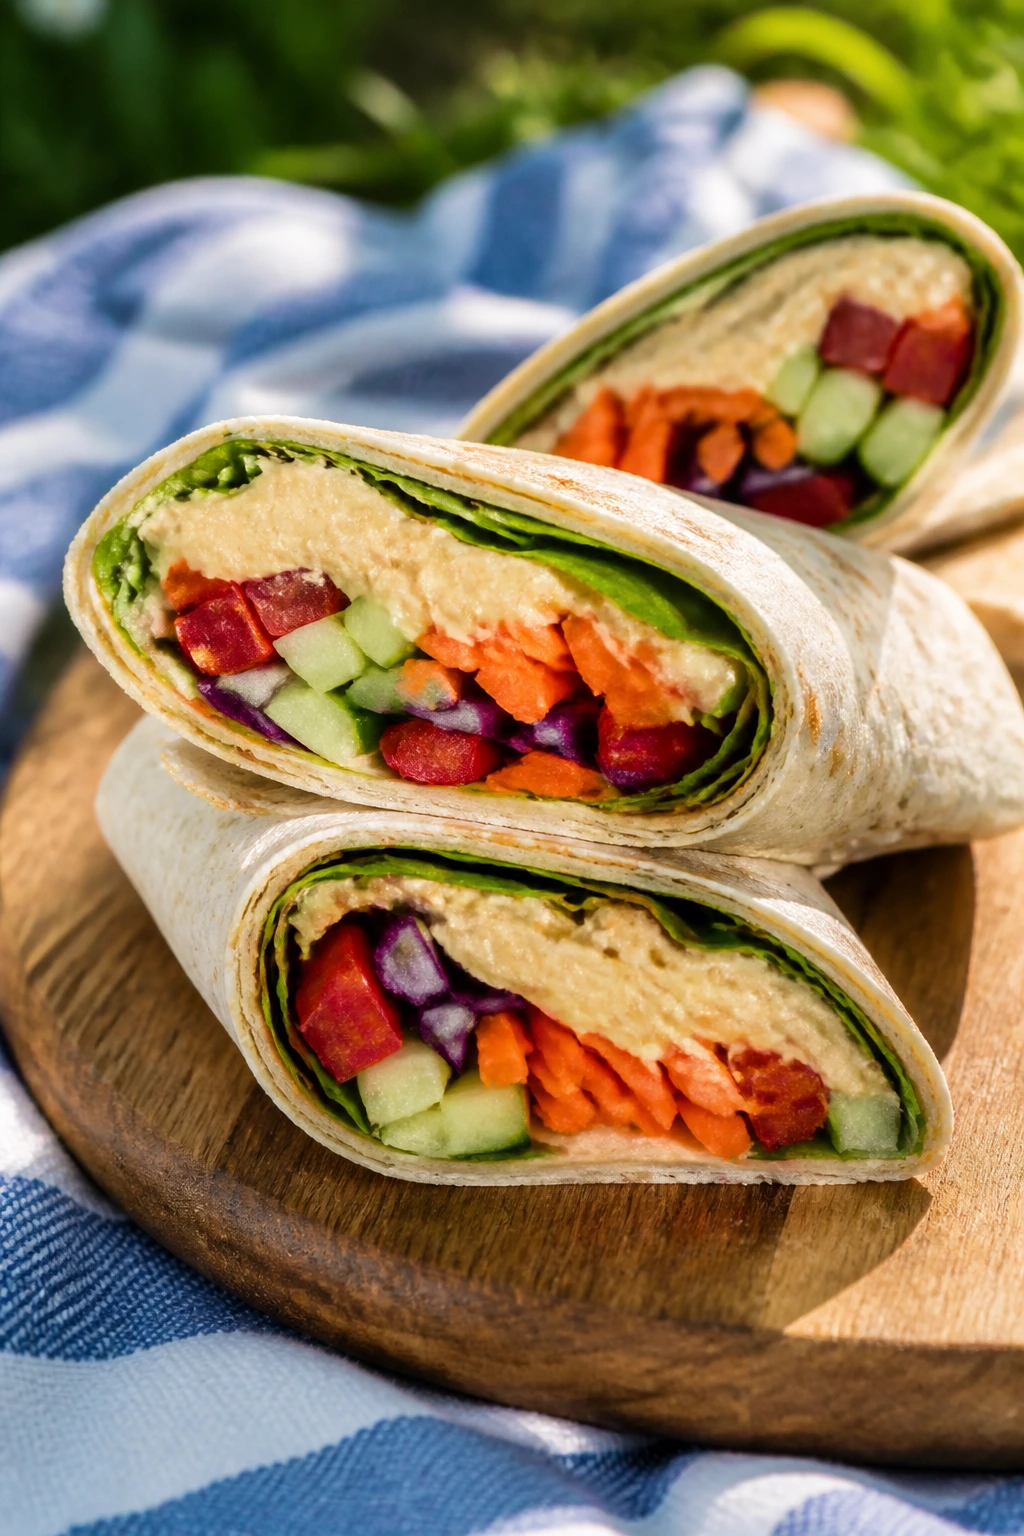
10. Hummus and Crunchy Veggie Wraps
This is the clean, crunchy lunch that saves the day when you want something quick and cold. Hummus works as both spread and glue, and the vegetables bring the kind of bite that doesn’t disappear after a short ride in the cooler.
Why It Works:
A thick layer of hummus seals the tortilla and keeps the vegetables from poking through. Carrots, cucumber, and bell pepper stay crisp longer than tomatoes or soft greens, which makes this wrap a much better picnic choice than a delicate salad wrap. If you use dry vegetables and roll tightly, the wrap slices neatly and doesn’t spit filling everywhere.
Key Ingredients: For the Wraps:
- 4 large tortillas
- 1 cup hummus
- 1 cup shredded carrots
- 1 cup cucumber sticks, patted dry
- 1 bell pepper, julienned
- 2 cups baby spinach
- 1/2 cup sprouts
- 1/4 cup crumbled feta, optional
- 1 tablespoon lemon juice
Quick Steps:
- Spread 1/4 cup hummus over each tortilla, leaving a small border.
- Layer carrots, cucumber, bell pepper, spinach, sprouts, and feta down the center.
- Drizzle with a few drops of lemon juice, then roll the tortillas tightly.
- Wrap each one in parchment and chill for 10 to 15 minutes before slicing.
Equipment for This Recipe:
- Cutting board
- Sharp knife
- Spoon or offset spatula
- Parchment paper
How to Serve This Dish:
Slice the wraps on a diagonal and serve with olives, grapes, or a handful of salted nuts. Mint iced tea or cucumber water fits the fresh vegetables well. If you want to turn these into a fuller lunch, add a piece of fruit and a square of cheese.
Pro Tips for This Recipe:
- Pat the cucumber dry so it doesn’t water down the wrap.
- Keep the filling near the center instead of spreading it edge to edge.
- Use a tortilla that bends easily; stiff wraps crack.
Variations on This Dish:
- Red Pepper Hummus Version: Use roasted red pepper hummus for a deeper, sweeter flavor.
- Avocado Addition: Add a few avocado slices if you’ll eat it the same day.
- Gluten-Free Wrap: Use a gluten-free tortilla that doesn’t split when rolled.
Common Mistakes to Avoid with This Dish:
- Don’t overfill the wrap. That’s the fastest route to a mess.
- Don’t use watery vegetables without drying them first.
11. Cold Soba Noodle Salad with Sesame Chicken
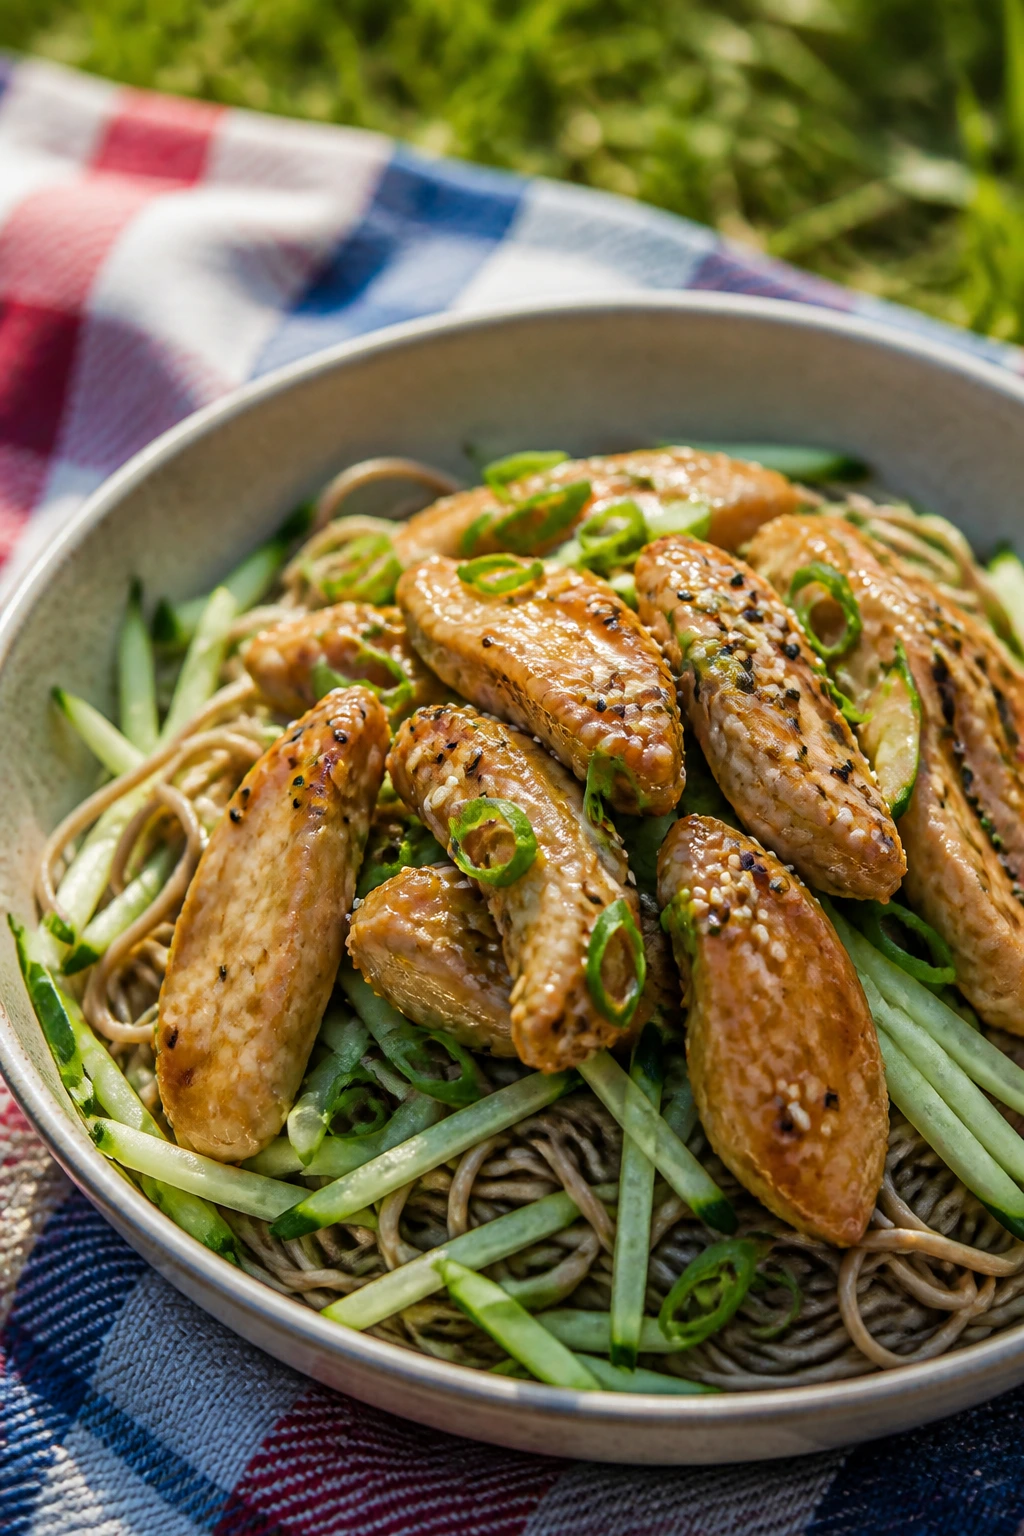
This one is for people who like a lunch that eats like a full bowl, not a sandwich. The soba noodles stay pleasantly springy when rinsed cold, and the sesame-soy dressing gives the salad a savory edge that works well with chilled drinks.
Why It Works:
Soba noodles are good picnic noodles because they hold their shape better than softer pasta and taste fine straight from the fridge. Sesame oil, soy sauce, vinegar, and peanut butter make a dressing that clings instead of pooling, which matters when the salad sits for a while. Keep the cucumber and scallions in thin slices so they distribute well through the bowl.
Key Ingredients: For the Salad:
- 8 ounces soba noodles
- 2 cups cooked shredded chicken
- 1 cucumber, julienned
- 3 scallions, thinly sliced
- 1 cup shelled edamame, thawed if frozen
For the Dressing:
- 3 tablespoons soy sauce
- 2 tablespoons rice vinegar
- 1 tablespoon sesame oil
- 1 tablespoon honey
- 1 tablespoon peanut butter
- 1 teaspoon grated fresh ginger
- 1 teaspoon chili crisp, optional
Quick Steps:
- Cook the soba noodles according to the package, usually 5 to 6 minutes, then drain and rinse under cold water.
- Whisk the soy sauce, vinegar, sesame oil, honey, peanut butter, ginger, and chili crisp if using.
- Toss the noodles with the dressing, chicken, cucumber, scallions, and edamame.
- Chill for at least 20 minutes so the noodles absorb some of the sauce.
Equipment for This Recipe:
- Pot
- Colander
- Whisk
- Large bowl
How to Serve This Dish:
Pack it in a shallow container and top with sesame seeds if you want a little extra texture. Ginger lemonade or iced green tea fits the soy-sesame profile especially well. A fork works, but chopsticks make it feel more deliberate if you’re eating at a table.
Pro Tips for This Recipe:
- Rinse the noodles very well after cooking so they don’t clump.
- Add the cucumber close to serving if you want it extra crisp.
- Taste the dressing before tossing; soba needs enough salt to stand up to chilling.
Variations on This Dish:
- Tofu Version: Replace the chicken with cubed baked tofu.
- Spicy Sesame Bowl: Add more chili crisp and a few sliced radishes.
- Rice Noodle Swap: Use rice noodles if you need a gluten-free version.
Common Mistakes to Avoid with This Dish:
- Don’t skip the cold rinse. Sticky soba is hard to toss and harder to eat.
- Don’t overdress it. The noodles should be coated, not swimming.
12. Caprese Pasta Salad Cups
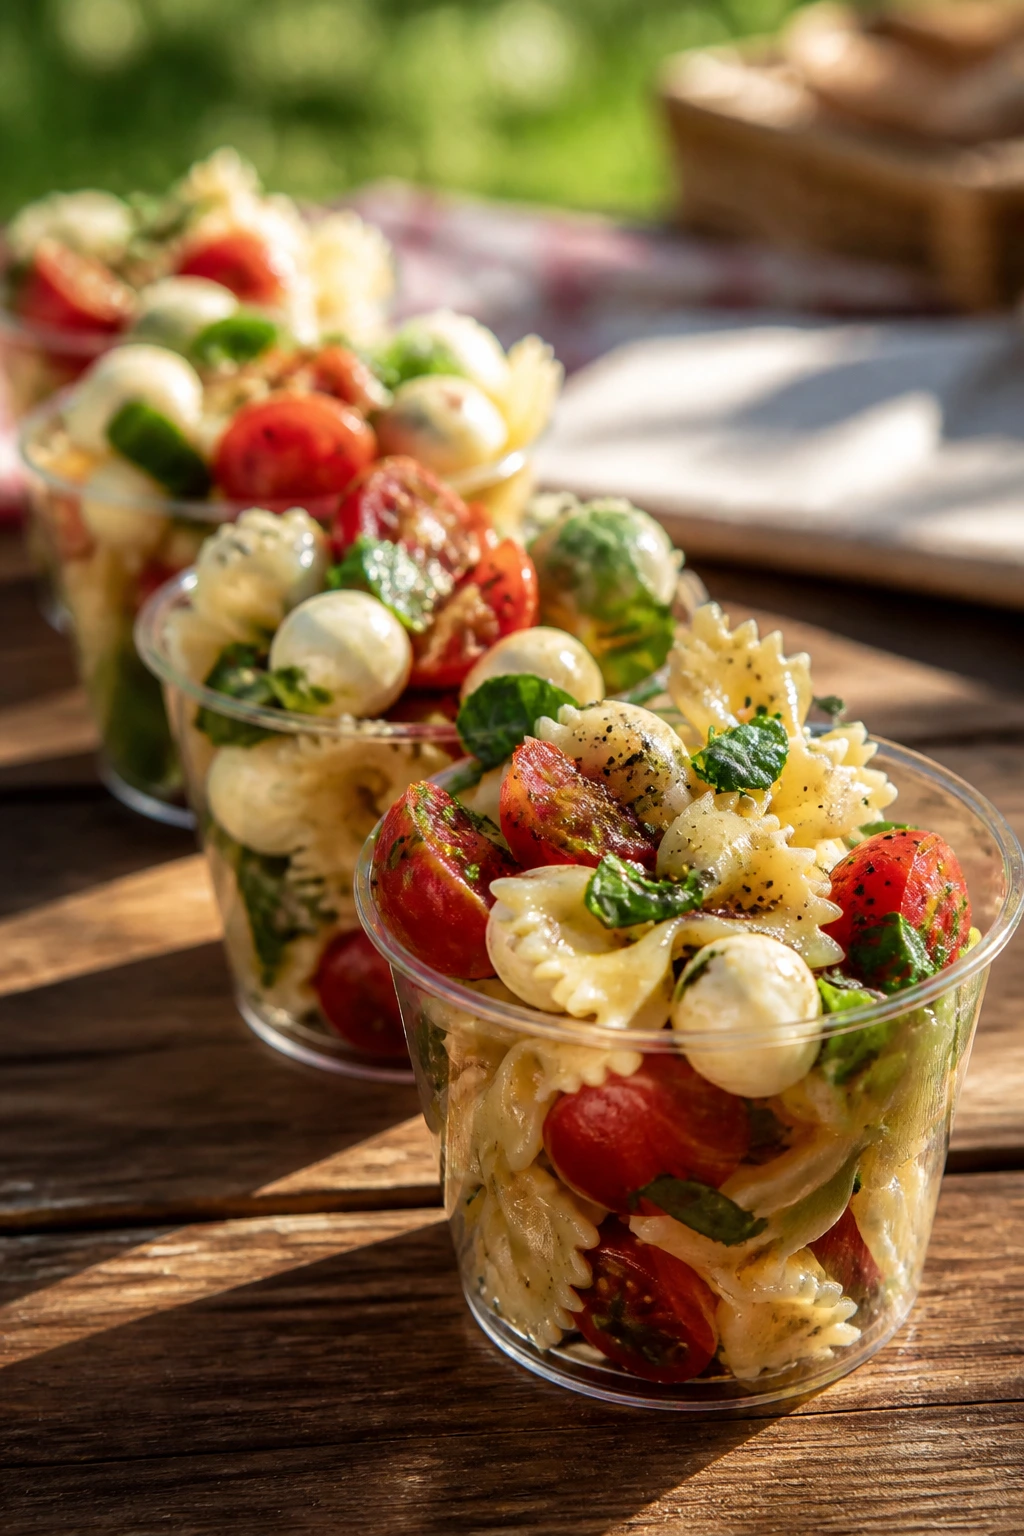
These little cups solve the awkward picnic problem of pasta salad sliding all over a plate. You get tomatoes, mozzarella, and basil in neat portions, which is strangely satisfying when you’re balancing a drink and a paper napkin.
Why It Works:
Farfalle or another short pasta catches the olive oil and balsamic in folds and corners, so every bite tastes finished. The cups also keep the salad from getting smashed, which is the real reason this format works so well for a blanket lunch. Make the pasta ahead, chill it, then portion it close to serving time for the cleanest look.
Key Ingredients: For the Salad:
- 8 ounces farfalle or rotini
- 1 cup cherry tomatoes, halved
- 8 ounces mozzarella pearls
- 1/4 cup basil leaves, torn
- 2 tablespoons olive oil
- 1 tablespoon balsamic vinegar or 2 teaspoons balsamic glaze
- 1/2 teaspoon kosher salt
- 1/4 teaspoon black pepper
For Serving:
- 6 to 8 small cups or containers
Quick Steps:
- Cook the pasta in salted water until al dente, then drain and rinse cold.
- Toss the pasta with olive oil, balsamic, salt, and pepper.
- Fold in the tomatoes, mozzarella, and basil.
- Spoon into small cups and chill until ready to pack.
Equipment for This Recipe:
- Pot
- Colander
- Mixing bowl
- Small cups or food containers
How to Serve This Dish:
Serve the cups with grilled chicken, crusty bread, or a few olives on the side. A cold sparkling water with lemon keeps the cheese from feeling too rich. If you want a more polished picnic spread, tuck a basil leaf on top of each cup.
Pro Tips for This Recipe:
- Cool the pasta fully before adding basil.
- Use small cups with lids if you want easy transport.
- Taste before serving; cold pasta often needs one more pinch of salt.
Variations on This Dish:
- Salami Caprese: Add chopped salami for a more filling version.
- Burrata Upgrade: Swap mozzarella pearls for torn burrata just before serving.
- Gluten-Free Pasta: Use a short gluten-free pasta that keeps its shape when chilled.
Common Mistakes to Avoid with This Dish:
- Don’t drown it in balsamic. Too much makes the cups wet and dark.
- Don’t mix in the basil while the pasta is hot or the leaves will darken.
13. Spanakopita Triangles
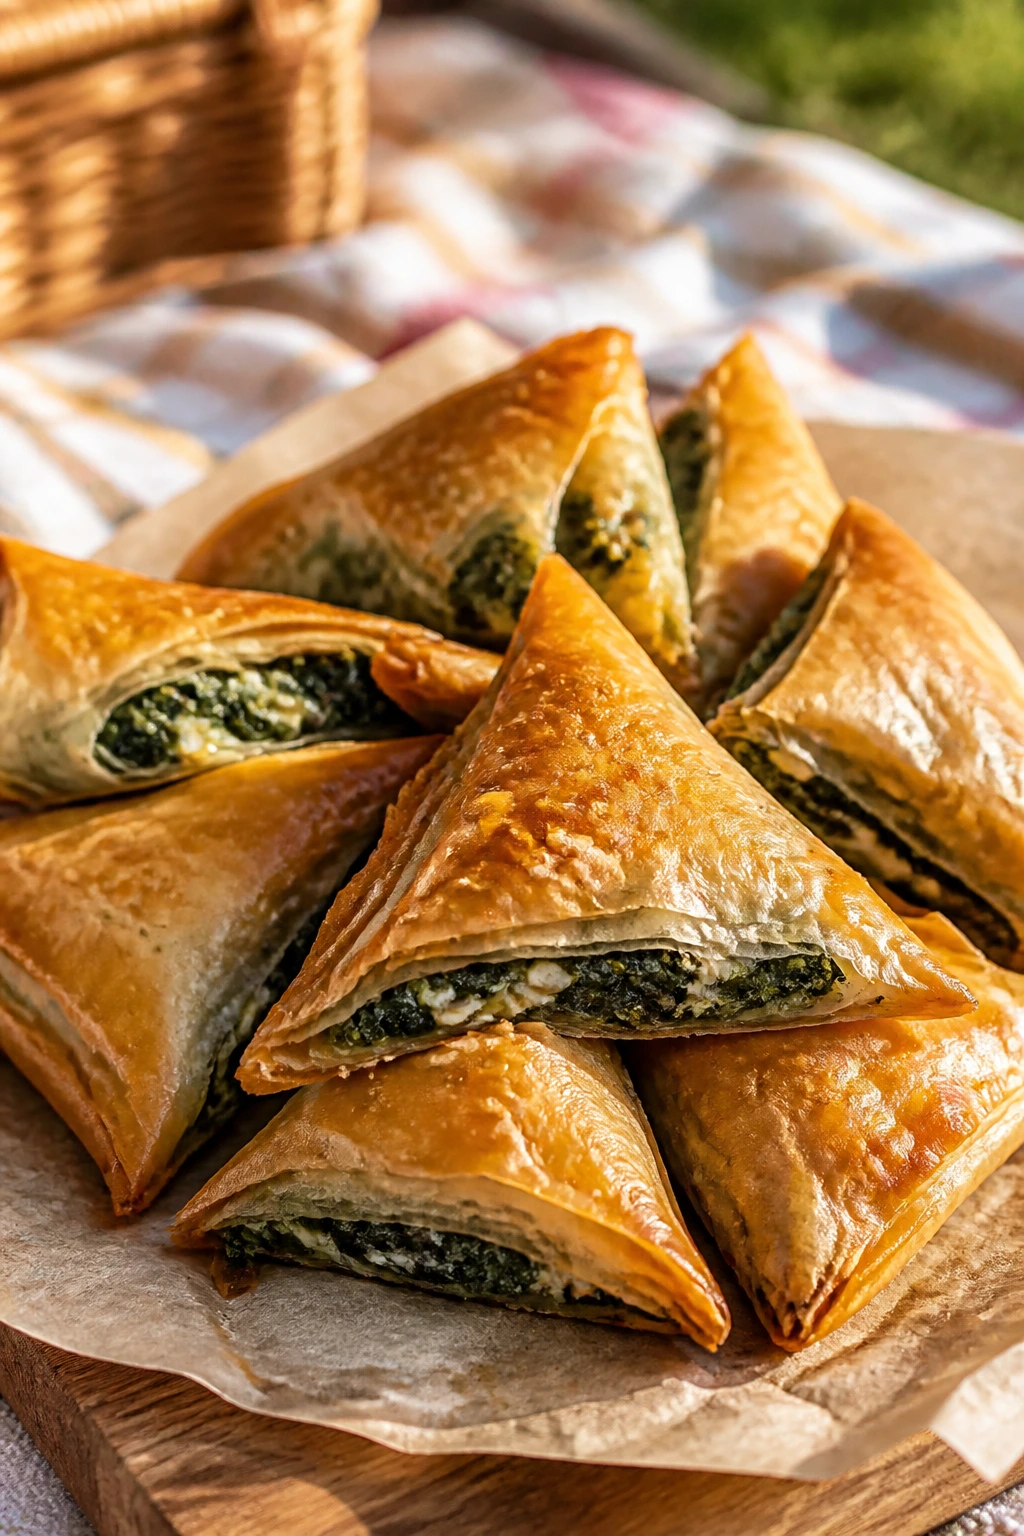
These are the kind of picnic bites that make people linger around the basket. Crisp phyllo, spinach, feta, and dill give you a salty, flaky bite that feels substantial without being bulky.
Why It Works:
Spanakopita travels well because the filling is set before baking and the phyllo hardens into crisp layers as it cools. The spinach must be cooked down and cooled enough to lose its moisture, or the triangles will leak and soften. Bake them until the edges are deeply golden; pale phyllo tastes dry and never quite finishes the job.
Key Ingredients: For the Filling:
- 1 tablespoon olive oil
- 1 small onion, finely chopped
- 10 ounces spinach, chopped if using whole leaves
- 1 cup crumbled feta
- 2 tablespoons chopped dill
- 1 egg
- 1/4 teaspoon black pepper
For the Phyllo:
- 8 sheets phyllo dough, thawed
- 1/2 cup melted butter or olive oil
Quick Steps:
- Cook the onion in olive oil over medium heat until soft, about 4 minutes, then add the spinach and cook until wilted and dry.
- Cool the spinach mixture, then stir in feta, dill, egg, and pepper.
- Layer phyllo sheets with butter or oil, cut into strips, and spoon the filling near one end of each strip.
- Fold into triangles, brush with more butter or oil, and bake at 375°F (190°C) for 18 to 22 minutes until golden and crisp.
Equipment for This Recipe:
- Skillet
- Pastry brush
- Baking sheet
- Sharp knife
How to Serve This Dish:
Serve warm or at room temperature with cucumber slices, olives, or a simple tomato salad. Mint tea on ice or sparkling water with lemon is a clean match for the salty feta. They also work well tucked into a larger lunch spread with grapes and crackers.
Pro Tips for This Recipe:
- Keep phyllo covered with a damp towel while you work.
- Cook off as much spinach moisture as possible.
- Let the triangles cool on a rack so the bottoms stay crisp.
Variations on This Dish:
- Puff Pastry Shortcut: Use puff pastry if phyllo feels fussy.
- Herb-Heavy Version: Add parsley and mint for a greener filling.
- Mini Cups: Press phyllo into a muffin tin for smaller, easier bites.
Common Mistakes to Avoid with This Dish:
- Don’t leave the spinach watery. Moisture ruins crisp pastry.
- Don’t let the phyllo dry out while assembling.
14. Mini Quiche Muffins with Spinach and Gruyère
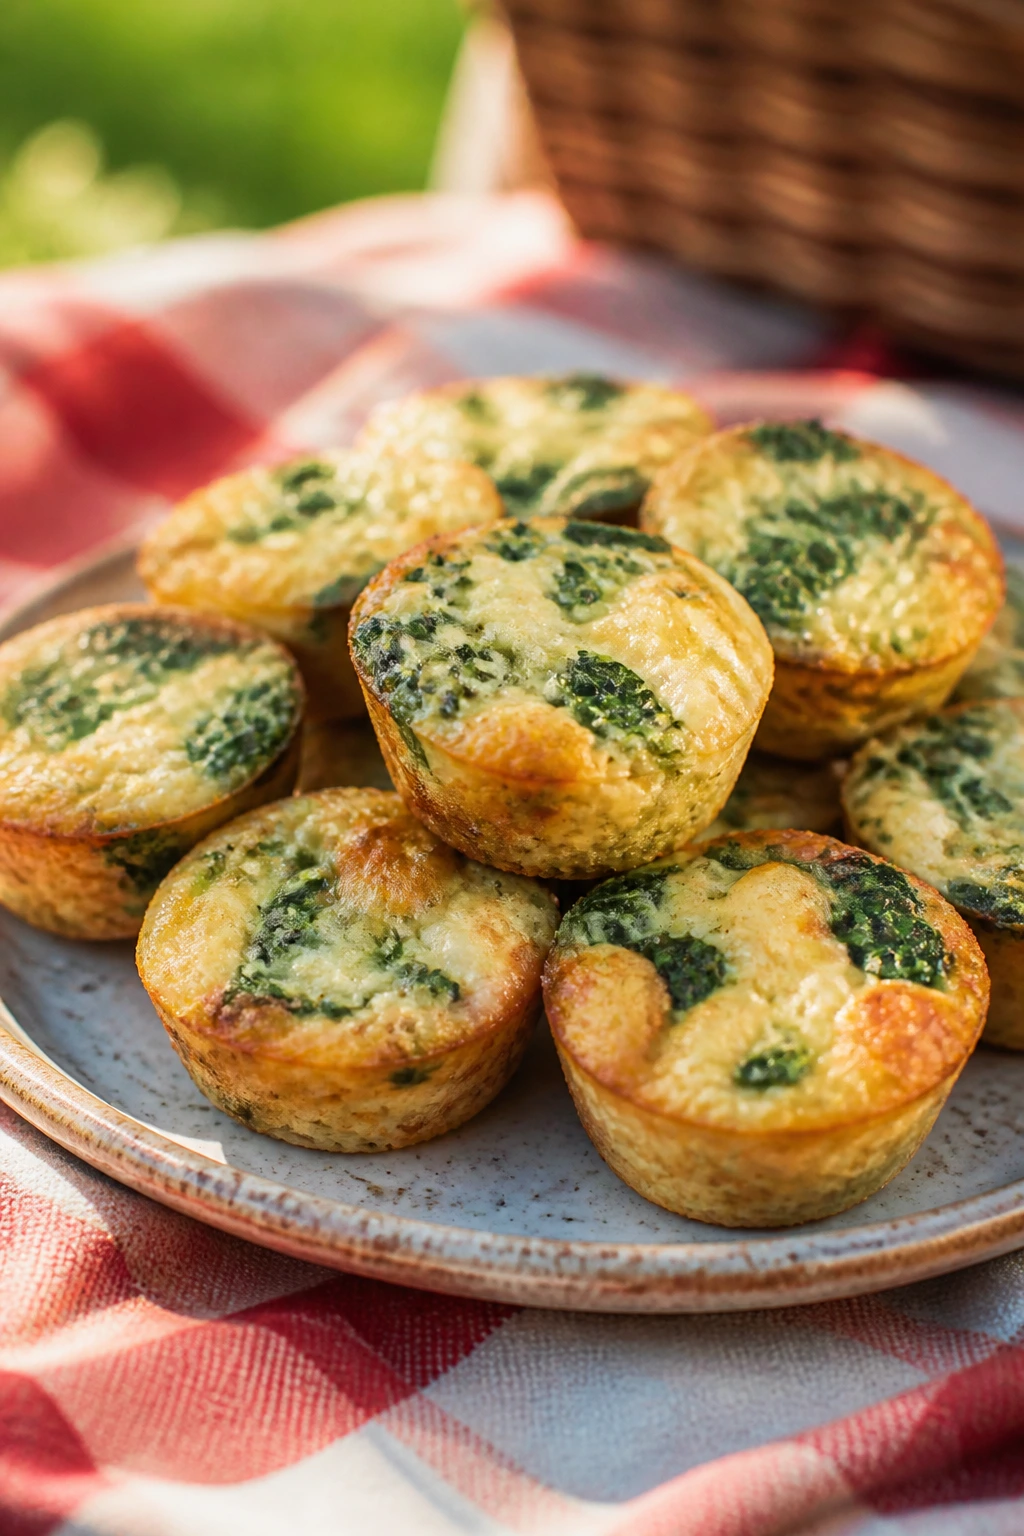
These are tidy, portable, and just rich enough to feel like a real lunch. The egg base sets into soft little rounds, and Gruyère gives the muffins a nutty edge that tastes especially good cold.
Why It Works:
Quiche muffins solve the picnic problem of loose fillings and crumbly crusts by baking everything into one bite-size package. Spinach and scallions keep the flavor from leaning heavy, and Gruyère melts into little pockets of salt and nuttiness. Pull them from the oven as soon as the centers are set; overbaked eggs turn rubbery fast.
Key Ingredients: For the Muffins:
- 8 large eggs
- 1/2 cup milk
- 1/2 teaspoon kosher salt
- 1/4 teaspoon black pepper
- 1 cup chopped spinach
- 3/4 cup shredded Gruyère
- 2 scallions, thinly sliced
- 1 tablespoon butter, softened, for the muffin tin
- 1/2 cup diced cooked bacon, optional
Quick Steps:
- Preheat the oven to 350°F (175°C) and grease a standard muffin tin with butter.
- Whisk the eggs, milk, salt, and pepper until smooth.
- Divide the spinach, Gruyère, scallions, and bacon if using among the muffin cups, then pour in the egg mixture.
- Bake for 18 to 20 minutes, until the centers are set and the tops look just dry.
- Cool in the tin for 5 minutes, then loosen and finish cooling on a rack.
Equipment for This Recipe:
- Muffin tin
- Mixing bowl
- Whisk
- Measuring cup
How to Serve This Dish:
Serve two muffins per person with fruit or a simple green salad. Cold sparkling water with lemon works well, and so does iced coffee if you’re packing brunch-style. They’re good warm, but they slice and travel better once fully cooled.
Pro Tips for This Recipe:
- Grease the tin well so the eggs release cleanly.
- Keep the add-ins small; big chunks make the muffins fall apart.
- Bake only until set in the middle, not browned all over.
Variations on This Dish:
- Bacon and Cheddar Version: Swap Gruyère for cheddar and add bacon.
- Mushroom Spin: Use sautéed mushrooms instead of bacon.
- Dairy-Light Option: Replace some milk with unsweetened almond milk and use less cheese.
Common Mistakes to Avoid with This Dish:
- Don’t overfill the cups. Egg mixture puffs as it bakes.
- Don’t bake until they’re deeply browned. That’s how you get tough quiche.
15. Pulled Pork Sliders with Tangy Slaw
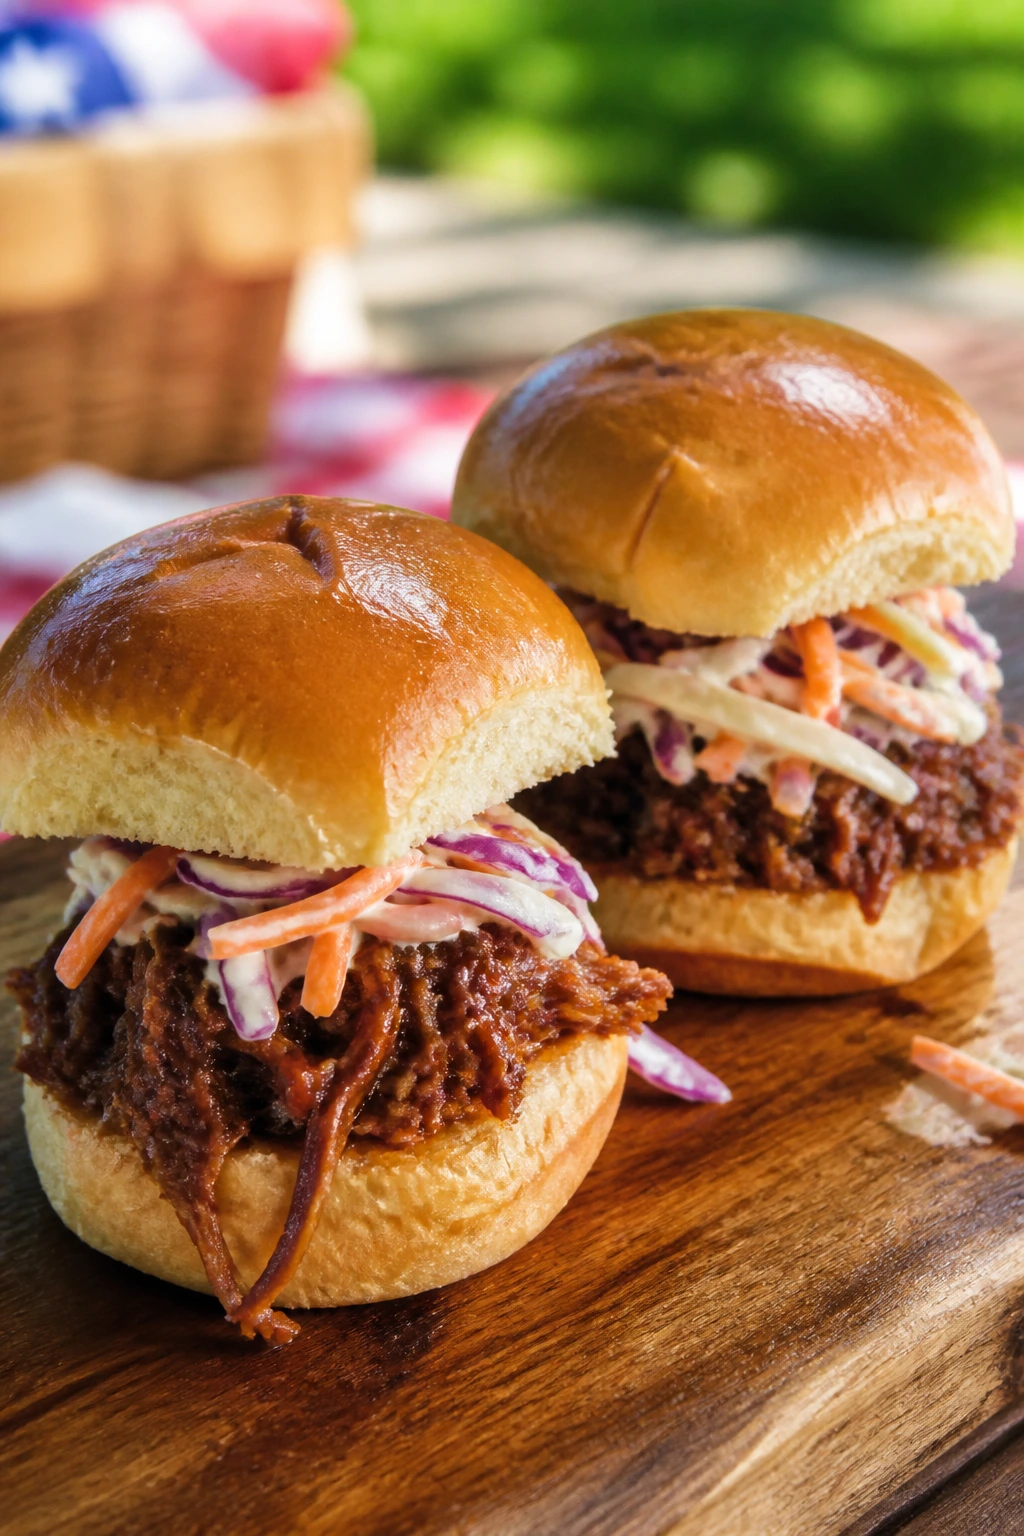
These sliders are messier than the rest, which is part of the charm. Sweet buns, smoky pork, and crisp slaw make a lunch that feels more like a small meal than a snack.
Why It Works:
Pulled pork stays tender when it’s reheated gently, and the tangy slaw cuts through the richness so the sliders don’t sit heavy. The key is to keep the slaw separate until the last minute if you’re packing for later. Once assembled, they need to be eaten soon; soft buns and pork juice don’t stay neat for long.
Key Ingredients: For the Pork:
- 3 cups cooked pulled pork
- 1/4 cup barbecue sauce
For the Slaw:
- 2 cups shredded cabbage
- 1 carrot, shredded
- 2 tablespoons apple cider vinegar
- 1 tablespoon mayonnaise or olive oil
- 1 teaspoon sugar
- 1/2 teaspoon kosher salt
- 1/4 teaspoon black pepper
For Assembly:
- 8 slider buns
Quick Steps:
- Toss the cabbage, carrot, vinegar, mayonnaise or oil, sugar, salt, and pepper together and let it sit for 10 minutes.
- Warm the pulled pork gently with barbecue sauce until just hot, or keep it chilled if you want a cold slider.
- Split the buns and pile on the pork, then top with slaw.
- Wrap each slider in foil or parchment for transport.
Equipment for This Recipe:
- Mixing bowl
- Saucepan or skillet
- Tongs or spoon
- Foil or parchment
How to Serve This Dish:
These sliders like potato salad, baked beans, or pickles on the side. Sweet tea or cola is a natural cold-drink pairing here, though a crisp lemonade cuts the richness nicely. If you’re serving a group, keep the pork and slaw separate and let people build their own.
Pro Tips for This Recipe:
- Drain the slaw lightly if it starts to release too much liquid.
- Reheat the pork slowly so it doesn’t dry out.
- Use sturdy buns; soft dinner rolls can collapse under the filling.
Variations on This Dish:
- Spicy BBQ Slider: Add hot sauce to the pork.
- Chicken Version: Use shredded chicken with the same barbecue sauce and slaw.
- Carolina-Style Twist: Add extra vinegar and cut back the sweet barbecue sauce.
Common Mistakes to Avoid with This Dish:
- Don’t soak the slaw in dressing. Wet slaw turns the buns soft fast.
- Don’t reheat the pork on high heat or it will dry out.
16. Banh Mi Sandwiches with Quick Pickles
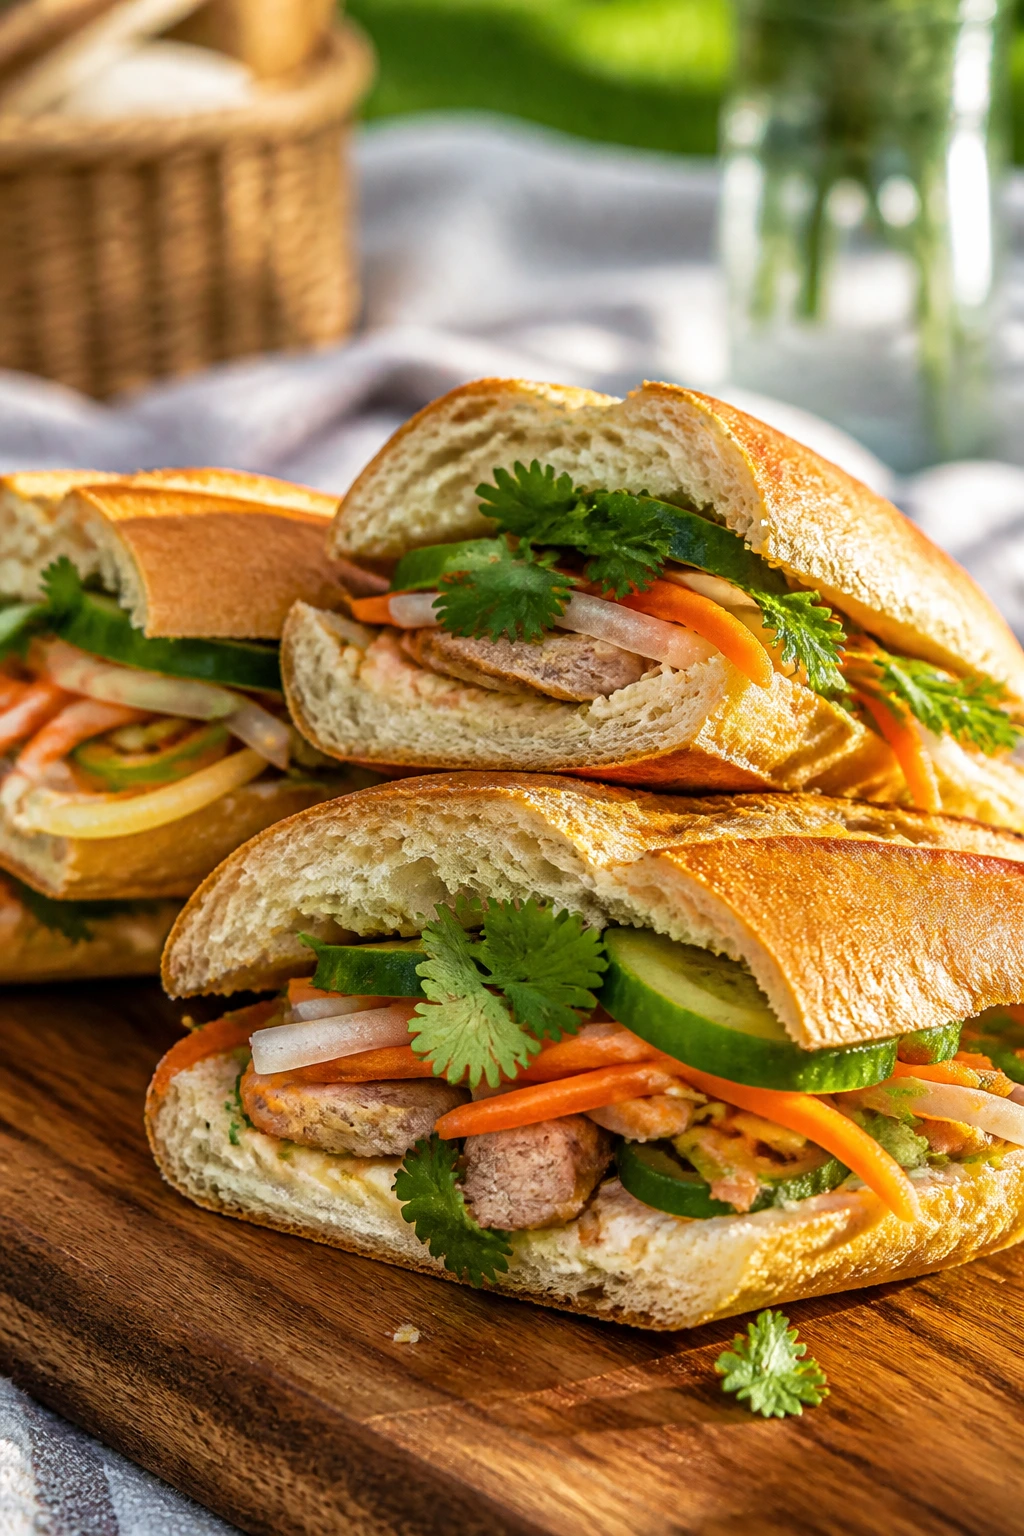
Banh mi sandwiches are brilliant picnic food because they bring crunch, acid, herbs, and protein into one tight package. The pickles are the whole trick — they keep the sandwich sharp and lively even after it’s been wrapped.
Why It Works:
Quick pickled carrot and daikon add snap and brightness, which is exactly what a picnic sandwich needs. Mayo gives the bread a little moisture barrier, while cucumber and cilantro keep the filling cool and fresh-tasting. Use a baguette with a crisp crust and a soft interior; a too-soft loaf gets squashed, and a too-crusty one shatters.
Key Ingredients: For the Pickles:
- 1 carrot, julienned
- 1 small daikon or 4 radishes, julienned
- 1/2 cup rice vinegar
- 1/2 cup water
- 1 tablespoon sugar
- 1 teaspoon kosher salt
For the Sandwiches:
- 1 baguette
- 8 ounces cooked sliced pork, chicken, or tofu
- 2 tablespoons mayonnaise
- 1 tablespoon sriracha
- 1 cucumber, thinly sliced
- 1/2 cup cilantro leaves
Quick Steps:
- Stir the vinegar, water, sugar, and salt until dissolved, then pour over the carrot and daikon and let sit for 15 minutes.
- Mix the mayonnaise and sriracha.
- Split the baguette, spread the mayo mixture on both sides, and layer in the protein, pickles, cucumber, and cilantro.
- Press the sandwich gently, wrap tightly, and chill for 10 minutes before cutting.
Equipment for This Recipe:
- Knife and cutting board
- Small bowl or jar
- Parchment or foil
- Spoon
How to Serve This Dish:
Serve with extra pickles, lime wedges, or salty chips. Iced jasmine tea or a cold lime soda pairs well with the herbs and heat. If you want a smaller picnic bite, cut the baguette into four sections and wrap each piece separately.
Pro Tips for This Recipe:
- Let the pickles sit long enough to soften just a little.
- Drain the pickles before adding them so the bread stays dry.
- Use enough mayo to coat the bread but not enough to drip.
Variations on This Dish:
- Vegetarian Banh Mi: Use fried tofu or seared mushrooms.
- Turkey Shortcut: Thin-sliced turkey makes a fast version.
- Extra Heat Version: Add sliced jalapeños or more sriracha.
Common Mistakes to Avoid with This Dish:
- Don’t use a soft roll. The texture matters here.
- Don’t skip the pickles; without them, the sandwich tastes flat.
17. Falafel Pita Pockets with Tahini Yogurt
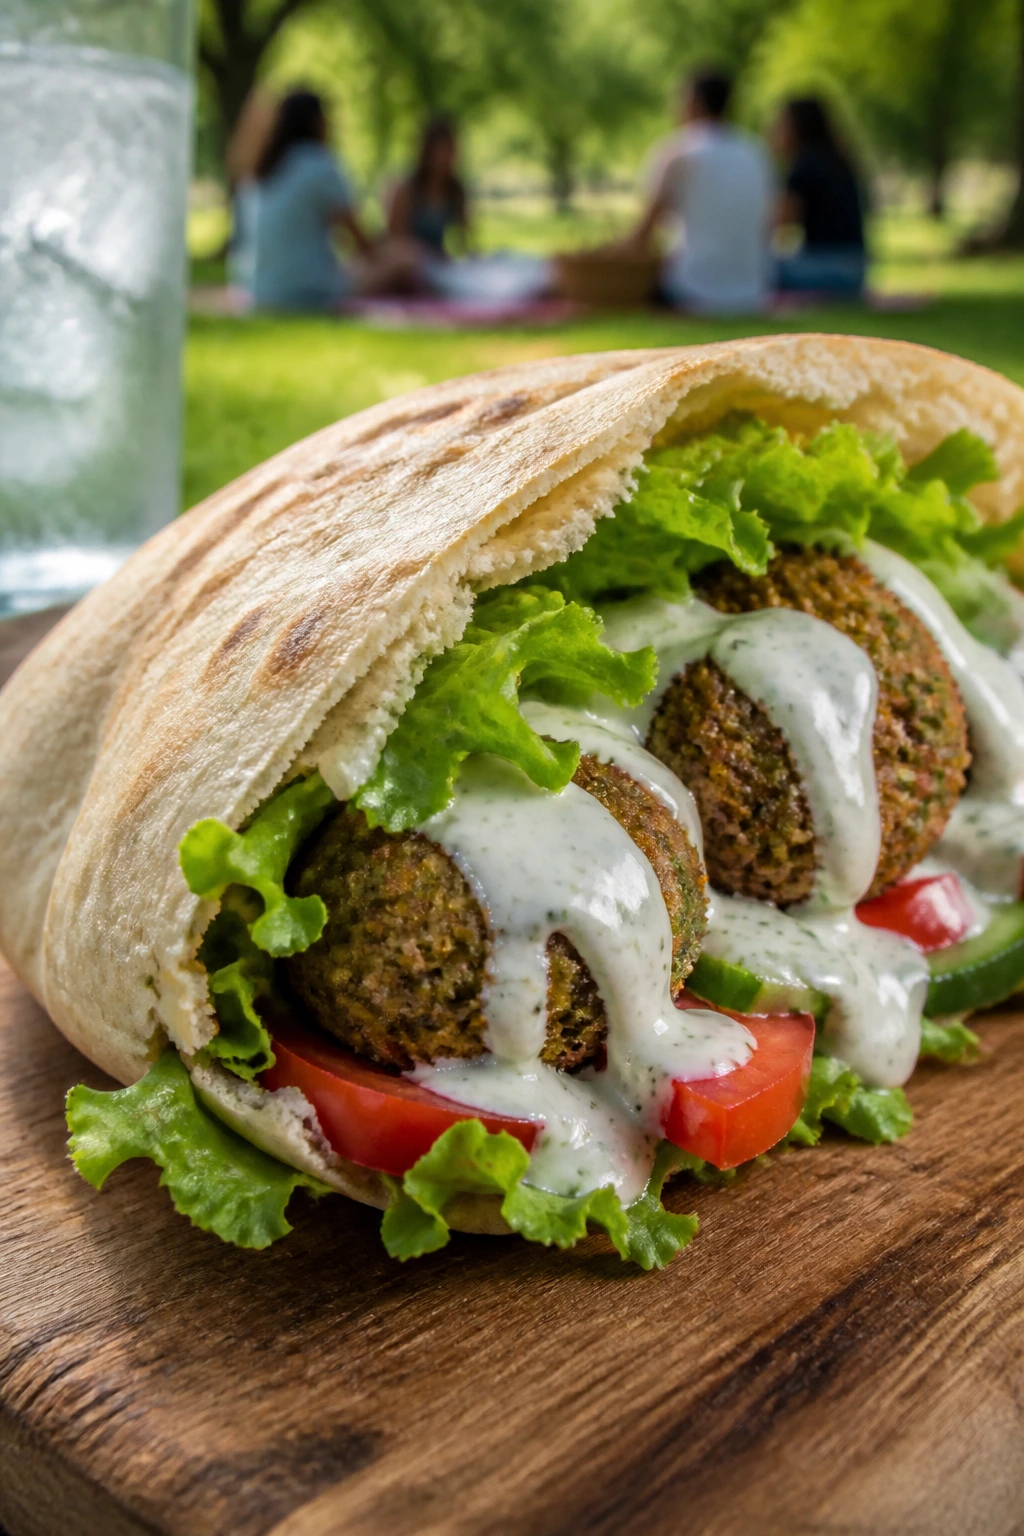
Falafel gives you a picnic lunch that feels hearty without needing a fork and knife. The tahini yogurt keeps the filling creamy, and the cucumber and tomato bring the kind of fresh crunch that survives a few hours in a container.
Why It Works:
Falafel is dense enough to stay intact, which makes it better for packed lunches than loose salads or soft spreads. Tahini and yogurt create a sauce that coats the vegetables without leaking into the pita, and the lemon keeps everything bright. If you’re using store-bought falafel, warm it briefly so the outside has a little firmness before packing.
Key Ingredients: For the Sauce:
- 1 cup Greek yogurt
- 2 tablespoons tahini
- 1 tablespoon lemon juice
- 1 small garlic clove, grated
- 1/4 teaspoon kosher salt
For the Pockets:
- 12 falafel, cooked
- 4 pita pockets
- 1 cucumber, diced
- 1 tomato, diced and seeded
- 2 cups shredded lettuce
- 1/4 teaspoon black pepper
Quick Steps:
- Whisk the yogurt, tahini, lemon juice, garlic, and salt until smooth.
- Warm the falafel according to package directions or pan-fry until crisp on the outside.
- Split the pita pockets and spread a spoonful of sauce inside each one.
- Fill with lettuce, cucumber, tomato, and falafel, then wrap tightly for the cooler.
Equipment for This Recipe:
- Small bowl
- Whisk or fork
- Skillet or oven
- Knife
How to Serve This Dish:
Serve with olives, baby carrots, or a few extra pita wedges. Mint lemonade or cold sparkling water with cucumber suits the tahini and lemon well. If you’re making these for a picnic spread, cut them into halves and secure each half with parchment.
Pro Tips for This Recipe:
- Seed the tomato if it’s watery.
- Don’t overfill the pita or it will split.
- Keep the sauce slightly thick so it doesn’t soak through.
Variations on This Dish:
- Vegan Sauce: Use a tahini-lemon sauce instead of yogurt.
- Spicy Falafel: Add a spoonful of harissa to the sauce.
- Falafel Bowl: Skip the pita and serve it over greens.
Common Mistakes to Avoid with This Dish:
- Don’t pack hot falafel directly into the pita. Steam softens the bread.
- Don’t use thin, torn pitas; they split too easily.
18. Smoked Salmon Bagels with Cucumber and Dill
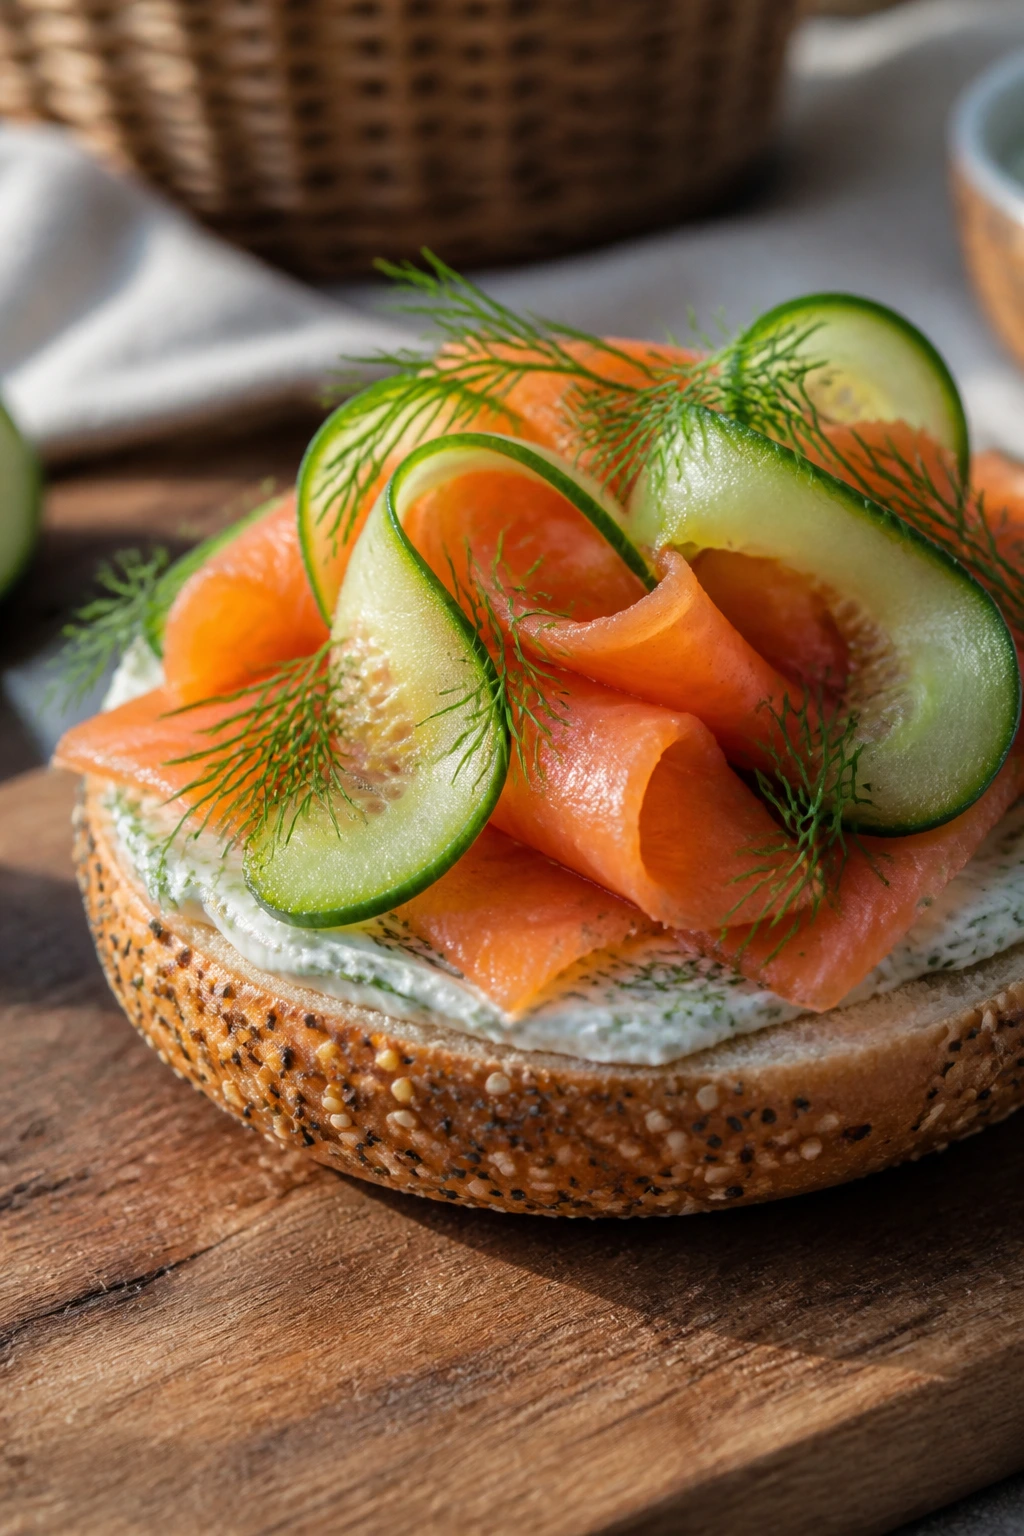
This is the most brunch-like picnic lunch in the bunch, and I mean that in the best way. Cream cheese, smoked salmon, cucumber, and dill give you something cold, salty, and luxurious enough to feel special without any actual cooking.
Why It Works:
Smoked salmon already carries salt and fat, so it pairs well with cool cucumber and sharp onion. The bagel gives you a chewy base that stands up to cream cheese better than delicate bread. Keep the toppings thin and even — this is not the place for towering sandwich architecture.
Key Ingredients: For Assembly:
- 4 mini bagels or 2 large bagels, split
- 4 ounces cream cheese, softened
- 8 ounces smoked salmon
- 1 cucumber, thinly sliced
- 1/4 red onion, sliced very thin
- 2 tablespoons chopped dill
- 1 tablespoon capers
- Lemon wedges, for serving
Quick Steps:
- Split the bagels and spread each half with cream cheese.
- Layer on smoked salmon, cucumber, and red onion.
- Sprinkle with dill and capers.
- Pack in a single layer so the toppings stay in place.
Equipment for This Recipe:
- Sharp knife
- Cutting board
- Small spreader
- Container with a flat lid
How to Serve This Dish:
Serve with kettle chips or a few sliced tomatoes. A cold cucumber-lime sparkling water or iced black tea works well here. If you want a cleaner picnic version, turn them into bagel halves rather than full sandwiches.
Pro Tips for This Recipe:
- Slice the onion very thin so it doesn’t overpower the salmon.
- Chill the cream cheese a little if it’s too soft.
- Pack lemon wedges separately and squeeze just before eating.
Variations on This Dish:
- Everything Bagel Version: Use everything bagels for extra seasoning.
- Dairy-Free Spread: Swap cream cheese for a dairy-free spread.
- Trout Swap: Cold-smoked trout works in the same format.
Common Mistakes to Avoid with This Dish:
- Don’t pile on too much cream cheese. It can dominate the salmon.
- Don’t let the bagels sit open in a warm bag or they dry out.
19. Steak and Arugula Sandwiches with Horseradish Mayo
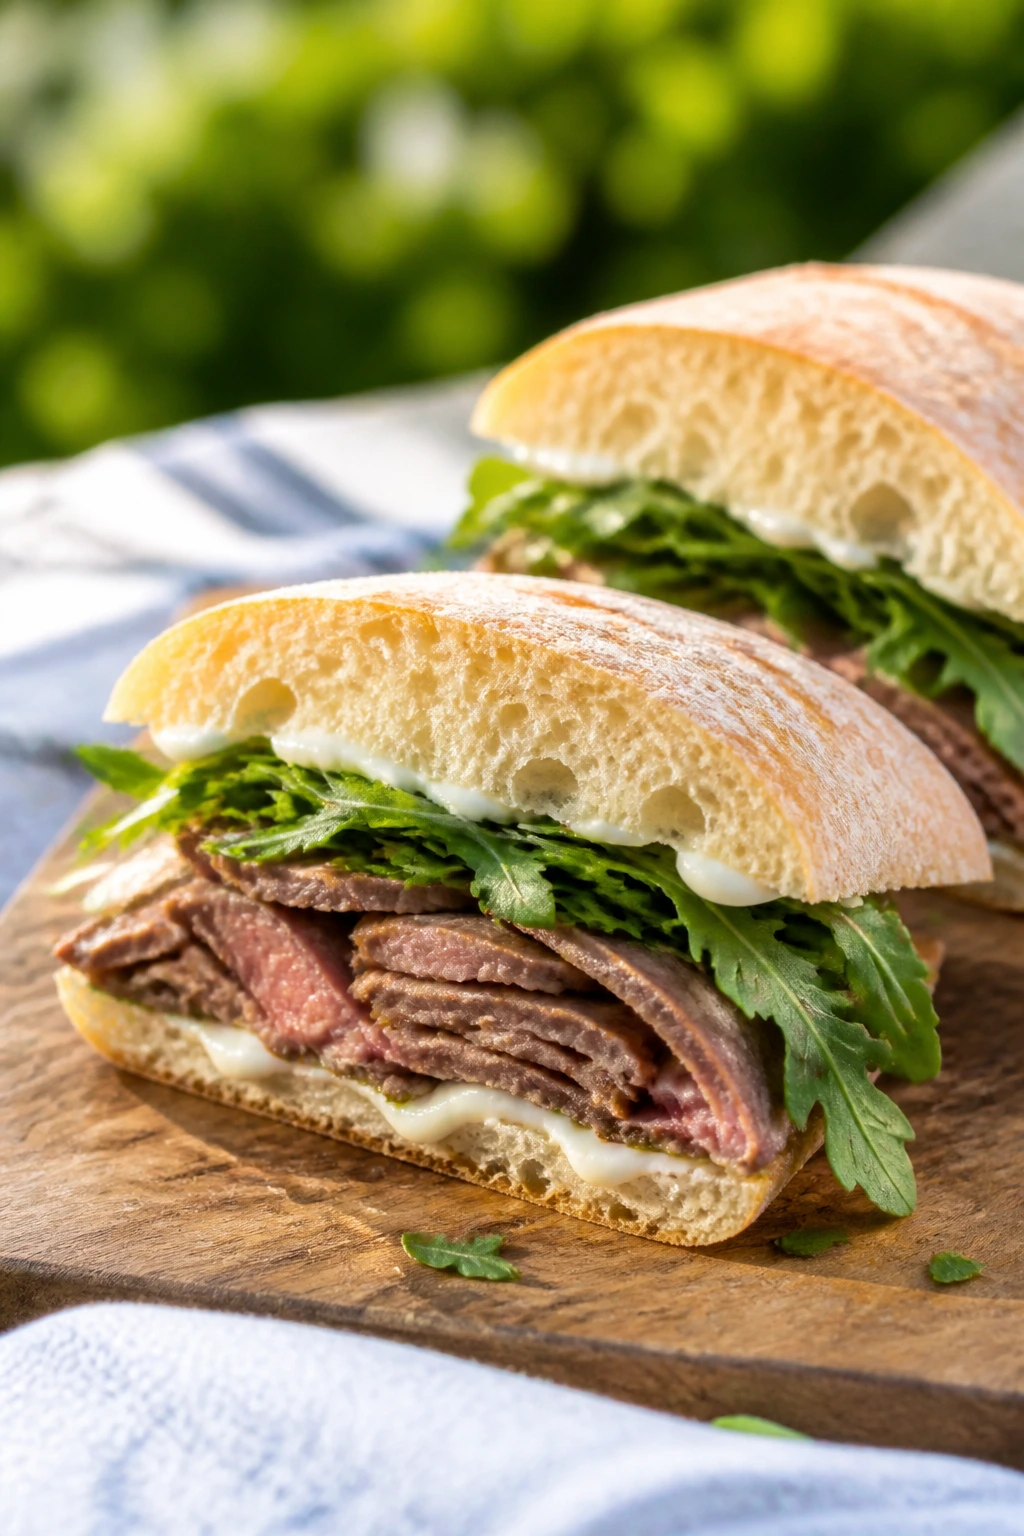
This is the boldest sandwich in the mix. Thin steak, peppery arugula, and a sharp horseradish spread give you something savory enough to feel like a proper lunch, even when it’s eaten on a folding chair.
Why It Works:
Leftover grilled steak is ideal here because it’s already cooked and just needs slicing. Horseradish mayo cuts through the beef’s richness, while arugula adds a peppery bite that keeps the sandwich from tasting heavy. The key is slicing the steak thin across the grain; thick slices make the sandwich awkward and chewy.
Key Ingredients: For the Sandwiches:
- 1 pound cooked steak, chilled and sliced thin
- 4 ciabatta rolls
- 1/3 cup mayonnaise
- 1 tablespoon prepared horseradish
- 2 cups arugula
- 1 medium tomato, sliced
- 1/2 teaspoon kosher salt
- 1/4 teaspoon black pepper
Quick Steps:
- Stir the mayonnaise and horseradish together.
- Slice the steak as thin as you can across the grain.
- Split the ciabatta rolls and spread both sides with horseradish mayo.
- Layer arugula, tomato, and steak, then season with salt and pepper before packing.
Equipment for This Recipe:
- Sharp knife
- Cutting board
- Small bowl
- Parchment or foil
How to Serve This Dish:
Serve with potato chips, pickles, or a crisp green salad if you’ve got room in the cooler. Cold brew or sparkling water with lemon is a strong drink pairing because it matches the sandwich’s sharpness. If you want to make it less messy, tuck the tomato inside the steak instead of on the outside.
Pro Tips for This Recipe:
- Chill the steak before slicing so the cuts stay neat.
- Use a roll with a firm crust so the juices don’t soak through instantly.
- Add the tomato close to eating time if you want cleaner bread.
Variations on This Dish:
- Roast Beef Shortcut: Thin-sliced roast beef works if you don’t have steak.
- Cheddar Upgrade: Add a slice of sharp cheddar for more heft.
- Mushroom Version: Swap steak for marinated grilled mushrooms.
Common Mistakes to Avoid with This Dish:
- Don’t slice the steak thick. It makes the sandwich hard to bite.
- Don’t use watery tomato slices unless you’ve patted them dry.
20. Antipasto Picnic Boxes
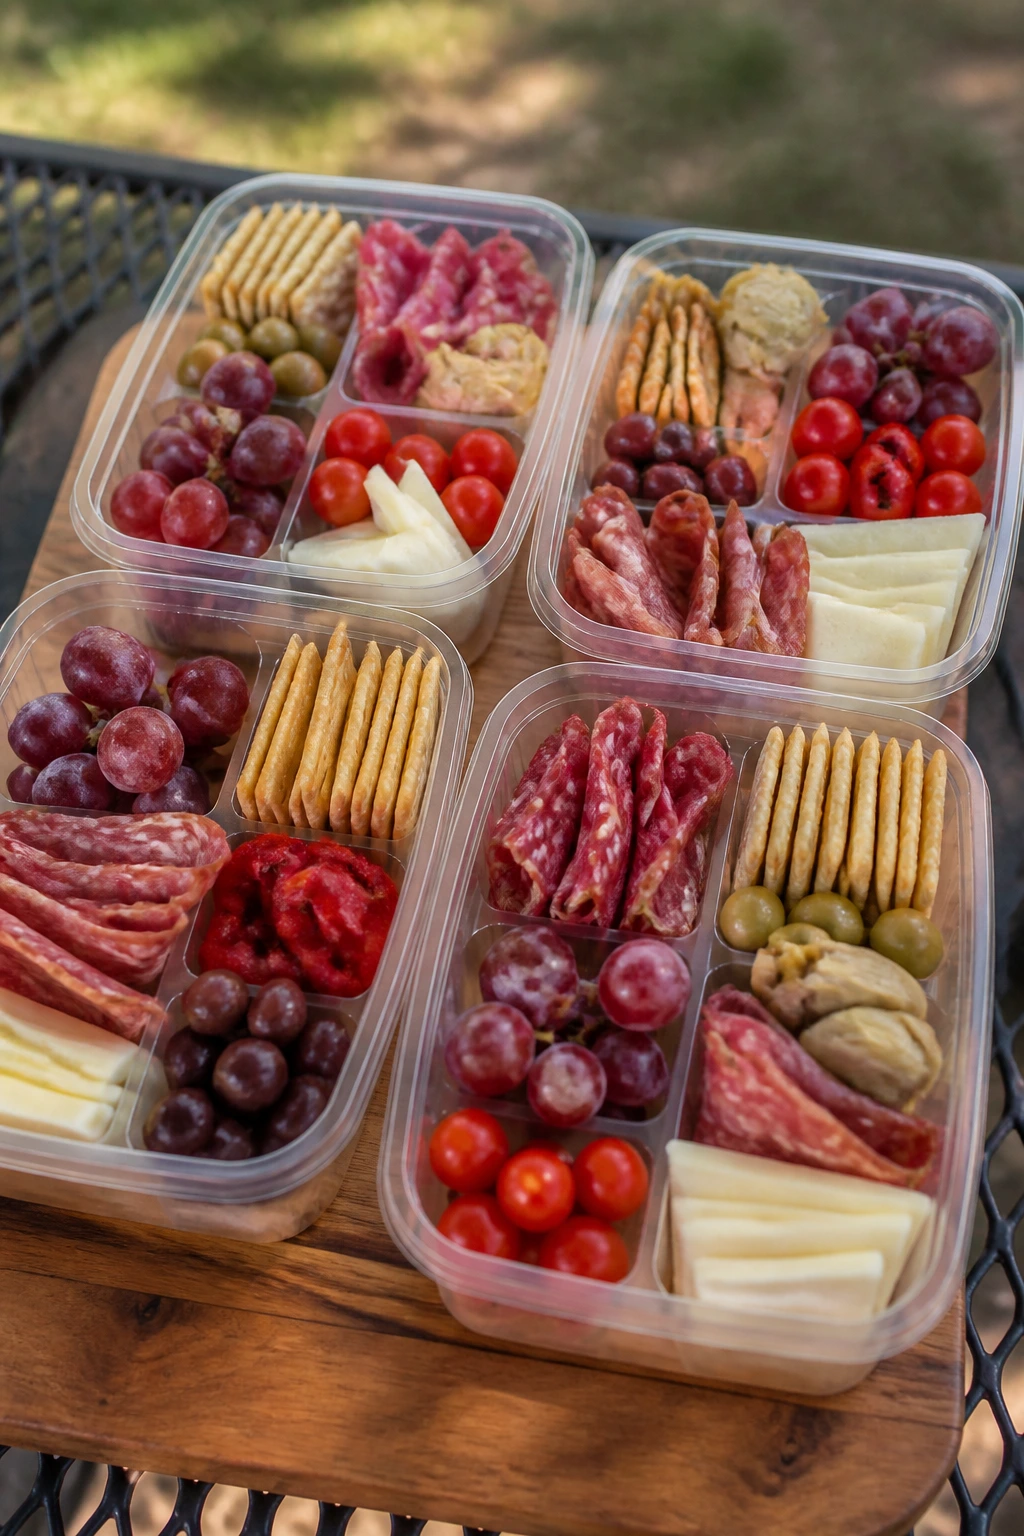
This is the easiest lunch on the list and one of the smartest. Instead of forcing everything into bread, you pack salty meats, cheese, fruit, crackers, and olives in separate little pockets and let people build their own bites.
Why It Works:
Antipasto boxes solve the soggy-lunch problem by keeping wet and dry ingredients apart until the moment you eat. The mix of salt, fat, acid, and sweetness — salami, provolone, olives, grapes, and roasted peppers — plays especially well with sparkling drinks. It’s the kind of lunch that feels casual but still looks thought-out.
Key Ingredients: For the Boxes:
- 6 ounces sliced salami
- 6 ounces provolone, sliced or cubed
- 1 cup grape tomatoes
- 1 cup olives, drained
- 1 cup marinated artichoke hearts, drained
- 1 cup roasted red peppers, sliced and drained
- 4 cups crackers
- 1 cup grapes
- 1/2 cup almonds
- 2 tablespoons basil leaves
Quick Steps:
- Drain the olives, artichokes, and roasted peppers well.
- Slice or cube the cheese so it’s easy to pick up.
- Divide everything into four lunch boxes or containers, keeping crackers separate from the moist items if you can.
- Tuck basil over the top and chill until ready to pack.
Equipment for This Recipe:
- Small containers or divided lunch boxes
- Knife
- Paper towel
- Cutting board
How to Serve This Dish:
Serve the boxes with sparkling water, lemon soda, or a dry iced tea. Add one small napkin and a fork, though most of this can be eaten by hand. If you want to stretch the lunch, include one extra protein like hard-boiled eggs or a few slices of leftover chicken.
Pro Tips for This Recipe:
- Pat the vegetables dry before boxing them up.
- Keep crackers in their own compartment or bag.
- Use a mix of shapes and textures so the box doesn’t feel one-note.
Variations on This Dish:
- Vegetarian Box: Swap salami for marinated chickpeas.
- Lower-Salt Version: Rinse the olives and use less cured meat.
- Kid-Friendly Box: Replace olives with more grapes, cheese cubes, and pretzels.
Common Mistakes to Avoid with This Dish:
- Don’t let the wet ingredients touch the crackers.
- Don’t overload the box; neat little gaps make it easier to pick food up.
Why Picnic Lunches Work Best When They’re Built for the Cooler
A picnic lunch lives or dies by texture. Bread that starts out soft often goes damp, leafy greens collapse under the weight of dressing, and anything mayo-heavy gets sketchy if it sits warm too long. The smartest picnic recipes respect that problem from the beginning. They use ingredients that can chill without turning unpleasant, like chickpeas, pasta, sturdy greens, roasted vegetables, cured meats, and hard cheeses.
There’s also a flavor reason these lunches work. Cold food mutes spice and sweetness a little, so the best picnic dishes lean on acid, salt, herbs, pickles, mustard, and citrus. That’s why chicken salad with lemon tastes sharper than a plain chicken sandwich, and why a banh mi held together by pickled vegetables still feels alive after a ride in the car. The drink matters here too. Iced tea, lemonade, sparkling water, and fruit spritzers give these lunches a clean finish that hot coffee or soda can’t always match.
Temperature control is the quiet hero. Pack cold foods cold, keep them in a cooler with ice packs, and don’t let the lunch sit out more than 2 hours, or 1 hour if the weather is hot. That’s not fussy; it’s just the difference between a picnic and a gamble.
Essential Gear for Packing Picnic Lunches
- Insulated cooler or thermal tote: Keeps chicken salad, egg salad, cheese, and pasta salads cold long enough to eat safely.
- Reusable ice packs: Flat ice packs sit under and over containers better than loose ice, which melts into a mess.
- Leakproof containers: Choose containers with tight lids for salads, pickles, and dressing-heavy fillings.
- Parchment paper or wax paper: Wraps sandwiches and sliders neatly and helps them hold shape.
- Sharp knife: Clean slices matter for wraps, bagels, sliders, and pinwheels.
- Cutting board: A sturdy board keeps filling prep from turning into a juggling act.
- Mixing bowls: You’ll use at least one for spreads, dressings, and salad fillings.
- Small cups or divided boxes: Best for pasta salad cups, antipasto boxes, and anything with wet and dry components.
- Paper towels: Dry tomatoes, cucumber, peppers, and washed greens before packing.
- Reusable spreader or spoon: Makes it easier to layer hummus, cream cheese, and mayo without tearing bread.
Smart Shopping for Bread, Produce, and Proteins
The bread aisle is where most picnic plans go wrong. Soft sandwich bread is fine for home, but for transport you want croissants with a little structure, baguettes with a crusty shell, pita pockets that hold a fold, ciabatta that doesn’t collapse, or biscuits that stay sturdy once cooled. If a loaf squishes when you press it with two fingers, it probably won’t love the trip.
Produce matters just as much. Choose tomatoes that are ripe but still firm, cucumbers that feel crisp, and bell peppers with taut skin. Grapes, apples, carrots, and radishes are easier picnic fruit-and-veg choices than soft berries or watery melon if you’re packing for several hours. If you do use juicy produce, seed it, drain it, and blot it dry.
For proteins, rotisserie chicken, deli turkey, canned tuna, hard-boiled eggs, smoked salmon, and leftover grilled steak all have a place here. Buy the version you actually trust to taste good cold. A bland protein gets worse after chilling, and a salty one usually gets better. Cheese blocks and wedges are worth buying over pre-shredded in some cases because they cut cleaner in sandwiches and hold moisture better in boxes.
How to Serve Picnic Lunches With a Cold Drink
Presentation:
Cut sandwiches on the diagonal, slice wraps into tight halves, and keep salads in shallow containers so the layers show. A parchment wrap around croissants, sliders, and baguettes makes the basket look tidy and keeps sticky fillings off your hands. Small handfuls of herbs — basil, dill, parsley, mint — make even a simple lunch feel thought through.
Accompaniments:
Use crisp sides that hold their shape: kettle chips, olives, grapes, carrot sticks, pickles, radishes, crackers, and small fruit. If one lunch is rich, add something acidic next to it, like marinated vegetables or a lemony slaw. That contrast matters more at a picnic because you usually eat slowly.
Portions:
Plan on 1 substantial sandwich or wrap per person, 1 to 1 1/2 cups of pasta or grain salad, or 2 to 3 savory bites like quiche muffins or spanakopita triangles. For mixed baskets, assume people will pick at several items, so one person may eat less of each and more of the whole spread.
Beverage Pairing:
Iced tea works with almost everything here. Lemonade brightens chicken salad, egg salad, and hummus wraps. Sparkling water with lime or cucumber is the cleanest choice for richer boxes, while cold ginger drinks or ginger ale are strong with banh mi, pulled pork, and steak sandwiches.
Extra Flavor Moves That Make the Basket Better
Flavor Enhancement:
A tiny bit of acid goes a long way in picnic food. A squeeze of lemon in chicken salad, a splash of vinegar in slaw, or a spoon of pickle brine in egg salad keeps cold food from tasting dull. If a filling feels heavy after it’s chilled, acid is usually the fix before anything else.
Customization:
Keep one or two fillings flexible. Chicken salad can take dill, curry powder, chopped apple, or avocado. Pasta salad can take roasted peppers, olives, or extra herbs. That way you can work with what’s in the fridge instead of rebuilding the whole lunch from scratch.
Serving Suggestions:
Use salty, crunchy extras on the side. Chips, pretzels, crackers, and roasted nuts add texture that a soft wrap or salad container doesn’t give you. A small jar of pickles or olives is never wasted in a picnic basket.
Make-It-Yours:
For dairy-free lunches, lean on hummus, tahini, olive oil, and avocado instead of cream cheese or yogurt. For gluten-free baskets, use lettuce cups, rice noodles, corn tortillas, or sturdy crackers. For kid-friendly packs, cut everything smaller and keep sauces separate; kids like control more than they like surprise.
Make-Ahead, Storage, and Cooler Safety
Most of these lunches can be built the night before, but they don’t all hold up the same way. Chicken salad, tuna salad, egg salad, and pulled pork keep well in the refrigerator for 3 to 4 days when stored in sealed containers. Pasta salads usually hold for 3 days, though the herbs look best in the first 24 hours. Cooked fillings like chicken, steak, or pulled pork can be frozen for up to 2 months, but the texture is best when thawed slowly in the fridge.
Sandwiches and wraps are trickier. Tortilla wraps can be assembled the night before if you keep wet ingredients low and roll them tightly. Croissants, ciabatta, bagels, and baguettes are best assembled the same day, ideally within an hour or two of serving. If you’re building for later, pack fillings and bread separately and assemble at the picnic site.
Food safety matters more than style here. Keep the cooler cold with two ice packs if you’re packing several containers, and don’t let perishable food sit out longer than 2 hours, or 1 hour if it’s warm outside. Cold pasta salad, egg salad, tuna salad, chicken salad, and dairy-heavy fillings should stay in the shade and go back into the cooler between servings. Leftovers should be chilled again within that same window.
If you need to reheat anything, keep it gentle. Pulled pork and biscuit sliders can be warmed in a 300°F (150°C) oven, wrapped in foil, for 10 to 12 minutes. Quiche muffins reheat well for about 8 minutes. Everything else on this list is better cold or at room temperature than overheated.
Picnic Variations for Different Eaters
Gluten-Free Basket:
Swap wraps for lettuce cups, gluten-free tortillas, corn crackers, or rice noodles. Tuna stuffed peppers, antipasto boxes, quinoa-style salads, and quiche muffins without crust fit in naturally. The main thing is not to chase a perfect bread replacement when the lunch is better as a box in the first place.
Dairy-Light Cooler:
Use hummus, olive oil, mustard, and avocado instead of cream cheese, yogurt, and heavy cheese spreads. The chickpea pockets, hummus wraps, banh mi, and antipasto boxes adapt cleanly. A little feta or hard cheese can still work if you keep the serving small and the rest of the meal bright.
Vegetarian Rotation:
You can build a very good picnic without chicken or tuna. Chickpea pita pockets, grilled vegetable orzo, spanakopita, caprese pasta salad, falafel pitas, and antipasto boxes all hold their own. Add roasted nuts, hard-boiled eggs, or marinated beans if you want more protein.
Kid-Sized Packs:
Cut pinwheels smaller, slice sandwiches into squares, and choose mild fillings like ham and cheddar, turkey and avocado, or cheese-heavy pasta salad. Kids often prefer the parts separated, so a box with crackers, cheese cubes, fruit, and a few slices of turkey works better than a piled-up sandwich. Smaller portions also help keep lunch from getting tossed after three bites.
Spice-Forward Lunches:
If you want more heat, add sriracha mayo to banh mi, chili crisp to soba noodles, hot sauce to chicken salad, or pickled jalapeños to wraps. Spicy food and cold drinks pair especially well because the drink cools the heat without washing out the flavor. Just keep the heat balanced with acid so it doesn’t feel one-note.
Common Mistakes to Avoid With Picnic Lunches
The first mistake is packing everything warm. Warm fillings create condensation, and condensation turns bread soft and makes salads lose their shape. Cool the food first, then pack it.
The second mistake is treating every lunch like it can sit the same way. Tomato sandwiches, hummus wraps, pasta salad, and egg salad all behave differently. Wet ingredients should be kept separate when possible, and crusty breads should be filled close to serving time. That one habit saves more lunches than any fancy recipe trick.
A third problem is overfilling. People love a tall sandwich, but a picnic sandwich has to survive transport, cutting, and eating by hand. If the filling bulges beyond the bread, it will usually get messy before lunch even starts.
Another one: under-seasoning cold food. Chilling flattens flavor. If the chicken salad, chickpea mix, or pasta salad tastes a touch too mellow before it goes into the cooler, it will taste even flatter later. Salt, lemon, vinegar, mustard, herbs, and pickles are what keep these lunches awake.
Last, don’t ignore container choice. A flimsy bag or soft-sided box lets food slide around and crushes delicate items like pinwheels and quiche muffins. Use rigid containers for anything you want to keep neat.
Picnic Lunch FAQs

Can I make these picnic lunch ideas the night before?
Yes, most of them are built for that. Chicken salad, egg salad, tuna salad, pasta salads, quiche muffins, and antipasto boxes all hold up overnight in the fridge. Sandwiches and wraps are the only ones I’d build late if possible, especially if they contain tomatoes or soft bread.
What’s the best bread for a picnic sandwich?
Use bread with structure: croissants, ciabatta, baguettes, pita, rye, or biscuits. Soft white sandwich bread usually gets soggy faster and compresses under the weight of fillings. If you love soft bread, toast it lightly or keep wet ingredients off it until the last minute.
How do I keep wraps from falling apart?
Dry the fillings, roll tightly, and wrap the finished wrap in parchment before slicing. A thin layer of hummus, cream cheese, or avocado can act like glue, but too much filling will push the seam open. If you’re making them ahead, chill them for 10 to 15 minutes so the roll firms up.
Can I leave these lunches out all afternoon?
Not safely if they contain dairy, eggs, meat, fish, or mayo. Keep them in a cooler until you’re ready to eat, and use the 2-hour rule as your ceiling, or 1 hour if the weather is warm. If the lunch has been sitting out longer than that, it’s better not to save it.
What’s the easiest picnic lunch for a crowd?
Antipasto boxes, pasta salad cups, pinwheels, and biscuit sliders are the least fussy for a group. They can be portioned ahead of time, and people can grab what they want without needing a serving spoon or a pile of plates. That alone makes the whole picnic feel calmer.
Can I make these lunches without a cooler?
Yes, but choose the sturdier and less perishable options: antipasto boxes, chickpea pitas packed cold, hummus wraps, and dry sandwiches assembled close to eating. Avoid egg salad, tuna salad, and anything dairy-heavy if the food will sit in the open for long. A small insulated bag with one ice pack helps more than people think.
Which lunches work best with sparkling water or lemonade?
Bright, salty, and herb-heavy lunches usually shine with cold drinks. Chicken salad, chickpea pita pockets, banh mi, falafel pitas, and hummus wraps all pair nicely with lemonade or sparkling water because the drink cuts through the salt and fat. Richer options like pulled pork or steak do better with iced tea or a sharper citrus drink.
How can I keep picnic food from getting soggy?
Keep wet ingredients separate when you can, dry produce well, and use a barrier like lettuce, cheese, or hummus on the bread. Pack crackers and chips away from moist foods, and don’t dress salads until you’re close to serving time if the recipe allows it. That little bit of separation changes everything.
A Basket Worth Packing
A good picnic lunch is less about novelty and more about control. If the bread holds, the filling stays cold, and the flavors still taste sharp after a short ride in a cooler, you’re already ahead. That’s why these picnic lunch ideas work: they respect the trip, and they still taste like someone cared.
The nicest part is how mix-and-match they are. You can build a basket around one sandwich, one salad, one box, and one cold drink, or keep the whole thing simple with two or three recipes that travel well. Either way, the lunch feels thought through instead of improvised in the parking lot, which is usually where picnic plans start to wobble.