
A picnic sandwich earns its keep the moment the bread kisses the grill and comes back with a hard-edged crust, a little smoke, and enough structure to survive a paper wrap. That’s the whole trick, really. A grilled sandwich for the weekend picnic should taste like something you planned, not something you slapped together because the cooler was getting warm and people were hovering.
The best picnic sandwich ideas for the grill do one very practical thing: they keep moisture where it belongs. That means salting tomatoes before they go anywhere near the bread, using cheeses that melt without turning oily, and choosing rolls or slices that can handle a bit of heat without collapsing into a soggy mess. I’ve got a soft spot for breads with some backbone — sourdough, ciabatta, hoagie rolls, even a good brioche bun if the filling is careful.
These forty ideas lean into that logic. Some are smoky and rich. Some are sharp and salty. A few are bright enough to eat in full sun, which matters more than people admit. And because a picnic sandwich should travel as well as it tastes, every one of these is built to be wrapped, carried, and eaten without a fork if that’s the mood.
Why You’ll Love This Collection
-
Grill-Ready Structure: These sandwiches are built with bread and fillings that hold together after a few minutes on the grate, so you get crisp edges instead of collapsed middles.
-
Picnic-Friendly Timing: Most of them can be grilled in under 15 minutes once the fillings are prepped, which means less standing around the fire.
-
Big Flavor, Short Ingredient Lists: You’ll see a lot of smart pairings — tomato and mozzarella, turkey and cranberry, shrimp and Cajun spice — that do most of the work for you.
-
Works With Leftovers: Grilled chicken, roast beef, pulled pork, and roasted vegetables all slide into these ideas without feeling like a second-choice meal.
-
Hot, Warm, or Room Temp: Several of these taste just as good after a short rest, which is exactly what you want when the picnic blanket is already spread out.
-
Enough Variety for a Crowd: Beef, chicken, pork, seafood, vegetarian, breakfast, and even a few sweet-savory combinations show up here, so nobody gets stuck eating the same thing twice.
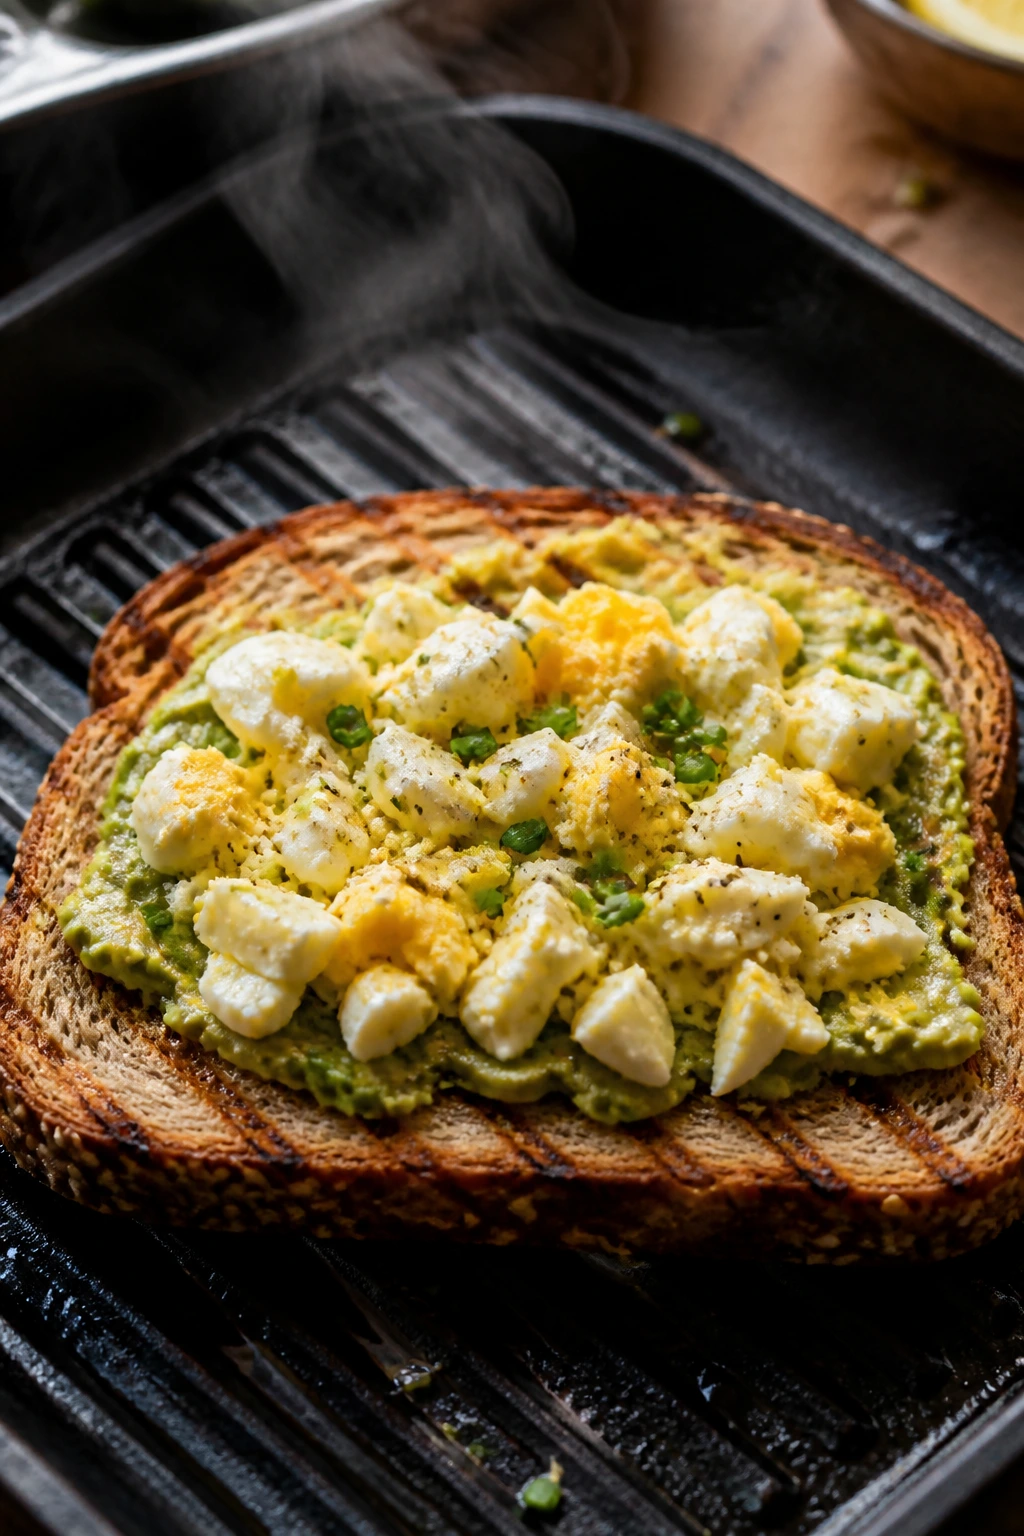
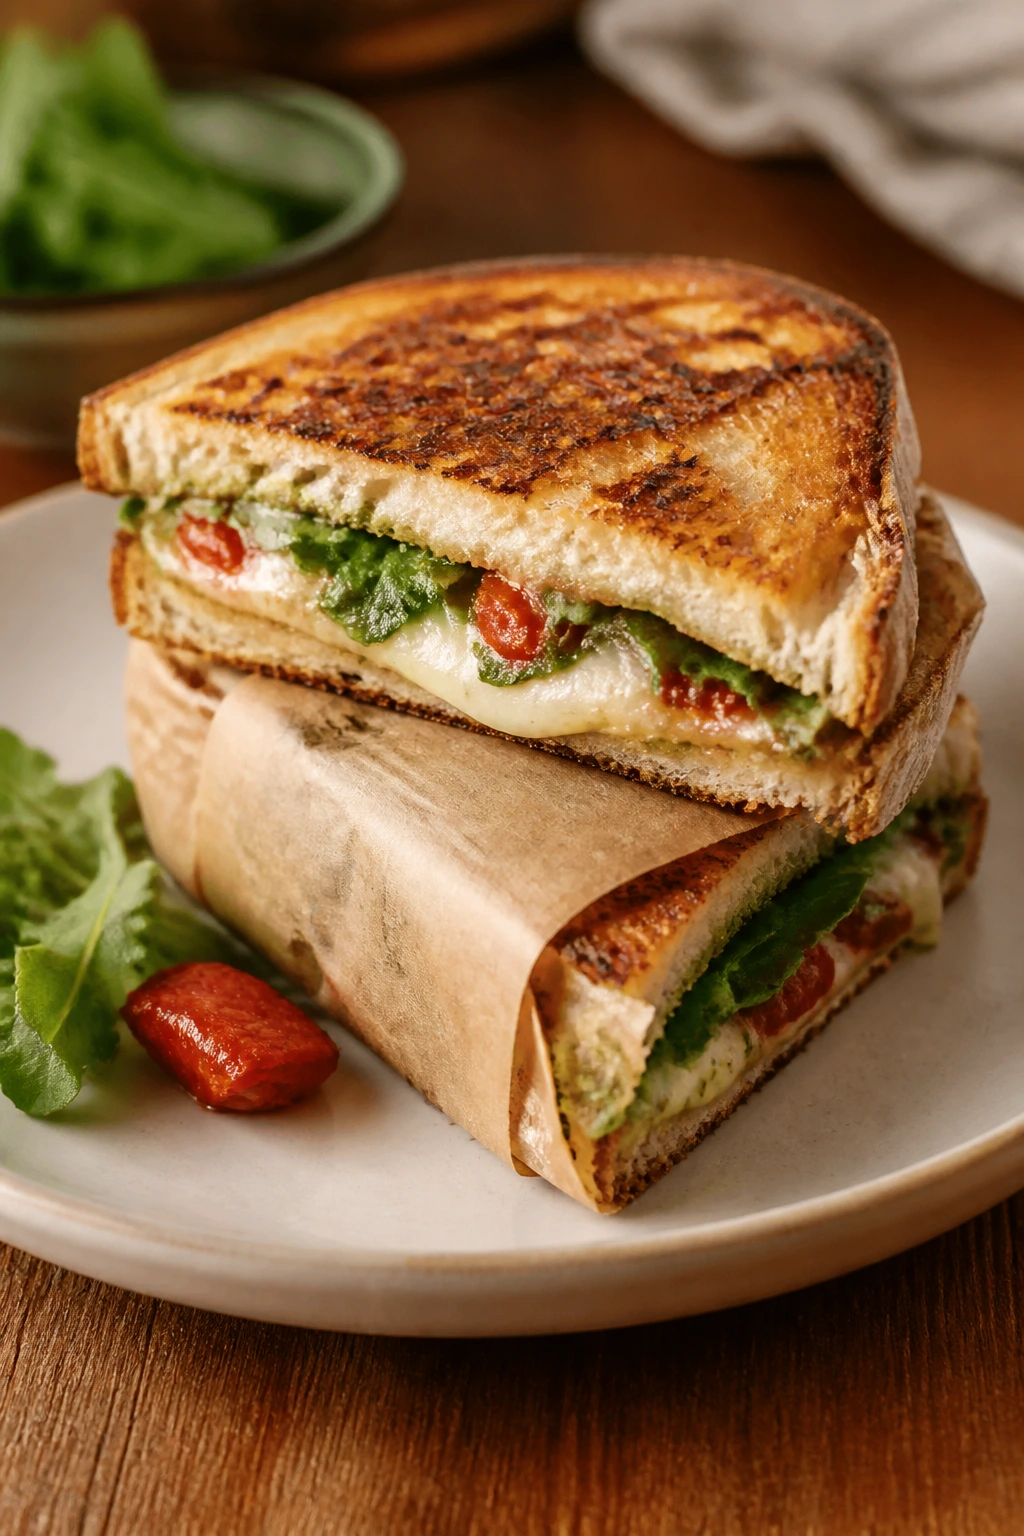
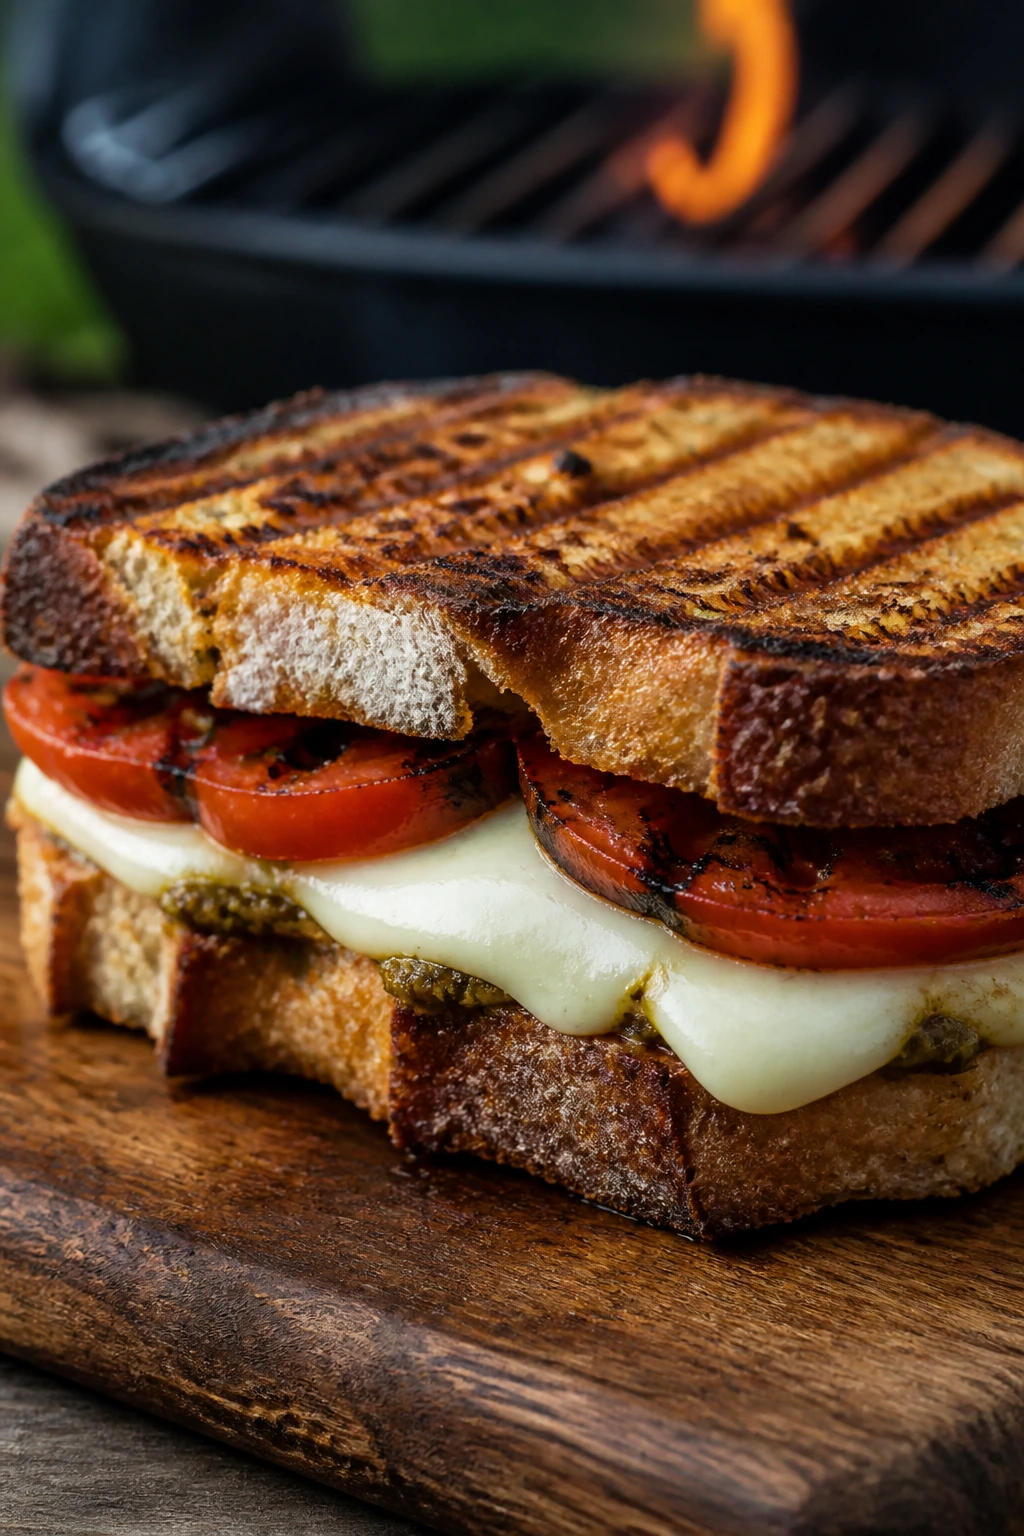
1. Charred Tomato and Fresh Mozzarella Press
Fresh mozzarella softens fast on the grill, and that little bit of tomato sweetness gives the whole sandwich a clean, juicy snap. I like this one on sourdough because the crust gets sturdy without going dry.
Why It Works: The tomato gets salted first, which keeps the bread from going wet, and the mozzarella melts just enough to glue everything together without spilling everywhere.
Key Ingredients:
- 4 slices sourdough bread
- 1 large tomato, sliced 1/4 inch thick
- 6 oz fresh mozzarella, sliced
- 2 tablespoons basil pesto
- 1 tablespoon olive oil
- 1 tablespoon balsamic glaze
Quick Steps:
- Preheat the grill to medium, about 375°F, and brush the outside of the bread with olive oil.
- Salt the tomato slices for 5 minutes, then blot them dry with paper towels.
- Spread pesto on the inside of the bread, layer tomato and mozzarella, then close the sandwich.
- Grill 2 to 3 minutes per side, pressing lightly, until the bread is marked and the cheese starts to ooze.
Equipment for This Recipe:
- Grill or grill pan
- Wide spatula
- Pastry brush
How to Serve This Dish: Cut it into triangles and wrap each one in parchment. A handful of kettle chips or a cucumber salad keeps the plate from feeling heavy.
Pro Tips for This Recipe:
- Use tomatoes that feel firm, not watery.
- Let the sandwich rest 2 minutes before cutting so the cheese settles.
- A little balsamic glaze goes a long way.
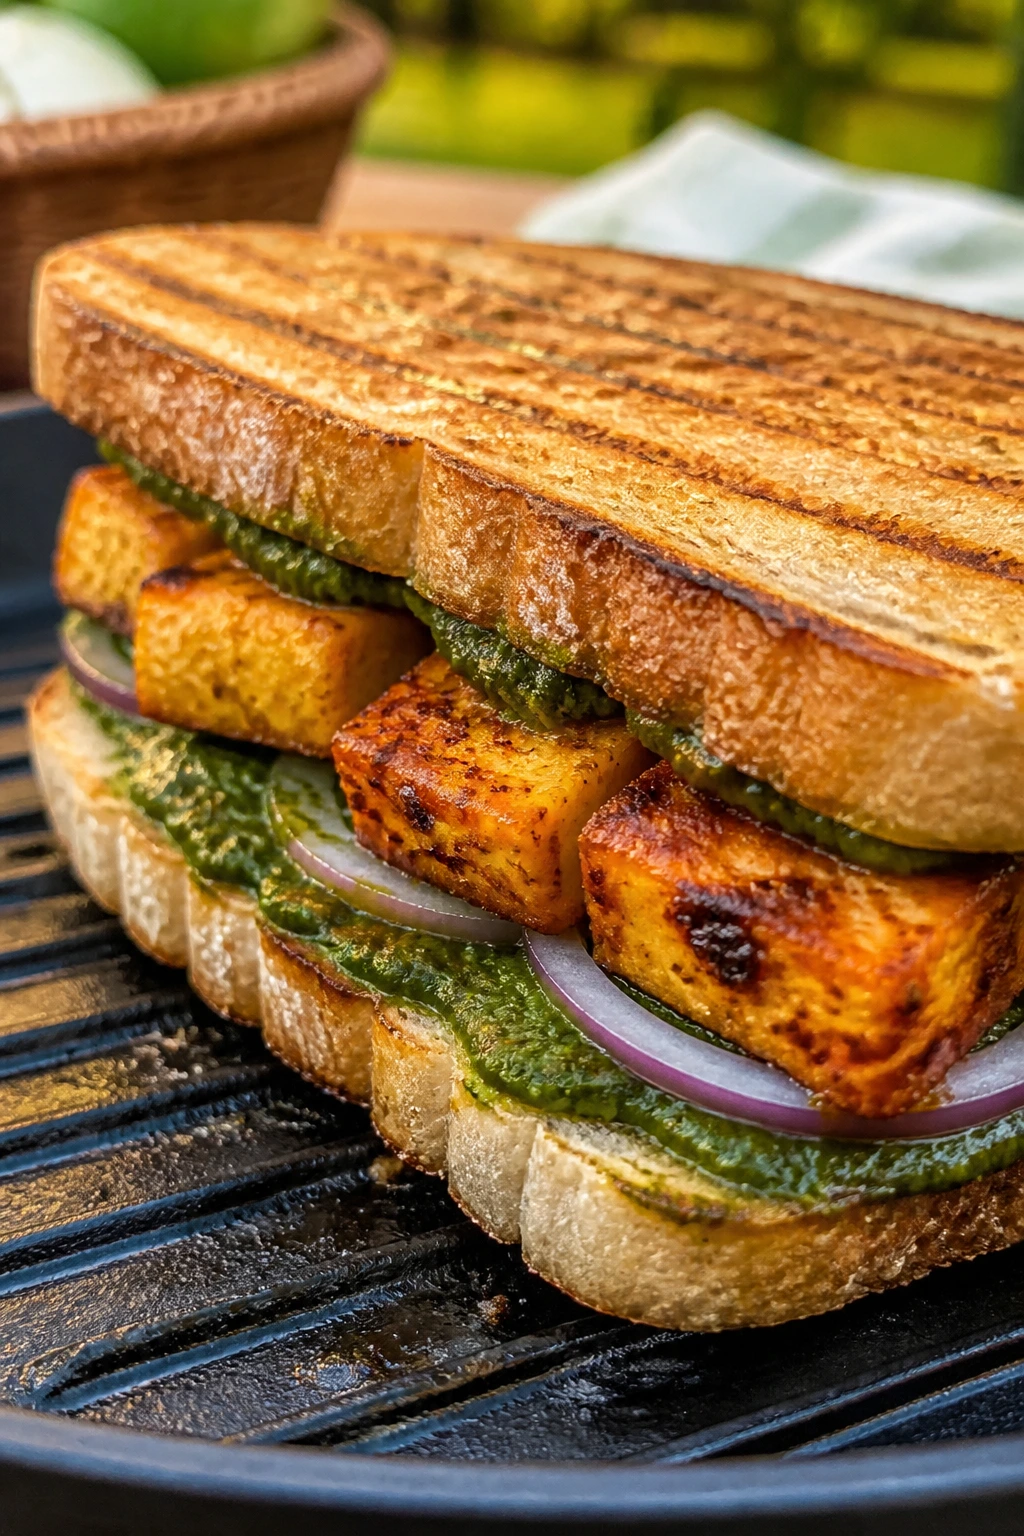
Variations on This Dish:
- Pesto-Heavy Version: Add another tablespoon of pesto and skip the glaze.
- Heirloom Slice: Use heirloom tomatoes for a sweeter, softer bite.
Common Mistakes to Avoid with This Dish:
- Don’t skip blotting the tomatoes or the bread will steam.
- Don’t use high heat; the bread will darken before the cheese melts.
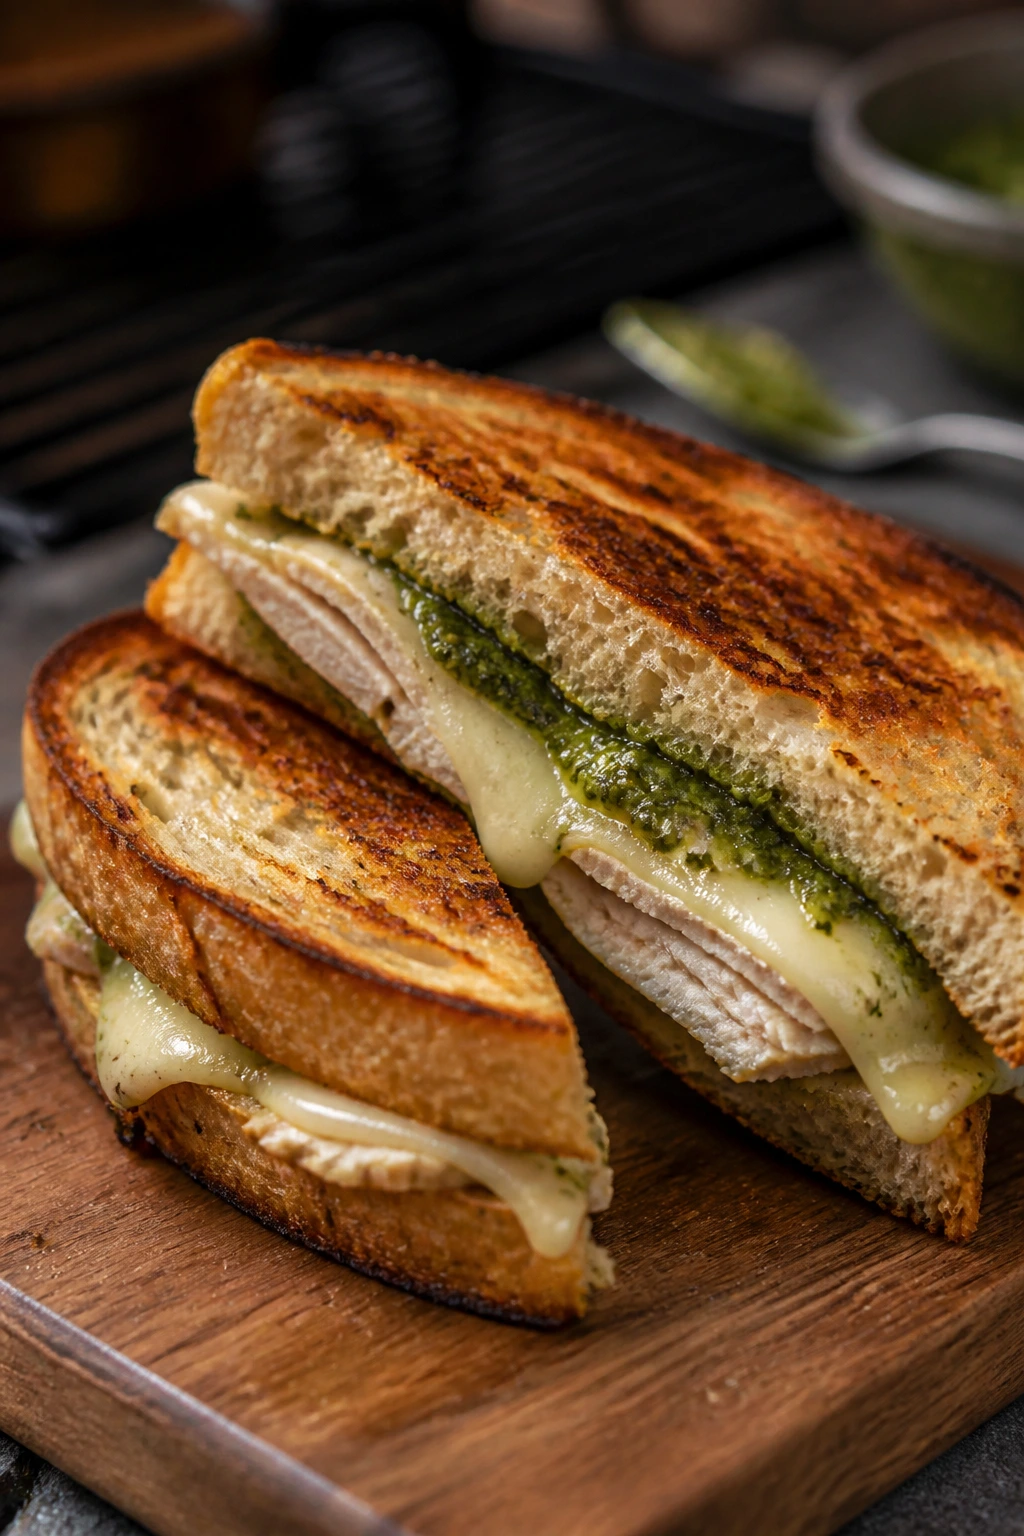
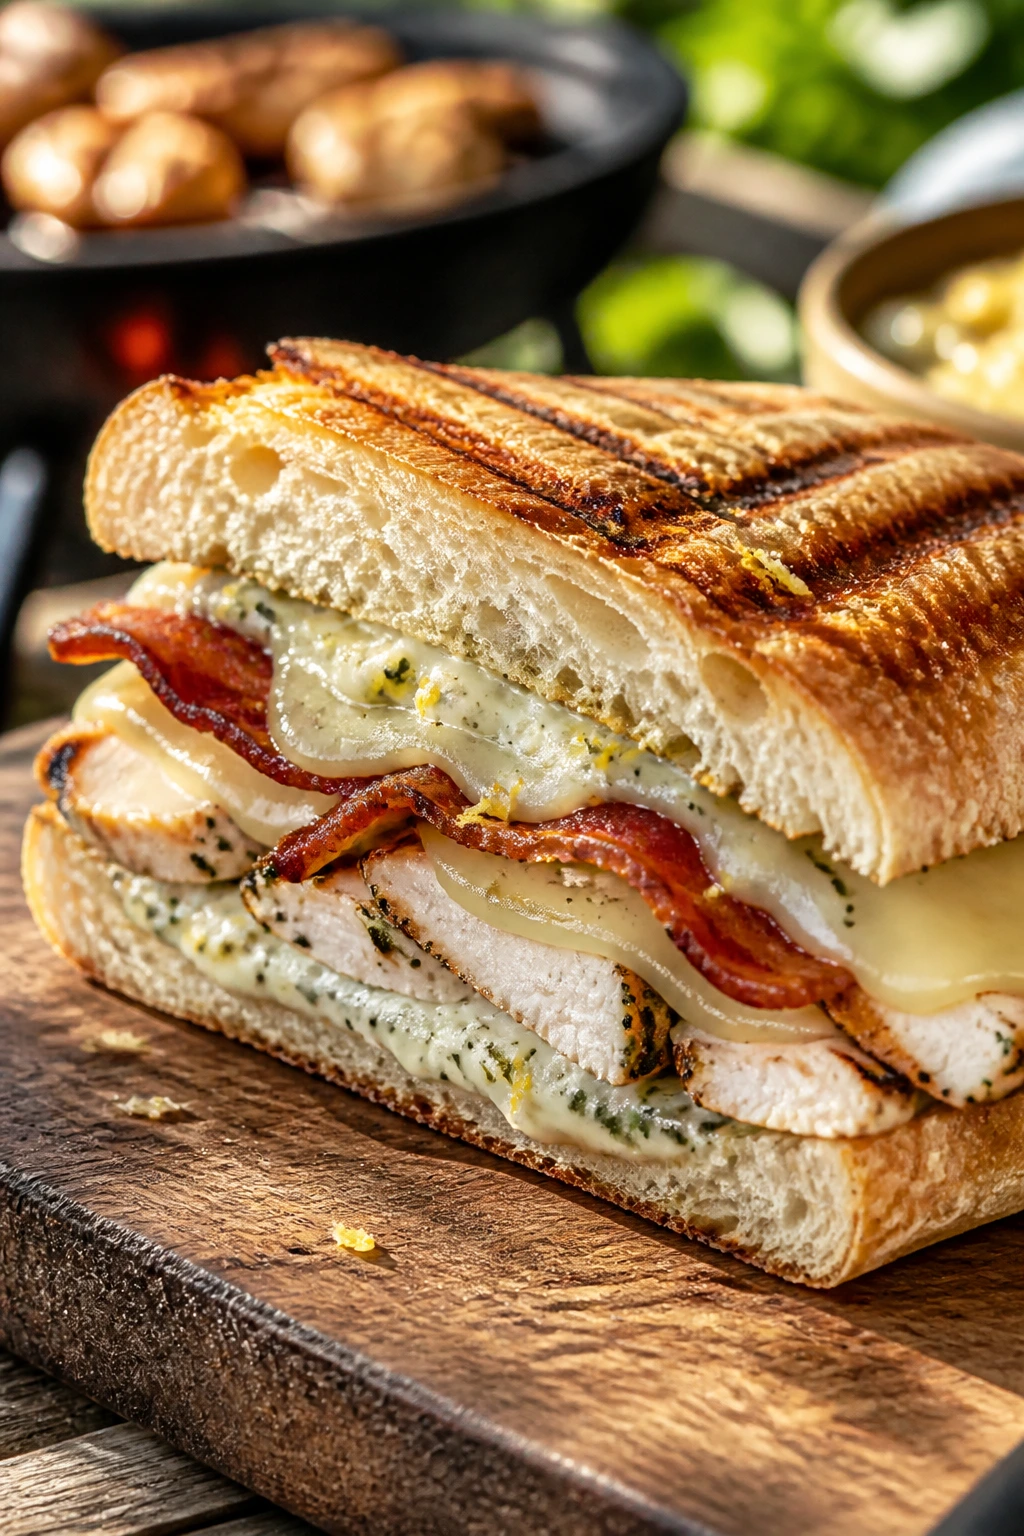
2. Lemon-Herb Chicken Club Melt
This one tastes like a picnic that got dressed up a little. The chicken is bright with lemon, the bacon gives it crunch, and the provolone melts into the bread in all the right places.
Why It Works: Grilled chicken breast stays lean, but the mayo and cheese keep the sandwich from feeling dry, which is the main failure point of a bad chicken club.
Key Ingredients:
- 2 grilled chicken breasts, sliced
- 4 slices thick-cut bacon, cooked
- 4 slices ciabatta
- 4 slices provolone
- 2 tablespoons mayonnaise
- 1 teaspoon lemon zest
- 1 tablespoon chopped parsley
Quick Steps:
- Mix mayonnaise, lemon zest, and parsley in a small bowl.
- Split the ciabatta and spread the lemon mayo on the cut sides.
- Layer chicken, bacon, and provolone, then close the sandwich.
- Grill over medium heat for 3 minutes per side until the bread is crisp and the cheese melts.
Equipment for This Recipe:
- Grill
- Sharp knife
- Spatula
How to Serve This Dish: Add arugula after grilling if you want a peppery bite. Potato salad works well here, especially one with mustard in it.
Pro Tips for This Recipe:
- Slice the chicken thin so the sandwich stays flat.
- Cook the bacon until it’s crisp; floppy bacon turns chewy on the grill.
- If your ciabatta is very airy, press it down with a grill-safe weight.
Variations on This Dish:
- Dill Club: Swap parsley for dill and add sliced cucumber.
- Spicy Club: Stir a spoonful of hot sauce into the mayo.
Common Mistakes to Avoid with This Dish:
- Don’t pile the chicken too high or the sandwich will roll apart.
- Don’t skip the lemon in the mayo; it wakes up the whole thing.
3. Philly Steak and Pepper Hoagie
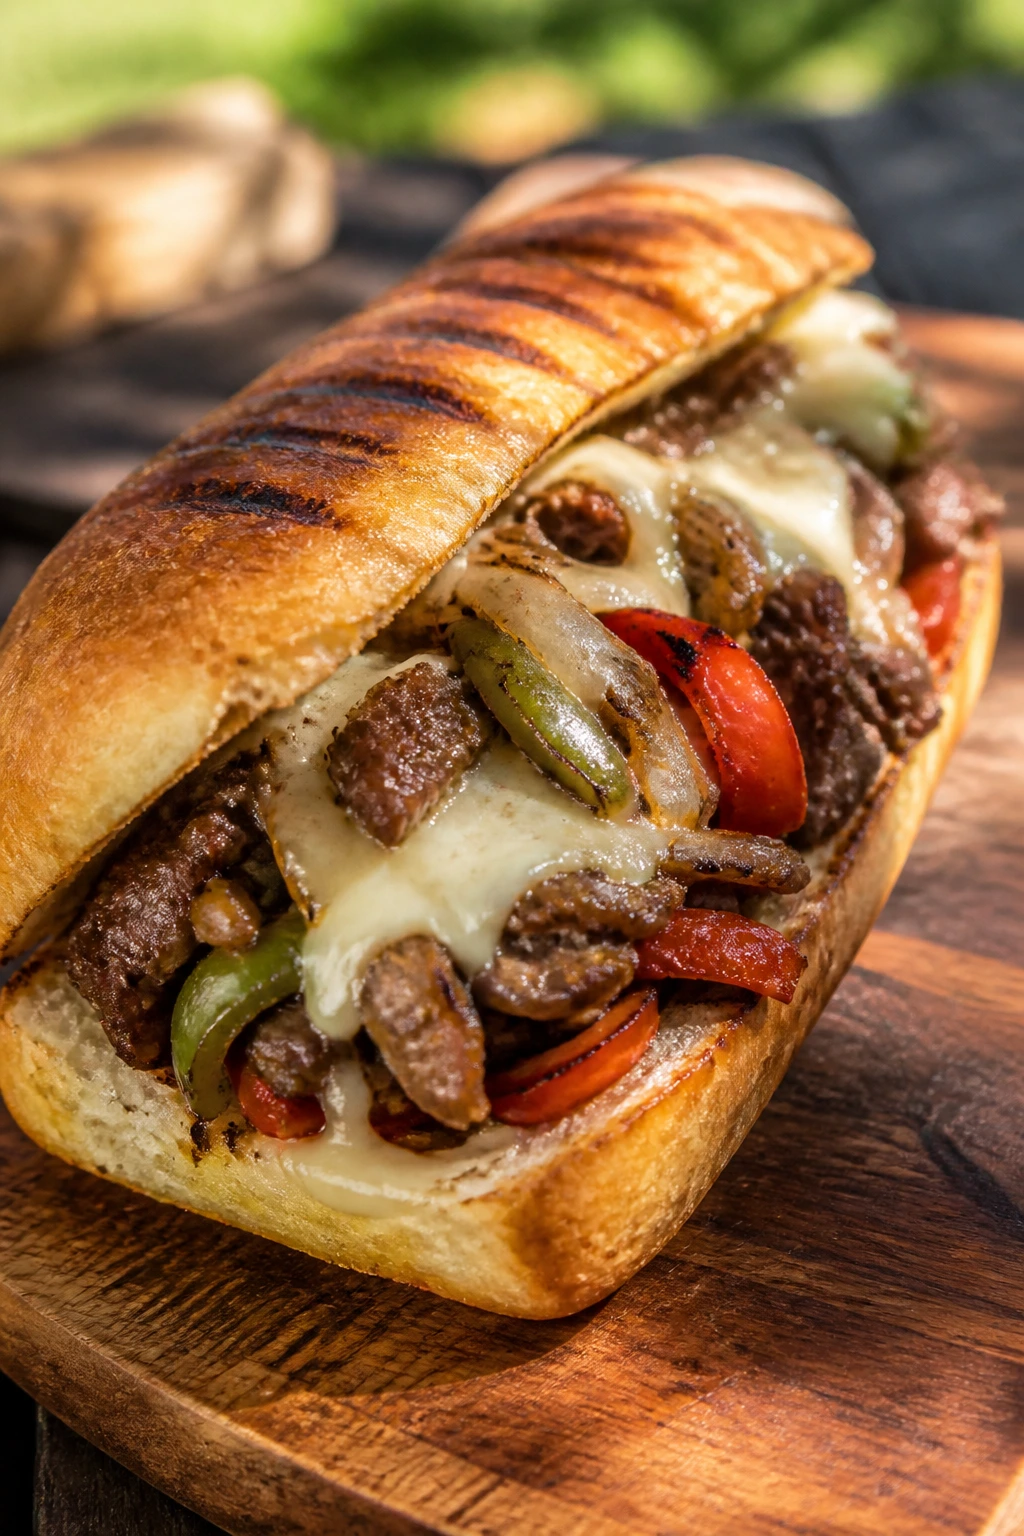
This is the sandwich that smells like a summer cookout the second the onions hit the heat. Thin steak, softened peppers, and melted provolone make it messy in the best way.
Why It Works: Shaved beef cooks fast and stays tender, while the peppers and onions give the sandwich enough moisture to feel juicy without turning the roll soggy.
Key Ingredients:
- 1 pound shaved ribeye or thin-sliced steak
- 1 green bell pepper, sliced
- 1 onion, sliced
- 4 hoagie rolls
- 6 slices provolone
- 1 tablespoon oil
- 1 teaspoon salt
Quick Steps:
- Preheat the grill to medium-high and oil a grill basket or cast-iron skillet.
- Cook the onions and peppers for 6 to 8 minutes until softened and lightly charred.
- Add the steak, salt, and cook for 2 to 3 minutes until just browned.
- Fill the rolls, top with provolone, and grill 1 minute more until the cheese melts.
Equipment for This Recipe:
- Grill basket or cast-iron skillet
- Tongs
- Hoagie rolls
How to Serve This Dish: Serve it wrapped in foil so it stays warm for the walk to the picnic table. Pickles on the side cut through the richness nicely.
Pro Tips for This Recipe:
- Freeze the steak for 15 minutes before slicing if you’re cutting it yourself.
- Use rolls with a little chew, not soft hot dog buns.
- A small smear of mayo on the bread helps it toast evenly.
Variations on This Dish:
- Mushroom Philly: Add sliced mushrooms with the peppers.
- Sharp Cheddar Philly: Swap provolone for cheddar if you want more bite.
Common Mistakes to Avoid with This Dish:
- Don’t overcook the steak or it turns stringy.
- Don’t overload the roll with vegetables; the sandwich needs room to close.
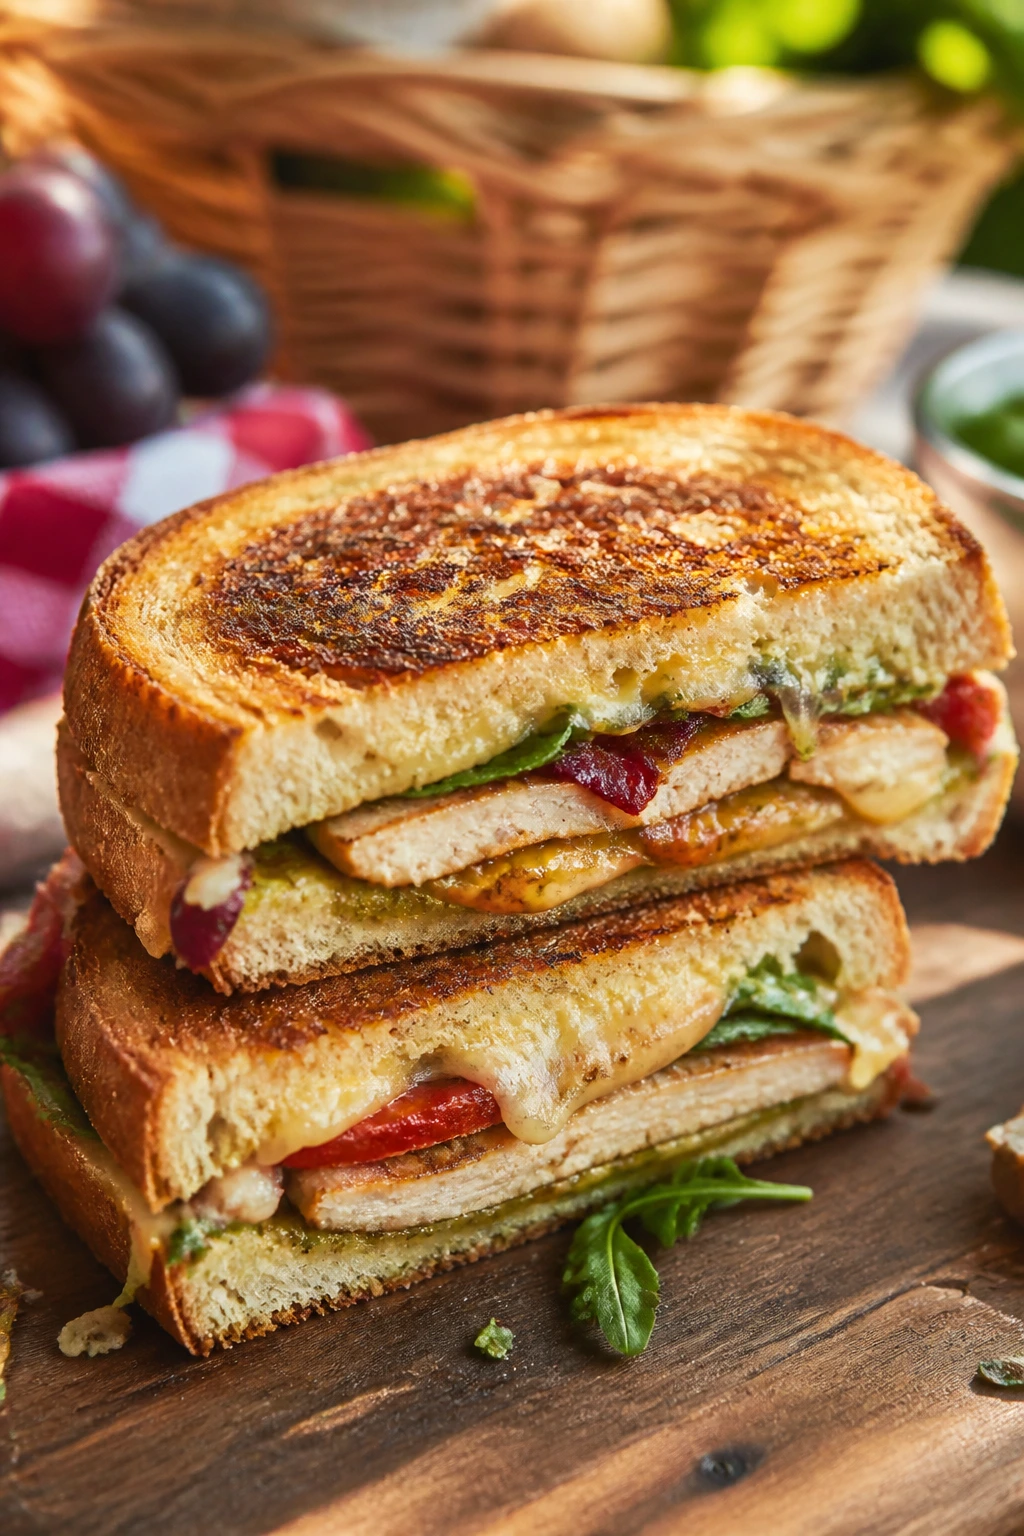
4. Pesto Turkey and Provolone Toastie
If you have leftover turkey, this is the move. Pesto gives it a herbal punch, and provolone melts into a smooth layer that tastes more intentional than it has any right to.
Why It Works: Turkey is mild, so the pesto and cheese carry the flavor, and the bread gets a sturdy, crisp shell that holds up beautifully in parchment.
Key Ingredients:
- 8 oz sliced turkey
- 4 slices country bread
- 4 slices provolone
- 2 tablespoons basil pesto
- 1 small tomato, sliced
- 1 tablespoon butter, softened
Quick Steps:
- Butter the outside of each bread slice.
- Spread pesto on the inside, then layer turkey, tomato, and provolone.
- Close the sandwich and grill over medium heat for 2 to 3 minutes per side.
- Cook until the bread is golden and the cheese melts at the edges.
Equipment for This Recipe:
- Grill pan or grill
- Spatula
- Butter knife
How to Serve This Dish: Cut it into narrow strips for easy sharing. A bowl of grapes or a simple green salad keeps the picnic basket light.
Pro Tips for This Recipe:
- Drain tomato slices on paper towels before building.
- Use a thin layer of pesto; too much makes the bread slippery.
- Press the sandwich once, not repeatedly.
Variations on This Dish:
- Sun-Dried Tomato Version: Add chopped sun-dried tomatoes for more punch.
- Mozzarella Swap: Use mozzarella if you want a softer melt.
Common Mistakes to Avoid with This Dish:
- Don’t use pesto so thickly that it squishes out when you flip.
- Don’t grill on very high heat; the butter will burn before the cheese warms.
5. Ham, Peach, and Swiss Grill
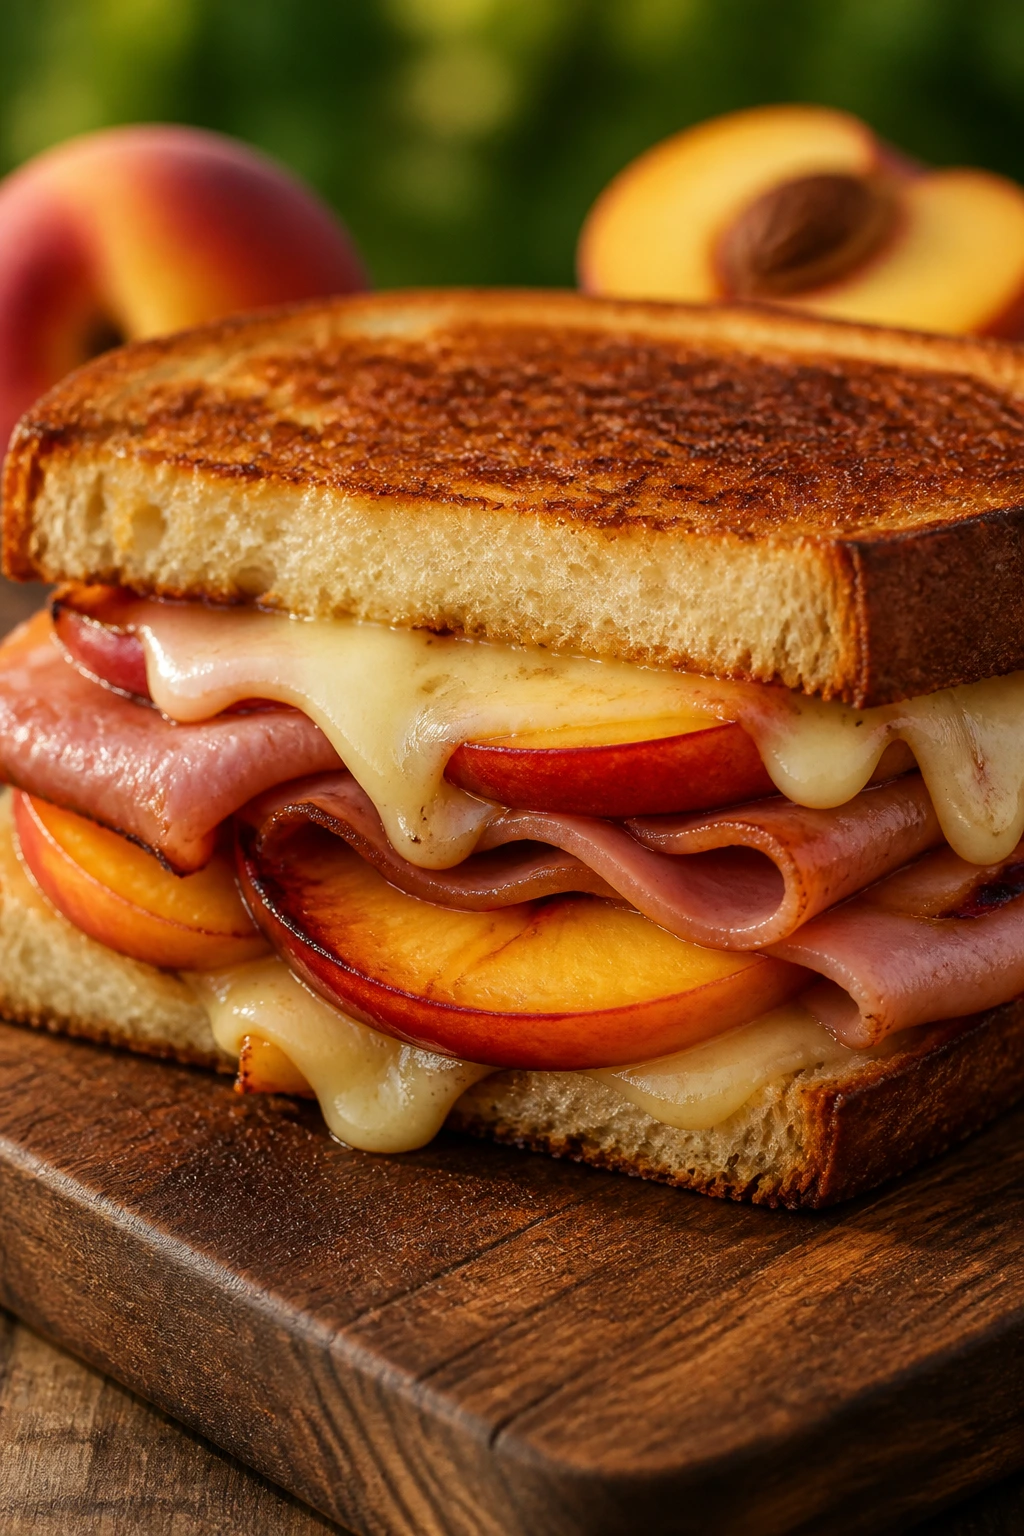
Sweet peaches and salty ham sound odd until you eat the first bite. Then it makes perfect sense, especially with Swiss cheese lending a nutty finish.
Why It Works: The peach slices soften just enough on the grill to turn jammy at the edges, while the ham stays savory and the Swiss keeps everything grounded.
Key Ingredients:
- 4 slices rustic bread
- 6 oz sliced ham
- 1 ripe peach, pitted and sliced
- 4 slices Swiss cheese
- 1 tablespoon Dijon mustard
- 1 tablespoon butter
Quick Steps:
- Butter the outside of the bread and spread Dijon on the inside.
- Layer ham, peach slices, and Swiss cheese.
- Grill over medium heat for 2 to 3 minutes per side.
- Cook until the bread is browned and the peaches are just soft.
Equipment for This Recipe:
- Grill or skillet
- Knife
- Spatula
How to Serve This Dish: Serve it warm with a handful of salty chips. If the peaches are very juicy, wrap the sandwich in parchment and let it sit 1 minute before cutting.
Pro Tips for This Recipe:
- Use peaches that are ripe but still firm.
- Keep the mustard layer thin; it should sharpen, not dominate.
- Swiss melts best when it’s sliced evenly.
Variations on This Dish:
- Prosciutto Peach: Swap ham for prosciutto.
- Honey Mustard Peach: Stir a little honey into the mustard.
Common Mistakes to Avoid with This Dish:
- Don’t use overripe peaches; they’ll slide out.
- Don’t skip the butter on the outside or the bread won’t brown evenly.
6. Brioche Smash Burger Sandwich
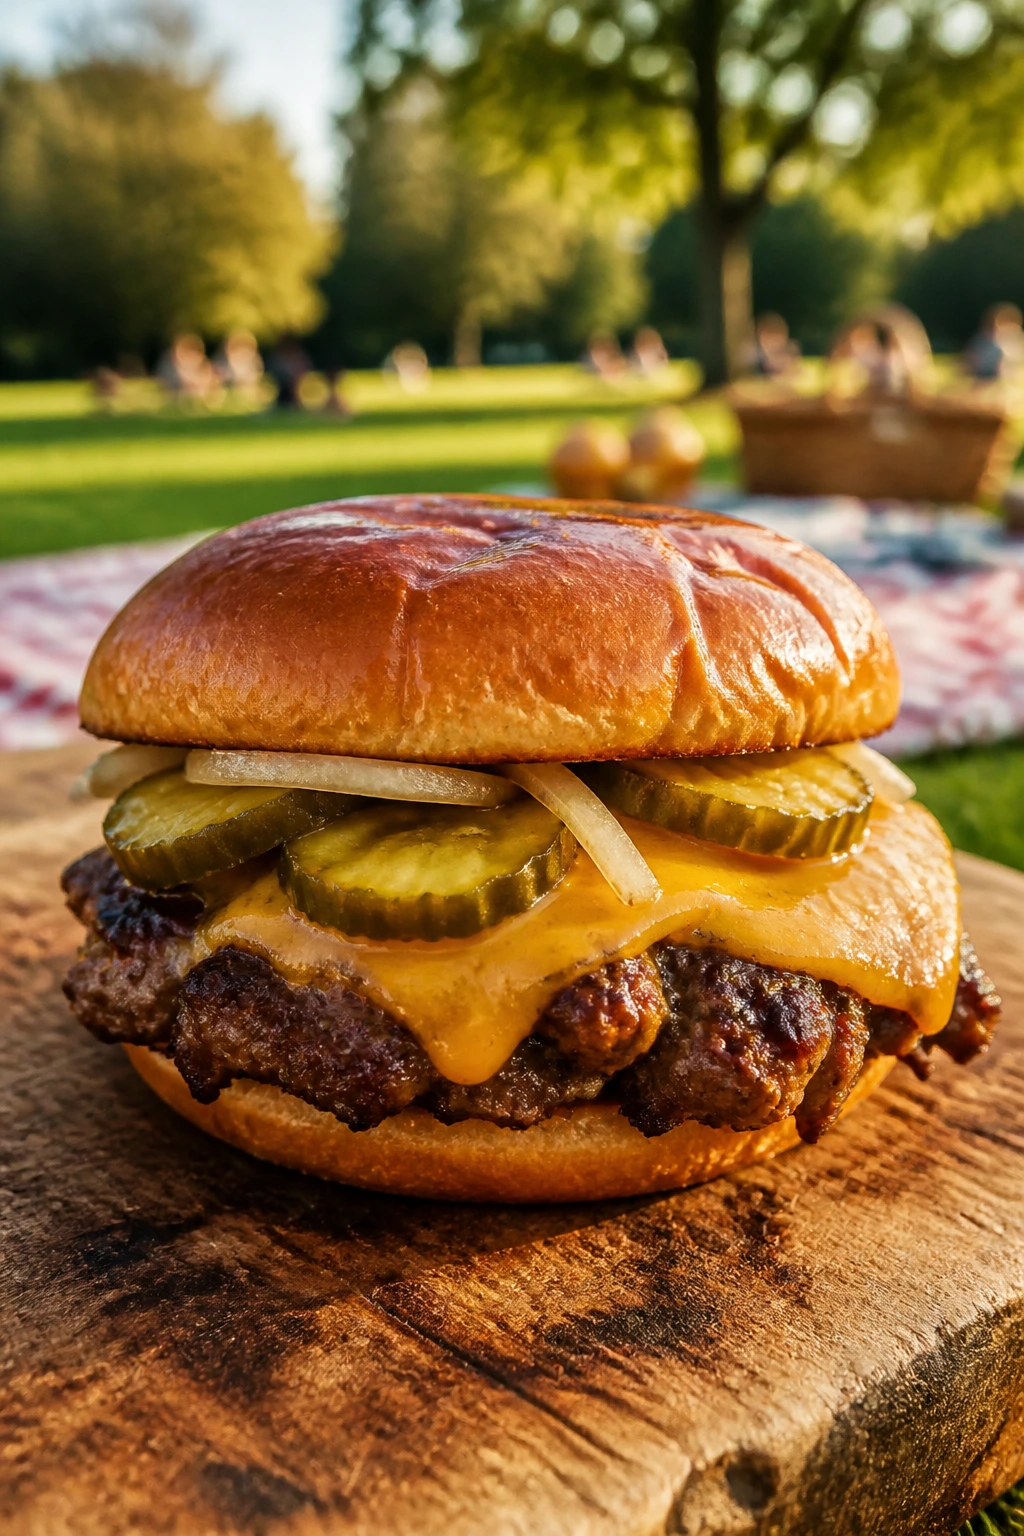
A smash burger in sandwich form is a little decadent and a little chaotic, which is exactly why it works at a picnic. The bun gets toasted, the cheese melts into the beef, and the pickles bring the whole thing back to life.
Why It Works: Thin patties cook fast on the grill, so the beef stays juicy, and the brioche gives you a soft, slightly sweet frame that handles the grease without falling apart.
Key Ingredients:
- 1 pound ground beef, divided into 4 balls
- 4 brioche buns
- 4 slices American or cheddar cheese
- 1 small onion, thinly sliced
- 8 dill pickle chips
- 2 tablespoons burger sauce or mayo
Quick Steps:
- Heat the grill to medium-high and oil the grates well.
- Smash each beef ball into a thin patty and grill 2 minutes on the first side.
- Flip, top with cheese, and cook 1 minute more until melted.
- Toast the buns, then build with sauce, onion, pickles, and patties.
Equipment for This Recipe:
- Grill
- Wide metal spatula
- Oil brush
How to Serve This Dish: Wrap each burger tightly so the bun holds its shape. Fries are obvious, but a pile of vinegar-dressed slaw works even better.
Pro Tips for This Recipe:
- Keep the patties cold until they hit the grill.
- Don’t press after the flip; the juices should stay inside.
- Toast the buns cut-side down for about 30 seconds.
Variations on This Dish:
- BBQ Smash: Add barbecue sauce and crispy onions.
- Jalapeño Burger: Add sliced jalapeños to the cheese melt.
Common Mistakes to Avoid with This Dish:
- Don’t make thick patties; smash burgers depend on surface area.
- Don’t use buns that are too soft or they’ll collapse under the juices.
7. Bacon, Apple, and Cheddar Melt
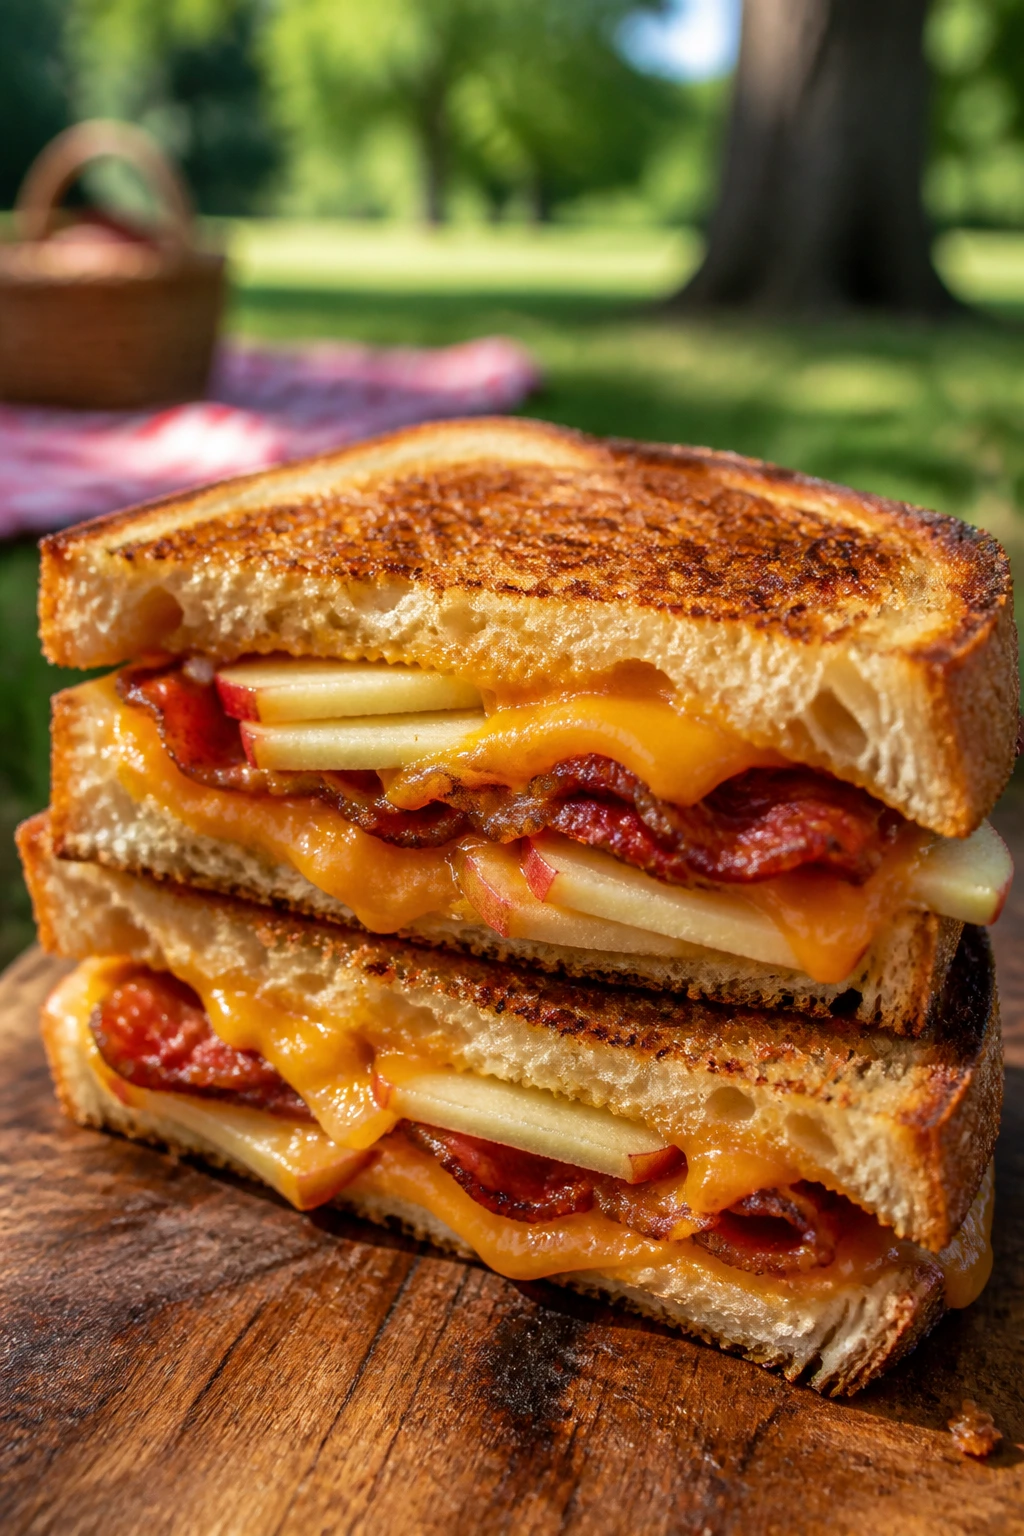
This one leans sharp, salty, and just a little sweet. The apple slices keep things crisp, which is a useful trick when bacon and cheddar are doing most of the heavy lifting.
Why It Works: Cheddar has enough bite to stand up to the apple, and the grilled bread gives the sandwich a firm shell that keeps the filling from wandering.
Key Ingredients:
- 4 slices sourdough
- 4 slices cheddar cheese
- 4 slices bacon, cooked crisp
- 1 small apple, thinly sliced
- 1 teaspoon Dijon mustard
- 1 tablespoon butter
Quick Steps:
- Butter the outside of the bread and spread Dijon on the inside.
- Layer cheddar, bacon, apple slices, and more cheddar.
- Grill over medium heat for 2 to 3 minutes per side.
- Remove when the cheese is melted and the bread is deep golden.
Equipment for This Recipe:
- Grill
- Knife
- Spatula
How to Serve This Dish: Slice it into small rectangles for picnic snacking. A few cornichons on the side keep the sweetness from taking over.
Pro Tips for This Recipe:
- Use a crisp apple like Honeycrisp or Pink Lady.
- Slice the apple thin; thick wedges make the sandwich slip.
- A second slice of cheese on top helps lock everything in.
Variations on This Dish:
- Smoked Gouda Version: Swap cheddar for smoked gouda.
- Maple Bacon Version: Brush the bacon lightly with maple before assembling.
Common Mistakes to Avoid with This Dish:
- Don’t use soft apples; they disappear into the cheese.
- Don’t overload with bacon grease or the bread will get slick.
8. Halloumi and Grilled Zucchini Stack
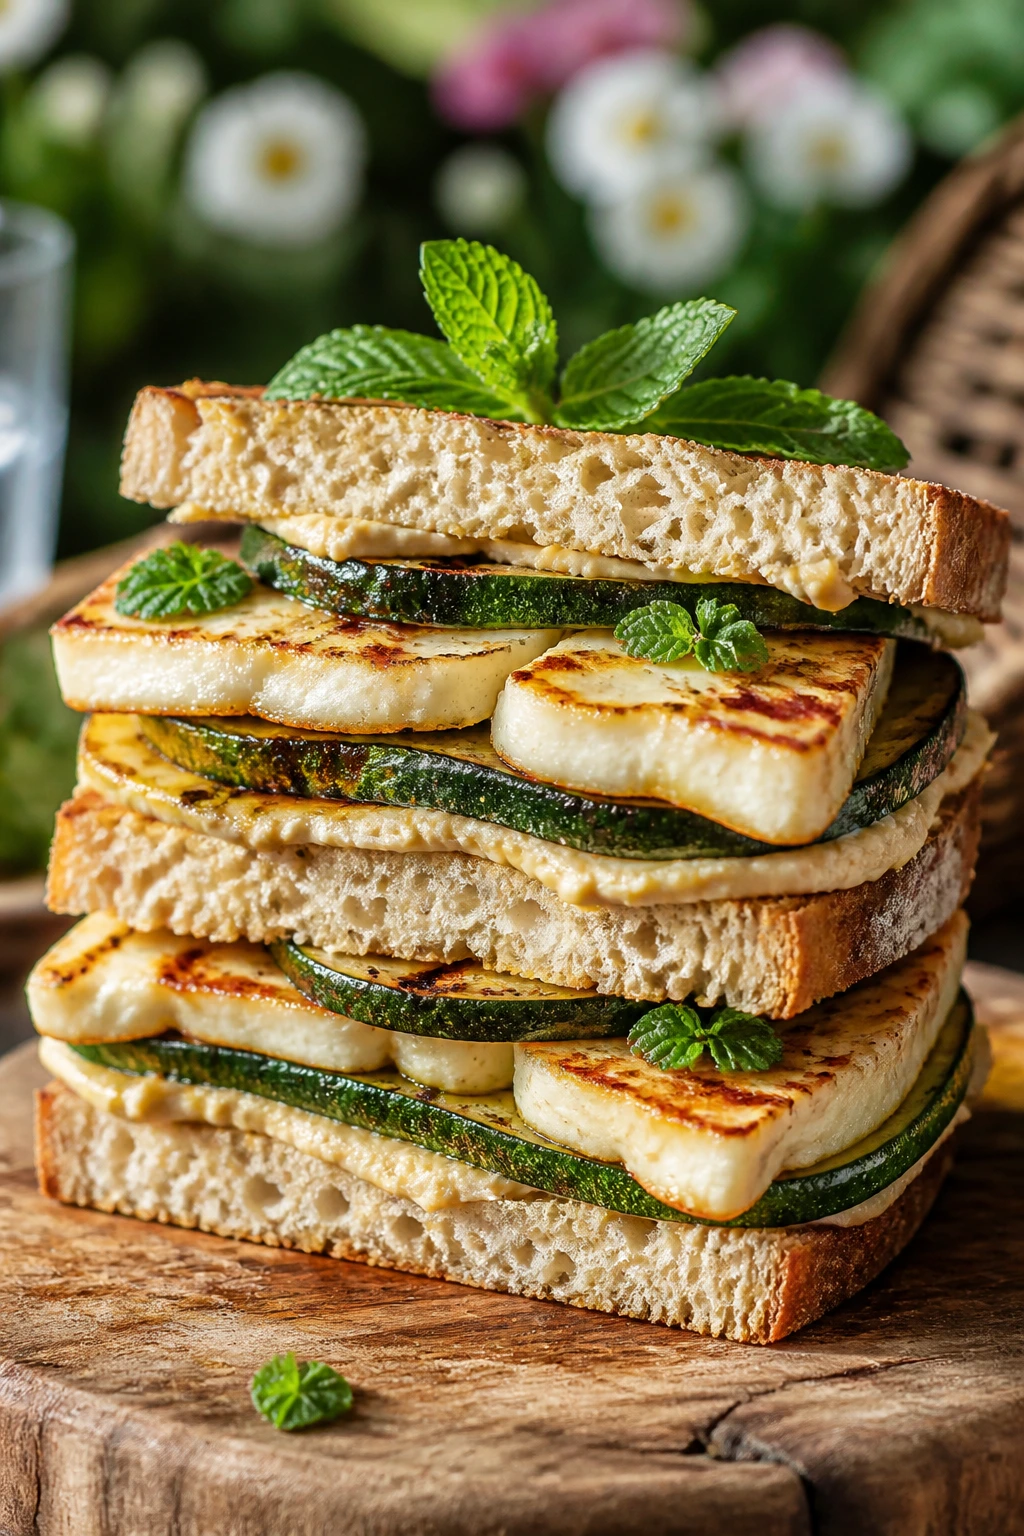
Halloumi was made for heat. It browns instead of melting, which gives you a salty chew that plays nicely with soft zucchini and a slice of hearty bread.
Why It Works: Halloumi keeps its shape on the grill, and that means the sandwich stays neat enough to wrap, even with vegetables inside.
Key Ingredients:
- 8 oz halloumi, sliced
- 1 zucchini, sliced lengthwise
- 4 slices ciabatta
- 2 tablespoons hummus
- 1 tablespoon olive oil
- 1 tablespoon chopped mint
Quick Steps:
- Brush zucchini and halloumi with olive oil.
- Grill both over medium-high heat for 2 to 3 minutes per side until marked.
- Spread hummus on the bread and layer zucchini, halloumi, and mint.
- Close the sandwich and grill 1 minute per side to warm the bread.
Equipment for This Recipe:
- Grill basket or grate
- Tongs
- Spatula
How to Serve This Dish: Serve with lemon wedges and a tomato salad. It’s one of the few sandwiches here that gets better with a little squeeze of citrus.
Pro Tips for This Recipe:
- Pat the halloumi dry first so it browns instead of steaming.
- Don’t slice the zucchini too thin or it turns limp.
- Add the mint after grilling so it stays bright.
Variations on This Dish:
- Roasted Pepper Halloumi: Add strips of grilled red pepper.
- Tahini Drizzle: Swap hummus for a thin tahini sauce.
Common Mistakes to Avoid with This Dish:
- Don’t crowd the grill basket; the cheese needs direct heat.
- Don’t overcook halloumi or it gets rubbery.
9. Buffalo Chicken Ranch Sandwich
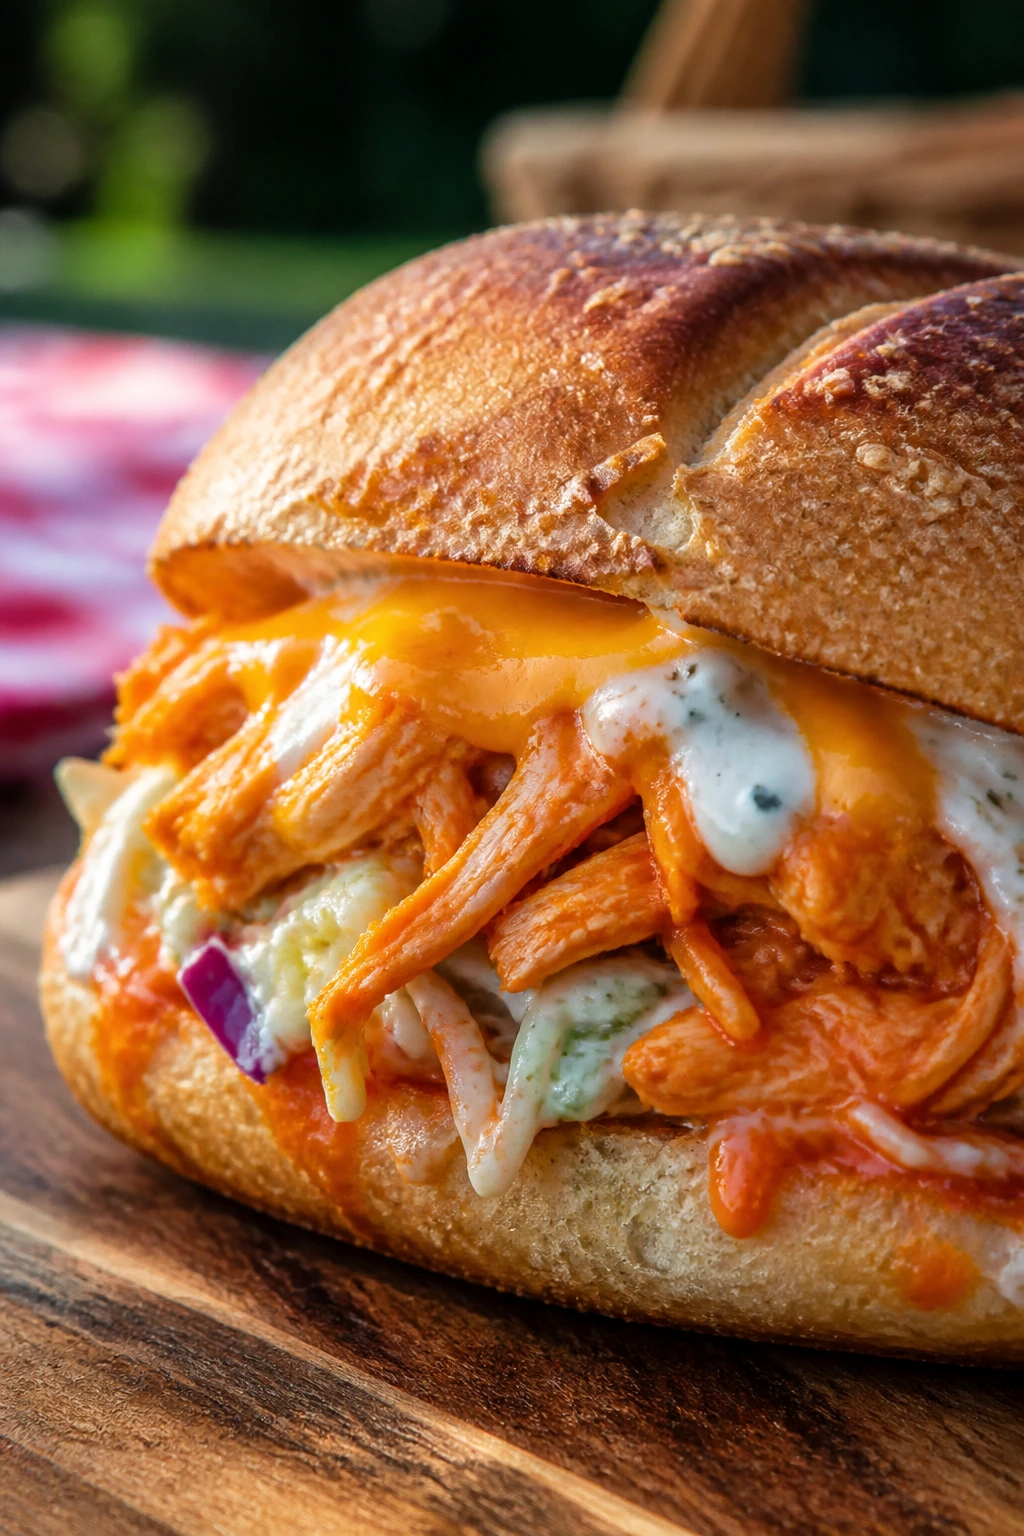
This is the sandwich I make when I want a little heat and a lot of crunch. The buffalo sauce wakes up the chicken, and the ranch cools everything down before the bite gets too loud.
Why It Works: Buffalo chicken is sticky in a good way, which helps it cling to the bread, and a sturdy roll keeps the sauce from leaking through your hands.
Key Ingredients:
- 1 pound cooked chicken, shredded
- 1/3 cup buffalo sauce
- 4 sandwich rolls
- 4 slices cheddar
- 1/4 cup ranch dressing
- 1/2 cup celery slaw
Quick Steps:
- Toss the chicken with buffalo sauce until coated.
- Split the rolls and spread ranch on the inside.
- Fill with chicken, cheddar, and celery slaw.
- Grill over medium heat for 2 to 3 minutes until the rolls are toasted and the cheese melts.
Equipment for This Recipe:
- Grill
- Mixing bowl
- Spatula
How to Serve This Dish: Serve it with carrot sticks or potato chips. A cold dill pickle on the side helps cut the heat.
Pro Tips for This Recipe:
- Use shredded rotisserie chicken if the grill is already busy.
- Keep the celery slaw dry so it stays crisp.
- Add the ranch inside the bun, not on top, to anchor the sauce.
Variations on This Dish:
- Blue Cheese Version: Swap ranch for blue cheese dressing.
- Smoky Buffalo: Stir a little smoked paprika into the sauce.
Common Mistakes to Avoid with This Dish:
- Don’t drown the chicken in sauce or it will slide out.
- Don’t use very soft rolls; they’ll go soggy fast.
10. Tuna Melt with Pickle Crunch
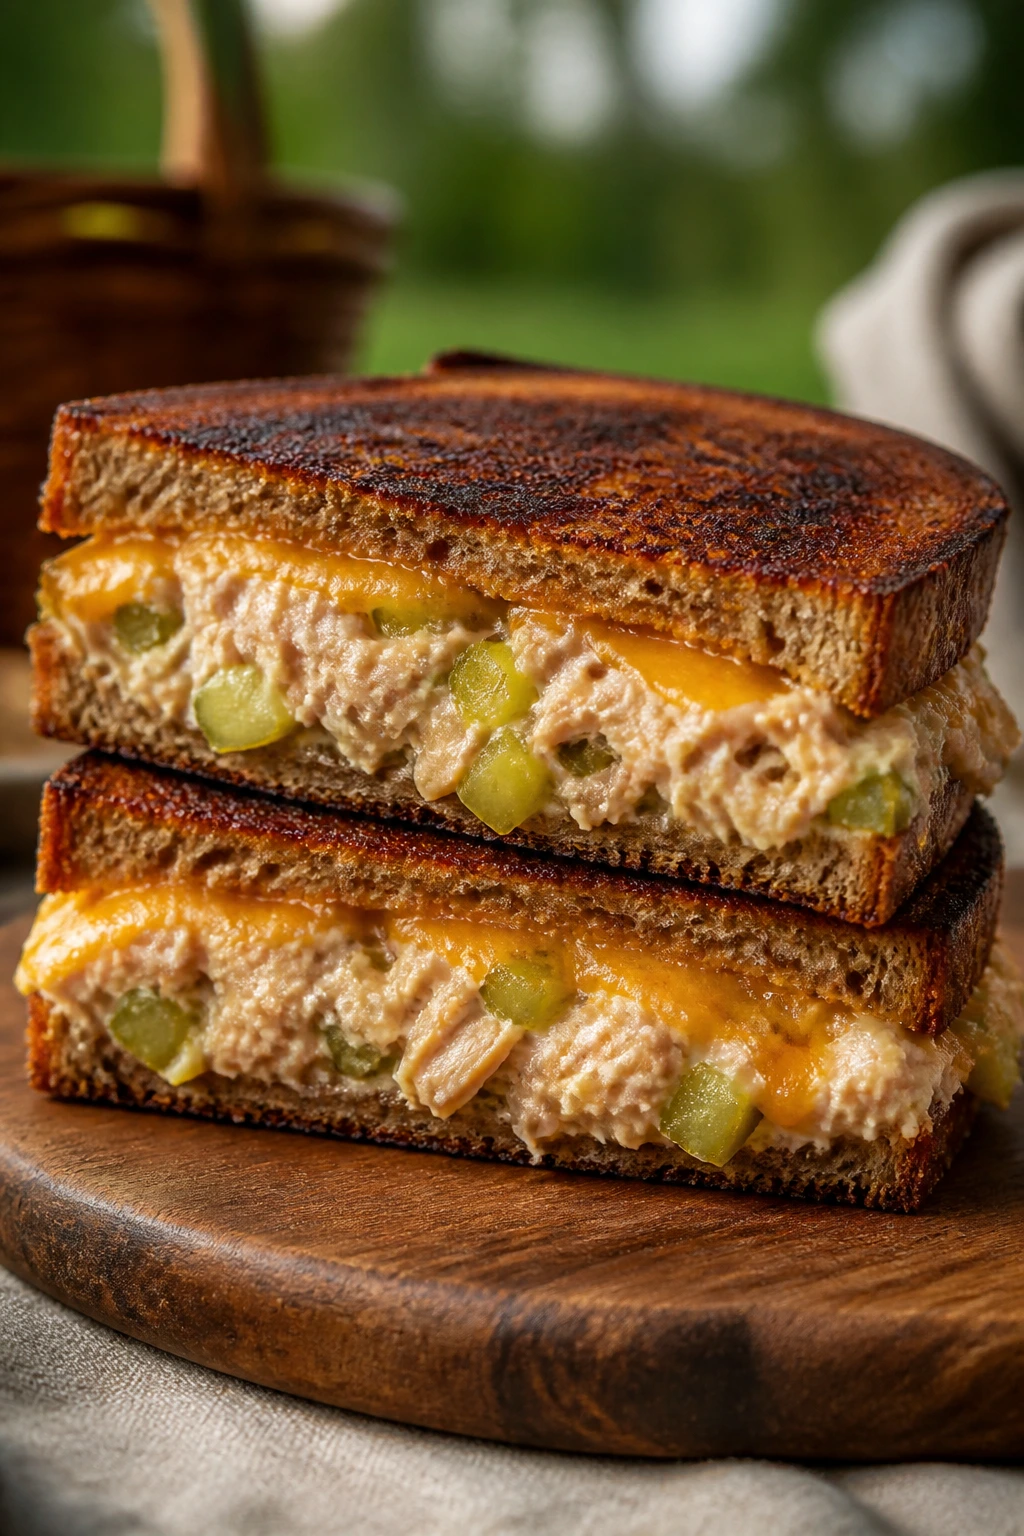
A tuna melt should be creamy, salty, and a little sharp. Pickles fix the usual problem, which is that tuna can taste flat if nobody nudges it awake.
Why It Works: The pickles and celery add crunch, the cheddar melts into the tuna, and rye bread gives the sandwich a sturdy, slightly sour base.
Key Ingredients:
- 1 can tuna, drained
- 2 tablespoons mayonnaise
- 1 tablespoon chopped dill pickle
- 1 tablespoon chopped celery
- 4 slices rye bread
- 4 slices cheddar
Quick Steps:
- Mix tuna, mayo, pickle, and celery in a bowl.
- Spoon the mixture onto two slices of rye and top with cheddar.
- Close the sandwiches and butter the outside.
- Grill over medium heat for 2 to 3 minutes per side until the bread browns and the cheese melts.
Equipment for This Recipe:
- Grill pan or skillet
- Bowl
- Spatula
How to Serve This Dish: Cut it in half and let the filling settle for a minute before wrapping. Tomato soup is classic, but cold cucumber salad is the smarter picnic move.
Pro Tips for This Recipe:
- Drain the tuna well so the filling stays thick.
- Chop the pickle fine so the sandwich doesn’t tear apart.
- Use medium cheddar, not extra-sharp, if you want a smoother melt.
Variations on This Dish:
- Dijon Tuna Melt: Add 1 teaspoon Dijon to the tuna mix.
- Jalapeño Tuna Melt: Add chopped pickled jalapeños for heat.
Common Mistakes to Avoid with This Dish:
- Don’t leave the tuna mixture watery.
- Don’t grill too hot or the bread will burn before the cheese loosens.
11. Smoked Salmon and Dill Cream Cheese Toastie
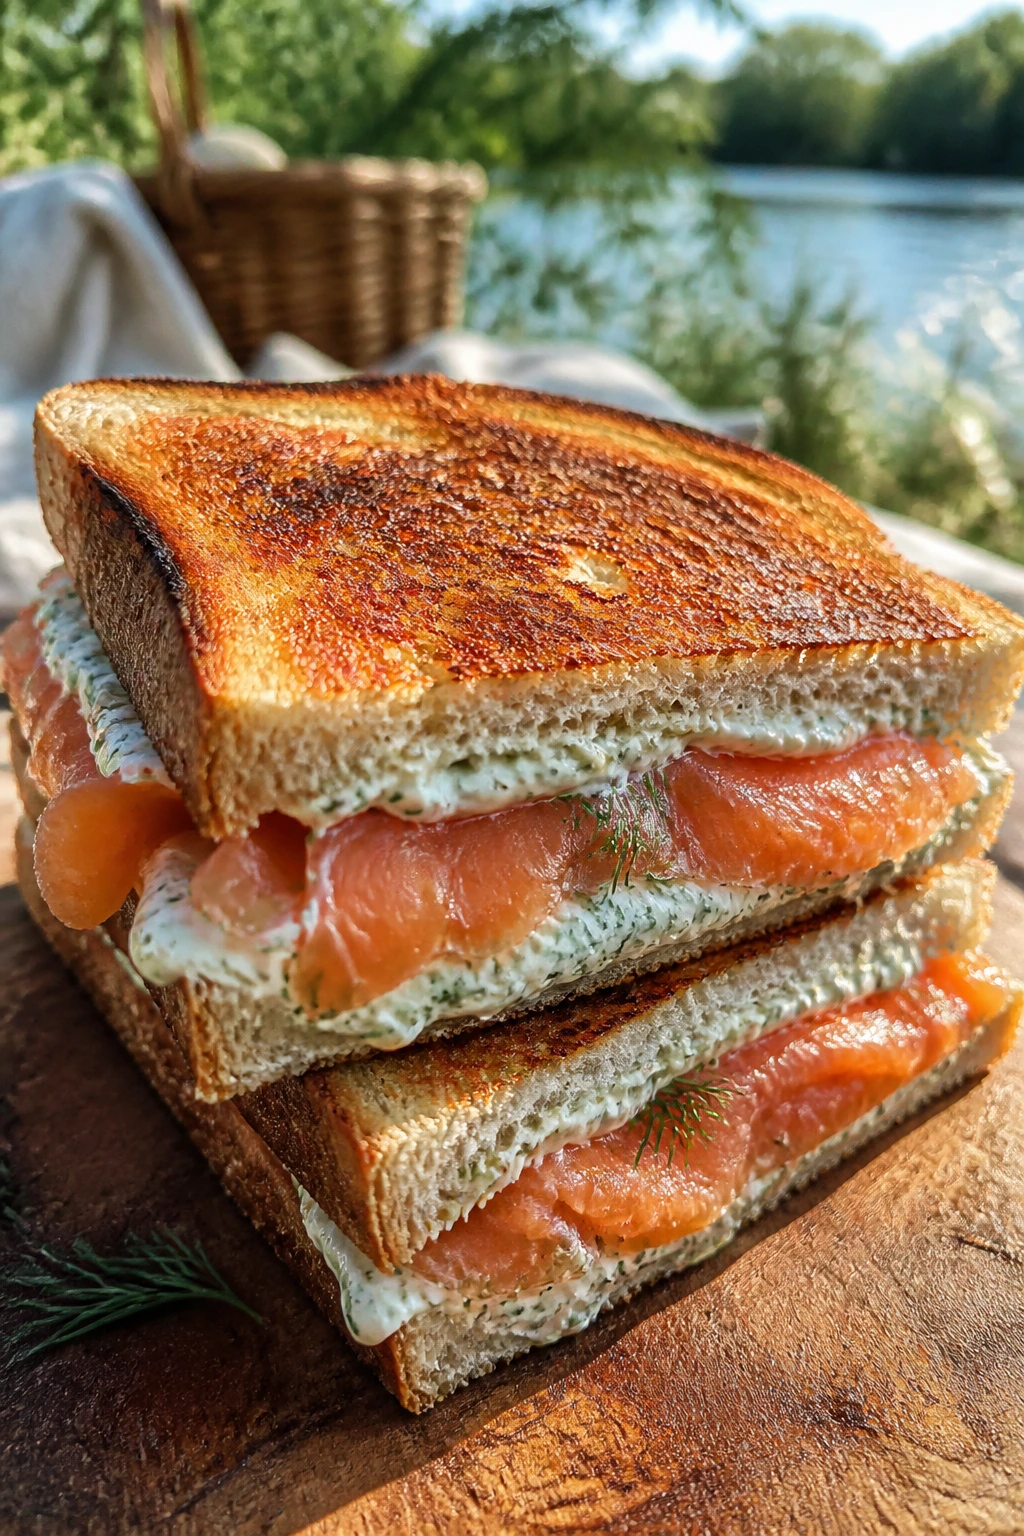
This one feels a little elegant, but it’s still a grill sandwich at heart. The bread gets toasted, the cream cheese softens, and the salmon stays silky if you add it at the right moment.
Why It Works: Smoked salmon doesn’t need much heat, so the sandwich is mostly about warming the bread and loosening the cream cheese without cooking the fish.
Key Ingredients:
- 4 slices hearty bread
- 4 oz smoked salmon
- 4 tablespoons cream cheese
- 1 tablespoon chopped dill
- 1/2 cucumber, thinly sliced
- 1 teaspoon lemon juice
Quick Steps:
- Mix cream cheese, dill, and lemon juice.
- Spread on the bread and layer cucumber and smoked salmon.
- Grill the assembled sandwich over low-medium heat for 1 to 2 minutes per side.
- Pull it off when the bread is crisp and the filling is warm, not hot.
Equipment for This Recipe:
- Grill or skillet
- Small bowl
- Spatula
How to Serve This Dish: Serve open-faced if you want it to look tidy. It pairs well with salted potato chips or a dill-heavy potato salad.
Pro Tips for This Recipe:
- Keep the heat lower than you would for a regular melt.
- Add the salmon after the bread has had a quick toast if you prefer less heat.
- Use thin cucumber slices so the sandwich doesn’t wobble.
Variations on This Dish:
- Caper Version: Add chopped capers to the cream cheese.
- Everything Bagel Version: Sprinkle the outside of the bread with seasoning.
Common Mistakes to Avoid with This Dish:
- Don’t overheat the salmon; it gets tough fast.
- Don’t use soft sandwich bread or it will wrinkle on the grill.
12. Caprese with Balsamic Onions
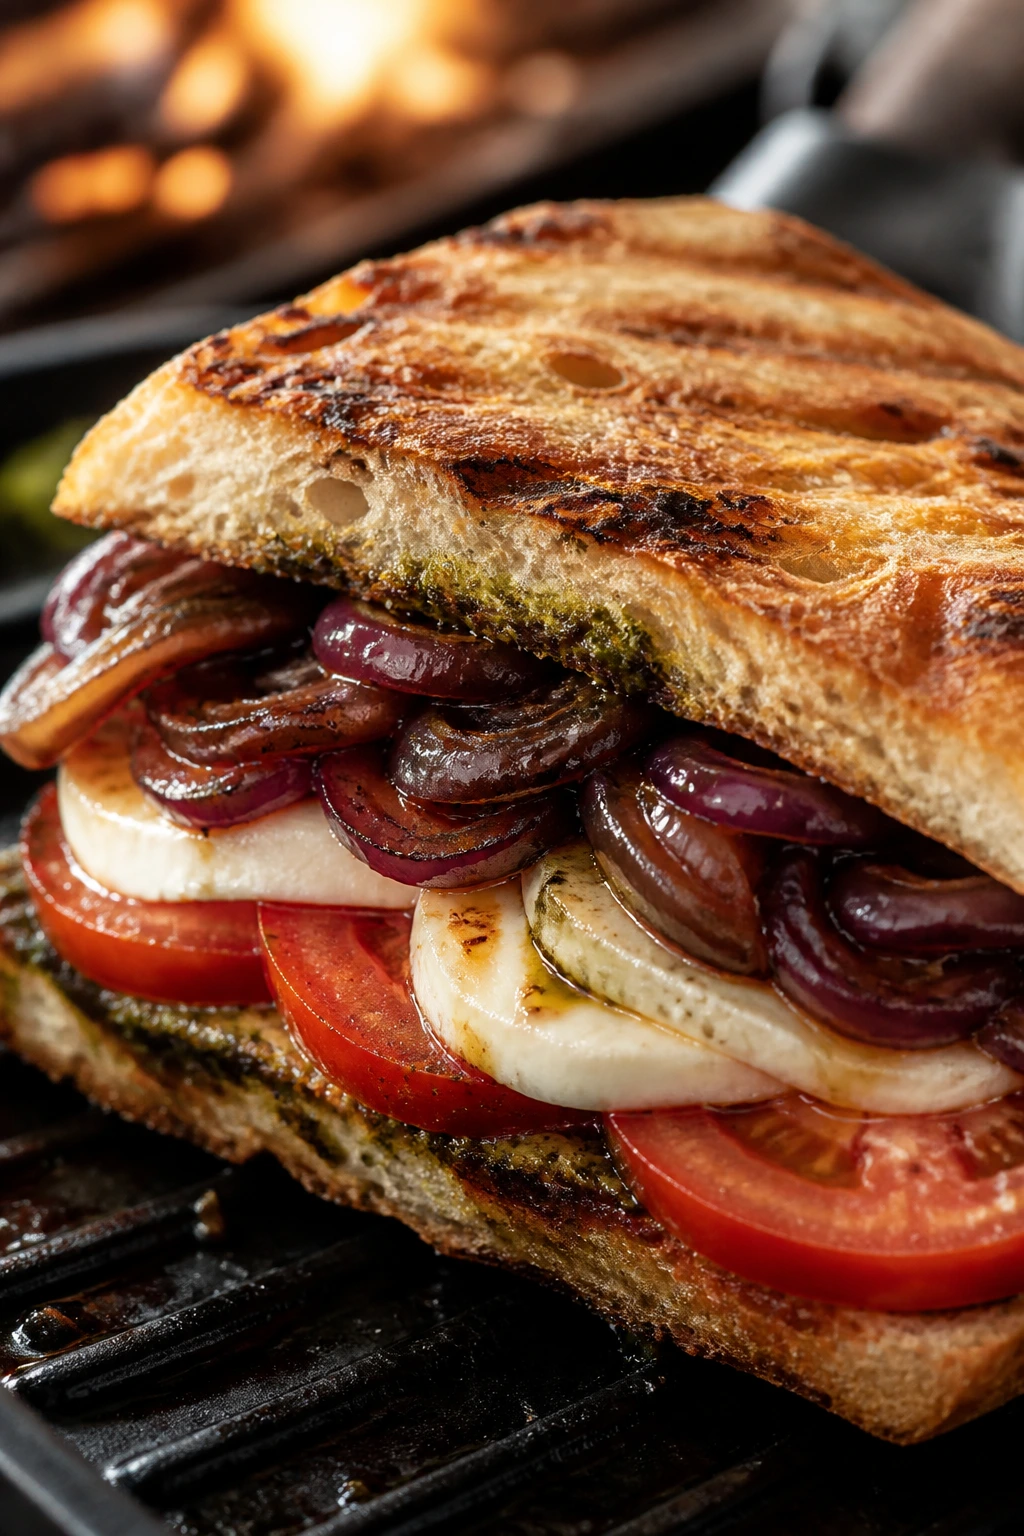
Caprese is easy to mess up when the tomatoes are watery and the cheese gets bland. Grilling the bread and cooking the onions a bit solves most of that.
Why It Works: The onions add sweetness and body, and the grilled ciabatta gives the sandwich enough crunch to handle fresh mozzarella and tomato.
Key Ingredients:
- 4 slices ciabatta
- 1 tomato, sliced
- 6 oz fresh mozzarella
- 1/2 red onion, sliced
- 2 tablespoons balsamic vinegar
- 1 tablespoon basil pesto
Quick Steps:
- Cook the onion in a grill pan with balsamic vinegar for 6 minutes until soft.
- Spread pesto on the bread and layer tomato, mozzarella, and onions.
- Grill over medium heat for 2 to 3 minutes per side.
- Remove when the bread is crisp and the cheese begins to melt.
Equipment for This Recipe:
- Grill
- Grill pan or skillet
- Spatula
How to Serve This Dish: Finish with torn basil leaves. A bowl of cherries or melon makes a good picnic side if you want to keep it light.
Pro Tips for This Recipe:
- Salt and drain the tomato slices first.
- Don’t use too much balsamic or the sandwich gets sticky.
- Fresh mozzarella should be patted dry.
Variations on This Dish:
- Pesto-Heavy Caprese: Double the pesto and skip the onions.
- Prosciutto Caprese: Add a thin layer of prosciutto for salt.
Common Mistakes to Avoid with This Dish:
- Don’t stack too many tomato slices.
- Don’t use very wet mozzarella straight from the package.
13. Cuban Sandwich on the Grill
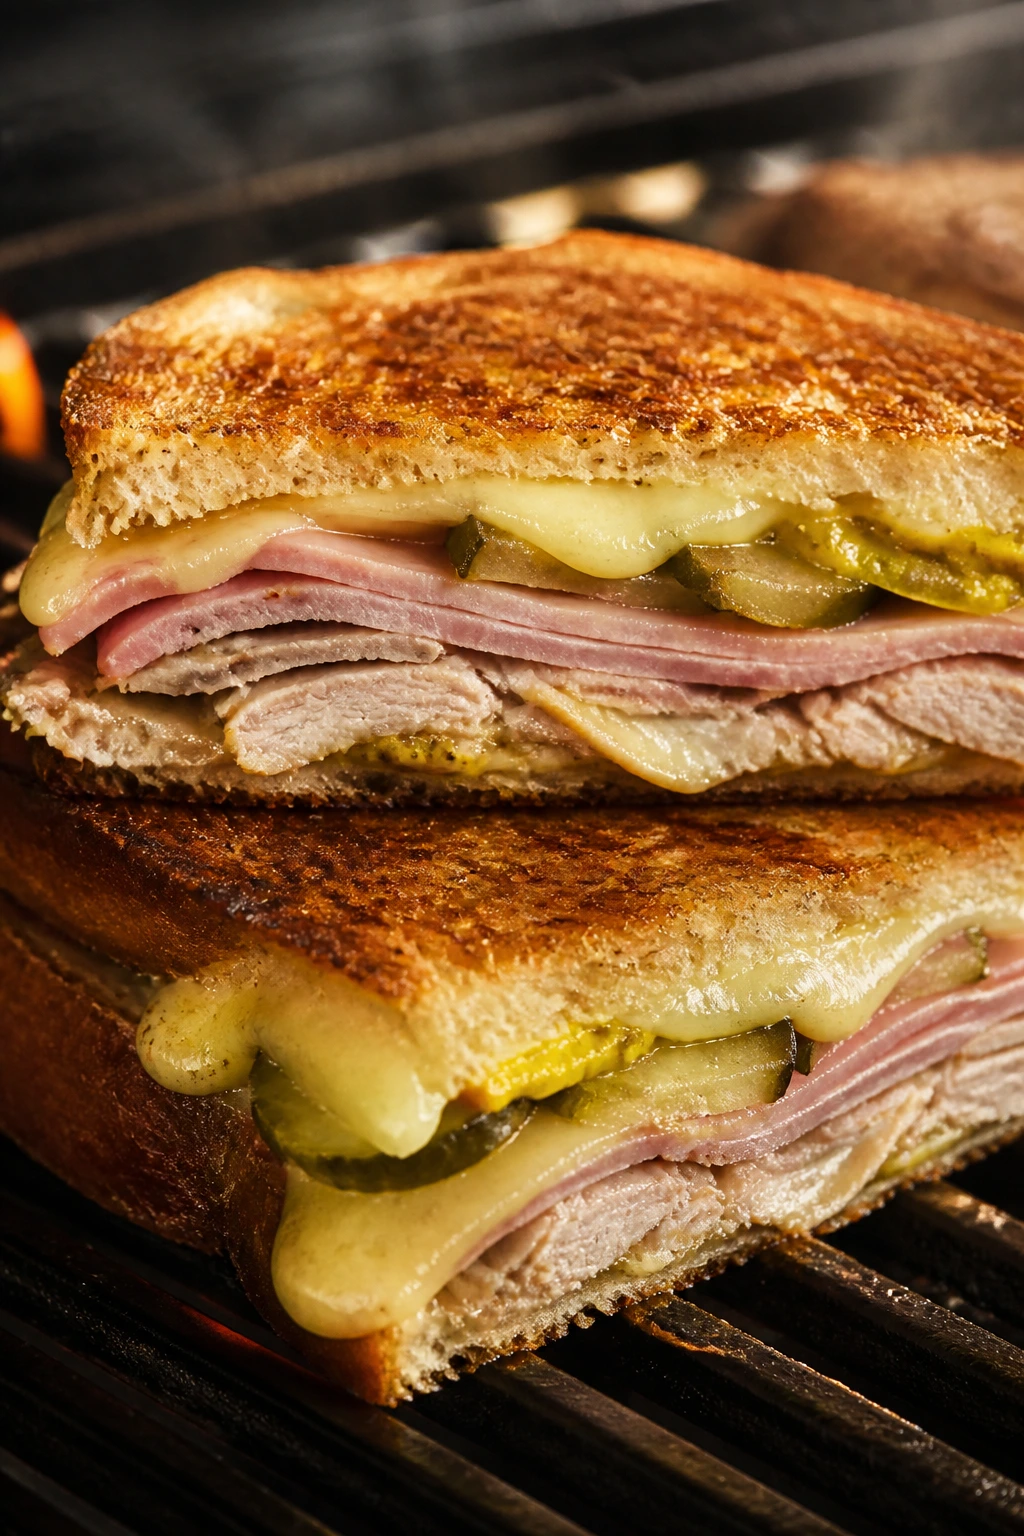
This is the loud, sharp, savory one. Ham, roast pork, Swiss, pickles, and mustard give you that familiar Cuban profile, and the grill adds a crust that the sandwich desperately needs.
Why It Works: The bread gets crisp and flattened, the cheese melts into the meats, and the pickles bring a bracing snap that keeps the sandwich from feeling heavy.
Key Ingredients:
- 1 Cuban-style loaf or 4 split rolls
- 4 oz sliced ham
- 4 oz sliced roast pork
- 4 slices Swiss cheese
- 1 tablespoon yellow mustard
- 8 dill pickle slices
Quick Steps:
- Split the bread and spread mustard on both cut sides.
- Layer ham, pork, Swiss, and pickles.
- Grill over medium heat with a press for 3 minutes per side.
- Cook until the bread is crisp and the cheese is fully melted.
Equipment for This Recipe:
- Grill
- Heavy skillet or grill press
- Spatula
How to Serve This Dish: Wrap it in foil and press it for a minute after grilling. It travels well with plantain chips or a vinegar slaw.
Pro Tips for This Recipe:
- Use thin slices of meat so the sandwich compresses cleanly.
- A little mustard goes farther than you think.
- Press gently; too much force squeezes the filling out.
Variations on This Dish:
- Mojo Pork Version: Add a little garlic-lime marinade to the pork.
- Spicy Cuban: Add sliced jalapeños to the pickles.
Common Mistakes to Avoid with This Dish:
- Don’t use thick, soft bread.
- Don’t skip the press if you want the classic flattened shape.
14. BBQ Pulled Pork and Slaw Bun
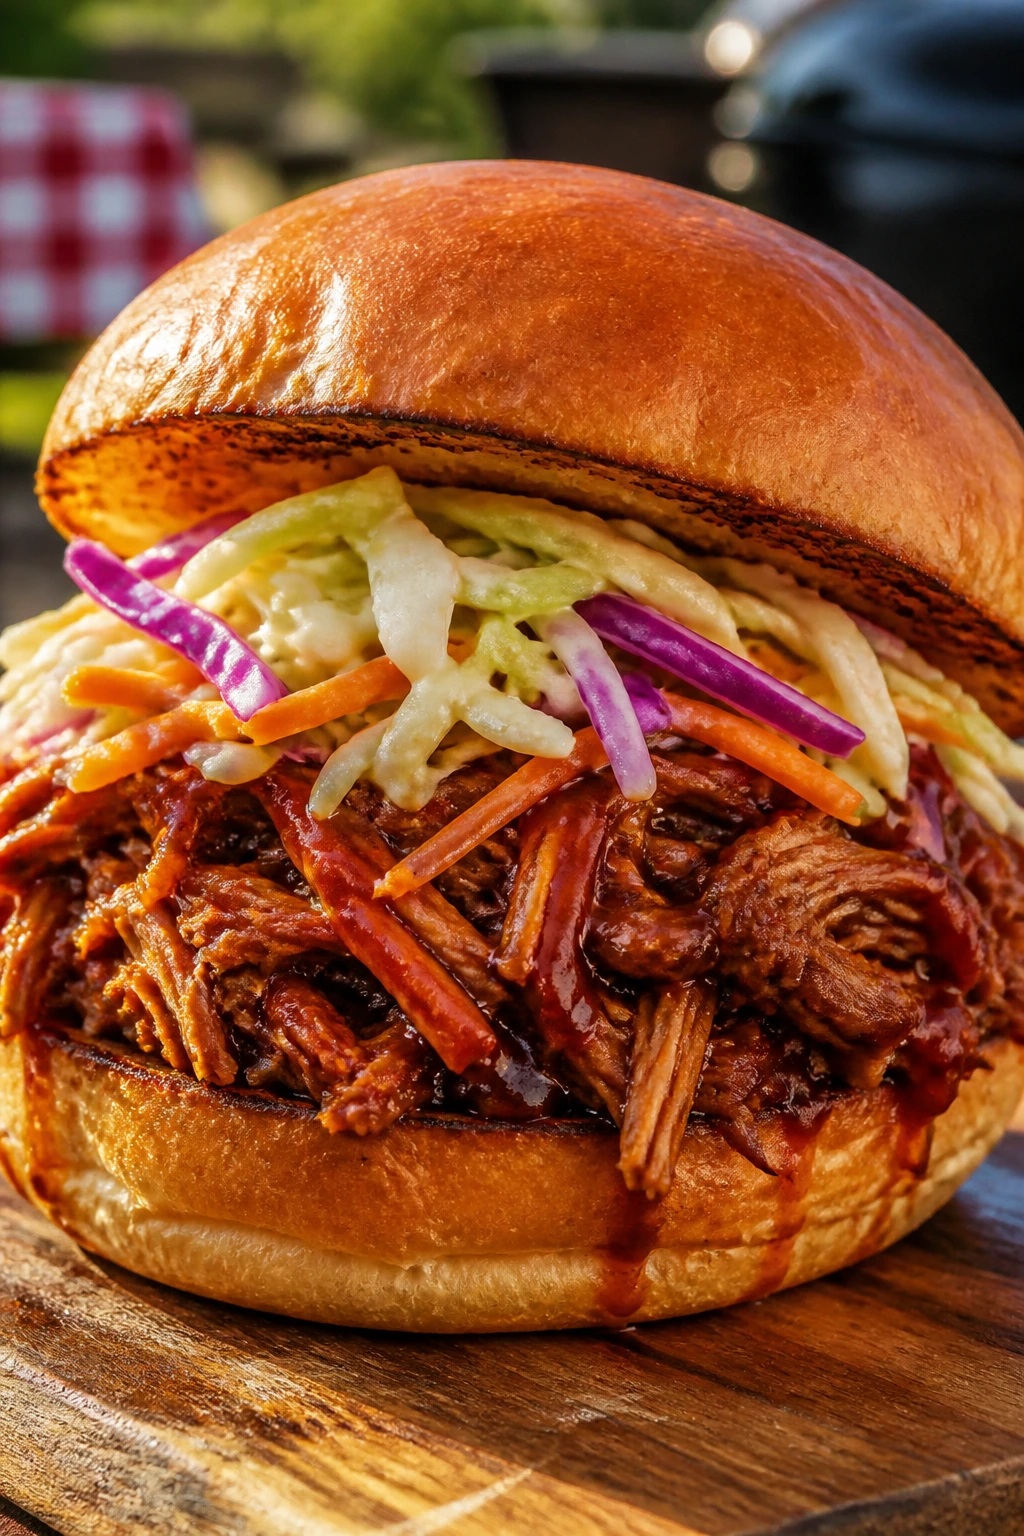
Pulled pork and barbecue sauce are already halfway to a picnic. The slaw gives it crunch, and a toasted bun keeps the whole thing from turning into a saucy pile.
Why It Works: Warm pork absorbs the sauce, while the slaw stays cool and crisp, so each bite has a little texture shift instead of one-note softness.
Key Ingredients:
- 2 cups pulled pork
- 1/3 cup barbecue sauce
- 4 brioche buns
- 1 cup coleslaw
- 8 dill pickle chips
- 1 tablespoon butter
Quick Steps:
- Warm the pulled pork with barbecue sauce in a skillet over medium heat for 4 minutes.
- Butter and toast the buns on the grill for 30 to 45 seconds.
- Fill with pork, slaw, and pickles.
- Close and warm the sandwich 1 minute more if you want the bun hotter.
Equipment for This Recipe:
- Skillet
- Grill
- Tongs
How to Serve This Dish: Serve with extra sauce on the side for people who want more. Corn on the cob or baked beans fit the mood without stealing the show.
Pro Tips for This Recipe:
- Drain watery slaw before using it.
- Use buns that are soft but not fragile.
- A few pickle chips sharpen the sweetness.
Variations on This Dish:
- Carolina Style: Swap barbecue sauce for a vinegar-pepper version.
- Cheddar Pork: Add a slice of cheddar under the slaw.
Common Mistakes to Avoid with This Dish:
- Don’t overfill the bun.
- Don’t put cold pork straight onto the grill and expect the sandwich to heat through.
15. Teriyaki Chicken and Pineapple Sandwich
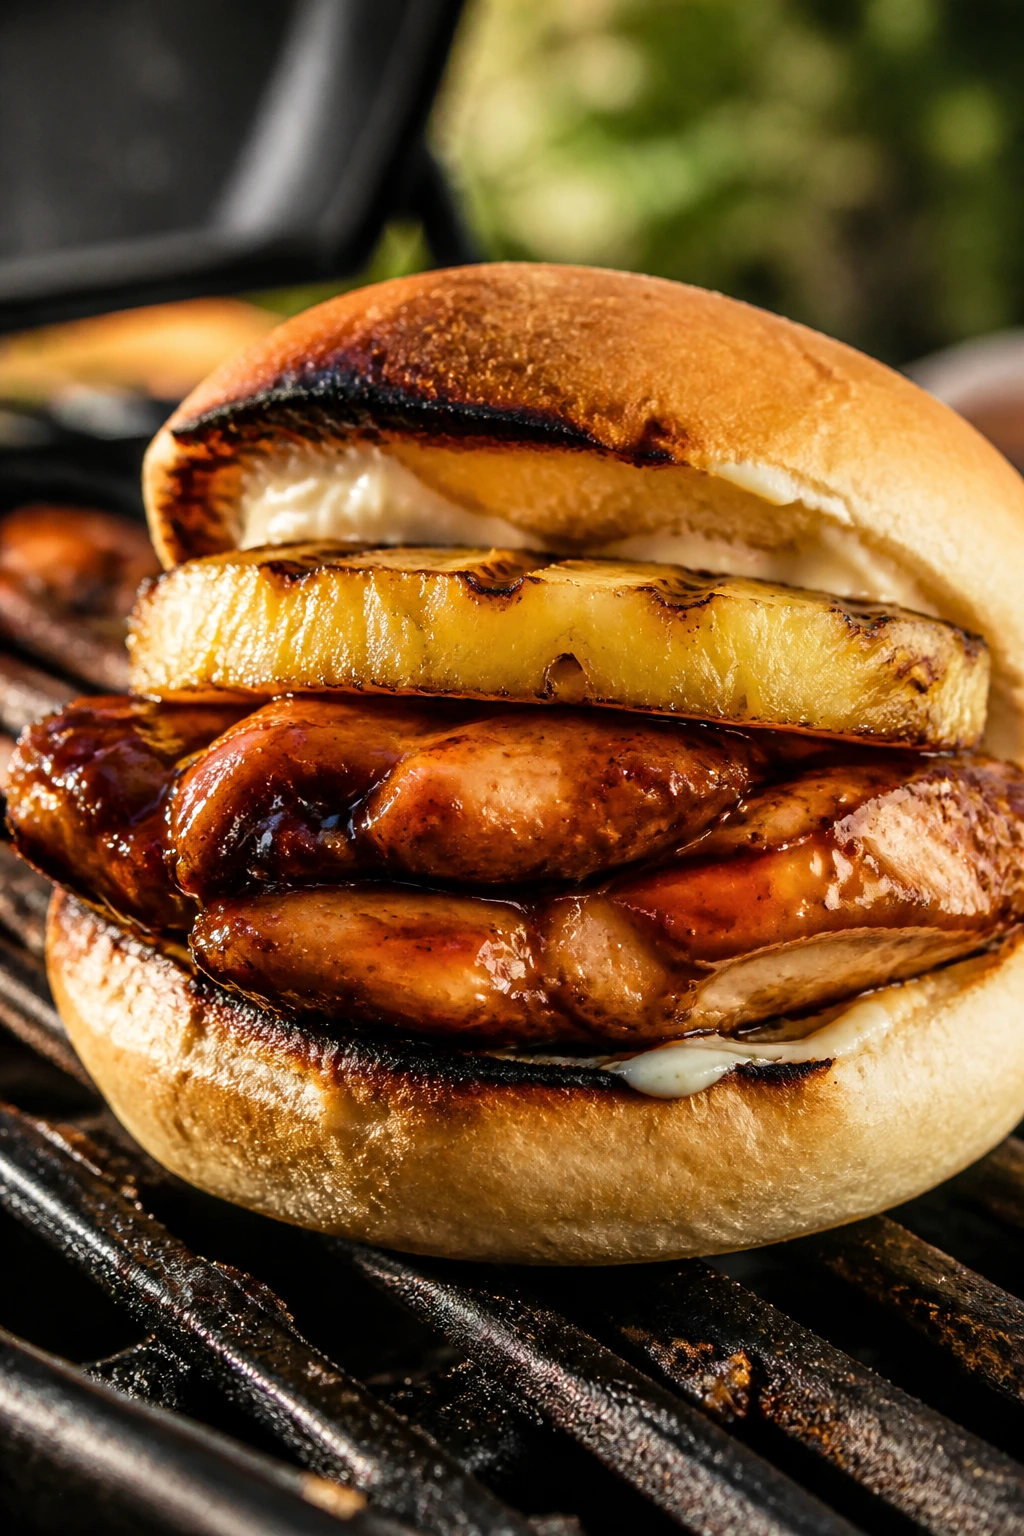
Sweet pineapple and sticky teriyaki make a messy, glossy sandwich that tastes bigger than it looks. It’s the kind of thing that works because the flavors are loud enough to carry the whole build.
Why It Works: The pineapple caramelizes fast, the chicken soaks up the sauce, and the bun catches the juices instead of letting them run away.
Key Ingredients:
- 1 pound cooked chicken, sliced
- 1/3 cup teriyaki sauce
- 4 sandwich rolls
- 4 pineapple rings
- 2 tablespoons mayonnaise
- 2 sliced scallions
Quick Steps:
- Toss the chicken with teriyaki sauce.
- Grill the pineapple rings for 1 to 2 minutes per side.
- Toast the rolls, spread mayo inside, and layer chicken and pineapple.
- Finish with scallions and warm the sandwiches briefly on the grill.
Equipment for This Recipe:
- Grill
- Tongs
- Small bowl
How to Serve This Dish: Serve with sliced cucumbers or a sesame slaw. It tastes best wrapped loosely so steam doesn’t soften the bread too much.
Pro Tips for This Recipe:
- Grill the pineapple until you see dark marks.
- Use a thick teriyaki sauce so it clings to the chicken.
- Toast the rolls after spreading mayo; it helps them brown.
Variations on This Dish:
- Spicy Teriyaki: Add chili crisp to the mayo.
- Ginger Version: Stir grated ginger into the sauce.
Common Mistakes to Avoid with This Dish:
- Don’t use too much sauce or the sandwich turns slippery.
- Don’t skip toasting the bun or the juices soak straight through.
16. Mushroom and Gruyère Melt
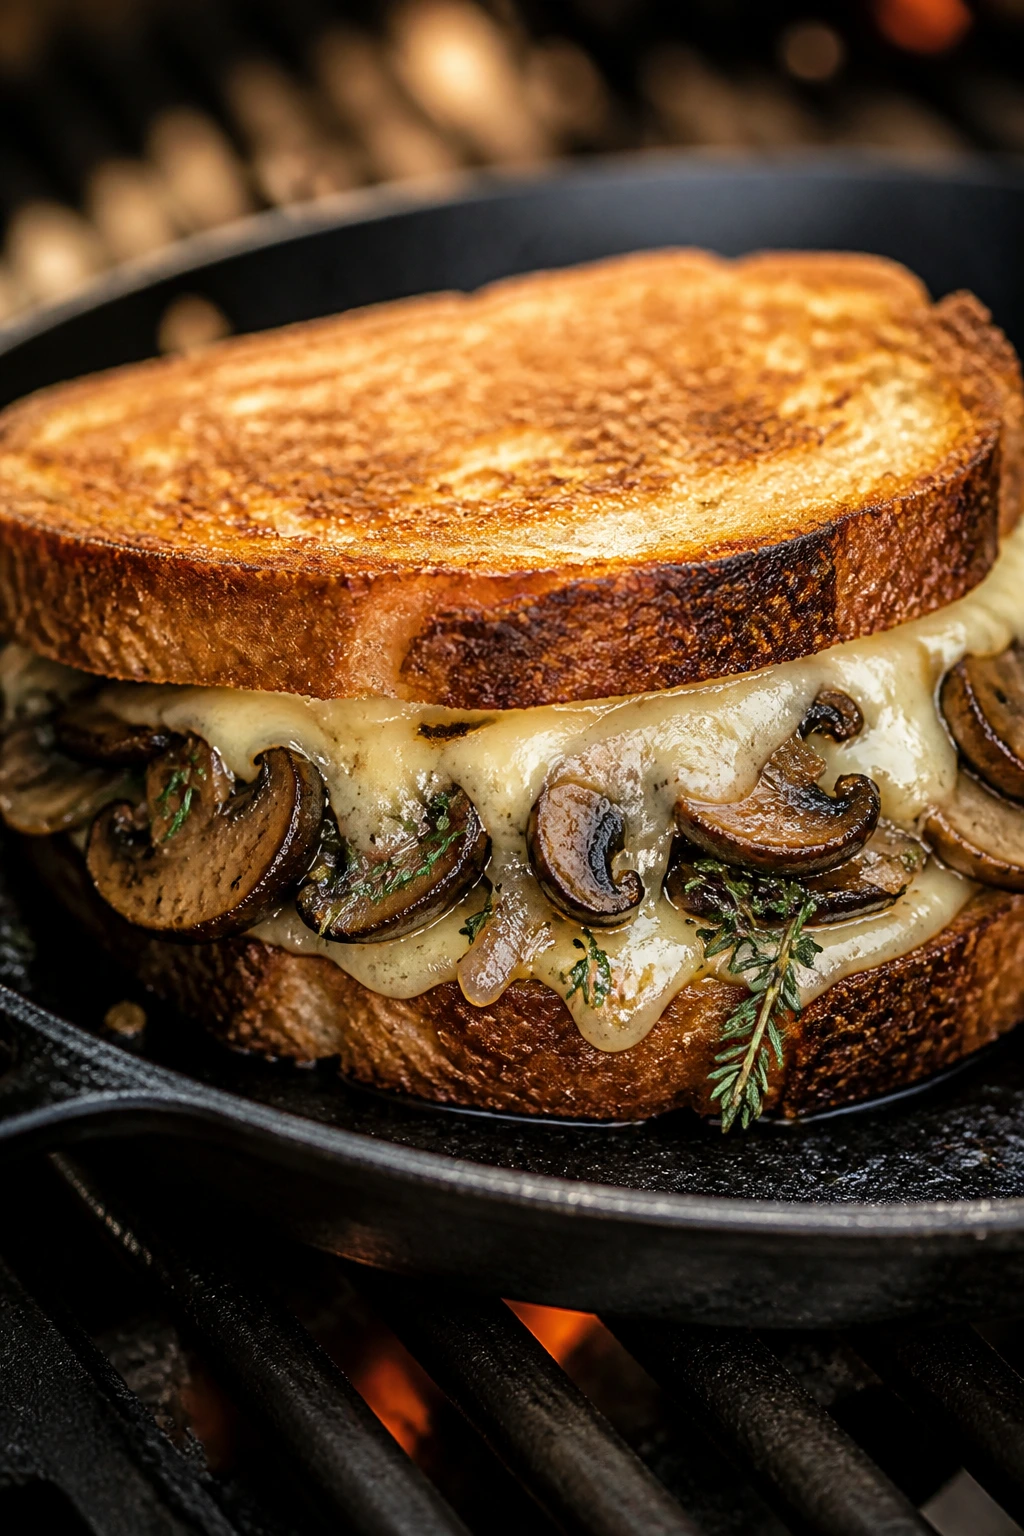
This is the sandwich for people who want something earthy and rich without a lot of fuss. Mushrooms cook down, Gruyère gets nutty and molten, and the bread picks up a dark, toasty edge.
Why It Works: Mushrooms bring their own savory moisture, which means the sandwich tastes full even without meat, and Gruyère melts cleanly instead of turning greasy.
Key Ingredients:
- 8 oz mushrooms, sliced
- 1 small onion, sliced
- 4 slices sourdough
- 4 slices Gruyère
- 1 teaspoon thyme leaves
- 1 tablespoon butter
Quick Steps:
- Sauté mushrooms and onions on the grill in a skillet for 8 minutes until browned.
- Add thyme and a pinch of salt.
- Layer the mushroom mixture and Gruyère between the bread slices.
- Grill 2 to 3 minutes per side until the bread is crisp and the cheese melts.
Equipment for This Recipe:
- Cast-iron skillet
- Grill
- Spatula
How to Serve This Dish: Pair with pickles or a mustardy salad. It works well as a smaller sandwich cut in half, since the filling is rich.
Pro Tips for This Recipe:
- Cook the mushrooms until the liquid is gone.
- Don’t skimp on the browning; that’s where the flavor lives.
- A swipe of Dijon on the bread sharpens the whole thing.
Variations on This Dish:
- Shallot Version: Swap onion for shallot.
- Fontina Swap: Use fontina if Gruyère is hard to find.
Common Mistakes to Avoid with This Dish:
- Don’t leave moisture in the pan or the bread will soften.
- Don’t rush the mushrooms; pale mushrooms taste thin.
17. Bacon, Egg, and Cheese Breakfast Melt
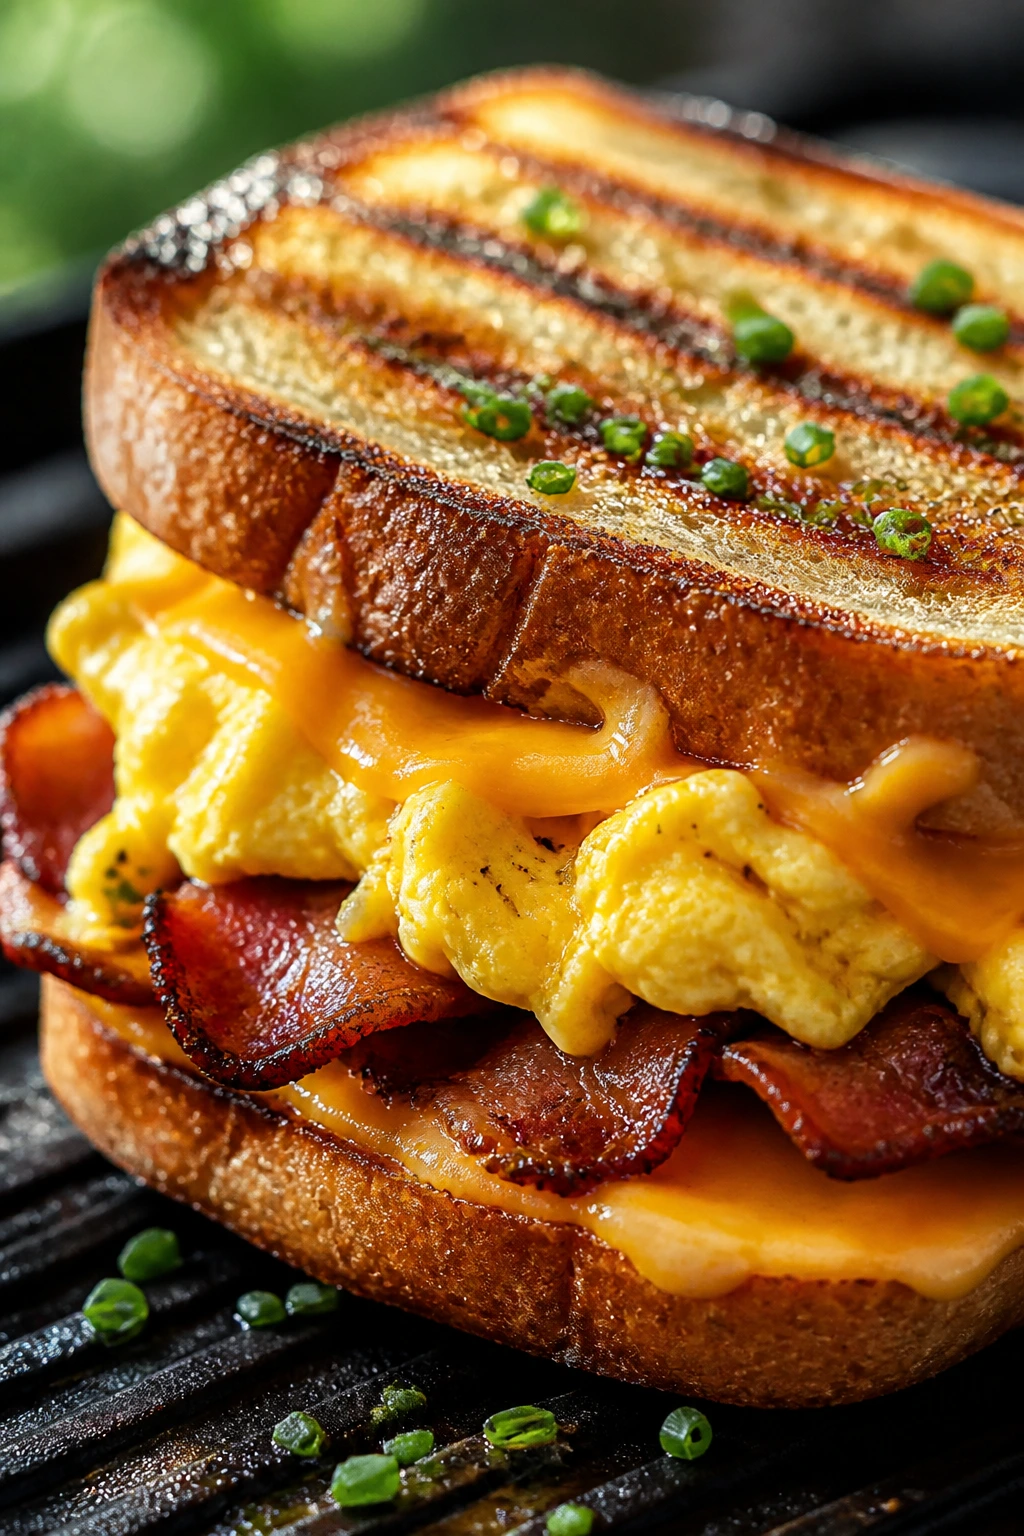
Breakfast on the grill has a very specific kind of charm. The egg should still be tender, the bacon crisp, and the cheese melted into the bread while the whole thing is hot enough to fog your glasses.
Why It Works: Eggs can be cooked flat and folded neatly, which keeps the sandwich stackable, and the bacon brings enough salt to make each bite taste finished.
Key Ingredients:
- 4 slices bread or English muffins
- 4 eggs
- 4 slices bacon, cooked
- 4 slices cheddar
- 1 tablespoon butter
- 1 tablespoon chives
Quick Steps:
- Scramble or fry the eggs in a skillet on the grill over medium heat.
- Butter the bread and layer egg, bacon, cheddar, and chives.
- Grill the sandwich 2 minutes per side until browned.
- Cook just until the cheese melts and the bread is crisp.
Equipment for This Recipe:
- Skillet
- Spatula
- Grill
How to Serve This Dish: Eat it while it’s hot. A few orange wedges or melon slices make a clean picnic side if you’re serving it early in the day.
Pro Tips for This Recipe:
- Make the eggs slightly softer than you want; they firm up in the sandwich.
- Use crisp bacon so the texture stays sharp.
- English muffins are neat, but thicker bread handles the grill better.
Variations on This Dish:
- Hot Sauce Melt: Add hot sauce to the eggs.
- Sausage Version: Swap bacon for cooked breakfast sausage.
Common Mistakes to Avoid with This Dish:
- Don’t overcook the eggs or the sandwich goes dry.
- Don’t use wet cheese slices straight from a very cold fridge; let them sit 5 minutes.
18. Turkey Reuben with Sauerkraut
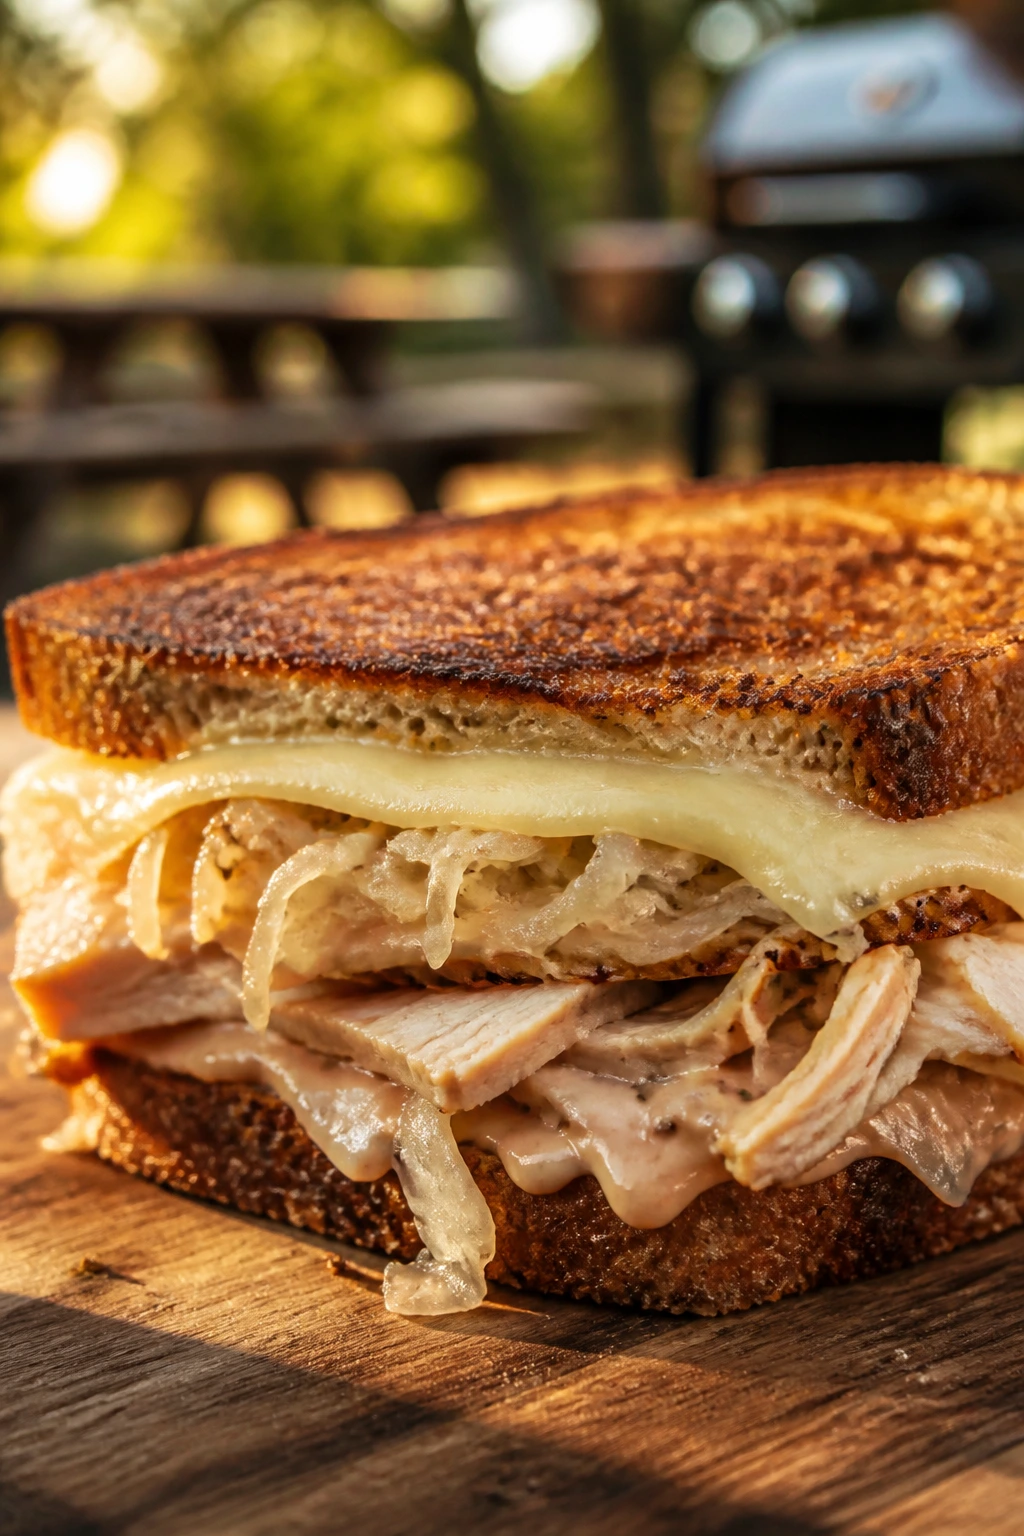
Turkey gives the Reuben a lighter frame, but the sauerkraut still brings the bite you expect. It’s tangy, salty, and a little old-school in a way that works especially well outdoors.
Why It Works: The rye toasts fast, the Swiss melts smoothly, and the sauerkraut adds enough acid to keep the sandwich from feeling dense.
Key Ingredients:
- 8 oz sliced turkey
- 4 slices rye bread
- 4 slices Swiss cheese
- 1/2 cup sauerkraut, drained
- 2 tablespoons Russian dressing
- 1 tablespoon butter
Quick Steps:
- Drain the sauerkraut well and squeeze out excess liquid.
- Spread Russian dressing on the rye, then layer turkey, kraut, and Swiss.
- Butter the outside and grill 2 to 3 minutes per side.
- Pull it off when the bread is crisp and the cheese has melted.
Equipment for This Recipe:
- Grill
- Spatula
- Paper towels
How to Serve This Dish: A dill pickle spear and potato chips fit naturally here. Wrap it tight; the rye holds up nicely and the sauerkraut stays put if it’s dry.
Pro Tips for This Recipe:
- Dry kraut is the difference between tidy and messy.
- Use thin turkey slices so the sandwich compresses well.
- Russian dressing should be thin enough to spread, not dump.
Variations on This Dish:
- Corned Beef Reuben: Use corned beef instead of turkey.
- Spicy Reuben: Add a little horseradish to the dressing.
Common Mistakes to Avoid with This Dish:
- Don’t use sauerkraut straight from the jar without draining.
- Don’t overstuff the rye or it will split at the seam.
19. Charred Veggie Hummus Sandwich
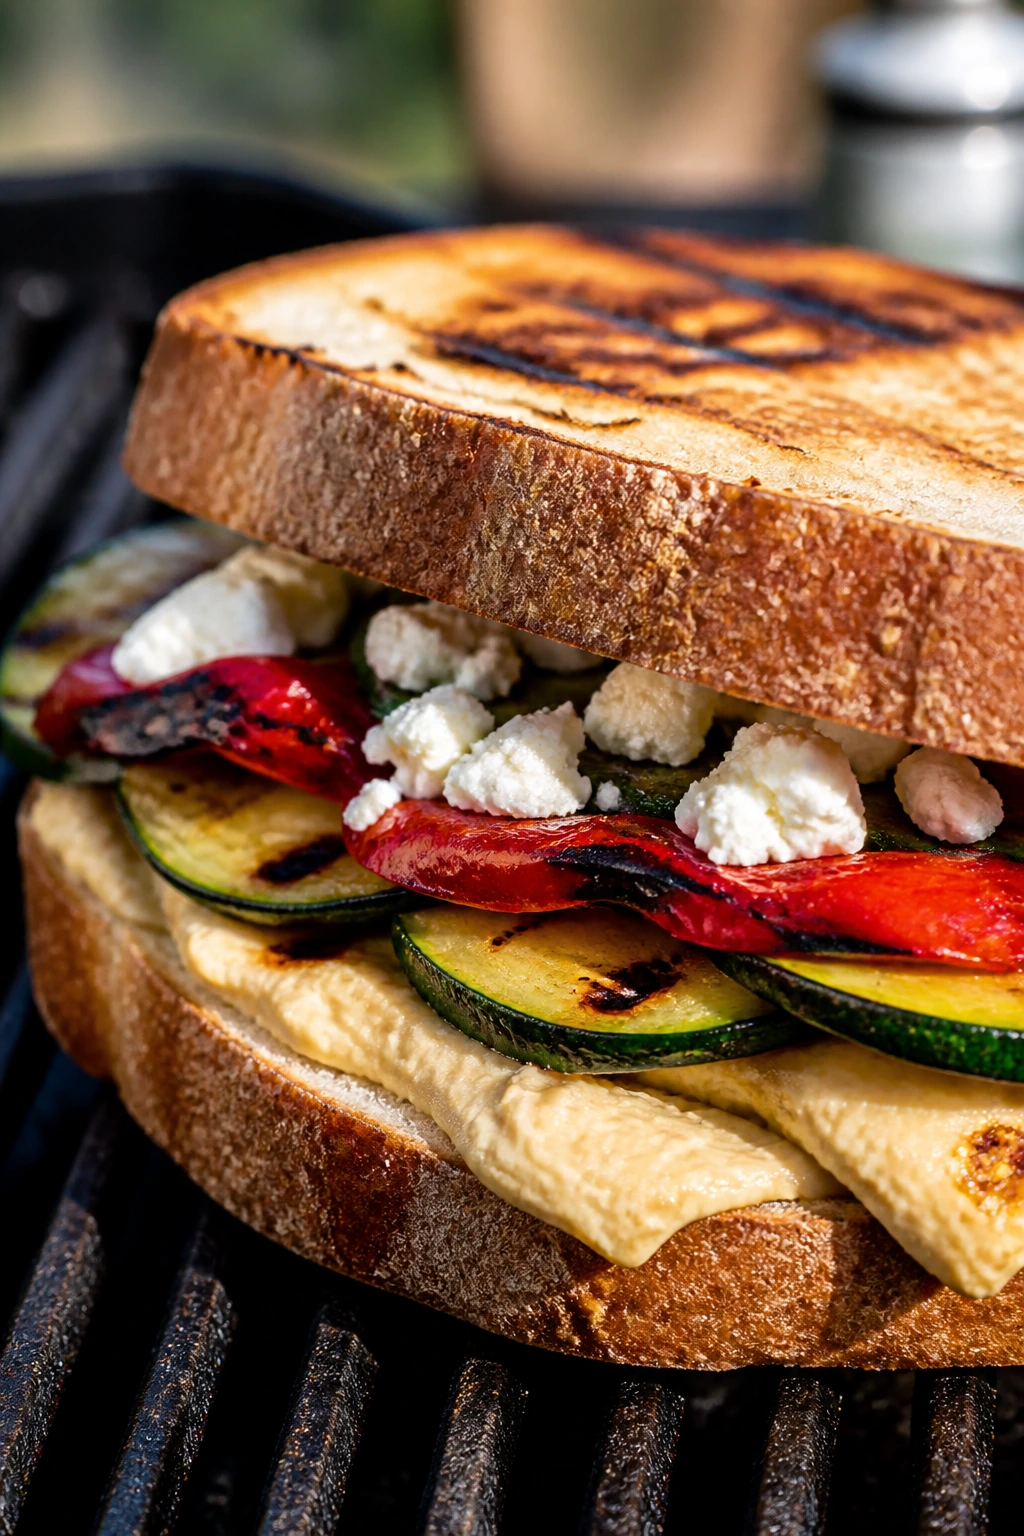
When the grill is already going, vegetables deserve their own sandwich. Hummus holds everything together, and char marks on zucchini and peppers make the filling taste intentional instead of leftover.
Why It Works: Hummus acts like glue, while the grilled vegetables bring sweetness and smoke, which gives you a vegetarian sandwich with some actual heft.
Key Ingredients:
- 4 slices ciabatta
- 1 zucchini, sliced lengthwise
- 1 red bell pepper, sliced
- 1/2 cup hummus
- 2 tablespoons feta
- 1 tablespoon olive oil
Quick Steps:
- Brush the zucchini and pepper with oil and grill 2 to 3 minutes per side.
- Spread hummus on the bread.
- Layer grilled vegetables and feta.
- Grill the assembled sandwich 1 minute per side to warm the bread.
Equipment for This Recipe:
- Grill
- Tongs
- Spatula
How to Serve This Dish: Add lemon wedges and a handful of olives on the side. It’s good at room temperature, which makes it picnic-friendly in the literal sense.
Pro Tips for This Recipe:
- Don’t slice the vegetables too thin.
- Use hummus that’s thick and smooth, not watery.
- A little crumbled feta gives the sandwich a salty finish.
Variations on This Dish:
- Roasted Red Pepper Hummus: Use flavored hummus instead of plain.
- Add Avocado: Put in a few slices if you want more creaminess.
Common Mistakes to Avoid with This Dish:
- Don’t overcook the vegetables until they slump.
- Don’t use flimsy bread; you want something with chew.
20. Steak, Arugula, and Blue Cheese Melt
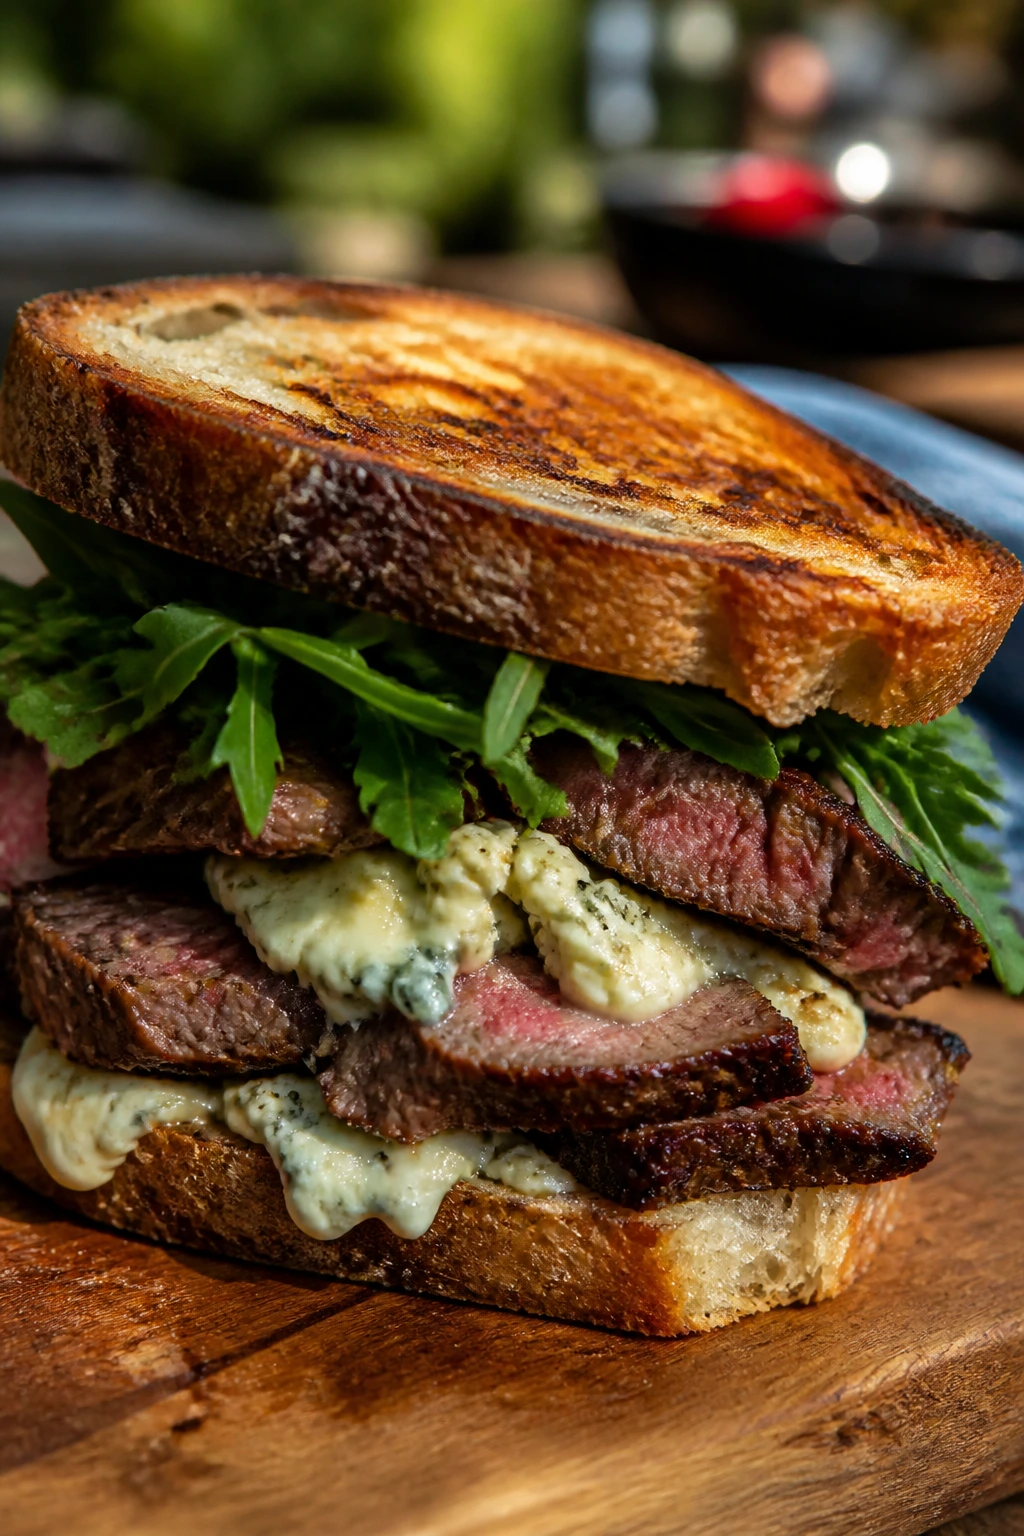
This is the bold one. Steak brings smoke, blue cheese brings bite, and arugula adds a peppery edge that keeps the whole thing from tasting heavy.
Why It Works: Steak loves heat, blue cheese softens fast, and arugula gives you a fresh finish after all that richness.
Key Ingredients:
- 8 oz cooked steak, thinly sliced
- 4 slices sourdough
- 3 oz blue cheese
- 1 cup arugula
- 1 tablespoon butter
- 1 tablespoon caramelized onions
Quick Steps:
- Butter the bread and layer steak, blue cheese, and onions.
- Grill over medium heat for 2 to 3 minutes per side.
- Add arugula after grilling.
- Cut once the cheese has softened and the bread is browned.
Equipment for This Recipe:
- Grill
- Spatula
- Knife
How to Serve This Dish: Serve it open for a second before cutting so the cheese settles. A cold cucumber salad keeps the whole plate from feeling too rich.
Pro Tips for This Recipe:
- Slice the steak against the grain.
- Use a light hand with blue cheese or it takes over.
- Add arugula at the end so it stays crisp.
Variations on This Dish:
- Roast Beef Version: Swap steak for thin roast beef.
- Gorgonzola Swap: Use a milder blue if needed.
Common Mistakes to Avoid with This Dish:
- Don’t grill the arugula inside the sandwich.
- Don’t use steak slices that are too thick.
21. Chicken Caesar Toasted Sandwich
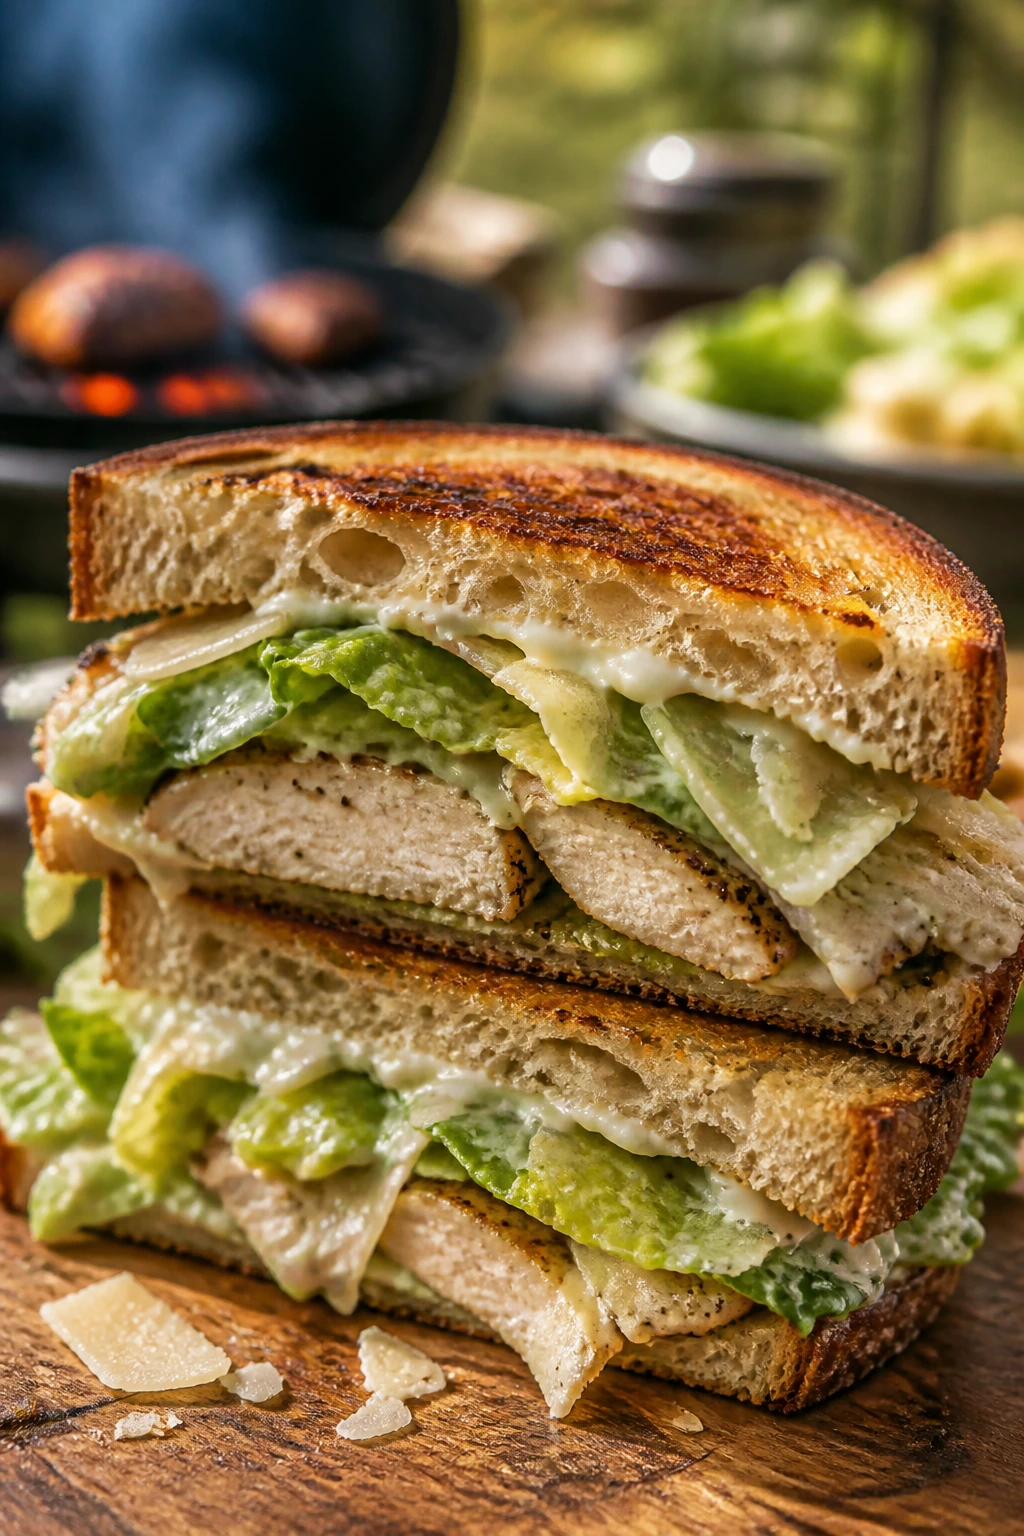
If you already like Caesar salad, this sandwich makes the case for turning it into lunch. The chicken gives it substance, the Parmesan sharpens the edges, and the toasted bread handles the dressing better than lettuce ever could.
Why It Works: Caesar dressing brings enough salt and fat to coat the chicken, and grilled bread turns a salad idea into something more portable.
Key Ingredients:
- 8 oz cooked chicken, sliced
- 4 slices sourdough
- 2 tablespoons Caesar dressing
- 2 tablespoons grated Parmesan
- 1 cup chopped romaine
- 1 tablespoon butter
Quick Steps:
- Butter the bread and spread Caesar dressing on the inside.
- Layer chicken and Parmesan, then grill 2 to 3 minutes per side.
- Add romaine after grilling.
- Serve once the bread is crisp and the cheese has warmed through.
Equipment for This Recipe:
- Grill
- Spatula
- Small bowl
How to Serve This Dish: Pack the romaine separately if you want it extra crisp. Crushed croutons on the side give it a salad-like crunch.
Pro Tips for This Recipe:
- Use thick-cut bread so the dressing doesn’t soak through.
- Add the romaine last.
- A few lemon drops make the chicken taste fresher.
Variations on This Dish:
- Anchovy Caesar: Stir a little anchovy paste into the dressing.
- Bacon Caesar: Add crisp bacon for more salt.
Common Mistakes to Avoid with This Dish:
- Don’t grill the lettuce.
- Don’t drown the bread in dressing.
22. Crispy Falafel Pita Press
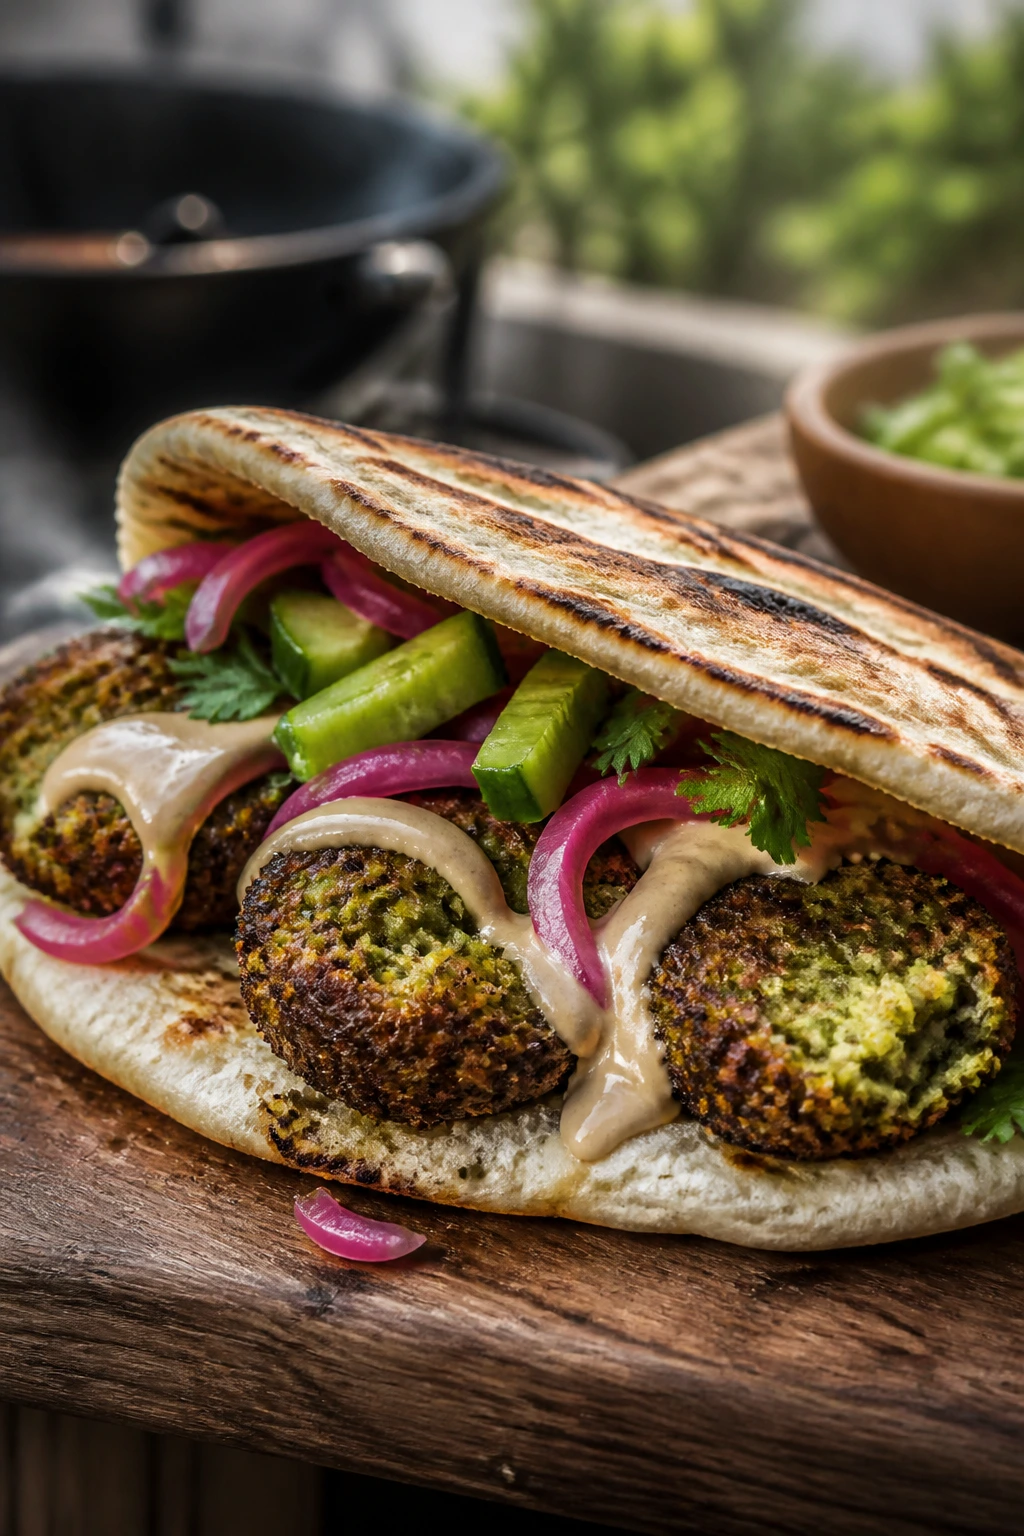
Falafel inside a grilled pita has a lovely little contradiction: the outside gets crisp while the inside stays soft. That contrast matters, especially when tahini and pickled vegetables show up.
Why It Works: The pita warms fast, the falafel keeps its shape, and the pickled onions cut through the chickpea richness so the sandwich doesn’t feel dense.
Key Ingredients:
- 6 falafel balls
- 2 pita rounds
- 1/3 cup tahini sauce
- 1/2 cup cucumber, sliced
- 1/4 cup pickled onions
- 2 tablespoons chopped parsley
Quick Steps:
- Warm the falafel on the grill or in a skillet for 3 to 4 minutes.
- Split the pita and spread tahini inside.
- Stuff with falafel, cucumber, pickled onions, and parsley.
- Press briefly on the grill, 30 to 45 seconds per side, to warm the pita.
Equipment for This Recipe:
- Grill or skillet
- Spatula
- Knife
How to Serve This Dish: Serve with extra tahini on the side. It’s solid at room temperature, which makes it a good picnic sandwich when the table is a long way from the fire.
Pro Tips for This Recipe:
- Don’t overfill the pita or it tears.
- Warm falafel gently; hard heat dries it out.
- Drain cucumber slices if they’re especially wet.
Variations on This Dish:
- Spicy Falafel: Add harissa to the tahini.
- Avocado Falafel: Add a few avocado slices for creaminess.
Common Mistakes to Avoid with This Dish:
- Don’t use pita that’s too thin.
- Don’t skip the pickles; they keep the sandwich lively.
23. Kielbasa and Caramelized Onion Roll

This is a sturdy, no-nonsense sandwich that works well when everyone is hungry and nobody wants something fussy. Kielbasa gives smoke and salt, and the onions bring sweetness that softens the edges.
Why It Works: Kielbasa is already cooked, which keeps the grilling simple, and the onions provide enough moisture and flavor to make the roll taste fuller.
Key Ingredients:
- 1 pound kielbasa, sliced lengthwise
- 1 large onion, sliced
- 4 hoagie rolls
- 4 slices Swiss or provolone
- 1 tablespoon mustard
- 1 tablespoon oil
Quick Steps:
- Cook the onion in a grill pan with oil for 10 minutes until golden.
- Grill the kielbasa for 3 to 4 minutes per side.
- Fill the rolls with mustard, onion, kielbasa, and cheese.
- Toast the whole sandwich 1 to 2 minutes until the cheese softens.
Equipment for This Recipe:
- Grill pan
- Tongs
- Spatula
How to Serve This Dish: Serve it with mustard for dipping if you like extra punch. Potato salad or dill chips fit the salty profile well.
Pro Tips for This Recipe:
- Slice the kielbasa lengthwise so it fits the roll.
- Let the onions cook until they actually color; pale onions are a miss here.
- Use a firm roll.
Variations on This Dish:
- Sauerkraut Version: Add a spoonful of kraut.
- Spicy Mustard Version: Swap yellow mustard for spicy brown.
Common Mistakes to Avoid with This Dish:
- Don’t skip the onion browning.
- Don’t use too much mustard or it overwhelms the sausage.
24. Grilled Meatball Sub
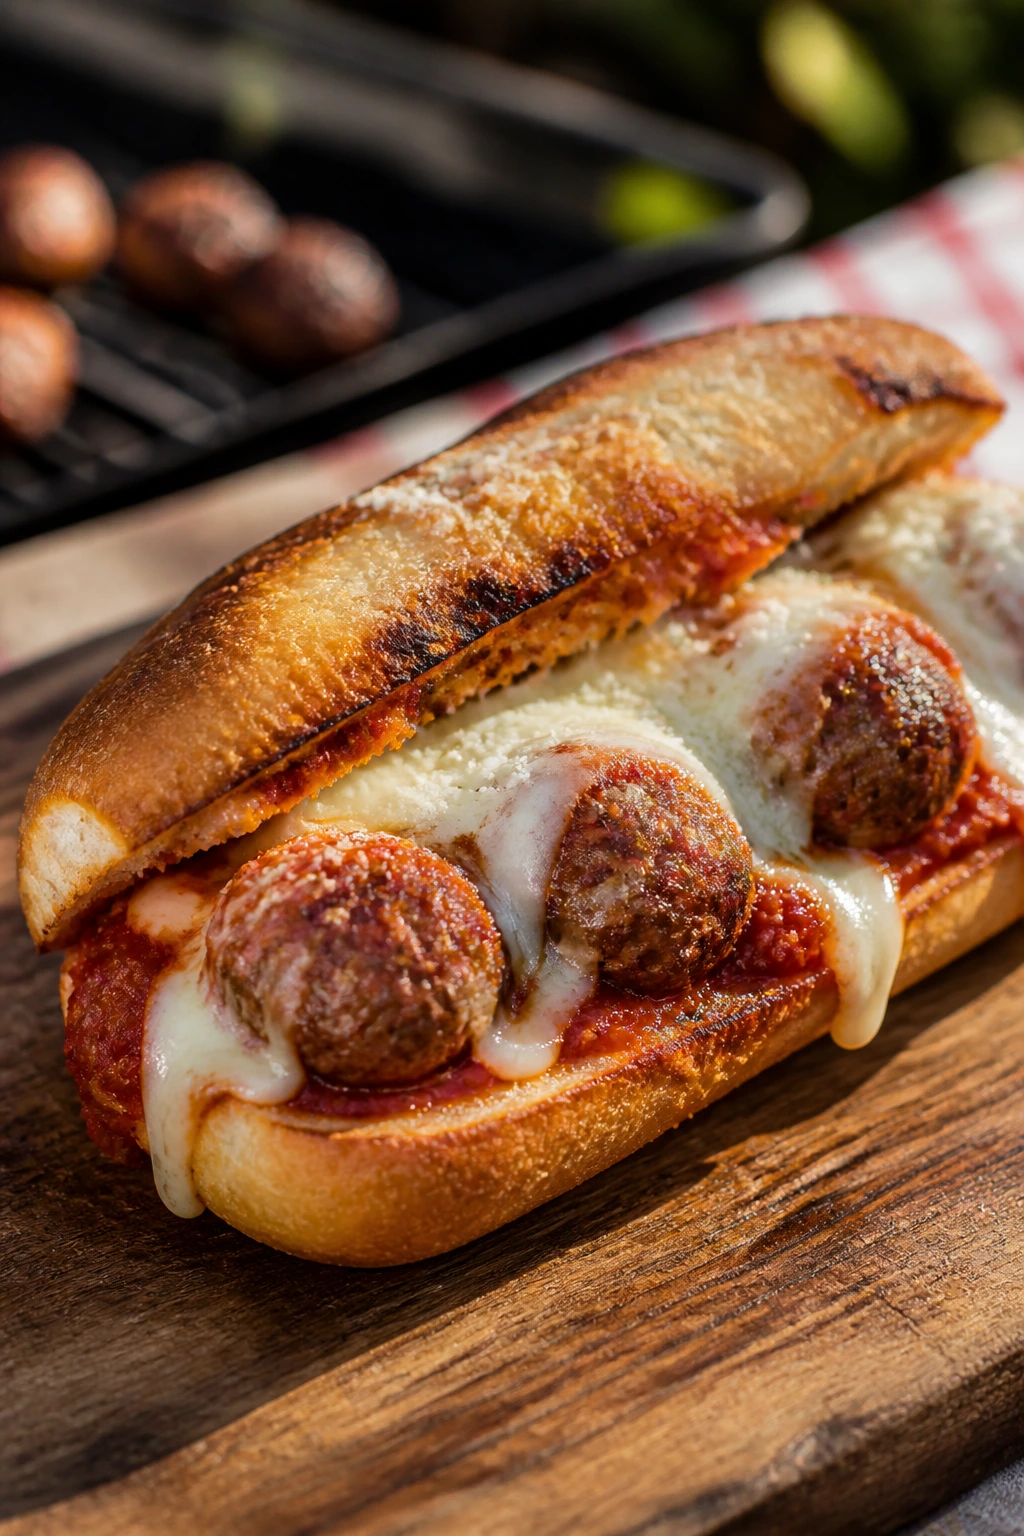
Meatballs on the grill sound a little extra until you taste the smoky edge they pick up. Marinara and mozzarella do the familiar sub thing, and the toasted roll keeps the sauce from getting away.
Why It Works: Meatballs become more picnic-friendly when they’re tucked into a toasted sub, and the grill adds enough char that the sandwich tastes less like leftovers and more like dinner.
Key Ingredients:
- 8 cooked meatballs
- 1 cup marinara sauce
- 4 hoagie rolls
- 4 slices mozzarella
- 1 tablespoon Parmesan
- 1 tablespoon olive oil
Quick Steps:
- Warm meatballs in marinara over medium heat for 5 minutes.
- Brush the rolls with oil and toast them on the grill.
- Fill with meatballs and sauce, then top with mozzarella.
- Grill 1 more minute until the cheese melts.
Equipment for This Recipe:
- Skillet
- Grill
- Tongs
How to Serve This Dish: Sprinkle with Parmesan and a little chopped parsley. It pairs well with a crisp green salad or a few pepperoncini.
Pro Tips for This Recipe:
- Drain excess sauce before loading the roll.
- Use meatballs that are medium-sized, not giant.
- Toast the roll before adding sauce.
Variations on This Dish:
- Spicy Sub: Stir red pepper flakes into the marinara.
- Chicken Meatball Version: Use chicken meatballs if you want it lighter.
Common Mistakes to Avoid with This Dish:
- Don’t overload with sauce.
- Don’t use rolls that split when warmed.
25. Spicy Shrimp Po’ Boy
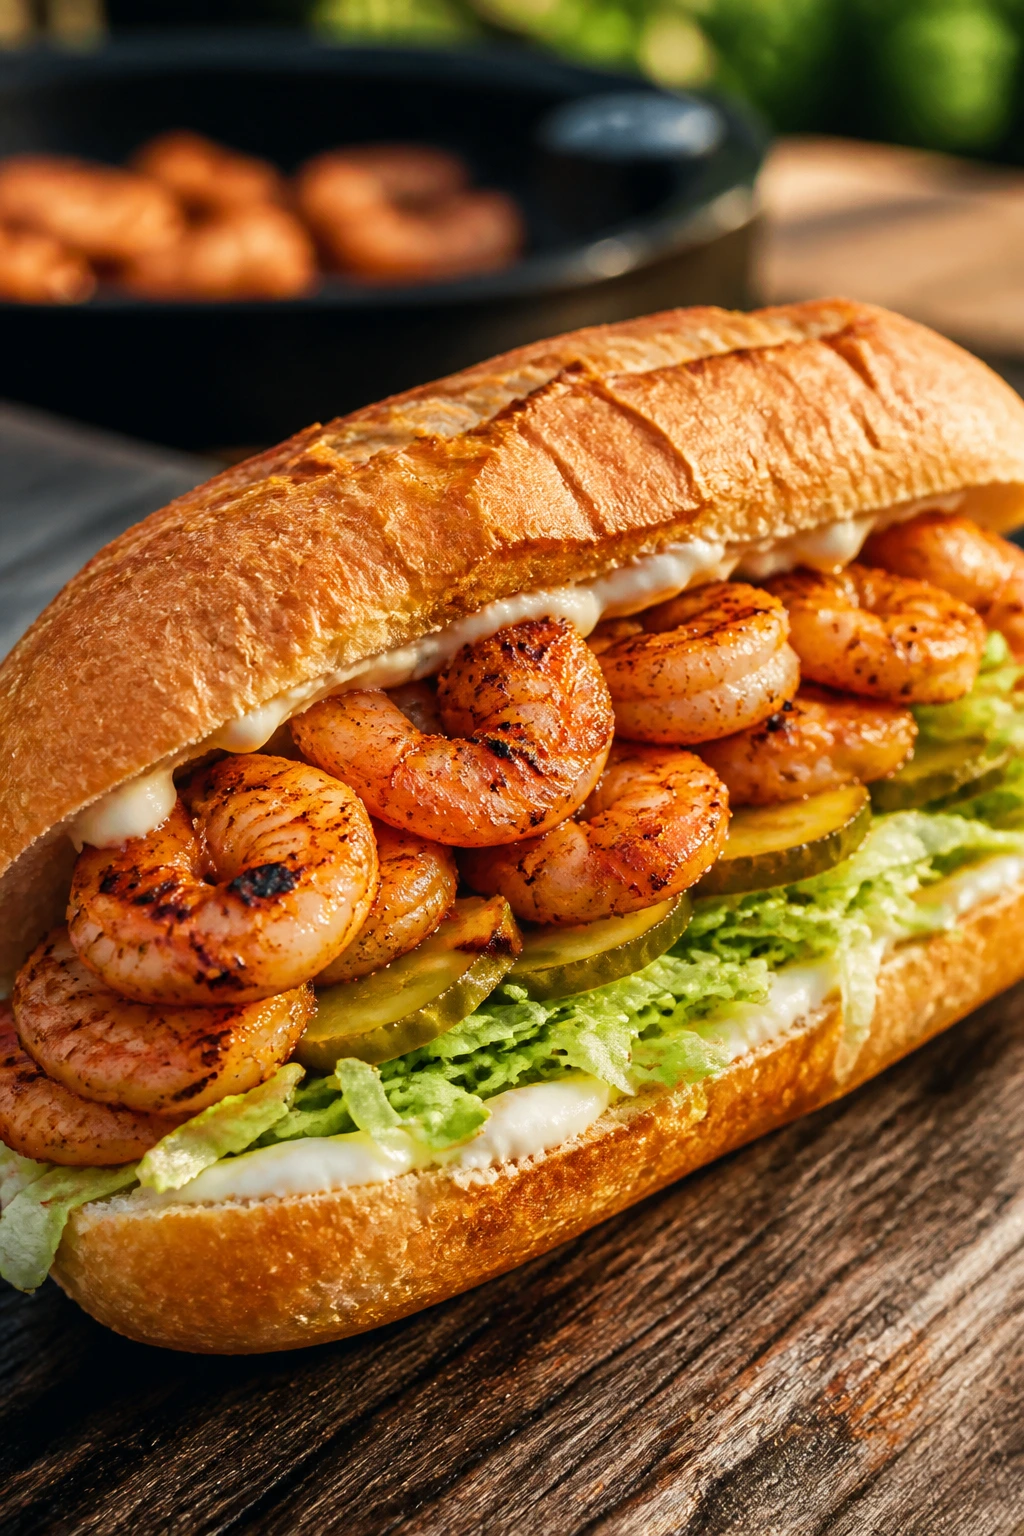
Shrimp cooks fast, which is exactly why it belongs on a weekend grill. The Cajun seasoning brings heat, and the cool lettuce and pickles make the sandwich feel balanced instead of heavy.
Why It Works: Quick-cooking shrimp stays tender if you don’t walk away, and the bread catches the juices while still holding enough structure for a messy, good sandwich.
Key Ingredients:
- 1 pound shrimp, peeled and deveined
- 2 tablespoons Cajun seasoning
- 4 French rolls
- 1/4 cup mayonnaise
- 1 cup shredded lettuce
- 1/2 cup sliced pickles
Quick Steps:
- Toss shrimp with Cajun seasoning.
- Grill over medium-high heat for 2 minutes per side until pink and curled.
- Spread mayo on the rolls and fill with shrimp, lettuce, and pickles.
- Close and press lightly so the sandwich stays compact.
Equipment for This Recipe:
- Grill basket or skewers
- Tongs
- Rolls
How to Serve This Dish: Serve it with lemon wedges and cold slaw. A little hot sauce on the side lets people push the heat up or down.
Pro Tips for This Recipe:
- Use large shrimp so they don’t overcook in seconds.
- Grill in a basket if your grates are wide.
- Don’t cut the rolls all the way through; a hinge helps.
Variations on This Dish:
- Garlic Shrimp Po’ Boy: Add garlic powder to the seasoning.
- Creole Mayo: Stir a little Creole mustard into the mayo.
Common Mistakes to Avoid with This Dish:
- Don’t overcook shrimp; they go rubbery fast.
- Don’t use flimsy bread that collapses under the filling.
26. Eggplant Parmesan Stack
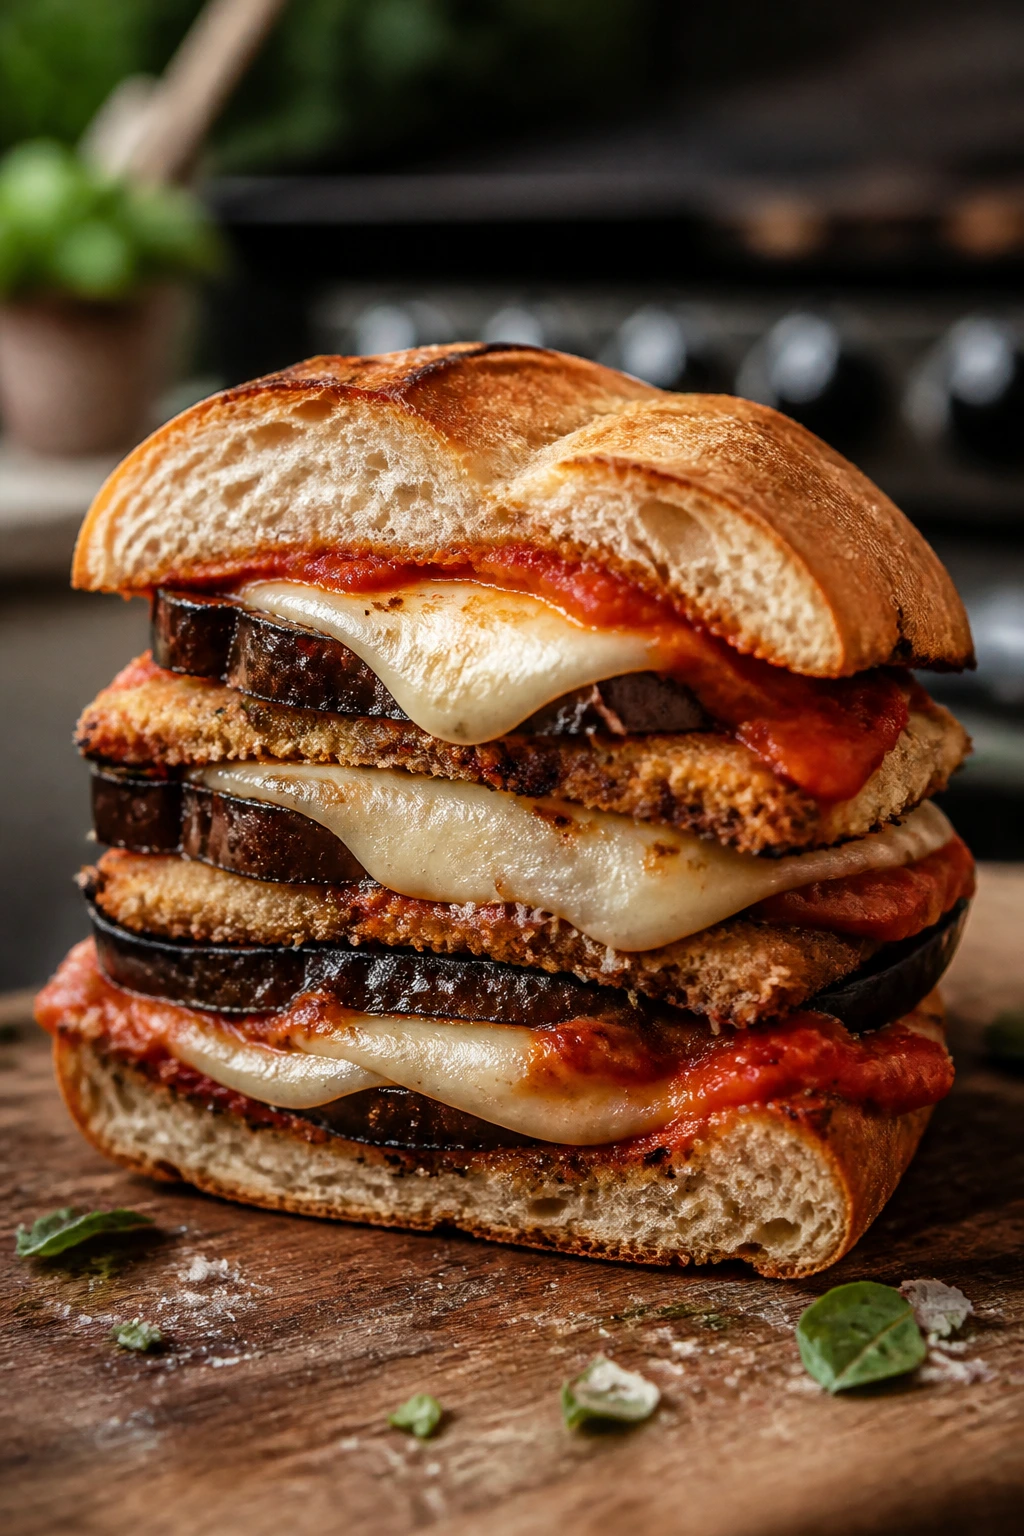
This is the vegetarian sandwich that makes even meat eaters stop talking for a minute. The eggplant softens, the cheese melts, and the marinara ties everything together in a way that feels rich but not clumsy.
Why It Works: Grilling the eggplant first keeps it from getting watery, and the layered cheese gives you the same pull you want from a good parm without needing a full casserole.
Key Ingredients:
- 1 eggplant, sliced into rounds
- 1 cup marinara sauce
- 4 slices mozzarella
- 2 tablespoons Parmesan
- 4 sandwich rolls
- 1 tablespoon olive oil
Quick Steps:
- Brush eggplant with oil and grill 3 minutes per side.
- Toast the rolls lightly.
- Layer eggplant, marinara, mozzarella, and Parmesan.
- Grill the assembled sandwich 1 to 2 minutes until the cheese melts.
Equipment for This Recipe:
- Grill
- Tongs
- Spatula
How to Serve This Dish: Eat it warm and let the cheese settle for a minute before cutting. A basil salad or a pile of marinated peppers works well next to it.
Pro Tips for This Recipe:
- Salt the eggplant first if it’s very seedy.
- Don’t slice it too thin or it disappears.
- Drain the marinara if it’s especially loose.
Variations on This Dish:
- Pesto Parm: Add pesto under the eggplant.
- Spicy Parm: Add red pepper flakes to the sauce.
Common Mistakes to Avoid with This Dish:
- Don’t skip pre-grilling the eggplant.
- Don’t use too much sauce or the sandwich gets soft fast.
27. Peanut Chicken Satay Wrap
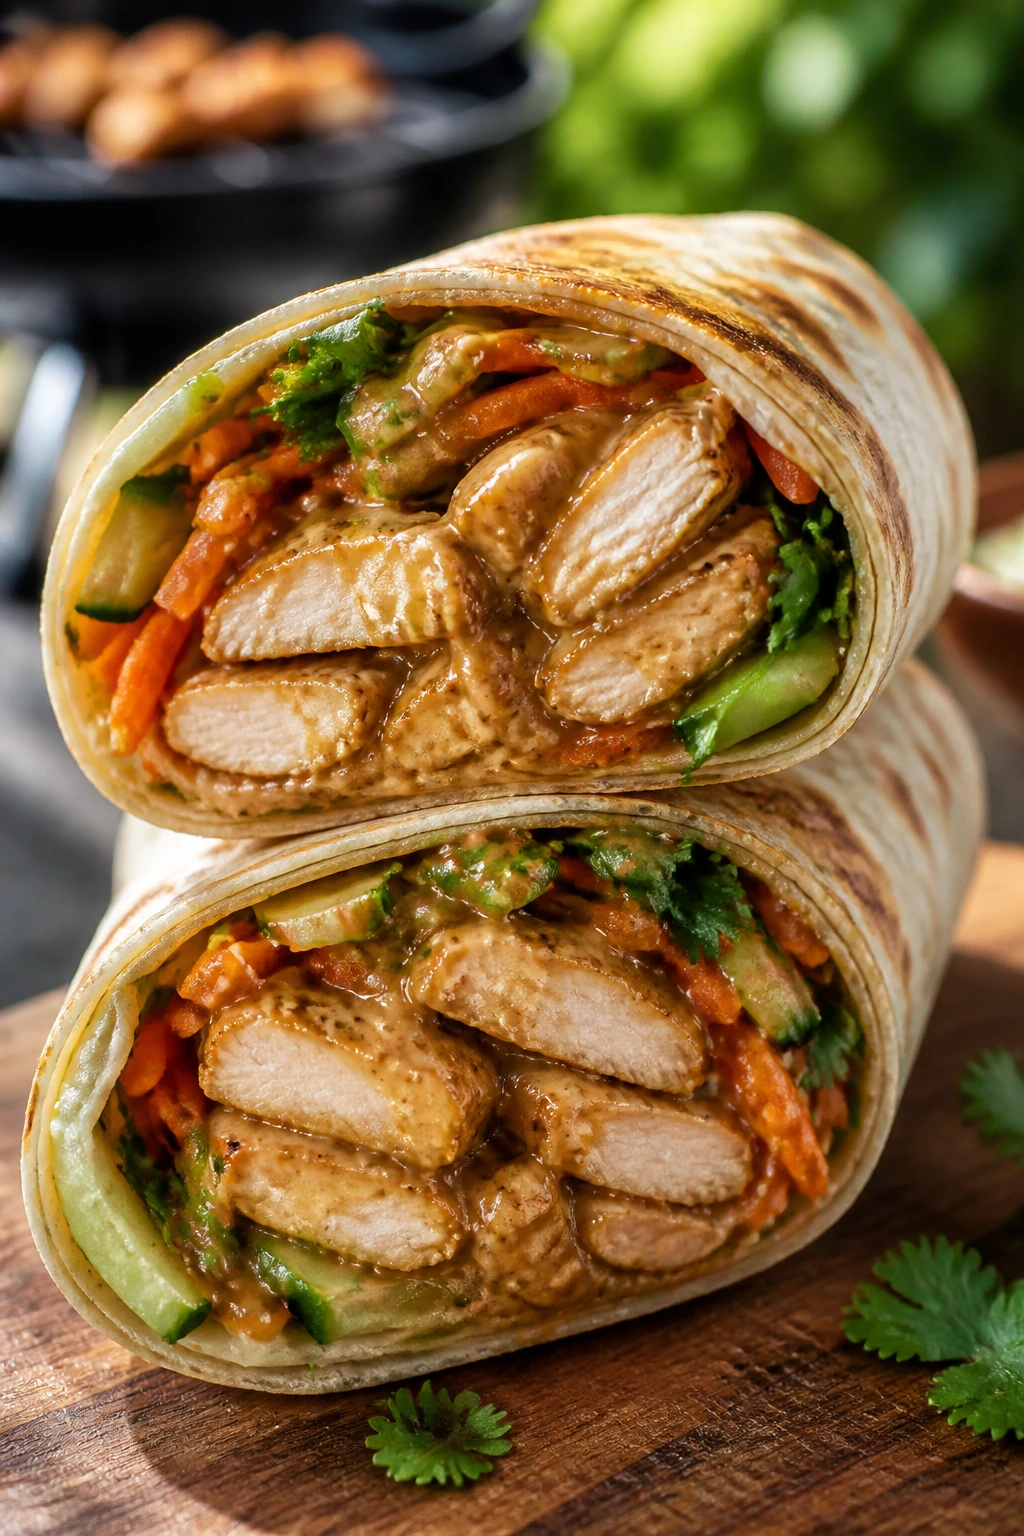
This one tastes like the grill got a little global without trying too hard. Peanut sauce gives the chicken a nutty glaze, and the wrap keeps it neat enough for one-handed eating.
Why It Works: The tortilla seals in the filling, and the peanut sauce stays thick enough to coat the chicken without running all over the cooler.
Key Ingredients:
- 1 pound cooked chicken, sliced
- 1/4 cup peanut sauce
- 4 large tortillas
- 1/2 cup shredded carrots
- 1/2 cup cucumber, julienned
- 2 tablespoons cilantro
Quick Steps:
- Toss the chicken with peanut sauce.
- Warm the tortillas on the grill for 15 seconds per side.
- Fill with chicken, carrots, cucumber, and cilantro.
- Roll tightly and grill seam-side down for 1 minute to seal.
Equipment for This Recipe:
- Grill
- Skillet or grill basket
- Knife
How to Serve This Dish: Slice on a diagonal and pack the pieces in parchment. A lime wedge on the side sharpens the peanut richness.
Pro Tips for This Recipe:
- Keep the filling dry except for the sauce.
- Don’t overstuff; wraps tear at the fold first.
- A little chili sauce on the side makes it louder.
Variations on This Dish:
- Tofu Satay: Swap chicken for grilled tofu.
- Crunch Wrap: Add chopped peanuts for extra texture.
Common Mistakes to Avoid with This Dish:
- Don’t use cold tortillas straight from the fridge.
- Don’t drown the filling in sauce.
28. Sloppy Joe Grilled Cheese

This is comfort food with a grill mark on it. The meat filling is saucy, the cheese binds it, and the bread gets toasted enough to hold the whole thing without crumbling.
Why It Works: A thick Sloppy Joe filling behaves better inside grilled bread than on a bun, because the cheese helps lock the saucy beef in place.
Key Ingredients:
- 1 pound ground beef
- 1/2 cup sloppy joe sauce
- 4 slices sandwich bread
- 4 slices cheddar
- 1 tablespoon butter
- 4 pickle slices
Quick Steps:
- Cook the beef and stir in the sauce until thick.
- Butter the bread and layer cheddar, beef, and a pickle slice.
- Grill over medium heat for 2 to 3 minutes per side.
- Remove when the bread is crisp and the cheese is fully melted.
Equipment for This Recipe:
- Skillet
- Grill or grill pan
- Spatula
How to Serve This Dish: Cut it into narrow strips for easier picnic handling. A pile of chips or a dill-heavy slaw fits nicely.
Pro Tips for This Recipe:
- Let the filling thicken before assembling.
- Use cheese on both sides of the beef if you want a tighter seal.
- Don’t push too much filling to the edges.
Variations on This Dish:
- Turkey Joe: Swap ground turkey for beef.
- Pepper Jack Joe: Use pepper jack for heat.
Common Mistakes to Avoid with This Dish:
- Don’t leave the filling wet.
- Don’t grill on high heat or the bread browns too fast.
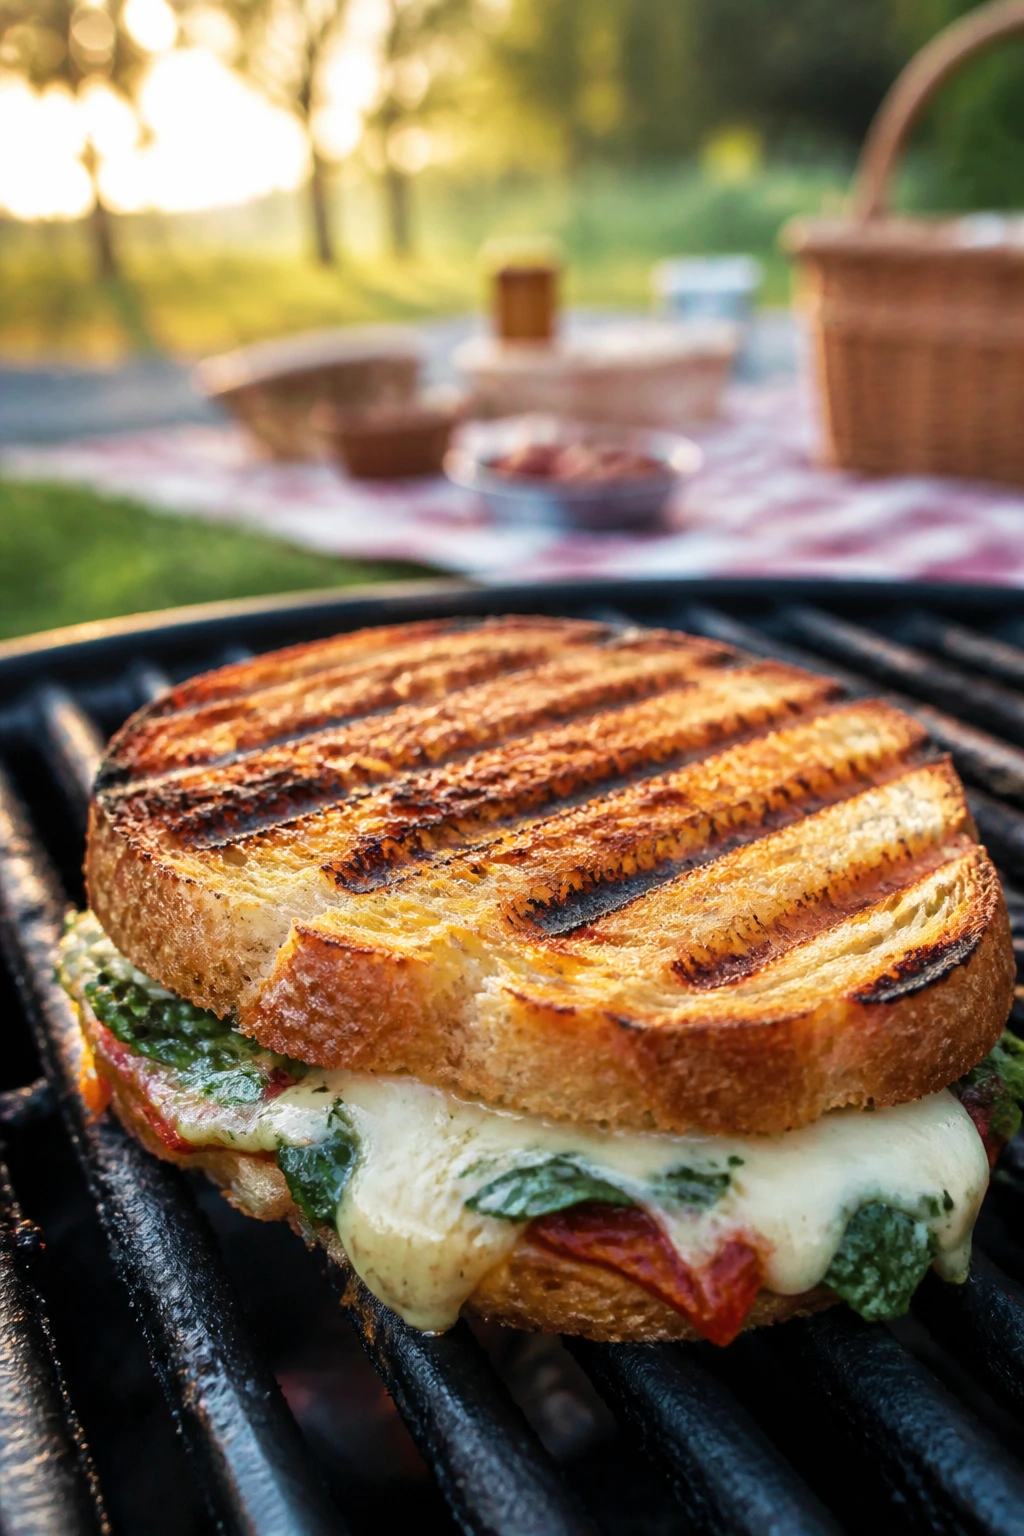
29. Turkey Cranberry Melt
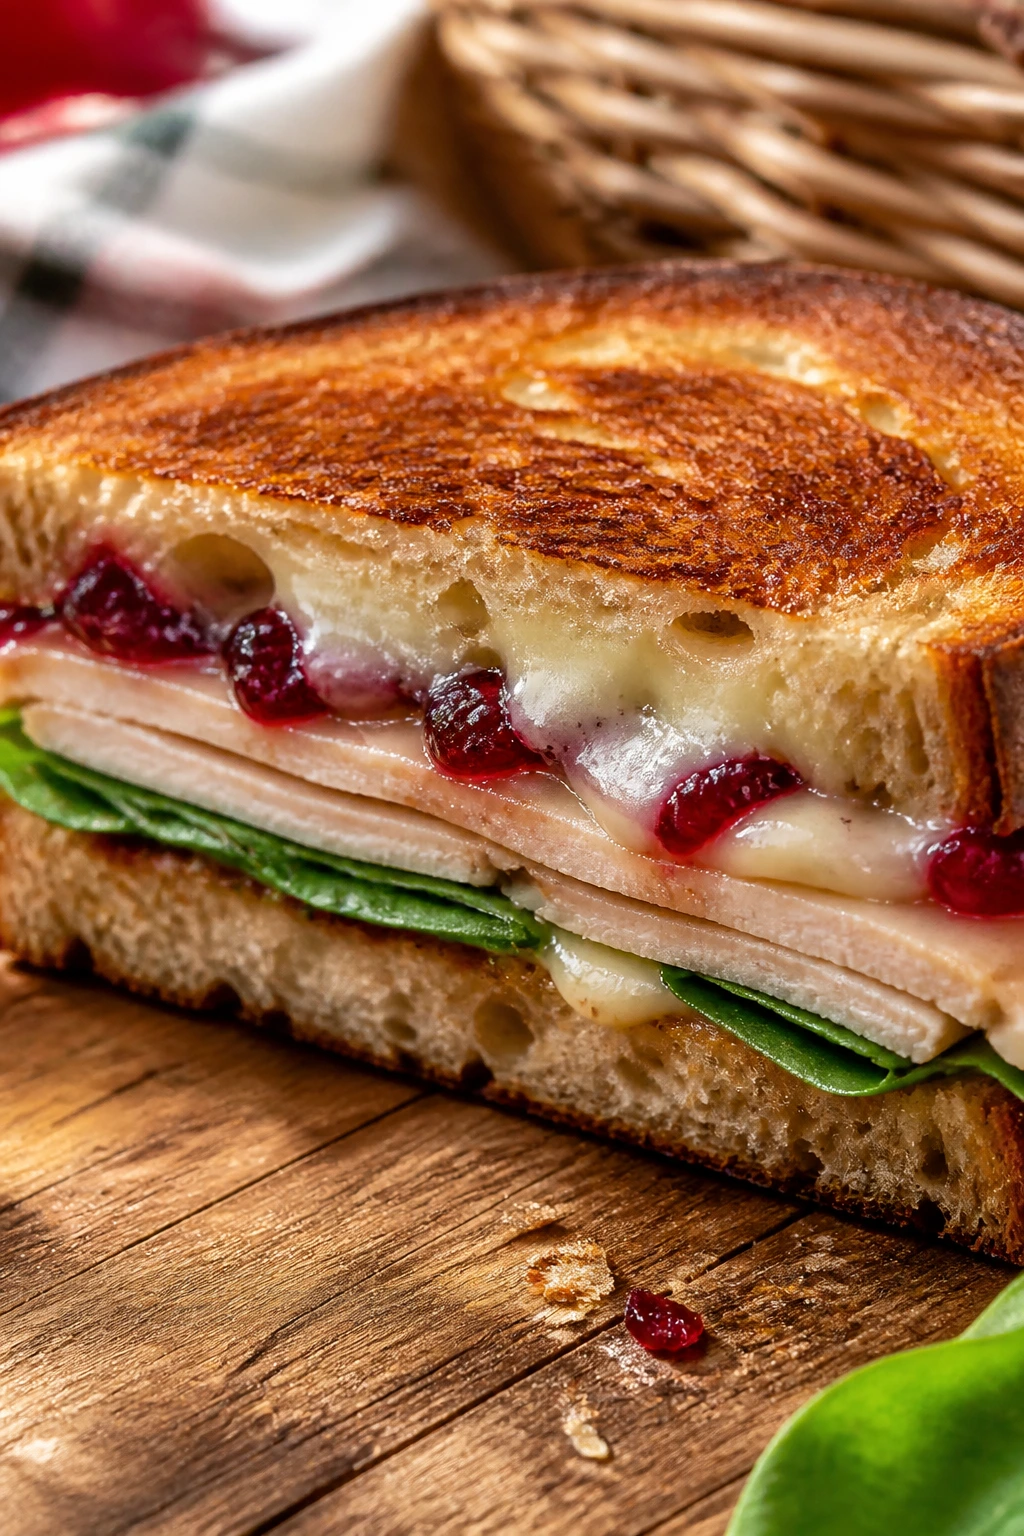
Turkey and cranberry taste like they were made to be wrapped in bread and toasted. Brie brings softness, and the cranberry adds that bright, tart hit that keeps the sandwich from feeling heavy.
Why It Works: Sweet-tart cranberry sauce melts into the turkey, while Brie turns creamy and gives the sandwich a rich, almost silky finish.
Key Ingredients:
- 8 oz sliced turkey
- 4 slices sourdough
- 4 oz Brie, sliced
- 2 tablespoons cranberry sauce
- 1 cup baby spinach
- 1 tablespoon butter
Quick Steps:
- Butter the outside of the bread.
- Spread cranberry sauce inside and layer turkey, Brie, and spinach.
- Grill over medium heat for 2 to 3 minutes per side.
- Remove when the Brie softens and the bread is golden.
Equipment for This Recipe:
- Grill
- Knife
- Spatula
How to Serve This Dish: It’s good cut in half and wrapped while still warm. A few salted almonds or a grape salad make sense beside it.
Pro Tips for This Recipe:
- Use a thin layer of cranberry sauce so it doesn’t flood the bread.
- Brie should be sliced cold, then built fast.
- Spinach goes in raw after the grill if you want it brighter.
Variations on This Dish:
- Brie-Free Version: Use cream cheese if Brie feels too rich.
- Apple Cranberry Turkey: Add a few apple slices.
Common Mistakes to Avoid with This Dish:
- Don’t overdo the cranberry.
- Don’t leave the Brie in one giant block; slice it so it melts evenly.
30. French Onion Grilled Cheese
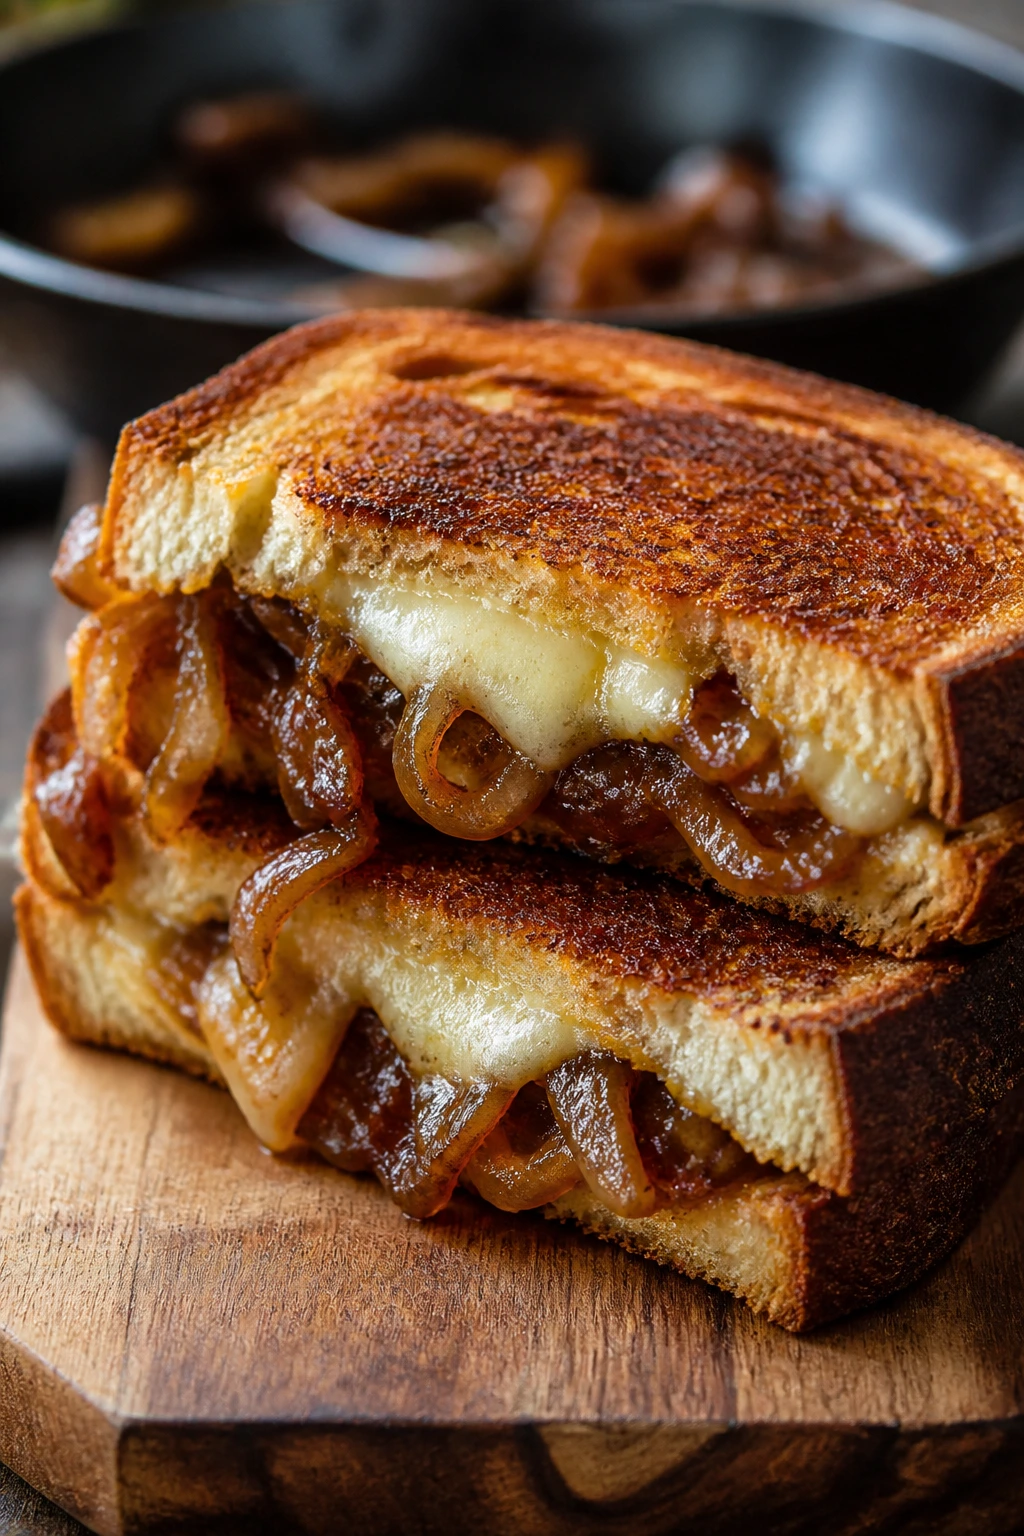
This sandwich tastes like a bowl of onion soup decided to get portable. The onions go deep and sweet, the Gruyère turns gooey, and the bread gets that dark, almost crackly crust.
Why It Works: Caramelized onions give a cooked sweetness that balances the cheese, and the sandwich holds together because the filling is thick, not wet.
Key Ingredients:
- 2 large onions, thinly sliced
- 4 slices sourdough
- 4 slices Gruyère
- 1 tablespoon butter
- 1 teaspoon thyme
- 1 teaspoon salt
Quick Steps:
- Cook onions in butter over medium heat for 15 minutes until deep golden.
- Stir in thyme and salt.
- Layer onions and Gruyère between bread slices.
- Grill 2 to 3 minutes per side until the bread is dark and the cheese melts.
Equipment for This Recipe:
- Skillet
- Grill or panini press
- Spatula
How to Serve This Dish: Serve it with pickles or a sharp green salad. It’s rich, so a small sandwich often feels better than a giant one.
Pro Tips for This Recipe:
- Cook the onions slowly; color is the point.
- Use more cheese than you think you need.
- Let the filling cool a minute before assembling.
Variations on This Dish:
- Swiss Version: Use Swiss if Gruyère is unavailable.
- Sherry Onion Version: Add a splash of sherry to the onions.
Common Mistakes to Avoid with This Dish:
- Don’t rush the onions.
- Don’t use wet cheese that won’t melt evenly.
31. Chipotle Chicken Avocado Sandwich
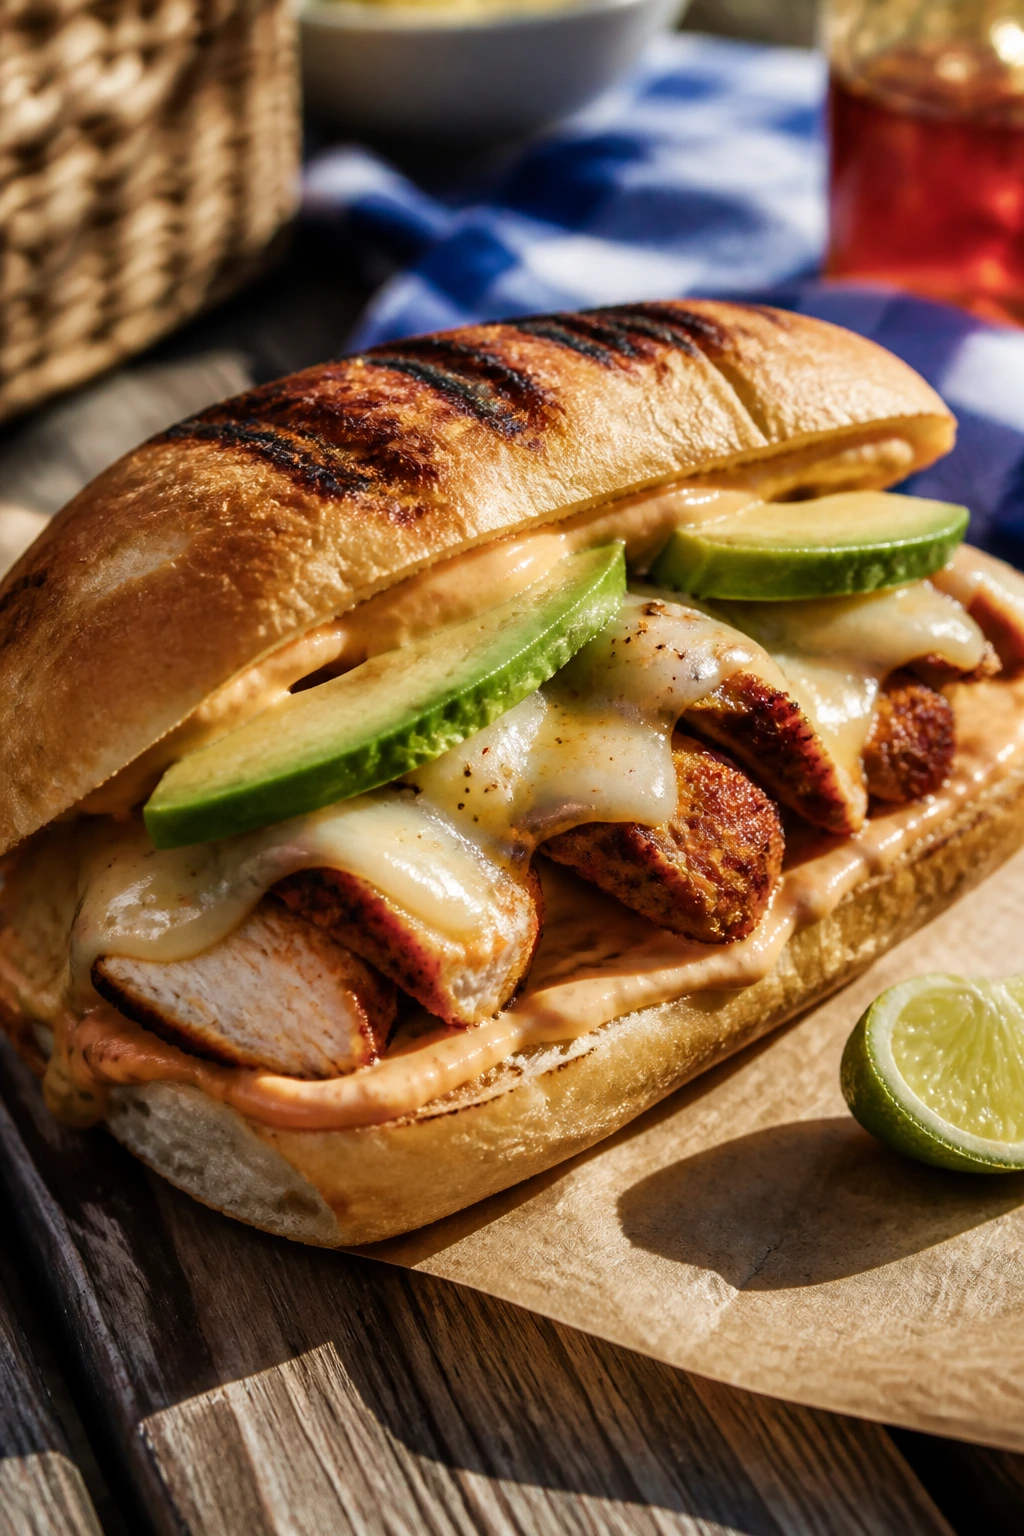
This sandwich hits hard in the best way: smoky, creamy, and a little spicy. Avocado smooths out the chipotle heat, and the chicken gives the whole thing enough substance to feel like lunch with a pulse.
Why It Works: Chipotle mayo clings to the chicken, avocado brings fat and softness, and the toasted roll keeps the sandwich from turning slippery.
Key Ingredients:
- 8 oz cooked chicken, sliced
- 4 sandwich rolls
- 1 avocado, sliced
- 2 tablespoons chipotle mayo
- 4 slices pepper jack
- 1 cup lettuce
Quick Steps:
- Spread chipotle mayo on the rolls.
- Layer chicken, pepper jack, and avocado.
- Grill over medium heat for 2 minutes per side.
- Add lettuce after grilling and serve right away.
Equipment for This Recipe:
- Grill
- Knife
- Spatula
How to Serve This Dish: Pair with tortilla chips or grilled corn. A little lime on the side sharpens the avocado.
Pro Tips for This Recipe:
- Add avocado after grilling if you want it fresher.
- Use just enough chipotle mayo to color the bread.
- Slice chicken thin so the layers sit flat.
Variations on This Dish:
- Grilled Pineapple Version: Add a pineapple ring.
- Cool Ranch Version: Swap chipotle mayo for ranch.
Common Mistakes to Avoid with This Dish:
- Don’t add too much avocado or the sandwich slips apart.
- Don’t use pale, flavorless chicken; season it well first.
32. Avocado Egg Salad Toastie
Egg salad and avocado belong together more than people admit. The avocado makes the filling creamy without drowning it, and the grilled bread gives the sandwich a bit of grit.
Why It Works: Egg salad can be heavy, but avocado lightens the texture and adds a clean finish, while toasted bread keeps the filling from making the whole thing soggy.
Key Ingredients:
- 4 hard-boiled eggs, chopped
- 1 avocado, mashed
- 2 tablespoons mayonnaise
- 1 tablespoon lemon juice
- 4 slices whole grain bread
- 1 tablespoon chives
Quick Steps:
- Mix eggs, avocado, mayo, lemon juice, and chives.
- Spread the mixture on the bread and close the sandwiches.
- Grill over medium heat for 1 to 2 minutes per side.
- Pull them off when the bread is crisp and the filling is warmed through.
Equipment for This Recipe:
- Bowl
- Grill pan
- Spatula
How to Serve This Dish: Serve it with sliced tomatoes or a fruit salad. It’s good at room temperature, which makes it a useful picnic sandwich.
Pro Tips for This Recipe:
- Don’t mash the avocado into puree; leave some texture.
- Use eggs that are fully cooled before chopping.
- A squeeze of lemon keeps the avocado green a little longer.
Variations on This Dish:
- Dill Egg Salad: Swap chives for dill.
- Spicy Egg Salad: Add a pinch of cayenne.
Common Mistakes to Avoid with This Dish:
- Don’t make the filling too wet.
- Don’t use bread that’s too soft to grill well.
33. Smashed Chickpea Salad Sandwich
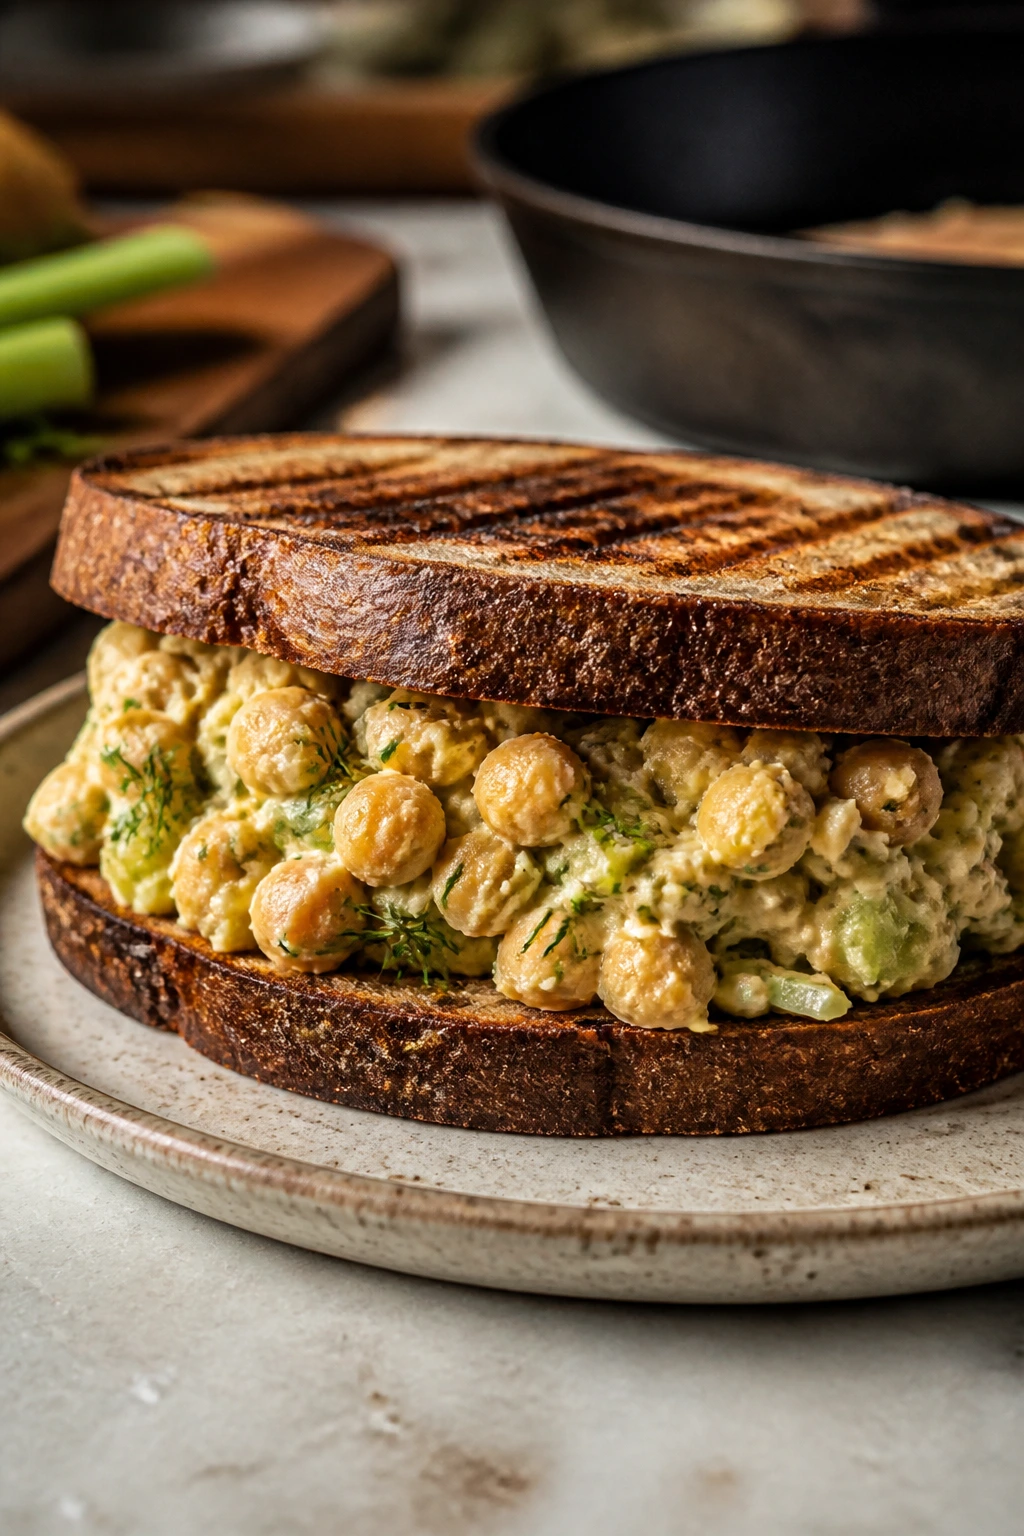
This is the pantry sandwich that still feels like a real plan. Chickpeas give you body, celery gives crunch, and a little lemon keeps the filling from tasting like canned beans and regret.
Why It Works: Smashed chickpeas behave like a sturdy salad filling, which means they’re easy to grill inside bread without leaking all over the crust.
Key Ingredients:
- 1 can chickpeas, drained
- 2 tablespoons mayonnaise
- 1 tablespoon lemon juice
- 1 celery stalk, diced
- 4 slices rye or whole grain bread
- 1 tablespoon chopped dill
Quick Steps:
- Mash the chickpeas with mayo and lemon until partly broken down.
- Stir in celery and dill.
- Spoon onto bread and grill over medium heat for 2 minutes per side.
- Cook until the bread is crisp and the filling is warm.
Equipment for This Recipe:
- Bowl
- Fork
- Grill pan
How to Serve This Dish: Add lettuce or cucumber if you want more crunch. It travels well wrapped in parchment because the filling stays thick.
Pro Tips for This Recipe:
- Leave some chickpeas whole for texture.
- Drain the beans well.
- Toast the bread first if it’s very soft.
Variations on This Dish:
- Curried Chickpea: Add curry powder.
- Pickle Chickpea: Add chopped dill pickles.
Common Mistakes to Avoid with This Dish:
- Don’t mash into paste.
- Don’t skip acid; lemon keeps it lively.
34. Greek Chicken Pita Pocket
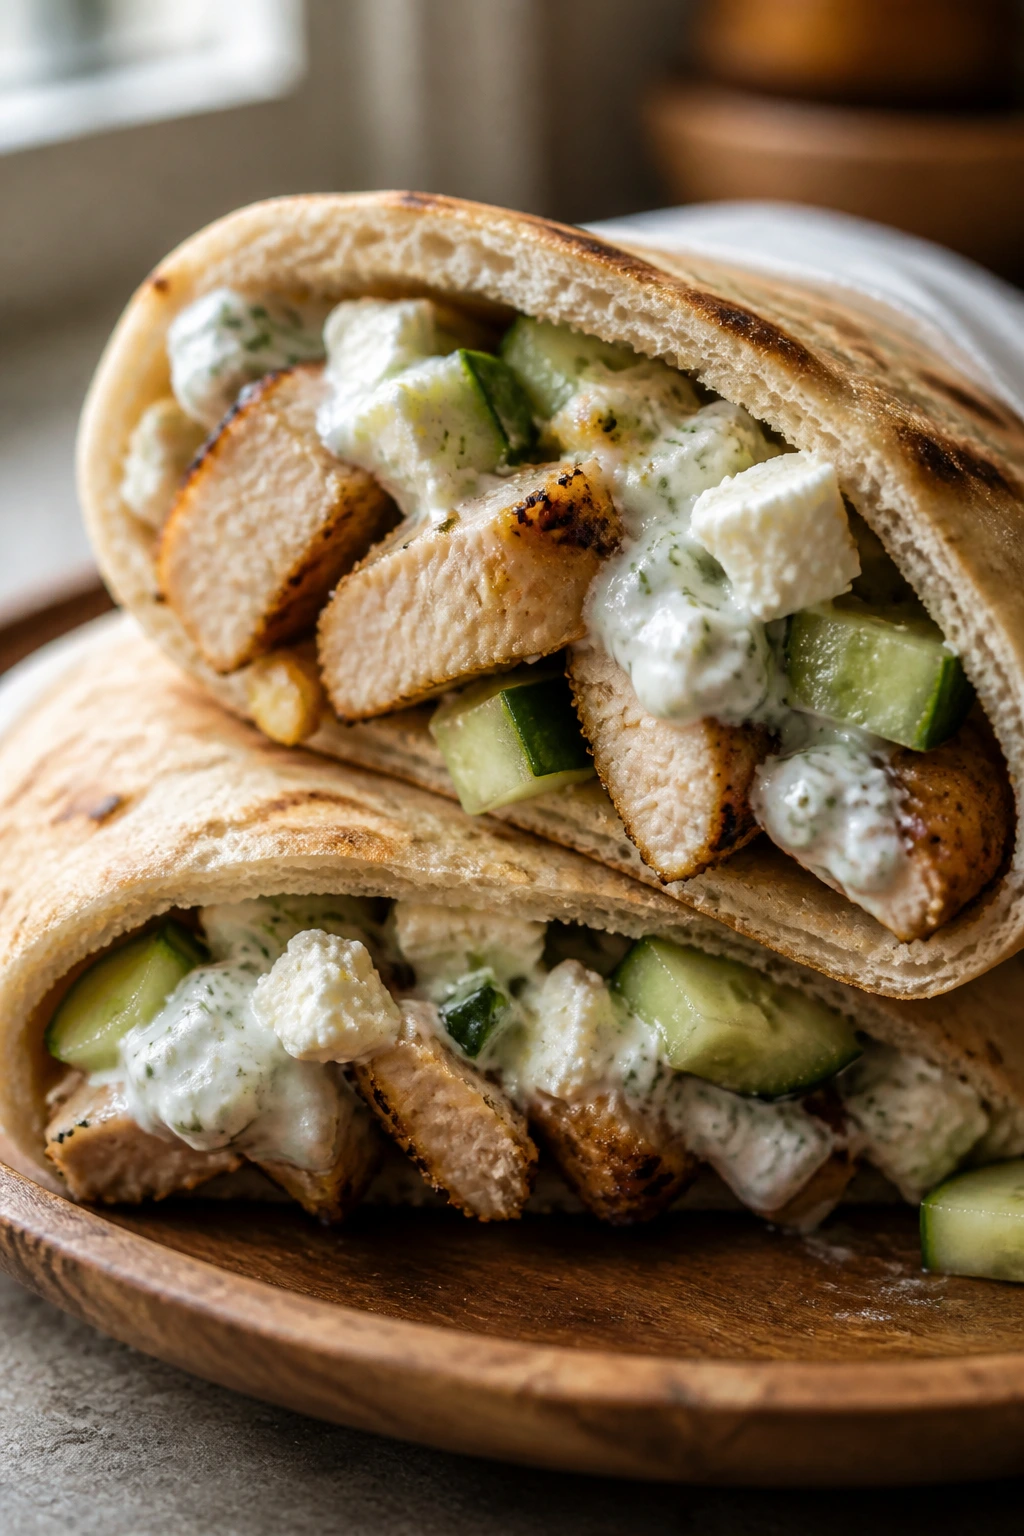
Greek flavors are made for grilling because they stay bright even when the bread is warm. Chicken, tzatziki, cucumber, and feta give you enough contrast that every bite feels fresh.
Why It Works: The pita warms fast, the tzatziki cools the chicken, and the feta gives a salty edge that makes the herbs pop.
Key Ingredients:
- 8 oz grilled chicken, sliced
- 2 pita rounds
- 1/4 cup tzatziki
- 1/2 cucumber, sliced
- 2 tablespoons feta
- 1 tablespoon chopped dill
Quick Steps:
- Warm the pita on the grill for 20 seconds per side.
- Spread tzatziki inside.
- Fill with chicken, cucumber, feta, and dill.
- Press briefly and serve while the pita is still soft.
Equipment for This Recipe:
- Grill
- Knife
- Spatula
How to Serve This Dish: Serve with olives and tomatoes. It’s one of the cleaner sandwiches in the bunch, which makes it a nice reset between richer ones.
Pro Tips for This Recipe:
- Dry the cucumber slices first.
- Don’t overstuff the pita pocket.
- Use cool tzatziki so the sandwich stays balanced.
Variations on This Dish:
- Lamb Version: Swap chicken for grilled lamb.
- Mint Version: Add mint to the tzatziki.
Common Mistakes to Avoid with This Dish:
- Don’t split the pita completely unless you mean to.
- Don’t use watery cucumber slices straight from the cutting board.
35. Roast Beef and Horseradish Cheddar
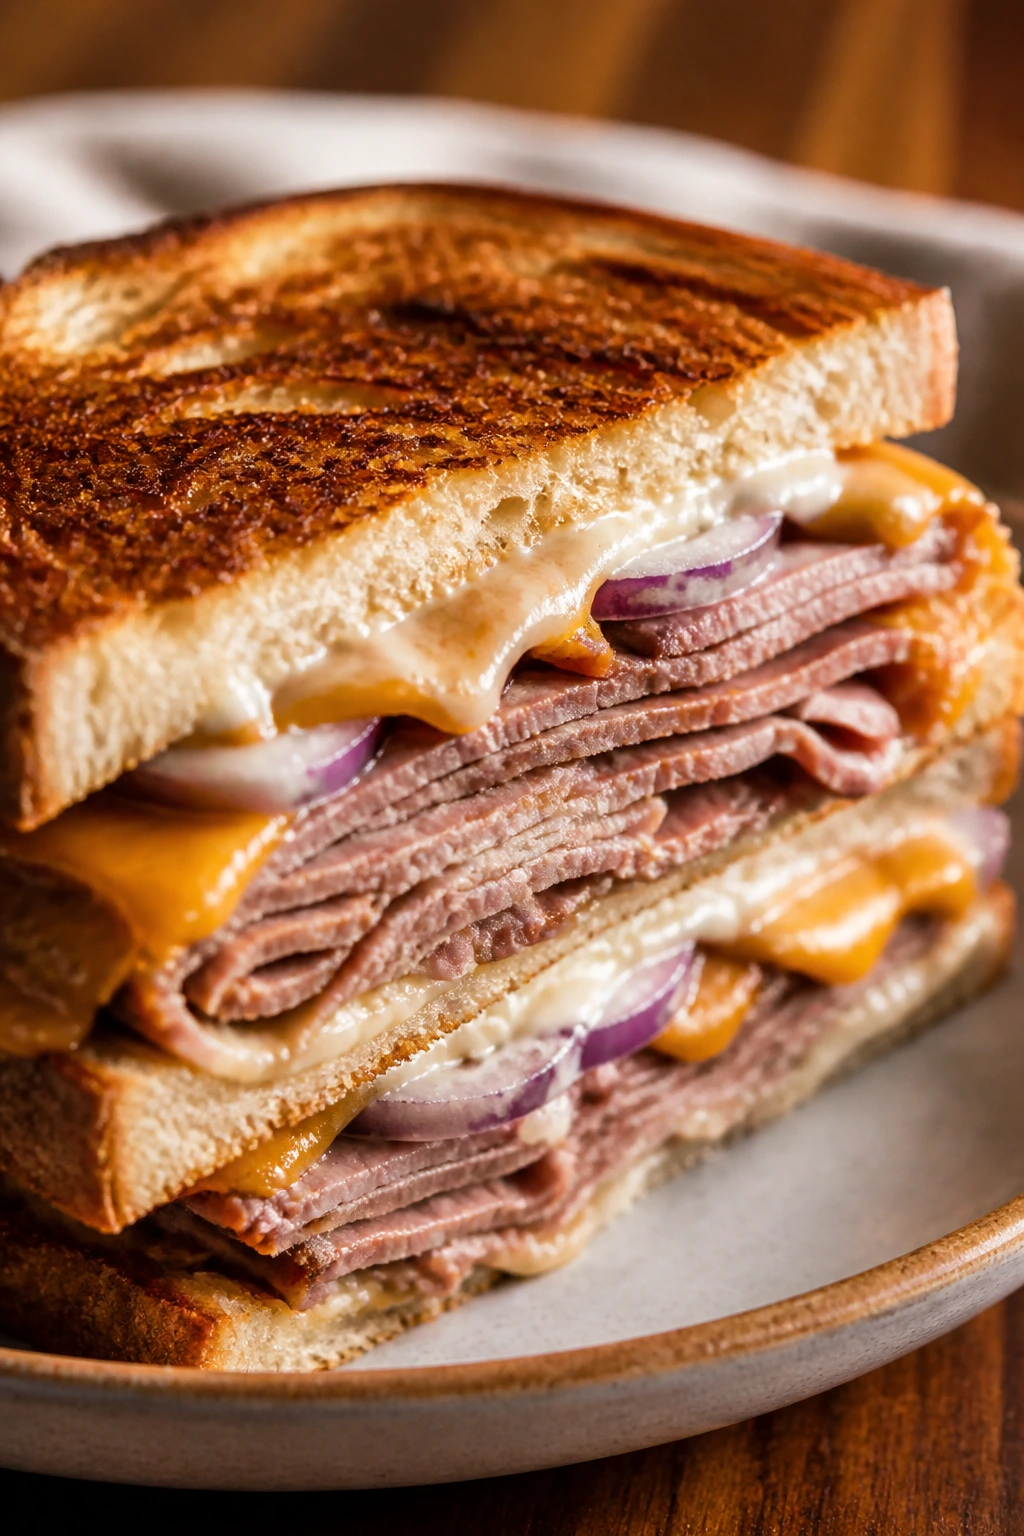
This is the sandwich that tastes like it knows exactly what it is. Roast beef brings depth, horseradish wakes up the back of your throat, and cheddar gives the whole thing a proper melt.
Why It Works: The horseradish cuts through the beef’s richness, while grilled bread keeps the sandwich sturdy enough to hold the thick slices.
Key Ingredients:
- 8 oz roast beef
- 4 slices sourdough
- 4 slices cheddar
- 2 tablespoons horseradish mayo
- 1/2 red onion, thinly sliced
- 1 tablespoon butter
Quick Steps:
- Spread horseradish mayo on the bread.
- Layer roast beef, onion, and cheddar.
- Butter the outside and grill 2 to 3 minutes per side.
- Remove when the cheddar melts and the bread is browned.
Equipment for This Recipe:
- Grill
- Spatula
- Knife
How to Serve This Dish: Serve with pickles and potato chips. It’s a sandwich that benefits from a cold side, not another warm one.
Pro Tips for This Recipe:
- Slice the onion thin so it doesn’t overpower the beef.
- Use roast beef that’s not overly wet.
- A little extra horseradish is fine if you like heat.
Variations on This Dish:
- Swiss Roast Beef: Swap cheddar for Swiss.
- Arugula Version: Add arugula after grilling.
Common Mistakes to Avoid with This Dish:
- Don’t go heavy on the horseradish unless you want it to dominate.
- Don’t grill so long that the roast beef dries out.
36. Banh Mi-Style Pork Sandwich
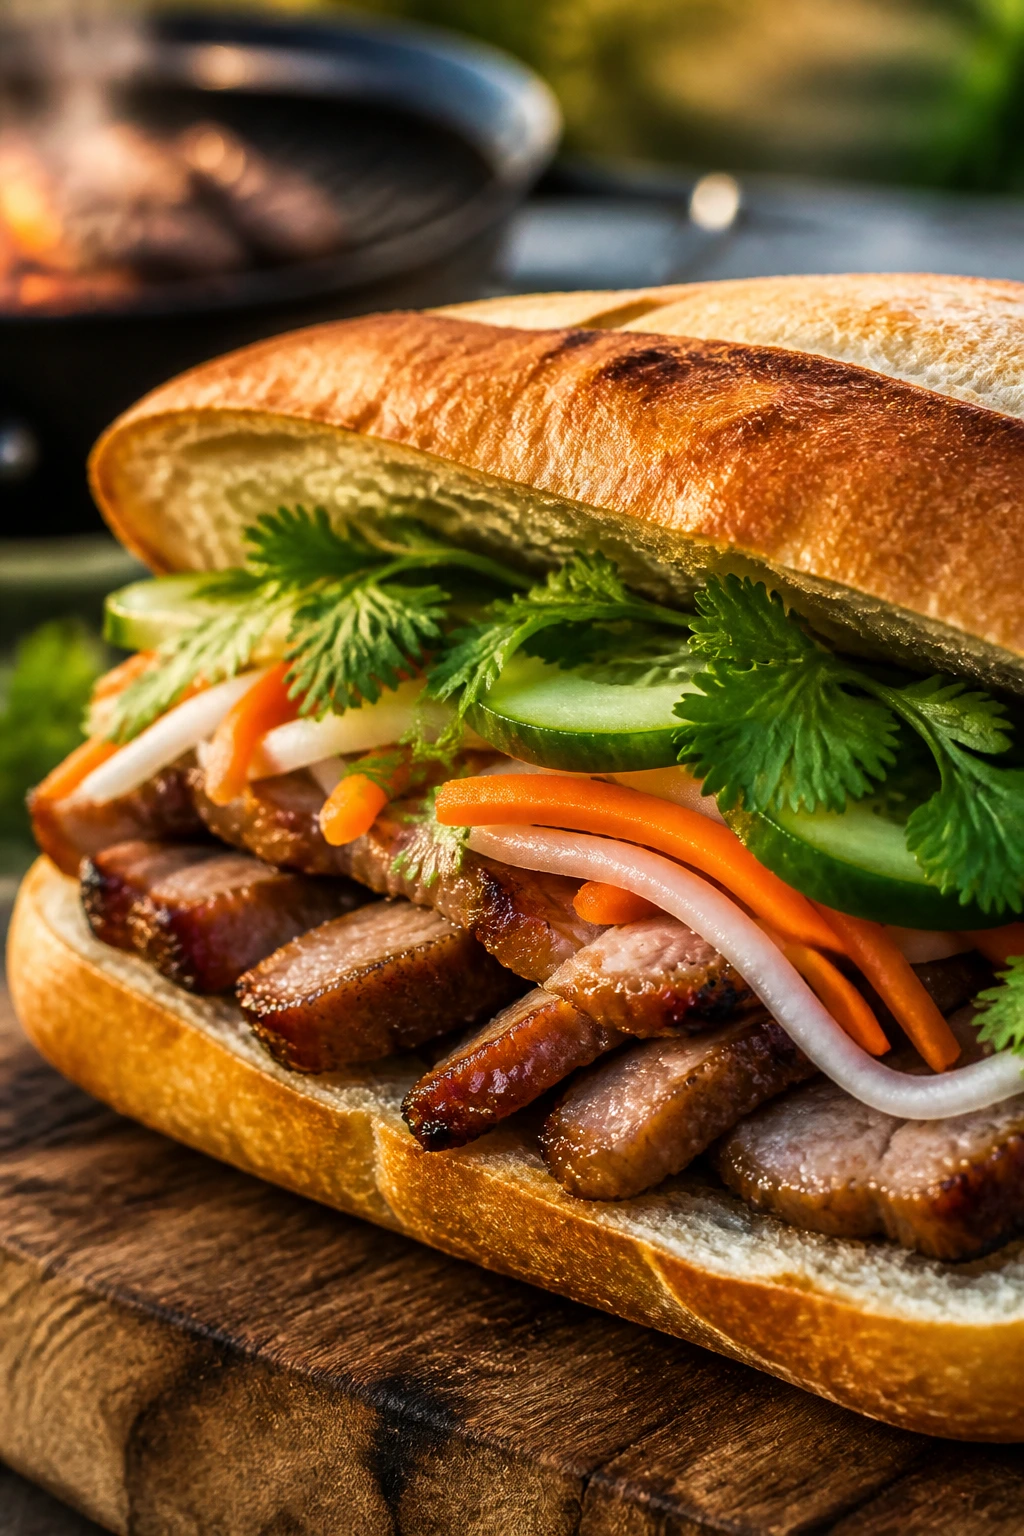
This one is sharp, crunchy, and loud enough to cut through a picnic spread. Pickled vegetables, cilantro, and pork give you contrast in every bite, which is the whole appeal.
Why It Works: The bread gets toasted but stays light, the pork brings richness, and the pickles keep the sandwich from feeling dense.
Key Ingredients:
- 8 oz cooked pork, sliced
- 4 small baguettes or rolls
- 1/4 cup mayonnaise
- 1/2 cup pickled carrot and daikon
- 1/2 cucumber, julienned
- 2 tablespoons cilantro
Quick Steps:
- Toast the baguettes lightly on the grill.
- Spread mayonnaise on the bread.
- Fill with pork, pickled vegetables, cucumber, and cilantro.
- Grill briefly, 1 minute per side, just to warm the bread.
Equipment for This Recipe:
- Grill
- Knife
- Tongs
How to Serve This Dish: Serve with lime wedges and a little hot sauce. The sandwich is strong enough to stand alone, but a small bowl of rice salad works too.
Pro Tips for This Recipe:
- Keep the pickled vegetables well drained.
- Use a light hand with mayo.
- Slice the pork thin so it layers neatly.
Variations on This Dish:
- Chicken Banh Mi: Swap pork for grilled chicken.
- Spicy Banh Mi: Add sliced jalapeños or sriracha mayo.
Common Mistakes to Avoid with This Dish:
- Don’t use a bread that’s too dense.
- Don’t skip the pickled vegetables; they’re the point.
37. Mediterranean Tuna Melt
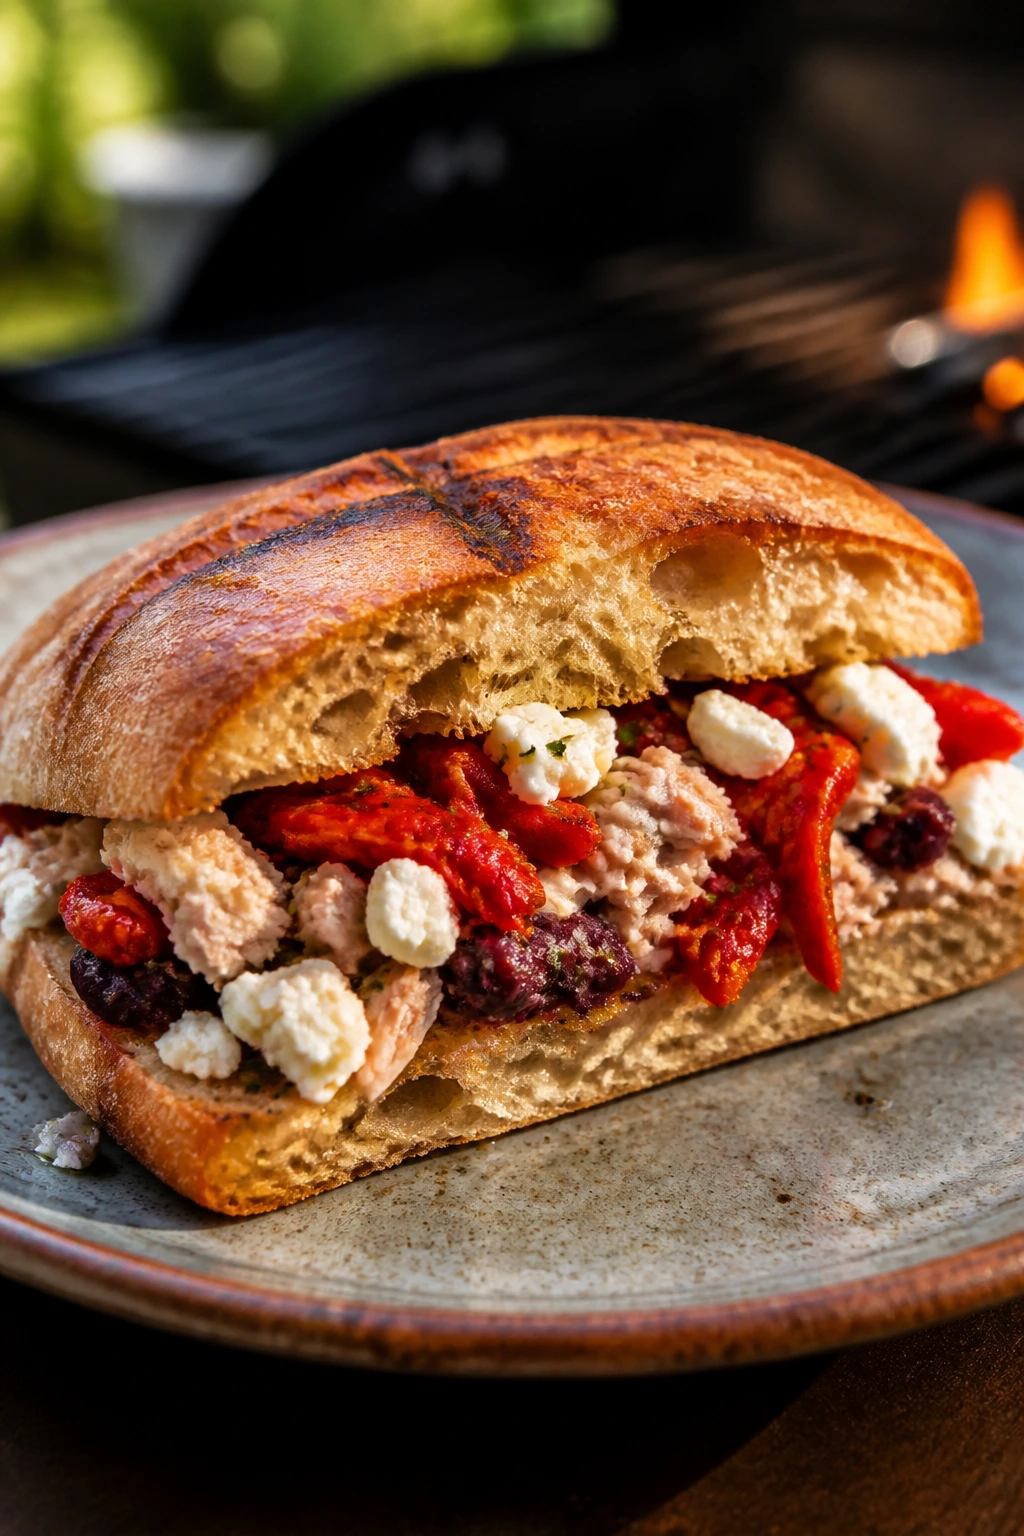
This tuna melt goes in a brighter direction. Olive tapenade, feta, and roasted red peppers give the filling more personality than the average pantry sandwich.
Why It Works: The salty, briny ingredients cut through tuna’s mildness, and the ciabatta gets crisp enough to hold the melt without going brittle.
Key Ingredients:
- 1 can tuna, drained
- 2 tablespoons olive tapenade
- 2 tablespoons mayonnaise
- 4 slices ciabatta
- 4 slices feta or mozzarella
- 1/4 cup roasted red peppers
Quick Steps:
- Mix tuna, tapenade, and mayo.
- Spread on the bread and layer with peppers and cheese.
- Grill over medium heat for 2 to 3 minutes per side.
- Serve once the cheese softens and the bread darkens.
Equipment for This Recipe:
- Bowl
- Grill or skillet
- Spatula
How to Serve This Dish: Serve with cucumber salad or olives. A squeeze of lemon right before eating makes the whole thing snap into place.
Pro Tips for This Recipe:
- Drain tuna really well.
- Chop the tapenade if it’s chunky.
- Roasted peppers should be patted dry.
Variations on This Dish:
- Feta-Forward Version: Use more feta and less mayo.
- Herbed Tuna: Add parsley or dill to the mix.
Common Mistakes to Avoid with This Dish:
- Don’t make the filling too wet.
- Don’t use bread that tears under pressure.
38. Sausage, Peppers, and Mozzarella Hoagie
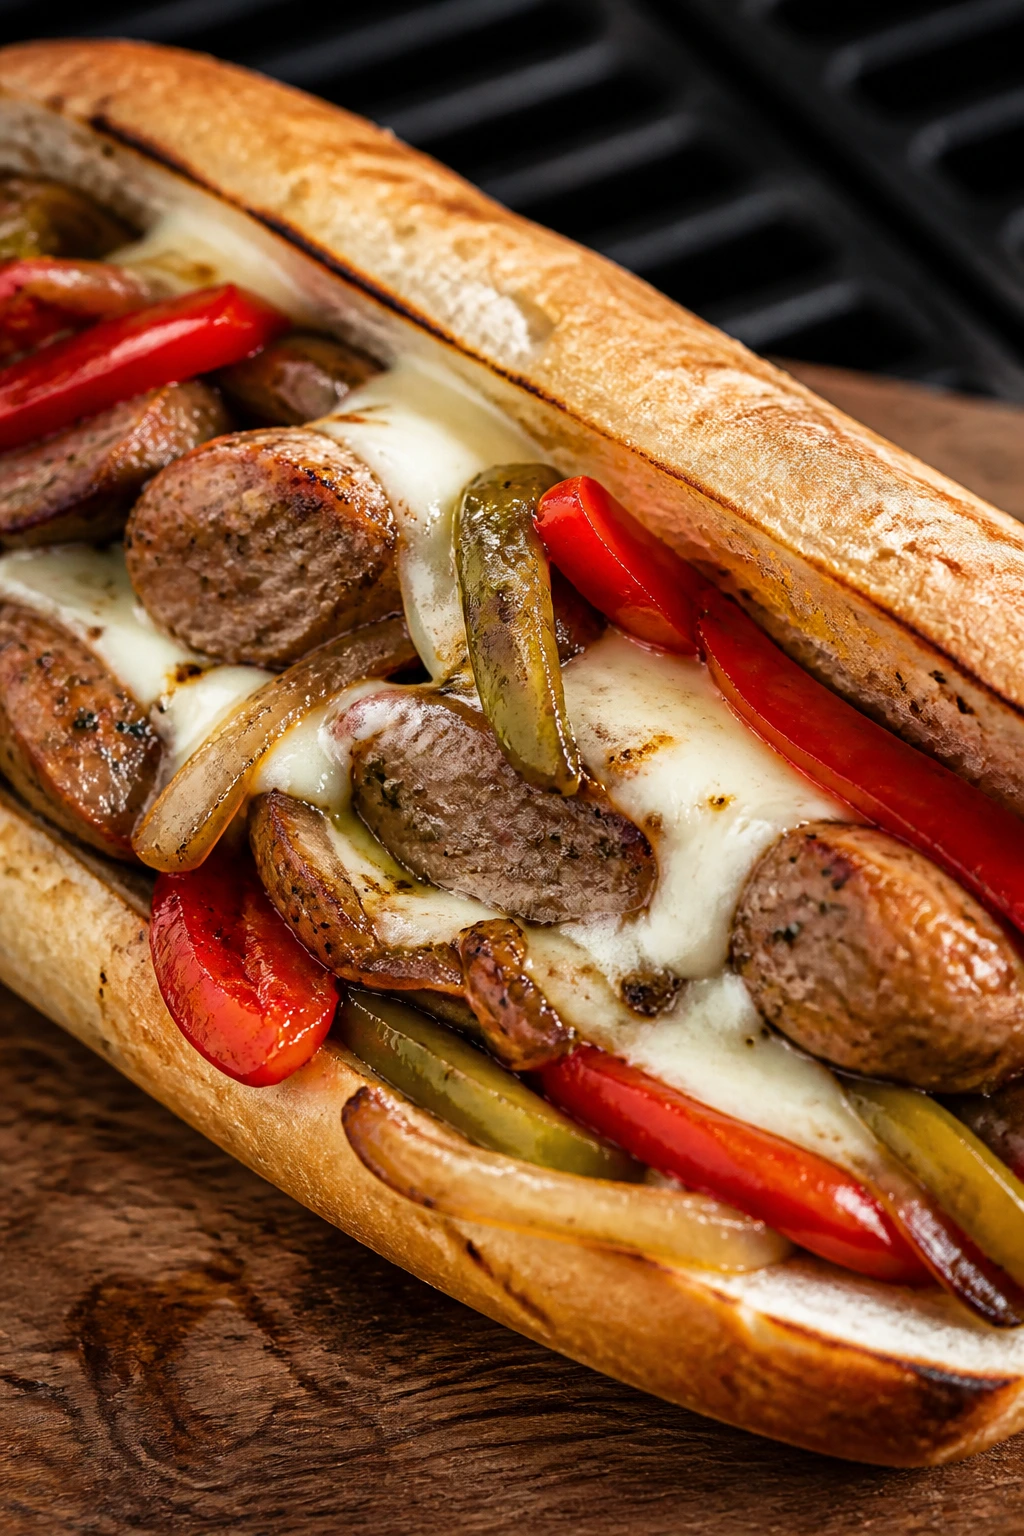
This is one of those sandwiches that tastes like a street fair without needing a paper tray. Sausage, peppers, onions, and mozzarella make a filling combo that stands up well to heat and travel.
Why It Works: The sausage brings fat and seasoning, the peppers add sweetness, and the hoagie roll keeps the whole thing in one manageable line.
Key Ingredients:
- 4 Italian sausages, cooked and sliced
- 1 bell pepper, sliced
- 1 onion, sliced
- 4 hoagie rolls
- 4 slices mozzarella
- 1 tablespoon oil
Quick Steps:
- Grill the peppers and onions in a skillet with oil for 8 minutes.
- Grill the sausage until browned and heated through.
- Fill the rolls with sausage, peppers, onions, and mozzarella.
- Grill 1 more minute until the cheese softens.
Equipment for This Recipe:
- Skillet
- Grill
- Tongs
How to Serve This Dish: Serve it with extra peppers on top if you like more sweetness. A vinegar slaw or chips with a sharp bite works well beside it.
Pro Tips for This Recipe:
- Cook the peppers until they slump a little.
- Slice the sausage on a bias for better texture.
- Use rolls that can handle a lot of filling.
Variations on This Dish:
- Spicy Sausage Version: Use hot Italian sausage.
- Provolone Swap: Use provolone for a cleaner melt.
Common Mistakes to Avoid with This Dish:
- Don’t undercook the peppers.
- Don’t use sausages that are too fatty without draining them a bit.
39. Blackberry Brie and Prosciutto Melt
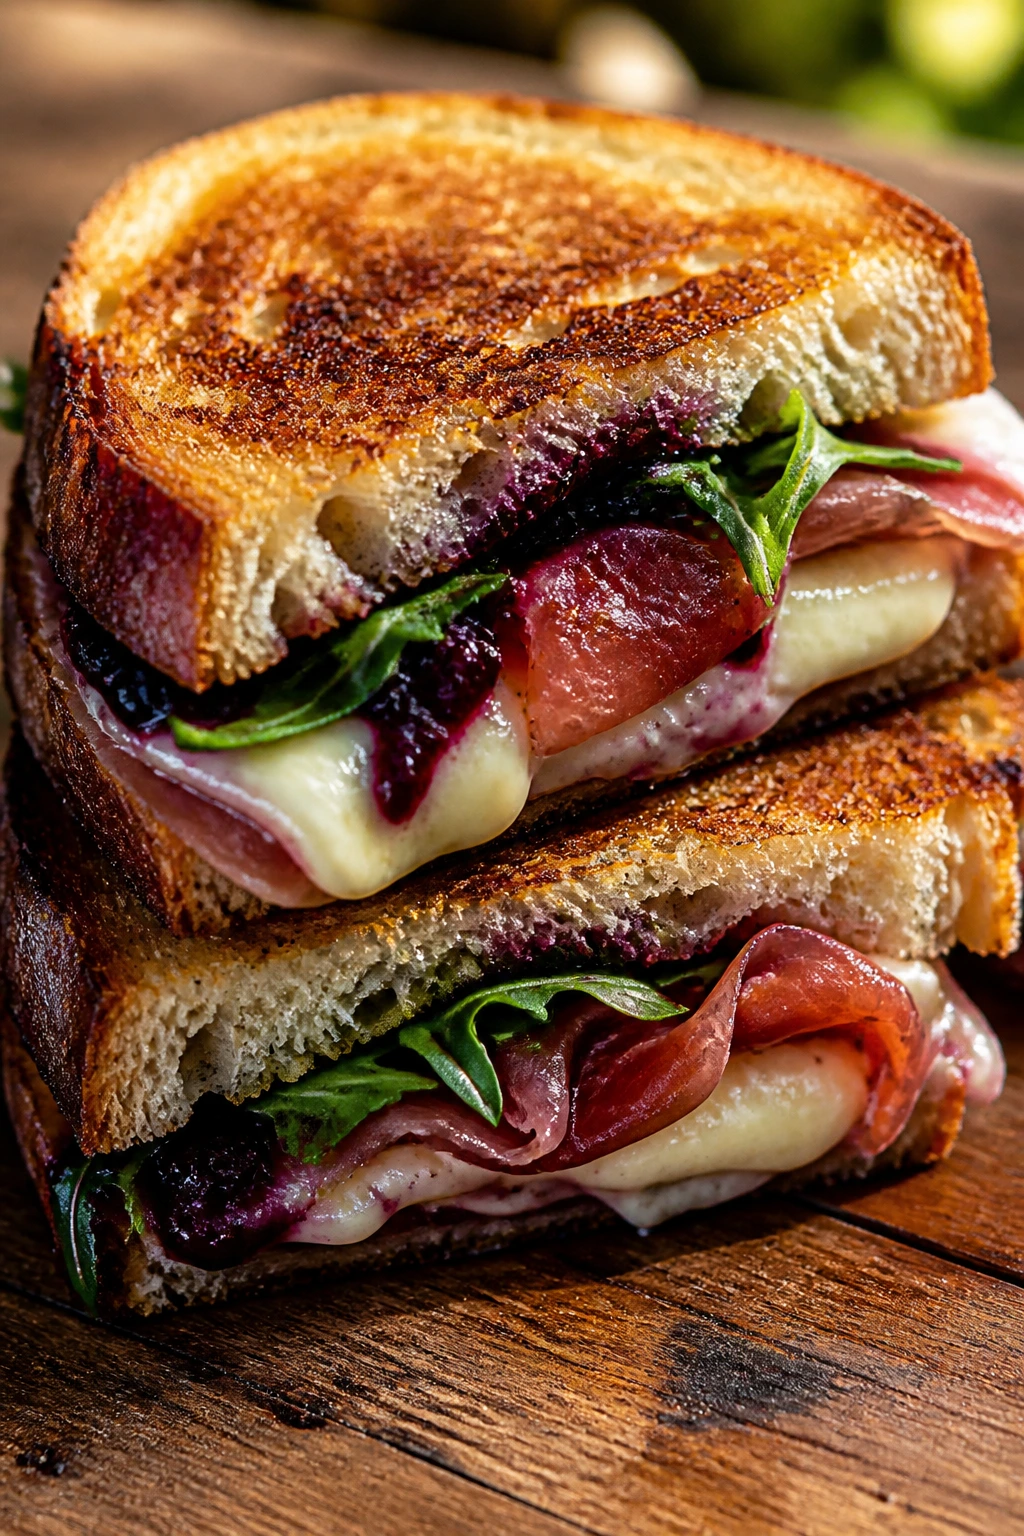
Sweet, salty, creamy, and just a little fancy — this sandwich is what happens when picnic food gets dressed up without losing its grip. Blackberry jam and Brie melt into each other, while prosciutto adds a thin hit of salt.
Why It Works: The jam gives the sandwich a glossy sweetness, the Brie melts fast, and the prosciutto stays savory enough to keep the whole thing from drifting into dessert territory.
Key Ingredients:
- 4 slices sourdough
- 4 oz Brie, sliced
- 4 slices prosciutto
- 2 tablespoons blackberry jam
- 1 cup arugula
- 1 tablespoon butter
Quick Steps:
- Butter the outside of the bread.
- Spread jam inside and layer Brie and prosciutto.
- Grill over medium heat for 2 minutes per side.
- Add arugula after grilling and cut once the Brie softens.
Equipment for This Recipe:
- Grill
- Spatula
- Knife
How to Serve This Dish: Serve it in smaller triangles; it’s rich enough that a little goes far. A sparkling drink or iced tea with lemon is a nice match.
Pro Tips for This Recipe:
- Use jam sparingly so it doesn’t flood the bread.
- Add arugula at the end for freshness.
- Brie should be chilled enough to slice cleanly.
Variations on This Dish:
- Fig Version: Swap blackberry jam for fig jam.
- Pear Version: Add very thin pear slices.
Common Mistakes to Avoid with This Dish:
- Don’t use too much jam.
- Don’t grill so long that the Brie runs out completely.
40. Crispy Paneer Tikka Sandwich
Paneer is one of the nicest grill fillings because it holds its shape and takes on spice without getting fussy. Paired with mint chutney and onion, it gives you something smoky, creamy, and bright all at once.
Why It Works: Paneer browns instead of melting, which makes the sandwich feel substantial, and the chutney gives it a sharp green finish that keeps the richness under control.
Key Ingredients:
- 8 oz paneer, cubed or sliced
- 2 tablespoons yogurt
- 1 tablespoon tikka spice or garam masala
- 4 slices bread or pav rolls
- 2 tablespoons mint chutney
- 1/4 red onion, sliced
Quick Steps:
- Mix yogurt and spice, then coat the paneer for 10 minutes.
- Grill paneer over medium-high heat for 2 minutes per side until browned.
- Spread mint chutney on the bread and add paneer and onion.
- Grill the sandwich 1 to 2 minutes per side until toasted.
Equipment for This Recipe:
- Grill or grill pan
- Small bowl
- Spatula
How to Serve This Dish: Serve it with extra chutney and a few lemon wedges. It’s strong enough to stand on its own, but a simple cucumber salad cools it down nicely.
Pro Tips for This Recipe:
- Dry the paneer before marinating if it’s wet.
- Don’t over-marinate; paneer only needs a short coating.
- Slice the onion thin so it stays crisp.
Variations on This Dish:
- Cheese-Heavy Version: Add a slice of mozzarella for extra melt.
- Spicy Paneer: Add chopped green chili to the marinade.
Common Mistakes to Avoid with This Dish:
- Don’t grill paneer too long or it gets squeaky.
- Don’t use watery chutney; thick is better here.
Why the Grill Wins for Picnic Sandwiches
The grill does one thing a skillet never quite copies: it gives bread a little attitude. Those browned ridges don’t just look nice. They dry the surface enough to help the sandwich survive a wrap, they add a faint smoky edge, and they create pockets that catch butter, mayo, mustard, and cheese in a way flat heat doesn’t.
Picnic sandwiches also need texture discipline. Wet tomato? Salt it and blot it. Soft cheese? Pair it with bread that can hold its line. Saucy meat? Tuck it behind a layer of cheese or something crisp. The grill rewards that kind of thinking because it toasts the outside fast while the filling warms underneath, so you get contrast instead of mush.
I like using the grill for sandwiches because it turns a simple lunch into something that feels made with intention. Not complicated. Just considered. And that’s the sweet spot when you’re packing food for a weekend table, a tailgate blanket, or the patch of shade everybody argues over.
Essential Equipment for These Recipes
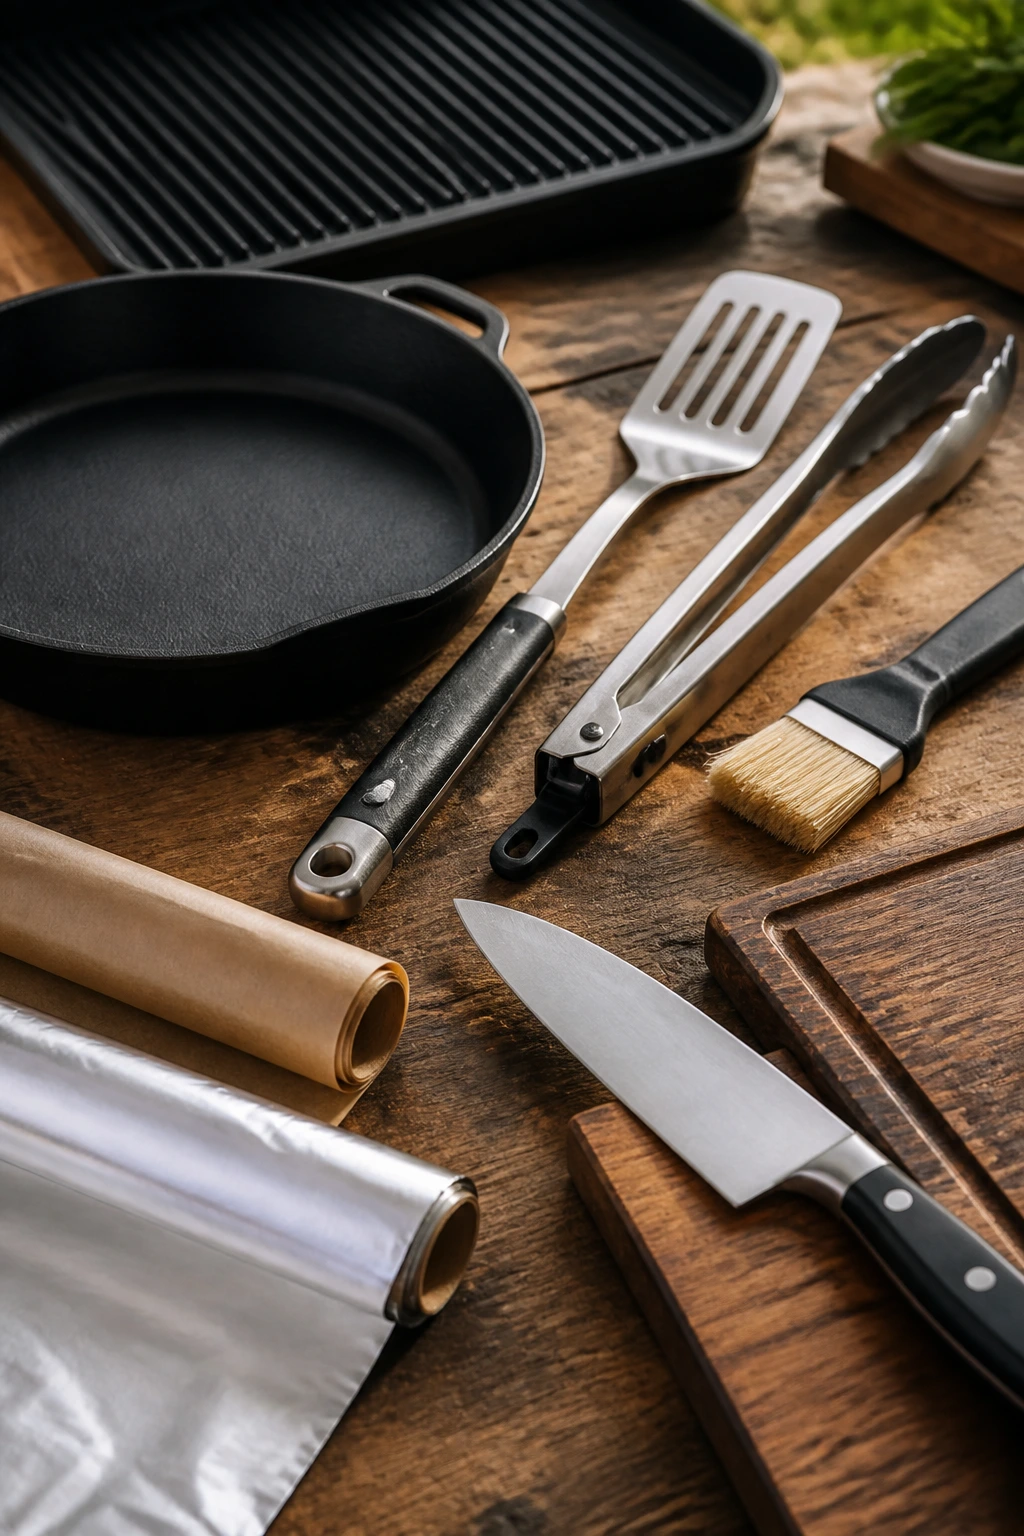
- Grill or grill pan: A gas grill, charcoal grill, or heavy grill pan all work; the key is steady medium heat.
- Long spatula: You want one with enough width to lift a sandwich without scraping the crust off.
- Tongs: Best for moving fillings, flipping vegetables, and keeping your hands out of the heat.
- Pastry brush: For butter, oil, or garlic butter on bread before grilling.
- Sharp knife: A clean cut matters more than people think; it keeps fillings from squishing out.
- Cutting board: A stable board makes slicing tomatoes, onions, and bread safer.
- Paper towels: Essential for tomatoes, pickles, cucumbers, and any ingredient that leaks.
- Foil or parchment: Use it for wrapping sandwiches for the picnic or holding them warm for a few minutes.
- Cast-iron skillet or grill basket: Handy for onions, mushrooms, shrimp, or anything small enough to fall through the grate.
Smart Shopping and Ingredient Tips
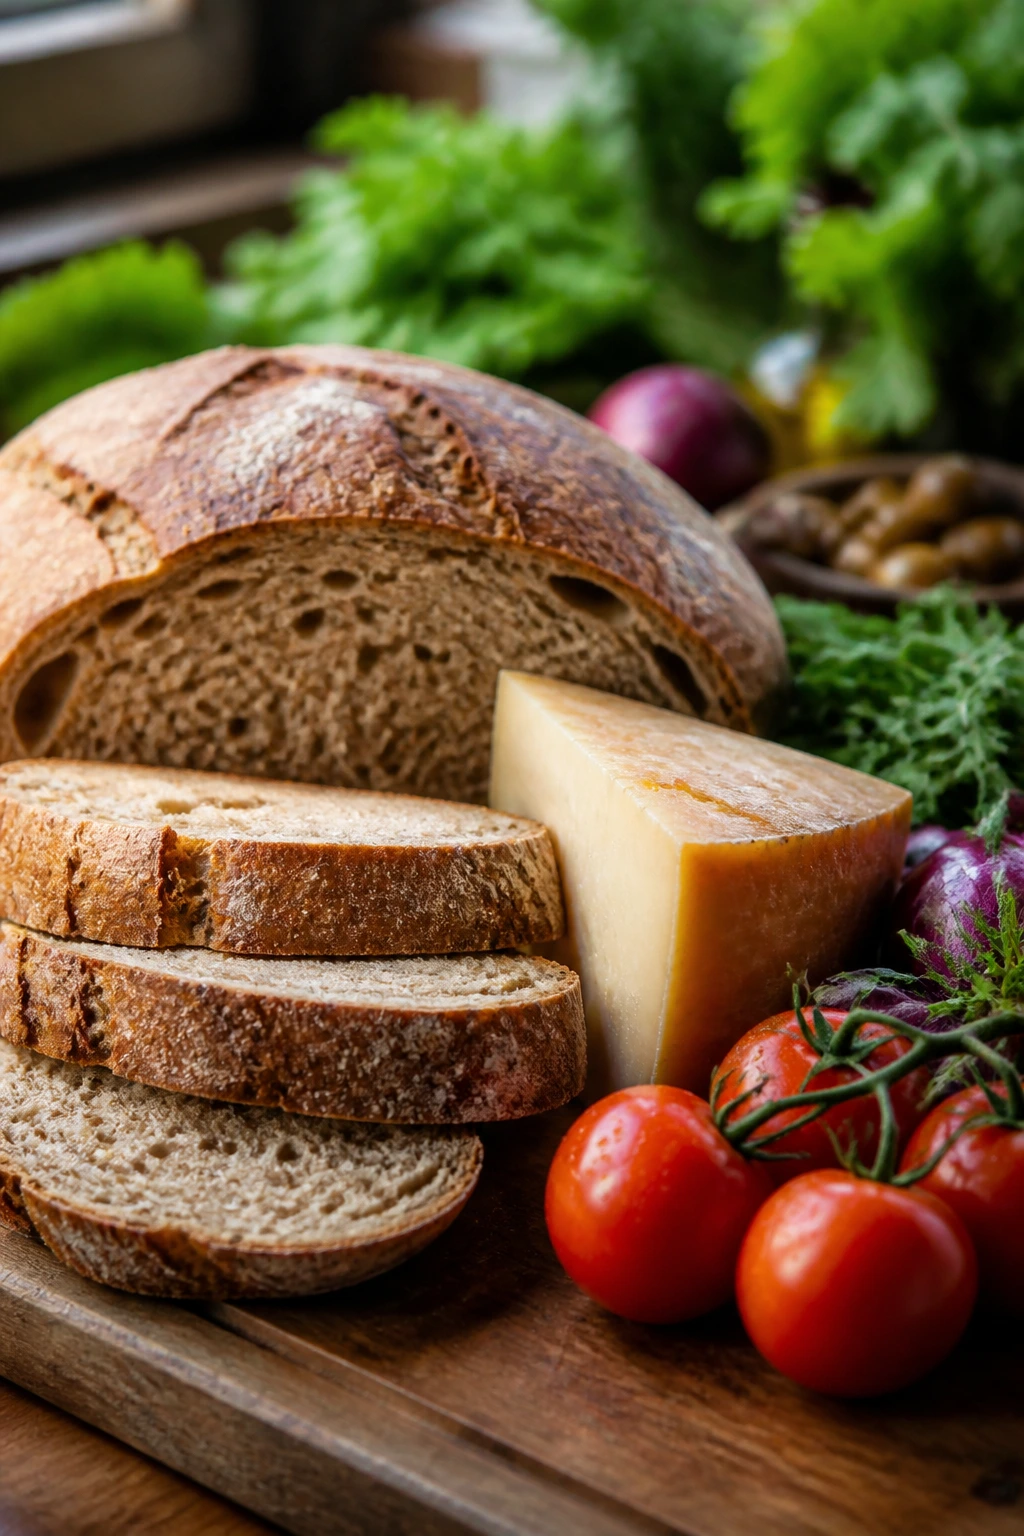
Bread matters more than the filling in a grill sandwich, and I mean that. Choose loaves and rolls with enough structure to brown without collapsing: sourdough, ciabatta, hoagie rolls, rye, country bread, and sturdy brioche all earn their keep. Very soft sandwich bread can work for a grilled cheese, but it needs careful heat and a quick flip.
For cheese, buy slices or grate it yourself only when the melt matters. Provolone, Swiss, cheddar, Gruyère, mozzarella, Halloumi, Brie, and pepper jack all behave differently, so pick the one that matches the filling. Sliced cheese often melts more evenly than thick chunks, and that detail saves a sandwich from turning lumpy.
If you’re buying vegetables, favor firmness. Tomatoes should give a little but not collapse in your hand. Peppers need a glossy skin and no soft spots. Zucchini should feel heavy for its size. If a vegetable carries a lot of water — tomato, cucumber, mushroom, eggplant — salt it, pat it dry, or cook off the liquid before it goes into the sandwich.
For meat, think about texture, not just flavor. Thin-sliced steak, shredded chicken, pulled pork, and sliced deli meats all work because they compress cleanly inside bread. Thick chunks make the sandwich fight back. That’s annoying on a picnic blanket and even worse when the cheese is hot.
How to Serve These Recipes
Presentation: Cut grilled sandwiches on a diagonal and wrap the bottom half in parchment so hands stay clean. For bigger sandwiches, I like stacking the halves slightly open on a plate or board so the filling is visible and the crust still looks crisp.
Accompaniments: Potato chips, dill pickles, slaw, cucumber salad, corn on the cob, fruit, and simple green salads all fit the theme without stealing attention. For richer sandwiches — like the burger, meatball sub, or French onion grilled cheese — lean toward something cold and sharp on the side.
Portions: Most of these recipes work as one sandwich per person if you’re serving a side. For picnic snacking, cut each sandwich into halves or thirds and let people mix and match. If you’re feeding a crowd, the best move is to grill a batch of fillings first, then assemble in shifts so the bread stays crisp.
Beverage Pairing: Iced tea with lemon, lemonade, sparkling water, or a cold lager all make sense here. For sweeter sandwiches like ham and peach or blackberry Brie, a dry sparkling drink keeps the balance tidy. For spicy ones, lemonade is usually the cleanest reset.
Additional Tips and Flavor Boosters
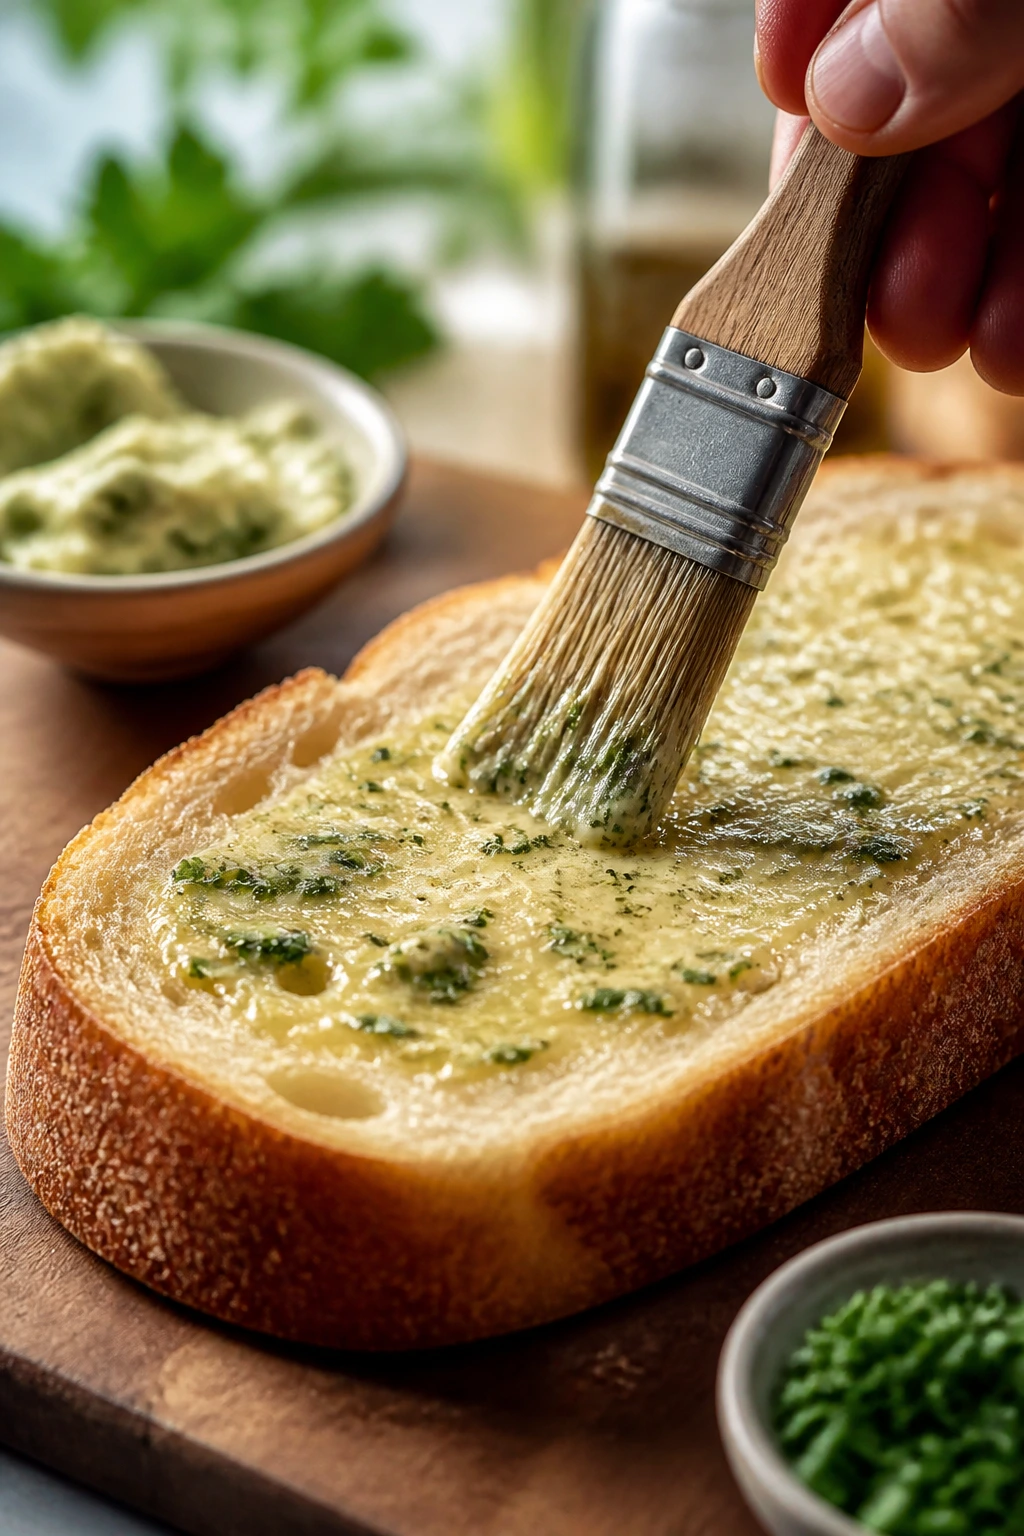
Flavor Enhancement: A thin swipe of compound butter — garlic, herbs, or even a little lemon zest — on the outside of the bread gives the grill a richer crust than plain butter alone.
Customization: Keep a bowl of pickled onions, sliced jalapeños, or chopped herbs nearby. Those three things fix a lot of sandwiches that taste flat after grilling.
Serving Suggestions: Cut the sandwich, then let it rest for 60 to 90 seconds before packing. That tiny pause stops the cheese from running and keeps the bread from steaming itself soft.
Make-It-Yours: For gluten-free eaters, choose sturdy gluten-free bread and toast it first before adding the filling. For dairy-free sandwiches, use hummus, avocado, mustard, or a dairy-free spread instead of cheese, and build in a little extra salt because cheese usually does that job.
Make-Ahead, Storage, and Reheating Guidance
Most of these sandwiches are best grilled close to serving time, but plenty of the parts can be made ahead. Cooked meats, grilled vegetables, onion fillings, pickled vegetables, sauces, and spreads all hold well in the fridge for 3 to 4 days. Keep wet ingredients separate until you’re ready to assemble, especially tomatoes, cucumbers, and saucy slaws.
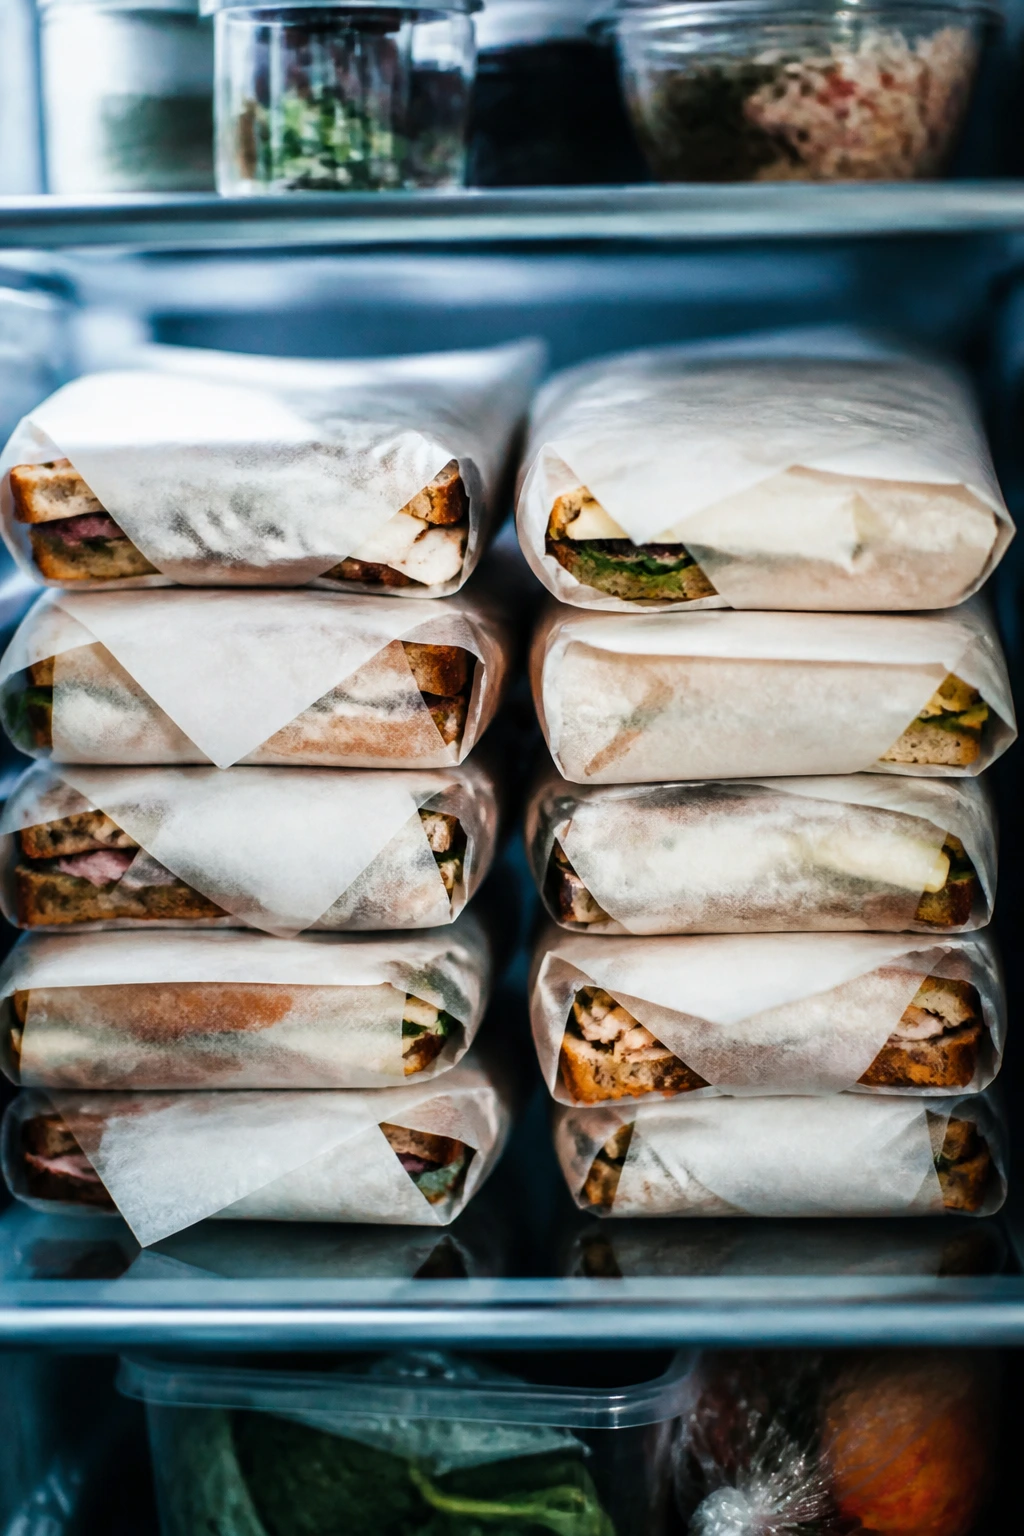
Assembled grilled sandwiches can sit wrapped for about 30 to 60 minutes if you’re heading to a picnic and want them warm. After that, the crust starts to soften. If you want to carry them farther, wrap them in parchment first, then foil, which keeps them tidy without trapping quite as much steam.
For leftovers, refrigerate sandwiches for up to 2 days. Reheat them on a skillet over medium-low heat for 2 to 3 minutes per side, or in a grill pan until the bread crisps again and the filling warms through. An air fryer works too at 350°F for about 4 to 6 minutes, though very delicate sandwiches like smoked salmon or avocado egg salad are better eaten cold the next day. You can also freeze some fillings — pulled pork, meatballs, cooked chicken, sausage, and steak — for up to 2 months, then assemble fresh sandwiches when you’re ready.
Variations and Adaptations to Try
Gluten-Free Griddle Swap: Use gluten-free bread with a little more butter or oil on the outside than you’d use for regular bread. A quick pre-toast in the grill pan helps it hold together before you add the filling.
Dairy-Light Picnic Build: Skip the cheese and lean on hummus, avocado, mustard, pesto, tahini, or a thick herb mayo. You’ll want a sharper seasoning hand here because cheese usually supplies some of the salt.
Vegetarian Picnic Rack: Focus on halloumi, eggplant, mushrooms, chickpeas, grilled zucchini, and pickled vegetables. These hold heat well and give you enough texture that the sandwich still feels substantial.
Spice-Forward Version: Add chipotle mayo, jalapeños, hot sauce, or pickled chilies to any chicken, pork, or beef sandwich. A little acid helps keep the heat from flattening the flavor.
Kid-Sized Sliders: Use small rolls or cut full sandwiches into quarters, then grill them for a shorter time so the bread doesn’t darken too much. Mild cheeses like mozzarella, cheddar, and Swiss usually play best here.
Cold-to-Warm Flex: Some fillings, like tuna, egg salad, smoked salmon, and avocado mixes, can be lightly toasted rather than heavily grilled. Warm the bread only, then add the filling so the texture stays cleaner.
Common Mistakes to Avoid
Wet fillings ruin the bread. Tomatoes, pickles, cucumbers, sauerkraut, and roasted peppers all carry more water than they look like they do. Drain, blot, or salt them first, or the sandwich will steam itself into a soft, tired mess.
High heat burns the bread before the center warms. Grilled sandwiches need medium heat more often than not. If the crust is going dark in under a minute, back off. The cheese should be soft before the exterior turns brittle.
Overstuffing makes the sandwich fall apart. A sandwich with too much filling tends to split at the seam and dump its insides the second you cut it. Build a flatter stack than your instincts tell you to make.
Loose sauces slide everywhere. Thin mayo, watery dressing, and runny barbecue sauce can all escape when the sandwich gets hot. Keep sauces thick, spread them thinly, and put them near the bread so they act like glue.
Skipping the rest makes cutting messy. Right off the grill, cheese and sauce are still moving. Give the sandwich a short rest — even 60 seconds helps — and the inside settles enough to slice cleanly.
Using the wrong bread. Soft white bread, crumbly artisan loaves, and overly airy buns all have limits. Choose bread with enough structure to hold heat, pressure, and a little moisture.
Frequently Asked Questions
What bread works best for picnic sandwiches on the grill?
Sourdough, ciabatta, rye, hoagie rolls, country bread, and sturdy brioche buns are all strong choices. You want a bread that toasts well and doesn’t disintegrate when it meets cheese, sauce, or juicy fillings.
How do I keep grilled sandwiches from getting soggy in the cooler?
Drain wet ingredients first, toast the bread well, and wrap the sandwiches in parchment before foil. That combination keeps the bread from steaming itself soft while still holding heat for a while.
Can I make these sandwiches ahead of time?
Yes, but not fully assembled in most cases. Grill the fillings ahead, chill them, and build the sandwiches shortly before grilling. If you must assemble early, leave out tomatoes, cucumbers, and sauces until the last minute.
Can I use a grill pan instead of an outdoor grill?
Absolutely. A heavy grill pan or cast-iron skillet gives you the same browned surface and is often easier for small sandwiches or delicate fillings. Just keep the heat at medium and don’t crowd the pan.
Which cheeses melt best for these sandwiches?
Provolone, Swiss, cheddar, Gruyère, mozzarella, pepper jack, Brie, and American all behave well, depending on the filling. If you want a neat melt, slice the cheese evenly and avoid giant chunks.
What if my sandwich keeps falling apart when I flip it?
It usually means the filling is too tall, the bread is too soft, or the heat is too low for the crust to set quickly. Flatten the stack, press lightly, and choose a firmer loaf next time.
Can these be served at room temperature?
Several of them can, especially the turkey cranberry, veggie hummus, Greek chicken pita, and banh mi-style pork. The richer melts are better hot, but the more structured sandwiches hold up just fine after a short rest.
What’s the best way to reheat leftovers without ruining the bread?
A skillet over medium-low heat is the safest bet. Give each side 2 to 3 minutes, cover briefly if you need the center to warm faster, and avoid blasting it in a microwave unless you’re willing to lose the crust.
How do I feed a crowd without standing over the grill all afternoon?
Grill the fillings in batches, keep them warm in foil, and set up a small sandwich-making station with bread, cheese, sauces, and toppings. Then toast the assembled sandwiches in waves so nobody gets a soft, cold center.
Grill Marks and Picnic Wraps
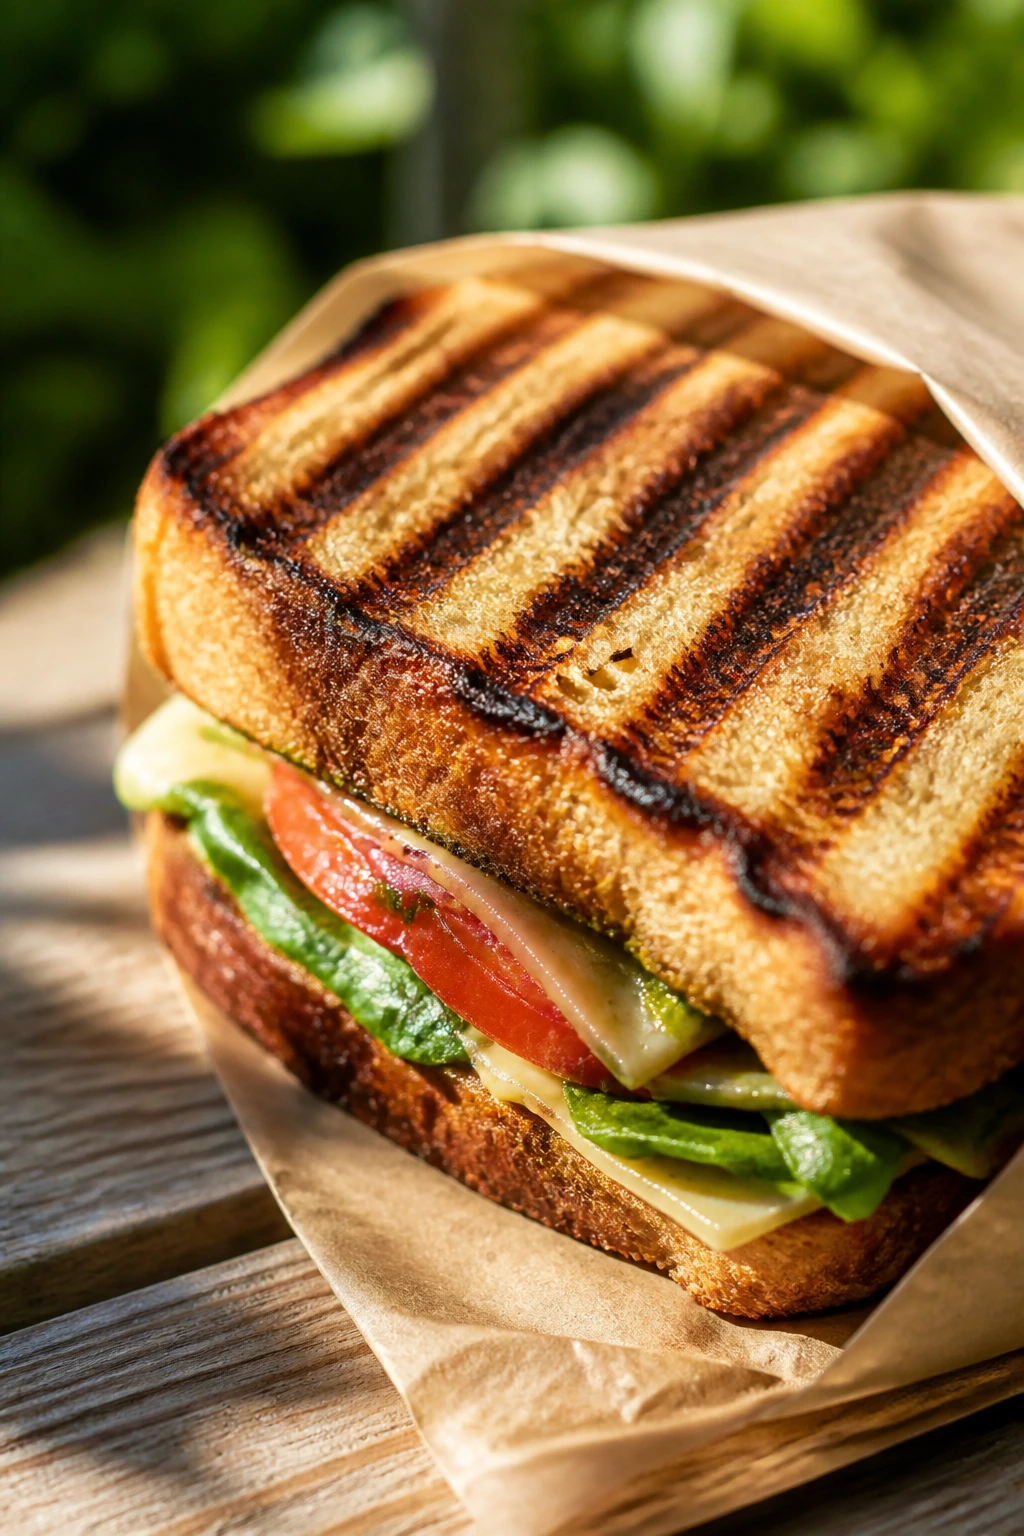
These forty picnic sandwich ideas work because they respect the sandwich first and the picnic second. That sounds backward until you realize it’s the only way the picnic part works at all. Good bread, dry fillings, a sensible amount of sauce, and enough heat to crisp the outside — those are the details that keep lunch from turning into a damp chore.
Pick two or three recipes that match the crowd, then lean on the leftovers, the grill marks, and the paper wrap. The nice thing about this kind of weekend cooking is that it doesn’t demand perfection. It just asks for a little care, a hot grate, and bread with enough backbone to do its job.