
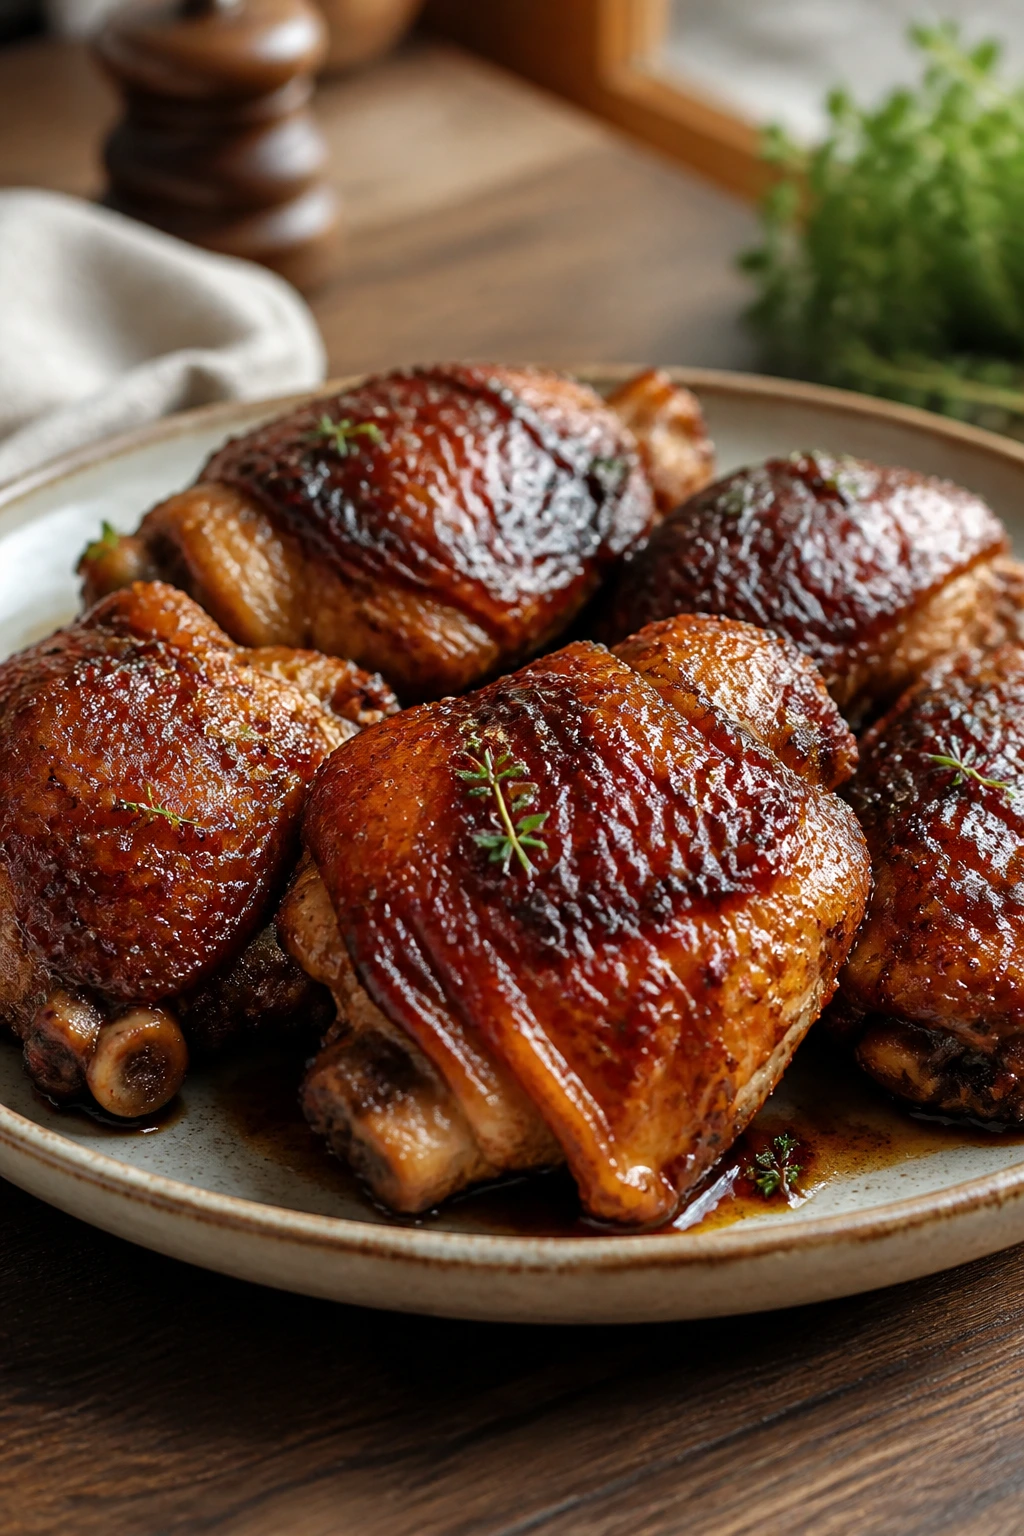
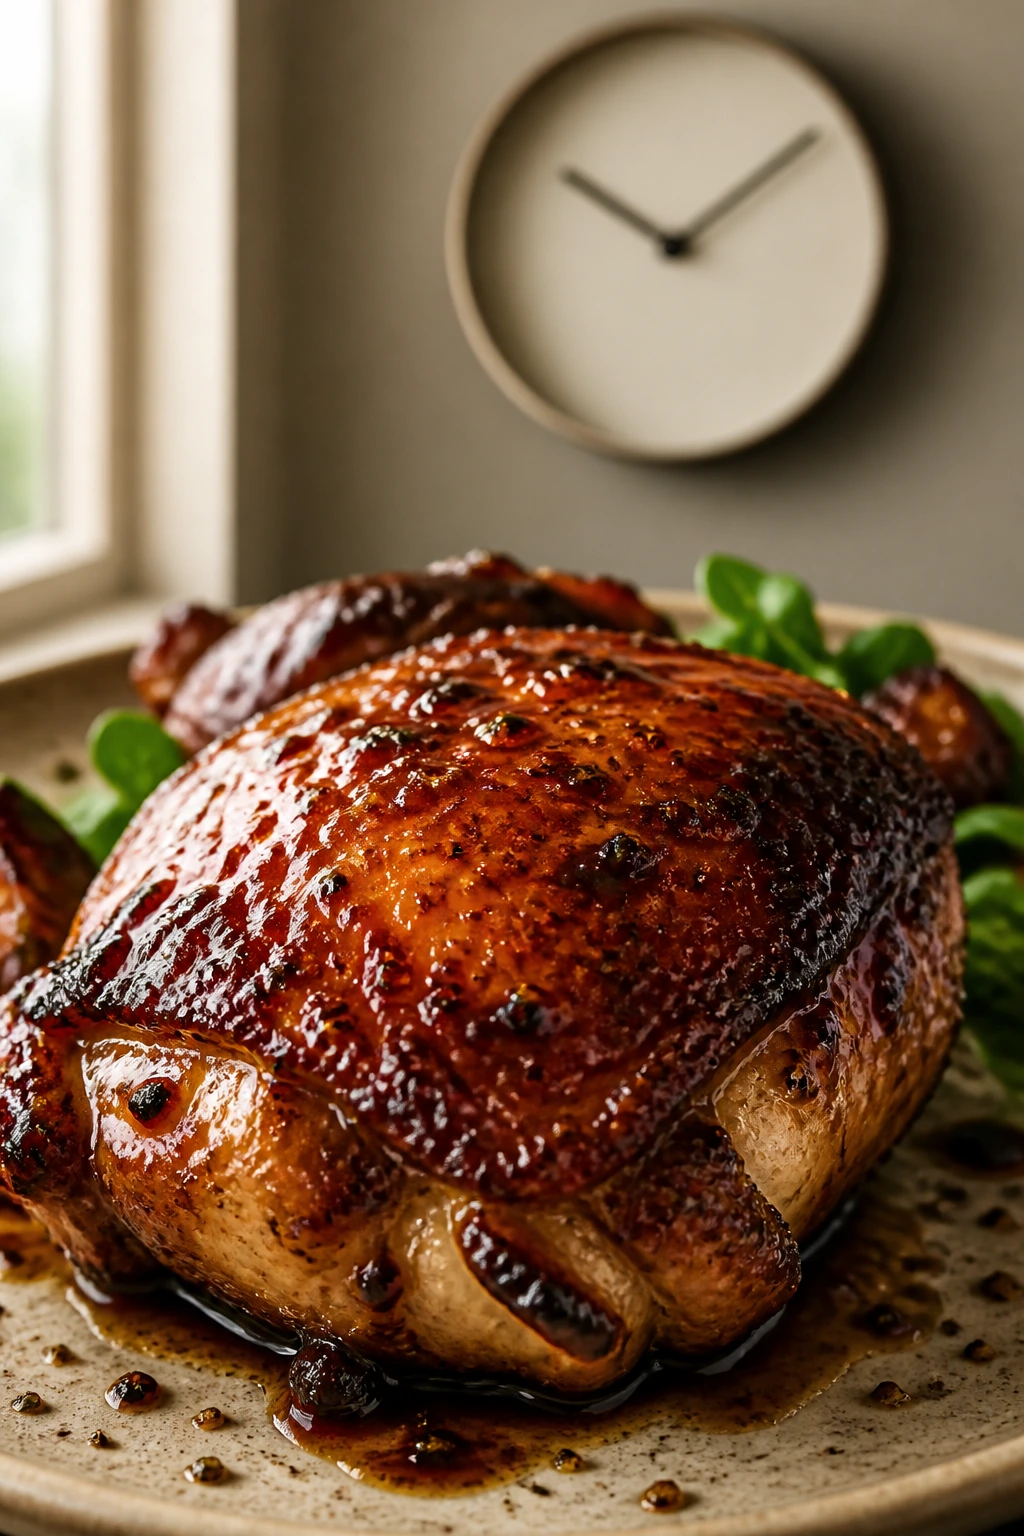
Crispy balsamic chicken thighs solve a very specific weeknight problem: you want dinner to taste like someone paid attention, but you do not want to stand over the stove for an hour polishing a sauce that might split the second you blink. Bone-in, skin-on thighs are the right cut for that job. They bring a little built-in drama — dark, bronzed skin, juicy meat, and a pan full of browned bits that actually mean something when you add the vinegar.
The best part is the timing. The skin gets its own private moment in the pan before the balsamic ever shows up. That matters more than most people think. If the vinegar goes in too early, you get sticky chicken. If the chicken gets too crowded, you get pale skin and a puddle of steam. Neither one is the goal here.
What you want is a skillet that smells sweet and sharp, with garlic softening in rendered chicken fat and the sauce tightening into a glossy spoon-coating glaze. When the thighs come out around 175°F in the thickest part, the meat relaxes instead of tightening up, and the skin keeps a little crackle under the sauce instead of turning floppy. That’s the sweet spot. The rest is mostly discipline.
Why These Crispy Balsamic Chicken Thighs Earn a Weeknight Spot
-
The skin stays crisp because the balsamic waits its turn. The chicken sears first, the glaze comes later, and that order keeps the top from going soggy.
-
The sauce has actual contrast. Balsamic vinegar brings sharpness, honey rounds the edges, and Dijon keeps the whole thing from tasting like syrup.
-
Chicken thighs are forgiving in the best way. A few extra minutes in the oven won’t wreck them the way it can with chicken breasts, especially when you’re juggling a side dish at the same time.
-
One skillet does almost everything. You brown the thighs, build the sauce, and finish in the oven without dragging out three pans and a sinkful of cleanup.
-
Leftovers still behave. Reheated thighs hold onto their flavor, and the glaze thickens overnight into something that clings even more tightly the next day.
-
The ingredient list is short, but nobody would call the flavor thin. That’s the sort of dinner I keep coming back to.
The Clock, the Yield, and the Sweet Spot of the Recipe
Yield: Serves 4
Prep Time: 15 minutes
Cook Time: 35 minutes
Total Time: 50 minutes
Difficulty: Intermediate — the steps are straightforward, but the skin needs a steady hand and the sauce needs a little attention so it doesn’t overreduce.
Chill/Rest Time: 5 minutes
Best Served: Right after the rest, while the skin is still crisp and the glaze is glossy.
A lot of the time here is passive. That’s the good kind. You’re not chopping a mountain of vegetables or making two sauces that need to be whisked at different temperatures. Most of the work happens in two places: drying and searing the thighs, then reducing the balsamic into something shiny enough to cling to the chicken without drowning it.
If you have an extra 20 to 30 minutes before cooking, let the salted thighs sit uncovered on a rack in the fridge. It dries the skin out further, which gives you a better crackle in the skillet. If you do not have that time, paper towels and patience are enough. I’ve made this both ways. The fridge version is a little better, but the no-fridge version still earns its keep.
The Short Ingredient List That Does the Heavy Lifting
For the Chicken
- 4 bone-in, skin-on chicken thighs, about 2 1/2 pounds total
- 1 1/2 teaspoons kosher salt
- 1 teaspoon freshly ground black pepper
- 1 teaspoon smoked paprika
For the Balsamic Pan Sauce
- 2 medium shallots, thinly sliced
- 4 cloves garlic, minced
- 1/2 cup balsamic vinegar
- 1/4 cup low-sodium chicken broth
- 2 tablespoons honey
- 1 tablespoon Dijon mustard
- 1 teaspoon fresh thyme leaves or 1/2 teaspoon dried thyme
- 1 tablespoon unsalted butter
- 1/4 teaspoon red pepper flakes, optional
The ingredient list is short enough to memorize after one cooking session, which is part of the appeal. The chicken does the heavy lifting, and the balsamic glaze doesn’t need a pantry raid to feel complete. If you keep kosher salt, mustard, vinegar, and honey around, half the battle is already won.
Why Each Ingredient Matters in the Pan
Bone-In, Skin-On Chicken Thighs
What to use: 4 large bone-in, skin-on chicken thighs, about 2 1/2 pounds total.
Preparation: Pat them dry very well, then season both sides so the salt reaches the meat and the skin gets a head start on browning.
Substitutions: Boneless thighs work if that’s what you have, but shorten the oven time by several minutes. Chicken drumsticks can also work, though they take a little longer and look less tidy on the plate.
Tips: Skin-on thighs give you rendered fat for the pan sauce, which is part of why this dish tastes so full without needing cream or a long ingredient list. Bone-in thighs also stay juicier if the oven runs hot or you get distracted by the timer.
Balsamic Vinegar, Honey, and Dijon
What to use: 1/2 cup balsamic vinegar, 2 tablespoons honey, and 1 tablespoon Dijon mustard.
Preparation: Stir these together before they hit the pan so you can move quickly once the garlic is fragrant.
Substitutions: Maple syrup can replace honey in a pinch, though the flavor turns a little woodsy. Whole-grain mustard works if Dijon is missing, but it makes the sauce slightly more rustic and less silky.
Tips: Buy balsamic that tastes dark, fruity, and sharp rather than thin and watery. The sauce reduces fast, and a better vinegar gives you deeper flavor without needing to dump in more sugar.
Shallots, Garlic, and Thyme
What to use: 2 medium shallots, 4 cloves garlic, and 1 teaspoon fresh thyme leaves or 1/2 teaspoon dried thyme.
Preparation: Slice the shallots thin so they soften fast, and mince the garlic finely enough that it disappears into the glaze.
Substitutions: Red onion can stand in for shallot, but it’s a little louder and less delicate. Rosemary can replace thyme if that’s what you have, though you’ll want to use less because rosemary hits harder.
Tips: Shallots are worth it here. They melt into the sauce without stealing the spotlight, and they give the glaze a faint sweetness that regular onion can’t quite match.
Butter and Heat
What to use: 1 tablespoon unsalted butter and, if you like a little bite, 1/4 teaspoon red pepper flakes.
Preparation: Add the butter at the end so it rounds out the sauce after the vinegar has reduced.
Substitutions: Olive oil can replace butter if you need dairy-free, though the finish will be a touch less silky. A pinch of cayenne can replace red pepper flakes if you want a sharper heat.
Tips: Butter is not there for richness alone. It softens the acidity at the very end and gives the glaze that glossy, restaurant-kitchen shine people always notice first.
The Pan and Tools That Make Crispy Skin Possible
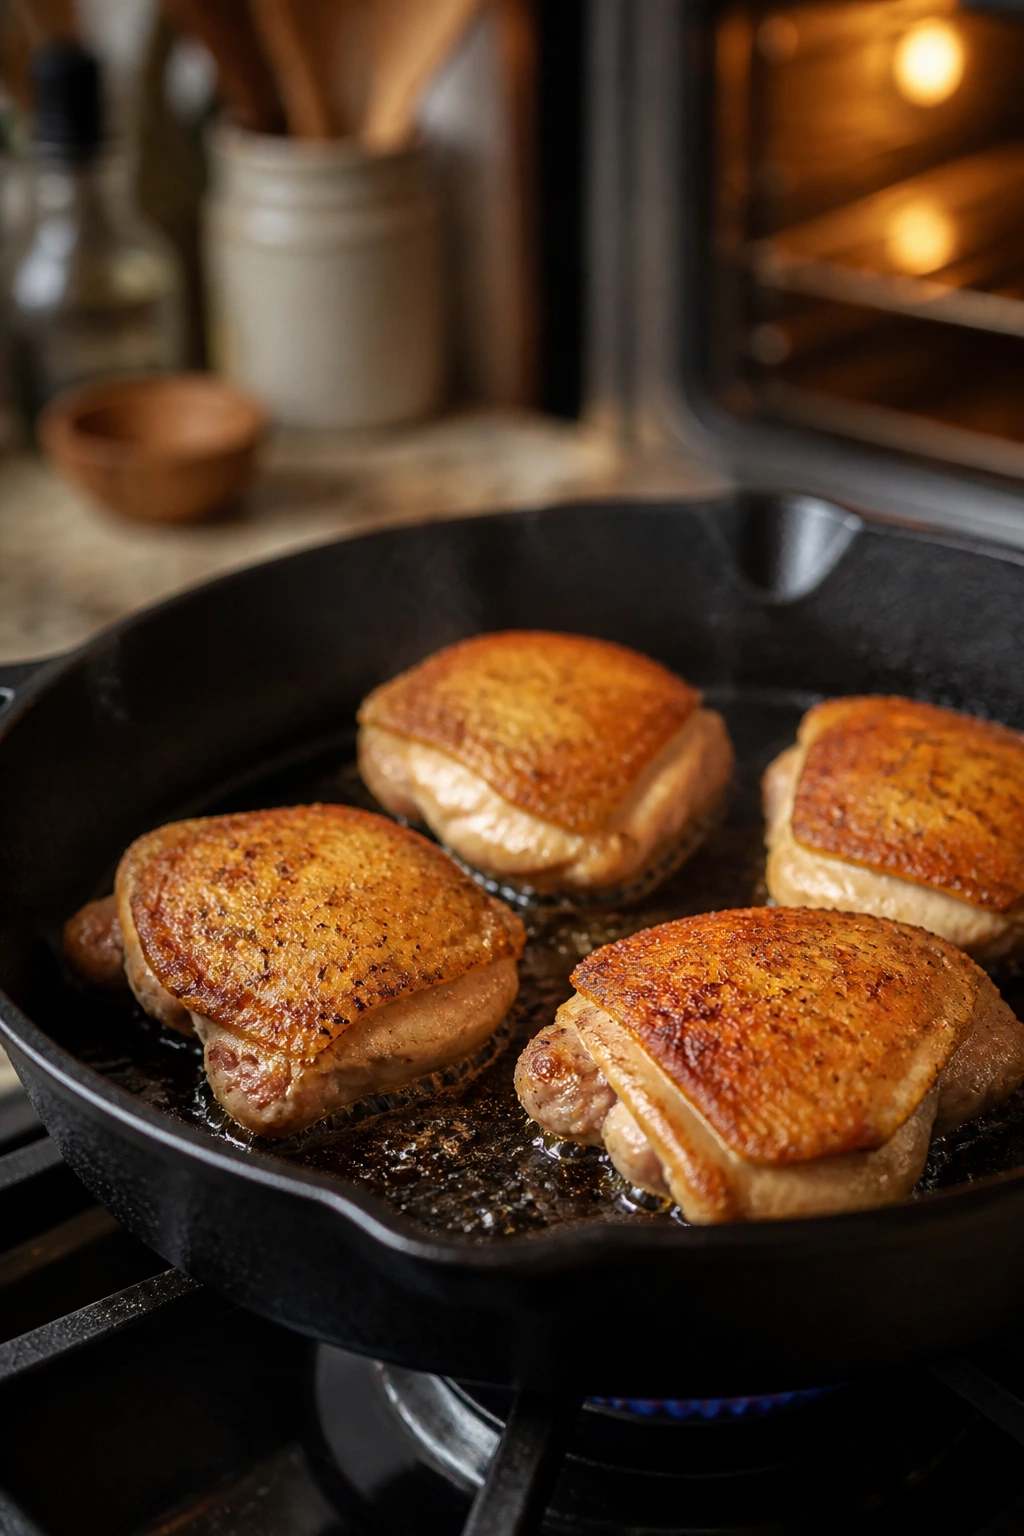
A good skillet matters here more than a fancy ingredient ever will. I’d reach for a 12-inch cast-iron skillet first, then a heavy stainless steel skillet if that’s what lives in your cabinet. Thin nonstick pans can cook the chicken through, sure, but they do not hold heat as steadily, and they usually fail at the one thing this recipe cares about most: browning the skin without scorching the sugar in the glaze.
You do not need much else, but the few things you do need should be the right ones. A thin metal spatula helps you test whether the skin has released from the pan. Tongs help with flipping. An instant-read thermometer saves you from guessing. And paper towels — humble, boring, non-negotiable paper towels — do more for crispy chicken than most people give them credit for.
- 12-inch cast-iron skillet or heavy stainless steel skillet — Big enough for 4 thighs without crowding.
- Instant-read thermometer — The easiest way to check for 175°F in the thickest part.
- Thin metal spatula or fish spatula — Helps you lift the chicken skin cleanly without tearing it.
- Tongs — Useful for flipping and moving the thighs without scraping the skin.
- Small whisk — Makes the balsamic glaze smooth after the butter goes in.
- Paper towels — Dry skin equals better browning. Every time.
- Cutting board and sharp knife — For shallots, garlic, and thyme.
If your skillet is slightly smaller than ideal, cook in batches. That’s not a failure; it’s the difference between browned skin and steamed skin. The chicken will forgive you. The pan will not.
Dry Skin, Hot Fat, and Why the Glaze Comes Last
The skin has to dry out before it can crisp. That sounds obvious, but it is the part people rush when they’re hungry and tired. Moisture on the skin turns into steam, steam softens the skin, and then you end up wondering why your chicken looks pale even though the oven was hot enough. The answer is usually right there in the paper towel.
Start with Dryness
Pat the thighs dry on both sides, then leave them alone for a minute while you season the other ingredients. If you have time, salt them and set them uncovered on a rack in the fridge for 20 to 30 minutes. The surface dries a little more, which helps the fat render instead of trapping moisture against the skin.
Let the Pan Do the Work
Starting skin-side down in a dry skillet is not the same thing as neglect. It’s a slow render. The fat under the skin needs a few minutes to melt out before the skin can brown properly, and that only happens if you resist the urge to flip too early. You’ll hear the sizzle settle down, then pick back up as the skin turns golden. That’s the signal.
Save the Balsamic for the End
Balsamic vinegar contains sugar. Sugar burns. That is the whole story. If it hits the pan too soon, it darkens fast and steals the chance for the chicken skin to crisp. Add it after the sear, after the shallots and garlic have had a minute, and after the chicken has already done the hard work. Then you get a glossy glaze instead of bitter sludge.
The Pan-to-Oven Method for the Chicken Thighs
Prep the Chicken
-
Pat the chicken thighs dry with paper towels on both sides. If you have 20 to 30 minutes, season them and set them uncovered on a rack in the fridge to dry further; if not, keep going.
-
Season the chicken thighs all over with 1 1/2 teaspoons kosher salt, 1 teaspoon black pepper, and 1 teaspoon smoked paprika, rubbing the seasoning under the skin where you can reach. The surface should look evenly dusted, not heavily coated.
Sear and Render
-
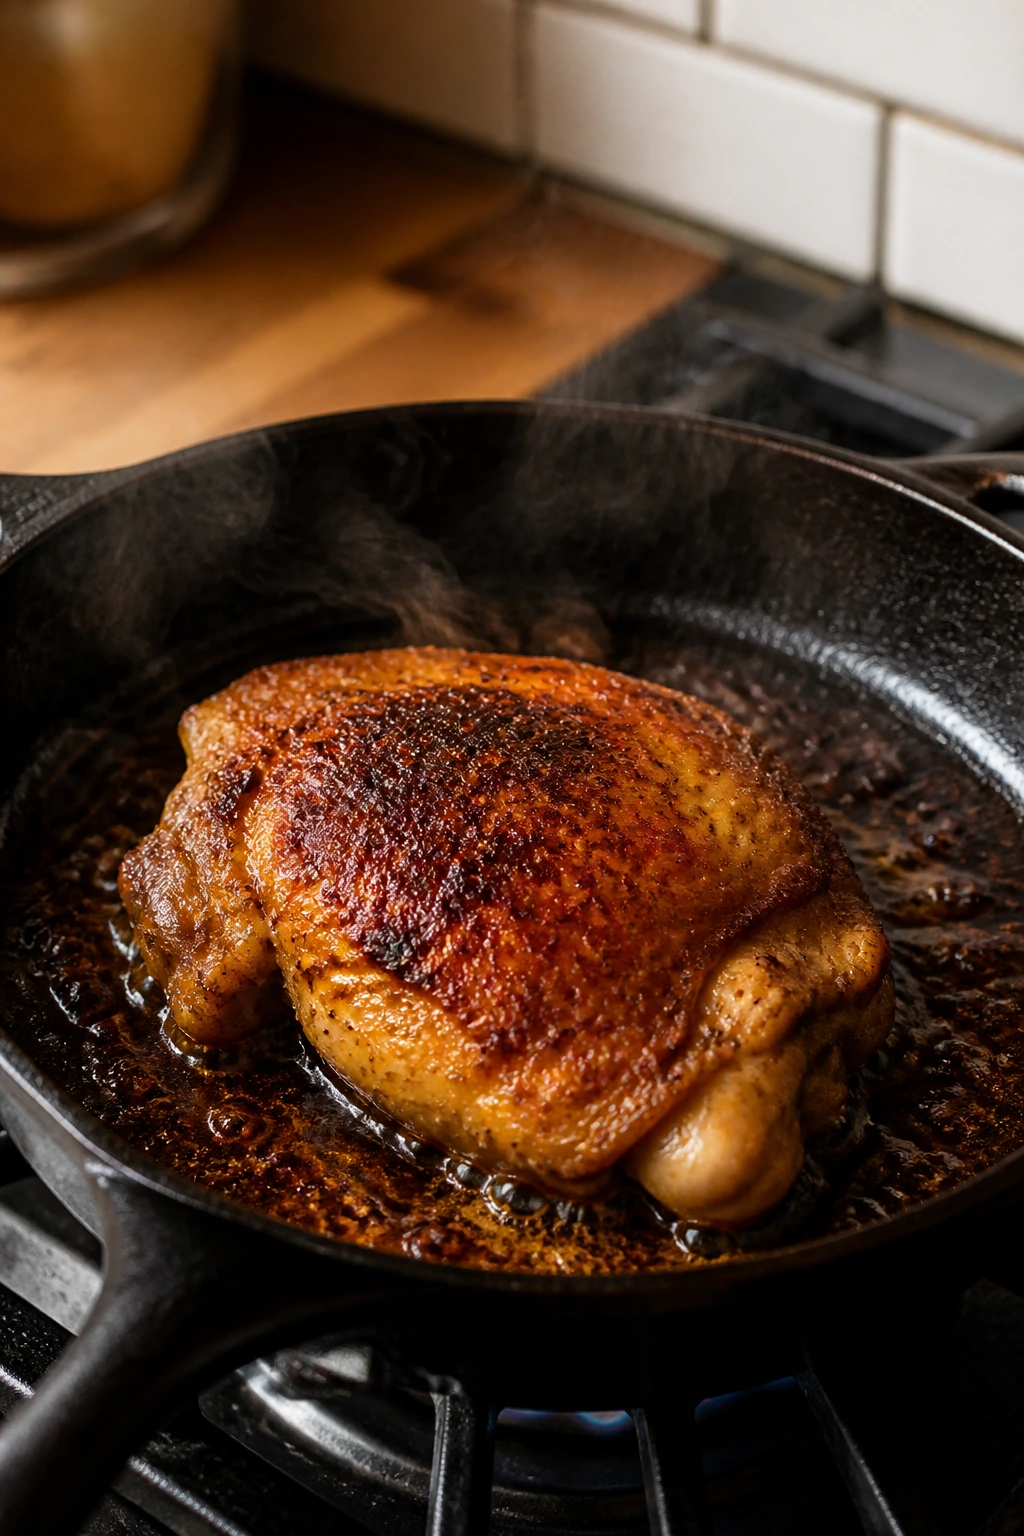
Place the thighs skin-side down in a cold, dry 12-inch cast-iron skillet. Turn the heat to medium and let them cook undisturbed for 12 to 15 minutes. Do not move them around. The skin should turn deep golden and release cleanly when it’s ready.
-
Flip the thighs and cook on the flesh side for 2 minutes. Transfer them to a plate while you build the sauce. The chicken will not be finished yet; that is exactly right.
Build the Glaze
-
Pour off all but about 1 tablespoon of fat from the skillet. Add the sliced shallots and cook over medium heat for 2 minutes, stirring once or twice, until they soften and start to turn translucent. Add the garlic and cook for 30 seconds until fragrant. Do not let the garlic brown.
-
Stir in the 1/2 cup balsamic vinegar, 1/4 cup chicken broth, 2 tablespoons honey, 1 tablespoon Dijon mustard, 1 teaspoon thyme, and red pepper flakes if using. Simmer for 2 to 3 minutes, stirring, until the sauce looks slightly thicker and glossy around the edges. It should coat the back of a spoon lightly, not cling like syrup.
Roast and Finish
-
Return the chicken to the skillet skin-side up, spooning some sauce around the thighs without covering the skin. Transfer the skillet to a 425°F (220°C) oven and roast for 15 to 18 minutes, until the thickest part of the thighs reaches 175°F and the juices run clear.
-
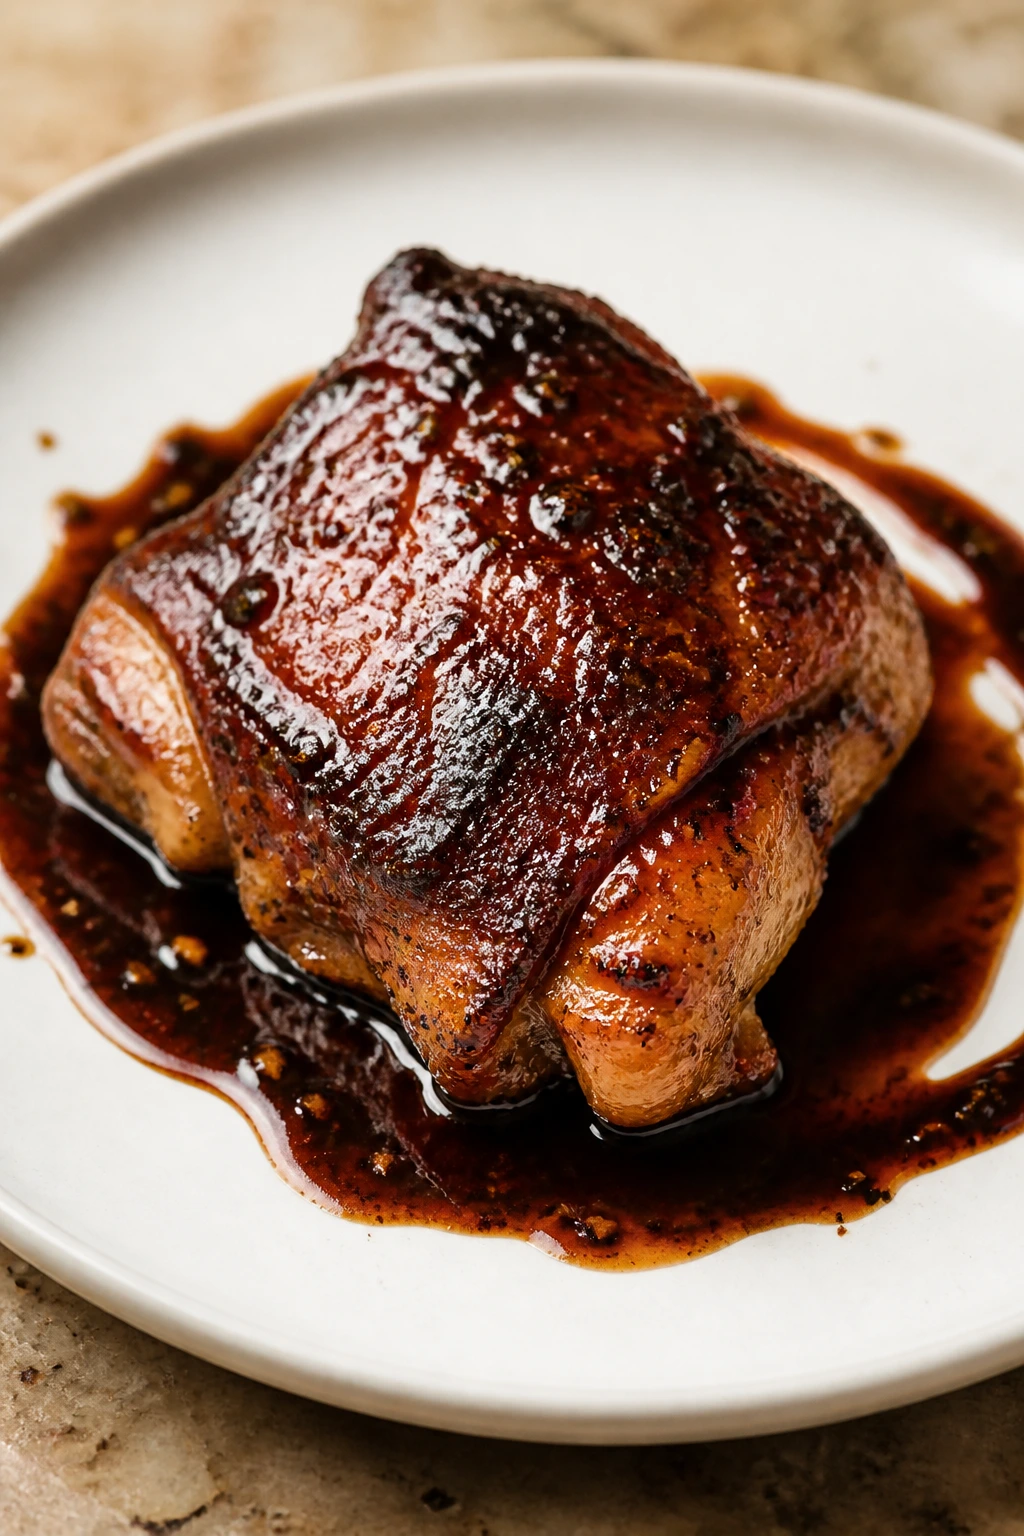
Transfer the chicken to a platter. Set the skillet back on the stove over medium-low heat, whisk in the 1 tablespoon butter, and simmer the sauce for 1 minute until it looks glossy and smooth. Spoon the glaze around the chicken, not all over the skin, and rest for 5 minutes before serving.
If the sauce tightens too much in the oven, splash in a tablespoon or two of broth when you finish it on the stove. That little rescue move keeps the glaze from turning sticky in the wrong way.
What to Put on the Plate Beside It
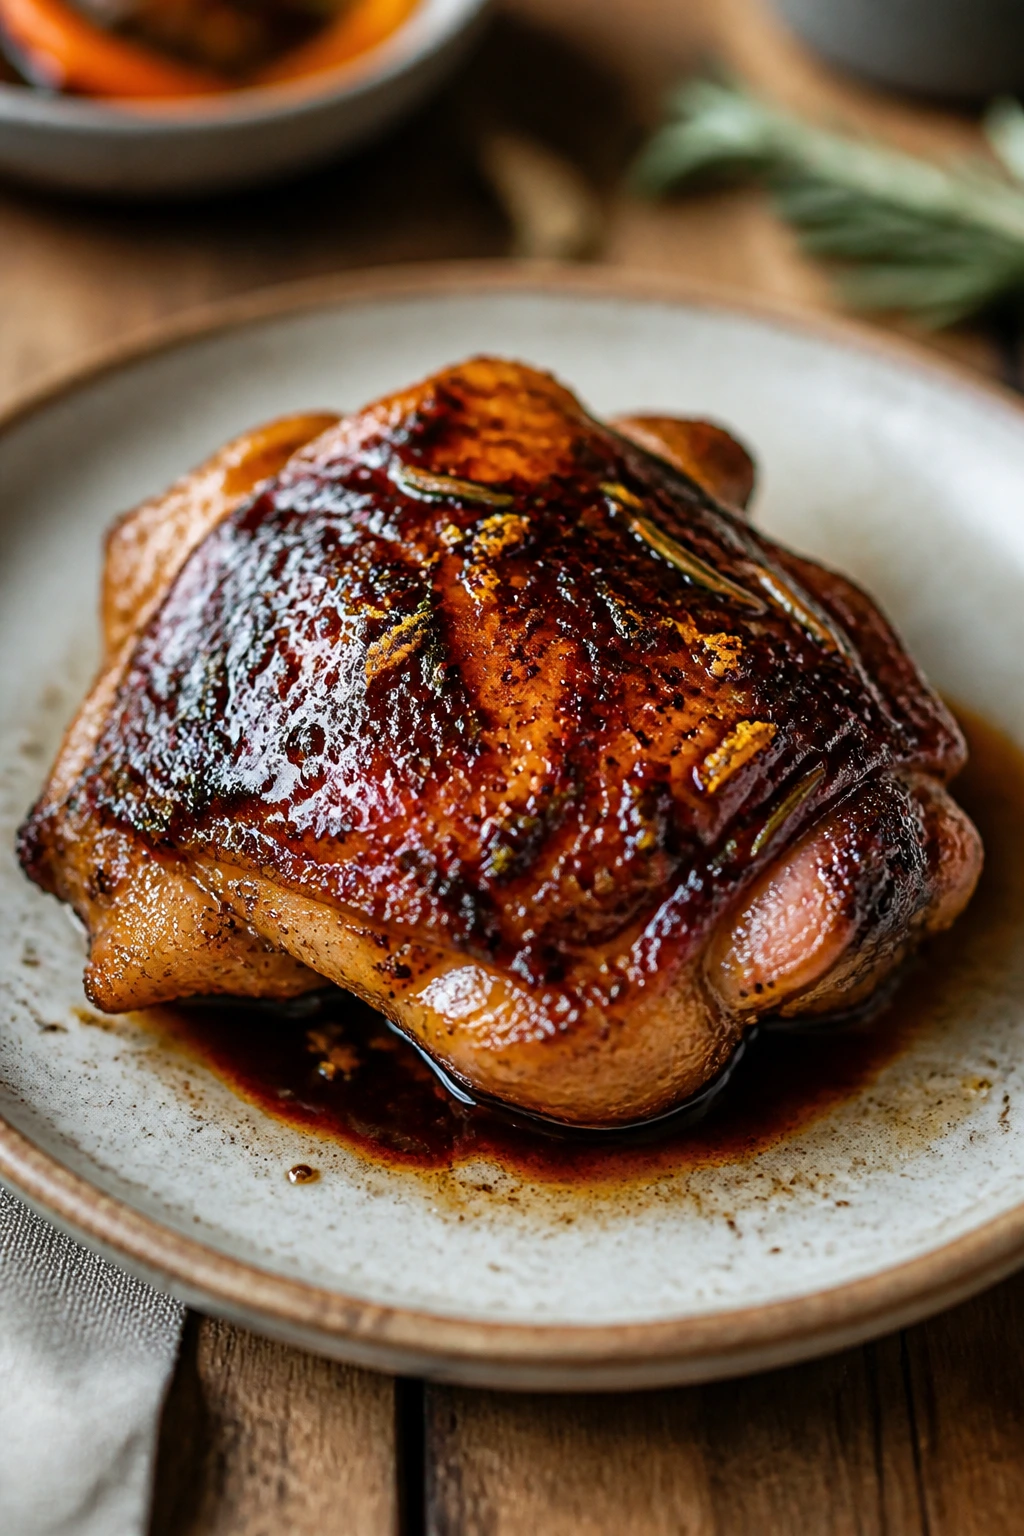
Presentation: Put one thigh on each plate and spoon the glaze mostly around the chicken, not over the top of the skin. A few thyme leaves and the dark shine of the sauce are enough; you do not need a complicated garnish to make this look finished.
Accompaniments: Mashed potatoes are the obvious landing spot for the balsamic glaze, and I’m not going to pretend that’s a bad choice. Buttered rice, mashed cauliflower, roasted carrots, broccolini, green beans, or a pile of garlicky sautéed spinach all work because they catch the sauce without competing with it.
Portions: One thigh per person is right if you’re serving potatoes or rice on the side. If the thighs are on the smaller side, or you’re feeding someone with a loud appetite, plan on 1 1/2 thighs per person and add a second vegetable so the plate doesn’t feel thin.
Beverage Pairing: A dry hard cider works better than people expect because it cuts through the honey and balsamic without making the meal feel heavy. If you want wine, a light pinot noir or a bright, unoaked red keeps the vinegar from tasting sharp. Sparkling water with a squeeze of lemon is the quiet option, and it works just fine.
This is one of those dinners that likes a starch with edges. Something soft enough to soak up sauce, but not so elaborate that it steals the whole plate. I usually think in terms of what the glaze wants to land on, because the glaze is half the reason you made the dish in the first place.
Small Moves That Improve the Whole Dish
Flavor Enhancement: Stir 1 teaspoon of finely grated orange zest into the finished sauce. It does not make the dish taste like orange chicken; it just brightens the balsamic so the glaze feels less heavy and a little more lifted.
Time-Saver: Season the thighs the night before and leave them uncovered on a rack in the fridge. That does two jobs at once: it dries the skin and saves you a few minutes of work when dinner time gets noisy.
Pro Move: If the skin is beautifully crisp but the chicken still needs a little more heat, move the skillet under a brief broiler blast for 1 to 2 minutes after the roast, but watch it closely. Balsamic sugar can go from deep brown to burnt faster than most people expect.
Cost-Saver: A bottle of mid-range balsamic is enough here. You do not need the syrupy expensive stuff unless you already own it and want to use it up. Because the vinegar reduces, the flavor concentrates, which makes decent balsamic taste better than it does straight from the bottle.
Make-It-Yours: Swap thyme for rosemary if you want a sharper, woodier note, or add sliced mushrooms when the shallots go in if you want the pan to feel more like a full supper. Both changes work because the sauce already has enough acid and sweetness to handle a little extra earthiness.
A tiny thing that helps more than people think: spoon the sauce around the thighs, not over the skin. I know I’ve said it already, but it matters enough to repeat. You worked for the crispness. Keep it.
Mistakes That Turn Crispy Skin Soft
-
Starting with damp chicken: Wet skin gives you weak, spotty browning and a faintly rubbery texture. Pat the thighs dry with paper towels, and if you can spare the time, air-dry them on a rack in the fridge before cooking.
-
Crowding the skillet: If the thighs touch too much, they steam instead of sear. Use a 12-inch skillet for 4 thighs, or cook in batches if your pan is smaller.
-
Adding the balsamic too early: Pouring the sauce in before the skin browns softens the skin and burns the sugar before the meat is done. Sear first, sauce second. That order is the whole trick.
-
Cranking the heat too high: Garlic burns fast, and balsamic gets bitter fast. Medium heat is enough once the glaze goes in. If the skillet starts smoking hard, lower the burner and keep going.
-
Guessing at doneness: The skin can look finished before the meat is cooked through. Check the thickest part with an instant-read thermometer and aim for 175°F for thighs; that number gives you juicy meat instead of stringy meat.
-
Reducing the sauce until it turns sticky and dark: The glaze should coat a spoon and pool thickly around the chicken, not harden into candy. If it gets too tight, add a splash of broth and whisk it back to life.
Variations for Different Moods and Pantry Shelves
Orange-Rosemary Glow
Add 2 teaspoons orange zest and 2 tablespoons orange juice to the sauce, then swap thyme for 1 teaspoon chopped rosemary. The result is brighter and a little less sharp, which makes it a nice match for roasted carrots or fennel.
Spicy Calabrian Skillet
Stir 1 teaspoon Calabrian chili paste or 1/2 teaspoon red pepper flakes into the glaze. The heat gives the balsamic some edge without flattening the sweetness, and it works especially well if you’re serving the chicken over polenta.
Mushroom and Shallot Dinner
Add 8 ounces sliced cremini mushrooms after the shallots and cook them until they release their moisture and start to brown. The sauce turns earthier and more savory, which is useful if you want the dish to feel a little deeper without changing the main method.
Pantry Dijon Swap
If you’re out of Dijon, use 1 tablespoon whole-grain mustard and a tiny splash more broth. The sauce will look more textured and taste a bit punchier, but it still clings to the chicken nicely.
Boneless Fast Track
Use boneless, skinless thighs if that’s what’s in the fridge. Sear them for less time — about 4 to 5 minutes per side — then finish in the oven for 8 to 10 minutes. The dish loses the crisp-skin drama, but it still gives you a fast balsamic chicken with a good amount of sauce.
Make-Ahead, Storage, and Reheating
You can season the chicken up to 24 hours ahead and leave it uncovered on a rack in the fridge. That helps the skin dry and saves a little evening chaos. The sauce ingredients — vinegar, broth, honey, mustard, thyme, and red pepper flakes — can also be mixed ahead and kept in the fridge for 2 days. Hold the butter back until the end, though. That last swirl tastes better fresh.
Leftover chicken keeps in the refrigerator for 3 to 4 days in a sealed container. If you want to freeze it, wrap the thighs tightly and freeze for up to 2 months. The sauce can be frozen separately in a small container, which is the better move if you care about preserving the texture. Skin never stays as crisp after freezing, so think of frozen leftovers as a future dinner base rather than a replica of the first plate.
For reheating, the oven beats the microwave every time. Set the chicken in a baking dish, add a spoonful of sauce or a tablespoon of broth, cover loosely with foil, and warm at 375°F (190°C) for 12 to 15 minutes. Uncover for the last 3 to 5 minutes if you want the skin to dry a little. On the stove, you can reheat gently in a skillet over medium-low heat with a splash of broth. That method works especially well if you’ve stored the thighs with some sauce underneath them.
If you’re making the dish for leftovers on purpose, keep some of the sauce aside and only spoon it on the plated chicken. That leaves the skin in better shape for the next day. The meal still tastes good if the skin softens a little, but there’s no need to surrender the texture before the first round is even over.
Questions Readers Ask Before They Cook It

Can I use boneless, skinless chicken thighs instead?
Yes, but the texture changes. You’ll lose the crackly skin and some of the rendered fat, so the dish becomes a fast balsamic chicken rather than a crispy one. Sear them briefly and shorten the oven time so they don’t dry out.
Do I need a cast-iron skillet for this recipe?
No, but a heavy skillet helps a lot. Cast iron holds heat well, which keeps the skin browning instead of stalling out. A heavy stainless skillet is the next best option; thin nonstick is the one I’d avoid for the sear.
Why did my balsamic sauce taste bitter?
Usually the vinegar or garlic got too hot. Balsamic contains sugar, so it can burn if the heat is aggressive, and garlic goes bitter fast once it browns. Keep the burner at medium after the sear and add the vinegar only after the aromatics have softened.
What internal temperature should the chicken thighs reach?
For thighs, 175°F is the sweet spot. They are safe at 165°F, but the extra few degrees let the connective tissue relax, which gives you meat that feels juicier and less stringy. That’s one of those places where the thermometer matters more than the clock.
Can I make the sauce ahead of time?
You can mix the vinegar, broth, honey, mustard, thyme, and red pepper flakes ahead, then finish it with butter after the chicken cooks. I would not fully reduce the sauce ahead of time because it thickens as it sits, and you want to judge the final texture fresh from the pan.
What if the skin is browned before the chicken is cooked through?
That’s common, especially with large thighs. Lower the oven temperature by 25 degrees and keep roasting, or tent the pan loosely with foil so the skin doesn’t darken too much while the interior catches up. A thermometer ends the guessing.
Can I swap maple syrup for honey?
Yes, and it works well. Maple syrup gives the glaze a deeper, slightly woodsy note that pairs nicely with thyme or rosemary. Use the same amount, then taste the sauce before adding more because maple can read sweeter than honey once it reduces.
A Pan Worth Keeping on the Stove
The charm of crispy balsamic chicken thighs is that the dish looks fancier than the method really is. The pan does most of the work. You just have to give the skin time, keep the heat honest, and stop the glaze from getting greedy before the chicken is ready.
That’s why I keep coming back to this kind of dinner. It does not require a long ingredient list or a complicated side to feel finished. It just needs a hot skillet, a little patience, and the good sense to let the balsamic show up at the end, where it belongs.
Crispy Balsamic Chicken Thighs — Recipe Card
Recipe Name: Crispy Balsamic Chicken Thighs
Description: Bone-in, skin-on chicken thighs seared until the skin is deeply golden, then finished with a glossy balsamic-honey-Dijon pan sauce. The skin stays crisp, the meat stays juicy, and the sauce clings to every bite.
Prep Time: 15 minutes
Cook Time: 35 minutes
Total Time: 50 minutes
Course: Dinner, Main Course
Cuisine: American
Servings: 4 servings
Calories: About 470 kcal per serving
Ingredients
For the Chicken:
- 4 bone-in, skin-on chicken thighs, about 2 1/2 pounds total
- 1 1/2 teaspoons kosher salt
- 1 teaspoon freshly ground black pepper
- 1 teaspoon smoked paprika
For the Balsamic Pan Sauce:
- 2 medium shallots, thinly sliced
- 4 cloves garlic, minced
- 1/2 cup balsamic vinegar
- 1/4 cup low-sodium chicken broth
- 2 tablespoons honey
- 1 tablespoon Dijon mustard
- 1 teaspoon fresh thyme leaves or 1/2 teaspoon dried thyme
- 1 tablespoon unsalted butter
- 1/4 teaspoon red pepper flakes, optional
Instructions
-
Pat the chicken thighs very dry with paper towels and, if time allows, let them sit uncovered on a rack in the fridge for 20 to 30 minutes.
-
Season the chicken all over with kosher salt, black pepper, and smoked paprika.
-
Place the thighs skin-side down in a cold, dry 12-inch cast-iron or heavy skillet. Turn the heat to medium and cook undisturbed for 12 to 15 minutes, until the skin is deep golden and releases cleanly.
-
Flip the thighs and cook for 2 minutes on the other side. Transfer to a plate.
-
Pour off all but about 1 tablespoon of fat from the skillet. Add the shallots and cook for 2 minutes, then add the garlic and cook for 30 seconds.
-
Stir in the balsamic vinegar, chicken broth, honey, Dijon mustard, thyme, and red pepper flakes if using. Simmer for 2 to 3 minutes until lightly thickened.
-
Return the chicken to the skillet skin-side up. Spoon sauce around the thighs, then bake at 425°F (220°C) for 15 to 18 minutes, until the chicken reaches 175°F in the thickest part.
-
Transfer the chicken to a platter. Return the skillet to the stove over medium-low heat, whisk in the butter, and simmer for 1 minute until the sauce is glossy. Spoon the sauce around the chicken and rest for 5 minutes before serving.
Notes: Keep the sauce off the skin until the very end if you want the crispest result. Reheat leftovers in a 375°F oven so the thighs warm through without turning rubbery.