
Crispy chicken for weeknight dinners works because it gives you one big, satisfying texture without asking for a long sauce, a fussy braise, or a sink full of pans. You can hear it before you taste it: that sharp, dry sizzle when the chicken hits hot oil, or the faint crackle of panko on a rack in the oven. That sound matters. It tells you the surface is drying, browning, and turning into the part everyone fights over.
The trick is not magic. It’s heat management, surface moisture, and choosing the cut that matches your clock. Thin chicken cutlets can be on the table in about 20 minutes. Skin-on thighs take a little longer but bring that salty, crackly edge that survives better than most fast dinners ever do. And if you’ve ever bitten into a pale, rubbery breading that peeled off in one sheet, you already know the difference.
I trust crispy chicken more than I trust most “easy” dinners. Too many quick chicken recipes promise speed and then hand you bland meat with a damp coating or a pan sauce that turns everything soft. The better approach is more direct: dry the chicken, season it properly, use enough heat, and stop cooking the second the thickest part reaches a safe temperature. No drama. No guessing. Just dinner that sounds good on the plate and still tastes crisp five minutes later.
Why This Approach Earns Its Spot on a Busy Night
Fast payoff: Thin cutlets, tenders, and boneless thighs all cook quickly, so you can move from prep board to dinner in roughly 20 to 35 minutes.
Better texture than plain roasting: A hot skillet, rack, or air fryer gives you browned edges and a drier surface than a standard bake on a bare sheet pan.
Flexible cuts: You can use skin-on thighs, boneless breasts, tenders, or drumsticks and still get a crisp finish if you match the method to the cut.
Pantry-friendly: Flour, cornstarch, panko, garlic powder, pepper, and oil are enough to build a crust that tastes deliberate instead of improvised.
Leftovers can still behave: Crispy chicken reheats better than saucy chicken, especially if you use a rack and a hot oven instead of the microwave.
Easy to turn into a real meal: One crisp chicken piece can land on rice, salad, potatoes, noodles, or a sandwich roll without needing a separate recipe to hold the plate together.
Choosing the Cut That Gives You the Best Crunch for the Clock
The chicken cut decides most of the timing before the pan ever gets hot. That part gets ignored all the time, and it’s a mistake. A thick, bone-in piece and a pounded cutlet may both be “chicken,” but they do not want the same treatment, and if you force them into the same method, one of them will lose.
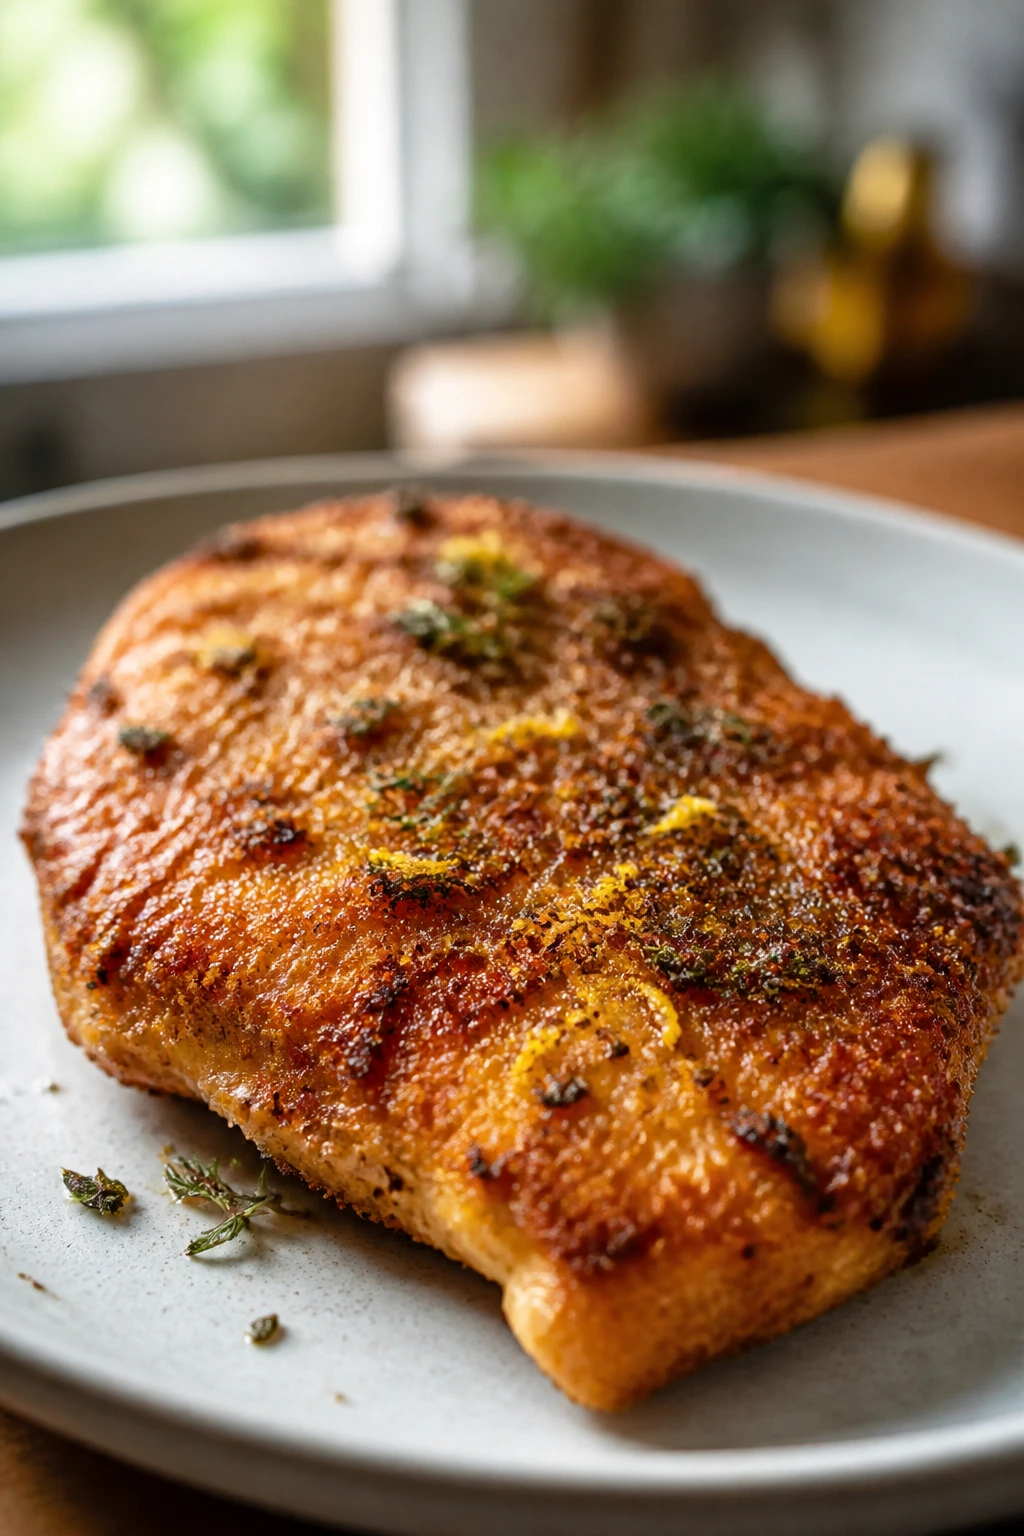
Boneless, skinless chicken breasts are the familiar weeknight choice, but they need a little respect. Slice them into cutlets, or pound them between parchment until they’re an even 1/2 inch thick. That thickness gives you fast cooking and keeps the edges from drying before the center is done. I like breast cutlets when I want a lighter plate and I’m willing to stand at the stove for a few minutes.
Boneless thighs are my safer pick. They stay juicy even if you wander off to check the rice or drain pasta water. They also brown well because the fat content is a little higher, which gives you more forgiveness in the pan and a better chance at a crust that actually tastes toasted rather than merely cooked. If you want the least anxiety, start here.
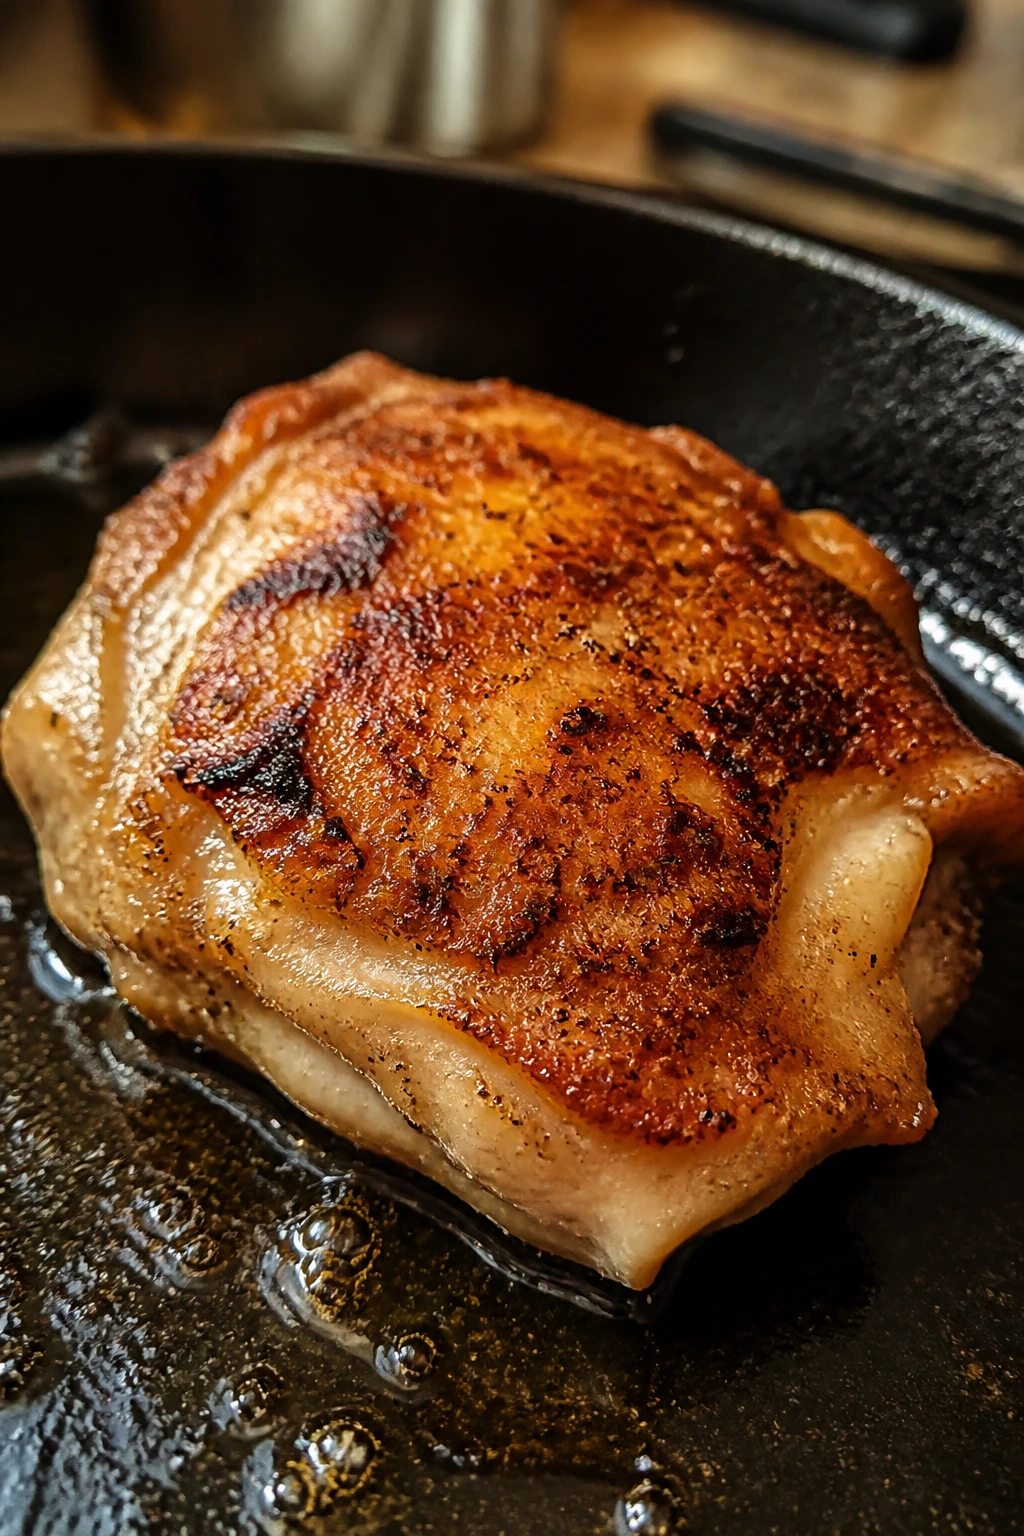
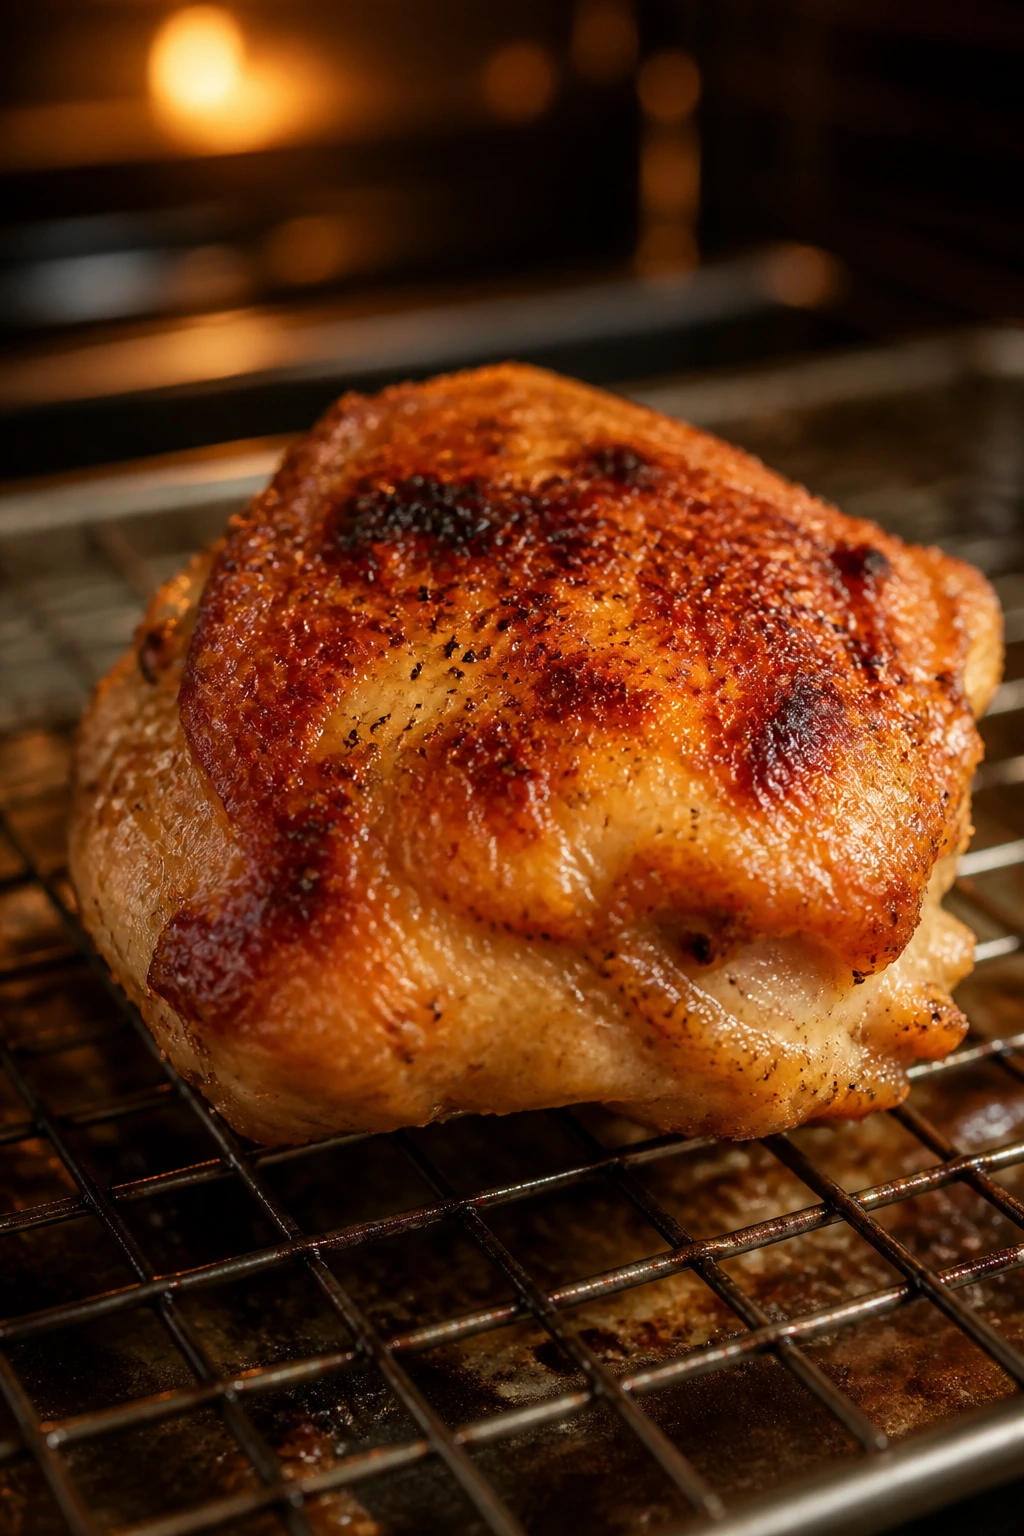
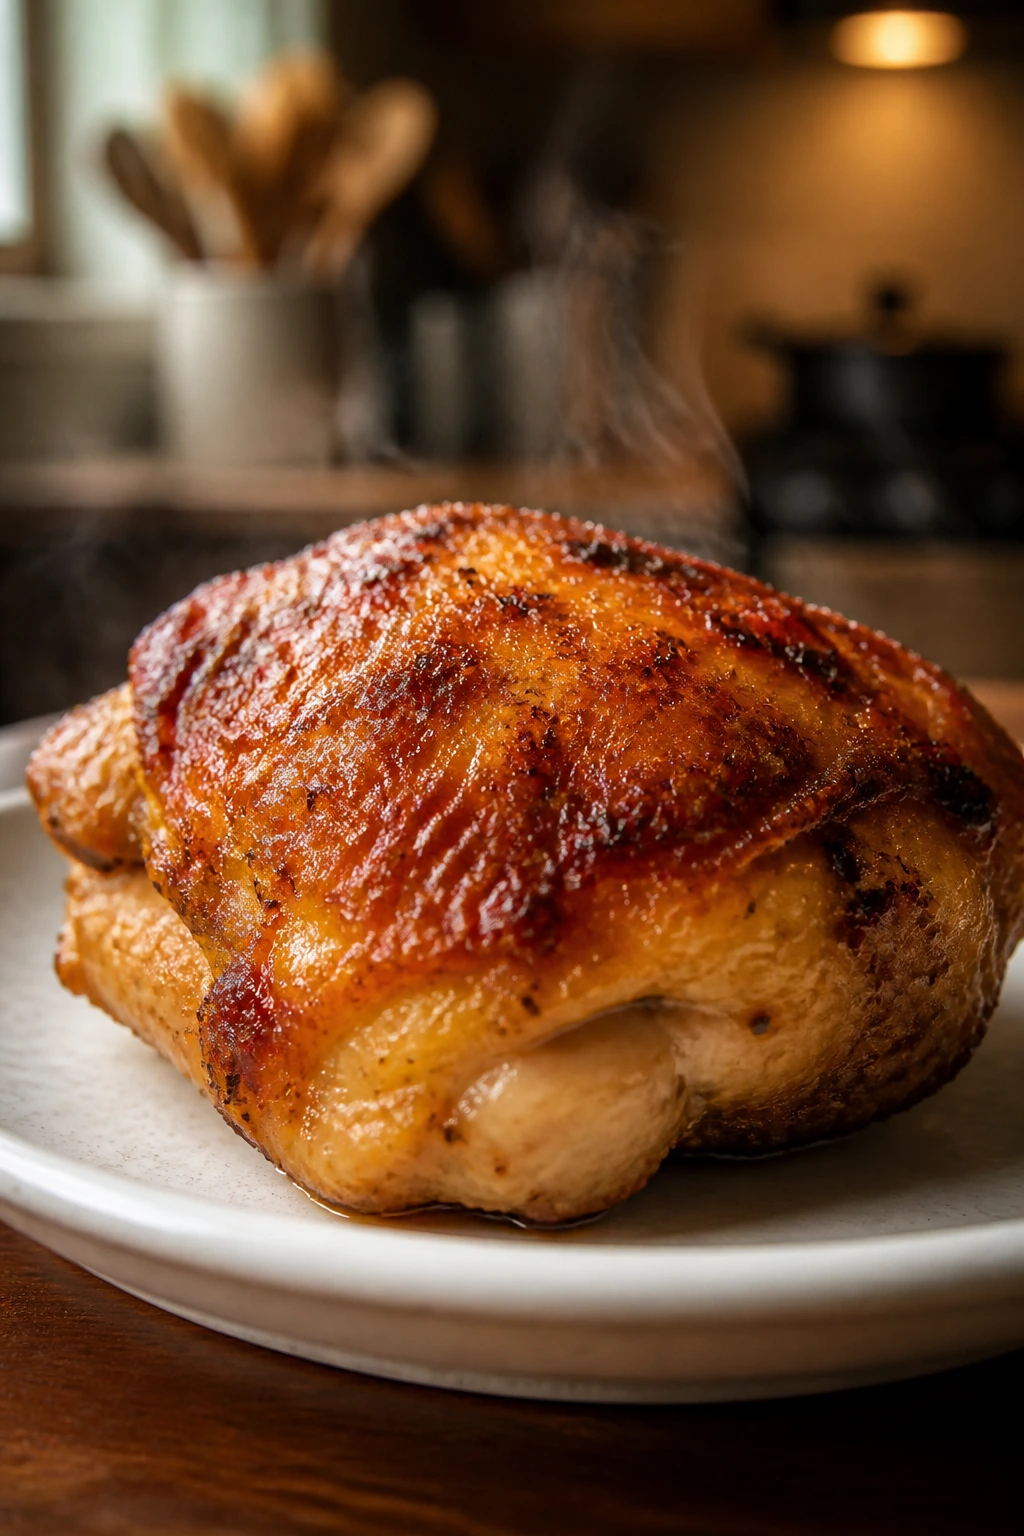
Skin-on, bone-in thighs are the slowest of the “fast” options, but the skin gives you something worth waiting for. The fat renders, the skin tightens, and the edges get papery and crisp if you cook them skin-side down long enough. Drumsticks can work too, though they need more time and more attention if you want the skin to stay crisp all the way to the table.
Tenders and cutlets win on speed. They’re the weeknight move when the clock is rude and the pantry is bare. They also make the cleanest sandwiches, which is a nice bonus if you like turning dinner into lunch without doing extra work.
The Drying and Seasoning Step That Changes Everything
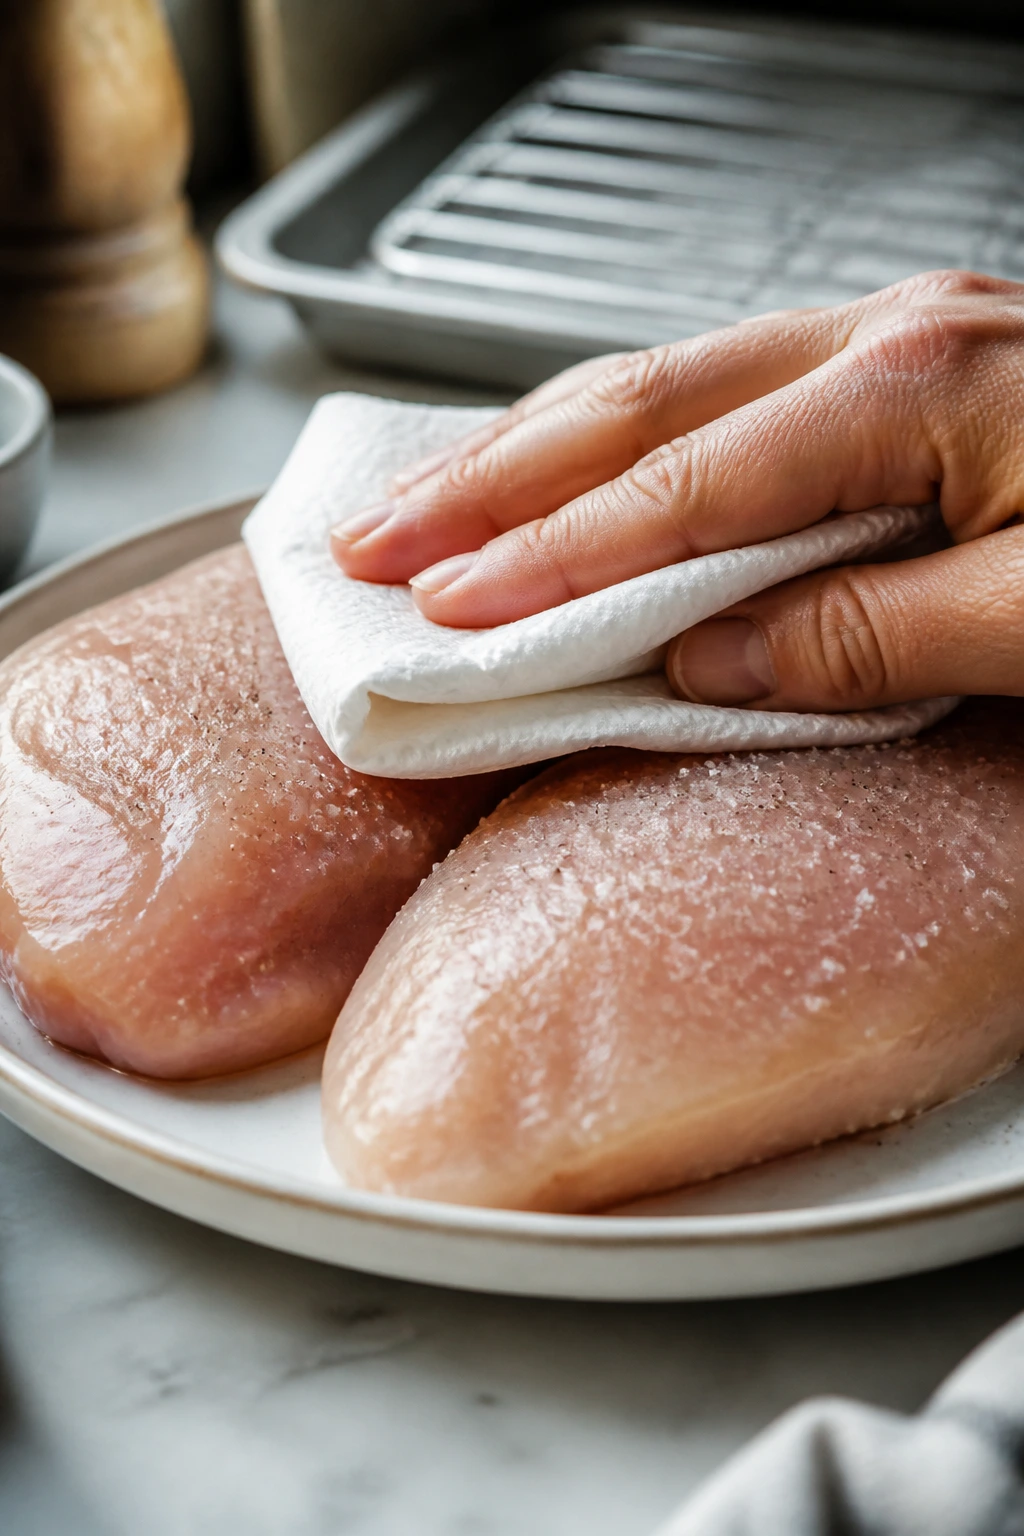
Moisture is the enemy of crispness. Not in some dramatic, kitchen-poster way. Just in the plain, annoying sense that wet chicken steams before it browns. If the surface is slick with water, the flour or crumbs cling unevenly, the oil cools too fast, and the crust becomes patchy instead of crisp.
Pat the chicken dry with paper towels before anything else. Do it well enough that the surface feels tacky, not damp. If you have an extra 15 to 30 minutes, salt the chicken and leave it uncovered in the refrigerator on a rack. That tiny dry-brine draws out moisture, then pulls it back in with the salt, which gives you a better seasoned bite and a surface that browns more cleanly.
For thicker pieces, pound them to even thickness before seasoning. Uneven chicken is where weeknight disappointment starts. A skinny flap will overcook while the thick side is still catching up, and then you’re eating one dry bite and one underdone bite from the same piece. That’s not a texture issue; that’s a timing issue wearing a fake mustache.
Season the chicken itself, not just the coating. Salt, black pepper, garlic powder, and a little paprika go a long way. If you’re using a breading, season the flour or crumbs too. A crust without seasoning tastes like the wrapper around the good part, and there’s no reason to settle for that.
One useful habit: let dredged chicken sit for 5 to 10 minutes before cooking. The coating hydrates just enough to stick, which helps it cling through the first flip. If you cook immediately, the crust can slough off in the oil.
Flour, Cornstarch, and Panko: Picking the Crunch That Fits Your Night
There isn’t one correct coating. There are three good ones, and each does a different job. Choosing well saves time later because you won’t be trying to rescue a crust that was wrong for the method in the first place.
Flour gives you a sturdy, familiar crust
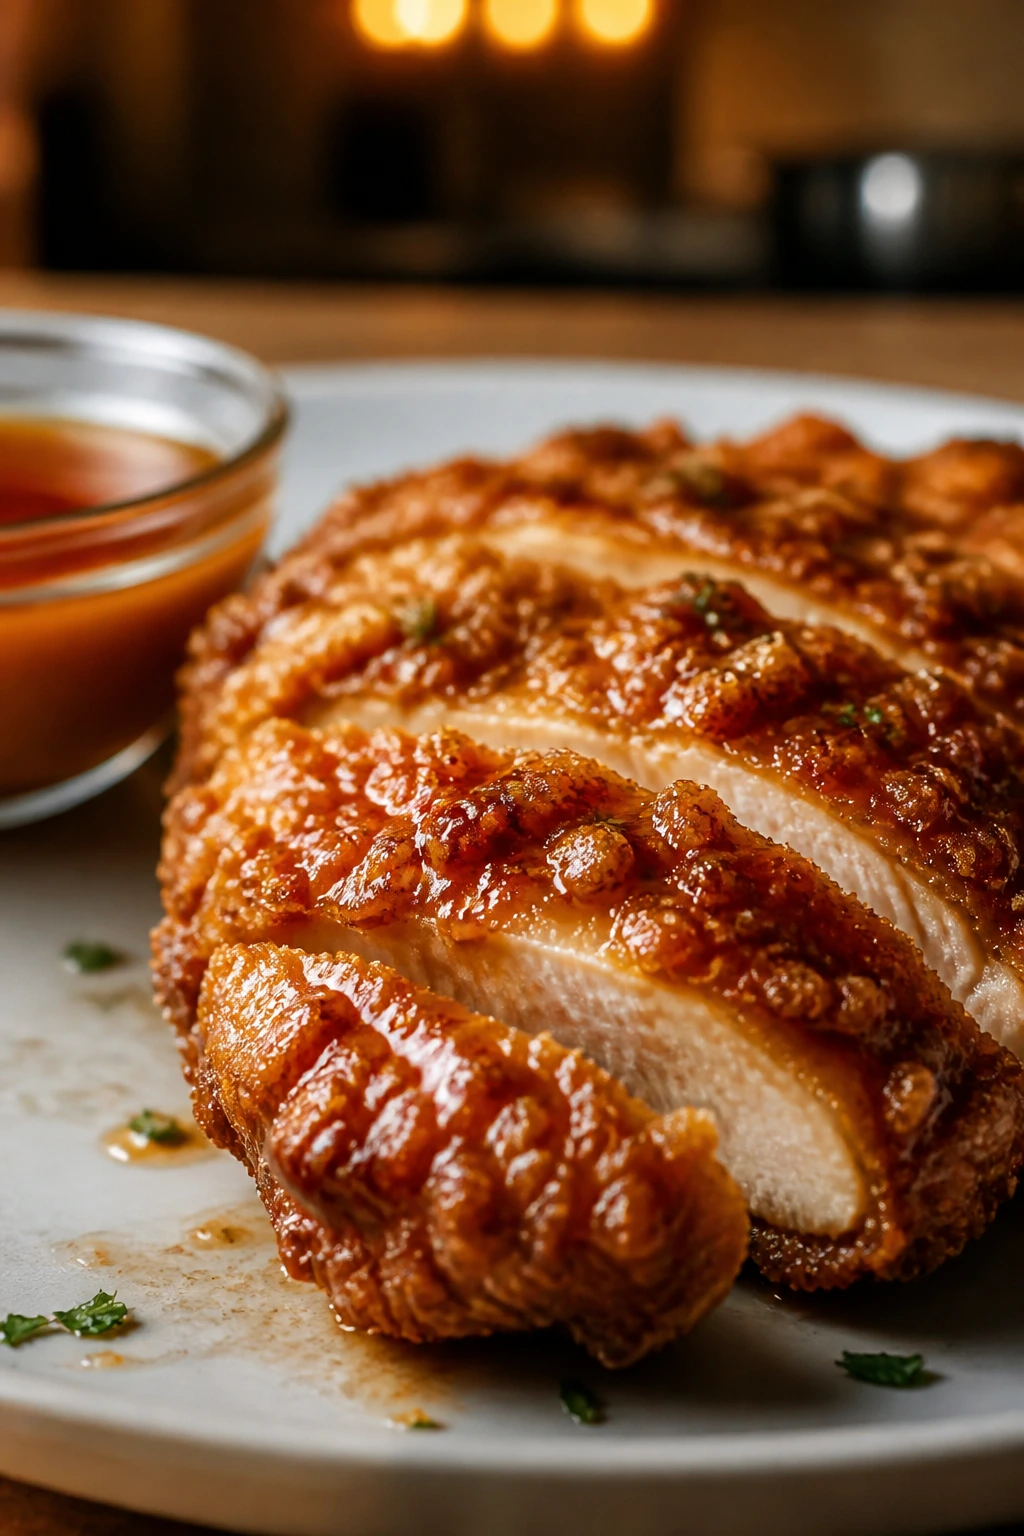
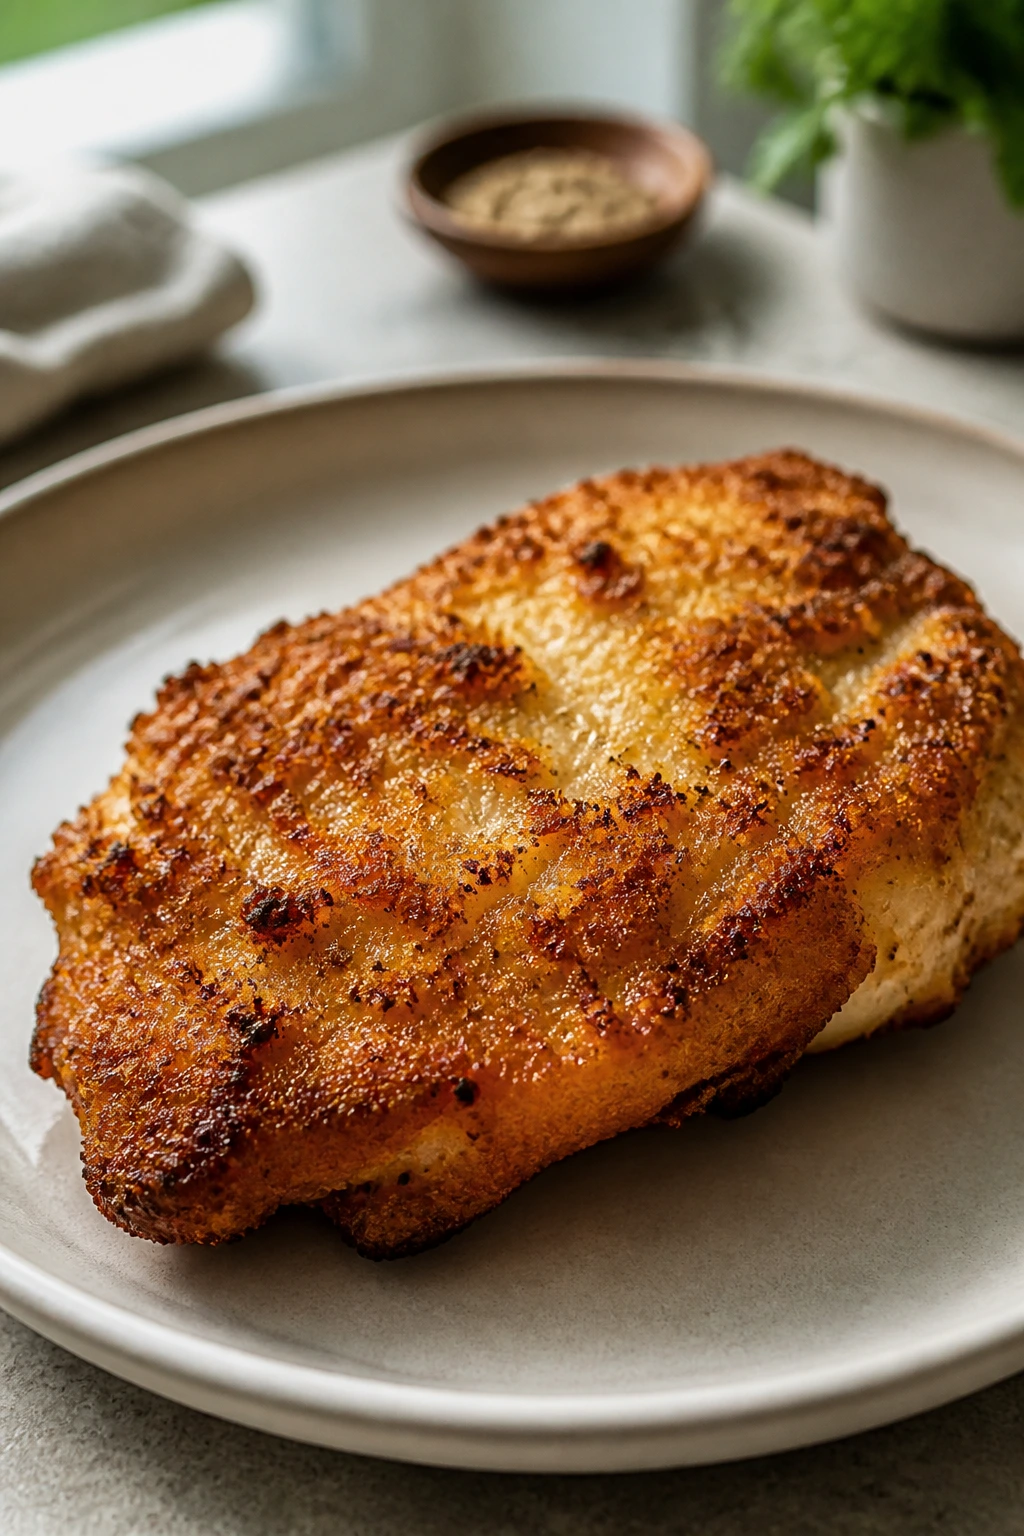
All-purpose flour is the base most people know. It browns evenly, holds seasoning well, and clings in a way that’s predictable enough for a tired Tuesday. It won’t give you the shattery crunch of a restaurant-style coating, but it does give you a crust that survives sauce and slicing better than people give it credit for.
Cornstarch brings a lighter, crisper finish
A little cornstarch mixed into the flour changes the texture in a useful way. It weakens some of the gluten structure, so the coating fries up drier and a little more brittle. I like a blend that leans mostly flour with about a quarter cornstarch if I’m pan-frying cutlets or air-frying breaded pieces. Too much cornstarch can make the crust feel delicate in a brittle, dusty way, so don’t go overboard.
Panko makes bigger shards and louder crunch
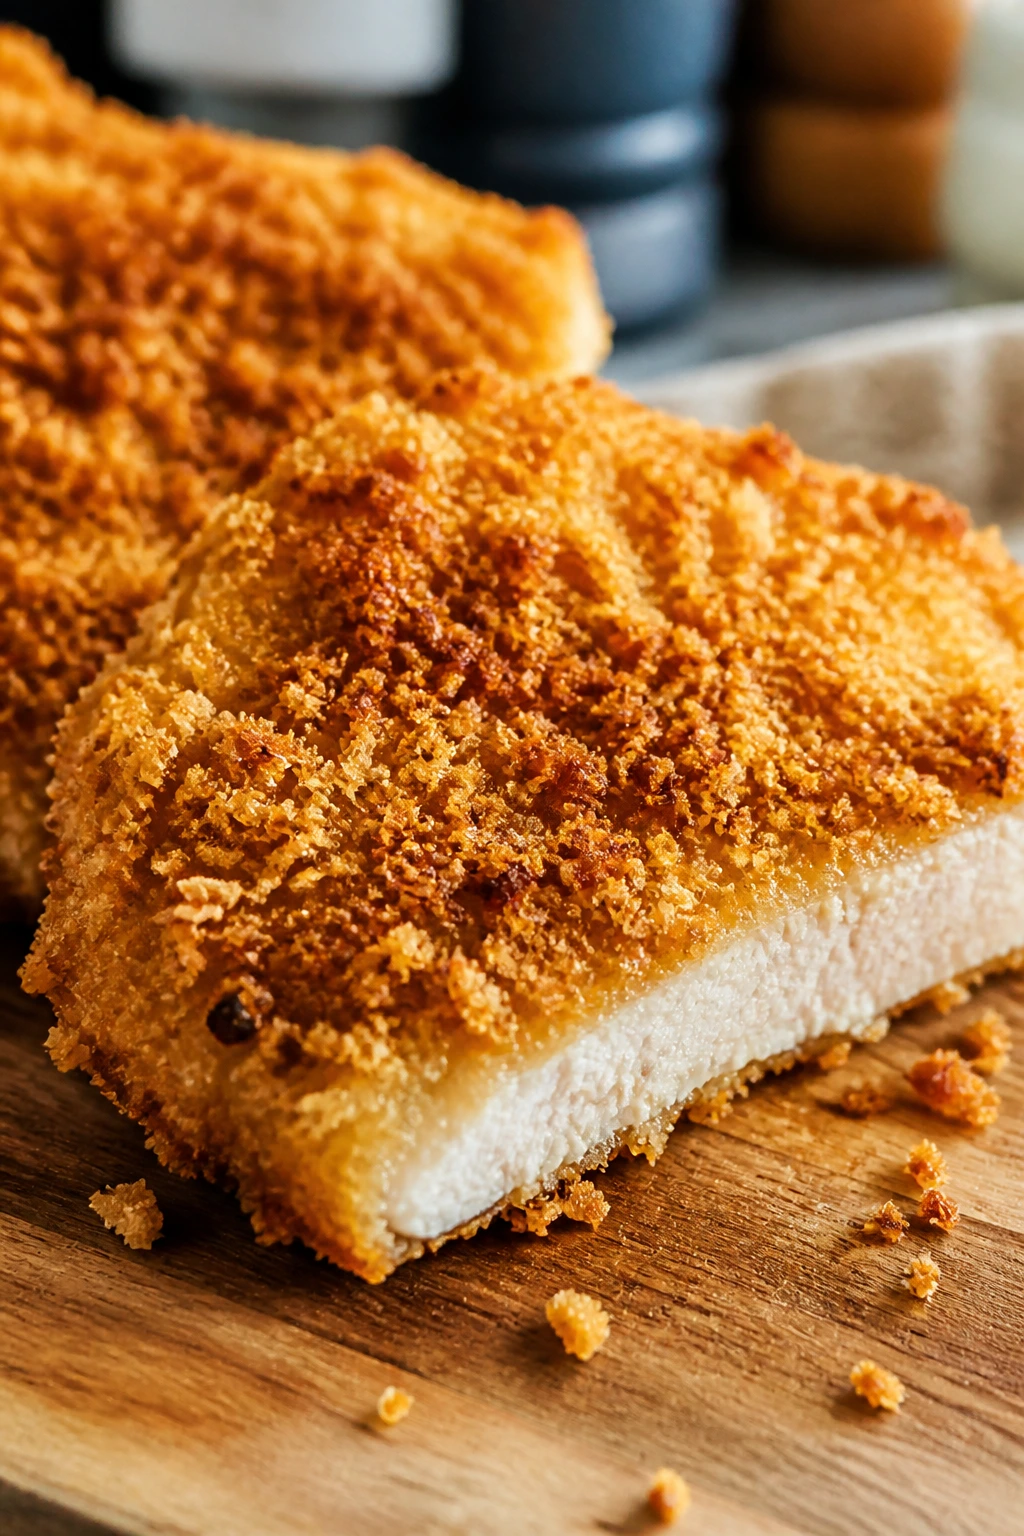
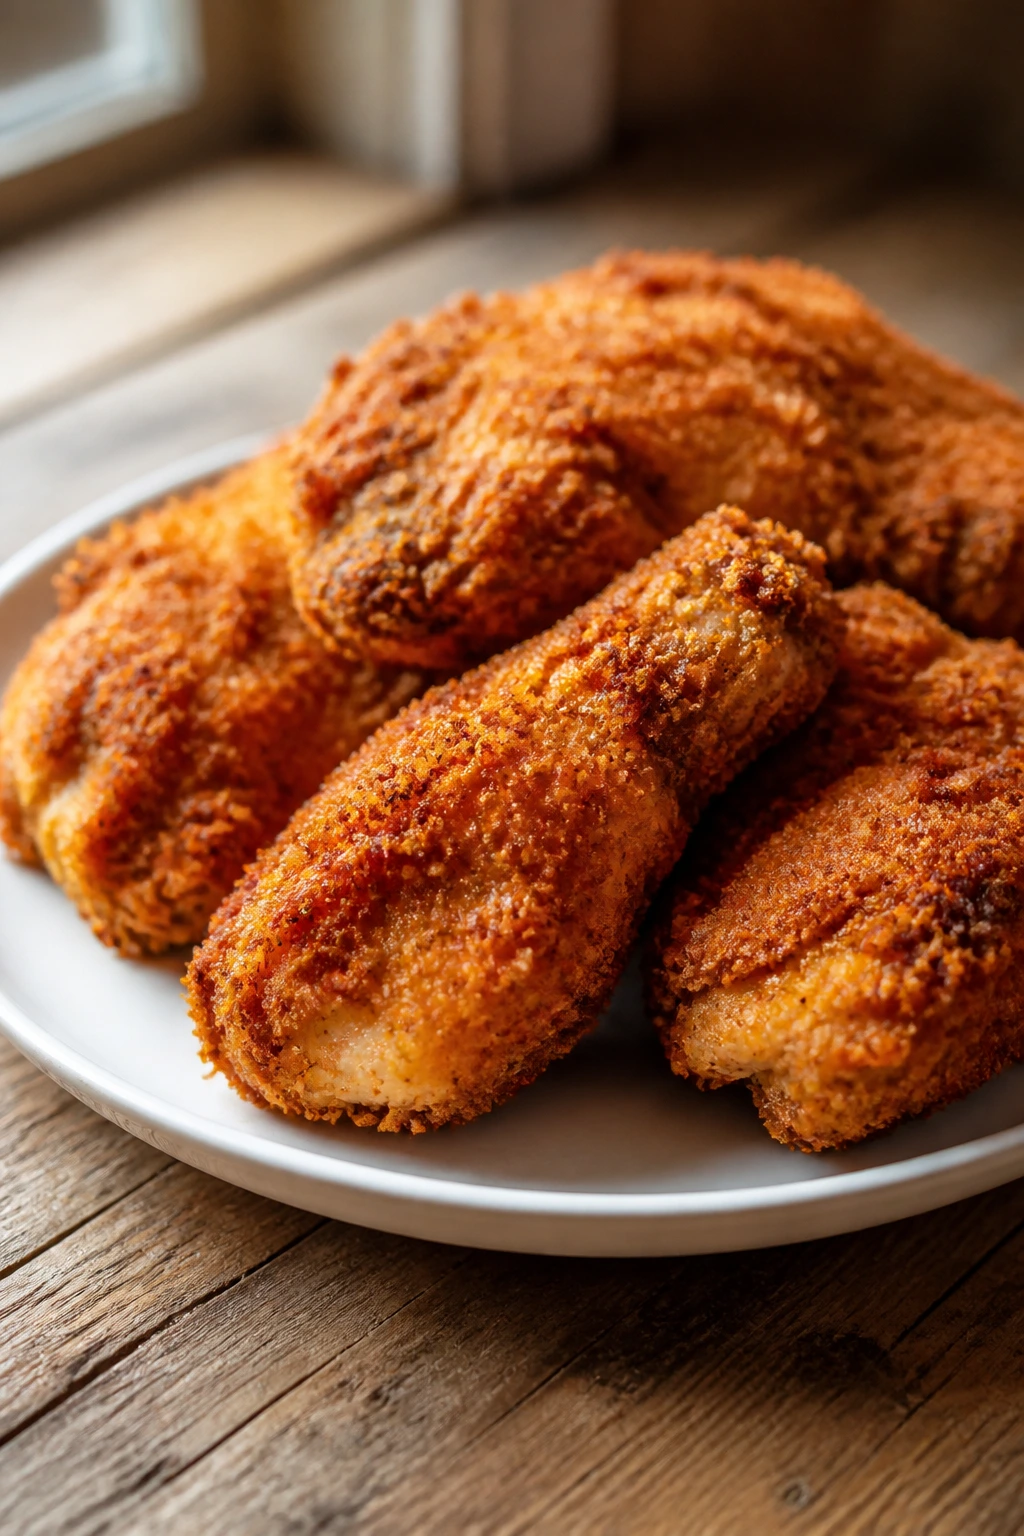
Panko is the choice when you want visible texture. Those coarse crumbs brown into jagged edges, which is why panko chicken looks so crisp even before the first bite. It works especially well in the oven or air fryer, where a light spray of oil helps the crumbs toast instead of sitting pale and dry on the surface.
A seasoning blend does more work than you think
Garlic powder, onion powder, paprika, black pepper, and kosher salt are the backbone. If you want a little warmth, add a pinch of cayenne. If you want more savory depth, add a spoonful of finely grated Parmesan to panko, but only if you’re cooking it hot enough to brown the cheese rather than steam it.
The smartest weeknight move is to keep the coating simple enough to remember. A complicated dredge slows you down, and dinner does not need a costume change.
Pan-Frying Chicken Cutlets for the Fastest Crisp
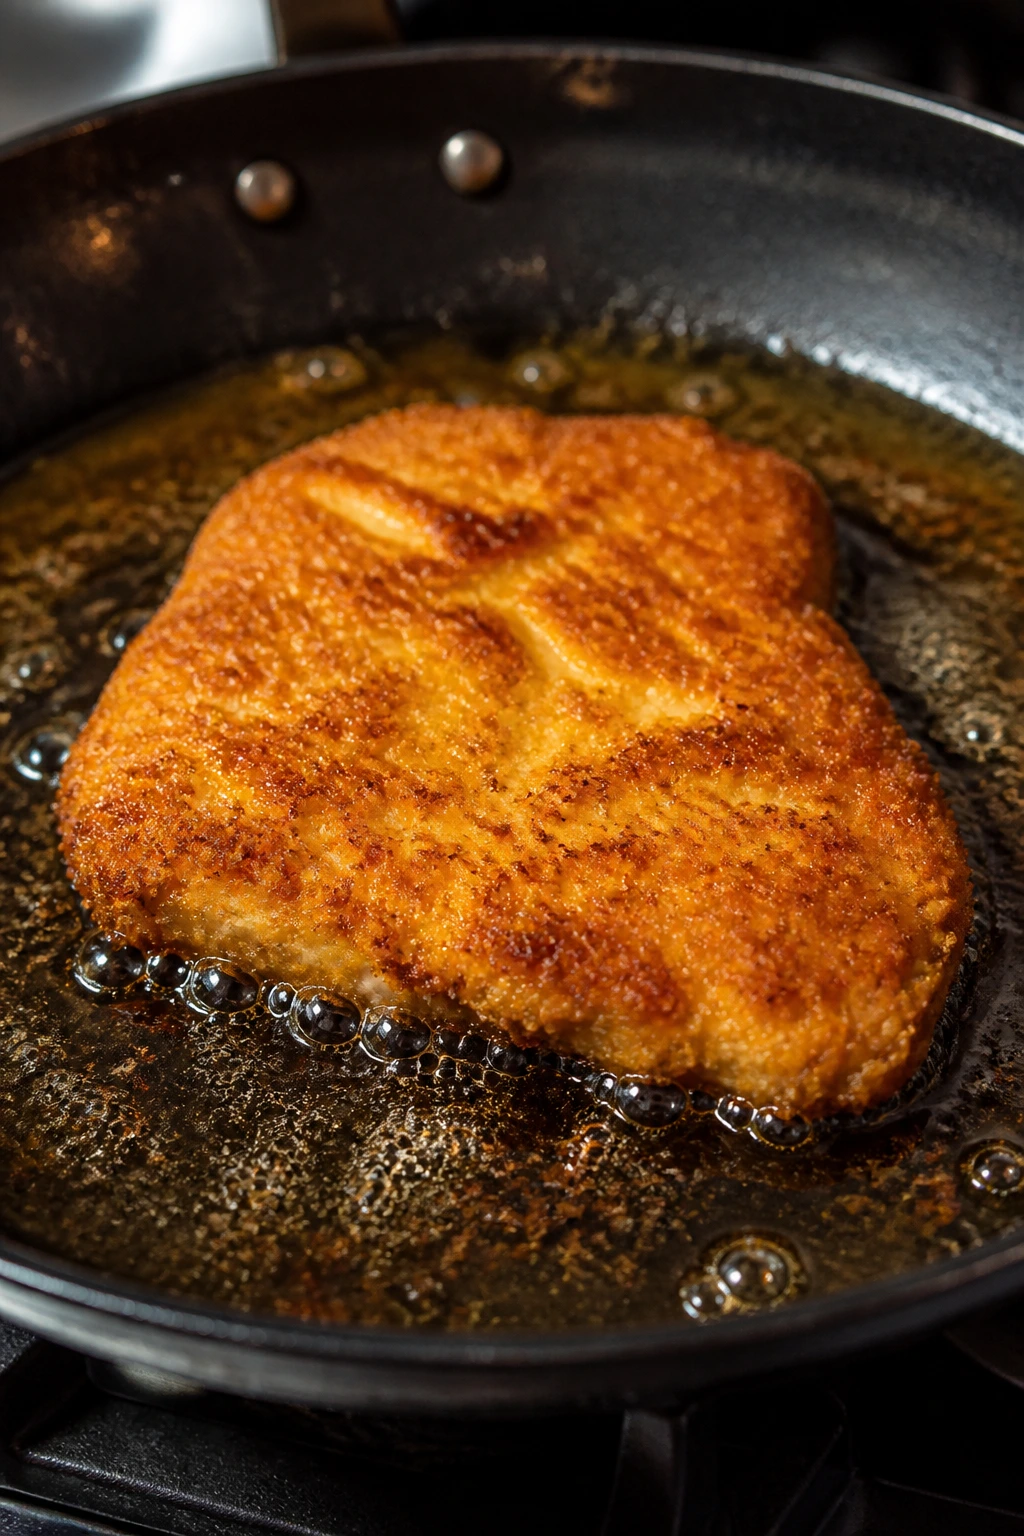
Pan-frying is the most direct route to crispy chicken. It gives you the best crust in the shortest time, and it’s the method I reach for when I want the chicken to sound like it belongs in a diner kitchen. The pan has to be hot enough to hiss on contact, but not so hot that the breading burns before the center cooks. That balance is what matters.
Set up the breading station:
-
Season the flour or crumbs first. Use about 1 cup flour for 1 1/2 pounds of chicken, plus 1 teaspoon kosher salt, 1 teaspoon garlic powder, 1/2 teaspoon black pepper, and 1/2 teaspoon paprika. If you’re using cornstarch, swap 1/4 cup of that flour for cornstarch.
-
Dredge the chicken in the dry mix, then shake off the excess. You want a thin, even coat, not a white shell that falls apart in the pan. If you’re using an egg wash or buttermilk step, let the extra drip off before the final coating.
-
Heat 1/4 inch of neutral oil in a 12-inch skillet over medium to medium-high heat. Cast iron gives the strongest browning, but stainless steel works well if you know how to control the heat. The oil is ready when it shimmers and a pinch of crumbs sizzles immediately without blackening in seconds.
-
Lay the chicken in the pan without crowding it. Give each piece room. If the pan is stuffed, the steam has nowhere to go, and the crust softens before it sets. Two cutlets at a time is often the right number.
-
Cook 3 to 5 minutes per side for thin cutlets or tenders. The crust should turn deep gold before you flip. If it tears when you lift the edge, leave it alone for another minute. The chicken will release more cleanly when the crust is ready.
-
Move finished chicken to a wire rack, not a flat plate. That keeps the underside from trapping steam. If you’re cooking multiple batches, hold the finished pieces in a 200°F oven for up to 20 minutes.
-
Check the thickest part with an instant-read thermometer. The USDA-safe temperature for poultry is 165°F. That number is not negotiable, and a thermometer takes the guesswork out of it.
A fried cutlet done well has a crisp edge, a moist center, and a clean, toasty smell. If it smells burnt or greasy, the oil was either too hot or too cool. Both problems show up fast.
Oven-Baked Chicken When You Want Less Standing at the Stove
The oven is not the enemy of crisp chicken. It just needs help. A naked sheet pan, a rack, enough heat, and a little oil can produce a crust that stays remarkably good for a weeknight dinner, especially with panko or a lightly seasoned flour coating.
Start by preheating the oven to 425°F and putting the rack in the upper-middle position. If you’re using a sheet pan, put it in the oven while it heats. A hot pan gives the bottom of the chicken a head start, which matters more than most people think.
For breaded cutlets, mist or brush both sides with a thin coat of oil. Not a puddle. Just enough to help the crumbs toast. Lay the chicken on a wire rack set over the hot sheet pan, leaving space between each piece. If you don’t have a rack, flip the chicken halfway through, but know that the bottom won’t get as crisp.
Bake thin cutlets for about 15 to 20 minutes, depending on thickness. Bone-in thighs need longer, usually 30 to 35 minutes, and they’re best when the skin has enough space to render instead of touching the pan. If the top looks pale near the end, a brief pass under the broiler can help, but stay close. Broilers have a habit of going from useful to scorched in less time than it takes to find the oven mitts.
Use the same thermometer rule here. 165°F at the thickest point. No guessing. No slicing the chicken open to “check.” That cuts out the juice you worked for.
The oven is also the better choice when you’re making a side dish that needs the stove. Roasted broccoli, rice, and crispy chicken can all happen together if you plan the timeline instead of winging it.
Air Fryer Chicken for Smaller Batches and Faster Cleanup
Air fryers earn their place with breaded chicken because they move hot air hard and fast across the surface. That’s the whole trick. A thin coating of crumbs or seasoned flour dries and browns quickly, so you get a crisp edge without a full pan of oil.
Preheat the air fryer to 375°F or 400°F, depending on how aggressive yours runs. Some machines brown hotter than the dial suggests, and a quick test batch tells you more than the manual ever will. Spray the basket lightly with oil, then place the chicken in a single layer with space between pieces.
For boneless cutlets or tenders, cook 8 to 12 minutes, flipping halfway through. For thicker boneless thighs, expect closer to 12 to 15 minutes. Bone-in pieces need more time and are usually better handled in the oven, where they can sit longer without the coating over-darkening before the meat catches up.
A light oil spray on top helps the crumbs toast. Without it, panko can look dry and a little chalky even when the chicken is technically cooked. That’s one of those small details that makes a big visual difference on the plate.
Don’t crowd the basket. Really. Two batches are better than one overloaded batch with damp spots on the crust. If you stack pieces or let them touch, the airflow drops off and you lose the very thing that makes the method work.
Air fryer chicken likes a short rest on a rack after cooking. Three to five minutes is enough. The crust settles, the juices even out, and you avoid that unpleasant steam that comes from cutting too soon.
How to Finish with Sauce Without Softening the Crust
The fastest way to ruin crispy chicken is to drown it before it reaches the table. Sauce has its place. It just should not sit on top of the crust long enough to soak through the coating and turn everything limp.
My preference is to serve sauces on the side or under the chicken, not over it. If you want lemon butter, honey mustard, ranch, yogurt-herb sauce, or buffalo sauce, keep it in a small bowl and let people dip. That keeps the crust intact and lets the chicken stay crisp through the first half of dinner instead of the first two bites.
Thin glazes can work if you brush them on right before serving. Gochujang-honey, maple-Dijon, and soy-garlic glazes are good examples because they cling in a light layer instead of flooding the crust. The glaze should look shiny, not thick. If it pools, it’s too much.
There’s also the plate-and-pour method. Put a spoonful of sauce on the plate, set the chicken on top, and leave part of the crust exposed. You still get the flavor, but the breading doesn’t get trapped under a wet blanket.
If you’re using pan drippings, keep them concentrated. A quick deglaze with a splash of chicken stock or lemon juice makes a useful little sauce, but reduce it until it lightly coats the spoon. Thin pan juices are for spooning around the plate, not over the chicken.
One small thing: add fresh lemon zest or chopped herbs after the sauce, not before. They brighten the chicken without soaking the crust, and they make the whole plate taste fresher with almost no extra work.
How to Serve Crispy Chicken So It Still Looks Crisp at the Table
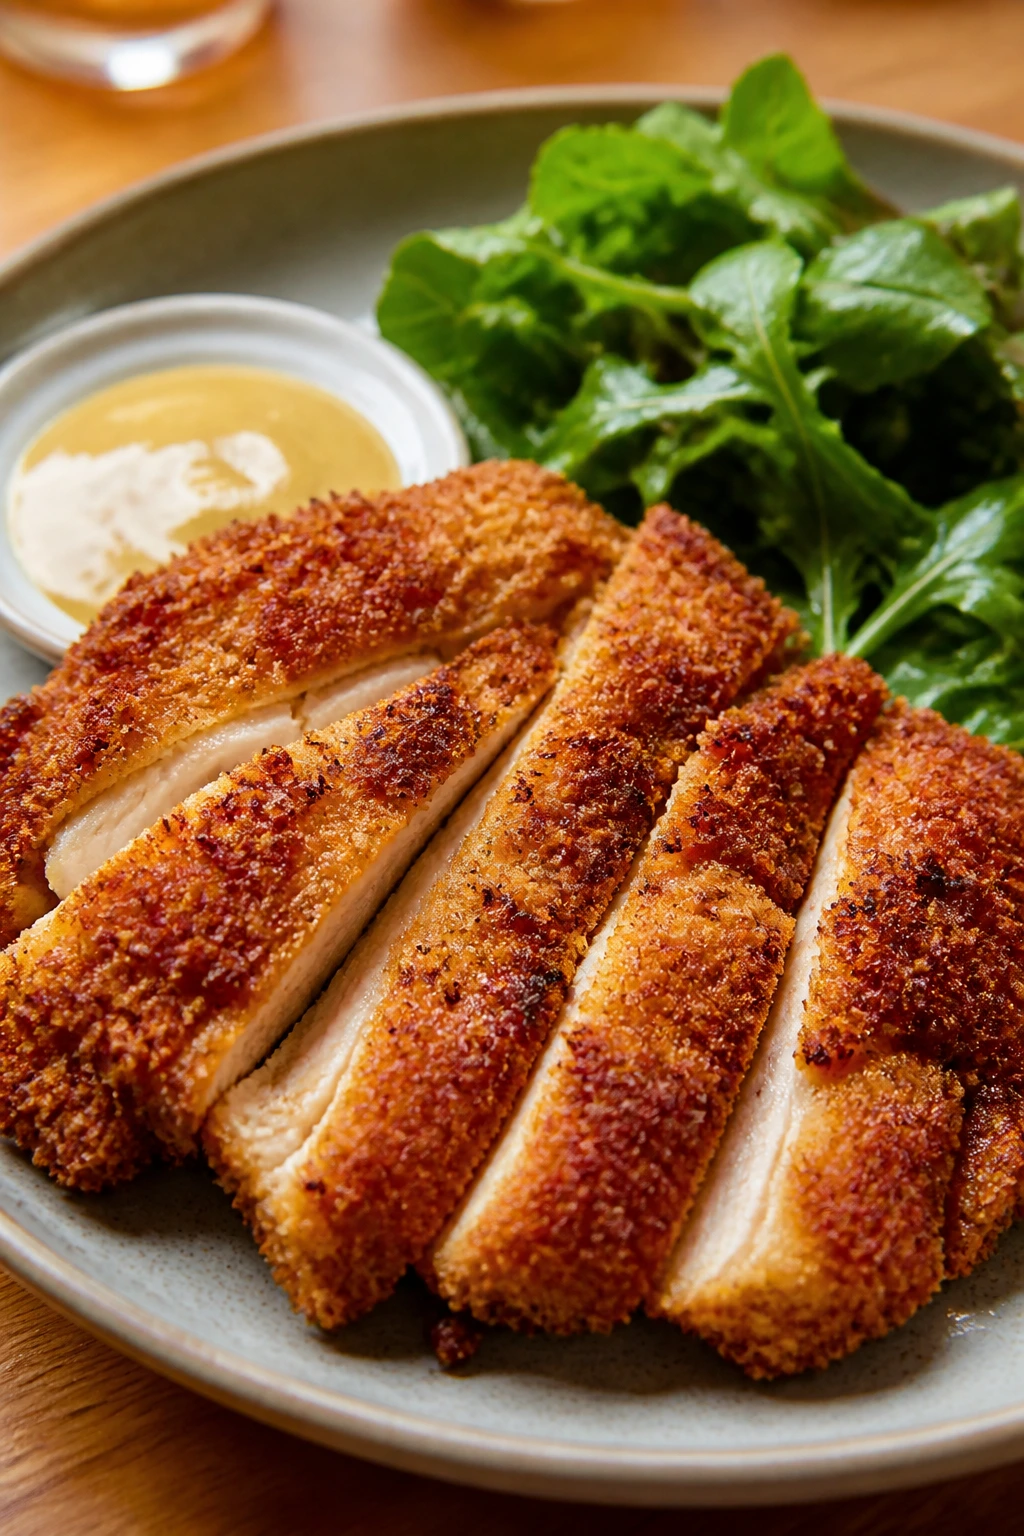
Crispy chicken can look sloppy if you dump it on a plate with no thought, and that’s a shame because half the pleasure is visual. The cleanest presentation is simple: a warm plate, a piece of chicken set slightly off-center, and something green or bright nearby so the crust has room to stand out.
Presentation: Put the chicken on a wire rack for the last minute after cooking, then move it to a warm platter. If you’re serving cutlets, lean them slightly so the browned edges stay visible. A lemon wedge, a scatter of chopped parsley, or a few flakes of finishing salt go a long way.
Accompaniments: I like crispy chicken with something soft and something sharp. Buttered rice, mashed potatoes, or roasted potatoes cover the soft part; slaw, a shaved cabbage salad, green beans, or a plain cucumber salad handle the sharp side. If you’re making breaded cutlets, a simple pasta with olive oil and garlic works too. The chicken gives the meal its snap, so the sides don’t need to compete.
Portions: Plan on one large cutlet or 2 boneless thighs per adult, or 2 to 3 tenders if they’re part of a bigger plate. For bone-in thighs, one or two per person usually works, depending on what else is on the table. If you’re stretching dinner for a crowd, add sides before you cut back on the chicken; that keeps the plate feeling generous.
Beverage Pairing: Sparkling water with lemon keeps the plate feeling bright. I also like iced tea, a dry lager, or a light white wine with enough acidity to cut through the crust. Heavy drinks can make the breading feel greasy. Lighter ones keep it lively.
If you’re serving family-style, put the chicken on a rack-lined tray rather than a flat bowl. It looks better, and the bottom pieces stay crisp longer. Small detail. Big difference.
Practical Tips That Make Weeknight Chicken Better
Flavor Enhancement: Finish hot chicken with flaky salt and a squeeze of lemon. That tiny hit of acid wakes up the crust and makes the seasoning taste sharper, especially on boneless thighs or breaded cutlets.
Time-Saver: Pound breasts or slice them into cutlets while they’re still cold from the fridge. Cold chicken is firmer and easier to handle, and even thickness means you spend less time guessing at the cook time.
Pro Move: Hold finished chicken on a wire rack set over a sheet pan in a 200°F oven for up to 20 minutes. That buys you a small window to finish rice, toss salad, or stir the pan sauce without the crust turning soft.
Cost-Saver: Buy thighs when you want the easiest crisp-to-price ratio. They’re usually cheaper than breasts and far less likely to dry out if your timing slips by a minute or two.
Cleanup Trick: Line the sheet pan under your rack with foil, but do not line the rack itself. The foil catches drips, the rack lets air circulate, and the pan is much easier to wash later.
Extra Crunch: If you’re baking or air-frying breaded chicken, give the top a light oil spray right before it goes in. Dry crumbs stay pale; a thin coat of oil helps them brown into something that actually tastes toasted.
Seasoning Tip: Salt the coating, not only the chicken. A seasoned crust makes the whole bite taste intentional, even if the side dish is plain rice or a bagged salad.
That’s the part a lot of quick chicken recipes miss. Crispness is only half the job. The other half is making sure the crust tastes like something.
Common Mistakes That Turn Crispy Chicken Soft or Gummy

The biggest mistakes are not dramatic. They’re small, ordinary things that add up to limp chicken.
-
Starting with wet chicken: If the surface is damp, the coating slips and the chicken steams before it browns. Pat it dry and let it sit uncovered for a few minutes if you have the time.
-
Crowding the pan or basket: Chicken that touches traps steam between the pieces, and the crust gets pale instead of crisp. Cook in batches. It feels slower, but the result is better and usually faster than trying to rescue a soggy first batch.
-
Using oil that’s too cool: Cold oil soaks into the coating and leaves it greasy. The fix is simple: wait for a real shimmer in the oil, or test with a breadcrumb that sizzles right away.
-
Saucing too early: A good crust can turn limp in a minute if it sits under wet sauce. Serve the sauce on the side or brush it on right before the chicken hits the plate.
-
Cutting into the chicken immediately: The juices need a minute to settle. If you slice right away, they spill out, and the center can seem drier than it actually is. Give cutlets or thighs a 3 to 5 minute rest.
-
Ignoring thickness: Uneven chicken cooks unevenly. Thin edges burn while thick centers stay pale. Pound breasts to a uniform thickness and flatten thick thighs a little if they’re especially bulky.
One more thing. If the first batch looks too dark, lower the heat before the second batch goes in. If it looks pale, raise it a little and give the pan another minute. The pan tells you what it wants if you pay attention.
Flavor Variations That Still Keep the Crunch
You can change the flavor without changing the method. That’s the part worth keeping. Once you understand how crispness happens, the seasoning can wander a little.
Lemon-Parmesan Cutlets: Mix finely grated Parmesan into the panko or flour, then finish the chicken with lemon zest after cooking. The cheese adds a salty, nutty edge, and the zest keeps the whole thing from feeling heavy.
Smoky Paprika Thighs: Use smoked paprika, garlic powder, black pepper, and a touch of cayenne in the dredge. This works especially well on boneless thighs because the richer meat holds up to a bolder seasoning profile.
Cornflake Crunch Chicken: Crush cornflakes into coarse crumbs and use them in place of panko. The texture is jagged and loud in a good way, and it browns beautifully in the oven or air fryer with a light oil spray.
Gochujang-Lime Glaze: Fry or bake the chicken plain, then brush on a thin glaze made from gochujang, honey, lime juice, and a little water. Keep it light. The goal is a glossy coating, not a sticky shell that smothers the crust.
Gluten-Free Crispy Chicken: Use a blend of rice flour and cornstarch, or go with gluten-free panko if you like a bigger crumb. The result stays light and crisp if you keep the coating thin and the oil hot.
Herb-Salt Skin-On Thighs: For bone-in thighs, season heavily with salt, black pepper, thyme, and a little garlic powder, then cook skin-side down until the skin turns deeply golden. This is the variation I reach for when I want the chicken to do most of the talking and the side dish can stay simple.
The Tools That Make Crisp Chicken Easier
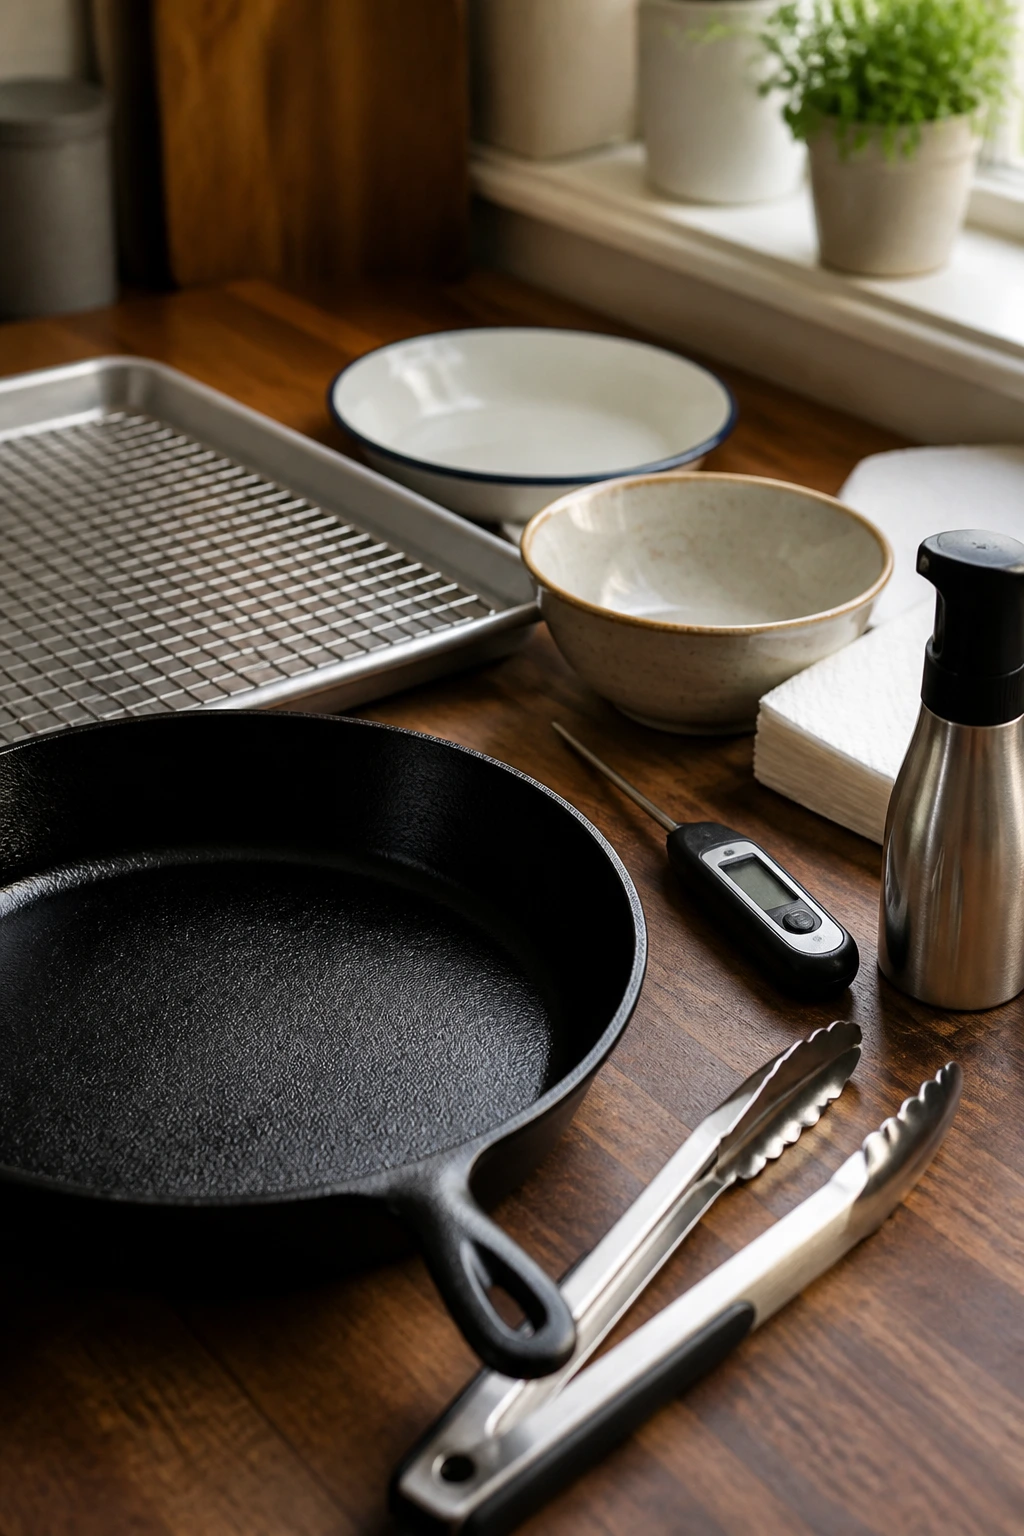
You do not need a pile of gadgets, but the right few tools make the job smoother and the crust better.
-
12-inch cast-iron or stainless skillet: Gives you enough surface area to cook a few pieces without crowding. Cast iron browns a little harder; stainless is easier to deglaze if you want pan sauce.
-
Rimmed sheet pan: Useful for baking, holding finished chicken, and catching drips under a rack. A rim keeps oil and juices from sliding off the edges.
-
Wire rack: The single most useful non-obvious tool here. It keeps air under the chicken so the bottom side doesn’t steam.
-
Instant-read thermometer: The easiest way to stop overcooking. Check the thickest part and look for 165°F.
-
Tongs: Better than a fork because they don’t pierce the crust or release juices prematurely.
-
Shallow bowls or pie plates: Makes dredging easier and keeps the coating station from becoming a mess.
-
Paper towels: For drying the chicken before seasoning and soaking up a little extra oil if needed.
-
Oil sprayer or pastry brush: Handy for oven and air fryer methods, especially if you want a thin, even coat of oil on the crumbs.
If you only buy one thing from that list, buy the thermometer. It saves more chicken than any other tool.
Make-Ahead, Storage, and Reheating Without Wrecking the Crust

Crispy chicken can be made ahead, but you need to be honest about what happens in the fridge. Moisture is still moisture, and cold air does not care how carefully you breaded the chicken.
For raw chicken, you can salt and dry-brine it uncovered in the refrigerator for up to 24 hours. That actually helps crispness, especially for skin-on pieces. If you’re breading chicken ahead of time, 2 to 4 hours is the sweet spot. Longer than that, and the coating starts to absorb moisture from the meat and lose its crunch before it ever reaches heat.
Cooked chicken keeps well in the refrigerator for 3 to 4 days in a covered container. Let it cool for no more than 2 hours before refrigerating, and if you stacked pieces, separate them with parchment so the crust doesn’t stick together in one damp layer. For the freezer, wrap pieces individually and freeze for up to 2 months. The crust will never be quite the same after freezing, but it can still be good enough for sandwiches or sliced salads.
Reheating matters more than storage if you want the chicken to taste crisp again. The oven is the safest bet: 400°F on a wire rack for 8 to 12 minutes for cutlets or tenders, and a few minutes longer for thicker thighs. An air fryer at 375°F for 4 to 6 minutes also works well, especially if you give the top a tiny spritz of oil first.
Avoid the microwave unless you have no other choice. It heats the chicken, yes, but it softens the coating in a way that never quite recovers. If you must microwave, do it briefly, then finish the piece in a hot skillet or toaster oven. Strange combination. Works better than it sounds.
For lunches, pack sauce separately and keep the chicken on a paper towel in the container if you’re okay with a tiny tradeoff in moisture. It buys you a little more crust by the time you open the box.
Questions That Come Up a Lot About Crispy Chicken at Dinner Time

What’s the best cut if I want the crispiest result with the least fuss?
Boneless thighs are the easiest place to start. They brown well, stay juicy, and forgive small timing errors better than breasts. If you want the fastest cook, thin cutlets or tenders win on speed.
Can I make crispy chicken without frying it?
Yes. A hot oven or air fryer can produce a very good crust if you use a rack, a light coat of oil, and enough space between the pieces. The key is airflow, not just heat.
Why does my breading fall off in the pan?
Usually the chicken was wet, the coating was too thick, or you flipped it too early. Dry the surface well, shake off the excess flour, and let the crust set before moving the chicken.
Do I need flour, or can I use cornstarch alone?
Cornstarch can make a very crisp crust, but it’s a little fragile on its own. A blend of flour and cornstarch usually gives you better structure and a lighter bite. That combo is especially useful for pan-fried cutlets.
What temperature should the chicken reach?
The thickest part should hit 165°F. That’s the safe temperature for poultry, and using a thermometer is the cleanest way to avoid dry chicken from overcooking.
Can I cook chicken from frozen and still get it crispy?
Not well. Frozen chicken releases too much moisture and cooks unevenly, which makes the crust suffer. Thaw it fully first so the outside can brown before the center overcooks.
How do I keep crispy chicken crisp in a lunch container?
Cool it completely before packing, keep sauce separate, and reheat it in an oven or air fryer if you can. A microwave will soften the crust, and once that happens, there’s no full fix.
Is bone-in chicken worth the extra cooking time on a weeknight?
If you want crackly skin and deeper flavor, yes. If you want dinner in under 30 minutes, choose cutlets or tenders instead. Bone-in pieces are more forgiving than they look, but they’re not a speed move.
The Chicken Dinner That Doesn’t Fall Apart at the Table
The nice thing about crispy chicken is that it doesn’t ask for much once you’ve handled the basics well. Dry surface. Hot cooking surface. Enough room. A short rest. That’s the whole song, and it works because every part is doing a job instead of hoping the others will cover for it.
That’s why this style of dinner keeps coming back to my kitchen. A cutlet with a browned crust, a thigh with crackly skin, a quick pile of greens, a spoonful of sauce on the side — none of it is fussy, but it still feels composed. You can hear the difference when you cut into it. You can taste it before the plate goes cold.
Get the chicken dry, choose the right method, and stop cooking at 165°F. The rest is just deciding whether tonight wants rice, potatoes, slaw, or a sandwich roll beside it, and that’s the kind of decision I’m happy to make on repeat.