
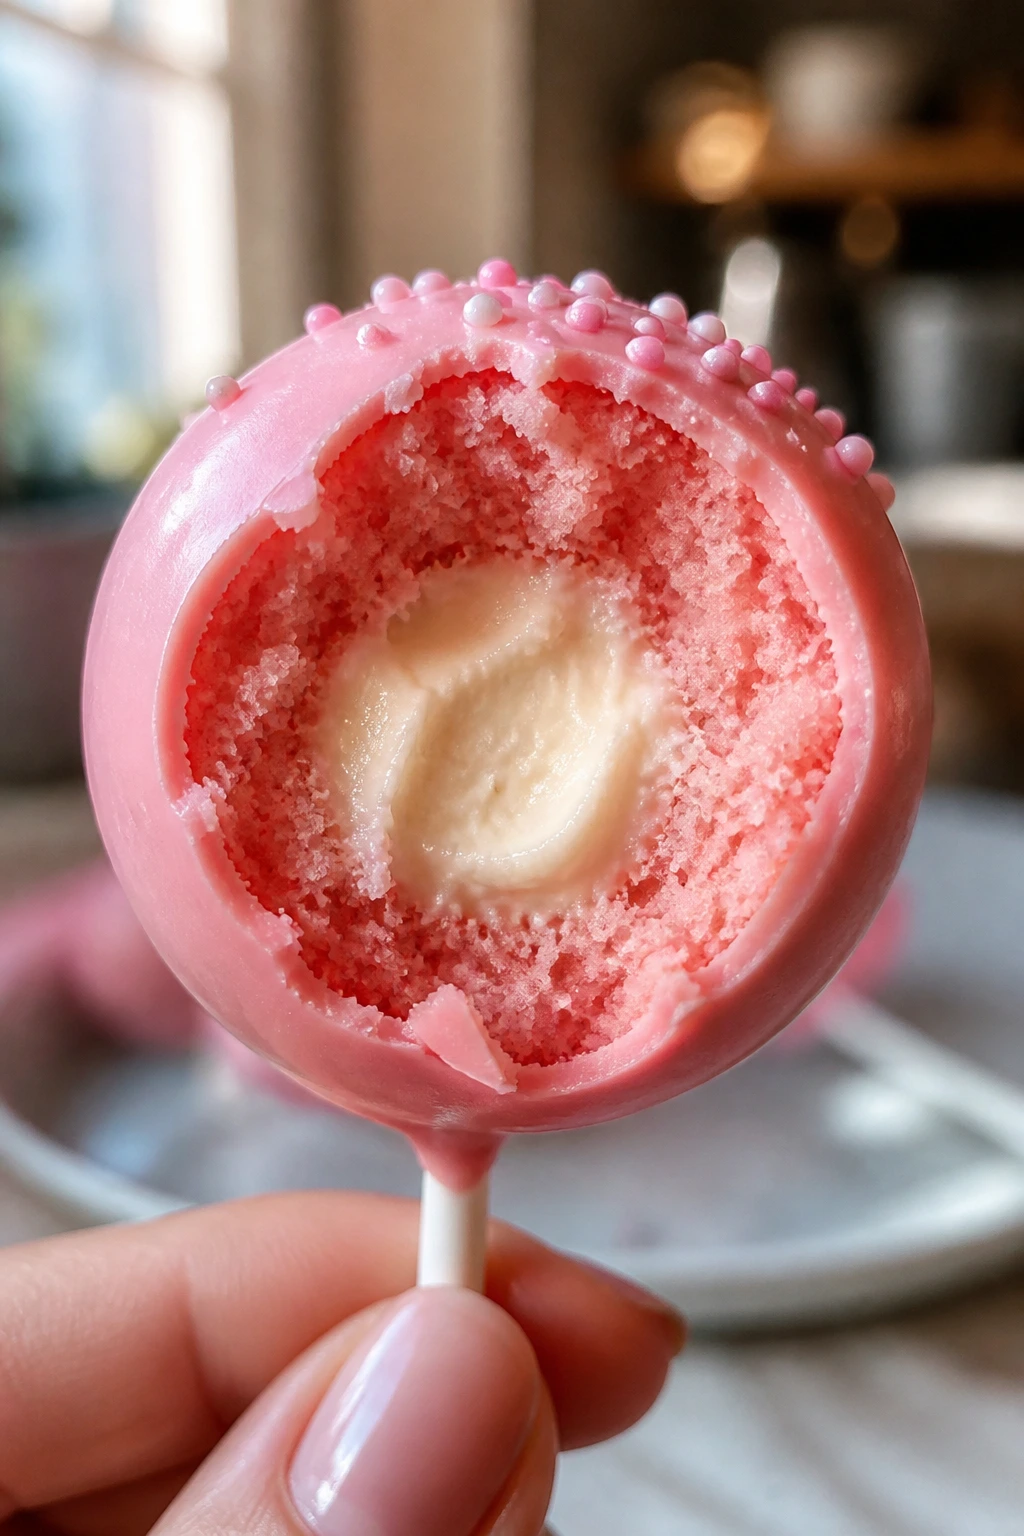
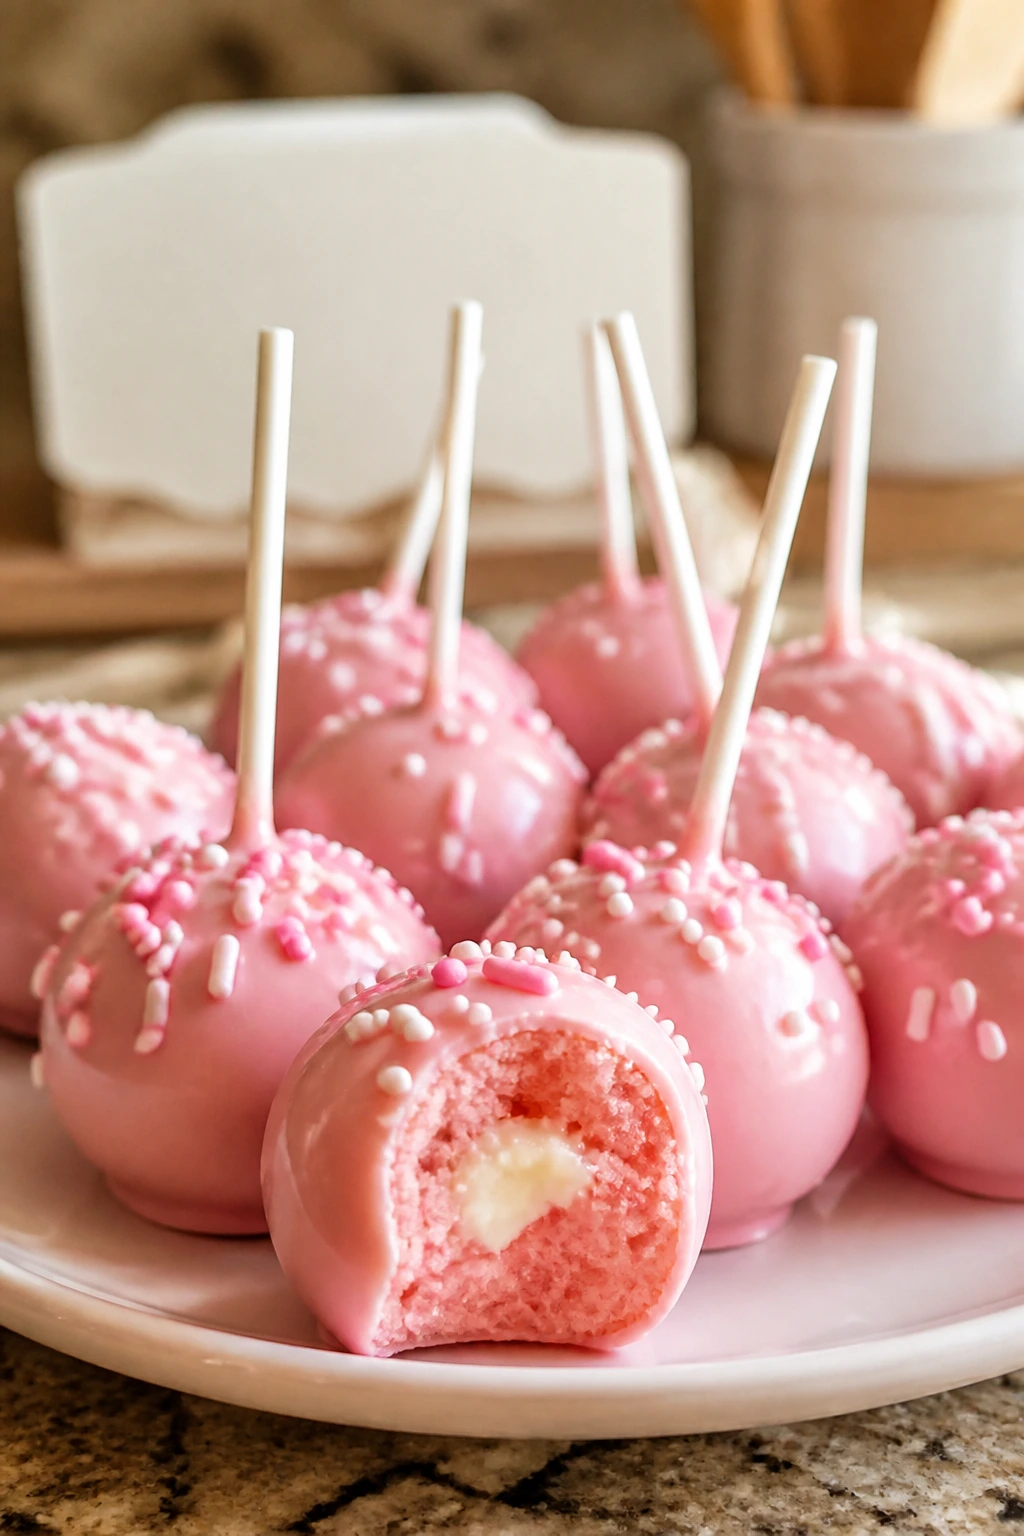
The center is the part that decides whether pink cake pops are cute or worth making again. A smooth shell can hide a dry, sandy middle for exactly one bite. Cream cheese frosting fixes that problem in the best way: it brings a little tang, a little richness, and enough cling to turn a pan of cooled cake into little rounds that hold their shape instead of crumbling under your fingers.
Candy melts make the whole process less dramatic, which I appreciate. Real chocolate can be lovely, but it has opinions. It wants tempering, it wants the right room temperature, it wants a calm kitchen and a patient hand. Candy melts are much easier. They set fast, they stay smooth, and they give these pink cake pops that clean outer shell that cracks softly when you bite in.
What I like most about this version is the balance. The crumb is soft and vanilla-scented, the frosting brings that gentle cream cheese tang, and the pink coating gives the whole tray a playful look without turning the dessert into pure sugar. The details matter here — how long the cake cools, how much frosting goes in, how warm the coating is — but none of those details are fussy once you know what you’re watching for.
Why These Pink Cake Pops Earn a Spot on the Dessert Tray
-
The cream cheese frosting keeps the middle from tasting flat: That tiny tang cuts through the sweet shell and makes the cake pop taste like an actual dessert, not just colored sugar on a stick.
-
The crumb stays soft for days: Once the cake is baked, cooled, and mixed with frosting, the texture lands somewhere between truffle and birthday cake bite.
-
Pink gel color gives the cake a blush, not a muddy tint: A small amount is enough, and gel food coloring doesn’t thin the batter the way liquid color can.
-
Candy melts are forgiving when you’re coating a batch: They melt fast, re-set quickly, and don’t demand the same precision as tempered chocolate.
-
The work can be split into stages: Bake the cake one day, roll the balls the next, dip when the kitchen is quiet. That rhythm matters with cake pops.
-
They travel well once set: If you need something that can stand upright in a box or tray without frosting sliding everywhere, these behave far better than a soft layer cake.
The Short List, the Timing, and the Tools
Making cake pops feels like three jobs stacked together: bake the cake, build the filling, then coat the finished balls before they soften. The good news is that each part is simple on its own. The trick is keeping the texture in the right place at each stage, because cake pops go wrong fastest when the cake is warm or the coating gets too thick.
Yield: Makes about 28 to 32 cake pops
Prep Time: 35 minutes
Cook Time: 30 minutes
Total Time: 2 hours 20 minutes, including cooling and chilling
Chill/Rest Time: About 1 hour 15 minutes total
Difficulty: Intermediate — the steps are straightforward, but the texture of the cake, frosting, and coating all need to line up.
Best Served: Within 24 hours of dipping, after the shell has fully set
For the Pink Vanilla Cake:
- 2 1/2 cups all-purpose flour
- 2 1/2 teaspoons baking powder
- 1/2 teaspoon fine salt
- 1 cup unsalted butter, softened to room temperature
- 1 3/4 cups granulated sugar
- 4 large eggs, at room temperature
- 2 teaspoons vanilla extract
- 1 cup whole milk, at room temperature
- 1 to 2 teaspoons pink gel food coloring
For the Cream Cheese Frosting Binder:
- 6 ounces cream cheese, softened to room temperature
- 3 tablespoons unsalted butter, softened to room temperature
- 2 1/2 cups powdered sugar, sifted
- 1 teaspoon vanilla extract
- Pinch of fine salt
For the Coating and Finish:
- 20 ounces pink candy melts
- 1 tablespoon refined coconut oil or vegetable shortening, optional, for thinning
- 1/3 cup pastel sprinkles or sanding sugar
For the Pink Vanilla Cake
What to use: The batter needs standard cake ingredients — flour, baking powder, salt, butter, sugar, eggs, milk, vanilla, and a little pink gel color. A 9×13-inch pan gives you a sheet cake that crumbles evenly and cools fast enough to handle.
Preparation: Bring the eggs, butter, and milk to room temperature before you start. Cold dairy fights the batter, and cold eggs can make the mixture look curdled for longer than it should.
Substitutions: If you want a stronger party-cake flavor, add 1/2 teaspoon almond extract in place of 1/2 teaspoon vanilla. A white or yellow boxed cake mix can stand in if that’s what you have, but the crumb will be softer, so go lighter with the frosting binder.
Tips: Use gel food coloring rather than liquid dye. Liquid color can loosen the batter and push the crumb toward gummy, which is the last thing you want once the cake gets mixed with frosting.
For the Cream Cheese Frosting Binder
What to use: Cream cheese, butter, powdered sugar, vanilla, and salt create a thick, tangy binder that holds the cake crumbs together without making them slick. The batch makes a little more than the pops need, which is useful because cake dryness can vary.
Preparation: Soften the cream cheese fully. Cold cream cheese leaves tiny lumps that survive the mixer and show up in the finished bite.
Substitutions: Neufchâtel works if that’s what you have, though it’s a touch softer. Dairy-free cream cheese can work in a pinch, but it usually needs a little extra powdered sugar to thicken.
Tips: The frosting should be firmer than cupcake frosting. If it looks fluffy and loose, chill it for 10 minutes before using it in the cake pop mixture.
For the Pink Candy Shell and Finish
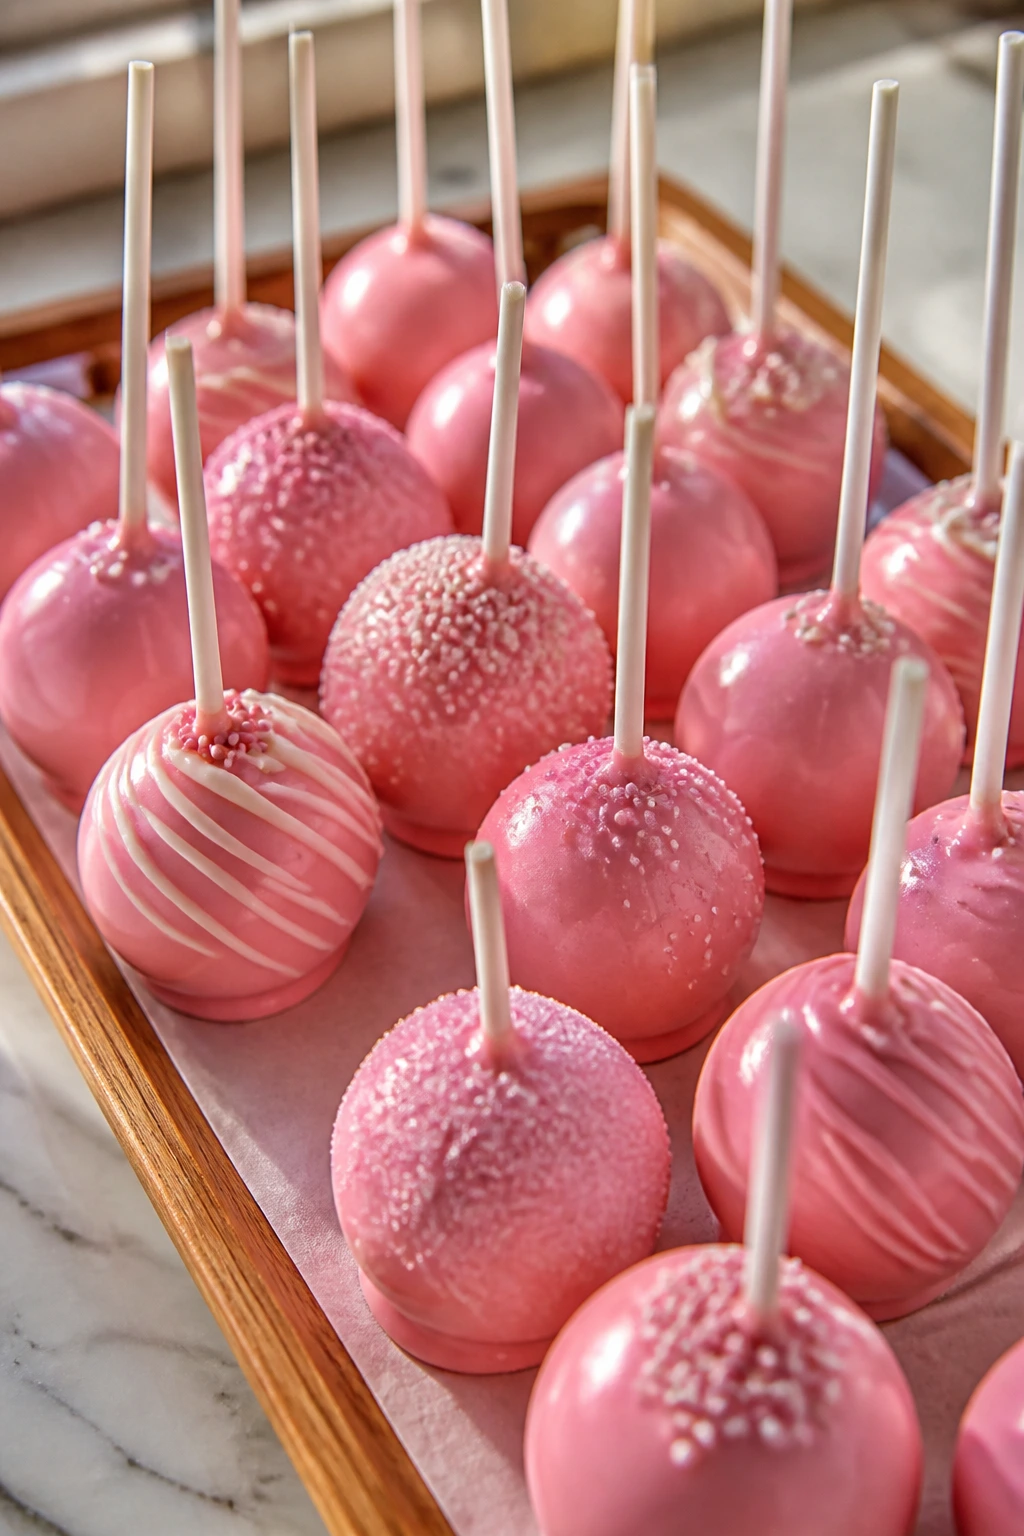
What to use: Pink candy melts give the pops their hard shell, and the sprinkles or sanding sugar add a little crunch and color. Candy melts are made with vegetable fats, so they set more predictably than white chocolate tinted with color.
Preparation: Melt the wafers slowly and keep a little extra in the bowl so the depth is easier to work with. A shallow puddle of coating makes dipping awkward.
Substitutions: White candy melts with oil-based pink coloring work well if you want to tint the shell yourself. Real white chocolate can be used, but it needs proper tempering and is less forgiving.
Tips: If the coating feels thick, thin it with 1 teaspoon of coconut oil at a time. Too much thinning makes the shell set dull and soft.
Special equipment
- 9×13-inch baking pan: The cake bakes evenly and cools into a crumb that’s easy to break up.
- Parchment paper: Line the pan and the cooling tray so the cake lifts cleanly.
- Stand mixer or hand mixer: Useful for the batter and the frosting; cake pop dough is easier when the frosting is smooth.
- Large mixing bowl: You’ll need room to crumble and mix without losing half the cake over the rim.
- Wire rack: Lets the cake cool all the way through instead of stewing in the pan.
- Rimmed baking sheet: Handy for lining up the rolled balls before dipping.
- Small cookie scoop: A 1 1/2-tablespoon scoop gives you consistent cake pop sizes.
- Microwave-safe bowl or heatproof bowl over a pot: Either one works for melting the candy coating.
- Foam block or sturdy cardboard box with small holes: This keeps the dipped pops upright while they set.
- Lollipop sticks: The little rods matter; they’re what turn cake balls into cake pops.
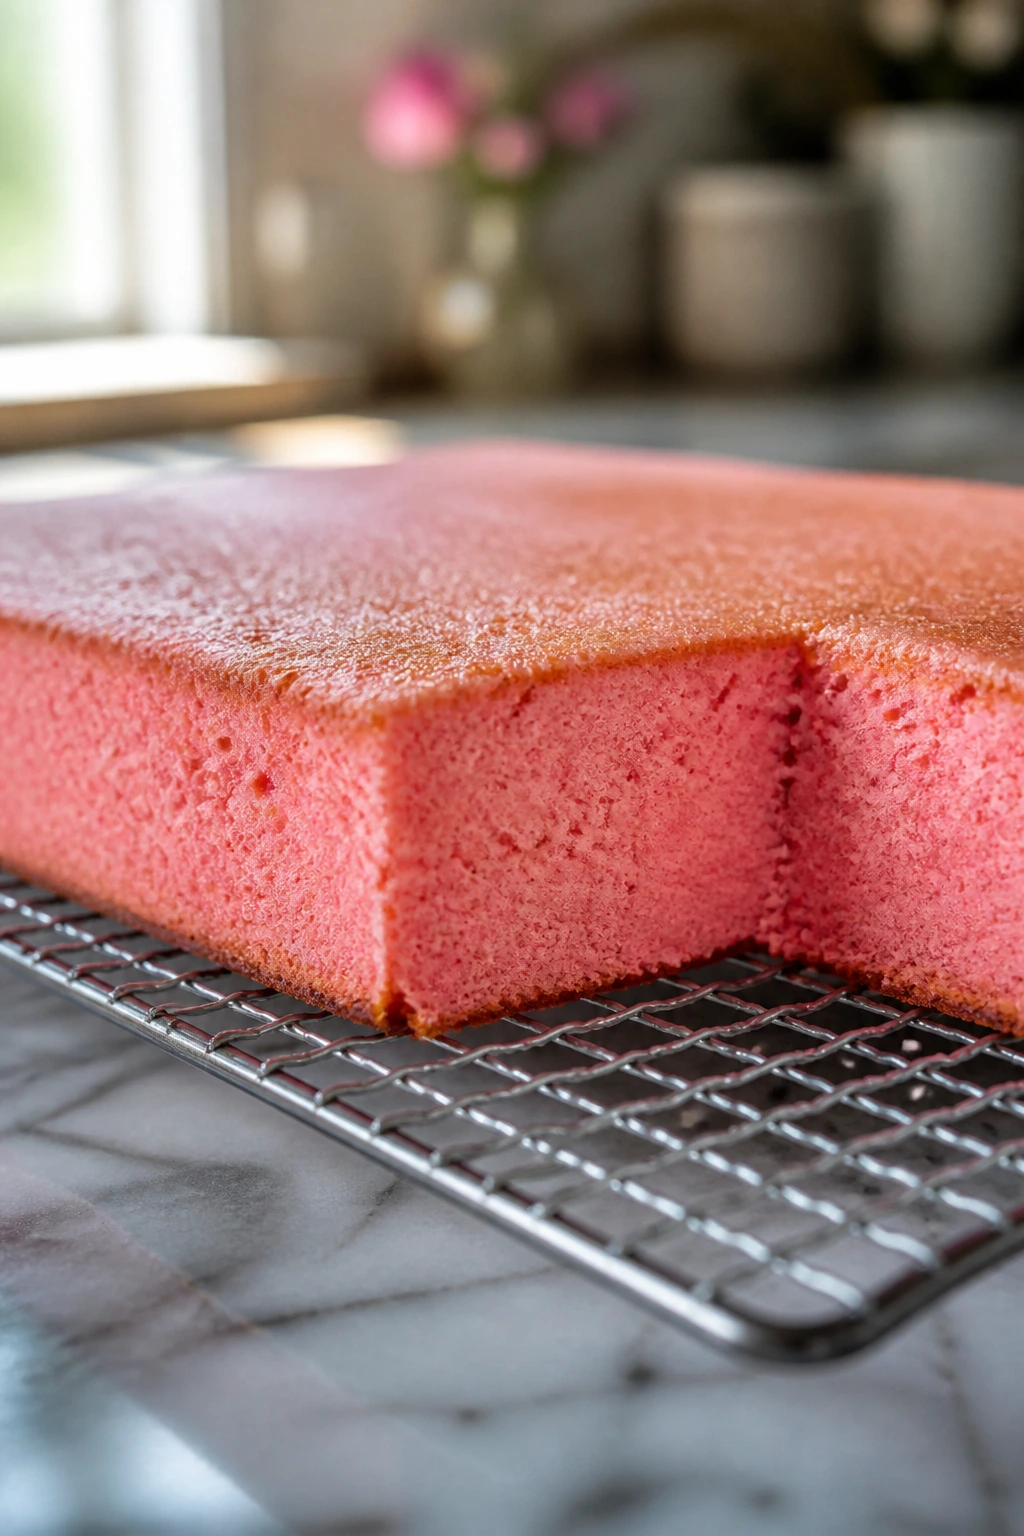
Baking the Pink Cake That Becomes the Pops
The cake itself is not a supporting actor here. It’s the whole structure. If the crumb is too wet, the pops turn heavy. If it’s too dry, the mixture takes extra frosting and gets greasy. The sweet spot is a soft sheet cake with a fine crumb and enough vanilla to taste like dessert, not like pink food coloring was the main event.
Prepare the Pan and Dry Ingredients:
-
Preheat the oven to 350°F (175°C) and position a rack in the center. Grease a 9×13-inch baking pan and line it with parchment, leaving a small overhang on the long sides so you can lift the cake out later.
-
In a medium bowl, whisk together the 2 1/2 cups flour, 2 1/2 teaspoons baking powder, and 1/2 teaspoon salt until the mixture looks even and aerated. Set it aside.
Build the Batter: 3. In a large bowl or stand mixer, beat the 1 cup softened butter and 1 3/4 cups granulated sugar on medium speed for 3 to 4 minutes, until the mixture turns pale and fluffy. It should look lighter and feel almost whipped.
-
Add the 4 eggs one at a time, beating well after each addition. Scrape the bowl, then add the 2 teaspoons vanilla extract and 1 to 2 teaspoons pink gel food coloring. The batter should look like a soft blush, not neon.
-
Reduce the mixer to low speed. Add the dry ingredients in three additions, alternating with the 1 cup milk in two additions. Begin and end with the flour mixture. Mix only until the last streak of flour disappears. Do not overmix — the cake needs a fine, tender crumb, not a rubbery one.
Bake and Cool: 6. Pour the batter into the prepared pan and smooth the top with an offset spatula. Bake for 28 to 32 minutes, rotating the pan once halfway through, until the top springs back when lightly pressed and a toothpick inserted in the center comes out with a few moist crumbs.
- Set the pan on a wire rack and let the cake cool in the pan for 15 minutes, then lift it out using the parchment. Cool completely, about 45 to 60 minutes more. The cake must be fully cool before crumbling or the frosting binder will melt into paste.
Whipping the Cream Cheese Frosting Binder
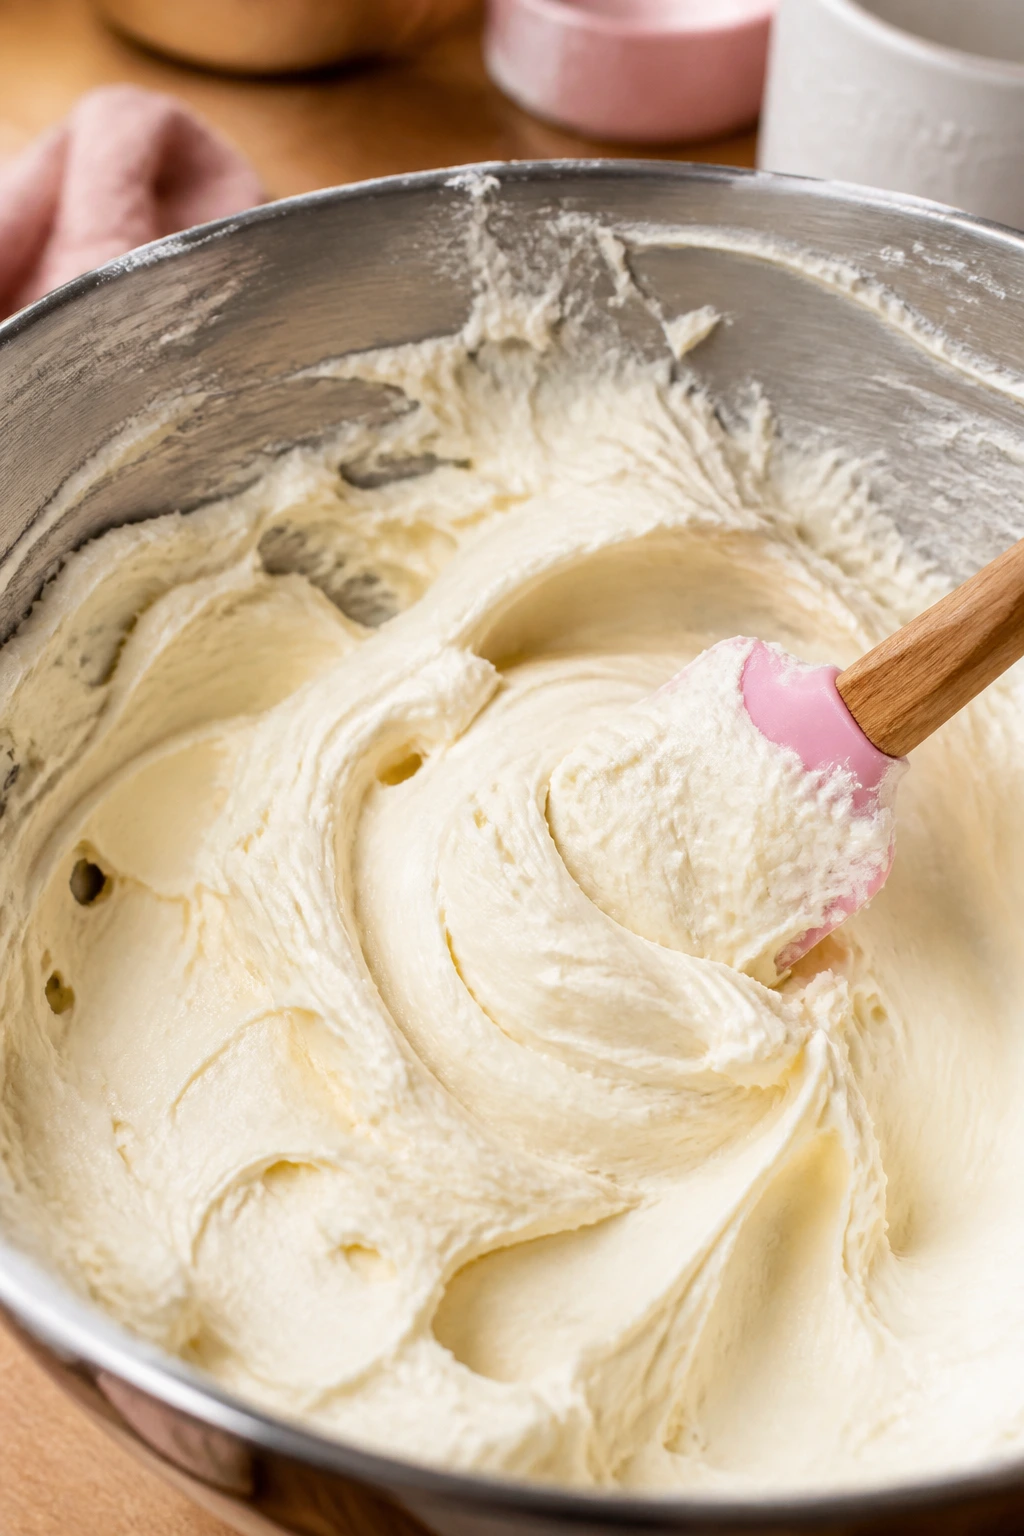
This frosting isn’t meant to sit in a pretty swirl on top of a cake. It’s there to give the crumbs structure and a little tang. That means you want it smooth, thick, and sturdy enough to hold shape when stirred into the cake. Soft is fine. Runny is not.
Make the Binder: 8. In a medium bowl, beat the 6 ounces cream cheese and 3 tablespoons butter on medium speed for about 1 minute, until smooth and lump-free. Add the 2 1/2 cups sifted powdered sugar, 1 teaspoon vanilla, and pinch of salt. Beat on low at first so the sugar doesn’t jump out of the bowl, then increase to medium until the frosting looks thick and spreadable.
- If the frosting looks slack, chill it for 10 minutes before using it. You want a binder that folds into the cake crumbs without making them shiny or sticky.
Crumbling and Mixing the Perfect Pop Dough

Here’s the part people overthink. They try to make the mixture look like exact dough, and then they end up with heavy balls that taste like frosting. The better move is to start with dry crumbs and add the cream cheese frosting slowly. Stop the moment the mixture holds together when squeezed.
Create the Cake Pop Mixture: 10. Break the cooled cake into chunks and place them in a large bowl. Crumble the pieces into fine crumbs with your fingers. If you want a slightly faster pass, pulse the cake in a food processor 5 to 7 times. Stop before it turns into paste; you still want texture.
-
Add 1 cup of the cream cheese frosting to the crumbs and fold with a spatula or clean hands. Add more frosting 1 tablespoon at a time only if the mixture still looks sandy. When it’s ready, it should clump when pressed and roll without cracking, but it should not feel wet or greasy on your palms.
-
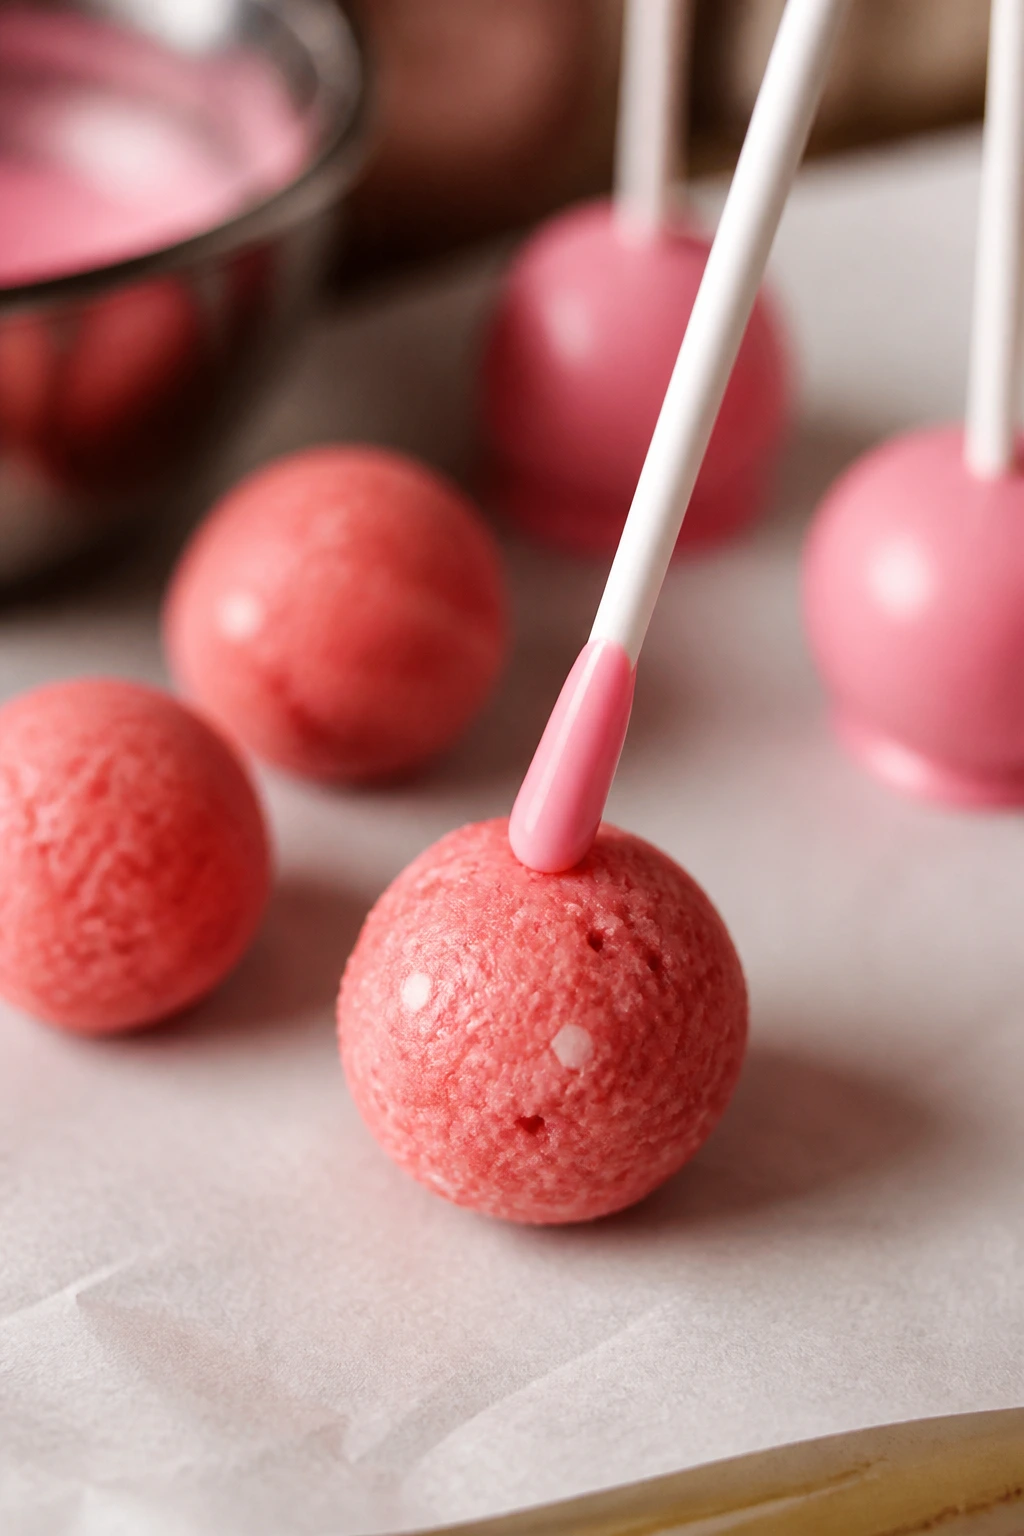
Scoop the mixture into 1 1/2-tablespoon portions and roll each one into a smooth ball. If the surface cracks, warm the dough between your palms for a few seconds and roll again. Line the balls on a parchment-lined baking sheet.
-
Chill the rolled balls for 30 minutes in the refrigerator. They should feel firm on the outside but not frozen hard. This step matters — chilled balls hold their shape when dipped, and the coating grabs them more cleanly.
Rolling, Sticking, and Dipping the Cake Pops
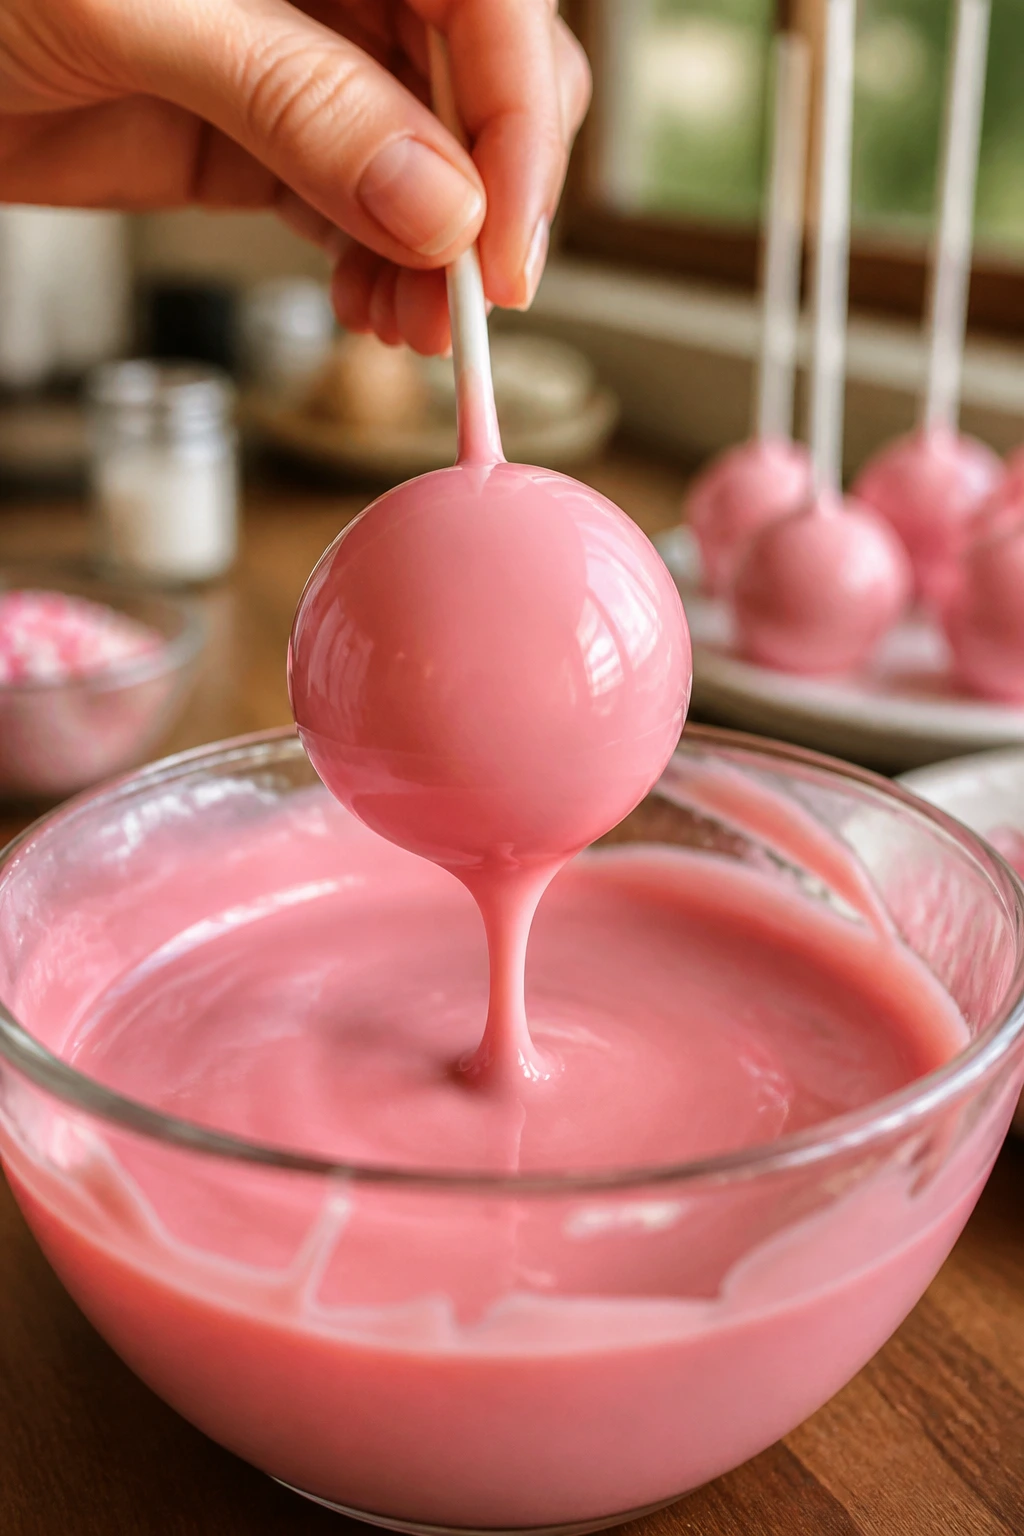
A lot of cake pop trouble comes from temperature mismatch. A cake ball that is too cold can crack the shell. A coating that is too hot can make the pops fall off the stick. You want both sides cooperating, not fighting each other.
Attach the Sticks: 14. Melt about 1 cup of the pink candy melts in a microwave-safe bowl in 20-second bursts, stirring well after each round. Keep going until the coating is almost smooth; a few small lumps will melt out from the residual heat. If needed, stir in 1 teaspoon coconut oil to loosen it.
- Dip the tip of a lollipop stick about 1/2 inch into the melted coating, then insert it halfway into a chilled cake ball. The candy acts like glue. Once all the sticks are inserted, chill the tray for 10 minutes so the connection sets.
Coat the Pops: 16. Rewarm the candy melts if needed, then dip each cake pop straight down into the bowl, submerging the ball to the base of the stick. Lift it out slowly and tap the wrist lightly so the excess coating falls back into the bowl. Do not shake hard — that’s how the coating slides off or forms wrinkles.
- Add sprinkles or sanding sugar immediately while the shell is still wet. Stand the finished pops upright in a foam block, cardboard box, or deep mug filled with sugar or dry rice if that’s what you have. Let them set for 10 to 15 minutes at room temperature, or 5 minutes in the refrigerator if the kitchen is warm.
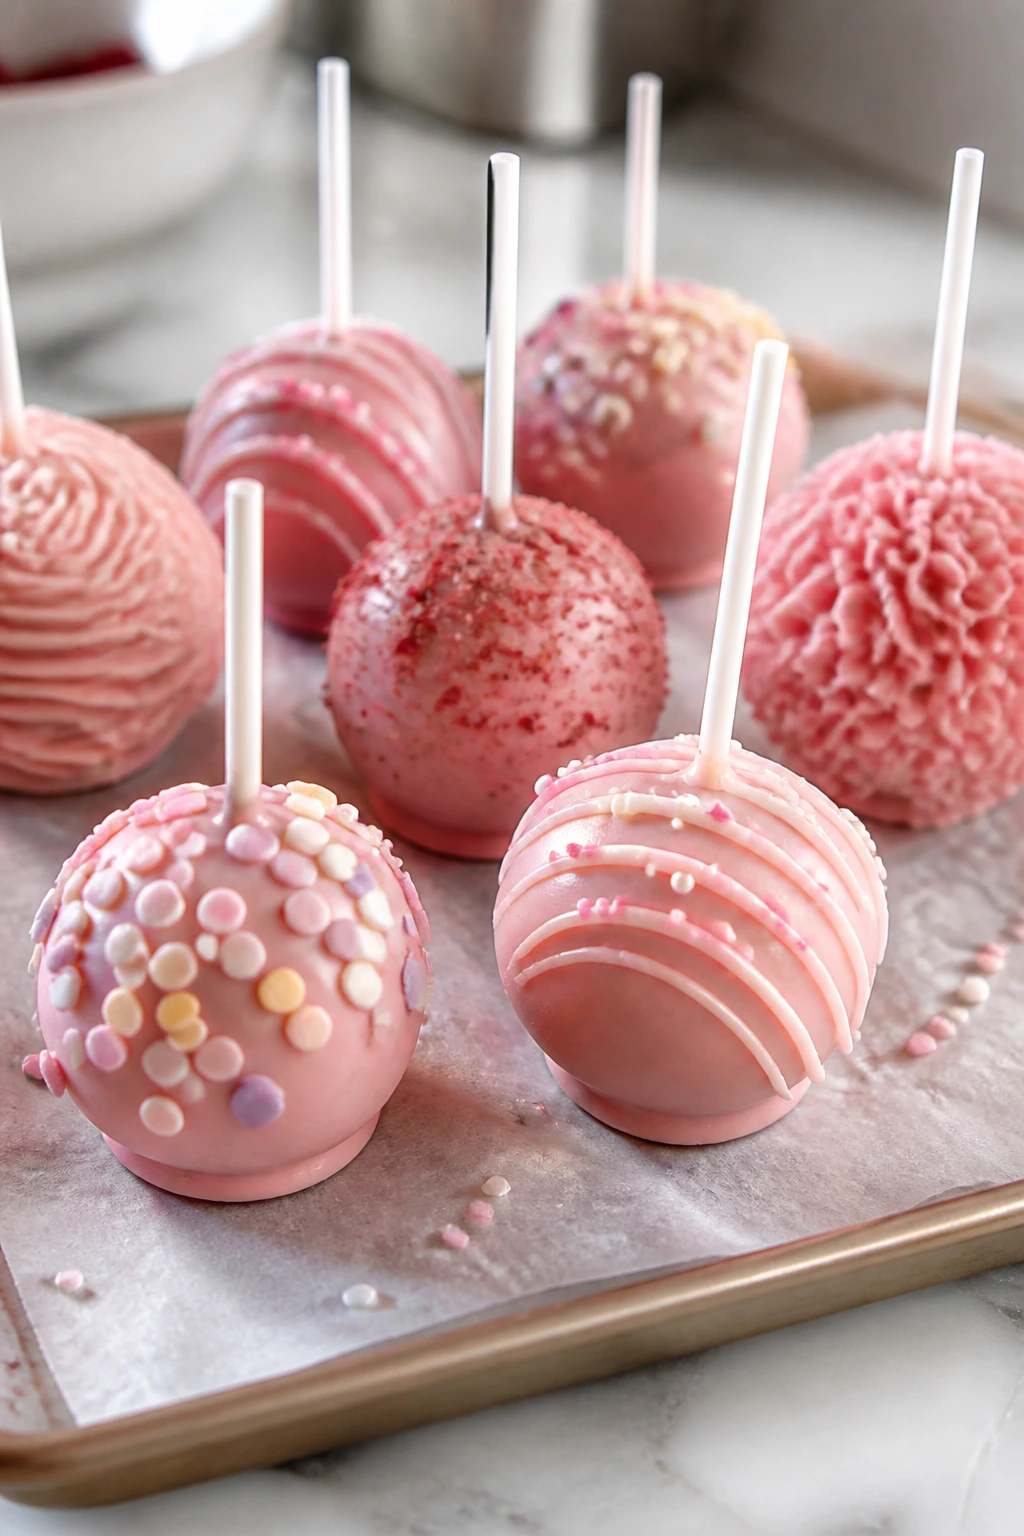
How to Plate Pink Cake Pops Without Fussy Tricks
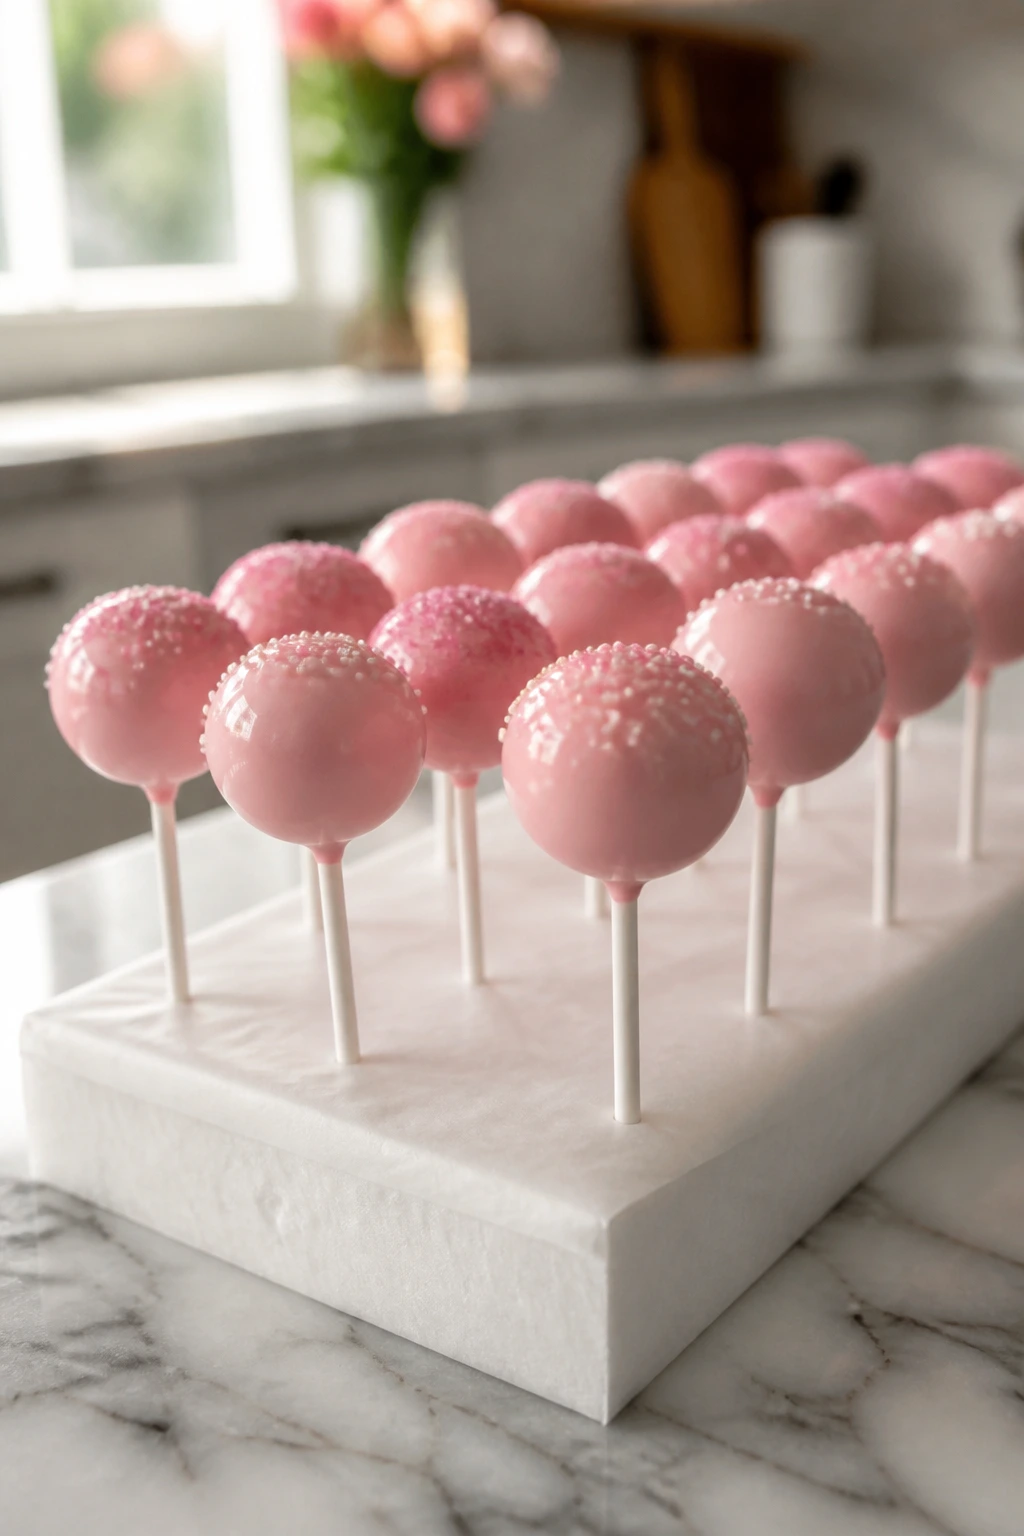
These pops are showy in a way that doesn’t need much help. The color does most of the work. Still, a little thought about how you set them out keeps them from looking like a craft project that wandered onto a dessert tray.
Presentation: Stand the pops upright in a foam block covered with parchment, or cluster them in a tall mug, mason jar, or sugar-filled vase. If you’re serving them on a platter, lay them in a single layer on a parchment-lined tray and keep the sticks pointing the same way. It looks cleaner than a loose pile.
Accompaniments: Keep the sides plain and cool: a bowl of strawberries, a few shortbread cookies, or a scoop of vanilla ice cream if you want a fuller dessert plate. The pops are sweet enough that they don’t need a second sugary thing crowding the plate.
Portions: One cake pop is enough after dinner for most people, especially if the rest of the meal was rich. Two works for a dessert table where people are grazing. If you’re scaling the batch up, make the balls the same size before you even think about the coating; uneven balls are a nuisance to dip.
Beverage Pairing: Strong black coffee, espresso, or plain cold milk are my favorites here. The shell is sweet, the center is creamy, and those drinks keep the whole thing from tipping into cloying territory.
Tiny Moves That Make the Pops Behave
Flavor Enhancement: A small splash of almond extract in the cake batter gives the crumb a bakery-style note that reads as nostalgic instead of loud. If almond isn’t your thing, a tiny pinch of lemon zest in the frosting binder brightens the cream cheese without making the pops taste citrusy.
Time-Saver: Bake the cake a day ahead and let it cool completely before you crumble it. Slightly older cake is easier to break down, and the crumb absorbs the frosting more evenly than a warm or freshly baked cake.
Pro Move: Dip the stick tip in coating before you insert it into the cake ball. That little glue step is one of the few “tricks” that actually earns its keep. It stops the cake from spinning or sliding during dipping.
Serving Suggestions: If you want the tray to look polished, finish half the batch with sanding sugar and half with tiny pastel sprinkles. That gives you texture without asking the same bite to do all the work. A few edible pearls can be pretty, but use them lightly; too many make the shell annoying to bite through.
Make-It-Yours: For a gentler pink, use barely 1 teaspoon of gel color in the cake and let the shell stay the star. For a brighter party tray, deepen the shell color and add a second decoration, like a thin drizzle of contrasting white candy melts.
Common Mistakes to Avoid with This Dish
-
Adding too much frosting to the crumbs: If the mixture feels greasy, sticks to your hands, or leaves a glossy smear on the bowl, it’s over-moistened. Fix it by kneading in more cake crumbs, one tablespoon at a time, until the dough holds together without shining.
-
Dipping ice-cold balls straight into warm coating: A big temperature gap can crack the shell the second the coating sets. Let the chilled cake balls sit out for 5 minutes before dipping so the exterior loses that frosty edge.
-
Overheating the candy melts: When candy melts are cooked too hard, they turn thick, grainy, or almost clay-like. Melt them in short bursts and stop when they still have a few tiny lumps; stirring will finish the job.
-
Forgetting the stick glue step: If you push a dry stick straight into the cake ball, the cake can split or slide off during dipping. Use a little melted coating on the tip first. It’s a small step, but it saves a lot of swearing.
-
Working with wet utensils or damp hands near the coating: Candy melts hate moisture. A few drops of water can make the whole bowl seize, and damp fingers can leave sticky spots on the shell. Dry everything before you begin dipping and keep the work area clean.
Variations That Keep the Pink Theme Interesting
Strawberry Blush Pops: Fold 2 tablespoons freeze-dried strawberry powder into the cake crumbs before you add the frosting, then finish the dipped pops with crushed freeze-dried strawberry bits or pink sanding sugar. The flavor stays light and fruity instead of turning jammy.
Birthday Confetti Pops: Stir 1/4 cup rainbow jimmies into the cake pop mixture after the frosting goes in. Use pastel sprinkles on the outside too, and you get a birthday-cake bite that works on a tray full of children and adults alike.
Lemon Cream Cheese Pops: Add the zest of 1 lemon to the cake batter and a teaspoon of lemon zest to the frosting binder. The shell can stay pink, but the center gets a sharper, cleaner flavor that cuts through the sweetness.
Gluten-Free Pink Pops: Swap the flour for a 1:1 gluten-free baking blend and let the cake cool completely before crumbling. Gluten-free cake can be a little more fragile, so start with a smaller amount of frosting and add only if the crumbs still refuse to hold shape.
Storing, Freezing, and Making Them Ahead
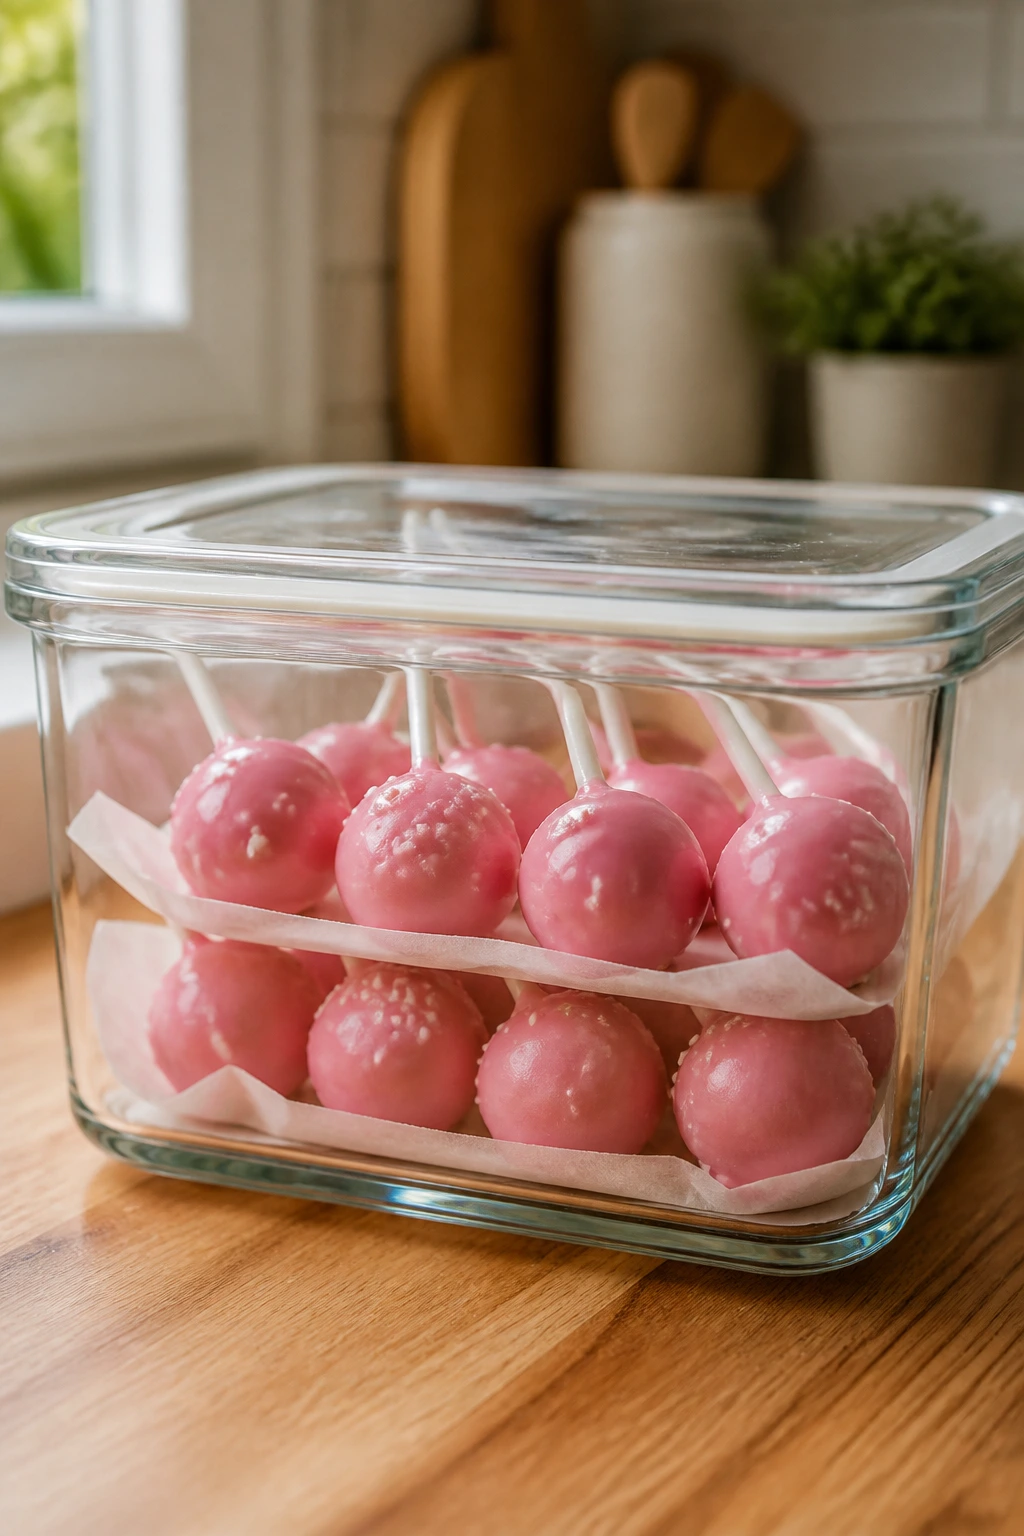
Cake pops keep better than frosted cake, which is one reason I make them when I need a dessert that can sit in the fridge without losing its shape. Still, the cream cheese frosting means you need to think about food safety and moisture, not just sweetness.
Room Temperature: Once dipped, the pops can sit out for up to 2 hours for serving. After that, they should go back into the refrigerator. If the room is warm, shorten that window.
Refrigerator: Store fully set cake pops in an airtight container for 3 to 4 days. Line the container with parchment and keep a sheet between layers if you have to stack them. If the coating has sprinkles or sanding sugar, let it set fully before packing anything on top.
Freezer: The best thing to freeze is the undipped cake balls. Freeze them on a baking sheet until firm, then move them to a freezer bag for up to 2 months. Thaw in the refrigerator before coating. You can freeze fully dipped pops, but the shell may get a slight dull look when it thaws, and condensation can soften the shine.
Make-Ahead: Bake the cake up to 1 day ahead, cool it completely, and wrap it tightly. The frosting binder can be made 2 to 3 days ahead and kept in the refrigerator; let it soften a little before mixing into the crumbs. Rolled balls can chill overnight if they’re sealed well, but I prefer to coat them the same day so the shell stays clean and smooth.
Reheating: Don’t reheat cake pops. Heat softens the coating, loosens the sticks, and can make the cream cheese filling sweat. If they’ve been refrigerated, let them sit at cool room temperature for 15 to 20 minutes before serving.
Frequently Asked Questions
Can I use a boxed cake mix instead of baking the cake from scratch?
Yes, and it’s a practical shortcut if you need to save time. Bake the mix in a 9×13-inch pan, cool it fully, and use a little less frosting than you think at first because boxed cakes can be softer and more moist than homemade ones.
Why do my cake pops crack after dipping?
Cracks usually come from a hot-cold shock: the cake balls are too cold, or the coating is too warm and sets too fast. Let the balls sit for a few minutes after chilling, and make sure the candy melts are just fluid, not steaming hot.
How do I know if I’ve added the right amount of frosting?
Squeeze a spoonful of the mixture in your palm. If it holds its shape and rolls without leaving a greasy sheen, it’s ready. If it slumps or feels wet, add more cake crumbs; if it crumbles, add a teaspoon of frosting at a time.
Can I make these without candy melts?
You can use tempered white chocolate, but the process is less forgiving and the coating can seize if moisture sneaks in. For the easiest path, candy melts are the better choice because they set smoothly and don’t need tempering.
Do cake pops with cream cheese frosting need to stay refrigerated?
Yes. Even though the coating forms a shell, the center still contains cream cheese and butter, so refrigeration is the safe move after they’ve sat out for a short serving window. Keep them covered so they don’t pick up fridge odors.
Why does the coating get too thick while I’m dipping?
Candy melts thicken as they cool. If the bowl starts to drag, rewarm it for 10 to 15 seconds and stir well, or thin it with a tiny bit of coconut oil. Don’t keep microwaving in long blasts; that’s how the coating turns stubborn.
Can I make cake pops without sticks?
Absolutely. Roll the mixture into truffles, dip them the same way, and place them on parchment instead of upright in a holder. They’ll still taste the same, though you lose the classic pop presentation.
A Tray Worth the Fuss
The best part of pink cake pops is the first bite: that crisp shell giving way to a soft, tangy center that tastes like cake instead of leftover crumbs in disguise. Once you get the balance right, the method stops feeling tricky and starts feeling dependable.
Keep the rule simple. Cool cake. Stiff frosting. Gentle coating. Those three pieces do the heavy lifting, and once they’re in line, the rest is just dipping and waiting for the shell to set.
Decadent Pink Cake Pops with Cream Cheese Frosting — Recipe Card
Recipe Name: Decadent Pink Cake Pops with Cream Cheese Frosting
Description: Soft pink vanilla cake is mixed with tangy cream cheese frosting, rolled into bite-size balls, and dipped in a smooth pink candy shell. The center stays plush, the coating sets cleanly, and the finished pops hold up well for parties or gifting.
Prep Time: 35 minutes
Cook Time: 30 minutes
Total Time: 2 hours 20 minutes, including cooling and chilling
Course: Dessert
Cuisine: American
Servings: Makes about 28 to 32 cake pops
Calories: About 190 kcal per cake pop
Ingredients
For the Pink Vanilla Cake:
- 2 1/2 cups all-purpose flour
- 2 1/2 teaspoons baking powder
- 1/2 teaspoon fine salt
- 1 cup unsalted butter, softened to room temperature
- 1 3/4 cups granulated sugar
- 4 large eggs, at room temperature
- 2 teaspoons vanilla extract
- 1 cup whole milk, at room temperature
- 1 to 2 teaspoons pink gel food coloring
For the Cream Cheese Frosting Binder:
- 6 ounces cream cheese, softened to room temperature
- 3 tablespoons unsalted butter, softened to room temperature
- 2 1/2 cups powdered sugar, sifted
- 1 teaspoon vanilla extract
- Pinch of fine salt
For the Coating and Finish:
- 20 ounces pink candy melts
- 1 tablespoon refined coconut oil or vegetable shortening, optional
- 1/3 cup pastel sprinkles or sanding sugar
Instructions
-
Preheat the oven to 350°F (175°C), grease a 9×13-inch baking pan, and line it with parchment paper.
-
Whisk together the flour, baking powder, and salt in a bowl. Set aside.
-
Beat the butter and sugar until pale and fluffy, then add the eggs one at a time, followed by the vanilla and pink gel food coloring.
-
Mix in the dry ingredients and milk in alternating additions, beginning and ending with the dry mixture. Stir only until combined.
-
Bake for 28 to 32 minutes, then cool completely on a wire rack.
-
Beat the cream cheese, butter, powdered sugar, vanilla, and salt until thick and smooth.
-
Crumble the cooled cake, mix in about 1 cup of frosting, and add more only as needed until the mixture holds together when squeezed.
-
Roll the mixture into balls, chill them for 30 minutes, then dip each lollipop stick tip in melted candy coating and insert it into a cake ball. Chill again for 10 minutes.
-
Melt the pink candy melts, dip each cake pop, tap off excess coating, decorate immediately, and let set upright until firm.
Notes: Keep the coating dry, don’t overfill the cake mixture with frosting, and let chilled cake balls sit for a few minutes before dipping to avoid cracks. Store in the refrigerator for 3 to 4 days or freeze the undipped balls for up to 2 months.