
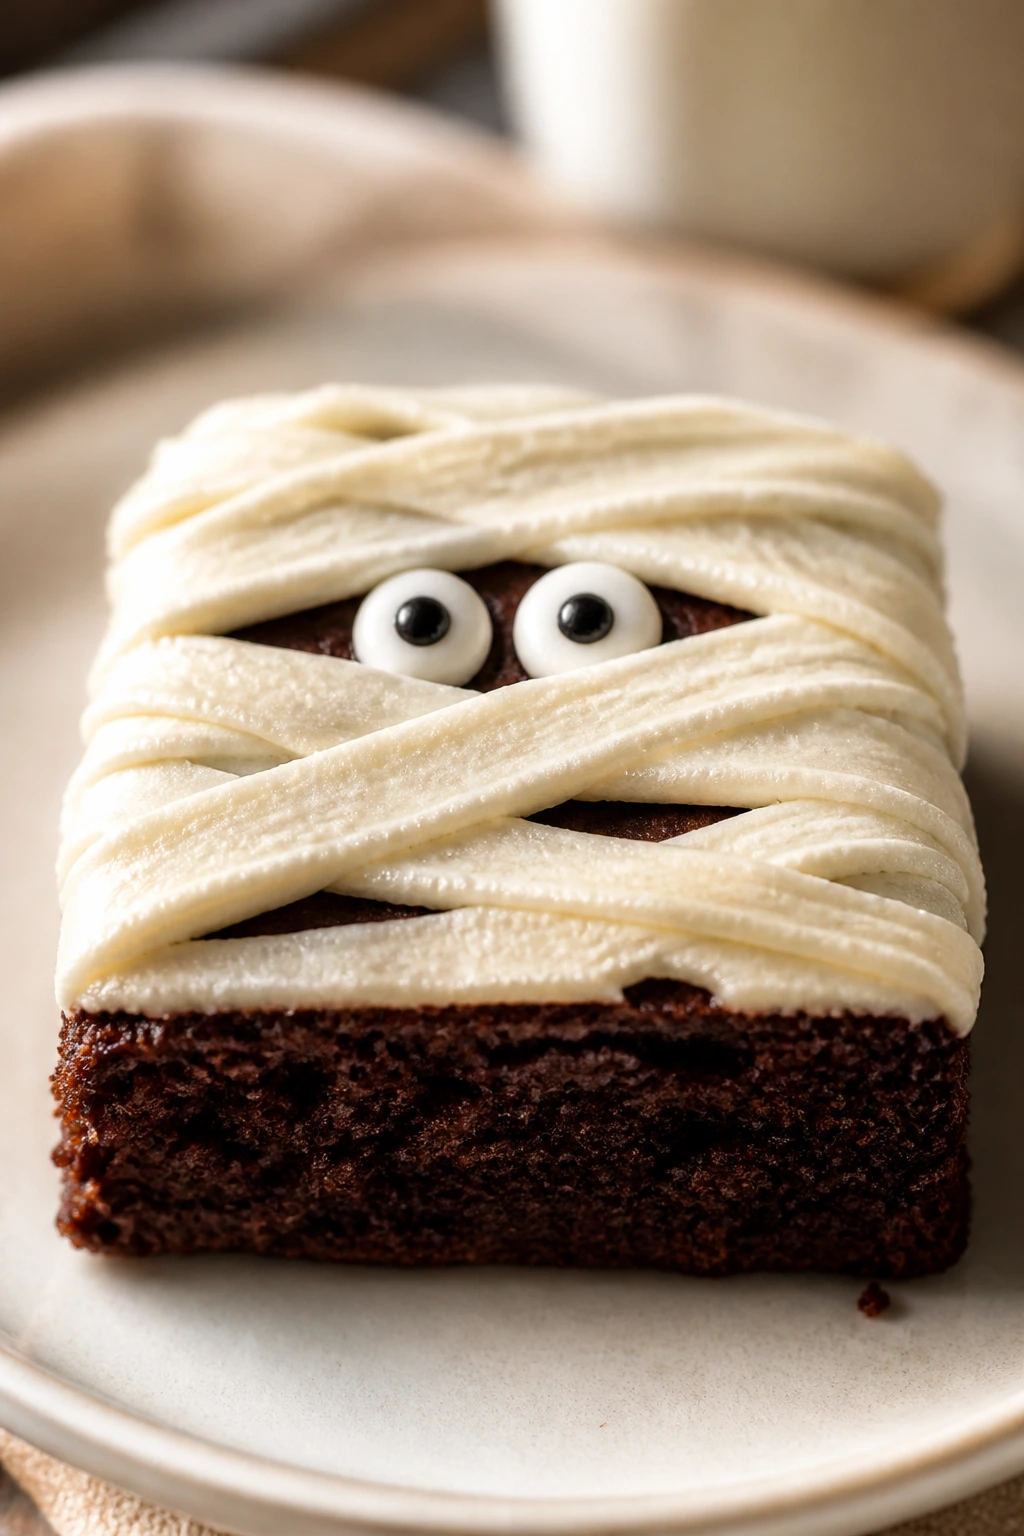
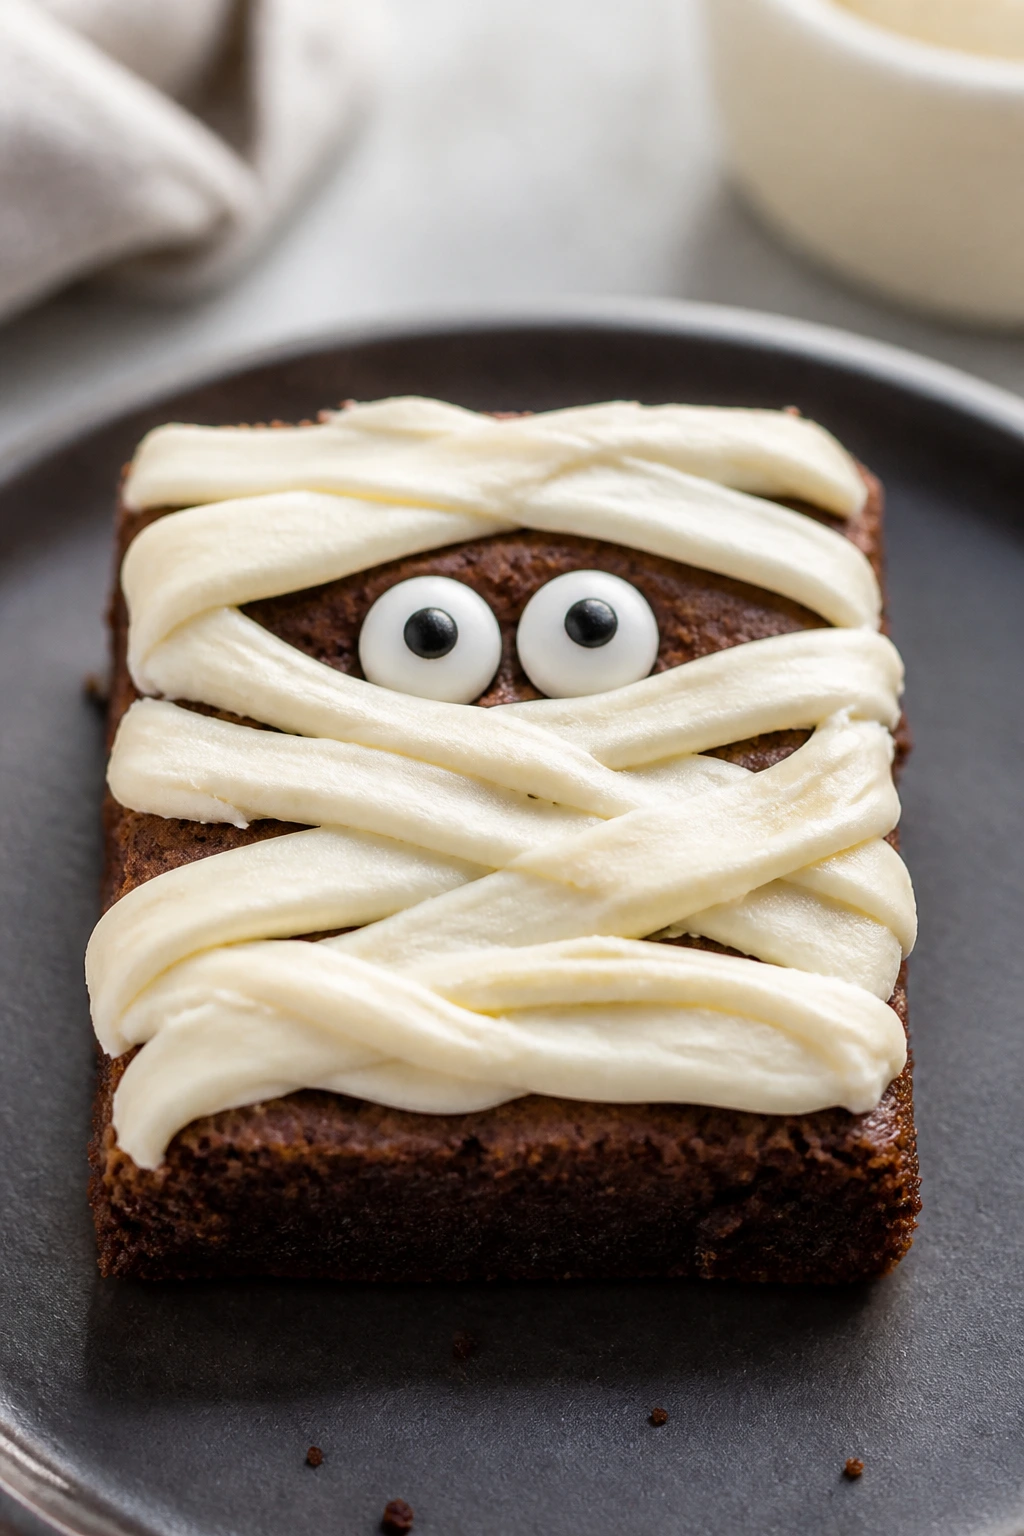
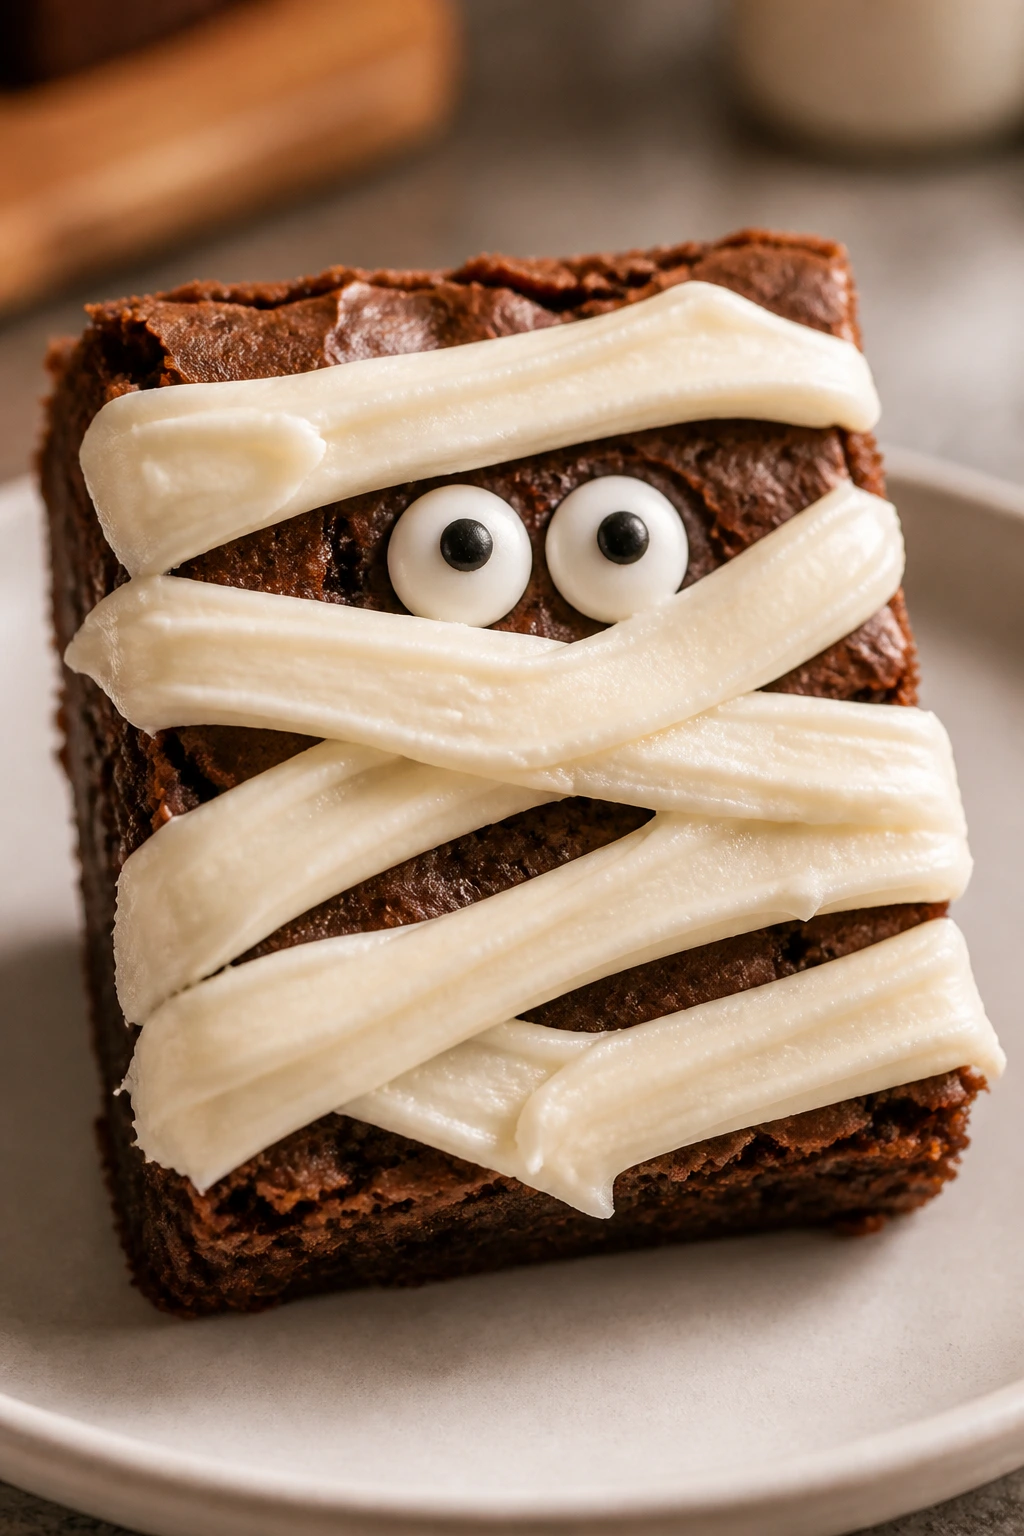
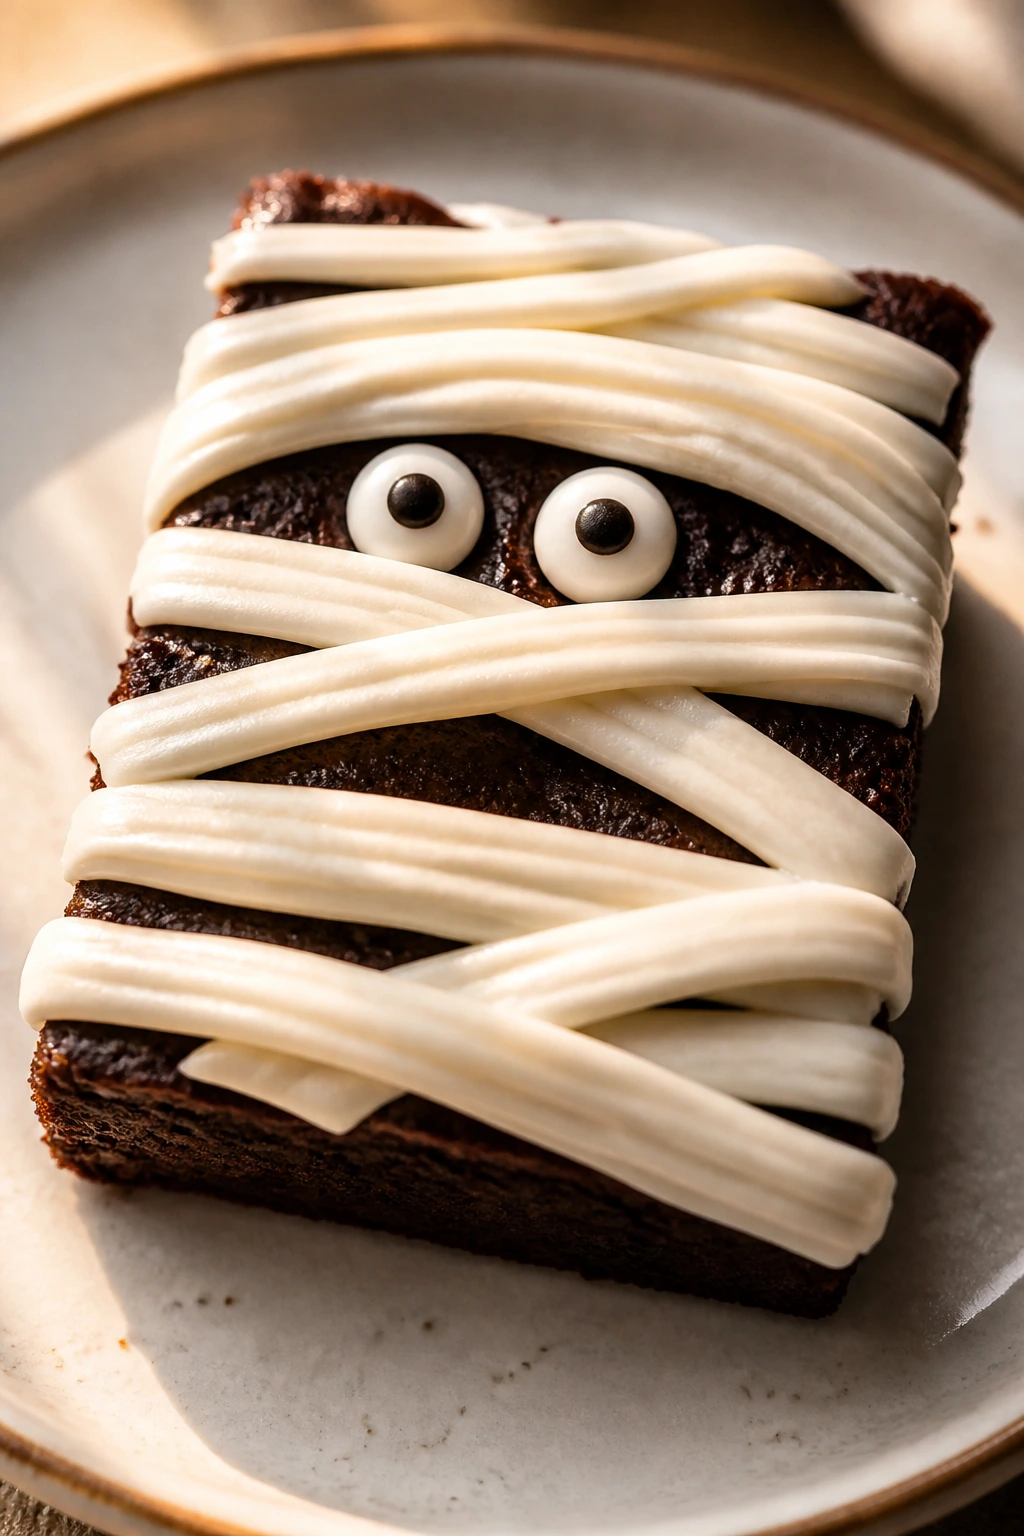
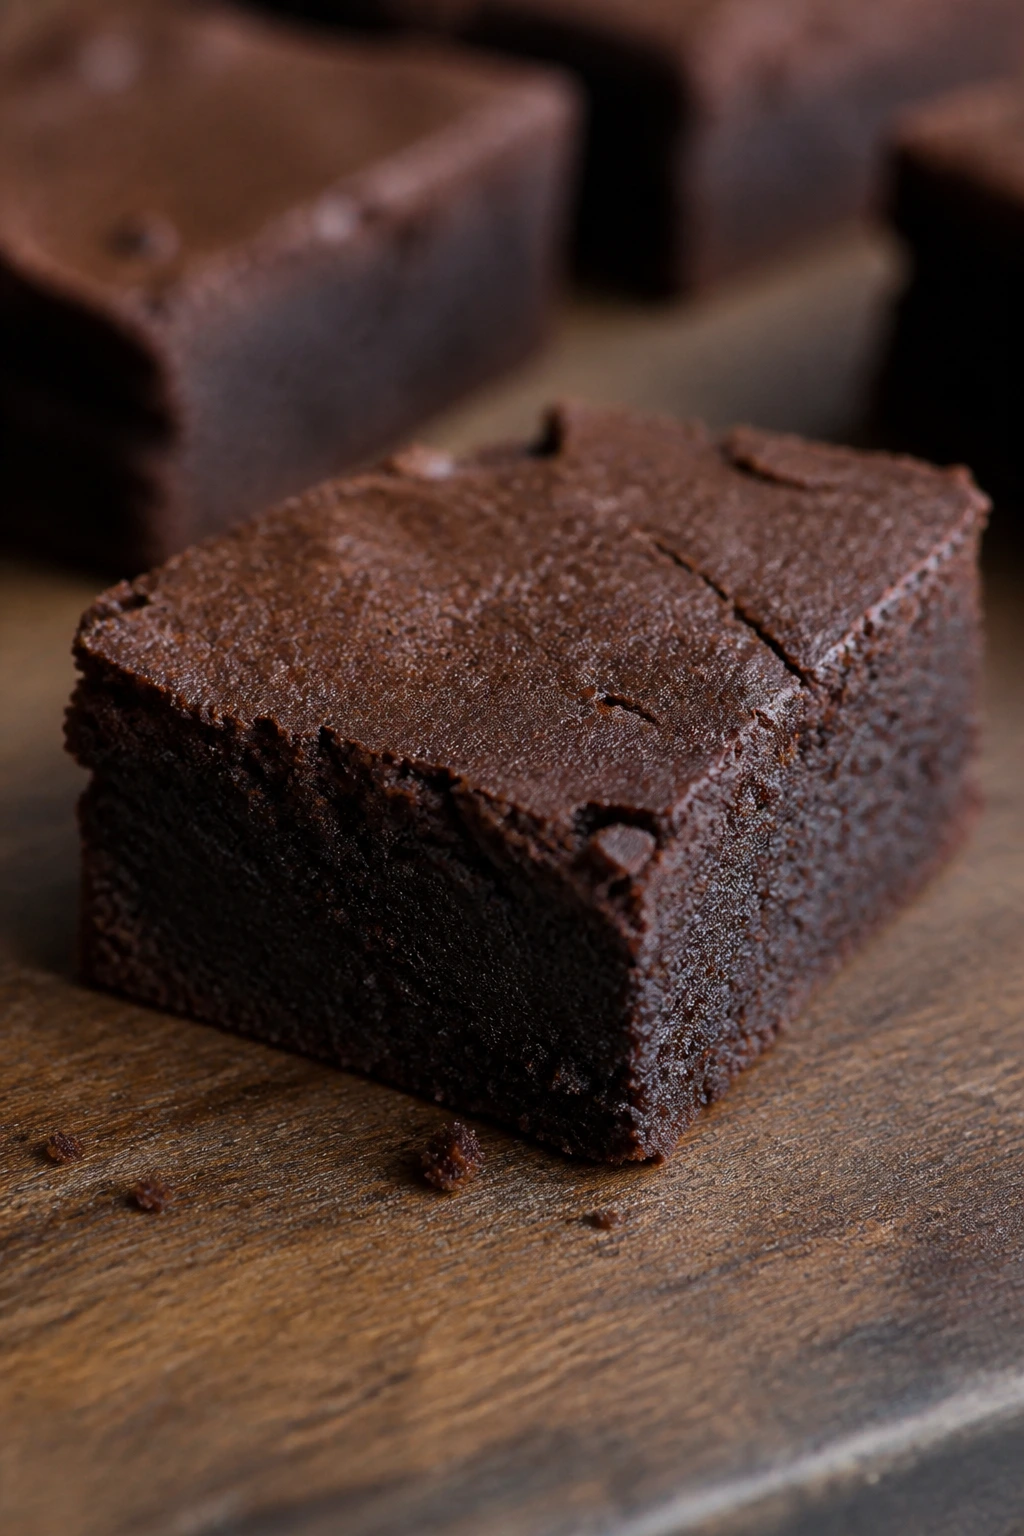
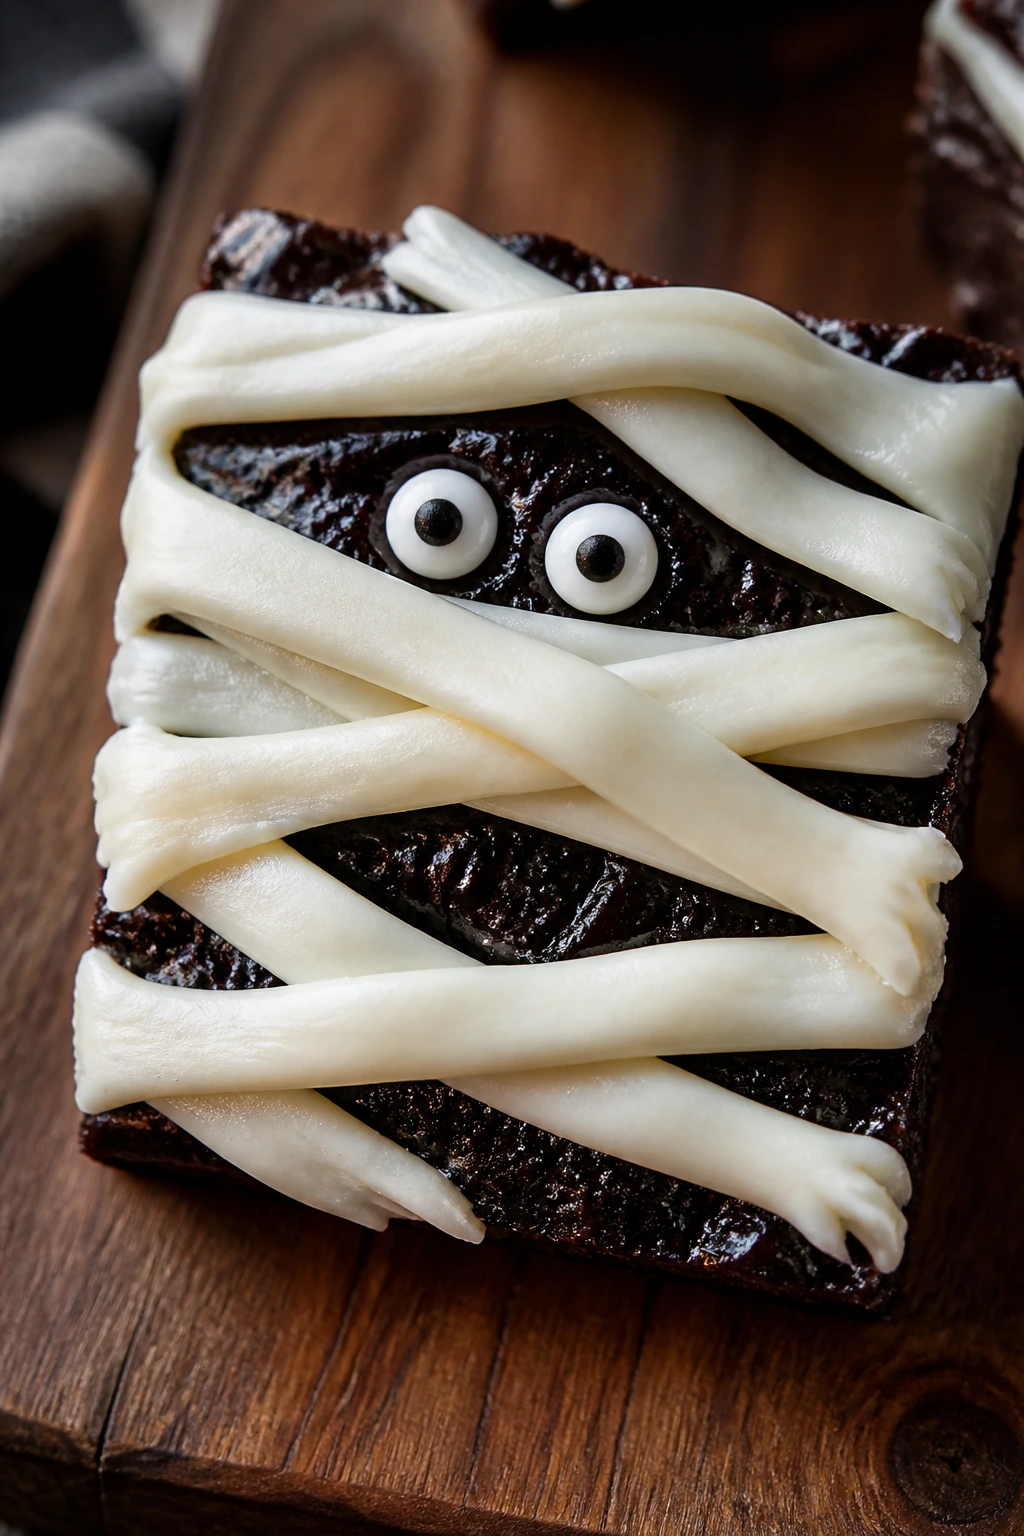
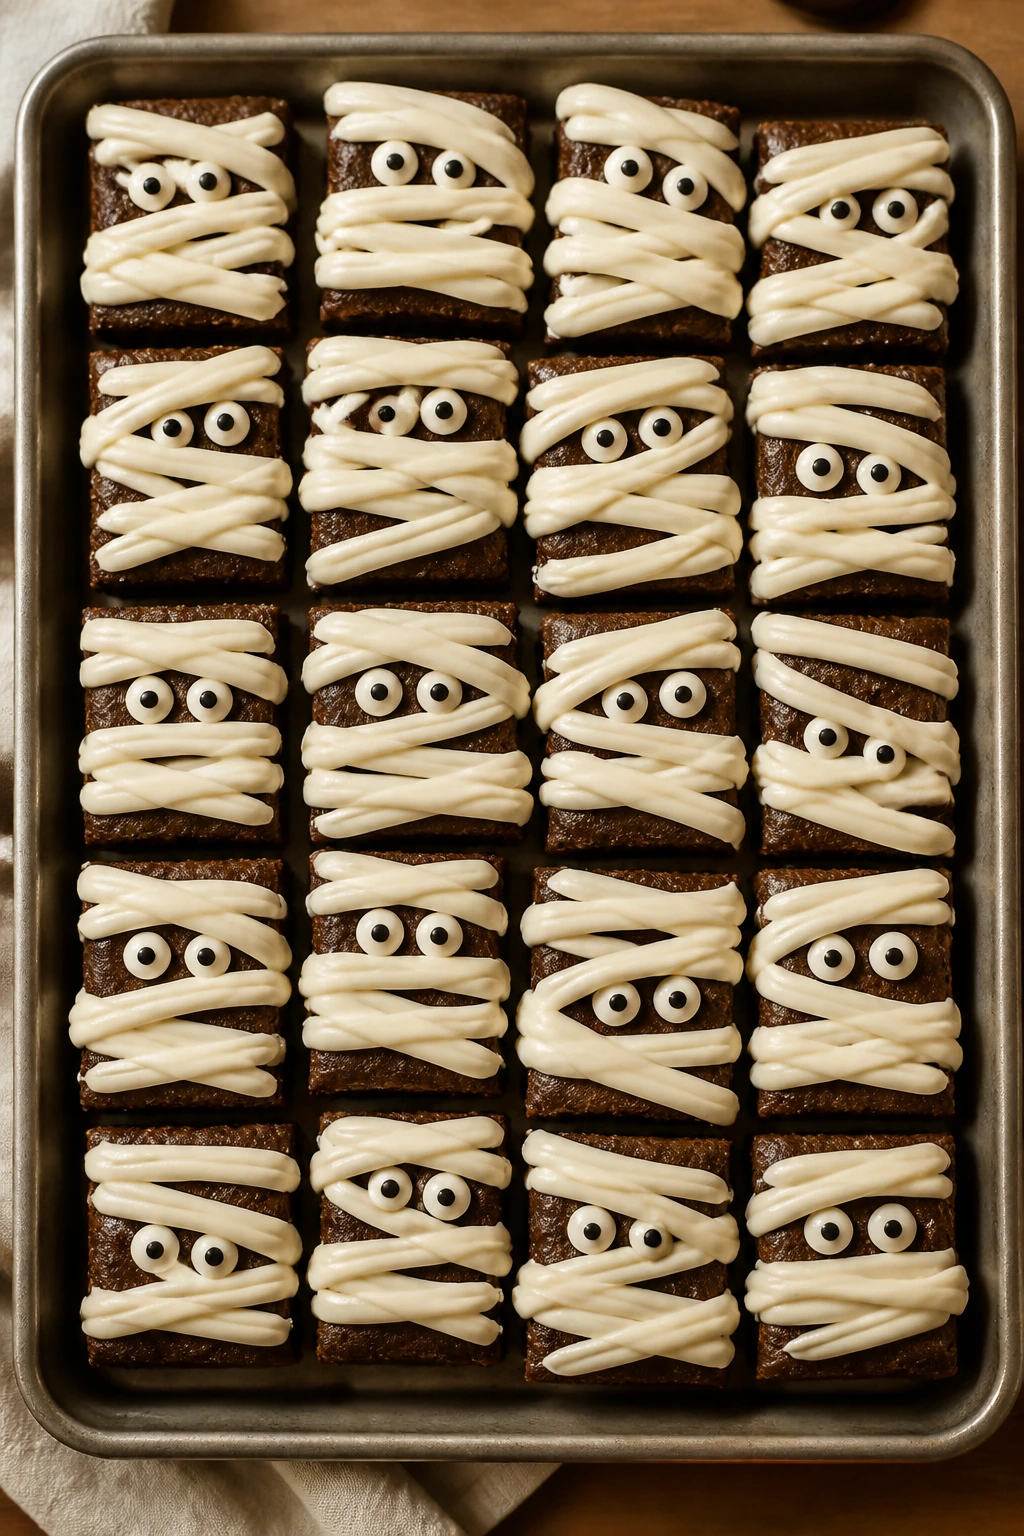
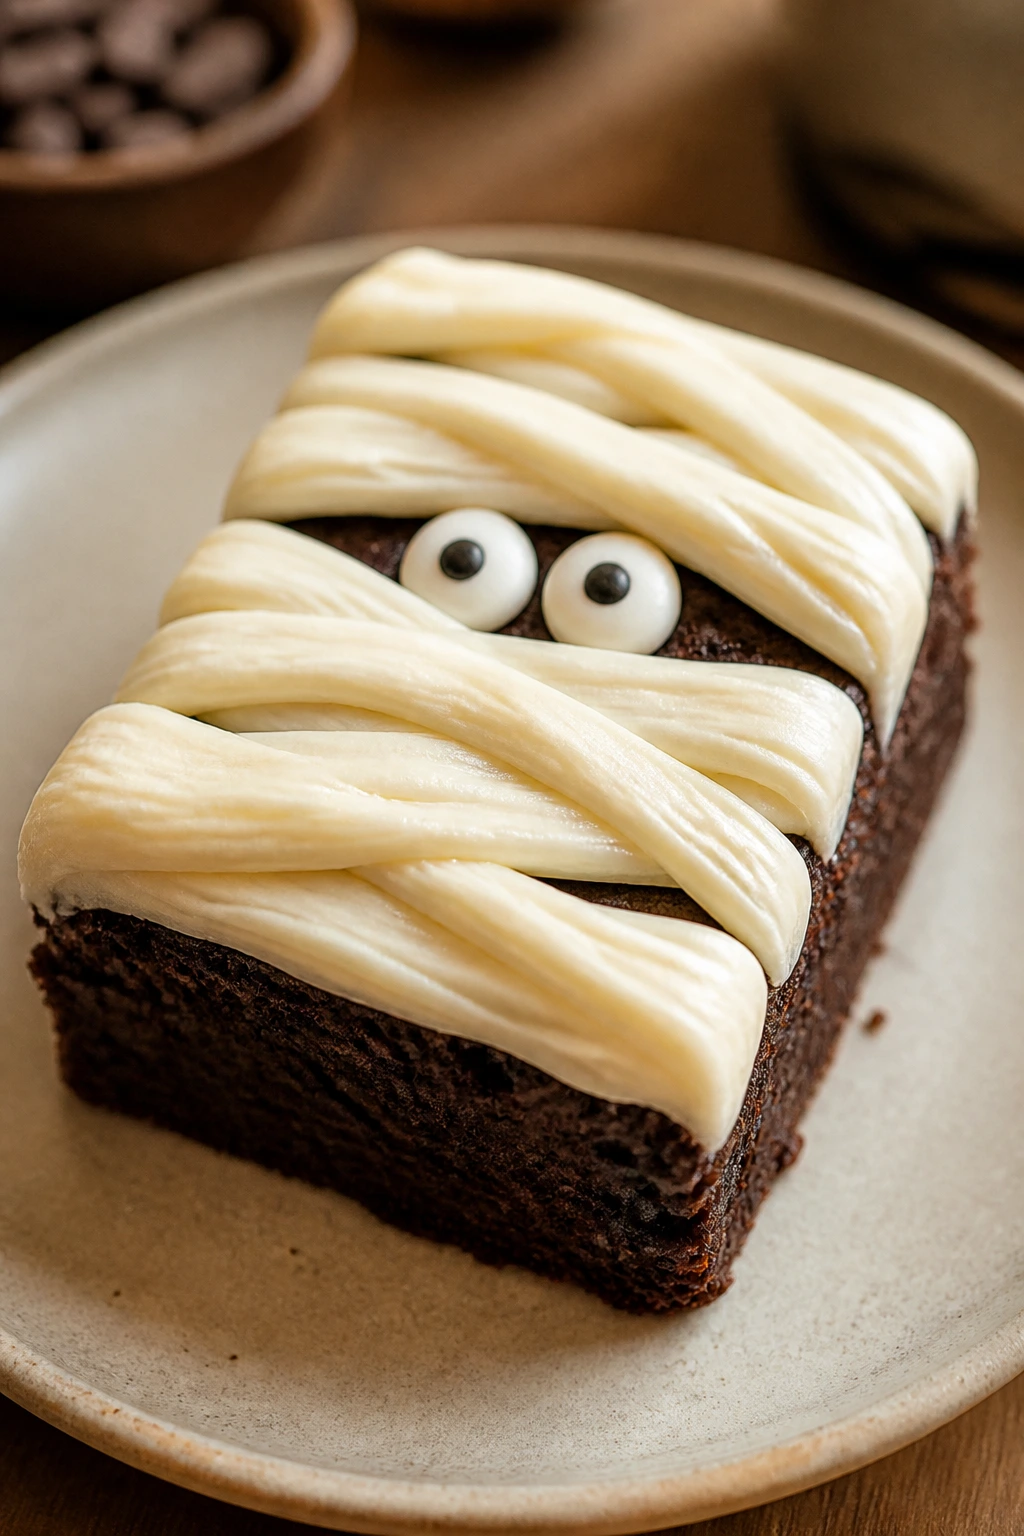
A tray of chocolate squares with crooked white bandages and tiny candy eyes does not need much help to disappear.
Fluffy Brownie Mummies with Cream Cheese Frosting are the kind of dessert that looks playful first and tastes better than it has any right to. The brownie base is soft and chocolatey with a little lift, not the dense, sticky slab that falls apart the second you drag a knife through it. That matters here. You need a crumb that can hold frosting strips without turning into a scoop of crumbs, and you need a top that gives the piping something to cling to.
Cream cheese frosting does the rest of the heavy lifting. Plain buttercream can taste all sugar and no shape against chocolate, but cream cheese brings a cool tang, a bit of salt, and that smooth finish that makes cocoa taste deeper. The result is less “fussy decorated bake sale item” and more “someone knew exactly how to make this look cute and still worth eating.” Which, to me, is the whole point.
Why Brownie Mummies Work on a Dessert Tray
Brownie mummies sit in a sweet spot that cake and cookies never quite reach. You get the clean, cut-table shape of a bar dessert, but the flavor lands richer than a sugar cookie and less fragile than a frosted cupcake. That means they travel well, sit well, and still look good after a little handling.
I also like that the decoration is forgiving. The bandages are supposed to look a little crooked. If one mummy has a wider forehead, if one pair of eyes sits lower than the others, if the frosting line breaks and leaves a little chocolate peeking through — that all reads as deliberate. You are not decorating a wedding cake. You are making brownies with personality.
There’s a practical reason they work so well, too. A brownie that leans slightly cake-like instead of ultra-fudgy holds its shape after cooling and gives the frosting a better surface to grip. That means fewer smears, fewer collapsed corners, and fewer moments where you wonder why the “cute dessert” suddenly looks like a pan of chocolate rubble.
And yes, they’re fun. But they’re also smart. One pan feeds a crowd, the frosting can be made ahead, and the candy eyes do most of the spooky work for you.
Why You’ll Love This Recipe
-
Clean square shape: A 9×13-inch pan cuts into 16 neat bars, which gives each mummy enough surface area for bandage strips without making the pieces too tall or unstable.
-
Balanced chocolate flavor: The brownie batter uses cocoa, vanilla, and a little espresso powder if you want it, so the chocolate tastes fuller instead of flat and sweet.
-
Pipeable frosting: Cream cheese frosting sets up thick enough to form bandages, especially if you chill it for a few minutes before piping.
-
Low-stress decorating: Crooked lines look better than perfect ones here, so you do not need bakery-level piping skills or a steady hand.
-
Party-friendly timing: The brownies can be baked a day ahead, which means the decorating happens after the baking panic is gone.
-
Easy to personalize: You can switch up the eyes, adjust the frosting flavor, or cut the bars smaller if you want more pieces for a dessert table.
Batch Size, Timing, and the Pan That Makes the Shape Work
A 9×13-inch metal pan is the right size for this recipe. It gives you brownies that are thick enough to feel satisfying, but not so thick that the frosting slides into the seams when you cut the squares. Metal bakes more evenly than glass and gives the edges a better chance of setting without drying out the middle.
Here’s the timing block that matters before you start. The brownies need to cool all the way down before they get frosted. If you skip that part, the cream cheese frosting softens, the bandages slump, and the candy eyes start drifting around like they’ve lost their place.
Yield: 16 brownie mummies
Prep Time: 25 minutes
Cook Time: 30 minutes
Total Time: 2 hours 15 minutes, including cooling and frosting set
Difficulty: Intermediate — the mixing is straightforward, but the brownies need to cool fully and the frosting needs to be thick enough to pipe cleanly.
Chill/Rest Time: 1 hour 20 minutes
Best Served: Slightly chilled or at cool room temperature
What Goes Into the Brownie Mummies
The ingredient list is short on purpose. There’s no reason to bury this dessert under a dozen extras when the texture and decoration do most of the talking. The brownies need structure, the frosting needs enough body to hold a line, and the eyes need to stay put.
For the Brownies:
- 1 cup (2 sticks) unsalted butter, melted and cooled for 5 minutes
- 2 cups granulated sugar
- 4 large eggs, room temperature
- 2 teaspoons pure vanilla extract
- 1/2 cup full-fat sour cream, room temperature
- 1 cup all-purpose flour
- 1 cup unsweetened cocoa powder, sifted if lumpy
- 1 teaspoon baking powder
- 1 teaspoon fine salt
- 1/2 teaspoon instant espresso powder, optional
For the Cream Cheese Frosting:
- 8 oz cream cheese, softened to room temperature
- 1/2 cup (1 stick) unsalted butter, softened
- 3 1/2 cups powdered sugar, sifted
- 1 teaspoon pure vanilla extract
- Pinch fine salt
- 2 to 3 tablespoons heavy cream, as needed for piping
For Decorating:
- 24 candy eyeballs or 48 mini chocolate chips
A quick note on the brownie batter: this is not a recipe where you need fancy chocolate chunks or melted bars folded into ribbons. The cocoa is doing the main chocolate job here, and the sour cream and eggs are what make the crumb soft without turning it gummy.
The frosting is equally direct. You want it white, thick, and smooth enough to pipe in ribbons. If it’s loose enough to run off a spoon, it is too loose for mummies.
Why Each Ingredient Pulls Its Weight
Brownie Batter Base
What to use: 1 cup melted unsalted butter, 2 cups granulated sugar, 4 large eggs, 2 teaspoons vanilla, 1/2 cup sour cream, 1 cup flour, 1 cup cocoa powder, 1 teaspoon baking powder, 1 teaspoon salt, and 1/2 teaspoon espresso powder if you want the chocolate deeper.
Preparation: Let the melted butter cool for a few minutes so it does not cook the eggs on contact. Bring the eggs and sour cream to room temperature; cold dairy tightens the batter and can leave you with little lumps that are harder to smooth out.
Substitutions: Plain Greek yogurt works in place of sour cream, and Dutch-process cocoa can stand in for natural cocoa if that’s what you keep in the pantry. You can also skip the espresso powder without changing the structure.
Tips: The sugar helps create that thin crackly top, so do not trim it down much. If you want the brownies to lean more cake-like and less fudgy, the baking powder and sour cream are the two ingredients doing that work.
I know sour cream in brownies sounds like a small detour. It isn’t. It adds moisture without making the batter thin, and that matters when the finished squares need to be firm enough to frost and cut.
Cream Cheese Frosting
What to use: 8 oz full-fat cream cheese, 1/2 cup softened butter, 3 1/2 cups powdered sugar, 1 teaspoon vanilla, a pinch of salt, and 2 to 3 tablespoons heavy cream.
Preparation: Soften the cream cheese and butter before you start; they should press easily with a fingertip, not feel cold in the center. Sift the powdered sugar if it looks clumpy, because little hard sugar bits make piping annoying fast.
Substitutions: If you need a dairy-free version, use a plant-based cream cheese and butter that are designed for baking, not spreading. Thin dairy-free frostings tend to need a little extra powdered sugar to hold a bandage shape.
Tips: Add the heavy cream slowly. One tablespoon too many and the frosting stops being pipeable and starts becoming a soft, glossy mess. You want a frosting that holds a ridge when you drag a spoon through it.
Mummy Decorations
What to use: 24 candy eyeballs or 48 mini chocolate chips.
Preparation: Keep the eyes ready in a small bowl before you start piping, because the frosting sets enough that you will want to place them while the surface is still tacky.
Substitutions: Mini chocolate chips work well if you press them in point-side down. You can also pipe tiny dots with dark frosting if you want a more handmade look.
Tips: Candy eyeballs are easiest on a party tray because they read clearly from across the table. If you use mini chocolate chips, the eyes look best when the pointed ends angle toward the center of the face.
The Tools That Make Decorating Easier
You do not need a pile of special gear, but a few things make this recipe much smoother.
- 9×13-inch metal baking pan — The brownie layer bakes evenly and cuts into neat rectangles; glass works, but it usually needs a few extra minutes.
- Parchment paper — Leave a little overhang on the long sides so you can lift the cooled brownies out in one piece.
- Large mixing bowls — One for dry ingredients, one for the brownie batter, and one for the frosting keeps the process clean.
- Whisk and silicone spatula — A whisk helps create that glossy batter base, while a spatula keeps you from overmixing once the flour goes in.
- Hand mixer or stand mixer — Not mandatory, but it makes the frosting smooth and fluffy much faster than beating by hand.
- Offset spatula or small butter knife — Useful for spreading the frosting thinly across the brownie squares before piping bandages.
- Piping bag with a small round tip, or a zip-top bag with the corner snipped — You need a narrow opening to make ribbon-like strips instead of thick blobs.
- Cooling rack — Lets air circulate under the brownie slab so the bottom does not stay damp.
- Sharp chef’s knife — Clean cuts matter here; a dull blade drags the crumb and ruins the edges.
A bench scraper is nice if you’re cutting the slab into squares all at once. Not required. Still nice.
Mixing the Batter So It Stays Light, Not Leaden
Prep the Pan and Dry Ingredients:
- Preheat the oven to 350°F (175°C) and position a rack in the center of the oven.
- Line a 9×13-inch metal pan with parchment paper, leaving enough overhang on the long sides to lift the brownies out later.
- In a medium bowl, whisk together the flour, cocoa powder, baking powder, salt, and espresso powder, if using. Whisk until the mixture looks even and there are no streaks of cocoa hiding in the corners.
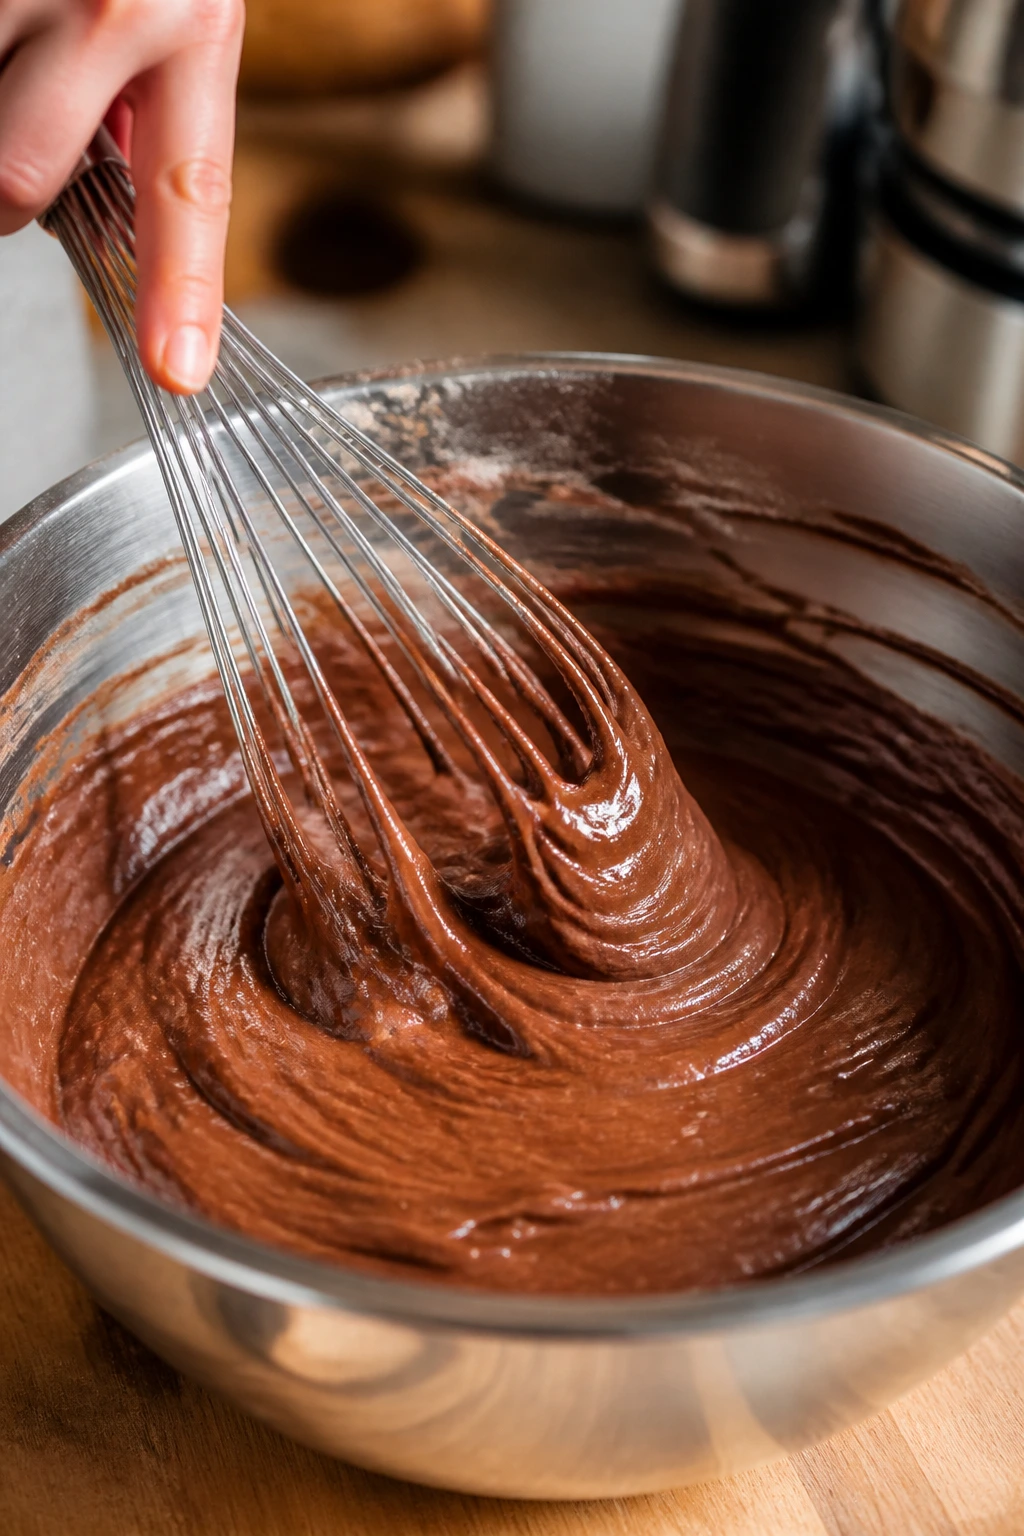
Build the Batter: 4. In a large mixing bowl, whisk the melted butter and sugar together for about 45 seconds, until the mixture looks glossy and a little thicker. Add the eggs one at a time, whisking after each one until the batter looks smoother and slightly lighter. 5. Whisk in the vanilla and sour cream until the batter turns silky. It should look thick, glossy, and a little pale around the edges.
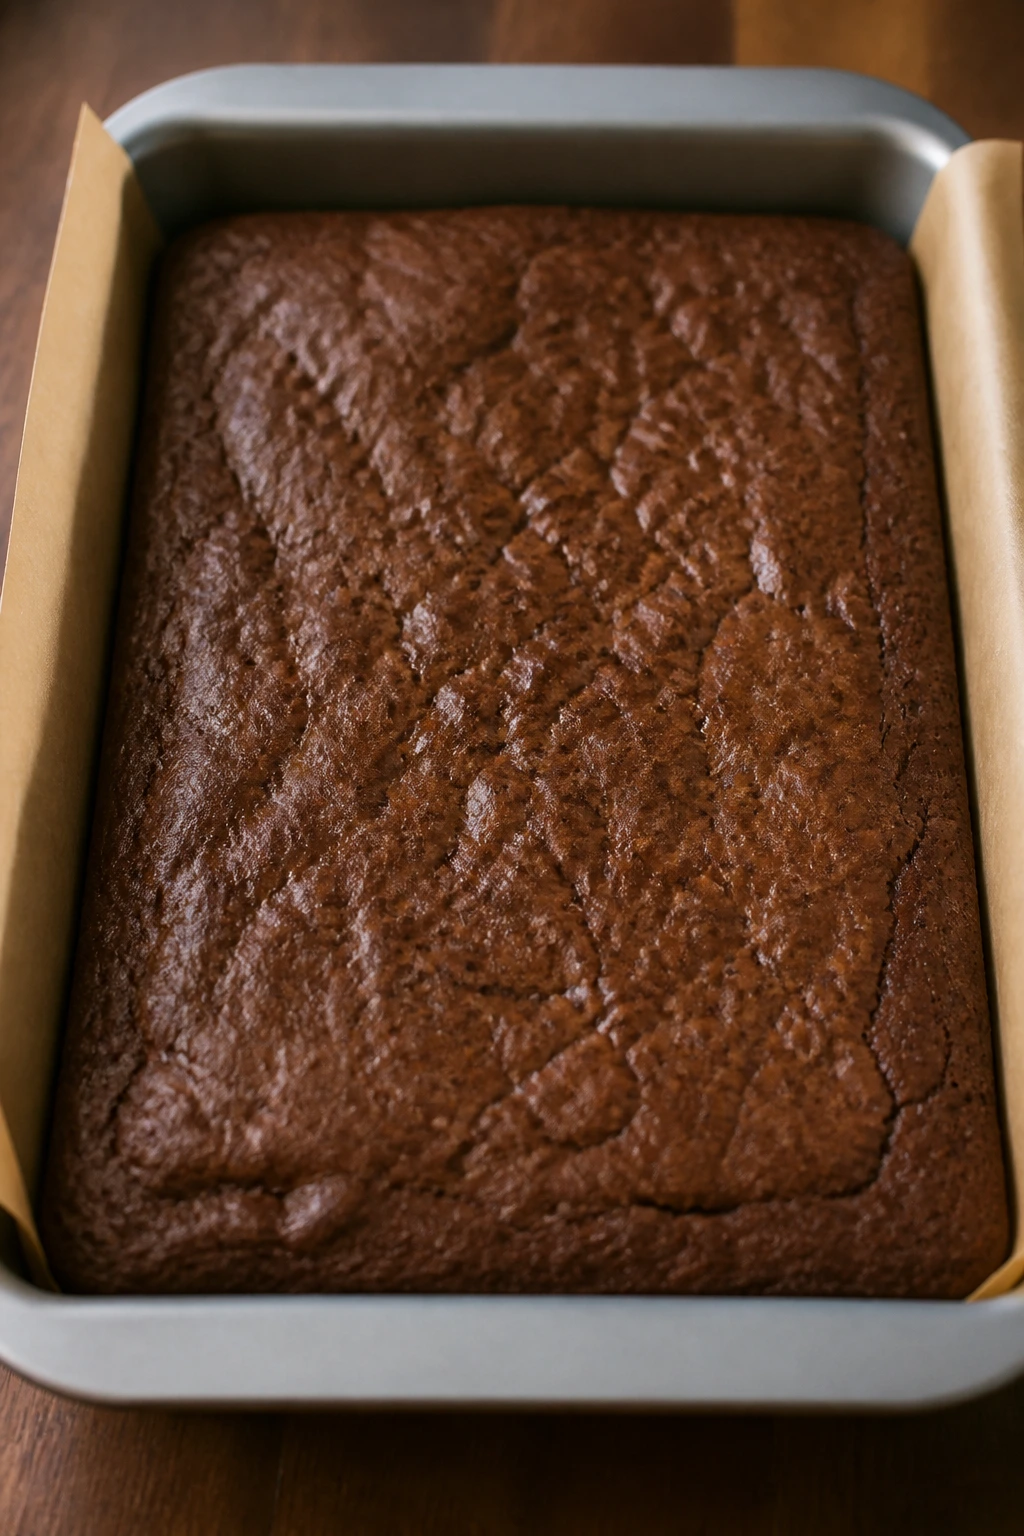
Fold, Don’t Beat: 6. Add the dry ingredients in two additions, folding with a silicone spatula just until the flour disappears. Stop as soon as you no longer see dry streaks. A few tiny cocoa smudges are fine; a beaten, tight batter is not. 7. Spread the batter into the lined pan and nudge it into the corners with an offset spatula or the back of a spoon. The layer should look even, with no big pockets of air trapped under the surface.
A note worth repeating: once the flour goes in, the batter needs a gentle hand. That is the difference between brownies with a light, tender crumb and brownies that bake up chewy in the wrong way.
The sour cream can make the batter look a little thicker than expected. That’s good. Thick batter holds its shape, and shape is half the battle when you’re planning to frost square little mummies.
Baking, Cooling, and Cutting the Slab
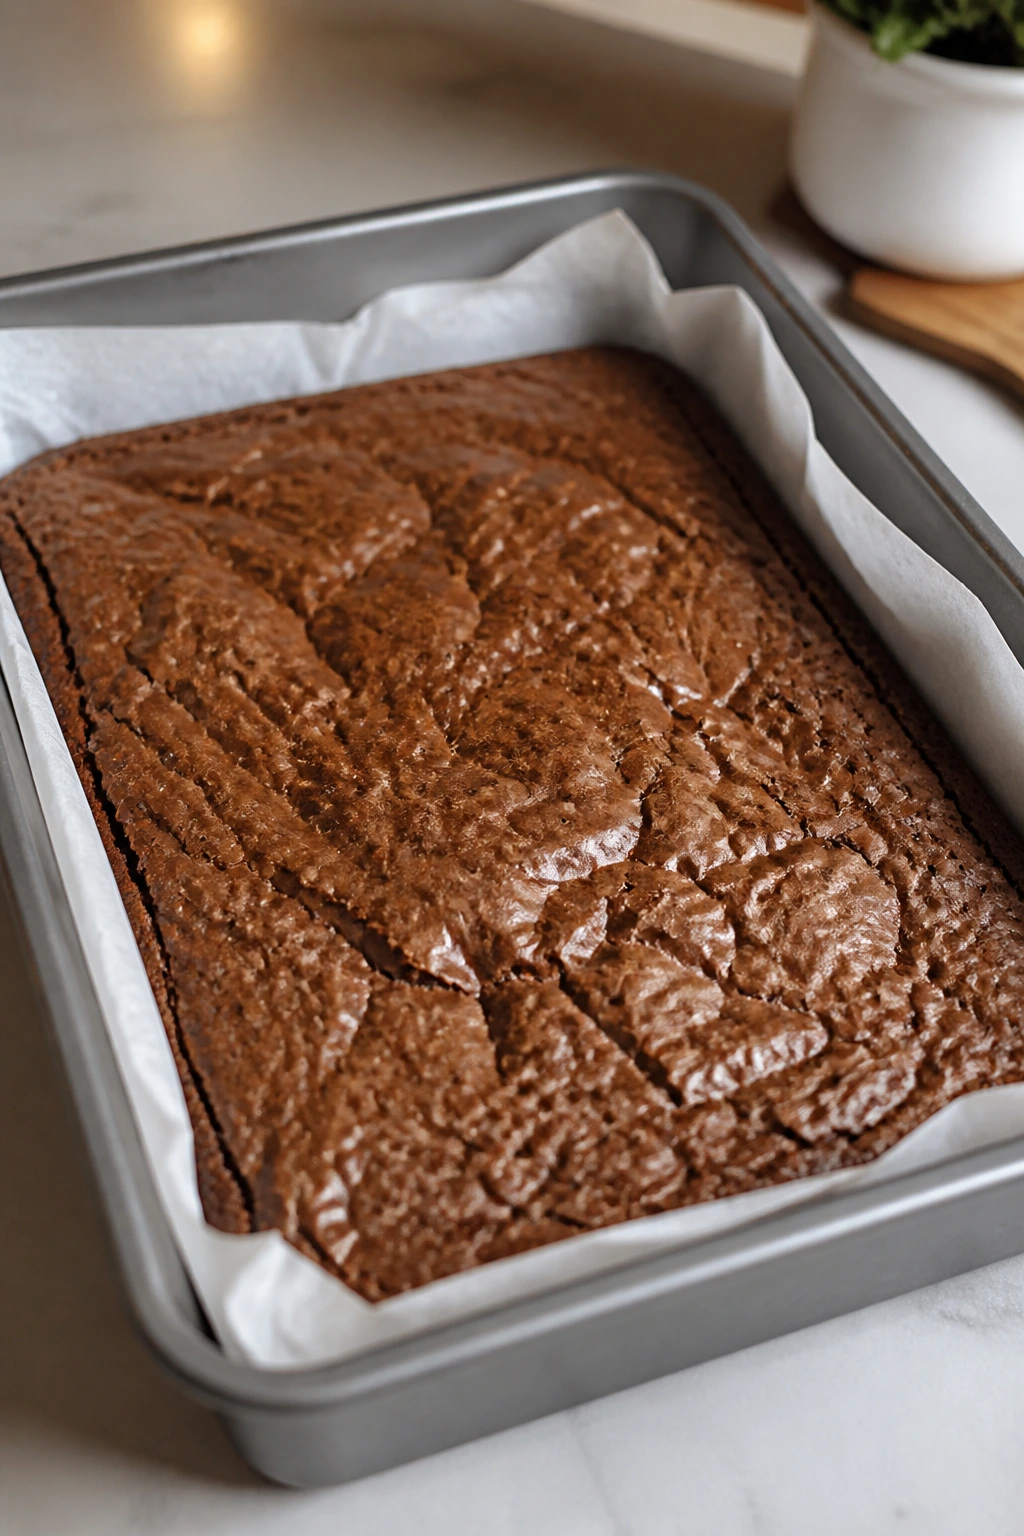
Bake the Brownies: 8. Bake for 28 to 32 minutes, rotating the pan once halfway through if your oven has hot spots. The top should look set and slightly crackly, and a toothpick inserted in the center should come out with moist crumbs, not wet batter. 9. If the middle still sloshes when you gently move the pan, give it 2 more minutes and check again. Do not wait until the toothpick is clean all the way through or the brownies will dry out at the edges.
Cool Completely: 10. Set the pan on a wire rack and let the brownies cool in the pan for 20 minutes. Use the parchment overhang to lift the slab out, then cool it completely on the rack for about 1 hour. The surface should feel fully cool, not even slightly warm. 11. If the slab feels soft when you press the center, chill it for 10 to 15 minutes before cutting. A chilled brownie cuts into sharper squares and gives you cleaner mummy faces.
Cutting them while warm is where people get into trouble. Warm brownies smear, bend, and leave crumbs everywhere. You want the knife to glide through a set slab, not plow through soft chocolate like a shovel.
For the cleanest edges, wipe the blade after every cut. Annoying? Yes. Worth it? Also yes.
Piping the Bandages and Giving the Mummy a Face
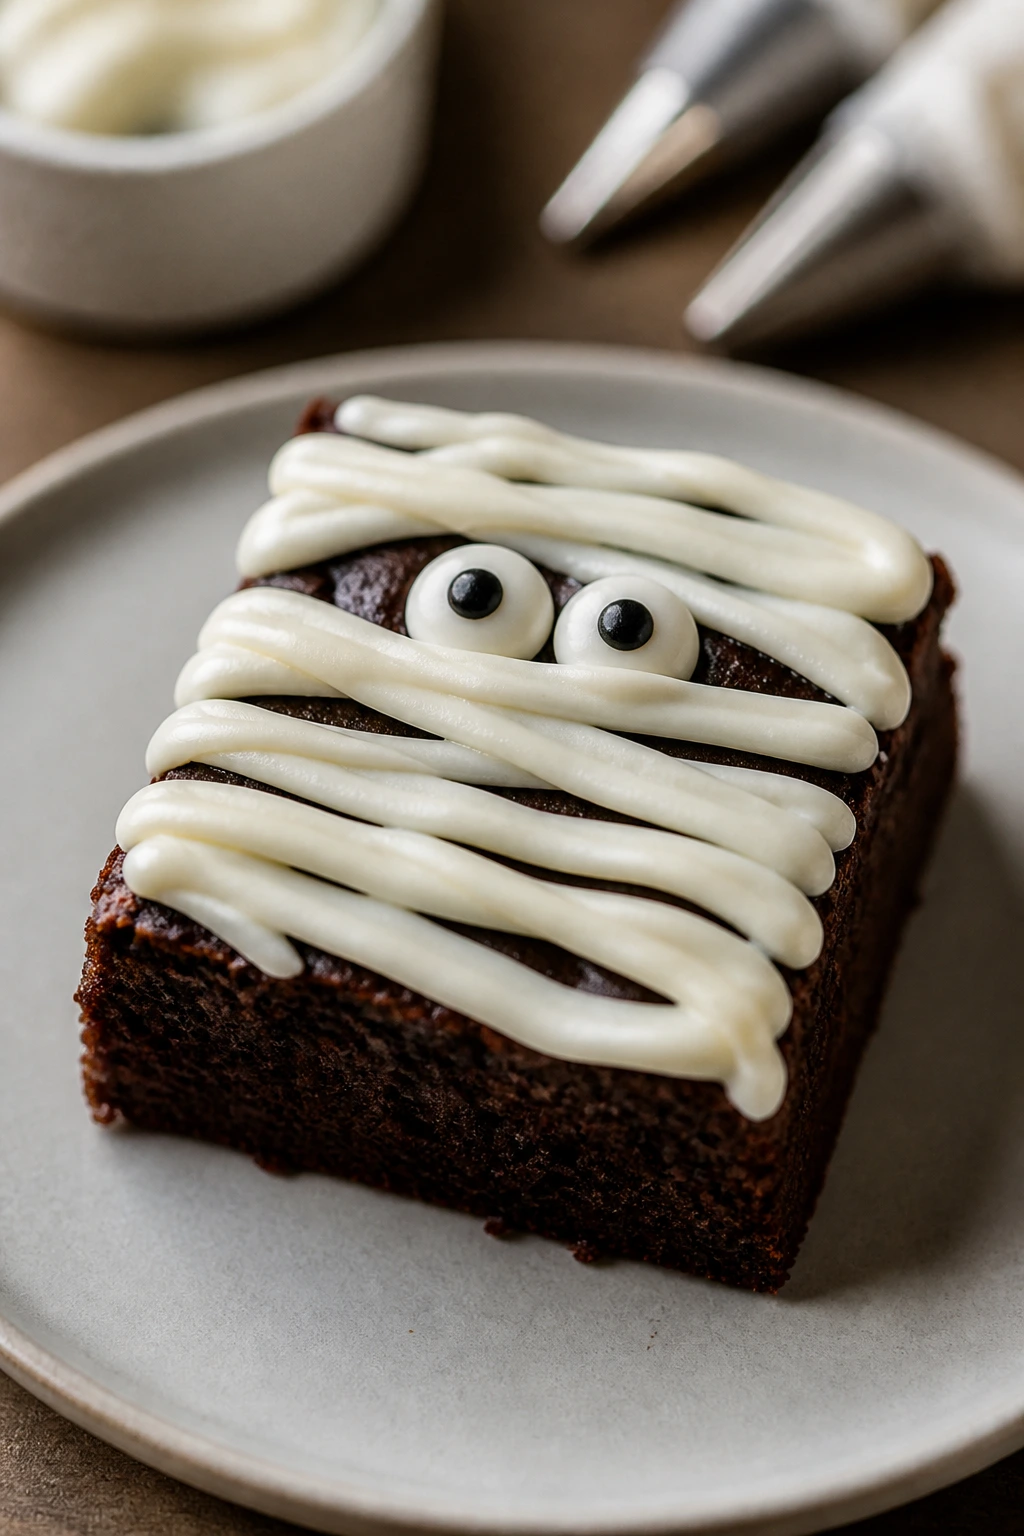
Make the Frosting: 12. In a large bowl, beat the cream cheese and butter together for 1 to 2 minutes, until the mixture is smooth and there are no little lumps of butter hiding in the corners. 13. Add the powdered sugar, vanilla, and salt. Beat on low speed first so the sugar does not dust the kitchen, then increase to medium and beat until the frosting looks fluffy and thick. 14. Add the heavy cream 1 tablespoon at a time until the frosting is pipeable but still holds its shape. You want it soft enough to squeeze from a piping bag, not loose enough to slide around on the brownie.
Decorate the Mummies: 15. Cut the cooled brownies into 16 squares. Spread a very thin layer of frosting on each square if you want a more opaque mummy look, or leave the brownie showing between bandage strips for a darker, more dramatic face. 16. Fill a piping bag fitted with a small round tip, or a zip-top bag with the corner snipped, and pipe 3 to 5 messy strips across the top of each brownie. Leave a narrow gap near the upper third for the eyes. The strips should overlap a little and curve in different directions; straight lines look too tidy for mummies. 17. Press 2 candy eyeballs into each open gap while the frosting is still tacky. If you are using mini chocolate chips, press them point-side down and keep the eyes close together so they read clearly. 18. Chill the finished brownies for 10 to 15 minutes to let the frosting set before serving or stacking in a container.
The best mummy faces are the slightly crooked ones. One bandage that droops a little lower than the rest makes the whole thing look intentional instead of copied from a stencil.
If the frosting starts softening while you decorate, put the bowl in the fridge for 5 minutes and stir again. A short chill beats adding more sugar, which can make the frosting grainy and too sweet.
How to Serve Them at a Party Table

Presentation: Arrange the brownie mummies on a dark platter, a parchment-lined tray, or a simple white board so the frosting stands out. A few scattered chocolate cookie crumbs around the edges look like dirt without turning the plate into a joke.
Accompaniments: Cold milk is the obvious choice, but these also work with hot coffee, hot chocolate, or a bowl of fresh raspberries on the side. The berries cut through the sweetness and keep the plate from feeling heavy.
Portions: One square per person is the standard move, especially if you cut the brownies into 16 pieces from the 9×13 pan. If you are serving dessert alongside other sweets, cut the slab into 20 smaller pieces instead and pipe the mummies a little closer together.
Beverage Pairing: A dark roast coffee brings out the cocoa, while a vanilla milkshake or plain whole milk keeps the frosting from feeling too rich. For an afternoon table, chai is a good match because the spice plays nicely with the cream cheese tang.
If the table is warm, keep half the tray in the fridge and rotate it out as people grab pieces. Cream cheese frosting behaves better when it stays cool.
Practical Tips That Make the Recipe Better

-
Flavor Enhancement: A pinch of flaky salt over the finished brownies gives the frosting a sharper edge and keeps the chocolate from tasting flat. If you like darker chocolate flavor, keep the espresso powder in the batter; it does not make the brownies taste like coffee, it just pulls the cocoa forward.
-
Customization: Swap the plain eyes for mini peanut butter chips, chocolate chips, or little dots of dark frosting if that is what you have. You can also tint a spoonful of frosting with a touch of cocoa and pipe a tiny mouth on one or two mummies for a more cartoonish finish.
-
Serving Suggestions: Put the brownies on the tray after you add the eyes, not before. That sounds obvious, but once the frosting is set, moving them around can smudge the bandages and drag the eyes out of place. A small offset spatula helps if you need to transfer them.
-
Make-It-Yours: For a gluten-free version, use a 1:1 gluten-free flour blend with xanthan gum. For a dairy-free version, use plant-based cream cheese and butter that are meant for baking, not the whipped spread from a tub. For a more grown-up edge, add a tiny pinch more salt and keep the frosting on the thin side so the chocolate stays front and center.
The biggest upgrade of all is restraint. You do not need six decorations and three drizzles here. The mummies look better when the lines are a little rough and the tray is clean.
The Mistakes That Flatten the Look or Dry Out the Crumb
-
Cutting the brownies before they’re fully cool. The symptom is obvious: ragged edges, dragged crumbs, and frosting that slides when you try to pipe. The fix is to cool the slab for the full hour on a rack, then chill it briefly if the center still feels soft.
-
Using tub-style cream cheese. Spreadable cream cheese has more water and less structure, so the frosting turns loose and refuses to hold a bandage shape. Use block cream cheese only, and beat it with the butter until it’s smooth before adding sugar.
-
Overmixing the batter after the flour goes in. You’ll see a tough, tight crumb and a shiny top that turns dry at the edges. Fold the dry ingredients in gently and stop the moment the flour disappears. Brownies are forgiving, but not that forgiving.
-
Overbaking by chasing a clean toothpick. If the tester comes out spotless, the brownies are usually past the sweet spot. Pull them when the center gives moist crumbs and the top looks set, then let carryover heat finish the job.
-
Adding too much heavy cream to the frosting. The bandages sag, the eyes slide, and the frosting smears the second you touch it. Add cream a teaspoon or tablespoon at a time until the frosting pipes smoothly but still holds a ridge.
-
Decorating while the brownies are still warm from the fridge. Cold brownies can make the frosting seize and look streaky. Give them about 15 to 20 minutes at room temperature before serving so the texture softens a little.
The odd thing about this dessert is that the “cute” part depends on a lot of discipline. Cool fully. Pipe thickly. Don’t rush the first cut.
Four Variations Worth Trying
Midnight Espresso Mummies
Add the optional espresso powder and use a dark cocoa if you have it. The brownies taste a little deeper and less sweet, which gives the cream cheese frosting more contrast. This is the version I’d make for adults who usually claim they “don’t like frosting” and then eat two pieces anyway.
Orange Cream Mummies
Stir 1 teaspoon orange zest and 1/4 teaspoon orange extract into the frosting. Chocolate and orange have enough history together that this feels natural, not gimmicky, and the citrus lifts the cream cheese without making it tart.
Gluten-Free Graveyard Squares
Swap the flour for a 1:1 gluten-free baking blend and bake for 2 to 4 minutes less, checking early. The brownies should still come out with moist crumbs on the tester, not wet batter. Gluten-free batters can dry faster at the edges, so keep an eye on the pan instead of the clock alone.
Dairy-Free Draped Mummies
Use plant-based butter, dairy-free cream cheese, and a splash of unsweetened oat milk or dairy-free cream for the frosting. The texture usually needs a longer chill before piping, so give it 10 extra minutes in the fridge if it starts feeling too loose. Flavor-wise, the chocolate base still does most of the work.
If you want one more twist, fold in a handful of toasted chopped pecans. It turns the bars into a little more of a bakery brownie without changing the decoration at all.
Keeping the Brownies Fresh for a Few Days
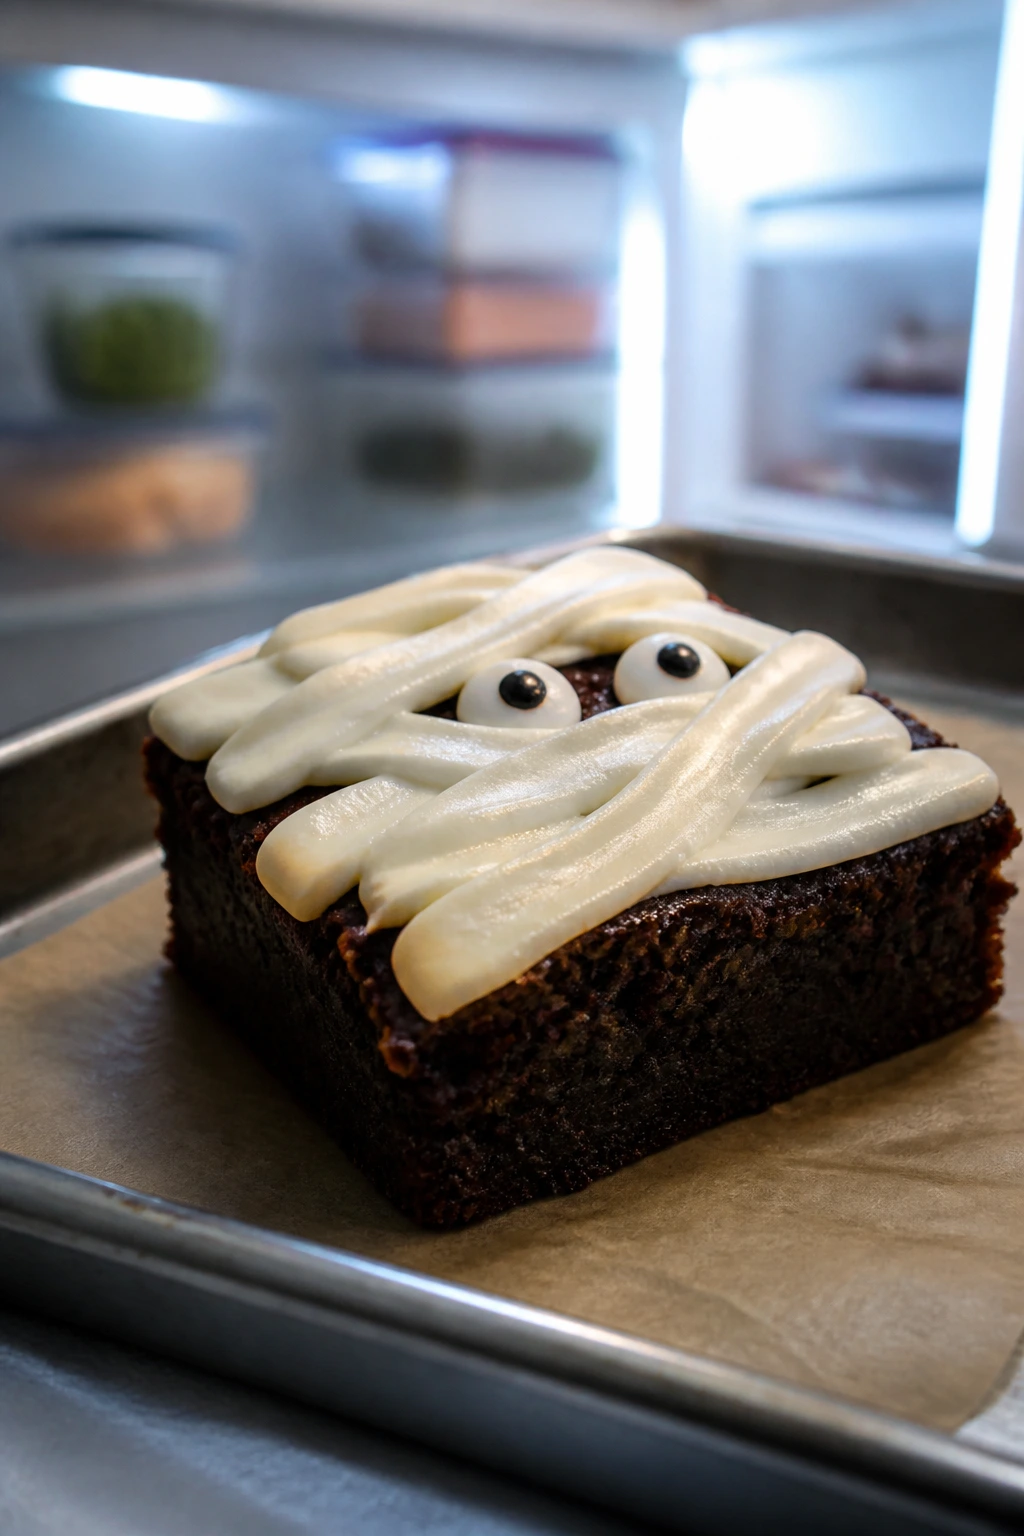
Cream cheese frosting changes the storage rules. These brownies should not sit out on the counter all day, even if the room feels cool. Once they’re frosted, store them in the refrigerator in a single layer or with parchment between layers so the bandages do not smear.
Room temperature: Up to 2 hours is the safe window for serving.
Refrigerator: 4 to 5 days in an airtight container. If the frosting looks firm straight from the fridge, let the brownies sit out for 15 to 20 minutes before serving so the crumb loosens and the chocolate flavor comes forward again.
Freezer: Up to 2 months. For the neatest result, freeze the undecorated brownie squares on a tray until firm, then wrap them tightly and freeze. Thaw overnight in the refrigerator, frost the next day, and add the eyes right before serving.
If you freeze the finished mummy squares, freeze them in a single layer first so the frosting sets hard, then wrap each piece lightly. They thaw fine, but the candy eyes can lose a little shine, which is why I still prefer frosting them after thawing when I can.
Make-ahead: Bake the brownies a day ahead and keep them unfrosted. The frosting can be made up to 2 days ahead and chilled; beat it again for 10 to 15 seconds before piping so it loosens up. If you’re planning a party tray, that split is the easiest way to keep the decorating clean.
Skip the microwave. Warmth makes cream cheese frosting sweat, and sweaty mummy bandages are not cute.
Frequently Asked Questions

Can I use a boxed brownie mix instead of making the batter from scratch?
Yes. Bake the brownie mix in a 9×13-inch pan and let it cool completely before frosting. If the box mix bakes up very fudgy, give it extra cooling time so the top firms enough to pipe on.
Why did my brownies come out cakey instead of soft and light?
That usually means they were overmixed or baked a little too long. The batter should be folded, not whipped once the flour goes in, and the pan should come out when the center still shows moist crumbs on the tester. A dry brownie base makes the frosting feel heavier.
Can I make these in a glass pan?
You can, but glass holds heat longer than metal, so the edges may brown faster. Lower the oven temperature by 25°F and start checking a few minutes early. I still prefer metal here because it gives cleaner edges.
How do I stop the candy eyes from sliding off?
Press them into frosting that is still tacky, or dab the back of each eye with a tiny bit of extra frosting before placing it. If the frosting softens while you work, chill the tray for 5 to 10 minutes and keep decorating.
Can I make the brownies a day ahead?
Absolutely, and I’d almost recommend it. Bake and cool the brownies the day before, cover them tightly, and frost them the next day once the slab has fully set. The texture cuts more cleanly after an overnight rest.
What can I use if I do not have candy eyeballs?
Mini chocolate chips work well, especially if you press them in point-side down. Two dots of dark frosting piped with a tiny round tip also do the job, though they look a little more handmade. That can be a nice look if you want the tray to feel less polished.
Can I cut the recipe in half or double it?
Halving it works fine in an 8×8-inch pan, but the bake time will be shorter and the frosting amount may need a small adjustment. For a double batch, I would use two 9×13 pans rather than one huge pan so the brownies bake evenly and cool faster. A single oversized slab gets awkward when you try to frost and decorate it.
A Tray Worth Reaching For
The nice thing about these brownies is that they do not depend on perfect decoration to work. If the bandages are crooked, they look more like mummies. If the eyes sit a little too close together, they still get a laugh. The whole dessert is built on that idea: a strong chocolate base, a tangy frosting, and a decoration that gets better the messier it looks.
That makes them useful far beyond one spooky table. Keep the brownie recipe and change the face, change the frosting flavor, or leave the top plain and cut the bars for any dessert spread where you want something that disappears fast. Once you’ve made them once, you’ll know the rhythm — cool completely, pipe thickly, and do not fuss with the bandages too much.
Fluffy Brownie Mummies with Cream Cheese Frosting — Recipe Card
Recipe Name: Fluffy Brownie Mummies with Cream Cheese Frosting
Description: Chocolate brownie squares baked in a 9×13-inch pan, topped with tangy cream cheese frosting, and finished with messy bandage strips and candy eyes for a playful dessert that still tastes like a real brownie.
Prep Time: 25 minutes
Cook Time: 30 minutes
Total Time: 2 hours 15 minutes, including cooling and frosting set
Course: Dessert
Cuisine: American
Servings: 16 servings
Calories: About 465 kcal per serving
Ingredients
For the Brownies:
- 1 cup (2 sticks) unsalted butter, melted and cooled 5 minutes
- 2 cups granulated sugar
- 4 large eggs, room temperature
- 2 teaspoons pure vanilla extract
- 1/2 cup full-fat sour cream, room temperature
- 1 cup all-purpose flour
- 1 cup unsweetened cocoa powder, sifted if lumpy
- 1 teaspoon baking powder
- 1 teaspoon fine salt
- 1/2 teaspoon instant espresso powder, optional
For the Cream Cheese Frosting:
- 8 oz cream cheese, softened
- 1/2 cup (1 stick) unsalted butter, softened
- 3 1/2 cups powdered sugar, sifted
- 1 teaspoon pure vanilla extract
- Pinch fine salt
- 2 to 3 tablespoons heavy cream, as needed for piping
For Decorating:
- 24 candy eyeballs or 48 mini chocolate chips
Instructions
- Preheat the oven to 350°F (175°C) and line a 9×13-inch metal pan with parchment paper, leaving overhang on the long sides.
- Whisk together the flour, cocoa powder, baking powder, salt, and espresso powder, if using.
- Whisk the melted butter and sugar until glossy, then whisk in the eggs one at a time, followed by the vanilla and sour cream.
- Fold the dry ingredients into the wet ingredients until no flour streaks remain, then spread the batter evenly in the pan.
- Bake for 28 to 32 minutes until the top is set and a toothpick comes out with moist crumbs.
- Cool in the pan for 20 minutes, then lift out and cool completely on a rack for about 1 hour.
- Beat the cream cheese and butter until smooth, then add the powdered sugar, vanilla, salt, and heavy cream until the frosting is thick and pipeable.
- Cut the brownies into 16 squares, pipe messy bandage strips on top, add eyes, and chill for 10 to 15 minutes before serving.
Notes: Use full-fat block cream cheese for the best piping texture. If the frosting gets too soft, chill it for 10 minutes and beat again briefly. For the cleanest squares, wipe the knife between cuts.