
Chicken can turn on you fast. One minute it’s glossy and promising in the pan, the next it’s leathery at the edges and dry in the middle, and nobody wants to eat a sad piece of poultry after a long day.
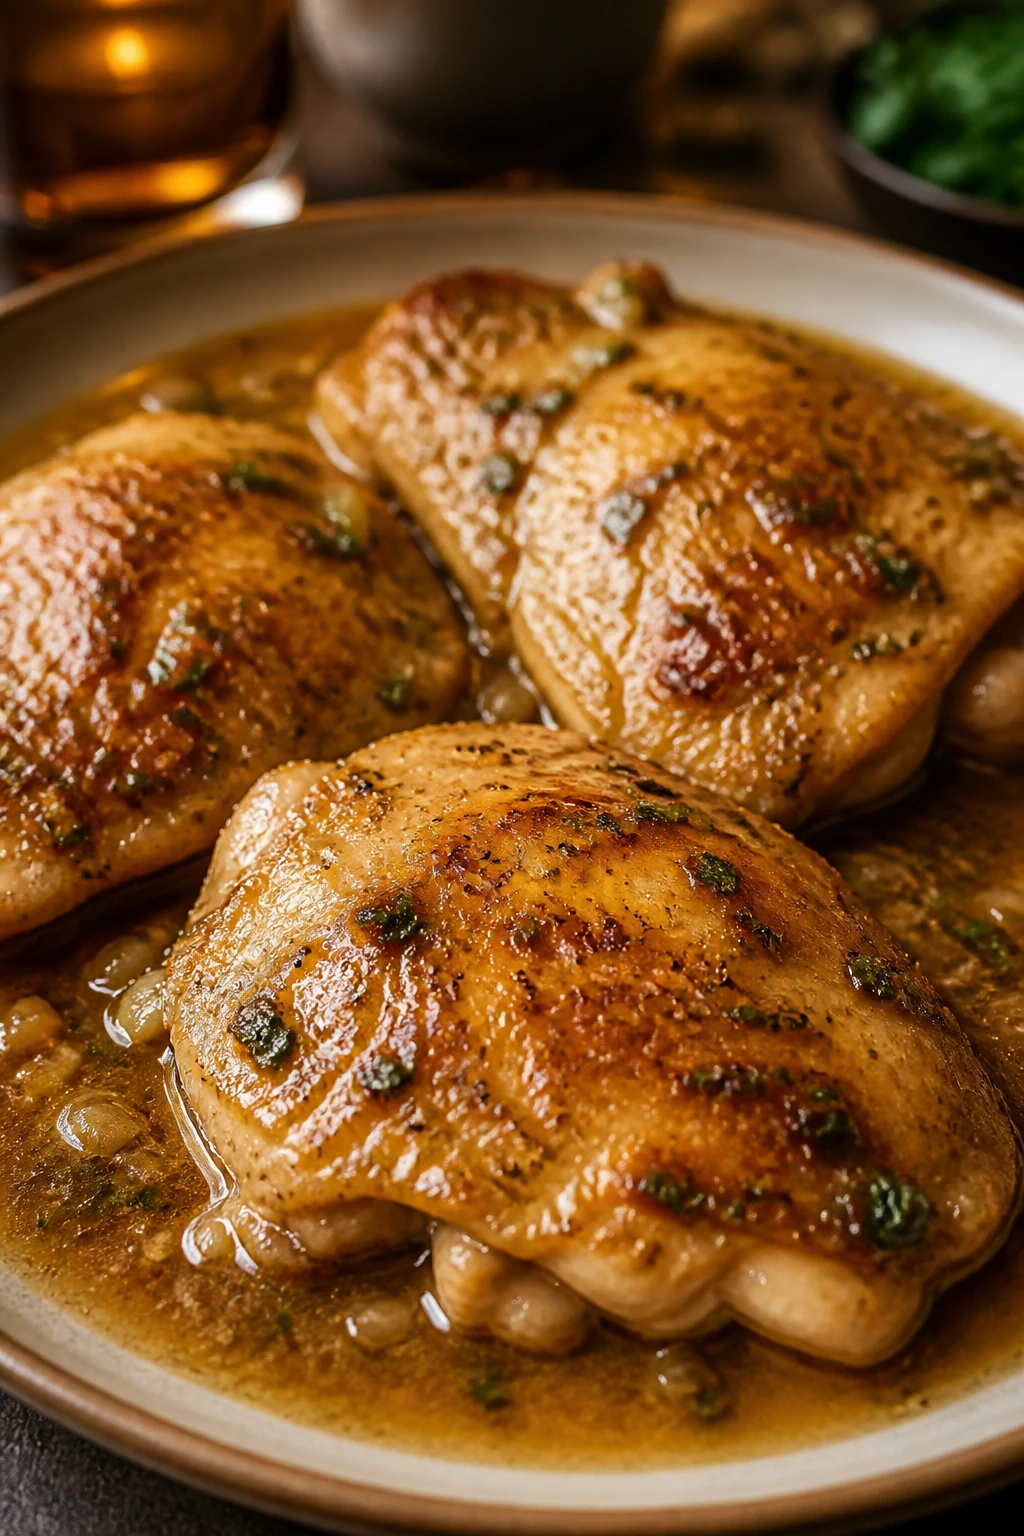
That’s why I keep coming back to tender simple chicken for weeknight dinners in the form I’m about to show you: boneless thighs, a light seasoning coat, a hard sear, and a quick lemon-Dijon pan sauce that picks up every browned bit from the skillet. It tastes like you spent more effort than you did. That’s the sweet spot.
I’m also going to make a small argument here: the best chicken dinners are not the ones with the longest ingredient list. They’re the ones that forgive a busy kitchen, forgive a distracted clock glance, and still land on the plate juicy enough that you don’t reach for extra sauce out of panic. This one does that, and it does it without asking for a marinade, a dozen spices, or a second pan.
Why Tender Simple Chicken Works on Busy Nights
Fast enough to make after work: The active time is short, and the stove does most of the work while you handle the side dish. You’re looking at about 15 minutes of prep and 15 minutes of cooking, which means dinner can happen before the kitchen starts feeling like a project.
Built for juicy results: Boneless skinless chicken thighs have more fat and connective tissue than breasts, so they stay tender even when the heat runs a little hot. That extra forgiveness matters on a Tuesday night when the phone rings, the rice boils over, or somebody asks where the scissors are.
The pan makes its own sauce: The browned bits left after searing are the good stuff. A splash of broth, a squeeze of lemon, and a little Dijon turn those stuck-on bits into a glossy sauce that tastes deeper than the ingredient list suggests.
Pantry ingredients do the heavy lifting: Salt, pepper, garlic powder, paprika, butter, broth, lemon, and Dijon are all ordinary items, but they behave well together. Nothing here is decorative. Every ingredient has a job.
It scales up without drama: Double the chicken if you’re feeding more people, and cook it in batches so the skillet stays hot. The sauce can be expanded with another splash of broth and a little more butter, which is handy when dinner needs to stretch.
Leftovers do not get boring: Slice the chicken and tuck it into rice bowls, wraps, salads, or a sandwich with crunchy lettuce. The lemony sauce clings to the meat, so the leftovers still taste intentional the next day.
Yield: Serves 4
Prep Time: 15 minutes
Cook Time: 15 minutes
Total Time: 30 minutes
Rest Time: 5 minutes
Difficulty: Beginner — the ingredients are simple, but the skillet temperature and the final rest matter if you want the chicken to stay juicy.
Best Served: Hot from the pan, with the sauce spooned over the top.
The Short Ingredient List That Does the Heavy Lifting
For the Chicken
- 2 lbs boneless, skinless chicken thighs, trimmed of excess fat
- 1½ teaspoons kosher salt
- 1 teaspoon freshly ground black pepper
- 1 teaspoon garlic powder
- 1 teaspoon sweet paprika
- 2 tablespoons all-purpose flour
- 1 tablespoon olive oil
For the Pan Sauce
- 2 tablespoons unsalted butter
- 3 garlic cloves, minced
- ½ cup low-sodium chicken broth
- 2 tablespoons fresh lemon juice
- 1 teaspoon Dijon mustard
- 2 tablespoons chopped fresh parsley
- Lemon wedges, for serving, optional
I like this list because it behaves. Nothing weird, nothing fussy, nothing that hangs around the fridge for six months after you use one teaspoon and forget the rest.
The flour is there for a reason. It gives the spices something to cling to, helps the chicken brown more evenly, and gives the sauce a touch of body when the broth and lemon go into the skillet. It’s not a breading. It’s a light dusting, and that distinction matters.
Why Each Ingredient Matters in the Skillet
The Chicken
What to use: 2 lbs boneless, skinless chicken thighs, with any loose fat trimmed off and pieces sorted so the thickest ones are roughly the same size.
Preparation: Pat the thighs dry with paper towels before seasoning. Dry surface, better browning.
Substitutions: Boneless skinless chicken breasts work if you pound them to an even ½-inch thickness; chicken tenderloins work too, though they cook faster and need close watching.
Tips: Thighs are more forgiving than breasts, and I’d choose them here without hesitation if you want a weeknight dinner that stays tender even if the stove runs a little fierce.
The Seasoning and Light Coating
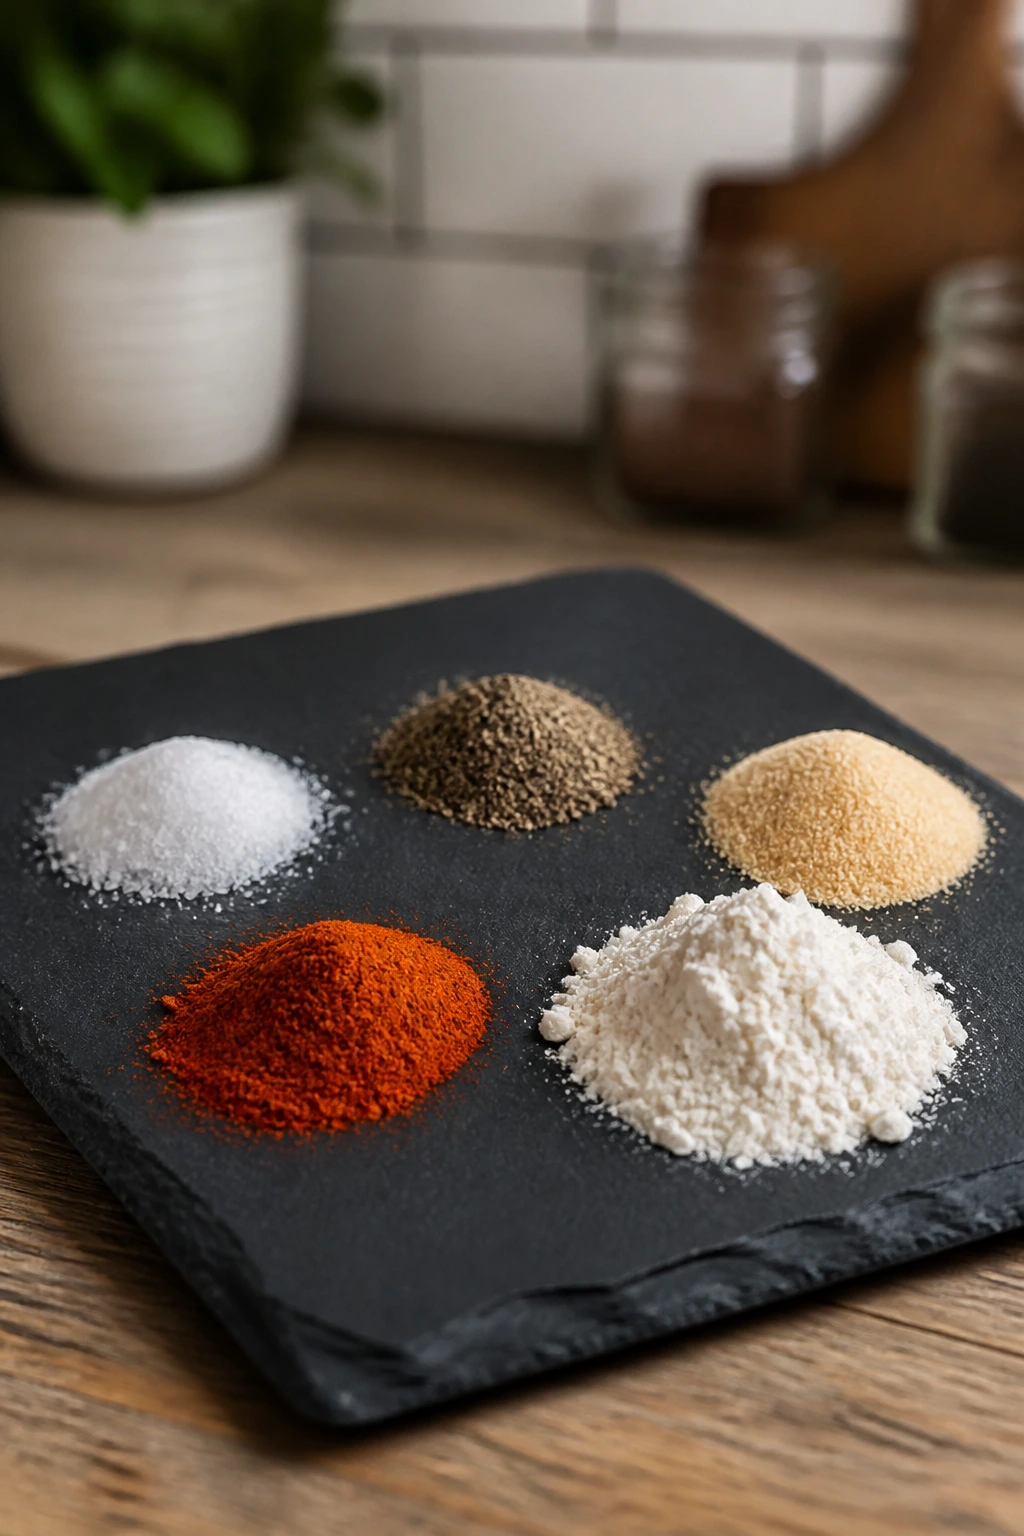
What to use: 1½ teaspoons kosher salt, 1 teaspoon black pepper, 1 teaspoon garlic powder, 1 teaspoon sweet paprika, and 2 tablespoons all-purpose flour.
Preparation: Mix the dry seasoning in a bowl, then sprinkle it over the chicken and press it lightly so it sticks.
Substitutions: Use cornstarch instead of flour if you need a gluten-free coating; smoked paprika can replace sweet paprika if you want a deeper, slightly campfire flavor.
Tips: The flour should look like a dusting, not a paste. If it turns gummy before it hits the pan, you used too much or added too much moisture.
The Sauce Builders
What to use: 2 tablespoons unsalted butter, 3 minced garlic cloves, ½ cup low-sodium chicken broth, 2 tablespoons fresh lemon juice, and 1 teaspoon Dijon mustard.
Preparation: Mince the garlic finely so it cooks in seconds, not minutes, and squeeze the lemon before the chicken goes in the pan so you’re not scrambling at the end.
Substitutions: If you’re out of broth, use water plus a pinch of salt; if you don’t keep Dijon around, a small spoonful of whole-grain mustard or even yellow mustard can fill the gap, though the flavor will be flatter.
Tips: Garlic should smell sweet and nutty in butter, not sharp and brown. Once it turns brown, the sauce picks up bitterness fast.
The Fresh Finish
What to use: 2 tablespoons chopped fresh parsley and a few lemon wedges for serving.
Preparation: Chop the parsley right before cooking so it stays bright and doesn’t wilt into a damp green pile on the cutting board.
Substitutions: Chives, dill, or a little basil can step in if that’s what you’ve got.
Tips: Fresh herbs go on at the end for a reason. Heat flattens them, and this dish needs that last green hit to keep the sauce from tasting heavy.
The Tools That Make Searing Easier
A good chicken dinner gets easier when the equipment is simple and reliable. You do not need much, but the few things you do use should work hard.
- 12-inch skillet: Stainless steel or cast iron is ideal for browning; nonstick works in a pinch, but it gives you less fond for the sauce.
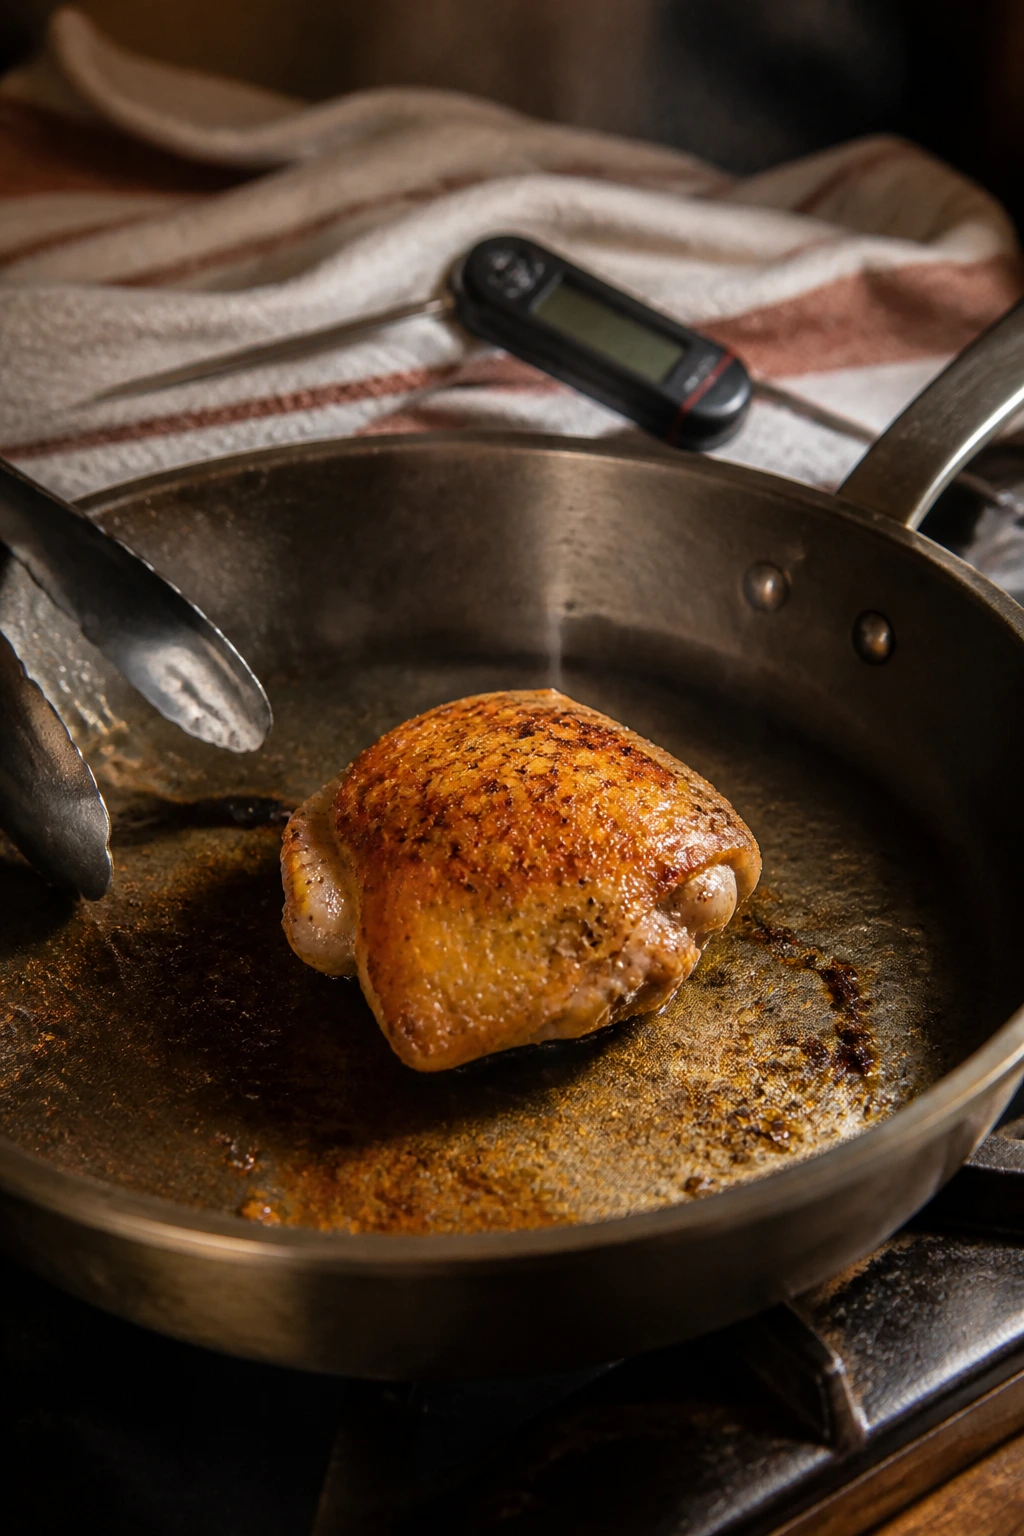
- Instant-read thermometer: This is the one tool that keeps you from guessing. Chicken thighs are done at 165°F in the thickest part, and a thermometer keeps the conversation short.
- Tongs: Easier than a fork, and they don’t poke out juices.
- Paper towels: Dry chicken browns better. That’s not theory; it’s the difference between a crust and a pale, steamy surface.
- Small bowl: Useful for mixing the seasoning coat before it lands on the chicken.
- Wooden spoon or silicone spatula: Good for scraping the browned bits from the skillet without scraping up the pan’s surface.
- Cutting board and sharp knife: For trimming fat and chopping parsley.
- Measuring spoons and cups: The sauce is simple, but the balance matters.
If your skillet is smaller than 12 inches, cook the chicken in two batches. Crowding is the easiest way to turn a sear into a steam bath.
How to Cook the Chicken So It Stays Juicy
Prep the chicken first.
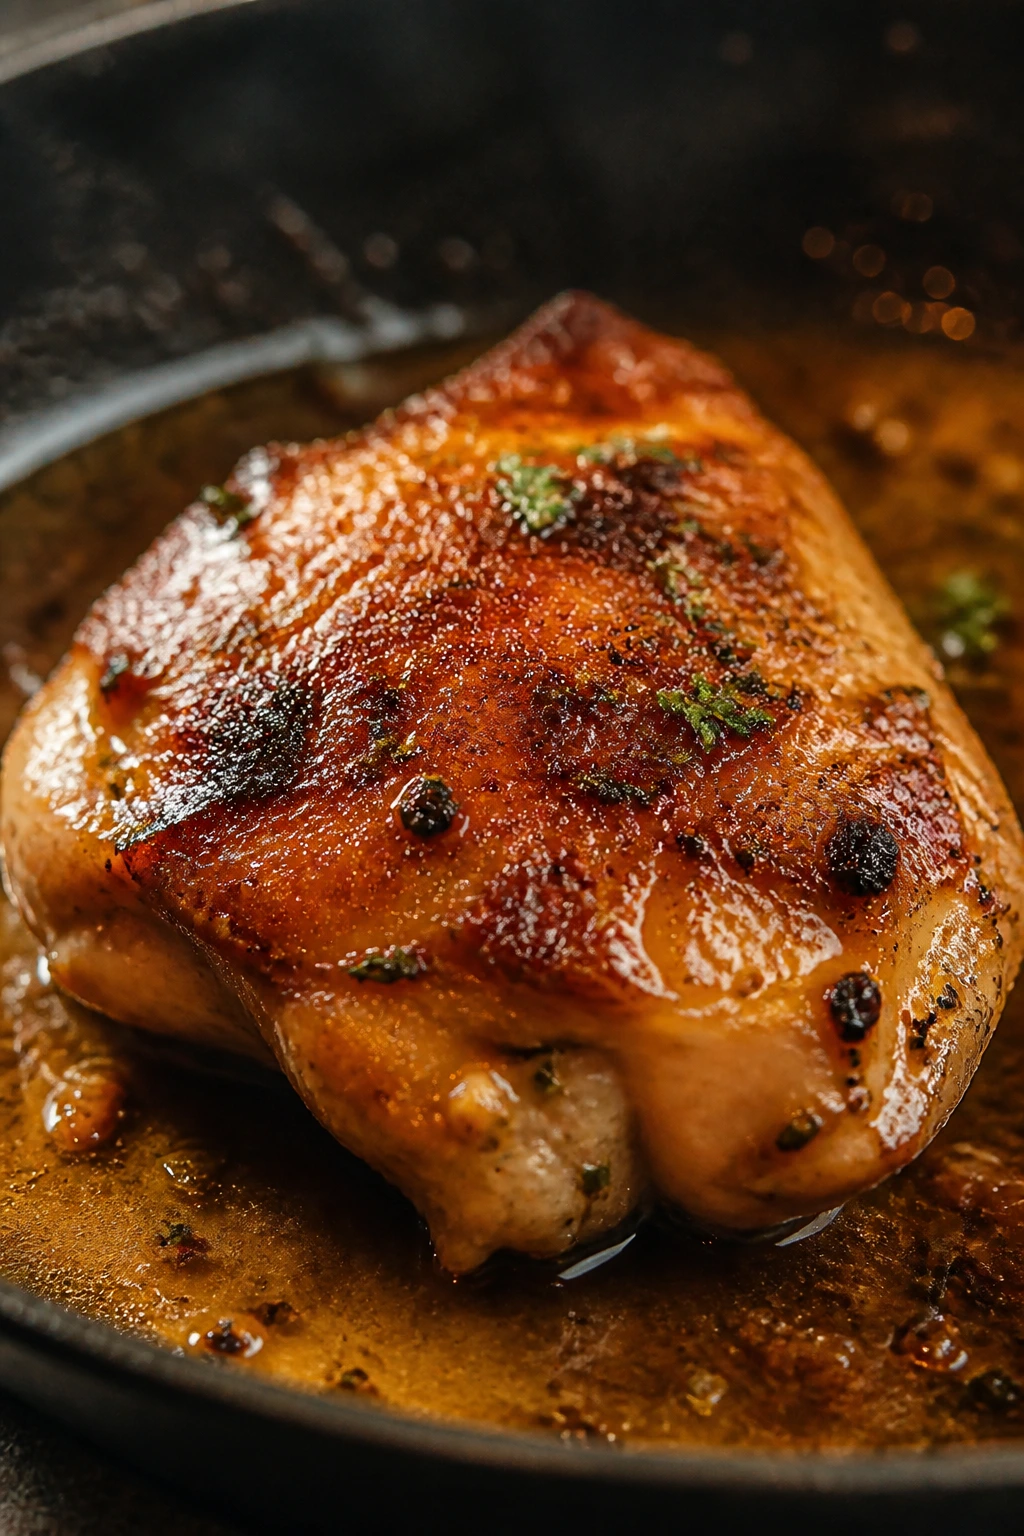
- Pat the chicken thighs dry with paper towels, then trim off any loose, rubbery fat with a sharp knife. Drying the surface matters more than people think, because wet chicken hisses, steams, and refuses to brown properly.
- In a small bowl, stir together the salt, pepper, garlic powder, paprika, and flour. Sprinkle the mixture evenly over both sides of the chicken and press it in gently with your fingers. Let it sit for about 10 minutes while you heat the skillet. Do not dump the flour on in a thick layer — you want a light coat, not a crust that turns pasty in the pan.
Sear the chicken.
3. Set a 12-inch skillet over medium-high heat and add the olive oil. Let the oil heat for 1 to 2 minutes, until it shimmers and slides easily around the pan. If it begins to smoke hard, pull the pan off the heat for 20 to 30 seconds and lower the burner slightly.
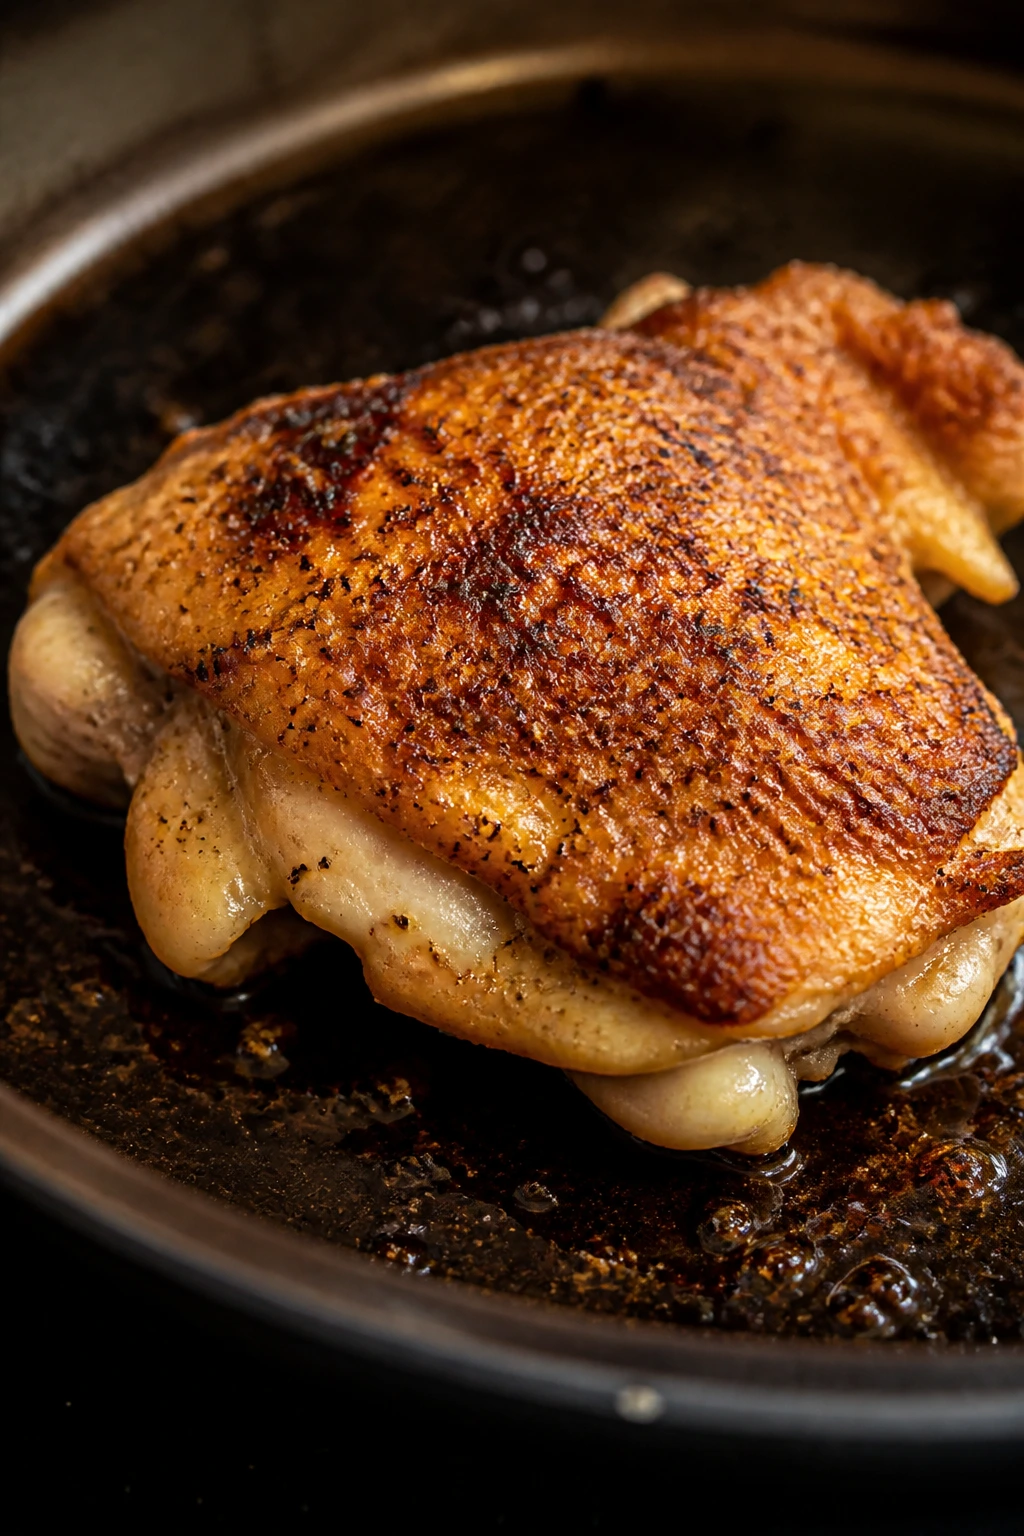
4. Lay the chicken in the skillet in a single layer, smooth-side down, and leave it alone for 4 to 5 minutes. You’re waiting for deep golden color and clean release from the pan. If it sticks, give it another 30 seconds.
5. Flip the chicken and cook for 4 to 6 minutes more, depending on thickness, until the thickest part registers 160°F on an instant-read thermometer. The chicken should feel springy, not soft and wobbly, in the center.
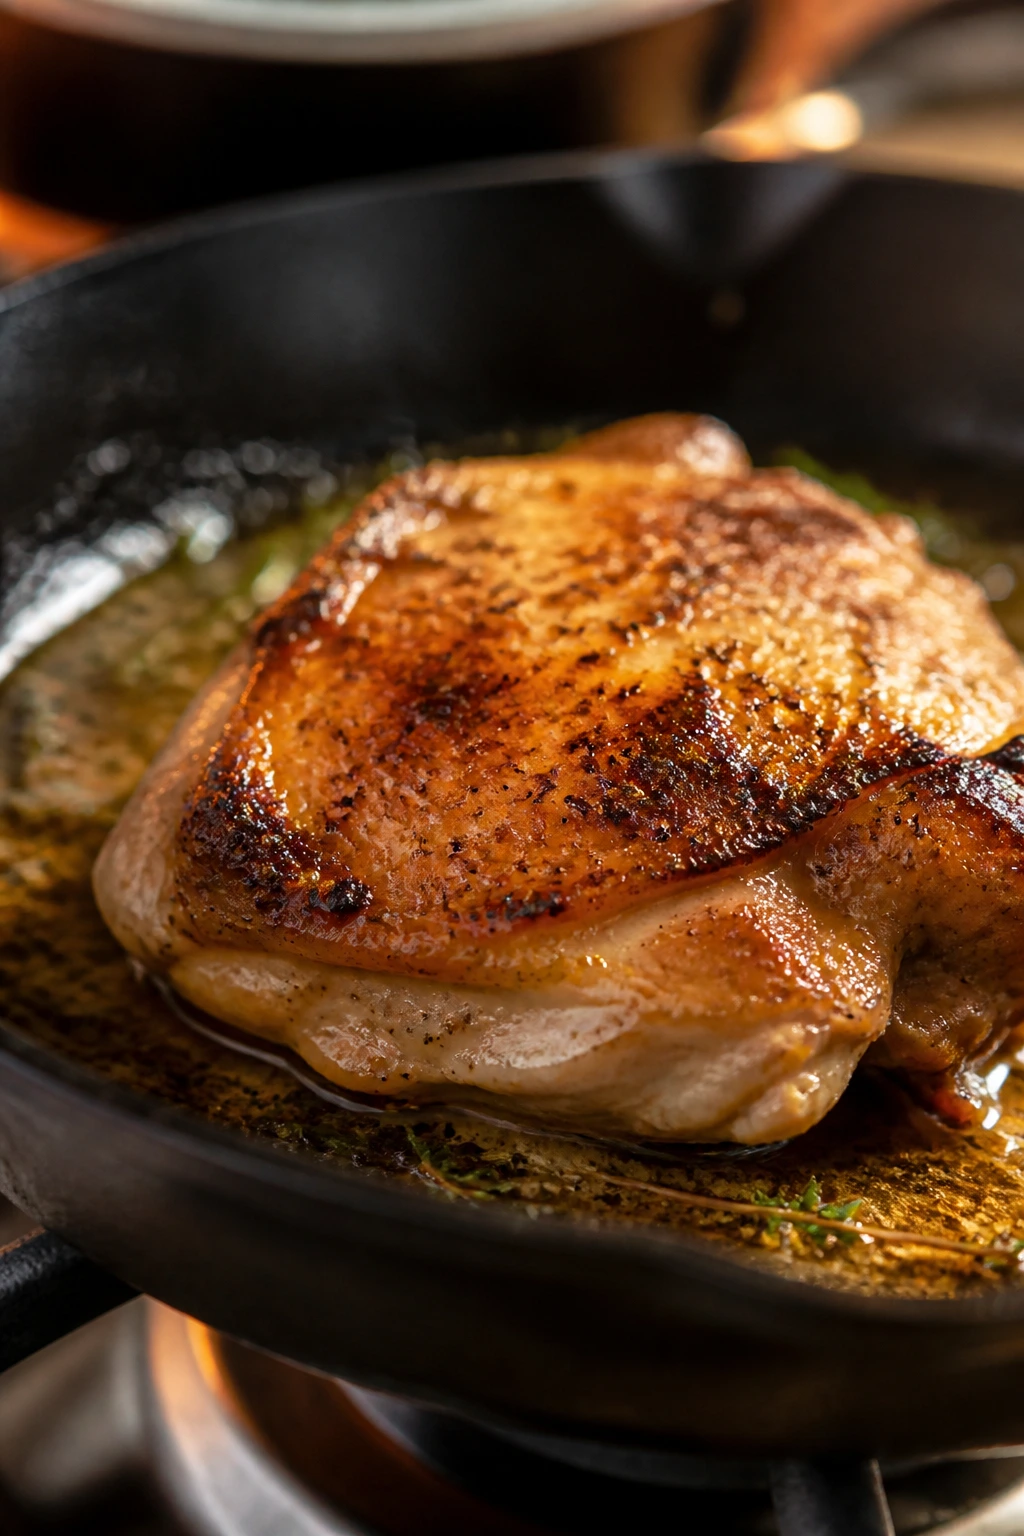
6. Move the chicken to a clean plate, but keep the skillet on the stove. The carryover heat will finish the job while the sauce comes together.
Build the sauce.
7. Reduce the heat to medium and add the butter. Once it melts, stir in the garlic and cook for 20 to 30 seconds, just until fragrant. You want sweet garlic, not browned garlic.
8. Pour in the chicken broth, lemon juice, and Dijon mustard. Scrape the bottom of the skillet with a wooden spoon, loosening every browned bit. Simmer for 1 to 2 minutes until the sauce looks glossy and lightly thickened.
9. Return the chicken and any plate juices to the skillet, turning the pieces in the sauce for 30 to 60 seconds so they pick up the flavor. Remove from the heat, scatter the parsley over the top, and rest for 5 minutes before serving. That short rest is not a nuisance; it keeps the juices in the meat instead of running onto the plate.
If you want one rule to remember, remember this one: the thermometer wins over guesswork. Cut into chicken if you must, but the goal is to stop relying on visual confidence and start relying on actual temperature.
How I’d Put This on the Table
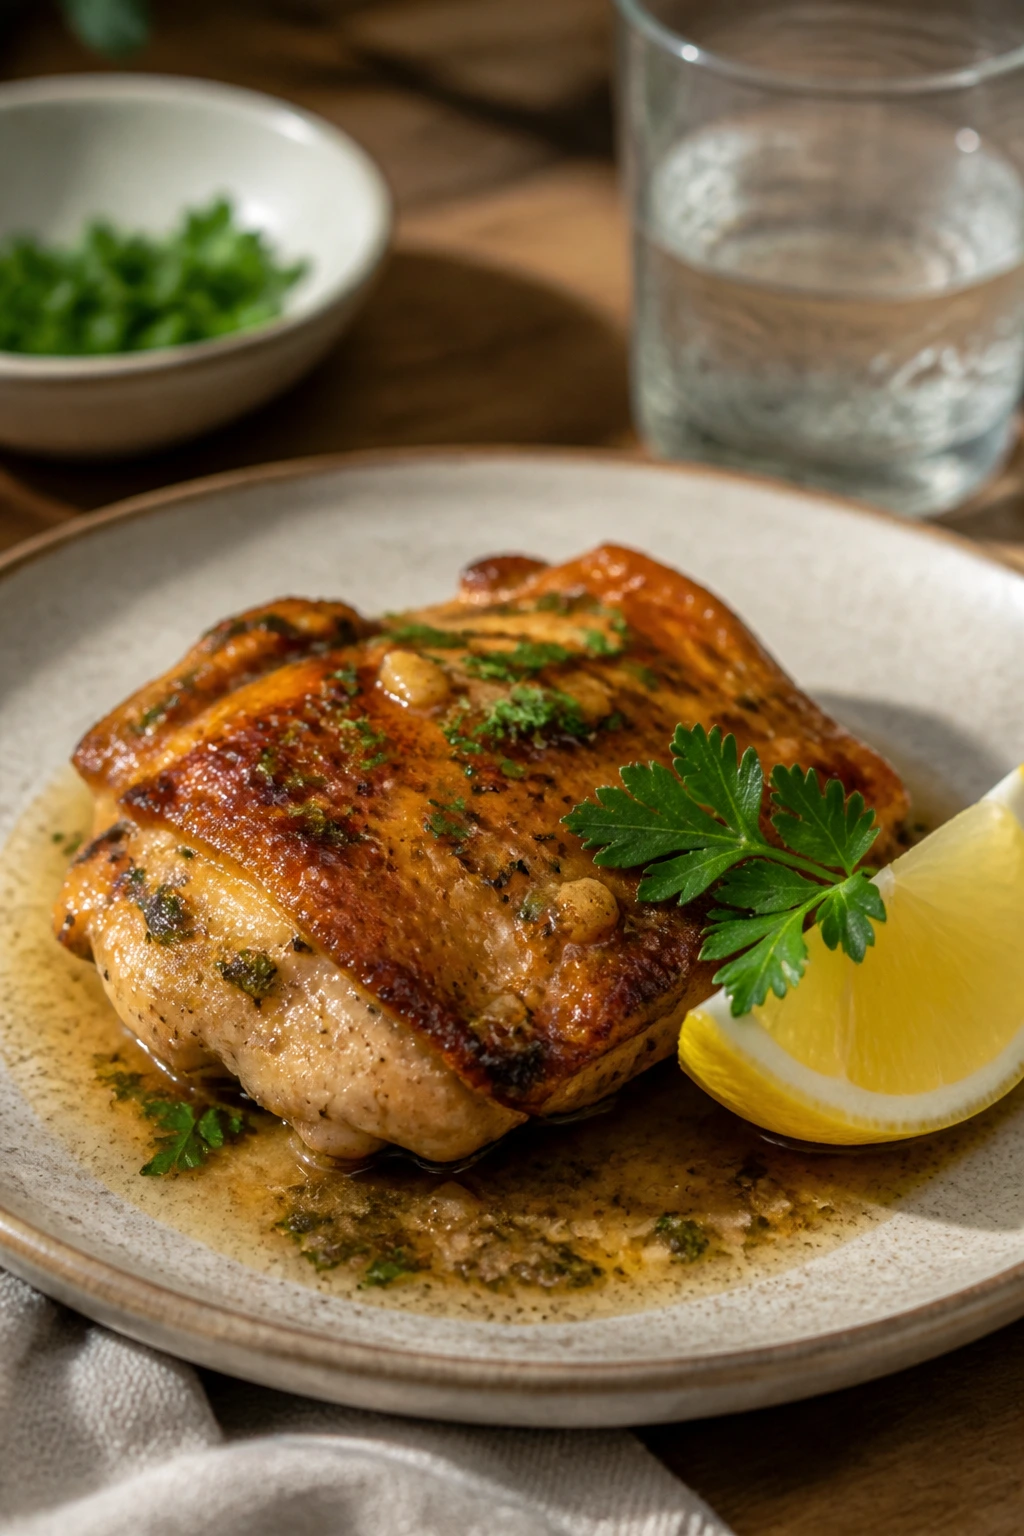
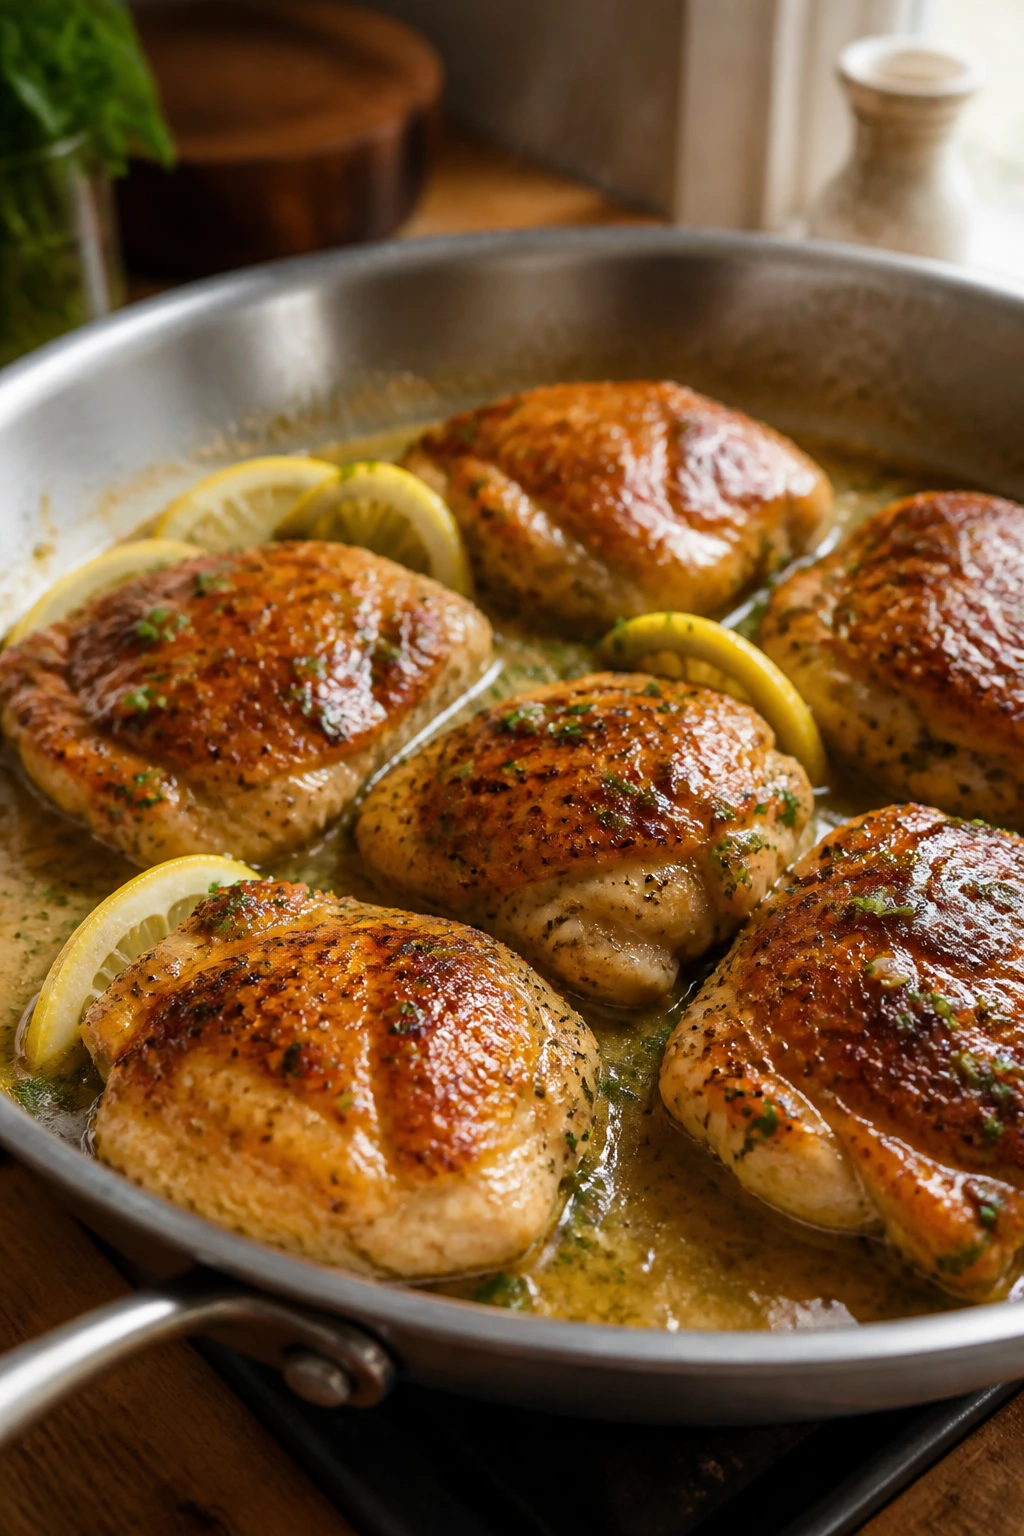
Presentation: Spoon a few tablespoons of the pan sauce onto the plate first, then set the chicken on top so the browned side stays visible. Scatter parsley over the top and tuck a lemon wedge at the edge of the plate if you like a sharper finish.
Accompaniments: This chicken likes mashed potatoes because the sauce sinks into the edges and makes every bite taste richer. Rice, buttered egg noodles, roasted broccoli, green beans, or a simple chopped salad all fit without arguing with the flavor.
Portions: Two thighs per adult is a good starting point if the sides are modest. If you’re serving big portions of potatoes or rice, one large thigh per person is enough, especially when the sauce gets spooned over the top.
Beverage Pairing: A dry white wine such as Pinot Grigio keeps the lemon in the sauce feeling bright. If you’re skipping wine, cold sparkling water with a squeeze of lemon or unsweetened iced tea does the job without crowding the plate.
I also like this chicken with crusty bread on the table, because the last bit of sauce in the skillet always disappears faster than expected. That’s not a flaw. That’s dinner being eaten by someone who knows what to do with bread.
Small Tweaks That Change the Flavor Without Making It Harder
Flavor Enhancement: Grate a little lemon zest into the sauce right after you turn off the heat. The zest gives you aroma before the first bite, and it makes the dish taste brighter without adding more acidity.
Time-Saver: Chop the parsley and mince the garlic before the skillet goes on the stove. Once the chicken is browned, things move quickly, and you don’t want to be standing there with one hand on the tongs and the other hand wrestling a garlic clove.
Cost-Saver: Buy the family pack of thighs when it’s priced well, then portion and freeze the extras in 1-pound bags. Thighs hold up better in the freezer than many people expect, and they’re a smart place to save money if chicken is a regular dinner.
Pro Move: If the skillet looks a little dark after searing, deglaze with a tablespoon of broth before adding the garlic. That tiny splash loosens the sticky browned layer and keeps the garlic from burning while you build the sauce.
You can also finish the chicken with a tiny pinch of red pepper flakes if you like a little heat. I wouldn’t turn this into a spicy dish, but a whisper of pepper plays well with lemon and butter.
The Mistakes That Turn Juicy Chicken Into Tough Chicken
Starting with wet chicken. The surface steams before it browns, and you end up with pale patches instead of a proper sear. Pat the pieces dry with paper towels, and if the chicken looks glossy from the package, dry it twice.
Moving it too soon. If you try to flip before the crust forms, the chicken tears and leaves half its surface behind in the skillet. Give it the full 4 to 5 minutes on the first side and let the pan do its job.
Cooking garlic on high heat. Burnt garlic tastes bitter in a way that lemon can’t cover up. Lower the heat before the butter and garlic go in, and keep the garlic moving for only 20 to 30 seconds.
Skipping the rest. Chicken cut the second it leaves the skillet sheds juices onto the cutting board. Let it sit for 5 minutes, and those juices stay where they belong.
Crowding the pan. Too many pieces at once drops the heat and makes the chicken pale and flabby. If the skillet looks full, cook in batches. It takes a few extra minutes and saves the whole dinner.
Guessing at doneness. Chicken thighs are forgiving, but they still need to hit 165°F in the thickest part. A thermometer removes the drama and stops you from overcooking the meat out of caution.
Variations That Still Feel Like Dinner
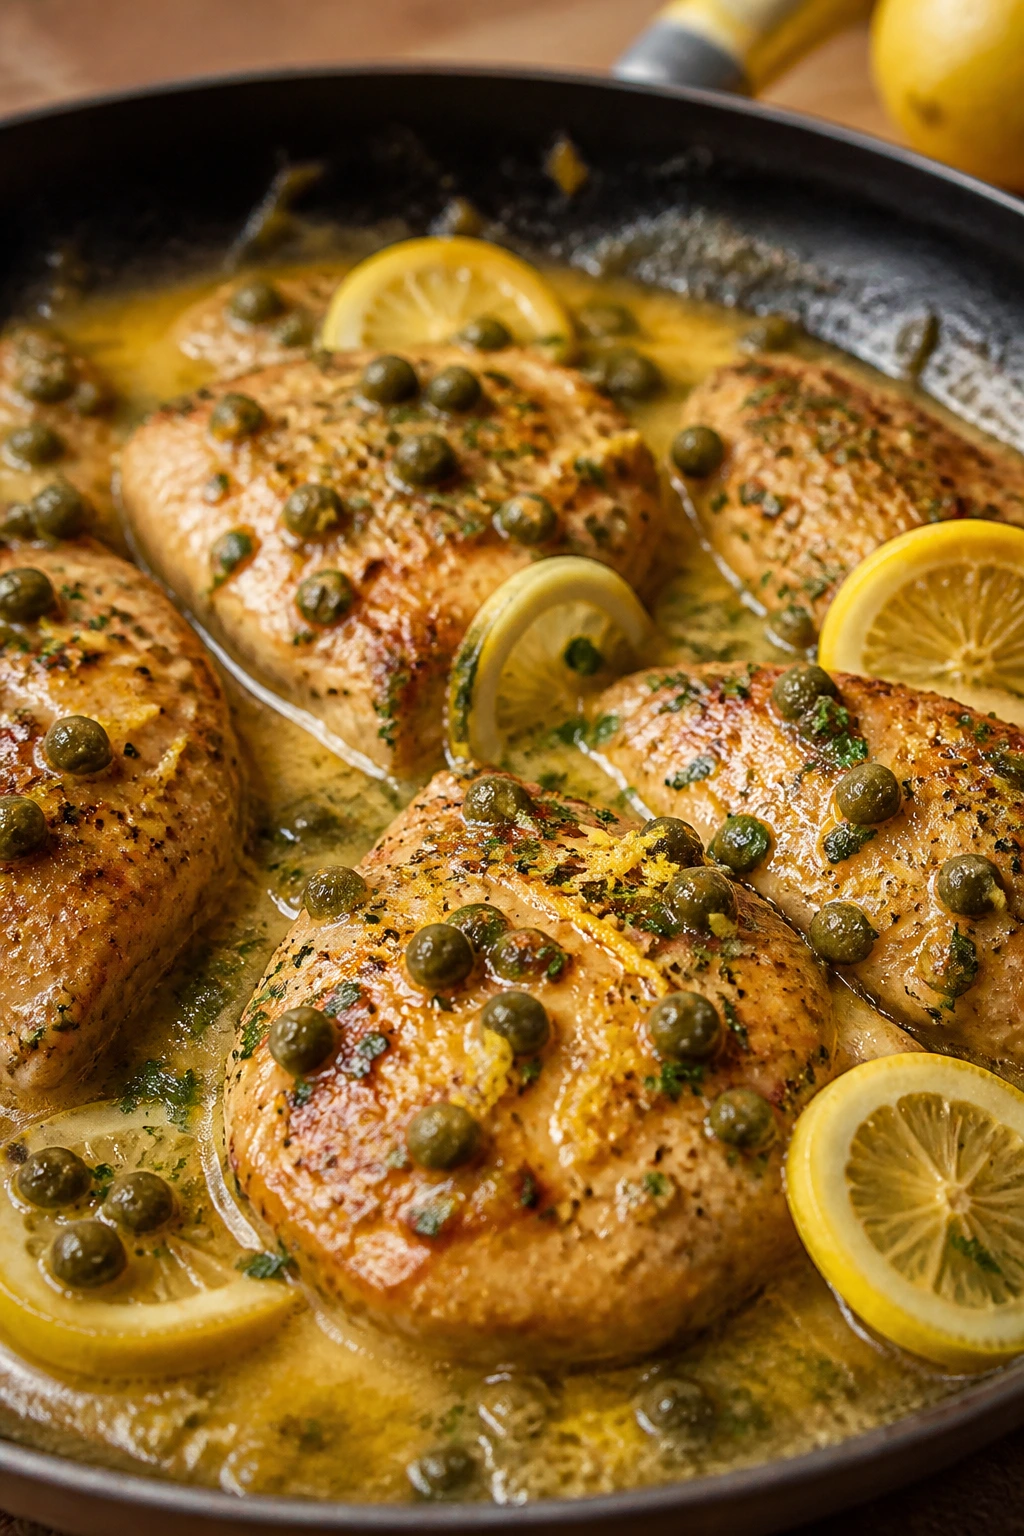
Caper-Lemon Skillet Chicken: Stir 1 tablespoon of capers into the sauce after the broth and lemon go in. The briny pop works well if you want the dish to lean sharper and more savory.
Smoky Paprika Chicken: Swap sweet paprika for smoked paprika and add a tiny pinch of cayenne. The chicken picks up a deeper color and a warmer finish, which pairs well with roasted potatoes.
Dairy-Free Lemon Chicken: Use 2 tablespoons of olive oil instead of butter in the sauce. You’ll lose a little richness, so add an extra teaspoon of lemon zest at the end to keep the flavor lively.
Gluten-Free Weeknight Chicken: Replace the flour with 2 teaspoons cornstarch and toss the chicken lightly just before it hits the skillet. You still get a little body on the chicken’s surface and a sauce that clings instead of sliding away.
Creamier Pan Sauce: Add 2 tablespoons of heavy cream after the broth simmers for a minute. It softens the lemon and gives the sauce a velvety finish, but I’d keep the cream light so the chicken still tastes like chicken and not like soup.
Chicken Breast Version: If breasts are what you have, pound them to an even ½-inch thickness, season the same way, and cook them for about 3 to 5 minutes per side. Pull them at 160°F and rest for 5 minutes. That extra step keeps the thin ends from drying out before the thick center is done.
Make-Ahead, Storage, and Reheating Without the Sadness
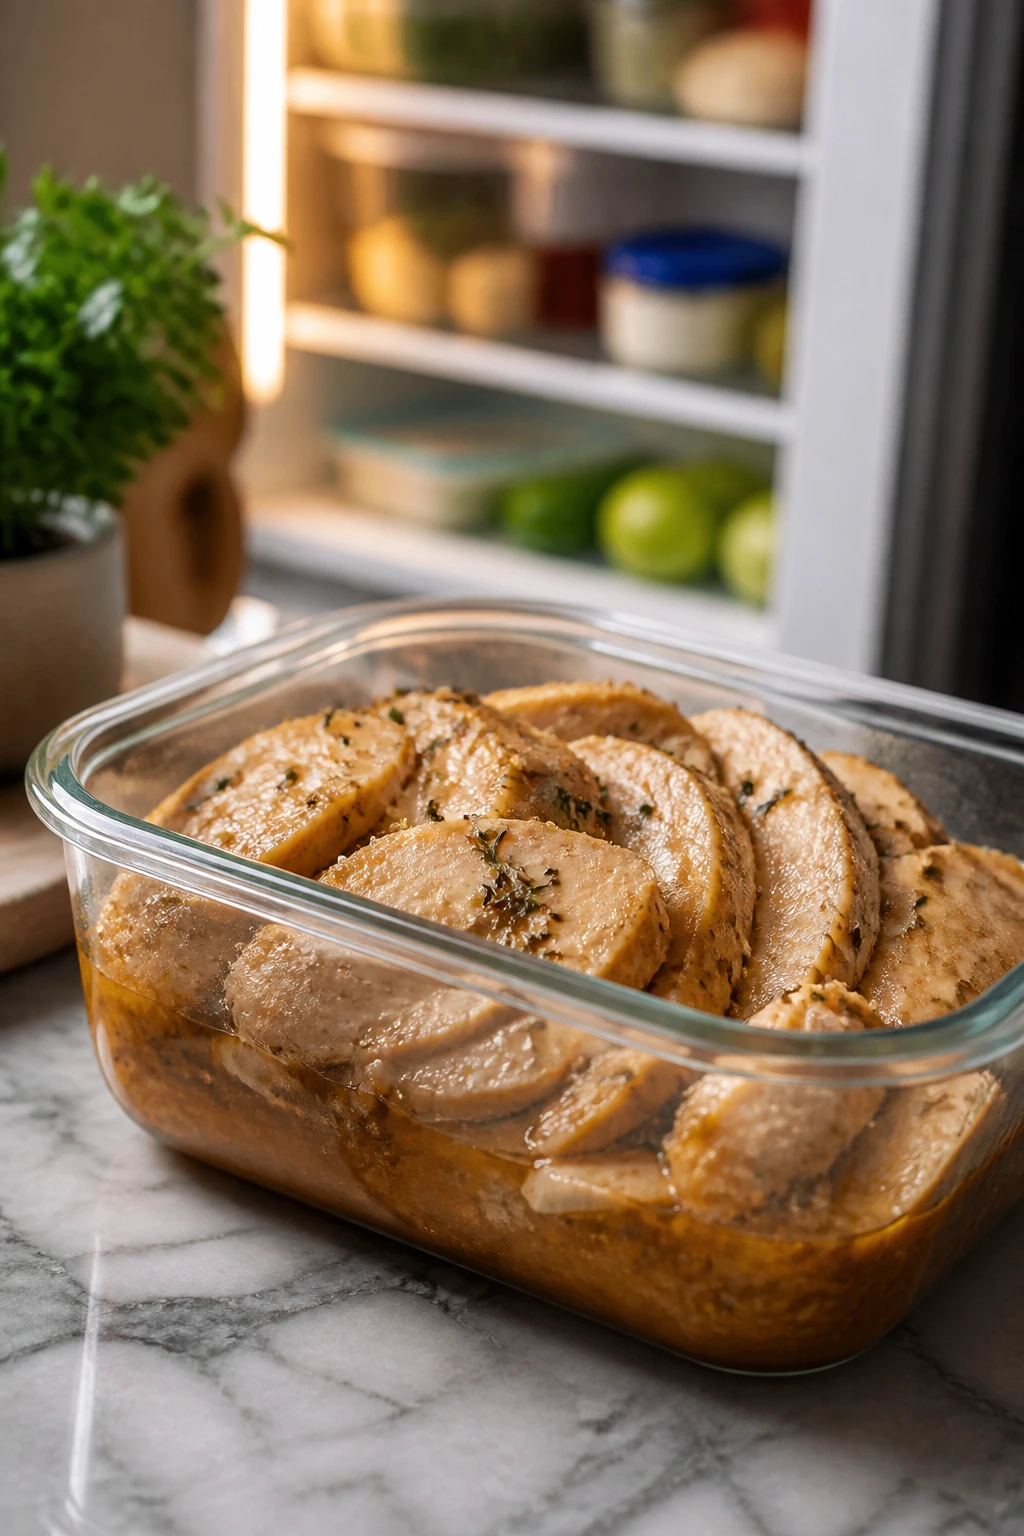
Fridge: Store leftover chicken and sauce in an airtight container for 3 to 4 days. Let it cool for about 20 to 30 minutes before sealing it up, but don’t leave it out longer than 2 hours.
Freezer: Freeze the cooked chicken for up to 2 months. The sauce may separate a little when thawed, but a gentle reheat and a spoonful of broth usually bring it back together.
Reheating on the stove: Put the chicken and sauce in a skillet over low heat with 1 to 2 tablespoons of broth or water. Cover loosely and warm for 5 to 7 minutes, turning once, until the chicken is hot in the center and the sauce loosens again.
Reheating in the microwave: Use medium power and heat in 45-second bursts, covering the chicken with a damp paper towel. High power makes the edges tough before the center is hot.
Make-ahead prep: You can trim and season the chicken up to 8 hours ahead and keep it covered in the refrigerator. The parsley can be chopped a day ahead, and the garlic can be minced a few hours early, though I still think fresh garlic smells best when it’s cut close to cooking time.
What improves overnight: The flavor of the sauce settles in the fridge, so the leftovers taste a little more rounded the next day. The texture is best fresh, but the second-day version is still good enough to pack for lunch.
If you’re planning meals ahead, keep the chicken and the side dish separate until serving. Rice absorbs sauce fast, and mashed potatoes do the same. Sometimes that’s what you want. Sometimes it leaves you with a dry container and regret.
Questions People Ask Before They Start
Can I use chicken breasts instead of thighs?
Yes, but pound them to an even thickness first. Breasts cook faster and dry out more easily, so the thermometer matters even more. Pull them at 160°F and let the carryover heat finish them during the rest.
Do I have to use flour?
No. The flour helps the seasoning stick and gives the sauce a little body, but you can swap in cornstarch for a gluten-free version or skip the coating entirely if you want a cleaner pan finish. Without it, the chicken still works, just with a thinner sauce.
What if I don’t have Dijon mustard?
Use a small spoonful of yellow mustard or whole-grain mustard. The flavor changes a bit, but the sauce still gets the tang and slight thickness that Dijon brings. If you leave mustard out completely, the sauce will taste flatter and more one-note.
How do I know the chicken is done without cutting it open?
Use an instant-read thermometer and check the thickest part. The USDA safe temperature for chicken is 165°F, and that little number saves you from guessing. The chicken should also feel springy when pressed lightly with tongs.
Can I make this ahead for meal prep?
Yes. Cook the chicken, cool it, and portion it with the sauce into airtight containers. Reheat gently so the meat doesn’t tighten up, and keep a splash of broth nearby if the sauce thickens in the fridge.
Why did my sauce taste bitter?
Usually the garlic browned too far or the lemon hit a pan that was too hot. Lower the heat before adding the garlic, and let the broth come in quickly so the garlic doesn’t sit on the heat long enough to scorch.
Can I bake the chicken instead of using the stove?
You can, but you’ll lose some of the browned bits that make the sauce good. If you want to bake it, sear the chicken first in the skillet, then finish it in a 400°F oven for a few minutes before making the sauce on the stove.
What’s the best way to double the recipe?
Cook the chicken in batches so the skillet stays hot, then make one larger batch of sauce after the second round. If you try to cram everything in at once, the chicken steams and the sauce turns thin.
A Chicken Dinner Worth Keeping Close
There’s a reason I trust skillet chicken more than a lot of more complicated dinner ideas. It doesn’t need a long ingredient list to taste finished, and it doesn’t need a second act to feel complete. Brown the meat, make the sauce, rest the chicken, eat dinner. Clean, direct, satisfying.
What I like most here is the margin for real life. The thighs stay tender if you cook them a touch too long. The sauce forgives a modest extra splash of broth. Even the leftovers keep their shape instead of collapsing into something vaguely chicken-adjacent. That’s the kind of dinner I keep in rotation.
If you remember anything at all, remember this: dry the chicken, sear it hard, and stop guessing about doneness. Those three moves make the difference between a forgettable skillet and a chicken dinner you’ll keep reaching for.
Tender Simple Chicken for Weeknight Dinners — Recipe Card
Recipe Name: Tender Simple Chicken for Weeknight Dinners
Description: Juicy boneless chicken thighs seasoned with garlic, paprika, and pepper, then finished in a quick lemon-Dijon pan sauce. It’s a one-skillet dinner that stays tender and tastes bigger than the ingredient list.
Prep Time: 15 minutes
Cook Time: 15 minutes
Total Time: 30 minutes
Course: Main Course
Cuisine: American
Servings: 4 servings
Calories: About 390 kcal per serving
Ingredients
For the Chicken:
- 2 lbs boneless, skinless chicken thighs, trimmed of excess fat
- 1½ teaspoons kosher salt
- 1 teaspoon freshly ground black pepper
- 1 teaspoon garlic powder
- 1 teaspoon sweet paprika
- 2 tablespoons all-purpose flour
- 1 tablespoon olive oil
For the Pan Sauce:
- 2 tablespoons unsalted butter
- 3 garlic cloves, minced
- ½ cup low-sodium chicken broth
- 2 tablespoons fresh lemon juice
- 1 teaspoon Dijon mustard
- 2 tablespoons chopped fresh parsley
- Lemon wedges, for serving, optional
Instructions
-
Pat the chicken thighs dry, trim any loose fat, and season both sides with the salt, pepper, garlic powder, paprika, and flour.
-
Heat the olive oil in a 12-inch skillet over medium-high heat until shimmering, then sear the chicken for 4 to 5 minutes per side, until browned and the thickest part reaches 160°F.
-
Transfer the chicken to a plate and keep the skillet on the stove.
-
Lower the heat to medium, add the butter and garlic, and cook for 20 to 30 seconds. Stir in the broth, lemon juice, and Dijon mustard, scraping up the browned bits.
-
Simmer for 1 to 2 minutes until the sauce is glossy and lightly thickened, then return the chicken and any juices to the skillet and turn to coat.
-
Remove from the heat, scatter the parsley over the top, rest for 5 minutes, and serve with lemon wedges if using.
Notes: A thermometer makes the difference between juicy and dry chicken. For gluten-free cooking, swap the flour for 2 teaspoons cornstarch.