
A good coconut curry should never taste like the last one you made. Same can. Same spoon. Same tired little mountain of white rice. And yet the bowl in front of you can still go in a completely different direction if you change the curry paste, the acid, the vegetable cut, the finishing herb, or the protein’s fat content.
That’s the real trick behind coconut curry dinners. Coconut milk is mild, silky, and a little sweet, which makes it a blank canvas that can lean Thai, Indian-ish, Malaysian, briny, smoky, sharp, or soft and herbaceous without losing its own character. The mistake people make is treating it like one flavor profile. It isn’t. Bloom the paste in oil and it wakes up. Add lime and it brightens. Stir in tomato and it deepens. Drop in peanut butter, miso, or fish sauce and it goes somewhere else entirely.
I’ve always liked coconut curry for the same reason I like a good white shirt: it starts plain, then picks up personality fast. The difference between a forgettable bowl and a dinner you keep thinking about the next day is usually one quiet move — a browned edge on chicken thighs, a squeeze of lime at the end, a handful of Thai basil, or the decision to simmer sweet potato until it starts to give up at the edges instead of staying chalky in the center. Tiny details. Big gap.
Why These Coconut Curry Dinners Don’t Blur Together
-
Same pantry, different moods: Coconut milk shows up in all sixteen recipes, but each one heads somewhere else — red curry and basil, tomato and spinach, peanut and beef, miso and eggplant, or lemongrass and cod.
-
Built around real weeknight timing: Most of these finish in 30 to 45 minutes, and the faster seafood versions move so quickly that the sauce is the only thing that slows you down.
-
Vegetables are used with intent: Bell peppers stay crisp, cauliflower breaks down and thickens the sauce, bok choy wilts in the last minute, and squash gets roasted first so it doesn’t taste boiled and tired.
-
Leftovers don’t feel like leftovers: The chickpea, turkey, beef, and lentil versions often taste better after a night in the fridge because the curry paste and coconut fat settle in together.
-
Heat is easy to control: One extra spoon of curry paste, a sliced chili, a dab of chili crisp, or a little more lime can move these bowls from mild to sharp without wrecking the whole pot.
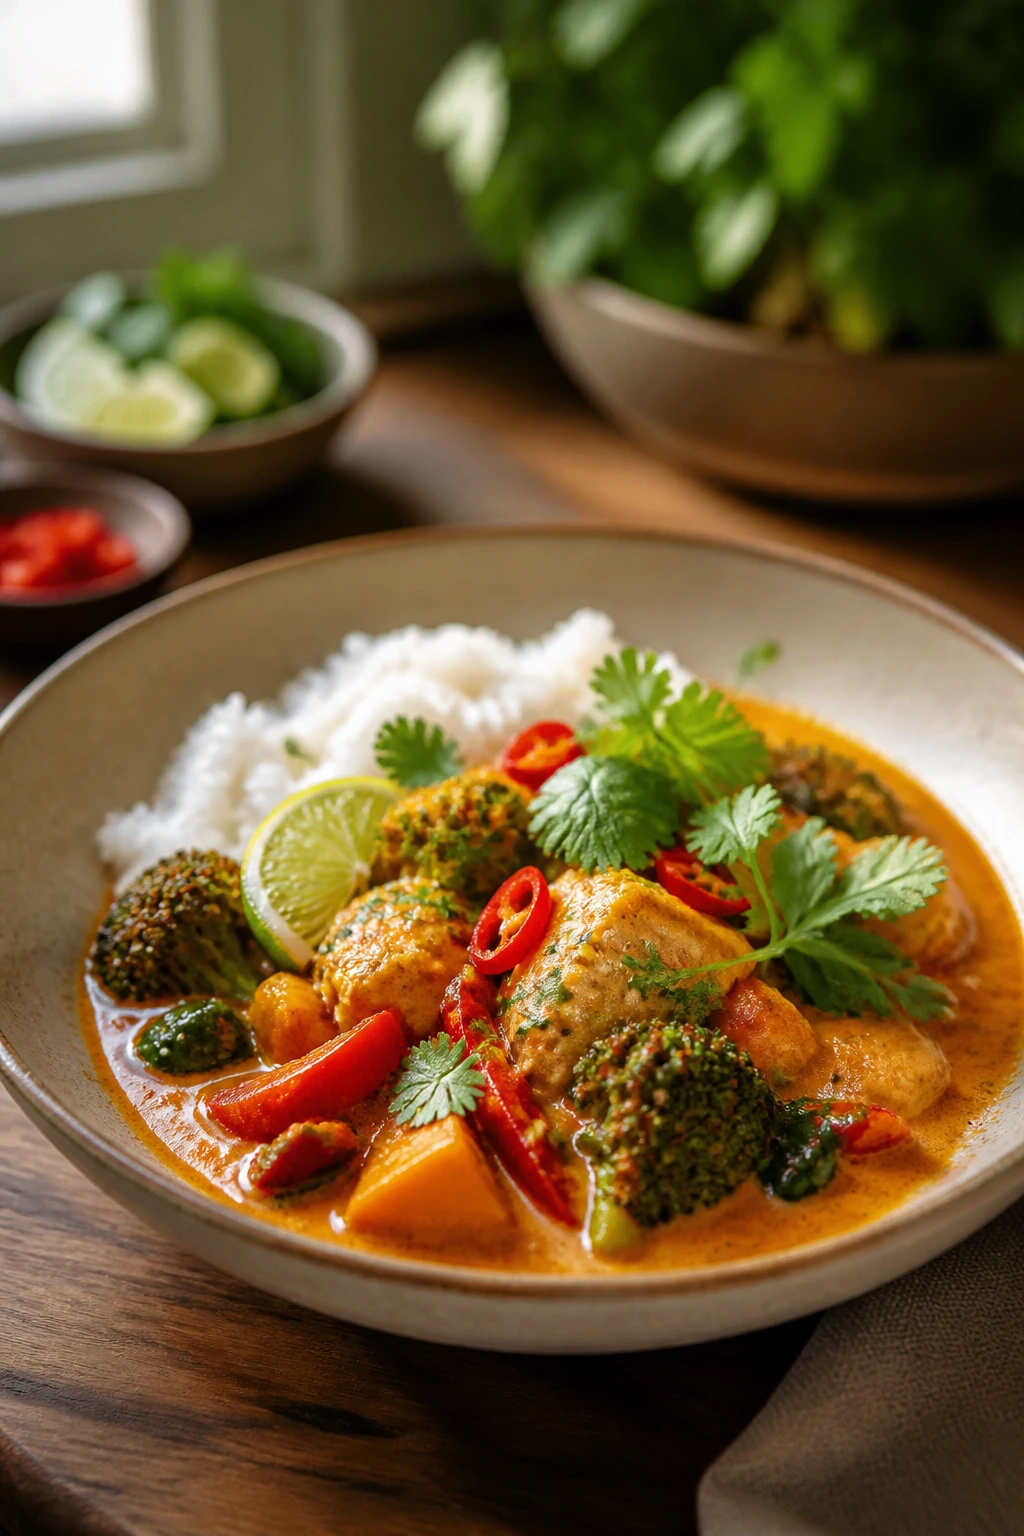
1. Red Curry Chicken with Bell Peppers and Thai Basil
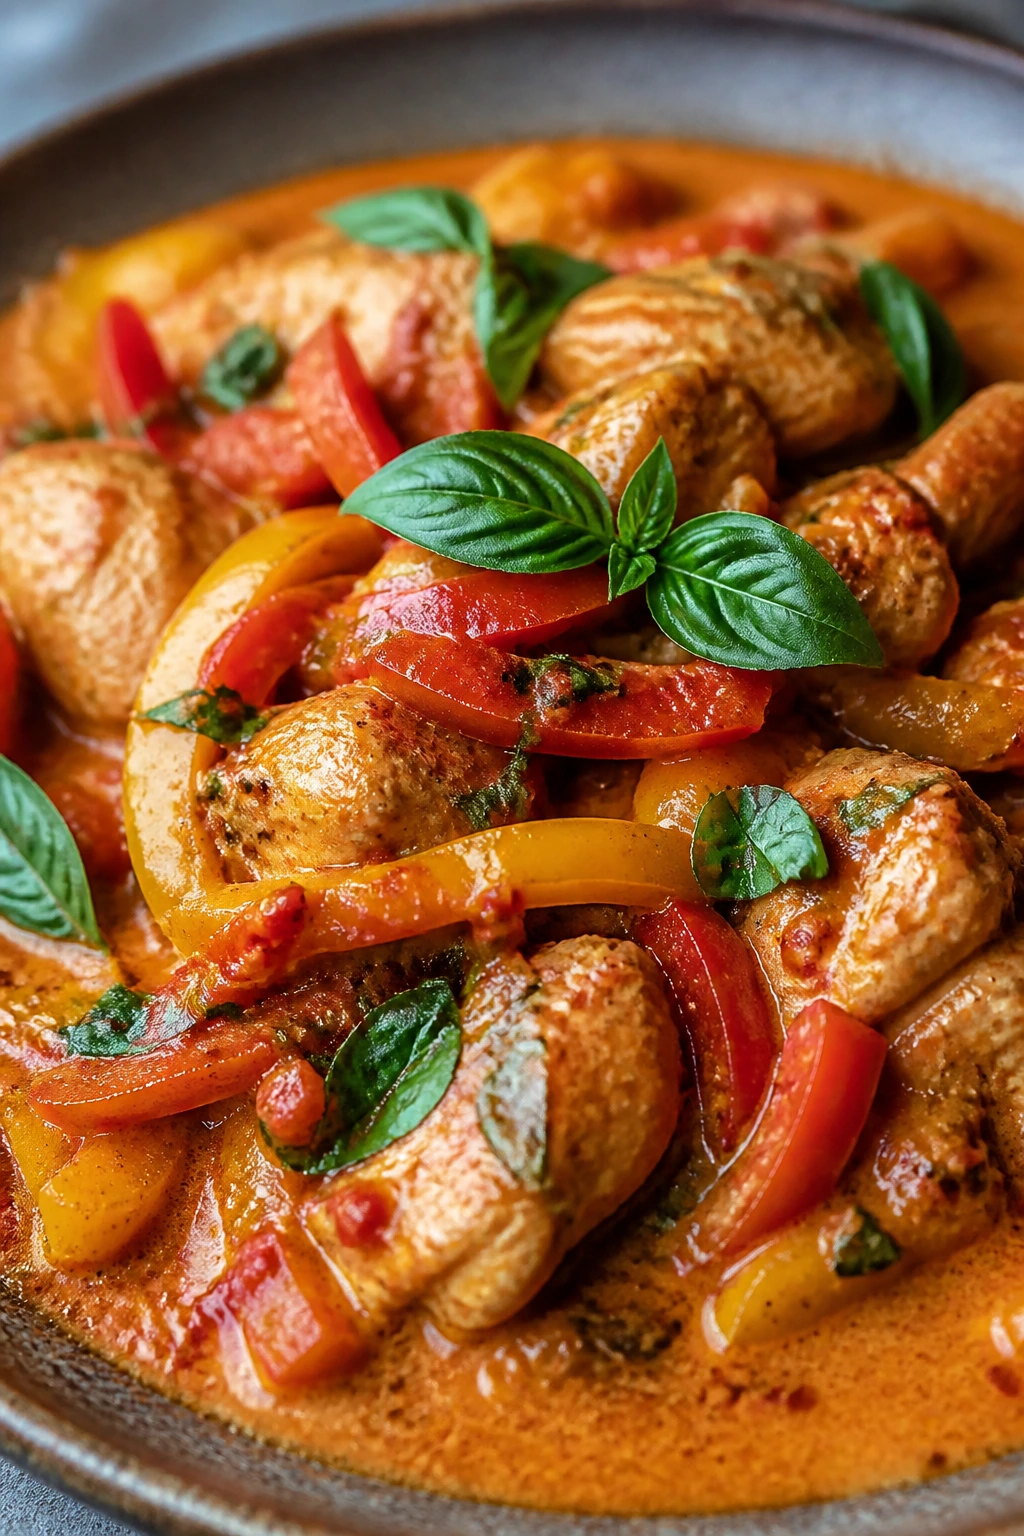
The smell alone tells you where this one is going: garlic, red curry paste, and coconut milk melting into each other until the pan turns glossy and brick-colored. Chicken thighs are the right cut here because they stay juicy through a simmer, and the bell peppers keep a bit of bite instead of collapsing into mush. Thai basil at the end changes the whole mood; it tastes faintly peppery, almost anise-like, and it makes the sauce feel fresh instead of heavy.
Why It Works:
Red curry paste brings heat, lemongrass, and dried chile in one shot, so you don’t need a long spice list. Chicken thighs tolerate a 10- to 12-minute simmer without drying out, which is why this curry feels forgiving instead of fussy. A splash of fish sauce and a pinch of brown sugar make the sauce taste complete, not sweet. Lime juice at the end keeps the coconut milk from drifting into bland territory.
Key Ingredients:
- 1½ lb boneless, skinless chicken thighs, trimmed and cut into 1½-inch pieces — the thighs stay tender and don’t seize up during simmering.
- 2 tbsp neutral oil — use something plain so the curry paste can lead.
- 2 tbsp red curry paste — taste the jar first; brands vary a lot in salt and heat.
- 1 small yellow onion, thinly sliced — it softens into the sauce and gives the base some body.
- 2 bell peppers, sliced into strips — red and yellow look and taste sweetest here.
- 1 can (13.5 oz) full-fat coconut milk — this gives the sauce its silky finish.
- ¾ cup chicken broth — enough to loosen the curry without making it watery.
- 1 tbsp fish sauce — the salty depth that makes the sauce taste finished.
- 1 tsp brown sugar — just enough to round the heat.
- 1 cup Thai basil leaves, loosely packed — add these at the end so they stay fragrant.
- 1 lime, cut into wedges — the acid wakes up the whole bowl.
- ½ cup sliced bamboo shoots, drained (optional) — adds crunch and a little old-school takeout charm.
Quick Steps:
- Brown the chicken: Heat the oil in a large skillet or Dutch oven over medium-high heat. Add the chicken in a single layer and cook for 3 to 4 minutes, just until the edges turn opaque and lightly golden. You do not need to cook it through yet.
- Soften the aromatics: Add the onion and bell peppers. Cook for 3 minutes, stirring often, until the onion starts to turn translucent and the peppers lose their raw snap.
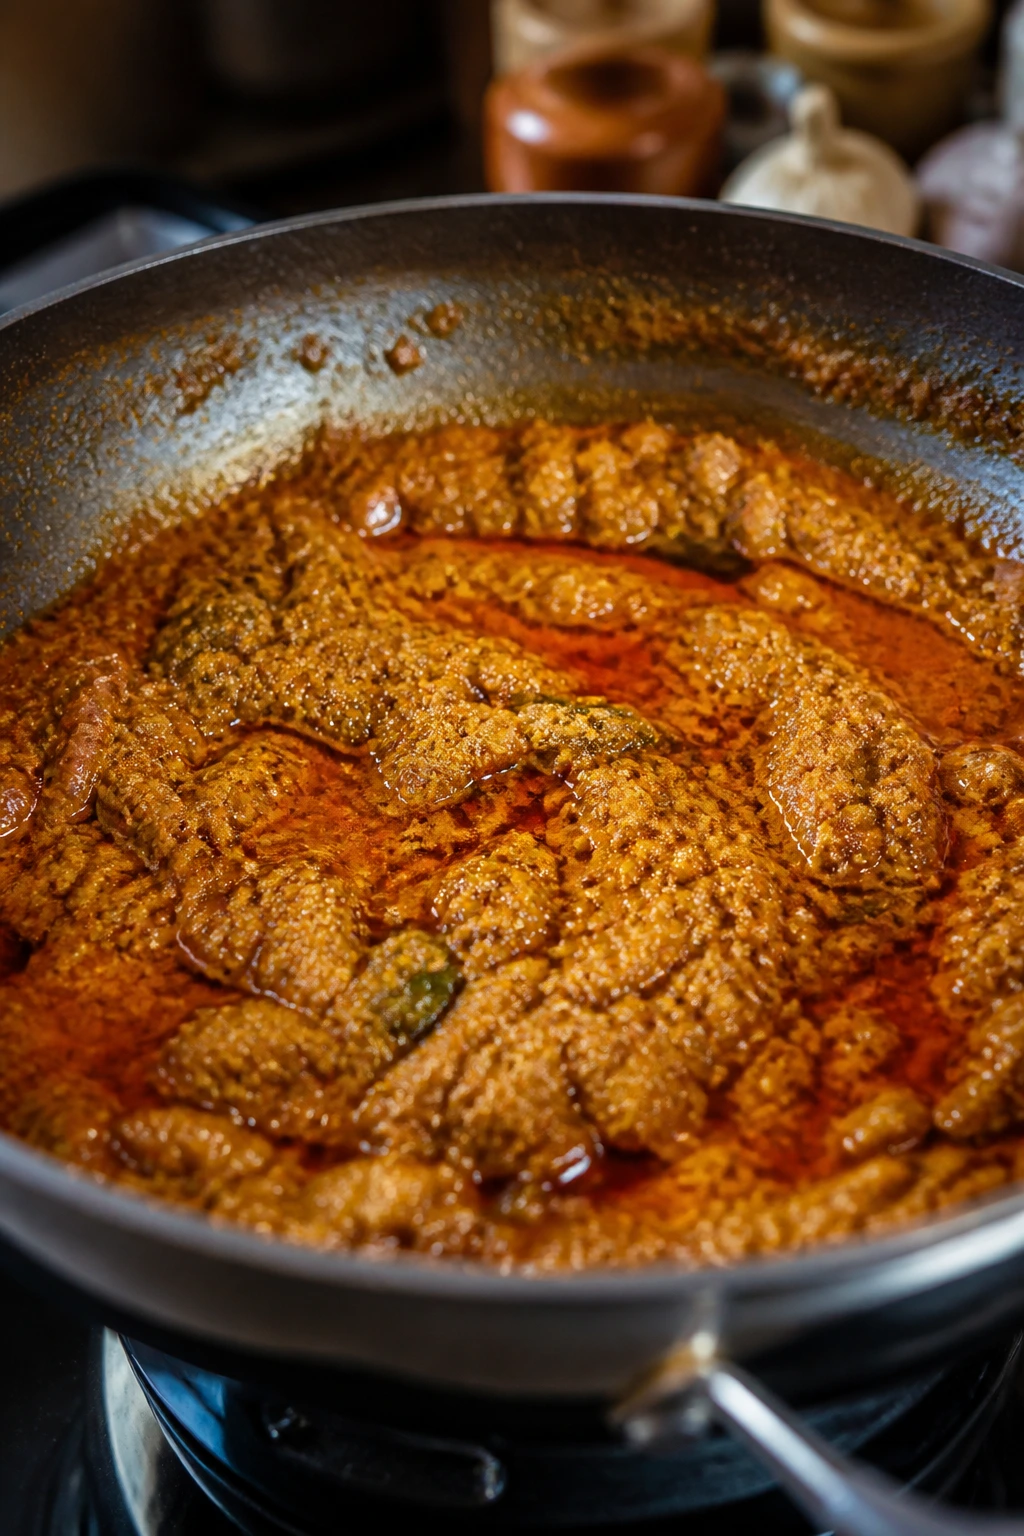
- Bloom the curry paste: Push everything to the side and add the curry paste to the hot pan. Stir it into the oil for about 30 seconds, until it smells deeper and a little toasted.
- Build the sauce: Pour in the coconut milk and broth, scraping up the browned bits from the pan. Add the fish sauce, brown sugar, and bamboo shoots if using, then bring the curry to a gentle simmer.
- Finish the chicken: Lower the heat and simmer for 8 to 10 minutes, until the chicken reaches 165°F and the sauce looks lightly thickened, not greasy.
- Add the herbs: Turn off the heat and fold in the Thai basil and lime juice. Taste, then add more lime if the sauce feels heavy.
Equipment for This Recipe:
- Large 12-inch skillet or Dutch oven — gives the chicken enough room to brown.
- Wooden spoon — useful for scraping the paste through the oil.
- Sharp chef’s knife — the pepper slices matter more than people think.
- Instant-read thermometer — the cleanest way to know the chicken is done.
How to Serve This Dish:
Spoon it over jasmine rice so the sauce has something to soak into. A few cucumber slices on the side keep the bowl from feeling too rich, and I like a little pile of basil on top rather than burying it in the sauce. This makes 4 generous servings, and one serving is usually enough with rice and a crisp vegetable.
Pro Tips for This Recipe:
- Brown the chicken in batches if your pan is small; crowded chicken steams, and steamed chicken never tastes as good here.
- Don’t dump the basil in early. It turns dark and tired fast.
- If your curry paste tastes aggressive, start with 1½ tablespoons and add more at the end.
Variations on This Dish:
- Pineapple Heat: Add 1 cup pineapple chunks with the coconut milk for a sweeter, tangier curry that leans brighter than the base version.
- Vegetable-First Bowl: Swap the chicken for 3 cups cauliflower florets and 1 cup snap peas, adding the snap peas in the last 2 minutes so they stay crisp.
Common Mistakes to Avoid with This Dish:
- Don’t let the sauce boil hard after the coconut milk goes in. A rolling boil can make it look split and grainy.
- Don’t overdo the fish sauce up front. The salt blooms as the curry simmers, and too much can take over the whole pan.
- Don’t skip the lime. Without acid, the sauce feels thick in a dull way.
2. Coconut Curry Shrimp with Pineapple and Lime
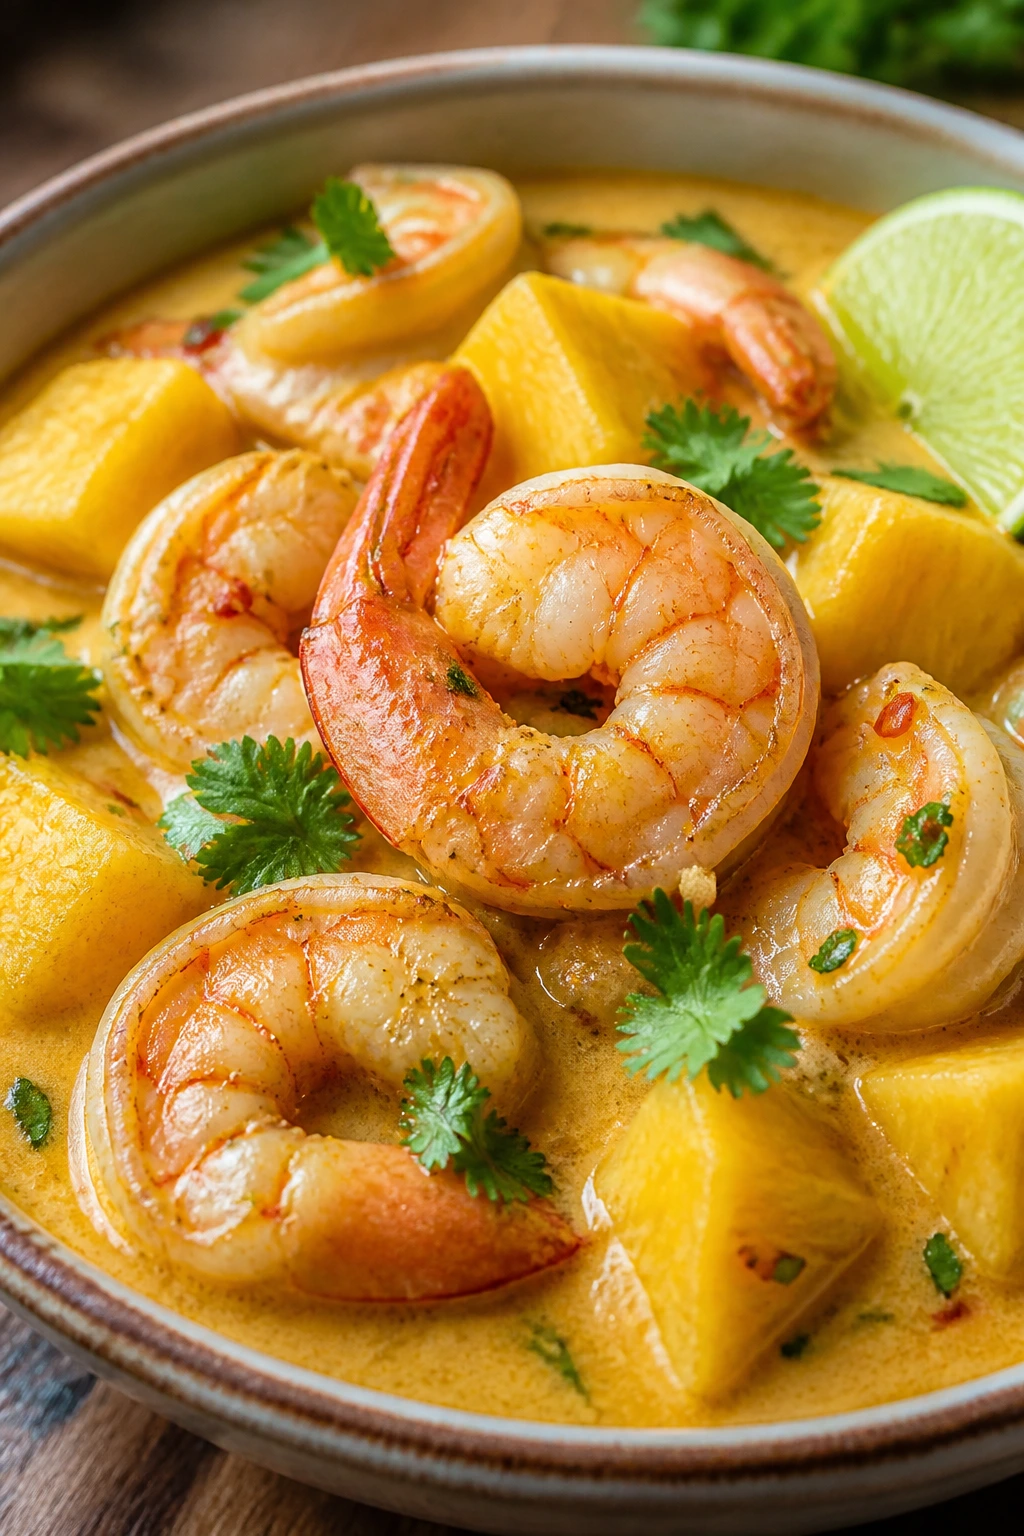
This one tastes like a vacation bowl, but in a useful way, not a cheesy way. The shrimp cook fast, the pineapple throws in a sharp-sweet edge, and the coconut milk keeps everything soft enough that the curry never feels sharp or thin. Yellow curry paste makes it warmer and rounder than the red curry in the chicken recipe, which is exactly why this version works.
Why It Works:
Shrimp need only a few minutes of heat, so they stay tender instead of rubbery. Pineapple adds acid and sugar at the same time, which makes the sauce taste lively even before the lime goes in. Yellow curry paste tends to lean more turmeric, ginger, and mild chile, so this bowl feels gentler and sunnier. Snap peas or bell peppers keep a little crunch and stop the dish from turning into a one-texture stew.
Key Ingredients:
- 1½ lb large shrimp, peeled and deveined — pat them dry so they sear instead of steaming.
- 2 tbsp neutral oil — enough to get the aromatics moving.
- 2 tbsp yellow curry paste — mild, fragrant, and perfect with sweet fruit.
- 1 small shallot, finely chopped — sweeter than onion and less likely to dominate the shrimp.
- 1 tbsp grated fresh ginger — gives the sauce a clean, bright edge.
- 1 can (13.5 oz) full-fat coconut milk — the base needs body to carry the pineapple.
- ½ cup seafood stock or chicken broth — just enough to loosen the sauce.
- 1 cup pineapple chunks, fresh or drained canned — use fresh if you want sharper acidity.
- 1 red bell pepper, thinly sliced — gives color and a little crunch.
- 1 cup snap peas, strings removed — they stay snappy if you don’t overcook them.
- 1 tbsp fish sauce — salty depth.
- 2 tbsp lime juice — add at the end so the sauce stays bright.
- ¼ cup cilantro leaves — a fresh finish that plays well with pineapple.
Quick Steps:
- Start the base: Heat the oil in a wide skillet over medium heat. Add the shallot and ginger and cook for 1 minute, just until fragrant and softened.
- Cook the curry paste: Stir in the yellow curry paste and cook for 30 to 45 seconds, until it darkens slightly and smells toasted.
- Build the broth: Add the coconut milk and broth, then stir in the fish sauce, bell pepper, and pineapple. Bring the pan to a gentle simmer.
- Add the shrimp: Slip the shrimp into the sauce in one layer and cook for 2 to 3 minutes, turning once, until they curl into a loose C-shape and turn opaque pink.
- Toss in the snap peas: Cook for 1 more minute, just until they turn bright green and lose their raw bite.
- Finish hard and fast: Turn off the heat, add the lime juice, and scatter cilantro over the top. Taste, then add a pinch more fish sauce if it needs salt.
Equipment for This Recipe:
- Wide skillet or sauté pan — shrimp need surface area.
- Slotted spoon — helpful if you want to pull shrimp out fast.
- Small grater — for fresh ginger.
- Measuring cups and spoons — the sauce depends on balance.
How to Serve This Dish:
Serve it over steamed jasmine rice or coconut rice if you want to lean into the tropical note. A wedge of lime on the plate matters here, and so does a spoonful of sauce over the rice before the shrimp go on top. This feeds 4 people, though shrimp lovers will happily stretch it into 3.
Pro Tips for This Recipe:
- Shrimp go from perfect to overcooked in a blink. Start checking them at the 2-minute mark.
- Fresh pineapple brings more bite than canned. If canned is all you have, drain it well and add a squeeze more lime.
- Keep the simmer gentle. Boiling shrimp in coconut milk is a fast way to get tough edges.
Variations on This Dish:
- Coconut-Peanut Shrimp: Stir in 1 tablespoon peanut butter with the coconut milk for a thicker, nutty sauce.
- Mango Lime Shrimp: Swap half the pineapple for chopped mango and add a little more cilantro at the end.
Common Mistakes to Avoid with This Dish:
- Don’t add the shrimp too early. They need less time than the sauce does.
- Don’t use pineapple syrup from the can unless you want a much sweeter curry.
- Don’t skip the lime at the end. Pineapple is bright, but it still needs acid to sharpen the coconut.
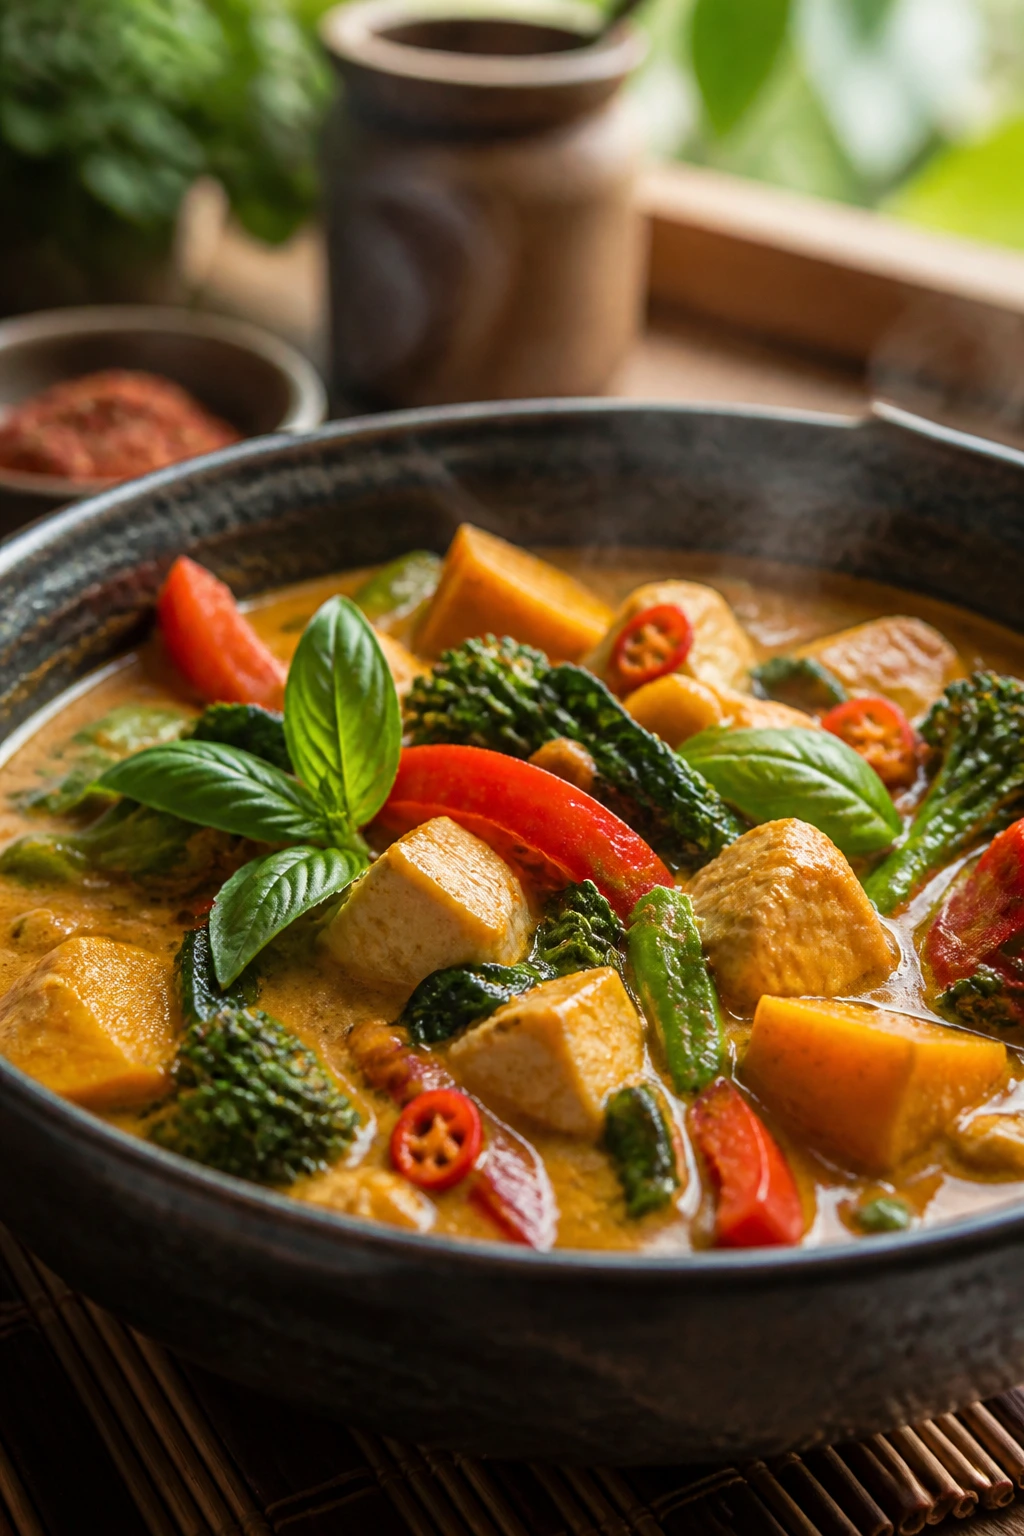
3. Chickpea, Tomato, and Spinach Coconut Curry
This is the one I make when the fridge looks uninspiring and the pantry is still doing its job. Tomato gives the curry a deeper red color and a little tang, chickpeas make it sturdy, and spinach folds in at the end like it was meant to be there. It tastes closer to a tomato-coconut braise than a Thai curry, and that’s a good thing.
Why It Works:
Chickpeas hold their shape through a long simmer and soak up the sauce without turning to paste. Crushed tomatoes add body and acid, which keeps the coconut milk from reading as sweet or one-note. Curry powder and cumin give the dish a more pantry-driven flavor than curry paste, so it feels different from the Thai-style bowls in the first two recipes. Spinach disappears in seconds, which is exactly what you want from a leafy green in a saucy dinner.
Key Ingredients:
- 2 tbsp olive oil — enough to soften the onion and bloom the spices.
- 1 large onion, diced — gives the sauce its base sweetness.
- 3 garlic cloves, minced — don’t let them brown too hard.
- 1 tbsp fresh ginger, grated — keeps the curry from tasting flat.
- 2 tbsp curry powder — use one you actually like, not the dusty jar at the back of the cabinet.
- 1 tsp ground cumin — deepens the warm spice note.
- 1 can (28 oz) crushed tomatoes — the tomato layer needs to be substantial.
- 2 cans (15 oz each) chickpeas, drained and rinsed — the main body of the dish.
- 1 can (13.5 oz) full-fat coconut milk — rounds out the tomato sharpness.
- 3 packed cups baby spinach — stirred in at the end so it stays green.
- 1 tsp sugar — a tiny amount, only to soften the tomato’s edge.
- 1 tbsp lemon juice — finishes the sauce with a clean snap.
- ½ cup chopped cilantro — optional, but it adds lift.
Quick Steps:
- Soften the onion: Heat the oil in a Dutch oven over medium heat. Add the onion and cook for 6 to 7 minutes, until soft and faintly golden.
- Bloom the spices: Stir in the garlic, ginger, curry powder, and cumin. Cook for 30 seconds, just until fragrant.
- Build the tomato base: Pour in the crushed tomatoes, chickpeas, sugar, and ½ cup water. Bring to a simmer and cook for 10 minutes, stirring now and then.
- Add coconut milk: Stir in the coconut milk and keep the heat low. Simmer for 8 to 10 minutes, until the sauce turns thick and glossy.
- Finish with greens: Add the spinach in handfuls and stir until just wilted, about 1 minute.
- Brighten the bowl: Turn off the heat, add lemon juice, and taste for salt. The sauce should be rich, tangy, and a little warm on the back end.
Equipment for This Recipe:
- Dutch oven or deep pot — gives the tomatoes room to bubble.
- Wooden spoon — useful for scraping the bottom so nothing sticks.
- Can opener — more important than people admit.
- Microplane or grater — if you’re using fresh ginger.
How to Serve This Dish:
This one likes basmati rice, warm naan, or even a chunk of toasted sourdough if that’s what you’ve got. A spoon of yogurt on top is optional, though I usually skip it because the curry already has enough creaminess. It serves 4 to 6, depending on how much rice you pile underneath.
Pro Tips for This Recipe:
- Let the tomatoes cook for the full 10 minutes before adding coconut milk. That’s where the raw edge disappears.
- If the curry feels thin, simmer it uncovered for 5 more minutes instead of adding extra chickpeas.
- A pinch of chili flakes works better than dumping in a lot of curry powder if you want more heat.
Variations on This Dish:
- Sweet Potato Chickpea Curry: Add 2 cups peeled sweet potato cubes with the tomatoes and simmer until tender.
- Creamier Pantry Version: Stir in 2 tablespoons cashew butter with the coconut milk for a richer, silkier sauce.
Common Mistakes to Avoid with This Dish:
- Don’t add spinach too early or it turns dark and limp.
- Don’t use watery diced tomatoes unless you reduce them longer; the sauce gets weak fast.
- Don’t skip the lemon or another acid. Tomato plus coconut needs that last sharp note.
4. Salmon Coconut Curry with Green Beans and Ginger
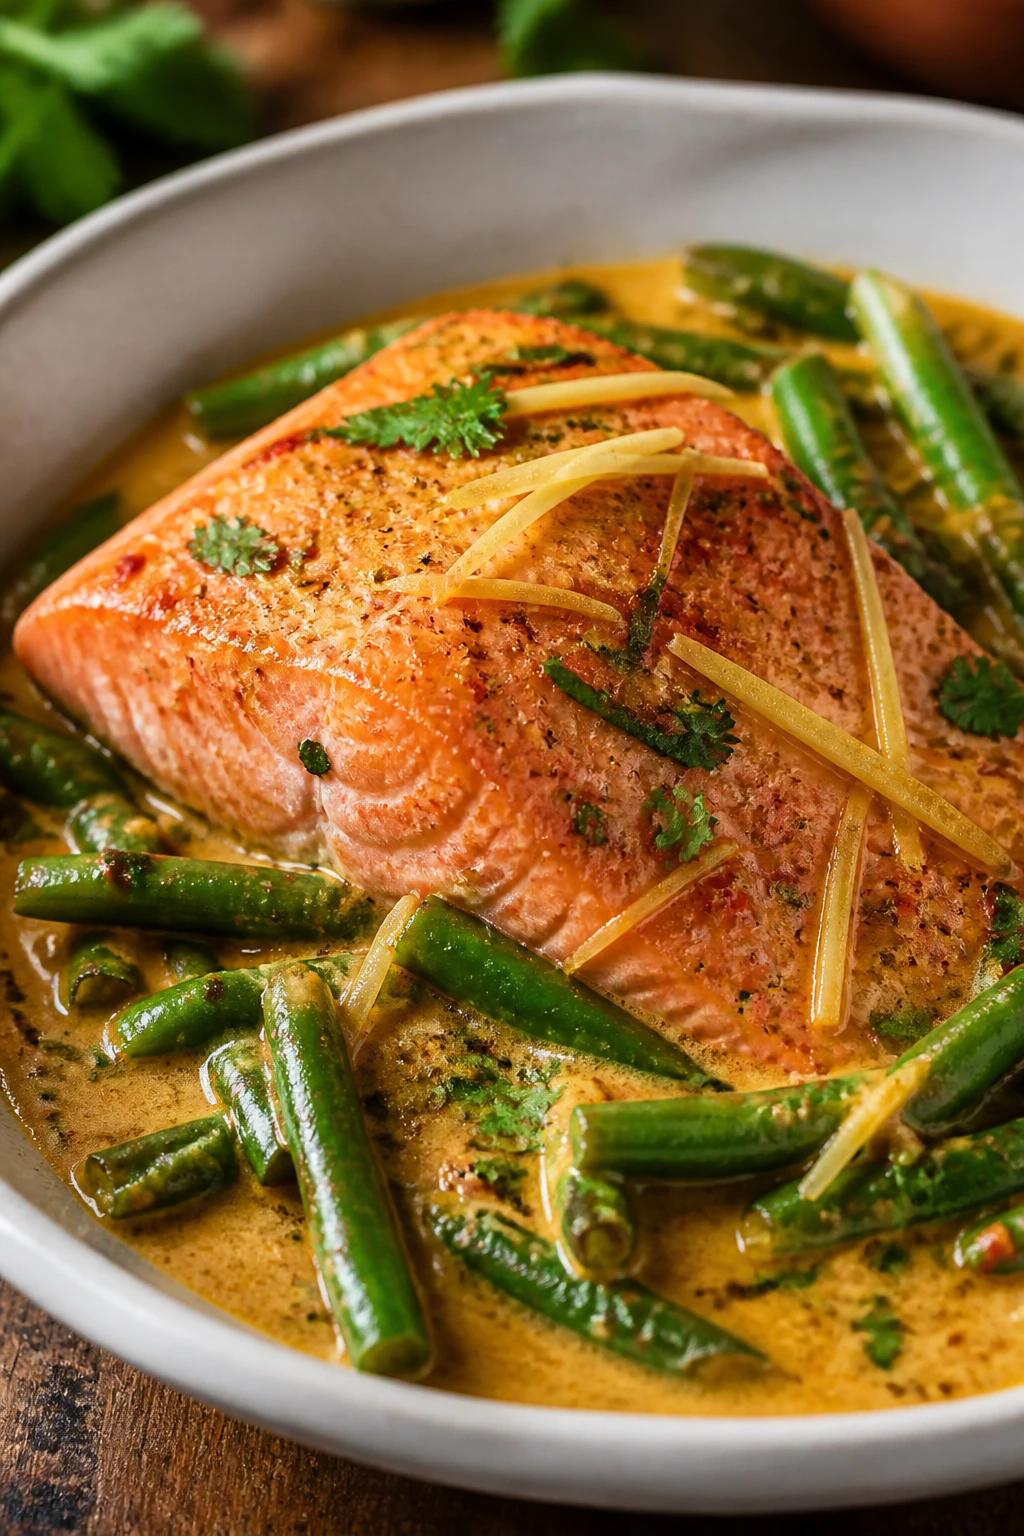
Salmon changes the texture of a coconut curry immediately. The sauce gets richer from the fish’s own fat, the green beans stay bright and firm, and ginger gives the whole pan a sharper, cleaner finish than you’d expect. This is not the curry you simmer all afternoon. It’s the curry you make when you want something polished without acting like you had time to be polished.
Why It Works:
Salmon cooks best in the sauce only after the curry base is already built. That way the fillets poach gently instead of breaking apart while the aromatics are still sorting themselves out. Green curry paste leans herbal and grassy, which works with salmon in a way red curry sometimes doesn’t. Lime zest and juice help cut through the fish oil so the sauce stays balanced.
Key Ingredients:
- 1½ lb salmon fillets, skin on or off, cut into 4 portions — choose center-cut pieces if you can.
- 1 tbsp neutral oil — just enough for the aromatics.
- 1 small shallot, minced — a gentle sweet base.
- 1 tbsp fresh ginger, grated — salmon likes ginger more than garlic-heavy sauces do.
- 2 tbsp green curry paste — herbal, peppery, and a little sharp.
- 1 can (13.5 oz) full-fat coconut milk — gives the poaching liquid its body.
- 1 cup chicken broth or fish stock — enough liquid to poach the beans and fish.
- 8 oz green beans, trimmed — they should stay bright and a little crisp.
- 1 tbsp soy sauce or tamari — adds salt without pushing the curry into fish-sauce territory.
- 1 lime, zested and juiced — use both.
- 2 tbsp chopped cilantro or Thai basil — choose one, not both.
- 1 tsp honey — just enough to round the ginger and curry paste.
Quick Steps:
- Cook the aromatics: Heat the oil in a large skillet over medium heat. Add the shallot and ginger and cook for 1 minute until fragrant.
- Bloom the paste: Stir in the green curry paste and cook for 30 seconds, letting it darken in the oil.
- Build the poaching sauce: Add the coconut milk, broth, soy sauce, lime zest, and honey. Bring the pan to a gentle simmer.
- Add the green beans: Simmer for 4 minutes, until they’re bright green and just starting to soften.
- Nestle the salmon: Lay the salmon in the sauce, skin side down if using skin-on fillets. Cover and cook for 5 to 7 minutes, until the fish flakes at the thickest part and reads 125°F to 130°F for medium.
- Finish cleanly: Turn off the heat, add lime juice, and scatter cilantro or basil over the top.
Equipment for This Recipe:
- Wide skillet with a lid — needed for gentle poaching.
- Fish spatula — keeps the fillets intact.
- Microplane — for lime zest.
- Instant-read thermometer — the easiest way to avoid overcooking.
How to Serve This Dish:
Serve it with jasmine rice or brown rice, depending on how much texture you want under the sauce. A simple cucumber salad works well on the side because the curry is rich enough already. This feeds 4, and the salmon should sit on top of the rice rather than disappear into it.
Pro Tips for This Recipe:
- Don’t boil the fish. A hard simmer breaks the salmon before the center is done.
- If your green beans are thick, give them an extra minute before adding the salmon.
- A little lime zest goes a long way. Too much can make the sauce taste perfumy.
Variations on This Dish:
- Cod Coconut Curry: Swap salmon for cod and cut the simmer time to 4 to 5 minutes after the fish goes in.
- Herby Finish: Use dill instead of basil if you want a more Nordic, cool finish.
Common Mistakes to Avoid with This Dish:
- Don’t leave the salmon in the pan after the heat is off if it’s already done. Carryover cooking is real.
- Don’t use tiny flake salmon pieces if you want neat fillets; they break apart too fast.
- Don’t skip the lime zest. It gives the dish a lift that juice alone can’t match.
5. Beef and Sweet Potato Coconut Curry

This curry has more weight to it. The beef brings depth, the sweet potato softens the edges, and peanut butter gives the sauce a nutty thickness that feels almost satiny on the tongue. It tastes deeper than the lighter Thai-style curries, which is why it earns its place here. I like it with a pile of rice and a handful of scallions on top.
Why It Works:
Thin-sliced beef cooks fast enough to stay tender, especially if you keep the simmer gentle. Sweet potato thickens the curry a little as it breaks down, which means the sauce doesn’t need a flour slurry or any weird help. Peanut butter and coconut milk get along better than people expect; one gives richness, the other gives softness. A little soy sauce and lime keep the whole thing from tasting heavy.
Key Ingredients:
- 1½ lb flank steak or sirloin, thinly sliced against the grain — slice it thin or it’ll chew like a boot.
- 2 tbsp neutral oil — divided.
- 1 large onion, sliced — the sweet base.
- 2 tbsp red curry paste — gives the sauce heat and color.
- 1 large sweet potato, peeled and cut into ¾-inch cubes — needs enough time to soften.
- 1 can (13.5 oz) full-fat coconut milk — the sauce body.
- 1 cup beef broth — helps the sweet potato cook without drying out the pan.
- 2 tbsp creamy peanut butter — use unsweetened if you can.
- 1 tbsp soy sauce — depth and salt.
- 1 tbsp lime juice — keeps the sauce bright.
- 2 scallions, sliced — a fresh top note.
- 2 tbsp chopped roasted peanuts — optional, but they make sense here.
Quick Steps:
- Sear the beef: Heat 1 tablespoon of the oil in a large skillet over high heat. Add the beef in a single layer and sear for 1 minute per side, just until browned but not cooked through. Remove to a plate.
- Cook the onion and curry paste: Lower the heat to medium and add the remaining oil and onion. Cook for 4 minutes, then stir in the curry paste and cook for 30 seconds.
- Simmer the sweet potato: Add the sweet potato, coconut milk, broth, peanut butter, and soy sauce. Bring to a steady simmer and cook for 12 to 15 minutes, until the potato is tender at the center.
- Return the beef: Slide the beef and any juices back into the pan. Simmer for 2 minutes, just long enough to warm it through.
- Finish with lime: Turn off the heat, stir in the lime juice, and taste for salt. Top with scallions and peanuts.
Equipment for This Recipe:
- Large skillet or Dutch oven — beef and sweet potato need room.
- Sharp knife — thin slices matter here.
- Wooden spoon — peanut butter clings; this helps.
- Cutting board with a damp towel underneath — keeps it steady while slicing beef.
How to Serve This Dish:
This curry likes jasmine rice, but it also does well with rice noodles if you want something slurpy. A crunchy side, like a cucumber salad, keeps the meal from getting too rich. Four servings feels right, though the beef version is the kind people sneak back to for seconds.
Pro Tips for This Recipe:
- Partially freeze the beef for 20 minutes before slicing. It makes thin cuts much easier.
- Don’t simmer the beef for the whole sweet potato cook time. It will toughen.
- If the sauce looks too thick, splash in another ¼ cup broth.
Variations on This Dish:
- Goat Cheese Finish? Skip It: Not here. Peanut and coconut already give enough creaminess.
- Chili-Crisp Beef Curry: Drizzle chili crisp on top if you want a sharp, crunchy finish.
Common Mistakes to Avoid with This Dish:
- Don’t cut the sweet potato too large or it stays hard while the sauce reduces.
- Don’t use chunky peanut butter unless you want visible bits in the sauce.
- Don’t overcook the beef during the first sear; it finishes later in the curry.
6. Tofu and Eggplant Coconut Curry with Miso
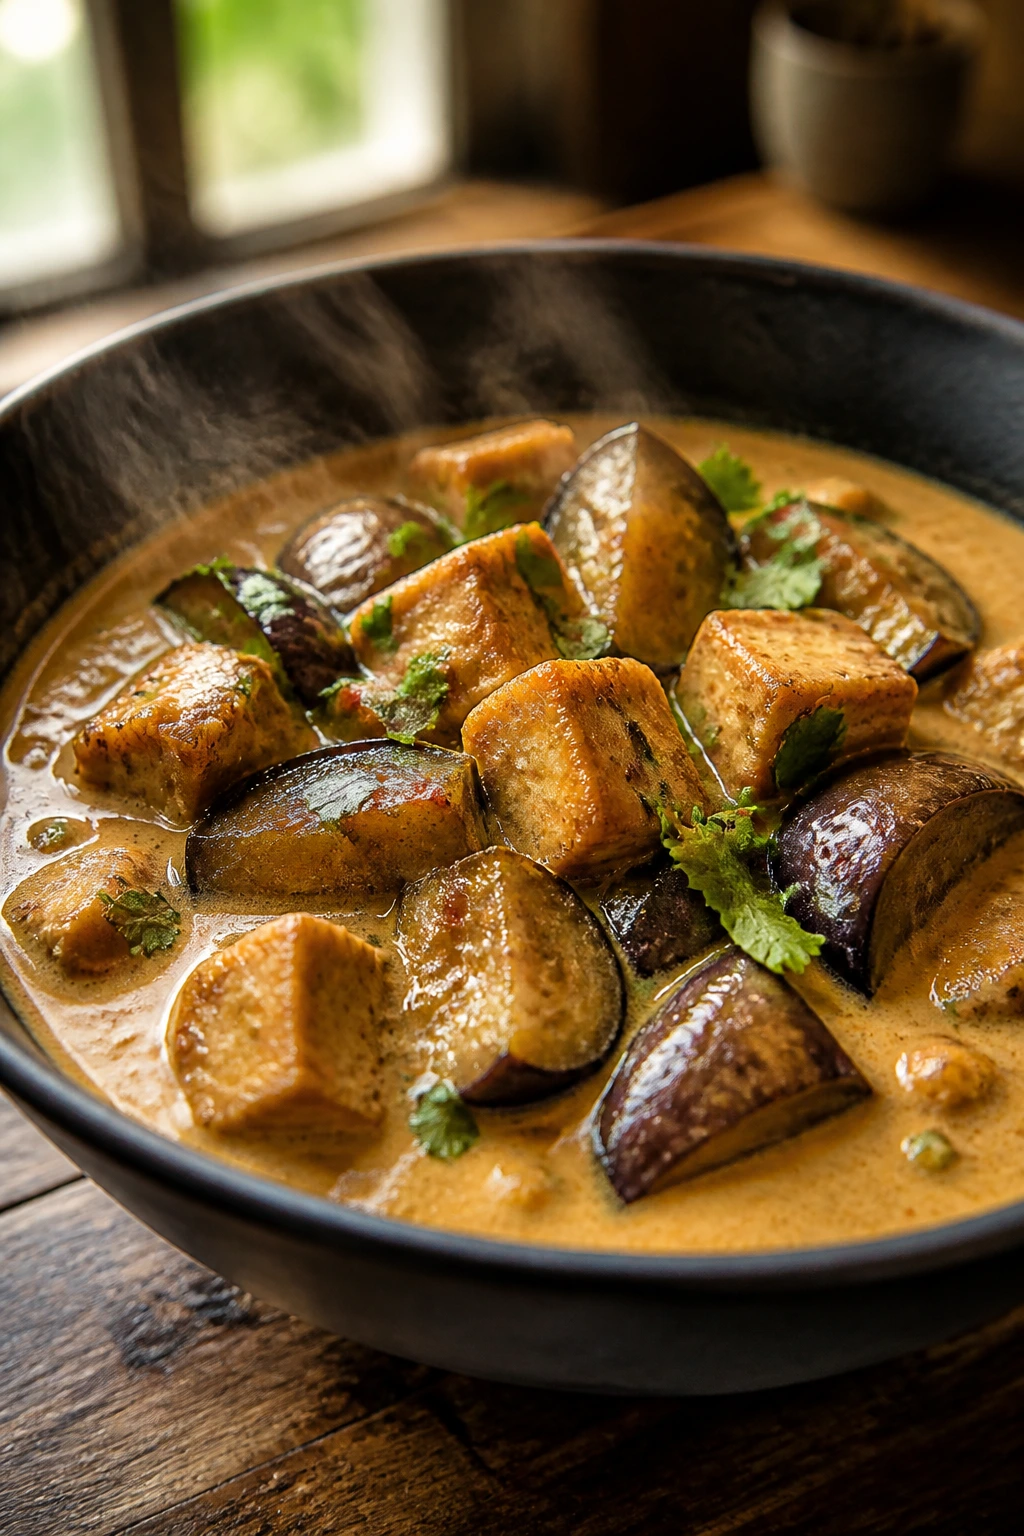
This is the vegetarian curry that doesn’t apologize for being vegetarian. Eggplant turns silky, tofu gets crisp on the outside if you treat it right, and white miso adds a deep savory edge that keeps the coconut milk from feeling soft and vague. Sesame oil at the end nudges the whole dish toward nutty, toasted territory. Different lane. Same comfort.
Why It Works:
Eggplant loves fat, and coconut milk gives it exactly what it wants while the miso brings umami that tofu soaks up like a sponge. Pressed extra-firm tofu holds shape in the pan instead of falling apart in the sauce. Green curry paste and ginger make the flavor sharper than a standard red curry, which helps the eggplant stay interesting even after a few bites. A little sesame oil at the end reads as flavor, not grease, if you keep it modest.
Key Ingredients:
- 1 block (14 to 16 oz) extra-firm tofu, pressed and cut into cubes — pressing matters more than people want to hear.
- 1 medium eggplant, cut into 1-inch cubes — keep the pieces big enough to stay intact.
- 2 tbsp neutral oil — for browning the tofu and eggplant.
- 1 small onion, sliced — builds the base.
- 1 tbsp fresh ginger, grated — brightens the sauce.
- 2 tbsp green curry paste — herbal and sharp.
- 1 tbsp white miso — stir it in off the heat if possible.
- 1 can (13.5 oz) full-fat coconut milk — provides richness.
- ¾ cup vegetable broth — loosens the sauce.
- 1 tbsp soy sauce — balances the miso.
- 1 tsp sesame oil — a finishing touch, not a frying oil.
- 2 scallions, sliced — fresh and crunchy.
- ¼ cup basil leaves — Thai basil if you have it, regular basil if you don’t.
Quick Steps:
- Brown the tofu: Heat 1 tablespoon of oil in a large skillet over medium-high heat. Add the tofu and cook for 6 to 8 minutes, turning occasionally, until the sides are golden.
- Cook the eggplant: Add the remaining oil and the eggplant. Cook for 5 minutes, stirring only now and then, until the cubes start to soften and catch some color.
- Build the curry base: Add the onion and ginger, then cook for 2 minutes. Stir in the curry paste and cook for 30 seconds.
- Add the liquids: Pour in the coconut milk, broth, soy sauce, and miso. Stir until the miso dissolves and the sauce is smooth.
- Simmer gently: Cook for 10 to 12 minutes, until the eggplant is fully tender and the sauce looks glossy.
- Finish: Turn off the heat, stir in sesame oil, and fold in the scallions and basil.
Equipment for This Recipe:
- Large nonstick or stainless skillet — useful for browning tofu and eggplant.
- Plate lined with paper towels — for drying the tofu.
- Spatula — for turning the tofu without breaking it.
- Measuring spoon for miso — a little goes far.
How to Serve This Dish:
Serve it over rice or soba noodles if you want a little more chew. I like a few extra scallions on top and a squeeze of lime, even though sesame and miso already pull the flavor in a different direction. This feeds 4, and the bowl looks best when the eggplant is visible rather than submerged.
Pro Tips for This Recipe:
- Press the tofu for at least 15 minutes. If it’s wet, it will steam instead of brown.
- Eggplant soaks up oil fast. Don’t panic if the pan looks dry after the first few minutes.
- Add the miso off the heat if your pan is scorching hot; it tastes cleaner that way.
Variations on This Dish:
- Crispy Tofu Bowl: Dust the tofu with cornstarch before frying for a harder crust.
- Peanut-Miso Version: Stir 1 tablespoon peanut butter into the sauce for a thicker, nuttier finish.
Common Mistakes to Avoid with This Dish:
- Don’t skip pressing the tofu. Soft tofu in this curry turns crumbly and bland.
- Don’t overcrowd the pan with eggplant or it steams and never browns.
- Don’t drown the sesame oil in the sauce. A teaspoon is enough.
7. Ground Turkey Coconut Curry with Peas and Carrots
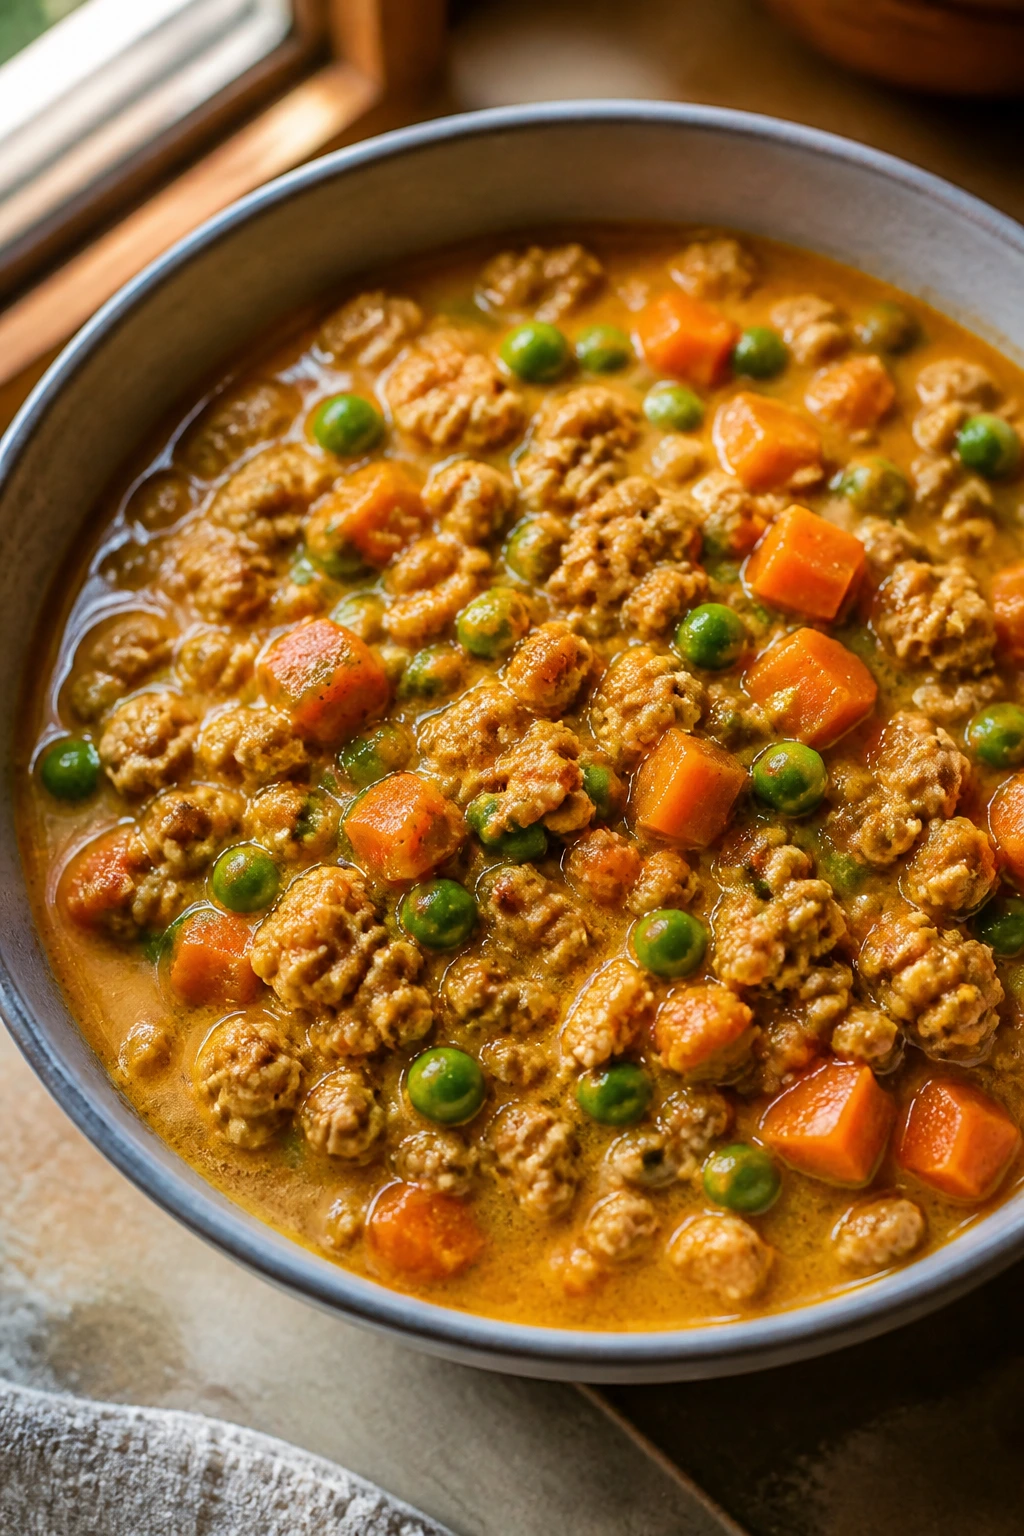
This one tastes like curry met weeknight meat sauce and decided to behave itself. Ground turkey keeps the curry light, peas and carrots bring a faint sweetness, and tomato paste adds a darker savory note so the whole thing doesn’t feel thin. It’s the most lunchbox-friendly of the bunch, and it reheats without turning weird.
Why It Works:
Ground turkey benefits from a little tomato paste and spice because, on its own, it can taste flat. Curry powder, garlic, and ginger give it a more layered base, while coconut milk smooths out the edges. Peas and carrots add color and a familiar sweetness that makes this one easy to like even for people who claim not to “do curry.” The sauce tightens up as it simmers, which makes it good over rice or mashed potatoes.
Key Ingredients:
- 1½ lb ground turkey — 93% lean works well here.
- 1 tbsp neutral oil — enough to get the turkey moving.
- 1 large onion, diced — gives the curry some body.
- 2 garlic cloves, minced — don’t burn them.
- 1 tbsp fresh ginger, grated — keeps the flavor bright.
- 2 tbsp curry powder — warm, earthy, and pantry-driven.
- 1 tbsp tomato paste — deepens the sauce.
- 1 can (13.5 oz) full-fat coconut milk — adds creaminess.
- ½ cup chicken broth — helps the turkey simmer without drying.
- 1 cup diced carrots — cut small so they cook through.
- 1 cup frozen peas — no need to thaw them first.
- 1 tbsp lemon juice — lifts the final bowl.
- 2 tbsp chopped cilantro — optional, but it freshens the meatiness.
Quick Steps:
- Brown the turkey: Heat the oil in a large skillet over medium-high heat. Add the turkey and cook for 5 to 6 minutes, breaking it up, until no pink remains and the edges start to brown.
- Add the aromatics: Stir in the onion and cook for 4 minutes. Add garlic and ginger and cook for 30 seconds.
- Toast the spices: Stir in the curry powder and tomato paste. Cook for 1 minute, until the paste darkens and the spices smell warm.
- Simmer the sauce: Add the coconut milk, broth, and carrots. Lower the heat and simmer for 10 minutes, until the carrots are tender.
- Add peas and finish: Stir in the peas and cook for 2 minutes. Turn off the heat, add lemon juice, and adjust salt.
Equipment for This Recipe:
- Large skillet — turkey needs room to brown.
- Wooden spoon or spatula — good for breaking up the meat.
- Microplane — if you want fine ginger.
- Colander or small bowl — to keep frozen peas ready.
How to Serve This Dish:
Serve it over rice, mashed potatoes, or even buttered noodles if you want an old-school comfort angle. A simple green salad on the side keeps the plate from feeling too soft and beige. Four to six servings is realistic, depending on how much starch you add.
Pro Tips for This Recipe:
- Let the turkey brown a little before stirring it apart completely. That browning carries flavor.
- Frozen peas go in at the end. They turn dull if they cook too long.
- If you want the curry thicker, simmer it uncovered for another 3 minutes.
Variations on This Dish:
- Turkey and Potato Curry: Swap the carrots for 2 cups diced Yukon gold potatoes and simmer until tender.
- Mild Family Version: Use 1 tablespoon curry powder and add an extra ¼ cup coconut milk.
Common Mistakes to Avoid with This Dish:
- Don’t stop browning the turkey too early. Pale ground turkey tastes pale.
- Don’t overcook the peas. They should stay green and a little sweet.
- Don’t leave out the tomato paste; it gives the curry a deeper backbone.
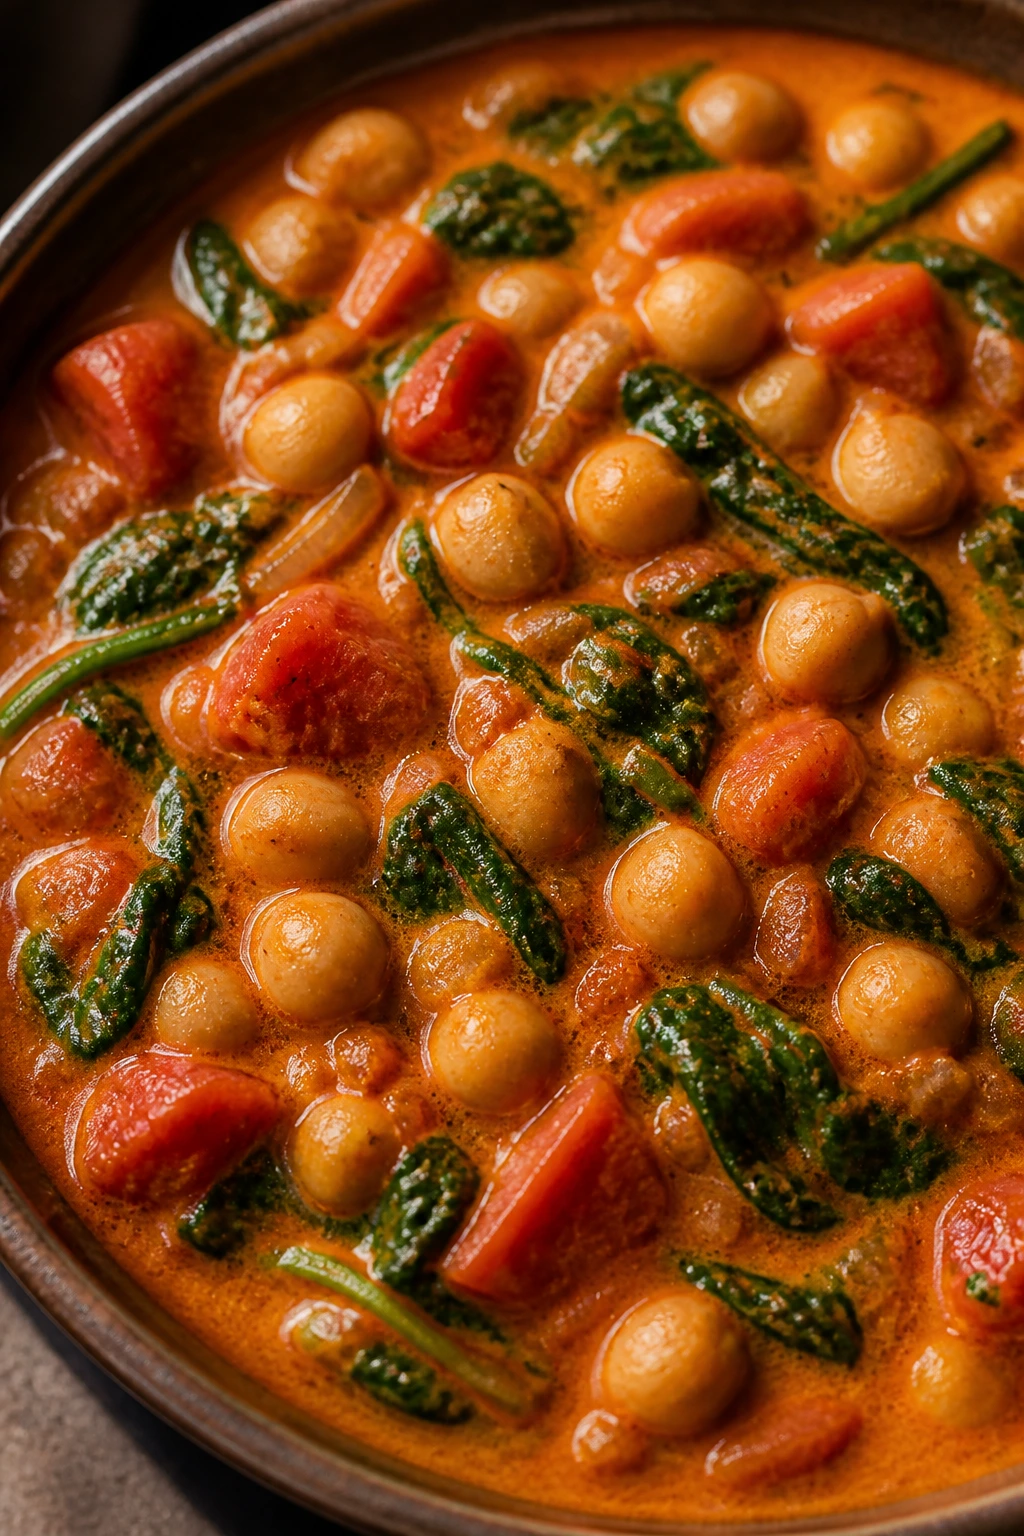
8. Cauliflower, Red Lentil, and Coconut Curry
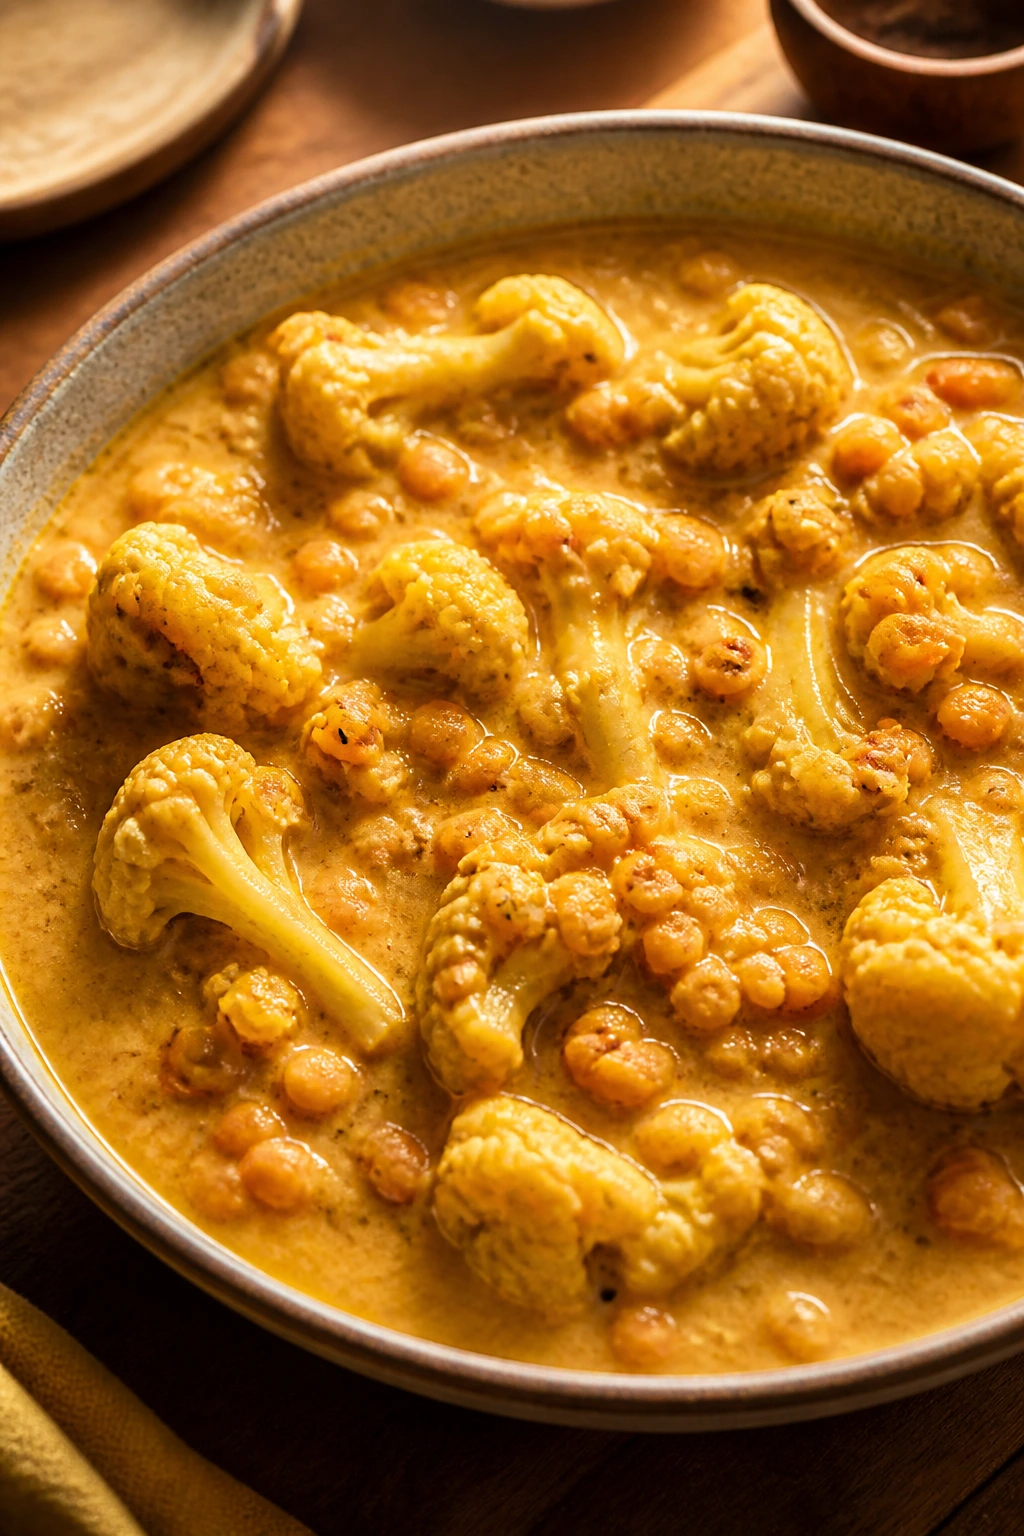
This is the big spoon curry. Thick, soft, and meant to be scooped rather than politely sipped. Red lentils collapse into the sauce, cauliflower softens at the edges, and the coconut milk turns everything into a bowl that feels fuller than the ingredient list looks. It’s vegetarian, but nobody eats it and complains it’s missing something.
Why It Works:
Red lentils cook fast and break down into a natural thickener, which means the curry gets body without flour or cream. Cauliflower gives you soft florets and little browned spots if you roast it first or let it simmer properly. Curry powder and cumin keep the flavor warm and earthy, while a final squeeze of lime cuts through the starch. This one is better than it sounds on paper. A lot better.
Key Ingredients:
- 1 medium head cauliflower, cut into small florets — smaller florets cook evenly.
- 1 cup red lentils, rinsed well — they need the dust washed off.
- 1 large onion, diced — the base.
- 1 tbsp grated ginger — brings the curry back to life.
- 2 tbsp curry powder — use a fresh jar.
- 1 tsp ground cumin — adds warmth.
- 1 can (14.5 oz) diced tomatoes — gives the sauce structure.
- 1 can (13.5 oz) full-fat coconut milk — rounds out the lentils.
- 2 cups vegetable broth — enough liquid for the lentils to soften.
- 1 tbsp lime juice — bright finish.
- ¼ cup chopped cilantro — for the top.
- Salt and black pepper — as needed.
Quick Steps:
- Soften the onion: Heat oil in a pot over medium heat and cook the onion for 5 minutes until translucent.
- Add spice: Stir in ginger, curry powder, and cumin. Cook for 30 seconds.
- Build the pot: Add tomatoes, lentils, broth, and cauliflower. Bring to a simmer.
- Cook until tender: Cover partially and simmer for 15 to 18 minutes, stirring once or twice, until the lentils have broken down and the cauliflower is tender.
- Stir in coconut milk: Add the coconut milk and simmer for 3 more minutes.
- Finish with lime: Turn off the heat, add lime juice, and taste for salt.
Equipment for This Recipe:
- Medium Dutch oven or soup pot — the lentils need room.
- Wooden spoon — lentils like to stick if you forget them.
- Fine-mesh strainer — for rinsing lentils.
- Ladle — because this one is thick enough to serve like stew.
How to Serve This Dish:
This works with rice, naan, or a spoon and a quiet kitchen. I like it with a little yogurt on top if I’m not trying to keep it fully dairy-free. It serves 4 to 6, and it thickens as it cools, so don’t panic if it seems loose at first.
Pro Tips for This Recipe:
- Rinse the red lentils until the water runs clearer. Dusty lentils make the pot cloudy in a bad way.
- Add a splash more broth if it starts sticking before the lentils are fully soft.
- Lime at the end matters here. Without it, the curry tastes heavier than it should.
Variations on This Dish:
- Roasted Cauliflower Version: Roast the cauliflower at 425°F for 20 minutes before adding it to the pot.
- Spinach Lentil Curry: Stir in 3 cups baby spinach at the end for a greener bowl.
Common Mistakes to Avoid with This Dish:
- Don’t boil it aggressively. Lentils can scorch on the bottom if the heat is too high.
- Don’t forget to stir once or twice during the simmer.
- Don’t use brown lentils and expect the same texture; they hold their shape and won’t thicken the sauce the same way.
9. Mussel Coconut Curry with Fennel and Tomato
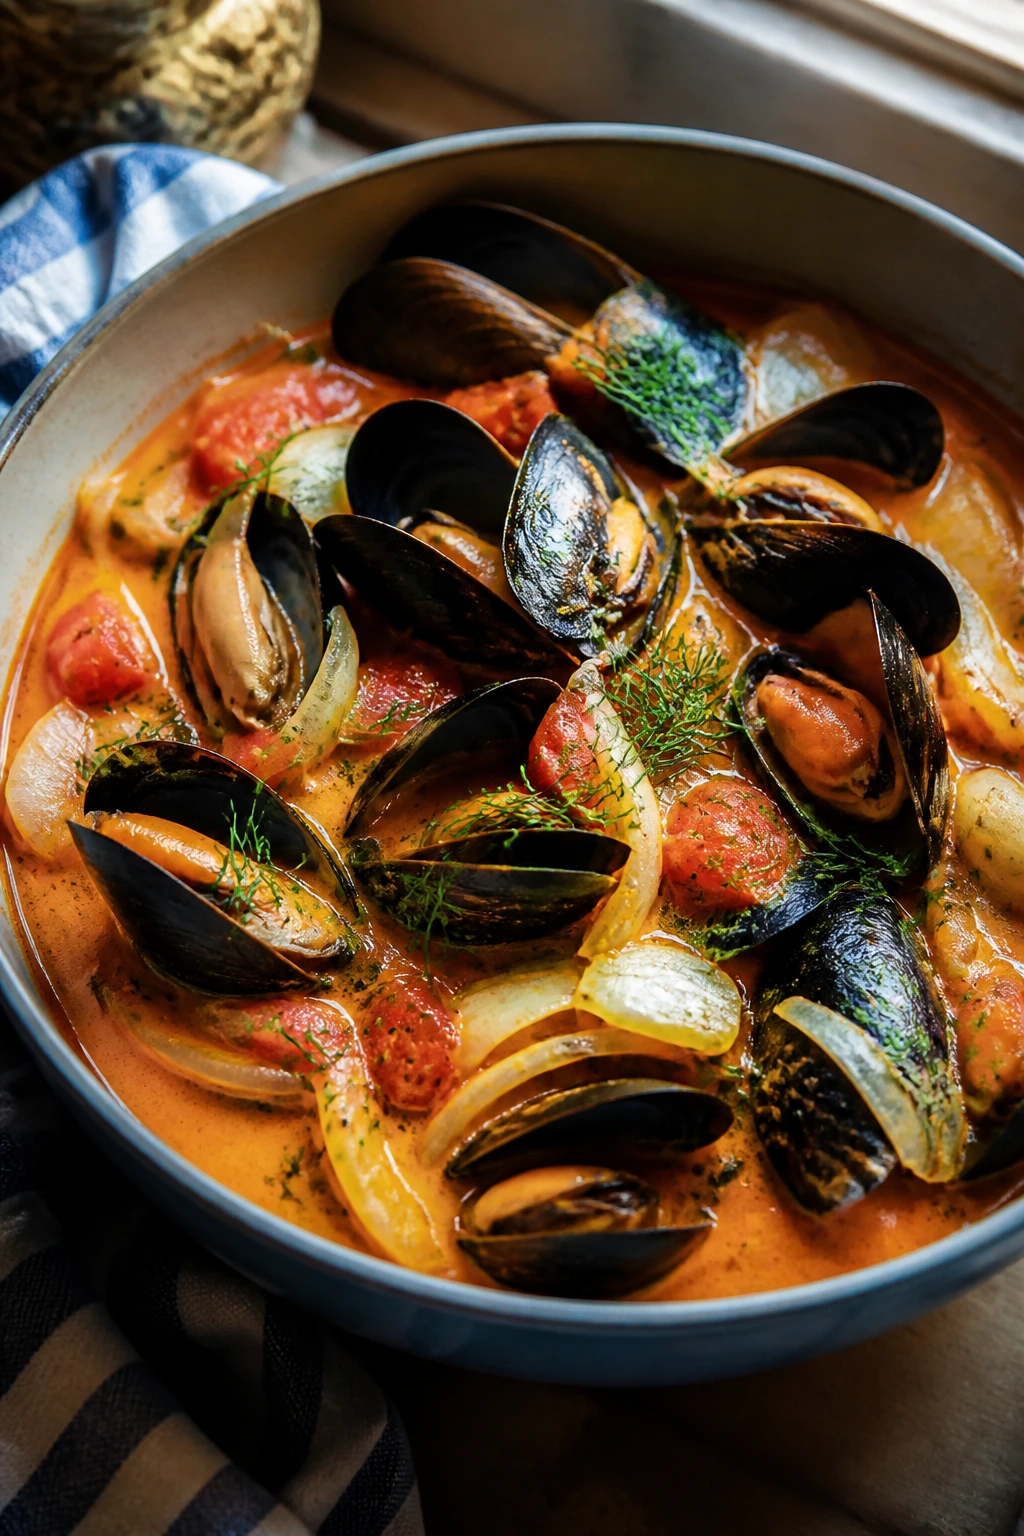
Briny, fragrant, and a little dramatic. Mussels bring their own ocean edge, fennel adds a faint anise sweetness, and the tomato-coconut base tastes more like a coastal stew than a standard curry. This is the bowl you make when you want dinner to feel like it came from a place with a harbor, even if it came from a supermarket fish counter.
Why It Works:
Mussels cook by steam, so they’re perfect for a curry sauce that’s already built and simmering. Fennel softens into the base without taking over, and tomato gives the broth enough structure to stand up to the shells. Green curry paste keeps the dish bright rather than muddy. The key is restraint. Mussels need a short, hot finish, not a long simmer.
Key Ingredients:
- 2 lb mussels, scrubbed and debearded — discard any with cracked shells or ones that stay open when tapped.
- 1 tbsp olive oil — enough to soften the vegetables.
- 1 small fennel bulb, thinly sliced — use the fronds too if they look good.
- 1 shallot, minced — sweet, soft base.
- 3 garlic cloves, minced — mussels love garlic.
- 2 tbsp green curry paste — herbal and sharp.
- 1 can (13.5 oz) full-fat coconut milk — gives the broth body.
- 1 cup crushed tomatoes — adds acidity and color.
- ¾ cup fish stock, clam juice, or water — enough liquid for steaming.
- 1 tbsp fish sauce — brings the shellfish flavor forward.
- 1 handful basil or parsley leaves — both work, just pick one.
- 1 lime, cut into wedges — non-negotiable.
Quick Steps:
- Soften the fennel: Heat the oil in a wide pot over medium heat. Add fennel and shallot and cook for 5 minutes until soft.
- Add garlic and curry paste: Cook for 30 seconds, stirring constantly so the garlic doesn’t scorch.
- Build the broth: Add coconut milk, tomatoes, stock, and fish sauce. Bring to a gentle simmer.
- Add the mussels: Tip in the mussels, cover, and cook for 5 to 7 minutes, shaking the pot once or twice, until the shells open.
- Finish and check: Discard any mussels that stay shut. Turn off the heat, add herbs and lime juice, and serve immediately.
Equipment for This Recipe:
- Large lidded pot — mussels need steam.
- Colander — for washing the shells.
- Tongs or a slotted spoon — for serving.
- Small bowl — for the discarded shells.
How to Serve This Dish:
Serve it with crusty bread, rice, or both if you like soaking up broth with conviction. Put the pot on the table if you want the dramatic version; it looks better that way. This serves 4 as a main course, though shellfish eaters will go through it fast.
Pro Tips for This Recipe:
- Clean and sort the mussels before you start cooking. The sauce waits for no one.
- Don’t overcook the mussels or they shrink and toughen.
- Use a wide pot so the shells can open in a single layer as much as possible.
Variations on This Dish:
- Tomato-Heavy Coastal Curry: Add an extra half cup of crushed tomatoes for a richer, redder broth.
- Herb-Forward Finish: Use parsley and fennel fronds instead of basil for a cleaner, greener finish.
Common Mistakes to Avoid with This Dish:
- Don’t eat any mussel that stays closed after cooking. Toss it.
- Don’t simmer the mussels too long after they open. They get chewy fast.
- Don’t use a tiny pot. Crowded shells steam unevenly and the broth splashes everywhere.
10. Pork Coconut Curry with Cabbage and Apple
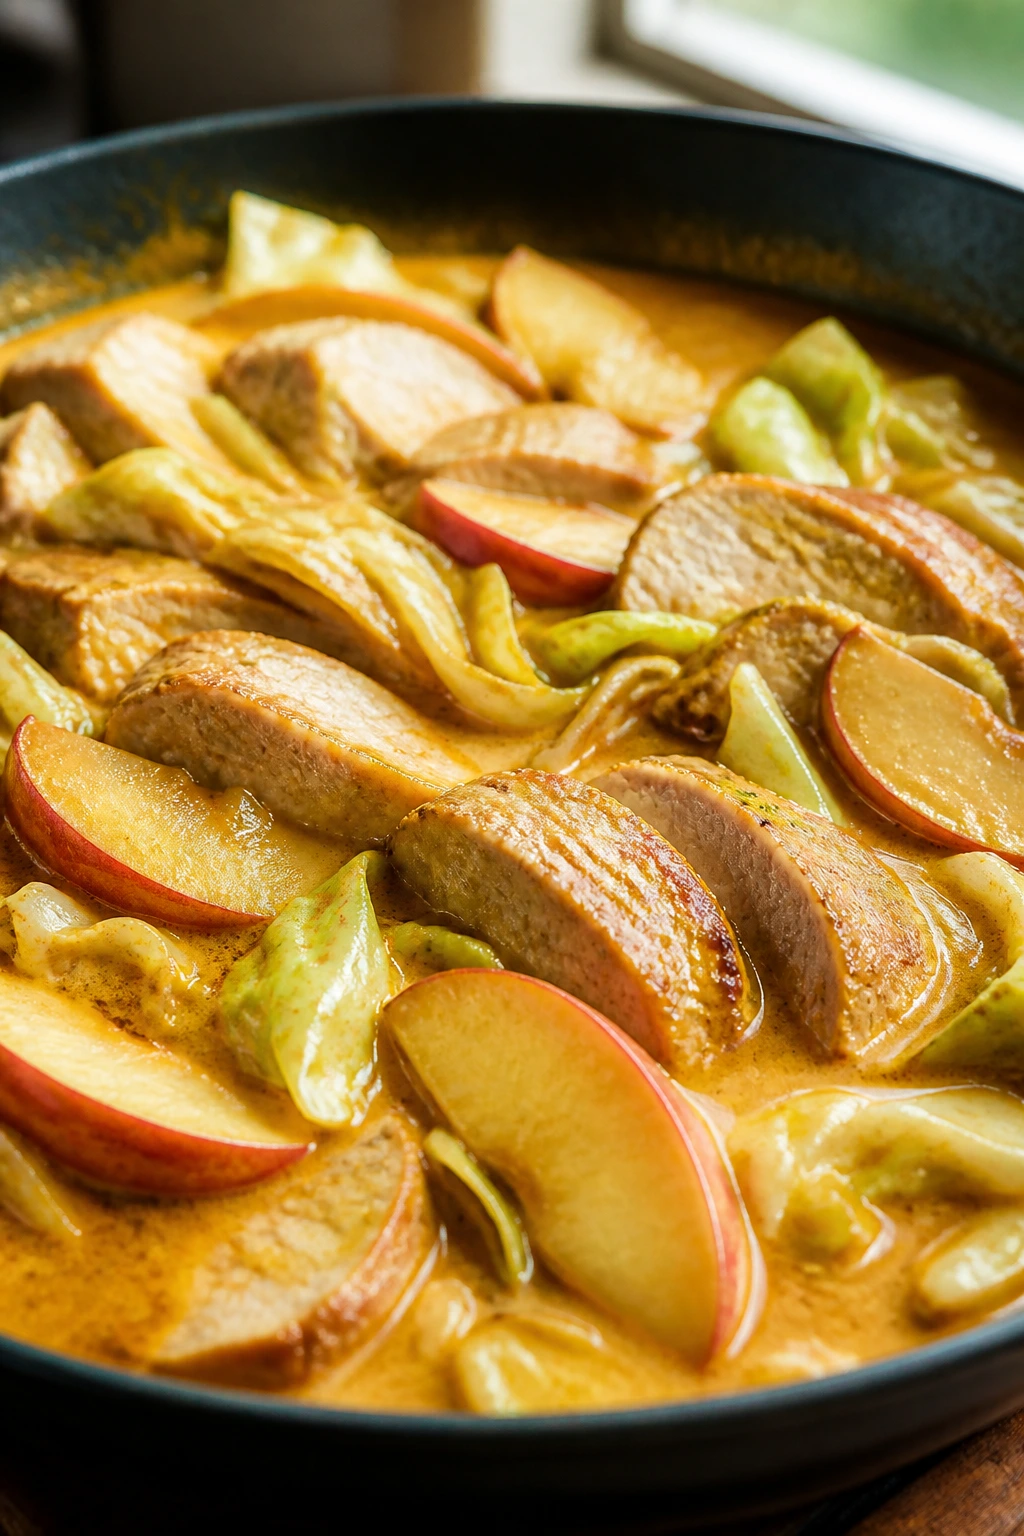
Pork and apple belong together, and coconut curry gives them a completely different stage. Cabbage adds crunch and volume, the apple softens into the sauce just enough to matter, and the curry paste keeps the whole bowl from tasting like a sweet braise in disguise. This is a quietly good dinner. Not flashy. Just smart.
Why It Works:
Pork tenderloin cooks fast and stays tender if you don’t overdo it. Cabbage has enough structure to stand up to a coconut sauce, and apples bring a tart-sweet note that works especially well with red curry paste. A splash of apple cider vinegar at the end sharpens everything in a way lime sometimes doesn’t. The final bowl tastes round, savory, and a little bright.
Key Ingredients:
- 1½ lb pork tenderloin, sliced into thin strips — trim the silver skin first.
- 1 tbsp neutral oil — for searing.
- 1 small green cabbage, thinly sliced — it shrinks a lot, so don’t be shy.
- 1 firm apple, peeled and thinly sliced — Granny Smith or Honeycrisp both work.
- 1 small onion, sliced — the base.
- 2 tbsp red curry paste — gives the sauce heat and color.
- 1 can (13.5 oz) full-fat coconut milk — the sauce body.
- ¾ cup chicken broth — for simmering the cabbage.
- 1 tbsp soy sauce — salt and depth.
- 1 tbsp apple cider vinegar — brightens the pork and apple.
- 1 tsp brown sugar — only enough to round the edges.
- 2 tbsp chopped parsley or cilantro — either works.
Quick Steps:
- Sear the pork: Heat the oil in a large skillet over medium-high heat. Add the pork in a single layer and sear for 2 minutes, just until browned. Remove to a plate.
- Cook the onion and curry paste: Add the onion to the pan and cook for 3 minutes. Stir in the curry paste and cook for 30 seconds.
- Add cabbage and apple: Toss in the cabbage and apple and cook for 4 minutes until the cabbage starts to soften.
- Simmer the curry: Pour in the coconut milk, broth, soy sauce, and brown sugar. Cover partially and simmer for 8 to 10 minutes, until the cabbage is tender but not limp.
- Return the pork: Add the pork and any juices back to the pan. Cook for 2 to 3 minutes, just until the pork is cooked through.
- Finish with vinegar: Turn off the heat, stir in apple cider vinegar, and top with herbs.
Equipment for This Recipe:
- Large skillet or sauté pan — pork and cabbage need room.
- Sharp knife — thin apple and cabbage slices are worth the effort.
- Tongs — helps turn the pork without shredding it.
- Cutting board with a juice groove — pork releases more liquid than you expect.
How to Serve This Dish:
Rice works, but buttered egg noodles are a perfectly reasonable detour here. A little extra herb on top makes the curry look lively, and a few thin apple slices on the side are not a bad idea if you want to lean into the flavor. This feeds 4.
Pro Tips for This Recipe:
- Slice the pork thin and across the grain so it stays tender.
- Don’t cook the cabbage until it goes floppy. A little bite keeps the dish from collapsing.
- Add the vinegar at the very end or it fades into the sauce.
Variations on This Dish:
- Pork and Napa Cabbage Curry: Use napa cabbage if you want a softer, faster-cooking version.
- Pork and Pear Curry: Swap the apple for firm pear and cut back the sugar slightly.
Common Mistakes to Avoid with This Dish:
- Don’t overcook pork tenderloin. It dries out fast.
- Don’t use a mealy apple. You want one that holds some shape.
- Don’t skip the vinegar finish. Apple and coconut both need that sharp edge.
11. Paneer Coconut Curry with Cashews and Green Beans
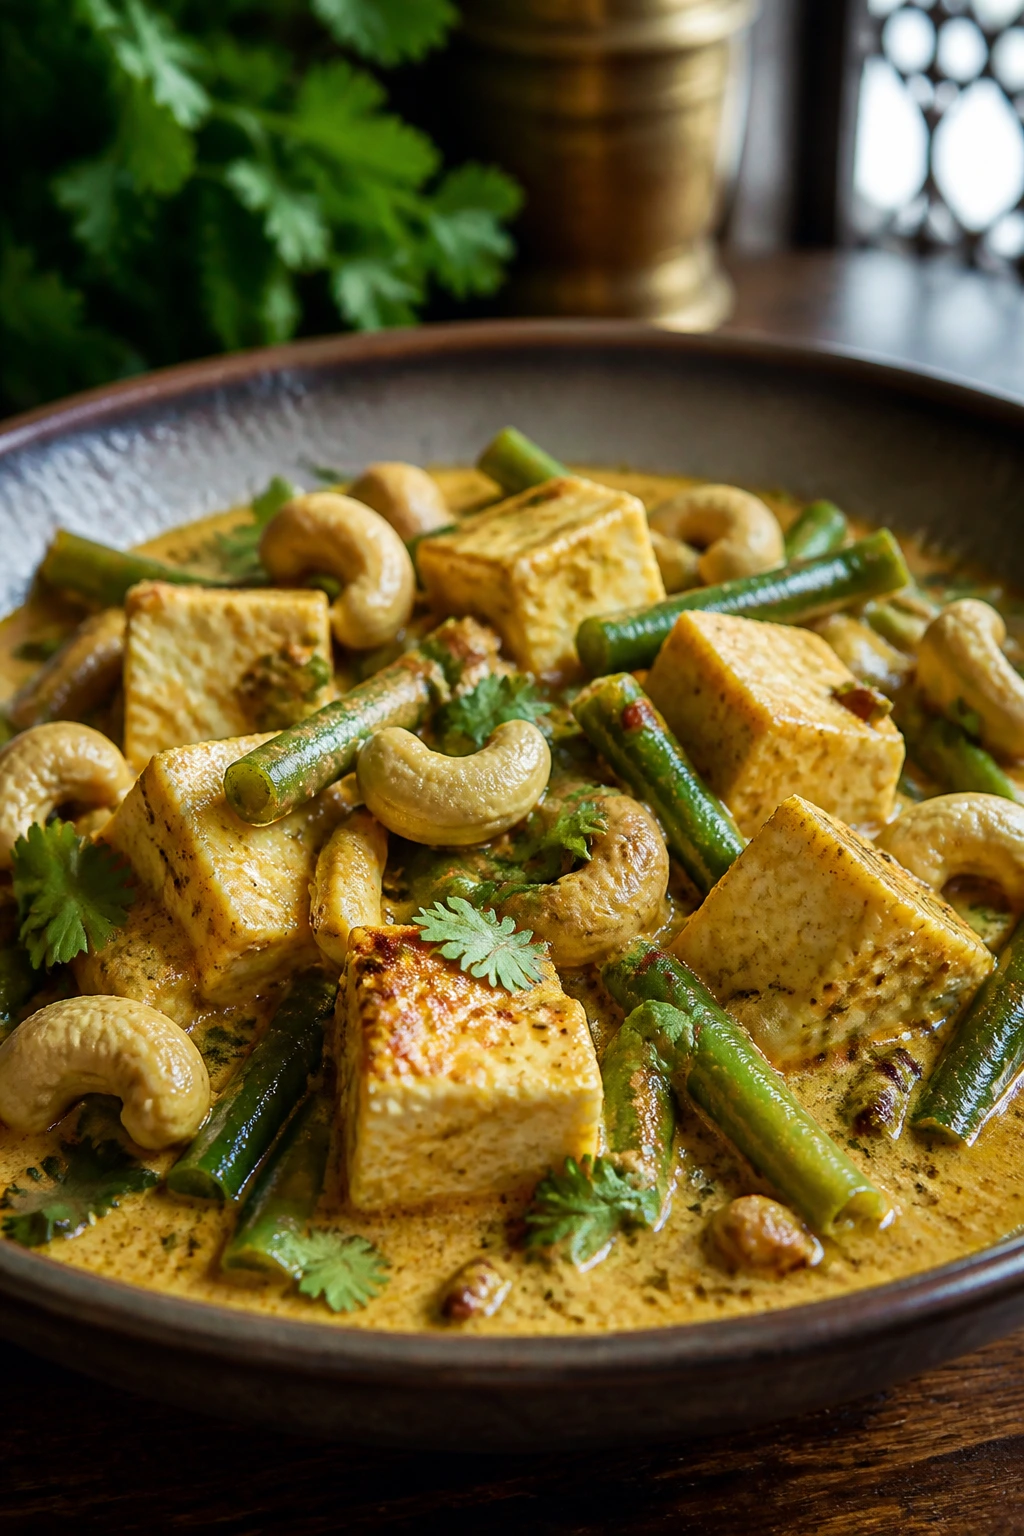
Paneer brings a chewy, milky richness that changes the texture of the whole bowl. Cashews make the sauce thicker and softer, green beans keep things from turning too creamy, and garam masala at the end gives the curry a warmer Indian-style finish than the Thai recipes above. This one feels plush without being heavy.
Why It Works:
Paneer can handle heat without melting, which makes it ideal for a simmering sauce. Cashews either thicken the curry naturally if you blend them or contribute a gentle crunch if you leave them whole. Green beans keep the bowl lively and stop the dish from becoming all sauce, all the time. A finish of garam masala works better than cooking it hard from the start, because the spice stays more fragrant that way.
Key Ingredients:
- 14 oz paneer, cut into cubes — pat it dry so it browns.
- 8 oz green beans, trimmed and cut in half — easier to eat.
- 1 tbsp ghee or neutral oil — for browning.
- 1 small onion, chopped — base flavor.
- 1 tbsp grated ginger — freshens the sauce.
- 2 tbsp mild curry powder or korma-style curry paste — choose one with warmth over heat.
- 1 can (13.5 oz) full-fat coconut milk — smooth and rich.
- ½ cup raw cashews — blend a few into the sauce or leave them whole.
- ¾ cup vegetable broth — for simmering.
- 1 tsp garam masala — stirred in at the end.
- 1 tbsp lemon juice — keeps the sauce from feeling too soft.
- 2 tbsp chopped cilantro — a fresh green finish.
Quick Steps:
- Brown the paneer: Heat the ghee in a skillet over medium heat. Add the paneer and cook for 3 to 4 minutes per side, until golden in spots. Remove to a plate.
- Cook the onion and ginger: Add the onion to the same pan and cook for 4 minutes. Stir in ginger and curry powder and cook for 30 seconds.
- Build the sauce: Add the coconut milk, broth, and cashews. Simmer for 5 minutes. If you want a smoother sauce, blend a scoop of it and return it to the pan.
- Add the green beans: Simmer for 6 to 8 minutes, until the beans are tender but still green.
- Return the paneer: Add it back and simmer for 2 minutes.
- Finish: Turn off the heat, add garam masala and lemon juice, and top with cilantro.
Equipment for This Recipe:
- Skillet or sauté pan — for browning paneer.
- Blender or immersion blender — optional if you want a smoother sauce.
- Measuring cups — cashews and liquid need balance.
- Spatula — paneer is sturdy but not indestructible.
How to Serve This Dish:
Serve it with basmati rice, naan, or both if you’re hungry in a serious way. A few extra cashews on top make the bowl feel finished. This makes 4 generous servings and looks especially good with the green beans peeking through the sauce.
Pro Tips for This Recipe:
- Don’t skip browning the paneer. Pale paneer tastes flat.
- If the cashews are hard, soak them in hot water for 10 minutes before blending.
- Add garam masala at the end so it smells alive instead of cooked out.
Variations on This Dish:
- Spinach Paneer Curry: Stir in 3 cups spinach during the last minute.
- Tomato-Cashew Version: Add 1 cup crushed tomatoes with the broth for a tangier sauce.
Common Mistakes to Avoid with This Dish:
- Don’t boil paneer for ages or it turns rubbery.
- Don’t use heavily salted curry paste and then add extra salt too soon.
- Don’t skip the lemon. Cashew and coconut need a sharp finish.
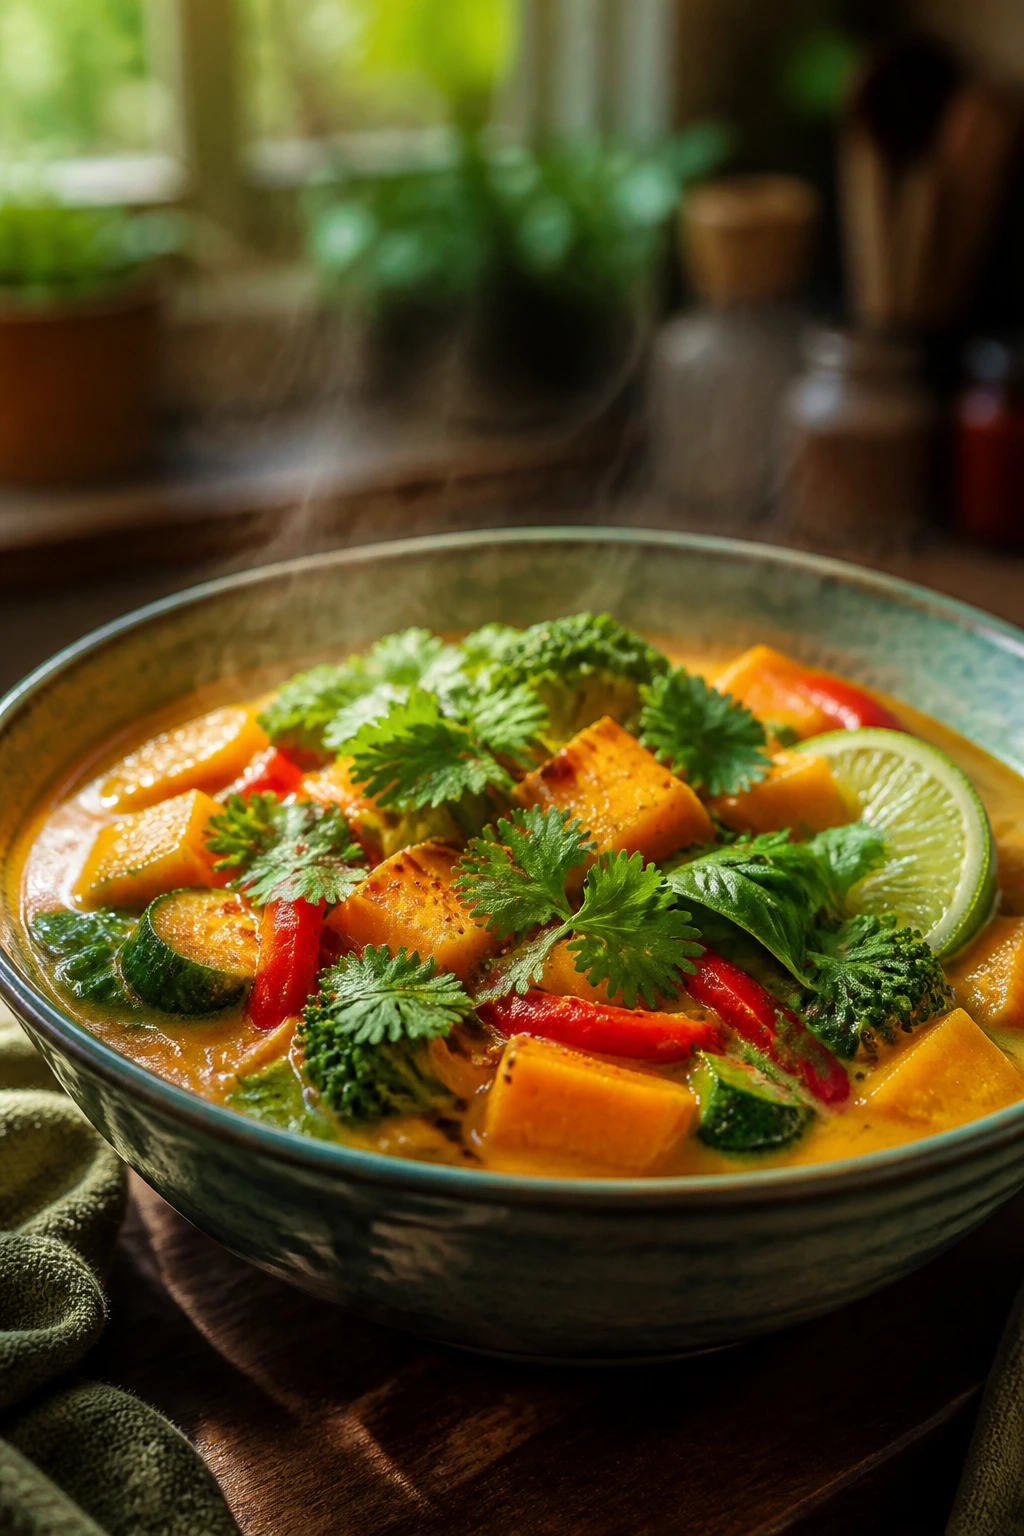
12. Butternut Squash and Kale Coconut Curry

This curry tastes like cold-weather comfort without the heavy, sleepy feeling that sometimes comes with it. Roasted butternut squash turns sweet and browned at the edges, kale adds chew, and chickpeas keep the bowl from turning into a side dish. I like this one because the squash carries the curry even if you’re a little light-handed with the spices.
Why It Works:
Roasting the squash first gives you caramelized flavor that you simply do not get from boiling. Kale holds up better than spinach or chard in a long simmer, so the bowl keeps a little texture. Chickpeas make the dish hearty without taking it in a meaty direction. A little maple syrup can soften the curry paste and bring the squash forward without making the whole pan sweet.
Key Ingredients:
- 1 medium butternut squash, peeled, seeded, and cubed — roast it first if you can.
- 2 tbsp olive oil — for roasting and sautéing.
- 1 large onion, diced — base flavor.
- 2 tbsp yellow curry paste — warm and mellow.
- 1 can (13.5 oz) full-fat coconut milk — gives the curry its body.
- 1 cup vegetable broth — enough to simmer the squash.
- 1 can (15 oz) chickpeas, drained and rinsed — makes the bowl more filling.
- 4 packed cups chopped kale, stems removed — tough enough to stand up.
- 1 tsp maple syrup — optional, but useful if the squash isn’t very sweet.
- 1 tbsp lime juice — balances the sweetness.
- 2 tbsp pumpkin seeds or toasted coconut — for crunch on top.
Quick Steps:
- Roast the squash: Heat the oven to 425°F. Toss the squash with 1 tablespoon oil and a pinch of salt, then roast for 20 to 25 minutes until the edges start to caramelize.
- Start the curry base: Heat the remaining oil in a pot over medium heat. Add the onion and cook for 5 minutes until soft.
- Bloom the paste: Stir in the curry paste and cook for 30 seconds.
- Build the sauce: Add coconut milk, broth, chickpeas, and maple syrup if using. Simmer for 8 minutes.
- Add kale and squash: Stir in the kale and roasted squash. Cook for 3 to 4 minutes until the kale softens.
- Finish with lime: Turn off the heat, add lime juice, and taste for salt.
Equipment for This Recipe:
- Sheet pan — for roasting squash.
- Large pot — for the curry itself.
- Wooden spoon — helps fold the squash in without smashing it.
- Peeler and sturdy knife — squash is not a lazy vegetable.
How to Serve This Dish:
This is excellent over rice, but it also works with a piece of warm flatbread if that’s what you’ve got. The orange squash and dark kale make a nice-looking bowl without much effort. Four to six servings, depending on whether you use rice.
Pro Tips for This Recipe:
- Roast the squash. Don’t boil it and hope for the best.
- Add the kale near the end so it stays green and slightly chewy.
- If the curry tastes flat, a little extra lime is usually better than extra salt.
Variations on This Dish:
- Sweet Potato Kale Curry: Use sweet potato instead of squash and keep the roasting time about the same.
- Red Lentil Add-In: Stir in ½ cup red lentils with the broth if you want a thicker, stew-like bowl.
Common Mistakes to Avoid with This Dish:
- Don’t skip roasting the squash unless you are in a rush and willing to lose flavor.
- Don’t overcook the kale into dark ribbons. It should still have some bite.
- Don’t forget the acid. Sweet squash plus coconut can go flat fast.
13. Cod Coconut Curry with Leeks and Lemongrass
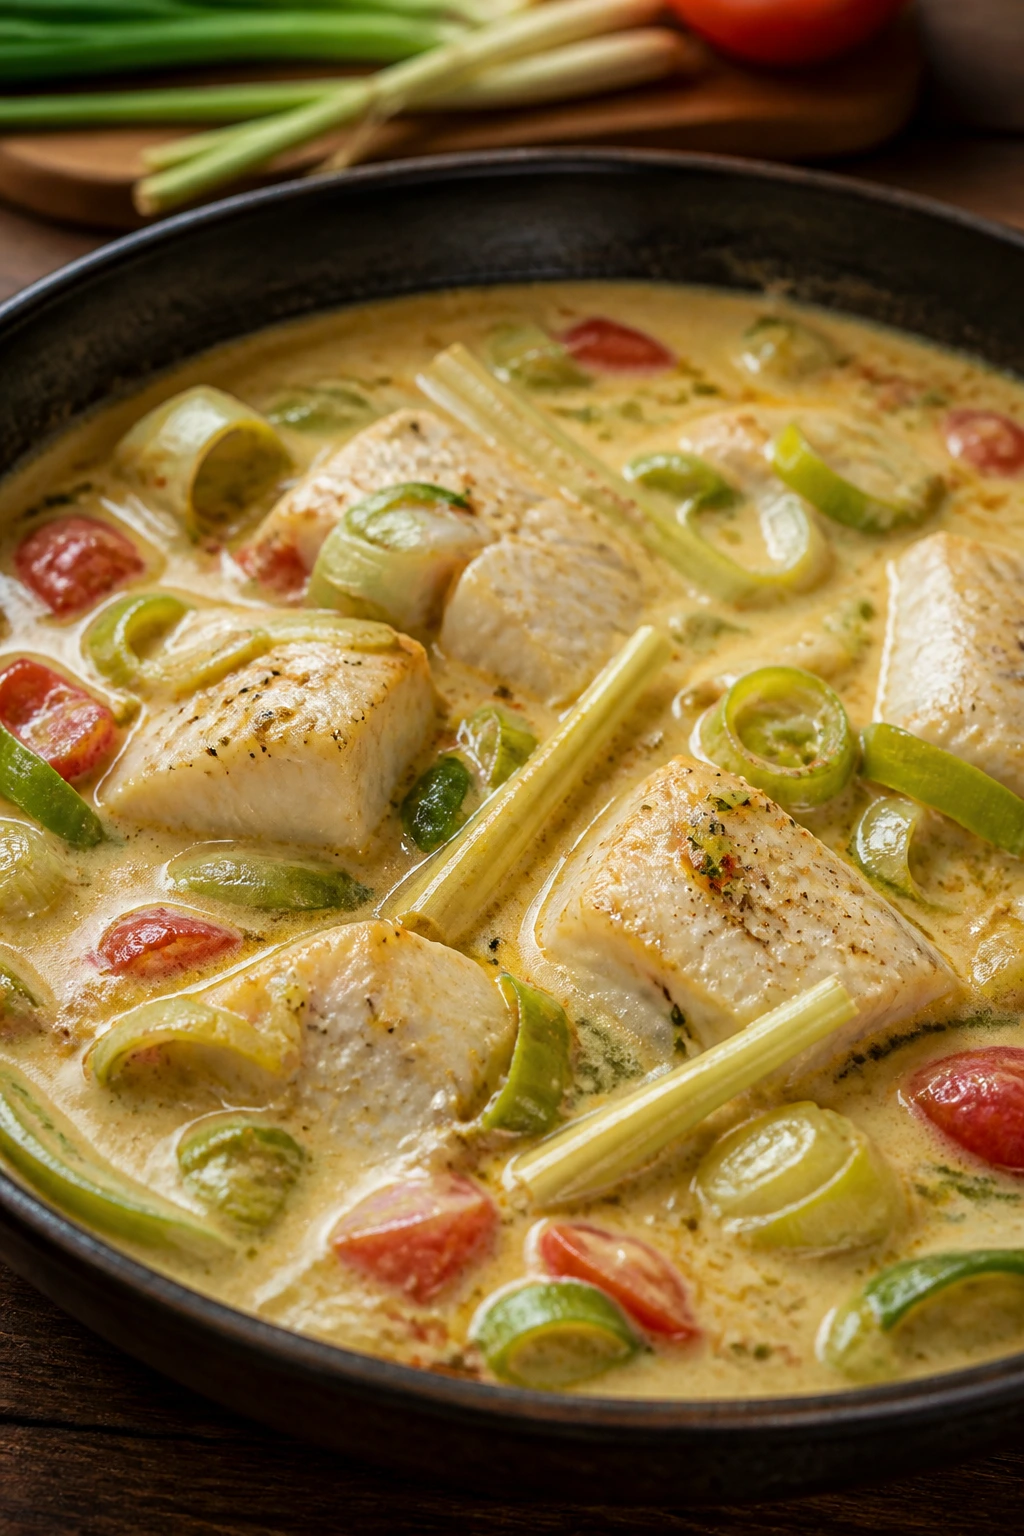
Cod is a quieter fish than salmon, and this curry respects that. Leeks give the sauce a sweet onion base, lemongrass adds perfume without making the broth heavy, and cherry tomatoes pop just enough to keep the white fish from feeling sleepy. It’s gentle, clean, and not at all boring.
Why It Works:
Cod flakes easily, so it needs a sauce that stays calm. Green curry paste and lemongrass bring brightness without overwhelming the fish. Leeks cook down to a soft sweetness that plays beautifully with coconut milk, and cherry tomatoes add small bursts of acidity that stop the broth from feeling too smooth. This is one of those curries where the last minute matters more than the first ten.
Key Ingredients:
- 1½ lb cod fillets, cut into large pieces — thick cuts hold together better.
- 2 leeks, white and light green parts only, sliced and rinsed — grit hides in there.
- 1 stalk lemongrass, bruised and cut into 3-inch pieces — smash it first so it releases flavor.
- 1 tbsp fresh ginger, grated — sharpens the broth.
- 2 tbsp green curry paste — herbal and fragrant.
- 1 can (13.5 oz) full-fat coconut milk — smooth base.
- 1 cup fish stock, clam juice, or water — enough for a shallow poach.
- 1 cup cherry tomatoes — they burst and season the broth.
- 1 tbsp fish sauce — a small amount goes a long way.
- 1 lime, juiced — for the finish.
- 2 tbsp cilantro or dill — choose one based on what you like with fish.
Quick Steps:
- Cook the leeks: Heat a little oil in a wide skillet over medium heat. Add the leeks and cook for 5 minutes, until they soften and turn glossy.
- Add ginger and lemongrass: Stir in the ginger and lemongrass and cook for 30 seconds.
- Build the sauce: Add the curry paste, coconut milk, stock, fish sauce, and cherry tomatoes. Simmer for 5 minutes, until the tomatoes start to burst.
- Add the cod: Nestle the fish into the sauce, cover, and cook for 6 to 8 minutes, until the cod flakes and looks opaque all the way through.
- Finish: Remove the lemongrass pieces, add lime juice, and scatter herbs over the top.
Equipment for This Recipe:
- Wide skillet with lid — cod needs a shallow poach.
- Tongs or spatula — to move the fish gently.
- Cutting board — for trimming leeks and bruising lemongrass.
- Small bowl — to hold the lemongrass after cooking.
How to Serve This Dish:
Rice is the obvious partner, but lightly buttered potatoes work surprisingly well under the sauce too. The bowl should look pale and bright, with herbs on top and tomatoes breaking through the coconut. This feeds 4.
Pro Tips for This Recipe:
- Rinse leeks thoroughly. One grain of sand ruins the whole pan.
- Don’t overcook cod. It goes from tender to dry with almost no warning.
- Bruise the lemongrass hard enough that it actually smells like something.
Variations on This Dish:
- Tomato-Lime Cod Curry: Add an extra half cup of tomatoes and a little more lime for a sharper broth.
- Herb Swap: Dill gives the dish a cooler, almost Scandinavian edge.
Common Mistakes to Avoid with This Dish:
- Don’t use thin cod pieces that fall apart before they’re cooked.
- Don’t leave lemongrass in the bowl if you can avoid it; it’s stringy and not pleasant to bite.
- Don’t boil the fish. Gentle heat is the whole point.
14. Lamb Coconut Curry with Cumin and Mint
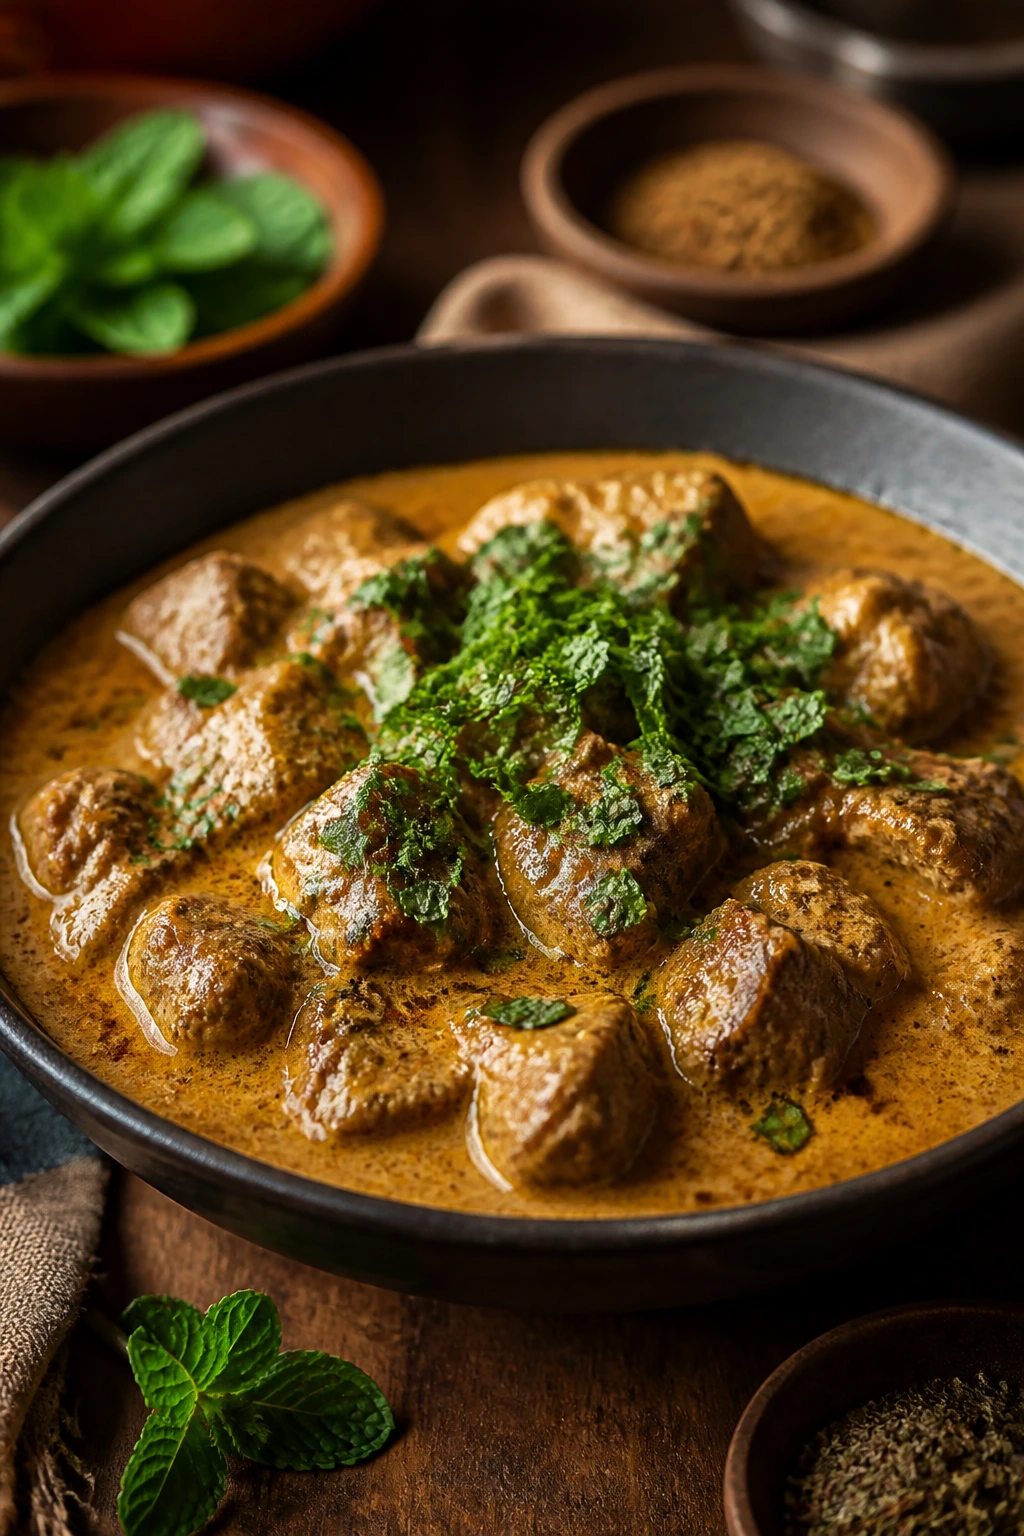
This one has the deepest flavor in the lineup. Lamb brings fat and a little sweetness, cumin adds earthiness, and mint at the end cuts through the richness in a way that feels almost shocking the first time you taste it. It’s warmer, darker, and more grounded than the brighter curries above.
Why It Works:
Lamb shoulder or stew meat benefits from a longer simmer, which means the curry has time to develop body without losing the coconut milk’s smoothness. Cumin, curry powder, and tomato paste build a savory base before the coconut milk softens everything. Mint at the end keeps the dish from feeling heavy. It’s the kind of curry that tastes like it came from a pot that was watched carefully.
Key Ingredients:
- 1½ lb lamb shoulder, cut into 1-inch cubes — or use stew meat if that’s easier to find.
- 1 tbsp neutral oil — for browning.
- 1 large onion, diced — the base.
- 2 tbsp curry powder — use a warm, earthy blend.
- 1 tsp ground cumin — reinforces the lamb.
- 1 tbsp tomato paste — gives the sauce depth.
- 1 can (13.5 oz) full-fat coconut milk — for richness.
- 1 cup beef broth — helps the lamb simmer.
- 1 medium Yukon gold potato, cubed — gives the curry another soft element.
- ½ cup frozen peas — added at the end.
- 1 tbsp lemon juice — bright finish.
- ¼ cup chopped mint — the freshest part of the bowl.
Quick Steps:
- Brown the lamb: Heat the oil in a Dutch oven over medium-high heat. Brown the lamb in batches for 5 to 6 minutes total, then remove it.
- Cook the onion: Lower the heat and cook the onion for 5 minutes until soft.
- Add spice: Stir in curry powder, cumin, and tomato paste. Cook for 1 minute.
- Simmer the lamb: Add the coconut milk, broth, lamb, and potato. Bring to a low simmer, cover, and cook for 35 to 45 minutes, until the lamb is tender and the potato gives easily when pierced.
- Finish the peas: Stir in peas and cook for 2 minutes.
- Brighten it: Turn off the heat, add lemon juice, and top with mint.
Equipment for This Recipe:
- Dutch oven — essential for the longer simmer.
- Slotted spoon — to remove the lamb during browning if needed.
- Sharp knife — lamb cubes should be even.
- Lid that fits well — keeps the simmer steady.
How to Serve This Dish:
Serve it with basmati rice or flatbread. The mint makes the bowl smell fresh even though the curry is rich and slow-cooked. This feeds 4 to 6, depending on the size of the lamb pieces.
Pro Tips for This Recipe:
- Brown the lamb in batches. If you crowd the pan, you lose the crust.
- Don’t rush the simmer. Lamb needs time to soften.
- Add mint at the end or it disappears into the sauce.
Variations on This Dish:
- Lamb and Chickpea Curry: Add 1 can chickpeas with the broth for a larger, more rustic pot.
- Rosemary-Lemon Twist: Swap mint for a little chopped rosemary and extra lemon if you want a drier, more herbal finish.
Common Mistakes to Avoid with This Dish:
- Don’t use a fast simmer and expect tender lamb in half the time.
- Don’t add mint too early; it tastes cooked and dull.
- Don’t skip browning. Lamb without color tastes oddly flat.
15. Mushroom Coconut Curry with Bok Choy and Sesame
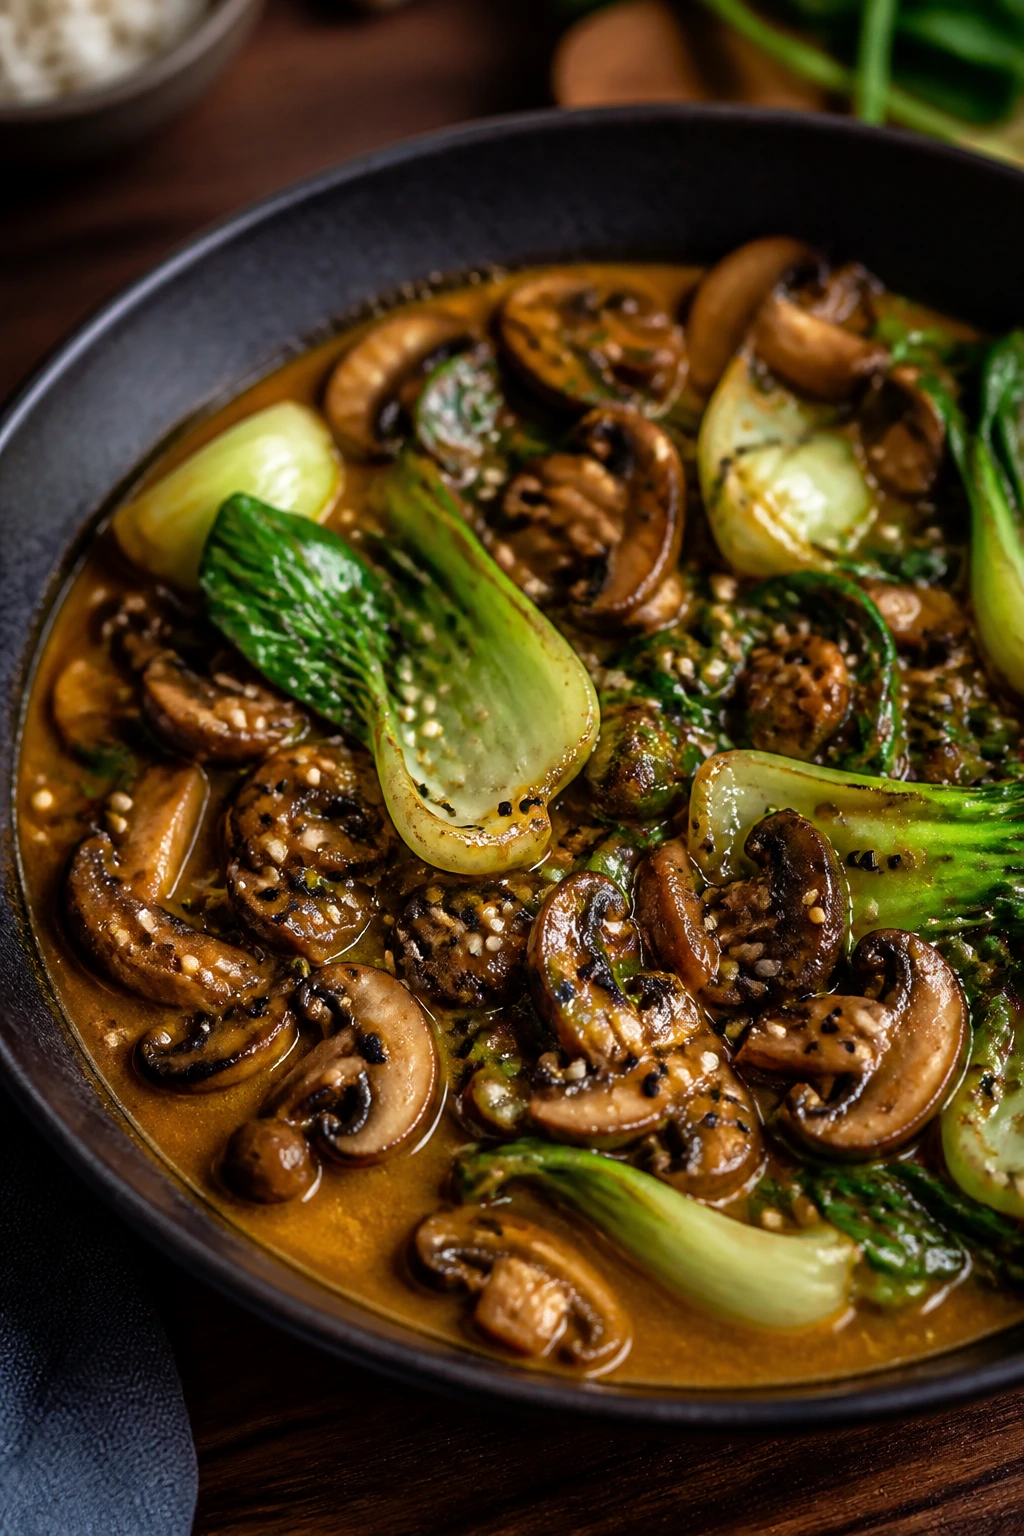
Mushrooms are the wild card in coconut curry, and they make a better case for themselves than most meat substitutes. They soak up curry paste, carry soy sauce well, and turn deeply savory if you let them brown before the coconut milk goes in. Bok choy adds a tender green crunch, sesame oil gives the final smell a toasted edge, and the whole pan tastes dark and clean at the same time.
Why It Works:
Mushrooms need high heat up front or they steam and go rubbery. Once they brown, they behave more like a sponge for the curry base, which is exactly what you want. Bok choy cooks fast and adds a second texture — soft stems, silky leaves. Soy sauce and rice vinegar make this curry taste sharper and more modern than the sweeter bowls in the set.
Key Ingredients:
- 1½ lb mixed mushrooms, sliced or torn — cremini, shiitake, oyster, or whatever looks good.
- 2 baby bok choy, halved or quartered — keep the stems attached.
- 1 tbsp neutral oil — for browning.
- 1 small onion, thinly sliced — base flavor.
- 1 tbsp grated ginger — brings a bright bite.
- 2 tbsp red curry paste — bold and a little fiery.
- 1 can (13.5 oz) full-fat coconut milk — smooths the mushrooms out.
- ½ cup vegetable broth — enough to loosen the sauce.
- 1 tbsp soy sauce — savory depth.
- 1 tsp rice vinegar — sharpens the finish.
- 1 tsp sesame oil — finish only.
- 1 tbsp sesame seeds — optional but good.
Quick Steps:
- Brown the mushrooms: Heat the oil in a large skillet over medium-high heat. Add the mushrooms and cook for 8 minutes, stirring now and then, until they release liquid and start to brown.
- Add onion and ginger: Stir in onion and ginger and cook for 3 minutes.
- Bloom the curry paste: Add the curry paste and cook for 30 seconds.
- Build the sauce: Pour in coconut milk, broth, soy sauce, and rice vinegar. Simmer for 5 minutes.
- Add bok choy: Nestle the bok choy into the pan and cook for 3 to 4 minutes, until the stems are tender and the leaves wilt.
- Finish: Turn off the heat, drizzle with sesame oil, and scatter sesame seeds on top.
Equipment for This Recipe:
- Large skillet — mushrooms need space to brown.
- Spatula — to keep the mushrooms moving.
- Knife and board — bok choy needs a clean trim.
- Measuring spoon for sesame oil — too much changes the whole dish.
How to Serve This Dish:
Serve it over rice, noodles, or even a bowl of quinoa if you want to keep it hearty. The dark mushrooms and green bok choy make the bowl look dramatic in a good way. Four servings feels right.
Pro Tips for This Recipe:
- Don’t salt the mushrooms too early. They’ll dump water and stop browning.
- Let the mushrooms actually brown before you add the liquid.
- Add the bok choy at the end so the stems stay a little crisp.
Variations on This Dish:
- Tofu and Mushroom Curry: Add pressed tofu cubes for a heavier meal.
- Sesame-Lime Finish: Swap rice vinegar for lime juice if you want a sharper, more citrusy ending.
Common Mistakes to Avoid with This Dish:
- Don’t crowd the mushrooms. They need air and heat.
- Don’t drown the bok choy in the sauce for too long or the stems go floppy.
- Don’t pour in too much sesame oil. It should whisper, not shout.
16. Coconut Curry Meatballs with Rice Noodles and Herbs

This is the most “dinner in a bowl” recipe in the set. The meatballs bring structure, rice noodles make it slurpable, and the coconut curry sauce coats everything in a way that feels halfway between soup and a saucy noodle plate. Basil, cilantro, and lime keep the whole thing from settling into comfort-food mush.
Why It Works:
Meatballs can do what sliced meat sometimes can’t: hold their shape, soak up sauce, and make the dish feel complete without much effort. Rice noodles absorb coconut curry fast, so they pick up flavor without needing a long boil. The sauce here wants to be thinner than the stew-like curries above, and that’s what makes this one distinct. It’s lighter on the spoon, faster on the fork, and not remotely samey.
Key Ingredients:
- 1½ lb ground chicken or turkey — chicken makes it a little richer, turkey a little leaner.
- 1 egg — binds the meatballs.
- ⅓ cup panko breadcrumbs — keeps them tender.
- 1 tbsp red curry paste — mixed into the meatballs for flavor.
- 2 garlic cloves, minced — the meatball base.
- 1 tbsp grated ginger — keeps the meatballs from tasting dense.
- 1 can (13.5 oz) full-fat coconut milk — sauce base.
- 1 cup chicken broth — thins the curry into a noodle sauce.
- 1 red bell pepper, thinly sliced — color and crunch.
- 8 oz rice noodles — soak or cook according to the package.
- 2 tbsp lime juice — finish.
- ½ cup basil and cilantro mix — fresh herbs matter here.
Quick Steps:
- Mix the meatballs: Combine the ground meat, egg, panko, curry paste, garlic, ginger, and a pinch of salt. Mix only until combined, then shape into 1½-inch meatballs.
- Cook the meatballs: Brown them in a skillet over medium heat for 6 to 8 minutes, turning gently, until they hold their shape and are mostly cooked through. Remove to a plate.
- Build the sauce: In the same pan, add the coconut milk, broth, and bell pepper. Bring to a simmer and cook for 4 minutes.
- Finish the meatballs: Return the meatballs to the pan and simmer for 5 minutes, until they reach 165°F.
- Prepare the noodles: Soak or boil the rice noodles until tender, then drain well.
- Assemble: Toss the noodles with the curry sauce, top with meatballs, and finish with lime and herbs.
Equipment for This Recipe:
- Large skillet with a lid — for the meatballs and sauce.
- Mixing bowl — don’t skip this.
- Tongs — for turning meatballs gently.
- Colander — rice noodles need a fast drain.
How to Serve This Dish:
Pile the noodles into bowls first, then spoon the meatballs and sauce over the top so the herbs stay visible. A few extra lime wedges on the side make sense here. This serves 4, and it’s one of the easiest curries in the set to stretch if you add more noodles.
Pro Tips for This Recipe:
- Don’t overmix the meatball mixture or they turn dense.
- If the meatballs are browning too fast, lower the heat and let them finish more gently.
- Drain the noodles well or they water down the sauce.
Variations on This Dish:
- Baked Meatball Version: Bake the meatballs at 400°F for 15 minutes instead of pan-browning them.
- Veggie Noodle Bowl: Swap meatballs for pan-seared tofu and add snap peas.
Common Mistakes to Avoid with This Dish:
- Don’t make the meatballs too large or they won’t cook evenly.
- Don’t overcook rice noodles; they keep softening in the hot sauce.
- Don’t let the sauce boil hard after the meatballs go in.
Why Coconut Curry Keeps Dinner Interesting
The reason coconut curry works in so many directions is plain enough once you cook it a few times: fat carries flavor, and coconut fat is unusually good at carrying spice without flattening it. A curry paste bloomed in oil tastes completely different from a curry powder stirred into broth, and both of them change again when you add tomatoes, miso, peanut butter, or lime.
The sauce is also forgiving in a way that rewards small decisions. A chicken thigh can simmer longer than shrimp. Cauliflower can stand in for potatoes. Mushrooms need browning; lentils don’t. Coconut milk makes all of those choices feel connected, but not identical. That’s the part I like best. Same pantry. Different dinner.
And if you get tired of the same bowls, the fix is almost never “start over.” It’s smaller than that. Swap the herb. Change the acid. Cook the paste a minute longer. Use a different vegetable cut. The curry changes faster than most people expect.
Essential Equipment for These Recipes
- 12-inch skillet or sauté pan: Best for quick curries with chicken, shrimp, salmon, mushrooms, and meatballs; the wide surface helps everything brown.
- Dutch oven or heavy pot: Better for chickpeas, lentils, lamb, and squash because the heat stays even and the sauce doesn’t scorch as easily.
- Sheet pan: Handy for roasting squash, sweet potato, or cauliflower before they go into the curry.
- Instant-read thermometer: The easiest way to keep chicken, salmon, shrimp, and meatballs from overshooting doneness.
- Sharp chef’s knife: A curry lives or dies on the prep cut; even slices cook evenly, uneven ones don’t.
- Wooden spoon or silicone spatula: Good for scraping curry paste into hot oil and lifting browned bits off the bottom.
- Fine grater or microplane: Useful for ginger, lime zest, and garlic when you want them to disappear into the sauce.
- Colander and large bowl: Needed for rice noodles, lentils, or rinsing vegetables and shellfish.
- Lid that fits your pot: A small thing, but it matters for poaching fish or steaming mussels.
Smart Shopping and Ingredient Tips
Full-fat canned coconut milk is the backbone of these dinners, and the can matters more than the label language. I want coconut, water, and maybe stabilizers; I do not want sweetened cream of coconut sneaking into dinner by accident. If the can has separated, that’s normal. Stir it before opening, or treat the thick cream and liquid as one after it hits the pan.
Curry paste is the other big variable, and different jars behave differently. Some brands are salty and hot enough that you need less than the recipe says. Others are mild and want more cooking time in oil before they taste like anything at all. Smell the jar. Taste a dab. If it tastes flat on its own, bloom it a little longer in the skillet.
Choose proteins for how they actually cook, not for how nice they sound on paper. Chicken thighs forgive mistakes; chicken breast does not. Shrimp need the fastest finish. Salmon and cod want gentle heat. Tofu needs pressing. Lamb wants time. Ground turkey benefits from extra spice and acid because it starts from a mild place. That’s not a flaw. It’s the job.
Vegetables should match the simmer. Bell peppers, green beans, bok choy, and spinach can go in late. Sweet potato, squash, cabbage, and cauliflower need more time. Frozen peas are fine. Frozen green beans are fine too if they’re going into a saucy curry. Frozen mushrooms are usually a mess. I’d skip those and buy fresh.
Fish sauce is worth keeping around if you cook coconut curry often. It doesn’t make the dish taste fishy when used in small amounts; it makes the sauce taste fuller. Tamari or soy sauce can stand in when you want a vegetarian or gluten-free bowl, but they don’t quite do the same thing. Lime juice, lemon juice, and rice vinegar are not interchangeable in every recipe, though all three can rescue a curry that tastes thick and sleepy.
How to Serve These Recipes
Presentation: Serve coconut curry in wide, shallow bowls if you want the sauce and toppings to show. Keep the rice or noodles slightly off-center, then spoon the curry around and over them so the herbs, peppers, or seafood stay visible. A final scatter of scallions, basil, cilantro, mint, sesame seeds, or chopped peanuts makes the bowl look alive instead of monochrome.
Accompaniments: Jasmine rice fits the Thai-style curries, basmati rice suits the lamb and paneer versions, and rice noodles make the meatballs and shrimp feel lighter. Warm naan or roti makes sense with the chickpea, lentil, and paneer bowls. Cucumber salad, quick pickled onions, or a plain shaved cabbage slaw help cut the coconut richness when the sauce leans thick.
Portions: Most of these recipes serve 4, though the lentil, chickpea, and turkey curries will stretch to 6 if you’re not overloading the bowls. Seafood curries feel lighter, so I plan a fuller side dish with them. For a bigger dinner, scale rice up by half again before you increase the curry itself.
Beverage Pairing: Dry Riesling works with the spicier Thai-style bowls. A crisp lager handles shrimp, cod, and mussels without fighting them. Iced jasmine tea is the quiet answer for almost everything here, and a lime soda does a good job when you want the meal to feel brighter.
Additional Tips and Flavor Boosters
Flavor Enhancement: Bloom the curry paste in oil until it smells toasted and the oil around it turns a deeper orange or brick color. That one minute changes the whole pot. A final squeeze of lime or lemon, added after the heat is off, does more than another spoon of spice ever will.
Customization: Want more heat? Add sliced fresno chiles, chili crisp, or a little extra paste. Want a softer bowl? Add more coconut milk and a handful of carrots or squash. Want more texture? Toast cashews, peanuts, or sesame seeds and scatter them on top.
Serving Suggestions: Keep a small tray of toppings near the stove: herbs, lime wedges, sliced scallions, chili oil, toasted coconut, and chopped nuts. People build the bowl they want, and that beats trying to make one “perfect” finish for everyone. A good curry should feel finished but not sealed.
Make-It-Yours: Use tamari instead of soy sauce for gluten-free bowls. Swap fish sauce for extra salt and a squeeze of lime in vegetarian versions. Use cauliflower rice or sautéed cabbage if you want to skip starch. If you’re lowering dairy or avoiding it entirely, nothing here needs cream at all — coconut already does the work.
Make-Ahead, Storage, and Reheating Guidance
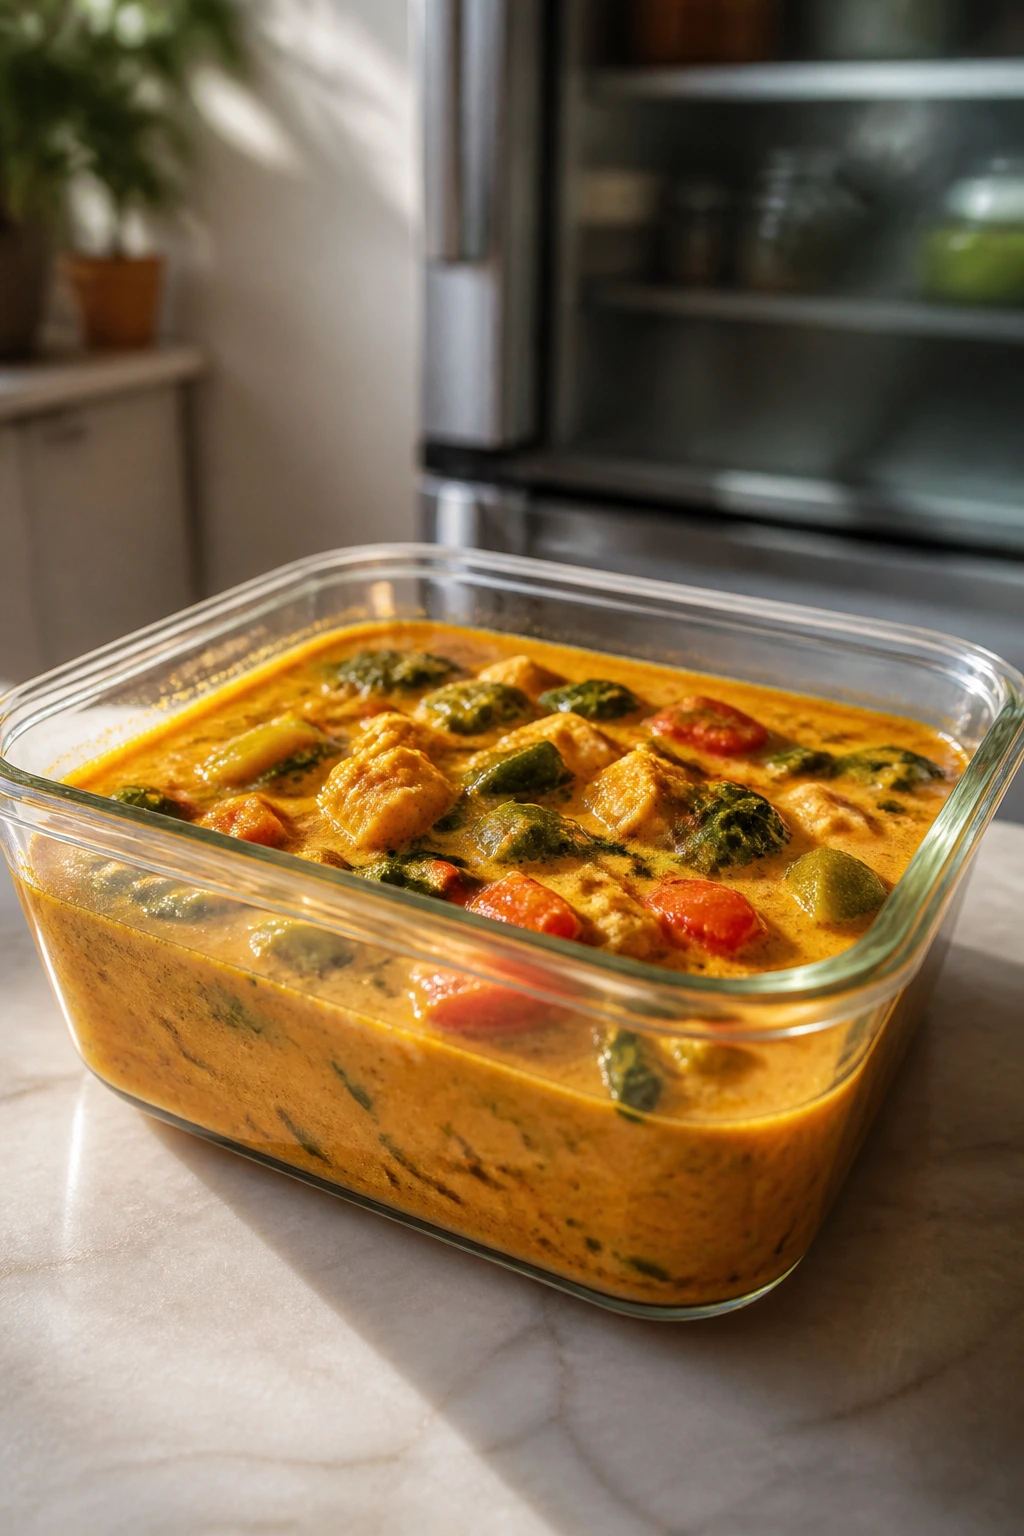
Most coconut curry dinners keep well in the fridge for 3 to 4 days if you cool them fast and store them in shallow containers. Let the curry come down from steaming hot to warm before lidding it, but don’t leave it sitting on the counter for hours. Seafood curries are the exception I respect: shrimp, cod, salmon, and mussels are best eaten within 2 days because the texture drops off after that.
Freezing works best for chicken, beef, turkey, chickpea, lentil, mushroom, and vegetable curries. Pack them in airtight containers or freezer bags, leave a little space for expansion, and freeze for up to 2 months. Tofu freezes fine but gets a more sponge-like texture after thawing, which some people like and some people absolutely do not. I wouldn’t freeze mussel curry at all, and I’d only freeze shrimp or cod if I had no other choice.
Reheat curries gently on the stovetop over low to medium-low heat, stirring once or twice and adding a splash of water, broth, or coconut milk if the sauce has thickened. A microwave works too, but use 50% power and stop to stir halfway through so the coconut milk doesn’t split at the edges. Rice and noodles should be stored separately whenever possible. They reheat better that way and don’t drink all the sauce.
A lot of these curries taste better the next day, especially the chickpea, lentil, beef, and turkey versions. The seafood ones are different. Fresh is the right move there. If you’re cooking ahead, make the sauce base and prep the vegetables the day before, then add delicate proteins and herbs right before serving. That keeps the bowl from going soft and samey.
Variations and Adaptations to Try
Low-Heat Family Bowl:
Use about half the curry paste and add a little more coconut milk, broth, and sweet vegetable like carrot or squash. This works especially well with chicken, chickpeas, and paneer, where the sauce can carry mild flavor without feeling thin. Keep lime at the end so the bowl still wakes up.
Pantry-Only Curry:
No paste? Use curry powder, garlic, ginger, and a spoon of tomato paste or miso to build depth. Bloom the powder in oil for 30 seconds, then add coconut milk and broth. It won’t taste like a jarred-paste curry, but it can still be deeply good.
Rice-Less Dinner Bowl:
Serve the curries over cauliflower rice, shredded cabbage, zucchini noodles, or sautéed greens. The beef, pork, and mushroom versions handle this especially well because they already have enough body. Keep the sauce a little thicker so the bowl doesn’t feel watery.
Protein Swap Map:
Chicken thighs can usually swap with turkey or pork strips, shrimp can swap with cod, and chickpeas can stand in for almost any meat in the vegetarian curries. Just change the cook time. That’s the part people get wrong; the swap is easy, the timing is where the meal lives or dies.
Bright Herb Finish:
Change the ending and you change the curry. Basil makes it feel Thai, cilantro makes it feel sharper, mint pushes lamb toward something more fragrant, and dill makes fish curries taste cool and clean. Keep the herb fresh, keep it at the end, and use more than a sad little sprinkle.
Common Mistakes to Avoid
Boiling the coconut milk hard:
That’s how you get a broken, greasy-looking sauce. Keep coconut milk at a gentle simmer once it goes in, and lower the heat if the bubbles start getting aggressive.
Adding every vegetable at the same time:
Green beans, spinach, squash, cauliflower, and bok choy all cook at different speeds. If you dump them in together, the fast ones collapse while the slow ones stay firm. Stage them by timing, not by convenience.
Underseasoning at the end:
Coconut milk softens salt, acid, and heat. If the curry tastes flat, it probably needs a little more lime, fish sauce, soy sauce, or salt — not another random spice.
Overcooking seafood:
Shrimp, cod, salmon, and mussels all punish hesitation. Add them late, keep the heat gentle, and stop cooking as soon as they’re done. Seafood curry should taste fresh, not tired.
Using curry paste as if all jars are the same:
They aren’t. One spoon from one brand can be mild; another brand can be salty enough to change the whole pot. Taste first, then adjust. It saves headaches.
Serving the curry too long after it finishes:
Rice drinks the sauce, noodles get sticky, and the curry thickens as it sits. If you’re not serving right away, hold a splash of hot broth or coconut milk nearby and loosen the pot before it goes to the table.
Frequently Asked Questions

Can I use light coconut milk instead of full-fat?
You can, but the sauce will be thinner and a little less plush. It works better in shrimp, cod, and vegetable curries than in beef, lamb, or lentil versions where you want more body.
What’s the difference between curry paste and curry powder?
Curry paste usually brings fresh aromatics, salt, and chile in one concentrated spoonful. Curry powder is drier, warmer, and less punchy on its own, so it needs oil, garlic, or ginger to taste complete.
How do I keep the coconut milk from splitting?
Keep the heat moderate, not wild, once the coconut milk goes in. If you add lime or vinegar, do it at the end or off the heat so the sauce stays smooth.
Can I use frozen vegetables?
Yes, with a little care. Frozen peas, green beans, cauliflower florets, and spinach work fine if you add them late; frozen mushrooms usually turn soggy and watery, so I’d avoid those.
Which curries freeze best?
Chicken, beef, turkey, chickpea, lentil, mushroom, squash, and cabbage curries freeze well for up to 2 months. Seafood curries are better fresh or within a short fridge window because the texture declines after freezing.
What if my curry tastes flat?
Add salt first, then acid, then a little heat. A squeeze of lime or lemon often fixes what extra spice cannot, and a spoon of fish sauce or soy sauce can make the sauce taste deeper without making it louder.
Can I make the base ahead and finish it later?
Yes, and that’s a smart move for many of these bowls. Build the sauce and cook sturdy vegetables ahead, then add shrimp, salmon, cod, herbs, or lime right before serving so the texture stays sharp.
What do I do if the sauce gets too thick?
Stir in warm broth, water, or a splash of coconut milk and loosen it over low heat. Coconut curry thickens as it cools, so a sauce that looks almost too thick in the pan may be exactly right a minute later.
Can I use curry powder if the recipe calls for curry paste?
You can, but use less and bloom it in oil first. Add garlic, ginger, and a little extra salt or soy sauce so the flavor doesn’t fall flat.
The Curry I Keep Coming Back To
What makes these coconut curry dinners worth keeping around is not that they all start the same way. It’s that they don’t end the same way at all. One turns bright with basil and lime. Another goes sweet and briny with pineapple. Another leans earthy with lentils, or nutty with peanut butter, or clean and delicate with cod and lemongrass.
That kind of range is the whole point. Coconut milk is soft enough to carry almost anything, but not bland enough to disappear. Once you start treating the curry base as a starting line instead of a fixed recipe, dinner gets a lot more interesting — and frankly, a lot less repetitive.
If there’s one habit worth stealing from all sixteen of these bowls, it’s this: bloom the paste, finish with acid, and match the protein to the heat. The rest is personality, and that part is yours.