
The best one-pan dinners have a small, stubborn kind of charm. They brown in the right places, stay saucy where they should, and leave you with one pan to wash instead of a pile of regret in the sink. On the nights when the kitchen already feels busy, that matters more than any fancy trick.
What I like most is that these meals don’t taste like shortcuts. A hot sheet pan gives you crisp edges on potatoes and vegetables. A skillet does the heavy lifting for sauces, noodles, grains, and meat in the same place, which means the flavor stays concentrated instead of wandering off into separate pots. A lot of weeknight food gets blamed for being boring when the real problem is too many steps and too much cleanup. One-pan dinners solve both.
There’s also a practical edge to them that I trust. You can keep an eye on the whole meal at once, hit the right safe temperature without guessing, and pull dinner together without turning the stove into a battlefield. That is the sweet spot: dinner that feels cooked, not assembled. And once you get comfortable with timing a protein beside vegetables or a grain in the same pan, the whole week opens up.
Why These One-Pan Dinners Make Weeknights Easier
- Less cleanup, more actual eating: Most of these recipes leave you with one pan, one spatula, and maybe a cutting board, which is the kind of math I can get behind.
- Real dinner, not a compromise: Chicken, salmon, beef, shrimp, beans, pasta, and vegetables all show up here, so nobody has to pretend a sad side salad counts.
- Better flavor from the pan itself: When ingredients roast or simmer together, the drippings, browned bits, and sauce work like built-in seasoning.
- Flexible around what’s in the fridge: A bell pepper can become another vegetable, parsley can become basil, and a skillet dinner usually forgives those swaps.
- Fast enough to fit a normal evening: Most of these land in the 20-to-40-minute range, which is where dinner needs to live when people are hungry and patience is thin.
- Easy to scale up or down: A sheet pan can feed four without fuss, and a skillet can stretch further if you add bread, rice, or a crisp salad beside it.
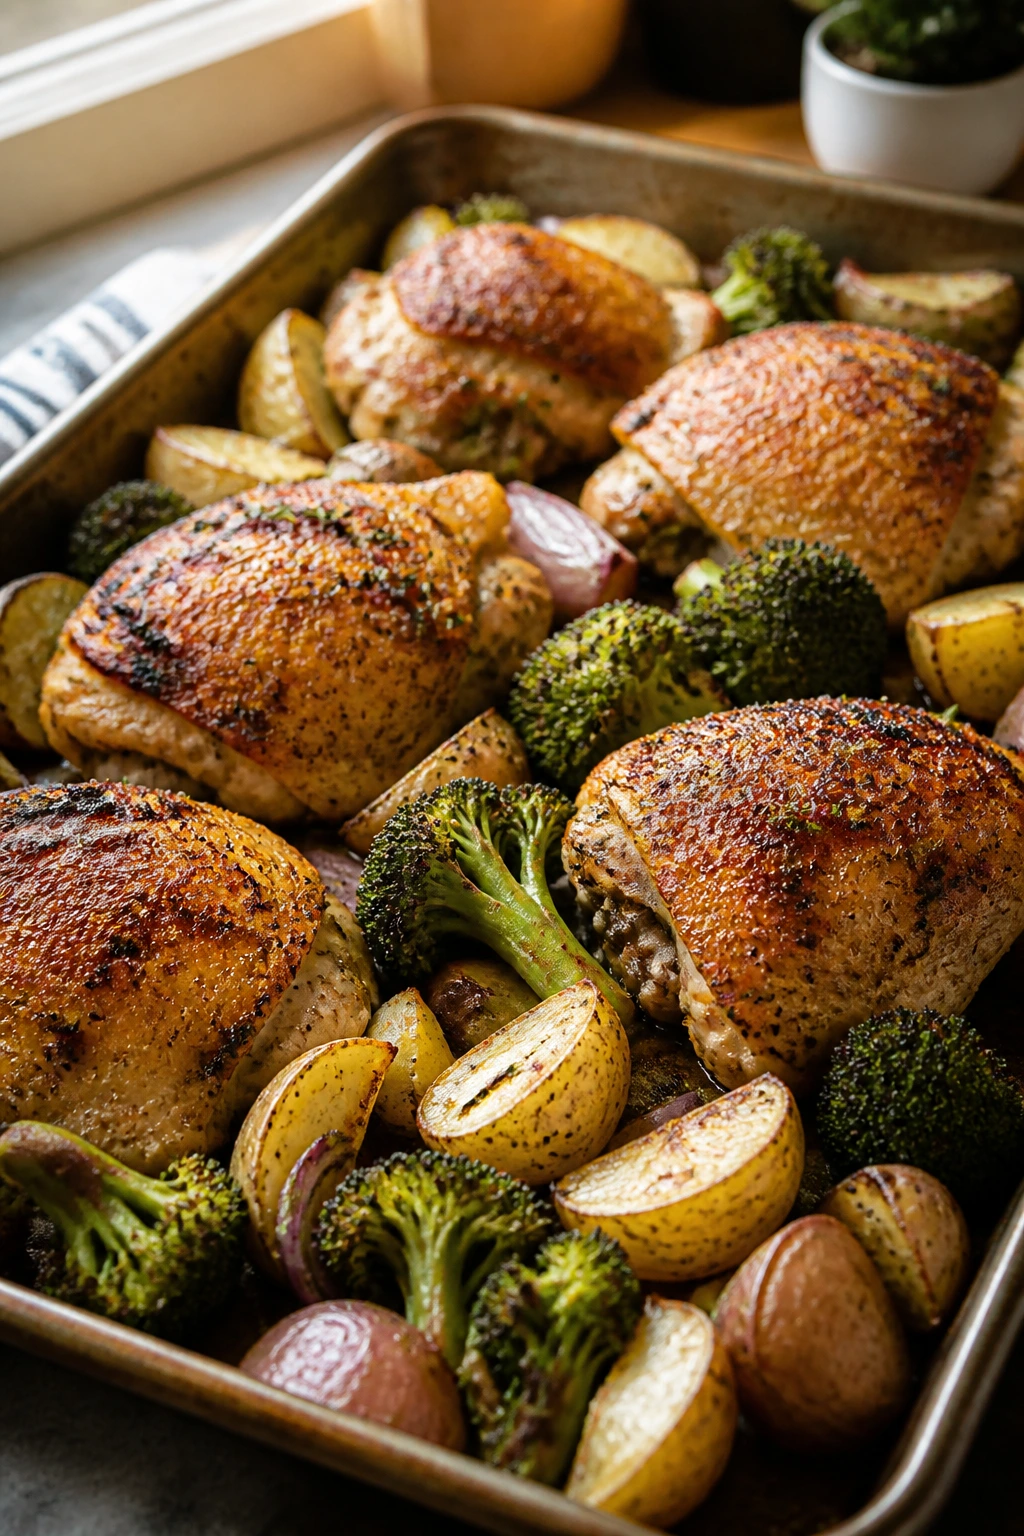
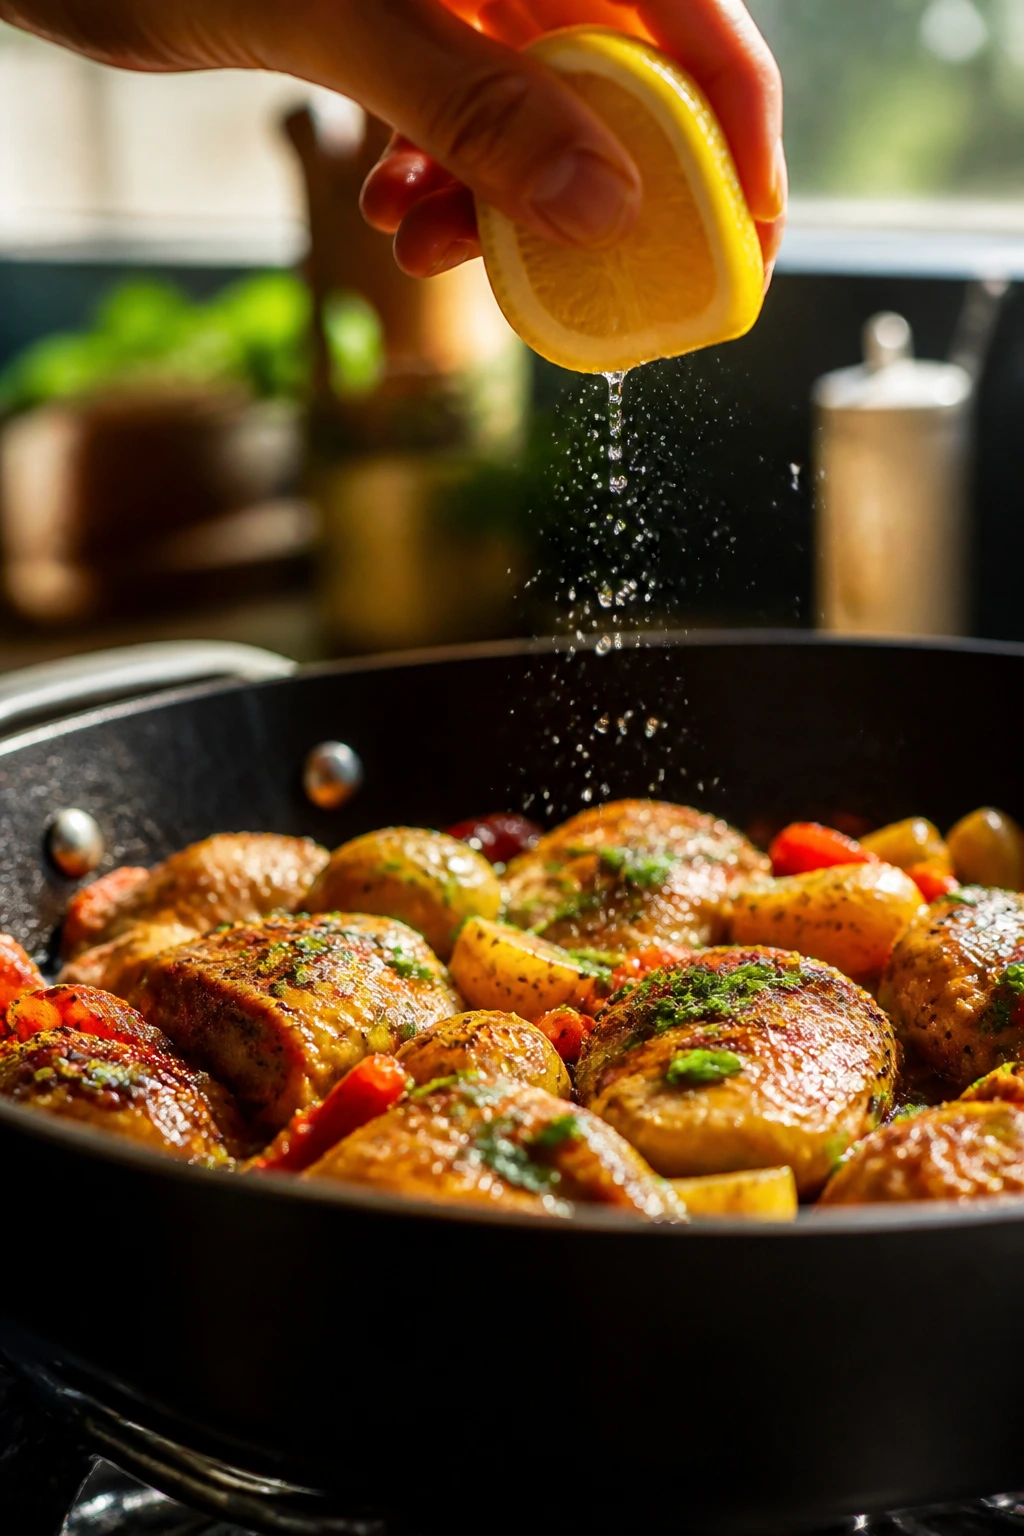
1. Lemon Garlic Chicken and Potatoes on a Sheet Pan
Lemon and garlic do a lot of heavy lifting here, and I mean that in the nicest way. The chicken turns bronzed on the outside while the potatoes soak up the juices that slide across the pan, which is exactly the kind of low-effort payoff one-pan dinners should deliver. Add broccoli at the end and you get those dark green edges that taste better than they look in any picture.
Why It Works
Bone-in chicken thighs hold up well at a hot oven temperature, so they stay juicy while the potatoes finish cooking. Baby potatoes give you crisp cut sides and a soft middle, and broccoli only needs a short blast at the end so it keeps some bite. The lemon brightens everything, but the garlic and olive oil keep the whole pan from tasting sharp or thin. If you’ve ever pulled a sheet pan dinner out and found pale vegetables and overcooked chicken, this solves that problem by staging the ingredients instead of dumping them all in at once.
Key Ingredients
- 2 pounds bone-in, skin-on chicken thighs — They stay tender and bring enough fat to flavor the potatoes.
- 1½ pounds baby potatoes, halved if larger — Try to keep them close in size so they roast evenly.
- 1 large broccoli crown, cut into florets — Add it late so the tips char a little without turning mushy.
- 3 tablespoons olive oil — This helps the chicken brown and keeps the potatoes from sticking.
- 4 garlic cloves, minced — Fresh garlic gives the pan its backbone.
- 1 lemon, zested and juiced — Zest first; it disappears fast once the lemon is cut.
- 1 teaspoon dried oregano — A little herb note keeps the pan from tasting one-note.
- 1 teaspoon kosher salt — Season the potatoes well or they’ll taste flat.
- ½ teaspoon black pepper — Enough to give the chicken a little edge.
- 2 tablespoons chopped parsley — Use it at the end for a fresh finish.
Quick Steps
- Heat the oven: Preheat to 425°F (220°C) and line a rimmed sheet pan with parchment or foil for easier cleanup.
- Season the potatoes: Toss the potatoes with 2 tablespoons olive oil, half the garlic, half the lemon zest, oregano, salt, and pepper. Spread them cut-side down on the pan.
- Start the roast: Bake the potatoes for 15 minutes, until the cut sides are starting to color and the edges look dry.
- Add the chicken: Pat the thighs dry, rub them with the remaining oil, garlic, lemon zest, salt, and pepper, then nestle them among the potatoes.
- Continue cooking: Roast for 20 minutes, then add the broccoli tossed with a drizzle of oil and a pinch of salt.
- Finish and check temperature: Roast for 10 to 12 minutes more, until the chicken reaches 165°F (74°C) at the thickest part and the potatoes are tender.
- Rest and serve: Let the pan sit for 5 minutes, squeeze over the lemon juice, and shower everything with parsley.
Tips and Variations
- For extra browning: Put the pan on the upper-middle rack for the last 10 minutes.
- Swap the green: Green beans or Brussels sprouts can replace the broccoli with the same timing.
- Make it sharper: Add a spoonful of Dijon mustard to the oil mixture if you want a more savory lemon flavor.
2. Taco Beef and Rice Skillet
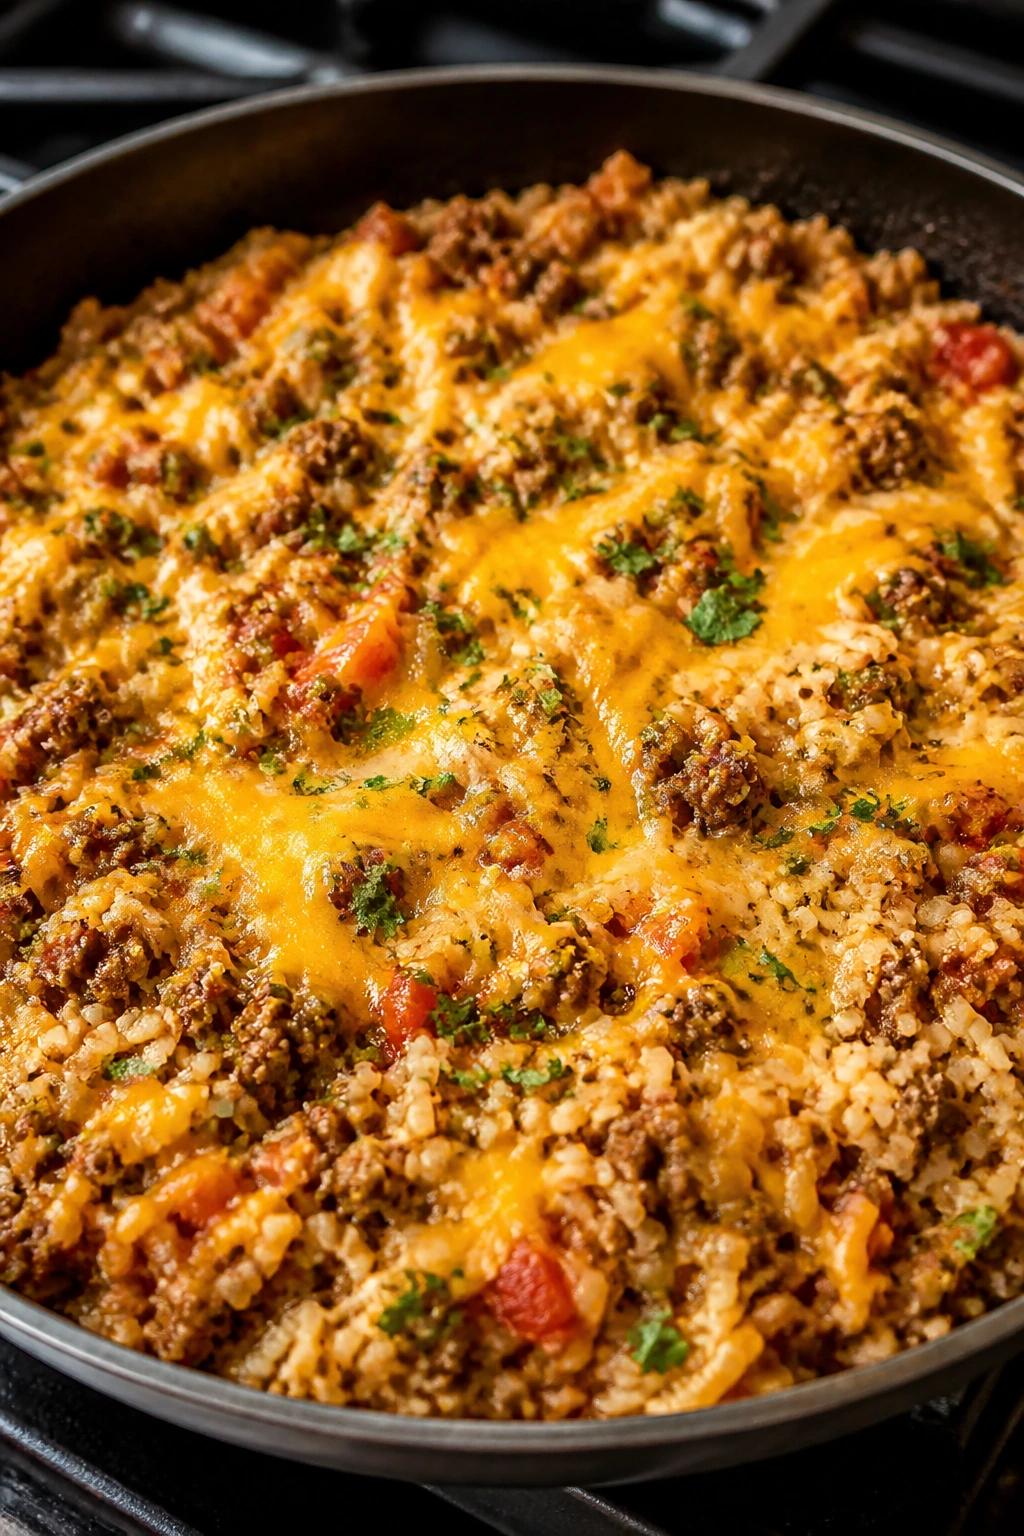
A skillet of taco beef and rice is the sort of dinner that disappears fast. It smells like cumin and toasted tomato paste before it even finishes simmering, and the cheese on top pulls the whole thing together into something far more satisfying than a plain bowl of rice. This is a pantry dinner with enough backbone to feel deliberate.
Why It Works
Ground beef brings enough fat to cook the onion and pepper in the same pan, which means you build flavor before the rice even goes in. Tomato paste deepens the sauce, and the broth cooks the rice right in the skillet so you don’t need a second pot. Using long-grain white rice keeps the timing manageable; it cooks in a predictable window and picks up the taco seasoning without turning gummy. The trick is to keep the simmer low and covered so the rice steams evenly instead of drying out on the bottom.
Key Ingredients
- 1 pound ground beef, preferably 85/15 or 90/10 — Enough fat for flavor, not so much that the pan turns greasy.
- 1 small yellow onion, diced — It softens into the beef and adds sweetness.
- 1 red bell pepper, diced — Use a firm pepper so it keeps some shape.
- 2 garlic cloves, minced — Add at the end of browning so it does not burn.
- 1 cup long-grain white rice, rinsed — Rinsing keeps the grains from clumping.
- 2 cups beef broth — This cooks the rice and carries the seasoning.
- 1 can diced tomatoes, 14.5 ounces — Use the juices too.
- 2 tablespoons tomato paste — It gives the skillet a deeper color and richer taste.
- 2 teaspoons chili powder, 1 teaspoon cumin, 1 teaspoon kosher salt — The core taco profile.
- 1 cup shredded cheddar cheese — Stir some in, save some for the top.
Quick Steps
- Brown the beef: Heat a large skillet over medium-high heat and cook the beef, onion, and bell pepper for 6 to 8 minutes, breaking the meat into small crumbles.
- Build the base: Stir in the garlic, tomato paste, chili powder, cumin, and salt. Cook for 1 minute, until the paste darkens slightly.
- Add the rice and liquid: Stir in the rinsed rice, diced tomatoes, and broth. Scrape up anything stuck to the pan bottom.
- Simmer gently: Bring the pan to a boil, reduce to low, cover, and cook for 18 minutes without lifting the lid.
- Check the texture: The rice should be tender and most of the liquid absorbed. If it still looks wet, cook uncovered for 2 to 3 minutes more.
- Finish with cheese: Stir in half the cheddar, then scatter the rest on top and cover for 2 minutes so it melts.
- Serve hot: Top with cilantro, sliced scallions, or a spoonful of sour cream.
Tips and Variations
- For a little heat: Add diced jalapeño with the onion or a pinch of cayenne with the spices.
- For a beanier version: Stir in 1 cup drained black beans with the tomatoes.
- If the rice sticks: Add ¼ cup broth, lower the heat, and let it finish slowly.
3. Sausage, Peppers, and Orzo Skillet
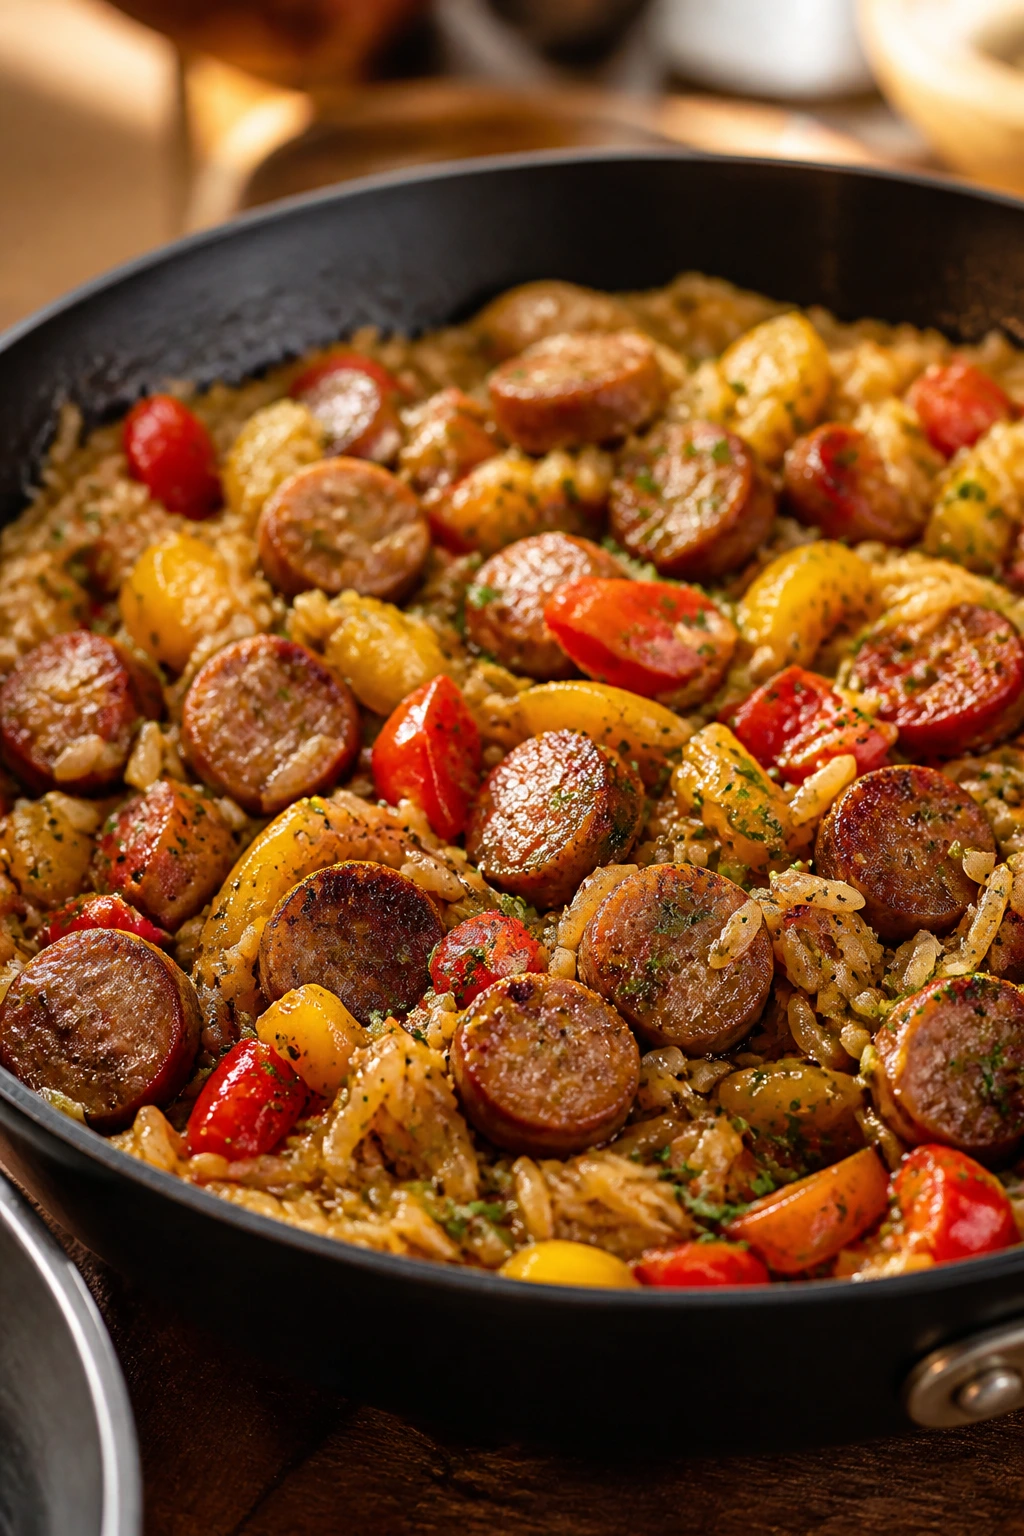
Sausage, peppers, and orzo belong together. The sausage gives off enough fat to perfume the pan, the peppers soften into sweet ribbons, and the orzo drinks up the broth until it turns glossy instead of dry. It’s the kind of meal that feels casual and a little bit smart at the same time.
Why It Works
Orzo is one of the easiest pasta shapes for a one-pan dinner because it cooks quickly and behaves a lot like rice. That means you can brown the sausage, sauté the vegetables, and simmer everything together without juggling timers all over the kitchen. Cherry tomatoes burst into the sauce, which keeps the dish from needing cream or a heavy jarred sauce. If the pan looks a little dry before the orzo finishes, a splash of broth fixes it fast.
Key Ingredients
- 1 pound Italian sausage, casings removed if using links — Hot or mild both work.
- 2 bell peppers, sliced — Use different colors if you want more sweetness and contrast.
- 1 red onion, sliced — It softens and turns silky in the skillet.
- 3 garlic cloves, minced — Add them after the vegetables start to soften.
- 1½ cups orzo — The pasta that turns the whole pan into dinner.
- 2½ cups chicken broth — Enough liquid for the orzo to cook without draining.
- 1 cup cherry tomatoes — They burst and thicken the sauce naturally.
- 2 cups baby spinach — Stir in at the end so it wilts without disappearing.
- 1 teaspoon dried Italian seasoning — Keeps the pan from tasting flat.
- ½ cup grated Parmesan — Stir some in while the orzo is hot.
Quick Steps
- Brown the sausage: Heat a large skillet over medium-high heat and cook the sausage for 5 to 6 minutes, breaking it up until it is browned in spots.
- Add the vegetables: Stir in the peppers and onion and cook for 5 minutes, until the onion is soft and the peppers start to slump.
- Season and toast: Add the garlic and Italian seasoning, then stir in the orzo for 30 seconds so it gets a light coating of fat.
- Pour in the broth: Add the chicken broth and cherry tomatoes, bring everything to a simmer, then cover.
- Cook the pasta: Simmer for 10 to 12 minutes, stirring once or twice, until the orzo is tender and the liquid is mostly absorbed.
- Finish the greens: Stir in the spinach and Parmesan, then cook for 1 minute until the spinach wilts.
- Taste and serve: Add black pepper and a little more cheese if needed.
Tips and Variations
- For a creamier skillet: Stir in 2 tablespoons of mascarpone or cream cheese at the end.
- For more vegetables: Mushrooms or zucchini can join the peppers without changing the method.
- For better texture: Keep the simmer low; a hard boil can make the orzo pasty.
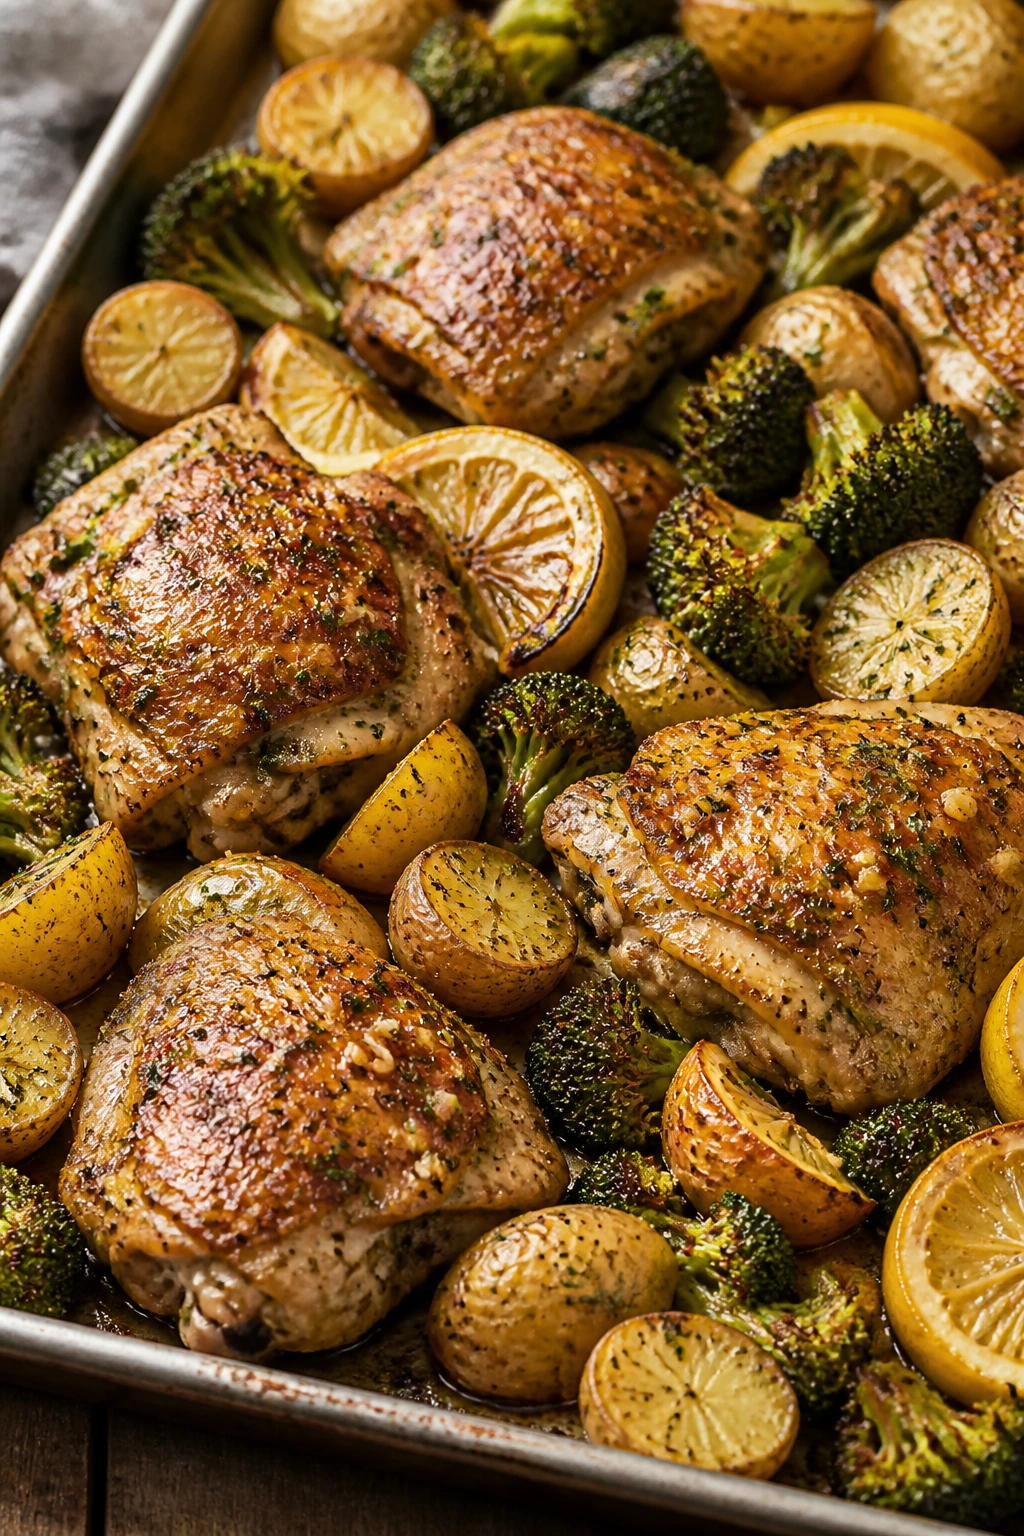
4. Salmon with Asparagus and Dill Potatoes on a Sheet Pan
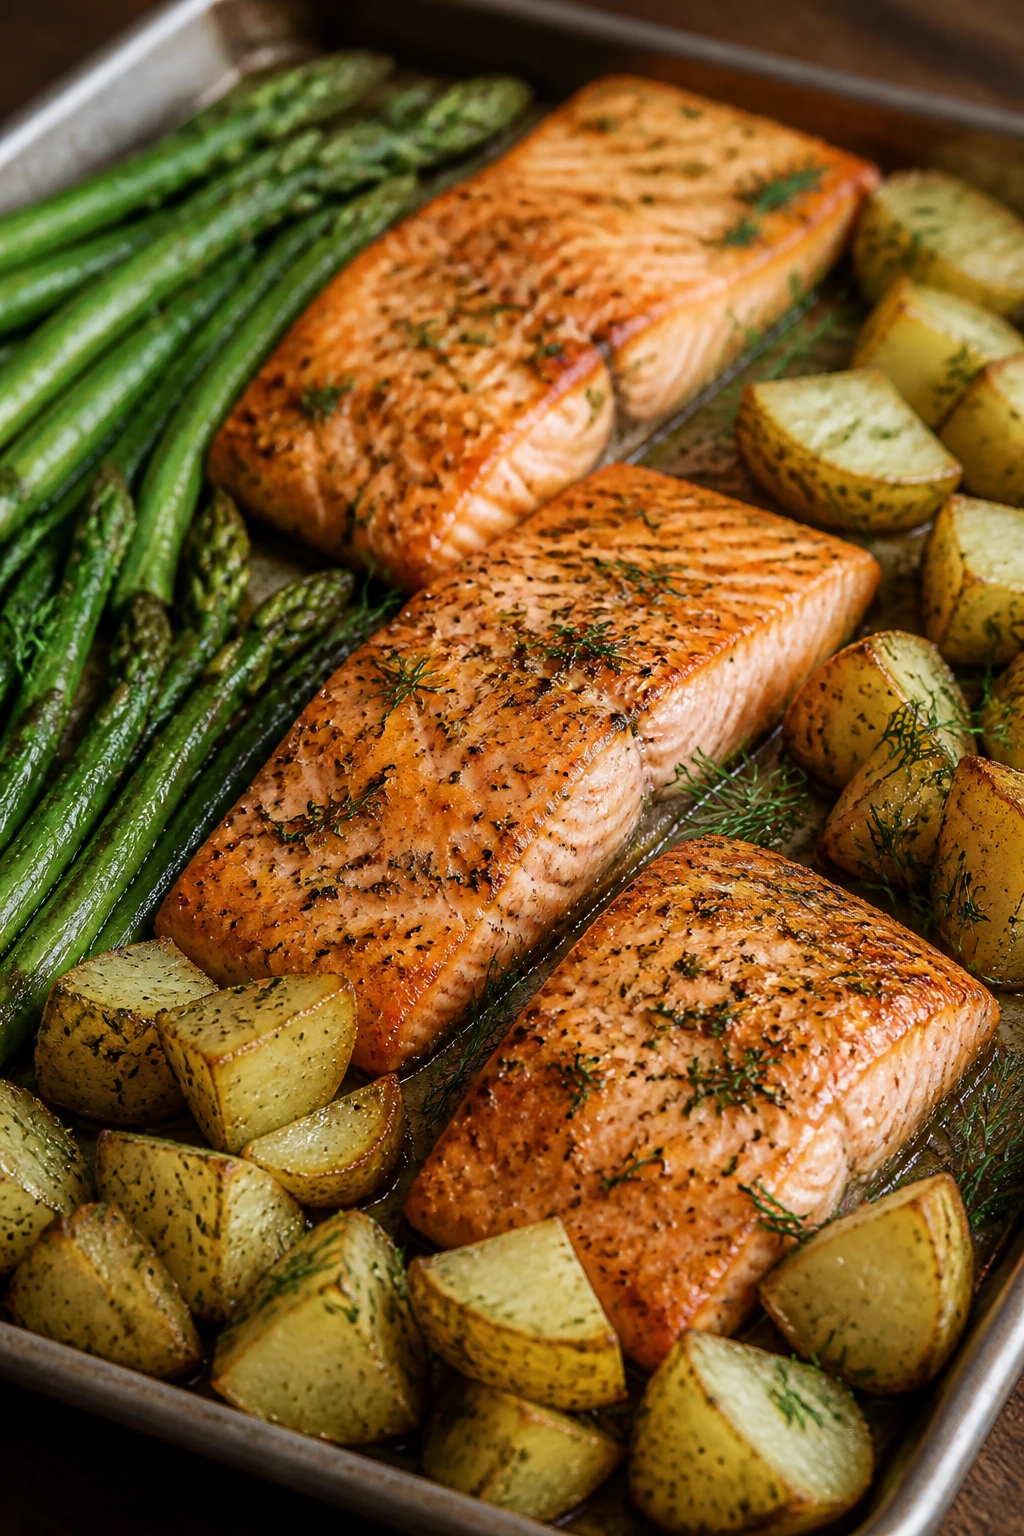
Salmon likes a hot pan and a little restraint. Roast the potatoes first, and you get crisp edges without overcooking the fish. Add the asparagus and salmon later, and the whole sheet pan comes out with bright green spears, flaky fish, and those little browned potato corners that always vanish first.
Why It Works
Salmon and asparagus finish in about the same window if you give the potatoes a head start. That matters, because potatoes need much longer than fish, and trying to make them start together is how people end up with dry salmon or raw potatoes. Dijon, lemon, and dill keep the flavor clean and sharp, which works better here than a heavy sauce. The fish is done when it flakes and reaches 145°F (63°C) in the thickest part; that safe temperature keeps the texture tender instead of chalky.
Key Ingredients
- 4 salmon fillets, about 6 ounces each — Choose pieces of similar thickness.
- 1½ pounds baby potatoes, halved — Smaller potatoes roast faster and crisp more easily.
- 1 bunch asparagus, trimmed — Thicker stalks need the same roast time as the salmon.
- 2 tablespoons olive oil — Divide it so the potatoes get enough.
- 1 lemon, zested and cut into wedges — Half goes on the pan, half at the table.
- 2 garlic cloves, minced — Mix with the fish and potatoes for a savory base.
- 2 tablespoons chopped fresh dill — Fresh dill tastes cleaner than dried here.
- 1 tablespoon Dijon mustard — It clings to the salmon and adds a little bite.
- 1 teaspoon kosher salt — Salt the potatoes generously.
- ½ teaspoon black pepper — Just enough to keep the fish from tasting one-note.
Quick Steps
- Start the potatoes: Heat the oven to 425°F (220°C). Toss the potatoes with half the oil, garlic, salt, pepper, and half the dill. Roast for 20 minutes.
- Prep the salmon: Stir the Dijon with the remaining oil, lemon zest, and a pinch of salt. Brush it over the salmon fillets.
- Add the asparagus: Toss the asparagus with a little oil and salt, then scatter it over the pan with the potatoes.
- Nestle in the salmon: Place the salmon among the vegetables and roast for 10 to 12 minutes.
- Check doneness: The salmon should flake at the center and hit 145°F (63°C) if you use a thermometer.
- Finish bright: Squeeze lemon over the pan and scatter the remaining dill on top before serving.
Tips and Variations
- For stronger browning: Pat the salmon dry before brushing it with the mustard mixture.
- For a different herb note: Parsley or chives work if dill is not your thing.
- For easier cleanup: Use parchment; salmon skin tends to leave behind sticky bits on bare metal.
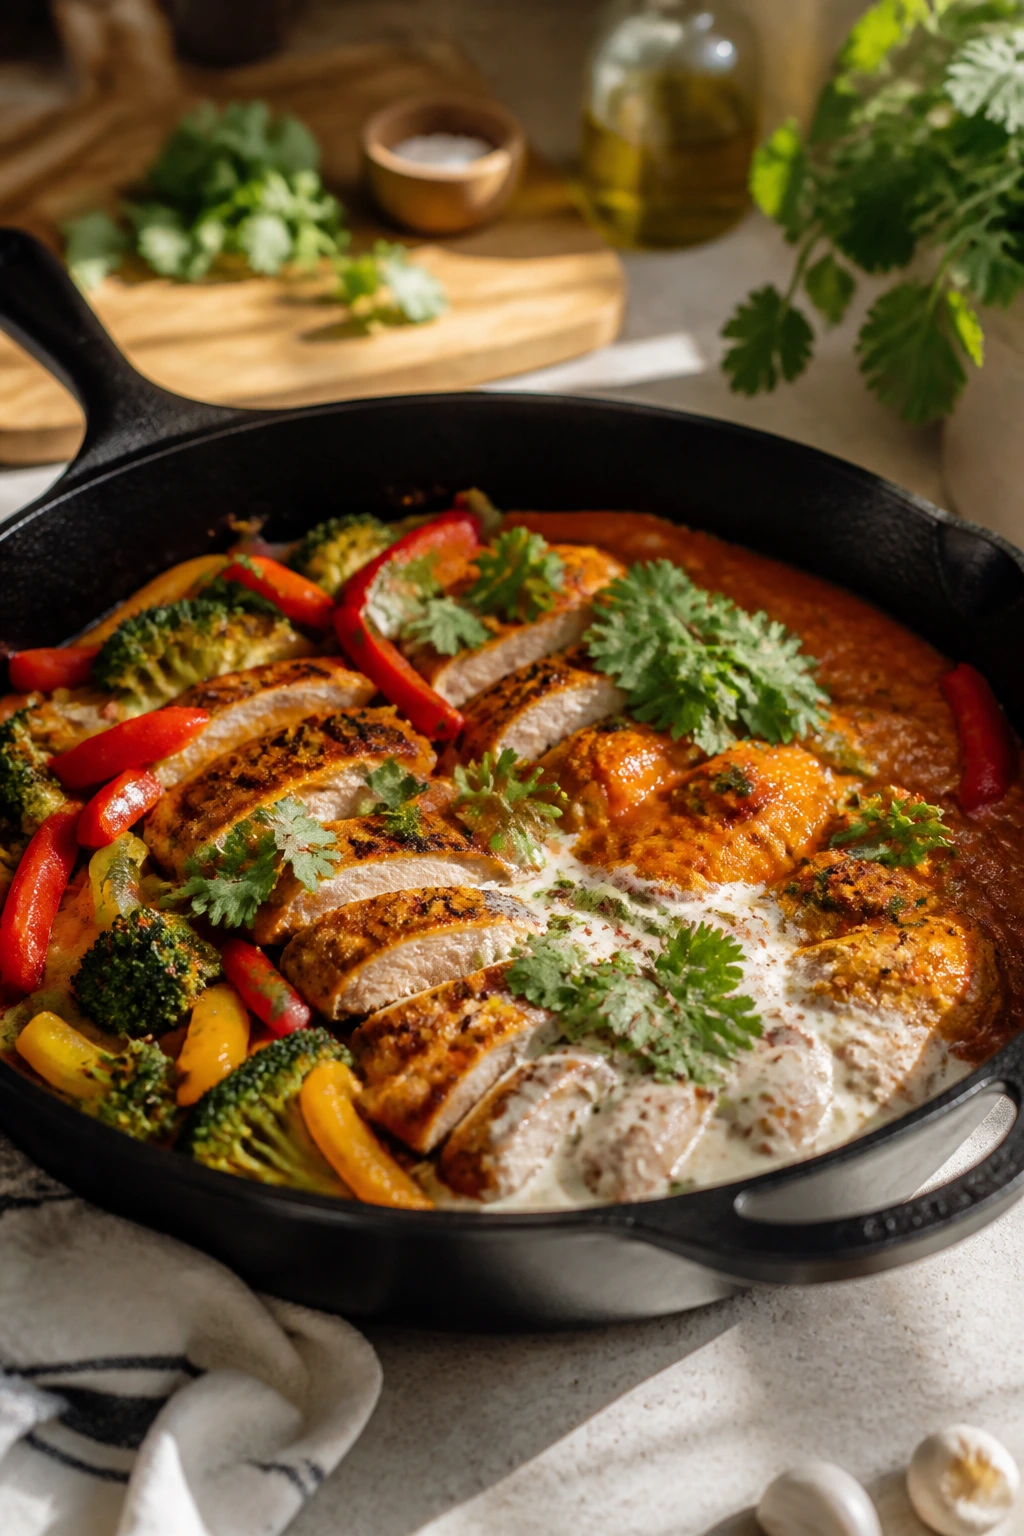
5. Creamy Tuscan Chicken and Spinach Skillet
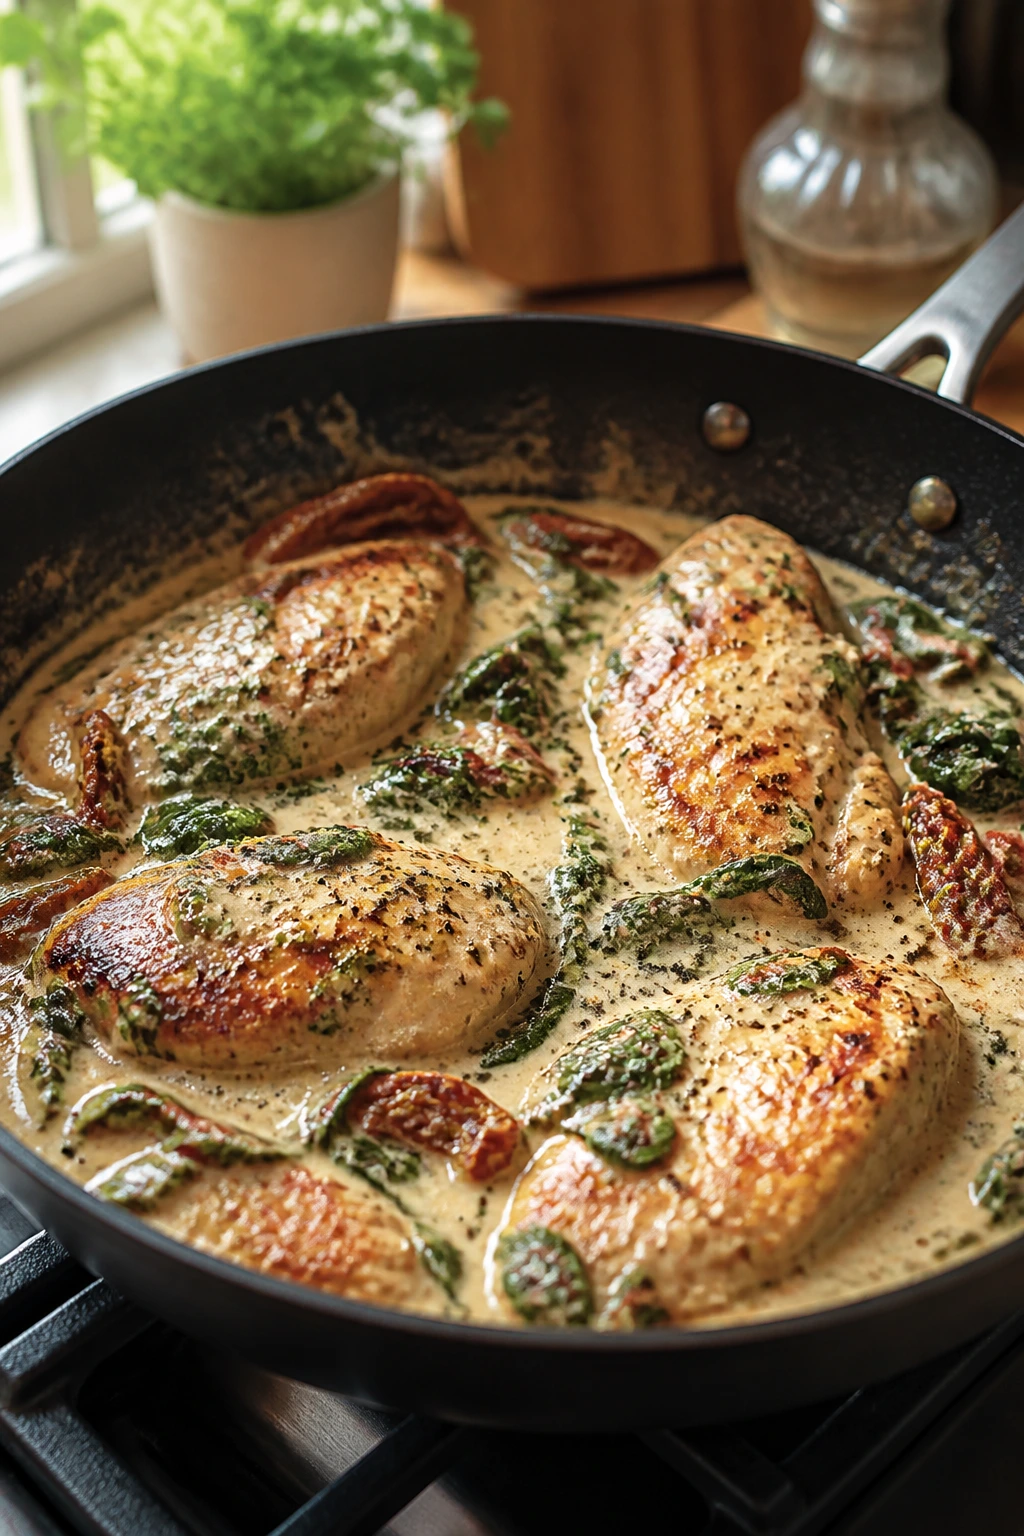
Creamy Tuscan chicken earns its place because it smells like dinner before it’s done. Garlic, sun-dried tomatoes, and cream make the skillet look rich and glossy, and the spinach collapses into the sauce without making it heavy. It tastes like you spent longer on it than you did.
Why It Works
Chicken cutlets cook quickly and evenly, which is the reason they’re so useful in skillet dinners. A short sear builds flavor, then the pan is deglazed with broth so the browned bits become part of the sauce instead of staying stuck to the bottom. Heavy cream and Parmesan give the sauce body, but the spinach and tomatoes keep it from feeling dull or one-dimensional. This is one of those pans where the sauce should coat the back of a spoon lightly; if it runs like milk, it needs another minute.
Key Ingredients
- 1½ pounds chicken cutlets or thin-sliced chicken breasts — Thin pieces cook fast and stay tender.
- ¼ cup all-purpose flour — A light dredge helps the chicken brown.
- 2 tablespoons olive oil — Use enough to coat the pan well.
- 3 garlic cloves, minced — The sauce starts here.
- ½ cup chopped sun-dried tomatoes — Drain them if they’re packed in oil.
- 1 cup chicken broth — This loosens the fond on the bottom of the skillet.
- ¾ cup heavy cream — It creates the silky texture.
- ½ cup grated Parmesan — Stir it in off the boil so it does not clump.
- 4 cups baby spinach — Add it at the end so it wilts cleanly.
- 1 teaspoon Italian seasoning — Keeps the sauce balanced.
- Salt and black pepper — Season the chicken before it hits the pan.
Quick Steps
- Season and dredge: Pat the chicken dry, season it with salt and pepper, and dust it lightly with flour.
- Sear the chicken: Heat the oil in a large skillet over medium-high heat and cook the chicken for 3 to 4 minutes per side, until golden. Remove it to a plate.
- Build the sauce base: Lower the heat to medium, add the garlic and sun-dried tomatoes, and cook for 30 seconds.
- Deglaze and simmer: Pour in the broth, scraping the pan, then add the cream and Italian seasoning. Simmer for 3 minutes.
- Melt in the cheese: Stir in the Parmesan until the sauce looks smooth and slightly thick.
- Return the chicken: Nestle the chicken back into the pan and cook for 3 to 5 minutes, until it reaches 165°F (74°C).
- Wilt the spinach: Stir in the spinach until it collapses, then serve right away.
Tips and Variations
- For a brighter sauce: Add a squeeze of lemon at the end.
- For a lighter version: Use half-and-half, but simmer gently or it may split.
- For more texture: A handful of sliced mushrooms can join the tomatoes after the chicken comes out.
6. Shrimp Fajita Rice Skillet
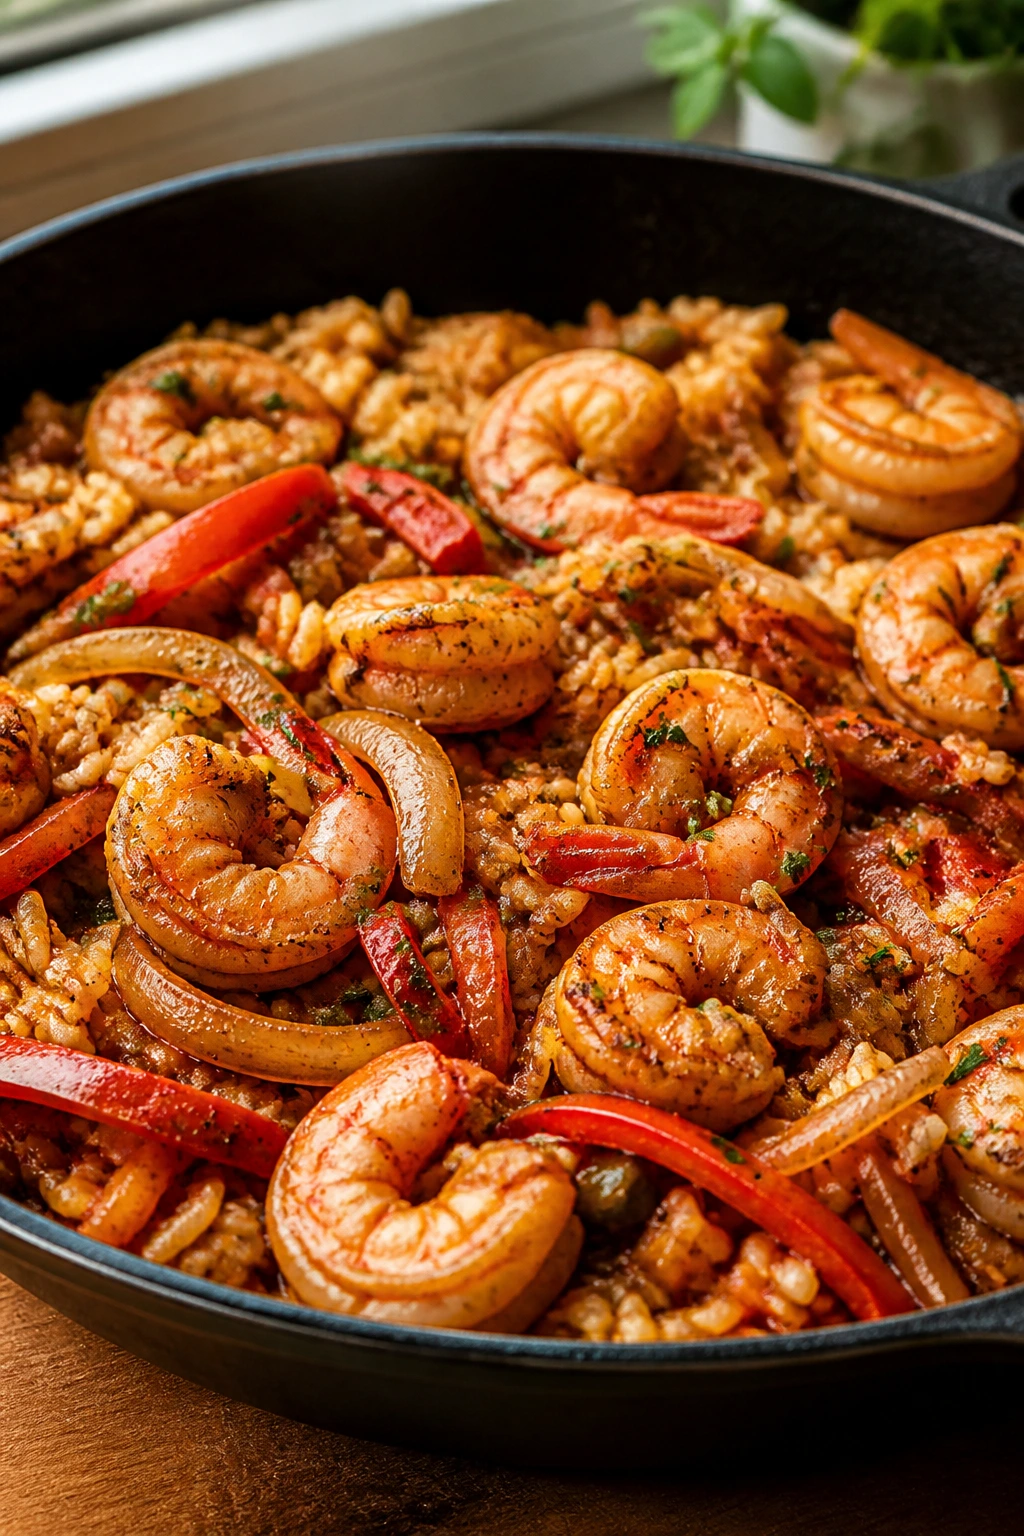
Shrimp fajita rice is bright, fast, and a little messy in the best way. The peppers stay sweet, the shrimp turns pink and snappy, and the rice soaks up the smoky broth like it was made for the job. This is the sort of skillet that makes you feel ahead of dinner for once.
Why It Works
Shrimp cooks in minutes, which is why it fits so well into a one-pan rice dinner. The peppers and onions get a head start, the rice simmers in the seasoned liquid, and the shrimp goes in near the end so it doesn’t toughen. If you add the shrimp too early, it turns rubbery before the rice is done. If you wait too long, the rice overcooks. The timing is the whole trick here, and once you get it, the pan is simple.
Key Ingredients
- 1½ pounds large shrimp, peeled and deveined — Pat them dry so they sear a little.
- 1 red bell pepper, sliced — The sweetness balances the spice.
- 1 yellow onion, sliced — It softens into the rice.
- 2 garlic cloves, minced — Adds depth without making the pan heavy.
- 1 cup long-grain white rice, rinsed — A predictable, steady cooker.
- 2 cups chicken broth — The rice needs this to finish.
- 1 can diced tomatoes, 14.5 ounces — Use the juices for extra flavor.
- 1 tablespoon fajita seasoning — Enough smoke and chili to carry the dish.
- 1 lime, juiced — Brightens the whole skillet at the end.
- 2 tablespoons chopped cilantro — Add right before serving.
Quick Steps
- Cook the vegetables: Heat a large skillet over medium-high heat with a little oil. Cook the onion and pepper for 4 to 5 minutes, until softened and lightly browned.
- Add the garlic and seasoning: Stir in the garlic and fajita seasoning for 30 seconds.
- Build the rice base: Add the rice, tomatoes, and broth. Stir once and bring to a boil.
- Simmer covered: Lower the heat, cover, and cook for 15 minutes.
- Add the shrimp: Nestle the shrimp into the rice, cover again, and cook for 4 to 5 minutes, until the shrimp are pink and opaque.
- Finish fresh: Remove from the heat, squeeze over the lime, and stir in the cilantro.
- Serve immediately: The rice should be tender and the shrimp just curled.
Tips and Variations
- For extra char: Sear the shrimp separately for 1 minute per side before adding them back.
- For more body: Stir in ½ cup frozen corn with the rice.
- For a softer finish: Cover the skillet and let it rest for 5 minutes before serving.
7. Sheet Pan Chicken Parmesan with Broccoli
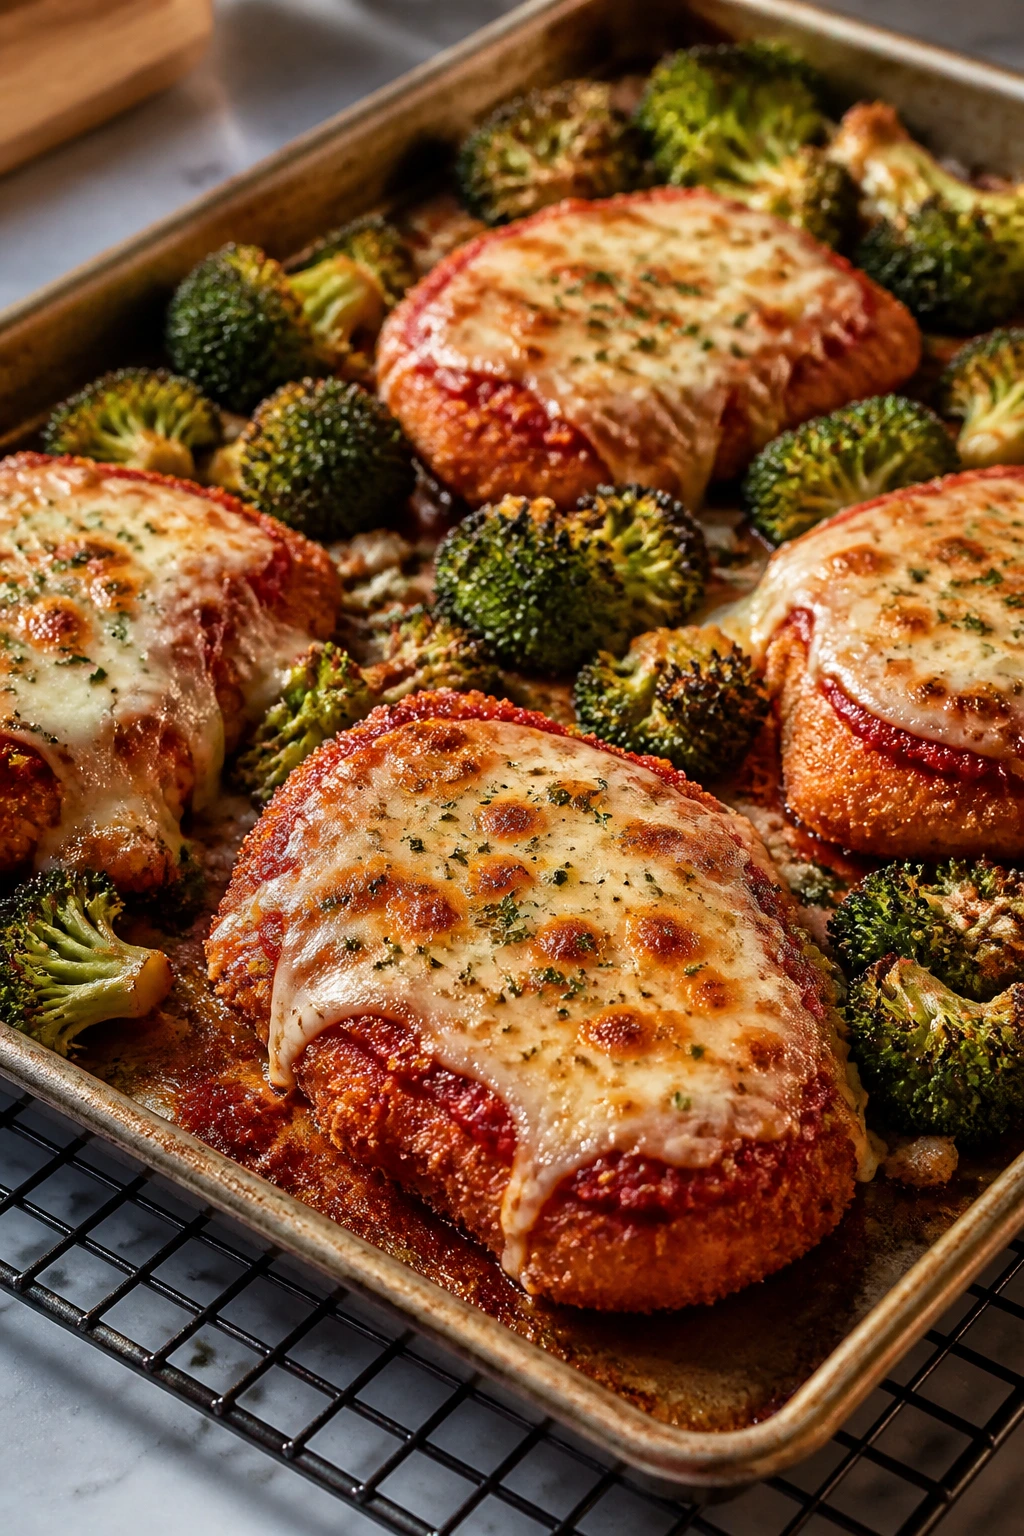
Sheet pan chicken Parmesan sounds like a cheat, and that’s exactly why it works. You still get crunchy breading, tomato sauce, and melted cheese, but the broccoli roasts beside the chicken instead of begging for a second pot. It’s a smarter version of a classic, not a sad imitation.
Why It Works
A thin chicken cutlet cooks fast enough to match the broccoli, which keeps the whole pan in one time zone. Panko gives a lighter crust than regular breadcrumbs, and a brief blast of marinara plus mozzarella at the end turns the top into the part everyone wants first. The broccoli benefits from the same high heat because it gets brown tips instead of steaming into green mush. If you want that crisp breading to survive, keep the sauce off the chicken until the last few minutes.
Key Ingredients
- 4 chicken cutlets, about 1½ pounds total — Pound them to an even thickness if needed.
- ½ cup all-purpose flour — The first layer helps the egg stick.
- 2 large eggs, beaten — The glue for the breading.
- 1 cup panko breadcrumbs — They crisp up better than fine crumbs.
- ½ cup grated Parmesan — Mix it into the breading for extra salt and flavor.
- 2 cups broccoli florets — Keep the pieces medium so they roast, not burn.
- 1½ cups marinara sauce — Use a thicker sauce if you can.
- 1 cup shredded mozzarella — Melt this over the chicken at the end.
- 2 tablespoons olive oil — Helps the broccoli and breading brown.
- 1 teaspoon Italian seasoning — A small amount is enough here.
Quick Steps
- Prep the pan: Heat the oven to 425°F (220°C) and line a sheet pan with parchment.
- Bread the chicken: Dredge each cutlet in flour, dip it in egg, then coat it with panko, Parmesan, and Italian seasoning.
- Season the broccoli: Toss the broccoli with olive oil, salt, and pepper, then spread it on the pan.
- Bake once: Add the chicken to the pan and bake for 15 minutes.
- Flip and continue: Turn the chicken, stir the broccoli, and bake for 8 to 10 minutes more, until the chicken reaches 165°F (74°C).
- Add sauce and cheese: Spoon marinara over each cutlet, top with mozzarella, and broil for 2 to 3 minutes until melted and bubbling.
- Rest briefly: Let it sit for 3 minutes before serving so the cheese settles.
Tips and Variations
- For a stronger crust: Spray the breaded chicken lightly with oil before baking.
- For a lower-carb version: Skip the breadcrumbs and coat the chicken in Parmesan and crushed pork rinds.
- For a sharper finish: Add a pinch of red pepper flakes to the marinara.
8. Beef and Broccoli Noodle Skillet
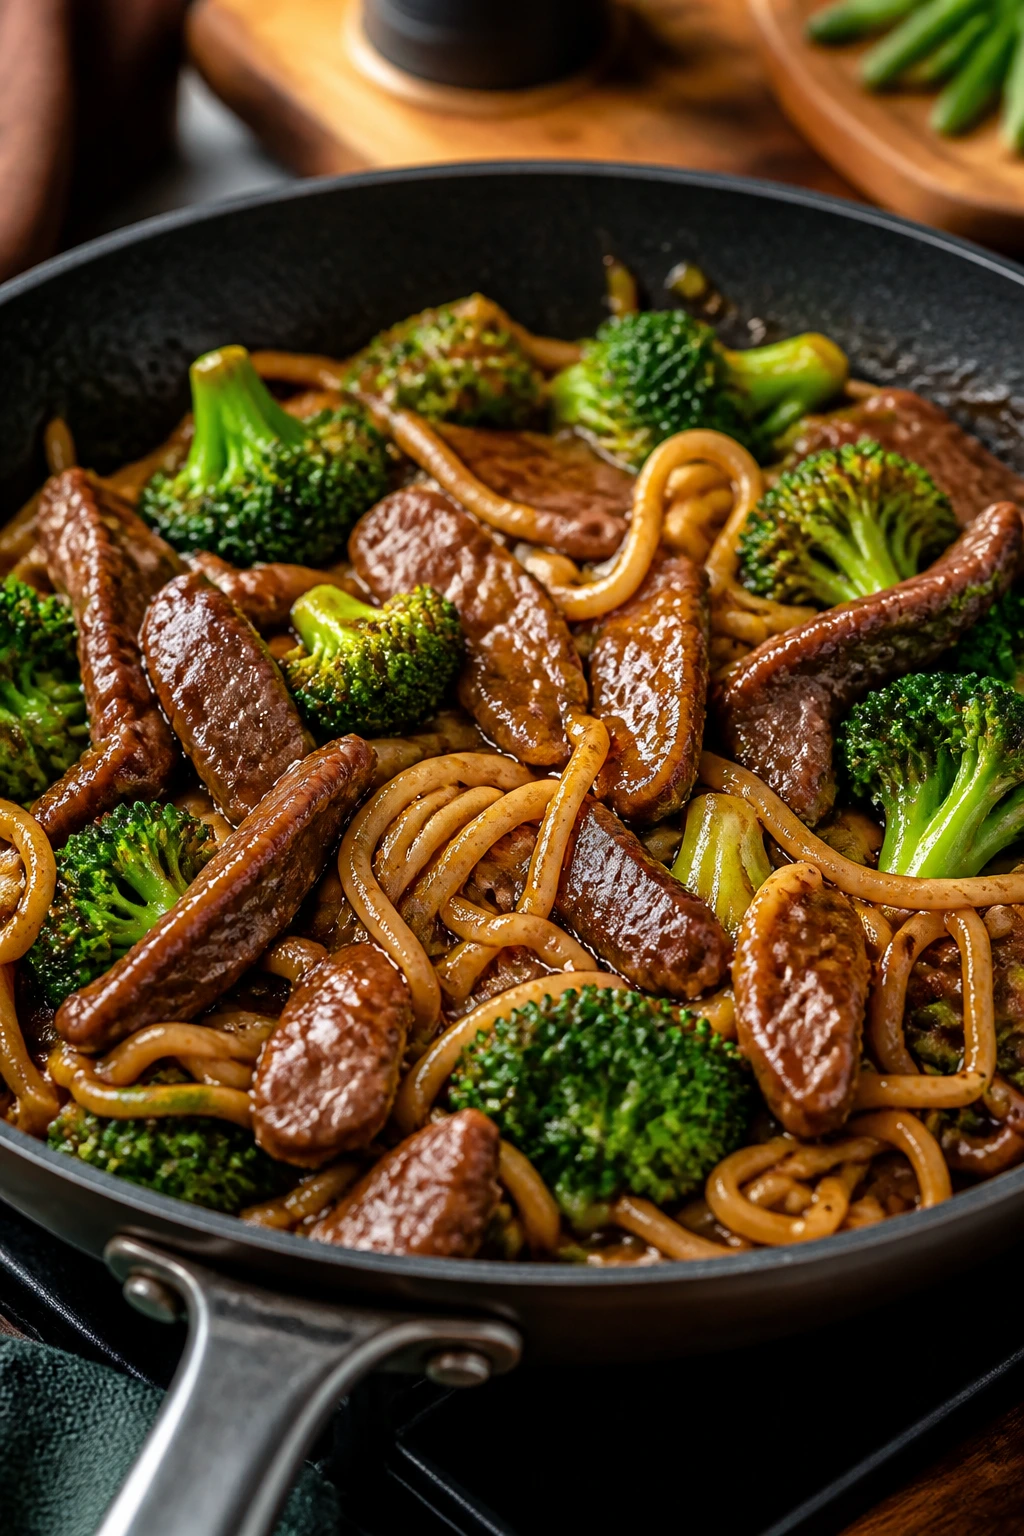
Stir-fries and noodle skillets live on speed. Thin strips of beef, broccoli florets, and noodles all finish in the same pan, and the sauce clings to everything instead of pooling at the bottom. You get that takeout-style comfort without the stack of containers that usually comes with it.
Why It Works
Thin steak cooks fast, which is the key to keeping it tender in a skillet meal. Broccoli only needs a short steam in the broth, and noodles like lo mein or spaghetti absorb flavor as they soften. A little cornstarch thickens the sauce so it sticks to the noodles instead of slipping away. If you’ve ever made a noodle skillet that turned soupy, the fix is simple: use less liquid than you think, keep the simmer lively, and finish with a short rest so the sauce tightens up.
Key Ingredients
- 1 pound flank steak or sirloin, sliced thin across the grain — Thin slices stay tender.
- 12 ounces broccoli florets — Cut them into bite-size pieces.
- 8 ounces lo mein noodles or spaghetti — Choose noodles that cook in about 8 to 10 minutes.
- 3 cups beef broth — The main cooking liquid.
- ¼ cup soy sauce — Brings salt and savory depth.
- 2 tablespoons hoisin sauce — Adds sweetness and body.
- 2 garlic cloves, minced — The base note of the sauce.
- 1 tablespoon grated ginger — Fresh ginger sharpens the whole skillet.
- 1 tablespoon cornstarch mixed with 2 tablespoons water — Thickens the sauce at the end.
- 1 teaspoon sesame oil — Finish with this, not early, so it stays fragrant.
Quick Steps
- Sear the beef: Heat oil in a large skillet over high heat and cook the beef for 1 to 2 minutes per side. Remove it before it overcooks.
- Start the sauce: Lower the heat to medium, add the garlic and ginger, and cook for 30 seconds.
- Add broth and noodles: Pour in the broth, soy sauce, and hoisin, then add the noodles and broccoli.
- Simmer covered: Cook for 8 to 10 minutes, stirring once or twice, until the noodles are tender and most of the liquid is gone.
- Thicken the skillet: Stir in the cornstarch slurry and cook for 1 minute, until the sauce turns glossy.
- Return the beef: Add the beef back to the pan and toss everything together.
- Finish with sesame oil: Drizzle over the oil and serve with scallions.
Tips and Variations
- For more crunch: Add sliced carrots with the broccoli.
- For a sweeter sauce: Stir in 1 teaspoon brown sugar with the soy sauce.
- For a deeper beef flavor: Keep the skillet very hot at the start so the meat sears instead of steaming.
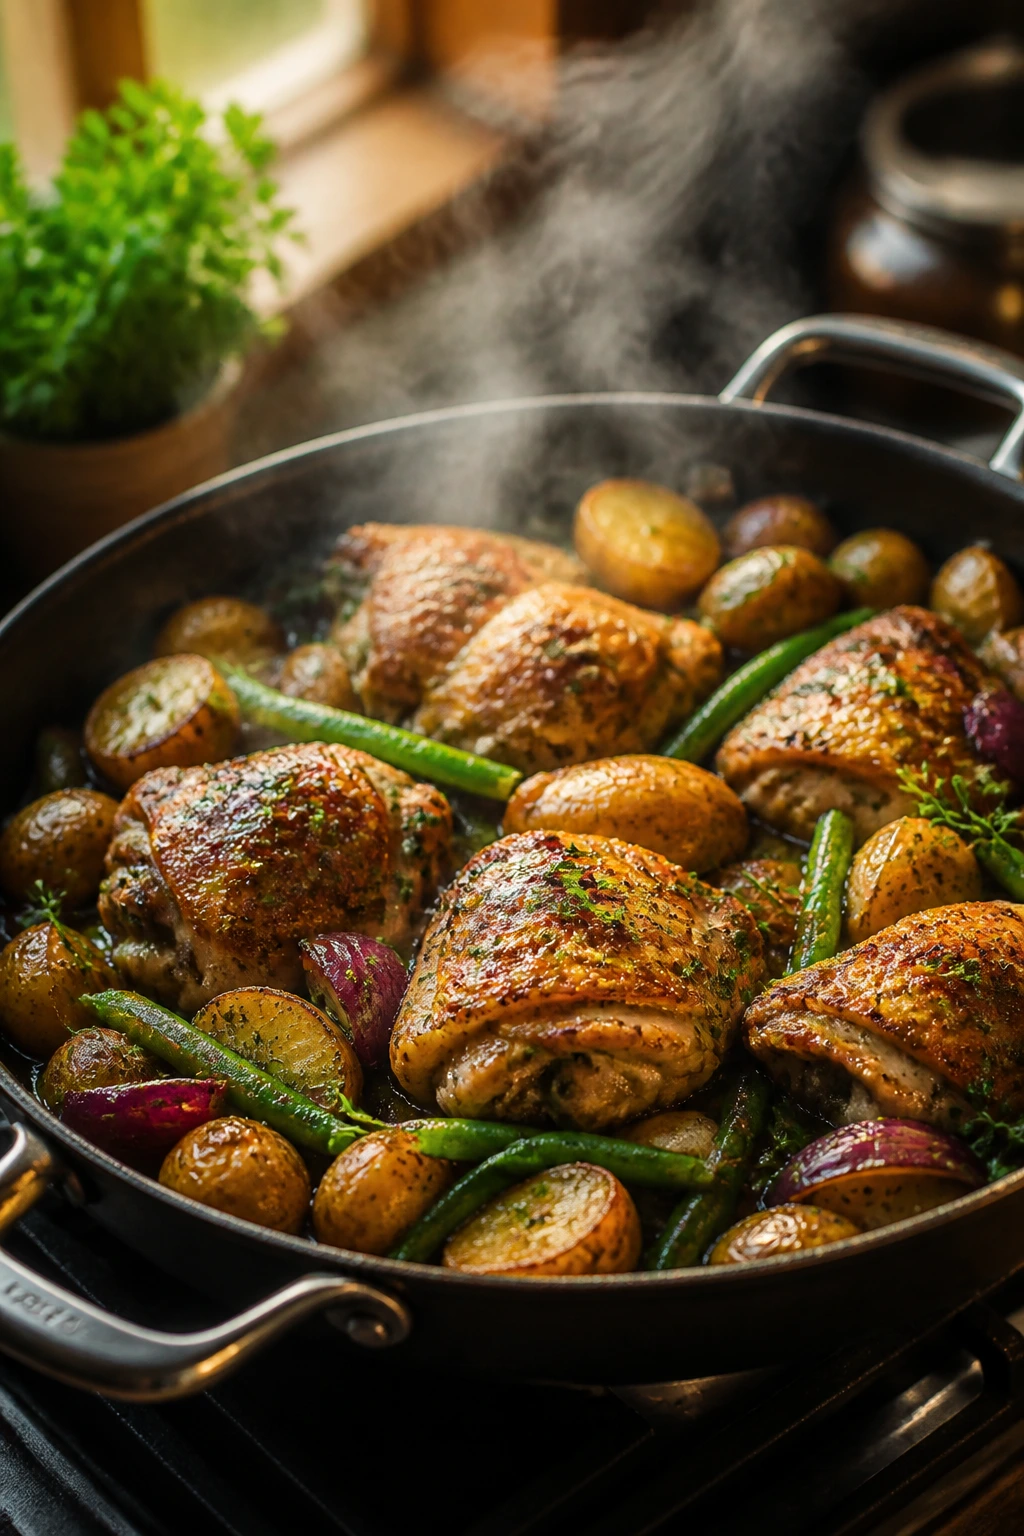
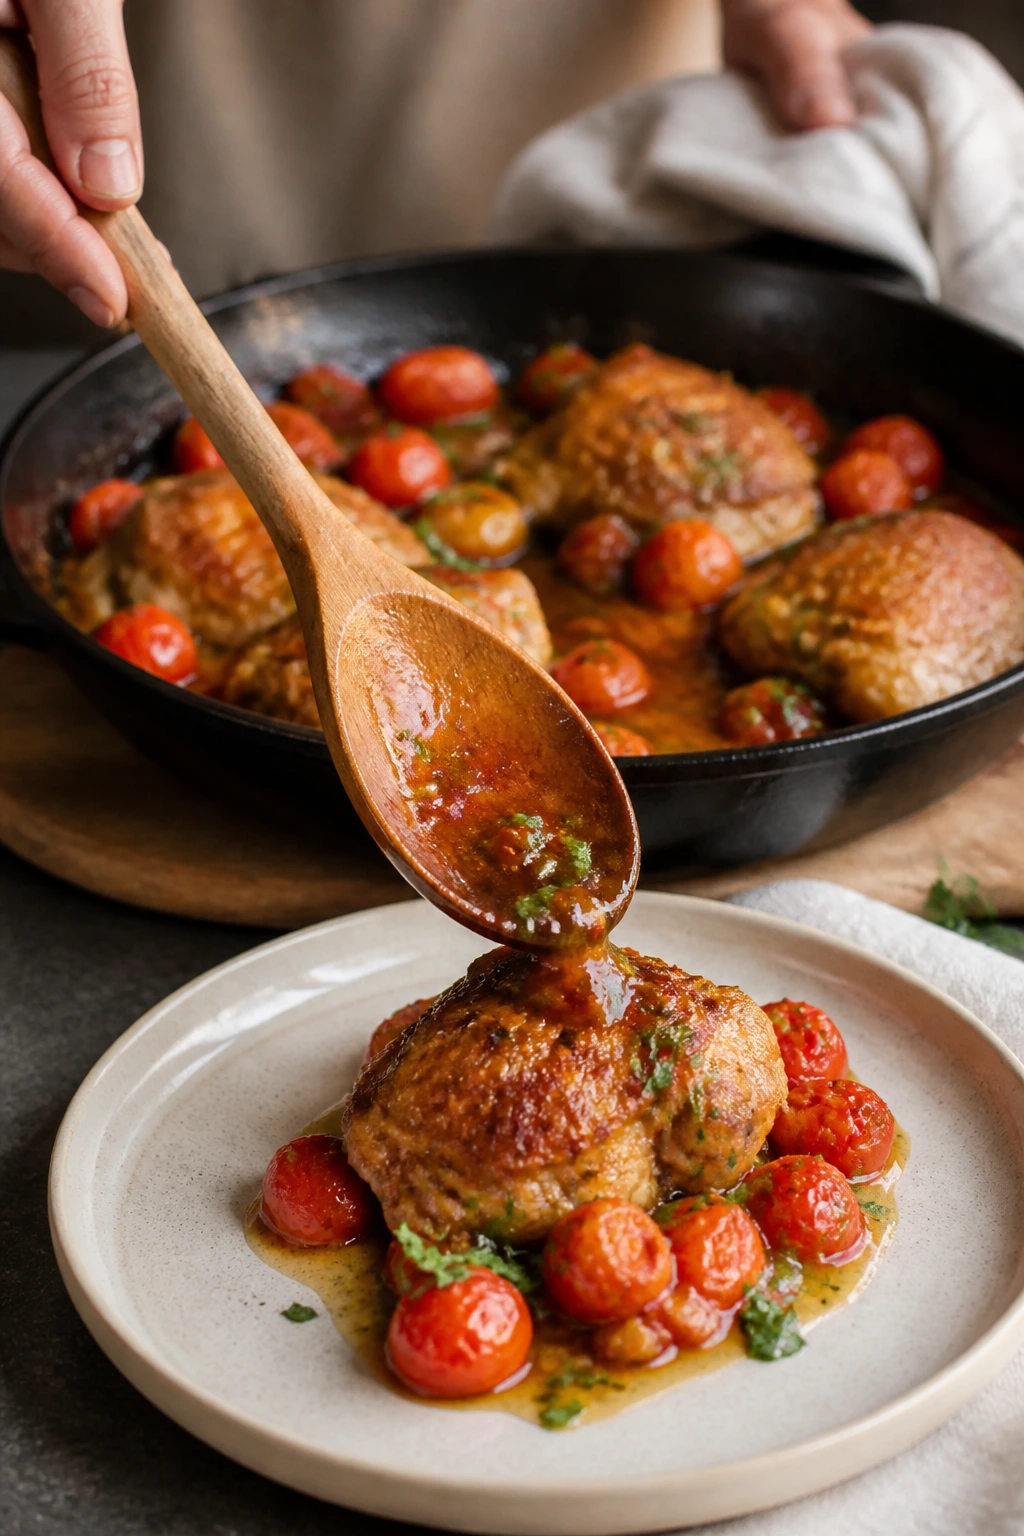
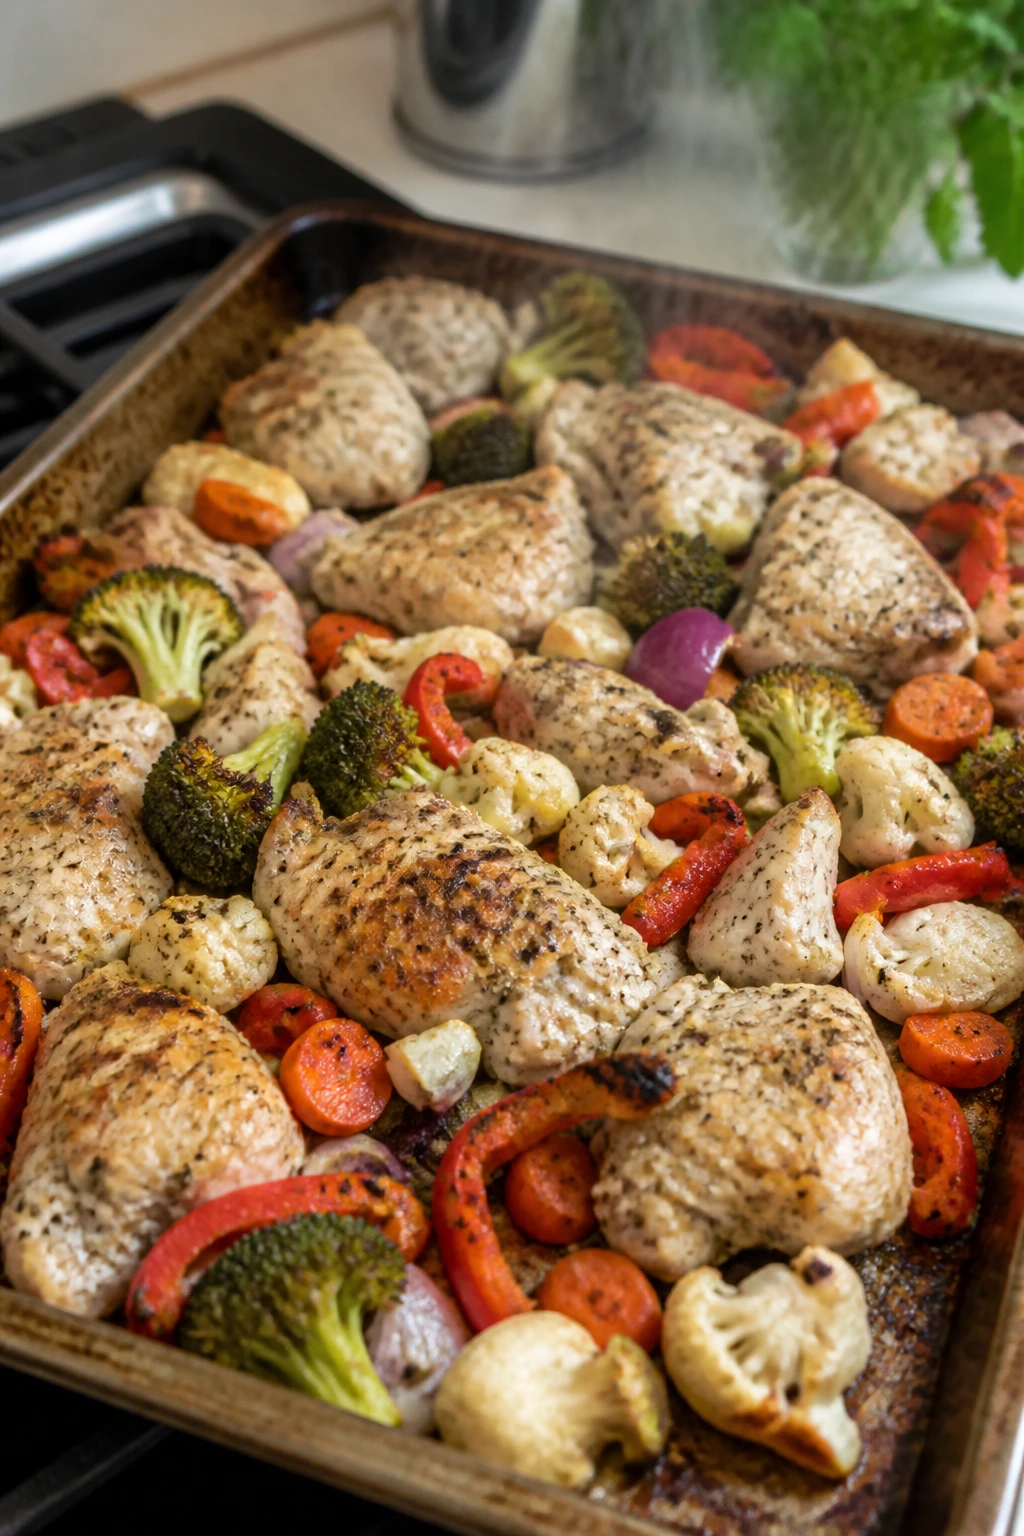
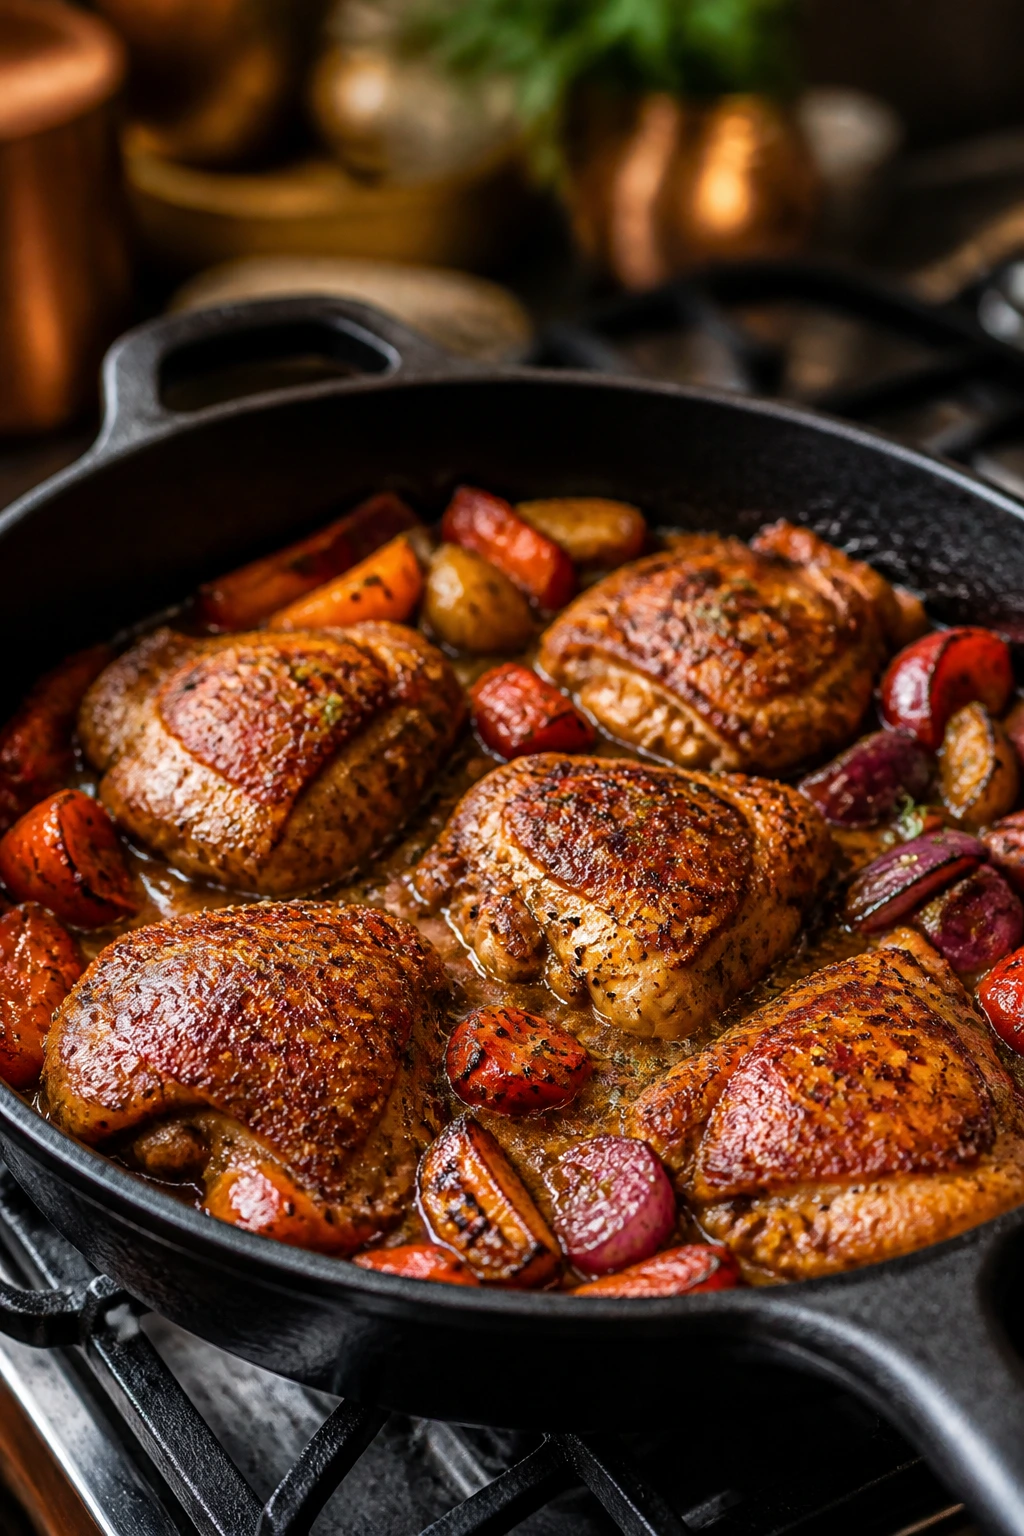
9. Pork Chops with Apples and Brussels Sprouts on a Sheet Pan
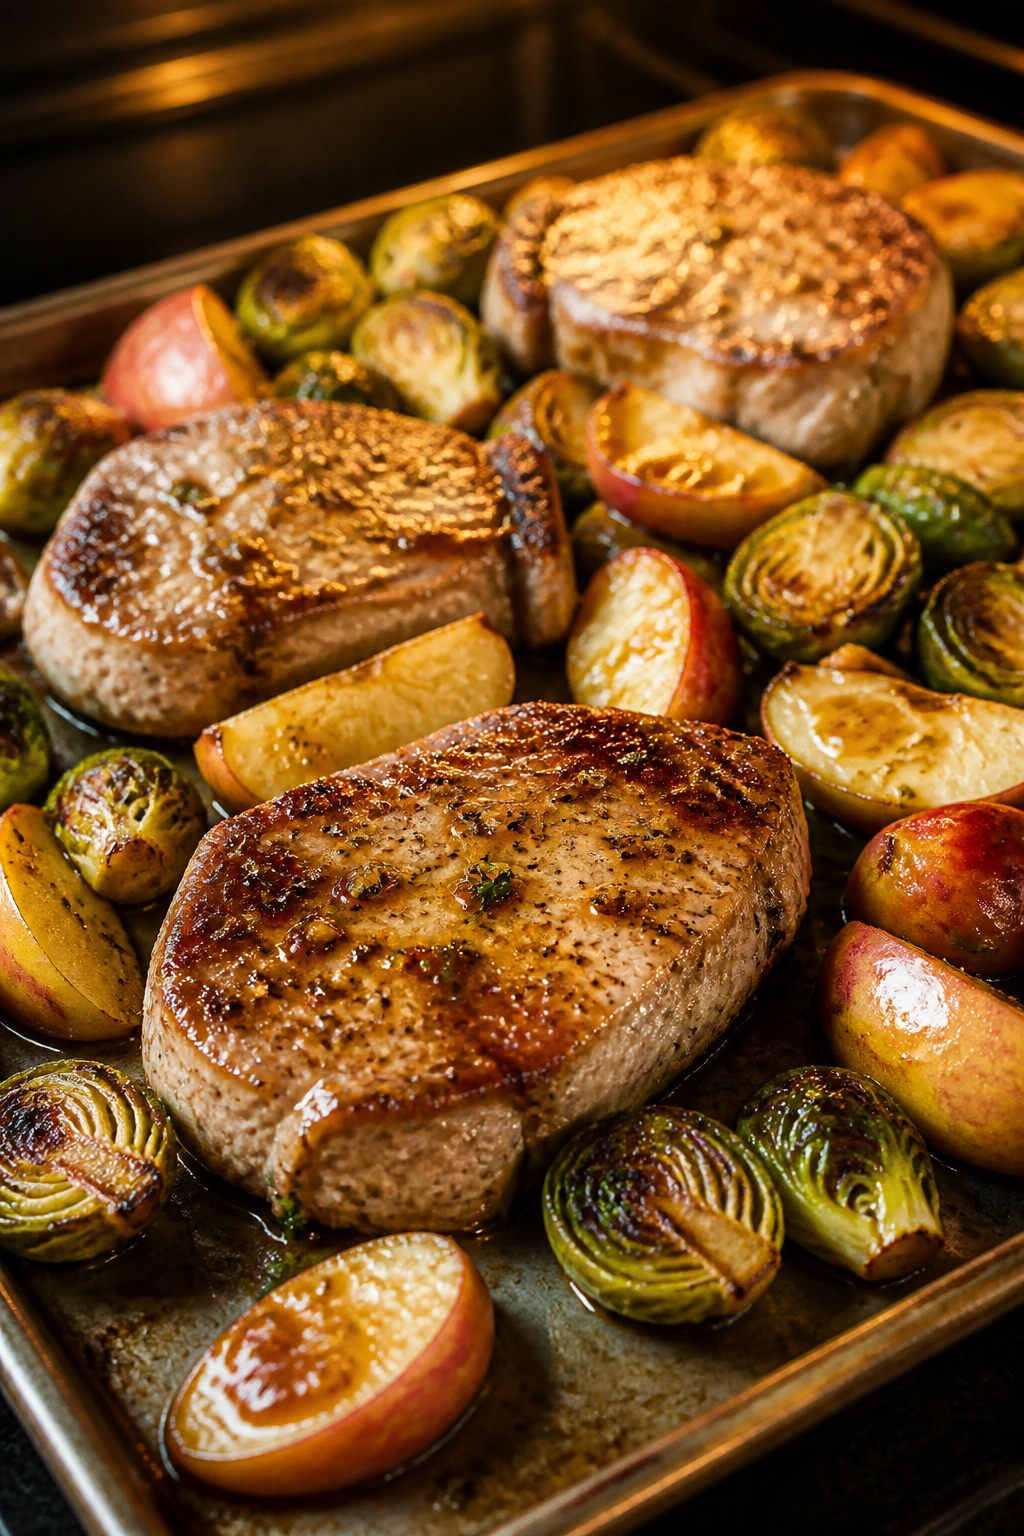
Pork chops with apples and Brussels sprouts hit that sweet-salty note people keep coming back to. The apples soften just enough to turn jammy, the sprouts caramelize on the cut sides, and the pork gets a quick glaze that keeps it from drying out in the oven. It’s a tidy pan with a lot going on in the best possible way.
Why It Works
Pork chops cook cleanly in a hot oven if they’re not too thick, and 1-inch chops are a sweet spot. Brussels sprouts need direct heat and a bit of space so they brown instead of steaming, while apples release juice that helps make a shallow glaze on the pan. Dijon and maple syrup give the whole tray a glossy finish without requiring a separate sauce. The goal is 145°F (63°C) at the center of the pork, then a short rest so the juices settle back in.
Key Ingredients
- 4 boneless pork chops, about 1 inch thick — Thinner chops cook too fast and dry out.
- 1½ pounds Brussels sprouts, trimmed and halved — Put the cut sides down for browning.
- 2 firm apples, cored and sliced — Honeycrisp, Gala, or Fuji all work.
- 1 small red onion, sliced — It softens into the pan juices.
- 2 tablespoons olive oil — Coat the vegetables well.
- 2 tablespoons Dijon mustard — Mix with the glaze for tang.
- 2 tablespoons maple syrup — Adds shine and light sweetness.
- 1 teaspoon fresh thyme leaves — A small herbal note fits the pork.
- 1 teaspoon kosher salt — Season the chops and vegetables.
- ½ teaspoon black pepper — Enough to sharpen the glaze.
Quick Steps
- Heat the oven: Set it to 425°F (220°C) and line a sheet pan.
- Toss the vegetables: Mix the Brussels sprouts, apples, and onion with olive oil, salt, pepper, and thyme. Spread them out in one layer.
- Start the roast: Bake the vegetables for 15 minutes.
- Glaze the chops: Stir together the Dijon and maple syrup, then brush it over the pork chops.
- Add the pork: Nestle the chops into the pan and roast for 12 to 15 minutes, until the pork reaches 145°F (63°C).
- Rest before serving: Let the chops sit for 5 minutes so they stay juicy.
- Spoon over the juices: The pan drippings make a fine little sauce all by themselves.
Tips and Variations
- For more browning: Dry the pork chops well before glazing.
- For a sharper finish: Add a splash of cider vinegar to the glaze.
- For a richer pan: A few dots of butter over the vegetables before roasting add sheen.
10. Mediterranean Chickpeas and Couscous Skillet
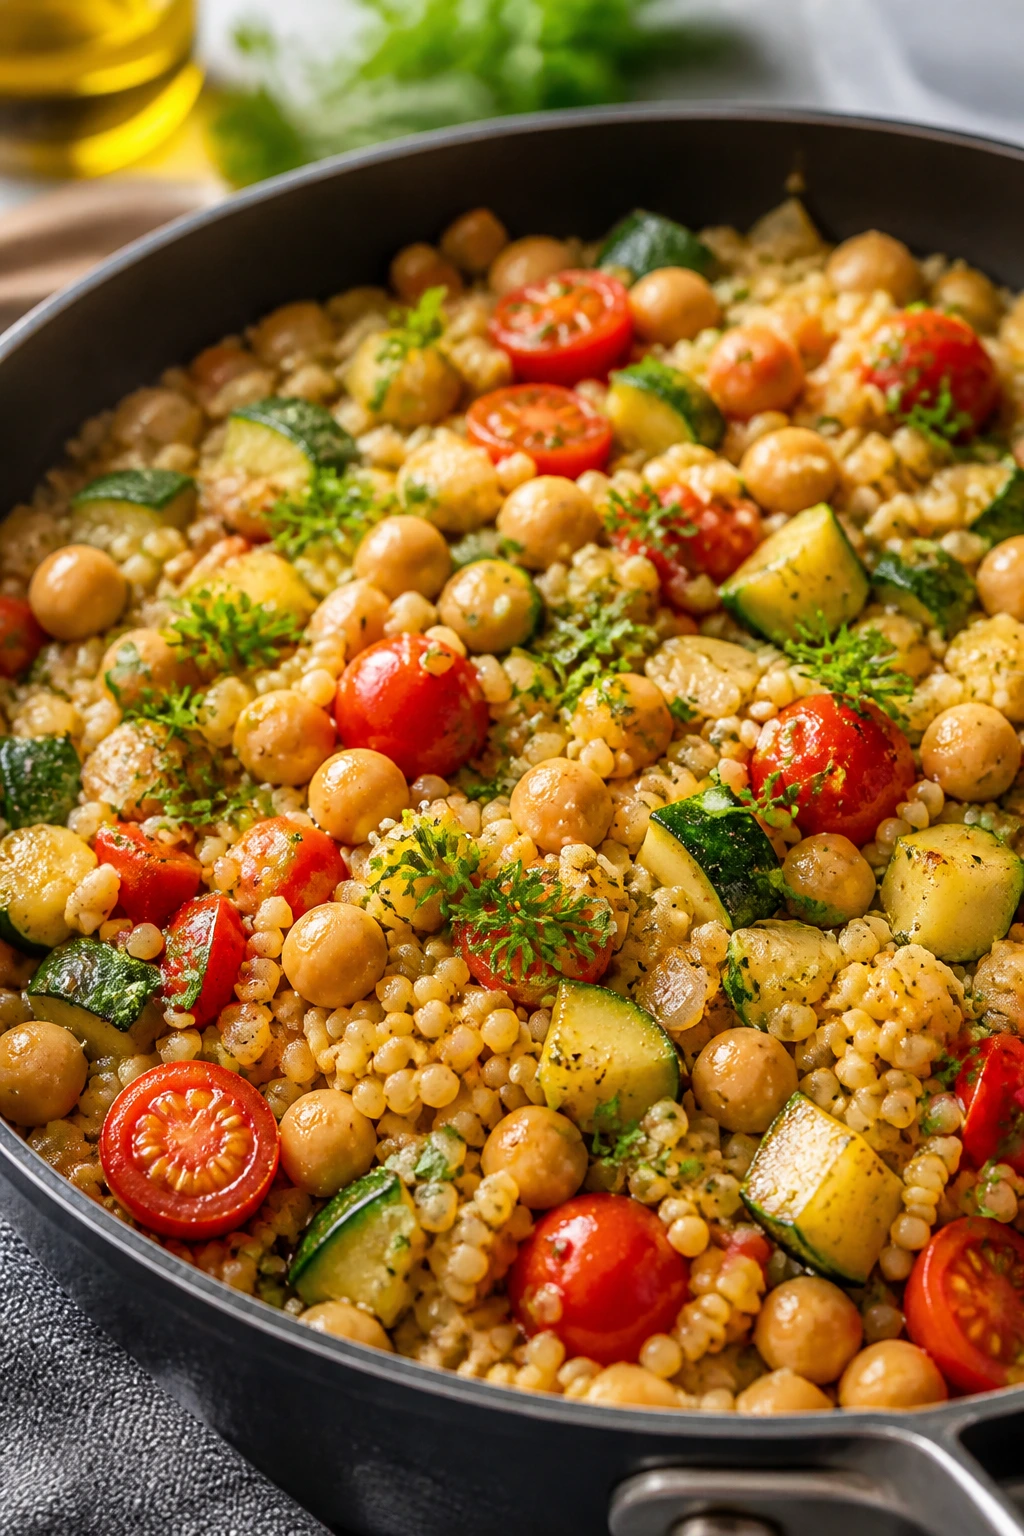
Chickpeas and couscous are a quiet, sturdy kind of dinner. Nothing about this skillet shouts, but it lands with enough lemon, feta, and olive oil to feel finished. The couscous cooks fast, the chickpeas add body, and the vegetables keep the whole pan from leaning too far into pantry-food territory.
Why It Works
Couscous is one of the easiest starches for a one-pan meal because it only needs hot liquid and a few minutes off the heat. Chickpeas bring protein and a creamy bite, while zucchini and tomatoes keep the skillet fresh and bright. A little cumin and lemon keep the flavor focused; feta is the finishing salt that pulls the whole thing together. If you want a dinner that can be on the table in under half an hour without tasting rushed, this is a dependable one.
Key Ingredients
- 2 cans chickpeas, drained and rinsed — Pat them dry if you want a little more texture.
- 1 medium zucchini, diced — Small pieces cook evenly.
- 1 red onion, diced — It melts into the base of the dish.
- 1 cup cherry tomatoes, halved — They burst and create sauce.
- 1½ cups couscous — The grain that makes the pan feel complete.
- 2 cups vegetable or chicken broth — Use hot broth so the couscous steams well.
- 3 cups baby spinach — Stir in at the end.
- 1 teaspoon ground cumin — Gives the pan a warm, earthy note.
- 1 lemon, zested and juiced — Brightens the chickpeas.
- ½ cup crumbled feta — Add at the end so it stays creamy.
Quick Steps
- Soften the vegetables: Heat olive oil in a large skillet over medium heat and cook the onion and zucchini for 5 minutes.
- Season the pan: Stir in cumin, salt, and pepper for 30 seconds.
- Add chickpeas and tomatoes: Cook for 2 minutes, just until the tomatoes start to slump.
- Pour in the broth: Bring it to a boil, then stir in the couscous.
- Cover and rest: Remove the pan from the heat, cover, and let it sit for 5 minutes.
- Fluff and finish: Fluff with a fork, then stir in spinach, lemon juice, lemon zest, and feta.
- Serve warm: A drizzle of olive oil on top does not hurt.
Tips and Variations
- For more herb flavor: Add chopped parsley or mint at the end.
- For extra richness: A spoonful of Greek yogurt on the plate works well.
- For a heartier version: Stir in roasted red peppers or artichoke hearts.
11. Turkey Meatballs, Zucchini, and Orzo Skillet
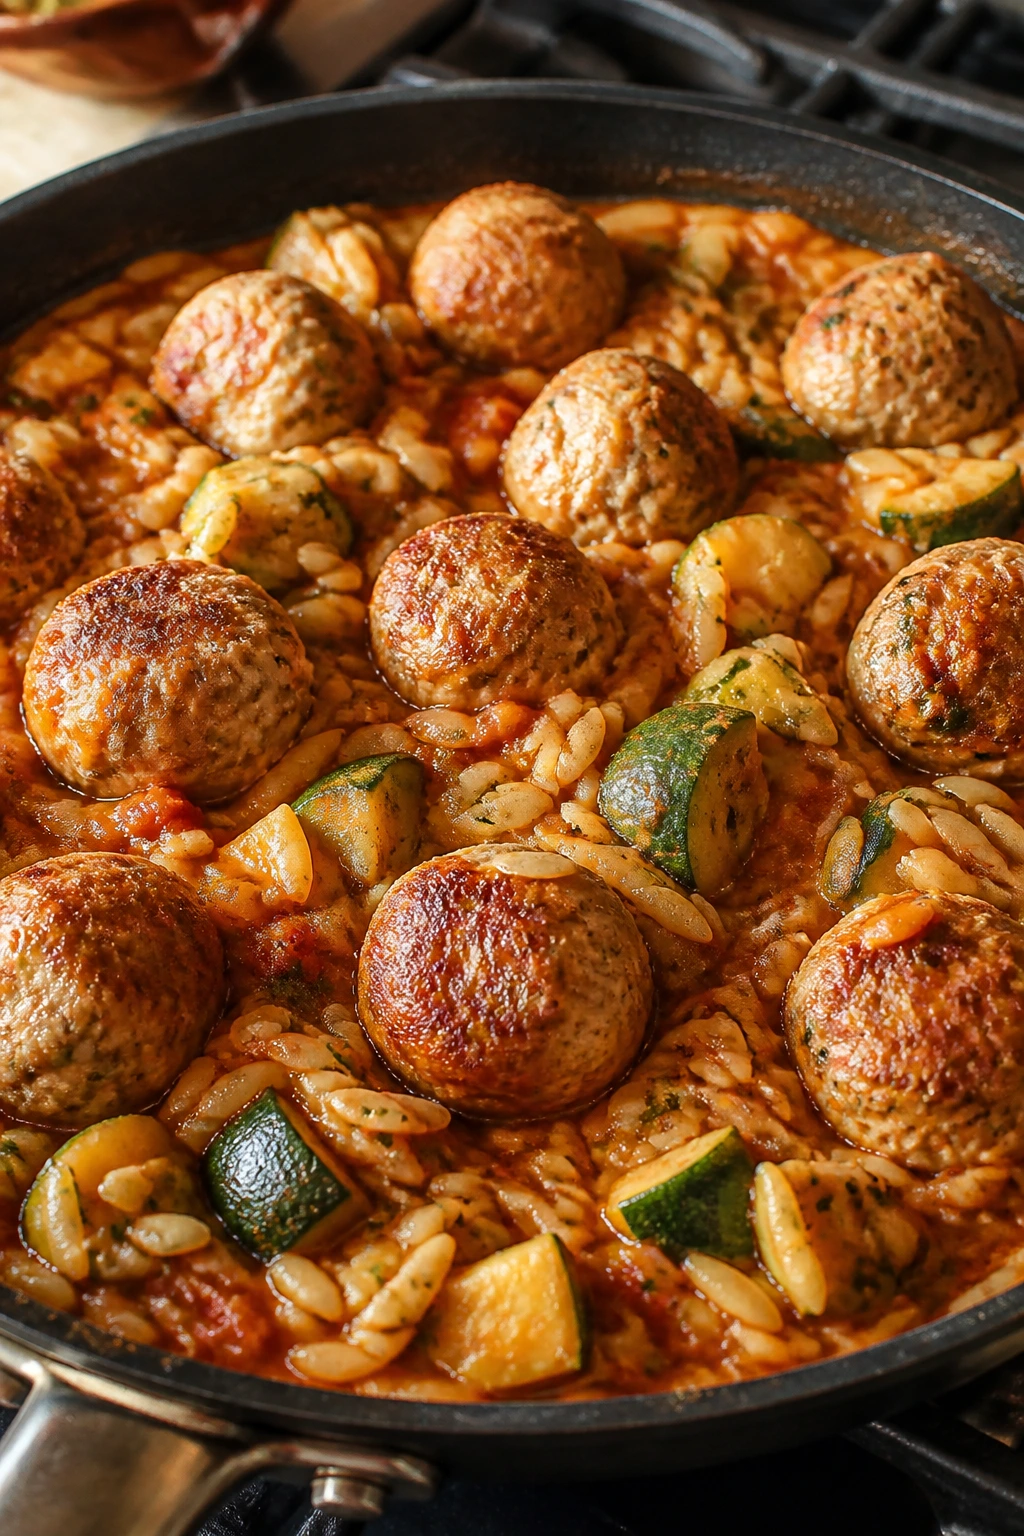
Turkey meatballs with zucchini and orzo feel lighter than baked pasta, but they still eat like a full meal. The meatballs simmer in marinara, the orzo takes on the sauce in the same pan, and the zucchini softens just enough to keep the skillet from feeling heavy. It’s the kind of dinner that looks more complicated than it is.
Why It Works
Ground turkey can get dry if you overwork it, so this recipe leans on breadcrumbs, egg, and Parmesan to keep the meatballs tender. Browning them first gives the pan fond, which then becomes part of the sauce once the marinara and broth go in. Orzo cooks quickly and absorbs the tomato flavor while the zucchini adds moisture and a little green relief. The important part is to keep the meatballs small enough to finish in the same time as the pasta.
Key Ingredients
- 1 pound ground turkey — Choose dark meat turkey if you want more moisture.
- ½ cup breadcrumbs — Helps the meatballs stay soft.
- 1 large egg — Binds the mixture.
- ¼ cup grated Parmesan — Adds salt and richness.
- 2 garlic cloves, minced — Mix into the meatballs and the sauce.
- 1¼ cups orzo — Cooks in the skillet and gives the meal body.
- 2 medium zucchini, diced — Add near the end so they keep some shape.
- 2 cups marinara sauce — Use a thick one if possible.
- 2½ cups chicken broth — This cooks the orzo.
- 2 tablespoons chopped basil — A fresh finish that fits the tomato sauce.
Quick Steps
- Mix the meatballs: Combine turkey, breadcrumbs, egg, Parmesan, garlic, salt, and pepper. Shape into 1½-inch meatballs.
- Brown them: Heat oil in a large skillet and brown the meatballs for 4 to 5 minutes, turning to color most sides. Remove them.
- Start the pasta: Add the orzo, marinara, and broth to the skillet and bring to a simmer.
- Cook the orzo: Stir in the zucchini and return the meatballs to the pan. Cover and cook for 10 to 12 minutes, stirring once.
- Check the meatballs: They should reach 165°F (74°C) and the orzo should be tender.
- Finish with basil: Stir in basil and a little extra Parmesan before serving.
Tips and Variations
- For more moisture: Mix 1 tablespoon of olive oil into the turkey.
- For a stronger flavor: Add a pinch of crushed red pepper to the sauce.
- For a baked finish: Transfer the skillet to the oven and top with mozzarella for the last 5 minutes.
12. Roasted Gnocchi with Sausage and Cherry Tomatoes
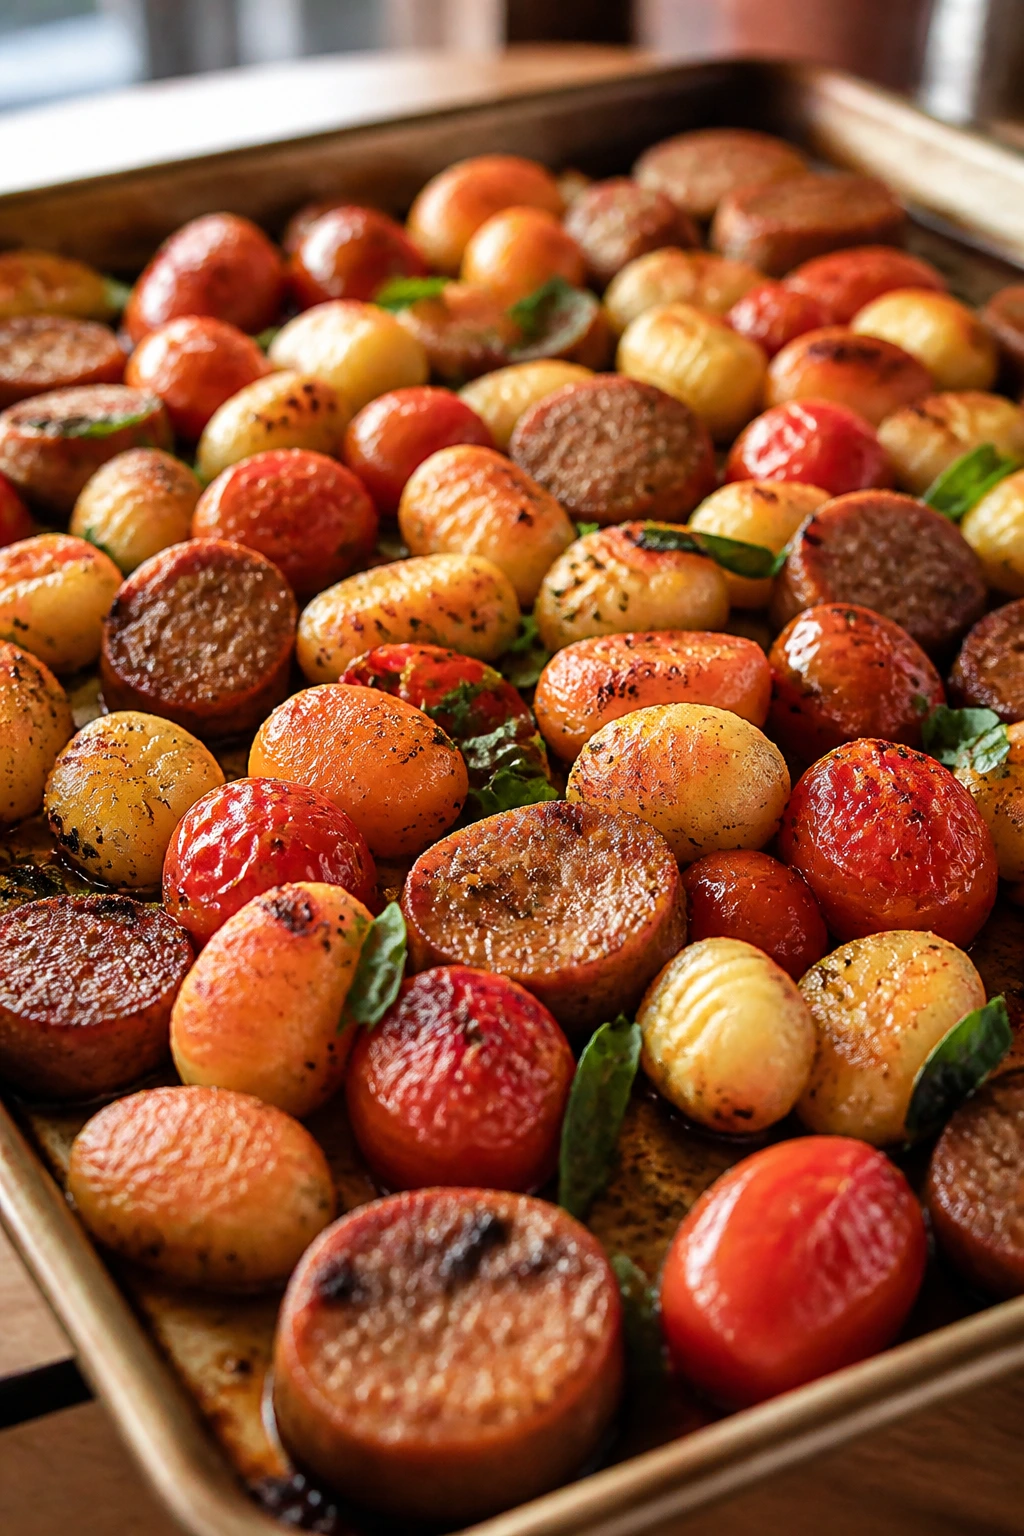
Roasted gnocchi gets a crackly edge you can’t fake on the stovetop. Toss it with sausage and cherry tomatoes, and the potatoes puff a little while the tomatoes collapse into a sticky sauce. This is one of the easiest ways to make gnocchi feel like dinner instead of a side.
Why It Works
Shelf-stable gnocchi roasts well because it’s already cooked; the oven just gives it texture. Sausage provides fat and seasoning, while tomatoes break down and coat everything with barely any intervention. Onions and zucchini can join the pan without throwing off the timing, which is rare and useful. The real charm here is that the gnocchi gets browned edges while staying tender inside, so the dish has more texture than most sheet pan meals manage.
Key Ingredients
- 1 pound shelf-stable gnocchi — No need to boil it first.
- 12 ounces Italian sausage, casings removed — Mild or hot both fit.
- 1 pint cherry tomatoes — They burst and turn jammy.
- 1 medium zucchini, sliced into half-moons — Adds freshness and shape.
- 1 small red onion, sliced — It softens and sweetens.
- 3 tablespoons olive oil — Helps everything roast instead of steam.
- 2 garlic cloves, minced — Add to the oil so it spreads evenly.
- 1 teaspoon dried oregano — Works with the sausage and tomatoes.
- ½ cup shredded mozzarella or Parmesan — Add near the end for a melted finish.
- A handful of basil leaves — Use them after roasting.
Quick Steps
- Heat the oven: Set it to 425°F (220°C) and line a sheet pan.
- Mix the pan: Toss gnocchi, sausage, tomatoes, zucchini, onion, olive oil, garlic, oregano, salt, and pepper together.
- Spread in one layer: Give the pieces room so they can brown.
- Roast: Bake for 20 to 25 minutes, stirring once halfway through.
- Check the sausage: It should reach 160°F (71°C) if you’re using raw sausage.
- Add cheese: Sprinkle mozzarella or Parmesan over the hot pan and return it to the oven for 2 minutes.
- Finish with basil: Tear the basil over the top right before serving.
Tips and Variations
- For more color: A few handfuls of spinach can go in during the last 2 minutes.
- For a sharper finish: Add a splash of balsamic vinegar after roasting.
- For more bite: Use spicy sausage and a pinch of red pepper flakes.
13. Teriyaki Chicken, Green Beans, and Noodles Skillet
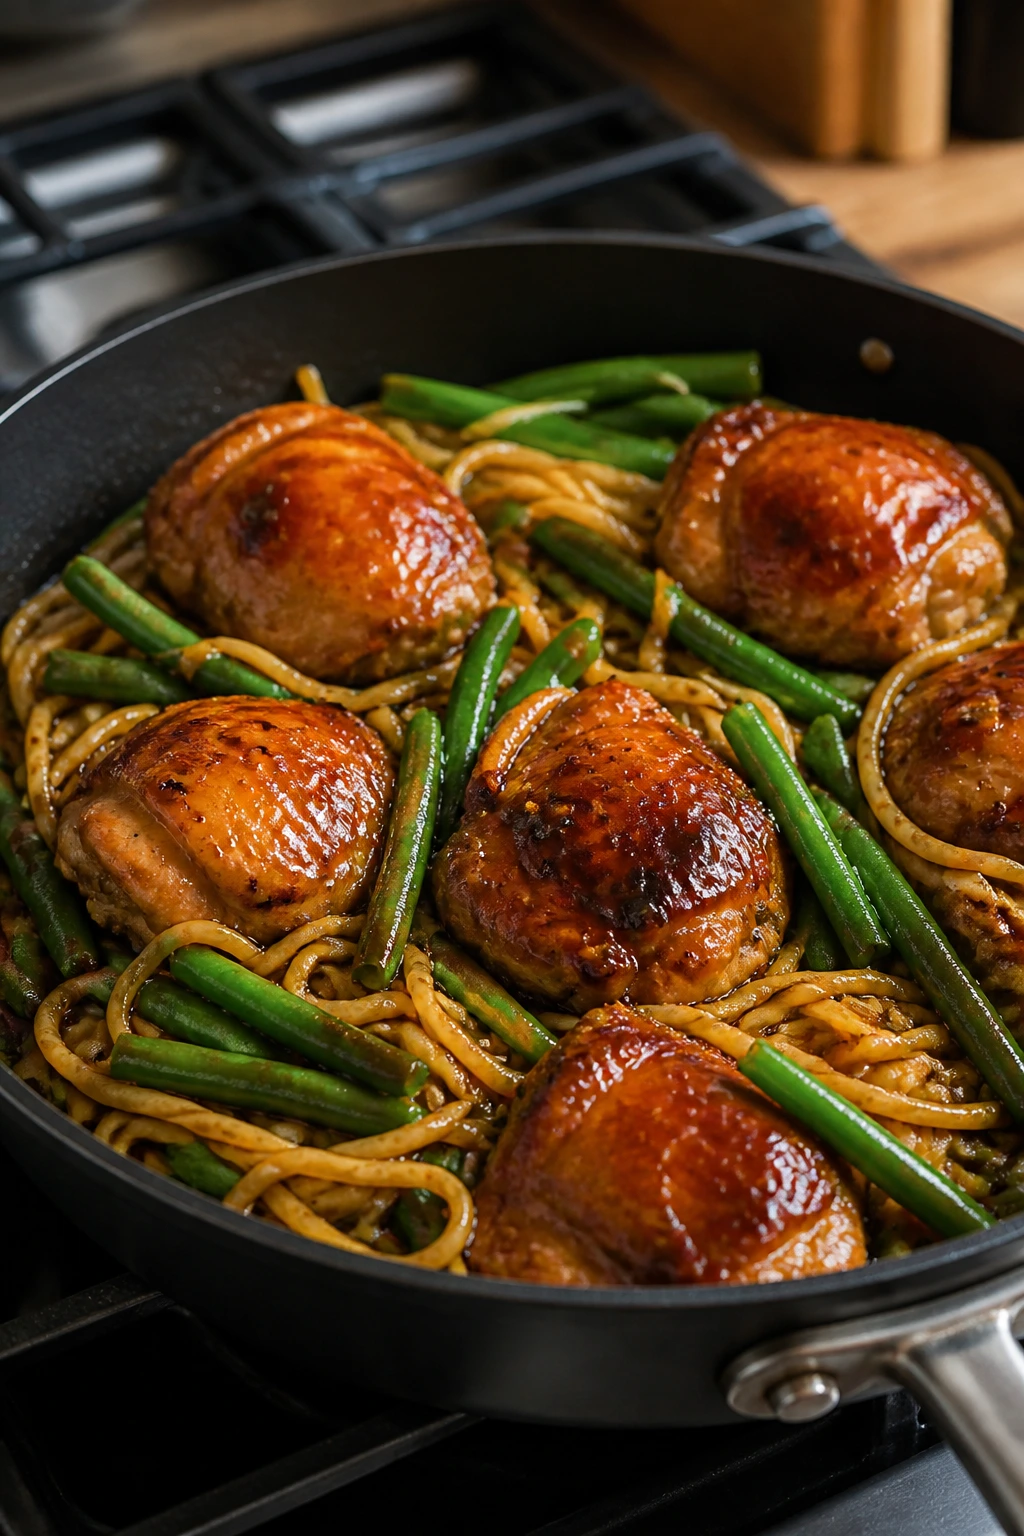
Teriyaki chicken turns sticky and glossy fast, which is exactly why it belongs in one pan. The noodles soak up the sauce, the green beans stay crisp-tender, and the chicken gets coated instead of drowned. It eats like takeout, but you stay in control of the salt and the texture.
Why It Works
Chicken thighs stay juicy during a one-pan noodle dish, and slicing them before cooking helps them finish at the same pace as the noodles. Green beans are sturdy enough to simmer without collapsing, which makes them a better fit here than softer vegetables. Teriyaki sauce adds sweetness and salt, but it works best when the pan already has a little broth and ginger underneath it. If you want the sauce to cling, don’t rush the final toss; the last minute is where the gloss happens.
Key Ingredients
- 1½ pounds boneless, skinless chicken thighs, sliced — Thighs handle the heat and stay tender.
- 8 ounces lo mein noodles or thin egg noodles — Choose noodles that cook quickly.
- 12 ounces green beans, trimmed — Snap or cut them in half if they’re long.
- ½ cup teriyaki sauce — Use a thick one if you have it.
- 2 cups chicken broth — This cooks the noodles.
- 2 garlic cloves, minced — Builds the base flavor.
- 1 tablespoon grated ginger — Fresh ginger keeps the sauce lively.
- 1 teaspoon sesame oil — Add near the end so it stays fragrant.
- 2 scallions, sliced — For garnish and a little sharpness.
- 1 teaspoon sesame seeds — Optional, but nice.
Quick Steps
- Brown the chicken: Heat a large skillet over medium-high heat and cook the chicken for 5 to 6 minutes, until lightly browned.
- Add the aromatics: Stir in the garlic and ginger for 30 seconds.
- Pour in the broth: Add the broth and bring it to a simmer.
- Add noodles and beans: Push the noodles and green beans into the liquid, cover, and cook for 5 minutes.
- Stir and finish cooking: Uncover, toss everything together, and cook for 2 to 4 minutes more until the noodles are tender.
- Glaze the pan: Stir in the teriyaki sauce and sesame oil, letting the sauce coat the noodles.
- Garnish: Top with scallions and sesame seeds.
Tips and Variations
- For more vegetables: Mushrooms or shredded cabbage fit the same timing.
- For a stronger glaze: Let the finished skillet sit for 2 minutes before serving.
- For a milder version: Use low-sodium teriyaki and add a squeeze of lime.
14. Skillet Enchilada Casserole
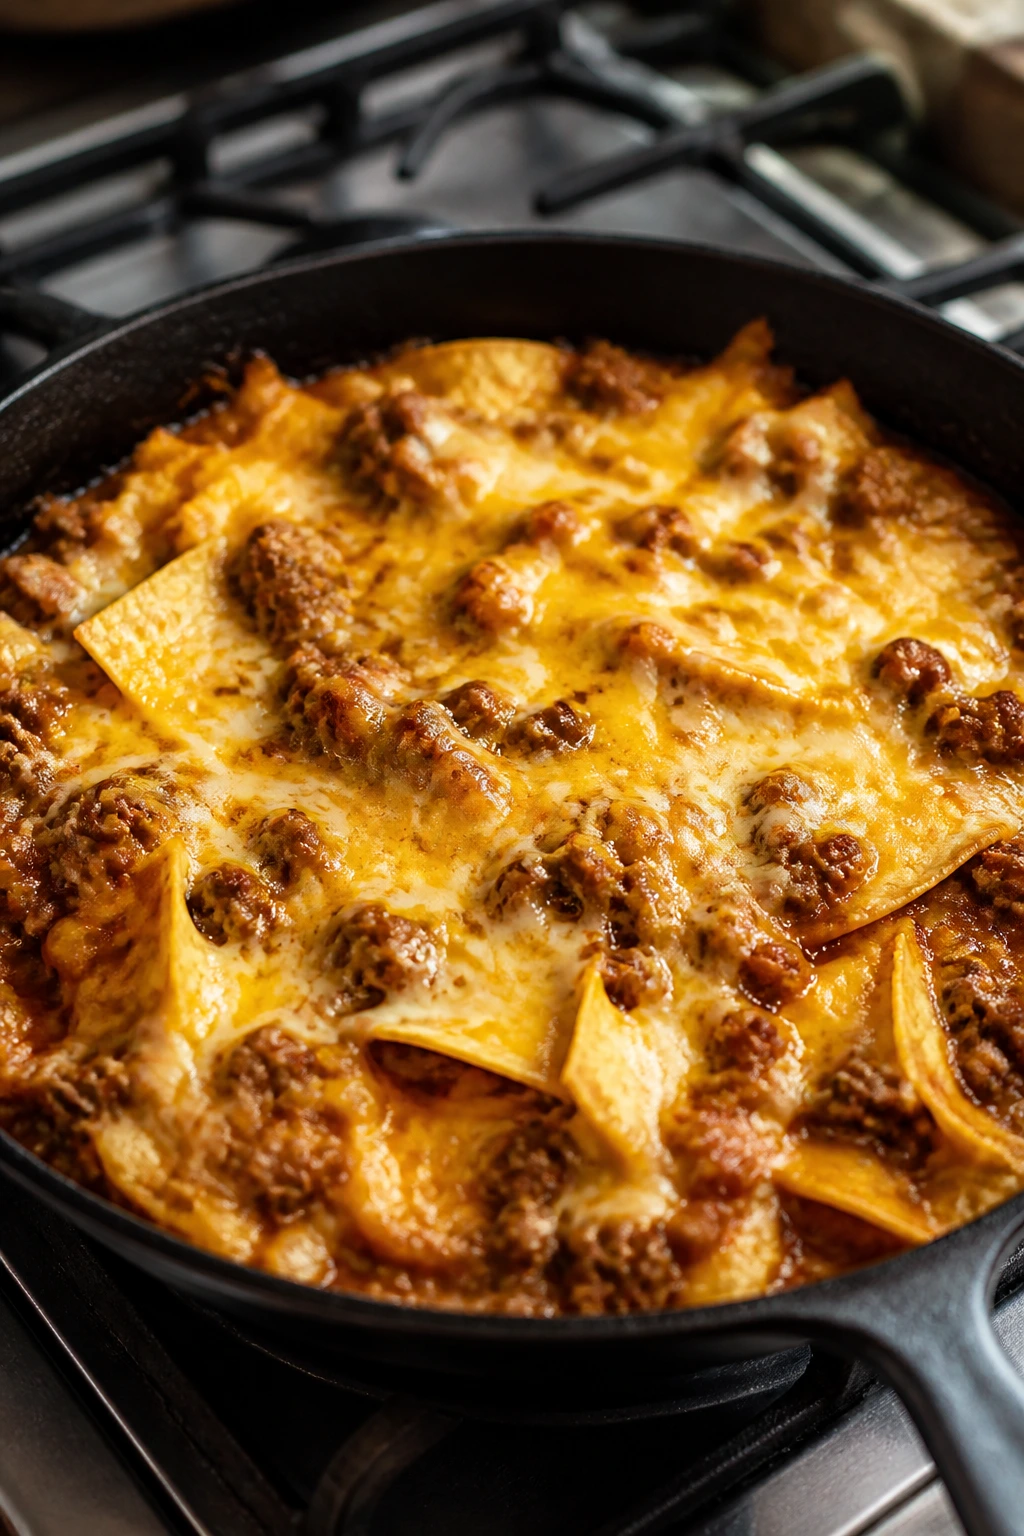
Enchilada casserole is what happens when you stop pretending dinner needs a second dish. Tortillas soften into the sauce, the cheese melts into a blanket, and the meat and beans turn into something that eats like a real casserole without the layering drama. It’s cozy, but not fussy.
Why It Works
This skillet borrows the best parts of enchiladas without the rolling step that makes people stop halfway through. Ground meat and onion build the base, beans add bulk, and tortillas break down into the sauce enough to feel cohesive without going mushy. If your enchilada sauce is thin, simmer it a little longer before adding the tortillas. The pan should finish thick, not soupy, and the cheese should melt into the top rather than sinking into the middle.
Key Ingredients
- 1 pound ground beef or ground turkey — Both work, depending on how rich you want it.
- 1 small onion, diced — Builds the first layer of flavor.
- 2 cups enchilada sauce — Red sauce works best here.
- 8 small corn tortillas, cut into strips — They soften into the casserole.
- 1 can black beans, drained and rinsed — Adds body and protein.
- 1 cup frozen corn — Stir it in straight from the freezer.
- 2 cups shredded Mexican blend cheese — The blanket on top.
- 1 teaspoon cumin — Deepens the sauce.
- 1 teaspoon kosher salt — Season the meat and sauce.
- Cilantro and avocado for serving — Optional, but useful.
Quick Steps
- Brown the meat: Cook the beef or turkey with onion over medium-high heat for 6 to 8 minutes until browned.
- Season the skillet: Stir in cumin and salt, then pour in the enchilada sauce.
- Add beans and corn: Stir them in and simmer for 3 minutes.
- Layer in tortillas: Fold in the tortilla strips so they’re coated in sauce.
- Top with cheese: Scatter the cheese over the surface.
- Melt and bubble: Cover for 3 minutes, or put the skillet under the broiler for 1 to 2 minutes if it’s oven-safe.
- Serve hot: Add cilantro and avocado at the table.
Tips and Variations
- For more heat: Mix diced green chiles into the sauce.
- For a firmer texture: Use slightly less sauce and let the casserole rest for 5 minutes before serving.
- For a bean-heavy version: Add pinto beans alongside the black beans.
15. Cod with Tomatoes and White Beans Skillet
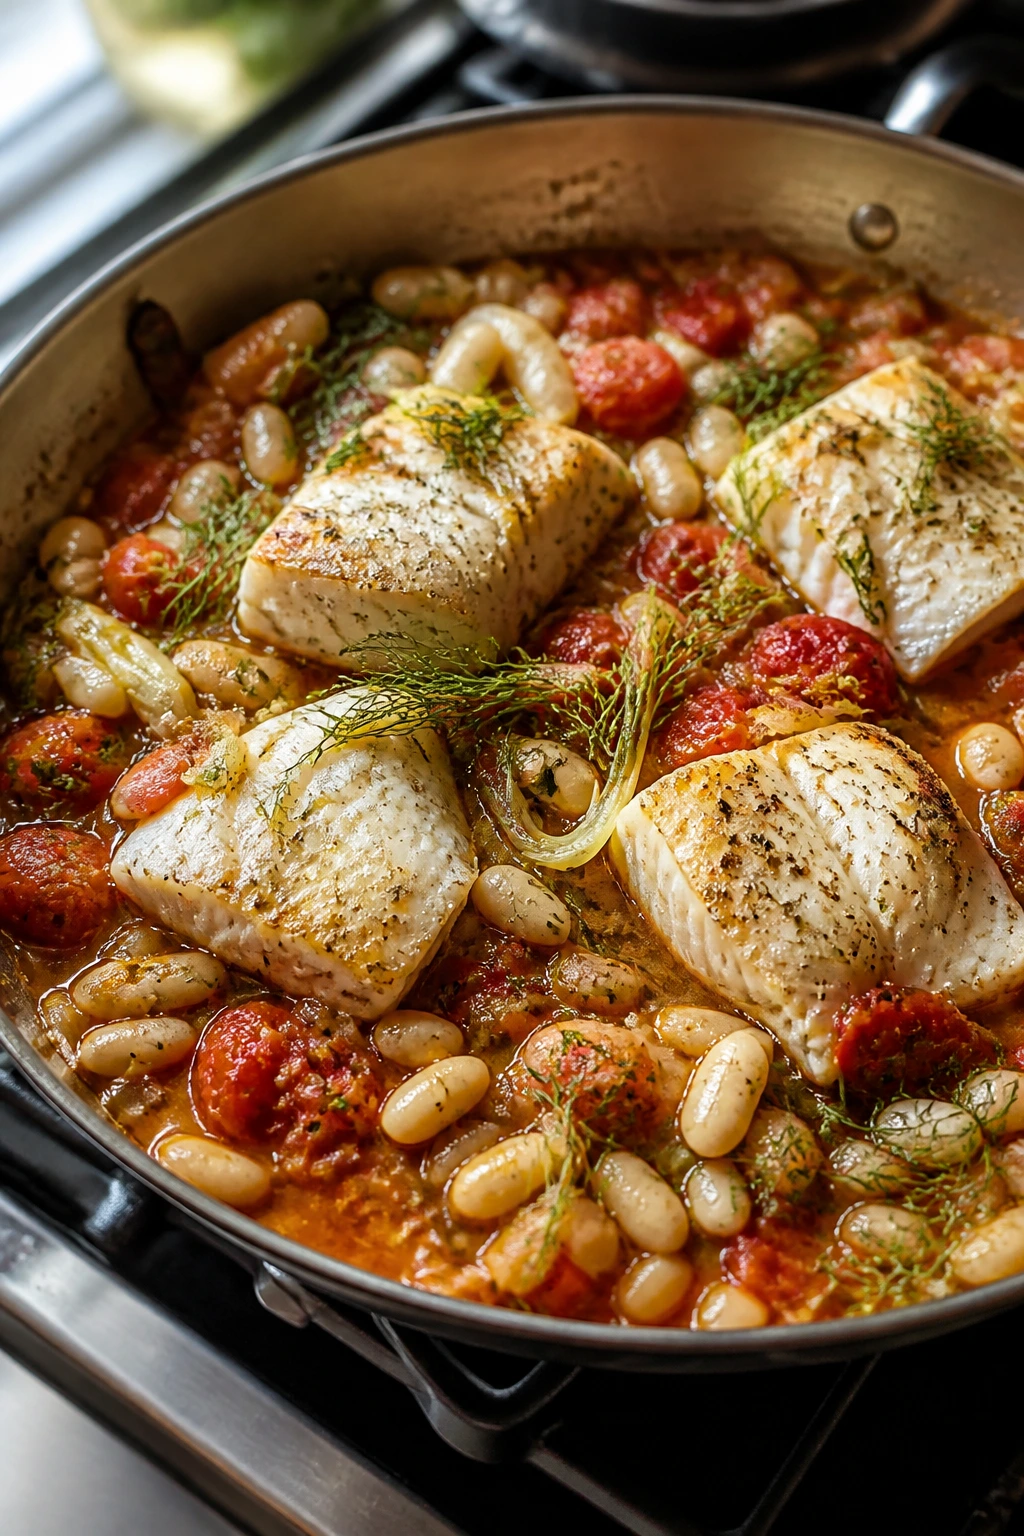
Cod is delicate, but it doesn’t need pampering. In a skillet with tomatoes, white beans, and garlic, it turns into a clean, brothy dinner that feels light without being skimpy. The fish poaches gently in the sauce, which is exactly the right move for a fillet that can go from tender to dry in a blink.
Why It Works
Cod cooks quickly, and a shallow skillet sauce keeps it moist while adding enough flavor to stand on its own. Tomatoes burst and create liquid, white beans add heft, and the broth gives the fish a gentle bath instead of a hard boil. This is where one-pan cooking feels elegant without trying too hard. The fish should flake with a fork and hit 145°F (63°C), but the pan itself tells you a lot: if the sauce is bubbling hard, turn the heat down before the cod overcooks.
Key Ingredients
- 1½ pounds cod fillets, cut into large pieces if needed — Choose even-thickness fillets.
- 1 pint cherry tomatoes — They create the sauce as they cook.
- 2 cans cannellini beans, drained and rinsed — Soft, creamy beans work best.
- 1 small fennel bulb or yellow onion, sliced — Fennel adds a gentle anise note.
- 3 garlic cloves, minced — Don’t skip these.
- 1 cup broth, fish or vegetable — Enough to simmer the fish.
- 2 tablespoons olive oil — For the vegetables.
- 1 lemon, juiced and zested — Brightens the beans and fish.
- 2 cups baby spinach — Stir in at the end.
- 2 tablespoons chopped parsley — For a fresh finish.
Quick Steps
- Cook the vegetables: Heat olive oil in a large skillet over medium heat and cook the fennel or onion for 5 minutes.
- Add garlic and tomatoes: Stir for 1 minute, then add the tomatoes and cook until they start to burst.
- Build the sauce: Stir in the beans and broth, then bring the skillet to a gentle simmer.
- Nestle in the cod: Place the cod pieces into the sauce in a single layer.
- Cover and poach: Cook for 6 to 8 minutes, until the cod flakes and reaches 145°F (63°C).
- Finish the greens: Stir in spinach, lemon zest, lemon juice, and parsley.
- Serve with bread: You’ll want something to mop up the broth.
Tips and Variations
- For more richness: Add a small pat of butter at the end.
- For extra flavor: A few olives or capers fit naturally here.
- For a heartier bowl: Serve over toasted bread or cooked rice.
16. Sheet Pan Steak Fajitas
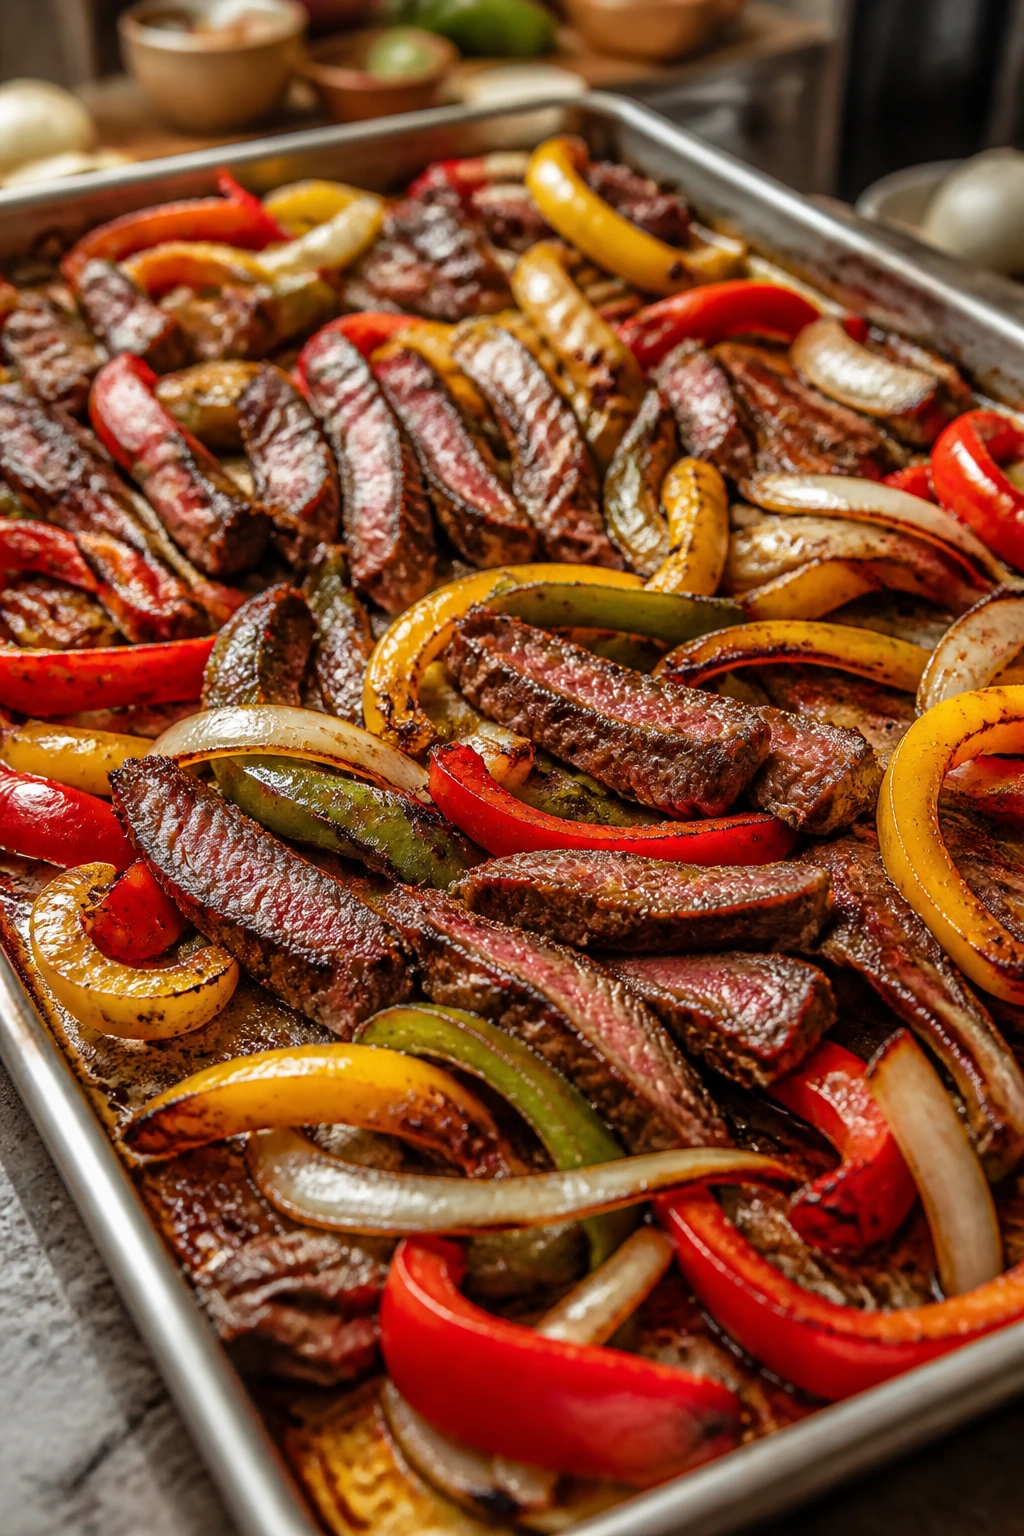
Steak fajitas bring the best kind of chaos to a sheet pan. The peppers char at the edges, the onions soften into sweetness, and the steak picks up the spice without losing its bite. The only real question is whether you eat them straight from the pan or stuff them into tortillas immediately.
Why It Works
Flank steak is built for quick roasting because it cooks fast and slices beautifully against the grain. Bell peppers and onions need high heat to char a little, which gives the fajitas their signature edge. Cooking the vegetables first for a few minutes keeps the steak from overcooking while the vegetables catch up. A hot pan and a short rest matter more here than any fancy marinade. Slice the steak after it rests, and it will stay far juicier.
Key Ingredients
- 1½ pounds flank steak — Try to choose a piece of even thickness.
- 3 bell peppers, sliced — Use two colors if you can.
- 1 red onion, sliced — Its sweetness fits the steak.
- 2 tablespoons olive oil — Coat the vegetables and steak lightly.
- 2 tablespoons fajita seasoning — Use homemade or store-bought.
- 1 lime, cut into wedges — Add after roasting.
- 8 small flour or corn tortillas — Warm them before serving.
- ½ cup chopped cilantro — For freshness.
- Sour cream or salsa — Optional, but useful.
Quick Steps
- Heat the oven: Set it to 425°F (220°C) and line a sheet pan.
- Season the vegetables: Toss the peppers and onion with oil, half the fajita seasoning, salt, and pepper.
- Start roasting: Bake the vegetables for 10 minutes.
- Season the steak: Rub the steak with the remaining seasoning and a little oil.
- Add the steak: Place the steak on the pan and roast for 8 to 12 minutes, depending on thickness and desired doneness.
- Check temperature: Pull it at 135°F (57°C) for medium-rare or 145°F (63°C) for medium, then rest for 5 minutes.
- Slice and serve: Cut the steak thinly against the grain, squeeze over lime, and pile into tortillas.
Tips and Variations
- For stronger char: Broil the pan for the final 1 to 2 minutes.
- For a sweeter fajita: Add sliced pineapple or a pinch of brown sugar to the vegetables.
- For easier slicing: Freeze the steak for 10 minutes before cutting it raw.
17. Red Lentil and Sweet Potato Curry Skillet
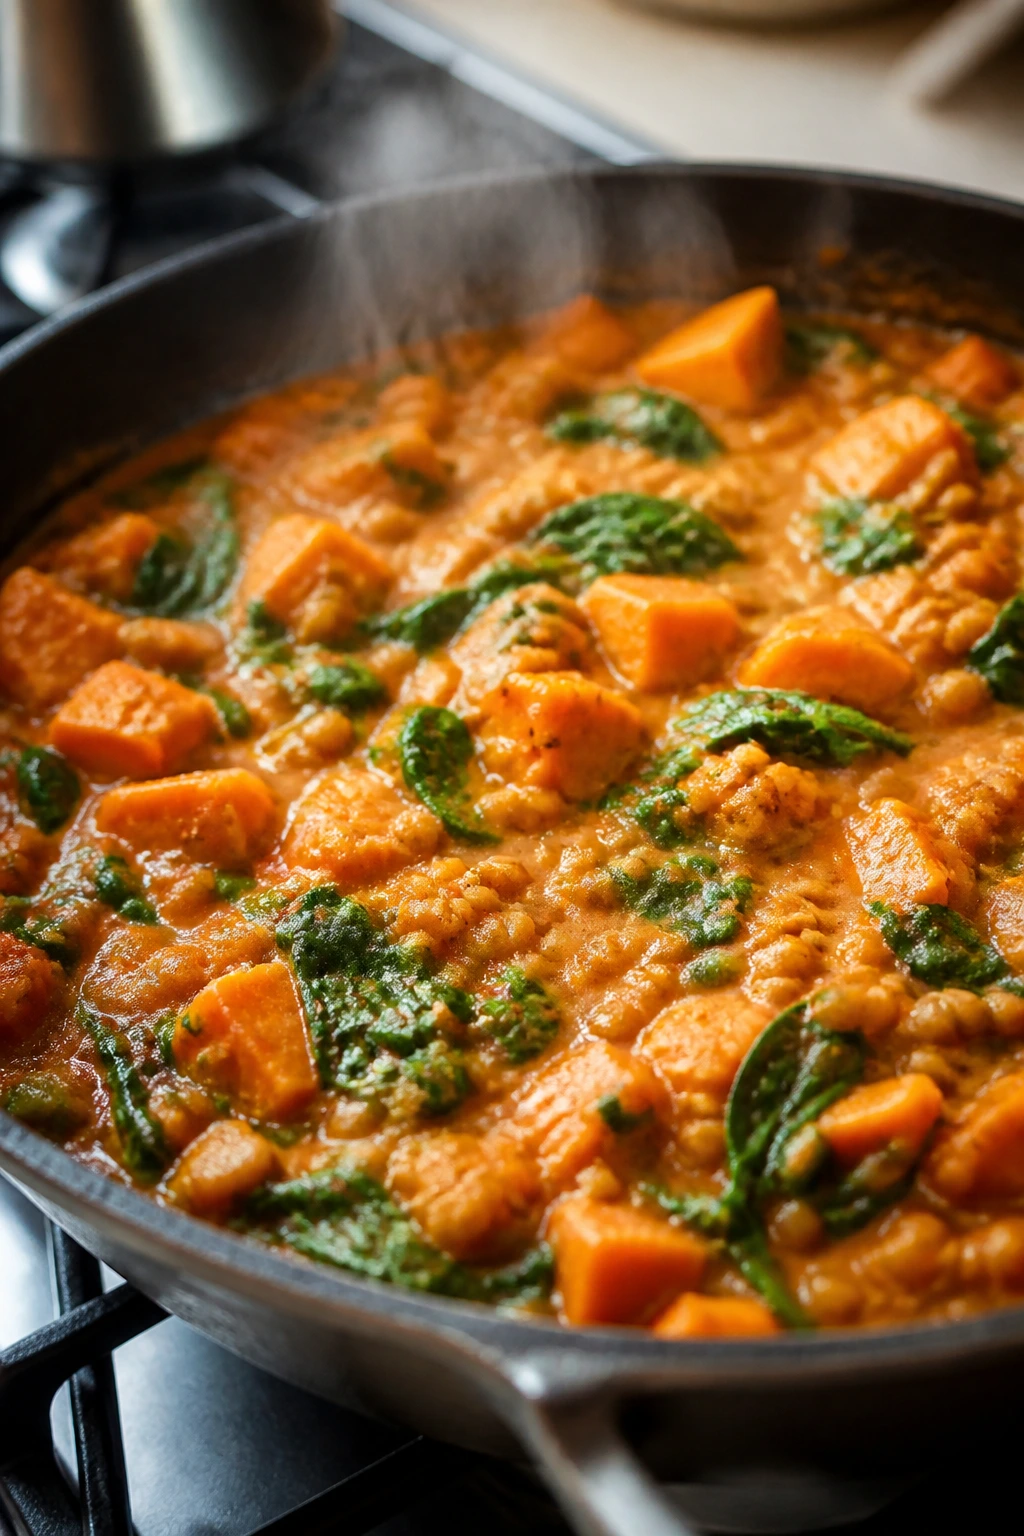
Red lentil curry can be as filling as any meat dinner if you give it enough body. Sweet potatoes melt into the coconut milk, the lentils thicken the sauce, and spinach brings the whole thing back into balance at the end. It’s rich, but the ingredients are still plain enough to live in a regular pantry.
Why It Works
Red lentils cook quickly and break down into a creamy base, which is why they’re so useful in a one-pan curry. Sweet potato adds sweetness and substance, and coconut milk gives the sauce a rounded texture without needing cream. Curry powder and tomato paste deepen the flavor in a way that feels built-in rather than layered on at the end. If the curry looks too thick before the lentils are done, add more broth in small splashes; if it looks too loose, keep simmering uncovered for a few minutes.
Key Ingredients
- 1 cup red lentils, rinsed — They soften fast and thicken the sauce.
- 1 medium sweet potato, peeled and diced — Cut it into small cubes so it cooks through.
- 1 yellow onion, diced — The base of the curry.
- 2 garlic cloves, minced — Adds depth.
- 1 tablespoon grated ginger — Keeps the curry from tasting flat.
- 1 tablespoon curry powder — The main seasoning.
- 1 tablespoon tomato paste — Gives the sauce a darker, richer edge.
- 1 can coconut milk, 13.5 ounces — Makes the curry creamy.
- 2 cups broth — Helps the lentils and sweet potato cook.
- 3 cups baby spinach — Stir in at the end.
Quick Steps
- Soften the onion and sweet potato: Heat oil in a large skillet over medium heat and cook for 5 minutes.
- Add aromatics: Stir in garlic, ginger, curry powder, and tomato paste for 1 minute.
- Pour in liquid and lentils: Add the lentils, coconut milk, broth, salt, and pepper. Stir well.
- Simmer gently: Cover and cook for 18 to 20 minutes, stirring once or twice, until the sweet potato is tender and the lentils have broken down.
- Adjust texture: Add a splash of broth if it becomes too thick.
- Stir in spinach: Cook for 1 minute until wilted.
- Finish and serve: Add lime juice if you want more brightness.
Tips and Variations
- For more protein: Stir in a can of chickpeas with the lentils.
- For a hotter pan: Add red pepper flakes or a spoonful of chili paste.
- For a lighter finish: Use half coconut milk and half broth.
18. Broccoli Cheddar Mac with Ham Skillet
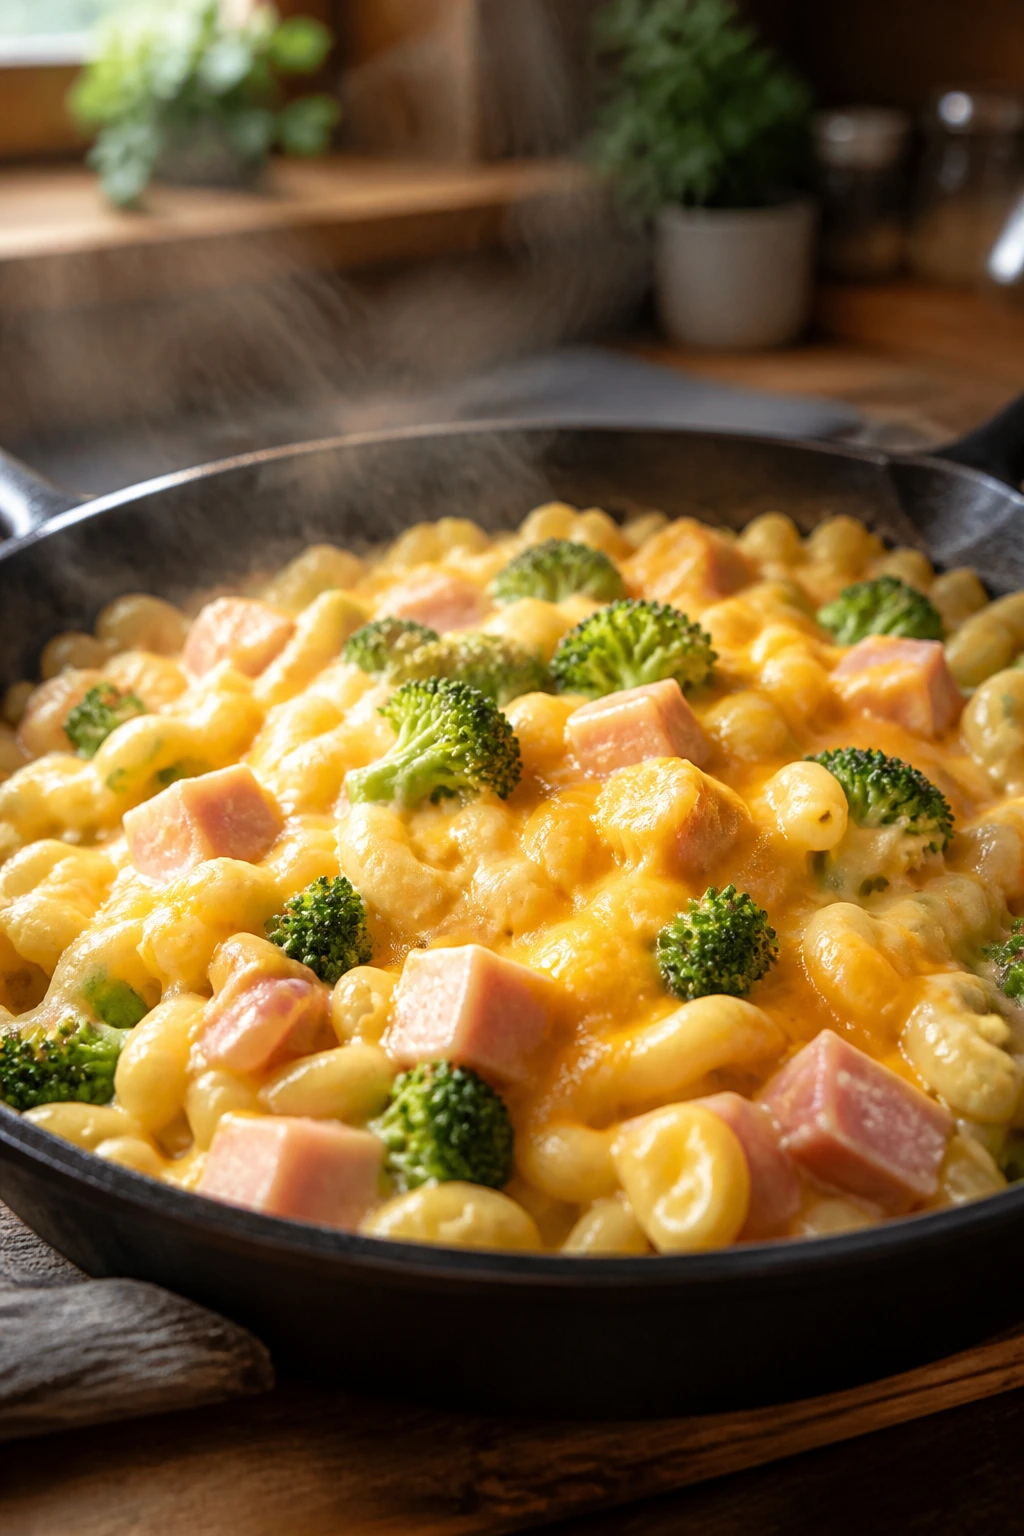
Broccoli cheddar mac with ham is the kind of skillet dinner that smells like a diner worth trusting. The cheese sauce wraps around the pasta, the ham adds salt and smoke, and the broccoli keeps the whole pan from becoming too soft. It’s a comfort meal with enough structure to feel like dinner, not just a pile of noodles.
Why It Works
This recipe uses the skillet itself as the pasta pot and sauce pan, which is the whole trick. The broth and milk cook the macaroni while the starch thickens the liquid, then the cheese melts right into that base without needing a separate roux. Broccoli goes in midway so it cooks but does not fall apart, and the ham reheats with the pasta instead of drying out in another dish. If the sauce seems thin before the cheese goes in, give the pasta another minute; the starch does more work than people expect.
Key Ingredients
- 12 ounces elbow macaroni — Small shapes cook evenly in a skillet.
- 2 cups broccoli florets — Cut them small enough to fit on a fork.
- 1½ cups diced ham — Use leftover ham or thick-cut deli ham.
- 3 cups chicken broth — This cooks the pasta and seasons the sauce.
- 2 cups milk — Whole milk gives the best texture.
- 3 cups shredded sharp cheddar — Sharp cheese gives the sauce more backbone.
- 2 tablespoons butter — Adds shine and a little richness.
- 1 tablespoon Dijon mustard — A small spoonful makes the cheese taste more like itself.
- 1 teaspoon garlic powder — Easy, steady seasoning.
- Black pepper to taste — Use more than you think.
Quick Steps
- Combine the liquids: In a large deep skillet, bring the broth, milk, butter, Dijon, garlic powder, salt, and pepper to a simmer.
- Cook the pasta: Stir in the macaroni and cook uncovered for 6 minutes, stirring often.
- Add the broccoli and ham: Stir them in and cook for 4 to 5 minutes more, until the pasta is tender and the broccoli is bright green.
- Check the liquid: There should be only a small amount left at the bottom of the pan.
- Melt the cheese: Remove from the heat and stir in the cheddar a handful at a time until smooth.
- Let it thicken: Rest for 2 minutes before serving so the sauce settles around the pasta.
- Serve warm: A little extra pepper on top is the right move.
Tips and Variations
- For a stronger cheese flavor: Swap half the cheddar for Gruyère or Monterey Jack.
- For a greener version: Stir in peas with the broccoli.
- For a crispy top: Transfer the skillet under the broiler for 2 minutes if it is oven-safe.
Why One Pan Works So Well for Dinner
One-pan cooking works because it keeps the heat, the flavor, and the cleanup in the same place. That sounds simple, but it changes the rhythm of dinner in a real way. You stop making separate components that need babysitting. You start building a meal that cooks as a whole.
A sheet pan gives you dry heat, which is perfect when you want crisp vegetables, roasted potatoes, or browned chicken skin. A skillet gives you control over sauce, steam, and timing, which is why it does such a good job with noodles, grains, and braises. A lot of people treat these as shortcuts. I don’t. They’re more like smart compression. You move the flavor-building steps into the same vessel, and the pan does the rest.
Crowding is the one thing that ruins the whole idea. If the ingredients pile up too thickly, they steam instead of roast, and the dinner loses its texture. That’s why the best one-pan dinner recipes keep a little spacing, use the right pan size, and add the fast-cooking ingredients later. There’s a reason a pan with room feels different when it comes out of the oven. You can hear it.
Another thing worth saying: one-pan cooking does not mean one-temperature-for-everything cooking. The vegetables that take longer go in first. Fish goes in late. Shrimp goes in even later. Grains need liquid and patience, while a steak needs a fast roast and a rest. That timing is the whole game, and once you respect it, these dinners start to feel easy in a way that is earned, not fake.
Essential Equipment for These Recipes

- Rimmed half-sheet pan — The workhorse for chicken, fish, fajitas, and roasted vegetable dinners; the rim keeps juices from spilling over.
- Large oven-safe skillet, 10 to 12 inches — Best for skillet pastas, saucy chicken, and one-pan casseroles that can move from stovetop to oven.
- Deep sauté pan or braiser — Helpful for recipes with rice, noodles, or extra liquid so the pan does not boil over.
- Instant-read thermometer — The cleanest way to hit safe temps for chicken, pork, salmon, steak, and shrimp without guessing.
- Sharp chef’s knife — A dull knife slows everything down and makes even chopping impossible.
- Cutting board with a sturdy grip — A plain board is fine, but make sure it doesn’t skate around while you slice.
- Tongs — Useful for turning chicken, pulling sausage from a skillet, and moving hot ingredients on a sheet pan.
- Wooden spoon or heatproof spatula — Good for scraping browned bits and stirring pasta or grains without scratching the pan.
- Measuring cups and spoons — Especially useful for the rice, orzo, couscous, and sauce-heavy recipes.
- Parchment paper or foil — Optional, but it makes cleanup much easier for sheet pan dinners with sticky sauces.
- A lid that fits your skillet — Needed for rice, couscous, and noodle dishes that finish with steam.
- Airtight storage containers — Handy for leftovers, and better than leaving food in the cooking pan.
Smart Shopping for Protein, Produce, and Pantry Staples
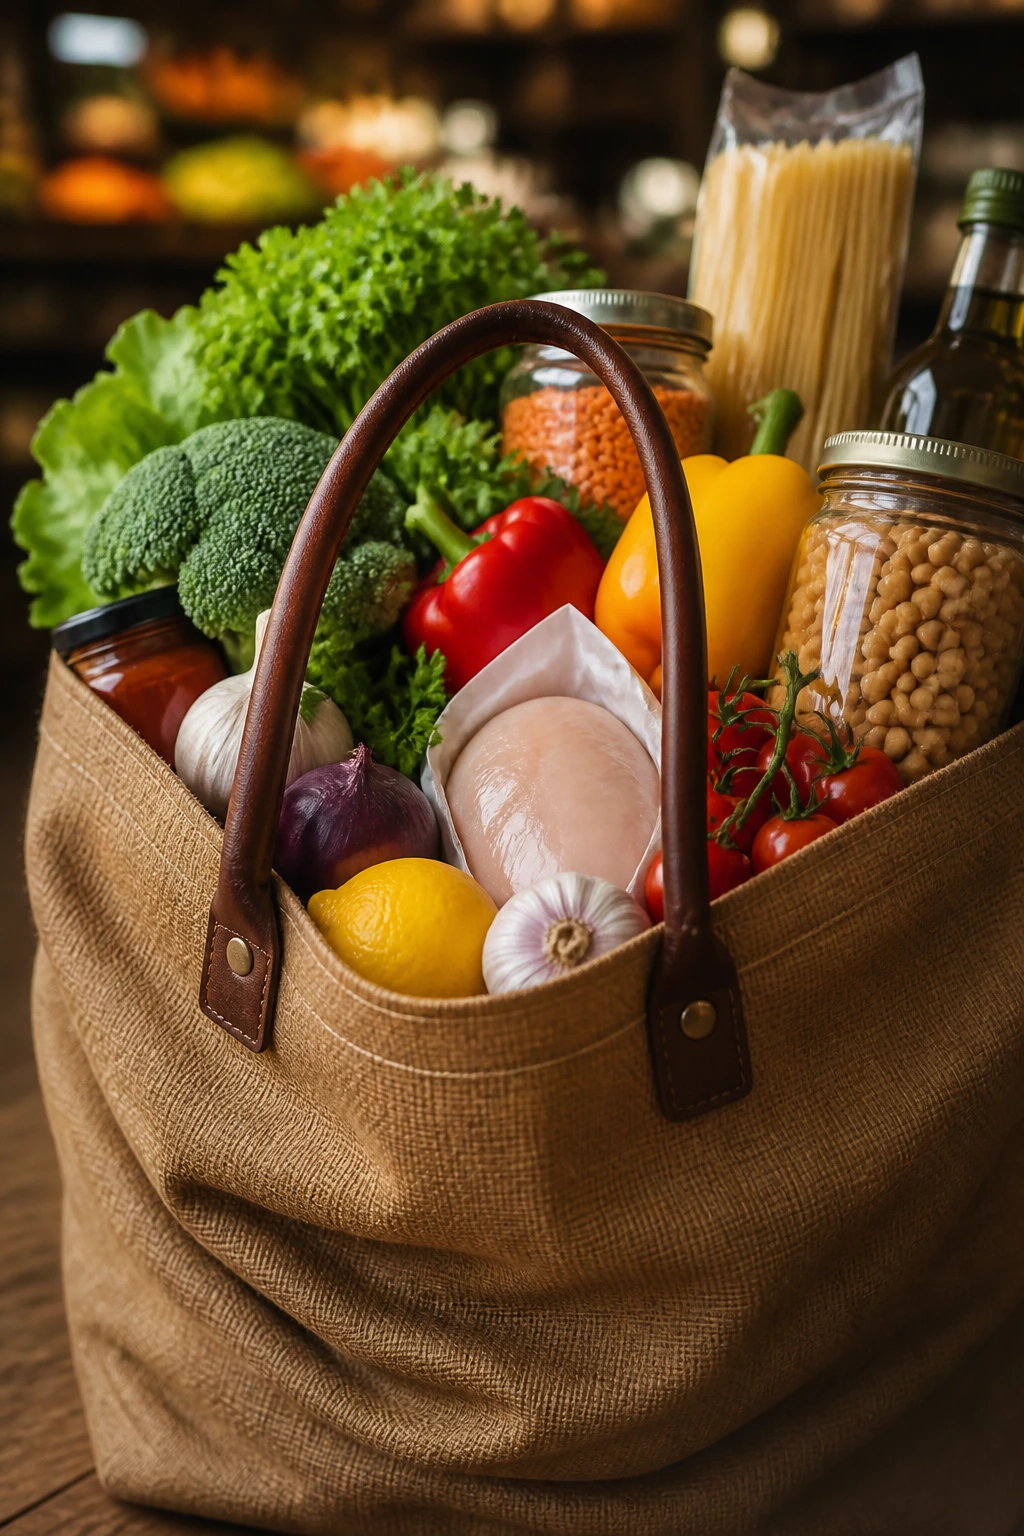
Start with the protein, because that choice decides a lot of the cooking method. Chicken thighs are more forgiving than breasts, especially on sheet pans, while thin chicken cutlets work better in saucy skillets because they cook quickly. Salmon should look moist and firm, not dry at the edges. Pork chops want a little thickness, around 1 inch, so they can roast without turning leathery. For beef, choose steak that slices well across the grain, like flank or sirloin, and for shrimp, buy peeled and deveined if you want the night to move fast.
Vegetables need a little attention too. Potatoes should be similar in size so they finish together. Brussels sprouts should feel heavy for their size and be tightly packed. Bell peppers should be firm, not wrinkled. If you’re using broccoli or green beans, look for bright color and tight florets or crisp snaps. For tomatoes, cherry or grape tomatoes are usually better than large slicing tomatoes in one-pan recipes because they burst in the pan instead of flooding it.
Pantry ingredients matter more than people give them credit for. A decent broth changes the whole dish, especially in skillet recipes where it becomes part of the sauce. Keep rice, orzo, couscous, canned beans, pasta, enchilada sauce, and canned tomatoes on hand, because those are the items that make a one-pan dinner possible on short notice. Low-sodium versions are a smart buy if you like to season yourself; they give you more control.
And then there are the little things that save the dinner from tasting flat: Dijon mustard, soy sauce, Parmesan, cumin, curry powder, lemon, lime, garlic, and fresh herbs if you can get them. None of those are fancy. They just make the same pan taste finished instead of merely cooked.
How to Serve These Dinners
Presentation: A sheet pan dinner looks best when you give it a quick finish on the pan and transfer it to a wide platter only if the table needs it. Skillet dinners can go straight from the pan to the table with a spoon for serving, which feels casual in a good way. A few herbs, a lemon wedge, or a final dusting of cheese go a long way.
Accompaniments: Keep the sides simple. A green salad with a sharp vinaigrette works with almost all of these. Crusty bread is useful for anything saucy, especially the cod, Tuscan chicken, enchilada skillet, and broccoli cheddar mac. For the fajitas and lemon chicken, warm tortillas or extra roasted potatoes make sense. For the more vegetable-heavy pans, a plain rice pilaf or a loaf of bread is enough.
Portions: Most of these recipes serve 4. If you have bigger appetites on the table, stretch them with bread, salad, or a bowl of fruit after dinner instead of trying to cram too much food onto the pan. For smaller households, half the recipe and keep the same timing where possible, but use a smaller pan so the food still roasts instead of spreading too thin.
Beverage Pairing: Lemon chicken, salmon, and cod all like sparkling water with citrus or a crisp white wine. The richer skillets — Tuscan chicken, mac and cheese, enchilada casserole — work nicely with iced tea, a light beer, or a red wine that isn’t too heavy. For fajitas and taco skillet dinners, a cold lager or lime soda fits the mood without stealing the show.
Extra Flavor Moves That Pay Off
Flavor Enhancement: A final hit of acid wakes up almost every one-pan dinner. Lemon juice on chicken, lime on fajitas, a splash of vinegar in bean dishes, or a spoonful of Dijon in creamy pans changes the whole finish without making the meal taste sharp.
Customization: Keep a small list of swap-ins in your back pocket. Broccoli can become green beans or cauliflower. Orzo can become couscous. Spinach can become kale if you add it earlier. Chicken thighs can replace breasts, and shrimp can replace fish in a fast skillet if you keep the cooking time short. Use the same flavor base and change the body of the dish.
Serving Suggestions: Fresh herbs are not decoration; they do real work. Parsley lightens rich pans, basil softens tomato sauces, dill sharpens salmon, cilantro helps fajita-style dinners, and scallions wake up noodles. A handful of crumbled feta, shaved Parmesan, or toasted breadcrumbs can change texture in a single minute.
Make-It-Yours: If you want to lean dairy-free, use olive oil and broth-heavy sauces instead of cream and cheese. For a gluten-free meal, skip the pasta dishes or swap in gluten-free noodles, rice, or couscous alternatives that suit the recipe. For a lower-sodium approach, use unsalted broth and season in layers rather than dumping salt in at the start.
Make-Ahead, Storage, and Reheating Guidance
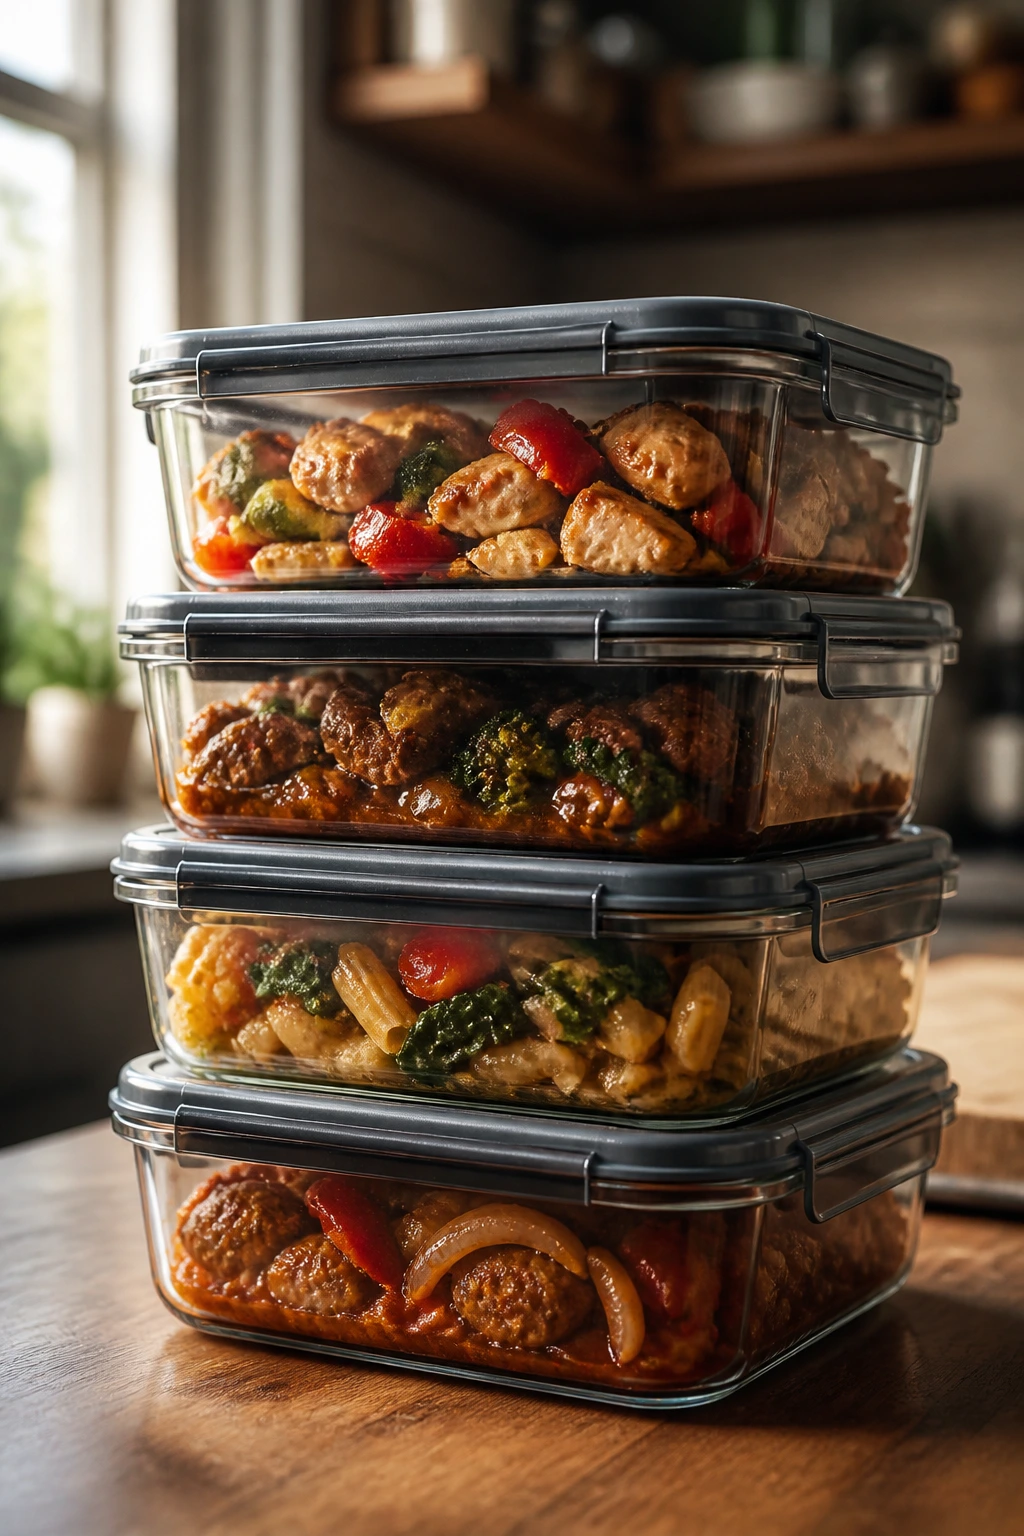
Most of these one-pan dinners keep well for 3 to 4 days in the refrigerator, as long as they’re cooled and packed in shallow airtight containers within about 2 hours of cooking. Fish dishes are the exception. Cod and salmon are best eaten within 1 to 2 days, because the texture slides downhill faster than chicken or beef. Shrimp is similar. If you know you’ll want leftovers, choose the chicken, beef, sausage, pasta, or bean-based recipes first.
Freezing works better for some pans than others. Taco beef and rice, enchilada casserole, sausage-orzo, turkey meatballs, lentil curry, and broccoli cheddar mac all freeze well for up to 2 to 3 months. Sheet pan chicken, salmon, and roasted vegetable dinners usually freeze less gracefully because the vegetables soften too much. They’ll still be safe, but the texture changes. If you’re freezing a creamy skillet, cool it fully first and store it in a tightly sealed container so the sauce does not separate from the start.
Reheating depends on the style of the dish. For sheet pan dinners with crisp parts, use a 375°F (190°C) oven for 10 to 15 minutes, loosely covered with foil if the top is already browned. For skillet pasta or rice dishes, add a splash of broth or water and warm over low heat, stirring gently until the food loosens and heats through. Microwaves work fine for most leftovers, but use short bursts and stir in between so the center does not turn icy while the edges overcook.
A few dishes actually improve overnight. Taco beef and rice, enchilada casserole, and lentil curry all settle into themselves after a rest in the fridge. That said, if a recipe depends on crispness — roasted gnocchi, fajita steak, sheet pan chicken parmesan — eat it fresh if you can. The flavor will survive the night. The texture may not.
Easy Swaps and Variations to Try
Gluten-Free Pantry Swap: Use rice, potatoes, corn tortillas, or gluten-free pasta where the recipe calls for wheat noodles or breadcrumbs. Tamari can replace soy sauce, and certified gluten-free broth keeps the whole pan safe without changing the flavor much.
Dairy-Free Dinner Fix: Skip the cream, cheese, and butter-heavy finishes and lean on olive oil, lemon, coconut milk, and herbs instead. The Tuscan chicken becomes a tomato-and-broth skillet, the mac and cheese turns into a different dish entirely, and the lentil curry already fits this style with almost no changes.
Lower-Sodium Approach: Use unsalted broth, rinse canned beans well, and hold back on cheese until the end. Salt in layers rather than all at once. That keeps the food tasting seasoned instead of flat and over-salty at the same time.
Kid-Calm Version: Cut the vegetables smaller, keep the spice mild, and serve the sauce on the side when possible. That works especially well for fajitas, chicken parmesan, and skillet pasta. Children usually care more about texture than they admit.
Heat-Seeking Version: Add red pepper flakes, chopped jalapeños, harissa, or chipotle powder depending on the base flavor. Use a light hand at first. Heat is easier to add than remove.
Seasonal Pantry Turn: In place of the exact vegetables listed, use what roasts or simmers well at the same speed. Zucchini, carrots, mushrooms, spinach, kale, cauliflower, green beans, and cabbage all show up in one-pan dinners without needing a full rewrite.
Common Mistakes That Can Ruin a One-Pan Dinner
Crowding the pan: If the ingredients are piled on top of each other, they steam instead of brown. That gives you soft vegetables and pale chicken skin. Use a larger sheet pan, split the recipe between two pans, or cook in batches. Space is flavor.
Adding everything at once: Potatoes, rice, or sturdy vegetables need more time than shrimp, fish, or spinach. If you dump every ingredient in at the start, something ends up wrong. Stage the pan so the long-cooking items start first and the delicate ones join later.
Skipping the thermometer: Guessing works until it doesn’t. Chicken should hit 165°F, pork 145°F, salmon 145°F, ground beef 160°F, and steak should be pulled based on your preferred doneness, not on a hunch. A thermometer takes the drama out of dinner.
Using too little seasoning: One pan does not mean one tiny pinch of salt. Potatoes, rice, beans, pasta, and vegetables all need seasoning in their own right. If the dish tastes flat at the end, the problem usually started before the lid went on.
Letting sauce turn watery: A skillet pasta or casserole needs enough heat to reduce the liquid. If the pan seems loose, cook it uncovered for a few extra minutes instead of serving it soupy. On a sheet pan, use vegetables that can handle their own juices.
Forgetting the rest time: Meat keeps cooking after it comes off the heat. Slice too early and the juices run out onto the cutting board. Give chicken, pork, and steak a few minutes to settle. It’s not wasted time. It’s insurance.
Questions People Ask About One-Pan Dinners

Can I use frozen vegetables in these recipes?
Yes, but the texture changes a bit. Frozen broccoli, green beans, or corn work well in skillet meals and some sheet pan dinners, but add them later than fresh vegetables because they release extra moisture as they thaw.
How do I keep chicken from drying out on a sheet pan?
Use chicken thighs when you can, or pound breasts to an even thickness and pull them at 165°F without overbaking them. A light coating of oil and not crowding the pan also helps a lot.
What size pan do I need?
A rimmed half-sheet pan works for most sheet pan dinners. For skillet recipes, a 10- to 12-inch oven-safe skillet or a deep sauté pan is the safer bet because rice, pasta, and sauce all take up more room than people expect.
Can I double these recipes?
Usually, yes, but sheet pan dinners often need two pans so they don’t crowd. Skillet recipes can sometimes be doubled if your pan is wide enough, though a crowded skillet will steam and take longer to finish.
Which recipes reheat best?
The bean, rice, pasta, and casserole-style dinners hold up best: taco beef and rice, enchilada casserole, sausage orzo, turkey meatballs, lentil curry, and broccoli cheddar mac. Salmon and shrimp are the most delicate leftovers.
What if my sauce is too thin?
Let it simmer uncovered for a few more minutes. If that still doesn’t fix it, stir in a small cornstarch slurry — 1 teaspoon cornstarch mixed with 1 tablespoon cold water — and cook until glossy.
Can I make these ahead for a busy night?
Yes. Chop vegetables, mix seasonings, and portion the protein the day before. Some dishes, especially the skillet pasta and bean-based recipes, can be fully cooked and reheated with good results.
Do I need parchment paper for every sheet pan dinner?
No, but it saves time on cleanup, especially with honeyed, cheesy, or lemony recipes. If you want stronger browning, skip the parchment and oil the pan lightly instead.
The Pan Does the Heavy Lifting
The best part about one-pan dinners is that they make dinner feel less like a production and more like a reasonable habit. You still get browned chicken, glossy sauce, caramelized vegetables, and safe, properly cooked protein. You just do it with fewer dishes and fewer chances for the evening to go sideways.
That is the part I keep coming back to. A good one-pan dinner is not a compromise. It is a cleaner way to cook when the clock is loud and the sink is already full of something else. Pick the protein you like, match it to the right pan, and let the oven or skillet do what it does best.