
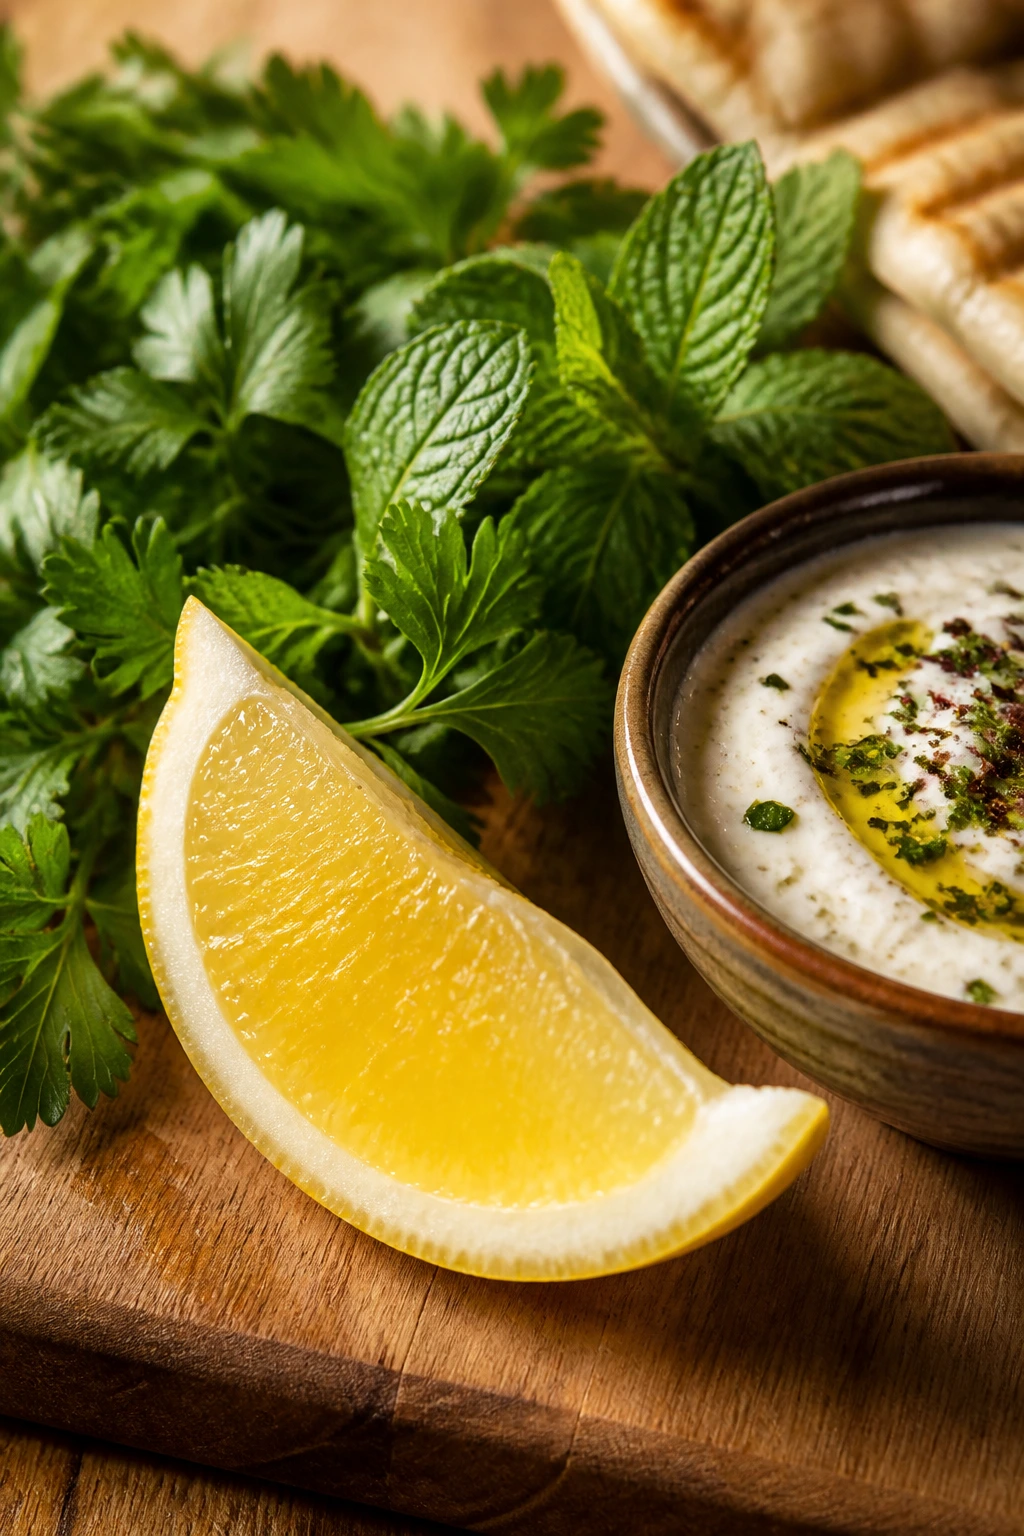
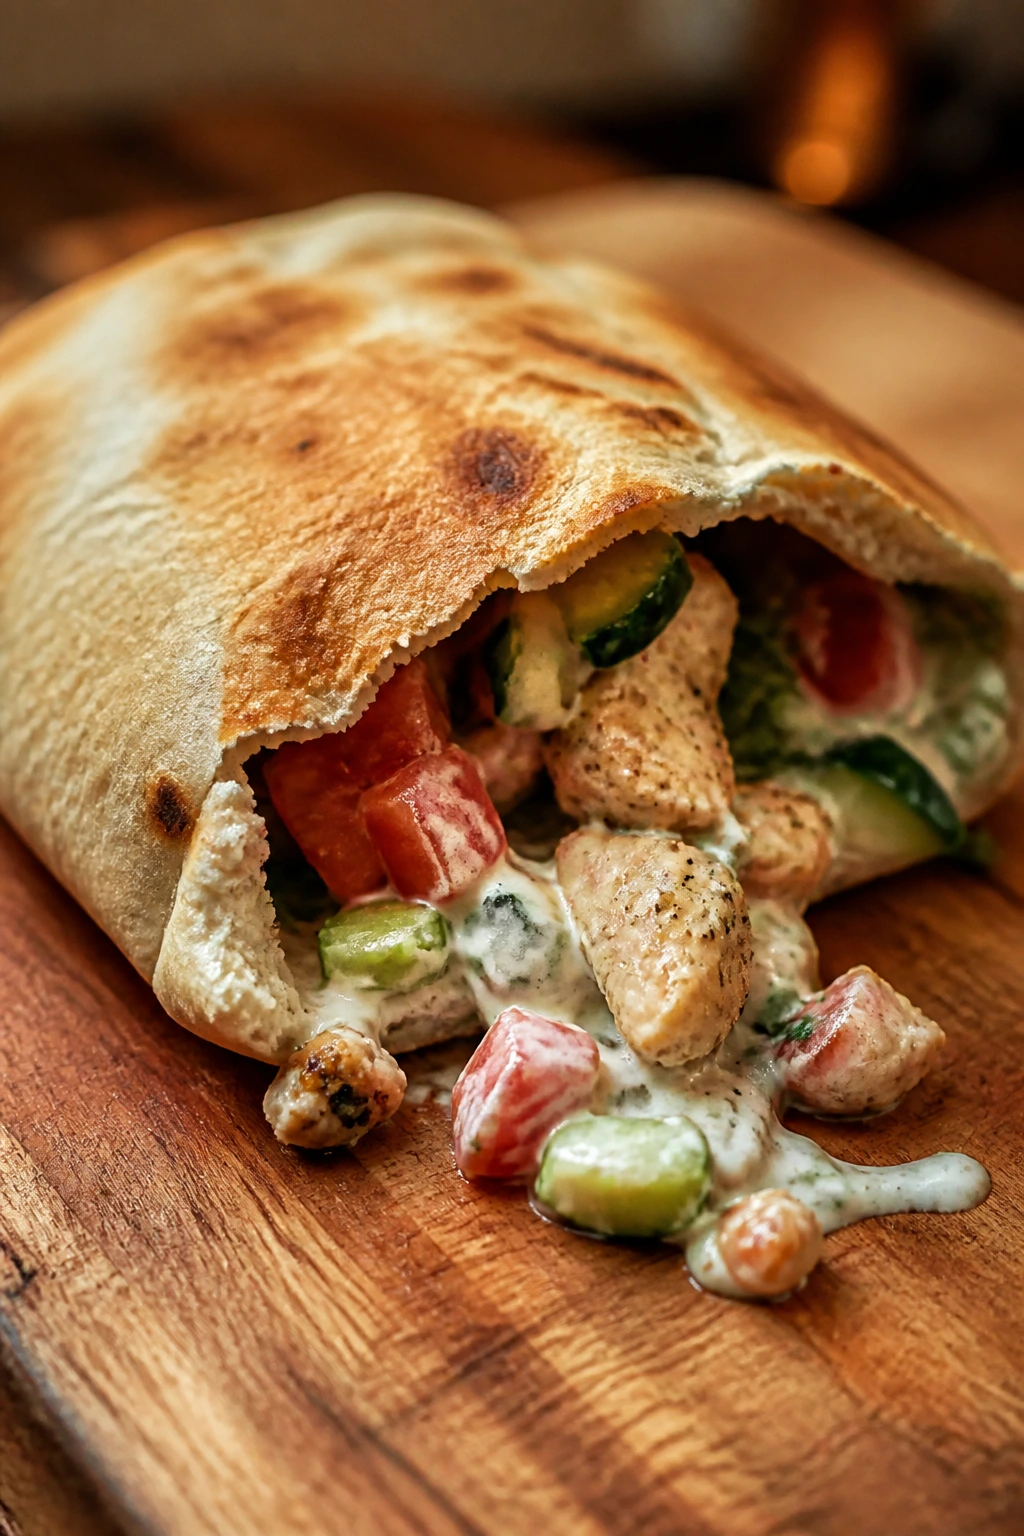
Some dinners belong in a bowl. These do not.
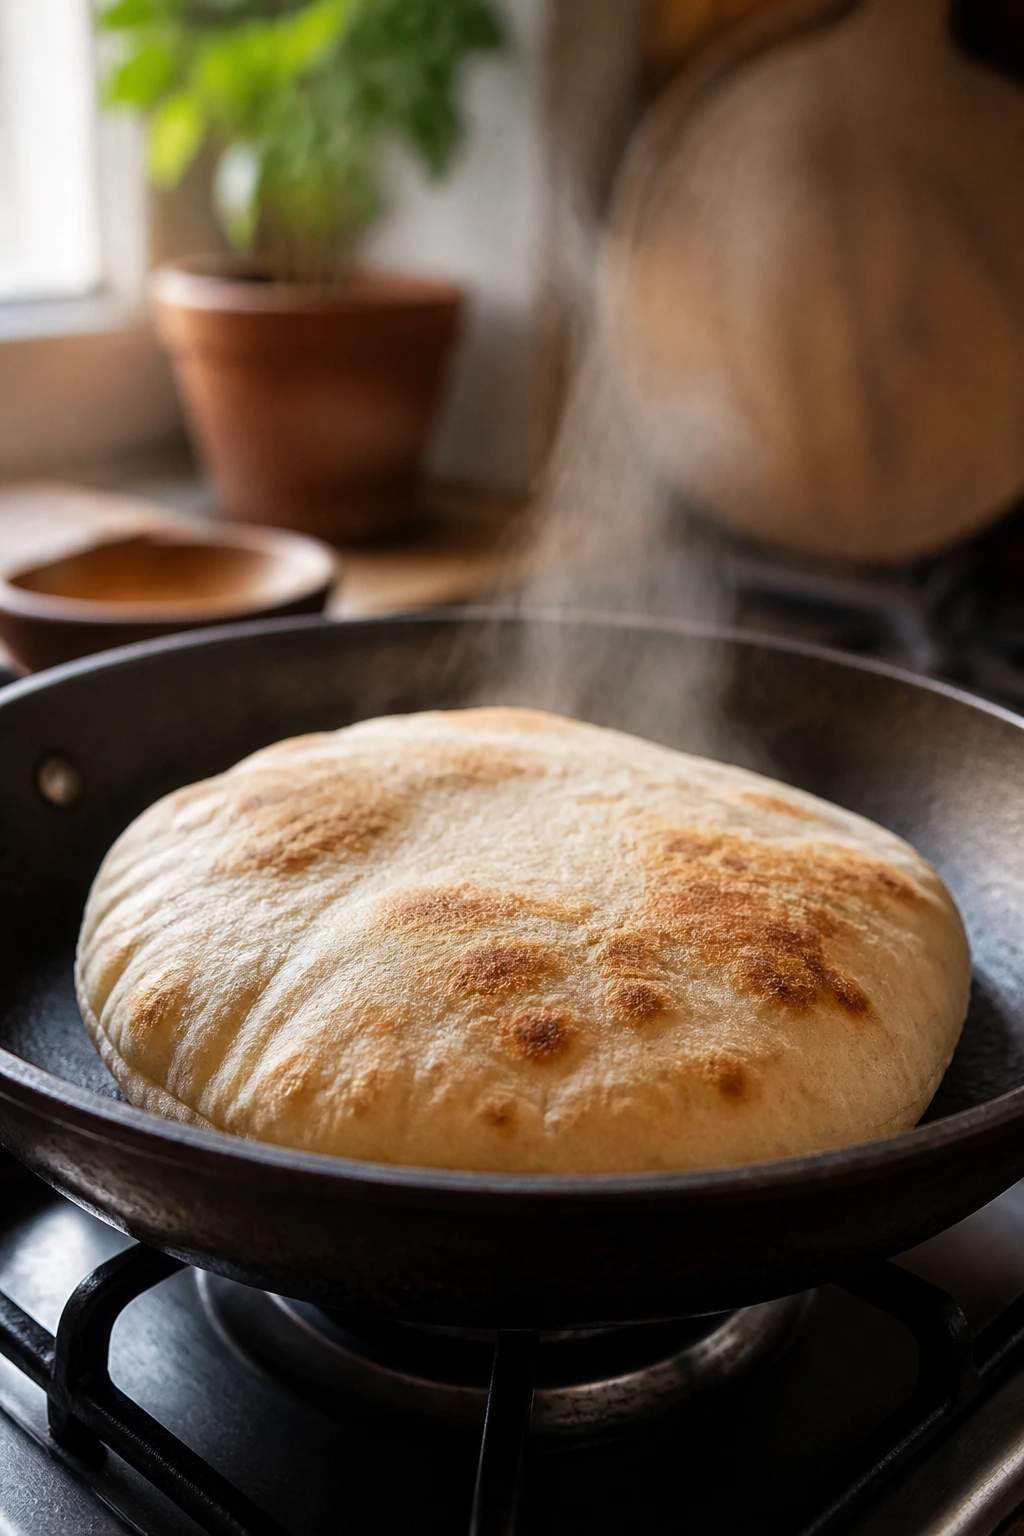
Pita-wrapped dinners are for the nights when one hand is already busy—holding the steering wheel, steadying a drink, keeping a kid from “helping,” or just carrying a plate from counter to couch—and you still want something that eats cleanly. A good pita pocket does a lot of work. It holds saucy meat, crisp lettuce, pickles, herbs, and a smear of yogurt or tahini without turning into a drippy mess by the third bite. And when it’s warmed right, the bread stays soft and a little chewy at the edge instead of collapsing like a sad envelope.
I’ve always liked pita for dinner because it gives you structure. Tortillas can fold and flop. Sandwich bread can go soggy fast. Pita has a sturdier feel, especially the thicker pocket-style rounds that puff in a hot oven or on a skillet. You can load them from the top, tuck them in foil, and eat them standing at the counter if that’s what the evening requires.
Why These Handheld Pita Dinners Earn a Spot in Your Rotation
- Less Mess, More Bite: The pocket keeps saucy fillings contained, so you’re not chasing chicken, onions, or tahini down your wrist.
- Fast but Not Flat: Most of these use a simple protein, a quick sauce, and one crunchy element, which gives you a full dinner without a lot of cleanup.
- Flexible by Design: Swap chicken for chickpeas, beef for mushrooms, or salmon for shrimp without rebuilding the whole meal.
- Good Warm or Lukewarm: Pita dinners don’t need to be piping hot to taste right, which makes them forgiving when everyone eats at different times.
- Easy to Pack and Carry: Wrap them in foil or parchment and they hold together for lunchboxes, road trips, or a plate eaten one-handed over the sink.
- Built for Big Flavor: Garlic, lemon, pickles, herbs, hot sauce, yogurt, tahini, and charred edges do most of the heavy lifting here.
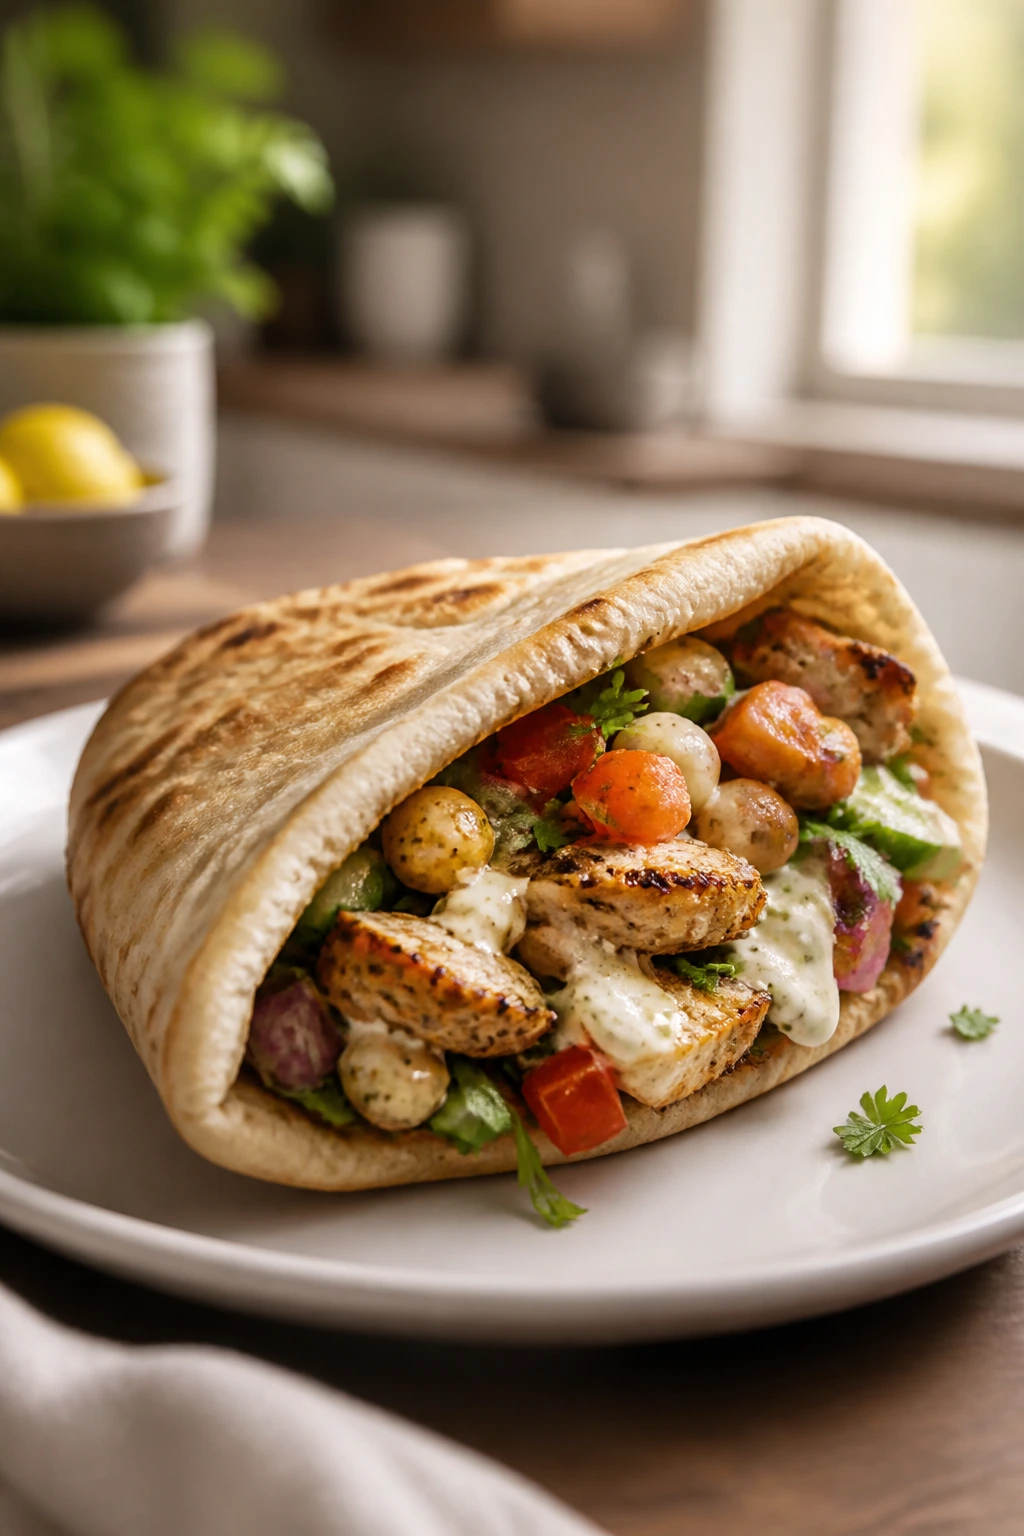
1. Chicken Shawarma Pitas with Tahini Yogurt
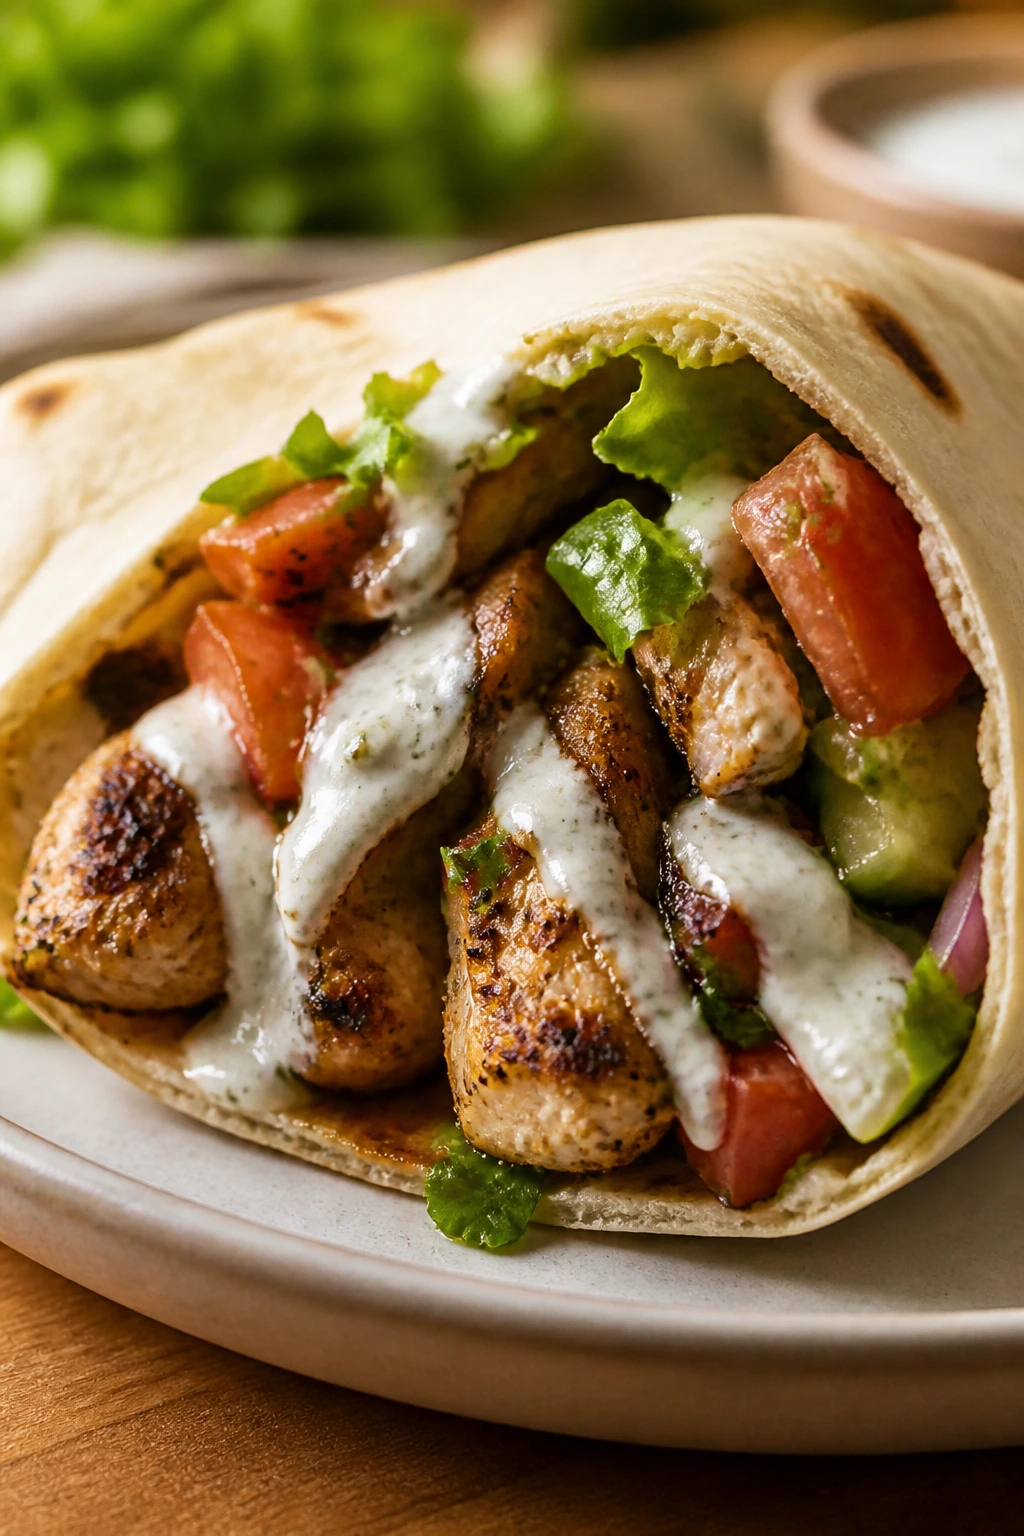
Intro:
This is the pita I reach for when I want dinner to smell like the good corner of a Middle Eastern grill. The chicken gets warm spices, a little citrus, and enough browning in the skillet to bring out those crisp little edges that make every bite worth slowing down for. Stuff it into warm pita with lettuce, tomato, and a cool tahini-yogurt sauce, and the whole thing eats like a full meal with no fork in sight.
Why It Works:
Shawarma-style seasoning loves chicken thighs because the fat carries cumin, coriander, paprika, and garlic without drying out. A quick sear in a hot skillet gives you browned bits that taste deeper than a simple roast. The sauce cools everything down, and that contrast matters more than people think.
Key Ingredients:
- 2 lbs boneless, skinless chicken thighs
- 2 tablespoons olive oil
- 2 teaspoons ground cumin
- 2 teaspoons ground coriander
- 1 teaspoon smoked paprika
- 1 teaspoon garlic powder
- 1 teaspoon kosher salt
- 1/2 teaspoon black pepper
- 2 tablespoons lemon juice
- 1/2 cup plain Greek yogurt
- 2 tablespoons tahini
- 4 large pita rounds, warmed
- 1 cup shredded lettuce
- 1 cup chopped tomato
- 1/2 red onion, thinly sliced
Quick Steps:
- Marinate the chicken: Toss the thighs with olive oil, cumin, coriander, paprika, garlic powder, salt, pepper, and lemon juice. Let it sit for 20 minutes while you prep the rest.
- Mix the sauce: Stir Greek yogurt, tahini, 1 tablespoon water, and a pinch of salt until smooth and spoonable.
- Heat the skillet: Warm a large skillet over medium-high heat until a drop of water skitters across the surface.
- Cook the chicken: Sear the thighs for 5 to 6 minutes per side, until deeply browned and the thickest piece reaches 165°F / 74°C. Rest for 5 minutes, then slice.
- Warm the pita: Heat each pita in a dry skillet for 20 to 30 seconds per side, just until flexible.
- Fill and serve: Open the pocket carefully, spread in sauce, then add lettuce, tomato, onion, and sliced chicken.
Equipment for This Recipe:
- Large skillet
- Mixing bowl
- Tongs
- Cutting board and sharp knife
- Small bowl for sauce
How to Serve This Dish:
Serve it with lemon wedges and a pile of crunchy cucumbers on the side. If you want it extra neat, wrap the bottom half of each pita in parchment before handing it over.
Pro Tips for This Recipe:
- Cut the chicken after resting so the juices stay in the meat, not on your board.
- If your pita tears easily, warm it longer; cold pita splits at the seam.
- A spoonful of pickled onions changes the whole sandwich.
- Don’t drown the pocket in sauce. A thin smear goes farther than a flood.
Variations on This Dish:
- Spicy Shawarma: Add 1/2 teaspoon cayenne and a spoonful of harissa to the marinade.
- Chicken Shawarma Bowl-to-Pita Swap: Serve the same filling in pita or over rice, depending on how hungry everyone is.
- Dairy-Free Version: Use a tahini-lemon sauce made with water instead of yogurt.
Common Mistakes to Avoid with This Dish:
- Skipping the rest time: Slicing immediately makes the chicken look dry. Resting keeps it juicy.
- Using low heat: You’ll steam the chicken instead of browning it.
- Overstuffing the pita: A pocket with too much filling splits at the seam before you reach the table.
2. Beef Kofta Pitas with Cucumber Relish
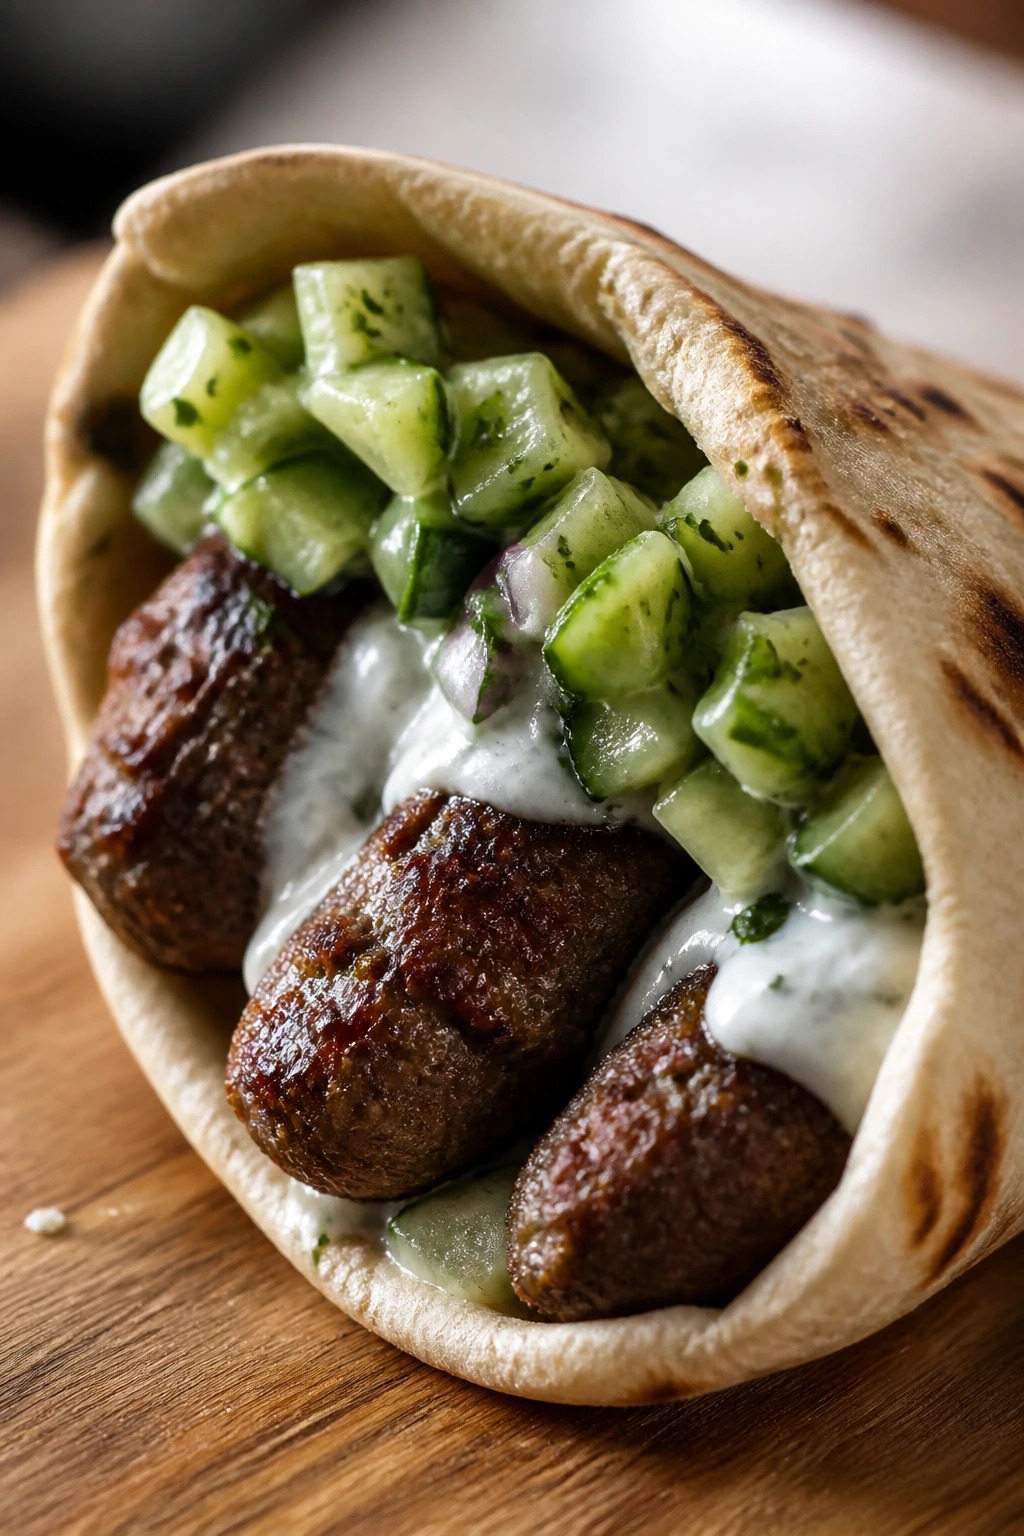
Intro:
Kofta has a way of tasting like it was made for a grill, even when you cook it in a plain skillet. The spices are warm, the parsley keeps it bright, and the beef stays juicy if you shape it into slim logs instead of dense little bricks. Tucked into pita with cucumber, tomato, and a quick yogurt sauce, it feels sturdy enough for one hand and bold enough to keep you coming back for the last bite.
Why It Works:
Ground beef with a little fat holds the shape and gets a proper crust. Onion and parsley keep the mix from tasting heavy, and the cucumber relish gives you the crunch that kofta needs. The whole thing gets better once the meat hits the hot pan and the spices bloom in the fat.
Key Ingredients:
- 1 1/2 lbs ground beef, 80/20
- 1 small onion, finely grated
- 2 cloves garlic, minced
- 1/3 cup chopped parsley
- 1 teaspoon ground cumin
- 1 teaspoon ground allspice
- 1 teaspoon kosher salt
- 1/2 teaspoon black pepper
- 4 pita rounds, warmed
- 1 cucumber, diced
- 1 cup diced tomato
- 1/2 cup plain yogurt
- 1 tablespoon lemon juice
Quick Steps:
- Mix the kofta: Combine beef, onion, garlic, parsley, cumin, allspice, salt, and pepper in a bowl. Mix gently until just combined.
- Shape the meat: Form 8 oblong logs, about 4 inches long and 1 inch thick.
- Cook the kofta: Heat a skillet over medium-high heat and cook 3 to 4 minutes per side, until browned and cooked through to 160°F / 71°C.
- Make the relish: Stir cucumber, tomato, lemon juice, and a pinch of salt.
- Whisk the sauce: Mix yogurt with a splash of water so it drizzles.
- Assemble: Open each pita, add sauce, kofta, relish, and a little extra parsley.
Equipment for This Recipe:
- Large skillet
- Mixing bowl
- Grater for the onion
- Spoon or clean hands for shaping
- Small bowl
How to Serve This Dish:
Serve with olives or a simple chopped salad if you want the plate to feel fuller. I like these wrapped loosely in foil, which keeps the pita warm and the juices from leaking out.
Pro Tips for This Recipe:
- Grate the onion finely so it melts into the meat. Big onion chunks make the logs fall apart.
- Wet your hands before shaping. The meat sticks less.
- If the first side isn’t browning in 3 minutes, your pan isn’t hot enough yet.
- Let the kofta sit for 2 minutes before stuffing the pita.
Variations on This Dish:
- Lamb Kofta Pitas: Swap half or all of the beef for ground lamb and keep the spices the same.
- Harissa Kofta: Add 1 teaspoon harissa paste for a sharper heat.
- Fresh Herb Kofta: Use mint along with parsley for a cooler, brighter finish.
Common Mistakes to Avoid with This Dish:
- Overmixing the meat: It turns dense and springy instead of tender.
- Making the logs too thick: They brown too slowly and can dry at the edges.
- Skipping the relish: Kofta without crunch tastes heavy by the third bite.
3. Crispy Falafel Pitas with Herb Sauce
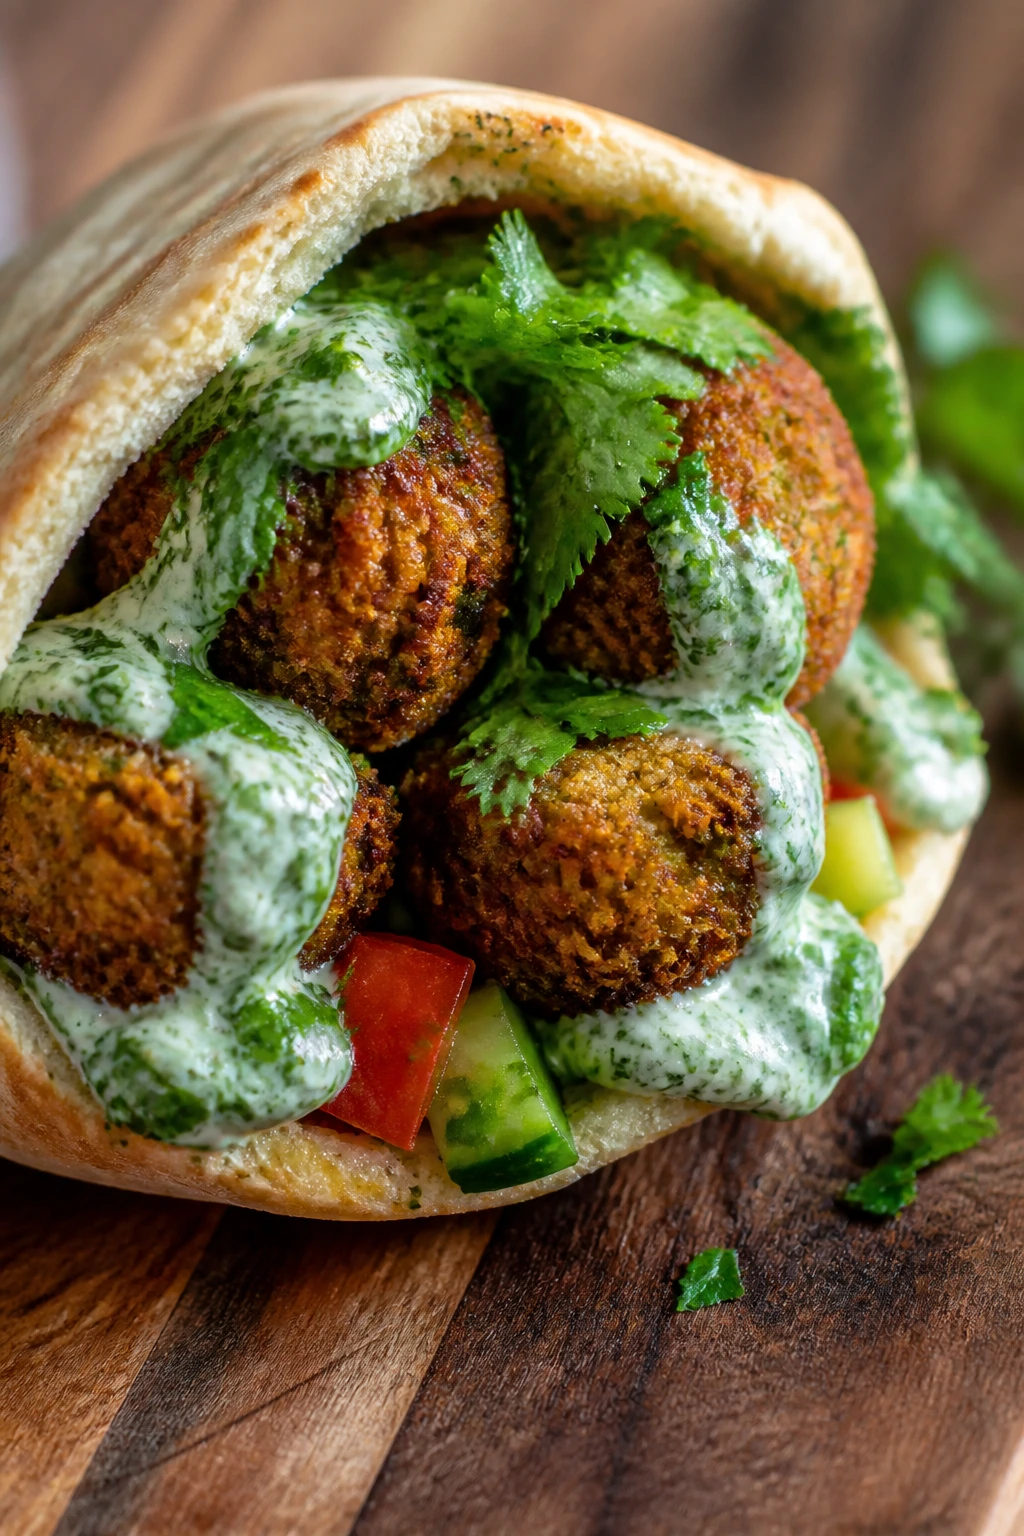
Intro:
Falafel in pita is one of those dinners that makes sense the moment you bite through the crust. The outside should be crisp and almost sandy, while the inside stays green, herbal, and a little fluffy from the chickpeas. Add a garlicky herb sauce and a few slices of tomato, and you’ve got a hand-held dinner that eats like it came from a very good street cart.
Why It Works:
Falafel needs dried chickpeas soaked overnight because canned chickpeas are too soft and turn the mixture pasty. That dry-soaked texture is what gives you a crust that holds up in the oil or air fryer. Herbs do the rest; they make the whole pocket taste fresh instead of heavy.
Key Ingredients:
- 1 1/2 cups dried chickpeas, soaked overnight and drained
- 1 small onion, chopped
- 3 cloves garlic
- 1 cup parsley leaves
- 1/2 cup cilantro leaves
- 1 teaspoon ground cumin
- 1 teaspoon ground coriander
- 1 teaspoon kosher salt
- 1/2 teaspoon baking soda
- 3 tablespoons flour
- 4 pita rounds, warmed
- 1 cup shredded lettuce
- 1 cup diced tomato
- 1/2 cup yogurt or tahini sauce
Quick Steps:
- Process the falafel mixture: Pulse chickpeas, onion, garlic, herbs, cumin, coriander, salt, baking soda, and flour until it looks like damp coarse sand.
- Chill briefly: Rest the mix for 20 minutes so it firms up.
- Shape the patties: Form 10 to 12 small balls or ovals.
- Cook until crisp: Fry in 350°F / 175°C oil for 3 to 4 minutes per side, or air-fry at 400°F / 205°C for about 12 minutes, flipping halfway.
- Drain: Set on paper towels for a minute so the crust stays crisp, not greasy.
- Fill the pita: Add sauce, lettuce, tomato, falafel, and a squeeze of lemon.
Equipment for This Recipe:
- Food processor
- Mixing bowl
- Skillet or deep fryer, or air fryer
- Slotted spoon
- Paper towels
How to Serve This Dish:
Serve falafel pitas with extra lemon wedges and a bowl of pickles on the table. They’re at their best when the outside is still crisp and the sauce is cool.
Pro Tips for This Recipe:
- Do not use canned chickpeas here; the texture goes wrong fast.
- If the mixture won’t hold together, chill it longer instead of adding lots of flour.
- Fresh herbs are not optional in falafel. They carry the flavor.
- Warm pita twice: once before filling, once for 15 seconds after stuffing.
Variations on This Dish:
- Spinach Falafel: Swap 1/2 cup of the herbs for spinach to make the filling greener and milder.
- Baked Falafel Pitas: Brush with oil and bake at 425°F / 220°C for 18 to 20 minutes.
- Spicy Falafel: Add 1/2 teaspoon cayenne or chopped jalapeño to the mix.
Common Mistakes to Avoid with This Dish:
- Using wet mixture straight from the processor: It falls apart in the pan.
- Crowding the oil: Temperature drops and the falafel soaks up grease.
- Skipping the acid: Lemon or pickles cut the chickpea richness and keep the pita from tasting one-note.
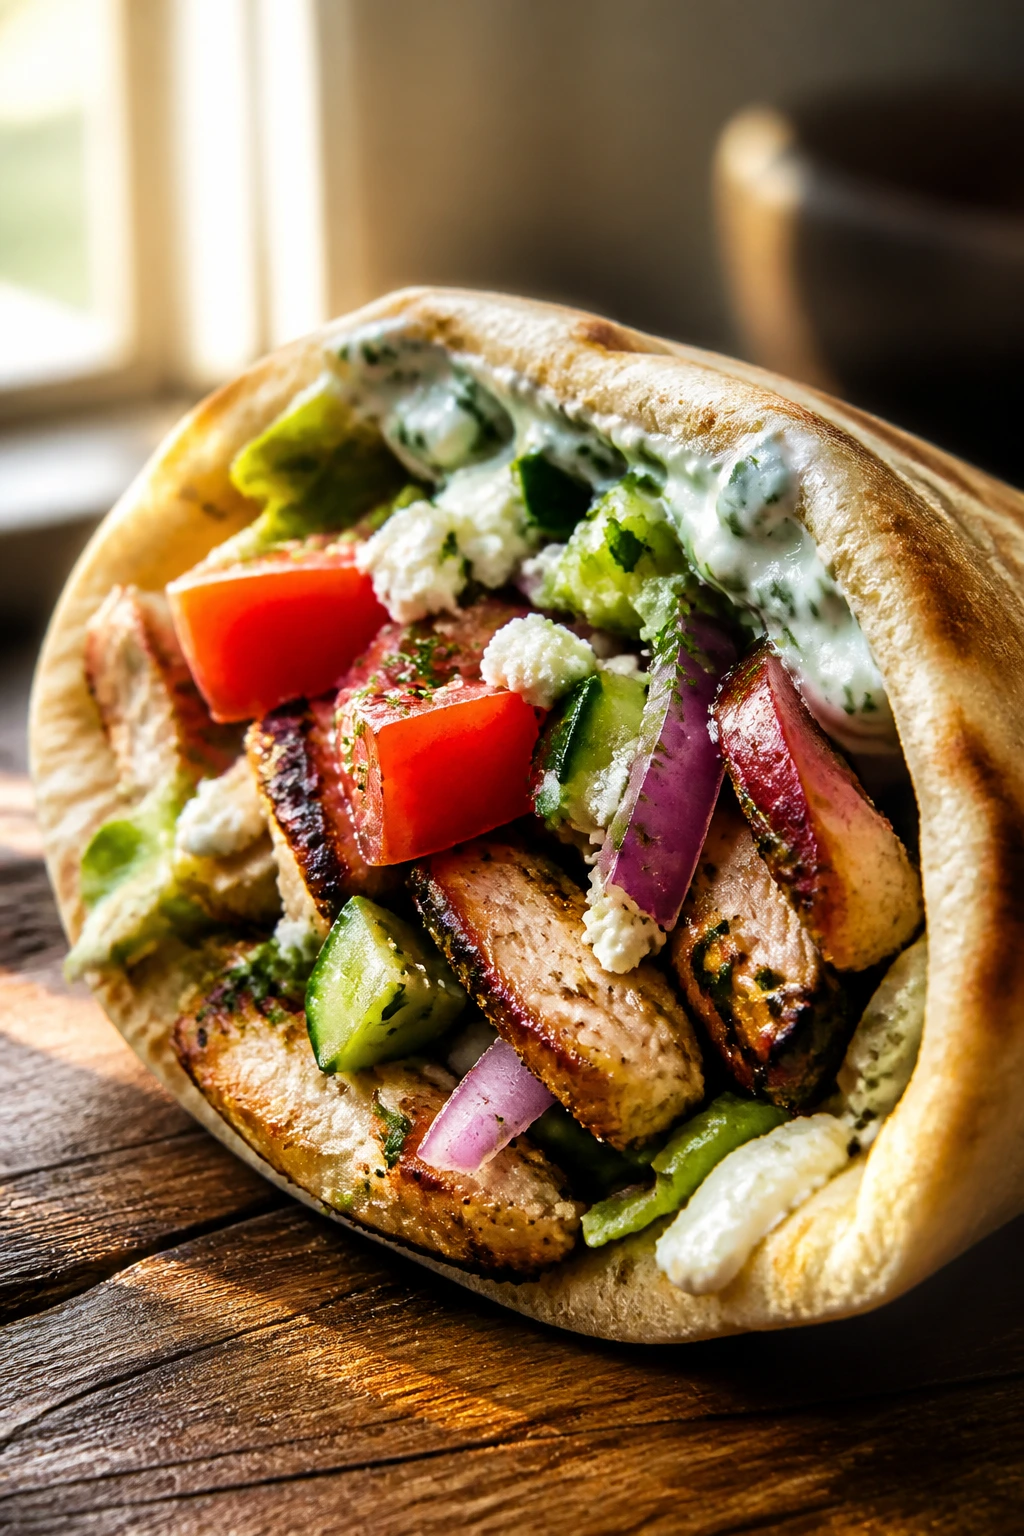
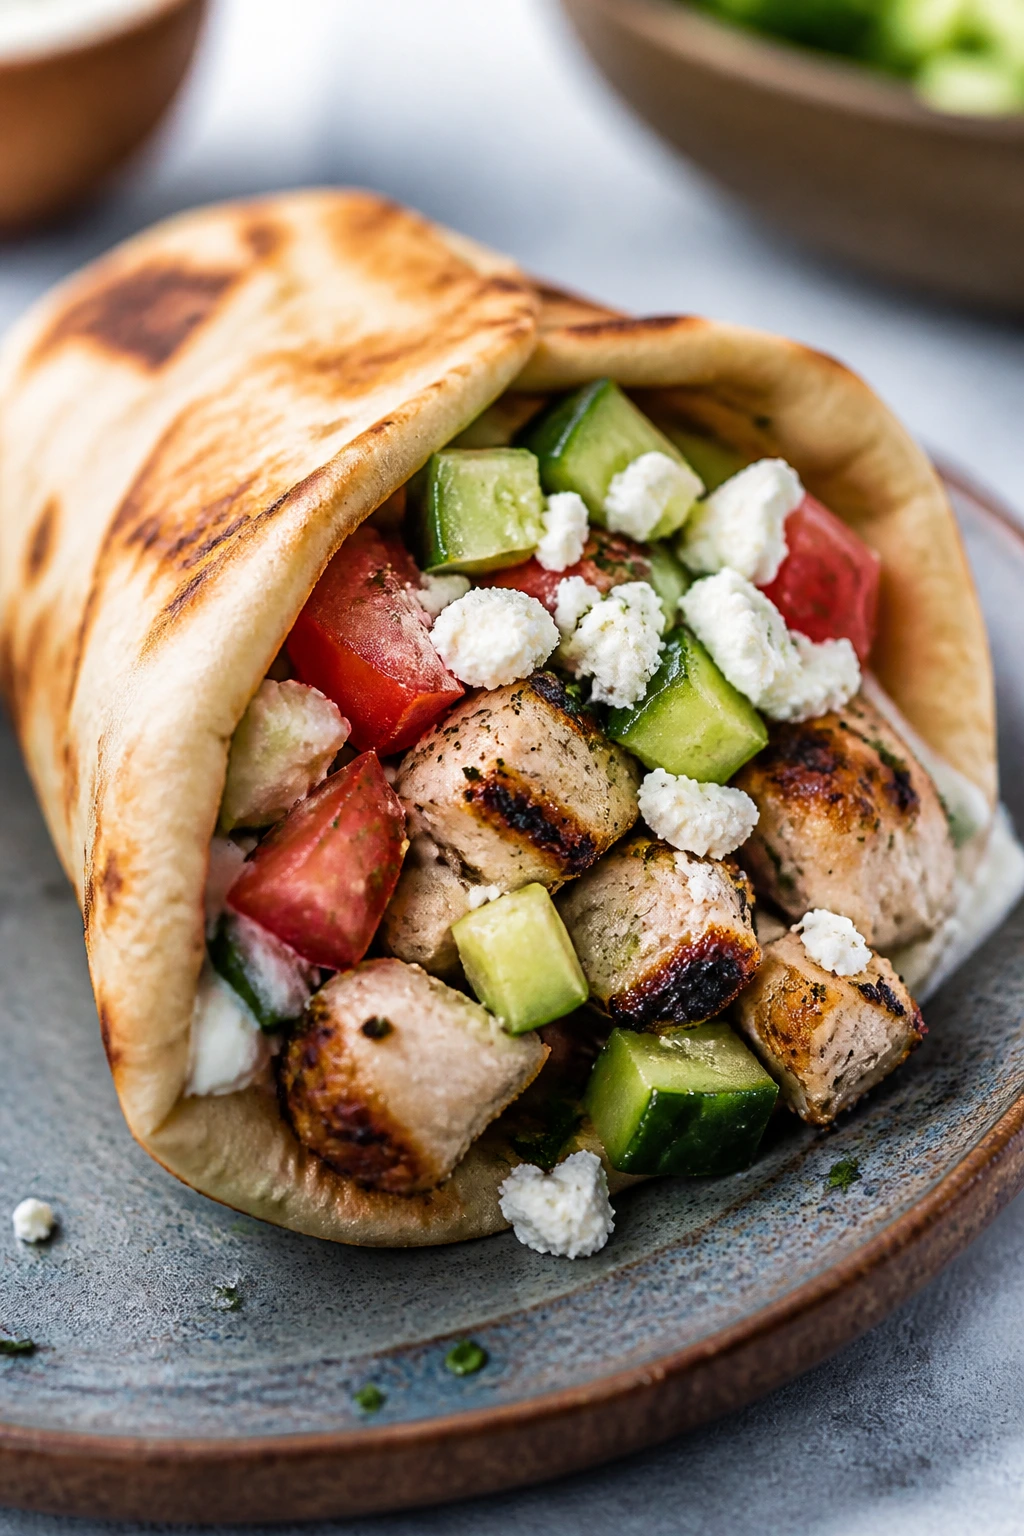
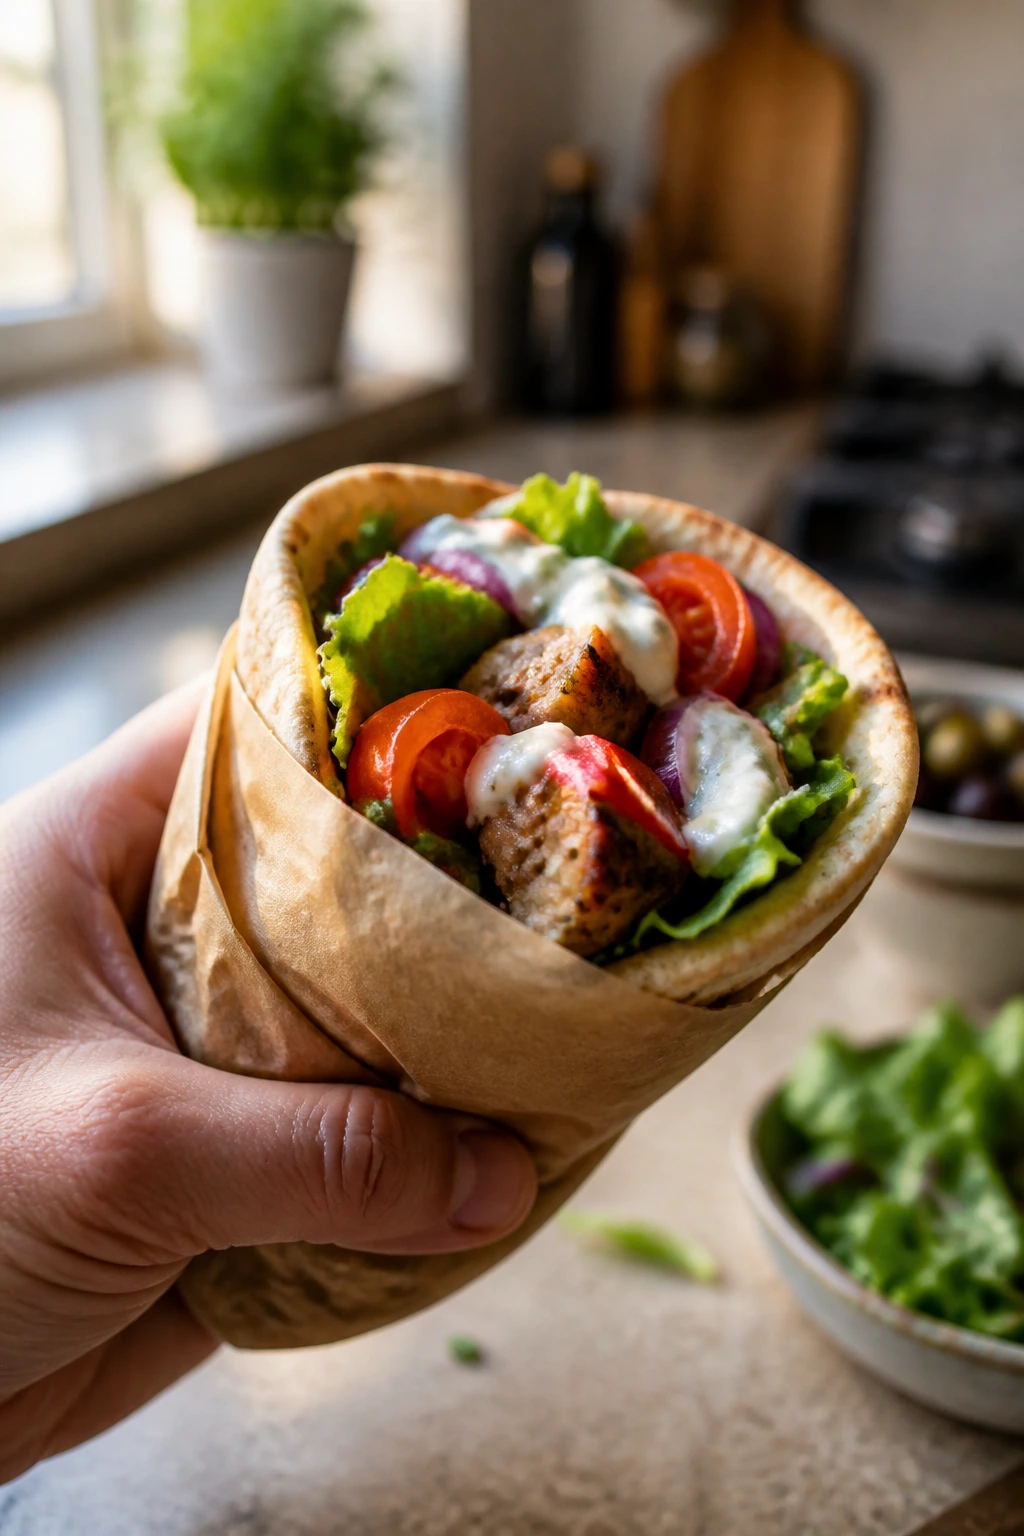
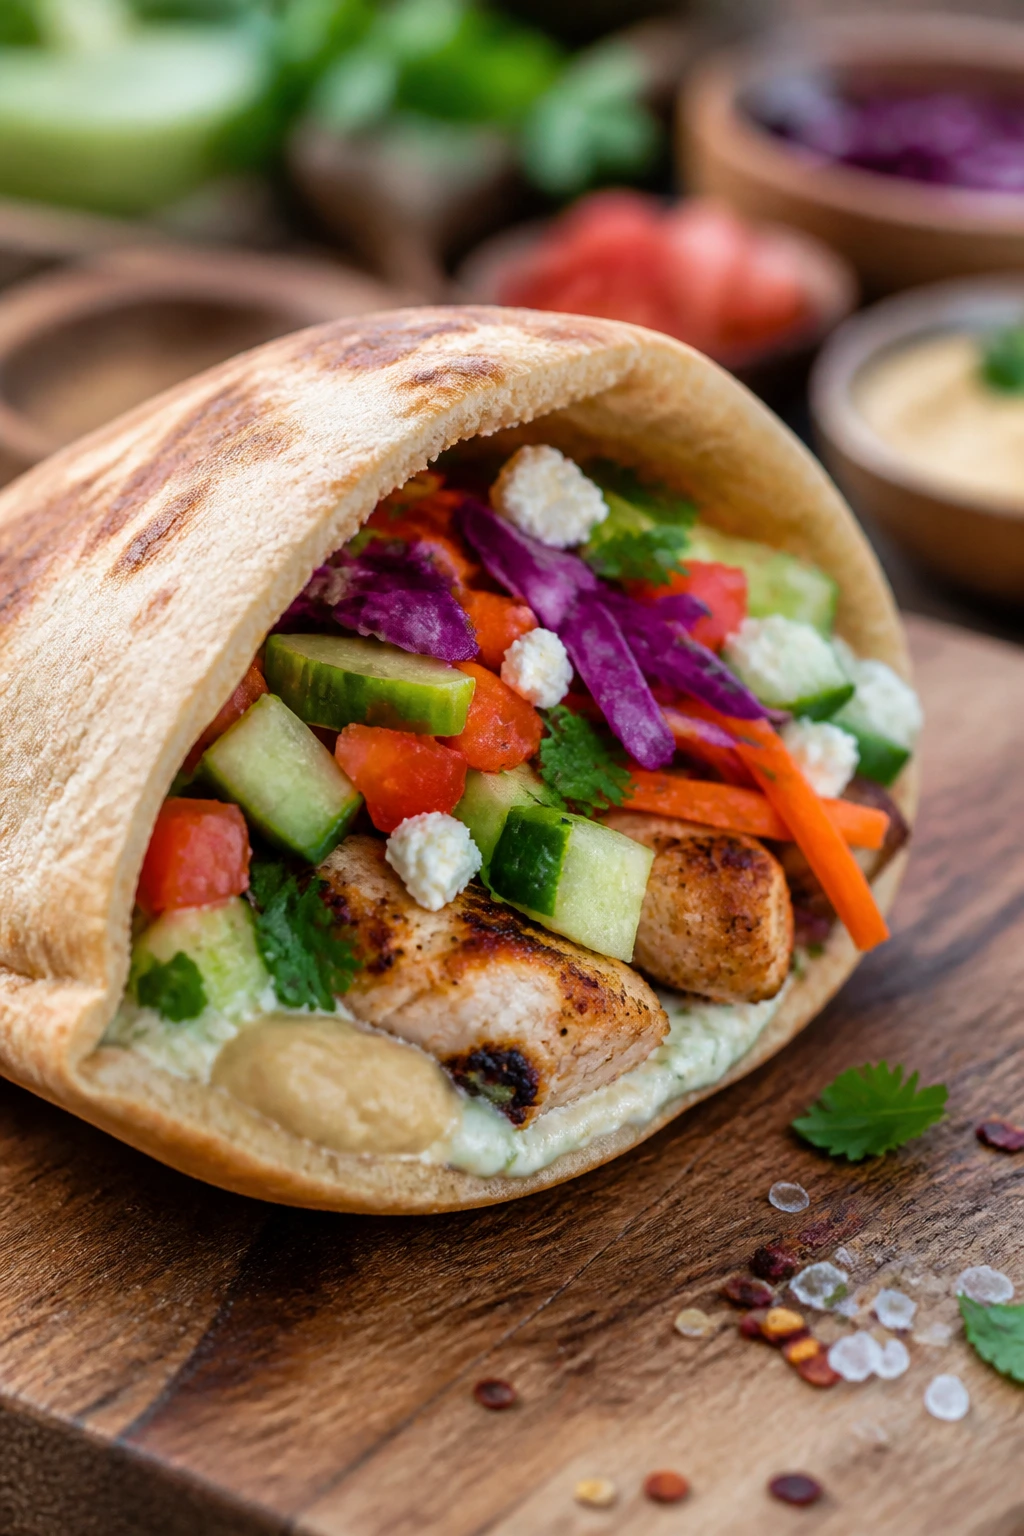
4. Greek Chicken Souvlaki Pitas
Intro:
Chicken souvlaki is what I make when I want dinner to taste clean and bright without turning into a salad pretending to be a meal. The marinade leans hard on lemon, garlic, and oregano, and the chicken picks up a char that works especially well against cool cucumber and a slab of feta. In pita, it’s tidy enough to eat standing over the sink, which is not a complaint in my house.
Why It Works:
A simple yogurt-lemon marinade tenderizes the chicken while oregano and garlic sink in fast. Cubes cook quickly on a hot pan or grill, so you get browned edges before the meat dries out. Feta and cucumber do the cooling job that souvlaki always needs.
Key Ingredients:
- 2 lbs boneless chicken breast or thighs, cut into 1 1/2-inch pieces
- 1/4 cup olive oil
- 3 tablespoons lemon juice
- 3 cloves garlic, minced
- 2 teaspoons dried oregano
- 1 teaspoon kosher salt
- 1/2 teaspoon black pepper
- 1 cup chopped cucumber
- 1 cup cherry tomatoes, halved
- 1/2 cup crumbled feta
- 4 pita rounds, warmed
- 1/2 cup tzatziki
Quick Steps:
- Marinate: Toss chicken with olive oil, lemon juice, garlic, oregano, salt, and pepper. Chill for 30 minutes to 4 hours.
- Thread or spread: If using skewers, thread the chicken; if not, keep the pieces loose for pan cooking.
- Cook: Grill or pan-sear over medium-high heat for 10 to 12 minutes total, turning until browned and the centers hit 165°F / 74°C.
- Rest: Let the chicken sit for 5 minutes, then pull from skewers if needed.
- Assemble: Fill pita with tzatziki, chicken, cucumber, tomatoes, and feta.
- Finish: Add a pinch more oregano if you like a sharper herbal edge.
Equipment for This Recipe:
- Mixing bowl
- Grill, grill pan, or skillet
- Tongs
- Skewers, optional
- Knife and cutting board
How to Serve This Dish:
These are good with lemon potatoes or a chopped romaine salad. A little extra tzatziki on the side is smart because the bread absorbs it fast.
Pro Tips for This Recipe:
- Cut the chicken evenly so every piece finishes at the same time.
- Use thighs if you want more forgiveness on the heat.
- Don’t marinate overnight in straight lemon juice; the texture can go a little mushy.
- Warm the feta slightly from the residual heat of the chicken. It softens just enough.
Variations on This Dish:
- Pork Souvlaki Pitas: Swap in pork shoulder cubes and keep the same marinade.
- Halloumi Souvlaki Pitas: Grill thick halloumi slabs for a vegetarian version.
- Garlic-Heavy Version: Add 1 extra clove of garlic and a pinch of dried dill.
Common Mistakes to Avoid with This Dish:
- Cooking over low heat: You’ll lose the char and get pale, rubbery chicken.
- Forgetting to rest: The juices run out the second you slice.
- Overloading the pita with watery tomatoes: Seed them first if they’re very juicy.
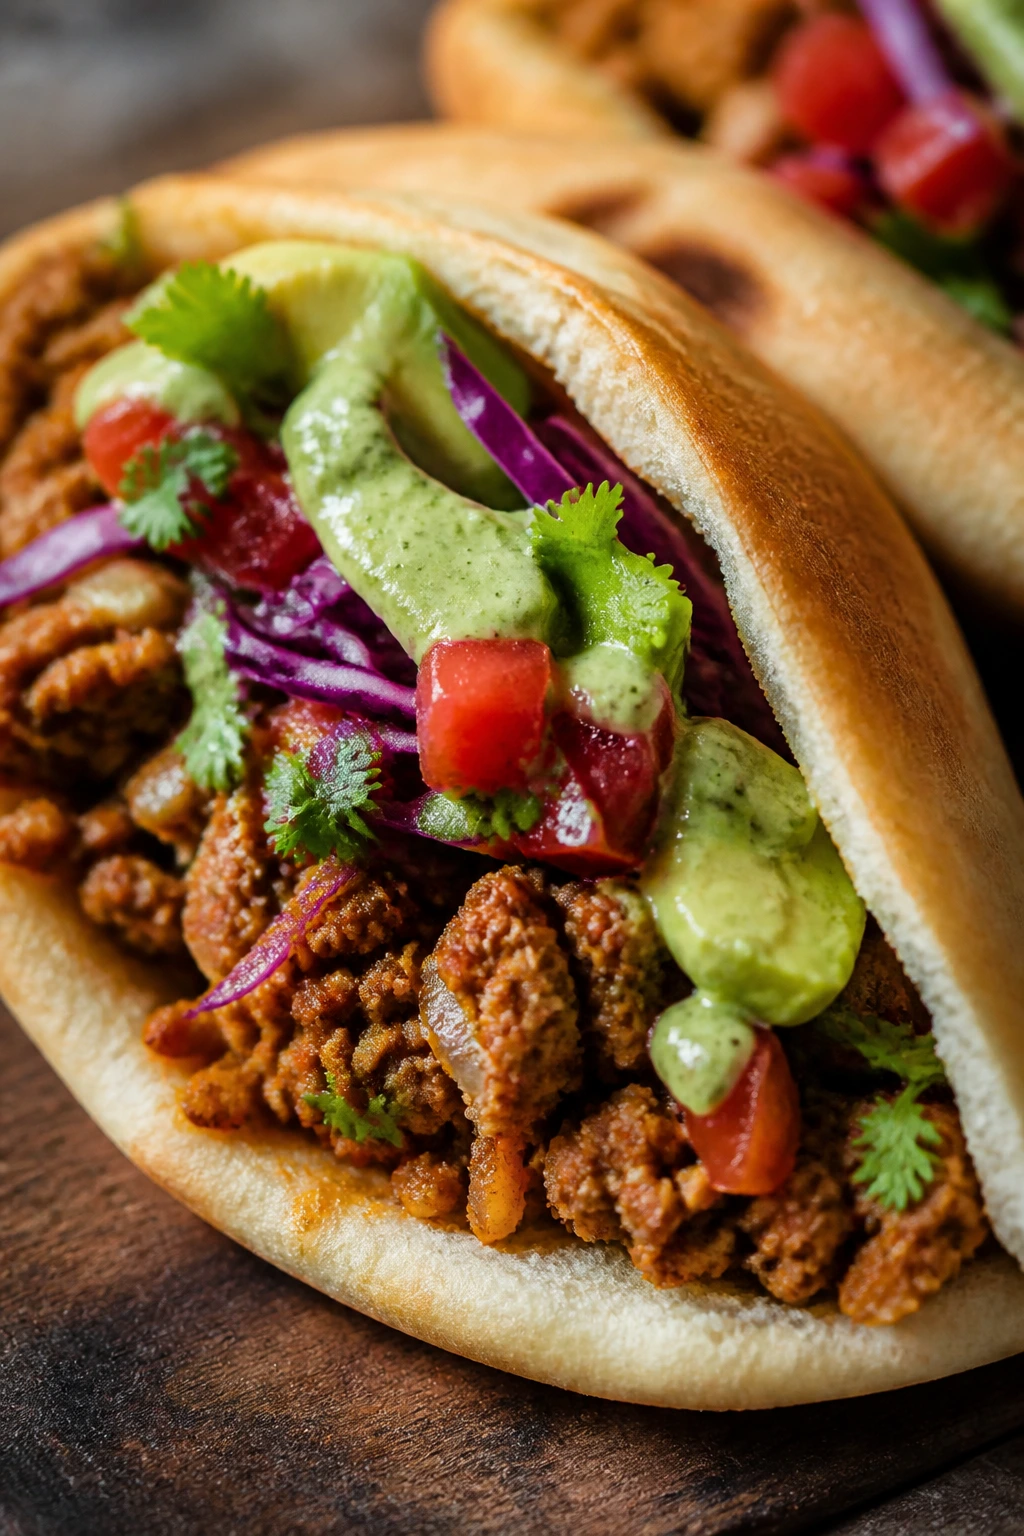
5. Smoky Turkey Taco Pitas
Intro:
This is the kind of dinner that happens when taco night and pita night shake hands. The turkey cooks quickly, takes smoke and cumin beautifully, and never feels as heavy as beef can on a weeknight. Add shredded cabbage, salsa, and a spoon of avocado crema, and the whole thing lands somewhere between a taco and a wrap, which is exactly why it disappears so fast.
Why It Works:
Ground turkey needs flavor built into the pan, not saved for later. Tomato paste, chili powder, and smoked paprika give it depth, and a hot skillet creates little browned bits that carry the whole filling. Pita is sturdier than a soft tortilla here, so it gives the taco filling a better grip.
Key Ingredients:
- 1 1/2 lbs ground turkey
- 1 tablespoon olive oil
- 1 small onion, diced
- 2 cloves garlic, minced
- 2 tablespoons tomato paste
- 2 teaspoons chili powder
- 1 teaspoon smoked paprika
- 1 teaspoon ground cumin
- 1 teaspoon kosher salt
- 1 cup shredded cabbage
- 1/2 cup salsa
- 1 avocado, mashed with 2 tablespoons yogurt or sour cream
- 4 pita rounds, warmed
Quick Steps:
- Sauté the onion: Cook onion in olive oil over medium heat for 3 minutes, until softened.
- Brown the turkey: Add turkey and break it up. Cook for 5 to 6 minutes until no pink remains.
- Build the spice base: Stir in garlic, tomato paste, chili powder, paprika, cumin, and salt. Cook 1 minute until fragrant.
- Moisten lightly: Add 2 to 3 tablespoons water if the mixture looks dry.
- Warm the pita: Heat until soft and flexible.
- Fill: Add turkey, cabbage, salsa, and avocado crema.
Equipment for This Recipe:
- Large skillet
- Wooden spoon or spatula
- Small bowl for crema
- Knife and cutting board
How to Serve This Dish:
Serve with lime wedges and corn chips if you want something beside the pita. The cabbage brings crunch, so you do not need much else.
Pro Tips for This Recipe:
- Tomato paste cooked for 1 minute gives the turkey a deeper, less “diet food” flavor.
- Mash the avocado with yogurt instead of plain avocado so it spreads cleanly.
- If your salsa is thin, drain it a bit first.
- Add chopped cilantro at the end if you want a fresher finish.
Variations on This Dish:
- Chipotle Turkey Pitas: Add chopped chipotle in adobo for smoke and heat.
- Black Bean Turkey Mix: Stir in 1 cup drained black beans for a fuller filling.
- Cheesy Taco Pitas: Melt shredded cheddar into the turkey during the last minute.
Common Mistakes to Avoid with This Dish:
- Leaving the turkey dry: A spoonful of water or salsa keeps it scoopable.
- Using cold pita: It cracks instead of folding.
- Skipping acid: Lime or salsa keeps the filling from tasting flat.
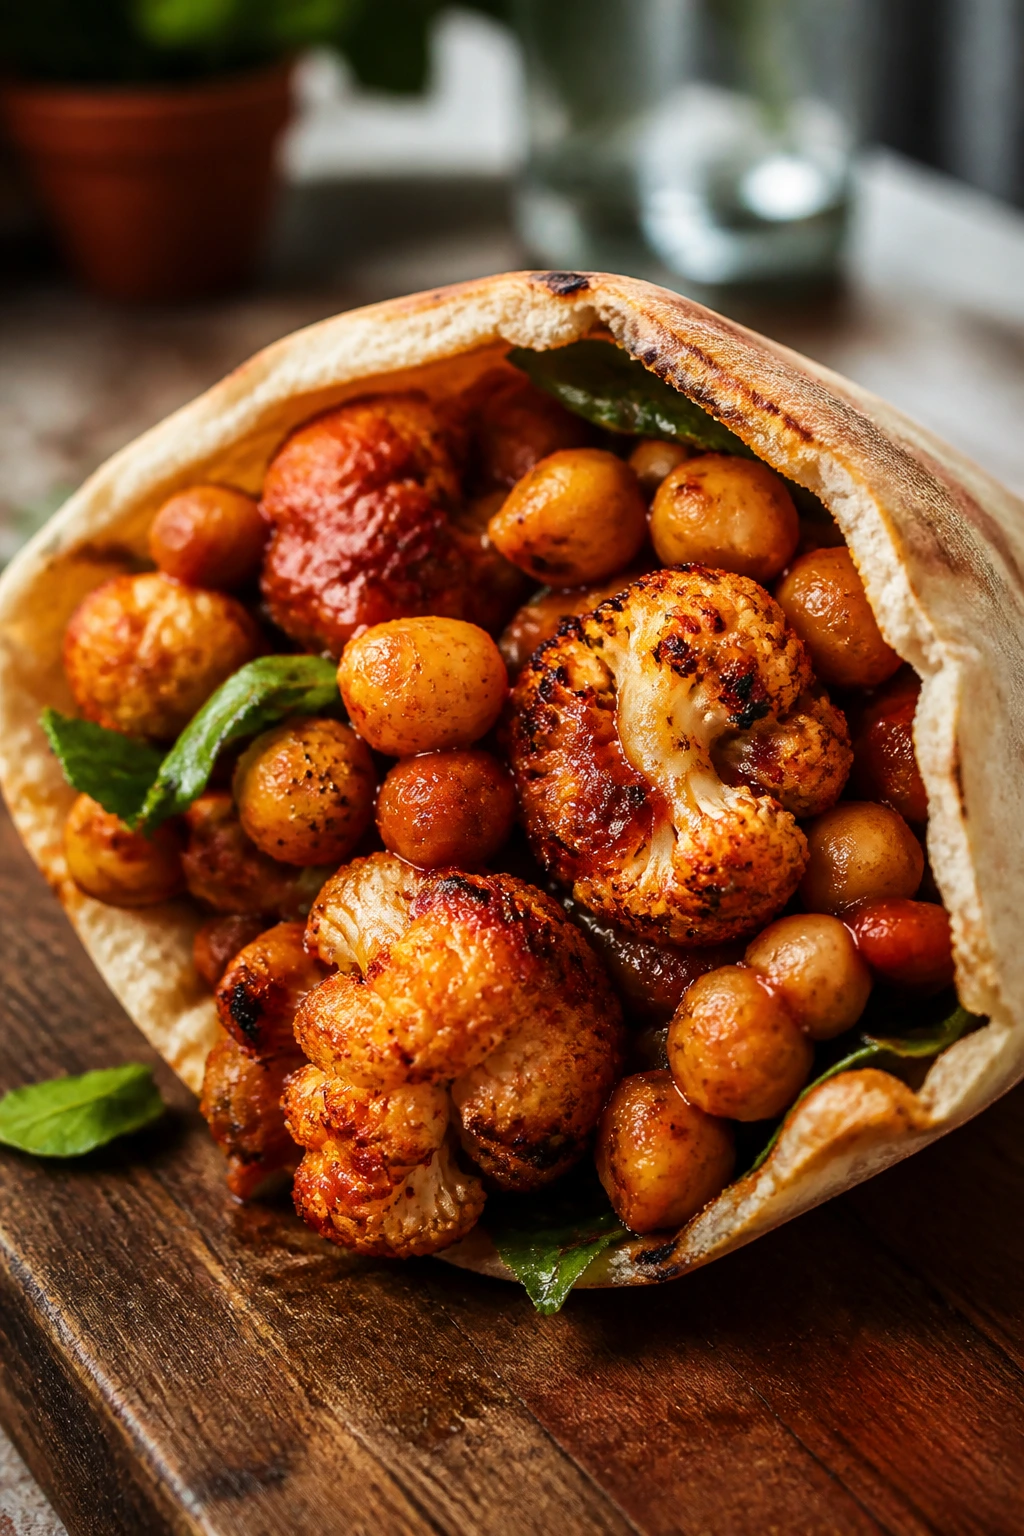
6. Harissa Chickpea and Cauliflower Pitas
Intro:
Harissa gives this dinner its backbone. Chickpeas bring the heft, cauliflower gets a little charred and sweet at the edges, and the whole filling turns deep red-orange in the oven, which is one of those colors that makes you hungry before it even lands on the plate. Pita pockets make sense here because the filling is saucy in the best way, and you want every bit of that spiced oil trapped inside.
Why It Works:
Roasting concentrates the cauliflower and keeps the chickpeas from going chalky. Harissa paste carries chili, garlic, and warm spice without needing a long ingredient list. A cool yogurt drizzle keeps the heat from running away with the whole meal.
Key Ingredients:
- 1 large head cauliflower, cut into small florets
- 2 cans chickpeas, drained and dried well
- 3 tablespoons olive oil
- 2 tablespoons harissa paste
- 1 teaspoon kosher salt
- 1/2 teaspoon ground cumin
- 1/2 cup plain yogurt
- 1 tablespoon lemon juice
- 4 pita rounds, warmed
- 1 cup baby spinach
- 1/2 red onion, thinly sliced
Quick Steps:
- Heat the oven: Preheat to 425°F / 220°C.
- Toss everything: Coat cauliflower and chickpeas with olive oil, harissa, salt, and cumin.
- Roast hard: Spread on a sheet pan and roast for 25 to 30 minutes, stirring once, until the cauliflower edges are browned.
- Mix the yogurt drizzle: Stir yogurt and lemon juice with a pinch of salt.
- Warm the pita: A dry skillet or the oven for 30 seconds works fine.
- Assemble: Add spinach, roasted filling, onion, and yogurt sauce.
Equipment for This Recipe:
- Rimmed sheet pan
- Large bowl
- Mixing spoon
- Small bowl
- Dry skillet, optional
How to Serve This Dish:
These are good with cucumbers or a tomato salad on the side. A few toasted sesame seeds on top give a nice little crunch.
Pro Tips for This Recipe:
- Dry the chickpeas well so they roast instead of steam.
- Cut cauliflower small enough to fit in the pita without falling out.
- If your harissa is very salty, reduce the added salt a touch.
- A squeeze of lemon at the end wakes up the whole filling.
Variations on This Dish:
- Sweet Potato Harissa Pitas: Swap half the cauliflower for small sweet potato cubes.
- Tahini Harissa Pitas: Use tahini instead of yogurt for a dairy-free drizzle.
- Extra-Green Version: Add chopped parsley or mint right before stuffing.
Common Mistakes to Avoid with This Dish:
- Crowding the pan: The vegetables steam and go soft.
- Using too much harissa: It can swamp the chickpeas.
- Skipping the sauce: You need the cool, creamy contrast.
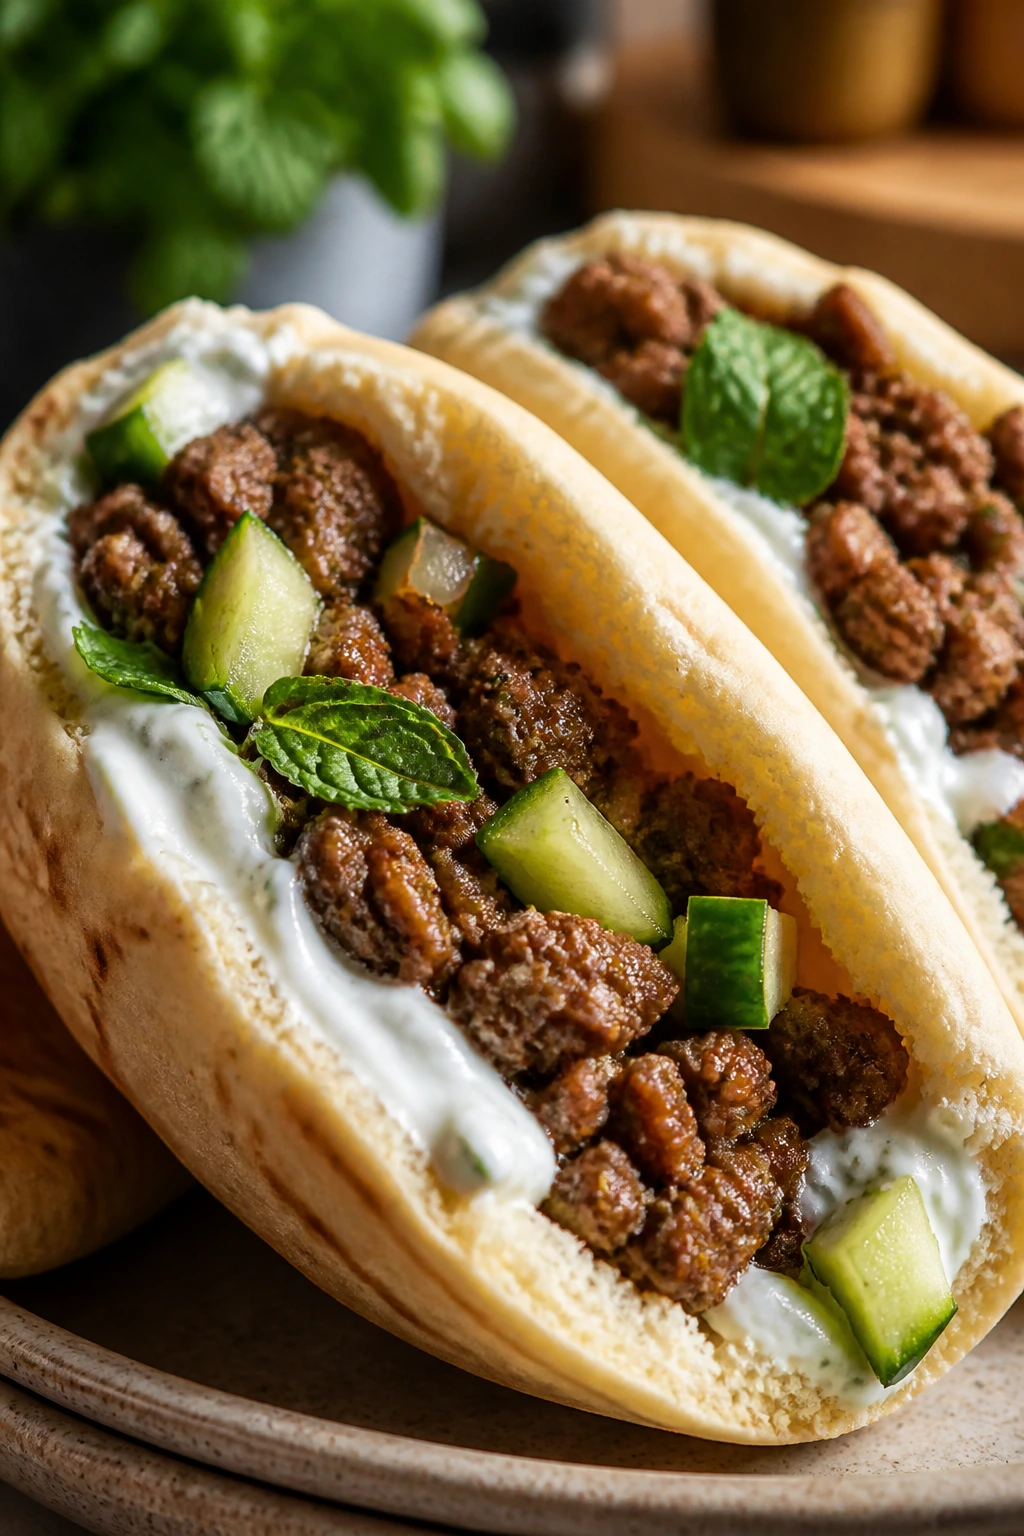
7. Lamb and Mint Pita Pockets
Intro:
Lamb has a richer, deeper flavor than most meats, and mint keeps it from feeling heavy. Cook it with garlic, onion, and a little cumin, then tuck it into pita with yogurt and cucumber, and suddenly the dinner feels both sturdy and bright. I like this one because it eats like a proper meal but still feels easy enough to make on a Tuesday.
Why It Works:
Ground lamb brings enough fat that the filling stays juicy in the pan. Mint, yogurt, and cucumber give you a cool edge that cuts through the richness. If you brown the meat properly, you get little crusty bits that taste far better than a soft sauté.
Key Ingredients:
- 1 1/2 lbs ground lamb
- 1 small onion, diced
- 2 cloves garlic, minced
- 1 teaspoon ground cumin
- 1 teaspoon kosher salt
- 1/2 teaspoon black pepper
- 1/4 cup chopped mint
- 1/2 cup plain yogurt
- 1 cucumber, diced
- 4 pita rounds, warmed
- 1 cup chopped romaine
- 1 tablespoon lemon juice
Quick Steps:
- Cook the onion: Sauté onion in a skillet over medium heat for 3 minutes.
- Brown the lamb: Add lamb, garlic, cumin, salt, and pepper. Cook for 7 to 8 minutes, breaking it up, until browned and cooked through.
- Finish with mint: Stir in mint off the heat so it stays fresh.
- Mix the sauce: Combine yogurt, lemon juice, and a pinch of salt.
- Warm the pita: Use a skillet or wrap in foil and warm in the oven.
- Fill: Add lettuce, lamb, cucumber, and yogurt.
Equipment for This Recipe:
- Skillet
- Spatula
- Small bowl
- Cutting board and knife
How to Serve This Dish:
Serve with roasted potatoes or a simple cucumber salad. A little extra mint on top makes the whole thing smell better the second you open the pita.
Pro Tips for This Recipe:
- Do not drain all the fat unless the pan looks flooded; lamb needs some of it.
- Add mint at the end so it doesn’t go dark and flat.
- Pita pockets tear less if you make a small slit instead of forcing them fully open.
- Lemon juice in the yogurt keeps the lamb from tasting too dense.
Variations on This Dish:
- Spiced Lamb Pitas: Add cinnamon and allspice for a warmer flavor.
- Turkey-Mint Pitas: Use ground turkey if you want a lighter filling.
- Herby Yogurt Pitas: Mix dill and mint into the sauce for a sharper finish.
Common Mistakes to Avoid with This Dish:
- Overcooking the lamb until dry: Medium heat and a short cook are enough.
- Adding mint too early: It loses its lift.
- Using watery cucumber without draining it: The pita gets soggy fast.
8. Buffalo Chicken Ranch Pitas
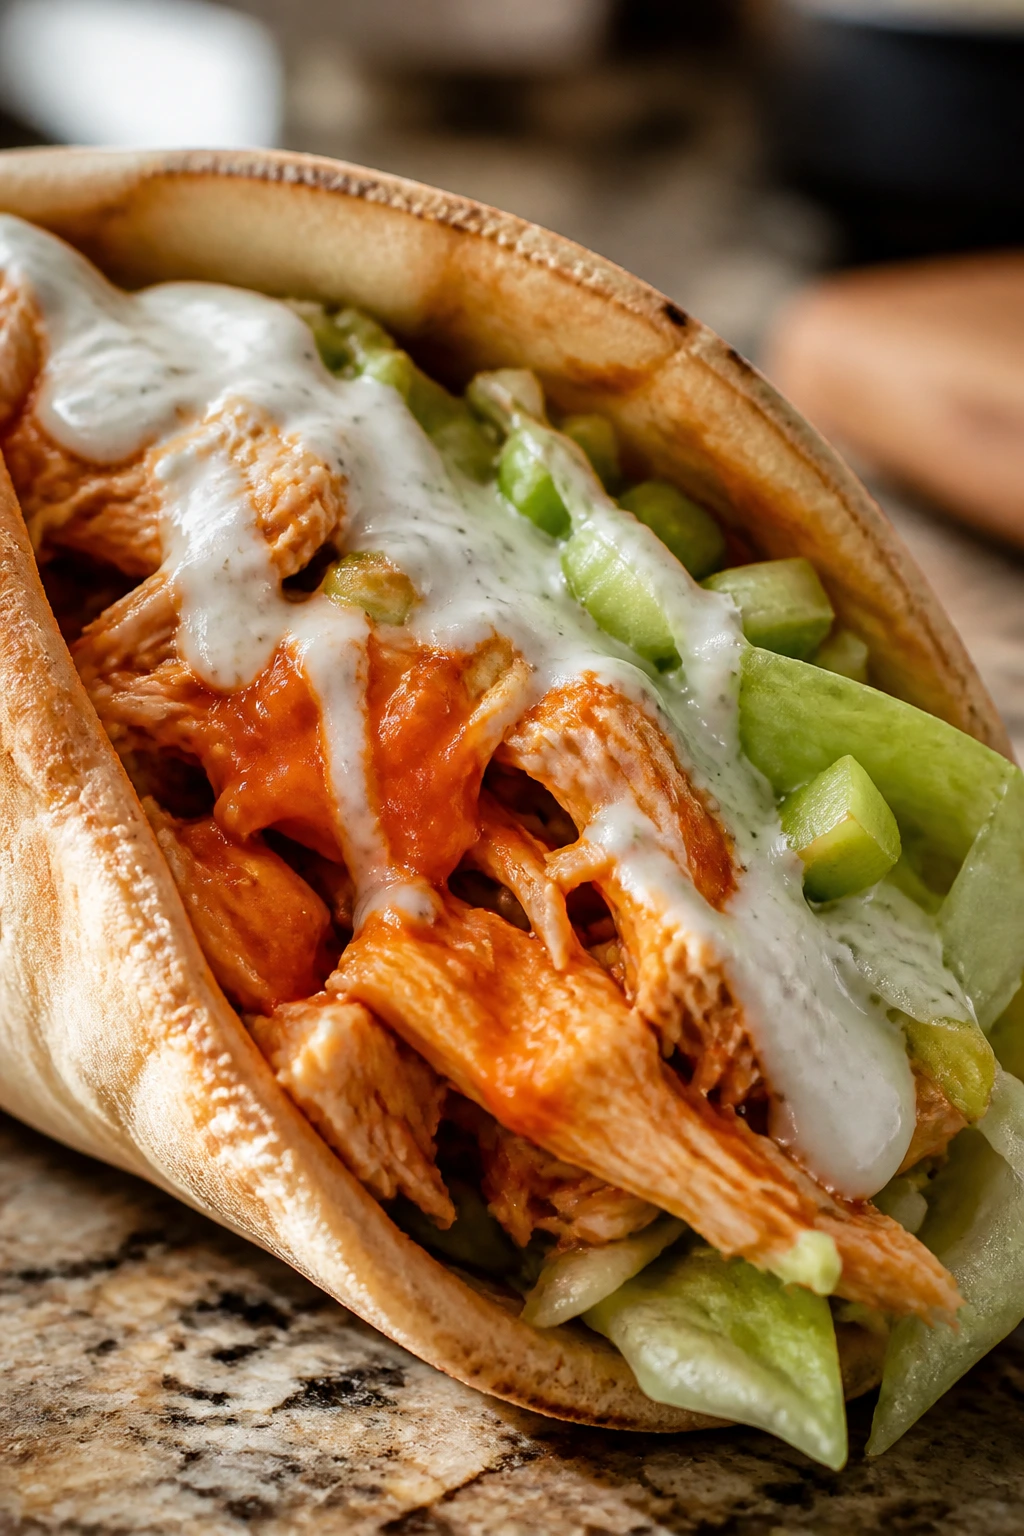
Intro:
This is the messy-fun one, and yes, it still works one-handed if you don’t overfill it. The chicken gets tossed in buttery hot sauce, then balanced with cool ranch, celery, and a little crunch from shredded lettuce. It’s the kind of pita that tastes like game-day food but behaves better than wings on a plate.
Why It Works:
Buffalo sauce needs something to hold onto, and cooked shredded chicken does that well. The ranch cools the heat, celery brings snap, and pita gives you enough structure to keep the sauce from running everywhere. Use warm chicken, not cold chicken, so the sauce coats instead of clumping.
Key Ingredients:
- 2 lbs boneless chicken breasts or thighs
- 1 tablespoon olive oil
- 1 teaspoon kosher salt
- 1/2 teaspoon black pepper
- 1/2 cup hot sauce
- 2 tablespoons melted butter
- 1/2 cup ranch dressing
- 1 cup shredded lettuce
- 1 cup diced celery
- 4 pita rounds, warmed
Quick Steps:
- Cook the chicken: Season and pan-sear or bake at 400°F / 205°C for 20 to 25 minutes until the chicken reaches 165°F / 74°C.
- Shred or slice: Let it rest 5 minutes, then shred with forks or slice thin.
- Toss the sauce: Mix hot sauce and melted butter, then coat the chicken.
- Warm the pita: Keep it flexible, not crisp.
- Build the pocket: Spread ranch inside, then add lettuce, celery, and buffalo chicken.
- Serve fast: These are best while the chicken is still hot.
Equipment for This Recipe:
- Skillet or baking sheet
- Forks for shredding
- Mixing bowl
- Knife and cutting board
How to Serve This Dish:
Serve with carrot sticks and extra ranch for dipping. If you want less mess, line each pita with a few lettuce leaves before adding the chicken.
Pro Tips for This Recipe:
- Warm the butter before mixing with hot sauce so the sauce stays smooth.
- Lettuce under the chicken helps catch drips.
- Thin-sliced celery is better than big chunks; it spreads out in the pocket.
- Don’t let the chicken sit in the sauce for an hour or it turns watery.
Variations on This Dish:
- Blue Cheese Buffalo Pitas: Swap ranch for blue cheese dressing.
- Cauliflower Buffalo Pitas: Use roasted cauliflower florets instead of chicken.
- Extra-Hot Version: Add cayenne to the sauce, a little at a time.
Common Mistakes to Avoid with This Dish:
- Adding too much sauce: The pita gets slippery and falls apart.
- Using cold chicken: The sauce sets up oddly and won’t coat evenly.
- Skipping the crunch: Without celery, the texture is one-note.
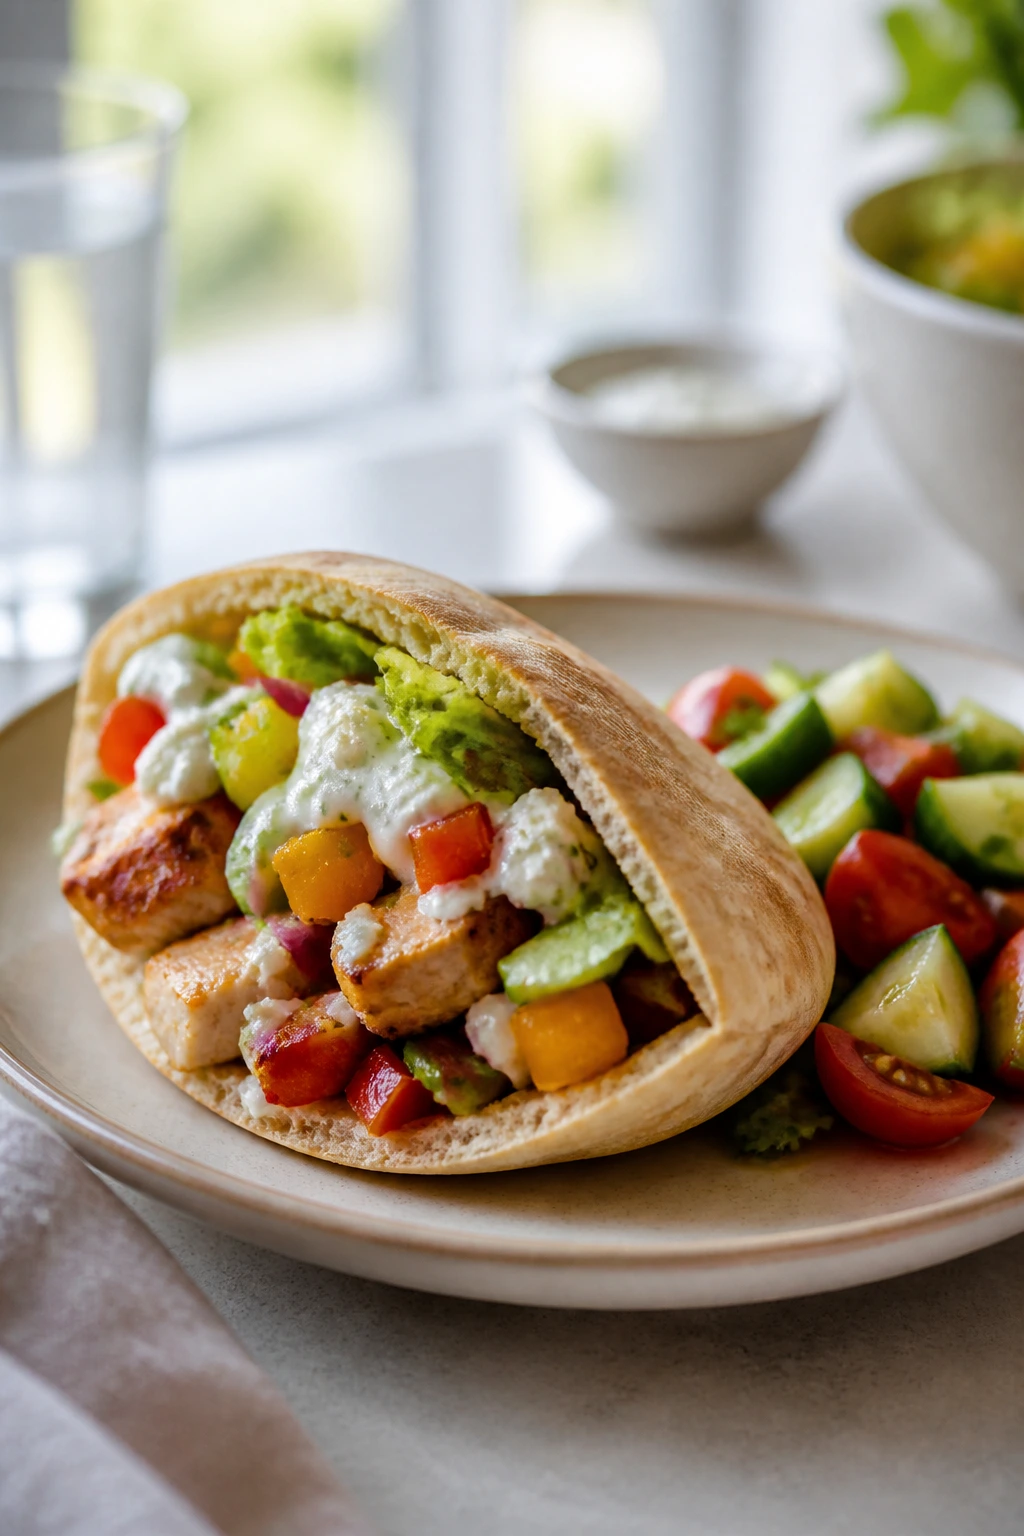
9. Lemon-Garlic Shrimp Pitas
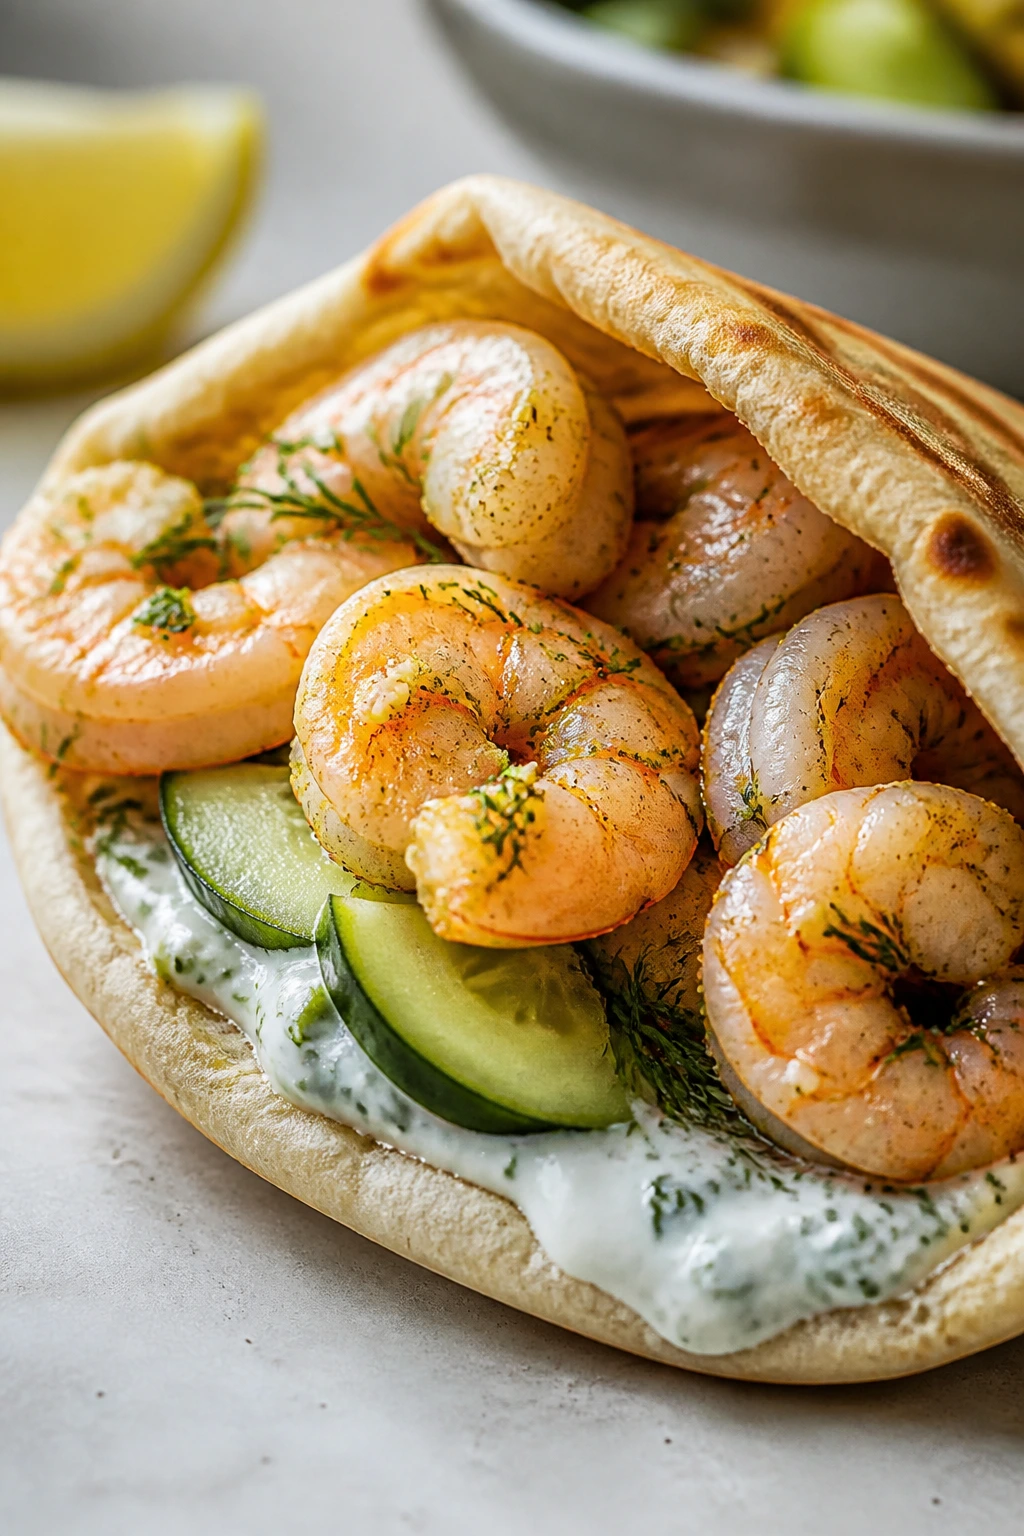
Intro:
Shrimp is one of the fastest dinners you can stuff into pita, and that speed is part of the appeal. The trick is keeping the garlic fragrant, not bitter, and pulling the shrimp from the heat the moment they curl into tight little C’s. With cucumber, herbs, and a lemony yogurt drizzle, this one tastes like a bright dinner that happened to cook in ten minutes.
Why It Works:
Shrimp cooks in minutes, which means you get a hot filling without waiting on a long simmer. Lemon and garlic pair naturally with the sweet brininess of shrimp, and the pita acts as a soft barrier between the sauce and your fingers. Don’t wander away from the pan here; shrimp turns rubbery fast.
Key Ingredients:
- 1 1/2 lbs large shrimp, peeled and deveined
- 2 tablespoons olive oil
- 3 cloves garlic, minced
- 1 teaspoon kosher salt
- 1/2 teaspoon black pepper
- 1 teaspoon lemon zest
- 2 tablespoons lemon juice
- 1/2 cup Greek yogurt
- 1 cucumber, sliced
- 1/4 cup chopped dill or parsley
- 4 pita rounds, warmed
Quick Steps:
- Season the shrimp: Toss with olive oil, garlic, salt, pepper, and lemon zest.
- Heat the skillet: Medium-high heat works best.
- Cook fast: Add shrimp in a single layer and cook 1 1/2 to 2 minutes per side until pink and just curled.
- Mix the sauce: Stir yogurt with lemon juice and chopped herbs.
- Warm the pita: Keep it soft enough to fold around the shrimp.
- Assemble: Add sauce, shrimp, cucumber, and more herbs.
Equipment for This Recipe:
- Skillet
- Mixing bowl
- Zester or fine grater
- Tongs or spatula
How to Serve This Dish:
Serve with a tomato-cucumber salad or a handful of olives. These are best eaten right away, while the shrimp still smells sweet and garlicky.
Pro Tips for This Recipe:
- Dry the shrimp first or they steam.
- Use large shrimp so they don’t overcook by the time you stuff the pita.
- Add the lemon juice at the end if your pan runs very hot.
- A little dill gives the filling a sharper edge than parsley alone.
Variations on This Dish:
- Spicy Shrimp Pitas: Add red pepper flakes or a spoonful of chili paste.
- Mediterranean Shrimp Pitas: Add chopped tomato and a bit of feta.
- Garlic-Butter Shrimp Pitas: Swap half the oil for butter.
Common Mistakes to Avoid with This Dish:
- Overcooking shrimp: It turns squeaky and tight.
- Using small shrimp: They overcook before you can get them into the pita.
- Skipping the herb finish: Shrimp needs that fresh lift.
10. Teriyaki Salmon Pitas with Slaw
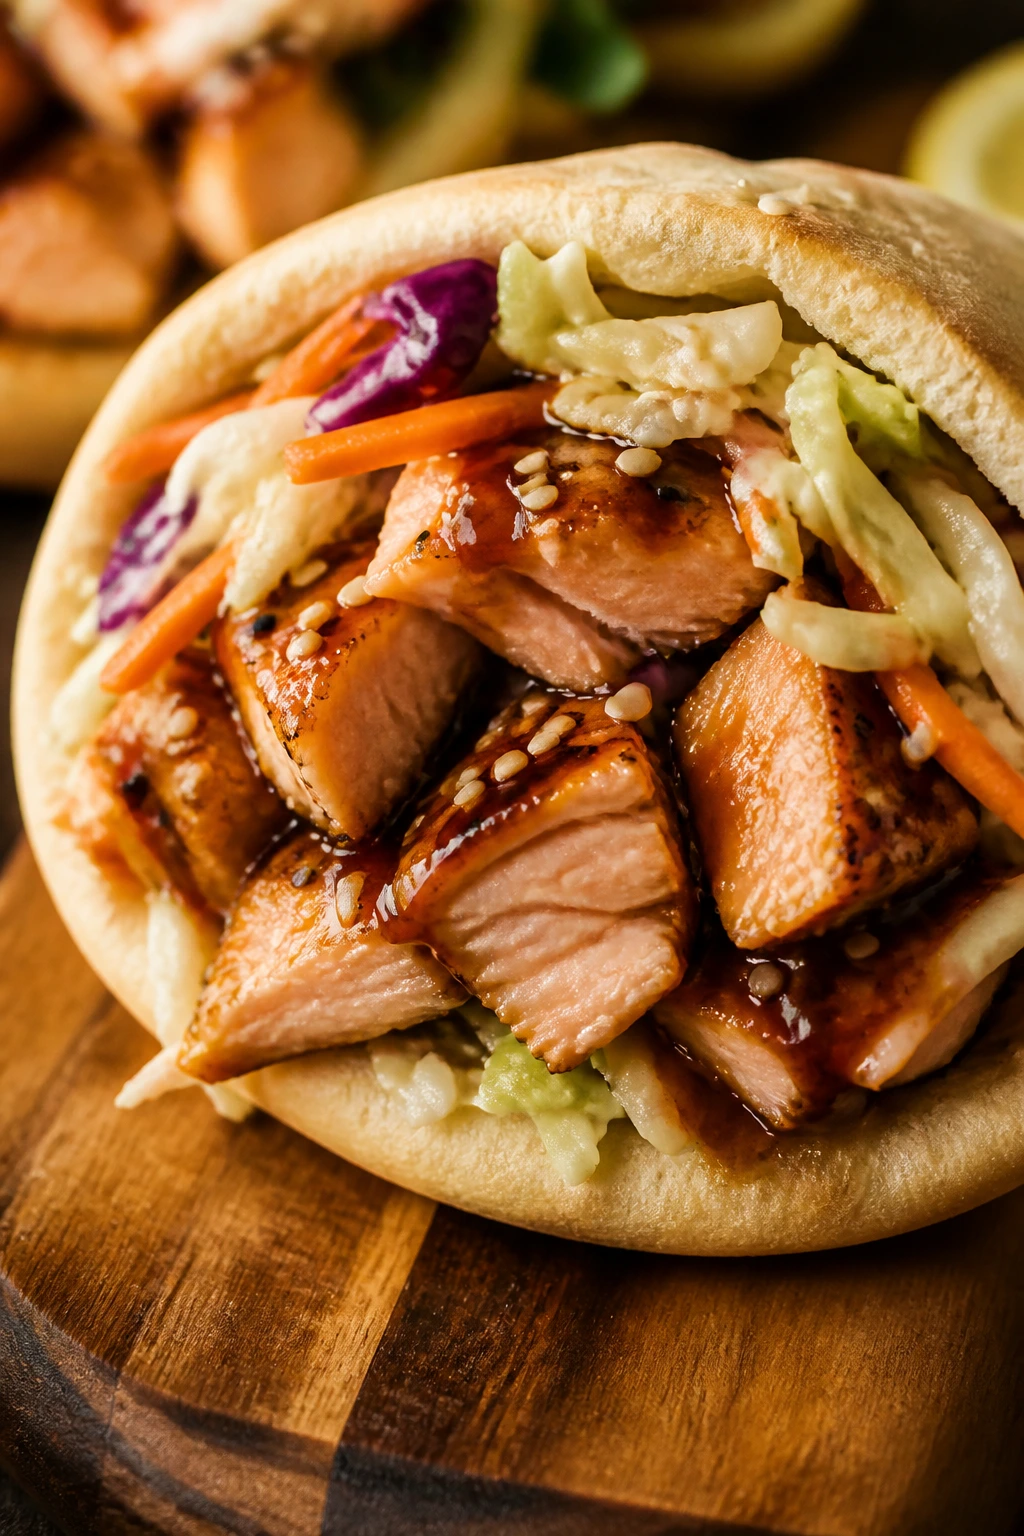
Intro:
Salmon inside pita sounds a little unusual until you taste it with crisp slaw and sweet-salty glaze. The fish flakes into big soft pieces, the teriyaki clings to the surface, and the slaw keeps the whole thing from getting too rich. I like this one on nights when I want fish without setting out a proper fork-and-knife situation.
Why It Works:
Salmon stands up to a sticky glaze better than lean fish because it has enough fat to stay moist. The slaw adds crunch and acid, which is what keeps the pita from feeling like it’s all soft filling. If you bake the salmon just until it flakes, it stays juicy inside the wrap.
Key Ingredients:
- 2 lbs salmon fillet, skin on or off
- 1/3 cup teriyaki sauce
- 1 tablespoon olive oil
- 3 cups shredded cabbage
- 1 carrot, shredded
- 2 tablespoons rice vinegar
- 1 teaspoon sesame oil
- 1 teaspoon honey
- 4 pita rounds, warmed
- 2 tablespoons sliced scallions
- 1 tablespoon sesame seeds
Quick Steps:
- Heat the oven: Set to 400°F / 205°C.
- Glaze the salmon: Brush with teriyaki and olive oil.
- Bake: Roast for 12 to 15 minutes until the fish flakes easily in the center.
- Make the slaw: Toss cabbage, carrot, rice vinegar, sesame oil, and honey.
- Warm the pita: A dry skillet keeps it pliable.
- Assemble: Flake the salmon into pita, add slaw, scallions, and sesame seeds.
Equipment for This Recipe:
- Rimmed baking sheet
- Small bowl
- Mixing bowl
- Fork for flaking
- Tongs
How to Serve This Dish:
Serve with extra slaw on the side and maybe some sliced avocado if you want more richness. The sesame seeds are small, but they matter; they give the filling a little nutty snap.
Pro Tips for This Recipe:
- Pull the salmon when the center still looks slightly translucent; it finishes as it rests.
- Don’t use too much teriyaki or it turns syrupy in the pita.
- A fork flutters salmon into better pieces than a knife.
- If the slaw sits too long, drain off excess liquid before filling.
Variations on This Dish:
- Ginger-Soy Salmon Pitas: Add grated ginger to the glaze.
- Miso Salmon Pitas: Blend a little white miso into the teriyaki.
- Air-Fryer Salmon Pitas: Cook at 390°F / 200°C for about 8 to 10 minutes.
Common Mistakes to Avoid with This Dish:
- Overbaking the salmon: It dries out and flakes too finely.
- Making the slaw too wet: The pita gets soggy.
- Using cold pita: It cracks around the salmon pieces.
11. Cheesesteak Pitas with Peppers and Onions
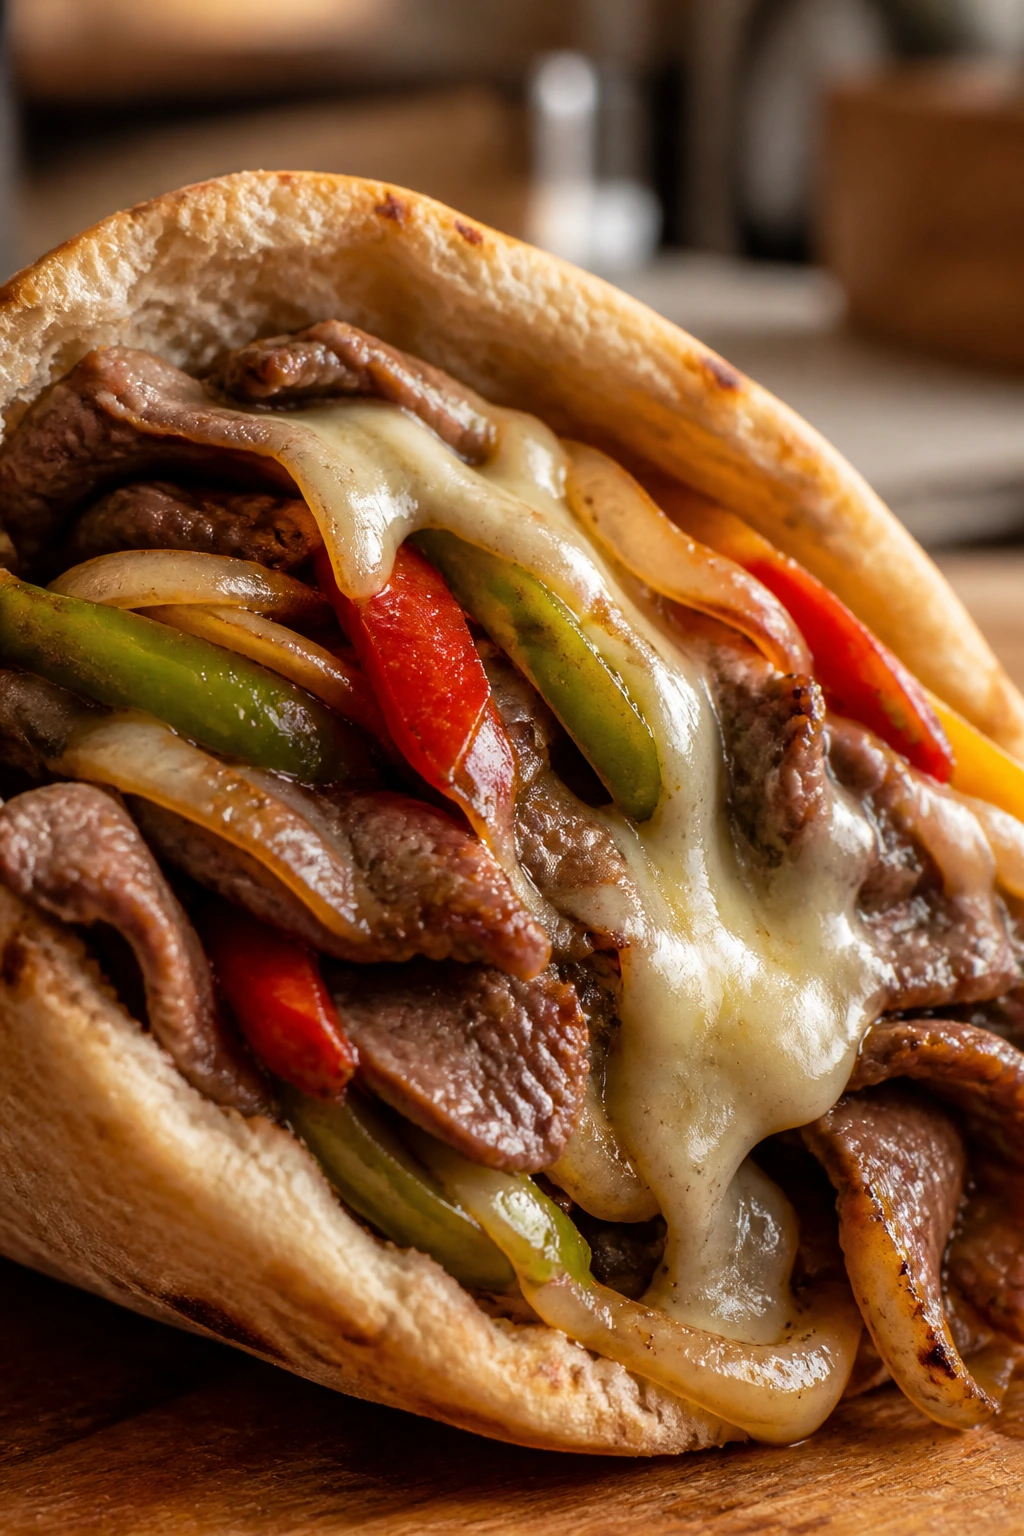
Intro:
This one is all about thin beef, sweet onions, and that very specific moment when cheese melts into the pan juices. Pita makes a surprisingly good shell for cheesesteak filling because it catches the drips and doesn’t get overwhelmed by the weight of the meat. The peppers are optional only if you’re a purist; I’m not, and I like the extra sweetness.
Why It Works:
Thin-sliced beef cooks fast and stays tender if you don’t crowd the pan. Onions and peppers soften into the meat, and provolone melts into a smooth, stretchy layer that binds the whole thing together. A soft pita is easier to eat than a long roll when the filling is this hot.
Key Ingredients:
- 1 1/2 lbs thin-sliced ribeye or sirloin
- 1 tablespoon oil
- 1 large onion, sliced
- 1 green bell pepper, sliced
- 1 red bell pepper, sliced
- 1 teaspoon kosher salt
- 1/2 teaspoon black pepper
- 6 slices provolone
- 4 pita rounds, warmed
- 1 tablespoon butter
Quick Steps:
- Cook the vegetables: Sauté onions and peppers in oil over medium-high heat for 8 to 10 minutes until soft and browned at the edges.
- Brown the beef: Add beef in batches and season with salt and pepper. Cook 2 to 3 minutes until just no longer pink.
- Melt the cheese: Return all filling to the pan, lay provolone on top, and cover 30 to 45 seconds until melted.
- Warm the pita: Use butter in a skillet if you want extra flavor.
- Stuff: Spoon filling into pita while hot.
- Eat right away: Cheesesteak waits for no one.
Equipment for This Recipe:
- Large skillet or griddle
- Spatula
- Knife and cutting board
- Lid or foil to melt cheese
How to Serve This Dish:
Serve with potato wedges or pickles. If you want to keep things tidy, wrap the lower half in parchment before handing it off.
Pro Tips for This Recipe:
- Partially freeze the beef for 20 minutes so it slices thinner if you’re doing it yourself.
- Use high heat, but don’t scorch the onions.
- Provolone melts smoother than a thick slice of cheddar here.
- Keep the filling hot so the pita softens around it.
Variations on This Dish:
- Mushroom Cheesesteak Pitas: Add sliced mushrooms with the onions.
- Spicy Cheesesteak: Use pepper jack instead of provolone.
- Chicken Cheesesteak Pitas: Swap in thin-sliced chicken breast.
Common Mistakes to Avoid with This Dish:
- Cooking the beef all at once in a crowded pan: It steams and gets gray.
- Using cold cheese: It takes too long to melt and overcooks the filling.
- Waiting to stuff the pita: The cheese firms up fast.
12. Mushroom Halloumi Pitas
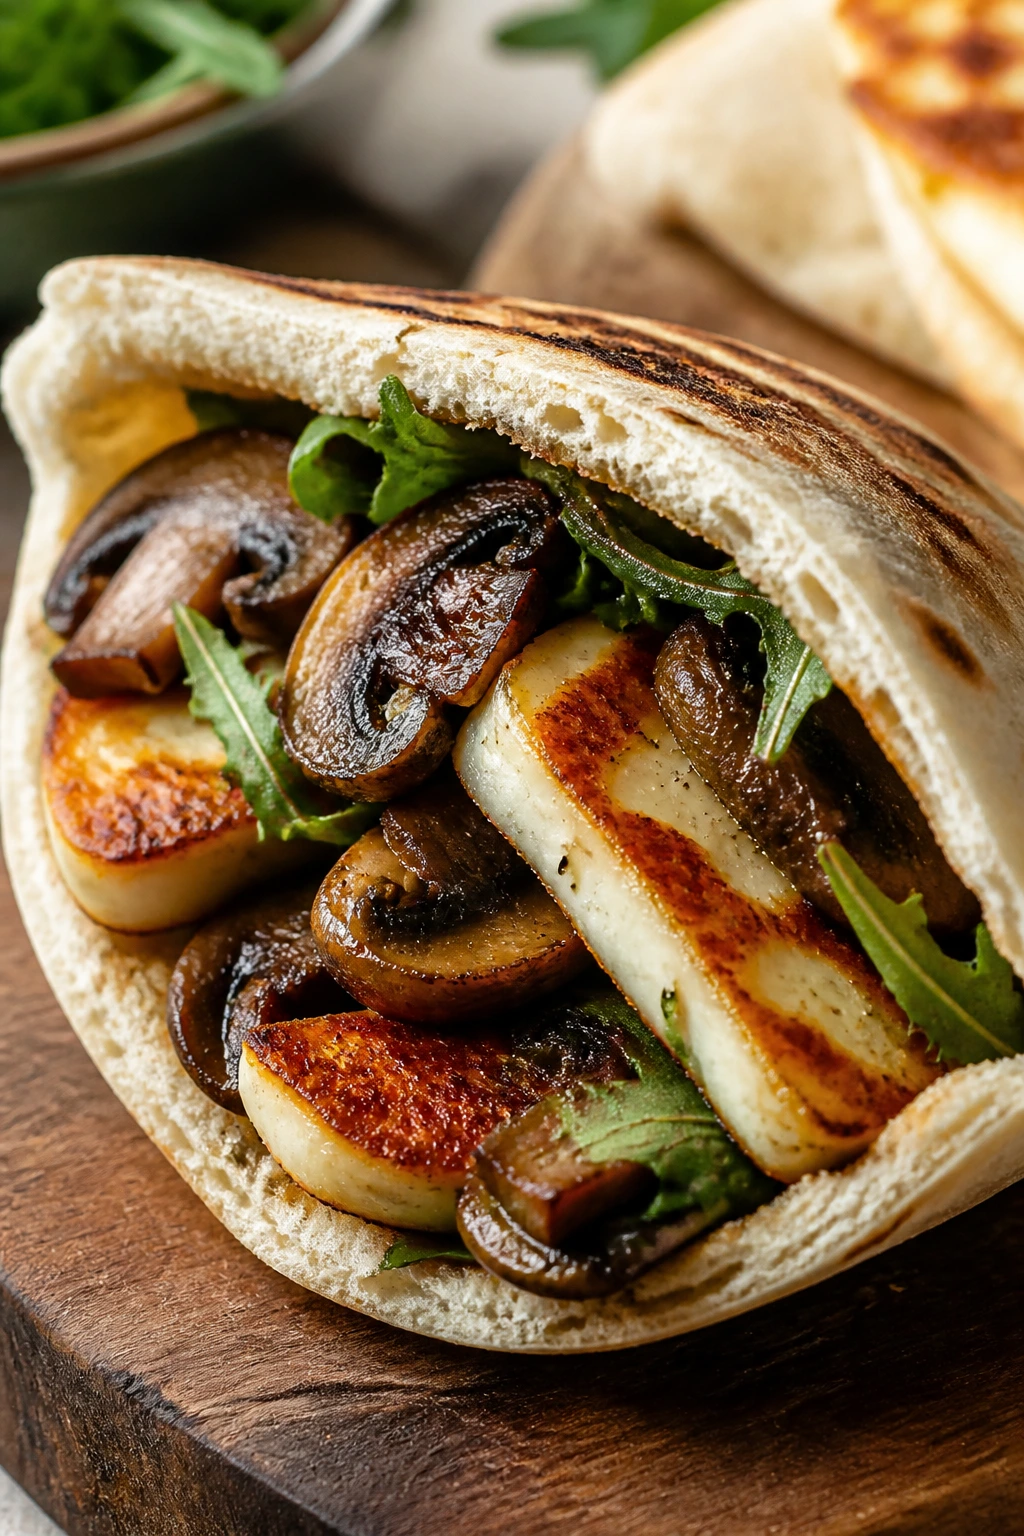
Intro:
Halloumi brings the squeak, mushrooms bring the browning, and together they make a vegetarian pita that eats far more like dinner than a side dish. The cheese gets golden on the outside and stays firm enough to hold shape, while the mushrooms soak up garlic and thyme. This is the one I make when I want meatless food that still feels substantial in the hand.
Why It Works:
Halloumi doesn’t melt away the way most cheeses do, so it stays put inside pita. Mushrooms need a hot pan and enough space to lose their moisture before they brown, which gives the filling deep flavor instead of bland softness. A lemony yogurt or tahini sauce pulls the whole thing together.
Key Ingredients:
- 12 oz halloumi, sliced into 1/2-inch slabs
- 1 lb mushrooms, sliced
- 2 tablespoons olive oil
- 2 cloves garlic, minced
- 1 teaspoon dried thyme
- 1/2 teaspoon kosher salt
- 1/4 teaspoon black pepper
- 4 pita rounds, warmed
- 1 cup arugula
- 1/2 cup yogurt or tahini sauce
- 1 tablespoon lemon juice
Quick Steps:
- Cook the mushrooms: Heat oil over medium-high heat and cook mushrooms for 8 to 10 minutes until their liquid evaporates and the edges brown.
- Add garlic and thyme: Stir in and cook 1 minute.
- Sear the halloumi: In a separate pan, cook halloumi 1 to 2 minutes per side until golden.
- Mix the sauce: Add lemon juice to yogurt or tahini sauce.
- Warm the pita: Make it soft and pocketable.
- Fill: Add arugula, mushrooms, halloumi, and sauce.
Equipment for This Recipe:
- Two skillets, or one skillet in batches
- Spatula
- Small bowl
- Knife and board
How to Serve This Dish:
Serve with a cucumber salad or roasted potatoes. The halloumi tastes best hot, when the edges are still crisp.
Pro Tips for This Recipe:
- Don’t salt the mushrooms too early or they dump their water and refuse to brown.
- Pat halloumi dry before searing.
- A little lemon zest in the sauce sharpens the whole pocket.
- If the pita is fragile, double it up.
Variations on This Dish:
- Spinach Halloumi Pitas: Add a handful of spinach at the end so it wilts into the filling.
- Harissa Halloumi Pitas: Stir a spoonful of harissa into the sauce.
- Tomato-Herb Halloumi Pitas: Add chopped tomato and parsley for a fresher version.
Common Mistakes to Avoid with This Dish:
- Crowding the mushrooms: They steam and go soft.
- Cutting halloumi too thin: It can break before you get it into the pita.
- Skipping acid: The cheese and mushrooms need something bright.
13. Baked Meatball Marinara Pitas

Intro:
This is the closest thing to a sandwich shop dinner that still counts as a pita wrap. The meatballs stay tender, the marinara gives you a little sauciness without drowning the bread, and the melted cheese turns everything into one cohesive bite. It’s messy in a controlled way, which is my favorite kind of dinner.
Why It Works:
Baked meatballs cook evenly and are easier to manage than pan-fried ones. Marinara keeps the filling soft, and a little mozzarella helps the meatballs cling together inside the pita. The pocket shape keeps the sauce where it belongs instead of running down the table.
Key Ingredients:
- 1 1/2 lbs ground beef or beef-pork mix
- 1 egg
- 1/2 cup breadcrumbs
- 1/4 cup grated Parmesan
- 2 cloves garlic, minced
- 1 teaspoon kosher salt
- 1/2 teaspoon black pepper
- 2 cups marinara sauce
- 1 cup shredded mozzarella
- 4 pita rounds, warmed
- 2 tablespoons chopped basil
Quick Steps:
- Heat the oven: Preheat to 425°F / 220°C.
- Mix the meatballs: Combine meat, egg, breadcrumbs, Parmesan, garlic, salt, and pepper.
- Shape: Roll into 16 small meatballs.
- Bake: Cook on a sheet pan for 12 to 15 minutes until browned and cooked through.
- Simmer in sauce: Warm marinara and drop the meatballs in for 2 minutes.
- Assemble: Add mozzarella, meatballs, sauce, and basil to warmed pita.
Equipment for This Recipe:
- Rimmed baking sheet
- Large bowl
- Saucepan
- Mixing spoon
How to Serve This Dish:
Serve with a plain green salad or roasted broccoli. If you want extra stability, spoon a little cheese into the pita before the meatballs so it acts like glue.
Pro Tips for This Recipe:
- Make the meatballs small enough to fit the pita without needing a knife.
- Don’t overmix the meat mixture; it gets tough.
- A quick simmer in the sauce helps the meatballs absorb flavor.
- Fresh basil at the end matters more than it looks like it should.
Variations on This Dish:
- Turkey Meatball Pitas: Use ground turkey and add a little olive oil for moisture.
- Spicy Arrabbiata Pitas: Swap in a hotter tomato sauce.
- Mozzarella-Only Version: Skip Parmesan if you want a milder filling.
Common Mistakes to Avoid with This Dish:
- Making giant meatballs: They don’t fit well and tear the pita.
- Pouring on too much sauce: The bread softens too quickly.
- Skipping the cheese: It helps bind the filling.
14. Curried Chicken Salad Pitas
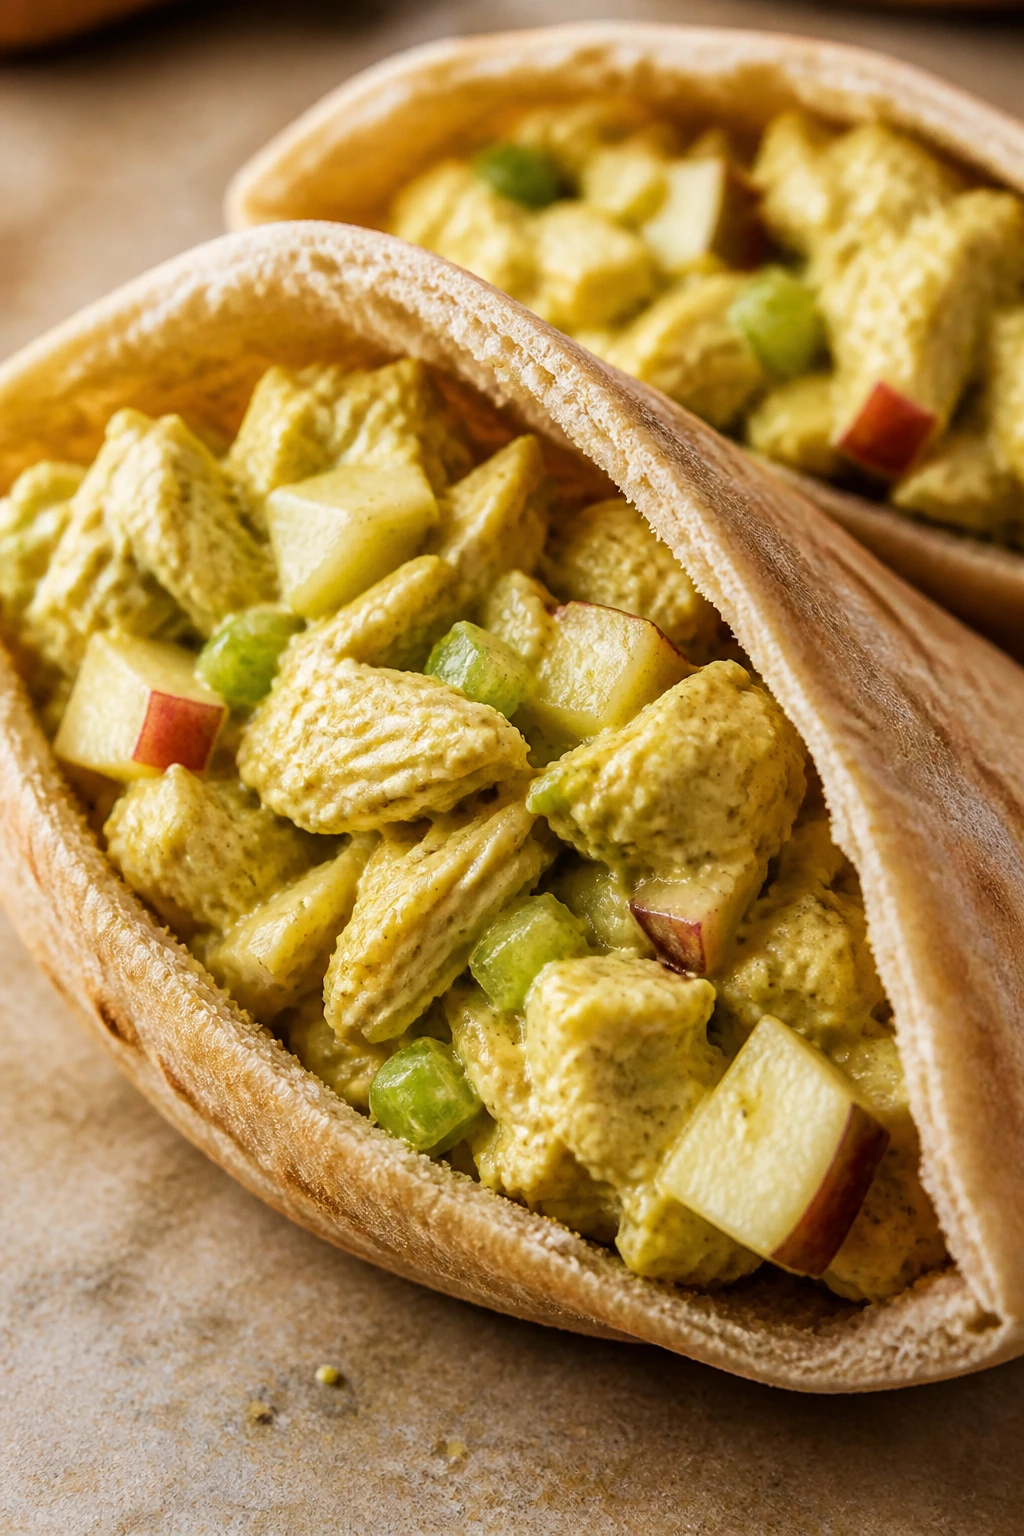
Intro:
This is the cool-weather, warm-kitchen cousin of a chicken sandwich. The curry powder gives the chicken salad a faint golden color and a savory edge, while celery, apple, and yogurt keep it crisp and bright. Stuffed into pita, it’s tidy, satisfying, and a little unexpected in the best way.
Why It Works:
Chicken salad works in pita because the pocket contains the loose filling better than slices of bread do. Curry powder tastes better once it sits with yogurt and lemon for a few minutes, and chopped celery gives the crunch that keeps each bite awake. Using cooked chicken that’s chilled and diced makes the texture cleaner.
Key Ingredients:
- 3 cups cooked chicken, diced
- 1/2 cup plain Greek yogurt
- 2 tablespoons mayonnaise
- 1 to 2 teaspoons curry powder
- 1 tablespoon lemon juice
- 1/2 cup diced celery
- 1/2 apple, diced small
- 2 tablespoons chopped scallions
- 1/2 teaspoon salt
- 4 pita rounds, warmed
- 1 cup lettuce
Quick Steps:
- Mix the dressing: Stir yogurt, mayonnaise, curry powder, lemon juice, and salt.
- Add the chicken and crunch: Fold in chicken, celery, apple, and scallions.
- Taste and adjust: Add more curry powder if you want it deeper.
- Warm the pita lightly: Just enough to soften it.
- Fill: Add lettuce, then scoop in the chicken salad.
- Serve chilled or cool: This one does not need to be piping hot.
Equipment for This Recipe:
- Mixing bowl
- Spoon
- Knife and board
- Measuring spoons
How to Serve This Dish:
Serve with grapes, carrot sticks, or a simple tomato salad. It also packs well if you wrap it in parchment and chill it for later.
Pro Tips for This Recipe:
- Dice the apple small so the pita doesn’t split around big chunks.
- Let the salad sit 10 minutes before filling so the curry blooms.
- If the mixture seems dry, add yogurt, not more mayo.
- Warm pita only lightly; too much heat makes the pocket brittle.
Variations on This Dish:
- Golden Raisin Curry Chicken Pitas: Add 2 tablespoons chopped raisins for sweetness.
- Dairy-Free Version: Use all mayonnaise or a dairy-free yogurt.
- Hot Curry Chicken Pitas: Add a pinch of cayenne or chili powder.
Common Mistakes to Avoid with This Dish:
- Using too much curry powder at once: It can turn bitter.
- Overfilling with wet salad: The pita softens before dinner starts.
- Skipping the celery: The texture needs that snap.
15. Eggplant Parmesan Pitas

Intro:
Eggplant parmesan in pita sounds like a trick until you try it. The eggplant gets tender and browned, the marinara turns it saucy, and the mozzarella brings that stretchy, familiar comfort without needing a giant casserole dish. It’s a smart way to turn a classic into something you can hold in one hand without losing the point of the dish.
Why It Works:
Small eggplant pieces cook faster than full slices and fit into pita more neatly. Breading gives them texture, while sauce and cheese make the filling cohesive. The bread pocket catches the drips, which is honestly the best part of this whole setup.
Key Ingredients:
- 2 medium eggplants, cut into 1-inch cubes
- 1 teaspoon kosher salt
- 1 cup breadcrumbs
- 1/2 cup grated Parmesan
- 2 eggs, beaten
- 2 tablespoons olive oil
- 2 cups marinara sauce
- 1 1/2 cups shredded mozzarella
- 4 pita rounds, warmed
- 2 tablespoons chopped basil
Quick Steps:
- Salt the eggplant: Toss cubes with salt and let sit 15 minutes, then pat dry.
- Bread: Dip in egg, then coat with breadcrumbs mixed with Parmesan.
- Bake or fry: Bake at 425°F / 220°C for 20 to 25 minutes, or pan-fry in oil until golden.
- Warm the sauce: Heat marinara in a small saucepan.
- Assemble the filling: Add eggplant, sauce, and mozzarella to the pita.
- Finish with basil: Serve while the cheese is still melted.
Equipment for This Recipe:
- Sheet pan or skillet
- Three shallow bowls
- Saucepan
- Tongs or spatula
How to Serve This Dish:
Serve with a green salad and extra marinara for dipping if you like things saucier. A little black pepper on top sharpens the cheese.
Pro Tips for This Recipe:
- Salted eggplant browns better and tastes less spongy.
- Smaller cubes are easier to fit into pita than long strips.
- If baking, flip the cubes once so both sides crisp.
- Add the cheese while the sauce is hot so it melts fast.
Variations on This Dish:
- Zucchini Parmesan Pitas: Swap in zucchini if you want a lighter filling.
- Spicy Eggplant Pitas: Add red pepper flakes to the sauce.
- No-Breading Version: Roast the eggplant cubes and skip the coating.
Common Mistakes to Avoid with This Dish:
- Not salting the eggplant: It can taste watery and bland.
- Using too much sauce: The pita turns soft too quickly.
- Skipping the cheese melt step: The filling feels disconnected.
16. Korean Beef Pitas with Quick Pickles
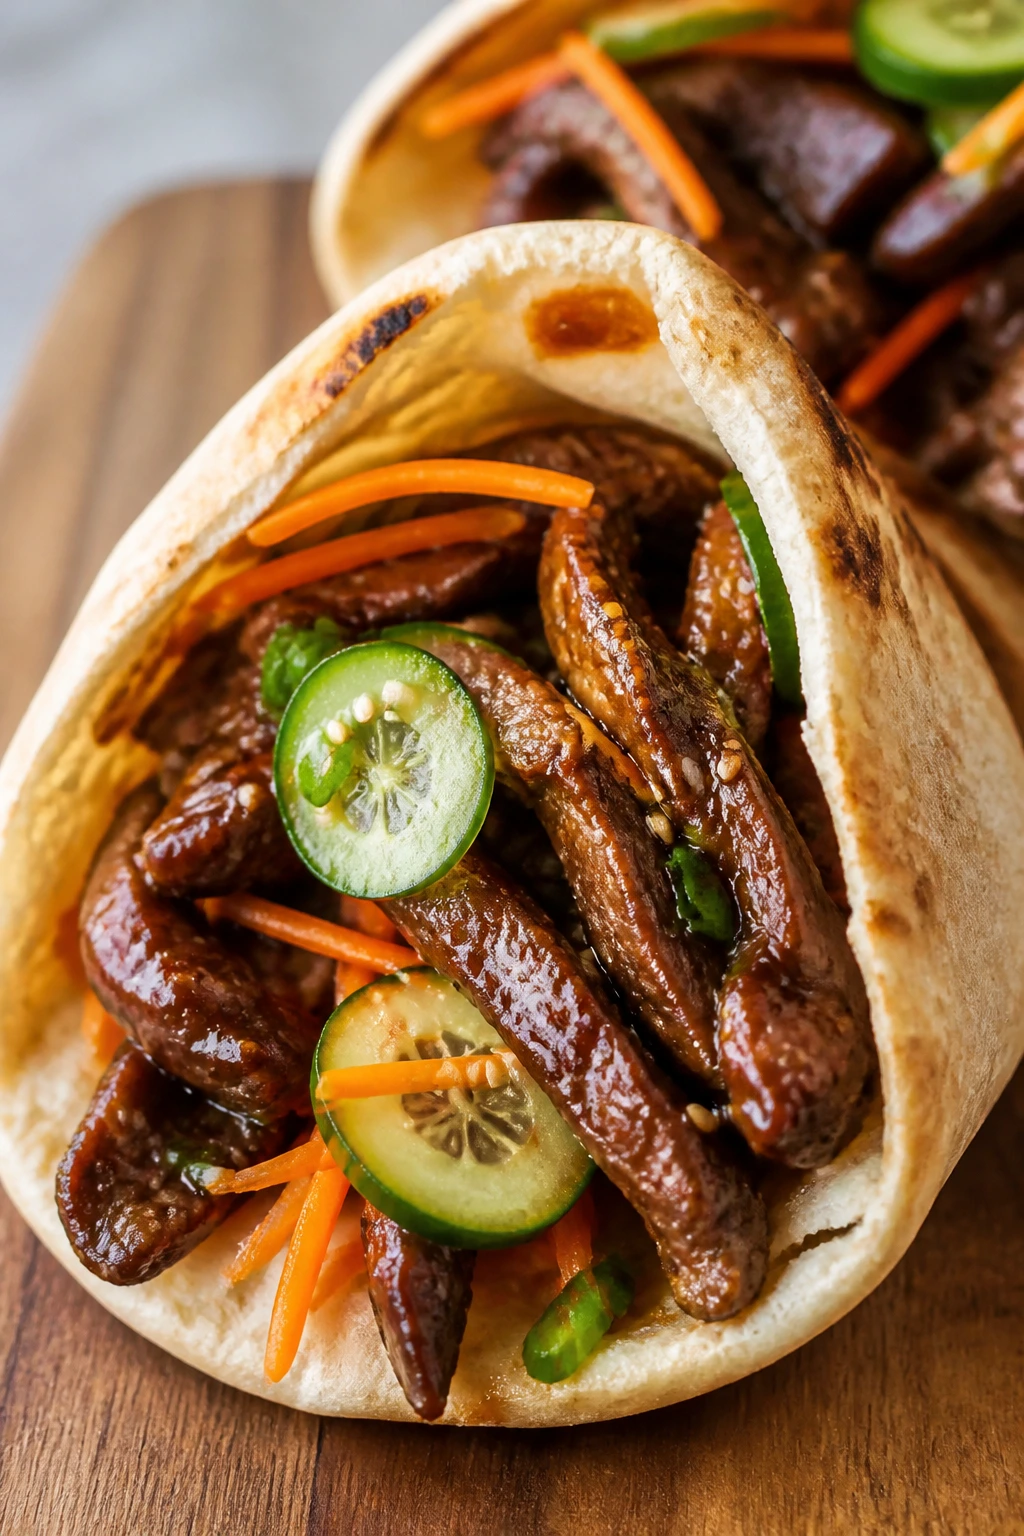
Intro:
Sweet-savory beef, a touch of ginger, and sharp quick pickles make this one feel louder than the ingredient list looks. The beef cooks in minutes and picks up glossy edges from the sauce, while the pickles cut through the richness with a clean snap. In pita, it eats like a hybrid between a rice bowl and a sandwich, except you don’t need a spoon.
Why It Works:
Ground beef takes well to soy, garlic, ginger, and sesame because it has enough fat to carry the sauce. Quick pickles give you acidity without a long wait, and pita handles the juices better than rice paper or a flimsy roll. A little gochujang turns up the heat without turning the filling into paste.
Key Ingredients:
- 1 1/2 lbs ground beef
- 2 tablespoons soy sauce
- 1 tablespoon brown sugar
- 2 cloves garlic, minced
- 1 tablespoon grated ginger
- 1 teaspoon sesame oil
- 1 tablespoon gochujang, optional
- 1 cucumber, thinly sliced
- 1 carrot, julienned
- 2 tablespoons rice vinegar
- 4 pita rounds, warmed
- 2 tablespoons sliced scallions
- 1 tablespoon sesame seeds
Quick Steps:
- Pickle the vegetables: Toss cucumber and carrot with rice vinegar and a pinch of salt; let sit 10 minutes.
- Brown the beef: Cook in a skillet over medium-high heat until no pink remains.
- Season: Stir in soy sauce, brown sugar, garlic, ginger, sesame oil, and gochujang if using. Cook 1 to 2 minutes until glossy.
- Warm the pita: Make it soft and foldable.
- Assemble: Add beef, pickles, scallions, and sesame seeds.
- Serve immediately: The sauce tastes best when it’s still tacky, not dried out.
Equipment for This Recipe:
- Skillet
- Small bowl
- Knife and board
- Tongs or spoon
How to Serve This Dish:
Serve with edamame or a simple cucumber salad. A little extra gochujang stirred into mayo makes a good dip on the side.
Pro Tips for This Recipe:
- Don’t add too much brown sugar or the beef turns sticky in the wrong way.
- Quick pickles can be sliced thin; they don’t need a long cure.
- Sesame seeds add texture, not just decoration.
- If the filling looks dry, add a spoonful of water to loosen the sauce.
Variations on This Dish:
- Turkey Bulgogi Pitas: Use ground turkey and add a touch more sesame oil.
- Spicy Pork Pitas: Swap in ground pork and extra gochujang.
- Lettuce-Heavy Version: Add shredded romaine for a fresher crunch.
Common Mistakes to Avoid with This Dish:
- Using too much sauce and no pickles: The filling tastes heavy.
- Burning the garlic: Add it after the beef browns a bit.
- Letting the beef dry out: A teaspoon of water fixes the pan if needed.
17. Tuna Niçoise Pitas
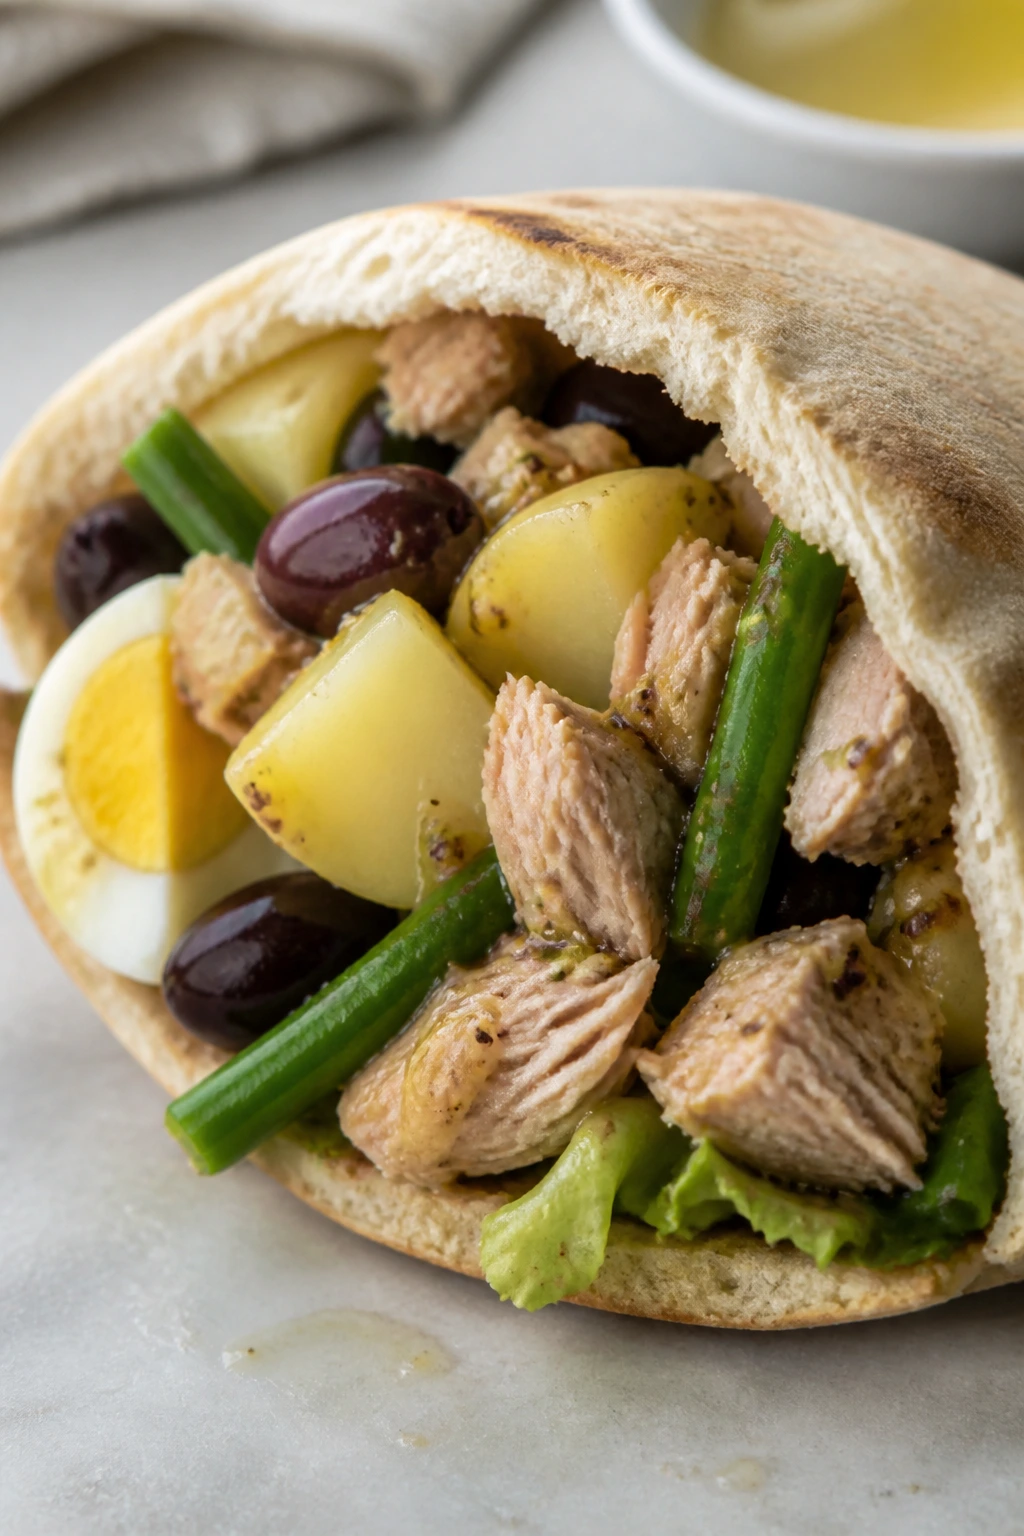
Intro:
This one is a little more composed, a little less greasy, and very good when you want dinner from pantry items without acting like you’re settling. Tuna, green beans, eggs, olives, and potatoes give you a full plate of flavors in a pocket, and the mustardy dressing ties everything together. It eats neatly, but it still has enough texture to feel like an actual meal.
Why It Works:
The classic Niçoise flavors already know how to live together: briny olives, creamy egg, firm potato, and tuna that doesn’t need much dressing. Pita keeps the mix contained, while the mustard vinaigrette gives the filling some movement. If you use chilled ingredients, the whole thing stays tidy.
Key Ingredients:
- 2 cans tuna in olive oil or water, drained
- 2 eggs, hard-boiled and chopped
- 1 cup cooked baby potatoes, diced
- 1 cup blanched green beans, chopped
- 1/3 cup sliced olives
- 2 tablespoons olive oil
- 1 tablespoon Dijon mustard
- 1 tablespoon lemon juice
- 1 tablespoon capers, optional
- 4 pita rounds, warmed
- 1 cup lettuce
Quick Steps:
- Make the dressing: Whisk olive oil, Dijon, lemon juice, and a pinch of salt.
- Combine the filling: Fold tuna, eggs, potatoes, green beans, olives, and capers with just enough dressing to coat.
- Taste: Add black pepper and a little more lemon if needed.
- Warm the pita softly: Don’t crisp it.
- Layer: Add lettuce first, then the tuna mixture.
- Serve cool or room temperature: It holds up well either way.
Equipment for This Recipe:
- Mixing bowl
- Whisk
- Knife and board
- Small saucepan, if cooking potatoes and beans
How to Serve This Dish:
Serve with sliced tomatoes or a simple green salad. A few extra olives on the side make the plate feel deliberate instead of thrown together.
Pro Tips for This Recipe:
- Use tuna packed in olive oil if you want a richer filling.
- Don’t mash the potatoes; cubes hold better in pita.
- Chill the eggs before chopping so the yolk doesn’t smear everywhere.
- Add the dressing right before filling so the lettuce stays crisp.
Variations on This Dish:
- Sardine Niçoise Pitas: Use good sardines instead of tuna.
- White Bean Niçoise Pitas: Replace tuna with white beans for a vegetarian option.
- Anchovy Mustard Version: Mash one anchovy into the dressing for more depth.
Common Mistakes to Avoid with This Dish:
- Overdressing the filling: It turns the pita soggy fast.
- Using warm potatoes: They wilt the lettuce and soften the pocket.
- Skipping the olives: You lose the briny edge that makes it taste like Niçoise at all.
18. Breakfast-for-Dinner Pitas with Egg, Potato, and Greens
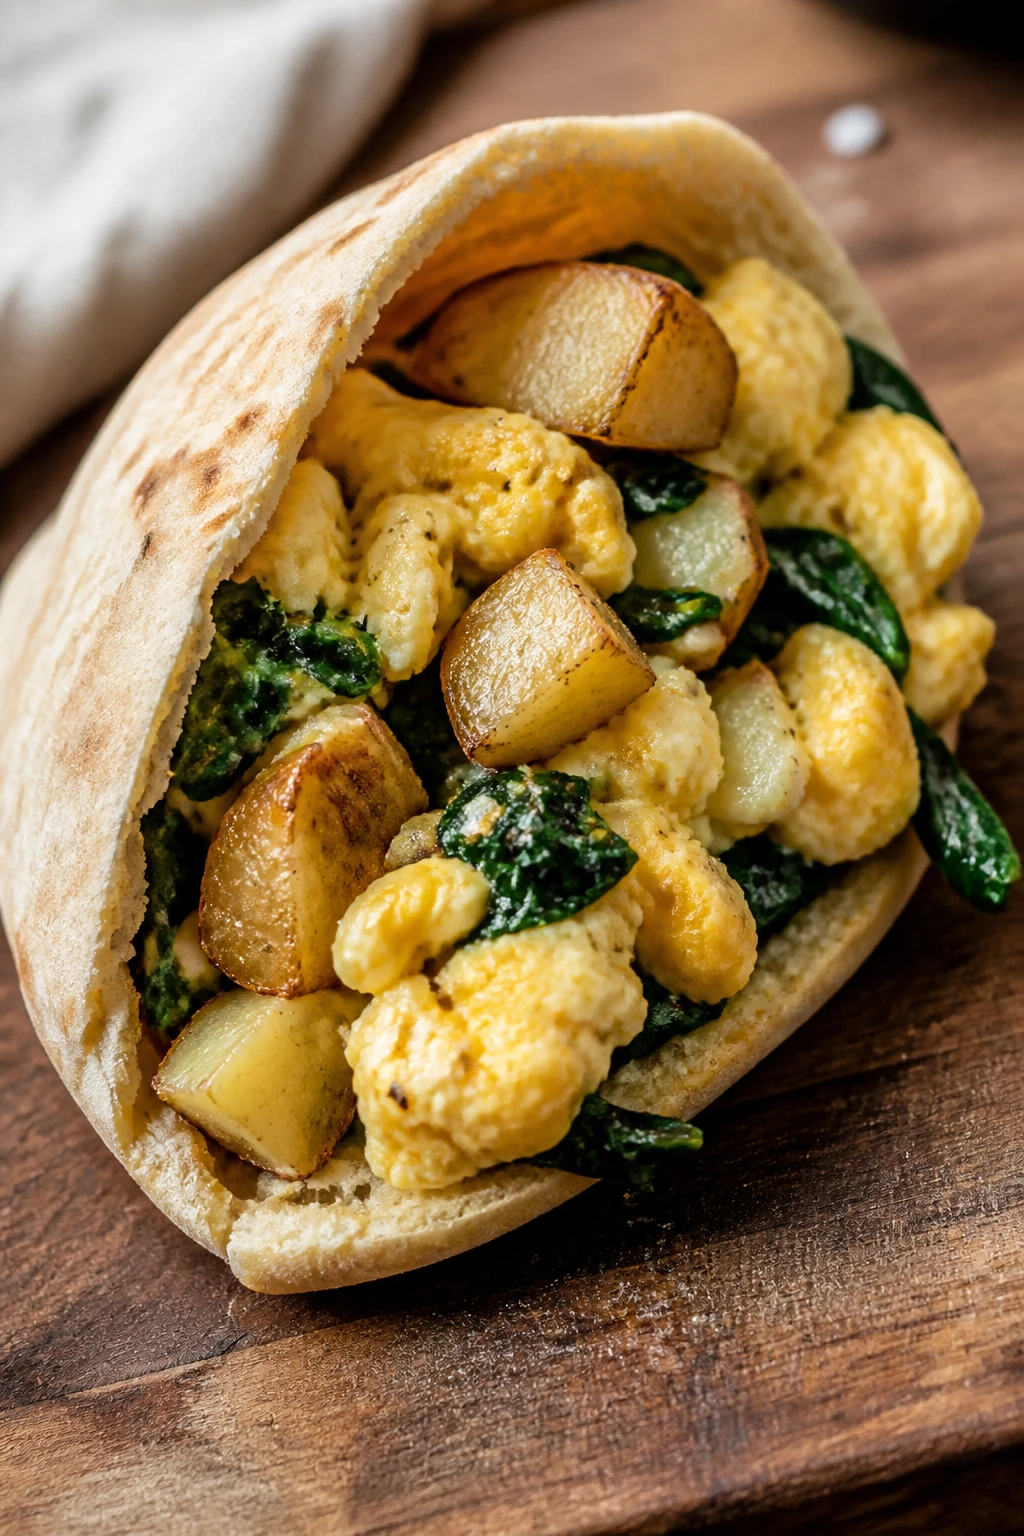
Intro:
Eggs inside pita are one of those things people overlook until they try them hot, with crisp potatoes and a handful of greens. The yolk gets creamy, the potatoes bring a little crunch, and the greens wilt just enough to feel intentional. It’s the kind of dinner that solves the “I need food now” problem without feeling like a concession.
Why It Works:
Eggs are cheap, fast, and forgiving, which is why they shine here. The potatoes give the pita some heft, the greens keep it from tasting flat, and a little cheese or hot sauce can steer it in nearly any direction. This one is especially good when the fridge is half empty and you still want dinner to feel assembled.
Key Ingredients:
- 4 large eggs
- 2 cups diced cooked potatoes or hash browns
- 1 tablespoon butter or oil
- 1 cup spinach or arugula
- 1/2 cup shredded cheese, optional
- 1 teaspoon kosher salt, divided
- 1/2 teaspoon black pepper
- 1 tablespoon hot sauce, optional
- 4 pita rounds, warmed
Quick Steps:
- Crisp the potatoes: Cook in butter or oil over medium-high heat until golden, about 6 to 8 minutes.
- Cook the eggs: Scramble or fry them in the same pan, seasoning with salt and pepper.
- Wilt the greens: Toss spinach or arugula into the hot pan for 20 seconds.
- Warm the pita: Keep it soft and pocket-ready.
- Assemble: Add potatoes, eggs, greens, cheese, and hot sauce if using.
- Eat right away: Eggs taste best while still tender.
Equipment for This Recipe:
- Skillet
- Spatula
- Bowl, if scrambling eggs
- Knife and board
How to Serve This Dish:
Serve with fruit or sliced tomatoes if you want a little freshness next to the eggs. A smear of salsa or pesto changes the whole thing fast.
Pro Tips for This Recipe:
- Day-old potatoes crisp better than freshly cooked ones.
- Scrambled eggs stay neater inside pita than runny yolks, though fried works if you’re careful.
- Add greens at the very end so they don’t disappear.
- Cheese melts best if you put it on while the eggs are still hot.
Variations on This Dish:
- Mediterranean Egg Pitas: Add feta, tomato, and oregano.
- Southwestern Breakfast Pitas: Use salsa, black beans, and cheddar.
- Herbed Potato Pitas: Add dill or chives to the eggs.
Common Mistakes to Avoid with This Dish:
- Using soggy potatoes: They smear instead of crisp.
- Overcooking the eggs: They turn rubbery in the pita.
- Forgetting salt: Eggs need more seasoning than people think.
Why Pita-Wrapped Dinners Work So Well on Busy Nights
Pita has a practical advantage that gets overlooked: it creates a built-in boundary. Sauce goes in the center, crunchy things sit against the bread, and the whole dinner stays more contained than a burrito bowl or an open-faced sandwich. That matters when you’re eating quickly, standing up, or trying to keep dinner from turning into a cleanup project.
The other reason pita works is temperature control. Warm fillings feel cozy, but not every component needs to be blazing hot. A cool sauce, fresh herbs, sliced onion, or quick pickle can land against a hot filling and make the whole thing taste brighter. That contrast keeps these dinners from feeling repetitive, even when the formula looks simple on paper.
I also like that pita recipes reward good textures. A roasted cauliflower pocket is different from a juicy chicken shawarma one, and a tuna Niçoise pita lives in a different lane from a cheesesteak pita. Same bread. Totally different dinner.
Essential Equipment for These Recipes
- Large skillet: The workhorse for chicken, beef, shrimp, turkey, and anything that needs a quick brown.
- Rimmed baking sheet: Best for roasting cauliflower, salmon, eggplant, or chicken in batches.
- Mixing bowls, 2 to 3 sizes: One for the filling, one for sauces, one for quick pickles or slaws.
- Sharp chef’s knife: Thin slicing matters here; it keeps the pita from tearing.
- Cutting board with a damp towel underneath: Stops the board from sliding when you’re chopping onions or carving chicken.
- Tongs or a sturdy spatula: Helpful for flipping meat and moving hot pieces without smashing them.
- Small whisk or fork: Enough for yogurt sauces, vinaigrettes, and quick dressings.
- Food processor, optional: Useful for falafel and saves time, but a coarse mix is better than a puree.
- Parchment or foil: Good for wrapping stuffed pitas if you want cleaner hands and fewer leaks.
- Measuring spoons: Spice-heavy fillings need actual measurements, not guesses.
Smart Shopping and Ingredient Tips

Buy pita with the thickness you want to eat. Thin pita is nice for a lighter pocket, but it tears easier once you add anything saucy. The thicker, pocket-style rounds tend to hold up better, especially if you warm them in a dry skillet or wrapped in foil so they stay flexible.
For proteins, choose cuts that behave well in quick cooking. Chicken thighs are better than breasts for shawarma and souvlaki if you want more forgiveness. Salmon should be a thick fillet, not a skinny tail piece that dries out before the center cooks. Ground beef for kofta or cheesesteak-style fillings needs enough fat to stay juicy; 80/20 is a sweet spot.
Fresh herbs matter more here than in a lot of other dinners. Parsley, dill, mint, cilantro, and scallions are not decoration. They’re part of the structure. If the filling is rich or salty, herbs keep it from tasting flat after the second bite.
Pickles, olives, capers, and quick slaws are the quiet heroes of this whole collection. They cut through fat and make the pockets taste sharper. If your fridge is thin on fresh ingredients, a jar of pickles and a lemon can still rescue dinner.
How to Serve These Recipes
Presentation:
Slice the pitas on the diagonal if you want the filling to show, or wrap the bottom third in parchment for a cleaner handhold. A little sauce visible at the opening makes the pocket look generous without turning it into a mess.
Accompaniments:
A chopped cucumber-tomato salad, roasted potatoes, celery sticks, pickles, olives, or a simple leafy salad work across most of these dinners. If the filling is rich—cheesesteak, lamb, meatballs, buffalo chicken—pair it with something acidic or crunchy rather than another heavy side.
Portions:
Two stuffed pita rounds usually feed one very hungry adult or two lighter eaters. For bigger appetites, plan on 2 pita rounds plus a side. If you’re serving a crowd, keep the fillings in warm pans and let everyone stuff their own.
Beverage Pairing:
Lemon water, mint tea, a light beer, or a crisp white wine all fit these dinners well. For spicy versions, cold sparkling water with lime is a smart, no-drama choice.
Additional Tips and Flavor Boosters
Flavor Enhancement:
A little acid at the end changes everything. Lemon juice, rice vinegar, pickled onions, or even a splash of brine from a pickle jar keeps a pita filling from tasting heavy after a few bites.
Customization:
If you want more crunch, add shredded cabbage or romaine. If you want more richness, add avocado, feta, or a spoonful of tahini sauce. If you want a little heat, gochujang, harissa, chili crisp, or hot sauce all work in different pockets.
Serving Suggestions:
Toast sesame seeds and sprinkle them on top of beef, salmon, or halloumi fillings. Fresh herbs should go in last, not first, so they keep their scent. And if the pita is large enough, tuck in a lettuce leaf before the filling; it acts like a soft liner and helps with leaks.
Make-It-Yours:
For gluten-free eaters, serve the fillings in lettuce cups or gluten-free wraps instead of pita. For dairy-free versions, tahini sauce is your best friend. For lower-salt versions, lean on herbs, lemon, garlic, and toasted spices instead of extra sauce.
Make-Ahead, Storage, and Reheating Guidance
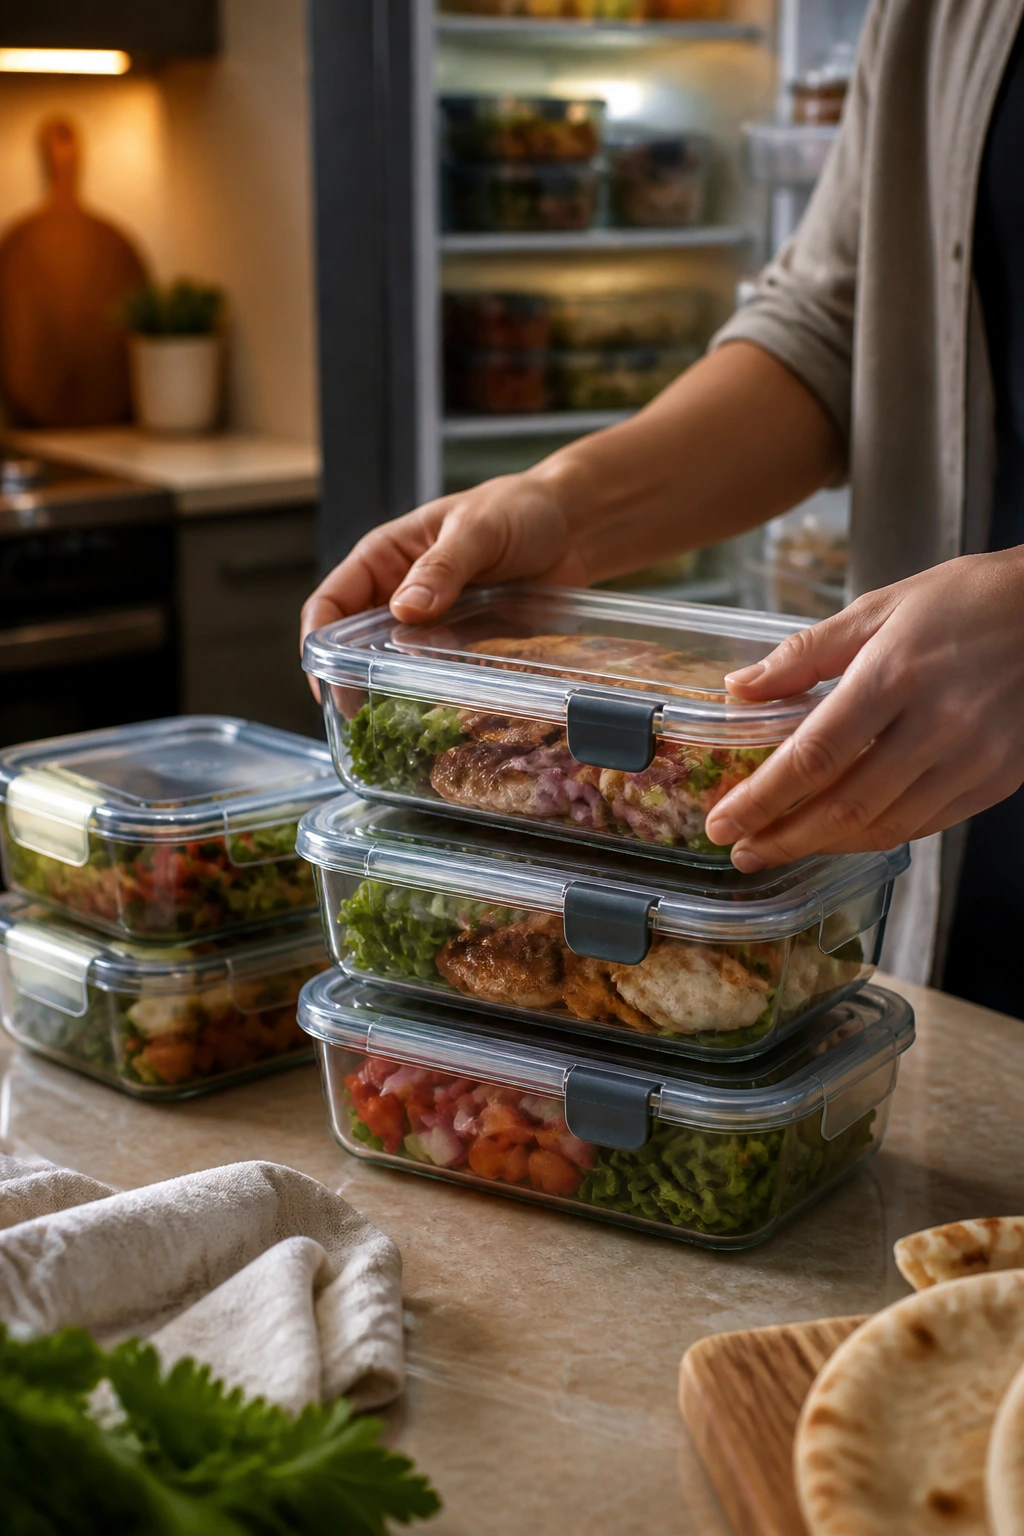
Most of these fillings keep well for 3 to 4 days in the fridge if you store the bread separately. Stuffed pitas soften fast, so I don’t recommend assembling them more than a few hours ahead unless you like a very soft pocket. The exception is dry fillings like tuna salad or chicken salad, which can be packed a little earlier if you keep the lettuce apart.
Cooked meats, roasted vegetables, and grains freeze differently. Chicken shawarma, kofta, taco turkey, meatballs, and cheesesteak-style fillings freeze well for up to 2 months in airtight containers. Shrimp and salmon are better fresh or refrigerated; freezing after cooking tends to make them mealy. Falafel can be frozen after shaping or after cooking, and halloumi is best made fresh.
For reheating, use the method that protects texture. Skillet fillings reheat best in a pan over medium heat with a teaspoon of water to loosen the sauce. Roasted fillings do well in a 350°F / 175°C oven for 10 to 15 minutes. Microwave only if you must, and cover loosely so the moisture doesn’t blast out and leave the meat chewy.
Keep sauces separate until serving if you’re making ahead. That one habit saves a lot of disappointment. Yogurt sauces, tahini sauces, and vinaigrettes can be made 2 to 3 days ahead, stirred again before using, and kept in small jars. Warm the pita right before filling it, not before storing it.
Variations and Adaptations to Try
The Gluten-Free Pocket:
Use certified gluten-free wraps, lettuce leaves, or roasted potato “boats” instead of pita. The fillings in this collection are flexible enough that you won’t lose the main idea, only the bread.
The Dairy-Free Route:
Swap yogurt sauces for tahini-lemon sauce, olive oil vinaigrette, or mashed avocado with salt and lime. Buffalo chicken and taco turkey barely change at all, which is one reason I like them for mixed households.
The Low-Carb Build:
Turn any of these into pita-less bowls with chopped greens at the base, or use large lettuce leaves as the wrap. The chicken, beef, falafel, and mushroom fillings all hold up well without bread.
The Extra-Crunch Edition:
Add cabbage slaw, shredded carrots, celery, cucumbers, or quick pickled onions. These are the fillings that make one-handed eating less slippery and a lot more interesting.
The Spice-Up Version:
Harissa, gochujang, chipotle, chili crisp, or hot sauce can be added to nearly any filling. Start small. One teaspoon can be enough if the rest of the pocket is already salty or tangy.
The Lunchbox Adaptation:
Pack the filling in a separate container and warm the pita later. Keep sauce in a tiny lidded cup. The structure of these meals holds up better when the wet parts stay separate until the last minute.
Common Mistakes to Avoid
The first mistake is using pita that’s too cold or too dry. Cold pita cracks when you try to open it, and dry pita tears at the seam. Warm it in a skillet, oven, or microwave wrapped in a damp towel for just long enough to soften the bread.
Another common problem is overstuffing. People do it because the filling looks smaller than it feels in the pan. Then the pocket splits, the sauce leaks, and dinner becomes a napkin situation. Fill the pita with a modest amount, press it gently closed, and accept that a second pita is sometimes the smarter move.
Soggy fillings are another trap. Tomatoes, sauces, pickles, and juicy vegetables all have a place here, but they need balancing with something dry or crisp. Lettuce, cabbage, cucumbers, or even a layer of cheese can act like a buffer. If the filling seems wet in the bowl, it will be wetter inside the bread.
People also under-season the filling. Pita absorbs flavor, which means a bland mixture tastes even flatter once it’s tucked inside. Salt the meat well, taste the sauce, and use lemon or vinegar where the filling feels heavy.
The last mistake is forgetting texture contrast. Soft meat on soft bread on soft sauce gets boring fast. A handful of herbs, sliced onion, pickles, or a crunchy vegetable changes the whole experience.
Frequently Asked Questions
Can I use store-bought pita, or should I make my own?
Store-bought pita is absolutely fine for these dinners, and honestly, the thicker pocket-style rounds often hold up better than homemade ones unless you’re comfortable baking bread. Warm them well so they open cleanly.
How do I keep the pita from tearing when I fill it?
Warm it first, and don’t force the pocket wider than it wants to go. If it’s still stubborn, use a knife to make a neat slit along the seam rather than ripping it apart with your fingers.
Which of these dinners travel best?
Chicken salad pita, tuna Niçoise pita, falafel pita, and curried chicken salad pita all travel well if you keep wet ingredients controlled. Foil or parchment helps a lot, especially for lunch or road food.
Can I make the fillings ahead of time?
Yes. Most cooked fillings can be made 1 to 3 days ahead and reheated gently. Keep sauces, fresh herbs, and pita separate until serving so the texture stays right.
What’s the best pita choice if I’m buying one type for the whole list?
A thicker pocket pita is the safest bet. It handles meat, vegetables, and sauce better than a thin flatbread, and it opens more reliably after warming.
How do I stop the filling from making the pita soggy?
Use a dry base like lettuce or spinach, avoid over-saucing, and let hot fillings cool for a minute before stuffing. If there’s a watery component like tomato or pickle, drain it first.
Can I bake the fillings instead of cooking them on the stove?
Often, yes. Chicken, cauliflower, salmon, eggplant, and meatballs all work well in the oven. Shrimp and shaved beef are better on the stove because they cook too fast to babysit in a baking pan.
What if my pita pockets won’t open at all?
Warm them a little longer, then press the center gently to create steam inside. If they still resist, cut them into large wedges and stuff them like soft wraps instead of forcing a pocket that isn’t there.
A Good Pita Is a Quiet Little Dinner Win
There’s a reason these dinners keep showing up in my kitchen: they’re practical without feeling plain. A pita pocket gives you enough structure to eat with one hand, enough softness to feel satisfying, and enough flexibility to swing from smoky chicken to bright shrimp to roasted vegetables without changing your whole shopping list.
The best part is that you can match the filling to the mood of the night. Want something sharp and fast? Shrimp or turkey. Want something richer? Kofta, cheesesteak, or lamb. Want to use what’s left in the fridge? Eggs, tuna, chickpeas, mushrooms, and potatoes will all behave. That kind of range is hard to beat when dinner needs to show up without a fuss.