
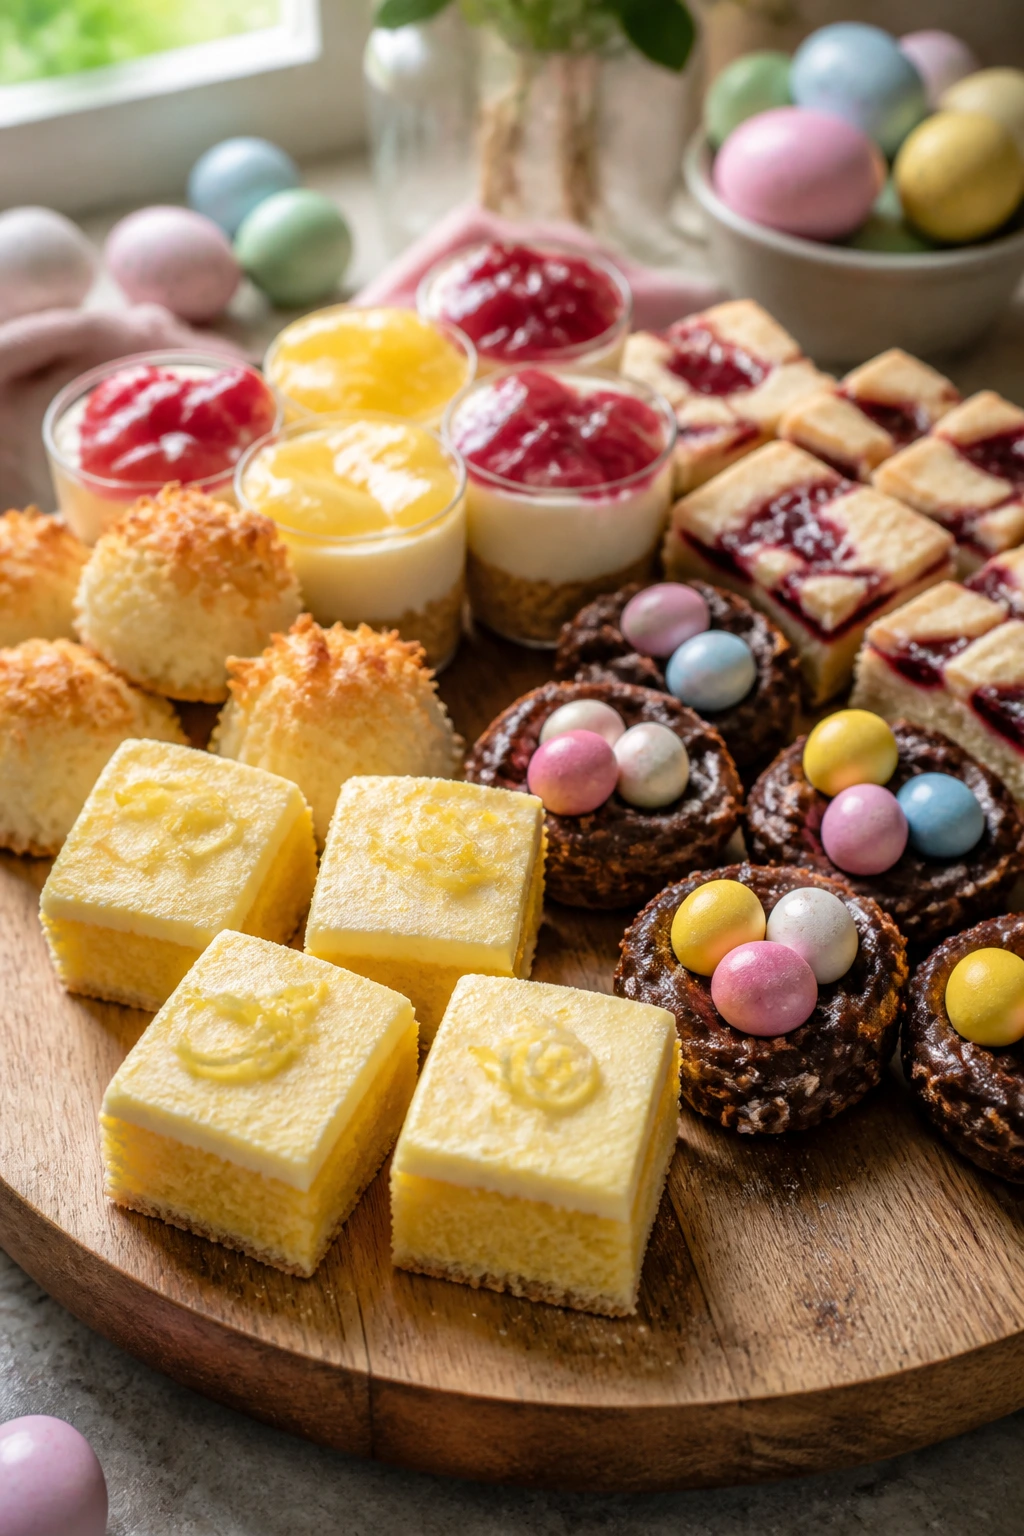
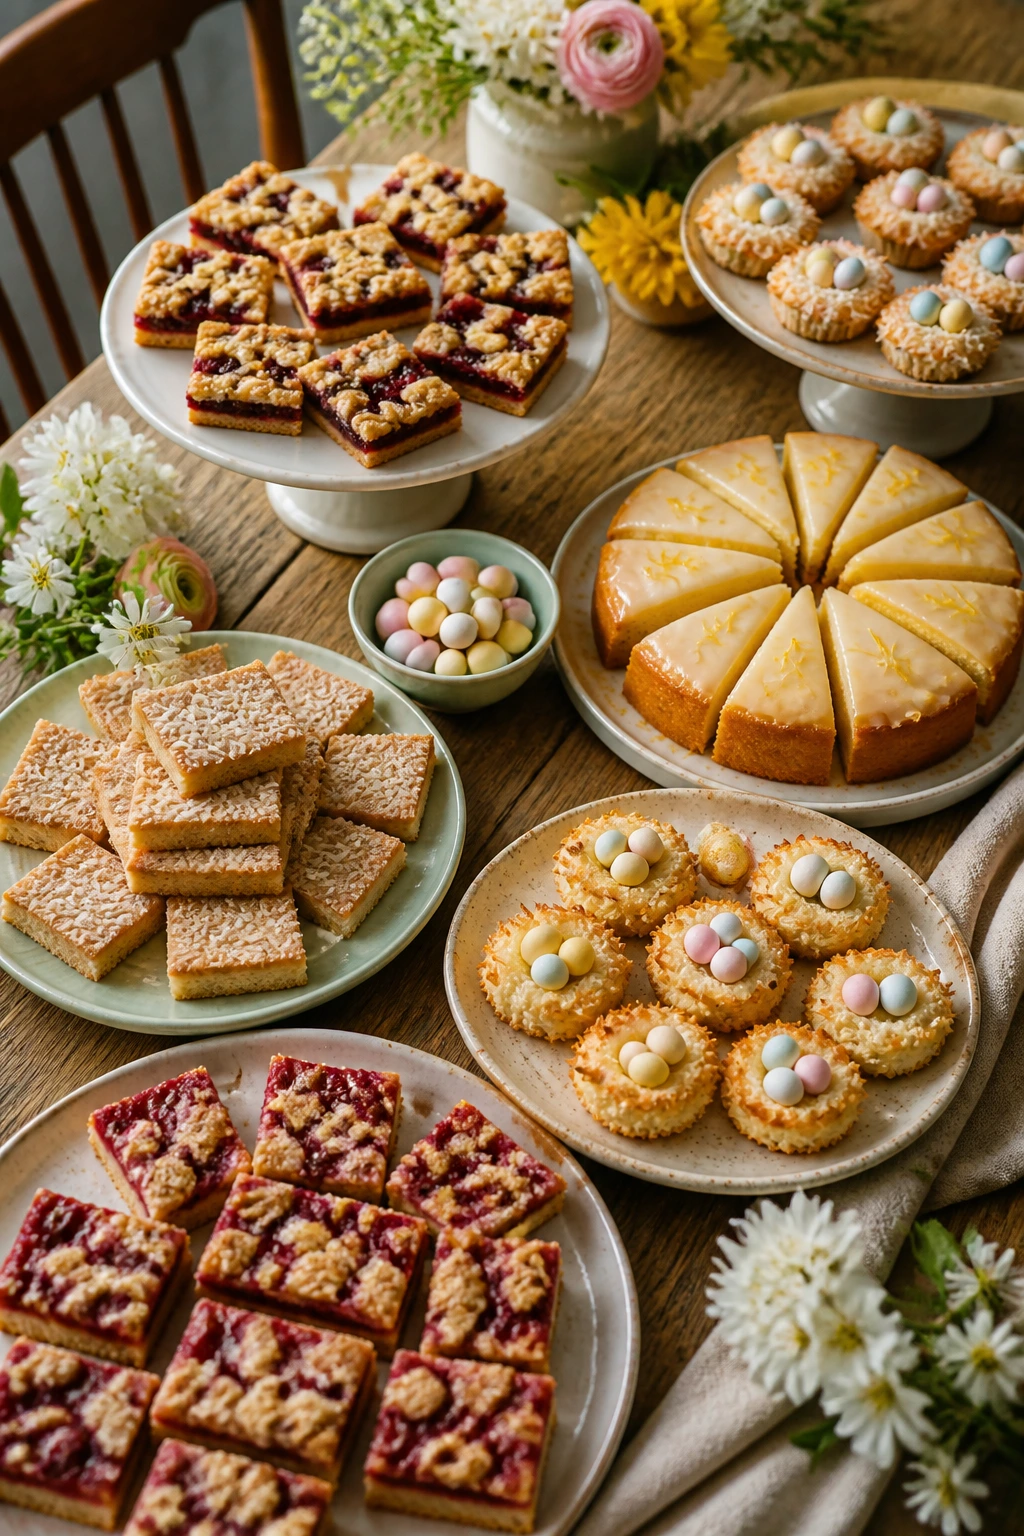
Easter desserts do not need a special trip to three stores and a cart full of pastel extras. A good bit of sugar, flour, cocoa, oats, jam, coconut, and one or two bright finishing touches can do almost all the work, which is why pantry-staple baking has such an easy fit with this holiday. You get the look people expect — light glaze, candy eggs, coconut nests, lemon, chocolate, spring colors — without building every dessert from scratch like you’re catering a church hall.
That matters more than it sounds. Easter usually lands in that awkward sweet spot where you want the table to feel festive, but you also do not want to spend the whole day measuring and sifting and washing a mountain of bowls. Pantry desserts solve that problem cleanly. They lean on things many homes already have: brown sugar, peanut butter, oats, graham crackers, sweetened condensed milk, jam, chocolate chips, and the kind of baking basics that keep showing up long after the holiday plates are put away.
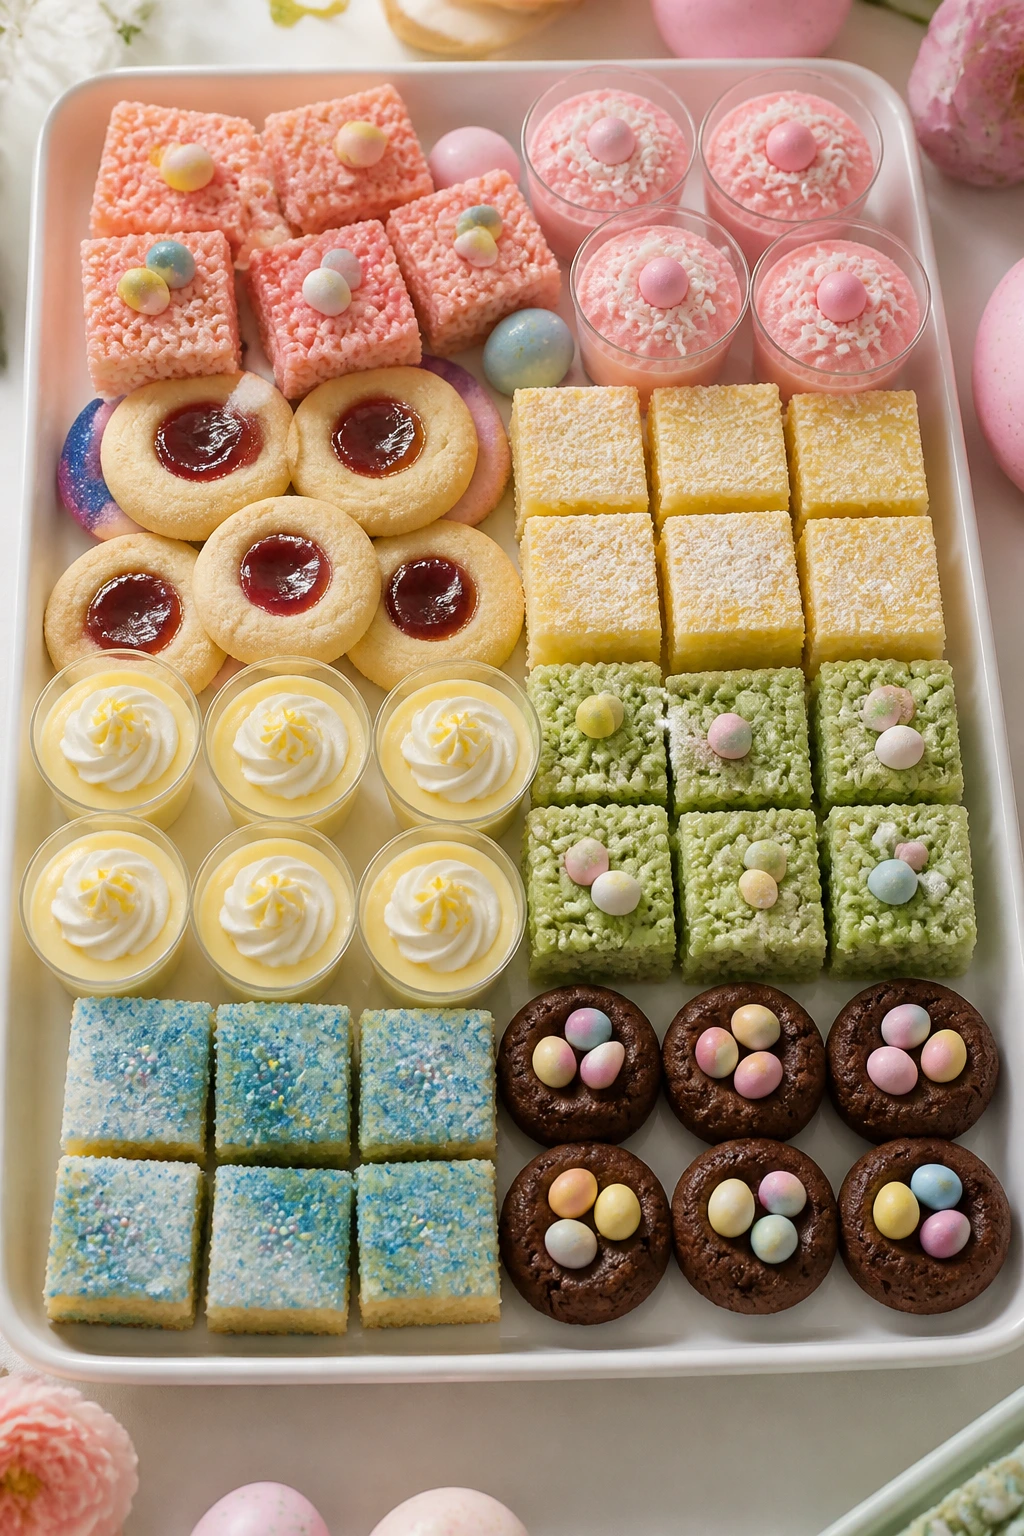
The best part is that “pantry” does not mean boring. It means flexible. A lemon glaze can make a plain sheet cake feel bright. Cocoa crinkle cookies can pick up pastel sprinkles without turning fussy. Jam, coconut, cereal, and candy eggs can make a tray look intentionally Easter-ish with almost no effort. That’s the sweet spot here — practical desserts that still know how to dress up.
Why This Collection Works So Well for Easter
- Mostly shelf-stable staples: Flour, sugar, cocoa, oats, graham crackers, and chocolate chips do the heavy lifting, so you can bake without a long shopping list.
- Easy to decorate for the holiday: A handful of candy eggs, sprinkles, shredded coconut, or pastel drizzle changes the look fast.
- Good for mixed skill levels: Some desserts are bake-and-slice bars, others are no-bake bites, and none demand pastry-school nerves.
- Built for sharing: Most of these make a pan, a batch, or a full tray, which is what Easter dessert tables actually need.
- Flexible on timing: Several can be made the day before, and a few taste better after they sit and settle.
- Not overly precious: If one glaze runs, one cookie cracks, or one tray looks a little messy, it still reads festive.
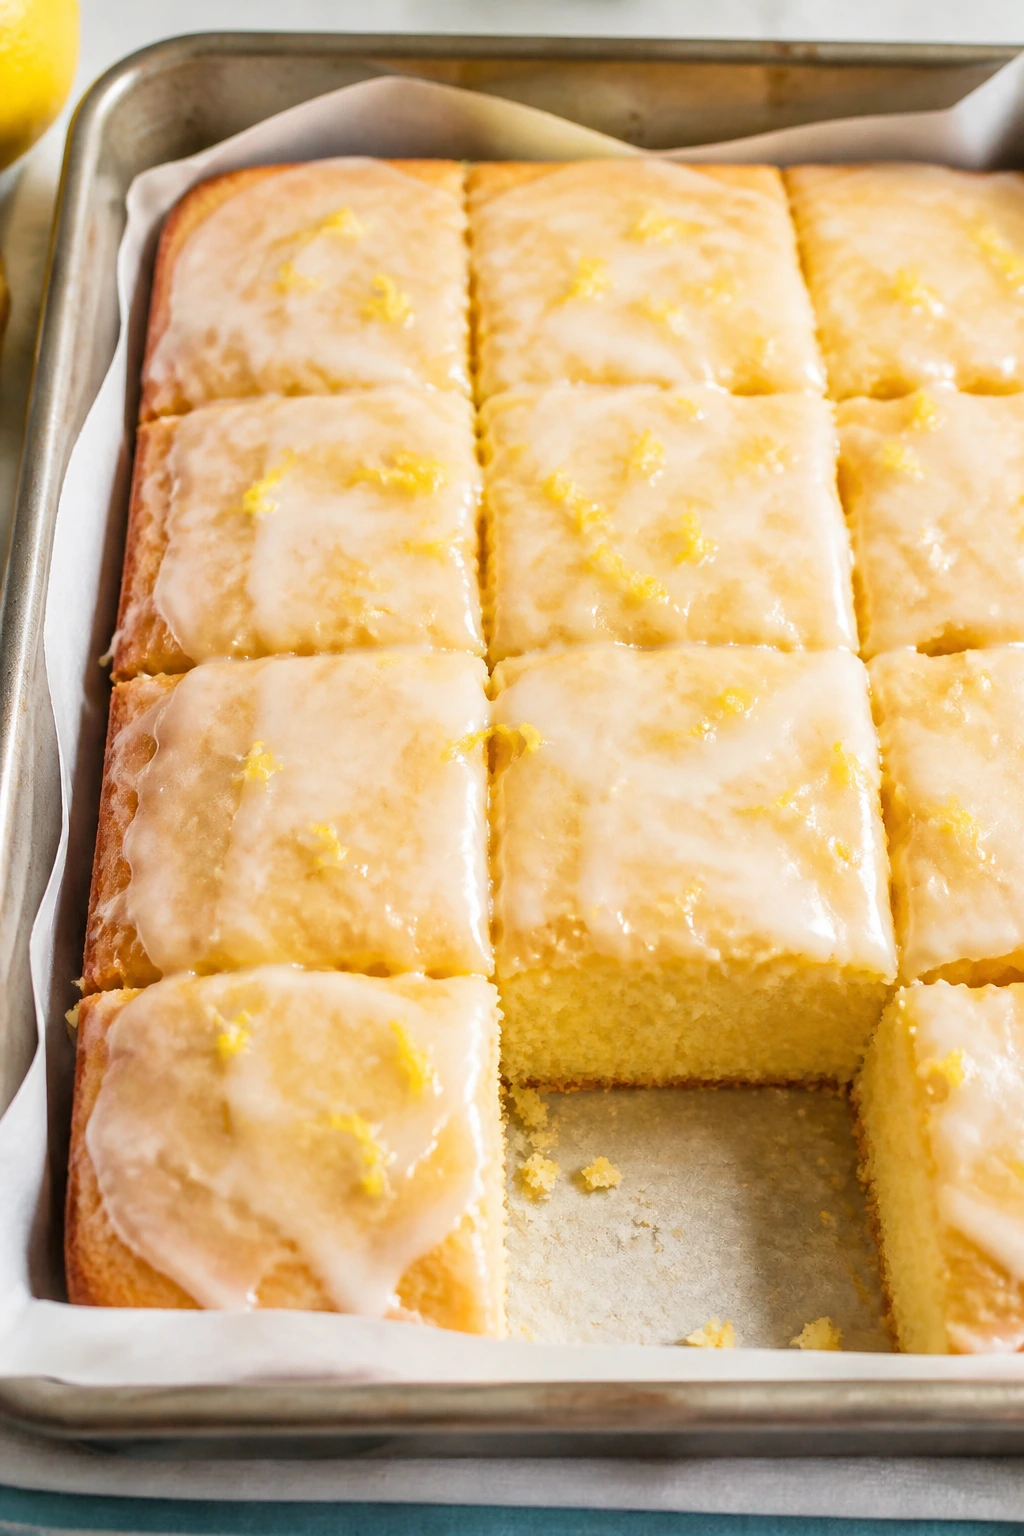
1. Lemon Sheet Cake With Vanilla Glaze
A lemon sheet cake is one of those desserts that looks cheerful before anyone tastes it. The crumb stays soft, the glaze sinks into the top just enough, and the whole pan smells like butter, citrus, and warm sugar. It’s simple, but not plain.
Why It Works:
The batter uses pantry basics, but the lemon zest and juice pull it out of ordinary cake territory. Sheet cakes bake evenly in a 9×13 pan, which means fewer dry corners and less fuss than a layer cake. The vanilla glaze sets in a thin, shiny coat that keeps each square tidy on a dessert tray.
Key Ingredients:
- 2 cups all-purpose flour, spooned and leveled
- 1 1/2 cups granulated sugar
- 2 teaspoons baking powder
- 1/2 teaspoon fine salt
- 3 large eggs
- 3/4 cup whole milk
- 1/2 cup unsalted butter, melted and cooled
- 2 tablespoons lemon zest
- 1/4 cup lemon juice
- 1 cup powdered sugar for the glaze
Quick Steps:
- Preheat the oven to 350°F and grease a 9×13-inch pan.
- Whisk flour, sugar, baking powder, and salt in one bowl.
- Beat eggs, milk, melted butter, lemon zest, and lemon juice in another bowl.
- Stir the wet mixture into the dry mixture until just smooth, then pour into the pan.
- Bake 28 to 32 minutes, until the center springs back and a tester comes out clean.
- Whisk powdered sugar with 1 to 2 tablespoons lemon juice or milk, then glaze the cooled cake.
Equipment for This Recipe:
- 9×13-inch baking pan
- Two mixing bowls
- Whisk and rubber spatula
How to Serve This Dish:
Cut it into neat squares and serve it on a white platter so the glaze shows. A spoonful of whipped cream or a few berries on the side makes it look more polished with almost no effort.
Pro Tips for This Recipe:
- Use fresh lemon zest; bottled juice won’t give the same smell.
- Cool the cake before glazing or the icing thins out and disappears.
- If your lemons are small, add an extra teaspoon of zest before baking.
Variations on This Dish:
- Lemon-Blueberry Patch: Fold 1 cup of frozen blueberries through the batter for a little burst of fruit.
- Orange-Vanilla Version: Swap lemon for orange zest and juice if that’s what you have.
Common Mistakes to Avoid with This Dish:
- Overbaking the center: The cake turns dry fast; pull it when the middle springs back lightly.
- Glazing too soon: Warm cake melts the glaze into a puddle instead of a finish.
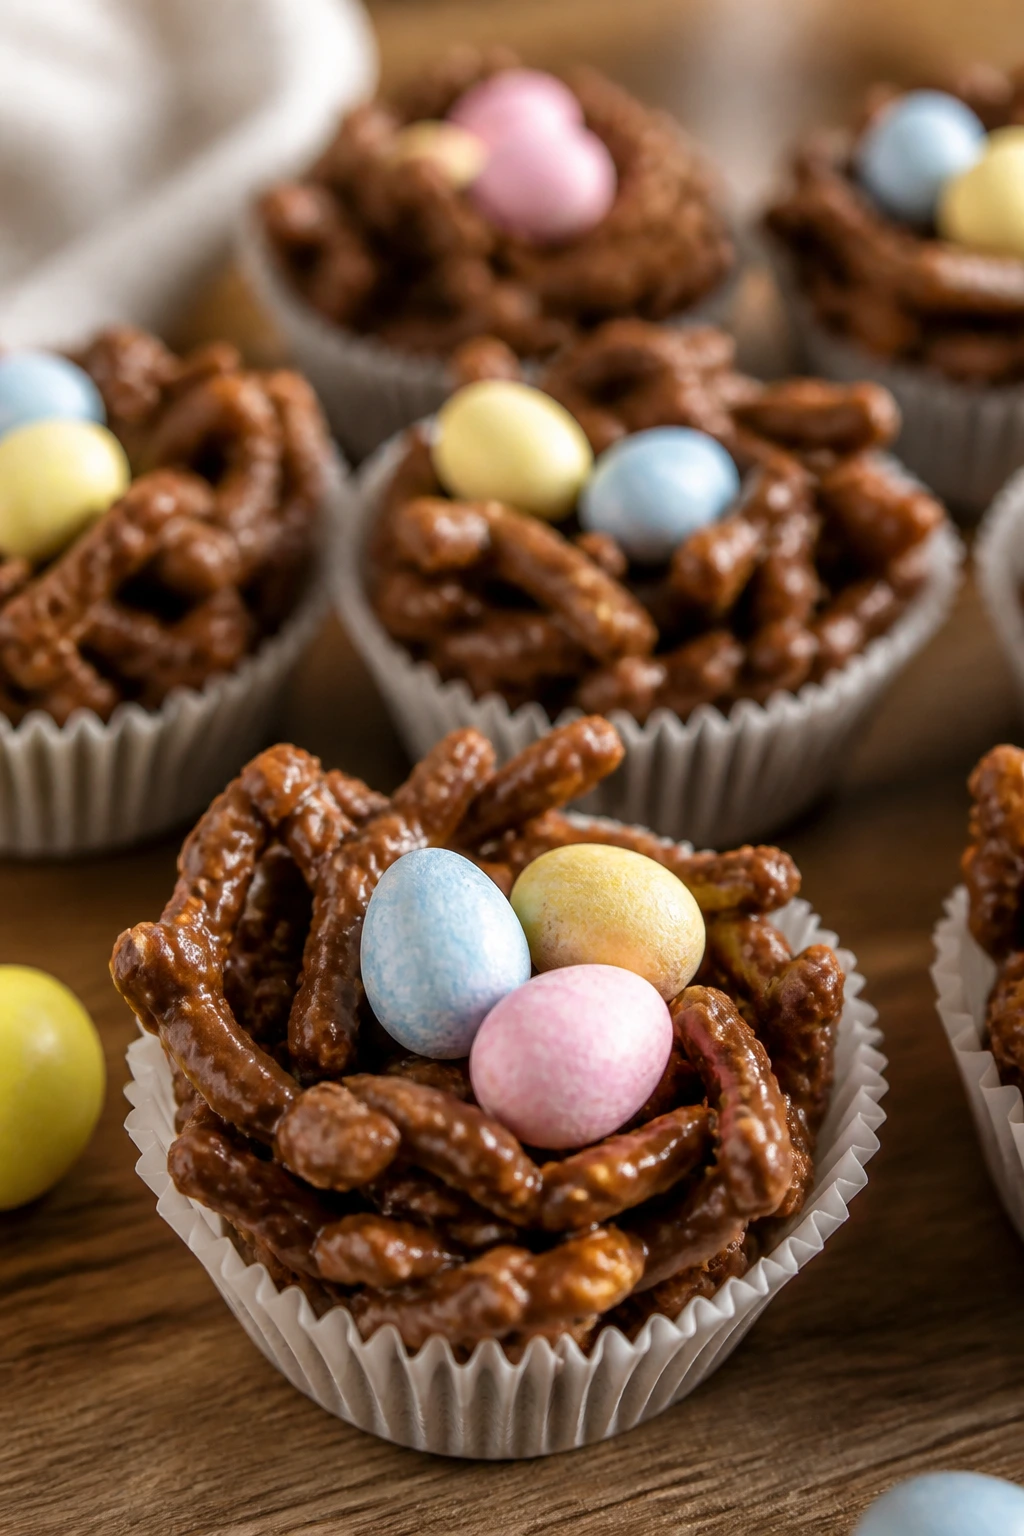
2. Peanut Butter Chocolate Nests
These little nests look like they took effort. They didn’t. The texture is chewy and crisp at the same time, and the peanut butter holds the whole thing together while the candy eggs sit right in the center like they belong there.
Why It Works:
No-bake treats are perfect when the oven is already busy. Melted peanut butter and marshmallow or honey act like glue, while cereal or pretzel sticks give the nest shape. The chocolate keeps the flavor familiar, which matters when you want a dessert kids and adults both reach for.
Key Ingredients:
- 3 cups cornflakes or crushed pretzel sticks
- 1 cup creamy peanut butter
- 1/2 cup honey
- 1 cup semi-sweet chocolate chips
- 1 teaspoon vanilla extract
- 1/4 teaspoon salt
- 1 cup mini candy eggs
Quick Steps:
- Line a muffin tin with paper liners or grease it lightly.
- Melt peanut butter, honey, chocolate chips, vanilla, and salt together over low heat.
- Stir in the cornflakes or pretzels until fully coated.
- Scoop the mixture into the muffin cups and press a dent into each center.
- Chill 20 to 30 minutes, then fill each nest with candy eggs.
Equipment for This Recipe:
- Muffin tin
- Saucepan or microwave-safe bowl
- Spoon or cookie scoop
How to Serve This Dish:
Set them on a tray with a few loose candy eggs around the edges. They work best as a grab-and-go dessert after a bigger meal, not as something you need to slice.
Pro Tips for This Recipe:
- Let the chocolate mixture cool for 2 minutes before mixing in cereal so it doesn’t go soggy.
- Press the center while the nests are still warm; they hold shape better.
- Use smooth peanut butter, not the oily natural kind, unless you want extra adjusting.
Variations on This Dish:
- Chocolate-Pretzel Crunch: Use crushed pretzels for a saltier, crisper nest.
- Sunbutter Swap: Sunflower seed butter works if you need a nut-free version.
Common Mistakes to Avoid with This Dish:
- Overheating the mixture: Boiling peanut butter can make the candy shell greasy.
- Filling before chilling: Candy eggs slide around if the nests are still soft.
3. Coconut Macaroons With Chocolate Drizzle
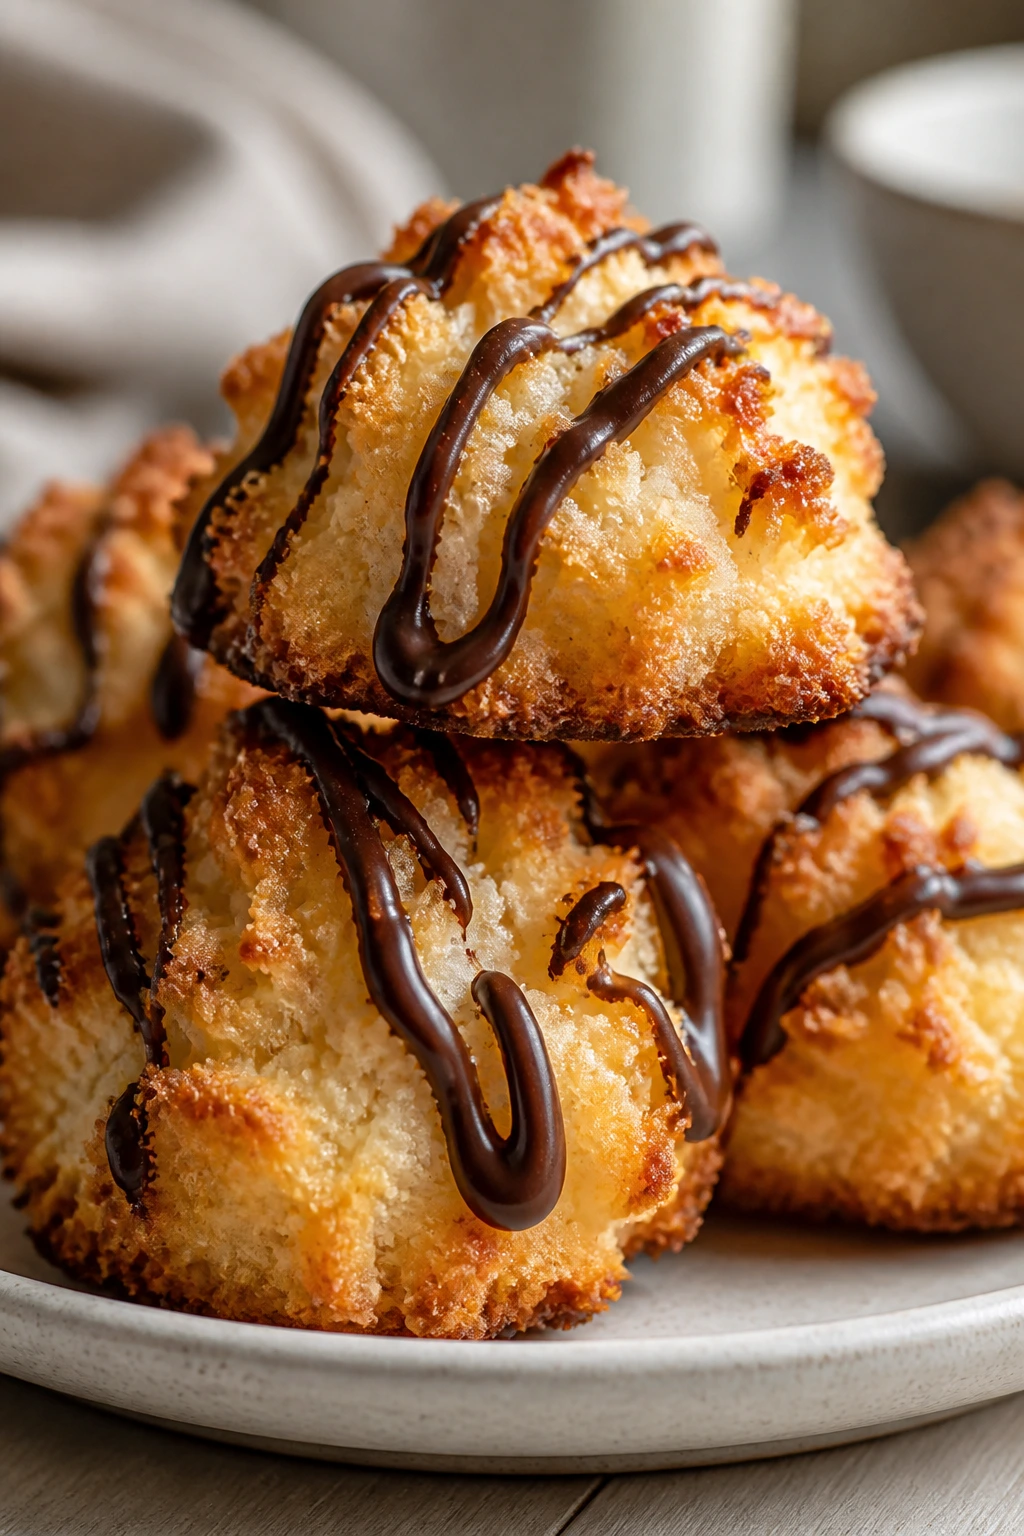
Macaroons are one of the easiest ways to make a platter look like spring without buying specialty ingredients. Toasty coconut, a crisp edge, and a chewy middle do all the work. The chocolate drizzle is the part people notice first, though.
Why It Works:
Shredded coconut is the whole story here, so the recipe stays short and pantry-friendly. Egg whites give the cookies lift and help the edges set without flour. A drizzle of melted chocolate adds a darker stripe that plays well against the pale coconut.
Key Ingredients:
- 4 cups sweetened shredded coconut
- 3 large egg whites
- 2/3 cup granulated sugar
- 1 teaspoon vanilla extract
- 1/4 teaspoon salt
- 1/2 cup semi-sweet chocolate chips
- 1 teaspoon coconut oil, optional for drizzling
Quick Steps:
- Heat the oven to 325°F and line two baking sheets with parchment.
- Stir coconut, egg whites, sugar, vanilla, and salt in one bowl.
- Scoop tightly packed mounds onto the sheets.
- Bake 18 to 22 minutes, until the edges are golden and the tops are lightly toasted.
- Cool completely, then drizzle with melted chocolate.
Equipment for This Recipe:
- Baking sheets
- Parchment paper
- Small cookie scoop
How to Serve This Dish:
Pile them in a shallow bowl so the coconut edges stay visible. They’re rich, so two or three pieces per person is plenty.
Pro Tips for This Recipe:
- Pack the mounds firmly or they spread and lose the tall, craggy look.
- Cool fully before drizzling so the chocolate stays neat.
- A pinch of extra salt wakes up the coconut.
Variations on This Dish:
- Lemon-Coconut Macaroons: Add 1 teaspoon lemon zest to the mixture for a brighter finish.
- Chocolate-Dipped Edges: Dip the bottoms instead of drizzling for a cleaner, bakery-style look.
Common Mistakes to Avoid with This Dish:
- Using unsweetened coconut without adjusting sugar: The texture changes fast and the cookies can taste flat.
- Pulling them too early: Pale macaroons stay sticky in the middle.
4. No-Bake Cheesecake Cups
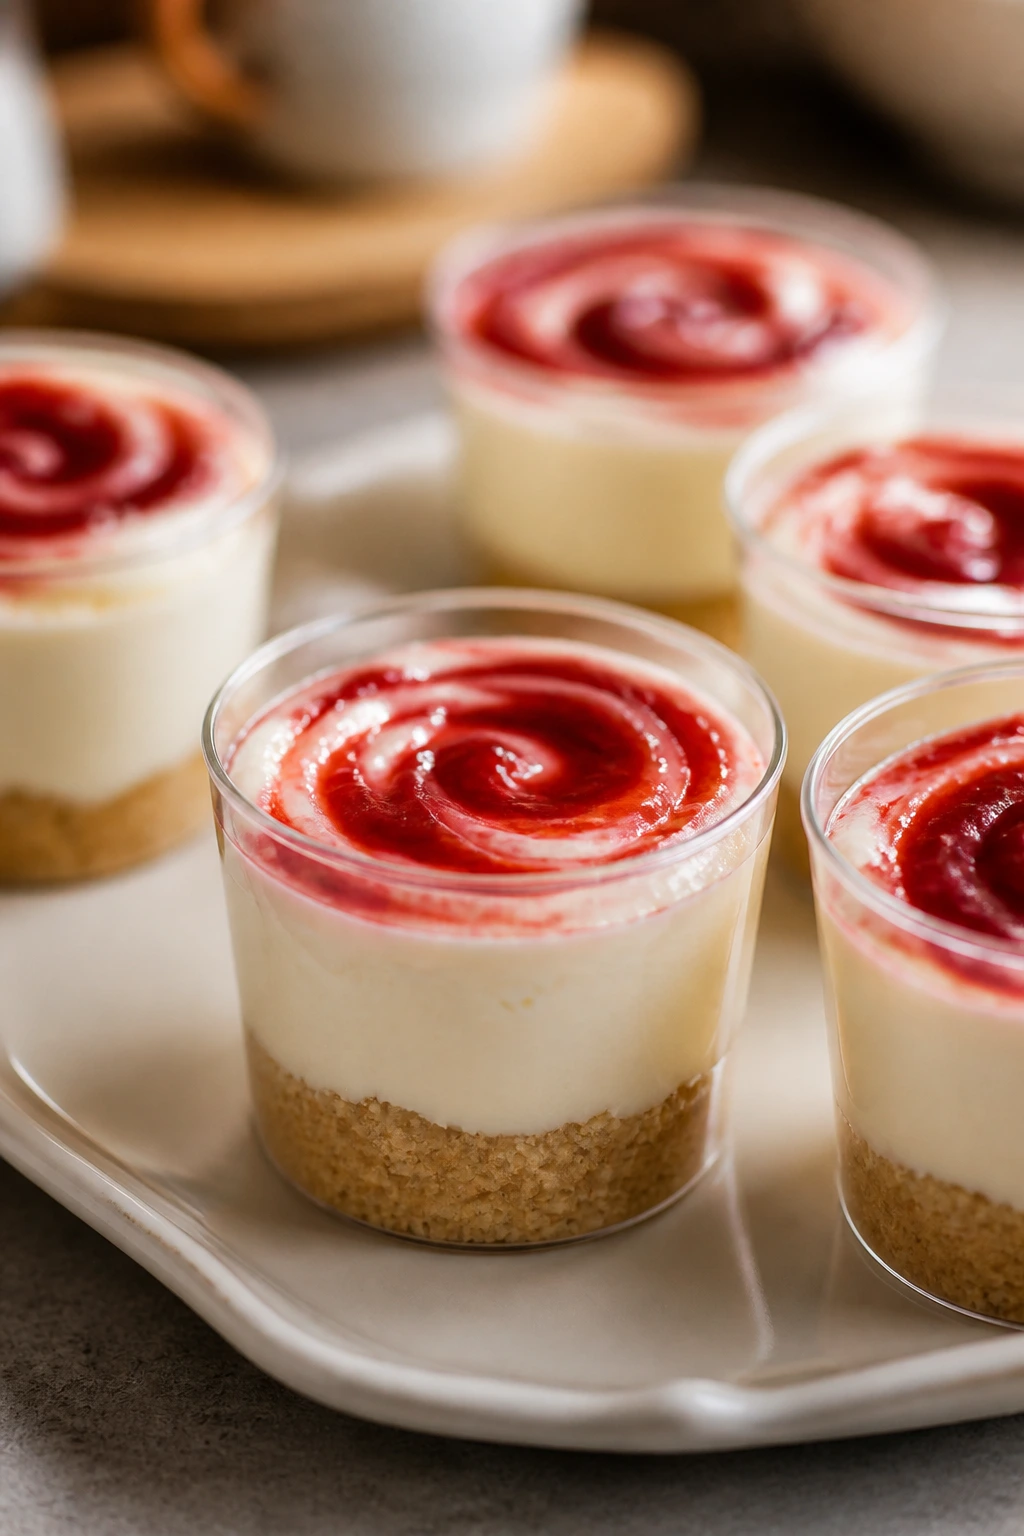
These are the dessert equivalent of clean handwriting. Layered crumbs, a creamy filling, and a bit of fruit or jam on top make each cup look intentional. They also disappear fast.
Why It Works:
Cream cheese and powdered sugar give you that tangy cheesecake flavor without turning on the oven. Graham crackers are the obvious base because they already lean sweet and buttery. The cups chill into neat portions, which is handy when you want dessert ready before the main meal ends.
Key Ingredients:
- 1 1/2 cups graham cracker crumbs
- 5 tablespoons melted butter
- 16 ounces cream cheese, softened
- 1 cup powdered sugar
- 1 teaspoon vanilla extract
- 1 tablespoon lemon juice
- 1 cup whipped topping or softly whipped cream
- 1/2 cup strawberry jam or berry preserves
Quick Steps:
- Mix graham crumbs with melted butter and press into small cups or jars.
- Beat cream cheese, powdered sugar, vanilla, and lemon juice until smooth.
- Fold in whipped topping.
- Spoon the filling over the crusts.
- Swirl jam on top and chill at least 2 hours.
Equipment for This Recipe:
- Mixing bowl
- Hand mixer
- Small jars or dessert cups
How to Serve This Dish:
Serve them cold with tiny spoons. A thin stripe of jam on top gives each cup a little color without needing decorations.
Pro Tips for This Recipe:
- Soften the cream cheese fully or the filling stays lumpy.
- Use thick jam, not runny jelly, if you want the swirl to hold.
- Make them in clear cups; the layers do half the decorating.
Variations on This Dish:
- Lemon Cheesecake Cups: Skip the jam and add extra zest to the filling.
- Chocolate Crumb Cups: Use crushed chocolate cookies instead of graham crackers.
Common Mistakes to Avoid with This Dish:
- Skipping the chill time: The filling needs time to firm up.
- Overmixing the whipped topping: It can turn loose and make the filling slack.
5. Jam Swirl Shortbread Bars

Shortbread bars are the sort of dessert that tastes far fancier than it looks. The base is buttery and crumbly, the jam bakes into a sticky stripe, and the top browns just enough to smell like a bakery.
Why It Works:
Shortbread uses a small list of ingredients, which is exactly why it belongs in a pantry-staple Easter lineup. Jam adds color, sweetness, and a bit of shine without extra work. Slice them into narrow bars and they suddenly look like a tray made for sharing.
Key Ingredients:
- 2 cups all-purpose flour
- 1/2 cup granulated sugar
- 1 cup unsalted butter, softened
- 1/2 teaspoon salt
- 3/4 cup thick raspberry or apricot jam
- 1 teaspoon vanilla extract
Quick Steps:
- Heat the oven to 350°F and line an 8×8-inch pan with parchment.
- Beat butter, sugar, vanilla, and salt until creamy.
- Mix in flour until a soft dough forms.
- Press two-thirds of the dough into the pan, spread jam over it, then crumble the rest on top.
- Bake 30 to 35 minutes, until the top is pale gold and the jam bubbles at the edges.
Equipment for This Recipe:
- 8×8-inch baking pan
- Parchment paper
- Mixing bowl and spatula
How to Serve This Dish:
Cut them into slim rectangles and stack them on a cake stand. They’re rich enough to stand alone, but a cup of coffee or tea makes them feel even more finished.
Pro Tips for This Recipe:
- Use thick jam so the bars don’t turn wet in the middle.
- Chill before slicing for the cleanest cuts.
- A dusting of powdered sugar hides uneven jam edges in a good way.
Variations on This Dish:
- Apricot Almond Bars: Add 1/2 teaspoon almond extract to the dough.
- Mixed Berry Bars: Swirl two jams together for a deeper color.
Common Mistakes to Avoid with This Dish:
- Spreading jam too close to the edge: It leaks and burns.
- Cutting while warm: The bars crumble instead of slicing.
6. Carrot Cake Snack Cake
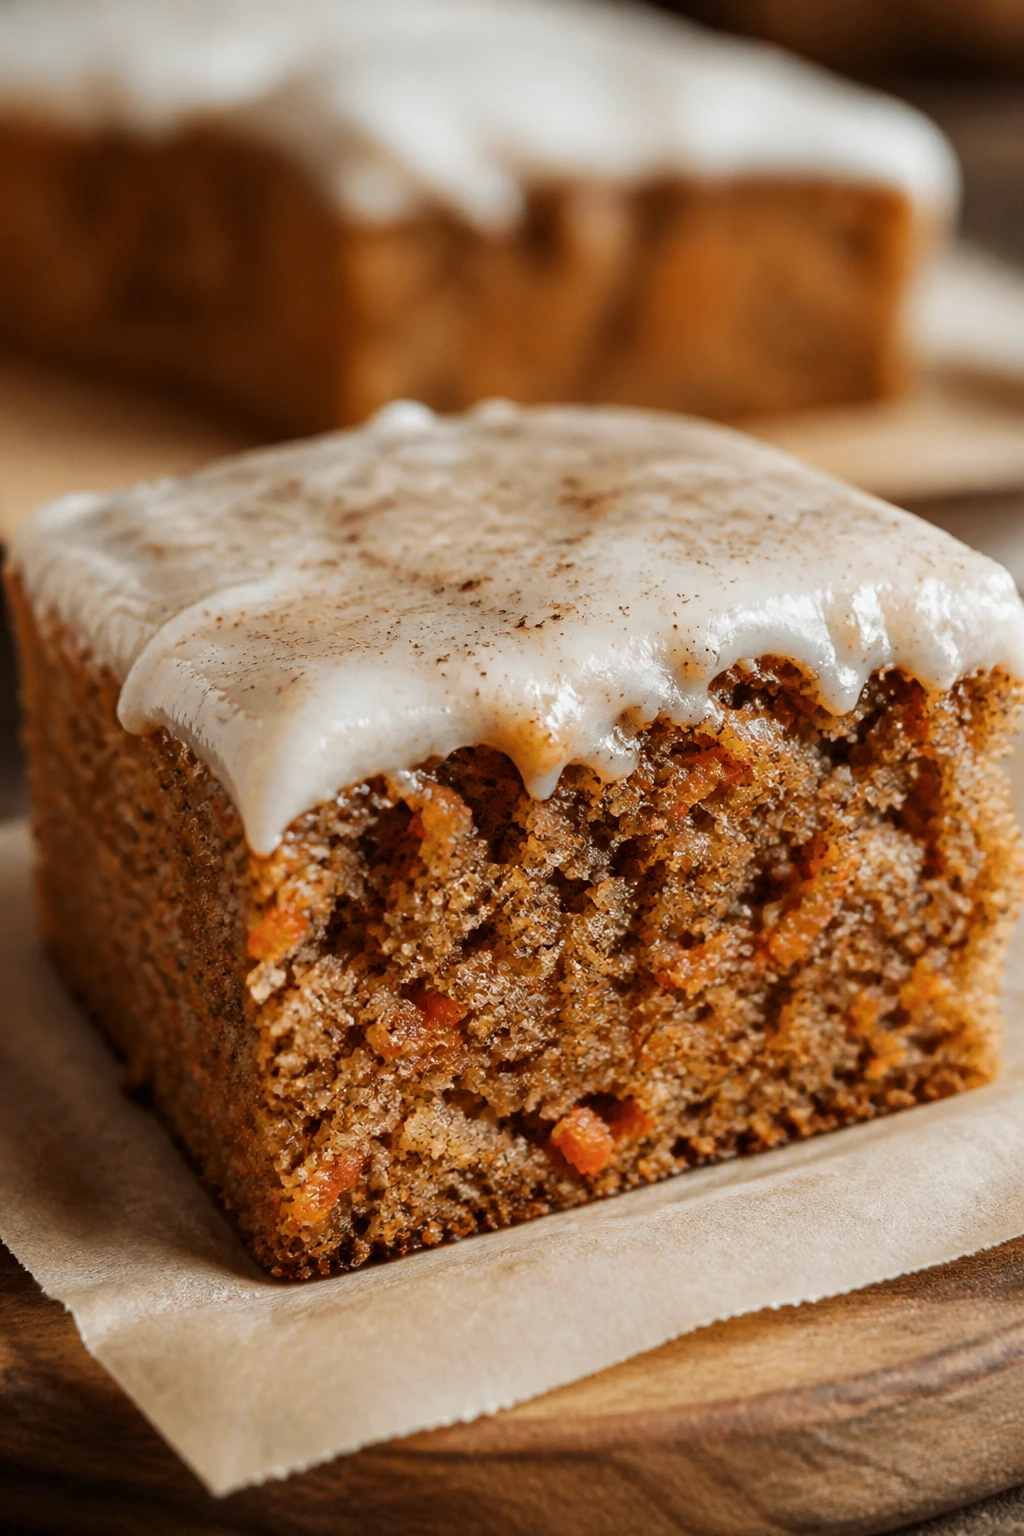
If Easter had a default cake, this would be the one. The texture stays tender, the spices are warm instead of loud, and the carrots melt into the crumb so the cake tastes moist rather than vegetal. That’s the whole charm.
Why It Works:
Carrot cake leans on pantry basics but still feels like a holiday bake. Brown sugar and oil keep the crumb soft for days, and cinnamon brings the familiar carrot-cake smell that people expect. A simple cream cheese glaze gives you enough richness without turning the cake into a project.
Key Ingredients:
- 2 cups all-purpose flour
- 1 cup granulated sugar
- 1/2 cup brown sugar
- 2 teaspoons baking soda
- 2 teaspoons cinnamon
- 1/2 teaspoon salt
- 3 large eggs
- 1 cup neutral oil
- 2 cups finely grated carrots
- 1 teaspoon vanilla extract
Quick Steps:
- Preheat the oven to 350°F and grease an 8×8-inch pan.
- Whisk dry ingredients in one bowl.
- Beat eggs, oil, and vanilla, then stir in the carrots.
- Fold wet ingredients into dry ingredients until no flour streaks remain.
- Bake 32 to 38 minutes, cool, then glaze if you want a cream cheese finish.
Equipment for This Recipe:
- 8×8-inch pan
- Box grater or food processor
- Mixing bowls
How to Serve This Dish:
Serve it in squares with a thin glaze or plain, if you like a less sweet finish. A few chopped walnuts on top are optional, but not necessary.
Pro Tips for This Recipe:
- Grate the carrots finely so they melt into the batter.
- Don’t squeeze out all the moisture; that’s part of the softness.
- A little extra cinnamon helps if your spice jar has been open for a while.
Variations on This Dish:
- Pineapple Carrot Cake: Add 1/2 cup drained crushed pineapple for a wetter, fruitier crumb.
- Walnut Tray Bake: Fold in 3/4 cup chopped walnuts for crunch.
Common Mistakes to Avoid with This Dish:
- Using huge carrot shreds: They leave stringy pieces in the crumb.
- Overbaking: The cake loses its soft middle fast.
7. Chocolate Crinkle Cookies
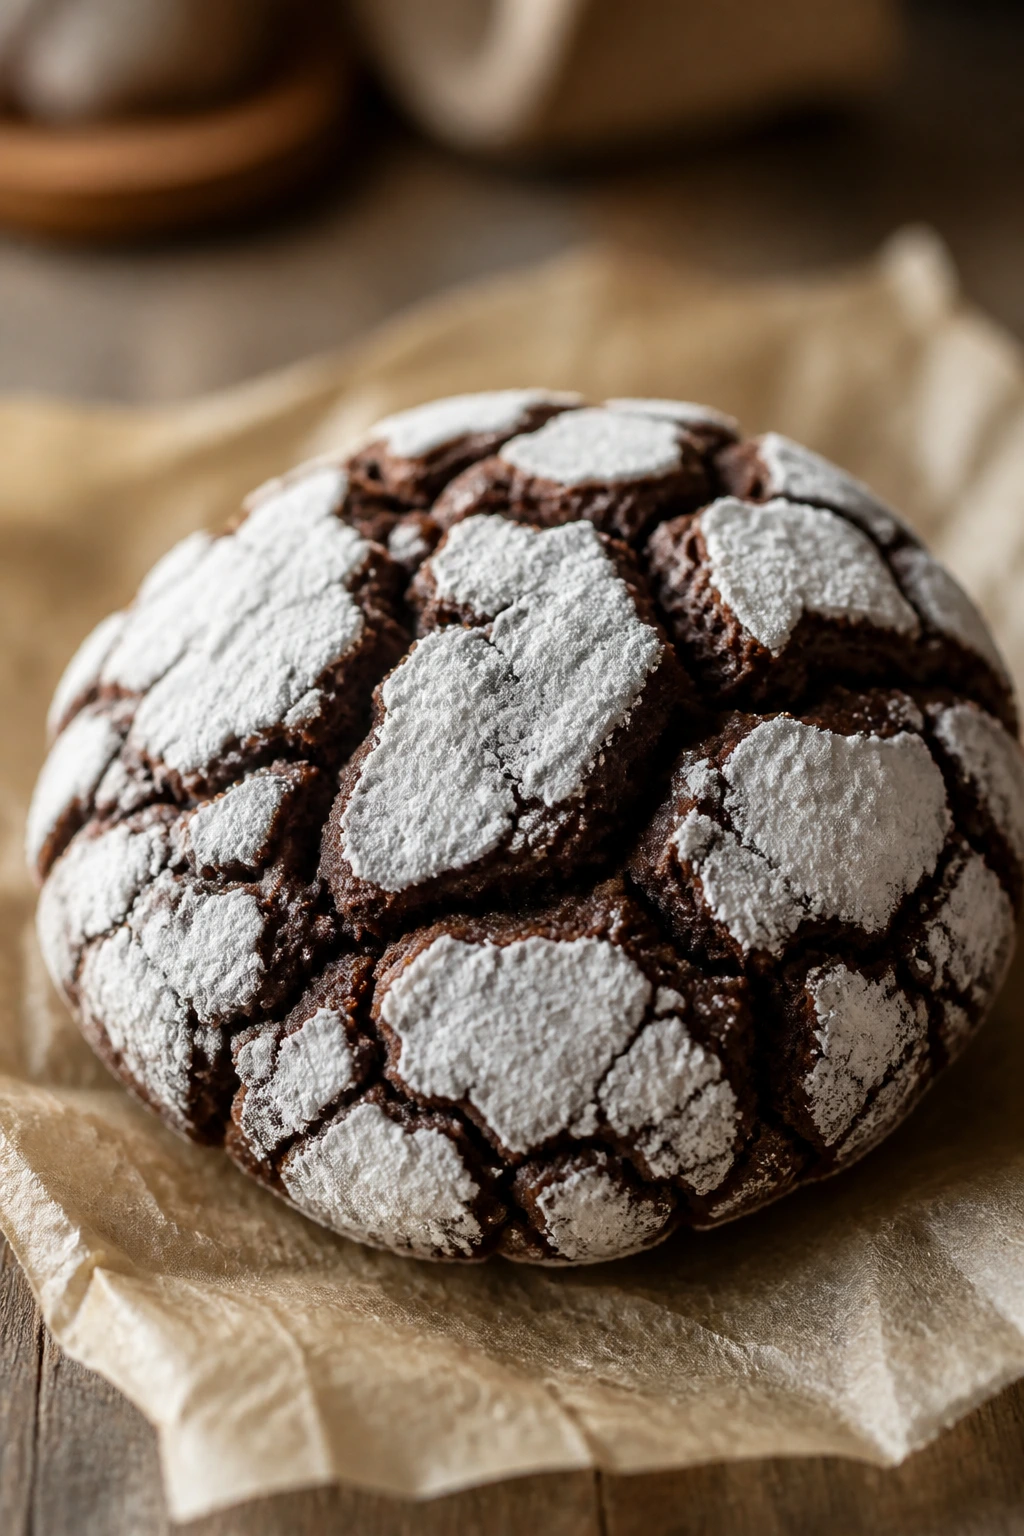
Crinkle cookies are built for Easter trays because they bring contrast: dark cocoa underneath, white sugar on top, and those little crackled lines that show up in the oven. They look dramatic without any decorating skill at all.
Why It Works:
Cocoa, sugar, and eggs make a rich cookie dough that chills well and scoops cleanly. Rolling the dough in powdered sugar before baking gives the crackled finish people love. The exterior dries slightly while the center stays soft, which is exactly the texture you want here.
Key Ingredients:
- 1/2 cup unsweetened cocoa powder
- 1 cup granulated sugar
- 1/4 cup brown sugar
- 1/2 cup vegetable oil
- 2 large eggs
- 1 teaspoon vanilla extract
- 1 1/2 cups all-purpose flour
- 1 teaspoon baking powder
- 1/2 teaspoon salt
- 1/2 cup powdered sugar for rolling
Quick Steps:
- Whisk cocoa, sugars, oil, eggs, and vanilla until glossy.
- Stir in flour, baking powder, and salt.
- Chill the dough 30 minutes.
- Roll into balls, coat heavily in powdered sugar, and set on a lined sheet.
- Bake at 350°F for 10 to 12 minutes, until the tops crack but the centers still look soft.
Equipment for This Recipe:
- Mixing bowl
- Baking sheet
- Cookie scoop
How to Serve This Dish:
Stack them high on a dark plate so the sugar cracks show. They pair well with milk, coffee, or a lemon dessert on the same tray.
Pro Tips for This Recipe:
- Chill the dough or the cookies spread too much.
- Coat the balls generously in powdered sugar for a stronger crackle.
- Pull them before they look fully set; they finish on the sheet.
Variations on This Dish:
- Peppermint Crinkle: Add a few drops of peppermint extract for a cooler flavor.
- Orange Cocoa Crinkle: Use orange zest to brighten the chocolate.
Common Mistakes to Avoid with This Dish:
- Skipping the chill: Warm dough makes flat cookies.
- Undercoating with sugar: The crackled look gets faint and patchy.
8. Easter Bunny Fudge
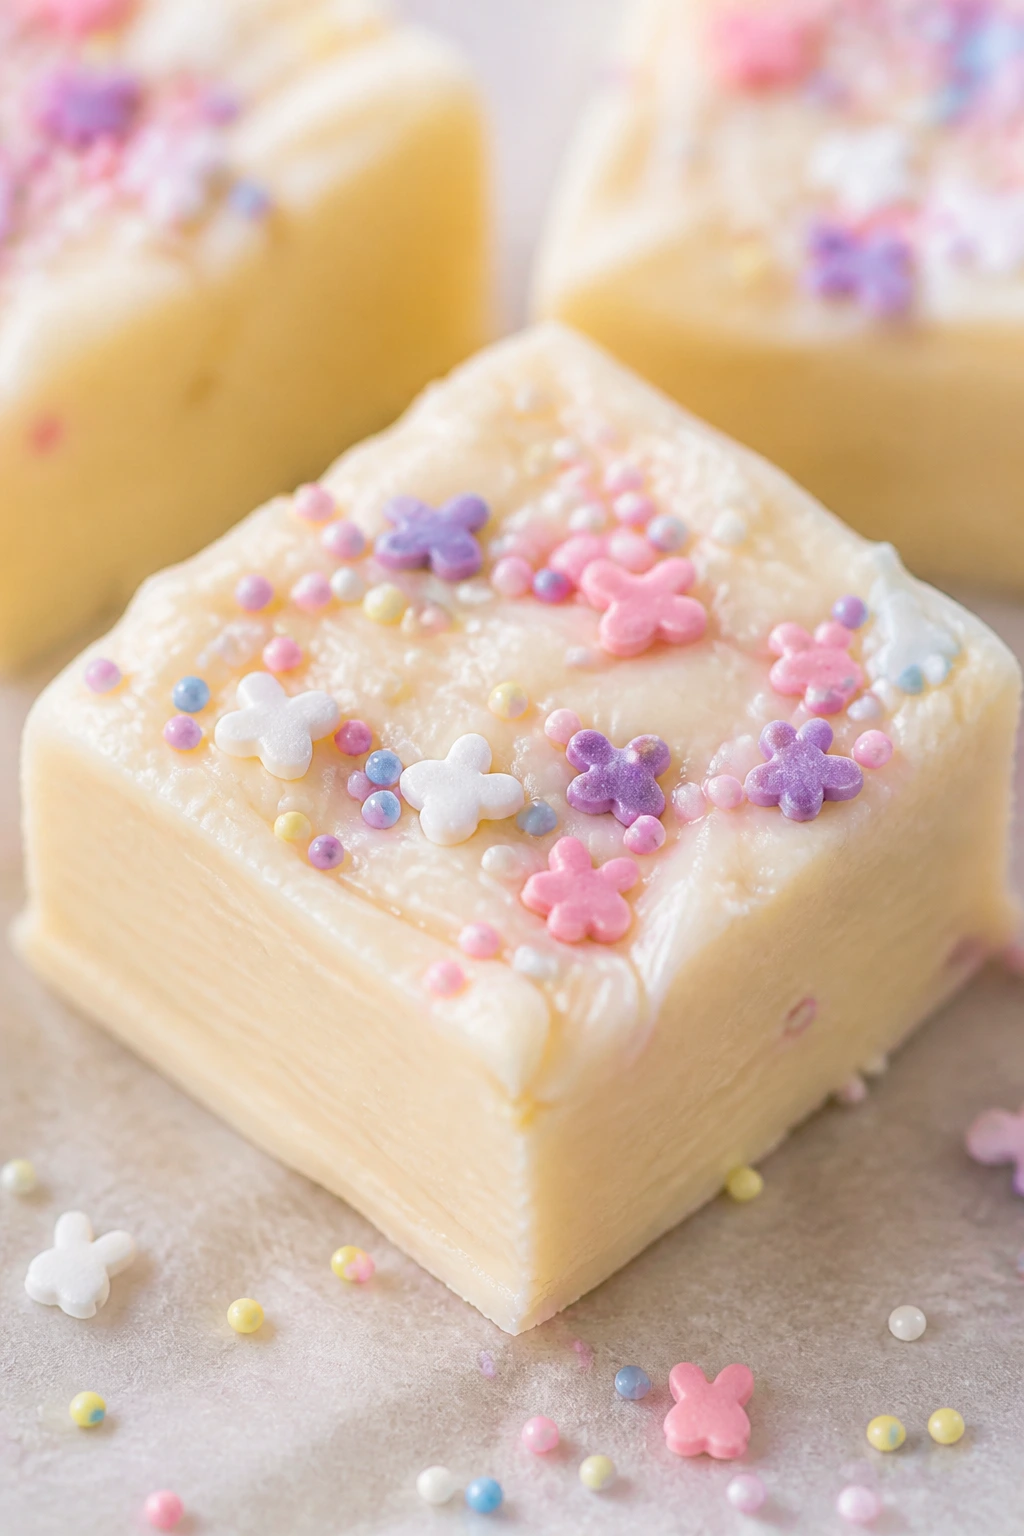
Fudge is the opposite of subtle. Good. Easter trays need one or two pieces that are candy-shop loud, and this is that piece. The white chocolate base takes color well, and the sprinkles or jelly beans do the rest.
Why It Works:
White chocolate chips and sweetened condensed milk make a smooth, sliceable fudge that sets in the fridge. Since the flavor is mild, it acts like a blank canvas for pastel sprinkles, chopped candy eggs, or crushed cookies. The square shape makes it easy to pack into gift boxes or paper cups.
Key Ingredients:
- 3 cups white chocolate chips
- 1 can sweetened condensed milk, 14 ounces
- 2 tablespoons unsalted butter
- 1 teaspoon vanilla extract
- 1/4 teaspoon salt
- 1/2 cup pastel sprinkles
- 1/2 cup chopped candy eggs
Quick Steps:
- Line an 8×8-inch pan with parchment.
- Melt white chocolate chips, condensed milk, and butter together over low heat.
- Stir in vanilla and salt.
- Fold in half the sprinkles and candy eggs, then spread into the pan.
- Top with the rest of the decorations and chill until firm, about 2 hours.
Equipment for This Recipe:
- Saucepan or microwave-safe bowl
- 8×8-inch pan
- Offset spatula
How to Serve This Dish:
Cut the fudge into small cubes; it’s rich enough that larger pieces feel heavy. Paper candy cups make it look neater on a dessert tray.
Pro Tips for This Recipe:
- Keep the heat low or white chocolate can seize.
- Press toppings in gently so they stick after chilling.
- Warm the knife with hot water for cleaner cuts.
Variations on This Dish:
- Cookies-and-Cream Fudge: Stir in crushed sandwich cookies instead of candy eggs.
- Chocolate Swirl Fudge: Add 2 tablespoons cocoa to half the mixture for a marbled look.
Common Mistakes to Avoid with This Dish:
- Overheating white chocolate: It turns grainy fast.
- Cutting before firm: The squares smear and lose shape.
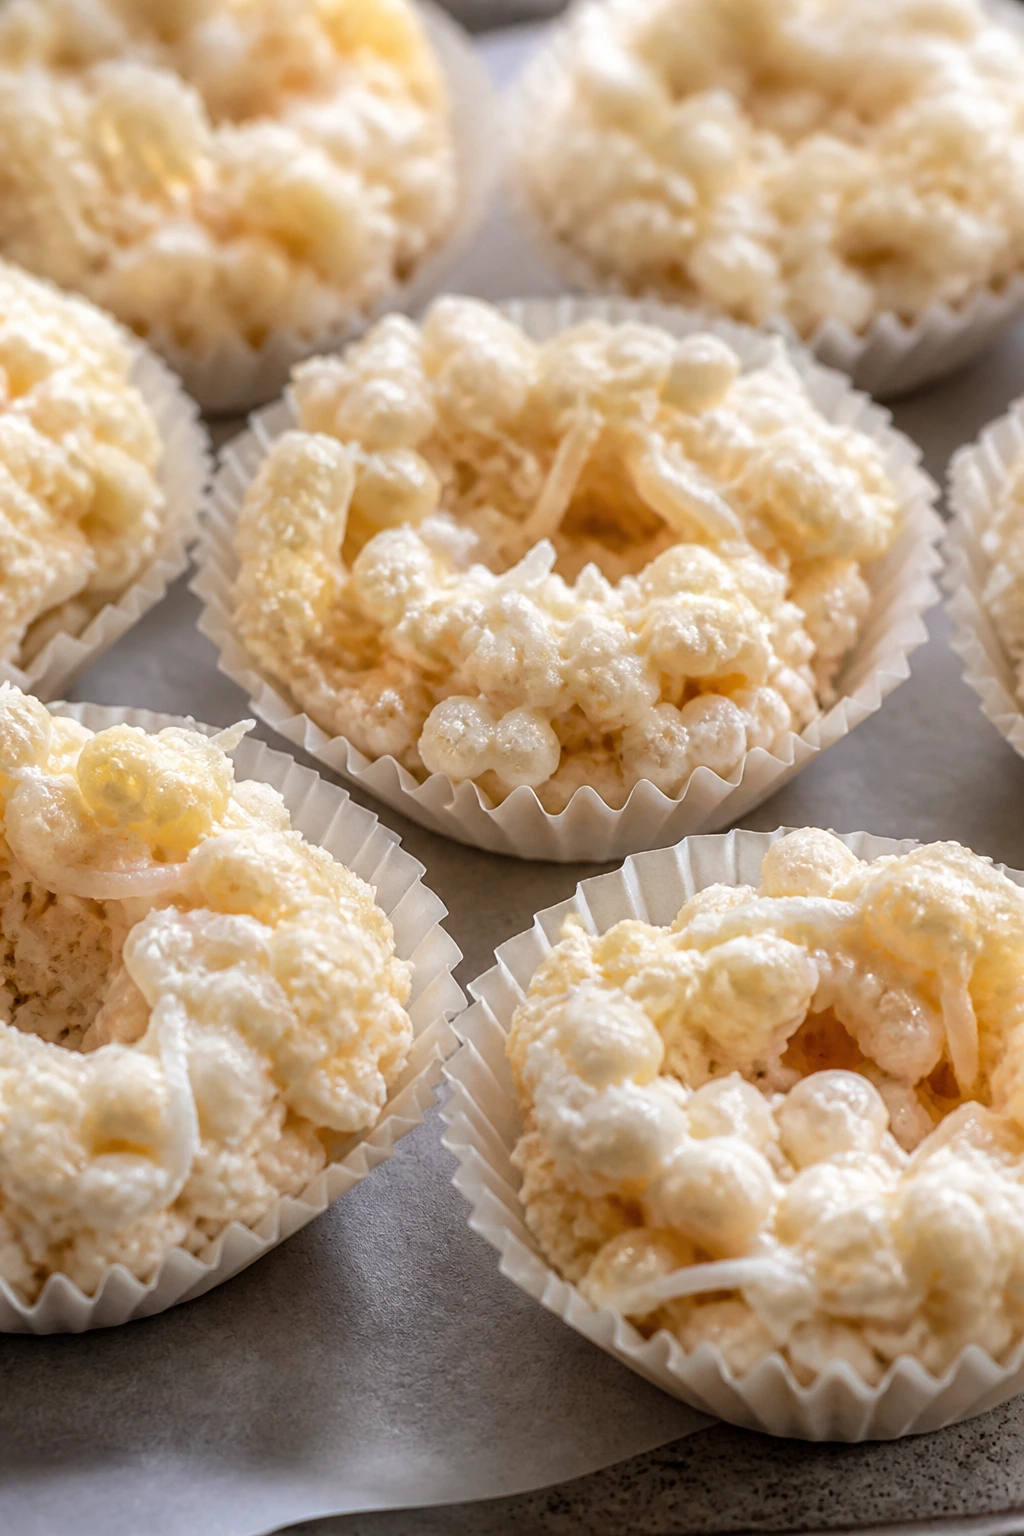
9. Rice Krispie Egg Treats
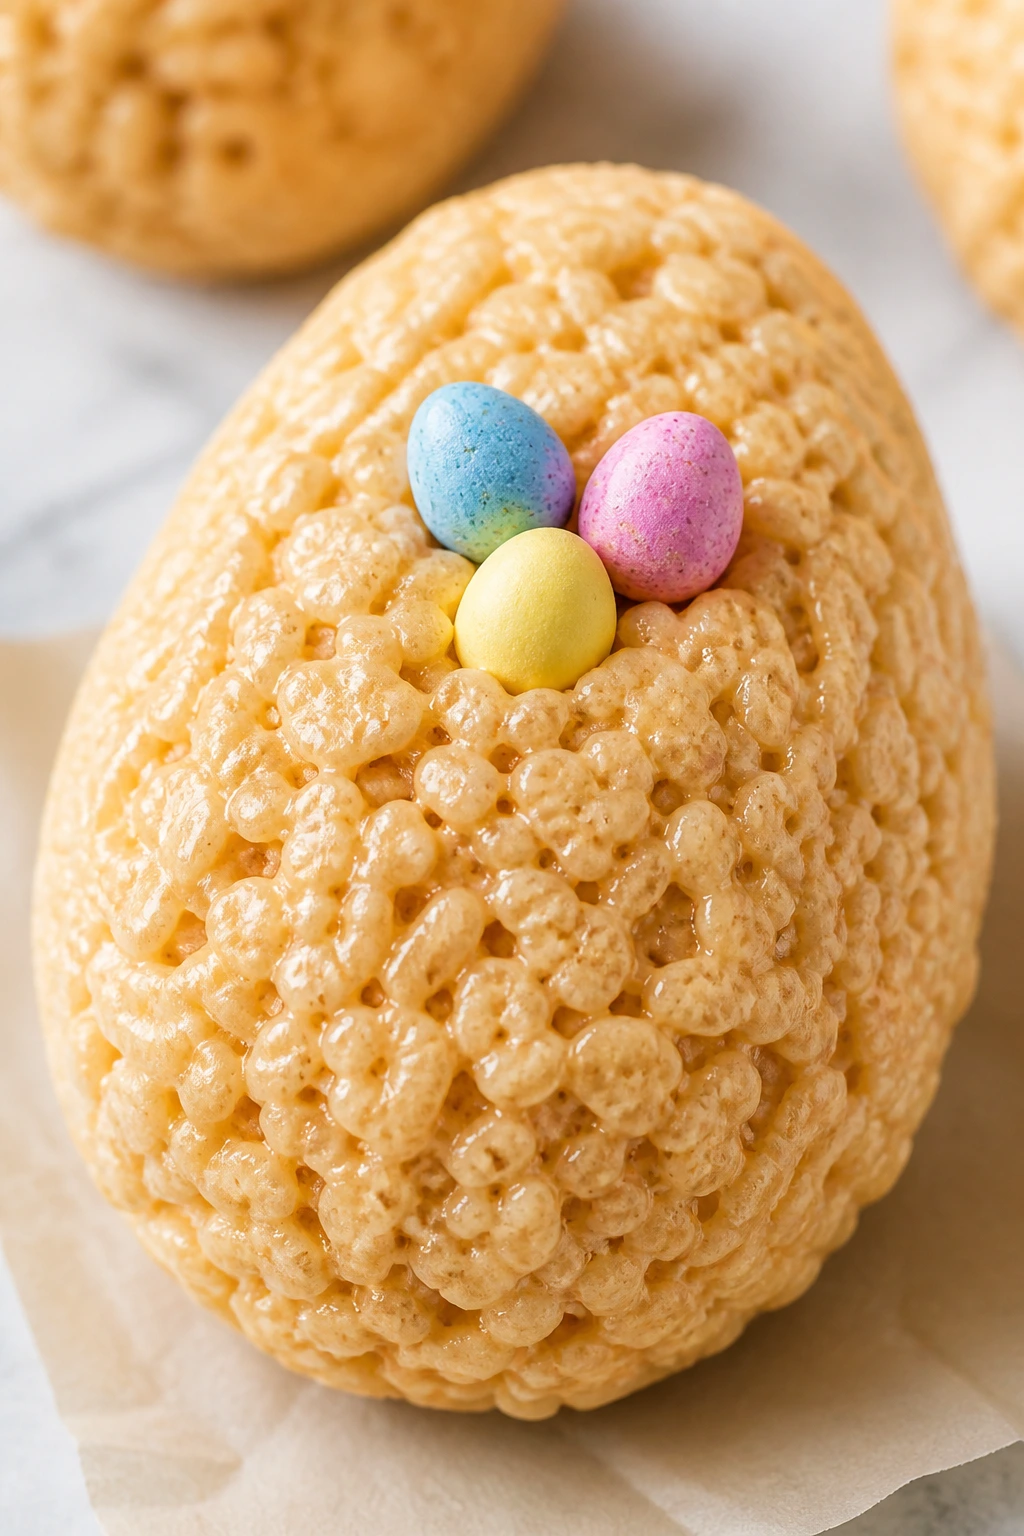
These are cheerful in a very direct way. The cereal gives them a light snap, the marshmallow keeps them chewy, and the egg shape makes them feel custom-made for the holiday without needing a mold from a specialty shop.
Why It Works:
Rice cereal treats are pantry baking at its most forgiving. Marshmallows and butter bind quickly, and the mixture can be shaped by hand while it’s still warm. A few mini eggs pressed on top make the whole pan look like a basket.
Key Ingredients:
- 6 cups crisp rice cereal
- 4 tablespoons unsalted butter
- 1 bag mini marshmallows, about 10 ounces
- 1 teaspoon vanilla extract
- 1/4 teaspoon salt
- 1 cup mini candy eggs or jelly beans
- 1 tablespoon butter for your hands
Quick Steps:
- Melt butter and marshmallows over low heat until smooth.
- Stir in vanilla and salt.
- Fold in cereal until coated.
- Shape the warm mixture into egg forms with buttered hands.
- Press candy eggs into the tops and cool on parchment.
Equipment for This Recipe:
- Large saucepan
- Parchment-lined tray
- Buttered hands or gloves
How to Serve This Dish:
Arrange them in a nest of shredded paper or on a tray with extra candy eggs scattered around. They work well as a kid-friendly dessert or a table centerpiece that gets eaten.
Pro Tips for This Recipe:
- Butter your hands well; sticky cereal is no joke.
- Shape them while warm so they hold together.
- Add the decorations before the surface sets.
Variations on This Dish:
- Chocolate Egg Treats: Mix in 1/4 cup cocoa powder with the marshmallow base.
- Peanut Butter Nest Treats: Stir in 1/2 cup peanut butter with the butter.
Common Mistakes to Avoid with This Dish:
- Using high heat: Marshmallows stiffen and taste burnt.
- Packing too tightly: The eggs turn hard instead of chewy.
10. Oatmeal Raisin Sandwich Cookies
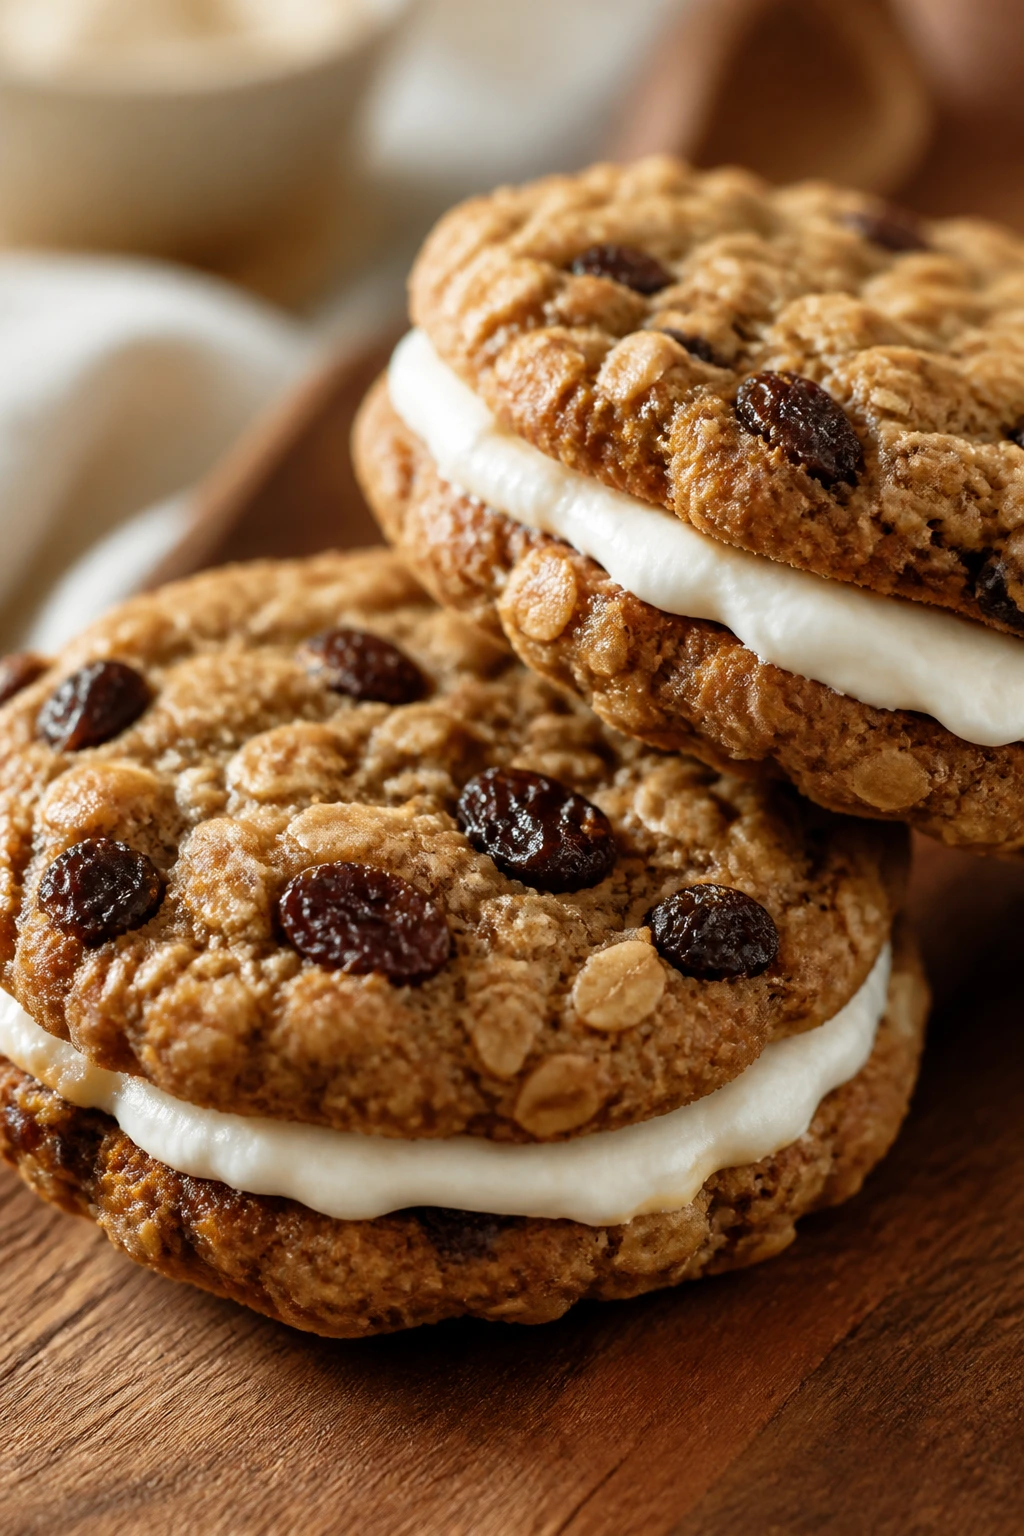
A tray of oatmeal raisin cookies can sound old-fashioned, then surprise you by being the first thing gone. Make them into sandwich cookies with a simple filling, and they suddenly feel more like a dessert plate than a lunchbox leftover.
Why It Works:
Oats, brown sugar, and cinnamon give the cookie base a warm, familiar taste. Raisins add chew, and a cream cheese filling makes the whole thing feel a little more Easter-brunch than weekday snack. Sandwiching two cookies also makes the portions look more generous.
Key Ingredients:
- 1 1/2 cups all-purpose flour
- 1 1/2 cups rolled oats
- 1 cup brown sugar
- 1/2 cup butter, softened
- 1 large egg
- 1 teaspoon cinnamon
- 1 teaspoon vanilla
- 1 cup raisins
- 4 ounces cream cheese
- 1 cup powdered sugar
Quick Steps:
- Cream butter and sugar, then beat in egg and vanilla.
- Mix in flour, oats, cinnamon, salt, and raisins.
- Scoop and bake at 350°F for 10 to 12 minutes.
- Cool fully.
- Beat cream cheese with powdered sugar, spread between two cookies, and sandwich together.
Equipment for This Recipe:
- Mixing bowl
- Baking sheets
- Cookie scoop
How to Serve This Dish:
Set them on a plate in pairs and dust the tops lightly with powdered sugar. They are sweet enough to stand alone, but they also sit well next to fruit.
Pro Tips for This Recipe:
- Cool the cookies before filling or the cream cheese softens too much.
- Slightly underbake for a softer bite.
- Soak raisins in hot water for 5 minutes if they’re dry and tough.
Variations on This Dish:
- Coconut Oat Sandwiches: Swap half the raisins for shredded coconut.
- Jam-Filled Version: Use raspberry jam instead of cream filling for a brighter finish.
Common Mistakes to Avoid with This Dish:
- Overbaking: Oat cookies go dry fast.
- Filling while warm: The sandwich slides apart.
11. Lemon Poppy Seed Muffin Tops
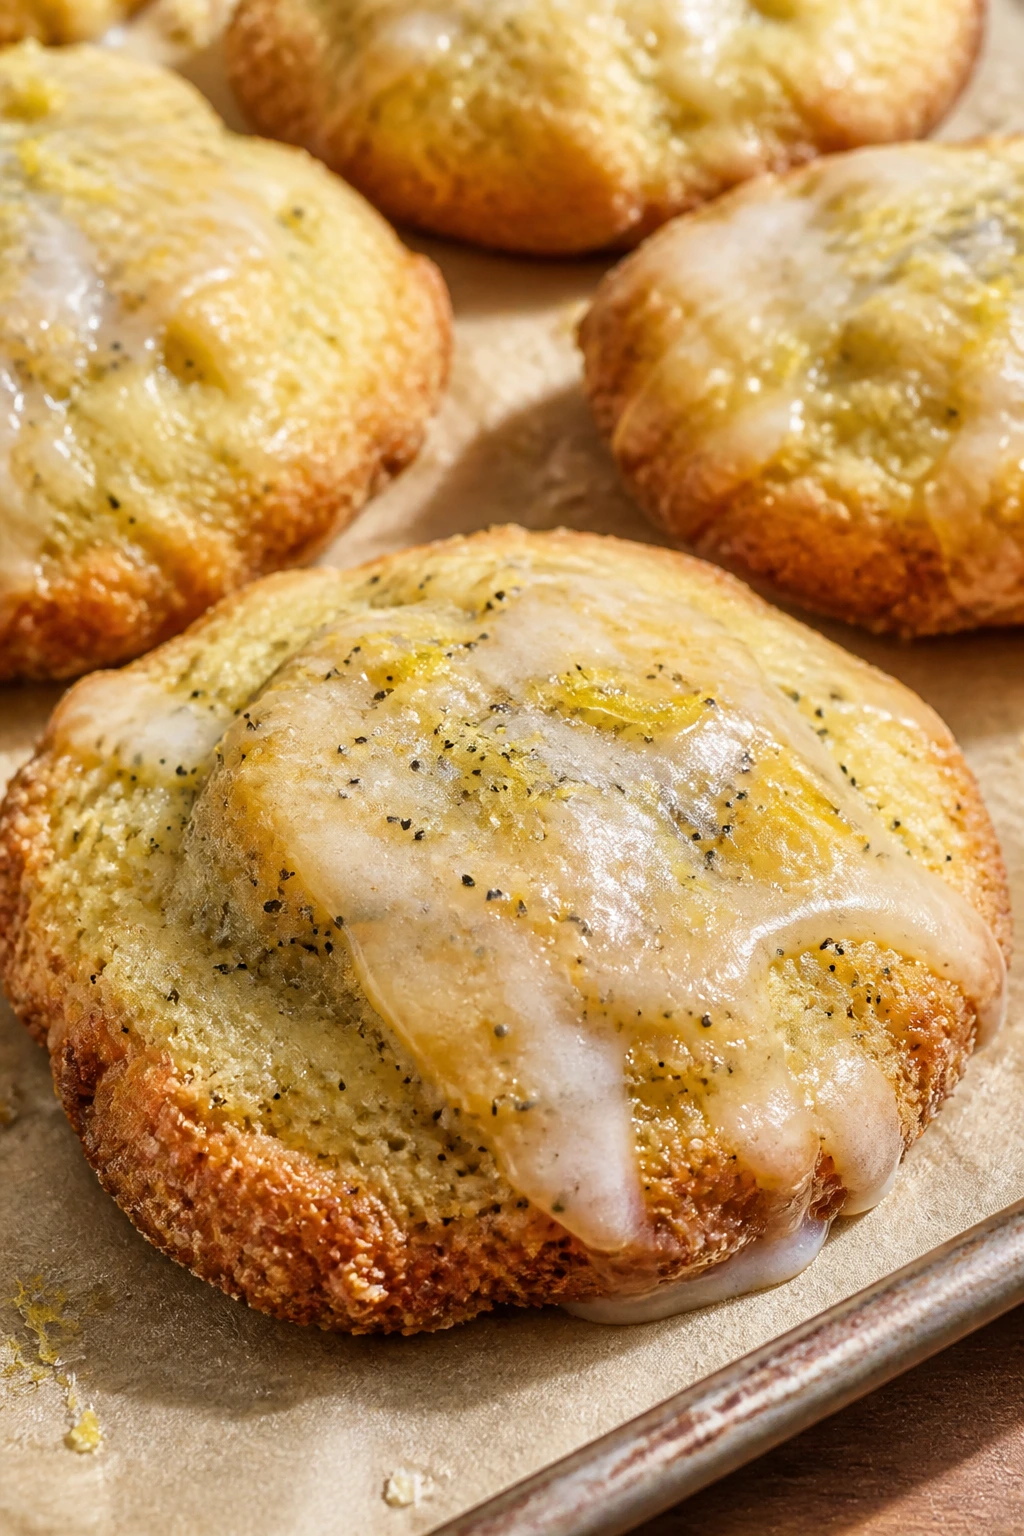
Muffin tops are the best part of the muffin anyway. Here, you get the crisp edge, the soft middle, and the lemon scent that makes the whole kitchen smell ready for spring. They’re casual, but not lazy.
Why It Works:
The batter uses the usual pantry lineup, but poppy seeds add a little texture that keeps each bite interesting. Baking them as muffin tops shortens the bake time and gives more browned surface area. A quick glaze can make them dessert-like without pushing them into full cake territory.
Key Ingredients:
- 2 cups all-purpose flour
- 3/4 cup granulated sugar
- 2 teaspoons baking powder
- 1/2 teaspoon salt
- 2 tablespoons poppy seeds
- 2 large eggs
- 3/4 cup milk
- 1/2 cup melted butter
- 2 tablespoons lemon juice
- 1 tablespoon lemon zest
Quick Steps:
- Heat the oven to 375°F and line a sheet pan.
- Whisk dry ingredients and poppy seeds.
- Stir eggs, milk, butter, lemon juice, and zest together.
- Fold wet into dry and scoop into mounds.
- Bake 12 to 15 minutes, until the tops spring back and edges go gold.
Equipment for This Recipe:
- Baking sheet
- Parchment paper
- Cookie scoop
How to Serve This Dish:
Serve them warm with a thin lemon glaze or plain with tea. They work as dessert or as a sweet end to brunch, which is a nice little overlap.
Pro Tips for This Recipe:
- Don’t overmix or the tops turn tough.
- A microplane gives finer zest and a cleaner lemon flavor.
- Glaze only after the muffin tops cool.
Variations on This Dish:
- Orange Poppy Seed Tops: Swap orange for lemon.
- Blueberry Lemon Tops: Fold in 3/4 cup blueberries before scooping.
Common Mistakes to Avoid with This Dish:
- Scooping too much batter per mound: They spread into blobs.
- Baking too low: The edges stay pale and soft.
12. Brown Sugar Peach Cobbler Bars
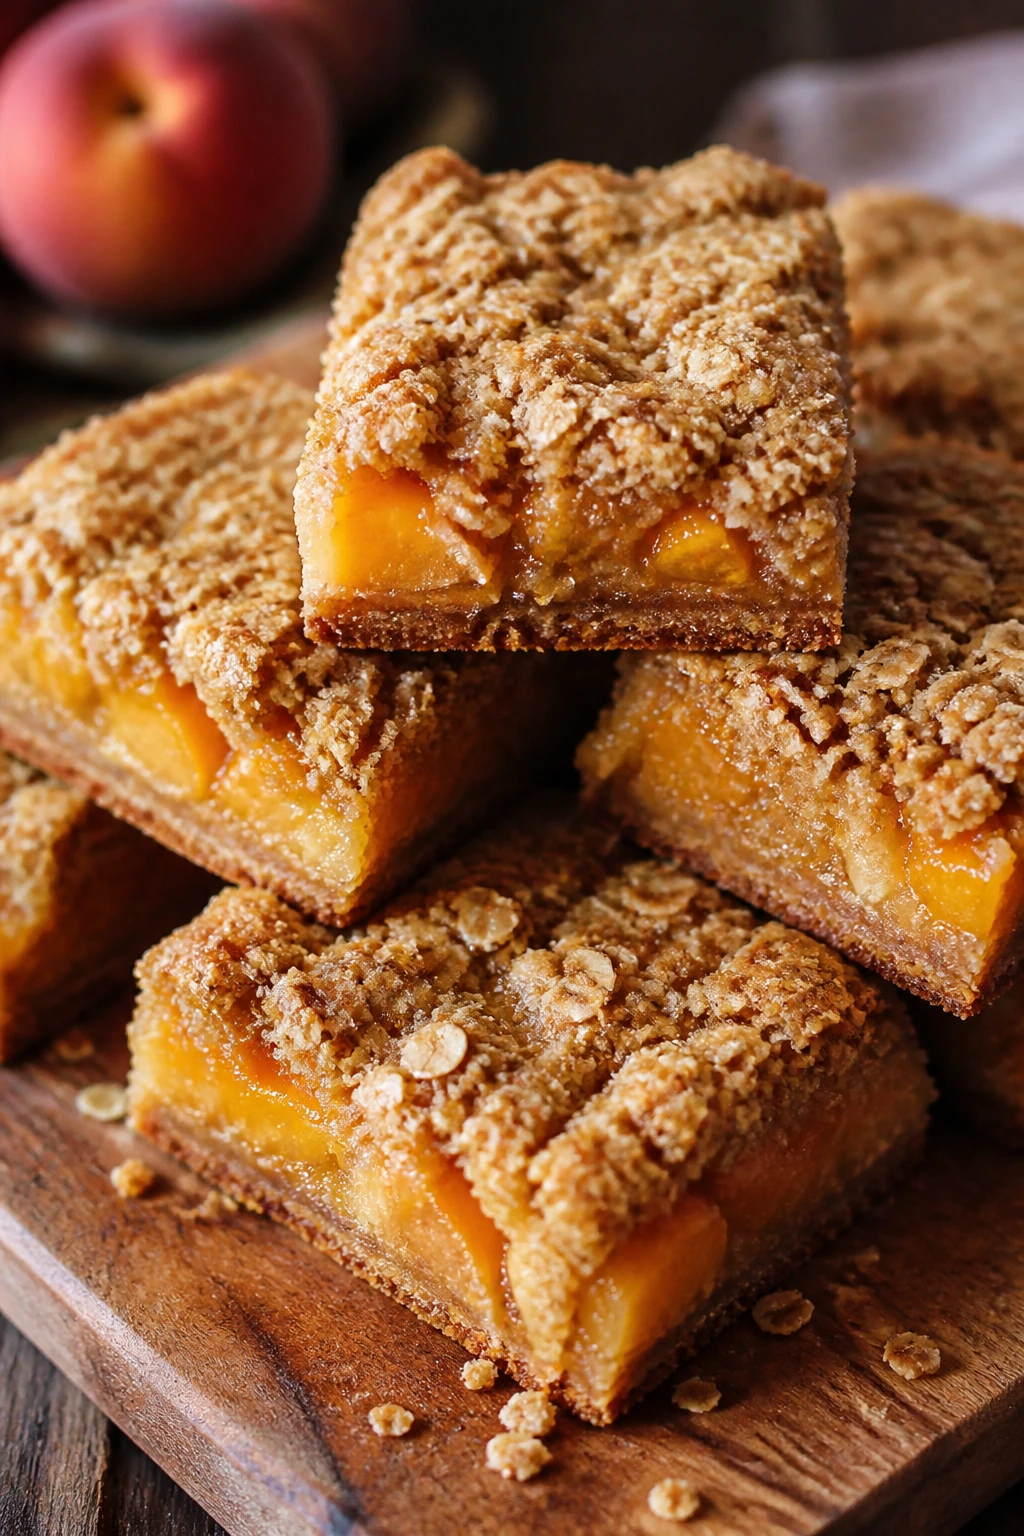
These bars taste like a cobbler cut into tidy squares. The brown sugar base brings a caramel note, and the peaches soften into the top layer so you get a jammy pocket instead of a runny filling.
Why It Works:
Canned peaches make this easy to pull from the pantry or freezer shelf with almost no planning. Oat crumbs on top mimic a cobbler crust, which keeps the texture somewhere between bar cookie and baked fruit dessert. That middle ground is useful when you need something sturdy for serving.
Key Ingredients:
- 2 cups all-purpose flour
- 1 cup old-fashioned oats
- 1 cup brown sugar
- 1/2 cup granulated sugar
- 1 cup butter, melted
- 1 teaspoon cinnamon
- 1 can sliced peaches, 15 ounces, drained
- 1 tablespoon cornstarch
- 1 teaspoon vanilla extract
Quick Steps:
- Heat the oven to 350°F and line a 9×9-inch pan.
- Mix flour, oats, sugars, cinnamon, and melted butter into crumbs.
- Press half into the pan.
- Toss peaches with cornstarch and vanilla, then spread over the base.
- Crumble the rest on top and bake 35 to 40 minutes.
Equipment for This Recipe:
- 9×9-inch pan
- Mixing bowl
- Spatula
How to Serve This Dish:
Serve them slightly warm, with or without vanilla ice cream. They cut cleaner after a full cool-down, but warm bars smell better.
Pro Tips for This Recipe:
- Drain the peaches well so the bars set.
- A little extra cinnamon works nicely with canned fruit.
- Line the pan with parchment for easy lifting.
Variations on This Dish:
- Apricot Cobbler Bars: Use canned apricots instead of peaches.
- Ginger Peach Bars: Add 1/2 teaspoon ground ginger for a sharper note.
Common Mistakes to Avoid with This Dish:
- Leaving too much syrup on the fruit: The center stays wet.
- Cutting too early: The filling spills.
13. Vanilla Pudding Parfaits
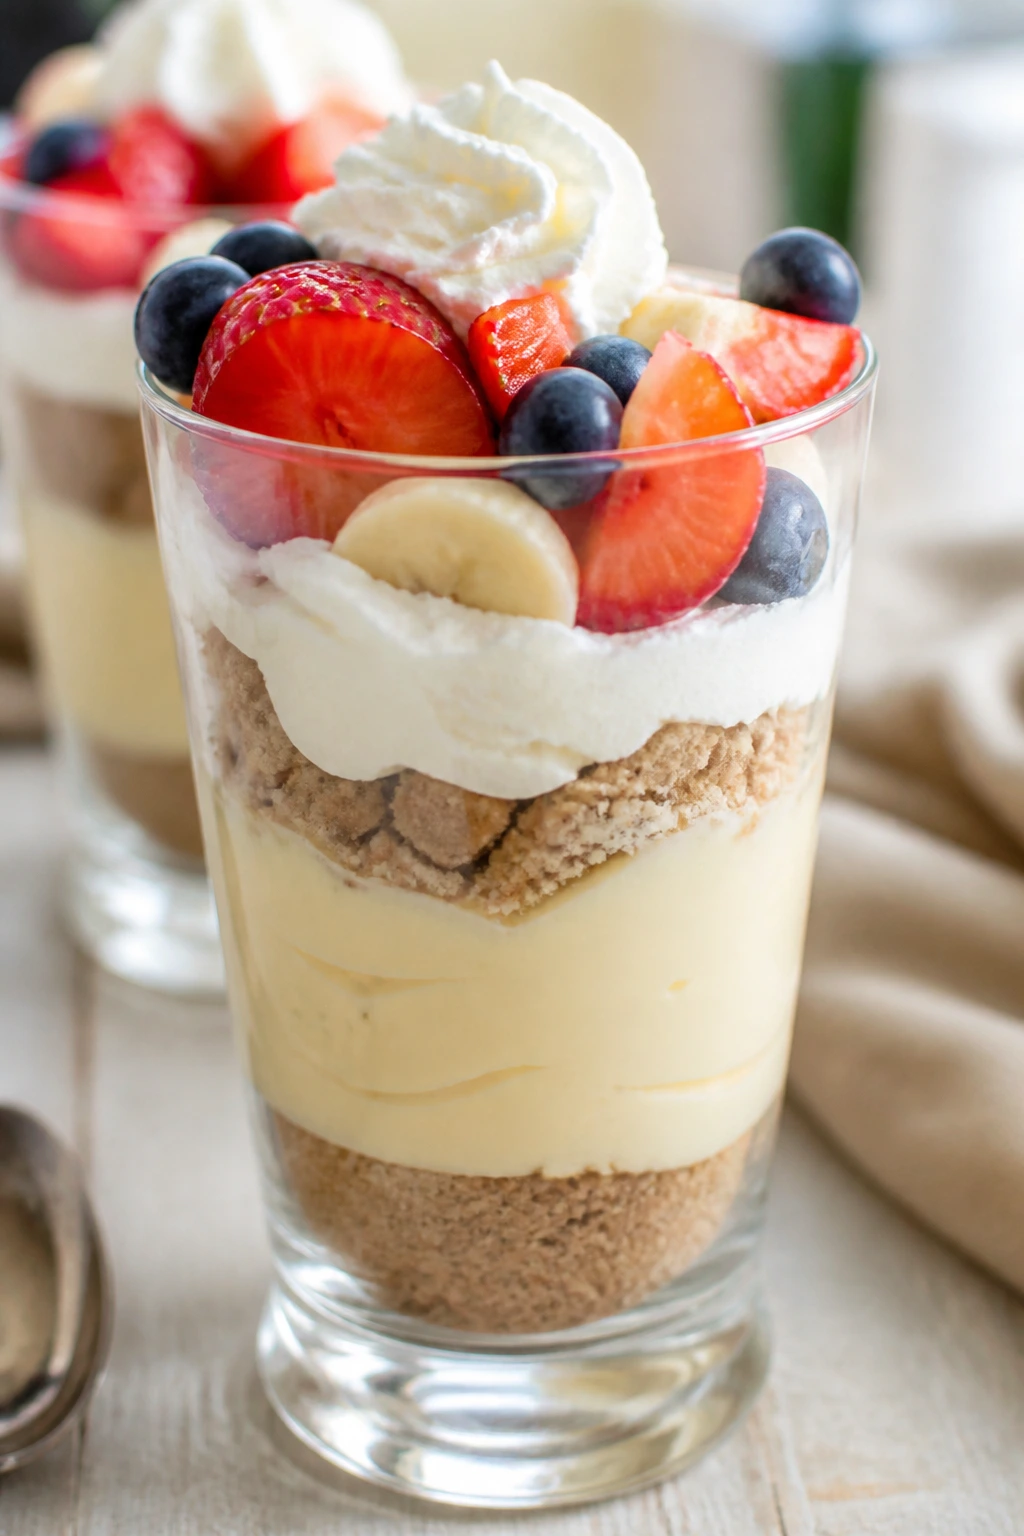
Parfaits are one of those desserts that look fussy in a glass and then turn out to be mostly assembly. That’s a gift on a crowded holiday table. You get creamy vanilla layers, something crunchy underneath, and a fruit topping that does the color work.
Why It Works:
Instant pudding keeps the recipe fast and predictable. Graham crumbs or crushed cookies give structure, while jam or fruit on top adds a bright, sticky finish. Clear cups make the layers visible, which is half the appeal.
Key Ingredients:
- 1 box instant vanilla pudding mix
- 2 cups cold milk
- 1 cup whipped topping
- 1 1/2 cups graham cracker crumbs
- 3 tablespoons melted butter
- 1/2 cup strawberry jam
- 1/2 cup sliced strawberries or raspberries
Quick Steps:
- Mix pudding with cold milk until thick.
- Fold in whipped topping.
- Combine crumbs and melted butter, then spoon into cups.
- Layer pudding and jam over the crumbs.
- Top with fruit and chill 30 minutes.
Equipment for This Recipe:
- Mixing bowl
- Whisk
- Small dessert cups
How to Serve This Dish:
Serve cold with small spoons or dessert forks. The layers show best in clear glasses, but even plain jars do the job.
Pro Tips for This Recipe:
- Chill the pudding mix well before layering.
- Use a thick jam so the middle doesn’t slide.
- Crumbs should be pressed lightly, not packed hard.
Variations on This Dish:
- Chocolate-Vanilla Parfaits: Swap in chocolate pudding for half the cups.
- Coconut Cream Parfaits: Stir shredded coconut into the crumb layer.
Common Mistakes to Avoid with This Dish:
- Warm milk: The pudding stays loose.
- Too much jam: The layers smear together.
14. Strawberry Jam Thumbprints
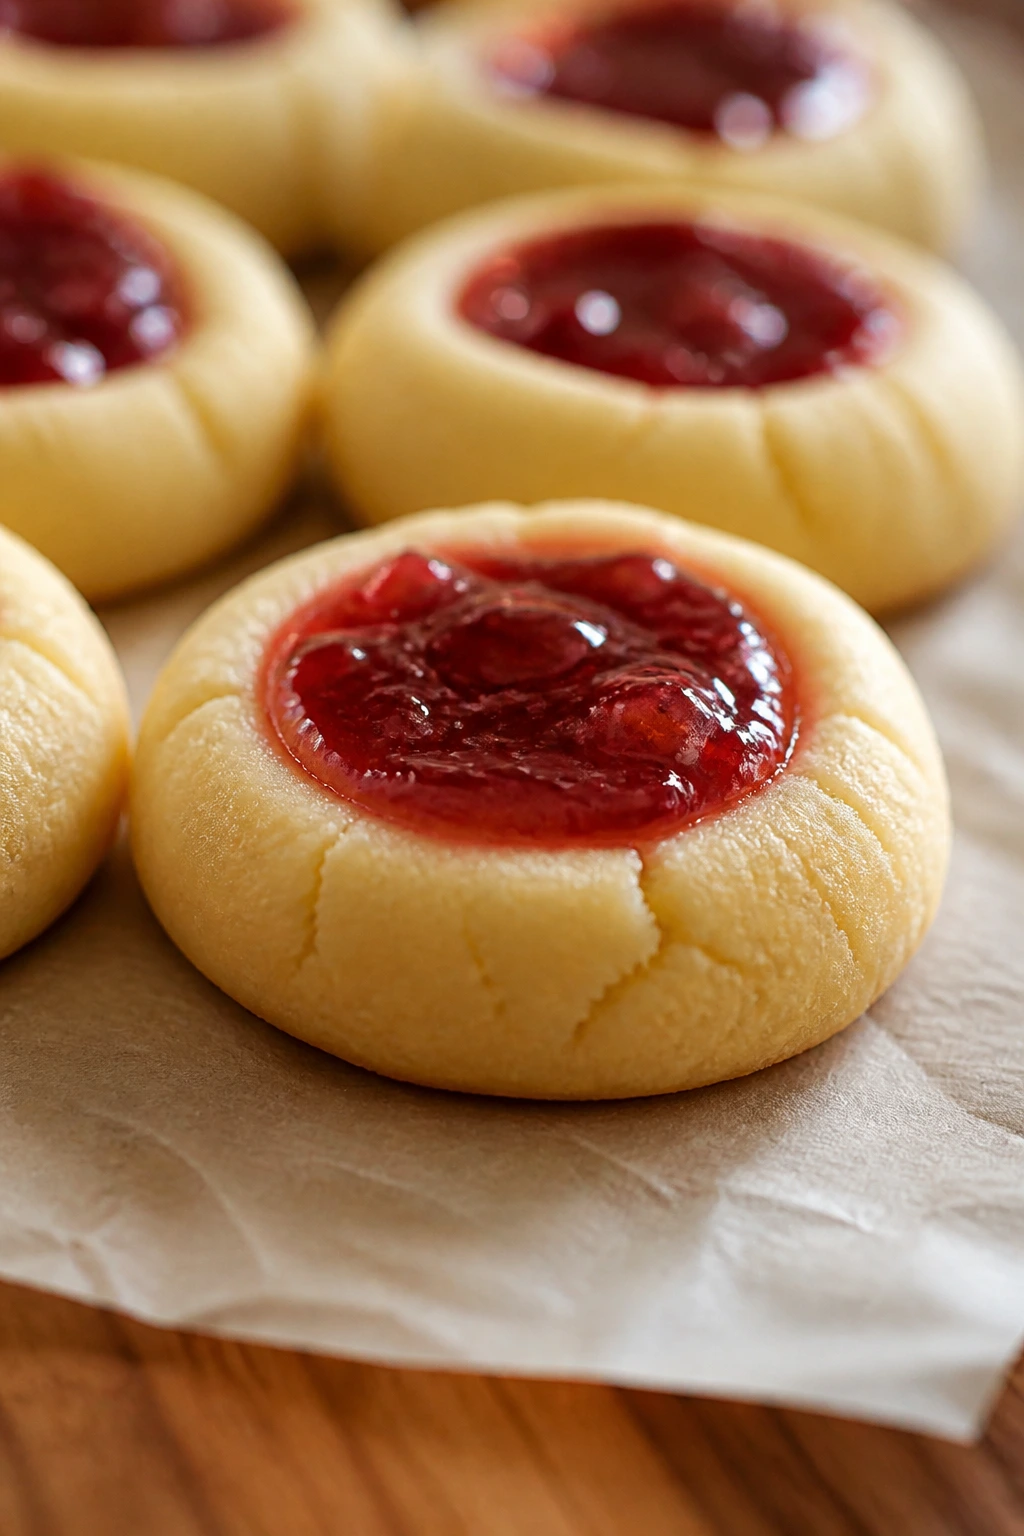
Thumbprints are tiny, tidy, and useful. A buttery cookie with a jam center is easy to eat, easy to stack, and easy to make look festive with one good jar of jam.
Why It Works:
The dough is simple enough to mix by hand. Jam adds the color and holiday feel, while the indentation keeps the filling from wandering. A short bake keeps the cookie tender rather than crunchy.
Key Ingredients:
- 1 cup butter, softened
- 2/3 cup granulated sugar
- 1 egg yolk
- 1 teaspoon vanilla extract
- 2 cups all-purpose flour
- 1/2 teaspoon salt
- 1/2 cup strawberry jam
Quick Steps:
- Cream butter and sugar.
- Beat in egg yolk and vanilla.
- Mix in flour and salt.
- Roll into balls, press a thumbprint in each, and fill with jam.
- Bake at 350°F for 12 to 14 minutes.
Equipment for This Recipe:
- Baking sheets
- Parchment paper
- Small spoon or teaspoon
How to Serve This Dish:
Arrange them in circles or rows so the jam centers line up. They make a nice companion to richer chocolate desserts because they bring fruit and brightness.
Pro Tips for This Recipe:
- Chill the dough 15 minutes if it feels too soft.
- Fill the wells lightly; overfilling causes spills.
- A thicker jam keeps the center glossy after baking.
Variations on This Dish:
- Apricot Thumbprints: Use apricot preserves for a softer color.
- Lemon Curd Thumbprints: If you have lemon curd, that works too.
Common Mistakes to Avoid with This Dish:
- Pressing too deep: The bottoms crack.
- Using runny jelly: It bakes out onto the pan.
15. Chocolate Bark With Pretzels and Candy Eggs
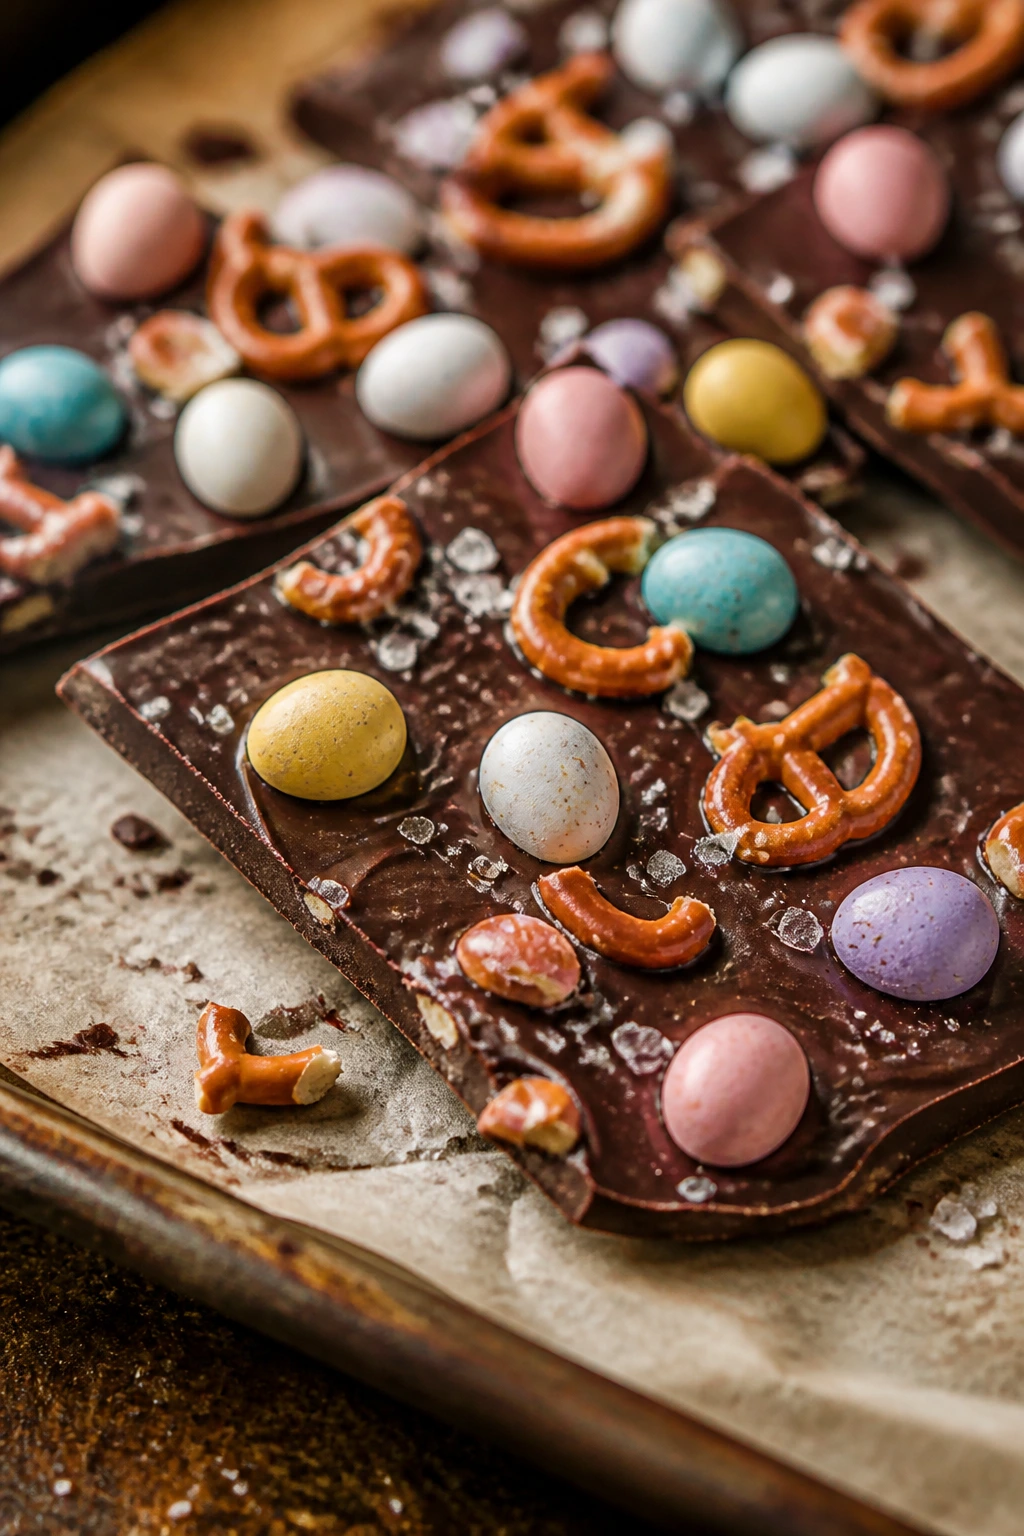
Chocolate bark is the dessert version of a snack mix with a better outfit. It breaks into jagged pieces, which means nobody expects perfect edges, and that’s part of the charm. The pretzels bring salt, the candy eggs bring color, and the chocolate ties it together.
Why It Works:
Melted chocolate sets fast, so this is a good last-minute sweet. Pretzels keep the texture snappy and stop the bark from feeling one-note. A handful of candy eggs turns a plain slab into a holiday tray piece without extra baking.
Key Ingredients:
- 12 ounces semi-sweet chocolate chips
- 1 teaspoon coconut oil, optional
- 1 cup mini pretzels, lightly crushed
- 1/2 cup roasted peanuts
- 1/2 cup candy eggs
- 1 tablespoon flaky salt, optional
Quick Steps:
- Line a baking sheet with parchment.
- Melt chocolate with coconut oil until smooth.
- Spread into a thin layer.
- Scatter pretzels, peanuts, candy eggs, and salt over the top.
- Chill until set, then break into shards.
Equipment for This Recipe:
- Baking sheet
- Parchment paper
- Microwave-safe bowl
How to Serve This Dish:
Pile the shards in a bowl or tuck them into cellophane bags for gifting. It looks especially good mixed with a few plain cookies on a dessert tray.
Pro Tips for This Recipe:
- Spread the chocolate thin or the bark gets clunky.
- Press toppings in gently so they stick.
- Use parchment, not wax paper, for cleaner release.
Variations on This Dish:
- White-Chocolate Easter Bark: Swap the base for white chocolate chips.
- Cookie Crumble Bark: Sprinkle crushed shortbread over the chocolate before chilling.
Common Mistakes to Avoid with This Dish:
- Overcrowding toppings: The chocolate can’t hold them all.
- Stirring while it sets: Leave it alone so it firms evenly.
16. Spiced Molasses Cookies
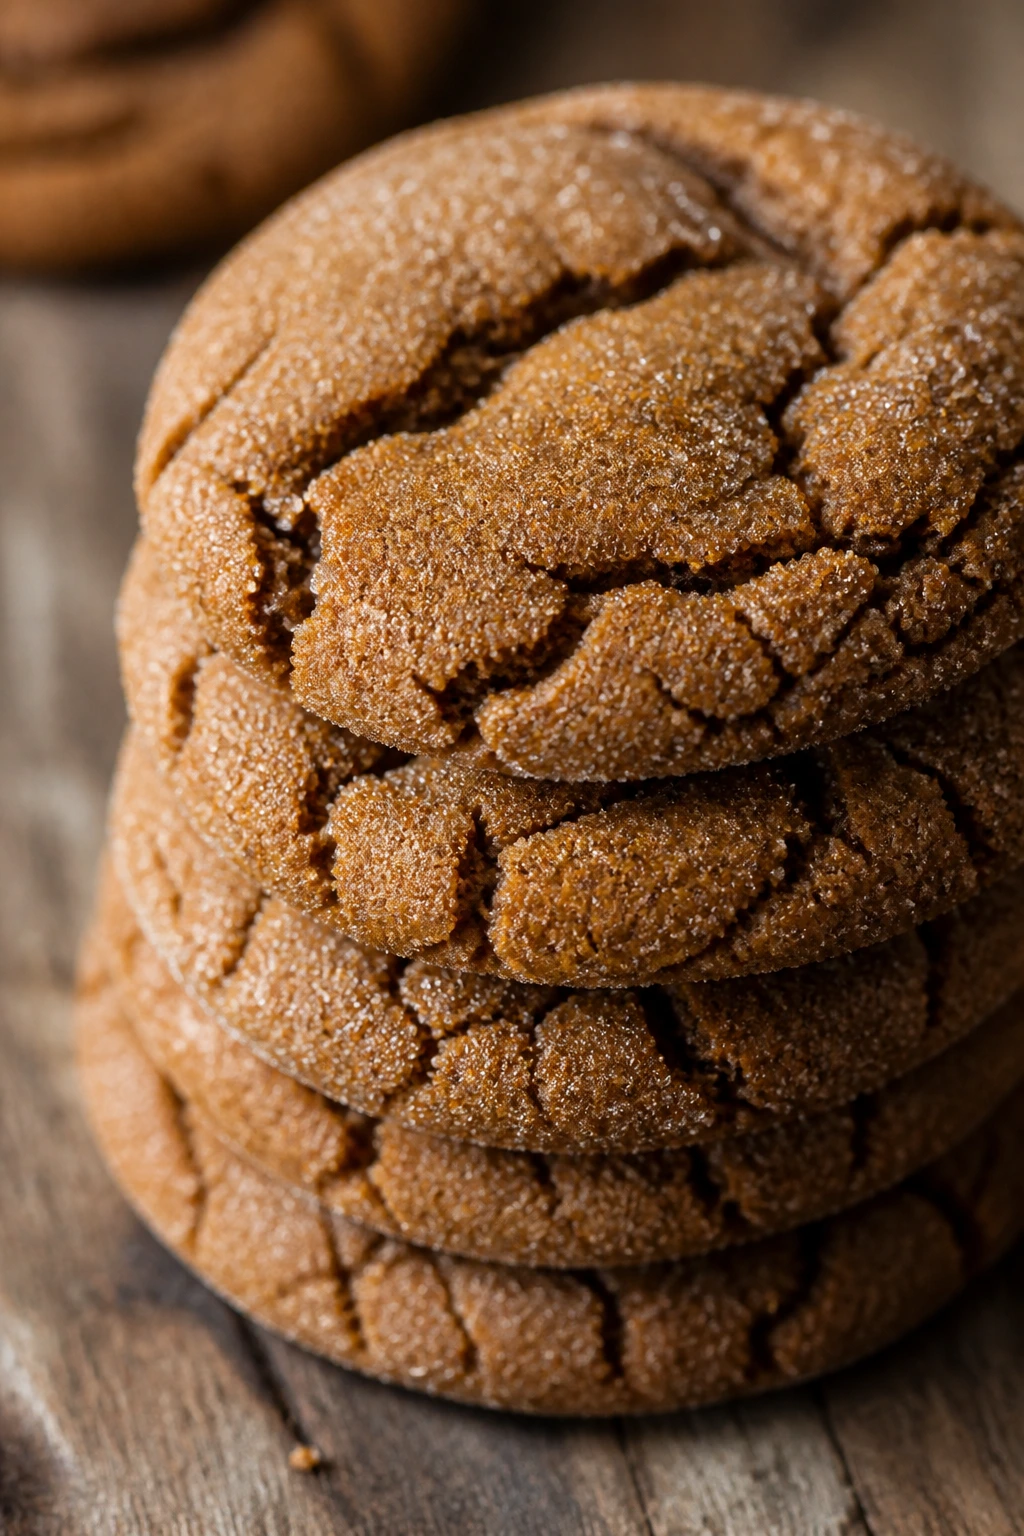
Molasses cookies bring a darker, deeper flavor to a holiday table that can get crowded with lemon and sugar. They smell like ginger, cinnamon, and brown sugar warming in the oven, which is a very specific kind of comfort.
Why It Works:
Molasses keeps these cookies soft and gives them a rich color. The spices carry well because the dough is simple, and rolling the cookies in sugar before baking gives a little sparkle that reads nicely next to brighter Easter treats. They also stay chewy for days.
Key Ingredients:
- 2 1/4 cups all-purpose flour
- 1 teaspoon baking soda
- 2 teaspoons ground ginger
- 1 teaspoon cinnamon
- 1/4 teaspoon cloves
- 3/4 cup butter, softened
- 1 cup brown sugar
- 1/4 cup molasses
- 1 egg
- 1/3 cup granulated sugar for rolling
Quick Steps:
- Whisk flour, baking soda, spices, and salt.
- Cream butter and brown sugar.
- Beat in molasses and egg.
- Mix in dry ingredients and chill 20 minutes.
- Roll balls in granulated sugar and bake at 350°F for 10 to 12 minutes.
Equipment for This Recipe:
- Mixing bowl
- Baking sheet
- Cookie scoop
How to Serve This Dish:
Serve them alongside lighter desserts so the spice doesn’t get lost. A mug of coffee or strong black tea suits them better than milk, though milk still works.
Pro Tips for This Recipe:
- Chill the dough or the cookies spread too much.
- Pull them when the centers still look soft.
- Use fresh spices; tired spices flatten the flavor.
Variations on This Dish:
- Orange Molasses Cookies: Add orange zest for a brighter edge.
- Ginger-Heavy Version: Increase the ginger by 1/2 teaspoon if you like a sharper bite.
Common Mistakes to Avoid with This Dish:
- Baking until firm: They’ll end up dry once cooled.
- Using old molasses that tastes dusty: Fresh molasses is smoother and deeper.
17. Banana Bread With Cream Cheese Swirl
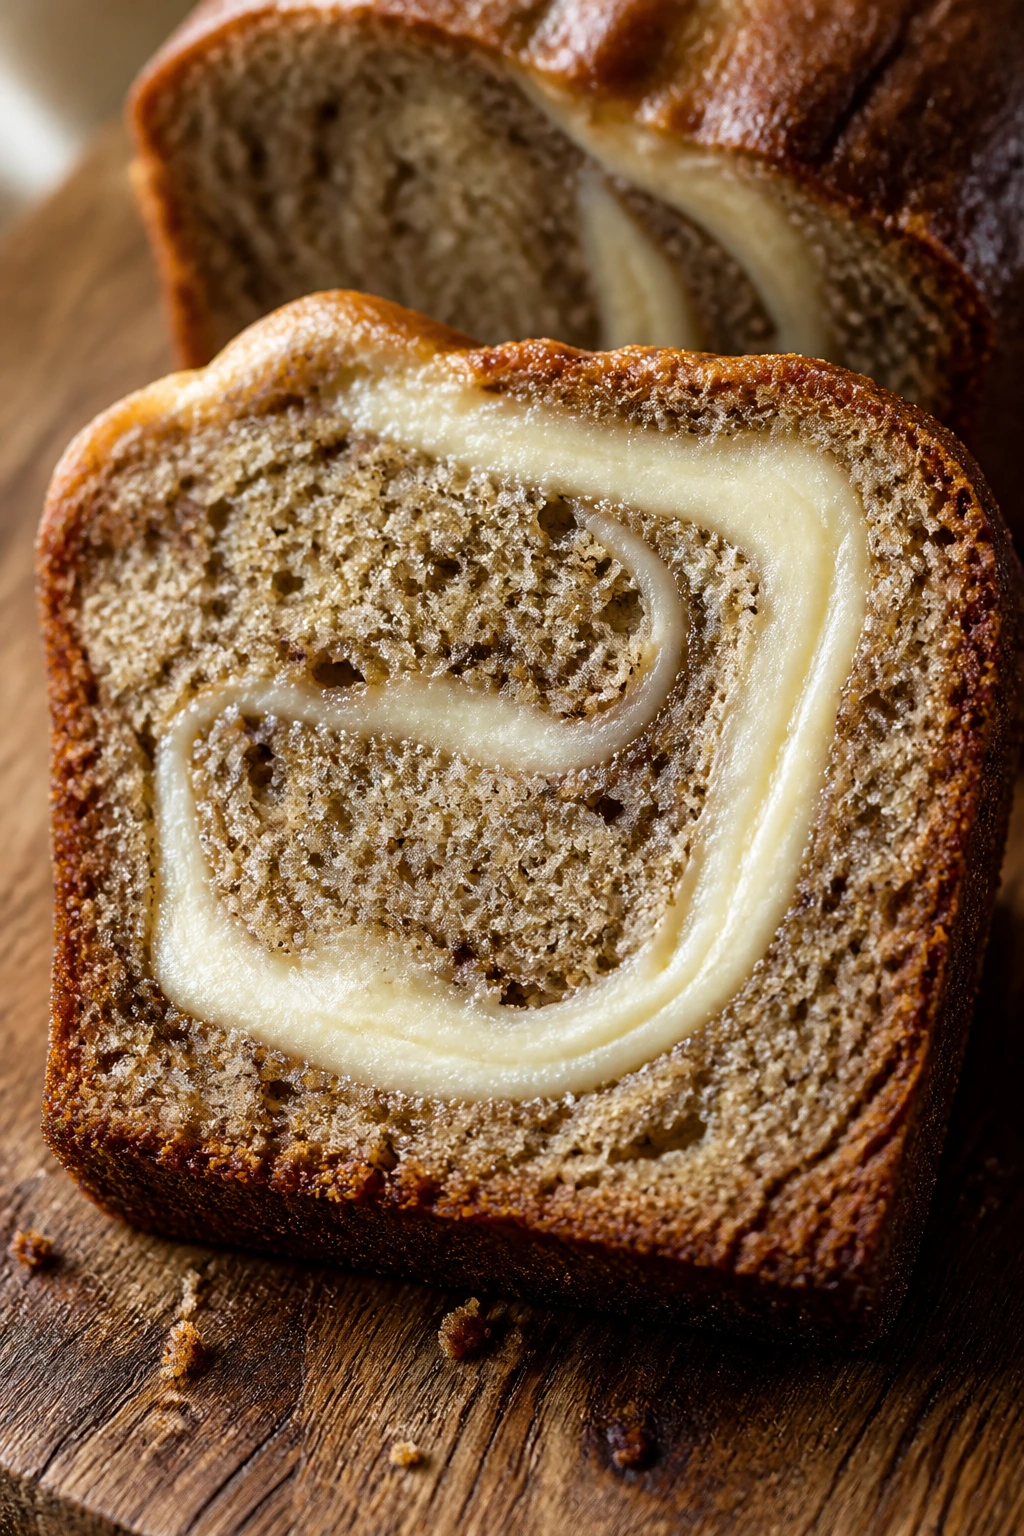
Banana bread is already the kind of bake people finish quickly with a knife in one hand. Add a cream cheese swirl and it becomes dessert enough for Easter, especially if you slice it thick and let the middle do the talking.
Why It Works:
Bananas add moisture, so the loaf stays tender without needing a special ingredient list. The cream cheese swirl cuts through the sweetness and makes each slice look bakery-made. It’s also a smart use for bananas that have gone very spotty on the counter.
Key Ingredients:
- 2 cups all-purpose flour
- 1 teaspoon baking soda
- 1/2 teaspoon salt
- 3 ripe bananas, mashed
- 3/4 cup brown sugar
- 1/2 cup melted butter
- 2 large eggs
- 1 teaspoon vanilla extract
- 4 ounces cream cheese
- 1/4 cup powdered sugar
Quick Steps:
- Heat oven to 350°F and line a loaf pan.
- Mix dry ingredients in one bowl.
- Whisk bananas, sugar, butter, eggs, and vanilla in another.
- Stir together, then top with a cream cheese mixture made from cream cheese and powdered sugar.
- Swirl lightly and bake 50 to 60 minutes.
Equipment for This Recipe:
- Loaf pan
- Mixing bowls
- Butter knife for swirling
How to Serve This Dish:
Cut it thick and serve at room temperature. A little extra cream cheese on the side turns it into a stronger dessert and less of a breakfast loaf.
Pro Tips for This Recipe:
- Use bananas that are dark and soft, not just yellow.
- Swirl gently so the cream cheese stays visible.
- Cool the loaf completely before slicing or the center tears.
Variations on This Dish:
- Chocolate Chip Banana Bread: Add 3/4 cup chips for a sweeter version.
- Cinnamon Swirl Version: Mix cinnamon into the cream cheese layer.
Common Mistakes to Avoid with This Dish:
- Using under-ripe bananas: The loaf tastes bland.
- Slicing warm: The crumb gets gummy.
18. Cherry Dump Cake
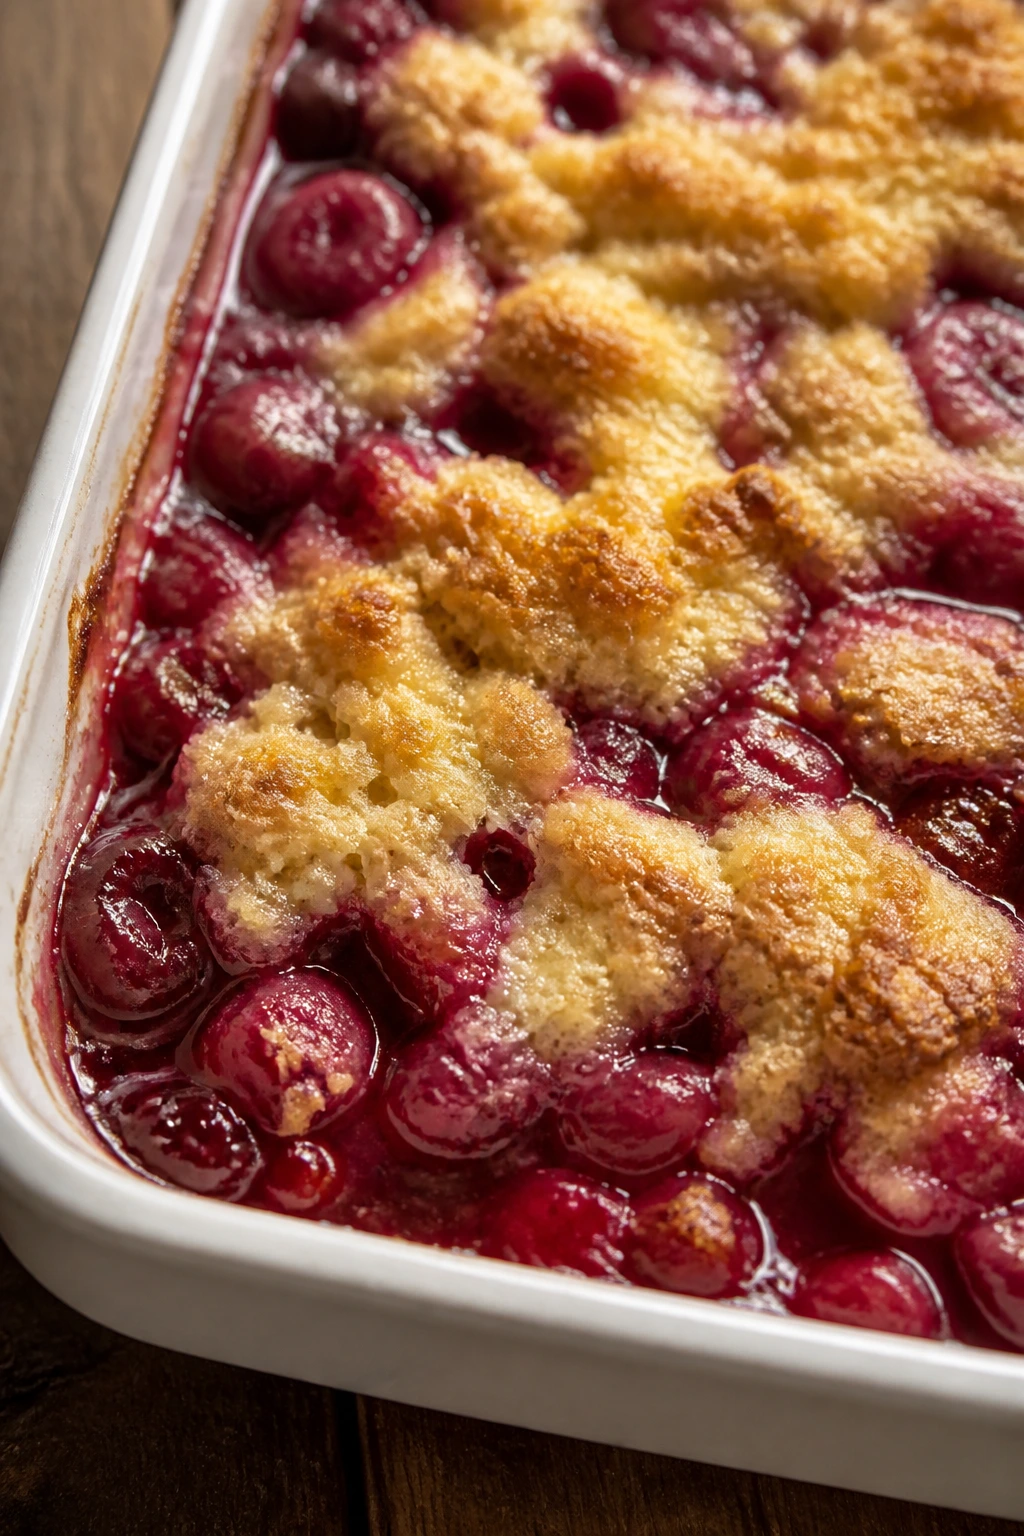
Dump cake sounds plain, but the finished dessert tastes like cherry cobbler with less work and fewer dishes. The fruit bubbles up around the cake mix, and the top turns golden and craggy in a way that looks homey on purpose.
Why It Works:
Canned pie filling and boxed cake mix make this a pantry-friendly shortcut with almost no prep. Butter melts through the dry mix during baking, which creates pockets of cake and crisp topping. A little almond extract gives the cherries a deeper flavor that matters more than most people expect.
Key Ingredients:
- 2 cans cherry pie filling, 21 ounces each
- 1 box yellow cake mix
- 3/4 cup unsalted butter, sliced thin
- 1/2 teaspoon almond extract
- 1/2 cup chopped pecans, optional
Quick Steps:
- Heat oven to 350°F and grease a 9×13-inch dish.
- Spread cherry filling in the dish and stir in almond extract.
- Sprinkle cake mix evenly over the top.
- Lay butter slices across the surface.
- Bake 40 to 45 minutes until the top is browned and the filling bubbles at the edges.
Equipment for This Recipe:
- 9×13-inch baking dish
- Spoon
- Sharp knife for slicing butter
How to Serve This Dish:
Scoop it warm into bowls. Vanilla ice cream is the obvious partner, but whipped cream does the job if you need less fuss.
Pro Tips for This Recipe:
- Cover the cake mix evenly with butter so dry patches don’t stay powdery.
- Use a spoon to spread the cherry filling all the way to the corners.
- Let it rest 10 minutes before serving so the filling thickens a little.
Variations on This Dish:
- Peach Dump Cake: Swap in peach pie filling for a softer, lighter flavor.
- Berry Mix Dump Cake: Use a mixed berry filling if you want less sweetness.
Common Mistakes to Avoid with This Dish:
- Stirring after adding the cake mix: The topping won’t bake correctly.
- Using too little butter: Dry spots stay raw.
19. Marshmallow Coconut Crispy Nests
These nests are a cousin of the cereal treat, but the coconut makes them look a little more finished and a little more Easter-specific. They’re sweet, chewy, and sturdy enough to hold mini eggs without collapsing.
Why It Works:
Marshmallow binds the cereal together, while shredded coconut adds texture and a pale color that reads like nest material. Nest-shaping is easier than it sounds; a muffin tin or a spoon can do most of the work. The shape does all the holiday styling for you.
Key Ingredients:
- 4 cups crisp rice cereal
- 3 cups shredded coconut
- 4 tablespoons butter
- 1 bag mini marshmallows, 10 ounces
- 1 teaspoon vanilla extract
- 1/4 teaspoon salt
- 1 cup mini candy eggs
Quick Steps:
- Line a muffin tin or baking tray with parchment.
- Melt butter and marshmallows on low heat.
- Stir in vanilla, salt, cereal, and coconut.
- Shape into nests using buttered fingers or a spoon.
- Chill briefly, then add candy eggs to the center.
Equipment for This Recipe:
- Muffin tin or parchment-lined tray
- Large saucepan
- Buttered spoon or gloves
How to Serve This Dish:
Put them on a tray with a few sprigs of herbs or shredded paper underneath if you want the look to feel more basket-like. They’re a good one-bite dessert after a larger meal.
Pro Tips for This Recipe:
- Toast the coconut lightly first if you want more flavor.
- Shape the middle while the mixture is warm, not after it cools.
- Add the candy eggs last so they stay bright.
Variations on This Dish:
- Chocolate Coconut Nests: Add 2 tablespoons cocoa to the marshmallow mixture.
- Almond-Coconut Version: Stir in a drop of almond extract for a bakery note.
Common Mistakes to Avoid with This Dish:
- Letting the mix cool before shaping: It cracks instead of forming a nest.
- Using too much coconut: The nests turn dry and loose.
20. Cocoa Peanut Clusters
These are the sort of candy-adjacent bites people keep reaching for by mistake because they don’t look like much at first. Then the cocoa hits, the peanut crunch lands, and suddenly the bowl is empty.
Why It Works:
Peanuts and cocoa are pantry friends, and a little sweet binder turns them into something that feels like homemade candy. Clusters are forgiving on shape, so there’s no need for precision. A tray of them can sit next to fancier desserts and still get attention.
Key Ingredients:
- 2 cups roasted peanuts
- 1/2 cup unsweetened cocoa powder
- 1 cup powdered sugar
- 1/2 cup melted butter
- 1/4 cup milk
- 1 teaspoon vanilla extract
- Pinch of salt
Quick Steps:
- Mix cocoa, powdered sugar, and salt.
- Stir in butter, milk, and vanilla until a thick paste forms.
- Fold in peanuts until coated.
- Drop spoonfuls onto parchment.
- Chill until firm.
Equipment for This Recipe:
- Mixing bowl
- Spoon
- Parchment-lined tray
How to Serve This Dish:
Serve them in mini paper cups so the sticky edges stay neat. They make a good contrast to fruit-forward desserts on the same tray.
Pro Tips for This Recipe:
- Add peanuts last so they stay chunky.
- If the mixture feels too loose, add more powdered sugar a tablespoon at a time.
- Keep clusters small; they set better.
Variations on This Dish:
- Salted Peanut Clusters: Add flaky salt on top before chilling.
- Chocolate-Oat Clusters: Stir in a handful of oats for more chew.
Common Mistakes to Avoid with This Dish:
- Too much liquid: The clusters won’t hold.
- Making them huge: They break apart when picked up.
21. Magic Cookie Bars
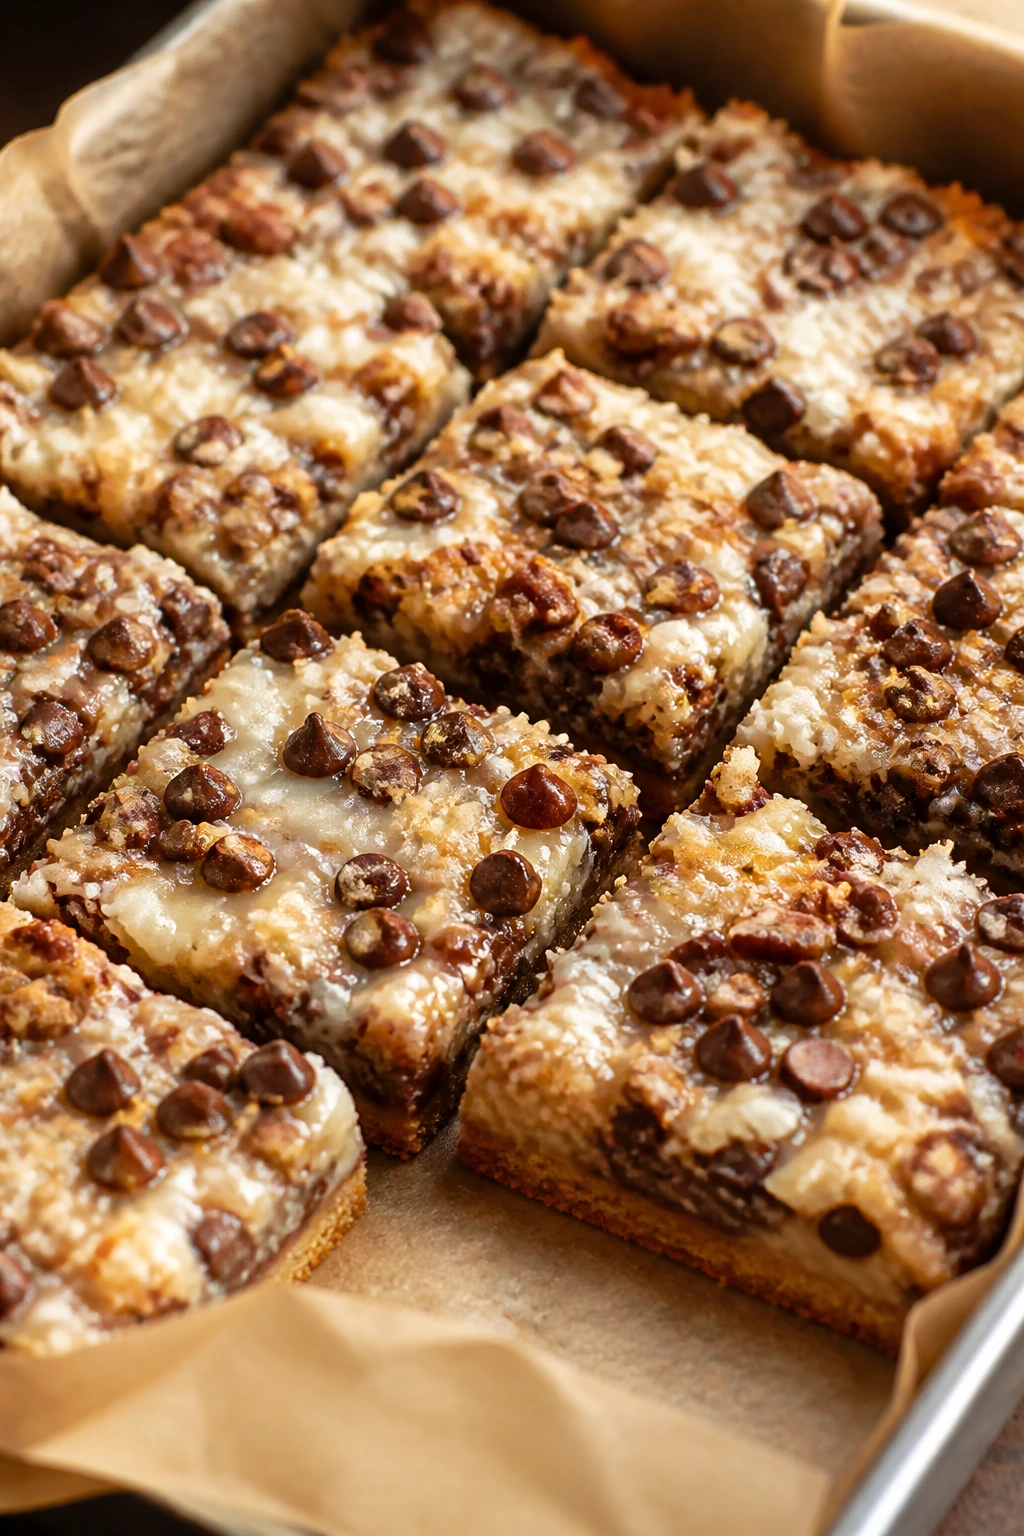
Magic cookie bars are popular for a reason, and it isn’t magic at all. It’s butter, graham crumbs, condensed milk, chocolate, coconut, and nuts building a pan of sweet layers that slice cleanly once cool.
Why It Works:
Each layer does one thing well. Graham crumbs create the base, condensed milk binds the toppings, and the chocolate-coconut-nut combination gives enough texture that no single bite feels dull. They’re rich, so a small square goes a long way.
Key Ingredients:
- 1 1/2 cups graham cracker crumbs
- 1/2 cup melted butter
- 1 can sweetened condensed milk, 14 ounces
- 1 cup semi-sweet chocolate chips
- 1 cup shredded coconut
- 1/2 cup chopped pecans or walnuts
Quick Steps:
- Heat oven to 350°F and line a 9×13-inch pan.
- Mix crumbs and butter, then press into the pan.
- Pour condensed milk over the crust.
- Sprinkle chocolate chips, coconut, and nuts on top.
- Bake 25 to 30 minutes until the top is golden and bubbling.
Equipment for This Recipe:
- 9×13-inch pan
- Parchment paper
- Spatula
How to Serve This Dish:
Cut into small bars. They’re dense enough that big pieces can feel heavy after a meal.
Pro Tips for This Recipe:
- Press the crust firmly so it slices neatly.
- Cool fully before cutting or the layers shift.
- Toast the coconut first if you want a deeper flavor.
Variations on This Dish:
- Butterscotch Cookie Bars: Swap half the chocolate chips for butterscotch chips.
- Pretzel Crunch Bars: Replace half the coconut with crushed pretzels.
Common Mistakes to Avoid with This Dish:
- Cutting warm bars: The layers slide apart.
- Using too little condensation on the crust: The base crumbles.
22. Apple Crisp With Oat Topping

Apple crisp doesn’t need spring berries to fit Easter. It brings warm fruit, a crunchy top, and the kind of aroma that makes people linger in the kitchen for “just a minute” and then ask for another spoonful.
Why It Works:
Apples soften into a thick filling while the oat topping stays crisp at the edges. Brown sugar and cinnamon do most of the flavor work, which is why this dessert feels comfortable in a pantry-based lineup. It’s also easy to scale up if the table is crowded.
Key Ingredients:
- 6 medium apples, peeled and sliced
- 1/3 cup granulated sugar
- 1 tablespoon lemon juice
- 1 teaspoon cinnamon
- 1 cup rolled oats
- 3/4 cup all-purpose flour
- 3/4 cup brown sugar
- 1/2 cup butter, melted
- 1/4 teaspoon salt
Quick Steps:
- Heat the oven to 350°F and grease an 8×8-inch dish.
- Toss apples with sugar, lemon juice, and cinnamon.
- Spread into the dish.
- Mix oats, flour, brown sugar, salt, and melted butter into crumbs.
- Scatter over apples and bake 35 to 45 minutes.
Equipment for This Recipe:
- Baking dish
- Mixing bowl
- Peeler and knife
How to Serve This Dish:
Serve it warm in bowls, preferably with vanilla ice cream or a spoon of whipped cream. The crisp top softens as it sits, so eat it while the edges still crackle.
Pro Tips for This Recipe:
- Slice the apples evenly so they cook at the same rate.
- Use tart apples if you want the filling to stay lively.
- Let it rest 10 minutes before serving so the juices thicken.
Variations on This Dish:
- Pear Crisp: Swap in pears if that’s what you have.
- Nut-Topped Crisp: Add chopped pecans to the oat mixture.
Common Mistakes to Avoid with This Dish:
- Using apples cut too thick: They stay hard in the middle.
- Skipping the rest: The filling runs everywhere.
23. Churro Biscotti
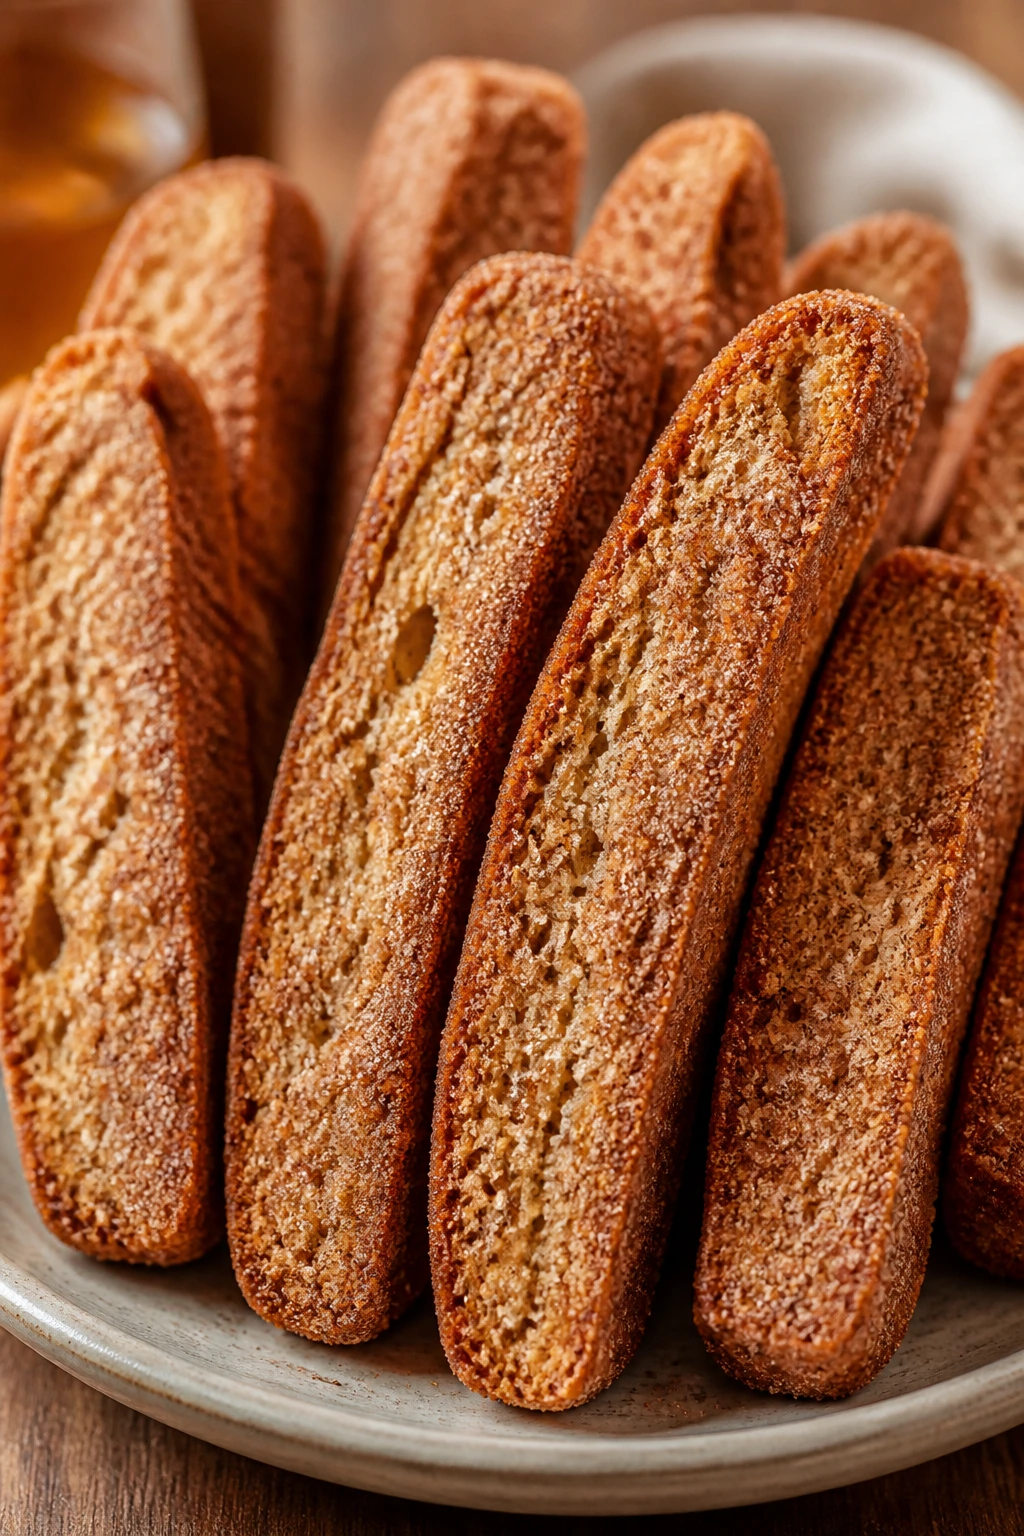
Biscotti may not be the first dessert you think of for Easter, which is exactly why it works. These are crunchy, cinnamon-sugar cookies meant for coffee, tea, or dessert boards, and the churro flavor makes them feel a little playful.
Why It Works:
Biscotti bake twice, which gives them their dry, dunkable texture. Cinnamon sugar on the outside mimics a churro without frying anything. They keep well, so they’re useful when your dessert table needs something that can wait.
Key Ingredients:
- 2 cups all-purpose flour
- 3/4 cup granulated sugar
- 1 teaspoon baking powder
- 1 teaspoon cinnamon
- 2 large eggs
- 1 teaspoon vanilla extract
- 1/4 cup melted butter
- 1/2 cup cinnamon sugar for rolling
Quick Steps:
- Heat the oven to 350°F and line a baking sheet.
- Mix flour, sugar, baking powder, cinnamon, and salt.
- Stir in eggs, vanilla, and melted butter to form a dough.
- Shape into a log, bake 25 minutes, cool briefly, then slice.
- Bake the slices again at 325°F until crisp.
Equipment for This Recipe:
- Baking sheet
- Sharp serrated knife
- Parchment paper
How to Serve This Dish:
Serve them upright in a jar or fanned on a plate. They’re best with coffee, hot chocolate, or a little bowl of melted chocolate for dipping.
Pro Tips for This Recipe:
- Slice with a serrated knife while the log is still warm.
- Bake the second time until just crisp, not rock-hard.
- Roll in cinnamon sugar while the first bake is warm.
Variations on This Dish:
- Orange Churro Biscotti: Add orange zest to the dough.
- Chocolate-Dipped Biscotti: Dip one end in melted chocolate after cooling.
Common Mistakes to Avoid with This Dish:
- Waiting too long to slice: The loaf cracks badly.
- Underbaking the second round: The centers stay soft.
24. Lemon Icebox Pie
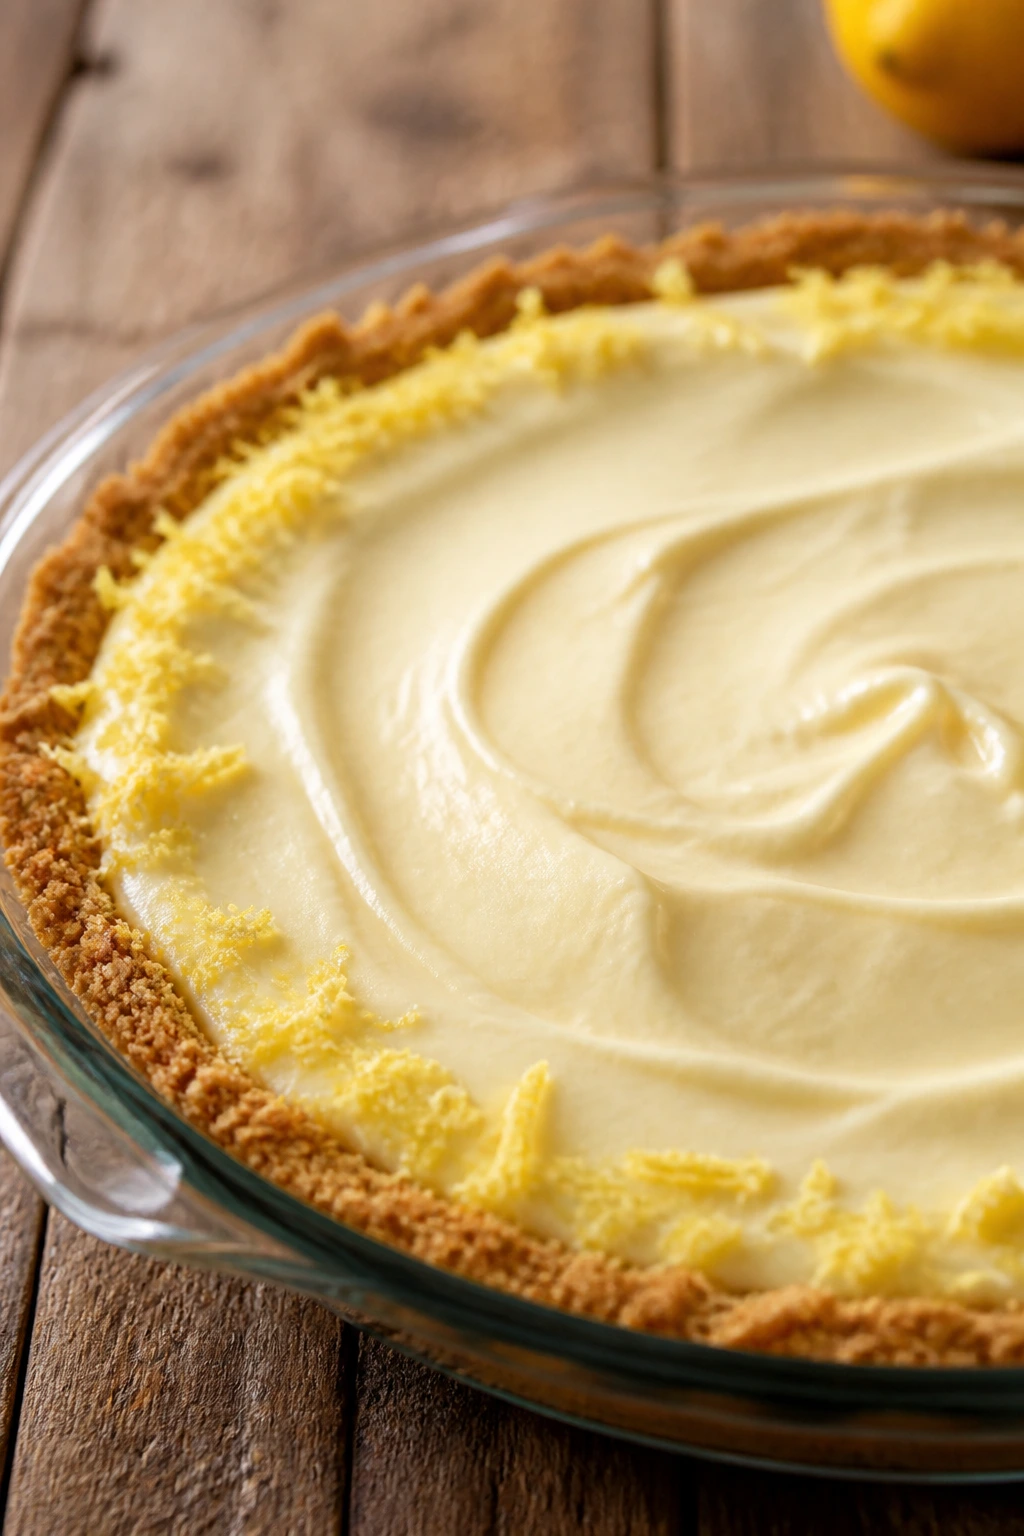
Icebox pie brings a cold, creamy bite to a table full of baked sweets, which is a welcome change. The filling is bright and smooth, and the graham crust gives enough crunch to keep each bite from feeling too soft.
Why It Works:
Lemon juice and condensed milk make a filling that thickens without much effort. The crust can be knocked together from graham crumbs and butter, both pantry-friendly and easy to press into shape. Chilling does the rest, and the pie looks finished with almost no decorating.
Key Ingredients:
- 1 1/2 cups graham cracker crumbs
- 6 tablespoons melted butter
- 1 can sweetened condensed milk, 14 ounces
- 1/2 cup lemon juice
- 1 tablespoon lemon zest
- 8 ounces cream cheese, softened
- 1 cup whipped topping
Quick Steps:
- Mix crumbs and butter, then press into a pie plate.
- Beat cream cheese until smooth.
- Add condensed milk, lemon juice, and zest.
- Fold in whipped topping.
- Spread into the crust and chill 4 hours.
Equipment for This Recipe:
- Pie plate
- Hand mixer
- Mixing bowl
How to Serve This Dish:
Serve cold with a thin curl of lemon peel or a few berries. It’s one of the cleanest desserts on the list, which makes it a good choice after richer dishes.
Pro Tips for This Recipe:
- Use enough lemon juice to balance the condensed milk.
- Chill fully or the slices slump.
- A pinch of salt sharpens the flavor.
Variations on This Dish:
- Lime Icebox Pie: Swap lime for lemon.
- No-Cream-Cheese Version: Use extra whipped topping if you want a lighter filling.
Common Mistakes to Avoid with This Dish:
- Not chilling long enough: The pie won’t cut cleanly.
- Too little citrus: The filling tastes flat.
25. Peanut Butter Blossoms

There’s a reason people keep making these. The cookie is soft and peanut-buttery, the chocolate kiss goes molten for a second, and the sugar coating gives the whole cookie a tiny sparkle on a tray.
Why It Works:
Peanut butter, sugar, and a chocolate center is a combination that doesn’t need much defense. The dough is easy to roll, and the kiss pressed into the middle after baking gives you that signature look. They’re one of the best cookies for gifting because they hold shape well.
Key Ingredients:
- 1/2 cup butter, softened
- 1/2 cup creamy peanut butter
- 1/2 cup granulated sugar
- 1/2 cup brown sugar
- 1 egg
- 1 teaspoon vanilla extract
- 1 1/4 cups all-purpose flour
- 1 teaspoon baking soda
- 1/2 cup extra sugar for rolling
- 24 chocolate kisses
Quick Steps:
- Cream butter, peanut butter, and sugars.
- Beat in egg and vanilla.
- Mix in flour, baking soda, and salt.
- Roll into balls, coat in sugar, and bake at 350°F for 10 minutes.
- Press a chocolate kiss into each warm cookie.
Equipment for This Recipe:
- Baking sheet
- Cookie scoop
- Parchment paper
How to Serve This Dish:
Stack them in a bowl or line them around the edge of a tray. They’re one of the first cookies to vanish, partly because the center is such a clean, obvious payoff.
Pro Tips for This Recipe:
- Unwrap the kisses before baking so you can press fast.
- Press the chocolate in right after baking while the cookie is soft.
- Cool on the sheet for a few minutes so they set around the kiss.
Variations on This Dish:
- Dark Chocolate Blossoms: Use dark chocolate kisses if you want less sweetness.
- Pretzel Blossom Centers: Put a small pretzel on top for a salty crunch.
Common Mistakes to Avoid with This Dish:
- Pressing the kiss in too late: The cookie cracks hard.
- Overbaking: They dry out and lose the soft center.
26. Vanilla Pound Cake With Berry Syrup
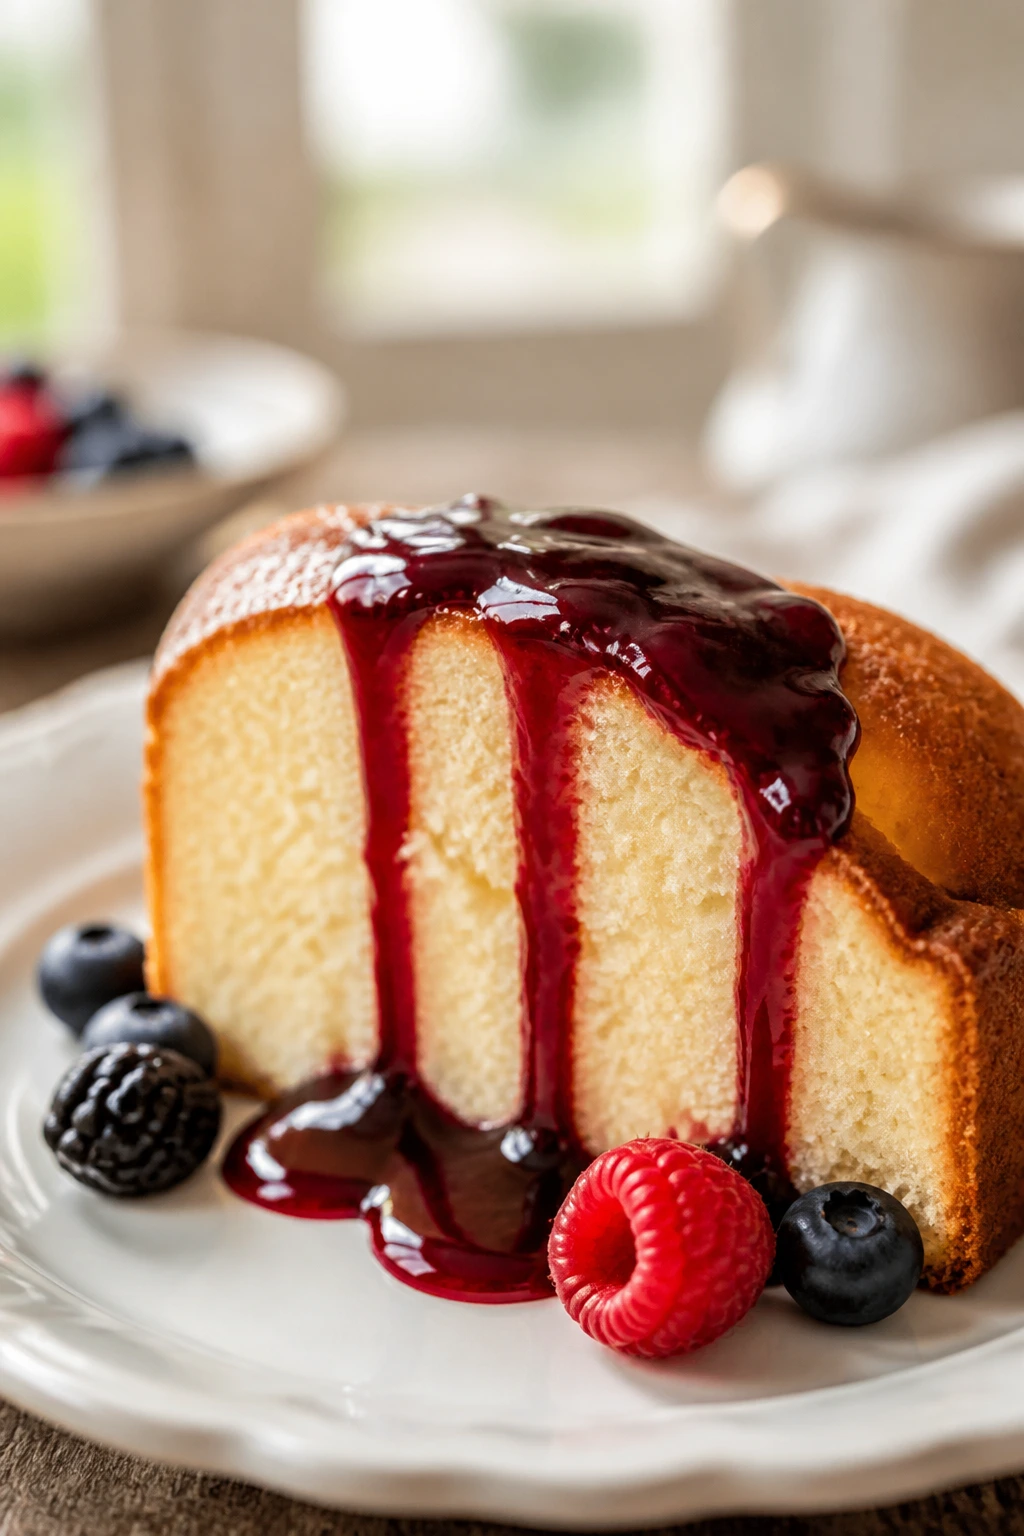
Pound cake is sturdy, sliceable, and plain in the best possible way. That makes it a useful Easter dessert because you can dress it up with syrup, cream, or berries and still let the cake stay simple underneath.
Why It Works:
Pound cake relies on butter, sugar, eggs, and flour in a way that makes the crumb tight and tender. That density helps it hold up under fruit syrup without collapsing. A quick berry syrup from jam or frozen fruit gives it the color that plain cake lacks.
Key Ingredients:
- 1 cup butter, softened
- 1 3/4 cups granulated sugar
- 4 large eggs
- 2 cups all-purpose flour
- 1 teaspoon baking powder
- 1/2 teaspoon salt
- 2 teaspoons vanilla extract
- 1/2 cup milk
- 1/2 cup berry jam
- 2 tablespoons water
Quick Steps:
- Heat oven to 325°F and grease a loaf pan.
- Cream butter and sugar until pale.
- Beat in eggs one at a time, then add vanilla.
- Mix in flour, baking powder, salt, and milk.
- Bake 55 to 65 minutes; warm jam with water for a syrup and spoon over slices.
Equipment for This Recipe:
- Loaf pan
- Hand mixer
- Small saucepan
How to Serve This Dish:
Serve thick slices with berry syrup draped over the top. A spoonful of whipped cream makes it dessert-like without crowding the plate.
Pro Tips for This Recipe:
- Room-temperature butter and eggs help the batter stay smooth.
- Don’t rush the cooling; the loaf needs time to set.
- Jam syrup works best if strained, but that step is optional.
Variations on This Dish:
- Lemon Pound Cake: Add zest for a brighter loaf.
- Almond Berry Cake: Swap a little vanilla for almond extract.
Common Mistakes to Avoid with This Dish:
- Rushing the creaming stage: The crumb turns heavy.
- Slicing hot cake: It squashes at the center.
27. Coconut Cream Pie Cups
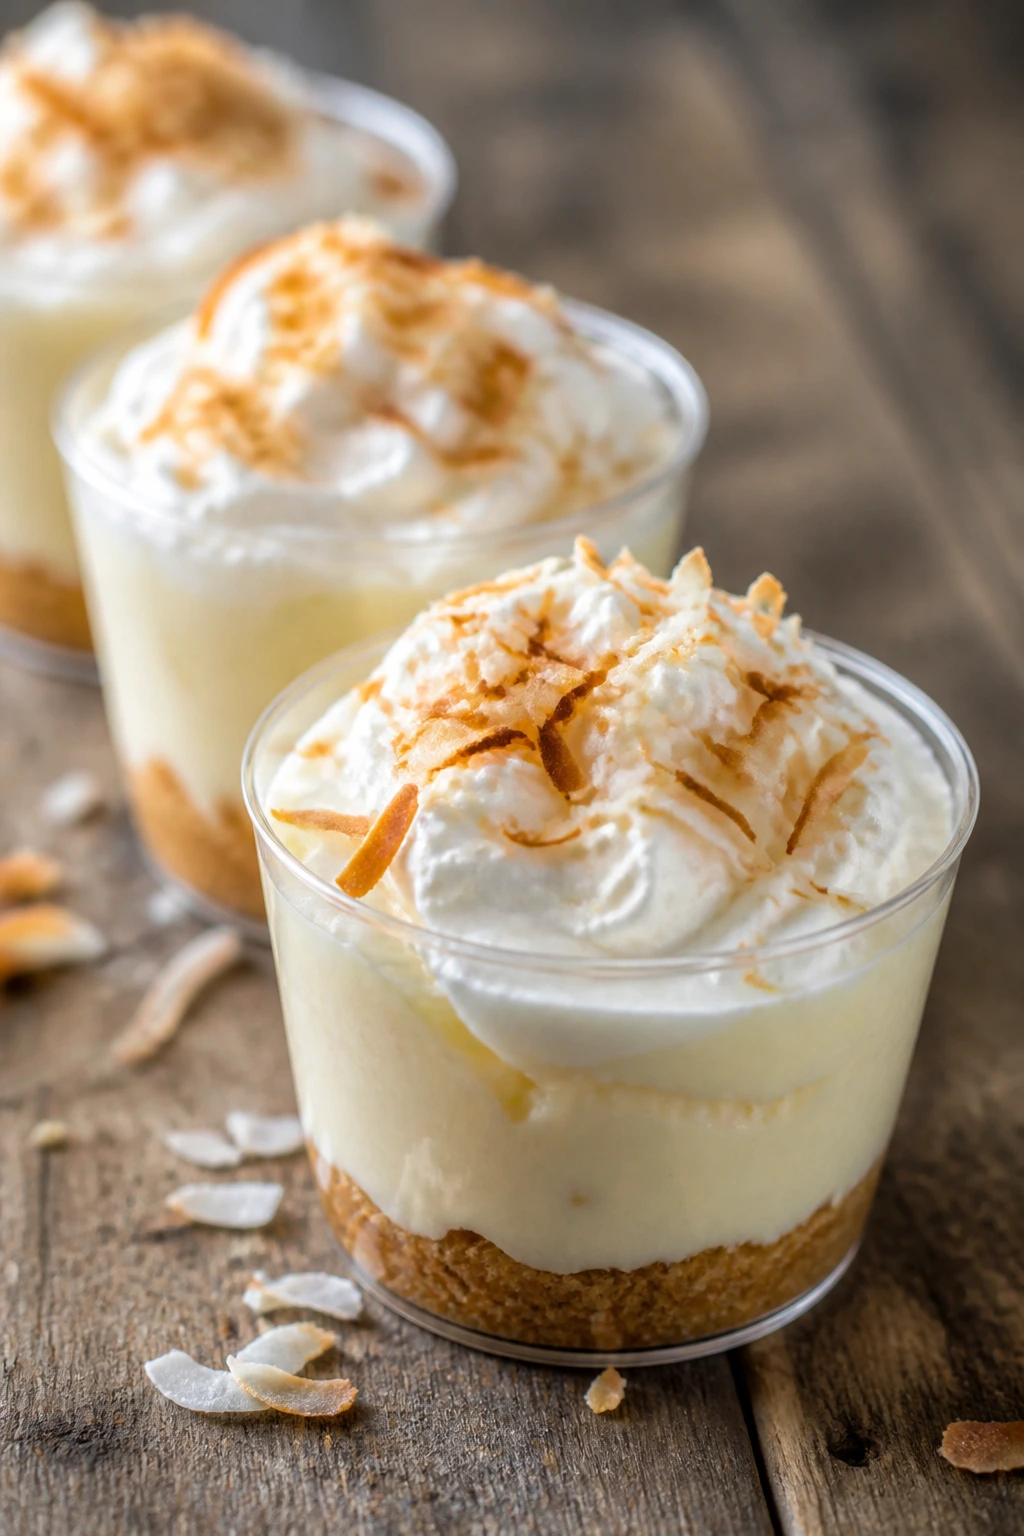
These cups give you the flavor of coconut cream pie without asking for a full pie shell. That’s useful. You get a creamy filling, a crumb base, and enough coconut on top to make the dessert feel complete.
Why It Works:
Instant pudding or stovetop pudding makes the filling thick and fast. Toasted coconut adds flavor and texture, while graham crumbs or cookie crumbs stand in for crust. The cup format keeps the layers tidy and travel-friendly.
Key Ingredients:
- 1 box instant vanilla pudding mix
- 2 cups milk
- 1 cup sweetened shredded coconut
- 1 1/2 cups graham cracker crumbs
- 5 tablespoons melted butter
- 1 cup whipped topping
- 1/2 teaspoon vanilla extract
Quick Steps:
- Mix crumbs with butter and divide among cups.
- Toast half the coconut in a dry skillet.
- Whisk pudding with milk and vanilla until thick.
- Fold in whipped topping and spoon over crumbs.
- Top with toasted coconut and chill.
Equipment for This Recipe:
- Mixing bowl
- Skillet for toasting coconut
- Small cups or jars
How to Serve This Dish:
Serve cold with a little extra coconut on top. They fit well into a dessert spread because they look tidy and don’t require slicing.
Pro Tips for This Recipe:
- Toasting the coconut makes a big difference here.
- Let the pudding thicken before layering.
- Use clear cups if you want the crumb base to show.
Variations on This Dish:
- Chocolate Coconut Cups: Use chocolate pudding for half the batch.
- Lime-Coconut Cups: Add a little lime zest to the filling.
Common Mistakes to Avoid with This Dish:
- Skipping the chill: The filling won’t hold.
- Using too much coconut on top: It can overpower the cream.
28. Snickerdoodle Blondies
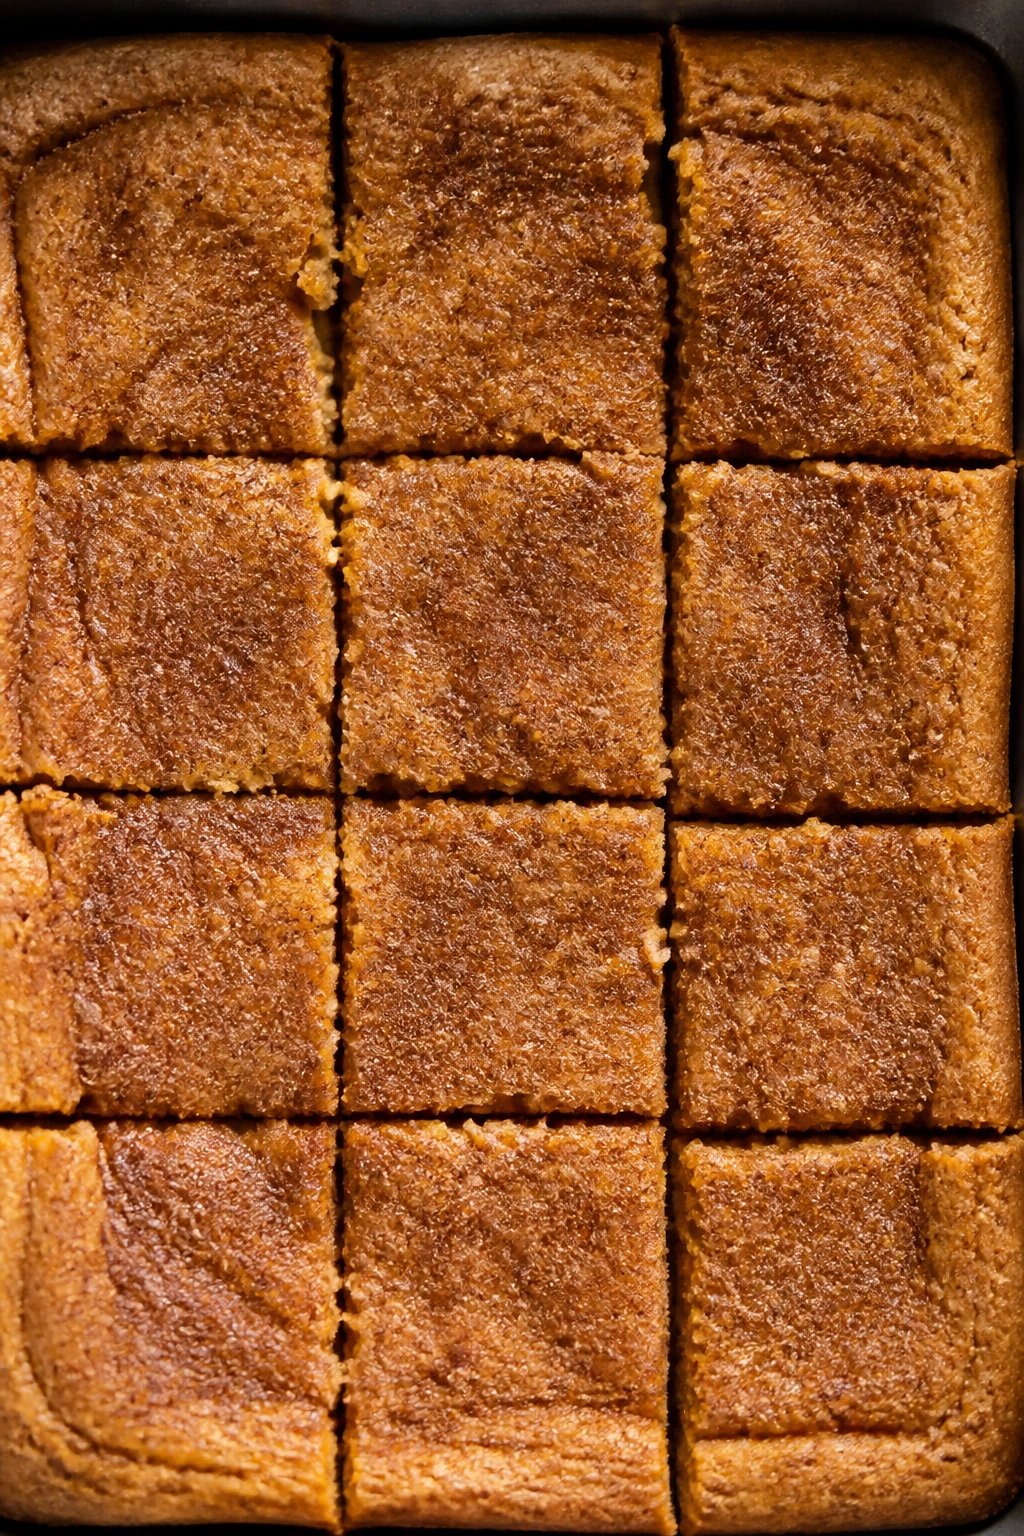
Snickerdoodle blondies are what happens when a cookie gets cut into bar form and decides to be easier about it. The cinnamon sugar top is the part people notice first, but the brown sugar base is what keeps them soft.
Why It Works:
Brown sugar and butter give blondies a chewy center that stays soft for days. Cinnamon sugar on top gives that snickerdoodle finish without individual rolling. A pan of bars slices fast, which matters when dessert needs to move from kitchen to table without drama.
Key Ingredients:
- 1 cup butter, melted
- 1 1/2 cups brown sugar
- 2 large eggs
- 2 teaspoons vanilla extract
- 2 cups all-purpose flour
- 1 teaspoon baking powder
- 1 teaspoon cinnamon
- 1/4 teaspoon salt
- 2 tablespoons sugar mixed with 1 teaspoon cinnamon for topping
Quick Steps:
- Heat oven to 350°F and line a 9×9-inch pan.
- Whisk melted butter and brown sugar.
- Stir in eggs and vanilla.
- Fold in dry ingredients.
- Spread into the pan, sprinkle with cinnamon sugar, and bake 22 to 26 minutes.
Equipment for This Recipe:
- 9×9-inch pan
- Mixing bowl
- Spatula
How to Serve This Dish:
Serve them in squares, not giant slabs. A light dusting of powdered sugar is optional, but the cinnamon top usually does enough.
Pro Tips for This Recipe:
- Pull them when the center still looks a little soft.
- Line the pan so the bars lift out cleanly.
- Add a few white chocolate chips if you want extra richness.
Variations on This Dish:
- Apple Snickerdoodle Bars: Fold in finely diced dried apples.
- Pumpkin Spice Version: Swap a teaspoon of flour for pumpkin spice if you like a stronger spice profile.
Common Mistakes to Avoid with This Dish:
- Overbaking: They lose the chewy middle that makes them work.
- Using too much cinnamon sugar: It turns gritty.
29. S’mores Brownies
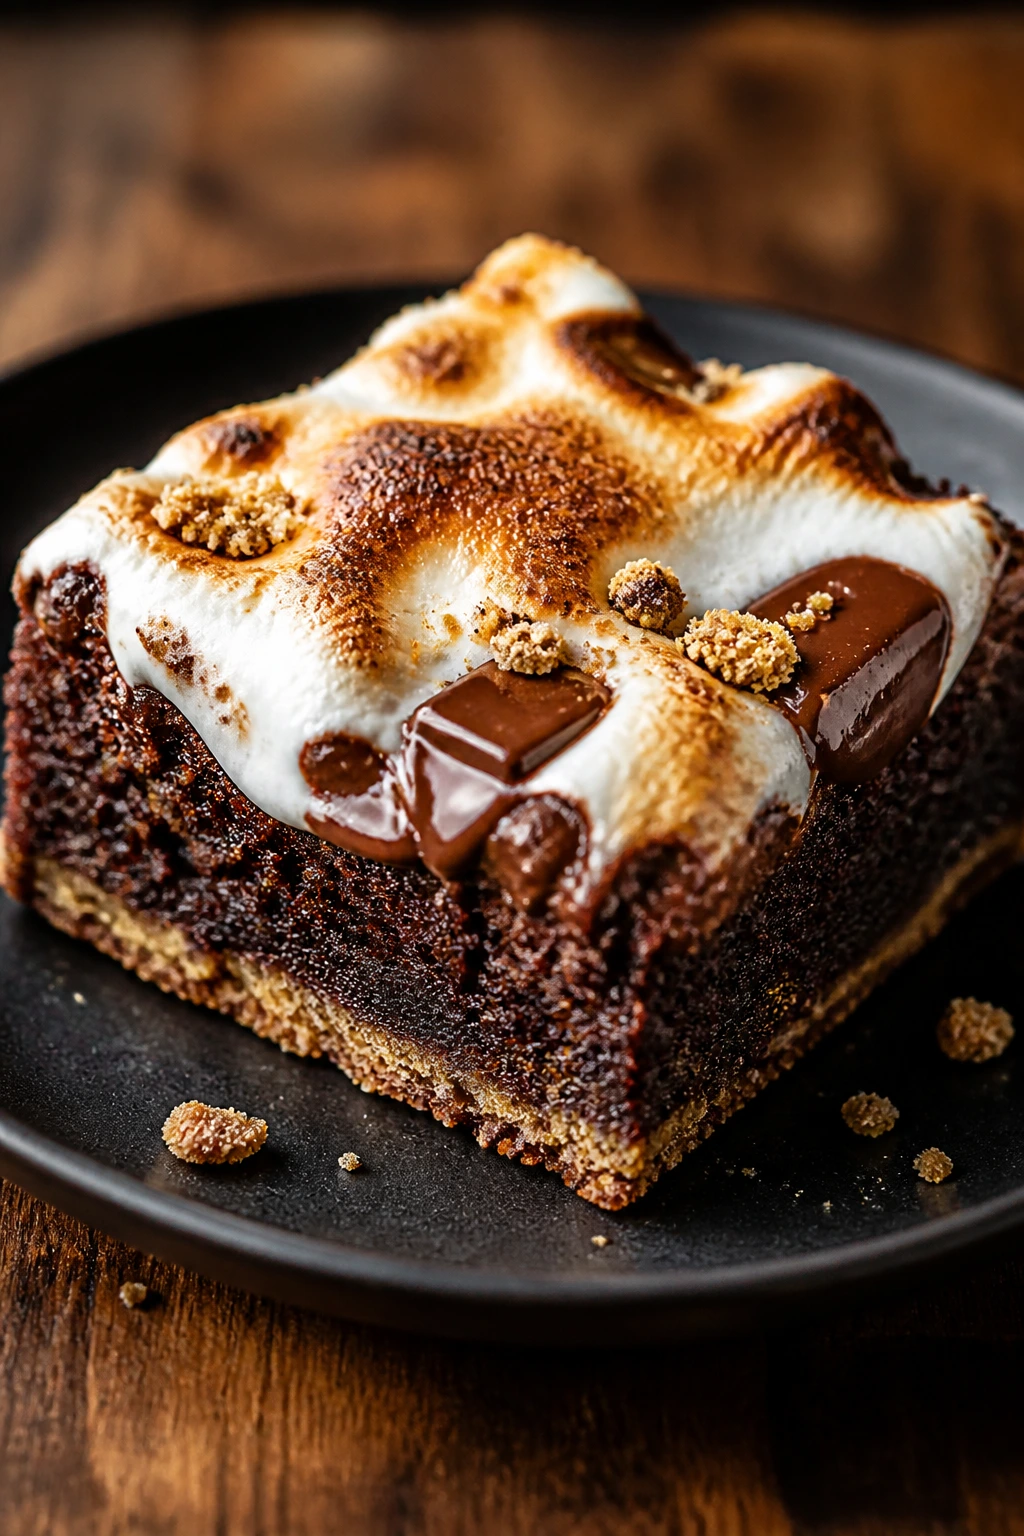
S’mores brownies bring campfire flavor into the kitchen without asking anyone to stand outside with a skewer. The graham layer, the chocolate brownie, and the marshmallow top all show up in each square, which makes the dessert feel playful in a very direct way.
Why It Works:
Brownies are naturally sturdy, so they can carry a graham base and marshmallow topping without falling apart. The marshmallows brown under the broiler, giving you that toasted look people expect from s’mores. It’s messy in a useful, edible way.
Key Ingredients:
- 1 box brownie mix or homemade brownie batter
- 1 1/2 cups graham cracker crumbs
- 5 tablespoons melted butter
- 2 cups mini marshmallows
- 1 cup chocolate chunks
- 1 tablespoon cocoa, if making brownies from scratch
Quick Steps:
- Heat oven to 350°F and line a 9×13-inch pan.
- Press graham crumbs mixed with butter into the bottom.
- Pour brownie batter over the crust.
- Bake until nearly set.
- Top with marshmallows and chocolate chunks, then broil briefly until toasted.
Equipment for This Recipe:
- 9×13-inch pan
- Mixing bowl
- Broiler-safe oven
How to Serve This Dish:
Serve warm with a fork or slightly cooled with clean squares. They are rich, so smaller cuts make more sense than giant slabs.
Pro Tips for This Recipe:
- Watch the broiler like a hawk; marshmallows brown fast.
- Let the brownies cool before slicing or they smear.
- Use parchment so the graham crust lifts cleanly.
Variations on This Dish:
- Peanut Butter S’mores Brownies: Swirl in 1/4 cup peanut butter.
- Mint S’mores Brownies: Add a little peppermint extract to the batter.
Common Mistakes to Avoid with This Dish:
- Broiling too long: Marshmallows go from toast to black almost instantly.
- Cutting while hot: The layers collapse.
30. Jelly Bean Sugar Cookie Bars
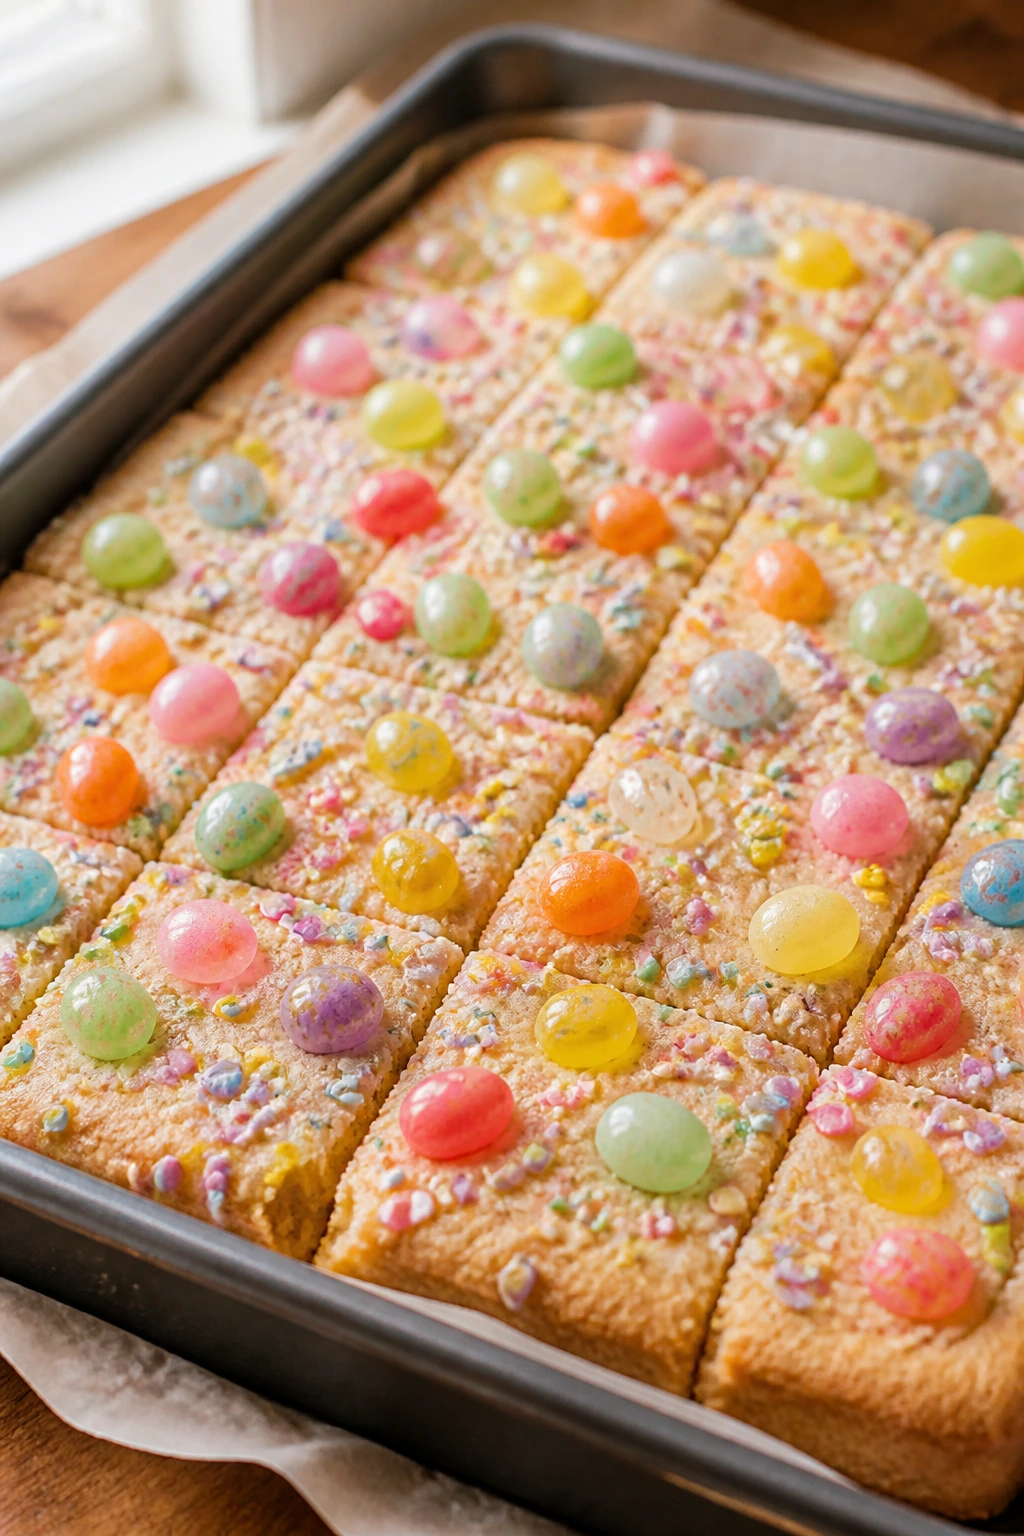
These are the easiest way to make a dessert tray look like Easter without laboring over frosting. Sugar cookie bars are soft, sliceable, and friendly to color, which makes them an obvious fit for jelly beans and sprinkles.
Why It Works:
Bar cookies bake evenly and give you a sturdy base for decorating. The sugar cookie flavor is familiar enough that the bright candies feel playful, not random. Because the bars slice neatly, they’re easy to serve to a crowd.
Key Ingredients:
- 1 cup butter, softened
- 1 1/4 cups granulated sugar
- 2 large eggs
- 2 teaspoons vanilla extract
- 2 3/4 cups all-purpose flour
- 1 teaspoon baking powder
- 1/2 teaspoon salt
- 1 cup jelly beans
- 1/4 cup pastel sprinkles
Quick Steps:
- Heat oven to 350°F and line a 9×13-inch pan.
- Cream butter and sugar, then beat in eggs and vanilla.
- Mix in flour, baking powder, and salt.
- Spread into the pan, press jelly beans and sprinkles on top, and bake 18 to 22 minutes.
- Cool fully before slicing.
Equipment for This Recipe:
- 9×13-inch pan
- Mixing bowl
- Offset spatula or spoon
How to Serve This Dish:
Cut into small squares so the candy topping doesn’t overwhelm the bite. They look nice next to plain cookies because the colors do all the visual work.
Pro Tips for This Recipe:
- Add the jelly beans before baking so they sink in a little.
- Keep the layer even so the bars bake flat.
- Use a sharp knife for cleaner edges once cooled.
Variations on This Dish:
- Chocolate Chip Cookie Bars: Swap out some candy for chips if you want less color and more chocolate.
- Lemon Sugar Bars: Add lemon zest to the dough for a brighter base.
Common Mistakes to Avoid with This Dish:
- Pressing candy too deeply: The topping can sink and harden.
- Slicing warm: The bars bend instead of cutting.
Why Pantry Staples Pull Their Weight at Easter
The smartest Easter desserts are not the ones with the longest ingredient lists. They’re the ones that know how to turn a plain bowl of flour, a bag of sugar, a few eggs, and a couple of color accents into something that feels special enough for the table. Pantry baking has always been good at that trick, and holiday baking is where it really earns its keep.
A lot of these desserts work because they lean on basic structure instead of fragile technique. Bars slice more easily than layer cakes. Cookies chill better than custards. Crispy treats and fudge set in the fridge while the main meal is still in progress. That is a gift when the oven is busy and somebody keeps asking whether the ham is ready.
The other advantage is shape. Easter desserts do not have to be elaborate to look festive. A lemon glaze, a handful of candy eggs, a coconut nest, or a bright jam swirl can do more visual work than a complicated frosting pattern. I’ll take a well-cut square with good texture over a five-step decoration project almost every time.
Essential Equipment for These Recipes
- 9×13-inch baking pan: The workhorse for sheet cakes, bars, blondies, and dump cakes.
- 8×8-inch and 9×9-inch pans: Best for smaller batches, richer bars, and anything you want to cut neatly.
- Mixing bowls in two or three sizes: You’ll use them for batters, fillings, and crumb toppings.
- Hand mixer: Worth having for cheesecake cups, pound cake, and anything with butter and sugar.
- Rubber spatula: Good for scraping bowls and folding in mix-ins without overworking batter.
- Parchment paper: Saves you from stuck bars and torn fudge.
- Cookie scoop: Keeps cookies, nests, and clusters close in size so they bake evenly.
- Baking sheets: Needed for cookies, bark, macaroons, and biscotti.
- Whisk: Useful for pudding, glaze, and anything that should be smooth before baking.
- Loaf pan: For banana bread and pound cake.
- Microplane or fine grater: Best for lemon zest and orange zest.
- Airtight containers: Necessary if you want cookies and bars to keep their texture after day one.
Smart Shopping and Ingredient Tips
Pantry desserts live or die on the basics, so the shopping choices matter more than the recipe name suggests. Buy flour that smells neutral, not stale. Check the baking powder date if you can; flat cakes and cookies are usually a leavening problem before they’re a skill problem. For cocoa, plain unsweetened cocoa works across the chocolate recipes here, but Dutch-process cocoa gives a darker color and a rounder flavor if the recipe is flexible.
Butter, peanut butter, and coconut deserve a little attention too. For baking, regular creamy peanut butter is easier to work with than natural peanut butter because it stays more stable in batters and candy. Shredded coconut should be moist and springy, not brittle. If it feels dry in the bag, it will taste dry in the cookie.
Canned fruit and jam need a fast check. Thicker jam gives better swirls and cleaner thumbprint centers. Canned peaches and cherries should be drained well unless the recipe calls for syrup; too much liquid turns bars soggy. Sweetened condensed milk is one of the most useful pantry items in this whole list because it carries fudge, icebox pie, bars, and cream pies with almost no effort.
Easter candy is the fun part, but don’t let it control the dessert. A handful of mini eggs, jelly beans, or pastel sprinkles is enough. Too much candy turns the dessert into a sugar pile with color on top.
How to Serve These Recipes
Presentation:
A good Easter dessert table needs contrast. Put a lemon dessert next to chocolate, a chewy cookie next to a crisp bark, and one cold item next to the baked pans. Clear glasses help with parfaits and cheesecake cups, while a plain white tray makes pastel decorations look cleaner. If you have only one serving platter, group desserts by color rather than by type.
Accompaniments:
Fresh berries, whipped cream, vanilla ice cream, and hot coffee cover almost everything here. Lemon and berry desserts like plain whipped cream. Chocolate bars and brownies welcome a cold glass of milk or coffee. Coconut, jam, and fruit desserts can sit beside a fruit salad if you want the whole spread to feel lighter.
Portions:
Bars and fudge should be cut small. Rich desserts like magic bars, peanut butter blossoms, and cheesecake cups are better in two-bite portions than in big wedges. Cakes and loaf slices can run larger, about 1-inch to 1 1/2-inch thick, because the crumb needs room to show. If the table has many desserts, cut everything smaller than you think.
Beverage Pairing:
Coffee is the safest partner for almost all of these, especially the cookies, blondies, and pound cake. Tea works well with lemon bars, shortbread, and jam cookies. For kids or casual family dessert, cold milk still wins — no argument, no fuss.
Additional Tips and Flavor Boosters
Flavor Enhancement:
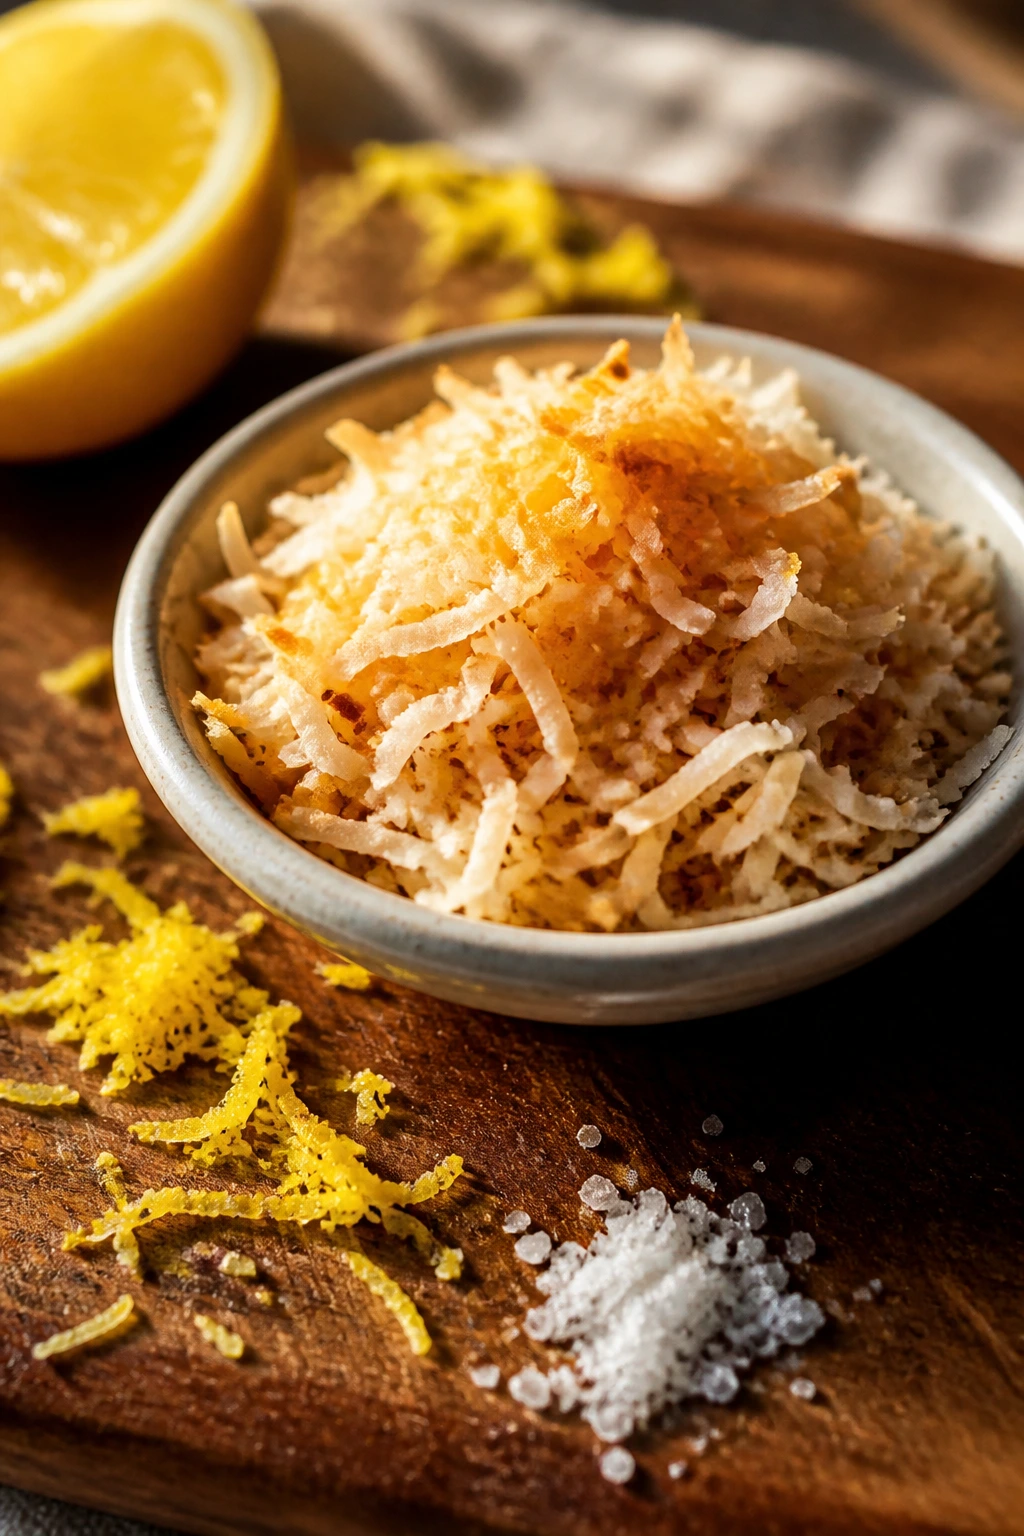
A pinch of salt on chocolate desserts makes a bigger difference than another spoonful of sugar. On lemon bakes, fresh zest beats more juice every time. On coconut or peanut butter desserts, a quick toast of the coconut or peanuts gives you deeper flavor without changing the recipe.
Customization:
Use jam, preserves, or canned fruit to shift the fruit desserts toward whatever’s already in the pantry. Swap peanut butter for sunflower seed butter if you need a nut-free tray. If you want more color, keep the decorations simple: pastel sprinkles, candy eggs, or a thin drizzle of melted white chocolate is enough.
Serving Suggestions:
Dust bars with powdered sugar only after they cool. Add a spoonful of whipped cream to warm fruit desserts. Press a few extra candy eggs or a stripe of jam on top of plain cookies so they read as Easter desserts at a glance.
Make-It-Yours:
Gluten-free bakers can lean on almond flour in some cookie-style recipes or use a trusted cup-for-cup blend in bars and cakes. Dairy-free versions work best in bark, cobbler, fruit crisps, and some cookies if you use plant butter. Lower-sugar versions are easiest in fruit desserts, where the fruit itself carries some of the sweetness.
Make-Ahead, Storage, and Reheating Guidance
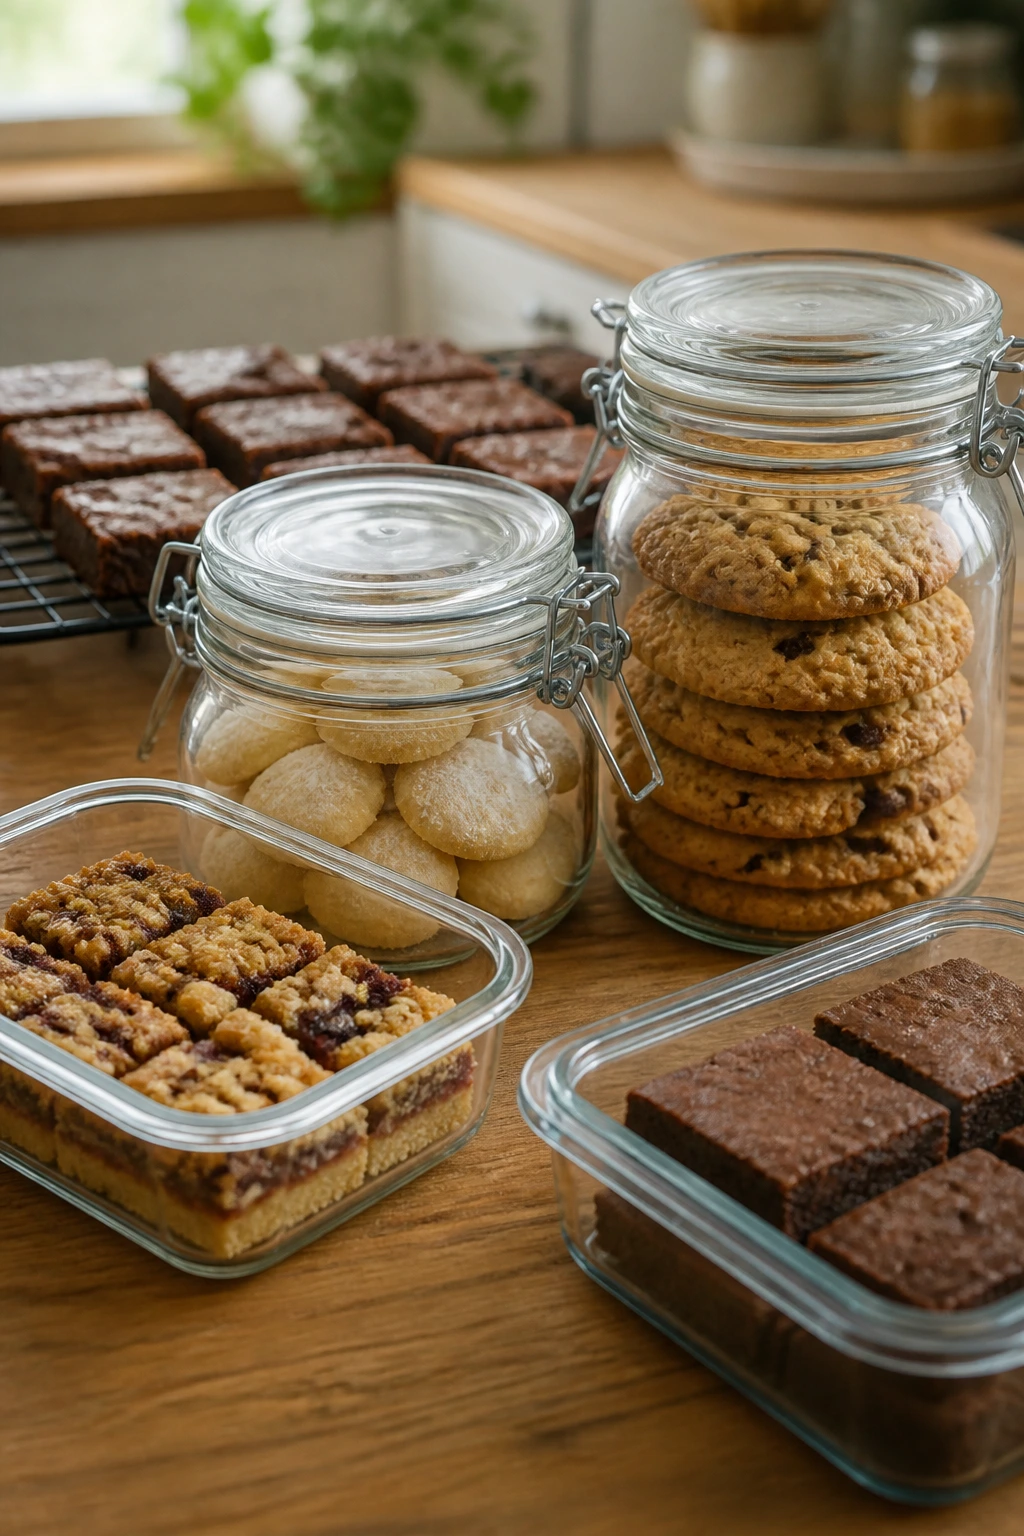
Most of these desserts hold up well, which is one of the reasons pantry baking is so useful for a holiday meal. Cookies, bars, fudge, bark, and cereal treats usually keep 3 to 5 days at room temperature in airtight containers, as long as they are fully cool before packing. Cakes, cheesecakes, pudding cups, and anything with dairy filling should go into the fridge and stay there for up to 4 days.
Freezing works for many of the baked items. Lemon sheet cake, carrot cake, banana bread, pound cake, blondies, and cookie bars freeze well for up to 2 months when wrapped tightly and stored in freezer bags or containers. Thaw them in the fridge overnight or on the counter while still wrapped so condensation doesn’t fog the surface. Cookies can be frozen either baked or as dough balls, which is useful if you want to stagger baking.
Reheating is simple when the dessert needs it. Fruit crisps, cobblers, dump cake, and brownies can be warmed in a 300°F oven for 8 to 12 minutes until the edges loosen and the center smells hot again. If the dessert has frosting, glaze, or a cream filling, skip the oven and serve it cold or at room temperature. A lot of these are better the next day once the flavors settle, especially bars and fudge. Coconut macaroons, biscotti, and bark stay crisp longest when stored in a dry cupboard, not the fridge.
Variations and Adaptations to Try

Gluten-Free Easter Tray:
Use a good cup-for-cup gluten-free blend in the bars, cakes, and cookies that rely on flour. Gluten-free oats work fine in crisps and oatmeal cookies. The texture can be a little more fragile, so cool everything fully before cutting.
Dairy-Free Dessert Basket:
Plant butter, coconut milk, and dairy-free chocolate chips handle a surprising amount of this menu. Bark, fruit crisp, chocolate cookies, and several no-bake treats adapt cleanly. Anything with cream cheese or pudding needs a smarter swap, but the holiday look stays easy.
Fruit-Forward Spring Version:
Lean harder on lemon, jam, cherries, berries, peaches, and apples. This keeps the table brighter and cuts the heavy chocolate note if that’s not what you want after a big meal. A fruit-heavy spread also photographs better in the sense that it looks fresher and less brown.
Chocolate-Lover’s Basket:
Keep the lemon and fruit items in the minority and bring in cocoa, chocolate chips, brownie mix, and chocolate bark. Add a few salty pieces like pretzel bark or peanut clusters so the table doesn’t flatten into one note. Chocolate on chocolate works better when at least one dessert has salt or crunch.
Kid-Decorator Version:
Choose cookie bars, bark, fudge, and cereal treats as the base, then set out candy eggs, jelly beans, and sprinkles for topping. Kids do not need delicate desserts; they need sturdy ones that can handle a little chaos. Keep the glazes simple and let the finishing become part of the fun.
Lower-Sugar Plate:
Use lemon desserts, shortbread, biscotti, and fruit crisps more heavily than candy-loaded bars. Reduce frosting and drizzle, and lean on toasted coconut, citrus zest, or fruit syrup for flavor. The table still feels festive even when the sugar gets dialed back a bit.
Common Mistakes to Avoid
Using stale baking supplies:
If the baking powder or soda has lost its punch, cakes and cookies bake flat and heavy. The fix is simple: replace anything that smells off or has been open so long you cannot remember when. Old cocoa is less obvious, but it can taste dusty.
Decorating before the dessert is cool:
Glaze melts, chocolate softens, and sprinkles bleed when the base is still warm. Let bars, cakes, and cookies cool all the way before finishing them. The one exception is chocolate kisses on blossoms, which need to go on while the cookies are warm.
Ignoring moisture levels:
Too much syrup from canned fruit, too much jam, or too much liquid in a no-bake filling creates a dessert that won’t set. Drain fruit well, use thick preserves, and measure condensed milk carefully. The goal is a clean slice, not a spoonable collapse.
Cutting too soon:
Bars and fudge need time to firm up. If you rush them, the edges smear and the center falls apart. A cool dessert slices cleaner, tastes more balanced, and survives transport better.
Choosing the wrong pan size:
An 8×8 pan and a 9×13 pan are not interchangeable in these recipes. Too large, and the bars dry out; too small, and the center stays raw. Use the pan size the recipe asks for, or adjust the bake time with your eyes on the texture, not the clock alone.
Frequently Asked Questions
Can I make most of these Easter desserts a day ahead?
Yes, and many are better that way. Bars, cookies, fudge, and cake slices usually settle overnight, while cream-based cups and pies simply need a full chill before serving.
Which desserts hold up best on a buffet table?
Bars, cookies, bark, shortbread, fudge, and cereal treats travel the best because they do not need knives or cold serving dishes. Anything with whipped filling or pudding belongs closer to the fridge.
What pantry staples should I keep on hand for this kind of baking?
Flour, sugar, brown sugar, cocoa, baking powder, baking soda, oats, graham crackers, peanut butter, sweetened condensed milk, chocolate chips, vanilla, and jam will cover a lot of ground. Add coconut and a box of cereal, and the menu gets wider fast.
Can I skip Easter candy and still make these desserts feel festive?
Absolutely. Use jam swirls, lemon glaze, toasted coconut, or a dusting of powdered sugar instead. Color matters more than novelty here, and fruit or citrus can do that job well.
What if my bars come out too soft?
Most of the time, they need more cooling time rather than more baking time. Put them in the fridge for 30 to 45 minutes, then slice again with a sharp knife. If they are still too soft after chilling, the recipe may have used too much liquid or not enough flour.
Can I freeze decorated cookies or bars?
Yes, but plain is safer. Freeze unfrosted bars and cookies in airtight layers, then decorate after thawing. Sticky toppings like glaze, jam, or fresh candy can lose their neat look in the freezer.
Is boxed cake mix worth using here, or should I bake from scratch?
Boxed cake mix is worth it when you need speed, especially for dump cakes and some bar-style desserts. From-scratch batter gives you more control over flavor, but boxed mix keeps the whole thing practical, and that is the point of pantry baking.
How do I keep coconut desserts from tasting dry?
Use sweetened shredded coconut and avoid overbaking. If the recipe allows it, a little condensed milk, melted butter, or egg white helps bind the coconut so it stays chewy instead of papery.
What’s the best dessert to make if I only have one hour?
Chocolate bark, peanut butter chocolate nests, fudge, and rice cereal treats are the fastest wins. They rely on melting and chilling more than baking, so they fit into a short window without drama.
A Table That Feels Finished
A good Easter dessert spread does not need every recipe to be elaborate. It needs a few bright things, a few rich things, and enough variety that nobody feels stuck with the same texture twice. Pantry staples make that possible without turning the day into a baking marathon.
The nicest part is how forgiving these desserts are. A jam bar can be rustic, a lemon cake can be glazed a little unevenly, and a tray of coconut nests can lean more homemade than polished. That’s fine. Honestly, that’s the point. A dessert table should look like people are meant to eat it, not admire it from a distance.
If you keep a solid pantry and a small stash of Easter candy on hand, you’re already most of the way there. The rest is heat, time, and a little color on top.