
A plate of romantic desserts should look a little dangerous. The berries ought to glisten, the chocolate should hold a clean shine, and the cream needs enough shape to stand up for a photo before anyone steals a bite. That’s the real trick with romantic desserts: they’re not about piling on sugar and hoping the candlelight does the rest. They’re about line, color, contrast, and a little restraint.
Pink, red, white, and deep chocolate all do different jobs on a plate. Raspberries bring that sharp tart snap. Rosewater can make a filling smell like a florist’s cooler, if you use it lightly. Pistachios give you green flecks that look intentional instead of loud. And pastry — when it’s rolled thin, baked crisp, and cut neatly — makes even a simple fruit filling feel dressed for dinner.
The best desserts in this category also hold up in real life. They don’t slump the second the spoon touches them. They can travel from kitchen to table without collapsing into a puddle. A few lean on dramatic assembly at the end, which is half the fun, and a few can be made hours ahead so you’re not trying to whisk custard while guests are already sitting down. First up are the desserts that live and die by a clean line, a glossy finish, and a very steady hand.
Why You’ll Love This Collection
-
Built for the table, not just the camera: These desserts rely on glossy chocolate, neat fruit placement, and clean cuts, so they still look composed after the first slice or spoonful.
-
A lot of them can be made ahead: Panna cotta, truffles, cheesecakes, cookies, and bars chill well, which means less last-minute scrambling and fewer sticky counters.
-
Small portions feel special: Mini tarts, cups, and bites let you serve something polished without putting a giant slice in front of anyone.
-
Color does the heavy lifting: Raspberries, strawberries, cherries, rose, pistachio, blood orange, and hibiscus give you that blush-and-crimson palette without depending on food dye.
-
There’s a range of effort: Some recipes are as easy as melted chocolate and fruit. Others ask for pastry cream, meringue, or choux, which keeps the collection useful whether you want simple or showy.
-
They taste as good as they look: Pretty is nice. But a dessert that looks delicate and tastes flat is a waste of berries and time, and none of these recipes settles for that.
1. Raspberry Rose Macarons
These are the sort of macarons that make a dessert tray look intentional. The shells bake up crisp outside and chewy in the middle, with a pale pink blush that sets off the raspberry filling nicely.
Why It Works: Almond flour gives the shells that smooth, polished top, while a little rosewater in the buttercream keeps the flavor floral instead of perfumy. The raspberry jam brings tartness, which keeps the sweetness from getting too soft. Macarons also age well overnight in the fridge, and that’s when the texture gets its best bite.
Key Ingredients:
- 1 cup almond flour, finely ground for smooth shells
- 1 3/4 cups powdered sugar, sifted to avoid lumps
- 3 large egg whites, room temperature
- 1/4 cup granulated sugar, for the meringue
- 1/2 teaspoon cream of tartar, to stabilize the whites
- Pink gel food coloring, a tiny drop for color
- 1/2 cup unsalted butter, softened
- 1 1/2 cups powdered sugar, for the filling
- 3 tablespoons raspberry jam, seedless if you want a smoother bite
- 1/2 teaspoon rosewater, or less if yours is strong
Quick Steps:
- Make the meringue: Whip egg whites and cream of tartar until foamy, then add granulated sugar slowly and beat to glossy stiff peaks.
- Fold the batter: Sift in almond flour and powdered sugar, then fold until the batter flows like slow lava and settles in 10 seconds.
- Pipe and rest: Pipe 1 1/2-inch rounds on parchment and let them sit 30 to 45 minutes, until the tops feel dry.
- Bake: Bake at 300°F (150°C) for 14 to 16 minutes, until the shells lift cleanly from the paper.
- Fill and chill: Beat the butter, powdered sugar, jam, and rosewater together, sandwich the shells, and chill at least 12 hours before serving.
Equipment for This Recipe:
- Stand mixer or hand mixer
- Piping bag with a plain round tip
- Two baking sheets
- Parchment paper or silicone mats
How to Serve This Dish: Stack them in a small tower on a cake stand, or spread them in a loose crescent on a white platter. A few fresh raspberries and one or two edible rose petals are enough.
Pro Tips for This Recipe:
- Resting the piped shells matters. If they’re sticky, the macarons will crack.
- Use gel coloring, not liquid. Liquid can throw off the batter.
- Aged egg whites whip more predictably than very fresh ones.
Variations on This Dish:
- Lemon-Raspberry Macarons: Add 1 teaspoon lemon zest to the filling for a brighter finish.
- Chocolate-Rose Macarons: Swap 1 tablespoon almond flour for cocoa powder and keep the rosewater in the filling.
- Pistachio Shells: Replace 2 tablespoons almond flour with finely ground pistachios for a softer green tint.
Common Mistakes to Avoid with This Dish:
- Skipping the rest time: Wet shells crack in the oven and lose their smooth tops.
- Overmixing the batter: The batter turns runny and spreads into flat discs.
- Baking too hot: Brown shells are a clue the oven ran hot; use an oven thermometer and lower the temp next time.
2. Chocolate-Dipped Strawberries with Pistachio Dust
There’s a reason these keep showing up on romantic dessert plates: they look polished in about fifteen minutes and they taste exactly like the moment you want them to be. Juicy berries, crisp chocolate, green pistachio dust. That’s it.
Why It Works: Strawberries bring their own shape, so you don’t need much decoration to make them look special. Dark chocolate gives you a shiny shell, and pistachios add color plus a little crunch. The contrast between cold fruit and snapped chocolate is the whole appeal.
Key Ingredients:
- 18 large strawberries, washed and dried very well
- 8 ounces dark chocolate, chopped
- 1 teaspoon coconut oil, optional for a smoother dip
- 1/4 cup finely chopped pistachios
- 1 tablespoon freeze-dried strawberry powder, optional for extra color
Quick Steps:
- Line a tray with parchment and make sure the strawberries are completely dry.
- Melt the chocolate gently over a double boiler or in short microwave bursts.
- Stir in coconut oil if you want a thinner, glossier coating.
- Dip each strawberry about two-thirds of the way up, then shake off the excess.
- Roll the lower half in pistachios, set on the tray, and chill 20 minutes until firm.
Equipment for This Recipe:
- Small heatproof bowl
- Parchment-lined tray
- Paring knife, if you want to trim stems neatly
How to Serve This Dish: Put them on a long narrow plate so the dipped tips face the same direction. If you want to be fussy in the best way, dust the plate with a little freeze-dried strawberry powder.
Pro Tips for This Recipe:
- Dry berries are non-negotiable. Any moisture will make the chocolate seize.
- Use strawberries with long stems if you want the best grip for dipping.
- Chill just until set; long refrigeration can cause condensation when they warm.
Variations on This Dish:
- White Chocolate Cloud: Use white chocolate and a few pink sugar crystals instead of pistachios.
- Half-Dunked Espresso Strawberries: Stir 1 teaspoon espresso powder into the melted chocolate.
- Crunchy Almond Version: Swap pistachios for finely chopped toasted almonds.
Common Mistakes to Avoid with This Dish:
- Using damp berries: The chocolate will clump and slide.
- Overheating chocolate: It turns thick and dull instead of smooth.
- Chilling too long before serving: Condensation can blur the shine.
3. Mini Heart-Shaped Strawberry Galettes
These look rustic in a very deliberate way. The edges fold up around the fruit, the strawberry juice turns glossy in the oven, and the heart shape gives them enough romance to feel like more than just a pie in miniature.
Why It Works: Galettes are forgiving, which makes them a smart choice when you want a dessert that looks hand-crafted instead of fussy. Cornstarch thickens the berry juices so the centers don’t run. A little lemon zest keeps the strawberries bright.
Key Ingredients:
- 1 sheet pie dough or half of a double-crust recipe, chilled
- 2 cups sliced strawberries
- 1/4 cup granulated sugar
- 1 tablespoon cornstarch
- 1 teaspoon lemon zest
- 1 tablespoon lemon juice
- 1 egg, beaten for egg wash
- 2 tablespoons coarse sugar, for the edges
Quick Steps:
- Heat the oven to 400°F (200°C) and line a sheet pan with parchment.
- Toss the strawberries, sugar, cornstarch, lemon zest, and lemon juice together.
- Roll the dough to 1/8 inch thick and cut out heart shapes about 5 inches wide.
- Spoon the filling into the center, leaving a 1-inch border, then fold the edges up over the fruit.
- Brush with egg wash, sprinkle with coarse sugar, and bake 20 to 24 minutes until golden and bubbling.
Equipment for This Recipe:
- Rolling pin
- Sheet pan
- Sharp knife or heart cutter
- Pastry brush
How to Serve This Dish: Serve warm with a spoon of whipped cream or a small scoop of vanilla ice cream. A tiny mint leaf on top keeps the plate from feeling too heavy.
Pro Tips for This Recipe:
- Keep the dough cold so the hearts hold their shape.
- Cut the strawberries evenly or the smaller bits will dissolve before the larger ones soften.
- Let the galettes rest for 10 minutes before moving them; hot fruit filling is slippery.
Variations on This Dish:
- Raspberry-Strawberry Mix: Replace 1 cup of strawberries with raspberries for sharper flavor.
- Almond Cream Base: Spread 2 tablespoons almond cream under the fruit for a richer center.
- Balsamic Finish: Drizzle a few drops of thick balsamic reduction after baking.
Common Mistakes to Avoid with This Dish:
- Overfilling the center: The juices will leak and burn on the pan.
- Using warm dough: It shrinks and loses the heart shape.
- Serving straight from the oven: The filling needs a short rest to thicken.
4. Lavender Honey Panna Cotta
This dessert looks like a small satin cushion in a glass. It trembles a little when you set the spoon against it, and that soft wobble is half the charm.
Why It Works: Cream and milk make panna cotta rich without turning it dense, and gelatin gives it that clean, sliceable wobble. Lavender and honey lean floral, so the flavor feels romantic without becoming candy-like. A berry topping cuts through the richness.
Key Ingredients:
- 2 cups heavy cream
- 1 cup whole milk
- 1/3 cup honey
- 2 teaspoons dried culinary lavender
- 2 1/4 teaspoons unflavored gelatin
- 3 tablespoons cold water
- 1 teaspoon vanilla extract
- 1 cup mixed berries, for topping
Quick Steps:
- Sprinkle gelatin over cold water and let it bloom for 5 minutes.
- Warm the cream, milk, honey, and lavender over medium heat until steaming, not boiling.
- Turn off the heat, cover, and steep 10 minutes, then strain out the lavender.
- Whisk the bloomed gelatin into the warm cream mixture until dissolved, then add vanilla.
- Pour into ramekins and chill 4 hours, until set with a soft jiggle.
Equipment for This Recipe:
- Small saucepan
- Fine-mesh strainer
- Whisk
- Ramekins or small glasses
How to Serve This Dish: Turn the panna cotta onto chilled plates, or leave it in glasses if you want a cleaner look. Spoon berries and a little syrup around the base, not on top, so the surface stays smooth.
Pro Tips for This Recipe:
- Do not boil the cream; boiling can mute the lavender and weaken the set.
- Strain carefully or you’ll get little lavender flecks in the finished custard.
- Lightly oil the ramekins if you plan to unmold them.
Variations on This Dish:
- Rose Honey Panna Cotta: Swap half the lavender for 1/2 teaspoon rosewater.
- Citrus-Lavender Version: Add 1 strip of lemon peel during steeping.
- Dairy-Free Style: Use full-fat coconut milk and coconut cream in place of dairy cream.
Common Mistakes to Avoid with This Dish:
- Adding gelatin to boiling liquid: The set can weaken.
- Using too much lavender: The flavor turns soapy fast.
- Unmolding too early: Chill until the center feels firm all the way through.
5. Red Velvet Whoopie Pies
These are soft, plush, and a little nostalgic, which is not a bad thing when you want a dessert that feels affectionate. The cream cheese filling peeks out in the middle like a neat white seam.
Why It Works: Red velvet gives you a cocoa-tinted cake with a gentle tang from buttermilk. Baked as whoopie pies, the texture stays tender instead of dry. The filling adds enough richness that each sandwich feels like its own little cake.
Key Ingredients:
- 2 cups all-purpose flour
- 2 tablespoons cocoa powder
- 1 teaspoon baking soda
- 1/2 teaspoon fine salt
- 1/2 cup unsalted butter, softened
- 3/4 cup granulated sugar
- 1 large egg
- 1 cup buttermilk
- 1 teaspoon vanilla extract
- 1 tablespoon red gel food coloring
- 8 ounces cream cheese, softened
- 2 cups powdered sugar
- 3 tablespoons unsalted butter, softened, for filling
Quick Steps:
- Heat the oven to 350°F (175°C) and line two sheet pans with parchment.
- Whisk the dry ingredients in one bowl and beat the butter and sugar in another until fluffy.
- Add the egg, buttermilk, vanilla, and coloring, then stir in the dry mix until just combined.
- Drop 2-tablespoon portions onto the pans and bake 10 to 12 minutes, until the tops spring back.
- Beat the filling ingredients until smooth, sandwich the cookies, and chill 20 minutes.
Equipment for This Recipe:
- Electric mixer
- Parchment-lined baking sheets
- Medium cookie scoop
- Offset spatula
How to Serve This Dish: Stack two on a plate with a dusting of powdered sugar. They’re rich, so one sandwich is usually enough after dinner unless the dinner was suspiciously small.
Pro Tips for This Recipe:
- Use gel coloring so you don’t thin the batter.
- Pull them from the oven when they still look soft; they finish setting on the pan.
- Chill the filling before sandwiching if your kitchen runs warm.
Variations on This Dish:
- Strawberry Velvet: Add 2 tablespoons freeze-dried strawberry powder to the batter.
- Chocolate Cream Filling: Swap half the cream cheese for whipped ganache.
- Mini Bites: Pipe 1-tablespoon rounds for smaller, party-sized sandwiches.
Common Mistakes to Avoid with This Dish:
- Overbaking the cakes: They turn dry fast.
- Using cold cream cheese: The filling goes lumpy.
- Adding too much color: The batter can taste flat if the tint is overdone.
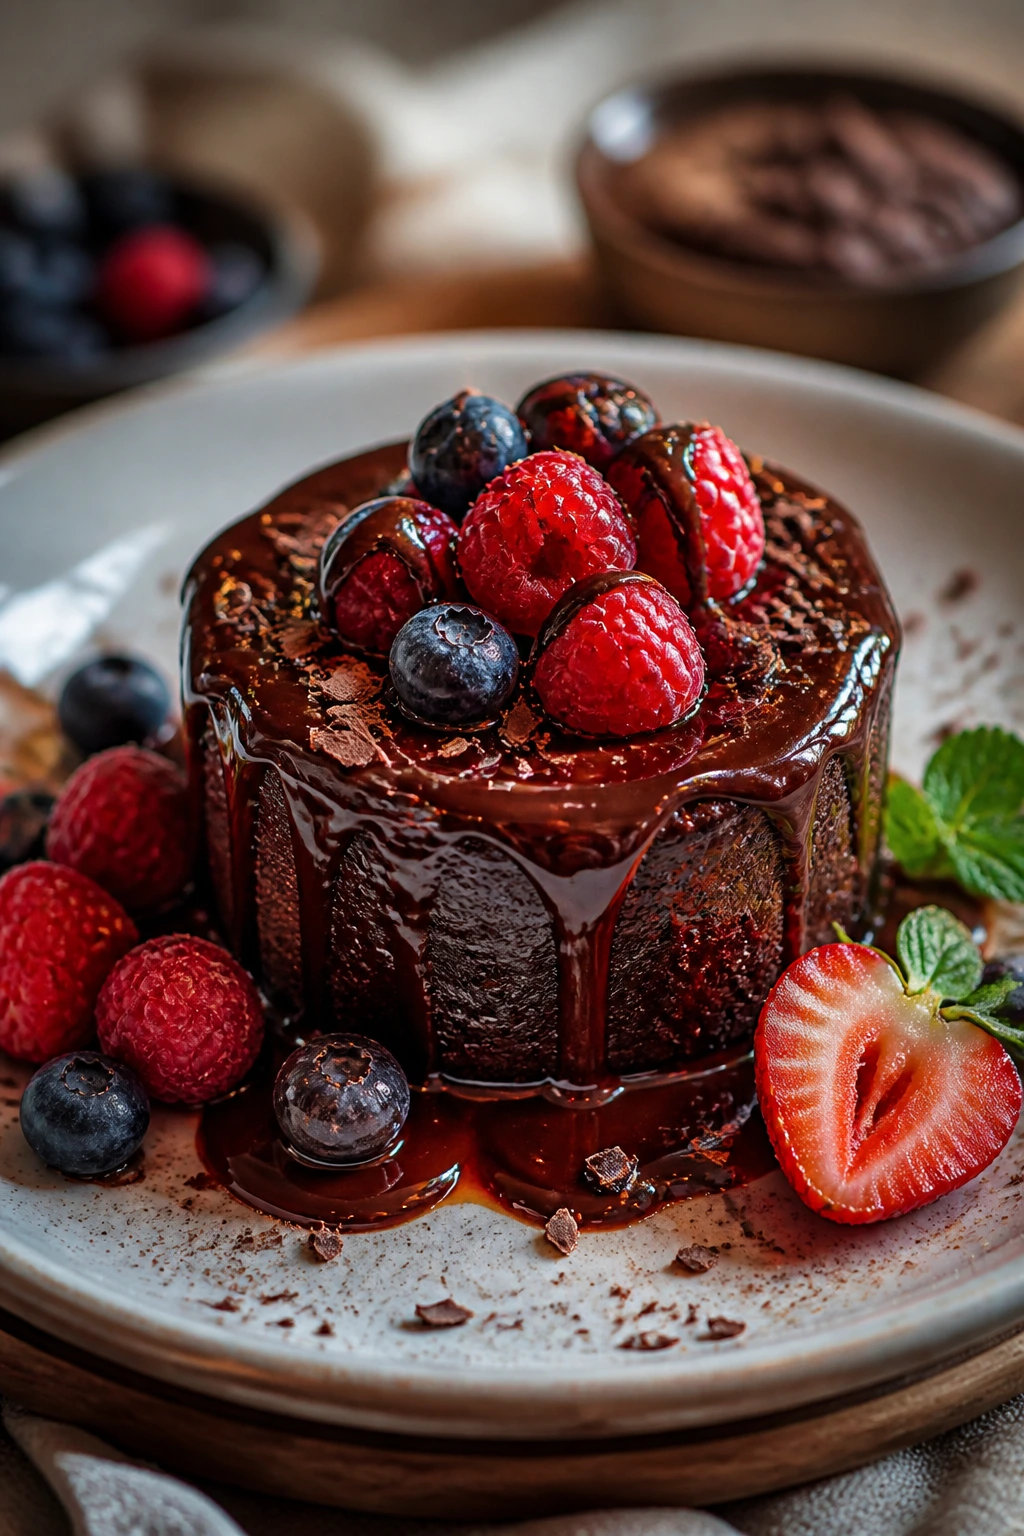
6. Flourless Chocolate Torte
If you want a dessert that looks polished with almost no decoration, this is the one. It slices into a dense, glossy wedge with a thin crackly top and a center that tastes like an expensive truffle.
Why It Works: Without flour, the torte stays intensely chocolatey and silky. Eggs give it structure, while a small amount of cocoa powder deepens the flavor. It looks dramatic on a plate because the cut surface is smooth and almost black against whipped cream or berries.
Key Ingredients:
- 8 ounces dark chocolate, chopped
- 1/2 cup unsalted butter
- 3/4 cup granulated sugar
- 4 large eggs
- 1/4 cup unsweetened cocoa powder
- 1/2 teaspoon fine salt
- 1 teaspoon vanilla extract
- Fresh berries and whipped cream, for serving
Quick Steps:
- Heat the oven to 325°F (165°C) and line an 8-inch springform pan with parchment.
- Melt the chocolate and butter together until smooth, then stir in sugar and salt.
- Beat in the eggs one at a time, then fold in cocoa powder and vanilla.
- Pour into the pan and bake 28 to 32 minutes, until the center still has a slight wobble.
- Cool completely, then chill 2 hours before slicing.
Equipment for This Recipe:
- 8-inch springform pan
- Heatproof bowl
- Whisk
- Parchment paper
How to Serve This Dish: Use a hot knife for clean slices and plate each wedge with a spoonful of softly whipped cream. A few raspberries break up the density in a good way.
Pro Tips for This Recipe:
- Line the pan well; this cake likes to cling.
- Do not overbake or you lose the fudgy middle.
- Chill before slicing if you want sharp edges.
Variations on This Dish:
- Espresso Torte: Add 1 teaspoon espresso powder to the chocolate.
- Orange-Chocolate Version: Stir in 1 teaspoon orange zest.
- Salted Hazelnut Finish: Sprinkle chopped toasted hazelnuts over the top before serving.
Common Mistakes to Avoid with This Dish:
- Skipping the chill: Warm torte smears instead of slicing cleanly.
- Overbaking: The center turns dry and crumbly.
- Using weak chocolate: Choose one with at least 60 percent cacao for depth.
7. Mini Berry Pavlovas
These are all edges and air. The shells crack a little when you bite in, then the soft center gives way to cream and berries. They look delicate because they are delicate.
Why It Works: A slow bake dries the outside while leaving the center marshmallow-soft. Cornstarch and vinegar help the meringue keep that tender middle instead of turning brittle all the way through. Fresh berries give the whole thing color and a tart finish.
Key Ingredients:
- 4 large egg whites
- 1 cup granulated sugar
- 1 teaspoon cornstarch
- 1 teaspoon white vinegar
- 1 teaspoon vanilla extract
- 1 cup heavy cream
- 2 tablespoons powdered sugar
- 2 cups mixed berries
Quick Steps:
- Heat the oven to 250°F (120°C) and line a baking sheet with parchment.
- Whip egg whites to soft peaks, then add sugar slowly until the meringue is glossy and stiff.
- Fold in cornstarch, vinegar, and vanilla.
- Spoon or pipe 6 small nests and bake 1 hour, then turn the oven off and cool inside.
- Top with whipped cream and berries just before serving.
Equipment for This Recipe:
- Stand mixer or hand mixer
- Parchment-lined baking sheet
- Piping bag, optional
- Mixing bowl
How to Serve This Dish: Place one pavlova in the center of each dessert plate and let the berries spill a little over the edge. They look nicest when the cream is barely swirled, not piled high.
Pro Tips for This Recipe:
- Make the meringue in a grease-free bowl.
- Cool in the oven to prevent big cracks.
- Add cream only at the last minute or the shells soften.
Variations on This Dish:
- Raspberry-Only Pavlovas: Use just raspberries and a spoon of raspberry coulis.
- Chocolate Pavlovas: Fold 1 tablespoon cocoa into the meringue.
- Citrus Cream Version: Add lemon zest to the whipped cream.
Common Mistakes to Avoid with This Dish:
- Opening the oven early: Sudden temperature changes cause collapse.
- Overbeating the whites: They become dry and grainy.
- Assembling too soon: The meringue absorbs cream quickly.
8. Rosewater Shortbread Cookies

Shortbread can look plain if you let it, but these are not plain. The edges bake pale gold, the centers stay tender, and a little rosewater makes the whole cookie smell almost like a bouquet next to a teacup.
Why It Works: Shortbread depends on butter, sugar, and a dry crumbly dough, so the shape stays neat when cut into hearts or circles. Rosewater is strong enough to notice in a small amount, which makes it perfect here. Chopped pistachios add green flecks that make the cookies look finished.
Key Ingredients:
- 1 cup unsalted butter, softened
- 1/2 cup powdered sugar
- 1 teaspoon rosewater
- 2 cups all-purpose flour
- 1/4 cup cornstarch
- 1/4 teaspoon fine salt
- 1/4 cup finely chopped pistachios
Quick Steps:
- Heat the oven to 325°F (165°C) and line a baking sheet.
- Beat butter and powdered sugar until smooth, then mix in rosewater.
- Stir in flour, cornstarch, salt, and pistachios until a soft dough forms.
- Roll to 1/4 inch thick, cut into hearts, and chill the shapes 20 minutes.
- Bake 14 to 16 minutes, until the bottoms are just golden.
Equipment for This Recipe:
- Mixing bowl
- Rolling pin
- Heart-shaped cutter
- Baking sheet
How to Serve This Dish: Pile them into a small linen-lined basket or fan three on a dessert plate beside tea or coffee. They’re pretty enough to stand alone, which is useful.
Pro Tips for This Recipe:
- Chill the dough before baking so the edges stay crisp.
- Use culinary rosewater, not perfume-y flavoring.
- Don’t overbake; pale shortbread tastes better than dark shortbread.
Variations on This Dish:
- Lemon Rose Shortbread: Add 1 teaspoon lemon zest.
- Dip in Chocolate: Half-dip the cooled cookies in dark chocolate.
- Jam Thumbprint Style: Press a shallow well into each cookie and fill with raspberry jam.
Common Mistakes to Avoid with This Recipe:
- Adding too much rosewater: It can turn harsh fast.
- Skipping the chill: The cookies spread and lose clean edges.
- Baking until brown: Shortbread should stay pale.
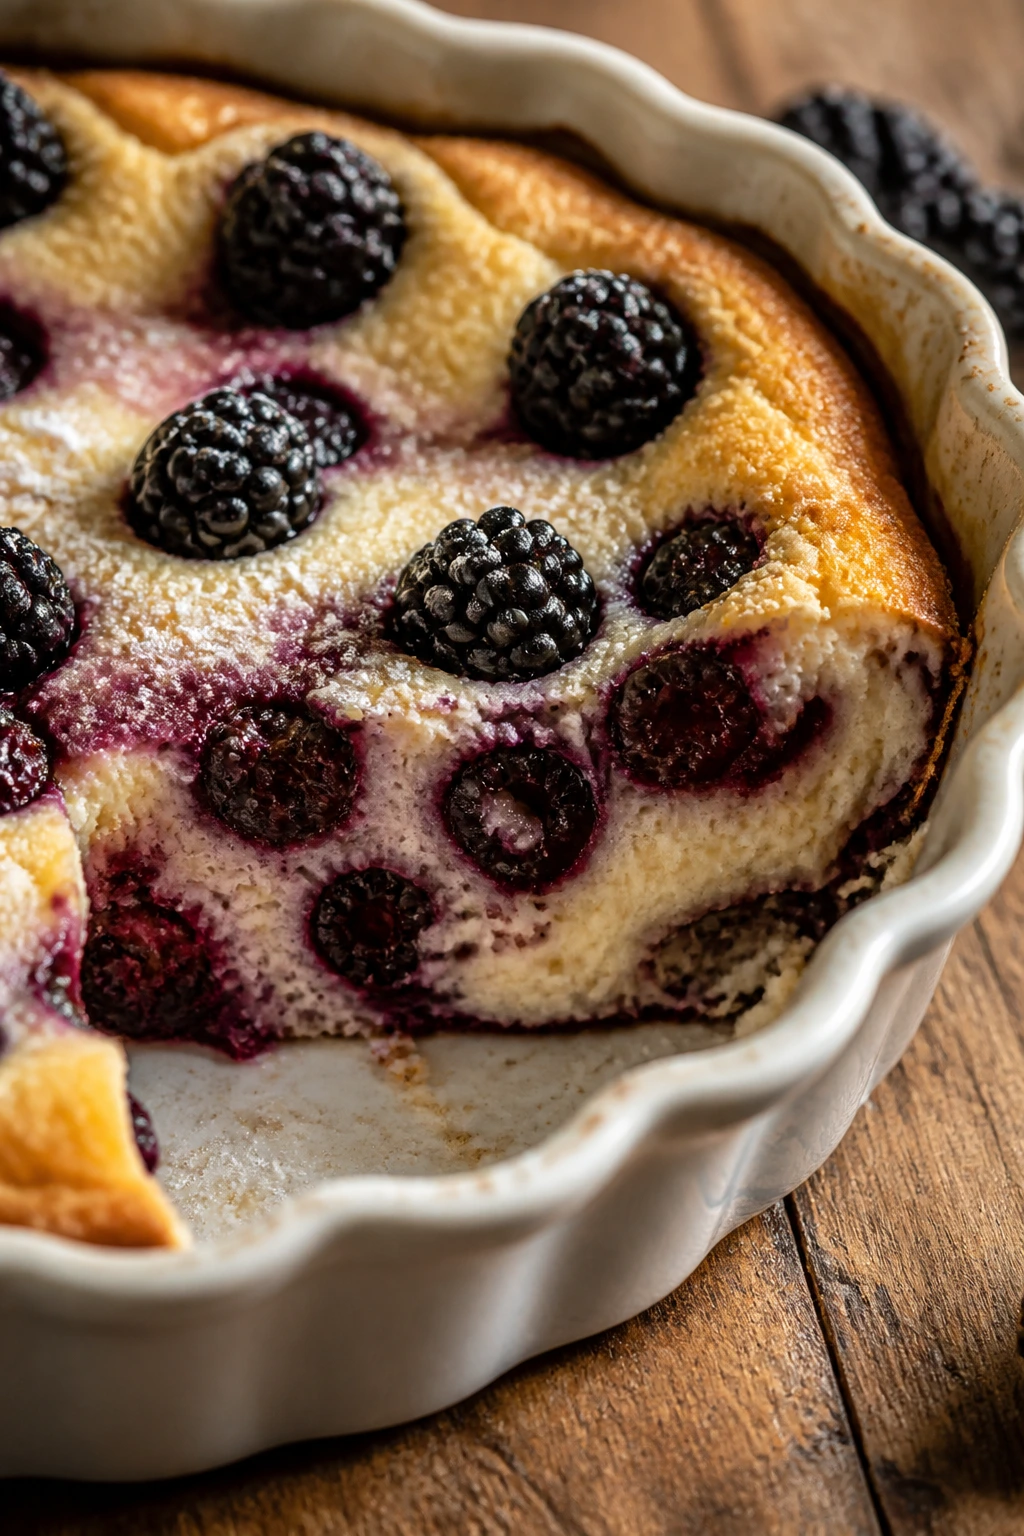
9. Cherry Clafoutis
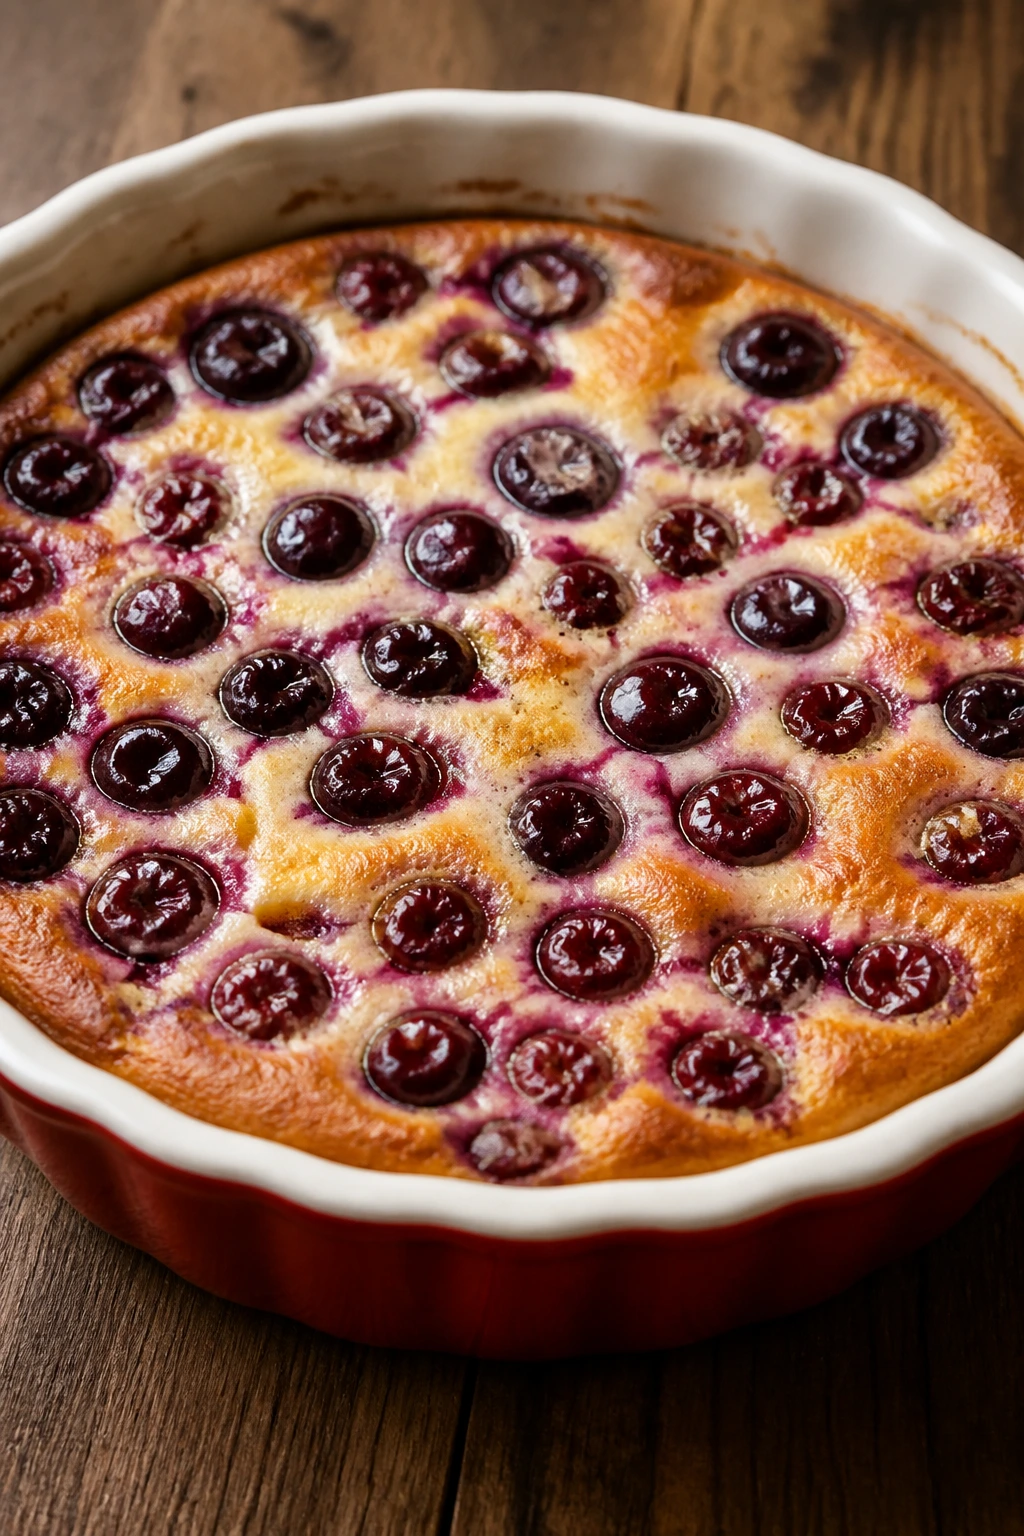
Clafoutis sits somewhere between custard and cake, and that’s part of why it looks so nice in the dish. The cherries sink and rise in soft pockets, leaving jewel-like spots against the creamy batter.
Why It Works: The batter is simple enough to let the fruit stay in charge. Eggs and milk set into a tender custard, while a little flour keeps the texture sliceable. The cherries bleed just enough color to make the top look painted.
Key Ingredients:
- 2 cups pitted cherries
- 3 large eggs
- 1/2 cup granulated sugar
- 1 cup whole milk
- 1/2 cup all-purpose flour
- 1 teaspoon vanilla extract
- 1/2 teaspoon almond extract
- 2 tablespoons melted butter
- Powdered sugar, for dusting
Quick Steps:
- Heat the oven to 350°F (175°C) and butter a 9-inch baking dish.
- Scatter the cherries in the dish.
- Whisk eggs, sugar, milk, flour, vanilla, almond extract, and melted butter until smooth.
- Pour over the fruit and bake 35 to 40 minutes, until puffed and lightly golden.
- Cool slightly, then dust with powdered sugar.
Equipment for This Recipe:
- 9-inch baking dish
- Whisk
- Mixing bowl
- Fine sieve, for powdered sugar
How to Serve This Dish: Serve warm in the baking dish for a rustic look, or slice chilled pieces onto plates with a spoon of crème fraîche. A few extra cherries on top make it feel deliberate.
Pro Tips for This Recipe:
- Pit the cherries carefully so they keep their shape.
- Use room-temperature ingredients for a smoother batter.
- Dust with sugar right before serving so it stays snowy.
Variations on This Dish:
- Blackberry Clafoutis: Swap the cherries for blackberries and reduce the sugar slightly.
- Vanilla Bean Version: Use seeds from half a vanilla bean.
- Rum Kiss: Add 1 tablespoon dark rum to the batter.
Common Mistakes to Avoid with This Recipe:
- Using too much flour: The custard turns bready.
- Overbaking: It should be set but still soft in the center.
- Serving too hot: The texture needs a short rest.
10. Tiramisu Cups
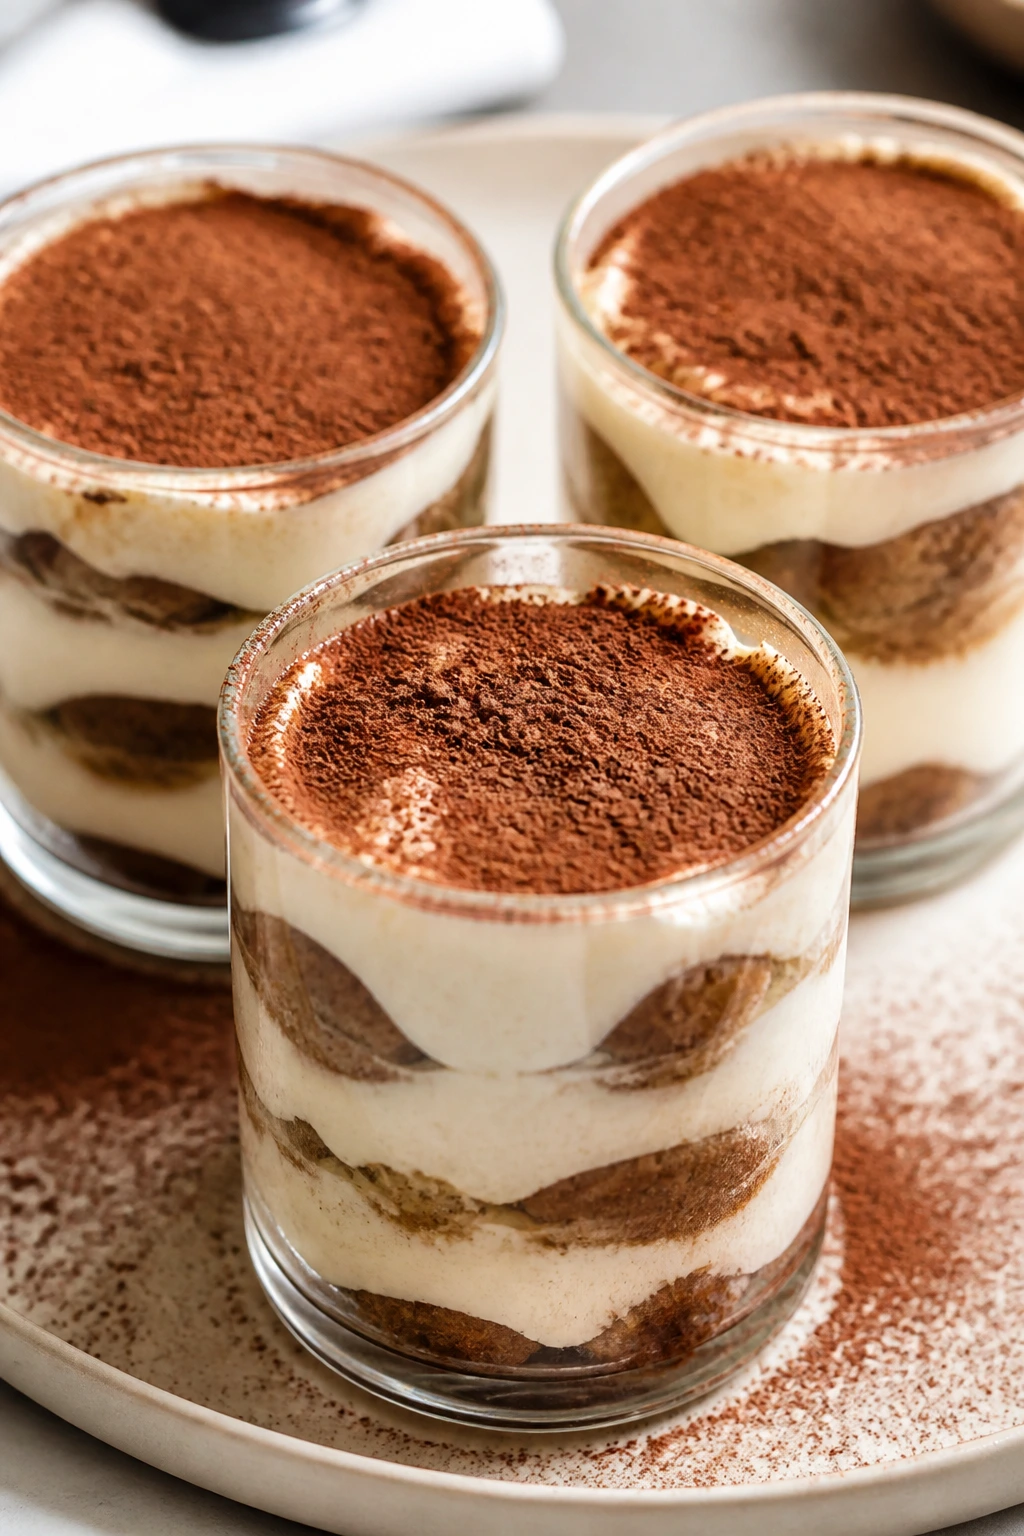
Tiramisu in cups feels more dressed up than the pan version, which is a funny thing to say about a dessert that’s usually casual. The layers show, the cocoa stays crisp on top, and each spoonful gives you cream, espresso, and soft cake in one neat bite.
Why It Works: Mascarpone gives the filling that cool, rich texture without needing much sugar. Coffee-soaked ladyfingers soften just enough, and the glass shows the stripes of cream and cocoa. It’s a dessert that looks precise even when it’s easy.
Key Ingredients:
- 1 cup strong espresso, cooled
- 2 tablespoons coffee liqueur, optional
- 12 ladyfingers
- 8 ounces mascarpone
- 1 cup heavy cream
- 1/4 cup powdered sugar
- 1 teaspoon vanilla extract
- Unsweetened cocoa powder, for dusting
Quick Steps:
- Mix the espresso and liqueur in a shallow dish.
- Whip mascarpone, cream, powdered sugar, and vanilla until thick and smooth.
- Dip ladyfingers quickly in the coffee and layer them in cups.
- Spoon in mascarpone cream, then repeat once.
- Chill 4 hours and dust with cocoa before serving.
Equipment for This Recipe:
- Hand mixer
- Small glasses or cups
- Mixing bowl
- Fine sieve
How to Serve This Dish: Use clear glasses so the layers show. A neat cocoa dusting and one coffee bean on top are enough.
Pro Tips for This Recipe:
- Dip ladyfingers fast or they turn mushy.
- Chill long enough for the layers to set.
- Use fresh cocoa right before serving for the best top layer.
Variations on This Dish:
- Berry Tiramisu: Add a thin layer of raspberry jam between the cream layers.
- Chocolate Tiramisu: Fold 2 tablespoons melted cooled chocolate into the mascarpone.
- No-Liqueur Version: Replace the coffee liqueur with an extra tablespoon of espresso.
Common Mistakes to Avoid with This Dish:
- Over-soaking the ladyfingers: The cups collapse.
- Using grainy mascarpone: Let it soften first.
- Dusting too early: Cocoa can absorb moisture and darken.
11. Blood Orange Olive Oil Cake
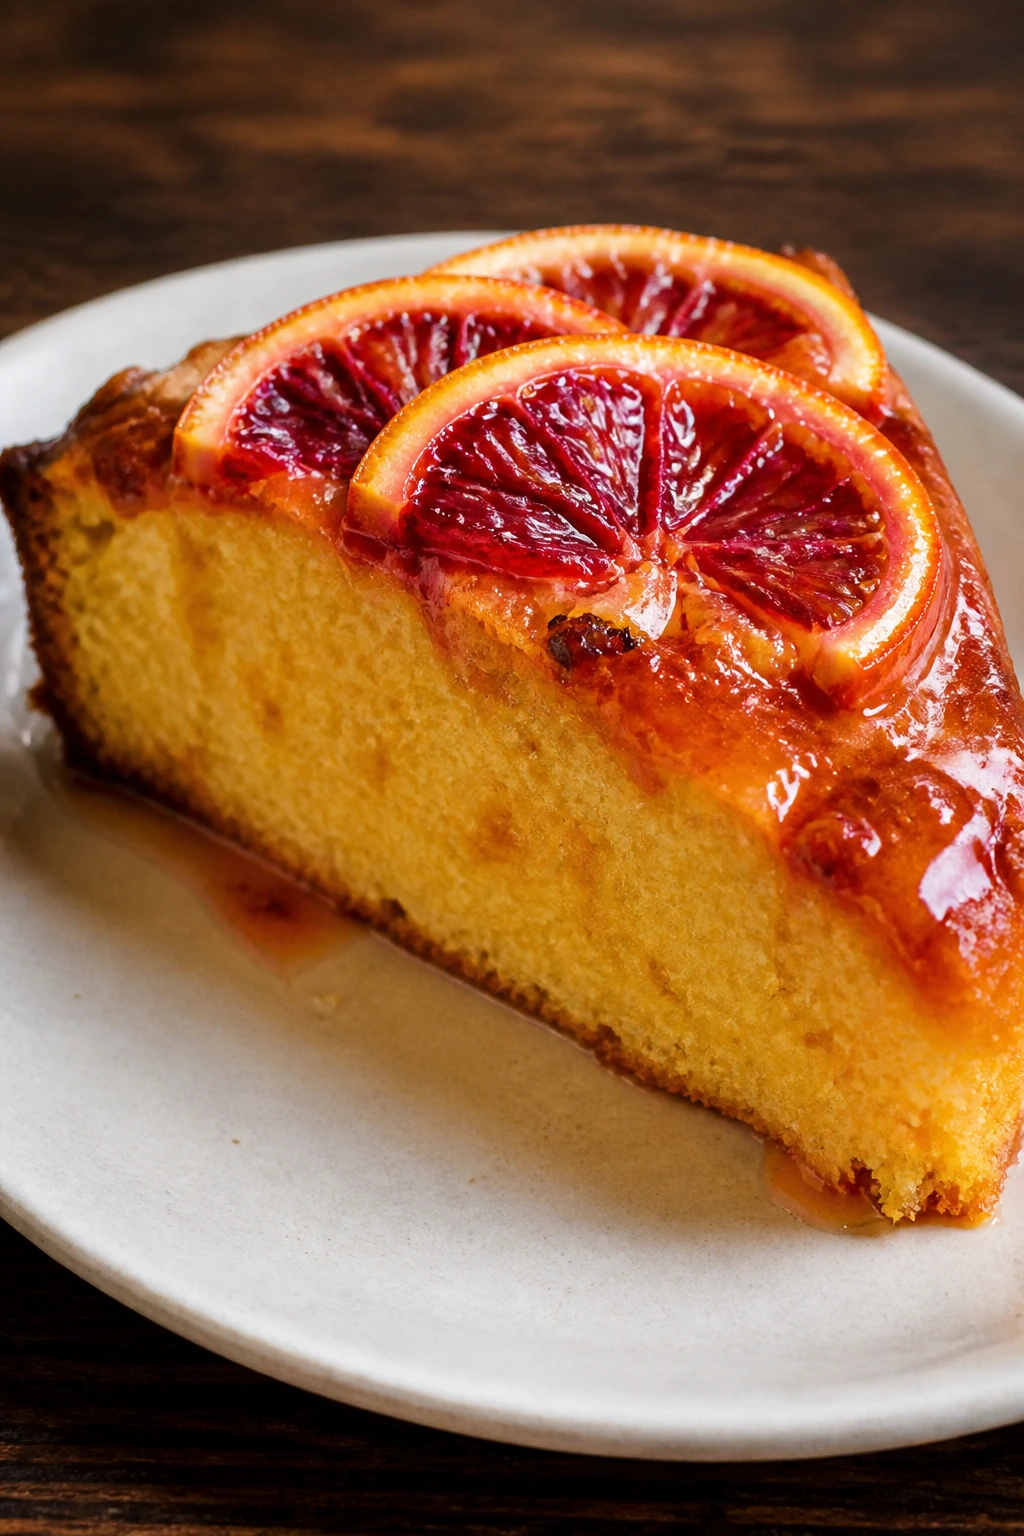
This cake is all citrus shine and soft crumb. Blood orange slices on top make it look like stained glass, and the olive oil keeps the crumb tender for days.
Why It Works: Olive oil gives a moist, supple texture that butter doesn’t quite match here. Blood orange juice and zest add sharpness, while a simple glaze makes the top glossy. It slices cleanly, which matters when the fruit on top is doing the decorating for you.
Key Ingredients:
- 2 cups all-purpose flour
- 1 1/2 cups granulated sugar
- 2 teaspoons baking powder
- 1/2 teaspoon fine salt
- 3 large eggs
- 3/4 cup olive oil
- 1/2 cup plain yogurt
- 1/2 cup blood orange juice
- 1 tablespoon blood orange zest
- 1 cup powdered sugar, for glaze
Quick Steps:
- Heat the oven to 350°F (175°C) and line a 9-inch cake pan.
- Whisk flour, sugar, baking powder, and salt.
- Beat in eggs, olive oil, yogurt, juice, and zest until smooth.
- Bake 35 to 40 minutes, until a toothpick comes out clean.
- Cool, glaze with powdered sugar and blood orange juice, and top with thin orange slices.
Equipment for This Recipe:
- 9-inch cake pan
- Whisk
- Mixing bowl
- Zester
How to Serve This Dish: Serve thin slices with a spoon of softly whipped cream or ricotta. A few blood orange rounds on the plate make it look finished.
Pro Tips for This Recipe:
- Use good olive oil; mild and fruity works best.
- Don’t overmix once the flour goes in.
- Glaze the cake after it has cooled or the glaze runs off.
Variations on This Dish:
- Lemon Olive Oil Cake: Swap blood orange for lemon.
- Almond Version: Add 1/2 teaspoon almond extract.
- Berry Topper: Finish with sugared raspberries instead of citrus slices.
Common Mistakes to Avoid with This Dish:
- Using bitter oil: It shows up fast in the crumb.
- Cutting before cool: The slices break.
- Too much glaze: A thin coat looks better and tastes cleaner.
12. White Chocolate Raspberry Cheesecake Bars
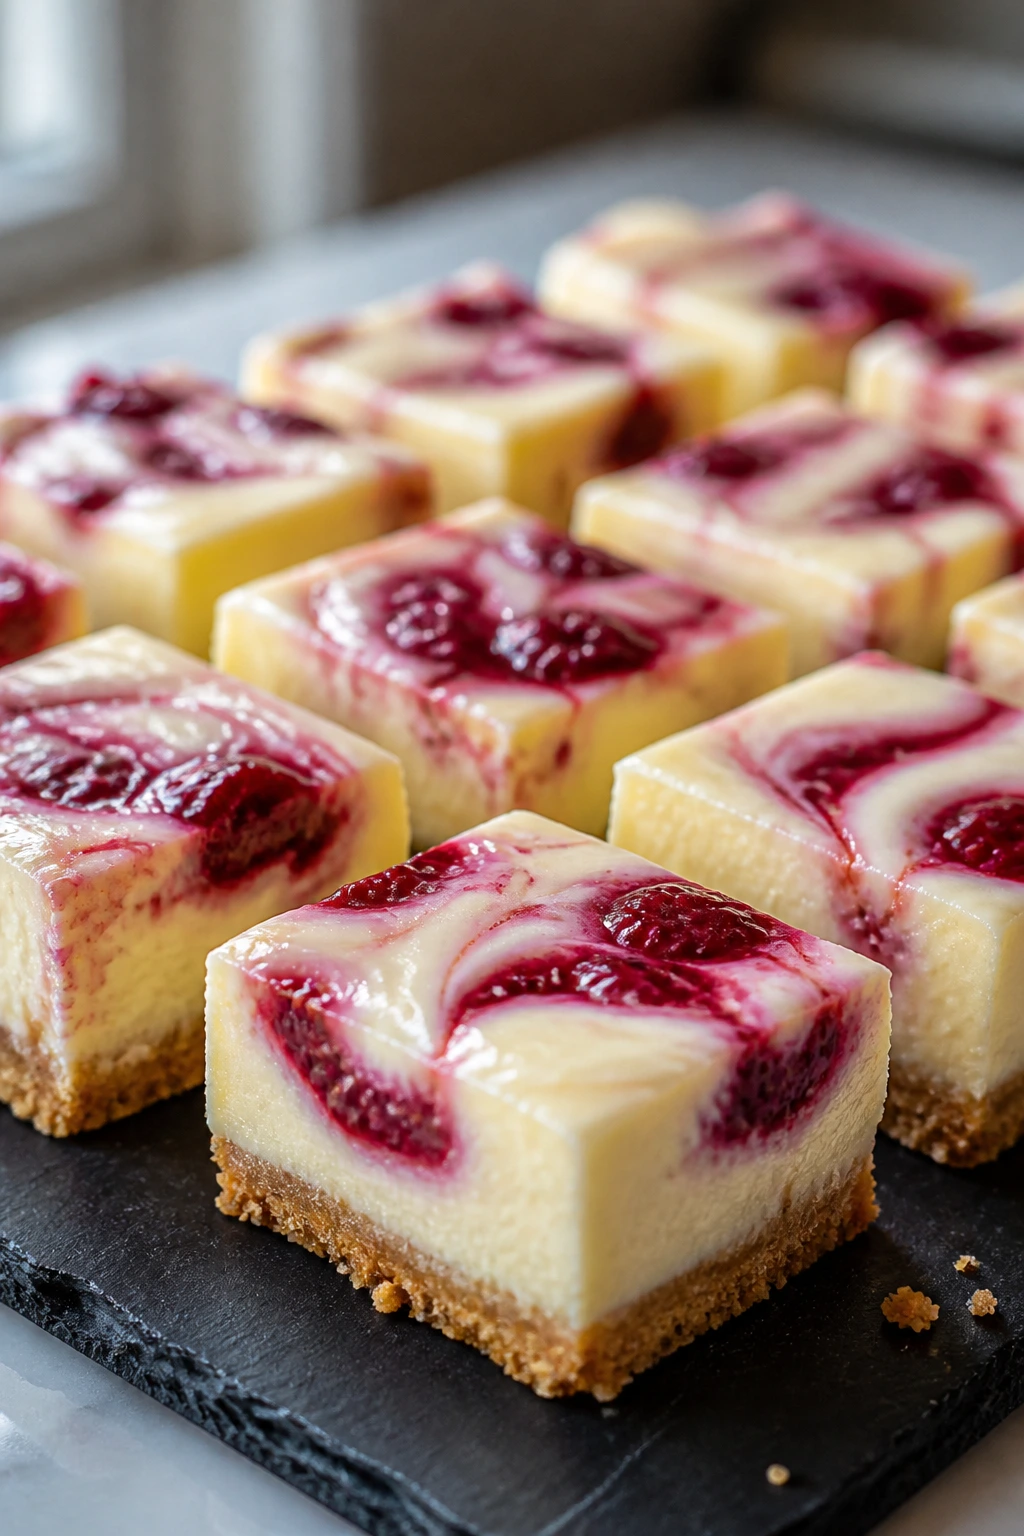
These bars give you the neatness of squares and the softness of cheesecake in one tidy package. The raspberry swirl sits on top like a brushstroke.
Why It Works: White chocolate makes the filling rich and slightly vanilla-like, while raspberry puree cuts through the sweetness. A graham crust keeps the bars easy to lift and slice. They chill into sharp, clean edges, which is exactly what you want here.
Key Ingredients:
- 2 cups graham cracker crumbs
- 1/2 cup melted butter
- 16 ounces cream cheese, softened
- 3/4 cup granulated sugar
- 2 large eggs
- 1 cup melted white chocolate
- 1 teaspoon vanilla extract
- 1/2 cup raspberry puree
- 1 tablespoon cornstarch
Quick Steps:
- Heat the oven to 325°F (165°C) and line an 8×8-inch pan with parchment.
- Mix crumbs and butter, press into the pan, and bake 8 minutes.
- Beat cream cheese and sugar until smooth, then mix in eggs, white chocolate, and vanilla.
- Stir cornstarch into raspberry puree and swirl it through the filling.
- Bake 30 to 35 minutes, chill 4 hours, and slice cleanly.
Equipment for This Recipe:
- 8×8-inch baking pan
- Electric mixer
- Parchment paper
- Offset spatula
How to Serve This Dish: Cut into neat rectangles and top each one with a fresh raspberry. The bars look especially good on a pale plate with a few crumbs left at the edge.
Pro Tips for This Recipe:
- Soften the cream cheese fully or the filling stays lumpy.
- Don’t over-swirl; a few ribbons look better than a pink flood.
- Chill long enough to get a firm slice.
Variations on This Dish:
- Dark Chocolate Swirl: Replace half the white chocolate with dark chocolate.
- Lime-Raspberry Bars: Add lime zest to the filling.
- Cookie Crust: Use crushed vanilla wafers instead of graham crumbs.
Common Mistakes to Avoid with This Recipe:
- Overbaking: Cheesecake bars crack when they’re cooked too hard.
- Warm slicing: The edges smear.
- Too much puree: The filling turns loose.
13. Almond Financiers with Candied Rose Petals
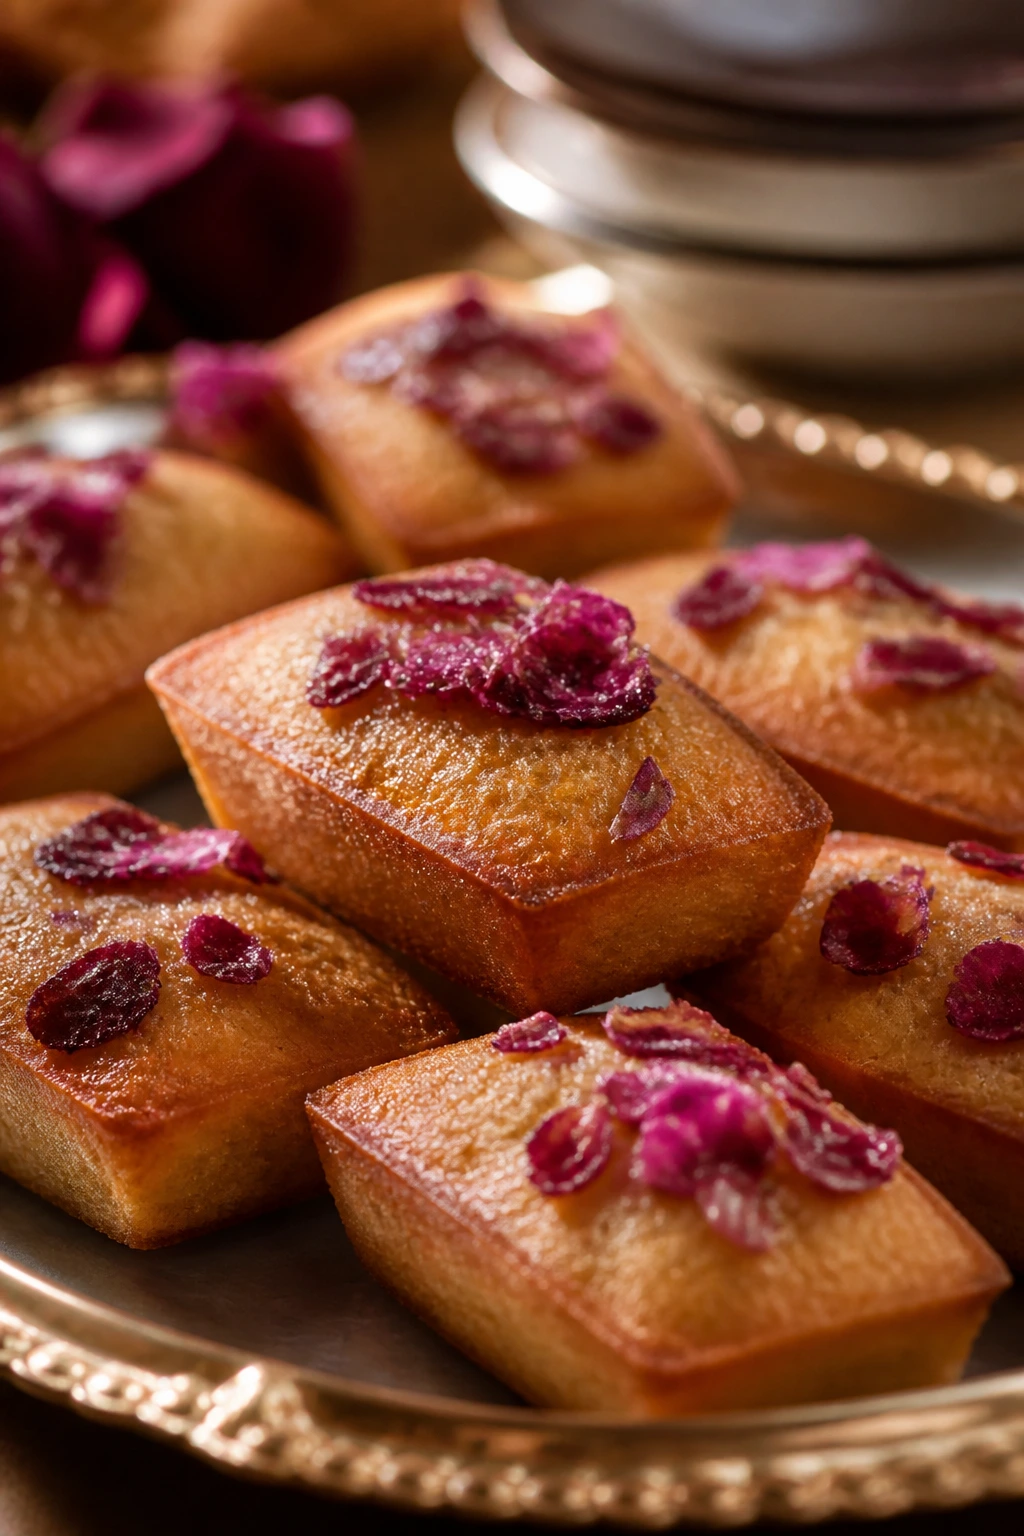
Financiers are small, neat, and a little bit aristocratic-looking, which makes them a strong fit for a romantic dessert spread. The browned butter gives them a toasty perfume, and the rose petals on top make the whole tray look like it belongs in a window bakery.
Why It Works: Almond flour keeps the crumb tender, while egg whites give the cakes lift without heaviness. Brown butter adds the kind of nutty depth that makes small cakes taste expensive. Edible rose petals turn them into something special with almost no extra work.
Key Ingredients:
- 1/2 cup unsalted butter
- 1 cup almond flour
- 1/2 cup powdered sugar
- 1/4 cup all-purpose flour
- 4 large egg whites
- 2 tablespoons honey
- 1/2 teaspoon vanilla extract
- 2 tablespoons sliced almonds
- Edible rose petals, for garnish
Quick Steps:
- Brown the butter in a small saucepan until nutty and golden, then cool slightly.
- Whisk almond flour, powdered sugar, flour, and a pinch of salt.
- Stir in egg whites, honey, vanilla, and browned butter.
- Spoon into mini molds and top with sliced almonds.
- Bake at 375°F (190°C) for 12 to 14 minutes, then garnish with rose petals after cooling.
Equipment for This Recipe:
- Financier pan or mini muffin pan
- Small saucepan
- Whisk
- Cooling rack
How to Serve This Dish: Arrange them in a tight cluster on a narrow platter. A few rose petals scattered around the base keeps the look soft and calm.
Pro Tips for This Recipe:
- Cool the browned butter a little so it doesn’t scramble the egg whites.
- Use a mini mold if you want the edges crisp and tidy.
- Add petals after baking, not before, or they darken too much.
Variations on This Dish:
- Pistachio Financiers: Replace 1/4 cup almond flour with ground pistachios.
- Orange Blossom Version: Add 1/2 teaspoon orange blossom water.
- Berry Financiers: Press one raspberry into the center of each cake before baking.
Common Mistakes to Avoid with This Recipe:
- Burning the butter: It goes bitter fast.
- Overfilling molds: The batter puffs and spills.
- Using decorative petals that aren’t edible: Always check the package.
14. Strawberry Champagne Jellies
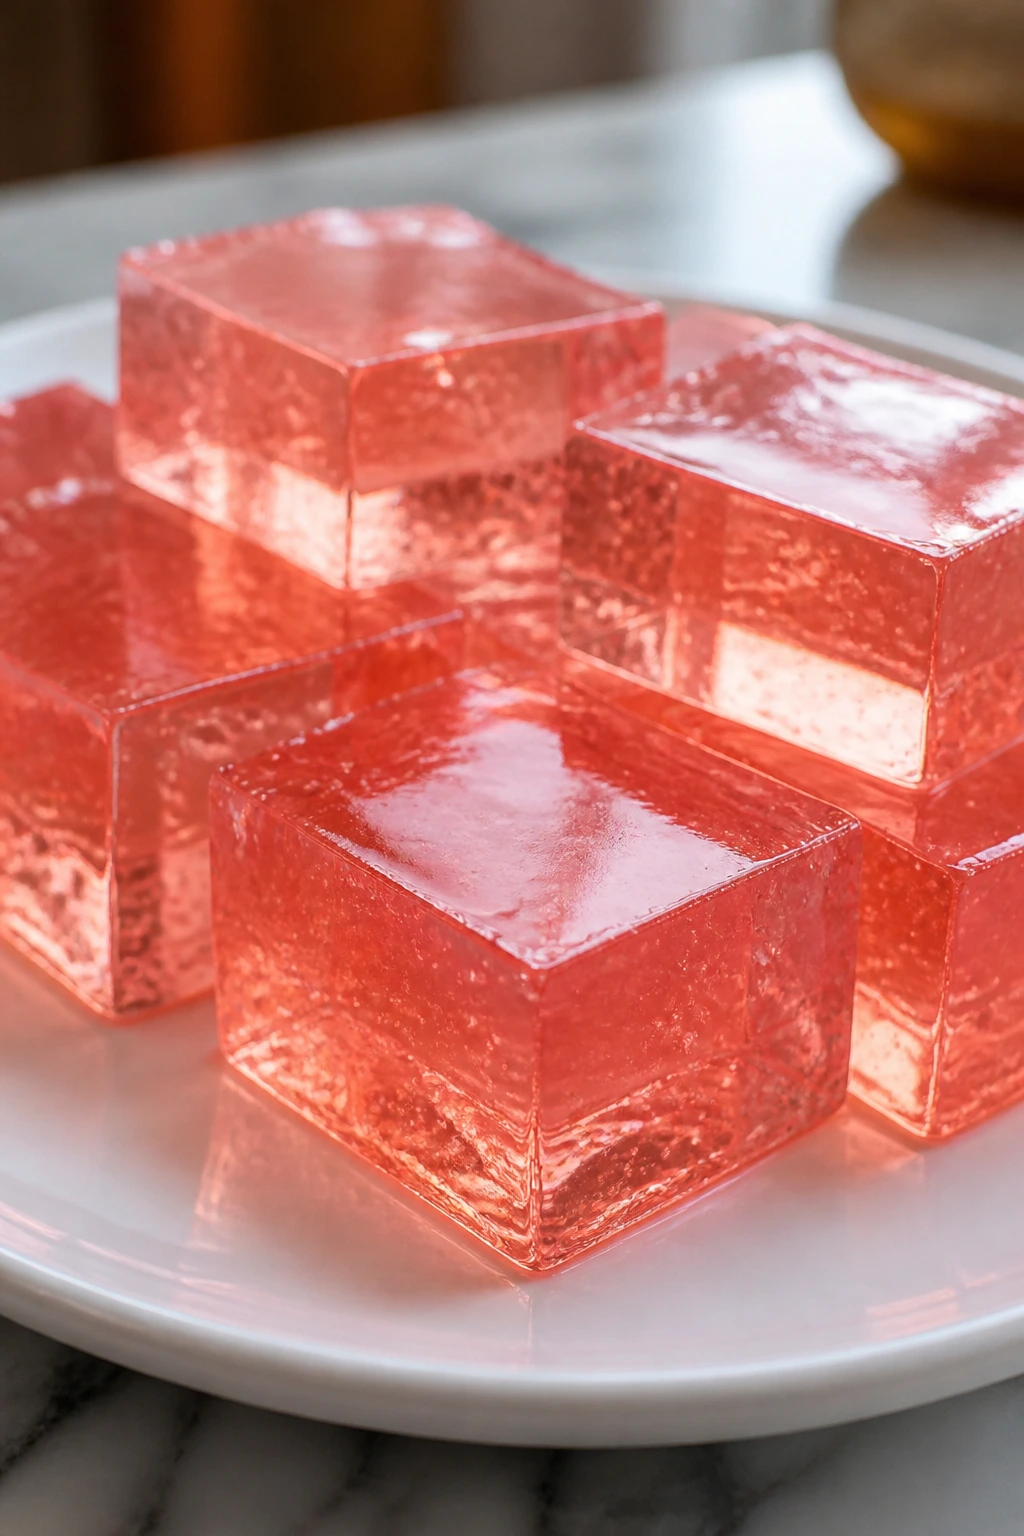
These are playful in a grown-up way. The clear pink cubes or domes catch the light, and the strawberry flavor stays bright instead of muddy.
Why It Works: Champagne gives the jelly a light, celebratory note, while strawberry puree adds color and fruit flavor. Gelatin sets the mixture cleanly, so you can unmold it into sharp shapes. It’s the kind of dessert that looks more difficult than it is.
Key Ingredients:
- 1 cup strawberry puree
- 1 cup champagne or sparkling wine
- 1/4 cup granulated sugar
- 2 1/2 teaspoons unflavored gelatin
- 1/4 cup cold water
- 1 teaspoon lemon juice
- Fresh strawberry slices, for garnish
Quick Steps:
- Bloom gelatin in cold water for 5 minutes.
- Warm the strawberry puree with sugar until the sugar dissolves.
- Stir in the bloomed gelatin, then add champagne and lemon juice.
- Pour into molds or small glasses and chill 4 hours until set.
- Unmold or serve in the cups with strawberry slices.
Equipment for This Recipe:
- Small saucepan
- Silicone molds or glasses
- Whisk
- Measuring cups
How to Serve This Dish: Serve chilled on a white plate with one sliced berry beside the jelly. If you use clear glasses, a tiny mint leaf gives the top a little lift.
Pro Tips for This Recipe:
- Add the champagne after removing the pan from heat so the bubbles don’t vanish too fast.
- Strain the puree if you want a very smooth finish.
- Chill until the center is firm; soft-set jelly won’t unmold well.
Variations on This Dish:
- Nonalcoholic Version: Use sparkling grape juice instead of champagne.
- Rose-Strawberry Jelly: Add a few drops of rosewater.
- Layered Jellies: Set a thin champagne layer first, then add strawberry on top.
Common Mistakes to Avoid with This Dish:
- Boiling the champagne: It flattens the flavor.
- Too little chilling: The jelly bends instead of holding shape.
- Skipping the garnish: These look best with one clean fruit accent.
15. Chocolate Mousse with Sea Salt
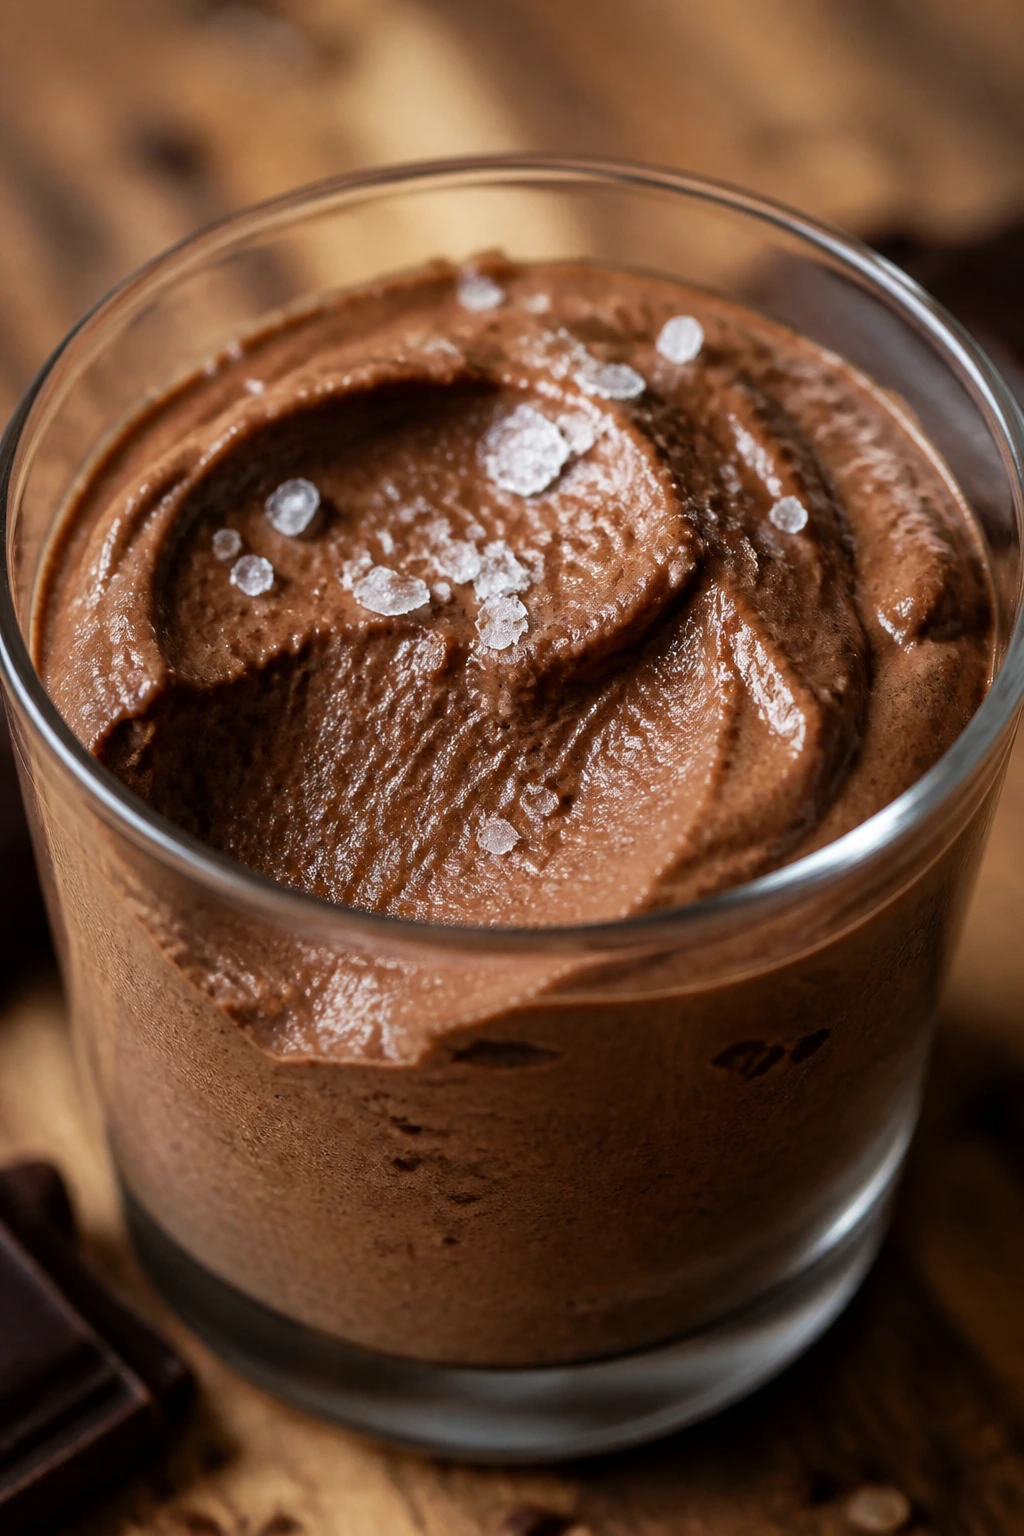
Chocolate mousse is all about contrast: airy but rich, dark but soft, simple but not plain. A tiny bit of sea salt on top keeps the flavor from feeling one-note.
Why It Works: Whipped cream lightens the mousse without making it flimsy, and melted chocolate gives it body. Eggs add extra structure if you want a classic style, but even a simpler version can set into elegant spoonfuls. The salt sharpens the chocolate instead of fighting it.
Key Ingredients:
- 6 ounces dark chocolate
- 2 tablespoons unsalted butter
- 3 large eggs, separated
- 1/4 cup granulated sugar
- 1 cup heavy cream
- 1/4 teaspoon fine salt
- Flaky sea salt, for topping
Quick Steps:
- Melt the chocolate and butter together, then cool slightly.
- Beat egg yolks with half the sugar and stir into the chocolate.
- Whip the cream to soft peaks in a separate bowl.
- Whip the egg whites with the rest of the sugar to glossy peaks, then fold everything together gently.
- Chill 3 hours and finish with flaky salt before serving.
Equipment for This Recipe:
- Heatproof bowl
- Electric mixer
- Rubber spatula
- Serving glasses or ramekins
How to Serve This Dish: Spoon it into small glasses and smooth the top with the back of a spoon. A few raspberries or one chocolate curl are enough.
Pro Tips for This Recipe:
- Fold gently or you lose the mousse’s airy texture.
- Use good chocolate; this dessert shows every weak note.
- Chill long enough for a clean spoonful.
Variations on This Dish:
- Espresso Mousse: Add 1 teaspoon espresso powder to the melted chocolate.
- Orange Chocolate Mousse: Stir in 1 teaspoon orange zest.
- Dairy-Light Version: Replace half the cream with whipped coconut cream.
Common Mistakes to Avoid with This Recipe:
- Overfolding: The mousse deflates.
- Using chocolate that’s too sweet: It muddies the flavor.
- Skipping the salt: The chocolate tastes flatter without it.
16. Lemon Posset with Berries
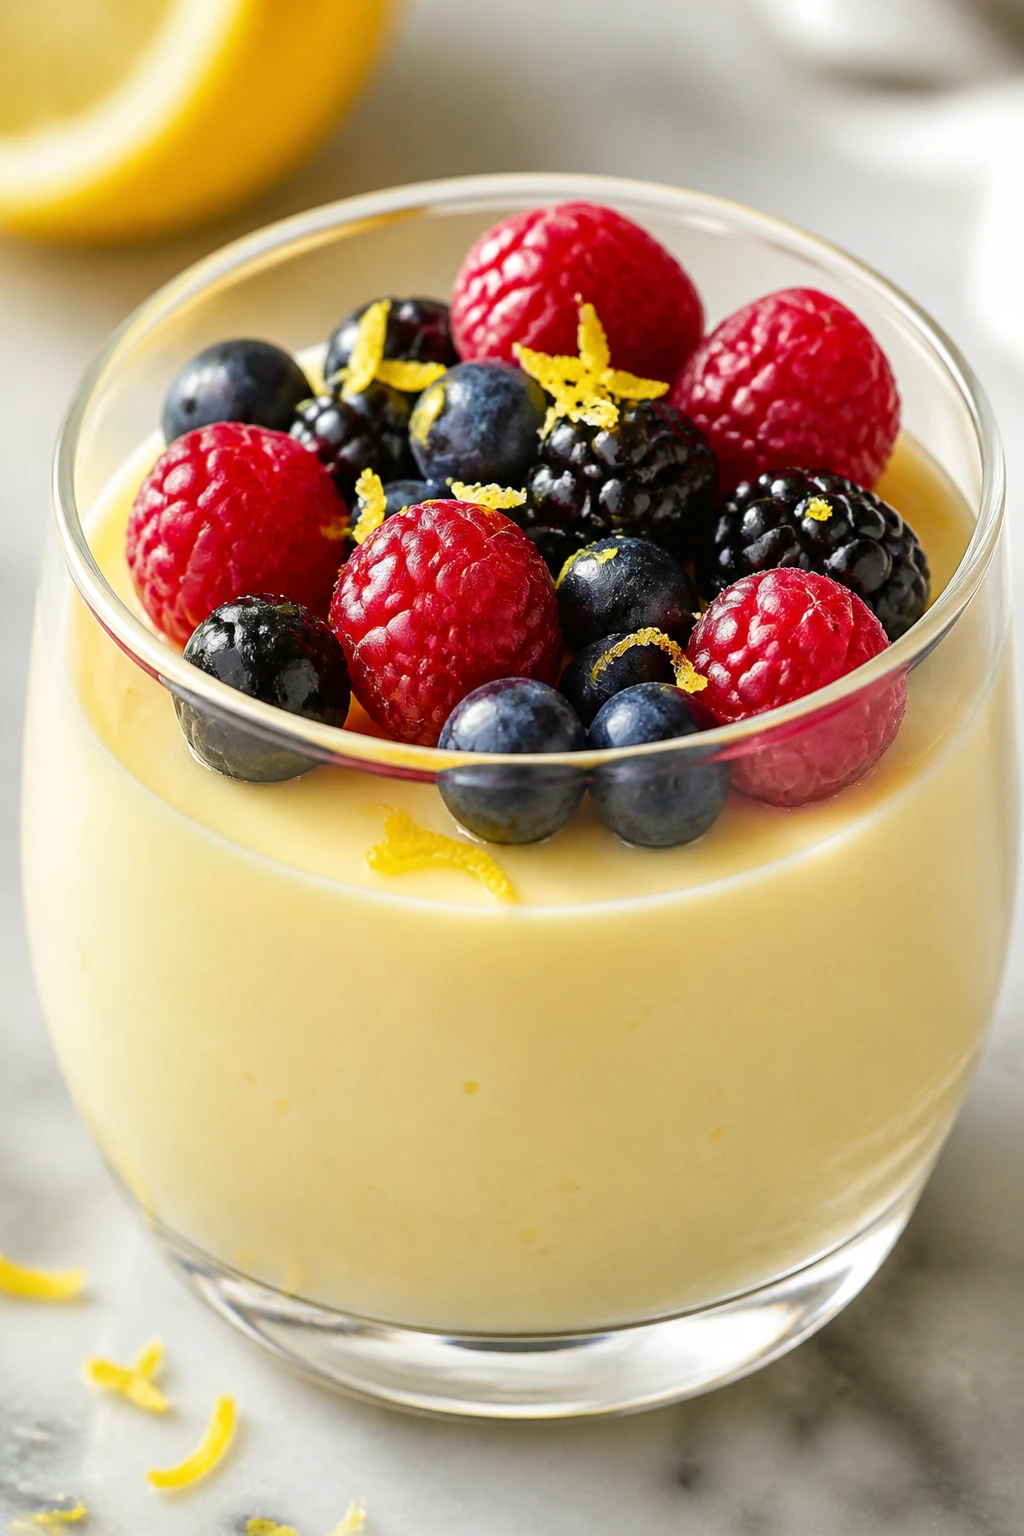
This is one of the easiest desserts in the whole collection, and it still looks polished. The surface sets into a pale, silky cream that takes well to fresh berries and a little grated zest.
Why It Works: Cream, sugar, and lemon juice do the heavy lifting. The acid thickens the cream on its own, so you get a spoonable set without eggs or gelatin. It’s bright, clean, and just rich enough.
Key Ingredients:
- 2 cups heavy cream
- 3/4 cup granulated sugar
- 1/3 cup fresh lemon juice
- 1 teaspoon lemon zest
- 1 cup fresh berries
- Shortbread cookies, optional for serving
Quick Steps:
- Bring the cream and sugar to a gentle boil in a saucepan.
- Simmer 3 minutes, stirring often.
- Remove from heat and whisk in lemon juice and zest.
- Pour into small glasses or ramekins and chill 4 hours until set.
- Top with berries before serving.
Equipment for This Recipe:
- Small saucepan
- Whisk
- Ramekins or glasses
- Microplane
How to Serve This Dish: Keep it in small glasses and top with a loose pile of berries. One shortbread cookie on the side adds texture and gives the plate a little height.
Pro Tips for This Recipe:
- Use fresh lemon juice; bottled juice tastes blunt here.
- Don’t let the cream scorch.
- Chill uncovered only until the top sets, then cover gently.
Variations on This Dish:
- Lime Posset: Swap lemon for lime for a sharper finish.
- Blood Orange Posset: Use blood orange juice, but add less because it is softer.
- Vanilla Posset: Add 1 teaspoon vanilla for a warmer flavor.
Common Mistakes to Avoid with This Recipe:
- Boiling too hard: The cream can split.
- Not chilling long enough: It stays loose.
- Using too much zest: It can overpower the cream.
17. Matcha Strawberry Swiss Roll
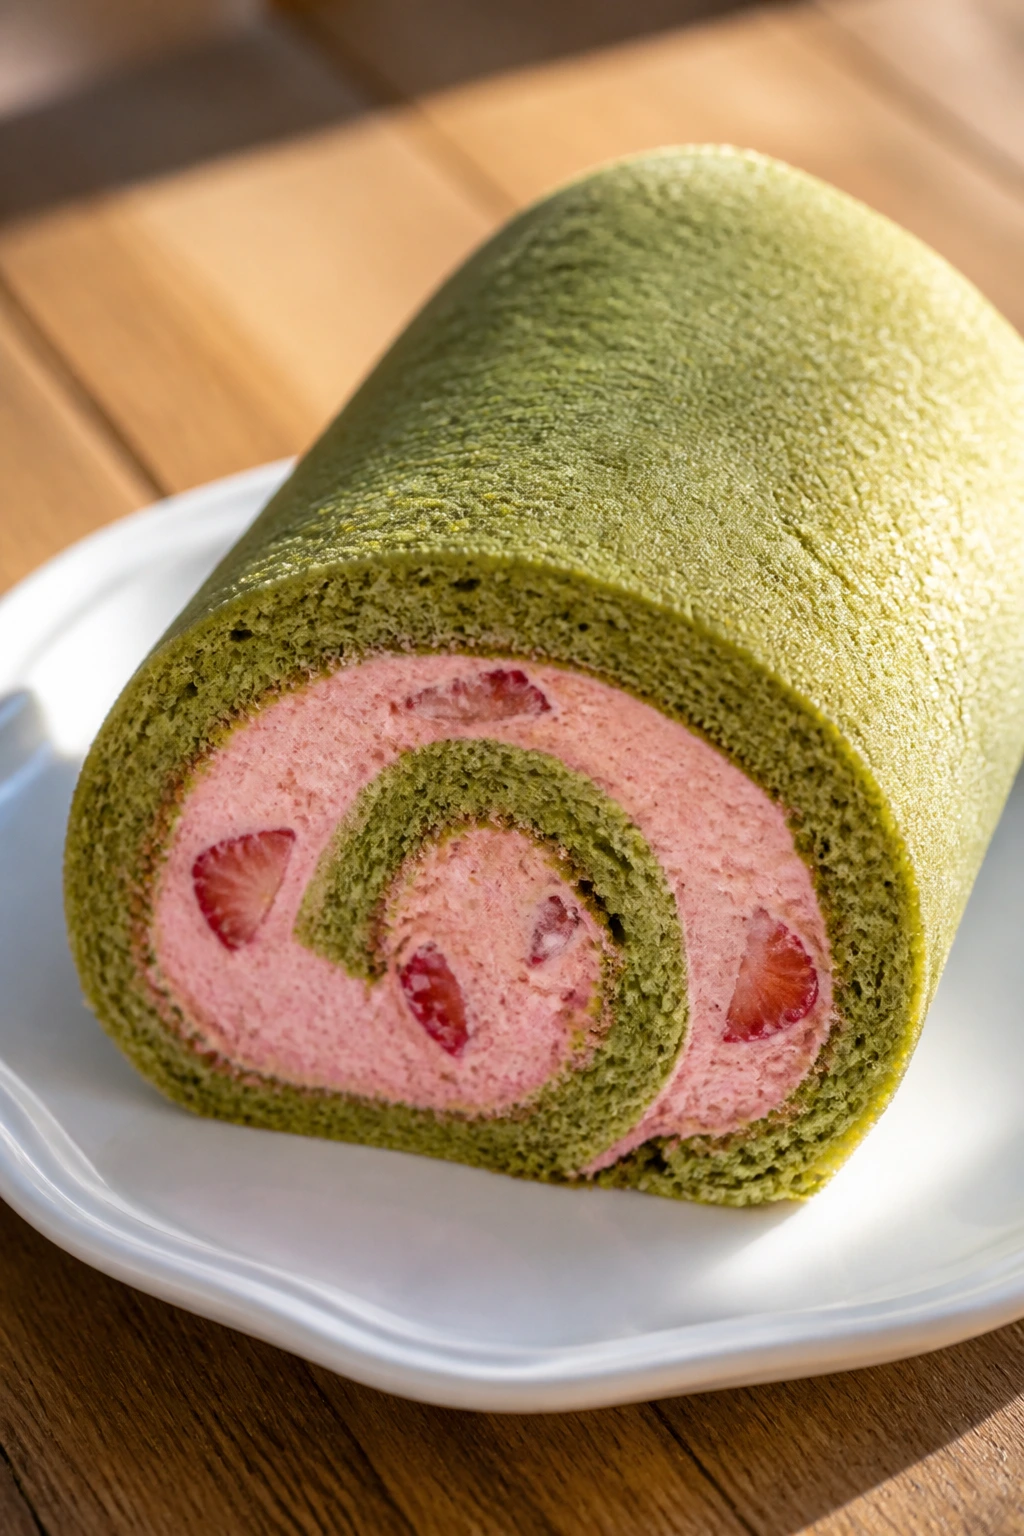
This cake rolls up like a ribbon, which already earns it points. The pale green sponge and red berry filling make a clean color contrast that looks almost too neat to slice.
Why It Works: A thin sponge bakes fast and stays flexible enough to roll without cracking. Matcha gives a gentle earthy note that keeps the sweetness in check, while strawberries add freshness and a bright stripe in the center. The result feels light, not heavy.
Key Ingredients:
- 4 large eggs
- 1/2 cup granulated sugar
- 3/4 cup cake flour
- 1 tablespoon matcha powder
- 1 teaspoon baking powder
- 1 cup heavy cream
- 2 tablespoons powdered sugar
- 1 1/2 cups sliced strawberries
- 1 teaspoon vanilla extract
Quick Steps:
- Heat the oven to 350°F (175°C) and line a jelly roll pan with parchment.
- Beat eggs and sugar until pale and thick, then fold in flour, matcha, and baking powder.
- Spread into a thin even layer and bake 10 to 12 minutes.
- Turn onto a sugared towel, roll while warm, and cool.
- Fill with whipped cream, strawberries, and vanilla, then roll again and chill.
Equipment for This Recipe:
- Jelly roll pan
- Parchment paper
- Clean kitchen towel
- Electric mixer
How to Serve This Dish: Trim the ends for a clean spiral and dust the top lightly with matcha. A row of sliced strawberries beside the roll keeps the plating honest.
Pro Tips for This Recipe:
- Roll it while warm or it sets in a flat shape.
- Use cake flour if you want a softer sponge.
- Don’t overfill or the spiral pops open.
Variations on This Dish:
- Vanilla Strawberry Roll: Skip the matcha and flavor the sponge with vanilla.
- Raspberry Roll: Use raspberries and a thin layer of jam.
- Chocolate Matcha Roll: Add 1 tablespoon cocoa to the sponge for a deeper color.
Common Mistakes to Avoid with This Recipe:
- Waiting too long to roll: The cake cracks.
- Using too much filling: It squeezes out at the seam.
- Baking too long: The sponge becomes stiff.
18. Mini Éclairs with Pink Glaze
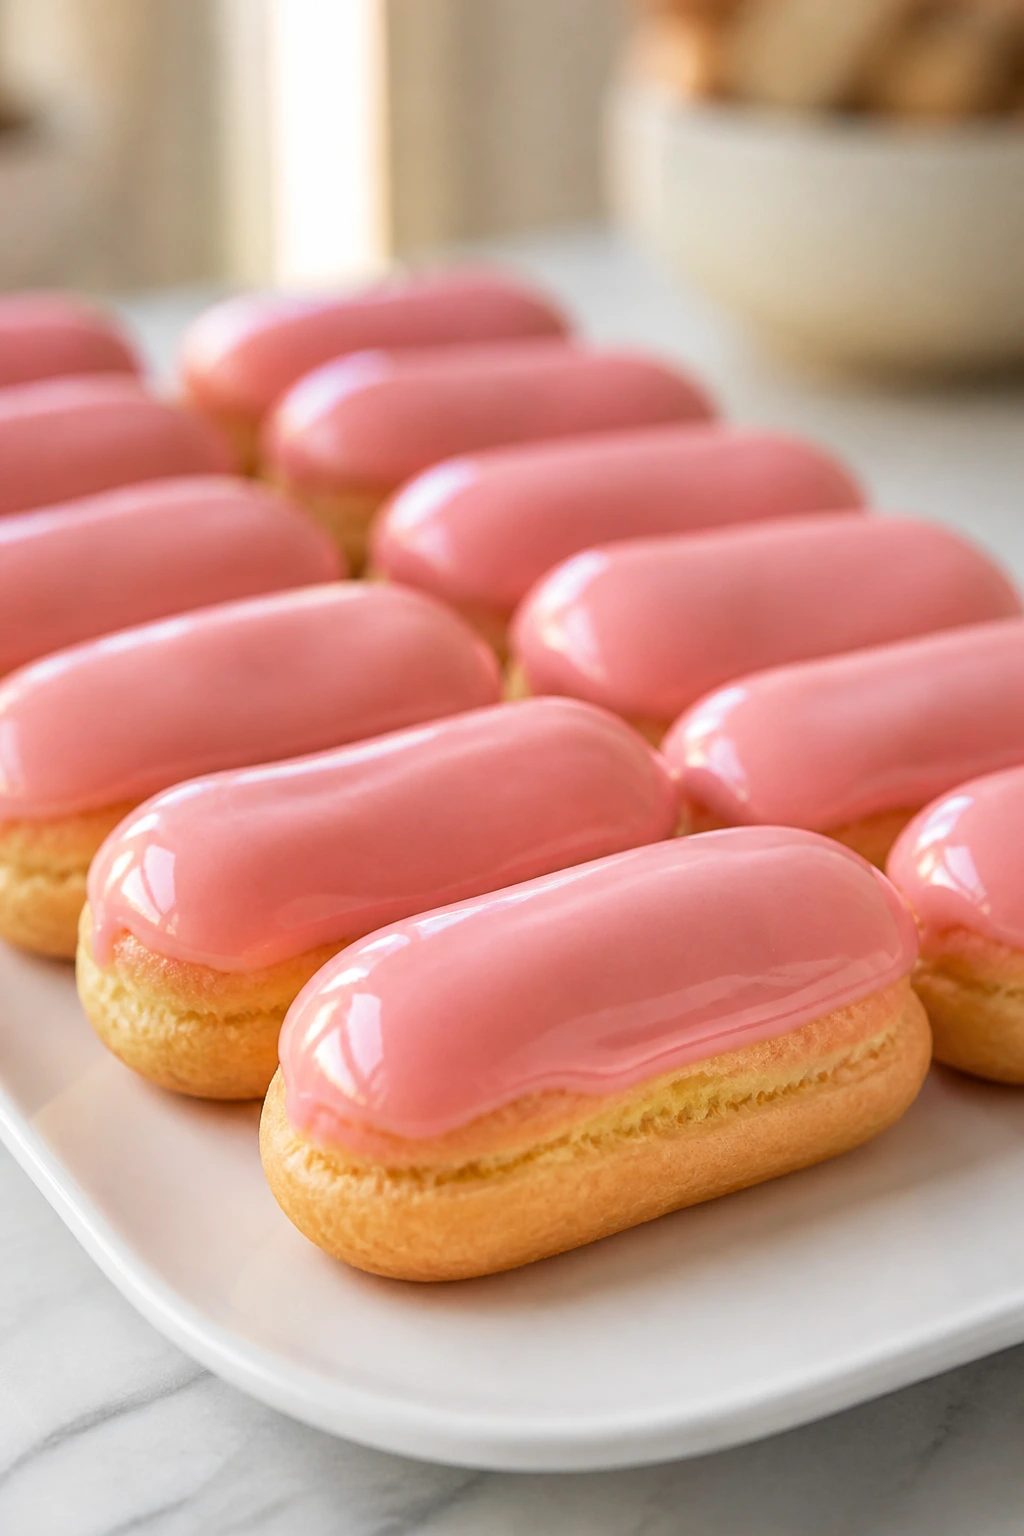
Éclairs look fancy because they’re neat, not because they’re difficult to admire. The choux pastry puffs into elegant little shells, and a pink glaze gives them that romantic finish without much effort.
Why It Works: Choux pastry relies on steam, so it puffs into a hollow shell that’s perfect for filling. Pastry cream gives the center richness, and a strawberry glaze makes the tops shiny and soft. Mini size keeps the whole dessert manageable.
Key Ingredients:
- 1/2 cup water
- 1/2 cup whole milk
- 1/2 cup unsalted butter
- 1 cup all-purpose flour
- 4 large eggs
- 2 cups milk, for pastry cream
- 1/2 cup sugar
- 3 egg yolks
- 3 tablespoons cornstarch
- 1/2 cup strawberry puree
- 1 cup powdered sugar, for glaze
Quick Steps:
- Heat oven to 400°F (200°C) and line a sheet pan.
- Cook water, milk, butter, and flour into a smooth paste, then beat in eggs one at a time.
- Pipe 3-inch logs and bake 20 to 25 minutes until deep golden.
- Cook the pastry cream, cool it, then fill the éclairs with a piping bag.
- Stir strawberry puree into powdered sugar for glaze and drizzle on top.
Equipment for This Recipe:
- Piping bag with plain tip
- Sheet pan
- Saucepan
- Pastry cream whisk
How to Serve This Dish: Line them up on a rectangular tray like little parked cars — neat, glossy, and exactly aligned. A thin stripe of glaze on the plate is enough if you want extra polish.
Pro Tips for This Recipe:
- Do not open the oven during the first 15 minutes.
- Dry the pastry shells fully or they collapse when filled.
- Chill the pastry cream before piping.
Variations on This Recipe:
- Chocolate Éclairs: Use dark chocolate glaze instead.
- Raspberry Cream Éclairs: Fold raspberry puree into the filling.
- Vanilla Bean Version: Flavor the pastry cream with vanilla bean paste.
Common Mistakes to Avoid with This Recipe:
- Underbaking the shells: They deflate after cooling.
- Using runny cream: The filling leaks.
- Glazing warm pastries: The top turns messy instead of smooth.
19. Raspberry Almond Tartlets

These tartlets look like miniature bakery windows. The almond filling bakes up soft and fragrant, and the raspberries sit on top in tidy red rows.
Why It Works: Almond cream gives you a rich base that doesn’t need much sugar or decoration. Tart shells stay crisp beneath the filling, and the berries provide tartness plus a clean, bright finish. A touch of apricot glaze adds shine.
Key Ingredients:
- 1 batch tart dough, enough for 6 mini tartlets
- 1/2 cup unsalted butter, softened
- 1/2 cup sugar
- 1 cup almond flour
- 2 large eggs
- 1 teaspoon vanilla extract
- 1 1/2 cups fresh raspberries
- 2 tablespoons apricot jam
- 1 tablespoon water
Quick Steps:
- Heat oven to 350°F (175°C) and line tartlet pans with dough.
- Beat butter and sugar, then mix in almond flour, eggs, and vanilla.
- Fill the shells with almond cream and bake 18 to 22 minutes.
- Cool completely, then arrange raspberries on top.
- Warm apricot jam with water and brush lightly over the berries.
Equipment for This Recipe:
- Mini tart pans
- Mixing bowl
- Pastry brush
- Small saucepan
How to Serve This Dish: Serve each tartlet on its own small plate with a fork already waiting. They look especially good when the berries are packed in tight and the glaze is barely visible.
Pro Tips for This Recipe:
- Bake until the almond filling is set, not dry.
- Use tight, even berry placement for the neatest look.
- Brush glaze gently or you’ll move the fruit around.
Variations on This Recipe:
- Blueberry Almond Tartlets: Swap the raspberries for blueberries.
- Chocolate-Almond Base: Add 1 tablespoon cocoa to the almond cream.
- Citrus Tartlets: Add lemon zest to the filling.
Common Mistakes to Avoid with This Recipe:
- Overfilling the shells: The cream spills over.
- Using jam too hot: It can slide the berries around.
- Serving before cooling: The filling needs to set.
20. Poached Pears in Red Wine
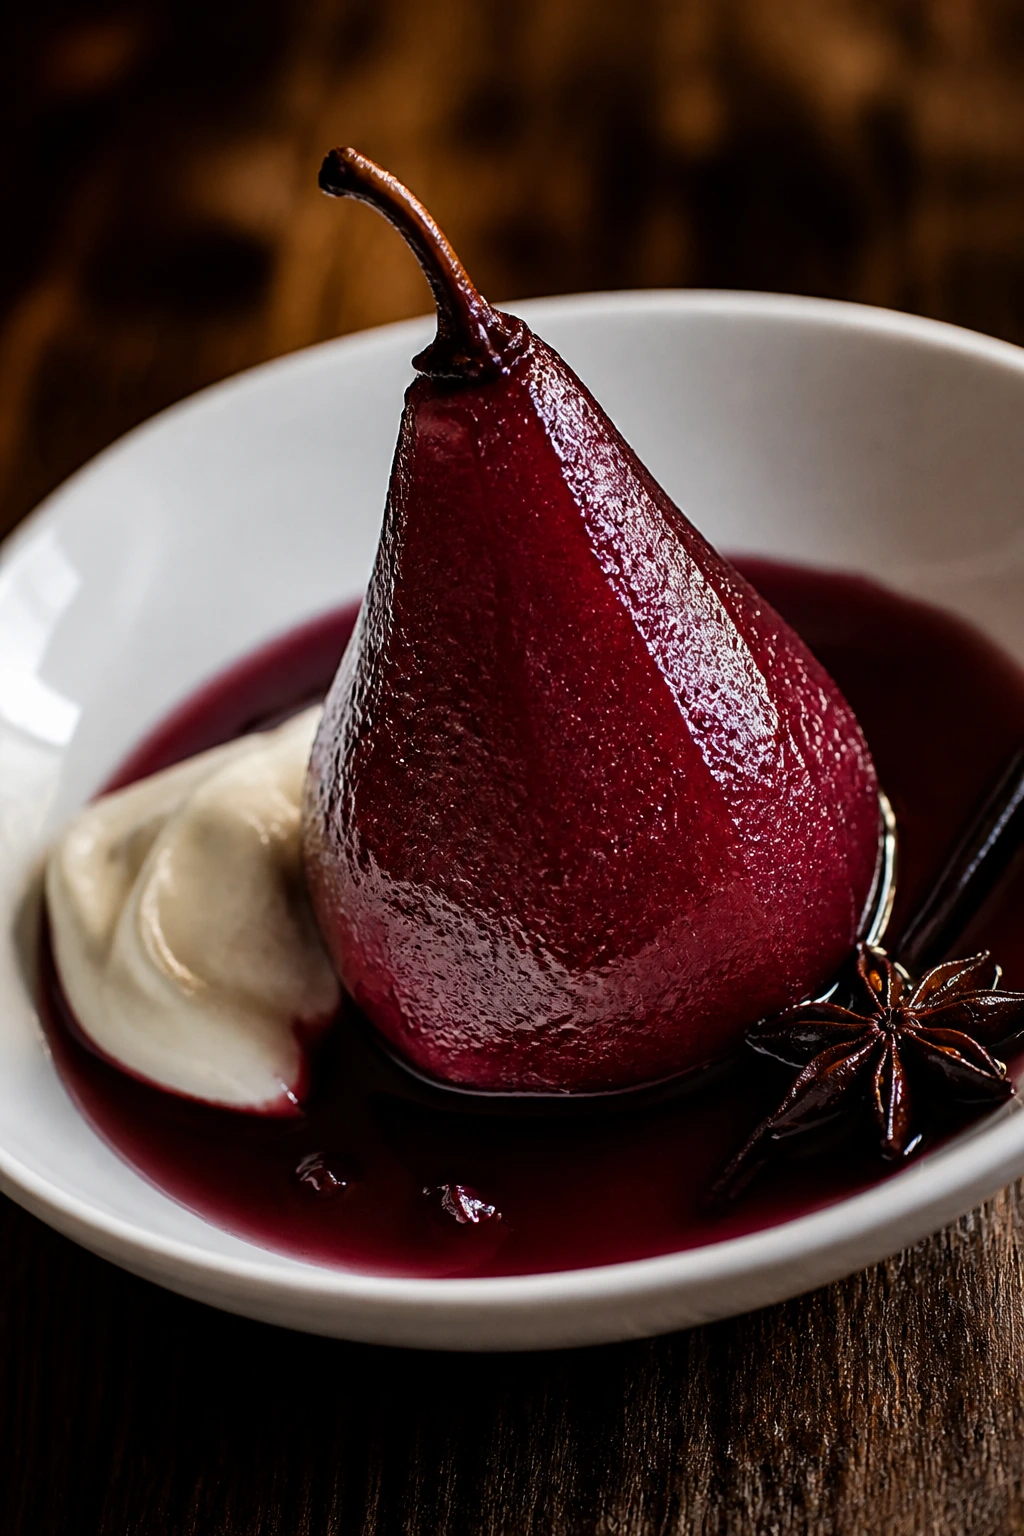
These pears look dramatic even before they’re plated. The wine stains the fruit deep burgundy, and the whole thing can be served with a spoon of cream or ice cream for a very clean, grown-up finish.
Why It Works: Pears hold their shape beautifully when poached slowly. Red wine, sugar, and spices give the syrup its color and perfume, while the fruit softens just enough to become spoon-tender. A glossy reduction makes them feel finished rather than rustic.
Key Ingredients:
- 4 firm pears, peeled
- 2 cups red wine
- 1 cup water
- 3/4 cup sugar
- 1 cinnamon stick
- 2 strips orange peel
- 1 teaspoon vanilla extract
Quick Steps:
- Combine wine, water, sugar, cinnamon, and orange peel in a saucepan.
- Bring to a gentle simmer and add the pears.
- Poach 20 to 30 minutes, turning sometimes, until tender but not mushy.
- Remove pears and reduce the liquid until syrupy.
- Spoon syrup over the pears and finish with vanilla.
Equipment for This Recipe:
- Medium saucepan
- Vegetable peeler
- Slotted spoon
- Sharp knife
How to Serve This Dish: Place one pear on a shallow plate and spoon syrup around the base. Add mascarpone or vanilla ice cream if you want a colder contrast.
Pro Tips for This Recipe:
- Choose pears that are ripe but still firm.
- Keep the poach gentle so the fruit doesn’t split.
- Reduce the syrup until it lightly coats a spoon.
Variations on This Dish:
- White Wine Pears: Use white wine for a lighter color.
- Spiced Pears: Add star anise and cloves.
- Chocolate Pears: Serve with shaved dark chocolate.
Common Mistakes to Avoid with This Recipe:
- Using soft pears: They fall apart.
- Boiling hard: The exterior breaks before the center softens.
- Skipping the syrup reduction: The plate loses its shine.
21. Dark Chocolate Truffles with Cocoa
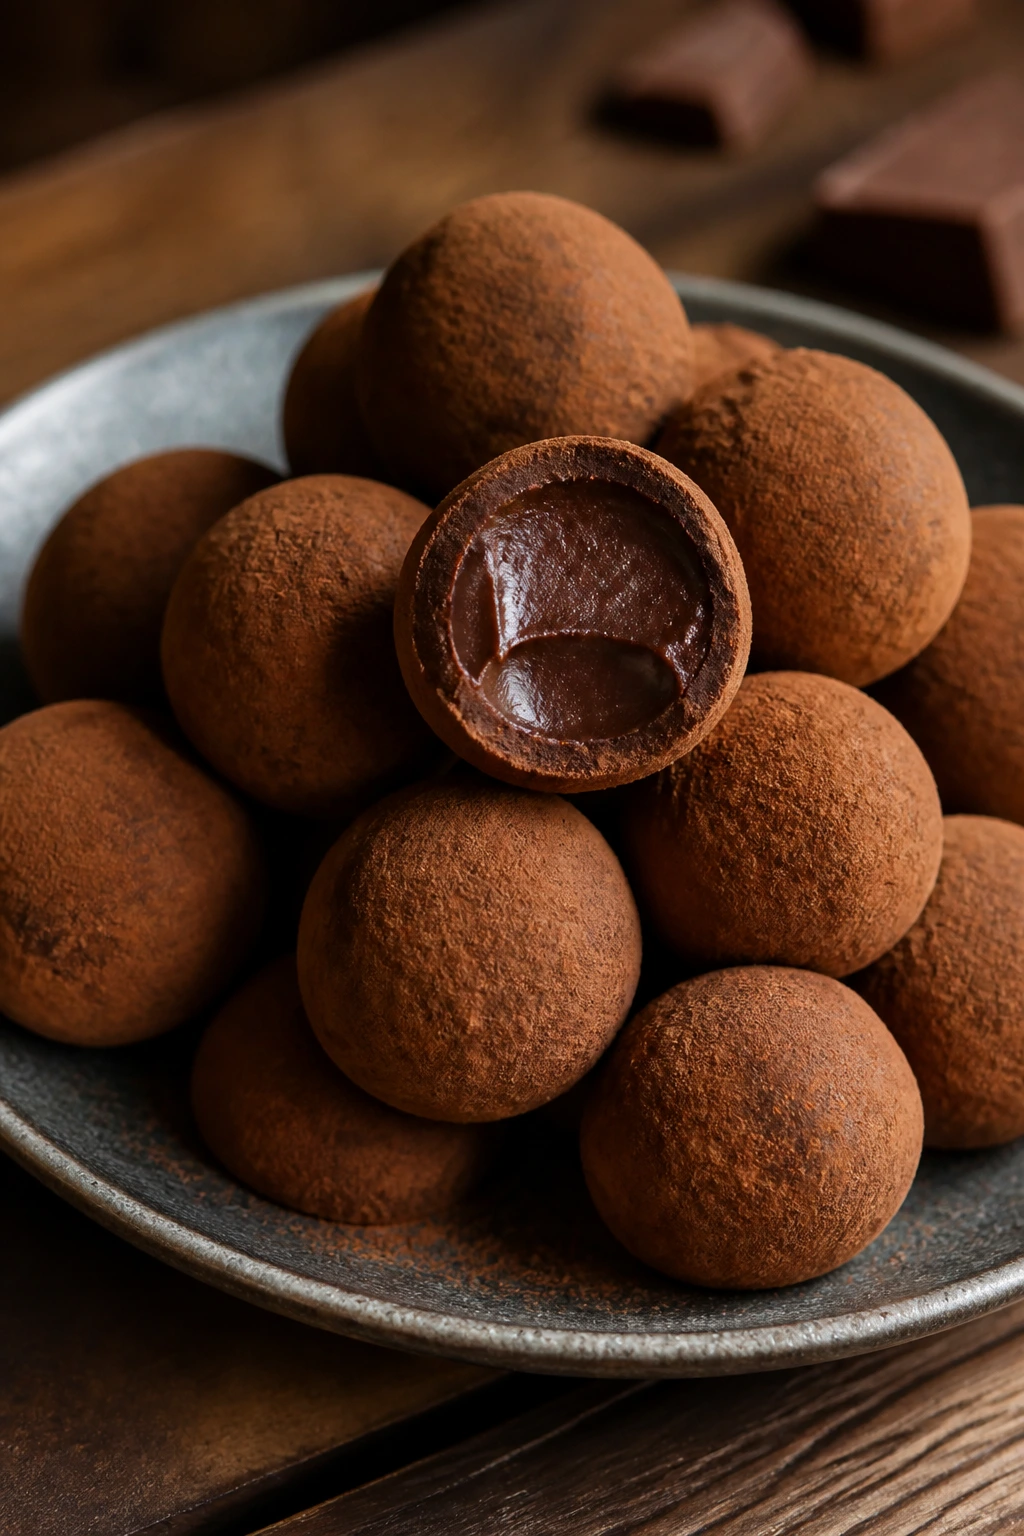
Truffles are proof that a tiny dessert can still feel luxurious. Rolled in cocoa, they look like little coins from a fancy candy box, and the center melts almost immediately.
Why It Works: Ganache is just chocolate and cream, but that simplicity is the appeal. Once chilled, it firms into a rich center that can be rolled cleanly. Cocoa powder gives the outside a matte finish that feels elegant, not fussy.
Key Ingredients:
- 8 ounces dark chocolate, finely chopped
- 1/2 cup heavy cream
- 1 tablespoon unsalted butter
- 1 teaspoon vanilla extract
- 1/4 teaspoon fine salt
- 1/2 cup unsweetened cocoa powder
Quick Steps:
- Heat cream until steaming, then pour over chocolate.
- Let sit 2 minutes, then stir until smooth.
- Mix in butter, vanilla, and salt, then chill 2 hours.
- Scoop and roll into 1-inch balls.
- Coat in cocoa powder and chill again until firm.
Equipment for This Recipe:
- Heatproof bowl
- Small scoop or spoon
- Baking sheet
- Fine sieve, optional for cocoa dusting
How to Serve This Dish: Arrange them in a low bowl lined with parchment or in small paper cups. They also work well beside espresso after dinner.
Pro Tips for This Recipe:
- Chop the chocolate finely so it melts evenly.
- Dust your hands lightly with cocoa if the ganache is sticky.
- Chill only until firm enough to roll; too cold makes the mixture crack.
Variations on This Recipe:
- Sea Salt Truffles: Add flaky salt on top before the coating sets.
- Hazelnut Truffles: Roll in finely chopped toasted hazelnuts.
- Espresso Truffles: Stir in 1 teaspoon espresso powder.
Common Mistakes to Avoid with This Recipe:
- Using too much cream: The ganache stays soft.
- Skipping the chill: The truffles won’t hold shape.
- Overhandling: Warm hands melt the coating fast.
22. Pistachio Baklava Hearts
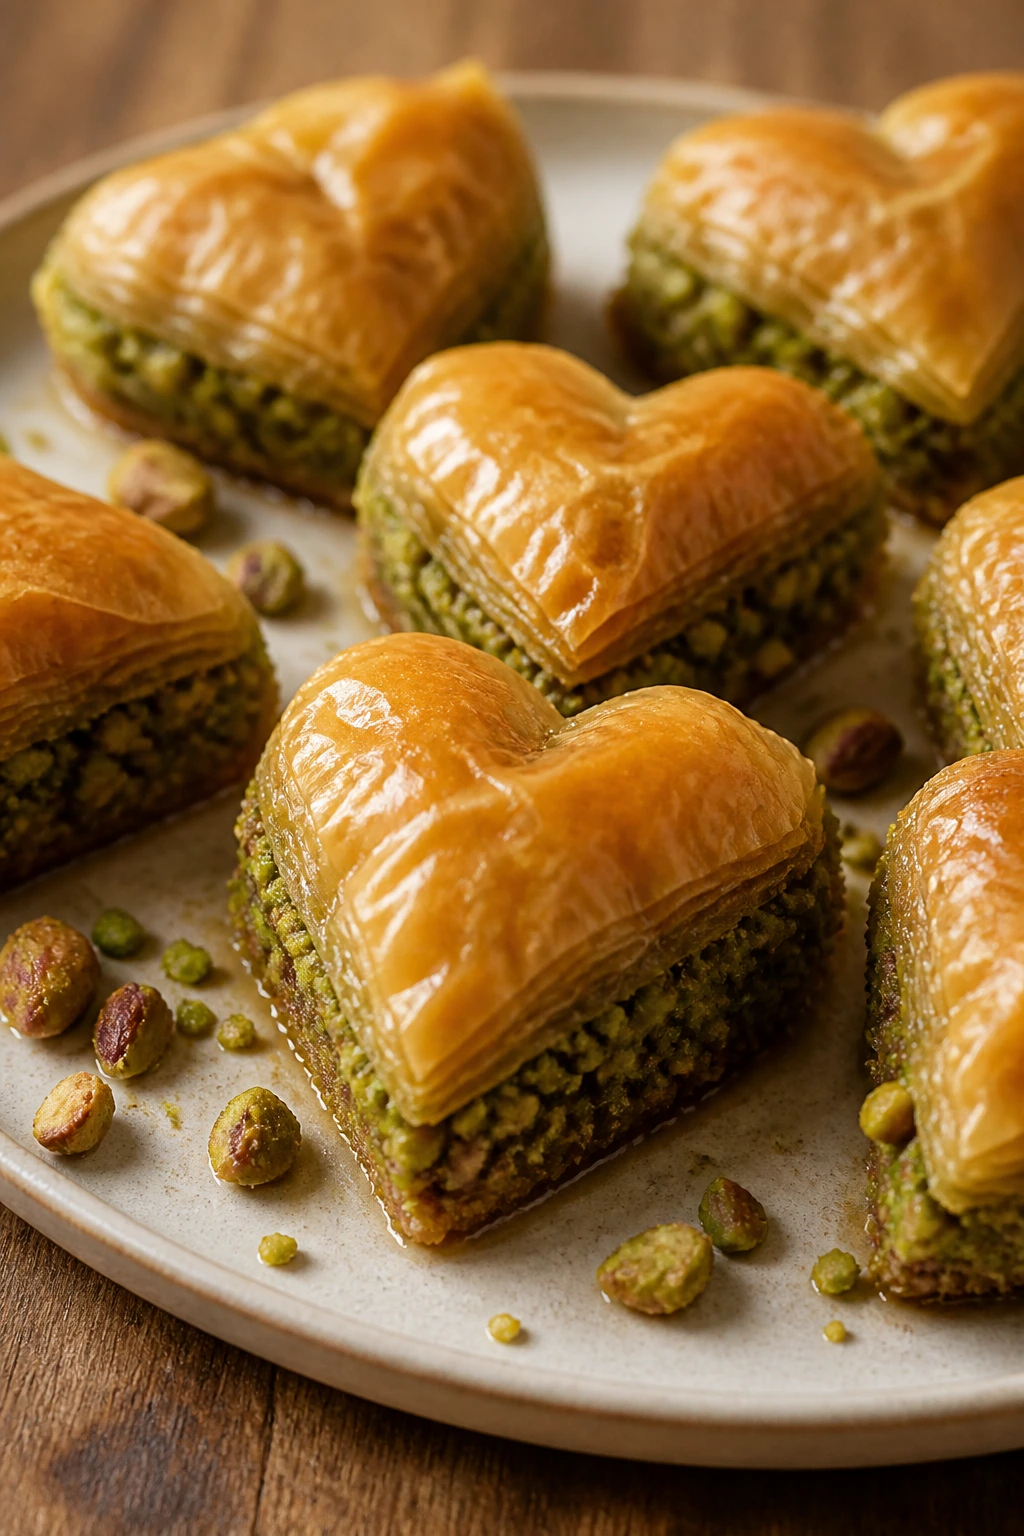
Baklava already looks like a celebration, and the heart shape takes it one step further. The layers bake into crisp, glossy shards with green pistachios tucked inside.
Why It Works: Phyllo dough bakes into thin, crackly layers, while butter keeps the sheets separate and golden. Pistachios have a natural green color that shows well under honey syrup. Cutting the tray into hearts after baking keeps the shape neat without slowing down assembly.
Key Ingredients:
- 1 pound phyllo dough, thawed
- 2 cups shelled pistachios, chopped
- 1/2 cup walnuts, chopped
- 1/2 cup unsalted butter, melted
- 1/2 teaspoon cinnamon
- 3/4 cup honey
- 1/2 cup sugar
- 1/2 cup water
- 1 strip orange peel
Quick Steps:
- Heat oven to 350°F (175°C) and brush a baking dish with butter.
- Layer phyllo sheets, brushing each with butter and sprinkling every few layers with nuts and cinnamon.
- Bake 35 to 40 minutes until deep gold.
- Simmer honey, sugar, water, and orange peel for 5 minutes to make syrup.
- Pour syrup over hot baklava, cool, and cut into heart shapes.
Equipment for This Recipe:
- Pastry brush
- Sharp knife
- 9×13-inch baking dish
- Small saucepan
How to Serve This Dish: Put the hearts on a platter and let a little syrup pool underneath. They’re sticky in the best way, so serve with napkins.
Pro Tips for This Recipe:
- Keep phyllo covered with a towel so it doesn’t dry out.
- Use a very sharp knife for the first cut.
- Pour syrup over hot pastry for the best soak.
Variations on This Recipe:
- Rose Baklava: Add 1 teaspoon rosewater to the syrup.
- Honey-Almond Hearts: Swap half the pistachios for sliced almonds.
- Chocolate Drizzle: Finish cooled pieces with a fine thread of dark chocolate.
Common Mistakes to Avoid with This Recipe:
- Letting phyllo dry out: It tears and cracks.
- Using cold syrup on hot pastry? No. The syrup should be warm or at least room temperature.
- Cutting with a dull knife: It drags the layers instead of slicing them.
23. Coconut Mango Sago Cups
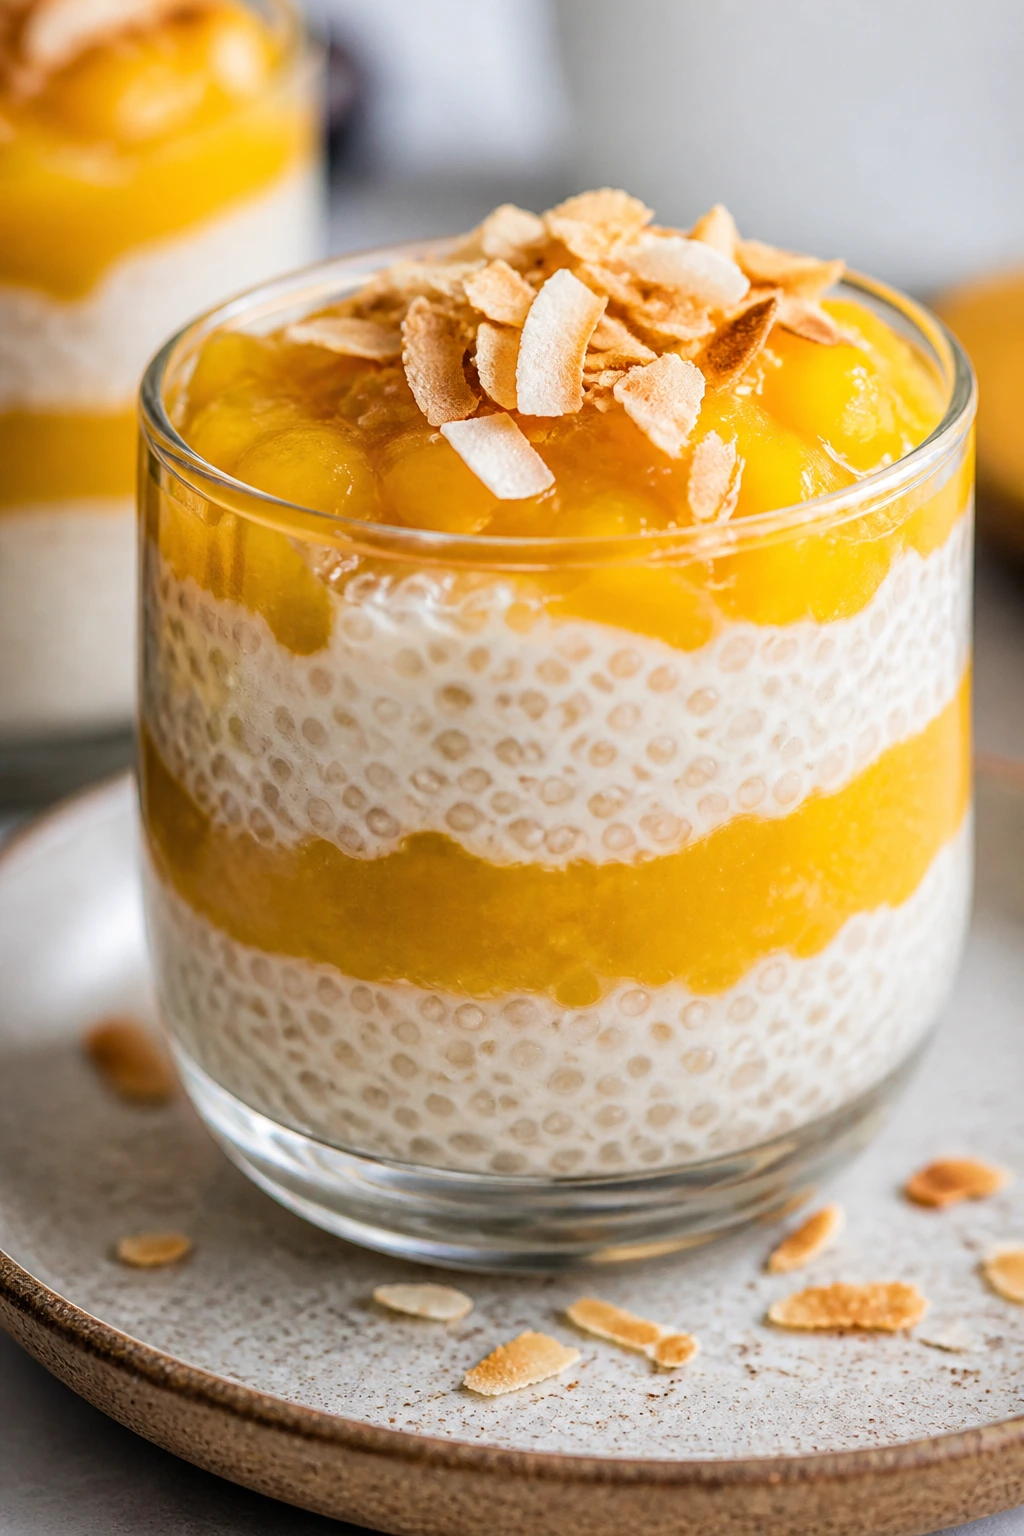
These are a little tropical, a little glossy, and very pretty in a glass. Mango puree on top gives you a bright golden layer over the pale coconut pearls.
Why It Works: Sago pearls bring a soft chew, while coconut milk makes the base creamy without needing dairy. Mango adds color and a vivid sweet-tart top note. Clear cups show the layers, which is half the appeal.
Key Ingredients:
- 1/2 cup small sago pearls
- 2 cups water
- 1 1/2 cups coconut milk
- 1/4 cup sugar
- 2 ripe mangoes, diced
- 1 tablespoon lime juice
- Toasted coconut, for topping
Quick Steps:
- Simmer sago in water until the pearls turn mostly translucent, about 12 to 15 minutes.
- Drain and rinse under cool water.
- Stir coconut milk and sugar together, then fold in the sago.
- Blend half the mango with lime juice for a puree.
- Layer coconut sago and mango puree in cups, then chill.
Equipment for This Recipe:
- Small saucepan
- Fine strainer
- Blender
- Glass cups
How to Serve This Dish: Build the layers cleanly with a spoon or piping bag so the edges stay sharp. Top with diced mango and toasted coconut right before serving.
Pro Tips for This Recipe:
- Stir the sago often so the pearls don’t clump.
- Use ripe mangoes or the puree tastes flat.
- Chill long enough for the coconut layer to thicken.
Variations on This Recipe:
- Passion Fruit Topper: Add passion fruit pulp over the mango.
- Berry Sago Cups: Use strawberry puree instead of mango.
- Pandan Coconut Version: Steep pandan in the coconut milk if you like that flavor.
Common Mistakes to Avoid with This Recipe:
- Undercooking sago: The centers stay chalky.
- Using thin coconut milk: The cups lose richness.
- Assembling while hot: The layers run together.
24. Caramelized White Chocolate Pots de Crème

This dessert has the sort of quiet shine that makes people lean in. The caramelized white chocolate tastes nutty and deep, which keeps the custard from feeling sugary or one-note.
Why It Works: White chocolate develops toasted, caramel notes when handled carefully, and those notes play nicely with cream and egg yolks. Pots de crème set into a soft, spoonable custard that feels rich without needing a crust. The texture is smooth enough to show off a berry garnish.
Key Ingredients:
- 6 ounces white chocolate
- 2 cups heavy cream
- 1 cup whole milk
- 5 large egg yolks
- 1/4 cup granulated sugar
- 1 teaspoon vanilla extract
- 1/4 teaspoon fine salt
- Fresh raspberries, for topping
Quick Steps:
- Heat oven to 250°F (120°C) and spread white chocolate on a lined baking sheet.
- Stir every 10 minutes until the chocolate turns golden and caramel-smelling, about 30 to 45 minutes.
- Heat cream and milk, then whisk into yolks, sugar, vanilla, and salt.
- Stir in the caramelized white chocolate until smooth.
- Pour into ramekins, set in a water bath, and bake 30 to 35 minutes until just set.
Equipment for This Recipe:
- Ramekins
- Baking dish for water bath
- Whisk
- Fine-mesh sieve
How to Serve This Dish: Chill the pots de crème, then top with raspberries and a tiny pinch of salt. A spoon should slide through with almost no resistance.
Pro Tips for This Recipe:
- Stir the white chocolate often while caramelizing or it scorches.
- Strain the custard for the smoothest finish.
- Bake gently; a firm jiggle is the goal.
Variations on This Recipe:
- Dark Chocolate Pots de Crème: Replace the white chocolate with dark chocolate.
- Orange Version: Add orange zest to the custard.
- Coconut Twist: Swap half the milk for coconut milk.
Common Mistakes to Avoid with This Recipe:
- Overcaramelizing the chocolate: It can turn bitter.
- Overbaking the custard: The texture turns grainy.
- Skipping the sieve: Tiny lumps show in the finished cups.
25. Strawberry Mille-Feuille
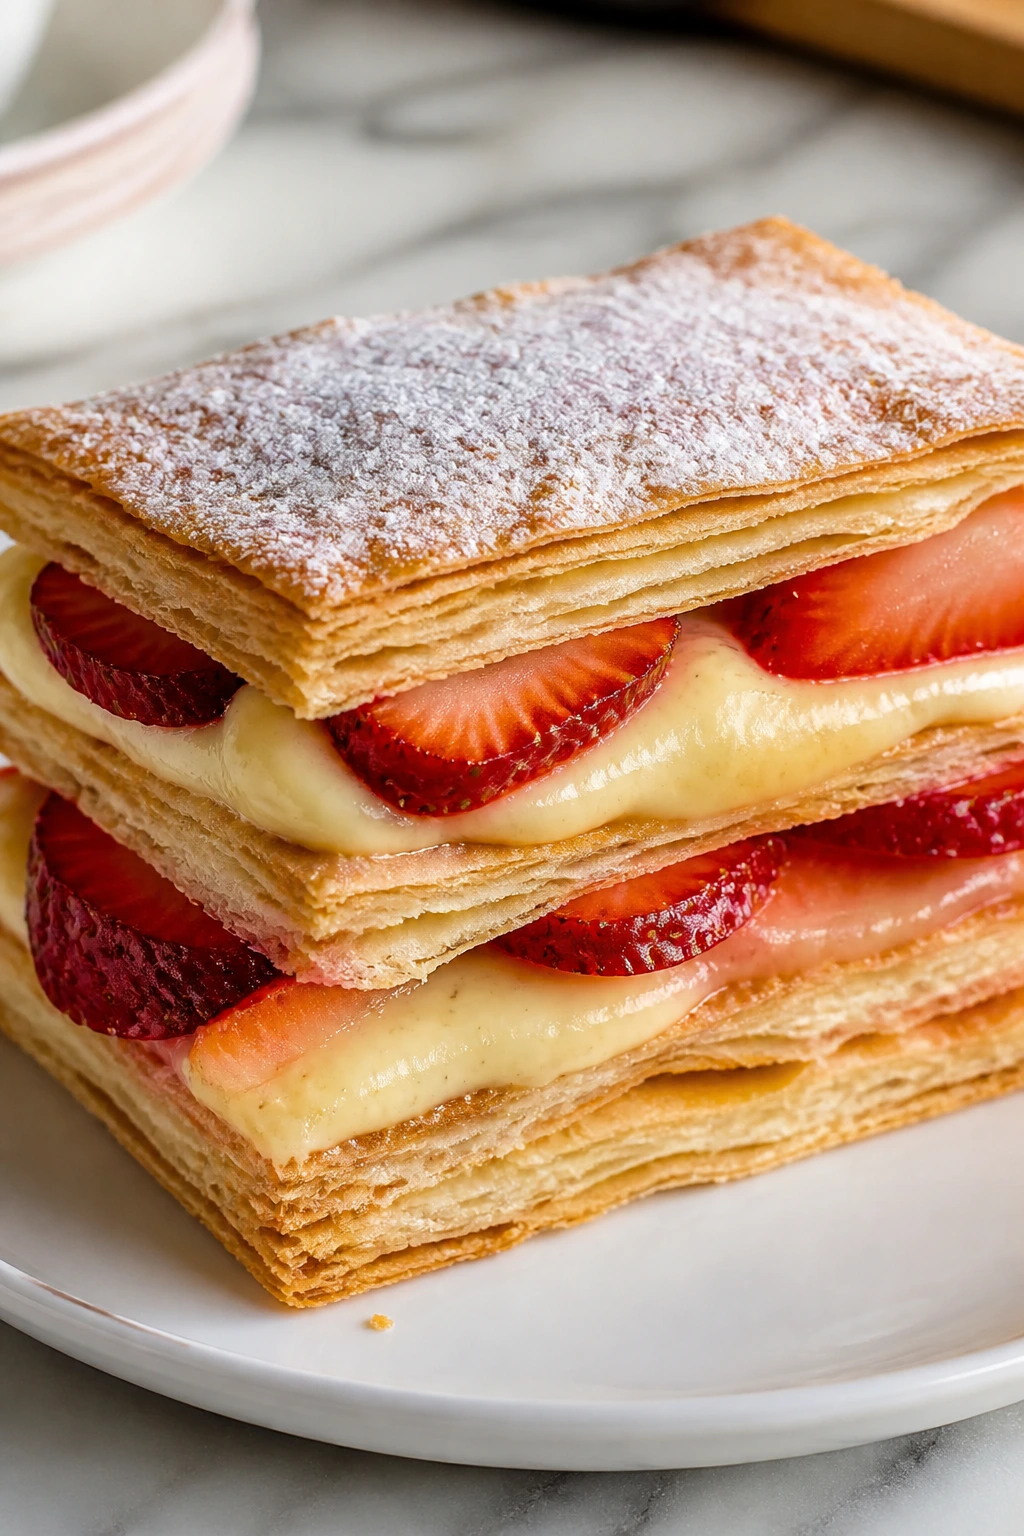
Mille-feuille is all about layers that stay crisp until the moment they don’t. That puff pastry, pastry cream, and strawberry stack looks expensive because the lines are so clean.
Why It Works: Puff pastry puffs into crisp, flaky sheets that can hold cream without turning into mush if you assemble close to serving. Strawberry slices add color and freshness. A powdered sugar finish makes the top look snowy and neat.
Key Ingredients:
- 1 sheet puff pastry, thawed
- 2 cups milk
- 1/2 cup sugar
- 4 egg yolks
- 3 tablespoons cornstarch
- 2 tablespoons butter
- 1 teaspoon vanilla extract
- 2 cups sliced strawberries
- Powdered sugar, for dusting
Quick Steps:
- Bake puff pastry between trays at 400°F (200°C) until deeply golden and crisp.
- Cook milk, sugar, yolks, cornstarch, and butter into pastry cream, then chill.
- Cut the pastry into equal rectangles.
- Layer pastry, cream, and strawberries twice.
- Dust the top with powdered sugar and serve soon after assembling.
Equipment for This Recipe:
- Sheet pan
- Second baking tray or another pan for weight
- Saucepan
- Sharp serrated knife
How to Serve This Dish: Slice with a serrated knife and wipe between cuts. The cleaner the cut, the prettier the layers.
Pro Tips for This Recipe:
- Cool the pastry fully before filling.
- Assemble close to serving so the pastry stays crisp.
- Chill the pastry cream until thick enough to hold its shape.
Variations on This Recipe:
- Raspberry Mille-Feuille: Use raspberries and a thin jam layer.
- Chocolate Pastry Cream: Add melted chocolate to the cream.
- Phyllo Shortcut: Use baked phyllo sheets if you want a lighter crunch.
Common Mistakes to Avoid with This Recipe:
- Filling too early: The pastry softens quickly.
- Using warm cream: It melts the pastry.
- Uneven slicing: The layers lose their clean look.
26. Cherry Hand Pies
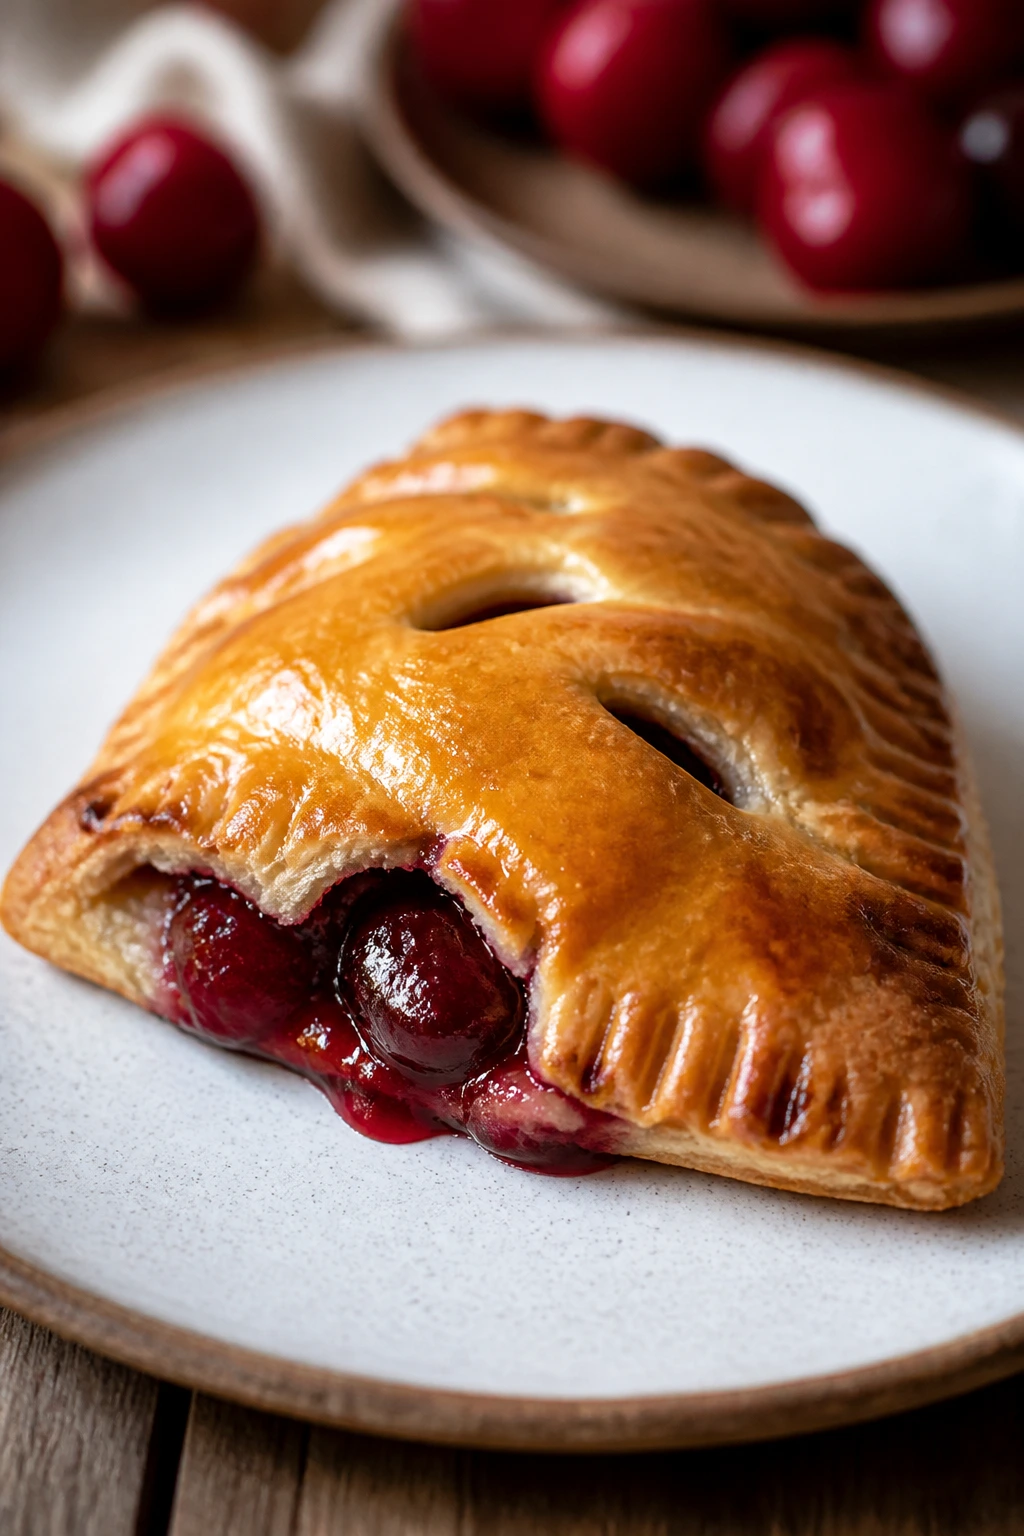
Hand pies are charming because they’re self-contained. One flaky pocket, one neat cherry center, no knife required.
Why It Works: The pastry seals in the fruit, so the filling bubbles instead of leaking everywhere. Cherry filling gives you deep red color and a bright tart-sweet balance. A simple egg wash adds that bakery-style shine.
Key Ingredients:
- 2 rounds pie dough
- 2 cups pitted cherries, chopped
- 1/3 cup sugar
- 1 tablespoon cornstarch
- 1 tablespoon lemon juice
- 1 egg, beaten
- 1 tablespoon coarse sugar
Quick Steps:
- Heat oven to 400°F (200°C) and line a tray.
- Cook cherries, sugar, cornstarch, and lemon juice for 5 minutes until thick.
- Cut dough into hearts or circles, spoon filling on half, and seal the edges.
- Brush with egg wash and sprinkle with coarse sugar.
- Bake 18 to 22 minutes, until golden and bubbling.
Equipment for This Recipe:
- Rolling pin
- Baking sheet
- Fork or crimper
- Small saucepan
How to Serve This Dish: Serve warm with the seam side up if you want the crimp to show. A thin drizzle of icing is optional, not required.
Pro Tips for This Recipe:
- Cool the filling before assembling or the dough softens.
- Vent the tops so steam can escape.
- Crimp firmly to prevent leaks.
Variations on This Recipe:
- Mixed Berry Hand Pies: Use cherries, blueberries, and raspberries together.
- Almond Cherry Pies: Add almond extract to the filling.
- Glazed Version: Brush with a simple powdered sugar glaze after cooling.
Common Mistakes to Avoid with This Recipe:
- Overfilling: The pies burst open.
- Warm filling: It melts the dough.
- Skipping the vent hole: Steam has nowhere to go.
27. Pink Velvet Cupcakes
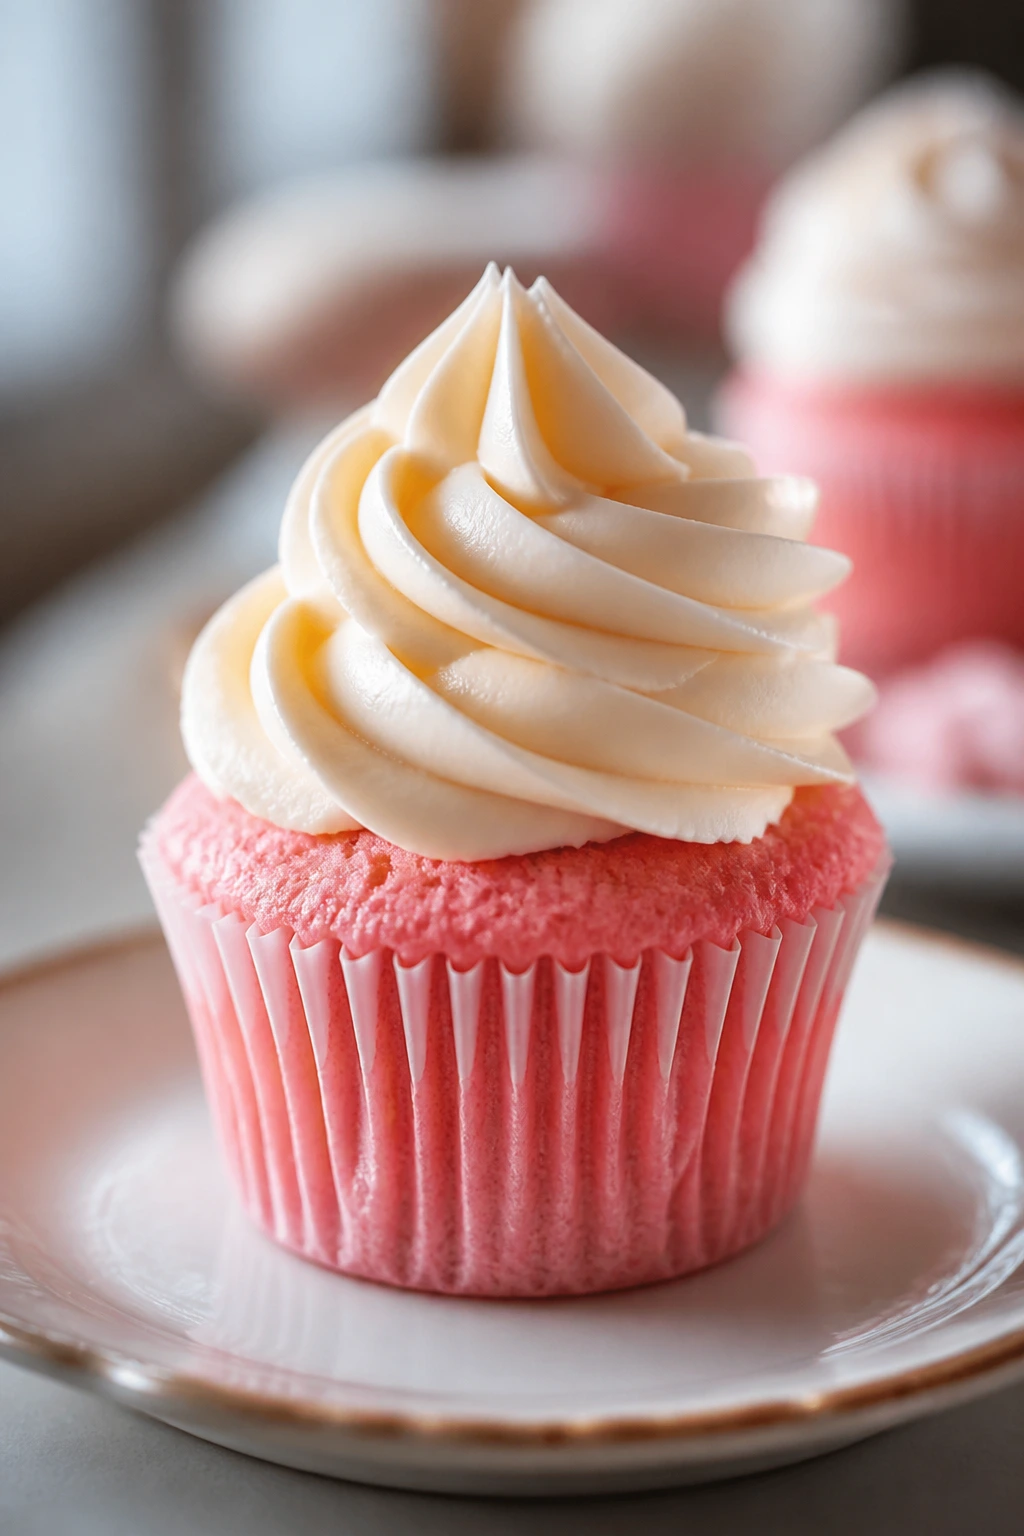
These cupcakes look soft before you even taste them. The crumb stays tender, the frosting swoops on top like a little cloud, and the pink color makes them feel festive without turning gaudy.
Why It Works: A velvet cake wants a soft, fine crumb, and buttermilk helps with that. Freeze-dried strawberry powder gives the batter natural color and a faint berry note. Cream cheese frosting balances the sweetness and pipes neatly.
Key Ingredients:
- 1 1/2 cups all-purpose flour
- 1 tablespoon freeze-dried strawberry powder
- 1 teaspoon baking powder
- 1/2 teaspoon baking soda
- 1/2 teaspoon fine salt
- 1/2 cup unsalted butter, softened
- 3/4 cup sugar
- 2 large eggs
- 1/2 cup buttermilk
- 8 ounces cream cheese, softened
- 2 cups powdered sugar
Quick Steps:
- Heat oven to 350°F (175°C) and line a muffin tin.
- Whisk dry ingredients, then beat butter and sugar until fluffy.
- Add eggs, then alternate dry ingredients and buttermilk.
- Fill cups two-thirds full and bake 18 to 20 minutes.
- Cool and pipe on cream cheese frosting.
Equipment for This Recipe:
- Muffin tin
- Mixer
- Cupcake liners
- Piping bag
How to Serve This Dish: Top with a single strawberry slice or a few edible petals. They look best when the frosting is tall but not over-swirled.
Pro Tips for This Recipe:
- Use freeze-dried strawberry powder, not wet puree, for cleaner color.
- Don’t overfill the cups.
- Chill the frosting a bit if it’s too soft to pipe.
Variations on This Recipe:
- Raspberry Velvet: Swap strawberry powder for raspberry powder.
- Chocolate Pink Velvet: Add 1 tablespoon cocoa to the batter.
- Mini Cupcakes: Bake in mini tins for bite-sized portions.
Common Mistakes to Avoid with This Recipe:
- Too much coloring: The flavor gets muddied.
- Overmixing the batter: The cupcakes become dense.
- Frosting warm cakes: It slides off.
28. Burnt Honey Panna Cotta
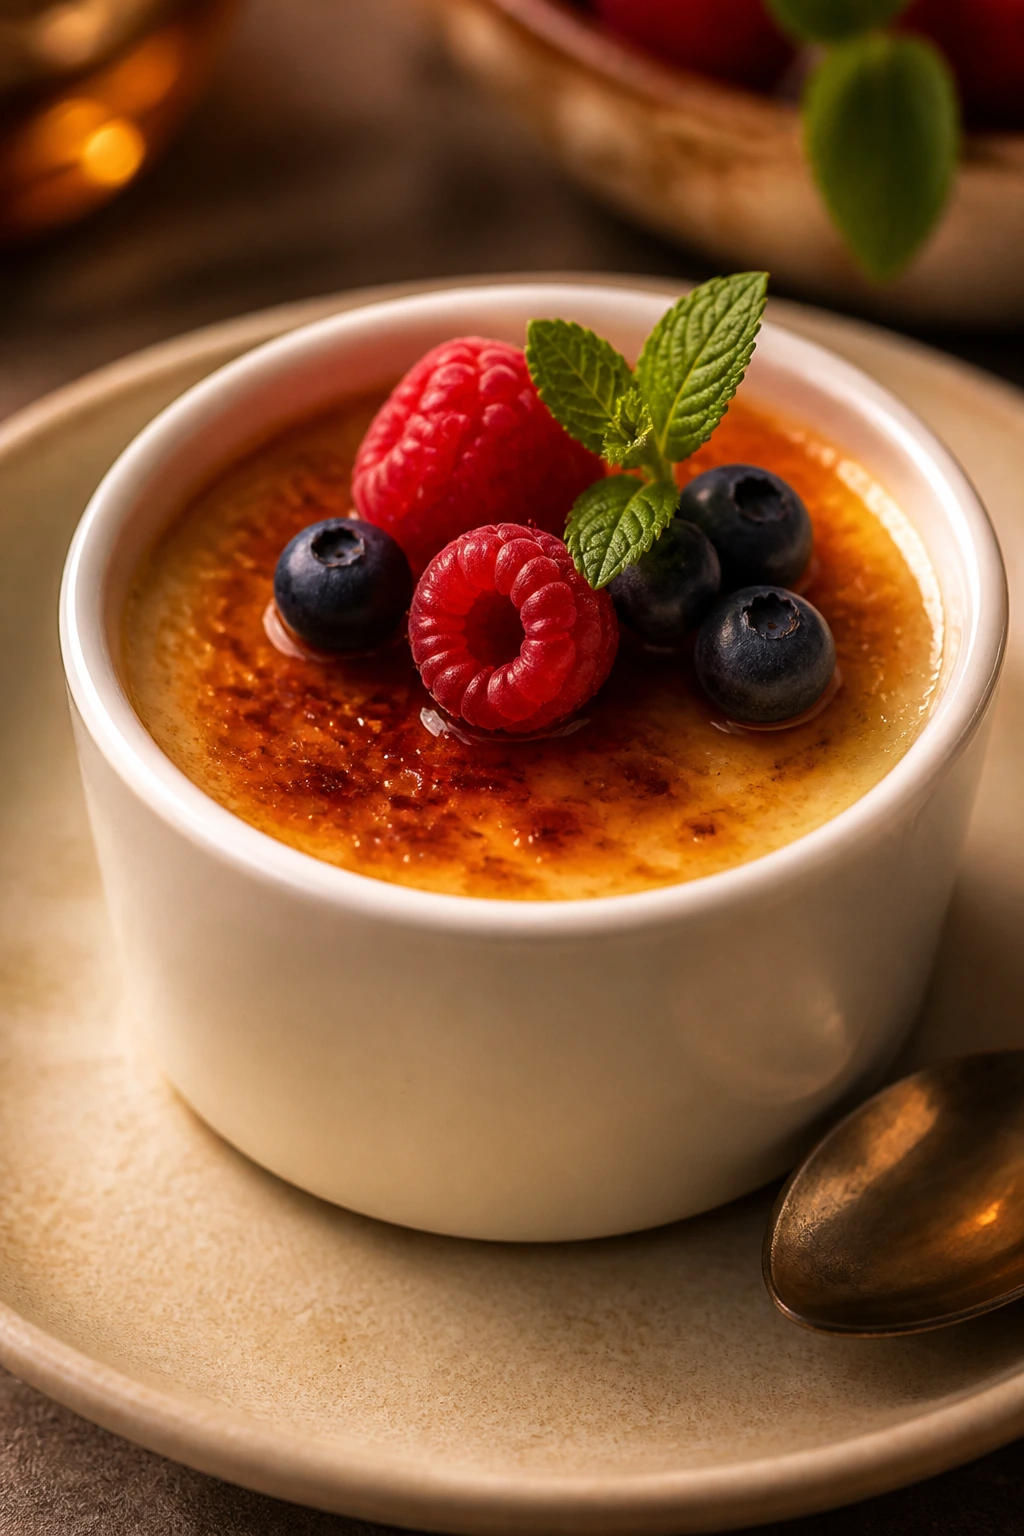
This one tastes like honey with a little edge. Burnt just enough, not scorched, the honey gives the cream a toasted note that feels more complex than sweet.
Why It Works: Heating honey until it darkens slightly changes the flavor from flat sweetness to something deeper and almost caramel-like. The cream smooths out that bitterness, and gelatin sets the mixture into a soft, elegant wobble. A berry garnish gives the plate freshness and color.
Key Ingredients:
- 1/3 cup honey
- 2 cups heavy cream
- 1 cup whole milk
- 2 1/4 teaspoons unflavored gelatin
- 3 tablespoons cold water
- 1 teaspoon vanilla extract
- 1/4 teaspoon fine salt
- Fresh berries, for serving
Quick Steps:
- Bloom gelatin in cold water.
- Warm honey in a saucepan until it smells toasted and darkens slightly.
- Add cream and milk carefully, whisking until smooth.
- Stir in gelatin, vanilla, and salt.
- Pour into molds and chill 4 hours until set.
Equipment for This Recipe:
- Saucepan
- Whisk
- Ramekins or molds
- Fine strainer
How to Serve This Dish: Unmold onto chilled plates and top with berries. The contrast between pale custard and red fruit does most of the decorating.
Pro Tips for This Recipe:
- Watch the honey closely; the line between toasted and burnt is short.
- Strain the mixture if you want a flawless surface.
- Chill fully or the center slumps.
Variations on This Recipe:
- Lavender-Honey Version: Steep lavender in the cream.
- Salted Caramel Style: Add a pinch more salt and a caramel drizzle.
- Yogurt Topping: Spoon thick yogurt beside the panna cotta for tang.
Common Mistakes to Avoid with This Recipe:
- Burning the honey too far: It turns bitter.
- Boiling after gelatin goes in: The set can weaken.
- Serving too warm: The custard loses its shape.
29. Plum Galette with Crème Fraîche
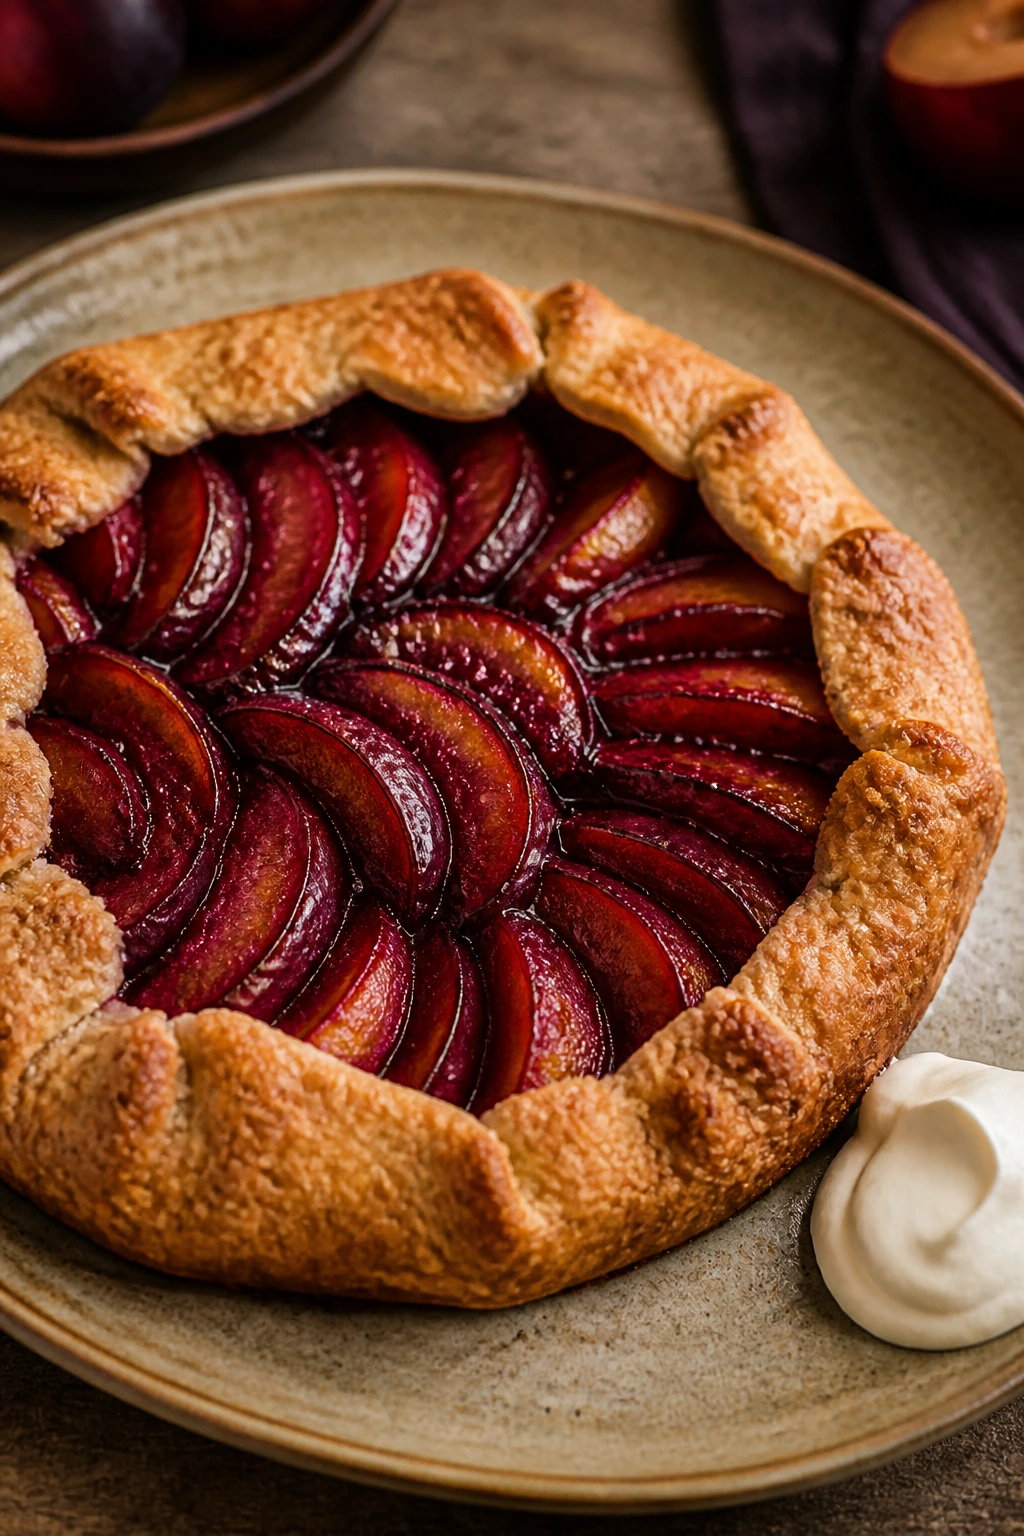
Plums can look almost jewel-like when they’re sliced thin and fanned out over pastry. The purple skin and rosy flesh give this galette a moody, romantic look.
Why It Works: Plums soften into jammy pockets while the crust stays rustic and crisp. A little almond flour under the fruit helps soak up juices. Crème fraîche on the side brings cool tang and cuts through the sweetness.
Key Ingredients:
- 1 sheet pie dough
- 4 ripe plums, sliced thin
- 1/4 cup sugar
- 1 tablespoon cornstarch
- 1 tablespoon almond flour
- 1 egg, beaten
- 1 tablespoon coarse sugar
- Crème fraîche, for serving
Quick Steps:
- Heat oven to 400°F (200°C) and line a tray.
- Toss plums with sugar and cornstarch.
- Roll the dough, sprinkle almond flour in the center, and fan the fruit on top.
- Fold the edges up, brush with egg wash, and sprinkle with coarse sugar.
- Bake 25 to 30 minutes until the crust is deeply golden.
Equipment for This Recipe:
- Rolling pin
- Sheet pan
- Pastry brush
- Knife
How to Serve This Dish: Serve warm with a spoon of crème fraîche alongside, not on top, so the crust stays crisp. A few plum slices on the plate help echo the filling.
Pro Tips for This Recipe:
- Use plums that are ripe but still firm.
- Almond flour under the fruit prevents a soggy center.
- Let it cool slightly before slicing.
Variations on This Recipe:
- Apricot Galette: Swap plums for apricots.
- Spiced Plum Version: Add cinnamon and cardamom.
- Honey Finish: Drizzle honey over the cooled galette.
Common Mistakes to Avoid with This Recipe:
- Using overripe fruit: The juices run too much.
- Skipping the almond flour: The crust softens.
- Serving too soon: The filling needs a short rest.
30. Heart-Shaped Linzer Cookies
These cookies are all about the cutout window. The jam peeks through in the center, and the powdered sugar on top makes them look like little snow-dusted postcards.
Why It Works: An almond-rich dough bakes tender and crisp at once, which is exactly what you want for a sandwich cookie. Raspberry jam provides the bright red center that makes the hearts obvious. They store well, too, which is handy.
Key Ingredients:
- 1 cup unsalted butter, softened
- 3/4 cup powdered sugar
- 1 large egg yolk
- 1 teaspoon vanilla extract
- 2 cups all-purpose flour
- 1 cup almond flour
- 1/4 teaspoon salt
- 1/2 cup raspberry jam
Quick Steps:
- Beat butter and powdered sugar until smooth, then mix in egg yolk and vanilla.
- Stir in flour, almond flour, and salt to form a dough.
- Chill 1 hour, then roll and cut hearts, cutting windows in half of them.
- Bake at 350°F (175°C) for 10 to 12 minutes.
- Sandwich with jam and dust the tops with powdered sugar.
Equipment for This Recipe:
- Rolling pin
- Heart cookie cutters
- Baking sheets
- Fine sieve
How to Serve This Dish: Stack them in a leaning row so the jam windows show. They’re pretty on a cake stand and even better in a small gift box.
Pro Tips for This Recipe:
- Chill the dough or the shapes spread.
- Use seedless jam if you want a cleaner look.
- Dust only the top cookies, not the jam layer.
Variations on This Recipe:
- Strawberry Linzers: Swap raspberry jam for strawberry.
- Chocolate Linzers: Add 1 tablespoon cocoa to the dough.
- Orange-Almond Version: Add orange zest to the dough.
Common Mistakes to Avoid with This Recipe:
- Rolling too thin: The cookies crack.
- Too much jam: It squeezes out.
- Skipping the chill: The cutouts lose shape.
31. Mini Baked Alaska with Raspberry Swirl
Baked Alaska has a little drama, and that’s part of its appeal. A cold center, toasted meringue, and a streak of raspberry make it look like a dessert that knows how to make an entrance.
Why It Works: The ice cream stays insulated inside sponge cake and meringue, so the outside browns before the center melts. Raspberry swirl keeps the filling from looking plain. Mini versions are easier to manage than one big dome.
Key Ingredients:
- 1 small sponge cake, cut into 6 rounds
- 1 quart vanilla ice cream, slightly softened
- 1/2 cup raspberry puree
- 4 large egg whites
- 3/4 cup sugar
- 1/4 teaspoon cream of tartar
- 1 teaspoon vanilla extract
Quick Steps:
- Freeze sponge rounds with scoops of ice cream on top for at least 2 hours.
- Spoon raspberry puree over the ice cream and return to the freezer.
- Whip egg whites, cream of tartar, and sugar to stiff peaks.
- Cover each mini cake with meringue, sealing it all the way around.
- Broil briefly or torch until golden, then serve right away.
Equipment for This Recipe:
- Baking sheet
- Ice cream scoop
- Mixer
- Kitchen torch or broiler
How to Serve This Dish: Serve on chilled plates and move fast; the toast-to-table window is short. A few raspberries around the base make the cold-and-hot contrast obvious.
Pro Tips for This Recipe:
- Freeze the cakes very hard before torching.
- Seal the meringue completely so the ice cream stays in.
- Use a torch if you want more control than broiling.
Variations on This Recipe:
- Chocolate Baked Alaska: Use chocolate ice cream and a dark sponge.
- Berry Medley: Swirl in mixed berry puree.
- Coconut Meringue: Add shredded coconut to the meringue.
Common Mistakes to Avoid with This Recipe:
- Soft freezer base: The dessert melts fast.
- Thin meringue layer: The ice cream leaks.
- Too much broiler time: The surface burns before it’s toasted.
32. Chocolate-Covered Cherry Cheesecake Bites
These bites give you a cherry center, creamy filling, and chocolate shell all in one mouthful. They’re tidy, portable, and surprisingly pretty lined up in paper cups.
Why It Works: Cream cheese gives the filling a cool tang, cherries add color, and chocolate hardens into a smooth shell that keeps the shape clean. They’re basically cheesecake in party clothes.
Key Ingredients:
- 8 ounces cream cheese, softened
- 1/2 cup powdered sugar
- 1 teaspoon vanilla extract
- 1 cup graham cracker crumbs
- 1 cup pitted cherries, chopped
- 10 ounces dark chocolate, melted
- 1 teaspoon coconut oil
Quick Steps:
- Mix cream cheese, powdered sugar, vanilla, and crumbs.
- Fold in chopped cherries and chill the mixture 20 minutes.
- Roll into 1-inch balls and freeze 30 minutes.
- Dip in melted chocolate mixed with coconut oil.
- Chill until the shell sets.
Equipment for This Recipe:
- Baking sheet
- Parchment paper
- Small scoop
- Heatproof bowl
How to Serve This Dish: Place each bite in a mini paper cup. A thin white chocolate drizzle across the top gives them a finished look.
Pro Tips for This Recipe:
- Freeze the balls before dipping or they fall apart.
- Chop the cherries small enough to roll cleanly.
- Use parchment so the chocolate bottoms don’t stick.
Variations on This Recipe:
- Raspberry Cheesecake Bites: Swap cherries for raspberries.
- White Chocolate Shell: Use white chocolate on the outside.
- No-Crumb Version: Skip the graham crumbs for a softer center.
Common Mistakes to Avoid with This Recipe:
- Warm filling: It becomes sticky and hard to roll.
- Overcrowding the tray: The bites knock into each other.
- Using wet fruit: Extra moisture weakens the shell.
33. Apricot Tart with Frangipane
Apricots arranged over almond cream make a tart that looks quietly expensive. The slices soften into wedges of orange-gold while the almond filling rises around them.
Why It Works: Frangipane gives the tart a rich almond base that stays tender underneath the fruit. Apricots bake into soft, glossy pieces without losing their shape. A warm apricot glaze at the end gives the top a nice sheen.
Key Ingredients:
- 1 tart shell, 9 inches
- 1/2 cup unsalted butter, softened
- 1/2 cup sugar
- 1 cup almond flour
- 2 large eggs
- 1 teaspoon vanilla extract
- 5 apricots, sliced
- 2 tablespoons apricot jam
- 1 tablespoon water
Quick Steps:
- Heat the oven to 350°F (175°C) and line the tart shell with parchment and weights.
- Bake the shell 15 minutes, then remove the weights.
- Beat butter, sugar, almond flour, eggs, and vanilla into a smooth frangipane.
- Spread into the shell, arrange apricot slices on top, and bake 25 to 30 minutes.
- Warm apricot jam with water and brush over the cooled tart.
Equipment for This Recipe:
- Tart pan
- Pie weights
- Mixing bowl
- Pastry brush
How to Serve This Dish: Serve in slim wedges with a spoon of crème fraîche or whipped cream. The tart looks best when the fruit slices are fanned evenly.
Pro Tips for This Recipe:
- Use apricots that are firm, not mushy.
- Bake until the almond center is set but still soft.
- Brush glaze lightly so the fruit shine stays clear.
Variations on This Recipe:
- Plum Frangipane Tart: Swap apricots for plums.
- Cherry Almond Tart: Use cherries and add almond extract.
- Rosemary Apricot Tart: Add a tiny pinch of rosemary to the glaze.
Common Mistakes to Avoid with This Recipe:
- Using too much filling: It puffs and spills.
- Serving before cooling: The frangipane needs time to settle.
- Soggy crust: Blind bake the shell long enough.
34. Blackberry Clafoutis
Blackberries make clafoutis look more dramatic than cherries. The dark fruit sinks into the pale batter and leaves soft purple stains that feel very elegant.
Why It Works: The batter is simple enough to let the berries do the talking. Blackberries release enough juice to paint the top, but not so much that the dessert turns soupy. The custard settles into a soft, sliceable texture.
Key Ingredients:
- 2 cups blackberries
- 3 large eggs
- 1/2 cup sugar
- 1 cup milk
- 1/2 cup all-purpose flour
- 1 teaspoon vanilla extract
- 2 tablespoons melted butter
- Powdered sugar, for serving
Quick Steps:
- Heat the oven to 350°F (175°C) and butter a baking dish.
- Scatter blackberries in the dish.
- Whisk eggs, sugar, milk, flour, vanilla, and butter until smooth.
- Pour over the fruit and bake 35 minutes until puffed and set.
- Cool slightly and dust with powdered sugar.
Equipment for This Recipe:
- Baking dish
- Whisk
- Mixing bowl
- Sieve
How to Serve This Dish: Serve straight from the dish for a rustic look, or spoon into shallow bowls with a little cream. The purple streaks in each portion are half the charm.
Pro Tips for This Recipe:
- Use berries that are dry and ripe.
- Let the dessert rest a bit so the custard sets.
- Dust after cooling, not while steaming.
Variations on This Recipe:
- Raspberry Clafoutis: Replace the blackberries with raspberries.
- Orange Clafoutis: Add orange zest to the batter.
- Almond Clafoutis: Stir in a splash of almond extract.
Common Mistakes to Avoid with This Recipe:
- Overmixing the batter: It gets tough.
- Using watery berries: The dessert can weep.
- Serving too hot: The custard should settle first.
35. Rose Milk Rice Pudding
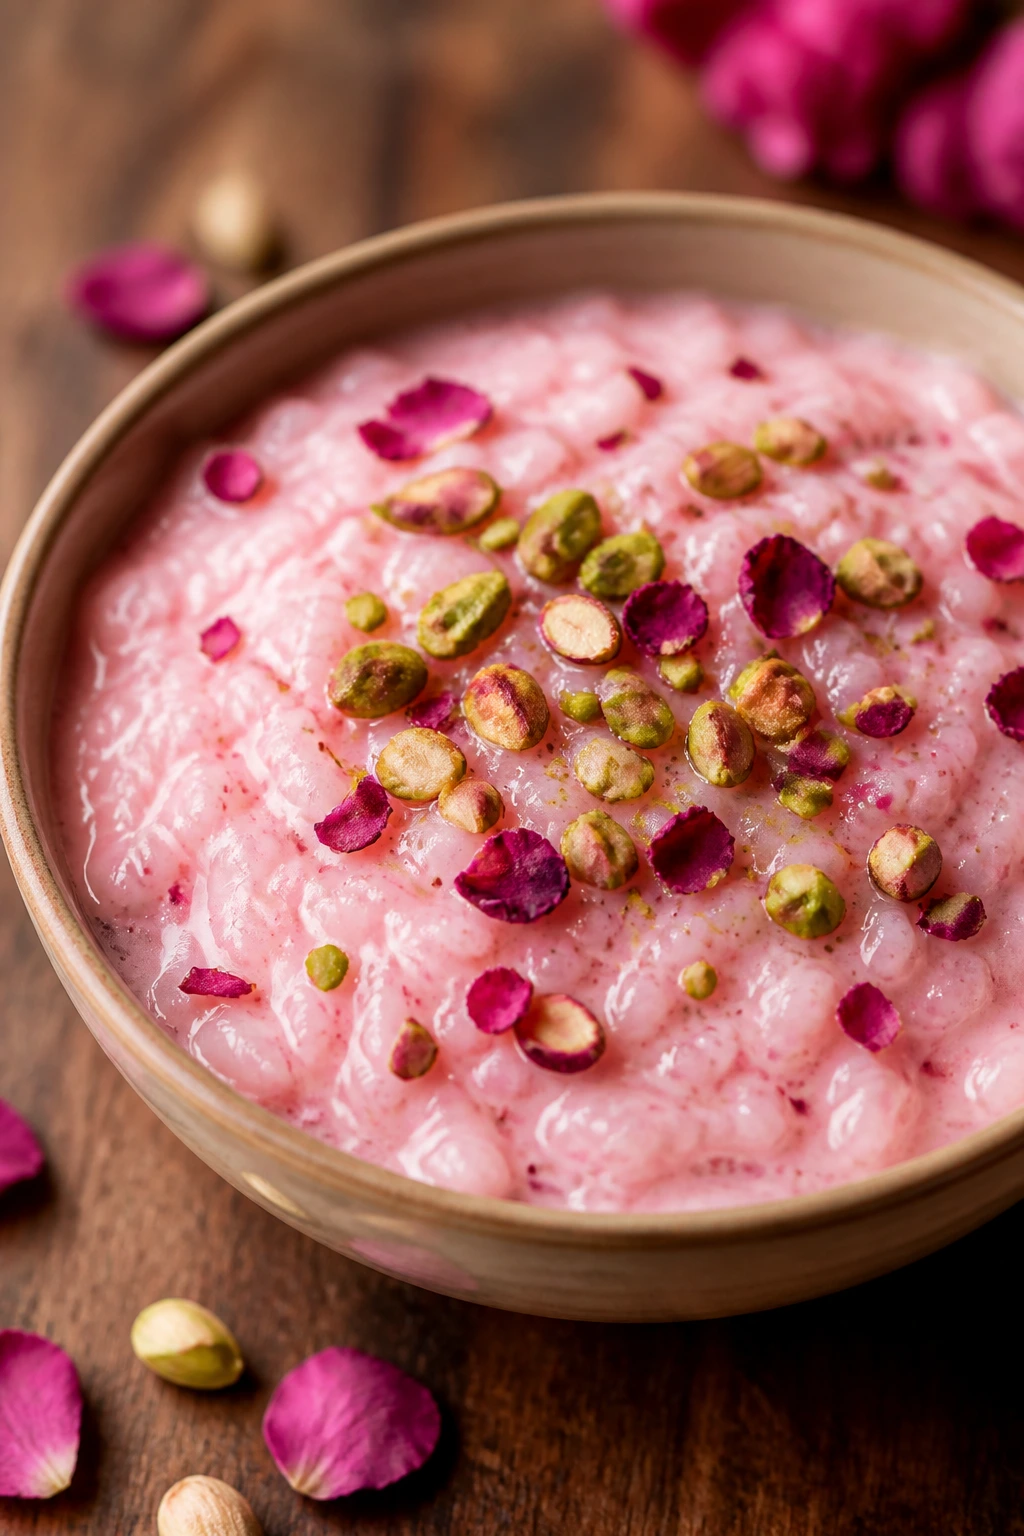
This pudding is soft, pale, and scented just enough to feel special. The rose and cardamom make it taste like dessert from a quieter, more elegant room.
Why It Works: Slow-cooked rice turns creamy as it releases starch into the milk. Rosewater adds perfume without overpowering the pudding, and cardamom gives a little lift. Pistachios on top bring color and crunch.
Key Ingredients:
- 1/2 cup arborio rice
- 4 cups whole milk
- 1/2 cup heavy cream
- 1/3 cup sugar
- 1/2 teaspoon ground cardamom
- 1 teaspoon rosewater
- 1/4 cup chopped pistachios
- 1 tablespoon dried rose petals, edible, optional
Quick Steps:
- Combine rice, milk, cream, sugar, and cardamom in a saucepan.
- Simmer on low, stirring often, for 35 to 40 minutes until creamy.
- Stir in rosewater off the heat.
- Spoon into bowls and chill slightly or serve warm.
- Top with pistachios and rose petals.
Equipment for This Recipe:
- Heavy saucepan
- Wooden spoon
- Small bowls
- Measuring cups
How to Serve This Dish: Serve in shallow bowls so the toppings stay visible. A drizzle of honey makes the surface glisten.
Pro Tips for This Recipe:
- Stir often so the milk doesn’t scorch.
- Add rosewater at the end for the cleanest flavor.
- Use arborio rice if you want the creamiest texture.
Variations on This Recipe:
- Orange Cardamom Rice Pudding: Add orange zest and skip the rosewater.
- Coconut Version: Use part coconut milk for a softer flavor.
- Berry-Topped Pudding: Finish with macerated berries.
Common Mistakes to Avoid with This Recipe:
- Boiling hard: The milk can scorch.
- Adding rosewater too early: The aroma fades.
- Not stirring enough: The rice sticks to the pot.
36. Champagne Granita with Berries
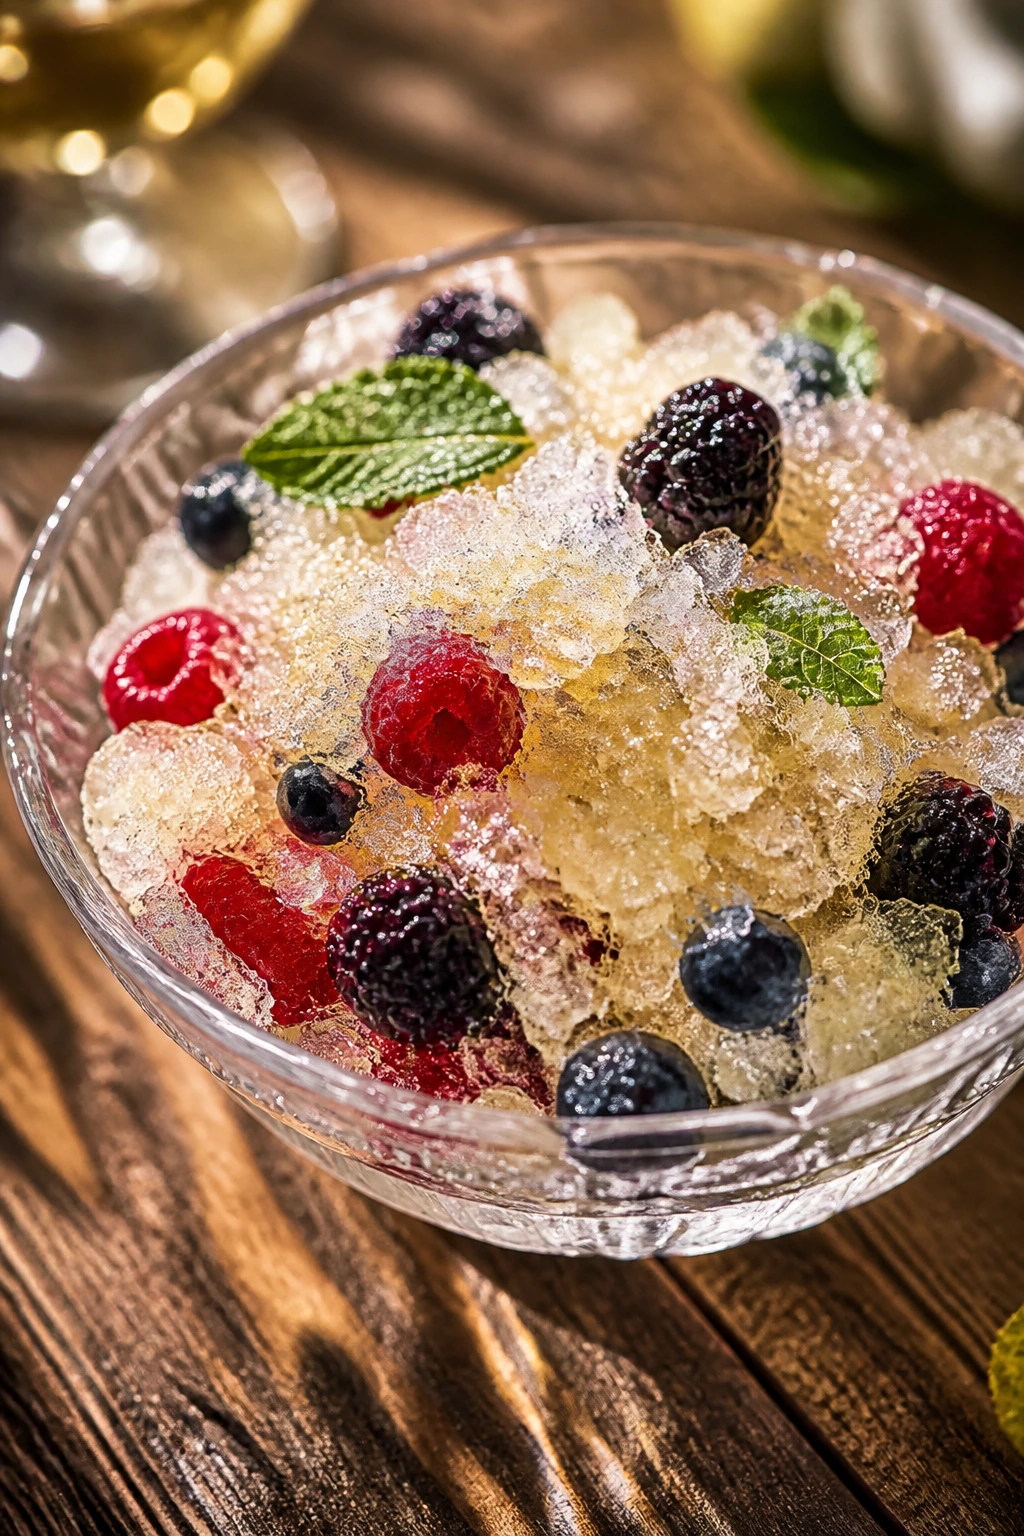
This is the frozen dessert version of a toast. It shaves into crystalline flakes that catch the light, and the berries underneath make it look crisp and celebratory.
Why It Works: Granita needs sugar and liquid frozen shallowly so it can be scraped into flakes. Champagne gives a clean, bright flavor, and berries bring color and tartness. The texture is what makes it memorable — icy, light, and sharp.
Key Ingredients:
- 2 cups champagne or sparkling wine
- 1/2 cup water
- 1/3 cup sugar
- 1 tablespoon lemon juice
- 1 cup mixed berries
- Mint leaves, for garnish
Quick Steps:
- Warm water and sugar until the sugar dissolves, then cool.
- Stir in champagne and lemon juice.
- Pour into a shallow dish and freeze.
- Scrape with a fork every 30 minutes until fluffy crystals form, about 3 hours.
- Spoon into glasses over berries.
Equipment for This Recipe:
- Shallow freezer-safe dish
- Fork
- Small saucepan
- Stemmed glasses, optional
How to Serve This Dish: Spoon it into chilled glasses with berries at the bottom. It looks nicest when the crystals are loose, not packed down.
Pro Tips for This Recipe:
- Use a shallow pan for faster freezing.
- Don’t let the liquid freeze solid without scraping.
- Add berries fresh at the end so they don’t ice over.
Variations on This Recipe:
- Strawberry Champagne Granita: Blend in strawberry puree.
- Nonalcoholic Sparkler: Use sparkling grape juice.
- Lime Granita: Swap lemon for lime and add mint.
Common Mistakes to Avoid with This Recipe:
- Too much sugar: It freezes too soft.
- Not scraping often enough: You get a block instead of crystals.
- Serving too late: The texture melts fast.
37. Vanilla Bean Crème Brûlée with Berries
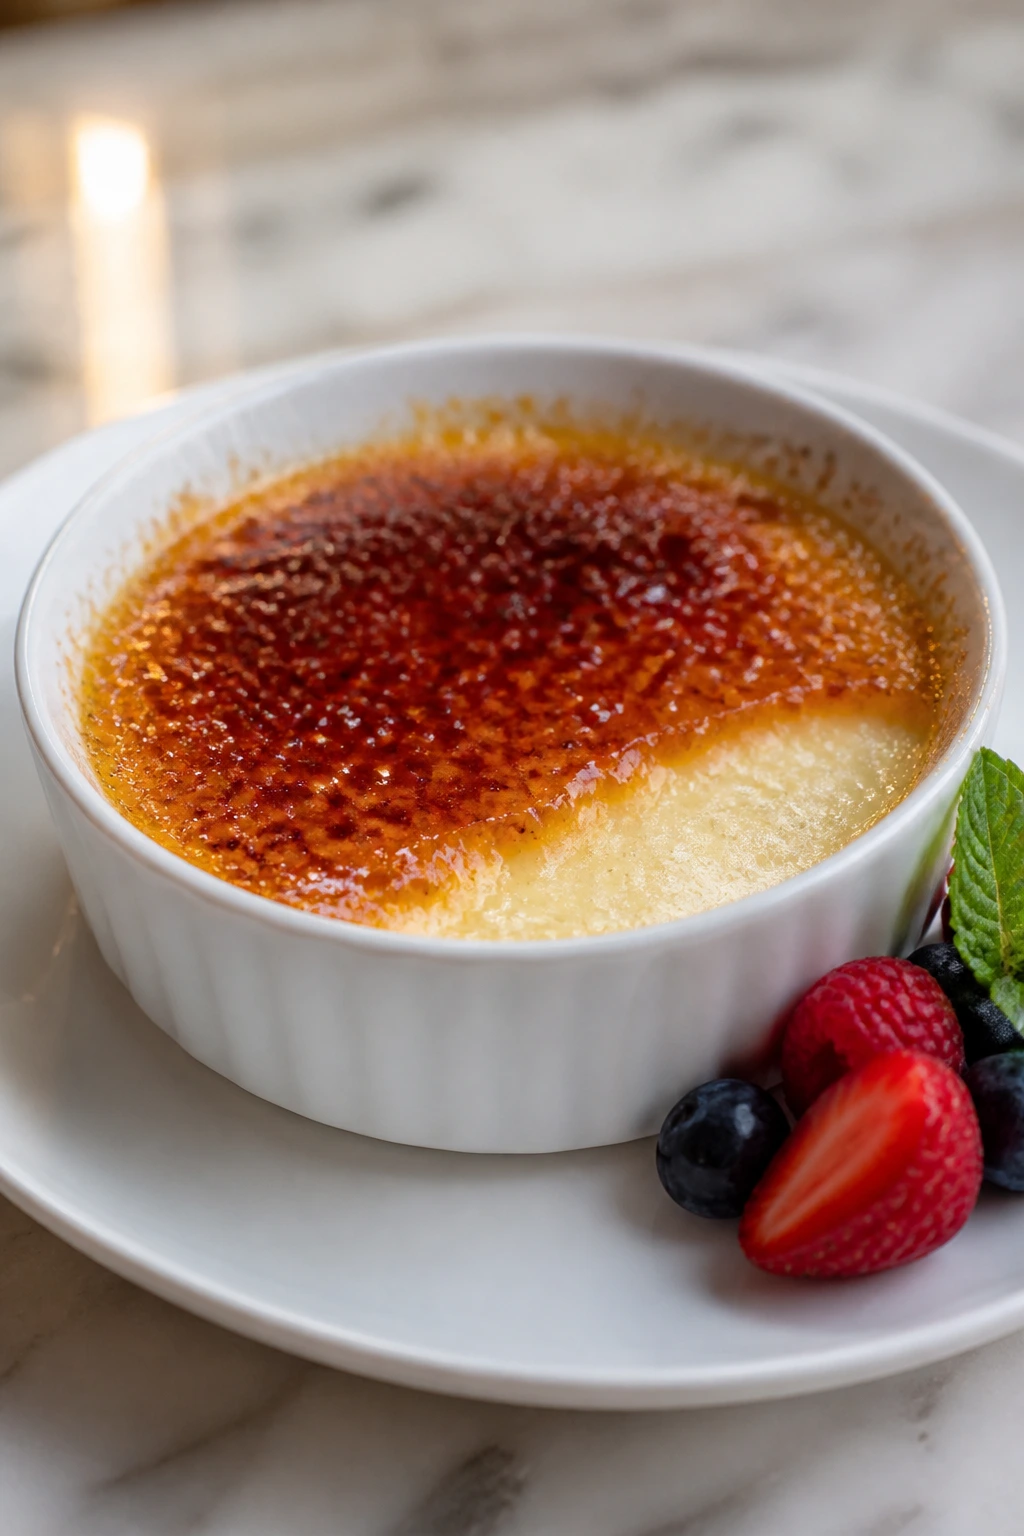
A good crème brûlée is all about the crack. That sugar shell breaks cleanly, then the custard underneath slides in like silk.
Why It Works: Egg yolks and cream make a custard that sets gently in the oven. Vanilla bean gives visible specks and a fuller flavor than extract alone. Fresh berries break up the richness and keep the plate from feeling heavy.
Key Ingredients:
- 2 cups heavy cream
- 1 vanilla bean, split and scraped
- 5 large egg yolks
- 1/2 cup sugar
- 1/8 teaspoon fine salt
- 3 tablespoons sugar, for brûlée topping
- Fresh berries, for serving
Quick Steps:
- Heat oven to 325°F (165°C) and set ramekins in a baking dish.
- Warm cream with vanilla bean seeds and pod, then remove the pod.
- Whisk yolks, sugar, and salt, then temper in the cream.
- Pour into ramekins and bake in a water bath 30 to 35 minutes.
- Chill, sprinkle sugar on top, and torch until caramelized.
Equipment for This Recipe:
- Ramekins
- Kitchen torch
- Baking dish for water bath
- Whisk
How to Serve This Dish: Serve with berries on the side, not piled on the shell. You want the torch crack to be the first thing anyone notices.
Pro Tips for This Recipe:
- Bake until the edges are set but the center still jiggles.
- Chill fully before brûléeing.
- Torch the sugar in a thin, even layer.
Variations on This Recipe:
- Lavender Crème Brûlée: Steep lavender in the cream.
- Orange Vanilla Version: Add orange zest to the cream.
- Berry Brûlée: Add a thin spoon of berry compote under the custard.
Common Mistakes to Avoid with This Recipe:
- Overbaking: The custard turns grainy.
- Caramelizing too early: The sugar softens before serving.
- Using too much topping sugar: The shell gets thick and bitter.
38. Coconut Meringue Kisses with Lemon Curd
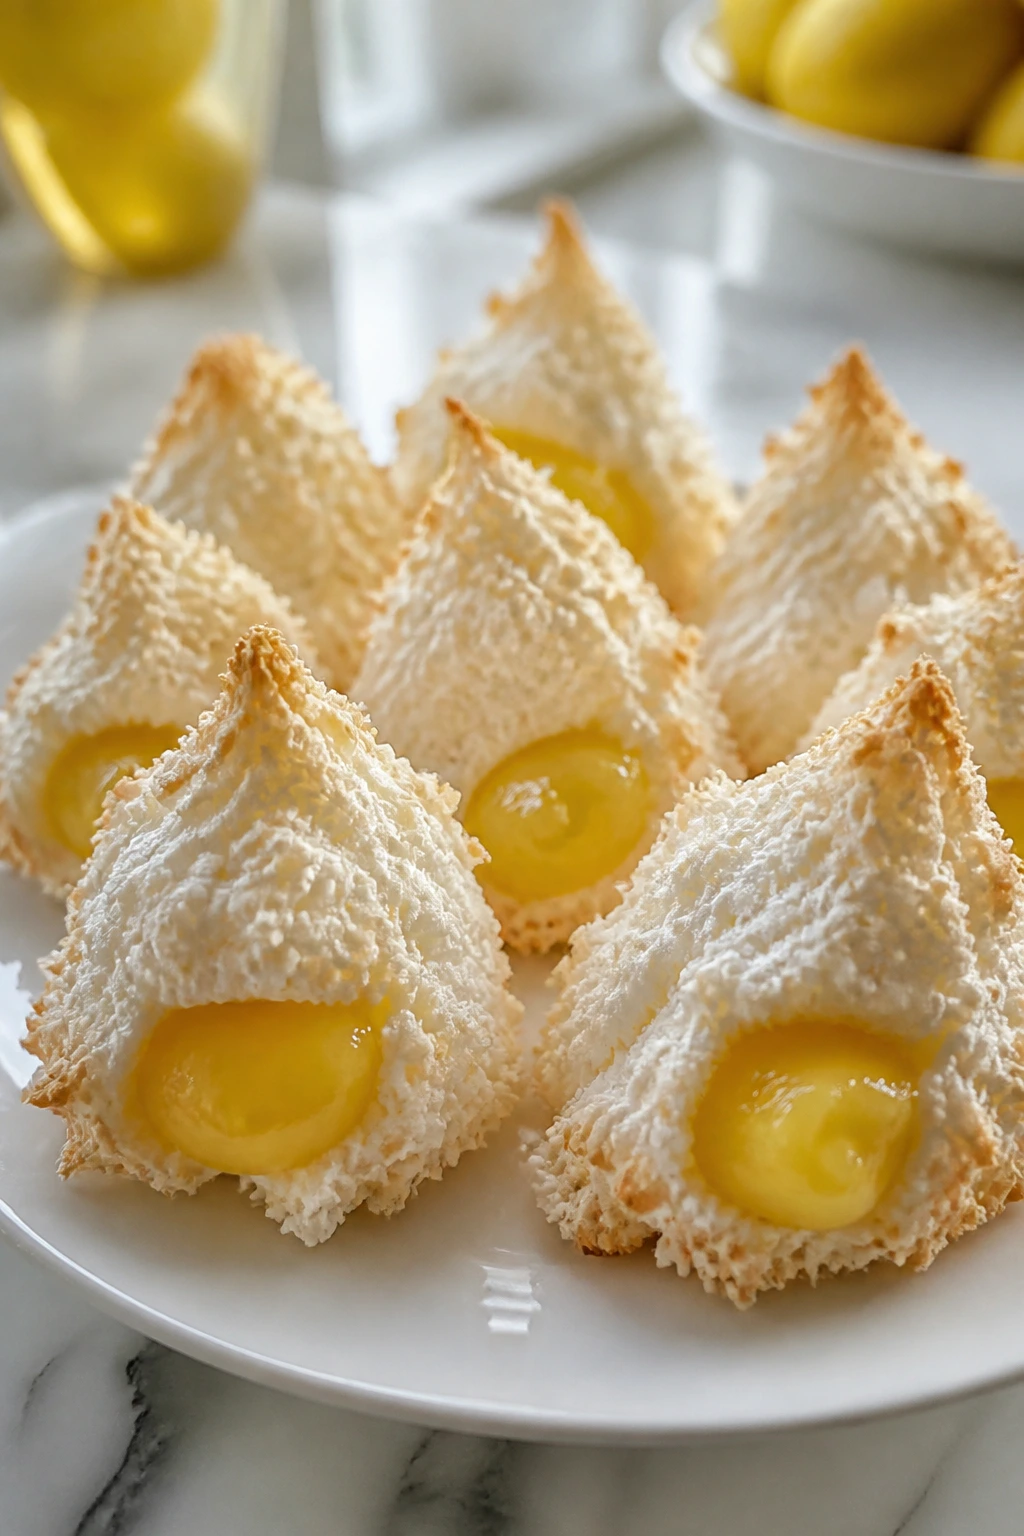
These little kisses are crisp, airy, and fragile in the best way. The coconut gives them texture, and the lemon curd in the middle adds that bright yellow center that always looks good against white.
Why It Works: Meringue bakes dry and light, while coconut adds a little chew and visual fleck. Lemon curd brings acidity and color. Because the cookies are small, they feel dainty rather than sugary.
Key Ingredients:
- 3 large egg whites
- 3/4 cup sugar
- 1/2 teaspoon cream of tartar
- 1/2 cup unsweetened shredded coconut
- 1 teaspoon vanilla extract
- 1/2 cup lemon curd
Quick Steps:
- Heat oven to 225°F (110°C) and line a baking sheet.
- Whip egg whites and cream of tartar, then add sugar slowly until stiff and glossy.
- Fold in coconut and vanilla.
- Pipe small kisses and bake 1 hour, then cool in the oven.
- Sandwich or top with lemon curd just before serving.
Equipment for This Recipe:
- Mixer
- Piping bag
- Parchment-lined sheet pan
- Small spoon
How to Serve This Dish: Put them on a small white plate with a tiny swipe of lemon curd under each one. It keeps the arrangement neat and gives the cookies a little base.
Pro Tips for This Recipe:
- Make sure the bowl is grease-free.
- Bake low and slow to keep them white.
- Add curd only right before serving.
Variations on This Recipe:
- Raspberry Curd Kisses: Use raspberry curd instead.
- Chocolate Coconut Kisses: Dust the finished cookies with cocoa.
- Lemon-Zest Meringues: Add fine lemon zest to the meringue.
Common Mistakes to Avoid with This Recipe:
- Humidity: It softens the meringue quickly.
- Overwhipping: The mixture turns dry and grainy.
- Adding curd too early: The shells lose their crispness.
39. Strawberry Scones with Vanilla Glaze
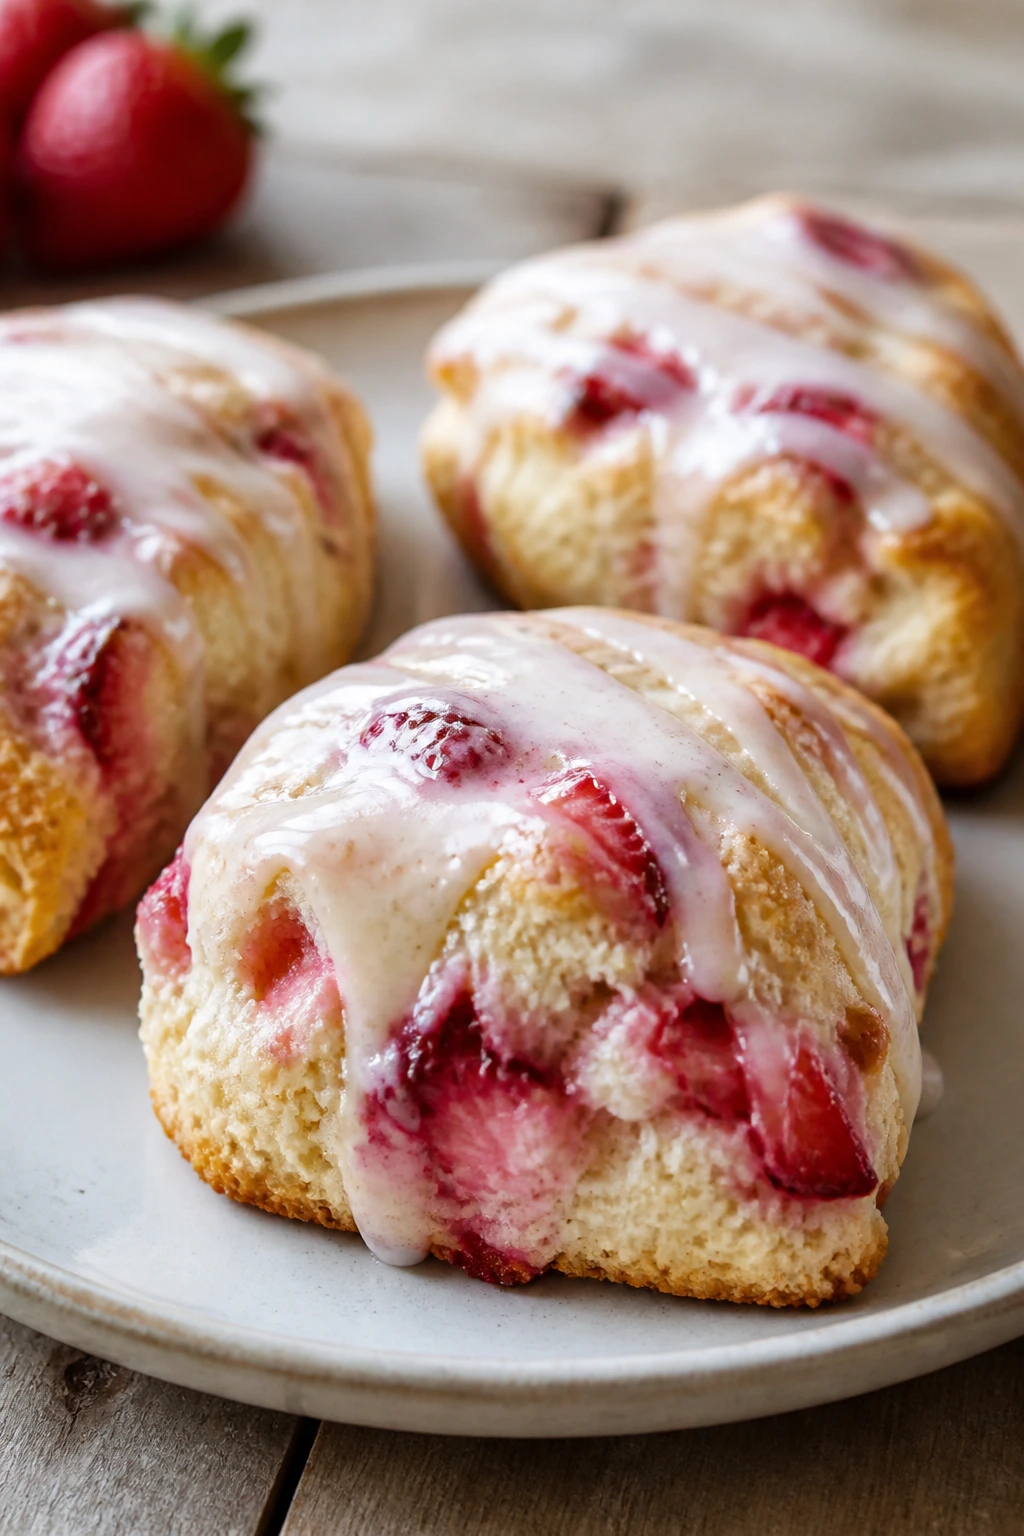
These scones look soft and breakfast-bright, but they also work as a dessert because the strawberries make them feel a little indulgent. The vanilla glaze drips just enough to look polished.
Why It Works: Cold butter creates flaky layers in the dough, and strawberries bake into pink pockets without overwhelming the crumb. The glaze gives shine and a sweet finish. Serve them warm and they feel like a small luxury.
Key Ingredients:
- 2 cups all-purpose flour
- 1/3 cup sugar
- 1 tablespoon baking powder
- 1/2 teaspoon salt
- 1/2 cup cold unsalted butter, cubed
- 3/4 cup heavy cream
- 1 cup diced strawberries
- 1 teaspoon vanilla extract
- 1 cup powdered sugar, for glaze
Quick Steps:
- Heat the oven to 400°F (200°C) and line a sheet pan.
- Cut butter into flour, sugar, baking powder, and salt until pea-sized.
- Fold in cream, strawberries, and vanilla just until combined.
- Shape into a round, cut into wedges, and bake 18 to 20 minutes.
- Mix powdered sugar with a little cream and drizzle the glaze over cooled scones.
Equipment for This Recipe:
- Sheet pan
- Pastry cutter or fork
- Mixing bowl
- Cooling rack
How to Serve This Dish: Split them open a little and serve with clotted cream or whipped cream. A few sliced strawberries on the plate keep the look fresh.
Pro Tips for This Recipe:
- Keep the butter cold.
- Handle the dough gently or the scones get tough.
- Glaze after cooling so it sets in a clean line.
Variations on This Recipe:
- Raspberry Scones: Swap in raspberries and use less mixing.
- Lemon Strawberry Scones: Add lemon zest to the dough.
- Buttermilk Version: Use buttermilk for a tangier crumb.
Common Mistakes to Avoid with This Recipe:
- Warm butter: The layers disappear.
- Overmixing: The scones bake dense.
- Using very wet berries: They streak the dough too much.
40. Mini Fruit Tarts with Pastry Cream
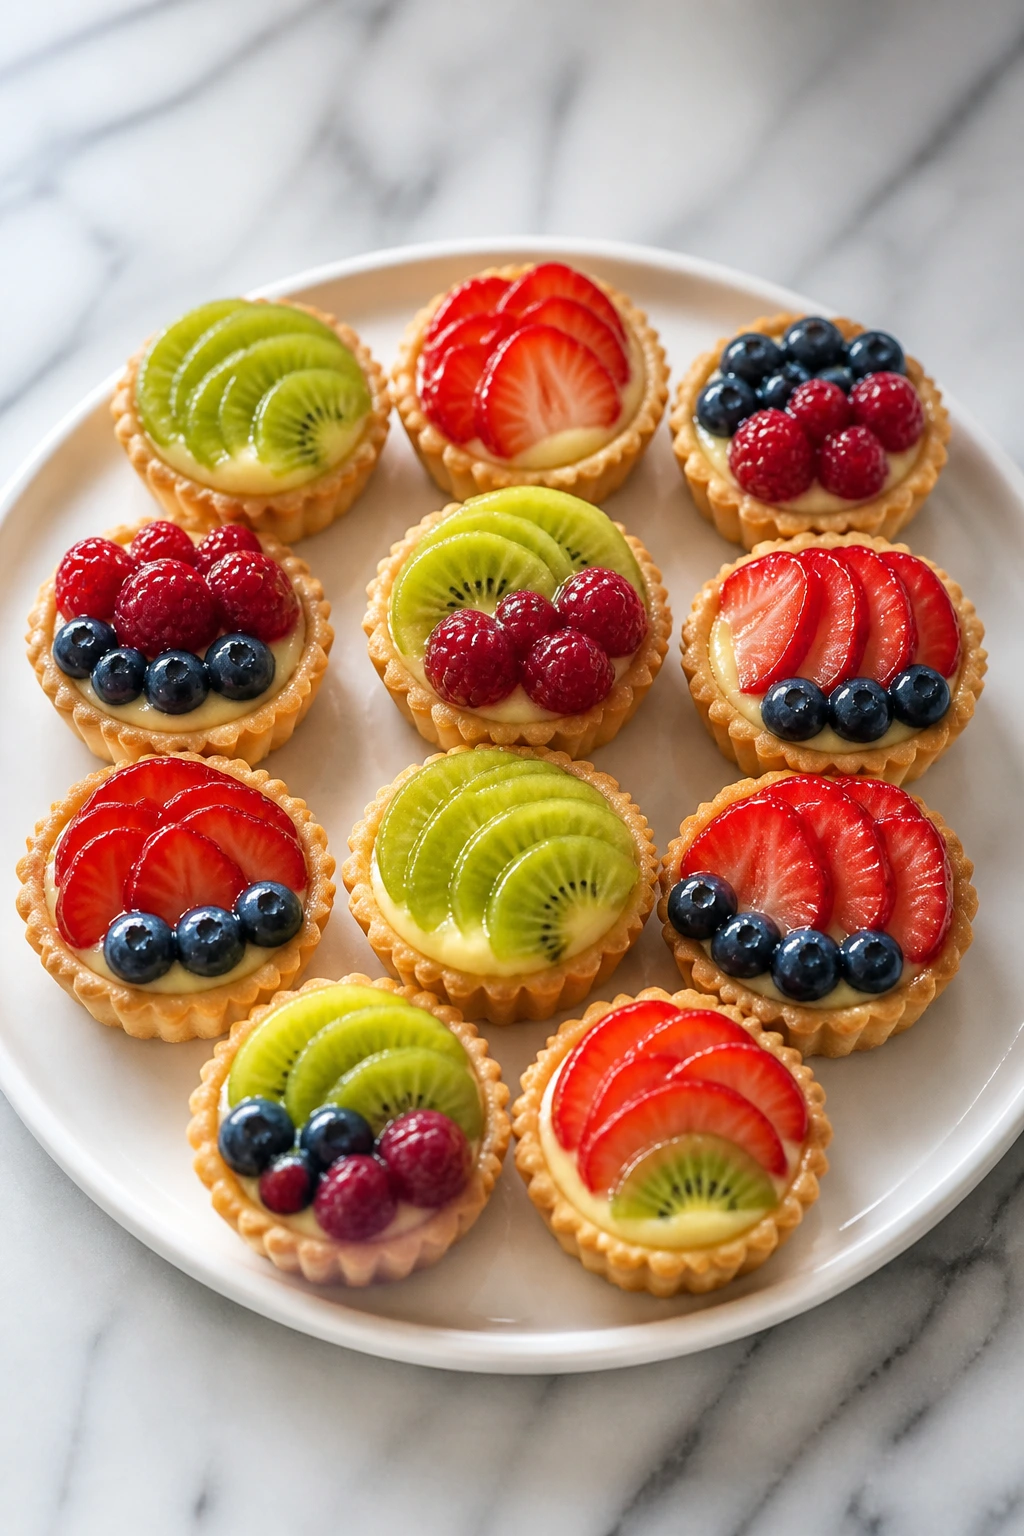
These little tarts are the dependable showstoppers of the bunch. Crisp shells, pale cream, and whatever fruit you arrange on top — neat arcs of kiwi, strawberries, raspberries, and blueberries if you want color.
Why It Works: Tart shells stay crisp beneath pastry cream if you keep them chilled. The cream gives a smooth base that lets fruit shine. A thin glaze ties the fruit together and gives the tops a bakery finish.
Key Ingredients:
- 1 batch sweet tart dough, for 6 mini tarts
- 2 cups milk
- 1/2 cup sugar
- 4 egg yolks
- 3 tablespoons cornstarch
- 2 tablespoons butter
- 1 teaspoon vanilla extract
- 2 cups mixed fruit, sliced neatly
- 2 tablespoons apricot jam
Quick Steps:
- Bake tart shells until golden and cool.
- Cook milk, sugar, yolks, cornstarch, butter, and vanilla into pastry cream.
- Chill the cream until thick.
- Fill tart shells and arrange fruit in rows or rings.
- Warm apricot jam with a little water and brush over the fruit.
Equipment for This Recipe:
- Mini tart pans
- Saucepan
- Whisk
- Pastry brush
How to Serve This Dish: Put one tart on each plate and let the fruit pattern face outward. They’re best when the slices look precise, not crowded.
Pro Tips for This Recipe:
- Dry fruit well before arranging it.
- Chill the shells before filling.
- Use a light glaze; too much makes the fruit slippery.
Variations on This Recipe:
- Berry-Only Tarts: Use strawberries and raspberries only.
- Lemon Cream Tarts: Add lemon zest to the pastry cream.
- Chocolate Shells: Use cocoa tart dough.
Common Mistakes to Avoid with This Recipe:
- Warm pastry cream: It softens the shell.
- Overloading the top: The fruit slides off.
- Cutting soft fruit too thick: The pattern looks messy.
41. Raspberry Sorbet Floats
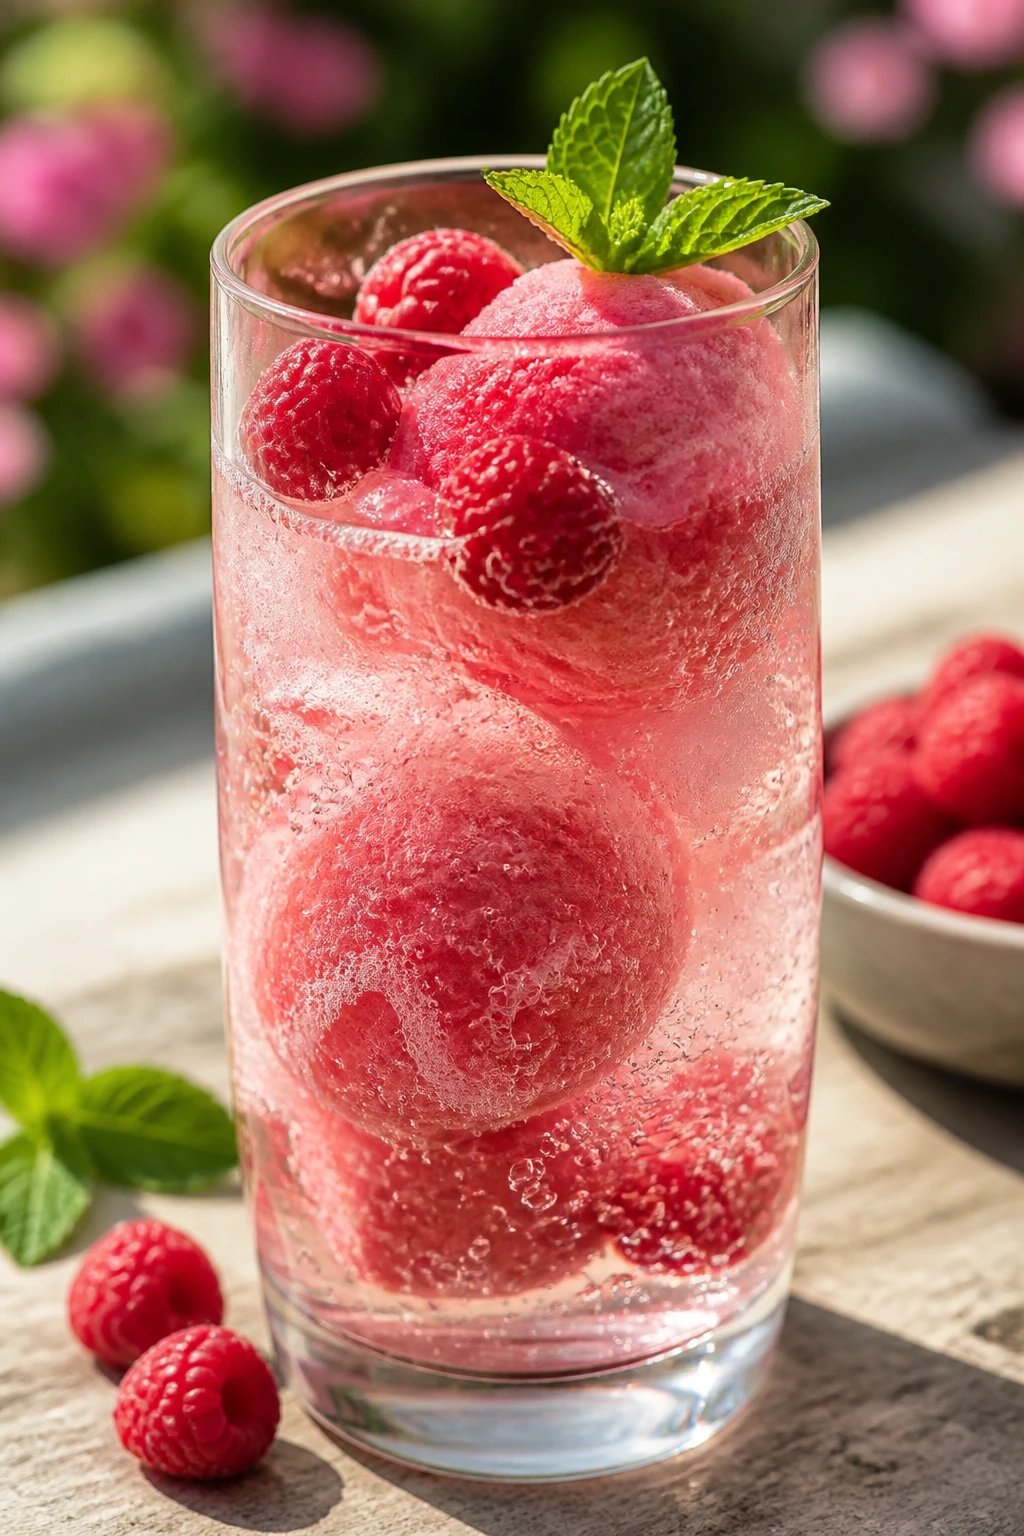
This one sits right at the line between dessert and drink, which makes it fun. The sorbet melts into bubbles if you use sparkling water, and the whole glass turns pink and cold.
Why It Works: Sorbet gives you a concentrated fruit flavor with no dairy to weigh it down. Sparkling water or prosecco adds lift, and fresh berries make the float look layered. It’s a fast dessert that still feels deliberate.
Key Ingredients:
- 4 cups raspberries
- 3/4 cup sugar
- 1/2 cup water
- 1 tablespoon lemon juice
- Sparkling water or prosecco
- Fresh mint, for garnish
Quick Steps:
- Simmer sugar and water until dissolved.
- Blend syrup, raspberries, and lemon juice until smooth, then strain.
- Freeze in a shallow dish, scraping every 30 minutes, or churn in an ice cream maker.
- Spoon sorbet into glasses.
- Top with sparkling water or prosecco and mint.
Equipment for This Recipe:
- Blender
- Fine-mesh strainer
- Shallow dish or ice cream maker
- Tall glasses
How to Serve This Dish: Build the sorbet in chilled glasses and pour the bubbles slowly along the side. The foam on top is part of the look.
Pro Tips for This Recipe:
- Strain the seeds if you want a smooth float.
- Chill the glasses first.
- Add the liquid right before serving.
Variations on This Recipe:
- Strawberry Float: Use strawberries instead of raspberries.
- Lemon-Berry Float: Add more lemon juice for sharper flavor.
- Nonalcoholic Sparkle: Use lemon soda or sparkling water.
Common Mistakes to Avoid with This Recipe:
- Too much liquid: The sorbet disappears.
- Serving warm glasses: The ice melts too fast.
- Freezing in a deep container: It takes longer to scrape.
42. Chocolate Espresso Pots de Crème
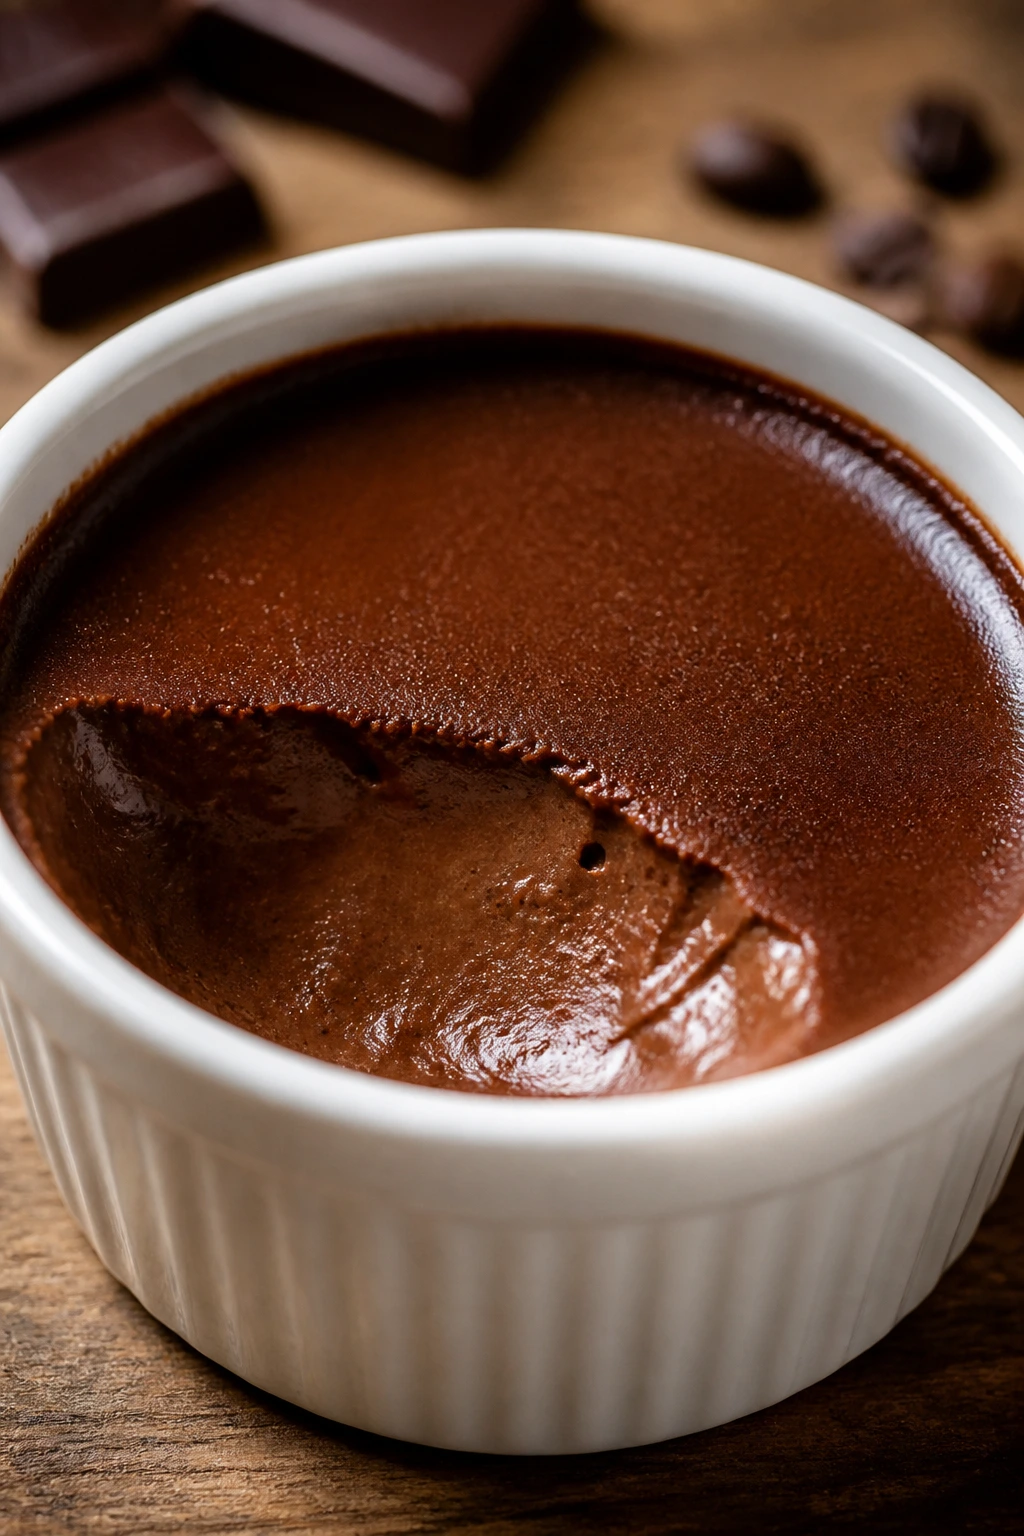
These are deep, dark, and quiet about it. The espresso sharpens the chocolate so each spoonful tastes fuller, not sweeter.
Why It Works: Egg yolks and cream set into a custard that’s smoother than pudding and richer than mousse. Espresso brings depth without making it taste like coffee dessert, unless you push it too far. A small ramekin makes the portion feel polished.
Key Ingredients:
- 1 1/2 cups heavy cream
- 1/2 cup whole milk
- 6 ounces dark chocolate, chopped
- 4 large egg yolks
- 1/4 cup sugar
- 1 teaspoon espresso powder
- 1/4 teaspoon fine salt
Quick Steps:
- Heat cream, milk, and espresso powder until steaming.
- Whisk yolks, sugar, and salt.
- Temper in the cream mixture, then stir in chocolate until smooth.
- Pour into ramekins and bake in a water bath at 325°F (165°C) for 25 to 30 minutes.
- Chill 3 hours and serve cold.
Equipment for This Recipe:
- Ramekins
- Baking dish for water bath
- Whisk
- Fine strainer
How to Serve This Dish: Top with whipped cream or one candied espresso bean if you have them. The dark surface looks best when it stays mostly bare.
Pro Tips for This Recipe:
- Strain the custard for a cleaner finish.
- Bake gently or the texture gets grainy.
- Chill until the center is fully set.
Variations on This Recipe:
- Orange Espresso Pots: Add orange zest.
- Salted Caramel Version: Drizzle with caramel before serving.
- Milk Chocolate Style: Use milk chocolate for a softer flavor.
Common Mistakes to Avoid with This Recipe:
- Overbaking: The custard turns scrambled.
- Too much espresso: It overwhelms the chocolate.
- Skipping the chill: The texture is too loose.
43. Cherry Almond Bakewell Tartlets
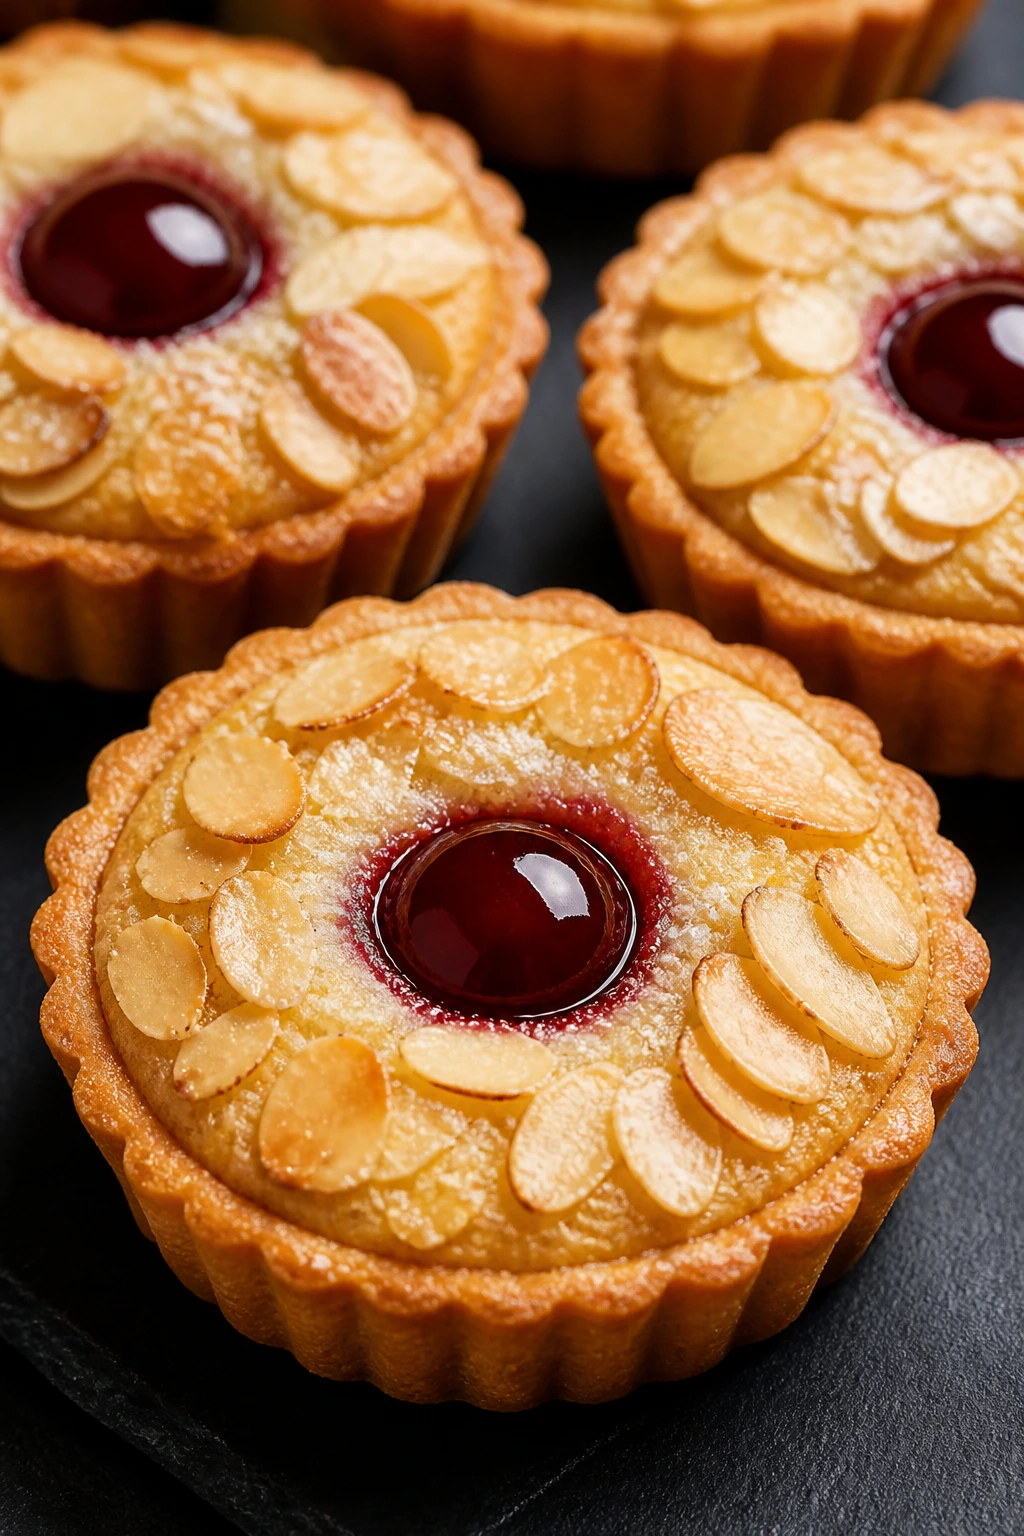
Bakewell tartlets look tidy and cheerful at the same time. The almond cream puffs a little under the cherry layer, and the sliced almonds on top give them a neat, bakery look.
Why It Works: Cherry jam keeps the center glossy and bright, while frangipane gives the tartlets a soft, almond-rich body. Tart shells stay crisp beneath the filling, so each bite still has contrast. They’re small enough to feel charming instead of heavy.
Key Ingredients:
- 1 batch tart shells for 6 mini tartlets
- 1/2 cup cherry jam
- 1/2 cup unsalted butter, softened
- 1/2 cup sugar
- 1 cup almond flour
- 2 large eggs
- 1 teaspoon almond extract
- 1/4 cup sliced almonds
Quick Steps:
- Bake tart shells and cool.
- Spoon a thin layer of cherry jam into each shell.
- Beat butter, sugar, almond flour, eggs, and almond extract into frangipane.
- Spread over the jam and top with sliced almonds.
- Bake at 350°F (175°C) for 20 to 25 minutes until set and golden.
Equipment for This Recipe:
- Mini tart pans
- Mixing bowl
- Spoon or spatula
- Cooling rack
How to Serve This Dish: Serve with the almond side up and a few fresh cherries nearby. The jam peeking from the edges is enough of an accent.
Pro Tips for This Recipe:
- Keep the jam layer thin.
- Bake until the almond filling is set in the center.
- Cool before removing from the pans.
Variations on This Recipe:
- Raspberry Bakewell Tartlets: Use raspberry jam instead.
- Orange Almond Tartlets: Add orange zest to the frangipane.
- Glazed Cherry Tops: Brush the finished tartlets with warmed jam.
Common Mistakes to Avoid with This Recipe:
- Too much jam: The filling slides.
- Underbaking: The center stays wet.
- Removing too soon: Warm tartlets can break.
44. Strawberry Shortcake Parfaits
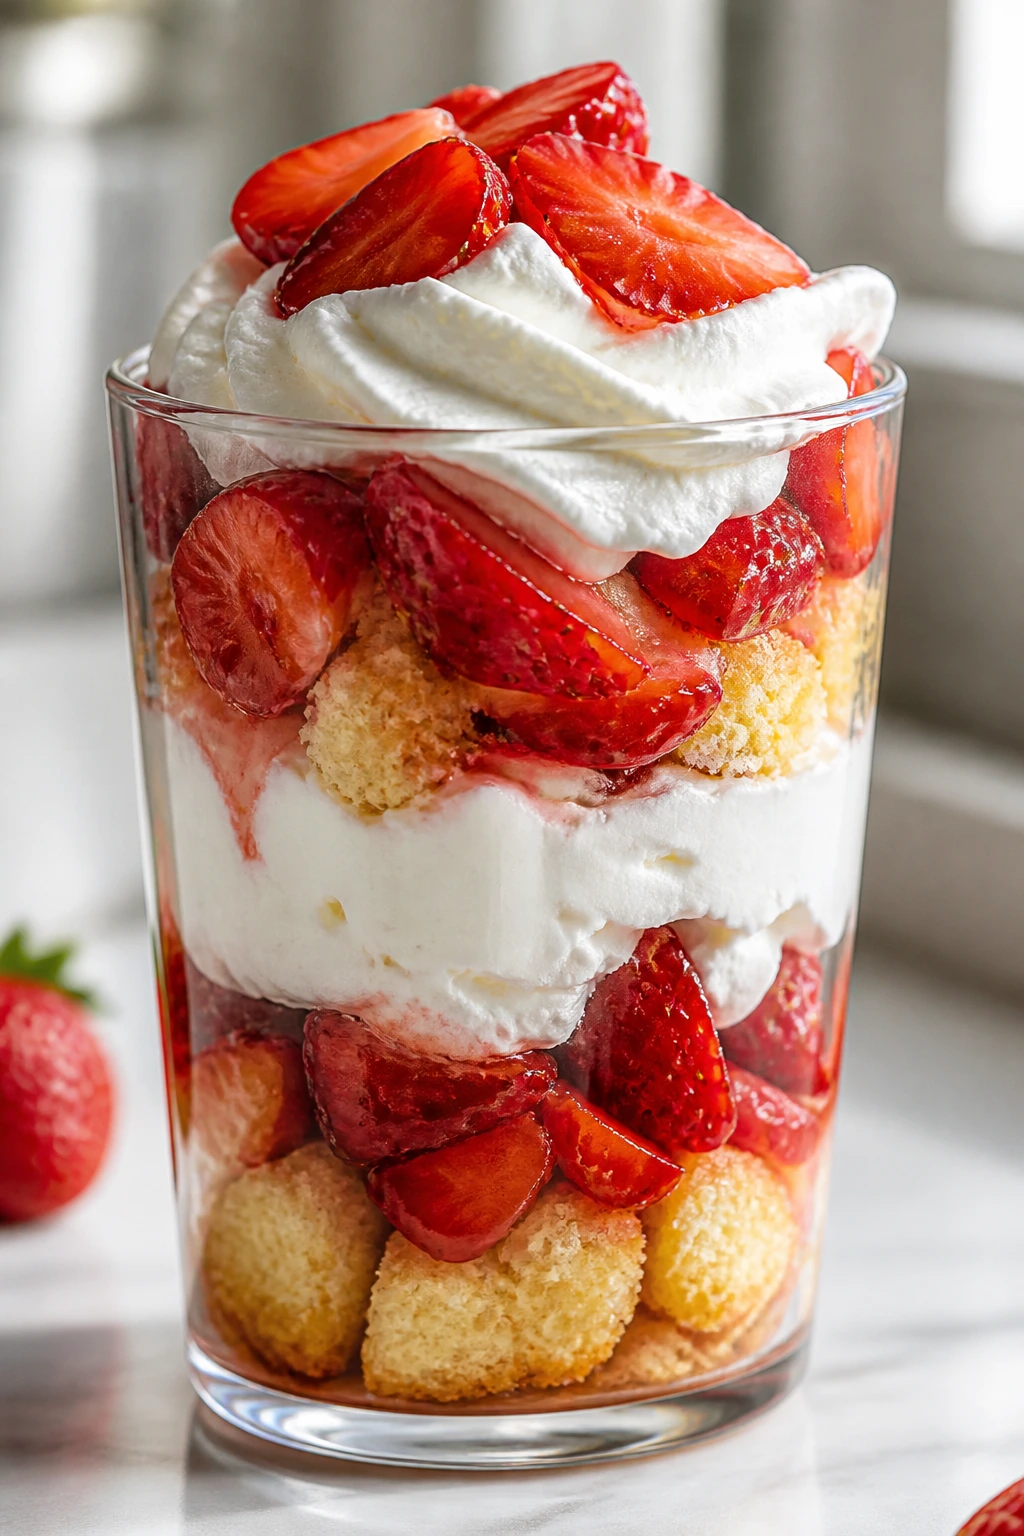
Shortcake in a glass keeps all the familiar parts but gives them sharper lines. The biscuit crumbs, strawberries, and cream stack up in layers that look neat instead of messy.
Why It Works: Macerated strawberries release juice that soaks lightly into the cake or biscuit layer. Whipped cream adds softness, and a glass shows every stripe. It’s a dessert that feels casual but still photographs like you meant it.
Key Ingredients:
- 2 cups strawberries, sliced
- 2 tablespoons sugar
- 2 cups whipped cream
- 4 shortcakes or biscuits, crumbled
- 1 teaspoon vanilla extract
- Fresh mint, optional
Quick Steps:
- Toss strawberries with sugar and let them sit 20 minutes.
- Whip cream with vanilla if needed.
- Layer biscuit crumbs, strawberries, and cream in glasses.
- Repeat the layers once.
- Chill 15 minutes or serve right away.
Equipment for This Recipe:
- Mixing bowls
- Tall glasses
- Spoon
- Hand mixer, if whipping cream
How to Serve This Dish: Use clear glasses for the layered look and finish with a strawberry fan on top. A little extra juice at the bottom is fine; that’s part of the charm.
Pro Tips for This Recipe:
- Keep the biscuit pieces fairly chunky.
- Macerate strawberries just long enough to get syrup, not mush.
- Chill briefly so the layers settle.
Variations on This Recipe:
- Raspberry Shortcake Parfaits: Add raspberries for more tartness.
- Lemon Cream Version: Add lemon zest to the whipped cream.
- Angel Food Swap: Use cubes of angel food cake instead of biscuits.
Common Mistakes to Avoid with This Recipe:
- Over-soaking the fruit: It loses shape.
- Using flat cream: Whip it to soft peaks.
- Building too far ahead: The crumbs soften quickly.
45. Lemon Raspberry Cake Roll
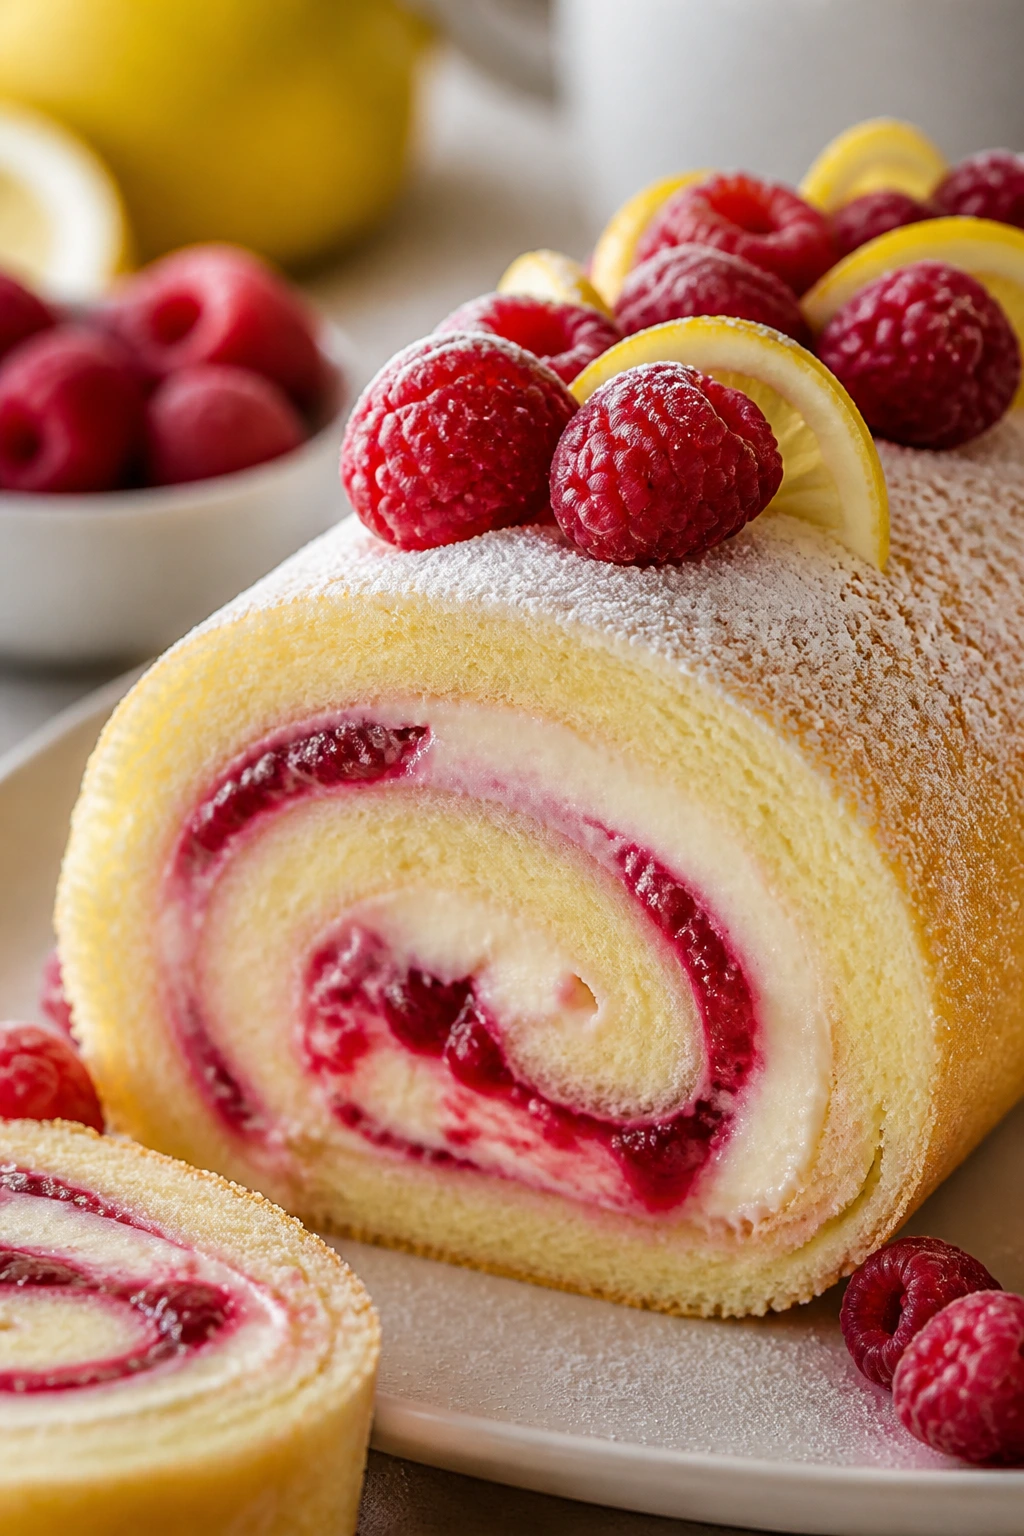
Cake rolls look fancier than they are, which is one reason I like them. The spiral shows off the filling, and the bright lemon with raspberry looks clean and sharp.
Why It Works: A thin sponge bakes fast and bends without cracking if you roll it while warm. Lemon cream gives the cake a tart backbone, and raspberry jam adds color to the center line. The spiral is the decoration.
Key Ingredients:
- 4 large eggs
- 3/4 cup sugar
- 3/4 cup cake flour
- 1 teaspoon baking powder
- 1/4 teaspoon salt
- 1 cup whipped cream
- 1/2 cup lemon curd
- 1/3 cup raspberry jam
- Powdered sugar, for dusting
Quick Steps:
- Heat the oven to 350°F (175°C) and line a jelly roll pan.
- Beat eggs and sugar until pale and thick, then fold in flour, baking powder, and salt.
- Bake 10 to 12 minutes.
- Turn onto a towel, roll warm, and cool.
- Fill with lemon cream and raspberry jam, roll again, and chill.
Equipment for This Recipe:
- Jelly roll pan
- Parchment paper
- Clean towel
- Electric mixer
How to Serve This Dish: Trim both ends for a clean spiral and dust with powdered sugar. A few raspberries on the plate echo the filling.
Pro Tips for This Recipe:
- Roll while warm or the cake cracks.
- Don’t overfill the center.
- Chill before slicing for the cleanest spiral.
Variations on This Recipe:
- Strawberry-Lemon Roll: Use strawberry jam instead.
- Cream Cheese Filling: Add cream cheese to the filling for more body.
- Berry Swirl Roll: Mix raspberry jam into the whipped cream.
Common Mistakes to Avoid with This Recipe:
- Waiting too long to roll: The cake hardens.
- Uneven filling: The spiral looks lopsided.
- Cutting warm: The cake smears.
46. Salted Caramel Macarons
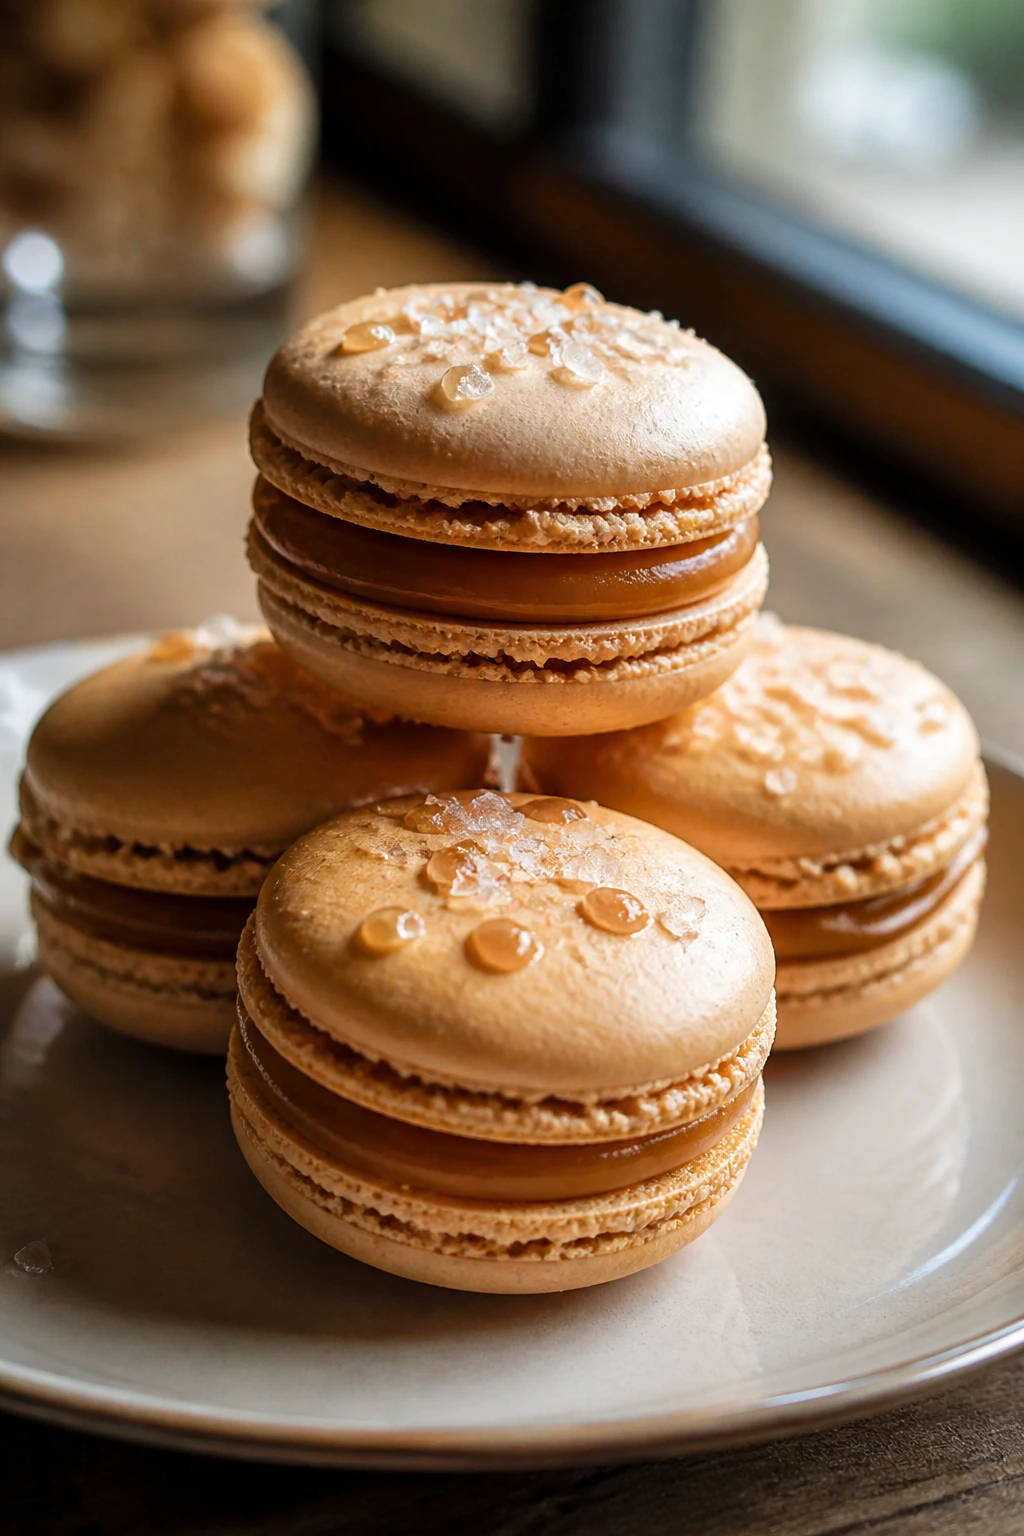
These have the same elegant shell as the raspberry version, but the filling leans deeper and more buttery. Salted caramel gives the whole cookie a golden, toasty look and a richer finish.
Why It Works: Macaron shells stay crisp and neat, while caramel filling adds a soft center that balances the airy shell. Salt keeps the caramel from turning cloying. A tiny drizzle of extra caramel on top makes the cookies look deliberate.
Key Ingredients:
- 1 cup almond flour
- 1 3/4 cups powdered sugar
- 3 egg whites
- 1/4 cup granulated sugar
- 1/4 teaspoon cream of tartar
- 1/2 cup sugar, for caramel
- 3 tablespoons heavy cream
- 2 tablespoons unsalted butter
- Flaky sea salt
Quick Steps:
- Make and pipe the macaron shells, then bake and cool them as in the first macaron recipe.
- Cook the sugar until amber.
- Stir in cream and butter carefully, then cool and add a pinch of salt.
- Pipe caramel filling onto half the shells and sandwich.
- Chill before serving so the filling softens the centers.
Equipment for This Recipe:
- Piping bags
- Baking sheets
- Small saucepan
- Offset spatula
How to Serve This Dish: Stack them in a small glass dish and finish with a few flakes of salt on top. They look best when the caramel is the color of old copper.
Pro Tips for This Recipe:
- Cook caramel just to amber; darker means bitter.
- Cool the filling before piping or it runs.
- Age the filled macarons overnight for a softer bite.
Variations on This Recipe:
- Chocolate-Caramel Macarons: Add cocoa to the shells.
- Vanilla Bean Caramel: Stir vanilla bean paste into the filling.
- Bourbon Caramel: Add a spoonful of bourbon to the cooled caramel.
Common Mistakes to Avoid with This Recipe:
- Burning the caramel: It turns bitter fast.
- Using warm filling: The shells slip apart.
- Serving immediately: The texture improves after chilling.
47. Hibiscus Poached Peaches
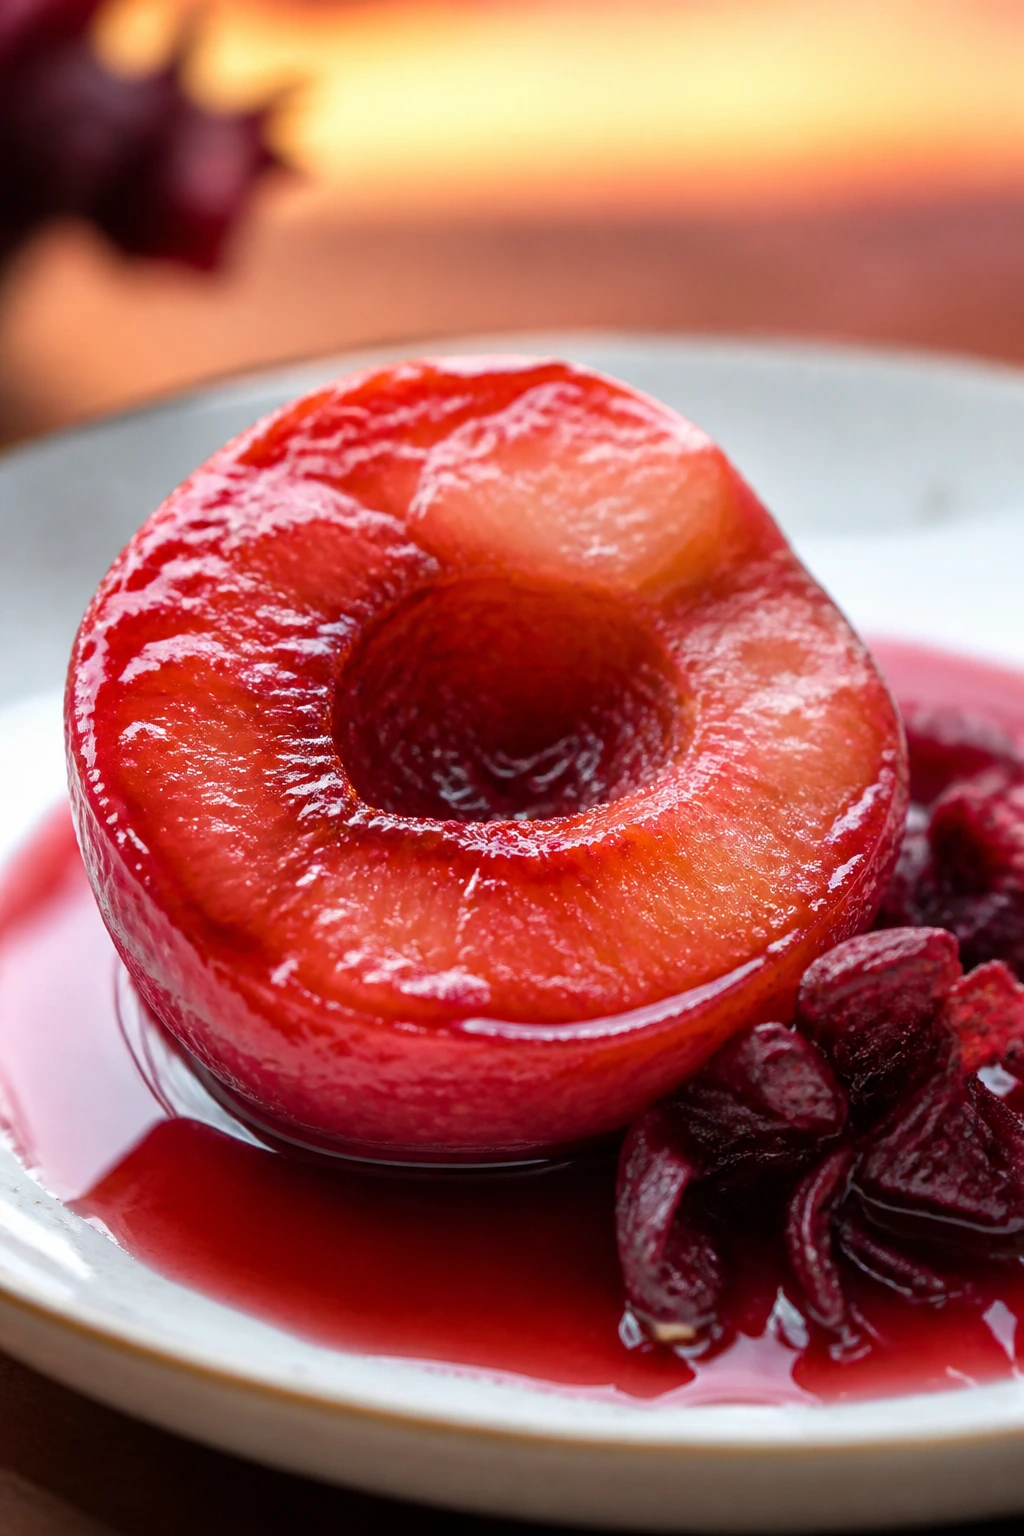
These peaches turn the color of a sunset after a long soak in hibiscus tea. They look soft and romantic without needing frosting or piped cream.
Why It Works: Hibiscus gives the poaching liquid a deep rosy color and a tart floral note. Peaches absorb enough of the syrup to look stained but stay firm enough to slice. The finished syrup can be reduced and drizzled over the top for shine.
Key Ingredients:
- 4 ripe but firm peaches, halved and pitted
- 2 cups water
- 1/2 cup sugar
- 2 hibiscus tea bags or 2 tablespoons dried hibiscus
- 1 strip lemon peel
- 1 teaspoon vanilla extract
Quick Steps:
- Simmer water, sugar, hibiscus, and lemon peel for 5 minutes.
- Add peaches and poach gently for 8 to 12 minutes until tender.
- Remove the fruit and reduce the syrup slightly.
- Cool the peaches in the syrup for deeper color.
- Serve with syrup and vanilla yogurt or cream.
Equipment for This Recipe:
- Medium saucepan
- Slotted spoon
- Vegetable peeler
- Serving dish
How to Serve This Dish: Place a peach half cut-side up and spoon the syrup over the center. A spoonful of thick yogurt beside it keeps the plate from feeling too sweet.
Pro Tips for This Recipe:
- Use peaches that still have some firmness.
- Let them cool in the syrup for the strongest color.
- Strain out the hibiscus if you want a clear syrup.
Variations on This Recipe:
- White Peach Version: Use white peaches for a softer look.
- Rose-Hibiscus Peaches: Add a touch of rosewater.
- Wine Poached Style: Replace half the water with white wine.
Common Mistakes to Avoid with This Recipe:
- Boiling hard: The peaches split.
- Using overripe fruit: They fall apart.
- Not reducing the syrup: The plate looks flat.
48. Blueberry Cheesecake Swirl Brownies
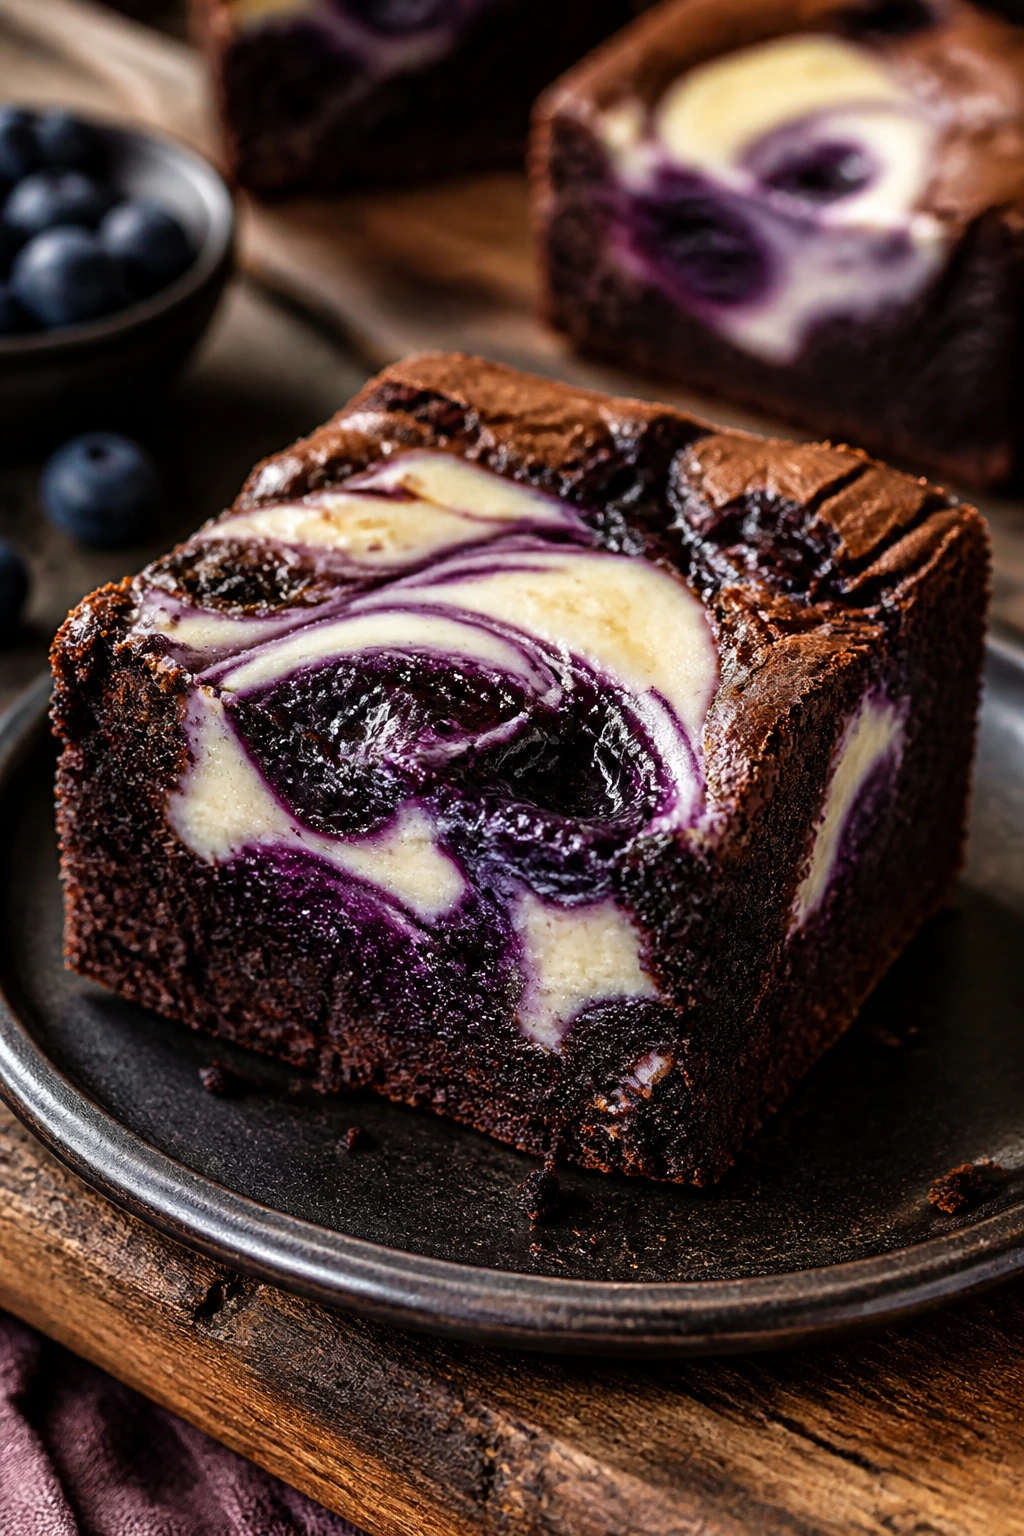
Brownies with a cheesecake ripple and a blueberry streak look like a dessert that couldn’t decide what it wanted to be — which is exactly why they work. The dark base makes the pale swirl pop.
Why It Works: Chocolate brownies give you a dense foundation, while the cheesecake layer cuts through the richness. Blueberries add a bright purple ribbon that looks dramatic in every slice. The contrast between fudgy and creamy is the whole point.
Key Ingredients:
- 1/2 cup unsalted butter
- 6 ounces dark chocolate
- 3/4 cup sugar
- 2 large eggs
- 1/2 cup all-purpose flour
- 8 ounces cream cheese, softened
- 1/4 cup sugar
- 1 egg
- 1 cup blueberries
Quick Steps:
- Heat oven to 350°F (175°C) and line an 8-inch pan.
- Make the brownie batter and spread it in the pan.
- Beat cream cheese, sugar, and egg until smooth.
- Spoon cheesecake mixture on top, add blueberries, and swirl gently.
- Bake 30 to 35 minutes until the center is set but not dry.
Equipment for This Recipe:
- 8-inch square pan
- Mixer
- Spatula
- Parchment paper
How to Serve This Dish: Cut into squares and show the swirls on the top surface. A few blueberries around the plate make the color story clearer.
Pro Tips for This Recipe:
- Swirl lightly so the layers stay distinct.
- Don’t overbake or the cheesecake cracks.
- Chill before cutting if you want cleaner squares.
Variations on This Recipe:
- Raspberry Swirl Brownies: Use raspberries instead.
- White Chocolate Brownies: Use a blondie base with the same swirl.
- Nut Version: Add chopped hazelnuts to the brownie batter.
Common Mistakes to Avoid with This Recipe:
- Too much swirling: The layers muddy.
- Warm slicing: The cheesecake layer smears.
- Overbaking: The center gets dry and cakey.
49. Rose Apple Tarts
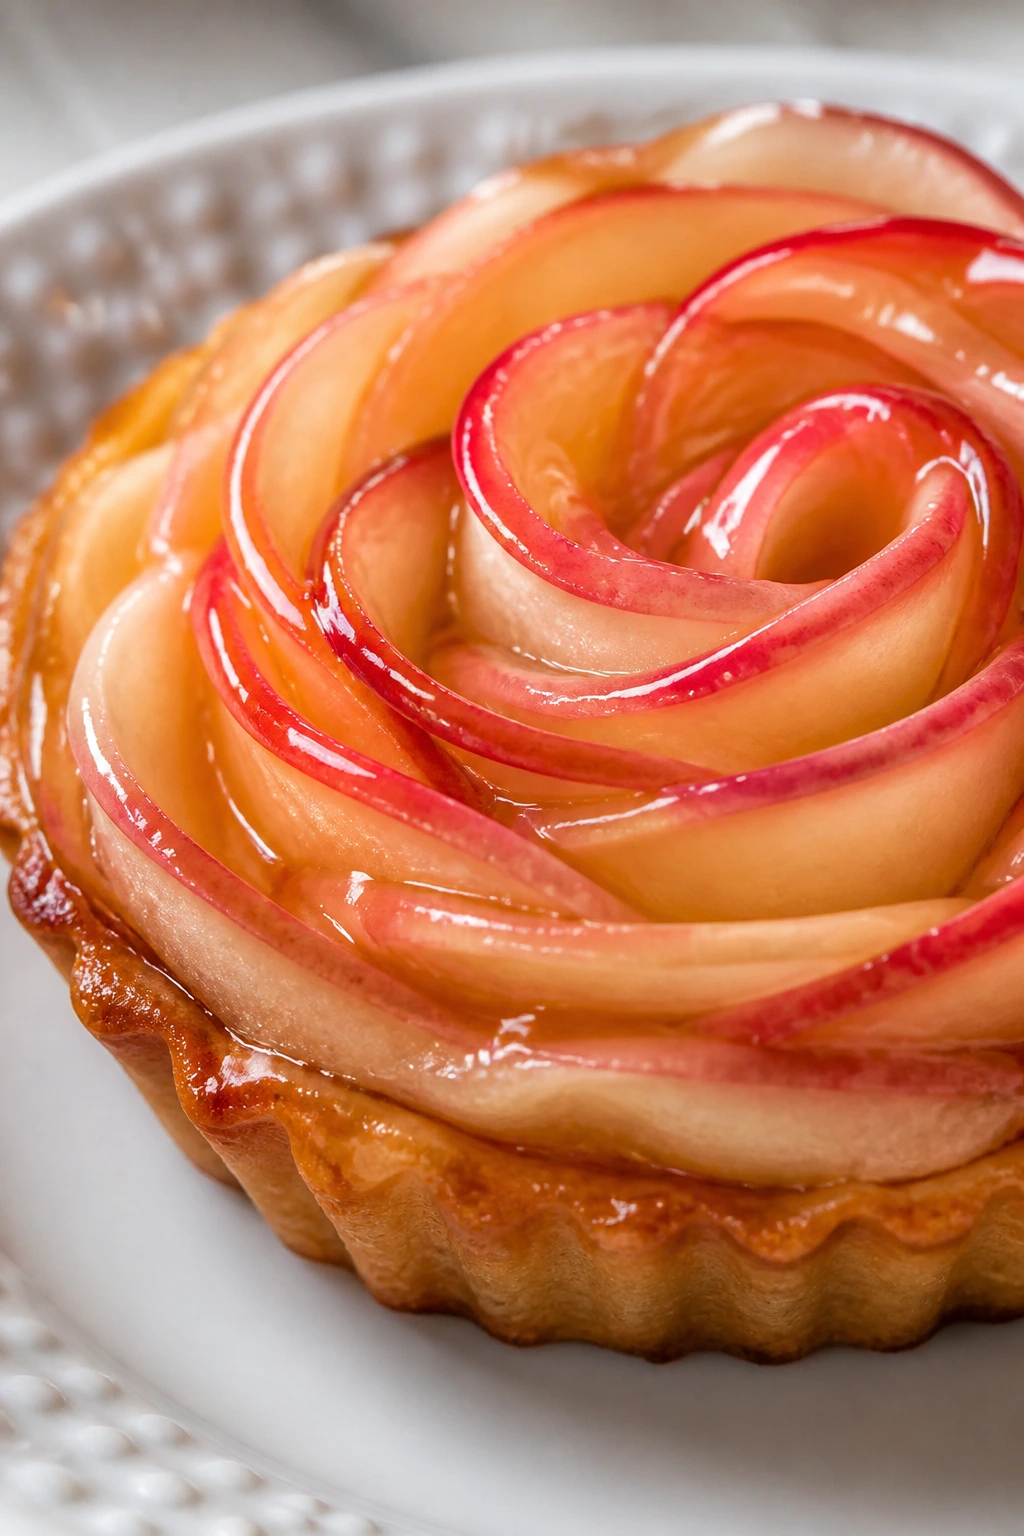
These are the kind of tarts that make a dessert tray feel carefully arranged. Thin apple slices curl into roses, and the pale pink blush from the fruit looks almost painted on.
Why It Works: Thin apple slices soften and shape themselves into a rose pattern when layered tightly. Apricot jam gives the tart a glossy finish and a little sweetness. A crisp pastry base keeps the fruit from sinking.
Key Ingredients:
- 1 sheet puff pastry or tart dough
- 3 apples, thinly sliced
- 1 tablespoon lemon juice
- 2 tablespoons sugar
- 1 teaspoon cinnamon
- 2 tablespoons apricot jam
- 1 tablespoon water
- 1 tablespoon melted butter
Quick Steps:
- Heat oven to 375°F (190°C) and line tart pans or a tray.
- Toss apple slices with lemon juice, sugar, and cinnamon.
- Arrange the slices in rose shapes on the pastry.
- Brush with melted butter and bake 25 to 30 minutes.
- Warm apricot jam with water and glaze the tops.
Equipment for This Recipe:
- Sharp knife or mandoline
- Tart pan or sheet pan
- Pastry brush
- Small saucepan
How to Serve This Dish: Serve with the “rose” facing up and the glaze catching the light. A spoon of crème fraîche on the side softens the sweetness.
Pro Tips for This Recipe:
- Slice the apples very thin so they bend easily.
- Keep the pastry cold until baking.
- Glaze after baking for the cleanest shine.
Variations on This Recipe:
- Pear Rose Tarts: Use pears instead of apples.
- Berry-Filled Center: Add a spoon of berry jam underneath.
- Almond Cream Base: Spread almond cream under the apples.
Common Mistakes to Avoid with This Recipe:
- Thick apple slices: They won’t curl.
- Overcrowding the roses: The design gets muddy.
- Skipping the glaze: The tops look dry.
50. Meringue Nests with Cream and Curled Fruit
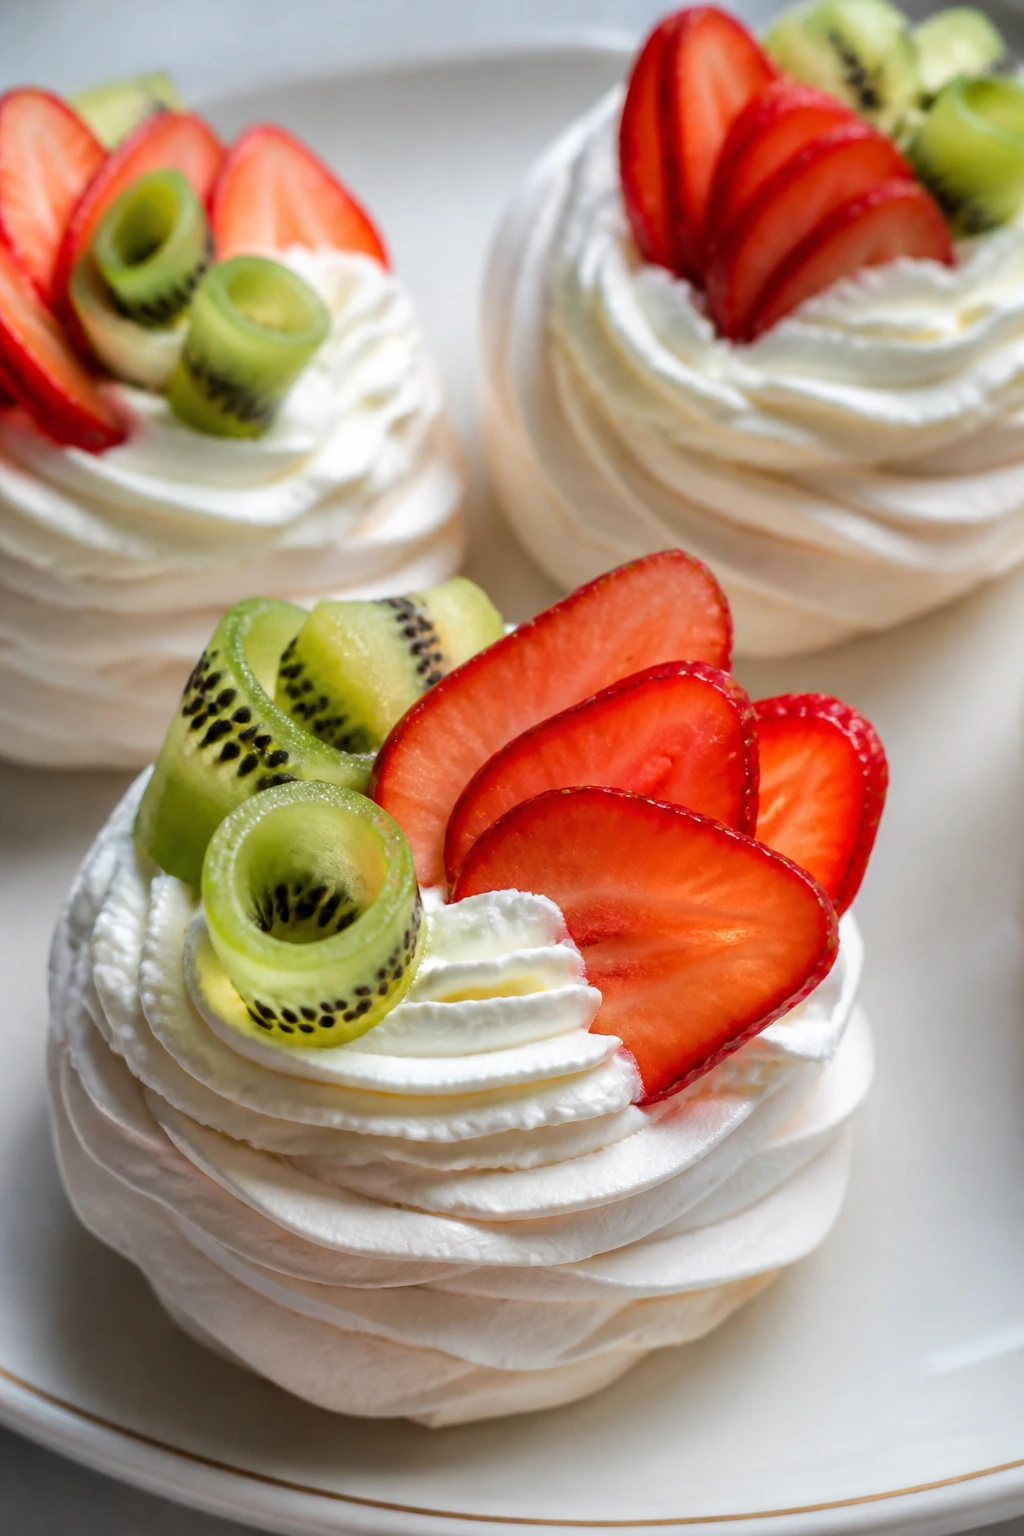
These are the lightest-looking dessert on the list, and that’s saying something. The nests sit crisp and white on the plate, with whipped cream and fruit curling through the center like a tiny arrangement.
Why It Works: Meringue dries into a fragile shell that holds a soft center. Whipped cream gives it contrast, and curled fruit — strawberries, kiwi, citrus peel — adds the color that makes the whole thing feel alive. They’re airy enough to end a meal without heaviness.
Key Ingredients:
- 4 large egg whites
- 1 cup sugar
- 1 teaspoon cornstarch
- 1 teaspoon white vinegar
- 1 teaspoon vanilla extract
- 1 cup heavy cream
- 2 tablespoons powdered sugar
- 2 cups sliced fruit, curled or fanned
- Edible flowers, optional
Quick Steps:
- Heat oven to 225°F (110°C) and line a baking sheet.
- Whip egg whites, then add sugar slowly until stiff and glossy.
- Fold in cornstarch, vinegar, and vanilla.
- Pipe or spoon nests and bake 1 hour, then cool in the oven.
- Fill with whipped cream and arrange fruit on top right before serving.
Equipment for This Recipe:
- Mixer
- Piping bag, optional
- Parchment-lined baking sheet
- Small spoon
How to Serve This Dish: Put each nest on a small plate so the fruit can spill slightly over the edge. A few edible flowers make the whole thing feel softer.
Pro Tips for This Recipe:
- Use room-temperature whites for better volume.
- Bake low and slow to keep the nests white.
- Add cream at the last minute.
Variations on This Recipe:
- Chocolate Nests: Dust the cream with cocoa.
- Berry-Only Version: Use mixed berries for a tighter color story.
- Lemon Cream Nests: Add lemon zest to the whipped cream.
Common Mistakes to Avoid with This Recipe:
- Humidity: It softens the meringue.
- Overbeating: The whites become dry and spiky.
- Filling too early: The shells lose their crisp edges.
What Makes a Dessert Feel Romantic on the Plate
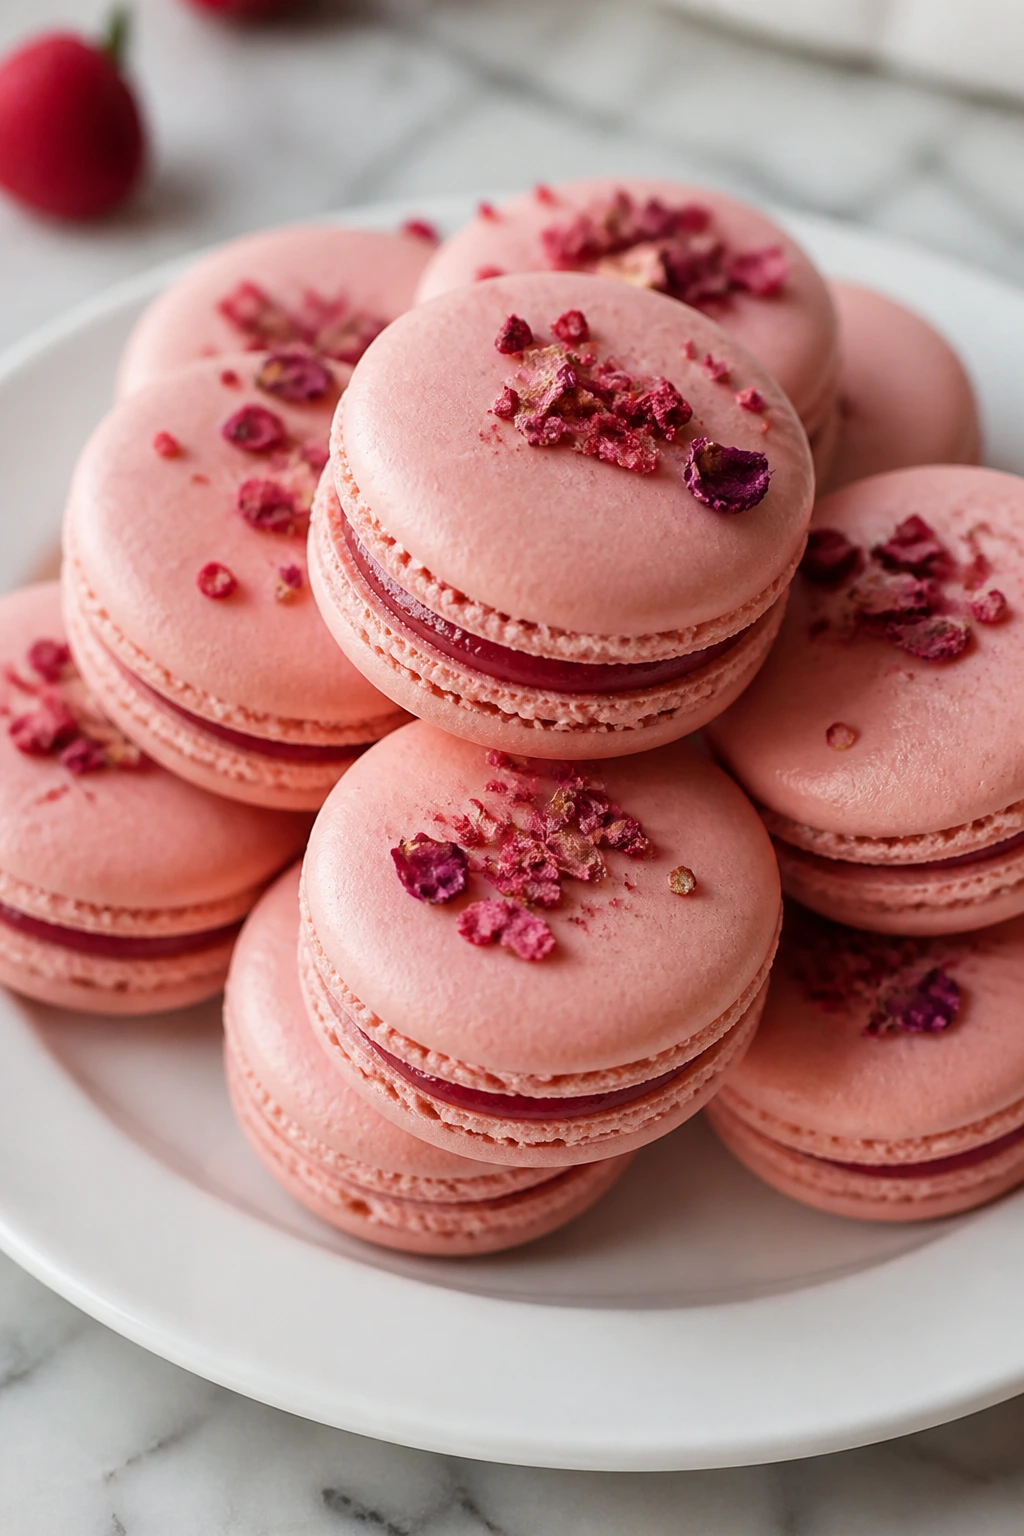
A romantic dessert usually earns the label in three ways: color, shape, and restraint. Color is the easiest place to start. Raspberries, cherries, strawberries, blood orange, hibiscus, rose, pistachio, and dark chocolate give you a natural palette that feels softer than neon sprinkles and more elegant than a random drizzle. The plate does not need to scream. It needs one or two clear notes that your eye can follow.
Shape matters more than people think. A heart-shaped galette, a tidy tartlet, a rolled cake, or a glass dessert with visible layers all give the eye something to hold onto. Smooth custard beside crisp pastry. Tall cream beside flat fruit. A neat slice with a clean edge and a little syrup pooled underneath. Those contrasts do more work than extra garnish ever will.
Restraint is what keeps the whole thing from tipping into costume. I’d rather see three perfect berries and one clean mint leaf than a pile of edible glitter fighting with a piped border. Use the garnish that solves a problem — a berry to echo the filling, pistachios to add color and crunch, powdered sugar to make dark chocolate pop. That’s the sweet spot. Pretty enough to pause over, not so precious that no one wants to cut in.
Essential Equipment for These Recipes

-
Stand mixer or hand mixer: Useful for macarons, meringues, whipped cream, buttercream, and any batter that needs air.
-
Baking sheets: You’ll use these constantly for cookies, macarons, puff pastry, and anything that needs a flat, even bake.
-
Parchment paper: Keeps delicate desserts from sticking and helps you move them without tearing edges.
-
Small saucepan: Handy for custards, syrups, caramel, poaching liquid, and chocolate melting by the gentler route.
-
Fine-mesh strainer: Worth owning for custards, panna cotta, and fruit sauces when you want a smooth finish.
-
Ramekins and small glasses: These make mousse, pots de crème, panna cotta, and parfaits look finished with very little effort.
-
Pastry brush: Useful for egg wash, fruit glaze, buttering phyllo, and any tart that needs shine.
-
Kitchen torch: Not required for every recipe, but it matters for crème brûlée and any dessert where a toasted top sells the effect.
-
Piping bags with plain and star tips: These help with macarons, eclairs, meringues, and clean cream layers.
-
Sharp serrated knife: The right knife for mille-feuille, cake rolls, and any dessert with layers that hate being crushed.
-
Offset spatula: Small tool, big payoff. It smooths fillings, spreads batter, and helps with neat layers.
-
Cooling rack: A simple thing, but it keeps pastry and cakes from steaming themselves soggy underneath.
Smart Shopping for Fruit, Chocolate, and Dairy
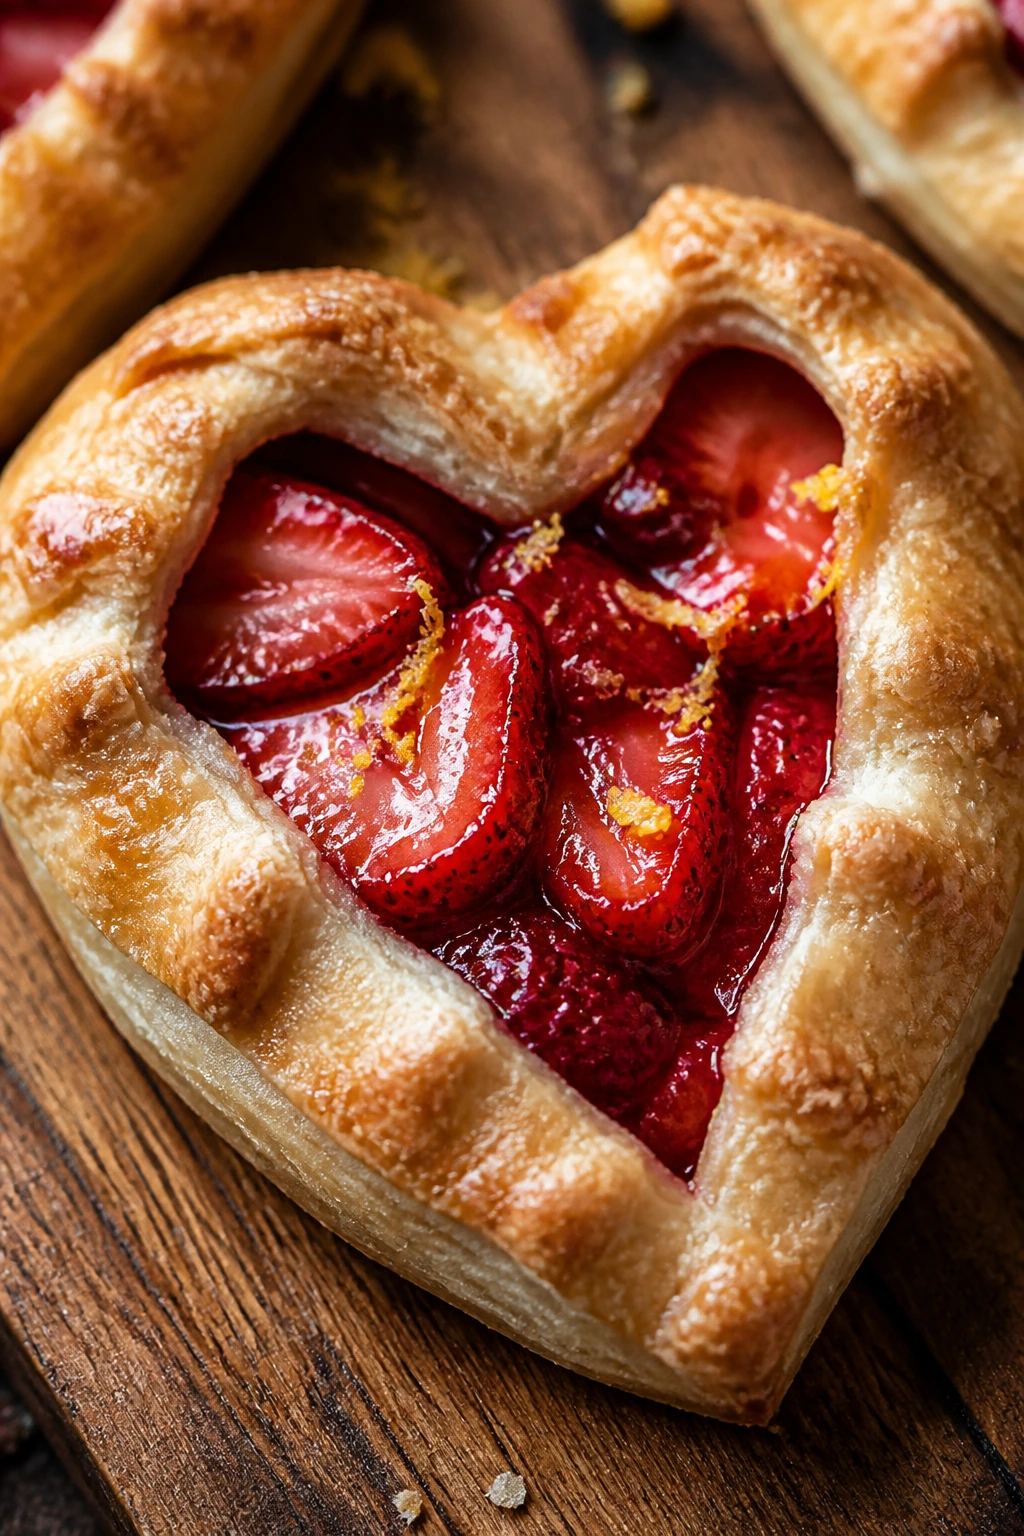
A pretty dessert starts at the store, not the garnish stage. Fruit should look vivid and smell like fruit. Strawberries ought to be red all the way to the shoulders, not white and tired. Raspberries should hold their shape in the carton; if they’re collapsing before you get home, they’ll collapse on the plate too. For peaches and pears, you want ripe but still firm fruit so the slices stay neat under heat or syrup.
Chocolate matters more than most people admit. If a dessert depends on chocolate for shine — truffles, mousse, torte, dipped berries — use a bar you’d eat out of hand. Dark chocolate around 60 to 70 percent gives depth without harshness. White chocolate should list cocoa butter near the top, not a bunch of filler. Cheap chocolate can work in a baked batter, but it turns grumpy fast in ganache and dipping coatings.
Dairy is where a lot of texture lives. Heavy cream whips better when it’s cold and fresh. Cream cheese should soften at room temperature so your filling doesn’t get lumps you have to fight later. For custards and panna cotta, whole milk gives a rounder texture than low-fat milk, and that matters when the whole dessert is supposed to feel silky.
A final note on eggs: use the size the recipe asks for, and let them come to room temperature when possible. They whip better for sponge cakes, macarons, meringues, and roll cakes. Cold eggs are not a disaster. But warm eggs do a better job of taking in air, and airy batter is what makes these desserts look light instead of heavy.
How to Serve These Desserts
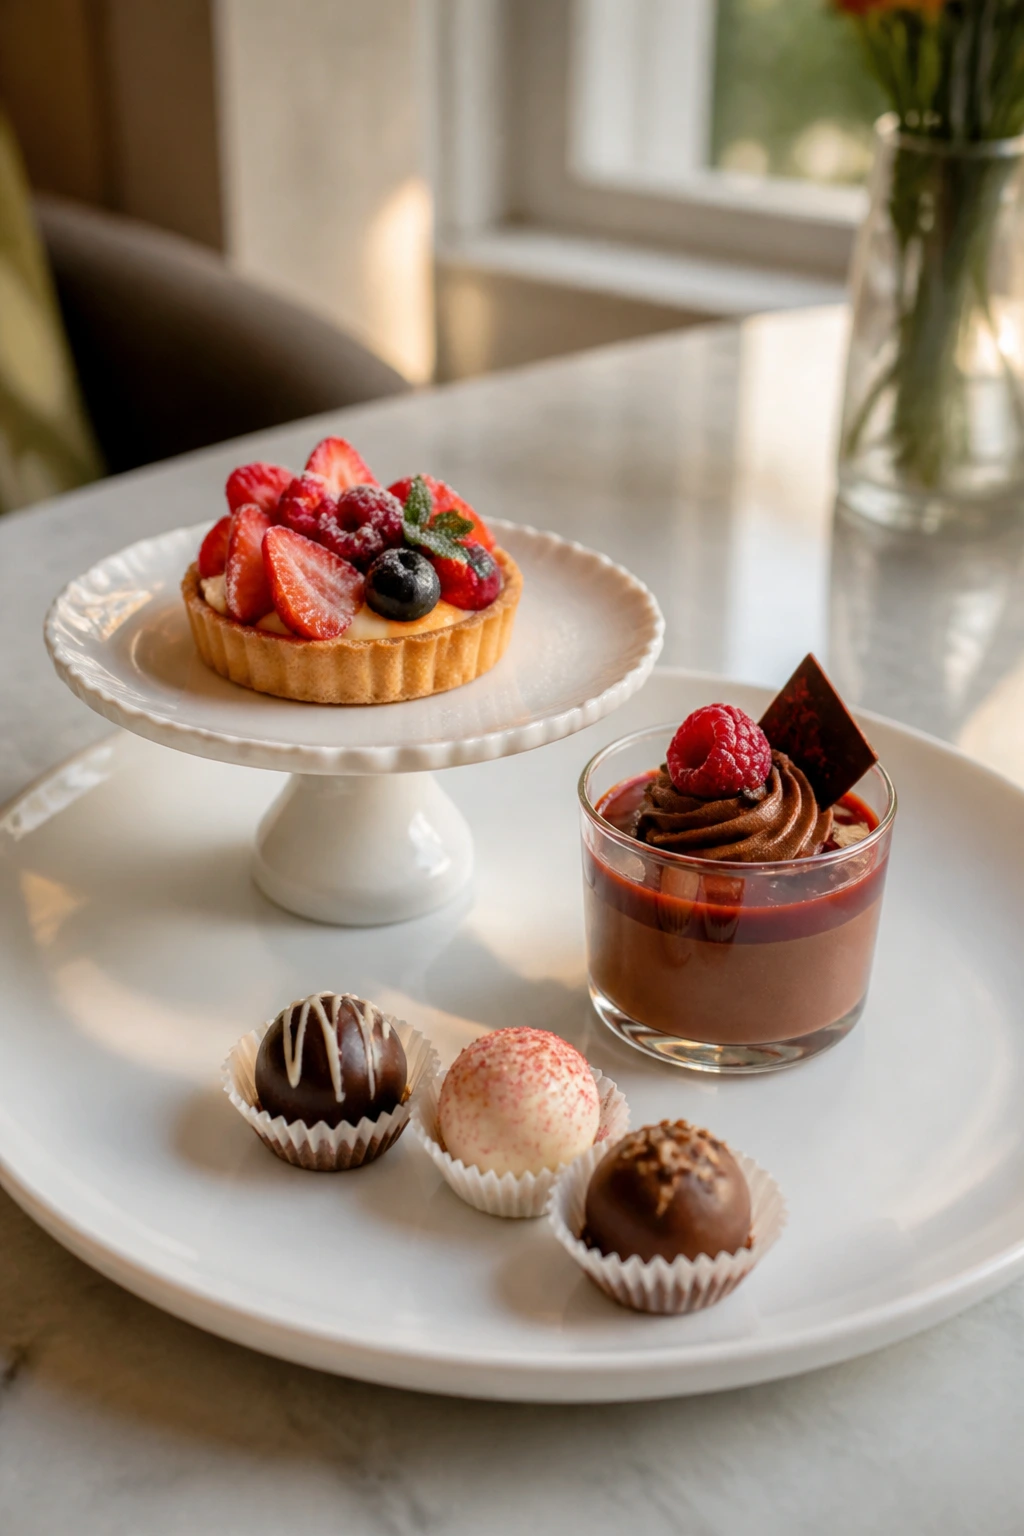
Presentation: Use white, cream, stone, or pale pink plates when the dessert itself is colorful. That gives berries, chocolate, and glaze a clean backdrop. Leave a little negative space around each serving so the dessert has room to breathe. If you’re serving several items together, vary the height — a tart on a small cake stand, mousse in a low glass, truffles in paper cups — so the table looks arranged rather than crowded.
Accompaniments: Pair rich desserts like torte, mousse, cheesecake bars, and pots de crème with unsweetened whipped cream or tart berries. Lighter desserts — pavlovas, possets, sorbet floats, poached fruit — work well with shortbread, crisp cookies, or a spoon of crème fraîche. Coffee is the easy default for chocolate-heavy plates, but black tea, chamomile, and sparkling wine all fit naturally with the fruit-forward recipes.
Portions: Most of these desserts are happiest in smaller servings. One tartlet, one mousse cup, one torte wedge, two macarons, or a single hand pie is often enough after dinner. If you’re building a dessert spread, plan for 2 to 3 small pieces per person rather than one giant slice. The visual effect improves when the plate stays uncluttered.
Beverage Pairing: Dark chocolate and coffee remain the strongest pair in the room. For fruit desserts, a dry sparkling wine or a lightly sweet tea works well. If you want an alcohol-free pairing, try iced hibiscus tea, earl grey, or still water with a slice of lemon; those drinks keep the palate clean between bites.
Additional Tips and Flavor Boosters
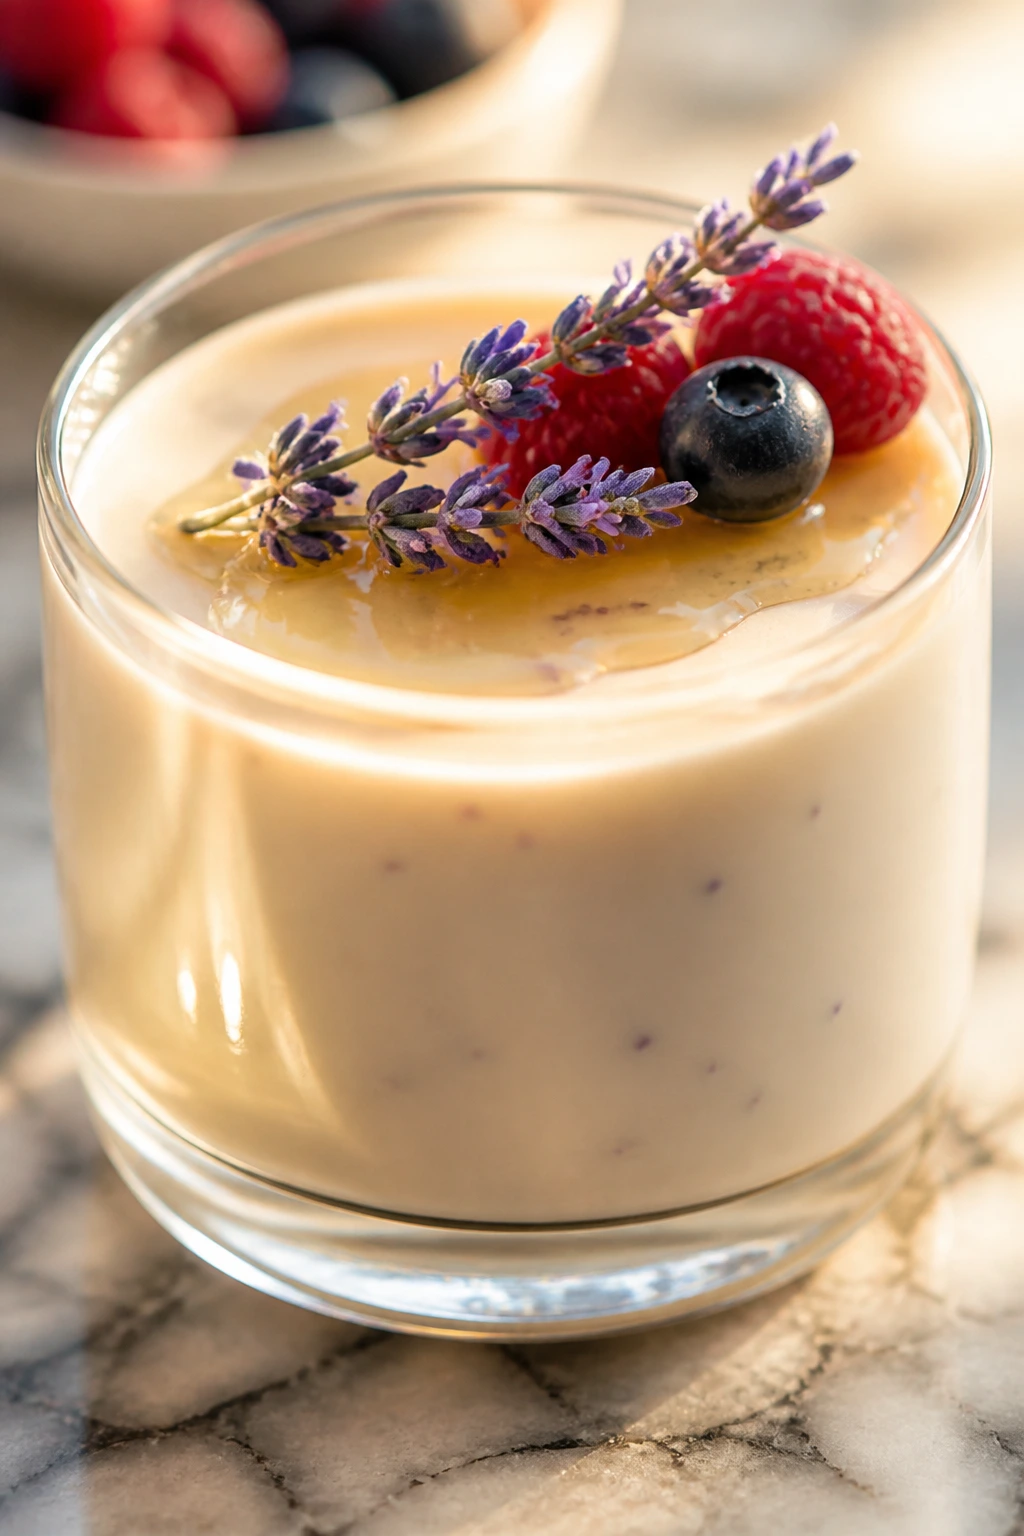
Flavor Enhancement: A thin swipe of berry coulis on the plate can make even a plain slice of cake look deliberate. For chocolate desserts, a tiny pinch of flaky salt or a shot of espresso powder deepens the flavor without making the dessert taste like coffee. Citrus zest is the fastest way to wake up cream, custard, and berry fillings.
Customization: Keep one or two finishes in your back pocket. Toasted pistachios work across macarons, bars, truffles, and cakes. Freeze-dried strawberry powder adds pink color without extra moisture. If you want a more floral note, use rosewater or orange blossom in tiny amounts — measured in drops, not a glug.
Serving Suggestions: Edible flowers are nice, but they are not mandatory. A neat line of sliced fruit, a dusting of powdered sugar, or a single chocolate curl often looks cleaner. I also like a narrow spooned trail of sauce that stops before it gets fussy. It gives the plate direction.
Make-It-Yours: If you need gluten-free desserts, reach first for mousse, posset, panna cotta, flourless torte, truffles, and meringue-based recipes. For dairy-free versions, sorbet, granita, poached fruit, and some coconut-based puddings are the easiest wins. For a less sweet finish, lean harder on tart fruit, plain yogurt, crème fraîche, or dark chocolate.
Make-Ahead, Storage, and Reheating Guidance
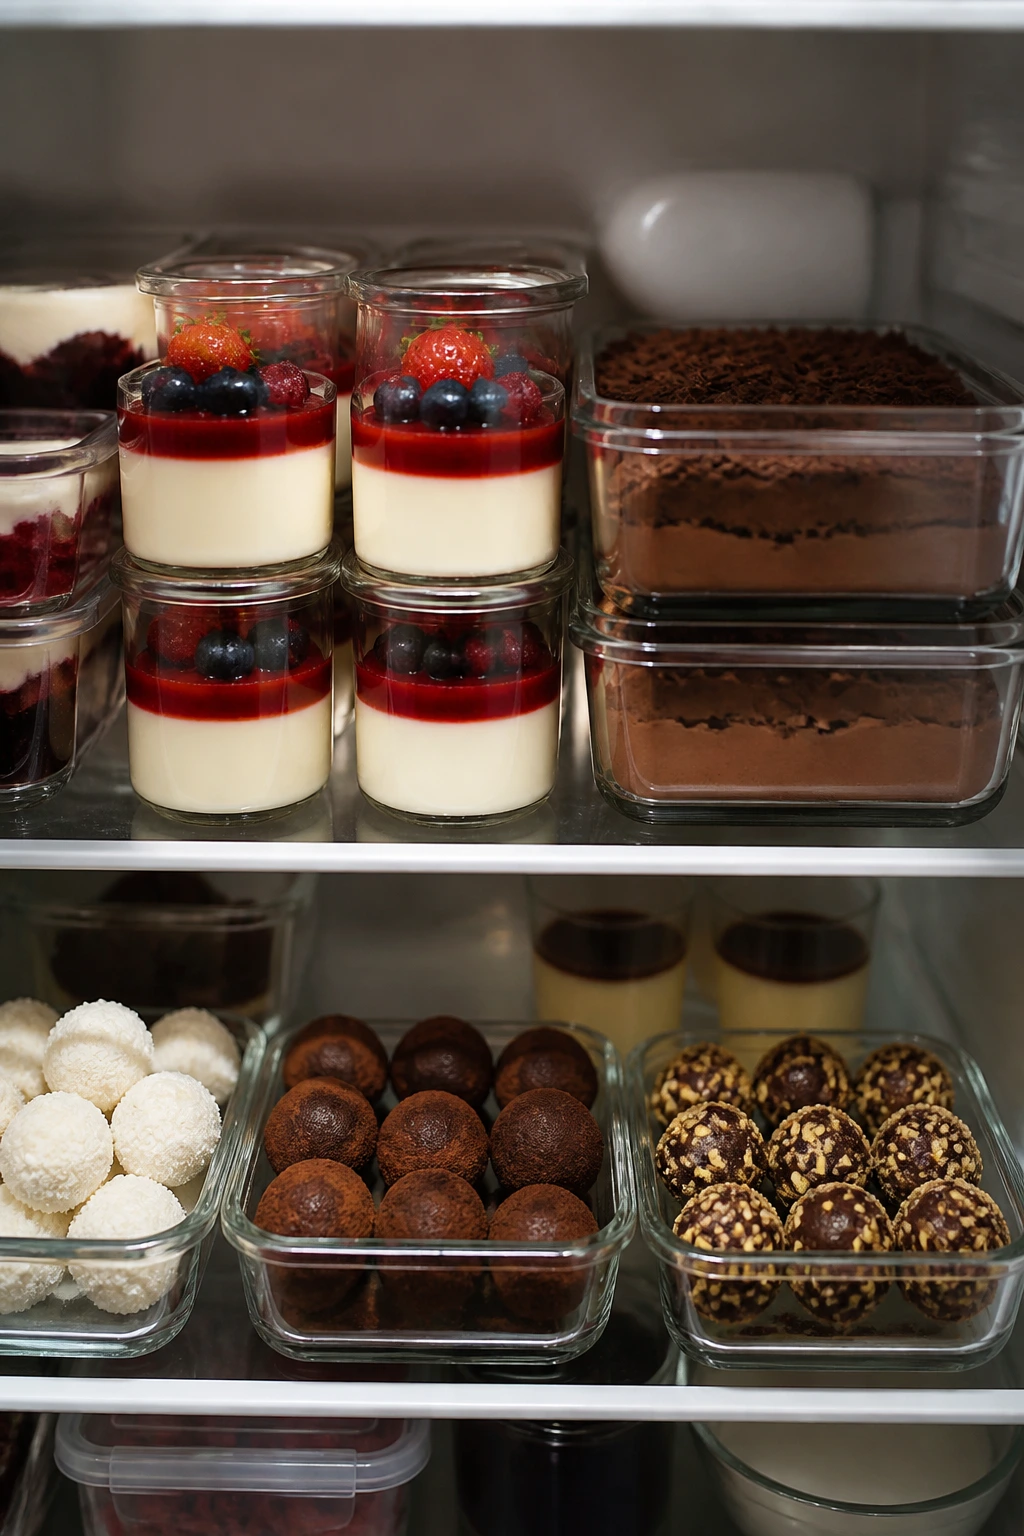
A lot of these desserts actually improve when they get a little time to settle. Macarons, cheesecake bars, tiramisu cups, panna cotta, pots de crème, mousse, and truffles are all friendly to advance prep. In the fridge, most cream-based desserts keep well for 3 to 4 days, covered tightly so they don’t pick up fridge smells. Tart shells and baked cookies can last longer, but the fillings are what set the timeline.
If you’re freezing, think in terms of components. Unfilled macaron shells freeze well for about 1 month in an airtight container, and so do many cookie doughs, tart shells, and cake layers. Truffles freeze cleanly too, though it’s best to coat them after thawing if you want a neat finish. Creamy desserts like panna cotta and custards usually do not love the freezer; the texture can turn grainy once thawed.
Fruit desserts need a little judgment. Poached pears keep in syrup in the fridge for 3 days. Clafoutis and fruit tarts are best the day they’re made, but they’ll still taste good the next day if you keep them covered and chill them promptly. Anything with fresh whipped cream softens over time, so if you can hold back the cream until the last minute, do it.
Reheating is mostly about restraint. Warm galettes, hand pies, and scones in a 300°F (150°C) oven for 8 to 10 minutes so the pastry crisps back up. Don’t microwave them unless you’ve made peace with limp pastry. Desserts with custard, mousse, and gelatin should be served cold and not reheated at all. When in doubt, rewarm the pastry, not the filling.
Variations and Adaptations to Try
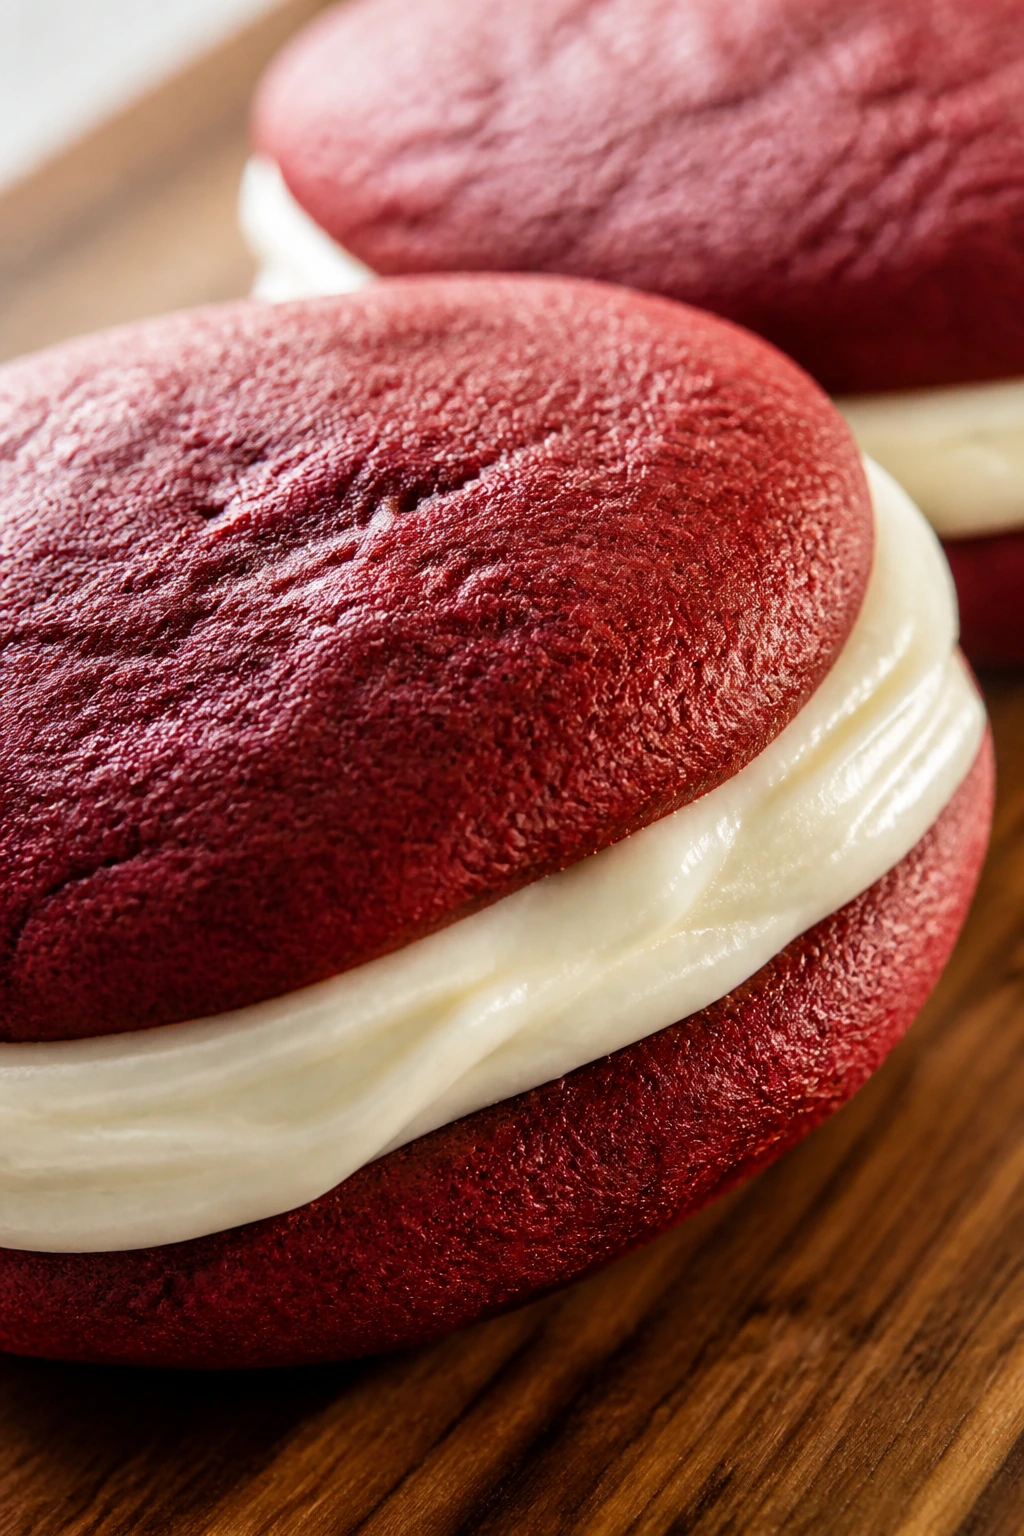
The Berry-First Swap: If strawberries are the default in half your dessert tray, switch some of them for raspberries, blackberries, or cherries. The color gets deeper, and the flavor usually sharpens in a good way. This works especially well in tartlets, parfaits, mousse cups, and galettes.
The Citrus Lift: Add lemon, lime, blood orange, or orange zest to cream fillings, glazes, and curds. A teaspoon or two is enough to make the dessert feel brighter and less heavy. That’s useful for anything with white chocolate, cheesecake, or whipped cream.
The Almond Path: Almond flour, almond extract, sliced almonds, and frangipane all help build that bakery look. This variation fits shortbread, tartlets, financiers, Bakewell-style desserts, and fruit cakes. The flavor reads as warm, not loud.
The Dairy-Free Lane: Coconut milk, coconut cream, sorbet, granita, poached fruit, and dark chocolate truffles offer a lot of room for swaps. You can also use coconut whipped cream on some fruit desserts if you want the soft finish without dairy. Just keep an eye on sweetness, since coconut can lean rich fast.
The Grown-Up Finish: A little liqueur goes a long way. Coffee liqueur in tiramisu, champagne in jellies or granita, bourbon in caramel, or a splash of rum in poached fruit can make a dessert feel more dressed up. Keep the amount modest so the alcohol supports the flavor instead of leading it.
Common Mistakes to Avoid
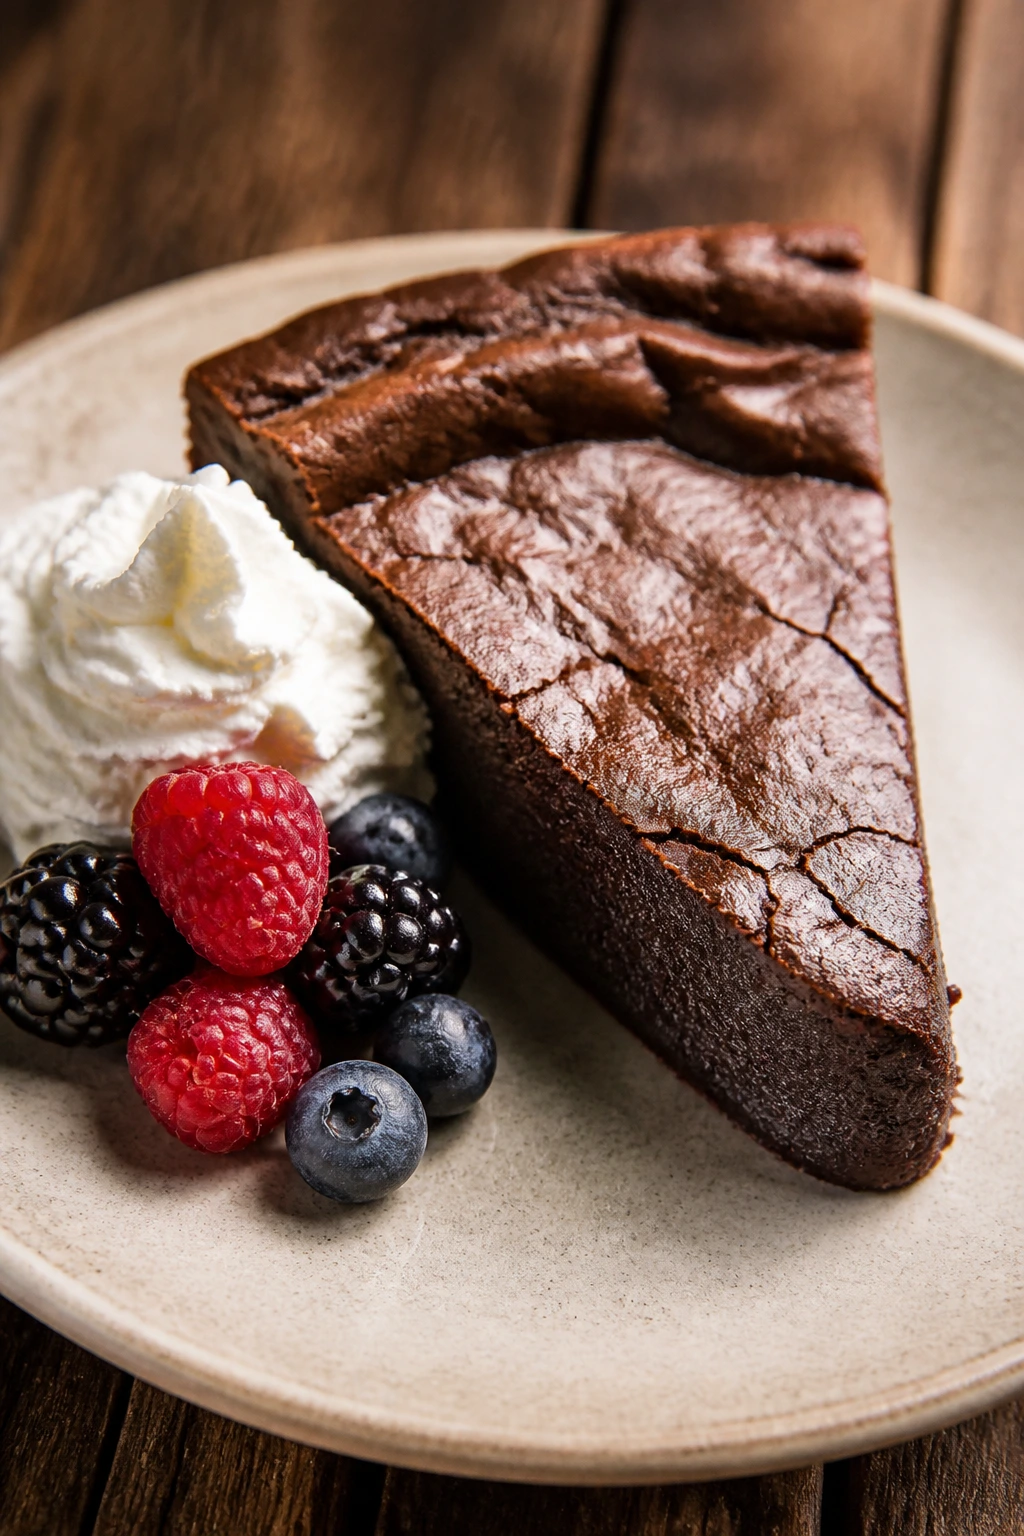
A pretty dessert can go sideways in the same few ways every time. The first mistake is rushing the chill time. Mousse, panna cotta, cheesecake bars, custards, and truffles all need time to set, and if you cut that short you end up with a spoonable mess instead of a neat serving. If a recipe says chill for 3 hours, give it 4 if you want cleaner edges.
The second mistake is adding wet fruit too early. Strawberries, raspberries, peaches, and cherries give off juice quickly, which is lovely in a sauce and annoying on a pastry shell. If you’re filling tartlets, stacking parfaits, or topping pavlovas, keep the fruit dry and add it close to serving. Macerated fruit has its place, but it is a different tool.
Overhandling is another sneaky problem. Meringue collapses when folded too hard. Cake rolls crack if you wait too long to roll them. Macaron batter turns flat if you stir it past the sweet spot. Shortbread becomes tough when you knead it like bread. Most of these desserts reward a light hand and a little patience.
Heat control trips people up too. Too hot, and chocolate seizes, custards scramble, pastry burns, or honey turns bitter. Too cool, and caramel won’t set, choux won’t puff, and meringue won’t dry. Use an oven thermometer if yours runs uneven, and do not guess when the recipe depends on a temperature window. Pretty desserts are often technical in boring, important ways.
Finally, don’t bury the decoration under clutter. If the dessert already has a clear shape — a rose tart, a jelly cup, a macaron, a glazed tartlet — give it one or two accents and stop. Too many garnishes blur the lines you worked to create.
Questions People Ask Before Making Romantic Desserts
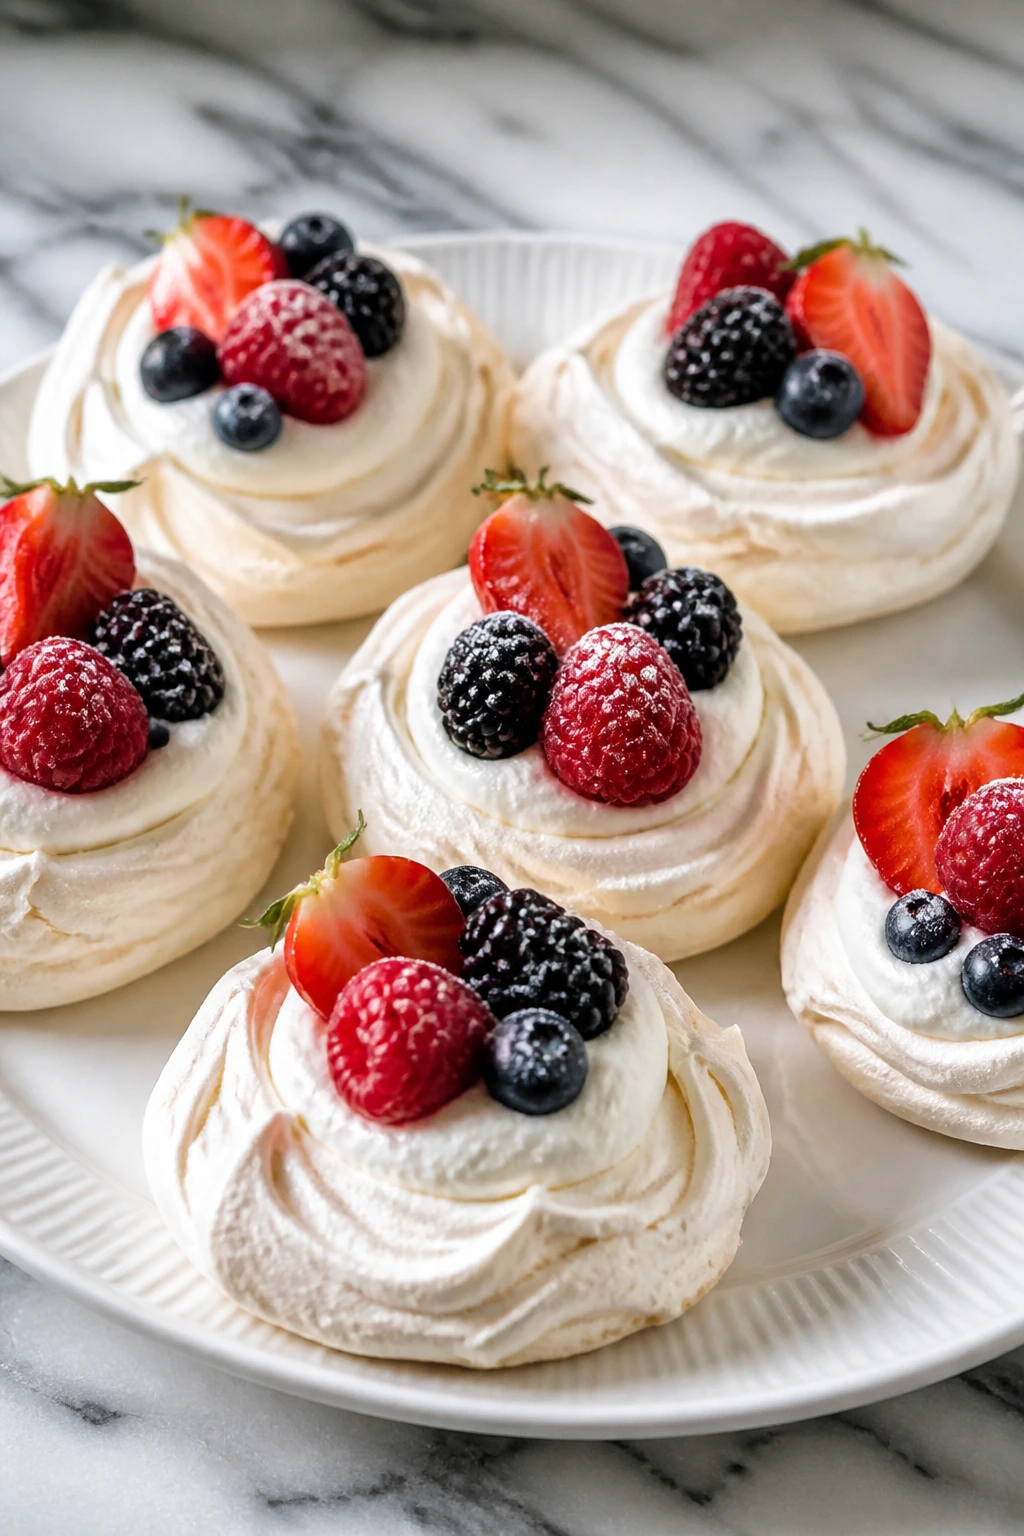
Can I make most of these desserts the day before?
Yes, and a good number of them are better that way. Cheesecake bars, panna cotta, pots de crème, mousse, truffles, tiramisu cups, and many cookies hold up well overnight. Just hold back fragile toppings like whipped cream, fresh berries, and sugar shells until the last minute.
What desserts here travel well for a dinner party?
Truffles, bars, cookies, tartlets, hand pies, financiers, and cheesecake bites are the safest bets. They keep their shape, don’t depend on last-minute torching, and can ride in a covered box. Anything with meringue, sorbet, or soft cream wants a shorter trip.
How do I make the desserts look pretty without using food dye?
Use the fruit and finishes you already have. Raspberry powder, blood orange, hibiscus, rosewater, pistachios, cocoa, and fresh berries give you plenty of color. A clean glaze, powdered sugar, or a simple fruit fan usually looks better than dye anyway.
What if my meringue cracks or weeps?
A few cracks are normal on pavlovas and nests. If they weep, the oven was probably too hot, the sugar wasn’t fully dissolved, or humidity got in the way. Keep the oven low, beat the sugar in slowly, and store meringue in a dry place until serving.
Can I use frozen fruit?
Yes, but treat it carefully. Frozen fruit works well in purees, sauces, jellies, and baked fillings, where extra juice is not a problem. For tartlets, pavlovas, and fresh toppings, thaw and drain the fruit well or the dessert turns sloppy.
How do I stop a tart shell from getting soggy?
Blind bake it until the shell is fully crisp, then cool it before adding filling. A thin layer of melted chocolate or almond flour under fruit can help create a moisture barrier. And if the filling is wet, fill close to serving.
What if I don’t have a kitchen torch?
For crème brûlée, use the broiler, but keep the ramekins close to the heat and watch them closely. For most of the other desserts, you do not need a torch at all. A good glaze, powdered sugar, or toasted garnish does the job just fine.
Which desserts are best if I want something for two?
Mini pavlovas, two tartlets, a small flourless torte, two parfait glasses, or a pair of poached pears all work beautifully for a smaller table. I’d also put the chocolate mousse and panna cotta high on that list because the portions are easy to scale down cleanly.
The Sweetest Kind of Theater
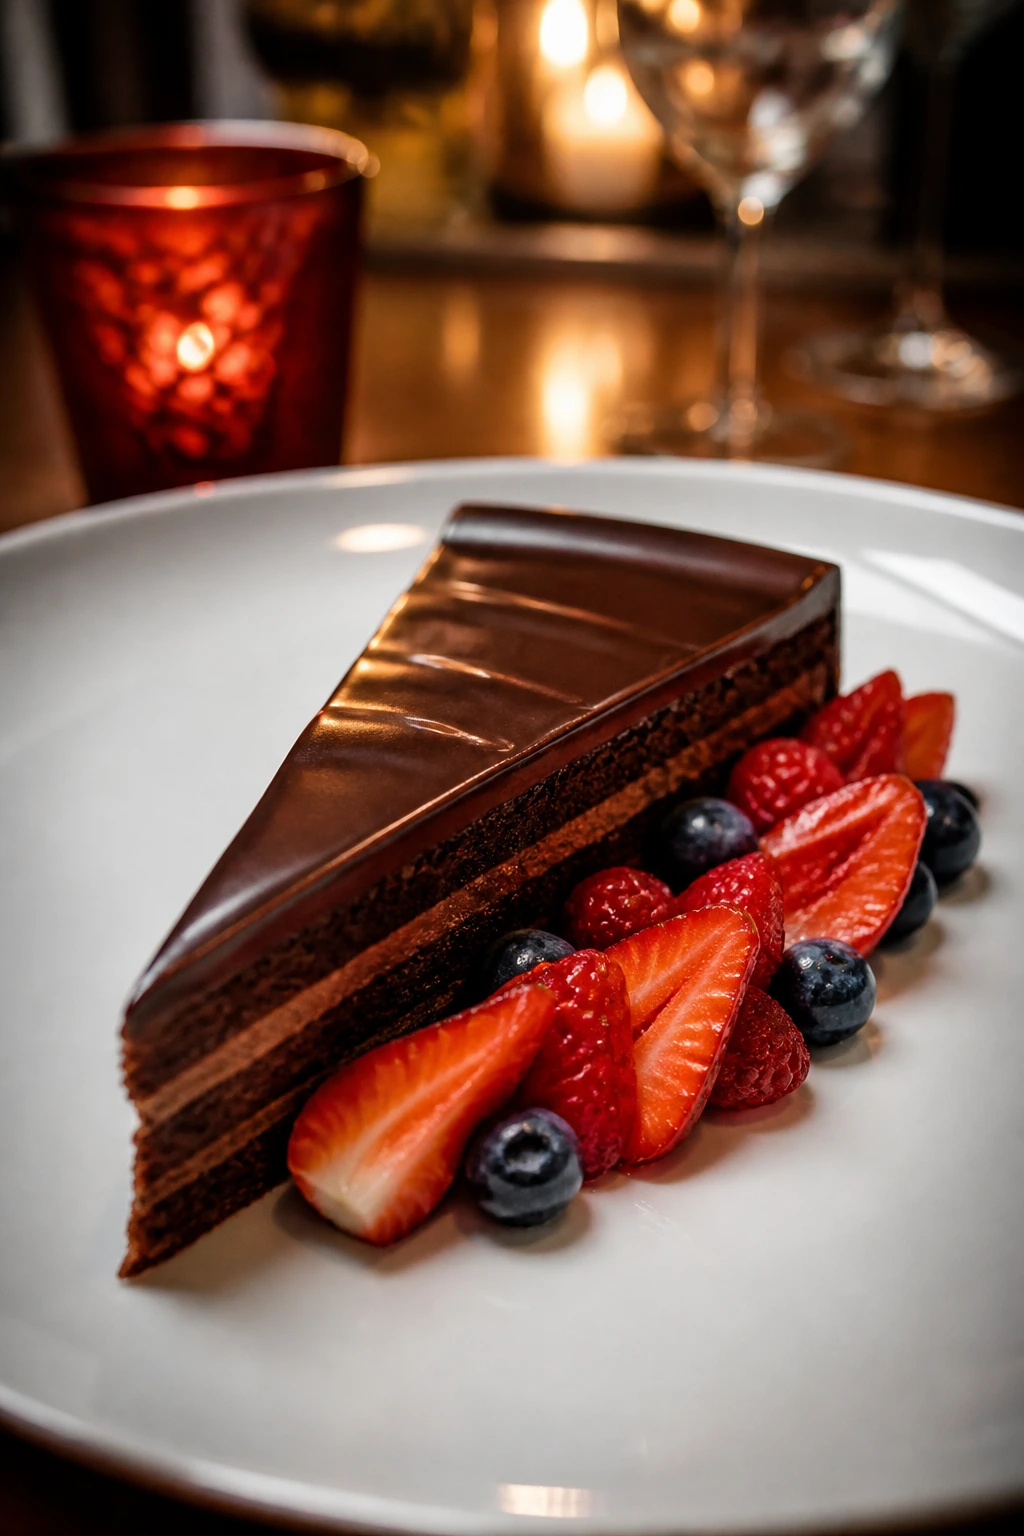
Romantic desserts work because they do two things at once: they taste good, and they make the table look cared for. That doesn’t mean they need to be complicated. A sharp slice of torte, a row of dipped strawberries, or a tartlet with fruit arranged in a clean fan can carry more charm than a dessert covered in extra decoration.
The smartest move is to pick the kind of dessert that fits your evening, then let the natural colors and textures do the rest. Some nights call for crisp pastry and berries. Some call for mousse, custard, or a neat little shell of chocolate. The nice part is that the whole collection gives you room to choose without losing the mood.
If you start with good fruit, real chocolate, and a little restraint, the plate takes care of itself.