
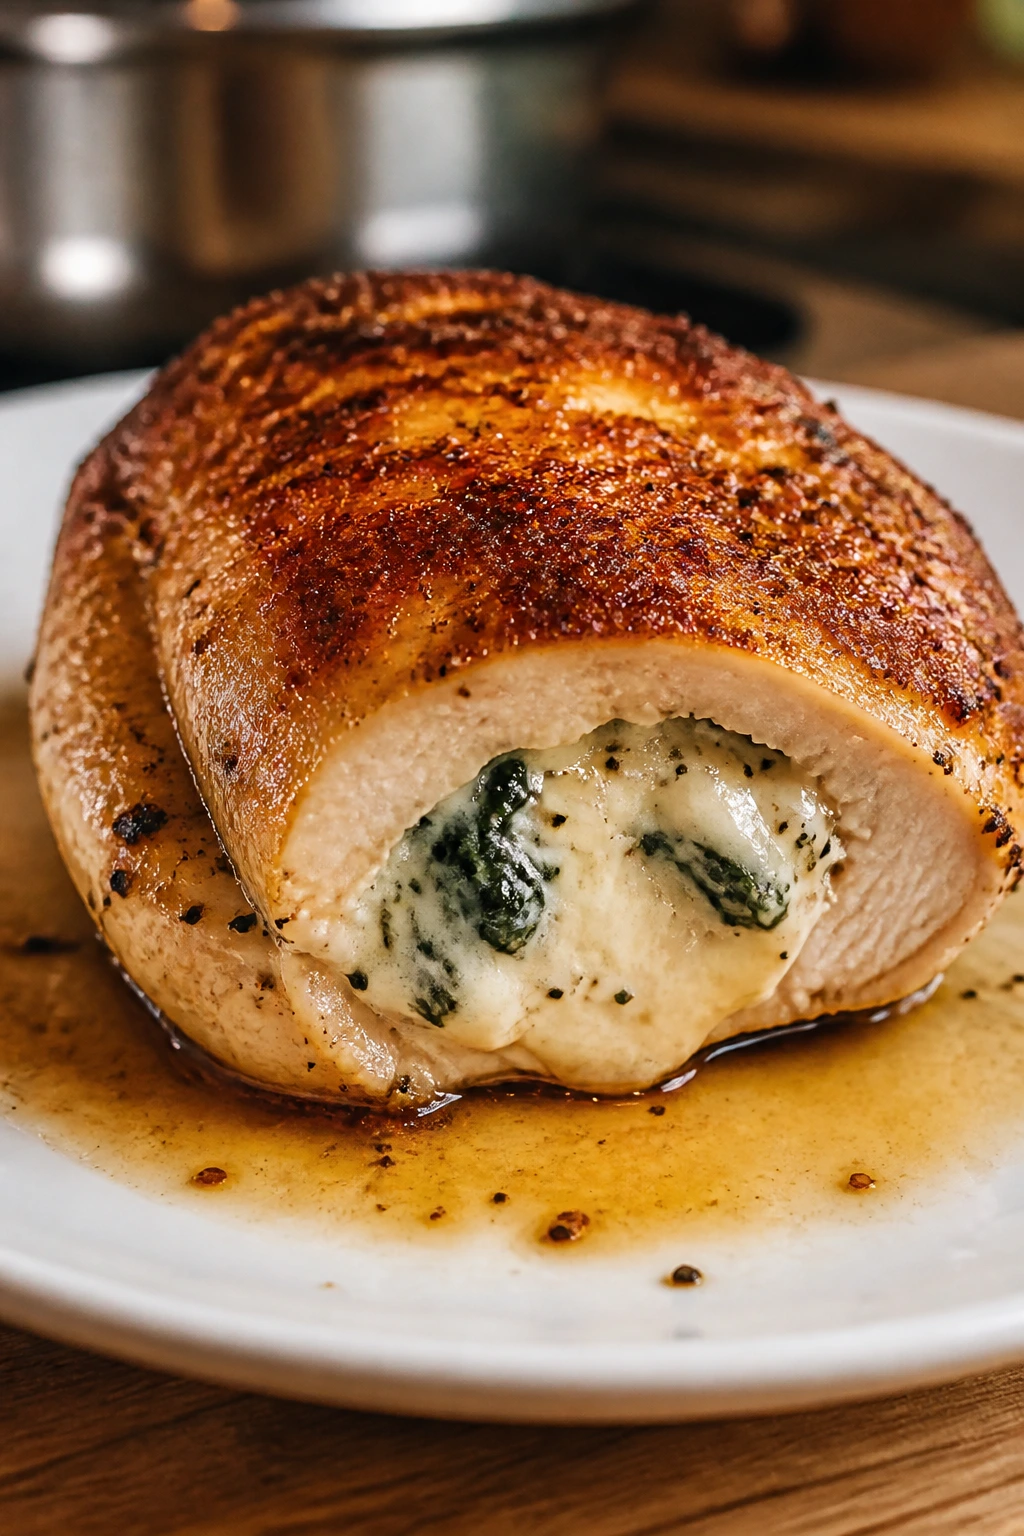
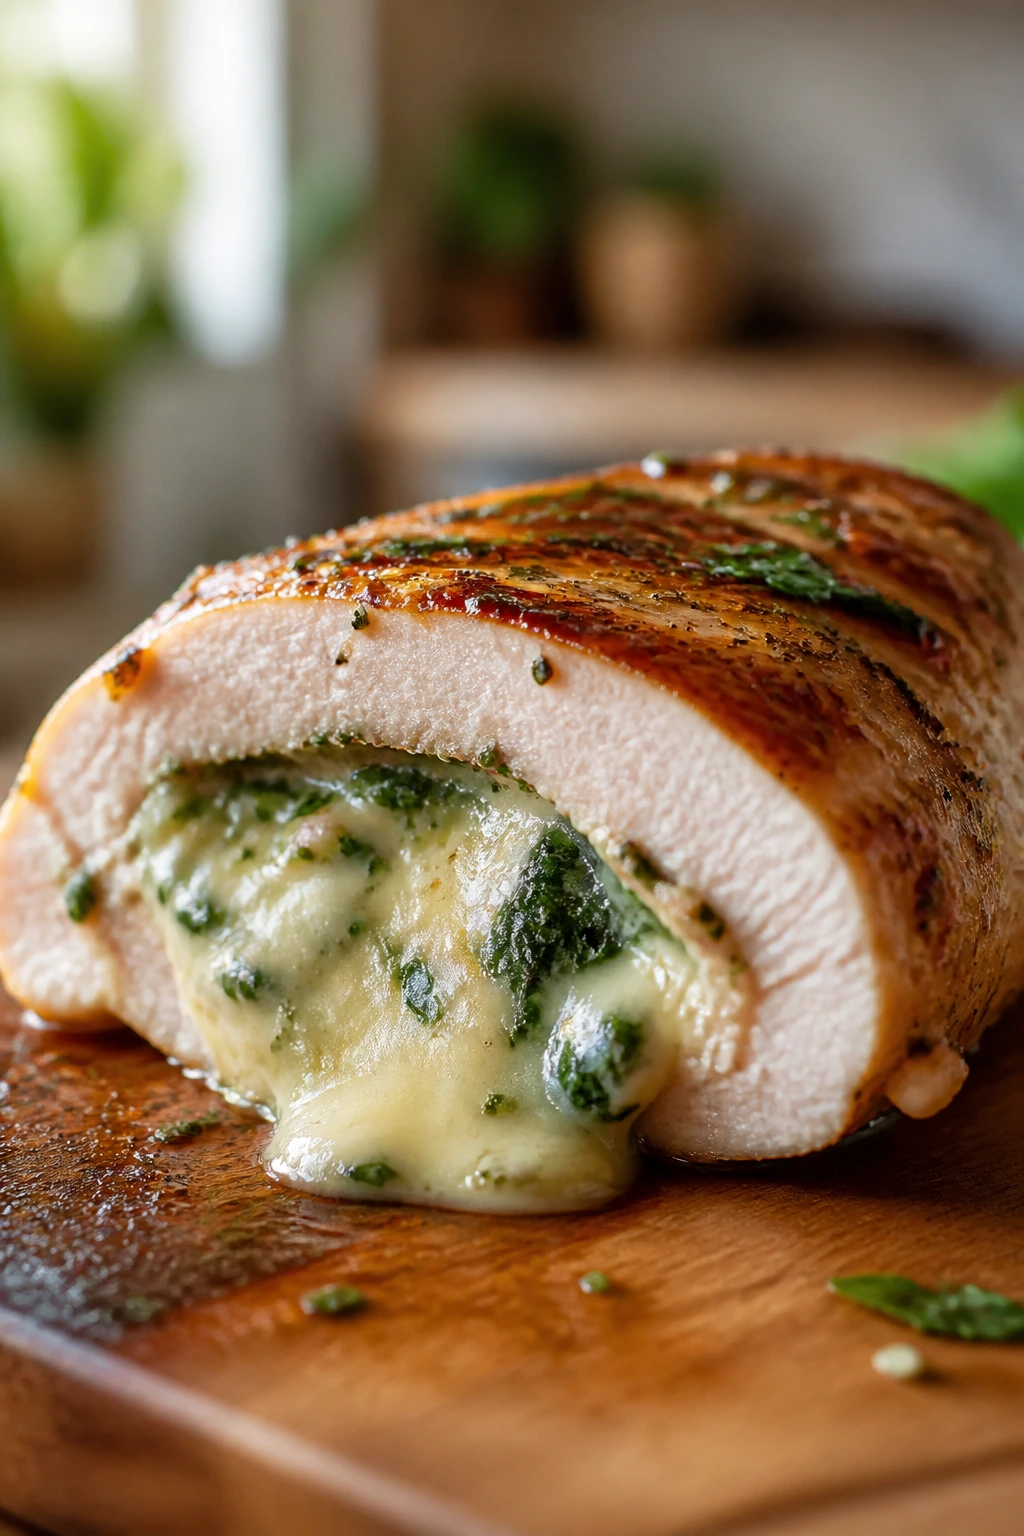
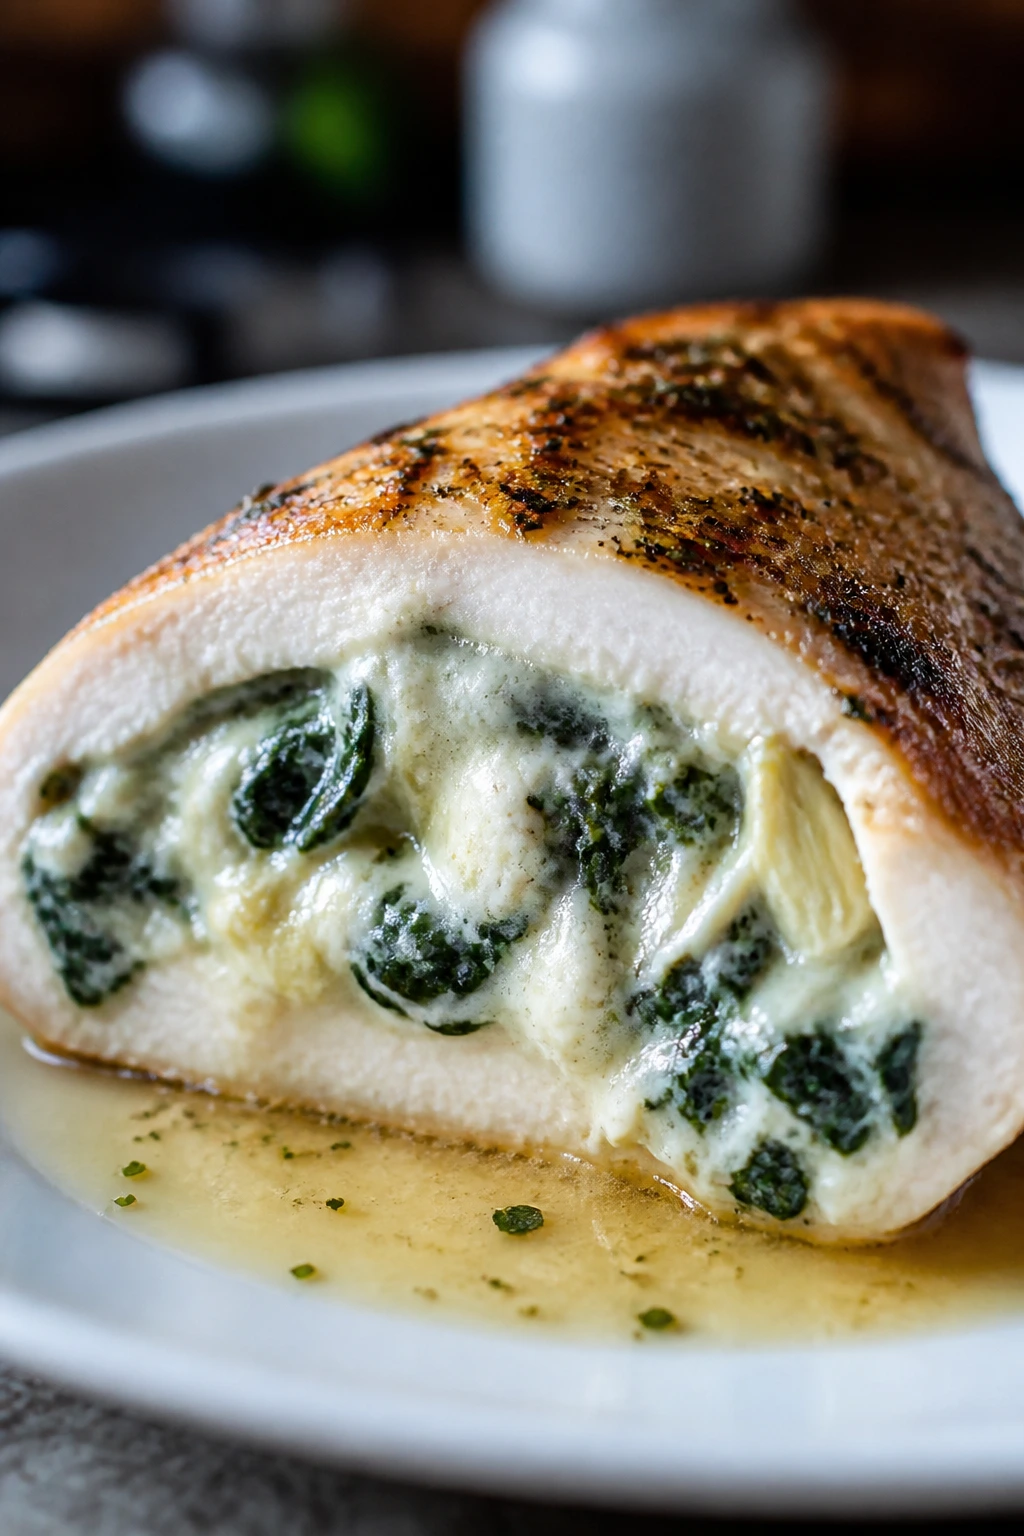
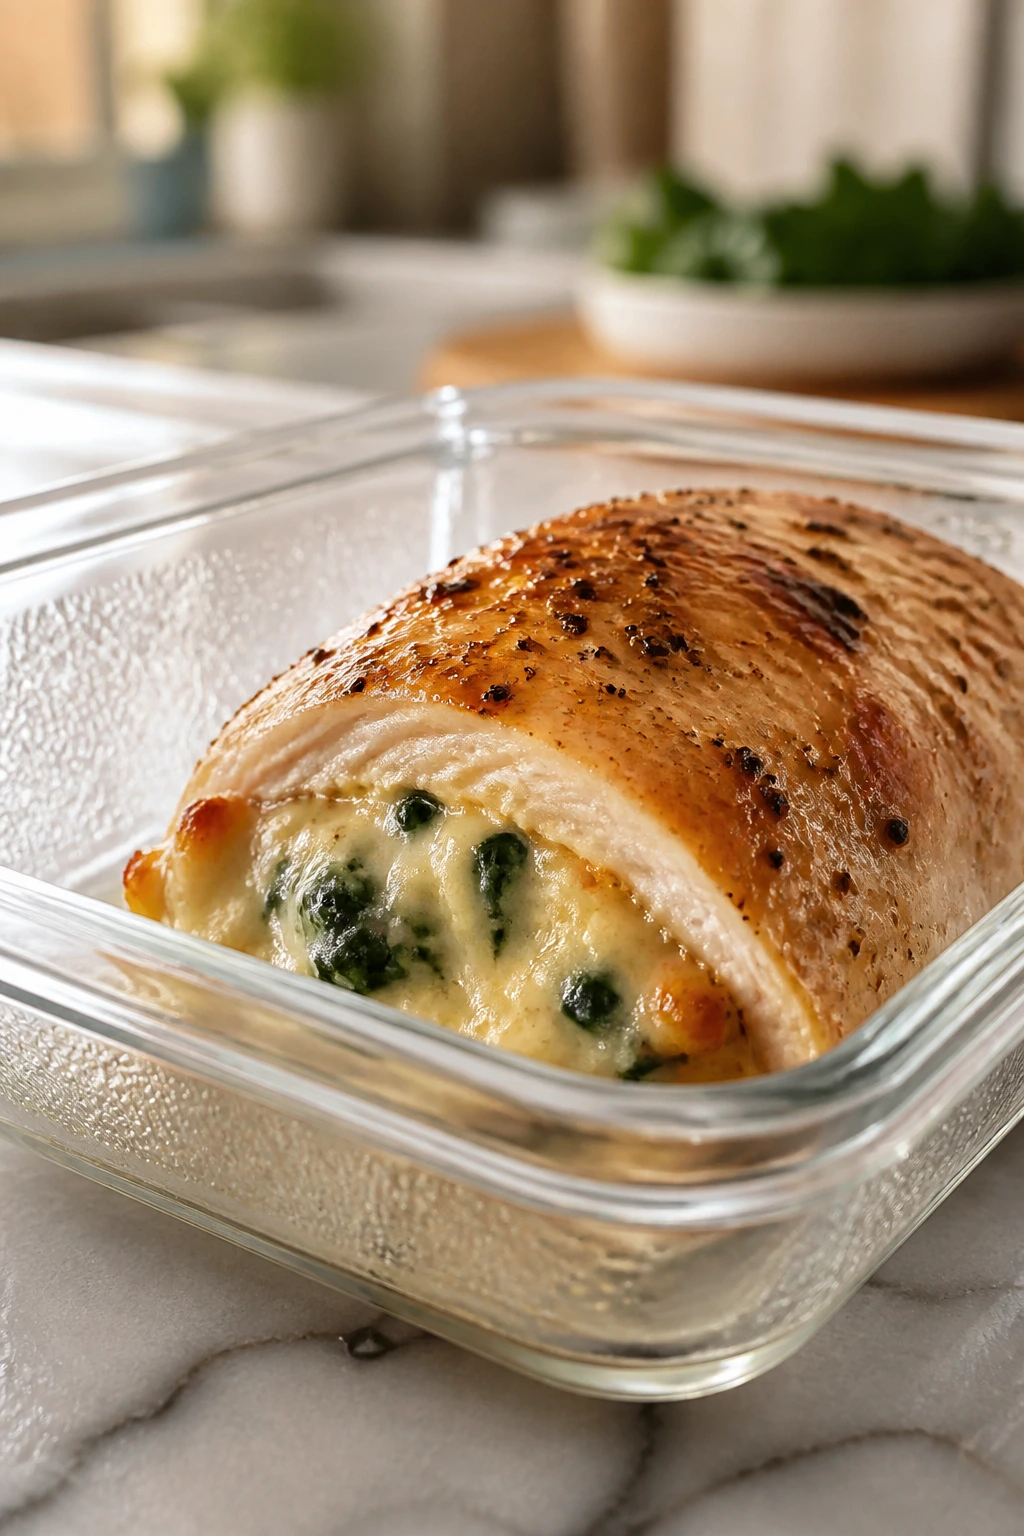
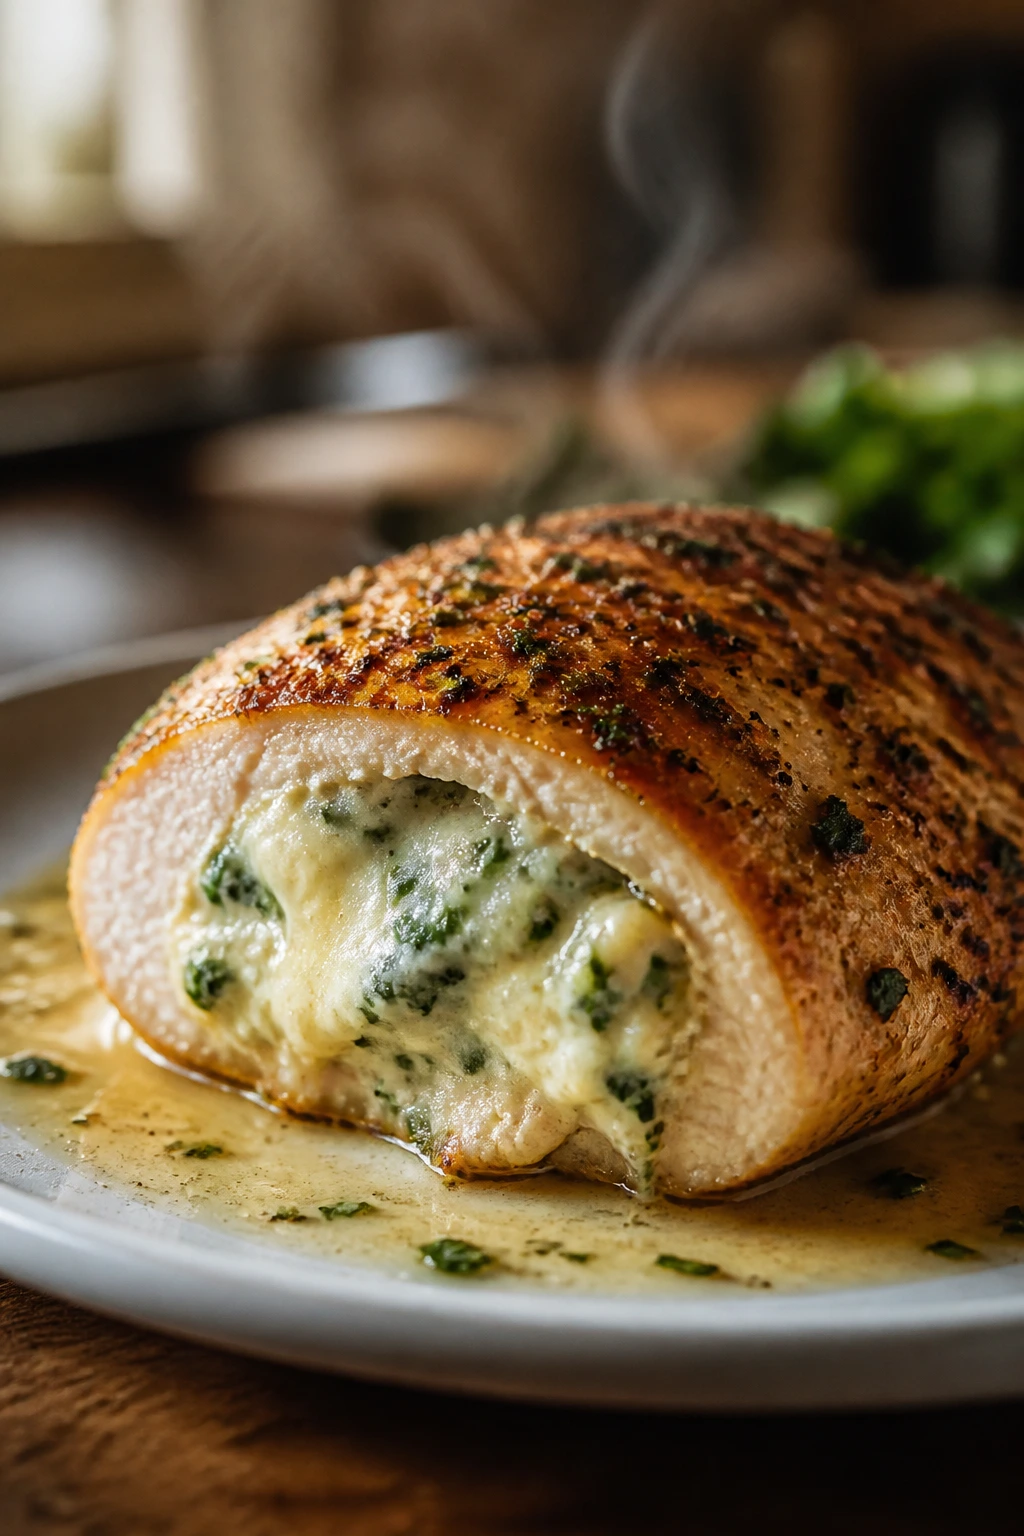
A chicken breast can look polished on the plate and still eat like cardboard if it’s cooked bare and left on its own. Stuff it with a creamy cheese filling, though, and the whole thing changes shape: the lean meat stays protected, the center turns soft and molten, and the browned edges give you enough savory bite to keep every forkful interesting. That’s the appeal of creamy cheese stuffed chicken breast for weeknight dinners. It gives plain chicken a center worth cutting into.
What I like about this style of dinner is that it does not ask for a long marinade, a fussy sauce, or a sink full of pans. A sharp knife, an oven-safe skillet, and a little discipline with the pocket cut are doing most of the work here. If your chicken breasts are uneven, that’s fine. If the filling looks too stiff at first, that’s fine too. The important part is keeping the filling thick enough to stay inside the meat and using heat that browns the outside before the cheese has a chance to leak everywhere.
There’s also a practical payoff that gets overlooked. Chicken breast is lean, so it punishes overcooking fast. The filling buys you insurance. The cream cheese and mozzarella melt into the center, the Parmesan adds salt and depth, and the hot pan drippings turn into a quick little sauce that makes the whole plate feel deliberate instead of thrown together.
Why Creamy Cheese Stuffed Chicken Breast Works on a Busy Night
-
The filling solves the dryness problem: Lean chicken breast dries out quickly when it’s cooked flat and naked; a cheese center gives you a pocket of moisture that keeps the slices tender even if the oven runs a little hot.
-
You get two textures in one bite: The seared outside brings savory browning, while the middle stays soft and creamy, so the dish never feels one-note.
-
It uses ordinary grocery-store ingredients: Cream cheese, mozzarella, Parmesan, and chicken broth are easy to find, and none of them need special handling beyond softening the cream cheese.
-
The method is repeatable: Once you know how deep to cut the pocket and how much filling to use, the rest is just seasoning, searing, and checking the temperature.
-
It scales cleanly: Two breasts or six, the rhythm stays the same, which makes it practical for a quiet dinner or a bigger family meal.
-
Leftovers still make sense: Sliced cold over greens, reheated gently with rice, or tucked into a lunch box, the chicken keeps its shape better than many sauced dinners.
Yield, Timing, and the Shape of the Finished Plate
Yield: Serves 4
Prep Time: 20 minutes
Cook Time: 25 minutes
Total Time: 45 minutes active + 5 minutes resting
Difficulty: Intermediate — the steps themselves are straightforward, but pocket-cutting, stuffing, and searing take a little care.
Chill/Rest Time: 5 minutes resting after baking; optional 10 to 15 minutes chilling after stuffing helps the filling stay put
Best Served: Hot from the oven, after the juices have settled and the cheese is soft rather than flowing
What Goes Into the Chicken and the Filling
For the Chicken
- 4 boneless, skinless chicken breasts, 6 to 8 ounces each
- 1 teaspoon kosher salt
- 1/2 teaspoon black pepper
- 1 teaspoon garlic powder
- 1 teaspoon paprika
- 1 tablespoon olive oil
For the Creamy Cheese Filling
- 4 ounces cream cheese, softened to room temperature
- 1 cup shredded mozzarella
- 1/4 cup grated Parmesan
- 1 small garlic clove, minced very fine
- 1 tablespoon chopped fresh parsley, plus more for serving
- 1 teaspoon lemon zest
- 1/4 teaspoon kosher salt
- 1/8 teaspoon red pepper flakes, optional
For the Pan Finish
- 1/2 cup chicken broth
- 1 tablespoon unsalted butter
- 1 teaspoon lemon juice
What Each Ingredient Is Doing in the Bite
Chicken Breasts
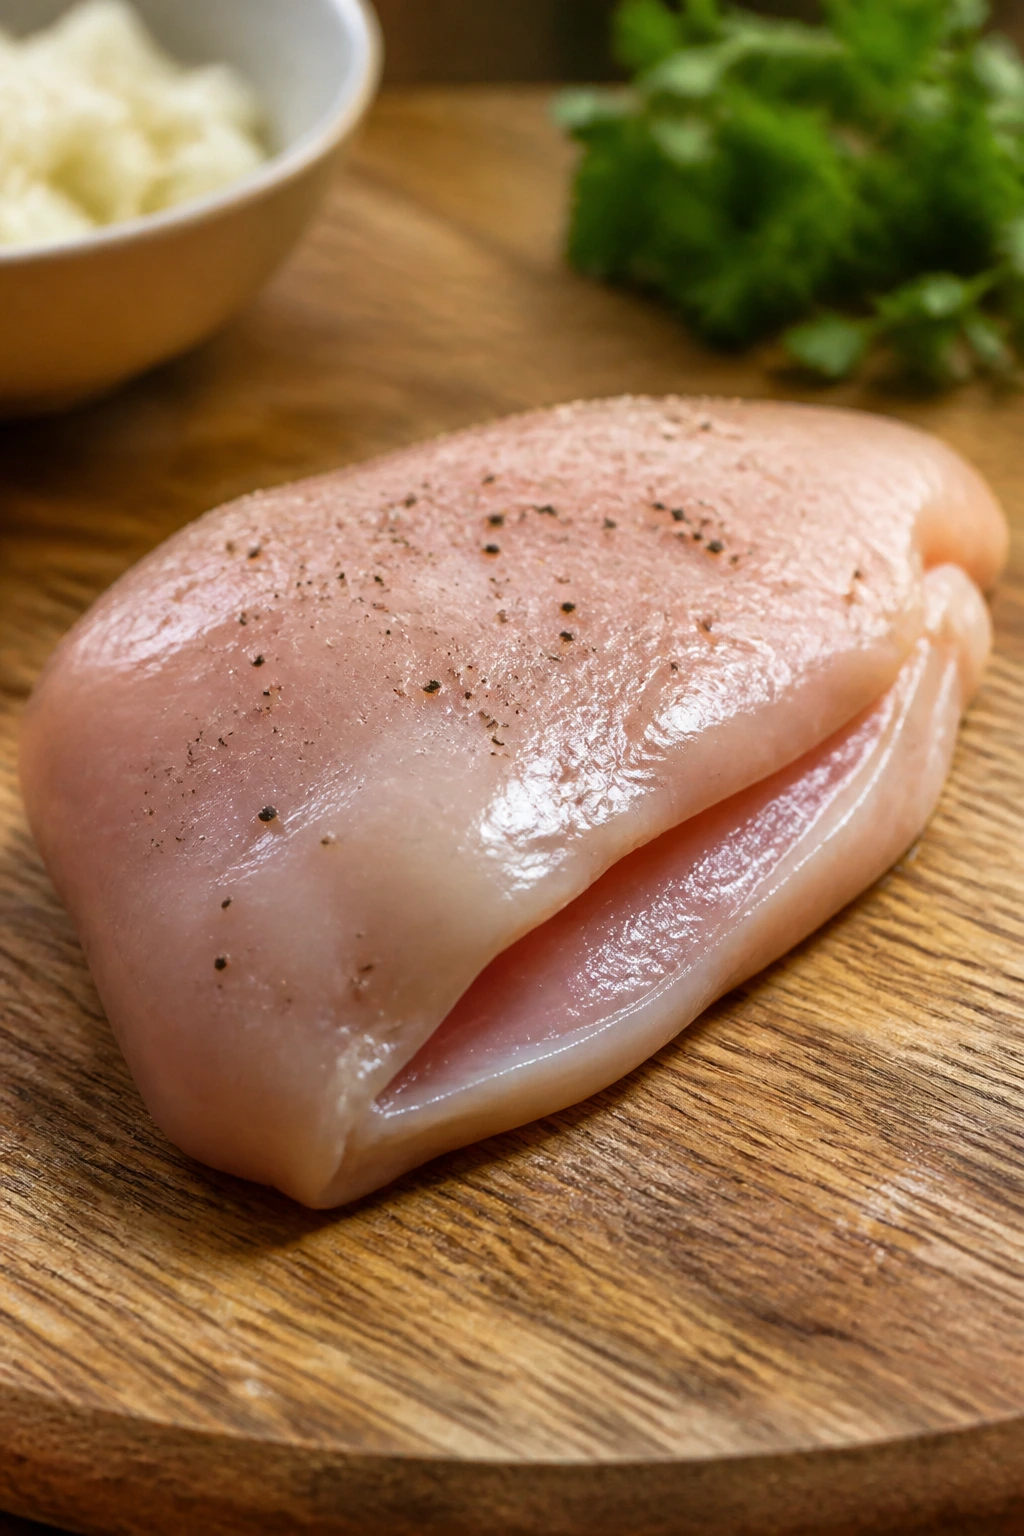
What to use: Four boneless, skinless chicken breasts that weigh about 6 to 8 ounces each. Bigger pieces can be used, but once they start drifting past 10 ounces they get awkward to stuff cleanly and tend to cook unevenly.
Preparation: Pat the breasts dry, then cut a pocket into the thick side with a sharp paring knife or boning knife. Stop about 1/2 inch from the far edge so the filling has a wall to sit against.
Substitutions: Boneless turkey cutlets can work with the same method, though they’re leaner and cook a touch faster. Thin pork loin can also be stuffed this way if you want a different flavor, but the timing shifts a little.
Tips: Buy breasts that look plump and even, not thin on one end and huge on the other. If the pack has a lot of liquid, drain it and dry the chicken again before seasoning.
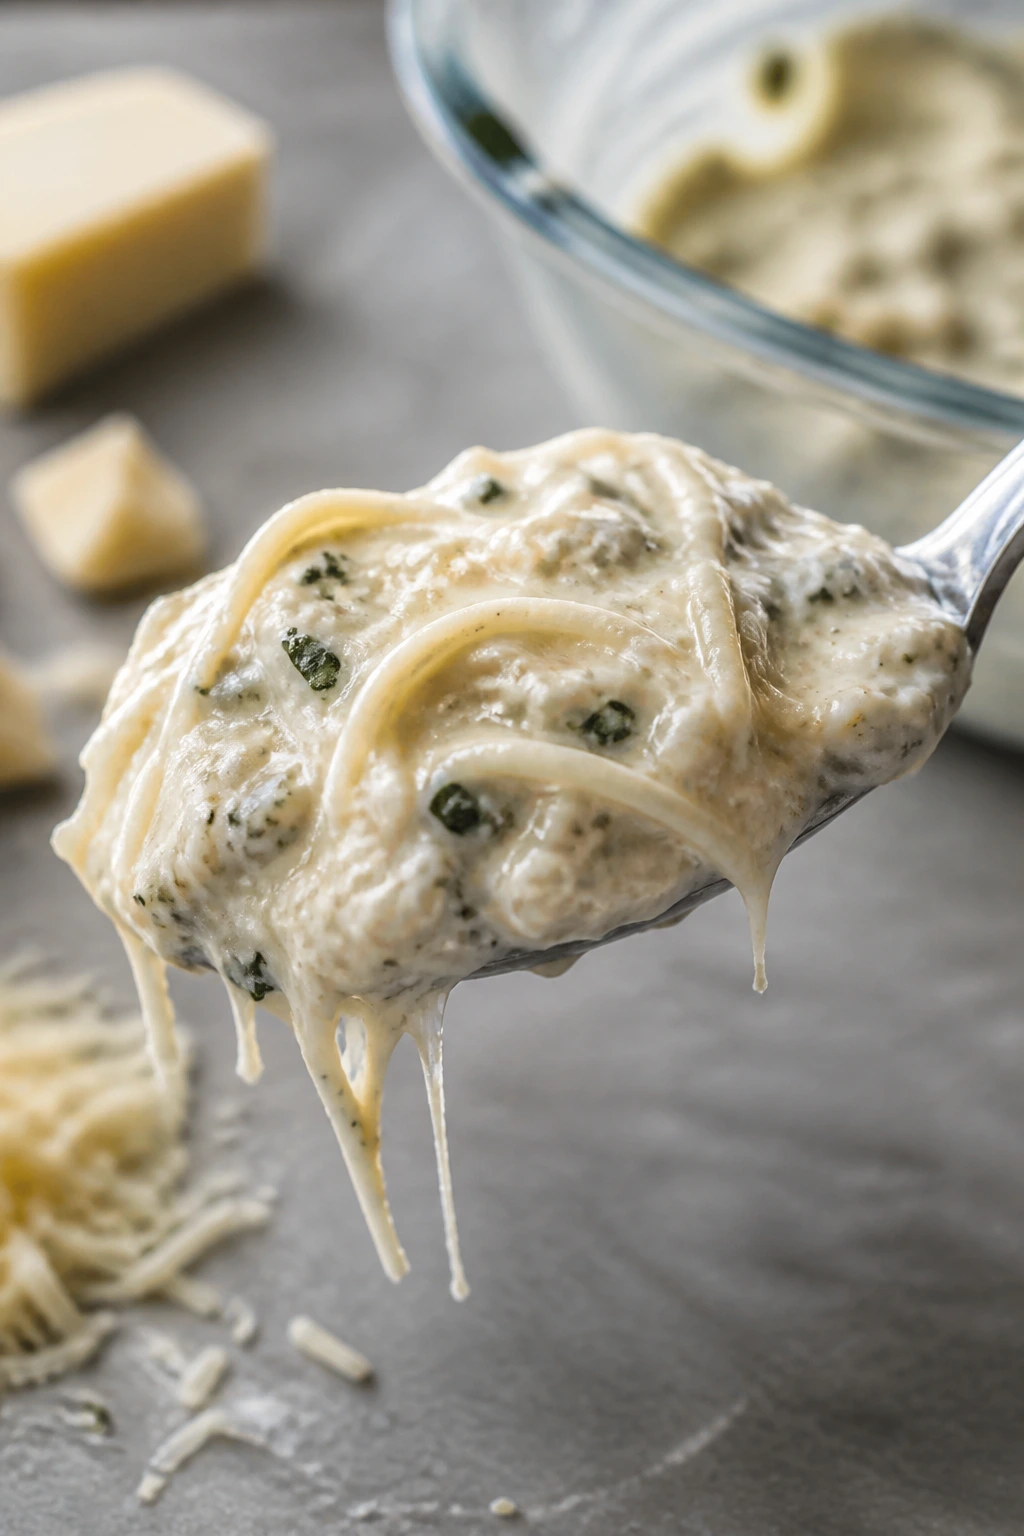
Creamy Cheese Filling
What to use: Four ounces of cream cheese, 1 cup shredded mozzarella, 1/4 cup Parmesan, garlic, parsley, lemon zest, salt, and a pinch of red pepper flakes if you want a little edge.
Preparation: Let the cream cheese soften fully so it mixes smoothly with the other cheeses. Stir the filling until it holds its shape on a spoon; if it looks loose, chill it for 10 minutes.
Substitutions: Neufchâtel gives a lighter filling with the same basic texture. Fontina or provolone can stand in for mozzarella if you want a deeper melt and a slightly less stretchy center.
Tips: Use low-moisture mozzarella here. Fresh mozzarella is wetter and can make the filling leak instead of stay thick and creamy.
Seasoning and Pan Finish
What to use: Kosher salt, black pepper, garlic powder, paprika, olive oil, chicken broth, butter, and a little lemon juice to finish the pan juices.
Preparation: Mix the dry seasonings before you touch the chicken so the coating goes on evenly. Keep the broth ready before you start searing; once the chicken is browned, the pan moves fast.
Substitutions: Low-sodium broth gives you more control over seasoning. If you don’t have lemon juice, a tiny splash of white wine vinegar can brighten the sauce without making it taste sharp.
Tips: The paprika is there for more than color. It gives the crust a warmer, roasted flavor that helps the outside taste intentional instead of just browned.
Parsley, Lemon, and the Final Lift
What to use: Fresh parsley and lemon zest in the filling, then a little more parsley and lemon juice at the end.
Preparation: Chop the parsley finely so it disappears into the cheese instead of sitting in clumps. Zest the lemon before you cut it.
Substitutions: Chives, dill, or basil can replace the parsley if that’s what you have. Lemon zest can be swapped for a tiny pinch of dried herb and a few drops more juice, but the bright citrus note does help cut the richness.
Tips: These finishing ingredients are small on paper and loud on the plate. Skip them, and the dish leans heavy in a hurry.
The Tools That Make Stuffing Less Messy
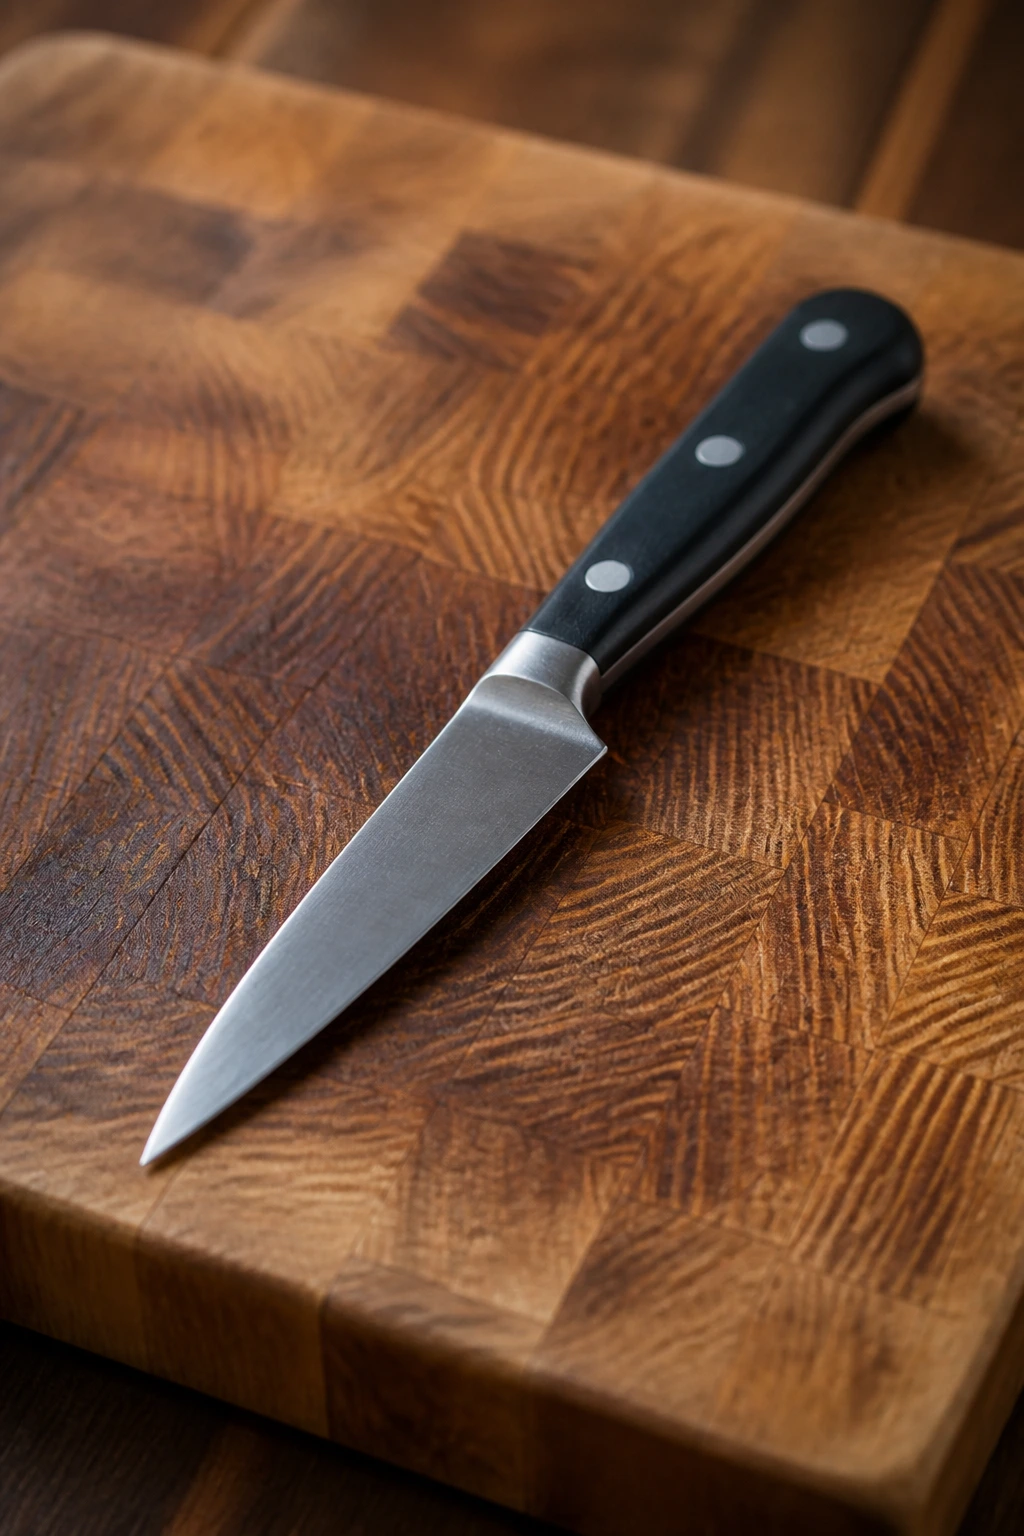
- Sharp paring knife or boning knife: You need a narrow blade for cutting a clean pocket without tearing through the side.
- Cutting board with a damp towel underneath: That little trick keeps the board from skating while you work.
- Medium mixing bowl: Big enough to mash the filling without sending cream cheese up the sides.
- Oven-safe 12-inch skillet or cast-iron pan: This lets you sear and finish in one pan, which means better flavor and fewer dishes.
- Instant-read thermometer: The easiest way to know the thickest part has reached 165°F without slicing the chicken open too early.
- Toothpicks: Keep the filling inside while the chicken sears and bakes.
- Tongs: Useful for flipping the chicken without squeezing out the filling.
- Small spoon or butter knife: Helpful for packing the filling into the pocket without tearing the meat.
Stuff, Sear, and Bake Without Losing the Filling
Make the Filling
-
In a medium bowl, combine the softened cream cheese, mozzarella, Parmesan, minced garlic, parsley, lemon zest, kosher salt, and red pepper flakes if using. Stir until the mixture is thick, smooth, and evenly blended. It should look like a spoonable paste, not a runny dip.
-
If the filling feels too soft to hold its shape, slide the bowl into the refrigerator for 10 minutes. Do not skip this if your kitchen is warm; a firmer filling stays inside the chicken much better during searing.
Prep the Chicken
-
Pat the chicken breasts dry with paper towels, then season all over with the salt, pepper, garlic powder, and paprika. Use your fingers to press the seasoning into the surface so it doesn’t fall off in the pan.
-
Cut a deep pocket into the thick side of each breast, stopping about 1/2 inch before you reach the opposite edge and ends. Do not slice all the way through. You want a pocket, not a split breast.
-
Spoon about 3 to 4 tablespoons of filling into each pocket. Press the opening closed gently, then secure each breast with 2 or 3 toothpicks placed parallel to the cut so the filling has less room to escape.
Sear and Finish
-
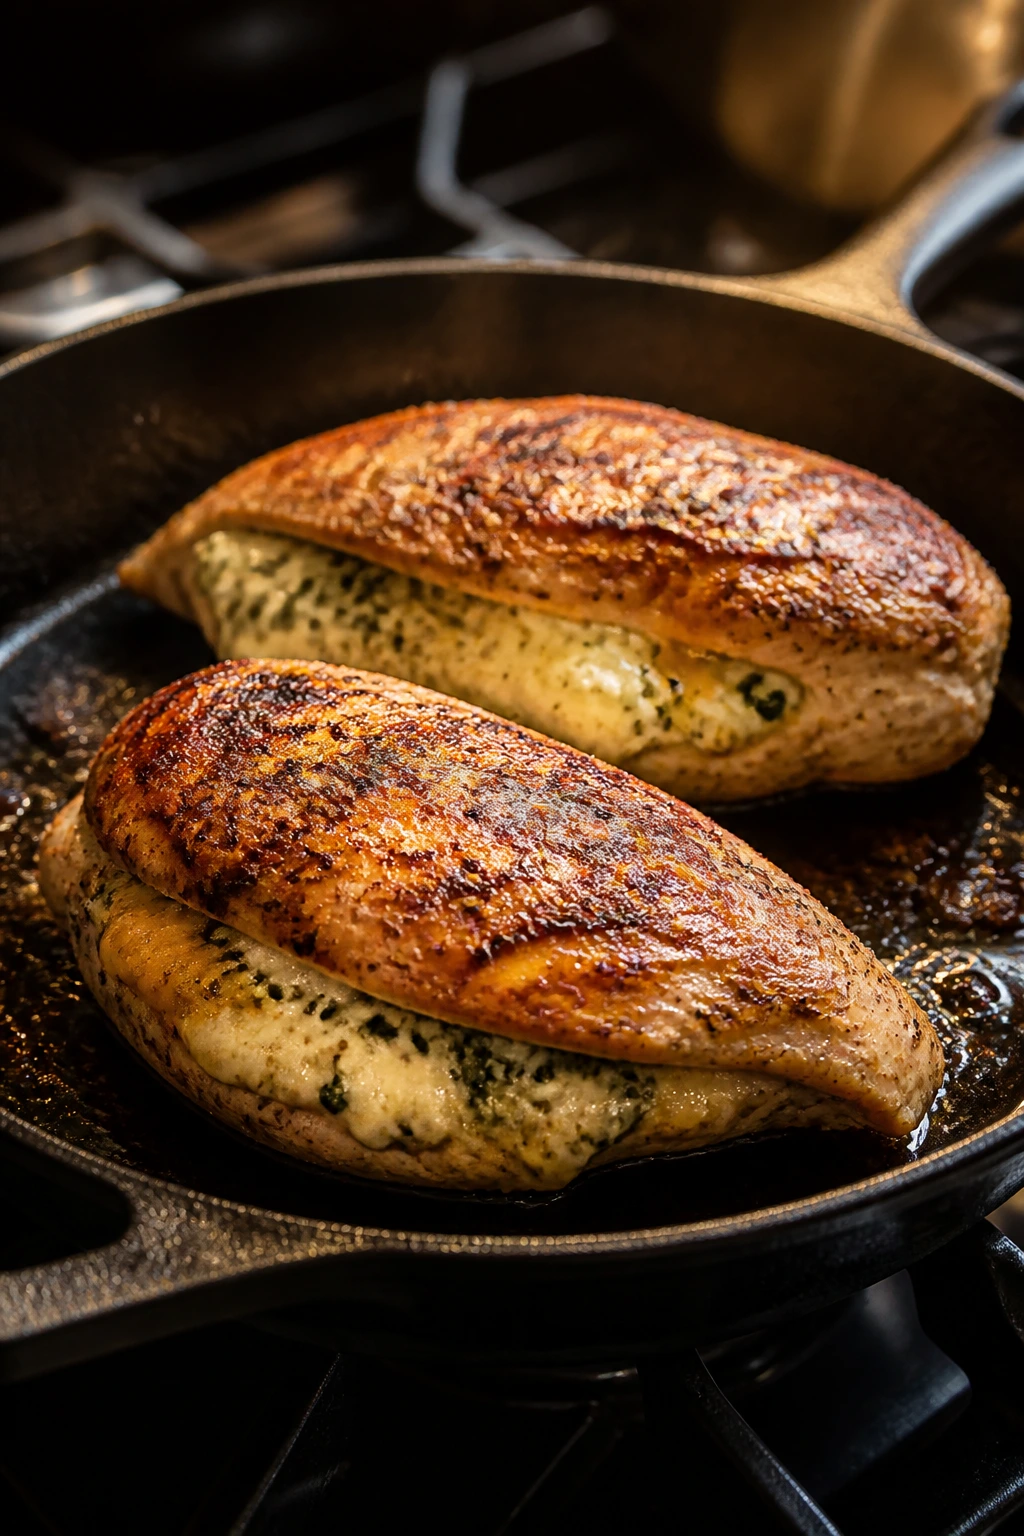
Preheat the oven to 400°F (200°C). Heat the olive oil in an oven-safe skillet over medium-high heat until it shimmers. Lay the chicken seam-side away from you into the pan and sear for 3 to 4 minutes per side, until the outside is deep golden brown. The chicken will not be cooked through yet. That’s fine.
-
Add the chicken broth and butter to the skillet, scraping up the browned bits from the bottom with a wooden spoon. If your skillet is not oven-safe, transfer the chicken to a baking dish first and pour the broth and butter around the chicken, not over the top.
-
Move the skillet to the oven and bake for 12 to 15 minutes, until the thickest part of the chicken reaches 165°F and the juices run clear. The cheese should be hot and soft, with a little melting at the opening of each pocket.
-
Remove the chicken from the oven and let it rest for 5 minutes before taking out the toothpicks. Finish with lemon juice and extra parsley, then spoon the pan juices around the plate or over the top.
How to Serve It So the Cheese Stays the Star
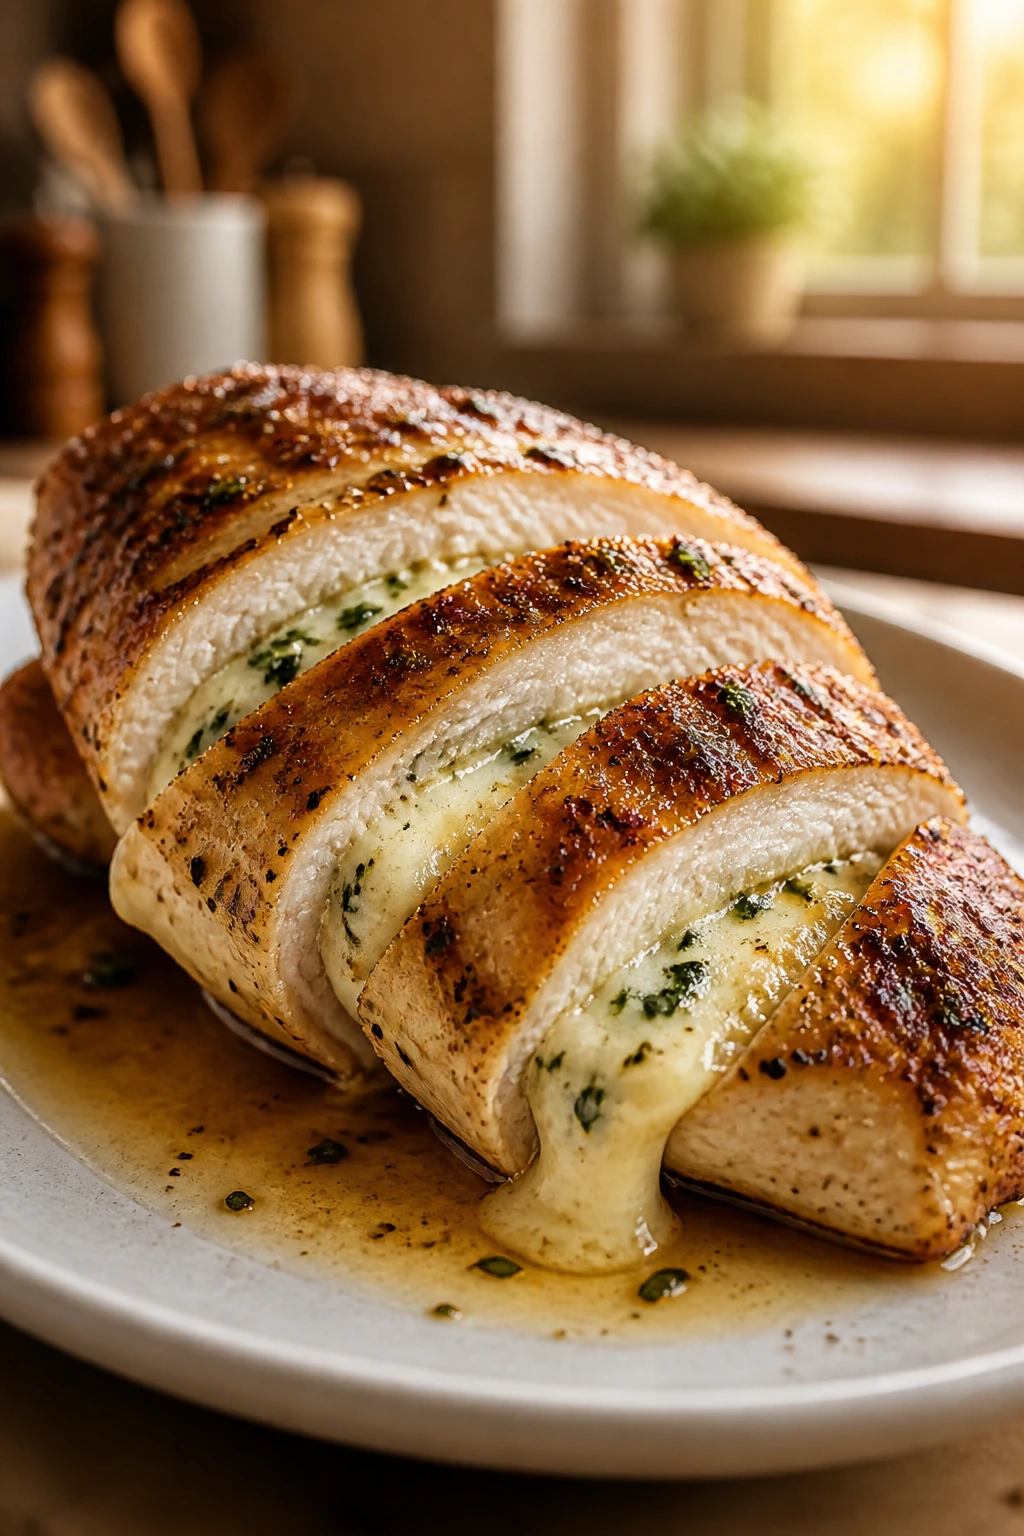
Presentation: Slice each breast on a slight diagonal after resting, not immediately out of the oven. A few clean slices on the plate show off the filling, and a spoonful of the pan juices around the chicken makes the whole thing look richer without hiding the browned surface.
Accompaniments: Mashed potatoes are the obvious move, and I’m not going to pretend otherwise. Buttered rice, roasted broccoli, green beans, or a crisp salad with lemon dressing all make sense too. The best side dishes here are the ones that catch the little pool of broth and butter under the chicken.
Portions: One stuffed breast is a full dinner for most people when you put it next to a starch and a vegetable. If the breasts are on the large side, cutting each one in half after resting makes for a cleaner plate and a more even serving size.
Beverage Pairing: A chilled Sauvignon Blanc, dry Riesling, or light Chardonnay works well because the acidity cuts through the cheese. If you want something nonalcoholic, sparkling water with lemon or unsweetened iced tea keeps the plate from feeling heavy.
Small Tweaks That Make the Chicken Juicier
Flavor Enhancement: A teaspoon of Dijon mustard in the filling gives the cheese a little bite and keeps the center from tasting flat. It does not make the dish mustardy; it just gives the filling a sharper edge.
Time-Saver: Mix the filling in the morning and keep it covered in the refrigerator. By dinner, it will be firmer and easier to spoon into the chicken, which cuts down on the mess.
Pro Move: Chill the stuffed chicken for 10 to 15 minutes before it hits the pan. That short rest helps the filling set, and the pocket is less likely to spring open when the chicken first touches the heat.
Cost-Saver: If the breasts are huge, cut them into two thinner portions instead of trying to cram a mountain of filling into one thick piece. You’ll get more even cooking and stretch the filling across more servings.
Better Browning: Dry the chicken again right before it goes into the skillet. Moisture on the surface turns the first minute of searing into steam, and steam is the enemy of a crisp, browned crust.
Common Mistakes That Ruin Creamy Cheese Stuffed Chicken Breast
-
Cutting the pocket too deep. If the knife goes all the way through the breast, the filling has nowhere to stay and starts leaking into the pan. Stop short of the far edge and leave a solid wall of meat.
-
Overstuffing the chicken. A pocket that’s packed to the rim looks generous for about 30 seconds, then starts pushing apart in the skillet. Three to four tablespoons per breast is the safe range for most 6- to 8-ounce pieces.
-
Starting with cold, wet chicken. Damp surface moisture blocks browning and can make the seasoning slide off. Pat the chicken dry and let it sit for a few minutes after seasoning so the surface loses that slick look.
-
Cooking only by color. Golden brown outside does not mean the center is ready. Use an instant-read thermometer and pull the chicken when the thickest part reaches 165°F, not when you think the filling has “looked done” long enough.
-
Skipping the rest. Slice too soon and the cheese runs out, the broth floods the cutting board, and the meat loses more juice than it needs to. Five minutes is enough to make the slices cleaner.
-
Using cream cheese that never softened. Cold cream cheese stays lumpy, tears the chicken when you stuff it, and leaves the filling patchy. Give it time to soften on the counter before mixing.
Flavor Swaps That Still Make Sense
Spinach-Artichoke Center
Add 1/2 cup chopped thawed spinach that has been squeezed nearly dry and 1/4 cup finely chopped artichoke hearts to the filling. The result tastes a little like the center of a spinach artichoke dip, but in a more structured, dinner-friendly form. If the spinach still feels damp, press it again in a clean kitchen towel before it goes in.
Bacon and Chive
Fold 2 slices of cooked bacon, crumbled very fine, and 1 tablespoon chopped chives into the cheese mixture. The bacon brings salt and smoke, so go a little lighter on the chicken seasoning if you use it. This version is especially good with baked potatoes because the flavors naturally line up.
Jalapeño Popper Style
Add 1 small jalapeño, seeded and minced very fine, plus an extra 2 tablespoons mozzarella. The pepper should be chopped small enough that it disperses through the filling instead of tearing the pocket when you bite into it. If you want more heat, leave in a few seeds; if you want only the flavor, scrape them out.
Mushroom and Thyme
Sauté 1/2 cup finely chopped mushrooms in a dry skillet until the moisture cooks off, then cool them and mix them into the filling with 1/2 teaspoon thyme. This gives the center a deeper, earthier flavor and makes the chicken feel a little less rich. It’s a smart choice if you’re serving mashed potatoes or buttered noodles alongside it.
Lighter Cheese Swap
Replace the cream cheese with Neufchâtel and use part-skim mozzarella. The filling will still be creamy, but it sets a touch firmer and feels a little lighter on the plate. Do not overfill the pockets with this version; the lower-fat filling moves around more when it heats up.
Keeping Leftovers Tender
Let the chicken cool for no more than 2 hours at room temperature, then move it to an airtight container. In the refrigerator, the cooked chicken keeps for 3 to 4 days. The filling stays safe inside that window, though the outer crust will soften a bit as it sits.
For freezing, wrap each cooked breast tightly in foil or parchment, then place the wrapped pieces in a freezer bag or container. They hold up for up to 2 months. I prefer freezing the cooked chicken rather than freezing it raw, because the cheese filling can turn grainy and leak more after thawing if it never got a chance to set in the oven.
Reheat leftovers in a 300°F (150°C) oven, covered loosely with foil, for 15 to 20 minutes or until the center reaches 165°F again. A splash of broth in the pan helps keep the chicken from drying out. If you’re using the microwave, go low and slow at 50% power in short bursts; full power makes the cheese separate and the chicken edge out into rubber.
The filling can be mixed up to 2 days ahead, and the chicken can be stuffed and refrigerated for up to 8 hours before cooking. Any longer than that, and the salt starts drawing moisture from the meat. If you want the cleanest sear, stuff the chicken, chill it briefly, and cook it the same day.
Questions Home Cooks Ask First

Can I use chicken thighs instead of chicken breasts?
Boneless thighs are harder to stuff cleanly because they’re smaller and less even in shape. If you want to use thighs, pound them thin, spread the filling on top, and roll them up instead of cutting a pocket.
Do I really need an oven-safe skillet?
No, but it makes the process cleaner because you can sear and bake in one pan. If your skillet won’t go in the oven, sear the chicken first, then move it to a baking dish and pour the broth and butter around it.
What cheese melts best in the filling?
Cream cheese gives the filling body, mozzarella gives stretch, and Parmesan gives salt. If you want to swap a cheese, fontina or provolone works well because both melt smoothly without turning watery.
How do I keep the filling from leaking out?
Don’t cut the pocket too deep, don’t overstuff it, and pin the opening with toothpicks. Searing seam-side away from you also helps the opening stay tucked instead of getting knocked open by the tongs.
Can I make this ahead of time for dinner later?
Yes. Mix the filling earlier in the day and stuff the chicken up to 8 hours before cooking. Keep the chicken covered in the refrigerator until you’re ready to sear and bake it.
What if the chicken is done but the cheese doesn’t look very melted?
That can happen if the filling was very cold to start. If the chicken has reached 165°F, the meat is done; let it rest for 5 minutes and the filling will soften more as the heat settles through the center.
Can I cook creamy cheese stuffed chicken breast in an air fryer?
Yes, if your air fryer basket is large enough to keep the breasts from touching. Cook at 375°F for about 14 to 18 minutes, depending on thickness, and check the center with a thermometer before serving.
What if my chicken breasts are different sizes?
Separate the biggest one into two thinner cutlets or lightly pound the thick end so the pieces finish at the same time. Mixed sizes are one of the quickest ways to end up with one dry breast and one underdone one.
A Chicken Dinner Worth Repeating
There are fancier chicken dinners, but most of them ask for more effort than they repay. This one earns its place because it gives you a crisp-edged outside, a soft cheese center, and a pan that makes its own sauce while dinner is finishing in the oven. That combination is hard to beat on a night when you want something that feels made, not assembled.
The nice part is how quickly the whole method settles into muscle memory. Cut a pocket. Mix the filling. Sear until brown. Bake until the thermometer says 165°F. After you’ve done it once, the rhythm stops feeling like a recipe and starts feeling like a habit worth keeping.
Creamy Cheese Stuffed Chicken Breast — Recipe Card
Recipe Name: Creamy Cheese Stuffed Chicken Breast
Description: Boneless chicken breasts are filled with a creamy mix of cream cheese, mozzarella, and Parmesan, then seared and baked until juicy. The pan juices turn into a quick sauce that keeps the plate from feeling heavy.
Prep Time: 20 minutes
Cook Time: 25 minutes
Total Time: 45 minutes active + 5 minutes resting
Course: Dinner, Main Course
Cuisine: American
Servings: 4 servings
Calories: About 460 kcal per serving
Ingredients
For the Chicken
- 4 boneless, skinless chicken breasts, 6 to 8 ounces each
- 1 teaspoon kosher salt
- 1/2 teaspoon black pepper
- 1 teaspoon garlic powder
- 1 teaspoon paprika
- 1 tablespoon olive oil
For the Creamy Cheese Filling
- 4 ounces cream cheese, softened to room temperature
- 1 cup shredded mozzarella
- 1/4 cup grated Parmesan
- 1 small garlic clove, minced very fine
- 1 tablespoon chopped fresh parsley, plus more for serving
- 1 teaspoon lemon zest
- 1/4 teaspoon kosher salt
- 1/8 teaspoon red pepper flakes, optional
For the Pan Finish
- 1/2 cup chicken broth
- 1 tablespoon unsalted butter
- 1 teaspoon lemon juice
Instructions
-
Mix the cream cheese, mozzarella, Parmesan, garlic, parsley, lemon zest, salt, and red pepper flakes until thick and smooth.
-
Pat the chicken dry, season all over with salt, pepper, garlic powder, and paprika, then cut a deep pocket into the thick side of each breast without slicing through.
-
Fill each pocket with about 3 to 4 tablespoons of cheese mixture and secure with toothpicks.
-
Heat the olive oil in an oven-safe skillet over medium-high heat and sear the chicken for 3 to 4 minutes per side until golden brown.
-
Add the chicken broth and butter, scrape up the browned bits, then transfer the skillet to a 400°F (200°C) oven and bake for 12 to 15 minutes, until the chicken reaches 165°F (74°C) in the thickest part.
-
Rest for 5 minutes, remove the toothpicks, finish with lemon juice and parsley, and serve with the pan juices.
Notes: Chill the filling for 10 minutes if it feels soft. Use an instant-read thermometer for the cleanest finish. If your skillet is not oven-safe, move the chicken to a baking dish after searing and pour the broth around it.