
Tuesday nights need a cheat code.
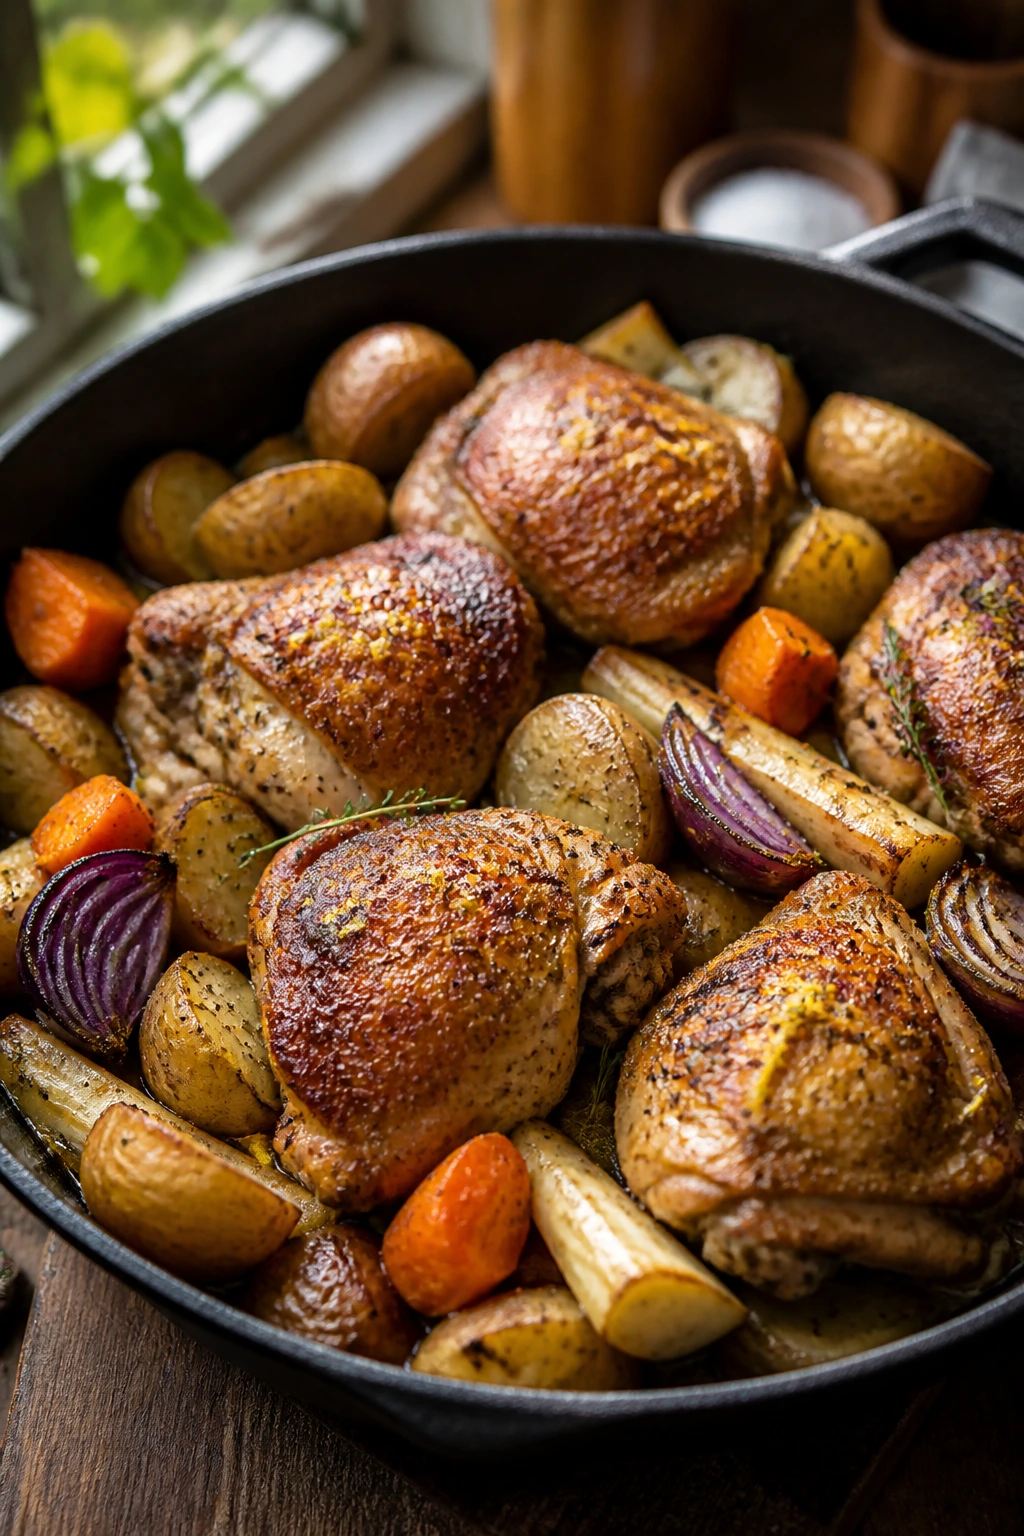
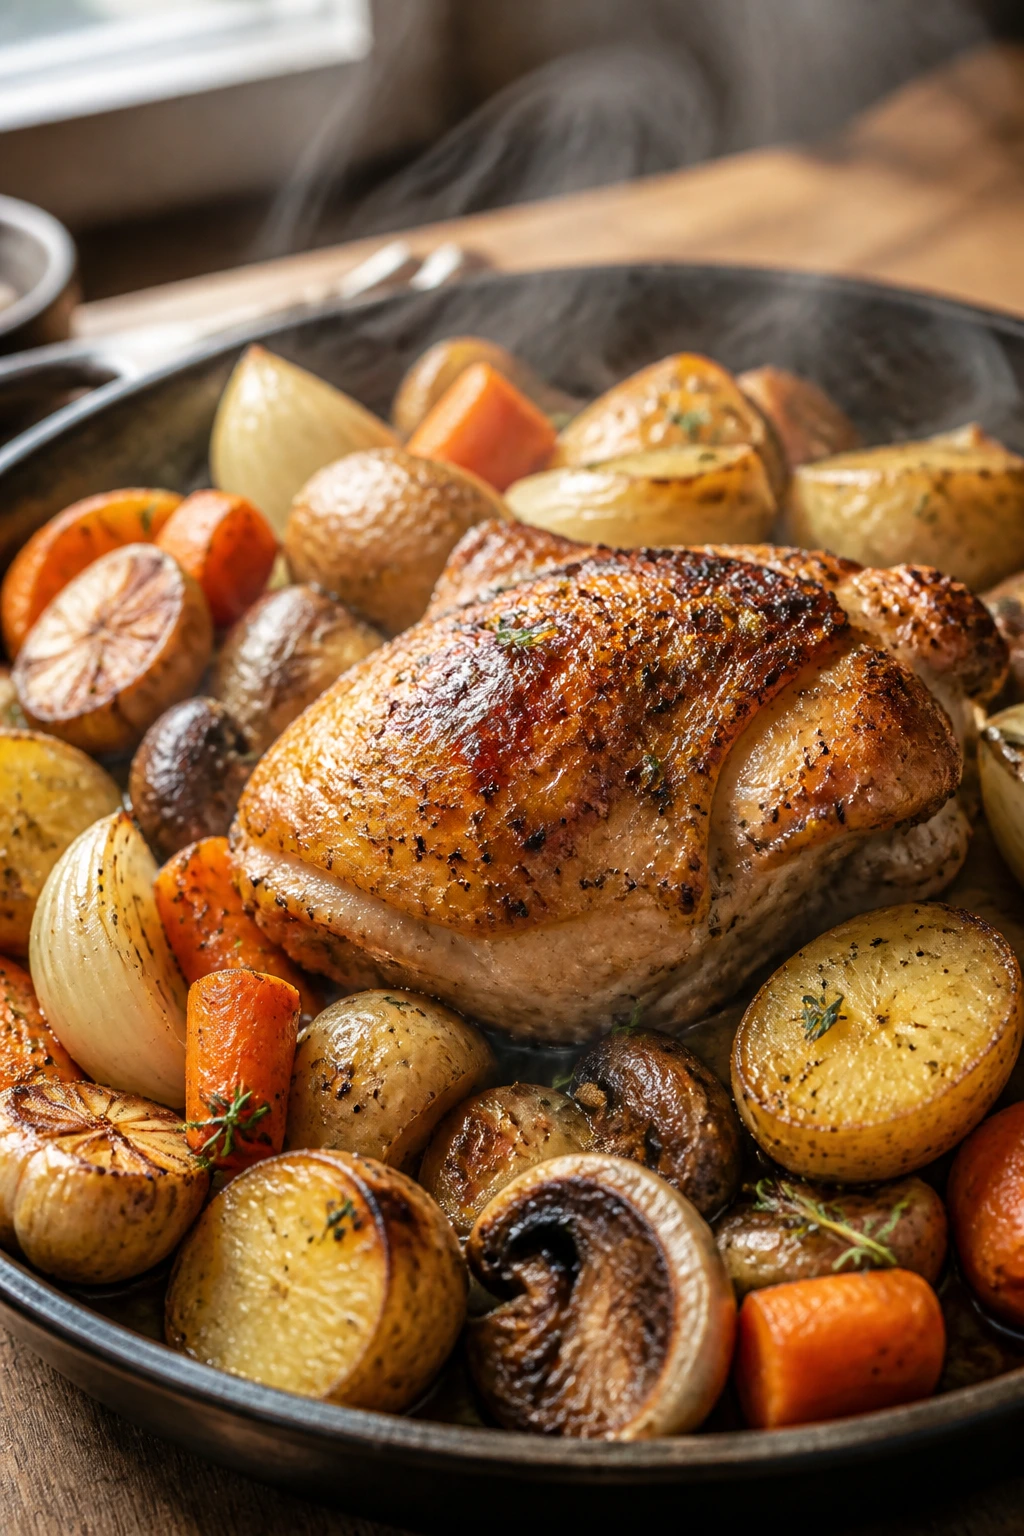
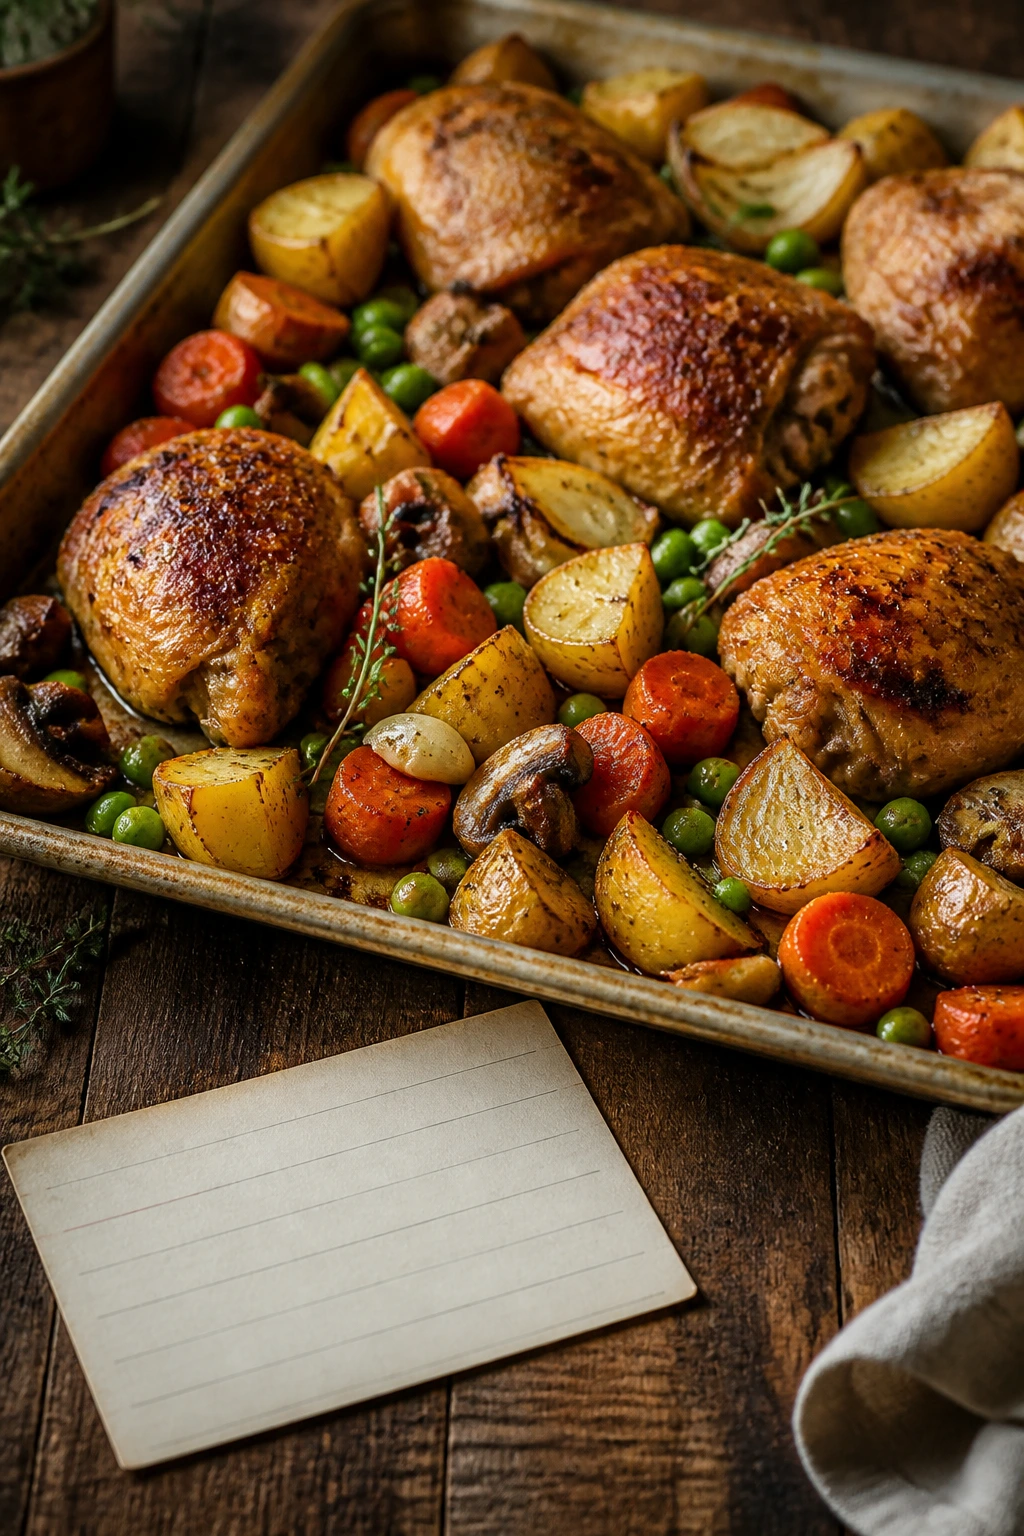
A roasted chicken cottage is what I cook when I want the smell of a Sunday roast without surrendering the whole evening. The pan comes out with crisped chicken skin, potatoes that have soaked up the fat at the edges, onions that have gone soft and sweet, and a little gravy that tastes like it came from a much slower day.
I like this kind of dinner because it behaves. Bone-in thighs give you a wider margin than breasts, the vegetables finish at the same pace if you cut them sensibly, and the oven does most of the work while you answer one text, set the table, or stand there pretending you’re “keeping an eye on things.” There’s no drama here. Just a hot pan, good browning, and a sauce that makes the whole thing feel finished.
Why This Cottage-Style Roast Earns Its Keep
-
It starts with vegetables that actually keep pace: The potatoes and carrots get a 15-minute head start, which means they’re not still chalky when the chicken is done.
-
Chicken thighs give you breathing room: If the onions need another minute or the mushrooms release a little more liquid, the thighs will forgive that delay in a way breast meat often will not.
-
The pan does two jobs at once: The drippings season the vegetables while the same drippings turn into a quick mustard-thyme gravy. That’s not extra effort. That’s smart cooking.
-
The leftovers stay useful: Cold roasted chicken slices cleanly for lunch, and the vegetables reheat without collapsing into mush if you handle them gently.
-
It feels rustic without becoming fussy: The ingredient list is familiar, the flavors are grounded in pantry staples, and the result still looks like someone spent more time on it than they did.
Yield: Serves 4 to 6
Prep Time: 20 minutes
Cook Time: 45 minutes
Total Time: 1 hour 5 minutes
Difficulty: Beginner — the steps are straightforward, and the oven does the heavy lifting.
Chill/Rest Time: 10 minutes resting before serving
Best Served: Hot from the oven, after the chicken has rested and the gravy has been whisked smooth
The Ingredient List for the Pan
For the Chicken and Vegetables:
- 6 bone-in, skin-on chicken thighs, about 2 1/2 to 3 pounds
- 1 1/2 pounds Yukon Gold potatoes, scrubbed and cut into 1-inch chunks
- 3 medium carrots, peeled and cut into 1/2-inch coins
- 1 large yellow onion, cut into 8 wedges
- 8 ounces cremini mushrooms, halved
- 4 cloves garlic, smashed
- 2 tablespoons olive oil, divided
- 1 teaspoon kosher salt, divided, plus more to taste
- 1/2 teaspoon black pepper, divided
- 1 teaspoon smoked paprika
- 1 tablespoon Dijon mustard, divided
- 1 tablespoon chopped fresh thyme, or 1 teaspoon dried thyme
For the Pan Sauce and Finish:
- 1 cup low-sodium chicken broth
- 1 teaspoon cornstarch mixed with 1 tablespoon cold water
- 1 tablespoon unsalted butter
- 1 cup frozen peas
- 2 tablespoons chopped fresh parsley
- 1 teaspoon lemon juice, optional but useful
Why Each Ingredient Pulls Its Weight
Chicken Thighs
What to use: 6 bone-in, skin-on thighs, about 2 1/2 to 3 pounds total.
Preparation: Pat them very dry before seasoning so the skin can brown instead of steaming.
Substitutions: Drumsticks work on the same timeline; bone-in breasts can work too, but they need a shorter roast and a more careful eye.
Tips: Thighs are the safer choice for a weeknight roast because they stay juicy even if your oven runs a touch hot or you leave them in a few minutes too long.
Potatoes, Carrots, and Onions
What to use: 1 1/2 pounds Yukon Gold potatoes, 3 medium carrots, and 1 large yellow onion.
Preparation: Keep the potatoes at about 1-inch pieces and the carrots at 1/2-inch coins so they roast through at the same pace.
Substitutions: Red potatoes hold shape nicely, parsnips bring a sweeter edge, and sweet potatoes can stand in for part of the Yukon Golds if you like a softer, richer pan.
Tips: Yukon Golds are the best fit here because they get tender and creamy without falling apart into paste.
Mushrooms and Garlic
What to use: 8 ounces cremini mushrooms and 4 smashed garlic cloves.
Preparation: Halve the mushrooms so the cut sides can brown; leave the garlic in big pieces so it perfumes the pan without burning.
Substitutions: Button mushrooms work fine, and if you hate mushrooms, you can replace them with extra carrots or fennel wedges.
Tips: Mushrooms drink up the drippings like little sponges, which is exactly why I keep them in the mix.
Mustard, Thyme, and Paprika
What to use: 1 tablespoon Dijon mustard, 1 tablespoon thyme, and 1 teaspoon smoked paprika.
Preparation: Mix the mustard with the chicken before it goes into the oven, and rub the paprika over the skin so it blooms in the heat.
Substitutions: Whole-grain mustard gives a rougher texture, dried thyme works when the fresh stuff looks sad, and sweet paprika can replace smoked paprika if that’s what’s in the cupboard.
Tips: The mustard does not make the chicken taste sharply mustardy; it helps the spices cling and gives the gravy a little backbone.
Broth, Butter, Peas, and Parsley
What to use: 1 cup low-sodium chicken broth, 1 teaspoon cornstarch mixed with 1 tablespoon cold water, 1 tablespoon butter, 1 cup frozen peas, 2 tablespoons parsley, and 1 teaspoon lemon juice if you want the sauce brighter.
Preparation: Keep the broth ready before the chicken finishes so the pan juices don’t sit around and go dull.
Substitutions: Vegetable broth works if that’s what you have, and chopped dill can stand in for parsley if you want a greener, sharper finish.
Tips: Frozen peas go in at the end because they only need heat, not roasting; if they cook too long, they turn chalky and lose that sweet pop.
Tools That Keep Dinner Moving
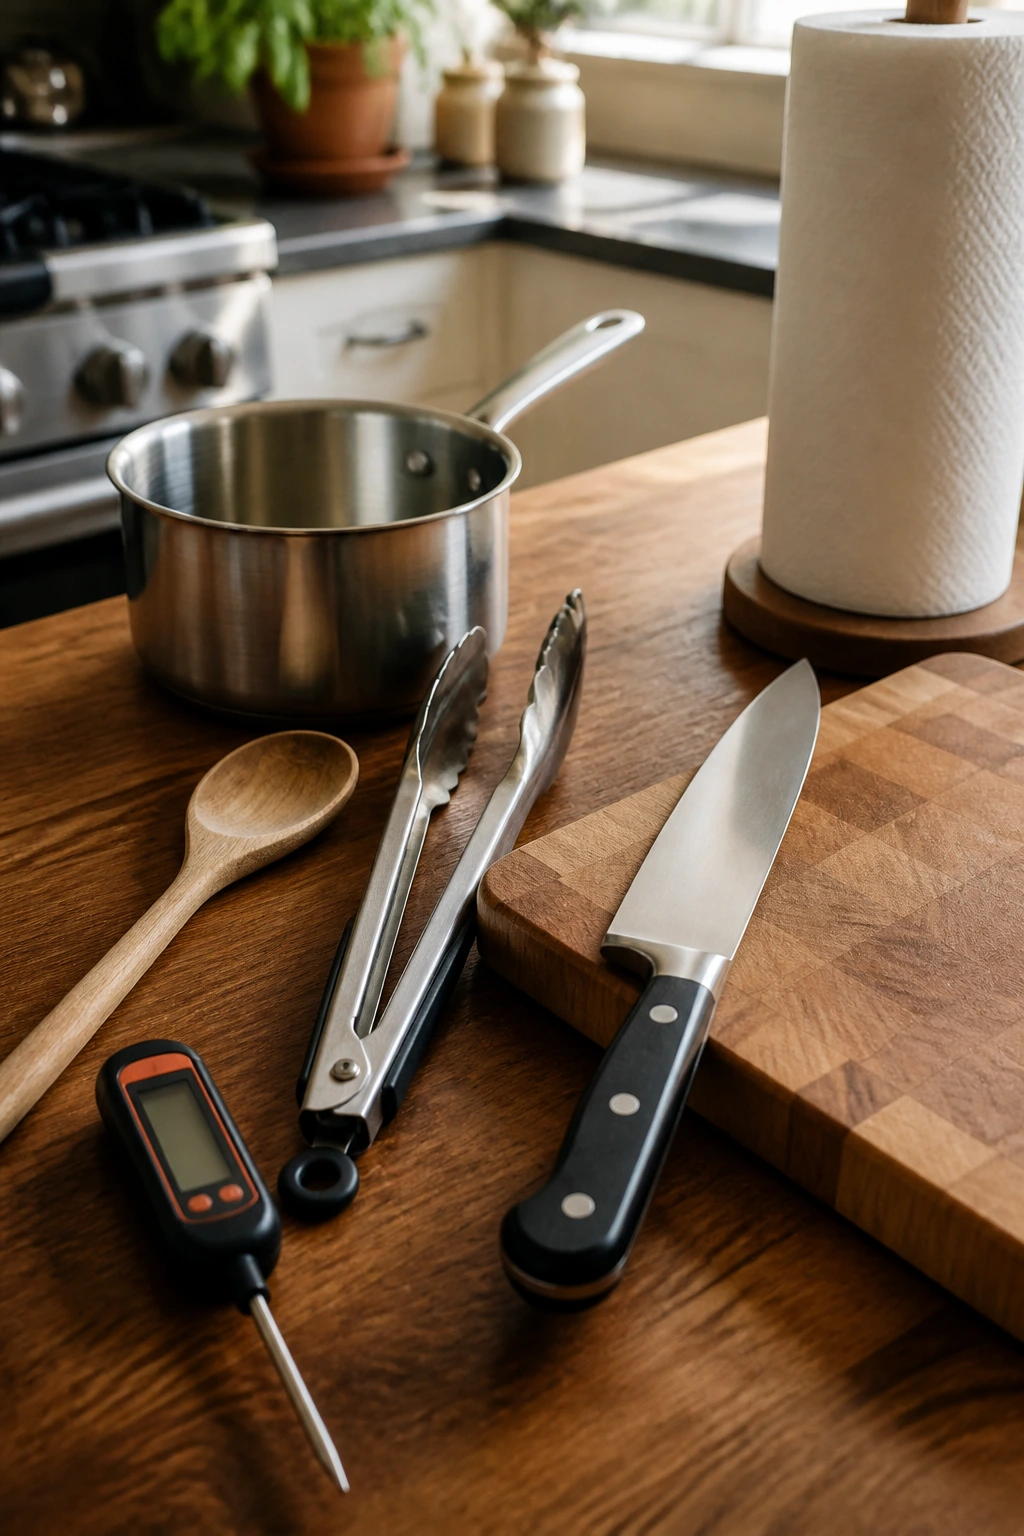
- Large rimmed baking sheet — A 13×18-inch sheet gives the vegetables space to brown; use two smaller pans if yours is crowded.
- Instant-read thermometer — This is the one tool that keeps chicken from being guessed at.
- Mixing bowl — Big enough to toss the vegetables without launching carrots onto the counter.
- Chef’s knife and cutting board — The vegetable pieces need to be even, not decorative.
- Tongs — Helpful for moving the chicken without tearing the skin.
- Small saucepan — Best for turning the drippings and broth into a quick gravy.
- Wooden spoon or whisk — A whisk makes the sauce smoother, but a spoon works in a pinch.
- Paper towels — Dry skin browns better. That’s the whole argument.
Step-by-Step: Turning Raw Ingredients Into Dinner
Prep the Pan and Vegetables
-
Preheat the oven to 425°F (220°C) and position a rack in the center. A hotter oven gives the skin enough energy to crisp before the vegetables collapse.
-
In a large bowl, toss the potatoes, carrots, onion, mushrooms, and garlic with 1 tablespoon olive oil, 1/2 teaspoon kosher salt, 1/4 teaspoon black pepper, and the thyme. Spread everything in a single layer on a large rimmed baking sheet. Do not pile the vegetables on top of one another; crowded vegetables steam, and steaming is the enemy of browning.
-
Roast the vegetables for 15 minutes, until the onions start to soften at the edges and the potatoes have a little color on the cut sides. They do not need to be fully tender yet. They just need a head start.
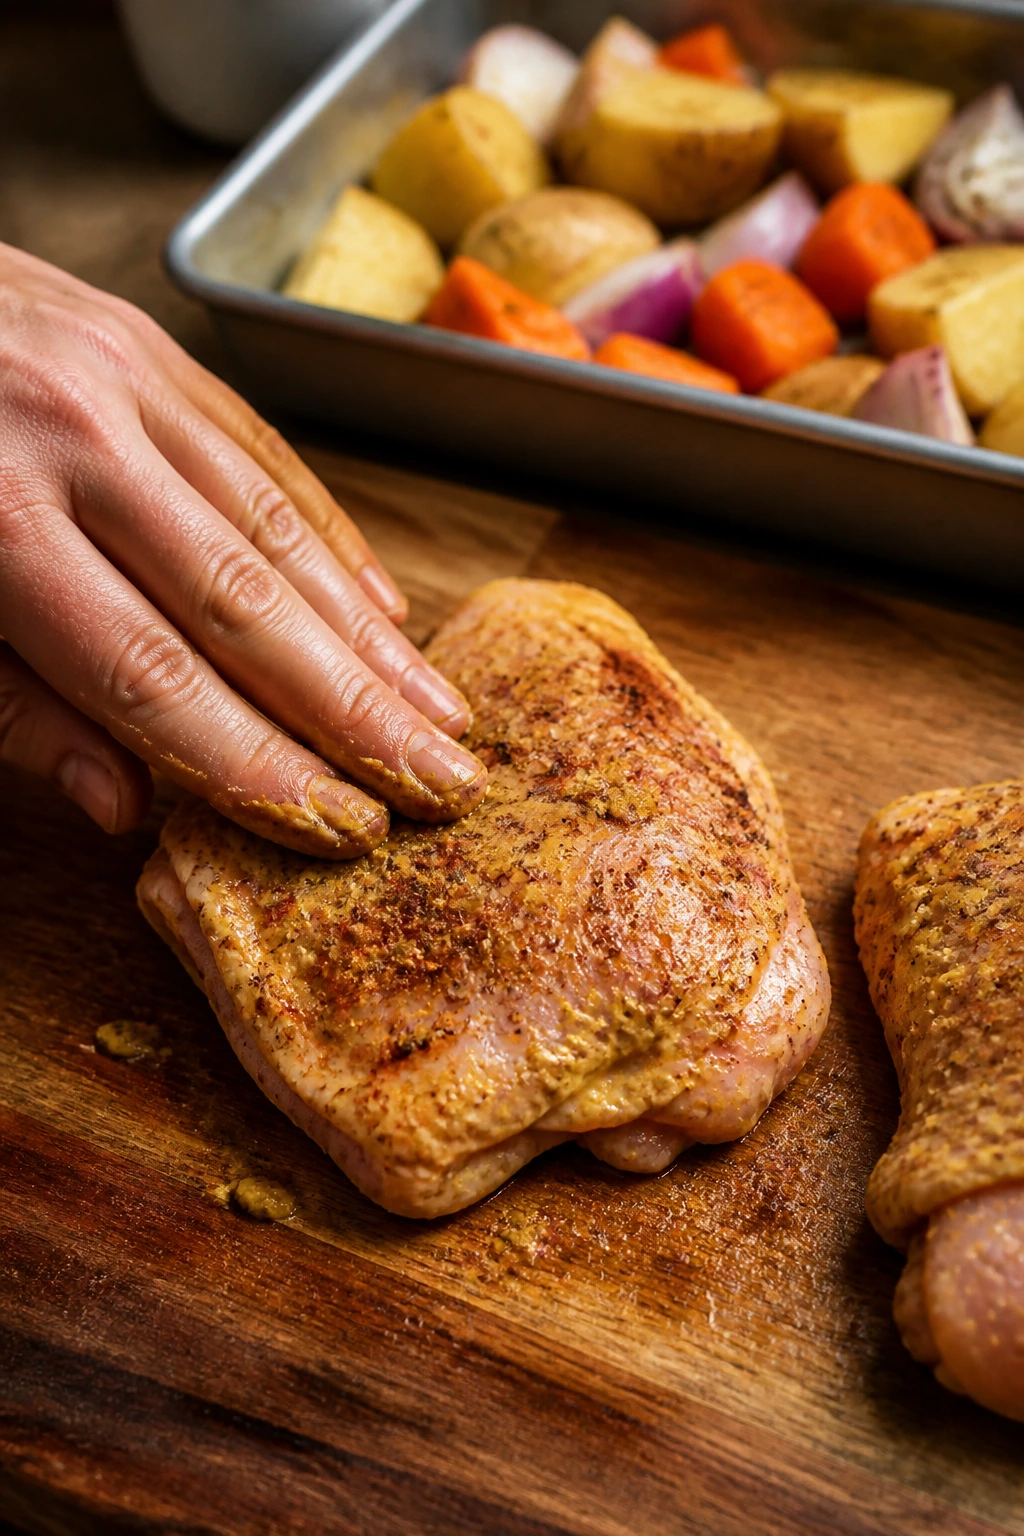
Season the Chicken
-
Pat the chicken thighs dry with paper towels. In a small bowl, stir together the remaining 1 tablespoon olive oil, 2 teaspoons Dijon mustard, the smoked paprika, and the remaining 1/2 teaspoon kosher salt and 1/4 teaspoon black pepper. Rub that mixture over the top and sides of the chicken thighs. Aim for an even coat, not a thick paste.
-
Remove the pan from the oven and stir the vegetables once so the browned edges don’t stick. Nestle the chicken thighs skin-side up on top of the vegetables, leaving a little space between each piece. The skin needs exposure to hot air. If the pan is jammed, split everything between two pans.
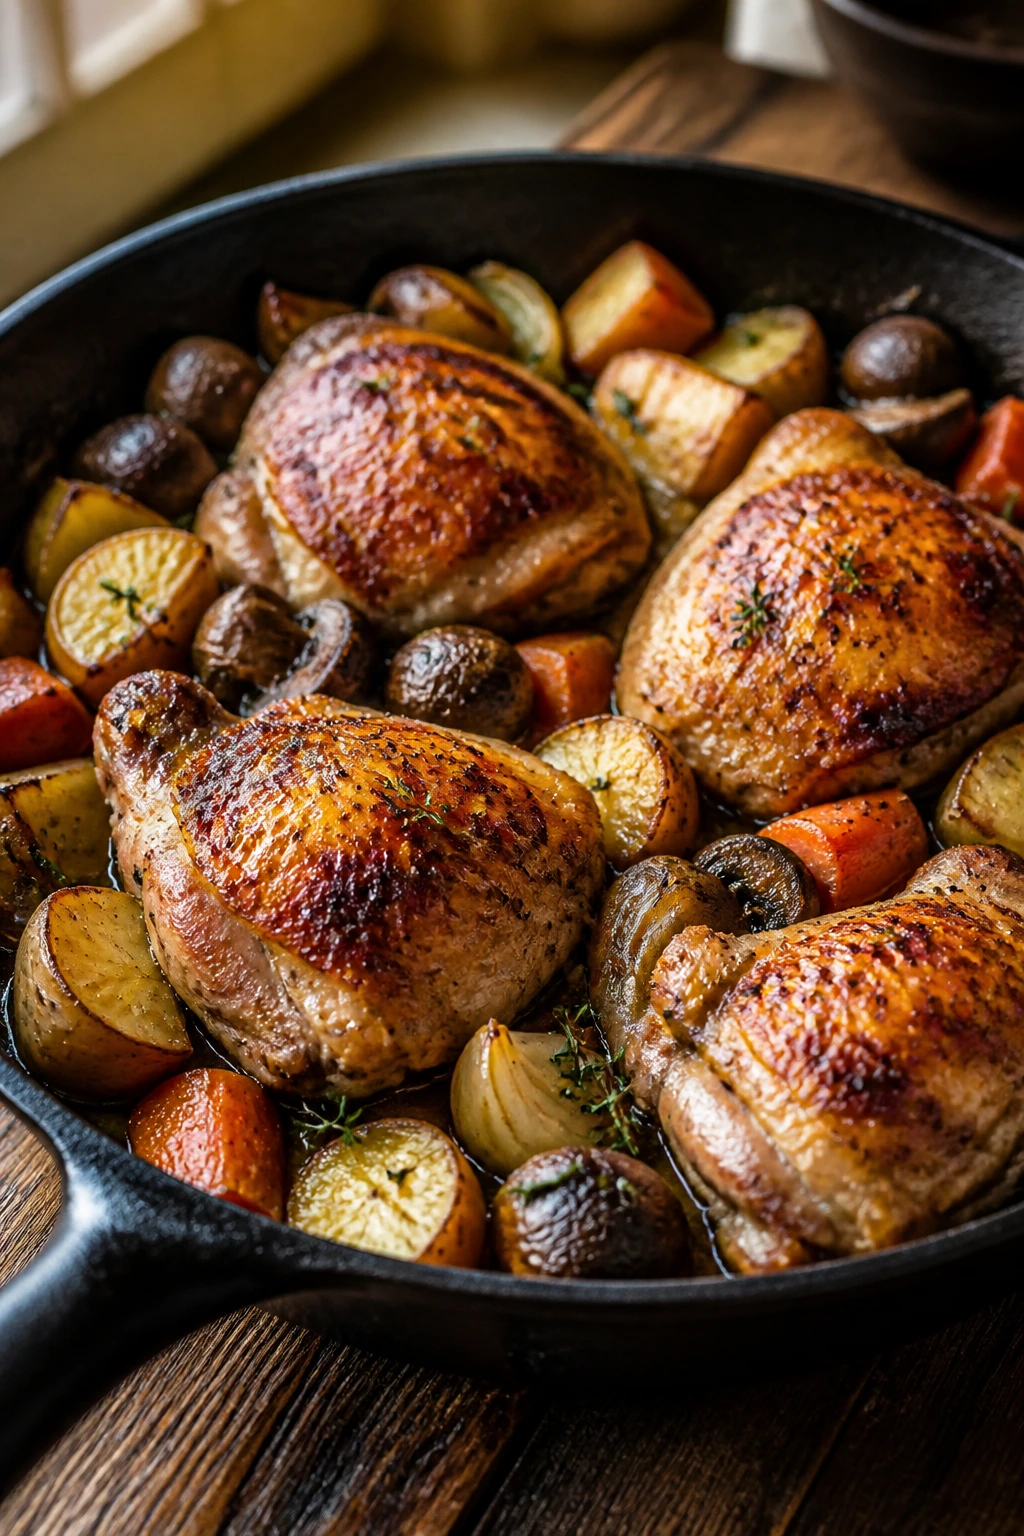
Roast Until the Skin Turns Deep Gold
-
Return the pan to the oven and roast for 25 to 30 minutes, rotating the pan halfway through if your oven has hot spots. Start checking the chicken at the 25-minute mark. The thickest part of each thigh should read 165°F on an instant-read thermometer, and the skin should look deeply browned with crisp patches along the edges.
-
Scatter the frozen peas over the hot vegetables and roast for 5 more minutes. That warms them through without turning them dull or wrinkled. If the chicken hits temperature before the vegetables are fully tender, lift the chicken to a plate and give the vegetables a few more minutes on their own.
Make the Gravy and Finish
-
Transfer the chicken and vegetables to a warm platter. Carefully tilt the pan and pour any collected juices into a small saucepan. Add the chicken broth and the remaining 1 teaspoon Dijon mustard, then bring the mixture to a simmer over medium heat.
-
Whisk in the cornstarch slurry and simmer for 1 to 2 minutes, until the sauce turns glossy and lightly thickened. Whisk in the butter and the lemon juice, if using. The butter should melt into the sauce cleanly, not sit on top in slicks.
-
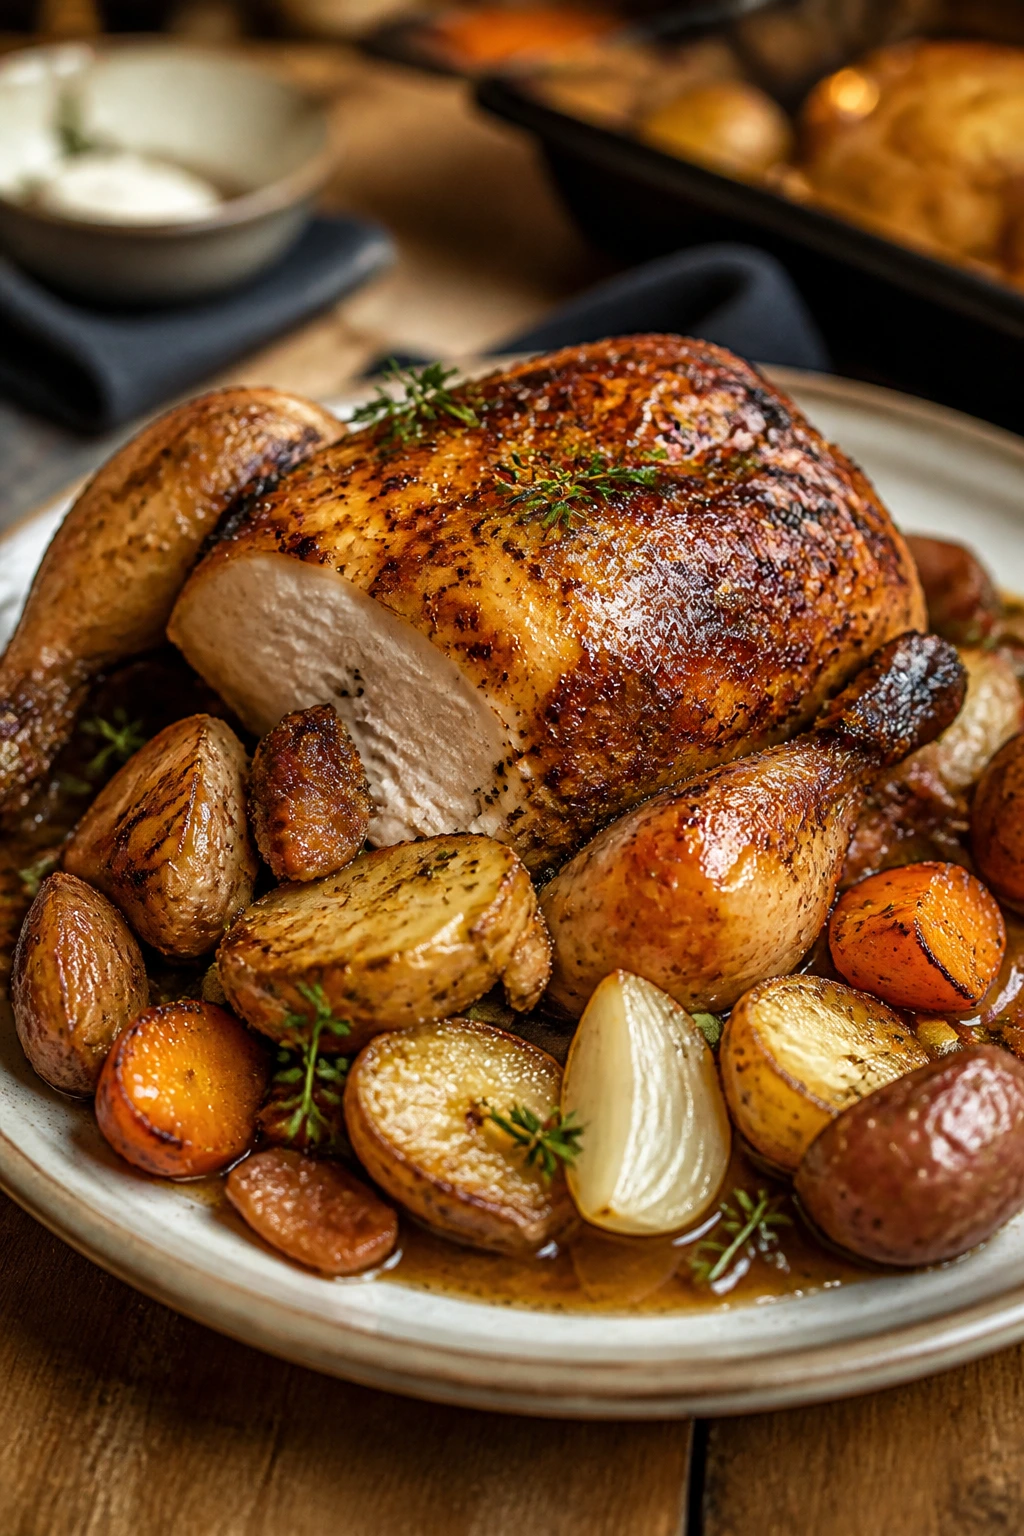
Spoon the gravy over the chicken and vegetables, sprinkle with parsley, and let the chicken rest for 10 minutes before serving. Never cut it the second it leaves the oven; the juices need that rest or they’ll run straight onto the board.
How to Serve the Chicken and Vegetables
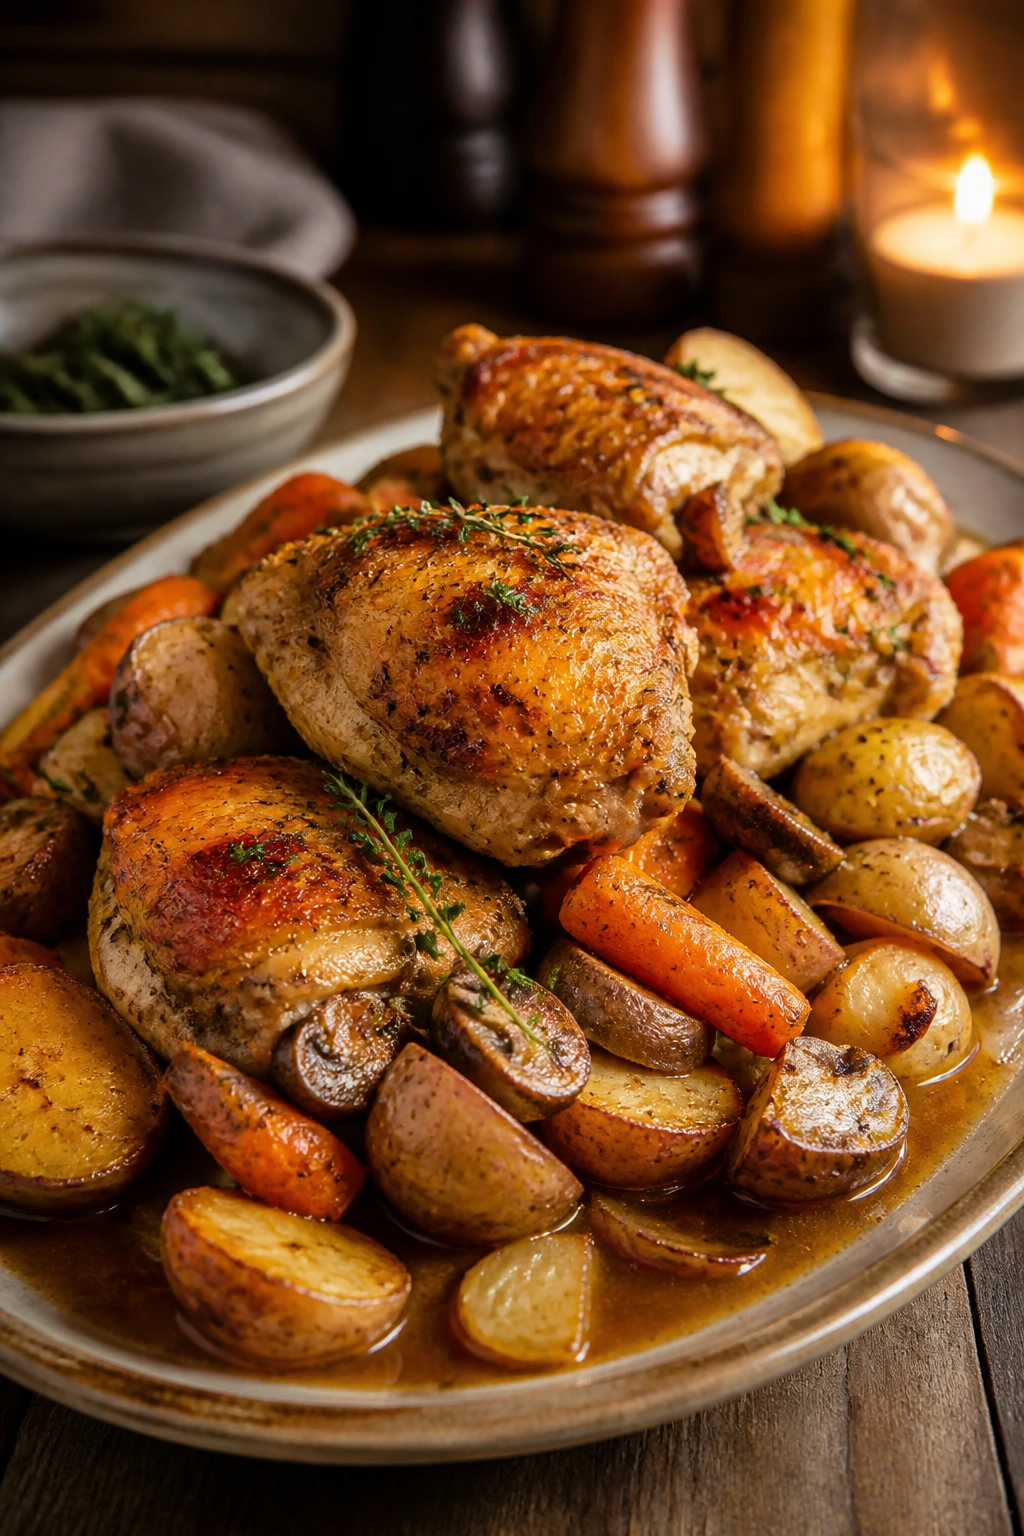
Presentation:
Pile the potatoes, carrots, mushrooms, and onions onto a wide platter first, then set the chicken thighs on top so the skin stays visible. Spoon the gravy around the edges rather than flooding the whole pan; a few crisp spots should stay crisp.
Accompaniments:
A sharp green salad with lemon dressing keeps the plate from feeling heavy. If you want bread, choose something with a sturdy crust — a baguette or a country loaf works better than soft sandwich bread because it can drag through the gravy without disintegrating.
Portions:
One thigh with a generous scoop of vegetables is a full dinner for most people. If you’re serving very hungry eaters, count on one and a half thighs each and put the potatoes at the center of the table so people can help themselves.
Beverage Pairing:
A dry cider is my favorite with this roast because its acidity cuts through the chicken skin and buttered gravy. A light red, like pinot noir, also works if you want something softer and less sharp.
Small Moves That Make the Roast Taste Better
Flavor Enhancement:
A tiny squeeze of lemon at the end matters more than people think. The acid doesn’t make the dish taste lemony; it just wakes up the drippings and keeps the gravy from tasting flat.
Time-Saver:
You can cut the vegetables the morning before and keep them covered in the fridge. If you do that, dry the potatoes and carrots well before they hit the bowl, or the surface moisture will slow browning.
Texture Move:
If you want the skin a little crisper, slide the pan under the broiler for 1 to 2 minutes at the end. Stay close. Skin goes from bronzed to bitter faster than most people expect, and a broiler never gives second chances.
Cost-Saver:
Drumsticks are usually cheaper than thighs and roast in the same general window. They do need a few extra minutes if they’re large, so use the thermometer rather than the clock alone.
Common Mistakes That Dry Out the Chicken

-
Crowding the pan — If the vegetables are stacked too tightly, they steam instead of roast, and the chicken skin turns soft from trapped moisture. Fix it by using a bigger pan or dividing everything between two sheets.
-
Cutting the potatoes too large — Big chunks stay hard while the chicken keeps cooking, which is how you end up with perfect skin and stubborn potatoes. Keep them around 1 inch so they can finish in the same window.
-
Skipping the drying step on the chicken — Wet skin looks pale and feels rubbery. Pat it dry with paper towels and give the rub a chance to cling before the pan goes into the oven.
-
Adding the peas too early — Peas tossed in at the start lose their color and taste older than they should. They only need the final 5 minutes.
-
Pulling the chicken too soon or too late — Guessing from color is a bad habit. Use the thermometer, hit 165°F in the thickest part, and then rest the meat so the juices settle.
-
Drowning the tray in liquid — A sheet pan roast needs heat and open air, not a bath. Too much broth in the oven softens the vegetables and leaves you with steamed chicken instead of roasted chicken cottage.
Variations That Still Taste Like Dinner
Lemon-Thyme Cottage Roast
Add the zest of 1 lemon to the chicken rub and finish the gravy with the full teaspoon of lemon juice. This version tastes brighter and leans a little cleaner on the palate, which is useful when you’re serving it with bread or a salad that already has oil in it.
Smoky Paprika Supper Pan
Double the smoked paprika to 2 teaspoons and swap the yellow onion for a red onion. The result is deeper and a bit sweeter, with a stronger roasted edge on the vegetables. I like this one when the weather is cold enough to justify something more assertive.
Creamy Mustard Finish
Whisk 2 tablespoons crème fraîche or heavy cream into the gravy after the cornstarch thickens it. The sauce turns silkier and clings to the potatoes in a way that feels almost restaurant-level, though I’d still keep the amount modest so the chicken stays the main event.
Root Cellar Version
Replace half the potatoes with parsnips or turnips cut to the same size. Parsnips brown faster and bring a faint sweetness; turnips stay a little firmer and give the pan a more earthy taste. If you use both, cut the turnips slightly smaller so they don’t lag behind.
Make-Ahead, Storage, and Reheating
The best make-ahead move is the simplest one: cut the vegetables and mix the dry seasonings ahead of time. You can do that up to 24 hours in advance and keep everything covered in the fridge. If you want to season the chicken early, do it up to 12 hours ahead and leave the thighs uncovered on a plate in the refrigerator; that dries the skin and gives you better browning.
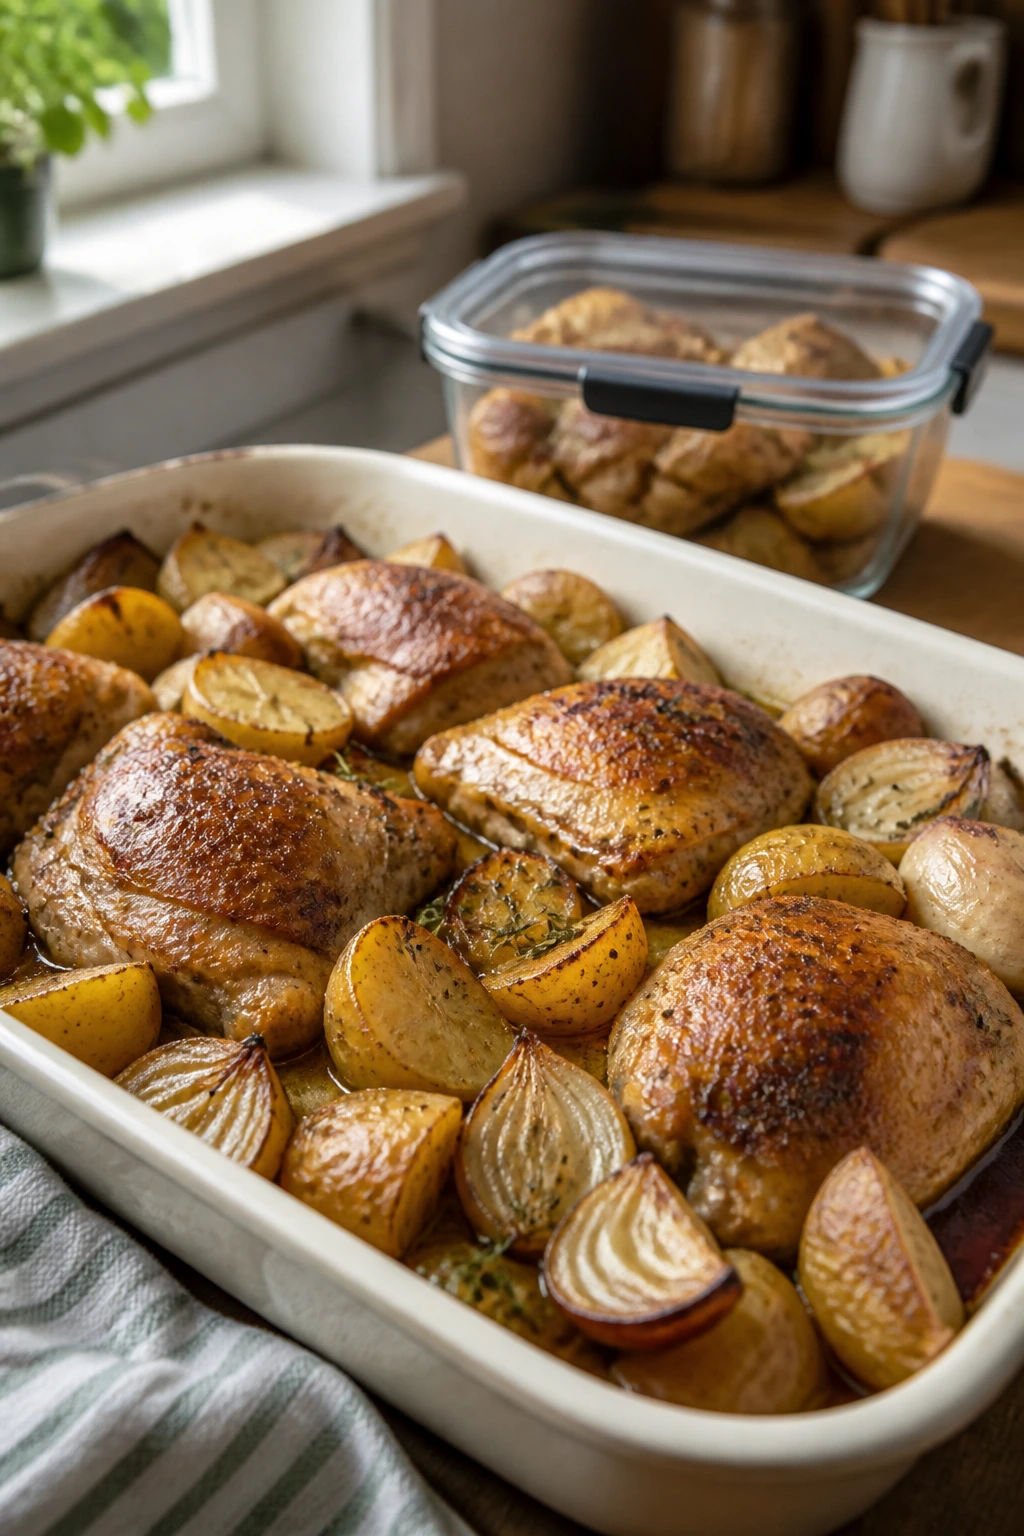
Cooked roasted chicken cottage keeps well in the refrigerator for 3 to 4 days in airtight containers. If possible, store the chicken, vegetables, and gravy separately. That keeps the skin from getting soggy and gives you a little more control when reheating.
For the freezer, the chicken and vegetables can be frozen for up to 2 months. The potatoes soften a bit after thawing, so I like this option most when the leftovers are going into soup, a hash, or a quick reheat with extra gravy. Freeze the sauce in a small container or a zip-top bag laid flat, then thaw it in the fridge overnight.
Reheat in a 325°F oven for about 15 to 20 minutes, covered loosely with foil. Pull the foil off for the last few minutes if you want the skin to firm up again. On the stovetop, a skillet over medium heat with 1 or 2 tablespoons of broth works well for the vegetables and gravy; the chicken can be warmed alongside them if you don’t mind softer skin. The microwave works in short bursts at 50% power, but that’s the least flattering route, so I treat it as a last resort.
Questions People Ask Before Cooking Roasted Chicken Cottage
Can I use chicken breasts instead of thighs?
Yes, but you need to change the timing. Bone-in breasts should go in later than thighs, and boneless breasts need even more caution because they dry out fast. If you insist on using breasts, start the vegetables first, add the chicken when the potatoes are partly tender, and check the thickest part early.
Do I have to roast the vegetables before adding the chicken?
I think so, yes. That 15-minute head start keeps the potatoes and carrots from lagging behind the chicken, and it also gives the onion and mushrooms a better chance to brown instead of just relaxing into the pan.
What if my potatoes are still hard when the chicken reaches 165°F?
Pull the chicken to rest and keep the vegetables in the oven for another 5 to 10 minutes. Next time, cut the potatoes a little smaller or use a pan with more surface area so the heat moves more evenly around them.
Can I make this without mushrooms?
Absolutely. Replace them with extra carrots, fennel wedges, or more potatoes if that’s what you like. Mushrooms add a savory, meaty note, but the roast still works without them.
How do I keep the chicken skin crisp?
Dry the chicken well, keep the pan from overcrowding, and avoid spooning gravy over the skin until you’re ready to eat. If the skin still needs help, a very short broil at the end usually fixes it.
Is this recipe gluten-free?
Yes, as long as the chicken broth is gluten-free and your cornstarch hasn’t been cross-contaminated. The rest of the ingredient list is naturally free of gluten.
Can I make the gravy thicker?
Use 1 1/2 teaspoons cornstarch instead of 1 teaspoon, or simmer it a little longer before adding the butter. Don’t dump in a lot of cornstarch at once; that’s how sauces turn pasty instead of glossy.
What’s the best way to reheat leftovers without drying the chicken out?
A covered oven at 325°F is the safest bet. Add a spoonful of broth to the pan, cover loosely with foil, and warm just until heated through. That keeps the chicken from turning stringy and helps the gravy loosen back up.
Why I Keep Coming Back to This Roast
Roasted chicken cottage works because it respects a weeknight. It doesn’t ask for a marinade, a complicated sear, or a stack of side dishes trying to prove something. It asks for a hot oven, a sharp knife, and the small discipline of cutting the vegetables to the right size.
What comes out of the pan feels more generous than the work you put in. The chicken is crisp where it should be crisp, the vegetables taste like they were cooked with purpose, and the gravy ties the whole thing together without turning the plate heavy. Keep the cut sizes sensible, give the chicken dry skin, and let the oven do the rest — that’s the whole trick, and it’s one worth repeating.
Roasted Chicken Cottage — Recipe Card
Recipe Name: Roasted Chicken Cottage
Description: A rustic one-pan roasted chicken dinner with potatoes, carrots, onions, mushrooms, peas, and a quick mustard-thyme gravy. The chicken skin turns crisp, the vegetables pick up the drippings, and the whole tray eats like a proper dinner.
Prep Time: 20 minutes
Cook Time: 45 minutes
Total Time: 1 hour 5 minutes
Course: Dinner, Main Course
Cuisine: American
Servings: 4 to 6
Calories: About 410 kcal per serving
Ingredients
For the Chicken and Vegetables:
- 6 bone-in, skin-on chicken thighs, about 2 1/2 to 3 pounds
- 1 1/2 pounds Yukon Gold potatoes, scrubbed and cut into 1-inch chunks
- 3 medium carrots, peeled and cut into 1/2-inch coins
- 1 large yellow onion, cut into 8 wedges
- 8 ounces cremini mushrooms, halved
- 4 cloves garlic, smashed
- 2 tablespoons olive oil, divided
- 1 teaspoon kosher salt, divided, plus more to taste
- 1/2 teaspoon black pepper, divided
- 1 teaspoon smoked paprika
- 1 tablespoon Dijon mustard, divided
- 1 tablespoon chopped fresh thyme, or 1 teaspoon dried thyme
For the Pan Sauce and Finish:
- 1 cup low-sodium chicken broth
- 1 teaspoon cornstarch mixed with 1 tablespoon cold water
- 1 tablespoon unsalted butter
- 1 cup frozen peas
- 2 tablespoons chopped fresh parsley
- 1 teaspoon lemon juice, optional
Instructions
-
Preheat the oven to 425°F (220°C) and position a rack in the center.
-
Toss the potatoes, carrots, onion, mushrooms, and garlic with 1 tablespoon olive oil, 1/2 teaspoon kosher salt, 1/4 teaspoon black pepper, and the thyme. Spread in a single layer on a large rimmed baking sheet and roast for 15 minutes.
-
Pat the chicken thighs dry. Rub them with the remaining 1 tablespoon olive oil, 2 teaspoons Dijon mustard, the smoked paprika, and the remaining salt and pepper.
-
Remove the pan, stir the vegetables, and nestle the chicken thighs skin-side up on top. Roast for 25 to 30 minutes, until the chicken reaches 165°F in the thickest part.
-
Scatter the frozen peas over the pan and roast for 5 more minutes.
-
Transfer the chicken and vegetables to a platter. Pour the pan juices into a small saucepan, add the broth and remaining 1 teaspoon Dijon mustard, and simmer over medium heat.
-
Whisk in the cornstarch slurry and cook for 1 to 2 minutes until glossy and lightly thickened. Whisk in the butter and optional lemon juice, then stir in the parsley.
-
Spoon the gravy over the chicken and vegetables and rest the chicken for 10 minutes before serving.
Notes: Cut the potatoes no larger than 1 inch so they finish on time. If the pan looks crowded, split everything between two baking sheets for better browning.